


Parallels® Panel

Copyright Notice
Parallels Holdings, Ltd.
c/o Parallels International GMbH
Vordergasse 49
CH8200 Schaffhausen
Switzerland
Phone: +41 526320 411
Fax: +41 52672 2010
Copyright © 1999-2011 Parallels Holdings, Ltd. and its affiliates. All rights reserved.
This product is protected by United States and international copyright laws. The product’s
underlying technology, patents, and trademarks are listed at http://www.parallels.com/trademarks.
Microsoft, Windows, Windows Server, Windows NT, Windows Vista, and MS-DOS are registered
trademarks of Microsoft Corporation.
Linux is a registered trademark of Linus Torvalds.
Mac is a registered trademark of Apple, Inc.
All other marks and names mentioned herein may be trademarks of their respective owners.

Contents
Preface 8
Typographical Conventions ........................................................................................................... 8
Feedback ....................................................................................................................................... 9
Operating Inside Parallels Containers 10
Becoming Familiar with Parallels Plesk Panel 12
Server Administration Panel ........................................................................................................ 13
Control Panel ............................................................................................................................... 14
Power User Panel........................................................................................................................ 16
Changing Your Password and Contact Information 18
If Your Panel Works with Customer & Business Manager .......................................................... 19
Serving Your Customers and Employing Resellers 20
Understanding Plans and Subscriptions ..................................................................................... 21
Hosting service customers ................................................................................................ 21
Resellers ........................................................................................................................... 22
Allocation of Resources and Services .............................................................................. 23
Hosting service customers ................................................................................................ 23
Resellers ........................................................................................................................... 23
Relations Between Subscriptions and Service/Add-on Plans ........................................... 23
Hosting subscriptions ........................................................................................................ 23
Reseller subscriptions ....................................................................................................... 25
Syncing Subscriptions and Plans. States of Subscriptions ............................................... 25
Unsynced subscriptions .................................................................................................... 25
Properties of Plans and Subscriptions ........................................................................................ 28
Hosting Plans and Subscriptions ...................................................................................... 29
Overuse policy................................................................................................................... 30
Disk space ......................................................................................................................... 30
Traffic ................................................................................................................................ 30
Notify upon reaching ......................................................................................................... 30
Sites published with SiteBuilder ........................................................................................ 30
Domains ............................................................................................................................ 31
Mobile sites ....................................................................................................................... 31
Subdomains ...................................................................................................................... 31
Domain aliases .................................................................................................................. 31
Mailboxes .......................................................................................................................... 31
Mailbox size....................................................................................................................... 31
Mailing lists ........................................................................................................................ 31
Additional FTP accounts ................................................................................................... 32
MySQL databases and Microsoft SQL Server databases (Windows hosting) ................. 32
MySQL databases quota and Microsoft SQL databases quota (Windows hosting) ......... 32
Validity period/Expiration Date .......................................................................................... 32
Java applications ............................................................................................................... 32
Web users ......................................................................................................................... 33

Preface 4
DNS zone management .................................................................................................... 33
Hosting settings management........................................................................................... 33
Management of access to server over SSH (Linux\Unix hosting) .................................... 34
Management of access to server over Remote Desktop (Windows hosting) ................... 34
Anonymous FTP management ......................................................................................... 34
Scheduler management .................................................................................................... 34
Spam filter management ................................................................................................... 34
Antivirus management ...................................................................................................... 35
Data backup and restoration using the server repository ................................................. 35
Back up and restore using a personal FTP repository ...................................................... 35
Web statistics management .............................................................................................. 35
Log rotation management ................................................................................................. 35
Access to Application Catalog........................................................................................... 35
Domain creation ................................................................................................................ 35
Subdomains management ................................................................................................ 36
Domain aliases management............................................................................................ 36
Additional FTP accounts management ............................................................................. 36
Java applications management......................................................................................... 36
Mailing lists management .................................................................................................. 36
Hosting performance settings management ..................................................................... 36
Additional write/modify permissions management (Windows hosting) ............................. 37
Hard disk quota assignment .............................................................................................. 37
Database server selection ................................................................................................. 37
Enable hosting................................................................................................................... 37
Hard disk quota ................................................................................................................. 38
SSL support....................................................................................................................... 38
Web statistics .................................................................................................................... 38
Custom error documents ................................................................................................... 38
SSH access to server shell under the subscription's system user (Linux/Unix hosting) .. 38
Scripting ............................................................................................................................ 39
Additional write/modify permissions (Windows hosting) ................................................... 39
Allow web users to use scripts .......................................................................................... 39
Webmail ............................................................................................................................ 41
Enable mailing lists ........................................................................................................... 41
Policy on mail for non-existent users ................................................................................ 41
Master ............................................................................................................................... 42
Slave ................................................................................................................................. 42
Use dedicated IIS application pool (Windows hosting) ..................................................... 42
Maximum bandwidth usage .............................................................................................. 42
Connections limited to ....................................................................................................... 42
Retain web and traffic statistics......................................................................................... 43
Log rotation ....................................................................................................................... 43
Reseller Plans and Subscriptions ..................................................................................... 44
Overuse policy................................................................................................................... 45
Overselling policy .............................................................................................................. 45
Customers ......................................................................................................................... 45
Other Resources ............................................................................................................... 45
Ability to use remote API ................................................................................................... 46
Access to the Panel .......................................................................................................... 46
Customer account creation ............................................................................................... 46
Allow overselling ............................................................................................................... 46
Other Permissions ............................................................................................................. 46
Allocate shared IP addresses ........................................................................................... 46
Allocate exclusive IP addresses........................................................................................ 47
Serving Customers ...................................................................................................................... 47
Managing Service Plans ................................................................................................... 48
Subscribing to Hosting Services ....................................................................................... 50
Changing Services Provided to Customers ...................................................................... 52
Managing Customers ........................................................................................................ 54

Preface 5
Managing Service Subscriptions ....................................................................................... 57
Employing Resellers .................................................................................................................... 60
Creating Reseller Account/Subscription ........................................................................... 61
Changing Reseller Subscription ........................................................................................ 61
Adding Services to Your Offerings .............................................................................................. 64
Using Integrated Customer and Business Manager 66
Configuring Your Parallels Plesk Panel 70
Obtaining and Installing a License Key ....................................................................................... 71
Upgrading the Trial License Key ....................................................................................... 72
Installing Additional License Keys for Parallels Plesk Panel Add-ons .............................. 73
Upgrading Your License Key ............................................................................................ 74
Rolling Back to Your Previously Used License Key .......................................................... 74
Securing Your Parallels Plesk Panel ........................................................................................... 74
Restricting Administrative Access to Parallels Plesk Panel .............................................. 75
Securing Communication to Server with SSL Encryption ................................................. 76
Rebranding Your Parallels Plesk Panel ...................................................................................... 79
Changing Interface Language ........................................................................................... 79
Setting a Custom Logo ...................................................................................................... 80
Setting Up Interface Languages........................................................................................ 80
Hiding and Unhiding Sets of Buttons ................................................................................ 82
Adding and Removing Custom Buttons ............................................................................ 83
Adjusting Session Preferences ................................................................................................... 85
Logging Actions Performed by Your Customers in the Panel ..................................................... 86
Setting Up Action Logging ................................................................................................. 87
Downloading the Action Log ............................................................................................. 87
Clearing the Action Log ..................................................................................................... 88
Configuring the Server 89
Adding and Removing IP Addresses........................................................................................... 90
Viewing and Selecting Software Components Used on the Server ............................................ 93
Configuring DNS Services ........................................................................................................... 93
Configuring the Panel to Run Behind Router with NAT .............................................................. 98
Configuring the Panel to Run Behind a Firewall ....................................................................... 100
Using the Software Firewall Built into Your Panel (Windows Hosting) ........................... 101
Configuring Port Range for Passive FTP Mode (Windows Hosting) ......................................... 105
Setting Up Mail Services ........................................................................................................... 106
Setting Up Spam Protection ............................................................................................ 110
Setting Up Virus Protection (Linux Hosting) .................................................................... 119
Setting Up Virus Protection (Windows Hosting) .............................................................. 120
Selecting Webmail Software ........................................................................................... 120
Configuring Mailman Mailing List Software (Linux Hosting) ........................................... 121
Preventing Your Customers From Sending Mass E-mail (Linux Hosting) ...................... 122
Configuring Parallels Plesk Panel to Use SiteBuilder in Trial Mode ......................................... 122
Customizing SiteBuilder Trial Mode Notifications ........................................................... 123
Customizing SiteBuilder Getting Started Demo ........................................................................ 126
Configuring Parallels Plesk Panel for Database Hosting .......................................................... 127
Setting Up Remote Database Hosting ............................................................................ 128
Managing Database Servers........................................................................................... 130
Configuring the Connection to External Database Management Systems (Windows Hosting) 131
Creating New Connections to External Databases (Windows Hosting) ......................... 132
Changing Settings of Existing ODBC Connections (Windows Hosting) ......................... 132
Removing Connections to External Databases (Windows Hosting) ............................... 133
Enabling Support for Adobe ColdFusion (Linux Hosting) ......................................................... 133

Preface 6
Enabling Integration with Google Services for Websites .......................................................... 134
Providing Panel Users with Access to Google Services for Websites ............................ 136
Enabling Integration with UNITY Mobile Services for Mobile Sites ........................................... 137
Enabling Support for Miva E-commerce Applications (Linux Hosting) ...................................... 139
Enabling Support for Miva E-commerce Applications (Windows Hosting)................................ 140
Prepackaging Applications ........................................................................................................ 140
Configuring ASP.NET (Windows Hosting) ................................................................................ 143
Configuring IIS Application Pool (Windows Hosting) ................................................................ 145
Configuring Shared SSL (Windows Hosting) ............................................................................ 147
Configuring Statistics ................................................................................................................. 148
Configuring E-mail Notification System ..................................................................................... 148
Tags used in notification messages ................................................................................ 149
Adjusting System Date and Time .............................................................................................. 152
Enabling Piped Logs for Web Server to Reduce the Risk of Web Service Disruption (Linux Hosting)
................................................................................................................................................... 152
Extending Parallels Plesk Panel Capabilities with Modules and Add-ons (Linux Hosting) ....... 153
Restricting the Use of Potentially Insecure Hosting Options ..................................................... 154
Scripting Options ............................................................................................................. 155
Execution of Scripts via Cron Task Scheduler (Linux Hosting) ...................................... 157
Setting Up Help Desk ................................................................................................................ 157
Administering the System 159
Viewing Statistics ....................................................................................................................... 160
Automating Report Generation and Delivery by E-mail .................................................. 161
Viewing Virus and Spam Protection Statistics (Windows Hosting) ................................. 162
Managing System Services ....................................................................................................... 162
Monitoring Mail Server Message Queue and Troubleshooting Mail Congestion (Linux Hosting)165
Scheduling Tasks ...................................................................................................................... 166
Scheduling Tasks on Linux-based Servers ..................................................................... 167
Scheduling Tasks on Windows-based Servers ............................................................... 169
Delegating Administrative Privileges to Technical Support Engineers (Windows Hosting) ...... 171
Creating Additional Administrator Accounts .................................................................... 172
Modifying Additional Administrator Accounts .................................................................. 172
Suspending and Activating Additional Administrator Accounts ...................................... 173
Removing Additional Administrator Accounts ................................................................. 173
Backing Up and Restoring Data ................................................................................................ 174
Schedule backups. .......................................................................................................... 174
Restore data from backup archives. ............................................................................... 174
Configuring Global Backup Settings ............................................................................... 175
Configuring the Panel for Using FTP Repository ............................................................ 175
Backing Up the Entire Server .......................................................................................... 176
Backing Up Individual Accounts and Sites ...................................................................... 177
Scheduling Backups ........................................................................................................ 177
Restoring Data From Backup Archives ........................................................................... 179
Downloading Backup Files from Server .......................................................................... 180
Uploading Backup Files to Server ................................................................................... 180
Removing Backup Files from Server .............................................................................. 180
Accessing the Server Using Remote Desktop (Windows Hosting) ........................................... 181
Monitoring Connections to the Panel and FTP Services........................................................... 183
Monitoring Connections to the Panel .............................................................................. 183
Monitoring Connections to FTP Service ......................................................................... 184
Monitoring Terminal Session Connections to Your Server (Windows Hosting) .............. 185
Migrating Data from Other Hosting Platforms 186
Importing Data From a File ........................................................................................................ 189
Importing Data From Linux/Unix-based Servers ............................................................. 190

Preface 7
Importing Data From Windows-based Servers ............................................................... 191
Updating and Upgrading the Panel 192
Notes on updating procedures: ....................................................................................... 193
Changing Updater Settings ....................................................................................................... 194
Sending E-mail Notices to Multiple Customers at Once 195
Creating, Editing and Removing Message Templates .............................................................. 196
Sending E-mail Notices ............................................................................................................. 198
Using Event Tracking Mechanism 200
Adding Event Handlers (Linux Hosting) .................................................................................... 201
Adding Event Handlers (Windows Hosting) .............................................................................. 202
Removing Event Handlers ......................................................................................................... 204
Glossary 205
Add-on plan ..................................................................................................................... 205
Reseller plan ................................................................................................................... 205
Hosting plan .................................................................................................................... 205
Subscription..................................................................................................................... 205
Custom subscription ........................................................................................................ 205
Webspace ....................................................................................................................... 205

8 Preface
In this section:
Typographical Conventions ............................................................................... 8
Feedback .......................................................................................................... 9
Formatting convention
Type of Information
Example
Special Bold
Items you must select,
such as menu options,
command buttons, or
items in a list.
Go to the System tab.
Titles of chapters,
sections, and subsections.
Read the Basic Administration
chapter.
Italics
Used to emphasize the
importance of a point, to
introduce a term or to
designate a command line
placeholder, which is to be
replaced with a real name
or value.
The system supports the so
called wildcard character search.
Monospace
The names of commands,
files, and directories.
The license file is located in the
http://docs/common/licen
ses directory.
Preface
Typographical Conventions
Before you start using this guide, it is important to understand the documentation
conventions used in it.
The following kinds of formatting in the text identify special information.

Preface 9
Formatting convention
Type of Information
Example
Preformatted
On-screen computer
output in your commandline sessions; source code
in XML, C++, or other
programming languages.
# ls –al /files
total 14470
Preformatted Bold
What you type, contrasted
with on-screen computer
output.
# cd /root/rpms/php
CAPITALS
Names of keys on the
keyboard.
SHIFT, CTRL, ALT
KEY+KEY
Key combinations for
which the user must press
and hold down one key
and then press another.
CTRL+P, ALT+F4
Feedback
If you have found an error in this guide, or if you have suggestions or ideas on how to
improve this guide, please send your feedback using the online form at
http://www.parallels.com/en/support/usersdoc/. Please include in your report the guide's title,
chapter and section titles, and the fragment of text in which you have found an error.

The following operations are not available from the Panel when it is operating inside
C H A P T E R 1
Operating Inside Parallels Containers
Parallels Containers:
Adding to and removing IP addresses from the server's network cards.
Changing host name.
Setting system date and time.
When installing the Panel inside a Parallels Container, you need to configure the
Offline Service parameter for the Container to ensure that the both Parallels Plesk
Panel web interface and the Parallels Power Panel, used for managing Containers, are
accessible.
By default, the Container is configured so that the following parameters are enabled for
the Offline Management service: VZPP-plesk (redirection of connections on the port
8443) and VZPP (redirection of connections on the port 4643). You need to disable the
VZPP-plesk service. You can do this on Parallels Virtuozzo Containers for Linux and
Windows by using the Parallels Management Console utility.
To configure the container using the Parallels Management Console:
1. Open the Parallels Management Console.
2. Connect to the Parallels Containers hardware node.
3. Click Virtuozzo Containers.
4. Select the Container, right-click it, and select Properties from the context
menu.
5. Go to Network > Offline Management, and disable the VZPP-plesk service.
To configure the container using the command line tools on a Linux-
based hardware node:
1. Connect to the hardware node over SSH.
2. Issue the following command:
vzctl set CT_ID --offline_management yes --offline_service vzpp --save
To configure the container using the command line tools on a Windows-
based hardware node:
1. Connect to the hardware node over Remote Desktop.
2. Issue the following commands:
vzctl set CT_ID --offline_management yes --save

Operating Inside Parallels Containers 11
vzcfgt set CT_ID offlineservices vzpp
After configuring the Container, you will be able to access the Container management
functions from the Panel (at Tools > Manage Your Container [in the Server Management
group]).

Parallels Plesk Panel provides two separate panels with different sets of available
In this chapter:
Server Administration Panel .............................................................................. 13
Control Panel .................................................................................................... 14
Power User Panel ............................................................................................. 16
C H A P T E R 2
Becoming Familiar with Parallels Plesk Panel
functions: Server Administration Panel and Control Panel. System administration and user
account management tasks are performed in Server Administration Panel. All
operations related to managing websites, hosting features, and mail accounts are
performed in Control Panel. Server Administration Panel provides links for access to
Control Panel: You can use them to log in to Control Panel and manage websites on
behalf of your resellers and customers.
There is also the power user interface - a special modification of the user interface
switchable on and off through the command line.
The power user interface combines the simplicity of Parallels Small Business Panel
and powerful hosting management features of Parallels Plesk Panel product line. It is
intended for users who do not need functions for reselling shared hosting services and
accommodating new resellers and customers:
There is no hierarchy of user accounts specific to shared hosting: no resellers and
no customers.
There are no service plans, subscriptions, and limits on amounts of resources
consumed by websites.

Becoming Familiar with Parallels Plesk Panel 13
Server Administration Panel
When you log in to Parallels Plesk Panel as administrator, it shows a Home page with
a summary on allocated and used resources.
The top banner area provides the following links:
A link with your name. Click this if you need to update your contact information.
Log out. This is where you close your session when you have finished working with
the Panel.
Help. This provides context-sensitive help with a search function.
The navigation pane on the left provides access to the following sets of functions:
Home. This is where you start working with the Panel. Most of the operations you
might need to perform are accessible from this area.
Customers. This is where you perform operations on user accounts. Customers are
end users of hosting services; they cannot resell hosting services. You can
accomplish the following tasks from this area of the Panel:
Create, modify, suspend, activate, and remove user accounts
View traffic usage reports
Resellers. This is where you perform operations on reseller accounts. Resellers can
use hosting services and resell the services to end users. Resellers cannot create
reseller accounts for other users. You can accomplish the following tasks from this
area of the Panel:
Create, modify, and remove user accounts for resellers and their customers.
View traffic usage reports
Domains. This is where you can view information about hosted websites and their
domain names, and go to the Control Panel for managing them.
Subscriptions. This is where you manage customer subscriptions to your services.
Subscription is a way a customer obtains services and resources provided by a
service plan.
Service Plans. This is where you manage your service plans. Service plan is a set of
resources and services provided to hosting service customers by means of
subscriptions. There are also service plan add-ons that extend the amount of
resources and services provided with a subscription.
Tools & Utilities. This is where you configure and manage system services, and view
resource usage statistics.
Settings. This is where you configure the global settings related to hosting services
and Panel branding.
Modules. This link is available only on Linux-based hosting servers. Click it to install
or manage additional modules that add useful functions to Parallels Plesk Panel.
These modules are Firewall, Counter-Strike Game Server, and VPN.
Profile & Preferences. This is where you set interface language and skin, and update
contact information.

14 Becoming Familiar with Parallels Plesk Panel
Change Password. This is where you change your password for logging in to the
Server Administration Panel as administrator.
Note: The number and location of these icons and links in your Panel depend on the
number of available services, installed applications, and functions provided in
accordance with your software license. For this reason, some of the functions and
items described in this guide might not be available to you. If you want to use the
functions that are currently missing in your Panel, then upgrade your software license,
install the necessary software packages, or contact your hosting service provider for
assistance.
If the Customer and Business Manager component is installed, the navigation pane
also includes the following groups of links:
Business Operations. Manage customer accounts and service subscriptions.
Business Monitoring. View accounting reports and work with invoices and payments.
Business Setup. Set up Customer and Business Manager for serving your
customers.
To learn more about working with Customer and Business Manager, refer to the
chapter Using Integrated Customer and Business Manager (on page 66).
To see information about a tool or an item on the page, hover the cursor over an item,
without clicking it, and a small hover box appears with supplementary information
regarding the item being hovered over.
The main working area on the right provides access to the tools available for the
current section of the Panel selected in the navigation pane. Additional operations are
accessible from the More Actions menus.
To navigate through Parallels Plesk Panel, you can use a path bar: a chain of links that
appears in the right part of the screen, below the banner area.
To return to a previous screen, use the shortcuts in the path bar, or the Up Level icon in
the upper-right corner of the screen.
To sort a list by a certain parameter in ascending or descending order, click on the
parameter's title in the column heading. The order of sorting will be indicated by a small
triangle displayed next to the parameter's title.
Control Panel
Control Panel provides access to the following functions:
Home. Provides access to the most frequently performed operations. The most part
of administrative tasks can be performed using the links on this page:
View statistics on resource usage by websites.
Host a new website and fill it with content using the integrated SiteBuilder visual
editor.
Manage files.

Becoming Familiar with Parallels Plesk Panel 15
Secure sites with SSL encryption.
Set up e-mail addresses.
Manage user roles and user accounts.
Select and install applications on websites.
Users. Provides access to functionality for creating, modifying, deleting user
accounts and user roles.
Mail. Provides access to functionality for creating, modifying, deleting e-mail
addresses and mailing lists.
Websites & Domains. Provides access to functionality for registering domain names,
creating, modifying, deleting websites, setting up hosting features, databases,
subdomains, domain aliases, viewing website visits statistics, and managing files
published at the websites.
Applications. Provides access to functionality for installing, configuring, and
removing web applications that add useful features to your sites, such as blogs,
photo galleries, online stores, and other applications.
Statistics. Provides reports on disk space and traffic used by websites.
Account. This is where you view information about your hosting package, change
your contact information and password for access to the Panel.
Note: The number and location of these icons and links in your Panel depend on the
number of available services, installed applications, and functions provided in
accordance with your software license. For this reason, some of the functions and
items described in this guide might not be available to you. If you want to use the
functions that are currently missing in your Panel, then upgrade your software license,
install the necessary software packages, or contact your hosting service provider for
assistance.
Above the tabs, the following links are located:
Link with your name. Click this to specify your contact information, e-mail address,
and set a new password for accessing the Panel.
Log out. This closes your session when you have finished working with the Panel.
Help. View the context-sensitive help articles.

16 Becoming Familiar with Parallels Plesk Panel
Power User Panel
When you switch on the Power User mode, as described in Parallels Plesk Panel
Deployment Guide, section Enabling Power User UI, Server Administration Panel and
Control Panel are replaced with a single Panel which provides access to the following
functions:
Home. Provides access to the most frequently performed operations. The most part
of administrative tasks can be performed using the links on this page:
View statistics on resource usage by websites.
Host a new website and fill it with content using the integrated SiteBuilder visual
editor.
Manage files.
Secure sites with SSL encryption.
Set up e-mail addresses.
Manage user roles and user accounts.
Select and install applications on websites.
Users. Provides access to functionality for creating, modifying, deleting user
accounts and user roles.
Mail. Provides access to functionality for creating, modifying, deleting e-mail
addresses and mailing lists.
Websites & Domains. Provides access to functionality for registering domain names,
creating, modifying, deleting websites, setting up hosting features, databases,
subdomains, domain aliases, viewing website visits statistics, and managing files
published at the websites.
Applications. Provides access to functionality for installing, configuring, and
removing web applications that add useful features to your sites, such as blogs,
photo galleries, online stores, and other applications.
Statistics. Provides reports on disk space and traffic used by websites.
Server. Provides controls for setting up the Panel and managing services.
Webspaces. Provides access to functions for setting up and managing webspaces.
Each webspace is associated with one main domain name, one IP address, and is
suitable for hosting multiple websites. You might want to create separate
webspaces for hosting websites with SSL protection on dedicated IP addresses.
Note: The number and location of these icons and links in your panel depend on the
number of available services, installed applications, and functions provided in
accordance with your software license. For this reason, some of the functions and
items described in this guide might not be available to you. If you want to use the
functions that are currently missing in your Panel, then upgrade your software license,
install the necessary software packages, or contact your hosting service provider for
assistance.

Becoming Familiar with Parallels Plesk Panel 17
Above the tabs, the following links are located:
Link with your name. Click this to specify your contact information, e-mail address,
and set a new password for accessing the Panel.
Log out. This closes your session when you have finished working with the Panel.
Help. View the context-sensitive help articles. There is no dedicated Power User
Panel guide; however, when you click this link, the relevant help topics will be
shown either from Administrator's Guide or Control Panel User's Guide.

To change your password:
C H A P T E R 3
Changing Your Password and Contact Information
1. Click the Change Password link in the navigation pane.
2. Enter your old and new passwords.
3. Click OK.
To update your contact information:
1. Click the Profile & Preferences link in the navigation pane.
2. Update your information as required, and click OK.
If you forgot your password:
1. In your web browser’s address bar, type the URL where your Parallels
Plesk Panel is located.
2. For example, https://your-server.com:8443.
3. Press ENTER. Parallels Plesk Panel login screen will open.
4. Click the Forgot your password? link.
5. You will be prompted to specify your login name and e-mail address
registered in the system. Type your login name into the Login box, type
your e-mail address registered in the system into the E-mail box, and
click OK.
6. If your password cannot be sent by e-mail because it was stored by the
system in encrypted form, you will be prompted to set up a new
password using a secret code that will be generated for that purpose
and sent to your e-mail.
7. Once you received the e-mail from the password reminder, click the link
in the message body. A new browser window will open.
8. At this step, specify your login name and a new password.
The Secret Code field of the form should be automatically filled by the system, and if
it is not, copy the secret code from the message you received to the clipboard and
paste to the form.
9. Click OK to submit.

Changing Your Password and Contact Information 19
The instructions on how to restore your password will be sent to your e-mail
In this chapter:
If Your Panel Works with Customer & Business Manager ..................................19
address.
If Your Panel Works with Customer & Business Manager
For the Panel to work fine with Customer & Business Manager, you will have to actually
change two passwords. The first is that you and Business Manager use to work with
the Panel, and the second is a global password you use to log in to both Business
Manager and the Panel.
To change your password if you employ Business Manager:
1. Change your password in the Panel by following instructions from
section Changing Your Password and Contact Information (on page 18).
2. Update this password in connection settings of Business Manager.
a. Click Business Setup > All Settings.
b. Click Server Groups.
c. Select the ID of the server group where the Panel resides
(PleskUnix or PleskWin).
d. Click Edit.
e. Change the password to the one you specified at step 1.
3. Set this password as global account password.
a. Make sure you are in Business Manager and click the Profile link
in the upper-right corner of the page.
b. Repeat the password you specified at step 1.

In this chapter:
Understanding Plans and Subscriptions ............................................................ 21
Properties of Plans and Subscriptions ............................................................... 27
Serving Customers ............................................................................................ 47
Employing Resellers .......................................................................................... 60
Adding Services to Your Offerings ..................................................................... 64
C H A P T E R 4
Serving Your Customers and Employing Resellers

Serving Your Customers and Employing Resellers 21
Understanding Plans and Subscriptions
Parallels Plesk Panel lets you organize your business by means of service plans and
subscriptions.
Hosting service customers
Service plan is a set of services and resources offered to hosting service customers.
Typically, the resources include disk space on the server and bandwidth for hosting
websites, and the services include web hosting service, mail hosting service, and such. It is
assumed that a service plan you create in the Panel represents your particular business
offer.
There are also add-on plans which let you broaden the amount of resources and/or services
provided to a customer with a particular service plan.
Subscription is an instance of service plan assigned to a customer. To provide a particular
customer with services and resources offered with a service plan, you subscribe the
customer to the service plan, or, in other words, you create a subscription for the customer.
For more details about how subscriptions are related to service plans and add-ons, refer to
the section titled Relations Between Subscriptions and Service/Add-on Plans (on page 23).
Actually, not only customers can be subscribed to hosting services and host their websites
and mail, the Panel administrator and resellers can have their own subscriptions as well,
which they may use for their own purposes.
Subscriptions are meant for multi-domain hosting, each hosting subscription provides disk
space and other resources, and services defined by the plan and necessary for hosting
several sites. Each subscription is assigned a system user account, used by a hosting
customer to connect to the server over FTP and SSH or Remote Desktop connection, and an
IP address, which can be exclusively allocated for the subscription or shared with other
subscriptions. Each subscription is also linked to a domain, called 'main domain' - a domain
created along with the subscription, which is necessary for allocating system resources. All
subscriptions are named after their 'main domains', and such domains cannot be transferred
from one subscription to another. The following diagram explains how domains and websites
are hosted with subscriptions.

22 Serving Your Customers and Employing Resellers
Here, example.com and jenny.net are main domains of the subscriptions, and other domains
In this section:
Allocation of Resources and Services ............................................................... 23
Relations Between Subscriptions and Service/Add-on Plans ............................ 23
Syncing Subscriptions and Plans. States of Subscriptions ................................ 25
depicted as orange rectangles are websites hosted with these subscriptions.
Resellers
If your business model employs resellers, plans and subscriptions work as well, almost in the
same way as they do for the hosting service customers. The differences are as follows:
In such a case, we are talking about reseller plans and reseller subscriptions.
Reseller add-on plans are not implemented.
A reseller subscription is not linked to a domain, a reseller subscription provides a set of
resources and services that the subscribed reseller redistributes by the means of service
subscriptions belonging to their customers or to themselves.

Serving Your Customers and Employing Resellers 23
Allocation of Resources and Services
Hosting service customers
Service plans define potential services, the Panel does not check if a service or a resource
that a service plan should provide is actually available in the system. For example, when
creating a plan, you can select to provide ColdFusion when ColdFusion is not installed on the
server, and the Panel will let you do it and will show no error or warning messages.
Subscriptions provide actual resources and services, which are allocated during creation of
each subscription.
Resellers
Said above is true for reseller subscriptions, and for the service plans that resellers create. A
reseller can create a service plan which includes unlimited amounts of all resources, and all
services and privileges, no matter how many of the resources and services are actually
provided with their reseller subscription.
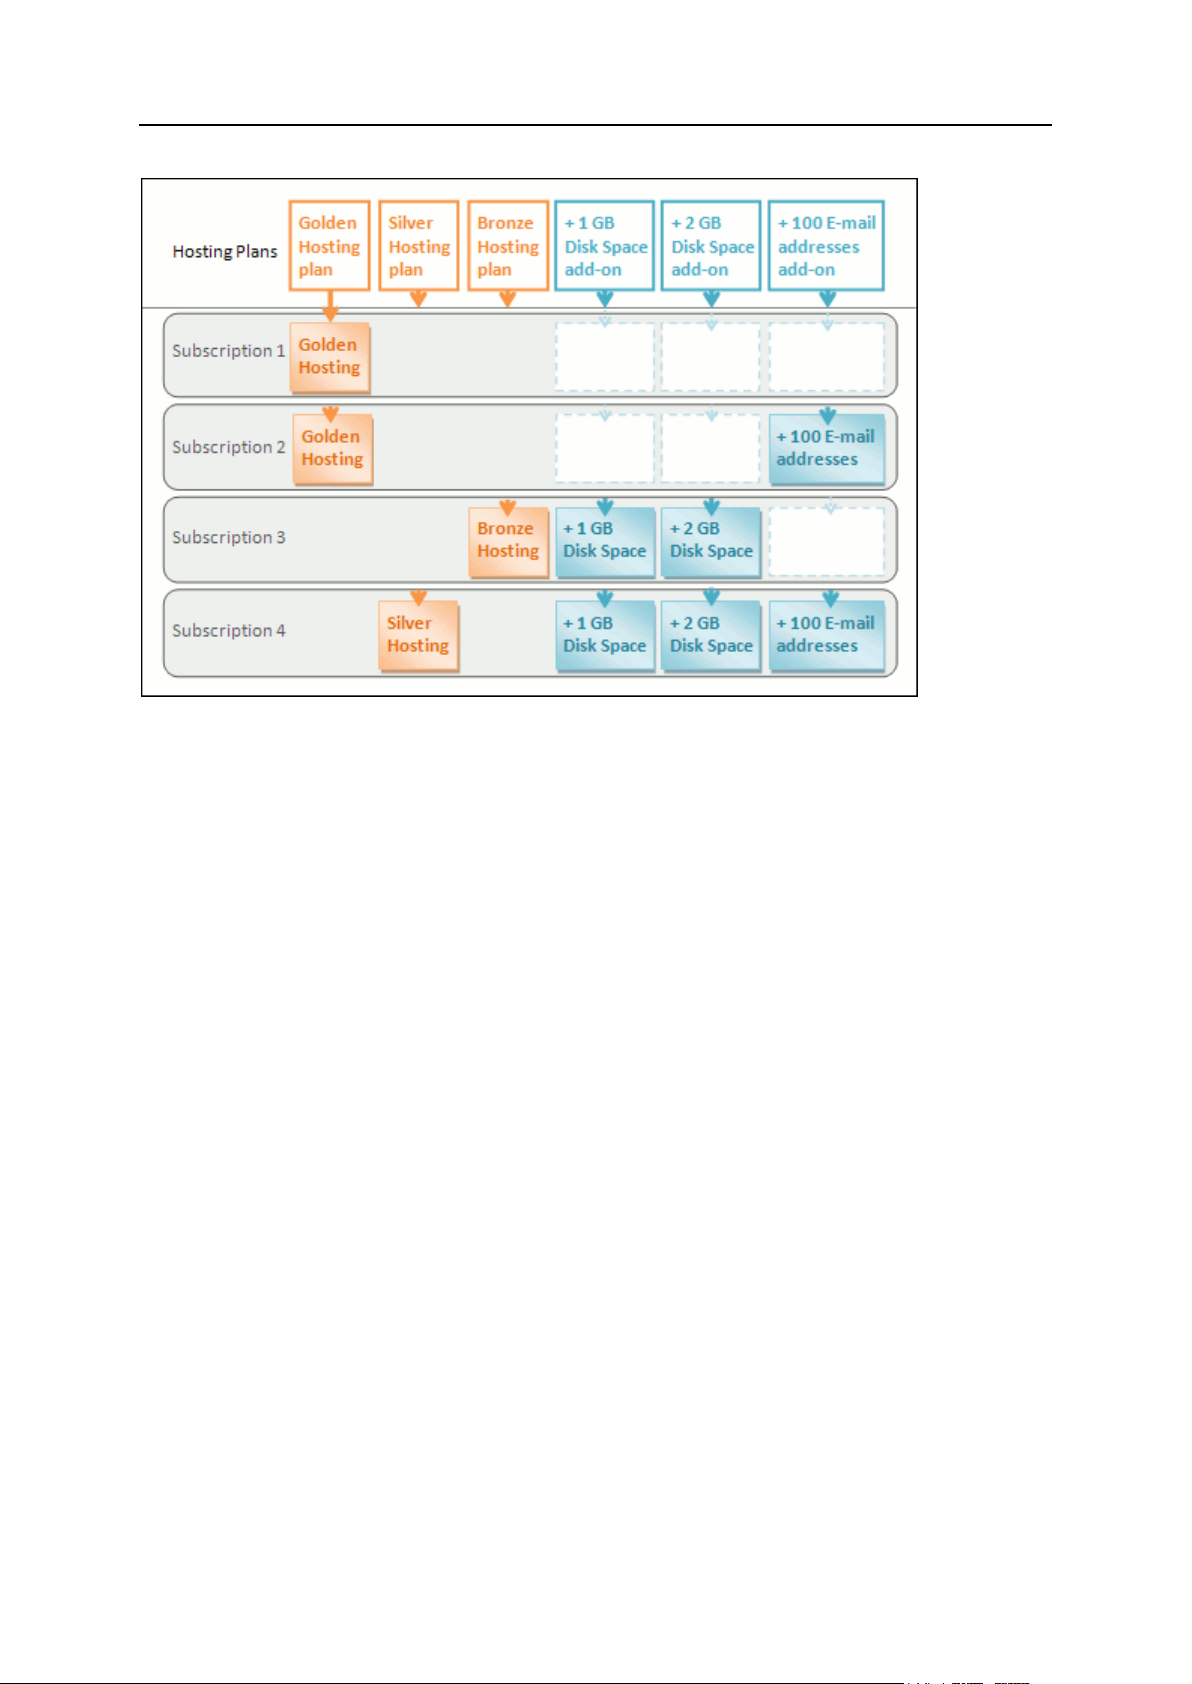
Relations Between Subscriptions and Service/Add-on Plans
Hosting subscriptions
Normally, a subscription is associated with a service plan, and this association is reflected in
a list of subscriptions: each subscription name contains the service plan name put in
brackets at the end. The amount of resources and services provided with a subscription can
be extended by associating the subscription with add-on plans. A subscription can be
associated with several add-ons, but each add-on can be added to the subscription only
once.
The following chart represents how hosting plan subscriptions are associated with plans and
add-ons.
24 Serving Your Customers and Employing Resellers

Serving Your Customers and Employing Resellers 25
It is also possible that a subscription is not associated with a service plan, and so it cannot
be associated with any add-on plans: add-ons are only added to a "main" service plan. We
call such subscriptions custom subscriptions, and their names are extended with "(Custom)" in
the list of subscriptions. Having a custom subscription may be useful in case you want to
provide services on some specific terms which outstand from the usual offerings in your
business model.
You can change the association between a subscription and plans at any time as follows:
Associate the subscription with another service plan.
Add and remove add-on plans.
Remove the subscription association with the service plan and add-ons.
Reseller subscriptions
Reseller subscription is either associated with a reseller plan, or is a custom subscription not
associated with any plan.
Syncing Subscriptions and Plans. States of Subscriptions
Subscriptions associated with a particular plan are synchronized, or synced, with it: any
changes made to the plan are automatically applied to all its subscriptions. This is true for all
kinds of plans: service plans, their add-ons, and reseller plans.
The Panel allows the following deviations from the default subscription state of being synced
with its plans:
Locked state, which means locked for syncing, indicates that a subscription is excluded
from syncing with the associated plans.
A subscription gets locked if you change the parameters of the subscription, without
changing the associated service plan. Such locking secures your customizations so that
they are not overwritten the next time you change the plan and all its subscriptions get
synced.
Unsynced state indicates that some services or resources offered with the associated
plan(s) cannot be actually provided with the subscription.
Unsynced subscriptions
A subscription is automatically marked as 'Unsynced' if the Panel cannot provision the
resources and/or services defined by the plan. This may happen in the following cases:
When the subscription is created.
When properties of the associated plan are changed.
When an add-on plan is added to or removed from the subscription.

26 Serving Your Customers and Employing Resellers
Hosting Subscriptions
In case a plan offers a privilege which makes it possible for a subscriber to change a
particular resource or service, this resource/service allocation is not synced. For example, if
a subscription provides the privilege of DNS zone management, then the DNS zone settings
of the associated service plan are ignored during synchronization.
To know which of the subscription's resources or services are not synced with
the plan:
1. Go to Subscriptions, and click the unsynced subscription name.
2. Click Sync.
The Panel will retry syncing the subscription with associated plans, and will display the
conflicting properties if syncing fails.
Be sure to take the note of the conflict report: which properties are affected, and what the
Plan value and the Available value are.
Clicking OK at this page will initiate setting the subscription values according to the
available values, Cancel will leave everything unchanged.
Once you have identified the problem, you can resolve it. There are two possible ways:
1. Fine-tune the plan to conform to the system actual state.
2. Fine-tune the system to provide resources and services offered with the plan.
To change the plan properties to conform to the system:
1. Go to Service plans > <plan name>.
2. Adjust values of the problem properties so that they correspond to the
Available values (see above).
3. Click Update & Sync.
The subscriptions will be synced automatically.
To adjust the system and re-sync a subscription:
1. Adjust your system: install missing components, add hard disks - whatever is
indicated by the conflict report.
2. Go to Subscriptions, and click the unsynced subscription name.
3. Click Sync.
The Panel will retry syncing the subscription with associated plans.

Serving Your Customers and Employing Resellers 27
Reseller Subscriptions
To know which of the subscription's resources or services are not synced with
the plan:
1. Go to Resellers, and click the unsynced reseller name.
2. Click Sync.
The Panel will retry syncing the subscription with the associated plan, and will display the
conflicting properties if syncing fails.
Be sure to take the note of the conflict report: which properties are affected, and what the
Plan value and the Available value are.
Clicking OK at this page will initiate setting the subscription values according to the
available values, Cancel will leave everything unchanged.
Once you have identified the problem, you can resolve it. There are two possible ways:
1. Fine-tune the plan to conform with the system actual state.
2. Fine-tune the system to provide resources and services offered with the plan.
To change the plan properties to conform with the system:
1. Go to Service plans.
2. Click the Reseller Plans tab and click the <plan name> in the list.
3. Adjust values of the problem properties so that they correspond to the
Available values (see above).
4. Click Update & Sync.
The subscriptions will be synced automatically.
To adjust the system and re-sync a subscription:
1. Adjust your system: configure IP addresses, add more hard disks - whatever
is indicated by the conflict report.
2. Go to Resellers, and click the unsynced reseller name.
3. Click Sync.
The Panel will retry syncing the reseller subscription with associated plans.

28 Serving Your Customers and Employing Resellers
Properties of Plans and Subscriptions
In this section:
Hosting Plans and Subscriptions ....................................................................... 29
Reseller Plans and Subscriptions ...................................................................... 44

Serving Your Customers and Employing Resellers 29
Hosting Plans and Subscriptions
In this section:
Resources......................................................................................................... 30
Permissions ...................................................................................................... 33
Hosting Parameters .......................................................................................... 37
Mail ................................................................................................................... 40
DNS .................................................................................................................. 42
Performance ..................................................................................................... 42
Logs & Statistics ............................................................................................... 42
Applications ...................................................................................................... 43
Additional Services ........................................................................................... 44
Properties of a hosting plan and subscription are grouped as follows:
Resources
Includes validity period, policy on overusing resources, system resources like disk space
and traffic, and service resources like websites, subdomains, mailboxes, databases and
so on.
Permissions
Includes provided services and privileges.
Note: Some permissions prevent settings of the following services from syncing (on page
25). See the details in the Permissions section (on page 33).
Hosting Parameters
Includes parameters of the provided hosting service.
Mail
Includes parameters of the provided mail service.
DNS
Specifies if the DNS zones of the subscription's domains should be master or slave.
Note: In case the DNS zone management privilege is provided, this parameter is not synced,
and subscribers can set up this parameter on a per-domain basis.
Performance
Includes parameters that affect performance of all services provided with the plan.
Logs & Statistics
Includes settings of how statistics and logs of the plan's subscriptions should be stored
Note: Hosting, Mail, DNS, Performance, Logs & Statistics parameters are fully visible and
editable in the Server Administration Panel only for service plans. For subscriptions,
these parameters are available only in the Control Panel. To view or modify the
parameters of a particular subscription, go to Subscriptions and click Control Panel to the
right of the subscription name. Also note that the availability of these parameters to a
subscriber depends on the permissions.
Applications
Lets you select which applications should be available to subscribers.

30 Serving Your Customers and Employing Resellers
Resources
Overuse policy
Defines what happens if the subscription's usage of disk space and traffic reaches limit
values:
Overuse is not allowed will suspend the subscription only if you select the checkbox Suspend
subscription when its disk space or traffic usage goes beyond the limit. If you do not select it,
websites will not be suspended; only a notice will be sent to recipients specified in Settings
> Notifications: Resource usage limits exceeded by subscription option.
You can also set up sending notifications as soon as usage of disk space or traffic
reaches a particular value (the Notify upon reaching options), in order to prevent
subscriptions from suspension. The notifications will be sent to users and/or e-mail
addresses specified at Settings > Notifications: Resource usage limits exceeded by subscription
option.
Overuse is allowed will let the subscription operate properly.
The option When limit on usage of a resource is reached, send email according to server
notification settings triggers sending notifications to users and/or e-mail addresses
specified at Settings > Notifications: Resource usage limits exceeded by subscription option.
Note: The overuse policy does not apply to the limits set on size of mailboxes. Therefore,
even if you enable overuse, be sure to allocate enough disk space to mailboxes.
Disk space
The total amount of disk space allocated to the subscription. It includes disk space occupied
by all files related to the subscription: contents of websites, databases, applications,
mailboxes, log files and backup files.
Traffic
The amount of data that can be transferred from the subscription's websites and FTP/Samba
shares during a month.
Notify upon reaching
Available only if overuse is not allowed. Sets the soft quota for disk space or traffic usage in
order to prevent subscriptions from suspension. When the quota is reached, the Panel sends
notifications to users and/or e-mail addresses specified at Settings > Notifications: Resource
usage limits exceeded by subscription option.
Sites published with SiteBuilder
The number of websites that can be published with SiteBuilder.

Serving Your Customers and Employing Resellers 31
Domains
The total number of domain names that the subscriber will be able to host within the
subscription. This includes websites, web forwardings that point to websites hosted on other
servers, and domain names on which a website or a web forwarding is not yet set up
(domains with no hosting).
Mobile sites
The total number of websites that the subscriber will be able to host with the UNITY Mobile
online service, which optimizes sites for viewing on mobile devices.
Subdomains
The total number of subdomains that the subscriber will be able to host within the
subscription.
Domain aliases
The total number of additional alternative domain names that the subscriber will be able to
use for their websites.
Mailboxes
The total number of mailboxes that the subscriber can host within the subscription.
Mailbox size
The amount of disk space that is allocated to each mailbox in a subscription for storing e-mail
messages and auto-reply attachment files.
Total mailboxes quota (available only for Windows hosting)
The total amount of disk space in megabytes available for all mailboxes within the
subscription.
Mailing lists
The total number of mailing lists that the subscriber can host within the subscription.

32 Serving Your Customers and Employing Resellers
Additional FTP accounts
The maximum number of FTP accounts used to access the files and folders created within a
subscription. This number does not include an account that is always created during the
subscription creation.
Databases (Unix hosting)
The total number of databases that can be created on the Panel database servers and used
by the subscription's websites.
MySQL databases and Microsoft SQL Server databases (Windows hosting)
The maximum number of MySQL and Microsoft SQL Server databases respectively that can
be created on the Panel database servers and used by the subscription's websites.
MySQL databases quota and Microsoft SQL databases quota (Windows hosting)
The maximum amount of disk space (in megabytes) that the subscription's MySQL and
Microsoft SQL Server databases respectively can occupy.
Validity period/Expiration Date
The term for a subscription.
In service plan properties, it is Validity period: it is used only when a subscription is created:
the Panel derives the subscription expiration date from it.
In subscription properties, it is Expiration date: At this date, the subscription will be suspended,
meaning that all sites within the subscription will be suspended, their web, FTP and mail
services will no longer be accessible to the Internet users, and the subscriber and their users
will not be able to log in to the Control Panel.
Subscriptions are not renewed automatically, so to bring a subscription's services back to
operation, you will need to manually activate the subscription (on page 57).
Java applications
The total number of Java applications or applets that can be hosted on the subscription's
websites.

Serving Your Customers and Employing Resellers 33
Web users
The total number of personal web pages that the subscriber can host for other users under
their websites. This service is mostly used in educational institutions that host noncommercial personal pages of their students and staff. These pages usually have addresses
like http://example.com/~webuser.
FrontPage accounts (Windows hosting)
The maximum number of Microsoft FrontPage accounts that the subscriber can create within
the subscription.
Shared SSL links (Windows hosting)
The total number of shared SSL links that the subscriber can use within the subscription.
ODBC connections (Windows hosting)
The total number of ODBC connections that the subscriber can use within the subscription.
ColdFusion DSN connections (Windows hosting)
The total number of ColdFusion DSN connections that the subscriber can use within the
subscription.
Permissions
Permissions define what privileges and services are provided with the subscription.
DNS zone management
Allows the subscriber to manage the DNS zones of their domains.
Note: If this permission is provided, then the DNS service settings are not synced.
Hosting settings management
Allows modifying parameters of hosting service provided with the subscription: changing
hosting account features and switching on or off support for programming and scripting
languages, custom error documents, SSL support, and (Windows only) Microsoft FrontPage
support.
Note: If this permission is provided, then the mentioned hosting parameters are not synced.
PHP safe mode management (Linux/Unix hosting)

34 Serving Your Customers and Employing Resellers
Allows the subscriber to toggle such hosting parameter as PHP safe mode for their sites. By
default, PHP is configured to operate in safe mode with functional restrictions. However,
some web applications may not work properly with the safe mode enabled. To learn more
about PHP safe mode, refer to http://php.net/features.safe-mode.
Note: If this permission is provided, then the parameter is not synced.
Setup of potentially insecure web scripting options that override provider's policy. Allows the
subscriber to override the hosting security policy, if it is set up. To learn about configuring the
policy, refer to the section Restricting the Use of Potentially Insecure Hosting Options (on
page 155).
Management of access to server over SSH (Linux\Unix hosting)
Provides the Access over SSH service, which lets the subscriber access a server shell over
SSH under their system user account. Also, lets the subscriber set up such hosting
parameter as SSH access to server shell under the subscription's system user.
Note: If this permission is provided, then the mentioned hosting parameter is not synced.
Management of access to server over Remote Desktop
(Windows hosting)
Lets the subscriber access the server via Remote Desktop protocol.
Anonymous FTP management
Provides the anonymous FTP service, which lets the subscriber set up a directory shared
over FTP protocol and available to anonymous users. A subscription should reside on a
dedicated IP address in order to provide this service.
Scheduler management
Provides the Scheduler service, which lets the subscriber schedule running of scripts or
utilities.
If you are running Parallels Plesk Panel on Linux, you can learn about the new security
settings applied to scheduled tasks in the section Execution of Scripts via Cron Task
Scheduler (on page 157).
Spam filter management
Lets the subscriber customize filtering settings of SpamAssassin spam filter.

Serving Your Customers and Employing Resellers 35
Antivirus management
Lets the subscriber change settings of server-side protection of incoming and outgoing mail
from viruses.
Data backup and restoration using the server repository
Provides the Backup/Restore service which lets the subscriber use storage on the server for
their backups.
Back up and restore using a personal FTP repository
Provides the Backup/Restore service which lets the subscriber use external FTP servers for
storing their backups.
Web statistics management
Lets the subscriber set up such hosting parameter as Web statistics, that is, selecting which
web statistics engine should be used, and toggling if the data is accessible via a specific
password-protected directory.
Note: If this permission is provided, then the mentioned hosting parameter is not synced.
Log rotation management
Lets the subscriber adjust the cleanup and recycling of processed log files for his or her sites.
Also, lets the subscriber remove log files.
Note: If this permission is provided, then the Logs & Statistics parameters (on page 42) are not
synced.
Access to Application Catalog
Provides the subscriber with access to prepackaged applications that can be installed on
websites. If you select this option, be sure to select the PHP support checkbox and clear the
checkbox PHP safe_mode on on the Hosting Parameters tab.
Domain creation
Lets the subscriber add domains, create websites and set up web forwardings.

36 Serving Your Customers and Employing Resellers
Subdomains management
Lets the subscriber set up additional websites accessible by <subdomain>.<domain>
addresses.
Domain aliases management
Lets the subscriber set up additional alternative domain names for their websites and allow.
Additional FTP accounts management
Lets the subscriber manage FTP accounts for accessing the subscription's files and folders.
Java applications management
Lets the subscriber install Java applications and applets on their websites.
Mailing lists management
Lets the subscriber use mailing lists provided by the GNU Mailman software.
Note: If this permission is provided, then the Enable mailing lists parameter (on page 40) is not
synced.
Hosting performance settings management
Lets the subscriber set up limits on bandwidth usage and number of connections to their
websites.
Note: If this permission is provided, then the Performance settings (on page 42) for bandwidth
usage and the number of connections are not synced.
IIS application pool management (Windows hosting)
Provides the dedicated IIS pool service, and lets the subscriber manage their IIS application
pool: enable or disable it, and set up the maximum amount of CPU that the pool may use.
Note: If this permission is provided, then the Performance parameter (on page 42) called Use
dedicated pool is not synced.

Serving Your Customers and Employing Resellers 37
Additional write/modify permissions management (Windows hosting)
Lets the subscriber toggle such hosting parameter as Additional write/modify permissions.
These permissions are required if a subscriber's web applications use a file-based database
(like Jet) located in the root of httpdocs folder. Please note that selecting this option might
seriously compromise the websites security.
Note: If this permission is provided, then the mentioned hosting parameter is not synced.
Shared SSL management (Windows hosting)
Provides the shared SSL service, and lets the subscriber set up shared SSL links for their
websites within the subscription.
Hard disk quota assignment
Lets the subscriber set up such hosting parameter as Hard disk quota.
Note: If this permission is provided, then the mentioned hosting parameter is not synced.
Database server selection
Lets the subscriber select a database server of each type for creating their databases, as
opposed to always using the default database server.
Hosting Parameters
These parameters define the hosting service provided with the plan.
Note: Unless specifically noted, the parameters are not synced if the Hosting management
permission is selected.
Enable hosting
Defines if the hosting service is actually provided with the plan.
Clear this option to make up a service plan that provides only mail service. Subscribers of
such a plan will be able to have 'domains without hosting' which will serve mailboxes.

38 Serving Your Customers and Employing Resellers
Hard disk quota
Hard quota imposed on disk space in addition to the soft quota (set with the option Notify
when reaching (on page 30)). Hard disk quota will not allow writing more files to the web space
when the limit is reached: users will get an "Out of disk space" error at an attempt to write
files.
Note: (Linux/Unix hosting) Confirm that your operating system supports hard disk quota
before you set any value other than Unlimited. In case you define a hard quota when it is not
supported, you will get a synchronization conflict on all the plan's subscriptions. For details
on syncing subscriptions with plans, refer to the section Syncing Subscriptions and Plans (on
page 25).
SSL support
Allows setting up SSL encryption on websites hosted within the subscription.
Web statistics
Selects a statistics engine that will create reports on how the subscription's websites are
visited: how many people visited a site, and which webpages they viewed.
The accessible via password protected directory /plesk-stat/webstat option allows a subscriber view
website statistics at URLs like https://example.com/plesk-stat/webstat using their system
user account login and password.
Note: This parameter is not synced if the Web statistics management permission is selected.
Custom error documents
Allows subscribers to design and use their own error pages that the web server returns with
HTTP error codes.
SSH access to server shell under the subscription's system user (Linux/Unix hosting)
Allows subscribers to upload securely web content to the server through SSH.
Note: This parameter is not synced if the Management of access to server over SSH permission is
selected.

Serving Your Customers and Employing Resellers 39
Scripting
In this section:
PHP Settings ..................................................................................................... 40
Support for programming and scripting languages that should be interpreted, executed or
otherwise processed by a web server: Microsoft ASP.NET framework, PHP hypertext
preprocessor (PHP), Common Gateway Interface (CGI), Perl, Python, Fast Common
Gateway Interface (FastCGI), Microsoft or Apache Active Server Pages (ASP), Server Side
Includes (SSI), ColdFusion, and Miva scripting required for running Miva e-commerce
solutions.
To learn more about adjustable PHP settings, see the section PHP Settings (on page 40).
Additional write/modify permissions (Windows hosting)
This option is required if subscriber's web applications use a file-based database (like Jet)
located in the root of httpdocs folder. Please note that selecting this option might seriously
compromise the website security.
Allow web users to use scripts
Allows scripting at web pages available at URLs like
http://example.com/~<username>/<webpage>, where <username> refers to a web user.
Web users are individuals who do not need their own domain names. This service is popular
with educational institutions that host non-commercial personal pages of their students and
staff.
FrontPage support (Windows hosting). The options in the FrontPage support group allow
subscribers to connect to the server and create websites with Microsoft Frontpage.

40 Serving Your Customers and Employing Resellers
PHP Settings
You can adjust the following PHP settings:
PHP handler type.
ISAPI (only on Windows). This mode uses less server resources, but a website is
isolated only if it is operating in a dedicated IIS application pool.
Apache module (only on Unix). This mode uses less server resources, but it is the least
secure option. A site is isolated only if PHP safe mode is switched on.
FastCGI application. This mode is faster than CGI, but consumes more memory.
Provides site isolation.
CGI application. This is the slowest mode of operation, but it uses the least amount of
memory.
Note: When PHP is operating in CGI or FastCGI modes, PHP settings are taken from
the global php.ini file, and PHP safe mode cannot be switched off by means of
security policy settings. If your customers want to use applications that require
PHP safe mode to be switched off, and you decide to switch it off, then you need
to modify the php.ini file located in /etc/ directory on Linux platforms, and
%plesk_dir%\Additional\PHP and
%plesk_dir%\Additional\PleskPHP5 directories on Windows platforms.
PHP safe mode.
Switching on PHP safe mode isolates sites, but some applications might not work
because of it.
Switching off PHP safe mode is recommended to ensure stable work of most
applications, but site isolation will not be provided if Apache module is selected as the
PHP handler type.
Note: You can fine-tune the safe mode settings by modifying the php.ini file.
PHP version (only on Windows).
Version 4.x is outdated, you should use it only if you need to host some old PHP
application versions.
Version 5.x is current and its use is recommended.
Note: When dedicated IIS application pool on Windows is enabled for a site, site isolation
means that a site cannot interfere with other sites and other sites cannot interfere with it. In
all other cases, site isolation implies only that a site cannot interfere with others, but other
sites that are not isolated can interfere with it.
These parameters define the mail service provided with the plan.

Serving Your Customers and Employing Resellers 41
Webmail
Provides the webmail service, which allows users of mailboxes within the subscription to
work with their mail using a web-based mail application.
Enable mailing lists
Turns on the mailing lists service provided by the GNU Mailman software on the
subscription's websites.
Note: This parameter is not synced if the permission Mailing lists management is selected.
Policy on mail for non-existent users
Defines how mail server should treat e-mail messages sent to e-mail addresses that are
supposed to be registered under the subscription's domains but actually do not exist. The
following options are available:
Bounce with message returns the mail back to sender with a notice.
Forward to address forwards the mail to another e-mail address.
Reject silently rejects the mail without accepting it. This setting can decrease mail server
load caused by a large amount of spam, which is often directed at randomly generated
user names. However, this might be useful to spammers because scanning your mail
server for valid e-mail addresses will speed up in such a case.
Redirect to external mail server with IP address (on Windows hosting), forwards the mail to the
specified mail server.

42 Serving Your Customers and Employing Resellers
DNS
These parameters define how the DNS service running on the Panel-managed server will
serve DNS zones for websites hosted on the plan.
Master
A master or primary name server stores locally the zone file it serves, while a secondary
server only retrieves a copy of this file from the primary.
Slave
A slave or secondary server retrieves a copy of the zone file from the primary name server.
Performance
These system parameters define performance of all services provided with the plan.
Use dedicated IIS application pool (Windows hosting)
Enables the use of dedicated IIS application pool for web applications within the subscription.
Using dedicated IIS application pool dramatically improves the stability of web applications
due to worker process isolation mode. This mode gives each site hosted on the server a
possibility to allocate a separate process pool for execution of its web applications. This way,
malfunction in one application will not cause stopping of all the others. This is especially
useful when you are using shared hosting package. The Maximum CPU use (%) option limits the
amount of the server CPU that the pool can use.
Maximum bandwidth usage
Defines the maximum speed (measured in KB per second) that a domain can share among
all its connections.
Connections limited to
Defines the maximum number of simultaneous connections to web server for all websites
within the subscription. This setting is intended for preventing the websites from Denial of
Service (DOS) attacks and excessive usage of bandwidth.
Logs & Statistics
These parameters define how statistics and logs of the subscription should be stored.

Serving Your Customers and Employing Resellers 43
Retain web and traffic statistics
Sets a period (in months) for which reports on the subscription's web statistics (generated by
selected web statistics component) and traffic statistics (generated by the Panel) should be
available.
Log rotation
Enables automatic cleanup and recycling of web server log files. You can also switch on
compression of processed log files and sending them to a specific e-mail address.
Applications
Depending on your Panel license, a number of prepackaged applications may be available to
you from the Panel. You can install them on your own sites and provision them to your users.
The applications are provided by the Application Catalog - an external repository of web
applications. The Application Catalog may be configured by providers to include applications
packaged by Parallels and its partners (the default setting), or point to a custom applications
repository.
The list of available applications can be expanded: You can upload to the server your custom
applications packaged in APS format and specify which of them should be available for
installation on websites. For more information about working with application packages, refer
to the section Prepackaging Applications (on page 140).
When setting up a service plan, you can select which of the apps should be provisioned to
the subscribers:
To provide all applications available from the Application Catalog, plus those that you
manually uploaded to the server and marked as available to users (on page 140), on the
Permissions tab, select the option Access to Application Catalog.
To provide only selected applications, on the Permissions tab, select the option Access to
Application Catalog, and then go to the Applications tab and select the option Provide only
applications that I select. Use the button >> to add the selected applications to the plan.

44 Serving Your Customers and Employing Resellers
Additional Services
In this section:
Resources ......................................................................................................... 45
Permissions ....................................................................................................... 46
IP Addresses ..................................................................................................... 46
After you add custom services, as described in the section Adding Services to Your Offerings
(on page 64), the Additional Services tab appears in hosting plan properties. On this tab, you
can select the services that you want to provide to subscribers.
Reseller Plans and Subscriptions
Properties of a reseller plan are grouped as follows:
Resources
Includes policy on overusing and overselling of resources, the number of customer
accounts a reseller can create, system resources like disk space and traffic, and service
resources like websites, subdomains, mailboxes, databases, and so on.
Permissions
Reseller permissions either denote the operations available to a reseller in the Panel, or
define which services and privileges can be enabled in the service subscriptions of the
reseller's customers. If a particular permission in a reseller subscription is Off, then a
service subscription will not provide the corresponding service or a privilege. A disabled
permission also means that a reseller is prohibited to perform the designated action in
Control Panel. For example, if a reseller subscription does not provide a privilege to use
Scheduler (Scheduler management is Off), then none of the reseller's subscribers will be
able to use it, and neither will the reseller themselves when they go to the Control Panel.
IP addresses
Defines IP addresses that will be allocated to resellers. It is important that a reseller has
at least one IP address allocated to them, otherwise, they will not be able to create a
single service subscription.

Serving Your Customers and Employing Resellers 45
Resources
Overuse policy
Defines what happens to the reseller subscription if the total disk space and traffic usage by
the reseller's service subscriptions (own reseller's service subscriptions and those belonging
to the reseller's customers) reaches the limit values defined by the reseller plan.
Overuse is not allowed will suspend the reseller subscription and all their customers only if
you select the checkbox Suspend reseller when their disk space or traffic usage goes beyond the
limit. If you do not select it, reseller subscriptions and their customers will not be
suspended; only a notice will be sent to recipients specified in Settings > Notifications:
Resource usage limits exceeded by reseller account option.
You can also set up sending notifications as soon as usage of disk space or traffic
reaches a particular value (the Notify upon reaching options), in order to prevent
subscriptions from suspension. The notifications will be sent to users and/or e-mail
addresses specified at Settings > Notifications: Resource usage limits exceeded by reseller
account option.
Overuse is allowed will let the subscription operate properly.
The option When limit on usage of a resource is reached, send email according to server
notification settings triggers sending notifications to users and/or e-mail addresses
specified at Settings > Notifications: Resource usage limits exceeded by reseller account option.
Note: The overuse policy does not apply to the limits set on size of mailboxes. Therefore,
even if you enable overuse, be sure to allocate enough disk space to mailboxes.
Overselling policy
Defines whether a reseller can sell more resources than allocated to them with the plan.
If overselling is allowed, a reseller is governed by actual resource usage instead of initial
resource allocation. Overselling is a marketing strategy based on the following scheme: a
reseller, who was allotted, for example, ten gigabytes of disk space, allocates five gigabytes
of disk space for each of their customers, assuming that none of them will actually use all of
their allocated disk space.
Customers
Defines the total number of customer accounts that a reseller can create.
Other Resources
Note: Other resources have the same meaning as the ones defined in the hosting plans and
subscriptions (on page 30). The only difference is that a reseller does not use the provided
resources directly, but redistributes them by means of service subscriptions they create for
their customers or for hosting their own websites.

46 Serving Your Customers and Employing Resellers
Permissions
Reseller-specific privileges (the ones that do not affect service subscriptions they create for
their customers) are as follows:
Ability to use remote API
Defines if a reseller can remotely manage websites through custom applications. The remote
API is an interface that can be used for developing custom applications integrated with
websites, which could be used, for instance, for automating setup of hosting accounts and
provisioning of services for customers purchasing hosting services from your site. To learn
more, refer to the Parallels Plesk Panel API documentation available at the PTN portal
(http://www.parallels.com/ptn/documentation/ppp/).
Access to the Panel
Defines if a reseller can use the Panel graphical user interface.
Customer account creation
Defines if a reseller can create user accounts and subscriptions for their customers in the
Panel.
Allow overselling
Defines if a reseller can set up overselling policy, meaning that a reseller can themselves
define if overselling is allowed to them or not.
Other Permissions
Note: Meanings of the other permissions are the same as in the service subscriptions (on
page 33).
IP Addresses
These parameters define IP resources provided with the plan.
Allocate shared IP addresses
Defines shared IP addresses that will be available to a reseller.

Serving Your Customers and Employing Resellers 47
Allocate exclusive IP addresses
In this section:
Managing Service Plans .................................................................................... 48
Subscribing to Hosting Services ........................................................................ 50
Changing Services Provided to Customers ....................................................... 52
Managing Customers ........................................................................................ 54
Managing Service Subscriptions ....................................................................... 57
Defines that a specified number of dedicated IP addresses should be allocated to a reseller.
The IPs are provisioned automatically: the required amount is taken from the number of free
dedicated IP addresses in your IP pool.
Serving Customers
To learn about the new hosting model which employs service plans and subscriptions, refer
to the section titled Understanding Plans and Subscriptions (on page 21).

48 Serving Your Customers and Employing Resellers
Managing Service Plans
To learn about service plans, refer to the section titled Understanding Service Plans and
Subscriptions (on page 21).
If you installed the Customer and Business Manager component and configured it to work
with your Panel, then you should create and manage hosting plans only through Business
Manager. Otherwise, your customers will not be billed.
After you set up plans through Business Manager, you can change their settings by clicking
the corresponding Business Manager links in the list of hosting plans. For information about
working with plans through Business Manager, refer to the chapter Using Integrated
Customer and Business Manager (on page 66).
To create a service plan:
1. Go to Service Plans.
2. Click Add New Plan.
3. Define the plan name and properties (on page 27).
4. Click OK.
To create an add-on plan:
1. Go to Service Plans.
2. Click Add New Add-on.
3. Define the plan name and properties (on page 27).
Note that the resources and services defined in add-on plans are always added to the
ones provided with a service plan. If a service is not selected in the add-on properties, it
does not mean that the service will be removed from associated subscriptions. On the
contrary, it does not affect anything.
4. Click OK.
To change the resources and/or services provided with a plan:
1. Go to Service Plans and click the service plan name in the list.
2. Update the plan properties (on page 27).
3. Apply the properties:
Click OK - in case the plan does not have any subscriptions.
Click Update & Sync - in case the plan has at least one subscription.
Your changes will be applied, and all subscriptions associated with the plan will be
synced (on page 25).

Serving Your Customers and Employing Resellers 49
To remove plans:
1. Go to Service Plans and select the plans you want to remove.
Note that the Panel prohibits removing plans that are associated with at least one
subscription, that is why such plan's checkboxes cannot be selected.
2. Click Remove.
3. Click Yes at the confirmation box.

50 Serving Your Customers and Employing Resellers
Subscribing to Hosting Services
Any person who has a user account created in the Server Administration Panel can be
subscribed to a service plan: customers, resellers, and the Panel administrator. Every user
can be subscribed to several service plans at once, meaning that they will have several
service subscriptions, some of which may be custom, and some may be associated with
different add-on and service plans.
Subscribing a new customer means creating the customer account together with their first
subscription.
To subscribe a new customer to a service plan and, optionally, add-ons:
1. Go to Customers, and click Add New Customer.
2. Specify the customer contact/billing information, Panel account username
and password, attributes of the domain linked with the subscription.
3. Select a service plan with which the subscription should be associated.
4. Select add-on plans if you wish to add any.
5. Leave the Proceed to customizing the subscription... checkbox cleared.
6. Click OK.
To subscribe a new customer to a service plan and add-ons on specific terms
(customize subscription associated with plans):
1. Go to Customers, and click Add New Customer.
2. Specify the customer contact/billing information, Panel account username
and password, attributes of the domain linked with the subscription.
3. Select a service plan and add-ons.
4. Select the Proceed to customizing the subscription... checkbox.
5. Click OK.
The customer account and the subscription will be created, and the Panel will offer to
customize such subscription properties as resources (on page 30) and permissions (on
page 33). Customizing hosting, mail, DNS service parameters is not available in the
Server Administration Panel.
6. Customize the subscription properties.
7. Click Update & Lock.
The customized subscription will get locked for syncing, it will not be synced with the
service plan or add-ons in case they change. For details, refer to the section Syncing
Subscriptions and Plans. States of Subscriptions (on page 25).

Serving Your Customers and Employing Resellers 51
To subscribe a new customer to your services on specific terms (create custom
subscription):
1. Go to Customers, and click Add New Customer.
2. Specify the customer contact/billing information, Panel account username
and password, attributes of the domain linked with the subscription.
3. Select None next to the Service plan.
The subscription properties will be set according to the Panel default service plan.
4. Leave the Proceed to customizing the subscription... checkbox selected.
5. Click OK.
The customer account and their custom subscription will be created. For details on
custom subscriptions, refer to the section titled Relations between Subscriptions and
Service/Add-on Plans (on page 23).
The Panel will offer to customize such subscription properties as resources (on page 30)
and permissions (on page 33). Customizing hosting, mail, DNS service parameters is not
available in the Server Administration Panel.
6. Customize the subscription properties.
7. Click OK.
To add a subscription to host your own websites and mail:
1. Go to Subscriptions, and click Add New Subscription.
2. Specify attributes of the domain provisioned with the subscription, service
plan and add-ons.
3. Optionally, select the Proceed to customizing the subscription... checkbox.
4. Click OK.

52 Serving Your Customers and Employing Resellers
Changing Services Provided to Customers
The Panel offers several ways of changing the services provided to customers. They are as
follows:
Modifying an existing subscription:
Adding add-on plans. The subscription will be extended.
Switching the subscription to another service plan.
Customizing the subscription parameters. The subscription will provide a custom set
of resources and services, it will remain being associated with plans, but it will be
locked for syncing.
Note: Customizing only resources and permissions is available, other subscription
properties, such as the hosting, mail, and DNS services parameters cannot be
changed from the Server Administration Panel.
Unbinding the subscription from the plans and making custom changes. The
subscription will provide a custom set of resources and services, and will not be
associated with any service plans.
Note: Customizing only resources and permissions is available, other subscription
properties, such as the hosting, mail, and DNS services parameters cannot be
changed from the Server Administration Panel.
Creating a new subscription in addition to the one a customer already has.
Modifying the service plan. This operation affects all subscriptions associated with the
plan being changed, so it is recommended to use this way in case the plan needs an
upgrade because most of the subscribers start feeling a lack of resources.
Note: For details, refer to the section titled Understanding Service Plans and Subscriptions (on
page 21).
To extend a subscription by adding add-on plan:
1. Go to Subscriptions > <Subscription Name>.
2. Click Change Plan.
3. Select required add-ons in the box titled Available and click >>.
4. Click OK.
Note: You can add add-ons to several subscriptions at once: Go to Subscriptions, select
target subscriptions in the list and click Change Plan.
To switch a subscription to another service plan:
1. Go to Subscriptions > <Subscription Name>.
2. Click Change Plan.
3. Select new service plan.

Serving Your Customers and Employing Resellers 53
4. Click OK.
Note: You can switch several subscriptions at once: Go to Subscriptions, select target
subscriptions in the list and click Change Plan.
To customize a subscription and keep it associated with plans:
1. Go to Subscriptions > <Subscription Name>.
2. Click Customize.
3. Change the resources (on page 30) and permissions (on page 33) provided
with the subscription.
4. Click Update & Lock.
To customize a subscription and unbind it from the plans
1. Go to Subscriptions > <Subscription Name>.
2. Click Change Plan.
3. Select None next to the Service plan.
4. Select the Proceed to customizing the subscription... checkbox.
5. Click OK.
6. Change the resources (on page 30) and permissions (on page 33) provided
with the subscription.
7. Click OK.
To add a new subscription for a customer:
1. Go to Customers > <Customer Name>.
2. Click Add New Subscription.
3. Specify attributes of the domain provisioned with the subscription, service
plan and add-ons.
4. Optionally, select the Proceed to customizing the subscription... checkbox.
5. Click OK.
To modify a plan:
1. Go to Service Plans and click the service plan name in the list.
2. Update the plan properties (on page 27).
3. Click Update & Sync.
Your changes will be applied, and all subscriptions associated with the plan will be
synced (on page 25).

54 Serving Your Customers and Employing Resellers
Managing Customers
Aside from creating customer accounts (on page 50), you can do the following with accounts
of your customers:
Change contact information.
Change password and username a customer uses to access Control Panel.
Note: The Panel does not notify customers upon the login information change
automatically. What is more important is that a customer must provide their username
and e-mail address to retrieve their password. So be sure to update your customers on
login information changes, especially if you change their username. Otherwise, they will
not be able to use the Panel.
Suspend accounts.
Access to the Panel is blocked for suspended customers and Control Panel users that
they created. The customer's subscriptions are suspended, too, meaning that their
websites, FTP and mail services will no longer be accessible to the internet users.
Activate accounts.
Once an account is activated, all its subscriptions are activated, too, and all the services
start working properly.
Remove accounts.
Once a customer account is removed, all customer's subscriptions and websites are
removed as well.
If you installed the Customer and Business Manager component and configured it to work
with your Panel, then the following additional links are available in the Panel:
Business Manager.
Billing Details.
Invoices.
Payment History.
Generate Outstanding Invoices (in the More Business Operations menu).
Create Invoice (in the More Business Operations menu).
Credits (in the More Business Operations menu).
Billing Accounts (in the More Business Operations menu).
Use these links for managing customer accounts in Business Manager. To learn about
available operations, refer to the chapter Using Integrated Customer and Business Manager
(on page 66).
To change a customer's contact information:
1. Go to Customers, and click the <Customer Name> in the list.
2. Click Edit Contact Info.
3. Update the information, and click OK.

Serving Your Customers and Employing Resellers 55
To change password and username a customer uses to access Control Panel:
1. Go to Customers, and click the <Customer Name> in the list.
2. Click Change Login Info.
3. Update password and username, and click OK.
To suspend a customer account:
1. Go to Customers, and click the <Customer Name> in the list.
2. Click Suspend.
To suspend several accounts at once:
1. Go to Customers.
2. (Optional) Filter out active accounts:
a. Click the button next to the search field above the list.
This will open the list filter.
b. Under the Status filter, select Active.
3. Select target accounts in the list.
4. Click More Actions > Suspend.
To activate a customer account:
1. Go to Customers, and click the <Customer Name> in the list.
2. Click Activate.
To activate several accounts at once:
1. Go to Customers.
2. (Optional) Filter out suspended accounts:
a. Click the button next to the search field above the list.
This will open the list filter.
b. Under the Status filter, select Suspended.
3. Select target accounts in the list.
4. Click More Actions > Activate.

56 Serving Your Customers and Employing Resellers
To remove customer accounts:
1. Go to Customers, and select the accounts you want to remove.
2. Click Remove.
3. Click Yes at the confirmation box.

Serving Your Customers and Employing Resellers 57
Managing Service Subscriptions
To learn about subscriptions, refer to the section titled Understanding Service Plans and
Subscriptions (on page 21).
Aside from creating subscriptions (on page 50), you can do the following with service
subscriptions belonging to your customers, your resellers and yourself:
Change hosting settings of a subscription.
That is, the IP address on which the subscription's websites are hosted, and credentials
of system user account linked with the subscription (used to manage files and folders of
websites within the subscription, and to access the server via SSH or Remote Desktop).
Transfer one or several subscriptions to another user.
This means that you change owner of subscriptions, or, in other words, reassign
subscriptions to another user: another customer, reseller, or yourself. In this case, the
subscriptions are automatically unbound from their plans and become custom (on page
23).
Suspend subscriptions.
Websites, FTP and mail services of suspended subscriptions are no longer accessible to
the Internet users. Suspending a subscription manually may be useful in cases a website
hosted within the subscription gets attacked.
Activate subscriptions that were suspended manually.
Once a subscription is activated, all the services provided with it start working properly.
Renew an expired subscription.
The Panel does not renew subscriptions automatically, so it suspends a subscription
when the subscription expiration date comes.
Remove subscriptions.
If you installed the Customer and Business Manager component and configured it to work
with your Panel, then the following additional links are available in the Panel:
Business Manager.
Billing Details.
Upgrade.
Downgrade.
Add-ons
Use these links for managing subscriptions in Business Manager. To learn about available
operations, refer to the chapter Using Integrated Customer and Business Manager (on page
66).
To change a subscription's hosting settings:
1. Go to Subscriptions, and click the <Subscription> in the list.
2. Click Change Hosting Settings.
3. Update the information, and click OK.

58 Serving Your Customers and Employing Resellers
To transfer a subscription to another user:
1. Go to Subscriptions, and click the <Subscription> in the list.
2. Click Change Subscriber.
3. Select a new subscriber and click Next >>.
4. Review the information about the changes to be made to the subscription
settings and click OK.
To transfer several subscriptions to another user:
1. Go to Subscriptions.
2. Select the subscriptions you want to reassign.
3. Click Change Subscriber.
4. Select a new subscriber and click Next >>.
5. Review the information about the changes to be made to the subscription
settings and click OK.
To suspend a subscription:
1. Go to Subscriptions, and click the <Subscription Name> in the list.
2. Click Suspend.
To suspend several subscriptions at once:
1. Go to Subscriptions.
2. (Optional) Filter out active subscriptions:
a. Click the button next to the search field above the list.
This will open the list filter.
b. Under the Status filter, select Active.
3. Select target subscriptions in the list.
4. Click Suspend.
To activate a subscription:
1. Go to Subscriptions, and click the <Subscription Name> in the list.
2. Click Activate.

Serving Your Customers and Employing Resellers 59
Note: Activating a subscription in this way is good only for the subscriptions that were
suspended manually. If you activate in such a way an expired subscription, it will be
automatically suspended on the next day. In such cases, renew subscriptions as described
below.
To activate several subscriptions at once:
1. Go to Subscriptions.
2. (Optional) Filter out suspended subscriptions:
a. Click the button next to the search field above the list.
This will open the list filter.
b. Under the Status filter, select Suspended.
3. Select target subscriptions in the list.
4. Click Activate.
Note: Activating subscriptions in this way is good only for the subscriptions that were
suspended manually. If you activate in such a way expired subscriptions, they will be
automatically suspended on the next day. In such cases, renew subscriptions as described
below.
To renew an expired subscription:
1. Go to Subscriptions, and click the <Subscription Name> in the list.
2. Click Activate.
3. Click Customize.
4. On the Resources tab, set up a new expiration date, or select Unlimited.
5. Click Update & Lock.
6. Click Unlock & Sync.
To remove subscriptions:
1. Go to Subscriptions, and select the ones you want to remove.
2. Click Remove.
3. Click Yes at the confirmation box.

60 Serving Your Customers and Employing Resellers
Employing Resellers
In this section:
Creating Reseller Account/Subscription ............................................................ 61
Changing Reseller Subscription ........................................................................ 61
To learn about the new hosting model which employs reseller plans and subscriptions, refer
to the section titled Understanding Plans and Subscriptions (on page 21).

Serving Your Customers and Employing Resellers 61
Creating Reseller Account/Subscription
A reseller subscription is inseparable from a reseller account. So, to create a reseller, you
create a reseller subscription. In common case, a reseller is subscribed to a reseller plan.
However, depending on the amount of your resellers and your intention to provide them with
different amounts of resources and services, you may choose one of the following ways or a
combination of them:
Have several reseller plans, and several resellers subscribed to each of them.
(Reseller subscriptions are associated with plans, and synced.)
This way is useful if you have many resellers with who you work on different terms, and
you wish that the terms are changed with least efforts, taking advantage of syncing (on
page 25) subscriptions with the associated plan.
Have one or several reseller plans, and resellers subscribed to them while some of
the subscriptions are modified and locked for syncing. (Reseller subscriptions are
associated with plans, some of them are synced and some are locked for syncing.)
This way is almost the same as the previous one, with the only difference: you want some
of your resellers to have subscriptions slightly different from the associated plan. In such
case, use the Proceed to customizing the subscription parameters option when creating a
reseller.
Have a few resellers with custom subscriptions (on page 23).
This way is good if you have a few resellers whose subscription properties are easier to
change manually, without having to create a set of plans. In such case, select none next
to Service plan when creating a reseller.
Changing Reseller Subscription
The Panel offers several ways of changing the resources and services allocated to resellers.
They are as follows:
Modifying the associated reseller plan. This operation affects all subscriptions associated
with the plan being changed, so it is recommended to use this way in case the plan needs
an upgrade because most of the subscribers start feeling a lack of resources or services.
Modifying the subscription:
Switching the subscription to another service plan.
Customizing the subscription parameters. The subscription will provide a custom set
of resources and services, it will remain being associated with plans, but it will be
locked for syncing.
Unbinding the subscription from the plan and making custom changes. The
subscription will provide a custom set of resources and services, and will not be
associated with a reseller plan.
To modify a reseller plan:
1. Go to Service Plans.
2. Click the Reseller Plans tab and click the service plan name in the list.
3. Update the plan properties (on page 44).

62 Serving Your Customers and Employing Resellers
4. Click Update & Sync.
Your changes will be applied, and all subscriptions associated with the plan will be synced
(on page 25).
To switch a reseller subscription to another plan:
1. Go to Resellers > <Reseller Name>.
2. Click Change Plan.
3. Select new reseller plan.
4. Click OK.
To customize a reseller subscription (resources and permissions) and keep it
associated with the plan:
1. Go to Resellers > <Reseller Name>.
2. Click Customize.
3. Change the resources (on page 45) and permissions (on page 46) provided
with the subscription.
4. Click Update & Lock.
To customize a reseller subscription (IP addresses) and keep it associated with
the plan:
1. Go to Resellers > <Reseller Name>.
2. Click IP Addresses.
3. Change the IP addresses allocated to the subscription:
To allocate an IP address, click Add IP Address, select the address or addresses (to
select multiple IP addresses, press and hold the Control button on the keyboard and
left-click the required addresses) in the Vacant IPs box and click OK.
To revoke an IP address, select the respective checkbox and click Remove IP Address.
Confirm removal and click OK.
To assign an SSL certificate to an IP address, click the IP address you need, select
the required certificate from the SSL Certificate menu and click OK.
As soon as you add or remove IPs, the subscription will get locked for syncing with the
plan.
To customize a reseller subscription and unbind it from the plan:
1. Go to Resellers > <Reseller Name>.
2. Click Change Plan.
3. Select None next to the New plan.

Serving Your Customers and Employing Resellers 63
4. Select the Proceed to customizing the subscription... checkbox.
5. Click OK.
6. Change the resources (on page 45) and permissions (on page 46) provided
with the subscription.
7. Click OK.

64 Serving Your Customers and Employing Resellers
Adding Services to Your Offerings
In addition to the hosting services and features provided by the Panel, you can expand your
offerings by using the following means:
Install third-party applications packaged as Panel modules and include the services they
provide into your hosting plans.
When such a module is installed, the service provided by it is registered in the Panel and
is made available for inclusion into hosting plans by the server administrator and
resellers: The option corresponding to the new service is listed in hosting plan properties,
on the Additional Services tab.
Add custom options to plans.
If you, for example, run an online support service at http://premium-
support.example.com, and want to include the support option into a service plan, you
should set up a custom plan option:
1. Go to Service Plans > Additional Services > Add Service.
2. Specify service name (Premium support), service description, and select the option
to place a button to Control Panel with the link to the online service
(http://premium-support.example.com).
After this is done, a new tab called Additional Services appears in hosting plan settings. It
shows your Premium support option which you or your resellers can select for provisioning
to customers.
To add a service provided by an application packaged as a module:
Install the module according to the instructions provided in the section Extending Parallels
Plesk Panel Capabilities with Modules and Add-ons (on page 153), or use the instructions
provided by the module packager.
To add a service as a custom plan option:
1. Go to Service Plans > Additional Services tab.
2. Click Add Service.
3. Specify the following:
Service name.
Service description.
Use custom button for the service. Select this checkbox to place a hyperlink to your online
service or a web application to subscriber's Control Panel.
URL attached to the button. Specify the Internet address where the user should be
directed after clicking the button. For example: http://premium-
support.example.com.
Background image for the button. If you do not select an image, the Panel will use the
default image .

Serving Your Customers and Employing Resellers 65
Open URL in the Panel. Leave this checkbox cleared if you want the external web
resource to open in a new browser window or tab.
If you want the Panel to send the customer and subscription information with the
HTTP request, specify what information should be included:
Subscription ID.
Primary domain name associated with a subscription.
FTP account username and password.
Customer's account ID, name, e-mail, and company name.
4. Click OK.
If you do not want to let your resellers use an additional service and provision
it to their customers:
1. Go to Service Plans > Additional Services tab.
2. Select a checkbox corresponding to the service and click Make Unavailable.
To let resellers use an additional service and provision it to their customers:
1. Go to Service Plans > Additional Services tab.
2. Select a checkbox corresponding to the service and click Make Available.
To remove a custom plan option from service plan properties:
1. Go to Service Plans > Additional Services tab.
2. Select a checkbox corresponding to the service and click Remove Service.
To remove an additional service provided by a module:
Remove the module from the Panel.

Customer and Business Manager (hereinafter referred to as Business Manager) is a
C H A P T E R 5
Using Integrated Customer and Business Manager
billing solution bundled with your Parallels Plesk Panel package. You can install it as
an additional component during or after installation of Parallels Plesk Panel.
Business Manager simplifies the process of signing up, provisioning, and billing new
customers according to the following scheme:
1. In Business Manager, you set up service plans corresponding to your service
offerings, add the plans to an online store that can be configured to accept all types
of payments, and integrate the store into your website.
2. A user visiting your site selects one of your hosting plans and subscribes to the
services.
3. Business Manager processes the order. After the payment is received, it sets up a
user account and subscription in Parallels Plesk Panel, and notifies the new
customer by e-mail.
4. The customer logs in to Parallels Plesk Panel and starts using the web hosting, email, and other services provided by subscription.
5. Several days before the end of the billing period, Business Manager sends an
invoice to the customer stating the account balance and due payment date. On the
due date, Business Manager charges the due amount on the customer's card or
bank account, or uses another payment collection scheme that you select.
In addition to automated provisioning and billing, Business Manager offers the following
advantages:
Support for integration with payment systems, domain name registrars, and
certification authorities issuing SSL certificates.
Customizable online store.
Compliance with requirements for stores operating in the European Union
countries.
When Business Manager is installed, the following links to the administrative areas of
Business Manager are added to Parallels Plesk Panel:
In the left navigation pane of the Server Administration Panel:
Business Operations. Manage customer accounts and service subscriptions.
Customers. Add, suspend, and remove customer accounts, change customer's
billing and contact information. Prepare invoices and collect payments.
For more information, refer to the Parallels Customer and Business Manager
Administrator's Guide, section Administering Customers.

Using Integrated Customer and Business Manager 67
Subscriptions. View and change properties of service subscriptions. Move
subscriptions to other service plans by upgrading and downgrading them. For
more information, refer to the Parallels Customer and Business Manager
Administrator's Guide, section Managing Subscriptions.
Domains. View and change properties of service subscriptions to plans that
provide domain name registration services.
For more information, refer to the Parallels Customer and Business Manager
Administrator's Guide, section Managing Subscriptions.
SSL Certificates. View and change properties of service subscriptions to plans
that provide SSL certificates.
For more information, refer to the Parallels Customer and Business Manager
Administrator's Guide, section Managing Subscriptions.
Business Monitoring. View accounting reports and work with invoices and payments.
Reports. View reports on orders, subscriptions, payments, transactions, and
invoices.
For more information, refer to the Parallels Customer and Business Manager
Administrator's Guide, section Viewing Accounting Information.
Accounting. View accounting reports.
For more information, refer to the Parallels Customer and Business Manager
Administrator's Guide, section Generating Accounting Reports.
Invoices. View invoices for customer accounts.
For more information, refer to the Parallels Customer and Business Manager
Administrator's Guide, section Managing Invoices.
Payment transactions. View report on payment operations.
For more information, refer to the Parallels Customer and Business Manager
Administrator's Guide, section Viewing Transactions List.
Events. View and manage system tasks scheduled for execution.
For more information, refer to the Parallels Customer and Business Manager
Administrator's Guide, section Understanding Events.
Business Setup. Set up Customer and Business Manager for serving your
customers.
Service Plans. Set up and manage service plans for provisioning services to your
customers.
For more information, refer to the Parallels Customer and Business Manager
Administrator's Guide, chapter Creating Plans.
Discounts & Promotions. Set up coupons for allowing customers to receive
discounts.
For more information, refer to the Parallels Customer and Business Manager
Administrator's Guide, section Creating Coupons.
Pricing options. Set prices for variations of service offerings.
For more information, refer to the Parallels Customer and Business Manager
Administrator's Guide, section Setting Pricing for Plan Variations.

68 Using Integrated Customer and Business Manager
All Settings. Set up all aspects of Customer and Business Manager and prepare
it for serving customers.
For more information, refer to the Parallels Customer and Business Manager
Administrator's Guide, chapter Getting Started with Business Manager.
In the list of customer accounts that opens when you click the link Customers in the
Hosting Services group of the navigation pane, there are Business Manager links
corresponding to each customer record. Click these links if you want to manage
customer accounts, change billing and contact information, prepare invoices or collect
payments. For more information, refer to the Parallels Customer and Business
Manager Administrator's Guide, section Administering Customers.
In the customer account management page that opens when you click the link
Customers in the Hosting Services group of the navigation pane, and then click customer's
name, there are the following links:
Billing Details. This is where you can view the summary information about the
customer's payments, invoices, and purchased services. There you can also
suspend or cancel a customer account.
For more information, refer to the Parallels Customer and Business Manager
Administrator's Guide, section Administering Customers.
Invoices. This is where you can view invoices for the customer account.
For more information, refer to the Parallels Customer and Business Manager
Administrator's Guide, section Managing Invoices.
Payment History. This is where you can view the history of customer's payments.
For more information, refer to the Parallels Customer and Business Manager
Administrator's Guide, section Viewing Accounting Totals.
Generate Outstanding Invoices (in the More Business Operations menu). This is where
you can create outstanding invoices on demand.
For more information, refer to the Parallels Customer and Business Manager
Administrator's Guide, section Generating Invoices Manually.
Create Invoice (in the More Business Operations menu). This is where you can create
custom invoices for one-time charges.
For more information, refer to the Parallels Customer and Business Manager
Administrator's Guide, section Adding One-Time Custom Invoice.
Credits (in the More Business Operations menu). This is where you can deposit funds
(add credits) into a customer account.
For more information, refer to the Parallels Customer and Business Manager
Administrator's Guide, section Adding Credits to Customer Account.
Billing Accounts (in the More Business Operations menu). This is where you can view,
add and remove billing accounts used for charging the customer for the services.
For more information, refer to the Parallels Customer and Business Manager
Administrator's Guide, section Managing Billing Accounts and Details.
In the list of subscriptions that opens when you click the link Subscriptions in the Hosting
Services group of the navigation pane, there are Business Manager links corresponding to
each subscription. Click these links if you want to view and change properties of
service subscriptions, or assign other service plans to subscriptions by upgrading and
downgrading them. For more information, refer to the Parallels Customer and Business
Manager Administrator's Guide, section Managing Subscriptions.

Using Integrated Customer and Business Manager 69
In the subscription management page that opens when you click the link Subscriptions
in the Hosting Services group of the navigation pane, and then click the domain name
associated with a subscription, there are the following links:
Billing Details. This is where you can view and change subscription properties,
upgrade or downgrade a subscription, manage add-ons, transfer the subscription to
another customer, suspend or delete it.
For more information, refer to the Parallels Customer and Business Manager
Administrator's Guide, section Subscription Details.
Upgrade. This is where you can allocate more resources to the subscription by
upgrading it to another service plan.
For more information, refer to the Parallels Customer and Business Manager
Administrator's Guide, section Upgrading Subscriptions.
Downgrade. This is where you can reduce the amounts of allocated resources by
downgrading the subscription to another service plan.
For more information, refer to the Parallels Customer and Business Manager
Administrator's Guide, section Downgrading Subscriptions.
Add-ons. Change plan add-ons associated with the subscription.
For more information, refer to the Parallels Customer and Business Manager
Administrator's Guide, section Viewing Add-ons with Their Properties.
In the list of hosting plans that opens when you click the link Service Plans in the Hosting
Services group of the navigation pane, there are Business Manager links corresponding to
each plan. Click these links if you want to view and change settings of hosting plans.
For more information, refer to the Parallels Customer and Business Manager
Administrator's Guide, chapter Managing Plan Settings.
Important: When using Business Manager with Parallels Plesk Panel, you should
create and manage hosting plans only through the Business Manager. Otherwise,
your customers will not be billed.
For information about setting up new hosting plans in Business Manager, refer to the
Parallels Customer and Business Manager Administrator's Guide, chapter Creating
Plans. Operations on reseller plans and reseller accounts are not currently supported
by Business Manager.
To help you get started with configuring Business Manager, refer to Parallels Plesk
Panel 10.1 Quick Start Guide to Customer and Business Manager.
For the comprehensive operating instructions for Business Manager, refer to the
Parallels Customer and Business Manager Administrator's Guide.

This chapter discusses the configuration steps required to set up and manage your
In this chapter:
Obtaining and Installing a License Key .............................................................. 71
Securing Your Parallels Plesk Panel ................................................................. 74
Rebranding Your Parallels Plesk Panel ............................................................. 79
Adjusting Session Preferences .......................................................................... 85
Logging Actions Performed by Your Customers in the Panel ............................ 86
C H A P T E R 6
Configuring Your Parallels Plesk Panel
Parallels Plesk Panel.

Configuring Your Parallels Plesk Panel 71
Obtaining and Installing a License Key
In this section:
Upgrading the Trial License Key ........................................................................ 72
Installing Additional License Keys for Parallels Plesk Panel Add-ons ................ 73
Upgrading Your License Key ............................................................................. 74
Rolling Back to Your Previously Used License Key ........................................... 74
The Panel comes with a trial license key, which is already installed in the Panel. This
license key provides limited functionality and is active only for a short period of time.
Therefore, you should obtain a proper license key from Parallels or its partners and
install it into the Panel.
Parallels Plesk Panel license keys have a built-in expiration date. This has been
implemented to help prevent fraud and theft. It requires the Parallels Plesk Panel
software to check with Parallels licensing server during a 10 day period before the
expiration date to verify that the key has not been reported stolen and is being used in
accordance with the End User License Agreement (that is, installed on only one
server). Once this is verified, the expiration date is prolonged.
Parallels Plesk Panel will attempt to connect over TCP/IP to the licensing server
through port 5224. Please make sure that this is not blocked by a firewall. The update
process runs automatically and the administrator of Parallels Plesk Panel-managed
server does not need to do anything unless there is a problem. Should the Parallels
Plesk Panel key expire, check your firewall and then go to Tools & Utilities > License
Management (in the Panel group) and click Retrieve Keys. If the key cannot be updated,
contact your reseller or Parallels (if you purchased the license key directly from
Parallels).
You can test the connection to the licensing server anytime by going to Tools & Utilities >
License Management (in the Panel group) and clicking Retrieve Keys.

72 Configuring Your Parallels Plesk Panel
Upgrading the Trial License Key
To upgrade the trial license key:
1. Go to Tools & Utilities > License Management (in the Panel group), and click
Order Parallels Panel Upgrades.
2. The Parallels online store will open in a separate browser window. In
this window, select the items and features you want to include into your
Parallels Plesk Panel license and click Submit. In the next steps, indicate
the currency, number of license keys, provide contact details, billing
address, and payment method, and submit the form. The new key will
be sent to the specified e-mail address.
3. Save the new key to the hard drive on your local machine.
4. Open again the License Management screen in Parallels Plesk Panel (Tools
& Utilities > License Management), and click Upload Key.
5. Enter the path to the key file that you saved on your local machine or
click Browse to locate it.
6. Select the Replace the currently installed license key with the selected one
checkbox to confirm that you really want to replace the current license
key with the new one.
If this checkbox is not selected, the new license key will not be installed.
7. If your new license key allows hosting fewer sites than you already host
on the server, Parallels Plesk Panel will stop working. However, to
prevent the Panel from comparing the amount of the resources used
and those covered by the new key, select the Allow the resources usage
override checkbox.
This might be helpful if you want to temporarily install a license key that provides
less resources and then upgrade it through the Panel.
8. Click OK to install the new key to the Panel.

Configuring Your Parallels Plesk Panel 73
Installing Additional License Keys for Parallels Plesk Panel Add-ons
To install an additional license key for an add-on Parallels Plesk Panel
component:
1. Go to Tools & Utilities > License Management (in the Panel group).
2. Click Order Panel Add-Ons.
3. The Parallels online store page listing available add-ons will open in a
separate browser window. On this page, select the add-ons you want to
order and click Submit.
4. Because Parallels Plesk Panel add-ons are added to the license keys
that already exist, you need to enter the number of your license key to
which you add this feature and click Submit.
5. In the next steps, indicate the currency, number of keys, provide
contact details, billing address, and payment method, and submit the
form. You will be notified by e-mail when your order is processed.
6. When you receive the e-mail notification, return to the License
Management screen (Tools & Utilities > License Management) and click Retrieve
Keys to retrieve the ordered license key. The Panel's License Manager
will retrieve the upgraded license key from the Parallels licensing server
and automatically install it to your Panel.

74 Configuring Your Parallels Plesk Panel
Upgrading Your License Key
In this section:
Restricting Administrative Access to Parallels Plesk Panel ................................ 75
Securing Communication to Server with SSL Encryption................................... 76
If you are planning to expand your customer base and host more sites on the server
than your current license allows, you need to upgrade your license key.
To upgrade the license key:
1. Go to Tools & Utilities > License Management (in the Panel group).
2. Click Order Panel Upgrades.
3. On the Parallels online store page, select the desired upgrade option
and click Submit.
4. In the next step, indicate purchase details and submit the form. You will
be notified by e-mail when your order is processed.
5. After you receive the e-mail notification, return to the License Management
screen (Tools & Utilities > License Management) and click Retrieve Keys to
retrieve the ordered license key. The Panel's License Manager will
retrieve the purchased license key from the licensing server and
automatically upload it to your Panel.
Rolling Back to Your Previously Used License Key
To roll back to the license key you previously used:
1. Go to Tools & Utilities > License Management (in the Panel group).
2. Click Roll Back Key. The previously installed license key will be restored.
Securing Your Parallels Plesk Panel

Configuring Your Parallels Plesk Panel 75
Restricting Administrative Access to Parallels Plesk Panel
To alleviate security concerns, you may want to restrict administrative access to your
control panel from specific IP addresses.
To allow administrative access to the Panel only from specific IP
addresses or networks:
1. Go to Settings > Restrict Administrative Access (in the Security group).
2. Click Add New Network and specify the required IP addresses. Click OK.
To specify subnets, you can use wildcard symbols (*) and subnet masks.
3. Select the Denied from the networks that are not listed option, and click Set.
When prompted to confirm the operation, click OK.
To prohibit administrative access from specific IP addresses or networks:
1. Go to Settings > Restrict Administrative Access (in the Security group).
2. Click Add New Network and specify an IP address. Click OK.
To specify subnets, you can use wildcard symbols (*) and subnet masks.
3. Select the Allowed, excluding the networks in the list option, and click Set.
When prompted to confirm the operation, click OK.

76 Configuring Your Parallels Plesk Panel
Securing Communication to Server with SSL Encryption
For security reasons, you can access your control panel only through a secure
connection provided by Secure Sockets Layer-enabled hypertext transfer protocol. All
data you exchange with the Parallels Plesk Panel-managed server are encrypted, thus
preventing interception of sensitive information. The SSL certificate used in the data
encryption process is automatically generated and installed on the server during
installation of the control panel. This is the so-called self-signed certificate: it is not
signed by a recognized certification authority (CA), therefore, upon attempt to connect
to your control panel, you and your customers will see warning messages in web
browsers.
To gain customer confidence, you should purchase an SSL certificate from a reputable
certification authority, and install it to the control panel.
You can either:
use the functions for purchasing SSL certificates from Comodo, GeoTrust, Inc. or
GoDaddy provided by your control panel,
OR
create a certificate signing request (CSR) from the control panel and submit it to the
certification authority of your choice, which will create an SSL certificate for you.
Note: If you are going to use the control panel's facilities for purchasing a certificate
through MyPlesk.com online store, you should not use command line tools for
creating the certificate signing request.
To purchase an SSL certificate from Comodo, GeoTrust, Inc. or GoDaddy
through MyPleskCom online store and secure your control panel:
1. Go to Tools & Utilities > SSL Certificates (in the Resources group). A list of
SSL certificates that you have in your repository will be displayed.
2. Click Add SSL Certificate.
3. Specify the certificate properties:
Certificate name. This will help you identify this certificate in the repository.
Encryption level. Choose the encryption level of your SSL certificate. We
recommend that you choose a value more than 1024 bit.
Specify your location and organization name. The values you enter should not
exceed the length of 64 symbols.
Specify the host name for which you wish to purchase an SSL certificate. For
example: your-domain.com
Enter your e-mail address.
4. Make sure that all the provided information is correct and accurate, as it
will be used to generate your private key.

Configuring Your Parallels Plesk Panel 77
5. Click Buy SSL Certificate.
Your private key and certificate signing request will be generated. Do not delete
them. MyPlesk.com login page will open in a new browser window.
6. Register or log in to an existing MyPlesk.com account and you will be
taken step by step through the certificate purchase procedure.
7. Choose the type of certificate that you wish to purchase.
8. Click Proceed to Buy and order the certificate. In the Approver E-Mail
drop-down box, please select the correct Approver e-mail.
The approver e-mail is an e-mail address that can confirm that certificate for
specific domain name was requested by an authorized person.
9. Once your certificate request is processed, you will be sent a
confirmation e-mail. After you confirm, the certificate will be sent to your
e-mail.
10. When you receive your SSL certificate, save it on your local machine or
network.
11. Return to the SSL Certificates repository (Tools & Utilities > SSL
Certificates).
12. Click Browse in the middle of the page and navigate to the location of the
saved certificate. Select it, and then click Send File. This will upload the
certificate to the repository.
13. Select the checkbox corresponding to the certificate you just added,
and click Secure control panel.
To secure your control panel with an SSL certificate from other certificate
authorities:
1. Go to Tools & Utilities > SSL Certificates (in the Resources group). A list of
SSL certificates that you have in your repository will be displayed.
2. Click Add SSL Certificate.
3. Specify the certificate properties:
Certificate name. This will help you identify this certificate in the repository.
Encryption level. Choose the encryption level of your SSL certificate. We
recommend that you choose a value more than 1024 bit.
Specify your location and organization name. The values you enter should not
exceed the length of 64 symbols.
Specify the host name for which you wish to purchase an SSL certificate. For
example: your-domain.com
Enter your e-mail address.
4. Make sure that all the provided information is correct and accurate, as it
will be used to generate your private key.

78 Configuring Your Parallels Plesk Panel
5. Click Request. Your private key and certificate signing request will be
generated and stored in the repository.
6. In the list of certificates, click the name of the certificate you need. A
page showing the certificate properties opens.
7. Locate the CSR section on the page, and copy the text that starts with the
line -----BEGIN CERTIFICATE REQUEST----- and ends with the line -----END
CERTIFICATE REQUEST----- to the clipboard.
8. Visit the website of the certification authority from which you want to
purchase an SSL certificate, and follow the links on their site to start a
certificate ordering procedure. When you are prompted to specify CSR
text, paste the data from the clipboard into the online form and click
Continue. The certification authority will create an SSL certificate in
accordance with the information you supplied.
9. When you receive your SSL certificate, save it on your local machine or
network.
10. Return to the SSL Certificates repository (Settings > SSL Certificates).
11. Click Browse in the middle of the page and navigate to the location of the
saved certificate. Select it, and then click Send File. This will upload the
certificate to the repository.
12. Select the checkbox corresponding to the certificate you just added,
and click Secure control panel.
In case you need to generate a self-signed certificate, follow this
procedure:
1. Go to Tools & Utilities > SSL Certificates (in the Resources group). A list of
SSL certificates that you have in your repository will be displayed.
2. Click Add SSL Certificate.
3. Specify the certificate properties:
Certificate name. This will help you identify this certificate in the repository.
Encryption level. Choose the encryption level of your SSL certificate. We
recommend that you choose a value more than 1024 bit.
Specify your location and organization name. The values you enter should not
exceed the length of 64 symbols.
Specify the host name for which you wish to purchase an SSL certificate. For
example: your-domain.com
Enter your e-mail address.
4. Click the Self-Signed button. Your certificate will be generated and stored
in the repository.

Configuring Your Parallels Plesk Panel 79
Rebranding Your Parallels Plesk Panel
In this section:
Changing Interface Language ........................................................................... 79
Setting a Custom Logo ...................................................................................... 80
Setting Up Interface Languages ........................................................................ 80
Hiding and Unhiding Sets of Buttons ................................................................. 82
Adding and Removing Custom Buttons ............................................................. 83
Changing Interface Language
To change the interface language and other settings for your Panel:
1. Click the Profile & Preferences link in the navigation pane.
2. Specify the following:
a Administrator's interface language. Select the language for your Panel.
b Button label length. To prevent lengthy button captions in languages other than
English from overlapping in the Panel, you may want to specify a limit here. Any
button caption longer than the defined limit will be shortened and ended with
ellipsis (...).
c Allow multiple sessions under administrator's login. By default Parallels Plesk Panel
allows multiple simultaneous sessions for several users logged in to the Panel
using the same login and password combination. This can be useful when
delegating management functions to other users or in case if you accidentally
close your browser without logging out, thus becoming unable to log in again
until your session expires. You may want to switch off this capability, if you do
not need it.
To select the default interface language for your customers:
1. Go to Settings > Languages (in the Panel Appearance group).
2. Select a checkbox corresponding to the language that will be s et as
default for new Panel users and click Make Default.

80 Configuring Your Parallels Plesk Panel
Setting a Custom Logo
You can replace the default Parallels Plesk Panel logo banner in the top frame with
your own logo. It will be visible to your customers when they log in to their Panels. You
can also make your logo a clickable hyperlink.
You should use a GIF, JPEG, or PNG format file for your logo, preferably not larger
than 100 kilobytes to minimize the download time. It is recommended that you use an
image of 50 pixels in height.
To set up your logo image:
1. Go to Settings > Panel Branding (in the Panel Appearance group).
2. Specify the path to file or click Browse to locate it. Click Open.
3. To make the logo a clickable hyperlink that refers users to your
corporate website, type the desired URL into the Enter new URL for logo
box.
4. To change the text that is shown in the browser's title bar, clear the Use
default checkbox and type your company name or any other text into the
Panel's title bar text box.
5. Click OK to submit.
When you wish to restore the default Parallels Plesk Panel logo, click the Default Logo
button.
Note: In addition to customizing through the Panel GUI the logo image, URL attached
to it, and browser's title bar text, Parallels Plesk Panel 10 offers the option to change
the visual appearance and branding of the Panel by using custom themes. For
information about using custom themes, refer to the document Customizing Panel
Appearance and Branding.
Setting Up Interface Languages
The Panel 10 is shipped with 10 supported languages:
German (Germany)
English (United States)
Spanish (Spain)
French (France)
Italian (Italy)
Japanese (Japan)
Dutch (The Netherlands)
Russian (Russian Federation)
Chinese (China)

Configuring Your Parallels Plesk Panel 81
Chinese (Taiwan)
All the supported languages are installed during the Panel installation (either clean
installation or upgrade), and do not require any additional actions from you to start
using them. The number of languages you can use depends on the Panel license you
purchased. The Panel will alert you when you attempt to use more languages than
allowed.
To view the interface languages installed in the Panel:
1. Go to Settings > Languages (in the Panel Appearance group). The following
information is displayed:
Language status icon shows the current status of the language pack:
language pack is accessible to users, not accessible, the language pack
is not available to users because the limit on the number of language packs
supported by your current license is exceeded.
Note: you can make a language unavailable to control panel users. To do this,
click an icon . To make a language available to users, click an icon .
Language pack contains the four-letter language code;
Language shows the name of the language;
Country displays the countries where this language is native;
Used displays the number of control panel users at all levels that use this
language in their interface.
To select a new default language for the Panel:
1. Go to Settings > Languages (in the Panel Appearance group).
2. Select the checkbox corresponding to the language you wish to set as
default and click Make Default.

82 Configuring Your Parallels Plesk Panel
Hiding and Unhiding Sets of Buttons
You can easily hide predefined groups of buttons from the Panel. In this case, users do
not see the controls they are not allowed to operate or the features that are not
supported (services not installed).
To hide groups of buttons:
1. Go to Settings > Interface Management (in the Control Panel Appearance group)
> Interface Controls Visibility tab.
2. Select the checkboxes to hide the following sets of buttons:
Buttons related to services provided by MyPlesk.com online store. If you are
reselling domain registration services and SSL certificates, select the
checkboxes Hide buttons for domain registration, Hide buttons for certificate
purchasing, and Hide buttons for extra services. All buttons related to MyPlesk.com
will be removed from the control panel at all user levels.
Mail bounce controls. If you wish to prohibit your users from using their own mail
bounce policies for e-mail addressed to non-existent e-mail recipients within
their domains, select the Hide controls for rejection of messages for non-existent mail
addresses checkbox.
News feeds shown on default website pages.
Parallels Virtuozzo Containers promotional links in the Panel.
3. Click OK.
To make groups of hidden buttons visible in the interface:
1. Go to Settings > Interface Management (in the Control Panel Appearance group)
> Interface Controls Visibility tab.
2. Clear the corresponding checkboxes to make the hidden groups of
buttons again visible in the interface, then click OK.

Configuring Your Parallels Plesk Panel 83
Adding and Removing Custom Buttons
You can add custom hyperlink buttons to the Panel and make them visible for your
resellers and customers. The links may lead to web resources, such as your corporate
site, or to a web application that can process online requests and accept additional
information about the users who click these links.
You can specify what information about users should be passed:
Subscription ID.
Primary domain name associated with a subscription.
FTP account username and password.
Customer's account ID, name, e-mail, and company name.
You can place the buttons in the following locations of the Server Administration Panel
and Control Panel, and decide who should be able to see them:
On the Home page in the Server Administration Panel, visible only to you and to the
users logged in under additional administrator accounts. This is achieved by
selecting the Admin Home option in the button properties.
On the Home page in the Server Administration Panel, visible only to your resellers.
This is achieved by selecting the Reseller's Home page option in the button properties.
On the Home tab in the Control Panel, visible to the hosting service customers and
their users who are allowed to log in to the Control Panel. This is achieved by
selecting the Customer's Home page option in the button properties.
On the Websites & Domains tab in the Control Panel, visible to the hosting service
customers and their users who are allowed to log in to the Control Panel. This is
achieved by selecting the Websites & Domains page of Subscription option in the button
properties.
On the Home page in the Server Administration Panel and Control Panel, visible to
you, all resellers and customers. This is achieved by selecting the Common access
option in the button properties.
To add a custom hyperlink button to the Server Administration Panel or
Control Panel:
1. Go to Settings > Custom Buttons (in the Control Panel Appearance group), and
click Create Custom Button.
2. Specify the following properties of the button:
Type the text that will show on your button in the Button label box.
Choose the location for your button.
Specify the priority of the button. Your custom buttons will be arranged in the
Panel in accordance with the priority you define: the lower the number, the
higher the priority. Buttons are placed in the left-to-right order.

84 Configuring Your Parallels Plesk Panel
To use an image for a button background, type the path to its location or click
Browse to browse for the desired file. It is recommended that you use a 16x16
pixels GIF or JPEG image for a button to be placed in the navigation pane, and
32x32 pixels GIF or JPEG image for buttons placed in the main frame or
desktop.
Type the hyperlink of your choice to be attached to the button into the URL box.
Using the checkboxes, specify whether you want the customer information and
other data to be transferred within the URL. These data can be used for
processing by external web applications.
In the Context help tip contents input field, type in the help tip that will be displayed
when you hover the mouse pointer over the button.
Select the Open URL in Parallels Plesk Panel checkbox if you want the destination
URL to be opened in the main frame of the Panel, otherwise, leave this
checkbox cleared to open the URL in a separate browser window or tab.
If you want to make this button visible only to you, select the Show to me only
checkbox.
3. Click Finish to complete creation.
To remove a hyperlink button from the Panel:
1. Go to Settings > Custom Buttons (in the Control Panel Appearance group).
2. Select a checkbox corresponding to the button that you want to remove
and click Remove.

Configuring Your Parallels Plesk Panel 85
Adjusting Session Preferences
You can adjust the allowed idle time for all sessions in Parallels Plesk Panel as
required.
To adjust session security parameters:
1. Go to Settings > Session Idle Time (in the Security group).
2. Specify the required Session idle time in minutes in the appropriate field.
Should a user session remain idle for the time period exceeding the one
specified as the Session idle time, the control panel terminates this
session.
3. Click OK.
To allow IP changes during one client session (available only on Windows
hosting):
1. Go to Settings > Session Idle Time (in the Security group).
2. Select the Allow IP changes during one session checkbox. This option will
allow customers with dynamic IP addresses and unstable Internet
connection to work with Parallels Plesk Panel at the cost of increasing
the security risks.
3. Click OK.
To reset all parameters back to their default values:
1. Go to Settings > Session Idle Time (in the Security group) and click Default.
The default session idle time will be set to 30 minutes.
2. Click OK.

86 Configuring Your Parallels Plesk Panel
Logging Actions Performed by Your Customers in the Panel
You may wish to keep track of actions performed by various users in the system. All actions
will be recorded in a log file that you will be able to download for viewing. The following
system events (actions) can be logged:
Administrator information changed
System service restarted, started, or stopped
IP address added, removed, changed
Login settings (allowed period of inactivity for all user sessions in the control panel)
changed
Customer account created, deleted, personal or system information changed
The status of customer account changed (suspended/activated)
Customer's interface preferences changed
Customer's IP pool changed
Web applications were added to or removed from a customer's pool
The limit on disk space is reached for a customer account
The limit on traffic usage is reached for a customer account
The limit on disk space is reached for a website
The limit on traffic usage is reached for a website
Website created, deleted, settings changed
Website owner changed
Website status changed (suspended/activated)
DNS zone updated for a website
Subdomain created, deleted, settings changed
Domain alias created, deleted, settings changed
DNS zone of the domain alias changed
Resource allotments were changed for a customer account
Customer's permissions for operations were changed
Resource allotments were changed for a website
Users logged in and out of the Panel
Mail accounts created, deleted, changed
Mailing lists created, deleted, settings changed
Website hosting set up, deleted, changed
Web forwarding hosting accounts were created, deleted, reconfigured
Web application installed, reconfigured, uninstalled
Web application package installed, uninstalled, updated
License key expired or updated
Database server created, deleted, updated

Configuring Your Parallels Plesk Panel 87
Database created or deleted
In this section:
Setting Up Action Logging ................................................................................. 87
Downloading the Action Log ............................................................................. 87
Clearing the Action Log ..................................................................................... 88
Database user account created, deleted, updated
Customer's GUID updated
Domain's GUID updated
Parallels Plesk Panel component was updated or added
Setting Up Action Logging
To set up action logging:
1. Go to Settings > Action Log (in the Logs & Notifications group).
2. In the Logged actions group, select the actions to be logged using the
checkboxes.
3. In the Store records in the database field, specify the action log cleaning options:
on a daily, weekly or monthly basis, or in accordance with the specified
number of records stored in the database.
4. To retain all action log records, select the Do not remove records option.
5. To apply all the changes made, click OK.
Downloading the Action Log
To download the action log to your machine:
1. Go to Settings > Action Log (in the Logs & Notifications group).
2. In the Log files section, select the time period using the drop-down boxes, and
click Download.
The dialog window will open, prompting you to select the location for the downloaded log
file to be saved to.
3. Select the location, and click Save.

88 Configuring Your Parallels Plesk Panel
Clearing the Action Log
To clear the action log:
1. Go to Settings > Action Log (in the Logs & Notifications group).
2. In the Log files section, click Clear Log.

After you have installed and configured Parallels Plesk Panel software on your server,
In this chapter:
Adding and Removing IP Addresses ................................................................. 90
Viewing and Selecting Software Components Used on the Server .................... 93
Configuring DNS Services ................................................................................. 93
Configuring the Panel to Run Behind Router with NAT ...................................... 98
Configuring the Panel to Run Behind a Firewall ................................................ 100
Configuring Port Range for Passive FTP Mode (Windows Hosting) .................. 105
Setting Up Mail Services ................................................................................... 106
Configuring Parallels Plesk Panel to Use SiteBuilder in Trial Mode ................... 122
Customizing SiteBuilder Getting Started Demo ................................................. 126
Configuring Parallels Plesk Panel for Database Hosting ................................... 127
Configuring the Connection to External Database Management Systems (Windows
Hosting) ............................................................................................................. 131
Enabling Support for Adobe ColdFusion (Linux Hosting) ................................... 133
Enabling Integration with Google Services for Websites .................................... 134
Enabling Integration with UNITY Mobile Services for Mobile Sites .................... 137
Enabling Support for Miva E-commerce Applications (Linux Hosting) ............... 139
Enabling Support for Miva E-commerce Applications (Windows Hosting) .......... 140
Prepackaging Applications ................................................................................ 140
Configuring ASP.NET (Windows Hosting) ......................................................... 143
Configuring IIS Application Pool (Windows Hosting) .......................................... 145
Configuring Shared SSL (Windows Hosting) ..................................................... 147
Configuring Statistics ......................................................................................... 148
Configuring E-mail Notification System .............................................................. 148
Adjusting System Date and Time ...................................................................... 152
Enabling Piped Logs for Web Server to Reduce the Risk of Web Service Disruption
(Linux Hosting) .................................................................................................. 152
Extending Parallels Plesk Panel Capabilities with Modules and Add-ons (Linux
Hosting) ............................................................................................................. 153
Restricting the Use of Potentially Insecure Hosting Options .............................. 154
Setting Up Help Desk ........................................................................................ 157
C H A P T E R 7
Configuring the Server
you need to configure the services required for its operation. To configure your hosting
server, follow the instructions provided in this chapter.

90 Configuring the Server
Adding and Removing IP Addresses
After installation, the Panel reads all your IP addresses from the network configuration
files and can then use these IP addresses for hosting websites.
When you obtain a new IP address that you would like to use on the server, you should
add the address through the control panel, as the Panel might not recognize manual
modifications you make to the network configuration files.
With the Panel, you can mark all your IP addresses as shared or dedicated before you
assign them to your customers. This allows the control panel to distinguish between
them and not to let you assign a dedicated IP address to several customers at once. A
dedicated IP address can be assigned to a single customer, while a shared IP address
can be shared among several user accounts.
Note that SSL protection with authentic digital certificates and Anonymous FTP
services are available only to dedicated hosting accounts on a dedicated IP address.
Shared hosting accounts can also have SSL protection, but visitors to such protected
sites will get error messages in their browsers.
To view the IP addresses you have at your disposal:
1. Go to Tools & Utilities > IP Addresses (in the Resources group).
Your IP addresses are listed and the following supplementary information is given:
An icon in the S (Status) column shows if your IP address is properly
configured on the network interface. If your IP address was removed from the
network interface, an icon will show .
An icon in the T (Type) column shows if an address was allocated to a single
customer as a dedicated IP address, and if an address is shared among
many customers.
The IP address, Subnet Mask and Interface columns show which IP addresses are
on which network interfaces.
The Resellers column shows the number of user accounts who you assigned a
given IP address. To view the users by names, click the respective number in
the Resellers column.
The Domains column shows a number of websites hosted on an IP address. To
view the domain names of these websites, click the respective number in the
Domains column.
2. To update the list of IP addresses and their status, click Reread IP.

Configuring the Server 91
To add a new IP address to the server:
1. Go to Tools & Utilities > IP Addresses (in the Resources group), and click Add
IP Address.
2. Select the network interface for the new IP from the Interface menu. All
network cards installed on your server are shown in this menu.
3. Enter the IP address and subnet mask in the corresponding box (e.g.,
123.123.123.123/16).
4. Select the type of the new IP address, shared or exclusive.
5. From the drop-down box, select the SSL certificate for the new IP
address. You can select the following certificates:
Default certificate - the certificate that comes with the Parallels Plesk Panel
distribution package. However, this certificate is not recognized by web
browsers as it is not signed by a Certificate Authority (a warning message
appears). The default certificate is used to provide access to the control panel
via the https protocol (https://server-name-or-IP-address:8443/).
Other certificates - the certificates (self-signed or signed by a Certificate Authority)
that you added to the repository of SSL certificates (about adding certificates,
see the section Securing Sites with SSL encryption).
6. If your server is running Windows operating system, select the FTP over
SSL checkbox if you want to enable the ability to use secure FTP
connection (FTP over SSL) for the domain on an exclusive IP address.
Note: To enable secure FTP connections, the FTP server installed on your
Parallels Plesk Panel server must support FTP over SSL. Currently, only Gene6
and Serv-U FTP servers support FTP over SSL.
7. Click OK.
To remove an IP address from the server:
1. Go to Tools & Utilities > IP Addresses (in the Resources group).
2. Select the respective checkbox and click Remove, confirm removal and
click OK.
To assign an IP address to a reseller:
1. Go to Tools & Utilities > IP Addresses (in the Resources group), and click the
corresponding number in the Resellers column, then click Assign.
2. Select the user account you need and click OK.

92 Configuring the Server
To revoke an IP address from a user:
1. Go to Tools & Utilities > IP Addresses (in the Resources group), and click the
corresponding number in the Resellers column.
2. Select the respective checkbox and click Remove.
3. Confirm removal and click OK.
Since users can refer to a web resource on your server by typing an IP address and
there can be several websites hosted on that address, the Panel needs to know which
of the sites to show in such cases. The Panel automatically assigns the first website
created on an IP address as the default website; however, you can select any other
website and make it default.
To assign a default website (default domain) for an IP address:
1. Go to Tools & Utilities > IP Addresses (in the Resources group), and click the
IP address you need.
2. In the Default site menu, select the site you need and click OK.
To change an IP address allocation type (shared, exclusive) or assign
another SSL certificate to an IP address:
1. Go to Tools & Utilities > IP Addresses (in the Resources group), and click the
IP address you need.
2. Select the required IP address allocation type and SSL certificate, and
click OK.

Configuring the Server 93
Viewing and Selecting Software Components Used on the Server
Parallels Plesk Panel supports a variety of third-party software components, from
antivirus solutions to webmail servers. If you are using Windows-based hosting, then
you can select the components that should be used on your server.
To see the list of available components and to select the software
components that should be used by Parallels Plesk Panel:
1. Go to Settings > Server Components (in the General group).
All installed components are listed. If you are using Windows-based hosting, then
you can see the current state of components and select which components should
be used. The current state of a component is marked by an icon:
means that the Panel is using this component, and the component is
working.
means that the Panel is not using this component (usually because a license
key has expired or missing), but the component is working.
means that the Panel is not using this component, because the component is
stopped.
means that the Panel is not using this component, but the component is
installed in the system and available.
2. Click the component name (for example, Mail Server) and select the
required component from the list of available components supported by
Parallels Plesk Panel.
3. Click OK. Parallels Plesk Panel will start the selected component.
Some components (for example, Merak Mail Server) can be configured by clicking
their name in the Component version table. Individual component settings depend on
the component. After finishing the configuration of a component, click OK.
To refresh the list of available components, click Refresh.
Configuring DNS Services
Your Parallels Plesk Panel works in cooperation with a DNS server, which enables you
to run DNS service on the same machine where you host websites.

94 Configuring the Server
Setup of DNS zones for newly added domains is automated: When you add a new
domain name to control panel, a zone file is automatically generated for it in
accordance with the server-wide DNS zone template and registered in the name
server's database, and name server is instructed to act as a primary (master) DNS
server for the zone.
You can:
Add resource records to and remove from the template.
Override the automatic zone configuration with custom settings on a per-domain
basis.
Select another DNS server (for example, switch to Microsoft DNS server from BIND
DNS server).
Switch off the domain name service on this machine if your provider or another
organization is running DNS service for your sites.
To view the default records in the server-wide DNS template:
Go to Settings > DNS Template Settings (in the General group). All resource record
templates will be displayed. The <ip> and <domain> templates are automatically
replaced in the generated zone with real IP addresses and domain names.
To add a new resource record to the server-wide DNS template:
1. Go to Settings > DNS Template Settings (in the General group).
2. Click Add DNS Record.
3. Select the resource record type and specify the record properties as
desired.
Note that you can use <ip> and <domain> templates that will be replaced in the
generated zone with real IP addresses and domain names. You can use a wildcard
symbol (*) to specify any part of the domain name, and you can specify the exact
values you need.
4. Click OK.
To remove a resource record from the server-wide DNS template:
1. Go to Settings > DNS Template Settings (in the General group).
2. Select a checkbox corresponding to the record template you wish to
remove, and click Remove.
3. Confirm removal and click OK.
The Panel updates automatically the zone name, host name, administrator’s e-mail
address, and serial number, and writes the default values for the rest of Start of
Authority record parameters to the zone files it maintains. If you are not satisfied with
the default values, you can change them through the control panel.

Configuring the Server 95
To change the Start of Authority (SOA) record settings in the server-wide
DNS template:
1. Go to Settings > DNS Template Settings (in the General group).
2. Click SOA Records Template.
3. Specify the desired values:
TTL. This is the amount of time that other DNS servers should store the record in
a cache. The Panel sets the default value of one day.
Refresh. This is how often the secondary name servers check with the primary
name server to see if any changes have been made to the domain's zone file.
The Panel sets the default value of three hours.
Retry. This is the time a secondary server waits before retrying a failed zone
transfer. This time is typically less than the refresh interval. The Panel sets the
default value of one hour.
Expire. This is the time before a secondary server stops responding to queries,
after a lapsed refresh interval where the zone was not refreshed or updated.
The Panel sets the default value of one week.
Minimum. This is the time a secondary server should cache a negative response.
The Panel sets the default value of three hours.
4. Click OK. The new SOA record parameters will be set for the newly
created domains.
Usage of serial number format recommended by IETF and RIPE is mandatory for many
domains registered in some high-level DNS zones, mostly European ones. If your
domain is registered in one of these zones and your registrar refuses your SOA serial
number, using serial number format recommended by IETF and RIPE should resolve
this issue.
Parallels Plesk Panel servers use UNIX timestamp syntax for configuring DNS zones.
UNIX timestamp is the number of seconds since January 1, 1970 (Unix Epoch). The
32-bit timestamp will overflow by July 8, 2038.
RIPE recommends using YYYYMMDDNN format, where YYYY is year (four digits), MM
is month (two digits), DD is day of month (two digits) and NN is version per day (two
digits). The YYYYMMDDNN format will not overflow until the year 4294.
To change the Start of Authority (SOA) serial number format to
YYYYMMDDNN for the server-wide DNS template:
1. Go to Settings > DNS Template Settings (in the General group).
2. Click SOA Records Template.
3. Select the Use serial number format recommended by IETF and RIPE checkbox.

96 Configuring the Server
Note: See the sample of SOA serial number generated with the selected format. If
the resulting number is less, than the current zone number, the modification may
cause temporary malfunction of DNS for this domain. Zone updates may be
invisible to Internet users for some time.
4. Click OK.
To restore the default Start of Authority (SOA) serial number format (UNIX
timestamp) for the server-wide DNS template:
1. Go to Settings > DNS Template Settings (in the General group).
2. Click SOA Records Template.
3. Clear the Use serial number format recommended by IETF and RIPE checkbox.
Note: See the sample of SOA serial number generated with the selected format. If
the resulting number is less, than the current zone number, the modification may
cause temporary malfunction of DNS for this domain. Zone updates may be
invisible to Internet users for some time.
4. Click OK.
By default, transfer of DNS zones is allowed only for name servers designated by NS
records contained within each zone. If your domain name registrar requires that you
allow transfer for all zones you serve:
1. Go to Settings > DNS Template Settings (in the General group).
2. Click Transfer Restrictions Template. A screen will show all hosts to which
DNS zone transfers for all zones are allowed.
3. Specify the registrar's IP or network address and click Add Network.
If you are using third-party DNS servers, and are not running your own
DNS server, you should switch off your control panel's DNS server:
1. Go to Settings > DNS Template Settings (in the General group).
2. Click Switch Off.
To restore the original configuration of server-wide DNS template:
1. Go to Settings > DNS Template Settings (in the General group).
2. Click Restore Defaults.
You can specify whether your DNS server should provide recursive service for queries.

Configuring the Server 97
With recursive service allowed, your DNS server, when queried, performs all the lookup
procedures required to find the destination IP address for the requestor. When
recursive service is not allowed, your DNS server performs minimal number of queries
only to find a server that knows where the requested resource resides and to redirect
the requestor to that server. Therefore, recursive service consumes more server
resources and makes your server susceptible to denial-of-service attacks, especially
when the server is set to serve recursive queries from clients outside your network.
After your install Parallels Plesk Panel, the built-in DNS server defaults to serving
recursive queries only from your own server and from other servers located in your
network. This is the optimal setting. If your upgraded from earlier versions of Parallels
Plesk Panel, your DNS server defaults to serving recursive queries from any host.
If you want to change the settings for recursive domain name service:
1. Go to Settings > DNS Template Settings (in the General group) > DNS Recursion.
2. Select the option you need:
To allow recursive queries from all hosts, select Allow for all requests.
To allow recursive queries from your own server and hosts from your network,
select Allow for local requests only.
To allow recursive queries only from your own server, select Deny.
3. Click OK.
By default, users can create new subdomains and domain aliases in the DNS zones
belonging to other users. This means that they can set up websites and e-mail
accounts which could be used for spamming, fishing or identity theft.
To prevent users from setting up domains and domain aliases in the DNS
zones belonging to other users:
1. Go to Settings > Restrict Creation of Subzones (in the General group).
2. Select the Do not let users create DNS subzones in other users' DNS superzones
checkbox.
3. Click OK.
If you need to assign a new host name to your server:
1. Go to Settings > Server Settings (in the General group).
2. In the Full host name box, type the new host name and click OK.

98 Configuring the Server
Configuring the Panel to Run Behind Router with NAT
Every time you set up a new website in the Panel, the domain name used by your
website is associated with the IP address of your Panel-managed server in the DNS
zone of this domain. If you are running the Panel behind a routing device with NAT
(network address translation), this IP address will be an internal network address like
192.168.1.10. As the 192.168.x.x IP addresses are reserved by the Internet Assigned
Numbers Authority (IANA) for use by private networks, this website will not be
accessible to the Internet users. To work around this, you have to associate this
domain name with the public IP address of the routing device in the DNS zone of this
domain.
If you are using the Panel as a part of hosting package sold to you by your hosting
provider (as opposed to having your own server), then in most cases, your hosting
provider has already configured the routing device and the DNS zone template used for
creation of your websites. If so, you can proceed directly to Making Your Website
Accessible When the Panel Is Running Behind Router with NAT for instructions on how
to make your websites accessible to the Internet users.
To check if proper modifications of the DNS zone template were made by
your hosting provider:
1. Go to Settings > DNS Template Settings (in the DNS group).
2. Locate all resource records of A type. By default these records look like
this:
<domain>. A <ip>
mail.<domain>. A <ip>
ns.<domain>. A <ip>
webmail.<domain>. A <ip>
If you see real IP address instead of <ip> there, it means that your hosting provider has
modified the DNS zone template used for creation of your websites. Write down this IP
address and go to Making Your Website Accessible When the Panel Is Running
Behind Router with NAT for further instructions on how to make your websites
accessible to the Internet users.
However, if you see the records as they are displayed in the example above (with <ip>
instead of real IP address), it means that either the Panel provided to you as a part of
your hosting package is not running behind a router with NAT, or you have to modify
the DNS zone template manually.

Configuring the Server 99
To modify the DNS zone template used for creation of your websites:
1. Go to Settings > DNS Template Settings (in the DNS group).
2. Locate all resource records of A type. These records look like the
following:
<domain>. A <ip>
mail.<domain>. A <ip>
ns.<domain>. A <ip>
webmail.<domain>. A <ip>
3. Edit all of these A type records:
a. Click the corresponding links in the Host column.
b. In the Enter IP address input box, delete the <ip> templates, and
type the public IP address allocated to you by your hosting
provider. If you have forgotten the public IP address allocated to
you, contact your hosting provider for assistance.
4. Click OK.
If you are running your own Parallels Plesk Panel server behind a router with NAT, you
need to manually configure the routing device and modify the DNS zone template used
for creation of your websites.
If you are running your own server with the Panel behind a router with
NAT:
1. Configure your routing device so as to ensure the proper address
translation. Refer to the documentation of your routing device for
detailed instructions.
2. Log in to the Panel and go to Settings > DNS Template Settings (in the DNS
group).
3. Locate all resource records of A type. These records look like the
following:
<domain>. A <ip>
mail.<domain>. A <ip>
ns.<domain>. A <ip>
webmail.<domain>. A <ip>
4. Edit all of these A type records:
a. Click the corresponding links in the Host column.
b. In the Enter IP address input box, delete the <ip> templates, and
type the public IP address of the routing device.
c. Click OK.

100 Configuring the Server
d. Go to Making Your Website Accessible When the Panel Is
Service name
Ports used by service
Administrative interface of the Panel
TCP 8443, 8880
Samba (file sharing on Windows networks)
UDP 137, UDP 138, TCP 139, TCP
445
VPN service
UDP 1194
Web server
TCP 80, TCP 443
FTP server
TCP 21
SSH (secure shell) server
TCP 22
SMTP (mail sending) server
TCP 25, TCP 465
POP3 (mail retrieval) server
TCP 110, TCP 995
IMAP (mail retrieval) server
TCP 143, TCP 993
Mail password change service
TCP 106
MySQL server
TCP 3306
MS SQL server
TCP 1433
PostgreSQL server
TCP 5432
Licensing Server connections
TCP 5224
Domain name server
UDP 53, TCP 53
In this section:
Using the Software Firewall Built into Your Panel (Windows Hosting) ............... 101
Running Behind Router with NAT for further instructions on how
to make your websites accessible to the Internet users.
Configuring the Panel to Run Behind a Firewall
This section provides information about setting up the firewall built into your panel so
as to allow access to the Panel and its services.
The following is a list of ports and protocols used by Parallels Plesk Panel services.
 Loading...