

Page 1

Parallels® Plesk Panel
Page 2

Copyright Notice
Parallels Holdings, Ltd.
c/o Parallels International GMbH
Vordergasse 49
CH8200 Schaffhausen
Switzerland
Phone: +41 526320 411
Fax: +41 52672 2010
Copyright © 1999-2011 Parallels Holdings, Ltd. and its affiliates. All rights reserved.
This product is protected by United States and international copyright laws. The product’s
underlying technology, patents, and trademarks are listed at http://www.parallels.com/trademarks.
Microsoft, Windows, Windows Server, Windows NT, Windows Vista, and MS-DOS are registered
trademarks of Microsoft Corporation.
Linux is a registered trademark of Linus Torvalds.
Mac is a registered trademark of Apple, Inc.
All other marks and names mentioned herein may be trademarks of their respective owners.
Page 3

Contents
Preface 4
Terms, Acronyms, and Abbreviations ........................................................................................... 4
About This Document .................................................................................................................... 5
Who Should Read This Document ................................................................................................ 6
Before Proceeding to Configuration .............................................................................................. 6
Typographical Conventions ........................................................................................................... 7
Feedback ....................................................................................................................................... 8
Introduction to Business Manager 9
Achieving Hosting Services Provisioning 12
Business Manager Configuration Walk Through 16
Adding a Payment Gateway ........................................................................................................ 17
Associating the Payment Gateway with an Online Store ............................................................ 18
Adding and Configuring a Hosting Plan ...................................................................................... 19
Setting Taxes Applied to Subscribers ......................................................................................... 21
Verifying Business Manager Configuration 23
Appendix A. Modifying Online Store Appearance 25
Appendix B. Building Online Store into Your Website 26
Page 4

4 Preface
In this section:
Terms, Acronyms, and Abbreviations ................................................................ 4
About This Document ........................................................................................ 5
Who Should Read This Document .................................................................... 6
Before Proceeding to Configuration ................................................................... 6
Typographical Conventions ............................................................................... 7
Feedback .......................................................................................................... 8
Preface
Terms, Acronyms, and Abbreviations
Throughout this guide, we use the following terms, acronyms and abbreviators:
Service plan is a set of services and resources offered to hosting service customers.
Typically, the resources include disk space on the server and bandwidth for hosting
websites, and the services include web hosting service, mail hosting service, and such. It
is assumed that a service plan you create in the Panel represents your particular
business offer.
Subscription is an instance of service plan assigned to a customer. To provide a
particular customer with services and resources offered with a service plan, you
subscribe the customer to the service plan, or, in other words, you create a subscription
for the customer.
The Panel is a shorthand for Parallels Plesk Panel.
Business Manager is a shorthand for Customer & Business Manager.
Online store is an automatically generated website with a shopping cart that displays your
service plans and helps you distribute them.
Page 5

Preface 5
About This Document
This document contains introduction to Customer & Business Manager and instructions on
how to configure it to provide customers with web hosting services managed by Parallels
Plesk Panel. In brief, the document explains how to create a hosting plan in Business
Manager, import it to the Panel, and automate the process of subscribing to this plan.
With Customer & Business Manager you can easily leverage provisioning of domain names
and SSL certificates, but as they require you to register an account with a domain registrar or
an SSL provider, we will narrow the application facilities to web hosting services in this guide
for the sake of simplicity.
This guide also has two appendices that are optional from the configuration standpoint but
useful if you intend to customize your online store. They are as follows:
How to modify an online store appearance (header and footer) to match your branding
How to build an online store into your website
Page 6

6 Preface
Who Should Read This Document
This guide is addressed to hosters who intend to use Business Manager as business
automation software for Plesk Panel.
Before Proceeding to Configuration
Before you go the configuration steps described in this guide, make sure that the following
requirements are met:
Business Manager is installed as the Panel component.
Business Manager builds into the Panel installer, so you have the Panel and Business
Manager bundle ready to work together after successful installation. When Business
Manager is installed, you are able to connect other control panels to it.
The deployment scheme is a single Panel with Business Manager.
We limit the initial deployment configuration to a single Panel and Business Manager
bundle to simplify the explanation of how to configure end-to-end solution out of Business
Manager and the Panel.
Shared IP pool is configured in the Panel.
The available shared IPs are required to properly allocate web hosting resources. To
configure them, log in to the Panel as the Administrator and perform the initial
configuration.
You are in the Panel interface.
To configure Business Manager, log in to the Panel as the Administrator. If you are not
logged in to the Panel, locate the following URL and enter the Administrator’s credentials.
Error! Hyperlink reference not valid. hostname>:8443/
Initial configuration wizard is skipped for Business Manager.
Business Manager offers the initial configuration wizard when you log in to the application
for the first time. To acquaint you with the administrative interface and to explain the basic
concepts, we suppose that you skip the wizard. This will also let you return to a particular
step and adjust the configuration to tailor it to your needs without running the wizard in
future.
Page 7

Preface 7
Typographical Conventions
Formatting convention
Type of Information
Example
Special Bold
Items you must select, such as
menu options, command
buttons, or items in a list.
Go to the QoS tab.
Titles of chapters, sections,
and subsections.
Read the Basic Administration
chapter.
Italics
Used to emphasize the
importance of a point, to
introduce a term or to
designate a command line
placeholder, which is to be
replaced with a real name or
value.
The system supports the so
called wildcard character
search.
Monospace
The names of style sheet
selectors, files and directories,
and CSS fragments.
The license file is called
license.key.
Preformatted
On-screen computer output in
your command-line sessions;
source code in XML, C++, or
other programming languages.
Unix:
# ls –al /files
total 14470
Windows:
Preformatted Bold
What you type, contrasted with
on-screen computer output.
# cd /root/rpms/php
Formatting convention
Type of Information
Example
Special Bold
Items you must select, such
as menu options, command
buttons, or items in a list.
Go to the QoS tab.
Titles of chapters, sections,
and subsections.
Read the Basic Administration
chapter.
Italics
Used to emphasize the
importance of a point, to
introduce a term or to
designate a command line
placeholder, which is to be
replaced with a real name
or value.
These are the so-called
shared VPSs.
msiexec /i <name of the
aforementioned *.msi file or
GUID>
The following kinds of formatting in the text identify special information.
The following kinds of formatting in the text identify special information.
Page 8

8 Preface
Monospace
The names of style sheet
selectors, files and
directories, and CSS
fragments.
Install Plesk to the
”c:\plesk bin” directory.
Preformatted
On-screen computer output
in your command-line
sessions; logs; source code
in XML, C++, or other
programming s.
05:31:49 Success.
Admin John Smith was
added.
Preformatted Bold
What you type, contrasted
with on-screen computer
output.
>cd %plesk_bin%
Feedback
If you have found an error in this guide, or if you have suggestions or ideas on how to
improve this guide, please send your feedback using the online form at
http://www.parallels.com/en/support/usersdoc/. Please include in your report the guide’s title,
chapter and section titles, and the fragment of text in which you have found an error.
Page 9

The Plesk Panel concept implies that you organize available hosting services and
C H A P T E R 1
Introduction to Business Manager
resources into plans and offer your customers to subscribe to these plans. If you wish
to reduce time costs, you should consider a solution that automatically subscribes your
customers to your plans eliminating any actions from the administrator’s part. Along
with the automation, you should present your hosting plans to customers and keep
them in actual state giving your customers a choice. Finally, you should take control
over money flows from your customers. To assist you in these three aspects, we offer
Customer & Business Manager (Business Manager) - the Panel component that
leverages hosting provisioning. Two major advantages of Business Manager are as
follows:
The component automates the creation of new subscriptions by accepting them
through automatically-generated online stores. Instead of creating accounts
manually, customers visit your store, pick a plan that fits them best, and subscribe
to it. Each change you make to your plans is reflected in all your online stores.
The component is responsible for the financial part of subscriptions distribution. It
generates invoices, takes payments, performs administrative actions to accounts,
and maintains other financial routines.
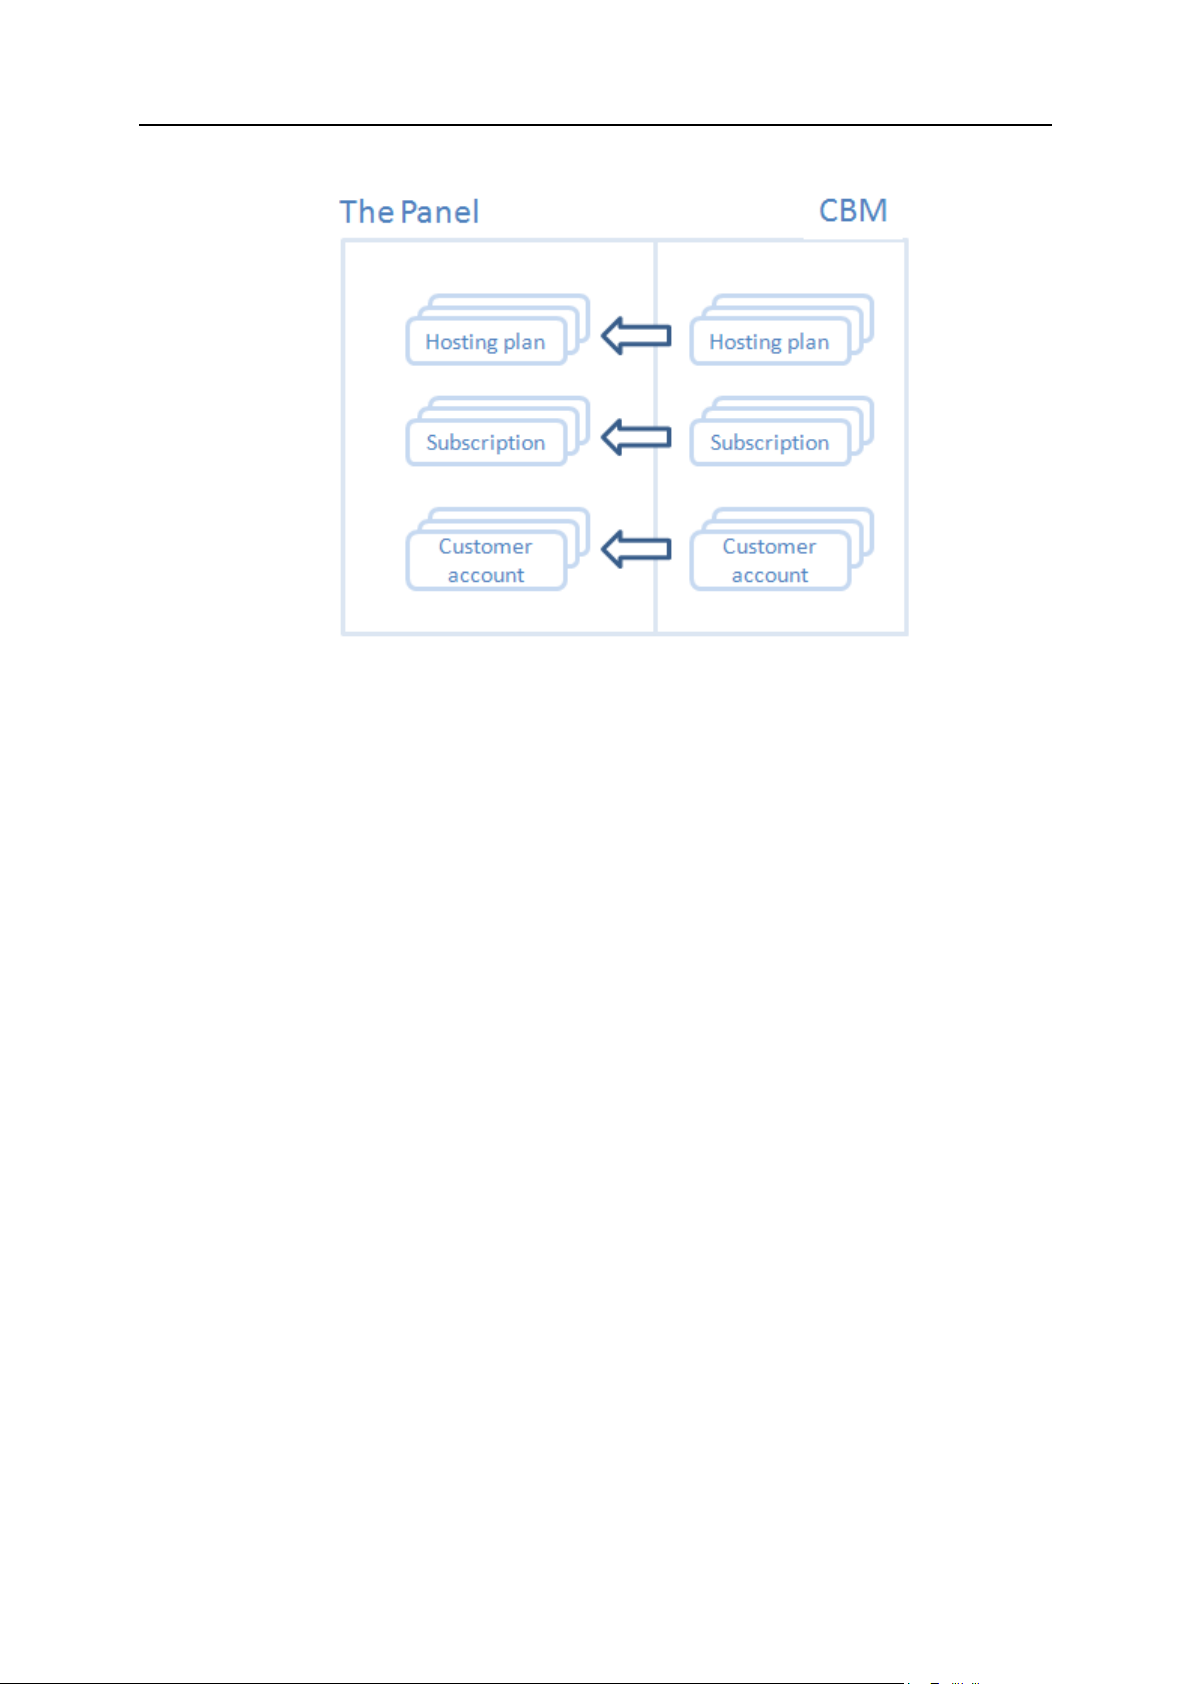
The major responsibilities of Business Manager are reflected in its architecture. The
component has own hosting plans, subscriptions, and customer accounts that are
linked to the corresponding objects in the Panel. This makes it possible to divide the
financial and technical information between the Panel and Business Manager. For
example, when you need financial details about a certain subscription, you refer to it in
Business Manager. When you wish to manage hosting resources, you refer to the
subscription in the Panel. Subscriptions in the Panel and in Business Manager are
different though objects. The same approach applies to hosting plans and customer
accounts.
Page 10
10 Introduction to Business Manager
Figure 1: Relations between Business Manager and the Panel objects.
Business Manager keeps its hosting plans, subscriptions, and customer accounts in
actual state by syncing them with respective Panel objects. It means that the
component periodically requests to create, modify, or remove objects owned by the
Panel. At the same time, Business Manager is unaware about the state of these
objects in the Panel. This means that when you, for example, create a subscription in
Business Manager, it is created in the Panel. Alternatively, when you do the same in
the Panel, the object is not created in Business Manager. In other words, there is only
one-way sync between the applications.
This one-way sync scheme dictates that if you want both Business Manager and the
Panel to recognize and handle a hosting plan, it is obligatory to create this plan in
Business Manager and sync it with the Panel. This way of sharing the plan data
between the two applications makes it possible to implement a typical distribution
scenario. The scenario is as follows:
1. Customer subscribes to a plan through a Business Manager online store. At this
step, Business Manager creates a new customer account and subscription.
2. Business Manager syncs information about customer account, service plan, and
subscription with the Panel.
3. The Panel receives this information and sets up the subscription.
4. When the customer pays for the subscription, Business Manager notifies the Panel
about it.
5. The Panel grants the customer permissions to log in and use services provided with
the subscription.
In this guide, we will explain how to set up Business Manager to accommodate this
scenario.
Page 11

Introduction to Business Manager 11
The Business Manager configuration as well as the other operations is performed
through the Panel. After you log in as the administrator to the Panel and complete the
initial configuration, you notice Business Manager operations in the left menu: Business
Operations, Business Monitoring, Business Setup. The operations are grouped by usage
frequency.
The first group contains day-by-day operations on customer accounts and
subscriptions (be it a web hosting subscription, domain name, or SSL certificate). Use
them to update subscription or contact details, generate invoices, view customer
balance, etc.
The second group - business monitoring - includes operations typically performed
every week: Generating statistical and financial reports, reviewing and managing the
invoices and transactions, and monitoring the scheduled tasks results.
The third group - business setup - consists of service plans and overall system
configuration. We will mostly use operations from this group to set up Business
Manager to make end-to-end hosting provisioning. To learn more about the operations
and the steps we will take to set up Business Manager, see the next chapter.
Page 12

This chapter explains how to set up Business Manager to accommodate the typical
C H A P T E R 2
Achieving Hosting Services Provisioning
provisioning scenario. It is the conceptual part of the instruction. If you wish to see the
step-by-step instruction, refer to Business Manager Configuration Walk Through (on page
16).
In short, this chapter tells how to perform the following operations:
Add a payment gateway to accept payments from customers
Associate the gateway with an online store
Create and configure a hosting plan you want to offer to customers
Set taxes applied to subscribers
You will find details on each of them below.
Adding a Payment Gateway
The first step is to add a payment gateway. If you plan to process credit cards, add a
primary gateway. If you wish to rely on payment intermediary service when processing
credit cards, add a third-party gateway.
The list of supported primary gateways is as follows:
Authorize.net
BluePay
Echo, Inc.
eWay
InternetSecure
LinkPoint
Moneris
PayFlowPro
ProTX
PSiGate
Quantum
Velocity Pay
To add one of these gateways, you need a merchant account with a corresponding
payment processing service. In addition, if you plan to store credit cards details in your
database, you need to configure encryption in your system. For details on encryption
configuration, see section Managing Security Settings > Setting Up Encryption of Parallels
Plesk Billing 6.0 Administrator Guide, which is accessible from the Parallels website.
Page 13

Achieving Hosting Services Provisioning 13
The list of supported third-party gateways is as follows:
PayPal
WorldPay
You also need a merchant account registered with one of these processing services.
Quick link: step-by-step instruction (on page 17).
Associating the Payment Gateway with an Online Store
After adding a payment gateway, modify online store settings to accept payments from
this gateway. Online store is a shopping cart with checkout to let customers subscribe
to your plans. Customer payments are processed by a payment gateway associated
with the store.
Quick link: step-by-step instruction (on page 18).
Adding and Configuring a Hosting Plan
Once your store is ready to accept payments, add a hosting plan to it. A hosting plan
comprises hosting services and resources you offer to your customers. You are free to
add new plans or update the predefined ones. The new plans become available
through your online stores after you configure them. The configuration consists of the
following steps:
1. Add your plan to one of available online stores.
2. Add billing cycles to the plan.
A billing cycle is a period between two subscription renewal dates, or, in other
words, the subscription length. By adding multiple billing cycles you let customers
choose the subscription length that fits them best.
3. Associate the plan with server groups.
Each server group includes control panels of the same type connected to Business
Manager. The groups corresponding to the Panel for Linux and for Windows are
created during the installation. Initially, the local Panel instance appears into one of
these groups.
When you associate a plan with a group, this lets the system to access the
information about all possible services and resources managed by the Panel.
Additionally, this facilitates load balancing. If your plan is associated with a certain
server group, a subscription will be provisioned onto the machine with the fewest
number of subscriptions among this group.
4. Set the plan properties.
Plan properties define privileges granted to a subscriber account on a related
hosting panel. For example, this includes account limits on bandwidth, had disk
space quotas, scripting support, and many others.
Page 14

14 Achieving Hosting Services Provisioning
Note: The Panel functionality might partly be unavailable due to license limitations
or other reasons. Please check the availability of a service or a resource before
adding them to your plans.
5. Set the subscription price for each billing cycle you would like to appear in online
stores.
When you finish the configuration, you can verify that the plan is displayed among
others in the online store.
Quick link: step-by-step instruction (on page 19).
Setting Taxes Applied to Subscribers
The online store is ready to accept orders. The only thing to do left is to set taxes
applied to plan subscribers.
As you work with international customers, you should be ready to set taxes charged in
different countries to conform to applicable legal standards. Business Manager lets you
achieve this through tax zones and tax zone groups.
A tax zone defines a tax for a particular country or sub-national unit where you intend
to offer your plans. For example, if you sell to the USA and the UK, create two tax
zones depending on the location of your customers. However, if your business
supposes the same tax for all customers, simply modify the default tax zone according
to your needs.
A tax zone group links together tax zones and a plan. If your plan is associated with a
tax zone group, the system will search for matches between subscriber’s location and
tax zones included into the group. If matches are found, the system will calculate the
total tax due using values in matched tax zones.
A tax zone defines either a stackable or non-stackable tax. Stackable taxes are applied
to a subscription price, while non-stackable are applied to a total of the price and
stackable tax values.
To calculate the total taxes due, the system uses the following algorithm:
1. Form a list of matching tax zones.
2. Sequentially apply each stackable tax to a subscription price. Sum all the tax values
calculated.
3. Sequentially apply each non-stackable tax to the total of the price and the step two
result. Sum all the tax values calculated.
4. Sum the step two and step three results.
For example, a subscription price is $100, and the matching tax zones are as follows:
Zone 1: Apply 10% stackable
Zone 2: Apply 20% stackable
Page 15

Achieving Hosting Services Provisioning 15
Zone 3: Apply 5% non-stackable
Zone 4: Apply 10% non-stackable
Then the total taxes due is calculated in the following way:
$100 * 0.10 = $10 (for Zone 1)
($100 * 0.20 = $20 (for Zone 2)
$10 + $20 = $30 (subtotal for stackable taxes)
($100 + $30) * 0.05 = $6.5 (for Zone 3)
($100 + $30) * 0.10 = $13 (for Zone 4)
$6.5 + $13 = $19.5 (subtotal for non-stackable taxes)
$30 + $19.5 = $49.5 (total taxes due)
Quick link: step-by-step instruction (on page 21).
After you set up taxes, check that Business Manager works as it should. For details on
how to do it, see Verifying Business Manager Configuration (on page 23).
Page 16

This chapter provides step-by-step guidance on how to configure the Customer &
In this chapter:
Adding a Payment Gateway .............................................................................. 17
Associating the Payment Gateway with an Online Store ................................... 18
Adding and Configuring a Hosting Plan ............................................................. 19
Setting Taxes Applied to Subscribers ................................................................ 21
C H A P T E R 3
Business Manager Configuration Walk Through
Business Manager to accommodate hosting services provisioning.
Page 17

Business Manager Configuration Walk Through 17
Adding a Payment Gateway
In this section, we will add a demo primary gateway that does not require any merchant
account and serves only for testing and presentation purposes. Please do not use it in
production.
To add the demo primary gateway:
1. Go to Business Setup > All Settings. The Business Manager panel opens.
2. Go to System > System Configuration.
3. Click Payment Gateways (in the Payment Settings group).
4. Click Add New Payment Gateway. This will open a payment gateway creation
wizard.
5. Select Primary gateway.
6. Select Demo Gateway (Stable) option next to Gateway module.
7. Specify the gateway name. This name is for your reference, customers will
not see it.
8. Click Next. This will bring you to the payment gateway settings page.
9. Select the Always approve option next to Gateway testing, and click OK.
This will open the payment gateways list containing the new gateway.
Page 18

18 Business Manager Configuration Walk Through
Associating the Payment Gateway with an Online Store
In this section, we will update the default online store settings to accept payments from the
previously created gateway.
To associate your primary gateway with the default online store:
1. Go to the online stores list.
If you are in Business Manager, go to Plans > Online Stores.
If you are in the Panel, go to All Settings > Plans > Online Stores.
2. Click Default Store. This will open the online store settings.
3. Select checkbox next to Primary Payment Gateway and select the gateway name.
4. Click Submit.
The list of online stores opens.
Page 19

Business Manager Configuration Walk Through 19
Adding and Configuring a Hosting Plan
In this section, we will add a new hosting plan and configure it.
To add a new plan:
1. Go to the plans list.
If you are in the Panel, go to Business Operations > Service Plans.
If you are in Business Manager, go to Plans > Plans.
2. Click Create New Plan. This will open a plan creation wizard.
3. Select Hosting Plan next to Type, and click OK. This will bring you to the plan
details page.
4. Replace Hosting Plan with a plan name next to Display Name. This name will
be displayed in online stores. Hereafter, we will use the Sample Plan name
to refer to this plan.
5. Select Required next to Are customers required to provide domain name when ordering
this plan?. This will not allow customers to subscribe to this plan without
providing a domain name. The Panel requires this name to correctly perform
provisioning.
6. Select Active next to Is Active.
7. Click Save.
This will open the plan details page.
The next step is to add this plan to one of the online stores. For sample purposes, we will
add it to the default online store.
We suppose that currently you are at the Sample Plan details page.
To add Sample Plan to the default online store:
1. Choose the Online Stores top-menu item. This will open the menu for adding
the plan to online stores.
2. Double-click Default Store to move it to the Selected group.
3. Click Save Changes.
This will make the Cycles top-menu option available.
The next step is to add billing cycles to this plan.
To add billing cycles to Sample Plan:
1. Choose the Cycles top-menu item. This will open the menu for billing cycles.
Page 20

20 Business Manager Configuration Walk Through
2. Select the billing cycles for this plan by double-clicking the required period.
For Sample Plan, we add 1 Month and 1 Year cycles. This means that
customers will be offered to either to order 1 -month or 1-year subscription to
this plan.
3. Click Save Changes.
This will make the rest of top-menu options available.
The next step is to set the plan properties.
To set the plan properties:
1. Choose the Server Groups top-menu item. This will open the menu for adding
the plan to server groups.
2. Double-click PleskUnix to move it to the Selected group.
3. Click Save Changes. This associates this plan with available Panel for
Linux/Unix services and resources.
4. Click the Properties top-menu option.
5. Define the services and resources offered with a plan subscription. For
Sample Plan, we set Disk space (the Client Limits column) to 10 GB.
6. Click Save Changes.
This will reload the plan details page.
The final step is to set pricing for your plan.
To set pricing for Sample Plan:
1. Choose the Prices top-menu item. This will open the pricing table. Please
note that you can set pricing for each billing cycle you included into your
plan.
2. Specify pricing for 1 Month and 1 Year cycles. The subscription price will be a
sum of Price and Setup Fee (one-time fee).
3. Click Save Changes.
This will display the notification about successfully performed operation.
To verify that the plan is displayed among others in the default online store, follow this link:
Error! Hyperlink reference not valid. hostname>:8443/plesk-
billing/order/products.php?storeID=1
Page 21

Business Manager Configuration Walk Through 21
Setting Taxes Applied to Subscribers
In this chapter, we will create a tax zone group. We also will create a tax zone that imposes
10% stackable tax on all Canada customers, add the zone to the group, and associate this
group with Sample Plan.
To create the tax zone group:
1. Go to the Business Manager configuration.
If you are in the Panel, go to Business Setup > All Settings.
If you are in Business Manager, go to System > System Configuration.
2. Click Tax Zone Groups (in the Invoice & Billing Settings group). This will open the
groups list.
3. Click the Add Tax Zone Group button in the top-right corner of the Manage Tax
Zone Groups page.
4. Specify Sample TZ Group next to Tax Zone Group Description.
5. Click Save.
This will open the tax zone groups list containing the new group.
To create the tax zone and add it to Sample TZ Group:
1. Go to the Business Manager configuration.
If you are in the Panel, go to Business Setup > All Settings.
If you are in Business Manager, go to System > System Configuration.
2. Click Tax Zones (in the Invoice & Billing Settings group). This will open the tax
zones list.
3. Click the Add Tax Zone button in the top-right corner of the Manage Tax Zones
page.
4. Select CA - Canada next to Country.
5. Specify the asterisk (“*”) next to State/Province to match all states or provinces.
6. Specify 10.00 next to Tax amount.
7. Specify the tax description next to Description. The system will display this
description in invoices.
8. Select Active next to Tax zone active.
9. Select checkbox next to Stackable.
10. Double-click Sample TZ Group to move it to the Selected group.
11. Click Save.
Page 22

22 Business Manager Configuration Walk Through
This will open the tax zones list containing the new zone.
To associate Sample Plan with Sample TZ Group:
1. Go to the plans list.
If you are in the Panel, go to Business Operations > Service Plans.
If you are in Business Manager, go to Plans > Plans.
2. Click Sample Plan.
3. Click the Prices top-menu option.
4. Select Sample TZ Group next to Related tax zone group
5. Click Save Changes.
This will display the notification about successfully performed operation.
Now when the configuration is successfully completed, we can verify that our solution works.
Page 23

We suppose that you have completed all the previous steps and want to verify that
C H A P T E R 4
Verifying Business Manager Configuration
your solution works properly. In this chapter, we will imitate the behavior of an ordinary
customer who visits your default online store, subscribes to Sample Plan, pays for the
subscription, and finally logs in to the Panel to access the services and resources
provided with the plan.
To fully automate this scenario, you should have an account with FraudGuardian - the
Business Manager module that inspects orders and activates customer accounts if it
considers them not to be fraudulent. Alternatively, you can manually activate the
accounts from the administrative interface. In this chapter, we will explain how to
perform the manual activation. For details on FraudGuardian, see section Configuring
Order Settings > Setting Up FraudGuardian of Parallels Plesk Billing 6.0 Administrator Guide.
To subscribe to Sample Plan:
1. Go to the online default store available at:
Error! Hyperlink reference not valid. hostname>:8443/plesk-
billing/order/products.php?storeID=1
2. Click the Buy Now button in the Sample Plan group.
3. Click continue.
4. Click use my own domain and specify a vacant domain name. In case you
specify an occupied domain name, the subscription will not be
provisioned to the Panel. We will use the example-123321.cn name.
5. Click continue with this domain. This will open a page displaying the
subscription information and associated domain name.
6. Check the Signed In As value displayed in the top-left corner. If you act
on behalf of the administrative account, click Sign Out.
7. Click proceed with purchase.
8. Specify valid contact information and credentials to access the Panel
account. We will use the following credentials:
Username: customer
Password: customer
9. Select the Credit Card payment method and the following details.
Name on Credit Card: John Doe
Credit Card Number: 4111111111111111
Page 24

24 Verifying Business Manager Configuration
Expiration Date: specify any date in future
10. Click continue.
11. Select I have read and agree to the terms and conditions of use, and click place
order.
This will open a page displaying the payment status and information about the
invoice.
The customer’s account is created and the account status is automatically set to
Pending.
To activate the customer’s account from the administrative interface:
1. Go to Business Manager homepage.
If you are in Business Manager, go to Customers > Home.
Otherwise, go to Business Manager by clicking any control that forwards you to
the component interface.
2. If you see the invitation to run the configuration wizard, click Don’t show
this message again.
3. Find the newly added customer in the New Customers group, select
Activate, and click Submit.
Finally, Business Manager puts the information about the subscription and customer
into the queue. The queue entries are periodically sent to the Panel to facilitate load
balancing. To speed up the process and initiate the sending of this information to the
Panel, run the events from Business Manager manually by clicking Events > Events >
Run Events.
After the operation is finished, you can finally log out as the Administrator and log in to
the Panel under the customer’s account. Follow this link to access the Panel:
Error! Hyperlink reference not valid. hostname>:8443/sso/ui
If you have successfully logged in, Business Manager is set up to offer hosting services
managed by the Panel.
Page 25

You are able to easily customize the look and feel of your online store if you have a
C H A P T E R 5
Appendix A. Modifying Online Store Appearance
basic knowledge of HTML and CSS. In this chapter, we will explain how to adjust the
presentation of the default online store. You can skip this step for now and return to it
once Business Manager is set up.
To customize the online store, log in to the server shell over SSH using the “root” user
account, and locate the <BM_dir>/lib-
themes/default/order/templates/shopping directory. Here <BM_dir> stands
for the directory to which Business Manager was installed. Typically, it is
/usr/local/plesk-billing on FreeBSD and RPM-based Linux systems, and
/opt/plesk-billing on deb-based Linux systems.
Modify these two files to update the online store header and footer:
header.tpl
footer.tpl
To adjust the online store style, modify the shoppingstyle.css file located in the
<BM_dir>/lib-themes/default/lib-billing/css/ directory.
Save the files after completing your modifications.
To view the results, go to the online store and click any of Order Now buttons.
Page 26

Business Manager lets you integrate an online store into an arbitrary web page by
C H A P T E R 6
Appendix B. Building Online Store into Your Website
using website widgets - snippets of PHP code that render an online store interface
when you include them into your pages. In this chapter, we will explain where website
widgets are stored and how to use them. You can skip this step for now and return to it
once Business Manager is set up.
In this chapter, we will include a website widget offered by default into the test.php
page.
To retrieve the website widget:
1. Go to Business Setup > All Settings. The CBM panel opens.
2. Go to System > System Configuration.
3. Click Website Widgets (in the Order Settings group).
4. Click Same Website PHP Code next to Normal Widget.
5. Copy the snippet code. In our case, the resulting code is as follows:
<?php
$websiteWidgetArgs = array(
„widgetID‟ => 1,
„method‟ => „local‟,
„whoisWidget‟ => 0,
„urlORpath‟ => „/opt/plesk-billing/order‟
);
include(“/opt/pleskbilling/order/website_widget_creator.php”);
chdir(dirname(__FILE__));
?>
Note: As file paths in code depend on your OS, you might have a different snippet.
Now when you have the code, create the test.php file in <BM_dir>/lib-
billing/order/ and paste the code there.
The widget works correctly only if the page character set is utf-8. To adjust the page
character set, add the following PHP code at the very beginning of the page (after the
<?php declaration).
header(“Content-Type: text/html; charset=utf-8”);
To check that online store renders correctly, visit the newly created page available at:
Page 27

Appendix B. Building Online Store into Your Website 27
Error! Hyperlink reference not valid. hostname>:8443/plesk-billing/order/test.php
 Loading...