

Page 1

Parallels Desktop
Enterprise Edition
Mass Deployment Guide
Copyright © 1999-2013 Parallels IP Holdings GmbH and its affiliates. All rights reserved.
Page 2

Parallels IP Holdings GmbH
Vordergasse 59
8200 Schaffhausen
Switzerland
Tel: + 41 52 632 0411
Fax: + 41 52 672 2010
www.parallels.com
Copyright © 1999-2013 Parallels IP Holdings GmbH and its affiliates. All rights reserved.
This product is protected by United States and international copyright laws. The product’s underlying technology,
patents, and trademarks are listed at http://www.parallels.com/trademarks.
Microsoft, Windows, Windows Server, Windows NT, Windows Vista, and MS-DOS are registered trademarks of Microsoft
Corporation.
Apple, Mac, the Mac logo, Mac OS, iPad, iPhone, iPod touch, FaceTime HD camera and iSight are trademarks of Apple
Inc., registered in the US and other countries.
Linux is a registered trademark of Linus Torvalds.
All other marks and names mentioned herein may be trademarks of their respective owners.
Page 3

Contents
Welcome to Parallels Desktop Enterprise Edition ...................................................4
About This Guide .............................................................................................................. 4
Mass Deployment of Parallels Desktop Enterprise Edition ..................................... 5
What You Need ................................................................................................................ 6
Overview of Parallels Desktop Mass Deployment ..............................................................7
Preparing Parallels Desktop Deployment Package ............................................................7
Adding Parallels Desktop Installation Image............................................................................. 8
Adding Virtual Machines .......................................................................................................... 9
Supplying Parallels Desktop License Key .............................................................................. 13
Changing Deployment Configuration Options........................................................................ 14
Deploying Parallels Desktop and Virtual Machines on Macs ............................................ 17
Deploying with Parallels Management Suite for SCCM 2007 ................................................. 18
Deploying with Parallels Management Suite for SCCM 2012 ................................................. 20
Deploying with Apple Remote Desktop ................................................................................. 22
Deploying Mac OS X Image Using NetBoot........................................................................... 27
Advanced Features of Parallels Desktop Enterprise Edition.................................28
Parallels Desktop License Renewal ................................................................................. 28
Setting Up Local Update Server ...................................................................................... 29
Installing Web Server ............................................................................................................. 29
Creating Parallels Update XML File ........................................................................................ 30
Configuring Individual Macs................................................................................................... 33
Participating in Customer Experience Program................................................................ 35
Customizing Request Support Option ............................................................................. 36
Protecting Virtual Machine Configuration ......................................................................... 37
Resetting Guest OS User Password................................................................................ 39
Enabling Nested Virtualization .........................................................................................40
Locking Virtual Machine on Suspend............................................................................... 41
Encrypted Virtual Machines — Command Line Options................................................... 42
Index ........................................................................................................................44
Page 4

C HAPTER 1
Welcome to Parallels Desktop Enterprise Edition
Parallels Desktop for Mac Enterprise Edition provides IT administrators the ability to support
Windows-based applications for Mac users with a configurable, policy-compliant solution that easily
fits into existing IT business processes. With the ability to support corporate policy compliance,
simplification of mass deployments and streamlining of the business user experience, Parallels
Desktop for Mac Enterprise Edition is built on the world’s best-selling, top-rated, most-trusted
solution for running Windows applications on the Mac.
In This Chapter
About This Guide ..................................................................................................... 4
About This Guide
This guide is intended for IT administrators who will be deploying Parallels Desktop for Mac
Enterprise Edition. By following the instructions provided in this guide, IT administrators will learn
how to deploy Parallels Desktop Enterprise Edition and how to set up and use its advanced
features.
Page 5

C HAPTER 2
Mass Deployment of Parallels Desktop Enterprise Edition
This chapter describes mass deployment of Parallels Desktop Enterprise Edition. It provides stepby-step instructions on how to prepare the deployment package and how to deploy it using
package deployment tools.
In This Chapter
What You Need........................................................................................................ 6
Overview of Parallels Desktop Mass Deployment...................................................... 7
Preparing Parallels Desktop Deployment Package.................................................... 7
Deploying Parallels Desktop and Virtual Machines on Macs...................................... 17
Page 6

Mass Deployment of Parallels Desktop Enterprise Edition
What You Need
Parallels Desktop Enterprise Edition is deployed to Macs using one of the available Mac package
deployment tools. The available options are described below.
Parallels Management Suite for Microsoft SCCM
Parallels Management Suite for Microsoft System Center Configuration Manager (SCCM) is an
optimal solution that offers comprehensive management of Mac devices throughout the company.
One of the Suite's features is Parallels Desktop Deployment, which enables you to deploy Parallels
Desktop on Mac computers across a network. If you are using Microsoft SCCM 2007 or Microsoft
SCCM 2012 to manage Windows devices in your enterprise, you can use Parallels Management
Suite for Microsoft SCCM to manage Mac devices and to deploy Parallels Desktop on them.
The complete instructions on how to use Parallels Management Suite for Microsoft SCCM to
deploy Parallels Desktop are provided later in this guide.
Other Mac Management Tools
If you don't use Parallels Management Suite for Microsoft SCCM to manage your Macs, you can
use one of the following tools to deploy Parallels Desktop:
• Apple Remote Desktop (ARD)
• Package Manager
• JAMF
®
• Absolute
• LANDesk
• Other tools are also available.
The complete instructions on how to use Apple Remote Desktop are provided later in this guide.
For the instructions on how to use other tools, please see their respective documentation.
Software Absolute® Manage, formerly LANrev
®
Management Suite
General Requirements
To deploy Parallels Desktop Enterprise Edition you'll also need:
• A Mac computer on which you'll prepare the Parallels Desktop deployment package. This
should be the Mac running Parallels Desktop, so you can create and configure virtual machines
to be deployed together with Parallels Desktop.
• A computer from which you'll be performing the deployment. If you are using Parallels
Management Suite for Microsoft SCCM, you'll be deploying Parallels Desktop from a Windows
server running the Configuration Manager console. If you are using Apple Remote Desktop,
you'll be deploying Parallels Desktop from a Mac running the Apple Remote Desktop Admin.
6
Page 7

Mass Deployment of Parallels Desktop Enterprise Edition
• The Parallels Desktop for Mac installation image file (the file with the ".dmg" extension).
• A Parallels Desktop for Mac Enterprise Edition license key provided to you by your Parallels
sales representative.
• The Parallels Desktop deployment package. You can download it from the following location:
http://download.parallels.com/desktop/tools/pd-autodeploy.zip
The zip file contains the Parallels Desktop Autodeploy.pkg file, which is a Mac OS X
installation package that contains the framework for deploying Parallels Desktop. Download the
file and unzip it to any folder on the Mac where you have Parallels Desktop installed.
For the list of hardware and operating system requirements for running Parallels Desktop, please
refer to Parallels Desktop User's Guide.
Overview of Parallels Desktop Mass Deployment
Parallels provides a special Mac OS X installation package that automates the deployment of
Parallels Desktop. The package contains all the necessary scripts and instructions to perform the
deployment of Parallels Desktop for Mac and virtual machines.
To perform mass deployment of Parallels Desktop Enterprise Edition:
1 If you haven't done so already, download the Parallels Desktop deployment package from the
following URL:
http://download.parallels.com/desktop/tools/pd-autodeploy.zip
Unzip the pd-autodeploy.zip file to any folder on a Mac computer.
2 Prepare the Parallels Desktop deployment package (p. 7).
3 Deploy the
package to Macs (p. 17).
Preparing Parallels Desktop Deployment Package
To prepare the Parallels Desktop deployment package (Parallels Desktop
Autodeploy.pkg):
1 Add the Parallels Desktop installation image to the package (p. 8).
2 Add one or
3 Supply your
4 Change the
more virtual machines to the package (p. 9).
Parallels Desktop Enterprise Edition license key (p. 13).
deployment configuration options (if needed) (p. 14).
7
Page 8
Mass Deployment of Parallels Desktop Enterprise Edition
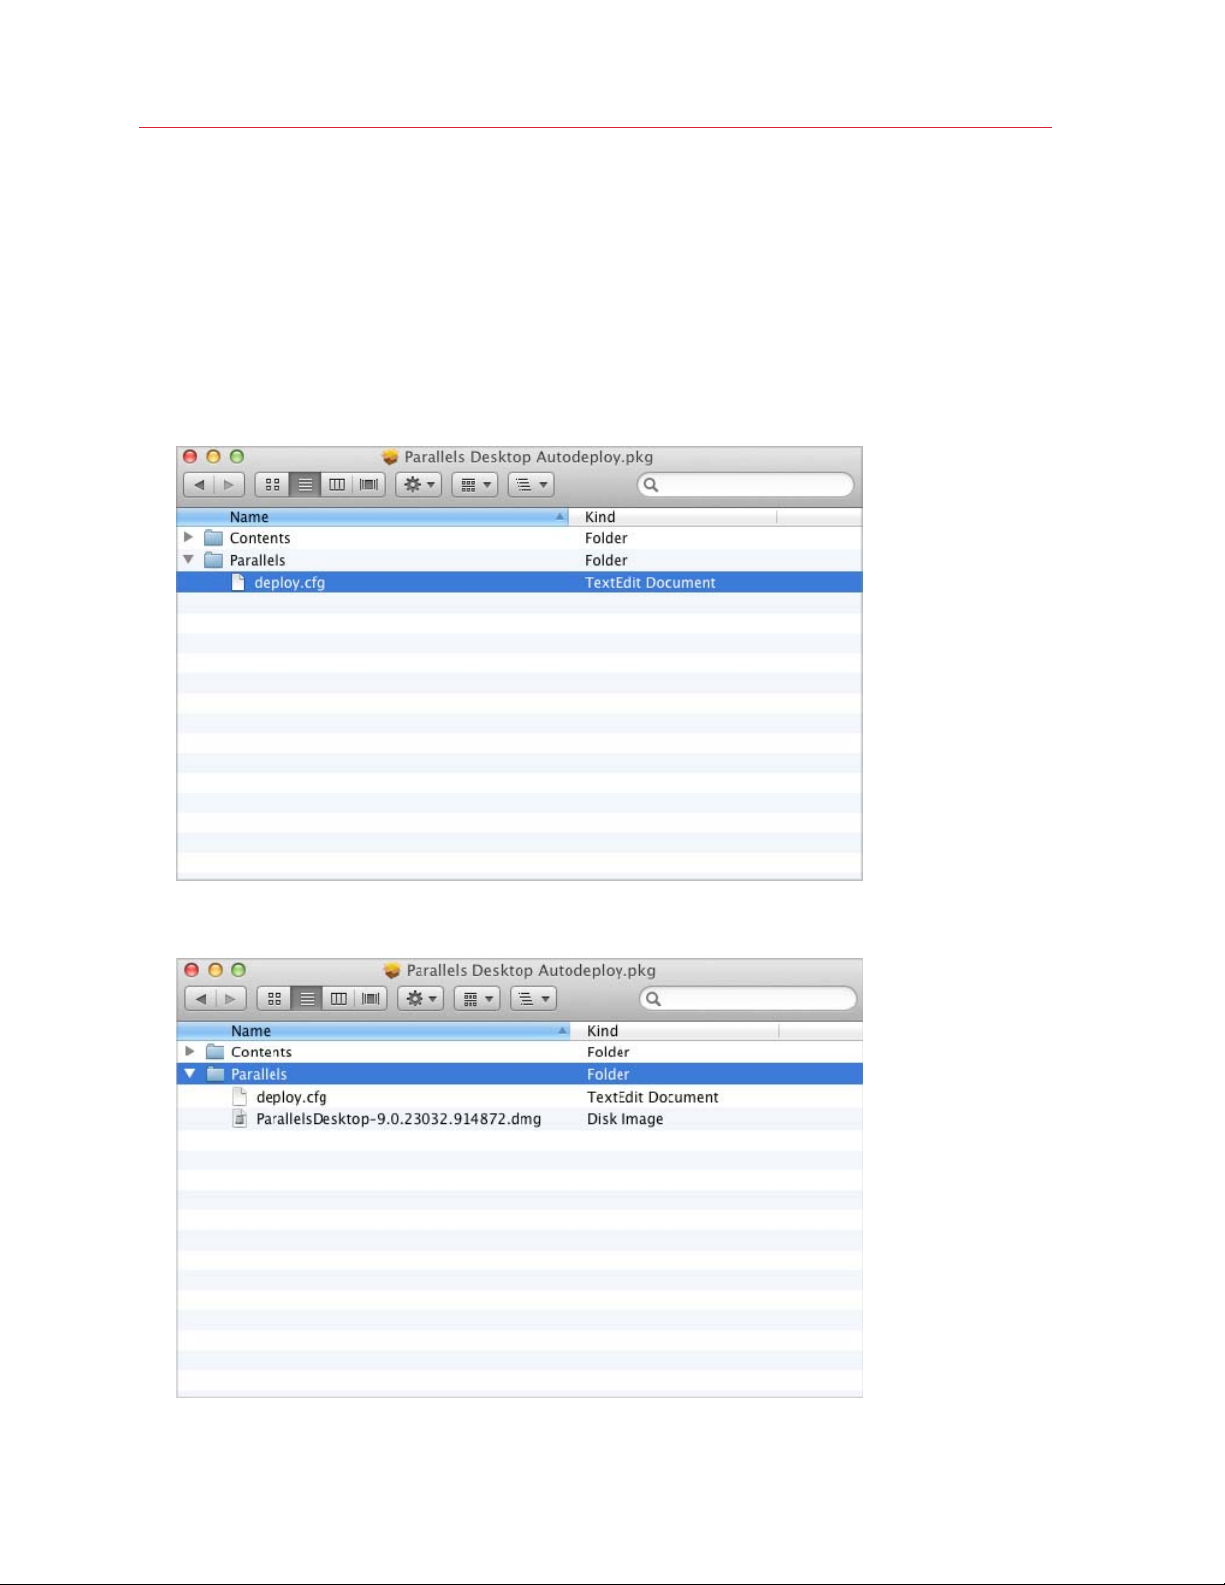
Adding Parallels Desktop Installation Image
To add the Parallels Desktop installation image file to the deployment package:
1 Make sure you have the Parallels Desktop Autodeploy.pkg file on your Mac.
2 Right-click the file and then click Show Package Contents.
3 Expand the Parallels folder to see its contents. The folder should contain the deploy.cfg
file. This is the deployment configuration file, which you will modify later.
4 Copy the Parallels Desktop installation image file to the Parallels folder. Your package
contents should now look like this:
8
Page 9
Mass Deployment of Parallels Desktop Enterprise Edition
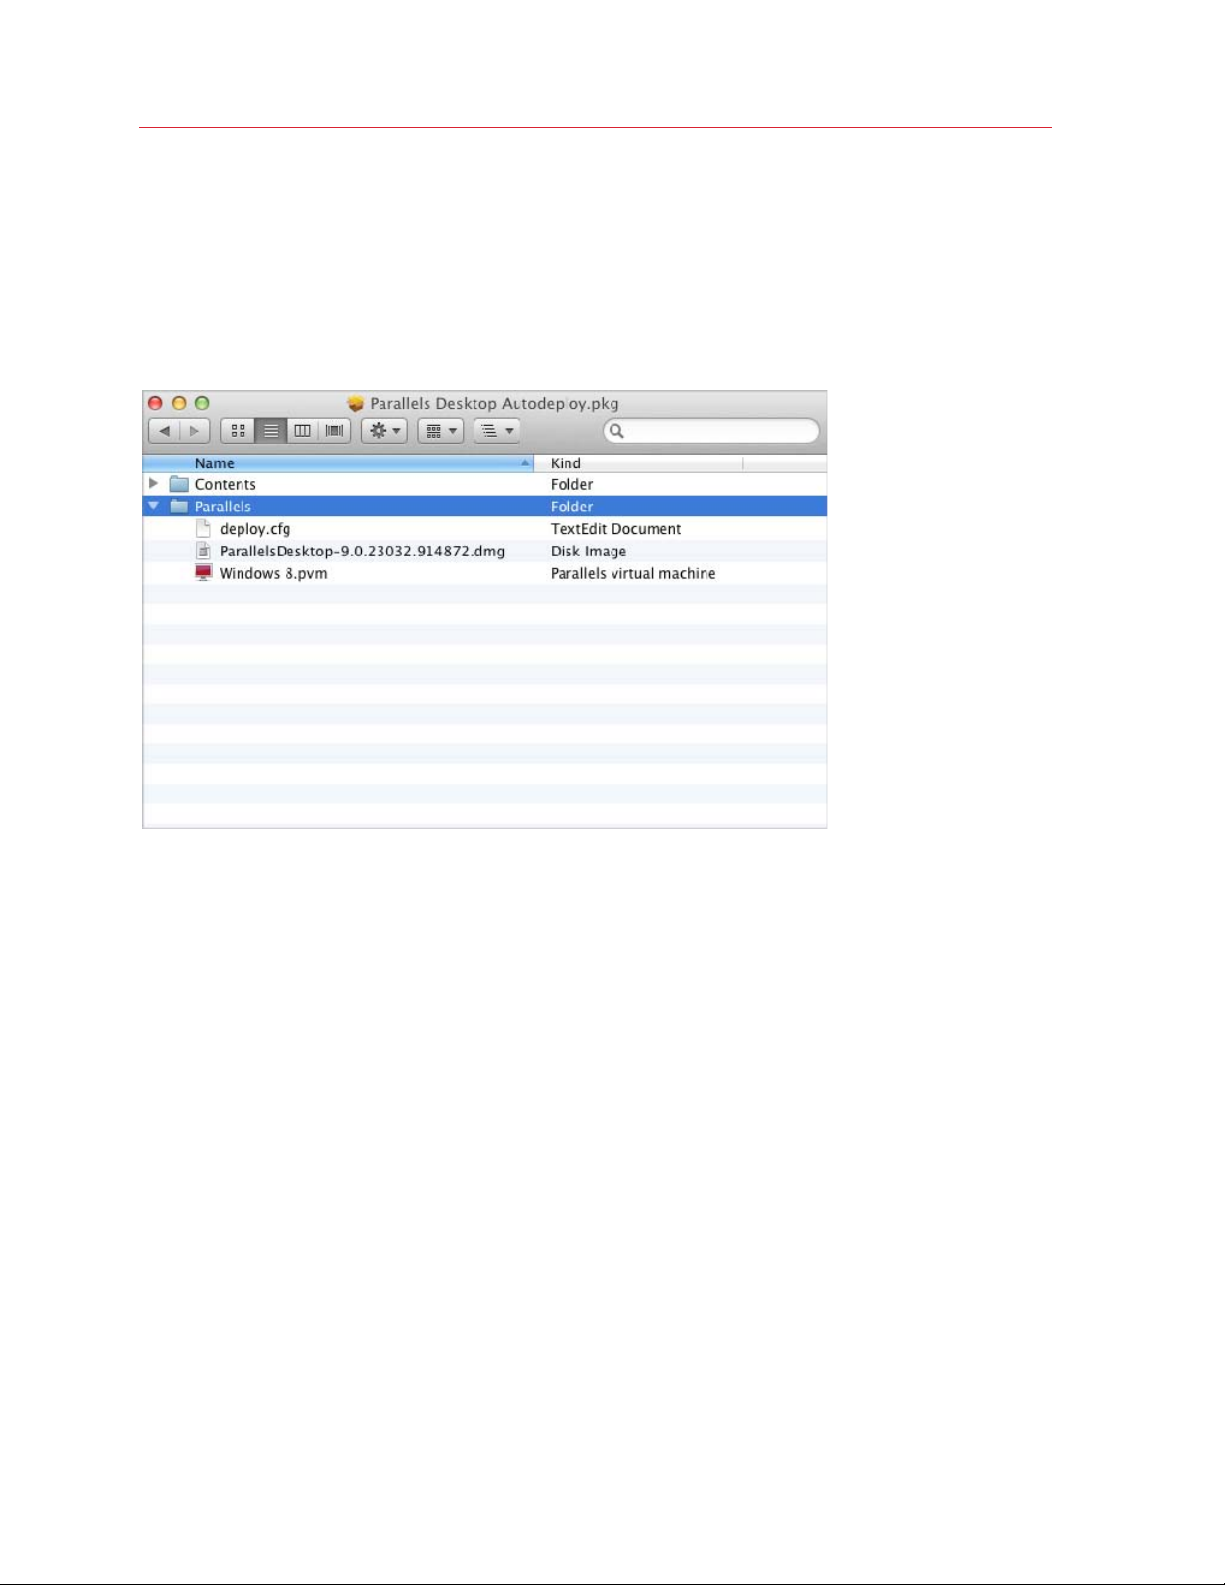
Adding Virtual Machines
To add a virtual machine to the deployment package, simply copy its file to the Parallels folder
(the same folder in the package that contains the deploy.cfg file and the Parallels Desktop
installation image). You can include more than one virtual machine. Once the virtual machine is
added, your package contents should look similar to the following:
Before copying a virtual machine to the deployment package, you should configure it according to
your needs. Read the following subsections for the information about the modifications that you
can make to the virtual machine configuration prior to deploying it.
Installing Parallels Tools
Parallels Tools is a collection of utilities and drivers that vastly improve the virtual machine
performance and enable some features that are not available otherwise. Parallels Tools are included
with every copy of Parallels Desktop and are highly recommended to be installed in every virtual
machine right after an operating system is installed in it. Your source virtual machine should have
Parallels Tools installed.
9
Page 10
Mass Deployment of Parallels Desktop Enterprise Edition
Generating Windows SID and Computer Name
When you deploy a virtual machine that runs Windows as a guest operating system, the deployed
copies of Windows will have the same Windows Security ID (SID) and computer name as the
source. You can set up Windows in the source virtual machine in such a way that the SID and
computer name will be automatically re-generated in every deployed copy of Windows on its initial
startup.
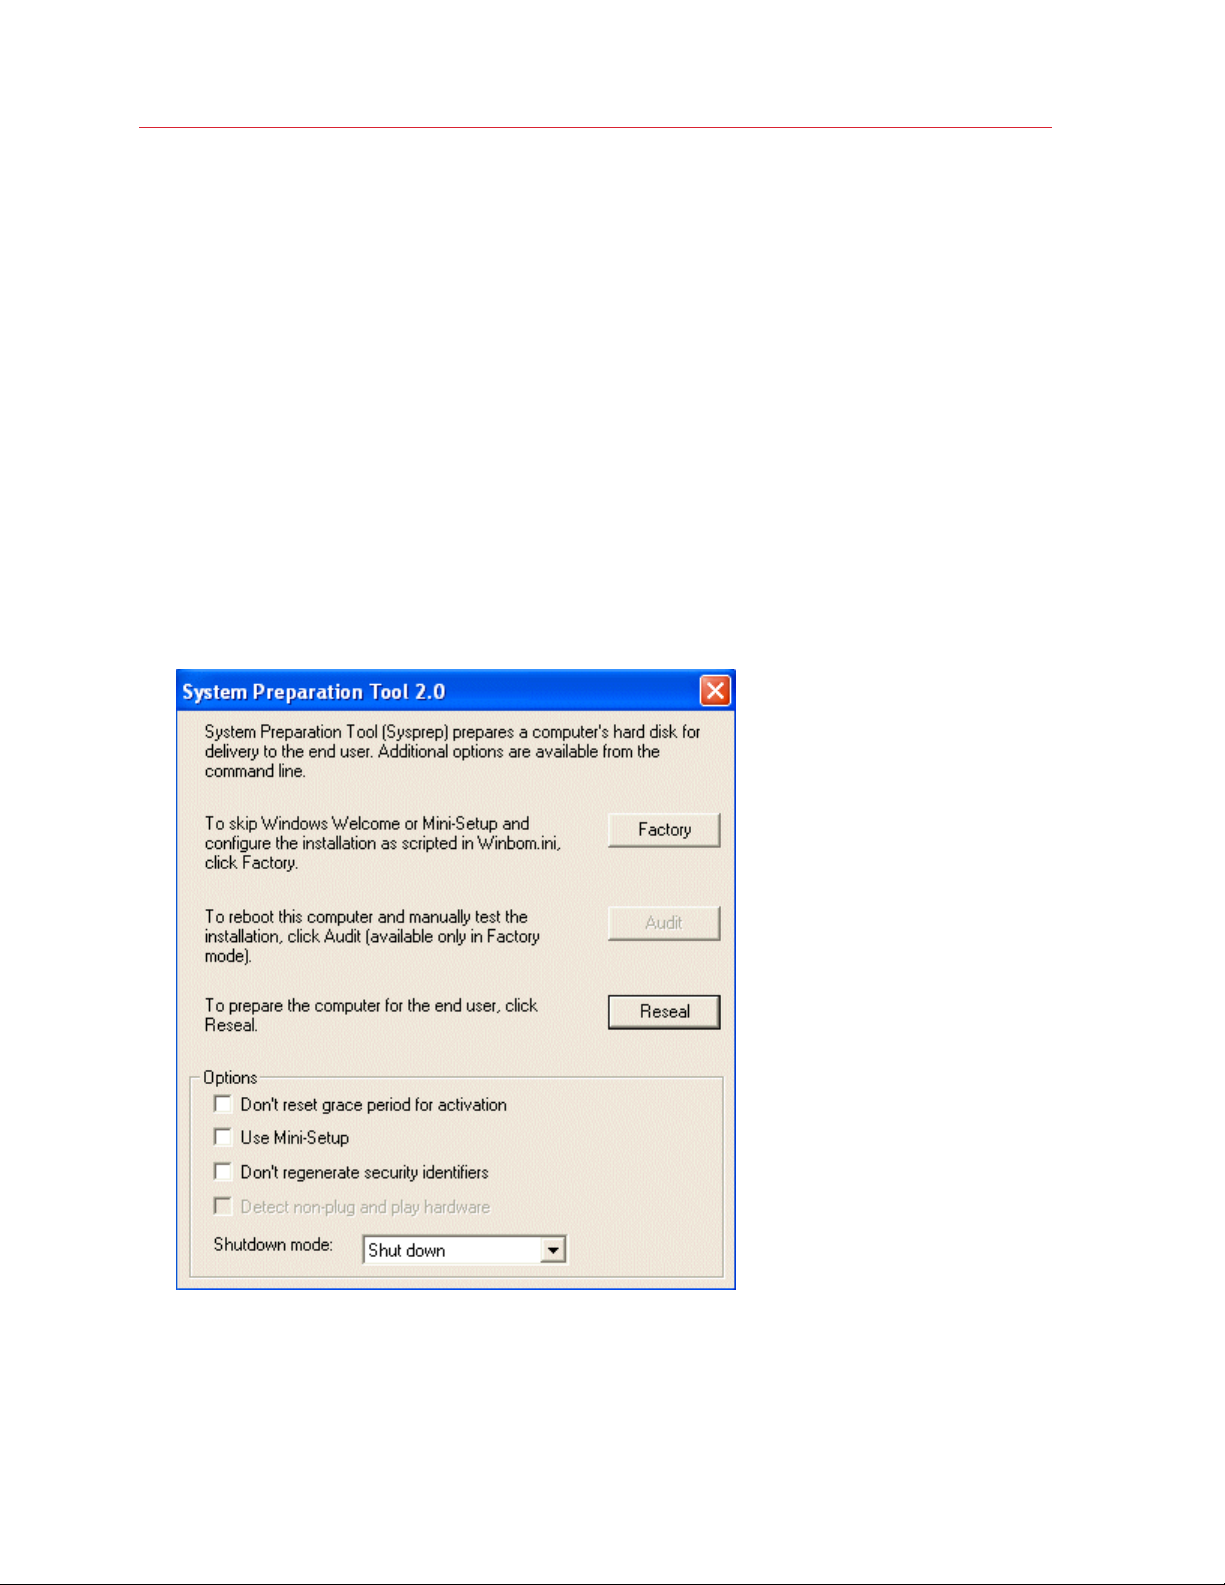
Using Sysprep to Generate SID
Microsoft System Preparation Tool (Sysprep) is a tool provided by Microsoft that can be used to
generate a new Windows Security ID. Download the latest version of Sysprep for your version of
Windows from the Microsoft Web site and install it according to Microsoft instructions.
Run Sysprep and do the following:
1 In the System Preparation Tool windows, make sure that the Don't regenerate security
identifiers check box is cleared.
10
Page 11

Mass Deployment of Parallels Desktop Enterprise Edition
2 Click the Reseal button and then click OK in the displayed window.
Note: Once these modifications are done, stop your virtual machine. Do not restart it, because restarting
Windows in this state will re-generate the SID and will disable Sysprep.
Generating Computer Name
You can use one of the following tools to generate a new Windows computer name:
• SetupMgr.exe (Windows XP) or Windows System Image Manager (Windows Vista, Windows 7)
are Microsoft utilities that can generate an XML-based answer file for Sysprep, which it will
process on initial Windows startup. If using the SetupMgr.exe tool to create an answer file for
sysprep, select the Automatically generate computer name radio button in the left pane of
the Setup Manager window.
If generating an answer file using Windows System Image Manager (SIM), add the Microsoft-
Windows-Shell-Setup component to the Pass 4 Specialize section of the answer file, then
add a computername and then validate your answer file.
• You can also modify the sysprep.inf file by opening it in a text editor and adding the
following entry:
[UserData] ComputerName=*
11
Page 12

Mass Deployment of Parallels Desktop Enterprise Edition
Other Configuration Options
When preparing a source virtual machine for mass deployment, you may change any of its
configuration settings according to your needs. The following list describes a few common options:
• Shared Folders and Profiles. Parallels Desktop offers great flexibility in bridging the
capabilities of the Mac OS X and your guest operating system by configuring shared folders and
profiles. Think over which files and folders you wish to share between the two operating
systems and set up them in advance.
• Configuring USB Settings. Hardware devices that connect through USB ports including
printers and removable drives can only be used by one operating system at a time. By default,
Parallels Desktop will ask the user which OS to connect the device to when a new device is
detected. This default can be changed by making all USB devices connect only to the Mac OS
X or to the guest operating system.
• Installing Applications. You can install all the necessary applications in the virtual machine
before deploying it.
• Parallels Desktop Enterprise Edition Options. Parallels Desktop Enterprise Edition provides
some additional configuration options. With the Enterprise Edition you can:
• Set up a local update server and specify the Parallels Desktop automatic update options.
• Customize the "Request Support" option.
• Configure participation in the Customer Experience program.
• Password-protect a virtual machine configuration.
• Enable nested KVM and XEN support in a virtual machine.
For the information on how to configure these options, see Changing Deployment
Configuration Options (p. 14) and Advanced Features of Parallels Desktop Enterprise
Edition (p. 28).
For the co
mplete information about Parallels virtual machine configuration, please refer to the
Parallels Desktop User's Guide.
12
Page 13

Mass Deployment of Parallels Desktop Enterprise Edition
Supplying Parallels Desktop License Key
Parallels Desktop Enterprise Edition license key is required to activate Parallels Desktop on target
Macs. The key must be embedded in the deployment package.
To embed the license key in the deployment package:
1 Right-click the Parallels Desktop Autodeploy.pkg file and then click Show Package
Contents.
2 Expand the Parallels folder to see its contents. The deploy.cfg file contained in the
folder is a deployment configuration file. One of the parameters is used to specify the Parallels
Desktop license key.
3 Open the deploy.cfg file in a text editor.
4 Find the License section in the file and enter your Parallels Desktop Enterprise Edition license
key as a value of the license_key variable. The license must be supplied in the following
format: "XXXXXX-XXXXXX-XXXXXX-XXXXXX-XXXXXX" (including the quotes and dashes).
5 Save the deploy.cfg file.
To learn about other configuration parameters in the deploy.cfg file, please read the
Changing Deployment Configuration Options section (p. 14).
Note: Parallels Desktop activation requires Internet access. The Parallels Desktop activation routine uses
port 443 to communicate with Parallels licensing server. Please make sure that the Macs on which you
plan to deploy Parallels Desktop can communicate through this port.
13
Page 14

Mass Deployment of Parallels Desktop Enterprise Edition
Changing Deployment Configuration Options
The deployment package contains a special script, which is automatically executed on a target
Mac after the package is transferred and the Parallels Desktop software is installed on it. The script
performs the necessary actions on the Mac to finalize the deployment. The script reads the
configuration parameter values from the deploy.cfg file contained in the Parallels folder of the
Parallels Desktop Autodeploy.pkg file. You can modify the configuration parameters as
needed for your environment.
The following tables describe the configuration parameters in the deploy.cfg file.
The License section is used to specify a Parallels Desktop Enterprise Edition license key:
Variable Description
license_key
Specifies the Parallels Desktop license key. See Supplying Parallels
Desktop License Key (p. 13) for more info.
The Virtual Machines section allows to modify the virtual machine deployment options:
Variable Description
Specifies the registration mode for the deployed virtual machines.
Possible values:
"Private" — The virtual machines will be registered for the active
user only. The virtual machines will be placed into the
vm_register_mode
vm_reset_hwid
/Users/<user>/Documents/Parallels folder.
"Shared" — The virtual machines will be registered for all users of a
Mac. The virtual machines will be placed into the
/Users/Shared/Parallels folder.
The default destination folder for virtual machines can be modified
using the vm_destination_folder variable (see below).
Specifies whether the virtual machine SMBOIS ID (hardware ID) will be
regenerated. Each Parallels virtual machine is assigned a universally
unique SMBIOS ID when it is created. When you deploy a virtual
machine to many Macs, each resulting copy of the machine will have
the same SMBIOS ID. This is the default behavior and should not be
normally changed. If your enterprise management system relies on
unique SMBOIS IDs, you can change the value of the
vm_reset_hwid variable as follows:
vm_deploy_mode
14
"no" — Keep the original SMBIOS ID.
"yes" — Regenerate the ID.
Specifies whether the virtual machines will be copied or moved from
the deployment package to their target folders on a Mac.
Possible values:
"Copy" — Copy the virtual machine from the package to the
destination folder.
"Move" — Move the virtual machine from the package to the
Page 15

vm_destination_folder
<VM_file_name>
Mass Deployment of Parallels Desktop Enterprise Edition
destination folder.
Before a virtual machine can be registered in Parallels Desktop, it
needs to be copied (or moved) from the deployment package to a
folder on the Mac. You can specify whether to use a Copy or a Move
operation.
Copying is slower but must be used if the deployment package is readonly or is placed on a network share. The virtual machine file will not be
removed from the package after it's been copied to a Mac.
Moving is fast and can be used when the deployment package is
copied directly to a Mac. If the virtual machine destination folder and
the deployment package are placed on the same mount point, the
move operation completes almost instantly. The virtual machine is
removed from the package as a result. Note that moving will be as slow
as copying if the virtual machine destination folder and the deployment
package are placed on different mount points.
Allows to change the default destination folder for virtual machines. The
default folder is determined by the value of the vm_register_mode
variable (see above). The vm_destination_folder variable allows
to change the default folder while keeping the selected virtual machine
registration mode.
This variable takes a name of a virtual machine file and allows you to
change the destination location and/or name of the target virtual
machine.
The virtual machines contained in the Parallels folder of the deployment
package will be copied to a default location on a Mac, which is
determined by the vm_register_mode variable (or the
vm_destination_folder variable if is present). If you have
more than one virtual machine in this folder, you can specify a different
destination location and/or name for a specific virtual machine if
needed.
To specify a different location, you need to define a variable/value pair
as shown in the examples below. The variable name should be the
same as the virtual machine file name (including the ".pvm" extension).
The variable value should contain an absolute path where you want the
virtual machine to be copied on a Mac. You can specify a different
destination location, a different virtual machine name, or both. Note that
only the specified virtual machine will be copied to the specified
location. All other virtual machines will be copied to the default location.
Examples:
"Shared_VM.pvm"="/Users/Shared/Shared
VM.pvm"
"Private_VM.pvm"="~/Documents/Parallels/P
rivate VM.pvm"
The Software Updates section allows to configure the Parallels Desktop automatic updates:
Variable Description
updates_url
Specifies where the updates will be downloaded from.
Possible values:
15
Page 16

Mass Deployment of Parallels Desktop Enterprise Edition
"Parallels" — Download the updates from the Parallels Web site
over the Internet.
"None" — Turn off automatic updates.
<URL> — Download the updates from a local update server. The
variable should contain a complete URL (in quotes) of the
parallels_updates.xml file on your local Web server. For more
information, please see Setting Up Local Update Server (p. 29).
Specifies how often Parallels Desktop should check for updates.
Possible values:
"0" — never
updates_auto_check
"1" — once a day
"2" — once a week
"3" — once a month
Specifies the automatic update download options:
"on" — Download the updates automatically. This value should be
specified when using a local update server.
updates_auto_download
"off" — Notify the user about the updates but don't download them
automatically. This option is useful only when updates are downloaded
from the Parallels Web site and the user has full control over the update
functionality.
The Help and Support section allows to configure the "Request Support" option in the Parallels
Desktop graphical user interface.
Variable Description
Specifies a URL of a page that will be displayed when user selects the
Help > Request Support menu option in the Parallels Desktop
support_url
graphical user interface. To display the default message, specify an
empty string (this is the default behavior). To display your own Web
page (help desk, wiki, etc.), specify its URL. See also Customizing
Request Support Option (p. 36).
The Problem Reporting section allows to specify whether Parallels Desktop problem reports
should contain screenshots of the Mac OS X and the virtual machine desktops. You may wish not
to include the screenshots in the problem reports for security reasons.
Variable Description
Possible values:
report_allow_screenshots
"yes" — Include screenshots of the Mac OS X and the virtual
machine desktops in Parallels Desktop problem reports.
"no" — Do not include the screenshots.
16
Page 17

Mass Deployment of Parallels Desktop Enterprise Edition
Deploying Parallels Desktop and Virtual Machines on Macs
Once the deployment package contains all the necessary software and data, you can deploy it to
Macs using one of the available remote Mac management tools (p. 6). This section provides
instructio
• Parallels Management Suite for Microsoft SCCM 2007 (p. 18)
ns on how to deploy Parallels Desktop using the following tools:
• Parallels Management
• Apple Re
For instructi
respective documentation.
If you are using NetBoot to deploy a Mac OS X image with Parallels Desktop pre-installed, you can
skip to Deploying Mac OS X Image Using NetBoot (p. 27).
mote Desktop (p. 22)
ons on how to deploy software using other remote management tools, please see their
Suite for Microsoft SCCM 2012 (p. 20)
17
Page 18

Mass Deployment of Parallels Desktop Enterprise Edition
Deploying with Parallels Management Suite for SCCM 2007
Parallels Management Suite for Microsoft SCCM 2007 provides facilities to deploy Parallels
Desktop on Mac computers from the Configuration Manager console. The deployment is done
through the SCCM Software Distribution feature. To use the functionality described in this topic,
you need Microsoft System Center Configuration Manager 2007 fully deployed and operational and
Parallels Management Suite for Microsoft SCCM 2007 installed and running. For the complete
information about Parallels Management Suite, please read the administrator's guide that came
with it.
The basic steps of deploying Parallels Desktop are:
1 Prepare the Parallels Desktop deployment package (we've described how to do it earlier in this
guide) and copy it to the Windows server running the Configuration Manager console.
2 Create a software distribution package using the Configuration Manager console.
3 Add a program to the package.
4 Copy the package to a distribution point and create an advertisement.
The following describes each step in detail.
Creating a Software Distribution Package
The Parallels Desktop deployment package is distributed to Macs using the standard Configuration
Manager functionality:
1 In the Configuration Manager console, navigate to System Center Configuration Manager /
Site Database / Computer Management / Software Distribution.
2 Right-click Packages, select New, and then click Package.
3 Use the New Package Wizard to create a software distribution package.
4 On the Data Source page of the wizard, specify the location of the Parallels Desktop
Autodeploy.pkg folder in the Source Directory field. Select the This package contains
source files option.
5 Complete the New Package Wizard.
Creating a Program for the Package
1 In the Configuration Manager console, navigate to System Center Configuration Manager /
Site Database / Computer Management / Software Distribution / Package / <package
name>.
2 Right-click Programs, select New, and then click Program.
3 Use the New Program Wizard to create a program for the package.
4 On the General page of the wizard, type the following in the Command line field:
18
Page 19

Mass Deployment of Parallels Desktop Enterprise Edition
chmod 700 "Parallels Desktop
Autodeploy.pkg/Contents/Resources/postflight" && installer -pkg
"Parallels Desktop Autodeploy.pkg" -target /
5 Complete the wizard.
Sending the Package to a Distribution Point
To send a copy of the package to a distribution point from which client Macs will download it:
1 Expand the package, right-click Distribution Points, and then click New Distribution Points.
2 Use the New Distribution Points Wizard to select a distribution point to which you want to
send the package.
Creating an Advertisement
1 In the Configuration Manager console, navigate to System Center Configuration Manager /
Site Database / Computer Management / Software Distribution.
2 Right-click Advertisements, point to New, and then click Advertisement.
3 Use the New Advertisement Wizard to create an advertisement as usual.
The package will be advertised to Macs in the specified collection and will be distributed to them
according to the specified schedule.
19
Page 20

Mass Deployment of Parallels Desktop Enterprise Edition
Deploying with Parallels Management Suite for SCCM 2012
Parallels Management Suite for Microsoft SCCM 2012 provides facilities to deploy Parallels
Desktop on Mac computers from the Configuration Manager console. The deployment is done
through the SCCM Software Distribution feature. To use the functionality described in this topic,
you need Microsoft System Center Configuration Manager 2012 fully deployed and operational and
Parallels Management Suite for Microsoft SCCM 2012 installed and running. For the complete
information about Parallels Management Suite, please read the administrator's guide that came
with it.
The basic steps involved in deploying Parallels Desktop are.
1 Prepare the Parallels Desktop deployment package. We've described this step earlier in this
guide.
2 Create a software distribution package using the Configuration Manager console.
3 Send the package to a distribution point.
4 Deploy the package.
Creating a Software Distribution Package
The Parallels Desktop deployment package is distributed to Macs using the standard Configuration
Manager functionality:
1 In the Configuration Manager console, navigate to Administration / Overview / Application
Management / Packages.
2 On the toolbar, click Create Package.
3 Use the Create Package and Program Wizard to create a software distribution package and
a program.
4 On the Package page, specify the package name, description, and other information. Select
the This package contains source files option and then click the Browse button. Browse for
and select the Parallels Desktop Autodeploy.pkg folder. When done, click Next.
5 On the Program Type page, select the Standard program item and click Next.
6 On the Standard Program page, specify the information about the program. Type the following
in the Command line field:
chmod 700 "Parallels Desktop
Autodeploy.pkg/Contents/Resources/postflight" && installer -pkg
"Parallels Desktop Autodeploy.pkg" -target /
7 When done specifying the program information, click Next.
8 Click Next on the Requirements page.
9 Review the summary and click Next to create the package.
20
Page 21

Mass Deployment of Parallels Desktop Enterprise Edition
Sending the Package to a Distribution Point
To send a copy of the package to a distribution point, right-click the package of interest and click
Distribute Content in the pop-up menu. Use the Distribute Content Wizard to specify a
distribution point to which you want to send the package.
Please make sure that the distribution point is properly configured as described in the Configuring
a Distribution Point section.
Deploying Parallels Desktop
To deploy Parallels Desktop:
1 In the Configuration Manager console, right-click the package and then click Deploy in the
pop-up menu. The Deploy Software Wizard opens.
2 On the General page, click the Browse button next to the Collection field and select the
collection containing your Macs (e.g. All Mac OS X Systems). Click OK and then click Next.
3 On the Content page, verify the distribution point info and click Next.
4 Click Next on the Deployment Settings page.
5 On the Scheduling page, specify the schedule for this deployment. Click New to specify the
assignment schedule. When done, click Next.
6 Use the default values on the rest of the wizard pages and complete the wizard.
The package will be advertised to Macs in the specified collection and will be distributed to them
according to the specified schedule.
21
Page 22

Mass Deployment of Parallels Desktop Enterprise Edition
Deploying with Apple Remote Desktop
To use Apple Remote Desktop, you need Apple Remote Desktop Admin, which should run on your
administrator Mac, and Apple Remote Desktop client, which should run on client Macs.
Apple Remote Desktop Admin doesn't come standard with Mac OS X. You will have to obtain the
software from Apple and install it on a Mac from which you are deploying Parallels Desktop. Apple
Remote Desktop client is installed during the standard Mac OS X installation.
Note: Before continuing, please verify that the versions of Apple Remote Desktop Admin and each
instance of Apple Remote Desktop client match. If they don't, update the necessary software.
Configuring Remote Management Services on Target Macs
For a remote management tool (ARD in our case) to be able to distribute the software, the Remote
Management Services have to be configured in Mac OS X on each individual Mac. In order to do
so, you need to log in to each Mac and perform the following steps:
1 In Mac OS X, open System Preferences.
2 Click Sharing.
3 In the Service list, select Remote Management.
4 Click Options.
5 Select the following options: Observe, Control, Open and quit applications, Change
settings, Delete and replace items, Copy items (see the picture below).
22
Page 23

Mass Deployment of Parallels Desktop Enterprise Edition
6 Click OK.
7 Close System Preferences.
Deploying the Package
To deploy the package to Macs:
1 On the administrator Mac, open the Finder and click Applications > Remote Desktop to
display the main window of Apple Remote Desktop.
Note: If you have set up a Task Server, you can deploy the package from that server.
2 Click All Computers in the left section of the ARD main window. The Mac computers
connected to your network are displayed in the right pane of the window.
23
Page 24

Mass Deployment of Parallels Desktop Enterprise Edition
3 Select the desired destination Macs and click Install in the ARD toolbar (or select Manage >
Install Packages menu). The Install Packages window opens.
4 Add the Parallels Desktop Autodeploy.pkg file to the Packages list either by
dragging it there with the mouse or by locating the package using the '+' button
24
Page 25

Mass Deployment of Parallels Desktop Enterprise Edition
5 Click Install to distribute the deployment package to selected Macs. The installation progress is
displayed in the main window. The result of the package distribution to each individual Mac is
displayed in the Status column.
When the package is distributed to a Mac, it runs on it and installs Parallels Desktop and the virtual
machine(s). It then activates Parallels Desktop using the supplied license key.
Using Apple Remote Desktop Templates
Apple Remote Desktop allows to save package installation settings as templates. This feature may
be useful if you need to deploy Parallels Desktop more than once using different settings. For
example, you may have a virtual machine specifically configured for your developers and another
one configured for your graphics designers or quality assurance engineers. Instead of modifying the
deployment package every time you need to deploy Parallels Desktop to a specific group of Mac
users, you can create separate packages and save them as templates.
To create an ARD template:
1 On the administrator Mac, open Apple Remote Desktop.
2 Click All Computers in the left pane of the ARD main window.
3 Select the computers where the deployment package is to be installed and click Install in the
ARD toolbar.
4 In the Install Packages window, add the desired Parallels Desktop deployment package either
by dragging it to the top area of the displayed window or locating it by using the '+' button.
5 Save current installation setup as a template by selecting Save as Template from the
Template pop-up menu located in the upper right-hand corner of the Install Packages
window.
25
Page 26

Mass Deployment of Parallels Desktop Enterprise Edition
6 In the displayed window, specify the name that you would like to use for the template and click
OK.
The next time when you are ready to deploy Parallels Desktop to a specific group of Mac users,
simply select the desired template from the same Template pop-up menu in the Install Packages
window and then click Install.
26
Page 27

Mass Deployment of Parallels Desktop Enterprise Edition
Deploying Mac OS X Image Using NetBoot
If you are using NetBoot to deploy a Mac OS X image with Parallels Desktop Enterprise Edition preinstalled, some additional steps need to be taken to properly activate a copy of Parallels Desktop
on individual Macs.
The following describes the process of installing Parallels Desktop in Mac OS X and creating an
image from it suitable for NetBoot deployment:
1 Install Mac OS X on a Mac.
2 Install Parallels Desktop Enterprise Edition (build 8.0.18354 or higher).
3 Make sure your Mac can connect to the Internet.
4 Activate Parallels Desktop using your Enterprise Edition license key.
5 Tune Parallels Desktop settings and install and configure virtual machines according to your
needs.
6 In Mac OS X, open Terminal and deactivate the Parallels Desktop license by typing the following
command:
prlsrvctl deactivate-license
On successful license deactivation, you should see the following output:
The License has been successfully deactivated
7 Quit Parallels Desktop.
8 In Terminal, type the following command to prepare Parallels Desktop to activate a license in
deferred mode:
prlsrvctl install-license --key <key> --deferred
where <key> is the Parallels Desktop Enterprise Edition license key.
On success, you should see the following output:
The License has been successfully prepared for deferred activation.
This means that the next time Parallels Desktop starts, it will try to activate the license
automatically. The Internet connection is required for activation. If a Mac can't connect to the
Internet, the Parallels Desktop license activation will be postponed until the Internet connection
is available.
9 You can now create a Mac OS X image from this system and deploy it to other Macs in your
enterprise using NetBoot.
27
Page 28

C HAPTER 3
Advanced Features of Parallels Desktop Enterprise Edition
This chapter explains how to set up and use the advanced features of Parallels Desktop for Mac
Enterprise Edition.
In This Chapter
Parallels Desktop License Renewal........................................................................... 28
Setting Up Local Update Server ............................................................................... 29
Participating in Customer Experience Program ......................................................... 35
Customizing Request Support Option ...................................................................... 36
Protecting Virtual Machine Configuration .................................................................. 37
Resetting Guest OS User Password ......................................................................... 39
Enabling Nested Virtualization................................................................................... 40
Locking Virtual Machine on Suspend........................................................................ 41
Encrypted Virtual Machines — Command Line Options............................................ 42
Parallels Desktop License Renewal
A Parallels Desktop Enterprise Edition license is renewed automatically via the Internet. When
Parallels Desktop is running on a Mac, it sends a license renewal request to the Parallels Key
Administrator server at random intervals. Once a license update is available, it is automatically
downloaded and installed.
Parallels Desktop uses port 443 (the standard SSL port) to communicate with the Parallels Key
Administrator server from which it obtains license updates. If you are not using the most recent
version of Parallels Desktop, please read the Note section below for additional information.
Note
Port 443 is used for license renewal by Parallels Desktop 8 build 8.0.18345.820589 and newer.
Older versions of Parallels Desktop use a non-standard port 5224.
For more information about the Parallels Desktop Enterprise Edition licensing, please contact your
Parallels sales representative
Page 29

Advanced Features of Parallels Desktop Enterprise Edition
Setting Up Local Update Server
With the Enterprise Edition of Parallels Desktop you can set up a local update server on your
network from which Mac users can get Parallels Desktop updates. Updates are released
periodically to improve the performance and reliability of Parallels Desktop. To reduce Internet traffic
when downloading updates, you can set up a local update server, download the available updates
to it, and then set up individual Macs on your network to take the updates from it instead of the
Internet. Read on to learn about setting a local update server.
Installing Web Server
To set up a Parallels Desktop update server, you'll need a local Web server. Install a Web server on
a computer connected to your network (or use an existing one).
29
Page 30

Advanced Features of Parallels Desktop Enterprise Edition
Creating Parallels Update XML File
Create a file named parallels_updates.xml on the Web server where it can be accessed via
HTTP. The file is an XML document that should contain specifications for a particular Parallels
Desktop update available on your local updated server.
To create your own document, use the following sample XML document and the XML document
specification that follows it as a reference.
Sample parallels_updates.xml file
<?xml version="1.0" encoding="UTF-8"?>
<ParallelsUpdates schemaVersion="1.0">
<Product>
<ProductName>Parallels Desktop</ProductName>
<UpdateEnabled>1</UpdateEnabled>
<Version>
<Major>8</Major>
<Minor>0</Minor>
<SubMinor>12494</SubMinor>
<SubSubMinor>262214</SubSubMinor>
<StringRepresentation>Sumer</StringRepresentation>
<Update uuid="desktop.8.0.13291.237436.en_US.parallels.mac">
<UpdateType>0</UpdateType>
<UpdateName>Build 13291 is available!</UpdateName>
<UpdateDescription>Update description goes here</UpdateDescription>
<FilePath>URL to the update file goes here</FilePath>
<FileSize>219515</FileSize>
<Status>0</Status>
<DateTime>2012-06-17 01:23:00</DateTime>
<Chargeable>0</Chargeable>
<LocaleName>en_US</LocaleName>
<DistributorName>parallels</DistributorName>
<OsType>mac</OsType>
<Ancestry>
<Ancestor>desktop.8.0.12927.482436.en_US.parallels.mac</Ancestor>
<Ancestor>desktop.8.0.12473.274921.en_US.parallels.mac</Ancestor>
<Ancestor>desktop.8.0.12262.823647.en_US.parallels.mac</Ancestor>
</Ancestry>
</Update>
</Version>
</Product>
</ParallelsUpdates>
XML Document Specification
Name Type Description
ParallelsUpdates
Product
ProductName
UpdateEnabled
30
string Use "Parallels Desktop".
int
Root element.
Container for Parallels Desktop information.
Specifies whether the automatic updates are enabled. To
enable updates, specify 1.
Page 31

Advanced Features of Parallels Desktop Enterprise Edition
Version
Major
Minor
SubMinor
SubSubMinor
StringRepresentation
Update
int
int Minor version number. Specify 0.
Container for Parallels Desktop version information.
Major version number.
For Parallels Desktop 7, specify 7.
For Parallels Desktop 8, specify 8.
Build number. This element may be empty.
Revision number. This element may be empty.
Product codename. This element may be empty.
Container for the information about the Parallels Desktop
update.
Attributes:
uuid — string; a globally unique ID identifying the
product.
The uuid attribute is very important and must contain the
correct information for the update to work. The attribute
value consists of the following parameters (substrings)
separated by periods (see the provided XML example):
desktop — specify "desktop".
major — major version number (8).
UpdateType
UpdateName
UpdateDescription
FilePath
FileSize
Status
DateTime
Chargeable
LocaleName
DistributorName
OsType
minor — minor version number (0).
build — build number.
revision — revision number.
locale — locale ("en_US", "de_DE", etc).
vendor — vendor ("parallels").
platform — platform ("mac").
int Update type. Specify 0.
string The name for the update, user-defined.
string The update description.
string
int The update file size, in megabytes.
int Specify 0.
string
int Specify 0.
string Locale name ("en_US", "it_IT", etc).
A URL to the update file on your local update server. The
actual update files can be obtained from Parallels.
Date and time when the updated was published. Use the
following format:
yyyy-mm-dd hh:mm:ss
The update distributor name. Specify "parallels".
Operating system type. Specify "mac".
31
Page 32

Advanced Features of Parallels Desktop Enterprise Edition
Ancestry
Ancestor
string
Container for the list of updates that directly preceded this
update.
An individual Parallels Desktop update information.
This element may appear more than once in the same
document, one for each update.
The value is combined using the following parameters
(substrings) separated by periods (see the provided XML
example):
desktop — specify "desktop".
major — Parallels Desktop major version number.
minor — minor version number.
build — build number.
revision — revision number.
locale — locale ("en_US", "ru_RU", etc.)
vendor — vendor ("parallels").
platform -— platform ("mac").
32
Page 33

Advanced Features of Parallels Desktop Enterprise Edition
Configuring Individual Macs
The next step involves configuring individual Macs to take their updates from the local update
server. This can be done automatically during the mass deployment of Parallels Desktop by
modifying the appropriate deployment configuration option. Please see the Changing Deployment
Configuration Options section (p. 14) for the complete info (see the description of the Software
Updates section of the
If you have an existing Parallels Desktop installation that was not configured for automatic updates
during deployment, then read on to learn how to do it manually.
Note: The information provided below applies only to Parallels Desktop installations that were not
configured for automatic updates during the mass deployment process.
To configure the Parallels Desktop automatic updates, you need to modify the Parallels Desktop
property list file on a Mac as follows:
1 Find the com.parallels.Parallels Desktop.plist file located in the
Library/Preferences sub-folder in the user's home folder. This is the Parallels Desktop
property list file that contains the user-specific information.
configuration file).
2 Open the file using the Property List Editor application (included with Mac OS X).
3 Set the update policy by modifying the Application
Preferences.VolumeLicenseUpdatePolicy property. If the property doesn't exist, add
it to the file specifying its data type as String. Set the property value using one of the following
options (see also the Notes subsection below):
• "Parallels" — when this value is set, the updates will be downloaded from the Parallels
update server via the Internet. The value is case-sensitive.
• Complete URL of the parallels_updates.xml file residing on your local update server.
For example, "http://10.0.0.1/pdfm/v8/en_us/parallels/parallels_updates.xml". When the
URL is specified, the updates will be obtained from the local update server.
• "None" — automatic updates are disabled. The value is case-sensitive.
4 Specify how often Parallels Desktop should check for updates. This is done by modifying the
Application Preferences.Check for updates property. If the property doesn't exist,
add it to the file specifying its data type as Number. Specify the property value using one of the
following options:
• 0 -— Never.
• 1 — Once a day.
• 2 — Once a week.
• 3 — Once a month.
33
Page 34

Advanced Features of Parallels Desktop Enterprise Edition
5 Set the automatic download option. Find the App lication preferences.Download
updates automatically property. If it doesn't exist, add it to the file specifying its data
type as Boolean. Set the property value using one of the following options:
• true — Download updates automatically. Specify this value when using a local update
server.
• false — Notify the user about the updates but don't download them automatically. This
option is useful only when updates are downloaded from the Parallels update server and the
user has full control over the update functionality.
6 Save the file and close the Property List Editor application.
Note: If Parallels Desktop is running while you are modifying the plist file, it will have to be restarted for
the changes to take effect.
Notes
On initial Parallels Desktop activation using an Enterprise Edition key, the Parallels Desktop update
properties will be absent from the com.parallels.Parallels Desktop.plist file. In such a
case, a Mac user will be able to configure Parallels Desktop automatic updates using the Parallels
Desktop graphical user interface.
When the update-related properties are added to the com.parallels.Parallels
Desktop.plist file, the automatic updates will be performed according to the specified values.
In addition, the value of the Application Preferences.VolumeLicenseUpdatePolicy
property will affect the Parallels Desktop update-related elements in the Parallels Desktop graphical
user interface as follows:
• If the property contains a URL of the local update server or "None", the Parallels Desktop
update-related controls will be disabled (grayed out) in the Parallels Desktop graphical user
interface. The displayed settings will have no effect on how the Parallels Desktop updates are
carried out. Therefore, the user will not be able to configure automatic updates or check for
updates manually.
• If the property doesn't exist, has no value, or contains "Parallels" as a value, the Parallels
Desktop update controls will be enabled in the user interface giving the user the ability to
configure automatic updates and check for updates manually.
Note: The Application Preferences.VolumeLicenseUpdatePolicy property value has no
effect when Parallels Desktop is activated using the Parallels Desktop Standard Edition license key.
34
Page 35

Advanced Features of Parallels Desktop Enterprise Edition
Participating in Customer Experience Program
The Parallels Customer Experience Program is a feedback solution that allows Parallels Desktop to
automatically collect usage statistics and system information that will help Parallels to develop new
features and updates for future releases. When you install Parallels Desktop on a Mac computer, it
is automatically set up to participate in the Customer Experience Program. If you want to turn the
participation off, you can use the prlsrvctl command line utility and execute the following
command on every Mac after installing Parallels Desktop:
prlsrvctl set --cep off
To turn the participation in the Customer Experience Program back on, execute the following
command:
prlsrvctl set --cep on
35
Page 36

Advanced Features of Parallels Desktop Enterprise Edition
Customizing Request Support Option
The Parallels Desktop graphical user interface has a menu option named Help > Request
Support. By default, this option opens a screen with the Parallels technical support information.
With the Enterprise Edition of Parallels Desktop you can customize the action performed by this
menu option.
The following choices are available:
• The menu option can display the following default text message: "Please contact your system
administrator for assistance." The message cannot be modified.
• The menu option can open a custom URL, such as a corporate Help Desk or a wiki page. The
system administrator can specify a custom URL (read below).
The customization can be done during mass deployment of Parallels Desktop by modifying the
appropriate deployment configuration parameter. Please see the Changing Deployment
Configuration Options section (p. 14) for the complete info (see the description of the Help and
Support section of the configuratio
n file).
You can also make these changes manually on an individual Mac as follows:
1 Log in to the Mac.
2 In the Finder, navigate to the /Users/<User_Name>/Library/Preferences directory
and locate the com.parallels.Parallels Desktop.plist file.
3 Open the file using the Property List Editor application, which is included with Mac OS X.
4 Find the SupportRequestUrl property in the file. If the property doesn't exist, add it to the
file specifying its data type as String.
5 To specify the action that should be performed by the Help > Request Support menu, set the
value of the SupportRequestUrl property:
• To display the default text message, clear the property value.
• To open a URL, specify the full URL to the desired Web page or a resource.
Note: The SupportRequestUrl property value has no effect when Parallels Desktop is activated using
the Parallels Desktop Standard Edition license key.
36
Page 37

Advanced Features of Parallels Desktop Enterprise Edition
Protecting Virtual Machine Configuration
Parallels Desktop Enterprise Edition provides an ability to password-protect the configuration
settings of a virtual machine. When deploying Parallels Desktop, you can set the password in the
source virtual machine before adding it to the deployment package. The deployed virtual machines
will retain the password and the Mac users will not be able to modify the configuration without
providing the correct password.
Using Parallels Desktop Graphical User Interface to Set the Password
The password is set using the Parallels Desktop graphical user interface as follows:
1 In Mac OS X, open Parallels Desktop and select the desired virtual machine (the source virtual
machine when preparing it for mass deployment).
2 On the Parallels Desktop menu bar, select Virtual Machine > Configure to open the Virtual
Machine Configuration dialog.
3 Click the Options tab.
4 Select Security in the left pane.
5 In the right pane, find the Restrict Editing option (a button). If the option is turned off, the
button caption will read "Turn On..." Click it to turn the option on.
6 On the next screen, enter the password, then enter it again to verify, and then click the OK
button. The button caption should now read "Turn Off...".
To change or remove the password:
• To change the password, click the Change Password button and then enter the old and the
new passwords.
• To remove the password, click the Turn Off... button and then enter the current password to
remove the configuration lock.
If the password is set and the user tries to view or modify the virtual machine configuration, a dialog
will be displayed asking to provide the password. Without the correct password, the user will be
denied access to the Virtual Machine Configuration dialog.
Using Command Line Tools to Set the Password
In addition to the graphical user interface, you can use the prlctl command-line utility to set,
reset, and view the password protection of a virtual machine.
To set the password, type the following command in Terminal:
prlctl set "vm_name" --password-to-edit
where vm_name is the virtual machine name in quotes.
37
Page 38

Advanced Features of Parallels Desktop Enterprise Edition
You'll be asked to enter a password and then confirm it.
Please enter a new password:
Please confirm password:
To change or remove the password, type the following command:
prlctl set "vm_name" --password-to-edit
where vm_name is the virtual machine name in quotes.
You'll be asked to enter the current password.
Please enter current password:
You will then be asked to enter and confirm a new password. To remove the password, leave the
line blank and press Enter twice (when asked to enter and confirm the password).
Please enter a new password:
Please confirm password:
To view the current protection status, type the following command:
prlctl list "vm_name" -i
The output will look similar to the following:
Encrypted: no
Edit restricted: yes
Compatibility with Other Parallels Desktop Versions
The configuration protection functionality works only in Parallels Desktop 7 or later. If you set a
password in a virtual machine and then open the virtual machine in an earlier version of Parallels
Desktop, the protection will NOT work (i.e. the user will be able to view and modify the virtual
machine configuration).
You can only set or remove the password in the Enterprise Edition of Parallels Desktop. However, if
the password is set and the virtual machine is opened in the Standard Edition of Parallels Desktop,
the password will continue to work (i.e the virtual machine configuration will remain locked).
38
Page 39

Advanced Features of Parallels Desktop Enterprise Edition
Resetting Guest OS User Password
When you deploy Parallels Desktop with a Windows (or other operating system) virtual machine,
you should supply the Windows login name and password to your users. The users may change
the password to their own later. If a user forgets the new password, it is possible to reset it without
logging in to Windows. To use this functionality, Parallels Tools must be installed in Windows in a
virtual machine. If Parallels Tools are not installed and the user forgets the password, it will be
impossible to reset it and the virtual machine will have to be reinstalled.
To begin, make sure that the virtual machine is running. If it's not running, start it and wait until you
see the Windows login prompt. To reset the password, open Terminal in Mac OS X and enter the
following command:
prlctl set vm_name --userpasswd username:new_password
where:
• vm_name — virtual machine name. To obtain the list of virtual machines installed on this Mac,
type prlctl list.
• username — guest OS (e.g. Windows) user name.
• new_password — new password.
Example:
prlctl set My_windows_8 --userpasswd JohnDoe:A12345
Once the new password is set, you can use it to log in to Windows.
39
Page 40

Advanced Features of Parallels Desktop Enterprise Edition
Enabling Nested Virtualization
Parallels Desktop Enterprise Edition supports KVM and XEN virtualization in Linux virtual machines.
If you have a virtual machine running a version of Linux that supports KVM or XEN virtualization, you
can run virtual machines inside a Parallels virtual machine.
To enable KVM and XEN support in a Parallels virtual machine:
1 In Mac OS X, open Parallels Desktop and select the desired virtual machine (e.g. the source
virtual machine when preparing it for mass deployment).
2 On the Parallels Desktop menu bar, select Virtual Machine > Configure to open the Virtual
Machine Configuration dialog.
3 Click the Hardware tab.
4 Select Boot Order in the left pane.
5 In the right pane, find the Boot flags edit box and enter the following two lines into it:
kernel.nvmx.enable=1
kernel.report_virt=0
6 Close the Virtual Machine Configuration dialog.
You can now install and use KVM or XEN in the virtual machine.
40
Page 41

Advanced Features of Parallels Desktop Enterprise Edition
Locking Virtual Machine on Suspend
To avoid possible security and privacy issues, a suspended Windows virtual machine can be
completely locked from user interaction and viewing. When this option is enabled and a virtual
machine is suspended, the Windows desktop in the virtual machine window (and in the virtual
machine list) is replaced with a black background and the Windows session is interrupted. When
the virtual machine is resumed, the Windows session is remained locked and the user will have to
enter his/her user ID and password to unlock it and to see the Windows desktop.
To enable or disable this option:
1 In Mac OS X, open Parallels Desktop and select the desired virtual machine (e.g. the source
virtual machine when preparing it for mass deployment).
2 On the Parallels Desktop menu bar, select Virtual Machine > Configure to open the Virtual
Machine Configuration dialog.
3 Click the Security tab.
4 Locate the Lock guest on Suspend option and set it according to your needs.
5 Close the Virtual Machine Configuration dialog.
Please note that the Lock guest on Suspend option is available only for virtual machine running
Windows with Parallels Tools installed. For all other virtual machines, the option will be hidden.
41
Page 42

Advanced Features of Parallels Desktop Enterprise Edition
Encrypted Virtual Machines — Command Line Options
A Parallels virtual machine can be encrypted using the Parallels Desktop graphical user interface.
You can also use the prlctl command line utility (included with Parallels Desktop) to perform the
full set of encryption operations on a virtual machine.
The following encryption command line options are available:
• Encrypt a virtual machine
prlctl encrypt <ID | NAME>
• Decrypt a virtual machine
prlctl decrypt <ID | NAME>
• Change the encryption password
prlctl change-passwd <ID | NAME>
The <ID | NAME> parameter can be either the virtual machine ID or the virtual machine name.
When encrypting a virtual machine, you'll be asked to enter a password phrase, which will be used
to encrypt the machine. When decrypting a virtual machine, you will be asked to enter the current
password. When changing the password, you'll be asked to enter the old password and then the
new password.
The encryption password will also be required to perform any other command line operation on an
encrypted virtual machine, including starting, stopping, restarting, pausing, suspending, cloning,
deleting a virtual machine, etc. For example, to start an encrypted virtual machine, you'll use the
following command:
$ prlctl start my_virtual_machine
After executing the command above, you'll be asked to enter the password:
Virtual machine "my_virtual_machine" is encrypted - password required to continue
operation
Please enter password:
After typing in the correct password, you'll see the following output:
Starting the VM...
The VM has been successfully started.
If you need to execute a command remotely without having to enter the password on every Mac,
you can send the password via standard input (stdin) as shown in the following example:
$ echo mypass | prlctl start my_virtual_machine
Virtual machine 'my_virtual_machine' is encrypted - password required to continue
operation
Please enter password:
Starting the VM...
The VM has been successfully started.
42
Page 43

Advanced Features of Parallels Desktop Enterprise Edition
If you need to provide two passwords (as with the change-passwd command that changes the
password), you can save the passwords to a text file and then use the following syntax:
$ cat /tmp/pass | prlctl change-passwd my_virtual_machine
Virtual machine 'my_virtual_machine' is encrypted - password required to continue
operation
Please enter password:
Please enter new password:
The password has been successfully changed.
The /tmp/pass file in the example above should contain the old password on the first line and the
new password on the second line:
$ cat /tmp/pass
mypass
newpass
43
Page 44

Index
Index
A
About This Guide - 4
Adding Parallels Desktop Installation Image -
7, 8
Adding Virtual Machines - 7, 9
Advanced Features of Parallels Desktop
Enterprise Edition - 12, 28
C
Changing Deployment Configuration Options
- 7, 12, 13, 14, 33, 36
Configuring Individual Macs - 33
Creating Parallels Update XML File - 30
Customizing Request Support Option - 16,
36
D
Deploying Mac OS X Image Using NetBoot -
17, 27
Deploying Parallels Desktop and Virtual
Machines on Macs - 7, 17
Deploying with Apple Remote Desktop - 17,
22
Deploying with Parallels Management Suite
for SCCM 2007 - 17, 18
Deploying with Parallels Management Suite
for SCCM 2012 - 17, 20
L
Locking Virtual Machine on Suspend - 41
M
Mass Deployment of Parallels Desktop
Enterprise Edition - 5
O
Other Configuration Options - 12
Overview of Parallels Desktop Mass
Deployment - 7
P
Parallels Desktop License Renewal - 28
Participating in Customer Experience
Program - 35
Preparing Parallels Desktop Deployment
Package - 7
Protecting Virtual Machine Configuration - 37
R
Resetting Guest OS User Password - 39
S
Setting Up Local Update Server - 15, 29
Supplying Parallels Desktop License Key - 7,
13, 14
E
Enabling Nested Virtualization - 40
Encrypted Virtual Machines — Command
Line Options - 42
G
Generating Windows SID and Computer
Name - 10
I
Installing Parallels Tools - 9
Installing Web Server - 29
W
Welcome to Parallels Desktop Enterprise
Edition - 4
What You Need - 6, 17
 Loading...