

Page 1

Parallels Desktop for Mac
Business Edition
IT Administrator's Guide
Version 11 Update 1
Copyright © 1999-2015 Parallels IP Holdings GmbH and its affiliates. All rights reserved.
Page 2

Parallels IP Holdings GmbH
Vordergasse 59
8200 Schaffhausen
Switzerland
Tel: + 41 52 632 0411
Fax: + 41 52 672 2010
www.parallels.com
Copyright © 1999-2015 Parallels IP Holdings GmbH and its affiliates. All rights reserved.
This product is protected by United States and international copyright laws. The product’s underlying technology,
patents, and trademarks are listed at http://www.parallels.com/trademarks.
Microsoft, Windows, Windows Server, Windows NT, Windows Vista, and MS-DOS are registered trademarks of Microsoft
Corporation.
Apple, Mac, the Mac logo, Mac OS, iPad, iPhone, iPod touch, FaceTime HD camera and iSight are trademarks of Apple
Inc., registered in the US and other countries.
Linux is a registered trademark of Linus Torvalds.
All other marks and names mentioned herein may be trademarks of their respective owners.
Page 3

Contents
Introduction ...............................................................................................................6
Parallels Desktop Business Edition Features Overview ......................................................6
Parallels Business Account, Subscriptions and Licenses .......................................8
Parallels Business Account Overview ................................................................................ 8
Getting Started with Parallels Business Account................................................................ 9
Using Your Parallels Business Account ...........................................................................14
Sign Into Your Account.......................................................................................................... 14
View Subscription Information ............................................................................................... 15
View Product Details ............................................................................................................. 19
Add More Licenses to a Subscription.................................................................................... 20
Create and Manage Sublicenses........................................................................................... 21
Manage Licensed Computers................................................................................................ 24
Export Computer Information to a CSV File ........................................................................... 27
Blacklist a Computer ............................................................................................................. 27
Deactivate Parallels Desktop License on a Mac..................................................................... 29
Download Parallels Desktop and Documentation .................................................................. 30
Get Support .......................................................................................................................... 30
Parallels Desktop for Mac Business Edition Features ...........................................32
Setting Asset Tag in Virtual Machine BIOS ......................................................................32
Customizing Parallels Desktop Control Center UI ............................................................ 33
Hiding Pro Edition Features in the Business Edition UI..................................................... 34
Protecting Virtual Machine Configuration .........................................................................35
Locking Virtual Machine on Suspend............................................................................... 36
Encrypted Virtual Machines ............................................................................................. 37
Running Virtual Machines in the Background ("headless" mode)...................................... 38
System Requirements ........................................................................................................... 38
Configuring Parallels Desktop to Run as a Service................................................................. 38
Configuring Virtual Machines to Run in the Background ........................................................ 40
Managing the Parallels Desktop Service ................................................................................ 42
Page 4

Contents
Configuring Expiring Virtual Machine ............................................................................... 43
Resetting Guest OS User Password................................................................................ 44
Creating Linked Clones ...................................................................................................45
NetBoot Support for OS X Virtual Machines .................................................................... 47
Setting Up Local Update Server ...................................................................................... 47
Installing Web Server............................................................................................................. 48
Creating Parallels Update XML File........................................................................................ 48
Configuring Individual Macs................................................................................................... 50
Customizing Request Support Option ............................................................................. 52
Participating in Customer Experience Program................................................................ 53
Parallels Desktop License Renewal ................................................................................. 53
Mass Deployment of Parallels Desktop and Virtual Machines ..............................55
Prerequisites ................................................................................................................... 55
Supported Deployment Tools.......................................................................................... 56
Preparing Parallels Desktop Deployment Package ..........................................................57
Adding Parallels Desktop Installation Image........................................................................... 57
Adding Virtual Machines ........................................................................................................ 58
Supplying Parallels Desktop License Key .............................................................................. 60
Changing Deployment Configuration Options........................................................................ 60
Deploying Parallels Desktop and Virtual Machines to Macs .............................................66
Deploying with Parallels Mac Management for Microsoft SCCM............................................ 66
Deploying with Apple Remote Desktop ................................................................................. 68
Deploying OS X Image Using NetBoot................................................................................... 72
Parallels Desktop Command Line Interface........................................................... 73
Parallels Desktop Management: prlsrvctl Utility................................................................ 73
General Syntax...................................................................................................................... 73
prlsrvctl info........................................................................................................................... 74
prlsrvctl install-license............................................................................................................ 74
prlsrvctl deactivate-license..................................................................................................... 75
prlsrvctl net............................................................................................................................ 75
prlsrvctl problem-report......................................................................................................... 77
prlsrvctl set............................................................................................................................ 78
prlsrvctl shutdown ................................................................................................................. 79
prlsrvctl statistics ................................................................................................................... 80
Page 5

prlsrvctl usb........................................................................................................................... 80
prlsrvctl user list..................................................................................................................... 82
Virtual Machine Management: prlctl Utility .......................................................................82
General Syntax...................................................................................................................... 82
prlctl capture ......................................................................................................................... 83
prlctl change-passwd ............................................................................................................ 83
prlctl convert.......................................................................................................................... 84
prlctl clone............................................................................................................................. 84
prlctl create ........................................................................................................................... 85
prlctl debug-dump................................................................................................................. 88
prlctl delete............................................................................................................................ 90
prlctl enter ............................................................................................................................. 90
prlctl exec.............................................................................................................................. 90
prlctl installtools ..................................................................................................................... 91
Contents
prlctl list ................................................................................................................................. 91
prlctl pause, suspend, resume............................................................................................... 92
prlctl problem-report.............................................................................................................. 93
prlctl register, unregister ........................................................................................................ 93
prlctl server............................................................................................................................ 94
prlctl set ................................................................................................................................ 94
prlctl snapshot..................................................................................................................... 107
prlctl snapshot-delete.......................................................................................................... 108
prlctl snapshot-list ............................................................................................................... 108
prlctl snapshot-switch ......................................................................................................... 108
prlctl start, stop, restart, reset, status .................................................................................. 109
Index ......................................................................................................................111
Page 6

C HAPTER 1
Introduction
Welcome to Parallels Desktop for Mac Business Edition. Built on the world’s best-selling, top-rated,
most-trusted solution for running Windows applications on the Mac, Parallels Desktop Business
Edition adds the capabilities that help IT administrators and purchasing agents save time and
money.
Note: This guide refers to version 11 Update 1 of Parallels Desktop. If you are using a newer version of
Parallels Desktop (including updates), please download the latest guide from the Parallels website.
In This Chapter
Parallels Desktop Business Edition Features Overview .............................................. 6
Parallels Desktop Business Edition Features Overview
With Parallels Desktop for Mac, your Mac users can seamlessly run both Windows and OS X
applications side-by-side with speed, control and confidence. Business users can experience as
much or as little Windows as they want. Multiple view modes make it possible for users to
customize the level of integration between Mac and Windows without compromising performance.
Best of all, IT can lock down, secure, and control the settings that matter most.
Parallels Desktop Business Edition Features Highlights
• License management portal.
• Split license keys into sublicenses.
• Maintain corporate compliance with restricted virtual machines.
• Set an expiration date for a virtual machine.
• Run virtual machines in the background (“headless” mode).
• Mass deployment of virtual machines and management through Microsoft SCCM.
• Business-level support including 24/7 phone and email support options.
Page 7

Introduction
Parallels Desktop Business Edition Feature Matrix
See how Parallels Desktop Business Edition compares to Parallels Desktop standard edition.
Feature
World’s most powerful, best-performing solution for running Windows
applications on a Mac
Merge the coolness of Mac with the utility of Windows. Seamlessly utilize
Mac features inside Windows and leverage Windows' strengths on your
Mac.
Microsoft Visual Studio Plug-in. A Microsoft Visual Studio plug-in enables
rapid debugging of apps inside your VM.
Support for popular development, design, and test tools including Docker,
Jenkins, and Chef. Leverage popular productivity tools to reduce time
spent on development and testing.
Advanced networking tools. Create virtual networks for complex network
scenarios and testing, including simulating various network scenarios.
Mass deploy and mass manage Parallels Desktop and Windows VMs for
your employees.
Licensing and Support
Premium 24/7 phone and email support
Centralized license management via Licensing Portal
Simple deployment with unified volume license key
Standard
•
•
First 30 days
Pro
•
•
•
•
•
•
Business
•
•
•
•
•
•
•
•
•
Customizable in-product “Request Support” option
Removed in-product notifications and third-party offerings
Configurable software update policy and local update server options
Security
Restrict end-users from changing virtual machine settings
Restrict end-users from creating new virtual machines
Create expiring virtual machines
Enforce USB device policies
Configurable policies via SCCM and Parallels Mac Management
•
•
•
•
•
•
•
•
•
•
7
Page 8

C HAPTER 2
Parallels Business Account, Subscriptions and Licenses
This chapter provides information about creating and using a Parallels Business Account.
In This Chapter
Parallels Business Account Overview........................................................................ 8
Getting Started with Parallels Business Account....................................................... 9
Using Your Parallels Business Account..................................................................... 14
Parallels Business Account Overview
A Parallels business account allows you to manage your Parallels Desktop Business Edition
subscriptions and licenses.
With a Parallels business account you can:
• Renew a subscription.
• Add more licenses to a subscription.
• Register you Parallels Desktop Business Edition subscription bought through a reseller.
• Manage your licenses and Macs that use these licenses:
• See the list of licensed computers in your organization.
• Deactivate a license on a computer.
• Blacklist a computer.
• Split license keys into sublicenses.
• Contact Parallels Support.
• Download Parallels Desktop Business Edition.
• Download the documentation.
The chapter provides step-by-step instructions on how to create and use a Parallels business
account.
Page 9

Parallels Business Account, Subscriptions and Licenses
Getting Started with Parallels Business Account
To begin, you need to:
1 Create a Parallels business account on the Parallels My Account website.
2 Register a subscription that you purchased from the Parallels website or through a reseller. If
you don't have a subscription yet, you can buy it online by following a link from your Parallels
business account.
3 This section describes how to accomplish these tasks.
Create a Parallels Business Account
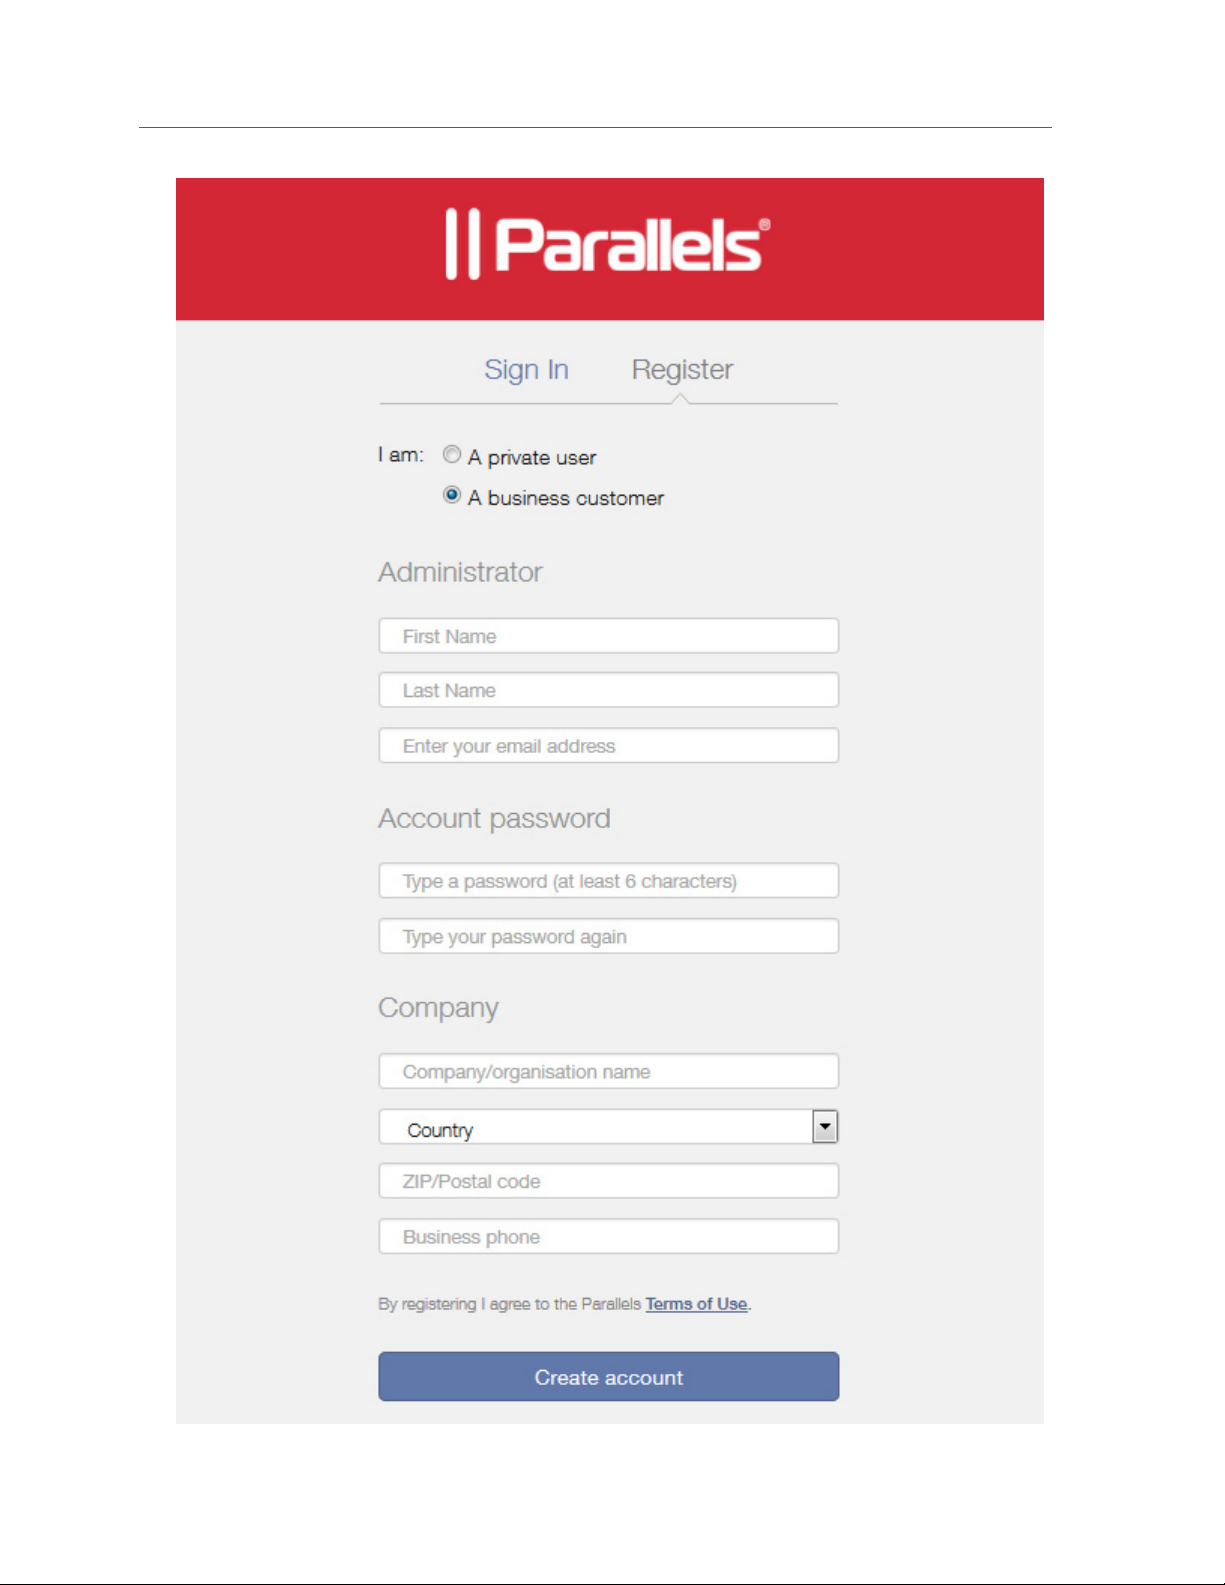
To create an account:
1 Enter the following URL into a Web browser:
https://account.parallels.com/#/register_ba
2 The URL opens the business account registration page:
9
Page 10
Parallels Business Account, Subscriptions and Licenses
10
Page 11
Parallels Business Account, Subscriptions and Licenses
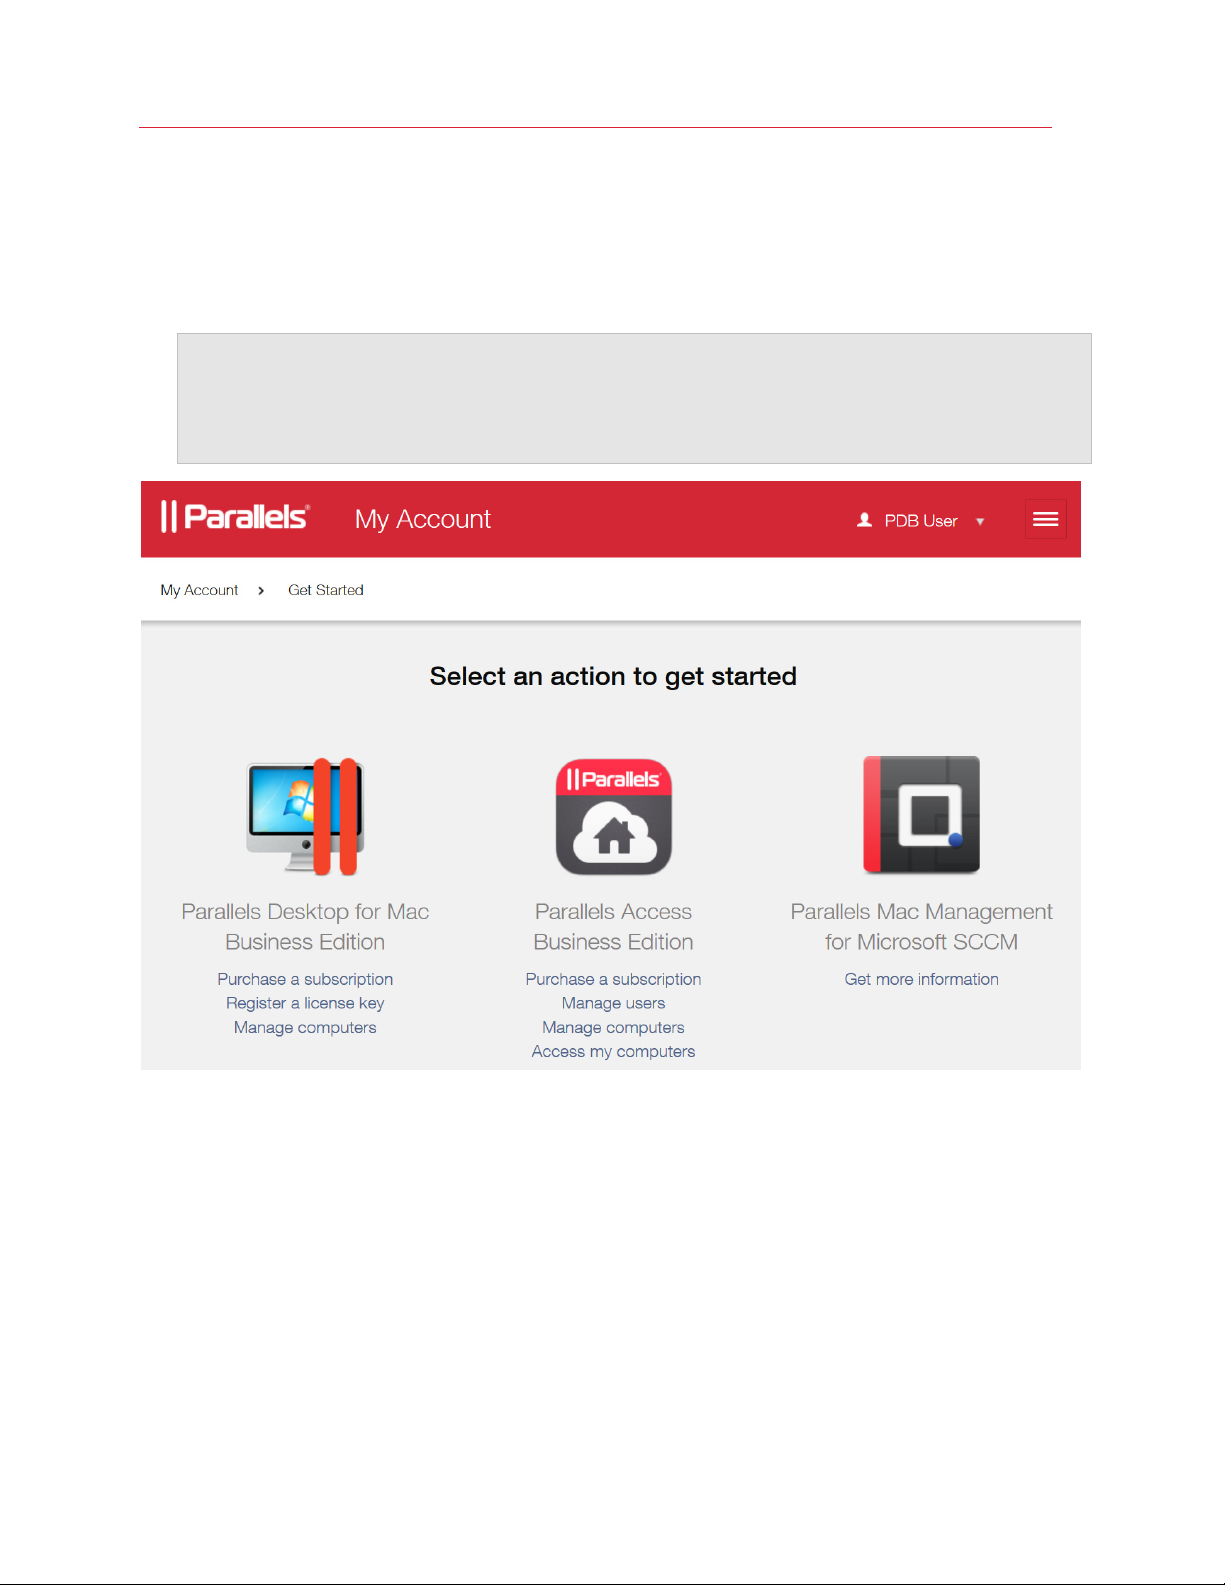
3 Complete the form and click Create account. Once the account is created, you will see the
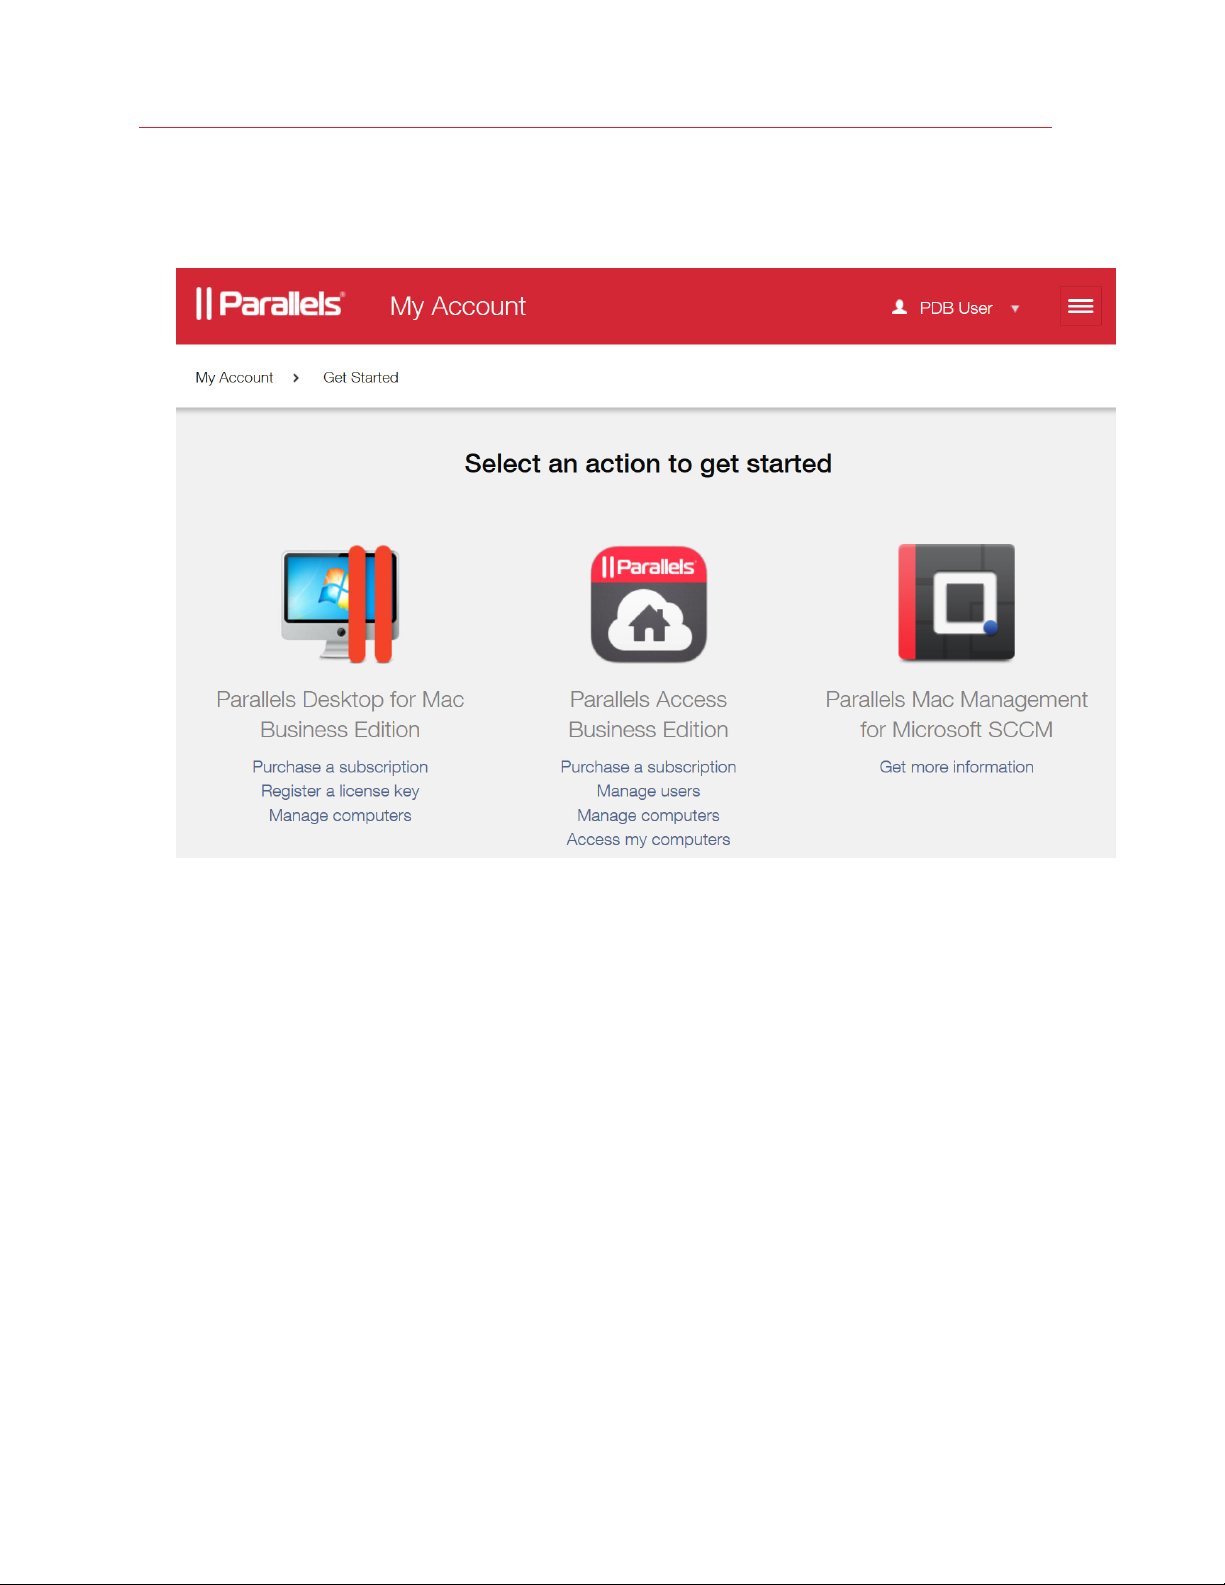
Get Started page. On the screenshot below, PDB User is a sample user in this demonstration.
You will see your user name in its place.
Register a Subscription with Your New Parallels Business Account
If you already have a subscription, you need to register it as follows:
11
Page 12

Parallels Business Account, Subscriptions and Licenses
1 On the Get Started page (see above), click the Register a license key option located in the
Parallels Desktop for Mac Business Edition section. The Add Subscription page opens.
2 Enter the license key that came with your subscription into the field provided and then click the
Apply button. Your license key will be registered and your subscription information will be
added to your account.
3 If you would like to purchase a new subscription, click the Select a Product Plan button. You'll
be redirected to the Parallels website where you can compare product plans and purchase a
desired subscription. Once you obtain the license key, return to your Parallels business account
and register the license key as described above.
View Subscription Information
To view the information about your subscription(s) at any time:
12
Page 13
Parallels Business Account, Subscriptions and Licenses
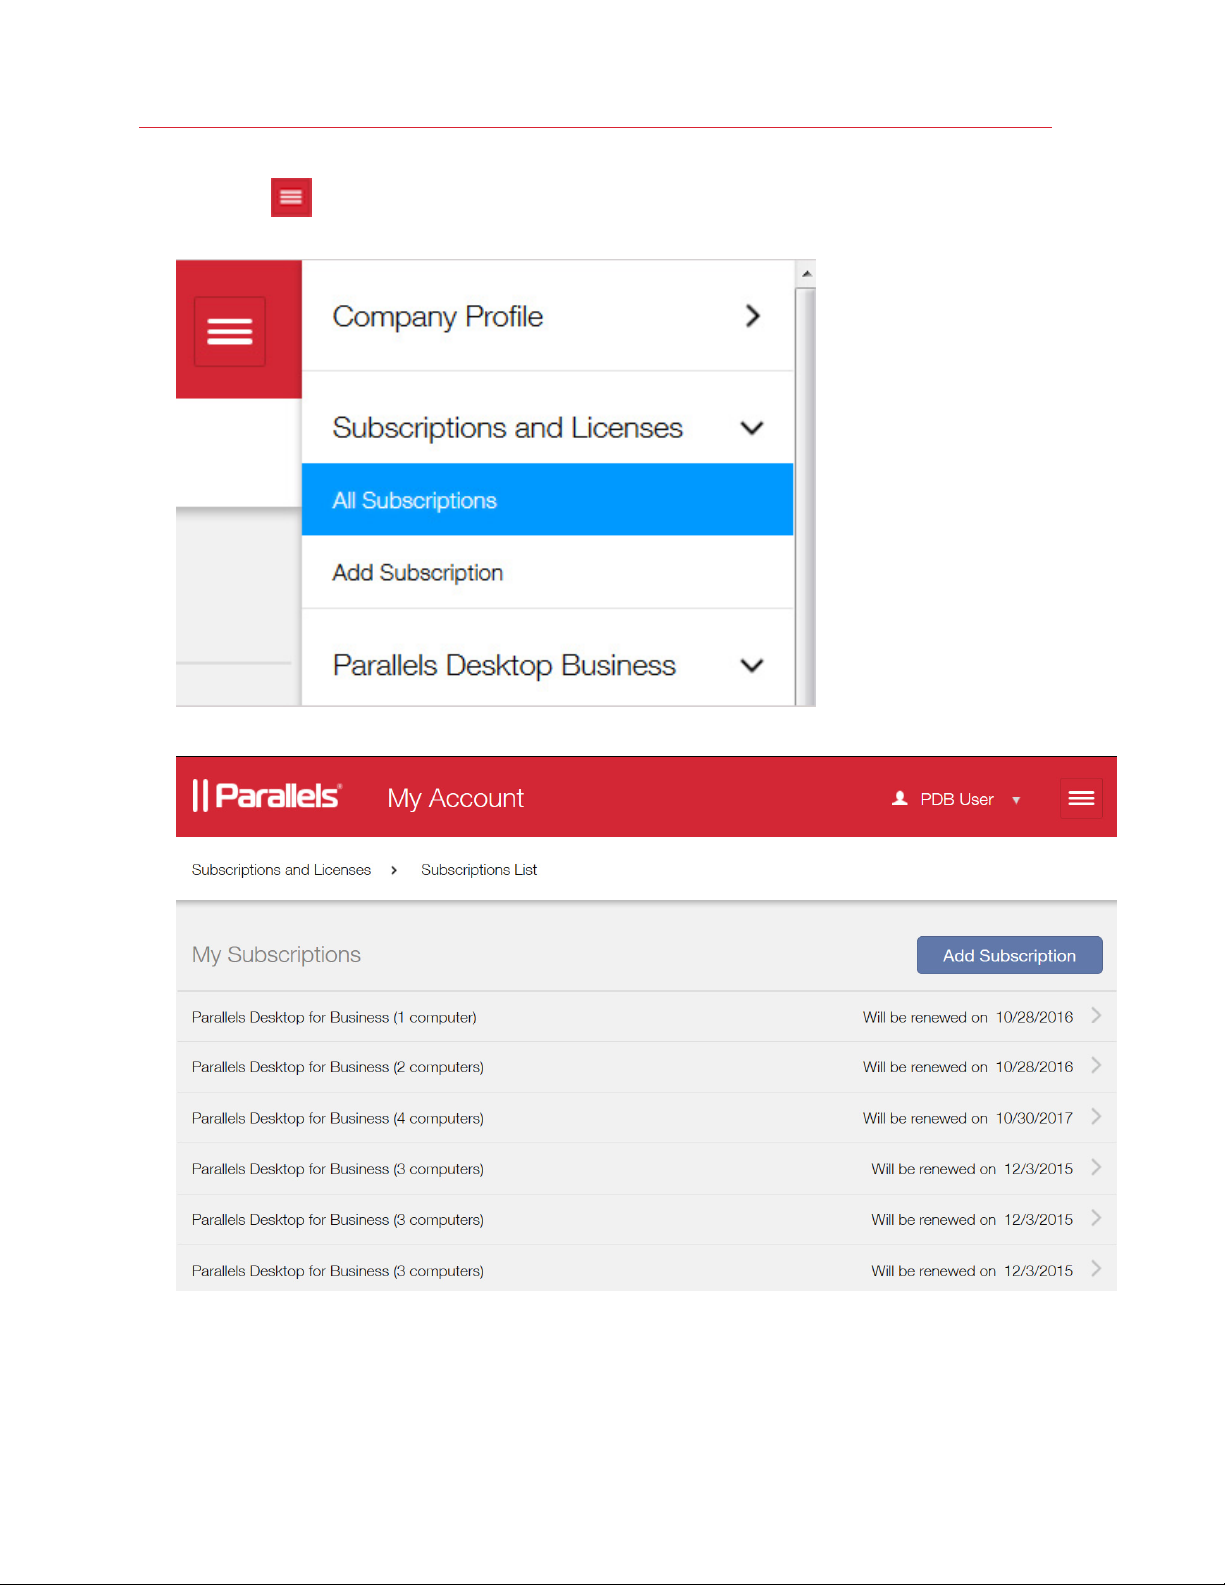
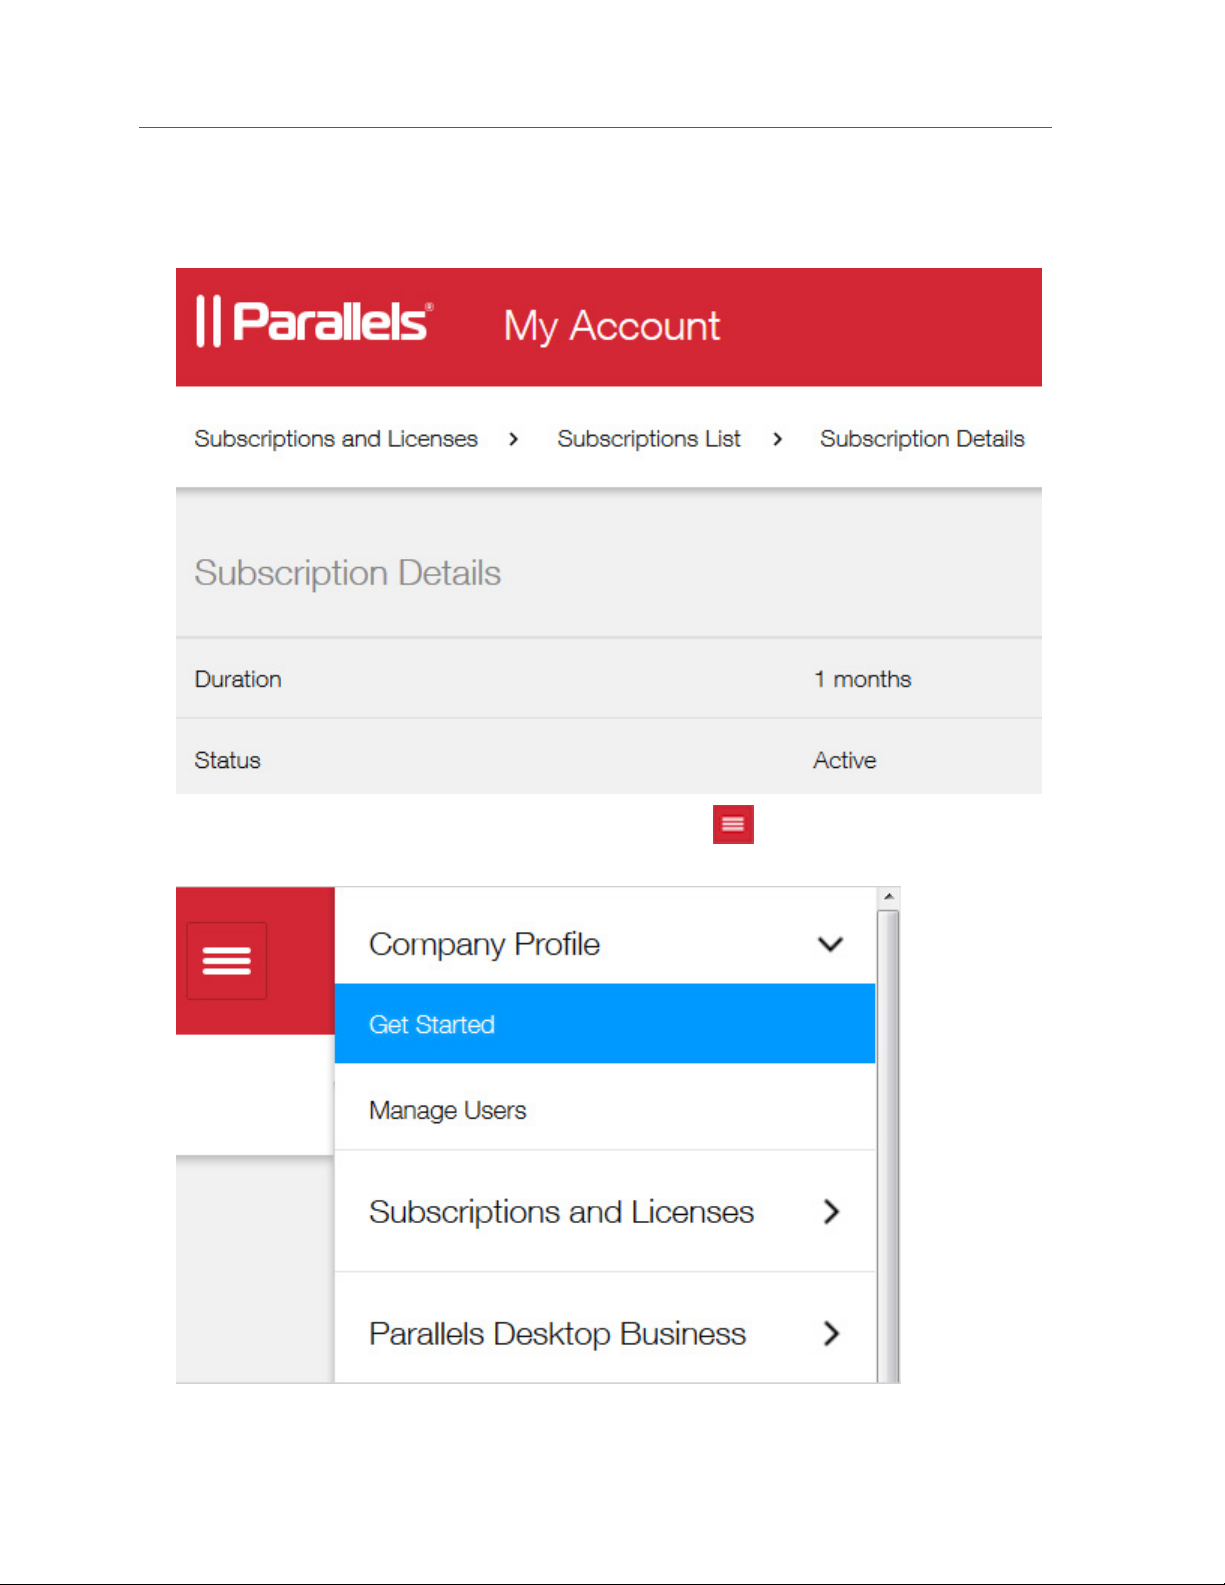
1 Click the
the Subscriptions and Licenses section and click All Subscriptions.
2 The Subscription List page opens where you can view your subscriptions.
icon next to your user name to open the side menu. In the side menu, expand
Read on to learn more about using your Parallels business account.
13
Page 14
Parallels Business Account, Subscriptions and Licenses
Using Your Parallels Business Account
This section describes how to use your Parallels business account to manage subscriptions,
licenses, and computers in your organization.
Sign Into Your Account
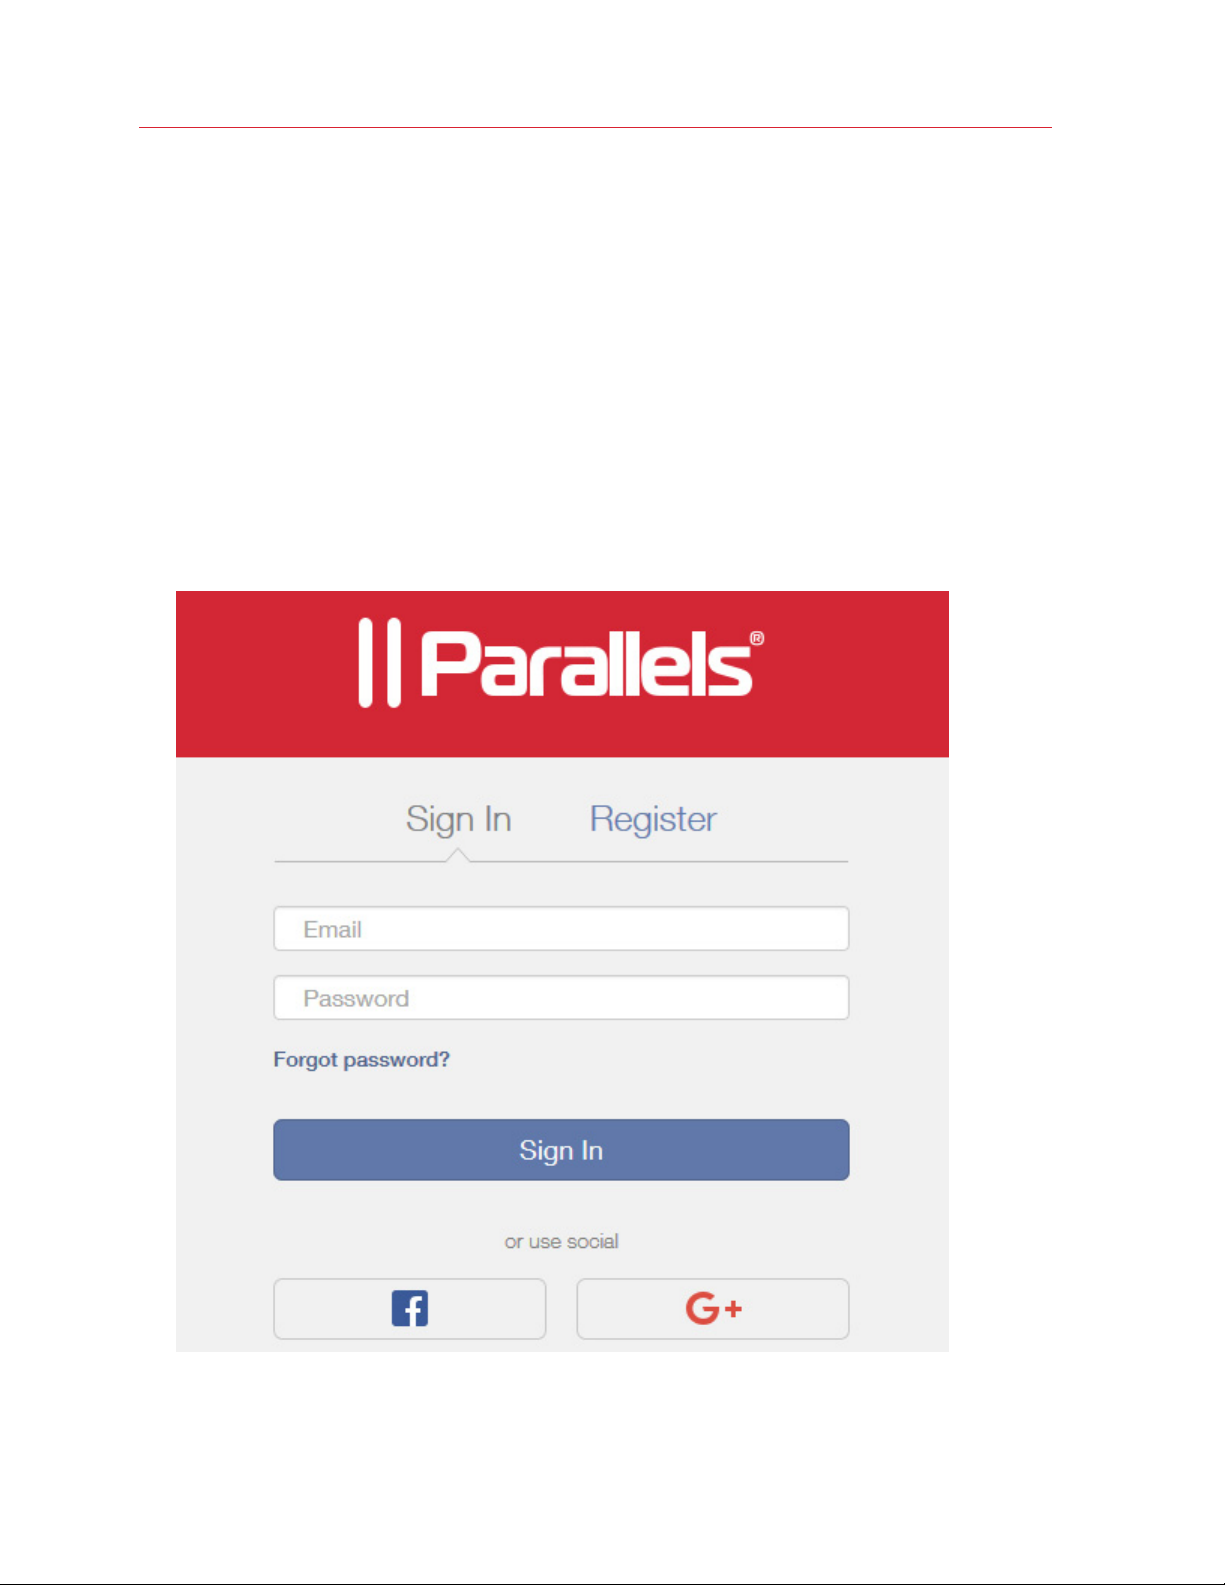
To sign into your Parallels business account:
1 Open the following URL in your Web browser:
https://account.parallels.com
2 The Parallels My Account Sign In page opens.
14
Page 15
Parallels Business Account, Subscriptions and Licenses
3 Enter the email address and password that you used when you created your Parallels business
account. If you've been invited to use an account as an administrator, specify the credentials
that were given to you by the account owner. Click Sign In.
4 If this is the first time you log into the account, you will see the Get Started page (shown
below). Otherwise, you'll be taken to the last page you visited during your previous session.
Note: If after signing in, you don't see the Get Started page as shown below, it probably means that
you signed in using a regular Parallels account (not business account). If you have both regular and
business accounts, sign off and then sign in again using your business account credentials. If you
created a regular account by mistake, you'll need to create a business account as described in the
Getting Started with Parallels Business Account section (p. 9).
View Subscription Information
To view the list of subscriptions registered to your Parallels business account:
15
Page 16

Parallels Business Account, Subscriptions and Licenses
1 Click the
the Subscription and Licenses section and click All Subscriptions.
2 The Subscription List page opens where you can view your subscriptions.
icon next to your user name to open the side menu. In the side menu, expand
16
Page 17

Parallels Business Account, Subscriptions and Licenses
3 Click on a subscription to open the Subscription Details page.
4 In addition to viewing subscription details on this page, you can perform the following
administration tasks:
• Disable (or enable) auto-renewal of your subscription.
• Change your payment options.
• See the details about Parallels product(s) included in this subscription.
• Open another page where you can manage computers that use the license key(s) included
in the subscription.
You can read more about the above tasks in the sections that follow this one.
17
Page 18
Parallels Business Account, Subscriptions and Licenses
5 To return to the Subscription List page, click Subscription List in the navigation bar, which is
located under the page header (in this example it's Subscriptions and Licenses > Subscription
List > Subscription Details).
6 To return to the Get Started page at any time, click the
open the side menu. In the side menu, click Company Profile > Get Started.
icon next to your user name to
18
Page 19
Parallels Business Account, Subscriptions and Licenses
View Product Details
To view the Parallels product(s) included in a subscription:
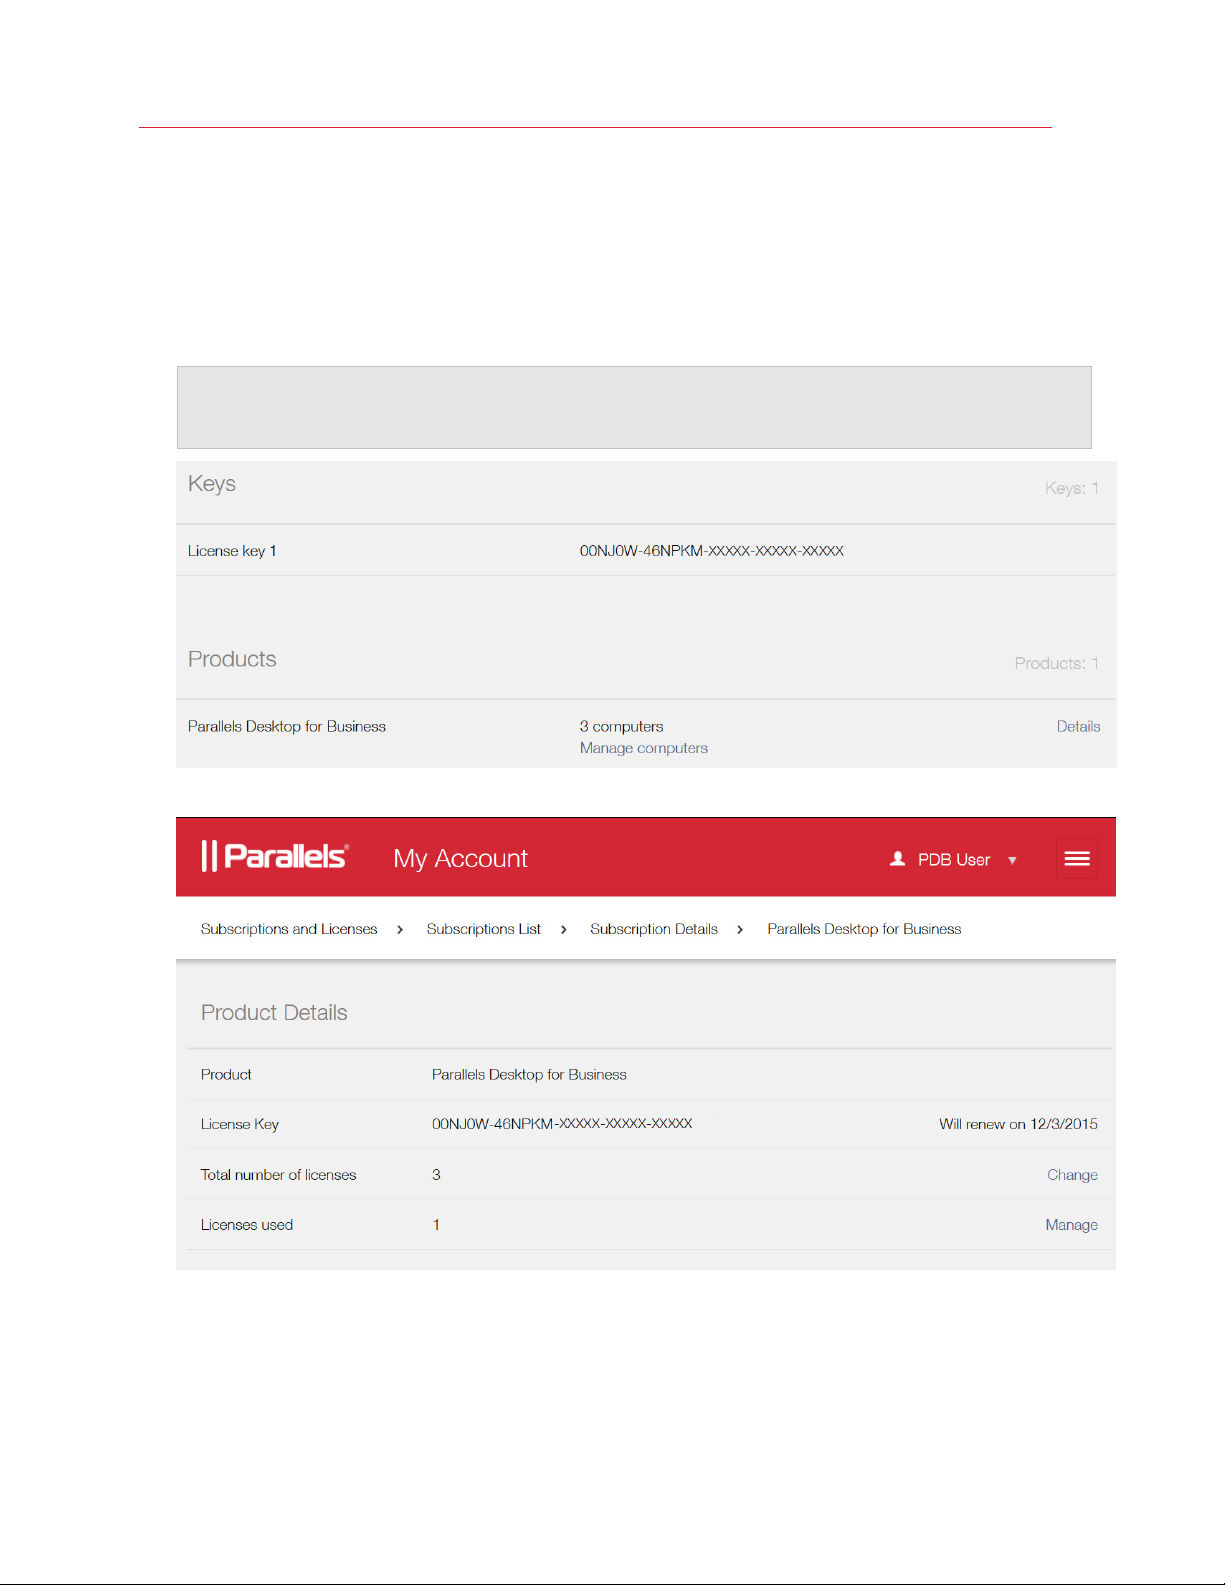
1 Open the Subscription Details page (see the previous topic) and click Details in the Products
section, as shown in the screenshot below.
Note: If you don't see the Details link on your screen, it means that sublicensing (which is a part of the
Product Details page) has not been activated for your account yet. You will be notified in a separate
email from Parallels when sublicensing becomes available for your account.
2 The product details page opens:
In the upper portion of the page, you can view the name of the Parallels product included in this
subscription (e.g. Parallels Desktop for Business), the license key and the automatic renewal date,
the total number of licenses, and the sublicense information if the main license has them.
19
Page 20
Parallels Business Account, Subscriptions and Licenses
On this page, you can add more licenses to a subscription and change your billing options. You
can also create and modify sublicenses. Read on to learn how to manage your licenses and
sublicenses.
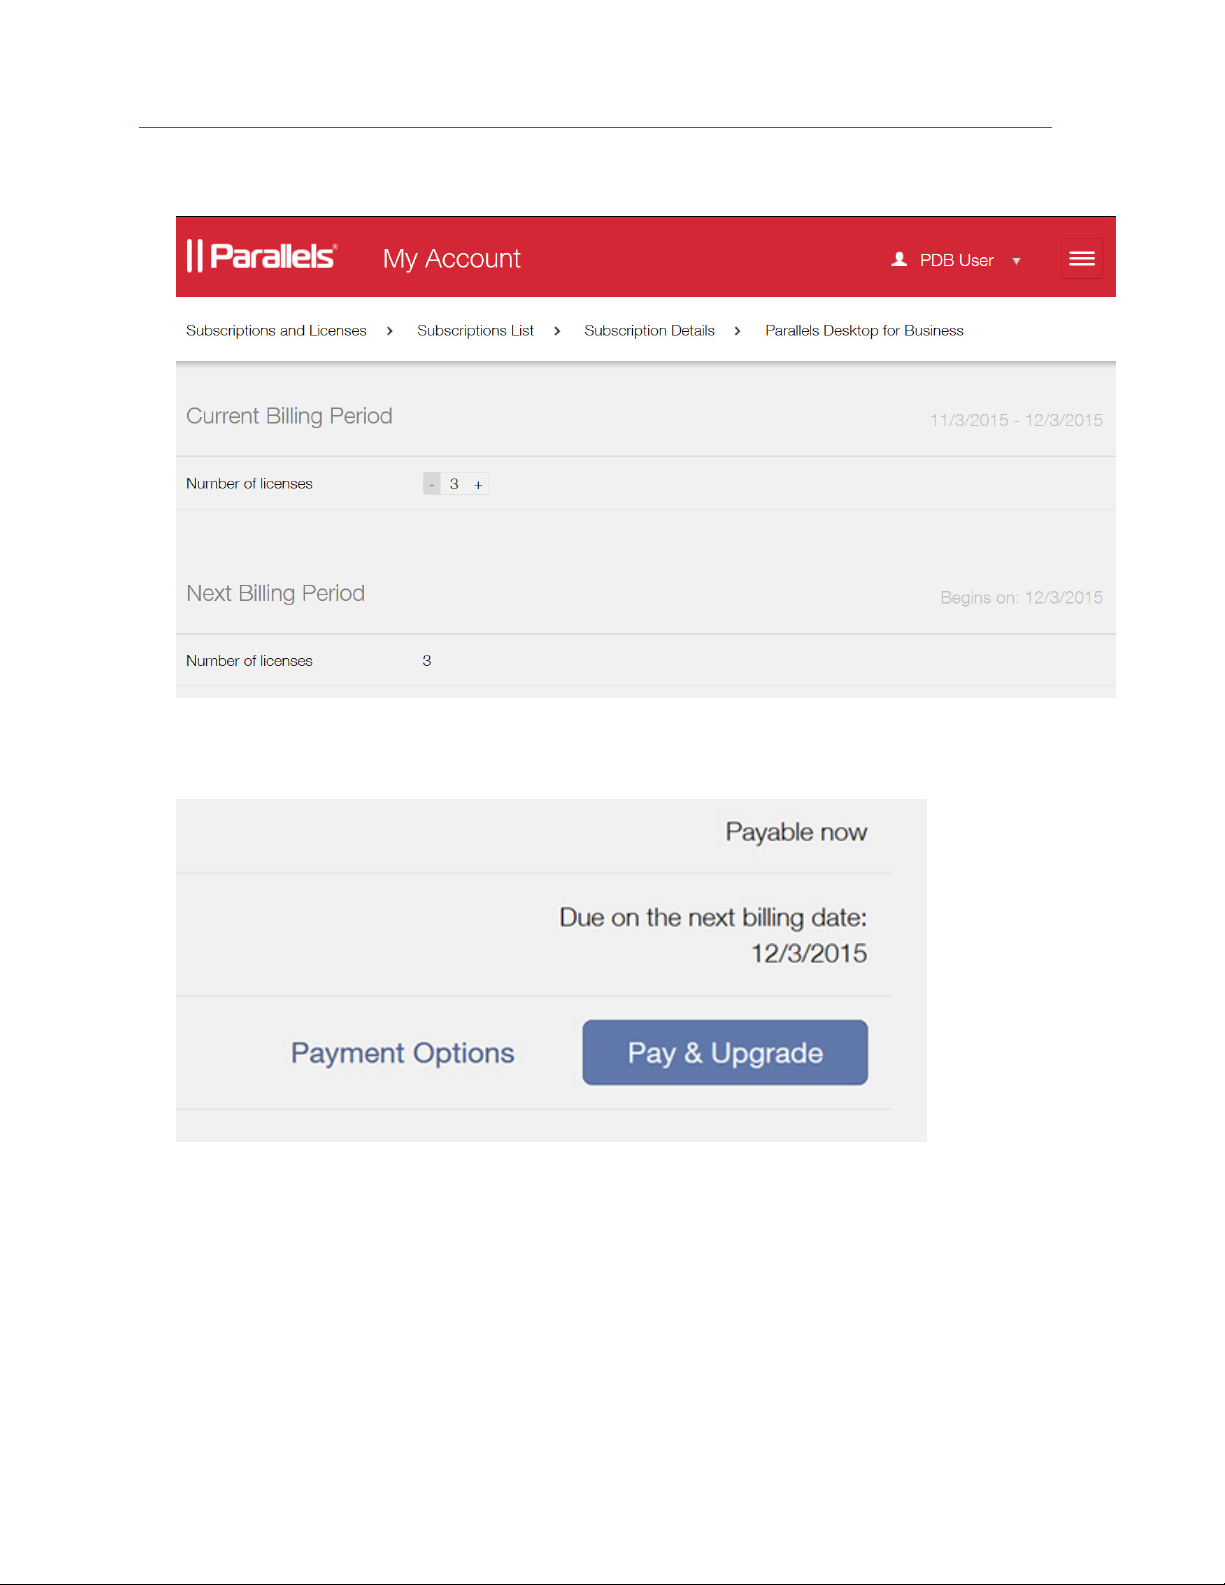
Add More Licenses to a Subscription
To add more licenses to a subscription:
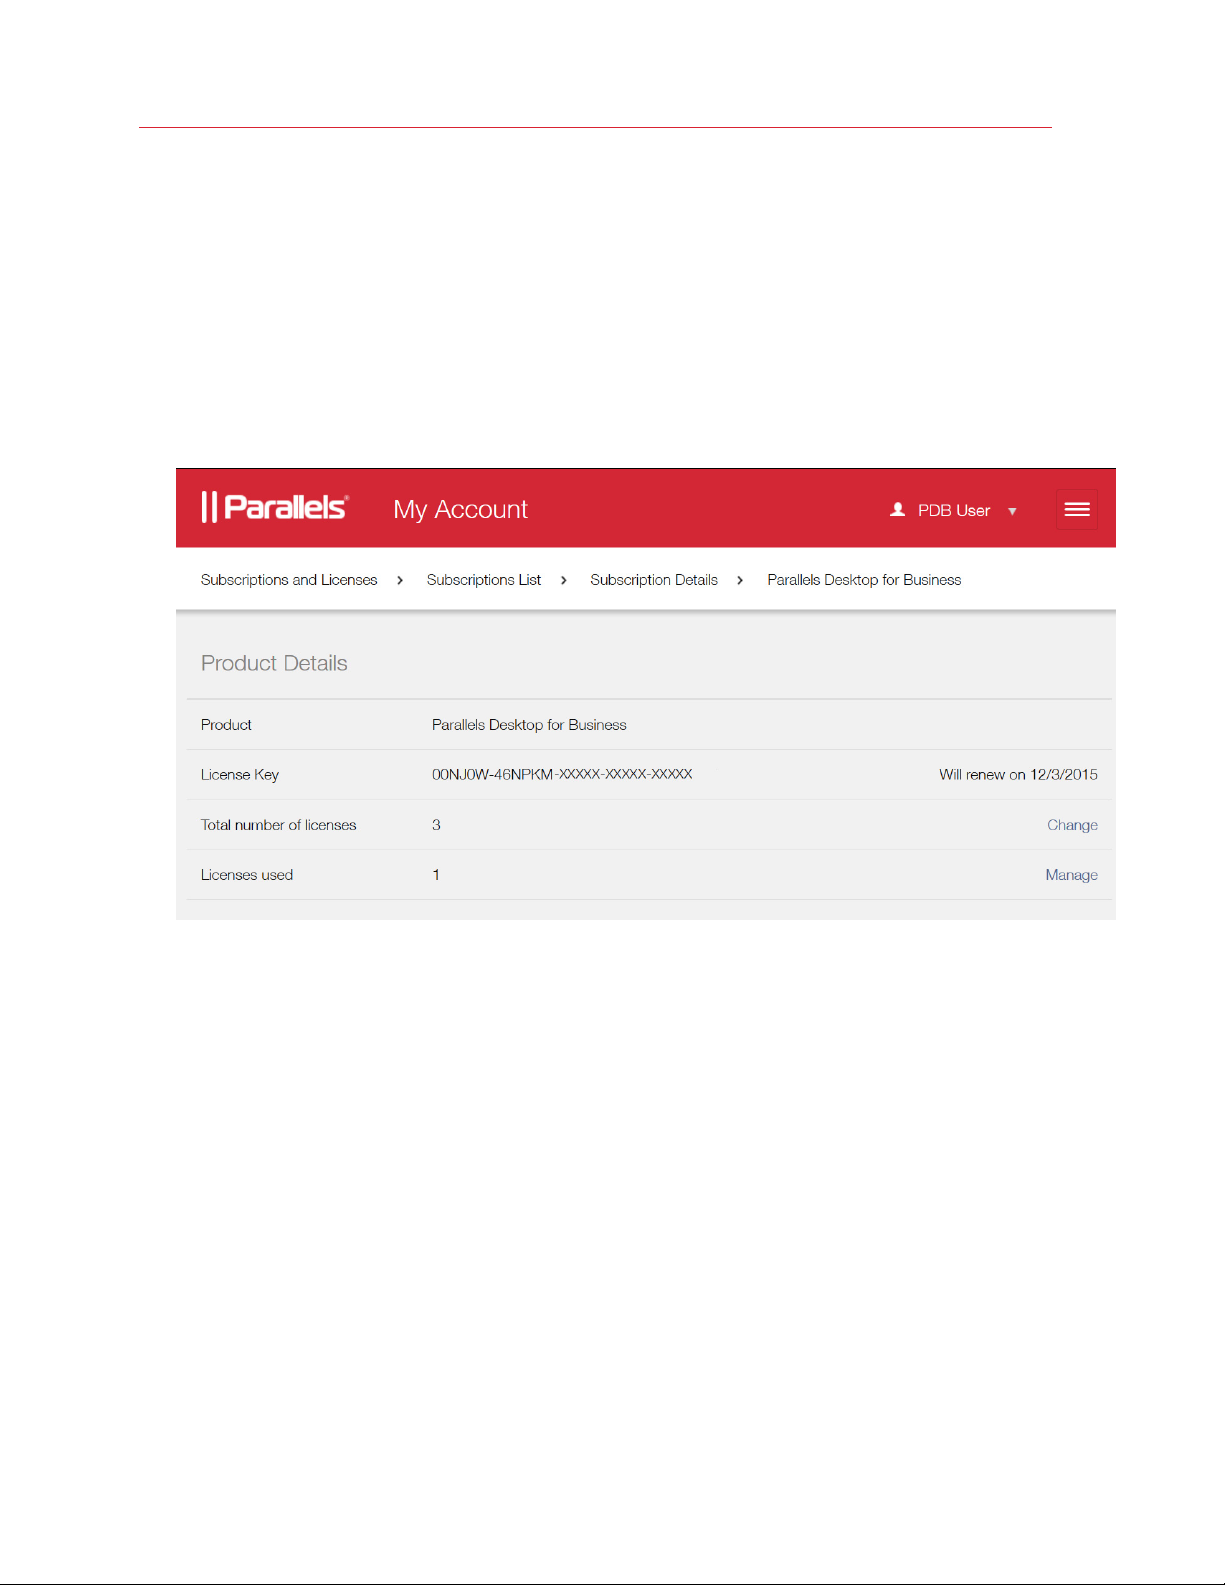
1 On the product details page (see View Product Details (p. 19)), click the Change link located
on the Total number of licenses row, as shown o
n the screenshot below.
20
Page 21
Parallels Business Account, Subscriptions and Licenses
2 The Parallels Desktop for Business page opens:
3 Use the plus sign icon on the Number of licenses row to add more Parallels Desktop for
Business licenses to your subscription. When you do, the Pay & Upgrade button becomes
enabled. Click the button to pay for additional licenses online for immediate availability.
4 To change payment options, click the Payment Options link. This will open a secure form
where you can make the desired changes.
Create and Manage Sublicenses
You can split your Parallels Desktop Business Edition license into sublicenses. A sublicense is a
virtual license that is linked to the master license but has its own attributes, including its own
sublicense key, the total number of individual licenses, and its own expiration date.
21
Page 22
Parallels Business Account, Subscriptions and Licenses
If you have Mac users in your company to whom you don't want to give your master license key
(e.g. temporary workers, consultants, employees in a remote office), you can create one or more
sublicenses for them from your master license. For example, if you have consultants working on a
contract basis, you can create a sublicense key for them with the expiration date matching the
contract duration. At the end of the contract, the sublicense expires and the licenses that were
allocated to it go back to your master license pool.
To create a sublicense:
1 On the Product Details page (see Viewing Product Details (p. 19)), click the Create a
Sublicense
with the button).
button (the screenshot below shows the lower portion of the Product Details page
22
Page 23
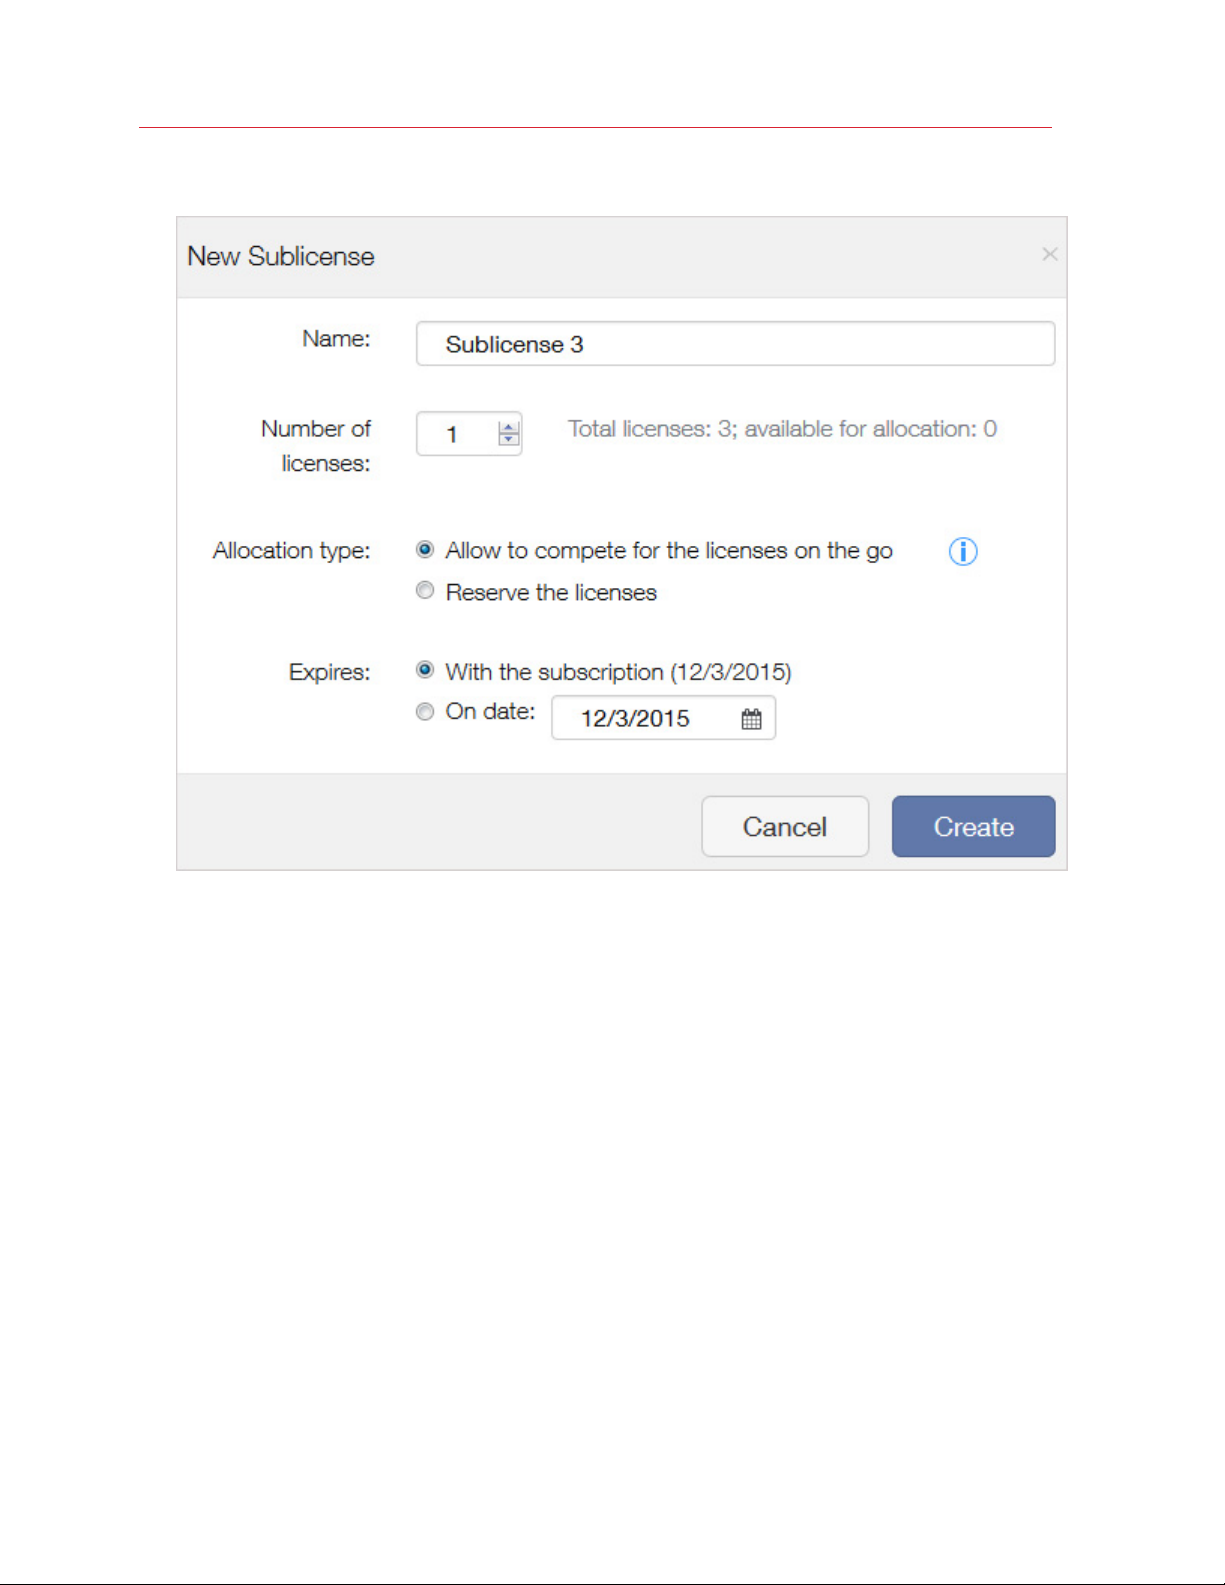
2 The New Sublicense dialog opens.
Parallels Business Account, Subscriptions and Licenses
3 Enter the name for the new sublicense, the total number of licenses that it should contain
(limited by the total number of licenses in your subscription), and the sublicense expiration date.
The Allocation type section allows you to choose dynamic or reserved allocation of licenses:
• Dynamic allocation enables users of a sublicense to use allocated licenses as needed.
Unused licenses remain in the main license pool, which is linked to the master subscription
license key, and can be distributed from there to other sublicenses.
• Reserved allocation allows reserving all the allocated licenses exclusively for this particular
sublicense. None of the licenses (including unused ones) are available in the main license
pool, which is linked to the master subscription license key, or in other sublicenses.
4 When done, click Create to create a sublicense.
23
Page 24

Parallels Business Account, Subscriptions and Licenses
5 To modify a sublicense, click the Edit link (see the first screenshot in this topic), which opens
the Edit Sublicense dialog:
6 On the Edit Sublicense page, you can modify the sublicense properties or delete the
sublicense if needed.
Manage Licensed Computers
After you install and activate Parallels Desktop Business Edition on Macs in your organization, your
Parallels business account is updated with the information about these computers.
Note: You can install and activate Parallels Desktop Business Edition on Macs manually or you can mass
deploy it using the special software package that you can download from the Parallels website. The
deployment and configuration procedures are described in detail in the Parallels Desktop Business
Edition documentation.
To view the computer information:
24
Page 25

Parallels Business Account, Subscriptions and Licenses
1 Click the
Parallels Desktop Business > Active Computers:
icon next to your user name to open the side menu. In the side menu, click
2 The Active Computers page opens.
25
Page 26
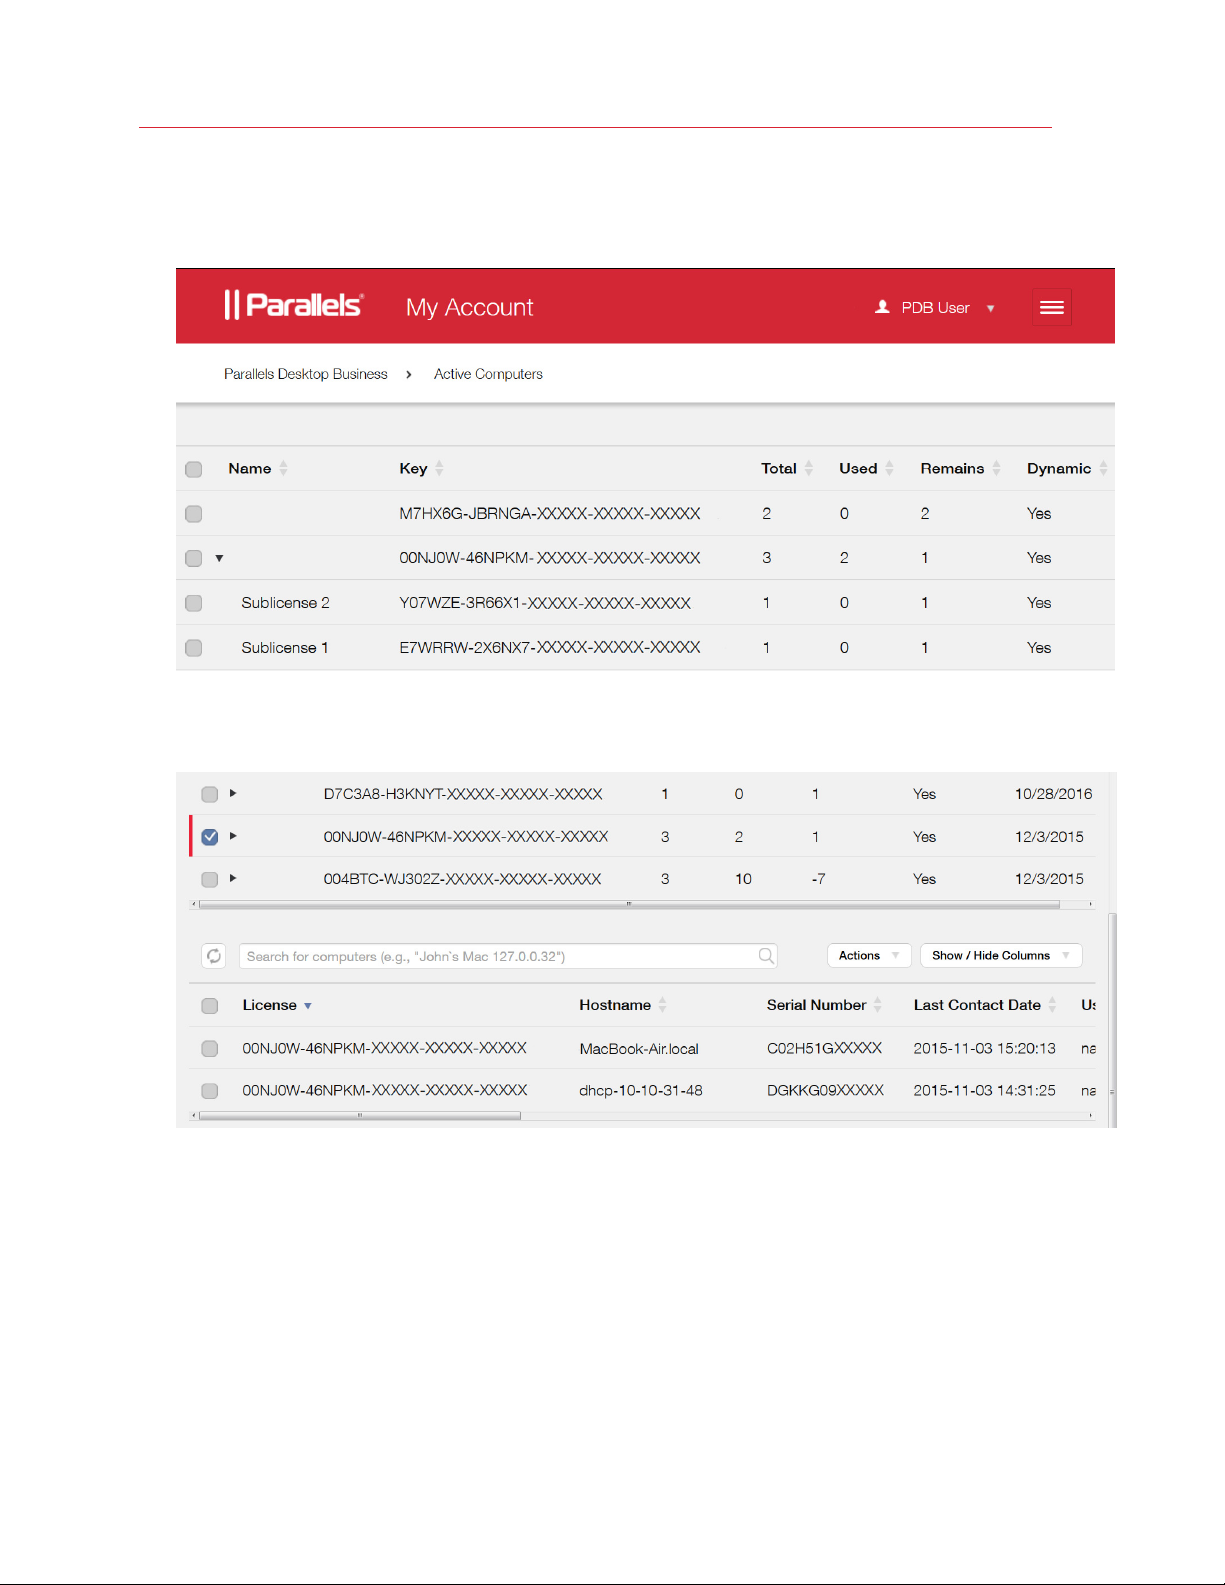
Parallels Business Account, Subscriptions and Licenses
3 The upper section of the page (the screenshot above) contains the list of license keys registered
to your account. If a key was split into sublicenses, it will have a black arrow icon before the
Name column. Click the arrow to display the sublicense keys.
4 To view the computers that use a given license key to run Parallels Desktop, select the check-
box at the beginning of the key row. The computer list is displayed in the lower portion of the
screen.
5 You may need to scroll the page horizontally to see all columns in the computer list. You can
also click the Show / Hide Columns button to select only the rows you want displayed.
6 The Actions drop-down menu allows you to:
• Export the computer list to a CSV file.
• Blacklist a computer.
• Deactivate a license on a computer.
Read on to learn how to use these actions.
26
Page 27
Parallels Business Account, Subscriptions and Licenses
Export Computer Information to a CSV File
To export the complete computer information table to a CSV file, click the Actions drop-down
menu and select Export all to a SCV file.
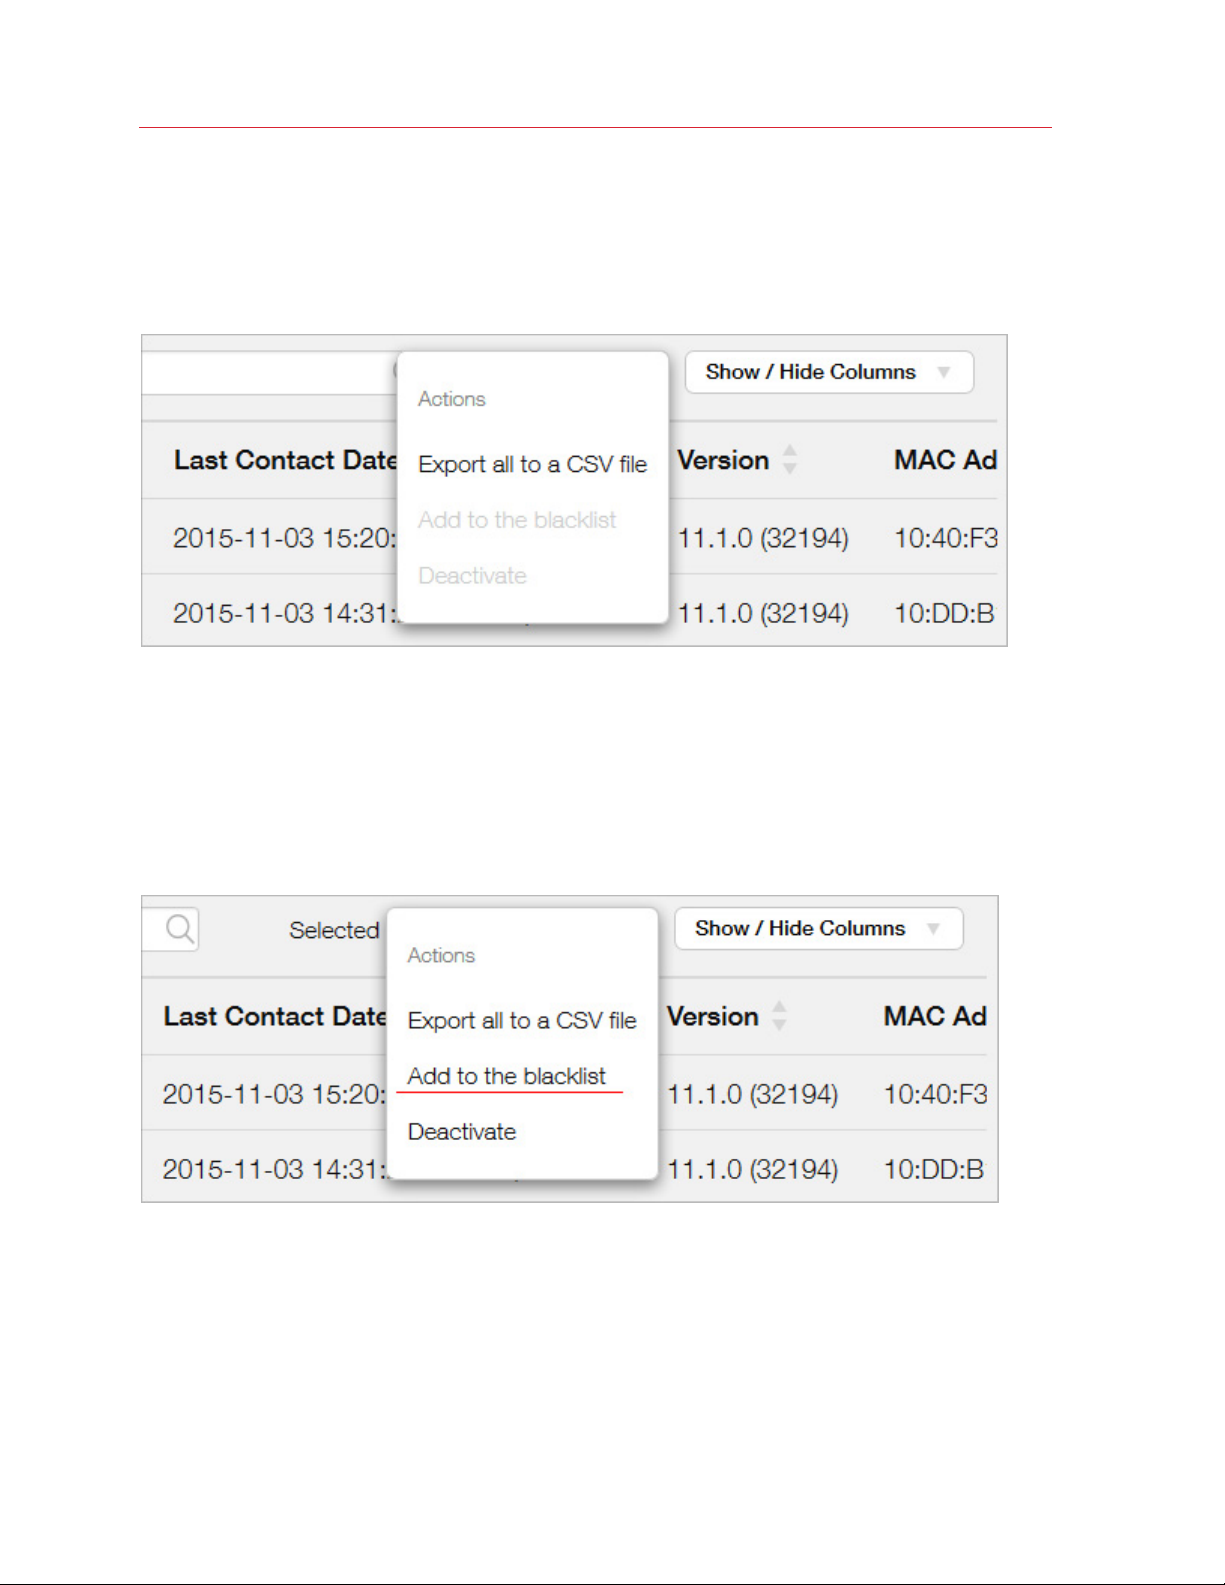
Blacklist a Computer
You can blacklist a computer that has an active version of Parallels Desktop installed. When you
blacklist a computer, the license is deactivated on it permanently. This means that the same license
key cannot be used to reactivate Parallels Desktop Business Edition on the computer later.
To blacklist a computer, select it and then click Actions > Add to blacklist.
27
Page 28
Parallels Business Account, Subscriptions and Licenses
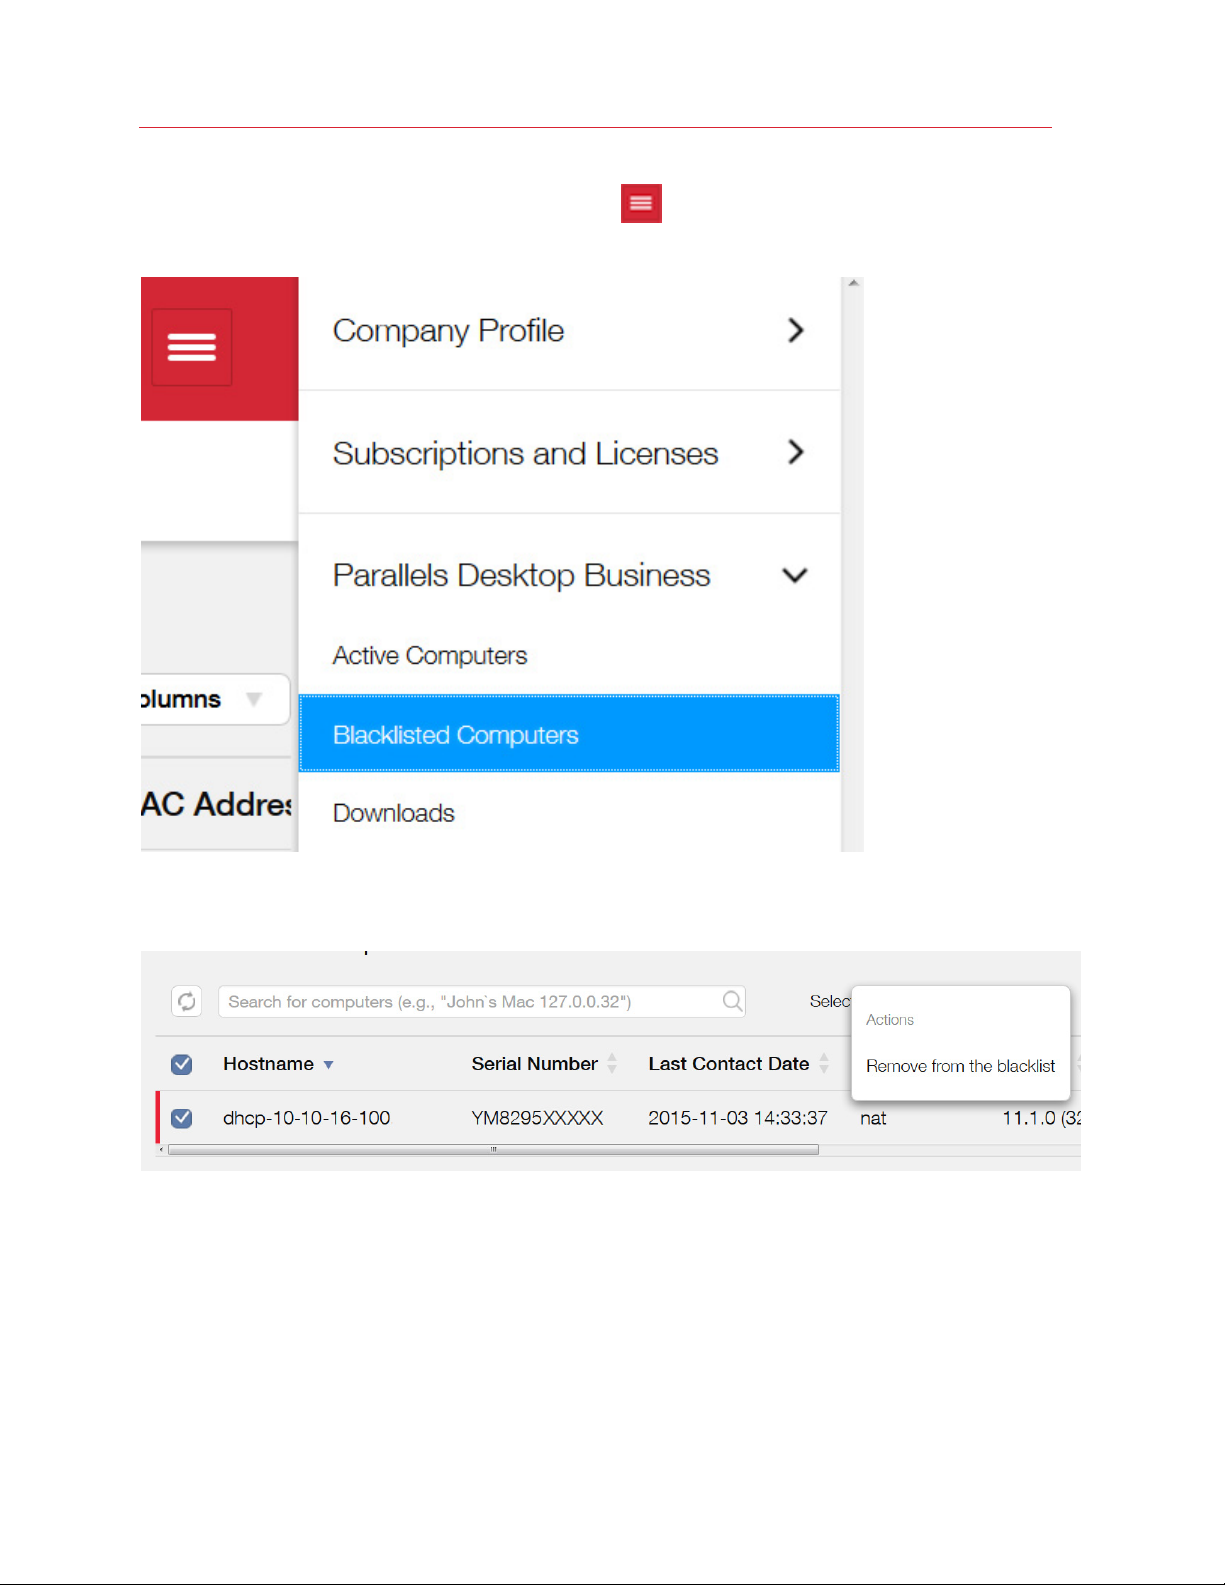
To view the list of blacklisted computers, click the
side menu. In the side menu, click Parallels Desktop for Business > Blacklisted Computers.
icon next to your user name to open the
To remove a computer from the list of blacklisted computers, select the computer and then click
Actions > Remove from the blacklist.
28
Page 29
Parallels Business Account, Subscriptions and Licenses
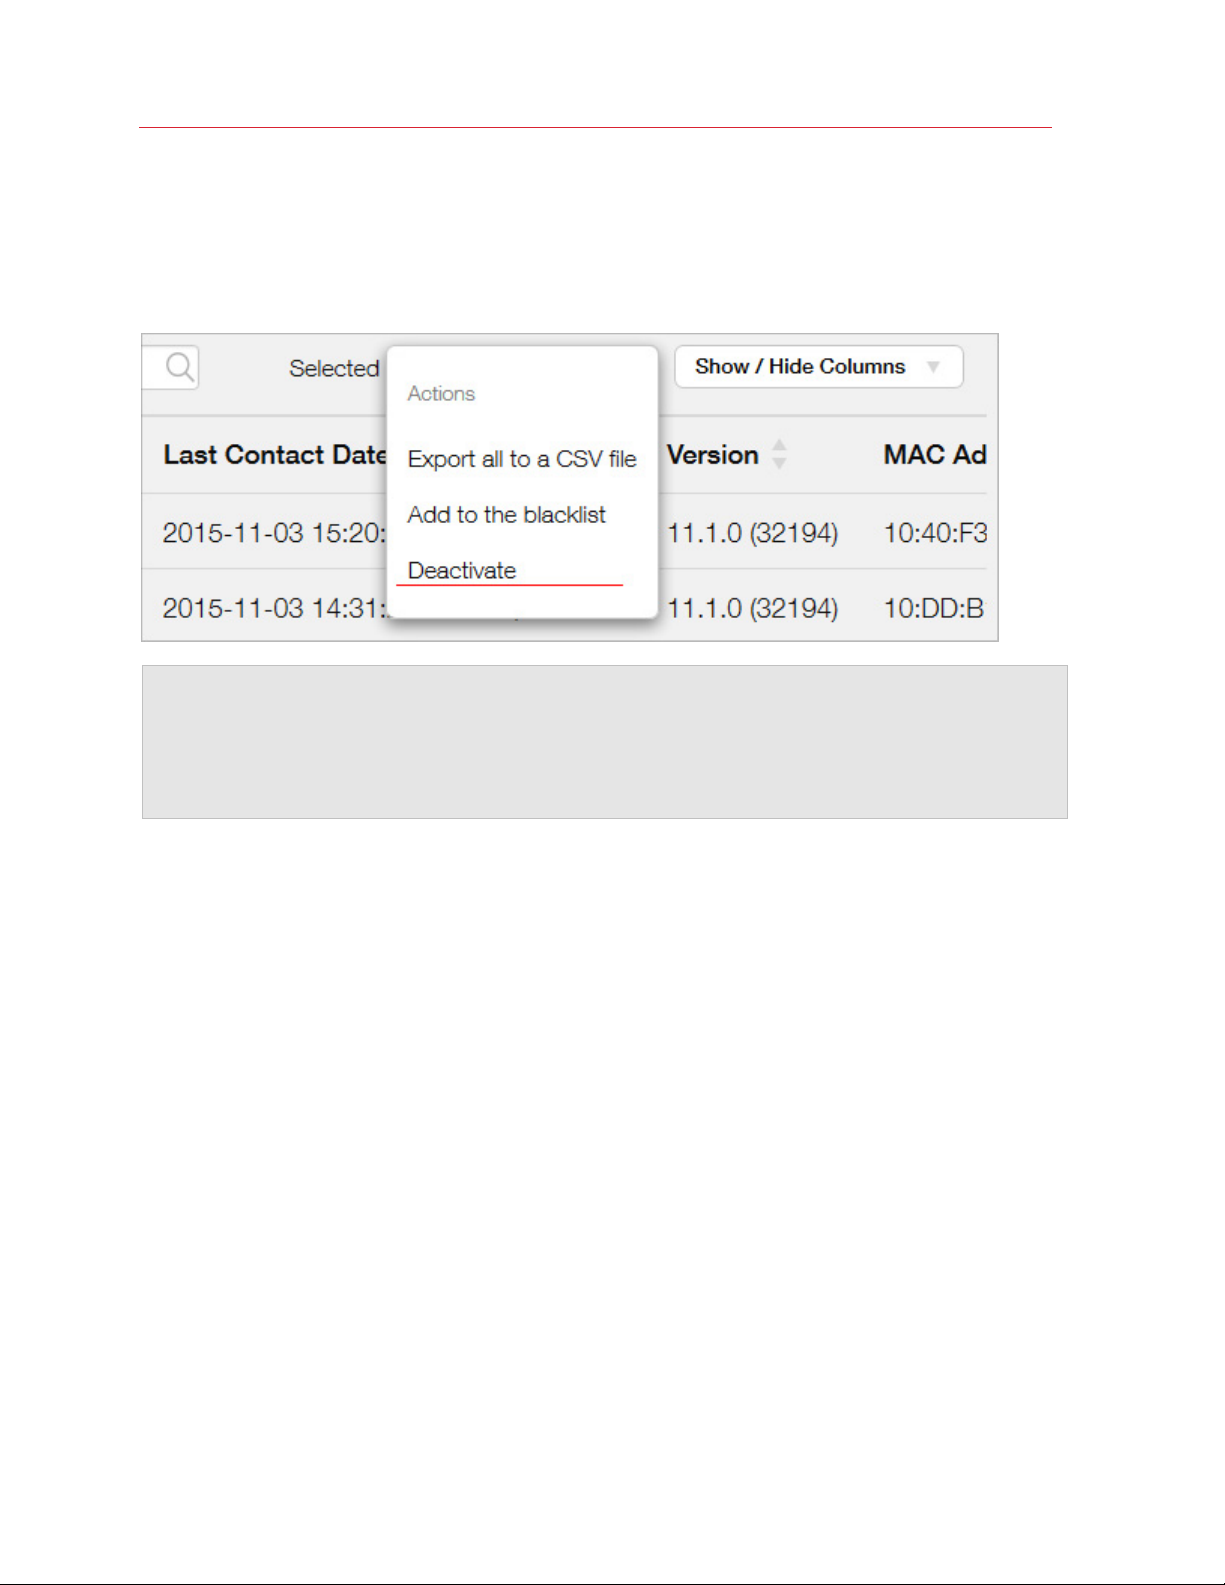
Deactivate Parallels Desktop License on a Mac
Deactivating a Parallels Desktop license on a Mac computer disables Parallels Desktop on it. To
deactivate a license on a Mac, select it and then click the Actions > Deactivate.
Note: Parallels Desktop Business Edition will continue to run on the affected computer until the
computer checks in with the licensing server. This could be anywhere from a few minutes to seven days.
If you want to deactivate the license on a computer immediately, you can log into it and run the following
command in Terminal:
prlsrvctl deactivate-license
29
Page 30
Parallels Business Account, Subscriptions and Licenses
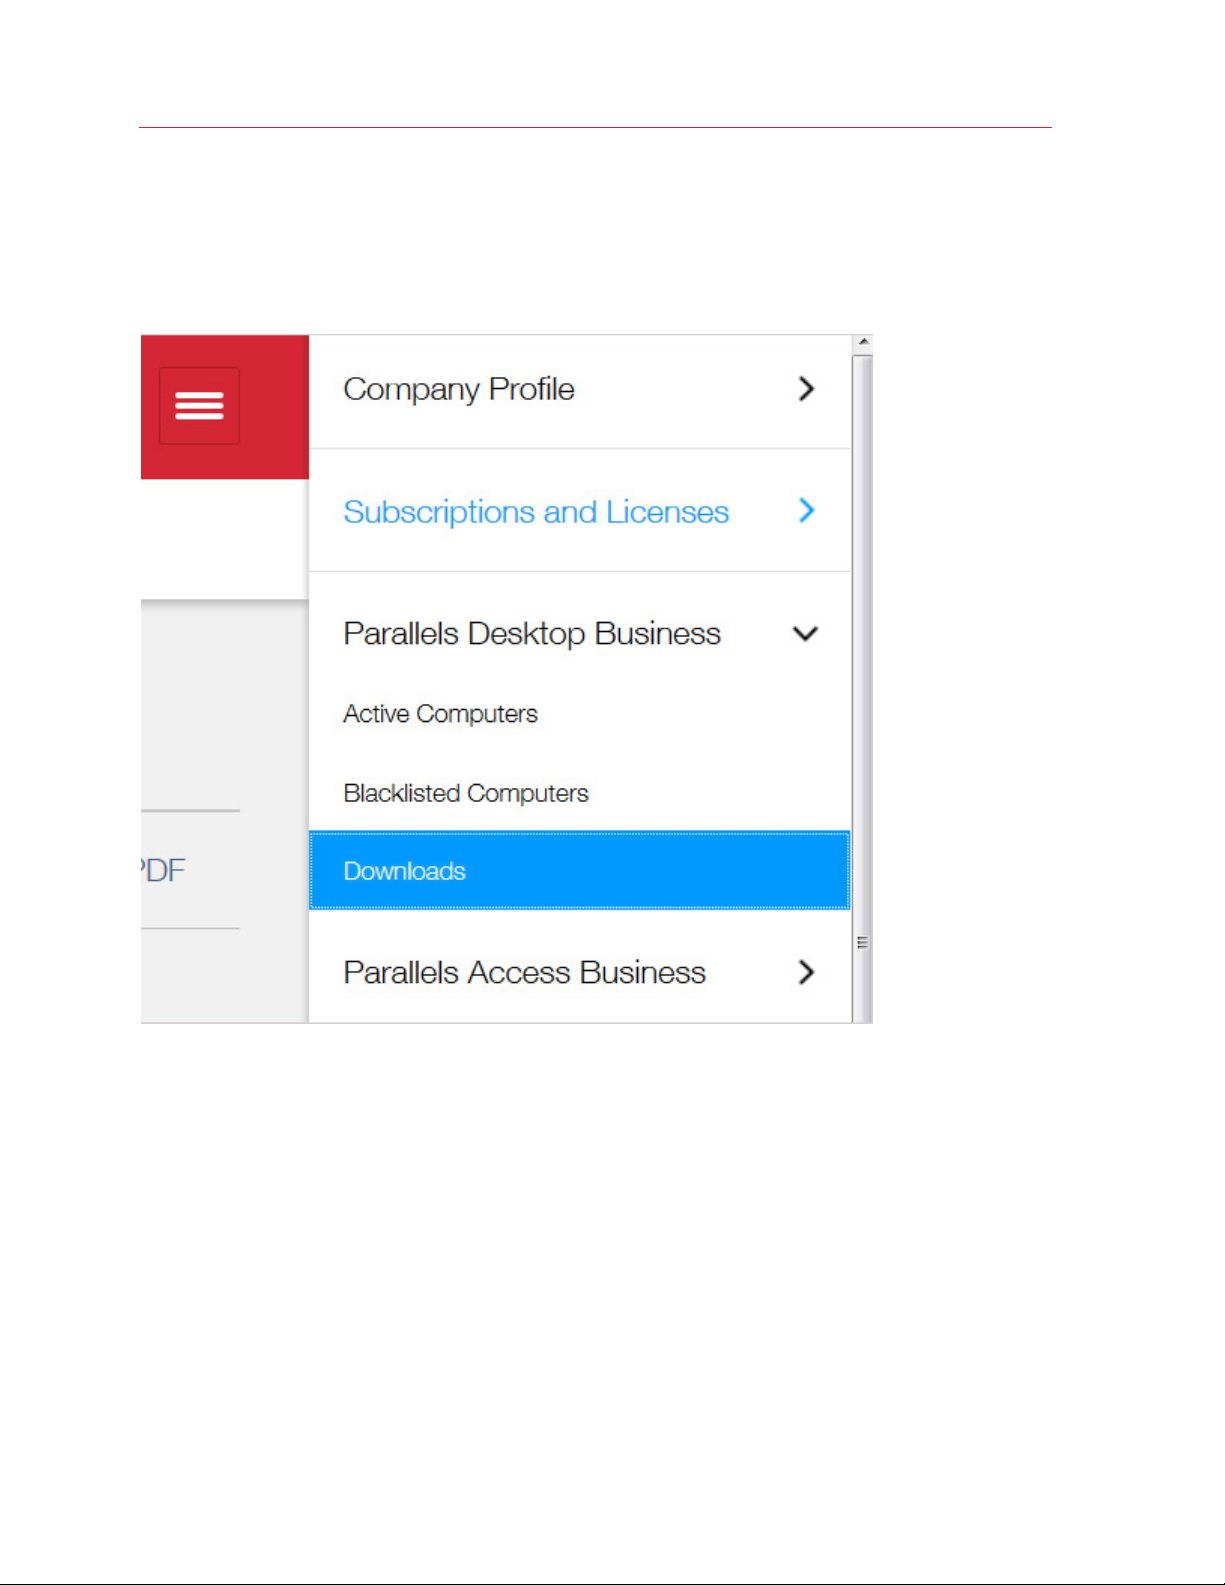
Download Parallels Desktop and Documentation
To open the Download page, open the side menu and click Parallels Desktop Business >
Downloads.
The Download page contains links to Parallels Desktop Business Edition and the documentation.
To download the desired version of Parallels Desktop, click the corresponding Download button.
To view the documentation in the browser, click PDF. To download the documentation, right-click
PDF and then click "Save Link As" or "Save Target As" depending on the browser you are using.
Get Support
The Support page provides Parallels contact information that you can use to talk to or email with
Parallels Support. The page also provides download links to the Parallels Desktop documentation.
30
Page 31

Parallels Business Account, Subscriptions and Licenses
To open the Support page, open the side menu and click Support > Parallels Desktop
Business.
At the top of the Support page, you'll see the support ID assigned to your company. You'll need
this ID when contacting Parallels support.
31
Page 32

C HAPTER 3
Parallels Desktop for Mac Business Edition Features
This chapter explains how to use the advanced features of Parallels Desktop for Mac Business
Edition.
In This Chapter
Setting Asset Tag in Virtual Machine BIOS................................................................ 32
Customizing Parallels Desktop Control Center UI ..................................................... 33
Hiding Pro Edition Features in the Business Edition UI .............................................. 34
Protecting Virtual Machine Configuration .................................................................. 35
Locking Virtual Machine on Suspend........................................................................ 36
Encrypted Virtual Machines ...................................................................................... 37
Running Virtual Machines in the Background ("headless" mode)
Configuring Expiring Virtual Machine......................................................................... 43
Resetting Guest OS User Password ......................................................................... 44
Creating Linked Clones ............................................................................................ 45
NetBoot Support for OS X Virtual Machines.............................................................. 47
Setting Up Local Update Server ............................................................................... 47
Customizing Request Support Option ...................................................................... 52
Participating in Customer Experience Program ......................................................... 53
Parallels Desktop License Renewal........................................................................... 53
............................... 38
Setting Asset Tag in Virtual Machine BIOS
Asset tags help identify, control, and track computer assets in an organization. Parallels Desktop
for Mac Business Edition provides the ability to set an asset tag in the virtual machine BIOS, which
can then be read using the standard tools of the guest operating system. You can set an asset tag
using the Parallels Desktop graphical user interface or the prlctl command line utility that comes
with Parallels Desktop.
To set an asset tag using the Parallels Desktop GUI:
1 On the Parallels Desktop menu bar, select Actions > Configure to open the virtual machine
configuration dialog.
2 Select Hardware > CPU & Memory.
3 Use the Asset tag field to specify the desired tag.
Page 33

Parallels Desktop for Mac Business Edition Features
To set an asset tag using the prlctl command line utility, use the following syntax:
prlctl set ID|name --asset-id tag
where ID|name is the virtual machine ID or name, and tag is the asset tag to set.
To obtain the asset tag in Windows, use the WMIC.exe command:
WMIC SystemEnclosure get SMBIOSAssetTag
For the complete syntax of the WMIC utility please see the Microsoft documentation.
Once set, the asset tag never changes. Even if you perform such virtual machine operations as
cloning, template manipulation, registering, or any other, the asset tag always stays the same. If
you do want to change an existing asset tag for any reason, you can do it manually using of the
methods described above.
Customizing Parallels Desktop Control Center UI
Parallels Desktop Control Center is a part of the Parallels Desktop graphical user interface. It's a
window that lists registered virtual machines that the Mac user can run and use. By default, the
design of this window (graphics, text, etc) is provided by Parallels and looks like the following:
You can customize the design by specifying a URL to your own HTML document that will be
displayed as a banner at the top of the window. The HTML page can contain text, graphics, and
links such as your company logo, a welcome message, a link to a support page, etc. The HTML
document format doesn't have any specific requirements.
The URL must be specified during the preparation stage of the Mass Deployment process (p. 55).
Specific
variables in the mass deployment configuration file (deploy.cfg):
• control_center_banner_url
• control_center_banner_height
• control_center_banner_min_width
ally, you need to specify the URL string and the HTML page size using the following
33
Page 34

Parallels Desktop for Mac Business Edition Features
For the description of how to specify the variables and their values, please see Changing
Deployment Configuration Options (p. 60). The variables are described in the Virtual Machines
section.
The following is an exa
top.
You can download a sample HTML document defining the banner from the following URL:
mple of Parallels Desktop Control Center displaying a custom banner at the
http://download.parallels.com/desktop/tools/header.zip
Hiding Pro Edition Features in the Business Edition UI
Parallels Desktop for Mac Business Edition includes features that were introduced in Parallels
Desktop for Mac Pro Edition. These features were specifically designed for software developers
using Parallels Desktop as their development platform. The features are represented in the UI as
menu items. If you are not going to use these features, you can hide the corresponding menu items
in the Parallels Desktop graphical user interface.
To hide the Parallels Desktop Pro Edition features in the UI, you need to modify the
com.parallels.Parallels Desktop.plist file located in the ~/Library/Preferences
folder. The following command-line examples demonstrate how to do it.
To hide the Pro Edition features in the UI, execute the following command:
defaults write "com.parallels.Parallels Desktop" "Advanced.TraditionalLook" -bool yes
34
Page 35

Parallels Desktop for Mac Business Edition Features
To show the features in the UI, execute the following:
defaults write "com.parallels.Parallels Desktop" "Advanced.TraditionalLook" -bool no
After executing the command, you'll need to restart Parallels Desktop for the changes to take
effect.
Protecting Virtual Machine Configuration
Parallels Desktop Business Edition provides the ability to password-protect the configuration
settings of a virtual machine.
Using Parallels Desktop Graphical User Interface to Set the Password
The password is set using the Parallels Desktop graphical user interface as follows:
1 In OS X, open Parallels Desktop and select a virtual machine.
2 On the Parallels Desktop menu bar, select Actions > Configure to open the virtual machine
configuration dialog.
3 Select Security.
4 Click the Restrict Editing: Turn On... button.
5 Enter the password, then enter it again to verify and click OK.
To change or remove the password:
• To change the password, click Restrict Editing: Change Password, then enter the old and
the new passwords.
• To remove the password, click Restrict Editing: Turn Off, then enter the current password to
remove the configuration lock.
If the password is set and the user tries to view or modify the virtual machine configuration, a dialog
will be displayed asking to provide the password. Without the correct password the user will be
denied access to the virtual machine configuration dialog.
Using Command Line Tools to Set the Password
In addition to the graphical user interface, you can use the prlctl command-line utility to set,
reset, and view the password protection of a virtual machine.
To set the password, type the following command in Terminal:
prlctl set "vm_name" --password-to-edit
where vm_name is the virtual machine name in quotes.
You'll be asked to enter a password and then confirm it.
35
Page 36

Parallels Desktop for Mac Business Edition Features
Please enter a new password:
Please confirm password:
To change or remove the password, type the following command:
prlctl set "vm_name" --password-to-edit
where vm_name is the virtual machine name in quotes.
You'll be asked to enter the current password.
Please enter current password:
You will then be asked to enter and confirm a new password. To remove the password, leave the
line blank and press Enter twice (when asked to enter and confirm the password).
Please enter a new password:
Please confirm password:
To view the current protection status, type the following command:
prlctl list "vm_name" -i
The output will look similar to the following:
Encrypted: no
Edit restricted: yes
Compatibility with Other Parallels Desktop Versions
The described functionality works only in Parallels Desktop 7 or later. If you set a password in a
virtual machine and then open the virtual machine in an earlier version of Parallels Desktop, the
protection will NOT work (i.e. the user will be able to view and modify the virtual machine
configuration).
You can only set or remove the password in Parallels Desktop Business Edition. However, if the
password is set and the virtual machine is opened in the Parallels Desktop Standard Edition, the
password will continue to work (i.e the virtual machine configuration will remain locked).
Locking Virtual Machine on Suspend
To avoid possible security and privacy issues, a suspended Windows virtual machine can be
completely locked from user interaction and viewing. When this option is enabled and a virtual
machine is suspended, the Windows desktop in the virtual machine window (and in the Parallels
Desktop Control Center) is replaced with a black background and the Windows session is
interrupted. When the virtual machine is resumed, the Windows session is remained locked and the
user will have to enter their user ID and password to unlock it and to see the Windows desktop.
To enable or disable this option:
1 In OS X, open Parallels Desktop and select the desired virtual machine (e.g. the source virtual
machine when preparing it for mass deployment).
2 On the Parallels Desktop menu bar, select Actions > Configure to open the virtual machine
configuration dialog.
36
Page 37

Parallels Desktop for Mac Business Edition Features
3 Click the Security tab.
4 Depending on your needs select or clear the On Suspend: [ ] Always lock Windows option.
5 Close the dialog.
Note: The On Suspend: [ ] Always lock Windows option is available only for virtual machine running
Windows with Parallels Tools installed. For all other virtual machines, the option will be hidden.
Encrypted Virtual Machines
A Parallels virtual machine can be encrypted using the Parallels Desktop graphical user interface.
You can also use the prlctl command line utility (included with Parallels Desktop) to perform the
full set of encryption operations on a virtual machine.
The following encryption command line options are available:
• Encrypt a virtual machine
prlctl encrypt <ID | NAME>
• Decrypt a virtual machine
prlctl decrypt <ID | NAME>
• Change the encryption password
prlctl change-passwd <ID | NAME>
The <ID | NAME> parameter can be either the virtual machine ID or the virtual machine name.
When encrypting a virtual machine, you'll be asked to enter a password phrase, which will be used
to encrypt the machine. When decrypting a virtual machine, you will be asked to enter the current
password. When changing the password, you'll be asked to enter the old password and then the
new password.
The encryption password will also be required to perform any other command line operation on an
encrypted virtual machine, including starting, stopping, restarting, pausing, suspending, cloning,
deleting a virtual machine, etc. For example, to start an encrypted virtual machine, you'll use the
following command:
$ prlctl start my_virtual_machine
After executing the command above, you'll be asked to enter the password:
Virtual machine "my_virtual_machine" is encrypted - password required to continue
operation
Please enter password:
After typing in the correct password, you'll see the following output:
Starting the VM...
The VM has been successfully started.
If you need to execute a command remotely without having to enter the password on every Mac,
you can send the password via standard input (stdin) as shown in the following example:
37
Page 38

Parallels Desktop for Mac Business Edition Features
$ echo mypass | prlctl start my_virtual_machine
Virtual machine 'my_virtual_machine' is encrypted - password required to continue
operation
Please enter password:
Starting the VM...
The VM has been successfully started.
If you need to provide two passwords (as with the change-passwd command that changes the
password), you can save the passwords to a text file and then use the following syntax:
$ cat /tmp/pass | prlctl change-passwd my_virtual_machine
Virtual machine 'my_virtual_machine' is encrypted - password required to continue
operation
Please enter password:
Please enter new password:
The password has been successfully changed.
The /tmp/pass file in the example above should contain the old password on the first line and the
new password on the second line:
$ cat /tmp/pass
mypass
newpass
Running Virtual Machines in the Background ("headless" mode)
Parallels Desktop Business Edition allows to run virtual machines as background processes without
the graphical user interface displayed on the Mac desktop. This is sometimes called the "headless"
mode. Parallels Desktop is also run as a background process (service) in this mode and is able to
start the virtual machines automatically on Mac startup.
With this functionality you can run multiple virtual machines on a single high-performance Mac
providing virtual machine access to your users. The users can connect to their designated virtual
machines via VNC, RDP, SSH, or other remote tools.
This chapter describes how to set up and run Parallels Desktop and the virtual machines as
background processes.
System Requirements
To run Parallels Desktop as a service, you need:
• Parallels Desktop build 9.0.23350 or later.
• OS X 10.7.4 or later.
Configuring Parallels Desktop to Run as a Service
By default, Parallels Desktop is installed as an OS X application with a graphical user interface. To
configure it to run as a service, do the following:
38
Page 39

Parallels Desktop for Mac Business Edition Features
1 Open Parallels Desktop and click Parallels Desktop > Preferences in the menu bar. The
preferences window opens.
2 On the General tab page, select the On Mac Startup: [ ] Start Parallels Desktop as a
service option.
3 Select the On Quit: [ ] Disable Resume for Parallels Desktop option. When this option is
selected, a virtual machine will be shut down according to its startup and shutdown settings. If
this option is cleared, the virtual machine will be either suspended or stopped regardless of its
startup and shutdown settings or the user input. The rule of thumb is, if you want your virtual
machines to continue running after the Parallels Desktop application is closed, you should
select the Disable Resume for Parallels Desktop option.
To better understand this feature, consider the following scenario:
1. Parallels Desktop is running as a service.
2. The Mac user opens the Parallels Desktop application (the graphical user interface) to
change some setting or to look at the virtual machine window.
39
Page 40

Parallels Desktop for Mac Business Edition Features
3. The user then closes the virtual machine window. Depending on the virtual machine startup
and shutdown settings (see Configuring Virtual Machines to Run in the Background (p.
40)), it will be either kept running in the background, suspended, stopped, or a message will
be displayed
4. Suppose the message above is displayed and the user clicks Keep Running to keep the
virtual machine running in the background. If the user then closes the Parallels Desktop
application and the Disable Resume for Parallels Desktop option is cleared, the virtual
machine may be suspended or stopped depending on the OS X system preferences
settings. This can happen regardless of the virtual machine startup and shutdown settings
or the user input. The OS X system setting that control this behavior can be found in
System Preferences > General > Closing windows when quitting an application.
to the user asking what to do.
This option is disabled by default in OS X 10.7 and enabled in OS X 10.8. The Disable
Resume for Parallels Desktop option, when selected, overrides this OS X setting for
Parallels Desktop (other OS X applications are not affected). Therefore, if you don't want
your virtual machines to be suspended or stopped, you should either disable the Closing
windows when quitting an application setting in OS X preferences or select the Disable
Resume for Parallels Desktop option in Parallels Desktop preferences.
4 Restart the Parallels Desktop application to start the Parallels Desktop service.
You now need to configure your virtual machines to run in the background. The following section
describes how to do it.
Configuring Virtual Machines to Run in the Background
To configure a virtual machine to run in the background, follow these steps:
1 Open the virtual machine configuration dialog.
40
Page 41

Parallels Desktop for Mac Business Edition Features
2 Click Options and then select Startup and Shutdown.
3 In the Start Automatically menu, select When Mac starts. This tells the Parallels Desktop
service to start the virtual machine automatically when OS X starts.
4 In the Startup delay field, set the automatic startup delay, in second. If you have multiple virtual
machines with no autostart delay set, they will start concurrently when you start or restart the
host computer. By using the autostart delay you can reduce the load on the host during
startup. The autostart delay option can also be helpful when one or more virtual machines
depend on a service running in another virtual machine. By setting the autostart delay option for
virtual machines, you can ensure that the virtual machine providing the service is up and
running before the other virtual machines are started. You can also set the startup delay using a
command line interface (see below).
5 In the On Mac Shutdown menu, select Suspend. This tells the Parallels Desktop service to
suspend the virtual machine when the Mac is shut down or restarted.
6 In the On Windows Close menu, select Keep running in background (or Ask me what to do
if you want a dialog displayed when you close the virtual machine window). This way the virtual
machine will not be accidentally shut down or suspended when you open and close its window
while Parallels Desktop is running as a service.
7 Set the rest of the options according to your usual preferences.
8 Close the virtual machine configuration dialog and start the virtual machine.
41
Page 42

Parallels Desktop for Mac Business Edition Features
You may now close the virtual machine window and the Parallels Desktop application. This will only
close the graphical user interface. The Parallels Desktop service and the virtual machines will
continue to run in the background (provided the virtual machines and Parallels Desktop were
configured correctly as described in this and previous sections of this guide).
Setting Startup Delay Using CLI
To set an automatic startup delay for a virtual machine using a command line interface:
prlctl set ID|name --autostart-delay number
where ID|name is the virtual machine ID or name, and number is the startup delay in seconds.
Managing the Parallels Desktop Service
You can manage the Parallels Desktop service using launchctl, the standard OS X command
line utility that allows to manage daemons, applications, processes, etc. The name of the Parallels
Desktop service is com.parallels.desktop.launchdaemon. See usage examples below.
Examples of using launchctl:
To see if the Parallels Desktop service is running:
$ sudo launchctl list | grep parallels
8421 - com.parallels.desktop.launchdaemon
To stop the Parallels Desktop service:
$ sudo launchctl stop com.parallels.desktop.launchdaemon
To start the service
$ sudo launchctl start com.parallels.desktop.launchdaemon
If Parallels Desktop is running as a service and you want to change the Parallels Desktop or a virtual
machine preferences (or you simply want to see a virtual machine window), you can open the
Parallels Desktop application (the graphical user interface) at any time by double-clicking the
Parallels Desktop icon. While the application is running, you can work with it as usual. When you
are done, you can close the virtual machine window and the Parallels Desktop application. The
Parallels Desktop service will keep running in the background. The virtual machine will keep running
if configured to do so (described in the previous sections of this document).
You can also view and modify Parallels Desktop and virtual machine settings using the standard
Parallels Desktop command line tools. This may be helpful if you can't access the Mac directly (e.g.
it is located in a different building, it doesn't have a monitor and keyboard, etc.). Simply connect to
the Mac using SSH (or some other client) and use the prlsrvctl utility to manage Parallels
Desktop and prlctl utility to manage virtual machines. The documentation for both utilities is
included with Parallels Desktop and is available via command line.
42
Page 43

Parallels Desktop for Mac Business Edition Features
If Parallels Desktop is running as a service and you want to change it to run as an application, open
the Parallels Desktop application (by double clicking the Parallels Desktop icon) and modify the
Start Parallels Desktop as a service option as described in the previous section. Restart the
Parallels Desktop application for the changes to take effect.
Configuring Expiring Virtual Machine
You can set an expiration date for a virtual machine. This can be a useful option if you are preparing
a virtual machine for a contractor (or a third party user) and want to make sure that it works only for
the duration of the contract.
To set an expiration date for a virtual machine:
1 In OS X, open Parallels Desktop and select the desired virtual machine.
2 On the Parallels Desktop menu bar, select Actions > Configure to open the virtual machine
configuration dialog.
3 Select the Security tab.
4 An expiration date can only be set on an encrypted virtual machine. If your machine is not yet
encrypted, click Encryption: Turn On, specify an encryption password, and click OK. Make
sure to record the password or you will not be able to start the virtual machine. Wait until the
encryption process finishes.
5 To set an expiration date for the virtual machine, click Expiration Date: Set Date, specify a
password and click OK. Make sure to record the password to be able to change the expiration
settings later. You should keep this password secret to prevent the prospective user of the
virtual machine from changing the expiration date.
6 On the next screen, specify the following options:
• Do not allow this VM start after: specifies the virtual machine expiration date.
• Contact info: specifies the system administrator email, phone number, or other contact
information. This information will be included in the message that will be displayed to the
user when the virtual machine is about to expire. You can include each piece of information
on a separate line.
• Time Server: specifies the time server URL. The virtual machine expiration time will be
checked against this server. The default time server is https://parallels.com.
• Date Check Frequency: specifies how often the date and time should be verified against
the time server. You can specify it in minutes, hours, or days.
• If unable to check date, use VM for: specifies for how long the virtual machine should be
kept working if the time server cannot be reached. For the duration of this period, the virtual
machine will continue to check the date. If it succeeds before this period is over, the counter
is reset and the virtual machine will continue to work normally.
7 Click OK when done entering the expiration info.
43
Page 44

Parallels Desktop for Mac Business Edition Features
8 To modify the current expiration date or password, click Expiration Date: Change Date or
Expiration Date: Change Password and enter the new values.
Note: When giving the virtual machine to a contractor, make sure to provide them the encryption
password, which is needed to start the virtual machine. Please note that this is NOT the expiration date
password you've set in step 5 above. This is the password you set when you encrypted the virtual
machine.
When the expiration date approaches, the virtual machine user will be notified as follows: a
message will begin to be displayed seven days before the expiration date. The message will be
shown to the user every 24 hours and additionally on every virtual machine startup. Once the date
is reached, the virtual machine will be locked, so the user will not be able to start or resume it
anymore.
Resetting Guest OS User Password
If a virtual machine user forgets the password of their guest OS account (e.g. Windows user
password), it can be reset outside the virtual machine using the command line interface.
To use this functionality the following conditions must be met:
• Parallels Tools must be installed in the guest OS.
• The virtual machine must be running. If it's stopped, start it and wait until you see the guest OS
login prompt.
• Depending on your requirements, the following option can be selected or cleared in the virtual
machine configuration dialog: Security > Require Password to: [ ] Change guest OS
password via CLI. If this option is selected, you will be asked to provide the OS X administrator
password to change the guest OS password from the OS X command line. If the option is
cleared, the administrator password will not be required. By default, the option is cleared.
To reset the password, open Terminal in OS X and enter the following command:
prlctl set vm_name --userpasswd username:new_password
where:
• vm_name is the virtual machine name. To obtain the list of virtual machines installed on this
Mac, type prlctl list.
• username is the guest OS user name.
• new_password is the new password.
Example:
prlctl set My_Win8_VM --userpasswd JohnDoe:A12345
If the Require Password to: Change guest OS password via CLI option is selected in the virtual
machine configuration dialog (see above), the command will display the following text and prompt:
Only host administrator can change user password in the guest OS.
44
Page 45

Parallels Desktop for Mac Business Edition Features
Confirm your administrator credentials.
Username:
Enter the name of the OS X user with administrative privileges and press the Enter key. Type the
user password and press Enter again.
Once the new password is set, you can use it to log in to the guest OS.
Creating Linked Clones
A clone is a copy of an existing virtual machine. The result of a cloning operation is a virtual
machine that is identical to the original virtual machine. A clone has the same configuration as the
original, the same guest OS, and the same installed applications and data. The only exception is
the virtual machine UUID and the MAC address of the network adapter, which are reset
automatically during the cloning operation.
There are two types of cloning operations in Parallels Desktop:
• Full cloning. When you create a full clone, all of the files comprising the virtual machine are
copied, so the new virtual machine is created as completely independent from the original
virtual machine.
• Linked cloning. A linked clone is a virtual machine that shares the read-only areas of the virtual
hard disk with the original virtual machine. When you create a linked clone, the original virtual
hard disk file is not copied. Instead, both the original virtual machine and the clone use the
same hard disk with the shared areas of it marked as read-only. When any of the virtual
machines make any changes to the hard disk data, a new independent storage is created for it
which only that virtual machine can read from and write to. The unaffected areas of the original
virtual hard disk are continued to be shared between the original virtual machine and the clone.
This functionality allows to save a considerable amount of disk space on the Mac hosting the
virtual machines.
Before Your Create a Linked Clone
Before creating a linked clone of an existing virtual machine, make sure that:
• The original virtual machine is stopped.
• The original virtual machine is not encrypted.
Creating a Linked Clone
To create a linked clone of an existing virtual machine:
1 In Parallels Desktop Control Center, select the virtual machine you want to clone.
2 On the Parallels Desktop menu bar, select File > New Linked Clone.
3 Select the target folder. By default, Parallels Desktop saves clones in the Documents >
Parallels folder.
45
Page 46

Parallels Desktop for Mac Business Edition Features
4 Click Save to begin the cloning operation.
Creating a Linked Clone from a Snapshot
In addition to creating a linked clone from the current virtual machine state, you can choose an
existing snapshot of a virtual machine and create a linked clone from it. You don't have to revert the
original virtual machine to the snapshot to create a clone from it.
To create a linked clone from a snapshot:
1 In Parallels Desktop Control Center, select the virtual machine you wish to clone and open its
window.
2 On the Parallels Desktop menu bar, select Actions > Manage Snapshots.
3 Select a snapshot from which you wish to create a clone.
4 Click the New Linked Clone button.
5 Select the target folder. By default, Parallels Desktop saves clones in the Documents >
Parallels folder.
6 Click Save to begin the cloning operation.
Working with Linked Clones
From the user point of view, a linked clone is just like a regular, completely separate virtual
machine. A user of a linked clone doesn't see what's going on in the original virtual machine and
other linked clones, and vice versa. The virtual hard disk sharing and independent storage
management is done in the background transparently to the virtual machine users.
When you create a linked clone, the virtual hard disk is shared almost completely between the
original and the clone(s). When the users of the linked clones begin to install applications, add data,
or make any other changes inside their virtual machines, a dedicated disk space is allocated to
them where these changes are saved. As a result, the total usage of the host's disk space
increases. Still, a large portion of the system and application data on the original virtual disk
continues to be shared between the original virtual machine and the linked clones, so the overall
host's disk usage remains much lower than if these were independent virtual machines. Provided
that the virtual machine users don't do anything drastic, like installing a different operating system,
the linked clones normally take much less disk space than independent virtual machines.
For the linked clones to work, the following must be observed:
• You must not delete the original virtual machine. If you do, the linked clones will no longer work.
• If you created a linked clone from a virtual machine snapshot, the snapshot and its entire history
in the original virtual machine must not be deleted.
• You should not encrypt the original virtual machine if there are existing linked clones that were
created from it. Doing so will make the linked clones inoperable.
46
Page 47

Parallels Desktop for Mac Business Edition Features
NetBoot Support for OS X Virtual Machines
NetBoot is a technology from Apple that allows to boot a Mac computer from a network. Parallels
Desktop Business Edition provides NetBoot support for OS X virtual machines. Using this
functionality, you can boot a virtual machine from a network and install (or reinstall) a desired
version of OS X on it.
To NetBoot an OS X virtual machine, the following requirements must be met:
1 A NetBoot server hosting a NetBoot or NetInstall image must be set up and running on your
network. If you don't know how to do it, read the NetBoot documentation from Apple first.
2 Parallels virtual machines can boot from the default image only, which means that the default
image on the NetBoot server must be the one you want your VMs to boot from.
3 A virtual machine must be of the Mac OS X type. When creating a new virtual machine, select
Mac OS X as the operating system.
4 Unlike physical Macs, a virtual machine will NOT boot from a network if you hold down the N
key. A virtual machine will choose a boot device (hard disk, CD/DVD, network) according to its
boot order list. The following scenarios need to be considered:
• If a virtual machine is blank (OS X is not installed on it yet), it will try to boot from the hard
disk first, then the CD/DVD, and then the network (the default boot order). Since there's no
OS X on either the hard disk or the CD/DVD, the boot from these devices will fail and the VM
will boot from the network (NetBoot).
• If a virtual machine has a bootable disk but you want it to boot from a network instead,
Network must be specified as the first item in the VM's boot order list. To make this
modification, open the virtual machine configuration dialog, select Hardware > Boot Order,
and then move the Network item to the top of the boot order list.
5 When the virtual machine boots from the network, you can use the standard OS X utilities to
install or reinstall the operating system on it.
Setting Up Local Update Server
With the Business Edition of Parallels Desktop you can set up a local update server on your
network from which Mac users can get Parallels Desktop updates. Updates are released
periodically to improve the performance and reliability of Parallels Desktop. To reduce Internet traffic
when downloading updates, you can set up a local update server, download the available updates
to it, and then set up individual Macs on your network to take the updates from it instead of the
Internet. Read on to learn about setting a local update server.
47
Page 48

Parallels Desktop for Mac Business Edition Features
Installing Web Server
To set up a Parallels Desktop update server, you'll need a local Web server. Install a Web server on
a computer connected to your network (or use an existing one).
Creating Parallels Update XML File
Create a file named parallels_updates.xml on the Web server where it can be accessed via
HTTP. The file is an XML document that should contain specifications for a particular Parallels
Desktop update available on your local updated server.
To create your own document, use the following sample XML document and the XML document
specification that follows it as a reference.
Sample parallels_updates.xml file
<?xml version="1.0" encoding="UTF-8"?>
<ParallelsUpdates schemaVersion="1.0">
<Product>
<ProductName>Parallels Desktop</ProductName>
<UpdateEnabled>1</UpdateEnabled>
<Version>
<Major>8</Major>
<Minor>0</Minor>
<SubMinor>12494</SubMinor>
<SubSubMinor>262214</SubSubMinor>
<StringRepresentation>Sumer</StringRepresentation>
<Update uuid="desktop.8.0.13291.237436.en_US.parallels.mac">
<UpdateType>0</UpdateType>
<UpdateName>Build 13291 is available!</UpdateName>
<UpdateDescription>Update description goes here</UpdateDescription>
<FilePath>URL to the update file goes here</FilePath>
<FileSize>219515</FileSize>
<Status>0</Status>
<DateTime>2012-06-17 01:23:00</DateTime>
<Chargeable>0</Chargeable>
<LocaleName>en_US</LocaleName>
<DistributorName>parallels</DistributorName>
<OsType>mac</OsType>
<Ancestry>
<Ancestor>desktop.8.0.12927.482436.en_US.parallels.mac</Ancestor>
<Ancestor>desktop.8.0.12473.274921.en_US.parallels.mac</Ancestor>
<Ancestor>desktop.8.0.12262.823647.en_US.parallels.mac</Ancestor>
</Ancestry>
</Update>
</Version>
</Product>
</ParallelsUpdates>
XML Document Specification
Name Type Description
ParallelsUpdates
48
Root element.
Page 49

Parallels Desktop for Mac Business Edition Features
Product
ProductName
UpdateEnabled
Version
Major
Minor
SubMinor
SubSubMinor
StringRepresentation
Update
string Use "Parallels Desktop".
int
int
int Minor version number. Specify 0.
Container for Parallels Desktop information.
Specifies whether the automatic updates are enabled. To
enable updates, specify 1.
Container for Parallels Desktop version information.
Major version number.
For Parallels Desktop 7, specify 7.
For Parallels Desktop 8, specify 8.
Build number. This element may be empty.
Revision number. This element may be empty.
Product codename. This element may be empty.
Container for the information about the Parallels Desktop
update.
Attributes:
uuid — string; a globally unique ID identifying the
product.
The uuid attribute is very important and must contain the
correct information for the update to work. The attribute
value consists of the following parameters (substrings)
separated by periods (see the provided XML example):
desktop — specify "desktop".
UpdateType
UpdateName
UpdateDescription
FilePath
FileSize
Status
DateTime
major — major version number (8).
minor — minor version number (0).
build — build number.
revision — revision number.
locale — locale ("en_US", "de_DE", etc).
vendor — vendor ("parallels").
platform — platform ("mac").
int Update type. Specify 0.
string The name for the update, user-defined.
string The update description.
string
int The update file size, in megabytes.
int Specify 0.
string
A URL to the update file on your local update server. The
actual update files can be obtained from Parallels.
Date and time when the updated was published. Use the
following format:
yyyy-mm-dd hh:mm:ss
49
Page 50

Parallels Desktop for Mac Business Edition Features
Chargeable
LocaleName
DistributorName
OsType
Ancestry
Ancestor
int Specify 0.
string Locale name ("en_US", "it_IT", etc).
string
The update distributor name. Specify "parallels".
Operating system type. Specify "mac".
Container for the list of updates that directly preceded this
update.
An individual Parallels Desktop update information.
This element may appear more than once in the same
document, one for each update.
The value is combined using the following parameters
(substrings) separated by periods (see the provided XML
example):
desktop — specify "desktop".
major — Parallels Desktop major version number.
minor — minor version number.
build — build number.
revision — revision number.
locale — locale ("en_US", "ru_RU", etc.)
vendor — vendor ("parallels").
platform -— platform ("mac").
Configuring Individual Macs
The next step involves configuring individual Macs to take their updates from the local update
server. This can be done automatically during the mass deployment of Parallels Desktop by
modifying the appropriate deployment configuration option. Please see the Changing Deployment
Configuration Options section (p. 60) for the complete info (see the description of the Software
Updates section of the
If you have an existing Parallels Desktop installation that was not configured for automatic updates
during deployment, then read on to learn how to do it manually.
Note: The information provided here applies only to Parallels Desktop installations that were not
configured for automatic updates during the mass deployment process.
To configure the Parallels Desktop automatic updates, you need to modify the Parallels Desktop
property list file on a Mac as follows:
1 Find the com.parallels.Parallels Desktop.plist file located in the
Library/Preferences subfolder in the user's home folder. This is the Parallels Desktop
property list file that contains the user-specific information.
configuration file).
50
Page 51

Parallels Desktop for Mac Business Edition Features
2 Open the file using the Property List Editor application (included with OS X).
3 Set the update policy by modifying the Application
Preferences.VolumeLicenseUpdatePolicy property. If the property doesn't exist, add
it to the file specifying its data type as String. Set the property value using one of the following
options (see also the Notes subsection below):
• "Parallels" — when this value is set, the updates will be downloaded from the Parallels
update server via the Internet. The value is case-sensitive.
• Complete URL of the parallels_updates.xml file residing on your local update server.
For example, "http://10.0.0.1/pdfm/v8/en_us/parallels/parallels_updates.xml". When the
URL is specified, the updates will be obtained from the local update server.
• "None" — automatic updates are disabled. The value is case-sensitive.
4 Specify how often Parallels Desktop should check for updates. This is done by modifying the
Application Preferences.Check for updates property. If the property doesn't exist,
add it to the file specifying its data type as Number. Specify the property value using one of the
following options:
• 0 -— Never.
• 1 — Once a day.
• 2 — Once a week.
• 3 — Once a month.
5 Set the automatic download option. Find the Application preferences.Download
updates automatically property. If it doesn't exist, add it to the file specifying its data
type as Boolean. Set the property value using one of the following options:
• true — Download updates automatically. Specify this value when using a local update
server.
• false — Notify the user about the updates but don't download them automatically. This
option is useful only when updates are downloaded from the Parallels update server and the
user has full control over the update functionality.
6 Save the file and close the Property List Editor application.
Note: If Parallels Desktop is running while you are modifying the plist file, it will have to be restarted for
the changes to take effect.
Notes
On initial Parallels Desktop activation using a Business Edition key, the Parallels Desktop update
properties will be absent from the com.parallels.Parallels Desktop.plist file. In such a
case, a Mac user will be able to configure Parallels Desktop automatic updates using the Parallels
Desktop graphical user interface.
51
Page 52

Parallels Desktop for Mac Business Edition Features
When the update-related properties are added to the com.parallels.Parallels
Desktop.plist file, the automatic updates will be performed according to the specified values.
In addition, the value of the Application Preferences.VolumeLicenseUpdatePolicy
property will affect the Parallels Desktop update-related elements in the Parallels Desktop graphical
user interface as follows:
• If the property contains a URL of the local update server or "None", the Parallels Desktop
update-related controls will be disabled (grayed out) in the Parallels Desktop graphical user
interface. The displayed settings will have no effect on how the Parallels Desktop updates are
carried out. Therefore, the user will not be able to configure automatic updates or check for
updates manually.
• If the property doesn't exist, has no value, or contains "Parallels" as a value, the Parallels
Desktop update controls will be enabled in the user interface giving the user the ability to
configure automatic updates and check for updates manually.
Note: The Application Preferences.VolumeLicenseUpdatePolicy property value has no
effect when Parallels Desktop is activated using the Parallels Desktop Standard Edition license key.
Customizing Request Support Option
The Parallels Desktop graphical user interface has a menu option named Help > Request
Support. By default, this option opens a screen with the Parallels technical support information.
With the Business Edition of Parallels Desktop you can customize the action performed by this
menu option.
The following choices are available:
• The menu option can display the following default text message: "Please contact your system
administrator for assistance." The message cannot be modified.
• The menu option can open a custom URL, such as a corporate Help Desk or a wiki page. The
system administrator can specify a custom URL (read below).
The customization can be done during mass deployment of Parallels Desktop by modifying the
appropriate deployment configuration parameter. Please see the Changing Deployment
Configuration Options section (p. 60) for the complete info (see the description of the Help and
Support section of the configuratio
You can also make these changes manually on an individual Mac as follows:
1 Log in to the Mac.
2 In the Finder, navigate to the /Users/<User_Name>/Library/Preferences directory
and locate the com.parallels.Parallels Desktop.plist file.
n file).
3 Open the file using the Property List Editor application, which is included with OS X.
52
Page 53

Parallels Desktop for Mac Business Edition Features
4 Find the SupportRequestUrl property in the file. If the property doesn't exist, add it to the
file specifying its data type as String.
5 To specify the action that should be performed by the Help > Request Support menu, set the
value of the SupportRequestUrl property:
• To display the default text message, clear the property value.
• To open a URL, specify the full URL to the desired Web page or a resource.
Note: The SupportRequestUrl property value has no effect when Parallels Desktop is activated using
the Parallels Desktop Standard Edition license key.
Participating in Customer Experience Program
The Parallels Customer Experience Program is a feedback solution that allows Parallels Desktop to
automatically collect usage statistics and system information that will help Parallels to develop new
features and updates for future releases. When you install Parallels Desktop on a Mac computer, it
is automatically set up to participate in the Customer Experience Program. If you want to turn the
participation off, you can use the prlsrvctl command line utility and execute the following
command on every Mac after installing Parallels Desktop:
prlsrvctl set --cep off
To turn the participation in the Customer Experience Program back on, execute the following
command:
prlsrvctl set --cep on
The same actions can also be done through the Parallels graphical user interface by clicking
Parallels Desktop > Preferences > Advanced and then selecting (or un-selecting) the Feedback
option.
If you are using the Parallels mass deployment package to deploy Parallels Desktop, you can set
this option in the deployment configuration file (p. 60). When that's done, Parallels Desktop will be
installed on
a Mac with this option already set as desired.
Parallels Desktop License Renewal
A Parallels Desktop Business Edition license is renewed automatically via the Internet. When
Parallels Desktop is running on a Mac, it sends a license renewal request to the Parallels Key
Administrator server at random intervals. Once a license update is available, it is automatically
downloaded and installed.
Parallels Desktop uses port 443 (the standard SSL port) to communicate with the Parallels Key
Administrator server from which it obtains license updates. If you are not using the most recent
version of Parallels Desktop, please read the Note section below for additional information.
53
Page 54

Parallels Desktop for Mac Business Edition Features
Note
Port 443 is used for license renewal by Parallels Desktop 8 build 8.0.18345.820589 and newer.
Older versions of Parallels Desktop use a non-standard port 5224.
For more information about Parallels Desktop Business Edition licensing, please contact your
Parallels sales representative
54
Page 55

C HAPTER 4
Mass Deployment of Parallels Desktop and Virtual Machines
This chapter describes mass deployment of Parallels Desktop Business Edition. It provides stepby-step instructions on how to prepare the deployment package and how to deploy it using the
available deployment tools.
In This Chapter
Prerequisites ............................................................................................................ 55
Supported Deployment Tools................................................................................... 56
Preparing Parallels Desktop Deployment Package.................................................... 57
Deploying Parallels Desktop and Virtual Machines to Macs....................................... 66
Prerequisites
To mass deploy Parallels Desktop Business Edition you'll need:
• A Mac computer on which you'll prepare the Parallels Desktop deployment package. The Mac
must have Parallels Desktop installed in order create and configure virtual machines to be
deployed together with Parallels Desktop itself.
• A Windows or a Mac computer from which you'll be performing the deployment. If you are
using Parallels Mac Management for SCCM, you'll be deploying Parallels Desktop from a
Windows computer running the Configuration Manager console. If you are using Apple Remote
Desktop, you'll be deploying Parallels Desktop from a Mac running the Apple Remote Desktop
Admin. For other remote deployment tools, see their respective system requirements.
• The Parallels Desktop for Mac installation image file (the file with the ".dmg" extension). This is
the same image file that you use to install Parallels Desktop on a single Mac.
• A Parallels Desktop for Mac Business Edition license key provided to you by your Parallels sales
representative.
• The Parallels Desktop Autodeploy.pkg file contained in the same .zip file that
contains this documentation. The file is an OS X installation package that contains the
framework for deploying Parallels Desktop. If for any reason you cannot find it, you can
download the .zip file containing it from the following location:
http://download.parallels.com/desktop/tools/pd-autodeploy.zip
Page 56

Mass Deployment of Parallels Desktop and Virtual Machines
Note: If you deployed Parallels Desktop in the past and have a prepared deployment package from that
time, don't use it because it may not be compatible with your build of Parallels Desktop. Always
download the latest version of the Parallels Desktop Autodeploy.pkg from the Parallels
website using the link above.
Download or copy the deployment package file to the Mac computer where you'll be preparing
it for the deployment of Parallels Desktop and virtual machines.
For the list of hardware and operating system requirements for running Parallels Desktop, please
refer to Parallels Desktop User's Guide.
Supported Deployment Tools
Parallels Desktop Business Edition can be deployed to Macs using one of the available Mac
package deployment tools. The available options are described below.
Parallels Mac Management for Microsoft SCCM 2012
Parallels Mac Management for Microsoft System Center Configuration Manager (SCCM) is an
optimal solution that offers comprehensive management of Mac devices throughout the company.
One of the features of Parallels Mac Management is the ability to deploy Parallels Desktop on
managed Mac computers.
The complete instructions on how to use Parallels Mac Management to deploy Parallels Desktop
are provided later in this guide.
Other Mac Management Tools
If you don't use Parallels Mac Management for Microsoft SCCM to manage your Macs, you can
use one of the following tools to deploy Parallels Desktop:
• Apple Remote Desktop (ARD)
• JAMF Casper Suite
• IBM Endpoint Manager
The complete instructions on how to use Apple Remote Desktop are provided later in this guide.
For the instructions on how to use other tools, please see their respective documentation.
56
Page 57

Mass Deployment of Parallels Desktop and Virtual Machines
Preparing Parallels Desktop Deployment Package
Before the Parallels Desktop deployment package can be deployed on target Macs, the Parallels
Desktop installation image must be added to it and the Parallels Desktop license key must be
specified. When deploying virtual machines, the virtual machine files must also be included in the
package. The deployment configuration options can then be customized according to your
requirements.
The following sections describe how to add the necessary files and how to make the desired
modifications to the Parallels Desktop deployment package.
Adding Parallels Desktop Installation Image
To deliver the Parallels Desktop installation image to target Macs, you need to include it in the
deployment package.
To add the image file to the package:
1 On a Mac computer to which you've downloaded the Parallels Desktop
Autodeploy.pkg file, right-click the file and then click Show Package Contents.
2 Expand the Parallels folder to see its contents. The folder should contain the deploy.cfg
file. This is the deployment configuration file, which you will modify later.
57
Page 58

Mass Deployment of Parallels Desktop and Virtual Machines
3 Copy the Parallels Desktop installation image file to the Parallels folder. Your package
contents should now look like this:
Adding Virtual Machines
To add a virtual machine to the deployment package, simply copy the virtual machine file (.pvm) to
the Parallels folder (the same folder in the package that contains the deploy.cfg file and the
Parallels Desktop installation image). You can include more than one virtual machine.
Before copying a virtual machine to the deployment package, you should configure it according to
your needs. Read the following subsections for the information about the modifications that you
can make to the virtual machine configuration prior to adding it to a deployment package.
Installing Parallels Tools
Parallels Tools is a collection of utilities and drivers that vastly improve the virtual machine
performance and enable some features that are not available otherwise. Parallels Tools are included
with every copy of Parallels Desktop and are highly recommended to be installed in every virtual
machine right after an operating system is installed in it. Your source virtual machine should have
Parallels Tools installed.
Generating Windows SID and Computer Name
When you deploy a virtual machine that runs Windows as a guest operating system, the deployed
copies of Windows will have the same Windows Security ID (SID) and computer name as the
source. You can set up Windows in the source virtual machine in such a way that the SID and
computer name will be reset in each deployed copy of Windows on its initial startup.
58
Page 59

Mass Deployment of Parallels Desktop and Virtual Machines
Using Sysprep to Reset SID and Computer Name
Microsoft System Preparation (Sysprep) is a Microsoft tool that can be used to prepare Windows to
be deployed on other computers. If your virtual machine is running Windows 8, Windows 8.1,
Windows Server 2012, or Windows Server 2012 R2, use the Sysprep.exe command-line utility.
To reset the security ID (SID), include the /generalize option as shown in the following example:
Sysprep /generalize
To change the computer name, use the /oobe option that enables the user to customize their
Windows operating system, including naming the computer:
Sysprep /generalize /shutdown /oobe
For the complete description of the command-line version of Sysprep, please refer to Microsoft
documentation.
If your virtual machine is running another version of Windows, download the latest version of
Sysprep for that version from the Microsoft website and use it according to Microsoft instructions.
Other Configuration Options
When preparing a source virtual machine for mass deployment, you may change any of its
configuration settings according to your needs. The following list describes a few common options:
• Shared Folders and Profiles. Parallels Desktop offers great flexibility in bridging the
capabilities of OS X and your guest operating system by configuring shared folders and profiles.
Think over which files and folders you wish to share between the two operating systems and
set up them in advance.
• Configuring USB Settings. Hardware devices that connect through USB ports including
printers and removable drives can only be used by one operating system at a time. By default,
Parallels Desktop will ask the user which OS to connect the device to when a new device is
detected. This default can be changed by making all USB devices connect only to OS X or to
the guest operating system.
• Installing Applications. You can install all the necessary applications in the virtual machine
before deploying it.
• Parallels Desktop Business Edition Options. Parallels Desktop Business Edition provides the
following additional configuration options:
• Set up a local update server and specify the Parallels Desktop automatic update options.
• Customize the "Request Support" option.
• Configure participation in the Customer Experience program.
For the information on how to configure these options, see Changing Deployment
Configuration Options (p. 60) and P
For the complete information about Parallels virtual machine configuration, please refer to the
Parallels Desktop User's Guide.
arallels Desktop Business Edition Features (p. 32).
59
Page 60

Mass Deployment of Parallels Desktop and Virtual Machines
Supplying Parallels Desktop License Key
Parallels Desktop Business Edition license key is required to activate Parallels Desktop on target
Macs. The key must be embedded in the deployment package.
To embed the license key in the deployment package:
1 Right-click the Parallels Desktop Autodeploy.pkg file and then click Show Package
Contents.
2 Expand the Parallels folder to see its contents. The deploy.cfg file contained in the
folder is a deployment configuration file. One of the parameters is used to specify the Parallels
Desktop license key.
3 Open the deploy.cfg file in a text editor.
4 Find the License section in the file and enter your Parallels Desktop Business Edition license
key as a value of the license_key variable. The license must be supplied in the following
format: "XXXXXX-XXXXXX-XXXXXX-XXXXXX-XXXXXX" (including the quotes and dashes).
5 Save the deploy.cfg file.
To learn about other configuration parameters in the deploy.cfg file, please read the
Changing Deployment Configuration Options section (p. 60).
Note: Parallels Desktop activation requires Internet access. The Parallels Desktop activation routine uses
port 443 to communicate with Parallels licensing server. Please make sure that the Macs on which you
plan to deploy Parallels Desktop can communicate through this port. Additionally, please verify that the
Macs can reach the licensing server at desktop.parallels.com.
Changing Deployment Configuration Options
The deployment package contains a special script, which is automatically executed on a target
Mac after the package is transferred and the Parallels Desktop software is installed on it. The script
performs the necessary actions on the Mac to finalize the deployment. The script reads the
configuration parameter values from the deploy.cfg file contained in the Parallels folder of the
Parallels Desktop Autodeploy.pkg file. You can modify the configuration parameters as
needed.
The following tables describe the configuration parameters in the deploy.cfg file. You can open
the file for editing in a text editor.
License
The License section is used to specify a Parallels Desktop Business Edition license key.
Variable Description
license_key
60
Specifies the Parallels Desktop license key. See Supplying
Page 61

Mass Deployment of Parallels Desktop and Virtual Machines
Parallels Desktop License Key (p. 60) for more info.
Virtual Machines
The Virtual Machines section is used to specify virtual machine deployment options.
Variable Description
Specifies the registration mode for the deployed virtual machines.
Possible values:
"Private" — The virtual machines will be registered for the
active user only. The virtual machines will be placed into the
vm_register_mode
vm_reset_hwid
/Users/<user>/Documents/Parallels folder.
"Shared" — The virtual machines will be registered for all users
of a Mac. The virtual machines will be placed into the
/Users/Shared/Parallels folder.
The default destination folder for virtual machines can be modified
using the vm_destination_folder variable (see below).
Specifies whether the virtual machine SMBOIS ID (hardware ID)
will be regenerated. Each Parallels virtual machine is assigned a
universally unique SMBIOS ID when it is created. When you
deploy a virtual machine to many Macs, each resulting copy of
the machine will have the same SMBIOS ID. This is the default
behavior and should not be normally changed. If your enterprise
management system relies on unique SMBOIS IDs, you can
change the value of the vm_reset_hwid variable as follows:
vm_deploy_mode
"no" — Keep the original SMBIOS ID.
"yes" — Regenerate the ID.
Specifies whether the virtual machines will be copied or moved
from the deployment package to their target folders on a Mac.
Possible values:
"Copy" — Copy the virtual machine from the package to the
destination folder.
"Move" — Move the virtual machine from the package to the
destination folder.
Before a virtual machine can be registered in Parallels Desktop, it
needs to be copied (or moved) from the deployment package to
a folder on the Mac. You can specify whether to use a Copy or a
Move operation.
Copying is slower but must be used if the deployment package is
read-only or is placed on a network share. The virtual machine file
will not be removed from the package after it's been copied to a
Mac.
Moving is fast and can be used when the deployment package is
copied directly to a Mac. If the virtual machine destination folder
and the deployment package are placed on the same mount
point, the move operation completes almost instantly. The virtual
machine is removed from the package as a result. Note that
moving will be as slow as copying if the virtual machine
61
Page 62

Mass Deployment of Parallels Desktop and Virtual Machines
_
destination folder and the deployment package are placed on
different mount points.
Allows you to change the default destination folder for virtual
machines. The default folder is determined by the value of the
vm_destination_folder
<VM_file_name>
vm_register_mode variable (see above). The
vm_destination_folder variable allows you to change the
default folder while keeping the selected virtual machine
registration mode.
This variable takes a name of a virtual machine file and allows you
to change the destination location and/or name of the target
virtual machine.
The virtual machines contained in the Parallels folder of the
deployment package will be copied to a default location on a
Mac, which is determined by the vm_register_mode
variable (or the vm_destination_folder variable if is
present). If you have more than one virtual machine in this folder,
you can specify a different destination location and/or name for a
specific virtual machine if needed.
To specify a different location, you need to define a variable/value
pair as shown in the examples below. The variable name should
be the same as the virtual machine file name (including the ".pvm"
extension). The variable value should contain an absolute path
where you want the virtual machine to be copied on a Mac. You
can specify a different destination location, a different virtual
machine name, or both. Note that only the specified virtual
machine will be copied to the specified location. All other virtual
machines will be copied to the default location.
Examples:
"Shared_VM.pvm"="/Users/Shared/Shared VM.pvm"
"Private
VM.pvm"
VM.pvm"="~/Documents/Parallels/Private
The following three variables belong to the same subsection which allows you to customize the Parallels
Desktop Control Center by displaying a custom HTML banner at the top of its window. For additional
information, see Customizing Parallels Desktop Control Center (p. 33).
The URL of a custom HTML page to be displayed as a banner in
control_center_banner_url
control_center_banner_height
control_center_banner_min_widt
h
the Parallels Desktop Control Center window.
To disable the banner, comment out the variable or specify an
empty string as a value.
The banner height, in pixels. The recommended value is 350.
To use the current value (if you are updating Parallels Desktop on
a Mac), comment out the variable.
The banner minimum width, in pixels. When resizing the Control
Center window, its minimum width will be limited accordingly. The
recommended value is 350.
To use the current value (if you are updating Parallels Desktop on
a Mac), comment out the variable. To disable the minimum width
limitation, comment out the variable or specify 0 (zero) as a value.
62
Page 63

Mass Deployment of Parallels Desktop and Virtual Machines
Launch Options
The Launch Options section is used to specify whether Parallels Desktop should run as a service
on or an application.
Variable Description
Specifies whether Parallels Desktop should run as an application
or as a service.
The value of "yes" specifies that Parallels Desktop will run as a
service. The service will start automatically on host startup and
will stop on host shutdown. The service can be managed by
launchctl (the standard OS X command line utility that allows you
to manage daemons, applications, processes, etc.).
The value of "no" specifies that Parallels Desktop will run as an
OS X application. The user will have to start and exit Parallels
Desktop manually.
start_pd_as_service
Depending on whether Parallels Desktop is already installed on a
target Mac or not, the following will happen:
- If Parallels Desktop is already installed on a Mac as a service
and the value of "no" is specified, the new installation will set up
Parallels Desktop to run as an application.
- If this option is commented out and Parallels Desktop is already
installed on a Mac, no changes will be made to the way Parallels
Desktop runs.
- If this option is commented out and Parallels Desktop is not
installed on a Mac, it will run as an application.
Software Updates
The Software Updates section is used to configure Parallels Desktop automatic updates.
Variable Description
Specifies where the updates will be downloaded from.
Possible values:
"Parallels" — Download the updates from the Parallels
website over the Internet.
updates_url
updates_auto_check
"None" — Turn off automatic updates.
<URL> — Download the updates from a local update server. The
variable should contain a complete URL (in quotes) of the
parallels_updates.xml file on your local Web server. For
more information, please see Setting Up Local Update Server
(p. 47).
Specifies how often Parallels Desktop should check for updates.
Possible values:
"0" — never
"1" — once a day
63
Page 64

Mass Deployment of Parallels Desktop and Virtual Machines
"2" — once a week
"3" — once a month
Specifies the automatic update download options:
"on" — Download the updates automatically. This value should
be specified when using a local update server.
updates_auto_download
"off" — Notify the user about the updates but don't download
them automatically. This option is useful only when updates are
downloaded from the Parallels website and the user has full
control over the update functionality.
Help and Support
The Help and Support section is used to specify the action for the Help > Request Support
menu item in the Parallels Desktop graphical user interface.
Variable Description
Specifies a URL of a page that will be displayed when user
selects the Help > Request Support menu option in the Parallels
support_url
Desktop graphical user interface. To display the default message,
specify an empty string (this is the default behavior). To display
your own Web page (help desk, wiki, etc.), specify its URL. See
also Customizing Request Support Option (p. 52).
Specifies a URL that will be included in error message dialogs
related to licensing operations. The URL should point to a web
page or a resource that the user can visit to get help with the
problem.
lic_admin_url
The error message appears when there's a problem with
activating, renewing, or deactivating a Parallels Desktop license. If
you specify a URL using this variable, it will be included in the
message dialog in the form "For details click <URL>". If you don't
specify a URL (comment out the variable or specify an empty
string), the default "Contact your system administrator" message
will be displayed.
Problem Reporting
The Problem Reporting section is used to specify whether Parallels Desktop problem reports
should contain screenshots of the OS X and virtual machine desktops. You can exclude the
screenshots for security reasons.
Variable Description
"yes" — Include screenshots of the OS X and virtual machine
report_allow_screenshots
desktops in Parallels Desktop problem reports.
"no" — Do not include the screenshots.
64
Page 65

Mass Deployment of Parallels Desktop and Virtual Machines
Customer Experience
The Customer Experience section allows you to specify whether the Macs should participate in
the Parallels Customer Experience Program. The Parallels Customer Experience Program is a
feedback solution that allows Parallels Desktop to automatically collect usage statistics and system
information that will help Parallels to develop new features and updates for future releases.
Variable Description
"off" — participation in the program is turned off.
cep_participation
"on" — participation in the program is turned on.
See also Participating in Customer Experience Program (p.
53).
Security
The Security section allows you to enable or disable the password requirement for a number of
Parallels Desktop operations.
Variable Description
"on" — require an administrator password to create a virtual
password_to_create_vm
password_to_add_vm
password_to_remove_vm
password_to_clone_vm
machine.
"off" — a password is not required.
"on" — require an administrator password to add an existing
virtual machine.
"off" — a password is not required.
"on" — require an administrator password to remove a virtual
machine from Parallels Desktop.
"off" — a password is not required.
"on" — require an administrator password to clone a virtual
machine.
"off" — a password is not required.
User Experience
The User Experience section allows you to hide the Parallels Desktop Pro Edition features in the
graphical user interface. For more information about these features, see Hiding Pro Edition
Features in the Business Edition UI (p. 34).
Variable Description
"no" — hide the features in the UI.
show_developers_menu
"yes" — show the features in the UI.
65
Page 66

Mass Deployment of Parallels Desktop and Virtual Machines
Deploying Parallels Desktop and Virtual Machines to Macs
Once the deployment package contains all the necessary files and is configured as desired, you
can deploy it to Macs using one of the available remote Mac management tools. This section
provides instructions on how to deploy Parallels Desktop using the following tools:
• Parallels Mac Management for Microsoft SCCM (p. 66)
• Apple Re
Note: If you are looking for the information on how to use NetBoot to deploy an OS X image with
Parallels Desktop pre-installed, please read the Deploying OS X Image Using NetBoot section (p. 72).
mote Desktop (p. 68)
Deploying with Parallels Mac Management for Microsoft SCCM
Parallels Mac Management for Microsoft SCCM enables you to deploy Parallels Desktop to Mac
computers via the SCCM Software Distribution functionality. For the complete information about
Parallels Mac Management for Microsoft SCCM, please read the Administrator's Guide that comes
with it.
The basic steps of Parallels Desktop deployment are:
1 Prepare the Parallels Desktop deployment package (we've described this step earlier in this
guide).
2 Create a software distribution package using the Configuration Manager console.
3 Send the package to a distribution point.
4 Deploy the package.
The following describes steps 2-4 in detail.
Creating a Software Distribution Package
The Parallels Desktop deployment package is distributed to Macs using the standard Configuration
Manager functionality:
1 In the Configuration Manager console, navigate to Administration / Overview / Application
Management / Packages.
2 On the toolbar, click Create Package.
3 Use the Create Package and Program Wizard to create a software distribution package and
a program.
66
Page 67

Mass Deployment of Parallels Desktop and Virtual Machines
4 On the Package page, specify the package name and an optional description, manufacturer,
language, and version information. Select the This package contains source files option and
click Browse. Select the folder that contains the Parallels Desktop Autodeploy.pkg
folder. Please note that you must select the parent folder of the Parallels Desktop
Autodeploy.pkg folder, NOT the .pkg folder itself.
5 Click Next.
6 On the Program Type page, select the Standard program item and click Next.
7 On the Standard Program page, specify the information about the program. Type the following
in the Command line field:
chmod 700 "Parallels Desktop
Autodeploy.pkg/Contents/Resources/postflight" && installer -pkg
"Parallels Desktop Autodeploy.pkg" -target /
8 When done specifying the program information, click Next.
9 Click Next on the Requirements page.
10 Review the summary and click Next to create the package.
Sending the Package to a Distribution Point
To send a copy of the package to a distribution point, right-click the package of interest and click
Distribute Content in the pop-up menu. Use the Distribute Content Wizard to specify a
distribution point to which you want to send the package.
Please make sure that the distribution point is properly configured. For more information, see the
Parallels Mac Management Administrator's Guide.
Deploying Parallels Desktop
To deploy Parallels Desktop:
1 In the Configuration Manager console, right-click the package and then click Deploy in the
pop-up menu. The Deploy Software Wizard opens.
2 On the General page, click the Browse button next to the Collection field and select the
collection containing your Macs (e.g. All Mac OS X Systems). Click OK and then click Next.
3 On the Content page, verify the distribution point info and click Next.
4 Click Next on the Deployment Settings page.
5 On the Scheduling page, specify the schedule for this deployment. Click New to specify the
assignment schedule. When done, click Next.
6 Use the default values on the rest of the wizard pages and complete the wizard.
The package will be advertised to Macs in the specified collection and will be distributed to them
according to the specified schedule.
67
Page 68

Mass Deployment of Parallels Desktop and Virtual Machines
Deploying with Apple Remote Desktop
To use Apple Remote Desktop, you need Apple Remote Desktop Admin, which should run on your
administrator Mac, and Apple Remote Desktop client, which should run on client Macs.
Apple Remote Desktop Admin doesn't come standard with OS X. You will have to obtain the
software from Apple and install it on a Mac from which you are deploying Parallels Desktop. Apple
Remote Desktop client is installed during the standard OS X installation.
Note: Before continuing, please verify that the versions of Apple Remote Desktop Admin and each
instance of Apple Remote Desktop client match. If they don't, update the necessary software.
Configuring Remote Management Services on Target Macs
For a remote management tool (ARD in our case) to be able to distribute the software, the Remote
Management Services have to be configured in OS X on each individual Mac. In order to do so, you
need to log in to each Mac and perform the following steps:
1 In OS X, open System Preferences.
2 Click Sharing.
3 In the Service list, select Remote Management.
4 Click Options.
5 Select the following options: Observe, Control, Open and quit applications, Change
settings, Delete and replace items, Copy items (see the picture below).
6 Click OK.
7 Close System Preferences.
Deploying the Package
To deploy the package to Macs:
68
Page 69

Mass Deployment of Parallels Desktop and Virtual Machines
1 On the administrator Mac, open the Finder and click Applications > Remote Desktop to
display the main window of Apple Remote Desktop.
Note: If you have set up a Task Server, you can deploy the package from that server.
2 Click All Computers in the left section of the ARD main window. The Mac computers
connected to your network are displayed in the right pane of the window.
3 Select the desired destination Macs and click Install in the ARD toolbar (or select Manage >
Install Packages menu). The Install Packages window opens.
69
Page 70

Mass Deployment of Parallels Desktop and Virtual Machines
4 Add the Parallels Desktop Autodeploy.pkg file to the Packages list either by
dragging it there with the mouse or by locating the package using the '+' button
5 Click Install to distribute the deployment package to selected Macs. The installation progress is
displayed in the main window. The result of the package distribution to each individual Mac is
displayed in the Status column.
When the package is distributed to a Mac, it runs on it and installs Parallels Desktop and the virtual
machine(s). It then activates Parallels Desktop using the supplied license key.
Using Apple Remote Desktop Templates
Apple Remote Desktop allows you to save package installation settings as templates. This feature
may be useful if you need to deploy Parallels Desktop more than once using different settings. For
example, you may have a virtual machine specifically configured for your developers and another
one configured for your graphics designers or quality assurance engineers. Instead of modifying the
deployment package every time you need to deploy Parallels Desktop to a specific group of Mac
users, you can create separate packages and save them as templates.
To create an ARD template:
70
Page 71

Mass Deployment of Parallels Desktop and Virtual Machines
1 On the administrator Mac, open Apple Remote Desktop.
2 Click All Computers in the left pane of the ARD main window.
3 Select the computers where the deployment package is to be installed and click Install in the
ARD toolbar.
4 In the Install Packages window, add the desired Parallels Desktop deployment package either
by dragging it to the top area of the displayed window or locating it by using the '+' button.
5 Save current installation setup as a template by selecting Save as Template from the
Template pop-up menu located in the upper right-hand corner of the Install Packages
window.
6 In the displayed window, specify the name that you would like to use for the template and click
OK.
The next time when you are ready to deploy Parallels Desktop to a specific group of Mac users,
simply select the desired template from the same Template pop-up menu in the Install Packages
window and then click Install.
71
Page 72

Mass Deployment of Parallels Desktop and Virtual Machines
Deploying OS X Image Using NetBoot
If you are using NetBoot to deploy an OS X image with Parallels Desktop Business Edition preinstalled, some additional steps need to be taken to properly activate a copy of Parallels Desktop
on individual Macs.
The following describes the process of installing Parallels Desktop in OS X and creating an image
from it suitable for NetBoot deployment:
1 Install OS X on a Mac.
2 Install Parallels Desktop Business Edition.
3 Make sure your Mac can connect to the Internet.
4 Activate Parallels Desktop using your Business Edition license key.
5 Tune Parallels Desktop settings and install and configure virtual machines according to your
needs.
6 In OS X, open Terminal and deactivate the Parallels Desktop license by typing the following
command:
prlsrvctl deactivate-license
On successful license deactivation, you should see the following output:
The License has been successfully deactivated
7 Quit Parallels Desktop.
8 In Terminal, type the following command to prepare Parallels Desktop to activate a license in
deferred mode:
prlsrvctl install-license --key <key> --deferred
where <key> is the Parallels Desktop Business Edition license key.
On success, you should see the following output:
The License has been successfully prepared for deferred activation.
This means that the next time Parallels Desktop starts, it will try to activate the license
automatically. The Internet connection is required for activation. If a Mac can't connect to the
Internet, the Parallels Desktop license activation will be postponed until the Internet connection
is available.
9 You can now create an OS X image from this system and deploy it to other Macs in your
enterprise using NetBoot.
72
Page 73

C HAPTER 5
Parallels Desktop Command Line Interface
Parallels Desktop Business Edition comes with two command-line utilities: prlsrvctl and
prlctl.
prlsrvctl
The prlsrvctl utility is used to administer Parallels Desktop. The tasks that can be performed
include getting general information about Parallels Desktop and its configuration settings, modifying
Parallels Desktop preferences, getting a list of users, obtaining statistics, installing a license, and
others.
prlctl
The prlctl utility is used to perform administration tasks on virtual machines. The utility supports
a full range of tasks from creating and administering virtual machines to installing Parallels Tools,
getting statistics, and generating problem reports.
The rest of this chapter provides detailed technical information about the commands and options
available with each utility.
In This Chapter
Parallels Desktop Management: prlsrvctl Utility ......................................................... 73
Virtual Machine Management: prlctl Utility................................................................. 82
Parallels Desktop Management: prlsrvctl Utility
This chapter documents the prlsrvctl command-line utility.
General Syntax
The prlsrvctl command-line utility is used to perform management tasks on Parallels Desktop.
The tasks include getting the Parallels Desktop information, modifying Parallels Desktop
preferences, installing a license, obtaining statistics and problem reports, and others.
Page 74

Parallels Desktop Command Line Interface
Syntax
prlsrvctl command [options] [-v, --verbose number]
Parameters
Name Description
command
The name of the command to execute.
options
-v, --verbose number
Command options. See individual commands for available options.
Show verbose output. The greater the number, the more verbose
output will be produced.
Remarks
To display help, enter prlsrvctl on the command line without any parameters.
prlsrvctl info
Displays the host computer and Parallels Desktop configuration information.
Syntax
prlsrvctl info
Remarks
The information returned by the info command includes the following:
• Host machine name.
• Parallels Desktop version number.
• Host operating system type and version.
• The default virtual machine directory name and path.
• Parallels Desktop memory limits.
• Parallels Desktop minimum allowable security level.
• Parallels Desktop license information.
• Host machine hardware configuration information.
• Other miscellaneous info.
prlsrvctl install-license
Installs Parallels Desktop license on the host computer.
74
Page 75

Parallels Desktop Command Line Interface
Syntax
prlsrvctl install-license -k,--key key [-n,--name name] [-c,--company name] [--deferred]
Parameters
Name Description
-k, --key key
-n, --name name
License key.
License user name.
-c,--company name
--deferred
License company name.
The license will be activated the next time Parallels Desktop is started. If
a license has already been activated, it should be deactivated first before
using this option. See prlsrvctl deactivate-license (p. 75)
prlsrvctl deactivate-license
Deactivates Parallels Desktop license.
Syntax
prlsrvctl deactivate-license
prlsrvctl net
The prlsrvctl net command is used to create and configure virtual networks.
Subcommands
Name Description
net add
net set
net del
net list
Creates a new virtual network
Configures the parameters of an existing virtual network.
Removes an existing virtual network.
List the available virtual networks.
net add
The prlsrvctl net add command is used to create a new virtual network.
Syntax
prlsrvctl net add vnetwork_id [-i,--ifname if] [-m,--mac mac_address]
75
Page 76

Parallels Desktop Command Line Interface
[-t,--type bridged|host-only]
[-d,--description description]
Parameters
Name Description
vnetwork_id
A user-defined name that will identify the new virtual network.
-i,--ifname if
-m,--mac mac_address
-t,--type value
-d,--description description
--ip-scope-start IP_address
--ip-scope-end IP_address
net set
The name of a physical network adapter on the host to which this
virtual network should be bound.
The MAC address of a virtual network adapter on the host to
which this virtual network should be bound.
The type of the virtual network to create. Possible values are:
• bridged. A virtual machine connected to this
type of virtual network appears as an independent
computer on the network.
• host_only (default). A virtual machine
connected to this type of virtual network can
access only the host and the virtual machine
connected to the same virtual network.
A user-defined description of the virtual network.
Sets the start and end IP addresses for the DHCP pool. The
virtual machines connected to the network you are creating will
automatically receive their IP addresses from this DHCP pool.
The prlsrvctl net set command is used to modify an existing virtual network.
Syntax
prlsrvctl net set vnetwork_id [-i,--ifname if] [-m,--mac mac_address]
[-t,--type bridged|host-only]
[-d,--description description]
[-n, --name new_name]
Parameters
Name Description
vnetwork_id
-i,--ifname if
-m,--mac mac_address
76
The name of the virtual network to modify.
The name of a physical network adapter on the host to which this
virtual network should be bound.
The MAC address of a virtual network adapter on the host to
which this virtual network should be bound.
Page 77

Parallels Desktop Command Line Interface
-t,--type
The type of the virtual network to create. Possible values are:
• bridged. A virtual machine connected to this
type of virtual network appears as an independent
computer on the network.
• host_only. A virtual machine connected to this
type of virtual network can access only the host
and the virtual machines connected to the same
virtual network.
-d,--description description
-n, --name new_name
A user-defined description of the virtual network.
A new name for the virtual network. Use this parameter if you
would like to rename the virtual network.
net del
The prlsrvctl net del command is used to delete an existing virtual network.
Syntax
prlsrvctl net del vnetwork_id
Parameters
Name Description
vnetwork_id
The name of the virtual network to delete.
net list
The prlsrvctl net list command lists the existing virtual networks.
Syntax
prlsrvctl net list
prlsrvctl problem-report
Obtains the Parallels Desktop problem report and displays it on the screen.
Syntax
prlsrvctl problem-report [-s, --send] [-d, --dump]
77
Page 78

Parallels Desktop Command Line Interface
Parameters
Send the problem report to Parallels (-s, --send) or dump it to stdout (-d, --dump).
Remarks
The command collects technical data about the Parallels Desktop and displays the report on the
screen (the output can also be piped to a file). The report can then be directed to Parallels technical
support for analysis.
prlsrvctl set
Sets the Parallels Desktop preferences.
Syntax
prlsrvctl set [--mem-limit auto|size]
[-s,--min-security-level low|normal|high]
[-c,--cep on|off]
[--mng-settings allow|deny]
[{--device device --assignment host|vm}]
[--default-encryption-plugin plugin-id] |
[--reset-default-encryption-plugin]
[--allow-attach-screenshots on|off]
Parameters
Name Description
--mem-limit
-s,--min-security-level
Sets the upper limit of the memory size that can be
reserved for Parallels Desktop operations. The following
options are available:
• auto -- if this option is used, the memory
size will be calculated automatically.
• size -- user-defined memory size, in
megabytes.
The lowest allowable security level that can be used to
connect to the Parallels Desktop. The following options are
available:
• low -- plain TCP/IP (no encryption).
• normal -- most important data is sent and
received using SSL over TCP/IP (user
credentials during login, guest OS clipboard,
etc.) Other data is sent and received using
plain TCP/IP with no encryption.
• high -- all of the data is sent and received
78
Page 79

Parallels Desktop Command Line Interface
using SSL.
-c,--cep
--mng-settings
--device device --assignment
--default-encryption-plugin
plugin-id
--reset-default-encryption-plugin
--allow-attach-screenshots
Enables/disables the participation in the Customer
Experience Program. The following options are available:
• on -- enables CEP.
• off -- disables CEP.
Grants or denis permission to new users to modify Parallels
Desktop preferences. By default, only administrators of the
host OS can modify Parallels Desktop preferences. When a
new Parallels Desktop user profile is created (this happens
when a user logs in to Parallels Desktop for the first time),
he/she will be granted or denied this privilege based on the
default setting. This parameter allows you to set that default
setting. Please note that this parameter only affects new
users (the users that will be created in the future). The
profiles of the existing users will not be modified.
Sets the assignment mode for the specified VTd device.
The following options are available:
• host -- assign the device to host.
• vm -- assign the device to virtual machines.
Specifies which encryption plug-in should be used by
default. An encryption plug-in implements an encryption
algorithm, which is used to encrypt a virtual machine. Use
this option to specify the ID of the plug-in, which should be
used by default.
Resets the default encryption plug-in assignment and sets
the built-in plug-in to be used by default.
Specifies whether to attach screenshots to problem reports:
prlsrvctl shutdown
Shuts down Parallels Desktop.
Syntax
prlsrvctl shutdown [-f,--force]
Parameters
Name Description
-f, --force
Specifies whether the shutdown operation should be forced. If one or
more virtual machines are running, clients are connected, or some tasks
• on -- attach screenshots.
• off -- do not attach screenshots.
79
Page 80

Parallels Desktop Command Line Interface
are currently in progress, then forcing the shutdown will stop all
processes automatically and will shut down the Parallels Desktop.
prlsrvctl statistics
Obtains Parallels Desktop statistics.
Syntax
prlsrvctl statistics [-a, --all] [--loop] [--filter name]
Parameters
Name Description
-a, --all
This parameter is not currently used.
--loop
--filter name
Subscribes to receive statistics on the periodic basis. Once you execute
the command with this option, the statistics will be displayed in your
console window every time a new set of values is collected. To
unsubscribe, press the Enter key or Ctrl-C in your console window.
This parameter is not currently used.
prlsrvctl usb
The prlsrvctl usb command is used to permanently assign a USB device to a specific virtual
machine. A permanently assigned USB device will be connected to the virtual machine
automatically on server restart.
Subcommands
Name Description
usb list
usb set
Lists USB devices connected to the host together with the
information about their virtual machine assignments for the current
user.
Permanently assigns a USB device to the specified virtual
machine.
usb del
Removes a previously created USB device assignment.
usb list
Lists the USB devices connected to the host.
80
Page 81

Parallels Desktop Command Line Interface
Syntax
prlsrvctl usb list
Options
None.
Returns
A list of USB devices in tabular format with the following columns:
Name — the USB device name.
ID — a string that uniquely identifies the USB devices on the physical server. The ID never changes
even if the device is disconnected from the server and then reconnected again. Please note that if a
device ID is listed in quotes, they are a part of the ID and must be included in other calls that use it
as an input parameter.
VM UUID — a universally unique ID of the virtual machine to which this USB device is permanently
assigned. If a USB device is not assigned to any virtual machine, this column will be empty.
usb set
Permanently assigns a USB device to the specified virtual machine. A permanently assigned USB
device will be connected to the virtual machine automatically on server restart. The USB device
assignment is performed for the current user only. Other users may create their own USB device
assignments.
Syntax
prlsrvctl usb set <usb_dev_ID> <vm_ID|vm_name>
Options
Name Description
<usb_dev_ID>
<vm_ID|vm_name>
The USB device ID.
The universally unique ID or name of the virtual machine to which
to assign the USB device.
usb del
Deletes a USB device assignment. The USB device assignment is performed on the user level, so if
you remove an assignment, it will only be removed for the current user. Other users may have their
own USB devices assignments, which will not be affected.
81
Page 82

Parallels Desktop Command Line Interface
Syntax
prlsrvctl usb del <usb_dev_ID>
Options
Name Description
<usb_dev_ID>
The USB device ID.
prlsrvctl user list
Displays the list of Parallels Desktop users.
Syntax
prlsrvctl user list [-o,--output name[,name...]]
Parameters
Name Description
-o,--output name
Names of the fields to include in the output. The following fields are
available:
• name -- User name.
• mng_settings -- Indicates whether the user is
allowed to modify Parallels Desktop preferences.
• def_vm_home -- The user default virtual machine
folder.
The fields must be specified using the lower case letters.
Virtual Machine Management: prlctl Utility
This chapter documents the prlctl command-line utility.
General Syntax
The prlctl utility is used to perform administration tasks on virtual machines. The utility supports
a full range of tasks from creating and administering virtual machines to getting statistics and
generating problem reports.
82
Page 83

Parallels Desktop Command Line Interface
Syntax
prlctl command ID|name [options] [-v, --verbose number]
Parameters
Name Description
command
The name of the command to execute.
ID
name
options
-v, --verbose number
The ID of the virtual machine on which to perform the operation. To
obtain the list of the available virtual machines, use the prlctl
list command (p. 91).
The name of the virtual machine on which to perform the operation.
To obtain the list of the available virtual machines, use the prlctl
list command (p. 91).
Command options. See individual commands for available options.
Show verbose output. The greater the number, the more verbose
output will be produced.
Remarks
To display help, enter prlctl without any parameters.
prlctl capture
Captures the screen of a virtual machine desktop and saves it to a file on the client machine. The
data is saved in the Portable Network Graphics (PNG) format.
Syntax
prlctl capture ID|name --file name
Parameters
Name Description
ID
name
--file name
The virtual machine ID.
The virtual machine name.
Name and path of the file to which the image should be saved. You should
include the file extension (.png) or the file will be saved without one.
prlctl change-passwd
Changes the encryption password for the specified virtual machine.
83
Page 84

Parallels Desktop Command Line Interface
Syntax
prlctl change-passwd ID|name
Parameters
Name Description
ID
name
Virtual machine ID.
Virtual machine name.
Remarks
The command can be used to change the password that was used to encrypt a virtual machine. A
user will be asked to enter the current and the new password.
The virtual machine must be currently encrypted for this command to work. If you would like to
encrypt an unencrypted virtual machine, use the encrypt command.
prlctl convert
This command is used to convert third-party virtual machines and disks to Parallels virtual
machines and disks. The following third-party virtual machines and disks are supported:
• Microsoft Hyper-V
• Microsoft Virtual PC
• Virtual Box
• VMware
Syntax
prlctl convert <path> [--dst <path>] [--force]
Options
Name Description
<path>
--dst=<path>
--force
Full path to the third-party virtual machine's configuration file on the local server.
Set the destination directory for the resulting virtual machine and its configuration
file. If omitted, the default directory (/var/parallels) is used.
Convert the third-party virtual machine even if its guest OS cannot be identified.
prlctl clone
Creates an exact copy of the specified virtual machine.
84
Page 85

Parallels Desktop Command Line Interface
Syntax
prlctl clone ID|name --name new_name [--template] [--dst path] [--changesid]
[--linked] [--detach-external-hdd yes|no]
Parameters
Name Description
ID
name
--name new_name
--template
--dst path
--changesid
--linked
--detach-external-hdd yes|no
ID of the virtual machine to clone
Name of the virtual machine to clone.
Name to be assigned to the new virtual machine.
Create a virtual machine template instead of a real virtual
machine. Templates are used as a basis for creating new virtual
machines.
Name and path of the new virtual machine directory. If this
parameter is omitted, the new virtual machine will be created in
the default directory.
Generate a new Windows security identifier (SID) for a
Windows-based virtual machine. For this parameter to work,
Parallels Tools must be installed in the virtual machine.
Create a linked virtual machine.
If set to no, hard disks located outside a source virtual machine
are not removed from the configuration of the resulting clone.
Setting the parameter to yes removes outside hard disks from
the configuration.
Note: Outside hard disks are not copied to the
cloned virtual machine.
prlctl create
Creates a new virtual machine. A virtual machine can be created from scratch or from a virtual
machine template. When created from scratch, the target operating system type or version must
be specified. To create a virtual machine from a template, the template name must be passed to
the command.
Syntax
prlctl create name {--ostype name|--distribution {name|list}} [--location path]
prlctl create name --ostemplate name [--location path]
Parameters
Name Description
85
Page 86

Parallels Desktop Command Line Interface
name
-o, --ostype name
User-defined new virtual machine name. If the name consists of two
or more words separated by spaces, it must be enclosed in quotes.
The name of the family of the operating system that will be installed in
the virtual machine. Select from one of the following:
• windows
• linux
• macos
• feebsd
• os2
• msdos
• netware
• solaris
• other (specify this option if the operating system you are
planning to install is not listed above).
86
Page 87

Parallels Desktop Command Line Interface
-d, --distribution
name|list
The operating system version that you are planning to install in the
virtual machine.
To display the list of known operating systems, supply the list
value instead of the OS name.
Or supply one of the following values (grouped by family):
Windows
• win-311
• win-95
• win-98
• win-me
• win-nt
• win-2000
• win-xp
• win-2003
• win-vista
• win-2008
• win-7
• win (specify this option if the Windows OS version you
are using is not listed above).
Linux
• rhel
• rhel3
• suse
• debian
• fedora-core (specify this option for all Fedora Core
distributions except for Fedora Core 5).
• fc-5
• ubuntu
• mandriva
• centos
• redhat
• opensuse
Mac OS
• macos-10.4
• macos-10.5
• snowleopard
FreeBSD
• freebsd-4
• freebsd-5
• freebsd-6
87
Page 88

Parallels Desktop Command Line Interface
--ostemplate name
--location path
The name of the virtual machine template from which to create the
new virtual machine. Use the prlctl list --template
command to obtain the list of the available templates.
Name and path of the directory where to store the new virtual
machine files. If this parameter is omitted, the files will be crated in
the default virtual machine directory.
Remarks
When creating a virtual machine from scratch, you may specify the operating system family or
version. If an operating system version is specified using the --distribution parameter, the
virtual machine will be configured for that operating system. If an operating system family is
specified using the --ostype parameter, the virtual machine will be configured for the default
version of this OS family. The default versions are determined internally by Parallels and are kept in
sync with other Parallels management tools such as Parallels Management Console. The best way
to find out the default versions used in your Parallels installation is by creating a sample virtual
machine.
prlctl debug-dump
Creates a virtual machine dump in ELF format and saves it to a file. The resulting dump file can be
opened with the Linux crash utility or (with some limitations) with the GDB debugger. To convert
the dump file to a Windows or OS X format, use the supplied prlcore2dmp utility (p. 89).
Syntax
prlctl debug-dump ID|NAME [--name dump_file_name] [--path output_directory_path]
Parameters
Name Description
ID|NAME
--name
--path
Source virtual machine ID or name.
Destination dump file name. If not specified, the file is named
guest_<date>_<time>.dmp
Destination directory. If not specified, the dump file will be
created in the directory containing the virtual machine.
Remarks
To create a dump, the virtual machine must be running or paused. Suspended virtual machines are
not supported by this command.
The command returns 0 (zero) on success and a non-zero value on failure.
88
Page 89

Parallels Desktop Command Line Interface
Examples
The following command creates the guest_2015-08-10-215443.dmp dump file in the virtual
machine directory. The virtual machine is specified by ID.
prlctl debug-dump {a885d908-4938-4d84-91bd-6eac81174cc1}
The following command created the /tmp/crash_D1.dmp file. The virtual machine is specified by
name.
prlctl debug-dump "Win_8" --name crash_D1.dmp --path /tmp
prlcore2dmp
The prlcore2dmp utility can be used to convert an ELF dump file created with the prlctl
debug-dump (p. 88) command to a Windows or OS X format. A resulting Windows compatible file
can be ope
debuger.
Syntax
ned in the WinDbg debugger. An OS X compatible file can be opened in the LLDB
prlcore2dmp core_file_path [--name output_file_name] [--path output_directory] [-windbg] [--macho] [--cpu]
Parameters
Name Description
core_file_path
--name
--path
--windbg
--macho
--cpu
Path to the source dump file.
Destination file name. If not specified, the memory.dmp name
is used.
Destination directory. If not specified, the file is created in the
source directory.
Convert for WinDbg (Windows).
Convert for LLDB (OS X Mach-O format).
The CPU number to use for virtual to physical address
translation. This option can be used only with the --macho
option.
Remarks
The command returns 0 (zero) on success and a non-zero value on failure.
Examples
The following command creates the /tmp/memory.dmp file which can be opened with WinDbg.
prlcore2dmp /tmp/crash_D1.dmp --windbg
89
Page 90

Parallels Desktop Command Line Interface
The following command creates the ~/Documents/core_dump.dmp file which can be opened
with LLDB.
prlcore2dmp /tmp/crash_D1.dmp --macho --cpu 1 --name core_dump.dmp --path ~/Documents
prlctl delete
Deletes a virtual machine from the <host computer>. The command removes a virtual machine
from the Parallels Service registry and permanently deletes all its files from the host. Once
completed, this operation cannot be reversed.
Syntax
prlctl delete ID|name
Parameters
Name Description
ID
name
The ID of the virtual machine to delete.
The name of the virtual machine to delete.
prlctl enter
Creates a command prompt channel to a virtual machine. By using this command, you can create
a command prompt channel and execute commands in a virtual machine. Parallels Tools must be
installed in a virtual machine to use this utility.
Syntax
prlctl enter exec vm_id|vm_name
Parameters
Name Description
vm_id|vm_name
The UUID or the name of the virtual machine.
prlctl exec
Executes a command inside a virtual machine. Parallels Tools must be installed in a virtual machine
to use this utility. Commands in Linux guests are invoked with bash -c.
90
Page 91

Syntax
prlctl exec vm_id|vm_name command
Parameters
Name Description
Parallels Desktop Command Line Interface
vm_id|vm_name
command
The UUID or the name of the virtual machine.
A command to execute.
prlctl installtools
Installs Parallels Tools in the specified virtual machine.
Syntax
prlctl installtools ID|name
Parameters
Name Description
ID
name
Notes
To use this command, the target virtual machine must be running.
The ID of the target virtual machine.
The name of the target virtual machine.
prlctl list
Obtains a list of virtual machines on the host computer. The command allows you to obtain a
summary list containing only the virtual machine ID, name, and status, or to obtain a detailed
information about a specific or all virtual machines.
Syntax
prlctl list [--all] [--template] [--no-header]
[-o, --output name[,name...]] [-s, --sort name|-name]
prlctl list --info [ID|name]
Parameters
Name Description
91
Page 92

Parallels Desktop Command Line Interface
-a, --all
-t, --template
--no-header
-o, --output name
-s, --sort name
-i, --info
ID
name
List all, running, stopped, suspended, and paused virtual machines. If this
and the rest of the parameters are omitted, only the running virtual machines
will be displayed.
List the available virtual machine templates. The real virtual machines will not
be included in the output.
Do not display column headers.
Display one (or any combination) of the following fields:
• uuid -- Virtual machine ID.
• name -- Virtual machine name.
• status --Virtual machine status (running, stopped, etc.).
The above fields can be combined in a single command using comma
separator (e.g. uuid, name). The excluded fields will not be displayed. The
field names must be typed in lower case.
Sort the virtual machine list by the specified parameter in ascending order.
Display detailed information about a virtual machine.
The ID of the virtual machine for which to display the detailed information. If
not specified, the information will be displayed for all registered virtual
machines.
The name of the virtual machine for which to display the detailed
information. If not specified, the information will be displayed for all
registered virtual machines.
prlctl pause, suspend, resume
Pause, suspend, and resume a virtual machine.
Syntax
prlctl pause ID|name
prlctl suspend ID|name
prlctl resume ID|name
Parameters
Name Description
ID
name
Remarks
The pause command pauses a virtual machine. To continue the virtual machine operation, use
the prlctl start command (p. 109).
92
The ID of the virtual machine to pause, suspend, or resume.
The name of the virtual machine to pause, suspend, or resume.
Page 93

Parallels Desktop Command Line Interface
The suspend command suspends the virtual machine operation. When a running virtual machine
is suspended, the state of the virtual machine processes is saved to a file on the host. After that,
the machine is stopped. To resume the machine, use the resume command.
prlctl problem-report
Obtains a problem report for the specified virtual machine and displays it on the screen.
Syntax
prlctl problem-report ID|name <-d,--dump|-s,--send [--proxy
[user[:password]@proxyhost[:port]]] [--no-proxy]>
Parameters
Name Description
ID
name
-d, --dump
-s, --send
--proxy
user:password@proxyhost:port
--no-proxy
The ID of the virtual machine for which to obtain the problem
report.
The name of the virtual machine for which to obtain the report. If
the name consists of separate words, it must be enclosed in
quotes.
Collect technical data about a virtual machine and display it on
the screen. You can also pipe the output to a file and then send it
to the Parallels technical support to analyze your problem.
Send the generated problem report to the Parallels technical
support.
Use the specified information to send the generated report
through a proxy server, if you use one to connect to the Internet.
Do not use a proxy server to send the generated report. This is
the default behavior, so you can omit this parameter.
prlctl register, unregister
The register command is used to register a virtual machine with Parallels Service.
The unregister command removes a virtual machine from the Parallels Service registry.
Syntax
prlctl register path
prlctl unregister ID|name
Parameters
Name Description
93
Page 94

Parallels Desktop Command Line Interface
path
ID|name
An absolute path to the virtual machine directory.
The ID or the name of the virtual machine to remove from the Parallels
Service registry.
Remarks
Use the register command when you have a virtual machine on the host that doesn't show up
in the list of the virtual machines registered with the Parallels Service. This can be a machine that
was previously removed from the registry or a machine that was manually copied from another
location.
The unregister command removes a virtual machine from the Parallels Service registry but does
not delete the virtual machine files from the host. You can re-register such a machine with the
Parallels Service later using the register command.
prlctl server
Obtains information about the host computer and Parallels the Parallels Desktop installed on it.
Also, allows you to shut down the Parallels Desktop.
Syntax
prlctl server shutdown|info
Parameters
Name Description
info
shutdown
Displays the Parallels Desktop information.
Shuts down Parallels Desktop. If one or more virtual machines are running,
clients are connected, or some tasks are currently in progress then the
shutdown operation will be aborted.
prlctl set
The prlctl set command is used to modify the configuration of a virtual machine and manage
virtual machine devices and shared folders. The following subsections provide technical information
on how to use the command to perform these tasks.
Modifying Virtual Machine Configuration
The prlctl set command can be used to modify virtual machine configuration parameters,
including virtual CPU availability, RAM and video memory size, startup and shutdown options, and
some others.
94
Page 95

Parallels Desktop Command Line Interface
Syntax
prlctl set ID|name [--cpus number] [--memsize number]
[--videosize number] [--description description]
[--autostart off|open-window|start-app|start-host
[--autostop stop|suspend]
[--start-as-user administrator|owner|user:passwd]
[--tools-autoupdate on|off]
[--userpasswd os_user:new_pass]
[--asset-id tag]
Parameters
Name Description
ID
name
Target virtual machine ID.
Target virtual machine name.
--cpus number
--memsize number
--videosize number
--description VM_description
--autostart off|open-window|startapp|start-host
--autostart-delay number
Number of virtual CPUs in the virtual machine. If
the host has more than one CPU, this option
allows you to set the number of virtual CPUs to
be available in the virtual machine.
The amount of memory (RAM) available to the
virtual machine, in megabytes.
The amount of video memory available to the
virtual machine graphics card.
Short description of the virtual machine.
Defines the virtual machine start-up options:
• off — turns autostart off (default).
• open-window — the VM starts when
its window is opened in the PD Control
Center.
• start-app — the VM starts when
Parallels Desktop is started.
• start-host — the VM starts on the host
start-up.
Sets the time delay used during the virtual
machine automatic startup.
--autostop stop|suspend
Sets the automatic shutdown mode for the
specified virtual machine:
• stop -- the virtual machine is stopped
when you shut down the Parallels
Service.
• suspend -- the virtual machine is
suspended when the Parallels Service is
shut down.
95
Page 96

Parallels Desktop Command Line Interface
--start-as-user
administrator|owner|user:passwd
--tools-autoupdate on|off
--userpasswd os_user:new_pass
--asset-id ID
Specifies the account to use to autostart the
virtual machine:
• administrator -- start the virtual
machine as the administrator of the host
operating system.
• owner -- start the virtual machine as
the virtual machine owner.
• user:passwd -- start the virtual
machine as the specified user.
Turns on/off automatic updating of Parallels
Tools in the guest operating system. If this option
is set to ON, Parallels Tools updates will be
performed automatically every time an update is
available for your Parallels Desktop. If this option
is set to OFF, no automatic Parallels Tools
updates will be performed, so that you can do it
manually at a convenient time.
Resets the password for the specified user of the
guest OS running in a virtual machine. The
parameters are:
os_user -- guest OS user name.
new_pass -- new password.
Sets an asset ID (aka asset tag) in the virtual
machine BIOS. Asset IDs are used for computer
identification and inventory purposes.
Managing Virtual Devices
Adds virtual devices to a virtual machine, modifies and deletes existing virtual devices.
General Syntax
prlctl set ID|VM_name --device-add dev_type options
prlctl set ID|VM_name --device-set name options
prlctl set ID|VM_name --device-del name
Parameters
Name Description
ID
VM_name
--device-add dev_type options
96
The virtual machine ID.
The virtual machine name.
Adds a virtual device to the specified virtual
machine.
The dev_type parameter specifies the virtual
device type (hdd, cdrom, fdd, net, etc.).
Page 97

Parallels Desktop Command Line Interface
The options parameters specifies device-type
specific options.
--device-set name options
--device-del name
Modifies the configuration of an existing virtual
device in the specified virtual machine.
The name parameter specifies the virtual device
name.
The options parameters specifies device-type
specific options.
Deletes a virtual device from the virtual machine.
The name parameter specifies the name of the
virtual device to delete.
Remarks
All device-related parameters can be subdivided into the following categories:
• Hard disk drives (p. 97)
• Optical disk drives (p. 99)
• Network cards (p. 101)
• Floppy disk
• USB devices
drives (p. 101)
(p. 105)
• Serial ports (p. 103)
• Parallel ports (p. 104)
• Sound cards
Each group
(p. 105)
of parameters is explained in the following subsections in detail.
Notes
All operations on virtual machine devices (adding, modifying, or removing a device) must be
performed on a stopped virtual machine. An attempt to perform any of these operations on a
running virtual machine will result in error.
Hard Disk Drive Management Parameters
This group of parameters is used to add and configure virtual hard disks in a virtual machine.
Syntax
prlctl set ID|VM_name --device-add hdd [--image name]
[--type expand|plain][--size number][--split]
[--iface ide|scsi][--position number]
[--enable|--disable]
prlctl set ID|VM_name --device-add hdd --device name
97
Page 98

Parallels Desktop Command Line Interface
[--iface ide|scsi][--position number]
[--enable|--disable]
prlctl set ID|VM_name --device-set hddN [--image name]
[--type expand|plain][--size number][--split]
[--iface ide|scsi][--position number]
[--enable|--disable]
prlctl set ID|VM_name --device-set hddN --device name
[--iface ide|scsi][--position number]
[--enable|--disable]
Parameters
Name Description
ID
VM_name
--device-add
--device-set
hdd
hddN
--image name
The virtual machine ID.
The virtual machine name.
Adds a virtual hard disk drive to the virtual machine.
You can connect up to four IDE devices and up to seven SCSI devices
to a virtual machine. This includes hard disks and optical disk drives.
Modifies the parameters of an existing virtual hard disk.
Specifies the type of the virtual device to add to the virtual machine (in
this instance, a virtual hard disk).
The name of the virtual hard disk to modify. Virtual hard disks are named
using the hddN format where N is the drive index number starting from 0
(e.g. hdd0, hdd1). To obtain the list of disk names, use the prlctl
list command with the --info option.
This options is used to create a virtual hard disk using an
image file. You have an option of creating a new image file
or to use an existing image.
--device name
--type expand|plain
98
• To use an existing image file, specify its name and path
using the name parameter.
• To create a new image file, omit the --image
parameter. New image files are created in the virtual
machine directory and are automatically named using
the harddiskN.hdd format, where N is the disk index
number (e.g. harddisk0.hdd, harddisk1.hdd).
This option is used to create a virtual hard disk based on a boot camp
partition (Mac hosts). The name parameter must contain the boot camp
partition name.
For image file based virtual disk drives, specified the disk type:
• expand -- expanding disk. The image file is small initially and
grows in size as you add data to it. This is the default virtual
disk type.
• plain -- plain disk. The image file has a fixed size from the
Page 99

--size number
--split
--iface ide|scsi
Parallels Desktop Command Line Interface
moment it is created (i.e the space is allocated for the drive
fully). Plain disks perform faster than expanding disks.
The size of the virtual hard disk, in megabytes. The default size is 32,000
MB.
Splits the hard disk image file into 2 GB pieces. You should split a virtual
disk if it is stored on a file system that cannot support files larger than 2
GB (e.g. FAT16).
Interface type:
• ide -- IDE drive.
• scsi - SCSI drive (default).
--position number
The SCSI or IDE device identifier to be used for the virtual disk. The
allowed ID ranges are the following:
• for IDE devices: 0:0, 0:1, 1:0, 1:1;
• for SCSI device: 0:0, 1:0, 2:0, 3:0, 4:0, 5:0, 6:0.
You can use one of the following formats for specifying IDs: ID:bus,
ID-bus, ID. For example, if you specify 3:0 (or 3-0 or 3) as number for
a SCSI drive, the guest OS will see the drive as having ID 3 on SCSI bus
0.
--enable
--disable
Enables the specified virtual disk drive. All newly added disk drives are
enabled by default (provided the --disable option is omitted).
Disables the specified virtual disk drive. The disk drive itself is not
removed from the virtual machine configuration.
Optical Disk Drive Management Parameters
This group of parameters is used to add and configure virtual optical disk drives, such as DVD or
CD drives.
Syntax
prlctl set ID|VM_name --device-add cdrom --image image_name
[--iface ide|scsi] [--position number]
[--enable|--disable] [--connect|--disconnect]
prlctl set ID|VM_name --device-add cdrom --device device_name
[--iface ide|scsi] [--position number]
[--enable|--disable] [--connect|--disconnect]
prlctl set ID|VM_name --device-set cdromN
{--device name|--image name} [--iface ide|scsi]
[--position number][--enable|--disable]
[--connect|--disconnect]
99
Page 100

Parallels Desktop Command Line Interface
Parameters
Name Description
ID
name
--device-add
--device-set
cdrom
cdromN
--device name
--image name
--iface ide|scsi
The virtual machine ID.
The virtual machine name.
Adds a DVD/CD drive to the virtual machine. You can connect up to four
IDE devices and up to seven SCSI devices to a virtual machine. This
includes virtual hard disks and DVD/CD drives.
Modifies the parameters of an existing virtual optical disk.
Specifies the virtual device type (in this instance, a CD or DVD drive).
The name of the DVD/CD drive to modify. The N postfix indicates the
drive index number. To obtain the list of the available drives, use the
prlctl list command with the --info option.
The name of the physical optical disk to connect to the virtual machine.
The name of an existing disk image file to mount in the virtual machine.
Currently, the following image file formats are supported: .iso, .cue,
.ccd, and .dmg. The image must not be compressed and/or
encrypted.
Interface type:
--position number
--enable
--disable
--connect
--disconnect
• ide -- IDE disk.
• scsi -- SCSI disk (default).
The SCSI or IDE device identifier to be used for the DVD/CD drive. The
allowed ID ranges are the following:
• for IDE devices: 0:0, 0:1, 1:0, 1:1;
• for SCSI device: 0:0, 1:0, 2:0, 3:0, 4:0, 5:0, 6:0.
You can use one of the following formats for specifying IDs: ID:bus,
ID-bus, ID. For example, if you specify 3:0 (or 3-0 or 3) as number for
a SCSI drive, the guest OS will see the drive as having ID 3 on SCSI bus
0.
Enables the specified DVD/CD drive. All newly added drives are enabled
by default (provided the --disable option is omitted).
Disables the specified optical disk drive. The disk drive itself is not
removed from the virtual machine configuration.
Automatically connect the specified optical disk drive during the virtual
machine startup process.
Do not automatically connect the specified optical disk drive during the
virtual machine startup process.
100
 Loading...