

Paragon P7 Installation & Maintenance Instructions Manual

P 7
OWNER MANUAL
INCLUDES
USER INSTRUCTION
&
INSTALLATION & MAINTENANCE
INSTRUCTIONS
Please read these instructions carefully before you start installing or using this
appliance
Keep this booklet handy for future reference
This appliance is
for use in Great Britain or
IRELAND only
Paragon Fires
Charlton & Jenrick LTD
Telford
Shropshire
TF3 3AR

2 LT6757 ( Iss 1 06/14 )
P7 Instructions
CONTENTS
PAGE
USERS INSTRUCTIONS
SECTION ONE Introduction Consumer Protection Information 3
Heath & Safety Notice 3
Introduction 3
Important Information 4
SECTION TWO Operating Appliance Lighting the Appliance 5
Replacing Hand Set Battery 6
Replacing Appliance Battery 6
SECTION THREE Cleaning Cleaning Pilot Assembly 7
SECTION FOUR Fuel Bed Cleaning & Layout Cleaning Fuel Bed 7
Log Fuel Bed Layout 8
SECTION FIVE General Points 11
INSTALLATION INSTRUCTIONS
SECTION SIX Appliance Data 12
SECTION SEVEN Regulations and Warnings 13
SECTION EIGHT Siting the Appliance Flue (Class1) 14
SECTION NINE To Install Appliance Checking the Flue and Fire Opening 15
Gas Supply Routing 15
SECTION TEN Checking Fire Operation Check Gas soundness 17
Checking Product Clearance 18
Advice To Customer 18
MAINTENANCE INSTRUCTIONS
SECTION ELEVEN Maintenance General 19
Pilot Linting 19
To remove the burner tray 19
Replacement of gas control 19
Replacement of injectors 19
Replacement of Oxy-pilot assembly 20
Replacement of Control Unit (EDB) 20
3 LT6757 ( Iss 1 06/14 )
P7 Users Instructions
SECTION ONE Introduction
Consumer Protection Information
As manufacturers and suppliers of heating products, we take every care, as far as is reasonably
practicable, that these products are so designed and constructed as to meet the general safety
requirement when properly used and installed. To this end, our products are thoroughly tested and
examined before despatch.
IMPORTANT NOTICE: Any alteration that is not approved by the appliance manufacturer could
invalidate the approval of the appliance, operation of the warranty and could affect your statutory
rights.
Health and Safety Notice
Important
This appliance could contain some of the materials, indicated below, that could be interpreted as
being injurious to health and safety. It is the users / installers responsibility to ensure that the
necessary personal protective clothing is worn when handling these materials, see below for
information.
Artificial Fuels, Mineral Wool, Insulation Material, Refractory/Ceramic Fibres, Glass Yarn - may
be harmful if inhaled, may be irritating to skin, eyes, nose and throat.
When handling avoid inhaling and contact with skin or eyes. Use disposable gloves, facemasks and
eye protection. After handling wash hands and other exposed parts. If a vacuum is used for cleaning
the coals or cleaning after servicing / installation it is recommended that it be of the type fitted with a
HEPA filter.
Disposal of refractory/ceramic materials. To keep dust to a minimum these materials should be
securely wrapped in polythene and be clearly labelled ‘RCF waste’. These materials are not classified
as ‘hazardous waste and should be disposed of at a site licensed for the disposal of industrial waste.
INTRODUCTION
The P7 as been designed and tested to the requirements of EN 509 and is suitable for use in GB
(Great Britain) and IE (Ireland).
The P7 incorporates a single gas control, which selects ignition pilot, with variable setting between
low and high settings and is operated via remote control. The system is powered by a battery
pack; therefore no mains electrical supply is required.
Like all appliances incorporating an aerated burner a low frequency noise may be heard, this may
be more noticeable on the low setting.
The P7 incorporates a safety device in the form of an Oxygen Depletion System, which
constantly monitors the oxygen in the room and will cause the fire to switch off if the oxygen level
reduces, for instance due to insufficient ventilation or a blocked flue.
If this regularly occurs do not attempt to relight the appliance until a qualified engineer has
checked it, the problem may not be due to lack of air or a defective flue.
The pilot can be left on (standby setting) or the pilot can be extinguished and relit each time the
fire is used.

4 LT6757 ( Iss 1 06/14 )
P7 Users Instructions
SECTION ONE Introduction Continued
The P7 is battery operated; therefore no mains electrical supply is required. Power to the appliance is
provided by 6 high power alkaline 1.5V batteries (AA size) (a spare set of 6 AA batteries is supplied
with the appliance).
If you hear a repeated ‘bleep’ sound come from the appliance this indicates the appliance battery
pack is low and should be changed. If this is ignored the system will go into a lock out mode, which
will not allow the appliance to be use until a new set of batteries are loaded. (See Page 6)
IMPORTANT INFORMATION
The appliance is for use on Natural Gas G20 @ 20mbar only.
The chimney or flue (unless new or previously used with a gas appliance) shall be swept before
installation if it has been used for solid fuel.
Failure to install appliance correctly could lead to prosecution.
In GB (Great Britain), the appliance must be installed by a competent person i.e. GAS SAFEregistered, in accordance with the GAS SAFETY (INSTALLATION AND USE) REGULATIONS,
The Building Regulations (or The Building Regulations (Scotland) or The Building Regulations
(Northern Ireland)) and The Current I.E.E. Wiring Regulations, if appropriate.
In IE (Ireland), the appliance must be installed by a competent person and installed in accordance
with the current edition of I.S.813 Domestic Gas Installation, the current Building Regulations and
the current ETCI rules for electrical installation, if appropriate.
A fireguard conforming to BS6539 (1997) must be used to protect young children, the elderly or
infirm.
During initial firing, an odour may be evident. This is the starch binder used during the
manufacture of the fibre components of the fire, and there are no harmful effects produced.
During the normal operation of the fire some black staining may appear on some parts of the fuel
bed. This is quite normal and adds to the appearance of the appliance. However, if excessive
black staining does occur it may be due to the fuel bed being incorrectly laid. This should be
checked prior to contacting a service engineer.

5 LT6757 ( Iss 1 06/14 )
P7 Users Instructions
SECTION ONE Operating Appliance
Before attempting to operate the appliance check
that nothing has been placed in front of the
appliance that may interfere with the remote sensor
operation.
To light the appliance using the remote hand set:
a. Point the remote control hand set in the direction of
the appliance and simultaneously press the buttons
marked ‘ off’ and ‘standby’. Continue to hold in
these two buttons until a ‘bleep’ is heard
(approximately 2-3 sec.) and then release these
buttons. The appliance will automatically go through
the ignition sequence producing and the pilot should
ignite. Once the pilot is alight the appliance will
automatically go to the high setting (approximately
20-25sec). If the ignitor stops sparking and the pilot
fails to light, repeat this procedure.
b. If the ignitor stops sparking and the pilot fails to light press the
' '
button before repeating this
procedure.
c. The appliance can be adjusted up or down by pressing the
appropriate button
' '
(low setting) or
' '
(high setting). These buttons have a duel function. If
they are pressed until a ‘bleep’ is heard and then released immediately the appliance will
automatically go to the maximum
' '
or minimum settings
' '
. On the other hand if the button is
not released, gradual adjustment is made until the button is released or until the maximum or
minimum setting is reached.
d. To switch off the appliance press the
' '
button or if the appliance is to be switch off for a short
period it is recommended that the ‘standby’ button be used. This switches the main burner off but
leaves the pilot on and will extend battery life.
e. The appliance can be switch off without using the hand set by removing the appliance batteries
located behind the ash pan cover. When the batteries are removed there will be a delay (up
3minutes) after which double bleeps may be heard and shortly after the appliance will extinguish.
Ensure that the battery is reconnect once the fire as been extinguished. The appliance cannot be
operated without the use of the handset.
NOTE: If the fire is extinguished for any reason wait 3 minutes before relighting.

6 LT6757 ( Iss 1 06/14 )
P7 Users Instructions
SECTION ONE Operating Appliance Continued
LOW BATTERY INDICATION (HAND SET)
If while pressing any of the buttons on the
remote hand set the low battery indicator lamp
either stops flashing or appreciably slows
then the battery should be changed.
TO REPLACE BATTERY IN HAND SET (9V
SIZE 2X1.5V AAA)
Remove the cover from the rear of the handset
and fit replacement battery. Take care not to
stain the battery connections.
LOW BATTERY INDICATION
(APPLIANCE)
If you hear a repeated ‘bleep’ sound come
from the appliance this indicates the appliance battery pack is low and should be changed as soon as
possible. The appliance will continue to work normally for a short period but if the warning is ignored
you may experience difficulty lighting the appliance or the appliance may automatically switch off for
no apparent reason.
NOTE: The appliance cannot be used when the battery is completely flat.
TO REPLACE APPLIANCE BATTERIES (6 High Power Alkaline AA 1.5V)
(Rechargeable batteries can be used providing they are a nickel metal hydride type 1.5V AA
with a minimum capacity of 2200mAh).
(A long life lithium battery is available as an optional extra call the number shown on the last
page of these instructions for further information).
a. Lift off the outer trim or Inlet Cover
b. The battery power pack holder is located on the right
hand side on the base of the Firebox or within the
fireplace frame assembly. WARNING, batteries
will overheat if fitted incorrectly, when fitting the
batteries ensure that they are fitted as per the
marking on the rear of the holder (i.e. minus of
battery against spring). If rechargeable batteries
are used they MUST be a Nickel Metal Hydride type with a minimum capacity of 2200mAh.
c. If the appliance is fitted with the special lithium battery (optional) disconnect the wires at the
battery connector and replace ensuring the connection is made correctly.
d. Important: Place the battery pack or holder inside the insulation blanket and ensure that it is
placed to the left hand side of the appliance as shown and refit fret and ash pan cover. (Illustration
shows lithium battery without insulation sleeve.)
e. Once the new batteries are loaded the fire will continue to bleep until re-set. This can be done by
pressing the “off “ button on the handset followed by the normal ignition sequence as above. If the fire
continues to bleep this may indicate a loose connection or badly loaded batteries.
7 LT6757 ( Iss 1 06/14 )
P7 Users Instructions
SECTIONTHREE Cleaning
Warning: -
Before you clean any part of
the appliance ensure that the
appliance is turned off and
cold.
CLEANING: PILOT
ASSEMBLY (With
Fireplace frame fitted)
(Before cleaning ensure that
the appliance is turned off and
cold)
In some instances you may
experience ignition problems
even when the appliance is
new. This may be due to the
aeration hole in the pilot body
being partial blocked with dust,
pet hairs, or other foreign
matter. The source of this
debris could be such things as carpet fibres, decorating or pet etc.
To gain access to the pilot please do the following.
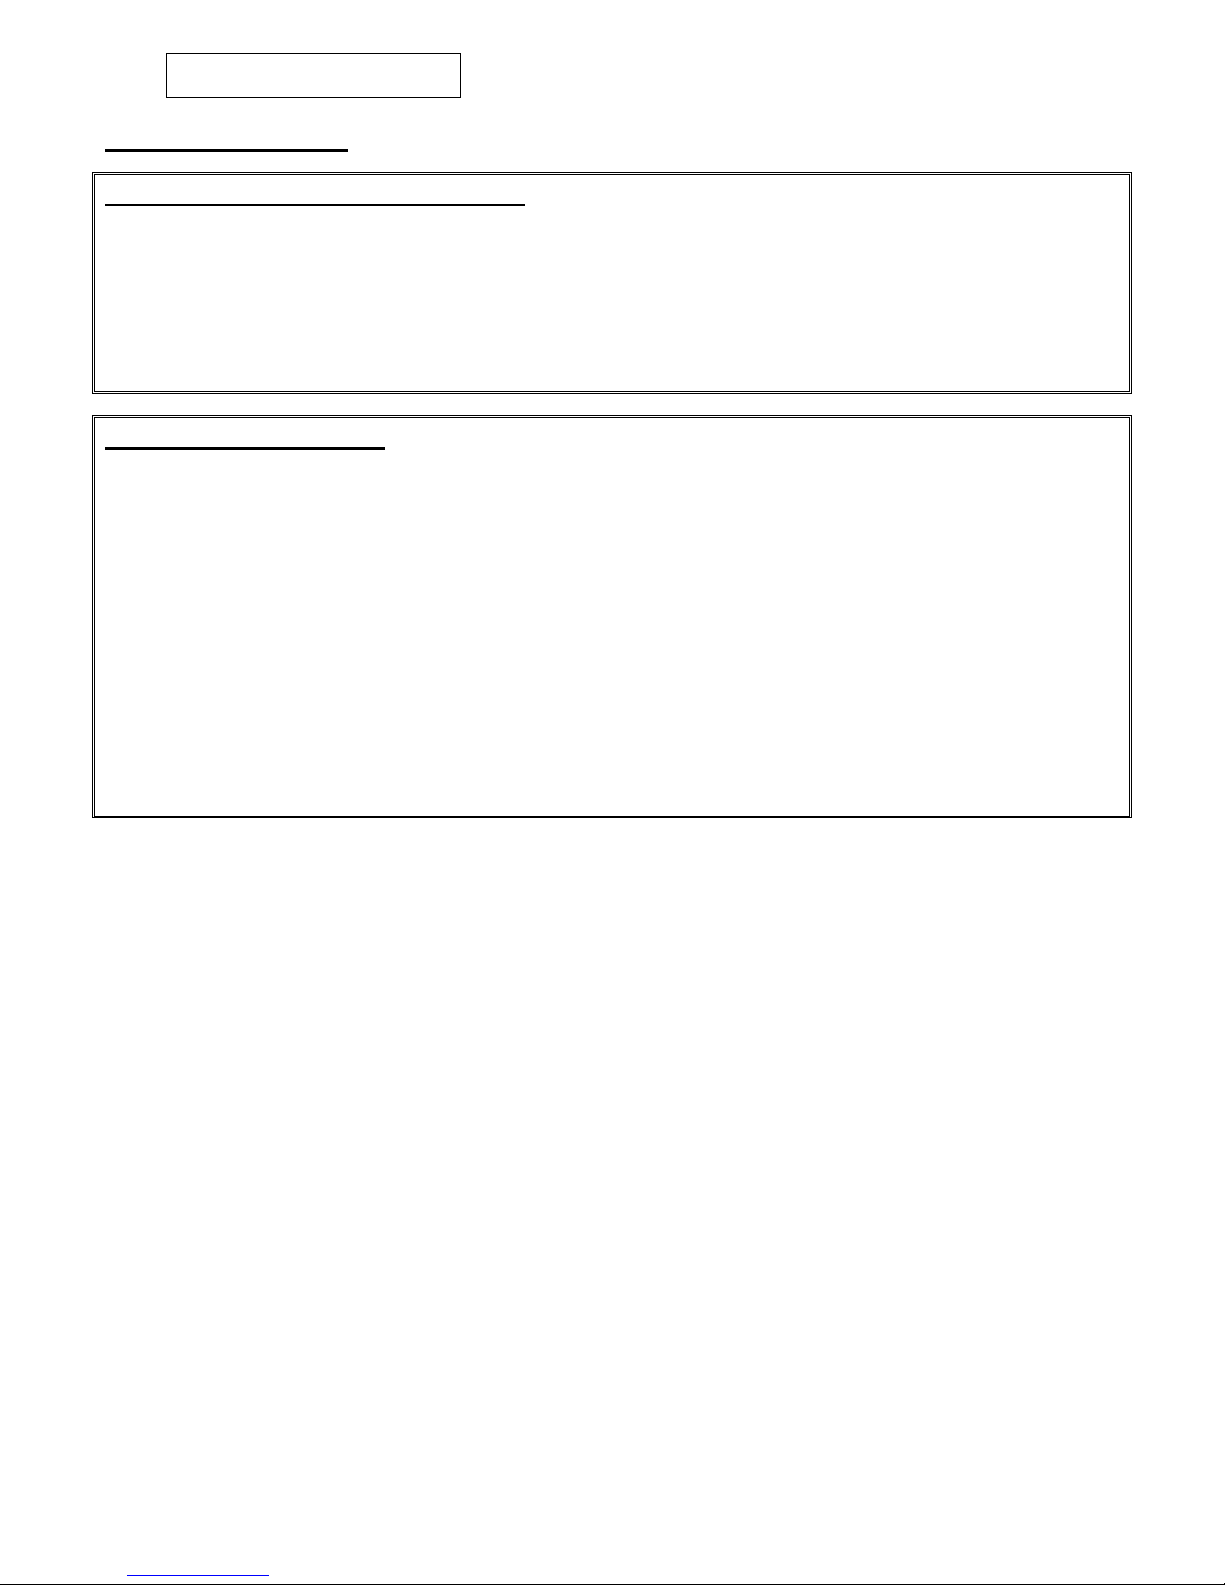
Remove the log fuel bed shapes and bark shapes.
Lift out the air tray assembly from the location points within the shelf.
The pilot is located on the right hand side of the appliance, any debris in or around the aeration hole
should be remove using the nozzle of a vacuum cleaner. It is advisable not to blow the debris into the
hole as this may cause more of a restriction and not rectify the problem.
Note: - Take care when cleaning in this area so as not to damage the pilot assembly.
P7 Users Instructions
SECTION FOUR Fuel Bed Cleaning and Layout
Before you clean any part of the appliance ensures that the appliance is turned off and cold.
Use only the fuel bed components provided and no additional parts must added.
Important: - Refer to the ‘Health & Safety Notice located on page 3 of this booklet before
cleaning or replacing any refractory material.
The fuel bed components are delicate and they should be handled with great care.
The moulded shapes may be removed for cleaning. They can be brushed very gently with a soft
brush to remove dust or any deposits.
A vacuum cleaner may only be used after the loose components and moulded shapes have been
removed.
CARE SHOULD BE TAKEN TO AVOID CONTACT WITH THE REFRACTORY LINING THIS IS A
DELICATE SURFACE AND SHOULD NOT BE WIPED OR RUBBED.
It is important that all the fuel bed moulded shapes are positioned as shown in these
instructions.
8 LT6757 ( Iss 1 06/14 )
P7 Users Instructions
SECTION FOUR Fuel Bed Cleaning and Layout
Log Fuel bed
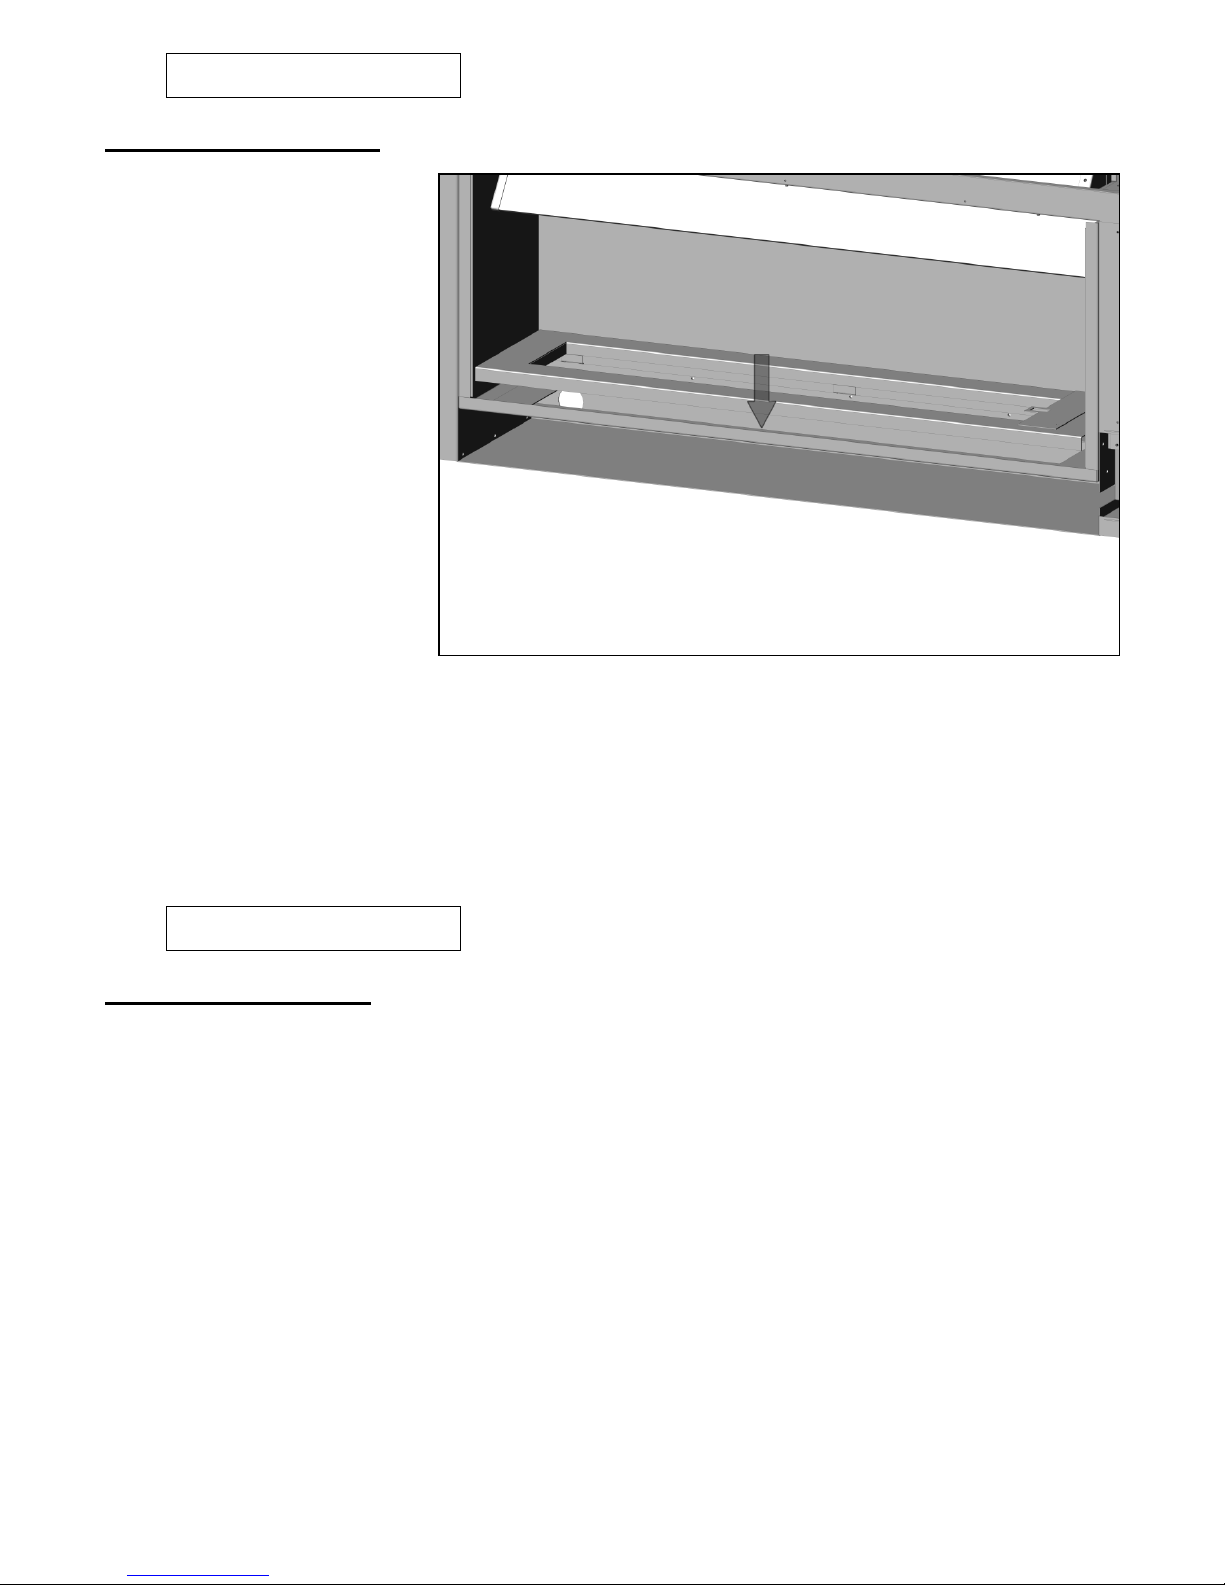
Place air tray within burner shelf assembly. Place three of the log shapes along the back edge
of the air tray assembly as shown.
Place single layer of large bark chippings as shown.
9 LT6757 ( Iss 1 06/14 )
P7 Users Instructions
SECTION FOUR Fuel Bed Cleaning and Layout
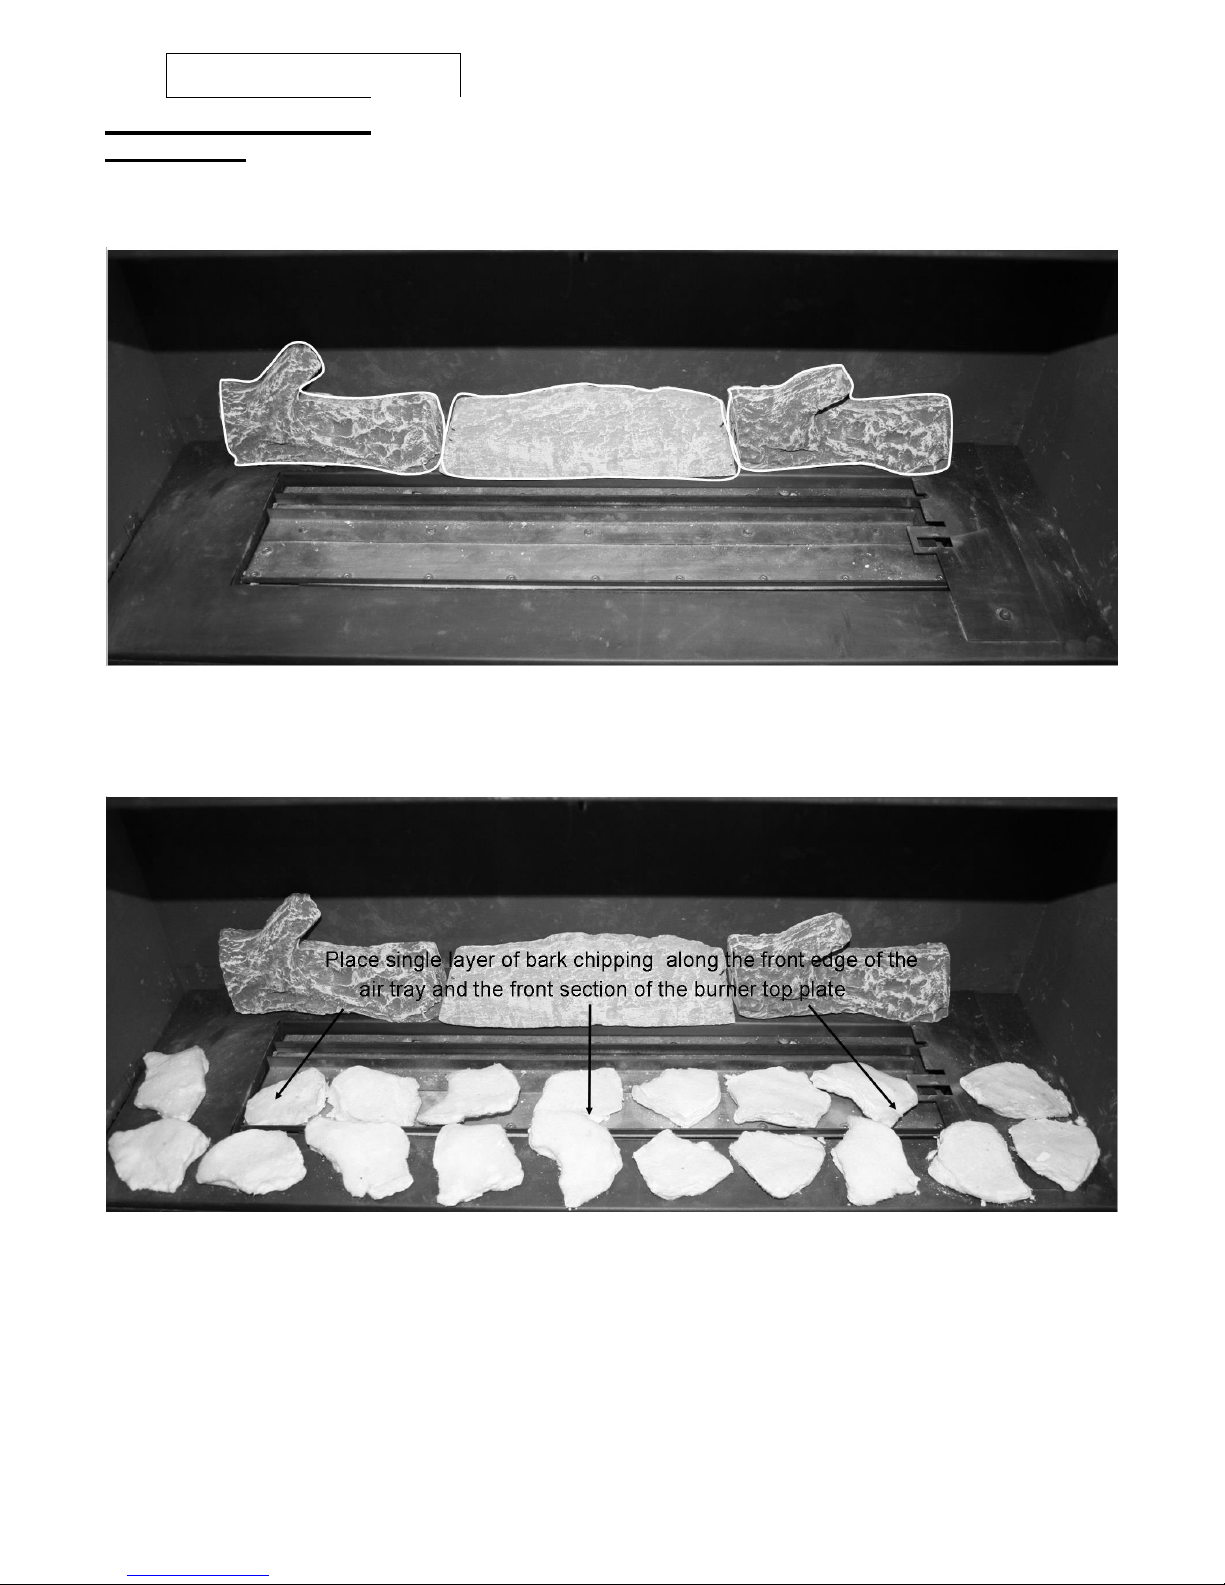
Place two log shapes as shown.
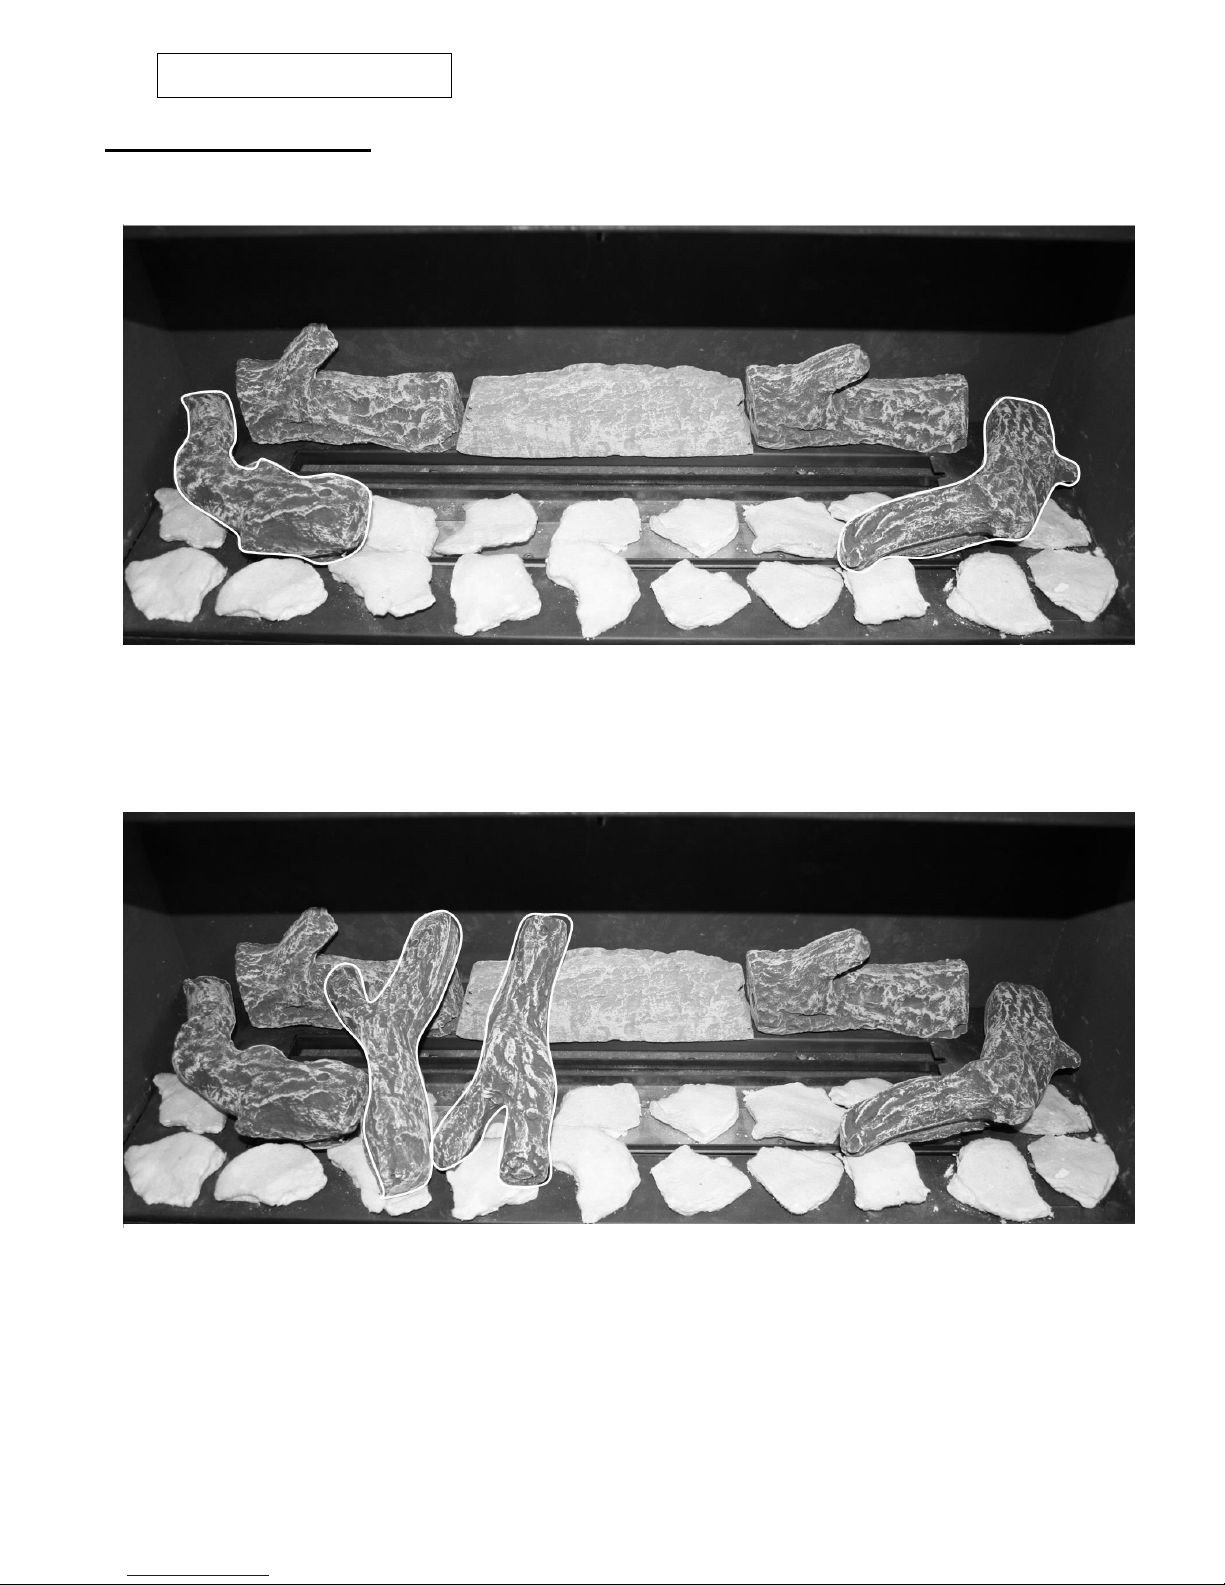
Place two log shapes as shown.
 Loading...