

Page 1

PARAGON
Hard Disk Manager
VERSION 16
User Manual
Paragon Software GmbH
Systemprogrammier ung
Wiesentalstraße 22
79115 Freiburg, Germany
Tel. +49 (0) 761 59018201
Fax +49 (0) 761 59018130
Web www.paragon-software.com
E-Mail sales@paragon- software.com
Page 2

2
Table of Contents
Product Overview ............................................................................................................................... 4
Getting Started ................................................................................................................................... 4
Product Components .................................................................................................................................... 4
System Requirements ................................................................................................................................... 4
Installation ................................................................................................................................................... 5
First Start ..................................................................................................................................................... 5
Activating Free Functions ...................................................................................................................................... 5
Buying Locked Functions ....................................................................................................................................... 6
Activating Paid Functions ...................................................................................................................................... 7
Using the Product .................................................................................................................................................. 8
Changing Program Settings ............................................................................................................... 15
Application Section..................................................................................................................................... 16
Simulation Mode Options ................................................................................................................................... 16
CD/DVD/BD Recording Options ........................................................................................................................... 16
Backup Section ........................................................................................................................................... 17
Application-level Exclude Options ....................................................................................................................... 17
Backup Image Options ......................................................................................................................................... 17
Copy and Backup Options ................................................................................................................................... 18
VD Container Options .......................................................................................................................................... 19
Partitioning Section .................................................................................................................................... 19
General Options .................................................................................................................................................. 19
Partitioning Options ............................................................................................................................................ 20
Notifications Section .................................................................................................................................. 21
Credentials Options ............................................................................................................................................. 21
Managing Account ............................................................................................................................ 22
Building Recovery Media .................................................................................................................. 23
Booting from Recovery Media .......................................................................................................... 27
Protecting System and Data .............................................................................................................. 28
Backup Scenarios ........................................................................................................................................ 28
Configuring a One-shot Backup Task ................................................................................................................... 28
Configuring a Regular Backup Routine ................................................................................................................ 37
Checking Backup Integrity ................................................................................................................................... 43
Pinning Backup .................................................................................................................................................... 44
Repairing Corrupted Backup ............................................................................................................................... 45
Managing Backup Jobs ........................................................................................................................................ 46
Windows Restore Scenarios ........................................................................................................................ 49
Restoring Individual Files and Folders ................................................................................................................. 49
Restoring an Entire Disk or Separate Volumes .................................................................................................... 51
Mounting a Backup Image ................................................................................................................................... 55
Adding a Backup Image ....................................................................................................................................... 56
Transferring Files between Storages ................................................................................................................... 57
WinPE Restore Scenarios ............................................................................................................................ 59
Restoring a Failed System ................................................................................................................................... 59
Fixing Boot Problems ........................................................................................................................................... 62
Copyright© 1994-2018 Paragon Software Group. All rights reserved.
Page 3

3
Managing Partitions and Disks .......................................................................................................... 65
Basic Partitioning Tasks .............................................................................................................................. 65
Creating a Partition ............................................................................................................................................. 65
Formatting a Partition ......................................................................................................................................... 67
Deleting a Partition.............................................................................................................................................. 67
Moving/Resizing a Partition ................................................................................................................................ 68
Undeleting a Partition ......................................................................................................................................... 68
Converting File System ........................................................................................................................................ 70
Changing Volume Label ....................................................................................................................................... 71
Changing Drive Letter .......................................................................................................................................... 72
Hiding/Unhiding Partition ................................................................................................................................... 72
Making Partition Active/Inactive ......................................................................................................................... 73
Updating MBR ..................................................................................................................................................... 73
Getting Disk/Partition Properties ........................................................................................................................ 73
Complex Partitioning Tasks ......................................................................................................................... 74
Splitting a Partition .............................................................................................................................................. 74
Redistributing Free Space .................................................................................................................................... 77
Merging Partitions ............................................................................................................................................... 79
Advanced Partitioning Tasks ....................................................................................................................... 81
Changing Cluster Size .......................................................................................................................................... 81
Converting to Logical/Primary ............................................................................................................................. 81
Changing Serial Number ...................................................................................................................................... 82
Change Primary Slots ........................................................................................................................................... 82
Converting a Partition Table ................................................................................................................................ 83
Editing Disk Sectors ............................................................................................................................................. 84
NTFS Optimization ...................................................................................................................................... 84
Compact MFT ...................................................................................................................................................... 85
Degragment MFT ................................................................................................................................................. 85
Partitioning Virtual Disks ............................................................................................................................ 85
Checking Partitions for Problems ...................................................................................................... 87
Testing Partition Surface ............................................................................................................................. 87
Checking File System Integrity .................................................................................................................... 87
Erasing Data ..................................................................................................................................... 88
Copying Data .................................................................................................................................... 91
Extra WinPE Scenarios ...................................................................................................................... 96
Unlocking Bitlocked Volumes ...................................................................................................................... 96
Adding Specific Drivers ............................................................................................................................... 97
Configuring Network .................................................................................................................................. 98
Network Troubleshooter .......................................................................................................................... 100
Using the Command Prompt ..................................................................................................................... 102
Troubleshooting ............................................................................................................................. 103
Copyright© 1994-2018 Paragon Software Group. All rights reserved.
Page 4

4
Product Overview
Hard Disk Manager 16 is an integrated set of powerful tools that is specially designed to tackle most of the
problems you might face while using PC. Its functionality covers all aspects of a computer life cycle beginning from
carrying out all the necessary partitioning operations to install the system from scratch and providing its data
reliable protection to secure utilization of an outdated hard disk.
In this guide you will find the answers to many of the technical questions, which might arise while using our
program.
Our company is constantly releasing new versions and updates to its software, that's why images
shown in this manual may be different from what you see on your screen.
Getting Started
Product Components
• Windows installation package for regular system and data protection, drive partitioning, OS migration,
and other operations. It’s the main component of the product.
• WinPE bootable environment for emergency scenarios. You can prepare it on a USB thumb drive or in an
ISO file with the program’s wizard (highly recommended). Additionally to the Windows wizards and dialogs,
this media includes several more utilities that help you add missing hardware drivers, set up network
environment, and fix OS boot problems.
System Requirements
For the Windows installation package
• Windows 7 SP1 and later. Please note that the list of supported Windows versions may vary for your
product.
• Opened ports in Firewall: inbound and outbound 80, 443
For the WinPE bootable environment
• Intel Pentium III CPU or its equivalent, with 1000 MHz processor clock speed
• At least 1 GB of RAM
During the installation additional free space (up to 1GB) will be required.
• SVGA video adapter and monitor
• Keyboard
• Mouse
Additional requirements
Copyright© 1994-2018 Paragon Software Group. All rights reserved.
Page 5
5
In case there is some previous version of the program installed on the computer, the program will
• Network card to send/retrieve data to/from a network computer
• Recordable CD/DVD drive to burn data to compact discs
• External USB hard drive to store data
Installation
Before the installation, please make sure the systems requirements are met. If everything is OK, please do the
following to install the product:
1. Click on the supplied setup file to initiate the installation. First your system will be checked for the presence
2. Then your system will be checked for the presence of Microsoft .NET 4.0 or later and if not found, it will be
3. The Welcome page will inform that the application is being installed. Click Next to continue.
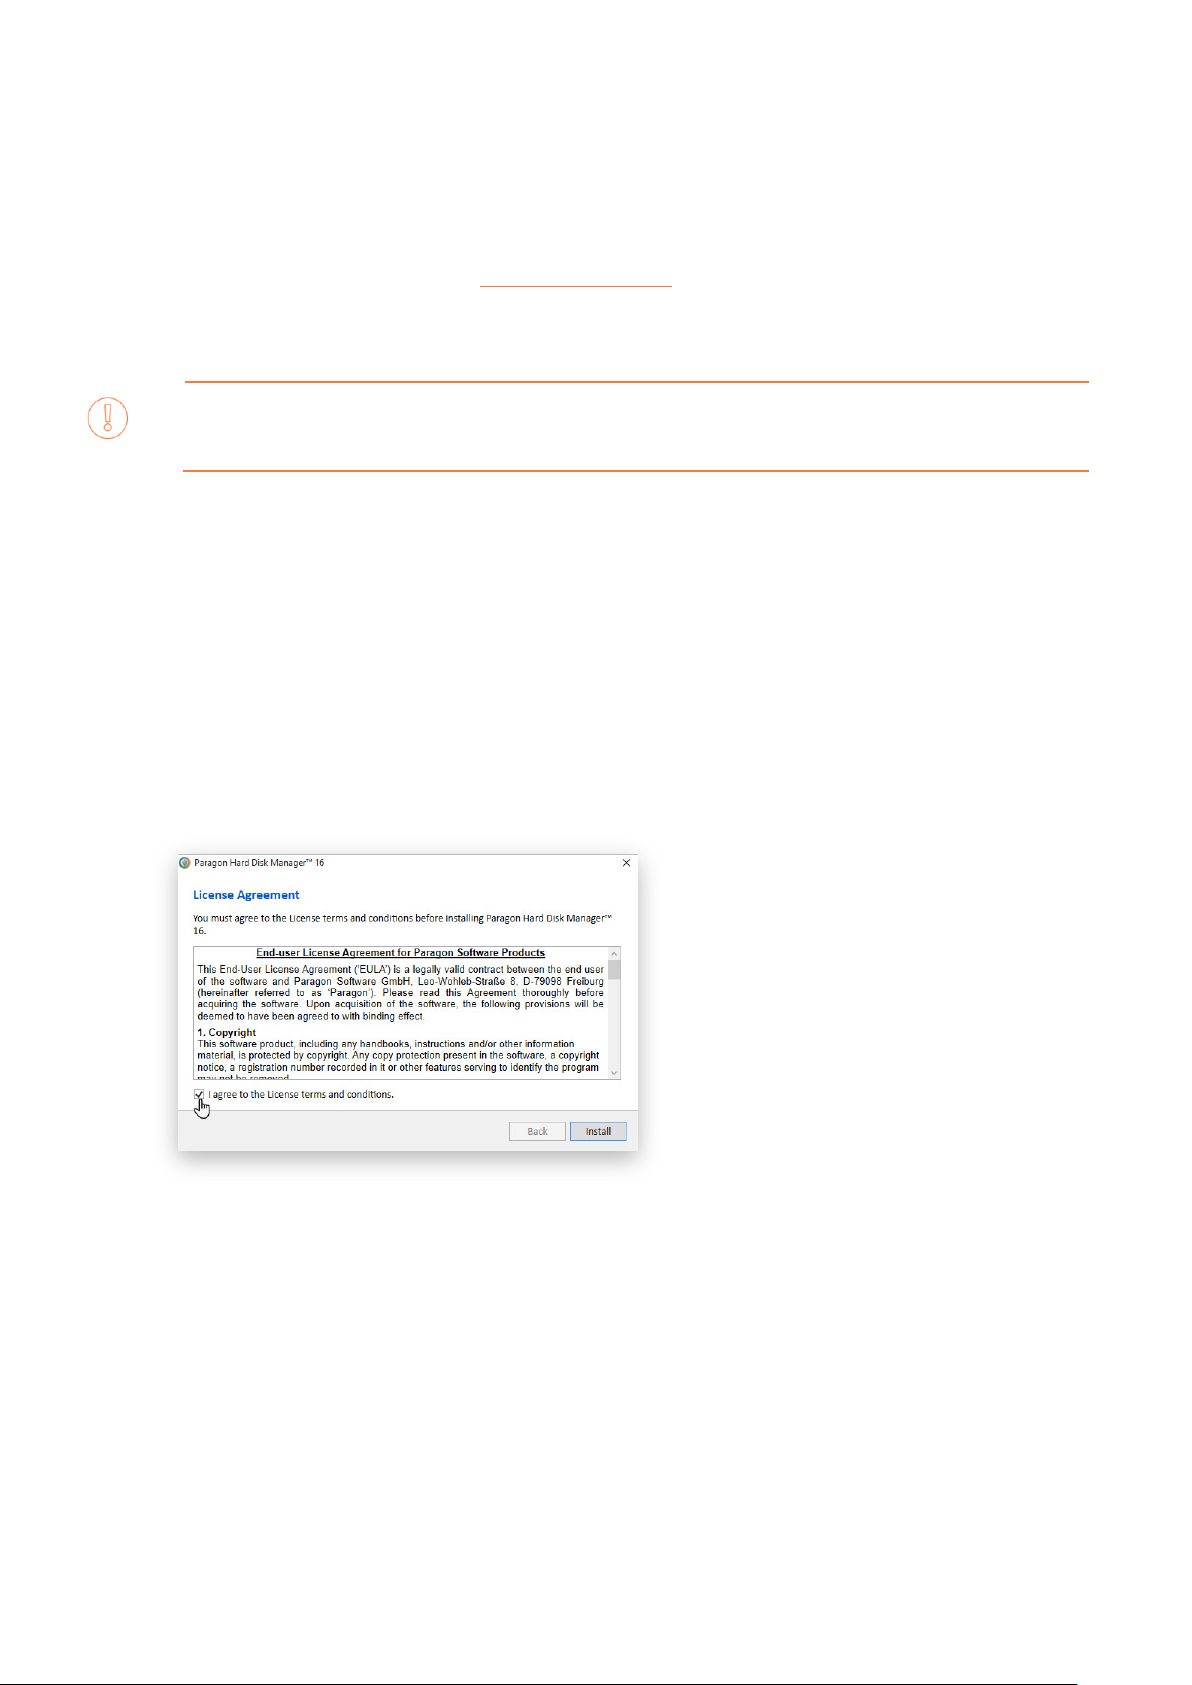
4. Please Read Paragon License Agreement carefully and then select the appropriate option to accept.
offer the user to uninstall it first.
of Visual Studio C++ 2015 Redistributable and if not found, it will be installed automatically (comes with
the installation package). Note! Before installing this library in Windows 8.1 or Windows Server 2012 R2,
the following OS updates should be present: KB2919442, KB2919355.
downloaded from Microsoft’s website and then installed.
Otherwise you won’t be able to proceed with the installation.
5. The final page reports the end of the setup process. Click Finish to complete the wizard.
First Start
Activating Free Functions
1. After the installation you can see a program icon on the Windows desktop. Double click it to launch.
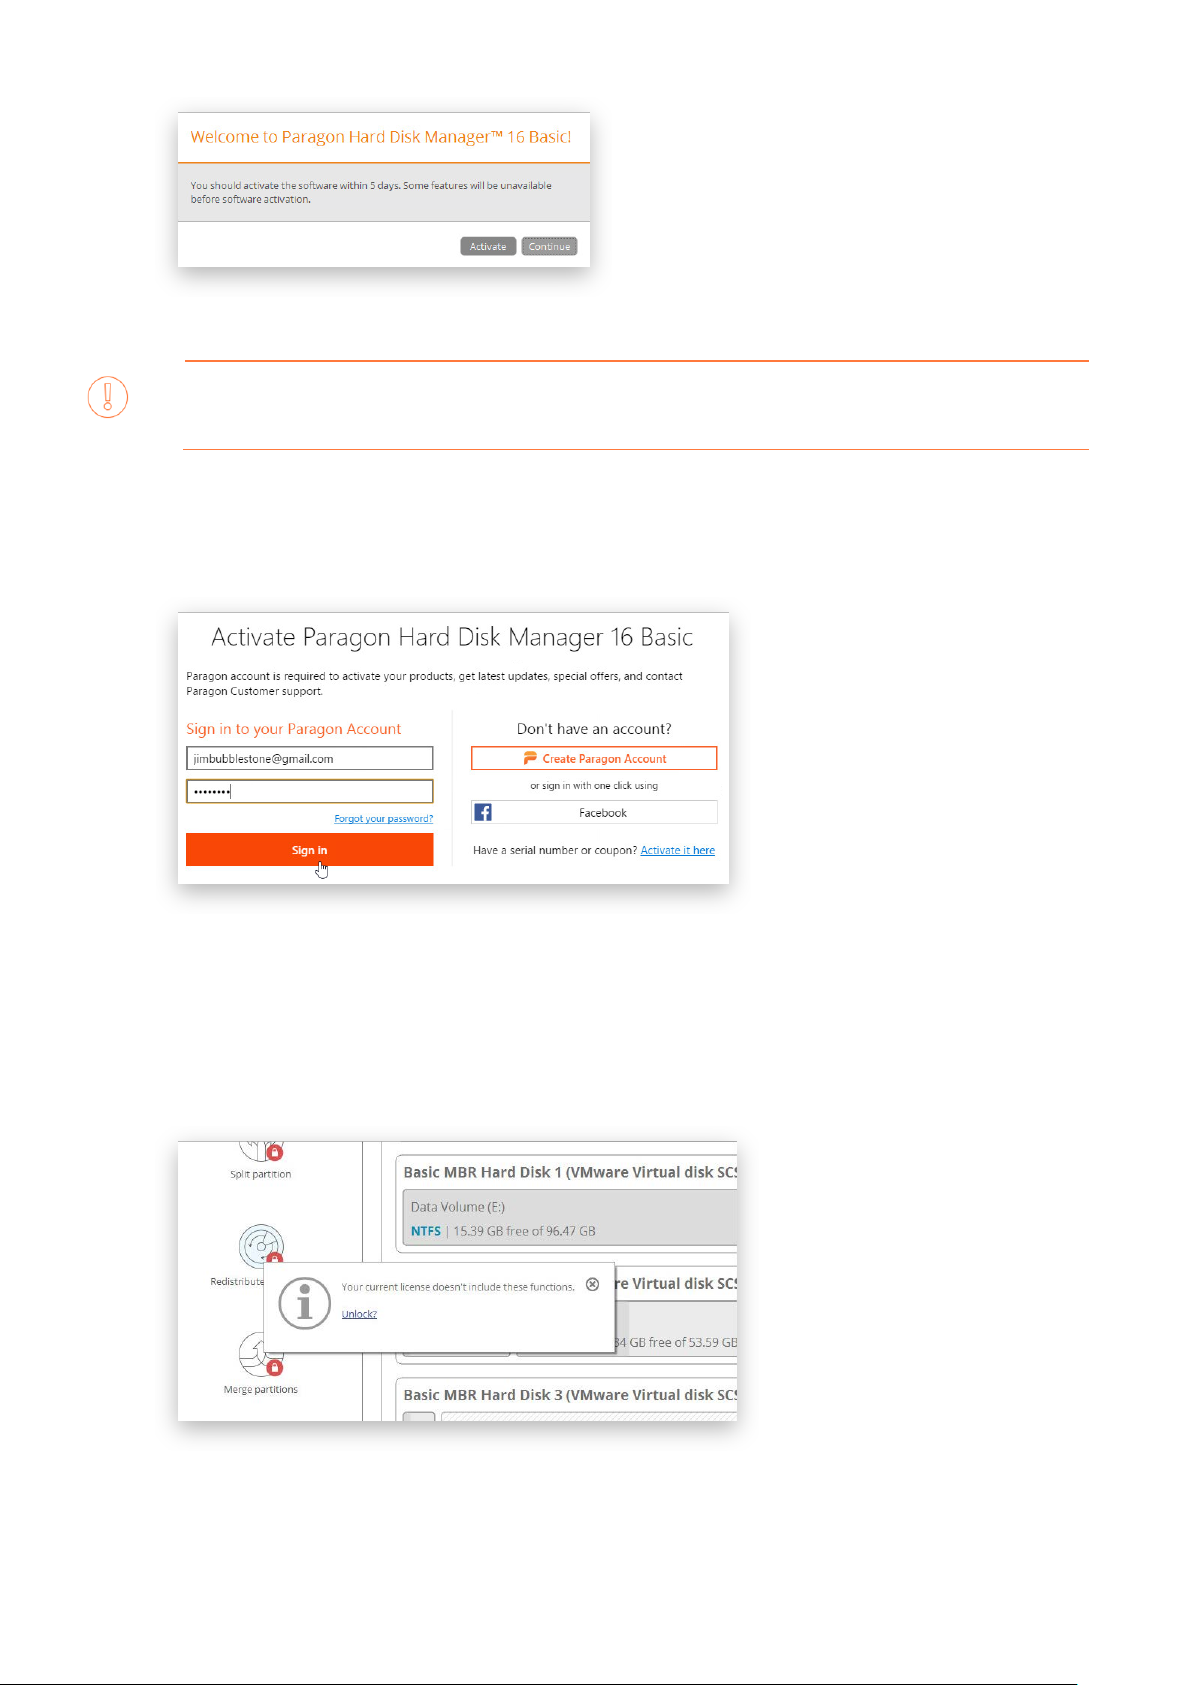
2. Once started, you will see an activation dialog. Hard Disk Manager is a commercially distributed product
that includes basic drive partitioning and disaster recovery features that you can use completely for free
after the activation over the Internet. Please note that you have 5 days to try the basic disaster recovery
features without the activation at all. Click Activate to proceed.
Copyright© 1994-2018 Paragon Software Group. All rights reserved.
Page 6
6
3. In the opened dialog enter an email and password of your Paragon’s account, then click Sign in. If you
4. The product activation completes automatically after signing in to your account.
Depending on the product version, you may have a 30-day activation free period.
don’t have an account yet, please create it by clicking the corresponding option. Alternatively, you can sign
in with your Facebook account.
Buying Locked Functions
You can purchase a locked product feature or an entire functionality scope either in your MyParagon Account or
directly from the program’s interface (recommended).
1. Select a locked product element, then click Unlock.
2. Click on Buy in the opened dialog.
Copyright© 1994-2018 Paragon Software Group. All rights reserved.
Page 7
7
3. Depending on your selection, you will be prompted to buy a corresponding license or a set of licenses with
a good discount. Please note that one consumer license can be activated and used on three different
devices simultaneously, while the scope of a business license is subject to negotiation with the Sales Team
and may vary for each customer. By clicking Proceed to checkout below the desired license, you will be
redirected to Paragon’s e-shop, where you can complete the purchase.
4. As a result the purchased license will be binded to your MyParagon Account. All you need is to activate it
on the computer.
Activating Paid Functions
If you have purchased a product license online and it’s binded to your MyParagon Account (the main scenario),
please consult the Managing Account
the corresponding locked product functions. If you’ve got a serial number at your disposal, which is not registered
in MyParagon Account, please take the following steps:
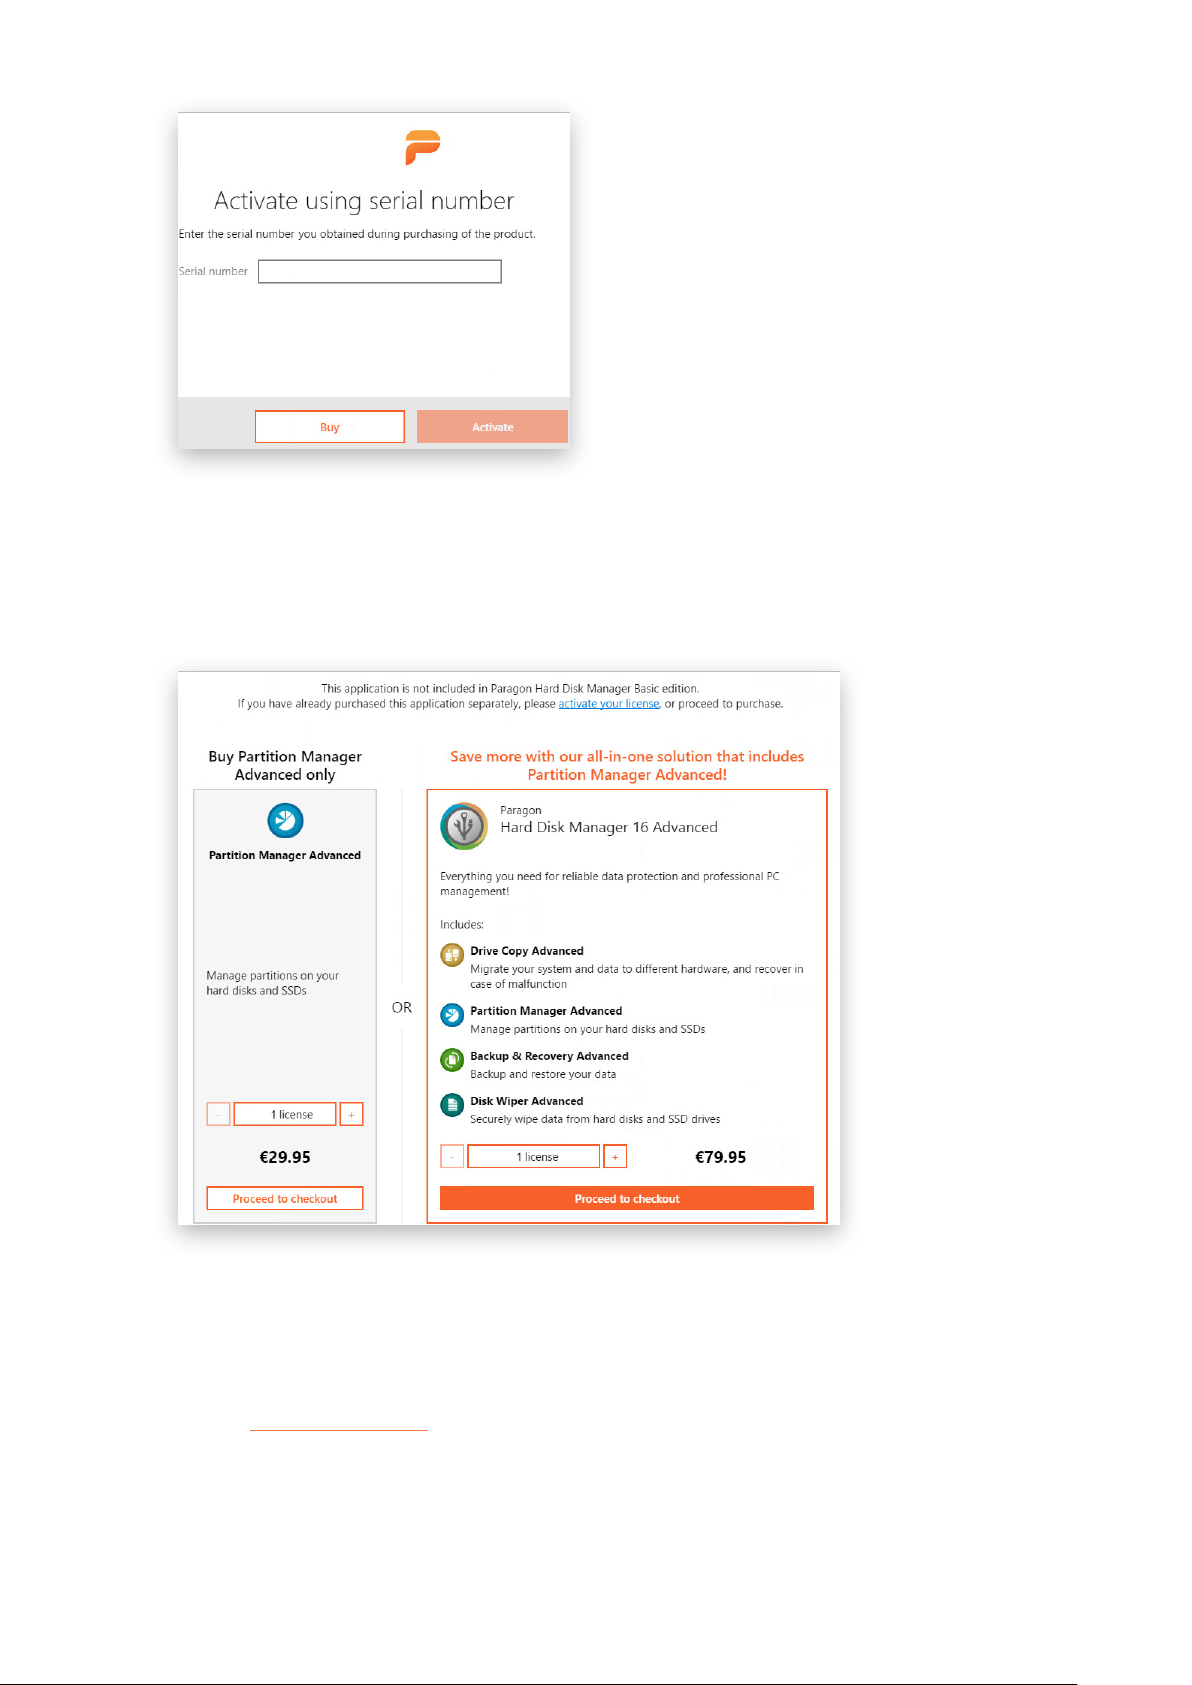
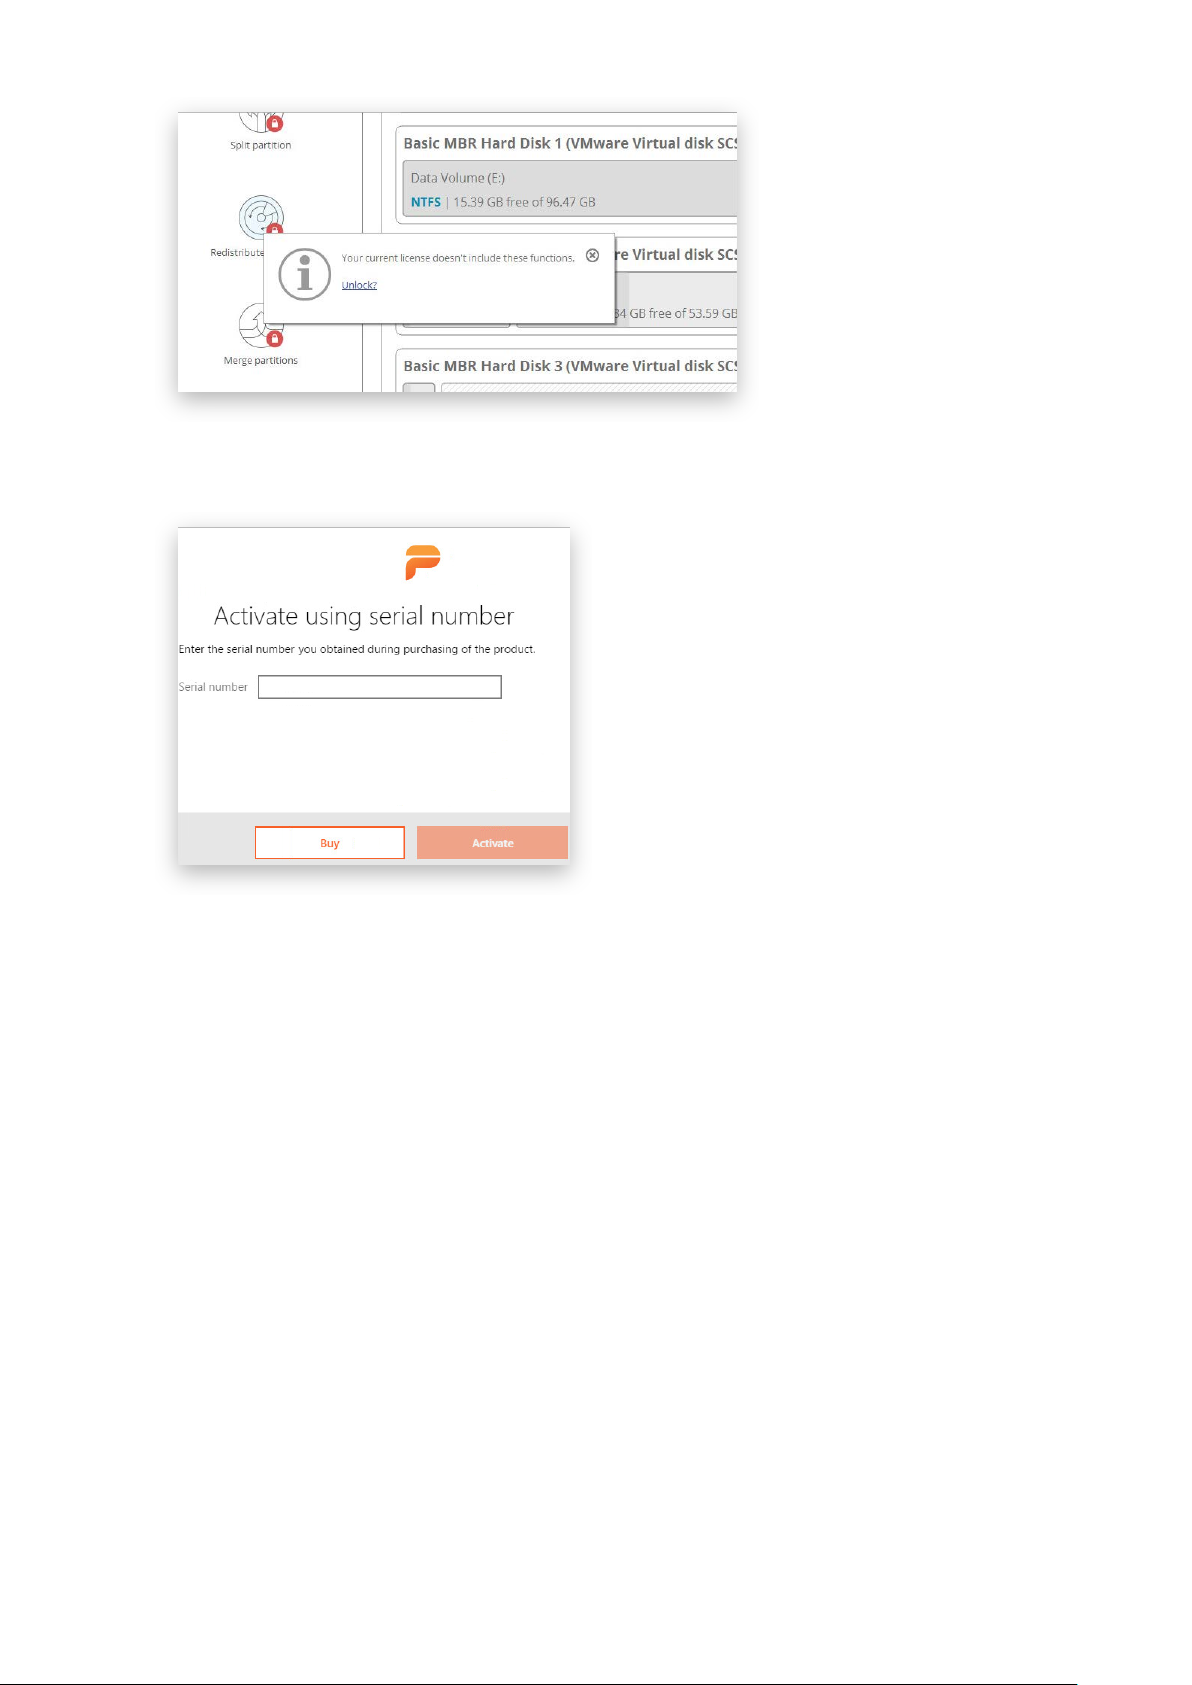
1. Select a locked product feature or an entire functionality scope, which serial number you have, then click
Unlock.
Copyright© 1994-2018 Paragon Software Group. All rights reserved.
section to learn how to activate this license on the computer, thus enabling
Page 8
8
2. Enter your serial number, then click Activate. This info will be sent to our activation server to complete the
procedure.
Using the Product
After the activation you will get access to the program interface. You will be prompted to take a brief product tour
and build recovery media.
Copyright© 1994-2018 Paragon Software Group. All rights reserved.
Page 9

9
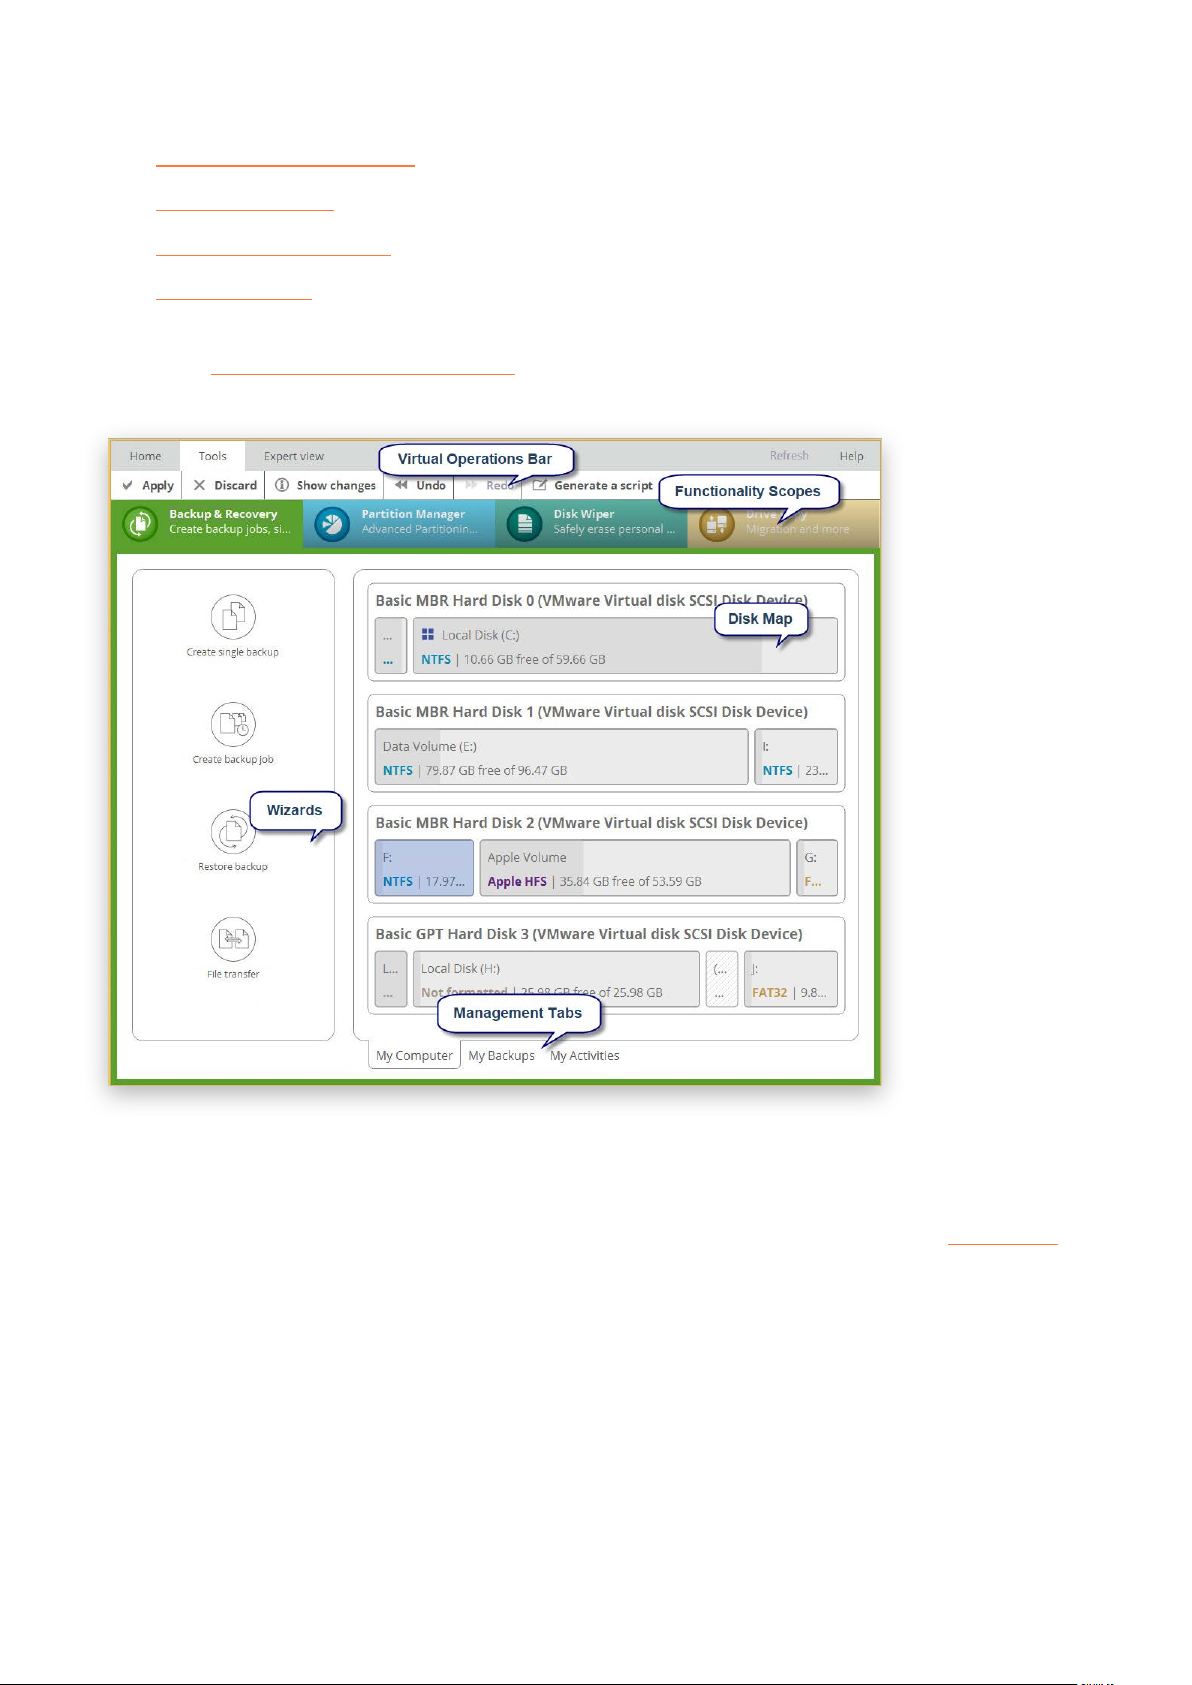
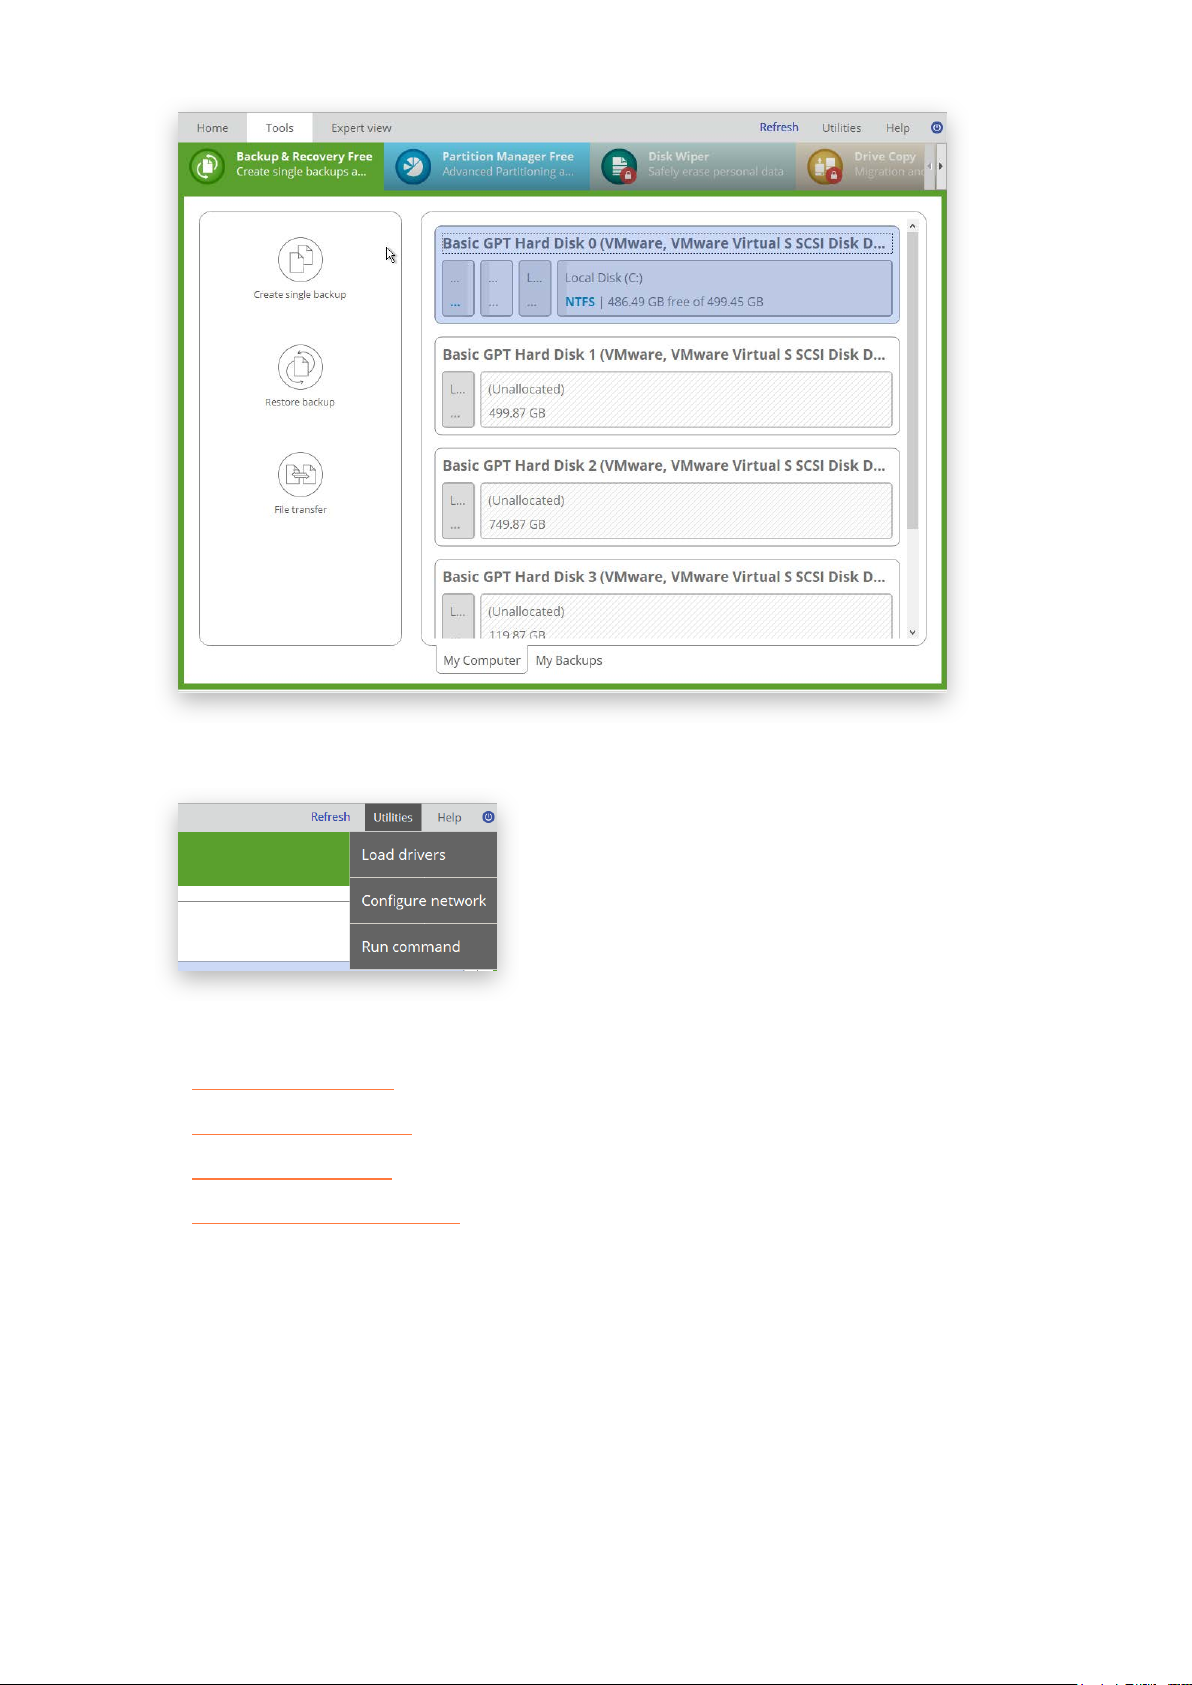
The upper area of the main window contains several tabs: Home, Tools and Expert view
.
Home
Use this tab to change the program settings, manage your account, build bootable recovery media, collect program
logs, or go to Paragon’s website to download a free update, register the product, visit Paragon’s Knowledge Base,
etc.
Copyright© 1994-2018 Paragon Software Group. All rights reserved.
Page 10
For more details, please consult the following chapters:
10
- Changing Program Settings
- Managing Account
- Building Recovery Media
- Troubleshooting
Tools
It is displayed each time you launch the program
. Use this tab to see the layout of system storage devices, open
program wizards and dialogs, monitor backup activities and some other actions.
Functionality Scopes
For your convenience, the product functions are distributed among four groups. For example, partitions become
resizable and can be moved directly on the Disk Map only when you are in Partition Manager, while ‘My Backups’
tab appears in Backup & Recovery. If you’d like everything to be available in one view, just go to Expert view
.
Virtual Operations Bar
By default, the program does not accomplish operations that may destroy the on-disk data (format, delete, restore,
etc.) immediately, but places them on a special list (the so-called simulation mode). First it helps to avoid possible
mistakes as you should confirm all provided changes. Second it saves your time and effort when executing several
operations, as you don’t need to wait for each operation to physically complete before proceeding to the next
operation.
A corresponding bar appears in the upper area after you accomplish a potentially dangerous operation.
Copyright© 1994-2018 Paragon Software Group. All rights reserved.
Page 11
11
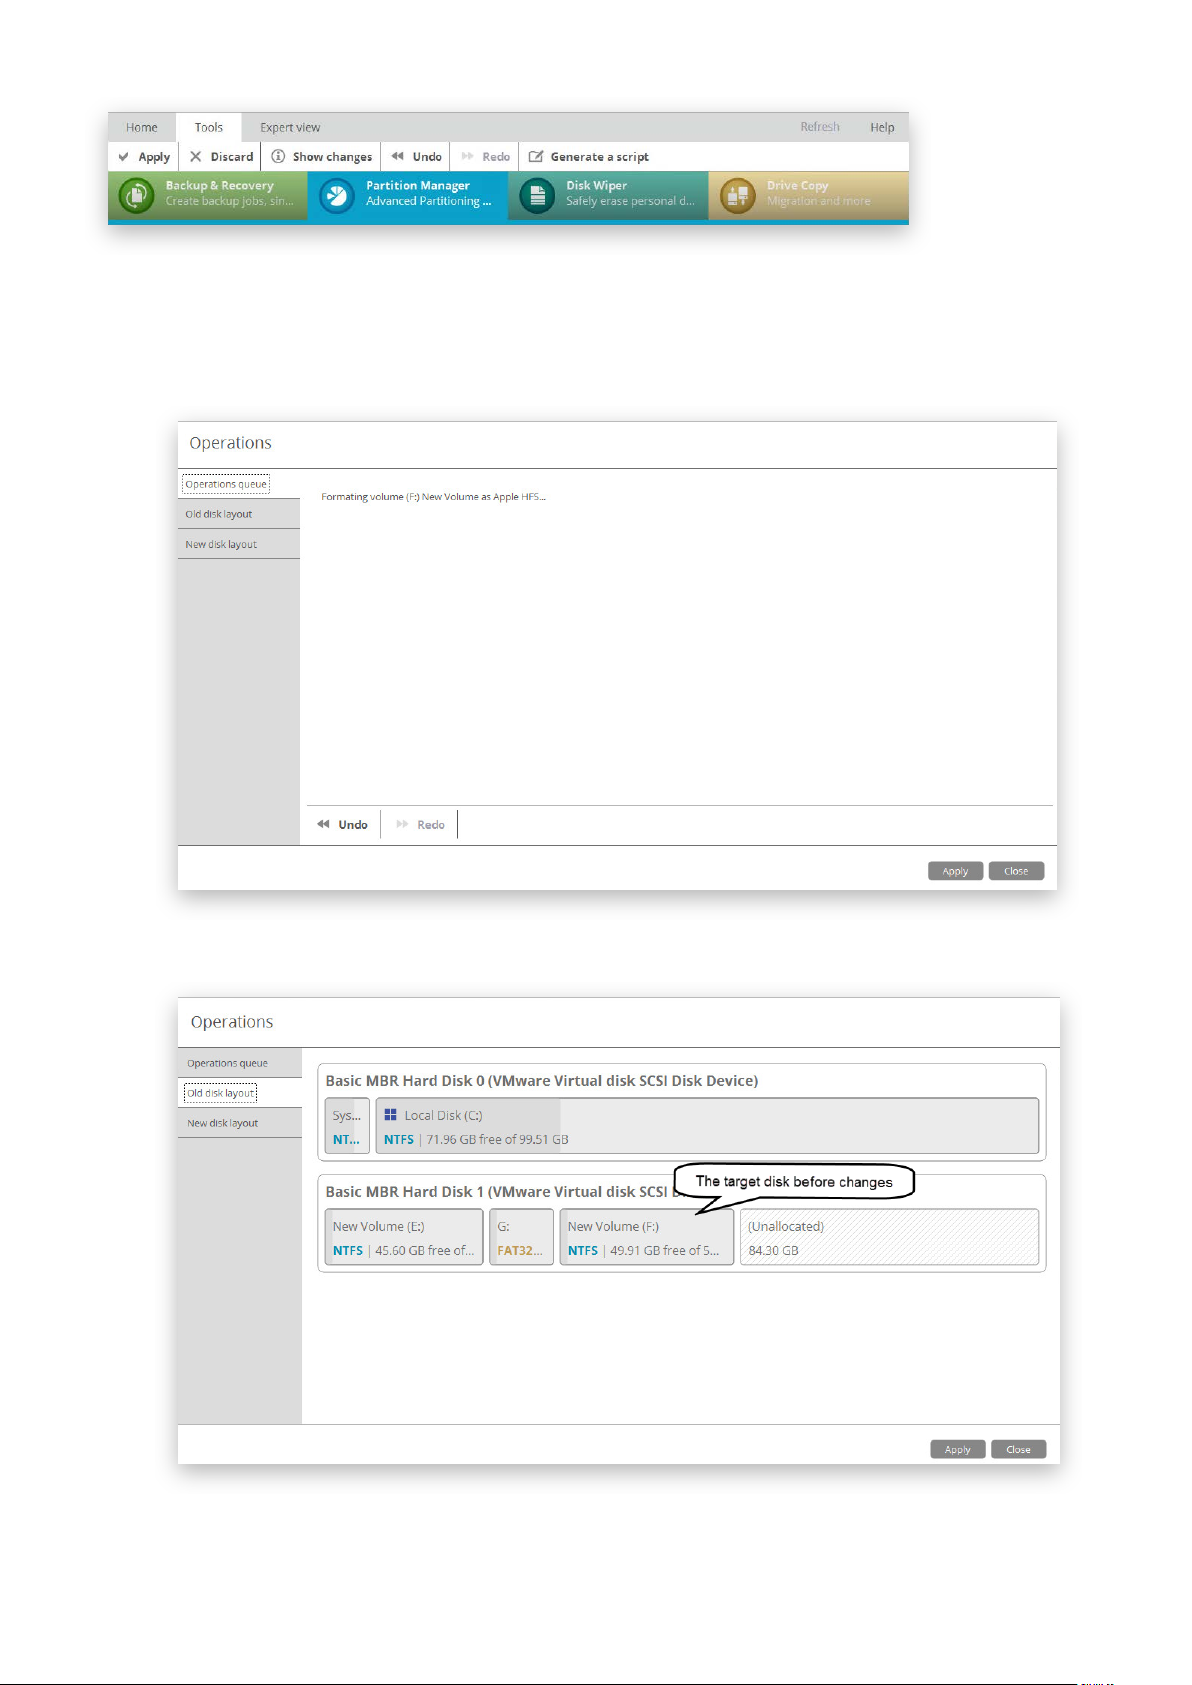
• Apply. Click to physically execute pending changes.
• Discard. Click to cancel all pending changes.
• Show changes. Click to see and manage pending changes.
Select Old disk layout to see your disks before accomplishing pending changes.
Select New disk layout to see your disks after accomplishing pending changes. Use the arrow buttons
below to see how the target disk layout changes after each operation.
Copyright© 1994-2018 Paragon Software Group. All rights reserved.
Page 12
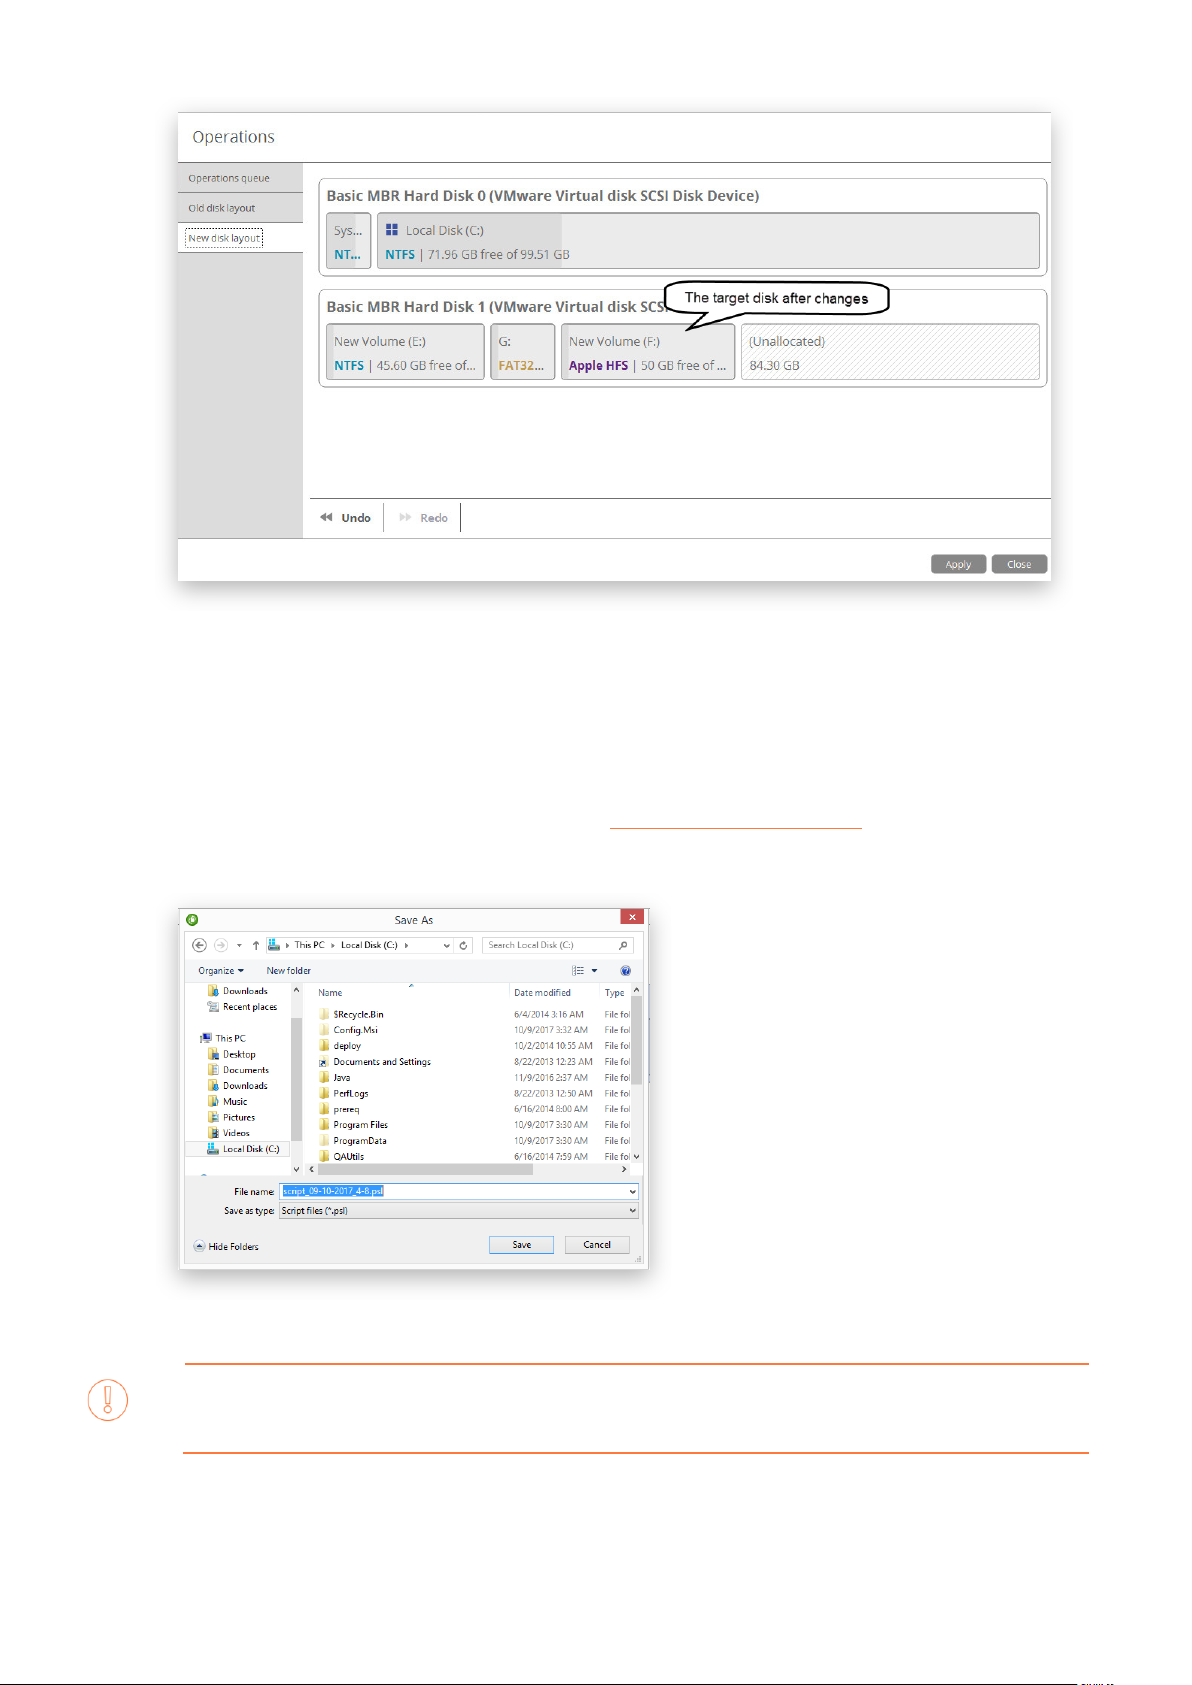
• Undo. Click to cancel the last pending operation.
12
• Redo. Click to cancel the last undo pending operation.
• Generate script. Generate a script out of all pending changes. A script may describe one or several
operations with macro-language commands. The program installation package includes an interpreter
utility “hdmengine_scriptsapp.exe” that allows executing any set of operations automatically in the
unattended mode. For more details, please consult Using the Command Prompt
.
If necessary, you can change the default location and filename for the created script file.
To learn more about scripts, please consult the Paragon Scripting Language manual.
Copyright© 1994-2018 Paragon Software Group. All rights reserved.
Page 13
13
Disk Map
The Disk Map displays the layout of storage devices. Each device is represented with a rectangle bar that contains
small-sized bars, which represent partitions or logical disks. By looking at the size of the bar’s shaded area it is
possible to estimate the used disk space.
Large-sized bars display the following information about storage devices:
• Type (physical, virtual),
• Used partitioning scheme (MBR or GPT),
• Total capacity.
Small-sized bars display the following information about logical disks and blocks of free space:
• Volume label (if exists),
• Total size,
• File system.
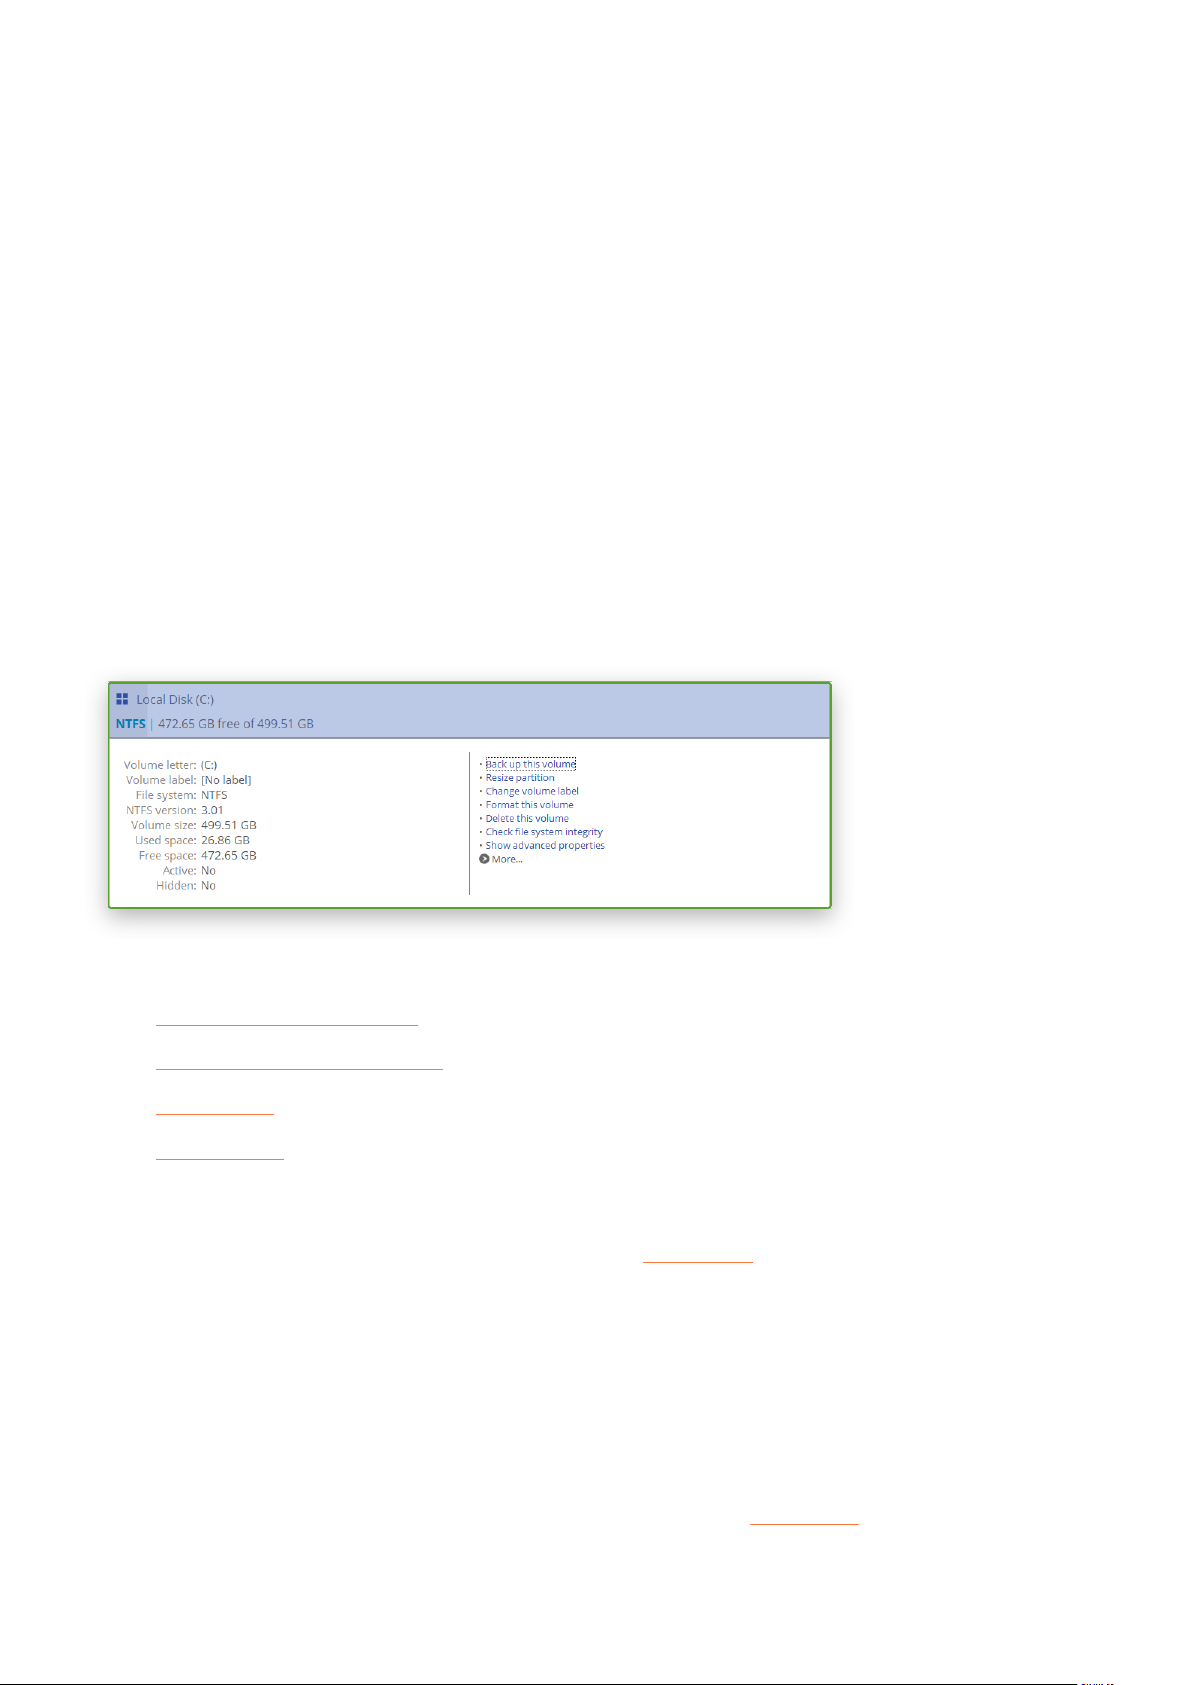
Left click a disk, volume, or block of free space to call a context-sensitive menu with detailed information on the
selected object and a list of available operations.
For more details, please consult the following chapters:
- Protecting System and Data
- Managing Partitions and Disks
- Erasing Data
- Copying Data
Wizards
Wizards are also grouped by functionality scopes. If the program window is relatively small, the wizards get into
several tabs. Use the arrow buttons to switch between them. In Expert view
you can choose what wizards to
display and to hide.
Management Tabs
• Select My Computer (opened by default) to see the layout of storage devices. This tab is available in all
four functionality scopes.
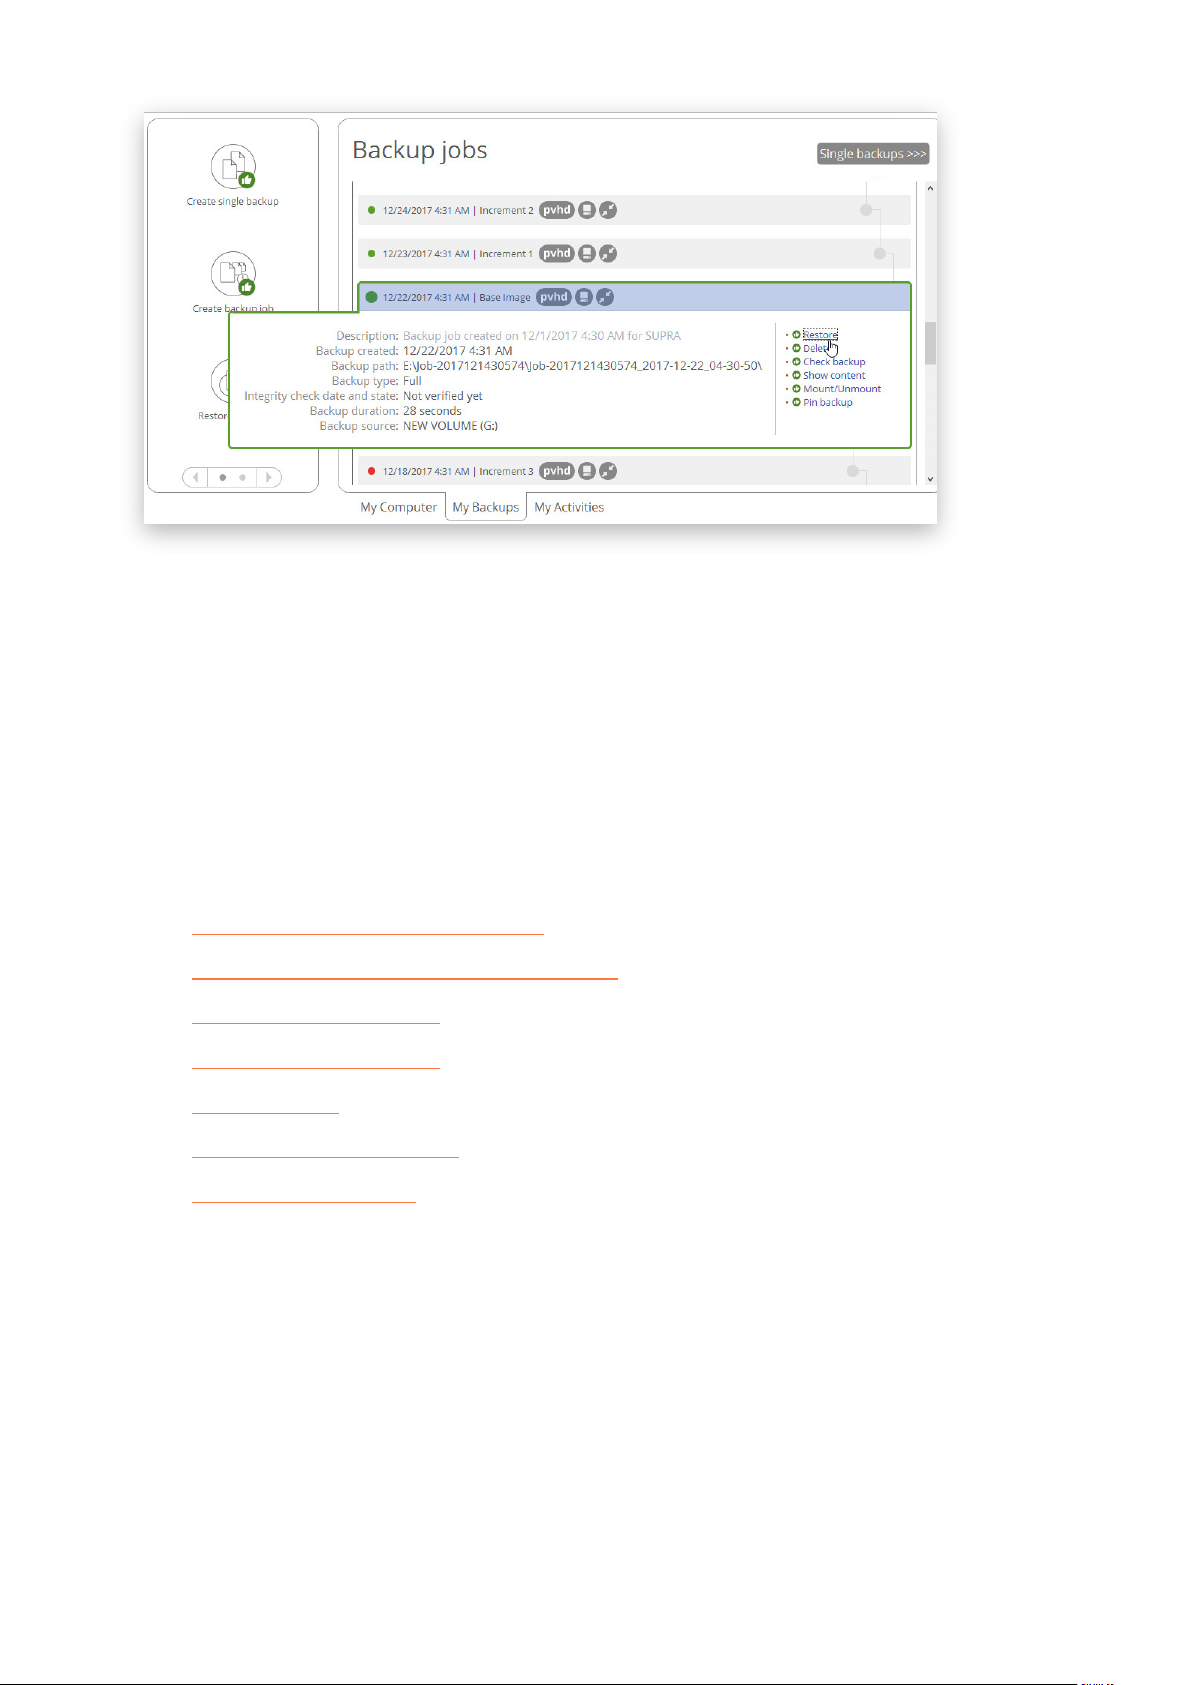
• Select My Backups > Single backups>>> to see all configured one-shot backup tasks or My Backups >
Backup jobs>>> to see configured regular backup routines. Left click a backup image to call a context-
sensitive menu with detailed information on the selected object and a list of available operations. Please
note that this tab is only available in Backup & Recovery scope or Expert view
.
Copyright© 1994-2018 Paragon Software Group. All rights reserved.
Page 14
14
At each program start and after clicking Refresh, all backup data files are checked for availability. As a result,
the program marks each backup image with one of the following flags:
• Green circle means that all files required for restoring a backup image are available.
• Grey circle means that remote backup storage where a backup image resides is not available, either
the specific external drive is not connected or network share cannot be reached (a network connection
problem or the remote computer is switched off).
• Red circle means that a backup image is corrupted and cannot be restored. This problem can have
different reasons, those that can be fixed and those that cannot.
For more details, please consult the following chapters:
- Restoring Individual Files and Folders
- Restoring an Entire Disk or Separate Volumes
- Mounting a Backup Image
- Checking Backup Integrity
- Pinning Backup
- Repairing Corrupted Backup
- Adding a Backup Image
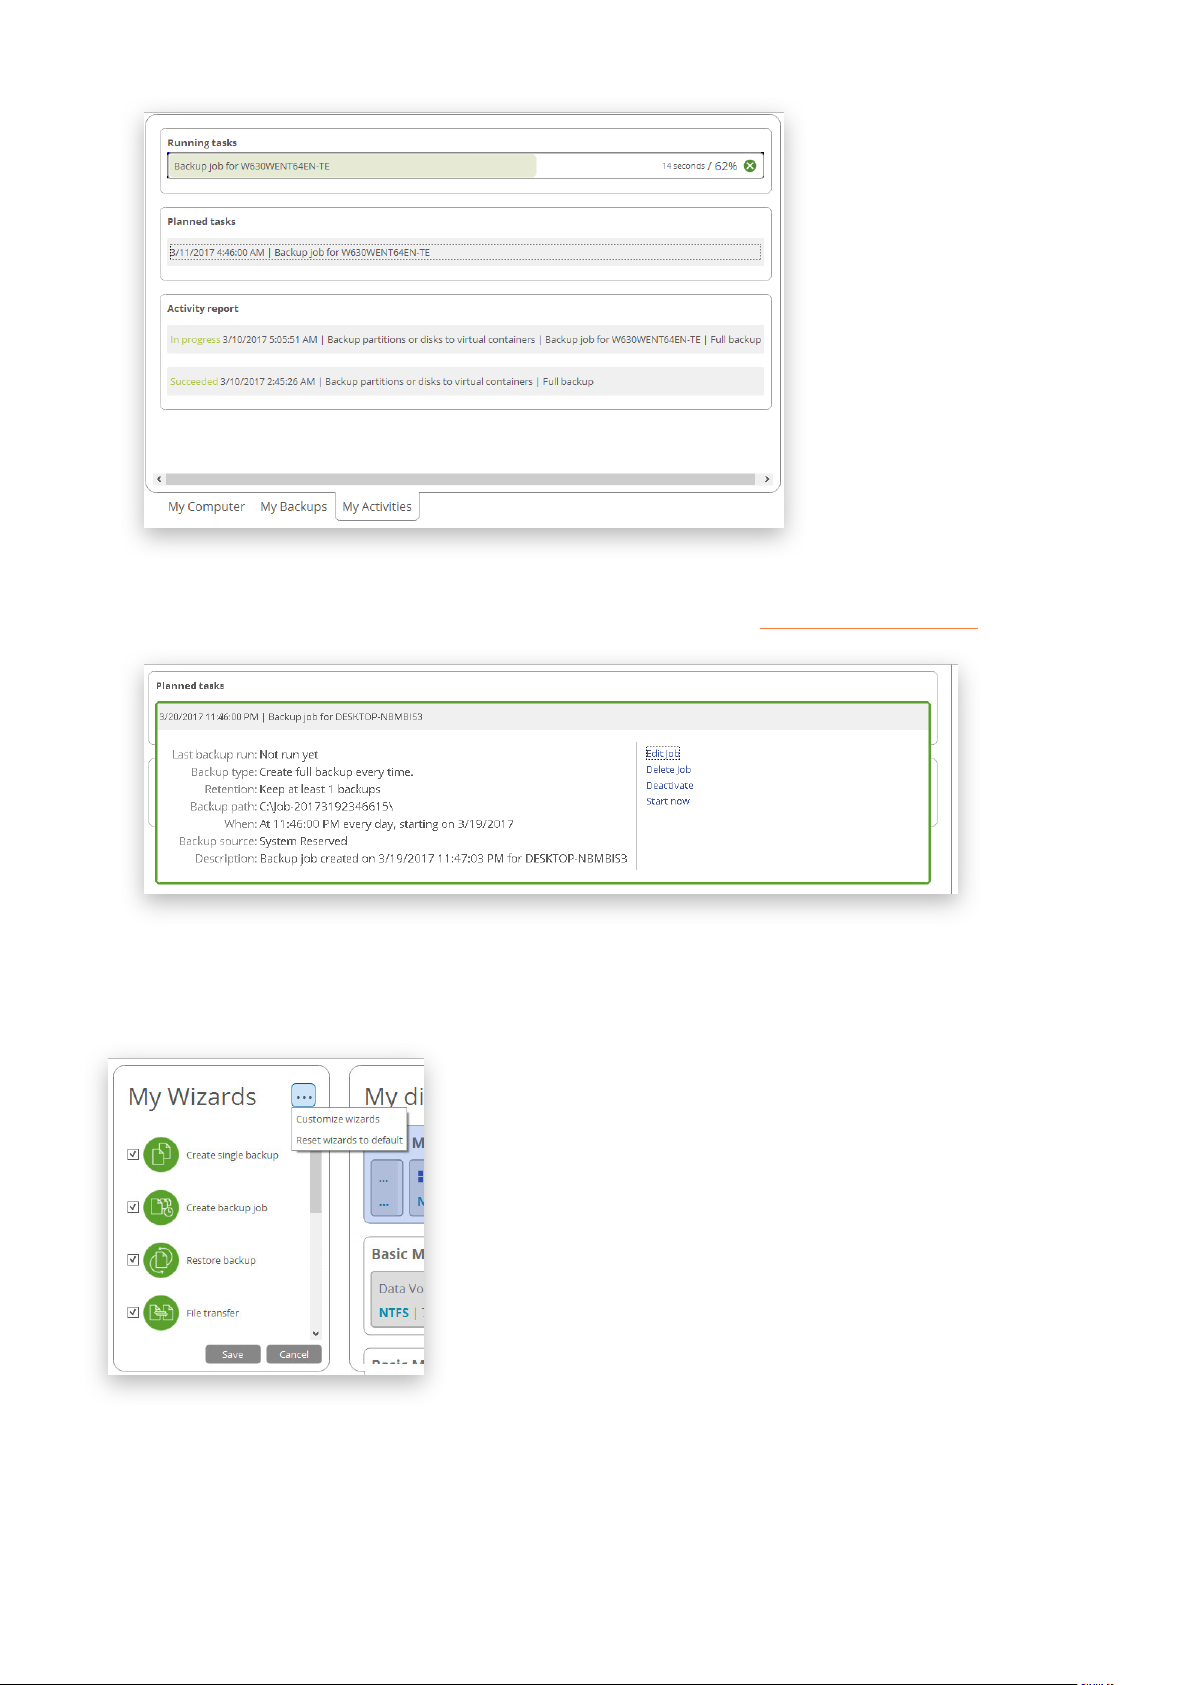
• Select My Activities to see completed, scheduled and currently executed operations and their statuses.
Please note that this tab is only available in Backup & Recovery scope.
Copyright© 1994-2018 Paragon Software Group. All rights reserved.
Page 15
15
For any scheduled backup job you can call a context-sensitive menu with detailed information on the selected
object and a list of available operations. For more details, please consult Managing Backup Jobs
.
Expert view
Use this tab to have all product functions in one view. This mode also allows you to adjust the working environment
by hiding wizards you don’t need.
Changing Program Settings
Select Home > Settings to access the program settings. All settings are grouped into several sections, which
functions are described in the following paragraphs. By selecting a section from the list, you can open a set of
options.
Copyright© 1994-2018 Paragon Software Group. All rights reserved.
Page 16
16
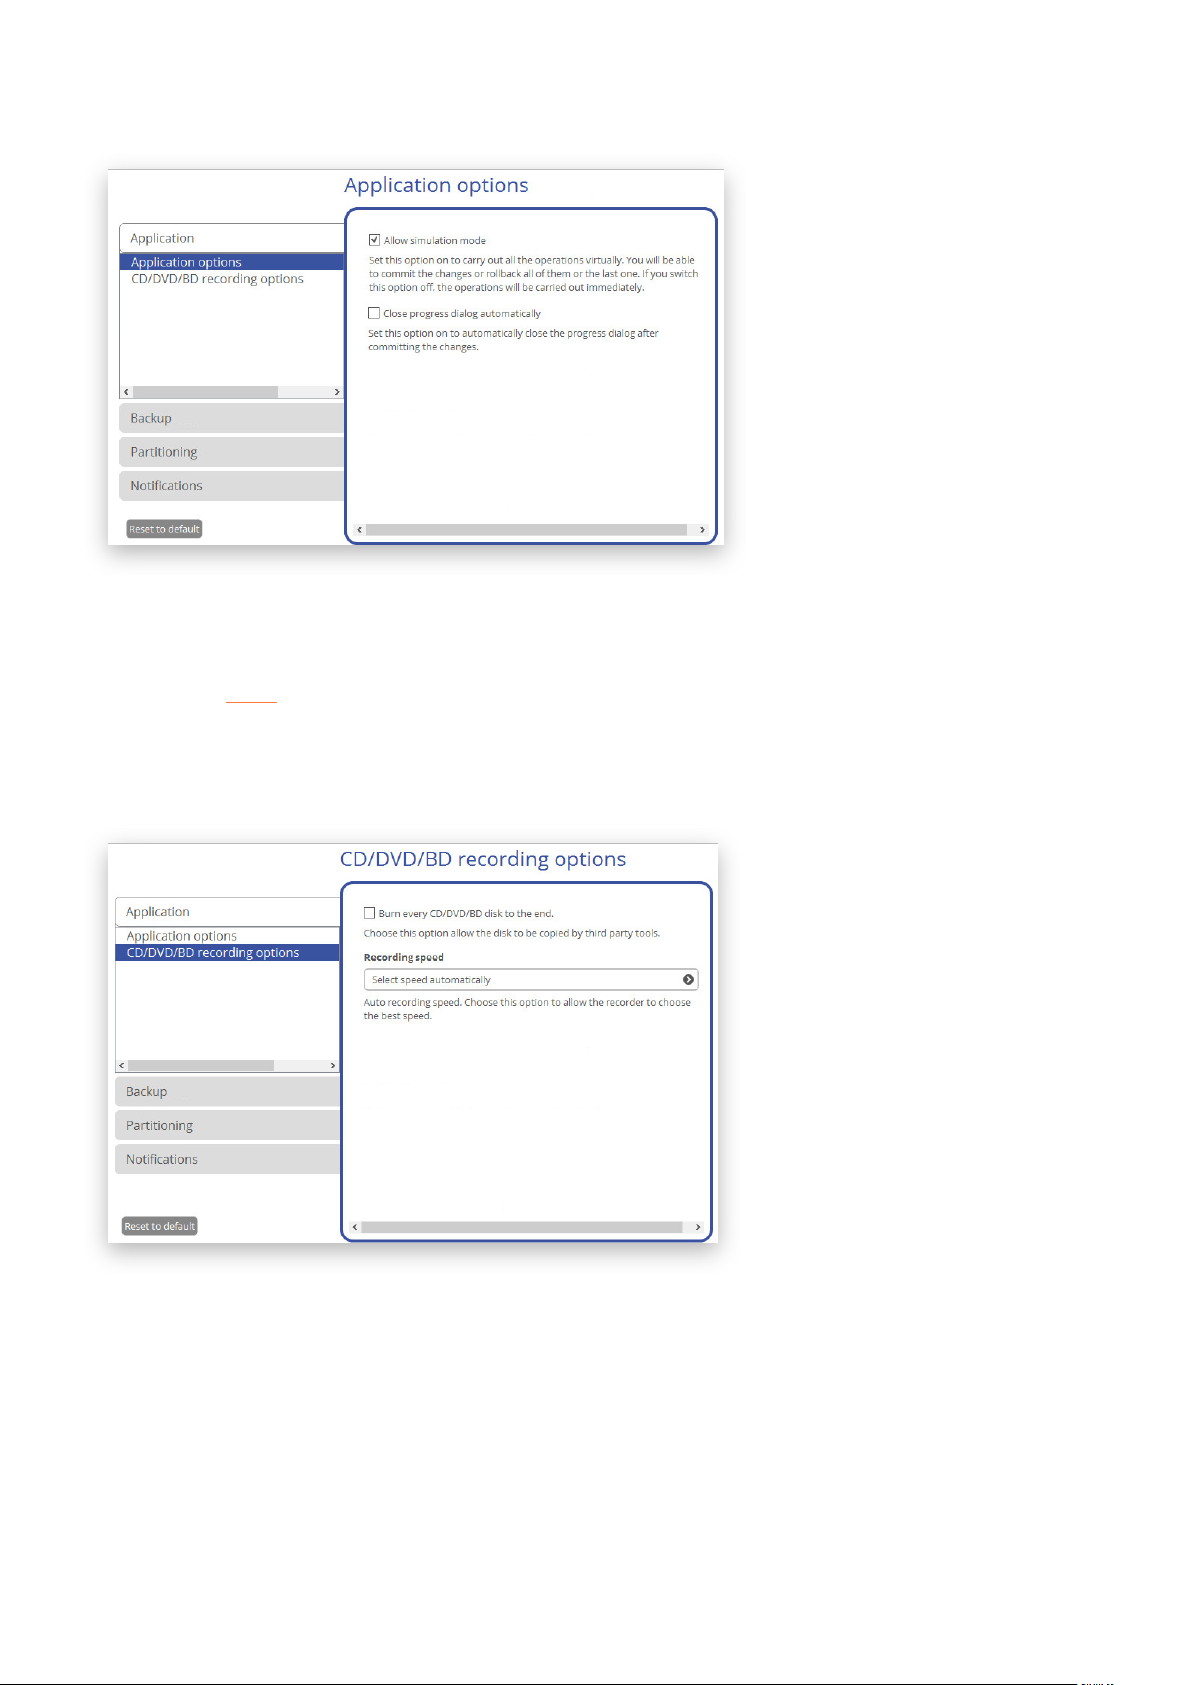
Application Section
Simulation Mode Options
• Allow simulation mode (enabled by default). The simulation mode is an effective way of protection from
any troubles, since no potentially dangerous operation is executed until confirmation, thus giving you a
second chance to weigh all pros and cons of this or that particular operation. For more details, please
consult Tools
.
• Close progress dialog automatically. Mark the checkbox to automatically close the progress dialog after
accomplishing operations.
CD/DVD/BD Recording Options
• Burn every CD/DVD/BD to the end. By default, the program does not create ISO 9660 compliant burning
sessions, as it processes data on-the-fly and can only estimate the resulted session size. That’s why no third
party tool will get access to the recorded data. To tackle the issue, mark the checkbox to make the program
create a standard Disk-at-Once session. It may slow down the burning process, as every CD/DVD/BD will be
recorded up to the end, no matter how much actual information to contain.
• Recording speed. Define how fast compact discs should be recorded (minimum, normal and maximum).
Besides there is automatic mode when the program sets the most appropriate speed for each disc.
Copyright© 1994-2018 Paragon Software Group. All rights reserved.
Page 17
17
Backup Section
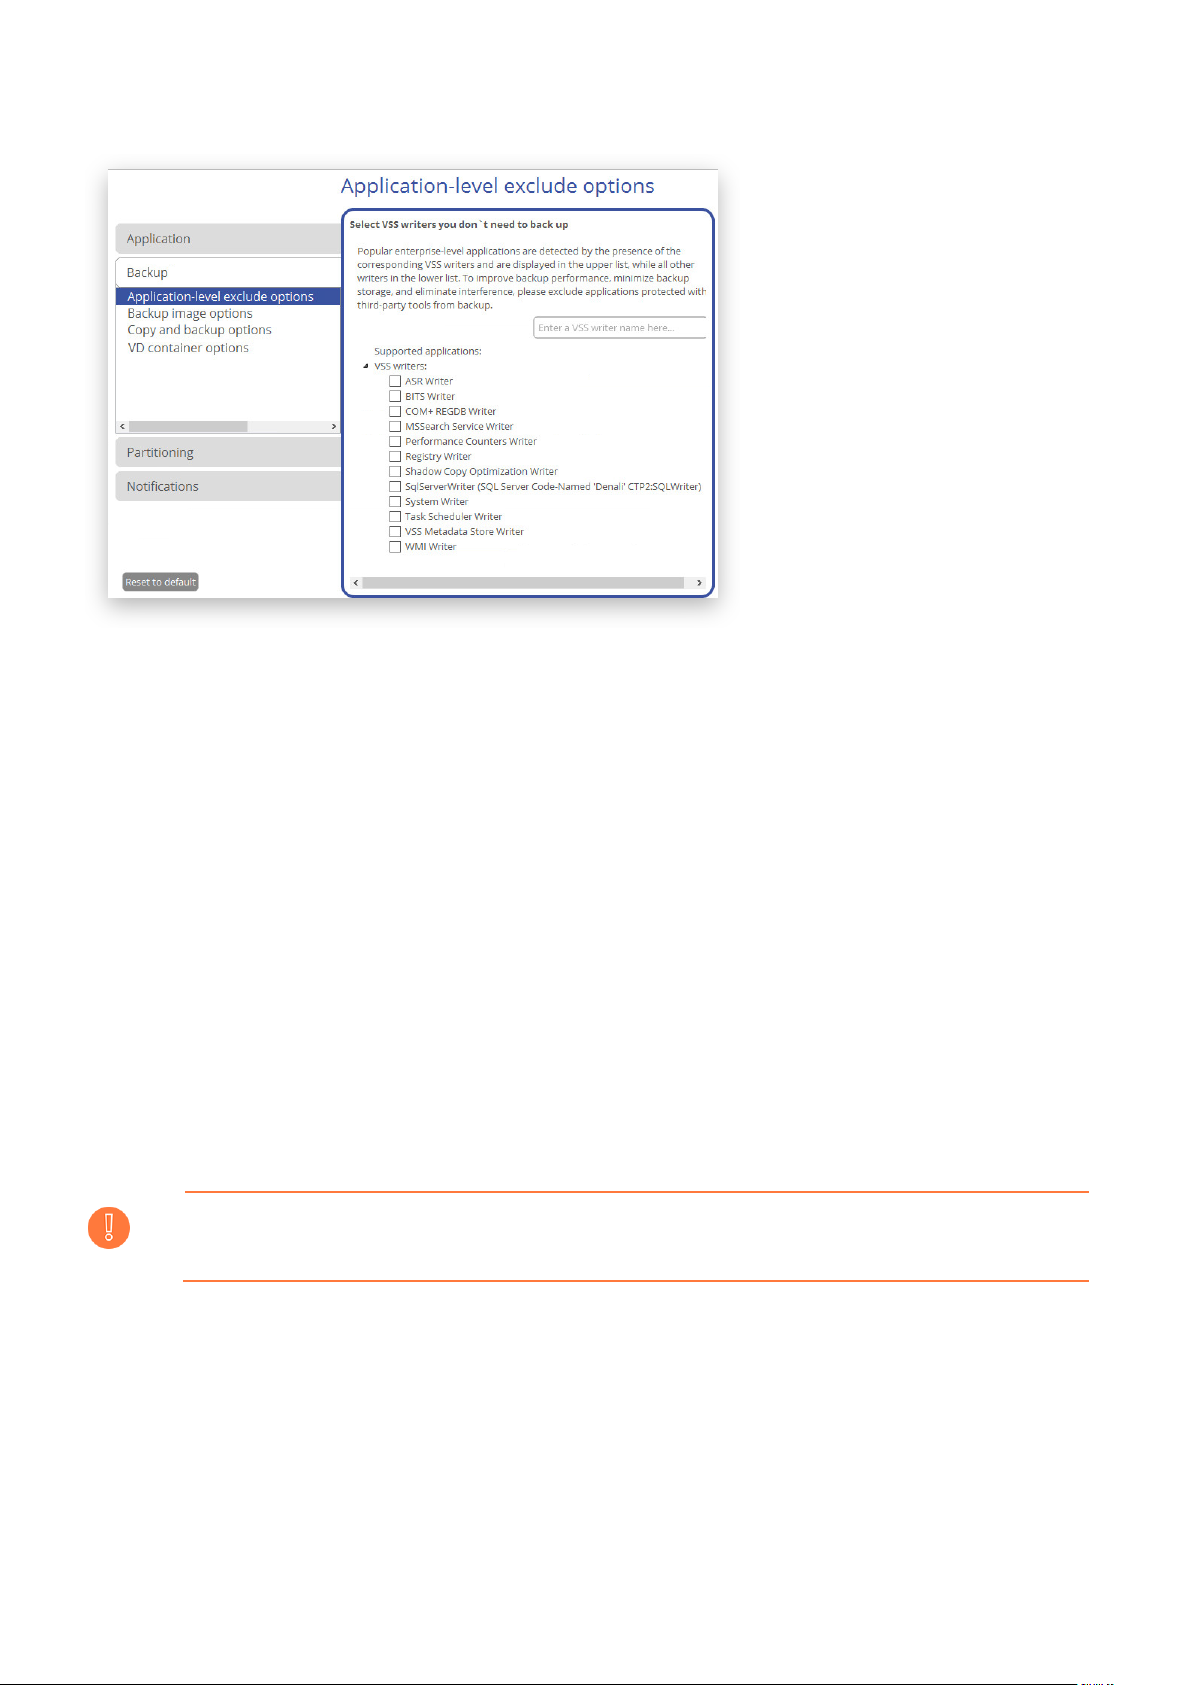
Application-level Exclude Options
Our program automatically detects supported enterprise-level applications deployed in the system by the presence
of the corresponding VSS writers and displays them in the upper list. If a found application is being protected with
a specially designed tool, please select it in the list to exclude from backup operations. This will help you to
significantly improve backup performance of your Windows server, minimize backup storage, and eliminate
interference.
Supported enterprise-level applications:
• MS Exchange
• MS SQL
• MS SharePoint
• MS Hyper-V
• VMware Server
Additionally, in the lower list you can see all other VSS writers running in the system for you to choose those you
don’t need to back up.
Windows OS may not run correctly after restore if you exclude system writers from backup.
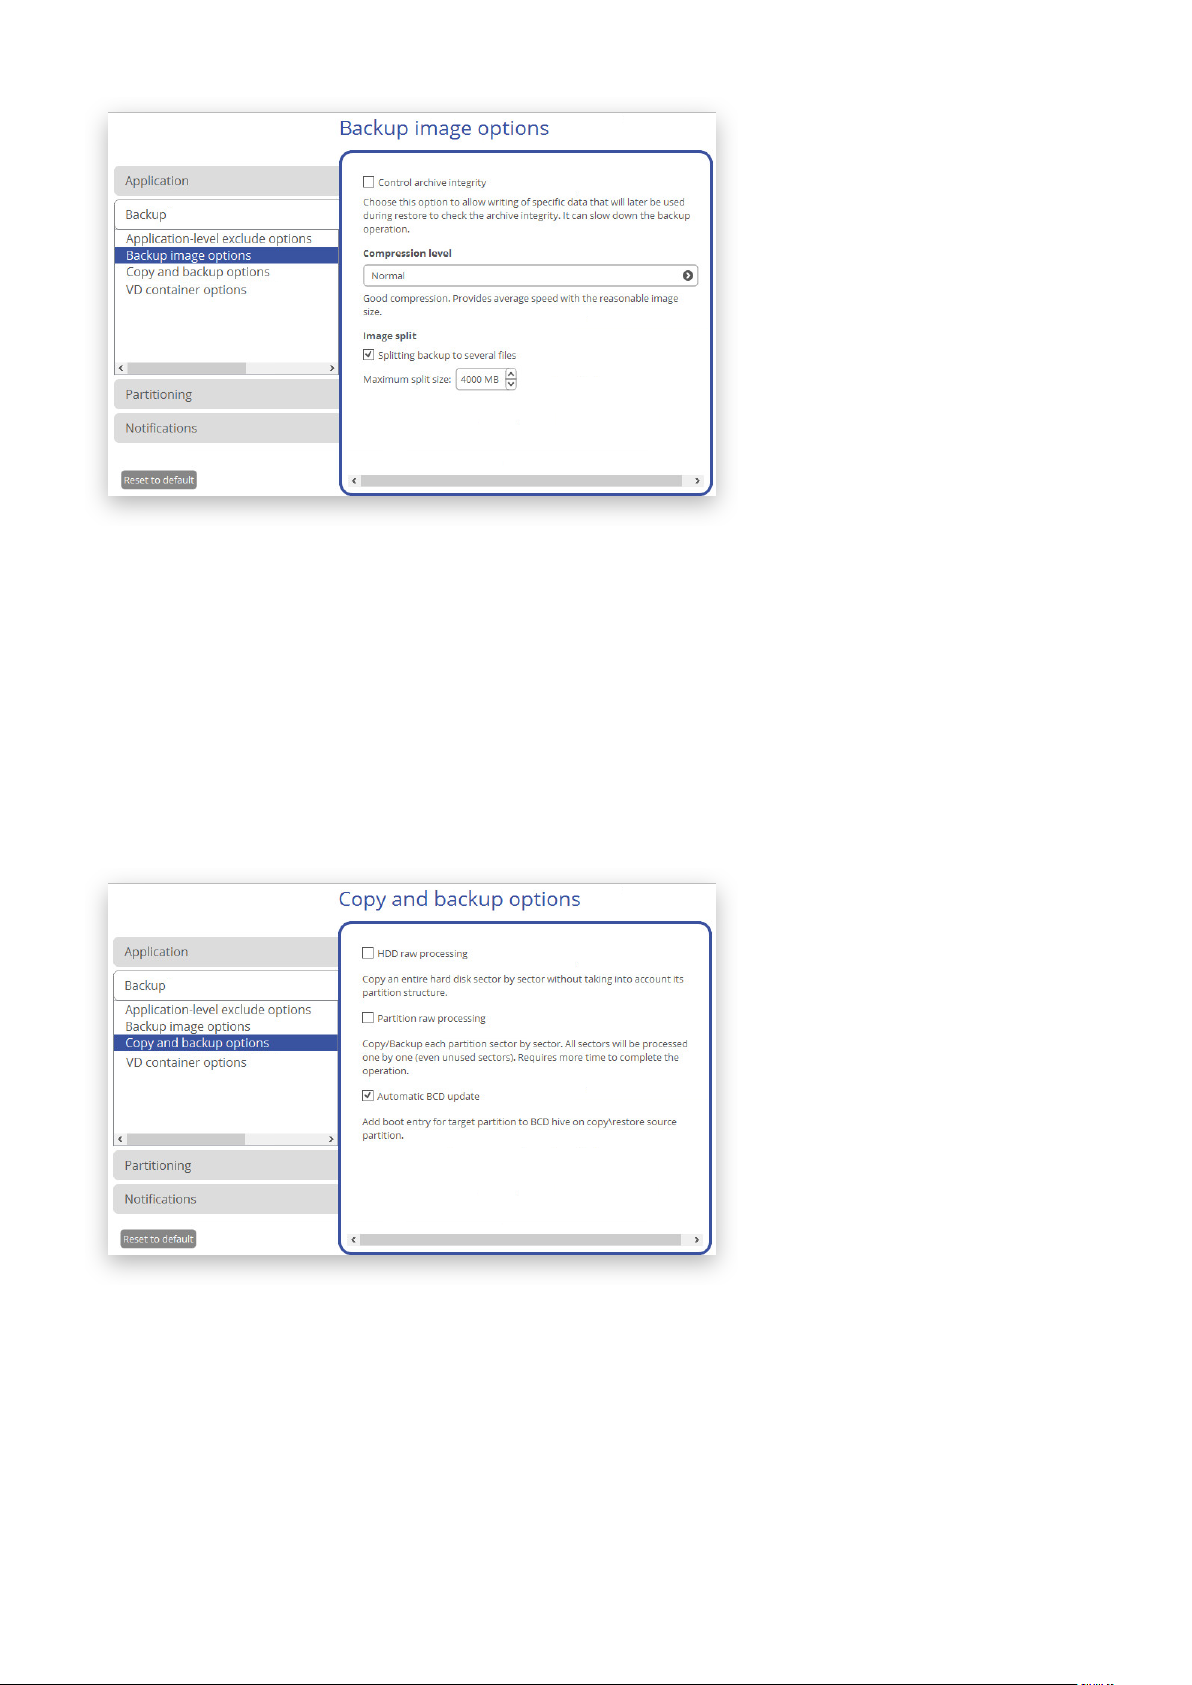
Backup Image Options
Copyright© 1994-2018 Paragon Software Group. All rights reserved.
Page 18
18
• Control archive integrity (enabled by default). Use this option to make sure all backup images created
with the program are 100 percent flawless. If you decided not to control the archive integrity, the backup
operation would take about 3-5% less time.
• Compression level. Select the default compression level for all created backup images from the pull-down
list.
• Image split. By default, every backup image will be split to files of 4GB. This can help to avoid problems
caused by a maximum file size limitation of your file system (e.g. 4GB for FAT32). Use the spinner control to
set another size or disable this option if necessary.
Copy and Backup Options
• HDD raw processing. Mark the checkbox to back up a hard disk in the sector-by-sector mode, thus
ignoring its information structure (e.g. unallocated space or unused sectors of existing partitions will be
processed as well). This can help to avoid problems with hidden data created by certain applications or the
system administrator. If you enable this option, the operation will take more time to complete.
• Partition raw processing. Mark the checkbox to back up a partition in the sector-by-sector mode to
successfully process unknown file systems. If you enable this option for processing supported file systems,
the operation will take more time to complete.
Copyright© 1994-2018 Paragon Software Group. All rights reserved.
Page 19
19
• Skip archive files stored in archive library. By default, backup images registered in the archive database
will be skipped from processing, thus reducing the operation time and the resulted backup size.
• Automatic BCD Update. If necessary, unmark the checkbox to suppress automatic update of BCD (Boot
Configuration Data) after copy/restore operations.
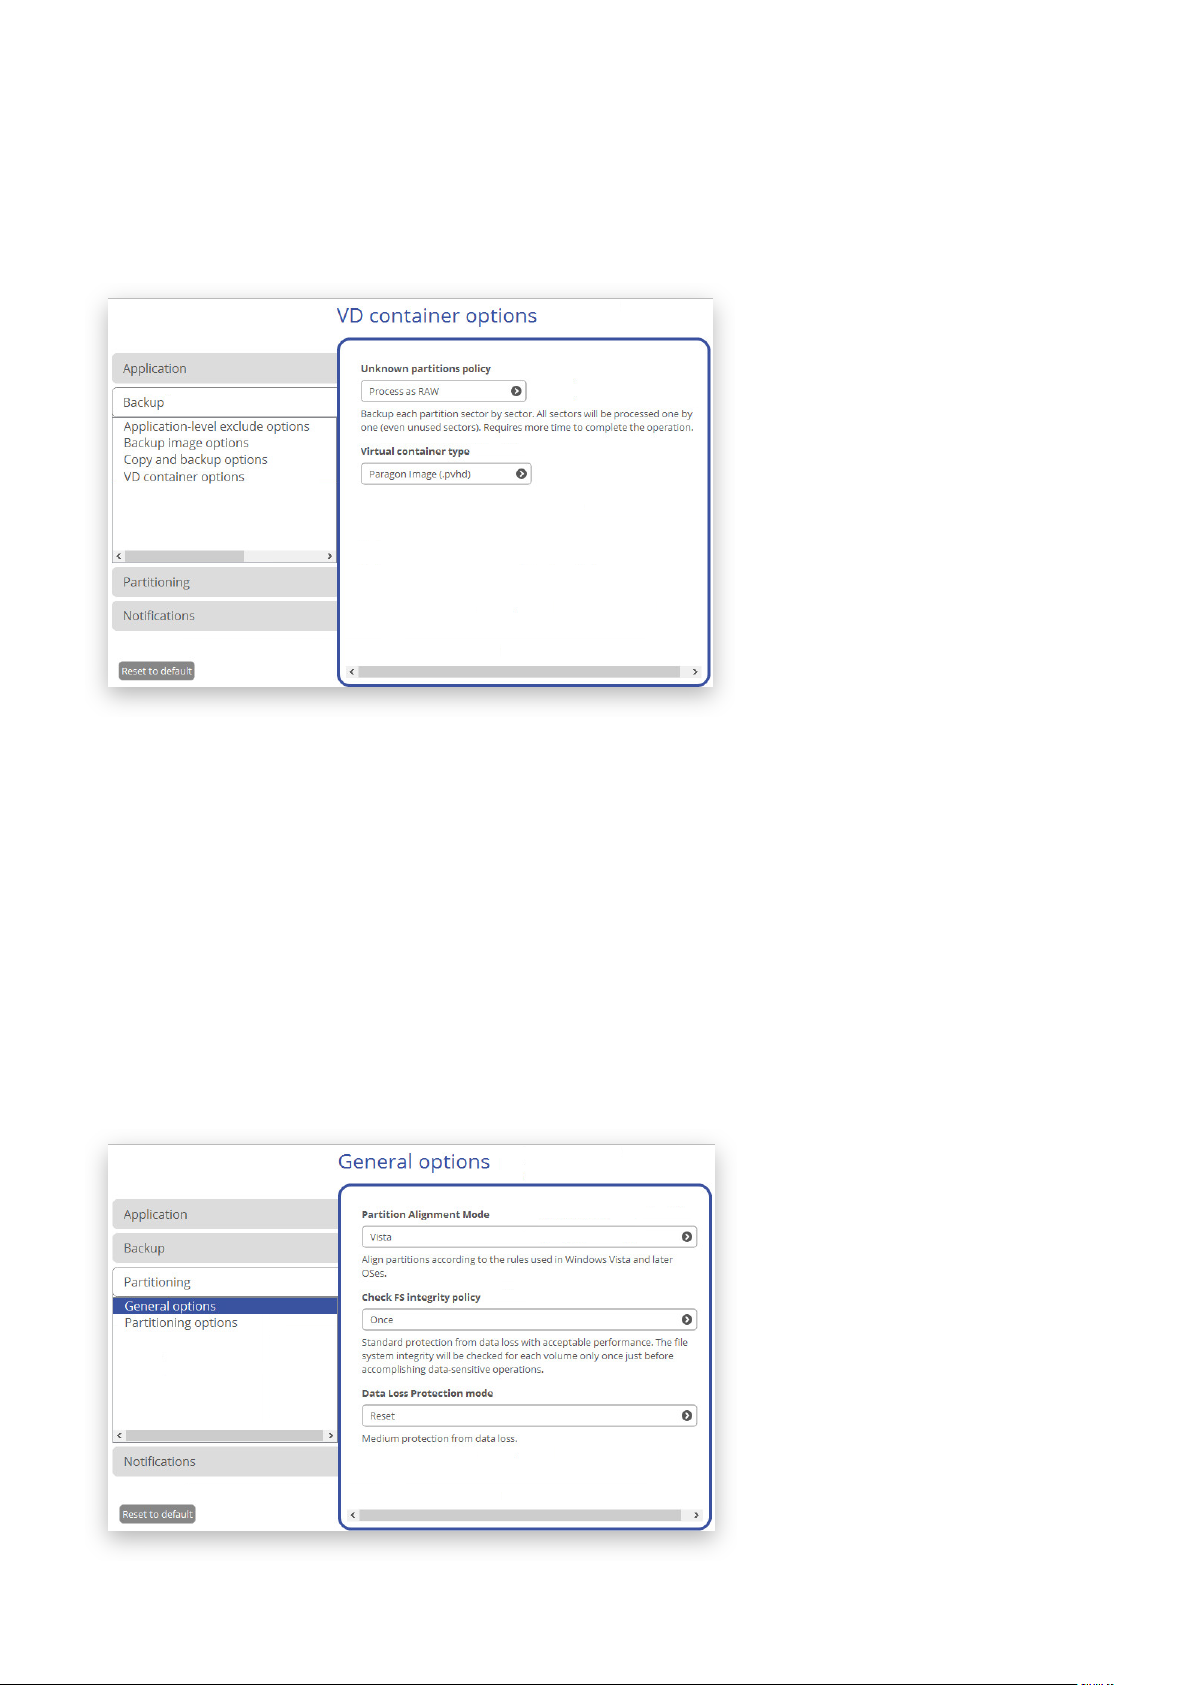
VD Container Options
• Unknown partitions policy. Here you can define behavior for processing unknown or unformatted
partitions (skip from backup, process in the sector-by-sector mode, or ask the user each time this type of
partition has been found).
• Virtual container type. By default, the program is configured to back up to pVHD (Paragon Virtual Hard
Drive). Use this option to switch the resulted virtual container to VHD, VHDX, or VMDK. Please note that the
use of pVHD enables to get full backup images several times smaller than the original objects, while
incremental updates – dozens of times smaller when comparing to VHD, VHDX or VMDK, which have some
fixed size of blocks, not dynamic. Besides encryption and password protection are only available for pVHD.
However, if you’re having a VMware or Microsoft hypervisor at your disposal and are planning to do instant
virtualization, please make sure the used backup format matches your hypervisor.
Partitioning Section
General Options
Copyright© 1994-2018 Paragon Software Group. All rights reserved.
Page 20

20
• Partition Alignment Mode. There are three options you can choose from:
- Legacy. DOS and Windows operating systems before Vista required that partitions had to be aligned to
the “disk cylinder” or 63 sectors to address and access sectors correctly. It was OK until 4K hard drives
came into scene. When partitions are aligned this way on a 4K disk, each logical cluster is linked to two
physical 4K clusters, which leads to double read-write operations.
- Vista. Since Windows Vista operating systems do not use the archaic CHS (cylinder/head/sector)
addressing scheme, but the Logical Block Addressing (LBA), where sectors are addressed continuously
over the whole disk drive. It is optimal for both, 512B and new 4K disks.
- Inheritance. Select the option to disable the automatic partition alignment.
• Check FS integrity policy. Accomplishment of any data-sensitive operation (resize, move, merge,
redistribute, change cluster size, etc.) is potential with data loss. To minimize this risk, it’s recommended to
check integrity of your file system before this type of operations, despite the fact that it’s quite time
consuming. We offer you several options to let you choose, which is best for you:
- Always. Maximum protection, but minimal performance. The file system integrity will be checked each
time it’s necessary to guarantee the maximum protection for the on-disk data.
- Once. Standard protection with acceptable performance. The file system integrity will be checked for
each volume only once just before accomplishing data-sensitive operations.
- Never. No protection, but maximum performance. If you’re not 100% sure your disk is rock solid,
please do not use this option.
• Data Loss Protection mode. To guarantee safety for your information when a data-sensitive operation has
been abruptly interrupted as a result of a computer reset, or a power outage, there are several techniques,
that correspond to the options below:
- Do not protect. No protection, but maximum performance. If you’re not 100% sure you’re completely
safe from a power outage, or an accidental reset of your computer, please do not use this option.
- Reset. Standard protection with acceptable performance. Maintaining a special journal, our program
enables to automatically complete a data-sensitive operation interrupted by an accidental reset of your
computer from our bootable recovery media, thus reviving the corrupted partition.
- Power loss. Maximum protection, but minimal performance. Besides journaling, our program will also
disable cache of your disk when accomplishing data-sensitive operations to avoid data loss even in
case of a power outage.
Partitioning Options
Copyright© 1994-2018 Paragon Software Group. All rights reserved.
Page 21
21
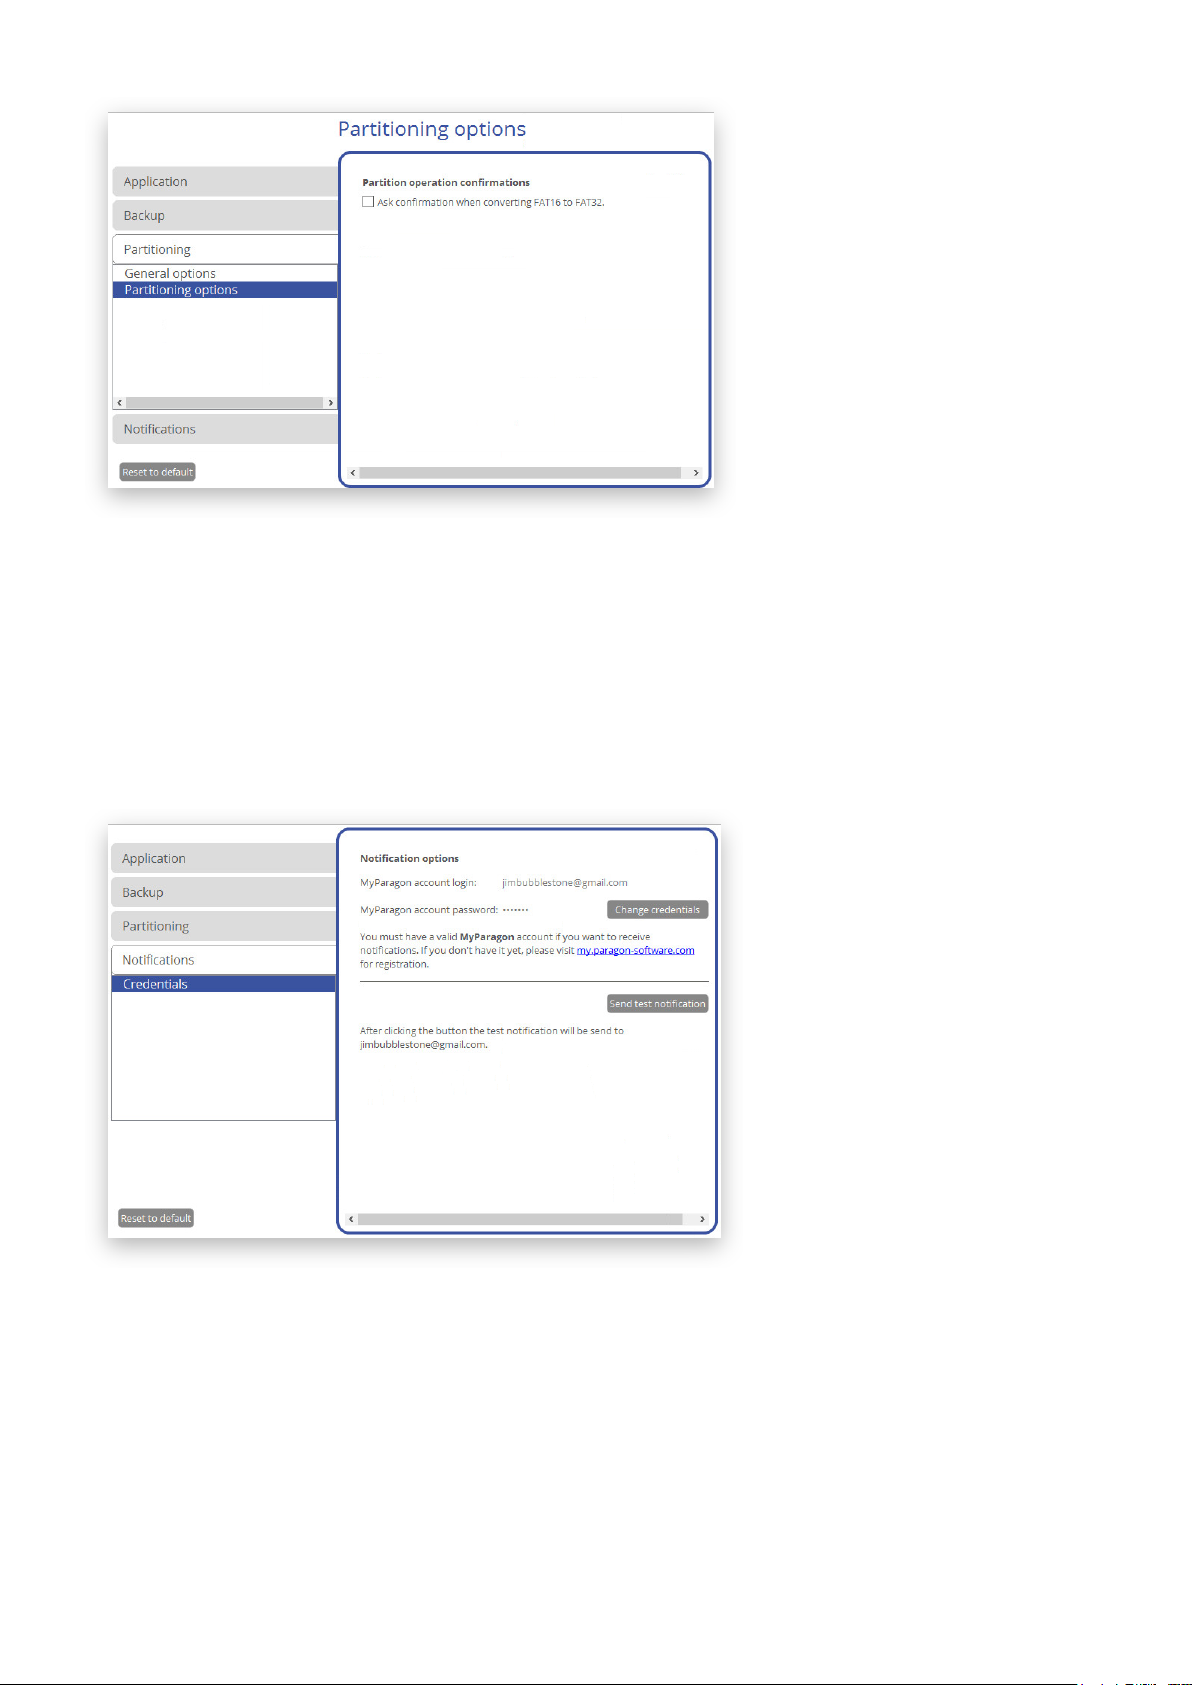
• Ask confirmation when converting FAT16 to FAT32. Mark the checkbox to automatically request
confirmation before converting FAT16 to FAT32. There are a number of situations when this kind of
conversion is the only way to accomplish the operation. For instance, you are going to transfer your
software environment to a larger hard disk with the proportional resize of existing partitions. As a result
you may get original FAT16 partitions go beyond the 4GB limit. Thus without conversion to FAT32, this
operation will in no way be possible to accomplish. The same goes for any copy disk/partition or restore
disk/partition operation involving an extra upsizing.
Notifications Section
Credentials Options
The program can be set up to notify you by email about successful completion and/or failure of most operations.
Notifications are enabled on the last page of program wizards, while in this section you should specify an email and
password of a valid Paragon’s account. This email address will be used as recipient to receive notifications. If you
don’t have an account yet, please create it by following the provided hyperlink.
When you’re done with the account credentials, check notifications can reach the destination mailbox by clicking
the corresponding button. You don't need to reply to the test email.
Copyright© 1994-2018 Paragon Software Group. All rights reserved.
Page 22
22
Managing Account
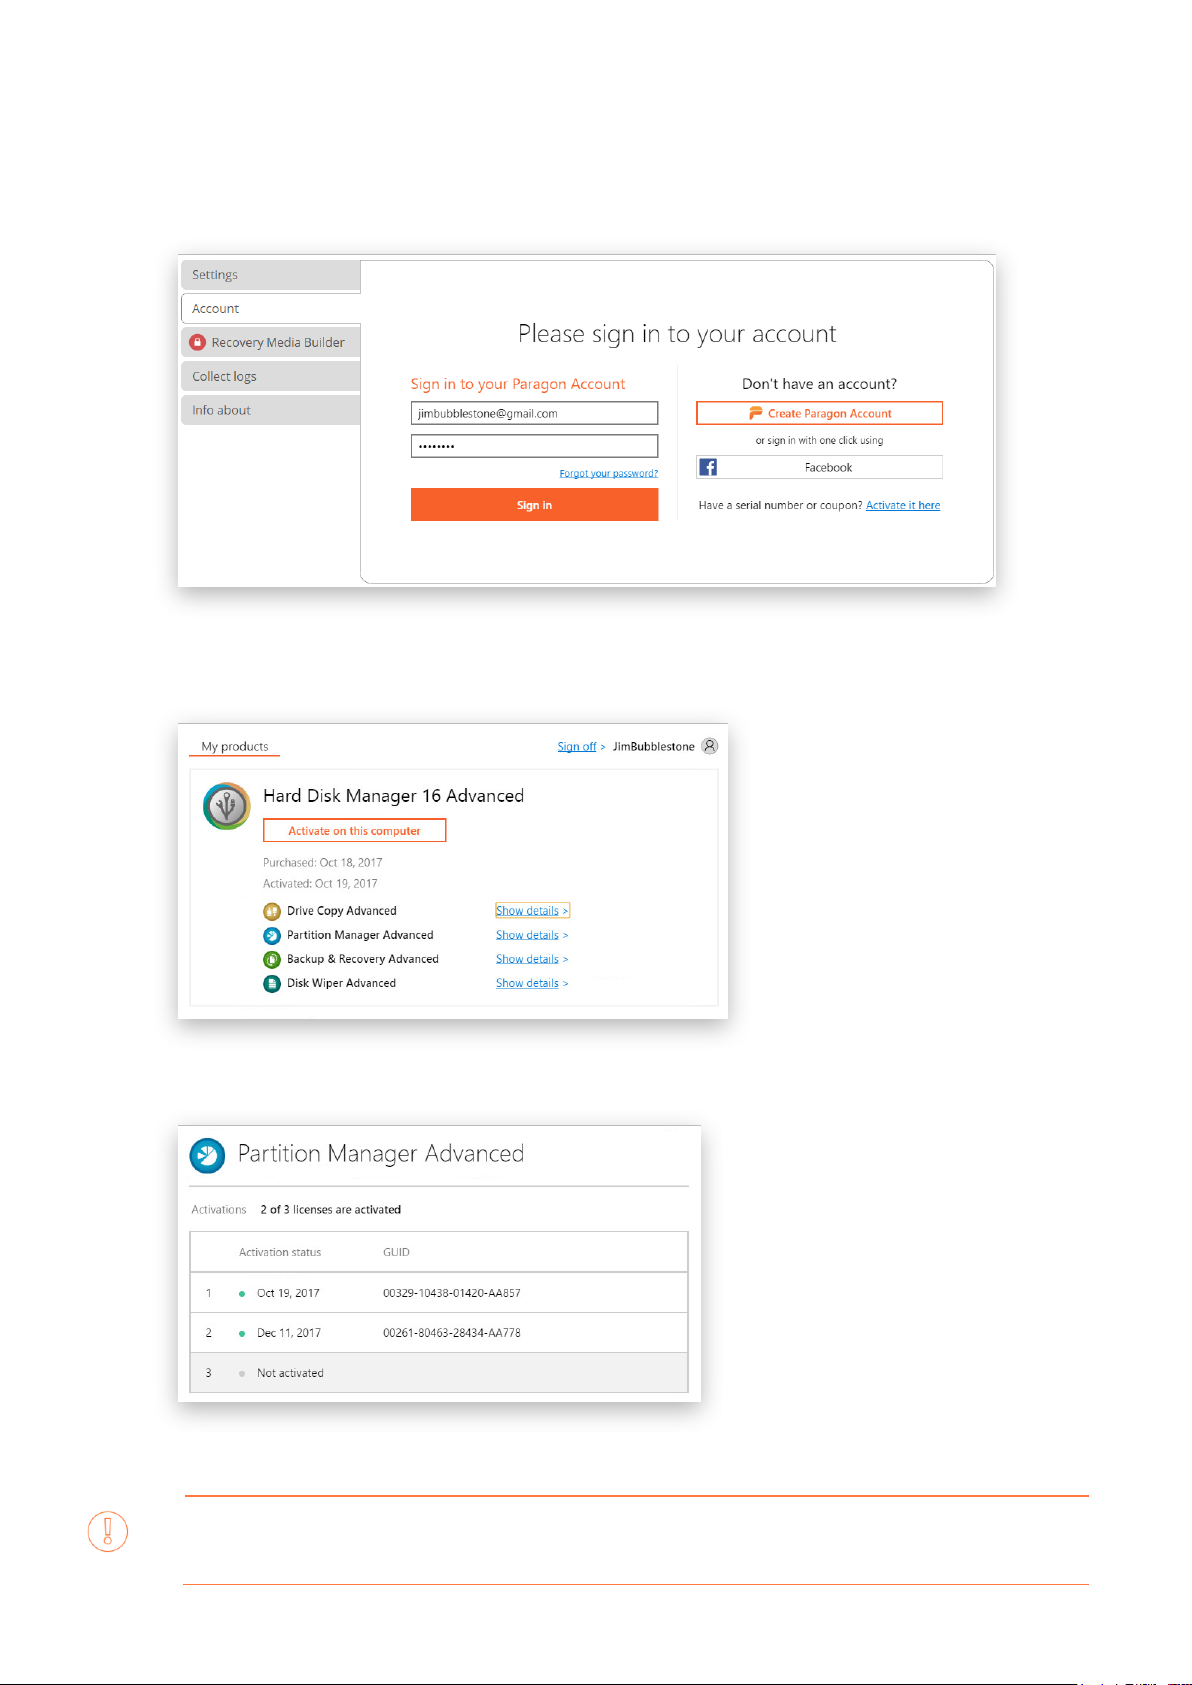
1. Select Home > Account. In the opened dialog enter an email and password of your Paragon’s account,
then click Sign in. If you don’t have an account yet, please create it by clicking the corresponding option.
Alternatively, you can sign in with your Facebook account.
2. If a success, you can see a list of purchased product licenses. Click Activate on this computer to enable
paid features on the computer.
3. Use Show details > opposite a product license to see the current activation status.
Copyright© 1994-2018 Paragon Software Group. All rights reserved.
If you need to activate a license on one of your computers, but all three slots are already occupied,
please use MyParagon Account to release the activation from one of your machines or purchase
Page 23
23
one more license.
WAIK/ADK is a Microsoft’s proprietary tool and can be obtained from its Download Center for free.
Moreover you will need to download a version, which is suitable for your Windows OS – Recovery
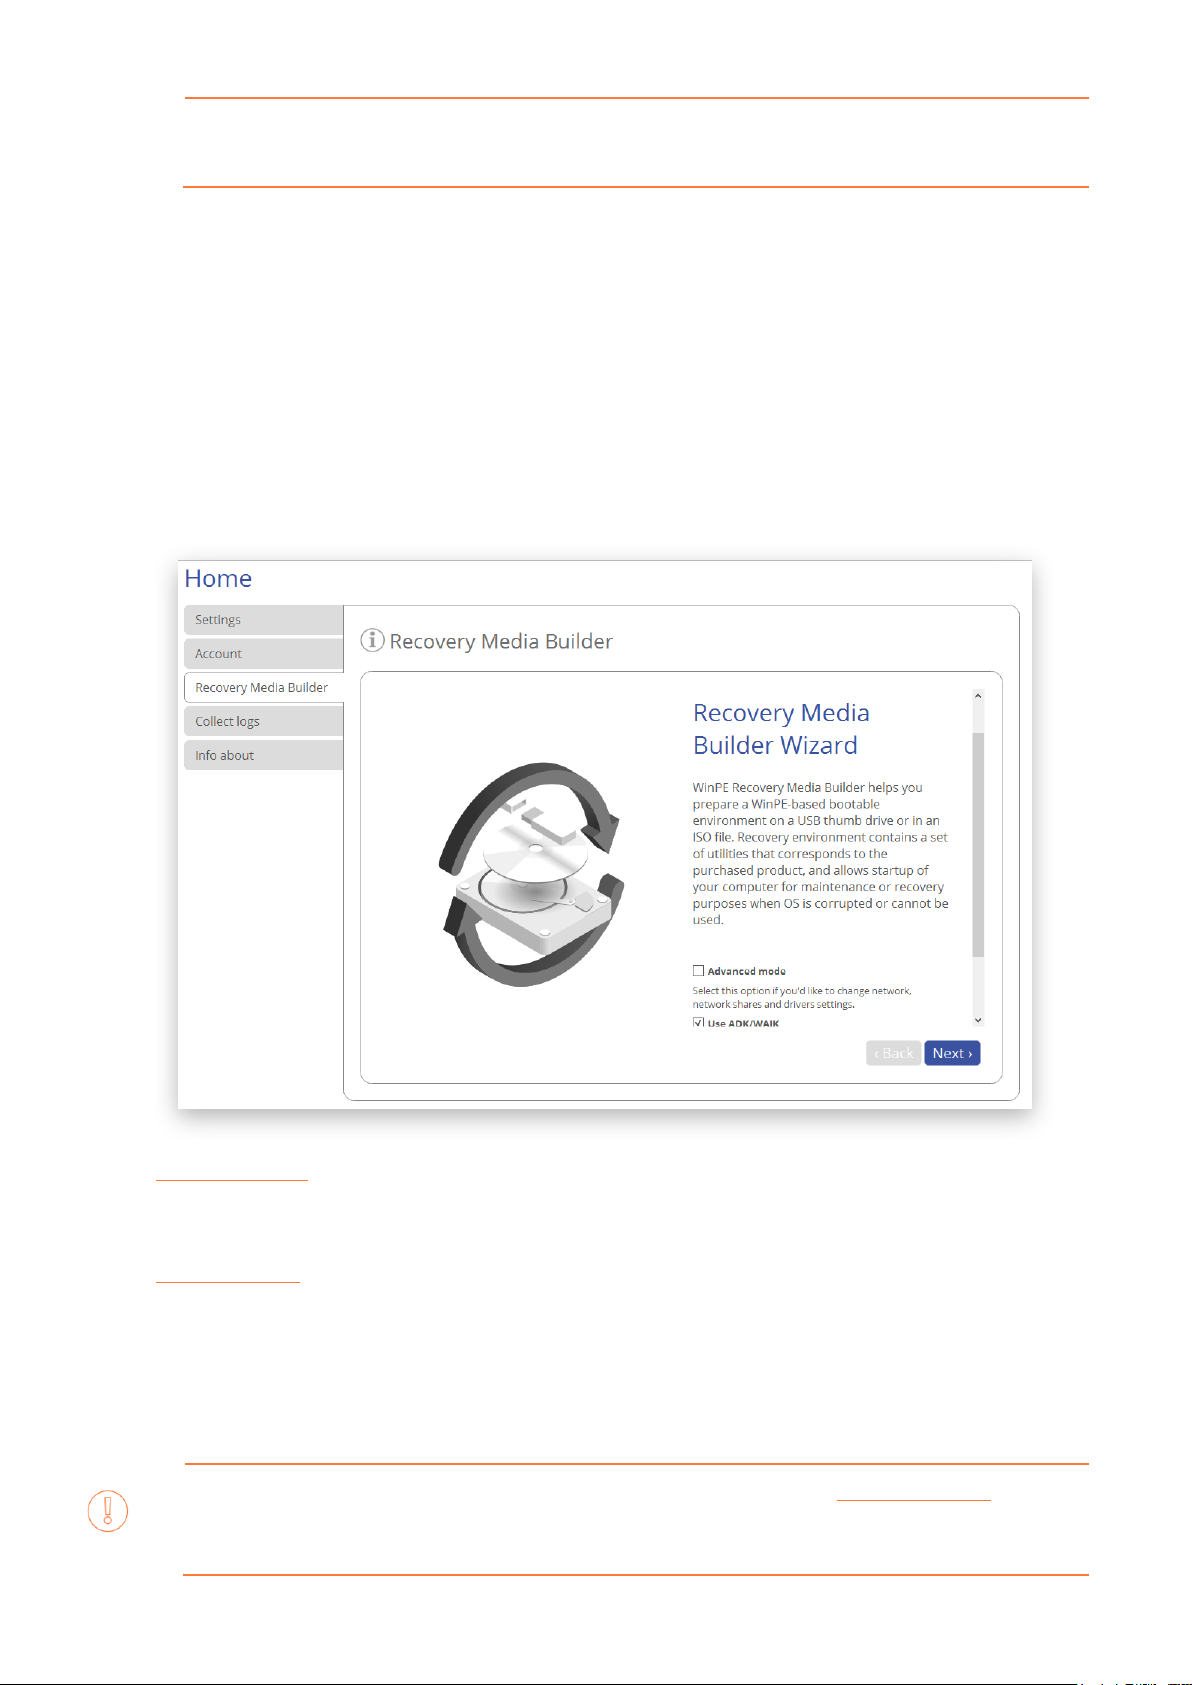
Building Recovery Media
The program includes a user-friendly wizard that will guide you through the process of creating a WinPE-based
recovery media on a USB thumb drive or in an ISO file to later burn it to CD/DVD. For advanced users, there are
capabilities to add drivers for specific hardware devices, configure network settings, and map network shares in the
process.
1. Select Home > Recovery Media Builder.
2. The welcome page introduces the wizard’s functionality. Besides you can see two options here:
• Advanced mode. Please mark this option if you’d like the future bootable media to have pre-configured
network settings, mapped network resources, or injected drivers for specific storage controllers or network
cards.
• Use ADK/WAIK. Recovery Media Builder doesn’t require Windows Assessment and Deployment Kit (ADK)
or Automated Installation Kit (WAIK) to be installed in the system to build a WinPE-based environment, as it
can directly use WIM image inside the operating system. However, some system builders remove this
image from preinstalled Windows OS. If this is your case, mark the option to use ADK/WAIK. You will also
need it to create an ISO image of the WinPE environment.
Copyright© 1994-2018 Paragon Software Group. All rights reserved.
Please note that you need a genuine Windows installation to be able to download this tool.
Page 24
24
Media Builder automatically detects your system and offers the required download link.
3. Click on Removable flash media, then select a thumb drive of at least 512MB in size from the list of flash
memory devices available in the system at the moment (if several). If you’d like to create an ISO image of
the WinPE environment, please use the corresponding option.
4. If selecting a thumb drive, the wizard will warn you that all data on it will be deleted.
Additional steps of the advanced mode
5. Inject additional drivers for specific storage controllers or network cards. First click on the required link.
In the opened dialog browse for an .INF file of the required driver package located on a floppy disk, local
disk, CD/DVD or a network share.
Copyright© 1994-2018 Paragon Software Group. All rights reserved.
Page 25
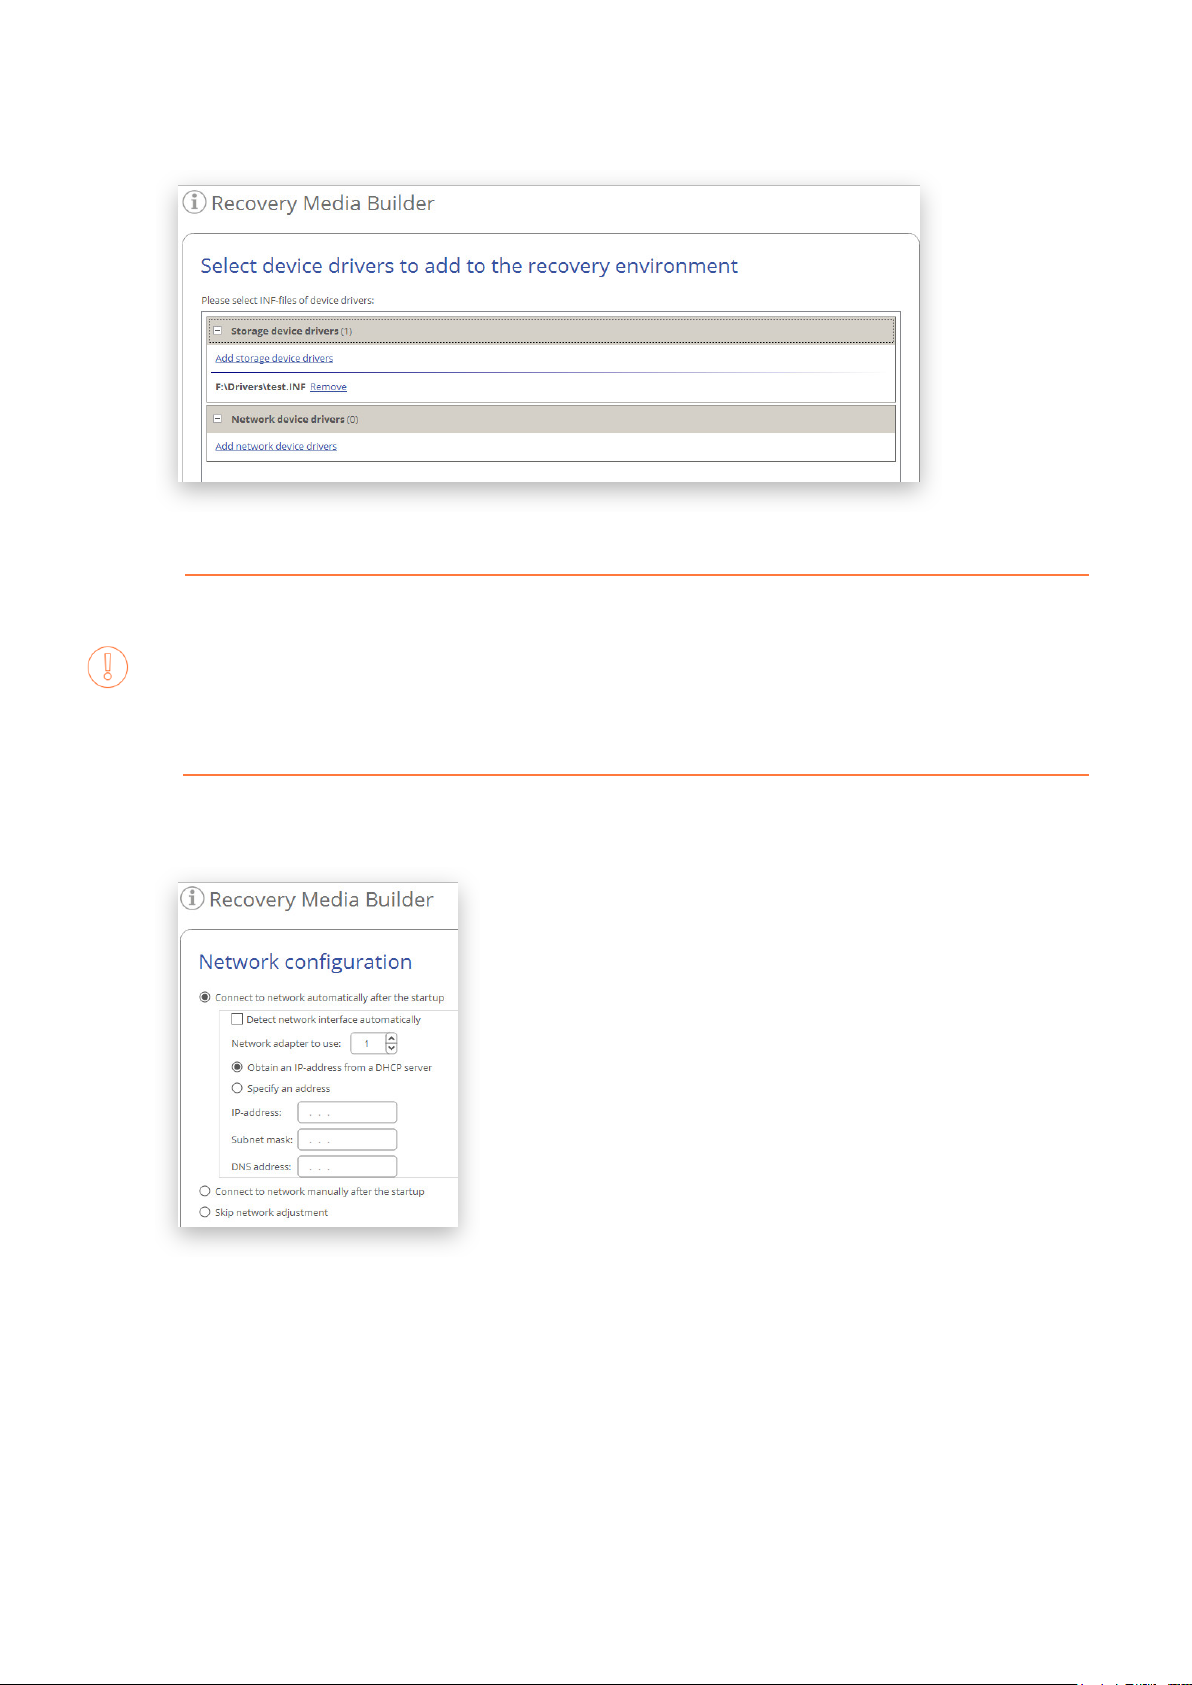
25
Recovery Media Builder can build 32-bit WinPE media configured to the uEFI mode, which is the
If successfully injected, you can see the specified driver on the list. If you’d like to add another driver, please
repeat the procedure.
only type compatible with Windows pads running on Intel Atom.
By default, WinPE environment doesn’t support touch screens, thus Windows pads can only be
managed by mouse and/or keyboard. You can add required drivers however through our driver
injector.
6. Set up a network connection if needed. You’ve got several options to choose from:
• Connect to network automatically... Specify the following parameters if you’d like to have an active
network connection once the bootable environment has been started up:
- A network adapter to use. Select a network adapter (if several in the system) to be used for the
network connection.
- IP address settings. Choose whether to get an IP address automatically from a DHCP server or set
it manually.
• Connect to network manually... If selecting this option you will be prompted to configure network
properties each time the computer has been started up from the bootable media.
Copyright© 1994-2018 Paragon Software Group. All rights reserved.
Page 26

26
With no pre-defined user credentials your network share will be attempted to map under the Guest
• Skip network adjustment. Please use this option if you don’t need network support on the bootable
media.
7. Map a network share if needed. You’ve got several options to choose from:
• Mount a network share automatically... Mark this option if you’d like to have a mapped network
resource once the computer has been started up from the bootable media. Manually type in a path to
the required network share or click Browse to find it, then provide user credentials if necessary.
account.
Please use back slashes for WinPE-based media, like \\server\share, while for Linux – forward
slashes, like //server/share.
• Mount a network share manually... If selecting this option you will be prompted to map a network
resource each time the computer has been started up from the bootable media.
• Don’t mount a network share. Please use this option if you don’t need to map network resources.
Additional steps if using WAIK/ADK
8. If you install WAIK or ADK by their default locations, the wizard automatically detects it. Otherwise, you will
need to browse for the required folder. If you haven’t installed one of these tools yet, click Download
WAIK/ADK to get them directly from the Microsoft website.
Manually browsing for Windows OS kits:
Copyright© 1994-2018 Paragon Software Group. All rights reserved.
Page 27

27
The wizard won’t continue until you install WAIK or ADK.
9. When done with all parameters, please confirm the operation to proceed.
If running RMB under Windows 7, 8, 8.1, Server 2008 R2, Server 2012 R1/R2, please use ADK
8.1.
Booting from Recovery Media
The recovery media helps to boot your PC to load in an existing backup, secure important data, or rectify booting
errors when Windows OS fails to start up.
1. Start up the computer from the prepared recovery media. To automatically boot from it, you should
configure the on-board BIOS to start up from CD/USB first.
2. Once loaded, you will see the already familiar program interface, so please consult First Start
details.
for more
Copyright© 1994-2018 Paragon Software Group. All rights reserved.
Page 28
28
3. Additionally to the Windows wizards and dialogs, the recovery media includes several more utilities.
For more details, please consult the following chapters:
- Fixing Boot Problems
- Adding Specific Drivers
- Configuring Network
- Using the Command Prompt
4. Select an operation to start. If you have questions on how to use the program, please refer to the
embedded help system, you can find in the right top corner of the window.
Protecting System and Data
Backup Scenarios
Configuring a One-shot Backup Task
The Create Single Backup Wizard allows you to create a point-in-time full backup image of entire disks, individual
volumes or files. Full copies of disks and partitions help to secure your software environment, including the
operating system, applications and data. This way, in case of emergency you will be able to recover your system to
a working state within several minutes. But what if you need to back up a specific file or folder? Partition-level
backup will surely protect the files you want, but it will also back up plenty of data you don’t need, eating up time
Copyright© 1994-2018 Paragon Software Group. All rights reserved.
Page 29
29
and backup storage. To solve this problem, the program also includes the file-level backup capabilities to protect
the needed files like family pictures, favorite music, some project or document, or a financial report you’re working
on, while avoiding all the rest.
Backup data consistency at a specific point-in-time while OS or applications keep modifying data on disks is
achieved by utilizing Microsoft Volume Shadow Copy Service that enables to quiesce a running machine, in other
words to freeze its file system and to unlock files to be able to copy them to a backup location.
1. Open Backup & Recovery scope.
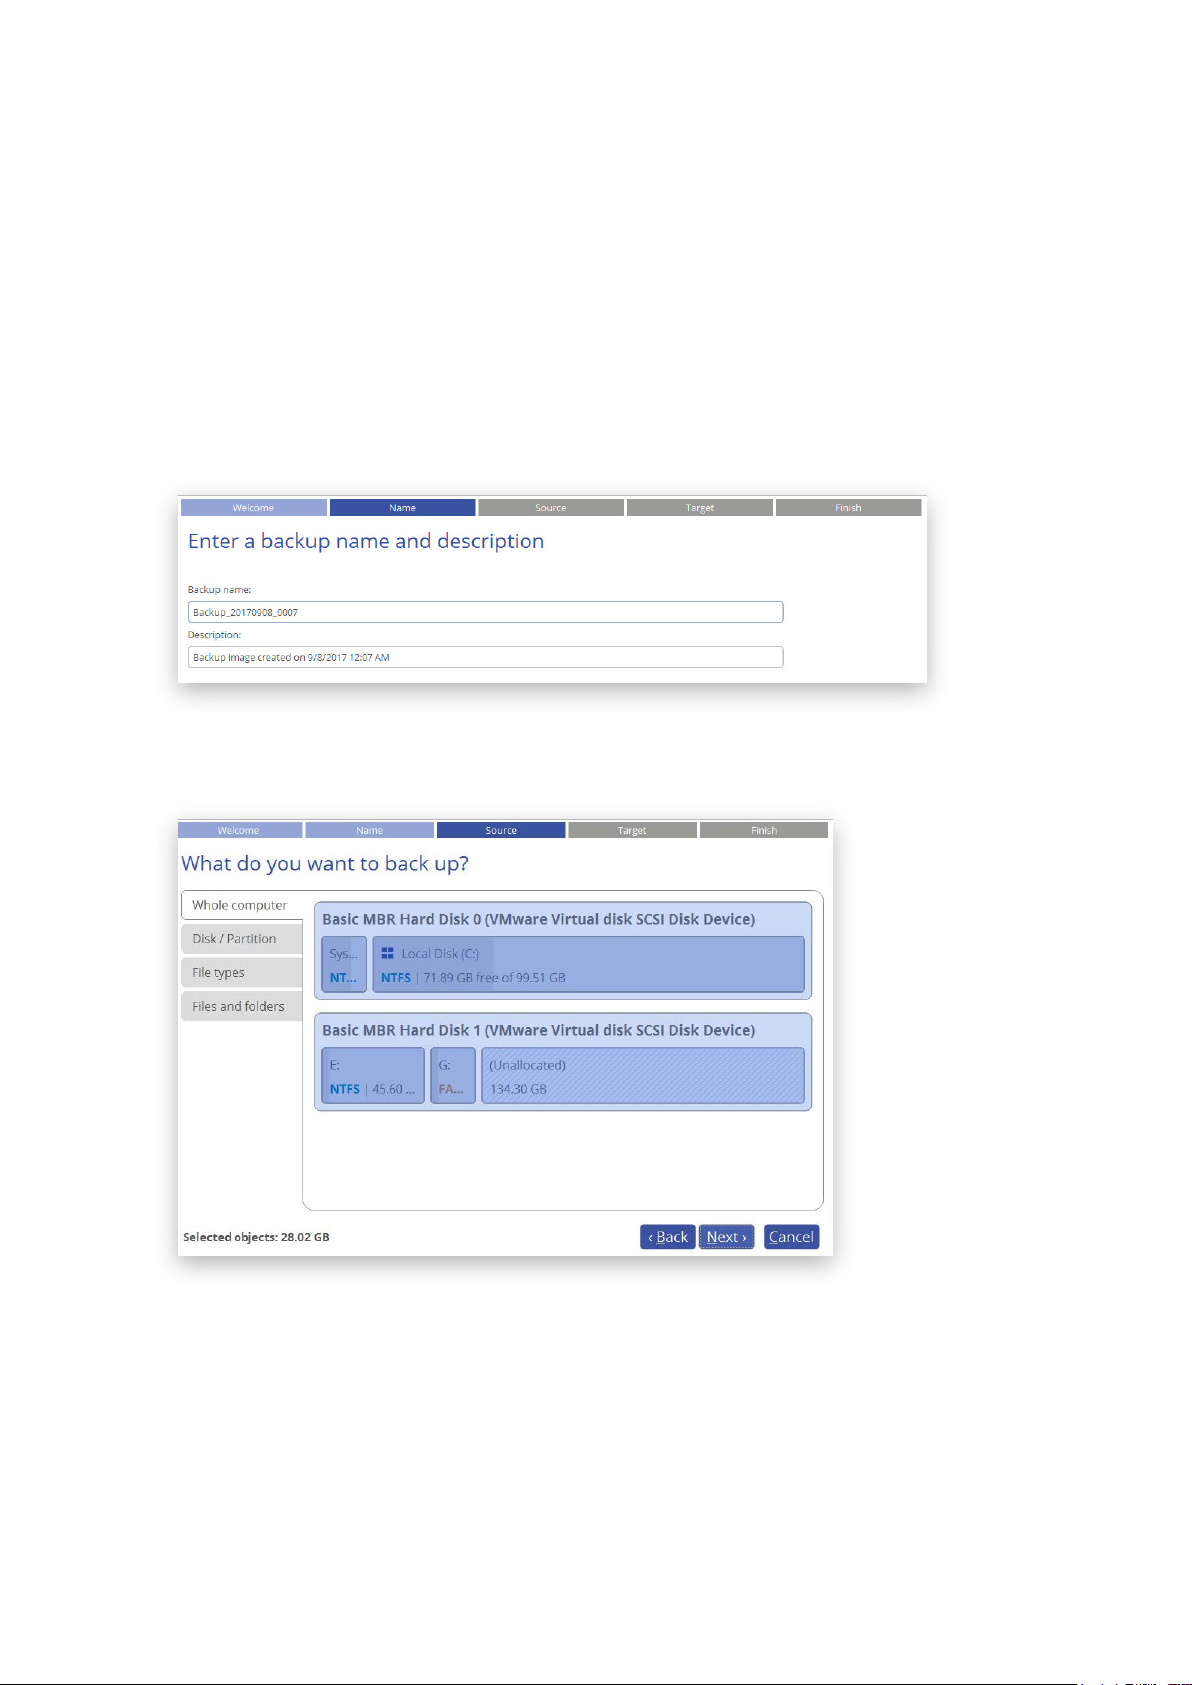
2. Select Tools > Create single backup, then click Next on the Welcome page of the wizard.
3. If necessary, edit the default backup name and description containing the current date and time.
4. Initially the wizard prompts you to back up all available storage devices. If you don’t need that, select the
most suitable option on the left.
Disk / Partition
Left click an object(s) you’d like to back up.
Copyright© 1994-2018 Paragon Software Group. All rights reserved.
Page 30
30
When selecting a volume that hosts Windows OS you may be warned that the wizard automatically selects
another one that contains boot system files to ensure successful startup of the operating system after
restore. Though it’s not recommended, you can use the Ctrl key to deselect any volume you consider
unnecessary.
Types of files
The wizard includes three predefined categories containing file masks for popular document, music, and
picture formats. Either select an entire category(ies) or use the arrow icon to expand it and choose a certain
file mask(s). If you don’t find the required mask, add your own through the My type filters option.
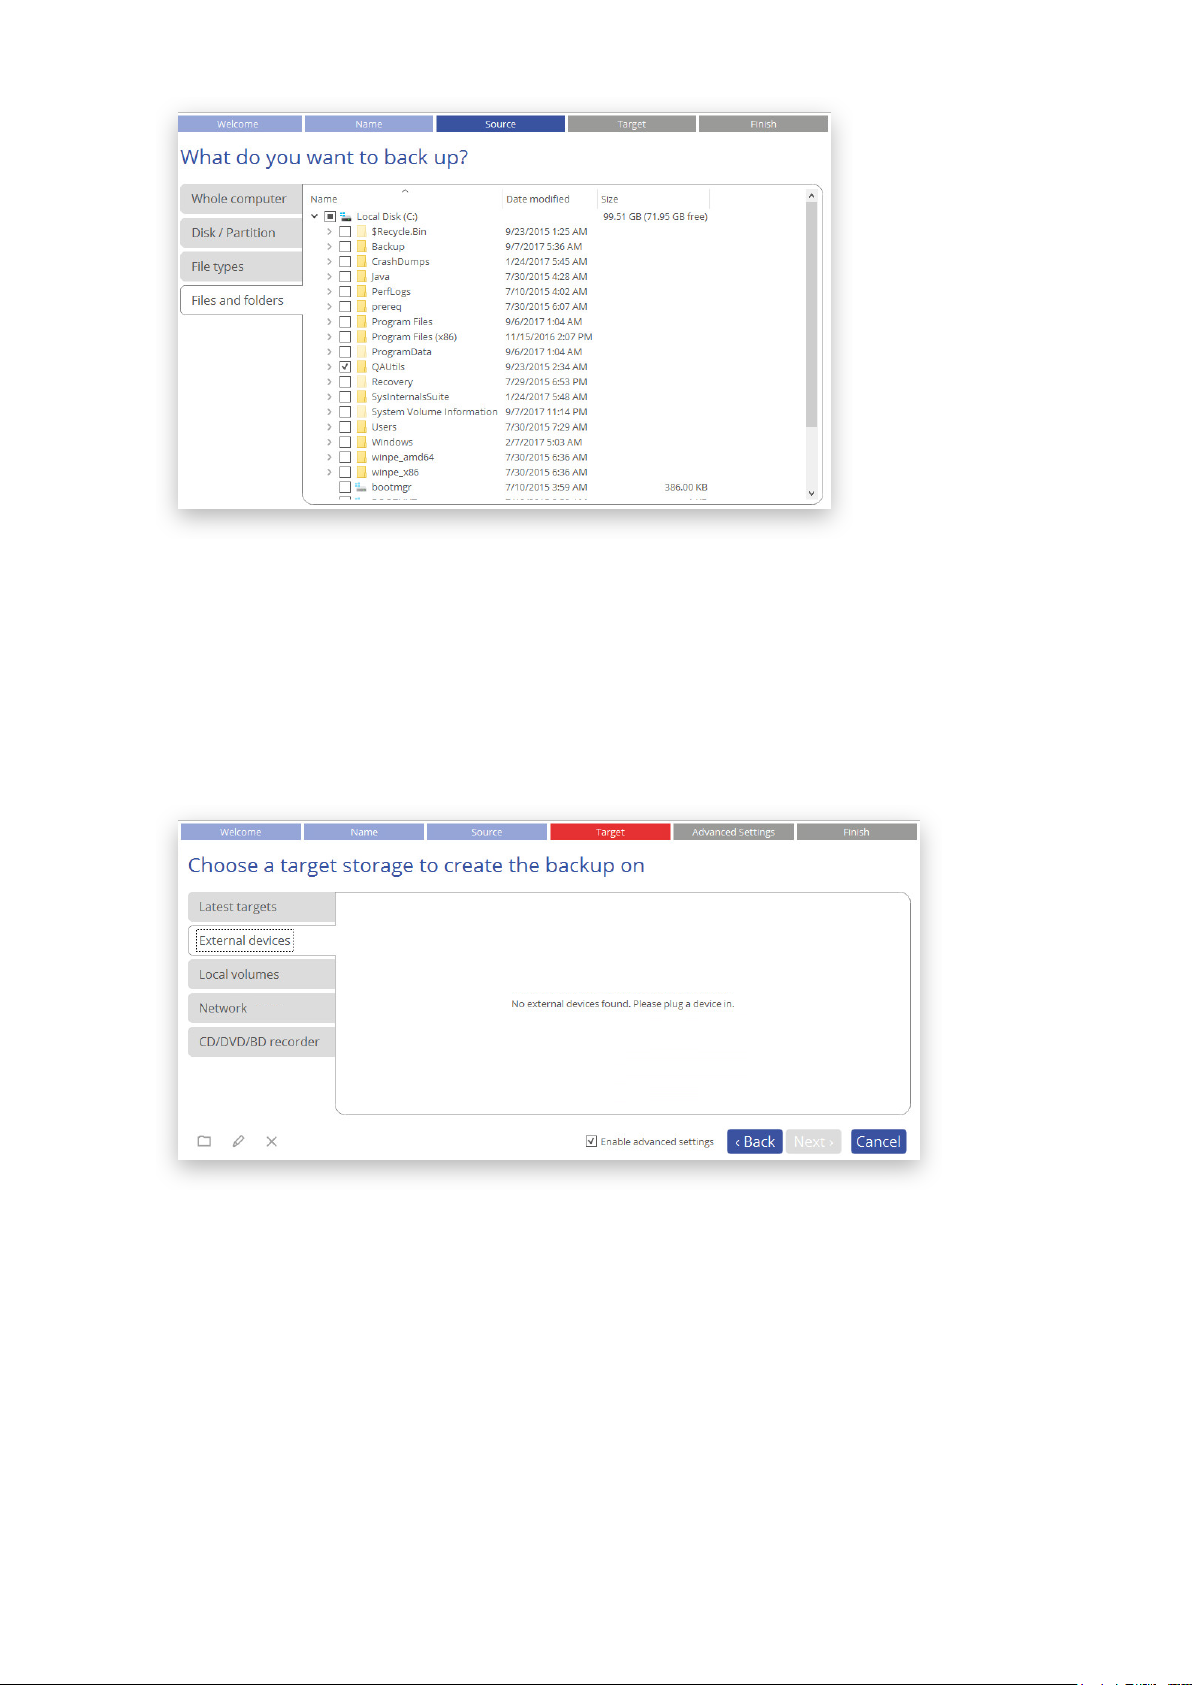
File and folders
From a list of all partitions available in the system, mark a checkbox opposite a file, folder or even a whole
partition to build up contents of the future backup image.
Copyright© 1994-2018 Paragon Software Group. All rights reserved.
Page 31
31
5. Specify location of the resulted backup image. If you’d like to exclude unimportant files from backup,
enable password protection or set other advanced parameters, mark the corresponding checkbox and
these options will get available later in the wizard.
External devices
If you’d like to save it on an externally connected storage (hard disk, thumb drive, etc.), select External
devices, then choose it from the list. If it’s not present, please make sure it’s available in the system, then
try again.
Local volumes
If you want to save it locally, select Local volumes, then browse to the target folder.
Copyright© 1994-2018 Paragon Software Group. All rights reserved.
Page 32

32
Network
If you’re going to save it on a network share, select Network > Add to add a network share.
In the opened dialog edit the default connection name if necessary, then specify the required share by
manually entering its location or through browsing the network, finally provide access credentials in the
corresponding fields.
Once the connection is established, click on it to select and browse its contents. By using the corresponding
options on the right you can edit or delete the connection.
Copyright© 1994-2018 Paragon Software Group. All rights reserved.
Page 33

33
CD/DVD/BD recorder
If you want to record it to CD/DVD/BD or create an ISO-image, select CD/DVD/BD recorder, then a
recorder from the list of available devices.
6. At this step you can modify advanced backup settings, if the corresponding checkbox has been marked on
the previous page of the wizard. Please note that all parameters set right here will be relevant for this
backup task only.
• Compression level. Select the desired compression level from the pull-down list.
• Image split. By default, the created backup image will be split to files of 4GB. This can help to avoid
problems caused by a maximum file size limitation of your file system (e.g. 4GB for FAT32). Use the
spinner control to set another size or disable this option if necessary.
Copyright© 1994-2018 Paragon Software Group. All rights reserved.
Page 34

34
• Password protection. Specify a password and encryption algorithm to protect backup data from
unauthorized access. Please note that this option becomes available when Paragon’s container
(.pvhd) is selected in Home > Settings > VD container options
.
• Expert settings.
- Application-level excludes options. If your computer hosts an enterprise-level application,
supported by our program, and it is protected with a specially designed tool, please select it in
the list to exclude from backup. This will help you to significantly improve backup performance,
minimize backup storage, and eliminate interference. For more details, please consult
Application-level Exclude Options
.
- Backup exclude options. Specify data you don’t want to back up by either creating new or
using existing exclude filters. The wizard includes several predefined categories containing file
masks for popular document, music, video and picture formats. Either select an entire
category(ies) or use the arrow icon to expand it and choose a certain file mask(s). If you don’t
find the required mask, add your own through the My type filters option.
Copyright© 1994-2018 Paragon Software Group. All rights reserved.
Page 35

35
- Run during backup options. Specify external applications to execute at various phases of the
backup process in order to obtain consistent backup images of systems with high availability
requirements (MS SQL, MS Exchange, etc.). The point is to provide a coherent state of all open
files and databases involved in a backup, taking into account that applications may still keep
writing to disks.
• Run before starting backup. Specify an executable file (through browsing or typing a full
path to it) that helps you to prepare running applications for backup. It may include specific
commands/programs to delete unnecessary files, suspend services, flush transactions or
caches, etc.
• Run after finishing backup. Specify an executable file to run after backup. It may include
commands/programs to resume the previously suspended services, etc.
The program supports three types of executable files (.exe, .bat, .cmd). You can set parameters
for your files directly from the line. However, if a file path contains word gaps, you need to
enclose it in quotes in order to let the program distinguish between the path and the used
parameters.
Requirements for batch files:
• All programs and commands must execute sequentially and finish before your .bat file
completes its work.
• We recommend you to use external commands/programs in the following format -
Start/wait program.exe. The wait option allows starting an application and waiting until it
completes its work. This guarantees all included commands complete their execution
before your .bat file does.
7. Review all parameters of the operation and modify them if necessary by going back to any of the required
steps. If you’d like to be notified by email about successful completion and/or failure of this operation,
mark the corresponding option and then select the required mode. Please make sure
the email recipient is
specified. Click Finish to start the backup process.
Copyright© 1994-2018 Paragon Software Group. All rights reserved.
Page 36

36
Creating an Incremental Update
After you get the first full backup image, we recommend you to do incremental updates regularly to keep the
backup data up-to-date. An incremental backup only includes data changed since the time of creating the latest
image in a chain, so it doesn't include data duplicates, which minimizes the backup storage footprint. Besides,
incremental imaging allows having different time stamps of one and the same data.
If you need to regularly update backup data, you’d better use the Create Backup Job Wizard.
For more details, please consult Configuring a Regular Backup Routine
.
1. Open Backup & Recovery scope.
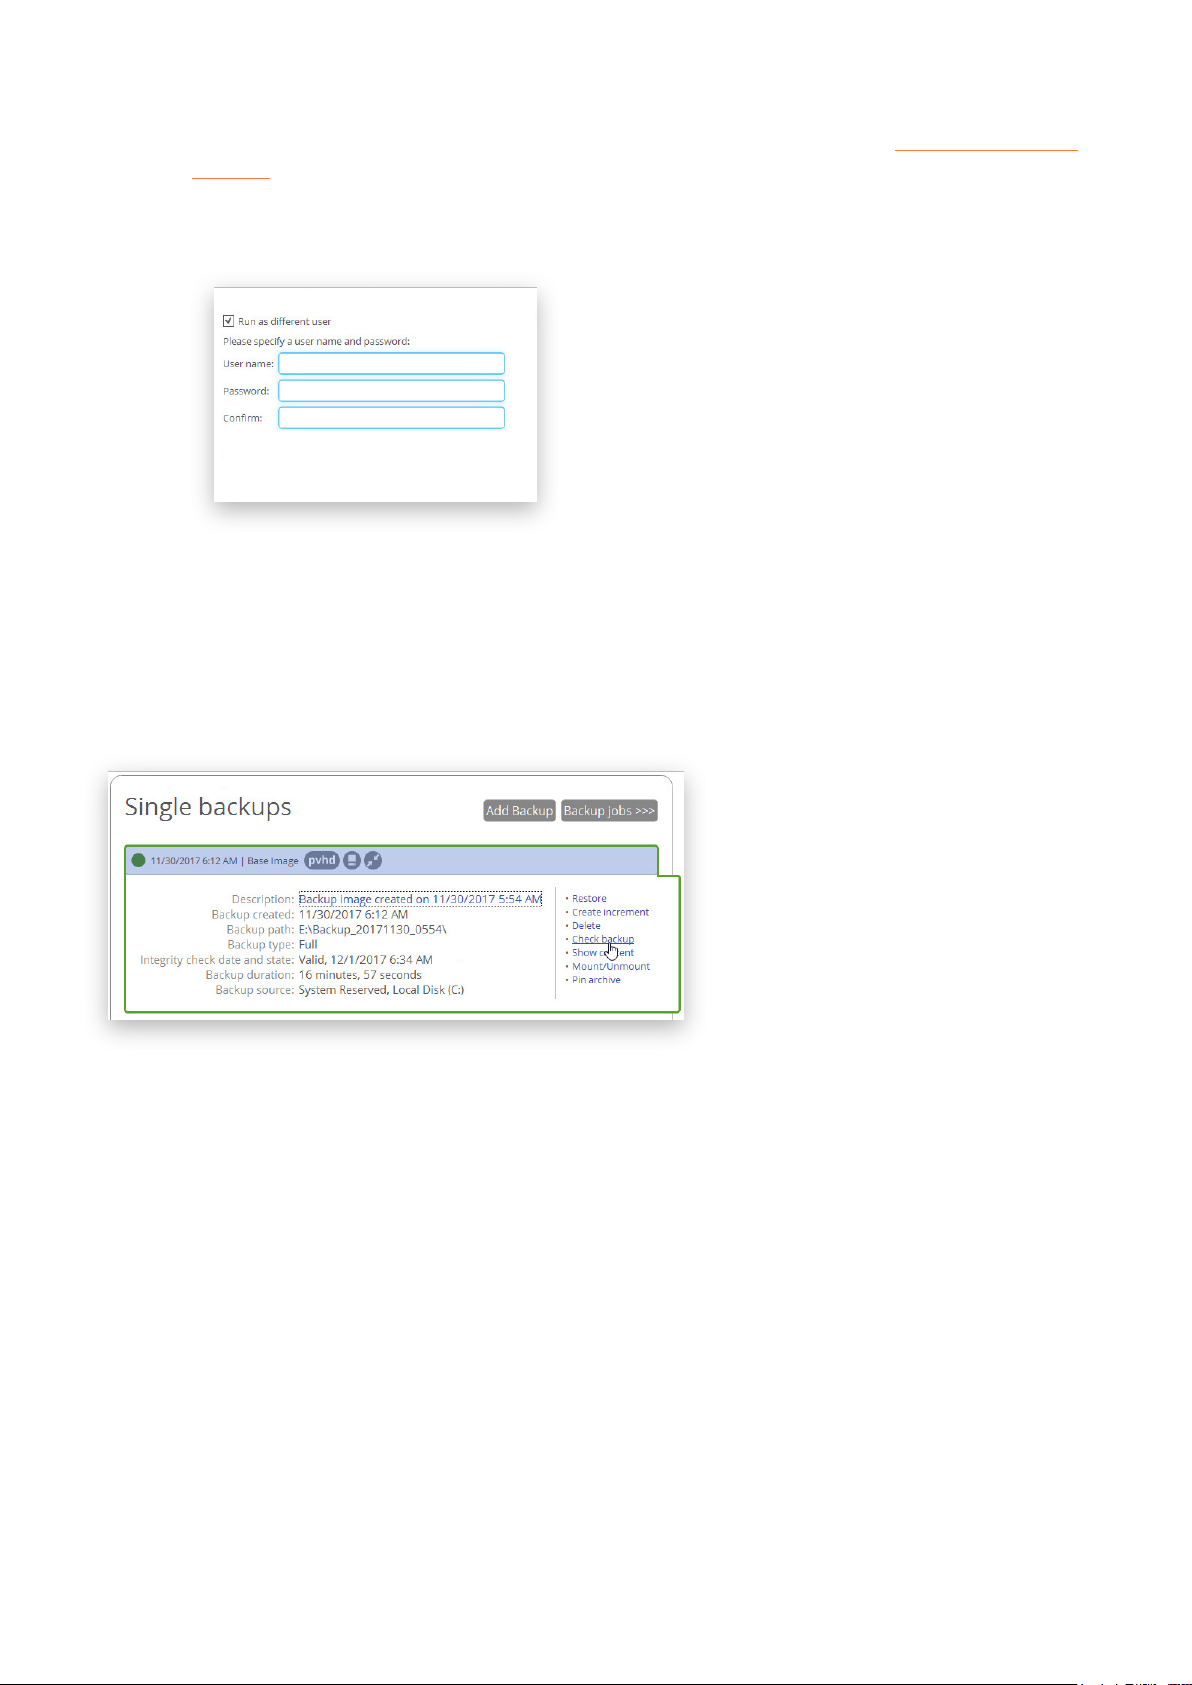
2. Select My Backups > Single backups>>> to see all configured one-shot backup tasks. Left click a backup
image to call a context-sensitive menu, then Create increment.
Copyright© 1994-2018 Paragon Software Group. All rights reserved.
Page 37

37
3. Change the default backup name, if necessary. Click Create to start the backup process.
Configuring a Regular Backup Routine
If you develop a specific project on a day-to-day basis and have to make a backup every evening so as not to lose
the progress of your efforts, backup automation is a must. Besides, the backup automation enables to optimally
utilize resources of your PC by scheduling backup tasks during off hours or whenever the computer has the least
work-load to perform.
Paragon’s technicians recommend you to configure regular backup jobs instead of one-short backup tasks to
minimize negative aftereffects in case of emergency. The Create Backup Job Wizard will help in this process. The
three predefined backup strategies should fill the needs of any home user. For advances users there’s a way to
create comprehensive backup policies that utilize full, incremental, and differential backup methods and their
combinations, where backup runs can be scheduled from every hour till certain days of the month, or evoked by a
certain event (system start or user logon).
1. Open Backup & Recovery scope.
2. Select Tools > Create backup job, then click Next on the Welcome page of the wizard.
3. If necessary, edit the default backup name and description containing the current date and time.
4. Initially the wizard prompts you to back up all available storage devices. If you don’t need that, select the
most suitable option on the left, then required objects. For more details, please consult
scenario.
the previous
Copyright© 1994-2018 Paragon Software Group. All rights reserved.
Page 38

38
In the current version of the product you’re not allowed to modify all parameters of the
5. Specify location of future backup images (local or external storage, or a network share). For more details,
please consult the previous scenario
.
6. Select one the predefined backup strategies recommended by Paragon’s technicians, then adjust it to your
needs. If you’d like to exclude unimportant files from backup, enable password protection or set other
advanced parameters, mark the corresponding checkbox and these options will get available later in the
wizard.
selected backup strategy during configuration of a backup job. However, you can do it later
when editing. For more details, please consult
Managing Backup Jobs.
Copyright© 1994-2018 Paragon Software Group. All rights reserved.
Page 39

39
Daily Backup
The daily backup is a necessity when it comes to protecting valuable information that keeps changing
constantly, for example some project or document, or a financial report you’re working on every day. The
main rule here is the more valuable the data, the more frequent backups are required. For production
environments like SQL Server or Exchange Server, where multiple transactions occur every second, the
optimal interval between backups is about 30 minutes. By reducing it even further you risk to heavily
overload the entire infrastructure. For home users it is the daily backup that is considered optimal.
• The main parameter you need to set is time you believe most convenient for backup, e.g. at night or
early in the morning.
• To keep data precisely up to date with minimal time and backup storage footprint, we recommend a
seven-day backup cycle of one full backup image followed by six incremental updates. To avoid the
situation when backup data eats up the entire storage space, we also suggest enabling a retention
policy that will only keep seven latest restore points.
• Finally, there are several auxiliary options you can use to tune up the backup job. Click Edit > to see
them and adjust. Use the question mark next to the required option to get more details.
On demand Backup
The on demand backup begins immediately without waiting for a schedule to run. It only produces full
images. This type of backup might be useful before applying OS patches or installing some new software.
Copyright© 1994-2018 Paragon Software Group. All rights reserved.
Page 40

40
It’s similar to a one-shot backup operation, but additionally includes a simple backup data retention policy
that keeps one latest backup on the storage (off by default).
• To avoid the situation when backup data eats up the entire storage space, we suggest enabling a
retention policy that will only keep one latest restore point.
• There are several auxiliary options you can use to tune up the backup job. Click Edit > to see them and
adjust. Use the question mark next to the required option to get more details.
Weekly Backup
As you guess, the weekly backup comes into play when your data is not changed very often. Obviously,
there’s no need to back up your music collection on a daily basis, as in most cases losing the latest album
won’t be a huge disaster. Thus we recommend this backup strategy for protecting non-critical data when
rollback to a state that took place a week ago works fine for you.
Copyright© 1994-2018 Paragon Software Group. All rights reserved.
Page 41

41
• The main parameters you need to set is time and day of week you believe most convenient for backup,
e.g. at Sunday nights.
• We consider the use of the incremental imaging on a weekly basis not optimal, as the amount of data
changes may be so huge, so it can nullify primary benefits of this backup method, i.e. small backup
times and image files. Furthermore, restore from this incremental chain may be time-consuming. Thus
we recommend it to create full backup images only. To avoid the situation when backup data eats up
the entire storage space, we also suggest enabling a retention policy that will only keep three latest
restore points.
• Finally, there are several auxiliary options you can use to tune up the backup job. Click Edit > to see
them and adjust. Use the exclamation mark next to the required option to get more details.
One Backup
This backup strategy is daily-based, but only produces and keeps one full backup image on the storage. We
suggest using it if you don’t need to have several restore points that reflect various time stamps of your
data and prefer an external storage device as backup media.
• The main parameter you need to set is time you believe most convenient for backup.
• To avoid the situation when backup data eats up the entire storage space, we also suggest enabling
a retention policy that will only keep the latest restore point.
New strategy
Click New strategy to create your own backup policy that utilizes full, incremental, and differential backup
methods and their combinations, where backup runs can be scheduled from every hour till certain days of
the month, or evoked by a certain event (system start, user logon). For more details, please consult
Managing Backup Jobs
Copyright© 1994-2018 Paragon Software Group. All rights reserved.
.
Page 42

42
7. At this step you can modify advanced backup settings, if the corresponding checkbox has been marked on
the previous page of the wizard. Please note that all parameters set right here will be relevant for this
backup task only. For more details, please consult Configuring a One-shot Backup Task
.
8. Review all parameters of the operation and modify them if necessary by going back to any of the previous
steps. When ready, click Finish to complete the wizard.
• If you’d like to force creation of the first backup image after completing the wizard, mark the Create
initial backup now option.
Copyright© 1994-2018 Paragon Software Group. All rights reserved.
Page 43
43
• If you’d like to be notified by email about successful completion and/or failure of this operation, mark
the corresponding option and then select the required mode. Please make sure
specified.
• To allow the scheduled backup tasks while a non-admin user is logged in, specify administrative
credentials by marking the corresponding option.
the email recipient is
Checking Backup Integrity
Unfortunately, backup media may fail at any moment. You can't predict when this will happen, but you can be
certain it will. We suggest verifying integrity of backup images on a regular basis to make sure of their ongoing
viability.
Any pVHD-based backup listed on My Backups tab can be verified for errors by clicking on it, then selecting Check
backup in the opened context-sensitive menu.
There’s also a separate wizard that helps you to check pVHD containers and legacy PBF images created by previous
versions of our product.
1. Open Backup & Recovery scope.
2. Select Tools > Verify backup, then click Next on the Welcome page of the wizard.
3. Browse for the required backup image file (pVHD or PBF) or index file (PFI), then click Next to start the
operation, which takes a couple of minutes.
Copyright© 1994-2018 Paragon Software Group. All rights reserved.
Page 44

44
Only pVHD containers and legacy PBF images are available to check at the moment.
Pinning Backup
By pinning a backup image, you protect backup data it contains from both accidental and planned deletion caused
by backup storage retention.
Key peculiarities:
• Pinning is only available for restore points created by regular backup jobs.
• If you pin an incremental update, the initial full image and all increments between in the corresponding
chain will be pinned as well.
• If you pin a differential update, the initial full image will be pinned as well.
• If you delete a backup job with pinned restore points, they will not be deleted, but moved to the Single
backups view.
1. Open Backup & Recovery scope.
2. Select My Backups > Backup jobs>>> to see configured regular backup routines. Left click a restore point
of the required job to call a context-sensitive menu, then Pin backup.
Copyright© 1994-2018 Paragon Software Group. All rights reserved.
Page 45

45
3. If the selected backup requires additional backup elements for restore, all these images will be pinned as
well, acquiring the dependent backup icon.
4. Use the same algorithm to unpin the backup when not required any more.
Repairing Corrupted Backup
If one of your backup images (entire backup chain) is marked with the red circle in My Backups view, then this
backup is corrupted and cannot be restored until repaired.
This problem can have different reasons, those that can be fixed and those that cannot. You can try the following
actions for repairing corrupted backup data:
Copyright© 1994-2018 Paragon Software Group. All rights reserved.
Page 46

46
1. Click Refresh to force obtaining the update status on all backup data files. If the program finds a missing
backup index file (.pfi) during this action, it is rebuilt automatically.
2. Left click a corrupted backup image to see where it’s resided and then check that the corresponding folder
exists by this path and contains the index (.pfi) and backup container (.pvhd or .vhd, vxdx, .vmdk) files.
• If the backup files are missing by the given path (you or Windows OS may have changed disk drive
letter, or you may have moved this folder manually to another location), then add it back to the archive
database. For more details, please consult Adding a Backup Image
• If the backup files are available by the given path, maybe the problem is in a corrupted index file (.pfi).
Please delete it, then click Refresh. If it still doesn’t help, this means one or several backup container
files are damaged. The only way out is to create a new backup image.
.
Managing Backup Jobs
1. Open Backup & Recovery scope.
2. Select My Activities or My Backups, then left click any of the planned backup jobs to call a context-
sensitive menu with detailed information on the selected object and a list of available operations.
3. Select the required operation from the list:
• Edit Job. While being able to only specify the basic parameters during creation of the backup job
now you’re allowed to change every single option of the specified backup strategy by using the Edit>
link.
, right
Copyright© 1994-2018 Paragon Software Group. All rights reserved.
Page 47

47
- When. Backup runs can be scheduled from every hour till certain days of the month.
Furthermore, you can choose a certain backup trigger event (system start or user logon). If
necessary, you can also disable the schedule.
- Backup Type. The program supports full, incremental and differential sector-level backup imaging
and their combinations, which opens a way to create comprehensive backup policies to suit your
needs at best. Below you can find some details on each backup type to help you make the right
choice.
Copyright© 1994-2018 Paragon Software Group. All rights reserved.
Page 48

48
A full backup image includes all contents of the specified backup objects (all system hard disks, one
or several partitions or disks) at the moment of its creation. If you roll back your system to the
initial state on a regular basis, that’s exactly what you’re looking for. But if you want to have
multiple time stamps of the same data, unchanged data will inevitably be duplicated in all images,
thus taking additional space on backup media.
As an attempt to solve this problem, there has been developed a supplementary method called a
differential backup. Containing only data changed since the time of creating a full or parental
backup image it enables to considerably save your system resources. It is achieved by the exact bitwise comparison of the previous data (saved in the parental image) with the current data (the
backup object itself). Unfortunately, this type of backup doesn’t help to avoid data duplicates inside
several differentials based on one parental image. Thus if you’re planning to keep two or more
restore points, take a closer look at the incremental imaging.
Unlike differentials, an incremental backup only includes data changed since the time of creating
the latest image in a chain, either full or incremental. In general, this type of backup is great except
for one thing – restore of an incremental backup requires processing the initial full image and all
increments between, which depending on the size of your backup chain may take plenty of time,
while restore of a differential backup always involves two objects – one differential and its parental.
- Retention. To avoid the situation when backup data eats up the entire storage space, we also
suggest enabling a retention policy to automatically get rid of obsolete restore points.
You can choose from the three data retention policies:
Keep a certain number of backup images,
Keep all backup images created during a certain number of days,
Delete an entire backup chain when the storage runs out of space.
Copyright© 1994-2018 Paragon Software Group. All rights reserved.
Page 49

49
• Delete Job to delete the backup job.
• Deactivate to stop the ongoing backup operation.
• Start now to force creation of the next backup image, either incremental or full, which depends on the
used backup strategy. By selecting the corresponding option you may force out-of-turn full backup,
thus starting a new backup chain.
• Generate script to make a program script out of the backup job to run it later from the command
prompt. For more details, please consult Using the Command Prompt
.
To learn more about scripts, please consult the Paragon Scripting Language manual.
Windows Restore Scenarios
Restoring Individual Files and Folders
1. Open Backup & Recovery scope.
2. Select My Backups > Single backups>>> to see all configured one-shot backup tasks or My Backups >
Backup jobs>>> to see configured regular backup routines. Left click a backup image to call a contextsensitive menu, then Restore.
3. You will be prompted to check the selected backup for errors (recommended). Mark the corresponding
option to skip this action if you’re sure in its viability.
Copyright© 1994-2018 Paragon Software Group. All rights reserved.
Page 50

50
4. Select Files and Folders, then browse the backup image to specify what you need to extract by marking
checkboxes next to the required data items.
5. Choose a way the selected data will be restored, either to original location by replacing files with identical
names, to original location non-destructively, thus keeping two versions of files with the same names, or to
a different location. The latter option requires setting a restore path.
Copyright© 1994-2018 Paragon Software Group. All rights reserved.
Page 51

51
Restore to the original location with overwriting existing files requires exclusive access rights to
the entire target volume. By default, if the target volume cannot be locked, our program ends
this type of operation with a corresponding error.
Click ‘Advanced options > Restore on reboot’ to allow restore in a special boot-time mode,
when the volume lock is not possible.
6. Choose whether to execute the operation immediately after finishing the wizard, set up another restore
operation(s) and then run all at once, or generate a program script for later execution
notified by email about successful completion and/or failure of this operation, mark the corresponding
option and then select the required mode. Please make sure
initiate the operation.
the email recipient is specified. Click Finish to
. If you’d like to be
If selecting files with security attributes that cannot be restored at file-level correctly, the wizard will prompt
you to restore the corresponding volume entirely.
Restoring an Entire Disk or Separate Volumes
1. Open Backup & Recovery scope.
2. Select My Backups > Single backups>>> to see all configured one-shot backup tasks or My Backups >
Backup jobs>>> to see configured regular backup routines. Left click a backup image to call a contextsensitive menu, then Restore.
Copyright© 1994-2018 Paragon Software Group. All rights reserved.
Page 52

52
3. You will be prompted to check the selected backup for errors (recommended). Mark the corresponding
option to skip this action if you’re sure in its viability.
4. Initially the wizard prompts you to specify an entire backup image or individual volumes or disks for restore
– that’s exactly what we need.
5. The program offers to restore the selected backup object exactly where it belongs. However, you can
choose any disk of enough capacity available in your system.
Copyright© 1994-2018 Paragon Software Group. All rights reserved.
Page 53

53
You will get a corresponding warning when trying to rewrite a bootable partition.
6. Next you can see the resulted disk layout. If necessary, specify a number of additional parameters (depends
on the selected backup object).
Restoring a partition
Change size of the partition and its location as well as assign a particular drive letter. If you’ve got to do
with a 64-bit Windows configured to the uEFI boot mode, the Switch EFI to boot from destination drive
option will become available for you to define what instance of Windows OS you’d like to boot from once
the operation is over. Anyway you can specify a bootable device at any time through Boot Corrector.
Restoring a disk
If attempting to restore to a larger disk, use the corresponding option to resize on-disk partitions
proportionally to occupy the entire target disk.
Copyright© 1994-2018 Paragon Software Group. All rights reserved.
Page 54

54
The program also provides you the option to preserve the original Disk Identifier (also Disk ID or Disk
Signature) during restore. A Disk Identifier is a four-byte long number, randomly generated and written to
the first disk sector during creation of the Master Boot Record. Windows OS since Vista uses disk signatures
for location of boot devices in Boot Configuration Database (BCD), which stores information on boot critical
files and settings. Windows requires the signatures to be unique, so if you try to connect a disk that has the
same signature as the already connected storage device, Windows keeps this disk in offline mode and
refuses to assign drive letters to its volumes – this problem is known as disk signature collision. This is why
it is not recommended to preserve the original disk ID during restore, as in most cases it doesn’t affect
anything. For Windows Embedded and similar installations however, the change of the disk signature
renders Windows OS completely unbootable, because these systems are linked to it.
Having protection against the disk signature collision, our program doesn’t let you restore contents of a
disk to another disk and keep the disk ID unchanged when the original disk is mounted. To accomplish this
scenario, you should either disconnect the original disk or make it offline in the Windows Disk Management
utility. If this disk hosts a running Windows OS, then you have to use the WinPE recovery media
.
For more details, please consult the following resources:
- https://www.logicsupply.com/explore/io-hub/windows-embedded-matter-now/
- https://blogs.technet.microsoft.com/markrussinovich/2011/11/06/fixing-disk-signature-collisions/
7. Choose whether to execute the operation immediately after finishing the wizard, set up another restore
operation(s) and then run all at once, or generate a program script for later execution
. If you’d like to be
notified by email about successful completion and/or failure of this operation, mark the corresponding
option and then select the required mode. Please make sure
the email recipient is specified. Click Finish to
initiate the operation.
Copyright© 1994-2018 Paragon Software Group. All rights reserved.
Page 55

55
Mounting a Backup Image
You can assign a drive letter to any partition inside an existing backup image. As a result of the operation you will
get a new partition in the system to easily browse through its contents and copy the required information even with
the standard Windows tools.
Before you start, please read the following limitations:
• System restart is required after the product installation to correctly mount backup images in Windows
Server environment;
• Backup partitions will only be mounted for the current session and won’t be available after the system
restart;
• Backup images containing Windows Storage Spaces are not supported;
• Backup images containing ReFS partitions are not supported;
• Backup images located on physical (unmounted) partitions or in the backup capsule cannot be mounted;
• Backup images containing LVM/LDM volumes are not supported.
3. Open Backup & Recovery scope.
4. Select My Backups > Single backups>>> to see all configured one-shot backup tasks or My Backups >
Backup jobs>>> to see configured regular backup routines. Left click a backup image to call a contextsensitive menu, then Mount/Unmount.
Copyright© 1994-2018 Paragon Software Group. All rights reserved.
Page 56

56
5. In the opened dialog you can see contents of the selected backup image. Select a partition you’d like to
mount, then one of the vacant drive letters from the list to associate with the partition. Click Save to
confirm.
6. Once mounted, you can treat the backup partition as you would any other Windows volume (browse,
retrieve files, modify files).
7. Use the same algorithm to unmount the backup image when not required any more.
Adding a Backup Image
You can add existing backup images to the archive database and this way make them available in the program
interface.
Supported backup data containers:
• Volume- and file-level virtual containers (pVHD, VHD(X), VMDK) created by the current version and then
somehow transferred to another location.
Copyright© 1994-2018 Paragon Software Group. All rights reserved.
Page 57

57
Although legacy PBF-based backup images cannot be added to the archive database (My Backups
• Volume- and file-level virtual containers (pVHD, VHD(X), VMDK) created by any 15
th
version.
tab), you’re allowed to specify an old image as restore point in the Restore Wizard.
1. Open Backup & Recovery scope.
2. Select My Backups > Single backups>>>, then Add Backup.
3. Browse for the required backup image, then click Open. By default, the program is configured to display
backup index files (PFI) only. If you don’t have it, please select Paragon Archives, then point to a
supported virtual container.
If no index file is found near the selected container, the program will offer to rebuild it.
Transferring Files between Storages
1. Open Backup & Recovery scope.
2. Select Tools > File transfer, then click Next on the Welcome page of the wizard.
Copyright© 1994-2018 Paragon Software Group. All rights reserved.
Page 58

58
3. Select a source disk, then mark files and directories you want to copy. The wizard enables you to browse
both mounted and unmounted (without a drive letter) partitions. It is also possible to map a network drive.
All selected files get to the Clipboard.
4. The wizard enables you to copy data to a local or external drive, a network share, a physical partition
(without a drive letter), or burn it to a CD/DVD/BD disc. Choose the most suitable option.
Local/Network
Select a local, external, or network drive to copy the data to. If you’d like to replace files with identical
names, mark the corresponding option.
Copyright© 1994-2018 Paragon Software Group. All rights reserved.
Page 59

CD/DVD/BD
59
Select a recorder from the list of available devices and then set a volume label by entering it in the
appropriate field.
5. Click Finish to initiate the operation.
WinPE Restore Scenarios
Restoring a Failed System
If your computer fails to start up because of a software glitch or after you accidentally deleted the entire Windows
partition or some system files, you can get it back on track by utilizing a previously prepared recovery media and
one of available backup images.
1. Start up the computer from the WinPE recovery media
2. Select Restore backup in the Wizards pane.
3. The welcome page introduces the wizard’s functionality. Click Next to continue.
Copyright© 1994-2018 Paragon Software Group. All rights reserved.
.
Page 60

60
4. Specify a backup image for restore. Depending on the location, first select a corresponding tab on the left,
then browse for the required backup image file. To learn how to map a network share, please consult
Configuring Network
.
5. You will be prompted to check the selected backup for errors (recommended). Mark the corresponding
option to skip this action if you’re sure in its viability.
6. Initially the wizard prompts you to specify an entire backup image or individual volumes or disks for restore
– that’s exactly what we need. If you need to restore individual files, select Files and folders, then backup
data you want to recover. For more details, please consult Restoring Individual Files and Folders
.
7. The program offers to restore the selected backup object exactly where it belongs. However, you can
choose any disk of enough capacity available in your system.
Copyright© 1994-2018 Paragon Software Group. All rights reserved.
Page 61

61
You will get a corresponding warning when trying to rewrite a bootable partition.
8. Next you can see the resulted disk layout. If necessary, specify a number of additional parameters (depends
on the selected backup object).
Restoring a partition
Change size of the partition and its location as well as assign a particular drive letter. If you’ve got to do
with a 64-bit Windows configured to the uEFI boot mode, the Switch EFI to boot from destination drive
option will become available for you to define what instance of Windows OS you’d like to boot from once
the operation is over. Anyway you can specify a bootable device at any time through Boot Corrector
.
Restoring a disk
If attempting to restore to a larger disk, use the corresponding option to resize on-disk partitions
proportionally to occupy the entire target disk.
Copyright© 1994-2018 Paragon Software Group. All rights reserved.
Page 62

62
The program also provides you the option to preserve the original Disk Identifier during restore. This helps
to correctly restore Windows Embedded and similar installations. For more details, please consult the
Windows Restore Scenarios
chapter.
9. Choose whether to execute the operation immediately after finishing the wizard, set up another restore
operation(s) and then run all at once, or generate a program script for later execution
initiate the operation.
10. In the Progress window you can see in real-time a detailed report on all actions carried out by the program.
Mark the checkbox at the bottom of the window to automatically switch off the computer on the successful
accomplishment of the restore operation.
. Click Finish to
11. After completing the operation, please reboot the computer.
Fixing Boot Problems
If Windows OS doesn’t boot after replacing a failed hardware device or you have any other boot issue resulting
from a human or program error, or a boot virus activity, first try our boot repair tools before taking more radical
actions.
1. Start up the computer from the WinPE recovery media
Copyright© 1994-2018 Paragon Software Group. All rights reserved.
.
Page 63
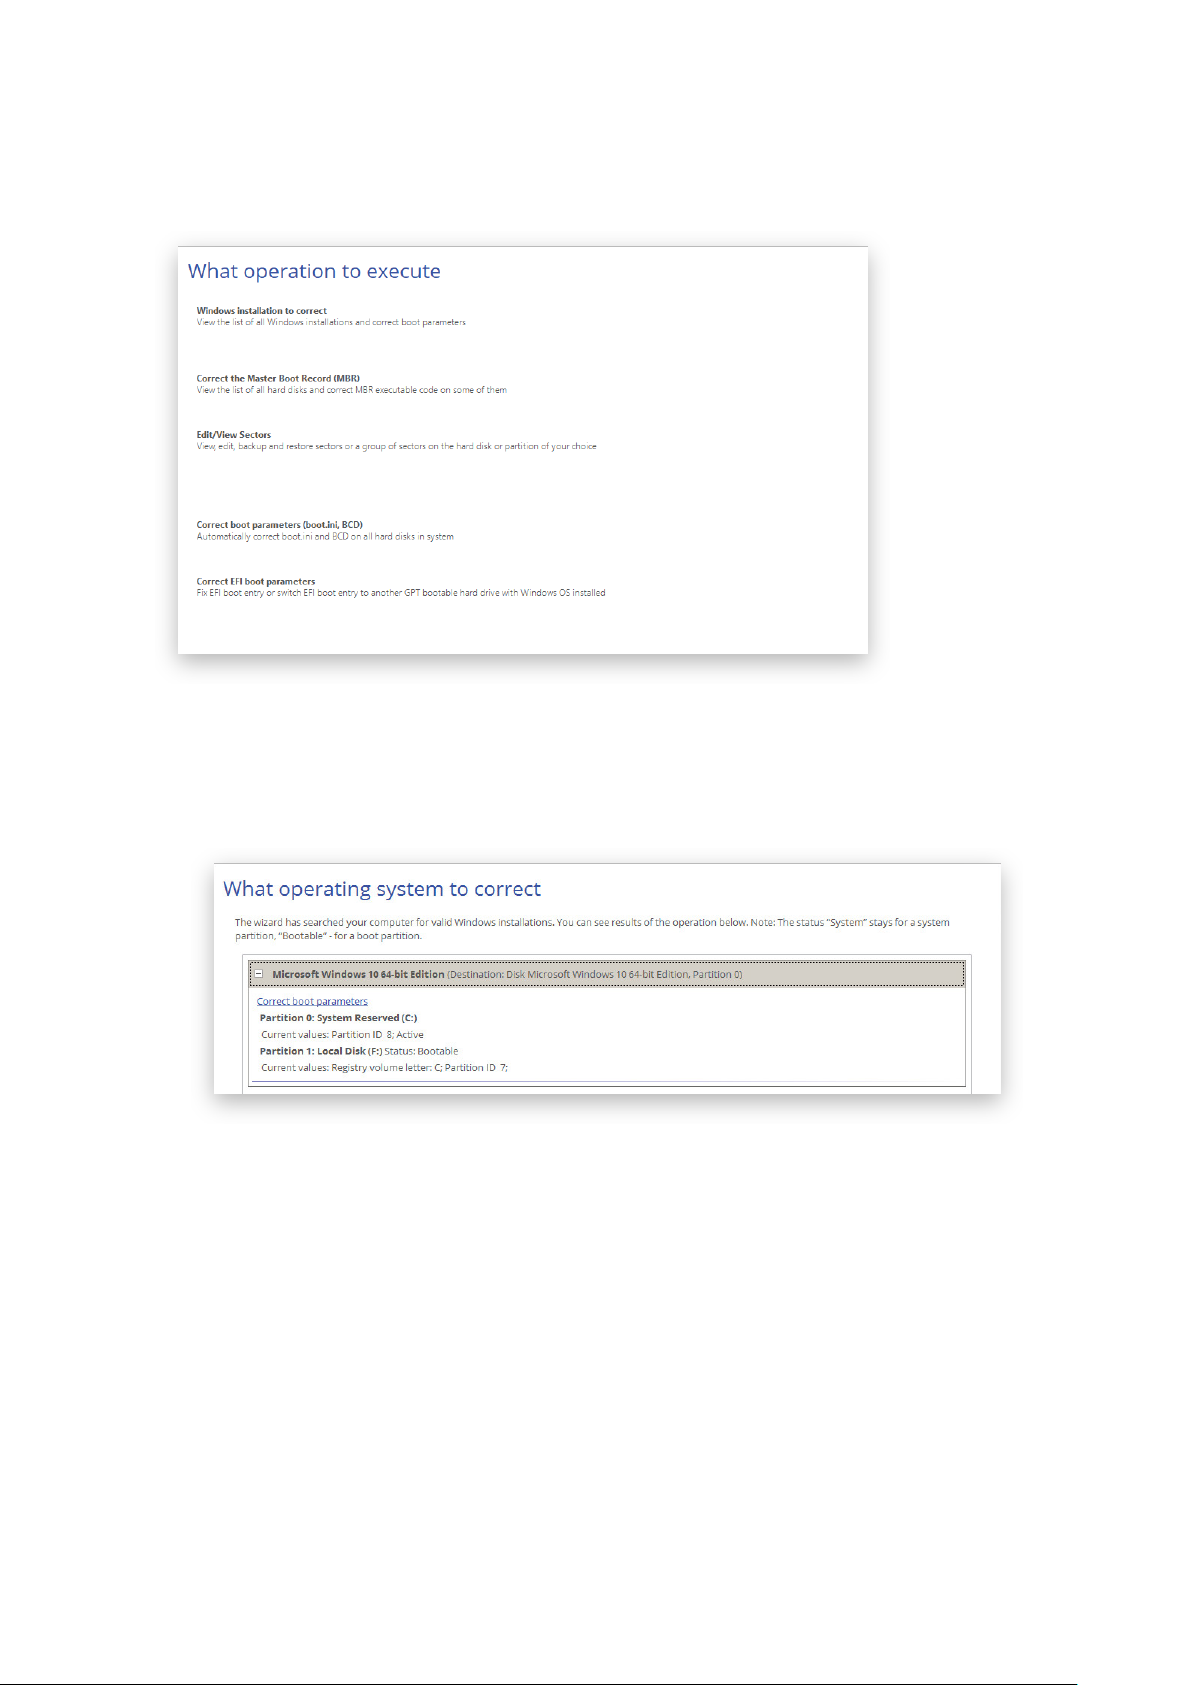
63
2. Select Boot Corrector in the Wizards pane.
3. The welcome page introduces the wizard’s functionality. Click Next to continue.
4. Click on the required operation to select.
• Windows installation to correct. Fix your Windows startup ability, if it fails to complete the startup
procedure due to an unknown reason.
Choose a failed Windows installation from the list of found installations (if several). If necessary, click on
the plus icon to get more info on the selected item.
If you want to manually correct the chosen installation, click Correct boot parameters, then edit the
required parameters. Otherwise, click Next to let the wizard fix the installation automatically.
Copyright© 1994-2018 Paragon Software Group. All rights reserved.
Page 64

64
• Correct the Master Boot Record. Use this option to overwrite the current bootable code in the MBR
(Master Boot Record) by the standard bootstrap code, thus repairing a corrupted bootable code after a
boot virus attack or a malfunction of boot management software.
• Edit/View Sectors. You can directly access and modify sectors of an entire disk drive or individual
partition, save and restore sectors from specified files as well as navigate through the system metadata.
Copyright© 1994-2018 Paragon Software Group. All rights reserved.
Page 65

65
• Correct boot parameters (boot.ini, BCD). If you have several operating systems on your disk
(Windows Vista and later) after copying a system partition for instance, update their BCD (Boot
Configuration Data) files to be able to choose an OS to start up.
• Correct EFI boot parameters. The wizard will detect and list all available GPT partitions that
accommodate 64-bit Windows OS. Choose the one you need to boot from, to let the wizard modify the
EFI boot entry correspondingly. Please note that this option is available on the 64-bit WinPE media
only.
5. When done with all parameters, please confirm the operation to proceed.
6. After completing the operation, please reboot the computer.
Managing Partitions and Disks
Partitioning lets you divide a single physical drive into a number of logical drives, each of which serves as a
container with its own drive letter and volume label, thus enabling the operating system to process data more
efficiently. Partitioning also makes it possible to organize data so that it is easy to find and manage. By detaching
the OS from the rest of the data you can tackle one more crucial issue – in case of a system malfunction, you can
get the system back on track in minutes by recovering it from a backup image located on the other partition of the
hard drive. Finally partitioning is a necessity if you’re planning to run several OSs on a single hard drive to
effectively delineate the boundaries of each OS.
Basic Partitioning Tasks
Creating a Partition
Copyright© 1994-2018 Paragon Software Group. All rights reserved.
Page 66

66
1. Open Partition Manager scope.
2. Select Tools > My Computer, then left click a block of free space on a disk you’d like to partition. Select
Create new volume here in the opened menu.
3. By default, there will be created an NTFS partition the size of the selected free block. Drag-and-drop
borders of the free block on the Disk Map to define the partition size and position. If you want to modify
other properties, click More options.
4. In the opened dialog you can change any predefined partition property.
• Select the desired partition type (Primary, Extended, or Logical). The available alternatives depend on
the selected block of free space – within a Logical block, only Logical partitions can be created; Within a
Primary block, both Primary partitions or the Extended Partition are allowed to create.
• Drag-and-drop borders of the free block on the Disk Map to define the partition size and position. An
accurate value in MB can be set in the corresponding field.
• To store data on the created partition you need to format it to one of the supported file systems:
- FAT32 – use for data disks that are 32GB or less
- NTFS – the primary file system for Windows OS
- Ext 2/3/4 – the primary file system for Linux OS
Copyright© 1994-2018 Paragon Software Group. All rights reserved.
Page 67

67
- Apple HFS – the primary file system for Mac OS X
• Enter a volume label to easily identify the partition later (optional parameter).
• Choose one of the vacant drive letters from the list to associate with the partition. The drive letter plays
an important role in telling Windows where to look data.
• By default, the amount of sectors per cluster will be specified according to the used OS and the chosen
file system. If you’d like to set another value, unmark the Use OS built-in routine and define the
desired value in the corresponding field. The cluster size is one of the crucial parameters of any file
system. Its value implicitly affects the performance of the files input-output activity since it defines the
size of the file system metadata. Besides, the so-called waste space factor also depends on it.
5. Click Create when ready. All introduced changes to the disk layout will be pended until confirmed
.
Formatting a Partition
When you create a new partition you will be prompted to choose the desired file system format as described above.
This section explains how to format an existing partition.
1. Open Partition Manager scope.
2. Select Tools > My Computer, then left click an existing partition. Select Format this volume in the
opened menu.
3. Select the desired file system from the list of the supported file systems and enter a volume label to easily
identify the partition later (optional parameter). Since the selected partition may contain data, which will be
lost after formatting, you need to confirm the operation.
4. If you want to change the default amount of sectors per cluster, click More options. The cluster size is one
of the crucial parameters of any file system. Its value implicitly affects the performance of the files inputoutput activity since it defines the size of the file system metadata. Besides, the so-called waste space factor
also depends on it.
5. Click Format when ready. All introduced changes to the disk layout will be pended until confirmed
Deleting a Partition
1. Open Partition Manager scope.
Copyright© 1994-2018 Paragon Software Group. All rights reserved.
.
Page 68
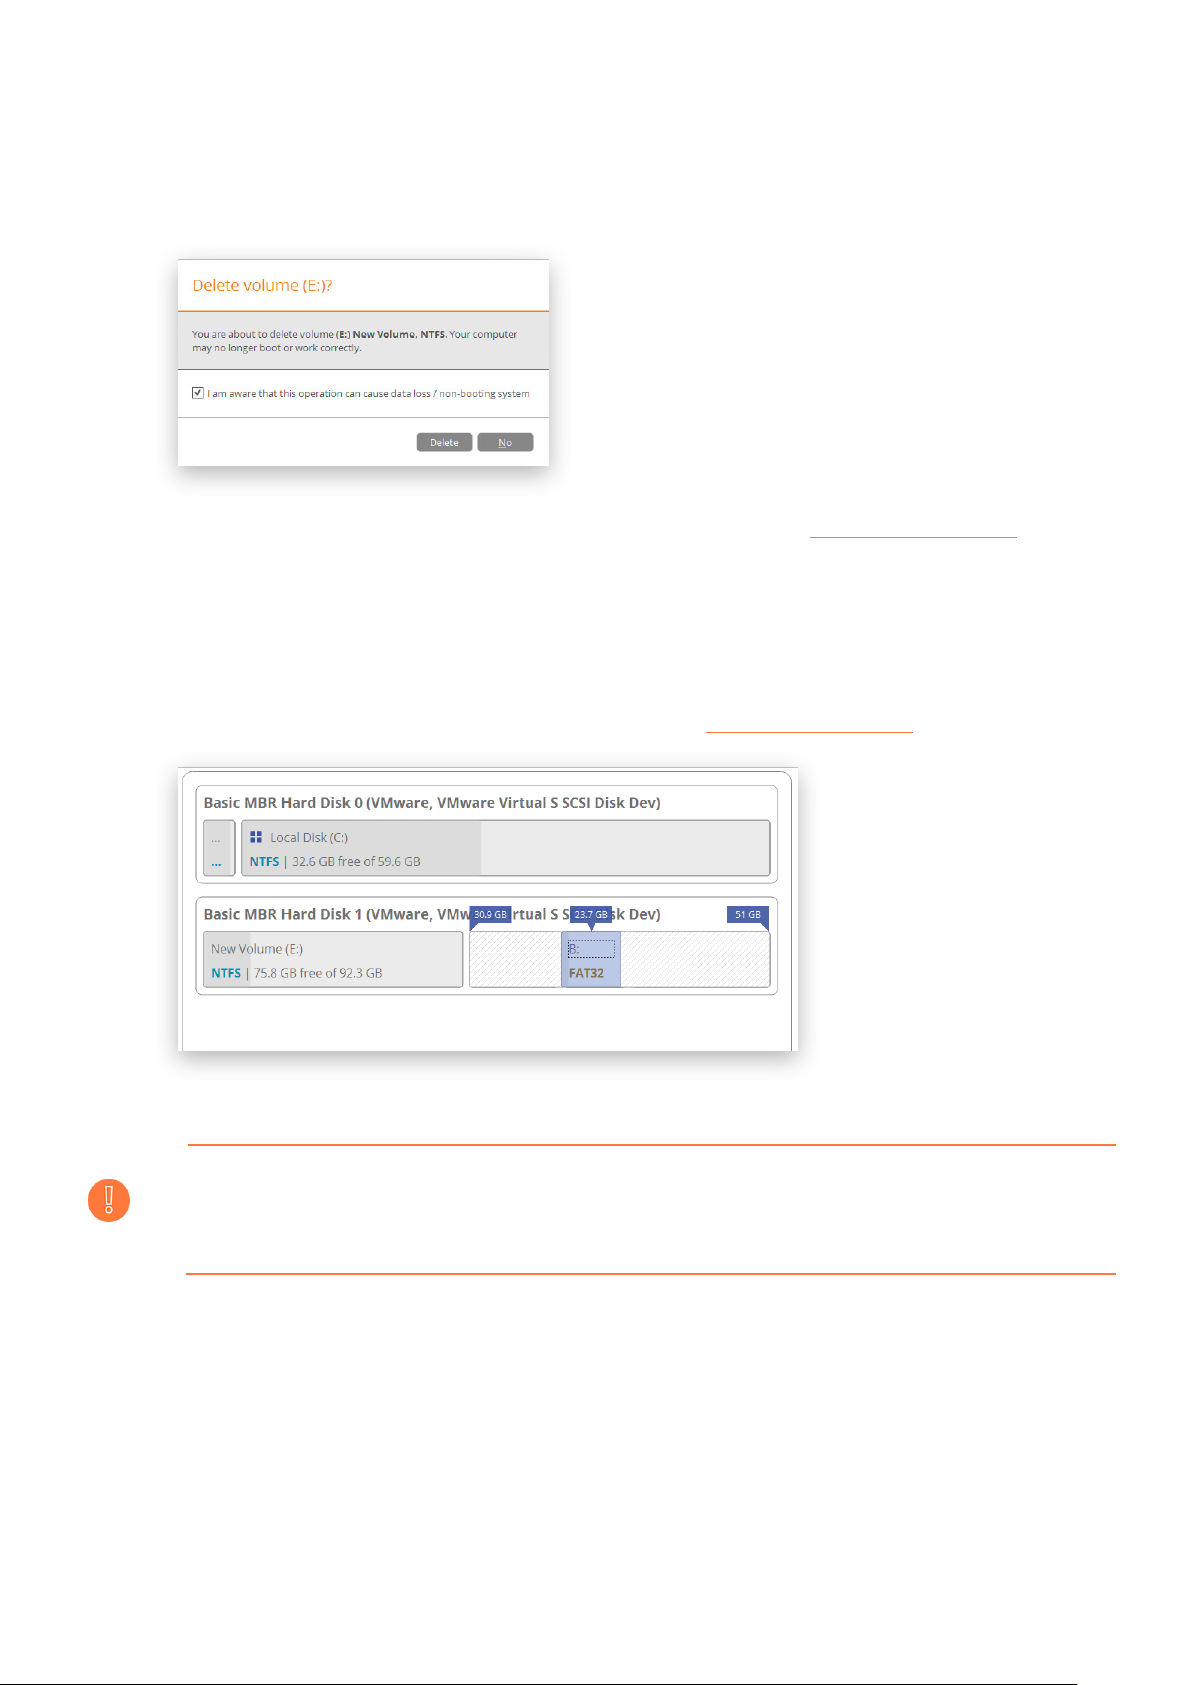
68
2. Select Tools > My Computer, then left click an existing partition. Select Delete this volume in the opened
menu.
3. Since the selected partition may contain data, which will be lost after deleting, you need to confirm the
operation.
4. Click Delete when ready. All introduced changes to the disk layout will be pended until confirmed
Moving/Resizing a Partition
1. Open Partition Manager scope.
2. Select Tools > My Computer, then drag-and-drop borders of a partition on the Disk Map to define its size
and position. All introduced changes to the disk layout will be pended until confirmed
.
.
Resize or free space redistribution that leads to shrinking of an unlocked bitlocked volume may
fail due to limitations of a Microsoft service used for accomplishing this type of operations.
Undeleting a Partition
When simply deleting a partition (without additional wiping) disk management software only removes references to
it in the Partition Table, thus leaving the possibility to recover it later.
The Undeleted Partitions Wizard can help you find and recover these partitions. A restored partition will be fully
functional, as long as other partitions were not created, moved or exceeded the disk space occupied by that
partition. That is why the program offers this function only for blocks of free space.
1. Open Partition Manager scope.
Copyright© 1994-2018 Paragon Software Group. All rights reserved.
Page 69
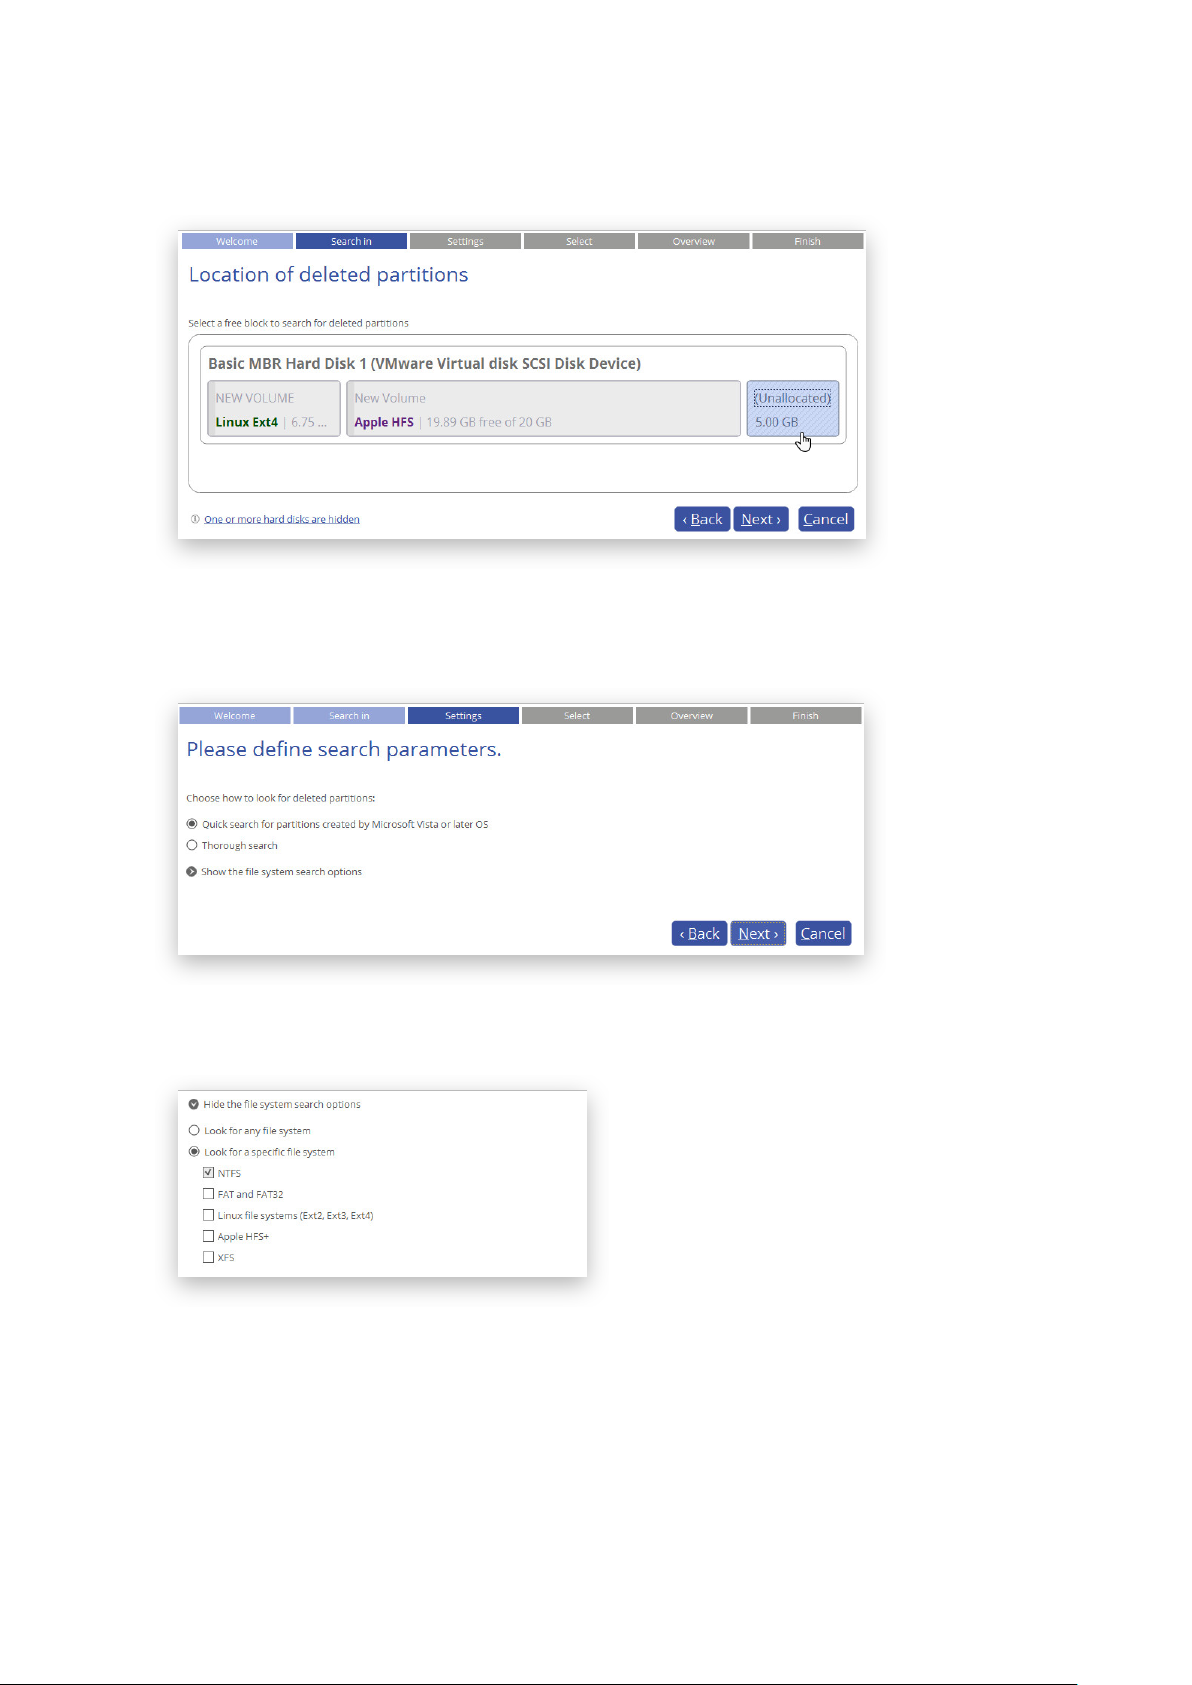
69
2. Select Tools > Undelete partitions, then click Next on the Welcome page of the wizard.
3. The wizard only displays disks that contain unallocated space. Choose a free block that used to be a
partition.
4. By default, the wizard selects the quick search method. In most cases it’s enough to find an accidentally
deleted partition. However, if the wizard fails to find the partition you need, you can select the ‘Thorough
search’ option to scan every single sector in the specified search area to get the most accurate results.
If you’d like to narrow the search results, select the corresponding option and mark a checkbox opposite
the required file system.
5. By default, the program searches records of any deleted partition ever existed on the selected block of free
space. So you can get several partitions to choose from. Most likely the required partition will be found
first.
Copyright© 1994-2018 Paragon Software Group. All rights reserved.
Page 70

70
6. Check the resulting disk layout, then click Next to confirm.
7. If you’d like to execute the operation immediately after finishing the wizard, disable the simulation mode by
unmarking the corresponding option. If you’d like to be notified by email about successful completion
and/or failure of this operation, mark the corresponding option and then select the required mode. Please
make sure the email recipient is specified
. Click Finish to complete.
Converting File System
You can change type of an existing file system without formatting and completely safe for your data. First the
original file system will be checked for consistency, then the partition data will be verified whether it meets the
Copyright© 1994-2018 Paragon Software Group. All rights reserved.
Page 71

71
requirements of the target file system or not. And only after having passed this testing, the program will reorganize the file system metadata and user files.
Our program supports the following scenarios:
• FAT16/32 <> NTFS conversion
• NTFS <> HFS conversion
1. Open Partition Manager scope.
2. Select Tools > My Computer, then left click an existing partition. Click More…, then select Convert file
system in the opened menu.
3. Initially the program suggests consistent values for all parameters.
• New file system. Choose a file system you would like to convert to from the list. The program only
displays variants available for the operation, taking into account parameters of the selected partition
and limitations of the used file system.
• New cluster size. Change the suggested cluster size. This parameter can have a profound effect on the
overall performance. In a nutshell, larger clusters waste more space, but generally provide for slightly
better performance, because of less fragmentation. So be particularly careful with it.
The cluster size value is expressed in sectors per cluster. To get it in Kbytes, please divide it into
4. Click Convert when ready. The operation will be pended until confirmed
half.
Changing Volume Label
.
1. Open Partition Manager scope.
2. Select Tools > My Computer, then left click an existing partition. Select Change volume label in the
opened menu.
3. Enter a new catchy volume label. The operation will be performed immediately after confirmation.
Copyright© 1994-2018 Paragon Software Group. All rights reserved.
Page 72

72
Changing Drive Letter
1. Open Partition Manager scope.
2. Select Tools > My Computer, then left click an existing partition. Select Change drive letter in the opened
menu.
3. Choose one of the vacant drive letters from the list to associate with the partition. The drive letter plays an
important role in telling Windows where to look data.
After changing drive letter of the system partition, your Windows OS won’t start up.
4. Click Change when ready. All introduced changes to the disk layout will be pended until confirmed
Some programs may not run properly either if changing drive letter of a data partition.
.
Hiding/Unhiding Partition
This option can help you hide a partition from OS, applications, and users, thus preventing access to its contents
and vice versa. To prevent the situation when the operating system becomes unbootable, the program doesn’t
allow you to hide OS partitions.
1. Open Partition Manager scope.
2. Select Tools > My Computer, then left click an existing partition. Click More…, then select Hide/Unhide
this partition in the opened menu.
3. Click Yes when ready. The operation will be pended until confirmed
Copyright© 1994-2018 Paragon Software Group. All rights reserved.
.
Page 73

73
Making Partition Active/Inactive
You can set an active/inactive flag for primary partitions on an MBR-type hard disk. Please note that OS starts up
only if the partition where its bootable files are resided is active or bootable.
1. Open Partition Manager scope.
2. Select Tools > My Computer, then left click an existing partition. Click More…, then select Mark this
partition active/inactive in the opened menu.
3. Click Yes when ready. The operation will be pended until confirmed
.
Updating MBR
The program enables you to overwrite the current bootable code in the MBR (Master Boot Record) by the standard
bootstrap code. This can help to repair a corrupted bootable code of a hard disk after a boot virus attack or a
malfunction of boot management software.
1. Open Partition Manager scope.
2. Select Tools > My Computer, then left click an existing MBR (Master Boot Record) disk. Select Update
MBR in the opened menu.
3. Click Yes when ready. The operation will be pended until confirmed
.
Getting Disk/Partition Properties
1. Open any functionality scope.
Copyright© 1994-2018 Paragon Software Group. All rights reserved.
Page 74

74
2. Select Tools > My Computer, then left click an existing partition or disk. Select Show advanced
properties in the opened menu.
3. The program displays detailed information on the properties of an entire storage device or individual
partition. Besides the general information, such as capacity, used space or file system type it provides the
possibility to get info on hard disk geometry, cluster size, exact partition location, etc.
Disk Properties:
Partition Properties:
Complex Partitioning Tasks
Splitting a Partition
Let’s assume you have one partition across the entire hard disk, like most other people who purchase a computer
with a preinstalled operating system. So besides OS, it holds all your documents, favorite music, movies and family
photos. This type of configuration is not optimal for effective data organization and safety. First, it negatively affects
the system: huge amount of data aggravated by its inevitable excessive fragmentation causes poor performance in
file search/access and read/write operations. Second, it’s inconvenient for the user: system files and folders piled up
with media and documents besides obvious difficulties in transparent organization become a naughty problem in
case of a system malfunction.
Copyright© 1994-2018 Paragon Software Group. All rights reserved.
Page 75

75
The Split Partition Wizard can help you detach the operating system and data or different types of data by splitting
one partition to two different partitions of the same type and file system – you just select a partition, then files and
folders you’d like to move to the new partition, finally redistribute free space between the two partitions if
necessary, and here you are!
Before you start, please take into account the cases when the split operation is impossible to perform:
• Partition's type is not supported (you have selected a non-standard primary or logical partition);
• The selected partition is located on a dynamic disk;
• You've already got 4 primary partitions on a Basic MBR disk;
• You've already got 3 primary partitions on a Hybrid (Retained) GPT+MBR disk;
• There's not enough free space on the selected partition (free up to 50 MB);
• The selected partition has an unsupported file system.
1. Open Partition Manager scope.
2. Select Tools > Split partition, then click Next on the Welcome page of the wizard.
3. Choose a partition you’d like to split.
4. Mark checkboxes next to files or folders you’d like to move to the new partition. Please don’t touch system
files or folders like “Windows”, “Users”, “Program Files”, config.sys, etc. for it may cause inability of the
operating system to start up. Click Calculate to find out the amount of data to move or Next to calculate
and proceed further. Please note that the calculation may take some time, so please be patient.
Copyright© 1994-2018 Paragon Software Group. All rights reserved.
Page 76

76
5. Redistribute free space between the partitions by clicking amongst them and dragging the border on the
Disk Map or by entering the required value for the new partition in the corresponding field. By default, the
wizard allocates all free space to the original partition. You should decide for yourself how much of it
should be given to the new partition. Anyway we strongly recommend you to allocate some free space to
both partitions.
Next you need to choose one of the vacant drive letters from the list to associate with the partition and
change the default volume label, if necessary.
6. Check the resulting disk layout, then click Next to confirm.
Copyright© 1994-2018 Paragon Software Group. All rights reserved.
Page 77

77
7. If you’d like to execute the operation immediately after finishing the wizard, disable the simulation mode by
unmarking the corresponding option. If you’d like to be notified by email about successful completion
and/or failure of this operation, mark the corresponding option and then select the required mode. Please
make sure the email recipient is specified
. Click Finish to complete.
Redistributing Free Space
The Redistribute Free Space Wizard can help you increase free space on one partition by up-taking the on-disk
unallocated space and the unused space of other partitions. By default, the wizard will add all existing blocks of the
free space to the target partition. Additionally, you will be able to specify partitions to act as space donor.
According to introduced changes the wizard will automatically recalculate positions of the involved partitions and
move their contents to new locations.
1. Open Partition Manager scope.
2. Select Tools > Redistribute free space, then click Next on the Welcome page of the wizard.
3. Choose a partition you’d like to expand at the expense of others. Blocks of the free space (if any) will be
automatically added to the target partition.
Copyright© 1994-2018 Paragon Software Group. All rights reserved.
Page 78
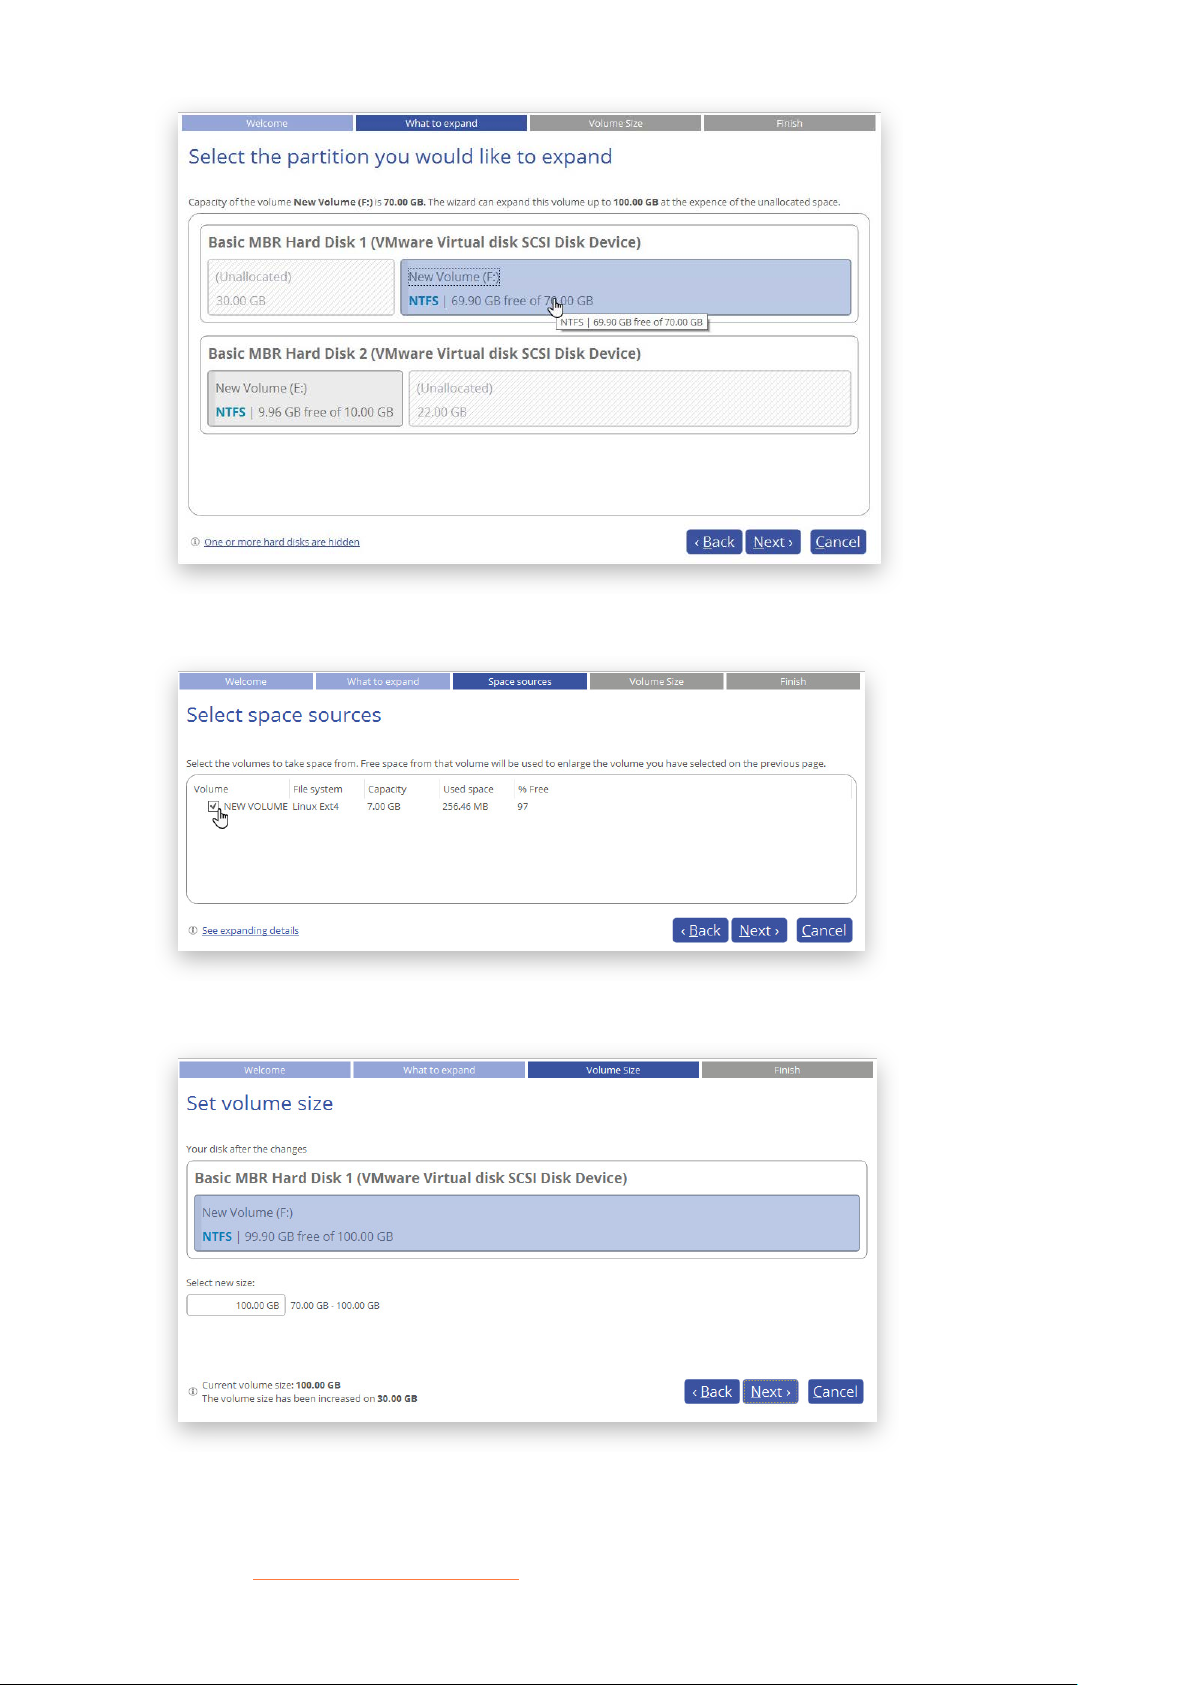
78
4. Choose one or several partitions (not only adjacent) to donate free space.
5. Set a new size for the target partition in the corresponding field.
6. If you’d like to execute the operation immediately after finishing the wizard, disable the simulation mode by
unmarking the corresponding option. If you’d like to be notified by email about successful completion
and/or failure of this operation, mark the corresponding option and then select the required mode. Please
make sure the email recipient is specified
Copyright© 1994-2018 Paragon Software Group. All rights reserved.
. Click Finish to complete.
Page 79

79
Merging Partitions
The Merge Partitions Wizard enables to consolidate the disk space, which originally belongs to two adjacent
partitions (or additionally separated by free blocks), into a single, larger partition. The order, in which two partitions
have been chosen, is important since all contents of the second selected partition will be placed in a folder on the
resulted joined partition.
Please note that the wizard can only merge two adjacent NTFS, FAT32 or FAT partitions, also separated by
unallocated space.
1. Open Partition Manager scope.
2. Select Tools > Merge partitions, then click Next on the Welcome page of the wizard.
3. Click on the left partition of the pair of partitions you need to merge, as the right one will be selected
automatically. During the operation all contents of the right partition will be placed in a folder on the
resulted joined partition.
If a system partition is the right one of the selected pair, Windows OS will become unbootable
Copyright© 1994-2018 Paragon Software Group. All rights reserved.
after the merge operation is over.
Page 80

80
4. By default, the wizard prompts an easy-to-understand folder name, which can be changed.
5. Check the resulting disk layout, then click Next to confirm.
6. If you’d like to execute the operation immediately after finishing the wizard, disable the simulation mode by
unmarking the corresponding option. If you’d like to be notified by email about successful completion
and/or failure of this operation, mark the corresponding option and then select the required mode. Please
make sure the email recipient is specified
. Click Finish to complete.
Copyright© 1994-2018 Paragon Software Group. All rights reserved.
Page 81

81
Advanced Partitioning Tasks
Changing Cluster Size
The cluster size can have a profound effect on the overall performance. In a nutshell, larger clusters waste more
space, but generally provide for slightly better performance, because of less fragmentation. So be particularly
careful with it.
1. Open Partition Manager scope.
2. Select Tools > My Computer, then left click an existing partition. Click More…, then select Change Cluster
Size in the opened menu.
3. Change the default cluster size according to your needs, then click Yes. All introduced changes to the disk
layout will be pended until confirmed
The cluster size value is expressed in sectors per cluster. To get it in Kbytes, please divide it into
half.
.
Converting to Logical/Primary
You can include a primary partition into the extended partition or exclude a logical partition from the extended
partition without partition duplication.
1. Open Partition Manager scope.
Copyright© 1994-2018 Paragon Software Group. All rights reserved.
Page 82

82
2. Select Tools > My Computer, then left click an existing partition. Click More…, then select Make partition
logical/primary in the opened menu.
3. Click Yes when ready. The operation will be pended until confirmed
The operating system won’t start up if you make the system partition logical.
.
Changing Serial Number
FAT16, FAT32, and NTFS file systems include the serial number parameter. It is generated automatically while
formatting a partition and is saved in the boot sector.
You can modify this parameter for FAT16, FAT32, or NTFS partitions without re-formatting.
1. Open Partition Manager scope.
2. Select Tools > My Computer, then left click an existing partition. Click More…, then select Change
volume serial number in the opened menu.
3. Enter a new serial number for the selected partition. It should contain 8 hexadecimal figures (0..9 or A..F).
The operation cannot proceed until you enter all 8 symbols.
4. Click Yes when ready. The operation will be pended until confirmed
.
Change Primary Slots
Different operating systems apply different approaches to enumeration of the primary partitions on MBR disks.
In Linux:
In Linux, every partition has a special symbolic name that encodes a hard disk containing a partition, and a partition
itself. Partitions are addressed and accessed by using their symbolic names. Symbolic names are automatically
generated by Linux in accordance with the order of hard disks in BIOS and the order of partition records in the
Copyright© 1994-2018 Paragon Software Group. All rights reserved.
Page 83

83
Partition Table. Thus changing enumeration of the primary partitions can lead to changing of paths to some
important resources.
In DOS:
MS-DOS uses a rather sophisticated algorithm for a drive letter assignment. A drive letter, which is assigned to a
partition, depends on the order of records in the Partition Table. Thus changing enumeration of the primary
partitions affects the drive letters assignment. In early versions of MS-DOS, it could even lead to the unavailability
of a partition.
Our program helps you to change enumeration of the primary partitions, and this way fix problems concerning an
inappropriate order of partitions on an MBR disk.
1. Open Partition Manager scope.
2. Select Tools > My Computer, then left click an existing MBR disk. Click More…, then select Change
primary slots in the opened menu.
3. Use the arrow buttons to move the selected partition up and down within the primary part of the partition
table.
4. Click Yes when ready. The operation will be pended until confirmed
.
Converting a Partition Table
Your storage device may have GPT (GUID Partition Table), MBR (Master Boot Record), including dynamic disk
configurations, or a hybrid GPT+MBR partition table.
GPT is now used on Windows and Mac computers as the primary partition scheme, while MBR used to be the main
and only partition scheme for Windows computers up to Vista. A hybrid GPT+MBR partition scheme is a necessity
for Apple BootCamp users. Dynamic disk configurations are mostly employed by business.
Our program allows easy non-destructive conversion between various partition schemes:
Copyright© 1994-2018 Paragon Software Group. All rights reserved.
Page 84

84
• Basic GPT <> Basic MBR disk conversion. Please note that only 64-bit Windows OSes since Vista are able to
boot from a GPT disk. So if you’ve got a 32-bit Windows OS accommodated on an MBR disk, it won’t start
up after converting to GPT.
• Dynamic GPT/MBR > Basic MBR disk conversion. Please note that our program can only process dynamic
disks containing solid simple volumes (without extension).
1. Open Partition Manager scope.
2. Select Tools > My Computer, then left click an existing disk. Select Convert to MBR/GPT disk in the
opened menu (available operation depends on the selected storage device).
3. Click Yes when ready. The operation will be pended until confirmed
According to the DOS partitioning scheme a hard disk can have up to four Primary partitions. If there is an
Extended partition on the disk, only three primary partitions are allowed. So when attempting to convert a
basic GPT disk or a dynamic disk containing several volumes, our program will ask you to choose the
preferred number of primary partitions, and the rest (if there are more than four volumes on the disk) will
be converted to logical disks within the Extended partition.
.
Editing Disk Sectors
You can directly access and modify sectors of an entire disk drive or individual partition, save and restore sectors
from specified files as well as navigate through the system metadata. For more details, please consult
Problems chapter.
Fixing Boot
NTFS Optimization
As you know NTFS partitions get more and more redundant records about deleted files over time, which slows
down performance. On database servers that host MS SQL or Exchange it may cause severe performance
degradation. We include tools that help you organize valid and delete redundant records inside NTFS MFT (Master
Copyright© 1994-2018 Paragon Software Group. All rights reserved.
Page 85

85
File Table) in a couple of minutes, so you don't need to rebuild the system or defragment the entire disk when that
is the only problem.
Compact MFT
1. Open Partition Manager scope.
2. Select Tools > My Computer, then left click an existing NTFS partition. Click More…, then select Compact
MFT in the opened menu.
• Compact records. Unmark the option if you don’t want to shift MFT records to the head of the table
(not recommended).
• Truncate MFT after compacting. Unmark the option if you don’t want to remove emptied table rows
that appeared during the operation (not recommended).
3. Click Yes when ready. The operation will be pended until confirmed
.
Degragment MFT
1. Open Partition Manager scope.
2. Since a hardware or software failure, or power outage during this operation may lead to data loss, please
make a backup of the specified NTFS partition. For more details, please consult Backup Scenarios
3. Select Tools > My Computer, then left click an existing NTFS partition. Click More…, then select
Defragment MFT in the opened menu.
chapter.
4. Confirm the operation, then click Yes. The operation will be pended until confirmed
.
Partitioning Virtual Disks
Guess you didn't know that partitioning of virtual disks could be done from outside without login into a guest
virtual machine? Our program helps you to connect a virtual disk as if it was an ordinary physical disk and do drive
partitioning. Our solution supports disks of all popular virtualization vendors, including VHD(X), VMDK, and VDI.
Copyright© 1994-2018 Paragon Software Group. All rights reserved.
Page 86

86
And if you feel uneasy about spoiling anything, just enable the non-destructive mode and all changes on the
connected disk will be saved to a snapshot. This snapshot can later be merged with its parental disk by using
standard tools included with the virtualization software.
Limitations:
• A virtual disk opened for writing with a 3rd party tool (e.g. being used by a virtual machine) won’t be
connected, as asynchronous parallel writing to the disk file will most likely result in data corruption.
• A virtual disk opened for reading with a 3rd party tool (e.g. it’s a parent VMware disk, which snapshot is
being used by a virtual machine) will be opened for reading only with the corresponding notification.
• The non-destructive connection is unavailable for .vdi disks, as our program doesn’t support Oracle
VirtualBox snapshots.
• Virtual disks connected from compact discs will be available for reading only.
• A double disk connection is prohibited.
1. Open Partition Manager scope, then click Add VD located in the upper right area of the Disk Map.
2. Connect a virtual disk from a local disk, a flash stick, a mapped network share, or a compact disc.
• Allow write on disk. By default, the selected disk will be connected in read/write mode until you
disconnect it or exit the program.
• Allow non-destructive write on disk. It is a special read/write mode, when all changes on the
connected disk are being saved to a snapshot, thus providing complete safety for the original disk’s
contents. If needed, this snapshot can later be merged with its parental disk by using standard tools of
virtualization software vendor.
• Read only. Use this mode to avoid modification of data on the virtual disk.
• Connect disk at the program start. Use this option to have the virtual disk connected automatically at
every program start.
Copyright© 1994-2018 Paragon Software Group. All rights reserved.
Page 87

87
Although you’re allowed to connect virtual disks from network shares, we do not recommend it
3. Click Connect when ready. The operation will be performed immediately.
4. As a result a new disk will appear on the Disk Map. Now you can change its layout, copy data from/to,
due to modest performance.
check surface and file system integrity, optimize NTFS, and accomplish other operations.
Checking Partitions for Problems
Testing Partition Surface
You can test surface of existing partitions and blocks of free space for bad or unstable sectors. During the operation
all found questionable and damaged sectors will be marked unusable in the file system metadata, thus minimizing
the risk of data loss.
1. Open Partition Manager scope.
2. Select Tools > My Computer, then left click an existing partition. Click More…, then select Test partition
surface in the opened menu.
3. Select the required verification level, and then click Yes. The operation will be pended until confirmed
.
Checking File System Integrity
You can check the integrity of a file system to detect and repair errors before copying data or performing drive
partitioning.
1. Open any functionality scope.
Copyright© 1994-2018 Paragon Software Group. All rights reserved.
Page 88

88
2. Select Tools > My Computer, then left click an existing partition. Select Check file system integrity in the
opened menu.
3. If you’d like the program to automatically fix file system errors and/or find and attempt to repair bad
sectors, just enable the corresponding options, and then click Yes. The operation will be
confirmed.
pended until
Erasing Data
You probably don’t have an idea that deleted data can be easily recovered by novice, while pros can retrieve data
even from a disk destroyed by mechanical means. Your private data is yours alone and should not be exposed to
third party in any way. This can be achieved by erasing your storage device.
1. Open Disk Wiper scope.
2. Select Tools > Wipe disks or partitions, then click Next on the Welcome page of the wizard.
3. Choose whether to irreversibly destroy all on-disk data or only remnants of deleted files. Please note that
the clear free space operation is available for known file systems only.
4. Select one or several partitions or disks you’d like to erase completely or clear free space only.
Copyright© 1994-2018 Paragon Software Group. All rights reserved.
Page 89
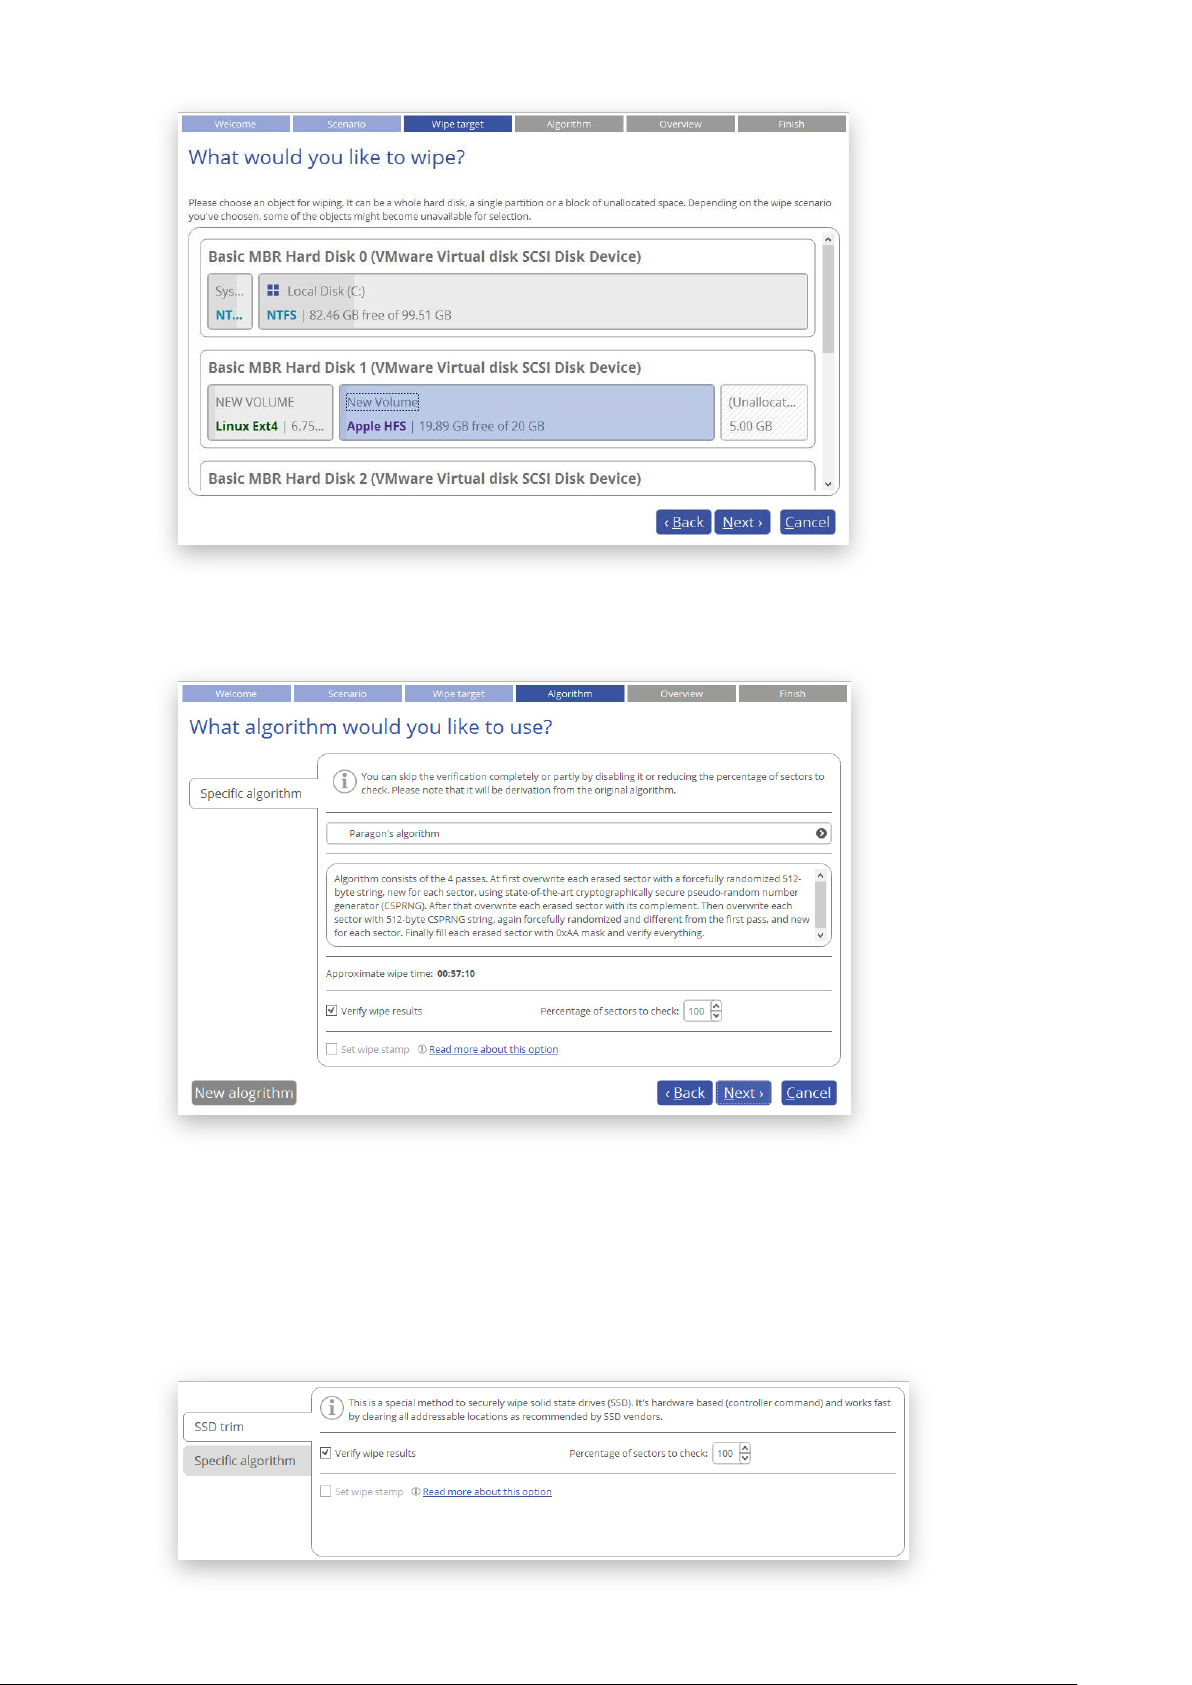
89
5. Select a specific data erasure algorithm or create your own method. Please note that SSD drives are
detected automatically and erased by the ‘trim’ command without eating up precious write cycles.
Please note that the SSD Trim option becomes available in the wizard, if our program detects one or several
SSD drives in your system. We highly recommend you not to apply traditional HDD-based wiping
algorithms for your solid state drives. First, the data wiping eats up write cycles, which are limited for SSD.
Second, none of erasure software is able to control the specific region the data is written to, as this is
controlled by SSD controllers. Thus the data wiping doesn’t guarantee complete data destruction on SSD.
Copyright© 1994-2018 Paragon Software Group. All rights reserved.
Page 90

90
The list of supported wiping algorithms may vary for your product.
The ‘trim’ command works for individual volumes, entire drives, and remnants of deleted files.
To create a new wiping algorithm, define up to four wiping patterns, number of passes for each wiping
pattern and for the group of patterns. The Mask spinner control allows you to set a two-figure hexadecimal
character value ("00" by default). The available range is from "00" to "FF". You can also choose whether to
carry out residual data verification or not specifying the percentage of sectors to check.
By marking the Set wipe stamp option, information on the used wipe program, algorithm, device serial
number, and other properties will be added to the MBR (Master Boot Record) of the wiped storage device
to get notified during the boot phase how and when the storage has been wiped. Please note this option is
available when wiping entire disks only.
6. Check the resulting disk layout, then click Next to confirm.
Copyright© 1994-2018 Paragon Software Group. All rights reserved.
Page 91

91
7. If you’d like to execute the operation immediately after finishing the wizard, disable the simulation mode by
unmarking the corresponding option. If you’d like to be notified by email about successful completion
and/or failure of this operation, mark the corresponding option and then select the required mode. Please
make sure the email recipient is specified
. Click Finish to complete.
Copying Data
Sooner or later each of us faces the problem of having not enough space on the internal disk to install a new game
or application, or to store a favorite music album or family pictures. Worse still, is a situation when a system HDD or
a trendy SSD starts to deteriorate, threatening to die any moment. When this is happening to us, the only thought
we've got is how to transfer Windows OS, applications and all data to a newer and larger storage device with
minimal time and effort.
Fortunately, there are technologies that help to straightforward the process of moving all contents of your disk,
including standard bootstrap code and other system service structures, to another storage device without having to
re-install the operating system and applications. Our program can help you to perform fast and safe migrations of
Copyright© 1994-2018 Paragon Software Group. All rights reserved.
Page 92

92
Windows OS, single partitions and entire disks to new storage devices and even downsizes to smaller capacity
drives.
1. Connect a new disk to the computer.
2. Launch Hard Disk Manager
.
3. Open Drive Copy scope.
4. Select Tools > Migrate, then click Next on the Welcome page of the wizard.
5. Select the preferred migration scenario. We pick the first option, as we‘re going to transfer Windows OS to
a fast but relatively small SSD drive.
6. The wizard will search your system for supported operating systems. If several OSes have been found, you
will need to choose the one you’d like to migrate.
7. Depending on your choice, it will then automatically pick one or two on-disk partitions (Windows may have
System Reserved, a special hidden partition that contains boot critical files, while in the uEFI+GPT mode
there will be another hidden partition, called EFI System Partition) and prompt you to select a destination
disk, if there are more than two storage devices besides the source.
If the selected disk is not enough in capacity to hold your OS, you will be prompted to exclude files from
the main system partition at the next step to try to fit in to the destination.
Copyright© 1994-2018 Paragon Software Group. All rights reserved.
Page 93

93
If the selected disk is the same size or larger than the source, but you’re still willing to remove redundant
data from the migration process, mark the corresponding option to do it later.
8. The destination disk will be checked for the presence of files. If found, you will be warned that all data
stored on this disk will be lost during the upcoming operation. Use Windows Explorer or any file manager
to save all important data to another location, then confirm you agree to proceed.
9. If the destination disk is not enough in capacity to hold your OS, first click Calculate to know exactly how
much data you need to exclude. The calculation takes a while, so please be patient.
Copyright© 1994-2018 Paragon Software Group. All rights reserved.
Page 94

94
The wizard includes two data exclusion modes, available under the corresponding tabs:
• Folders (default). Double click the system partition to see its contents, then unmark checkboxes
opposite unnecessary files and folders to try to fit in to the destination disk. We do not recommend
you to exclude system files, but those that could take plenty of disk space, like video, music,
photos, etc. When ready, click Calculate to make sure you get a success.
• File types. By clicking on this tab, you can see three predefined categories containing file masks for
popular document, music, and picture formats. Either select an entire category(ies) or use the arrow
icon to expand it and choose a certain file mask(s). If you don’t find the required mask, add your
own through the My type filters option. When done, click Calculate to make sure you get a
success.
Copyright© 1994-2018 Paragon Software Group. All rights reserved.
Page 95

95
If the destination disk is the same or larger than the source, then the data space calculation
won’t be available in the program’s interface.
10. Review all parameters of the operation and modify them if necessary by going back to any of the required
steps.
• If the destination disk is larger than the source, then the wizard will prompt you to expand the
resulted partition across all on-disk space. Unmark the corresponding option if you don’t need that.
• If the destination disk becomes Bootable GPT as a result of the migration process, you’ll see one
more option that will allow you to make OS bootable on this disk. Please note that you can specify
a bootable device at any time through Boot Corrector.
11. If you’d like to execute the operation immediately after finishing the wizard, disable the simulation mode by
unmarking the corresponding option. If you’d like to be notified by email about successful completion
and/or failure of this operation, mark the corresponding option and then select the required mode. Please
make sure the email recipient is specified
Copyright© 1994-2018 Paragon Software Group. All rights reserved.
. Click Finish to complete.
Page 96

96
12. When the migration is over, first check up Windows OS starts up from the SSD. If yes, delete the Windows
OS partition from the source disk, then re-partition the disk according to your needs.
Extra WinPE Scenarios
Unlocking Bitlocked Volumes
The program allows you to accomplish backup, restore, or copying of Windows BitLocker encrypted volumes, but
only when they are unlocked. Until that the locked volumes will be recognized in the program’s interface as
“Bitlocked”.
1. Start up the computer from the WinPE recovery media
2. Open Tools > My Computer. Left click a volume detected as “Bitlocked”, then select Unlock Bitlocker
encrypted volume in the opened menu.
3. Either enter a password or provide a path to a recovery key (recoverykey.bek). For more details, please
consult documentation provided by Microsoft.
4. Click Unlock when ready. All introduced changes to the disk layout will be pended until confirmed.
5. As a result of the operation the volume gets correctly recognized and is available to work with.
.
Copyright© 1994-2018 Paragon Software Group. All rights reserved.
Page 97

97
The same action can be accomplished in the Windows version of the program.
Resize or free space redistribution that leads to shrinking of an unlocked bitlocked volume may
fail due to limitations of a Microsoft service used for accomplishing this type of operations.
Adding Specific Drivers
The WinPE recovery media offers excellent hardware support. However, in case of not having a driver for your disk
controller, for example, your hard disks will be unavailable to work with. Please use this scenario to inject drivers for
unknown storage controllers, network cards, or other devices.
To avoid this action every time you start up the recovery media, we recommend you to inject
1. Start up the computer from the WinPE recovery media
2. Select Utilities > Load drivers.
3. Use the corresponding link to browse for an .INF file of the required driver package on a floppy disk, local
additional drivers during its creation. For more details, please consult Building Recovery Media
.
disk, CD/DVD or a network share. To learn how to map a network share, please consult
Network.
Configuring
.
Copyright© 1994-2018 Paragon Software Group. All rights reserved.
Page 98

98
To avoid this action every time you start up the recovery media, we recommend you to pre-
The chosen package gets on the list. Repeat this action to inject more drivers. Click Load drivers to
accomplish the operation.
The WinPE environment can either be 32- or 64-bit, so are to be drivers for injection.
Configuring Network
If your local network has a DHCP server, a network connection will be automatically configured once the WinPE
recovery media has loaded. Otherwise, you will need to do it manually by providing an IP address, a network mask,
default gateway, etc. in Network Configurator. Additionally, this wizard will help you map a network share, ping a
network resource, or measure transit delays of packets across an Internet Protocol (IP) network to track down
problematic nodes.
configure network settings and map network resources during its creation. For more details,
please consult
Building Recovery Media.
1. Start up the computer from the WinPE recovery media
2. Select Utilities > Configure network.
3. Provide an IP address, a network mask, default gateway, etc. to configure your network device according to
network environment.
Copyright© 1994-2018 Paragon Software Group. All rights reserved.
.
Page 99

99
4. Use the Network drives tab to manage network shares.
5. Click Map Network Drive to map a network share.
Copyright© 1994-2018 Paragon Software Group. All rights reserved.
Page 100

100
• Click the standard browse button [...] to browse for the required network share or manually enter a path
to it;
• Define a letter from the pull-down list of available drive letters;
• If you’d like to make this connection permanent, mark the corresponding checkbox. Otherwise it will
only be available for the current session;
• Click the Connect as user button at the foot of the dialog page to specify a user name and password
to access the selected network share, if necessary.
6. Use the Network identification tab to change a network name of your computer (generated
automatically) and a workgroup name.
7. By default, the wizard saves all network settings in the “netconf.ini” file located on the WinPE RAM drive,
thus it will only be available until you restart the computer. However, you can just once configure your
network device and then save this file to some other destination, for instance a local drive, and this way
avoid constant re-configuration, just by providing a path to it. So click Save to file to save the
“netconfig.ini” file to the required destination.
Network Troubleshooter
Network Configurator includes a traceroute/ping utility that enables to get detailed information on particular routes
and measure transit delays of packets across an Internet Protocol (IP) network. So with its help you can easily track
down problematic nodes.
1. Start up the computer from the WinPE recovery media
2. Select Utilities > Configure network.
3. Click on the Network identification tab, then select Ping to ping a network host. Click Start when you’re
ready with all parameters.
.
Copyright© 1994-2018 Paragon Software Group. All rights reserved.
 Loading...