

Paragon DTC 1000 Maintenance Manual
DTC 1000
Digital Temperature Controller
Complete Operation & Maintenance Instructions
See page 22 for instructions on upgrading your DTC
100, 600 or 800 series board to the DTC 1000.
°F / °C
Display
Page 12
Cone-Fire
Page 6
Ramp-Hold
Page 9
Present Status
(Current seg. &
Board temp.)
Page 13
Alarm
Page 13
Options
Page 14
(Cone Table)
Skip Segment
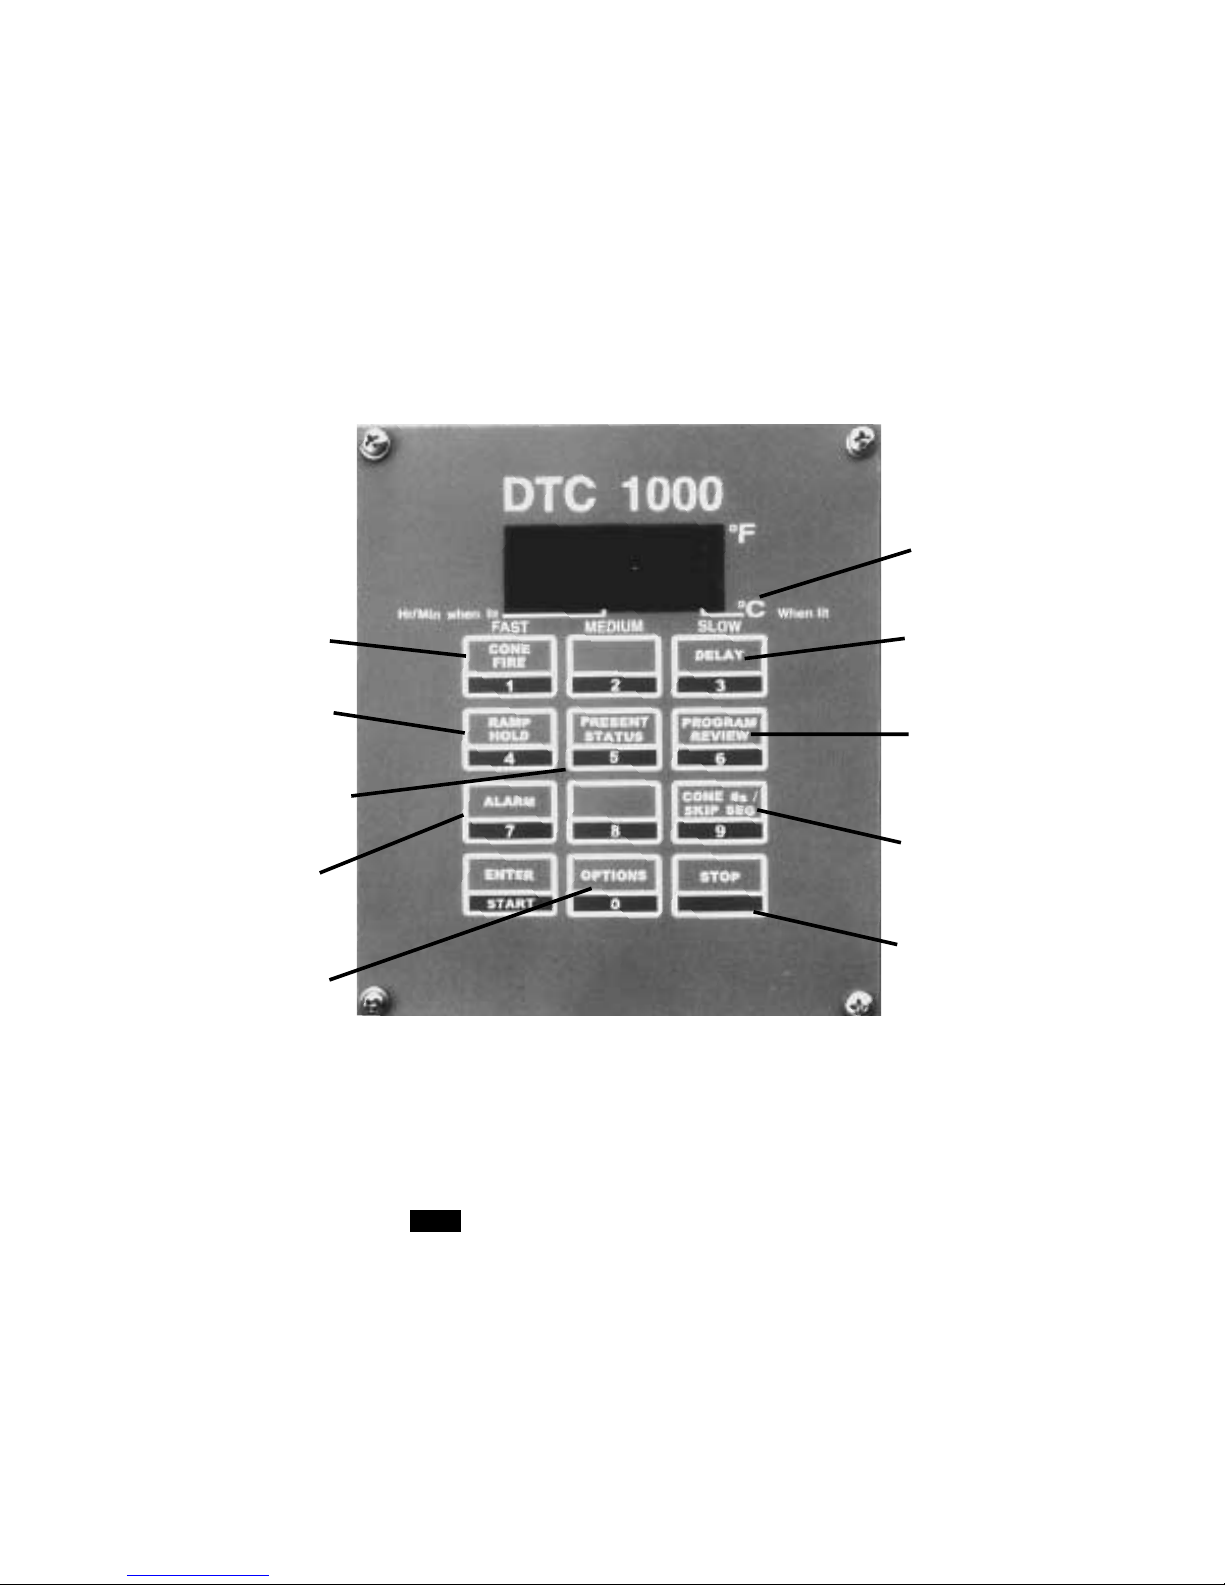
The Keypad
The controller is easy to master once you understand that the keys have two functions:
1 Select an operation.
Press akey to start the operation shown in the top half of the key. Most operations begin by
pressing START from IdLE display. Some operations begin during firing.
Delay
Page 13
Program
Review
Page 5
Cone #s
Page 8
Page 11
Stop
Page 5
2 Type Numbers.
After beginning an operation, press keys to enter numbers, such as time and temperature.
1

Introduction
Thank you for purchasing the DTC 1000 controller, our latest generation of digital
controllers.
The DTC 1000 operates in Cone-Fire and Ramp-Hold the same as the earlier DTC
600 and 800 series. If you are already familiar with the earlier controllers, you can follow
most of the same operating procedures with the DTC 1000.
The DTC 1000 includes new features not found in earlier controllers. These features
are accessed through the Options key. If you do not need them, they will remain hidden
until you press Options. Thus, the DTC 1000 remains as simple to operate as earlier
controllers.
The Cone-Fire mode applies to ceramics only. If you purchased a heat treating, glass
fusing, enameling or jewelry furnace, your version of the DTC 1000 will include only the
Ramp-Hold mode, not the Cone-Fire. In this case, please disregard “FAST,” “MED,”
“SLOW,” “Cone Fire” and “Cone #s” on your keypad.
If you purchased the TnF II portable controller, you should find a TnF II installation
instruction sheet in addition to these instructions.
Though you should read this entire manual to fully enjoy your DTC 1000, you can
begin firing after reading these sections: “Safety Rules” page 4, “Getting Started” pages
4-6, and the basics section of “Cone-Fire” pages 6-8 or “Ramp-Hold” pages 9-10. Though
the DTC 1000 is simple to operate, using it without reading instructions could ruin your
kiln or the ware inside. This is not covered by warranty. The time you spend reading now
could save you untold hours of wasted effort later when you begin firing.
Once you learn the basic features of the DTC 1000, you will be able to control every
stage of firing. This offers learning opportunities and convenience difficult to imagine with
a manual-controlled kiln.
We thank those who helped produce this manual, especially Amy Parker and Steven
Drollinger, who offered many suggestions.
©1999, byParagon Industries, Inc. IM-167/7-00
2

Contents
Getting Started
Safety Rules. . . . . . . . . . . . . . . . . . . . .4
Testing and Recording . . . . . . . . . . . 4
Room Temperature and Humidity. . 4
IdLE and CPL Messages. . . . . . . . . . 4
Which Instructions to Use. . . . . . . . . 4
Care of the Thermocouple . . . . . . . . 5
Display Dots . . . . . . . . . . . . . . . . . . . . 5
Correcting Entries . . . . . . . . . . . . . . . 5
Stop Key . . . . . . . . . . . . . . . . . . . . . . . 5
Cool-Down Temperature Display . . 5
Repeat Firings. . . . . . . . . . . . . . . . . . . 5
Program Review . . . . . . . . . . . . . . . . . 5
Pyrometric Witness Cones
In Ceramic Firings. . . . . . . . . . . . . . . 5
When Kiln Shuts Off Too Soon . . . . 6
Portable Controller
(TnF II) Installation. . . . . . . . . . . . . . 6
Ceramic Cone-Fire
Cone-Fire Quick Reference . . . . . . 23
Basics
Firing Speeds . . . . . . . . . . . . . . . . . . . 6
Cone-Fire Programming. . . . . . . . . . 6
Hold. . . . . . . . . . . . . . . . . . . . . . . . . . . 7
Pre-Heating the Ware . . . . . . . . . . . . 7
AOP . . . . . . . . . . . . . . . . . . . . . . . . . . . 8
Advanced
Cone Table . . . . . . . . . . . . . . . . . . . . . 8
Firing History in Cone-Fire . . . . . . . 8
Fine-Tuning Shelf Cones
With Cone Offset (CnoS) . . . . . . . . . 8
Interpreting Cone Bending . . . . . . . . 9
When Cone Temperature is
Off More Than 50°F. . . . . . . . . . . . . . 9
Ramp-Hold
Ramp-Hold Quick Reference . . . . . 24
Basics
User Programs . . . . . . . . . . . . . . . . . . 9
Segments. . . . . . . . . . . . . . . . . . . . . .10
Rate . . . . . . . . . . . . . . . . . . . . . . . . . . 10
Hold. . . . . . . . . . . . . . . . . . . . . . . . . . 10
AOP . . . . . . . . . . . . . . . . . . . . . . . . . . 10
Ramp-Hold Programming. . . . . . . . 10
Advanced
Segments for Controlled Cooling. . 11
Skip Segment . . . . . . . . . . . . . . . . . . 11
Sample Firing Schedules. . . . . . . . .11
Cone-Fire Program
Modified in Ramp-Hold . . . . . . . . . . . 11
Sculptured Stoneware Bisque
Firing Schedule, Cone 04. . . . . . . . . . 11
Glass Fusing Firing Schedule . . . . . . 11
Glass Slumping Firing Schedule. . . . 12
16 Segment Firing (16-S) . . . . . . . . 12
Additional Features
Selecting °F or °C (CHG°) . . . . . . . 12
°F/°C Temperature
Conversion Formula. . . . . . . . . . . . . 12
Delay Fire . . . . . . . . . . . . . . . . . . . . . 13
Temperature Alarm . . . . . . . . . . . . . 13
Setting Alarm From Idle. . . . . . . . . . .13
Setting Alarm During Firing . . . . . . . 13
Present Status:
Current Segment &
Circuit Board Temperature. . . . . . . . 13
Checking Circuit Board
Temperature From Idle . . . . . . . . . . . 13
Power Failures . . . . . . . . . . . . . . . . . 13
Firing Ceramics After an
Extended Power Failure. . . . . . . . . . . 14
Thermocouple Offset (tCoS). . . . . 14
Setting Thermocouple Offset . . . . . . 14
Options Quick Reference List . . . . 14
Turning Off Error Codes (ErCd). . 15
Trouble-Shooting &
Maintenance
Element Glow Test . . . . . . . . . . . . . 15
Board Upgrades . . . . . . . . . . . . . . . . 22
Controller Display
Does Not Light Up. . . . . . . . . . . . . . 16
Controller Display Lights
Up Normally, Some or All
Heating Elements Do Not Fire. . . . 16
Firing Interrupted by PF or ErrP . . 17
FAIL Message. . . . . . . . . . . . . . . . . . 18
Err 0 Message. . . . . . . . . . . . . . . . . . 18
Err 1 Message. . . . . . . . . . . . . . . . . . 18
Err 2 Message. . . . . . . . . . . . . . . . . . 18
Err 3 Message. . . . . . . . . . . . . . . . . . 18
Err 4 Message. . . . . . . . . . . . . . . . . . 19
Err 6 Message. . . . . . . . . . . . . . . . . . 19
Err 8 Message. . . . . . . . . . . . . . . . . . 19
Err A Message. . . . . . . . . . . . . . . . . . 19
Err B Message. . . . . . . . . . . . . . . . . . 19
Err d Message. . . . . . . . . . . . . . . . . . 19
Err E Message. . . . . . . . . . . . . . . . . . 19
Err H Message . . . . . . . . . . . . . . . . . 19
Err t . . . . . . . . . . . . . . . . . . . . . . . . . . 19
Err - . . . . . . . . . . . . . . . . . . . . . . . . . . 19
StUC Message . . . . . . . . . . . . . . . . . 19
Erratic Temperature Readings. . . . 20
Overfire . . . . . . . . . . . . . . . . . . . . . . . 20
Stuck Display . . . . . . . . . . . . . . . . . . 20
Relay Chatters or Buzzes. . . . . . . . .20
Kiln Switch Box Fuse
Blows Repeatedly . . . . . . . . . . . . . . . 20
Unwanted Beeping Sound. . . . . . . . 20
Replacing Switch Box Parts
Circuit Board Fuse . . . . . . . . . . . . . . . 21
Thermocouple. . . . . . . . . . . . . . . . . . . 21
TnF II Thermocouple . . . . . . . . . . . . 21
Controller Board . . . . . . . . . . . . . . . . . 21
Transformer . . . . . . . . . . . . . . . . . . . . 21
3

Safety Rules
The warranty on your DTC 1000 controller does not cover
damagefromoverfiring,regardlessofthe circumstances. It is
the operator’s responsibility to make sure the kiln turns offat
theendofthe firing.Followthesesafetyrulesinadditiontothe
ones in your kiln or furnace manual.
When not in use, unplug kiln or furnace or turn off
breaker.
any wall or combustible surface. (See manufac
turer’s recommendation for your model.)
Do not open lid or door until kiln or furnace has
cooled and all switches are off.
Fireonly in a well-ventilated,coveredand protected
area away from flammable materials. Keep cordset
away from hot sides of kiln or furnace.
Donotleave the kiln unattended, especiallynearthe
expected shut-off time.
DANGEROUS VOLTAGE! Do not touch heating
elements with anything. Disconnect kiln or furnace
Wear firing safety glasses (available from Paragon)
before servicing.
when looking into peephole of a hot kiln.
Do not operate if the controller itself is hotter than
Do not touch hot sides of kiln or furnace. Keep un
supervised children away.
Install your kiln or furnace at least 12 inches from
-
150°F/66°C.(Seeinstructions on page 13 forcheck
ingboardtemperature.) Neverallowthefiringroom
temperature to exceed 110°F/43°C. (Measure room
temperature at least three feet away from the kiln.)
Getting Started
Do NOT fire your kiln or furnace until you have read this section and “Cone-Fire
Basics” or “Ramp-Hold Basics.” To use your controller to its fullest capacity, read the advanced sections and “Additional Features.”
-
-
Testing and Recording
You will learn much by testing. How slowly should clay be
heated through quartz inversion? How slowly must you cool
glass through the annealing range? Find out for yourself by
testing.TheDTC1000canpreciselycontroleverystageoffir
ing, so you can easily experiment and test.
Keep a notebook of firing records. When you fire similar
projectsweekslater,after youhaveforgottenthedetailsofyour
previous firing, you will be grateful for your records.
Room Temperature and Humidity
ItisokaytostoretheDTC1000atsub-zerotemperatures.
But before operating, raise the room temperature to at least
0°F/-18°C.
The circuit board is rated for 155°F/68°C maximum oper
atingtemperature. However,maximumtemperature forrated
accuracyis125°F/52°C.Iftheboardgetshotter,openwindows
and exhaust hot air from the room. (See page 13 for instruc
tions on checking circuit board temperature.)
High humidity will not adversely affect the DTC 1000 un
less water condenses on the circuit board. If this happens, do
not fire the kiln until the moisture has evaporated from the
board.
IdLE and CPL Messages
The controller displays ErrP when you first apply power.
PressENTER. ErrP will change to IdLE anda flashing temperature. Operations begin from IdLE .
-
If the display shows FAIL instead of IdLE , the thermo
couple is either disconnected or burned out. (See page 18.)
CPL means “completed.” The controller will display
CPL , then IdLE , after it performsactionssuchaschanging
°Fto°C display. CPL mayremainfor awhilebefore IdLE ap
pears. Please be patient—the controller is processing data.
Which Instructions to Use
The DTC 1000 fires in two modes:
-
-
-
1) Ceramic Cone-Fire, based on pyrometric cones.
2) Ramp-Hold, based on firing rates and target tempera
tures.
Ceramickilns,usuallytop-loading,usebothCone-Fireand
Ramp-Hold. Heat treating, glass fusing, and enameling fur
naces and kilns usually come with Ramp-Hold only.
FAST, MEDIUM, SLOW, CONE-FIRE, and Cone #s
printed on the controller faceplate apply only to
Cone-Fire mode.
-
-
-
-
4
How to Tell if You Have Cone-Fire
1 From IdLE display, press ENTER, then 1.If ConE
appears, you have Cone-Fire mode. If ---- appears,
you have Ramp-Hold mode only.
2 Bring the controller back to IdLE display:
a) From ---- , press STOP. IdLE will appear.
b) From ConE , press ENTER 3 times slowly. CPL ,
then IdLE , will appear.
If you have Cone-Fire, all of this manual applies to your
controller. If you have Ramp-Hold only, skip Cone-Fire on
pages 6-9.
Care of the Thermocouple
The small metal rod protruding into the firing chamber is
the temperature sensor, or thermocouple. Do not let shelves,
posts or ware touch the thermocouple. This could affect the
temperature reading.
Bumping the thermocouple during loading can damage it
orpushit outofthefiringchamber.Itshouldprotrude intothe
firing chamber at least
thermocouple extends into the firing chamber even farther.)
Avoid firing clay with a high sulphur content. The sulphur
eatsintothethermocouple,makingitbrittleandeasytobreak.
1
5
"-
". (Do not be concerned if your
2
8
Display Dots
Single Center Dot: Time
Alower centerdot appearsduringtimedisplay.It separates
hoursfromminutes(i.e.1hour,30minutesdisplaysas01.30).
During temperature display, the dot disappears.
Single Right-Hand Dot: °C
When a temperature is displayed in °C, a lighted dot appears in the lower right. In °F it disappears.
Three Dot Display: Power Monitoring
To adjust temperature, the DTC 1000 sends power to the
relay(s) intermittently. The relays, inturn, power the heating
elements. To monitor when the relays are turned on, press 8
during firing. When three dots appear along the bottom dis
play, relays are receiving power.
ToturnoffPowerMonitoring,press8again.Thisfeatureis
used mostly for diagnostics.
Correcting Entries
If you enter the wrong temperature, cone, time, etc., while
programming, enter 0000. Then enter the correct numbers
before pressing ENTER.
The Stop Key
You can stop a firing at any time by pressing STOP.
Ifyou inadvertentlyenter Ramp-Hold,you donot haveto go
through all the prompts to get back out. Press STOP when
USEr appears. That will take you back to IdLE .
If you inadvertently enter Cone-Fire, STOP will NOT take
youback to IdLE . PressENTERafter eachCone-Fireprompt
until CPL , then IdLE , appears.
If you inadvertently press OPTIONS, you can get back to
IdLE by pressing STOP.
Cool-Down Temperature Display
When the firing is finished, CPLt will display alternating
with the total firing time in hours and minutes. To view the
current kiln temperature as the kiln cools, press ENTER.
CPLt will disappear. Then temperature will display.
Repeat Firings
To repeat the last firing, press ENTER twice from IdLE .
The kiln will begin firing. This works in both Cone-Fire and
Ramp-Hold.But first,make sureyouare repeatingthe correct
firing by using “Program Review” below.
Program Review
When you select a firing program in Cone-Fire or
Ramp-Hold and go back to IdLE , you have called a program
fromstorage. It is thenreadyto fire. “Program Review”shows
you the values for that program.
TostartProgramReview from IdLE ,pressENTER,then 6.
Valuesfor theprogramselected forfiring will displayone after
theother. Youcan alsouseProgram Reviewduring firingsimply by pressing 6.
TIP:InProgramReview,values for a program display
about one per second. You can speed up this display by
pressing 1repeatedly. If you hold down the 1key,values
will speed by. This works from both IdLE and during
firing.
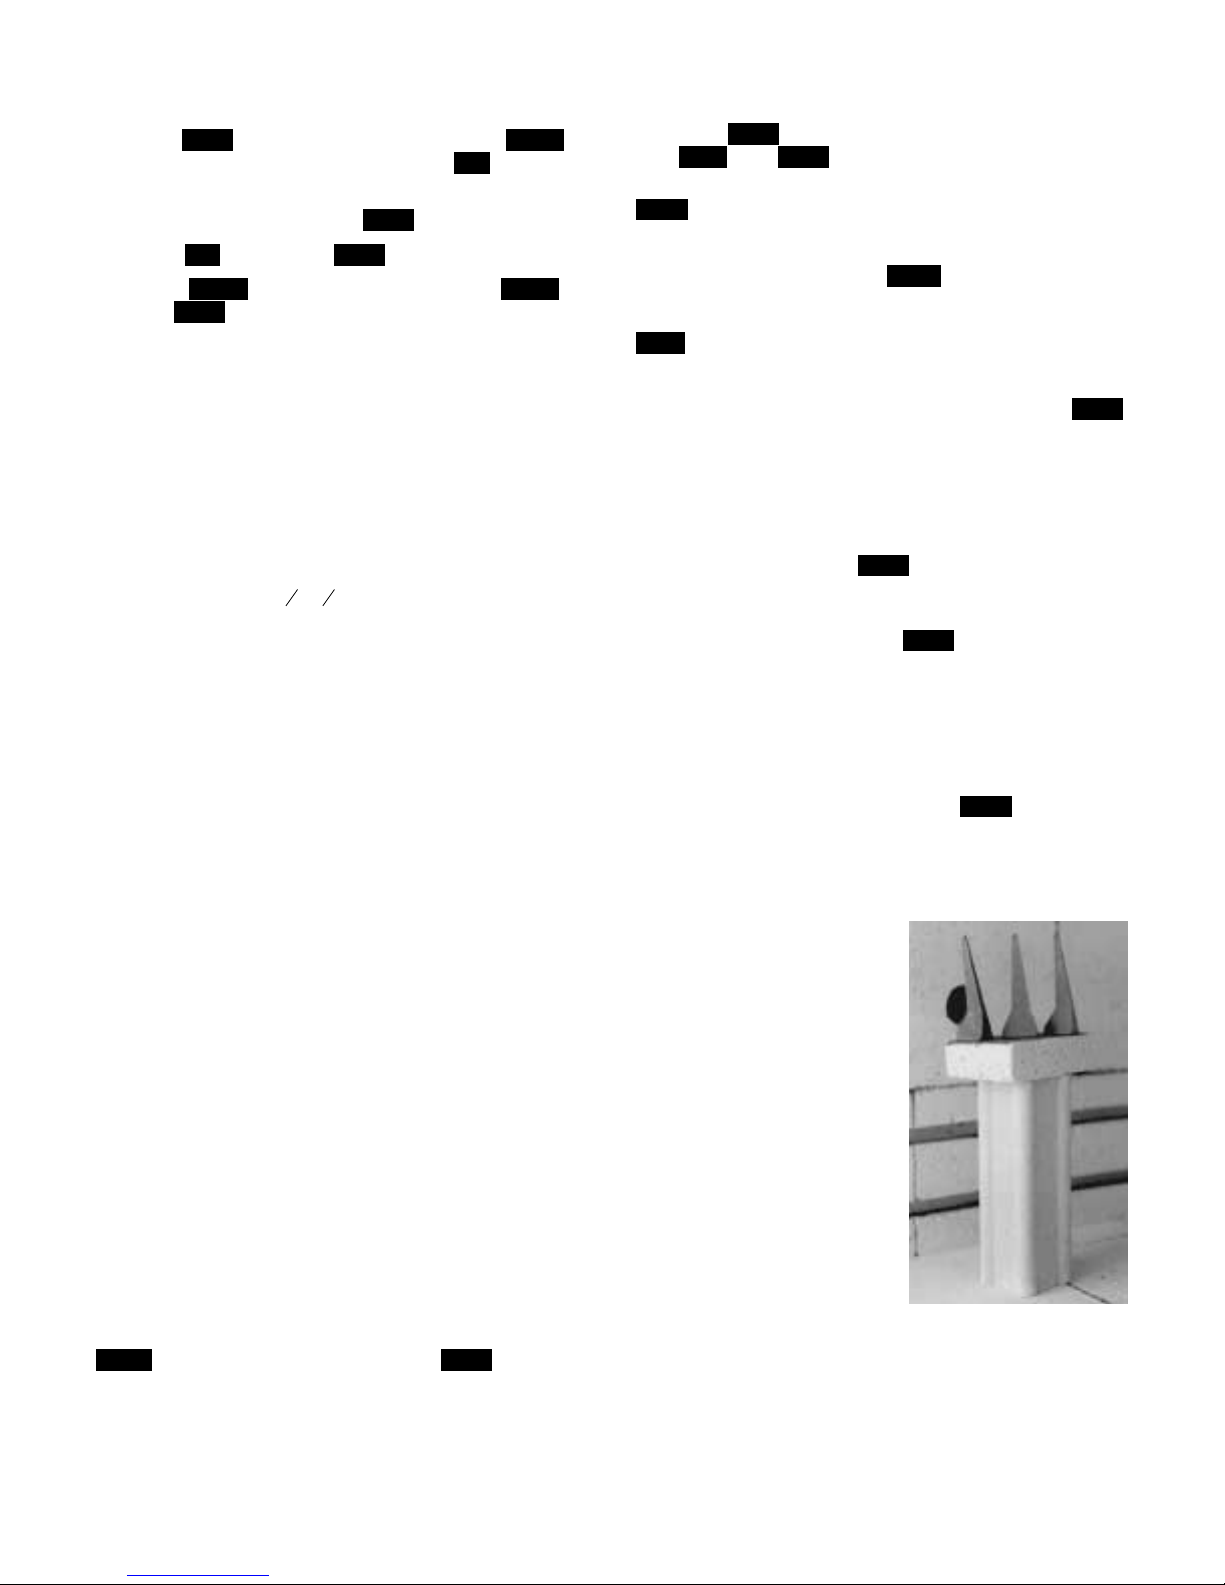
Pyrometric Witness Cones in
Ceramic Firings
Though the DTC 1000 fires
electronically,every ceramicfir
ing should include shelf, or wit
ness,cones.Theymeasureheat
work accurately and give a his
-
tory of the firing.
If you fire the same size load
and type of ware regularly, the
shelf cones let you compare one
firing to the next and alert you
when something is wrong. For
example,if the shelf conebends
farther and farther with each
consecutive firing, this may in
dicate thermocouple tempera
ture drift.
Keep cones 3" from the
peepholeto avoidcoolair drafts.
Wearfiring safetyglasses whenviewingthe conesat hightem
perature. Your dealer can tell you which cone number to use
for each clay and glaze.
-
-
-
-
-
-
5

When Kiln Shuts Off Too Soon
If the kiln shuts off below maturity, you can turn it back on
andkeepfiring.Simply program a higher temperature or hot
ter cone. Then from IdLE , press START twice. The kilnwill
begin firing, taking up where it left off.
Ceramicfirings: if thekiln shuts offwithin100°F/55°C of
maturity, and the temperature drops 50°F/28°C or more after
the kiln shuts off, do not depend on the pyrometric witness
cones in the kiln. Once the cones cool 50°F/28°C after they
Ceramic Cone-Fire
have been heated to within 100°F/55°C of maturity, they will
not bend properly. This is because they form a hard shell.
-
Portable Controller (TnF II) Installation
The wall-hanging portable DTC 1000 TnF II includes a
temperaturesensorcalledathermocouple.Keepthethermo
couplewireawayfromelectrical wires. Wrapping the thermo
couple wire around the kiln’s power cord or taping it to the
cord may cause erratic temperature display.
-
-
Cone-Fire mode is based on pyromet
ric cones. It is not designed for heat treat
-
ing, glass fusing and enameling. For these
firings, see “Ramp-Hold,” page 9. Use
Ramp-Hold to fire ceramic pieces that re
quire a custom firing schedule, such as
some types of stoneware sculpture or crys
talline glaze. To fire faster than Cone-Fire
Fast speed, use Ramp-Hold.
Do NOT use Cone-Fire until you have
read “Cone-Fire Basics” and “Cone-Fire
Programming.” To take full advantage of
other features in Cone-Fire mode, read
“Advanced Cone-Fire,” pg 8.
Cone-Fire Basics
Firing Speeds
Cone-Fire operates in Fast, Medium or Slow speed. The
instructions that follow will show you how to select speed.
To view the firing segment of a cone-fire, press 5 during
firing.(See“Present Status,” page 13.) Thesegmentnumber
willappear(seeleft columninthefollowingcharts),informing
you of how far the firing has progressed.
Fast (1)
Consider Fast for overglazes, decals, china paint, or small,
thin-walled ceramic greenware.
Cone-Fire Fast Firing Schedule
Segment in
“Present Actual
Status” Segment Rate of Firing Per Hour
5 — Pre-Heat (if any)
6 1 570° F. per hour until the last 250° F.
7 2 200° F. per hour during last 250° F.
Cone-Fire Programming
Use these instructions for your first firings. Later
youmayprefer“Cone-FireQuickReference,”pg.23.
AstheDTC1000promptsforcone,speed,etc.,val
uesenteredforthelastfiringwill appear.To usethese
-
values again, press ENTER.
To fire without Delay or Alarm: Follow steps 1
through 6 below. Then from IdLE press START
twice. To use Delay or Alarm, first read page 13.
1 Apply power to the kiln.
2 ErrP will appear. Press ENTER. IdLE will
appear.
3 Press ENTER then 1. ConE will appear. En-
ter cone number. (If ---- appears instead of
ConE , your controller uses Ramp-Hold
only.)
4 PressENTER. SPd willappear.Enterspeed:
FAST (1), MEDIUM (2), SLOW (3).
5 Press ENTER. HLd will appear. Enter hold
time, if any, in hours and minutes (e.g. 12
hours,30minutes=12.30).Nohold=00.00.
6 Press ENTER. IdLE will appear.
7 Toset alarm,press ENTERthen7. ALAr will
appear. Enter alarm temperature. (Enter
9999 to turn alarm off.) Then press ENTER.
8 Tosetdelay fire,press ENTER then3. dELA
will appear. Enter delay time in hours and
minutes(e.g. 12 hours, 30minutes= 12.30).
Press ENTER. (Delay zeroes out after each
firing.)
9 To start program, press ENTER twice.
-On- will appear, thenkiln temperature. Ifa
delay was programmed, -On- will appear,
then time remaining until start. To stop the
program during firing, press STOP.
When program fires to completion, CPLt will ap
pear alternating with total firing time in hours and
-
-
6

Medium (2)
Use Medium for larger slip-cast pieces or more tightly
loaded kilns.
Cone-Fire Medium Firing Schedule
Segment in
“Present Actual
Status” Segment Rate of Firing Per Hour
4 — Pre-Heat (if any)
5 1 110° F. per hour until 250° F.
6 2 400° F. per hour until the last 250° F.
7 3 120° F. per hour during the last 250° F.
Slow (3)
Use Slow for hand-thrown or heavily-cast pieces, stone
ware and porcelain.
Cone-Fire Slow Firing Profile
Segment in
“Present Actual
Status” Segment Rate of Firing Per Hour
2 — Pre-Heat (if any)
3 1 80°F per hour to 250°F
4 2 250°F per hour until temperature
5 3 110°F per hour until temperature
6 4 225°F per hour until the last 200°F
7 5 90°F per hour during the last
8 6 150°F per hour, cooling down to
reaches 950°F
reaches 1100°F
200°F of firing
1000°F
Hold
Cone-Fire“Hold” heat-soaksthe wareatthe endof thefir
ing. Without Hold time, the kiln shuts off after it reaches the
conetemperature.WithHoldtime,thekilnmaintainsthecone
temperature for the period you specify. Hold time helps even
outthe temperature throughoutthekiln. It alsohelps the heat
topenetratecompletely into the clay. Rapid firingislike cook
ing: the turkey will be done on the outside but not on the in
side.Hold helpsglaze absorbchina paint.It helpsto healglaze
defects such as bubbles. A little hold time can yield dramatic
results.
CAUTION: Too much hold time can overfire your
ware and burn out colors.
One way to add Hold time without over-firing is to fire to
one cone cooler than needed. Then add enough hold time to
bendthenexthotter cone.Holdtimeneededwillvary.As arule
of thumb, one hour of hold = one cone of heat work.
Example: to fire to cone 05
and add 30 minutes of hold time.
1
, program Cone-Fire for 05
2
Watch the pyrometric shelf cones through the peephole.
Press STOP when the correct shelf cone bends, noting how
much Hold time was needed. Program that much Hold time
thenext timeyou firethesame typeof wareloaded tothesame
capacity. You can hold for up to 99 hours and 99 minutes.
Youwill learn by experimentingwith ceramics. Hold isone
more tool to experiment with.
Pre-Heating the Ware
Moist greenware can explode during firing. This happens
when the moisture in the clayturns to steam rapidly and can
noteasilyescape. TheDTC1000“Pre-Heat”feature driesthe
ware at low temperature before the moisture can turn to
steam.
-
-
-
-
Pre-Heatis necessarywhenfiring thickgreenware, suchas
stoneware. It may also be necessary in humid weather, which
inhibits drying. If possible, however, avoid using Pre-Heat to
dry greenware. If the greenware feels damp or cool when you
touch it to your cheek, dry it longer before firing. Use a
dehumidifier in humid weather. Drying greenware in the kiln
tends to rust the kiln.
TIP:DuringPre-Heat, vent the lid. Otherwise the fire
bricks will absorb moisture, leading to rust behind the
stainless steel case. Moisture in the firebrick will also
slow the kiln to a crawl when firing begins.
VentingthelidduringPre-Heatissoimportantthatsome
ceramistsuse theextended ventpositionor evenleavethe
lid open. If you do this, you must be near your kilnatthe
end of Pre-Heat to lower the lid.
Pre-Heat raises the temperature 60°F/33°C per hour to
200°F/93°C.Thenitholdsat200°F/93°Cforthetimeyouspecify. Pre-Heat works in Cone-Fire only. After Pre-Heat is finished, the kiln will automatically begin firing to the cone you
have selected. Pre-Heat zeroes out after each firing.
CAUTION: At high altitude, water boils at a lower
temperature.This maycausethe ware todrytoo rapidly
even during Pre-Heat.
After entering cone number, speed, etc., in the Cone-Fire
program, activate Pre-Heat as follows. Then begin firing.
1 Press ENTER.
2 Press 0repeatedly until PrHt appears.
3 Press ENTER. Hld will appear, alternating with
00.00 .
4 EnterPre-Heat hold time in hoursand minutes (i.e. 1
hour, 30 minutes = 01.30).
5 Press ENTER. CPL will appear, then IdLE .
-
-
7

Mirror Test
Knowing how much Pre-Heat to use is a matter of experi
ence. There is no substitute. However, this mirror test will
help. Occasionally during
Pre-Heat, hold a mirror near
the top peephole. (Be careful
to avoid burns.) The mirror
mustbeatroomtemperature,
not hot, so hold it near the
peephole for only several sec
onds.
If the mirror fogs, mois
ture is still escaping from the
ware. When the mirror no
longer fogs, make a note of
howmuchPre-Heattimeyourware needed.Thatwill helpyou
determine how much Pre-Heat to use next time.
If you decide to interrupt Pre-Heat and begin firing to the
cone in Cone-Fire, press STOP. Follow the steps above that
you used to program Pre-Heat. But instead of entering
Pre-Heat hold time, enter 00.00. Press ENTER to go back to
IdLE . Press ENTER twice to begin firing again.
-
-
AOP
Theoptional“AOP” (AuxiliaryOutput)isanelectrical outlet, usually mounted in the kiln’s switch box. The AOP outlet
can power a kiln vent or other appliance. If your kiln is
equipped with AOP, AOP will appear in Cone-Fire after
HoLD . (If AOP does not appear in the display, your kiln is
not equipped with AOP.)
Whensetto OFF,theAOPoutletreceives powerduringthe
Cone-Fire firing. At the end of the firing, the AOP shuts off.
When set to On, the AOP remains powered during both
ConeFire firing and cooling. It shuts off after the kiln cools to
°150F/66°C.
TIP: For slow cooling in Cone-Fire, select AOP OFF.
Adjusting AOP in Cone-Fire
1 AfterprogrammingCone,Speed andHold, AOP will
appear, alternating with On or OFF .
2 To change the setting, press 1, then ENTER. CPL
will appear, followed by IdLE .
2 Enter the pyrometric cone number you are looking
-
up. Then touch ENTER. The display will show the
cone temperature. If you enter a non-existent cone
number, the display will show ConE , ready for you
to enter a different cone number.
Cone temperatures displayed are for self-supporting
cones fired at a rate of 108° F. during the last hour.
Firing History in Cone-Fire
Whenthekiln fires to completion, CPLt with flash, alter
nating with total firing time inhours/minutes. To view the fi
naltemperaturethe kilnreached, pressENTER. IdLE willap
pear. Press ENTER, then 6 (Program Review). Final firing
temperaturewilldisplayalongwiththecone,speedandhold.
Fine-Tuning Shelf Cones
With Cone Offset (CnoS)
SometimesthepyrometricconeprogrammedinCone-Fire
doesnotmatchthebendingoftheconeonthekilnshelf.Using
“Cone Offset,” you can adjust Cone-Fire to fire hotter or
cooler.
IMPORTANT: Cone Offset adjusts the firing temper
ature individually for each pyrometric cone number.
Adjusting one cone has no effect on the other cones. To
adjust all the cones equally, use “Thermocouple Offsets,” page 14.
Forinstance, the controllerfiresshelf cone 018toa perfect
sixo’clockbend.Butat cone6, theshelfconeover-fires.Using
Cone Offset, you could lower cone 6 firing temperature without affecting the perfect results you are getting at cone 018.
TIP:Before using Cone Offset, check that the thermo-
couple is protruding into the firing chamber by at least
1
5
"-
".Sometimes bumpingashelfagainstthe thermo-
2
8
couple pushes it out of the firing chamber, thereby preventing accurate temperature readings.
How to Use Cone Offset
1 From IdLE , press ENTER.
2 Press 0until CnoS appears.
3 PressENTER. ConE willappear,alternatingwiththe
last cone number entered in Cone-Fire. Enter the
new cone number.
-
-
-
-
Advanced Cone-Fire
Built-in Cone Table
Foryourconvenience,thecontrollercanlookupapyromet
ric cone temperature. Do not be concerned, however, if your
kiln’scone shut-offtemperaturedoes notmatch thetempera
ture in the Cone Table.The temperature of a cone varies de
pending on firing speed.
1 From IdLE, touchENTER then9. ConE willappear,
then the cone currently programmed in Cone-Fire
Mode.
8
4 Press ENTER. °FOS (or °COS for Celcius) will ap
pear, alternating with 9000 or an adjustment num
ber.
5 Enter adjustment number (see chart). Then press
-
-
-
ENTER. CPL will appear, then temperature and
IdLE .
Youcan raiseor lowerfiring chambertemperaturefor each
conefrom1 - 50°F/1 - 28°C.Place00infront ofthenumberto
make the kiln fire hotter. Place 90 in front to make it fire
cooler.
-
-
 Loading...