

Paradigm DEFIANCE V12, DEFIANCE V10, DEFIANCE V8, Defiance X12, Defiance X15 Owner's Manual
...Page 1

Owner’s Manual
SUBWOOFER
DEFIANCE V12
DEFIANCE V10
DEFIANCE V8
SW112
SW110
SW108
Page 2

Hereby, SVI Holdings (US) Inc.’s declares that
this Defiance Suwoofer is in compliance with the
essential requirements and other relevant provisions
of the following EU Compliance Directive Information.
• Conforms to European Union Low Voltage Directive
2014/35/EU;
• European Union EMC Directive 2014/30/EU;
• Defiance V10/V12 ONLY: European Union Radio
Equipment Directive (RED) 2014/53/EU.
• European Union Eco-Design Directive 2009/125/EC;
• European Union WEEE Directive 2012/19/EU;
• European Union Restriction of Hazardous Sub
-
stances Recast (RoHS2) Directive 2011/65/EU;
• European Union Registration, Evaluation, Autho
rization and Restriction of Chemicals (REACH)
Directive 2006/121/EC;
• You may obtain a free copy of the Declaration of
Conformity by contacting your dealer, distributor,
or SVI Holdings (US) Inc.’s worldwide headquarters. Contact information can be found here:
www.paradigm.com.
EU COMPLIANCE INFORMATION
1. Read these instructions.
2. Keep these instructions.
3. Heed all warnings.
4. Follow all instructions.
5. Do not use this apparatus near water.
6. Clean only with dry cloth.
7. Do not block any ventilation openings. Install in
accordance with the manufacturer’s instructions.
8. Do not install near any heat sources such
as radiators, heat registers, stoves, or other
apparatus (including amplifiers) that produce heat.
9. Do not defeat the safety purpose of the
polarized or grounding-type plug. A polarized
plug has two blades with one wider than the
other. A grounding type plug has two blades
and a third grounding prong. The wide blade or
the third prong are provided for your safety. If
the provided plug does not fit into your outlet,
consult an electrician for replacement of the
obsolete outlet.
10. Protect the power cord from being walked on
or pinched, particularly at plugs, convenience
receptacles, and the point where they exit from
the apparatus.
11. Only use attachments/accessories specified by
the manufacturer.
12. Use only with the cart, stand, tripod,
bracket, or table specified by the
manufacturer, or sold with the
apparatus. When a cart is used,
use caution when moving the cart/apparatus
combination to avoid injury from tip-over.
13. Unplug this apparatus during lightning storms or
when unused for long periods of time.
14. Refer all servicing to qualified service personnel.
Servicing is required when the apparatus has
been damaged in any way, such as power
supply cord or plug is damaged, liquid has been
spilled or objects have fallen into the apparatus,
the apparatus has been exposed to rain or
moisture, does not operate normally, or has
been dropped.
15. To reduce the risk of fire or electric shock, do
not expose this apparatus to rain or moisture.
The apparatus shall not be exposed to dripping
or splashing and that objects filled with liquids,
such as vases, shall not be placed on apparatus.
16. Where the mains plug or an appliance coupler
is used as the disconnect device, the disconnect
device shall remain readily operable.
17. Do not overload wall outlets or extension cords
beyond their rated capacity as this can cause
electric shock or fire.
18. No naked flame sources, such as lighted
candles, should be placed on the apparatus.
19. Maintain a minimum of 20-30cm distance
around the apparatus for sufficient ventilation.
20. The ventilation should not be impeded by
covering the ventilation openings with items,
such as newspapers, tablecloths, curtains, etc.
21. Apparatus may be used in tropical climates.
IMPORTANT SAFETY INSTRUCTIONS
Page 3

In accordance with the European Union
WEEE (Waste Electrical and Electronic
Equipment) directive effective August
13, 2005, we would like to notify you
that this product may contain regulated
materials which upon disposal, according to the
WEEE directive, require special reuse and recycling
processing. For this reason Paradigm Electronics
Inc. has arranged with our distributors in European
Union member nations to collect and recycle this
product at no cost to you.
To find your local distributor contact the dealer from
whom you purchased this product, email support@
paradigm.com or visit the distributor locator at
www.paradigm.com.
Please note, only this product itself falls under the
WEEE directive. When disposing of packaging and
other related shipping materials we encourage you
to recycle these items through the normal channels.
Contains FCC ID: QOQBGM113 and
IC: 5123A-BGM113
Frequency Range: 2402.0-2480.0 MHz
Maximum Transmit Power: 2.5 dBm
This device complies with part 15 of the FCC Rules.
Operation is subject to the following two conditions:
(1) This device may not cause harmful interference,
and (2) this device must accept any interference
received, including interference that may cause
undesired operation.
Per FCC regulation 47 CFR 15.21: Changes or
modifications not expressly approved by the party
responsible for compliance could void the user’s
authority to operate the equipment.
NOTE: This equipment has been tested and found
to comply with the limits for a Class B digital device,
pursuant to part 15 of the FCC Rules. These limits are
designed to provide reasonable protection against
harmful interference in a residential installation. This
equipment generates uses and can radiate radio
frequency energy and, if not installed and used in
accordance with the instructions, may cause harmful
interference to radio communications. However,
there is no guarantee that interference will not occur
in a particular installation. If this equipment does
cause harmful interference to radio or television
reception, which can be determined by turning the
equipment off and on, the user is encouraged to try
to correct the interference by one or more of the
following measures:
– Reorient or relocate the receiving antenna.
– Increase the separation between the equipment
and receiver.
– Connect the equipment into an outlet on a
circuit different from that to which the receiver
is connected.
– Consult the dealer or an experienced radio/TV
technician for help.
This device complies with Industry Canada licenceexempt RSS standard(s). Operation is subject to the
following two conditions:
(1) this device may not cause interference, and
(2) this device must accept any interference, including
interference that may cause undesired operation
of the device.
Any changes or modifications not expressly
approved by the party responsible for compliance
could void the user’s authority to operate the
equipment.
Radiation Exposure Statement:
This equipment complies with IC radiation exposure
limits set forth for an uncontrolled environment. End
users must follow the specific operating instructions
for satisfying RF exposure compliance. To maintain
with IC RF exposure compliance requirements
please follow operation instruction as documented
in this manual.
INDUSTRY CANADA (IC) COMPLIANCE NOTICE
Page 4
PARADIGM ELECTRONICS RESERVES THE RIGHT TO CHANGE SPECIFICATIONS AND/OR FEATURES
WITHOUT NOTICE AS DESIGN IMPROVEMENTS ARE INCORPORATED.
PARADIGM, ANTHEM, and ARC are registered trademarks of Paradigm Electronics Inc. Defiance Subwoofer
is a trademark of Paradigm Electronics Inc. Copyright © Paradigm Electronics Inc. All rights reserved.
040418
Thank you!
Thank you for choosing a Paradigm® Defiance Subwoofer. You are
about to hear the difference that Paradigm subwoofers make in your
home theater system! They are the product of countless hours of
comprehensive research and development and will reward you with
truly exceptional sound for many years.
To ensure proper installation, please read this manual and follow all
instructions. If you have further questions contact your Authorized Paradigm
Dealer or visit the Q&A page on our website at www.paradigm.com.
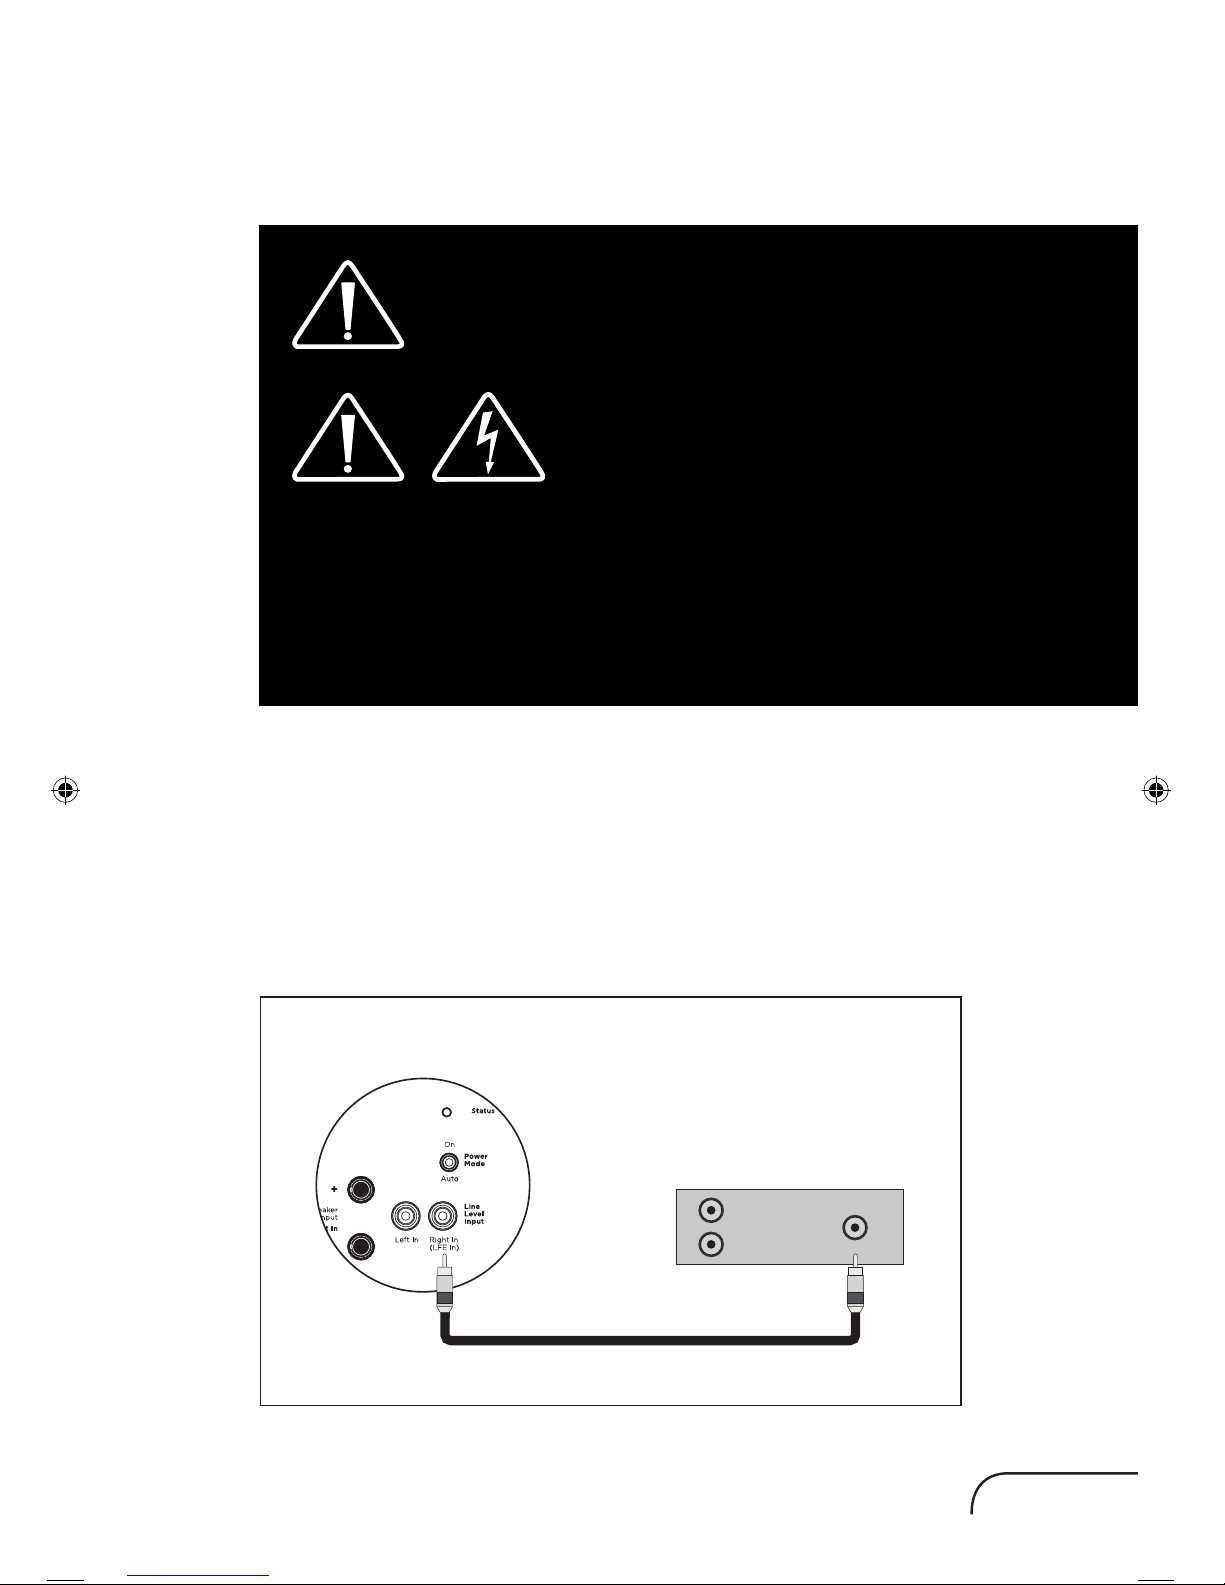
The exclamation point within an equilateral
triangle is intended to alert the user to
the presence of important operating and
maintenance (servicing) instructions in the
literature accompanying the appliance.
The lightning bolt flash with arrowhead symbol,
within an equilateral triangle, is intended to
alert the user to the presence of uninsulated
“dangerous voltage” within the product’s
enclosure that may be of sufficient magnitude
to constitute a risk of electric shock.
WARNING! Do not use your subwoofer outside
of the country of original sale — voltage
requirements vary by country. Improper voltage
can cause damage that will be potentially
expensive to repair. The subwoofer is shipped to
Paradigm authorized distributors with the correct
power supply for use in the country of intended
sale. A list of authorized distributors can be
accessed at www.paradigm.com or by emailing
support@paradigm.com.
Page 5

paradigm.com
2
Safety Warnings and Quick Installation ...................................... 3
Your New Subwoofer .................................................................... 6
Subwoofer Placement ................................................................... 7
The Advantages of Using Two Subwoofers ................................ 8
Connecting Your Subwoofer ...................................................... 10
Wired Connection ....................................................................... 10
Line Level Inputs (Left/Right) ....................................................... 11
Speaker Level Inputs (Left/Right) ................................................. 12
Connecting The Defiance WT Wireless Transmitter
(Sold Separately): Defiance V10/V12 ONLY .................................. 14
‘Pairing’ The Defiance WT Wireless System (Sold Separately):
Defiance V10/V12 ONLY .............................................................. 16
Wireless Operation ...................................................................... 16
Transmitter Operation .................................................................. 16
Controls & Connections: Defiance V10/V12 .............................. 18
Controls & Connections: Defiance V8 ........................................ 21
Fine Tuning: Defiance V10/V12 ................................................... 24
Fine Tuning: Defiance V8 ............................................................ 24
Setting Subwoofer Controls ....................................................... 25
(Crossover Set By Preamp/Receiver)
Setting Subwoofer Controls (Local Crossover Method) .............. 26
ARC
®
(Anthem Room Correction) (Sold Separately):
Defiance V10/V12 ONLY .............................................................. 27
Limited Warranty ......................................................................... 29
TABLE OF CONTENTS
Page 6
3
SAFETY WARNINGS AND
QUICK INSTALLATION
• Hazardous voltages exist inside—do not
remove cover.
• Refer servicing to a qualified technician.
• To prevent fire or shock hazard, do not expose
this module to moisture.
• Turn amplifier off and unplug subwoofer should
any abnormal conditions occur.
• The power cord should not be installed,
removed, or left detached from the speaker
while the other end is connected to an AC
power source.
• The main power switch near the AC inlet shall
remain readily operable.
• Use only with a grounded electrical outlet.
• No candles or other sources of open flame
should be placed on the speaker.
• No liquids either in glasses or vases should be
placed on speaker.
• Speaker should not be exposed to dripping or
splashing liquids.
• The terminals marked with the lightning bolt
symbol should be connected by an instructed
person or by way of ready made terminals.
• The power cord should remain readily operable
should any abnormal conditions occur.
Page 7

paradigm.com
4
We know you are eager to hear your new Paradigm subwoofer, so this
section is provided to allow fast and easy set up. Once you have your
subwoofer operational, please take the time to read, in depth, the rest
of the information in the enclosed manual. It will give you perspective on
how to attain the greatest possible performance from this most exacting
woofer system.
If you should experience any difficulties in the setup or operation of your
Paradigm subwoofer, please refer to the Room Acoustics, Placement
or Operation sections of the enclosed owner’s manual. Should you
encounter a persistent problem that cannot be resolved, please
contact your authorized Paradigm dealer. They will provide you with the
appropriate technical analysis to alleviate the situation.
Unpacking
Remove your new subwoofer from its packaging. Please retain the
original packaging materials for future use — replacement packaging
may be expensive.
Placement
You may choose to begin by placing the subwoofer in a corner near the
front of the room. If placed in a corner, align the subwoofer diagonally
so both woofers are equidistant from the adjacent wall. Before deciding
on a permanent corner placement, experiment with other positions.
Locations away from corners often prove more effective in providing
ideal low-frequency performance and blend with the main speakers.
Please see the Placement section for details.
Signal Connection
Use the best cables you can. High quality cables, available from your
specialty dealer, are recommended and will give you superior performance.
Attach your Preamp/Receiver outputs to the signal input connectors
located on the subwoofer’s rear panel. Please see the Controls and
Connections section for details. If you plan to connect your subwoofer
using Speaker Level (high level) inputs, refer to the Speaker Level Inputs
section for details.
Power Connection (AC) (see warning)
Make sure the level knob is set at 0. Plug the subwoofer into a wall outlet.
Review the AC Power Connection section of this manual for details.
Page 8

5
Setting the Controls (Using LFE Input): Defiance V10 and V12
• Setting Control: Set the switch to ‘Local’.
• Power Mode: Set the switch to ‘Auto’.
• Level: Set at twelve o’clock (straight up).
• Use your receiver’s bass management system to adjust subwoofer
integration.
Setting the Controls (Using LFE Input): Defiance V8
• Power Mode: Set the switch to ‘auto’.
• Level: Set at twelve o’clock (straight up).
• Use the Low Pass Filter and set to Bypass.
Setting the Controls (Using Left/Right Inputs): Defiance V10 and V12
• Setting Control: Set the switch to ‘App’.
• Power Mode: Set the switch to ‘Auto’.
• Download the Paradigm Sub Control app (from Google Play or the
Apple App Store).
• Using the app, adjust the following settings:
– Volume (level): Set at -14dB or twelve o’clock (straight up).
– Phase: Start with 0°.
– Low Pass Filter: Set lower than the low-end frequency response
of your main speakers. If you are uncertain of your main speaker
low-frequency response, start with 80Hz.
Setting the Controls (Using Left/Right Inputs): Defiance V8
• Power Mode: Set the switch to ‘auto’.
• Level: Set at twelve o’clock (straight up).
• Use the Low Pass Filter and set to 80Hz.
SAFETY WARNINGS AND
INSTALLATION IN BRIEF
(cont’d)
Page 9

paradigm.com
6
Break In
Although Paradigm® Defiance subwoofers sound great “out of the
carton,” they will sound even better once they are “broken in.” Allow
them to play for several hours before you begin any critical listening.
NOTE: If your subwoofer has been transported or stored in the cold, let
it warm to room temperature before use.
Cleaning
Paradigm Defiance Subwoofers have a durable premium finish. To
clean, use a damp soft cloth. Do not use a strong or abrasive cleaner.
Avoid getting any part of the subwoofer system wet. Do not place wet
objects (drinking glasses, potted plants, etc.) on top of the subwoofer—
if allowed to soak in, even a small amount of water may permanently
damage the subwoofer enclosure.
Power Requirements
The ‘Watts’ (W) rating indicated on the rear panel is the maximum AC power
your subwoofer will draw when producing its maximum power output.
However, the actual wattage draw will vary with the bass content of the
program material — more if there is a lot of deep bass, less when there is not
as much bass. Although generally not required for typical music and movie
program material, if the bass content of your program material is very loud
and more continuous in nature, we recommend connecting subwoofers
with higher wattage ratings (i.e. 1500 W) to dedicated AC circuits.
Room Acoustics
You are about to experience the astonishing bass performance of a stateof-the-art Paradigm Defiance subwoofer. These subwoofers incorporate
highly advanced patented technology and set all new standards for deep
bass extension, ultra-low distortion and sound power output and provide
unprecedented bass articulation and slam. It is important to note that just
as the amount of soft furnishings has a decided impact on mid and high
frequencies, those below 150Hz are dramatically affected by the room itself
— its size, shape, as well as by physical boundaries throughout the room.
Experimenting with subwoofer placement and control adjustments is the
best way to achieve optimal bass performance in any room. Keep in mind
the following guideline when deciding on best subwoofer placement:
• Concrete floors and walls tend to aggravate low-frequency standing
wave problems and are less preferred.
• Rooms where height, width and length are similar should be
avoided as they can exhibit significant low-frequency standing wave
problems. This may result in reduced clarity. If no other room is
possible, experiment with subwoofer placement to minimize acoustic
problems.
YOUR NEW SUBWOOFER
Page 10
7
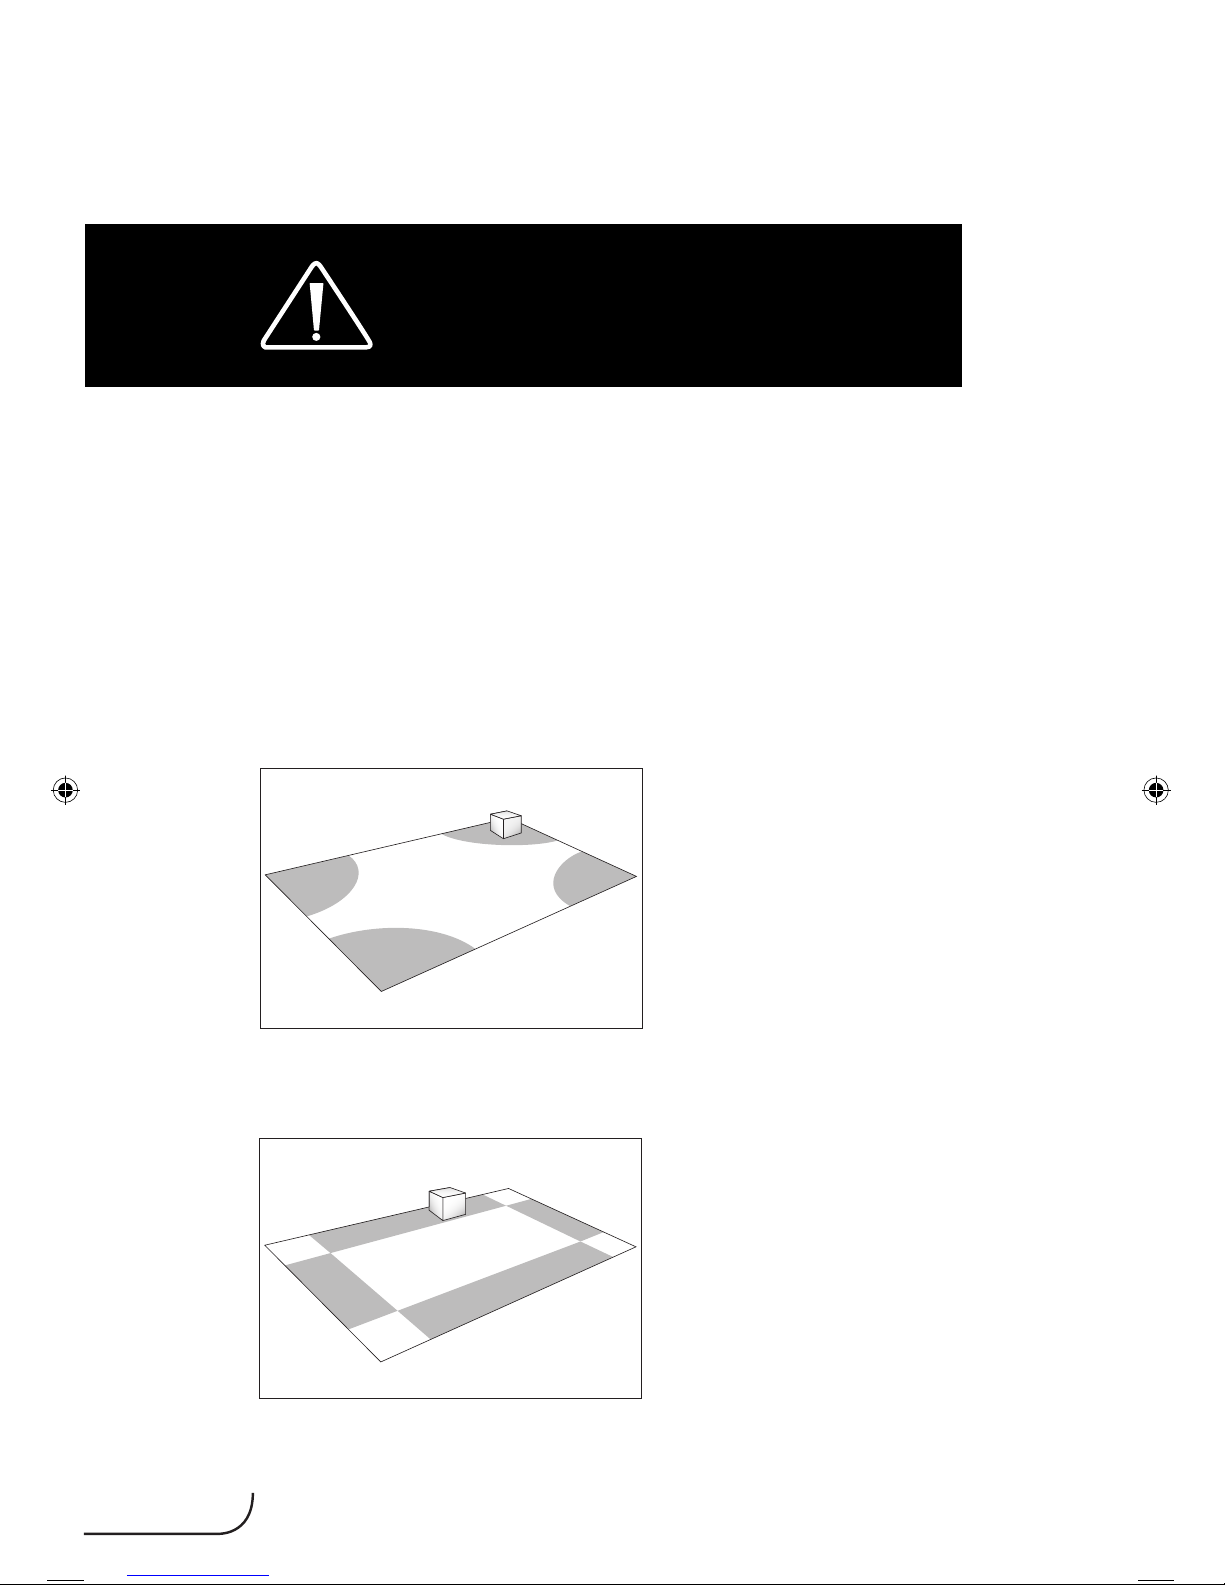
SUBWOOFER PLACEMENT
Bass is less and less directional as it goes down in frequency. For
best sonic integration, locating your subwoofer between your front
speakers or beside one of them and close to the back wall will usually
provide the best bass performance. If this location is not possible your
subwoofer may be placed anywhere in the room without affecting
the stereo image of your front speakers or the soundstage of your
multichannel speaker system.
Fig. 1a and Fig. 1b highlight how bass output is generally affected by
room placement. When seated in a typical listening area of your room,
placing the subwoofer inside the “shaded” areas will typically result in
bass performance as follows:
Fig. 1a: Corner placement provides the most bass, but sometimes at the
expense of accuracy.
Fig. 1b: A subwoofer placed near a wall usually provides a good balance
of quantity and accuracy.
SAFETY PRECAUTION: Before proceeding with
this section, be sure to read and follow all safety
precaution notices at the beginning of this manual.
Page 11
paradigm.com
8
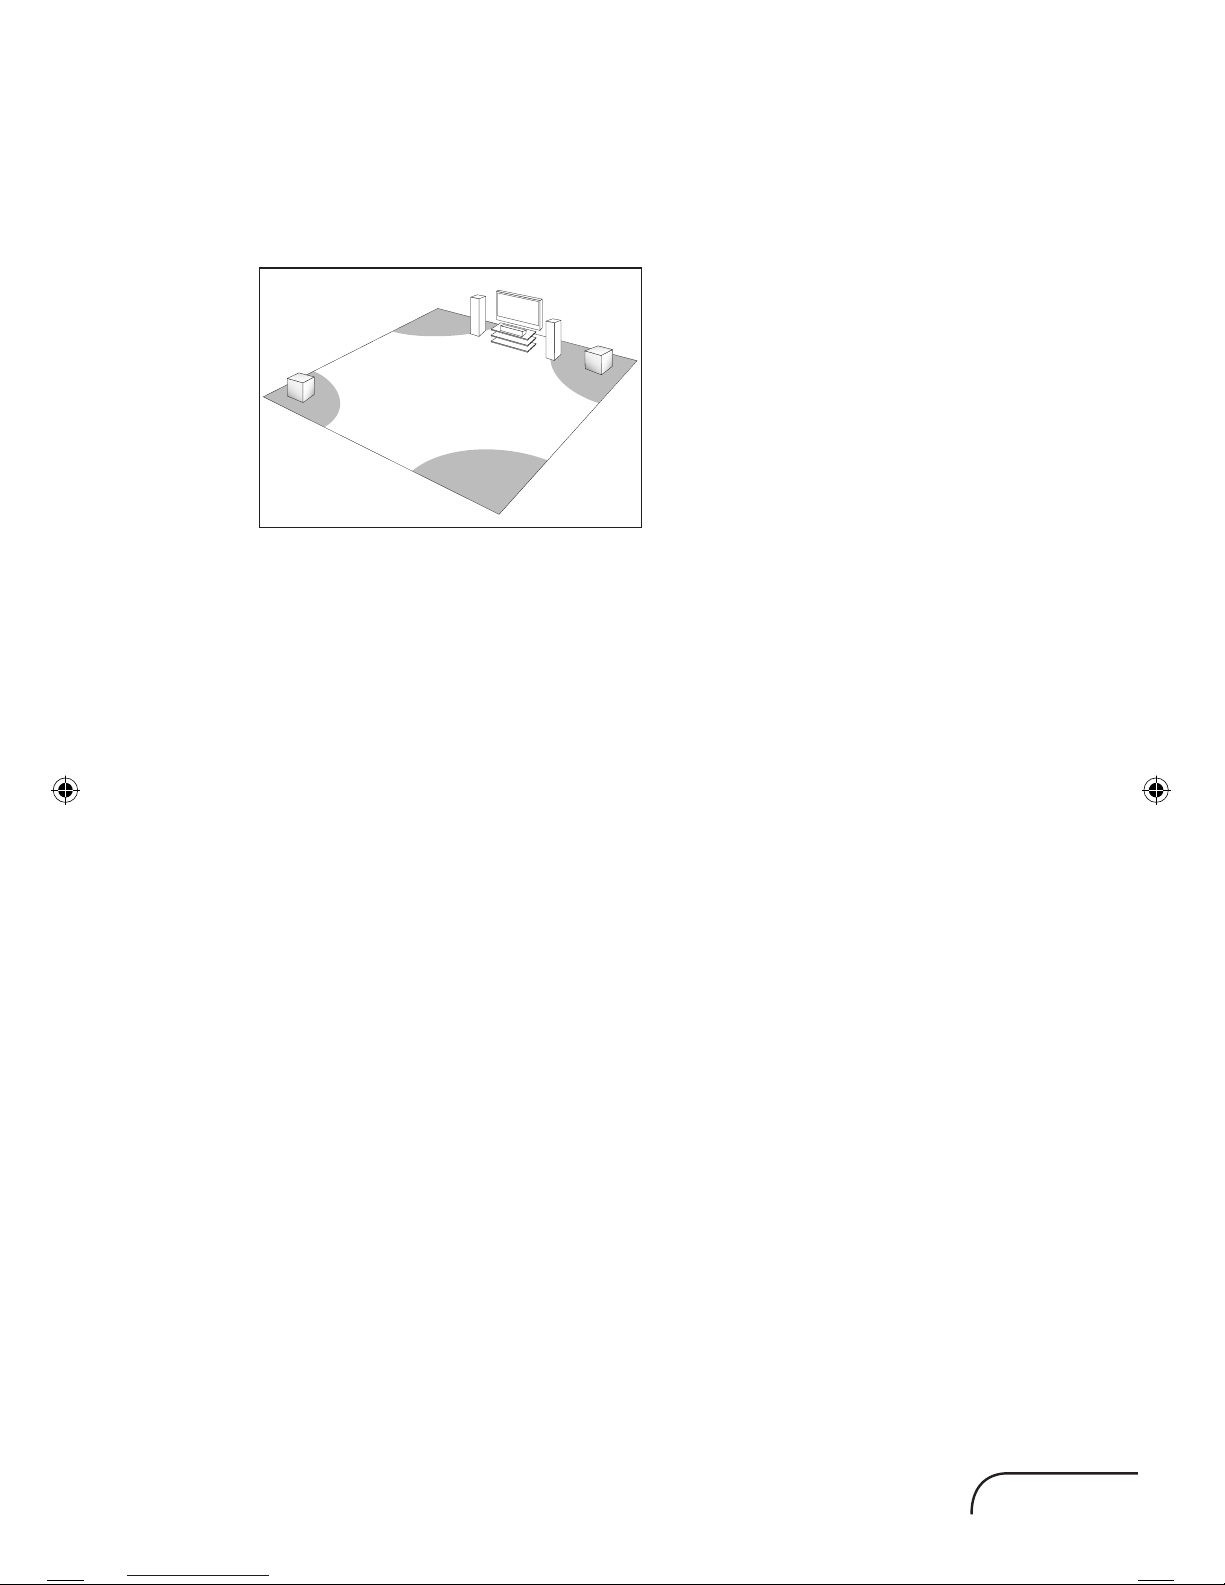
THE ADVANTAGE OF USING
TWO SUBWOOFERS
Fig. 2: When using two subwoofers, placing one in the front of the room
and the other in the rear of the room usually provides the best bass
performance and sonic integration. Consult the “Fine Tuning” section of
this Owners Manual for more information on adjusting phase settings.
If those locations are not possible, or if you want to experiment with
placement options using two subwoofers, the following procedure
will be a helpful guide to achieving better bass performance. Refer to
“Subwoofer Connection” (below) then proceed as follows:
1. Temporarily turn all speakers off (either by turning your amplifier off or
disconnecting them).
2. Connect and place one subwoofer in the central area of your listening
room. Follow directions for connection, as outlined in the following
section.
3. At a moderately loud level, play music or a video soundtrack with
extended bass that is repetitive or continuous.
4. Walk around your room and note where the bass sounds louder and
where it sounds quieter.
5. Place the first subwoofer within a louder bass area of your room; then
place the second subwoofer within a quieter bass area of your room.
6. Connect both subwoofers and switch all speakers back on; and
switch the amplifier on, or reconnect it.
7. Follow the “Fine Tuning” instructions to optimize your system’s
overall bass performance.
See your Dealer for connection instructions using two subwoofers.
Page 12

9
THE ADVANTAGES OF USING TWO
SUBWOOFERS IN YOUR LISTENING ROOM
(cont’d)
NOTE: The preceding is only a guideline. You may want to use a
bass test disc and SPL meter to more accurately determine the
bass characteristics of your listening room (see your Dealer for more
information).
Remember that room acoustics vary, which means that it may take
some experimenting with subwoofer placement to achieve the best
subwoofer performance.
Page 13
paradigm.com
10
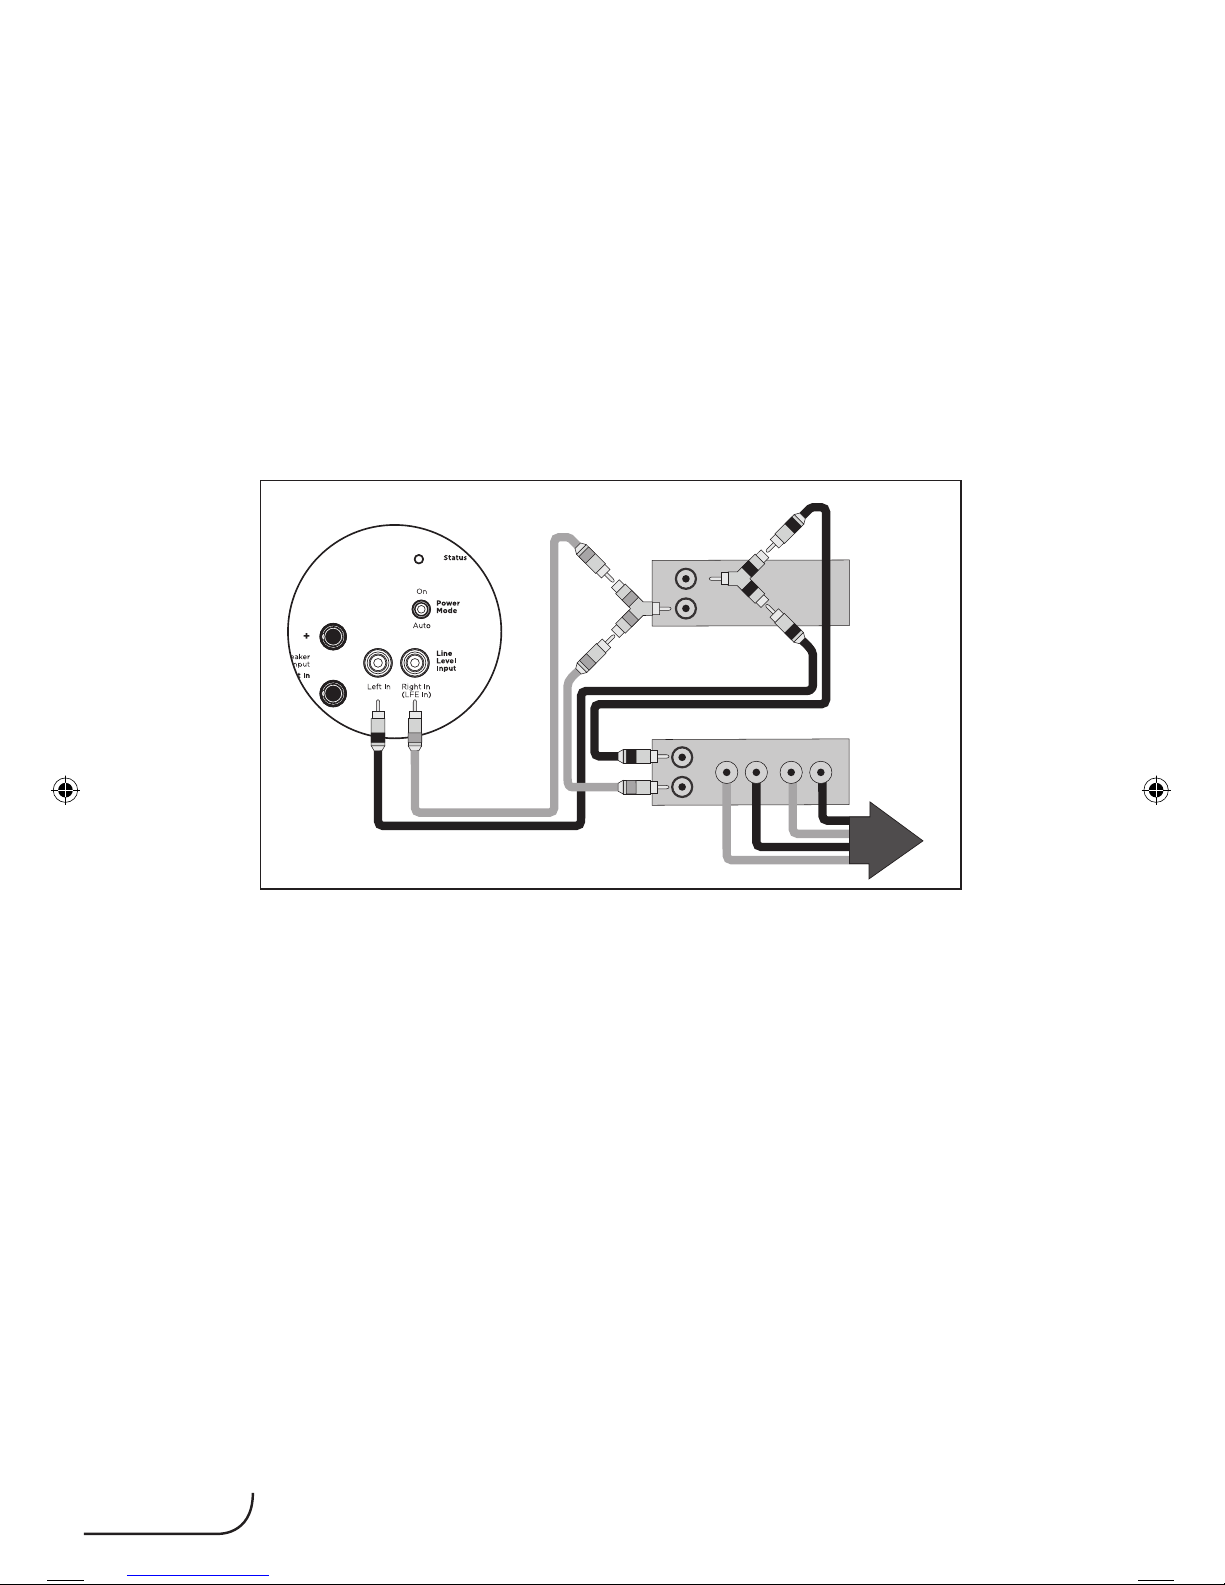
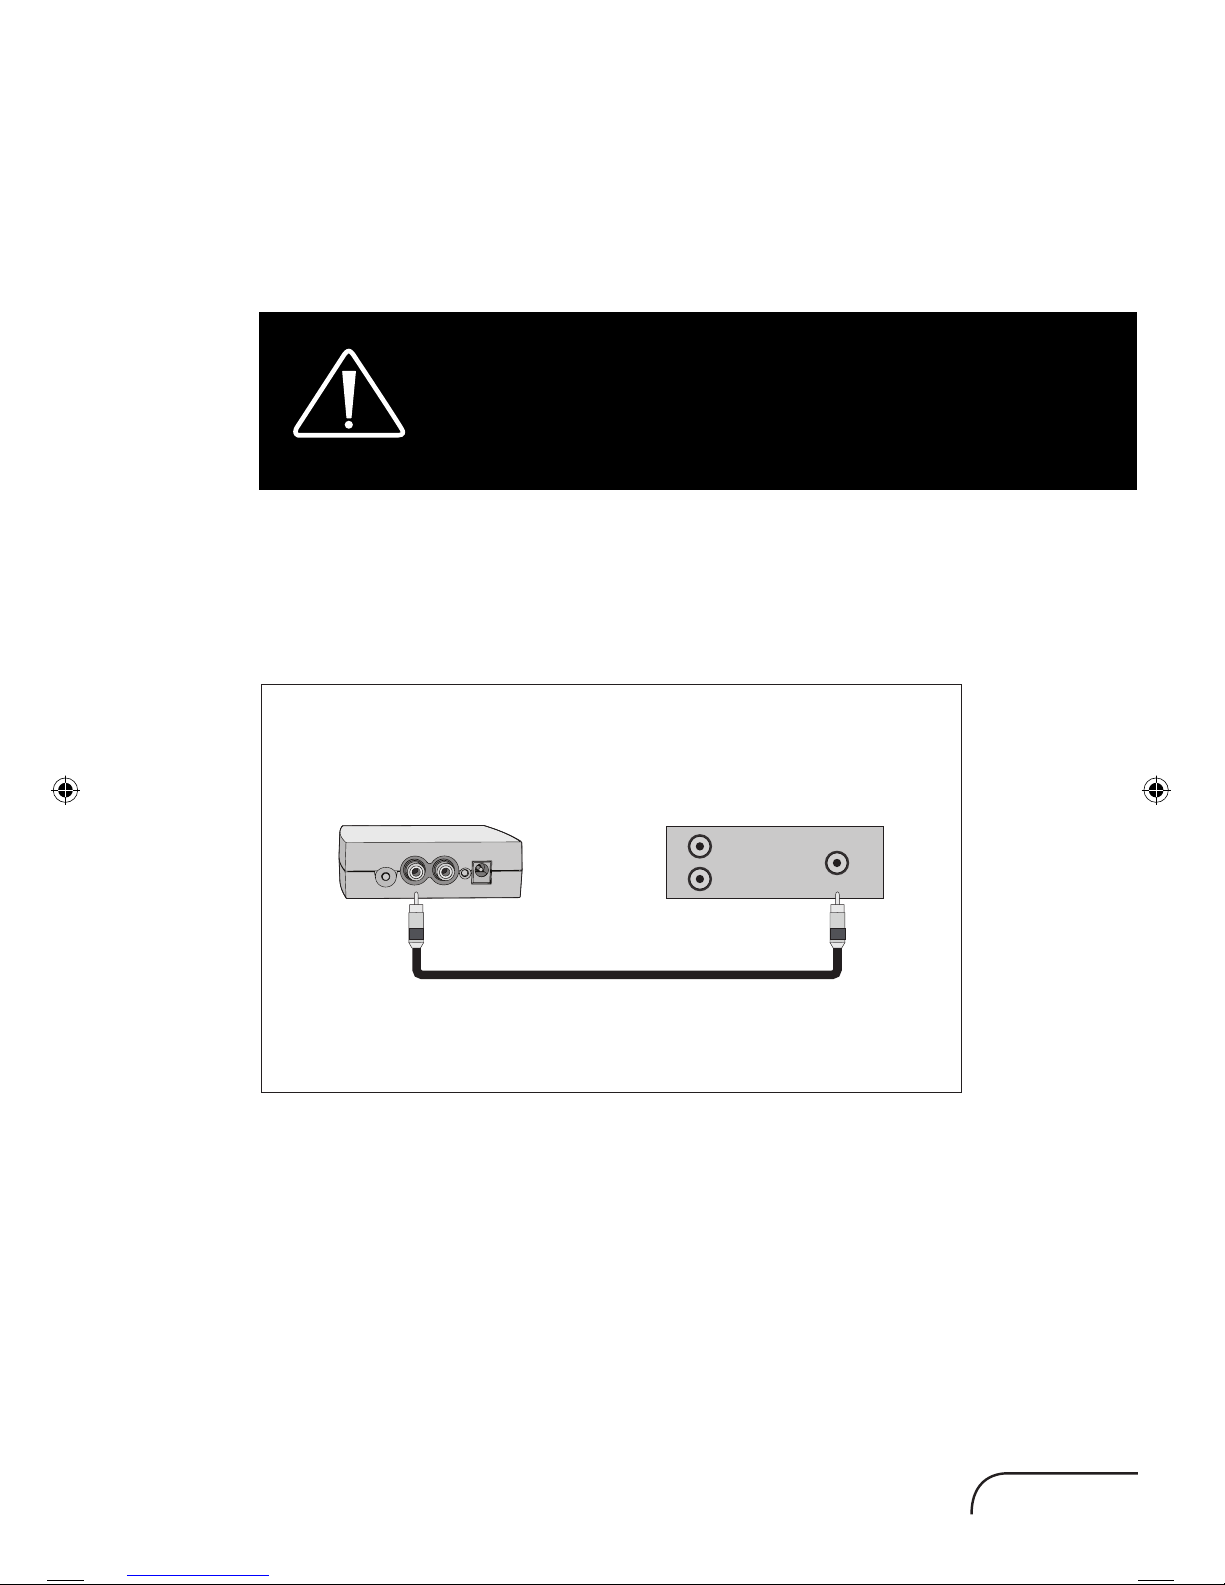
WIRED CONNECTION
Line Level Input (LFE) — Recommended
Line-Level Input From Sub/LFE Output — for use with a Preamp/
Receiver that has a Sub-Out/ LFE-Out jack.
Using a RCA to RCA interconnect cable (not included) connect the
subwoofer as shown.
CONNECTING YOUR SUBWOOFER
SAFETY PRECAUTION: Before proceeding
with this section, be sure to read and follow
all safety precaution notices and warnings at
the beginning of this manual.
Turn all components OFF before
connecting the subwoofer.
NOTE: Speakers set to “Large” with your Preamp/Receiver
will still be reproducing bass frequencies—be careful not to
overdrive them!
We recommend the use of high-quality cables and connectors.
(See your Dealer for more information).
Power Amplifier
Preamp /
Receiver
Subwoofer
Subwoofer
Preamp / Receiver
Sub Out
L
R
L
+– +
LR
–
L
R
L
L
R
Page 14
11
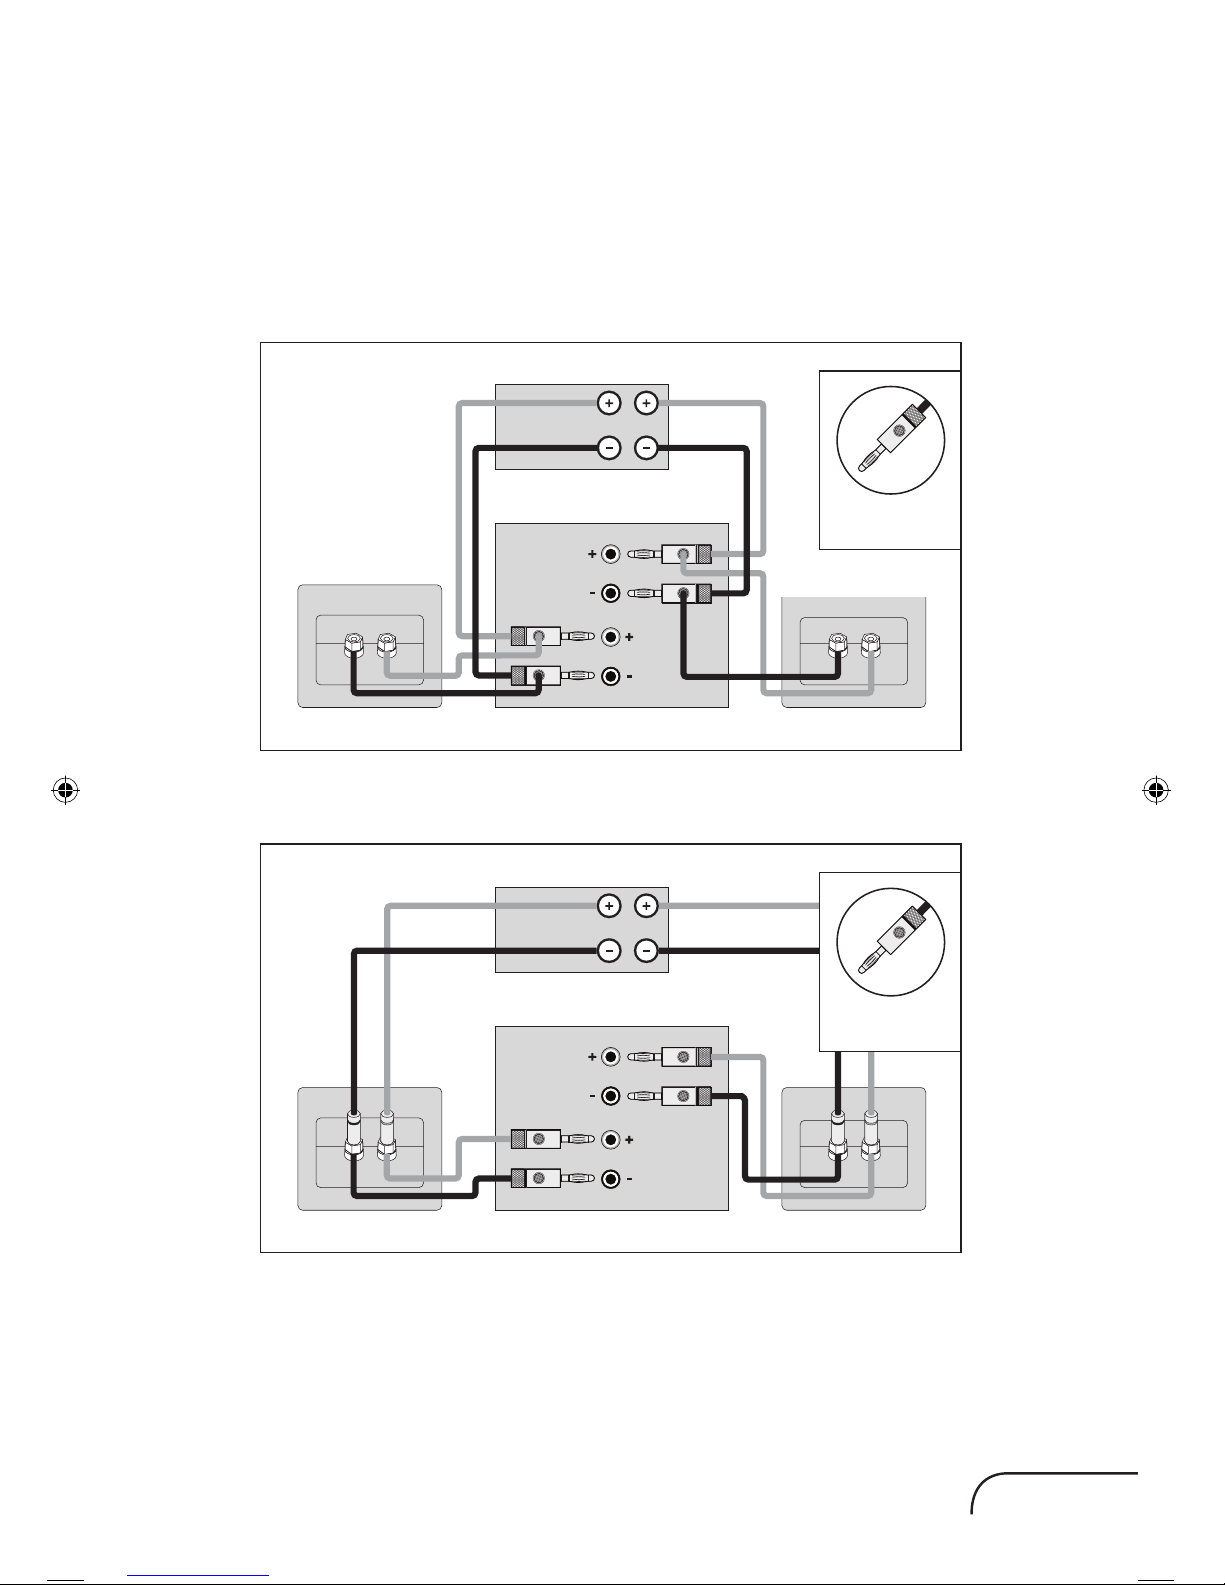
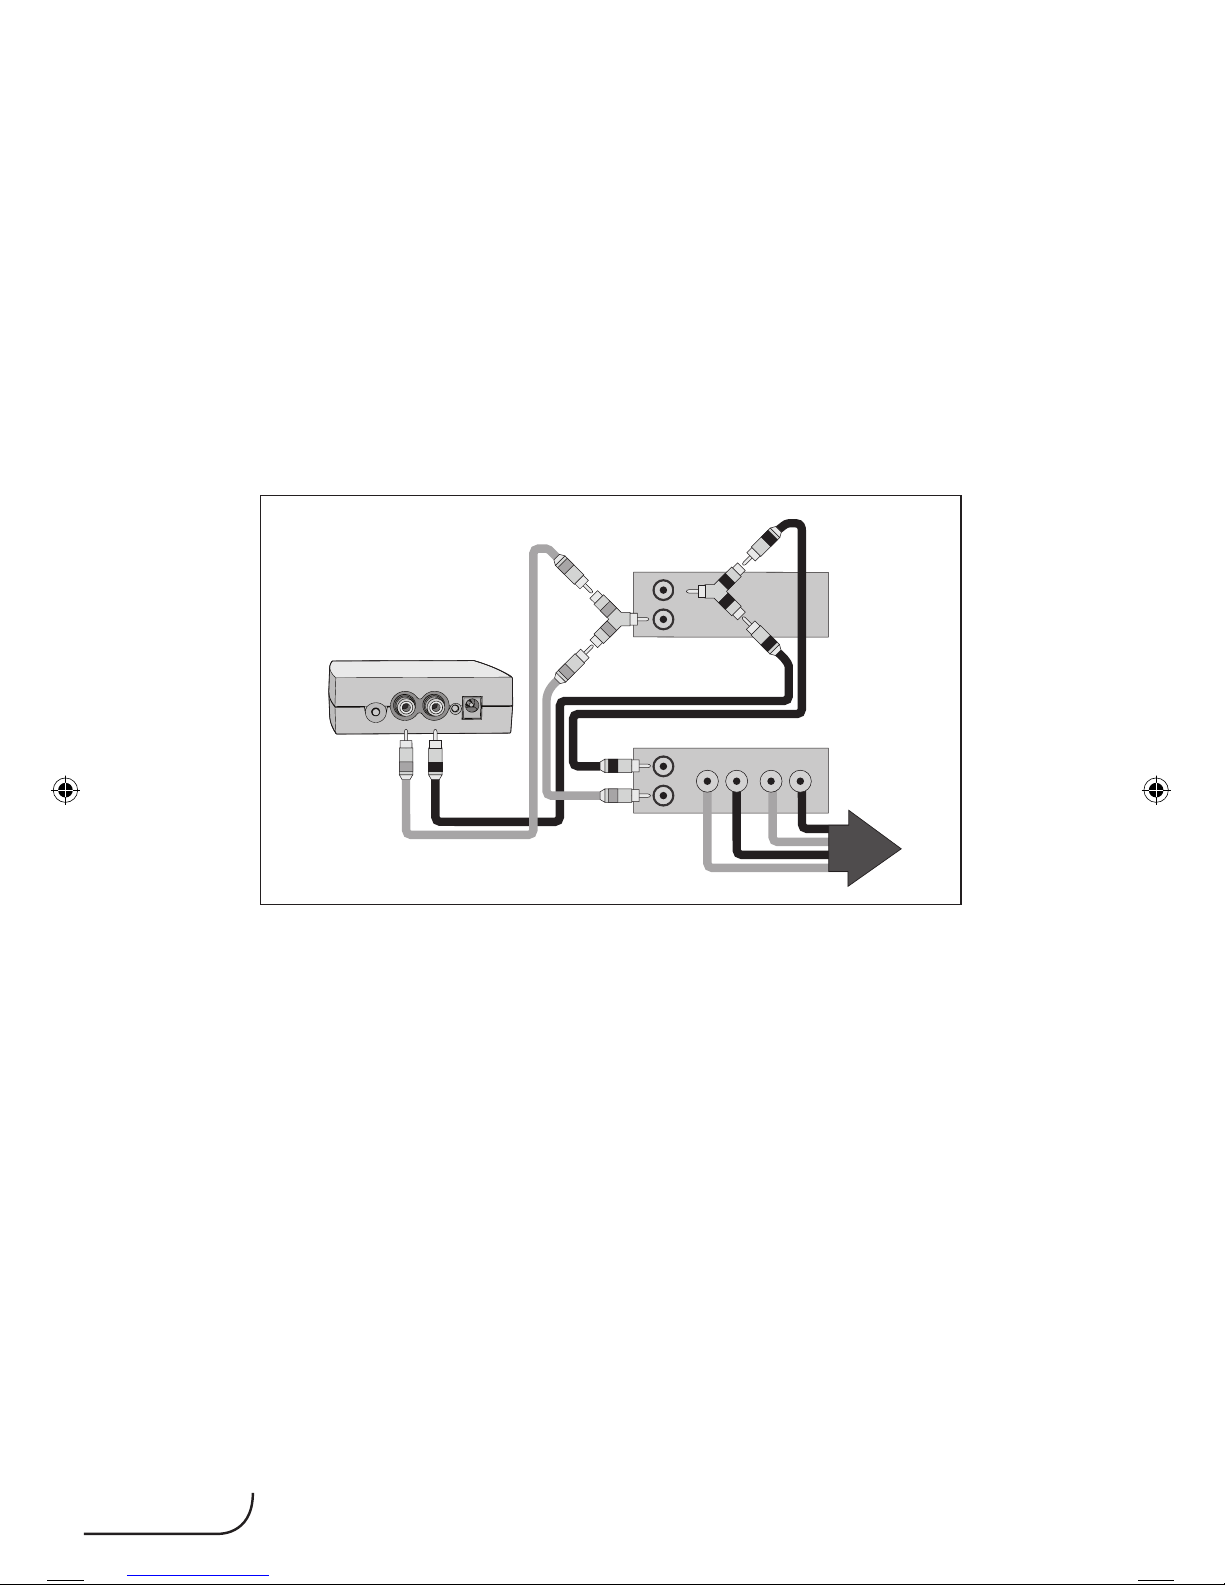
CONNECTING YOUR SUBWOOFER
(cont’d)
Line Level Inputs (Left/Right)
Line-Level Input From Pre-Out/Front-Out Without High-Pass Output
from Sub — for use with a Preamp/Receiver and Power Amplifier with
Pre-Out/Front-Out and Main-In jacks.
Using a RCA to RCA interconnect cables and ‘Y’ splitters (not included)
connect the subwoofer as shown.
Power Amplifier
Preamp /
Receiver
Subwoofer
L
+– +
LR
–
L
R
L
L
R
Speakers
Page 15
paradigm.com
12
Subwoofer
Speaker
Level
Input
Speaker
Teminals
Preamp / Receiver
Right
RL
Left
Left Speaker Right Speaker
Banana Plugs
are required for
Speaker Level Inputs
Subwoofer
Speaker
Level
Input
Speaker
Teminals
Preamp / Receiver
Right
RL
Left
Left Speaker Right Speaker
Subwoofer
Speaker
Level
Input
Speaker
Teminals
Preamp / Receiver
Right
RL
Left Speaker Right Speaker
Banana Plugs
are required for
Speaker Level Inputs
Speaker Level Inputs (Left/Right)
Speaker-Level Input — for use with a Preamp/Receiver that has no
Sub-Out/LFE-Out or Pre-Out/Front-Out facilities.
Using high-quality speaker cables, connect your subwoofer as shown in
either of the following connection options.
Option 1
Option 2
Banana Plugs
are required for
Speaker Level Inputs
Banana Plugs
are required for
Speaker Level Inputs
Page 16
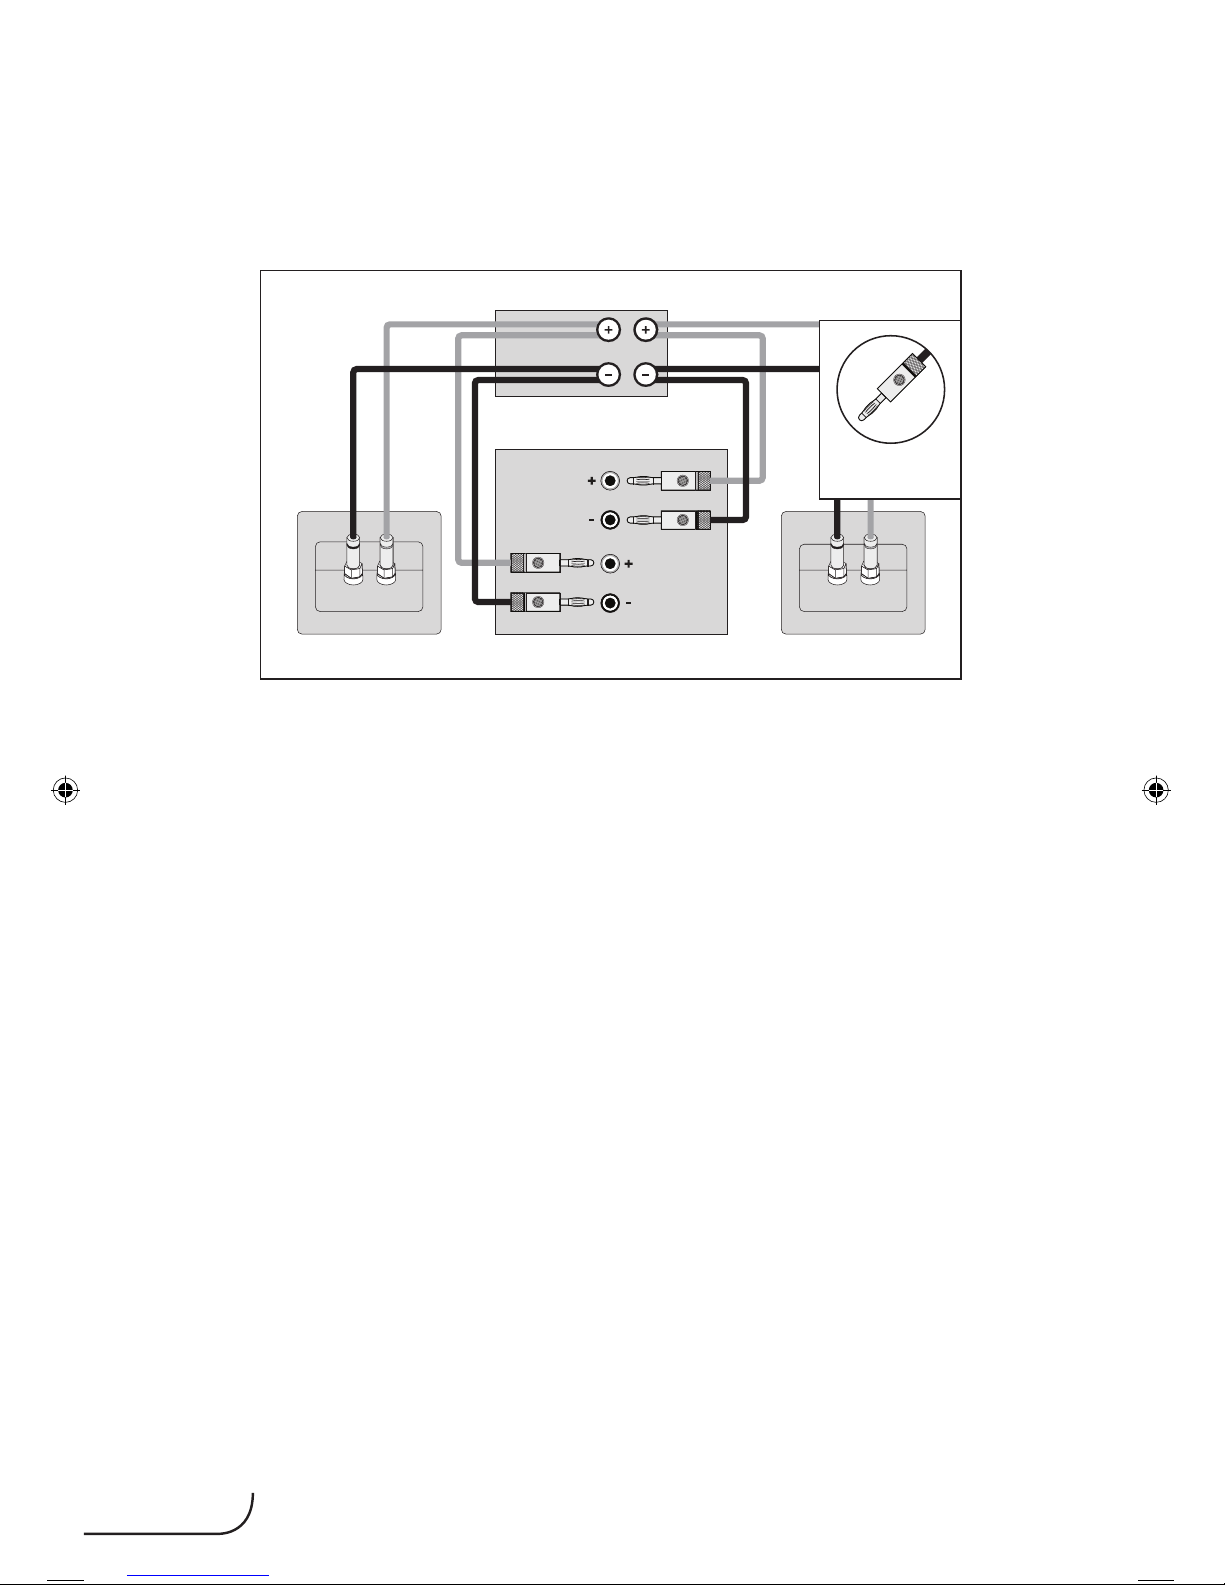
13
CONNECTING YOUR SUBWOOFER
(cont’d)
Subwoofer
Speaker
Level
Input
Speaker
Teminals
Preamp / Receiver
Right
L
Left
Left Speaker Right Speaker
R
Option 3
Banana Plugs
are required for
Speaker Level Inputs
Page 17
paradigm.com
14
Line-Level Input From Sub/LFE Output — for use with a Preamp/
Receiver that has a Sub-Out/LFE-Out jack.
Using a RCA to RCA interconnect cable (not included) connect the
Wireless Transmitter as shown.
Before connecting a Defiance WT wireless
transmitter to the Preamp/Receiver, ensure you
have “paired” the subwoofer and transmitter.
Preamp /
Receiver
Power Amplifier
Preamp / Receiver
Power Amplifier
Preamp /
Receiver
Subwoofer Subwoofer
Preamp / Receiver
Wireless Transmitter
Wireless Transmitter
Sub Out
L
R
L
+– +
LR
–
L
R
L
L
R
L
+– +
LR
–
L
R
L
L
R
Sub Out
L
L
R
CONNECTING THE DEFIANCE WT
WIRELESS TRANSMITTER (Sold
Separately): Defiance V10/V12 ONLY
Page 18
15
Line-Level Input From Pre-Out/Front-Out Without High-Pass
Output from Subwoofer — For use with a preamp/receiver and
power amplifier with Pre-Out/Front-Out and Main-In jacks.
Using RCA to RCA interconnect cables and ‘Y’ splitters (not included)
connect the wireless transmitter as shown.
Preamp /
Receiver
Power Amplifier
Power Amplifier
Preamp /
Receiver
Wireless Transmitter
L
+– +
LR
–
L
R
L
L
R
Speakers
L
+– +
LR
–
L
R
L
L
R
Speakers
CONNECTING THE DEFIANCE WT
WIRELESS TRANSMITTER (Sold Separately):
Defiance V10/V12 ONLY
(cont’d)
Page 19
paradigm.com
16
‘PAIRING’ THE DEFIANCE WT
WIRELESS SYSTEM
(Sold Separately):
Defiance V10/V12 ONLY
If you are not using a wireless option on your
subwoofer (Defiance V10 or V12 ONLY) skip this
section.
WIRELESS OPERATION
Subwoofer placement plays a major role in optimizing bass performance.
However, placement can impose the inconvenience, not to mention
the unsightliness, of running long lengths of cable through walls, along
baseboards and under floors and carpets. Going wireless means you
no longer have to worry about placement while cable clutter becomes a
thing of the past. Actual system setup time is often drastically reduced
with the wireless option.
TRANSMITTER OPERATION
In a typical listening room your new wireless transmitter has a maximum
range of 50’ (15 m). Obstructions such as walls, large pieces of
furniture, room dividers, etc., may reduce the wireless transmitter’s
range. Do not place the subwoofer and wireless transmitter farther
apart than the recommended range. We do not recommend installing
your wireless transmitter in another room. The wireless transmitter’s
compact dimensions allow it to fit neatly into a standard audio/video
rack. Your wireless transmitter features a 2.4 GHz uncompressed digital
self sensing design that will automatically adjust for the best wireless
connection while monitoring the integrity of the data stream.
An RCA audio cable is required (not included) to connect the wireless
transmitter to your Preamp/Receiver — see your dealer for cable
recommendations. One wireless transmitter is required for each wireless
subwoofer in operation.
Page 20
17
WARNING! To prevent signal dropouts or
interference, keep the Wireless Transmitter well out
of range of a microwave oven, mobile telephone or
Bluetooth device operating on the same frequency.
IMPORTANT! The Wireless Transmitter and
subwoofer must be no more than 50’ (15 m)
apart in the room.
The Defiance WT Wireless System is shipped already paired. To re-sync
the wireless system:
1. Verify the subwoofer is powered on and that the subwoofer’s status
light is red or white.
2. If the Wireless Transmitter’s power cord is plugged in, unplug it for
10 seconds.
3. Plug in the Wireless Transmitter’s power cord.
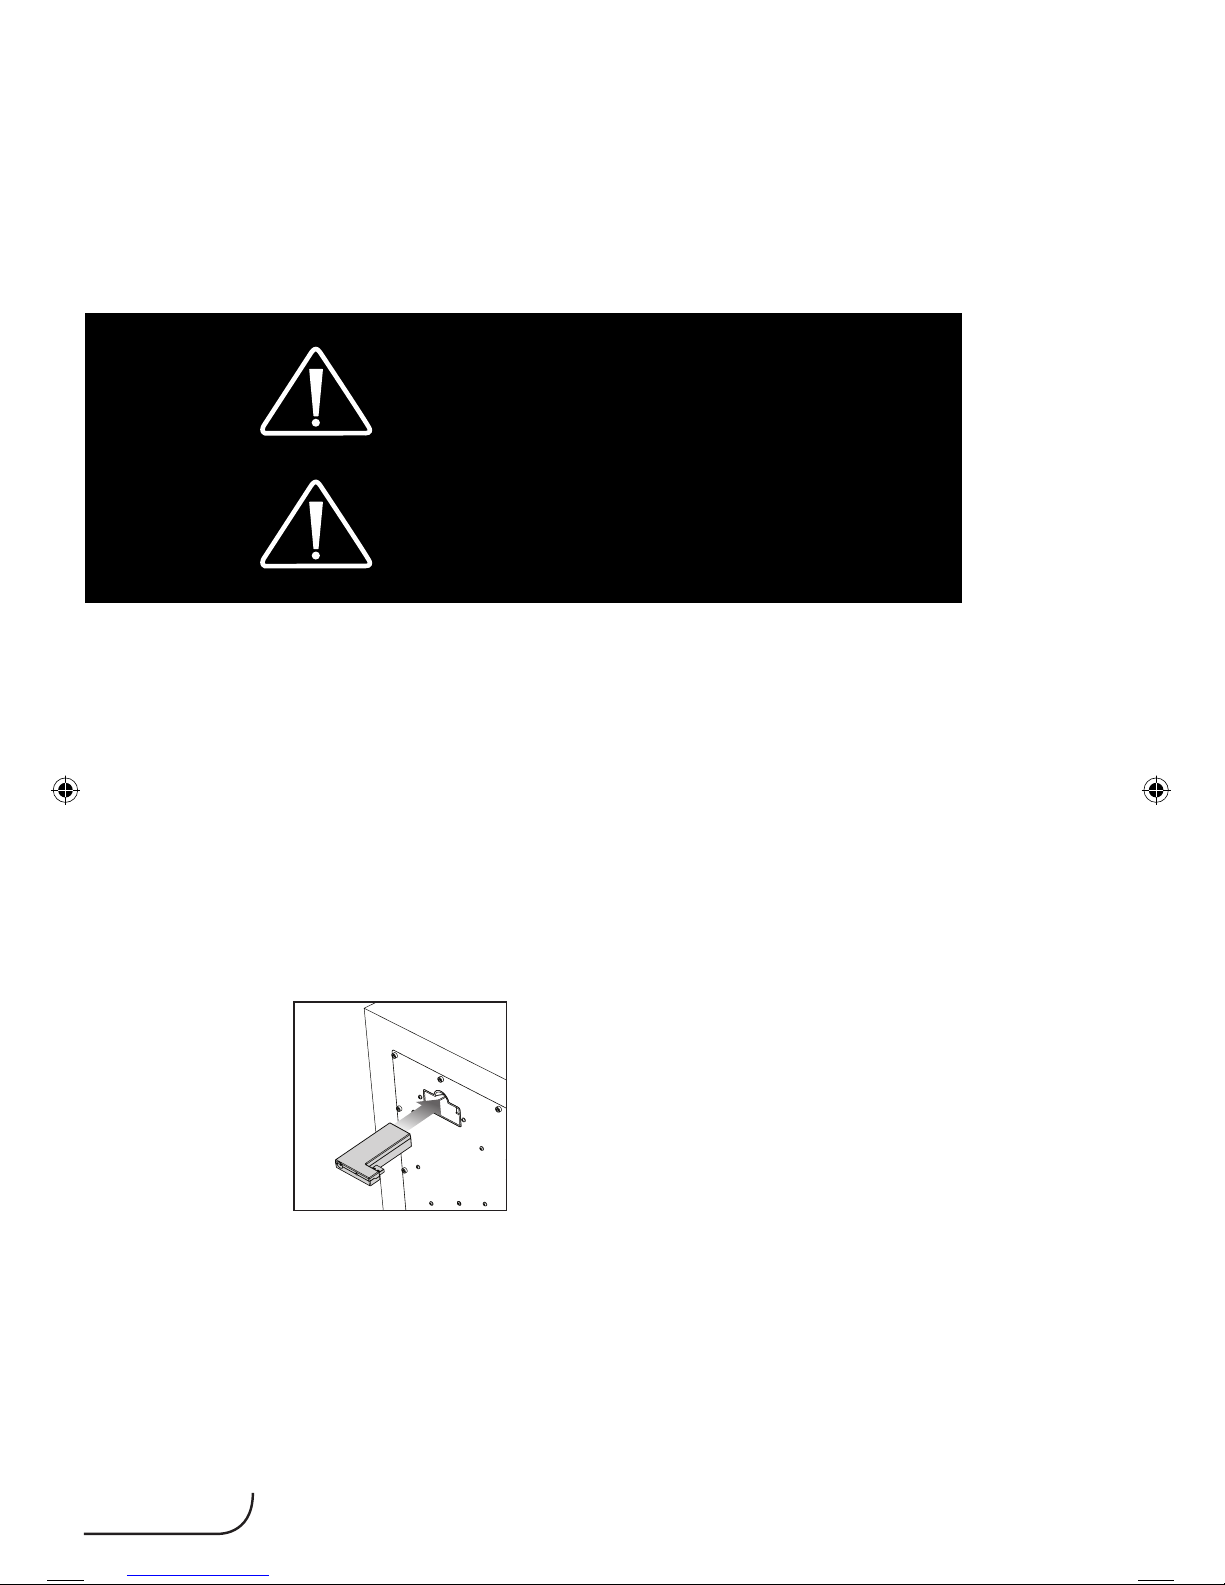
4. Plug the Wireless Receiver into the “Wireless Module Connection”
input on the back of the subwoofer (see diagram below).
5. Wait until the status lights begin flashing on both the Wireless
Receiver and Wireless Transmitter.
6. Push the Wireless Receiver’s sync button for 5 seconds.
7. Push and hold the Wireless Transmitter’s sync button until the
Wireless Receiver’s status light turns solid.
‘PAIRING’ THE DEFIANCE WT
WIRELESS SYSTEM
(Sold Separately):
Defiance V10/V12 ONLY
(cont’d)
Page 21
paradigm.com
18
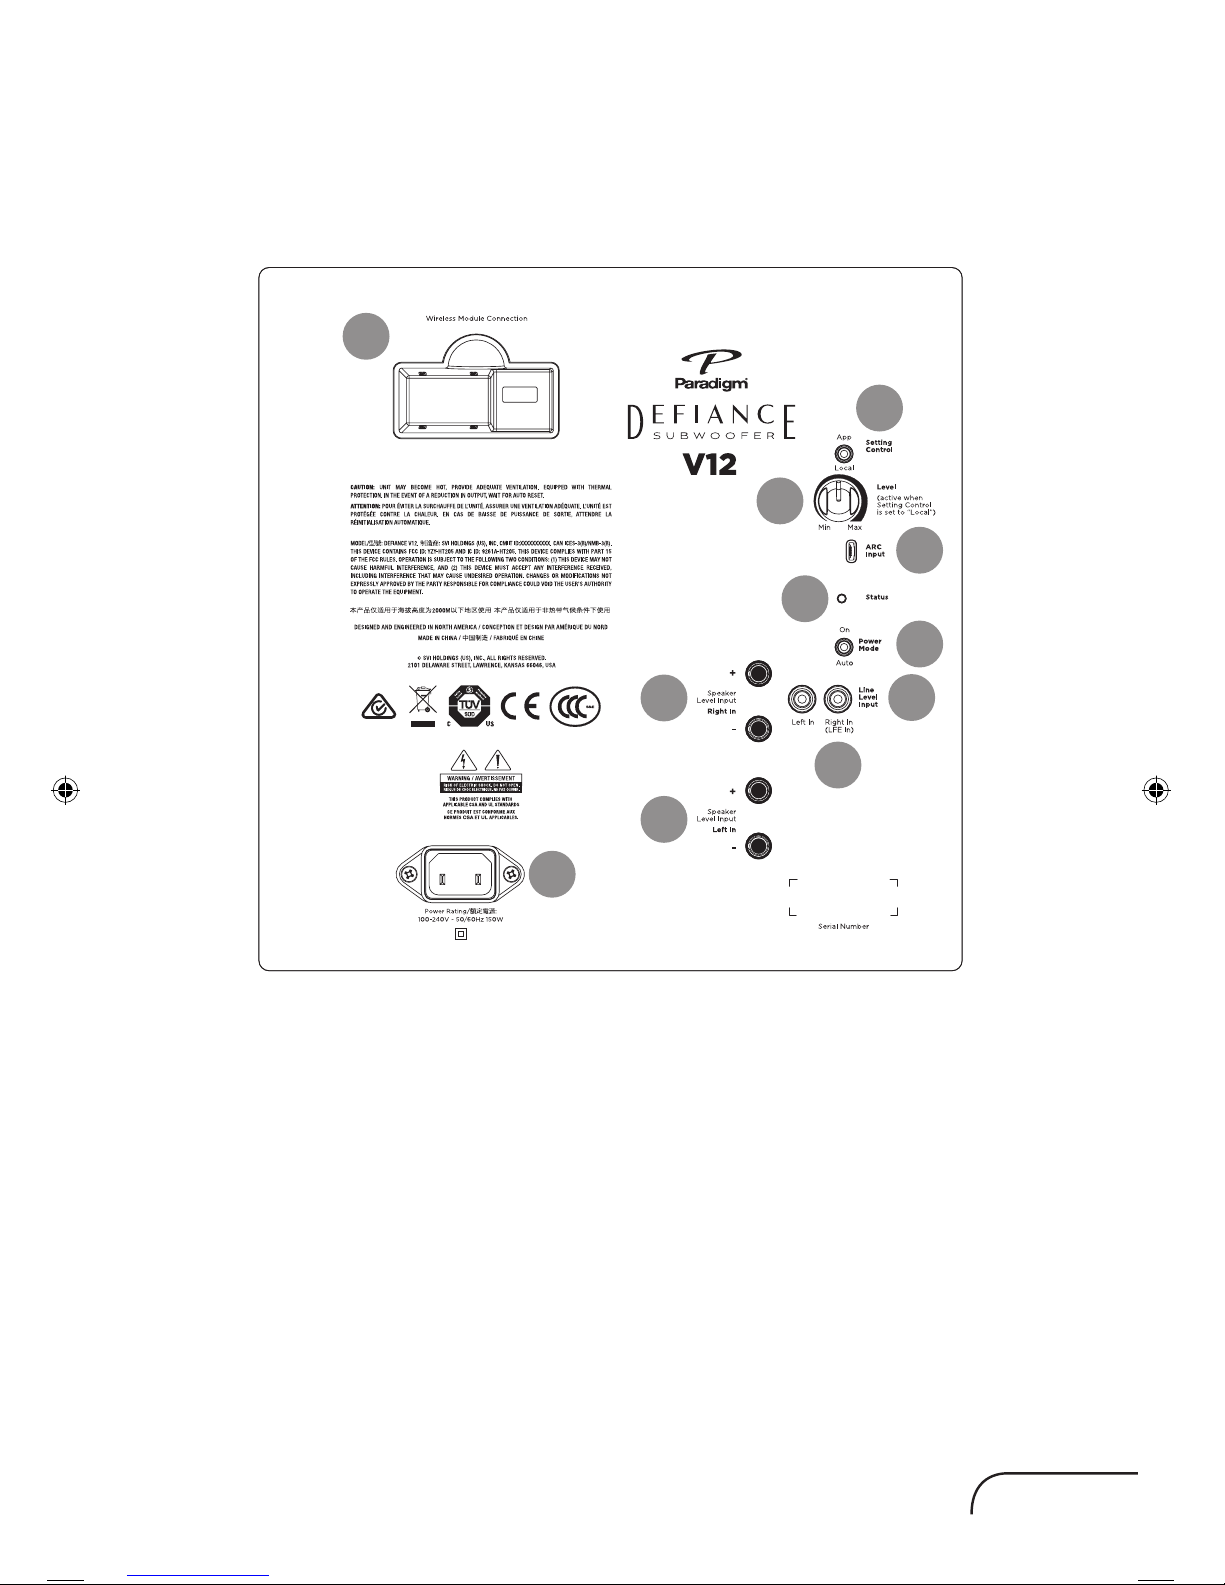
CONTROLS & CONNECTIONS:
Defiance V10/V12
1. Setting Control
The SETTING CONTROL switch adjusts how the volume/level of the
subwoofer will be controlled — App or Local.
App: With the switch set to “App”, all controls functions are controlled
via the subwoofer control app.
Local: With the switch set to “Local”, the Level (volume) knob control
is active.
2. Level
The Level adjusts the subwoofers output level to match that of your
speakers.
NOTE: Level knob is only active when the Setting Control is set to Local.
10
9
1
2
3
4
5
7
8
6
6
Page 22

19
3. ARC Input
The ARC USB connection is used to connect the subwoofer to PC/
Laptop when running ARC (Anthem Room Correction — sold separately).
NOTE: Not required when running ARC via Bluetooth.
4. Status Indicator
The subwoofers is equipped with a multi-colored LED, (located on the
rear) which indicates the current status of the subwoofer
• No illumination — Subwoofer is not on.
• White — Subwoofer is on
• Red — Subwoofer is in ‘Standby mode’
• Flashing — Subwoofer has detected an error code.
5. Power Mode
The Power Mode switch allows you to control how the subwoofer turns
On & Off.
• Auto — When set to “Auto”, the subwoofer will turn on when an
audio signal is detected.
NOTE: After several minutes of inactivity the subwoofer will enter
Standby Mode.
• On — When set to “On”, the subwoofer will always be on.
NOTE: If the subwoofer enters Standby Mode during quiet or low
level audio playback, this is likely due to a low audio output signal
from the audio system. Increasing the system volume should resume
normal subwoofer playback. Increasing the subwoofer output level
on the Preamp/Receiver and decreasing the level on the subwoofer
will solve this issue in the future for similar listening levels.
6. Speaker Level Inputs (Left/Right)
The Speaker Level Inputs allows standard speaker cable be used for
the subwoofer connection. To use these connections the speaker cable
should be terminated using banana style plugs.
CONTROLS & CONNECTIONS:
Defiance V10/V12 (cont’d)
Page 23

paradigm.com
20
NOTE: The setting of the Low Pass Filter control is applied to the signal
received through these inputs.
7. Line Level Input (Left/Right)
The Line Level Input allows the Main-Out or Pre-Out be used on your
Preamp/Receiver for the subwoofer connection.
NOTE: The setting of the Low Pass Filter control is applied to the signal
received through these inputs.
8. Line Level Input (LFE)
The Line Level LFE Input allows the LFE Out/Sub-Out be used on your
Preamp/Receiver for the subwoofer connection.
NOTE: The Low Pass Filter should be set to Bypass. LFE signals are
controlled from your Preamp/Receiver. By default, the Low Pass Filter
is set to Bypass
9. Defiance WT Wireless Module Input (Sold Separately)
The Defiance WT Wireless Module allows for wireless subwoofer integration.
NOTE: The Wireless Module must be paired with its matching transmitter
– See the Paradigm Defiance WT Manual.
10. AC Power Connection
The IEC power cord should be firmly inserted into the AC power
receptacle on the rear panel of the subwoofer. Then to any convenient
AC wall outlet.
NOTE: The sub also integrates a signal sensing power supply that
automatically switches off after sensing no music signal for several
minutes (this will occur when the power switch is set to ‘Auto’).
WARNING! The power cord should not be
installed, removed, or left detached from the
subwoofer while the other end is connected to
an AC power source.
Page 24

21
CONTROLS & CONNECTIONS:
Defiance V8
1
2
3
5
7
8
6
6
9
4
1. Level
The Level adjusts the subwoofers output level to match that of your
speakers.
2. Low Pass Filter
The level Low Pass Filter controls the subwoofers upper frequency cut-off.
This can be set to match the low-frequency roll-off of your front speakers.
Example: If your front speakers play to approximately 80Hz, you can set
the subwoofers Low Pass Filter frequency to 80Hz.
NOTE: The Low Pass Filter should be set to Bypass if a crossover has
been set in your Preamp/Receiver.
Page 25

paradigm.com
22
3. Phase (0 or 180°)
The Phase switch inverts the low frequency signal to synchronize the
subwoofer with the front speakers.
Example: The sound from your subwoofer may arrive at the listening
position out of alignment with the front speakers, causing a perceived
decrease bass.
NOTE: The Phase switch should be set to 0 for most applications.
4. Status Indicator
The subwoofers is equipped with a multi-colored LED, (located on the
rear) which indicates the current status of the subwoofer
• No illumination — Subwoofer is not on.
• White — Subwoofer is on
• Red — Subwoofer is in ‘Standby mode’
• Flashing — Subwoofer has detected an error code.
5. Power Mode
The Power Mode switch allows you to control how the subwoofer turns
On & Off.
• Auto — When set to “Auto”, the subwoofer will turn on when an
audio signal is detected.
NOTE: After several minutes of inactivity the subwoofer will enter
Standby Mode.
• On — When set to “On”, the subwoofer will always be on.
NOTE: If the subwoofer enters Standby Mode during quiet or low
level audio playback, this is likely due to a low audio output signal
from the audio system. Increasing the system volume should resume
normal subwoofer playback. Increasing the subwoofer output level
on the Preamp/Receiver and decreasing the level on the subwoofer
will solve this issue in the future for similar listening levels.
Page 26

23
6. Speaker Level Inputs (Left/Right)
The Speaker Level Inputs allows standard speaker cable be used for
the subwoofer connection. To use these connections the speaker cable
should be terminated using banana style plugs.
NOTE: The setting of the Low Pass Filter control is applied to the signal
received through these inputs.
7. Line Level Input (Left/Right)
The Line Level Input allows the Main-Out or Pre-Out be used on your
Preamp/Receiver for the subwoofer connection.
NOTE: The setting of the Low Pass Filter control is applied to the signal
received through these inputs.
8. Line Level Input (LFE)
The Line Level LFE Input allows the LFE Out/Sub-Out be used on your
Preamp/Receiver for the subwoofer connection.
NOTE: The Low Pass Filter should be set to Bypass. LFE signals are
controlled from your Preamp/Receiver.
9. AC Power Connection
The IEC power cord should be firmly inserted into the AC power
receptacle on the rear panel of the subwoofer. Then to any convenient
AC wall outlet.
NOTE: The sub also integrates a signal sensing power supply that
automatically switches off after sensing no music signal for several
minutes (this will occur when the power switch is set to ‘Auto’).
WARNING! The power cord should not be
installed, removed, or left detached from the
subwoofer while the other end is connected to
an AC power source.
CONTROLS & CONNECTIONS:
Defiance V8 (cont’d)
Page 27

paradigm.com
24
To fine tune your Paradigm Defiance V10 or V12 you will require the
Paradigm Subwoofer App.
This can be downloaded from the Apple App Store or Google Play Store.
All adjustments can then be made using the app.
TIP: The tuning steps below can be used as a guide when adjusting
settings via the app. Reference the controls on the app with the
description and function described instructions in “Setting Subwoofer
Controls” (see pages 25 & 26).
Once you have your speakers positioned in the room along with your
speaker distances and speaker levels calibrated with your Preamp/
Receiver, it’s time for a little fine tuning.
When fine tuning your subwoofer to best integrate with the rest of your
system, use music and video soundtracks that you know well. They
should contain selections with extended bass that is continuous and
repetitive.
Assess subwoofer bass output for best blend with your main speakers.
It should not be overbearing or draw attention to itself, nor should it be
thin and difficult to hear. It should add ‘weight’ and ‘punch’ to the overall
sound and keep pace with your main speakers.
If you are using a Preamp/Receiver to set crossover points start with
80Hz & adjust the Low Pass Filter according to the Low Pass Filter
instructions in “Setting Subwoofer Controls” (see pages 25 & 26).
If you are using a Preamp/Receiver with tone controls, set them to flat
(i.e. ‘0’) and switch loudness controls off.
Some subwoofer locations may result in bass frequency cancellations.
If bass sounds dislocated or weak, adjust the Phase according to
the Phase instructions in “Setting Subwoofer Controls” (see pages
25 & 26).
FINE TUNING:
Defiance V10/V12
FINE TUNING:
Defiance V8
Page 28

25
1. Turn the Level control completely counterclockwise to its minimum.
2. Turn the Low Pass Filter control to its highest frequency (i.e. Bypass).
3. Switch the Phase control to 0° (if not already set to 0°).
4. Listen to a bass music or video selection while seated in your primary
listening area and have an assistant turn up the Level control until the
subwoofer can be clearly heard.
5. With the help of an assistant, switch the Phase to 180°. If bass
response is now more pronounced, your subwoofer and front
speakers are now in phase. Do not change phase alignment again
unless you move the subwoofer or front speakers to a different
location in your room, or move or remove any large items of furniture
or room furnishings (i.e. carpet, draperies, etc.) TIP: Defiance
V10/V12: Using the app, slowly rotate the Phase control until you
hear the most bass.
6. Turn the Level control completely counterclockwise to its minimum.
7. Slowly rotate the Level control until you match the subwoofer’s
volume with the Volume of your front speakers. Bass should be
clearly audible, but not intrusive.
NOTE: If you happen to have an SPL meter, set the meter to 80, SLOW
and C weighted. Then enable the subwoofer test tones on your Preamp/
Receiver. With this set repeat Step 7 until the meter reads 75dB.
SETTING SUBWOOFER CONTROLS
(Crossover Set By Preamp/Receiver)
Page 29

paradigm.com
26
1. Turn the Level control completely counterclockwise to its minimum.
2. Turn the Low Pass Filter control to its highest frequency (i.e. Bypass).
3. Switch the Phase control to 0° (if not already set to 0°).
4. Listen to a bass music or video selection while seated in your primary
listening area and have an assistant turn up the Level control until the
subwoofer can be clearly heard.
5. With the help of an assistant, switch the Phase to 180°. If bass
response is now more pronounced, your subwoofer and front
speakers are now in phase. Do not change phase alignment again
unless you move the subwoofer or front speakers to a different
location in your room, or move or remove any large items of furniture
or room furnishings (i.e. carpet, draperies, etc.) TIP: Defiance
V10/V12: Using the app, slowly rotate the Phase control until you
hear the most bass.
6. Turn the Level control completely counterclockwise to its minimum.
7. Turn the Low Pass Filter control to its highest frequency (i.e. 35Hz).
8. Slowly rotate the Level control until you match the subwoofer’s
volume with the Volume of your front speakers. Bass should be
clearly audible, but not intrusive.
9. Slowly rotate the Low Pass Filter control until you hear the best
subwoofer/front speaker blend. If the sound is too thin you have not
set the frequency high enough; if the sound becomes boomy you
have set the frequency too high. Adjust until you find the most natural
bass balance.
NOTE: If you happen to have an SPL meter, set the meter to 80, SLOW
and C weighted. Then enable the subwoofer test tones on your Preamp/
Receiver. With this set repeat Step 8 until the meter reads 75dB.
SETTING SUBWOOFER CONTROLS
(Local Crossover Method)
Page 30

27
A True Scientific Solution to the Problems of the Room
Even when the finest speakers are perfectly positioned, the room itself
still has a dramatic impact on any system’s sound, an impact more
profound than that of any individual component. Various solutions have
fallen in and out of favor over the years, but none has solved the problem
of “the room,” until ARC (Anthem Room Correction) technology.
ARC technology is a proprietary digital signal processing system that
allows you to quickly and accurately optimize the performance of your
audio equipment to better suit the unique parameters of your room.
By listening to your room’s acoustic signature, ARC can tune your
equipment to correct for the performance-robbing effects (reflections,
resonances, standing waves, etc.) of the various surfaces and other
obstacles in your room.
ARC is easy to use, and just a few simple steps can optimize your
subwoofer for your unique listening space. ARC is sophisticated, one
of the most accurate and detailed digital room correction technologies
available today. ARC will work tomorrow, too; with constant advances
and updates available for download on the Anthem website.
Now there are THREE ways to calibrate your system using ARC or ARC
Mobile — each takes only a few minutes to complete.
EASY
Requirements:
• iOS Device
• ARC Mobile App
Download Anthem’s ARC Mobile app to your iOS device. This method
uses your iOS device’s built-in microphone for measurements.
This method walks you through step by step via the app.
ARC® (ANTHEM ROOM CORRECTION)
(Sold Separately)
: Defiance V10/V12 ONLY
IMPORTANT! The listening space must be silent
while performing ARC. A noisy computer fan,
a dishwasher or microwave running, etc. can
negatively affect ARC’s measurements.
Page 31

paradigm.com
28
INTERMEDIATE
Method for Apple iOS Device Users
Requirements:
• iOS Device
• ARC Mobile App
• ARC Universal Microphone
(sold separately — see your Paradigm dealer for details)
Download Anthem’s ARC Mobile app to an iOS device. Run the ARC
app and select “ARC Universal Microphone,” connect the supplied
3.5 mm cord from your iOS device to the ARC Universal Microphone
for measurements.
This method walks you through step by step via the app.
Method for Android Device Users
Requirements:
• Android Device
• ARC Mobile App
• ARC Universal Microphone
(sold separately — see your Paradigm dealer for details)
• OTG USB Adapter
(sold separately — see your Paradigm dealer for details)
Download Anthem’s ARC Mobile app to an Android device. Run the
ARC app and connect the USB OTG adapter from your Android device
to the ARC Universal Microphone for measurements.
This method walks you through step by step via the app.
PROFESSIONAL
Requirements:
• Windows PC
• ARC PC Software
• ARC Universal Microphone
(sold separately — see your Paradigm dealer for details)
Download and install Anthem’s ARC PC software to your Windows PC.
Connect either the calibrated ARC PC Microphone or ARC Universal
Microphone to your Windows PC, and connect your ARC-capable
speaker or electronics with either the second USB cord or through
a network connection. After running your measurements, you can
customize the results, set up multiple configurations, and print correction
curve graphs.
Page 32

29
PARADIGM® SUBWOOFERS: The Paradigm Subwoofers covered
in this manual are warranted to be and remain free of manufacturing
and/or material defects for a period of three (3) years from the date
of the original retail purchase. Within the time period specified, repair,
replacement or adjustment of parts for manufacturing and/or material
defects will be free of charge to the original owner.
DEFIANCE WT WIRELESS SYSTEM (SOLD SEPARATELY): Details
on the warranty for the Defiance WT Wireless System can be found in
the Defiance WT Wireless System Owners Manual.
Thermal or mechanical abuse/misuse is not covered under warranty.
Limitations:
• Warranty begins on date of original retail purchase from an
Authorized Paradigm
®
Dealer only. It is not transferable;
• Warranty applies to product in normal home use only. If the product
is subjected to any of the conditions outlined in the next section,
warranty is void;
• Warranty does not apply if the product is used in professional or
commercial applications. Warranty is Void if:
• The product has been abused (intentionally or accidentally);
• The product has been used in conjunction with unsuitable or faulty
equipment;
• The product has been subjected to damaging signals, derangement
in transport, mechanical damage or any abnormal conditions;
• The product (including cabinet) has been tampered with or damaged
by an unauthorized service facility;
• The serial number has been removed or defaced. Owner
Responsibilities:
• Provide normal/reasonable operating care and maintenance;
• Provide or pay for transportation charges for product to service
facility;
LIMITED WARRANTY
Page 33

paradigm.com
30
• Provide proof of purchase (your sales receipt given at time of
purchase from your Authorized Paradigm® Dealer). Should servicing
be required, contact your nearest Authorized Paradigm® Dealer,
Paradigm Electronics Inc., or Import Distributor (outside the U.S.
and Canada) to arrange, bring in or ship prepaid any defective
unit. Visit our website at www.paradigm.com for more information.
Paradigm Electronics Inc. reserves the right to improve the design
of any product without assuming any obligation to modify any
product previously manufactured. This warranty is in lieu of all
other warranties expressed or implied, of merchantability, fitness
for any particular purpose and may not be extended or enlarged by
anyone. In no event shall Paradigm Electronics Inc., their agents, or
representatives be responsible for any incidental or consequential
damages. Some jurisdictions do not allow limitation of incidental or
consequential damages, so this exclusion may not apply to you.
Retain this manual and your sales receipt for proof of warranty term
and proof of purchase.
Page 34

Manuel de l’utilisateur
SUBWOOFER
DEFIANCE V12
DEFIANCE V10
DEFIANCE V8
SW112
SW110
SW108
Page 35

1. Lisez les consignes.
2. Conservez les consignes.
3. Tenez compte de toutes les mises en garde.
4. Suivez les consignes.
5. N’utilisez pas cet appareil près de l’eau.
6. Nettoyez uniquement avec un linge sec.
7. Ne bloquez pas les ouvertures de ventilation.
Installez conformément aux instructions du
fabricant.
8. N’installez pas le produit près des sources de
chaleur, telles que les radiateurs, les registres
de chaleur, les poêles ou les autres appareils
qui produisent de la chaleur (y compris les
amplificateurs).
9. N’outrepassez pas la caractéristique de sécurité
de la fiche polarisée ou de type polarisé. Une
fiche polarisée a deux lames dont une est plus
large que l’autre. Une fiche de type polarisé a
deux lames et une troisième qui agit à titre de
broche de masse (grounding prong). La lame
large ou la broche de masse sont fournies pour
votre sécurité. Si la fiche fournie n’entre pas
dans la prise murale, consultez un électricien
pour qu’il remplace la prise obsolète.
10. Protégez le cordon d’alimentation pour qu’il
ne soit pas piétiné ou écrasé par des articles
placés ou appuyés sur ceux-ci, en prêtant
particulièrement attention à la fiche des
cordons, aux réceptacles d’utilité et à l’endroit
où ils sortent de l’appareil.
11. Utilisez uniquement les pièces ou les acces
-
soires recommandés par le fabricant.
12. Utilisez uniquement avec le
chariot, le pied, le trépied, le
support ou la table recommandé
par le fabricant ou vendu avec
l’appareil. Lorsque vous utilisez un chariot,
faites attention lorsque vous déplacez le chariot/
appareil pour éviter de vous blesser s’il bascule.
13. Débranchez l’appareil lors des orages
électriques ou lorsque vous ne l’utilisez pas
pendant une longue période.
14. Faites effectuer toutes les réparations par
un technicien compétent. Des réparations
sont nécessaires lorsque l’appareil a été
endommagé de quelque façon que ce soit,
par exemple, lorsque le cordon d’alimentation
est endommagé, que du liquide ou des objets
sont tombés dans l’appareil, que l’appareil a
été exposé à la pluie ou à l’humidité, qu’il ne
fonctionne pas normalement ou qu’il est tombé
sur le sol.
15. Afin de limiter les risques d’incendie ou
d’électrocution, n’exposez jamais ce produit à la
pluie ou à l’humidité. L’appareil ne doit pas être
exposé à des projections d’eau ; ne posez aucun
vase ou autre objet rempli de liquide sur l’appareil.
16. Lorsque la fiche d’alimentation ou la prise multiple
est utilisée comme dispositif de débranchement de
l’appareil, elle doit rester facilement accessible.
17. Evitez de surcharger prises murales et câbles
de rallonge, car cela peut entraîner des risques
d’incendie ou d’électrocution.
18. Aucune flamme nue, comme une chandelle, ne
doit être placée sur l’appareil.
19. Maintenez une distance minimale de 20 à 30
cm autour de l’appareil pour une ventilation
suffisante.
20. L’aération ne doit pas être bloquée en obturant
les ouvertures d’aération ou en plaçant sur ou
à côté de l’appareil des objets tels que des
journaux, des nappes, des rideaux, etc.
21. L’appareil peut être utilisé dans les climats
tropicaux.
Par la présente, SVI Holdings (US) Inc. déclare
que son produit Defiance WT est conforme aux
principales exigences et autres clauses pertinentes
des directives suivantes sur l’information de la
conformité pour l’EU.
• Conforme à la Directive européenne Basse tension
2014/35/UE;
• Directive européenne CEM 2014/30/UE;
•
Defiance V10/V12 UNIQUEMENT :
Directive
européenne 2014/53/UE relatives aux équipe
-
ments radioélectriques (RED);
• Directive européenne d’écoconception
2009/125/CE;
• Directive européenne WEEE 2012/19/UE;
• Directive européenne sur la restriction de
l’utilisation de certaines substances dangere
uses dans les équipements électriques et
électroniques (Union Restriction of Hazardous
Substances Recast) (RoHS2) 2011/65/UE;
•
Directive européenne concernant l’enregistrement,
l’évaluation et l’autorisation des substances
chimiques ainsi que les restrictions applicables à
ces substances (REACH) (Registration, Evaluation,
Authorization and Restriction of Chemicals)
2006/121/CE.
• Vous pouvez obtenir un exemplaire gratuit de
la Déclaration de conformité en communiquant
avec votre revendeur, votre distributeur ou
le siège social mondial de SVI Holdings (US)
Inc. Les coordonnées sont disponibles ici :
CONSIGNES DE SÉCURITÉ IMPORTANTES
INFORMATION SUR LA CONFORMITÉ POUR L’UE
Page 36

En vertu de la directive WEEE de l’Union
européenne (directive sur les déchets
électriques et électroniques) entrée en
vigueur le 13 août 2005, nous vous
avisons que ce produit pourrait renfermer
des matériaux réglementés dont l’élimination doit
faire l’objet de procédures de réutilisation et de
recyclage particulières. Pour cette raison, Paradigm
Electronics Inc. a demandé à ses distributeurs
dans les pays membres de l’Union européenne de
reprendre et de recycler ce produit gratuitement.
Pour trouver le distributeur le plus près, communiquez
avec le revendeur du produit ou consultez le site Web
www.paradigm.com.
Veuillez noter que seul le produit est régi par la
directive WEEE. Nous vous encourageons à recycler
les matériaux d’emballage et autres matériaux
d’expédition selon les procédures normales.
Contient ID FCC : QOQBGM113 and
IC : 5123A-BGM113
Gamme de fréquences :
2402,0-2480,0 MHz
Puissance d’émission maximale :
2,5 dBm
Cet appareil est conforme à la partie 15 du
Règlement FCC. Son fonctionnement est assujetti
aux deux conditions suivantes : (1) cet appareil
ne peut pas causer d’interférence nuisible et
(2) cet appareil doit accepter toute interférence
reçue, y compris l’interférence pouvant causer un
fonctionnement indésirable.
Selon la réglementation FCC 47 CFR 15.21: Les
changements ou modifications non expressément
approuvés par la partie responsable de la conformité
pourraient annuler l’autorité de l’utilisateur à utiliser
l’équipement.
Remarque : cet équipement a été testé et jugé
conforme aux limites d’un appareil numérique de
Classe B, en vertu de la Section 15 du règlement
de la FCC. Ces limites sont conçues pour offrir une
protection jugée raisonnable contre l’interférence
nuisible dans une installation résidentielle. Cet
équipement génère, utilise et peut émettre une
énergie radio fréquence et, s’il n’est pas installé et
utilisé conformément aux instructions, peut causer
une interférence nuisible aux radiocommunications.
Toutefois, il n‘existe aucune garantie qu’une
interférence ne se produira pas dans une installation
particulière. Si cet équipement cause une
interférence nuisible à la réception radiophonique
ou télévisuelle, qu’on peut déterminer en allumant
et en éteignant l’équipement, on invite l’utilisateur
à essayer de corriger l’interférence à l’aide de l’une
des mesures suivantes :
– Réorienter l’antenne de réception ou la changer
de place.
– Augmenter la distance entre l’équipement et le
récepteur.
– Raccorder l’équipement à une prise située sur
un circuit autre que celui sur lequel le récepteur
est raccordé.
– Consulter le revendeur ou un technicien radio/
TV compétent pour obtenir de l’aide.
Le présent appareil est conforme aux CNR d’Industrie
Canada applicables aux appareils radio exempts de
licence. L’exploitation est autorisée aux deux conditions
suivantes :
(1) l’appareil ne doit pas produire de brouillage, et
(2) l’utilisateur de l’appareil doit accepter tout
brouillage radioélectrique subi, même si le
brouillage est susceptible d’en compromettre le
fonctionnement.
Les changements ou modifications non expressément
approuvés par les autorités compétentes en matière de
conformité peuvent priver l’utilisateur du droit d’utiliser
l’équipement en question.
Déclaration d’exposition aux radiations:
Cet équipement est conforme aux limites d’exposition
aux radiations IC définies pour un environnement
non contrôlé. Les utilisateurs finaux doivent suivre les
instructions d’utilisation spécifiques pour satisfaire
à la conformité d’exposition RF. Pour maintenir les
exigences de conformité en matière d’exposition RF
IC, veuillez suivre les instructions d’utilisation telles que
documentées dans ce manuel.
CONFORMITÉ D’INDUSTRIE CANADA (IC)
Page 37

040418
Merci!
… nous vous remercions d’avoir choisi le caisson de sous-graves
de la série Defiance de Paradigm. Vous allez entendre la différence
que confèrent ces enceintes de pointe haut de gamme à votre
système audio ou de cinéma maison! Ces caisson de sousgraves sont le produit d’innombrables heures de recherche et de
développement approfondis et elles vous fourniront un son haut
de gamme de qualité supérieure pendant de nombreuses années.
Pour une installation appropriée, et pour profiter d’un son
exceptionnel, veuillez lire le présent manuel et suivre toutes les
instructions. Pour toute autre question, contactez un revendeur
Paradigm autorisé ou consultez la page Questions-Réponses de
notre site Web au www.paradigm.com.
PARADIGM ELECTRONICS SE RÉSERVE LE DROIT DE MODIFIER LES SPÉCIFICATIONS OU LES
CARACTÉRISTIQUES SANS PRÉAVIS, AU FUR ET À MESURE QUE DES AMÉLIORATIONS SONT
INCLUSES.
PARADIGM, ANTHEM, et ARC sont des marques de commerce déposées de Paradigm Electronics Inc.
Defiance Subwoofer sont des marques de commerce de Paradigm Electronics Inc. Droit d’auteur ©
Paradigm Electronics Inc. Tous droits réservés.
Le point d’exclamation dans un triangle équilatéral
avertit l’utilisateur de la présence de directives
importantes en lien avec le fonctionnement et la
maintenance (service) dans les documents qui
accompagnent le produit.
L’éclair avec une pointe en forme de flèche dans un
triangle équilatéral avertit l’utilisateur d’une « tension
dangereuse » non isolée à l’intérieur du produit qui peut
être d’une force suffisante pour constituer un risque de
décharge électrique.
MISE EN GARDE! N’utilisez pas le ou les produits
Paradigm à l’extérieur du pays où ils ont été achetés à
l’origine — les exigences en matière de tension varient
d’un pays à l’autre. Une tension inappropriée peut causer
des dommages potentiellement dispendieux à réparer.
Les produits Paradigm sont expédiés aux distributeurs
Paradigm autorisés avec l’alimentation électrique
appropriée pour une utilisation dans le pays où la vente est
prévue. Une liste des distributeurs autorisés est disponible
sur le site Web www.paradigm.com ou en envoyant un
courriel à l’adresse info@paradigm.com.
Page 38

Avertissements de sécurité et installation rapide ...................... 3
Votre nouveau caisson de sous-grave ........................................ 6
Positionnement du caisson de sous-graves ............................... 8
L’avantage d’utiliser deux caissons de sous-graves ................. 9
Raccordement du caisson de sous-graves .............................. 11
Raccord câblé ............................................................................. 12
Entrée niveau de ligne (gauche/droite) ......................................... 13
Entrées niveau d’enceinte (gauche/droite) ................................... 14
Raccordement d’un transmetteur sans fil Defiance WT
(vendu séparément): Defiance V10/V12 UNIQUEMENT .............. 16
« Jumeler » votre caisson de sous-graves avec le
transmetteur sans fil Defiance WT (vendu séparément):
Defiance V10/V12 UNIQUEMENT ............................................... 18
Fonctionnement sans fil .............................................................. 18
Fonctionnement du transmetteur ............................................... 19
Commandes et connexions : Defiance V10/V12 ....................... 22
Commandes et connexions : Defiance V8 ................................ 25
Réglages fin : Defiance V10/V12 ................................................ 29
Réglages fin : Defiance V8 .......................................................... 29
Réglage des commandes du caisson de sous-graves
(répartiteur réglé par l’entremise du préamplificateur ou récepteur) ..... 30
Réglage des commandes du caisson
de sous-graves (méthode répartiteur local) ................................... 31
ARC
MD
(Anthem Room Correction — vendu séparément) :
Defiance V10/V12 UNIQUEMENT ............................................... 32
Garantie limitée ........................................................................... 35
TABLE DES MATIÈRES
Page 39

3
AVERTISSEMENTS DE SÉCURITÉ
ET INSTALLATION RAPIDE
• Tensions dangereuses à l’intérieur, ne pas
enlever le couvercle.
• Les réparations doivent être effectuées par un
technicien compétent.
• Pour éviter les risques d’incendie ou de
décharge électrique, ne pas exposer ce
module à l’humidité.
• Éteindre l’amplificateur et débrancher le
caisson de sous-graves en cas de conditions
anormales.
• Le cordon d’alimentation ne doit pas être
installé, enlevé ou laissé détaché de l’enceinte
lorsque l’autre extrémité est raccordée à une
source d’alimentation CA.
• L’interrupteur d’alimentation principal qui se
trouve à proximité de la prise CA doit rester
facilement accessible.
• Utiliser ce produit uniquement avec une prise
électrique mise à la terre.
• Aucune chandelle ou autre source de flamme
nue ne doit être placée sur l’enceinte.
• Aucun liquide, dans un verre ou un vase, ne
doit être placé sur l’enceinte.
• L’enceinte ne doit pas être exposée à des
écoulements ou à des éclaboussures de liquide.
• Les bornes marquées d’un symbole d’éclair
doivent être raccordées par une personne
compétente ou par des bornes prêtes à l’emploi.
• Le cordon d’alimentation doit rester facilement
accessible en cas de conditions anormales.
Page 40

paradigm.com
4
Nous savons que vous êtes impatient d’entendre votre nouveau caisson
de sous-graves Paradigm; par conséquent, cette section est destinée à
vous permettre de l’installer de façon rapide et facile. Une fois le caisson
de sous-graves prêt à fonctionner, veuillez prendre le temps de lire
attentivement le reste des renseignements de ce manuel. Vous saurez
ainsi comment obtenir le meilleur rendement possible de ce système de
caisson de sous-graves très précis.
Si vous éprouvez des problèmes avec la configuration ou le
fonctionnement de votre caisson de sous-graves Paradigm, veuillez
consulter les sections Acoustique de la pièce ou Fonctionnement de ce
manuel. Si vous éprouvez un problème récurrent que vous ne pouvez pas
régler, veuillez communiquer avec votre revendeur Paradigm autorisé. Il
effectuera l’analyse technique appropriée pour régler le problème
Déballage
Retirez votre nouveau caisson de sous-graves de son emballage.
Veuillez conserver le matériel d’emballage d’origine pour une utilisation
ultérieure — un emballage de rechange peut être dispendieux.
Positionnement
Vous pouvez commencer en plaçant le caisson de sous-graves dans
un coin à proximité de la partie avant de la pièce. S’il est placé dans
un coin, alignez le caisson de sous-graves en position diagonale afin
que les deux haut-parleurs de graves soient équidistants par rapport au
mur. Avant de choisir la position de coin permanente, essayez d’autres
positions. Les emplacements éloignés des coins sont souvent plus
efficaces pour fournir un rendement idéal des basses fréquences et
une bonne intégration aux enceintes principales. Consultez la section
Positionnement pour obtenir de plus amples détails.
Raccordement du signal
Utilisez les meilleurs câbles disponibles. Des câbles de haute qualité,
disponibles auprès de votre revendeur spécialisé, sont recommandés
et offriront un rendement supérieur.
Raccordez les sorties de votre préamplificateur ou récepteur aux
connecteurs de l’entrée du signal situés sur le panneau arrière du
caisson de sous-graves. Consultez la section Commandes et raccords
pour obtenir de plus amples détails.
Si vous prévoyez de raccorder votre caisson de sous-graves à l’aide des
entrées Speaker Level (niveau élevé), consultez la section sur les entrées
Speaker Level (niveau d’enceinte) pour obtenir de plus amples détails
Raccord de l’alimentation (CA) (voir la mise en garde)
Assurez-vous que le bouton de niveau est réglé à 0. Branchez le caisson
de sous-graves à une prise murale. Consultez la section Raccord de
l’alimentation CA de ce manuel pour obtenir de plus amples détails.
Page 41

5
Réglage des commandes (avec entrée LFE) :
Defiance V10 et V12
• Commande de réglage : réglez l’interrupteur à « Local ».
• Mode d’alimentation : réglez l’interrupteur à « Auto ».
• Niveau : réglez le niveau à douze heures (tout droit).
• Utilisez le système de gestion des graves du processeur/récepteur
pour régler l’intégration du caisson de sous-graves.
Réglage des commandes (avec entrée LFE) :
Defiance V8
• Mode d’alimentation : réglez l’interrupteur à « Auto ».
• Niveau : réglez le niveau à douze heures (tout droit).
• Utilisez le filtre de passe basse et réglez-le à Bypass (contournement)
Réglage des commandes (avec les entrées Gauche/droite) :
Defiance V10 et V12
• Commande de réglage : réglez l’interrupteur à « App ».
• Mode d’alimentation : réglez l’interrupteur à « Auto ».
• Téléchargez l’appli de commande du caisson de sous-graves
Paradigm (sur Google Play ou Apple App Store).
• À l’aide de l’appli, ajustez les réglages suivants :
— Volume (niveau) : réglez-le à -14dB (ou midi ou tout droit).
— Phase : commencez avec 90° (avec polarité inversée allumée).
— Gain de la pièce : commencez avec 0dB.
— Filtre de passe basse : réglez plus bas que l’extrémité inférieure
de la plage de réponse de fréquence de vos enceintes principales.
Si vous n’êtes pas certain de la réponse de basse fréquence de
votre enceinte principale, commencez avec un réglage de 80Hz.
Réglage des commandes (avec les entrées Gauche/droite) :
Defiance V8
• Mode d’alimentation : réglez l’interrupteur à « Auto ».
• Niveau : réglez le niveau à douze heures (tout droit).
• Utilisez le filtre de passe basse et réglez-le à 80Hz.
AVERTISSEMENTS DE SÉCURITÉ
ET INSTALLATION EN BREF
(suite)
Page 42

paradigm.com
6
Rodage
Bien que vos caissons de sous-graves Paradigm Prestige offrent un son
excellent « en sortant de la boîte », le son sera encore meilleur après une
période de rodage. Laissez-les fonctionner pendant plusieurs heures
avant toute écoute critique.
REMARQUE : si votre caisson de sous-graves a été transporté ou
stocké au froid, laissez-le réchauffer à la température de la pièce avant
de l’utiliser.
Nettoyage
Les caissons de sous-graves Paradigm Defiance ont un fini durable
de grande qualité. Pour les nettoyer, utilisez un linge doux et humide.
N’utilisez pas de nettoyant puissant ou abrasif. Évitez de mouiller toute
partie du système du caisson de sous-graves. Ne placez pas d’objets
contenant des liquides (verres, plantes en pot, etc.) sur le dessus du
caisson de sous-graves — si on laisse de l’eau couler dans le caisson
de sous-graves, même une petite quantité d’eau peut endommager le
boitier du caisson de sous-graves de façon permanente.
Exigences en matière d’alimentation
La cote « Watts » (W) indiquée sur le panneau arrière est la puissance CA
maximale que votre caisson de sous-graves utilisera en produisant sa
puissance de sortie maximale. Toutefois, l’utilisation réelle de puissance
variera en fonction du contenu des graves du matériel joué — plus s’il
n’y a beaucoup de graves profondes, moins s’il n’y a pas beaucoup de
graves. Bien que cela ne soit généralement pas requis pour la musique
typique et le contenu des films, si le contenu des graves du matériel
joué est très fort et de nature plus continue, nous recommandons de
brancher les caissons de sous-graves avec des cotes de puissance plus
élevée (c.-à-d. : 1500 W) à des circuits CA dédiés.
Acoustique de la pièce
Vous êtes sur le point de faire l’expérience du rendement des graves
impressionnant d’un caisson de sous-graves Defiance de Paradigm
à la
fine pointe de la technologie. Ces caissons de sous-graves sont dotés
d’une technologie brevetée très avancée et établissent de nouvelles
normes en matière d’extension des graves profondes, de distorsion
très faible et de puissance sonore, en plus d’offrir une articulation et une
frappe des graves sans précédent. Il est important de noter que tout
comme la quantité de meubles mous peut avoir une influence décisive
sur les moyennes et hautes fréquences, les fréquences sous 150Hz
sont grandement influencées par la pièce elle-même — sa taille, sa
VOTRE NOUVEAU CAISSON
DE SOUS-GRAVE
Page 43

7
VOTRE NOUVEAU CAISSON
DE SOUS-GRAVE
(suite)
forme et les limites physiques dans toute la pièce. La meilleure façon
d’obtenir un rendement des graves optimal dans toute pièce est de faire
des expériences avec le positionnement du caisson de sous-graves et
les ajustements des commandes. N’oubliez pas les lignes directrices
suivantes lorsque vous décidez le meilleur positionnement du caisson
de sous-graves :
• Les planchers et les murs en béton ont tendance à aggraver les
problèmes d’ondes stationnaires de basse fréquence et sont moins
privilégiés.
• Les pièces qui comportent une hauteur, une largeur et une longueur
semblables doivent être évitées, car elles peuvent présenter des
problèmes d’ondes stationnaires de basse fréquence importants.
Cela peut diminuer la clarté. Si aucune autre pièce n’est possible,
essayez différents positionnements du caisson de sous-graves pour
minimiser les problèmes acoustiques.
Page 44

paradigm.com
8
Les graves sont de moins en moins directionnelles à mesure que la
fréquence baisse. Pour obtenir la meilleure intégration sonore, le fait
de placer votre caisson de sous-graves entre vos enceintes avant ou
à côté de l’une d’elles et proche du mur arrière offrira habituellement
le meilleur rendement des graves. Si cet emplacement n’est pas
possible, votre caisson de sous-graves peut-être placé n’importe où
dans la pièce sans influencer l’image stéréo de vos enceintes avant ou
le spectre sonore de votre système d’enceintes à canaux multiples.
Les Fig. 1a et Fig. 1b décrivent la façon dont la sortie des graves est
généralement influencée par le positionnement dans la pièce. Lorsque
vous êtes assis dans une aire d’écoute typique de votre pièce, le fait de
placer le caisson de sous-graves à l’intérieur des zones « ombragées »
donnera généralement le rendement des graves suivants :
Fig. 1a : un positionnement dans un coin offre le plus de graves, mais
parfois aux dépens de la précision. .
PRÉCAUTIONS DE SÉCURITÉ: Avant de passer à
cette section, assurez-vous de lire et de suivre toutes
les consignes de sécurité au début de ce manuel.
POSITIONNEMENT DU CAISSON DE
SOUS-GRAVES
Page 45

9
POSITIONNEMENT DU CAISSON
DE SOUS-GRAVES
(suite)
L’AVANTAGE D’UTILISER DEUX
CAISSONS DE SOUS-GRAVES
Fig. 2: Lorsque vous utilisez deux caissons de sous-graves, le fait de placer
un caisson à l’avant de la pièce et l’autre à l’arrière de la pièce
(voir Fig.
2) offre habituellement le meilleur rendement des graves et la meilleure
intégration sonore. Consultez la section « Réglages fins » de ce manuel de
l’utilisateur pour obtenir de plus amples renseignements sur le réglage des
paramètres de phase. Si ces emplacements ne sont pas possibles, ou si
vous souhaitez essayer des options de positionnement avec deux caissons
de sous-graves, la procédure suivante constitue un guide utile pour obtenir
un meilleur rendement des graves. Consultez la section « Raccord du
caisson de sous-graves » (ci-dessous), puis procédez de la façon suivante :
Fig. 1b: un caisson de sous-graves placé proche d’un mur offre
habituellement un bon équilibre entre la quantité et la précision.
Page 46

paradigm.com
10
1. Éteignez temporairement toutes les enceintes (en éteignant
l’amplificateur ou en les débranchant).
2. Raccordez et placez un caisson de sous-graves dans l’aire centrale
de votre salle d’écoute. Suivez les instructions pour le raccordement,
comme indiqué dans la section suivante.
3. À un niveau modérément fort, faites jouer de la musique ou une
bande sonore vidéo avec des graves étendues qui sont répétitives
ou continues.
4. Marchez dans la pièce et notez les endroits où les graves sonnent
plus fort et les endroits où elles sont plus faibles.
5. Placez le premier caisson de sous-graves dans une zone de graves
plus fortes dans votre pièce; placez ensuite le deuxième caisson de
sous-graves dans une zone plus tranquille de votre pièce.
6. Raccordez les deux caissons de sous-graves et rallumez toutes les
enceintes, puis allumez l’amplificateur ou rebranchez-le.
7. Suivez les instructions de la section « Réglages fins » pour optimiser
le rendement général des graves de votre système.
(Voir le revendeur pour obtenir les instructions de raccordement avec
deux caissons de sous-grave.)
REMARQUE : ce qui précède est uniquement une ligne directrice. Il
est recommandé d’utiliser un disque de test des graves ou un calibreur
de niveau de pression acoustique pour déterminer plus précisément
les caractéristiques des graves de votre salle d’écoute (consultez votre
revendeur pour plus de renseignements).
N’oubliez pas que l’acoustique de la pièce varie, ce qui signifie que vous
pourriez devoir faire des essais avec le positionnement du caisson de
sous-graves pour obtenir le meilleur rendement du caisson de sousgraves.
Page 47

11
RACCORDEMENT DU CAISSON
DE SOUS-GRAVES
MESURES DE SÉCURITÉ: avant de lire la section
ci-dessous, assurez-vous de lire et de suivre
l’ensemble des avis de mesure et d’avertissement
de sécurité au début du présent mode d’emploi.
ÉTEINDRE toutes les composantes
avant de raccorder le caisson.
REMARQUE : même si le syntoniseur audiovisuel ou
le processeur est en mode « Large », les enceintes
reproduiront des basses fréquences — attention de ne
pas trop les solliciter!
Pour le raccordement du caisson de sous-graves, il est
recommandé d’utiliser des câbles et connecteurs de
haute qualité (consulter votre détaillant pour obtenir de
plus amples renseignements).
Page 48

paradigm.com
12
RACCORD CÂBLÉ
Line Level Input (Entrée niveau de ligne) (LFE) — Recommandé
Line-Level Input From Sub/LFE Output (Entrée niveau de ligne de
sortie Sub/LFE) — pour une utilisation avec un préamplificateur ou un
récepteur doté d’une prise Sub-Out/ LFE-Out.
À l’aide d’un câble d’interconnexion RCA à RCA (non compris),
raccordez le caisson de sous-graves, comme illustré. Si votre caisson
de sous-graves a deux prises d’entrée de bas niveau (low-level input),
utilisez l’entrée de droite (LFE).
Amplificateur
Préamplificateur /
Récepteur
Caissons de sous-graves
Caissons de sous-graves
Préamplificateur / Récepteur
Sub Out
L
R
L
+– +
LR
–
L
R
L
L
R
Page 49

13
RACCORDEMENT DU CAISSON
DE SOUS-GRAVES
(suite)
Entrée niveau de ligne (gauche/droite)
Entrée niveau de ligne de Pre-Out/Front-Out sans sortie de passe haute
de Sub — Pour une utilisation avec un préamplificateur ou un récepteur
et un amplificateur avec prises Pre-Out/Front-Out et Main-In).
À l’aide d’un câble d’interconnexion RCA à RCA et de diviseurs en Y
(non compris), raccordez le caisson de sous-graves, comme illustré.
Amplificateur
Préamplificateur /
Récepteur
Caissons de sous-graves
L
+– +
LR
–
L
R
L
L
R
Enceintes
Page 50

paradigm.com
14
Entrées niveau d’enceinte (gauche/droite)
Entrée niveau d’enceinte — pour utilisation avec un préamplificateur
ou un récepteur qui n’a pas de prises Sub-Out/LFE-Out ou Pre-Out/
Front-Out.
À l’aide de câble d’enceinte de haute qualité, raccordez votre caisson
de sous-graves, comme illustré. Pour vous faciliter la tâche, vous pouvez
également raccorder vos enceintes avant à ces bornes.
Caisson de sous-graves
Entrée de
niveau
d'enceinte
Bornes
d'enceintes
Préamplificateur / Récepteur
Droit
D (R)G (L)
Gauche
Enceinte gauche Enceinte droit
Les fiches bananes sont
requises pour les entrées
de niveau haut-parleur
Caisson de sous-graves
Entrée de
niveau
d'enceinte
Bornes
d'enceintes
Préamplificateur / Récepteur
Droit
D (R)G (L)
Gauche
Gauche
Enceinte gauche Enceinte droit
Caisson de sous-graves
Entrée de
niveau
d'enceinte
Bornes
d'enceintes
Préamplificateur / Récepteur
Droit
D (R)G (L)
Enceinte gauche Enceinte droit
Les fiches bananes sont
requises pour les entrées
de niveau haut-parleur
Option 1
Option 2
Les fiches bananes sont
requises pour les entrées
de niveau haut-parleur
Les fiches bananes sont
requises pour les entrées
de niveau haut-parleur
Page 51

15
RACCORDEMENT DU CAISSON
DE SOUS-GRAVES
(suite)
Caisson de sous-graves
Entrée de
niveau
d'enceinte
Bornes
d'enceintes
Préamplificateur / Récepteur
Droit
G (L)
Gauche
Enceinte gauche Enceinte droit
D (R)
Option 3
Les fiches bananes sont
requises pour les entrées
de niveau haut-parleur
Page 52

paradigm.com
16
Entrée niveau de ligne de sortie Sub/LFE — pour une utilisation
avec un préamplificateur ou un récepteur doté d’une prise Sub-Out/
LFE-Out.
À l’aide d’un câble d’interconnexion RCA à RCA (non compris),
raccordez le transmetteur sans fil, comme illustré.
Avant de raccorder votre transmetteur sans fil au
préamplificateur ou au récepteur, assurez-vous
d’avoir « jumelé » le caisson de sous-graves et le
transmetteur.
Amplificateur
Préamplificateur / Récepteur
Amplificateur
Préamplificateur /
Récepteur
Préamplificateur /
Récepteur
Caissons de sous-graves Caissons de sous-graves
Préamplificateur / Récepteur
Transmetteur sans fil
Transmetteur sans fil
Sub Out
L
R
L
+– +
LR
–
L
R
L
L
R
L
+– +
LR
–
L
R
L
L
R
Sub Out
L
L
R
RACCORDEMENT D’UN TRANSMETTEUR
SANS FIL DEFIANCE WT
(vendu séparément):
Defiance V10/V12 UNIQUEMENT
Page 53

17
Entrée niveau de ligne de Pre-Out/Front-Out sans sortie de passe
haute de Sub — pour une utilisation avec un un préamplificateur ou
un récepteur et un amplificateur avec prises Pre-Out/Front-Out et
Main-In.
À l’aide de câbles d’interconnexion RCA à RCA et de séparateurs en
Y (non compris), raccordez le transmetteur sans fil, comme illustré.
Amplificateur
Amplificateur
Préamplificateur /
Récepteur
Préamplificateur /
Récepteur
Transmetteur sans fil
L
+– +
LR
–
L
R
L
L
R
Enceintes
L
+– +
LR
–
L
R
L
L
R
Enceintes
RACCORDEMENT D’UN TRANSMETTEUR
SANS FIL DEFIANCE WT
(vendu séparément):
Defiance V10/V12 UNIQUEMENT (suite)
Page 54

paradigm.com
18
Si vous n’utilisez pas une option sans fil sur votre
caisson de sous-graves (Defiance V10 ou V12
UNIQUEMENT), sautez cette section
FONCTIONNEMENT SANS FIL
Le positionnement du caisson de sous-graves joue un rôle majeur dans
l’optimisation du rendement des graves. Toutefois, le positionnement
peut nécessiter d’acheminer de longs câbles dans les murs, le long
des plinthes et sous les planchers et les tapis, ce qui peut présenter
des inconvénients et ne pas être plaisant pour l’œil. En passant au
mode sans fil, vous n’avez plus besoin de vous inquiéter au sujet du
positionnement et des nœuds de câbles. Souvent, l’option sans fil
permet de diminuer drastiquement le délai de configuration du système.
« JUMELER » VOTRE CAISSON
DE SOUS-GRAVES AVEC LE
TRANSMETTEUR SANS FIL
DEFIANCE WT
(vendu séparément):
Defiance V10/V12 UNIQUEMENT
Page 55

19
AVERTISSEMENT : pour éviter les baisses de signal
ou les interférences,gardez le transmetteur loin
des fours micro-ondes, des téléphones cellulaires
ou des appareils Bluetooth qui utilisent la même
fréquence.
IMPORTANT! Le transmetteur et le caisson de
sous-graves ne doivent pas être séparés de plus
de 50 pieds (15 m) dans la pièce.
FONCTIONNEMENT DU TRANSMETTEUR SANS FIL
Dans une salle d’écoute typique, votre nouveau transmetteur sans
fil a une portée maximale de 50 pi (15 m). Des obstacles comme
les murs, les gros meubles, les séparateurs de pièce, etc. peuvent
diminuer la portée du transmetteur san fil. Ne placez pas le caisson
de sous-graves et le transmetteur sans fil à une distance supérieure à
la distance recommandée. L’installation du transmetteur sans fil dans
une autre pièce n’est pas recommandée. Les dimensions compactes
du transmetteur sans fil permettent de l’insérer dans un support
audio/vidéo standard. Le transmetteur sans fil comprend un capteur
numérique automatique non compressé de 2,4 GHz qui s’ajustera
automatiquement pour offrir la meilleure connexion sans fil tout en
surveillant l‘intégrité du flux de données.
Un câble audio RCA est nécessaire (non compris) pour raccorder
le transmetteur sans fil à votre préamplificateur ou récepteur. (Voir
le revendeur pour obtenir des recommandations sur les câbles.)
Un transmetteur sans fil est requis pour chaque caisson de sous-
graves sans fil utilisé.
Le système sans fil Defiance WT est expédié déjà jumelé. Pour
resynchroniser le système sans fil:
1. Vérifiez que le caisson de sous-graves est allumé et que sa lumière
de statut est rouge ou blanche.
« JUMELER » VOTRE CAISSON
DE SOUS-GRAVES AVEC LE
TRANSMETTEUR SANS FIL
DEFIANCE WT
(vendu séparément):
Defiance V10/V12 UNIQUEMENT (suite)
Page 56

paradigm.com
20
2. Si le cordon d’alimentation du transmetteur sans fil est branché,
débranchez-le pendant 10 secondes.
3. Branchez le cordon d’alimentation du transmetteur sans fil.
4. Branchez le récepteur sans fil dans la partie arrière du caisson de
sous-graves.
5. Attendez que les lumières de statut commencent à clignoter sur le
récepteur sans fil et le transmetteur sans fil.
6. Appuyez sur le bouton de synchronisation du récepteur sans fil
pendant 5 secondes.
7. Appuyez et maintenez enfoncé le bouton de synchronisation du
transmetteur sans fil jusqu’à ce que la lumière de statut du récepteur
sans fil soit allumée de couleur unie (sans clignotement).
Page 57

21
COMMANDES ET CONNEXIONS :
Defiance V10/V12
1. Commande de réglage
L’interrupteur COMMANDE DE RÉGLAGE permet de régler la façon
dont le volume/niveau sera commandé — mode app ou local.
Appli : avec l’interrupteur réglé à « App », toutes les fonctions de
commande sont commandées par l’entremise de l’app de commande
du caisson de sous-graves.
Local : avec l’interrupteur réglé à « local », le bouton de commande du
niveau (volume) est actif.
10
9
1
2
3
4
5
7
8
6
6
Page 58

paradigm.com
22
2. Niveau
Le niveau ajuste le niveau de sortie du caisson de sous-graves afin qu’il
corresponde à celui de vos enceintes.
REMARQUE : le bouton de niveau est uniquement actif lorsque la
commande de réglage est réglée à Local.
3. Entrée ARC
La connexion ARC USB est utilisée pour raccorder le caisson de sous-
graves à un ordinateur/portable lorsque vous utilisez l’ARC (Anthem
Room Correction — vendu séparément).
REMARQUE : cela n’est pas nécessaire lorsque vous utilisez l’ARC par
l’entremise de Bluetooth.
4. Indicateur de statut
Le caisson de sous-graves est doté d’une DEL multicolore (située à
l’arrière) qui indique le statut actuel du caisson de sous-graves.
• Aucune illumination — le caisson de sous-graves n’est pas allumé
• Blanche — le caisson de sous-graves est allumé
• Rouge — le caisson de sous-graves est en mode « veille »
• Clignotante — le caisson de sous-grave a détecté une erreur de
code.
5. Mode d’alimentation
L’interrupteur de mode d’alimentation vous permet de commander la
façon dont le caisson de sous-graves s’allume et s’éteint.
• Auto — lorsqu’il est réglé à « Auto », le caisson de sous-graves
s’allume quand il détecte un signal audio.
REMARQUE : après plusieurs minutes d’inactivité, le caisson de
sous-grave bascule en mode veille.
• On (allumé) — lorsqu’il est réglé à « On », le caisson de sous-graves
sera toujours allumé.
Page 59

23
REMARQUE : si le caisson de sous-graves entre en mode Veille
pendant la lecture de matériel audio calme ou de faible niveau, cela
est probablement dû à un faible signal de sortie audio provenant
de votre système audio. Le fait d’augmenter le volume du système
devrait relancer la lecture normale du caisson de sous-graves. Le fait
d’augmenter le niveau de sortie du caisson de sous-graves sur le
préamplificateur ou récepteur et de diminuer le niveau sur le caisson
de sous-graves permettra de résoudre ce problème à l’avenir pour des
niveaux d’écoute semblable.
6. Entrées niveau d’enceinte (gauche/droite)
Les entrées de niveau d’enceinte permettent d’utiliser un câble
d’enceinte standard pour le raccordement du caisson de sous-graves.
Pour utiliser ces connexions, le câble d’enceinte doit se terminer par une
prise de type banane.
REMARQUE : la configuration de la commande du Filtre de passe
basse est appliquée au signal reçu par ces entrées.
7. Entrée niveau de ligne (gauche/droite)
L’entrée de niveau de ligne permet d’utiliser Main-Out ou Pre-Out sur
votre préamplificateur ou récepteur pour le raccordement du caisson
de sous-graves.
REMARQUE : la configuration de la commande du Filtre de passe
basse est appliquée au signal reçu par ces entrées.
8. Entrées niveau d’enceinte (LFE)
L’entrée de niveau de ligne LFE permet d’utiliser LFE Out/Sub-Out sur
votre préamplificateur ou récepteur pour le raccordement du caisson
de sous-graves.
REMARQUE : le filtre de passe basse doit être réglé à Bypass
(contournement). Les signaux LFE sont commandés à partir de votre
préamplificateur ou récepteur. Par défaut, le filtre de passe basse est
réglé à Bypass (contournement).
COMMANDES ET CONNEXIONS :
Defiance V10/V12 (suite)
Page 60

paradigm.com
24
MISE EN GARDE : le cordon d’alimentation ne
doit pas être installé, enlevé ou laissé détaché du
caisson de sous-graves lorsque l’autre extrémité
est raccordée à une source d’alimentation CA.
9. Entrée du module sans fil Defiance WT (vendu séparément)
Le module sans fil Defiance WT permet l’intégration du caisson de sous-
graves sans fil.
10. Raccordement de l’alimentation CA
Le cordon d’alimentation IEC doit être fermement inséré dans la prise
d’alimentation CA située sur le panneau arrière du caisson de sousgraves. Il doit ensuite être branché dans une prise murale CA.
REMARQUE : le caisson de sous-graves est également doté d’un
capteur de signal d’alimentation électrique qui s’éteint automatiquement
si aucun signal musical n’est capté pendant plusieurs minutes (cela se
produira lorsque l’interrupteur d’alimentation est réglé à « Auto »).
MISE EN GARDE : le cordon d’alimentation ne doit pas être installé,
enlevé ou laissé détaché du caisson de sous-graves lorsque l’autre
extrémité est raccordée à une source d’alimentation CA.
Page 61

25
COMMANDES ET CONNEXIONS :
Defiance V8
1
2
3
5
7
8
6
6
9
4
1. Niveau
Le niveau ajuste le niveau de sortie du caisson de sous-graves afin qu’il
corresponde à celui de vos enceintes.
REMARQUE : le bouton de niveau est uniquement actif lorsque la
commande de réglage est réglée à Local.
2. Filtre de passe basse
Le filtre de niveau de passe basse commande la coupure de fréquence
supérieure du caisson de sous-graves.
On peut le régler pour qu’il corresponde au déploiement de basse
fréquence de vos enceintes avant.
Page 62

paradigm.com
26
Exemple : si vos enceintes avant jouent à environ 80Hz, vous pouvez
régler la fréquence du filtre de passe basse du caisson de sous-graves
à environ 80Hz.
REMARQUE : le filtre de passe basse doit être réglé à Bypass
(contournement) si un répartiteur (crossover) a été réglé dans votre
préamplificateur ou récepteur.
3. Phase (0 ou 180°)
L’interrupteur de phase inverse le signal de basse fréquence pour
synchroniser le caisson de sous-graves avec les enceintes avant.
Exemple : le son provenant de votre caisson de sous-graves peut
arriver à la position d’écoute hors de son alignement avec les enceintes
avant, ce qui entraîne une diminution perçue des graves.
REMARQUE : l’interrupteur de phase doit être réglé à 0 pour la plupart
des applications.
4. Indicateur de statut
Le caisson de sous-graves est doté d’une DEL multicolore (située à
l’arrière) qui indique le statut actuel du caisson de sous-graves.
• Aucune illumination — le caisson de sous-graves n’est pas allumé.
• Blanche — le caisson de sous-graves est allumé.
• Rouge — le caisson de sous-graves est en mode « veille ».
• Clignotante — le caisson de sous-grave a détecté une erreur de code.
5. Mode d’alimentation
L’interrupteur de mode d’alimentation vous permet de commander la
façon dont le caisson de sous-graves s’allume et s’éteint.
• Auto — lorsqu’il est réglé à « Auto », le caisson de sous-graves
s’allume quand il détecte un signal audio.
REMARQUE : après plusieurs minutes d’inactivité, le caisson de
sous-grave bascule en mode veille.
• On (allumé) — lorsqu’il est réglé à « On », le caisson de sous-graves
sera toujours allumé.
Page 63

27
REMARQUE : si le caisson de sous-graves entre en mode Veille
pendant la lecture de matériel audio calme ou de faible niveau, cela
est probablement dû à un faible signal de sortie audio provenant
de votre système audio. Le fait d’augmenter le volume du système
devrait relancer la lecture normale du caisson de sous-graves. Le fait
d’augmenter le niveau de sortie du caisson de sous-graves sur le
préamplificateur ou récepteur et de diminuer le niveau sur le caisson
de sous-graves permettra de résoudre ce problème à l’avenir pour des
niveaux d’écoute semblable.
6. Entrées niveau d’enceinte (gauche/droite)
Les entrées de niveau d’enceinte permettent d’utiliser un câble
d’enceinte standard pour le raccordement du caisson de sous-graves.
Pour utiliser ces connexions, le câble d’enceinte doit se terminer par une
prise de type banane.
REMARQUE : la configuration de la commande du Filtre de passe
basse est appliquée au signal reçu par ces entrées.
7. Entrée niveau de ligne (gauche/droite)
L’entrée de niveau de ligne permet d’utiliser Main-Out ou Pre-Out sur
votre préamplificateur ou récepteur pour le raccordement du caisson
de sous-graves.
REMARQUE : la configuration de la commande du Filtre de passe
basse est appliquée au signal reçu par ces entrées.
8. Entrée niveau de ligne (gauche/droite)
L’entrée de niveau de ligne LFE permet d’utiliser LFE Out/Sub-Out sur
votre préamplificateur ou récepteur pour le raccordement du caisson
de sous-graves.
REMARQUE : le filtre de passe basse doit être réglé à Bypass
(contournement). Les signaux LFE sont commandés à partir de votre
préamplificateur ou récepteur.
COMMANDES ET CONNEXIONS :
Defiance V8 (suite)
Page 64

paradigm.com
28
9. Raccordement de l’alimentation CA
Le cordon d’alimentation IEC doit être fermement inséré dans la prise
d’alimentation CA située sur le panneau arrière du caisson de sousgraves. Il doit ensuite être branché dans une prise murale CA.
REMARQUE : le caisson de sous-graves est également doté d’un
capteur de signal d’alimentation électrique qui s’éteint automatiquement
si aucun signal musical n’est capté pendant plusieurs minutes (cela se
produira lorsque l’interrupteur d’alimentation est réglé à « Auto »).
MISE EN GARDE : le cordon d’alimentation ne
doit pas être installé, enlevé ou laissé détaché du
caisson de sous-graves lorsque l’autre extrémité
est raccordée à une source d’alimentation CA.
Page 65

29
Pour effectuer le réglage fin du Paradigm Defiance V10 ou V12, vous
aurez besoin de l’application Paradigm Subwoofer App.
Vous pouvez la télécharger à partir d’Apple App Store ou de Google
Play Store. Vous pouvez effectuer tous les ajustements à l’aide de cette
application.
CONSEIL : les étapes de réglage ci-dessous peuvent être utilisées comme
guide lorsque vous ajustez les paramètres par l’entremise de l’application.
Les commandes de l’application correspondent aux descriptions et aux
fonctions décrites dans “Réglage des commandes du caisson de
sous-graves” (voir pages 30 et 31).
Une fois que les enceintes sont placées dans la pièce, que la distance des
enceintes est établie et que les niveaux d’enceinte ont été calibrés par l’entremise
du processeur ou du récepteur A/V, il est temps de faire un réglage fin.
Lorsque vous effectuez le réglage fin de votre caisson de sous-graves pour
l’intégrer de la meilleure façon au reste de votre système, utilisez des contenus
musicaux et vidéo que vous connaissez bien. Ces contenus doivent comprendre
des sélections avec des graves étendues de nature continue ou répétitive.
Évaluez la sortie des graves du caisson de sous-graves pour obtenir la meilleure
intégration avec vos enceintes principales. Les graves ne doivent pas être
envahissantes ou attirer l’attention sur elles, et elles ne doivent pas être minces
ou difficiles à entendre. Elles doivent ajouter du « poids » et du « punch » au son
général et suivre le rythme des enceintes principales.
Si vous utilisez un
préamplificateur ou récepteur
pour régler les points de
répartiteur, commencez avec 80Hz et ajustez le Filtre de passe basse (Low
Pass Filter) en fonction des instructions sur la commande du Filtre de passe
basse dans
“Réglage des commandes du caisson de sous-graves”
(voir pages 30 et 31).
Si vous utilisez un
préamplificateur ou récepteur
avec commandes de ton,
réglez-les à plat (c.-à-d. : 0) et éteignez les commandes d’intensité sonore
(loudness).
Certaines positions de caisson de sous-graves peuvent entraîner des
annulations de basse fréquence. Si le son des graves est disloqué ou faible,
réglez la Phase conformément aux instructions de commande de l’alignement
de la Phase qui suivent dans
“Réglage des commandes du caisson de
sous-graves”
(voir pages 30 et 31).
RÉGLAGES FIN :
Defiance V10/V12
RÉGLAGES FIN :
Defiance V8
Page 66

paradigm.com
30
1. Tournez la commande Level (niveau) entièrement dans le sens
antihoraire jusqu’à son minimum.
2. DEFIANCE V8 UNIQUEMENT : Tournez la commande Low
Pass Filter (Filtre de passe basse) à sa fréquence la plus élevée
(c.-à-d. : Bypass (contournement)).
3. Écoutez un contenu de musique ou vidéo avec des graves en étant
assis dans votre aire d’écoute principale et demandez à un assistant
d’augmenter la commande Level (niveau) jusqu’à ce que vous
entendiez clairement le caisson de sous-graves.
4. Tournez la commande Level (niveau) entièrement dans le sens
antihoraire jusqu’à son minimum.
5. Tournez lentement la commande Level (niveau) jusqu’à ce que vous
obteniez un jumelage entre le volume du caisson de sous-graves et
le volume de vos enceintes avant. Les graves doivent être clairement
audibles, mais pas intrusives.
REMARQUE : Si vous avez un calibreur de niveau de pression
acoustique, réglez-le à 80, LENT et pondéré à C. Ensuite, activez les
tonalités de test du caisson de sous-graves sur votre préamplificateur ou
récepteur. Répétez l’étape 7 jusqu’à ce que le calibreur indique 75dB.
RÉGLAGE DES COMMANDES DU
CAISSON DE SOUS-GRAVES
(Répartiteur réglé par l’entremise du
préamplificateur ou récepteur)
Page 67

31
1. Tournez la commande Level (niveau) entièrement dans le sens
antihoraire jusqu’à son minimum.
2. DEFIANCE V8 UNIQUEMENT : Tournez la commande Low Pass
Filter (Filtre de passe basse) à sa fréquence la plus élevée (c.-à-d.
: Bypass (contournement)).
3. Écoutez un contenu de musique ou vidéo avec des graves en étant
assis dans votre aire d’écoute principale et demandez à un assistant
d’augmenter la commande Level (niveau) jusqu’à ce que vous
entendiez clairement le caisson de sous-graves.
4. Tournez la commande Level (niveau) entièrement dans le sens
antihoraire jusqu’à son minimum.
5. DEFIANCE V8 UNIQUEMENT :Tournez la commande Low Pass
Filter (Filtre de passe basse) à sa fréquence la plus élevée
(c.-à-d. : 35Hz).
6. Tournez lentement la commande Level (niveau) jusqu’à ce que vous
obteniez un jumelage entre le volume du caisson de sous-graves et
le volume de vos enceintes avant. Les graves doivent être clairement
audibles, mais pas intrusives.
7. DEFIANCE V8 UNIQUEMENT : Tournez lentement la commande
Low Pass Filter (Filtre de passe basse) jusqu’à ce que vous
entendiez la meilleure intégration caisson de sous-graves/enceinte
avant. Si le son est trop mince, vous n’avez pas réglé la fréquence
assez haut; si le son est trop résonant, vous avez réglé la fréquence
trop haut. Ajustez jusqu’à ce que vous trouviez l’équilibre des graves
le plus naturel.
REMARQUE : si vous avez un calibreur de niveau de pression
acoustique, réglez-le à 80, LENT et pondéré à C. Ensuite, activez les
tonalités de test du caisson de sous-graves sur votre préamplificateur ou
récepteur. Répétez l’étape 8 jusqu’à ce que le calibreur indique 75dB.
RÉGLAGE DES COMMANDES DU
CAISSON DE SOUS-GRAVES
(Méthode répartiteur local)
Page 68

paradigm.com
32
Même lorsque les meilleures enceintes sont parfaitement positionnées,
la pièce elle-même peut avoir un effet important sur tout système de son,
et un impact encore plus grand que toute autre composante individuelle.
De nombreuses solutions sont apparues et disparues au fil des années,
mais aucune n’a résolu le problème de la « pièce », jusqu’à l’apparition
de la technologie Anthem Room Correction (ARC).
La technologie ARC est un système de traitement du signal numérique
exclusif qui vous permet d’optimiser de façon rapide et exacte le
rendement de votre équipement audio afin de mieux l’adapter aux
paramètres uniques de votre pièce.
En écoutant la signature acoustique de votre pièce, l’ARC peut mettre
au point votre équipement afin de corriger les effets qui nuisent au
rendement (réflexions, résonances, ondes stationnaires, etc.) des
différentes surfaces et des autres obstacles dans votre pièce.
L’ARC est facile à utiliser, et quelques étapes simples peuvent optimiser
votre caisson de sous-graves en fonction de votre espace d’écoute
unique. L’ARC est sophistiqué; il s’agit de l’une des technologies de
correction numérique de la pièce parmi les plus précises et détaillées
actuellement disponibles sur le marché. L’ARC fonctionnera également
dans le futur, grâce aux avancées et aux mises à jour constantes
disponibles en téléchargement sur le site Web d’Anthem. À présent, il y
a TROIS façons d’étalonner votre système à l’aide de l’ARC ou de l’ARC
Mobile; chacune de ces méthodes ne prend que quelques minutes.
ARC
MD
(ANTHEM ROOM CORRECTION)
(vendu séparément)
: Defiance V10/V12
UNIQUEMENT
Une véritable solution scientifique aux problèmes de la pièce
IMPORTANT! L’aire d’écoute doit être silencieuse
pendant l’exécution de l’ARC. Un ventilateur
d’ordinateur bruyant, un lave-vaisselle ou un four
à micro-ondes en marche, etc. peuvent avoir un
effet négatif sur les mesures de l’ARC.
Page 69

33
FACILE
Exigences :
• Appareil iOS
• Application ARC Mobile
Téléchargez l’application ARC Mobile d’Anthem sur un appareil iOS.
Cette méthode utilise le microphone intégré de votre appareil iOS pour
les mesures.
Cette méthode vous offre une démarche étape par étape par l’entremise
de l’application.
INTERMÉDIAIRE
Méthode pour les utilisateurs de périphériques Apple iOS
Exigences :
• Appareil iOS
• Application ARC Mobile
• Microphone universel ARC
(vendu séparément — consultez votre revendeur Paradigm pour
plus de détails)
Téléchargez l’application ARC Mobile d’Anthem sur un appareil iOS.
Lancez l’application ARC et choisissez « ARC Universal Microphone »;
branchez le câble 3,5 mm fourni de votre appareil iOS au microphone
universel ARC pour prendre les mesures.
Cette méthode vous offre une démarche étape par étape par l’entremise
de l’application.
Méthode pour les utilisateurs de périphériques Android
Exigences :
• Appareil Android
• Application ARC Mobile
• Microphone universel ARC
(vendu séparément — consultez votre revendeur Paradigm pour
plus de détails)
ARC
MD
(ANTHEM ROOM CORRECTION)
(vendu séparément)
: Defiance V10/V12
UNIQUEMENT
(suite)
Page 70

paradigm.com
34
• OTG USB Adapter
(vendu séparément — consultez votre revendeur Paradigm pour
plus de détails)
Download Anthem’s ARC Mobile app to an Android device. Run the
ARC app and connect the USB OTG adapter from your Android device
to the ARC Universal Microphone for measurements.
Cette méthode vous offre une démarche étape par étape par l’entremise
de l’application.
PROFESSIONNEL
Exigences :
• PC Microsoft Windows
• Logiciel ARC pour PC
• Microphone universel ARC
(vendu séparément — consultez votre revendeur Paradigm pour
plus de détails)
Téléchargez et installez le logiciel ARC d’Anthem sur votre PC Windows.
Branchez le microphone ARC pour PC étalonné ou le microphone ARC
universel à votre PC Windows, puis branchez votre enceinte ou vos
appareils électroniques compatibles ARC avec un deuxième câble USB
ou par une connexion réseau.
Après avoir lancé les mesures, vous pouvez personnaliser les résultats,
établir des configurations multiples et imprimer les graphiques de courbe
de correction.
Page 71

35
Les caissons de sous-graves Paradigm : Les caissons de sous-
graves Paradigm mentionnés dans ce manuel sont garantis contre les
défauts de matériaux et de fabrication pendant une période de trois (3)
ans à compter de la date d’achat du matériel neuf.
Durant cette période, la réparation, le remplacement ou le réglage de
pièces pour des défauts de matériaux ou de fabrication ne seront pas à
la charge du premier acheteur.
Système sans fil Defiance WT (vendu séparément): Vous trouverez
des détails sur la garantie du
système sans fil Defiance WT
dans le
manuel de l’utilisateur du
système sans fil Defiance WT
.
Les dommages causés par l’exposition abusive à la chaleur ou l’usage
abusif ne sont pas couverts par la présente garantie.
Restrictions :
• La garantie entre en vigueur à la date d’achat d’origine chez un
revendeur autorisé Paradigm seulement. La garantie n’est pas
transférable.
• La garantie s’applique au produit pour une utilisation résidentielle
normale uniquement. Si le produit est assujetti à l’une des conditions
définies dans le paragraphe suivant, la garantie est nulle.
• La garantie ne s’applique pas à un usage commercial ou
professionnel. La garantie est annulée si :
• Le produit est assujetti à un usage abusif (accidentel ou intentionnel);
• Le produit est utilisé avec du matériel défectueux ou inadéquat;
• Le produit est soumis à des signaux électriques dommageables, un
transport dangereux, des dommages mécaniques ou toute autre
condition anormale;
• Le produit (y compris le boîtier) est altéré ou endommagé lors d’une
réparation non autorisée;
• La plaque du numéro de série de l’enceinte est enlevée ou défigurée.
Responsabilités du propriétaire :
• Apporter un soin et un entretien normaux et raisonnables;
• Fournir ou assumer les frais de transport jusqu’à l’atelier de
réparation;
GARANTIE LIMITÉE
Page 72

paradigm.com
36
• Fournir une preuve d’achat (conserver le reçu fourni lors de
l’achat par le revendeur autorisé Paradigm). Si une réparation est
nécessaire, contacter le revendeur autorisé Paradigm, Paradigm
Electronics Inc. ou le distributeur à l’étranger (à l’extérieur du
Canada et des États-Unis) pour planifier l’envoi prépayé de
l’appareil défectueux. Consulter le site Web www.paradigm.com
pour plus d’information. Paradigm Electronics inc. se réserve le
droit d’améliorer la conception de tout produit sans obligations de
modifier tout produit déjà fabriqué. La présente garantie tient en
lieu et place de toute autre garantie, explicite ou implicite, de qualité
marchande et d’adéquation pour tout usage particulier, et ne peut
être élargie ou étendue par quiconque. Paradigm Electronics inc. et
ses représentants ou agents ne peuvent pas être tenus responsables
de dommages découlant de l’utilisation de ces produits en aucun
cas. Dans les territoires où une réglementation spécifique interdit
une telle limitation de la responsabilité, cette exclusion ne s’applique
pas. Conserver le présent manuel et le reçu comme preuve d’achat
et de garantie.
 Loading...