


OWNERS MANUAL

IMPORTANT: Please read before wall mounting speakers.
Wall mount speakers securely enough that they cannot fall and cause
personal injury or damage to property. Use safety straps (if included).
Detailed information on attaching the safety straps is included in the
section on Wall Mounting later in the manual.
Paradigm DOES NOT supply hardware for mounting speakers to the
wall. Hardware shown in this manual is for example only and will vary
depending on the wall type. Always use screws appropriate for wall type
and weight of speakers.
If installing into drywall, install into 1/2˝ (13 mm) or 5/8˝ (16 mm) drywall
only. Screws must be long enough to go through anchor bolts
supplied)
NON LIABILITY: We are aware that the wall-mounting assemblies provided for
Cinema speakers could be used for purposes and in ways other than those for which
they were intended. The manufacturer, distributor, retailer and their respective
agents cannot be held responsible or liable for injuries or property damage—direct,
indirect or consequential—arising from the use of or inability to use these products
safely and properly. Every effort has been made to provide accurate, error-free
installation instructions. Paradigm Electronics Inc. disclaims liability for difficulties
that may arise from the misinterpretation of information contained in these
instructions.
and firmly into drywall (see inset circle, page 12).
(not
RECYCLING AND REUSE GUIDELINES (Europe)
In accordance with the European Union WEEE (Waste Electrical and Electronic Equipment) directive effective August 13, 2005, we would like to notify you that our speakers may contain
regulated materia ls which, upon d isposal, require special reuse and recycling processing. For this reason Paradigm Electronics Inc. (the manufacturer of Paradigm speakers and Anthem
electronic products) has arranged with its distributors in European Union member nations to collect and recycle this product at no cost to you. To find your local distributor please contact
the dealer from whom you purchased this product or go to our website at www.paradigm.com.
Please note that only the product falls under the WEEE directive. When disposing of packaging and other shipping material we encourage you to recycle through the normal channels.
Paradigm Electronics Inc. 205 Annagem Blvd., Mississauga, ON Canada L5T 2V1 032511
1

Thank you for choosing award-winning Cinema™speakers and congratulations. You are
about to hear the difference these sonically accurate speakers will make in your music and
home theater system. They are the product of countless hours of comprehensive research and
development and will reward you with exceptional sound for many years.
To ensure proper installation please read this manual and follow all instructions. If you have
further questions contact your Authorized Paradigm
®
Dealer or visit the Q&A page on our
website at www.paradigm.com.
TABLE OF CONTENTS
Your New Speakers . . . . . . . . . . . . . . . . . . . . . . . . . . . . . . . . . . . . . . . . . . . . . . . . . . . . . . . . . . . . . . 3
How to Avoid Speaker Damage . . . . . . . . . . . . . . . . . . . . . . . . . . . . . . . . . . . . . . . . . . . . . . . . . . . . 3
Speaker Placement . . . . . . . . . . . . . . . . . . . . . . . . . . . . . . . . . . . . . . . . . . . . . . . . . . . . . . . . . . . . . . 3
Stand Mounting . . . . . . . . . . . . . . . . . . . . . . . . . . . . . . . . . . . . . . . . . . . . . . . . . . . . . . . . . . . . . . . . . . 6
Wall Mounting . . . . . . . . . . . . . . . . . . . . . . . . . . . . . . . . . . . . . . . . . . . . . . . . . . . . . . . . . . . . . . . . . . . 8
Speaker Connection . . . . . . . . . . . . . . . . . . . . . . . . . . . . . . . . . . . . . . . . . . . . . . . . . . . . . . . . . . . . . 13
Troubleshooting Guide . . . . . . . . . . . . . . . . . . . . . . . . . . . . . . . . . . . . . . . . . . . . . . . . . . . . . . . . . . . 14
Technical Specifications . . . . . . . . . . . . . . . . . . . . . . . . . . . . . . . . . . . . . . . . . . . . . . . . . . . . . . . . . . . 15
Limited Warranty . . . . . . . . . . . . . . . . . . . . . . . . . . . . . . . . . . . . . . . . . . . . . . . . . . . . . . . . . . . . . . . 17
2

YOUR NEW SPEAKERS
Paradigm Cinema speakers are ideally suited to a variety of lifestyle applications. They are designed to
allow easy installation throughout your home. To ensure the best performance possible we strongly
recommend that you observe the placement guidelines provided in the “Speaker Placement” section.
Cleaning
Do not use a strong or abrasive cleaner on your speakers. Clean them with a soft damp cloth but do not
get them wet.
On Stands or Wall Mounting
We include tabletop/shelf stands (supports) and wall-mounting brackets for Cinema speakers (varies
by model). See the illustrations later in the manual for how to mount them to stands and wall brackets.
Paradigm floorstanding stands are also available for your new Cinema100s at an additional charge (see
your dealer for more information).
IMPORTA
straps (if included) as secondary restraints.
NT! If wall mounting take extra care during the installation process—always use the safety
HOW TO AVOID SPEAKER DAMAGE
Use an appropriate amplifier. At high volumes, a very powerful amplifier can overdrive your speakers
and damage them. On the other hand, if your amplifier isn’t powerful enough, it can produce clipping
distortion that can easily damage high-frequency dri
Don’t be fooled by your amplifier’s volume control. It adjusts listening level—it does not indicate
power output. If your speakers begin to sound harsh or grating, or if you hear the bass breaking up turn
the volume down immediately or you will damage your speakers! This type of damage constitutes
abuse and is not covered by warranty!
Tone controls and equalizers can demand e
which it produces clipping distortion. Use them sparingly, if at all, and do not use them when listening
at loud levels.
vers (see dealer).
ven more power from an amplifier, lowering the point at
SPEAKER PLACEMENT
The following placement guidelines will help you get the best performance from your Cinema speakers.
Ilustrations showing you how to attach speakers to stands and wall-mounting brackets are provided in
the section following this one. For the Cinema™Trio, follow placement instructions provided in the
illustration on page 5.
Front Speakers (Left/Right)
On the Stands (See illustration opposite)
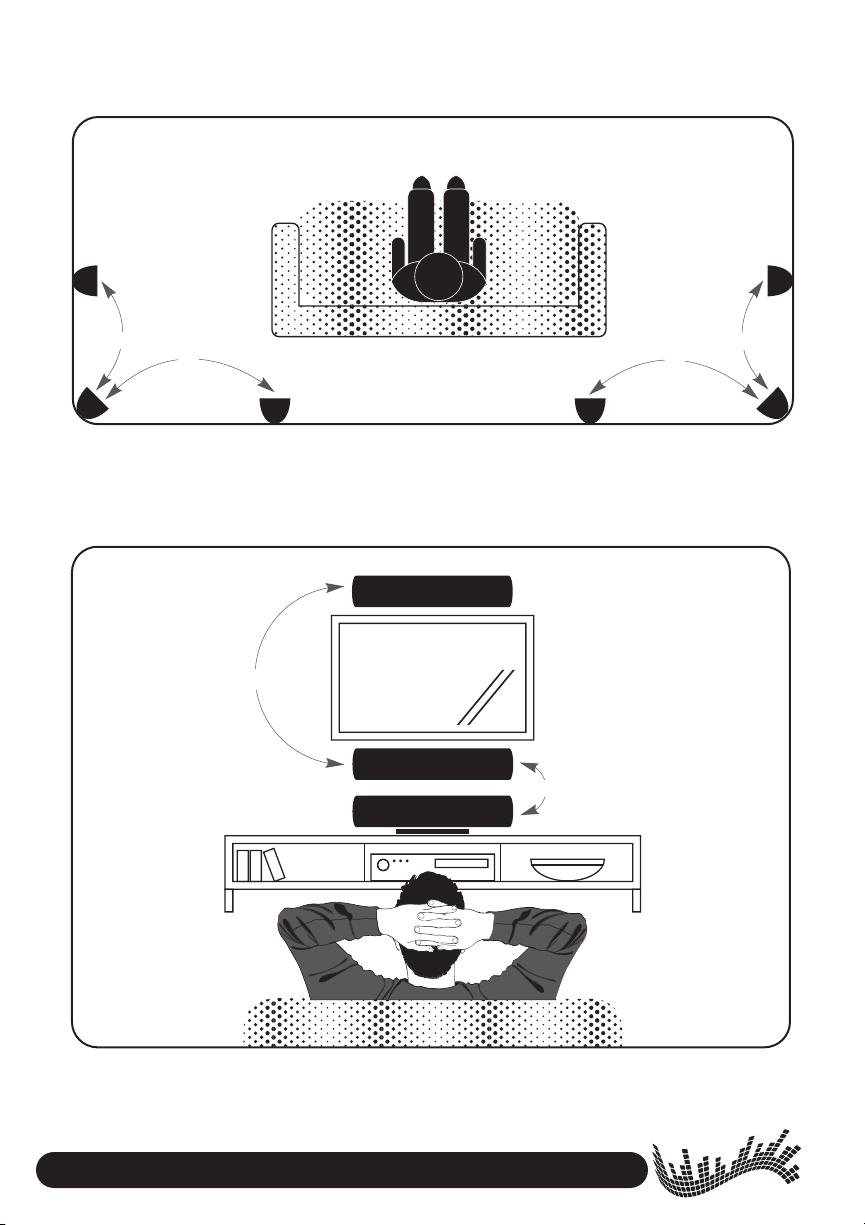
For the most accurate timbral balance, place your front speakers so that their high-frequency drivers
(tweeters) point toward the listening area and sound arrives at approximately ear level.
On the Wall (See illustration opposite)
Follow the placement directions provided in the paragraph above.
3

Center Speaker
On the Stand (see illustration below)
Place the center speaker on its stand below the display so that sound arrives as close to ear level as
possible. The speaker should sit about the same distance away from the listening area as the front speakers.
(Some receivers and processors electronically adjust for differences in distance between speakers… check to
see if yours does.)
On the Wall (see illustra
tion below)
Place the center speaker above or below the display, whichever position brings sound closest to ear
level. It should sit about the same distance away from the main listening areas as the front speakers. (See
note above about electronic adjustments for distance.)
CINEMA™100, 200 & 400
OR
OR
OR
OR
Cinema™200/400
Left/Right speakers are
wall mountable only.
Surround and Rear Speakers
When used as surround/rear speakers, Cinema speakers should be kept well away from the listening
area for optimal surround-sound performance (as shown on next page). They can be placed on stands
(supports) or on the wall, following the assembly directions provided for the appropriate model.
5.1 Surround Configuration
(5.1 requires 5 speakers plus a subwoofer)
Position speakers on each side, corner, or rear of the listening area as shown on next page.
7.1 Surround Configuration
(7.1 requires 7 speakers plus a subwoofer)
Position one surround speaker on each side or corner of the listening area as shown on the next page.
Position additional rear speakers behind the listening area—one slightly to the right, the other slightly to
the left, also as shown on next page.
4

SPEAKER PLACEMENT (CONTINUED)
Surround and rear configurations shown
OROR
OR
In a 7.1 configuration, choose side
OR
OR
or corner position for surrounds.
Rears should be positioned as shown.
Cinema Trio (Front/Left/Center speakers in one unit)
Place the speaker above or below the display, whichever position brings sound closest to ear level. If also
using surround/rear speakers follow the directions for correct placement provided earlier.
OR
OR
5

STAND MOUNTING (ALL HARDWARE INCLUDED)
Push down on terminal clips to
allow wire access. Connect wires
before attaching stand.
CINEMA™100
6

STAND MOUNTING (CONTINUED)
Stand is only used when speaker
is in a horizontal configuration
Stands are only used when speaker
is in a horizontal configuration
CINEMA™200 & 400
Self-adhesive bumper pads
CINEMA™TRIO
Self-adhesive bumper pads
7

WALL MOUNTING
3.258"
If you are not comfortable performing the following procedures, have a professional perform
the installation (see your Authorized Paradigm®Dealer about hiring a professional).
Vertical:
Speakers tilt left/right
to further improve
stereo imaging
CINEMA™100
Horizontal:
Speaker tilt up/down
for optimal dialog clarity
Assemble all parts before moving to Step 3
Attach bracket to wall
(screws not supplied)
Step 1
Do not tighten completely
with allen key until
you adjust for
desired angle
Step 3Step 2
8

WALL MOUNTING (CONTINUED)
WIRING INSIDE THE WALL
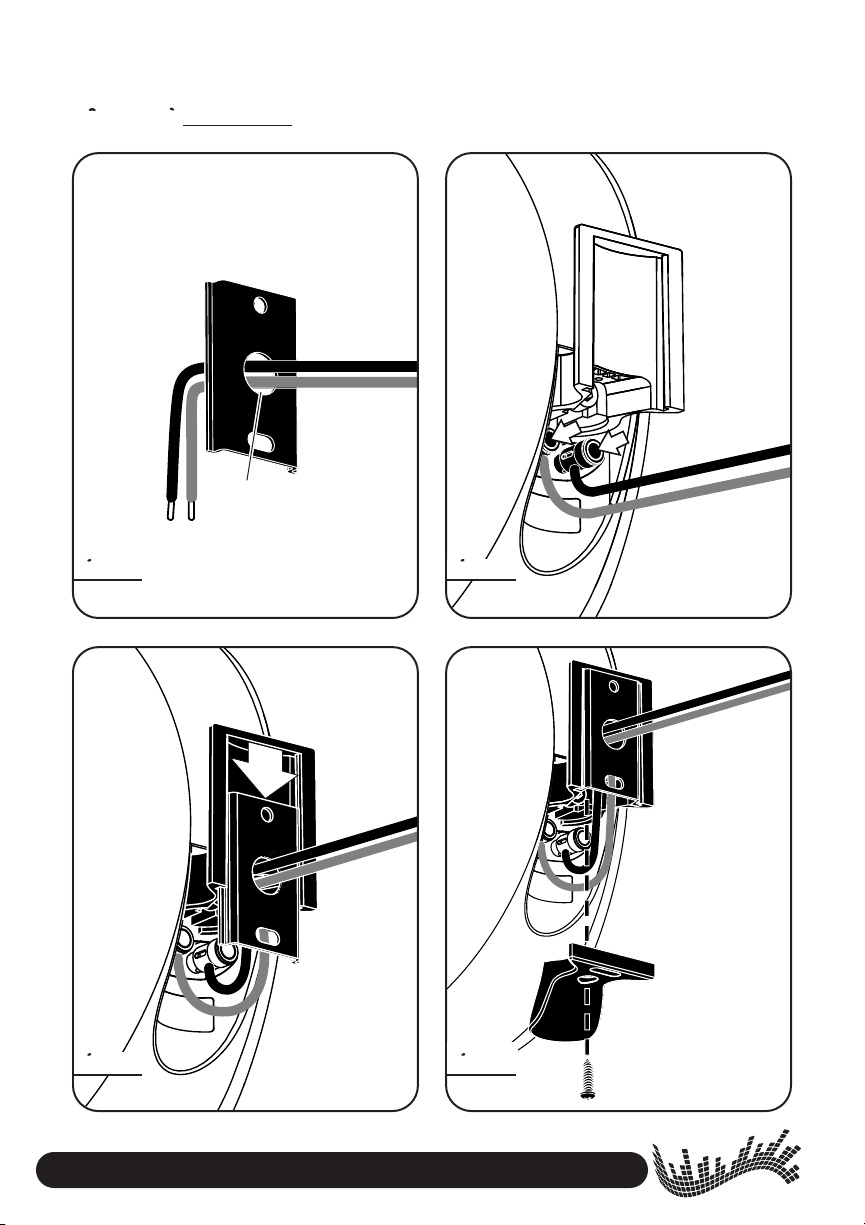
Snake wires from
inside wall through
hole in bracket
Step 4
Step 4
Step 4Step 5
Push down on
terminal clips to
allow wire access
Step 5 Step 6
Step 6 Step 7
9
Attach locking
cover to bracket
and screw in

WIRING ALONG THE WALL
Snake wires
through hole
in locking cover
Step 4Step 4 Step 4Step 5
Push down on
terminal clips to
allow wire access
Step 6 Step 7
Attach locking
cover to bracket
and screw in
10

WALL MOUNTING (CONTINUED)WALL MOUNTING (CONTINUED)
VERTICAL MOUNTING
FOR CINEMA™200, 400 & TRIO
HORIZONTAL MOUNTING
FOR CINEMA
™
200, 400 & TRIO
Wall screws not supplied
NOTE: This step is for
Position bracket vertically
on wall as shown, then
follow the steps for
horizontal positioning.
Step 1
positioning only. Screws
will be removed in next
step to allow installation of
additional anchor bolts
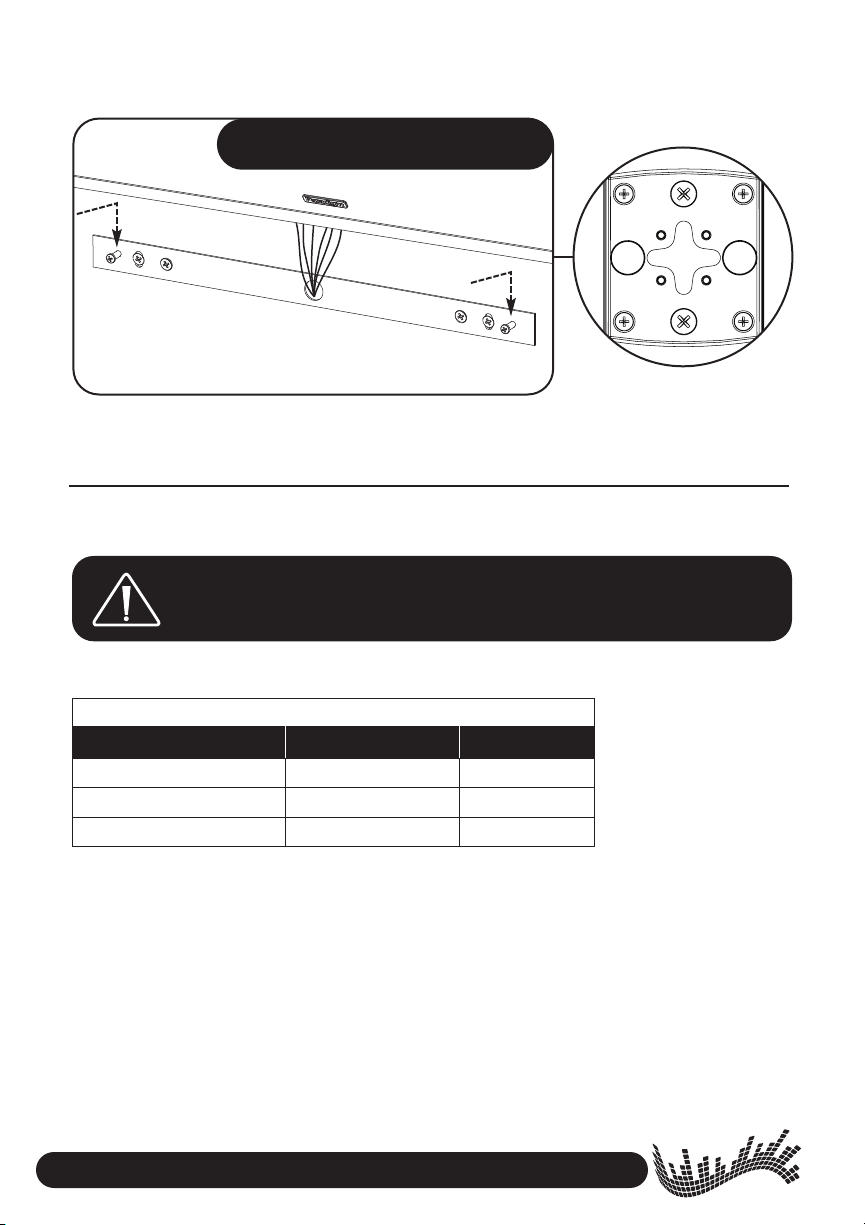
Position bracket and ensure it is level. Mark the two center screw holes. Drill pilot holes, then press
anchor bolts firmly into drywall and screw in. Follow with flathead screws: DO NOT SCREW ALL THE
WAY IN AT THIS POINT—leave screw heads protruding slightly.
Step 2
WARNING! For stability, all four
screws MUST be used
Bracket is slotted (see illustration), to allow further adjustment up or down, if necessary. Re-check to
ensure bracket is level. Mark inner screw holes.
11

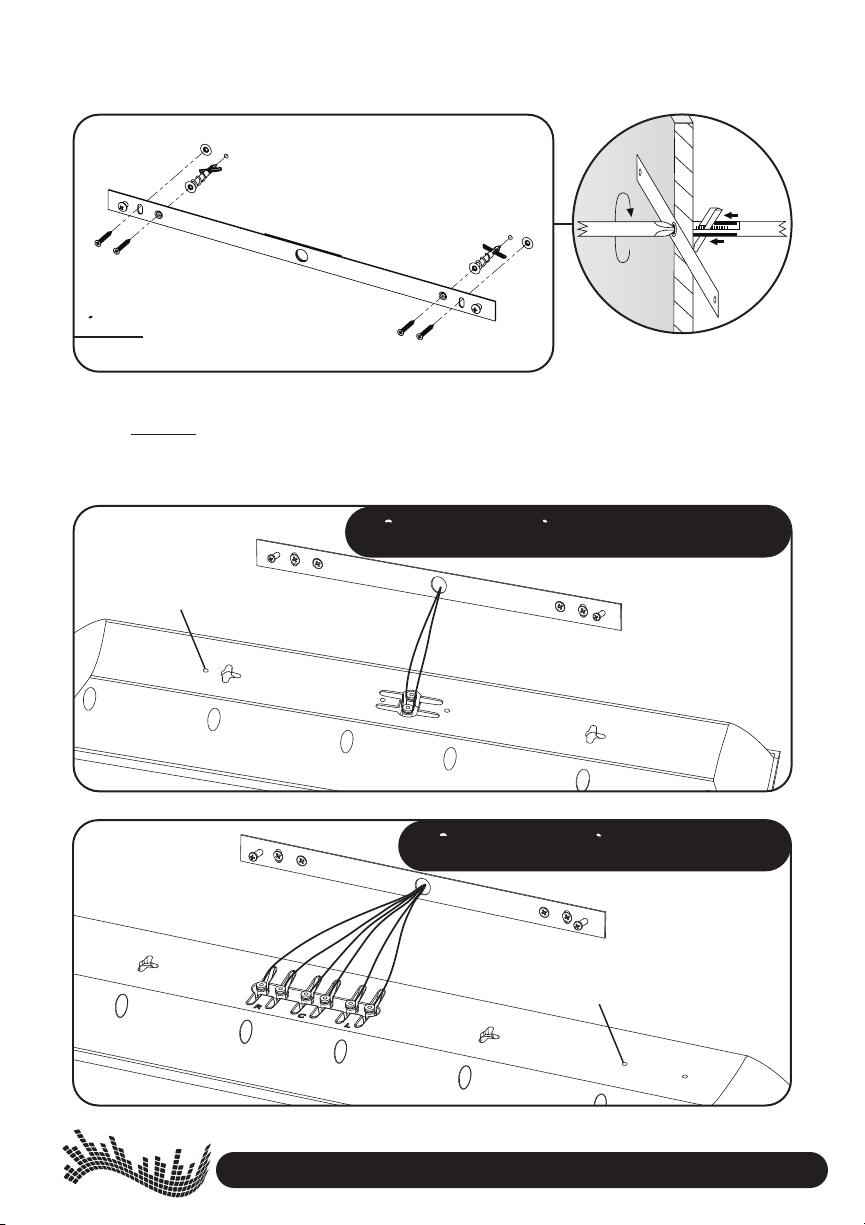
Step 3
Remove the two flathead screws (not shown). Drill inner pilot holes,
then press anchor bolts firmly into drywall and screw in. Now insert
all four flathead screws and tighten.
CINEMA™200 & 400 WIRING
Safety strap
attaches here
CINEMA™TRIO WIRING
WARNING! All screws must
be inserted straight and fully
tightened to ensure correct
operation of anchor bolts.
Safety strap
attaches here
12
WALL MOUNTING (CONTINUED)
CINEMA™200, 400 & TRIO
Align keyhole slots (see inset) on rear of speaker with protruding screw heads on the bracket, then using
an “in and down” motion mount speaker on bracket.
SPEAKER CONNECTION
3.258"
Turn your amplifier OFF before connecting speakers. This will avoid damage
which could result from accidental shorting of speaker cables.
The following chart identifies the minimum gauge requirements for various cable lengths:
MINIMUM GAUGE REQUIREMENTS
LENGTH DIAMETER GAUGE
Under 4.5 m (15 ft) 1.3 mm (0.05 in) 16 awg
Under 9 m (30 ft) 1.6 mm (0.06 in) 14 awg
Over 9 m (30 ft) 2.0 mm (0.08 in) 12 awg
Your speakers are equipped with binding posts that can be used with pin connectors, as well as with
bare wire. Refer to the diagram below and using high-quality speaker cable (see your dealer), connect
one speaker at a time to your receiver/amplifier. Connect the red (+) amplifier terminal to the red (+)
speaker terminal and the black (–) to the black (–) (see next page). Push binding posts to secure.
Turn your amplifier on and listen to your speakers. If you notice a complete lack of mid-bass and a
dislocated image, one or more of your speakers may be connected out-of-phase (their polarity is
reversed). Re-check to ensure that each speaker’s cable is connected with correct polarity: red (+) to
red (+) and black (–) to black (–). Make sure wires are firmly fastened. Push binding posts to secure.
13

CINEMA™100, 200 & 400
TROUBLESHOOTING GUIDE
CINEMA™TRIO
PROBLEM
No Sound
No Sound
from One or
More Speakers
Lack of Bass or
Dislocated Image
SOLUTION
Make sure receiver, preamp or amplifier is plugged in and turned on.
•
Check power outlet at the wall is working.
Are headphones plugged in, or is the system on Mute?
•
Re-check all connections.
•
• Check your balance control or VC-150 Volume Control (if using).
• Check that all power cords are properly plugged in and functioning
Swap a non-working speaker with one that works to determine if the
•
problem is with the speaker or something else (i.e. wiring, amplifier).
• One or more speakers may be connected out of phase (their polarity
is reversed).
• Re-check to ensure that each speaker’s cable is connected with correct
polarity: red (+) to red (+) and black (-) to black (-).
14

TECHNICAL SPECIFICATIONS
CINEMA™100 CINEMA™200
Design
Crossover(s)
High-Frequency Driver(s)
Bass / Midrange Driver(s)
Bass Driver(s)
Low-Frequency Extension*
Frequency Response:
On-Axis
30˚ Off-Axis
Sensitivity – Room / Anechoic
2-driver, 2-way acoustic suspension,
stand-mounted / wall-mounted
2nd-order electro-acoustic
at 1.8 kHz
25-mm (1 in) S-PAL
™
satinanodized pure-aluminum dome,
ferro-fluid damped and cooled
90-mm (3-1/2 in) mineral-filled
polypropylene cone, 25-mm (1 in)
high-temperature voice coil,
oversize ceramic / ferrite magnets
n/a
85 Hz (DIN)
±2 dB from 125 Hz – 20 kHz
±2 dB from 125 Hz – 15 kHz
88 dB / 85 dB
3-driver, 2-way LCR, acoustic
suspension, on-wall with option to
sit center speaker on a table or
shelf with supports included
2nd-order electro-acoustic
at 1.8 kHz
™
25-mm (1 in) S-PAL
satinanodized pure-aluminum dome,
ferro-fluid damped and cooled
Two 90-mm (3-1/2 in) mineralfilled polypropylene cones, 25-mm
(1 in) high-temperature voice coil,
oversize ceramic / ferrite magnets
n/a
80 Hz (DIN)
±2 dB from 120 Hz – 20 kHz
±2 dB from 120 Hz – 15 kHz
90 dB / 87 dB
Suitable Amplifier Power Range
Maximum Input Power
†
Impedance
Dimensions (h x w x d)
Weight (unpacked)
Finishes
15
15 – 100 watts
50 watts
Compatible with 8 ohms
21.2 cm x 12.2 cm x 15.7 cm
8-3/8 in x 4-13/16 in x 6-3/16 in
1.8 kg / 4.0 lb per speaker (with stand)
Black Gloss
15 – 150 watts
70 watts
Compatible with 8 ohms
50.5 cm x 16.1 cm x 10.4 cm
19-7/8 in x 6-5/16 in x 4-1/16 in
3.7 kg / 8.3 lb per speaker
Black Gloss

CINEMA™400 CINEMA™TRIO
Design
Crossover(s)
High-Frequency Driver(s)
Bass / Midrange Driver(s)
Bass Driver(s)
Low-Frequency Extension*
Frequency Response:
On-Axis
30˚ Off-Axis
Sensitivity – Room / Anechoic
5-driver, 2-1/2-way LCR, acoustic
suspension, on-wall with option to
mount center configuration on
table or shelf
2nd-order electro-acoustic at 2.1
kHz; 2nd-order electro-acoustic
a
t 500 Hz (bass drivers)
25-mm (1 in) S-PAL™satinanodized pure-aluminum dome,
ferro-fluid damped and cooled
Two 90-mm (3-1/2 in) mineralfilled polypropylene cones, 25-mm
(1 in) high- temperature voice coil,
oversize ceramic / ferrite magnets
Two 90-mm (3-1/2 in) mineralfilled polypropylene cones, 25-mm
(1 in) high- temperature voice coil,
oversize ceramic / ferrite magnets
75 Hz (DIN)
±2 dB from 115 Hz – 20 kHz
±2 dB from 115 Hz – 15 kHz
95 dB / 92 dB
All-in-one left / right / center:
7-driver, 3-channel, 2-way,
acoustic suspension
2nd-order electro-acoustic
at 1.8 kHz
™
Three 25-mm (1 in) S-PAL
satinanodized pure-aluminum domes,
ferro-fluid damped and cooled
Four 90-mm (3-1/2 in) mineralfilled polypropylene cones, 25-mm
(1 in) high- temperature voice coil,
oversize ceramic / ferrite magnets
n/a
85 Hz (DIN)
±2 dB from 125 Hz – 20 kHz
±2 dB from 125 Hz – 15 kHz
89 dB / 86 dB
Suitable Amplifier Power Range
Maximum Input Power
†
Impedance
Dimensions (h x w x d)
15 – 200 watts
100 watts
Compatible with 8 ohms
67.0 cm x 16.1 cm x 10.4 cm
26-3/8 in x 6-5/16 in x 4-1/16 in
Weight (unpacked)
Finishes
*
DIN 45 500 Indicates -3 dB in a typical listening room.
†
With typical program source, provided the amplifier clips no more than 10% of the time.
5.8 kg / 12.8 lb per speaker
Black Gloss
15 – 150 watts
70 watts per channel
Compatible with 8 ohms
16.1 cm x 91.5 cm x 10.4 cm
6-5/16 in x 36 in x 4-1/16 in
7.6 kg / 16.8 lb per speaker
Black Gloss
16

LIMITED WARRANTY
Paradigm®speakers covered in this manual are warranted to be and remain free of manufacturing
and/or material defects for a period of five (5) years from the date of original purchase.
Within the time periods specified, repair, replacement or adjustment of parts for manufacturing and/or
material defects will be free of charge to the original owner.
Thermal Or Mechanical Abuse/Misuse Is Not Cove
red Under Warranty.
Limitations:
®
• Warranty begins on date of original retail purchase from an Authorized Paradigm
Dealer only. It is
not transferable
• Warranty applies to product in normal home use only. If product is subjected to any of the
conditions outlined in the next section, warranty is void
• Warranty does not apply if the product is used in professional or commercial applications
Warra
nty is Void if:
• The product has been abused (intentionally or accidentally)
• The product has been used in conjunction with unsuitable or faulty equipment
• The product has been subjected to damaging signals, derangement in transpor t, mechanical
damage or any abnormal conditions
• The product (including cabinet) has been tampered with or damaged by an unauthorized
service facility
• The serial number has been remove
d or defaced
Owner Responsibilities:
• Provide normal/reasonable operating care and maintenance
• Provide or pay for transportation charges for product to service facility
• Provide proof of purchase (your sales receipt given at time of purchase from your Authorized
Paradigm
Should servicing be required, contact your nearest Authorized Paradigm
®
Dealer must be retained for proof-of-purchase date)
®
Dealer, Paradigm Electronics
Inc. or Import Distributor (outside the U.S. and Canada) to arrange, bring in or ship prepaid, any defective
unit. Visit our website, www.paradigm.com for more information.
Paradigm Electronics Inc. reserves the right to improve the design of any product without assuming any
obligation to modify any product previously manufactured.
This warranty is in lieu of all other warranties expressed or implied, of merchantability, fitness for any
particular purpose and may not be extended or enlarged by anyone. In no event shall Paradigm
Electronics Inc., their agents or representatives be responsible for any incidental or consequential
damages. Some jurisdictions do not allow limitation of incidental or consequential damages, so this
exclusion may not apply to you.
Retain this manual and your sales receipt for proof of warranty term and proof of purchase.
17

MODE D’EMPLOI
C
M
IMPORTANT : veuillez lire cette section avant de monter les enceintes
sur un mur.
Fixez les enceintes de façon sécuritaire pour ne pas qu’elles tombent
et causent des blessures ou des dommages. Lorsque vous les monter
sur un mur, vous devez utiliser des courroies de sécurité
(ci comprises)
dans le manuel.
Paradigm NE FOURNIT PAS le matériel pour monter les enceintes sur
un mur. Le matériel de montage illustré l’est à titre d’exemple
uniquement; le matériel variera en fonction du type de mur.
Effectuez l’installation dans une cloison sèche de 1/2 po (13 mm) ou de
5/8 po (16 mm) uniquement. Les vis doivent être assez longues pour
traverser les boulons d’ancrage et bien se fixer dans la cloison sèche
(voir
le médaillon, page 12).
NON-RESONSABILITÉ : nous savons que les pièces pour le montage au mur
fournies avec les enceintes Cine
autres que celles pour lesquelles elles sont conçues. Le fabricant, le distributeur, le
revendeur et leurs agents respectifs ne peuvent être tenus responsables de
blessures ou dommages directs, indirects ou consécutifs découlant de l’utilisation
de ces pièces ou de l’incapacité de les utiliser de façon sûre et convenable. Tous
les efforts ont été déployés afin de fournir de
et exemptes d’erreurs. Paradigm Electronics Inc. décline toute responsabilité
concernant des difficultés pouvant découler d’une interprétation incorrecte des
renseignements fournis dans le présent manuel.
ma peuvent être utilisées à des fins et de façons
s instructions d’installation exactes
DIRECTIVES EUROPEENNES SUR LE RECYCLAGE ET LE TRAITEMENT DES DECHETS
Dans le respect de la directive WEEE (Waste Electrical & Electronic Equipment) mise en place par les institutions Européennes à compter du 13 Août 2005, nous souhaitons vous informer
que nos enceintes peut contenir des matières devant faire l’objet d’une procédure de recyclage ou de traitement approprié des déchets. Dans cette optique, Paradigm Electronics Inc
(fabricant des enceintes Paradigm et des électroniques Anthem) avec ses Distributeurs agréés dans l’Union Européenne, ont mis en place une procédure de collecte et de retraitement
gratuite. Pour en savoir davantage sur cette procédure veuillez contacter votre revendeur, ou notre Distributeur dans votre pays (vous en obtiendrez les coordonnées sur simple demande
ou en consultant notre site internet www.paradigm.com).
Notez que seul le produit fini est concerné par cette directive et ses obligations. S’agissant de son emballage et de ses accessoires de transport nous vous recommandons de les recycler
selon les procédures mises en place par votre commune ou votre département.
Paradigm Electronics Inc. 205 Annagem Blvd., Mississauga, ON Canada L5T 2V1 032511
1

Félicitations! Nous vous remercions d'avoir choisi les enceintes primées CinemaMC.
Vous allez entendre la différence que conf rent ces enceintes de pointe haut de gamme à votre
système audio ou de cinéma maison. Elles sont le produit d'innombrables heures de recherche
et de développement approfondis et vous fourniront un son haut de gamme de qualité supérieure
pendant de nombreuses années.
Pour une installation appropriée
Pour toute autre question, contactez un revendeur Paradigm
, veuillez lire le présent manuel et suivre toutes les instructions.
MD
autorisé ou consultez la page
Questions-Réponses de notre site Web au www.paradigm.com.
TABLE DES MATIERES
Vos nouvelles enceintes . . . . . . . . . . . . . . . . . . . . . . . . . . . . . . . . . . . . . . . . . . . . . . . . . . . . . . . . . . . 3
Pour éviter d’endommager les enceintes . . . . . . . . . . . . . . . . . . . . . . . . . . . . . . . . . . . . . . . . . . . . . 3
Positionnement des enceintes . . . . . . . . . . . . . . . . . . . . . . . . . . . . . . . . . . . . . . . . . . . . . . . . . . . . . . 3
Montage sur un pied . . . . . . . . . . . . . . . . . . . . . . . . . . . . . . . . . . . . . . . . . . . . . . . . . . . . . . . . . . . . . . 6
Montage au mur. . . . . . . . . . . . . . . . . . . . . . . . . . . . . . . . . . . . . . . . . . . . . . . . . . . . . . . . . . . . . . . . . . 8
Raccordement des enceintes . . . . . . . . . . . . . . . . . . . . . . . . . . . . . . . . . . . . . . . . . . . . . . . . . . . . . . 13
Guide de dépannage . . . . . . . . . . . . . . . . . . . . . . . . . . . . . . . . . . . . . . . . . . . . . . . . . . . . . . . . . . . . . 14
Spécifications techniques. . . . . . . . . . . . . . . . . . . . . . . . . . . . . . . . . . . . . . . . . . . . . . . . . . . . . . . . . . 15
Garantie limitée . . . . . . . . . . . . . . . . . . . . . . . . . . . . . . . . . . . . . . . . . . . . . . . . . . . . . . . . . . . . . . . . 17
2

VOS NOUVELLES ENCEINTES
Les enceintes Paradigm Cinema conviennent parfaitement à une variété d’applications. Leur taille compacte
permet de les installer facilement partout dans la maison. Pour obtenir le meilleur rendement possible, nous
vous recommandons fortement de respecter les lignes directrices sur le positionnement fournies à la section
« Positionnement des enceintes ». Les supports d'enceinte pleine longueur sont également disponibles avec
vos nouvelles enceintes Cinema 100s; consultez le revendeur pour obtenir de plus amples renseignements.
Nettoyage
N’utilisez pas de nettoyant puissant ou abrasif sur les enceintes. Nettoyez-les avec un linge humide, mais ne
les mouillez pas.
Montage sur un pied ou au mur
Nous incluons des pieds (supports) et des supports de montage au mur pour les enceintes Cinema (qui
varient selon le modèle). Consultez les illustrations plus loin dans ce manuel pour savoir comment monter
les enceintes sur des pieds ou des supports muraux.
IMPORTANT! Si vous montez les enceintes sur un mur, accordez un soin particulier au processus d’installation
– utilisez toujours les courroies de sécurité (ci comprises) à titre de dispositif de retenue secondaire.
POUR EVITER D’ENDOMMAGER LES ENCEINTES
Utiliser un amplificateur adéquat. À volume élevé, un amplificateur trop puissant peut solliciter excessivement
les enceintes et les endommager. Par contre, si l'amplificateur n'est pas assez puissant, il peut provoquer un
écrêtage produisant des distorsions qui peuvent facilement endommager les haut-parleurs de hautes
fréquences (consulter le revendeur).
La commande de volume de l'amplificateur peut être trompeuse
le niveau d'écoute, mais n'indique pas le niveau de puissance. Si le son semble sec ou distordu, ou s'il y a
distorsion des graves, réduire immédiatement le volume pour ne pas endommager les enceintes! Ce type
de dommage est considéré comme un usage abusif, et la garantie ne le couvre pas!
Les commandes de tonalité ou d'égalisation peuvent solliciter encore plus l'amplificateur, réduisant le niveau
uquel il y aura écrêtage. Utiliser ces dispositifs le moins possible, et ne pas les utiliser pour l'écoute à
a
volume élevé.
. puisqu’elle permet seulement d'ajuster
POSITIONNEMENT DES ENCEINTES
Les lignes directrices en matière de positionnement suivantes vous aideront à obtenir le meilleur rendement
de vos enceintes Cinema à rendement élevé. Des illustrations qui vous indiquent comment fixer les enceintes
aux pieds et aux supports muraux sont fournies dans les sections suivantes. Pour le Cinema Trio, suivre les
instructions relatives au positionnement fournies dans l’illustration de la page 5.
Enceintes avant (gauche/droite)
Sur un pied (Voir l’illustration á droit)
Pour obtenir l’équilibre du timbre le plus précis possible, placez vos enceintes avant de façon à ce que les
haut-parleurs d’aigus (tweeters) soient orientés vers l’aire d’écoute et que le son parvienne environ au niveau
des oreilles.
Sur le mur (Voir l’illustration á droit)
Suivez les instructions de positionnement en avant.
3

Enceinte Centrale
Sur un pied (Voir ci-dessous)
Placez l’enceinte centrale sur son pied sous l’écran pour que le son arrive aussi près du niveau des oreilles
que possible. L’enceinte doit être placée environ à la même distance de l’aire d’écoute principale que les
enceintes avant. (Certains récepteurs et processeurs règlent électroniquement les différences de distance entre les
enceintes… vérifiez si le vôtre le fait.)
Sur le mur (Voir ci-dessous)
Placez l’enceinte centrale au-dessus ou au-dessous de l’écran, selon la position qui fait parvenir le son le plus
près du niveau des oreilles. L’enceinte doit être placée environ à la même distance de l’aire d’écoute principale
que les enceintes avant. (Voir la remarque ci-dessus concernant les réglages électroniques de la distance.)
CINEMAMC100, 200 & 400
OU
OU
OU
OU
Les enceintes gauche/
droite Cinema
™
200/400 peuvent
uniquement être
montées sur un mur.
Enceintes ambiophoniques
Lorsqu’elles sont utilisées à titre d’enceintes ambiophoniques/arrière, les enceintes Cinema doivent être
tenues assez loin de l’aire d’écoute pour obtenir un son ambiophonique optimal.
5.1 Configuration ambiophonique
(nécessite cinq enceintes et un caisson de sous-graves)
Placez les enceintes de chaque côté, coin, ou arrière de l’aire d’écoute, tel qu’illustré voir la page suivante.
7.1 Configuration ambiophonique (nécessite sept enceintes et un caisson de sous-graves)
Placez une enceinte de chaque côté ou coin de l’aire d’écoute, tel qu’illustré ci-dessous. Placez les
enceintes additionnelles derrière l’aire d’écoute – une légèrement à droit, l’autre légèrement à gauche,
tel qu’illustré.
4
POSITIONNEMENT DES ENCEINTES (SUITE)
Configurations ambiophonique et arrière illustrées
OROU
OU
Dans une configuration 7.1, choisissez le
positionnement sur le côté ou dans un coin pour
OU
OU
les enceintes ambiophoniques. Les enceintes
arrière doivent être placées, tel qu'illustré.
Cinema Trio (modèle « trois enceintes dans une »)
Placez l’enceinte au-dessus ou au-dessous de l’écran, selon la position qui fait parvenir le son le plus près
du niveau des oreilles.
OU
OU
5

MONTAGE SUR UN PIED (TOUT LE MATERIEL NECESSAIRE EST COMPRIS)
CINEMAMC100
Poussez vers le bas pour permettre
un accès aux câbles. Raccordez les
câbles avant de fixer le support.
6

MONTAGE SUR UN PIED (TOUT LE MATERIEL NECESSAIRE EST COMPRIS)
(SUITE)
Le ou les pieds doivent être utilisés lorsque l’enceinte
est utilisée dans une configuration horizontale
Coussins amortisseur auto-adhésif
Les pieds doivent être utilisés lorsque l’enceinte
est utilisée dans une configuration horizontale
CINEMAMC200 & 400
CINEMAMCTRIO
Coussins amortisseur auto-adhésif
7

MONTAGE AU MUR
3.258"
Consulter les instructions de montage pour votre modèle particulier. Si vous n’êtes pas à l’aise d’exécuter
les procédures suivantes, demandez à un professionnel d’effectuer l’installation (voir votre revendeur).
Vertical :
les enceintes s'inclinent
à gauche/droite pour
améliorer davantage
l'image stéréo
CINEMAMC100
Horizontal :
L’enceinte peuvent
être inclinées vers le
haut/bas pour une
clarté optimale
Assemblez toutes les pièces avant de passer
à l’étape 3
Attacher le support au mur
(vis non comprises)
Etape 1
Ne serrez pas complètement
avec la clé allen avant d'avoir
obtenu l'angle souhaité
Etape 3Etape 2
8
MONTAGE AU MUR (SUITE)
CABLAGE A L’INTERIEUR DU MUR
Passez les câbles de
l'intérieur du mur par
le trou dans le support
Etape 4
Etape 5
Poussez vers le bas
pour permettre un
accès aux câbles
Etape 6 Etape 7
9
Fixez le couvercle
de verrouillage au
support et vissez

CABLAGE LE LONG DU MUR
Passez le câble
dans le trou du
couvercle de
verrouillage
Etape 4 Etape 5
Poussez vers le bas
pour permettre un
accès aux câbles
Etape 6 Etape 7
Fixez le couvercle
de verrouillage au
support et vissez
10

MONTAGE AU MUR (SUITE)
MONTAGE VERTICAL POUR
CINEMAMC200, 400 & TRIO
MONTAGE HORIZONTAL POUR
CINEMA
MC
200, 400 & TRIO
Vis non comprises
REMARQUE : cette étape concerne
Placez le support à la
verticale, tel qu'illustré, puis
suivez les étapes pour le
positionnement horizontal.
Etape 1
uniquement le positionnement. Les
vis seront enlevées à la prochaine
étape afin de permettre l’installation
de boulons d’ancrage additionnels.
Placez le support et assurez-vous qu’il est au niveau. Marquez les deux trous de vis intérieurs. Percez
les trous de guidage, puis enfoncez fermement les boulons d’ancrage dans la cloison sèche et vissez.
Vissez ensuite les vis à tête plate : NE VISSEZ PAS COMPLÈTEMENT À CE POINT—laissez les têtes
de vis dépasser légèrement.
Etape 2
MISE EN GARDE! Pour plus de stabilité, les quatre
vis à tête plate DOIVENT être utilisées
Le support est doté de fentes (voir l’illustration), pour permettre un réglage vers le haut ou le bas, le cas
échéant. Vérifiez à nouveau pour vous assurer que le support est a
u niveau. Marquez les trous de vis
intérieurs.
11
Etape 3
Enlevez les deux vis à tête plate (voir l’illustration). Percez les trous de
guidage intérieurs, puis enfoncez fermement les boulons d’ancrage dans
la cloison sèche et vissez. Insérez maintenant les quatre vis à tête plate
et serrez.
CABLAGE DU MODELE CINEMAMC200 & 400
Poussez les bornes de
raccordement pour les fixer
CABLAGE DU MODELE CINEMAMCTRIO
MISE EN GARDE! Toutes les
vis doivent être insérées en
ligne droite et entièrement
serrées pour s’assurer que les
boulons d’ancrage fonctionnent
correctement.
Poussez les bornes de
raccordement pour les fixer
12

MONTAGE AU MUR (SUITE)
CINEMAMC200, 400 & TRIO
Alignez les trous en forme de serrure (voir l’encart) situés derrière l’enceinte sur les têtes de vis qui
dépassent sur le support, puis en faisant un mouvement de haut en bas, fixez l’enceinte sur le support.
RACCORDEMENT DES ENCEINTES
3.258"
ÉTEIGNEZ l’amplificateur avant de raccorder les enceintes. Vous éviterez ainsi les
dommages qui pourraient survenir lors du court-circuit accidentel des câbles d’enceinte.
Le tableau suivant indique les exigences minimales de calibre pour els différentes longueurs de câble :
EXIGENCES MINIMALES DE CALIBRE
LONGUEUR DIAMÈTRE CALIBRE
Moins de 4,5 m (15 pi) 1,3 mm (0,05 po) 16 awg
Moins de 9 m (30 pi) 1.6 mm (0.06 in) 14 awg
Plus de 9 m (30 pi) 2.0 mm (0.08 in) 12 awg
Vos enceintes sont dotées de bornes de raccordement de haute qualité qui peuvent être utilisées avec
les broches, ainsi qu’avec des fils nus. Consultez le diagramme ci-dessous. À l’aide de câbles d’enceinte
de haute qualité (voir votre revendeur), raccordez une enceinte à la fois à votre récepteur/amplificateur.
Raccordez la borne rouge (+) de l’amplificateur à la borne rouge (+) de l'enceinte et la borne noire
(-) de l’amplificateur à la borne noire (-) de l'enceinte (voir la page suivante). Poussez les bornes de
raccordement pour les fixer.
Allumez l’amplificateur et écoutez les enceintes. Si vous remarquez un manque complet de graves
moyennes et une image disloquée, une ou plusieurs enceintes pourraient être raccordées de façon
« déphasée » (leur polarité est inversée). Vérifiez à nouveau pour vous assurer que les câbles d’enceinte
sont raccordés avec la bonne polarité : rouge (+) avec rouge (+) et noir (-) avec noir (-). Poussez les
bornes de raccordement pour les fixer.
13

CINEMAMC100, 200 & 400
GUIDE DE DEPANNAGE
CINEMAMCTRIO
PROBLÈME
Pas de son
Aucun son d'une
ou plusieurs
enceintes
Déficience des
graves ou image
disloquée
SOLUTION
•
S'assurer que le préamplificateur ou l'amplificateur est branché et
allumé. Vérifier que la prise de courant fonctionne correctement.
• Des écouteurs sont-ils branchés ou le système est-il en mode sourdine (mute)?
• Vérifier tous les raccords.
• Vérifier la commande de réglage d'équilibre (balance) ou la commande de
volume VC 150 (si elle est utilisée).
• Vérifier le branchement et le fonctionnement de tous les cordons d'alimentation.
• Remplacer l'enceinte qui ne fonctionne pas par une enceinte qui fonctionne
pour vérifier si le problème est au niveau de l'enceinte ou ailleurs (c.-à-d.
le filage, l'amplificateur).
• Il se peut qu'une des enceintes soit déphasée (polarité inversée).
• Vérifier de nouveau la polarité de chaque raccordement : rouge (+) à rouge
+) et noir (-) à noir (-).
(
14

SPECIFICATIONS TECHNIQUES
CINEMAMC100 CINEMAMC200
Design
Raccord(s)
Haut-parleur de haute fréquence
Haut-parleur de basse / moyenne
fréquence
Haut-parleur de graves
Extension de basse fréquence*
Réponse de fréquence : sur l’axe
30˚ hors axe
2 hauts-parleurs, suspension
acoustique à deux voies,
monté
sur un pied / sur le mur
Électroacoustique 2e ordre à
1,8 KHz
MC
Dôme S-PAL
de 25-mm (1 po)
en aluminium en pure satin anodisé,
ferrofluide amorti/refroidi
Cône en polypropylène rempli
de matière minérale de 90-mm
(3-1/2 in), bobine acoustique
de 25-mm (1 po), aimants en
céramique / ferrite surdimensionné
n/d
85 Hz (DIN)
±2 dB à partir de 125 Hz – 20 kHz
±2 dB à partir de 125 Hz – 15 kHz
3 haut-parleurs, LCR à 2 voies,
suspension acoustique, option sur le
mur pour monter la configuration
centrale sur une table ou une étagère
Électroacoustique 2e ordre à
1,8 KHz
MC
Dôme S-PAL
de 25-mm (1 po)
en aluminium en pure satin anodisé,
ferrofluide amorti/refroidi
Deux cônes en polypropylène
rempli de matière minérale
de 90-mm (3-1/2 in), bobine
acoustique de 25-mm (1 po),
aimants en céramique / ferrite
surdimensionné
/d
n
80 Hz (DIN)
±2 dB à partir de 120 Hz – 20 kHz
±2 dB à partir de 120 Hz – 15 kHz
Sensibilité – salle / anéchoïque
Intervalle de puissance approprié
pour l’amplificateur
Alimentation maximale
†
Impédance
Dimensions (h x l x p)
Poids (déballé, avec pied)
Finish
F-1515
88 dB / 85 dB
15 à 100 watts
50 watts
Compatible avec 8 ohms
21,2 cm x 12,2 cm x 15,7 cm
8-3/8 po x 4-13/16 po x 6-3/16 po
1,8 kg / 4,0 lb p
ar enceinte
Lustre noir
90 dB / 87 dB
15 à 100 watts
70 watts
Compatible avec 8 ohms
50,5 cm x 16,1 cm x 10,4 cm
19-7/8 po x 6-5/16 po x 4-1/16 po
3,7 kg / 8,3 lb par enceinte
Lustre noir

CINEMAMC400 CINEMAMCTRIO
Design
Raccord(s)
Haut-parleur de haute fréquence
Haut-parleur de basse / moyenne
fréquence
Haut-parleur de graves
Extension de basse fréquence*
Réponse de fréquence : sur l’axe
30˚ hors axe
5 haut-parleurs, LCR à 2-1/2
voies, suspension acoustique,
o
ption sur le mur pour monter
la configuration centrale sur une
table ou une étagère
Électroacoustique 2e ordre à
2,1 KHz, Électroacoustique 2e ordre
à 500 Hz (haut-parleur de graves)
MC
Dôme S-PAL
de 25-mm (1 po)
en aluminium en pure satin anodisé,
ferrofluide amorti/refroidi
Deux cônes en polypropylène
rempli de matière minérale
de 90-mm (3-1/2 in), bobine
acoustique de 25-mm (1 po),
aimants en céramique / ferrite
surdimensionné
Deux cônes en polyprop
ylène
rempli de matière minérale de
90-mm (3-1/2 in), bobine
acoustique de 25-mm (1 po),
aimants en céramique / ferrite
surdimensionné
75 Hz (DIN)
±2 dB à partir de 115 Hz – 20 kHz
±2 dB à partir de 115 Hz – 15 kHz
Tous dans un gauche / droite / centre :
7 haut-parleurs, 3 canal, 2 voies,
suspension acoustique
Électroacoustique 2e ordre à
1,8 KHz
MC
Trois dômes S-PAL
de 25-mm
(1 po) en aluminium en pure satin
anodisé, ferrofluide amorti/refroidi
Quatre cônes en polypropylène
rempli de matière minérale
de 90-mm (3-1/2 in), bobine
acoustique de 25-mm (1 po),
aimants en céramique / ferrite
surdimensionné
n/d
85 Hz (DIN)
±2 dB à partir de 125 Hz – 20 kHz
±2 dB à partir de 125 Hz – 15 kHz
Sensibilité – salle / anéchoïque
Intervalle de puissance approprié
95 dB / 92 dB
15 à 200 watts
pour l’amplificateur
Alimentation maximale
Impédance
Dimensions (h x l x p)
†
100 watts
Compatible avec 8 ohms
67,0 cm x 16,1 cm x 10,4 cm
26-3/8 po x 6-5/16 po x 4-1/16 po
Poids (déballé, avec pied)
Finish
*
DIN 45 500 Indique -3 dB dans une salle d’écoute typique.
†
Avec un programme source typique, attendu que l’amplificateur n’écrête pas plus de 10 % du temps.
5,8 kg / 12,8 lb par enceinte
Lustre noir
89 dB / 86 dB
15 à 150 watts
70 watts par canal
Compatible avec 8 ohms
16,1 cm x 91,5 cm x 10,4 cm
6-5/16 po x 36 po x 4-1/16 po
7,6 kg / 16,8 lb p
ar enceinte
Lustre noir
16

‘
GARANTIE LIMITE
Les enceintes ParadigmMDcouvertes dans ce manuel sont garanties contre les défauts de matériaux et
de fabrication pendant une période de cinq (5) ans à compter de la date d’achat du matériel neuf.
Durant cette période, la réparation, le remplacement ou le réglage de pièces pour des défauts de
matériaux ou de fabrication ne seront pas à la charge du premier acheteur.
Les dommages causes par l’exposition abusive a la chaleur ou l'usage abusif
ne sont pas couverts par la presente garantie.
L
imitations :
• La garantie entre en vigueur à la date d’achat par le premier acheteur chez un revendeur autorisé
Paradigm
MD
Reference seulement. La garantie n’est pas transférable;
• La garantie s’applique aux enceintes pour une utilisation résidentielle normale. Si les enceintes sont
assujetties à l’une des conditions définies dans le paragraphe suivant, la garantie est nulle;
• La garantie ne s’applique pas à un usage commercial ou professionnel.
La garantie est revoquee si :
• L'enceinte est assujettie à un usage abusif (accidentel ou intentionnel);
• L'enceinte est utilisée avec du matériel défectueux ou non adéquat;
• L'enceinte est soumise à des signaux électriques dommageables, un transport dangereux, des dommages
mécaniques ou toute autre condition anormale;
L'enceinte (y compris le boîtier) est altérée ou endommagée lors d’une réparation non autorisée;
•
• La plaque du numéro de série de l'enceinte est enlevée ou défigurée.
‘
Responsabilites du proprietaire :
• Apporter un soin et un entretien normaux et raisonnables;
• Assumer les frais de transport jusqu’à l’atelier de réparation;
• Fournir une preuve d’achat (conser ver le reçu f
Paradigm
Si une réparation est nécessaire, contacter le revendeur autorisé ParadigmMD, Paradigm Electronics Inc.
ou le distributeur à l’étranger (à l’extérieur du Canada et des États-Unis) pour planifier l’envoi prépayé
de l’enceinte défectueuse. Consulter le site web www.paradigm.com pour plus d’information.
Paradigm Electronics Inc. se réserve le droit d’améliorer ou de modifier ses produits en tout temps sans
responsabilité ou engagement envers les produits existants.
La présente garantie tient en lieu et place de toute autre garantie, explicite ou implicite, de qualité
marchande et d’adéquation pour tout usage par ticulier, et ne peut être élargie ou étendue par
quiconque. Paradigm Electronics Inc. et ses représentants ou agents ne peuvent pas être tenus
responsables de dommages consécutifs ou indirects découlant de l’utilisation de ces produits. Dans les
endroits où une réglementation spécifique interdit une telle limitation de la responsabilité, cette exclusion
ne s’applique pas.
Conserver le présent manuel et le reçu comme preuves d’achat et de garantie.
MD
comme preuve de la date d’acquisition).
‘
‘
‘
‘
‘
‘
ourni lors de l’achat par le revendeur autorisé
17
 Loading...