

Page 1

Effortlessly Moving Images Out of your Camera and Into your Life
5” Digital Photo Frame
User Guide
Page 2

Note: Your frame style and features may differ from those documented in this User Guide.
UG-E-PAN5000W02_PAN5002DW_v1.0_08-09
2
Page 3

Table of Contents
Important Safety Precautions ................................................................. 4
Cleaning the Digital Photo Frame .......................................................... 4
Introduction .............................................................................................. 5
What’s In the Box ..................................................................................... 5
Setting up the Digital Photo Frame ......................................................... 6
Using the Control Buttons and Remote Control .................................... 7
Use the Control Buttons ......................................................................... 7
Using the Remote Control ...................................................................... 7
Replacing the Remote Control Battery ................................................... 8
Using the Digital Photo Frame’s Screens .............................................. 8
The Mode Selection Screen ................................................................... 8
Viewing Options ....................................................................................... 9
Setup Menu Descriptions ...................................................................... 10
PHOTO Function - The Thumbnails Screen ........................................ 11
Displaying All Pictures in Slideshow Mode ......................................... 12
Displaying Selected Pictures in Slideshow Mode ............................... 12
Photo Copy Method ............................................................................... 12
Changing the Photo Copy Method ....................................................... 12
Copying to and Deleting Photos from Built-in Memory ...................... 13
Copying Photos ................................................................................... 13
Deleting Photos ................................................................................... 13
FILE Function – A List of All Files ........................................................ 16
CLOCK Function – Clock and Calendar ............................................... 16
To Display the Calendar/Clock screen: ................................................ 16
Setting the Internal Clock ..................................................................... 17
Creating an ON/OFF schedule for your slideshows ............................. 17
Turn Scheduled Slideshows On or Off ................................................. 17
Changing the Decorative Frame .......................................................... 18
Copying Files from a Computer ............................................................ 18
Connect to a Windows Computer ........................................................ 18
Disconnect the Digital Photo Frame from the Computer ...................... 20
Frequently Asked Questions ................................................................. 20
Limited Warranty .................................................................................... 22
FCC Statement ....................................................................................... 23
3
Page 4

Important Safety Precautions
Always follow these basic safety precautions when using your Digital Photo
Frame. This will reduce the risk of fire, electric shock, and injury.
Warning: Do not expose this product to rain or moisture.
Warning: Do not remove the cover. There are no user-serviceable parts
inside. Refer all servicing to qualified personnel.
• The Digital Photo Frame is for indoor use only.
• Unplug the Digital Photo Frame before performing care and
maintenance.
• Do not block the ventilation holes on the back of the digital photo
frame at any time.
• Keep your Multimedia Digital Photo Frame out of direct sunlight and
heat sources.
• Protect the power cord. Route power cords so that they are not likely
to be walked on or pinched by items placed on or against them. Pay
particular attention to the point where the cord attaches to the Digital
Photo Frame.
• Only use the AC adapter included with the Digital Photo Frame.
Using any other power adapter will void your warranty.
• Unplug the power cord from the outlet when the unit is not in use.
Cleaning the Digital Photo Frame
Treat the screen gently, it is made of glass and can break. To clean
fingerprints or dust from the LCD screen, we recommend using a soft, nonabrasive cloth such as a camera lens cloth to clean the LCD screen. If you
use a commercial LCD Cleaning Kit, do not apply the cleaning liquid directly
to the LCD screen. Clean the LCD screen with cleaning cloth moistened with
the liquid.
Clean the outer surface of the Digital Photo Frame (excluding the screen)
with a soft cloth dampened with water.
4
Page 5

Introduction
Welcome to the Pandigital Multimedia Photo Frame! Now you can display
your digital photos directly from your memory card, no computer is
necessary. Simply insert a memory card into the Digital Photo Frame, and
turn on the power. You’ll be treated to a slideshow of your photos. It’s as
easy as that.
The Digital Photo Frame includes these key features:
• Displays digital photos without a computer; simply insert a
compatible memory card into the digital frame.
• Compatible memory cards include Secure Digital™, Multimedia
Card™, xD Card, Memory Stick™, MemoryStick Pro™, and Memory
Stick Pro Duo™(requires adapter).
• Supported file types: JPEG images (up to 16 Mega Pixels).
• Control the main functions with buttons on the frame or with the
included infrared remote control.
• Bright TFT active matrix LCD screen.
• USB2.0 high-speed connection to connect to your PC.
• Built-In Flash Memory.
To learn more about your new Digital Photo Frame’s features and take full
advantage of them, please take a few minutes to read this Guide.
What’s In the Box
• Digital Photo Frame
• AC Power Adapter
• This User’s Guide
• Remote Control
• USB Cable
• Decorative Frame
5
Page 6
Setting up the Digital Photo Frame
The Digital Photo Frame is easy to set up. Just follow these steps:
1. Plug the AC Power Adapter into the Digital Photo Frame and into a wall
outlet.
2. Insert a memory card into the card slot.
Secure Digital™ or MultiMedia Card™, MemoryStick™, MemoryStick Pro™, or xD Memory
Card™ (MemoryStick Pro Duo required MemoryStick™ adapter)
Note: The card will only fit in one direction; do not force it. The card should fit
snugly when properly inserted.
3. Slide the POWER button on the left side of the Digital Photo Frame up,
the Digital Photo Frame will power on and automatically start a slideshow
of the photos on the card. Slide the POWER button down to power off.
4. To display photos individually, press
EXIT on the remote control to pause
slideshow.
5. Press
arrows to choose a photo. Press
EXIT again to return to the thumbnail screen. Use the directional
ENTER on the Digital Photo Frame, or
on the remote control. The selected photo is displayed on the Digital
Photo Frame.
Note: Pull the plastic tab sticking out of the remote control. It protects the
battery, and the remote control will not work unless it is removed.
6. To restart the Slideshow, press
Enter again, or press Slideshow on the
remote control.
6
Page 7

Using the Control Buttons and Remote Control
You can use all of the Digital Photo Frame’s features with either the buttons
on top of the frame or using the remote control.
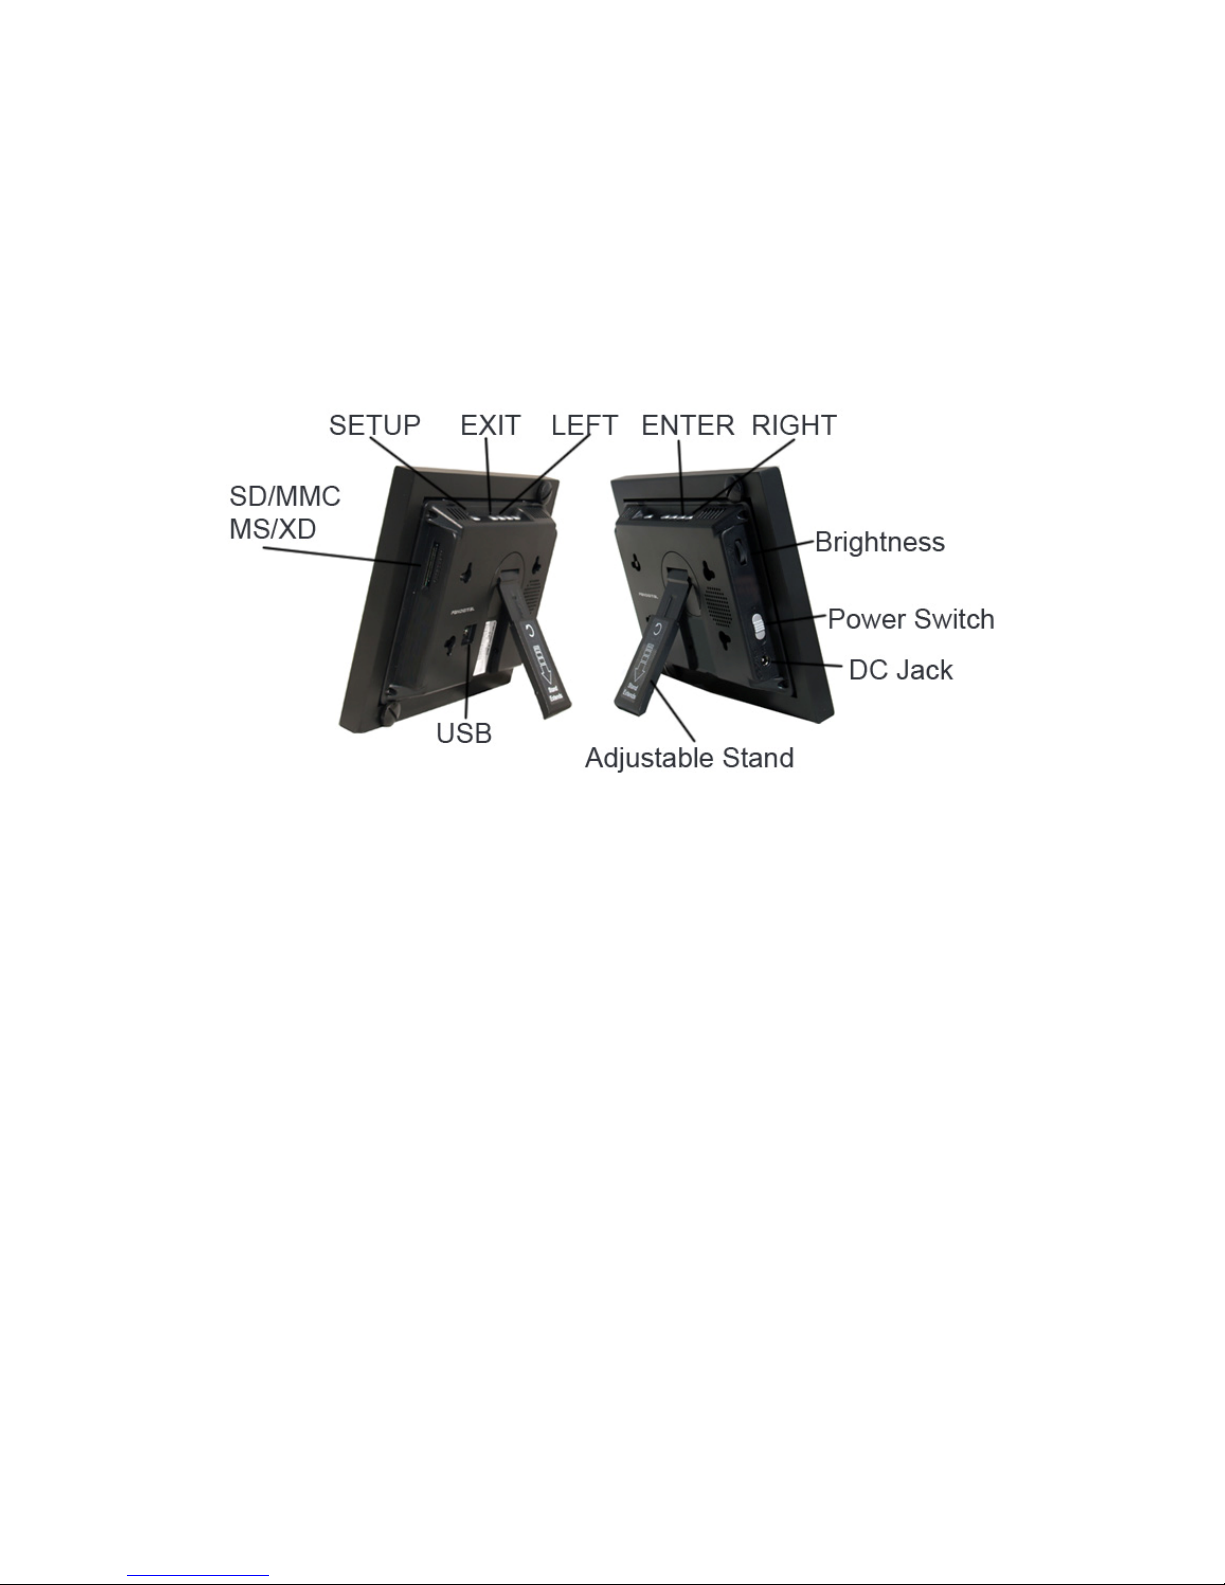
Use the Control Buttons
The control buttons are located on top of the Digital Photo Frame.
Button Action
Move the selection up or left, display the previous photo, or select the
previous file.
ENTER
EXIT
SETUP
Select the highlighted option, start a Slide Show, Pause or Play.
Move the selection down or right, display the next photo or select the next file.
Exit the current display, or go back a screen.
Open the Onscreen Menu.
Using the Remote Control
The remote control included with your digital photo frame includes all of the
functions on the digital photo frame and some additional ones. The figure
below shows all of the buttons and describes them. The features described in
this guide that use the remote illustrate how to use them.
Start Slideshow
Exit or go back
Access Setup screens
Scroll Up
Scroll Previous
Play/Pause/Select object
Volume adjust higher
or Select object
Volume - adjust lower
or De-select object
Scroll Forward
Scroll Down
Rotate image
Enlarge image
7
Page 8

Replacing the Remote Control Battery
1. Hold the remote control with the buttons facing down.
2. Push and hold the small release tab while pulling the battery tray out.
Replace the “CR2025” Lithium battery on the tray with the positive (+)
3.
side facing up.
4. Push the tray back in until it clicks into place.
Using the Digital Photo Frame’s Screens
You access the Digital Photo Frame’s functions with a series of screens, and
control them with either the buttons on the top of the frame or on the remote
control. The Card Selection Screen
Use the Card Selection menu to choose between memory cards and the
built-in memory.
1. To display the Card Selection screen, simply press
remote control till you reach this screen.
2. Press the LEFT and RIGHT arrows to select the desired memory
card, or built-in memory. Only available memory cards will be
highlighted. Press
The Mode Selection Screen
The Mode Selection Screen shows after you choose the memory source.
Use it to choose the type of files or application you wish to display or open.
8
EXIT on the
Enter to make the selection.
Page 9

Photo
Open the Thumbnails Screen to display still photos
and jpeg slideshows.
File View all of the files on the memory source.
Clock
Show the current date and time and schedule
On/Off functions.
Press the LEFT and RIGHT arrows on the Remote Control or the Digital
Photo Frame to select
Photo, File, or Clock and then press ENTER to make
the selection.
Viewing Options
You can control all of the viewing options in the Setup Menu using the
buttons on the top of the frame or remote control. You can display the onscreen Setup Menu at any time by pressing
SETUP.
9
Page 10

1. From the Select Card or Select Mode screen, press SETUP to open the
Setup Menu.
2. With the Setup menu open, use the UP and DOWN arrows to choose a
display option.
3. Press
ENTER to select the option. A second menu opens, listing the
available settings. A blue highlight shows the current setting.
4. Use the UP and DOWN arrows to choose the desired setting, press
ENTER to select the highlighted option.
Setup Menu Descriptions
Display Option Settings Description
Display Image
Size
Slide Show
Transition
Slide Show Speed
Original
Optimal
Normal
Random
Fade
Curtain
Open Door
Cross Comb
Fast
Medium
Slow
The Digital Photo Frame can optimize
your photos for display.
Special effects shown to transition from
one photo to the next in a Slide Show.
Determines how quickly the next photo
is displayed.
Slide Show
Shuffle
On/Off Displays photos randomly.
Family
Friends
View Folder
Photo Copy
Method
Set On/Off
Scheduled
10
Vacation
Events
Others
Optimized
Non-Optimized
Weekdays
Weekends
Displays the files you assigned to a
folder.
Copies photos in compressed or non
compressed format to the internal
memory.
Week Day
Turns on at xx:xx AM/PM
Turns off at xx:xx AM/PM
Weekend
Turns on at xx:xx AM/PM
Turns off at xx:xx AM/PM
Page 11

Power Saving
2 Hours
4 Hours
8 Hours
No Power
Saving
The Digital Photo Frame will turn itself
off after the specified amount of time.
Start Scheduled
ON/OFF
Factory Default
On/Off
Start scheduled ON/OFF control
Turns on at xx:xx AM/PM
Immediately returns all settings to the
factory defaults.
There is no warning message.
PHOTO Function - The Thumbnails Screen
This screen gives you a thumbnail view of all the photos on the selected
memory source. Use this screen to select a single photo, multiple or all
photos to display in a slideshow. You can also copy photos from external
memory to build-in memory from by using the SETUP menu on this screen.
1. From the Select Mode screen, choose
Screen.
2. Use the LEFT and RIGHT arrow buttons on the Digital Photo Frame or
the remote control to select the desired photo and press
the selected photo in single picture mode.
Photo to open the Thumbnails
ENTER to display
3. While in single picture mode, pressing the LEFT arrow button or the
RIGHT arrow button will bring you to the previous or next photo
respectively.
4. To stop the display and return to the Thumbnail screen, press
EXIT.
Rotating a Photo
In single picture mode you can rotate a photo by pressing ROTATE on the
remote control or pressing
SETUP and then selecting ROTATE PHOTO from
the setup menu. The photo will be rotated by 90 degrees counterclockwise
with each
ROTATE.
Zoom and Pan Function
To zoom in on a picture in single picture mode, press SETUP, next select
ZOOM PHOTO and press ENTER. This function allows you to zoom in up to
3X, before returning to the original picture size. While the photo is in
enlarged, use the LEFT and RIGHT arrow buttons to pan around the photo.
11
Page 12

Displaying All Pictures in Slideshow Mode
The Digital Photo Frame can include all of the photos on the selected
memory source in a slideshow.
With the Thumbnails Screen displayed, press
ENTER on the frame twice, to
start a slideshow of all the photos in the selected memory location.
To stop the Slideshow and return to the Thumbnails screen, press
EXIT.
Displaying Selected Pictures in Slideshow Mode
You need your remote control to create a custom slideshow.
1. With the Thumbnails Screen displayed, use the arrow buttons to highlight
a photo.
2. Press the
+ button to select the photo or - to de-select it (these functional
buttons only exit on your remote). A check mark is displayed at the
upper-right corner of the selected photo.
3. Continue selecting or de-selecting photos in the same manner.
4. When all desired photos are selected, press
SETUP on the Remote
Control or on the frame to open a setup menu.
5. Choose Start Slideshow and press
ENTER.
6. Choose Selected Photos option from the menu to start your custom
slideshow.
Photo Copy Method
There are two methods to copy photos from a memory card to the internal
memory. One is called optimized and the other, non-optimized. In the case of
optimized copy, the original photo is downscaled in size and re-encoded into
a smaller sized JPEG. Thus a lot more photos can be stored in the internal
memory. The non-optimized photo copy will simply copy the original photo
file into the internal memory.
Changing the Photo Copy Method
The DPF is produced with optimized photo copy as default. To change to
non-optimized, press
Setup and select Photo Copy Method.
12
Page 13

1. Select Non-optimized to copy the photo in its original file size, or
select Optimized to automatically compress your pictures before copying
to internal memory.
2. Press
EXIT to close the menu.
Copying to and Deleting Photos from Built-in Memory
The Digital Photo Frame can store photos in its built-in memory. You can
copy photos one at a time, or in batches. You can also delete photos from
internal memory, but not from memory cards.
Copying Photos
1. Press
2. Use the Arrows to highlight the desired memory card and press
select it.
3. Select the Photo function and press ENTER to open the Thumbnails
screen.
4. Use the arrow buttons to highlight the photo you want to copy.
EXIT until the Select Card screen opens.
ENTER to
5. Use the
upper-right corner of the thumbnail photo. Use the
6. After completing the photo selection, press
setup menu.
7. Select
selected.
8. Choose
card to the internal memory of the DPF.
9. Press
Note: We recommend that you keep backup copies of the photos you copy
onto your Digital Photo Frame.
Deleting Photos
1. With the photo displayed on screen, press
menu.
+ button to select the photo. A check mark should appear at the
– button to de-select it.
SETUP to open the on-screen
Copy Photo and then Copy Selected to copy the photos you
Copy All if you want to copy all the pictures from the memory
EXIT to close the menu.
SETUP to display the setup
13
Page 14

2. Select Delete Photo from the menu and press ENTER to delete the
picture. Note: You will not be asked to confirm.
3. Press
EXIT to close the menu.
4. You can also use the same steps to delete multiple photos while you are
in the thumbnail screen.
5. Use the
upper-right corner of the thumbnail photo. Use the
6. After completing the photo selection, press
+ button to select the photo. A check mark should appear at the
– button to de-select it.
SETUP to open the on-screen
setup menu.
7. Select
Delete Photo and then Delete Selected to delete the photos you
selected.
8. Choose
Delete All if you want to delete all the pictures from the memory
card to the internal memory of the DPF.
9. Press EXIT to close the menu.
View Folder Menu
Folders give you the ability to create a slideshow playlist that will play all the
pictures in that folder. The folders are
Others.
and
Family, Friends, Vacation, Events,
Assigning Pictures To Folders
Only pictures stored in the internal memory can be assigned to folders.
14
Page 15

1. In the Select Mode screen, select Photo and press ENTER to display the
thumbnail screen.
2. Select the pictures to add to the folder by pressing the + button. You can
deselect a picture by pressing the
3. After you have finished selecting all the pictures, press
select
4. Choose one of the folders to assign the selected photos to and press
Assign Selected Photos to option.
– button.
SETUP and then
ENTER.
Note: The pictures are assigned (linked) to the folder, not copied. Deleting
the picture from internal memory will also delete the link to the
assigned folder.
5. You can also assign pictures to folders in single picture mode or
slideshow mode by pressing
To option and pressing
photo to.
Un-assigning Pictures From Folders
1. From the Select Mode screen, press
ENTER and then selecting the folder to assign the
SETUP and then choosing the Assign Photo
SETUP and select the View Folder
option and press
2. Select the folder you want to un-assign pictures from and press
3. Select the pictures to un-assign by pressing the
deselect pictures by pressing the
4. After you have finished selecting all the pictures, press
Remove Photo From This Folder and press ENTER.
the
5. Choose Selected Photos to only un-assign the pictures you previously
selected, or choose All to un-assign all the pictures in that folder.
6. Press
Note: Un-assigning a picture from a folder will not delete the picture from
Slideshow Pictures from Folders
There are 2 ways you can start a slideshow of the pictures assigned to each
folder.
ENTER to confirm your selection.
Internal memory.
ENTER.
ENTER.
+ button. You can
– button.
SETUP and select
15
Page 16

1. From the Select Mode screen press SETUP, then choose View Folder and
press
three times.
2. From the Photo thumbnail screen, press SETUP, then choose Start
Slideshow
press
ENTER. Next select the folder to slideshow from and press ENTER
and press ENTER. Next select the folder to slideshow from and
ENTER.
FILE Function – A List of All Files
This function gives you a list of all the files on the memory source you
selected. Along with the file name, the size of the file, time and date the file
was created is also displayed.
CLOCK Function – Clock and Calendar
You can use your Digital Photo Frame as a desktop calendar that displays a
slideshow of your photos.
To Display the Calendar/Clock screen:
From the Select Mode Selection Screen, choose the
press
16
ENTER on the remote control.
CLOCK function and
Page 17

Setting the Internal Clock
1. Calendar/Clock screen, press
SETUP on the remote control to open the
Setup Menu.
2. Choose
Set Clock.
3. Use the RIGHT or LEFT arrow to move to a time or date field to be
changed.
4. Use the UP and DOWN arrows to change the value in the selected field.
5. When the date and time are correct, press
ENTER to set file was created
and resolution of the photo is also displayed.
Creating an ON/OFF schedule for your slideshows
You can set your digital photo frame to display slideshows at predetermined
times. For example if you have your DPF on your desk at work, you might
want to turn on the DPF from 9am to 5pm every Monday to Friday when you
are at work and to turn off during the weekends.
1. With the Calendar and Clock displayed, press
SETUP. Use the Arrow
buttons to select Set On/Off Schedule and press
ENTER.
2. Use the UP and DOWN arrow to set the hour you want your scheduled
slideshows to start, then use the right arrow to move to the minutes field,
set the minutes and AM/PM field in the same manner as the hours.
3. Set the time you want the slideshow to end in the same manner.
4. If you don’t want to play scheduled slideshows during the weekdays.
Select the Set Always OFF field and press ENTER. The field will toggle
to the Set On/OFF Time option.
5. You can set different times for scheduled slideshows on the weekends in
the same manner.
6. When you are done with the settings, press
EXIT to save them and return
to the Calendar/Clock page.
Turn Scheduled Slideshows On or Off
After you have created your slideshow schedules, you need to activate the
schedules by turning them on.
1. With the Calendar/Clock displayed, press
SETUP.
17
Page 18

2. Choose Start Scheduled ON/OFF, to turn the scheduling on.
You can also activate your preset schedule during slideshow mode in a
similar manner.
Note: After the schedule is activated, any user operations, e.g. pressing
remote buttons, or insertion/removal of memory cards, will cancel the
scheduled control immediately.
Changing the Decorative Frame
Depending on the model, your Digital Photo Frame may come with
interchangeable decorative frames.
1. To change the frame, remove two screws on the back of the frame and
lift the unit from the frame.
2. Place the unit into the new frame, replace the screws, and finger-tighten.
Copying Files from a Computer
You can connect the Digital Photo Frame to a Windows computer to copy
files to the built-in memory.
Connect to a Windows Computer
To copy files from between your computer and the Digital Photo Frame do
the following:
1. Plug in and turn on the Digital Photo Frame.
2. Connect the small end of the USB cable to the Mini USB port on the
Digital Photo Frame.
18
Page 19

3. Connect the Larger end of the USB cable to a USB port on your
computer.
4. Each memory card inserted in the Photo Frame and the built-in memory
is associated with one disk drive on your computer.
5. Double-click the desired drive to display the files on the card. The
example below shows a card with several JPG images on it.
6. To copy files from the memory card, select them and drag them to the
desired location on your computer.
19
Page 20

7. To copy photos from your computer to the built-in memory, first locate
the files on your computer, second, select the files you wish to copy,
choose File, Copy, and then move your cursor back to the disk drive in
the open window for the built-in memory.
Note: Most cameras and graphic programs store photos in the Windows
My Pictures folder. If you didn’t move them somewhere else, they
are probably there.
8. Click in the window, and choose
File> Paste.
9. Similarly, to copy photos from your computer to the memory card, you
copy and paste to the disk drive corresponding to the memory card.
Note: If your PC is connected to Local Area Network drives, or if you
have multiple drive letters already assigned to peripheral devices,
you will need to manage your drive settings in Windows to free up
the four drive letters immediately following your CD-ROM drive so
the Digital Photo Frame can assign them to memory card slots
properly.
Disconnect the Digital Photo Frame from the Computer
It is important not to just unplug or switch off the Digital Photo Frame when
files are being transferred from the memory card or computer to the built-in
memory. It can seriously damage the memory.
1. In Windows XP, left-click on the icon and select the correct storage
device.
2. Click
3. Select
OK. A final dialog box opens.
Close. When the message “It is Now Safe to Disconnect
Hardware” appears, you can disconnect the USB cable from your
computer.
5. You can make as many changes as you wish in the same manner. When
you are finished, press
EXIT to close the Setup Menu and return to the
previous screen.
Frequently Asked Questions
Q: How do I set up my Digital Photo Frame?
A: It is very simple to get your Digital Photo Frame out of the box and
running in just a few minutes. Just plug the power adapter into the Digital
Photo Frame and into a standard Wall Socket. Insert a memory card into
20
Page 21

the appropriate card slot on the side of the Digital Photo Frame, and turn
it on. Your first slide show will automatically start to play.
Q: What memory cards can the Digital Photo Frame Read?
A: Compatible memory cards include Secure Digital, MultiMedia Card,
MemoryStick, MemoryStick Pro, and XD card.
Q: I set up the Digital Photo Frame; why won’t it turn on?
A: The Adapter is not securely connected to the Photo Frame or the Power
Switch is not on.
Q: I have a memory card in the Digital Photo Frame; why can’t I view
my photos?
A: First, make sure that the memory card is one of the formats listed above
and that the files on the card are JPEG images files. Second, turn the
Digital Photo Frame Off and make sure that the memory card is inserted
all the way into the card slot and is facing the right direction. Third, turn
the Frame On. After a couple of seconds, you should see your first
photo. Press Exit to open the Card Selection screen and select the card.
Then select Photos. You should see the Thumbnails screen listing all
photos on the card. If you don’t, you may want to try another card.
Note: Some digital cameras save images in other formats. Please refer
to your camera’s manual if your photos are not JPEG files.
Q: Why is the picture display slower with some pictures and faster
with others?
A: Higher resolution pictures load more slowly. Try using lower resolution
pictures or down sampling your images. See your camera’s operating
manual for details on down sampling your photos.
Q: Can I insert multiple memory cards?
A: Yes. Turn on the unit before inserting any card. The Select Card Screen
lets you choose between all available memory cards and built-in
memory.
Q: Does the Digital Photo Frame have built-in memory?
A: Yes. The memory size depends on your model.
Q: Does the Digital Photo Frame support all JPEG?
A: No, it supports JPEG taken from a digital camera. The Digital Photo
Frame may not read all images files downloaded from the Internet or
from other software graphic applications.
21
Page 22

Limited Warranty
The limited warranty set forth below is given by Pandigital with respect to
Pandigital brand electronics products purchased and used in the United States of
America. Pandigital warrants this product against defects in material or
workmanship as follows:
LABOR: For a period of one (1) year from the date of purchase, if this product is
found to be defective, Pandigital will repair or replace the product, at its option, at
no charge. After this one (1) year, labor charges will be charged on a case by
case basis.
PARTS: For a period of one (1) year from the date of purchase, if this product is
found to be defective, Pandigital will supply at no cost, new or rebuilt
replacement parts, at its option, at no charge. After this one (1) year period, parts
will be charged for on a case by case basis. Modifications not approved by the
party responsible for compliance could void user’s authority to operate the
equipment.
This warranty does not cover: (1) customer instruction, installation or setup; (2)
cosmetic damage or damage due to accident, misuse, abuse or negligence; (3)
commercial use of the product; (4) modification of any part of the product; (5)
damage due to improper operation, improper maintenance, or connection to an
improper power supply; (6) loss of data, regardless of value or format, that may
result through proper and/or improper use of the product; (7) damage due to an
attempted repair of the product by anyone other than a facility authorized by
Pandigital to service the product; (8) consumables (such as fuses and batteries).
This warranty is valid only in the United States.
The product must be accompanied by a copy of the original retail purchase
receipt. If no proof of purchase is attached, the warranty will not be honored and
repair costs will be charged. This warranty is only valid with written
documentation detailing the complaint attached to the outside or inside of the
carton. This warranty is invalid if the factory applied serial number has been
altered and or removed from the product. This warranty does not provide
protection for the loss of data, regardless of format. Pandigital reserves the right
to modify and design this product without prior notice, written or otherwise.
To obtain warranty service, you must deliver the product freight prepaid in either
its original packaging or packaging affording an equal degree of protection, plus
proof of purchase.
Repair or replacement as provided under this warranty is the exclusive remedy of
the consumer. Pandigital, its parent company, affiliates or subsidiaries, shall not
be liable for any incidental or consequential damages for breach of any
expressed or implied warranty on this product. Except to the extent prohibited by
applicable law, any implied warranty of merchantability or fitness for a particular
purpose on this product is limited in duration to the duration of this warranty.
Some states do not allow the exclusion or limitation of incidental or consequential
damages, or allow limitation on how long an implied warranty lasts, so the above
limitations or exclusions may not apply. This warranty gives you specific legal
22
Page 23

rights, and you may have other rights, which vary from state to state.
All content included on the Pandigital website as well as Pandigital products,
including pre-loaded demonstration images, digital media, digital cookbooks, text,
graphics, logos, designs, photographs, button icons, images, audio/video clips,
digital downloads, data compilations, and software, is the property of Pandigital
or its suppliers and is protected by United States and international copyright laws
or other intellectual property laws and treaties. Said content shall not be
reproduced or used without express written permission from Pandigital and its
suppliers respectively.
Use of this product constitutes acceptance of these terms and conditions of
warranty.
Technical support telephone number: 1-800-715-5354.
FCC Statement
FCC Part 15 Information
This equipment has been tested and found to comply with the limits for a Class B
digital device, pursuant to Part 15 of the Federal Communication Commission
(FCC) Rules. These limits are designed to provide reasonable protection against
harmful interference in a residential installation.
This equipment generates, uses, and can radiate radio frequency energy and if
not installed and used in accordance with the instructions, may cause harmful
interference to radio communications. However, there is no guarantee that
interference will not occur in a particular installation.
If this equipment does cause harmful interference to radio or television reception,
which can be determined by turning the equipment off and on, the user is
encouraged to try to correct the interference by one or more of the following
measures:
Reorient or relocate the receiving antenna.
Increase the separation between the equipment and receiver.
Connect the equipment to an outlet on a circuit different from that to
which the receiver is connected.
Consult the dealer or an experienced radio/TV technician for help.
WARNING: Changes or modificati ons to this unit not expressly
approved by the party responsible for compliance could
void the user’s authority to operate the equipment.
23
 Loading...