


Digital Photo Frame

Digital Photo Frame
User's Guide
Version: PAN.1

Table of Contents
Table of Contents ...........................….........................................................…….................................. 2
Important Safety Precautions...........……………………………….....................……..............................3
Cleaning the LCD Screen ...........................................................................….………………..…3
Cleaning the Digital Photo Frame..................................................................….……….………..3
Introduction......................................................................................………………………….................. 4
What's In the Box.........................................................................................…………………………..... 5
Quick Start Guide………………………….............................................................................................. 5
Setting Up the Digital Photo Frame ........……………............................................................................ 5
Locating the Digital Photo Frame's Features ..........……….................................................................. 5
Using the Control Buttons and Remote Control .................………...................................................... 6
Use the Control Buttons .......................................................………............................................. 6
Use the Remote Control .................................................................………................................... 7
Install and Replace the Remote Control Battery .......................................……............................ 7
Setting Up the Slideshow .........................................................................................…………............. 8
Card Selection Screen ..................................................................................................………..... 8
Mode Selection Screen .........................................................................................……………...
.. 9
Thumbnail Screen ......................................................................................................………….... 9
Display a Single Photo on the Full Screen .................................................................……......... 10
Controlling the Slide Show and Photo .............................................................................………....... 10
Manually Change the Displayed Photo .......................................................................……….... 10
Rotate the Photo .......................................................................................................…………....10
Enlarge the Photo .....................................................................................................………........10
Copy the Displayed Photo to the Built-In Memory .........................................................……...…11
Delete the Displayed Photo................................................................…………………………......11
Adjust the LCD Color..........................................................................………………………….....11
Add Music to the Slide Show..........................................................…………………………….....11
Listening to MP3 Music...........................................................…………………………………………...12
Control the Volume..............................................................………………………………………...12
Watching a Video......................................................................………………………………………….12
Connect Speakers to the Digital Photo Frame...................................……………………………..13
Setting Viewing Options....................................................................……………………………………13
Changing the Decorative Frame...............................................................……………………………...14
Advanced Operations..............................................................................……………………………….14
Connect to a Windows Computer........................................................…………………………….15
Disconnect the Digital Photo Frame from the Computer.......................…………………………...16
Connect to a Macintosh....................................................................………………………………16
Connect a USB Flash Drive...................................………………………………...………………...16
Frequently Asked Questions.........................................…………………………………………………..17
Limited Warranty...........................................................…………………………………………………..18

Important Safety Precautions
Always follow these basic safety precautions when using your Digital Photo Frame. This will reduce the risk of
fire, electric shock, and injury.
Warning: To reduce the risk of fire or shock hazard, do not expose this product to rain or moisture.
Warning: To prevent the risk of electric shock, do not remove the cover. There are no user-serviceable
parts inside. Refer all servicing to qualified personnel.
• The Digital Photo Frame is for indoor use only.
• Unplug the Digital Photo Frame before performing care and maintenance.
• Do not block the ventilation holes on the back of the digital photo frame at any time.
• Keep your Multimedia Digital Photo Frame out of direct sunlight and heat sources.
• Protect the power cord. Route power cords so that they are not likely to be walked on or pinched by
items placed on or against them. Pay particular attention to the point where the cord attaches to the
Digital Photo Frame.
• Only use the AC adapter included with the Digital Photo Frame. Using any other power adapter will void
your warranty.
• Unplug the power cord from the outlet when the unit is not in use.
Cleaning the LCD Screen
Treat the screen gently. The screen is made of glass and can be scratched or broken.
To clean fingerprints or dust from the LCD screen, we recommend using a soft, non-abrasive cloth such
as a camera lens cloth to clean the LCD screen.
If you use a commercial LCD Cleaning Kit, do not apply the cleaning liquid directly to the LCD screen.
Clean the LCD screen with cleaning cloth moistened with the liquid.
Cleaning the Digital Photo Frame
Clean the outer surface of the Digital Photo Frame (excluding the screen) with a soft cloth dampened
with water.

Introduction
Welcome to the Pandigital Multimedia Photo Frame! Now you can display your digital photos directly from your
memory card, no computer is necessary. Simply insert a memory card into the Digital Photo Frame, and turn
on the power. You'll be treated to a slideshow of your photos. It's as easy as that. You can also display
individual photos, play video clips, and play background music with your slide show.
The Digital Photo Frame includes these key features:
• Displays digital photos (JPEG) without a computer.
• Simply insert a compatible memory card into the digital frame to show photos, play Mp3 music or
supported video files (memory card not included).
• Compatible memory cards include Secure Digital , MultiMedia Card , Compact Flash
TM
, Memory Stick ,
MemoryStick Pro , Memory Stick Duo , Memory Stick Pro Duo
TM
and xD Card.
• Instantly plays Mp3 music with the integrated speakers.
• Digital photo slide Show with Mp3 background music.
• Displays JPEG images and motion JPEG files (AVI) stored on digital cameras.
• Supports MPEG1, MPEG4 AVI/MJPEG (352*288CIF) and MP3.
• Supports up to 12 Mega Pixel image files (JPEG format).
• Control the main functions with buttons on the frame or with the included infrared remote control.
• Bright TFT LCD screen.
• USB2.0 high-speed connection to connect to your PC.
• USB1.1 (Host) for connecting to your digital camera.
• Built-In Memory.
To learn more about your new Digital Photo Frame's features, and take full advantage of them, please take a
few minutes to read this User's Guide.
What's In the Box
Digital Photo Frame
AC Power Adapter (9v, 2A)
This User's Guide
Remote Control
USB Cable
Decorative Frame
Quick Start Guide
Warranty Card
Quick Start Guide
This section describes the easy steps needed to display your first Slide Show.
Setting Up the Digital Photo Frame
The Digital Photo Frame is easy to set up. Just follow these steps:
1. Plug the AC Power Adapter into the Digital Photo Frame into a wall outlet.
2. Insert a memory card into the appropriate slot.
Slot 1 - Secure Digital
TM
or MultiMedia Cardt
Slot 2 - Compact Flash
TM
Slot 3 - Memory Stick
TM
, MemoryStick Pro , Memory Stick Duo
TM
or
Memory Stick Pro Duo
TM
Slot 4 - xD Memory Card
TM

Note: The card will only fit in one direction; do not force it. The card should fit snugly when
properly inserted. Turn the Power Switch on the back of the Digital Photo Frame ON. The Digital Photo
Frame will automatically start a slide show of the photos on the card.
4. To display photos individually, press the Exit button to open the Thumbnails Screen. Use
the Up and Down arrows to choose a photo. Press the Play button (>/II) on the top of the
Digital Photo Frame, or the Enter button on the remote control.
Note: Pull the plastic tab sticking out of the remote control. It protects the battery, and the
remote control will not work unless it is removed.
5. To restart the Slide Show, press the Play button (>/II) again, or press the Slide Show
button on the remote control.
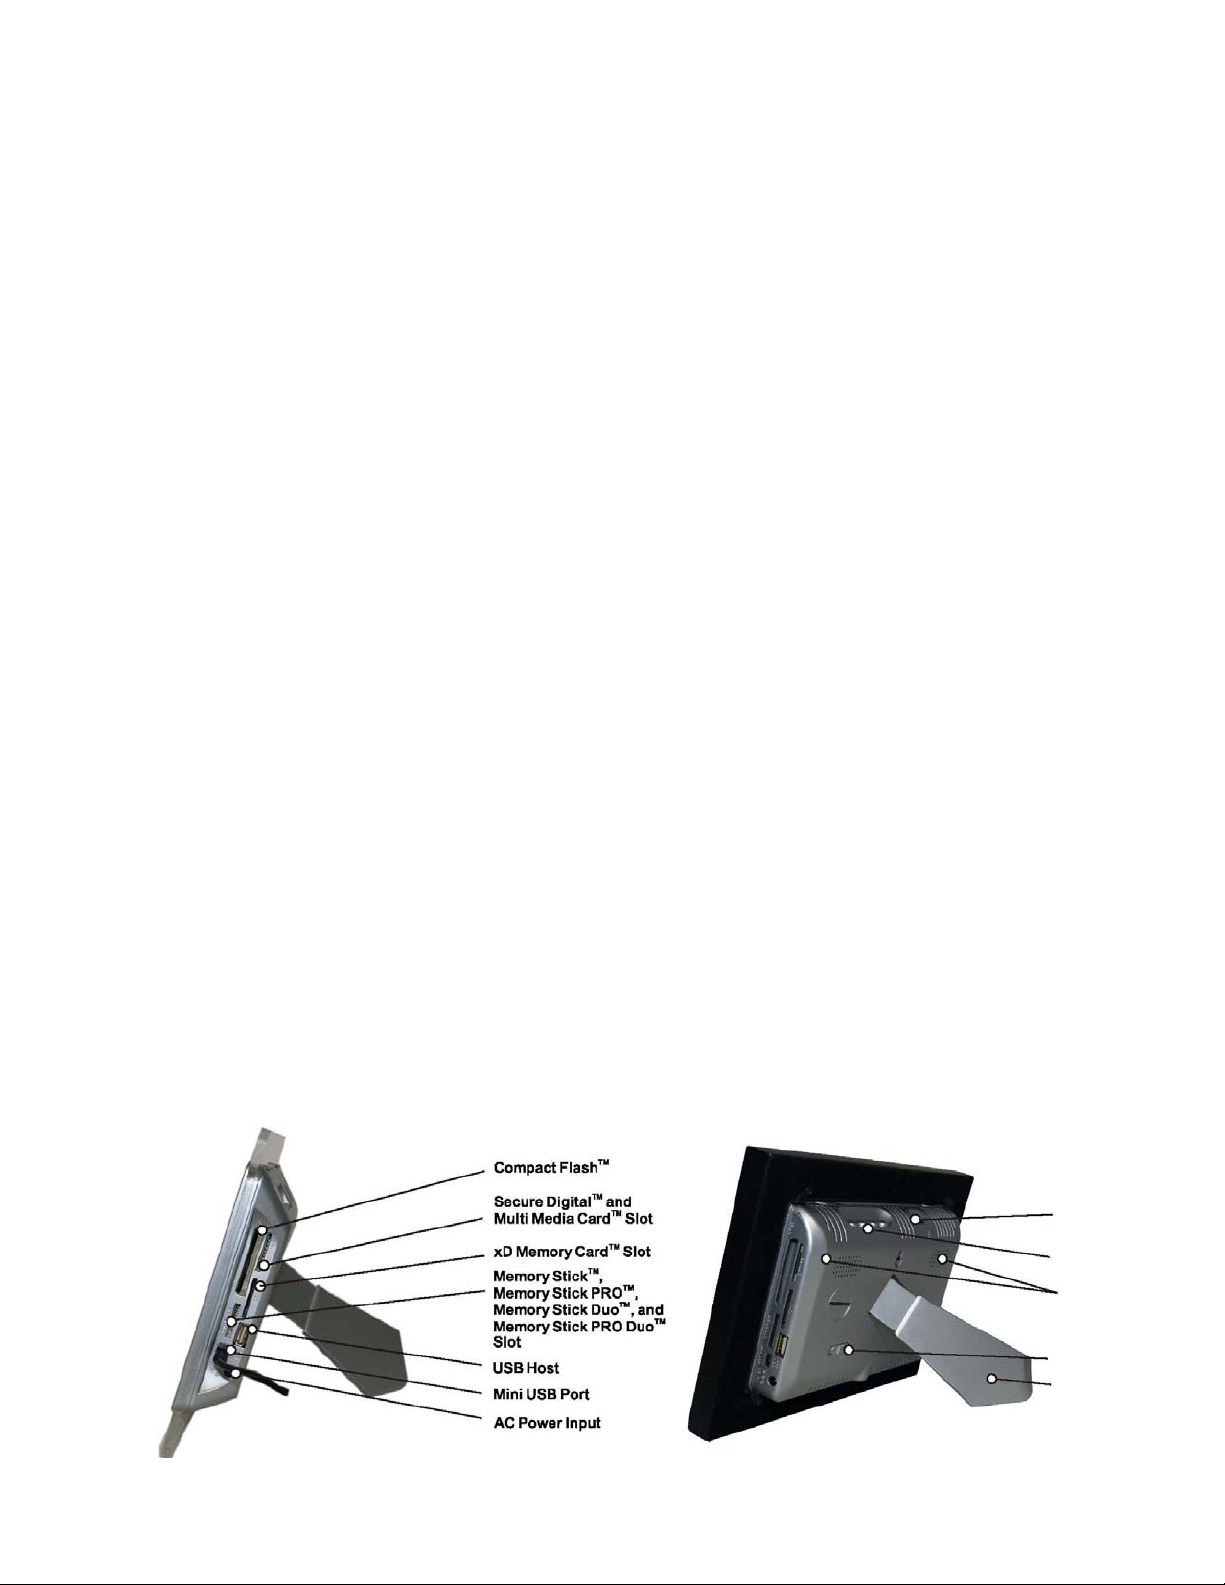
Locating the Digital Photo Frame's Features
Photo and description of buttons on photo frame.
Using the Control Buttons and Remote Control
You can use all of the Digital Photo Frame's features with either the buttons on top of the frame or using the
remote control.
Use the Control Buttons
The control buttons are located on top of the Digital Photo Frame. Their basic functions are the same no matter
when you press them.
Note: You can open the Setup Menu at any time by pressing and holding the EXIT button.
Button Action
<<
Move the selection up or left, display
the Previous photo, or select the
previous file.
II>
Select the highlighted option, start a
Slide Show, Pause or Play.
>>
Move the selection down or right,
display the next photo or select the
next file.
EXIT
Exit the current display, or go back a
screen.
 Loading...