

Page 1
Pandigital
®
Digital Photo Frame
USER GUIDE
Page 2

Important Safety Precautions:
Please always follow the following basic safety precautions when using your Digital Photo Frame (DPF).
This will reduce the risk of re, electric shock and injury.
• Do not drop or subject this product to jarring or strong vibrations.
• Do not expose this product to rain or moisture.
• Do not expose this product to extreme heat.
• Power off the Digital Photo Frame before performing care and maintenance.
• Clean the outer surface or the screen of the Digital Photo Frame with a soft cloth. Do not use liquid
cleaners.
• The LCD panel is made of plastic and can be easily damaged. Avoid sharp objects.
Page 3

Table of Contents
1. Introduction .......................................................................................................................................................................4
2. Features.............................................................................................................................................................................4
3. What’s In the Box .............................................................................................................................................................5
4. Specications ...................................................................................................................................................................5
5. Product Diagram...............................................................................................................................................................6
6. Using Your Digital Photo Frame ......................................................................................................................................7
• Use the Control Buttons ................................................................................................................................................ 7
• Charging the Battery .....................................................................................................................................................7
• Exit USB Mode..............................................................................................................................................................8
• Viewing Photos or Clock ...............................................................................................................................................9
• Setting Setup Menu ......................................................................................................................................................9
• Resetting to Default Settings ......................................................................................................................................10
• Setting Slide Show ...................................................................................................................................................... 10
• Setting Language ........................................................................................................................................................ 12
• Setting Brightness ....................................................................................................................................................... 12
• Setting Current Time ................................................................................................................................................... 13
• Deleting Pictures ......................................................................................................................................................... 15
7. Installing the Software onto a Computer .....................................................................................................................16
• Installing the Software.................................................................................................................................................16
• Computer System Requirements ................................................................................................................................ 17
• Connecting to Your Computer .....................................................................................................................................18
• About Pandigital Photo Manager ................................................................................................................................ 19
• How to Use Pandigital Photo Manager .......................................................................................................................20
8. Storage Capacities ......................................................................................................................................................... 24
9. Frequently Asked Questions ......................................................................................................................................... 25
10. Limited Warranty .......................................................................................................................................................... 26
11. FCC Statement .............................................................................................................................................................. 28
Page 4

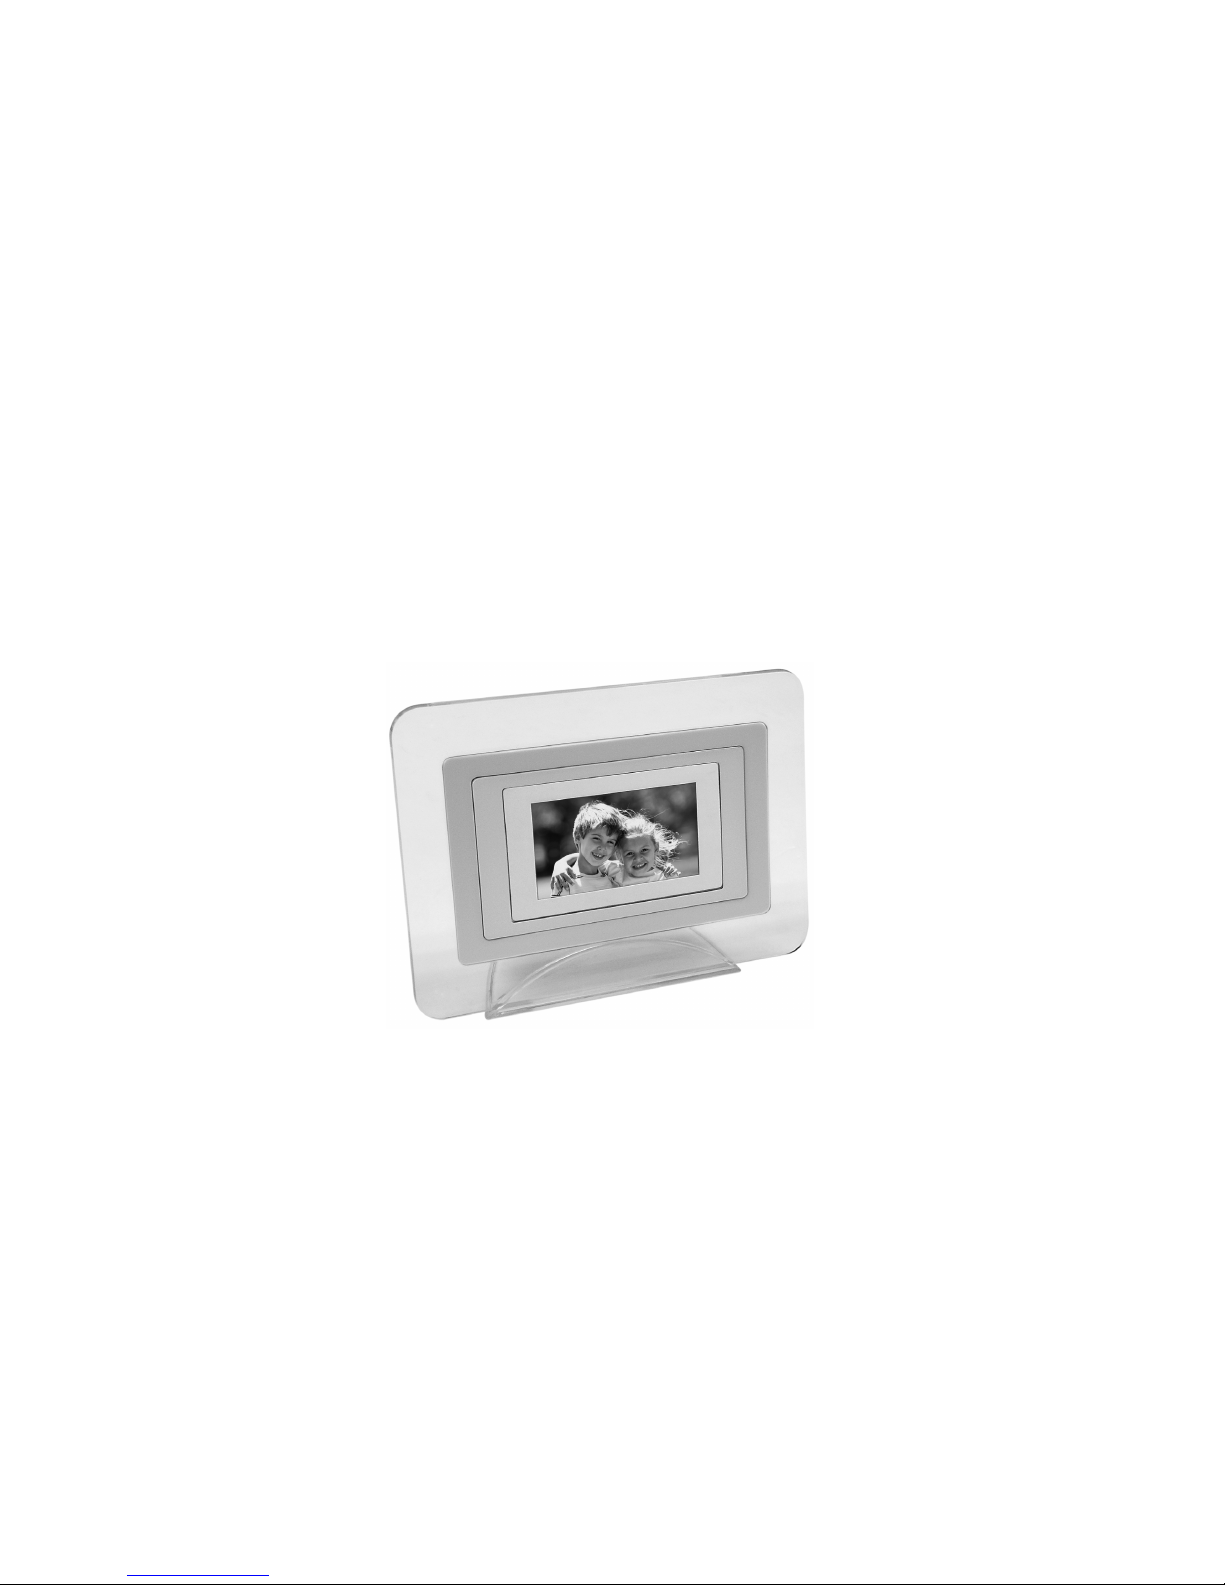
Introduction
Welcome to the Pandigital Multimedia Photo Frame! Simply connect your Digital Photo Frame to your
computer to download images and then play. It’s as easy as that.
Features
The Digital Photo Frame includes following key features:
◊ 2.7 inch TFT LCD screen
◊ 16:9 display
◊ Resolution: 480 X 234 pixels
◊ Multi-language operation menu
◊ Built-in chargeable Li-lon battery charged via USB cable
◊ Clock Function
4
Page 5

What’s In the Box
• Digital Photo Frame 1 piece
• User Guide 1 piece
• USB Cable 1 piece
• Warranty Card 1 piece
Specications
Panel Size 2.7 inches
Resolution 480 X 234
Brightness 150 cd/m²
Contrast Ratio 150:1
Horizontal / Vertical Viewing Angle 40 / 40 ; 10 / 30
Screen Size Mode 16 : 9
File Format Type JPEG
Operating Temperature 32-104° Fahrenheit; 0-40° Celsius
Storage Temperature 20~85% relative humidity, non condensing
5
Page 6
6
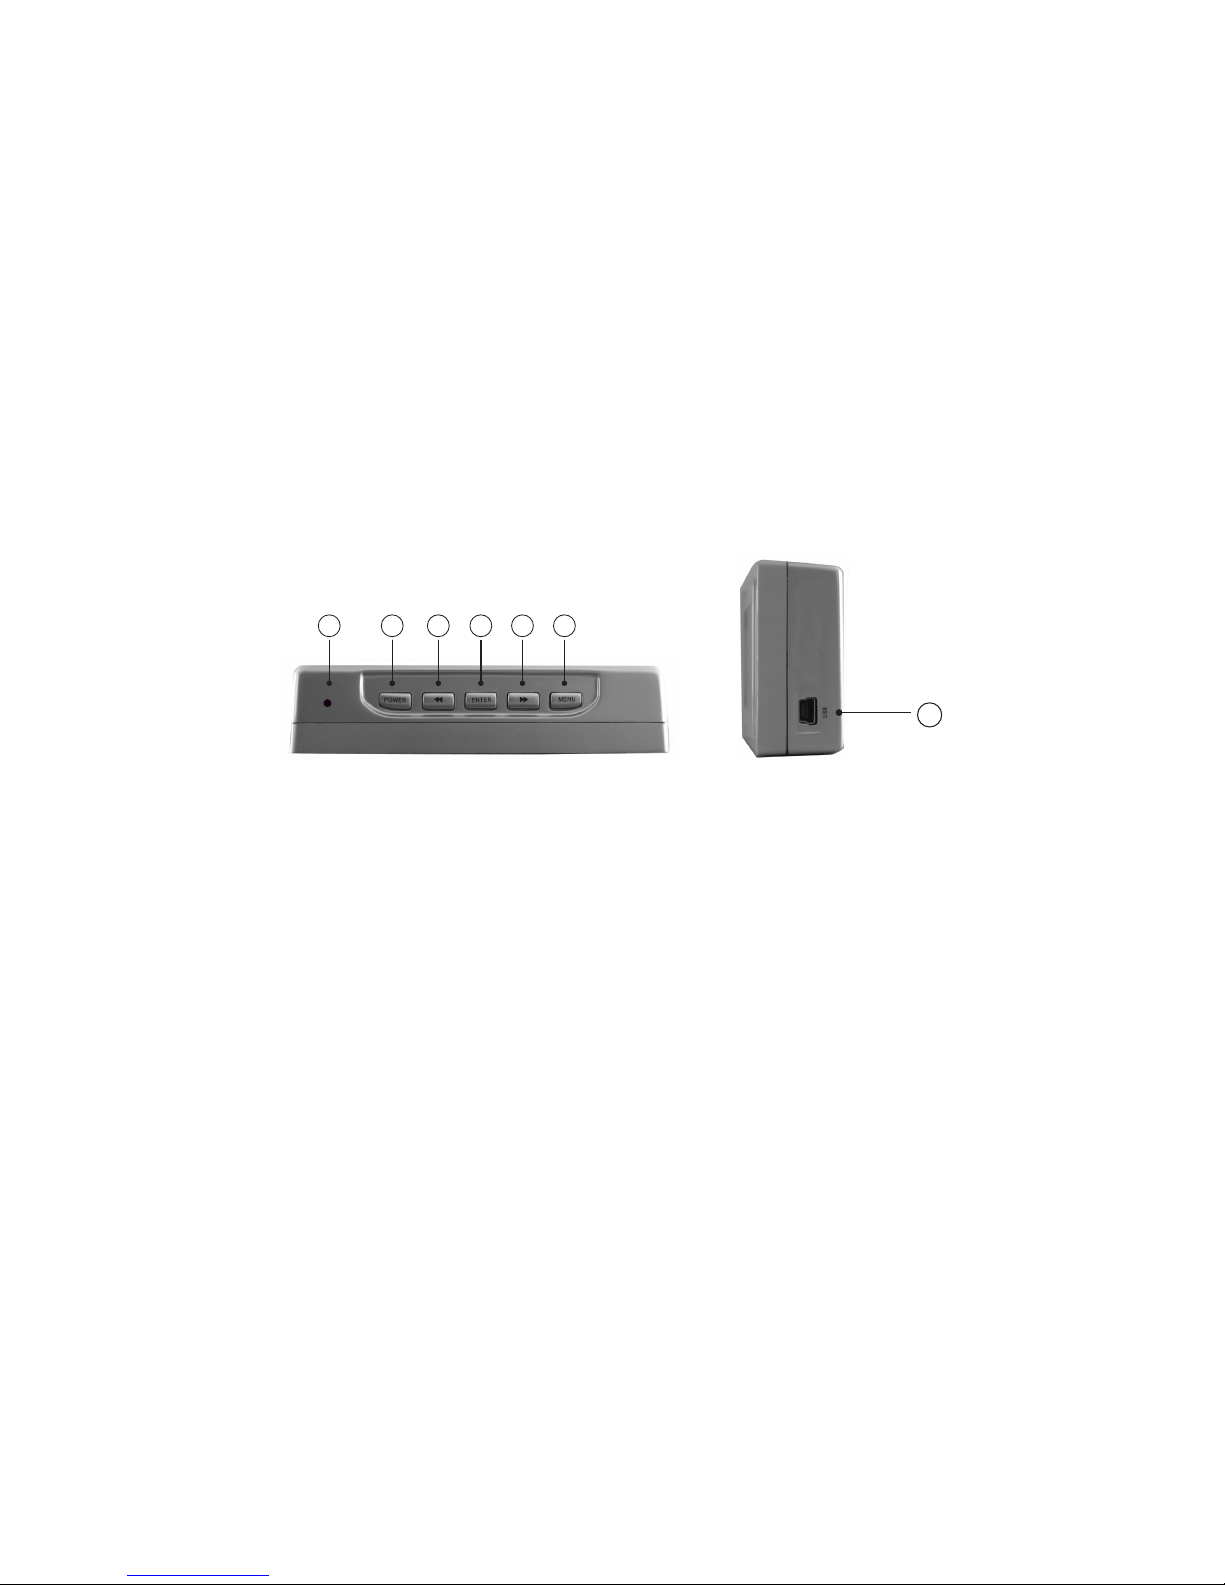
Product Diagram
1 2 3 4 5 6
Top View
7
Side View
1. Reset Button
2. Power Button
3. Left Button
4. Enter Button
5. Right Button
6. Menu Button
7. USB Port
Page 7

7
Using Your Digital Photo Frame (DPF)
Use the Control Buttons:
RESET Restart the Digital Photo Frame
POWER Power on or off
Move the selection up or left, display the previous photo, or select the previous le
ENTER Select the highlighted option, start a slideshow, pause or play, start clock function
Move the selection up or right, display the next photo, or select the next le
MENU Enter “Setup” menu in any mode, exit setup menu.
Charging the Battery:
One built-in chargeable Li-Ion battery is supplied with your frame. It can offer about 2 hours viewing on
your digital frame. To charge the battery, simply connect your frame to the USB port of your computer.
After connecting, the system will be in a charging state and the battery icon will keep on blinking. When it
nished charging , the battery icon will stop blinking.
Page 8

Exit USB Mode:
Whenever you connect your Digital Photo Frame to a computer,
system will be in charging state automatically. If you want to use the
DPF while it is connected to the computer, you will have to exit from
the USB Charging Mode.
1. While your Digital Photo Frame is connected to a computer via
the USB cable.
E X I T US B
Y E S
N O
2. Press the
ENTER
button.
3. Press the or button to select “YES” or “NO”.
4. Press the
ENTER
button again to conrm your choice.
NOTE:
This operation will not stop the charging mode. After you exit the USB mode, you can view your
images while charing the battery, but the speed of charging will be reduced.
8
Page 9
9
Viewing Photos or Clock
1. Press and hold the
POWER
button until the DPF power on. System will enter PLAYBACK mode
automatically.
2. Press the
ENTER
button to start slide show.
3. Press the button to select previous picture or press the button to select next picture.
4. In “SLIDE SHOW” mode, press the
ENTER
button to enter “CLOCK” mode. Press the
ENTER
button
again to exit “CLOCK” mode and back to “SLIDE SHOW” mode.
5. Press and hold the
POWER
button for about 3 seconds to turn the frame off.
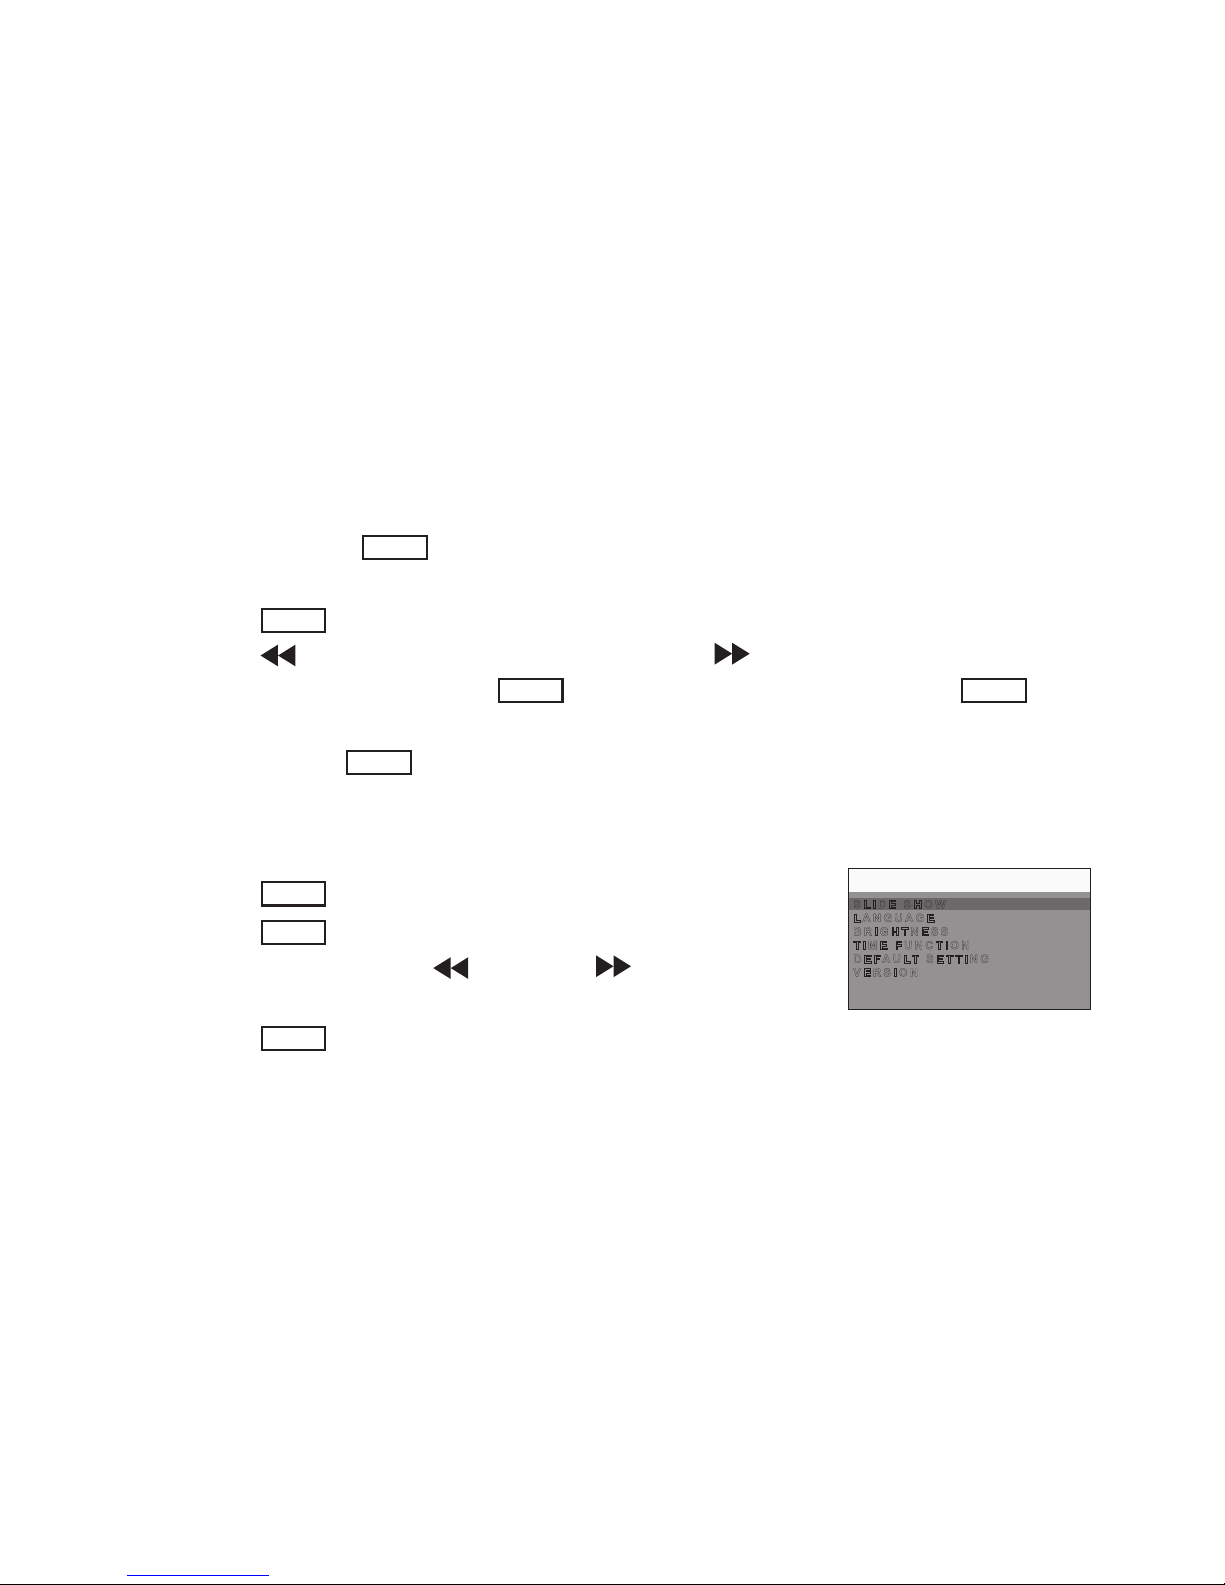
Setting Setup Menu:
S L I D E S H O W
L A N G U AG E
B R I G H TN E S S
T I M E FU N C T I O N
D E F A U L T S E T T I N G
V E R S I ON
MENU
1. Press the
MENU
button in any mode to enter “SETUP” mode.
2. Press the
MENU
button again to back to previous mode.
3. In “SETUP” mode, press the button or the button to scroll
up and down through menu options.
4. Press the
ENTER
button to select the highlighted option.
Page 10

10
Resetting to Default Settings:
Y E S
N O
DEFAULT SETTING
S L I D E S H O W
L A N G U AG E
B R I G H TN E S S
T I M E FU N C T I O N
D E F A U L T S E T T I N G
V E R S I ON
MENU
1. Press the button or the button to select “SLIDE SHOW”.
2. Press the
ENTER
button to enter.
3. Press the button or the button to select the desired setting.
4. Press the
ENTER
button to conrm and save your choice.
5. Or press the
MENU
button to exit without saving.
Setting Slide Show:
S L I D E S H O W
L A N G U AG E
B R I G H TN E S S
T I M E F U N C T I O N
D E F A U L T S E T T I N G
V E R S I ON
MENU
1. Press the button or the button to select “SLIDE SHOW”.
2. Press the
ENTER
button to enter.
Page 11

11
Setting Transition Interval:
T R A N S IT I O N I N T E R VA L
T R A N S IT I O N E F F E C T
SLIDE SHOW
TRANSITION INTERVAL
1. Press the button or the button to select “TRANSITION
INTERVAL”.
2. Press the
ENTER
button to enter.
3. Press the button or the button to select the desired setting.
4. Press the
ENTER
button to conrm and save your choice.
5. Or press the
MENU
button to exit without saving.
Setting Transition Effect:
T R A N S IT I O N I N T E R VA L
T R A N S IT I O N E F F E C T
SLIDE SHOW
N O N E
R A N D O M
A L L
S E Q U E SN T I A L
B L I N D
S P L I T
P U S H
C O V E R
SLIDE SHOW
1. Press the button or the button to select “TRANSITION
EFFECT”.
2. Press the
ENTER
button to enter.
3. Press the button or the button to select the desired setting.
4. Press the
ENTER
button to conrm and save your choice.
5. Or press the
MENU
button to exit without saving.
Page 12

Setting Language:
S L I D E S H O W
L A N G U AG E
B R I G H TN E S S
T I M E F U N C T I O N
D E F A U L T S E T T I N G
V E R S I ON
MENU
E N G L I SH
F R A N C E
S PA N IS H
D U T C H
P R O T U GU E S E
I TA L IA N
LANGUAGE
BRIGHENESS
S L I D E S H O W
L A N G U AG E
B R I G H TN E S S
T I M E F U N C T I O N
D E F A U L T S E T T I N G
V E R S I ON
MENU
1. Press the button or the button to select “LANGUAGE”.
2. Press the
ENTER
button to enter.
3. Press the button or the button to select the desired setting.
4. Press the
ENTER
button to conrm and save your choice.
5. Or press the
MENU
button to exit without saving.
Setting Brightness:
1. Press the button or the button to select “TRANSITION
EFFECT”.
2. Press the
ENTER
button to enter.
3. Press the button or the button to select the desired setting.
4. Press the
ENTER
button to conrm and save your choice.
5. Or press the
MENU
button to exit without saving.
12
Page 13

Setting Current Time:
S L I D E S H O W
L A N G U AG E
B R I G H TN E S S
T I M E F U N C T I O N
D E F A U L T S E T T I N G
V E R S I ON
MENU
1. Press the button or the button to select “TIME FUNCTION”.
2. Press the
ENTER
button to enter.
3. Press the button or the button to select “CURRENT TIME”.
4. Press the
ENTER
button to enter.
C U R R E NT T I M E
A U T O O F F
A U T O O F F A T
TIME FUNCTION
CURRENT TIME
00:00
5. Press the
ENTER
button to select a eld, such as hour and minute.
6. Press the button or the button to adjust the value in the
eld.
7. Press the
ENTER
button to conrm and save your choice.
8. Press the
MENU
button to exit.
13
Page 14

Setting Auto Off:
C U R R E NT T I M E
A U T O O F F
A U T O O F F A T
TIME FUNCTION
D I S A B LE
E N A B L E
AUTO OFF
C U R R E NT T I M E
A U T O O F F
A U T O O F F A T
TIME FUNCTION
AUTO OFF AT
00:00
1. Press the button or the button to select “AUTO OFF”.
2. Press the
ENTER
button to enter.
3. Select “ENABLE” option to open the “AUTO OFF” function.
4. Select “DISABLE” option to close the “AUTO OFF” function.
Setting Automatically Power Off Time:
1. Press the button or the button to select “AUTO OFF AT”.
2. Press the
ENTER
button to enter.
3. Press the
ENTER
button to select a eld, such as hour and minute.
4. Press the button or the button to adjust the value in the
eld.
5. Press the
ENTER
button to conrm and save your choice.
6. Press the
MENU
button to exit.
14
Page 15

Deleting pictures:
D E L E T E
Y E S
N O
D E L E T E A L L
Y E S
N O
1. Press the
ENTER
button to set the Frame to “PLAYBACK” mode.
2. Press the
POWER
button to delete single picture.
3. Press the
POWER
button again to delete all pictures.
4. Press the
POWER
button again to return “PLAYBACK” mode.
5. After you enter the delete function, Press the button or the
button to select “YES” or “NO”.
6. Press the
ENTER
button to conrm and save your choice.
7. Press the
MENU
button to exit.
15
Page 16

Installing the Software onto a Computer
Installing the Software:
PC
For Windows® Users:
IMPORTANT!
• Please backup all the necessary data before any driver and software installation.
• The CD-ROM is tested and recommended to use under English Windows OS.
• Please restart the computer after installing the software.
Open & Close
1. Before you begin, close all other software applications open on
your computer.
2. Insert the CD supplied into the computer CD-ROM Drive.
3. The CD User Interface Screen will automatically launch.
4. With the mouse, click the “Pandigital Photo Manager” button and
follow the screen instructions.
16
Page 17

Computer System Requirements:
For acceptable picture transferring and editing performance, we recommend the following minimum
requirements;
PC
For Windows® Users:
• Compatible with Microsoft® Windows® 98SE, Me, 2000, XP or Vista
• Pentium® III 450 MHz or equivalent processor
• USB Port
• 128MB RAM (256MB recommended)
• 30MB free disk space
• Color monitor with high color (16-bit) graphic capability or higher
• CD-ROM drive
• Standard mouse and keyboard
17
Page 18

Connecting to Your Computer:
For Win 2000, XP or Vista user, Connect your DPF to PC directly by USB cable.
For Win 98 or Win Me user, hold the “MENU” key then connect your DPF to PC by USB cable.
IMPORTANT NOTE:
For Win2000/XP/Vista User:
After you connect your digital photo frame to PC, a “Removable Disk” drive will appear on screen. The drive
only means the Windows System detected a new hardware but it can’t be opened. If user double clicks
this drive, an error message will show on the computer desktop. Users can only upload or download
images on the DPF through the software “Pandigital Photo Manger”.
18
Page 19

About Pandigital Photo Manager:
Pandigital Photo Manager allows you to add and delete pictures on your DPF. It also allows you to crop
and compress the pictures that you want to add to the DPF.
Interface Diagram Introduction:
Column A: Browse for images---List out folders in your
computer.
Column B: Pictures Located---List of all images in the location
which you selected in Column A.
Column C: Add or Delete Pictures---List of pictures that can be
added or deleted from the DPF internal memory.
Note: New pictures not yet transferred to the DPF is highlighted in RED. After you press the
Update Picture Frame
button the pictures highlighted in RED will be transferred to the DPF
Column D: Pictures in device---List of all pictures currently
stored on your digital photo frame.
19
Page 20

How to Use Pandigital Photo Manager:
1. Open Pandigital Photo Manager in desktop or Start menu. Pandigital Photo Manager will automatically
initialize data and download all the images from the DPF.
2. Open your image folder in column A and all images in the selected folder will show in column B.
20
Page 21

3. Click the settings button to setup the images in order to fit the Pan2701 screen preview. Or click
the crop button to adjust the images.
4. Click the transfer button to transfer those adjusted images in column B to column C.
21
Page 22

5. Click the delete button to delete a single selected image or click the delete all button to delete
all images in column C.
6. Click the update button
Update Picture Frame
to save all the images in column C to Your DPF.
7. When update finished, please click the close button at the left-top conner to exit Pandigital Photo
Manager.
22
Page 23

Import Note:
Photo Manager can only be used while the DPF is in USB Charging Mode. Under the following two
conditions, system will pop up an error message of Pandigital Photo Manager:
1. When you open the Pandigital Photo Manager without connecting
your DPF to your computer.
2. When you open the Pandigital Photo Manager or try to transfer
pictures to your DPF in PLAYBACK Mode , Clock Mode or Slide
Show Mode.
23
Page 24

Storage Capacities
The chart below indicates the approximate number of pictures your Digital Photo Frame can hold at each
setting based on the internal memory.
Resolution Compression Internal Memory
10 M
( 3648 X 2736 )
High Approx. 39
Middle Approx. 12
Low Approx. 6
3 M
( 2048 X 1536 )
High Approx. 53
Middle Approx. 14
Low Approx. 7
480 X 234
High Approx. 68
Middle Approx. 30
Low Approx. 15
Note:
1. The calculation is based on high compression (1:20) and low resolution(480 X 234).
2. Scene complexity affects a picture’s le size. Therefore, the number of pictures your Digital Photo
Frame can store may vary.
24
Page 25

Frequently Asked Questions
1. Question: What kind of photos does this device support?
Answer: Only the JPEG format is compatible with this Frame, which is the standard format for
nearly all digital cameras.
2. Question: Why the system not responds when the power is turned on?
Answer: First, please make sure your digital frame is fully charged. Connect your frame
to a computer by the USB cable and power on again. If it is still not respond, please connect
manufacturer or dealer.
3. Question: Why is the picture display slower with some pictures and faster with others?
Answer: Higher resolution pictures load more slowly. Try using lower resolution pictures or use
Pandigital Photo Manager to down sampling your photos.
4. Question: How to restart my Digital Photo Frame?
Answer: Simply depress the RESET button gently by a paper clip or ballpoint pen for a few
seconds. The Frame will restart automatically. If it is not respond, please connect manufacturer or
dealer.
6. Question: I am Win 98 / Win Me user, why does the system not respond after I connect the Frame
to a PC?
Answer: For Win 98 or Win Me user, please remember to hold the “MENU” key before you
connect your Frame to a PC.
For additional support, please visit our web site:
www.pandigital.net
25
Page 26

Limited Warranty
The limited warranty set forth below is given by Pandigital with respect to Pandigital brand electronics
products purchased and used in the United States of America. Pandigital warrants this product against
defects in material or workmanship as follows:
LABOR: For a period of ninety (90) days from the date of purchase, if this product is found to be defective,
Pandigital will repair or replace the product, at its option, at no charge. After this ninety (90) day period,
labor charges will be charged on a case by case basis.
PARTS: For a period of ninety (90) days from the date of purchase, if this product is found to be defective,
Pandigital will supply at no cost, new or rebuilt replacement parts, at its option, at no charge. After this
ninety (90) day period, parts will be charged for on a case by case basis.
This warranty does not cover: (1) customer instruction, installation or setup; (2) cosmetic damage or
damage due to accident, misuse, abuse or negligence; (3) commercial use of the product; (4) modication
of any part of the product; (5) damage due to improper operation, improper maintenance, or connection
to an improper power supply; (6) damage due to an attempted repair of the product by anyone other than
a facility authorized by Pandigital to service the product; (7) consumables (such as fuses and batteries).
This warranty is valid only in the United States.
26
Page 27

The product must be accompanies by a copy of the original retail purchase receipt. If no proof of purchase
is attached, the warranty will not be honored and repair costs will be charged. This warranty is valid with
attached written documentation detailing the complaint to the outside or inside of the carton. This warranty
is invalid if the factory applied serial number has been altered and or removed from the product. Pandigital
reserves the right to modify and design of this product without prior notice, written or otherwise.
To obtain warranty service, you must deliver the product freight prepaid in either its original packaging or
packaging affording an equal degree of protection, plus proof of purchase.
Technical support telephone number: 1-800-715-5354.
Repair or replacement as provided under this warranty is the exclusive remedy of the consumer. Pandigital,
its parent company, afliates or subsidiaries, shall not be liable for any incidental or consequential
damages for breach of any expressed or implied warranty on this product. Except to the extent prohibited
by applicable law, any implied warranty of merchantability or tness for a particular purpose on this product
is limited in duration to the duration of this warranty.
Some states do no allow the exclusion or limitation of incidental or consequential damages, or allow
limitation on how long an implied warranty lasts, so the above limitations or exclusions may not apply. This
warranty gives you specic legal rights, and you may have other rights, which vary from state to state.
27
Page 28

FCC Statement
FCC Part 15 Information
This equipment has been tested and found to comply with the limits for a Class B digital device, pursuant
to Part 15 of the Federal Communication Commission (FCC) Rules. These limits are designed to provide
reasonable protection against harmful interference in a residential installation.
This equipment generates, uses, and can radiate radio frequency energy and if not installed and used
in accordance with the instructions, may cause harmful interference to radio communications. However,
there is no guarantee that interference will not occur in a particular installation. If this equipment does
cause harmful interference to radio or television reception, which can be determined by turning the
equipment off and on, the user is encouraged to try to correct the interference by one or more of the
following measures:
• Reorient or relocate the receiving antenna.
• Increase the separation between the equipment and receiver.
• Connect the equipment to an outlet on a circuit different from that to which the receiver is
connected.
• Consult the dealer or an experienced radio/TV technician for help.
WARNING:
Changes or modications to this unit not expressly approved by the party responsible for compliance could
void the user’s authority to operate the equipment.
28
Page 29

Part No.: OM6083US001
Made in China
 Loading...