

Page 1

Effortlessly Moving Images Out of your Camera and Into your Life
Amenez en toute aisance vos images numériques de votre appareil photo dans votre vie
Cómo trasladar las imágenes con movimiento de su cámara digital a su vida sin esfuerzos
12” Digital Photo Frame – User Guide
12 po Cadre photo numérique – Guide de l’utilisateur
12” Portarretrato digital - Guía del usuario
Page 2

Register your Product / Enregistrement De Produit / Registro Del Producto
1
Qualify to win a FREE
digital photo frame!*
(valid in USA only)
Register now at http://www.pandigital.net
Inscrivez-vous maintenant sur http://www.pandigital.net
Regístrese ahora en http://www.pandigital.net
*For details, go to our website: www.pandigital.net
**The online signup is for the purpose of user and
product registration. Failure to register does not in any
way diminish any of your standard warranty rights, as
described in the documentation included with your
product.
**L’inscription en ligne a pour objectif l’enregistrement
de l’utilisateur et du produit. Omettre de s’inscrire
n’entraîne en aucun cas une diminution des droits de
garantie, tels qu’ils sont décrits dans la documentation
incluse avec ce produit.
**La suscripción en línea permite el registro de usuarios y
productos. No registrarse no afecta de ningún modo sus
derechos estándar a la garantía, de acuerdo con lo
descrito en la documentación que se incluye con el
producto.
Register your FREE 1-year warranty!**
Enregistrez votre garantie GRATUITE d’un an!**
Registre su garantía por 1 año GRATIS**
NOTE: If you must mail your 1-year registration, please
send your name, address, phone number, model &
serial number, and when & where purchased to:
Pandigital, P.O. Box 2969, Dublin, CA 94568-2969 USA
À NOTER: Dans le cas où vous devez poster votre
inscription d’un an, envoyez votre nom, adresse,
numéro de téléphone, modèle & numéro de série, date
et lieu d’achat à:
Pandigital, P.O. Box 2969, Dublin, CA 94568-2969 USA
NOTA: Para enviar su registro de garantía de 1 año por
correo, escriba a la siguiente dirección (por favor,
incluya su nombre completo, dirección, teléfono,
modelo y número de serie, y cuándo y dónde adquirió
el producto):
Pandigital, P.O. Box 2969, Dublin, CA 94568-2969 USA
Note: Your frame style and features may differ from those documented in this User Guide.
UG-E-FRC-SP_PAN1201DWB_v1.0_01-10
2
Page 3

Table of Contents
English
Introduction .................................................................................................................................................................. 5
DPF Key Features .............................................................................................................................................................................. 5
What’s in the Box ............................................................................................................................................................................... 5
Compatible Memory Cards ................................................................................................................................................................ 5
Overview of the DPF .................................................................................................................................................... 5
Remote Control ............................................................................................................................................................ 5
Control Buttons on DPF .............................................................................................................................................. 6
Getting Started ............................................................................................................................................................. 6
The HOME Screen ........................................................................................................................................................ 6
Setup Menu Overview .................................................................................................................................................. 6
About Selecting Options ............................................................................................................................................. 7
Select Media Source .................................................................................................................................................... 7
Personalized Digital Greeting Card ............................................................................................................................ 7
The Virtual Keyboard ......................................................................................................................................................................... 7
Enter Greeting .................................................................................................................................................................................... 7
Assign Personal Background Image .................................................................................................................................................. 8
PHOTOS ........................................................................................................................................................................ 8
Photo Thumbnails .............................................................................................................................................................................. 8
View Individual Photo during a Slideshow ......................................................................................................................................... 8
Adjust Screen Colors ......................................................................................................................................................................... 8
Optimal Image Display ....................................................................................................................................................................... 9
Photo Import Method .......................................................................................................................................................................... 9
Display Current Time with Photos...................................................................................................................................................... 9
Display Photo File Date/Time Stamp with Photos ............................................................................................................................. 9
Import Photos into Internal Memory ................................................................................................................................................... 9
Delete Photos from Internal Memory ................................................................................................................................................. 9
PHOTO SLIDESHOWS ............................................................................................................................................... 10
Slideshow of Photos in Internal Memory ......................................................................................................................................... 10
Slideshow of Photos on your Media Source .................................................................................................................................... 10
Pause a Slideshow ........................................................................................................................................................................... 10
Slideshow Folders ............................................................................................................................................................................ 10
Slideshow Background Music .......................................................................................................................................................... 10
Set Slideshow Music Mode .............................................................................................................................................................. 11
Set Slideshow Interval ...................................................................................................................................................................... 11
Set Slideshow Transition.................................................................................................................................................................. 11
Set Slideshow Shuffle ...................................................................................................................................................................... 11
MUSIC ......................................................................................................................................................................... 11
Select Media Source for Music ........................................................................................................................................................ 11
Playing Music Only ........................................................................................................................................................................... 11
Music Repeat Mode ......................................................................................................................................................................... 12
Import Music Files into Internal Memory .......................................................................................................................................... 12
Delete Music Files from the Internal Memory .................................................................................................................................. 12
VIDEOS ....................................................................................................................................................................... 12
Select Media Source for Videos ....................................................................................................................................................... 12
Watch a Video .................................................................................................................................................................................. 12
Video Repeat Mode ......................................................................................................................................................................... 12
Import Video Files into Internal Memory .......................................................................................................................................... 12
Delete Videos from the Internal Memory ......................................................................................................................................... 13
3
Page 4

CALENDAR/CLOCK ................................................................................................................................................... 13
Select Media Source for Calendar Slideshow ................................................................................................................................. 13
Set Schedule .................................................................................................................................................................................... 13
Disable Schedule ............................................................................................................................................................................. 13
Run the Schedule ............................................................................................................................................................................. 13
Run Schedule from Slideshow ............................................................................................................................................... 13
Run Schedule from CALENDAR/CLOCK Screen .................................................................................................................. 14
Set Date and Time ........................................................................................................................................................................... 14
Set Alarm .......................................................................................................................................................................................... 14
RECIPES ..................................................................................................................................................................... 14
View Recipes in Cookbook .............................................................................................................................................................. 14
Assign Recipes to ‘My Favorite Recipes’ ......................................................................................................................................... 14
View the Recipes in ‘My Favorite Recipes’ ...................................................................................................................................... 14
Copy or Reassign Recipes from one Category to Another ............................................................................................................. 15
Unassign Recipes from ‘My Favorite Recipes’ ................................................................................................................................ 15
Wi-Fi ............................................................................................................................................................................ 15
Set up DPF to connect to Photo Sharing Websites ......................................................................................................................... 15
The Virtual Keyboard ....................................................................................................................................................................... 15
Set up Wireless Network .................................................................................................................................................................. 15
Windows Live FrameIt ...................................................................................................................................................................... 16
Photo Sharing Websites................................................................................................................................................................... 17
DPF to PC – Wireless Connection ............................................................................................................................ 18
DPF to PC – USB Connection ................................................................................................................................... 18
USB Flash Drive to DPF Connection ........................................................................................................................ 19
Bluetooth Connection ............................................................................................................................................ 19
Set Sleep Mode .......................................................................................................................................................... 19
Set Language ............................................................................................................................................................. 20
Reset to Factory Defaults .......................................................................................................................................... 20
Frequently Asked Questions .................................................................................................................................... 20
Important Safety Precautions ................................................................................................................................... 20
Technical Specifications ........................................................................................................................................... 21
Limited Warranty ........................................................................................................................................................ 21
FCC Statement ........................................................................................................................................................... 22
Français
Español
4
Page 5
Introduction
Welcome to the Pandigital Multimedia Digital Photo Frame (DPF). Now you can display your digital photos directly from your memory card, no computer is
necessary.
DPF Key Features
Simple Plug & Play
Displays digital Photo files (JPEG up to 16 mega pixels)
Plays digital Music files (MP3)
Plays digital Video files (AVI)
Displays Calendar/Clock with photo slideshow and Alarm function
Includes preloaded Recipes from popular authors
Wireless connection to photo sharing websites and DPF-to-PC direct
file transfer
Does not require a computer
Infrared Remote Control and control buttons on the frame
512MB Internal Memory
2 USB2.0 ports (Device & Host)
What’s in the Box
Digital Photo Frame (DPF)
AC Power Cord and Adapter
Infrared Remote Control
Decorative Paper Mat
Quick Start Guide
User Guide
Compatible Memory Cards
Compatible memory cards include: Secure Digital™ (SD), MultiMedia
Card™(MMC), xD Card, Memory Stick™(MS), MemoryStick Pro™,
and Memory Stick Pro Duo™*
*The Memory Stick Pro Duo™ requires an additional adaptor to fit
properly into the DPF. You can purchase the adaptor at retail outlet
stores that sell memory cards.
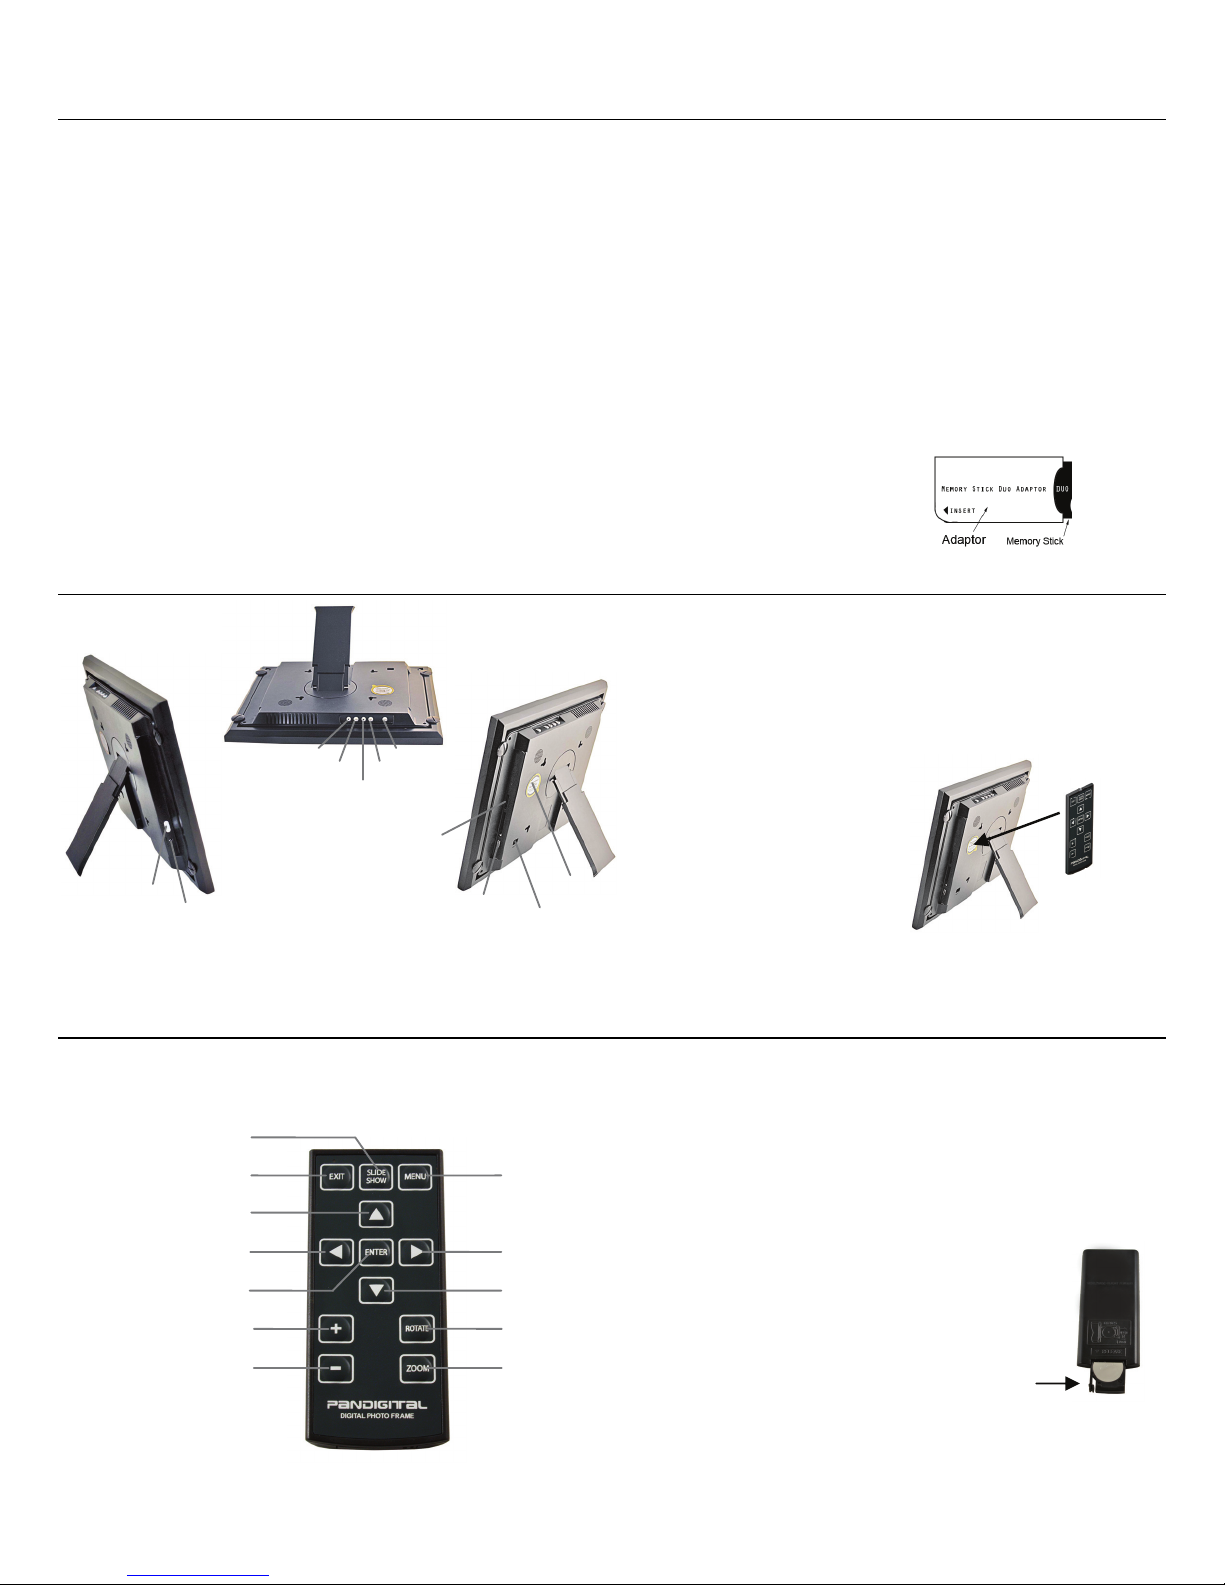
Overview of the DPF
Power ON/OFF
DC power jack
(The memory card slots, ports, and jacks in your DPF may be different than those pictured here.)
Scroll Left MENU
ENTER EXIT
Scroll Right
SD/MS/MSPro/MMC/
xD card slot
USB host
Magnetized area for
storing Remote Control
Mini USB device
Store Remote Control
You can avoid misplacing the remote control by safely
storing it on the back of the DPF when not in use.
The top back of the remote control has a built-in
magnet and the back of the DPF has a ‘magnetic area’
so you can simply attach the remote control to the back
of the DPF for safe keeping.
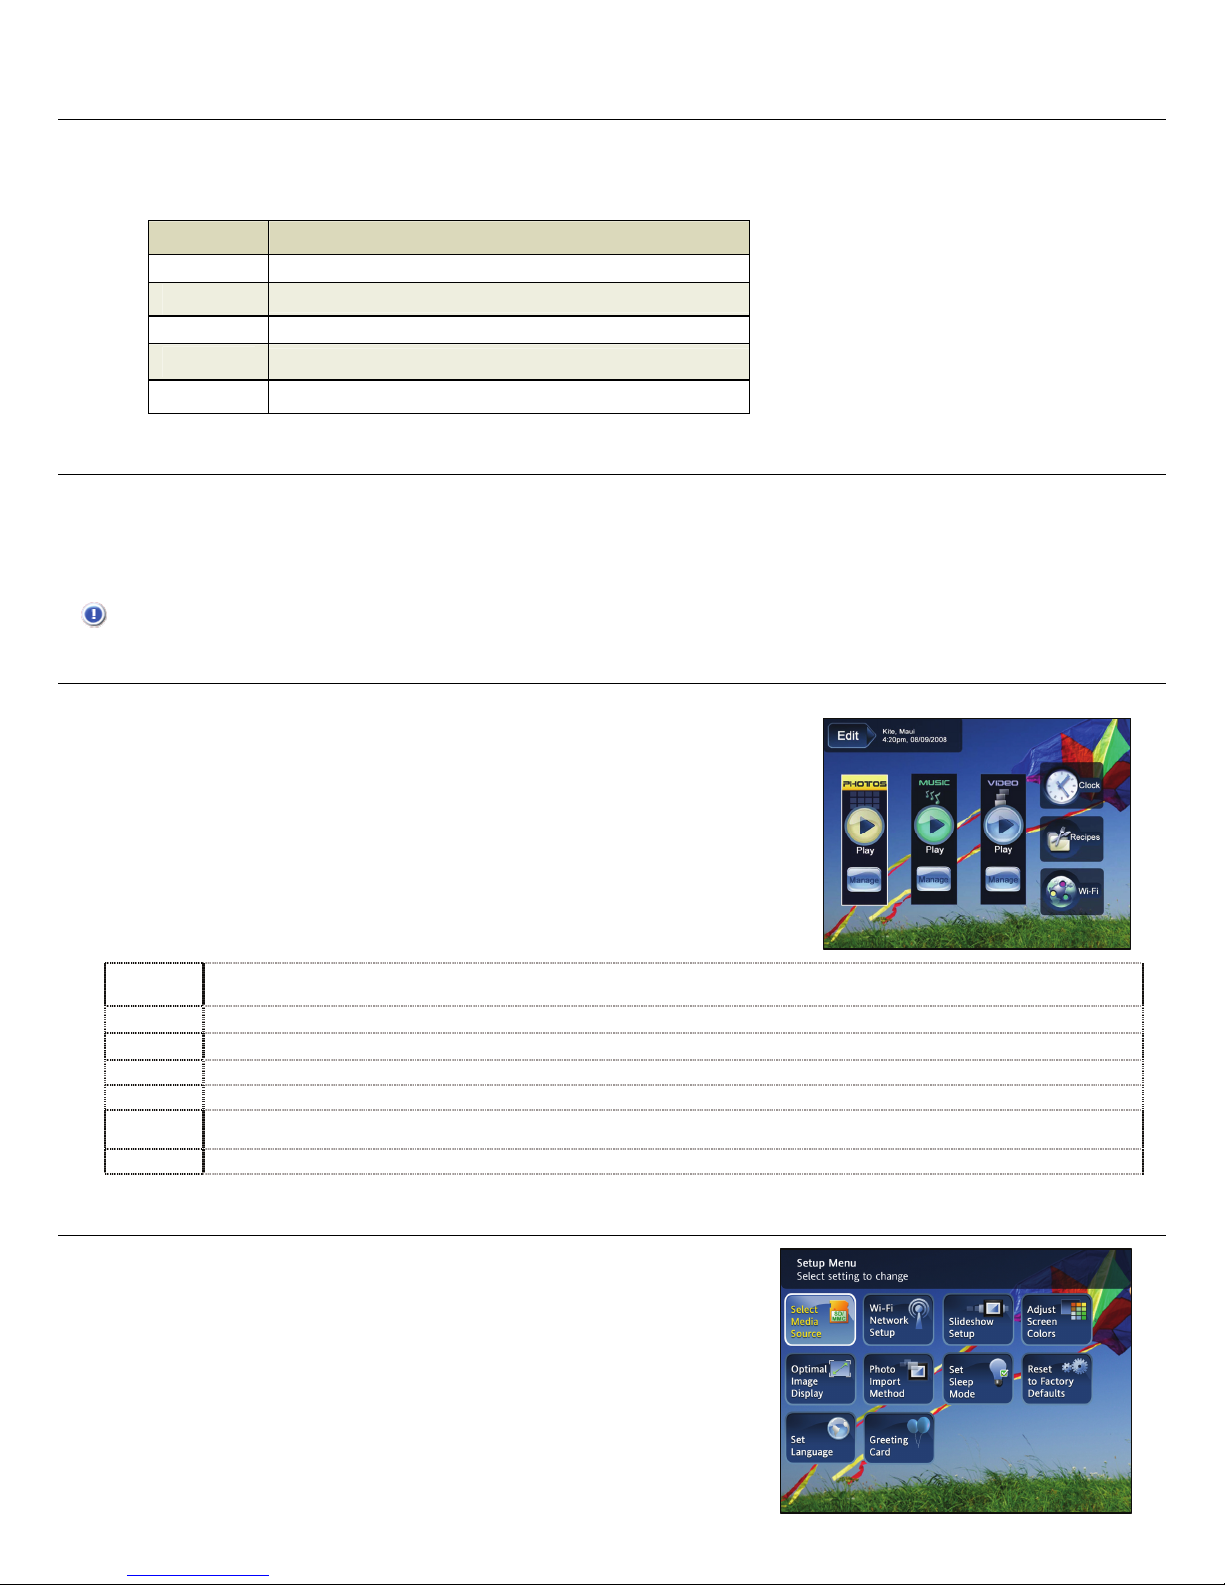
Remote Control
You can access all of the DPF’s features, and perform all of the functions by using the remote control. You will be able to perform several functions with the remote
control that are not possible with the top-back panel control buttons.
Note: Before first time use, pull the plastic tab sticking out of the remote control. It protects the battery and the remote control will not work unless it is removed.
Start Slideshow
Exit or go back
Play/Pause/Select object
Scroll Previous
Volume adjust higher
or Select object
Volume - adjust lower
or De-select object
Scroll Up
Access Setup screens
Scroll Forward
Scroll Down
Rotate image
Enlarge image
Replace the Remote Control Battery
1. Hold the remote control with the buttons facing
down.
2. Push and hold the small release tab while pulling the
battery tray out.
3. Replace the “CR2025” Lithium battery on the tray
with the positive (+) side facing up.
4. Push the tray back in until it clicks into place.
Release tab
5
Page 6
Control Buttons on DPF
You can perform many (but not all) of the DPF functions by using the control buttons located on the top-back panel of the DPF. Their basic functions are the same
no matter when you use them.
TIP: The instructions throughout this User Guide only reference the use of the remote control. However, if desired, you can use the frame control buttons when the
ENTER, EXIT, and MENU buttons are referenced.
W X,
Button Action
W
ENTER
X
EXIT
Scroll left
Select the highlighted option, start a Slideshow, Play and Pause
Scroll right
Exit the current display, or go back a screen
MENU
Displays function setup screens
Getting Started
1. Plug the AC Power Adapter into the DPF’s DC power jack and an electrical wall outlet.
2. Slide the power button on the left side of the DPF up to the ON position.
3. If prompted, select the desired language for the user interface display (varies by model).
4. After the initial start up screen is displayed, a slideshow will automatically begin displaying the photos that are stored in the internal memory.
5. To view your own photos, insert a memory card containing your photos into the slot on the DPF. Press
CAUTION: The memory cards will only fit in one direction; do not force them as this will damage the card reader.
The HOME Screen
The six main DPF features, PHOTOS, MUSIC, VIDEO, CLOCK, RECIPES, and Wi-Fi are accessed from the HOME screen.
To access the
PHOTOS
MUSIC
VIDEO
Clock
Recipes
Wi-Fi
Edit Quick access to single photo manage mode for Zooming, Rotating, or Deleting currently displayed photo.
HOME screen while a slideshow is playing, press MENU.
Display your photo files (.JPG or .JPEG) individually or as slideshows. PHOTOS-Manage: set viewing preferences, assign photos to
category folders, import and delete photo files (page 8)
Play your MP3 music files. MUSIC-Manage: set listening preferences, import and delete music files (page 11)
Play your AVI video files. VIDEO-Manage: set viewing preferences, import and delete video files (page 12)
View clock and calendar with photo slideshow, and manage the calendar, clock, and alarm settings (page 13)
View pre-loaded samples recipes and cookbooks (page 14)
With the Pandigital Wi-Fi USB adapter (sold separately) you can connect wirelessly for access to on-line photo sites (page 15) and to your PC
for file transfer (page 18)
Setup Menu Overview
Use the Setup Menu for DPF functions to optimize your viewing/listening preferences.
HOME screen press MENU to display the Setup Menu screen.
On the
ENTER on Start Slideshow.
6
Page 7
Select Media Source Select the media source for current viewing or listening (page 7)
Wi-Fi Network Setup Set up wireless network to which you want to connect (page 15)
Slideshow Setup Set multiple slideshow functions to optimize your viewing preferences (page 10)
Adjust Screen Colors Adjust LCD screen settings as desired (page 8)
Optimal Image Display
Photo Import Method Set photos to be imported compressed or original resolution and file size (page 9)
Set Sleep Mode Power saving function (page 19)
Reset to Factory Defaults Returns all function settings to the factory defaults (page 20)
Set Language
Greeting Card Create a personalized greeting which will be displayed when the unit is powered on (page 7)
Set photos to display as actual photo size, or optimized to best fit the screen (page 9)
Select desired DPF display language (page 20)
About Selecting Options
Throughout this User Guide, when you are instructed to ‘select’ a function option or button, unless otherwise instructed, use W X to highlight [the referenced
option]
, and then press ENTER to select.
Select Media Source
If you have inserted one or more external media sources (i.e., memory card, USB flash drive), you can use the Select Media Source function to switch between the
internal memory and your external media source for viewing your photos, videos, or listening to music.
You will also use this function to view the contents of the
1. On the HOME screen, press MENU to display the Setup Menu.
2. Select
3. The Photo Thumbnails or Slideshow Folders selection screen will be displayed.
Select Media Source, and then select the desired media source (sources not present will not be available).
Internal Memory = Built-in flash memory
SD/MMC = Secure DigitalTM / Multi MediaTM card
MS = Memory StickTM (Standard, Pro, and Duo)
xD = Standard flash memory card
USB = Standard USB flash drive
Slideshow Folders = View photos after assigning to folders (page 10)
Slideshow Folders after you assign photos to these folders (page 10).
Personalized Digital Greeting Card
You can set a personalized greeting which displays when the DPF is powered on. This feature is especially useful when presenting this DPF as a gift.
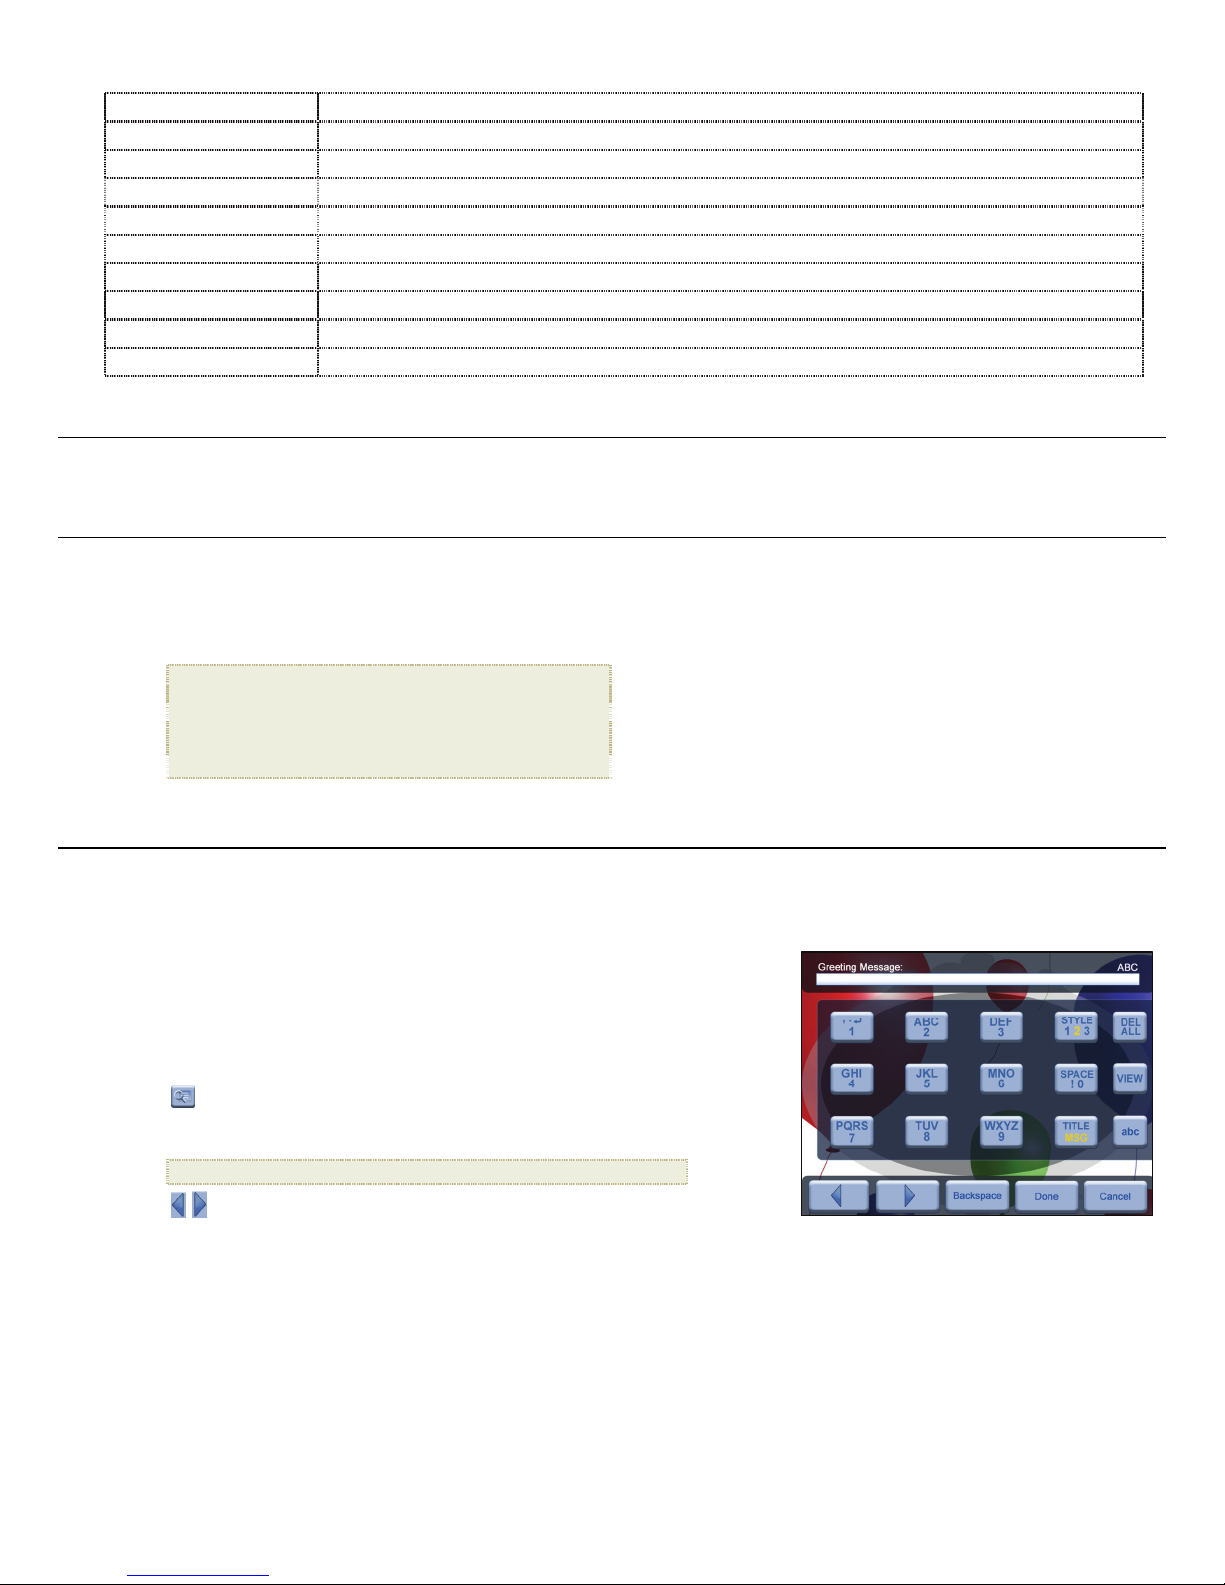
The Virtual Keyboard
You will use a virtual keyboard for entering your personalized greeting.
Navigate the keyboard as follows:
To select the desired characters, use W X S T to highlight the keys, and then press
ENTER multiple times as needed.
STYLE 1 2 3 4 = Select the background image appropriate for your greeting (can also be
your personal photo)
DEL = Clears the entry field
= View your greeting with selected background image
TITLE MSG = Toggle between the Title and Message entries
ABC/abc/SYM = Toggles between upper and lower case letters, and the following symbols:
_ ! : ; $ ( ) [ ] \ & / % ^ ! + = ~ - | < > { }
= Scroll through your entry to edit as needed
Backspace = Erases last selected character
Done = Completes entry
Cancel = Return to the previous screen without an entry
Note: You can also use the remote control buttons as follows:
‘
+’ = Scroll forward through entry to edit as needed
-‘ = Scroll back through entry to edit as needed
‘
ROTATE = Backspace, erases last selected character
ZOOM = Toggles between ABC / abc / SYM screens
Enter Greeting
1. On the HOME screen, press MENU to display the Setup Menu screen.
7
Page 8

2. Select
3. Select
4. Use the virtual keyboard to enter a title (i.e., Happy Birthday, Merry Christmas).
5. Select
Greeting Card.
Yes to create a new greeting or delete existing greeting, or select No to edit existing greeting.
TITLE MSG to enter your personalized message. Use ↵ (on 1 key) to enter multiple lines of text.
TIP: If entering multiple lines, to avoid losing your progress should you leave the unit or have a power interruption, it is recommended that you select
Done periodically to save your message.
6. Select
7. Select VIEW to view your greeting, and then press EXIT to return to the keyboard screen.
8. When satisfied with your greeting, select
STYLE 1 2 3 4 to choose a background appropriate for your greeting.
Style 1 Default – Blue with scroll (or your personal photo – see Assign Personal Background Image on page 8)
Style 2 – Balloons
Style 3 – Gift with gold ribbon
Style 4 – Roses
Done to save.
Assign Personal Background Image
You can enhance your personal greeting even more by assigning one of your own photos as the greeting background.
1. Choose the photo you want as your background, and then name it exactly
IMPORTANT: showme.jpg must be a standard JPG and not in a progressive format.
2. Copy your showme.jpg file into the root folder of the DPF’s internal memory.
Use the DPF to PC – USB Connection instructions on page 18 to copy the file to the root folder (do not copy into Photos folder).
3. Follow steps 1-6 under
4. Your greeting will now have your personal photo as the background.
5. Select
6. When satisfied with your greeting, select
VIEW to view your greeting, and then press EXIT to return to the keyboard screen.
Enter Greeting (above), and select the Default style.
Done to save.
showme.jpg.
PHOTOS
The PHOTOS feature includes many functions for optimizing and customizing your viewing preferences. You can view your photos individually or as slideshows
with or without background music. Other optional functions allow you to display the current time with your images, adjust the screen colors, choose slideshow
transitions, and even schedule slideshows according to your weekly schedule.
Photo Thumbnails
1. On the HOME screen, select the PHOTOS-Manage button.
2. Use W X S T to scroll through individual photos, or use the
3. To view an individual photo full screen, press
4. While the photo is displayed, you can use W X to view the next/previous photos.
ENTER on the highlighted photo.
Page Up/Page Down arrows to scroll full pages.
View Individual Photo during a Slideshow
1. With the desired photo displayed, press EXIT to pause the slideshow.
2. The photo will be displayed approximately 15 seconds and then the slideshow will automatically resume, or you can press
resume the slideshow.
ENTER or SLIDESHOW to
Zoom or Rotate Photos
You can temporarily magnify or rotate photos while viewing them in single photo view. The rotation of a photo will be saved only for photos in the internal
memory.
Zoom or Rotate a photo during a slideshow
1. With the photo displayed that needs rotating, press ZOOM or ROTATE, multiple times if necessary, to achieve the desired view.
2. Press
SLIDESHOW to resume the slideshow.
Zoom or Rotate a photo from the Photo Thumbnails screen
1. On the HOME screen, select the PHOTOS-Manage button.
2. On the
3. Press
TIP: When a photo is zoomed, you can pan around the photo by using W X S T to view portions of the photo that are not currently visible.
Photo Thumbnails screen, press ENTER to select the desired photo to be magnified or rotated, and then press ZOOM or ROTATE
multiple times if necessary to achieve the desired view.
EXIT to return to the Photo Thumbnails screen.
Adjust Screen Colors
You can adjust the four LCD color levels for optimal image viewing.
1. On the
2. Select Adjust Screen Colors.
HOME screen, press MENU to display the Setup Menu.
8
Page 9

3. Use S T to scroll through the LCD options, and use W X to adjust the setting until the desired view is achieved.
4. Use S T to select
Done.
Optimal Image Display
You can choose the desired display mode for displaying your photos on the DPF as follows:
1. On the
2. Select
HOME screen, press MENU to display the Setup Menu.
Optimal Image Display, and then select the desired setting.
Original = Displays photos in actual photo size.
Optimal (default) = Optimizes the size and resolution to best fit the screen, which may result in part of a photo not being visible on the screen.
Photo Import Method
When importing files into the internal memory from an external media source, the file can be optimized or left as the original file size and resolution.
1. On the
2. Select
HOME screen, press MENU to display the Setup Menu.
Photo Import Method, and then select the desired setting.
Optimized (default) = The photo file is downscaled in size and compressed into a smaller sized JPEG, allowing more photos to be stored in the internal memory.
Original = The photo file is stored keeping its original size and resolution
Display Current Time with Photos
You can have the current time displayed with your photos if desired.
1. On the
2. Select
3. Select
HOME screen, press MENU to display the Setup Menu.
Slideshow Setup, and then use S T to select Yes or No under Display Current Time.
Done.
TIP: If the time is incorrect, refer to Set Date and Time on page 14 to set the clock.
Display Photo File Date/Time Stamp with Photos
Most digital cameras typically include a Date/Time stamp when saving photo files. If your photo files contain this Date/Time information, you can have it
displayed with your photos if desired.
1. On the
2. Select
3. Select
HOME screen, press MENU to display the Setup Menu.
Slideshow Setup, and then use S T to select Yes or No under Display Photo Date/Time.
Done.
Import Photos into Internal Memory
You can import your photo files from external media sources (i.e., memory card, USB flash drive) into the DPF’s internal memory. The number of photo files
you can import depends on file size and available memory.
TIP: After starting an import, you can press
Import All Photos into Internal Memory
1. Insert your media source into the DPF. The memory card option screen will be displayed.
2. Select
3. When import is complete, press
Import All Photos.
Import Individual Photos into Internal Memory
1. Insert your media source into the DPF. The memory card option screen will be displayed.
2. Select
3. Use W X S T to scroll through the photos, and then press ‘
4. Press
5. Press
Select Photos to Import.
MENU, and then select Import Selected Photos.
EXIT to return to Photo Thumbnails screen.
Delete Photos from Internal Memory
You can delete photo files from the DPF’s internal memory, but not from an external media source (i.e., memory card, USB flash drive). Be sure you have
Internal Memory as your selected media source.
TIP: It is recommended to make backup copies of the photos before you delete them from the DPF.
1. On the
2. To delete all
3. A confirmation message appears; select Yes to delete the photos, or No to keep the photos in the internal memory.
HOME screen, select the PHOTOS-Manage button.
photos, press MENU, and then select Delete All.
To delete individual
photos, use W X S T to highlight the photos you want to delete, press ‘+’ to select (‘-‘ will deselect), press MENU, and then select
Delete Selected.
EXIT to cancel the import operation.
EXIT to return to the previous screen.
+’ to select the desired photos to import (‘-‘ will deselect).
9
Page 10

4. Press
EXIT to return to Photo Thumbnails screen.
TIP: If you select
Yes by mistake, press EXIT to cancel the delete operation. Photos already deleted will not be automatically restored.
PHOTO SLIDESHOWS
The DPF can display all of the photos on the selected media source as a slideshow, or you can select specific photos for a custom slideshow. You can also have
background music with your slideshows simply by storing music MP3 files on your selected media source.
Slideshow of Photos in Internal Memory
You can play a slideshow of the photos stored in the DPF’s internal memory by simply powering on the DPF (with no external media source or wireless Wi-Fi
adapter inserted*) and then wait for the slideshow to automatically begin.
Slideshow of Photos on your Media Source
Insert an external media source and then power on the DPF; the slideshow will begin displaying your photos (with no wireless Wi-Fi adapter inserted*).
If you insert a media source after power on, a
* If you have a Wireless Wi-Fi Adapter inserted in the DPF, and you have previously connected with a wireless network, a message will be displayed asking if
you want to connect to the wireless network at this time. If you select
displayed. If you select
photos exist on media source, the HOME screen will remain displayed.)
No, the HOME screen will be displayed; press Slideshow or wait approximately 15 seconds for the slideshow to begin. (If no
memory card option screen is displayed; select Start Slideshow.
Yes, the DPF will connect to the network and the Network options screen will be
Pause a Slideshow
To pause a slideshow press EXIT. The slideshow will pause for approximately 15 seconds, and then the slideshow will automatically resume. To resume
immediately, press
ENTER or SLIDESHOW.
Slideshow Folders
There are five category folders in the internal memory into which you can assign photo files for personalized organization and slideshows (these folder names
cannot be changed):
Only photos stored in the internal memory can be assigned to the slideshow folders. Assigned photos are not physically moved or copied into the folders,
rather, a link is assigned to the photo so it appears to be located in the folder. If you delete the actual photo file from internal memory, the link to the folder will
also be deleted.
Family – Friends – Vacation – Events – Others
Assign Photos to Slideshow Folder
1. On the HOME screen, select the PHOTOS-Manage button.
2. On the
3. To assign an individual
4. Select Assign to Folder, and then select the desired folder to assign the photo.
Photo Thumbnails screen, use W X S T to scroll through your photos.
photo: With the desired photo displayed, press MENU.
To assign multiple
photos: Press ‘+’ to select desired photos (‘-‘ will deselect), and then press MENU.
Play Slideshow from Slideshow Folder
1. On the HOME screen, press MENU.
2. Select
3. Select
4. Select the desired folder containing the photos you want to view in your slideshow.
5. On the
Select Media Source.
Slideshow Folders.
Folders Thumbnails screen, press Slideshow.
Copy or Reassign Photos to Different Folders
After assigning photos to folders you can copy those photos to other folders, or you can reassign photos to appear in a different folder.
1. With the slideshow folders slideshow playing (per above instructions), press
2. To copy or reassign an individual
To copy or reassign multiple
deselect), and then press
3. Select
Copy to Folder or Reassign to Folder, and then select the desired folder into which you want to reassign or copy the photos.
photo, highlight the desired photo and then press MENU.
photos, use W X S T to scroll through the photos, use ‘+’ to select those that you want to copy or reassign (‘-‘ will
MENU.
EXIT twice to display the Folder Thumbnails screen.
Slideshow Background Music
To play background music during a slideshow, simply copy at least one music MP3 file onto the same media source as your photos. The music will
automatically play as the slideshow is displayed.
If you have multiple MP3 files on your media source, each music file will play in succession until all have been played, and then will repeat according to the
Music Repeat Mode setting (page 12).
10
Page 11

Adjust the Volume
While the music is playing, press ‘+’ or ‘-‘ to adjust the volume.
Mute Slideshow Background Music
While the slideshow is playing, press ENTER to mute the background music. The slideshow will continue to display without the music until you press
ENTER again.
Set Slideshow Music Mode
You can set the DPF to not play background music with your slideshows, even if MP3 files are saved on your media source.
1. On the
2. Select
3. Use S T to select
4. Select Done.
HOME screen, press MENU to display the Setup Menu.
Slideshow Setup.
ON (default) = Play background music with slideshow
OFF = Do not play music with slideshow, even if MP3 files are stored on selected media source
Set Slideshow Interval
You can set the speed at which the slideshow photos transition from one to another.
1. On the
2. Select
3. Use S T to select
4. Select Done.
HOME screen, press MENU to display the Setup Menu.
Slideshow Setup,
5 (default), 10, 30, 60 seconds, 1 hour, or 24 hours
Set Slideshow Transition
You can set the transition ‘special effects’ as photos transition from one to another during a slideshow.
1. On the
2. Select
3. Use S T to select
4. Select Done.
HOME screen, press MENU to display the Setup Menu.
Slideshow Setup.
Off = Photos transition from one photo to the next without special effects.
Random (default) = Photos will transition using all special effects randomly throughout a slideshow.
Remaining special effects = Choose individual transition effect as desired
Set Slideshow Shuffle
You can set the slideshow to display your photos in a random ‘shuffle’ order, or display them in the order as stored on the selected media source.
1. On the
2. Select
3. Use S T to select
4. Select Done.
HOME screen, press MENU to display the Setup Menu.
Slideshow Setup.
ON = Displays photos randomly
OFF (default) = Displays photos in the order found on selected media source
MUSIC
Slideshow Music, and then use W X to select your desired setting.
Slideshow Interval, and then use W X to select your desired setting.
Slideshow Transition, and use W X to select your desired setting.
Slideshow Shuffle, and then use W X to select your desired setting.
Note: Music files must be standard MP3 format and not from licensed music from download services.
Select Media Source for Music
When you have the MUSIC screen displayed, you can easily select a different media source by selecting the current media source button in the upper right
corner and then select a different media source from the
Playing Music Only
1. On the HOME screen, select the MUSIC-Play button.
All present music files will be listed, and the first music file will begin playing.
2. To pause the music, press
3. To play a different music file, simply use W X S T to scroll through file names, and press
ENTER; the music will remain paused until you press ENTER again.
Select Media screen.
ENTER to play.
11
Page 12

Adjust the Volume
While the music is playing, press ‘+’ or ‘-‘ to adjust the volume.
Music Repeat Mode
By default, the Music Repeat Mode is set to continuously play all music files found on the selected media source until you stop them. If desired, you can
change the repeat mode to play all music files only once.
1. On the
2. Press
HOME screen, select the MUSIC-Manage button. All present music files will be listed.
MENU, and then select Repeat to toggle ON/OFF.
Repeat ON (default) = continuously play all music files on the selected media source until you stop them.
Repeat OFF = play the music files only once.
Import Music Files into Internal Memory
You can import your music files from external media sources (i.e., memory card, USB flash drive) into the DPF’s internal memory. The number of music files
you can import depends on file size and available memory.
TIP: After starting an import, you can press
1. On the
2. To import all
HOME screen, select the MUSIC-Manage button. The music files will be listed.
music files, press MENU and then select Import All.
To import individual
music files, use W X S T to scroll through the file names, press ‘+’ to select the files you want to import (‘-‘ will deselect), press
EXIT to cancel the import operation.
MENU, and then select Import Selected.
Delete Music Files from the Internal Memory
You can delete music files only from the DPF’s internal memory. It is recommended that you make backup copies of the music files before deleting them.
Internal Memory must be your selected media source.
Note:
1. On the
2. To delete all
3. A confirmation message appears. Select
HOME screen, select the MUSIC-Manage button. The music files will be listed.
files, press MENU and then select Delete All.
To delete individual
then select
files, use W X S T to scroll through the file names, press ‘+’ to select the files you want to delete (‘-‘ will deselect), press MENU, and
Delete Selected.
Yes to delete the music files, or No to keep the music files in the internal memory.
TIP: If you select
Yes by mistake, press EXIT to cancel the delete operation. Music files already deleted will not be automatically restored.
VIDEOS
The DPF supports motion JPEG AVI video files. If your movie file is not in AVI format, you may have to convert the file by using a software video converter which is
easily found for purchase on the Internet.
Select Media Source for Videos
When you have the VIDEO screen displayed, you can easily select a different media source by selecting the current media source button in the upper right
corner and then select a different media source from the
Select Media screen.
Watch a Video
1. On the HOME screen, select the VIDEO-Play button. All present video files will be listed, and the first video will begin playing.
2. To pause a video, press
3. Press
EXIT to stop the video.
ENTER; the video will remain paused until you press ENTER again.
Adjust the Volume
While the video is playing, press ‘+’ or ‘-‘ to adjust the volume.
Video Repeat Mode
By default, the Video Repeat Mode is set to continuously play all video files found on the selected media source until you stop them. If desired, you can
change the Repeat Mode to play all video files only once and automatically stop.
1. On the
2. Press
3. Select
HOME screen, select the VIDEO-Manage button. All present video files will be listed.
MENU.
Repeat to toggle ON/OFF.
Repeat ON (default) = continuously play all video files on the selected media source until you stop them.
Repeat OFF = play the video files only once.
Import Video Files into Internal Memory
You can import your video files from external media sources (i.e., memory card, USB flash drive) into the DPF’s internal memory. The number of videos you
can import depends on file size and available memory.
12
Page 13

TIP: After starting an import, you can press
EXIT to cancel the import operation.
Import Videos
1. On the HOME screen, select the VIDEO-Manage button. All present video files will be listed.
2. To import all
To import individual
video files, press MENU and then select Import All.
video files, use W X S T to scroll through the file names, press ‘+’ to select the files you want to import (‘-‘ will deselect), press
MENU, and then select Import Selected.
Delete Videos from the Internal Memory
You can delete video files only from the DPF’s internal memory. It is recommended that you make backup copies of the video files before deleting them.
Note:
Internal Memory must be your selected media source.
1. On the
2. To delete all
3. A confirmation message appears. Select
HOME screen, select the VIDEO-Manage button. The video files will be listed.
files, press MENU and then select Delete All.
To delete individual
then select
files, use W X S T to scroll through the file names, press ‘+’ to select the files you want to delete (‘-‘ will deselect), press MENU, and
Delete Selected.
Yes to delete the video files, or No to keep the video files in the internal memory.
TIP: If you select
Yes by mistake, press EXIT to cancel the delete operation. Video files already deleted will not be automatically restored.
CALENDAR/CLOCK
Your DPF can be used as a personal desk calendar with a real-time clock and alarm, and also displays a continuous slideshow of photos on the selected media
source.
To display the CALENDAR/CLOCK screen, select Clock from the HOME screen. The slideshow will be displaying photos found on the currently selected media
source.
Select Media Source for Calendar Slideshow
You can easily change the media source if you want the calendar/clock slideshow to display photos from a different media source (i.e., memory card,
slideshow folder).
CALENDAR/CLOCK screen, press MENU, and then select the Media Source button in the upper right corner.
On the
Select the desired media source from the
Select Media screen.
Set Schedule
You can schedule the DPF to automatically go into a “stand-by” mode and resume operation according to your weekly schedule. For example, if you have
your DPF on your desk at work, you may want to display the calendar/clock or play a slideshow from 8:30am to 5:30pm every weekday, and then set the
DPF to remain in stand-by mode throughout the weekend. The following Monday morning, the DPF would resume operation at 8:30am.
1. On the
2. Select
3. Use W X to move between the fields and S T to change the field values in
4. To set the
5. Use W X to move between the fields and S T to change the field values in
6. When correct times are set, select
CALENDAR/CLOCK screen, press MENU.
Set Schedule.
Weekdays On/Off.
Weekends On/Off, select the Enable Weekends Schedule button, and then use S to access the settings.
Weekends On/Off.
Done to return to the previous screen.
Disable Schedule
After the schedule has been set (per above instructions), you can disable the schedule whenever desired.
1. On the
2. Select
3. Select
CALENDAR/CLOCK screen, press MENU.
Set Schedule, and then select the Enable Weekdays Schedule or Enable Weekends Schedule button. The time fields will display OFF.
Done.
Run the Schedule
After the schedule times have been set (per above instructions), you will use the Run Schedule function whenever you want the schedule to take effect.
There are two methods for running the schedule, either from a slideshow or from the
CALENDAR/CLOCK screen.
CAUTION: After you select the Run Schedule function, any user intervention will cancel the activation (i.e., pressing remote or control button,
powering off) and the schedule will not take effect until you select this function again to re-activate.
Run Schedule from Slideshow
1. Start a slideshow and press ENTER to select the Run Schedule button when it appears in the lower left corner of the screen (approx 10 sec).
2. To run the schedule when the
Schedule
3. The DPF will go into stand-by mode according to the schedule, and when it resumes operation, the slideshow will again begin to play.
button when it appears.
Run Schedule button is no longer displayed, restart your slideshow and then press ENTER to select the Run
13
Page 14

Run Schedule from CALENDAR/CLOCK Screen
1. On the CALENDAR/CLOCK screen, press MENU.
2. Select
3. The DPF will go into stand-by mode according to the schedule, and when it resumes operation, the
A small timer clock will appear indicating the schedule is active, and then the DPF will operate according to the set schedule.
Run Schedule.
Calendar/Clock screen will again be
displayed.
Set Date and Time
1. On the CALENDAR/CLOCK screen, press MENU.
2. Select
3. Select
Set Date/Time, and then select the options and use S T to change the field values.
Done.
Set Alarm
You can use your DPF as an alarm clock when desired. You can set the frequency of the alarm, and set the alert to sound the built-in tone or play your
music file.
1. On the
2. Select
3. Select Done.
Note: At least one MP3 music file must be present on the selected media source for the alert to play music. If you set the alert to play music and there is no
CALENDAR/CLOCK screen, press MENU.
Set Alarm, and then select the options and use S T to change the field values.
Alarm = set the time you want the alarm to alert.
Frequency = set how often you want the alarm to alert (Once, Daily, Off)
Alert = set the alert to Music or default Tone (if music, the music file must reside on the currently selected media when alarm is activated)
When the alarm is set, a small alarm clock or music note will be displayed indicating the alarm alert has been set to either the default tone or music.
MP3 music file present, the default tone will sound instead.
Turn Alarm Off
When the alarm sounds, press any button on the remote control to stop it and return to the CLOCK/CALENDAR screen.
To cancel the alarm before its scheduled time, follow the previous instructions for setting the alarm and set the frequency to
OFF.
RECIPES
The DPF’s Recipes feature allows you to view recipes from popular authors such as bon appétit and Good Housekeeping (sold separately on our website
http://www.pandigital.net
Sample bon appétit seasonal recipes are included with this DPF so you can experience how the recipe feature works when you purchase and install the complete
seasonal cookbooks.
Note: The
You will use these instructions for the pre-loaded sample recipes as well as the complete cookbook collections.
Recipes feature is accessible only when the Internal Memory is the selected media source (page 7.)
).
View Recipes in Cookbook
1. On the HOME screen, select RECIPES.
2. Select
3. Use W X S T to scroll through the recipes. (When highlighted, the recipe name will be displayed at the top of the group.)
4. Press
Sample Recipes (or select a Cookbook if you have added seasonal cookbooks). The Cookbook Thumbnails screen will be displayed.
ENTER to view a recipe in full screen.
TIP: With an individual recipe displayed, a) press
recipes in slideshow, press
EXIT to pause, and ENTER to resume
ZOOM to enlarge recipe, b) use W X to view previous or next recipe, or c) press SLIDESHOW to view
Assign Recipes to ‘My Favorite Recipes’
You can assign recipes from a main Cookbook into six food group categories for quick and easy retrieval: Hors d’oeuvres, Soups, Salads, Entrées,
Desserts
1. On the
2. Select
3. Use W X S T to scroll through the recipes.
4. Select the desired food group category into which you will assign the recipes. A status message appears as the recipes are assigned.
and Others. (The food group category names are not changeable).
HOME screen, select RECIPES.
Sample Recipes (or select a Cookbook if you have added seasonal cookbooks). The Cookbook Thumbnails screen will be displayed.
To assign an individual
To assign multiple
recipe: highlight desired recipe, press MENU, and then select Assign to My Favorites.
recipes: press ‘+’ to select the desired recipes, press MENU, and then select Assign to my Favorites.
View the Recipes in ‘My Favorite Recipes’
After you have assigned recipes into the food group categories (per instructions above) you can quickly view them at any time.
1. On the
RECIPES screen, select My Favorite Recipes.
14
Page 15

2. Select the desired food group category to view.
3. On the
4. Press
Food Group Thumbnails screen, use W X S T to scroll through the recipes. (When highlighted, the recipe name will be displayed at the top of
the group.)
ENTER to view a recipe in full screen view.
TIP: With an individual recipe displayed, a) press
recipes in slideshow, press
EXIT to pause, and ENTER to resume
ZOOM to enlarge recipe, b) use W X to view previous or next recipe, or c) press SLIDESHOW to view
Copy or Reassign Recipes from one Category to Another
After you have assigned recipes into food group categories, you can reassign (move) or copy (duplicate) them from one category into another when desired.
1. On the
2. Select the desired food group category from which you will reassign recipes.
3. On the
4. Press
5. Select the desired food group category into which you will reassign or copy the recipes. A status message appears as the recipes are assigned or copied.
RECIPES screen, select My Favorite Recipes.
Food Group Thumbnails screen, use W X S T to scroll through the recipes, and then press ‘+’ to select recipes to reassign.
MENU, and then select Copy to Category or Reassign to Category.
Unassign Recipes from ‘My Favorite Recipes’
When you unassign recipes from a category, you are only removing the links to the recipes; you are not deleting the recipes. The actual recipe files will
remain in the main cookbook.
1. On the
2. Select the desired food group category from which you will unassign recipes.
3. On the
4. Press
RECIPES screen, select My Favorite Recipes.
Food Group Thumbnails screen, use W X S T to scroll through the recipes, and then press ‘+’ to select recipes you want to unassign.
MENU, and then select Unassign. A status message appears as the recipes are unassigned.
Wi-Fi
This feature allows a wireless connection with multiple online photo sharing and streaming RSS content feed websites (i.e., Windows Live FrameIt). You will be able
to view images you have uploaded to these sites, as well as receiving streaming news, weather, traffic, and other content feeds directly through the DPF.
Use this feature to also connect wirelessly to your PC for easy file transfer (page 18).
Set up DPF to connect to Photo Sharing Websites
Setting up your DPF to connect with the photo sharing websites requires 3 steps:
A. Set up Wireless Network by assigning the wireless network ID and password on the DPF.
B. Establish an account with the online photo sharing website and upload your photos to their website. (
depending on the DPF models
C. Assign your photo sharing website User ID and password on the DPF to connect with the site and view your uploaded photos directly through the DPF.
.)
The available online photo sharing websites vary
The Virtual Keyboard
You will use a virtual keyboard for entering your wireless network ID and password, as well as the User ID and Passwords associated with your online photo
sharing accounts.
Navigate the keyboard keys as follows:
Use the remote control W X S T buttons to highlight the keys, and then press
multiple times as needed, to select the desired characters
SYM = Access the following symbols:
\ / : ; ( ) $ & [ ] . , % ^ + = - | < > { } ! ~
NUM = Toggles between numeric and letter characters
ABC/abc = Toggles between upper and lower case letters
= Scroll through your entry to edit as needed
Backspace = Erases last selected character
Done = Completes entry
Cancel = Return to the previous screen without an entry
Note: You can also use the remote control buttons as follows:
‘
+’ = Scroll forward, ‘-‘ = Scroll back, ROTATE = Backspace, erases last selected character, ZOOM = Toggles between SYM / NUM / ABC / abc
ENTER,
Set up Wireless Network
Note: You must have an active wireless network within range of the DPF, and the Pandigital wireless Wi-Fi USB Adapter must be connected to the DPF.
(Wi-Fi adapter sold separately on our website: http://www.pandigital.net
1. Insert the Pandigital wireless USB adapter into the USB Host port on the DPF.
2. On the HOME screen, press MENU.
3. Select
Wi-Fi Network Setup. The Network Setup window will be displayed, similar to this example:
.)
15
Page 16

4. Select Scan for Available Network. The wireless networks within range will appear in the Network Setup window.
5. Select the desired Wi-Fi network to which you want to connect. The network screen will be displayed, similar to this example:
TIP: If your wirless network is configured to be ‘hidden’, the scan will not list it as an available network. Select one of the Network SSID buttons to
6. If necessary, change the
7. Select
and ‘SYM’ keys as needed for correct characters.)
8. Select
9. Select
A connection status message will be displayed, and then the MAC and IP address of the network to which you connected will be displayed.
10. Select
TIP: After making a successful connection with the wireless network, whenever you re-power on or re-insert the Wi-Fi adapter, a message will be
Windows Live FrameIt
You can wirelessly connect with Windows FrameIt, an online photo sharing and streaming live RSS data feeds website for viewing live News, Weather,
Traffic, Sports, and more.
Connect with FrameIt
Establish Account and Connect with FrameIt
manually enter the Network ID.
Secure Access type by pressing ENTER on the option button multiple times to select the appropriate security type.
Password, and then use the virtual keyboard to enter your Wi-Fi Password. (The ID and password are case sensitive; use the ‘ABC/abc’ ‘NUM’
Done on the virtual keyboard.
Connect. Do not press any other keys until the connection completes (20-30 seconds).
Done. The Wi-Fi screen will now display the online photo sharing site icons and the Connect to PC icon.
displayed asking if you want to connect to the wireless network at that time. If you select
options screen will be displayed.
1. On the HOME screen, select Wi-Fi.
2. Select
3. The DPF is pre-set to display the following live feeds when you initially access Windows Live FrameIt:
4. Select the RSS feed folder you want to view.
To view your own photos or other live feeds from FrameIt, you must first establish a personal account with FrameIt; go to http://frameit.live.com, set up
an account, create collections, and assign desired RSS feed content that you want to view on the DPF.
After establishing your account with FrameIt, on the
1. The first time you connect to FrameIt, select the
FrameIt.
World News
US Major City (weather)
Sports
MSNBC Top Stories
example:
HOME screen, select Wi-Fi.
FrameIt-User Settings button. The FrameIt screen will be displayed, similar to the following
Yes, the DPF will connect to the network and the Network
16
Page 17

2. Select
3. On your PC, go to http://frameit.live.com/device/claim.aspx
4. On the DPF:, on the
5. If applicable, repeat steps 3-5, selecting
6. Select
7. Proceed to step 2 in following View FrameIt RSS Feeds instructions.
View FrameIt RSS Feeds
)
1. On the
2. On the
3. The RSS feed folders that you assigned on frameit.live.com will be displayed; the titles will appear as you highlight the folders. Press
Import FrameIt Photos into Internal Memory
1. On the HOME screen, select Wi-Fi.
2. On the
3. To import all photo files, press MENU and then select Import All.
Zoom Photos on FrameIt
1. With the photo displayed that you want to enlarge, press ZOOM, multiple times if necessary to achieve desired view.
2. When complete, press
Photo Sharing Websites
The DPF can connect wirelessly to popular online photo sharing websites to which you have uploaded your photos, allowing you to view the uploaded photos
directly through the DPF.
Establish Accounts with Photo Sharing Websites
The online photo sharing websites that the DPF can access vary depending on the DPF models, and could change without notice. Follow these steps
to determine which sites are available with your DPF:
1. After completing the initial wireless network setup (page 15), on the
2. On the
3. When highlighted, the instructions for accessing the online photo sharing website will be displayed. Follow these instructions to establish your
Connect DPF with Photo Sharing Websites
1. After establishing accounts with the online photo sharing websites (per instructions above), on the HOME screen, select Wi-Fi.
2. Select the
Get Claim Token 1. A new Claim Token will be displayed, which you will need in the next step.
to enter the Claim Token, and then click Continue.
FrameIt screen, be sure the Status changed from Registration Required to Registered.
Get Claim Token 2 to connect with your second FrameIt account.
Connect to display the Photo Sharing screen. The FrameIt status should change from Setup Required to Setup Done.
IMPORTANT: This step assumes that you have already successfully connected the DPF with the Windows Live FrameIt site per previous
instructions.
HOME screen, select Wi-Fi.
Photo Sharing screen, select FrameIt.
ENTER to
display the contents of a highlighted folder.
Wait for the feed data to appear; the length of time it takes to appear depends on the amount of feed data contained within the selected folder. For
instance, a folder that contains a large number of photos will take substantially longer to display than when you select News or Weather feeds.
TIP: If you make changes to your Windows Live FrameIt account while your DPF is connected (i.e., create new collections), the new feed data
will not display until you disconnect and re-connect with FrameIt.
Photo Sharing screen, select FrameIt, and then select the desired folder containing photos you want to import.
To import individual
MENU, and then select Import Selected.
press
photo files, use W X S T to scroll through the file names, press ‘+’ to select the files you want to import (‘-‘ will deselect),
EXIT to resume viewing the photos.
HOME screen, select Wi-Fi.
Photo Sharing screen, use W X S T to highlight the desired photo sharing site to which you want to connect.
accounts with the desired websites. (You can create two accounts with each photo sharing website if desired.)
User Settings button associated with the desired online photo sharing website.
17
Page 18

3. Select
4. Select
5. Select
TIP: The ID and password are case sensitive; if the ‘Connected failed, please check ID and Password’ message appears, you may need to re-enter
6. When you are successfully connected, the albums or collection folders you created in your photo sharing account will be displayed.
7. Select a folder containing the photos you want to view. The
8. To view a photo individually, use W X S T to scroll through the photos and press
Note: Functions like zoom and rotate are available and behave in the same manner as described under the
User ID 1 or 2, and then use the virtual keyboard to enter your photo sharing account User ID.
Password 1 or 2, and then use the virtual keyboard to enter your photo sharing account Password.
Connect.
them being careful to use the appropriate upper/lower case characters.
Folder Photo Thumbnails screen will be displayed.
ENTER on the desired photo.
PHOTOS section, beginning on page 8.
Import Photos from Photo Sharing Website into DPF’s Internal Memory
1. On the HOME screen, select Wi-Fi.
2. On the
3. To import all
Photo Sharing screen, select the desired photo sharing website, and then select the desired folder containing photos you want to import.
photo files, press MENU and then select Import All.
To import individual
press
MENU, and then select Import Selected.
photo files, use W X S T to scroll through the file names, press ‘+’ to select the files you want to import (‘-‘ will deselect),
DPF to PC – Wireless Connection
You can connect the DPF to your PC wirelessly to transfer files from your PC into the DPF’s internal memory.
Note: You must have an active wireless network within range of the DPF, and the Pandigital wireless Wi-Fi USB Adapter must be connected to the DPF. (Wi-Fi
adapter sold separately on our website: http://www.pandigital.net
.)
Recommended Software
Recommended Windows Media Player 11 Recommended TwonkyMedia 5
Requires Windows XP SP3 or Vista SP2 Requires Macintosh OSX10.3 (Leopard)
Set up Universal Plug and Play (UPnP) Server
A UPnP Server must be set up on your computer before you will be able to connect the DPF to your PC wirelessly.
Windows - Go to Microsoft’s website for instructions on setting up and configuring your Windows UPnP Server:
http://www.microsoft.com/windows/windowsmedia/knowledgecenter/howto/mp11/sharemedia.aspx
Apple Macintosh - Go to the Twonky Vision website for instructions on setting up and configuring your Macintosh UPnP Server:
http://www.twonkyvision.de/server_download.html
Connect DPF to PC Wirelessly
1. On the HOME screen, select Wi-Fi.
2. Select
3. The media categories will be displayed (i.e., pictures). Select the category containing the files you want to import into the DPF.
4. To import all
5. Select
6. The image(s) will be transferred and the status of the transfer will be displayed.
Connect to PC, and then select the UPnP server to which you want to connect.
files within the selected folder, press MENU.
To import selected
files, use the ‘+’ button to select each file (‘-‘ will deselect), and then press MENU.
Import All in this folder or Import Selected.
Zoom or Rotate Photos
1. With the photo displayed, you can enlarge or rotate it by pressing ZOOM or ROTATE, multiple times if necessary to achieve desired view.
2. When complete, press
EXIT to resume viewing the photos.
DPF to PC – USB Connection
You can connect the DPF to a Windows PC or Macintosh computer via the USB cable (included) to copy files between the computer and the DPF’s internal
memory.
If you have memory cards inserted in the DPF, you can also copy between the PC, internal memory, and memory cards.
Connect DPF to Windows PC
1. Connect the small end of the USB cable to DPF’s Mini USB port, and the larger end to an available USB port on your computer.
2. A window opens listing all drives connected to your computer.
3. The internal memory (titled Pandigital) and each memory card present in the DPF will be associated with one disk drive on your computer.
IMPORTANT: If your PC is connected to Local Area Network drives, or if you have multiple drive letters already assigned to peripheral devices,
)
you will need to manage your drive settings in Windows to free up the four drive letters immediately following your CD-ROM drive
so the DPF can assign them to memory card slots properly.
18
Page 19

4. Double-click the desired drive to display the files on the card. The following example shows a card listing several JPG images.
5. To copy files from a media source, select and drag them into the DPF’s internal memory drive (Pandigital).
6. Similarly, to copy files from your computer to the internal memory, first locate the files on your computer, select the files you want to copy, and then drag
and drop them into the appropriate folder in the DPF’s internal memory drive.
TIP: Most cameras and graphic programs store photos in the Windows XP ‘My Pictures’ or Vista ‘Pictures’ folder. If you didn’t save them to any other
location, you may find them there.
Disconnect DPF from Windows PC
It is important to always perform a safe PC ‘release’ before disconnecting the DPF USB cable from the PC.
WARNING: Do not unplug or switch off the DPF when files are being transferred, as that can seriously damage the memory.
Windows Vista
1. On the Windows System Tray, click the hardware removal icon.
2. Click the
3. When the message “This device can now be safely removed from the computer” appears, you can disconnect the USB cable from your computer.
Windows XP
1. On the Windows System Tray, click the hardware removal icon.
2. Click
3. Select the storage device corresponding with the DPF, and then click
4. Click
5. When the message “It is now Safe to Disconnect Hardware” appears, you can disconnect the USB cable from your computer.
Safely remove USB mass Storage device message corresponding with the DPF device drive.
Remove Hardware Safely.
Stop to disconnect. A final dialog box opens.
Close.
Connect DPF to Macintosh Computer
1. Use the USB cable (included) to connect the DPF to your Macintosh computer.
2. Macintosh will recognize the DPF as an external storage device.
3. Drag and drop files between the two devices as you normally move files.
Disconnect DPF from Macintosh Computer
1. To safely disconnect the DPF from your Macintosh, select DPF’s icon on your desktop and press Command-e to eject the disk.
2. When the icon is no longer on the desktop, it is safe to unplug the USB cable.
USB Flash Drive to DPF Connection
The DPF recognizes a USB Flash Drive the same way it recognizes external memory cards. When you insert the flash drive, the DPF automatically recognizes
photo, music, and video files stored on it.
To import files from your flash drive to the DPF’s internal memory, follow the file import instructions under each feature section (
Video on page 12).
12,
Photos on page 8, Music on page
Bluetooth Connection
The Bluetooth feature allows you to download photos from popular Bluetooth-capable mobile phones (i.e., BlackBerry, Motorola, Nokia, SonyEricssson, and others)
directly into your DPF. A Bluetooth USB Adapter is required (not included with DPF)
Note: Phone models vary and not all phones support transmitting photos to devices like a DPF. Check to be sure your phone supports transmitting photos to
external devices like DPF.
Insert Bluetooth Dongle
1. Insert your Bluetooth dongle into the DPF’s USB host port and then turn on the DPF.
2. A popup window momentarily appears with the message “
Send Photo to DPF
1. From your Bluetooth device, search for available connection devices; select the Pandigital device (default authentication code “1234”).
2. Select the desired photo and then send to the DPF.
Bluetooth Dongle Enabled” indicating the Bluetooth feature is active.
Note: The actual procedure for sending photos to the DPF varies by mobile device manufacturer/model. Refer to your mobile device User Guide for
instructions.
During the photo transmission, “Photo Transmitting” appears on the DPF screen. When completed, the photo(s) will automatically be displayed in single
photo mode.
Set Sleep Mode
The DPF will stay on until you power it off, however, to save power you can set it to automatically go into a sleep mode when left idle for a specific amount of time.
1. On the
2. Select
HOME screen, press MENU to display the Setup Menu.
Set Sleep Mode, and then select the desired setting.
OFF (default) = Power saver is ‘disabled’; DPF will remain on until you power it off or change the sleep mode setting
2/4/8 Hours = The DPF will automatically go into sleep mode when left idle the specified amount of time
19
Page 20

3. Select
Done.
Set Language
Depending on model, this DPF may include multiple languages for the user interface display.
1. On the
2. Select
HOME screen, press MENU to display the Setup Menu.
Set Language, and then select the desired language.
Reset to Factory Defaults
If you have changed function settings, using this feature will restore settings to the factory pre-set defaults.
1. On the
2. Select
3. Press
HOME screen, press MENU to display the Setup Menu.
Reset to Factory Defaults, and then select Yes to reset, or No to leave current settings.
EXIT to return to the HOME screen.
Frequently Asked Questions
Q: How do I set up my DPF?
A: It is very simple to get your Digital Photo Frame setup. Just plug the power adapter into the DPF and into a standard wall outlet, and then power it on. A
slideshow will begin displaying the images pre-loaded in the internal memory. To view your own photos, insert a memory card or USB flash drive into the
appropriate card slot or USB port on the side of the DPF. Select
Q: What memory cards can the Digital Photo Frame Read?
A: Compatible memory cards include: Secure Digital™ (SD), MultiMedia Card™(MMC), xD Card, Memory Stick™(MS), MemoryStick Pro™, and Memory Stick
Pro Duo™.
Q: I set up the Digital Photo Frame; why won’t it turn on?
A: The power adapter may not be securely connected to the DPF or the power switch may not be in the ON position.
Q: I have a memory card in the DPF; why can’t I view my photos?
A: A) Be sure that the memory card is one of the formats listed above and that the files on the card are JPEG images files. Some digital cameras save images in
other formats. Refer to your camera’s user guide if your photos are not JPEG files.
B) Make sure the memory card is inserted all the way into the card slot.
C) On the
HOME screen and then select the PHOTOS-PLAY button. The slideshow should begin displaying your photos.
Q: Why is the photo display slower with some photos than others?
A: Higher resolution photos load more slowly. Try using lower resolution photos or down scaling your images. Refer to your camera’s operating user guide for
details on down scaling your photos.
Q: Can I insert multiple memory cards?
A: Yes, you can insert multiple cards at the same time, depending on slot availability. Use the ‘
immediate viewing/listening.
Q: Does the DPF have built-in (internal) memory?
A: Yes. The memory size varies by model.
Q: Does the DPF support all JPEG and Motion JPEG files?
A: No. The DPF only supports JPEG and Motion JPEG files taken from a digital camera. The DPF may not read all image files downloaded from the Internet or
from other software graphic applications.
Q: Can I add my own cookbook or recipes to the Recipes feature?
A: No. If you want to create .jpg files of your recipes using your own graphics editing software, you can copy the .jpg files to your memory source and then you
could view them on the DPF in PHOTOS mode.
Q: Which wireless Wi-Fi USB adapter can I use with my DPF, and where can I obtain one?
A: Use only a Pandigital Wi-Fi adapter which is available for purchase on our website at: http://www.pandigital.net
Q: Where do I obtain a Bluetooth adapter to use with my DPF?
A: You can purchase any brand of Bluetooth adapter from any retail outlet that sells them.
Q: I have the Pandigital wireless Wi-Fi adapter inserted, why can’t I connect to the online photo sharing sites?
A: The initial Wi-Fi setup requires 3 steps: 1) Assign up your Wireless Network connection on the DPF, 2) Establish an account with the photo sharing site, and 3)
Assign your photo sharing site’s User ID and password on the DPF. Refer to the initial Wi-Fi setup on page 15.
HOME screen, press MENU, choose Select Media Source, select the desired media source, and then press ENTER. Press EXIT to return to the
Start Slideshow from the memory card option screen.
Select Media’ function to select the desired media source for
.
Important Safety Precautions
Always follow these basic safety precautions when using your Multimedia Digital Photo Frame (DPF). This will reduce the risk of fire, electric shock, and injury.
WARNING: Do not expose this product to rain or moisture.
Do not remove the cover. There are no user-serviceable parts inside. Refer all servicing to qualified personnel.
The DPF is for indoor use only.
Unplug the DPF before performing care and maintenance.
20
Page 21

Do not block the ventilation holes on the back of the DPF at any time.
Keep your DPF out of direct sunlight and heat sources.
Protect the power cord. Route power cords so that they are not likely to be walked on or pinched by items placed on or against them. Pay particular
attention to the point where the cord attaches to the DPF.
Only use the AC adapter included with the DPF. Using any other power adapter will void your warranty.
Unplug the power cord from the power outlet when the unit is not in use.
Cleaning the DPF
Treat the screen gently, it is made of glass and can break. To clean fingerprints or dust from the LCD screen, we recommend using a soft, non-abrasive cloth
such as a camera lens cloth to clean the LCD screen. If you use a commercial LCD Cleaning Kit, do not apply the cleaning liquid directly to the LCD screen.
Clean the LCD screen with cleaning cloth moistened with the liquid.
Clean the outer surface of the DPF (excluding the screen) and the remote control with a soft cloth dampened with water.
Technical Specifications
Product Resolution 12.1” LCD Screen Digital Photo Frame, 1110x800 pixels, 15x9 aspect ratio
Compatible Media
Sources
Features
File Format JPEG image, AVI video, MP3 audio
USB Ports USB2.0 Host, USB2.0 Device
Internal Memory 1GB, up to 5000 compressed images
Bluetooth Support Yes (adapter not included)
Wi-Fi Compatible Yes (Pandigital Wi-Fi adapter sold separately)
Decorative Paper Mats 1 – White
Power Adapter
Secure Digital™, Multi Media Card™, xD Memory Card™, Memory Stick™, Memory Stick PRO™, Memory Stick PRO DUO, and
USB Flash Drive
PHOTOS displayed individually or as slideshow
MUSIC files played individually or as slideshow music
VIDEOS
CALENDAR/CLOCK with Alarm function and slideshow
RECIPES – view pre-loaded and purchased cookbooks
Wi-Fi - connect wirelessly to online photo sharing websites
Wireless file transfer between DPF & PC
Simple Plug & Play
No computer required
Input: 100V - 240V AC, 50~60 HZ
Output: 9V DC 2.0 A or 12V DC 1.5A (depending on model)
Limited Warranty
The limited warranty set forth below is given by Pandigital with respect to Pandigital brand electronics products purchased and used in the United States of America.
Pandigital warrants this product against defects in material or workmanship as follows:
LABOR: For a period of one (1) year from the date of purchase, if this product is found to be defective, Pandigital will repair or replace the product, at its option, at
no charge. After this one (1) year, labor charges will be charged on a case by case basis.
PARTS: For a period of one (1) year from the date of purchase, if this product is found to be defective, Pandigital will supply at no cost, new or rebuilt replacement
parts, at its option, at no charge. After this one (1) year period, parts will be charged for on a case by case basis. Modifications not approved by the party
responsible for compliance could void user’s authority to operate the equipment.
This warranty does not cover: (1) customer instruction, installation or setup; (2) cosmetic damage or damage due to accident, misuse, abuse or negligence; (3)
commercial use of the product; (4) modification of any part of the product; (5) damage due to improper operation, improper maintenance, or connection to an
improper power supply; (6) loss of data, regardless of value or format, that may result through proper and/or improper use of the product; (7) damage due to an
attempted repair of the product by anyone other than a facility authorized by Pandigital to service the product; (8) consumables (such as fuses and batteries). This
warranty is valid only in the United States.
The product must be accompanied by a copy of the original retail purchase receipt. If no proof of purchase is attached, the warranty will not be honored and repair
costs will be charged. This warranty is only valid with written documentation detailing the complaint attached to the outside or inside of the carton. This warranty is
invalid if the factory applied serial number has been altered and or removed from the product. This warranty does not provide protection for the loss of data,
regardless of format. Pandigital reserves the right to modify and design this product without prior notice, written or otherwise.
To obtain warranty service, you must deliver the product freight prepaid in either its original packaging or packaging affording an equal degree of protection, plus
proof of purchase.
Repair or replacement as provided under this warranty is the exclusive remedy of the consumer. Pandigital, its parent company, affiliates or subsidiaries, shall not
be liable for any incidental or consequential damages for breach of any expressed or implied warranty on this product. Except to the extent prohibited by applicable
law, any implied warranty of merchantability or fitness for a particular purpose on this product is limited in duration to the duration of this warranty.
Some states do not allow the exclusion or limitation of incidental or consequential damages, or allow limitation on how long an implied warranty lasts, so the above
limitations or exclusions may not apply. This warranty gives you specific legal rights, and you may have other rights, which vary from state to state.
All content included on the Pandigital website as well as Pandigital products, including pre-loaded demonstration images, digital media, digital cookbooks, text,
graphics, logos, designs, photographs, button icons, images, audio/video clips, digital downloads, data compilations, and software, is the property of Pandigital or its
suppliers and is protected by United States and international copyright laws or other intellectual property laws and treaties. Said content shall not be reproduced or
used without express written permission from Pandigital and its suppliers respectively.
21
Page 22

Use of this product constitutes acceptance of these terms and conditions of warranty.
Technical support telephone number: 1-800-715-5354.
FCC Statement
FCC Part 15 Information
This equipment has been tested and found to comply with the limits for a Class B digital device, pursuant to Part 15 of the Federal Communication Commission
(FCC) Rules. These limits are designed to provide reasonable protection against harmful interference in a residential installation.
This equipment generates, uses, and can radiate radio frequency energy and if not installed and used in accordance with the instructions, may cause harmful
interference to radio communications. However, there is no guarantee that interference will not occur in a particular installation.
If this equipment does cause harmful interference to radio or television reception, which can be determined by turning the equipment off and on, the user is
encouraged to try to correct the interference by one or more of the following measures:
Reorient or relocate the receiving antenna.
Increase the separation between the equipment and receiver.
Connect the equipment to an outlet on a circuit different from that to which the receiver is connected.
Consult the dealer or an experienced radio/TV technician for help.
WARNING: Changes or modifications to this unit not expressly approved by the party responsible for compliance could void the user’s authority to operate
the equipment.
22
Page 23

Français
Page 24

Table of Contents
Introduction .................................................................................................................................................................. 4
Caractéristiques principales du CPN ................................................................................................................................................. 4
Contenu du coffret .............................................................................................................................................................................. 4
Cartes mémoires compatibles ........................................................................................................................................................... 4
Vue d’ensemble du CPN .............................................................................................................................................. 4
Télécommande ............................................................................................................................................................. 4
Boutons de Contrôle sur le CPN ................................................................................................................................ 5
Comment démarrer ...................................................................................................................................................... 5
L’écran d’accueil .......................................................................................................................................................... 5
Vue d’ensemble de l’option SETUP Menu ................................................................................................................. 6
Comment sélectionner des options ........................................................................................................................... 6
Sélectionner la source de média ................................................................................................................................ 6
Carte de voeux ............................................................................................................................................................. 6
Le Clavier virtuel ................................................................................................................................................................................ 6
Entrer le message d’accueil ............................................................................................................................................................... 7
Associer un Fond d’image personnel ................................................................................................................................................ 7
PHOTOS ........................................................................................................................................................................ 7
Photos en format vignette (Photo Thumbnails) ................................................................................................................................. 7
Visionner une photo pendant le diaporama ....................................................................................................................................... 7
Agrandir ou Faire pivoter les photos .................................................................................................................................................. 8
Régler les couleurs de l’écran ............................................................................................................................................................ 8
Affichage optimal de l’image .............................................................................................................................................................. 8
Méthode d’importation de photo ........................................................................................................................................................ 8
Afficher l’heure avec les photos ......................................................................................................................................................... 8
Afficher la date/heure de prise de vue avec les photos ..................................................................................................................... 8
Importer des photos dans la mémoire interne ................................................................................................................................... 8
Supprimer des Photos de la mémoire interne ................................................................................................................................... 9
DIAPORAMA DES PHOTOS ........................................................................................................................................ 9
Diaporama de photos stockées dans la mémoire interne ................................................................................................................. 9
Diaporama de photos provenant de votre source de média ............................................................................................................. 9
Mettre en pause un diaporama .......................................................................................................................................................... 9
Répertoires de diapositives ................................................................................................................................................................ 9
Musique d'ambiance pour Diaporama ............................................................................................................................................. 10
Réglage du Mode musical du diaporama ........................................................................................................................................ 10
Régler l’intervalle de défilement du diaporama ............................................................................................................................... 10
Régler les effets de transition du diaporama ................................................................................................................................... 10
Régler le mélange du diaporama ..................................................................................................................................................... 11
MUSIQUE .................................................................................................................................................................... 11
Sélectionner une source média pour la musique ............................................................................................................................ 11
Écouter uniquement de la musique ................................................................................................................................................. 11
Mode de répétition musicale ............................................................................................................................................................ 11
Importer des fichiers musicaux dans la mémoire interne ................................................................................................................ 11
Supprimer des fichiers musicaux de la mémoire interne ................................................................................................................. 11
VIDEOS ....................................................................................................................................................................... 12
Choix de la source média pour les vidéos ....................................................................................................................................... 12
Regarder un vidéo ............................................................................................................................................................................ 12
Mode de répétition de vidéo ............................................................................................................................................................. 12
Importer des fichiers vidéo dans la mémoire interne ....................................................................................................................... 12
Supprimer des fichiers vidéo de la mémoire interne ....................................................................................................................... 12
CALENDRIER/HORLOGE .......................................................................................................................................... 12
2
Page 25

Sélectionner la source de média pour le diaporama du calendrier ................................................................................................. 12
Régler le programme ....................................................................................................................................................................... 13
Désactiver le programme ................................................................................................................................................................. 13
Démarrer le programme ................................................................................................................................................................... 13
Régler la date et l’heure ................................................................................................................................................................... 13
Régler l'alarme ................................................................................................................................................................................. 13
RECETTES .................................................................................................................................................................. 14
Voir les recettes dans le livre de cuisine .......................................................................................................................................... 14
Attribuer des recettes à ‘My Favorite Recipes’ ................................................................................................................................ 14
Voir les recettes dans "Mes recettes favorites" ............................................................................................................................... 14
Copier ou réassocier des recettes d'une catégorie vers une autre ................................................................................................. 14
Désassocier des recettes de "Mes recettes favorites" .................................................................................................................... 15
Wi-Fi ............................................................................................................................................................................ 15
Régler voter CPN pour vous connecter aux sites web de partage de photos ................................................................................ 15
Le clavier virtuel ............................................................................................................................................................................... 15
Réglage du réseau sans fil .............................................................................................................................................................. 15
Windows Live FrameIt ...................................................................................................................................................................... 16
Sites web de partage de photos ...................................................................................................................................................... 17
Du CPN au PC – Connexion sans fil ........................................................................................................................ 18
Du CPN au PC – Connexion USB ............................................................................................................................. 19
Connexion d’une clé USB sur le CPN ...................................................................................................................... 19
Connexion Bluetooth .............................................................................................................................................. 20
Régler le mode veille ................................................................................................................................................. 20
Choisir la langue ........................................................................................................................................................ 20
Rétablir les paramètres par défaut ........................................................................................................................... 20
Foire aux questions ................................................................................................................................................... 20
Précautions importantes de sécurité ....................................................................................................................... 21
Spécifications techniques ......................................................................................................................................... 21
Limite de la garantie .................................................................................................................................................. 22
Spécifications de la Commission fédérale des communications aux États-Unis ............................................................................ 22
3
Page 26

Introduction
g
Bienvenue dans le monde du cadre photo numérique Pandigital Multimedia (CPN). Désormais, il vous est possible d’afficher des photos numériques directement à
partir de votre carte mémoire, sans avoir à recourir à l’ordinateur.
Caractéristiques principales du CPN
Système plug et play convivial
Affichage de fichiers photos numériques (JPEG jusqu’ à 16
mégapixels)
Lit les fichiers numériques de Musique (MP3)
Lit les fichiers numériques Vidéo (AVI)
Affiche le Calendrier/Horloge avec le diaporama photo et la fonction
d'alarme.
Comprend des Recettes préchargées d'auteurs célèbtres.
Connexion Sans Fil aux sites web de partage de photos et transfert
directe de fichiers entre le CPN et le PC.
Nul besoin d’ordinateur
TéIécommande infrarouge et boutons de contrôle sur le cadre
512 MB de Mémoire Interne
2 ports USB 2.0 (Appareil et Hôte)
Contenu du coffret
Cadre photo numérique (CPN)
Cordon et adaptateur d’alimentation AC
TéIécommande infrarouge
Façade papier décoratif
Guide de démarrage rapide
Guide de l’utilisateur
Cartes mémoires compatibles
Compatible avec les cartes mémoires: Secure Digital™ (SD),
MultiMedia Card™(MMC), xD Card, Memory Stick™(MS),
MemoryStick Pro™, et Memory Stick Pro Duo™*
*La Memory Stick Pro Duo™ nécessite un adaptateur
supplémentaire pour s’ajuster correctement au CPN (non inclus). Il
vous est possible de vous procurer l’adaptateur chez des détaillants
vendeurs de cartes mémoires.
Vue d’ensemble du CPN
Marche/Arret
Connecteur CC
(Les fentes pour carte mémoire, les ports et les connecteurs de votre CPN peuvent différer de ceux représentés ici.)
Flèche gauche MENU
ENTER EXIT
Flèche droite
Port carte
SD/MS/MSPro/MMC/xD
Port USB
Port mini-USB
Zone aimantée pour
ranger la télécommande
Ranger soigneusement la télécommande
Vous pouvez éviter de mal placer la télécommande en la
rangeant avec précaution à l’arrière du CPN après
utilisation.
La face arrière supérieure de la télécommande est dotée
d’un aimant intégré, et l’arrière du CPN comprend une ‘zone
aimantée’ de sorte qu’il vous suffit de fixer la télécommande
à l’arrière du CPN pour un rangement sûr.
Télécommande
Vous pouvez accéder à toutes les caractéristiques du CPN et réaliser toutes les fonctions à l’aide de la télécommande. Il vous sera possible d’exécuter plusieurs
fonctions par le biais de la télécommande, qui seraient impossibles avec les boutons de contrôle du panneau arrière.
Note: Avant la première utilisation, retirer l’onglet en plastique dépassant de la télécommande. Il protège la pile, et la télécommande ne fonctionnera pas tant qu’il
ne sera pas retiré.
Débuter le diaporama
Quitter ou Ecran précédent
Défiler vers le haut
Marche/Pause/Sélectionner
Augmenter le volume
ou sélectionner un objet
Baisser le volume ou
désélectionner un objet
Précédent
un objet
Accéder aux Écrans
uration
de confi
Suivant
Défiler vers le bas
Pivoter l’image
Agrandir l’image
Changer la pile de la télécommande
1. Maintenir la télécommande les boutons dirigés vers
le bas.
2. Appuyer et maintenir enfoncé l’onglet d’ouverture
tout en tirant le plateau de pile vers l’extérieur.
3. Changer la pile Lithium “CR2025” sur le plateau en
dirigeant le pôle positif “+” vers le haut.
4. Faire rentrer le plateau jusqu’ à ce qu’il s’enclenche.
4
Onglet d’ouverture
Page 27

Boutons de Contrôle sur le CPN
Vous pouvez réaliser plusieurs (mais pas toutes) des fonctions situées sur le panneau supérieur arrière du CPN. Les fonctions de base sont identiques, quel que
soit le moment d’utilisation.
CONSEIL: Les instructions tout au long de ce guide de l’utilisateur font uniquement référence à l’utilisation de la télécommande. Toutefois, vous pouvez, si vous
le souhaitez, utiliser les boutons de contrôle du cadre quand les boutons W X,
Bouton Action
ENTER
EXIT
Défiler à gauche
Sélectionner l’option en surbrillance, Commencer un diaporama,
Marche et Pause
Défiler à droite
Quitter l’affichage en cours, ou revenir à l’écran précédent
ENTER, EXIT et MENU sont référencés.
MENU
Afficher les écrans de fonctions de configuration (Setup)
Comment démarrer
1. Brancher l’adaptateur sur le connecteur d’alimentation CC de votre CPN et sur une prise murale.
2. Glisser le bouton Power, qui se trouve à gauche du CPN, sur la position ON.
3. Lorsque vous voyez s’afficher l’invite, sélectionnez le langage que vous souhaitez afficher dans l’interface utilisateur (varie selon le modèle).
4. Après que l'écran de démarrage se soit affiché, un diaporama commencera à afficher automatiquement les photos stockées dans la mémoire interne.
5. Pour visionner vos photos, insérez une carte mémoire ou un lecteur Flash USB contenant vos photos dans le port approprié du CPN. Appuyer sur
Start Slideshow.
ATTENTION: Les cartes et lecteurs flash USB ne peuvent être insérés que dans un seul sens; ne forcez pas pour les faire rentrer dans les ports, ceci
endommagerait le port USB du lecteur de carte.
L’écran d’accueil
Les six fonctions principales du CPN, c’est-à-dire les PHOTOS, MUSIC, VIDEO, CLOCK,
RECIPES, et le Wi-Fi,sont accessibles à partir de l'écran HOME.
Pour accéder à l’écran HOME pendant un diaporama, appuyer sur le bouton MENU.
PHOTOS
MUSIQUE
VIDEO
Clock Affichage de l'horloge et du calendrier avec un diaporama photo et gérer les réglages du calendrier, de l'horloge et de l'alarme (page 12)
Recipes Voir des exemples préchargés de recettes et livres de cuisine (page 14)
Wi-Fi
Edit
Afficher vos fichiers photos (.JPG ou .JPEG) un par un ou en diaporama. PHOTOS-Manage : définir vos préférences de visionnage,
transférer des photos dans des répertoires, importer et supprimer des fichiers photos (page 7)
Lecture de vos fichiers musicaux MP3. MUSIC-Manage : permet de définir les préférences de votre écoute, d'importer et de supprimer
des fichiers musicaux (
Lecture de vos fichiers vidéo AVI. VIDEO-Manage: permet de définir les préférences, d'importer et de supprimer des fichiers vidéo (page
12).
En utilisant l'adaptateur Wi-fi USB Pandigital (vendu séparément), vous pouvez vous établir une connexion sans fil avec les sites de
photos en ligne (page 15) et votre PC pour le transfert de fichiers (page 18)
Accès rapide au mode de gestion d'une photo pour agrandir, faire pivoter ou effacer la photo affichée.
page 11).
ENTER sur
5
Page 28

Vue d’ensemble de l’option SETUP Menu
Utilisez le Setup Menu pour accéder aux fonctions du CPN et pour optimiser vos préférences de
visionnage/l'écoute. Sur l’écran
Menu
.
Select Media Source Sélectionner la source de média pour le visionnage ou l'écoute en cours (page 6)
Wi-Fi Network Setup Réglage du réseau sans fil auquel vous désirez vous connecter (page 15)
Slideshow Setup Définir plusieurs fonctions diaporama pour optimiser vos préférences de visionnage (page 9)
Adjust Screen Colors Régler les paramètres de l’écran LCD selon vos souhaits (page 8)
Optimal Image Display Définir les photos pour un affichage en format réel, ou optimisé pour s’ajuster au mieux à l’écran (page 8)
Photo Import Method Définir les photos à importer, compressées ou en résolution initiale, ainsi que la taille du fichier (page 8)
Set Sleep Mode
Reset to Factory Defaults Remettre tous les paramètres par défaut des fonctions (page 20)
Set Language Sélectionner la langue d’affichage du CPN (page 20)
Greeting Card Créez un message d'accueil personnalisé qui s'affichera au démarrage de l'appareil (page 6)
HOME, appuyer sur le bouton MENU pour afficher l’écran Setup
Fonction d’économie d’électricité (page 20)
Comment sélectionner des options
Tout au long de ce guide de l’utilisateur, lorsqu’il vous est demandé de ‘sélectionner’ une option ou un bouton de fonction, sauf indication contraire, utiliser W X pour
mettre en surbrillance
[the referenced option] (objet référencé), puis appuyer sur ENTER pour sélectionner.
Sélectionner la source de média
Si vous avez inséré une ou plusieurs sources de média externes (c.-à-d. une carte mémoire, une clé USB), vous pouvez utiliser la fonction Select Media Source
pour naviguer entre la mémoire interne et votre source de média externe afin de visionner vos photos, vos vidéos, ou d’écouter vos fichiers musicaux.
Vous utiliserez aussi cette fonction pour visualiser le contenu des répertoires de diapositives (
(page 9).
1. Sur l’écran
2. Sélectionner
Internal Memory = Mémoire flash intégrée
SD/MMC = Carte Secure DigitalTM / Multi MediaTM
MS = Memory StickTM (Standard, Pro, and Duo)
xD = Carte mémoire flash standard
USB = clé USB standard
Slideshow Folders = Visionner les photos après transfert dans les répertoires (page 9)
3. Les sélections Photo Thumbnails et Slideshow Folders vont s'afficher à l'écran.
HOME, appuyer sur MENU pour afficher Setup Menu.
Select Media Source, puis sélectionner la source de média souhaitée (les sources non présentes ne seront pas disponibles).
Slideshow Folders), une fois les photos affectées aux répertoires
Carte de voeux
Vous pouvez définir une message d’accueil personnalisé qui s’affiche lorsque vous allumez le CPN. Cette caractéristique est particulièrement utile lorsque vous
offrez ce CPN en cadeau.
Le Clavier virtuel
Vous utiliserez un clavier virtuel pour saisir votre message d’accueil personnalisé.
Naviguez avecle clavier comme suit:
Pour sélectionner les caractères de votre choix, utilisez W X S T pour mettre les
touches en surbrillance, puis appuyez sur
STYLE 1 2 3 4 = Sélectionner le fond d’image adapté à votre message d’accueil (peut
être également votre photo personnel)
DEL = Efface la zone de texte
= Visualiser votre message d’accueil avec le fond d’image sélectionné
ENTER, à plusieurs reprises comme requis.
6
Page 29

TITLE MSG = Basculer entre les zones de Titre et de Message
ABC/abc/SYM = Bascule entre les majuscules, minuscules et les symboles suivants :
_ ! : ; $ ( ) [ ] \ & / % ^ ! + = ~ - | < > { }
= Défiler pendant la saisie pour éditer comme requis
Backspace = Efface le dernier caractère sélectionné
Done = Terminer la saisie
Cancel = Retourner à l’écran précédent sans aucune saisie
Note : Vous pouvez également utiliser les boutons de la télécommande comme suit :
‘
+’ = Défiler en avant pendant la saisie pour éditer comme requis
‘
-‘ = Défiler en arrière pendant la saisie pour éditer comme requis
ROTATE = Revient en arrière, efface le dernier caractère sélectionné
ZOOM = Bascule entre les écrans ABC, abc et SYM
Entrer le message d’accueil
1. Sur l’écran HOME, appuyez sur MENU pour afficher l’écran Setup Menu.
2. Sélectionnez
3. Sélectionnez
d’accueil existant.
4. Utilisez le clavier virtuel pour saisir un titre (c.-à-d., Bon Anniversaire, Joyeux Noël).
5. Sélectionnez TITLE MSG pour saisir votre message personnalisé. Utilisez ↵ (sur 1 touche) pour saisir plusieurs lignes de texte.
CONSEIL: En cas de saisie de plusieurs lignes, afin d’éviter une perte de donnée, il vous est conseillé de sélectionner périodiquement
6. Sélectionnez
Style 1 Par défaut – Bleu avec des spirales (ou votre photo personnelle – voir Associer un Fond d’image personnel à la page 7)
Style 2 – Ballons
Style 3 – Cadeau avec ruban doré
Style 4 – Roses
7. Sélectionnez VIEW pour visualiser votre message d’accueil, puis appuyez sur EXIT pour retourner à l’écran clavier.
8. Si vous êtes satisfait de votre message d’accueil, sélectionnez
Greeting Card.
Oui pour créer un nouveau message d’accueil ou supprimer le message d’accueil existante, ou sélectionnez No pour éditer le message
Done pour
sauvegarder votre message, dans l’éventualité d’une panne de courant ou si vous devez vous éloigner de votre appareil.
STYLE 1 2 3 4 pour choisir un arrière-plan adapté à votre message d’accueil.
Done pour sauvegarder.
Associer un Fond d’image personnel
Vous pouvez mettre davantage en valeur votre message d’accueil personnel en associant l’une de vos photo personnelle en tant qu’arrière-plan de message
d’accueil.
1. Choisissez la photo que vous voulez comme arrière-plan, puis nommez-la exactement avec ce nom «
IMPORTANT: showme.jpg doit être un fichier JPG standard et ne doit pas au format progressif
2. Copiez votre fichier showme.jpg dans le répertoire racine de la mémoire interne du CPN. Utilisez les instructions de connexion USB – CPN vers PC de la
page 19 pour copier le fichier dans la racine (ne le copiez pas dans le répertoire Photos).
3. Suivez les étapes 1 à 6 selon la partie
4. Maintenant, votre message d’accueil aura votre photo personnelle comme arrière-plan.
5. Sélectionnez
6. Si vous êtes satisfait de votre message d’accueil, sélectionnez
VIEW pour visualiser votre message d’accueil, puis appuyez sur EXIT pour revenir à l’écran clavier.
Enter Greeting (ci-dessus), et sélectionnez le style Default.
Done pour sauvegarder.
showme.jpg ».
PHOTOS
La caractéristique PHOTOS inclut de nombreuses fonctions pour optimiser et organiser sur commande vos préférences de visionnage. Vous pouvez regarder vos
photos une par une ou en diaporama avec ou sans musique d'ambiance. D’autres fonctions facultatives vous permettent d’afficher l’heure en cours avec vos
images, de régler les couleurs de l’écran, de choisir les effets de transitions du diaporama, et même de programmer les diaporamas en fonction de votre horaire
hebdomadaire.
Photos en format vignette (Photo Thumbnails)
1. Sur l’écran HOME, sélectionner le bouton PHOTOS-Manage.
2. Utiliser W X S T pour faire défiler les photos une par une, ou utiliser les flèches
3. Pour visionner une photo en plein écran, appuyer sur
4. Pendant l’affichage de la photo, vous pouvez utiliser W X pour visionner les photos précédentes/suivantes.
Visionner une photo pendant le diaporama
1. En ayant la photo souhaitée affichée, appuyer sur EXIT pour arrêter le diaporama.
2. La photo sera affichée pendant 15 secondes environ, puis le diaporama se poursuivra automatiquement, ou bien vous pouvez appuyer sur
SLIDESHOW pour continuer le diaporama.
ENTER quand la photo est en surbrillance.
Page Up/Page Down pour défiler en pleine page.
ENTER ou
7
Page 30

Agrandir ou Faire pivoter les photos
Vous pouvez agrandir ou faire pivoter les photos provisoirement pendant que vous les visionnez dans une prise unique. La rotation de la photo sera
sauvegardée uniquement pour les photos stockées dans la mémoire interne.
Agrandir ou Faire pivoter une photo pendant un diaporama
1. En ayant la photo à tourner d’affichée, appuyer sur ZOOM ou ROTATE, à plusieurs reprises si nécessaire, afin d’obtenir l’effet désiré.
2. Appuyer sur
SLIDESHOW pour continuer le diaporama.
Agrandir ou Faire pivoter une photo à partir de l’écran Photo Thumbnails
1. Sur l’écran HOME, sélectionner le bouton PHOTOS-Manage.
2. Sur l’ écran
Photo Thumbnails, appuyer sur ENTER pour sélectionner la photo que l’on souhaite agrandir ou tourner, puis appuyer sur ZOOM ou
ROTATE, à plusieurs reprises si nécessaire, afin d’obtenir l’effet désiré.
3. Appuyer sur
CONSEIL: Lorsqu’un agrandisssement est fait sur une photo, vous pouvez faire un panoramique sur la photo en utilisant
EXIT pour revenir à l’écran PhotoThumbnails.
visualiser certaines parties de la photo invisibles à présent.
Régler les couleurs de l’écran
Vous pouvez régler les quatre niveaux de couleur LCD pour obtenir un contraste optimal.
1. Sur l’écran
2. Sélectionner
3. Utiliser S T pour parcourir les options LCD, et utiliser W X pour régler jusqu’ à obtention de l’effet souhaité.
4. Utiliser S T pour sélectionner
HOME, appuyer sur MENU pour afficher l’option Setup Menu.
Adjust Screen Colors.
Done.
Affichage optimal de l’image
Vous pouvez choisir le mode d’affichage souhaité pour afficher vos photos sur le CPN, et ce de la manière suivante:
1. Sur l’écran
2. Sélectionner
HOME, appuyer sur MENU pour afficher l’option Setup Menu.
Optimal Image Display, puis choisir le réglage souhaité.
Original = Affiche les photos dans leur taille réelle.
Optimal (par défaut) = Optimise la taille et résol ution pour s’ajuster au mieux à l’ écran,
ce qui pourrait causer la disparition d’une partie de la photo de l écran.
Méthode d’importation de photo
Lors de l’importation de fichiers vers une mémoire interne à partir d’une source de média externe, le fichier peut être optimisé, ou bien il peut conserver sa
taille de fichier et sa résolution initiales.
1. Sur l’ écran
2. Sélectionner
HOME, appuyer sur MENU pour afficher l’option Setup Menu.
Photo Import Method, puis choisir le réglage souhaité.
Optimized (par défaut) = La taille du fichier photo est réduite, et il est compressé en format JPEG,
ce qui permet de stocker davantage de photos dans la mémoire interne.
Original = Le fichier image est stocké en gardant sa taille et sa résolution de départ
Afficher l’heure avec les photos
Vous avez la possibilité d’afficher l’heure avec vos photos si vous le souhaitez.
1. Sur l’écran
2. Sélectionner
3. Sélectionner
CONSEIL: Si l’heure est incorrecte, reportez-vous à la rubrique Régler la date et l’heure de la page 13 pour régler l’heure.
HOME, appuyer sur MENU pour afficher l’option Setup Menu.
Slideshow Setup, puis utiliser S T pour sélectionner Yes ou No sous Display Current Time.
Done.
Afficher la date/heure de prise de vue avec les photos
Généralement, la plupart des appareils photo numériques restituent la date/heure de prise de vue lors de la sauvegarde des fichiers photos. Si vos fichiers
photos contiennent cette information, vous pouvez l’afficher avec vos photos, si vous le souhaitez.
1. Sur l’écran
2. Sélectionner
3. Sélectionner
HOME, appuyer sur MENU pour afficher l’option Setup Menu.
Slideshow Setup, puis utiliser S T pour sélectionner Yes ou No sous Display Photo Date/Time.
Done.
Importer des photos dans la mémoire interne
Vous pouvez importer vos fichiers photo de sources média externes (par exemple, à partir de cartes mémoires ou de clés USB) dans la mémoire interne du
CPN. Le nombre de fichiers photos pouvant être importés dépend de la taille du fichier et de la mémoire disponible.
CONSEIL: Une fois que vous avez débuté une importation, vous pouvez appuyer sur
W X S T pour
EXIT pour annuler l'importation.
8
Page 31

Importer Toutes les photos dans la mémoire interne
1. Insérer votre source de média dans le CPN. L’écran option carte mémoire s’affichera.
2. Sélectionner
3. À la fin de l’importation, appuyer sur
Import All Photos.
EXIT pour revenir à l’écran précédent.
Importer les photos une par une dans la mémoire interne
1. Insérer votre source de média dans le CPN. L’écran option carte mémoire s’affichera.
2. Sélectionner
3. Utiliser W X S T pour défiler les photos, puis appuyer sur ‘
4. Appuyer sur
5. Appuyer sur
Select Photos to Import.
+’ pour sélectionner les photos à importer (‘-‘ désélectionnera).
MENU, puis sélectionner Import Selected Photos.
EXIT pour retourner à l’écran Photo Thumbnails.
Supprimer des Photos de la mémoire interne
Vous pouvez supprimer des fichiers photos de la mémoire interne du CPN, mais non ceux d’une source de média externe (c-à–d. carte mémoire, clé USB).
Assurez-vous de choisir
CONSEILS: Il est conseillé de faire des copies de sauvegarde des photos avant de les supprimer du CPN.
1. Sur l’écran
2. Pour supprimer toutes
Pour supprimer les photos une par une
pour sélectionner (‘
3. Un message de confirmation apparait; sélectionner
4. Appuyez sur
CONSEIL: Si vous sélectionnez
Internal Memory en tant que source de média sélectionnée.
HOME, sélectionner le bouton PHOTOS-Manage.
les photos, appuyer sur MENU, puis sélectionner Delete All.
, utiliser W X S T pour mettre en surbrillance les photos que vous souhaitez supprimer, appuyer sur ‘+’
-‘ désélectionnera), appuyer sur MENU, puis sélectionner Delete Selected.
Yes pour supprimer les photos, ou No pour conserver les photos dans la mémoire interne.
EXIT pour revenir à l'écran Photo Thumbnails.
Yes par erreur, appuyez sur EXIT pour annuler la sélection. Les photos déjà supprimées ne seront pas
automatiquement restaurées.
DIAPORAMA DES PHOTOS
Le CPN peut afficher en diaporama l’ensemble des photos provenant de la source de média sélectionnée, ou vous pouvez sélectionner des photos spécifiques
pour un diaporama sur mesure. Vous pouvez également ajouter à vos diaporamas une musique d'ambiance en stockant simplement des fichiers musicaux MP3 sur
la source média choisie.
Diaporama de photos stockées dans la mémoire interne
Vous pouvez réaliser un diaporama des photos stockées dans la mémoire interne du CPN en allumant tout simplement le CPN (sans source média externe
ni adaptateur Wi-fi de connecté*), puis attendez que le diaporama débute automatiquement.
Diaporama de photos provenant de votre source de média
Insérer une source de média externe, puis allumer le CPN; le diaporama commencera à afficher vos photos (sans adaptateur Wi-fi de connecté*). Si vous
insérez une source de média après l’allumage, l’écran
* S'il y a un adaptateur Wi-fi de connecté au CPN et que vous avez précédemment effectué la connexion avec un réseau sans fil, un message va apparaître
pour vous demander si vous désirez vous connecter au réseau sans fil maintenant. Si vous choisissez
options Réseau va s'afficher. Si vous choisissez
le diaporama commence (s'il n'y a pas de photos dans la source média, l'écran HOME va continuer de s'afficher.)
Mettre en pause un diaporama
Pour mettre en pause un diaporama, appuyez sur EXIT. Le diaporama va se mettre en pause durant environ 15 secondes, puis reprendre automatiquement.
Pour le reprendre immédiatement, appuyez sur
Répertoires de diapositives
Il y a cinq catégories de répertoires dans la mémoire interne. Vous pouvez y transférer des fichiers photo pour une gestion personnalisée et pour les
diaporamas (ces répertoires peuvent être renommés):
Seules les photos stockées dans la mémoire interne peuvent être affectées dans les répertoires de diapositives. Les photos transférées ne sont ni déplacées
ni copiées physiquement dans les répertoires, plus exactement, un lien est attribué à la photo, de telle sorte qu’elle semble se trouver dans le répertoire. Si
vous supprimez de la mémoire interne le fichier photo réel, le lien vers le répertoire sera également supprimé.
Transférer des photos dans le Répertoire de Diapositives
1. Sur l’écran HOME, sélectionner le bouton PHOTOS-Manage.
2. Sur l’écran
3. Pour transférer une seule
Pour transférer plusieurs
4. Sélectionnez
Family – Friends – Vacation – Events – Others
Photo Thumbnails, utiliser W X S T pour parcourir vos photos.
photo: En ayant la photo de votre choix affichée, appuyer sur MENU.
photos: Appuyer sur ‘+’ pour sélectionner les photos voulues (‘-‘ désélectionnera), puis appuyer sur MENU.
Assign to Folder, puis le répertoire de votre choix pour y mettre la photo.
memory card option s’affiche; sélectionner Start Slideshow.
Yes, le CPN se connectera au réseau et l'écran des
No, l'écran HOME va s'afficher; appuyez sur Slideshow ou patientez pendant environ 15 secondes pour que
ENTER ou SLIDESHOW.
9
Page 32

Réaliser un diaporama à partir d’un Répertoire de Diapositives
1. Sur l’écran HOME, appuyer sur MENU.
2. Sélectionner
3. Sélectionner
4. Sélectionner le répertoire contenant les photos que vous souhaitez visualiser dans le diaporama.
5. Sur l’écran
Select Media Source.
Slideshow Folders.
Folders Thumbnails, appuyer sur Slideshow.
Copier ou retransférer des photos dans différents répertoires
Une fois les photos transférées dans des répertoires, vous pouvez les copier vers d’autres répertoires, ou bien vous pouvez les déplacer à nouveau
pour qu’elles apparaissent dans un autre répertoire.
1. À la projection de diaporama à partir de répertoires de diapositives (en suivant les instructions ci-dessus), appuyer deux fois sur EXIT pour afficher
l’écran
Folder Thumbnails
2. Pour copier ou réaffecter une photo particulière, mettre en surbrillance la photo, puis appuyer sur MENU.
Pour copier ou retransférer plusieurs
copier ou retransférer (‘
3. Sélectionner
Copy to Folder ou Reassign to Folder, puis sélectionner le répertoire dans lequel vous souhaitez retransférer ou copier les photos.
Musique d'ambiance pour Diaporama
Si vous désirez écouter une musique d'ambiance durant un diaporama, il suffit de copier au moins un fichier musical MP3 dans la même source média que
vos photos. La musique sera automatiquement lue en même temps que les photos s'affichent.
S'il y a plusieurs fichiers MP3 dans votre source média, les fichiers musicaux seront lus les uns après les autres jusqu'à ce qu'ils aient tous été lus, avant que
leur lecture ne reprenne depuis le début en fonction du réglage Music Repeat Mode (page 11).
Régler le volume
Au cours de la lecture de la musique, appuyez sur "+" ou "-" pour ajuster le niveau du volume.
Mettre en sourdine la musique d'ambiance d'un diaporama
Appuyez sur ENTER au cours de la lecture du diaporama pour mettre la musique d'ambiance en sourdine. Le diaporama va continuer de s'afficher,
mais sans la musique jusqu'à ce que vous appuyiez de nouveau sur
Réglage du Mode musical du diaporama
Vous pouvez régler le CPN pour qu'il ne joue pas de musique d'ambiance avec vos diaporamas, même si des fichiers MP3 se trouvent également présents
sur votre source média.
1. Dans le menu
2. Choisissez
3. Utilisez les touches S T pour choisir
HOME, appuyez sur MENU pour afficher le Setup Menu.
Slideshow Setup.
ON (valeur par défaut) = Joue une musique d'ambiance avec vos diaporamas
OFF = Ne joue pas de musique avec vos diaporamas, même si des fichiers MP3 sont stockés sur la source média sélectionnée.
4. Sélectionnez Done.
Régler l’intervalle de défilement du diaporama
Vous pouvez régler la vitesse à laquelle les photos du diaporama passent de l’une à l’autre.
1. Sur l’écran
2. Sélectionner
3. Utiliser S T pour sélectionner
5 (par défaut), 10, 30, 60 secondes, 1 heure, ou 24 heures
4. Sélectionner Done.
HOME, appuyer sur MENU pour afficher l’option Setup Menu.
Slideshow Setup,
Régler les effets de transition du diaporama
Vous pouvez régler les ‘effets spéciaux’ de transition lorsque les photos défilent l’une après l’autre pendant le diaporama.
1. Sur l’écran
2. Sélectionner
3. Utiliser S T pour sélectionner
Off = Les photos défilent l’une après l’autre sans effets spéciaux.
Random(par défaut) = Les photos défileront l’une après l’autre, en utilisant tous les effets spéciaux, et ce, au hasard tout au long du diaporama.
Remaining special effects (effets spéciaux restants) = Choisir l’effet de transition particulier que l’on veut.
4. Sélectionner Done.
HOME, appuyer sur MENU pour afficher l’option Setup Menu.
Slideshow Setup.
-‘ désélectionnera), puis appuyer sur MENU.
photos, utiliser W X S T pour parcourir les photos, utiliser ‘+’ pour sélectionner celles que vous voulez
ENTER.
Slideshow Music, puis servez vous de W X pour sélectionner le réglage de votre choix.
Slideshow Interval, puis sélectionner le réglage voulu à l’aide des boutons W X.
Slideshow Transition, puis sélectionner le réglage voulu à l’aide des boutonsW X.
10
Page 33

Régler le mélange du diaporama
Vous pouvez régler le diaporama pour que les photos soient affichées dans un ordre aléatoire, ou dans l’ordre tel qu’elles sont stockées dans la source de
média sélectionnée.
1. Sur l’écran
2. Sélectionner
3. Utiliser S T pour sélectionner
HOME, appuyer sur MENU pour afficher Setup Menu.
Slideshow Setup.
Slideshow Shuffle, puis sélectionner votre réglage à l’aide des boutonsS T.
ON= Affiche les photos au hasard
OFF (par défaut) = Affiche les photos dans l’ordre trouvé dans la source de média sélectionnée
4. Sélectionner Done.
MUSIQUE
Note: Les fichiers musicaux doivent être au format standard MP3 et ne doivent pas provenir de services de téléchargement sous licence.
Sélectionner une source média pour la musique
Lorsque l'écran MUSIC est affiché, vous pouvez facilement choisir une source média différente en sélectionnant la touche source média Actuelle dans le
coin supérieur droit puis en sélectionnant une source média différente depuis l'écran
Écouter uniquement de la musique
1. Sur l'écran HOME, sélectionnez le bouton MUSIC-Play.
Tous les fichiers musicaux présents seront listés et la lecture du premier fichier musical va commencer.
2. Pour mettre en pause la lecture musicale, appuyez sur
sur
ENTER.
3. Pour lire un autre fichier, utilisez simplement les touches W X S T pour vous déplacer dans les noms de fichiers, et appuyez sur
un.
Réglage du volume
Lorsque vous êtes en train d'écouter de la musique, appuyez sur "+" ou "-" pour ajuster le volume.
Mode de répétition musicale
Le mode Music Repeat Mode est réglé par défaut pour lire en continu tous les fichiers musicaux qui se trouvent dans la source média sélectionnée jusqu'à
ce que vous arrêtiez la lecture. Si vous le désirez, vous pouvez modifier le mode de répétition pour ne lire tous les fichiers musicaux qu'une fois.
1. Sur l'écran
2. Appuyez sur
HOME, sélectionnez la touche MUSIC-Manage. Tous les fichiers musicaux présents seront listés.
MENU, puis sélectionnez Repeat pour choisir ON ou OFF.
Repeat ON (par défaut) = lit de façon continue tous les fichiers musicaux de la source média choisie jusqu'à ce que vous arrêtiez la lecture.
Repeat OFF = Ne lit qu'une fois les fichiers musicaux.
Importer des fichiers musicaux dans la mémoire interne
Vous pouvez importer vos fichiers musicaux depuis des sources média externes (ex: cartes mémoires, clés USB) dans la mémoire interne du CPN. Le
nombre de fichiers musicaux que vous pouvez importer dépend de la taille des fichiers et de la mémoire disponible.
CONSEIL: Lorsque vous avez commencé une importation, vous pouvez appuyer sur
1. Sur l'écran
2. Pour importer tous les fichiers musicaux, appuyez sur
Pour importer des fichiers musicaux séparés, utilisez W X S T pour parcourir les noms de fichiers, appuyez sur "
vous désirez importer ("
HOME, sélectionnez la touche MUSIC-Manage et les fichiers musicaux seront listés.
-" pour désélectionner un fichier), appuyez sur MENU, puis choisissez Import Selected.
Supprimer des fichiers musicaux de la mémoire interne
Vous ne pouvez supprimer des fichiers musicaux que dans la mémoire interne du CPN. Il est recommandé d'effectuer des copies de sauvegarde des fichiers
musicaux avant de les effacer.
Note: La source média sélectionnée doit être
1. Sur l'écran
2. Pour supprimer tous
Pour supprimer des fichiers individuels,
désirez supprimer ("-" pour désélectionner un fichier), appuyez sur
3. Un message de confirmation apparaît alors. Choisissez
mémoire interne.
CONSEIL: Si vous sélectionnez
HOME, sélectionnez le bouton MUSIC-Manage et les fichiers musicaux seront listés.
les fichiers, appuyez sur MENU et sélectionnez ensuite Delete All.
Yes par erreur, appuyez sur EXIT pour annuler la suppression. Les fichiers musicaux déjà supprimés ne seront pas
automatiquement restaurés.
ENTER; La lecture musicale va rester interrompue jusqu'à ce que vous appuyiez de nouveau
MENU puis sélectionnez Import All.
Internal Memory.
utilisez W X S T pour parcourir les noms des fichiers et appuyez sur "+" pour sélectionner les fichiers que vous
MENU, et sélectionnez Delete Selected.
Yes pour effacer les fichiers musicaux ou bien No pour conserver les fichiers musicaux dans la
Select Media.
EXIT pour l'annuler.
ENTER pour en lire
+" pour sélectionner les fichiers que
11
Page 34

VIDEOS
Le CPN supporte les fichiers vidéo JPEG AVI. Si votre fichier vidéo n'est pas au format AVI, il se peut que vous deviez le convertir à l'aide d'un logiciel de
conversion vidéo qu'il est facile d'acheter sur Internet.
Choix de la source média pour les vidéos
Lorsque l'écran VIDEO est affiché, vous pouvez facilement choisir une autre source média en sélectionnant le bouton source média dans le coin supérieur
droit et en sélectionnant ensuite une autre source média depuis l'écran
Select Media.
Regarder un vidéo
1. Sur l'écran HOME, sélectionnez la touche VIDEO-Play. Tous les fichiers vidéo présents seront listés et la lecture de la première vidéo va commencer.
2. Pour mettre en pause la lecture d'une vidéo, appuyez sur
3. Appuyez sur
EXIT pour arrêter la vidéo.
ENTER; La vidéo va rester en pause jusqu'à ce que vous appuyiez de nouveau sur ENTER.
Réglage du Volume
Lorsque vous êtes en train de regarder la vidéo, appuyez sur "+" ou "-" pour ajuster le volume.
Mode de répétition de vidéo
Le mode de répétition de vidéo est réglé par défaut pour lire en continu tous les fichiers vidéo qui se trouvent sur la source média sélectionnée jusqu'à ce
que vous arrêtiez la lecture. Si vous le souhaitez, vous pouvez modifier le mode de répétition pour que l'ensemble des fichiers vidéo ne soit lu qu'une fois
avant que la lecture ne s'arrête automatiquement.
1. Sur l'écran
2. Appuyez sur
3. Sélectionnez
Repeat ON (par défaut) = lit de façon continue tous les fichiers vidéo de la source média sélectionnée jusqu'à ce que vous arrêtiez la lecture.
Repeat OFF = ne lit qu'une fois les fichiers vidéos.
HOME, sélectionnez la touche VIDEO-Manage, et tous les fichiers vidéo présents seront listés.
MENU.
Repeat pour choisir ON ou OFF.
Importer des fichiers vidéo dans la mémoire interne
Vous pouvez importer vos fichiers vidéo depuis des sources média externes (c-a-d. cartes mémoires, clés USB) dans la mémoire interne du CPN. Le
nombre de vidéos que vous pouvez importer dépend de la taille des fichiers et de la mémoire disponible.
CONSEIL: Une fois que vous avez commencé une importation,vous pouvez appuyer sur
EXIT pour annuler l'opération d'importation.
Importer des vidéos
1. Dans l'écran HOME, sélectionnez la touche VIDEO-Manage, et tous les fichiers vidéo présents seront listés.
2. Pour importer tous
Pour importer des fichiers vidéo individuels
que vous désirez importer ("-" pour désélectionner un fichier), appuyez sur
les fichiers vidéo, appuyez sur MENU, puis sélectionnez Import All.
, utilisez W X S T pour parcourir les noms des fichiers et appuyez sur "+" pour choisir les fichiers
MENU, puis sélectionnez Import Selected.
Supprimer des fichiers vidéo de la mémoire interne
Vous ne pouvez effacer de fichiers vidéo que dans la mémoire interne du CPN. Il est recommandé d'effectuer des copies de sauvegarde des fichiers vidéo
avant de les effacer.
Note: La source média sélectionnée doit être
1. Dans l'écran
2. Pour supprimer tous
Pour supprimer des fichiers individuels,
vous désirez supprimer ("-" pour désélectionner un fichier), appuyez sur
3. Un message de confirmation apparaît alors. Choisissez
mémoire interne.
CONSEIL: Si vous sélectionnez
HOME, sélectionnez la touche VIDEO-Manage et les fichiers vidéo seront listés.
les fichiers, appuyez sur MENU et sélectionnez ensuite Delete All.
pas automatiquement restaurés.
Internal Memory.
utilisez W X S T pour parcourir les noms des fichiers et appuyez sur "+" pour sélectionner les fichiers que
MENU, et sélectionnez Delete Selected.
Yes pour supprimer les fichiers vidéo ou bien No pour conserver les fichiers vidéo dans la
Yes par erreur, appuyez sur EXIT pour annuler la suppression. Les fichiers vidéo déjà supprimés ne seront
CALENDRIER/HORLOGE
Votre CPN peut également être utilisé comme un calendrier de bureau disposant d'une horloge en temps réel et d'une alarme tout en diffusant un diaporama
permanent des photos présentes dans la source média sélectionnée.
Pour afficher l’écran
actuellement sélectionnée.
Sélectionner la source de média pour le diaporama du calendrier
Vous pouvez changer aisément la source de média si vous souhaitez que le diaporama calendrier/horloge affiche des photos provenant d’une source de
média différente (c.- à-d. carte mémoire, répertoire de diapositives).
1. Sur l’écran
2. Sélectionner la source de média de votre choix à partir de l’écran
CALENDAR/CLOCK, sélectionner Clock à partir de l’écran HOME. Le diaporama affichera les photos se trouvant dans la source de média
CALENDAR/CLOCK, appuyer sur MENU, puis sélectionner le bouton Media Source situé dans le coin supérieur droit.
Select Media.
12
Page 35

Régler le programme
Vous pouvez programmer le CPN pour qu’il se mette en mode de veille automatiquement et redémarre ensuite d’après votre horaire hebdomadaire. Par
exemple, si au travail votre CPN se trouve sur votre bureau, vous voulez probablement afficher le calendrier/horloge ou passer un diaporama de 8h30 du
matin à 5h30 de l’après-midi les jours de la semaine, puis régler le CPN en mode de veille durant la fin de semaine. Le lundi matin suivant, le CPN
fonctionnera de nouveau à 8h30.
1. Sur l’écran
2. Sélectionner
3. Utiliser W X pour naviguer entre les champs et S T pour changer les valeurs des champs dans
4. Pour régler l’option
5. Utiliser W X pour se déplacer entre les champs et S T pour modifier les valeurs des champs dans
6. Une fois l’heure réglée, sélectionner
Désactiver le programme
Une fois le programme déterminé (selon les instructions ci-dessus), vous pouvez le désactiver à tout moment.
1. Sur l’écran
2. Sélectionner le bouton
3. Sélectionner
Démarrer le programme
Une fois les horaires de programmes définis (suivant les instructions ci-dessus), vous utiliserez la fonction Run Schedule chaque fois que vous souhaitez
mettre en route le programme.
Il y a deux méthodes de démarrage du programme, soit à partir d’un diaporama soit à partir de l’écran
ATTENTION: Une fois la fonction Run Schedule sélectionnée, toute manipulation de la part de l’utilisateur annulera l’activation (c.-à-d. appuyer sur la
Démarrer le programme à partir d’un diaporama
Démarrer un programme à partir de l’écran CALENDAR/CLOCK
Régler la date et l’heure
1. Sur l’écran CALENDAR/CLOCK, appuyer sur MENU.
2. Sélectionner
3. Sélectionner
Régler l'alarme
Vous pouvez utiliser votre CPN comme une alarme réveil lorsque vous le désirez. Vous pouvez régler la fréquence de l'alarme et choisir la sonnerie
incorporée ou bien l'un de vos fichiers musicaux.
1. Dans l'écran
2. Sélectionnez
Alarm = Déterminez l'heure à laquelle vous désirez que l'alarme se déclenche.
Frequency = Déterminez la fréquence à laquelle vous voulez que l'alarme se déclenche (Once, Daily, Off)
Alert = Réglez l'alarme sur Musique ou sur la Tonalité par défaut (si vous choisissez "music",
le fichier musical doit se trouver dans le média actuellement sélectionné lorsque l'alarme est activée)
3. Sélectionnez Done.
Lorsque l'alarme est réglée, une petite horloge ou une note de musique s'affiche pour indiquer que l'alarme a été réglée soit sur la tonalité par défaut soit sur
un fichier musical.
CALENDAR/CLOCK, appuyer sur MENU.
Set Schedule.
Weekdays On/Off.
Weekends On/Off, sélectionner le bouton Enable Weekends Schedule, puis utiliser S pour accéder aux paramètres.
Weekends On/Off.
Done pour revenir à l’écran précédent.
CALENDAR/CLOCK, appuyer sur MENU.
Set Schedule, puis le bouton Enable Weekdays Schedule ou Enable Weekends Schedule. Les champs temps afficheront OFF.
Done.
CALENDAR/CLOCK.
télécommande ou sur un bouton de contrôle, éteindre) et le programme ne sera pas mis en route tant que vous n’aurez pas
resélectionné cette fonction pour réactiver le programme.
1. Démarrez un diaporama et appuyez sur ENTER pour sélectionner la touche Run Schedule lorsqu'elle apparaît dans le coin inférieur gauche de
l'écran (environ 10 sec).
2. Pour démarrer le programme quand le bouton
sélectionner la touche
3. Le CPN se mettra en mode de veille conformément au programme, et quand il fonctionnera de nouveau, le diaporama sera relancé.
1. Sur l’écran CALENDAR/CLOCK, appuyer sur MENU.
2. Sélectionner
3. Le CPN entrera en mode de veille conformément au programme, et lorsqu’il fonctionne de nouveau, l’écran
nouvelle fois.
Un petit sablier va apparaître, signe que le programme est en cours, puis le CPN fonctionnera conformément au programme défini.
Run Schedule.
Run Schedule lorsqu'elle apparaît.
Run Schedule n’est plus affiché, redémarrez votre diaporama et appuyez sur ENTER pour
Calendar/Clock sera affiché une
Set Date/Time, puis sélectionner les options et utiliser S T pour modifier les valeurs des champs.
Done.
CALENDAR/CLOCK, appuyez sur MENU.
Set Alarm, puis choisissez les options et utilisez S T pour modifier les valeurs des champs.
13
Page 36

Note: Au moins un fichier musical MP3 doit se trouver sur la source média sélectionnée pour que l'alarme puisse jouer de la musique. Si vous réglez
l'alarme pour jouer de la musique et qu'il n'y a pas de fichier musical MP3 présent, la tonalité par défaut sera jouée à la place.
Désactiver l'alarme
Lorsque l'alarme sonne, appuyez sur n'importe quelle touche de la télécommande pour l'arrêter et revenir à l'écran CLOCK/CALENDAR.
Pour annuler l'alarme avant l'heure programmée, suivez les instructions précédentes à propos du réglage de l'alarme et réglez la fréquence sur
RECETTES
La fonction Recettes [Recipes] du CPN vous permet de voir les recettes d'auteurs célebres comme "Bon Appétit" et "Good Housekeeping" (vendues séparéments
sur notre site web http://www.pandigital.net
Des exemples de recettes de saison "Bon Appétit" sont inclus dans ce CPN afin que vous puissiez découvrir comment utiliser la fonction Recettes lorsque vous
achetez des livres de cuisine complets.
).
OFF.
Note: La fonction
Utilisez ces instructions pour les exemples pré-chargés de recettes ainsi que pour toute la collection des livres de cuisine.
Recipes n'est accessible que lorsque Internal Memory est sélectionnée comme source de média (page 6.)
Voir les recettes dans le livre de cuisine
1. Sur l'écran HOME, sélectionner RECIPES.
2. Sélectionner
3. Utiliser W X S T pour parcourir les recettes (lorsqu’il est mis en surbrillance, le nom de la recette va s'afficher au dessus du groupe).
4. Appuyer sur
CONSEIL: Lorsqu'une recette individuelle est affichée, a) Appuyer sur
Sample Recipes (ou bien sélectionnez un livre de cuisine si vous en avez ajouté). L'écran Cookbook Thumbnails va s'afficher.
ENTER pour voir une recette en plein écran.
ZOOM pour aggrandir l'affichage, b) Utiliser W X pour voir la recette précédente ou
suivante, ou c) Appuyer sur
pour reprendre.
SLIDESHOW pour voir les recettes sous forme de diaporama, appuyer sur EXIT pour mettre en pause et sur ENTER
Attribuer des recettes à ‘My Favorite Recipes’
Vous pouvez associer des recettes d'un Livre de cuisine principal dans six catégories de plats afin de pouvoir y accéder de façon simple et rapide: Hors
d’oeuvres, Soups, Salads, Entrées, Desserts
1. Sur l'écran
2. Sélectionner
Thumbnails
3. Utiliser W X S T pour parcourir les recettes.
Pour associer une recette isolée
Pour associer plusieurs
4. Sélectionner la catégorie de plats à laquelle vous désirez associer les recettes. Un message d'état apparaît lorsque la recette est associée.
HOME, sélectionner RECIPES.
Sample Recipes (ou bien sélectionnez un livre de cuisine si vous avez ajouté des Livres de cuisine supplémentaires). L'écran Cookbook
va s'afficher.
: Mettre en surbrillance la recette désirée, appuyer sur MENU, puis sélectionner Assign to My Favorites.
recettes, appuyer sur ‘+’ pour sélectionner les recettes désirées et appuyer sur MENU, puis sélectionner Assign to my Favorites.
et Others. (Les noms des catégories de plats ne sont pas modifiables).
Voir les recettes dans "Mes recettes favorites"
Après avoir associé des recettes dans une catégorie de plats (en suivant les instructions ci-dessus), vous pouvez les visionner rapidement à n'importe quel
moment.
1. Sur l'écran
2. Sélectionner la catégorie de plats que vous désirez voir.
3. Sur l'écran
haut du groupe).
4. Appuyer sur
CONSEIL: Lorsqu'une recette est affichée, a) Appuyer sur
RECIPES, sélectionner My Favorite Recipes.
Food Group Thumbnails, utiliser W X S T pour parcourir les recettes (lorsqu'il est mis en surbrillance, le nom de la recette va s'afficher en
ENTER pour voir une recette en plein écran.
ZOOM pour l'aggrandir, b) Utiliser W X S T pour voir la recette précédente ou suivante, ou c)
Appuyer sur
SLIDESHOW pour voir les recettes sous forme de diaporama. Appuyer sur EXIT pour mettre en pause et sur ENTER pour reprendre.
Copier ou réassocier des recettes d'une catégorie vers une autre
Après avoir attribué des recettes à un groupe d'aliments, vous pouvez les réassocier (les déplacer) ou les copier (dupliquer) d'une catégorie d'aliments vers
une autre, en fonction de vos désirs.
1. Sur l'écran
2. Sélectionner la catégorie de plats depuis laquelle vous désirez réassocier des recettes.
3. Sur l'écran
4. Appuyer sur
5. Sélectionner la catégorie de plats à laquelle vous désirez réassocier la recette ou dans laquelle vous désirez la copier. Un message d’état apparaît
lorsque les recttes sont associées ou copiées.
14
RECIPES, sélectionner My Favorite Recipes.
Food Group Thumbnails, utiliser W X S T pour parcourir les recettes, puis appuyer sur ‘+’ pour sélectionner les recettes à réassocier.
MENU, puis sélectionner Copy to Category ou Reassign to Category.
Page 37

Désassocier des recettes de "Mes recettes favorites"
Lorsque vous désassociez des recettes d'une catégorie, vous ne faites qu'en retirer le lien, vous n'effacez pas la recette. Le fichier de la recette reste
toujours dans le livre de cuisine principal.
1. Sur l'écran
2. Sélectionner la catégorie de plats de laquelle vous désirez désassocier des recettes.
3. Sur l'écran
désassocier.
RECIPES, sélectionner My Favorite Recipes.
Food Group Thumbnails, utiliser W X S T pour parcourir les recettes, puis appuyer sur ‘+’ pour sélectionner les recettes que vous désirez
4. Appuyer sur MENU, puis sélectionner Unassign. Un message d'état apparaît lorsque la recette est désassociée.
Wi-Fi
Cette fonction permet une connexion sans fil avec plusieurs sites de partage de photos en ligne et de contenu de flux RSS (par exemple Windows Live Framelt).Vous
pourrez visionner les images que vous avez téléchargées sur ces sites et recevoir les flux d'informations, les prévisions météorologiques et autres contenus
directement sur votre CPN.
Utilisez également cette fonction pour établir une connexion sans fil avec votre PC afin de transférer des fichiers plus facilement (page 18).
Régler voter CPN pour vous connecter aux sites web de partage de photos
Le réglage de votre CPN pour le connecter aux sites web de partage de photo se fait en 3 étapes:
A. Le réglage du réseau sans fil en assignant l'ID et le mot de passe du réseau sans fil sur le CPN.
B. Puis, établir un compte sur le site web de partage de photos en ligne et télécharger vos photos sur le site web (Les sites web de partage de photos en
ligne disponibles peuvent différer selon les modèles de CPN).
C. Pour finir, assignez à voter site web de partage de photo un ID et un mot de passe sur le CPN pour le connecter avec le site et visionner vos photos
téléchargées directement par le CPN.
Le clavier virtuel
Vous utiliserez le clavier virtuel pour saisir votre ID de réseau sans fil et votre mot de passe ainsi que l'ID et le mot de passe associé à vos compte de
partage de photo en ligne.
Naviguez sur les touches du clavier de la façon suivante:
Utilisez la télécommande W X S T pour mettre en surbrillance les touches, puis appuyez
ENTER autant de fois que nécessaire pour sélectionner les caractères désirés.
sur
SYM = Accès aux symboles suivants :
\ / : ; ( ) $ & [ ] . , % ^ + = - | < > { } ! ~
NUM = Permute entre les chiffres et les lettres.
ABC/abc = Permute entre les lettres majuscules et minuscules.
= Accédez à votre entrée pour l'éditer au besoin.
Backspace = Efface le dernier caractère sélectionné.
Done = Termine l'entrée.
Cancel = Revient à l'écran précédent sans entrée.
Note: Vous pouvez également utiliser les touches de la télécommande de la façon suivante:
+" = Parcourir vers l'avant.
"
"
-" = Parcourir vers l'arrière.
ROTATE = Effacement arrière, efface le dernier caractère sélectionné
ZOOM = Permute entre les écrans SYM / NUM / ABC / abc
Réglage du réseau sans fil
Note: Vous devez disposer d'un réseau sans fil actif dans la zone couverte par le CPN et l'adaptateur USB sans-fil Wi-fi Pandigital doit être connecté au
CPN (Adaptateur Wi-fi vendu séparément sur notre site web : http://www.pandigital.net
1. Insérez l'adaptateur USB sans fil Pandigital sur le port USB du CPN.
2. À l'écran
3. Sélectionnez
HOME, appuyez sur MENU.
Wi-Fi Network Setup. La fenêtre Network Setup va s'afficher comme illustrée ci-dessous:
.)
15
Page 38

4. Sélectionnez Recherche réseau disponible. Les réseaux sans fil à portée vont apparaître dans la fenêtre
5. Sélectionnez le réseau Wi-fi auquel vous désirez vous connecter. L'écran du réseau va s'afficher, comme ci-dessous:
Network Setup.
6. Si nécessaire, modifiez le type de
7. Sélectionnez Password, puis servez-vous du clavier virtuel pour saisir votre Wi-Fi Password. (L'identité et le mot de passe sont sensible à la casse,
8. Sélectionnez
9. Sélectionnez
10. Sélectionnez
Windows Live FrameIt
Vous pouvez effectuer une connexion sans fil avec Windows FrameIt, un site de partage de photos en ligne et de flux de données RSS pour accéder aux
nouvelles, aux prévisions météorologiques, à la circulations, aux sports et à bien d'autres choses.
Connexion avec FrameIt
Créer un compte et se connecter à FrameIt
CONSEIL: Si votre réseau sans fil est "caché", il ne sera pas listé parmi les réseaux disponibles. Sélectionnez l'une des touches du Réseau SSID pour
saisir manuellement votre Identité réseau (Network ID).
Secure Access en appuyant plusieurs fois sur ENTER la touche option afin de sélectionner le type approprié de
sécurité.
utilisez les touches "ABC/abc", "NUM" et "SYM" lorsque vous le devez afin d'accéder aux bons caractères).
Done sur le clavier virtuel.
Connect. N'appuyez sur aucune autre touche tant que la connexion n'est pas effectuée (20-30 secondes).
Un message d'état de la connexion va s'afficher, et les adresses MAC et IP du réseau auquel vous êtes connecté vont s'afficher comme sur cet exemple:
Done. L'écran Wi-Fi va maintenant afficher les icônes du site de partage de photos en ligne ainsi que l'icône Connect to PC.
CONSEIL: Une fois que vous avez établi avec succès une connexion avec le réseau sans fil, lorsque vous rallumez ou réinsérez l'adaptateur Wi-fi,
1. Sur l'écran HOME, sélectionnez Wi-Fi.
2. Sélectionnez
3. Le CPN est prérégler pour afficher les flux en direct suivants lorsque vous accédez pour la première fois à Windows Live FrameIt:
4. Sélectionnez le dossier de flux RSS que vous désirez regarder.
Pour voir vos propres photos et d'autres flux live depuis Framelt, vous devez d'abord créer un compte personnel chez Framelt; Allez sur
http://frameit.live.com
1. Après avoir crée votre compte avec Framelt, allez sur l'écran
un message va apparaître pour vous demander si vous désirez vous connecter au réseau sans fil. Si vous choisissez
se connecter au réseau et l'écran des options réseau va s'afficher.
FrameIt.
World News
US Major City (weather)
Sports
MSNBC Top Stories
, créez un compte et assignez les flux de contenus RSS que vous désirez voir sur votre CPN.
HOME et sélectionnez
Yes, le CPN va
Wi-Fi.
16
Page 39

2. La première fois que vous vous connectez, sélectionnez la touche
FrameIt-User Settings. L'écran FrameIt va s'afficher comme ci-dessous:
3. Sélectionnez
4. Sur votre PC:
Rendez-vous sur http://frameit.live.com/device/claim.aspx
5. Sur votre CPN:
Sur l'écran
6. Si nécessaire, répétez les étapes 3-5 en sélectionnant
7. Sélectionnez
8. Allez à l'étape 2 dans les instructions Voir les flux RSS Framelt qui suivent.
Voir les flux RSS FrameIt
)
1. Sur l'écran
2. Sur l'écran
3. Le flux RSS que vous avez assigné à framelt.live.com va s'afficher; les titres vont apparaître à mesure que vous mettez les répertoires en
surbrillance. Appuyez sur
Laissez au flux de données le temps d'apparaître; la durée nécessaire dépend de la quantité de données contenues dans le répertoire sélectionné.
Par exemple, un répertoire contenant une grande quantité de photos peut prendre beaucoup plus de temps à s'afficher qu'un répertoire
d'Informations ou de Prévisions Météorologiques.
CONSEIL: Si vous effectuez des modifications sur votre compte Windows Live Framelt alors que votre CPN est connecté (ex. Créer de
Importer des Photos Framelt dans la mémoire interne
1. Sur l'écran HOME, sélectionnez Wi-Fi.
2. Sur l'écran
3. Pour importer tous
Import All.
Pour importer des fichiers de photos individuels
sélectionner les fichiers que vous désirez importer ("-"pour désélectionner un fichier). Appuyez sur
Agrandir des photos dans FrameIt
1. Une fois la photo que vous désirez agrandir est affichée, appuyez plusieurs fois si nécessaire sur ZOOM jusqu'à l’obtention de la vue désirée.
2. Lorsque vous avez terminé, appuyez sur
Sites web de partage de photos
Le CPN peut établir une connexion sans fil avec les sites web de partage de photos en ligne les plus populaires, ce qui vous permet de visionner directement
les photos téléchargées sur votre CPN.
Créer des comptes sur les Sites Web de Partage de Photos
Les sites web de partage de photos en ligne auxquels votre CPN peut accéder dépendent des modèles de CPN et peuvent changer sans préavis. Suivez ces
étapes afin de déterminer quels sites sont disponibles avec votre CPN:
1. Après avoir terminé le réglage initial du réseau sans fil (page 15), sélectionnez Wi-Fi sur l'écran HOME,
2. Sur l'écran Photo Sharing, utilisez W X S T pour mettre en surbrillance le site de partage de photos auquel vous désirez vous connecter.
3. Une fois mis en surbrillance, les instructions pour accéder à ce site de partage de photos en ligne vont s'afficher. Suivez ces instructions pour établir vos
comptes sur les sites web désirés (Vous pouvez créer deux comptes sur chaque site de partage de photos si vous le désirez).
Get Claim Token 1, et un nouveau Claim Token va s'afficher, vous en aurez besoin pour l'étape suivante.
pour accéder au Claim Token et cliquez sur Continue.
FrameIt , assurez-vous que le Status soit passé de Registration Required à Registered.
Get Claim Token 2 pour vous connecter avec votre second compte FrameIt.
Connect pour afficher l'écran Photo Sharing. L'état de FrameIt doit passer de Setup Required à Setup Done.
IMPORTANT: Il est considéré pour cette étape que vous avez déjà connecté avec succès le CPN à Windows Live Framelt en
suivant les instructions ci-dessus.
HOME, sélectionnez Wi-Fi.
Photo Sharing, sélectionnez FrameIt.
ENTER pour afficher le contenu d'un répertoire en surbrillance.
nouvelles collections), les nouvelles données ne s'afficheront pas avant que vous ne vous soyez déconnecté puis reconnecté à
Framelt.
Photo Sharing, sélectionnez FrameIt, puis sélectionnez le répertoire de votre choix contenant les photos que vous désirez importer.
les fichiers de photos, appuyez sur MENU puis sélectionnez
, utilisez W X S T pour vous déplacer parmi les noms de fichiers et appuyez sur "+" pour
MENU, puis choisissez Import Selected.
EXIT pour reprendre le visionnage des photos.
17
Page 40

Connecter le CPN aux sites web de partage de photos
1. Une fois les comptes crées sur les sites web de partage de photos en ligne (selon les instructions ci-dessus), sélectionnez Wi-Fi sur l'écran HOME.
2. Sélectionnez la touche
3. Sélectionnez
4. Sélectionnez
CONSEIL: L'ID et le mot de passe sont sensibles à la casse. Si le message "Connected failed, please check ID and Password" apparaît, et que
5. Sélectionnez
6. Une fois que vous avez réussi à vous connecter, les répertoires des albums ou collections que vous avez crées sur votre compte de partage de
photos vont s'afficher.
7. Sélectionnez un répertoire contenant les photos que vous désirez voir. L'écran
8. Pour voir une photo particulière, utilisez W X S T pour vous déplacer parmi les photos, et appuyez sur
Note: Les fonctions comme le zoom et la rotation sont disponibles et fonctionnent comme décrit dans le paragraphe PHOTOS commençant à la
User ID 1 ou 2, puis servez-vous du clavier virtuel pour saisir votre identité (User ID) de votre compte de partage de photos.
Password 1 ou 2, puis servez-vous du clavier virtuel pour saisir le Password de votre compte de partage de photos.
vous devez les saisir à nouveau, prenez soin de bien respecter les majuscules et les minuscules lors de votre saisie.
Connect.
page 7.
User Settings associée au site web de partage de photos en ligne de votre choix.
Folder Photo Thumbnails va s'afficher.
ENTER sur la photo de votre choix.
Importer des photos depuis un site web de partage de photo vers la mémoire interne du CPN.
1. Sur l'écran HOME, sélectionnez Wi-Fi.
2. Sur l'écran
importer.
3. Pour importer tous
Pour importer des fichiers de photos individuels
sélectionner les fichiers que vous désirez importer ("-" pour désélectionner un fichier), appuyez sur
Photo Sharing, sélectionnez la photo de votre choix, puis sélectionnez le répertoire voulu, contenant les photos que vous souhaitez
les fichiers de photos, appuyez sur MENU et sélectionnez ensuite Import All.
, utilisez W X S T pour vous déplacer parmi les noms de fichiers, appuyez sur "+" pour
MENU, puis sélectionnez Import Selected.
Du CPN au PC – Connexion sans fil
Vous pouvez connecter le CPN à votre PC sans fil pour transférer des fichiers depuis votre PC vers la mémoire interne de votre CPN.
Note: Vous devez disposer d'un réseau sans fil à portée de votre CPN et l'adaptateur USB sans fil Wi-fi Pandigital doit être connecté au CPN. (Adaptateur Wi-Fi
vendu séparément sur notre site web: http://www.pandigital.net
Logiciel Recommandé
Recommandé: Windows Media Player 11 Recommandé: TwonkyMedia 5
Nécessite: Windows XP SP3 ou Vista SP2 Nécessite: Macintosh OSX10.3 (Leopard)
Réglage sur le Serveur Universel Prêt à l'Emploi (UPnP)
Un serveur UPnP doit être installé sur votre ordinateur avant que vous ne puissiez établir une connexion sans fil entre le CPN et votre PC.
Windows
Allez sur le site web de Microsoft pour accéder aux instructions concernant l'installation et la configuration de votre Serveur Windows UPnP:
http://www.microsoft.com/windows/windowsmedia/knowledgecenter/howto/mp11/sharemedia.aspx
Apple Macintosh
Allez sur le site web de Twonky Vision pour accéder aux instructions concernant l'installation et la configuration de votre Serveur UPnP Macintosh:
http://www.twonkyvision.de/server_download.html
Établir une connexion sans fil entre votre CPN et votre PC
1. Sur l'écran HOME, sélectionnez Wi-Fi.
2. Sélectionnez
3. Les catégories de média vont s'afficher (ex: Images). Sélectionnez la catégorie contenant les fichiers que vous désirez importer dans le CPN.
4. Pour importer tous
Pour importer des fichiers individuels
5. Sélectionnez
6. Le(s) image(s) seront transférées et la progression du transfert va s'afficher.
Connect to PC, puis choisissez le serveur UPnP auquel vous désirez vous connecter.
les fichiers contenus dans le répertoire sélectionné, appuyez sur MENU.
, utilisez la touche "+" pour sélectionner chaque fichier ("-" pour désélectionner un fichier), puis appuyez sur MENU.
Import All in this folder ou Import Selected.
Agrandir ou faire pivoter des photos
1. Vous pouvez agrandir ou faire pivoter les photos affichées en appuyant –plusieurs fois si nécessaire- sur ZOOM ou ROTATE, pour accéder à la
vue désirée.
2. Lorsque vous avez terminé, appuyez sur
EXIT pour reprendre le visionnage des photos.
. )
18
Page 41

Du CPN au PC – Connexion USB
Vous pouvez relier le CPN à PC fonctionnant sous Windows ou à un ordinateur Macintosh via un câble USB (fourni) pour copier des fichiers entre l’ordinateur et la
mémoire interne du CPN.
Si vous avez des cartes mémoire insérées dans le CPN, vous pouvez aussi réaliser des copies entre le PC, la mémoire interne et les cartes mémoire.
Relier le CPN à un PC fonctionnant sous Windows
1. Relier le bout plus étroit du câble USB au mini-port USB du CPN, et le bout plus large à un port USB disponible sur votre ordinateur.
2. Une fenêtre s’ouvre et répertorie les lecteurs reliés à votre ordinateur.
La mémoire interne (intitulée Pandigital) et chaque carte mémoire présente dans le CPN seront associées à un lecteur de disques sur votre ordinateur.
IMPORTANT: Si votre PC est connecté aux lecteurs d’un réseau local, ou si vous avez plusieurs lettres de lecteurs déjà attribuées aux
)
3. Double-cliquer sur le lecteur de votre choix pour afficher les fichiers se trouvant sur la carte. L’exemple suivant montre une carte répertoriant plusieurs
images JPG.
4. Pour copier des fichiers à partir d’une source de média, les sélectionner et les glisser-déplacer vers le lecteur de la mémoire interne du CPN (Pandigital).
5. De la même manière, pour copier des fichiers à partir de votre ordinateur vers la mémoire interne, repérer d’abord les fichiers sur votre ordinateur,
sélectionner les fichiers que vous souhaitez copier, puis effectuez un glisser-déposer dans le répertoire approprié de la mémoire interne du CPN.
CONSEIL: La plupart des appareils photo et des applications graphiques stockent les photos dans le répertoire intitulé ‘My Pictures’(mes images)
Déconnecter le CPN du PC fonctionnant sous Windows
Il importe de toujours éteindre le PC ‘en toute sécurité’ avant de déconnecter le câble USB du CPN du PC.
périphériques, il vous faudra régler les paramètres de vos lecteurs dans Windows pour libérer les quatre lettres de lecteurs qui
viennent immédiatement après votre lecteur CD-ROM, de sorte que le CPN puisse les attribuer correctement aux fentes de cartes
mémoire.
sous Windows XP ou bien ‘Pictures’ (images) sous Vista. Si vous ne les avez pas sauvegardées ailleurs, vous les trouverez
probablement là.
AVERTISSEMENT: Ne pas débrancher ou éteindre le CPN pendant le transfert de fichiers, car cela peut endommager gravement la mémoire.
Windows Vista
1. Sur la barre d’état système de Windows, cliquer sur l’icône Retirer un périphérique.
2. Cliquer sur le message
au lecteur du périphérique CPN.
3. Lorsque le message “Vous pouvez retirer ce périphérique en toute sécurité de votre ordinateur maintenant” apparaît, vous pouvez déconnecter le câble
USB de votre ordinateur.
Windows XP
1. Sur la barre d’état système de Windows, cliquer sur l’icône Retirer un périphérique.
2. Cliquer sur
3. Sélectionner le périphérique de stockage correspondant au CPN, puis cliquer sur
4. Cliquer sur
5. Lorsque le message “Vous pouvez maintenant déconnecter votre périphérique en toute sécurité” apparaît, vous pouvez déconnecter le câble USB
de votre ordinateur.
Remove Hardware Safely.
Close.
Retirer en toute sécurité un périphérique de stockage de masse USB (Safely remove USB mass Storage device) correspondant
Stop pour déconnecter. Une boîte de dialogue finale s’ouvre.
Connecter le CPN à un ordinateur Macintosh
1. Utiliser le câble USB (fourni) pour connecter le CPN à votre ordinateur Macintosh.
2. Macintosh reconnaîtra le CPN comme étant un système de stockage externe.
3. Glisser et déposer les fichiers entre les deux périphériques, comme lorsque vous déplacez, en temps ordinaire, des fichiers.
Déconnecter le CPN de l’ordinateur Macintosh
1. Pour déconnecter le CPN de votre Macintosh en toute sécurité, sélectionner l’icône du CPN situé sur votre bureau et appuyer sur Command-e pour
éjecter le disque.
2. Lorsque l’icône n’est plus sur le bureau, vous pouvez sans danger débrancher le câble USB.
Connexion d’une clé USB sur le CPN
Le CPN reconnaît une clé USB de la même façon qu'il reconnaît les cartes mémoire externes. Lorsque vous insérez la clé USB, le CPN reconnaît automatiquement
les fichiers de photos, de musique et de vidéos qui sont stockés dessus.
Pour importer le fichiers depuis votre clé USB vers la mémoire interne du CPN, suivez les instructions d'importation de fichiers que se trouvent dans les
paragraphes correspondants (
Photos à la page 7, Musique à la page 11, Vidéo à la page 12).
19
Page 42

Connexion Bluetooth
La fonction Bluetooth vous permet de télécharger directement sur votre CPN des photos depuis les téléphones portables disposant d'une connexion Bluetooth (ex:
Blackberry, Motorola, Nokia, SonyEricsson et autres).
Un adaptateur USB Bluetooth est nécessaire (non compris avec le CPN).
Note: Les modèles de téléphones varient et certains d'entre eux ne supportent pas le transfert de photos vers des équipements comme un CPN. Assurez-vous
que votre téléphone supporte la transmission de photos vers des équipements externes comme le CPN.
Insérer une clé électronique Bluetooth
1. Insérez votre clé électronique Bluetooth dans le port USB du CPN puis allumez le CPN.
2. Une fenêtre va momentanément s'afficher avec le message “
Bluetooth Dongle Enabled” pour indiquer que la fonction Bluetooth est active.
Envoyer des photos vers le CPN
1. Recherchez les appareils prêts à se connecter à partir de votre appareil bluetooth et sélectionnez celui nommé Pandigital (code d'identification par
défaut “1234”).
2. Sélectionnez la photo de votre choix et envoyez-la vers le CPN.
Note: La procédure réelle pour l'envoi de photos vers le CPN varie en fonction du modèle et du constructeur du téléphone portable. Consultez le
Guide de l'Utilisateur de votre téléphone portable pour obtenir les instructions.
Pendant le transfert de la photo, l'indication “Photo Transmitting” s'affiche sur l'écran du CPN. Une fois le transfert terminé, le(s) photo(s) vont
automatiquement commencer à s'afficher en mode d'image unique (single photo).
Régler le mode veille
Le CPN restera allumé tant que vous ne l’éteigniez pas. Cependant, pour économiser de l’énergie, vous pouvez le mettre en mode de veille automatique s’il ne fait
rien de particulier pendant une durée spécifique.
1. Sur l’écran
2. Sélectionner
OFF (par défaut) = La fonction économie d’énergie est ‘désactivée’; le CPN restera allumé jusqu’ à ce que vous l’ éteigniez ou changiez le paramètre du mode veille
2/4/8 Heures = Le CPN se mettra automatiquement en mode de veille lorsqu’il ne fait rien de particulier pendant une durée spécifique.
3. Sélectionner Done.
HOME, appuyer sur MENU pour afficher l’option Setup Menu.
Set Sleep Mode, puis sélectionner le paramètre de votre choix.
Choisir la langue
Selon le modèle, le CPN offre un choix multiple de langues pour l’affichage de l’interface de l’utilisateur.
1. Sur l’écran
2. Sélectionner
HOME, appuyer sur MENU pour afficher l’option Setup Menu.
Set Language, puis sélectionner la langue de votre choix.
Rétablir les paramètres par défaut
Si vous avez modifié les configurations de fonctions, recourir à cette option rétablira les paramètres par défaut.
1. Sur l’écran
2. Sélectionner
3. Appuyer sur
HOME, appuyer sur MENU pour afficher l’option Setup Menu.
Reset to Factory Defaults, puis sélectionner Yes pour rétablir, ou No pour conserver les paramètres actuels.
EXIT pour revenir à l’écran HOME.
Foire aux questions
Q: Comment faut-il faire pour configurer le CPN?
R: Votre Cadre Photo Numérique est très facile à configurer. Brancher tout simplement l’adaptateur d’alimentation sur le CPN et sur une prise ordinaire, puis
l’allumer. Un diaporama commencera à afficher les images chargées préalablement dans la mémoire interne. Pour visualiser vos photos, insérez une carte
mémoire ou une clé USB dans le port approprié situé sur le côté du CPN. Sélectionner
Q: Quelles sont les cartes mémoire lues par le Cadre Photo Numérique?
R: Les cartes mémoire compatibles comprennent : Secure Digital™ (SD), MultiMedia Card
Memory Stick Pro Duo
Q: J’ai configuré le Cadre Photo Numérique; pourquoi ne veut-il pas s’allumer?
R: Il se peut que l’adaptateur d’alimentation ne soit pas bien branché sur le CPN, ou que l’interrupteur ne soit pas positionné sur ON.
Q: J’ai une carte mémoire dans le CPN; pourquoi ne puis-je pas visualiser mes photos?
R: A) Assurez-vous que la carte mémoire appartienne aux formats de cartes répertoriés ci-dessus, et que les fichiers se trouvant sur la carte sont des fichiers
images JPEG. Certains appareils photo numériques sauvegardent les images en d’autres formats. Reportez-vous au guide d’utilisation de cet appareil si vos
photos ne sont pas des fichiers JPEG.
B) Assurez-vous que la carte mémoire est insérée jusqu’au bout dans la fente pour carte.
C) Sur l’écran
MC
.
HOME, appuyer sur MENU, choisir Select Media Source, sélectionner la source de média de votre choix, puis appuyer sur ENTER. Appuyer sur
EXIT pour retourner à l’écran HOME, puis sélectionner le bouton PHOTOS-PLAY. Le diaporama devrait commencer à afficher vos photos.
Start Slideshow à partir de l’écran d’option carte mémoire.
MC
(MMC), xD Card, Memory StickMC(MS), MemoryStick ProMC, et
20
Page 43

Q: Pourquoi l’affichage de photo est-il plus lent pour certaines photos?
R: Les photos à plus haute résolution se chargent plus lentement. Essayez d’utiliser des photos à plus faible résolution, ou de réduire la taille de vos images.
Reportez-vous au guide d’utilisation de votre appareil photo concernant la réduction de la taille des photos.
Q: Puis-je insérer plusieurs cartes mémoire?
R: Ouis, vous pouvez insérer plusieurs cartes en même temps, en fonction des ports disponibles. Utilisez la fonction "
que vous désirez voir/écouter en ce moment.
Q: Le CPN a-t-il une mémoire (interne) intégrée?
R: Oui. La taille de la mémoire varie selon le modèle.
Q: Le CPN gère-t-il tous les fichiers JPEG et Motion JPEG?
R: Non. Le CPN ne gère que les fichiers JPEG et Motion JPEG provenant d’un appareil photo numérique. Il se peut que le CPN ne lise pas tous les fichiers
images, téléchargés à partir d’Internet ou d’autres applications de logiciels graphiques.
Q: Puis-je ajouter mon propre livre de cuisine ou mes recettes à la fonction Recettes ?
A: Non. Si vous désirez créer des fichiers .jpg de vos recettes à l'aide de votre propre logiciel d'édition d'image, vous pouvez alors copier les fichiers jpg dans
votre source média puis les visionner sur le CPN en mode PHOTOS.
Q: Quel adaptateur USB sans-fil Wi-fi puis-je utiliser avec mon CPN, et ou puis-je me le procurer?
R: Utilisez exclusivement un adaptateur Wi-fi Pandigital, disponible à l'achat sur notre site web: http://www.pandigital.net
Q: Ou puis-je obtenir un adaptateur Bluetooth utilisable avec mon CPN?
R: Vous pouvez acheter un adaptateur Bluetooth de n'importe quelle marque chez tout commerçant les vendant.
Q: J'ai branché l'adaptateur sans fil Wi-fi Pandigital, pourquoi ne puis-je pas me connecter aux sites de partage de photos en ligne?
R: Le réglage Wi-fi initial se fait en 3 étapes: 1) Assignez votre connexion Réseau Sans-fil au CPN, 2) Créez un compte sur le site de partage de photos et 3)
Assignez votre identité utilisateur et votre mot de passe du site de partage de photos sur le CPN. Consultez les instructions de paramétrage initial Wi-fi à la
page 15.
Select Media" pour choisir la source média
.
Précautions importantes de sécurité
Suivez toujours ces précautions de sécurité fondamentales lorsque vous utilisez votre Cadre Photo Numérique Multimédia (CPN). Cela réduira les risques
d’incendie, de décharges électriques et de blessures.
AVERTISSEMENT: Ne pas exposer ce produit à la pluie ou à l’humidité.
Le CPN est réservé à un usage à l‘intérieur.
Débrancher le CPN avant d’effectuer tout entretien.
Ne boucher à aucun moment les trous de ventilation situés à l’arrière du CPN.
Éloigner votre CPN de la lumière du soleil et des sources de chaleur.
Protéger le cordon d’alimentation. Placer comme il faut les cordons d’alimentation pour éviter que l’on marche dessus ou que des articles placés sur ou
contre eux les pincent. Faire tout particulièrement attention à l’endroit où le cordon est fixé au CPN.
N’utiliser que l’adaptateur AC fourni avec le CPN. L’utilisation d’un autre adaptateur d’alimentation annulera votre garantie.
Débrancher le cordon d’alimentation de la prise de courant lorsque le cadre n’est plus utilisé.
Ne pas retirer le couvercle. À l’intérieur, il n’y a aucune pièce utile à l’utilisateur. S’adresser à une personne qualifiée pour l’entretien.
Comment nettoyer le CPN
Manipuler l’écran avec soin. Il est en verre et peut se casser. Pour nettoyer les taches de doigts ou la poussière de l’écran LCD, nous vous conseillons
d’utiliser un tissu doux et non abrasif, tel qu’un tissu pour l’objectif d’un appareil photo pour nettoyer l’écran LCD. Si vous utilisez un kit de nettoyage LCD
vendu dans le commerce, appliquez le liquide nettoyant directement sur l’écran LCD. Nettoyer l’écran LCD avec un chiffon imbibé de liquide.
Nettoyer la surface extérieure du CPN (à l’exception de l’écran) et la télécommande avec un tissu doux humecté d’eau.
Spécifications techniques
Résolution du produit Cadre photo numérique avec écran LCD de 11.1 po, 1110X800 pixels, format 15x9
Compatibilité avec les
sources média
Caractéristiques
Format de fichier Image JPEG, vidéo AVI, audio MP3
Port USB Port USB 2.0, Câble USB 2.0
Mémoire interne 1 Go, jusqu'à 5000 images compressées
Support Bluetooth Oui (adaptateur non inclu)
Secure Digital™, Multi Media Card™, xD Memory Card™, Memory Stick™, Memory Stick PRO™, Memory Stick PRO DUO, et
clé USB
PHOTOS affichées individuellement ou dans un diaporama
MUSIC Fichiers lus de façon individuelle ou à la suite (diaporama musical).
VIDEOS
CALENDAR/CLOCK avec fonction d'Alarme et diaporama
RECIPES- voir les livres de cuisine préchargés et achetés
Wi-Fi – connexion sans fil aux sites web de partage de photos en ligne
Transfert sans fil de fichiers entre le CPN et votre PC
Sytème Plug & Play convivial
Pas besoin d’ordinateur
21
Page 44

Compatible Wi-Fi Oui (adaptateur Wi-fi Pandigital vendu séparément)
Façades papier décoratif 1 – Blanc
Adaptateur alimentation Entrée : 100V - 240V AC, 50~60 HZ, Sortie: 9VDC 2.0A ou 12VDC, 1.5A (varie selon le modèle)
Limite de la garantie
La garantie limitée ci-dessous décrite est accordée par Pandigital pour les produits électroniques de marque Pandigital achetés et utilisés aux États-Unis. Pandigital garantit ce produit contre les
défauts de fabrication ou de main-d’oeuvre comme suit:
MAIN-D'OEUVRE: Pendant une période d’un (1) an à compter de la date d’achat, si ce produit s’avère défectueux, Pandigital réparera ou remplacera le produit, à sa convenance et gratuitement. Audelà de la période d’un (1) an, le coût de la main-d’oeuvre sera facturé au cas par cas.
PIÈCES DÉTACHÉES: Pendant une période d’un (1) an à compter de la date d’achat, si ce produit s’avère défectueux, Pandigital fournira gratuitement des pièces de rechange neuves ou remises à
neuf, à son choix et sans aucuns frais. Au-delà de la période d’un (1) an, les pièces seront facturées au cas par cas. Toute modification non approuvée par la partie responsable de la conformité pourra
annuler le droit de l’utilisateur de faire fonctionner l’appareil.
La garantie ne couvre pas: (1) les instructions, l’installation ou la configuration qui incombent au client; (2) les dommages esthétiques ou les dommages ayant pour origine un accident, une mauvaise
utilisation, une manipulation abusive ou la négligence; (3) l’utilisation commerciale du produit; (4) la modification de l’une des parties du produit; (5) les dommages résultant d’une mauvaise utilisation,
d’une maintenance abusive, ou d’une connexion à une alimentation électrique inadéquate; (6) la perte de données, quelle que soit la valeur ou le format, qui résulterait d’une utilisation adéquate et/ou
inadéquate du produit; (7) les dommages dus à une réparation du produit effectuée par quiconque autre qu’un service d’entretien agréé par Pandigital; (8) les consommables (tels que les fusibles et les
piles). La garantie n’est applicable qu’aux États-Unis.
Le produit doit être accompagné d’une copie de la preuve d’achat originale. Sans preuve d’achat, la garantie ne sera pas honorée et les frais de réparation seront facturés. La garantie est valable
seulement avec une documentation écrite, exposant en détail le motif de la plainte et jointe à l’extérieur ou à l’intérieur de la boîte. La garantie est annulée si le numéro de série de l‘usine a été altéré
et/ou retiré du produit. Elle ne protège pas contre la perte de données, quel que soit le format. Pandigital se réserve le droit de modifier et de concevoir ce produit sans avertissement préalable écrit ou
autre.
Pour obtenir le service de la garantie, vous devez amener le produit en réglant les frais de transport à l’avance, soit dans son emballage d’origine ou soit dans un emballage offrant des conditions
identiques de protection. Le produit doit également être accompagné de sa preuve d’achat.
La réparation ou le remplacement, tels que prévus dans la garantie, constitue le seul recours du consommateur. Pandigital, sa société mère ou ses filiales, ne pourront pas être tenus responsables de
tout dommage accessoire ou consécutif et de l’inexécution d’une garantie expresse ou implicite sur ce produit. Sauf pour les dispositions prohibées par les lois applicables, toute garantie implicite de
qualité marchande ou d’adaptation à un usage particulier relative à ce produit est limitée à la période de garantie.
Certains États n’autorisent pas l’exclusion ni la limitation des dommages accessoires ou consécutifs, ou bien ils permettent la limitation sur la durée de la garantie implicite, de sorte que les limitations
ou exclusions énoncées ci-dessus peuvent être nulles. La garantie vous donne des droits juridiques spécifiques, et vous pouvez aussi disposer d’autres droits, qui varient d’un État à l’autre.
Tout contenu inclus sur le site internet de Pandigital , de même que les produits Pandigital, y compris les images de démonstration chargées préalablement, le média numérique, les livres de cuisine
numériques, textes, graphiques, logos, conceptions, photographies, icônes boutons, images, clips audio/vidéo, téléchargements numériques, compilations de données et logiciels appartiennent à
Pandigital ou à ses fournisseurs, et tout cela est protégé par les États-Unis et la législation internationale sur la propriété littéraire et intellectuelle, ou par d’autres lois et traités sur la propriété
intellectuelle. Le contenu cité ne pourra pas être reproduit ni utilisé sans la permission expresse et écrite de Pandigital et de ses fournisseurs respectivement.
L’utilisation de ce produit représente l’acceptation des clauses et conditions de la garantie. Numéro de téléphone du support technique: 1-800-715-5354.
Spécifications de la Commission fédérale des communications aux États-Unis
FCC Partie 15 Information
Cet appareil a été testé et reconnu conforme aux limites applicables aux dispositifs numériques de la classe B, en vertu de la partie 15 des règlements de la Commission fédérale des
communications (FCC). Ces limites sont destinées à assurer une protection raisonnable contre les brouillages préjudiciables en environnement résidentiel.
Cet appareil produit, utilise et peut émettre de l’énergie par fréquence radio. S’il n’est pas installé et utilisé conformément aux instructions, il peut causer des brouillages préjudiciables aux
communications radio. Toutefois, il n’existe aucune garantie qu’aucune interférence ne se produira dans une installation en particulier.
Si l’appareil crée effectivement une interférence préjudiciable à la réception d’ondes de radio ou de télévision, ce qui peut être déterminé en allumant puis en éteignant l’appareil, il est recommandé
que l’utilisateur essaie de rectifier le problème de brouillage en appliquant l’une ou plusieurs des mesures suivantes:
Changer l’orientation ou la position de l’antenne réceptrice.
Éloigner l’équipement du récepteur.
Brancher l’équipement dans une prise se trouvant sur un circuit différent de celui sur lequel le récepteur est connecté.
Consulter le fournisseur or un technicien en radio et téléviseur expérimenté pour obtenir de l’aide.
AVERTISSEMENT: Tout changement ou toute modification apportés à cet équipement qui n’auront pas été approuvés expressément par la partie
responsable de la conformité, pourraient annuler le droit de l’utilisateur de faire fonctionner l’appareil.
22
Page 45

Español
Page 46

Table of Contents
Introducción ................................................................................................................................................................. 4
Funciones principales del PD ............................................................................................................................................................ 4
Artículos incluidos .............................................................................................................................................................................. 4
Tarjetas de memoria compatibles ...................................................................................................................................................... 4
Overview of the DPF .................................................................................................................................................... 4
Control remoto ............................................................................................................................................................. 4
Botones de control del PD .......................................................................................................................................... 5
Inicio .............................................................................................................................................................................. 5
Pantalla INICIO ............................................................................................................................................................. 5
Generalidades del menú SETUP ................................................................................................................................ 6
Acerca de la selección de opciones .......................................................................................................................... 6
Selección de origen de medios .................................................................................................................................. 6
Tarjeta de saludo ......................................................................................................................................................... 6
El teclado virtual ................................................................................................................................................................................. 6
Ingresar un saludo ............................................................................................................................................................................. 7
Asignar imagen de fondo personal .................................................................................................................................................... 7
Fotografías ................................................................................................................................................................... 7
Índices de las fotografías ................................................................................................................................................................... 7
Ver una fotografía individual durante una presentación .................................................................................................................... 8
Acercar o rotar fotografías ................................................................................................................................................................. 8
Ajuste de colores de pantalla ............................................................................................................................................................. 8
Muestra óptima de imagen ................................................................................................................................................................ 8
Método de importación de fotografías ............................................................................................................................................... 8
Mostrar la hora actual en las fotografías ........................................................................................................................................... 8
Mostrar la etiqueta de fecha/hora del archivo de la fotografía en las fotografías ............................................................................. 8
Importar fotografías a la memoria interna .......................................................................................................................................... 9
Eliminar fotografías de la memoria interna ........................................................................................................................................ 9
PRESENTACIONES DE FOTOGRAFÍAS .................................................................................................................... 9
Presentación de fotografías de la memoria interna ........................................................................................................................... 9
Presentación de fotografías en su origen de medios ........................................................................................................................ 9
Pausar una presentación ................................................................................................................................................................... 9
Carpetas de presentación .................................................................................................................................................................. 9
Música de fondo en una presentación ............................................................................................................................................. 10
Configurar el modo de música de la presentación .......................................................................................................................... 10
Configurar el intervalo de la presentación ....................................................................................................................................... 10
Configurar la transición de la presentación ..................................................................................................................................... 10
Configurar el orden de la presentación ............................................................................................................................................ 11
MÚSICA ....................................................................................................................................................................... 11
Seleccionar el origen de medios para la música ............................................................................................................................. 11
Reproducir solamente música ......................................................................................................................................................... 11
Modo de repetición de música ......................................................................................................................................................... 11
Importar archivos de música a la memoria interna .......................................................................................................................... 11
Eliminar archivos de música de la memoria interna ........................................................................................................................ 12
VIDEOS ....................................................................................................................................................................... 12
Seleccionar el origen de medios para los videos ............................................................................................................................ 12
Reproducir un video ......................................................................................................................................................................... 12
Modo de repetición de video ............................................................................................................................................................ 12
Importar archivos de video a la memoria interna ............................................................................................................................ 12
Eliminar videos de la memoria interna ............................................................................................................................................. 12
CALENDARIO / RELOJ .............................................................................................................................................. 13
Seleccionar el origen de medios para la presentación de calendario ............................................................................................. 13
Configurar programación ................................................................................................................................................................. 13
Deshabilitar programación ............................................................................................................................................................... 13
2
Page 47

Ejecutar programación ..................................................................................................................................................................... 13
Configurar fecha y hora .................................................................................................................................................................... 14
Configurar alarma ............................................................................................................................................................................ 14
RECETAS .................................................................................................................................................................... 14
Ver recetas en el libro de cocina ...................................................................................................................................................... 14
Asignar recetas a ‘Mis recetas favoritas’ ......................................................................................................................................... 14
Ver recetas en ‘Mis recetas favoritas’ .............................................................................................................................................. 14
Copiar o reasignar recetas de una categoría a otra ........................................................................................................................ 15
Eliminar recetas de ‘Mis recetas favoritas’ ...................................................................................................................................... 15
Wi-Fi ............................................................................................................................................................................ 15
Configurar el PD para conectarse con sitios Web de intercambio de fotografías ........................................................................... 15
El teclado virtual ............................................................................................................................................................................... 15
Configurar una red inalámbrica ........................................................................................................................................................ 16
Windows Live FrameIt ...................................................................................................................................................................... 17
Sitios Web de intercambio de fotografías ........................................................................................................................................ 18
PD a PC – Conexión inalámbrica .............................................................................................................................. 18
PD a PC – Conexión USB .......................................................................................................................................... 19
Conexión PD a dispositivo USB Flash ..................................................................................................................... 20
Conexión Bluetooth ................................................................................................................................................ 20
Configuración de modo inactivo .............................................................................................................................. 20
Configuración de idioma ........................................................................................................................................... 20
Restablecer valores predeterminados de fábrica ................................................................................................... 20
Preguntas frecuentes ................................................................................................................................................ 21
Precauciones de seguridad importantes ................................................................................................................. 21
Especificaciones técnicas ........................................................................................................................................ 22
Garantía Limitada ....................................................................................................................................................... 22
Declaración FCC - Información sobre la FCC Parte 15 .................................................................................................................. 22
3
Page 48

Introducción
j
g
Gracias por comprar el portarretrato digital (PD) de Pandigital Multimedia. Ahora puede ver sus fotografías digitales directamente desde la tarjeta de memoria, sin
la necesidad de utilizar una computadora.
Funciones principales del PD
Conexión y uso sencillos
Muestra archivos de Fotografías digitales (JPEG de hasta 16
megapíxeles)
Reproduce archivos de Música digitales (MP3)
Reproduce archivos de Video digitales (AVI)
Muestra Calendario/Reloj en la presentación de fotografías y la
función Alarma
Incluye Recetas precargadas de autores reconocidos.
Conexión Inalámbrica a sitios Web de intercambio de fotografías y
transferencia directa de archivos del PD a la PC.
No requiere una computadora
Control remoto infrarrojo y botones de control en el marco
Memoria interna de 512MB
2 puertos USB2.0 (dispositivo & host)
Artículos incluidos
Portarretrato digital (PD)
Cable de alimentación de CA y adaptador
Control remoto infrarrojo
Estera de papel decorativa
Guía de inicio rápido
Guía del usuario
Tarjetas de memoria compatibles
Entre las tarjetas de memoria compatibles se incluyen: Secure
Digital™ (SD), MultiMedia Card™ (MMC), xD Card, Memory Stick™
(MS), MemoryStick Pro™ y Memory Stick Pro Duo™*
*La tarjeta Memory Stick Pro Duo™ requiere un adaptador adicional
para ajustarla correctamente al PD (no incluido). Puede comprar el
adaptador en tiendas de venta minorista que comercialicen tarjetas de
memoria.
Overview of the DPF
ENCENDIDO/
APAGADO Conector de CC
(Las ranuras, puertos y conectores de la tarjeta de memoria del PD pueden ser diferentes a los de la fotografía.)
Flecha izquierda MENU
ENTER EXIT
Flecha derecha
Ranura para tarjeta
SD/MS/MS-Pro/
MMC/xD
Puerto USB
Dispositivo mini USB
Área magnetizada para
almacenar control remoto
Guardado seguro del control remoto
Puede evitar perder el control remoto colocándolo en la
parte posterior del PD mientras no lo está utilizando.
Sobre la parte posterior del control remoto hay un
imán incorporado y la parte posterior del PD tiene un
área magnética para poder colocar el control remoto
detrás del PD y guardarlo de manera segura.
Control remoto
Puede acceder a todas las funciones del PD y realizar todas las operaciones posibles desde el control remoto. Con el control remoto podrá ejecutar diversas
funciones que no están habilitadas desde los botones de control del panel posterior.
Nota: Antes del primer uso, retire la lámina de plástico del control remoto. Ésta protege la batería, y el control remoto no funcionará a menos que la retire.
Comenzar presentación
Subir el volumen o seleccionar
Bajar el volumen o deseleccionar
SALIR o volver
Desplazar arriba
Desplazar anterior
Reproducir/Pausar/
Seleccionar ob
eto
objeto
objeto
Acceder a pantallas de
confi
uración
Desplazar posterior
Desplazar abajo
Rotar imagen
Agrandar imagen
Reemplazo de la batería del control remoto
1. Sostenga el control remoto con los botones hacia
abajo.
2. Mantenga presionada la pestaña de liberación
pequeña y retire la bandeja de la batería.
3. Reemplace la batería de litio “CR2025” en la
bandeja con el signo (+) hacia arriba.
4. Empuje la bandeja nuevamente en su
lugar hasta oír un clic.
Pestaña de liberación
4
Page 49

Botones de control del PD
Con los botones del control remoto ubicado en el panel posterior del PD puede realizar varias (no todas) las funciones del PD. Las funciones básicas son las
mismas independientemente del momento en que las utilice.
CONSEJO: Las instrucciones de esta Guía del usuario sólo hacen referencia al uso del control remoto. No obstante, cuando lo desee puede utilizar los botones
de control del marco cuando se hace referencia a los botones W X,
Botón Función
Izquierda
ENTER
EXIT
Selecciona la opción resaltada, inicia una presentación, cumple la
función de Reproducción y Pausa.
Derecha
Sale de la pantalla actual o vuelve a la anterior.
ENTER, EXIT y MENU.
MENU
Muestra las pantallas funcionales de configuración.
Inicio
1. Conecte el adaptador eléctrico de CA en el conector de CC del PD
y una salida eléctrica de pared.
2. Deslice hacia arriba el botón de encendido/apagado que se encuentra en el lado izquierdo del PD en la posición de encendido.
3. Si aparece el mensaje, seleccione el idioma para la pantalla de interfaz de usuario (depende del modelo).
4. Después de que aparezca la pantalla de inicio, se mostrará una presentación automática de las fotos almacenadas en la memoria interna.
5. Para ver sus propias fotografías, inserte una tarjeta de memoria o un dispositivo USB flash con sus fotografías en la ranura/el puerto apropiado del PD. Presione
ENTER en Iniciar presentación.
PRECAUCIÓN: Las tarjetas y el dispositivo USB flash sólo pueden conectarse en una dirección, no presione para introducirlas porque se dañará la lectora de tarjetas o
el puerto USB.
Pantalla INICIO
Las funciones principales del PD, FOTOS, MÚSICA, VIDEO, RELOJ, RECETAS y Wi-Fi se encuentran en la pantalla INICIO. Para acceder a la pantalla INICIO
durante una presentación, presione
MENU.
FOTOS
MÚSICA
VIDEO
Reloj
Recetas
Wi-Fi
Editar
Muestra los archivos de fotos (.JPG o .JPEG) de manera individual o como presentación. FOTOS-Administrar: configuración de preferencias
de visualización, asignación de fotografías a las carpetas de categorías, importación y eliminación de archivos de fotos (página 7)
Reproduce sus archivos de música MP3. MÚSICA-Administrar: configuración de preferencias de sonido, importación y eliminación de
archivos de música (página 11)
Reproduce sus archivos de video AVI. VIDEO-Administrar: configuración de preferencias de visualización, importación y eliminación de
archivos de video (página 12)
Visualización del reloj y el calendario en la presentación de fotografías y control de configuración del calendario, el reloj y la alarma
(página 13)
Ver muestras de recetas y de libros de cocina precargadas (página 14).
Con el adaptador USB Wi-Fi Pandigital (se vende por separado), puede conectarse de manera inalámbrica para acceder a sitios de
fotografías en línea (página 15) y a su PC para transferir archivos (página 18)
Acceso rápido al modo de control de fotografías para acercar, rotar o eliminar la foto actual.
5
Page 50

Generalidades del menú SETUP
Utilice el menú Configuración para optimizar las preferencias de visualización/sonido con las funciones del PD. En la pantalla INICIO presione MENU para ver la
Configuración.
pantalla
Origen de medios Selección del origen de medios para la visualización o el sonido actual (página 6)
Red Wi-Fi Configuración de la red inalámbrica a la cual usted quiere conectarse (página 16)
Presentación Configuración de varias funciones de presentación para optimizar las preferencias de visualización (página 9)
Ajustar Colores Ajuste de la configuración deseada de la pantalla LCD (página 8)
Muestra de Imagen Configuración de las fotografías para visualizar en tamaño actual u optimizar para ajustar a la pantalla (página 8)
Método de Import Configuración de fotos para importar comprimidas o con la resolución y tamaño de archivo originales (página 9)
Modo Inactivo Función de ahorro de energía (página 20)
Valores Predeterminados Vuelve todas las funciones a los valores predeterminados de fábrica (página 20)
Configurar Idioma Seleccione el idioma de pantalla deseado del PD (página 20)
Tarjeta de saludo
Cree una tarjeta de saludo personalizada que aparecerá cuando se encienda la unidad (page 6)
Acerca de la selección de opciones
En esta Guía del usuario, cuando se indica que ‘seleccione’ una opción o un botón de función, a menos que se indique lo contrario, utilice W X para seleccionar [la
opción de la referencia]
y presione ENTER para seleccionar.
Selección de origen de medios
Si insertó uno o más orígenes de medios externos (por ejemplo, tarjeta de memoria, dispositivo USB flash), puede usar la función Origen de medios para cambiar
entre la memoria interna y su origen de medios externo para ver las fotografías, videos o para escuchar música.
También podrá utilizar esta función para ver los contenidos de las Carpetas de presentación después de asignar fotografías a dichas carpetas (página 9).
1. En la pantalla
2. Seleccione
Memoria interna = Memoria flash incorporada
SD/MMC = Tarjetas Secure DigitalTM / Multi MediaTM
MS = Memory StickTM (Standard, Pro y Duo)
xD = Tarjeta de memoria flash estándar
USB = Dispositivo USB flash estándar
Carpetas de presentación = Vea fotografías después de asignar a las carpetas (página 9)
3. Se mostrará la pantalla de selección Miniaturas o Carpetas de presentación.
INICIO presione MENU para ver Configuración.
Origen de medios y, a continuación, seleccione el origen de medios deseado (los orígenes que no estén presentes no están disponibles).
Tarjeta de saludo
Puede configurar un saludo personalizado para visualizar cuando se enciende el PD. Esta función es especialmente útil cuando se ofrece como regalo.
El teclado virtual
Para ingresar el saludo personalizado debe utilizar el teclado virtual.
Utilice el teclado de la siguiente manera:
Para seleccionar los caracteres deseados, utilice los botones W X S T para resaltar las
teclas y luego presione ENTER las veces que sea necesario.
6
Page 51

ESTILO 1 2 3 4 = Seleccione la imagen de fondo correspondiente para su saludo (también
puede ser una foto personal)
BORRAR = Borra el campo de entrada
= Visualiza el saludo con la imagen de fondo seleccionada
TÍTULO MSJ = Cambia entre las entradas del título y del mensaje
ABC/abc/SYM = Cambia entre las letras mayúsculas y minúsculas, y los siguientes
símbolos:
_ ! : ; $ ( ) [ ] \ & / % ^ ! + = ~ - | < > { }
= Permite desplazarse por su ingreso para editar según sea necesario
Retroceso = Borra el último carácter seleccionado
Listo = Completa el ingreso
Cancelar = Regresa a la pantalla previa sin ningún ingreso
Nota: También puede utilizar los botones del control remoto de la siguiente manera:
‘
+’ = Desplaza hacia delante por las entradas para editar según sea necesario
‘
-‘ = Desplaza hacia atrás por las entradas para editar según sea necesario
ROTATE = Retroceso, borra el último carácter seleccionado
ZOOM = Cambia entre las pantallas ABC / abc / SYM
Ingresar un saludo
1. En la pantalla INICIO, presione MENÚ para ver la pantalla Configuración.
2. Seleccione
3. Seleccione Sí para crear un nuevo saludo o elimine el existente, o seleccione No para editar el saludo existente.
4. Utilice el teclado virtual para ingresar un título (por ejemplo, feliz cumpleaños, feliz
Navidad, etc).
5. Seleccione TÍTULO MSJ para ingresar su mensaje personalizado. Utilice ↵ (con la tecla 1) para ingresar varias líneas de texto.
CONSEJO: Si ingresa varias líneas, para evitar perder el progreso en caso de dejar la unidad o de un corte de energía, se recomienda seleccionar
6. Seleccione
Estilo 1 Predeterminado: Azul con pergamino (o una foto personal. Consulte Asignar imagen de fondo personal en la página 3)
Estilo 2: Globos
Estilo 3: Regalo con lazo dorado
Estilo 4: Rosas
7. Seleccione VER para ver el saludo, luego presione SALIR para volver a la pantalla del teclado.
8. Al finalizar el saludo, seleccione Listo para guardar.
Tarjeta de saludo.
Listo periódicamente para guardar el mensaje.
ESTILO 1 2 3 4 para elegir un fondo adecuado para el saludo.
Asignar imagen de fondo personal
Puede optimizar aun más el saludo personal al asignar una o más fotos como fondo del saludo.
1. Elija la foto que desea como fondo y cambie el nombre por
IMPORTANT: showme.jpg debe ser un archivo JPG estándar y no un archivo de formato progresivo
2. Copie el archivo showme.jpg en la carpeta raíz de la memoria interna del PD. Utilice las instrucciones de conexión PC - USB del PD que se encuentran en la
página 19 para copiar el archivo en la carpeta raíz (no copie en la carpeta Photos).
3. Siga los pasos 1-6 de
4. El saludo tendrá su foto personal como fondo.
5. Seleccione
6. Al finalizar el saludo, seleccione Listo para guardar.
VER para ver el saludo, luego presione SALIR para volver a la pantalla del teclado.
showme.jpg.
Ingresar un saludo (ver arriba), y seleccione el estilo Predeterminado.
Fotografías
La función FOTOS incluye varias funciones para optimizar y personalizar las preferencias de visualización. Puede ver sus fotografías digitales de forma individual o
en presentaciones, con o sin música de fondo. Otras funciones óptimas le permiten mostrar la hora actual en las imágenes, ajustar los colores de la pantalla, elegir
la transición de la presentación e incluso programar presentaciones según su agenda semanal.
Índices de las fotografías
1. En la pantalla INICIO, seleccione el botón FOTOS-Administrar.
2. Utilice W X S T para pasar por cada fotografía o utilice las flechas
3. Para ver una fotografía de forma individual en pantalla completa, presione
4. Mientras se muestra la fotografía, puede utilizar W X para ver las fotos siguientes/anteriores.
Av. pág/Re. pág. para pasar por páginas completas.
ENTER en la fotografía seleccionada.
7
Page 52

Ver una fotografía individual durante una presentación
1. Al ver la fotografía deseada, presione EXIT para pausar la presentación.
2. La fotografía se mostrará aproximadamente 15 segundos y, a continuación, la presentación se reanudará automáticamente, o bien puede presionar
ENTER o SLIDESHOW para reanudar la presentación.
Acercar o rotar fotografías
Puede agrandar o rotar las fotografías temporalmente mientras las ve en la vista individual de fotografías. La rotación de una fotografía se guarda sólo en el
caso de las fotografías almacenadas en la memoria interna.
Acercar o rotar una fotografía durante una presentación
1. Cuando la fotografía que se está viendo debe rotarse, presione AMPLIAR o ROTAR varias veces si es necesario, para lograr la visualización
deseada.
2. Presione
PRESENTACIÓN para reanudar la presentación.
Acercar o rotar una fotografía desde la pantalla Photo Thumbnails
1. En la pantalla INICIO, seleccione el botón FOTOS-Administrar.
2. En la pantalla
Miniaturas, presione ENTER para seleccionar la fotografía que se desea agrandar o rotar y, a continuación, presione AMPLIAR o
ROTAR varias veces de ser necesario para lograr la visualización deseada.
3. Presione
CONSEJO: Para acercar una fotografía, puede hacerlo con W X S T para ver partes de la fotografía que está viendo.
EXIT para regresar a la pantalla Miniaturas.
Ajuste de colores de pantalla
Puede ajustar los cuatro niveles de color del LCD para lograr una visualización de imagen óptima.
1. En la pantalla
2. Seleccione
3. Utilice S T para desplazarse por las opciones del LCD, y utilice W X para ajustar a configuración hasta que se logre la visualización deseada.
4. Utilice S T para seleccionar
INICIO presione MENU para ver Configuración.
Colores de pantalla.
Listo.
Muestra óptima de imagen
Puede elegir el modo de visualización deseado para ver sus fotografías en el PD de la siguiente manera:
1. En la pantalla
2. Seleccione
INICIO presione MENU para ver Configuración.
Muestra óptima de imagen y seleccione la configuración deseada.
Original = Muestra las fotografías en el tamaño real.
Óptima (predeterminada)= Optimiza el tamaño y la resolución para que coincida con la pantalla.
Es posible que con este modo, parte de la fotografía no esté visible.
Método de importación de fotografías
Al importar archivos a la memoria interna desde el origen de medios externo, el archivo se puede optimizar o se pueden mantener el tamaño y la resolución
del archivo original.
1. En la pantalla
2. Seleccione
Optimizado (predeterminado)= Se reduce el tamaño del archivo de la fotografía y se comprime en un archivo JPEG
de menor tamaño, lo que permite que puedan almacenarse más fotografías en la memoria interna.
Original = El archivo de la fotografía se almacena y se mantienen el tamaño y la resolución del original
INICIO presione MENU para ver Configuración.
Muestra óptima de imagen y seleccione la configuración deseada.
Mostrar la hora actual en las fotografías
Si lo desea, puede ver la hora actual en las fotografías.
1. En la pantalla
2. Seleccione
3. Seleccione
CONSEJO: Si la hora no es la correcta, consulte Configurar fecha y hora en la página 13 para configurar el reloj.
INICIO presione MENU para ver Configuración.
Presentación y luego utilice S T para seleccionar Sí o No en Mostrar hora actual.
Listo.
Mostrar la etiqueta de fecha/hora del archivo de la fotografía en las fotografías
La mayoría de las cámaras digitales generalmente incluyen una etiqueta de fecha/hora al guardarse los archivos de las fotografías. Si los archivos de las
fotografías incluyen esta información de fecha y hora, puede mostrarla en las fotografías.
1. En la pantalla
2. Seleccione
INICIO presione MENU para ver Configuración.
Presentación y luego utilice S T para seleccionar Sí o No en Mostrar fecha y hora.
8
Page 53

3. Seleccione
Listo.
Importar fotografías a la memoria interna
Puede importar sus archivos de fotografías desde orígenes de medios externos (es decir, tarjeta de memoria, dispositivo USB flash) a la memoria interna del
PD. La cantidad de archivos de fotografías que puede importar depende del tamaño de los archivos y de la memoria disponible.
CONSEJO: Después de comenzar a importar, puede presionar
EXIT para cancelar la operación de importación.
Importar todas las fotografías a la memoria interna
1. Coloque el origen de medios en el PD. Aparece la pantalla de opciones de la tarjeta de memoria.
2. Seleccione
3. Al finalizar la importación, presione
Importar todas las fotografías.
EXIT para volver a la pantalla anterior.
Importar fotografías individuales a la memoria interna
1. Coloque el origen de medios en el PD. Aparece la pantalla de opciones de la tarjeta de memoria.
2. Seleccione
3. Utilice W X S T para desplazarse por las fotografías y presione ‘
4. Presione
5. Presione
Seleccionar fotografías para importar.
+’ para seleccionar las fotografías que desea importar (‘-' para deseleccionar).
MENU y seleccione Importar las fotografías seleccionadas.
EXIT para regresar a la pantalla Miniaturas.
Eliminar fotografías de la memoria interna
Puede eliminar archivos de fotografías de la memoria interna del PD, pero no de orígenes de medios externos (por ejemplo, tarjetas de memoria, dispositivo
USB flash). Asegúrese de que
CONSEJOS: Se recomienda realizar copias de seguridad de las fotografías antes de eliminarlas del PD.
1. En la pantalla
2. Para eliminar todas
Para eliminar fotografías individuales
deseleccionar), presione
3. Aparece un mensaje de confirmación; seleccione
interna.
4. Presione
CONSEJO: Si, por error, selecciona
EXIT para regresar a la pantalla Miniaturas.
eliminadas no se restauran de forma automática.
Memoria interna esté seleccionada como origen de medios.
INICIO, seleccione el botón Fotografías-Administrar.
las fotografías, presione MENU y seleccione Borrar todo.
, utilice W X S T para seleccionar las fotografías que desea borrar, presione ‘+’ para seleccionar (‘-' para
MENU y, a continuación, seleccione Borrar selección.
Sí para eliminar las fotografías, o No para que las fotografías se conserven en la memoria
Sí para eliminar fotografías, presione EXIT para cancelar la operación de eliminación. Las fotografías ya
PRESENTACIONES DE FOTOGRAFÍAS
El PD puede mostrar todas las fotografías del origen de medios seleccionado como una presentación, o usted puede seleccionar fotografías específicas para
programar una presentación personalizada. También puede tener música de fondo con sus presentaciones simplemente almacenando archivos de música MP3 en
su origen de medios seleccionado.
Presentación de fotografías de la memoria interna
Puede reproducir una presentación de las fotografías almacenadas en la memoria interna del PD con sólo encender el PD (sin insertar ningún origen de
medios externo ni adaptador Wi-Fi inalámbrico*) y esperar que la presentación comience de forma automática.
Presentación de fotografías en su origen de medios
Inserte un origen de medios externo y encienda el PD; comenzará la presentación de las fotografías (sin insertar ningún adaptador Wi-Fi inalámbrico*).
Si inserta un origen de medios después de encender el PD, aparece la pantalla
* Si insertó un adaptador Wi-Fi inalámbrico en el PD, y se ha conectado previamente a una red inalámbrica, se mostrará un mensaje preguntando si quiere
conectarse a la red inalámbrica en este momento. Si selecciona
Sí, el PD se conectará a la red y se mostrará la pantalla de opciones de red. Si selecciona
opciones de tarjetas de memoria; seleccione Iniciar presentación.
No, se mostrará la pantalla INICIO; presione PRESENTACIÓN o espere aproximadamente 15 a que comience la presentación. (Si no existen fotografías en
el origen de medios, se seguirá mostrando la pantalla INICIO).
Pausar una presentación
Para pausar una presentación, presione EXIT. La presentación permanecerá en pausa durante aproximadamente 15 segundos y luego se reanudará
automáticamente. Para que se reanude de inmediato, presione
ENTER o SLIDESHOW.
Carpetas de presentación
Hay cinco carpetas de categorías en la memoria interna, donde se pueden asignar archivos de fotografías para obtener una organización y presentaciones
personalizadas (los nombres de las carpetas no pueden cambiarse):
Familia – Amigos – Vacaciones – Eventos – Otros
Sólo las fotografías guardadas en la memoria interna pueden asignarse a las carpetas de presentaciones. Las fotografías asignadas no se mueven
físicamente ni se copian en las carpetas, sino que se asigna un vínculo a la fotografía, por lo tanto parece ubicada en la carpeta. Si elimina el archivo real de
la memoria interna, también se eliminará el vínculo con la fotografía.
9
Page 54

Asignar fotografías a la carpeta de presentaciones
1. En la pantalla INICIO, seleccione el botón FOTOS-Administrar.
2. En la pantalla
3. Para asignar una fotografía individual
Para asignar varias
4. Seleccione
Miniaturas, utilice W X S T para desplazarse por las fotografías.
fotografías: Presione ‘+’ para seleccionar las fotografías seleccionadas (‘-' para deseleccionar) y presione MENU.
Asignar a carpeta y, a continuación, seleccione la carpeta a la que desea asignar las fotografías.
Reproducir presentación desde una carpeta de presentaciones
1. En la pantalla INICIO, presione MENU.
2. Seleccione
3. Seleccione
4. Seleccione la carpeta deseada que contenga las fotografías que verá en la presentación.
5. En la pantalla
Origen de medios.
Carpetas de presentación.
Índice de carpetas, presione Presentación.
Copiar o reasignar fotografías a diferentes carpetas
Después de asignar fotografías a carpetas puede copiarlas a otras carpetas, o bien volver a asignar fotografías para que éstas aparezcan en otra
carpeta.
1. Durante la reproducción de la presentación de carpetas (según las instrucciones de arriba), presione
de carpetas
2. Para copiar o volver a asignar una fotografía individual
Para copiar o volver a asignar varias
copiar o reasignar (‘
3. Seleccione
.
-' para deseleccionar) y, a continuación, presione MENU.
Copiar a carpeta o Reasignar a carpeta y seleccione la carpeta a la que desea volver a asignar o copiar las fotografías.
Música de fondo en una presentación
Para reproducir música de fondo durante una presentación, simplemente copie al menos un archivo MP3 de música en el mismo origen de medios que las
fotografías. La música se reproducirá automáticamente mientras se muestra la presentación.
Si tiene varios archivos MP3 en el origen de medios, los archivos de música se reproducirán de manera sucesiva hasta que se hayan reproducido todos y
luego se repetirán según la configuración de
Ajuste del volumen
Mientras se reproduce la música, presione ‘+’ o ‘-‘ para ajustar el volumen.
Silenciar la música de fondo en una presentación
Mientras se muestra la presentación, presione ENTER para silenciar la música de fondo. Se seguirá mostrando la presentación sin la música hasta
que presione nuevamente
ENTER.
Configurar el modo de música de la presentación
Puede configurar el PD para que no se reproduzca música con las presentaciones, incluso si tiene guardados archivos MP3 en el origen de medios.
1. En la pantalla
INICIO presione MENU para ver Configuración.
2. Seleccione Configuración de presentación.
3. Utilice S T para seleccionar Música y luego utilice W X para seleccionar la configuración deseada.
Encendido(predeterminado) = Reproduce música de fondo con la presentación
Apagado= No reproduce música de fondo con la presentación aunque tenga archivos MP3 guardados en el origen de medios seleccionado.
4. Seleccione Listo.
Configurar el intervalo de la presentación
Puede configurar la velocidad de transición de las fotografías de una presentación entre una fotografía y otra.
1. En la pantalla
INICIO presione MENU para ver Configuración.
2. Seleccione Configuración de presentación.
3. Utilice S T para seleccionar Intervalo y utilice W X para seleccionar la configuración deseada.
5 (predeterminado), 10, 30, 60 segundos, 1 hora o 24 horas
4. Seleccione Listo.
Configurar la transición de la presentación
Puede configurar los “efectos especiales” de transición de una fotografía a otra durante una presentación.
: Al aparecer la fotografía deseada, presione MENU.
EXIT dos veces para ver la pantalla Índice
, seleccione la fotografía deseada y presione MENU.
fotografías, utilice W X S T para desplazarse por las fotografías, utilice ‘+’ para seleccionar las que desee
Modo de repetición de música (página 11).
10
Page 55

1. En la pantalla
INICIO presione MENU para ver Configuración.
2. Seleccione Configuración de presentación.
3. Utilice S T para seleccionar Transición y utilice W X para seleccionar la configuración deseada.
Apagado = Las fotografías se muestran sin efectos especiales entre una y otra.
Aleatorio (predeterminado) = Durante la presentación, la transición de una fotografía a otra utiliza efectos especiales aleatorios.
Efectos especiales restantes = Elija el efecto de transición individual deseado
4. Seleccione Listo.
Configurar el orden de la presentación
Puede configurar la presentación para que muestre las fotografías en orden aleatorio o en el orden que se encuentran almacenados en el origen de medios
seleccionado.
1. En la pantalla
2. Seleccione
3. Utilice S T para seleccionar Presentación aleatoria y utilice W X para seleccionar la configuración deseada.
INICIO presione MENU para ver Configuración.
Configuración de presentación.
ON = Muestra las fotografías de manera aleatoria
OFF (predeterminado) = Muestra las fotografías en el orden que se encuentran en el origen de medios seleccionado.
4. Seleccione Listo.
MÚSICA
Nota: Los archivos de música deben estar en formato MP3 estándar, los archivos de música patentada de servicios de descarga no son válidos.
Seleccionar el origen de medios para la música
Cuando se muestre la pantalla MÚSICA, podrá elegir fácilmente un origen de medios diferente seleccionando el botón origen del medio actual en el extremo
superior derecho y luego un origen de medios diferente de la pantalla
Reproducir solamente música
En la pantalla INICIO, seleccione el botón MÚSICA-REPRODUCIR.
Se mostrará una lista de todos los archivos de música presentes y se comenzará a reproducir el primer archivo.
Para pausar la música, presione
Para reproducir un archivo de música diferente, simplemente utilice W X S T para desplazarse por los nombres de los archivos y luego presione
para reproducir.
ENTER; la música seguirá en pausa hasta que presione nuevamente ENTER.
Ajuste del volumen
Mientras se reproduce la música, presione ‘+’ o ‘-‘ para ajustar el volumen.
Modo de repetición de música
Modo de repetición de música está configurado de manera predeterminada para reproducir en forma continua todos los archivos de música que se
encuentran en el origen de medios seleccionado hasta que usted los detenga. Si lo desea, puede cambiar el modo de repetición para reproducir todos los
archivos de música sólo una vez.
1. En la pantalla
2. Presione
INICIO, seleccione el botón MÚSICA-Administrar. Se mostrará una lista con todos los archivos de música presentes.
MENU y luego seleccione Repetir para cambiar ENCENDIDO/APAGADO.
Repetir ENCENDIDO (predeterminado) = Reproduce de manera continua todos los archivos de música
en el origen de medios seleccionado hasta que usted los detenga.
Repetir APAGADO = Reproduce los archivos de música sólo una vez.
Importar archivos de música a la memoria interna
Puede importar sus archivos de música desde orígenes de medios externos (es decir, tarjeta de memoria, dispositivo USB flash) a la memoria interna del
PD. La cantidad de archivos de música que puede importar depende del tamaño de los archivos y de la memoria disponible.
CONSEJO: Después de comenzar a importar, puede presionar
1. En la pantalla
2. Para importar todos los archivos de música, presione MENU y luego seleccione Importar todo.
Para importar archivos de música individuales
archivos que quiere importar (‘
INICIO, seleccione el botón MÚSICA-Administrar. Se mostrará una lista con los archivos de música.
-‘ para deseleccionar), presione MENU y luego seleccione Importar selección.
, utilice W X S T para desplazarse por los nombres de los archivos, presione ‘+’ para seleccionar los
Seleccionar medio.
EXIT para cancelar la operación de importación.
ENTER
11
Page 56

Eliminar archivos de música de la memoria interna
Puede eliminar archivos de música sólo de la memoria interna del PD. Se recomienda que realice copias de seguridad de los archivos de música antes de
eliminarlos.
Nota: El origen de medios seleccionado debe ser
1. En la pantalla
INICIO, seleccione el botón MÚSICA-Administrar. Se mostrará una lista con los archivos de música.
Memoria interna.
2. Para eliminar todos los archivos, presione MENU y luego seleccione Borrar todo.
Para eliminar archivos individuales
quiere eliminar (‘
3. Aparece un mensaje de confirmación. Seleccione Si para eliminar los archivos de música o No para conservar los archivos de música en la memoria
interna.
CONSEJO: Si, por error, selecciona
-‘ para deseleccionar), presione MENU y luego seleccione Borrar selección.
de forma automática.
, utilice W X S T para desplazarse por los nombres de los archivos, presione ‘+’ para seleccionar los archivos que
Si, presione EXIT para cancelar la operación de eliminación. Los archivos de música ya eliminados no se restaurarán
VIDEOS
El PD admite archivos de motion JPEG AVI. Si el archivo de video no está en formato AVI, debe convertirlo con un software conversor de videos que puede
comprarse fácilmente por Internet.
Seleccionar el origen de medios para los videos
Cuando se muestre la pantalla VIDEO, podrá elegir fácilmente un origen de medios diferente seleccionando el botón Origen de medios actual en el extremo
superior derecho y luego seleccionar un origen de medios diferente de la pantalla
Reproducir un video
En la pantalla INICIO, seleccione el botón VIDEO-Reproducir.
Se mostrará una lista de todos los archivos de video presentes y se comenzará a reproducir el primer video.
Para pausar un video, presione
Presione
EXIT para detener el video.
ENTER; el video seguirá en pausa hasta que presione nuevamente ENTER.
Ajuste del volumen
Mientras se reproduce el video, presione ‘+’ o ‘-‘ para ajustar el volumen.
Modo de repetición de video
Video Repeat Mode está configurado de manera predeterminada para reproducir en forma continua todos los archivos de video que se encuentran en el
origen de medios seleccionado hasta que usted los detenga. Si lo desea, puede cambiar el modo de repetición para reproducir todos los archivos de video
sólo una vez y que se detengan automáticamente.
1. En la pantalla
2. Presione
3. Seleccione
INICIO, seleccione el botón VIDEO-Administrar. Se mostrará una lista con todos los archivos de video presentes.
MENU.
Repetir para cambiar ENCENDIDO/APAGADO.
Repetir ENCENDIDO (predeterminado) = reproduce de manera continua todos los archivos de video
en el origen de medios seleccionado hasta que usted los detenga.
Repetir APAGADO = Reproduce los archivos de video sólo una vez.
Importar archivos de video a la memoria interna
Puede importar sus archivos de video desde orígenes de medios externos (es decir, tarjeta de memoria, dispositivo USB flash) a la memoria interna del
PD. La cantidad de videos que puede importar depende del tamaño de los archivos y de la memoria disponible.
CONSEJO: Después de comenzar a importar, puede presionar
Importar videos
1. En la pantalla INICIO, seleccione el botón VIDEO-Administrar. Se mostrará una lista con todos los archivos de video presentes.
2. Para importar todos
Para importar archivos de video individuales
archivos que quiere importar (‘
los archivos de video, presione MENU y luego seleccione Importar todo.
Eliminar videos de la memoria interna
Puede eliminar archivos de video sólo de la memoria interna del PD. Se recomienda que realice copias de seguridad de los archivos de video antes de
eliminarlos.
Nota: El origen de medios seleccionado debe ser
1. En la pantalla
INICIO, seleccione el botón VIDEO-Administrar. Se mostrará una lista con los archivos de video.
EXIT para cancelar la operación de importación.
, utilice W X S T para desplazarse por los nombres de los archivos, presione ‘+’ para seleccionar los
-‘ para deseleccionar), presione MENU y luego seleccione Importar selección.
Memoria interna.
Seleccionar medio.
12
Page 57

2. Para eliminar todos
Para eliminar archivos individuales
que quiere eliminar (‘
3. Aparece un mensaje de confirmación. Seleccione
interna.
CONSEJO: Si, por error, selecciona
los archivos, presione MENU y luego seleccione Borrar todo.
, utilice W X S T para desplazarse por los nombres de los archivos, presione ‘+’ para seleccionar los archivos
-‘ para deseleccionar), presione MENU y luego seleccione Borrar selección.
Sí para eliminar los archivos de video o No para conservar los archivos de video en la memoria
Sí, presione EXIT para cancelar la operación de eliminación. Los archivos de video ya eliminados no se
restaurarán de forma automática.
CALENDARIO / RELOJ
El PD se puede utilizar como calendario personal de escritorio con un reloj con la hora real y alarma, y también muestra una presentación continua de las
fotografías del origen de medios seleccionado.
Para ver la pantalla
origen de medios seleccionado.
Seleccionar el origen de medios para la presentación de calendario
Si desea que en la presentación de calendario/reloj aparezcan fotos de otro origen de medios (por ejemplo de una tarjeta de memoria o carpeta de
presentación), puede cambiar el origen de medios con facilidad.
1. En la pantalla
2. Seleccione el origen de medios deseado de la pantalla
Configurar programación
Puede programar el PD para que entre en modo “de espera” y vuelva a funcionar según su agenda semanal. Por ejemplo, si tiene el PD en su escritorio del
trabajo, posiblemente desee que aparezca el calendario/reloj o que reproduzca una presentación de 8:30 am a 5:30 pm todos los días de la semana, y que
el PD quede en espera durante el fin de semana. El PD continuará funcionando el lunes siguiente a las 8:30 am.
1. En la pantalla
2. Seleccione
3. Utilice W X para moverse por los campos y S T para cambiar los valores del campo en
4. Para configurar
5. Utilice W X para moverse por los campos y S T para cambiar los valores del campo en
6. Una vez configurada la hora correcta, seleccione
Deshabilitar programación
Una vez habilitada la programación (según las instrucciones de arriba), puede deshabilitarla cuando lo desee.
1. En la pantalla
2. Seleccione
mostrarán
3. Seleccione
Ejecutar programación
Una vez configuradas las horas de programación (según las instrucciones de arriba), utilizará la función Ejec. programa cuando desee que se realice la
tarea programada.
Para ello, hay dos métodos, desde una presentación o desde la pantalla
CALENDARIO/RELOJ, seleccione CALENDARIO de la pantalla INICIO. La presentación mostrará las fotografías que se encuentren en el
CALENDARIO/RELOJ, presione MENU y seleccione el botón Origen de medios que se encuentra en el extremo superior derecho.
Seleccionar medio.
CALENDARIO/RELOJ, presione MENU.
Conf. programa.
Días de semana encend./ apag.
Fin de semana encend. /Apag., seleccione el botón Habilitar prog. fin de semana y utilice S para acceder a la configuración.
Fin de semana encend./Apag.
Listo para volver a la pantalla anterior.
CALENDARIO/RELOJ, presione MENU.
Conf. programa y, a continuación, seleccione el botón Habilitar prog. días de semana o Habilitar prog. fin de semana. Los campos de tiempo
APAGADO.
Listo.
CALENDARIO/RELOJ.
PRECAUCIÓN: Después de haber seleccionado la función Ejec. programa, cualquier intervención del usuario cancelará la activación (por ejemplo, si
éste presiona un botón del control remoto, apaga) y la programación no se realizará hasta que seleccione esta función nuevamente y
la reactive.
Ejecutar programación desde una presentación
1. Inicie una presentación y presione ENTER para seleccionar el botón Ejec. programa cuando aparezca en el extremo inferior izquierdo de la pantalla
(aproximadamente 10 seg).
2. Para ejecutar la programación cuando ya no se muestre el botón
seleccionar el botón
3. El PD quedará en modo de espera según la programación y cuando se reanuda el funcionamiento, la presentación se vuelve a reproducir.
Ejec. programa cuando aparezca.
Ejecutar programación desde la pantalla CALENDARIO/RELOJ
1. En la pantalla CALENDARIO/RELOJ, presione MENU.
2. Seleccione
3. El PD quedará en modo de espera según la programación y cuando se reanuda el funcionamiento, la pantalla
a mostrar.
Aparece un pequeño temporizador que indica que la programación está activa y, a continuación, el PD funcionará según la programación configurada.
Ejec. programa.
Ejec. programa, vuelva a iniciar su presentación y luego presione ENTER para
CALENDARIO/RELOJ se vuelve
13
Page 58

Configurar fecha y hora
1. En la pantalla CALENDARIO/RELOJ, presione MENU.
2. Seleccione
3. Seleccione
Configurar fecha/hora y seleccione las opciones y S T para cambiar los valores del campo.
Listo.
Configurar alarma
Puede utilizar el PD como un reloj con alarma cuando lo desee. Puede configurar la frecuencia de la alarma y configurar para que el alerta sea el tono
incorporado o su archivo de música.
1. En la pantalla
2. Seleccione
Alarma = configura la hora que quiere que se active la alarma.
Frecuencia= configura la frecuencia con que quiere que se active la alarma (una vez, diariamente, apagada).
Alerta= Configura la activación con música o con el tono preestablecido (si se configura con música, el archivo de
música debe estar en los medios seleccionados en ese momento cuando se active la alarma).
3. Seleccione Listo.
Cuando se configure la alarma, se mostrará un pequeño reloj con alarma o una nota musical para indicar que se ha configurado la activación de la
alarma con el tono predeterminado o con música.
Nota: Para que la alarma se active con música, el origen de medios seleccionado debe contener al menos un archivo de música MP3. Si configura la
alarma para que reproduzca música y no hay ningún archivo MP3 presente, en su lugar, sonará el tono predeterminado.
CALENDARIO/RELOJ, presione MENU.
Configurar alarma y luego seleccione las opciones, y utilice S T para cambiar los valores del campo.
Apagado de la alarma
Cuando suene la alarma, presione cualquier botón del control remoto para detenerla y regresar a la pantalla CALENDARIO/RELOJ.
Para cancelar la alarma antes de la hora programada, siga las instrucciones anteriores de configuración de la alarma para configurar la frecuencia
APAGADO.
en
RECETAS
La función de Rcetas del PD le permite ver recetas de autores reconocidos, como de bon appétit y Good Housekeeping (se venden por separado en nuestro sitio
Web http://www.pandigital.net
Este PD incluye algunas recetas estacionales de muestra de bon appétit para que pueda ver cómo funciona esta característica cuando compre e instale los libros
de cocina estacionales completos.
Nota: Sólo se puede acceder a la función
para las recetas de muestra precargadas y para las colecciones completas de libros de cocina.
).
Recetas cuando el origen de medios seleccionado es Memoria interna (página 6). Deberá seguir estas instrucciones
Ver recetas en el libro de cocina
1. En la pantalla INICIO, presione RECETAS.
2. Seleccione
libros de cocina
3. Utilice W X S T para desplazarse por las recetas. (Cuando esté resaltada, aparecerá el nombre de la receta en la parte superior del grupo).
4. Presione
CONSEJO: Con una sola receta en pantalla, a) Presione
Recetas de muestra (o seleccione un Libro de cocina, si ha agregado libros de cocina estacionales). Aparecerá la pantalla de índices de
.
ENTER para ver una receta en pantalla completa.
AMPLIAR para agrandar la receta, b) Utilice W X para ver la receta anterior o siguiente,
o c) Presione
PRESENTACIÓN para ver las recetas en la presentación, presione EXIT para detener e ENTER para reanudar.
Asignar recetas a ‘Mis recetas favoritas’
Puede asignar recetas desde un libro de cocina principal a seis categorías de grupos de comidas para recuperarlas fácil y rápidamente. Hors d’oeuvres,
Sopas, Ensaladas, Entradas, Postres
1. En la pantalla INICIO, presione RECETAS.
2. Seleccione Recetas de muestra (o seleccione un Libro de cocina, si ha agregado libros de cocina estacionales). Aparecerá la pantalla de índices de
libros de cocina.
3. Utilice W X S T para desplazarse por las recetas.
Para asignar una receta individual
Para asignar varias
4. Seleccione la categoría del grupo de comidas donde desea asignar las recetas. Mientras se asignan las recetas, aparecerá un mensaje de estado.
recetas: Presione ‘+’ para seleccionar las recetas que desee, presione MENU y luego seleccione Asignar a Mis favoritos.
y Otros. (Los nombres de las categorías de grupos de comidas no se pueden cambiar).
: Resalte la receta que desee, presione MENU y luego seleccione Asignar a Mis favoritos.
Ver recetas en ‘Mis recetas favoritas’
Después de asignar las recetas en las categorías (según las instrucciones anteriores), podrá verlas rápidamente en cualquier momento.
1. En la pantalla
2. Seleccione la categoría que desee ver.
RECETAS, selecione Mis recetas favoritas.
14
Page 59

3. En la pantalla
receta en la parte superior del grupo).
4. Presione
CONSEJO: Con una sola receta en pantalla, a) Presione
Índice de grupos de comida, utilice W X S T para deslizarse por las recetas. (Cuando esté resaltada, aparecerá el nombre de la
ENTER para ver una receta en pantalla completa.
Presione
PRESENTACIÓN para ver las recetas en la presentación, presione EXIT para detener e ENTER para reanudar.
Copiar o reasignar recetas de una categoría a otra
Después de asignar las recetas a las categorías de grupos de comidas, puede reasignarlas (mover) o copiarlas (duplicar) de una categoría a otra cuando
lo desee.
1. En la pantalla RECETAS, selecione Mis recetas favoritas.
2. Seleccione la categoría del grupo de comidas desde donde reasignará las recetas.
3. En la pantalla Índice de grupos de comida, utilice W X S T para desplazarse por las recetas, y luego presione ‘+’ para seleccionar las recetas que
desea reasignar.
4. Presione MENU, y luego seleccione Copiar a categoría o Reasignar a categoría.
5. Seleccione la categoría del grupo de comidas donde reasignará o copiará las recetas. Mientras se asignan o copian las recetas, aparecerá un mensaje
de estado.
Eliminar recetas de ‘Mis recetas favoritas’
Al eliminar recetas de una categoría, sólo eliminará los enlaces a las recetas; no eliminará las recetas en sí. Los archivos reales permanecerán en el libro de
recetas principal.
1. En la pantalla
2. Seleccione la categoría del grupo de comidas desde donde eliminará las recetas.
3. En la pantalla
desea eliminar.
4. Presione
RECETAS, selecione Mis recetas favoritas.
Índice de grupos de comida, utilice W X S T para desplazarse por las recetas, y luego presione ‘+’ para seleccionar las recetas que
MENU y luego Eliminar asignación. Mientras se eliminan las recetas, aparecerá un mensaje de estado.
AMPLIAR para agrandar la receta, b) Utilice W X para ver la receta anterior o siguiente, o c)
Wi-Fi
Esta función permite realizar una conexión inalámbrica con varios sitios Web de intercambio de fotografías en línea y de contenido de transmisión RSS (es decir,
Windows Live FrameIt). Podrá ver imágenes que ha subido a estos sitios, así como recibir noticias, el clima, el tránsito y otros contenidos transmitidos directamente
a través del PD.
Además, utilice esta función para conectarse de manera inalámbrica con su PC para transferir archivos con facilidad (página 18).
Configurar el PD para conectarse con sitios Web de intercambio de fotografías
La configuración del PD para conectarse a sitios Web de intercambio de fotografías requiere 3 pasos:
A. Configure la red inalámbrica mediante la asignación de identificación y contraseña en el PD.
Los sitios Web de intercambio de
El teclado virtual
B. Establezca una cuenta con el sitio Web de intercambio de fotografías en línea y suba sus fotografías a su sitio Web. (
fotografías en línea disponibles varían según los modelos de PD
C. Asigne su identificación de usuario y contraseña del sitio Web de intercambio de fotografías en el PD y conéctese con el sitio para ver las fotografías
que subió directamente a través del PD.
Deberá usar un teclado virtual para ingresar su identificación y contraseña de la red inalámbrica, así como la identificación de usuario y contraseñas
asociadas con sus cuentas de intercambio de fotografías en línea.
Utilice las teclas del teclado de la siguiente manera:
Utilice los botones W X S T del control remoto para resaltar las teclas y luego
presione
deseados.
SYM = Permite el acceso a los siguientes símbolos:
ENTER, varias veces según sea necesario, para seleccionar los caracteres
).
\ / : ; ( ) $ & [ ] . , % ^ + = - | < > { } ! ~
NUM = Cambia entre los caracteres numéricos y las letras.
ABC/abc = Cambia entre letras mayúsculas y minúsculas.
= Permite desplazarse por su ingreso para editar según sea necesario.
Espacio = Borra el último carácter seleccionado.
Listo = Completa el ingreso.
Cancelar = Regresa a la pantalla previa sin ningún ingreso.
15
Page 60

Nota: También puede utilizar los botones del control remoto de la siguiente manera:
+’ = Desplaza hacia adelante
‘
‘
-‘ = Desplaza hacia atrás
ROTAR = Retroceso, borra el último carácter seleccionado
AMPLIAR = Cambia entre las pantallas SYM / NUM / ABC / abc
Configurar una red inalámbrica
Nota: Debe tener una red inalámbrica activa dentro del rango del PD y el adaptador Wi-Fi USB inalámbrico Pandigital debe estar conectado al PD. (El
adaptador Wi-Fi se vende por separado en nuestro sitio Web: http://www.pandigital.net
1. Inserte el adaptador USB inalámbrico Pandigital en el puerto USB del PD.
2. En la pantalla
3. Seleccione
4. Seleccione Buscar red disponible. En la pantalla
5. Seleccione la red Wi-Fi a la que quiere conectarse. Se mostrará la pantalla de red, similar a este ejemplo:
Config. red Wi-Fi. Se mostrará la pantalla Configuración de red, similar a este ejemplo:
.)
INICIO, presione MENU.
Configuración de red aparecerán las redes inalámbricas que estén dentro del rango.
16
CONSEJO: Si su red inalámbrica está ‘oculta’, en la búsqueda no se la incluirá en la lista como una red disponible. Seleccione uno de los botones
6. Si fuera necesario, cambie al tipo
apropiado.
7. Seleccione
mayúsculas y minúsculas; utilice las teclas ‘ABC/abc’ ‘NUM’ y ‘SYM’ para corregir los caracteres).
8. Seleccione
9. Seleccione
Se mostrará un mensaje del estado de la conexión y luego se mostrará la dirección MAC e IP de la red a la cual se conectó, similar a este ejemplo:
10. Seleccione
Network SSID para ingresar manualmente la identificación de la red.
Acceso seguro presionando ENTER en el botón de opciones varias veces para seleccionar el tipo de seguridad
Contraseña y luego utilice el teclado virtual para ingresar su contraseña Wi-Fi. (En la identificación y la contraseña, se distingue entre
Listo en el teclado virtual.
Conectar. No presione ninguna otra tecla hasta que se complete la conexión (de 20 a 30 segundos).
Listo. En este momento, la pantalla Wi-Fi mostrará los iconos del sitio de intercambio de fotografías en línea y el icono Conectar a PC.
Page 61

CONSEJO: Después de realizar una conexión SALIRosa con la red inalámbrica, cada vez que vuelva a encender o a insertar el adaptador Wi-Fi, se
Windows Live FrameIt
Puede conectarse de manera inalámbrica con Windows FrameIt, un sitio Web de intercambio de fotografías en línea y de datos de transmisión en vivo RSS
para ver en vivo las noticias, el clima, el tránsito, deportes y más.
Conectarse con FrameIt
Establecer una cuenta y conectarse con FrameIt
mostrará un mensaje preguntando si quiere conectarse a la red inalámbrica en ese momento. Si selecciona
se mostrará la pantalla de opciones de red.
1. En la pantalla INICIO, seleccione Wi-Fi.
2. Seleccione
3. El PD está preconfigurado para mostrar el siguiente contenido en vivo cuando accede inicialmente a Windows Live FrameIt:
4. Seleccione la carpeta de contenido RSS que desea ver.
Para ver sus propias fotografías u otros contenidos en vivo de FrameIt, primero debe establecer una cuenta personal con FrameIt; visite
http://frameit.live.com
1. Después de establecer su cuenta con FrameIt, en la pantalla
2. La primera vez que se conecta a FrameIt, seleccione el botón
ejemplo:
FrameIt.
Noticias del mundo
Principales ciudades de los Estados Unidos (clima)
Deportes
Historias del día de MSNBC
, configure una cuenta, cree colecciones y asigne el contenido RSS que quiere ver en el PD.
INICIO, seleccione Wi-Fi.
FrameIt-User Settings. Se mostrará la pantalla FrameIt, similar al siguiente
Sí, el PD se conectará a la red y
3. Seleccione
4. En su PC: Visite http://frameit.live.com/device/claim.aspx
5. En el PD: En la pantalla FrameIt, asegúrese de que Estado cambió de Registración obligatoria a Registrado.
6. Si corresponde, repita los pasos 3 a 5, seleccionando
7. Seleccione
Obtener reclamo del testigo 1. Se mostrará un nuevo reclamo del testigo, el cual necesitará en el siguiente paso.
para entrar en el reclamo del testigo y luego haga clic en Continuar.
Get Obtener reclamo de testigo 2 para conectarse a su segunda cuenta de FrameIt.
Conectar para mostrar la pantalla Intercambio de fotografías. El estado de FrameIt debería cambiar de Requiere configuración a
Configurado.
8. Continúe con el paso 2 siguiendo las instrucciones de Ver contenidos RSS de FrameIt.
Ver contenidos RSS de FrameIt
IMPORTANTE: En este paso se supone que usted ya ha conectado con éxito el PD con el sitio Windows Live FrameIt según las instrucciones
)
1. En la pantalla
2. En la pantalla
3. Se mostrará la carpeta de contenidos RSS que asignó en frameit.live.com; los títulos aparecerán cuando resalte las carpetas. Presione
para mostrar los contenidos de una carpeta resaltada.
Espere a que aparezcan los datos del contenido; el tiempo que tarden en aparecer depende de la cantidad de datos del contenido que tenga la
carpeta seleccionada. Por ejemplo, una carpeta que tenga una gran cantidad de fotografías tardará bastante más tiempo en mostrarse que si
selecciona contenidos de noticias y del clima.
CONSEJO: Si realiza cambios en su cuenta de Windows Live FrameIt mientras está conectado el PD (es decir, crea nuevas colecciones), no
previas.
INICIO, seleccione Wi-Fi.
Intercambio de fotografías, seleccione FrameIt.
ENTER
se mostrarán los nuevos datos del contenido hasta que se desconecte de FrameIt y vuelva a conectarse.
17
Page 62

Importar fotografías de FrameIt a la memoria interna
1. En la pantalla INICIO, seleccione Wi-Fi.
2. En la pantalla
importar.
3. Para importar todos
Para importar archivos de fotografías individuales
seleccionar los archivos que quiere importar (‘
Intercambio de fotografías, seleccione FrameIt y luego seleccione la carpeta deseada que contenga las fotografías que quiere
Acercar fotografías en FrameIt
1. Cuando se muestre la fotografía que quiere agrandar, presione AMPLIAR varias veces si fuera necesario para lograr la visualización deseada.
2. Al finalizar, presione
Sitios Web de intercambio de fotografías
El PD puede conectarse de manera inalámbrica a sitios Web populares de intercambio de fotografías en línea a los que haya subido sus fotografías, lo que
le permite ver las fotografías que subió directamente en el PD.
Establecer cuentas en sitios Web de intercambio de fotografías
Los sitios Web de intercambio de fotografías en línea a los que puede acceder el PD varían según los modelos de PD y podrían cambiar sin aviso.
Siga estos pasos para determinar qué sitios están disponibles con su PD:
Después de completar la configuración inicial de la red inalámbrica (página 16), en la pantalla
En la pantalla
Cuando esté resaltado, se mostrarán las instrucciones para acceder al sitio Web de intercambio de fotografías en línea.
Siga estas instrucciones para establecer sus cuentas en los sitios Web deseados.
intercambio de fotografías).
Intercambio de fotografías, utilice W X S T para resaltar el sitio de intercambio de fotografías al cual quiere conectarse.
Conectar el PD a sitios Web de intercambio de fotografías
1. Después de establecer cuentas en los sitios Web de intercambio de fotografías en línea (según las instrucciones anteriores), en la pantalla
INICIO, seleccione Wi-Fi.
2. Seleccione el botón
3. Seleccione
4. Seleccione
CONSEJO: En la identificación y la contraseña se distingue entre mayúsculas y minúsculas; si aparece el mensaje ‘Connected failed, please
5. Seleccione
6. Cuando se conecte con éxito, se mostrarán los álbumes o carpetas de colecciones que creó en su cuenta de intercambio de fotografías.
7. Seleccione una carpeta que contenga las fotografías que desea ver. Se mostrará la pantalla
8. Para ver una fotografía en particular, utilice W X S T para desplazarse por las fotografías y presione
Usuario 1 ó 2 y luego utilice el teclado virtual para ingresar su identificación de Usuario de la cuenta de intercambio de fotografías.
Contraseña 1 ó 2 y luego utilice el teclado virtual para ingresar su Contraseña de la cuenta de intercambio de fotografías.
check ID and Password’, tal vez deba volver a ingresarlas teniendo cuidado de utilizar los caracteres en mayúscula/minúscula
que correspondan.
Connect.
los archivos de fotografías, presione MENU y luego seleccione Importar todo.
, utilice W X S T para desplazarse por los nombres de los archivos, presione ‘+’ para
-‘ para deseleccionar), presione MENU y luego seleccione Importar selección.
EXIT para reanudar la visualización de fotografías.
INICIO, seleccione Wi-Fi.
(Si lo desea, puede crear dos cuentas en cada sitio Web de
Ajustes del usuario asociado al sitio Web de intercambio de fotografías en línea deseado.
Índice de carpetas.
ENTER en la fotografía deseada.
Nota: Las funciones como acercar y rotar están disponibles y funcionan de la misma manera que se describió en la sección
comienza en la página 7.
Importar fotografías de sitios Web de intercambio de fotografías a la memoria interna del PD
1. En la pantalla INICIO, seleccione Wi-Fi.
2. En la pantalla
contenga las fotografías que quiere importar.
3. Para importar todos
Para importar archivos de fotografías individuales
seleccionar los archivos que quiere importar (‘
Intercambio de fotografías, seleccione el sitio Web de intercambio de fotografías deseado y luego seleccione la carpeta que
los archivos de fotografías, presione MENU y luego seleccione Importar todo.
PD a PC – Conexión inalámbrica
Puede conectar el PD a su PC de manera inalámbrica para transferir archivos desde la PC a la memoria interna del PD.
Nota: Debe tener una red inalámbrica activa dentro del rango del PD y el adaptador Wi-Fi USB inalámbrico de Pandigital debe estar conectado al PD. (El
adaptador Wi-Fi se vende por separado en nuestro sitio Web: http://www.pandigital.net
Software recomendado
Se recomienda Windows Media Player 11 Se recomienda TwonkyMedia 5
Requiere Windows XP SP3 o Vista SP2 Requiere Macintosh OSX10.3 (Leopard)
18
FOTOS, que
, utilice W X S T para desplazarse por los nombres de los archivos, presione ‘+’ para
-‘ para deseleccionar), presione MENU y luego seleccione Importar selección.
.)
Page 63

Configurar un servidor Plug and Play Universal (UPnP)
Se debe configurar un servidor UPnP en su computadora antes de que pueda conectar el PD a la PC de manera inalámbrica.
Windows
Visite el sitio Web de Microsoft para obtener instrucciones sobre la configuración del servidor UPnP de Windows:
http://www.microsoft.com/windows/windowsmedia/knowledgecenter/howto/mp11/sharemedia.aspx
Apple Macintosh
Visite el sitio Web de Twonky Vision para obtener instrucciones sobre la configuración del servidor UPnP de Macintosh:
http://www.twonkyvision.de/server_download.html
Conectar el PD a una PC de manera inalámbrica
1. En la pantalla INICIO, seleccione Wi-Fi.
2. Seleccione
3. Se mostrarán las categorías de medios (es decir, imágenes). Seleccione la categoría que contiene los archivos que quiere importar al PD.
4. Para importar todos
Para importar los archivos seleccionados
Conectar a PC y luego seleccione el servidor UPnP al cual quiere conectarse.
los archivos de la carpeta seleccionada, presione MENU.
, utilice el botón ‘+’ para seleccionar cada archivo (‘-‘ para deseleccionar) y luego presione MENU.
5. Seleccione Importar todo a esta carpeta o Importar selcción.
6. La o las imágenes se transferirán y se mostrará el estado de la transferencia.
Acercar o rotar fotografías
1. Cuando se muestra la fotografía, puede agrandarla o rotarla presionando AMPLIAR o ROTATE varias veces si fuera necesario para lograr la
visualización deseada.
2. Al finalizar, presione
EXIT para reanudar la visualización de fotografías.
PD a PC – Conexión USB
Puede conectar el PD a una PC con Windows o Macintosh para copiar archivos entre la computadora y la memoria interna del PD a través del cable USB estándar
(incluido).
Si tiene insertadas tarjetas de memoria en el PD, también puede copiar desde una PC, memoria interna y tarjetas de memoria.
Conectar el PD a una PC con Windows
1. Conecte el extremo pequeño del cable USB al puerto Mini USB del PD, y el extremo más grande a un puerto USB disponible de su computadora.
2. Se abre una ventana donde se enumeran todas las unidades conectadas a su computadora, similar a la pantalla siguiente:
3. La memoria interna (llamada Pandigital) y cada tarjeta de memoria presente en el PD se asociarán con una unidad de disco de su PC.
IMPORTANTE: Si la PC está conectada a unidades de Red de Área Local (LAN) o si tiene diversas letras de unidades asignadas a dispositivos
)
4. Haga doble clic en la unidad que desee para mostrar los archivos que contiene la tarjeta. El siguiente ejemplo muestra una tarjeta que contiene diversas
imágenes JPG.
5. Para copiar archivos desde un origen de medios, selecciónelos y arrástrelos a la unidad de memoria interna del PD (Pandigital).
6. De manera similar, para copiar archivos desde la computadora a la memoria interna, primero busque los archivos en la computadora, seleccione los
que desea copiar y luego arrástrelos hasta la carpeta apropiada de la unidad de memoria interna del PD.
CONSEJO: La mayoría de las cámaras y programas de gráficos almacenan las fotografías en la carpeta ‘Mis imágenes’ de Windows XP o
periféricos, debe administrar los ajustes de las unidades en Windows para liberar las cuatro letras de inmediatamente
siguientes a la unidad de CD-ROM para que el PD pueda asignarlas a las ranuras de la tarjeta de memoria de forma adecuada.
‘Imágenes’ de Vista. Si no las guardó en otro lugar, puede encontrarlas allí.
Desconectar el PD de una PC con Windows
Siempre es importante realizar una “liberación” segura de la PC antes de desconectar el cable USB del PD de la PC.
ADVERTENCIA: No desconecte ni apague el PD mientras los archivos se están transfiriendo, ya que esto puede dañar gravemente la memoria.
Windows Vista
1. En la bandeja del sistema de Windows, haga clic en el icono de eliminación de hardware.
2. Haga clic en el mensaje
3. Cuando aparece el mensaje “Este dispositivo se puede quitar de forma de segura del equipo”, puede desconectar el cable USB de su computadora.
Windows XP
1. En la bandeja del sistema de Windows, haga clic en el icono de eliminación de hardware.
2. Haga clic en
3. Seleccione el dispositivo de almacenamiento que corresponde con el PD y haga clic en
4. Haga clic en
5. Cuando aparece el mensaje “Es seguro retirar el hardware”, puede desconectar el cable USB de la computadora.
Quitar hardware con seguridad.
Cerrar.
Quitar de forma segura el dispositivo de almacenamiento masivo USB que corresponde a la unidad del dispositivo PD.
Detener para desconectar. Se abre un cuadro de diálogo.
19
Page 64

Conectar el PD a una computadora Macintosh
1. Utilice el cable USB (incluido) para conectar el PD a la computadora Macintosh.
2. Ésta reconocerá el PD como un dispositivo de almacenamiento externo.
3. Arrastre los archivos entre los dos dispositivos como mueve habitualmente los archivos.
Desconectar el PD de la computadora Macintosh
1. Para desconectar de manera segura el PD de la Macintosh, seleccione el icono del PD en el escritorio y presione Command-e para expulsar el disco.
2. Cuando el icono desaparece del escritorio, es seguro desconectar el cable USB.
Conexión PD a dispositivo USB Flash
El PD reconoce un dispositivo USB Flash de la misma manera que reconoce tarjetas de memoria externas. Cuando inserta el dispositivo flash, el PD reconoce
automáticamente los archivos de fotografías, música y video que tiene almacenado.
Para importar archivos desde el dispositivo flash a la memoria interna del PD, siga las instrucciones de importación de archivos según cada sección de función
(
Fotos en la página 7, Música en la página 11, Video en la página 12).
Conexión Bluetooth
La función Bluetooth le permite descargar fotografías de teléfonos móviles populares con la función Bluetooth (es decir, BlackBerry, Motorola, Nokia,
SonyEricssson y otros) directamente en su PD.
Se requiere un adaptador USB Bluetooth (no se incluye con el PD)
Nota: Los modelos de teléfonos varían y no todos los teléfonos admiten la transmisión de fotografías a dispositivos como el PD. Verifique para estar seguro de
que su teléfono admite la transmisión de fotografías a dispositivos externos como el PD.
Insertar el Bluetooth Dongle
1. Inserte el Bluetooth dongle en el puerto USB del PD y luego encienda el PD.
2. Aparece momentáneamente una ventana emergente con el mensaje “
Enviar una fotografía al PD
1. Desde su dispositivo Bluetooth, busque los dispositivos con conexión disponible; seleccione el dispositivo Pandigital (código de autenticación
predeterminado “1234”).
2. Seleccione la fotografía deseada y luego envíela al PD.
Bluetooth Dongle Activado” que indica que la función Bluetooth está activa.
Nota: El procedimiento real para enviar fotografías al PD varía según el fabricante/modelo de dispositivo. Consulte la guía del usuario de su
dispositivo móvil para obtener instrucciones.
Durante la transmisión de fotografías, en la pantalla del PD aparece “Photo Transmitting”. Una vez que se complete, la o las fotografías se mostrarán
automáticamente en el modo de fotografía individual.
Configuración de modo inactivo
EL PD permanecerá encendido hasta que se apague, sin embargo, para ahorrar energía puede configurarlo de manera que se coloque automáticamente en modo
inactivo cuando se deja de esta forma durante una cantidad de tiempo determinada.
1. En la pantalla
2. Seleccione
APAGADO (predeterminado) = El ahorro de energía está ‘deshabilitado’; el PD permanecerá
encendido hasta que se apague o se cambie la configuración del modo inactivo
2/4/8 horas = El PD se colocará en modo inactivo automáticamente cuando se deje de esta
forma durante una cantidad de tiempo determinada
3. Seleccione Listo.
INICIO presione MENU para ver Configuración.
Modo inactivo y seleccione la configuración deseada.
Configuración de idioma
Según el modelo, este PD puede incluir varios idiomas para la interfaz de usuario de la pantalla.
1. En la pantalla
2. Seleccione
INICIO presione MENU para ver Configuración.
Idioma y seleccione el idioma deseado.
Restablecer valores predeterminados de fábrica
Si cambió la configuración de las funciones, con esta función podrá restablecer los valores de configuración predeterminados de fábrica.
20
Page 65

1. En la pantalla
2. Seleccione
3. Presione
INICIO presione MENU para ver Configuración.
Restablecer valores predeterminados y seleccione Sí para restablecer o No para dejar la configuración actual.
EXIT para regresar a la pantalla INICIO.
Preguntas frecuentes
P: ¿Cómo configuro el PD?
R: Es muy fácil configurar el Portarretrato digital. Simplemente conecte el adaptador de suministro eléctrico en el PD y en un tomacorriente estándar de la pared
y enciéndalo. Una presentación comienza a mostrar las imágenes cargadas previamente en la memoria interna. Para ver sus propias fotografías, inserte una
tarjeta de memoria o un dispositivo USB flash en la ranura de tarjeta o el puerto USB apropiados, ubicados en la parte lateral del PD. Seleccione
PRESENTACIÓN
P: ¿Qué tarjetas de memoria puede leer el Portarretrato Digital?
R: Entre las tarjetas de memoria compatibles se encuentran: Secure Digital™ (SD), MultiMedia Card™ (MMC), xD Card, Memory Stick™ (MS), MemoryStick
Pro™ y Memory Stick Pro Duo™.
P: Ya configuré el Portarretrato Digital, ¿por qué no se enciende?
R: El adaptador de suministro eléctrico posiblemente no esté conectado de forma segura al PD o el interruptor de alimentación posiblemente no esté en la
posición ENCENDIDO.
P: Hay una tarjeta de memoria en el PD, ¿por qué no puedo ver las fotografías?
R: A) Asegúrese de que la tarjeta de memoria sea de uno de los formatos de la lista de tarjetas compatibles y que los archivos estén guardados en formato
JPEG. Algunas cámaras digitales guardan las imágenes en otros formatos. Consulte la guía del usuario de su cámara si las fotografías no están en archivos
JPEG.
B) Asegúrese de que la tarjeta de memoria esté bien introducida en la ranura para la tarjeta.
C) En la pantalla
Presione
P: ¿Por qué algunas fotografías se muestran más lento que otras?
R: Las fotografías de mayor resolución se cargan más lentamente. Intente utilizar fotografías con resolución más baja o reducción de las imágenes. Consulte la
guía del usuario de su cámara para conocer los detalles para reducir el tamaño de las fotografías.
P: ¿Puedo introducir más de una tarjeta de memoria?
R: Sí, puede insertar varias tarjetas al mismo tiempo según la disponibilidad de ranuras. Utilice la función ‘
medios deseado para una visualización/reproducción inmediata.
P: ¿Tiene el PD una memoria incorporada (interna)?
R: Sí. El tamaño de la memoria depende del modelo.
P: ¿El PD admite todos los archivos JPEG y Motion JPEG?
R: No. El PD sólo admite archivos JPEG y Motion JPEG extraídos de una cámara digital. Es posible que el PD no lea todos los archivos de imágenes
descargados de Internet o de otras aplicaciones de gráficos.
P: ¿Puedo agregar mi propio libro de cocinas o recetas en la función Recetas?
R: No. Si desea crear archivos .jpg de recetas propias con su software de edición de gráficos, puede copiar los archivos .jpg en la fuente de memoria y luego
verlas en el PD en el modo FOTOS.
P: ¿Qué adaptador USB Wi-Fi inalámbrico puedo utilizar con mi PD y dónde puedo obtenerlo?
R: Utilice sólo un adaptador Wi-Fi Pandigital, que se puede comprar en nuestro sitio Web: http://www.pandigital.net
P: ¿Dónde obtengo un adaptador Bluetooth para utilizar con mi PD?
R: Puede comprar cualquier marca de adaptador Bluetooth en cualquier tienda de venta minorista que los venda.
P: Tengo conectado el adaptador Wi-Fi inalámbrico Pandigital, ¿por qué no puedo conectarme a los sitios de intercambio de fotografías en línea?
R: La configuración inicial Wi-Fi requiere 3 pasos:1) Asignar la conexión de la red inalámbrica al PD, 2) establecer una cuenta en un sitio de intercambio de
fotografías, y 3) asignar su identificación de usuario y contraseña del sitio de intercambio de fotografías al PD. Consulte la configuración inicial Wi-Fi de la
página 15.
Precauciones de seguridad importantes
Siempre siga estas instrucciones básicas de seguridad cuando utilice el portarretrato digital (PD) multimedia. De este modo, disminuirá el riesgo de sufrir un
incendio, una descarga eléctrica y lesiones.
de la pantalla de opciones de la tarjeta de memorias.
INICIO presione MENU, seleccione Origen de medios, seleccione el origen de medios que desee y presione ENTER.
EXIT para regresar a la pantalla INICIO y seleccione FOTOS - REPRODUCIR. La presentación debería comenzar a mostrar las fotos.
Seleccionar medio’ para seleccionar el origen de
.
Start
ADVERTENCIA: No exponer el producto a la lluvia o la humedad.
No retire la cubierta. No se incluyen piezas que el usuario pueda reparar. Si necesita un servicio técnico, consulte con personal
calificado.
El PD es sólo para uso doméstico.
Desconecte el PD antes de realizar tareas de limpieza y mantenimiento.
No obstruya los orificios de ventilación que se encuentran en la parte trasera del PD.
Mantenga el PD alejado de la luz solar directa y de fuentes de calor.
Proteja el cable de suministro eléctrico. Canalice los cables para impedir que se camine sobre ellos o se coloquen elementos sobre o contra ellos. Preste
especial atención al punto de contacto entre el cable y el PD.
Utilice únicamente el adaptador de CA incluido. Si utiliza otro adaptador, se anulará la garantía.
Desconecte el cable de suministro eléctrico del tomacorriente cuando la unidad no esté en uso.
21
Page 66

Limpieza del PD
Limpie la pantalla con suavidad, ya que es de vidrio y puede romperse. Para limpiar las huellas digitales o el polvo de la pantalla, recomendamos el uso de
un paño suave no abrasivo, como un paño para lentes de cámaras fotográficas. Si utiliza un set de limpieza para pantallas LCD, no rocíe el líquido de
limpieza directamente sobre la pantalla. Límpiela con un paño humedecido con el líquido.
Limpie la superficie externa del PD (excepto la pantalla) y el control remoto con un paño suave humedecido con agua.
Especificaciones técnicas
Resolución del producto Portarretrato digital en pantalla LCD de 12.1”–1110 x800 píxeles, relación de aspecto 15x9
Orígenes de medios compatibles
Funciones
Formato de archivos Imagen JPEG, video AVI, audio MP3
Puertos USB Host USB 2.0, Dispositivo USB 2.0
Memoria interna 1 GB, hasta 5000 imágenes comprimidas
Compatibilidad Bluetooth Sí (no se incluye el adaptador)
Compatibilidad Wi-Fi Sí (el adaptador Wi-Fi Pandigital se vende por separado)
Paspartús de papel decorativos 1 – Blanco
Adaptador de suministro eléctrico Entrada: 100 V – 240 V CA, 50~60 HZ, Salida: 9V DC 2.0 A o 12V DC 1.5A (según el modelo)
Secure Digital™, Multi Media Card™, xD Memory Card™, Memory Stick™, Memory Stick PRO™, Memory Stick PRO
DUO y dispositivo USB Flash
Muestra FOTOGRAFÍAS individuales o en presentaciones.
Reproduce archivos de MÚSICA individuales o en presentaciones
VIDEOS
CALENDARIO/RELOJ con la función alarma y en las presentaciones
RECETAS – Ver libros de cocina precargados y comprados
Wi-Fi: Se conecta de manera inalámbrica a sitios Web de intercambio de fotografías en línea
Transfiere archivos de manera inalámbrica entre el PD y la PC
Fácil conexión y reproducción
No se requiere computadora
Garantía Limitada
La garantía limitada que se describa a continuación es ofrecida por Pandigital en relación con los productos electrónicos de la marca Pandigital adquiridos en los Estados Unidos de América. Pandigital
garantiza que este producto no tiene fallas materiales ni de mano de obra de la siguiente manera:
MANO DE OBRA: Pandigital reparará o reemplazará el producto, según su criterio, sin cargo si se encuentran fallas durante un período de un (1) año a partir de la fecha de compra. Después de ese
período, se cobrará la mano de obra de acuerdo con cada caso.
PIEZAS: Pandigital suministrará sin costo piezas nuevas o reparadas de repuesto, según su criterio, sin cargo, si se encuentran fallas durante un período de un (1) año a partir de la fecha de compra.
Después de ese período, se cobrará el valor de las piezas de acuerdo con cada caso. Las modificaciones no aprobadas por la parte responsable del cumplimiento podría anular la autoridad del usuario
para poner el equipo en funcionamiento.
Esta garantía no cubre: (1) el accionar, la instalación o la configuración del cliente; (2) los daños físicos o provocados por un accidente, uso incorrecto, abuso o negligencia; (3) uso comercial del producto;
(4) modificación de cualquier pieza del producto; (5) daño debido al manejo incorrecto, mantenimiento incorrecto o la conexión a un suministro eléctrico incorrecto; (6) pérdida de datos, independientemente
del valor o el formato, que pueda producirse a través del uso adecuado y/o inadecuado del producto; (7) daño provocado por un intento de reparación del producto realizado por una persona ajena a un
centro autorizado por Pandigital para realizar el servicio técnico del producto; (8) materiales consumibles (tales como fusibles o baterías). Esta garantía sólo tiene validez en los Estados Unidos.
El producto debe estar acompañado de una copia del recibo de compra minorista original. Si no se adjunta el comprobante de compra, la garantía no tendrá validez y se cobrarán los costos de la
reparación. Esta garantía sólo es válida con la documentación escrita que detalla el reclamo que se indica fuera o dentro de la caja. Esta garantía no tendrá validez si el número de serie de fábrica ha sido
modificado y/o quitado del producto. Además, no ofrece protección contra la pérdida de datos, independientemente del formato. Pandigital se reserva el derecho de modificar y diseñar el producto sin
previo aviso por escrito o de otro modo.
Para obtener el servicio de garantía, debe enviar el producto por flete prepago en el embalaje original o un embalaje con el mismo nivel de protección, junto con el comprobante de compra. La reparación o
el reemplazo previstos según esta garantía es la única solución para el consumidor. Pandigital, su empresa matriz, filiales o subsidiarias, no serán responsables de ningún daño incidental o consecuente de
una brecha de ninguna garantía explícita o implícita de este producto. Salvo en la medida que la ley lo prohíba, toda garantía implícita de comercialización o aptitud de un fin en particular de este producto
se limita a la duración de esta garantía.
Algunos estados no permiten la exclusión o la limitación de los daños incidentales o consecuentes, o permiten limitaciones sobre la duración de una garantía implícita, de manera que las limitaciones o
exclusiones mencionadas pueden no corresponder a su caso. Esta garantía le otorga derechos legales específicos y usted puede tener otros derechos que varían de un estado a otro.
Todo el contenido del sitio Web de Pandigital, como así también los productos Pandigital, entre ellos, imágenes de demostración precargadas, medios digitales, los libros de cocina digitales, textos,
gráficos, logotipos, diseños, fotografías, iconos de botones, imágenes, clips de audio/video, descargas digitales, compilaciones de datos y software, es propiedad de Pandigital o sus proveedores y está
protegido por las leSí de derecho de autor de los Estados Unidos e internacionales u otras leSí y tratados de propiedad intelectual. Queda prohibida la reproducción o el uso de dicho contenido sin el
permiso expreso por escrito de Pandigital y sus proveedores, respectivamente.
El uso de este producto constituye la aceptación de los términos y condiciones de la garantía. Número de teléfono del soporte técnico:
Declaración FCC - Información sobre la FCC Parte 15
Este equipo ha sido probado y cumple con los límites de un dispositivo digital de Clase B, conforme con la Parte 15 de las normas de la Comisión Federal de Comunicaciones (FCC). Estos límites han
sido estipulados con el fin de ofrecer una protección razonable contra la interferencia nociva en una instalación residencial.
El equipo genera, utiliza y puede irradiar energía de radiofrecuencia y, si no se instala y utiliza de acuerdo con las instrucciones, puede provocar interferencia a las comunicaciones de radio. Sin
embargo, no es posible garantizar que no se producirán interferencias en una instalación en particular.
Si este equipo provoca interferencia en la recepción de la señal de radio o televisión, que puede determinarse al encender o apagar el equipo, le recomendamos al usuario que intente corregirla por
medio alguna de las siguientes medidas:
Reoriente o reubique la antena de recepción. Aumente la distancia de separación entre el equipo y el receptor.
Solicite la ayuda del distribuidor o de un técnico con experiencia en radio/TV. Conecte el equipo a un tomacorriente de un circuito diferente al que está conectado el receptor.
ADVERTENCIA: Los cambios o las modificaciones realizadas a esta unidad no aprobadas de forma explícita por la parte responsable del cumplimiento
podrían anular la autoridad del usuario para poner el equipo en funcionamiento.
22
Page 67

 Loading...