

Page 1

Effortlessly Moving Images Out of your Camera and Into your Life
Digital Photo Frame
User Guide
PAN1200-1300-1500DWPTFR
Page 2

Note: Your frame style and features may differ from those documented in this User Guide.
UG-E_PAN1200-1300-1500DWPTFR_v1.0_06-09
2
Page 3
Sign up now to enjoy the following benefits…
1
Year
Qualify to win a FREE
digital photo frame!*
(valid in USA only)
Register your FREE
1-year warranty!**
Sign up now at…
http://www.pandigital.net
*For details, go to our website: www.pandigital.net
**The online signup is for the purpose of user and product registration. Failure to register
does not in any way diminish any of your standard warranty rights, as described in the
documentation included with your product.
NOTE: If you must mail your 1-year registration, please send your name, address,
phone number, model & serial number, and when & where purchased to:
Pandigital, P.O. Box 2969, Dublin, CA 94568-2969 USA
3
Page 4

This page intentionally left blank
4
Page 5

Table of Contents
Introduction .................................................................................................. 8
DPF Key Features ................................................................................................... 8
Overview of the 12” and 13.3” DPF ............................................................. 9
Overview of the 15” DPF ............................................................................ 10
Remote Contr ol .......................................................................................... 10
PanTouch Interface .................................................................................... 12
Control Buttons o n DPF ............................................................................ 13
About Selecting Opt io ns ........................................................................... 13
Getting Start ed ........................................................................................... 14
The HOME Screen ...................................................................................... 14
SETUP Menu Overview .............................................................................. 16
Select Media Source .................................................................................. 17
PHOTOS ...................................................................................................... 18
Display Photo Thumbnails Screen ......................................................................... 18
Zoom or Rotate Photos ..................................................................................... 18
Import Photos into Internal Memory ....................................................................... 18
Delete Photos from Internal Memory ..................................................................... 19
Adjust Screen Colors ............................................................................................. 20
Optimal Image Display .......................................................................................... 21
Photo Import Method ............................................................................................. 21
PHOTO SLIDESHOWS ............................................................................... 22
Slideshow of Photos in Internal Memory ............................................................... 22
Slideshow of Photos on your Media Source .......................................................... 22
Pause a Slideshow ................................................................................................ 22
Slideshow Background Music ................................................................................ 22
Adjust the Volume ............................................................................................. 23
Mute the Background Music .............................................................................. 23
Slideshow Folders ................................................................................................. 23
Copy Photos into Slideshow Folders ................................................................ 23
Play Slideshow from Slideshow Folder ............................................................. 24
Copy or Move Photos to Different Folders ........................................................ 24
Slideshow Setup Options ...................................................................................... 25
Set Slideshow Music Mode ............................................................................... 25
Set Slideshow Interval ...................................................................................... 25
Set Slideshow Transition .................................................................................. 26
5
Page 6

Set Slideshow Shuffle ....................................................................................... 26
Display Current Time with Photos ..................................................................... 26
Display Photo File Date/Time Stamp with Photos ............................................. 27
MUSIC ......................................................................................................... 27
Playing Music Only ................................................................................................ 27
Adjust the Volume ............................................................................................. 28
Mute the Music .................................................................................................. 28
Set Music Repeat Mode ........................................................................................ 28
Import Music Files into Internal Memory ................................................................ 28
Delete Music Files from the Internal Memory ........................................................ 29
VIDEOS ....................................................................................................... 30
Watch a Video ....................................................................................................... 30
Adjust the Volume ............................................................................................. 30
Mute the Video .................................................................................................. 31
Video Repeat Mode ............................................................................................... 31
Import Video Files into Internal Memory ................................................................ 31
Delete Video Files from the Internal Memory ........................................................ 32
CALENDAR/CLO CK ................................................................................... 33
Set Date and Time ................................................................................................. 33
Set Alarm ............................................................................................................... 34
Select Media Source for Calendar Slideshow........................................................ 35
Set Schedule ......................................................................................................... 35
Disable the Schedule ............................................................................................. 36
Run the Schedule .................................................................................................. 36
RECIPES ..................................................................................................... 37
View Recipes in Cookbook .................................................................................... 37
Copy Recipes to ‘My Favorite Recipes’ ................................................................. 37
View the Recipes in ‘My Favorite Recipes’ ............................................................ 38
Delete, Move, or Copy Recipes from Categories ................................................... 38
Wi-Fi ............................................................................................................ 39
Set up DPF to connect to Photo Sharing Websites ............................................... 39
The Virtual Keyboard ............................................................................................. 39
Set up Wireless Network ....................................................................................... 41
Windows Live FrameIt ........................................................................................... 43
Photo Sharing Websites ........................................................................................ 45
Connect DPF with Photo Sharing Websites ...................................................... 46
6
Page 7

DPF to PC – Wireless Connection ............................................................ 48
DPF to PC – USB Connection.................................................................... 49
USB Flash Drive to DPF Connection ........................................................ 52
Bluetooth Connection ........................................................................... 53
Set Sleep Mode ........................................................................................... 54
Reset to Factory Defaults .......................................................................... 54
Set Language ............................................................................................. 54
System Info ................................................................................................. 55
Cleaning the DPF ....................................................................................... 55
Change the Decorative Mat ....................................................................... 55
Frequently Asked Questions ..................................................................... 56
Important Safety Precautions ................................................................... 59
Product Specifications .............................................................................. 60
Limited Warrant y ........................................................................................ 61
FCC Statement ........................................................................................... 62
7
Page 8

Introduction
Welcome to the Pandigital Multimedia Digital Photo Frame (DPF). Now
you can display your digital photos directly from your memory card, no
computer is necessary. View your photos as slideshows with background
music, or individually. You can even connect wirelessly to online photo
sharing websites to display your uploaded photos directly through the
DPF.
Use the DPF as a calendar/clock with personal photo slideshow, play
your digital videos, and view preloaded recipes.
This DPF also includes the PanTouch Technology, a touch icon-driven
interface allowing you to quickly and easily navigate and manage the
DPF functions without the remote control.
DPF Key Features
PanTouch Technology
Displays digital Photo files
Plays digital Music and Video files
Displays Calendar/Clock with photo slideshow and Alarm function
Includes preloaded Recipes from popular authors
Wireless Wi-Fi connection to photo sharing websites and PC
Simple Plug & Play
Does not require a computer
Infrared Remote Control and control buttons on the DPF
1 or 2GB Internal Memory
2 USB 2.0 ports
(depending on model)
Compatible Memory Cards
Compatible memory cards include: Secure Digital™ (SD), Compact
Flash (select models) , MultiMedia Card™(MMC), xD Card, Memory
Stick™(MS), MemoryStick Pro™, and Memory Stick Pro Duo™*
* The Memory Stick Pro Duo™
requires an additional adaptor to fit
properly into the DPF (not included).
You can purchase the adaptor at retail
outlet stores that sell memory cards.
8
Page 9
What’s in the Box
Digital Photo Frame (DPF)
AC Power Cord and Adapter
Infrared Remote Control
Decorative Paper Mats
USB Cable
Quick Start Guide
User Guide (on CD)
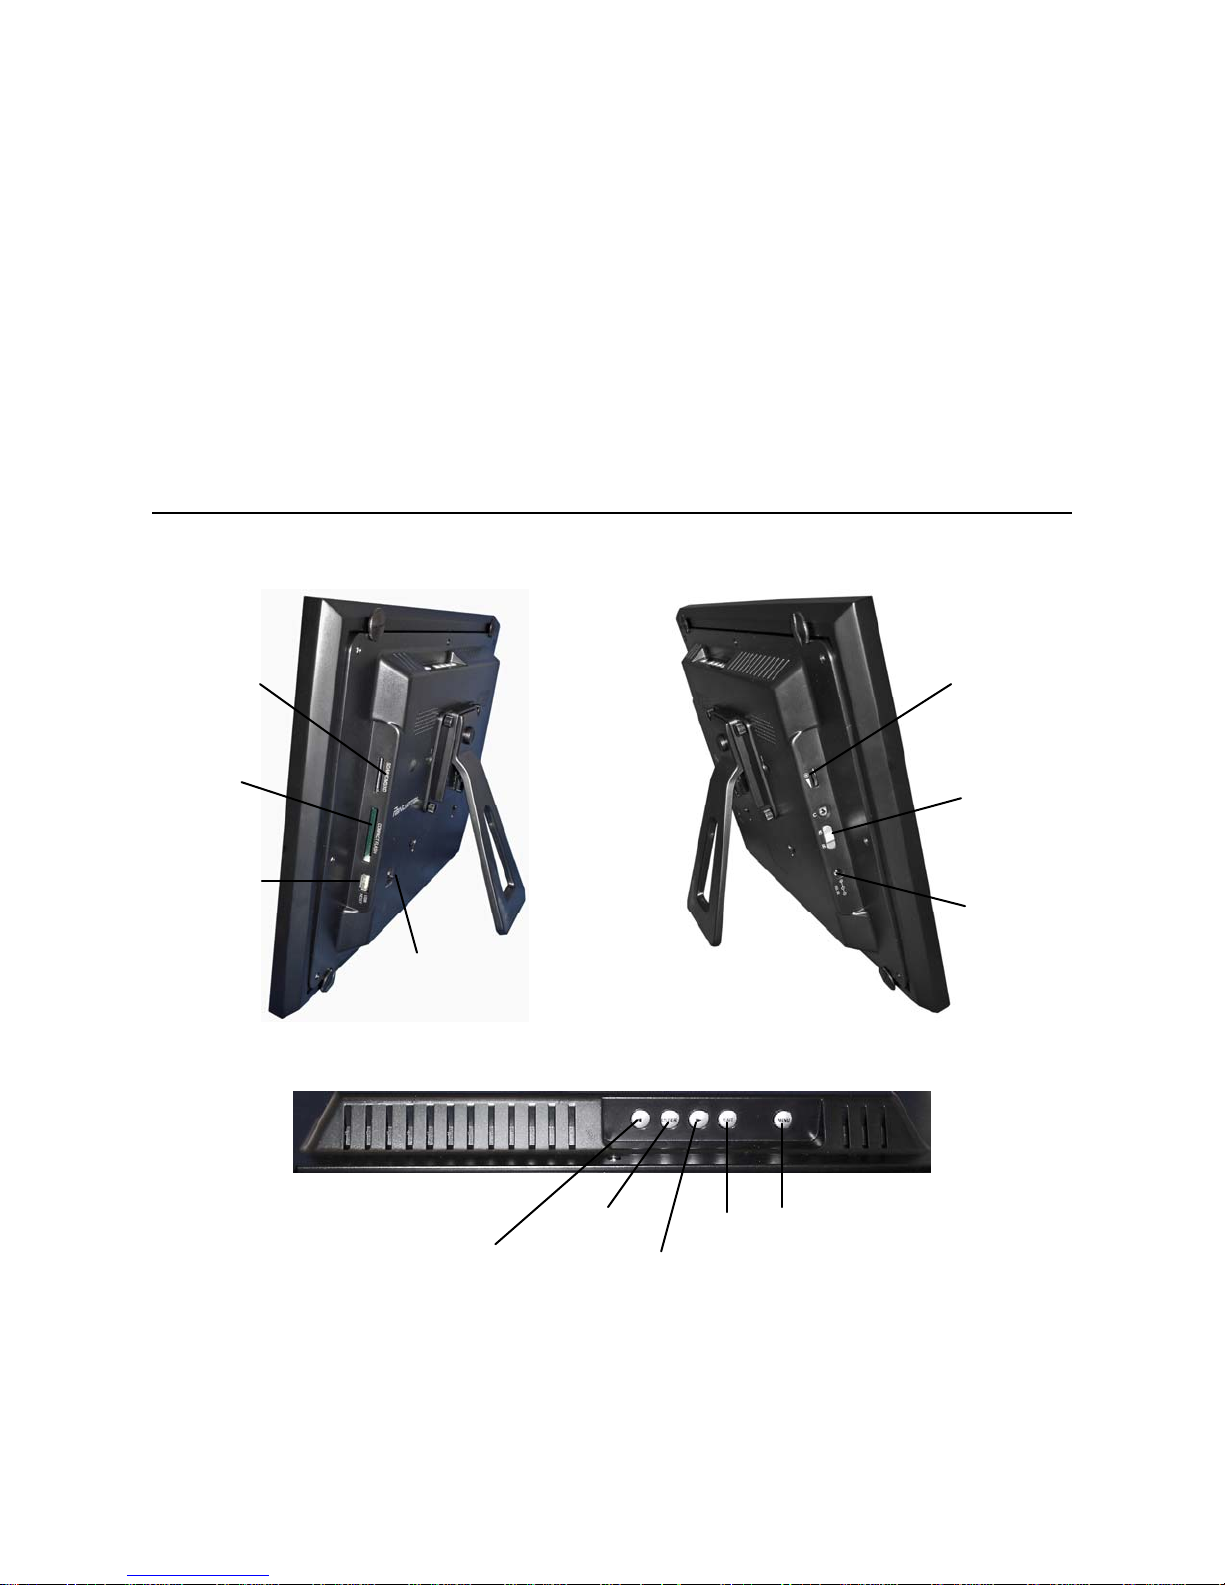
Overview of the 12” and 13.3” DPF
RIGHT SIDE
LEFTSIDE
Multi-Memory
Compact
Flash slot
card slot
USB Host
Mini USB
Device
TOP PANEL CONTROL BUTTONS
ENTER
EXIT
Brightness control
Power switch
ON/OFF
DC power jack
MENU
(Note: Your frame, memory card slots, ports, and jacks may be different than those pictured here.)
◄Left arrow
►Right arrow
9
Page 10

Overview of the 15” DPF
Power switch
Scroll forward
Play/Pause
Scroll back
Exit
Menu
Memory Card Slots
DC Power in
(Note: Your frame, memory card slots, ports, and jacks may be different than those pictured here.)
Remote Control
You can access all of the DPF’s features, and perform all of the functions
by using the remote control. You will be able to perform several functions
with the remote control that are not possible with the top-back panel
control buttons.
Throughout this User Guide, this icon depicts th e specific use of
the Remote Control.
Note: Before first time use, pull the plastic tab sticking out
of the remote control. It protects the battery and the
remote control will not work unless it is removed.
10
Page 11

Overview of Remote Control
Play Slideshow
Exit or go back
Scroll up
Scroll previous
Play/Pause/Select object
Volume adjust higher
or select object
Volume adjust lower
or de-select object
Access Setup screens
Scroll forward
Scroll down
Rotate image
Enlarge image
Store the Remote Control
Avoid misplacing the remote control by safely storing it on the back
of the DPF when not in use.
The back of the remote control has a built-in magnet and the back of
the DPF has a ‘magnetic area’ so you can simply attach the remote
control to the back of the DPF for safe keeping.
11
Page 12
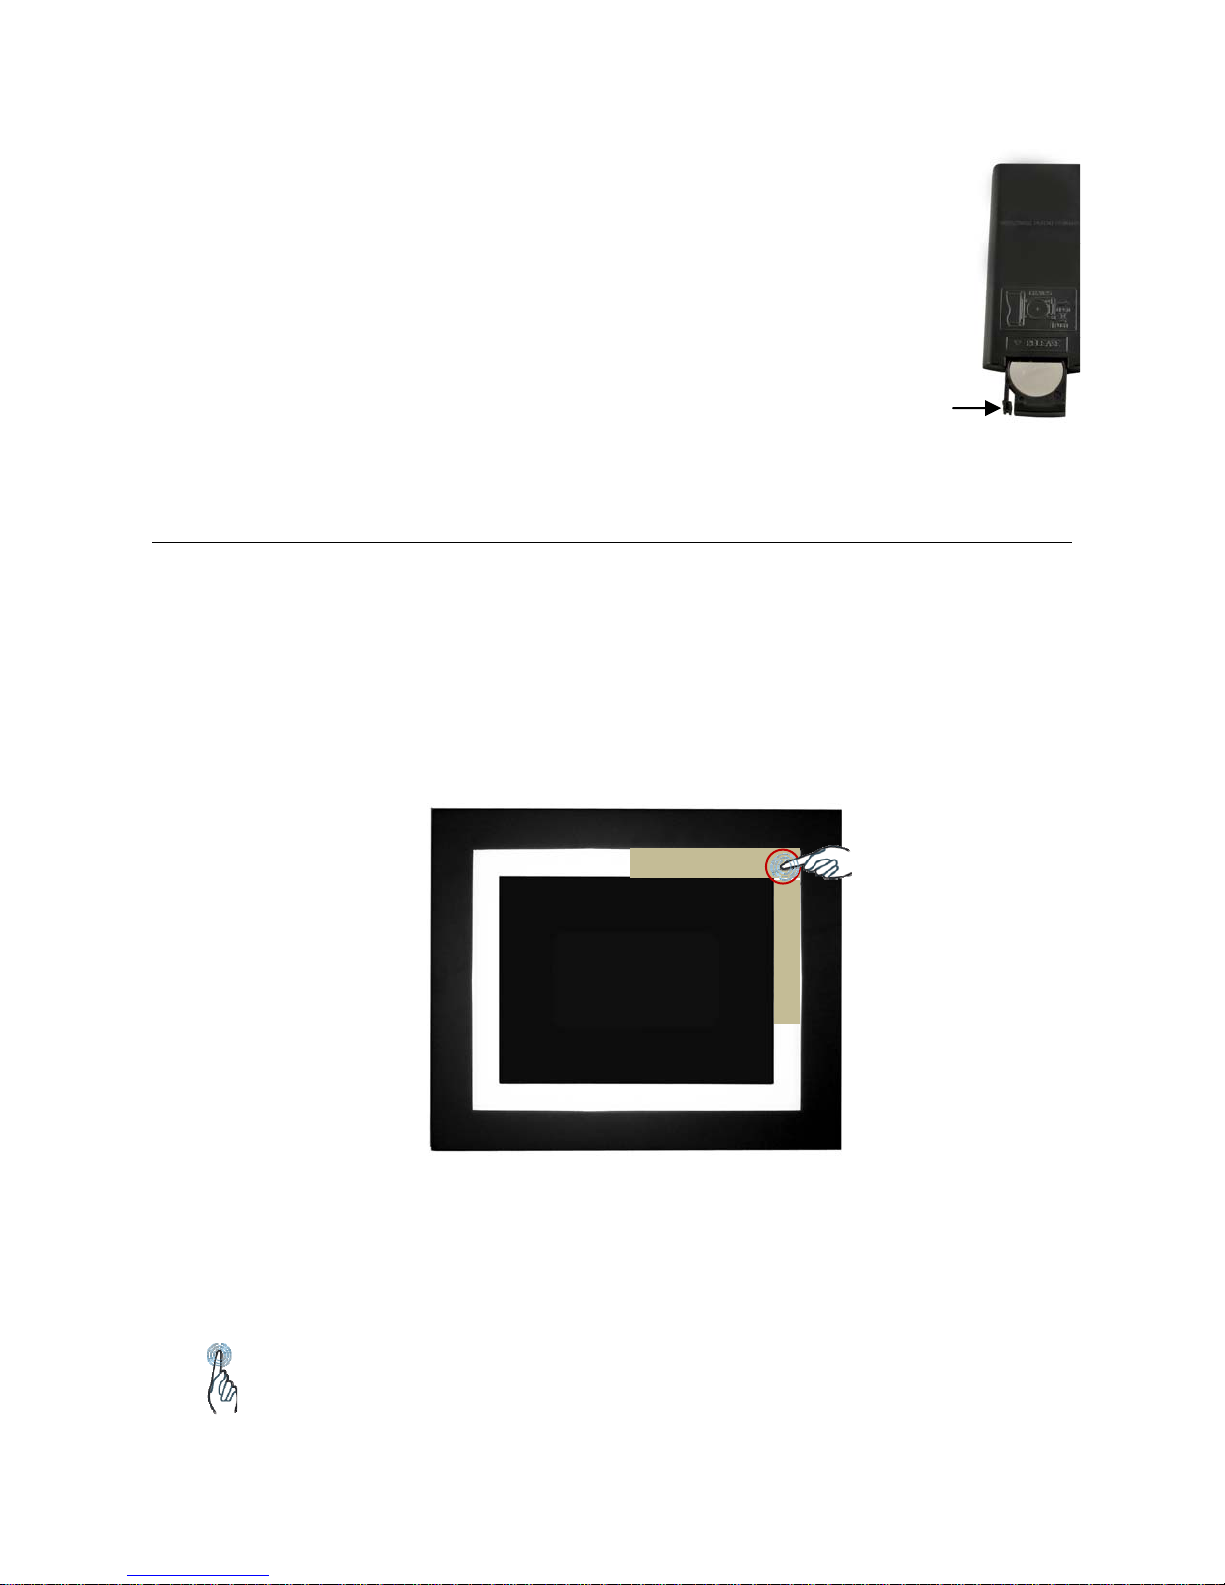
Replace the Remote Control Battery
1. Hold the remote control with the buttons facing down.
2. Push and hold the small release tab while pulling the
battery tray out.
3. Replace the “CR2025” Lithium battery on the tray with
the positive (+) side facing up.
4. Push the tray back in until it clicks into place.
Release tab
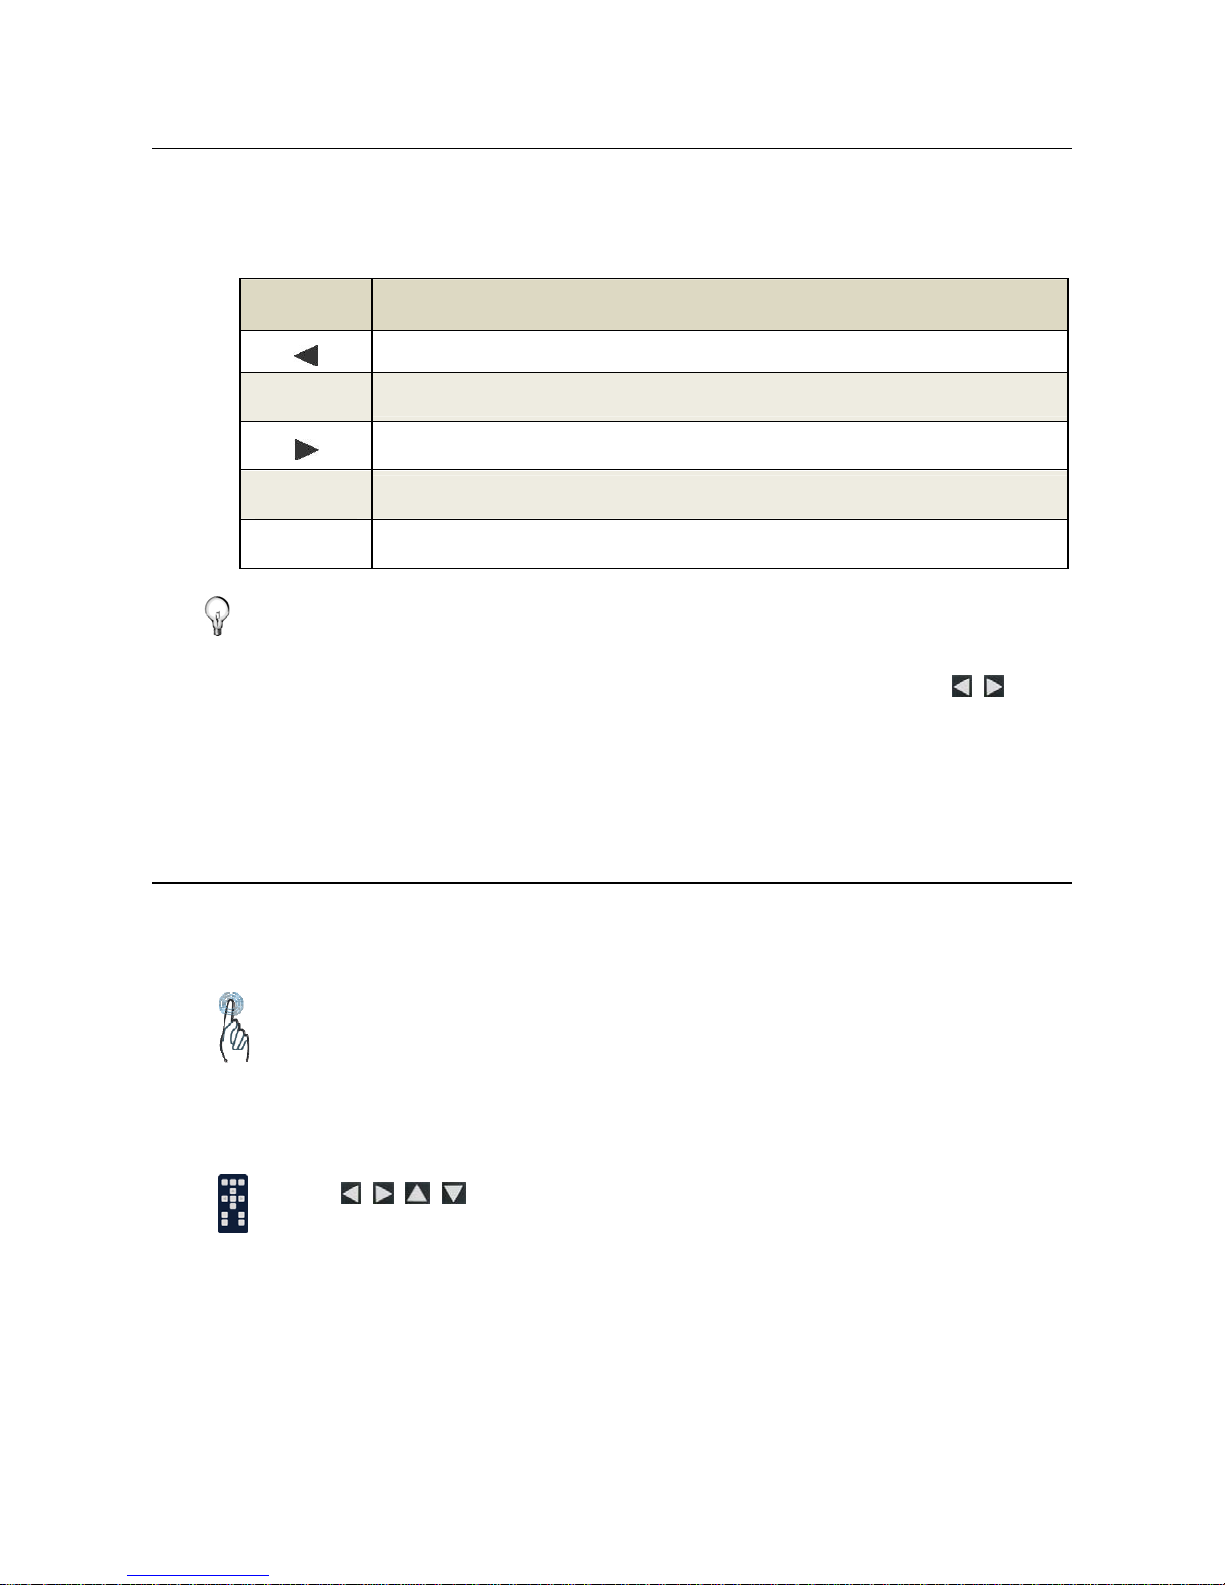
PanTouch Interface
This DPF includes our PanTouch technology, a touch icon-driven
interface allowing you to navigate through all the DPF features and
functions.
The touch sensors are located strategically along the top and right edge
of the frame under the paper mat and are activated by simply touching
the activation point in the upper right corner.
SENSORS AREA
S
E
N
S
O
R
S
PanTouch Interface
activation point
The navigation icons appear for 5 seconds (without any user interaction),
and then disappear until you activate the PanTouch interface again.
While the PanTouch interface is active, the remote control will be
inoperable.
Throughout this User Guide, this hand icon depicts the specific use
of the PanTouch interface.
12
Page 13
Control Buttons on DPF
You can perform many (but not all) of the DPF functions by using the
control buttons located on the back of the DPF. Their basic functions are
the same no matter when you use them.
Button Action
ENTER
EXIT
MENU
TIP: The instructions throughout this User Guide reference the use
of the PanTouch interface and the Remote Con trol. However,
you could also use the frame control buttons when the
Scroll left
Select the highlighted option, start a Slideshow, Play and Pause
Scroll right
Exit the current display, or go back a screen
Access the SETUP Menu screen
ENTER, EXIT, and MENU buttons are referenced.
About Selecting Options
Throughout this User Guide, when you are instructed to simply ‘touch’ or
‘select’ a function option or button, do the following:
,
Touch the upper right corner of the mat to activate the PanTouch
interface and then touch the desired option button, or use the arrows
to highlight
select (unless otherwise instructed).
Use
press
to highlight [the referenced option], and then
ENTER to select (unless otherwise instructed).
[the referenced option], and then touch ENTER to
13
Page 14

Getting Started
1. Plug the AC Power Adapter into the DPF’s DC power jack and an
electrical wall outlet.
2. Push the power button on the DPF to the ON position.
3. If prompted, select the desired language for the user interface
display (varies by model).
4. After the initial start up screen is displayed, a slideshow will
automatically begin displaying the photos that are stored in the
internal memory.
5. To view your own photos, insert a memory card or USB flash drive
containing your photos into the appropriate slot/port on the DPF, and
then select
CAUTION: The cards and USB flash drive will only fit in one direction;
PLAY SLIDESHOW on the memory source option screen.
do not force them as this will damage the card reader or
USB port.
The HOME Screen
The main DPF features, PHOTOS, MUSIC, VIDEO, CLOCK, RECIPES,
Wi-Fi, and the Setup Menu screen are accessed from the HOME
screen.
To access the
or activate the PanTouch interface and then touch
HOME screen while a slideshow is playing, press MENU
HOME.
14
Page 15

TIP: The background photo will change according to the photos
stored on the selected media source.
Clock
Recipes
View clock and calendar with photo slideshow, and manage
the calendar, clock, and alarm settings
View pre-loaded sample recipes and cookbooks (page 37)
With the Pandigital Wi-Fi USB adapter (sold separately) you
Wi-Fi
Edit
MENU Access the Setup Menu screen
can connect wirelessly for access to on-line photo sites
(page 39) and to your PC for file transfer (page 48)
Quick access to single photo manage mode for Zooming,
Rotating, Importing, or Deleting currently displayed photo
Play Slideshow of photos on currently selected media source
Display your photo files (.JPG or .JPEG) individually or as
PHOTOS
slideshows.
PHOTOS-Manage: set viewing preferences,
assign photos to category folders, import and delete photo
files
(page 18)
(page 33)
MUSIC
Play your MP3 music files. MUSIC-Manage: set listening
preferences, import and delete music files
VIDEO
Play motion JPEG AVI video files. VIDEO-Manage: set
viewing preferences, import and delete video files
(page 27)
(page 30)
15
Page 16

SETUP Menu Overview
Use the Setup Menu for DPF functions to optimize your viewing/listening
preferences. To access the
Setup Menu screen, on the HOME screen,
touch or press
Select Media
Source
MENU.
Select the media source for current viewing or
listening
(page 17)
Wi-Fi Network
Setup
Slideshow Setup
Adjust Screen
Colors
Optimal Image
Display
Photo Import
Method
Set Sleep Mode
Reset to Factory
Defaults
Set up wireless network to which you want to
connect
(page 41)
Multiple slideshow functions for optimizing your
viewing preferences
(begin on page 22)
Adjust LCD screen settings as desired (page 20)
Set photos to display as original photo size, or
optimized to best fit the screen
(page 21)
Set photos to be imported compressed or original
resolution and file size
(page 18)
Power saving function (page 54)
Returns all function settings to the factory defaults
(page 54)
16
Page 17
Set Language
Select desired DPF display language (page 54)
System Info
System Upgrade
View current settings and assign name to DPF
(page 55)
For firmware upgrades
Select Media Source
If you have inserted one or more external media sources (i.e., memory
card, USB flash drive), you can use the
switch between the internal memory and your external media source for
viewing your photos, videos, or listening to music.
You will also use this function to view the contents of the
Folders
1. On the
after you assign photos to these folders (page 23).
HOME screen, touch or press MENU to display the Setup
Select Media Source function to
Slideshow
Menu screen.
2. Select
Select Media Source, and then select the desired media
source (only present media sources will be available for selection).
Internal Memory = Built-in flash memory
SD/MMC = Secure DigitalTM / Multi MediaTM card
MS = Memory StickTM (Standard, Pro, and Duo)
xD = eXtreme Digital flash memory card
CF = Compact Flash
USB = Standard USB flash drive
Slideshow Folders = View photos after assigning to folders (page 23)
3. The Photo Thumbnails or Slideshow Folders screen will display
the photos found in the selected media source.
17
Page 18

PHOTOS
The PHOTOS feature includes many functions for playing slideshows,
viewing individual photos, and for optimizing your viewing preferences.
Display Photo Thumbnails Screen
1. On the HOME screen, select PHOTOS to display the Photo
Thumbnails screen.
2. To view a photo in full-screen, use the arrows to highlight the
desired photo, and then touch
Zoom or Rotate Photos
With an individual photo displayed (per above instructions),
touch or press
achieve desired view.
TIP: When a photo is zoomed, you can pan around the
photo by using the arrows to view portions of the pho to
that are not currently visible.
ZOOM or ROTATE, multiple times if required to
Import Photos into Internal Memory
You can import your photo files from external media sources (i.e.,
memory card, USB flash drive) into the DPF’s internal memory. The
number of photo files you can import depends on file size and
available memory.
View or press ENTER.
1. Insert your media source into the DPF. The memory card
option screen will be displayed.
2. To import all
To import selected
a) Touch
b) Touch
c) Use the arrows to scroll through the photos, and then
touch
18
photos, touch IMPORT ALL PHOTOS.
photos:
SELECT PHOTOS TO IMPORT.
MANAGE +.
to select each photo you want to import.
Page 19
d) Touch IMPORT SEL.
e) Confirm
1. Insert your media source into the DPF. The memory card
TIP: After starting an import, you can touch CANCEL or press
option screen will be displayed.
2. To import all
To import individual
a) Select
b) Use
press ‘
c) Press
d) Confirm
Yes or No.
photos, select IMPORT ALL PHOTOS.
photos:
SELECT PHOTOS TO IMPORT.
to scroll through the photos, and then
+’ to select the desired photos to import.
MENU, and then select IMPORT SEL.
Yes or No.
EXIT to stop the import operation. Photos that have
already been imported will not automatically be deleted.
Delete Photos from Internal Memory
You can delete photo files from the DPF’s internal memory, but not
from an external media source (i.e., memory card, USB flash drive).
In order to delete photo files, you must have
your selected media source.
TIP: It is recommended to make backup copies of the photos
before you delete them from the DPF.
1. On the
2. Touch
3. To delete all
Yes or No.
To delete selected
a) Use the arrows to scroll through the photos, and then
HOME screen, select PHOTOS.
MANAGE +.
photos, select DELETE ALL, and then confirm
photos:
Internal Memory as
use
to select each photo you want to delete.
19
Page 20

b) Select DELETE SEL.
c) Confirm
1. On the
2. To delete all
Yes or No.
HOME screen, select PHOTOS.
photos, press MENU and then select
DELETE ALL.
To delete selected
a) Use
press ‘
b) Press
c) Select
d) Confirm
TIP: If, by mistake, you select Yes to delete photos, you can
touch
Photos alre ad y deleted will n ot automatically be restored.
CANCEL or press EXIT to stop the delete operation.
to scroll through the photos, and then
+’ to select (‘-‘ will deselect).
MENU.
DELETE SEL.
Yes or No.
photos:
Adjust Screen Colors
There are four LCD color level settings that you can adjust for
optimal image viewing.
1. On the
Menu screen.
2. Select
3. Touch
balance adjustments.
4. Touch the desired setting option button at the top of the
screen;
5. Use the arrows to adjust the option setting until the desired
view is achieved.
6. Select
HOME screen, select MENU to display the Setup
Adjust Screen Colors.
NEXT PHOTO to view the preferred photo for optimal
Brightness, Contrast, Tint, or Color.
DONE to save the settings.
20
Page 21

1. On the
Menu
HOME screen, press MENU to display the Setup
screen.
2. Select Adjust Screen Colors.
3. Use
4. Use
to adjust the option setting until the desired view
is achieved.
5. Press
settings.
Optimal Image Display
The DPF can display your photos as original size or optimized to fit
the screen size.
1. On the
Setup Menu screen.
2. Select
setting (small green dot indicates selected option).
Original = Displays photos with actual photo size.
Optimal (default) = Optimizes the size and resolution to best fit the screen,
which may result in part of a photo not being visible on the screen.
HOME screen, touch or press MENU to display the
Optimal Image Display, and then select the desired
to access the LCD option button.
to scroll through the LCD options, and use
ENTER to access the DONE button to save the
Photo Import Method
When importing files into the internal memory from an external media
source, the file can be optimized or left as the original file size and
resolution.
1. On the
Setup Menu screen.
HOME screen, touch or press MENU to display the
2. Select Photo Import Method, and then select the desired
setting (small green dot indicates selected option).
Optimized (default) = The photo file is downscaled in size and compressed
into a smaller sized JPEG, allowing more photos to be stored in the internal
memory.
Original = The photo file is stored keeping its original size and resolution.
21
Page 22

PHOTO SLIDESHOWS
The DPF can display all of the photos on the selected media source as a
slideshow, or you can select specific photos for a custom slideshow. You
can also have background music with your slideshows simply by storing
music MP3 files on your selected media source.
Slideshow of Photos in Internal Memory
You can play a slideshow of the photos stored in the DPF’s internal
memory by simply powering on the DPF (if no external media source
or is inserted) and then wait for the slideshow to automatically begin.
Slideshow of Photos on your Media Source
Insert an external media source (i.e., memory card) into the DPF; a
memory source option
the slideshow will begin automatically unless you choose one of the
three options.
screen is displayed for 15 seconds and then
Pause a Slideshow
To pause a slideshow, touch or press EXIT. The slideshow will pause
for approximately 30 seconds, and then will automatically resume
playing.
To resume the slideshow without waiting for the 30-second timeout,
touch
or press ENTER.
Slideshow Background Music
To play background music during a slideshow, simply copy at least
one music MP3 file onto the same media source as your photos. The
music will automatically play as the slideshow is displayed.
If you have multiple MP3 files on your media source, each music file
will play in succession until all have been played, and then will repeat
according to the
Music Repeat Mode setting (page 28).
22
Page 23

Adjust the Volume
While the music is playing, activate the PanTouch interface and
then select the on-screen volume + or - buttons, or press the
remote control ‘
Mute the Background Music
Press ENTER or activate the PanTouch interface and then
touch
The slideshow will continue to play with the music muted until
you press
Slideshow Folders
There are five category folders in the internal memory into which you
can assign photo files for personalized organization and slideshows
(these folder names cannot be changed):
Only photos stored in the internal memory can be assigned to the
slideshow folders. Assigned photos are not physically moved or
copied into the folders, rather, a link is assigned to the photo so it
appears to be located in the folder. If you delete the actual photo file
from internal memory, the link to the folder will also be deleted.
Family – Friends – Vacation – Events – Others
+’ or ‘-‘ buttons.
.
ENTER again or touch .
Copy Photos into Slideshow Folders
1. On the HOME screen, select PHOTOS.
2. Touch
3. Use the arrows to highlight the desired photos, select
4. Use the arrows to highlight the desired slideshow folder
into which you will copy the selected photos, and then
select
1. On the HOME screen, select PHOTOS.
MANAGE +.
to select each photo, and then select COPY TO.
ENTER.
2. Press ‘
3. Press
+’ to select desired photos (‘-‘ will deselect).
MENU.
23
Page 24

4. Select COPY TO, and then select the desired folder
into which you will copy the photos
.
Play Slideshow from Slideshow Folder
1. On the HOME screen, touch or press MENU to display the
Setup Menu screen.
2. Select
3. Select
4. Select the desired folder containing the photos you want to
view in your slideshow.
5. Touch or press
touch
Select Media Source.
Slideshow Folders.
EXIT to return to the HOME screen, and then
or press SLIDESHOW.
Copy or Move Photos to Different Folders
After assigning photos to folders, you can copy or move those
photos to other folders.
1. With the slideshow folders slideshow playing (per
above), touch
Thumbnails screen.
2. Touch
3. Use the arrows to scroll through the photos, and then
use
4. Touch
5. Select the desired folder into which you want to copy
or move the selected photos.
1. With the slideshow folders slideshow playing (per
above), press
Thumbnails
2. Use
MANAGE +.
to select the photos you want to copy or move.
COPY TO or MOVE TO.
to scroll through the photos, press ‘+’
EXIT twice to display the Folder
EXIT twice to display the Folder
screen.
24
to select (‘
-‘ will deselect).
Page 25

3. Press MENU, and then select COPY TO or MOVE TO.
4. Select the desired folder into which you want to copy
or move the selected photos.
Slideshow Setup Options
You can set multiple options for customizing your slideshow
preferences.
Set Slideshow Music Mode
You can set the slideshow to display without music, even if music
files are present on the selected media source.
1. On the
Setup Menu screen.
2. Select
3. Use the left/right arrows to highlight
up/down arrows to toggle
ON (default) = Play background music with slideshow
OFF = Do not play music with slideshow, even if MP3 files are stored on
selected media source
HOME screen, touch or press MENU to display the
Slideshow Setup.
Slideshow Music, use the
ON/OFF.
4. Select Done to save all settings.
Set Slideshow Interval
You can set the speed at which the slideshow photos transition from
one to another.
1. On the
HOME screen, touch or press MENU to display the
Setup Menu screen.
2. Select
Slideshow Setup.
3. Use the left/right arrows to highlight
up/down arrows to scroll through the options.
5 (default), 10, 30, 60 seconds, 30 minutes, 1 hour, or 24 hours
4. Select Done to save all settings.
Slideshow Interval, use the
25
Page 26

Set Slideshow Transition
You can set the transition ‘special effects’ as photos transition from
one to another during a slideshow.
1. On the
Setup Menu screen.
2. Select
3. Use the left/right arrows to highlight
HOME screen, touch or press MENU to display the
Slideshow Setup.
Slideshow Transition, use
the up/down arrows to scroll through the options.
OFF = Photos transition from one photo to the next without special effects.
Random (default) = Photos will transition using all special effects randomly
throughout a slideshow.
Remaining special effects = Choose individual transition effect as desired
4. Select Done to save all settings.
Set Slideshow Shuffle
You can set the slideshow to display your photos in a random
‘shuffle’ order, or display them in the order as stored on the selected
media source.
1. On the
HOME screen, touch or press MENU to display the
Setup Menu screen.
2. Select
3. Use the left/right arrows to highlight
up/down arrows to toggle
ON = Displays photos randomly
OFF (default) = Displays photos in the order found on selected media source
Slideshow Setup.
Slideshow Shuffle, use the
ON/OFF.
4. Select Done to save all settings.
Display Current Time with Photos
The current time can be displayed in the upper left corner of the
screen with your photos if desired.
1. On the
Setup Menu screen.
2. Select
HOME screen, touch or press MENU to display the
Slideshow Setup.
26
Page 27

3. Use the left/right arrows to highlight Display Current Time, use
the up/down arrows to toggle
4. Select
TIP: If the time is incorrect, refer to Set Date and Time on page
Done to save the setting.
33 to set the clock.
ON/OFF,
Display Photo File Date/Time Stamp with Photos
Most digital cameras typically include a Date/Time stamp when
saving photo files. If your photo files contain this Date/Time
information, you can have it displayed with your photos if desired.
1. On the
Setup Menu screen.
2. Select
3. Use the left/right arrows to highlight
Date/Time
HOME screen, touch or press MENU to display the
Slideshow Setup.
Display Photo File
, use the up/down arrows to toggle ON/OFF, and
then touch or press
4. Select
Done.
ENTER to save the setting.
MUSIC
Note: Music files must be standard MP3 format and not from licensed
music download services.
Playing Music Only
1. On the HOME screen, select MUSIC. All present music files will
be listed.
2. Use the arrows to scroll through the list, and then touch
press
3. To play a different music file, simply select a different file name.
ENTER to play a music file.
or
4. To stop the music, touch
, or press EXIT.
27
Page 28

Adjust the Volume
While the music is playing, activate the PanTouch interface and
then use the on-screen volume + or - buttons, or press the
remote control ‘+’ or ‘-‘ buttons.
Mute the Music
Press ENTER or activate the PanTouch interface and then
touch
The music will remain muted until you press
touch
.
.
Set Music Repeat Mode
By default, the Music Repeat Mode is set to continuously play all
music files found on the selected media source until you stop them. If
desired, you can change the repeat mode to play all music files only
once.
Repeat ON (default) = continuously play all music files on the selected media
source until you stop them.
Repeat OFF = play the music files only once.
1. On the
(small green dot indicates ON).
ENTER again or
MUSIC screen, select REPEAT to toggle ON/OFF
1. On the
2. Select
indicates ON) .
Import Music Files into Internal Memory
You can import your music files from external media sources (i.e.,
memory card, USB flash drive) into the DPF’s internal memory. The
number of music files you can import depends on file size and
available memory.
28
MUSIC screen, press MENU.
Repeat to toggle ON/OFF (small green dot
Page 29

1. On the
2. To import all
HOME screen, select MUSIC.
music files, select IMPORT ALL, and then
confirm
To import selected
through the files, touch
import, select
1. On the
2. To import all
ALL
To import selected
highlight the files you want to import, press ‘
(‘
-‘ will deselect), press MENU, select IMPORT SEL,
and then confirm
TIP: After starting an import, you can touch CANCEL or press
Yes or No.
music files, use the arrows to scroll
on each file you want to
IMPORT SEL, and then confirm Yes or No.
HOME screen, select MUSIC.
music files, press MENU, select IMPORT
, and then confirm Yes or No.
music files, use to
+’ to select
Yes or No.
EXIT to stop the import operation. Music files that have
already been imported will not automatically be deleted.
Delete Music Files from the Internal Memory
You can delete music files only from the DPF’s internal memory. It is
recommended that you make backup copies of the music files before
deleting them.
Note: Internal Memory must be your selected media source.
1. On the
2. To delete all
confirm
To delete selected
through the files, touch
HOME screen, select MUSIC.
music files, select DELETE ALL, and then
Yes or No.
music files, use the arrows to scroll
on each file you want to
delete, select
DELETE SEL, and then confirm Yes or No.
29
Page 30

TIP: If, by mistake, you select Yes to delete, you can touch
VIDEOS
1. On the
2. To delete all
ALL
To delete selected
highlight the files you want to delete, press ‘
(‘
-‘ will deselect), press MENU, select DELETE SEL, and
then confirm
HOME screen, select MUSIC.
music files, press MENU, select DELETE
, and then confirm Yes or No.
music files, use to
+’ to select
Yes or No.
CANCEL or press EXIT to stop the delete operation. Music
files already deleted will not automatically be restored.
The DPF supports motion JPEG AVI video files. If your movie file is not
in AVI format, you may have to convert the file by using a software video
converter which is easily found for purchase on the Internet.
Watch a Video
1. On the HOME screen, select VIDEO. All present video files will
be listed.
2. Use the arrows to scroll through the list, and then touch
press
3. To play a different video file, simply select a different file name.
4. To stop the video, activate the PanTouch interface and then
touch
Adjust the Volume
While the video is playing, activate the PanTouch interface and
then use the on-screen volume + or - buttons, or press the
remote control ‘+’ or ‘-‘ buttons.
ENTER to play a video file.
, or press EXIT.
or
30
Page 31

Mute the Video
Press ENTER or activate the PanTouch interface and then
touch
The video will remain muted until you press
touch
Video Repeat Mode
By default, the Video Repeat Mode is set to continuously play all
video files found on the selected media source until you stop them. If
desired, you can change the repeat mode to play all video files only
once.
Repeat ON (default) = continuously play all video files on the selected media source
until you stop them.
Repeat OFF = play the video files only once.
1. On the
(small green dot indicates ON).
.
ENTER again or
.
VIDEO screen, select REPEAT to toggle ON/OFF
1. On the
VIDEO screen, press MENU.
2. Select
Repeat to toggle ON/OFF
(small green dot indicates ON).
Import Video Files into Internal Memory
You can import your video files from external media sources (i.e.,
memory card) into the DPF’s internal memory. The number of video
files you can import depends on file size and available memory.
1. On the
2. To import all
confirm
VIDEO screen, touch MANAGE +.
video files, select IMPORT ALL, and then
Yes or No.
31
Page 32

To import selected video files, use the arrows to scroll
through the files, select on each file to import, select
IMPORT SEL, and then confirm Yes or No.
1. On the
2. To import all
ALL
To import selected
highlight the files you want to import, press ‘
(‘
-‘ will deselect), press MENU, select IMPORT SEL, and
then confirm
TIP: After starting an import, you can touch CANCEL or press
HOME screen, select VIDEO.
video files, press MENU, select IMPORT
, and then confirm Yes or No.
video files, use to
Yes or No.
EXIT to stop the import operation. Video files that have
already been imported will not automatically be deleted.
Delete Video Files from the Internal Memory
You can delete video files only from the DPF’s internal memory. It is
recommended that you make backup copies of the video files before
deleting them.
+’ to select
32
Note: Internal Memory must be your selected media source.
1. On the
2. To delete all
confirm
To delete selected
through the files, touch
delete, select
1. On the
2. To delete all
ALL
HOME screen, select VIDEO.
video files, select DELETE ALL, and then
Yes or No.
video files, use the arrows to scroll
on each file you want to
DELETE SEL, and then confirm Yes or No.
HOME screen, select VIDEO.
video files, press MENU, select DELETE
, and then confirm Yes or No.
Page 33

To delete selected video files, use to
highlight the files you want to delete, press ‘
(‘
-‘ will deselect), press MENU, select DELETE SEL, and
then confirm
TIP: If, by mistake, you select Yes to delete, you can touch
Yes or No.
+’ to select
CANCEL or press EXIT to stop the delete operation. Video
files already deleted will not automatically be restored.
CALENDAR/CLOCK
Your DPF can be used as a personal desk calendar with a real-time
clock and alarm, and also displays a continuous slideshow of photos on
the selected media source.
To display the
HOME screen. The slideshow will be displaying photos found on the
currently selected media source.
CALENDAR/CLOCK screen, select CLOCK from the
Set Date and Time
1. On the CALENDAR/CLOCK screen, activate the PanTouch
interface or press
MENU, and then select SET DATE/TIME.
33
Page 34

2. Use the left/right arrows to scroll between the Date and Time
Set Alarm
options, and touch or press
ENTER to activate the entry fields.
3. Use left/right arrows to scroll through the fields, and the up/down
arrows to change the field values.
4. Select DONE to save settings.
You can use your DPF as an alarm clock when desired. You can set
the frequency of the alarm, and set the alert to sound the built-in tone
or play your music file.
1. On the
interface or press
CALENDAR/CLOCK screen, activate the PanTouch
MENU, and then select SET ALARM.
2. Use the left/right arrows to scroll between the options, and touch
or press
Alarm = set the time you want the alarm to alert.
Frequency = set how often you want the alarm to alert (Always, Once, Off)
Alert = set the alert to Music or default Tone (if music, the music file must
reside on the currently selected media when alarm is activated)
ENTER to activate the entry fields.
3. Use the left/right arrows to scroll through the fields, and the
up/down arrows to change the field values.
4. Select
DONE to save settings
When the alarm is set, a small bell or music note will be displayed
indicating the alarm has been set.
Note: At least one MP3 music file must be present on the selected
media source for the alert to play music. If you set the alert to
play music and there is no MP3 music file present, the default
tone will sound instead.
Turn Alarm Off
When the alarm sounds, activate the PanTouch interface or press
any button on the remote control to stop it and return to the
CALENDAR/CLOCK screen.
To cancel the alarm before its scheduled time, follow the previous
instructions for setting the alarm and set the frequency to
34
OFF.
Page 35

Select Media Source for Calendar Slideshow
You can easily change the media source if you want the
calendar/clock slideshow to display photos from a different media
source (i.e., memory card, slideshow folder).
1. On the
2. Select the new media source from the
Set Schedule
You can schedule the DPF to automatically go into a “stand-by”
mode and then resume operation according to your weekly schedule.
For example, if you have your DPF on your desk at work, you may
want to display the calendar/clock or play a slideshow from 8:30am
to 5:30pm every weekday, and then set the DPF to remain in standby mode throughout the weekend. The following Monday morning,
the DPF would resume operation at 8:30am.
CALENDAR/CLOCK screen, activate the PanTouch
interface or press
button in the top of the screen.
MENU, and then select the Media Source
Select Media screen.
1. On the
interface or press
2. Use the left/right arrows to scroll through the Weekdays and
Weekends options.
3. Touch or press
CALENDAR/CLOCK screen, activate the PanTouch
MENU, and then select SET SCHED.
ENTER to activate the entry fields.
35
Page 36

4. Use the left/right arrows to scroll through the fields, and the
up/down arrows to change the field values.
5. Touch or press
Weekends Schedule buttons.
6. Select
Done to save the settings.
Disable the Schedule
To disable the schedule, turn both Enable Weekdays/Weekends
Schedule
buttons OFF, and the entry fields will display OFF.
Run the Schedule
After the schedule times have been set (per instructions on page 35),
you will use the
schedule to take effect.
CAUTION: After you select the Run Schedule function, any user
ENTER to enable the Weekdays and/or
Run Schedule function whenever you want the
intervention will cancel the activation and the schedule
will not take effect until you select this function again to
re-activate.
36
At the start of a slideshow, touch
menu times out.
While a slideshow is playing, or on the
CALENDAR/CLOCK screen, activate the PanTouch
interface and touch
At the start of a slideshow, press
SCHED
seconds).
While a slideshow is playing, or on the
screen, press
A small timer clock will appear indicating the schedule is active, and
the DPF will go into stand-by mode according to the schedule.
button is displayed on the screen (approximately 10
MENU, and then select RUN SCHED.
RUN SCHED.
RUN SCHED before the
ENTER when the RUN
CALENDAR/CLOCK
Page 37

RECIPES
The DPF’s Recipes feature allows you to view recipes from popular
authors such as Bon Appétit and Good Housekeeping (sold separately
on our website http://www.pandigital.net
Sample Bon Appétit seasonal recipes are included with this DPF so you
can experience how the recipe feature works when you purchase and
install the complete seasonal cookbooks.
Note: The Recipes feature is accessible only when the Internal Memory
is the selected media source (page 17.)
You will use these instructions for the pre-loaded sample recipes as well
as the complete cookbook collections.
View Recipes in Cookbook
1. On the HOME screen, select RECIPES to display the Cookbooks
screen.
).
2. Select a Cookbook to display the
screen.
3. Use the arrows to highlight the recipes, and then touch
press
While the individual recipe is displayed, you can touch or press
ENTER to display a recipe in full screen.
ZOOM to enlarge the recipe. You can also use the arrows to
display the previous/next recipes.
Copy Recipes to ‘My Favorite Recipes’
You can copy recipes from a main Cookbook into six food group
categories for quick and easy retrieval:
Salads, Entrées, Desserts and Others. (The food group category
names are not changeable).
1. On the
HOME screen, select RECIPES.
Cookbook Thumbnails
VIEW or
Hors d’oeuvres, Soups,
2. Select a Cookbook to display the
screen.
Cookbook Thumbnails
37
Page 38

3.
Use the arrows to scroll through the recipes, touch
on each recipe that you want to copy, and then select
COPY TO.
4. Select the desired food group category into which you want to
copy the recipes.
Use
each recipe that you want to copy, press
select
to scroll through the recipes, press ‘+’ on
COPY TO.
View the Recipes in ‘My Favorite Recipes’
After you have copied recipes into the food group categories (per
instructions above) you can quickly view them at any time.
1. On the
2. Select the desired food group category to view.
3. Use the arrows to highlight the recipes, and then select
press
While the individual recipe is displayed, you can touch or press
RECIPES screen, select My Favorite Recipes.
ENTER to display a recipe in full screen.
MENU, and then
VIEW or
ZOOM to enlarge the recipe. You can also use the arrows to
display the previous/next recipes.
Delete, Move, or Copy Recipes from Categories
After you have copied recipes into food group categories, you can
delete them from the category, move, or copy them from one
category into another when desired.
1. On the
2. Select the desired food group category from which you will
delete, move, or copy recipes.
3.
RECIPES screen, select My Favorite Recipes.
Use the arrows to scroll through the recipes, touch
each recipe that you want to copy, move, or delete, and
then select
COPY TO, MOVE TO, or DELETE.
on
38
Page 39

Use
each recipe that you want to copy, move, or delete. Press
to scroll through the recipes, press ‘+’ on
MENU, and then select COPY TO, MOVE TO, or DELETE.
4. When applicable, select the desired food group category into
which you will move or copy the recipes.
Wi-Fi
This feature allows a wireless connection with multiple online photo sharing
and streaming RSS content feed websites (i.e., Windows Live FrameIt).
You will be able to view images you have uploaded to these sites, as well
as receive streaming news, weather, traffic, and other content feeds
directly through the DPF.
Use this feature to also connect wirelessly to your PC for easy file transfer
(page 48).
Set up DPF to connect to Photo Sharing Websites
Setting up your DPF to connect with the photo sharing websites
requires 3 steps:
A. Assign your wireless network ID and password on the DPF.
B. Establish an account with an online photo sharing website and
upload your photos to their website. (The available online photo
sharing websites vary depending on the DPF models.)
C. Assign your photo sharing website User ID and password on
the DPF, and then connect with the site to view your uploaded
photos directly through the DPF.
The Virtual Keyboard
You will use a virtual keyboard for entering your wireless network ID
and password, as well as the User ID and Passwords associated
with your online photo sharing accounts.
39
Page 40

Navigate the keyboard as follows:
To select the desired characters, use the arrows to highlight the
keys, and then touch or press
ABC = Toggles between character style buttons as follows:
ENTER multiple times as needed.
ABC = Upper case letters
abc = Lower case letters
NUM = Numeric characters
SYM = Access the following symbols:
\ / : ; ( ) $ & [ ] . , % ^ + = - | < > { } ! ~
= Scroll through your entry to edit as needed
BACKSPACE = Erases last selected character
ENTER = Selects the highlighted character
DONE = Completes entry
CANCEL = Return to the previous screen without an entry
TIP: You can also use the remote control buttons as follows:
‘
+’ = Scroll forward through entry to edit as needed
‘
-‘ = Scroll back through entry to edit as needed
ROTATE = Backspace, erases last selected character
ZOOM = Toggles between SYM / NUM / ABC / abc screens
40
Page 41

Set up Wireless Network
Note: You must have an active wireless network within range of the
DPF, and the Pandigital wireless Wi-Fi USB Adapter must be
connected to the DPF. (Wi-Fi adapter sold separately on our
website: http://www.pandigital.net
1. Insert the Pandigital wireless USB adapter into the USB Host
port on the DPF.
.)
2. On the
3. Select
HOME screen, touch or press MENU.
Wi-Fi Network Setup. The Network Setup window will
be displayed, similar to this example:
4. Select Scan for Available Network. The wireless networks
within range will appear in the
TIP: If your wireless network is configured to be ‘hidden’, the scan
will not list it as an available network. In that case, instead of
performing a scan, select one of the Network SSID buttons to
manually enter the Network ID and password.
5. Select the desired Wi-Fi network to which you want to connect.
The network screen will be displayed, similar to this example:
Network Setup window.
41
Page 42

6. If necessary, change the
option button, and then touch or press
select the appropriate security type.
7. Select
your
use the ‘ABC’ ‘a bc’ ‘NUM’ and/o r ‘SYM’ button as needed for
correct characters.)
8. Select
9. Select
the PanTouch interface or press any remote control buttons until
the connection completes (20-30 seconds).
10. If the connection fails, the Network Setup screen is displayed
again so you can re-enter your network ID & password, and
select a different security type if necessary.
11. When connected, the
displayed, similar to the following example:
Password, and then use the virtual keyboard to enter
Wi-Fi Password. (The ID and password are case sensitive;
Done in the Virtual Keyboard screen.
Connect in the Network Setup screen. Do not activate
Secure Access type by selecting the
ENTER multiple times to
Network Options screen will be
42
Page 43

TIP: After making a successful connection with the wireless
network, whenever you re-power on or re-insert the Wi-Fi
adapter, the DPF will connect to the network and the
Options
screen will be displayed.
Windows Live FrameIt
One of the online photo sharing sites you can wirelessly connect with
is Windows FrameIt, which also offers streaming live RSS data feeds
for viewing live News, Weather, Traffic, Sports, and more directly
through your DPF.
Connect with FrameIt
1. On the HOME screen, select Wi-Fi.
Wi-Fi
2. Select
3. The DPF is pre-set to display the following live feeds when
you initially access Windows Live FrameIt:
MSNBC Top Stories
Sports
US Major City (weather)
World News
4. Select the RSS feed folder you want to view.
FrameIt.
43
Page 44

Establish Account and Connect with FrameIt
To view your own photos or other live feeds from FrameIt, you
must first establish a personal account with FrameIt; go to
http://frameit.live.com
assign desired RSS feed content that you want to view on the
DPF.
, set up an account, create collections, and
1. After establishing your account with FrameIt, on the
screen, select
2. Use the arrows to highlight
then touch
Wi-Fi.
Windows Live FrameIt, and
USER SETUP or press MENU.
HOME
3. The FrameIt screen will be displayed, similar to the following
example:
44
4. Select
Get Token1; a new Token will be displayed, along
with the FrameIt web address for registering the Claim
Token.
5. On your PC:
Go to the FrameIt web address shown on the DPF screen,
register the Claim Token, and then click
Continue.
Your unit will be listed in the window of “Registered devices”.
6. On the DPF:
On the
to ‘Registered’), and then select
7. The
FrameIt screen, select Register (status will change
Connect.
FrameIt screen will display your RSS feed folders.
Page 45

8. Proceed to step 2 in following View FrameIt RSS Feeds
instructions.
View FrameIt RSS Feeds
IMPORTANT: This step assumes that you have already
)
successfully connected the DPF with the Windows
Live FrameIt site per previous instructions.
1. On the
2. On the
3. The RSS feed folders that you assigned on frameit.live.com
will be displayed. The titles will appear as you highlight the
folders. Select a folder to display the contents.
4. Wait for the feed data to appear; the length of time it takes to
appear depends on the amount of feed data contained within
the selected folder. For instance, a folder that contains a
large number of photos will take substantially longer to
display than when you select News or Weather feeds.
TIP If you make changes to your Windows Live FrameIt
account while your DPF is connected (i.e., create new
collections), the new feed data will not display until you
disconnect and re-connect with FrameIt.
HOME screen, select Wi-Fi.
Wi-Fi Options screen, select FrameIt.
Zoom Photos on FrameIt
1. With the photo displayed that you want to enlarge, press
ZOOM, or activate the PanTouch interface, touch EXIT, and
then touch
desired view.
2. To resume normal viewing, touch or press
Photo Sharing Websites
The DPF can connect wirelessly to popular online photo sharing
websites to which you have uploaded your photos, allowing you to
view the uploaded photos directly through the DPF.
Zoom, multiple times if necessary to achieve
EXIT.
45
Page 46

Connect DPF with Photo Sharing Websites
The online photo sharing websites that the DPF can access vary
depending on the DPF models, and could change without notice.
Follow these steps to determine which sites are available with
your DPF:
1. After completing the initial wireless network setup
on the
2. On the
desired photo sharing website icons.
3. When highlighted, the instructions for accessing the online
photo sharing website will be displayed. Follow these
instructions to establish your accounts with the desired
websites. (You can create two accounts with each photo
sharing website if desired.)
4. Touch
options.
5. Select
enter your photo sharing account
arrows to access the keys, and up/down arrows to access
the navigation buttons.)
6. Select
HOME screen, select Wi-Fi.
Wi-Fi Options screen, use the arrows to highlight the
USER SETUP or press MENU to access the setup
User ID 1 or 2, and then use the virtual keyboard to
User ID. (Use the left/right
Done.
(page 41),
46
7. Select
enter your photo sharing account
8. Select
TIP: The ID and password are case sensitive; if the
9. Select
10. When you are successfully connected, the albums or
collection folders you created in your photo sharing account
will be displayed.
11. Select a folder containing the photos you want to view. The
Folder Photo Thumbnails screen will be displayed.
Password 1 or 2, and then use the virtual keyboard to
Password.
Done on the Virtual Keyboard screen.
‘Connected failed, please check ID and Password’
message appears, you may need to re-enter them
being careful to use the appropriate upper/lower case
characters.
Connect on the photo sharing setup screen.
Page 47

12. To view a photo individually, use the arrows to scroll through
the photos and then touch
photo.
13. To play a slideshow of the photos, touch
VIEW or press ENTER on the
or press
SLIDESHOW.
Zoom Photos
1. With the photo displayed that you want to enlarge, press
ZOOM, or activate the PanTouch interface, touch EXIT, and
then touch
desired view.
2. To resume normal viewing, touch or press
Zoom, multiple times if necessary to achieve
EXIT.
Import Photos from Photo Sharing Website
You can import photos from the photo sharing website folders
into the DPF’s internal memory.
1. On the
2. On the
sharing website, and then select the desired folder
containing photos you want to import.
3. To import all
and then select
To import selected
HOME screen, select Wi-Fi.
Wi-Fi Options screen, select the desired photo
photo files, touch IMPORT ALL, or press MENU
IMPORT ALL.
photo files:
Use the arrows to scroll through the photos, touch
to select the photos you want to import, and then
touch
Use
on the photos you want to import (‘
press
IMPORT SEL.
to scroll through the photos, press ‘+’
-‘ will deselect),
MENU, and then select Import Selected.
47
Page 48

DPF to PC – Wireless Connection
You can connect the DPF to your PC wirelessly to transfer files from your
PC into the DPF’s internal memory.
Note: You must have an active wireless network within range of the DPF,
and the Pandigital wireless Wi-Fi USB Adapter must be connected
to the DPF. (Wi-Fi adapter sold separately on our website:
http://www.pandigital.net
Recommended Software
Recommended Windows Media Player 11
Requires Windows XP SP3 or Vista SP2
Recommended TwonkyMedia 5
Requires Macintosh OSX10.3 (Leopard)
Set up Universal Plug and Play (UPnP) Server
.)
A UPnP Server must be set up on your computer before you will be
able to connect the DPF to your PC wirelessly.
Windows
Go to Microsoft’s website for instructions on setting up and
configuring your Windows UPnP Server:
http://www.microsoft.com/windows/windowsmedia/knowledgecen
ter/howto/mp11/sharemedia.aspx
Apple Macintosh
Go to the Twonky Vision website for instructions on setting up
and configuring your Macintosh UPnP Server:
http://www.twonkyvision.de/server_download.html
Connect DPF to PC Wirelessly
1. On the HOME screen, select Wi-Fi.
2. Select
you want to connect.
Connect to PC, and then select the UPnP server to which
3. Select the desired media category (i.e., Music, Pictures).
4. The folders within the category will be displayed, similar to the
example below. Select the desired folder containing the files you
want to import.
48
Page 49

The list of files will be displayed.
To play a slideshow, music, or video, touch or press
name.
To import files:
Touch
touch
Manage +, use the arrows to scroll through the files,
on the files you want to import, and then touch
IMPORT.
Use
files you want to import (‘
then select
to scroll through the files, press ‘+’ on the
IMPORT SEL.
-‘ will deselect), press MENU, and
DPF to PC – USB Connection
ENTER on a file
You can connect the DPF to a Windows PC or Macintosh computer via
the USB cable (included) to copy files between the computer and the
DPF’s internal memory.
If you have memory cards inserted in the DPF, you can also copy
between the PC, internal memory, and memory cards.
49
Page 50

Connect DPF to Windows PC
1. Connect the small end of the USB cable to DPF’s Mini USB port,
and the larger end to an available USB port on your computer.
2. A window opens listing all drives connected to your computer,
similar to the following screen:
3. The internal memory (titled Pandigital) and each memory card
present in the DPF will be associated with one disk drive on your
computer.
IMPORTANT: If your PC is connected to Local Area Network
)
drives, or if you have multiple drive letters already
assigned to peripheral devices, you will need to
manage your drive settings in Windows to free up
the four drive letters immediately following your
CD-ROM drive so the DPF can assign them to
memory card slots properly.
4. Double-click the desired drive to display the files on the card.
The following example shows a card listing several JPG images.
50
Page 51

5. To copy files from a media source, select and drag them into the
DPF’s internal memory drive (Pandigital).
6. Similarly, to copy files from your computer to the internal
memory, first locate the files on your computer, select the files
you want to copy, and then drag and drop them into the
appropriate folder in the DPF’s internal memory drive.
Disconnect DPF from Windows PC
It is important to always perform a safe PC ‘release’ before
disconnecting the DPF USB cable from the PC.
WARNING: Do not unplug or switch off the DPF when files
are being transferred, as that can seriously
damage the memory.
Windows Vista
1. On the Windows System Tray, click the hardware removal
icon
2. Click the
message corresponding with the DPF device drive.
.
Safely remove USB mass Storage device
51
Page 52

3. When the message “This device can now be safely removed
from the computer” appears, you can disconnect the USB
cable from your computer.
Windows XP
1. On the Windows System Tray, click the hardware removal
icon
2. Click
3. Select the storage device corresponding with the DPF, and
then click
4. Click
5. When the message “It is now Safe to Disconnect
Hardware” appears, you can disconnect the USB cable
from your computer.
.
Remove Hardware Safely.
Stop to disconnect. A final dialog box opens.
Close.
Connect DPF to Macintosh Computer
1. Use the USB cable (included) to connect the DPF to your
Macintosh computer.
2. Macintosh will recognize the DPF as an external storage device.
3. Drag and drop files between the two devices as you normally
move files.
Disconnect DPF from Macintosh Computer
1. To safely disconnect the DPF from your Macintosh, select
DPF’s icon on your desktop and press
the disk.
2. When the icon is no longer on the desktop, it is safe to
unplug the USB cable.
USB Flash Drive to DPF Connection
The DPF recognizes a USB Flash Drive the same way it recognizes
external memory cards. When you insert the flash drive, the DPF
automatically recognizes photo, music, and video files stored on it.
52
Command-e to eject
Page 53

To import files from your flash drive to the DPF’s internal memory, follow
the file import instructions under each feature section (
18,
Music on page 28, Video on page 30).
Photos on page
Bluetooth Connection
The Bluetooth feature allows you to download photos from popular
Bluetooth-capable mobile phones (i.e., BlackBerry, Motorola, Nokia,
SonyEricssson, and others) directly into your DPF.
A Bluetooth USB Adapter is required (not included with DPF)
Note: Phone models vary and not all phones support transmitting photos
to devices like a DPF. Check to be sure your phone supports
transmitting photos to external devices like DPF.
Insert Bluetooth Dongle
1. Insert your Bluetooth dongle into the DPF’s USB host port and
then turn on the DPF.
2. A popup window momentarily appears with status messages
indicating the Bluetooth feature is active.
Send Photo to DPF
1. From your Bluetooth device, search for available connection
devices; select the
code “1234”).
2. Select the desired photo and then send to the DPF.
Note: The actual procedure for sending photos to the DPF varies by
mobile device manufacturer/model. Refer to your mobile device
User Guide for instructions.
During the photo transmission, “Photo Transmitting” appears on the
DPF screen. When completed, the photo(s) will automatically be
displayed in single photo mode.
Pandigital device (default authentication
53
Page 54

Set Sleep Mode
The DPF will stay on until you power it off, however, to save power you
can set it to automatically go into a sleep mode when left idle for a
specific amount of time.
1. On the
Menu screen.
2. Select
green dot indicates selected option).
OFF (default) = Power saver is ‘disabled’; DPF will remain on until you power it off
or change the sleep mode setting
2/4/8 Hours = The DPF will automatically go into sleep mode when left idle the
specified amount of time
HOME screen, touch or press MENU to display the Setup
Set Sleep Mode, and then select the desired setting (small
Reset to Factory Defaults
Use this feature to restore function settings to the factory pre-set
defaults.
Note: Wi-Fi network and photo sharing website connection settings will
not be changed.
1. On the
Menu screen.
2. Select
3. Confirm
Set Language
Depending on model, this DPF may include multiple languages for the
user interface display. Use this feature to change the language at any
time.
1. On the
Menu screen.
54
HOME screen, touch or press MENU to display the Setup
Reset to Factory Defaults.
Yes or No.
HOME screen, touch or press MENU to display the Setup
Page 55

2. Select Set Language to display the available languages.
3. Select the desired language.
System Info
You can view the current DPF settings, including your internal memory
size, wireless network connection, firmware version, and you can assign
a personal unit name if desired.
1. On the
Menu screen.
2. Select
3. To assign a different unit name, select
then use the virtual keyboard to enter the desired name. (Instructions
for navigating the virtual keyboard begin on page 39.)
4. Select
HOME screen, touch or press MENU to display the Setup
System Info.
EDIT FRAME NAME, and
Done to save.
Cleaning the DPF
Treat the screen gently, it is made of glass and can break. To clean
fingerprints or dust from the LCD screen, we recommend using a soft,
non-abrasive cloth such as a camera lens cloth to clean the LCD screen.
If you use a commercial LCD Cleaning Kit, do not apply the cleaning
liquid directly to the LCD screen. Clean the LCD screen with cleaning
cloth moistened with the liquid.
Clean the outer surface of the DPF (excluding the screen) and the
remote control with a soft cloth dampened with water.
Change the Decorative Mat
1. Power off the DPF, and then unplug the power adapter.
2. Remove two of the screws on the back of the frame and lift the unit
from the frame.
3. Remove the mat and insert the replacement mat.
55
Page 56

4. Place the unit back into the frame, replace the screws and only
finger-tighten.
Frequently Asked Questions
Q: How do I set up my DPF?
A: It is very simple to get your Digital Photo Frame setup. Just plug the
power adapter into the DPF and into a standard wall outlet, and
then power it on. After the welcome screen is displayed, a
slideshow will begin displaying the images pre-loaded in the internal
memory. To view your own photos, insert a memory device into the
appropriate slot or USB port on the side of the DPF. Select
SLIDESHOW
from the memory card option screen.
PLAY
Q: What memory cards can the Digital Photo Frame Read?
A: Compatible memory cards include: Secure Digital™, Compact Flash
(select models), MultiMedia Card™, xD Card, Memory Stick™,
MemoryStick Pro™, and Memory Stick Pro Duo™.
Q: Can I insert multiple memory cards?
A: Yes, you can insert multiple cards at the same time, depending on
slot availability. Use the
Select Media function to select the desired
media source for immediate viewing/listening.
Q: I set up the Digital Photo Frame; why won’t it turn on?
A: The power adapter may not be securely connected to the DPF or
the power switch may not be in the ON position.
Q: I have a memory card in the DPF; why can’t I view my photos?
A: A) Be sure that the memory card is one of the formats listed above
and that the files on the card are JPEG images files. Some digital
cameras save images in other formats. Refer to your camera’s user
guide if your photos are not JPEG files.
B) Make sure the memory card is inserted all the way into the card
slot.
56
Page 57

C) On the HOME screen, touch or press MENU to display the Setup
Menu screen. Select Select Media Source, and then select the
desired media source. Touch or press
screen and then select
PHOTOS>Slideshow or press Slideshow .
EXIT to return to the HOME
The slideshow should begin displaying your photos.
Q: Why doesn’t my remote work when the PanTouch interface has
been activated?
A: The PanTouch interface has ‘control’ as long as the navigation
buttons are visible. After 5 seconds of non-user intervention, the
navigation buttons will disappear and release control to the remote
control again.
Q: Why is the photo display slower with some photos than others?
A: Higher resolution photos load more slowly. Try using lower resolution
photos or down scaling your images. Refer to your camera’s operating
user guide for details on down scaling your photos.
Q: Does the DPF have built-in (internal) memory?
A: Yes. The memory size varies by model.
Q: Does the DPF support all JPEG and Motion JPEG files?
A: No. The DPF only supports JPEG and Motion JPEG files taken from a
digital camera. The DPF may not read all image files downloaded
from the Internet or from other software graphic applications.
Q: Can I add my own cookbook or recipes to the Recipes feature?
A: No. If you want to create .jpg files of your recipes using your own
graphics editing software, you can copy the .jpg files to your
memory source and then you could view them on the DPF in
PHOTOS mode.
Q: Which wireless Wi-Fi USB adapter can I use with my DPF, and
where can I obtain one?
A: Use only a Pandigital Wi-Fi adapter which is available for purchase
on our website at: http://www.pandigital.net
.
57
Page 58

Q: Where do I obtain a Bluetooth adapter to use with my DPF?
A: You can purchase any brand of Bluetooth adapter from any retail
outlet that sells them.
Q: I have the Pandigital wireless Wi-Fi adapter inserted, why can’t I
connect to the online photo sharing sites?
A: The initial Wi-Fi setup requires 3 steps: 1) Assign up your Wireless
Network connection on the DPF, 2) Establish an account with the
photo sharing site, and 3) Assign your photo sharing site’s User ID and
password on the DPF. Refer to the Wi-Fi setup beginning on page 39.
58
Page 59

Important Safety Precautions
Always follow these basic safety precautions when using your
Multimedia Digital Photo Frame (DPF). This will reduce the risk of fire,
electric shock, and injury.
WARNING: Do not expose this product to rain or moisture.
Do not remove the cover. There are no user-serviceable
parts inside. Refer all servicing to qualified personnel.
The DPF is for indoor use only.
Unplug the DPF before performing care and maintenance.
Do not block the ventilation holes on the back of the DPF at any time.
Keep your DPF out of direct sunlight and heat sources.
Protect the power cord. Route power cords so that they are not likely to
be walked on or pinched by items placed on or against them. Pay
particular attention to the point where the cord attaches to the DPF.
Only use the AC adapter included with the DPF. Using any other power
adapter will void your warranty.
Unplug the power cord from the power outlet when the unit is not in use.
59
Page 60

Product Specifications
LCD Screen Digital Photo Frame
Product
Resolution
Compatible
Media Sources
Features
12” 800X600 pixels, 4:3 aspect ratio
13.3” 1280X800 pixels, 8:5 aspect ratio
15” 1024X768 pixels, 4:3 aspect ratio
6-in-one Card reader
Compact Flash, Secure Digital™, Multi Media Card™, xD
Memory Card™, Memory Stick™, Memory Stick PRO™,
Memory Stick PRO DUO, and USB Flash Drive
PHOTOS displayed individually or as slideshow
MUSIC files played individually or as slideshow
background music
VIDEOS
CALENDAR/CLOCK with Alarm function and slideshow
RECIPES – view pre-loaded and purchased cookbooks
Wi-Fi - connect wirelessly to online photo sharing websites
Wireless file transfer between DPF & PC
Simple Plug & Play
No computer required
Photos – JPEG/JPG (up to 16 mega pixels)
File Format
USB Ports
Internal Memory
Bluetooth
Support
Wi-Fi Compatible Yes (Pandigital Wi-Fi adapter sold separately)
Decorative
Paper Mats
Frames Dark Espresso
Power Adapter
Video – Motion JPEG, AVI
Music – MP3
USB2.0 Host
USB2.0 Device
12” - 2GB, up to 10,000 compressed images
13.3” & 15” – 2GB, up to 4,800 compressed images
Yes (adapter not included)
2 – White and Charcoal
Input: 100V - 240V AC, 50~60 HZ
Output: 12VDC 1.5A or 12VDC 2.0A (depending on model)
60
Page 61

Limited Warranty
The limited warranty set forth below is given by Pandigital with respect to
Pandigital brand electronics products purchased and used in the United States of
America. Pandigital warrants this product against defects in material or
workmanship as follows:
LABOR: For a period of one (1) year from the date of purchase, if this product is
found to be defective, Pandigital will repair or replace the product, at its option, at
no charge. After this one (1) year, labor charges will be charged on a case by
case basis.
PARTS: For a period of one (1) year from the date of purchase, if this product is
found to be defective, Pandigital will supply at no cost, new or rebuilt
replacement parts, at its option, at no charge. After this one (1) year period, parts
will be charged for on a case by case basis. Modifications not approved by the
party responsible for compliance could void user’s authority to operate the
equipment.
This warranty does not cover: (1) customer instruction, installation or setup; (2)
cosmetic damage or damage due to accident, misuse, abuse or negligence; (3)
commercial use of the product; (4) modification of any part of the product; (5)
damage due to improper operation, improper maintenance, or connection to an
improper power supply; (6) loss of data, regardless of value or format, that may
result through proper and/or improper use of the product; (7) damage due to an
attempted repair of the product by anyone other than a facility authorized by
Pandigital to service the product; (8) consumables (such as fuses and batteries).
This warranty is valid only in the United States.
The product must be accompanied by a copy of the original retail purchase
receipt. If no proof of purchase is attached, the warranty will not be honored and
repair costs will be charged. This warranty is only valid with written
documentation detailing the complaint attached to the outside or inside of the
carton. This warranty is invalid if the factory applied serial number has been
altered and or removed from the product. This warranty does not provide
protection for the loss of data, regardless of format. Pandigital reserves the right
to modify and design this product without prior notice, written or otherwise.
To obtain warranty service, you must deliver the product freight prepaid in either
its original packaging or packaging affording an equal degree of protection, plus
proof of purchase.
Repair or replacement as provided under this warranty is the exclusive remedy of
the consumer. Pandigital, its parent company, affiliates or subsidiaries, shall not
be liable for any incidental or consequential damages for breach of any
expressed or implied warranty on this product. Except to the extent prohibited by
applicable law, any implied warranty of merchantability or fitness for a particular
purpose on this product is limited in duration to the duration of this warranty.
Some states do not allow the exclusion or limitation of incidental or consequential
damages, or allow limitation on how long an implied warranty lasts, so the above
61
Page 62

limitations or exclusions may not apply. This warranty gives you specific legal
rights, and you may have other rights, which vary from state to state.
All content included on the Pandigital website as well as Pandigital products,
including pre-loaded demonstration images, digital media, digital cookbooks, text,
graphics, logos, designs, photographs, button icons, images, audio/video clips,
digital downloads, data compilations, and software, is the property of Pandigital
or its suppliers and is protected by United States and international copyright laws
or other intellectual property laws and treaties. Said content shall not be
reproduced or used without express written permission from Pandigital and its
suppliers respectively.
Use of this product constitutes acceptance of these terms and conditions of
warranty.
Technical support telephone number: 1-800-715-5354.
FCC Statement
FCC Part 15 Information
This equipment has been tested and found to comply with the limits for a Class B
digital device, pursuant to Part 15 of the Federal Communication Commission
(FCC) Rules. These limits are designed to provide reasonable protection against
harmful interference in a residential installation.
This equipment generates, uses, and can radiate radio frequency energy and if
not installed and used in accordance with the instructions, may cause harmful
interference to radio communications. However, there is no guarantee that
interference will not occur in a particular installation.
If this equipment does cause harmful interference to radio or television reception,
which can be determined by turning the equipment off and on, the user is
encouraged to try to correct the interference by one or more of the following
measures:
Reorient or relocate the receiving antenna.
Increase the separation between the equipment and receiver.
Connect the equipment to an outlet on a circuit different from that to
which the receiver is connected.
Consult the dealer or an experienced radio/TV technician for help.
WARNING: Changes or modifications to this unit not expressly
approved by the party responsible for compliance could
void the user’s authority to operate the equipment.
62
 Loading...