

Page 1
OI.book Page i Wednesday, November 8, 2000 3:30 PM
Contents
Introduction................................................................... vii
About This Manual..................................................... vii
Icons Used in This Manual......................................... ix
Chapter 1: Safety First .................................................. 1
Batteries........................................................................ 1
Charging Devices......................................................... 1
General.......................................................................... 2
Availability of Service................................................... 2
Emergency (911) Service ............................................ 2
P
Safety Tips.................................................................... 2
Body-worn operation.......................................................4
Antenna Care..................................................................4
Phone Operation.............................................................4
Driving.............................................................................4
Electronic Devices............ ...... ..... ...... ..............................5
Aircraft.............................................................................6
Blasting Areas.................................................................6
Potentially Explosive Atmospheres.................................6
For Vehicles Equipped with an Air Bag...........................6
Chapter 2: Getting Started.............................. ....... ...... . 7
Battery Use................................................................... 7
Attaching the Battery to an EB-TX210 Series Phone......7
Attaching the Battery to an EB-TX220 Series Phone......7
Charging the Battery for an EB-TX210 or EB-TX220
Series Phone...................................................................9
EB-TX210 Series Battery Specifications.......................10
EB-TX220 Series Battery Specifications.......................10
Removing Battery from an EB-TX210 Series Phone....11
Removing Battery from an EB-TX220 Series Phone....11
Low-Battery Warning.....................................................12
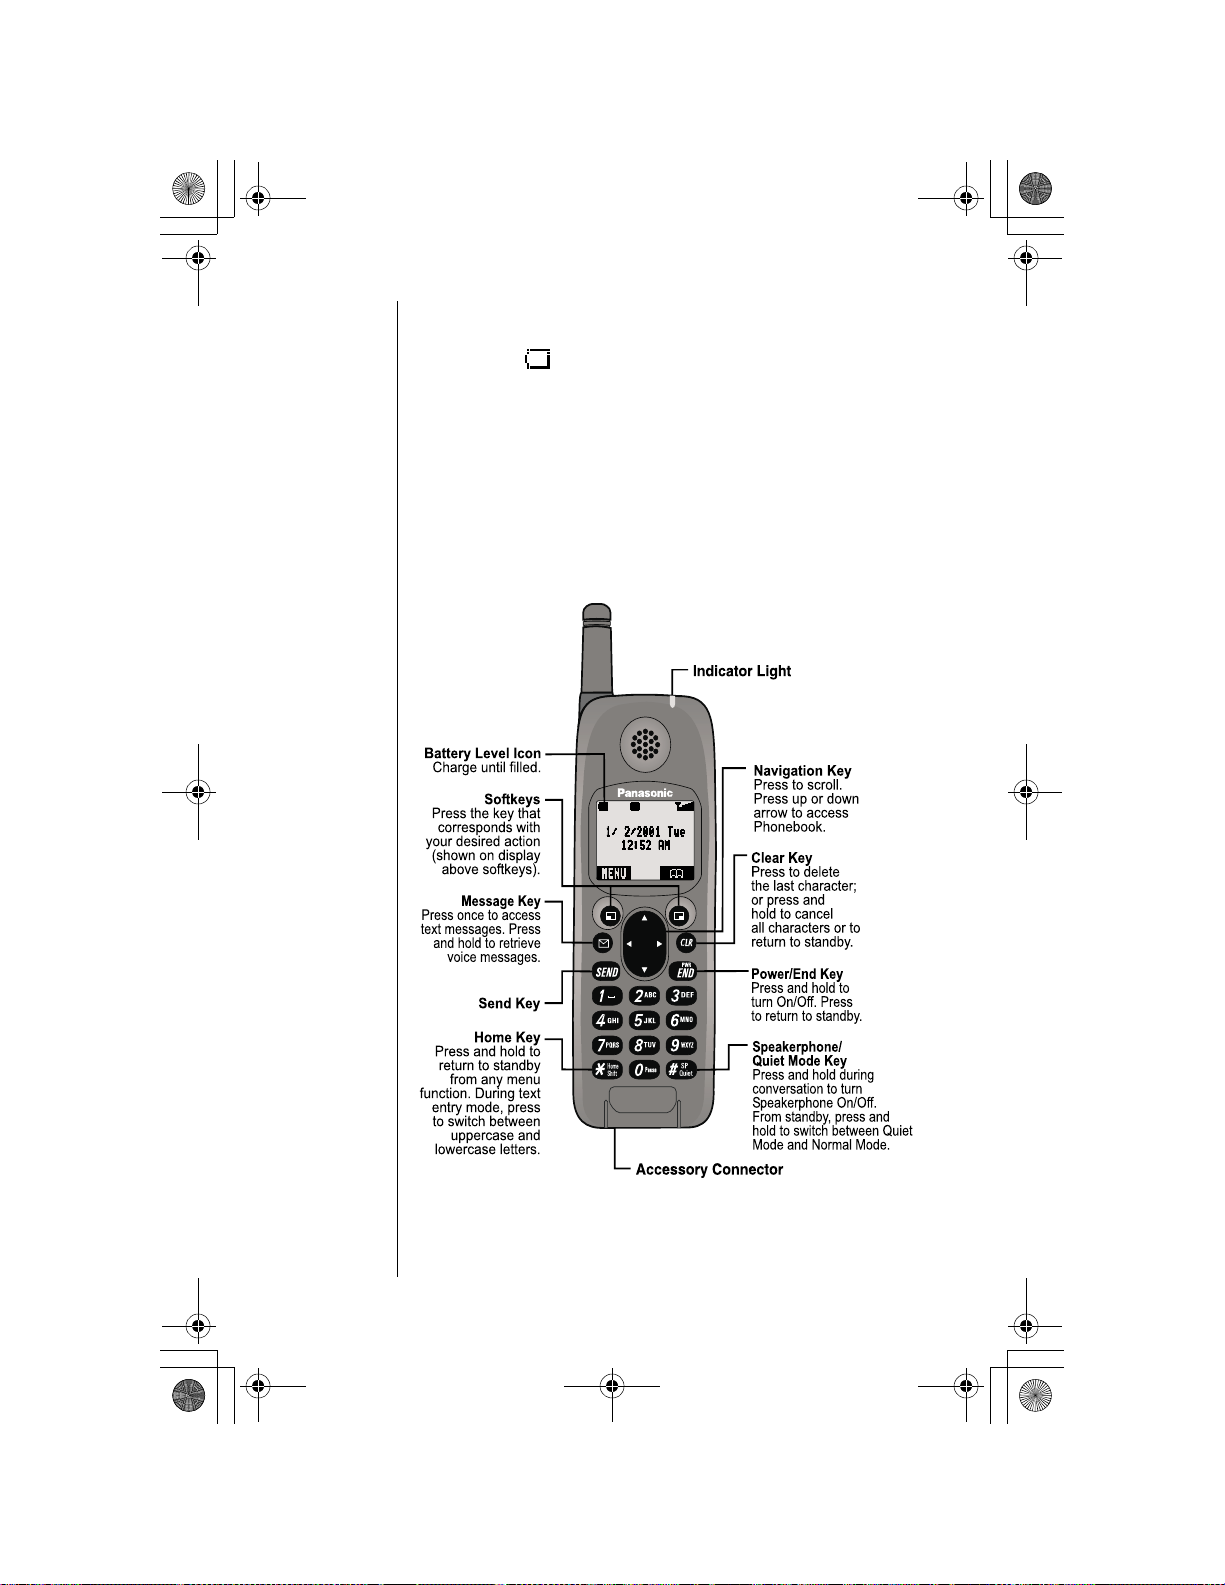
Phone Description ..................................................... 12
e
r
Recharging Tips .......................................................9
l
i
m
i
n
a
r
y
Contents
i
Page 2

OI.book Page ii Wednesday, November 8, 2000 3:30 PM
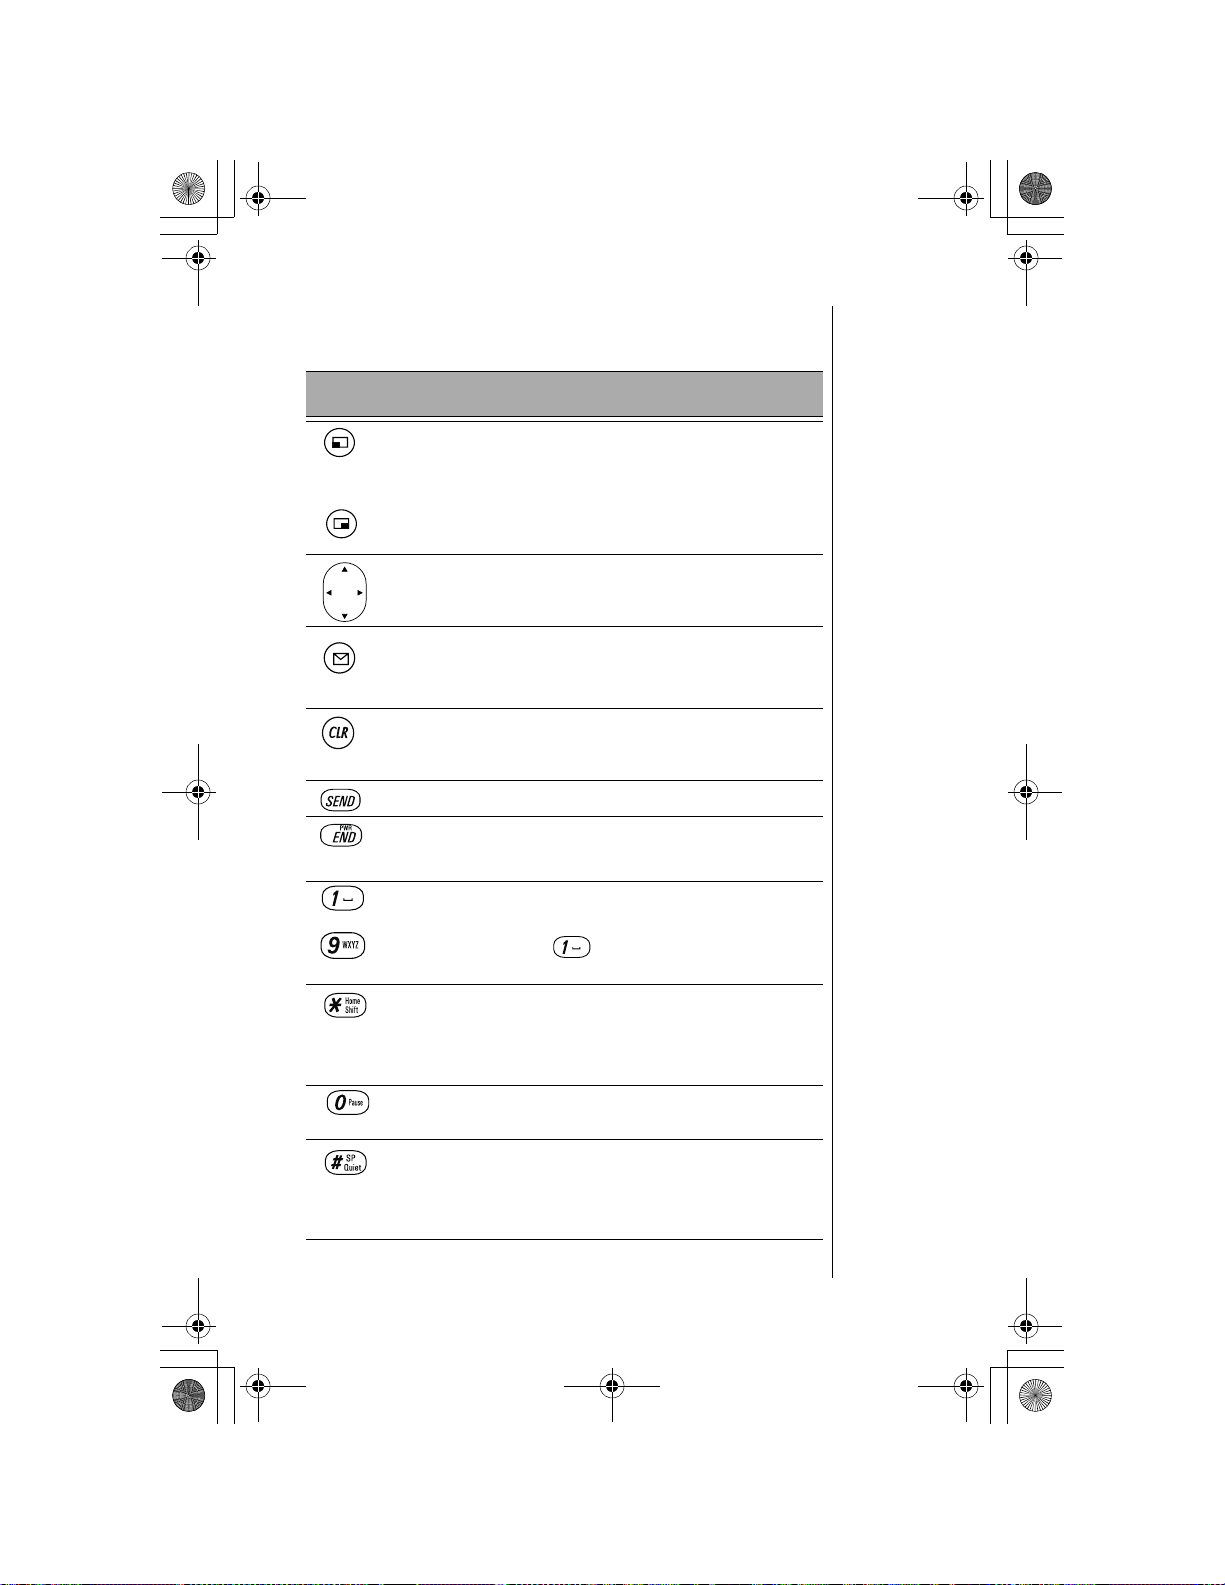
Function Keys ............................................................ 13
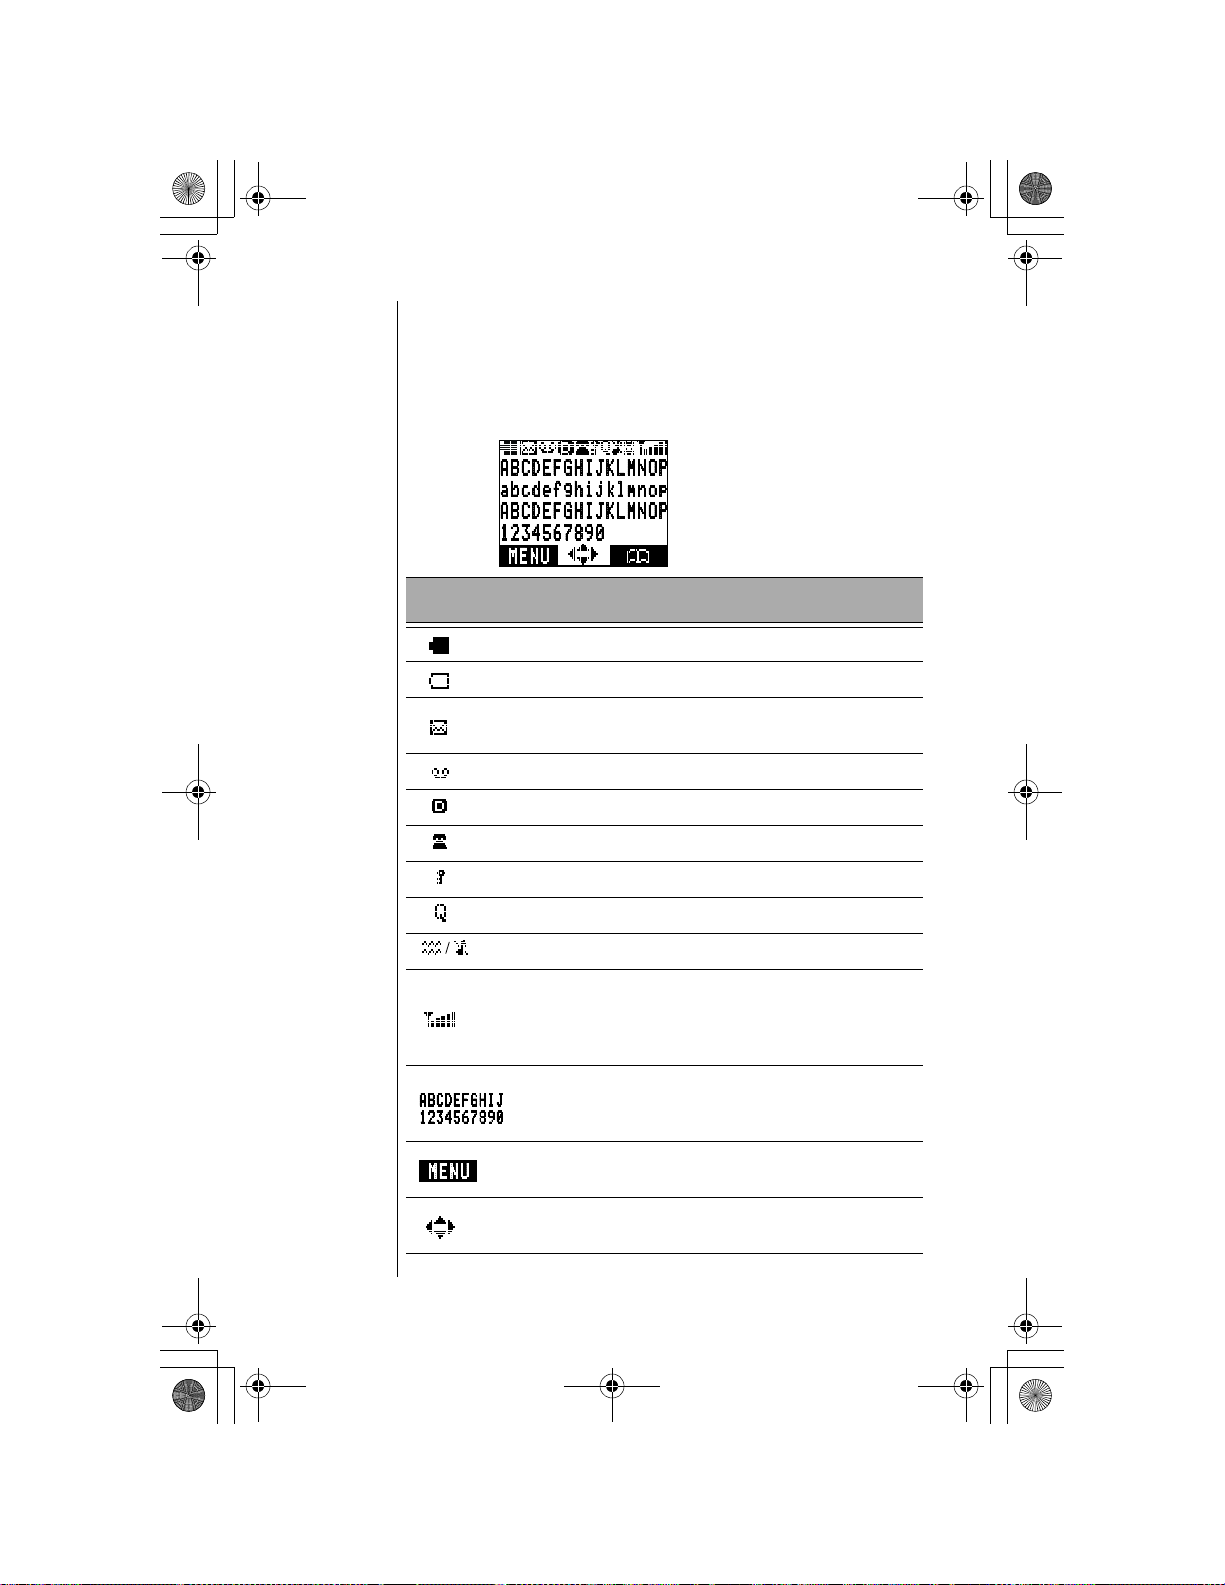
Display Icons.............................................................. 14
Master Display and Icons..............................................14
Powering Phone On and Off ..................................... 15
Powering ON........................................................ ...... ...15
Powering OFF...............................................................15
Standby Display......................................................... 15
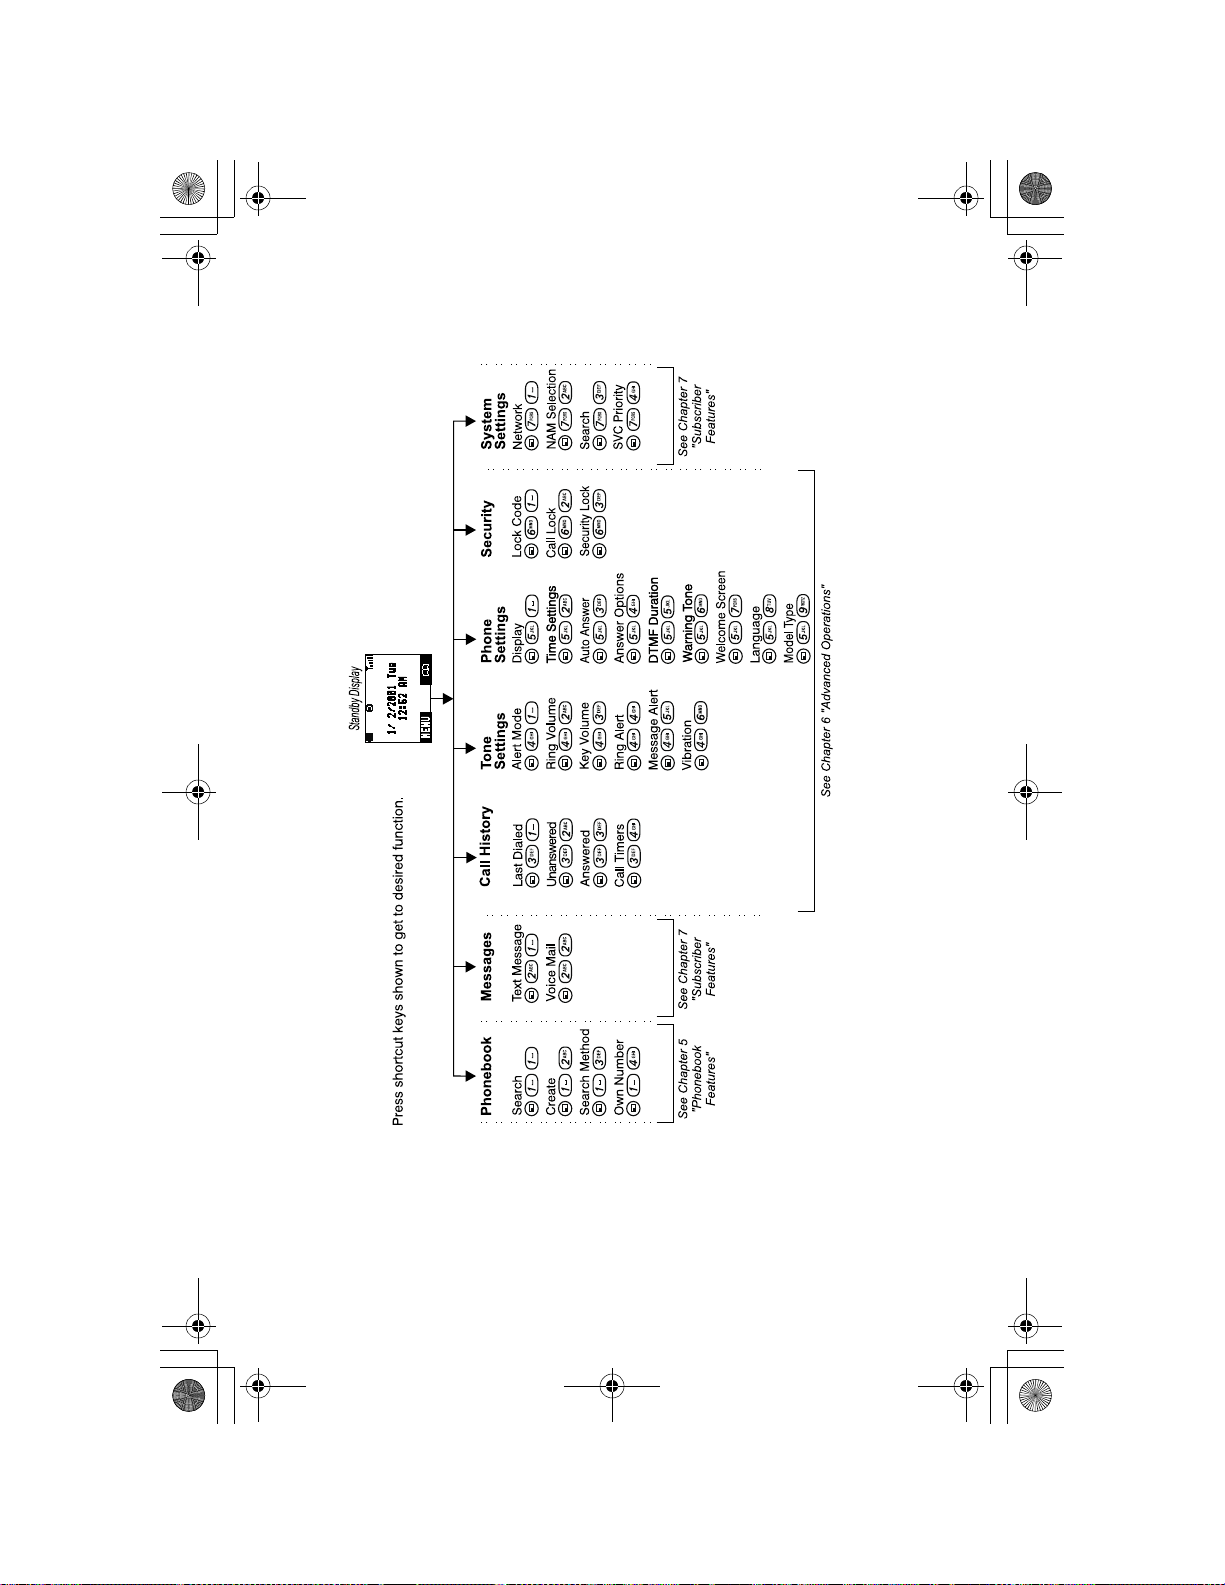
Moving through the Menu ......................................... 16
Menu Map of Shortcut Keys..........................................16
Menu Map.................................................................... 17
Setting Date and Time ............................................... 18
Setting Ring Volume.................................................. 19
Selecting a Ring Alert................................................ 20
Using the Private Handsfree Headset...................... 20
Chapter 3: Everyday Operations................................ 23
Placing Calls............................................................... 23
Dialing from the Keypad................................................23
Phonebook Dialing, Speed Dialing and
Super Speed Dialing.....................................................24
Programming Pauses or Waits.....................................24
Answering Calls......................................................... 25
In-Call Features.......................................................... 25
Voice Volume................................................................25
Displaying Your Own Phone Number During a Call......26
Muting the Mouthpiece ..................................................26
Scratchpad....................................................................27
Speakerphone...............................................................27
Unanswered Calls...................................................... 28
Answer Options.......................................................... 28
Voice Mail.................................................................... 29
Listening to New Voice Mail..........................................29
Resetting the Voice Mailbox Number............................29
Redialing Numbers .................................................... 30
Redialing One of the Last Ten (10) Numbers
Dialed from Your Phone................................................30
Automatic Redial...........................................................31
Vibration Alert ............................................................ 32
ii
Page 3

OI.book Page iii Wednesday, November 8, 2000 3:30 PM
Chapter 4: Text Entry Operations .............................. 33
Text Entry Methods.................................................... 33
Using Letter Entry (ABC) mode.....................................34
Using Word Entry (Word T9) mode...............................35
Using Numbers (NUM) mode........................................36
Using Symbols (SYM) mode.........................................36
Key Entry Table.............................................................36
Chapter 5: Phonebook Features ................................ 37
Creating a Phonebook Entry..................................... 37
Saving a Displayed Phone Number.......................... 39
Dialing Phonebook Entries ....................................... 40
Super Speed Dialing.....................................................40
Speed Dialing................................................................40
Dialing a Phonebook Entry by Scrolling........................41
Dialing a Phonebook Entry from the Menu...................41
Editing/Deleting a Phonebook Entry........................ 42
Selecting a Phonebook Search Method................... 43
Own Phone Number Review ..................................... 44
Chapter 6: Advanced Operations............................... 45
Call History................................................................. 45
Last Dialed Calls...........................................................45
Unanswered Calls.........................................................46
Answered Calls.............................................................46
Deleting Call Lists.............................................. ..... ......47
Call Timers....................................................................47
Tone Settings ............................................................. 48
Alert Mode.....................................................................48
Ring Volume..................................................................49
Key Volume...................................................................49
Ring Alert......................................................................50
Message Alert Type......................................................50
Phone Settings........................................................... 51
Display Settings............................................................51
Backlight .................................................................51
Display Contrast .....................................................52
iii
Page 4

OI.book Page iv Wednesday, November 8, 2000 3:30 PM
Time Settings................................................................53
Setting Date and Time ................................... .........53
Setting the Alarm ....................................................53
Auto Answer (Handsfree Mode Only) ...........................55
Answer Options.............................................................55
DTMF Tone Length .......................................................56
Warning Tone................................................................57
Creating a Welcome Screen.........................................57
Language......................................................................58
Model Type...................................................................59
Security Options ........................................................ 59
Changing Lock Code....................................................59
Call Lock.......................................................................60
If Incoming Lock is Selected ...................................61
If Outgoing Lock is Selected ...................................61
If Digit Limit is Selected ..........................................62
Security Lock.................................................................62
Turning On Security Lock .......................................62
Turning Off Security Lock from Standby ................63
Disabling Security Lock ..........................................63
Key Lock..................................................................... 64
Turning On Key Lock....................................................64
Turning Off Key Lock....................................................64
iv
Chapter 7: Subscriber Features ................................. 65
Caller ID....................................................................... 65
Call Waiting................................................................. 65
Three-Way Calling...................................................... 66
Text Messaging.......................................................... 66
Reading New Text Messages.......................................66
Reply to a Text Message (Inbox Only) ...................68
Forward a Text Message ........................................68
Edit a Text Message (Outbox Only) .......................68
Lock/Unlock a Text Message .................................69
Delete a Text Message ..........................................69
Call Back a Text Message ......................................69
Add Sender in Phonebook .....................................69
Page 5

OI.book Page v Wednesday, November 8, 2000 3:30 PM
Accessing Text Messages ............................................70
Create a Text Message ..........................................71
Voice Mail ................................................................... 72
Listening to New Voice Mail..........................................72
Resetting the Voice Mailbox Number............................73
System Settings......................................................... 74
Voice Privacy Mode......................................................74
Selecting Your Phone Number (NAM)..........................75
Searching for Available Systems ..................................76
Service Priority..............................................................77
Appendix A: Before Requesting Help......................... 79
Problems and Solutions............................................ 79
System Warning Tones ............................................. 84
Dropped Call Warning Tone..........................................84
Reorder Tone................................................................84
Intercept Tone...............................................................84
Phone Specifications................................................. 84
Appendix B: Phone Accessories ................................ 85
EB-TX210 Series Handset Batteries......................... 85
EB-TX220 Series Handset Battery............................ 85
EB-TX210 and EB-TX220
Additional Accessories ............................................. 86
EB-HF210EZ and EB-HF220EZ
Handsfree Carmount Kits.......................................... 87
Appendix C: Consumer Update .................................. 89
Index.............................................................................. 95
v
Page 6

OI.book Page vi Wednesday, November 8, 2000 3:30 PM
vi
Page 7
OI.book Page vii Wednesday, November 8, 2000 3:30 PM
Introduction
Congratulations on your purchase of one of the world’s most
technologically advanced mobile communications systems!
Your new Panasonic phone combines the advantages of
digital and analog coverage with a variety of time-saving and
easy-to-use features. The result: a phone that offers real
convenience, dependability, and mobility—in digital
analog service areas.
and
About This Manual
This manual contains comprehensive instructions for each of
your phone’s features. From making a call to troubleshooting
a problem, the answers to most of your questions are here.
Chapter 1:
Chapter 1 includes important safety and battery information.
Whether you are a novice or an experienced cellular user, be
sure to read this section
Chapter 2:
Chapter 2 describes the basics of setting up and operating
your phone. From connecting and charging your battery,
describing the phone’s keys and display icons, moving
through the feature menu, and using the Private Handsfree
Headset, this is the place to turn when you are ready to get
started.
Chapter 3:
Chapter 3 covers those features used on a daily basis —
placing and ending calls, answering calls, etc....
Chapter 4:
Chapter 4 covers the two modes of text entry: letter-by-letter
entry and the new WORD T9
rapid text entry when sending text messages.
Safety First
operating your phone.
before
Getting Started
Everyday Operations
Text Entry Operations
®
entry — designed to give you
Introduction
Chapter 5:
Chapter 5 covers how to save names, numbers, and
additional information in your phone’s memory.
Phonebook Features
vii
Page 8

OI.book Page viii Wednesday, November 8, 2000 3:30 PM
Chapter 6: Advanced Operations
Chapter 6 describes those features that allow you to
“customize” your phone according to your own preferences.
Would you like to use your phone as an alarm clock with a
personalized message? Would you like to secure your phone
from unauthorized use? Or maybe you would like to change
the language shown on the display? If you answered yes to
any of these questions, this is the chapter for you.
Chapter 7: Subscriber Features
Chapter 7 describes how to use features that may be offered
by your wireless service provider, such as Caller ID, Call
Waiting, Three-Way Calling, Text Messaging, Voice Mail,
etc.... Check with your wireless service provider for complete
information on available services.
Reference Information:
Appendix A: Before Requesting Help
As you begin to take advantage of your phone’s features, you
may experience minor problems. Don’t panic. You can fix
most of these problems. This chapter contains a detailed list
of solutions to some of the problems you may encounter.
viii
Appendix B: Phone Accessories
Many accessories are available for your phone. Appendix B
lists and illustrates each of these accessories. Please contact
your wireless service provider to purchase Panasonic
Genuine accessories.
Appendix C: Consumer Update
Appendix C contains a recent report published by the U.S.
Food and Drug Administration about the safety of mobile
phones.
Index
If you are looking for a specific topic and it is not listed in the
Table of Contents, the index may point you in the right
direction.
Page 9

OI.book Page ix Wednesday, November 8, 2000 3:30 PM
Icons Used in This Manual
The following icons indicate critical and time-saving
information found throughout this manual. Please take special
notice of information included with these icons.
Caution:
prevent you from damaging your phone or putting
your own safety at risk. Please be sure to read this
information.
Note:
how a particular feature or function will operate.
Tip:
shortcuts. Memorizi ng these tips can save you
valuable time.
Calls attention to information that could
Information that could have direct impact on
Points out helpful advice an d tim e- saving
ix
Page 10

OI.book Page x Wednesday, November 8, 2000 3:30 PM
x
Page 11
OI.book Page 1 Wednesday, November 8, 2000 3:30 PM
Safety First
Your new phone is a convenient and effective
communications tool, but it can be hazardous when used
improperly. To avoid harming yourself or anyone else, please
review the following information
Batteries
Batteries can cause property damage, injury, or burns if the
terminals are touched with a conductive material (i.e., metal
jewelry, keys, etc.). Therefore, use caution when handling a
charged battery. Additional precautions and notes are listed
below:
1
Never throw a battery into a fire; it may explode.
2
Fully recharge the battery if the battery is low or as soon as
the low-battery alert beeps.
3
Do not drop the battery.
4
Do not bridge battery contacts together with metallic objects.
5
Do not remove the batt ery fr om the pho ne wh ile the phone i s
powered on. Settings you have changed may revert to their
previous settings.
before
using your phone.
Safety First
Charging Devices
1
Use only Genuine Panasonic charging accessories. Use of
attachments not recommended by Panasonic or your
wireless service provider may result in fire, electrical shock,
or injury. Panasonic is not res ponsible for damages caused
by using non-Panasonic accessories.
2
Do not expose charging adapters to moisture, water, or the
weather.
3
Do not use an adapter with a damaged cord.
4
When using a DC adapter in an automobile, a small amount
of electricity flows through the adapter, even if the phone is
turned off. Remove the plug from the cigarette lighter
whenever the pho ne will be le ft in the ve hicle for l ong period s
of time.
The cigarette lighter must hav e a 12V negative
ground socket.
Do not use the adapter in a ve hi cl e that has a
positive ground system .
Safety First 1
Page 12

OI.book Page 2 Wednesday, November 8, 2000 3:30 PM
Chapter 1
General
Do not use the phone in extreme temperature or humi di ty.
1
The specified operating temperature range is -22°F to
+140°F (-30°C to +60°C).
Do not attempt to disass embl e the pho ne. Ther e are no user-
2
serviceable parts inside.
Do not expose the phone to rain or spill liquids on it.
3
Do not carry the phone by holding the antenna.
4
Do not use any accessories other than those designed for
5
use with your phone.
Use of attachments not recommende d or sold by you r
6
wireless service provider may result in fire, electrical shock,
or injury.
Panasonic cannot be held responsible for damages caused
7
by using non-Panasonic accessories.
Availab ility of Service
This phone, like any wireless phone, operates using radio signals, wireless and landline networks, and user-programmed
functions. Because of this, connection in all conditions cannot
be guaranteed. Therefore, you should never rely solely on any
wireless phone for essential communications (for example,
medical emergencies). When operating in analog mode, the
service area where you can place and receive calls will be
smaller than with other phones.
2 Safety First
Emergency (911) Service
If you need to make an emergency (911) call, power the
phone on, dial 911, and press . If you have stored the
numbers 911 in memory location number 9, simply press and
hold 9, and the emergency call will be placed. Emergency
calls can be made regardless of lock setting. Remember, to
make or receive any call, the phone must be switched on and
in a service area that has adequate signal strength.
Emergency calls might not be possible on all wireless phone
networks or when certain network service and/or phone
features are in use.
Safety Tips
Following the suggestions in this section will help ensure safe
and efficient operation of your Panasonic phone.
This Model Phone Meets The Government's
Requirements For Exposure To Radio Waves.
Your wireless phone is a radio transmitter and receiver. It is
designed and manufactured not to exceed the emission limits
Page 13

OI.book Page 3 Wednesday, November 8, 2000 3:30 PM
for exposure to radiofrequency (RF) energy set by the Federal
Communications Commission of the U.S. Government. These
limits are part of comprehensive guidelines and establish permitted levels of RF energy for the general population. The
guidelines are based on standards that were developed by
independent scientific organizations through periodic and
thorough evaluation of scientific studies. The standards
include a substantial safety margin designed to assure the
safety of all persons, regardless of age and health.
The exposure standard for wireless mobile phones employs a
unit of measurement known as the Specific Absorption Rate,
or SAR. The SAR limit set by the FCC is 1.6W/kg.
*
Tests for
SAR are conducted using standard operating positions specified by the FCC with the phone transmitting at its highest certified power level in all tested frequency bands. Although the
SAR is determined at the highest certified power level, the
actual SAR level of the phone while operating can be well
below the maximum value. This is because the phone is
designed to operate at multiple power levels so as to use only
the power required to reach the network. In general, the closer
you are to a wireless base station antenna, the lower the
power output.
Before a phone model is available for sale to the public, it
must be tested and certified to the FCC that it does not
exceed the limit established by the government-adopted
requirement for safe exposure. The tests are performed in
positions and locations (e.g., at the ear and worn on the body)
as required by the FCC for each model. The highest SAR
value for this model phone when tested for use at the ear is
1.49W/kg and when worn on the body, as described in this
user guide, is .93W/kg. (Body-worn measurements differ
among phone models, depending upon available accessories
and FCC requirements). While there may be differences
between the SAR levels of various phones and at various
positions, they all meet the government requirement for safe
exposure.
The FCC has granted an Equipment Authorization for this
model phone with all reported SAR levels evaluated as in
compliance with the FCC RF emission guidelines. SAR
information on this model phone is on file with the FCC and
can be found under the Display Grant section of
http://www.fcc.gov/oet/fccid
after searching on FCC ID
NWJ10A002A.
Additional information on Specific Absorption Rates (SAR)
can be found on the Cellular Telecommunications Industry
Association (CTIA) web-site at http://www.wow-com.com
* In the United States and Canada, the SAR limit for mobile phones used by
the public is 1.6 watts/kg (W/kg) averaged over one gram of tissue. The
standard incorporates a substantial margin of safety to give additional
protection for the public and to account for any variations in measurements.
Chapter 1
.
Safety First 3
Page 14

OI.book Page 4 Wednesday, November 8, 2000 3:30 PM
Chapter 1
All Panasonic branded accessories are tested and comply
with FCC RF exposure requirements. Non-Panasonic
accessories may not comply.
Body-worn operation
To maintain compliance with FCC RF exposure guidelines, if
you wear your wireless phone on your body while on a voice
or data call, always place the phone in a Panasonic supplied
or approved carry accessory. Use of non-Panasonic approved
accessories may exceed FCC RF exposure guidelines.
Antenna Care
Use only the supplied or an approved replacement antenna.
Unauthorized antennas, modifications, or attachments could
damage the phone and may violate FCC regulations.
Phone Operation
NORMAL POSITION: Hold the phone as you would any other
telephone, with the antenna pointed up and over your
shoulder.
FOR EFFICIENT OPERATION: For your phone to operate
most efficiently , do not touch the antenna unnecessarily when
the phone is in use. Contact with the antenna affects call
quality and may cause the phone to operate at a higher power
level than otherwise needed.
4 Safety First
Driving
Check the laws and regulations on the use of wireless
telephones in the areas where you drive. Always obey them.
Also, if using your phone while driving, please:
• Give full attention to driving—driving safely is your first
responsibility;
• Use handsfree operation, if available;
• Pull off the road and park before making or answering a call if
driving conditions so require.
Page 15

OI.book Page 5 Wednesday, November 8, 2000 3:30 PM
Electronic Devices
Most modern electronic equipment is shielded from RF
signals. However, certain electronic equipment may not be
shielded against the RF signals from your wireless phone.
Pacemakers:
•
recommends that a minimum separation of 6 inches (6”) or 15
centimeters (15 cm) be maintained between a handheld
wireless phone and a pacemaker to avoid potential
interference with th e pa cemaker . Th es e re co mm end ati ons a r e
consistent with ind ependent research and recommendations of
Wireless Technology Research.
Persons with pacemakers:
• Should ALWAYS ke ep t he p hone more than six inches fro m
their pacemaker when the phone is turned ON;
• Should not carry the phone in a breast pocket;
• Should use t he ea r o ppo si te the pacemaker t o minimize the
potential for interference;
• If you have any reaso n to sus pect th at interf erence is taki ng
place, turn your phone OFF immediately.
Hearing Aids:
•
with some hearing aids. In the event of such interference, you
may want to consult your service provider.
Other Medical Devices:
•
medical devi ce, consult the manufacturer of your device to
determine if they are adequately shielded from external RF
energy. Your physician may be able to assist you in obtaining
this information.
Turn your phone OFF in health care facilities when any
regulations posted in these areas instruct you to do so.
Hospitals or health c are fac ili ties may be using equipme nt th at
could be sensitive to external RF energy.
Vehicles:
•
inadequately shielded electronic systems in motor vehicles.
Check with the manufacturer or its representative regarding
your vehicle. You should also consult the manufacturer of any
equipment that has been added to your vehicle.
Posted Facilities:
•
posted notices so require.
The Health Industry Manufacturers Association
Some digital wireless phones may interfere
If you use any other personal
RF signals may affect improperly installed or
Turn your phone OFF in any facility where
Chapter 1
Safety First 5
Page 16

OI.book Page 6 Wednesday, November 8, 2000 3:30 PM
Chapter 1
Aircraft
FCC regulations prohibit using your phone while in the air;
switch off your phone before boarding an aircraft unless
otherwise advised by airline personnel.
Blasting Areas
To avoid interfering with blasting operations, turn your phone
OFF when in a “blasting area” or in other areas posted: “Turn
off two-way radio.” Obey all signs and instructions.
Potentially Explosive Atmospheres
Turn your phone OFF when in any area with a potentially
explosive atmosphere and obey all signs and instructions.
Sparks in such areas could cause an explosion or fire
resulting in bodily injury or even death.
Areas with a potentially explosive atmosphere are often but
not always clearly marked. They include fueling areas such as
gas stations; below deck on boats; fuel or chemical transfer or
storage facilities; vehicles using liquefied petroleum gas (such
as propane or butane); areas where the air contains
chemicals or particles, such as grain, dust or metal powders;
and any other area where you would normally be advised to
turn off your vehicle engine.
6 Safety First
For Vehicles Equipped with an Air Bag
An air bag inflates with great force. DO NOT place objects,
including both installed or portable wireless equipment, in the
area over the air bag or in the air bag deployment area. If invehicle wireless equipment is improperly installed and the air
bag inflates, serious injury could result.
For U.S. Customers:
Vehicles using liquefied petroleum
gas (such as propan e o r but a ne ) mus t co mp ly wi t h th e
National Fire Protection Standard (NFPA-58).
For a copy of this standard, contact the National Fire
Protection Association, One Batterymarch Park,
PO Box 9101, Quincy, MA 02269.
E-mail address:
Web site:
Custserv@NFPA.org
www.nfpa.org
.
.
Refer to Appendix C for the FDA Consumer Update on
Mobile Phones published by the U.S. Food and Drug
Administration.
Page 17
OI.book Page 7 Wednesday, November 8, 2000 3:30 PM
Getting Started
If you are looking at your phone and wondering where to go
from here, this is the place to start. This chapter is designed to
get you started, and to familiarize you with your phone’s most
basic features and functions.
Battery Use
Your phone’s battery may not be fully charged when you
remove it from the box. The battery must be fully charged
before using your phone for the first time. Attach and charge
the battery as described in this section.
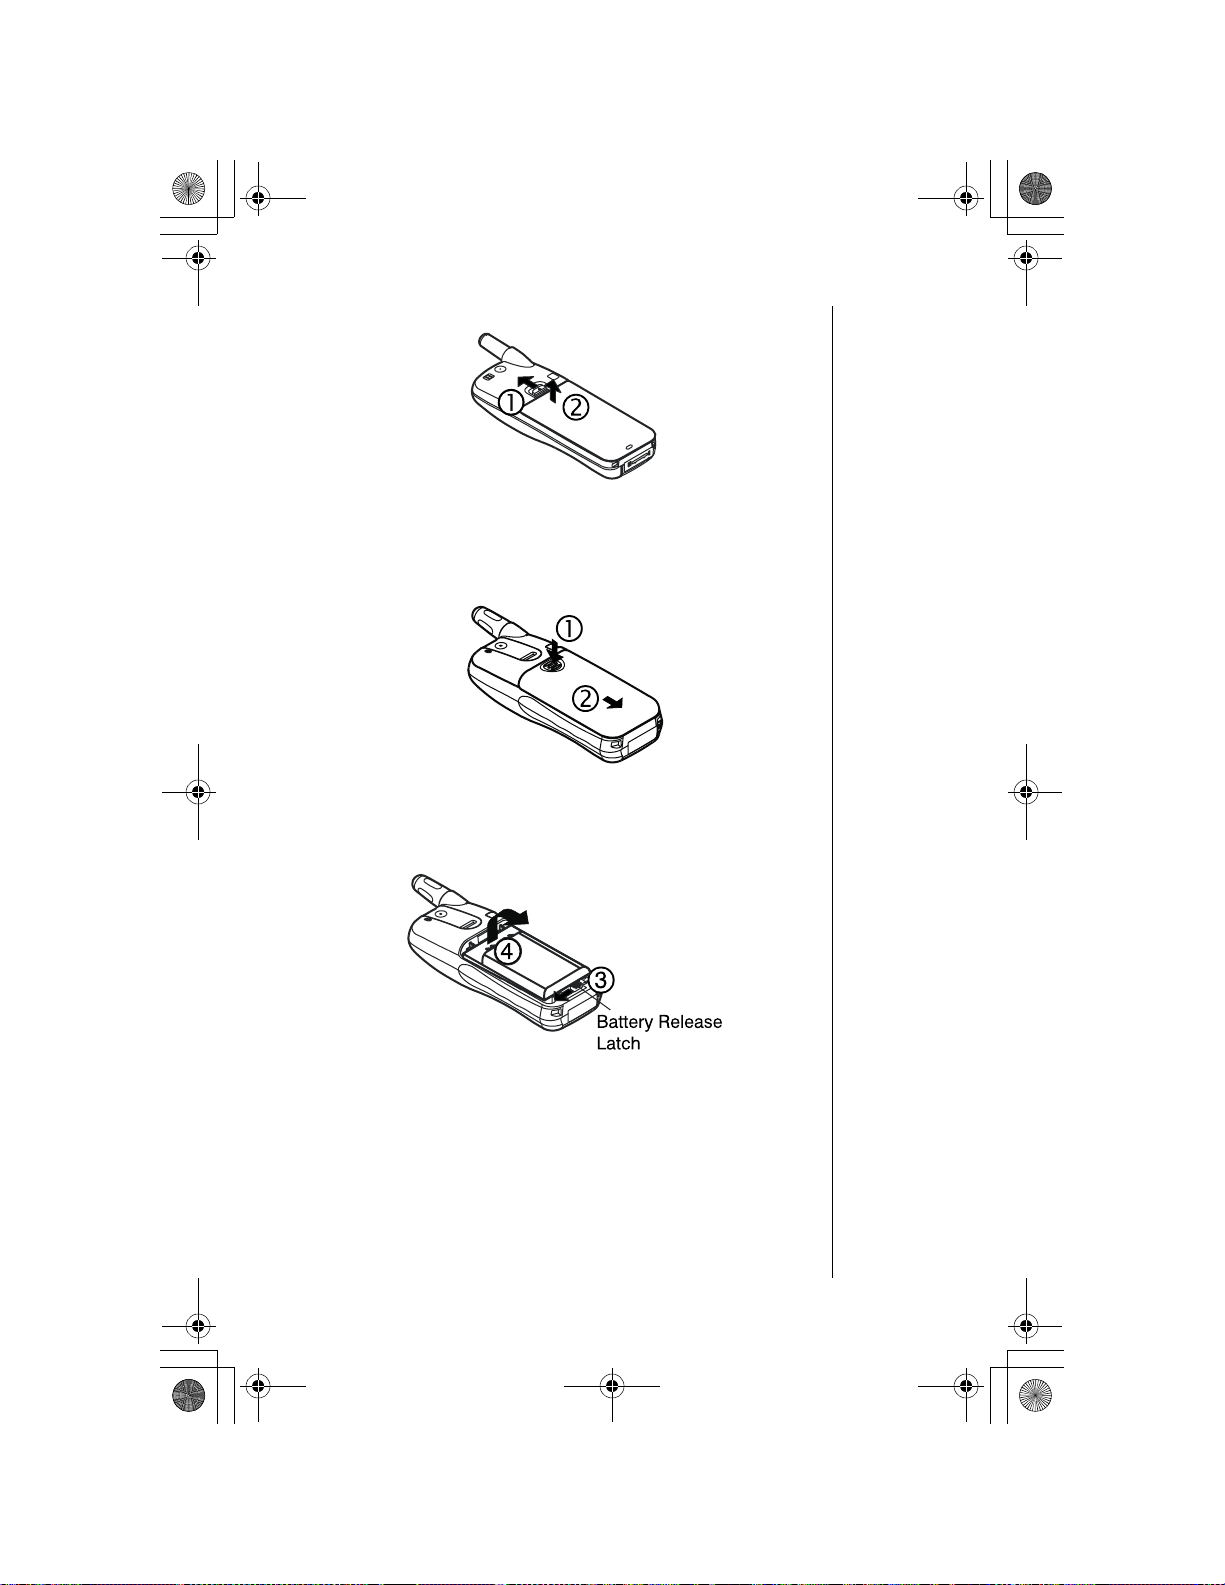
Attaching the Battery to an EB-TX210 Series Phone
1
Insert the bottom edge of the battery along the bottom, back
edge of phone.
2
Push the top of the battery toward the phone until it clicks
into place.
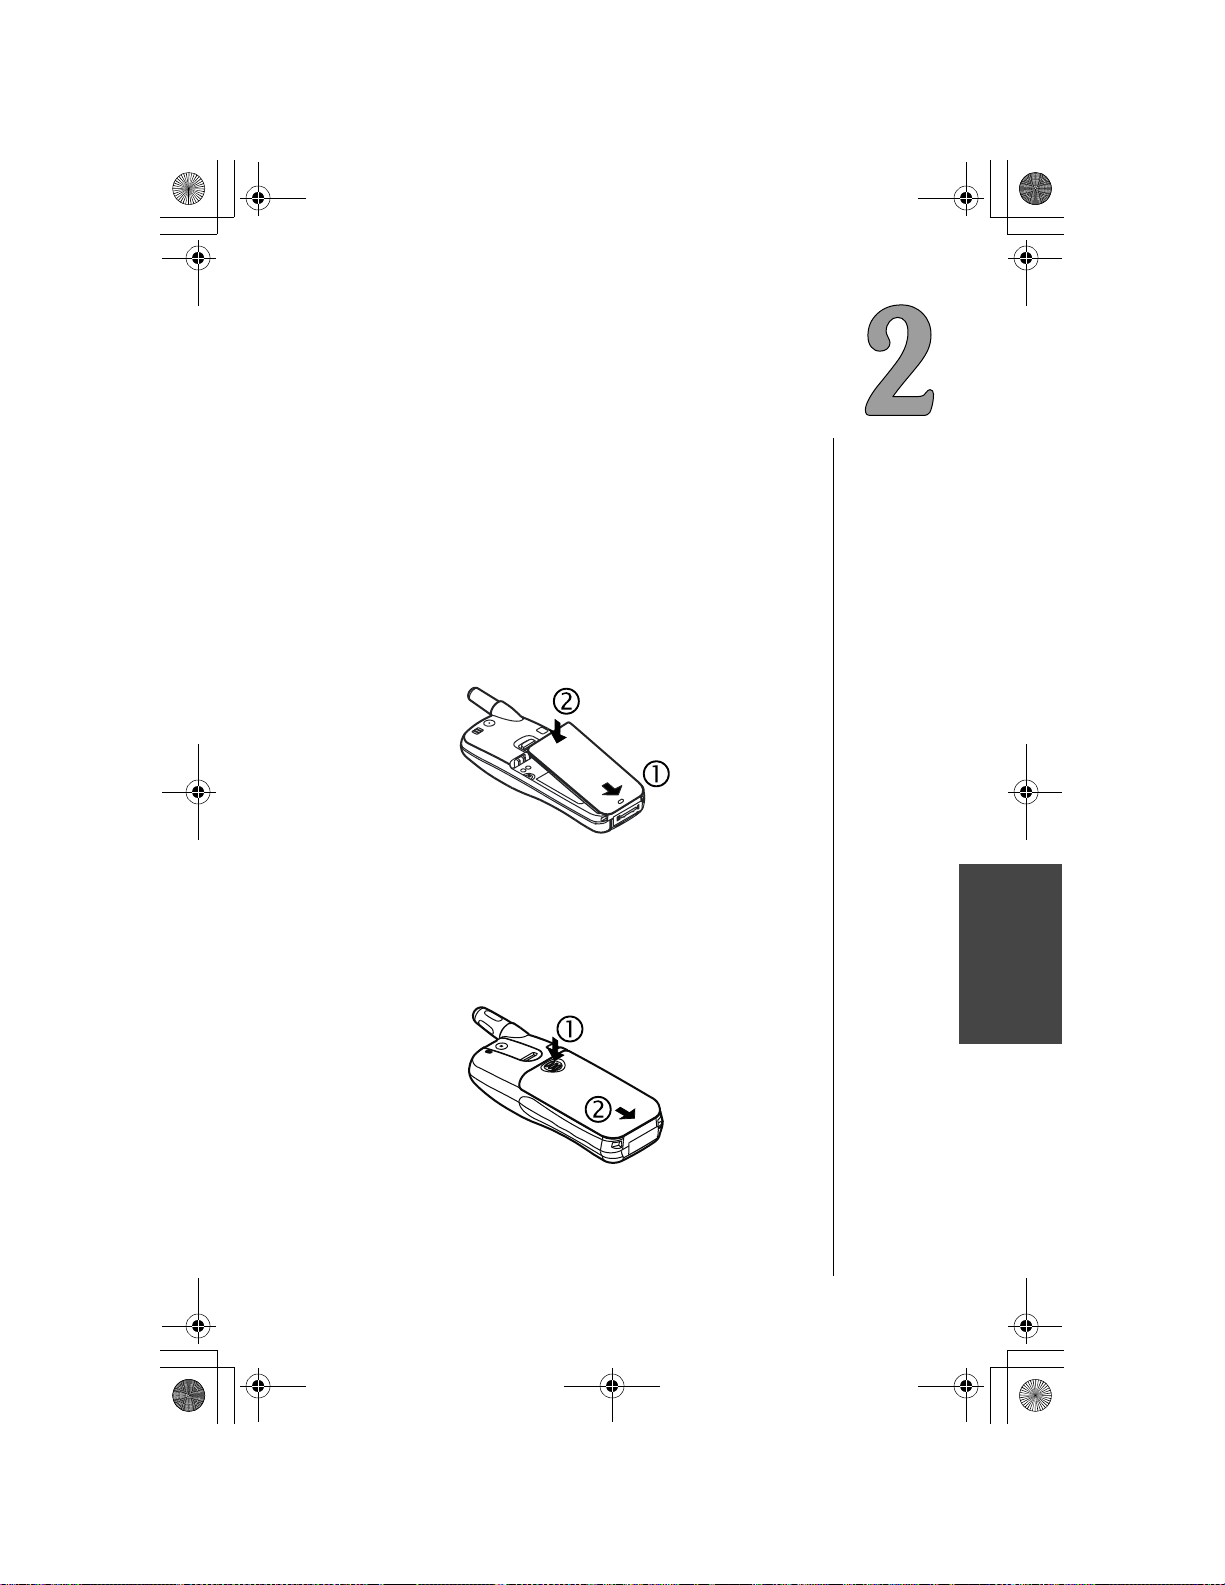
Attaching the Battery to an EB-TX220 Series Phone
1
Press down on the battery cover.
2
Remove the battery cover.
Getting Started
Getting Started 7
Page 18
OI.book Page 8 Wednesday, November 8, 2000 3:30 PM
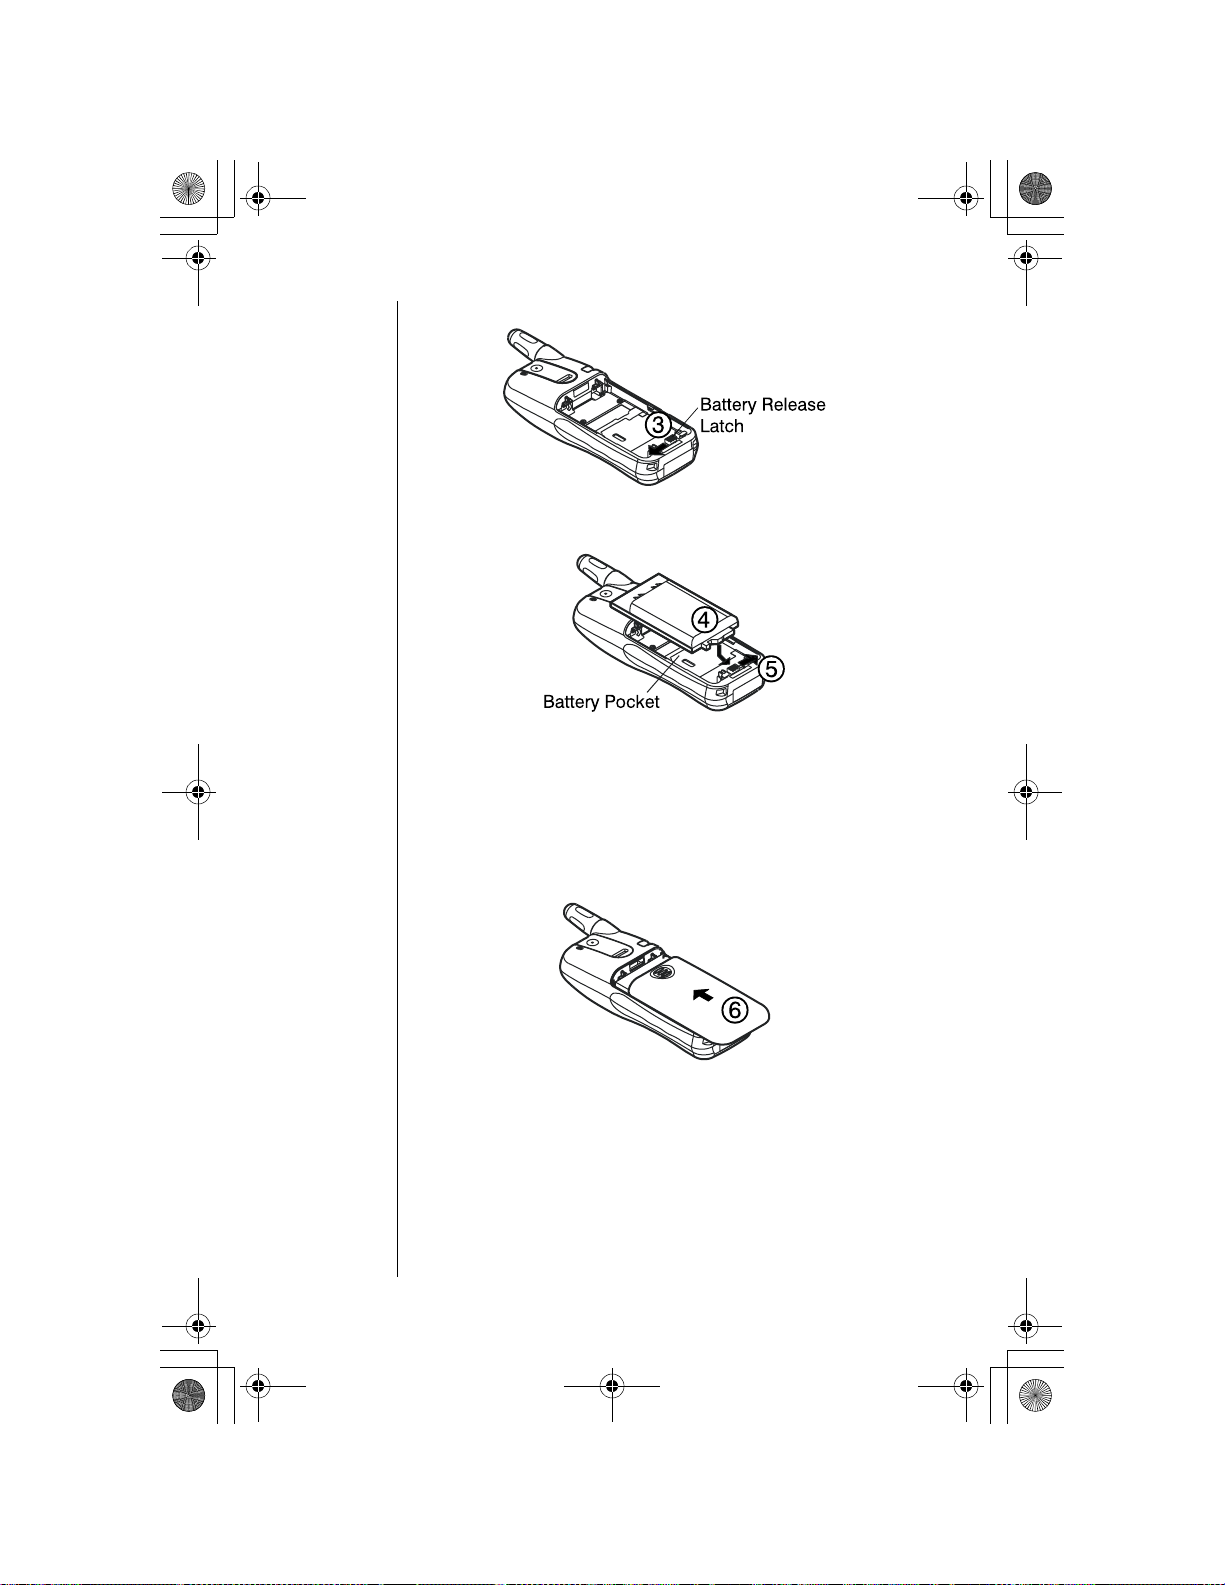
Chapter 2
Slide the battery release latch all the way to the left.
3
Insert bottom edge of battery into battery pocket, then lower
4
the top edge of the battery toward th e phone un til the battery
lies flat.
8 Getting Started
Slide the battery relea se latc h to the far right u ntil it c licks in to
5
place. The battery c ov er will not slide into pl ace i f the latch is
incorrectly positioned.
Slide battery cover onto phone until it clicks into place.
6
Page 19
OI.book Page 9 Wednesday, November 8, 2000 3:30 PM
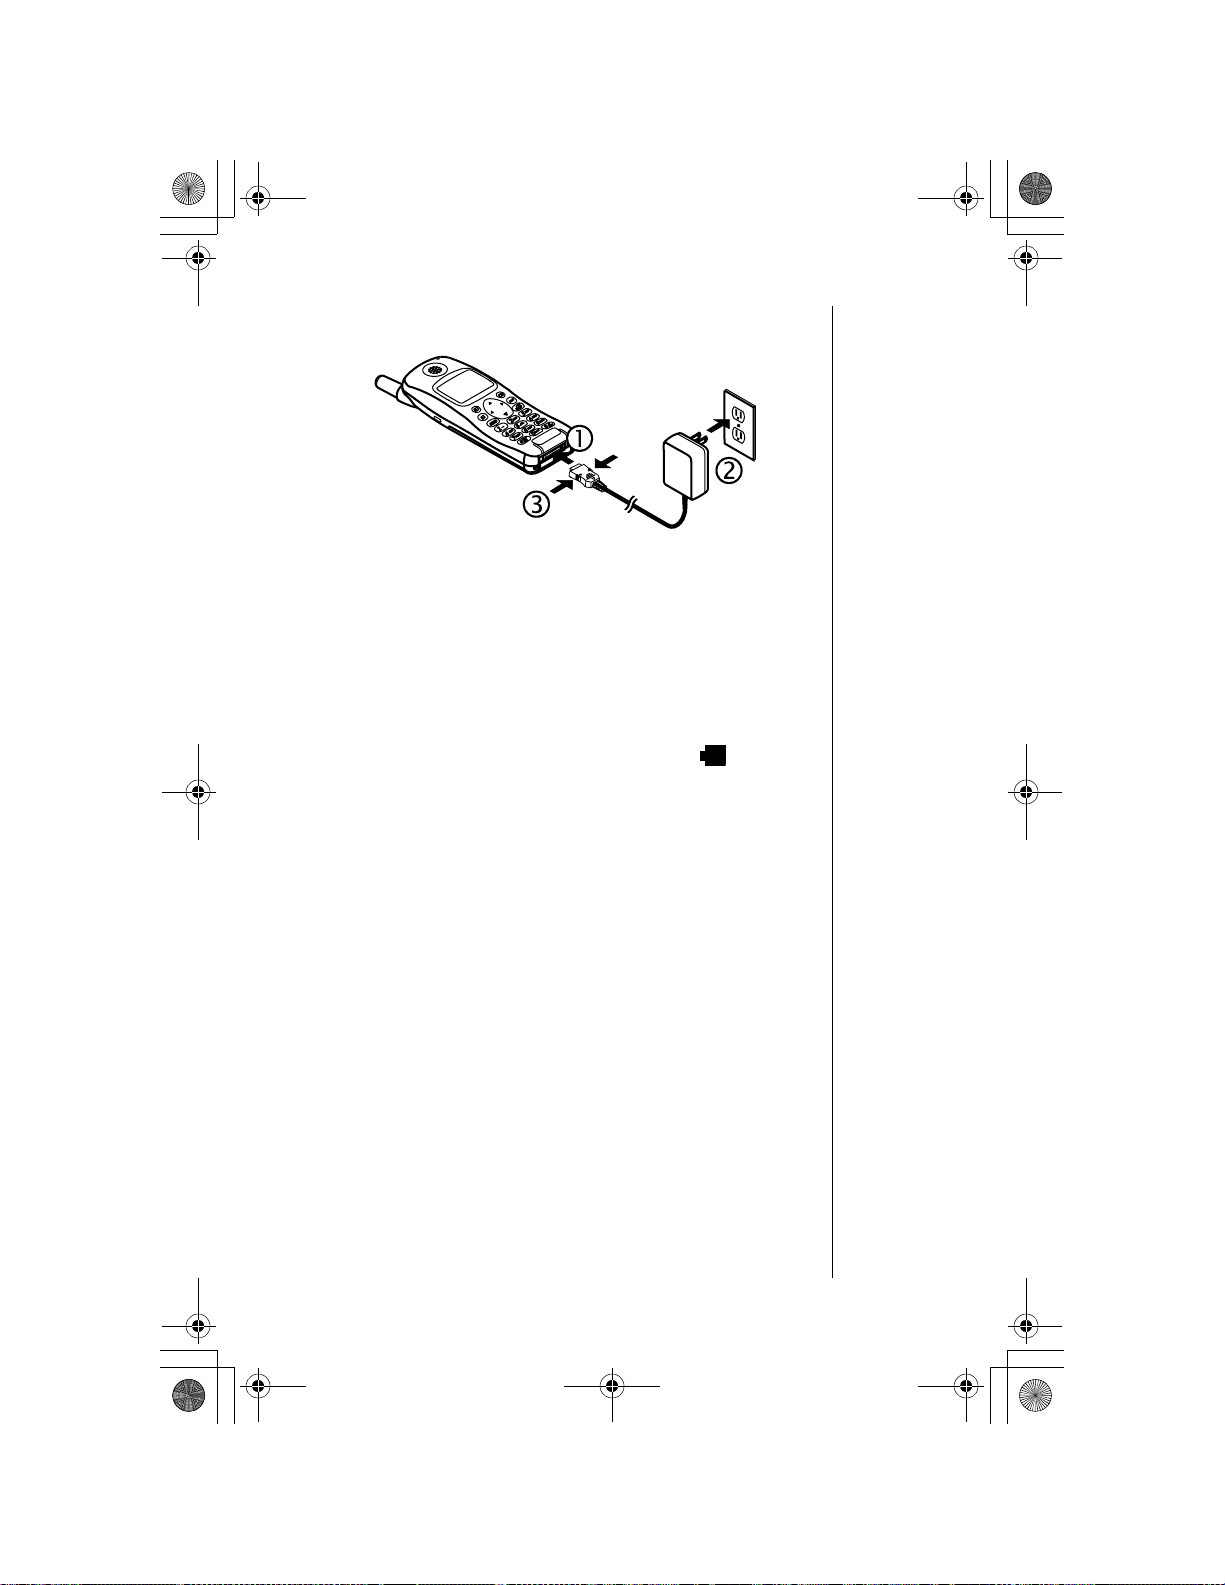
Charging the Battery for an EB-TX210 or EB-TX220
Series Phone
With the directional arrows facing up, attach the AC adapter
1
to the phone.
If you are using the EB-TX220 Series phone, you must
•
remove the connector cap from the bottom of the phone
before charging.
Insert the plug into an AC power outlet. The indicator light
2
turns red. If the phone is on during charging, the charg ing
time will be extended. When the battery is charged, the
indicator light turns off and the battery icon ( ) is filled.
To remove the AC Adapter from the phone,
3
side tabs on the connector and pull gently
press in both
.
Chapter 2
Recharging Tips
Your handset’s new battery will achieve maximum
•
performance after two or three charges. Allow your battery
to fully discharge at least once a month.
Recharge batteries in a we ll-ventil ated area between 41°F
•
(5°C) and 95°F (35°C). Temperature may slightly affect
charging time.
It is normal for your battery to become warm to the touch
•
while it is being recharged.
Fully charge the battery for the recomme nde d time .
•
You may use the phone during charging, but doing so will
•
extend the charging time.
Getting Started 9
Page 20
OI.book Page 10 Wednesday, November 8, 2000 3:30 PM
Chapter 2
EB-TX210 Series Battery Specifications
Mode Battery Type
(Lithium-Ion)
Talk
Time
Standby
Time
Charge
Time
Analog
Digital
EB-BS210
Standard
650 mAh
EB-BL210
Extended
1400 mAh
EB-BS210
Standard
650 mAh
EB-BL210
Extended
1400 mAh
Up to
60 min.
Up to
120 min.
Up to
120 min.
Up to
240 min.
Approx.
5.6 hrs.
Approx.
12 hrs.
Up to
200 hrs.
Up to
400 hrs.
EB-TX220 Series Battery Spec if icatio ns
Mode Battery Type
Analog
Digital
(Lithium-Ion)
EB-BL220
Internal
1400 mAh
EB-BL220
Internal
1400 mAh
Talk
Time
Up to
120 min.
Up to
240 min.
Standby
Time
Approx.
12 hrs.
Up to
400 hrs.
Approx.
100 min.
Approx.
200 min.
Approx.
100 min.
Approx.
200 min.
Charge
Time
Approx.
200 min.
Approx.
200 min.
10 Getting Started
Times listed in the tables above may vary depending
on usage and charging co nditions.
Page 21
OI.book Page 11 Wednesday, November 8, 2000 3:30 PM
Removing Battery from an EB-TX210 Series Phone
Slide and hold the latch on the back of phone.
1
While holding th e latc h, gra sp th e s id es of the battery and lift.
2
Removing Battery from an EB-TX220 Series Phone
Chapter 2
Press down on the battery cover.
1
Slide the battery cover off.
2
Slide the battery release latch all the way to the left.
3
Lift the battery out of the battery pocket.
4
Getting Started 11
Page 22
OI.book Page 12 Wednesday, November 8, 2000 3:30 PM
Chapter 2
Low-Battery Warning
The phone periodically beeps when the battery is low. The
battery icon (
displayed.
If your phone is at standby (idle) when the
message appears, you will not be able to place or receive
calls until the battery has been recharged, or until you attach
an AC or DC adapter. If you are in a call when you hear the
beep and the message appears, quickly end your call or
attach an AC or DC adapter.
) flashes and the
Phone Description
Low Battery
Low Battery
message is
You may enter up to 32 characters by pressing the number
keys. The keypad is also used to enter text as described in
“Text Entry Operations”, Chapter 4.
12 Getting Started
Page 23
OI.book Page 13 Wednesday, November 8, 2000 3:30 PM
Function Keys
Describes operations related to each function key.
Key Function
Chapter 2
through
Left Softkey:
the key.
From standby mode, press and hold to turn on Key Lock.
Right Softkey:
the key.
Navigation Key:
scroll in the desired direction. Use this key to scroll
through menus, text, and the Phonebook.
Message Key:
messages.
Press to enter text message menu.
Clear Key:
return to the previous display. Press and hold to clear the
display.
Send Key:
PWR/End Key:
Press to end a call and return to standby (idle).
1 through 9 Digit Keys:
In text entry mode, press to enter text, numbers, and/or
symbols. (Note: The key is used to enter spaces.)
See “Text Entry Operations”, Chapter 4.
Home Key:
(idle) from the menu.
In text entry mode, press to switch between uppercase
and lowercase letters.
Press to use the function displayed above
Press to use the function displayed above
Press the appropriate area of this key to
Press and hold to retrieve voice mail
Press to delete the previous character or to
Press to dial phone number on the display.
Press and hold to power phone on/off.
Press to enter numbers.
Press and hold to return “home” to standby
Pause Key:
(See “Programming Pauses or Waits” on page 24.)
Speakerphone/Quiet Mode Key:
press and hold to turn speakerphone on/off.
From standby mode, press and hold to turn Quiet mode
on/off.
Press and hold to enter a pause or wait time.
During conversation,
Getting Started 13
Page 24
OI.book Page 14 Wednesday, November 8, 2000 3:30 PM
Chapter 2
Display Icons
Icons that appear on the display depend on what features you
are using and the options you have selected.
Master Display and Icons
Icon Indicates
Charged battery.
Low battery (flashes).
New text message received. When icon is darkened,
indicates that text message storage is full.
New voice mail message received.
14 Getting Started
Digital service available.
Active call is in operation.
Voice privacy feature is on.
Quiet Mode is on.
Vibration alert is on. Ring volume is set to 0.
Incoming signal strength (varies by the number of bars
shown beside the signal icon):
Five bars indicates a strong signal.
No bars indicate a weak or no signal.
Display area (shows numbers, text, and symbols).
Softkey functions. The function changes depending on
the features or modes you are using.
Navigation key can be pressed to move in the directions
indicated by the displayed arrows.
Page 25
OI.book Page 15 Wednesday, November 8, 2000 3:30 PM
Powering Phone On an d Off
Powering ON
Press and hold until a tone sounds and the backlight
1
lights.
• The battery indicator and signal icon are displayed.
• If your Welcome Scree n is turn ed on, the messag e brie fly
appears.
Your wireless service provider’s name is displayed if you are
2
within the coverage area.
Powering OFF
Press and hold
to power off your phone.
Standby Display
The standby display appears when your phone is on and in an
“idle” state. You may return to the standby display at any time
(except during a call) by pressing
The backlight turns on automatically for 15 seconds when
powering up the phone or when pressing any key.
.
Chapter 2
The backlight remains on when using an optional
Handsfree Carmount Kit.
Getting Started 15
Page 26

OI.book Page 16 Wednesday, November 8, 2000 3:30 PM
Chapter 2
Moving through the Menu
You access the Main Menu from the standby display:
MENU shows on the bottom left side of the display. To access
the Main Menu, press the corresponding softkey ( ) on the
keypad just below where MENU is displayed. After entering
the Main Menu, press either softkey ( or ) to select the
options displayed above them.
Within the menu, the selected feature or function is indicated
by an arrow ( ). Use the navigation key scroll areas
to move up or down through the menu options. When an
option is selected using the softkeys, the display changes to
offer another level of softkey options. This process continues
until you have responded to all display prompts and options
for a particular softkey.
( or )
Menu Map of Shortcut Keys
Many of the phone’s features may be quickly accessed by
pressing shortcut keys instead of scrolling through the
numbered options on the display. For a complete list of the
shortcut keys, refer to the Menu Map on page 17. For
example, you can select Key Volume by pressing
then press
16 Getting Started
(MENU),
(Tone Settings) and (Key Volume).
Page 27
OI.book Page 17 Wednesday, November 8, 2000 3:30 PM
Chapter 2
Menu Map
Getting Started 17
Page 28

OI.book Page 18 Wednesday, November 8, 2000 3:30 PM
Chapter 2
Setting Date and Time
From standby, press
1
Press
2
Press
3
• The arrow points to
Press (OK).
4
Enter the digits for the date in the format: month/day/year.
5
Press
6
Enter the digits for the time using a 12-hour clock.
7
Press
8
Press (AM/PM) to switch between AM and PM.
9
Press (OK) to select.
10
• The display confirms that you adjusted the setting.
Press any key or wait 3 seconds to return to standby.
11
• The standby display shows the date and time, as well as
to scroll to Phone Settings. Press (OK).
to scroll to Time Settings. Press (OK).
to scroll to set the time.
to select the AM/PM setting.
the day of the week.
(MENU) to enter the Main Menu.
Date/Time
.
18 Getting Started
Page 29
OI.book Page 19 Wednesday, November 8, 2000 3:30 PM
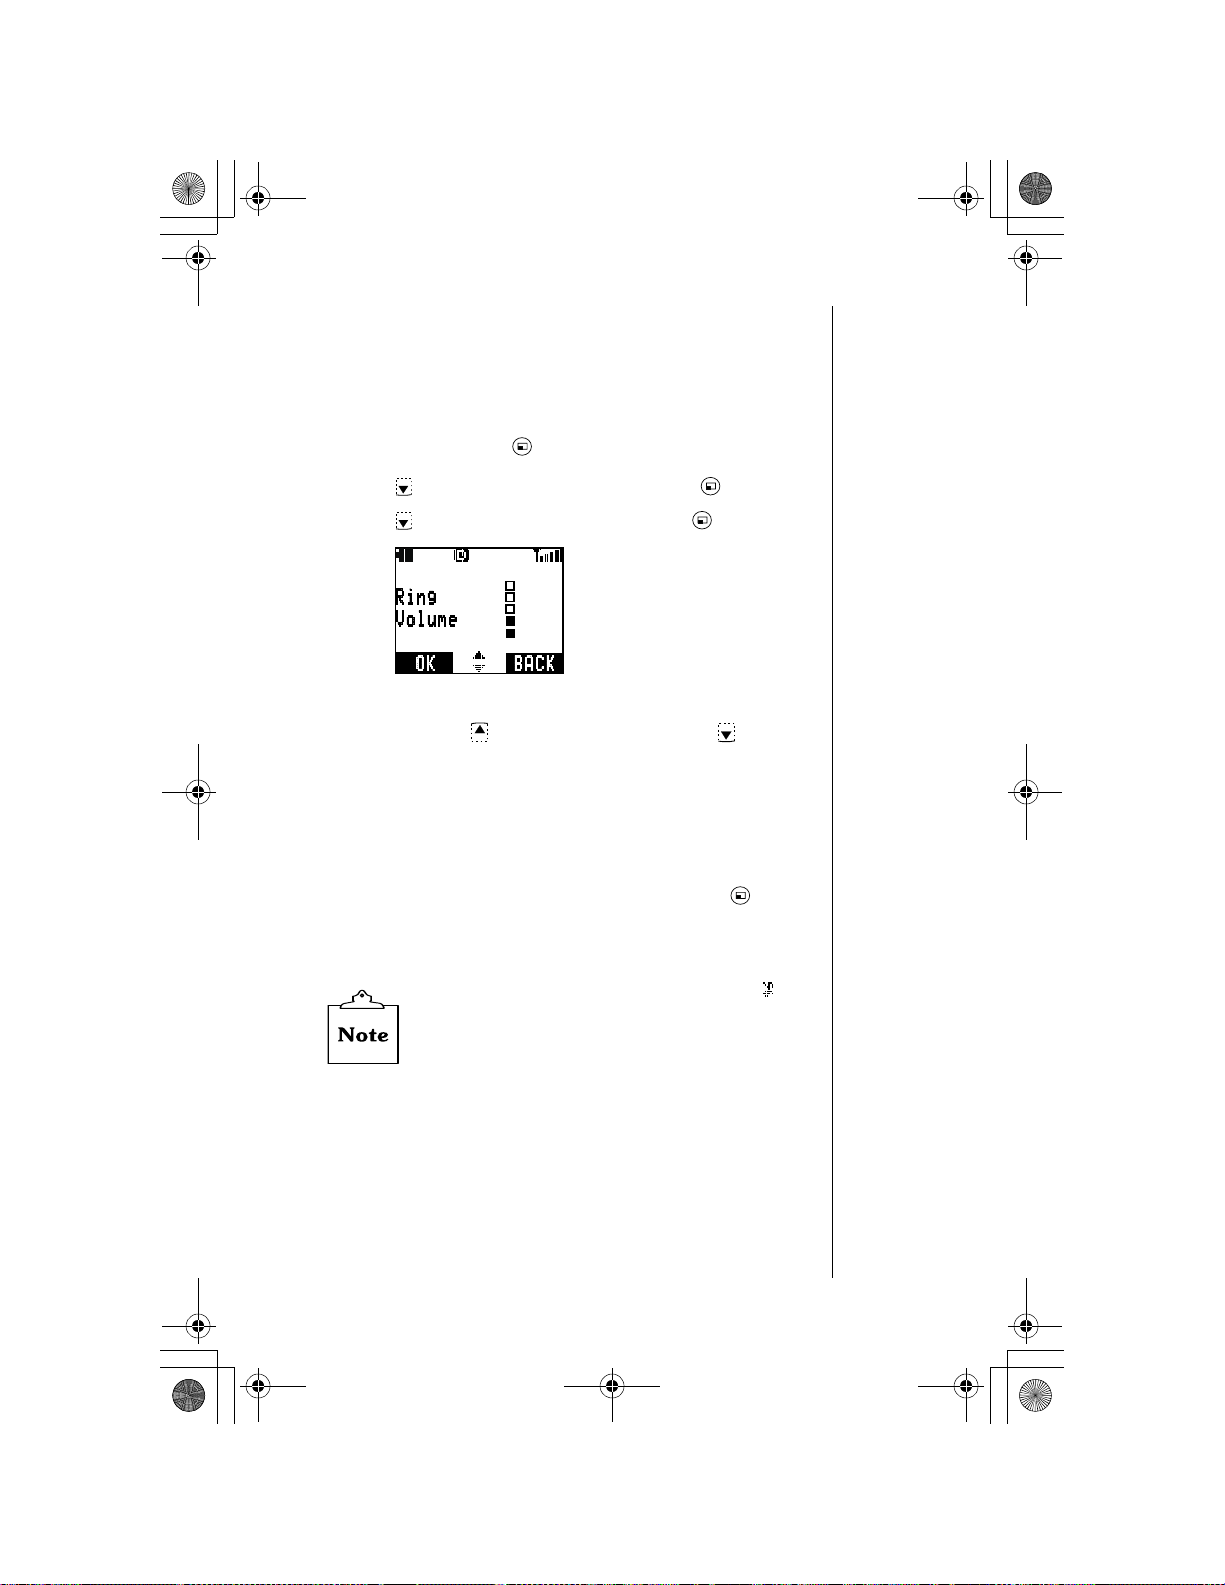
Setting Ring Volume
You may select from six different ring volume settings.
“Alert Mode” on page 48 for more information about using
your phone in special situations such as meetings, theaters,
etc.)
From standby, press (MENU) to enter the Main Menu.
1
Press
2
Press
3
• The display shows the current ring volume setting.
Press and hold to increase ring volume, or to
4
decrease volume.
• A ring tone is emitted and the displ ay indicate s the current
• If you select the lowest setting, the ring volume is muted
When the desired ring volume is reached, press
5
• The display confirms the new volume level setting.
to scroll to Tone Settings. Press (OK).
to scroll to Ring Volume. Press (OK).
ring volume setting.
(silent).
Chapter 2
(See
(OK).
Press any key or wait 3 seconds to return to standby.
6
When the volume is set to muted (silent), the icon
is displayed.
Getting Started 19
Page 30
OI.book Page 20 Wednesday, November 8, 2000 3:30 PM
Chapter 2
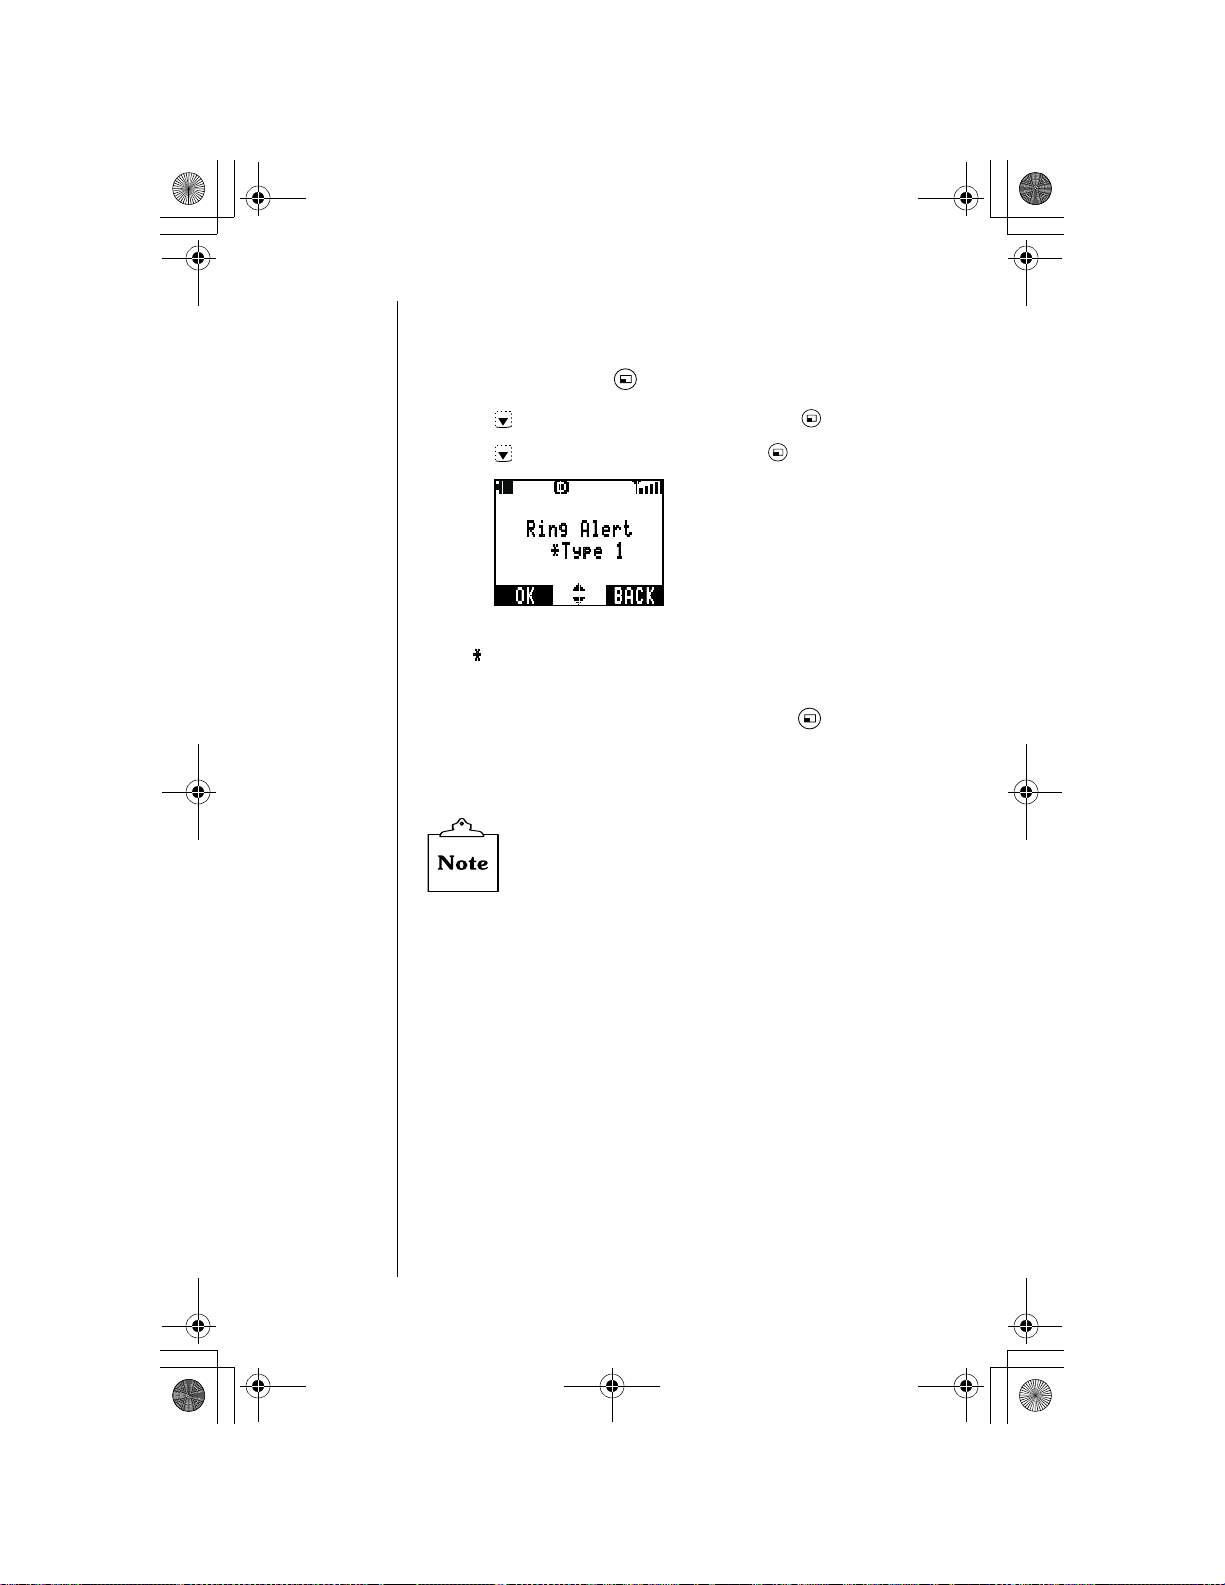
Selecting a Ring Alert
You have the option of selecting from 20 different ring alerts.
From standby, press (MENU) to enter the Main Menu.
1
Press
2
Press
3
• The current ring alert setting is displayed with an asterisk
As you scroll through the ring alerts , a sample ring is emitted.
4
Scroll to your choice of ring alerts and press (OK).
5
• The display confirms the new ring alert setting.
to scroll to Tone Settings. Press (OK).
to scroll to Ring Alert. Press (OK).
().
6
Using the Private Handsfree Headset
When the Private Handsfree Headset is plugged into the
phone, you can have a phone conversation without holding
the phone to your ear. The caller’s voice is heard through the
Private Handsfree Headset’s earpiece. When you speak, your
voice is picked up by the Private Handsfree Headset’s
microphone.
Attach the Private Handsfree Headset to your phone as
shown.
20 Getting Started
Press any key or wait 3 seconds to return to standby.
When selecting a new ring alert, it is not possible to
hear the sample ring if ring volume has been muted or
if you are in a conversation.
• If you are using the EB-TX220 Series phone, you must
remove the connector cap from the bottom of the phone
before plugging in
the Private Handsfree Headset
.
Page 31

OI.book Page 21 Wednesday, November 8, 2000 3:30 PM
Securely plug the Private Handsfree Headset jack in the
1
bottom of the phone until it clicks into place. This will
automatically disable the speaker and microphone in the
phone.
Attach the Private Handsfree Headset clip to your clothes.
2
Insert the earphone into your ear.
3
During conversation, increase or decrease volume to a
4
comfortable level by using the up and down arrows on the
phone’s center navigation key.
Chapter 2
The use of an ear insert device while driving may
violate the laws of some states/provinces. Be sure
to check applicable state/provincial laws before
using this device.
Getting Started 21
Page 32

OI.book Page 22 Wednesday, November 8, 2000 3:30 PM
Chapter 2
22 Getting Started
Page 33

OI.book Page 23 Wednesday, November 8, 2000 3:30 PM
Everyday
Operations
Your phone comes with a variety of features. In most cases,
however, only some of these features will be used on a daily
basis. This chapter will familiarize you with most of those
“everyday” operations. Descriptions of more advanced
features are covered in additional chapters.
Placing Calls
To place a call, power on your phone and confirm that you
have a strong signal indication. If you are in a digital service
area, the icon appears.
Dialing from the Keypad
1
From standby, enter the phone number (up to 32 digits).
2
Press to place the call.
During conversation , if you pres s and hold
speakerphone feature is activate d.
phone next to your ear when speakerphone is
activated.
• If the outgoing phone number matches an entry in the
Phonebook, the corresponding name is also displayed
with the number.
3
When the call connects,
• The call timer is displayed if the
(See “Call Timers” on page 47 for more information.)
4
Press to end the call.
Voice Call
Do not hold the
is displayed.
Current Call
, the
timer is on.
Everyday Operations 23
Everyday Operations
Page 34

OI.book Page 24 Wednesday, November 8, 2000 3:30 PM
Chapter 3
Phonebook Dialing, Speed Dialing and Super Speed
Dialing
To use these types of dialing, you must first program entries
into the Phonebook.
Programming Pauses or Waits
This feature is useful when you are placing a c all that requires
entry of additional digits once the call connects (i.e., voice
mail).
Enter the phone number.
1
To enter a Pause or Wait time, pres s a nd h old until a P
2
or a W appears after the entered phone number.
• If you program a Pause (P), the entered digits are
automatically transmitted during a call after a two-second
delay.
• If you program a Wait (W), the entered digits are not
transmit ted during a call until yo u press or
(SEND).
Continue to enter digits, Pauses, and Waits as needed.
3
See “Phonebook Features”, Chapter 5
.
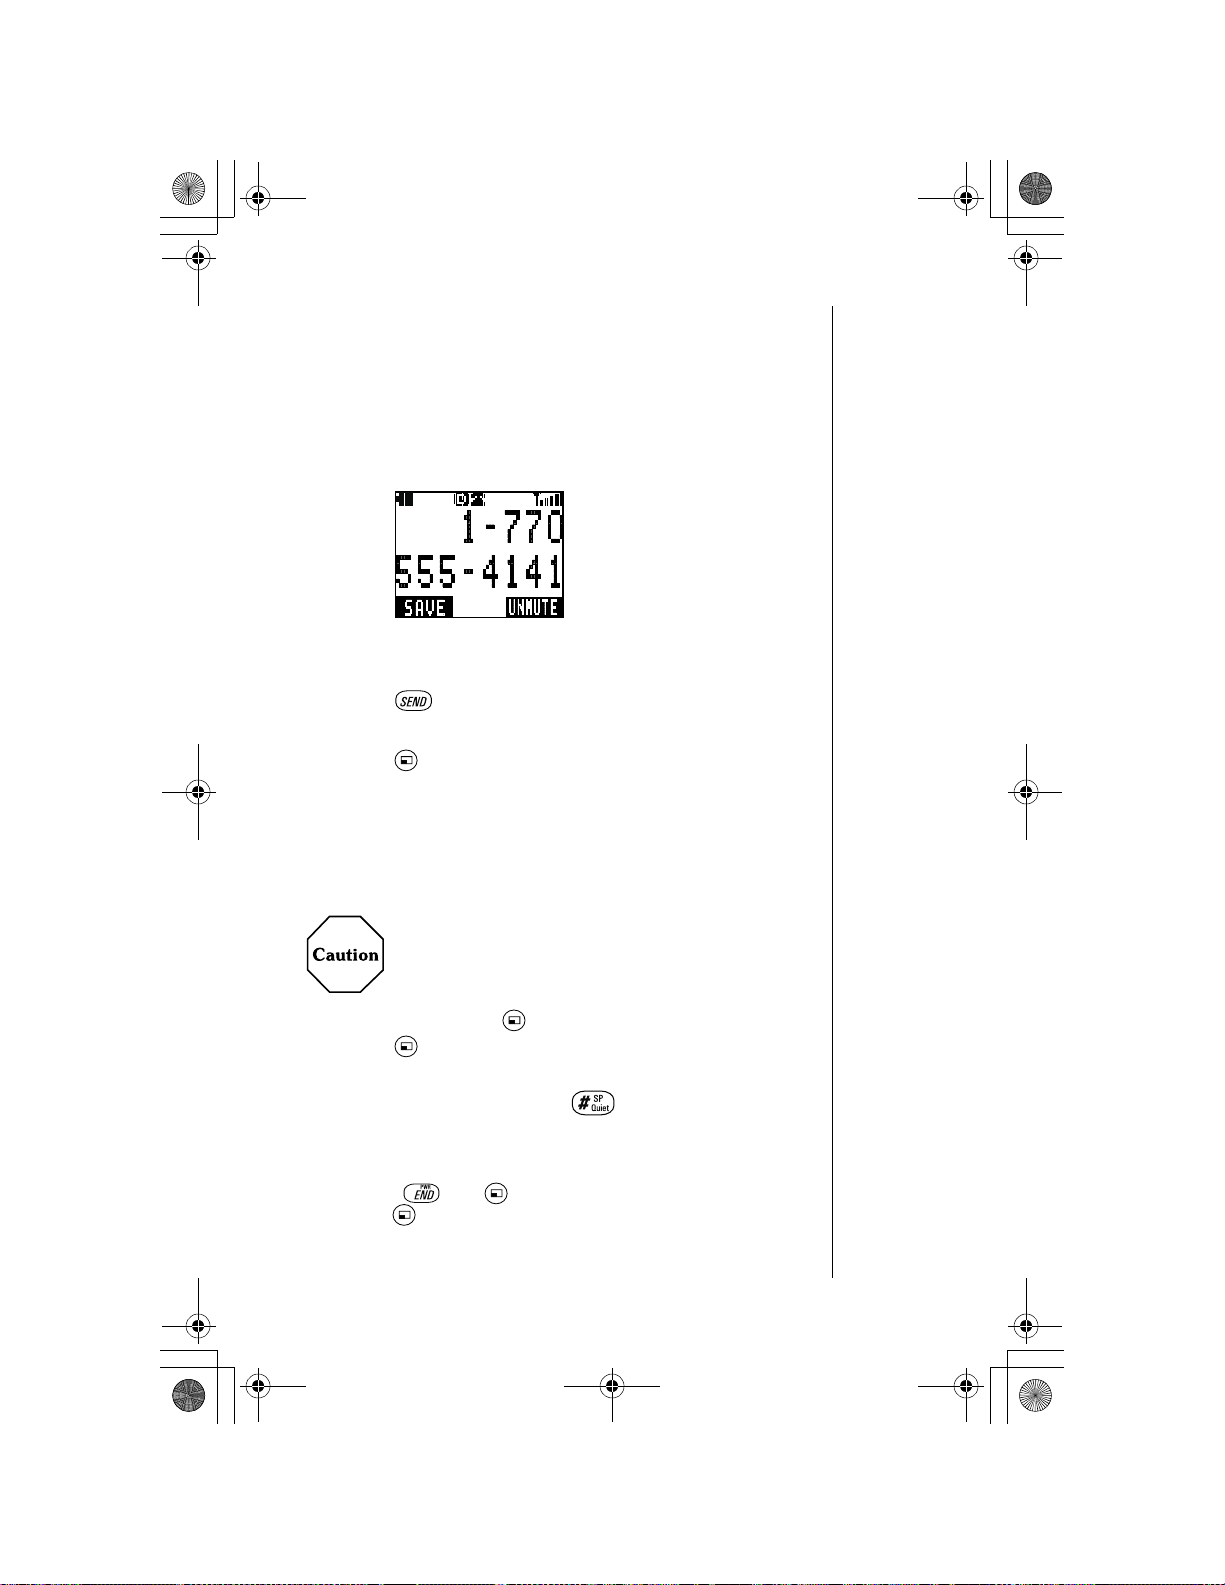
• In this sample display, the first seven digits are the phone
Press to place the call.
4
OR
Press (SAVE) to save the entry into th e Phonebook.
Chapter 5, “Phonebook Features”, for information on storing
entries.)
24 Everyday Operations
number to dial. The W (Wait) indicates that the phone will
wait until you press to transmit the digits “
P
(Pause) indicates that the phone will then automatically
transmit “
3456
” two seconds after “
901
” is transmitted.
901
”. The
(See
Page 35

OI.book Page 25 Wednesday, November 8, 2000 3:30 PM
Answering Calls
The phone must be on to receive calls. It will not ring or
vibrate when powered off.
When a call is received, the phone rings and/or vibrates.
1
• If you have Caller ID, the caller’s phone number is
displayed along with
• If the caller’s phone number matches an entry in the
Phonebook, the corresponding name appears and the
backlight changes color.
Press or any key except to answer.
2
• Quickly pressing will stop the ringing and/or
vibration alert, but not answer the call.
When you are ready to end the call, press to
3
disconnect.
Incoming Call
.
Chapter 3
In-Call Feature s
You can perform several functions while you are in a call.
Voice Volume
During a call, press and hold to increase the volume of
1
the caller’s voice, or pres s to decrease the volume of the
caller’s voice.
• The volume level is displayed .
Release the key when the desired volume is reached.
2
The voice call display retur ns.
3
Everyday Operations 25
Page 36
OI.book Page 26 Wednesday, November 8, 2000 3:30 PM
Chapter 3
Displaying Your Own Phone Number During a Call
During a call, you can view your own phone number.
During a call, press (MENU) to enter the Main Menu.
1
Press to scroll to
2
Press (OK) to select
3
Press to scroll down to
4
Press (OK) to view your phone number.
5
Press (OK) and the voice call display returns.
6
If your phone is programmed with more than one
phone number, only the number currently being
used is displayed.
If you would like to have a second phone number
programmed for your phone, contact your wireless
service provider.
Phonebook
Phonebook
Own Number
.
.
.
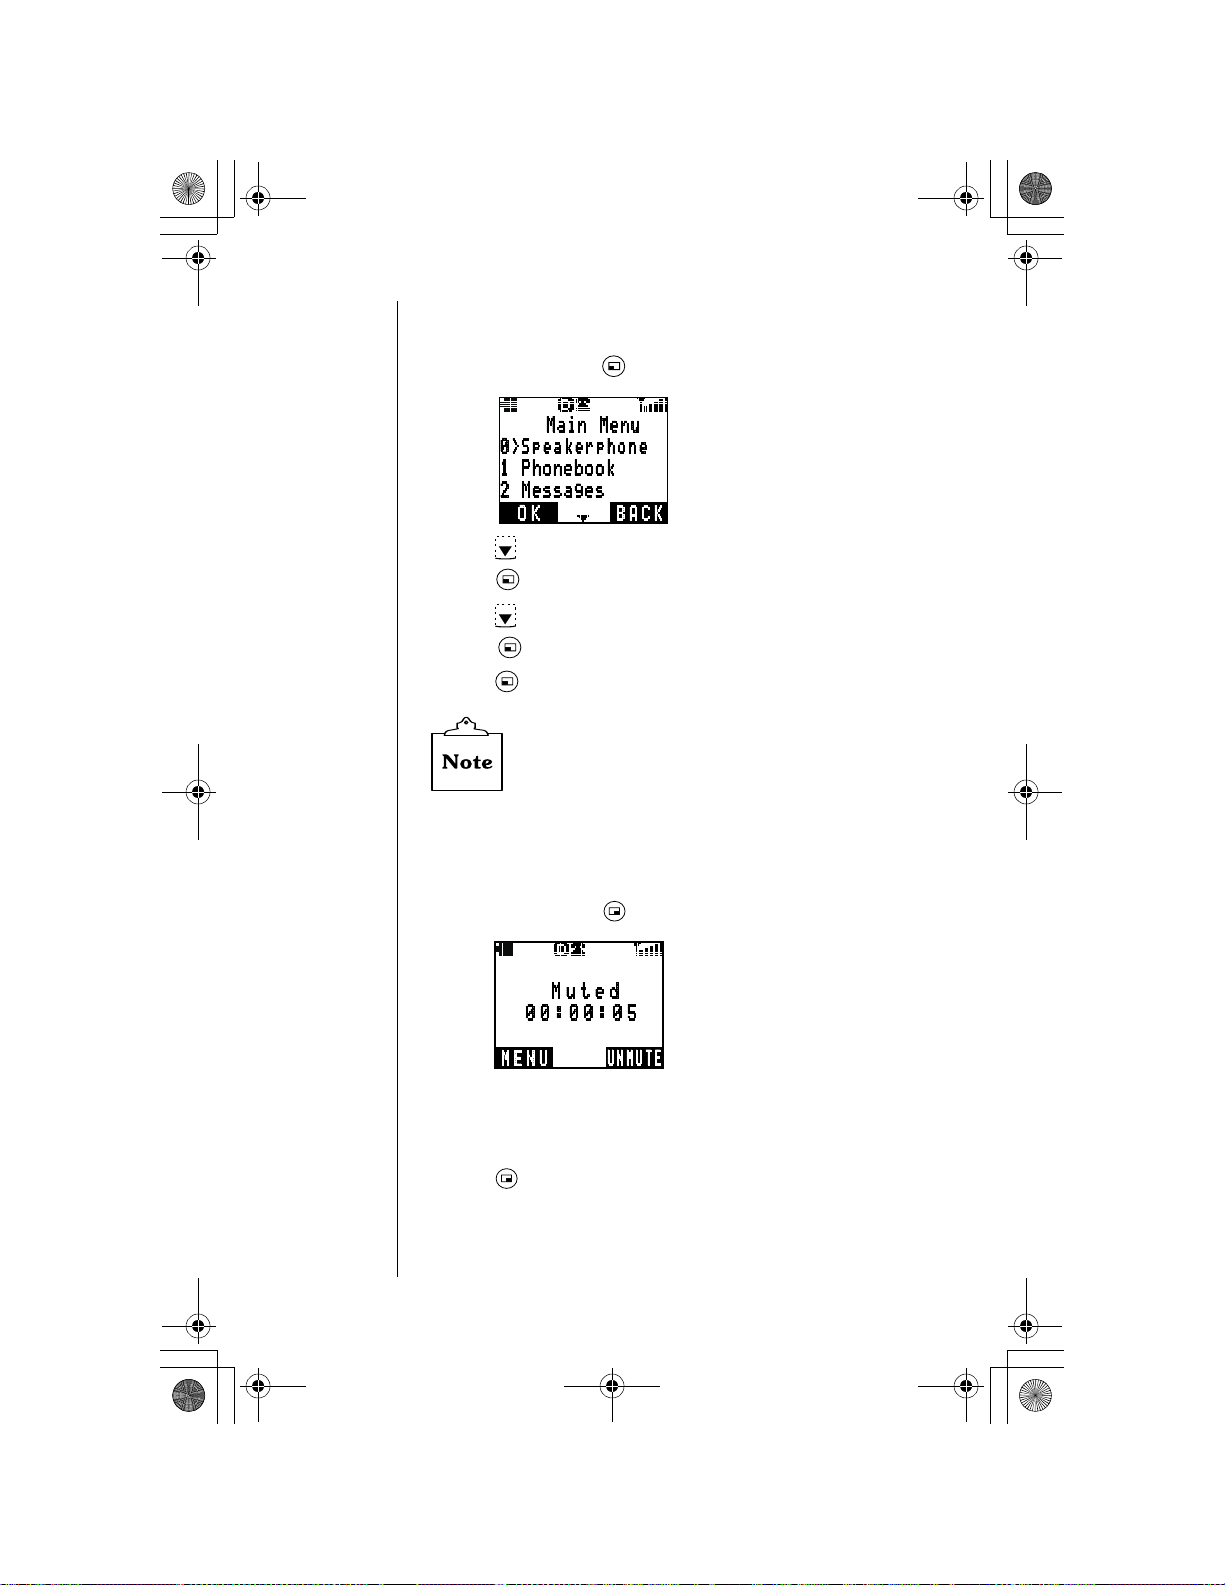
Muting the Mouthpiece
During a call, press (MUTE) to mute the mouthpiece.
1
• The display indicates when the mouthpiece is muted.
• When the mouthpiece is muted, you can still hear the
other person on the call, but that person cannot hear you.
Press (UNMUTE) to unmute and resume conversation.
2
26 Everyday Operations
Page 37
OI.book Page 27 Wednesday, November 8, 2000 3:30 PM
Scratchpad
This feature allows you to enter a phone number on your
phone’s display during a call. You may enter up to 32 digits.
After ending the call, you may dial the number on the display
or save the entry into the Phonebook.
During a call, enter numbers by pressing the keys on your
1
keypad.
After ending the call, the phone number remai ns on the
2
display.
Press to call the number on the display.
3
OR
Press (SAVE) to save the number into the Phonebook.
(See “Saving a Displayed Phone Number” on page 39 for
more information.)
Chapter 3
Speakerphone
You can talk on your phone without having to hold the phone
to your ear.
Do not hold the phone next to your ear when
speakerphone is activated.
During a call, press (MENU) to enter the Main Menu.
1
Press (OK) to select Speakerphone.
OR
During a call, press an d hold to turn on Speakerphone.
• The display indicates
To turn off the Speakerphone during the call, press any key
2
except and (MENU) to enter the Main Menu and
press (OK).
Speakerphone Set to on
.
OR
Ending the call also turns off the speakerphone.
Everyday Operations 27
Page 38

OI.book Page 28 Wednesday, November 8, 2000 3:30 PM
Chapter 3
Unanswered Calls
If an incoming call is not answered,
1
displayed.
Press (VIEW) to view the phone number and the time of
2
the unanswered call.
• If the caller’s phone number matches an entry in the
Phonebook, the corresponding name is also displayed.
Press or to scroll through the phone numbers of the
3
last ten (10) unanswered calls.
If desired, press to call the selected phone number.
4
Phone numbers of unan sw ered calls are displayed
only if you have subscribed to Caller ID through your
wireless service provi der.
Unanswered Call
is
Answer Options
Y ou can choose to answer calls in ei ther of the following ways:
• By pressing any key (except ).
• Only by pressing .
From standby, press (MENU) to enter the Main Menu.
1
Press to scroll to
2
Press to scroll to
3
• The current setting is displayed with an asterisk ( ).
To change the setting, scroll to the other option. Press
4
(OK) to select.
Press any key or wait 3 seconds to return to standby.
5
Phone Settings
Answer Options
. Press (OK).
. Press (OK).
28 Everyday Operations
Call Waiting can be answered only b y pr essing
or (ACCEPT), regardless of this setting.
Page 39

OI.book Page 29 Wednesday, November 8, 2000 3:30 PM
Voice Mail
You must subscribe to voice mail through your
wireless service provi der before you can retrieve
voice mail messages. I f yo ur voi ce mail phone
number has not been p ro grammed, contact your
wireless service provi der. Refer to Chapter 7 for
information about ad dit io nal subscriber features.
Listening to New Voice Mail
When a new voi ce mai l mess age is received, an alert sounds
1
and/or vibrates and appears on the top of the display.
• The display indicates the number of new voice mail
messages.
Chapter 3
Press (LISTEN) to automatically dial your voice mail
2
number.
OR
From the standby display, press and hold until it calls
your voice mailbox.
Follow the recorded instructions for your voice mail.
3
Press to end your call and return to standby.
4
Resetting the Voice Mailbox Number
Do not reset your voice mailbox number if it is
preprogrammed by your wireless service provider.
Your voice mail will be inaccessible if an incorrect
number is entered. Check with your wireless service
provider for specific information.
From standby, press (MENU) to enter the Main Menu.
1
Press to scroll to
2
3
Scroll to
Voice Mail
Messages
and press (OK).
. Press (OK).
Everyday Operations 29
Page 40

OI.book Page 30 Wednesday, November 8, 2000 3:30 PM
Chapter 3
• Your voice mailbox phone number is displayed.
Press (EDIT) and enter a new voice mailbox phone
4
number.
• You may also program Pause and Wait times. See
“Programming Pauses or Waits” on page 24.
Press (OK) to save the new phone number.
5
Redialing Numbers
You may easily redial one of the last ten (10) numbers dialed
from your phone. Or, when a system busy signal occurs, your
phone can automatically redial the number you are attempting
to call.
Redialing One of the Last Ten (10) Numbers Dialed
from Your Phone
From standby, press to view the last ten (10) dialed
1
phone numbers.
• If a dialed number matches an entry in the Phonebook,
Press or to scroll through the numbers.
2
Press to call.
3
30 Everyday Operations
the corresponding name is also displayed.
Page 41

OI.book Page 31 Wednesday, November 8, 2000 3:30 PM
Automatic Redial
If a call cannot be completed because of a system busy error
(or other system problem), your phone can automatically
redial the number for you.
If your call cannot be completed because of a system error,
1
wait until
Press (YES) to automatically redial the number.
2
Automatic Redial?
Automatic Redial?
cannot be completed because of a system busy error
or some other system pr obl em .
does not display if the called number is busy (i.e., the
person you are calling is using the phone).
When your phone is con nec t ed t o t he Pr i vate
Handsfree Headset or an optional Handsfree
Carmount Kit, the phone will aut om atically redial
without prompting for an answer to
Redial?
.
is displayed.
is displayed only when your call
Automatic Redial?
Automatic
• The phone automatically redials the number up to 15
times or until the call connects.
• An alert tone sounds when the call connects.
OR
Press (NO) to return to standby.
Chapter 3
Everyday Operations 31
Page 42
OI.book Page 32 Wednesday, November 8, 2000 3:30 PM
Chapter 3
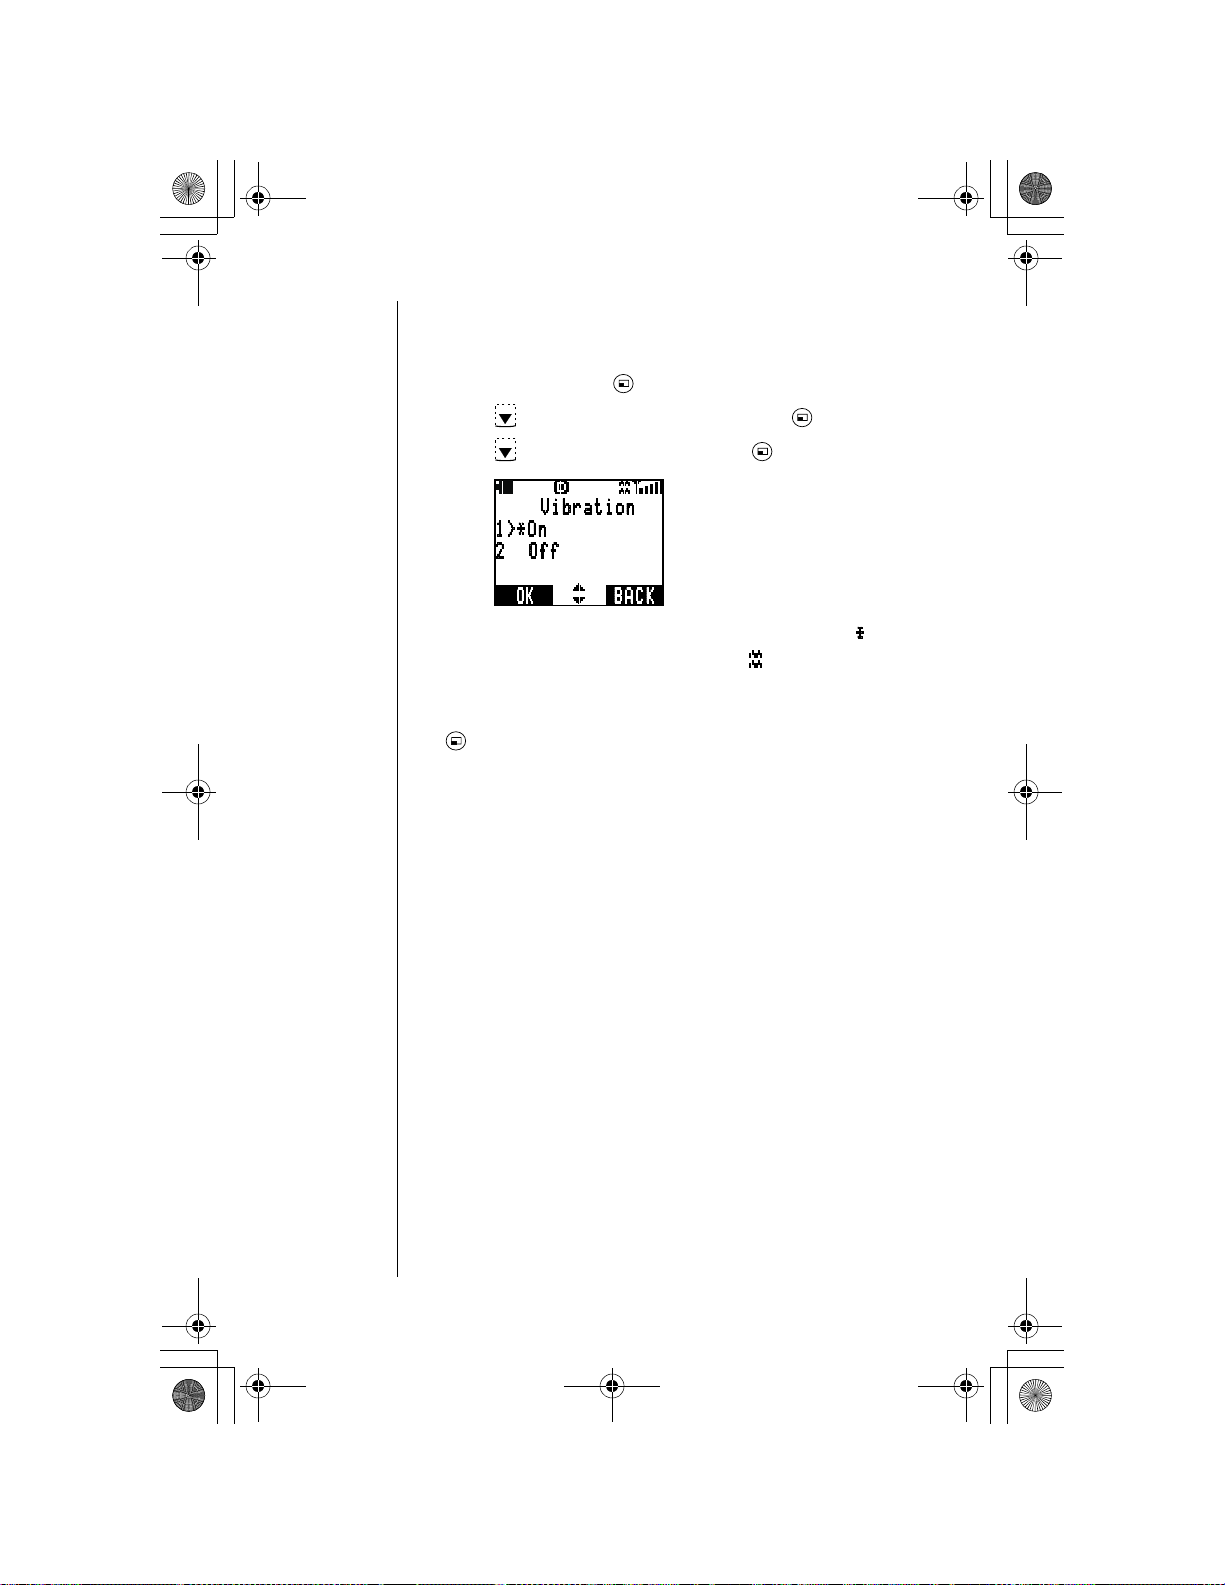
Vibra tion Alert
Your phone can alert you to incoming calls with vibration alert.
From standby, press (MENU) to enter the Main Menu.
1
Press to scroll to
2
Press to scroll to
3
• The current setting is displayed with an asterisk ( ).
• If selected, the vibration alert icon (
display.
To change the setting, scroll to the other option and press
4
(OK).
Tone Settings
Vibration
. Press (OK).
. Press (OK).
)
appears on the
32 Everyday Operations
Page 43
OI.book Page 33 Wednesday, November 8, 2000 3:30 PM
Text Entry
Operations
You can use your phone’s keypad to type and store text using
letters, numbers and symbols. Typically, you enter text to
store names and phone numbers in the phonebook, to update
the welcome screen, to create text messages, to edit text
messages you receive, and to create a personalized reminder
if you are using the phone’s alarm.
Text Entry Methods
When a feature requires a text entry, the display prompts you
to enter text. The text may be entered using either Letter Entry
(ABC) mode or Word Entry (Word T9
Letter Entry (ABC) mode is the traditional method of entering
text in mobile phones. This method is best when entering text
that is not commonly found in a dictionary (for example,
names of people or places). Letters are entered by pressing a
key associated with a desired character once, twice, three
times, or four times until the character appears on the display.
Word Entry (Word T9) mode allows you to quickly type text
with the aid of a built-in dictionary. Press each key only once
for each letter and the dictionary will automatically display
probable word choices for you.
To change entry mode, press when
, , , , or
In Letter Entry mode, press briefly to delete the lastentered character. In Word Entry mode, press briefly
to delete the last-entered character or an entered word.
In both Letter Entry and Word Entry modes, press and
hold to delete the entire entry.
In Letter Entry mode, the key is used to enter a
space or the number “1”. In Word Entry mode, the
key enters a space only.
The key is not used to enter any letters.
®
) mode.
,
are displayed.
,
Text Entry Operations
Text Entry Operations 33
Page 44

OI.book Page 34 Wednesday, November 8, 2000 3:30 PM
Chapter 4
Using Letter Entry (ABC) mode
Letter Entry is the selected mode when the bottom right
corner of the display shows or . Your phone
automatically defaults to Letter Entry uppercase ( ) when
text entry is required. To switch between uppercase and
lowercase, press
When using Letter Entry mode, press a key once to enter the
first letter on the key, press the key twice to enter the second
letter on the key, etc…. For example, press once for the
letter “D”, press twice for the letter “E”, etc….
• Press briefly to delete the last-entered character.
Press and hold to delete the entire entry.
• Press or to scroll across characters, to
move to the next character space, or to add a blank
space.
.
Refer to the Key Entry Table on page 36 for the complete list
of characters for each key.
34 Text Entry Operations
Page 45

OI.book Page 35 Wednesday, November 8, 2000 3:30 PM
Using Word Entry (Word T9) mode
Word Entry is the selected mode when the bottom right corner
of the display shows
, , or .
To select one of
the Word Entry modes when text entry is required, press
until the desired mode is shown.
Once in Word Entry mode, you
can switch between initial capitals, uppercase, and lowercas e
by pressing .
For example, to enter the word “first” in Word Entry mode,
press once, press once, press once, press
once, and press once. The word “first” should
appear on the screen.
Chapter 4
• As letters are entered, the dictionary will display
probable words. Several different words can appear
on the display during the entering p rocess.
• Press briefly to delete the last-entered character
or an entered word. Press and hold to delete the
entire entry.
If the first word found in the dictionary (and shown on the
display) is not the word you want to enter, press
to scroll
through the other options for that key sequence. Once the
desired word is displayed, press
(OK), , or
to
select it and move to the next word location.
If you have changed you r ph one’s language option,
the Word Entry dictionary changes to agree with the
selected language.
Text Entry Operations 35
Page 46

OI.book Page 36 Wednesday, November 8, 2000 3:30 PM
Chapter 4
Using Numbers (NUM) mode
Numbers mode is the selected mode when the bottom right
corner of the display shows
insert numbers in a text entry. To select Numbers mode, press
until appears. Then key in the desired number.
Using Symbols (SYM) mode
Symbols mode is the selected mode when the bottom right
corner of the display shows
press
until appears.
Each number key is associated with several symbols. To
select a specific symbol, enter the corresponding number on
the keypad. To scroll through additional screens of symbols,
press , , or . The table below shows the letters,
numbers, and symbols associated with each keypad key.
Key Entry Table
Letter entry
Key
1
2ABCÇÂ2 abcçâ22,-%
3DEFÉÈÊ3 deféèê33;_$^
4 GHI4 ghi4 4 : ( < |
5JKL5 jkl5 5?)>\
6 MNO6 mno6 6 ! {
7 PQRS7 pqrs7 7 @ }
8TUV8 tuv8 8/&[
9 WXYZ9 wxyz9 9 # + ]
00 00 N/A
#
* Press to enter a space or press twice to enter a
ABC
Switches between upper-
case and lowercase
“1” .
Letter entry
(space)1
.,;:?!@/# -_
Numbers mode is used to
.
. To select Symbols mode,
Mode
abc NUM SYM
*
1. =~
N/A Moves to next
Symbol display
N/A N/A
36 Text Entry Operations
Page 47

OI.book Page 37 Wednesday, November 8, 2000 3:30 PM
Phonebook
Features
The Phonebook has 100 memory locations. Each location can
hold a first and last name, up to four associated phone
numbers, an email address, and a distinctive ring tone. This
chapter includes information related to creating, saving,
searching, and accessing your Phonebook entries. For an
overview of how to move through the menu and use the
shortcut keys, see Chapter 2, “Getting Started”.
Creating a Phonebook Entry
1
From standby, press ( ) to enter the Phonebook.
Phonebook Features
First
Create
. Press (OK).
] Name, [
Last
] Name, [W]ork number,
Phonebook Full
Ring Alert
.
2
Press to scroll to
• For each entry, you can enter any or all of the following
information: [
[H]ome number, [C]ellphone number, [O]ther number,
special ring tone [ ], email address [@], and memory
location nu mber [#].
• If all memory locations are full,
displayed. You must delete an entry before adding
another one. See “Editing/Deleting a Phonebo ok Entry” on
page 42 for more information.
• If the special ring tone is set to standard, the phone will
ring at the same ring alert set in
is
Phonebook Features 37
Page 48

OI.book Page 38 Wednesday, November 8, 2000 3:30 PM
Chapter 5
Press to scroll to the desired item and press
3
(SELECT).
Enter the desired information.
4
• To enter text or symbols, see Chapter 4, “Text Entry
Operations”.
• To delete an entered character, press briefly.
• To delete an entire line, press and hold .
• If no name is entered for a phone number in the
Phonebook, “----” will indicate there is no name entry
when later scrolling through the Phonebook.
Press (OK) when you complete the information.
5
If additional information needs to be added, repeat steps 3
6
through 5 until the entry is complete.
T o save the entry i nto memo ry, press to scroll to
7
press (SELECT).
#: [ ]
and
• Press (ANY) to save the entry in the first available
OR
• To save the entry as a specific location number, enter a
• To determine which location n um bers are av ail ab le, pres s
38 Phonebook Features
location.
number between 1 and 100 and press (OK). If you
want to use Super Speed Dialing for the entry, enter a
location number between 1 and 9.
(MAP). A period “.” indicates that the location is
already being used. For example, in the following display,
locations 1, 3, 9, 12, 13, 14, and 25 are being used. The
remaining location numbers are available. Press
(BACK) to enter desired memory location number. After
entering a number, press (OK).
Page 49

OI.book Page 39 Wednesday, November 8, 2000 3:30 PM
When you are finished, press (EXIT).
8
• The display asks if you want to save the entry.
Press (YES) to save.
9
• If you have not entered a memory location number, the
phone auto matically as signs the first availabl e location
and displays it for you.
• If you entered a location number that is already being
used, the di splay asks if you want to overwrite the
previously saved entry. For example, the display shows,
Overwrite John Smith?
different location nu mber . Or, press (YES) to overwrite
(delete) the information that was prev io us ly sa ved in that
location.
Press (NO) to enter a
OR
Press (NO) to delete your entry and return to standby.
Chapter 5
Saving a Displayed Phone Number
When a phone number is displayed, press (SAVE).
1
• You may save the number as a
Phone #, Cell Phone #
Press or to scroll to the desired phone number type.
2
Press (OK) to store the phone number.
3
To enter additional information and to save your phone
4
number, continue with step 3 from the “Creating a
Phonebook Entry” procedure (previous procedure).
, or
Work Phone #, Home
Other #
.
Phonebook Features 39
Page 50

OI.book Page 40 Wednesday, November 8, 2000 3:30 PM
Chapter 5
Dialing Phonebook Entries
Super Speed Dialing
Super Speed Dialing lets you quickly dial the
number stored in memory locations 1 through 9.
From standby, press and
1
corresponds to the memory location number.
• The phone numbers stored in the mem ory lo catio n numb er
display briefly.
Continue pressing the key to dial the
2
stored in that memory location.
Super Speed Dialing dials only the first phone number
stored in the memory location. To dial another number
stored at that location, see “Speed Dialing”.
first
HOLD
the key ( - ) that
first
phone number
phone
Speed Dialing
From standby, enter the memory location number that
1
contains the phone number you want to call. (For example,
to dial a number stored in location 25, press .)
Press to view the phone numbers stored in the
2
memory location.
• If the entered memory location is empty , the display sh ows
Press or to scroll to the number you want to call.
3
Press to call.
4
40 Phonebook Features
the entered digits and the # sign.
Page 51

OI.book Page 41 Wednesday, November 8, 2000 3:30 PM
Dialing a Phonebook Entry by Scrolling
From standby, press or to scroll through the
1
Phonebook entries.
• Depending on your phone’s search method setting, the
display shows entries alphabetically by first or last name,
or by memory location number. To change the search
method setting, see “Selecting a Phonebook Search
Method”.
• To “jump” to a specific section of the alphabet, press the
number key that has the desired letter on it.
When the arrow poi nts to the d esired entry, press (VIEW)
2
to view the saved information.
Press or to scroll to the desired phone number and
3
press to call.
Chapter 5
Dialing a Phonebook Entry from the Menu
From standby, press ( ) to enter the Phonebook.
1
Press (OK) to select
2
• Depending on your phone’s search method setting, the
display shows entries alphabetically by first or last name,
or by memory location number. To change the search
method setting, see “Selecting a Phonebook Search
Method”.
Enter the name, a portion of the name, or the memory
3
location number, if desired.
Press (FIND or OK).
4
Search
.
Phonebook Features 41
Page 52

OI.book Page 42 Wednesday, November 8, 2000 3:30 PM
Chapter 5
If needed, press or to scroll to the number you want
5
to call.
• When the list of names appears, the following may
indicate there is no name entry: "----"
When the arrow points to the desired ent ry , press (VIEW)
6
to view the saved information.
Press or to scroll to the desired phone number and
7
press to call.
Editing/Deleting a Phonebook Entry
From standby, press ( ) to enter the Phonebook.
1
Press (OK) to select
2
• Depending on your phone’s search method setting, the
display shows entries alphabetically by first or last name,
or by memory location number. To change the search
method setting, see “Selecting a Phonebook Search
Method”.
Enter the name, a portion of the name, or the memory
3
location number, if desired.
Press (FIND or OK).
4
Press or to scroll to the desired entry to edit or delete.
5
Press (VIEW) to display details.
6
Press (OPTION).
7
Search
.
• You have the option to edit the
Scroll to the desired action, and press (OK).
8
• If you select
42 Phonebook Features
Prefix
(adding an area
code or prefix numbers),
information in that memory location (
Prefix
area code, a “1” in front o f the a rea code, or rem ove them .
Dial Setting
make a call by pressing or (SEND).
enables you to change the numbers. You can
Edit
the entry, or delete all of the
Delete Entry
, you may select whether to add an
).
Page 53

OI.book Page 43 Wednesday, November 8, 2000 3:30 PM
• If you select Edit, all stored information for the entry is
displayed. Scroll to the i nfor mation you want to edit, pres s
(SELECT), and enter the change. Press (OK).
Repeat until all desired changes have been made.
• If you select Delete Entry, the display asks if you want to
delete the displayed entry. Press (YES) to delete or
press (NO) to return to step 7.
Press (EXIT).
9
• The display asks if you want t o save the change.
Press (YES) to save the change.
10
• The display asks if you want to overwrite the previously
stored information. Press (YES) again to overwrite
and return to standby. Or, press (NO), select a new
location number, and press (OK) to return to standby.
OR
Press (NO) to return to standby without saving
changes.
Selecting a Phonebook Search Method
Setting the
Search Method
phone searches for information stored in the Phonebook. You
can set your phone to search for entries by first name, last
name, or memory location number.
From standby, press ( ) to enter the Phonebook.
1
Press to scroll to Search Method and press (OK).
2
allows you to determine how your
Chapter 5
• You have the option of setting your p hone to searc h for an
entry by First Name, Last Name, or memory Location #.
• The current setting is displayed with an asterisk ( ).
Press or to scroll to the desired setting.
3
Press (OK) to save.
4
• The display confirms the new setting and returns to
standby.
Phonebook Features 43
Page 54

OI.book Page 44 Wednesday, November 8, 2000 3:30 PM
Chapter 5
Own Phone Number Review
Y our phone can have up to two phone numbers (programmed
by your wireless service provider). You can select either
phone number to make a call.
From standby, press ( ) to enter the Phonebook.
1
Press to scroll to
2
• Your phone number is displayed.
If your phone is programmed with more than one
phone number, only the number currently bei ng used
is displa yed. See “Selecting Your Phone Number
(NAM)” on page 75 for infor m at io n on selecting your
other phone number.
Own Number
and press (OK).
44 Phonebook Features
Page 55

OI.book Page 45 Wednesday, November 8, 2000 3:35 PM
Advanced
Operations
Many advanced features and settings are accessible only
through the phone’s Menu. This chapter will show you how to
use your phone’s Menu to get the most from these advanced
features. If a particular Menu feature is not listed in this
chapter as it appears on the phone’s display, please turn to
“Phonebook Features” on page 37, or to “Subscriber
Features” on page 65 for more information.
For an overview of how to move through the Menu and how to
use the shortcut keys, see “Moving through the Menu” and
“Menu Map of Shortcut Keys” in Chapter 2.
See the “Menu Map of Shortcut Keys” in Chapter 2 for a quick
overview of all the Advanced feature options.
Call History
The Call History menu allows you to view and delete
information related to calls you have received and placed. It
also allows you to reset the timer that monitors your talk time.
Last Dialed Calls
1
From standby, press (MENU) to enter the Main Menu.
2
Press to scroll down to
3
Press (OK) to select
• The last dialed number is displayed.
• If you place a phone call to a number that is contained in
your last dialed numbers list, the older call record will be
replaced w ith the newer one.
Unanswered
•
pressing or .
Answered
or
Call History
Last Dialed
Calls can be checked by
. Press (OK).
.
Advanced Operations 45
Advanced Operations
Page 56

OI.book Page 46 Wednesday, November 8, 2000 3:35 PM
Chapter 6
Press or to scroll through the last 10 dialed numbers.
4
To call a number, press when the number is displayed .
5
To add a prefix, to delete, or to save the number, press
(OPTION) and select the desired action.
Unanswered Calls
From standby, press (MENU) to enter the Main Menu.
1
Press to scroll to
2
Press to scroll to
3
• The last unanswered number is displayed.
Last Dialed
•
pressing or .
• A call without caller ID will not be stored.
Press or to scroll through the last 10 unanswered
4
calls.
To call a number , press when the number is di sp lay ed .
5
To add a prefix, to delete, or to save the number, press
(OPTION) and select the desired action.
or
Call History
Unanswered
Answered
. Press (OK).
. Press (OK).
calls can be checked by
Answered Calls
From standby, press (MENU) to enter the Main Menu.
1
Press to scroll to
2
Press to scroll to
3
• The last answered number is displayed.
46 Advanced Operations
Call History
Answered
. Press (OK).
. Press (OK).
Page 57

OI.book Page 47 Wednesday, November 8, 2000 3:35 PM
• If you receive a phone call from a number that is
contained in your ans w ered numbers list, the older record
will be replaced with the newer one.
• Last Dialed or Unanswered calls can be checked by
pressing or .
Press or t o scroll through the last 10 answered calls.
4
To call a number, pr ess when the number is displayed.
5
To add a prefix, to delete, or to save the number, press
(OPTION) and select the desired action.
Deleting Call Lists
From standby, press (MENU) to enter the Main Menu.
1
Press to scroll to Call History. Press (OK).
2
Press to scroll to Last Dialed, Unanswered, or
3
Answered. Press (OK).
Press (OPTION).
4
Press to scroll to Delete Entry (delete the selected call),
5
or Delete All (delete all the calls in the list). Press (OK).
Chapter 6
Press (YES) to delete the selected list.
6
Call Timers
The
Last Call
you have spent connected on calls. The
allows you to reset the timer as desired. The
and
All Calls
options allow you to view the time
Custom
call option
Current Call
option allows you to select whether or not the timer is
displayed during conversation.
From standby, press (MENU) to enter the Main Menu.
1
Press to scroll to Call History. Press (OK).
2
Press to scroll to Call Timers. Press (OK).
3
• You are given four options: Last Call, All Calls, Custom,
and Current Call.
Advanced Operations 47
Page 58

OI.book Page 48 Wednesday, November 8, 2000 3:35 PM
Chapter 6
To view the time you have spent on the
4
Calls
, press to scroll to your choice. Press (OK) to
select.
OR
To view your phone’s call timer after the last reset, press
to scroll to
return to standby. Or, press (RESET), then (YES) to
reset the custom timer.
Custom
OR
To determine whether the call timer will display during
conversation, press to scroll to
(OK) to select.
• The current setting is displayed with an asterisk ( ).
• To change the setting, scroll to the other option.
The timers display as hours:minutes:secon ds.
When
All Calls
total timer will reset automatically.
The actual time invoiced for calls by your service
provider will vary from the tim e r epr esented on your
call timer. This has to do with the number of network
features selected, when billing begins and ends, and
rounding for billing.
Last Call
. After viewing, press (OK) to
Current Call
or
Custom
exceeds 999:59:59, th e
All
or
and press
Tone Settings
The Tone Settings menu lets you customize your phone for
use in special surroundings, or set the volume and tone of the
phone’s ring. It also allows you to select a specific al ert for the
text messages received.
Alert Mode
Your phone has two customizable Alert Modes for different
usage environments.
Quiet
and
etc., where a loud audible alert would be disturbing. Once
your phone has been set to the mode you want to customize,
the following settings can be modified:
Ring Volume (page 19) Message Alert (page 50)
Key Volume (page 49) Vibration (page 32)
Ring Alert (page 20)
48 Advanced Operations
Normal
mode for typical environments
mode for use in meetings, restaurants, movies,
In either mode, you can mute all of your phone’s
audible features except fo r low battery tone—the low
battery warning sounds, regardless of the settings.
Page 59

OI.book Page 49 Wednesday, November 8, 2000 3:35 PM
Chapter 6
To select either
Normal
or
mode, press and hold
Quiet
OR
From standby, press (MENU) to enter the Main Menu.
1
Press to scroll to
2
Press (OK) to select
3
• The current setting is displayed with an asterisk ( ).
Press or to scroll to
4
Press (OK).
• The display confirms the new mode setting.
• If Quiet Mode is selected, the Quiet Mode icon ( ) is
displayed.
Press any key or wait 3 seconds to return to standby.
5
Tone Settings
Alert Mode
Normal Mode
. Press (OK).
.
or
Quiet Mode
Ring Volume
See “Setting Ring Volume” in Chapter 2.
Key Volume
From standby, press (MENU) to enter the Main Menu.
1
Press to scroll to
2
Press (OK) to select
3
Tone Settings
Key V ol ume
. Press (OK).
.
.
.
• The display indicates the current key volume setting.
• If you select the lowest setting, the key volume is muted
(silent).
Advanced Operations 49
Page 60
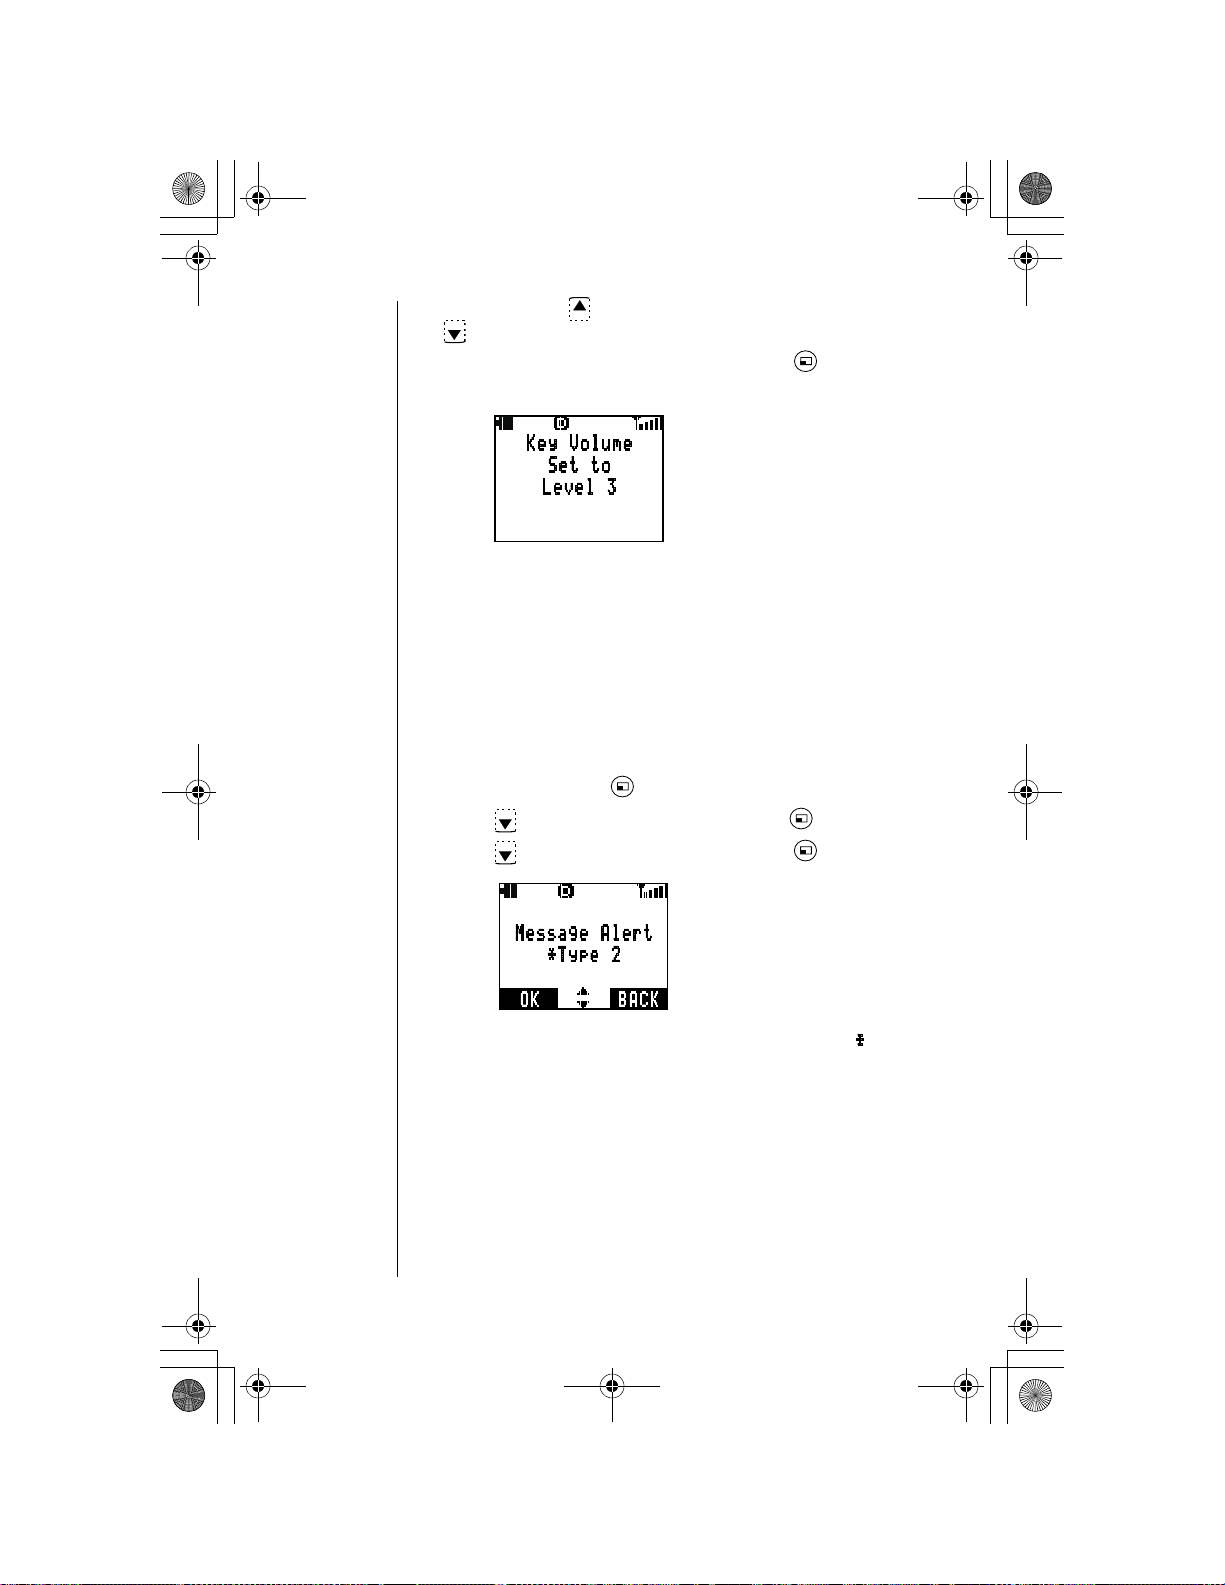
OI.book Page 50 Wednesday, November 8, 2000 3:35 PM
Chapter 6
Press and hold to increase key volume. Press and hold
4
to decrease key volume.
When the desired volume is reached, press (OK) to
5
select.
• The display confirms the new key volume setting.
Press any key or wait 3 seconds to return to standby.
6
Ring Alert
See “Selecting a Ring Alert” in Chapter 2.
Message Alert Type
This setting allows you to determine what type of alert you will
hear when a text message is received.
From standby, press (MENU) to enter the Main Menu.
1
Press to scroll to
2
Press to scroll to
3
Tone Settings
Message Alert
. Press (OK).
. Press (OK).
• The current setting is displayed with an asterisk ( ).
• As you scroll through the alert types, a sample alert
sounds for each of the 20 types.
• If vibration alert is set to on, the phone also vibrates as
you scroll through the alert types.
50 Advanced Operations
Page 61
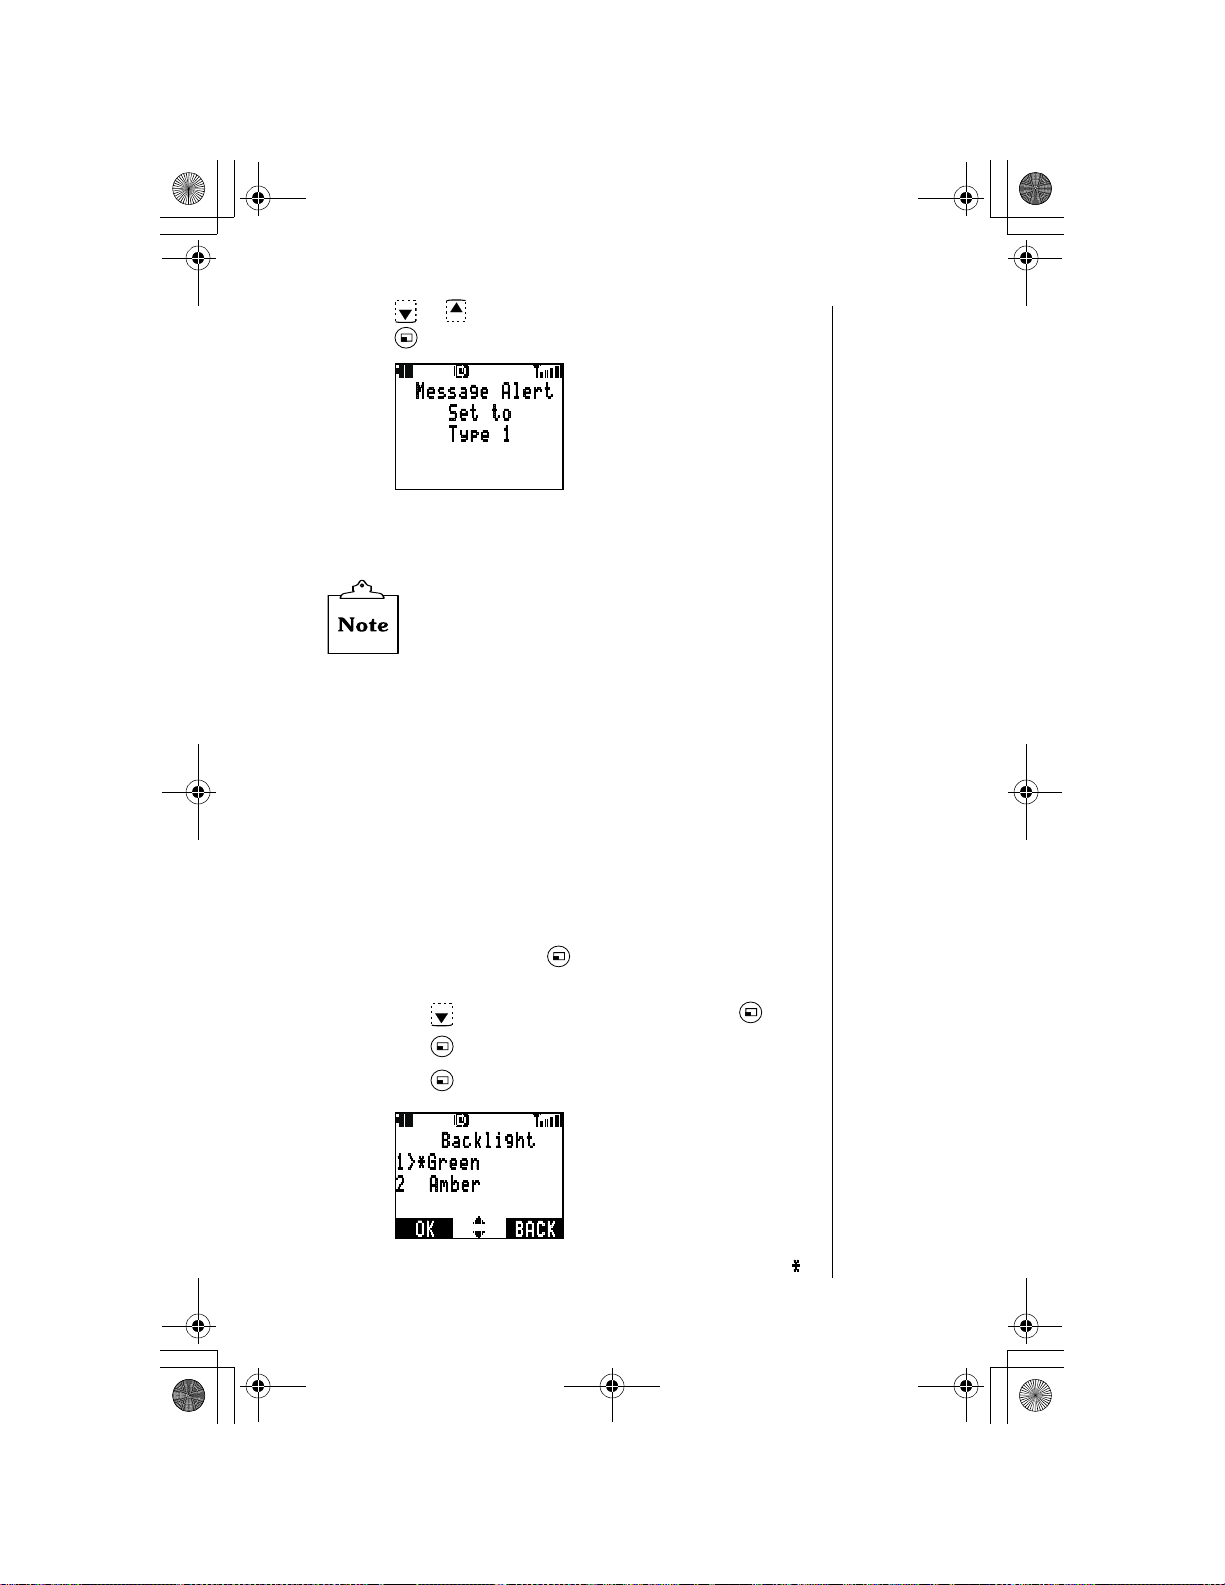
OI.book Page 51 Wednesday, November 8, 2000 3:35 PM
Press or to scroll to your desired message alert type.
4
Press (OK).
• The display confirms the new message alert type setting.
Press any key or wait 3 seconds to return to standby.
5
When selecting a new m essage alert type, it is not
possible to hear the sample alert if ringing is muted
(silent).
Phone Settings
The Phone Settings menu allows you to set specific features
according to your own preferences.
Chapter 6
Display Settings
Backlight
The backlight color can be set as green or amber. If a
caller’s phone number matches an entry in the
Phonebook, the corresponding name is displayed and the
backlight changes color.
From standby, press (MENU) to enter the Main
1
Menu.
Press to scroll to
2
Press (OK) to select
3
Press (OK) to select
4
• The current setting is displayed with an asterisk ( ).
Phone Settings
Display
Backlight
.
.
. Press (OK).
Advanced Operations 51
Page 62
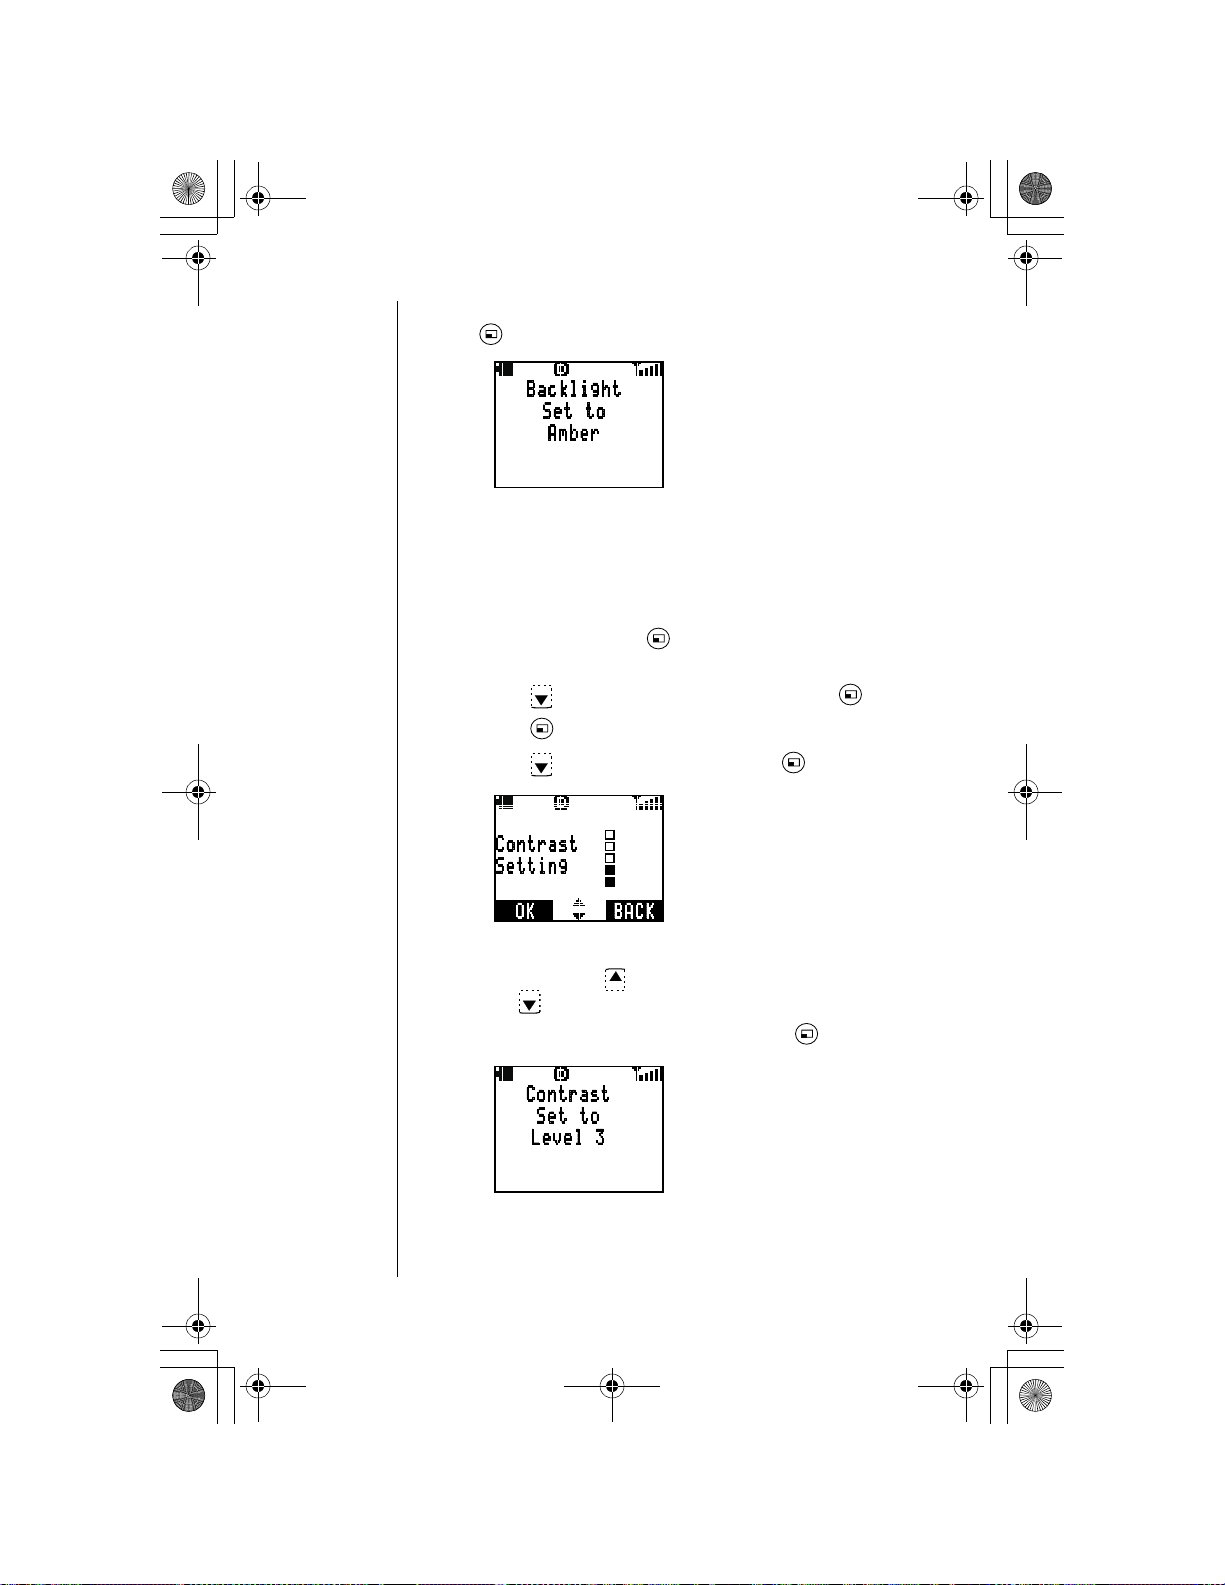
OI.book Page 52 Wednesday, November 8, 2000 3:35 PM
Chapter 6
To change the setting, scroll to the other option. Press
5
(OK) to select.
• The display confirms the new backlight setting.
Press any key or wait 3 seconds to return to standby.
6
Display Contrast
The contrast level of the phone’s display can be adjusted.
From standby, press (MENU) to enter the Main
1
Menu.
Press to scroll to
2
Press (OK) to select
3
Press to scroll to
4
Phone Settings
Display
Contrast
.
. Press (OK).
. Press (OK).
5
6
7
52 Advanced Operations
• The display indicates the current contrast setting.
Press and hold to increase the contrast. Press and
hold to decrease the contrast.
When the desired contrast is set, press (OK).
• The display confirms the new contrast setting.
Press any key or wait 3 seconds to return to standby.
Page 63

OI.book Page 53 Wednesday, November 8, 2000 3:35 PM
Time Settings
Setting Date and Time
See “Setting Date and Time” in Chapter 2.
Setting the Alarm
You can set two types of alarms: a scheduled, one-time
alarm or a daily alarm. You can program your phone for
up to five alarms, each with its own specific message
display.
From standby, press (MENU) to enter the Main
1
Menu.
Press to scroll to
2
Press to scroll to
3
Press to scroll to
4
Alarm 1 is displayed. I f desire d, pres s or to scroll
5
to a different alarm (5 alarms). When the desired alarm
is displayed, press (SELECT).
Phone Settings
Time Settings
Alarm Settings
Chapter 6
. Press (OK).
. Press (OK).
. Press (OK).
• The display in dicates if the current alarm is set on or
off.
Press or to scroll to the desired setting. Press
6
(OK).
Press or to select the alarm type (
7
One Time
• If you selected
clock.
• If you selected
date using a month/day/year format. Press and
enter the time using a 12-hour clock.
Press to move to the AM/PM setting.
8
Press (AM/PM) to switch between AM or PM. Press
9
). Press (OK).
(OK).
Daily
, enter the time using a 12-hour
One Time
, enter the desired alarm
Daily
or
Advanced Operations 53
Page 64

OI.book Page 54 Wednesday, November 8, 2000 3:35 PM
Chapter 6
Press or to select
10
from the
• If you selected
• If you selected
Once you have selected or entered the message that
11
will display with the alarm, press (OK).
Input Memo
one of the following preset messages that will be
displayed when your phone’s alarm is activated:
Good morning
Do not forget
Call office
Call home
Meeting
Leave office
Take medicine
Pick up
Appointment
you want the phone to display when the alarm is
activated. See Chapter 4, “Text Entry Operations” for
details about entering text.
Fixed Form
display. Press (OK).
Fixed Form
T ext Input
, press or to select
, enter the message that
Text Input
or
12
54 Advanced Operations
• The display confirms the new alarm setting.
Press any key or wait 3 seconds to return to standby.
When the time for the alarm com es, the alarm alert
lasts for 40 seconds. To stop the alarm or clear the
message from the displ ay, press any key.
If the phone is turned off at the time of the al ar m , no
alarm is activated.
Page 65

OI.book Page 55 Wednesday, November 8, 2000 3:35 PM
Auto Answer (Handsfree Mode Only)
Auto Answer functions only when the phone is used with the
Private Handsfree Headset or with the optional Handsfree
Carmount Kit.
When Auto Answer is on, the phone automatically answers an
incoming call after 6 seconds.
From standby, press (MENU) to enter the Main Menu.
1
Press to scroll to
2
Press to scroll to
3
• The current setting is displayed with an asterisk ( ).
To change the setting, scroll to the other option. Press
4
(OK) to select.
Phone Settings
Auto Answer
. Press (OK).
. Press (OK).
Chapter 6
• The display confirms the new Auto Answer setting.
Press any key or wait 3 seconds to return to standby.
5
This feature works
Handsfree Heads et or wi th th e opt ional Handsfree
Carmount Kit. This featur e aut o matically deactivates
when not bein g used with eith er accessory. See
“Phone Accessories”, Appendix B for accessory
information.
when used with the Private
ONLY
Answer Options
See “Answer Options” in Chapter 3.
Advanced Operations 55
Page 66

OI.book Page 56 Wednesday, November 8, 2000 3:35 PM
Chapter 6
DTMF Tone Length
The tone you hear when you press a key on your keypad is
called a “DTMF” tone. Most phone services and answering
machines require the phone to transmit this tone when a digit
key is pressed. This menu setting allows you to shorten or
lengthen the time the tone is emitted. DTMF tones are
transmitted even when key tones are turned off.
From standby, press (MENU) to enter the Main Menu.
1
Press to scroll to
2
Press to scroll to
3
• The current setting is displayed with an asterisk ( ).
T o c hange the DTMF se tting, scrol l to the other option . Press
4
(OK).
Phone Settings
DTMF Duration
. Press (OK).
. Press (OK).
• The display confirms the DTMF duration setting.
Press any key or wait 3 seconds to return to standby.
5
56 Advanced Operations
Page 67

OI.book Page 57 Wednesday, November 8, 2000 3:35 PM
Warning Tone
This setting allows you to turn warning tones on and off. A
warning tone is emitted when the battery charge is low, when
attempting to automatically redial a number, and when
powering on the phone.
From standby, press (MENU) to enter the Main Menu.
1
Press to scroll to
2
Press to scroll to
3
• The current setting is displayed with an asterisk ( ).
To change the setting, scroll to the other option. Press
4
(OK) to select.
Phone Settings
Warning Tone
. Press (OK).
. Press (OK).
Chapter 6
• The display confirms the Warning Tone setting.
Press any key or wait 3 seconds to return to standby.
5
Even when
tone will be emitted.
Warning T one
is set to off, the low battery
Creating a Welcome Screen
You can create a personalized message (up to 64 characters,
including spaces) that displays whenever your phone is
powered on.
From standby, press (MENU) to enter the Main Menu.
1
Press to scroll to
2
Press to scroll to
3
Phone Settings
Welcome Screen
. Press (OK).
. Press (OK).
Advanced Operations 57
Page 68

OI.book Page 58 Wednesday, November 8, 2000 3:35 PM
Chapter 6
Press or to scroll to On.
4
Press (OK) to select On.
5
To delete the current message, if any, press and hold .
6
Enter a new Welcome Screen message. See Chapter 4,
7
“Text Entry Operations” for details about entering text.
When the message is complete, press (OK).
8
• The display confirms that the Welcome Screen is set to
On.
Press any key or wait 3 seconds to return to standby.
9
Language
You have the option of setting your phone so that the
displayed language is English, Spanish, or French.
From standby, press (MENU) to enter the Main Menu.
1
Press to scroll to
2
Press to scroll to
3
Phone Settings
Language
. Press (OK).
. Press (OK).
• The current setting is displayed with an asterisk ( ).
To select another language, scroll to the language of your
4
choice and press (OK).
• The display confirms the new language setting.
The display returns to standby in the language you selected.
5
• All menu options and displayed words appear in the
selected language.
• The phone’s internal dictionary (used in WORD T9 Mode
—
changes to the selected language.
58 Advanced Operations
see Chapter 4 for information on WORD T9) also
Page 69

OI.book Page 59 Wednesday, November 8, 2000 3:35 PM
Model Type
To determine the model type of your phone, follow these
steps:
From standby, press (MENU) to enter the Main Menu.
1
Press to scroll to
2
Press to scroll to
3
• The display indicates your phone's model type.
Press (OK) to return to standby.
4
Phone Settings
Model Type
. Press (OK).
. Press (OK).
Security Options
The Security Options menu allows you to place restricti ons on
several of your phone’s functions. Options include locking
specific features, limiting the types of calls that can be placed
and received, and setting your phone so that it automatically
locks whenever powered off. A lock code is necessary to
activate these features. Panasonic recommends changing the
lock code to your own after your phone purchase.
If you ever misplace or forget your lock code — and your
phone is locked — contact your wireless service provider.
Remember that emergency (911) calls can be placed from
your phone even when security features are set.
Chapter 6
Changing Lock Code
From standby, press (MENU) to enter the Main Menu.
1
Press to scroll to
2
Press (OK) to select
3
Enter the four-digit lock code (enter
4
changed your lock code) and press (OK).
When prompted, enter a new four-digit lock code and press
5
(OK).
Security
Lock Code
. Press (OK).
.
1234
if you have never
Advanced Operations 59
Page 70

OI.book Page 60 Wednesday, November 8, 2000 3:35 PM
Chapter 6
To confirm your new code, re-enter the number and press
6
(OK). If you make a mistake, press briefly to erase
the last digit entered.
• The display confirms that the new lock code is set.
Press any key or wait 3 seconds to return to standby.
7
Record your new lock code below, then try to memorize
it. This number must be e nt er ed every time you reset a
security feature.
My lock code number is:_______________ _________.
Call Lock
Call Lock allows you to determine what types of incoming or
outgoing calls you want to lock or restrict.
From standby, press (MENU) to enter the Main Menu.
1
Press to scroll to
2
Press to scroll to
3
Security
Call Lock
. Press (OK).
. Press (OK).
• You are given the choice of setting lock features on
Incoming
Scroll to your choice. Press (OK).
4
60 Advanced Operations
and/or
Outgoing
calls.
Page 71

OI.book Page 61 Wednesday, November 8, 2000 3:35 PM
If Incoming Lock is Selected
(Continued from step 4 under “Call Lock”.)
• The current setting is displayed with an asterisk ( ).
• You have the option of unlocking or locking all
incoming calls.
To change the setting, scroll to the other option. Press
5
(OK).
Enter the lo ck code, and press (OK).
6
• The display confirms the new setting.
Press any key or wait 3 seconds to return to standby.
7
Chapter 6
Call Waiting will not function when
On.
Incoming Lock
is
If Outgoing Lock is Selected
(Continued from step 4 under “Call Lock”.)
You may lock and unlock all outgoing calls, or you may
prevent calls from being placed other than using numbers
stored in the Phonebook. This feature also lets you limit
the number of digits dialed from your phone.
• The current setting is displayed with an asterisk ( ).
• You have the option of selecting
Phonebook
To change the setting, scroll to the desired option and
5
press (OK).
Digit Limit
, or
Unlock, All Calls
.
,
Advanced Operations 61
Page 72

OI.book Page 62 Wednesday, November 8, 2000 3:35 PM
Chapter 6
If you selected
6
7
8
Digit Limit
Enter the lock code and press (OK).
If you selected
display confirms the new setting.
Press any key or wait 3 seconds to return to standby.
If Digit Limit is Selected
(Continued from step 5 under “If Outgoing Lock is
Selected”.)
Y ou may lim it the number of digits that can be dialed from
your phone. For example, to allow only local calls, restrict
the digit limit to seven.
Enter the lock code. Press (OK).
6
, move to “If Digit Limit is Selected”.
Unlock, All Calls
, or
Phonebook
, the
7
8
9
Security Lock
When this feature is on, the phone will lock automatically
whenever powered off and restricts unauthorized use. When
powered on again, you are required to enter the lock code.
Turn off this feature to disable it completely.
Turning On Security Lock
1
2
3
62 Advanced Operations
• The display shows the current setting.
Press to increase the digit limit. Press to
decrease the digit limit. The maximum digit limit is 31.
When the desired digit limit is displayed, press (OK).
Press any key or wait 3 seconds to return to standby.
From standby, press (MENU) to enter the Main
Menu.
Press to scroll to
Press to scroll to
• The current setting is displayed with an asterisk ( ).
Security
Security Lock
. Press (OK).
. Press (OK).
Page 73

OI.book Page 63 Wednesday, November 8, 2000 3:35 PM
Scroll to select the desire d setting and press (OK). If
4
you select On, enter the lock code and press (OK).
Press any key or wait 3 seconds to return to standby.
5
Turning Off Security Lock from Standby
Once Security Lock is activated, turning the phone off/on
does not turn this feature off. You can turn off Security
Lock temporarily by following these instructions.
The standby display indicates when Security Lock is
1
activated.
Press (UNLOCK).
2
Enter the lo ck code, and press (OK).
3
Security Lock
4
your phone off/on again).
is temporarily turned off (until you turn
Chapter 6
Disabling Security Lock
From standby, press (MENU) to enter the Main
1
Menu.
Press to scroll to
2
Press to scroll to
3
• The current setting is displayed with an asterisk ( ).
Scroll to select
4
Enter lock code and press (OK).
5
Press any key or wait 3 seconds to return to standby.
6
Security
Security Lock
Off
and press (OK).
. Press (OK).
. Press (OK).
Advanced Operations 63
Page 74

OI.book Page 64 Wednesday, November 8, 2000 3:35 PM
Chapter 6
Key Lock
This feature lets you lock the keypad to prevent your phone’s
keys from being pressed accidentally. You can still receive
calls by pressing
emergency (911) calls even when the key lock is on.
Turning On Key Lock
From standby, press and hold (MENU).
1
• The key lock is on.
Press any key or wait 3 seconds to return to standby.
2
any key except
and you can place
Turning Off Key Lock
Press (UNLOCK).
1
When the display asks whether you would like to
2
Keypad?
64 Advanced Operations
Unlock
, press (YES). The keypad is unlocked.
Page 75
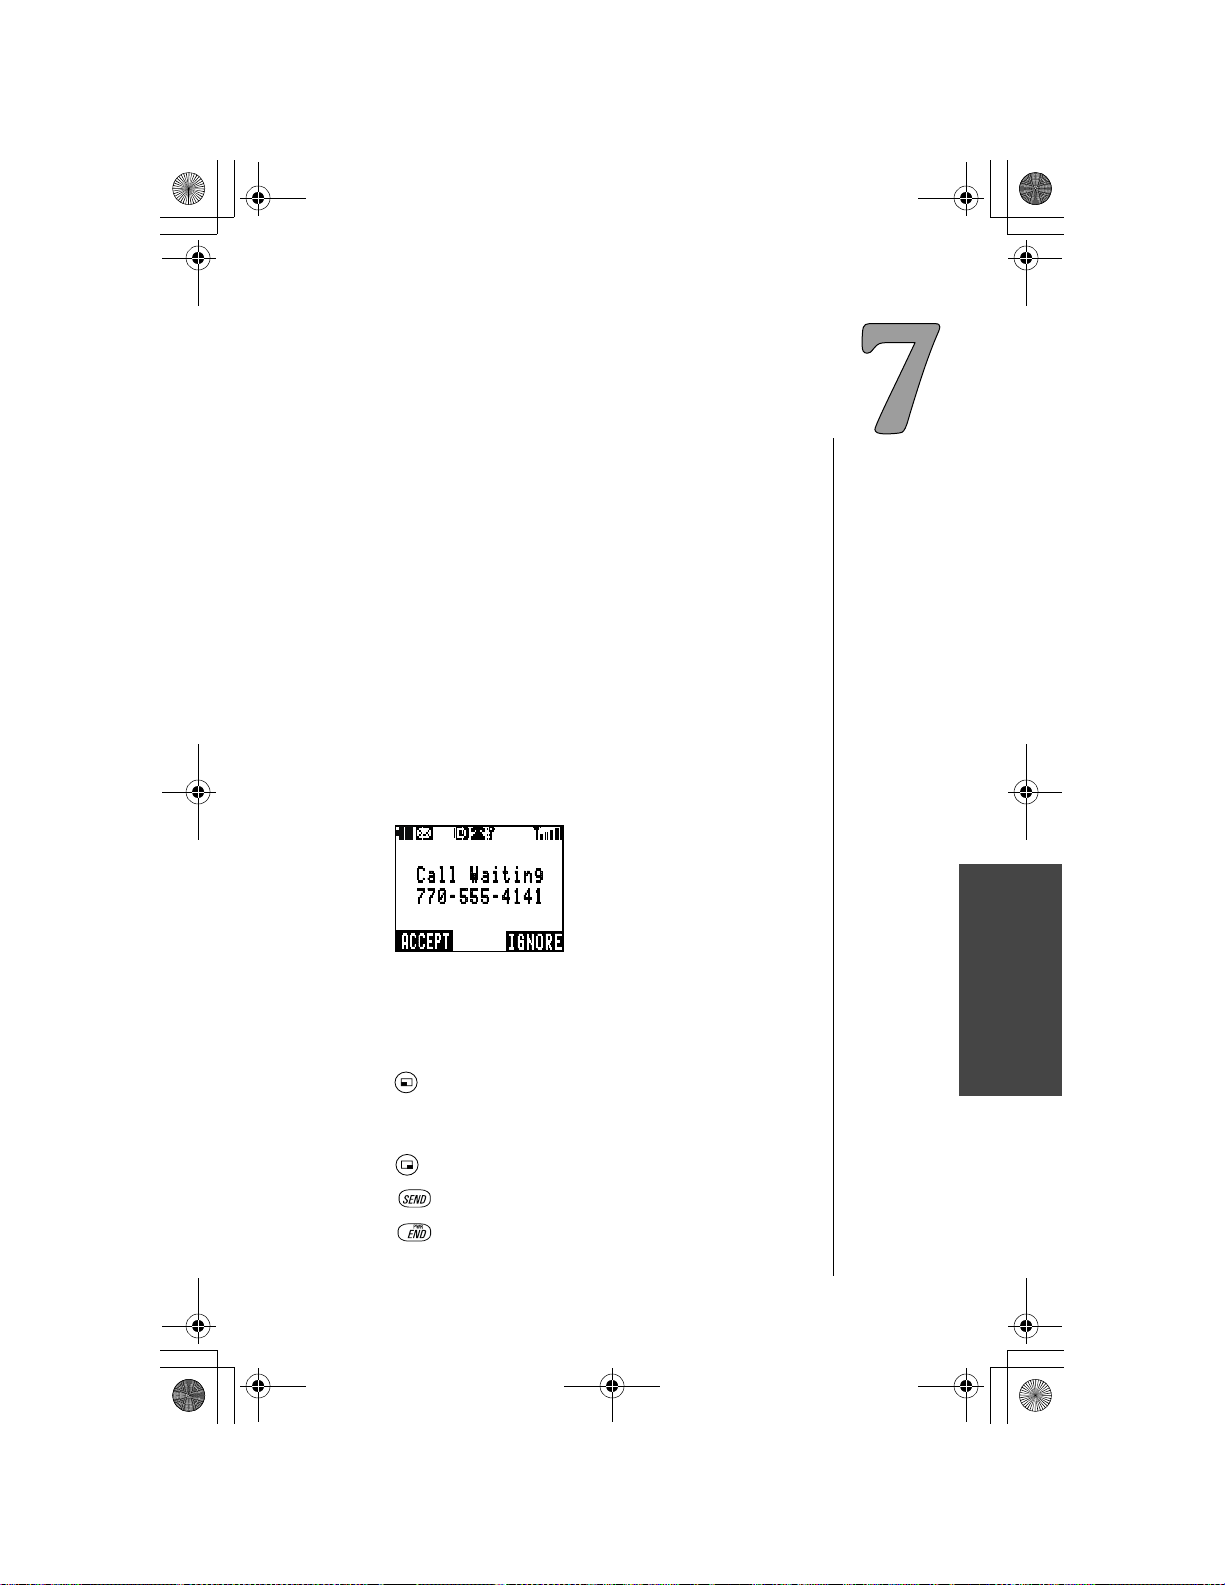
OI.book Page 65 Wednesday, November 8, 2000 3:35 PM
Subscriber
Features
Several features on your phone are available only if you
subscribe for the particular service from your wireless service
provider. If you do not have one of the services listed below,
contact your wireless service provider for more information.
Caller ID
This feature displays the phone number of the person calling
you. If the caller’s phone number matches an entry in the
Phonebook, the corresponding name is also displayed.
Call Waiting
1
An alert sounds when you receive an incoming call during
conversation.
• The display indicates that a call is waiting.
• If the caller’s phone number matches an entry in the
Phonebook, the corres pondin g name is dis play ed and the
backlight changes color.
2
Press (ACCEPT) to connect with the incoming call. The
first call is put on hold.
OR
Press (IGNORE) if you want to continue yo ur curre nt call.
3
Press to switch between the two calls.
4
Press to end the current call in conversation.
Subscriber Features
Subscriber Features 65
Page 76

OI.book Page 66 Wednesday, November 8, 2000 3:35 PM
Chapter 7
Three-Way Calling
This feature lets you dial a third party while you are in
conversation. You may continue your conversation with one
party when the other party hangs up.
During conversation, enter a phone number or recall it from
1
the Phonebook.
Press .
2
• The phone call you are in is temporarily placed on hold.
When the third party answers, press again to connect
3
all parties.
Press to end all calls.
4
This feature may not be available in all areas.
Contact your wireless service provider for more
information.
Text Messaging
Reading New Text Messages
When a new text message is received (up to 30), an alert
1
sounds and flashes on the top of the display.
• If you have received 30 messages, the oldest read
• If the envelope icon is dark ( ), you have 30 unread
• The display indicates how many new text messages you
66 Subscriber Features
message will be overwritten when you receive a new
message.
(including locked) messages waiting and the inbox is full.
See “Delete a Text Message” on page 69 and delete a
message.
have received.
Page 77

OI.book Page 67 Wednesday, November 8, 2000 3:35 PM
Press (VIEW) to view the inbox message list.
2
• The display icons indicate the message status:
:Unread message
:Locked message
:Read message
• The urgency level of the received message is also
displayed:
!!
:Very urgent message
!
:Urgent message
:Normal message
:Bulk message
If you have one new message, press or to scroll
3
through the message, sender, and reception time.
OR
If you have more than one message, press or to
scroll through the list of m essages . When the arrow point s to
the desired message, press or to scroll through the
message, sender, and reception time.
Once you finish reading a message, press (REPLY) to
4
reply to the message, or press (OPTION) and go to
step 5.
Press or to scroll to your desired action and press
5
(OK).
• If you selected
“Reply to a Text Message (Inbox Only)”.
• If you selected
“Forward a Text Message”.
• If you selected
section titled “Edit a Text Message (Outbox Only)”.
• If you selected
titled “Lock/Unlock a Text Message”.
• If you selected
“Delete a Text Message”.
• If the message cont ains a phone number that yo u wan t to
call back, go to the following section titled “Call Back a
Text Message”.
• If you selected
titled “Add Sender in Phonebook”.
Reply
, go to the following section titled
Forward,
Edit
Lock/Unlock
Delete
Add Sender
go to the following section titled
(Outbox Only), go to the following
, go to the following section
, go to the following section titled
, go to the following section
Chapter 7
Subscriber Features 67
Page 78
OI.book Page 68 Wednesday, November 8, 2000 3:35 PM
Chapter 7
Reply to a Text Message
(Inbox Only)
(Continued from step 5 under “Reading New Text
Messages”.)
Enter your message.
6
Press (OK).
7
Press or to select an address source: a
8
No.
• Y ou can a lso select a destination f rom the Phonebo ok
Enter a destination. Press (OK). (See “Text Entry
9
Operations”, Chapter 4).
Press and (YES) to send the message.
10
• The outbox holds up to 20 unsent messages. If the
E-mail Address.
or an
(follow the display prompts) by pressing ( ).
outbox is full, delete or send an outbox message to
make more room in the outbox.
Press (OK).
Forward a Text Message
(Continued from step 5 under “Reading New Text
Messages”.)
Press or to scroll to the destination source list.
6
Press (OK).
7
Enter the destination.
8
Press (OK).
9
• The message can be edited by pressing or .
Phone
10
Edit a Text Message
You can edit the destination or the messages in the
outbox.
(Continued from step 5 under “Reading New Text
Messages”.)
6
68 Subscriber Features
Press and (YES) to send the message.
(Outbox Only)
Follow the screen prompts.
• For additional information about text entry, see “Text
Entry Operations”, Chapte r 4.
Page 79

OI.book Page 69 Wednesday, November 8, 2000 3:35 PM
Lock/Unlock a Text Message
(Continued from step 5 under “Reading New Text
Messages”.)
Press (OK) to lock or unlock the message.
6
• Even if the message is locked, it can be changed or
deleted manually.
Delete a Text Message
(Continued from step 5 under “Reading New Text
Messages”.)
Press (OK) to delete the message.
6
• The display confirms that you want to delete the
message.
Press (YES) to delete.
7
Call Back a Text Message
When the text contains a telephone number, you can call
that number.
(Continued from step 5 under “Reading New Text
Messages”.)
Press to scroll to the phone number you want to call
6
back. (Phone numbers are automatically inserted.) To
call that number, go to step 7.
• Press (OPTION) to edit the
deleting a rea code), or
Prefix
in
phone number is incorrect.)
Press (SEND) to send the call.
7
to change the numbe rs. (This is useful if the
Save
Prefix
. Or, selec t
(adding/
Dial Setting
Chapter 7
Add Sender in Phonebook
(Continued from step 5 under “Reading New Text
Messages”.)
Press to scroll to
6
automatically inserted.)
Add or edit the additiona l Phonebo ok field s as des cribed
7
in “Creating a Phonebook Entry” in Chapter 5.
Save As
(E-mail address, if any, is
Subscriber Features 69
Page 80
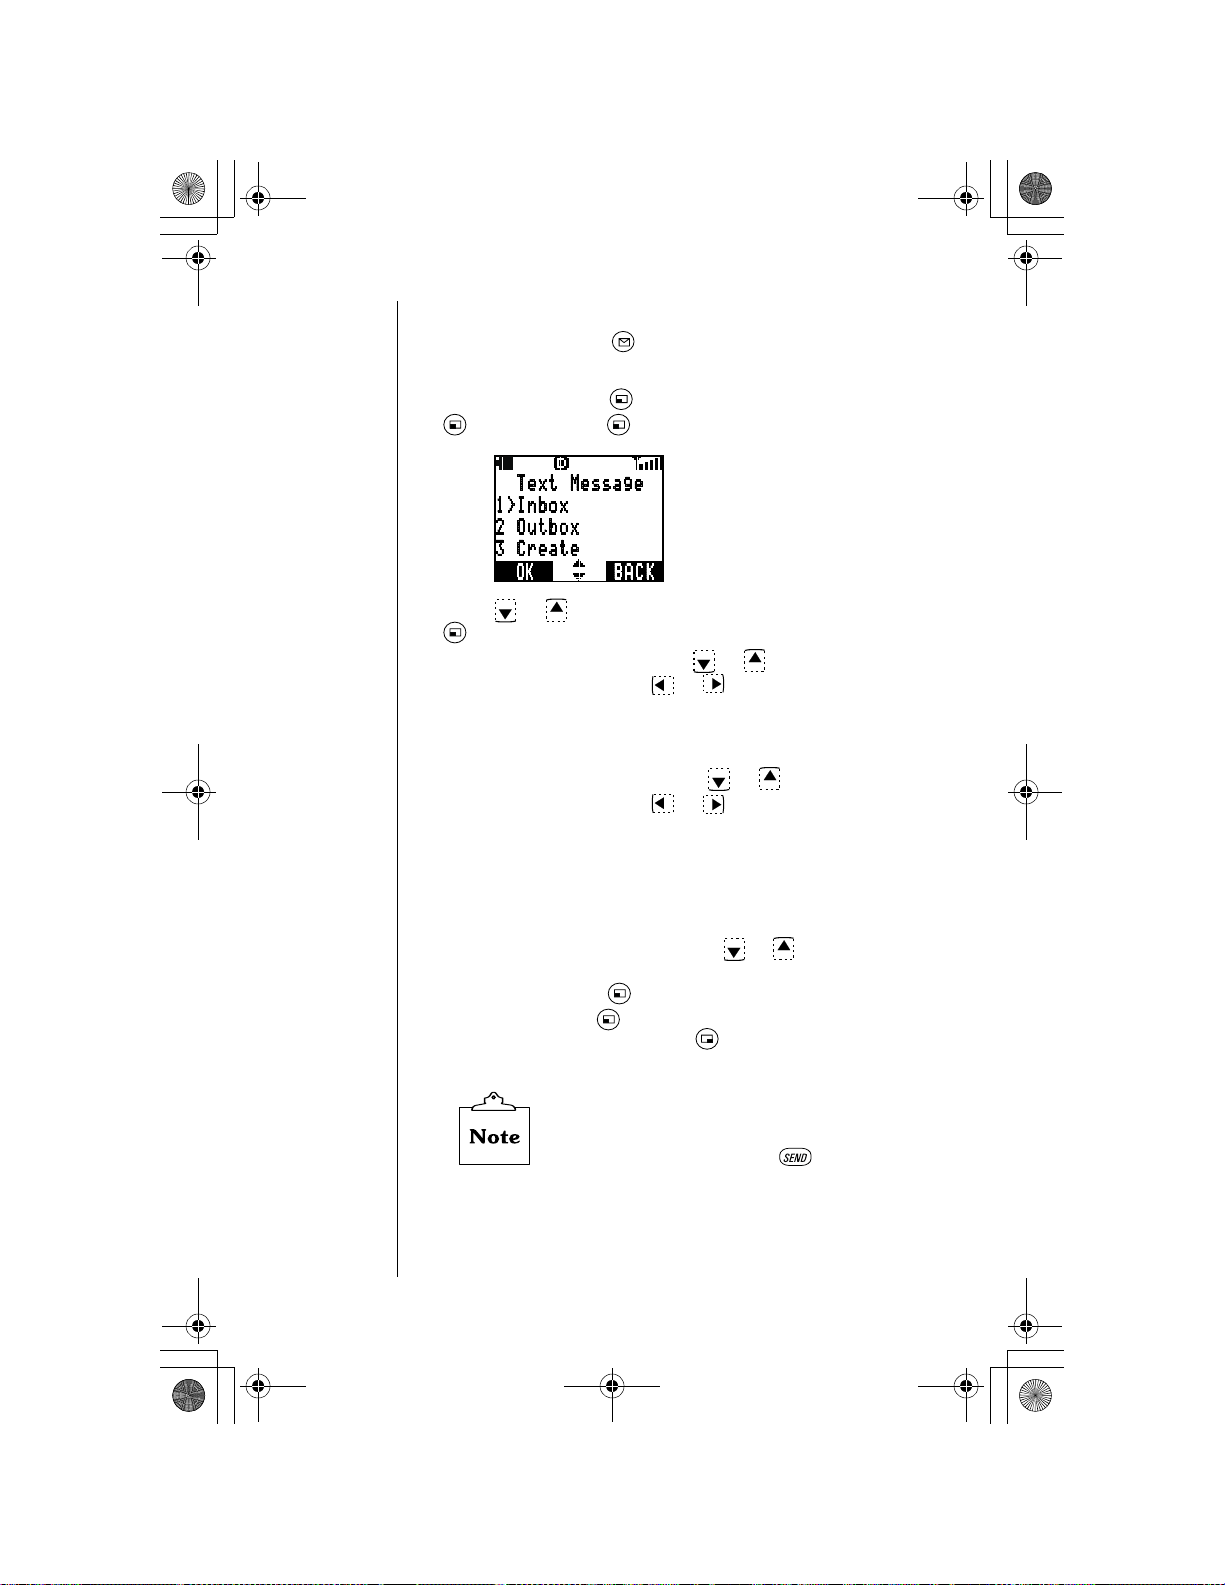
OI.book Page 70 Wednesday, November 8, 2000 3:35 PM
Chapter 7
Accessing Text Messages
From standby, press .
1
OR
From standby, press (MENU), scroll to
(OK), and press (OK) again to select
Press or to scroll to your desired selection and press
2
(OK).
• If you selected
desired message, then or to scroll through the
message, sender, and the time. After reading through a
message, you can select your desired action. Go to Step
4 on page 67.
• If you selected
desired message, then or to scroll through the
message, destinat ion , an d th e ti me . After reading through
a message, you can select your desired action. Go to
Step 4 on page 67.
• If you selected
“Create a Text Message”.
• If you selected
Inbox
all
messages. Press (OK). The display confirms your
selection. Press (YES) to delete all the
Outbox
Delete All
messages, or to select delete all
messages, or press (NO) to return to the
display.
You cannot delete Locked messages in
All
.
If a phone number is displayed after
an Inbox message, pressing calls the
displayed number.
Inbox
, press or to scroll to the
Outbox
Create
Delete All
, press or to scroll to the
, go to the following section titled
, press or to select delete
Messages
Text Message
Outbox
Inbox
or
From:
, press
.
Delete
in
70 Subscriber Features
Page 81

OI.book Page 71 Wednesday, November 8, 2000 3:35 PM
Create a Text Message
You may type a text message (up to 160 characters
including the E-mail address).
(Continued from step 2 under “Accessing Text
Messages”.)
Enter a message. You can press or to move
3
within the message or to add a space. (See “Text Entry
Operations”, Chapter 4, for more detail.)
After entering the message, press (OK).
4
Press or to select an address source: a
5
No.
• Y ou ca n also se lect a destina tion from the Pho nebook
Enter a destination. Press (OK). Note that you can
6
switch back and forth between the destination screen
and the message screen by pressing or .
• If necessary, the message can be edited by pressing
E-mail Address
or an
(follow the display prompts) by pressing ( ).
(EDIT) and using or . (See “Text Entry
Operations”, Chapter 4).
. Press (OK).
Chapter 7
Phone
Press (OPTION).
7
Press or to select
8
Save Message
before sending), or
• The outbox holds up to 20 unsent messages. If the
outbox is full, delete or send an outbox message to
make more room in the outbox.
After you scroll to your selection, press (OK).
9
(to store the message in the outbox
Send
(to send the message),
Abort
(to delete the message).
Subscriber Features 71
Page 82

OI.book Page 72 Wednesday, November 8, 2000 3:35 PM
Chapter 7
Voice Mail
Y our voice mail phone number must be programmed into your
phone before you can retrieve voice mail messages. If your
voice mail phone number has not been programmed, contact
your wireless service provider.
Listening to New Voice Mail
When a new voice mail message is received, the phone
1
emits an alert so und an d/or vi brat es, and appears on the
top of the display.
• The display indicates the number of new voice mail
messages.
Press (LISTEN) to automatically dial your voice mail
2
number.
OR
From the standby display, press and hold until it calls
your voice mailbox.
Follow the recorded instructions for your voice mail.
3
Press to end your call and return to standby.
4
72 Subscriber Features
Page 83

OI.book Page 73 Wednesday, November 8, 2000 3:35 PM
Resetting the Voice Mailbox Number
Do not reset your voice mailbox number if it is
preprogrammed by your wireless service provider.
Your voice mail will be inaccessible if an incorrect
number is entered. Check with your wireless
service provider for specific information.
From standby, press (MENU) to enter the Main Menu.
1
Press to scroll to
2
Scroll to
3
• Your voice mailbox phone number is displayed.
Press (EDIT) and enter a new voice mailbox phone
4
number.
• You may also program Pause and Wait times. See
Voice Mail
“Programmi ng Pauses or Waits” in Chapter 3.
Messages
and press (OK).
. Press (OK).
Chapter 7
Press (OK) to save the new phone number.
5
Subscriber Features 73
Page 84

OI.book Page 74 Wednesday, November 8, 2000 3:35 PM
Chapter 7
System Settings
Voice Privacy Mode
When this feature is on, your conversations and messages
are encrypted with a special code that can be interpreted only
by your wireless service provider. Voice privacy is available
only if offered by your wireless service provider. Contact your
wireless service provider for additional information.
From standby, press (MENU) to enter the Main Menu.
1
Press to scroll to
2
Press (OK) again to select
3
Press (OK) again to select
4
• The current setting is marked with an asterisk ( ).
System Setting
Network
Voice Privacy
and press (OK).
.
.
To change the setting, scroll to the other option and press
5
• The display confirms the new voice privacy setting.
• If you selected On, the encryption icon ( ) is displayed
Press any key or wait 3 seconds to return to standby.
6
74 Subscriber Features
(OK).
during calls.
Page 85

OI.book Page 75 Wednesday, November 8, 2000 3:35 PM
Selecting Your Phone Number (NAM)
Your phone can have up to two phone numbers (programmed
by your wireless service provider). You can select either
phone number to make a call.
From standby, press (MENU) to enter the Main Menu.
1
Press to scroll to
2
Press to scroll to
3
• NAM1 is your current phone number setting.
If you have a second phone number (NAM2), view it by
4
pressing or .
To select the other phone number (other than the one you
5
are currently using), make sure the desired phone number
(NAM) is displayed and press (OK).
System Setting
NAM Selection
and press (OK).
and press (OK).
Chapter 7
• The display confirms the NAM setting.
Press any key or wait 3 seconds to return to standby.
6
• If you changed the NAM setting, a network search occurs.
If you would like to ha ve a seco nd phone numb er
programmed for your phone, contact your
wireless service provider.
Subscriber Features 75
Page 86

OI.book Page 76 Wednesday, November 8, 2000 3:35 PM
Chapter 7
Searching for Available Systems
Your phone’s search default is set to
automatically searches for available network systems, and
then selects the appropriate one. It will default to this setting
every time you turn on your phone, even when you have
changed the search setting. To search for a particular
network, select
displayed. When
Manual
New Search
a new search for available systems and asks if you use the
network.
From standby, press (MENU) to enter the Main Menu.
1
Press to scroll to
2
Press to scroll to
3
Normal
, which means it
. Up to 16 network names may be
is selected, your phone begins
System Setting
Search
and press (OK).
and press (OK).
• The three search settings are displayed.
Scroll to your preferred search setting and press (OK).
4
• If you selected
• If you selected
• If you selected
76 Subscriber Features
Normal
to return to standby.
Manual
you use and press (OK) to select it. Then, press any
key or wait 3 seconds to return to standby.
New Search
displayed. Press (YES) to select it or (NO) to have
the phone search for another available network. After you
select a network, press any key or wait 3 seconds to
return to standby.
, press any key or wait 3 seconds
, press to scroll to a network
, an available network n ame is
Page 87

OI.book Page 77 Wednesday, November 8, 2000 3:35 PM
Service Priority
Your phone automatically searches for available networks
when powered on. To change the
Service Priority
order,
follow this procedure. If you are not sure which service you
have, contact your wireless service provider.
From standby, press (MENU) to enter the Main
1
Menu.
Press to scroll to
2
Press to scroll to
3
System Setting
SVC Priority
and press (OK).
and press (OK).
Chapter 7
Public
Custom
(3rd).
and press (OK).
Residential
SVC Priority
Service Priority
(1st),
order.
Press to scroll to
4
• The default search order is
(2nd), and
Press or to change the
5
When your preferred order is displayed, press (OK).
6
• The display co nfirms that the
updated.
Press any key or wait 3 seconds to return to standby.
7
Private
was
Subscriber Features 77
Page 88

OI.book Page 78 Wednesday, November 8, 2000 3:35 PM
Chapter 7
78 Subscriber Features
Page 89

OI.book Page 79 Wednesday, November 8, 2000 3:35 PM
Before
Requesting
Help
As you learn how to use all of your phone ’s features, y ou may
occasionally experience minor problems. Fortunately, you can
fix most of these problems yourself. Listed below are some of
the problems you might encounter, as well as procedures that
may help you arrive at a solution. If your problem persists,
please contact your wireless service provider or visit
Panasonic’s website at
www.panasonic.com
Problems and Solutions
Problem Possible Cause(s) Solution(s)
.
Appendix A: Before Requesting Help
Phone will not
turn o n
“Initia lizatio n
Erro r xx x x” or
“Run Time
Erro r xx x x” is
displayed
Phone turns
off
inadvertently
Battery is too lo w or not
charged.
Battery co ntacts need to
be cleaned.
was not pressed
long enough.
Your phone has detected a
programming error.
Battery is too low or will not
hold a charge.
Recharge the battery. O r,
connect the AC or DC
adapter.
Wipe the battery contacts
and phone contacts with a
dry cloth.
Try pressing and holding
for a t le a s t t h re e
seconds.
Contact your wireless
service provider.
Connect an AC or DC
adapter and confirm that
the battery icon is
disp lay ed . If the b atte ry
icon does not displa y,
contact your wireless
service provider.
79
Page 90
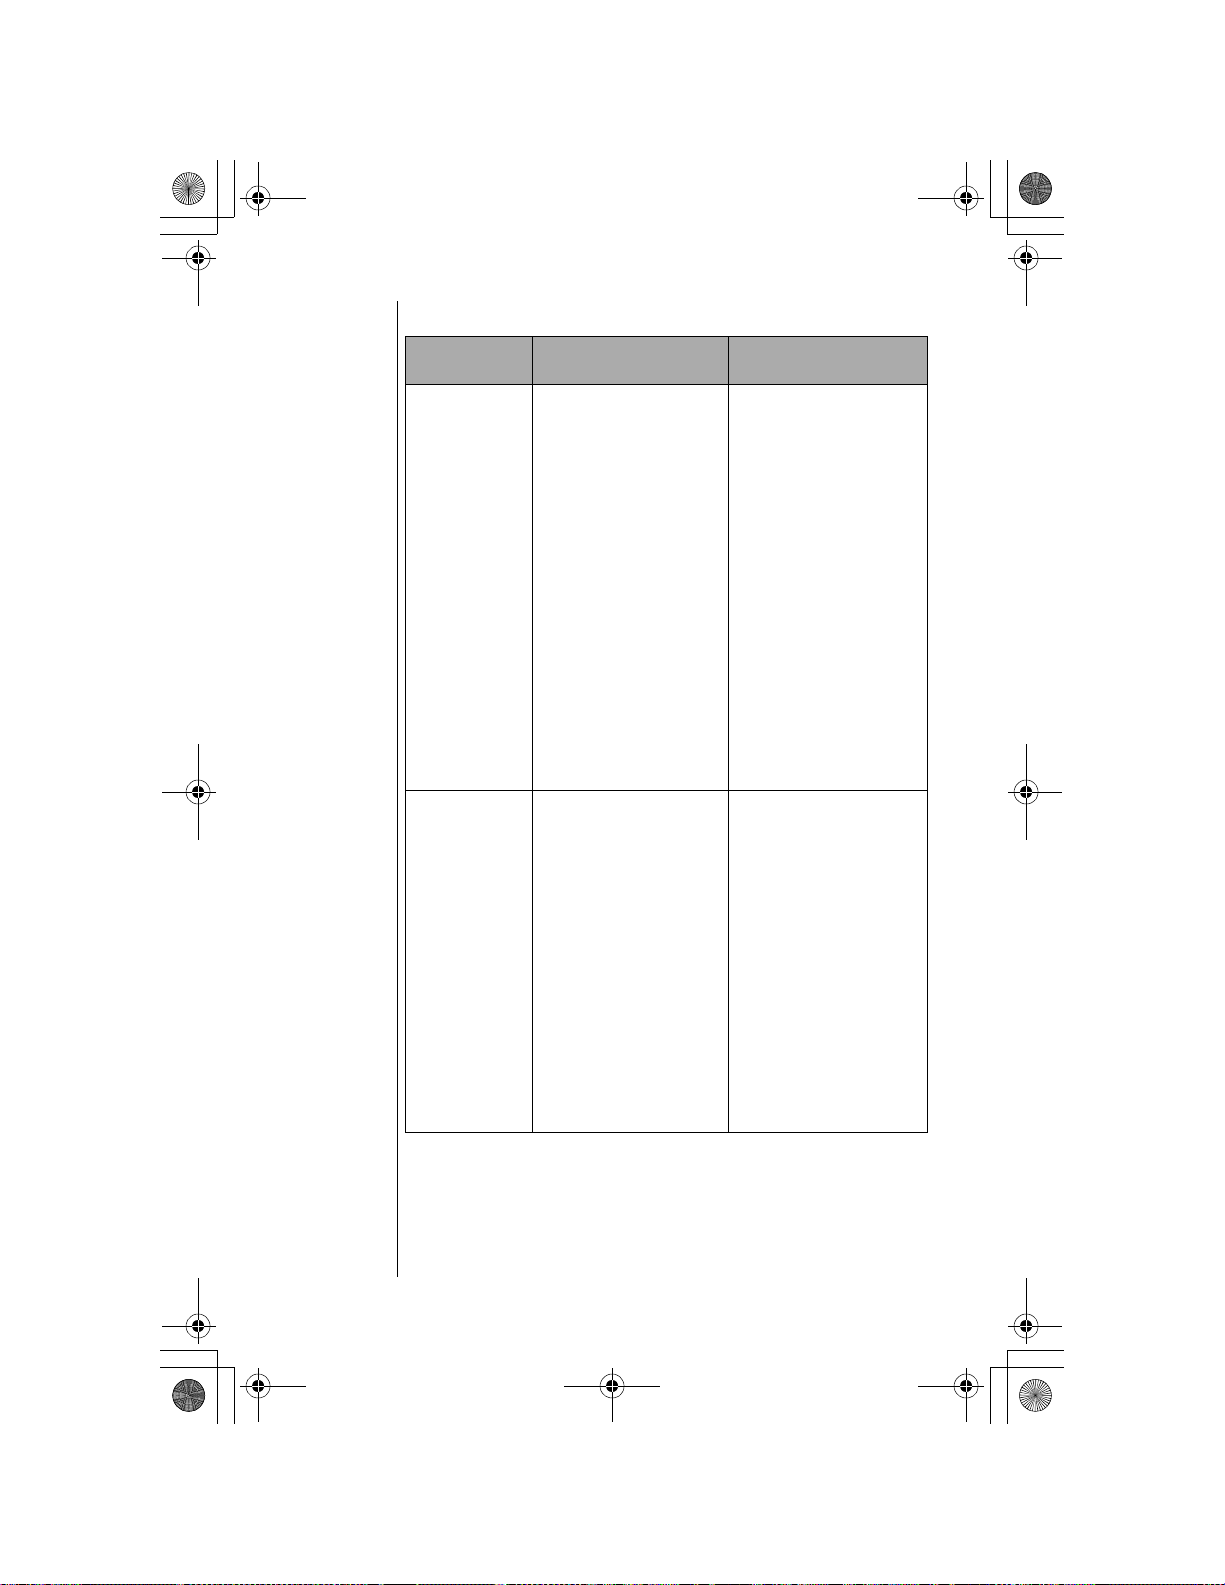
OI.book Page 80 Wednesday, November 8, 2000 3:35 PM
Appendix A
Problems and Solutions
Problem Possible Cause(s) Solution(s)
Battery will not
recharge
“No Service”
is dis p lay e d
The am bient air
temperature exceeds
113°F (45°C ) o r is less
tha n 3 2 °F (0°C).
Contact between your
batte ry and recharger is
inco mp lete .
The battery has n ot been
charged for a long time
and has been deeply
discharged.
The battery is defective.
Signal is too weak. Mo ve to another location,
Lower or raise the air
temperature; allow the
phone to cool off or warm
up before recharging.
Disconnect your charger
from the phone and then try
reconnecting it.
Atte mp t to re ch a rg e th e
ba tter y. It may ta ke a few
minutes for recharging to
begin. If the battery will not
recharge, replace it.
Replace the battery.
It’s normal for a
Note:
ba tte ry to slo w ly lo se its
ability to hold a charge.
or wait a few minutes if you
are trave lin g in an
automobile.
If yo u are in a building,
move n ear a w indow o r go
outside to send or receive
calls .
If you know you are
Note:
in a c e llu la r s e rv ic e area
and the phone continues to
indicate “No Service”,
contact your wirele ss
service provider.
80
Page 91

OI.book Page 81 Wednesday, November 8, 2000 3:35 PM
Problems and Solutions
Problem Possible Cause(s) Solution(s)
Appendix A
Un a ble to
receive calls
Missing
incoming calls
Calls dropped/
disconnected
inadvertently
Phone is off.
Security features may be
set so tha t the phone will
not receive calls.
Answe r Options setting is
set to use
a call.
Se rv ice is no t a ctiv ate d .
Verify th a t rin g v o lu me is
not s e t to s ilen t.
You are outsid e of a
cellular service area.
Phone automatically
disconnects calls when the
ba tte ry le v e l is lo w.
to answer
Turn on phone.
Check Call Restriction
(Se e “Call Lock”
settin g s.
on page 60 for more
inf o r ma tion.)
Press
call o r change the Answ er
Options set ting to
(See “Answer O ptions” on
page 28.)
Contact your wireless
service provider.
Set ring volume on.
Check your wireless
servi ce pr ovi der’s coverage
map (including roaming
areas) and try to move to a
loc a ti o n w it h in th e
coverage area.
If p roblems persist, contact
your wireless service
provider.
Recharge the battery.
to answer a
Any K ey
.
81
Page 92

OI.book Page 82 Wednesday, November 8, 2000 3:35 PM
Appendix A
Problems and Solutions
Problem Possible Cause(s) Solution(s)
Un a b le to
place calls
Un a b le to
access Voice
Mailbox
Phone is off.
Security features m ay be
set so that the phone
cannot place calls.
You are outside of a
ce llula r s e rv ic e a rea .
An error was made dialing
the num ber.
Service is not activated.
Voice Mail phone number
is not programmed into
phone.
DTMF tones may be se t to
short instead of long.
Voic e Mail se rv ice is n o t
activated.
Confirm pho ne is on.
Check C all Restriction
(Se e “Call L oc k ”
setting s.
on pa g e 6 0 for m o re
info rm a tio n .)
Check your wireless
servic e provider’s coverage
map (including roam ing
areas) and try to move to a
loca tio n within th e
coverage area.
Confirm the num ber is
correct.
Contact your wireless
service provider.
Program Voice Mail phone
number. Refer to add itional
information from your
wirele ss service provid er.
Set DTM F tones to long.
(Se e “D T M F Tone Length”
on pa g e 56 fo r d eta ils.)
Contact your wireless
service provider.
82
Keys do not
work when
pressed
Lost or forgot
lock code
Keypad m ay be locked.
(The displa y show s Ke y
Lock On.)
Phone m ay not be on.
If Key Lock On is displ ayed,
press
then (YES) to unlock.
Verify that phone is on.
Try entering “
lock code.
Contact your wireless
service provider.
(UNLO CK ) and
” as the
1234
Page 93

OI.book Page 83 Wednesday, November 8, 2000 3:35 PM
Problems and Solutions
Problem Possible Cause(s) Solution(s)
Appendix A
Un a ble to
store entries
int o
Phonebook
Un a ble to
enter text as
desired when
pressing keys
Unable to set a
subscriber
feature
It is difficu lt to
hear the other
party
You can hear
the othe r
party, but th e
other party
can’t hear you
The Phoneboo k is full. Delete an entry from the
(Se e “E d itin g /
appears above it.
Phone m ay be in
WORD T9 ( ) mode
instea d of Letter ( )
mode.
The feature you are trying
to set is not offer ed by your
w irele s s s e r v ic e p rov id er.
Your phone’s earpiece
vo lume is s e t t o o lo w.
Your microphone may be
muted.
Phonebook.
Deleting a P honebook
Entry” on p age 4 2 for
details.)
If shows above the
right softkey ( ), press
the right s oftk ey ( ) u nti l
(See “Text E n try
Operations”, C h a p te r 4 .)
Contact your wireless
service provider for more
inf o r ma tion.
Press during
conversation.
If the display shows
“Muted”, press
(UNMUTE).
83
Page 94

OI.book Page 84 Wednesday, November 8, 2000 3:35 PM
Appendix A
System Warning Tones
If your call cannot be completed because of a wireless system
error, you will hear one of the following warning tones:
Dropped Call Warning Tone
A slow busy tone sounds when your call drops because of low
signal strength or if a caller hangs up.
Reorder Tone
A fast busy tone sounds when the cellular system is too busy
to complete the call.
Intercept Tone
A rapid high/low tone sounds when a call is attempted before
service has been established. Before placing a call, confirm
that you are within a wireless service provider’s coverage
area.
Phone Specifications
84
Sizes w ith standard
battery
with ext ended
battery
Weight with standard
battery
with ext ended
battery
Maximum
RF Output
EB-TX210 EB-TX220
4.6” x 1.7” x .8 ”
(11 8 mm x 42 m m
x 2 0 .7 mm)
4.6” x 1.7” x 1.04”
(11 8 mm x 42 m m
x 2 6 .7 mm)
3.1 oz. (87 g) N /A
3.9 oz. (109 g) 4.9 oz. (138 g)
600 mW 600 mW
N/A
4.8” x 1.9” x 1.2”
(121 mm x 47 mm
x 2 9 .7 mm)
Page 95

OI.book Page 85 Wednesday, November 8, 2000 3:35 PM
Phone
Accessories
A variety of accessories are available for your Panasonic phone.
Contact your local wireles s servic e provi der to p urchas e Gen uine
Panasonic accessories.
Replacement antennas are available from
Panasonic.
In the U.S., call 1 (800) 833-9626.
In Canada, contact your cellular dealer.
Using non-Panasonic accessories or accessories not
recommended by your wireless service provider may result
in poor performance of your phone, or even cause an
electrical hazard.
EB-TX210 Series Handset Batteries
Appendix B: Phone Accessories
Standard Battery
EB-BS210B (Blue)
EB-BS210G (Gold)
(Li-Ion 650 mAh)
Extended Battery
EB-BL210B (Blue)
EB-BL210G (Gold)
(Li-Ion 1400 mAh)
EB-TX220 Series Handset Battery
Internal Battery
EB-BL220
(Li-Ion 1400 mAh)
85
Page 96
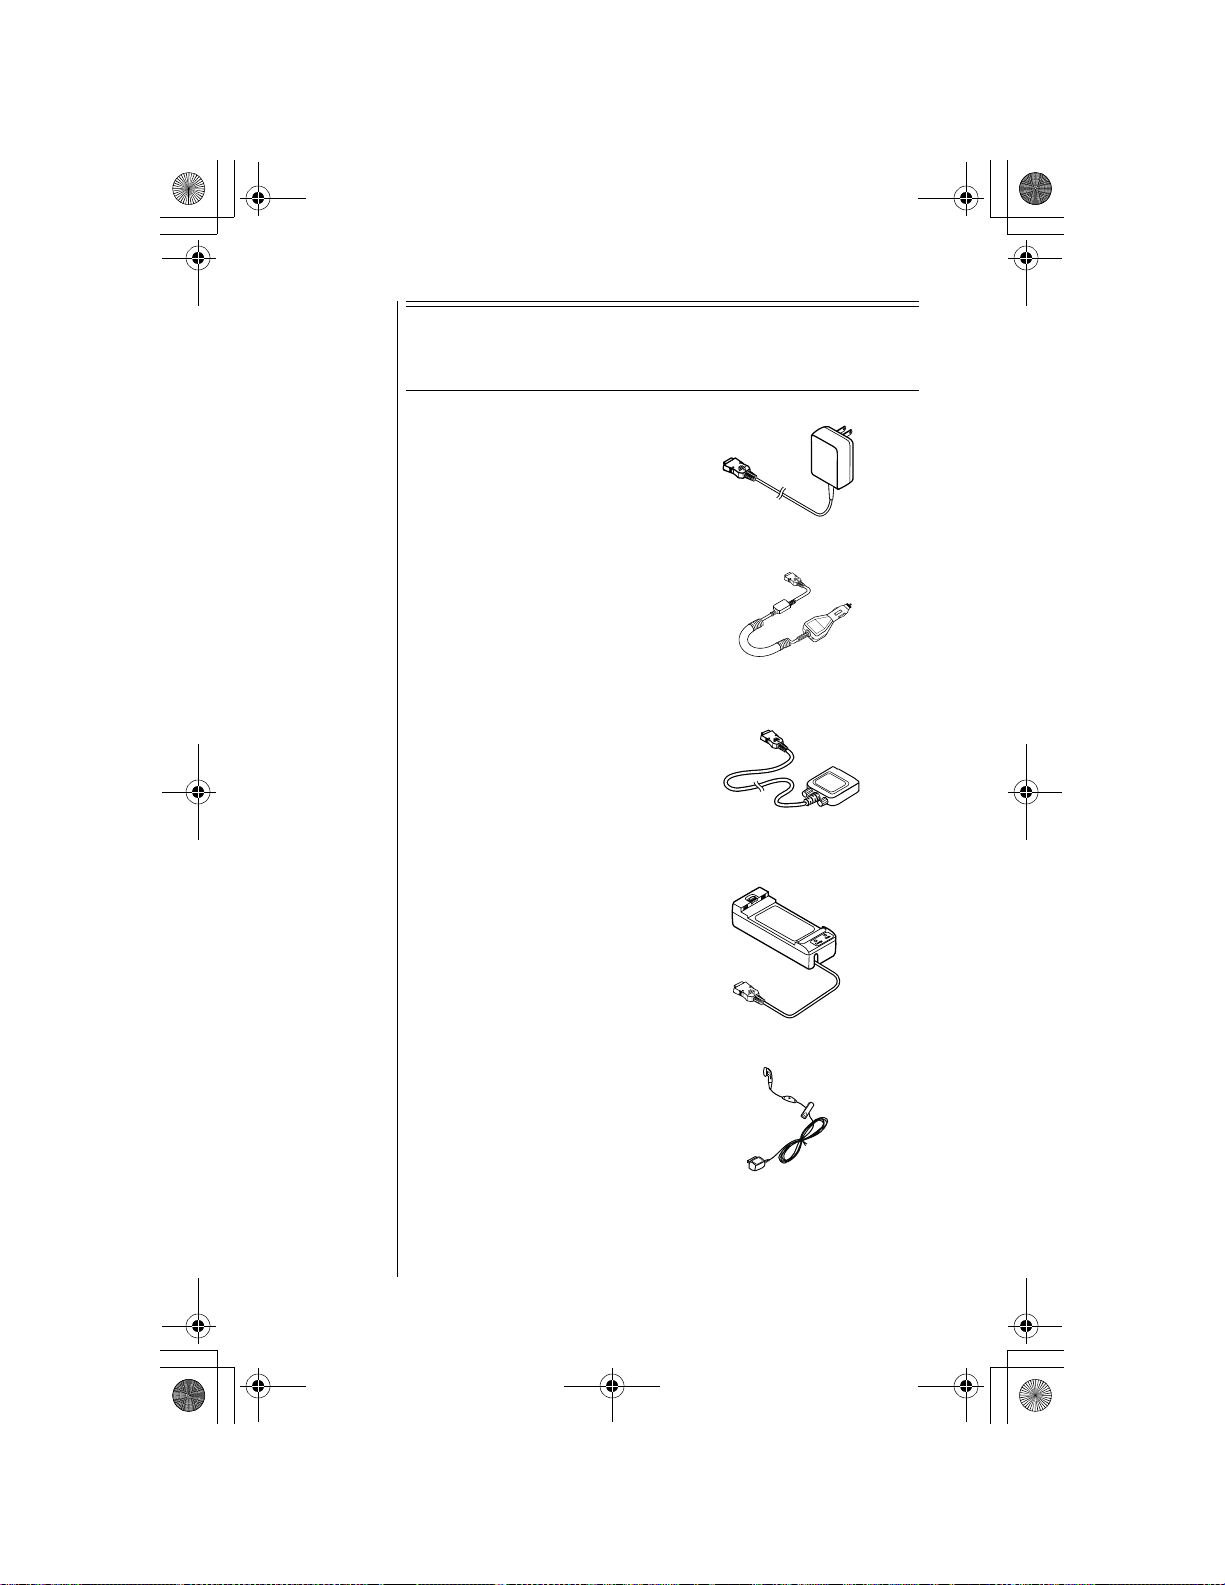
OI.book Page 86 Wednesday, November 8, 2000 3:35 PM
Appendix B
EB-TX210 and EB-TX220
Additional Accessories
AC Adapter
EB-CA210
DC Adapter
EB-CD220
Data Cable
EB-RS210
86
Spare Battery Charger
EB-CV210
Private Handsfree Headset
EB-EM210
Page 97

OI.book Page 87 Wednesday, November 8, 2000 3:35 PM
EB-HF210EZ and EB-HF220EZ
Handsfree Carmount Kits
Handsfree Unit
Adjustable Angle Bracket
Handset Holder
(for EB-TX210
Series Handset)
Appendix B
Handset Holder
(for EB-TX220
Series Handset)
Power Supply Cable
Interface Cable
87
Page 98

OI.book Page 88 Wednesday, November 8, 2000 3:35 PM
Appendix B
EB-HF210EZ and EB-HF220EZ
Handsfree Carmount Kits
(continued)
Microphone
Speaker
All Panasonic branded accessories are tested and
comply with FCC RF exposure requirements. NonPanasonic accessories may not comply.
88
Page 99
OI.book Page 89 Wednesday, November 8, 2000 3:35 PM
Consumer
Update
Consumer Update on Mobile Phones
(Published by U.S. Food and Drug Administration, Center for
Devices and Radiological Health, October 20, 1999.)
FDA has been receiving inquiries about the safety of mobile
phones, including cellular phones and PCS phones. The
following summariz es what is know n--a nd what rem ain s
unknown--about whether these products can pose a hazard to
health, and what can b e do ne to minimize any potential ri sk . Thi s
information may be used to respond to questions.
Why the concern?
Mobile phones emit low levels of radiofrequency energy (i.e.,
radiofrequency radiation) in the microwave range while being
used. They also emit very low levels of radiofrequency energy
(RF), considered no n-sign ificant, when in the stan d-by mode . It is
well known that hi gh l eve ls of R F c an prod uc e bi olo gical damage
through heating effects (this is how your microwave oven is able
to cook food). Ho wever, it is not known whether, to what extent, or
through what mechanism, lower levels of RF might cause
adverse health ef fects as well . Although some res earch has been
done to addres s these questio ns, no clear pi cture of the biologic al
effects of this type of radiation has emerged to date. Thus, the
available science does not allow us to conclude that mobile
phones are absolu tely safe, or tha t t hey a re uns afe. Ho wev er, the
available scientific evidence does not
health effects associated with the use of mobile phones.
demonstrate any adverse
Appendix C: Consumer Update
What kind of phones are in question?
Questions have be en rais ed about hand-held mobil e p hon es , th e
kind that have a built-in antenna that is positioned close to the
user’s head during normal telephone conversation. These types
of mobile phones are of concern because of the short distance
between the phone’s antenna — the primary sourc e of the RF —
and the person’s head. The exposure to RF from mobile phones
in which the ante nna is loca ted at greate r dista nces from t he use r
(on the outside of a car, for example) is drastically lower than that
from hand-held phones, because a person’s RF exposure
decreases rapidly with distance from the source. The safety of
so-called “cordless phones", which h ave a ba se unit conne cted to
89
Page 100

OI.book Page 90 Wednesday, November 8, 2000 3:35 PM
Appendix C
the telephone wiring in a house and which operate at far lower
power levels and frequencies, has not been questioned.
How much evidence is there that hand-held mobile phones
might be harmful?
Briefly , t here is not en ough e viden ce to know for su re, eith er way;
however, research efforts are on-going. The existing scientific
evidence is conflicting and many of the studies that have been
done to date have suffered from flaws in their research methods.
Animal experiments investigating the effects of RF exposures
characteristic of mobi le phones ha ve yielded conflicting res ults. A
few animal studies, however, have suggested that low levels of
RF could accelerate the development of cancer in laboratory
animals. In one study, mice genetically altered to be predisposed
to developing one type of cancer developed more than twice as
many such cancers when they were exposed to RF energy
compared to controls. There is much uncertainty among
scientists about whether results obtained from animal studies
apply to the use of mobile phones. First, it is uncertain how to
apply the results obtained in rats and mice to humans. Second,
many of the studies that showed increased tumor development
used animals that had already been treated with cancer-causing
chemicals, and other studies exposed the animals to the RF
virtually continuously — up to 22 hours per day.
For the past five years in the United States, the mobile phone
industry has supp orted resear ch into th e safety of mobile phones.
This research has resulted in two findings in particular that merit
additional study:
1 In a hospital-based, case-control study , researchers looked for an
association between mobile phone use and either glioma (a type of
brain cancer) or acoustic neuroma (a benign tumor of the nerve
sheath). No statistically significant association was found between
mobile phone use and acoustic neuroma. There was also no
association between mobile phone use and gliomas when all types
of gliomas were considered together. It should be noted that the
average length of mobile phone exposure in this study was less than
three years.
When 20 types of glioma were considered separately, however, an
association was found between mobile phone use and one rare type
of glioma, neuroepithelliomatous tumors. It is possible with multiple
comparisons of the same sample that this association occurred by
chance. Moreover, the risk did not increase with how often the
mobile phone was used, or the length of the calls. In fact, the risk
actually decreased with cumulative hours of mobile phone use. Most
cancer causing agents increase risk with increased exposure. An
ongoing study of brain cancers by the National Cancer Institute is
expected to bear on the accuracy and repeatability of these results.
1
90
 Loading...