

Page 1

Before attempting to connect or operate this product,
please read these instructions carefully and save this manual for future use.
Model No. WJ-SNT104E
Upgrade Software
Installation Guide
Page 2
■ General
The WJ-SNT104E Upgrade Software is exclusively provided
to upgrade the firmware of the WJ-NT104 Network Interface
Unit.
■ System Requirements
The following environment is required to run the firmware.
• IBM-PC compatible Personal Computer with Microsoft
Windows95/Windows98/WindowsNT4.0SP3 or later
Operating System installed.
• WWW Browser: Netscape Navigator Ver. 4.04 or later
(Except ver.6.0 series)
Internet Explorer Ver. 4.0 or later
• 8 MB of Hard Disk space is recommended.
• RS-232C port (COM1) compatible with 38 400 bps
communication speed for uploading.
• Computer Display: 800 x 600 pixels or more
■ Upgrade Software contents
The upgrade software (CD-ROM) includes the applications
below.
• Firmware Uploader for the WJ-NT104 Network Interface
Unit
SETUP.EXE, SETUP.W02, readme.txt
• Firmware for the WJ-NT104 Network Interface Unit
• Utility Software: TOOL SETUP.EXE, readme.txt
HTML (HTML lists are included)
• WJ-NT104 Operating Instructions (PDF data)
Refer to the WJ-NT104 Operating Instructions on the CDROM for further settings and operations. Adobe Acrobat
Reader 4.0 or later is required to display the instructions.
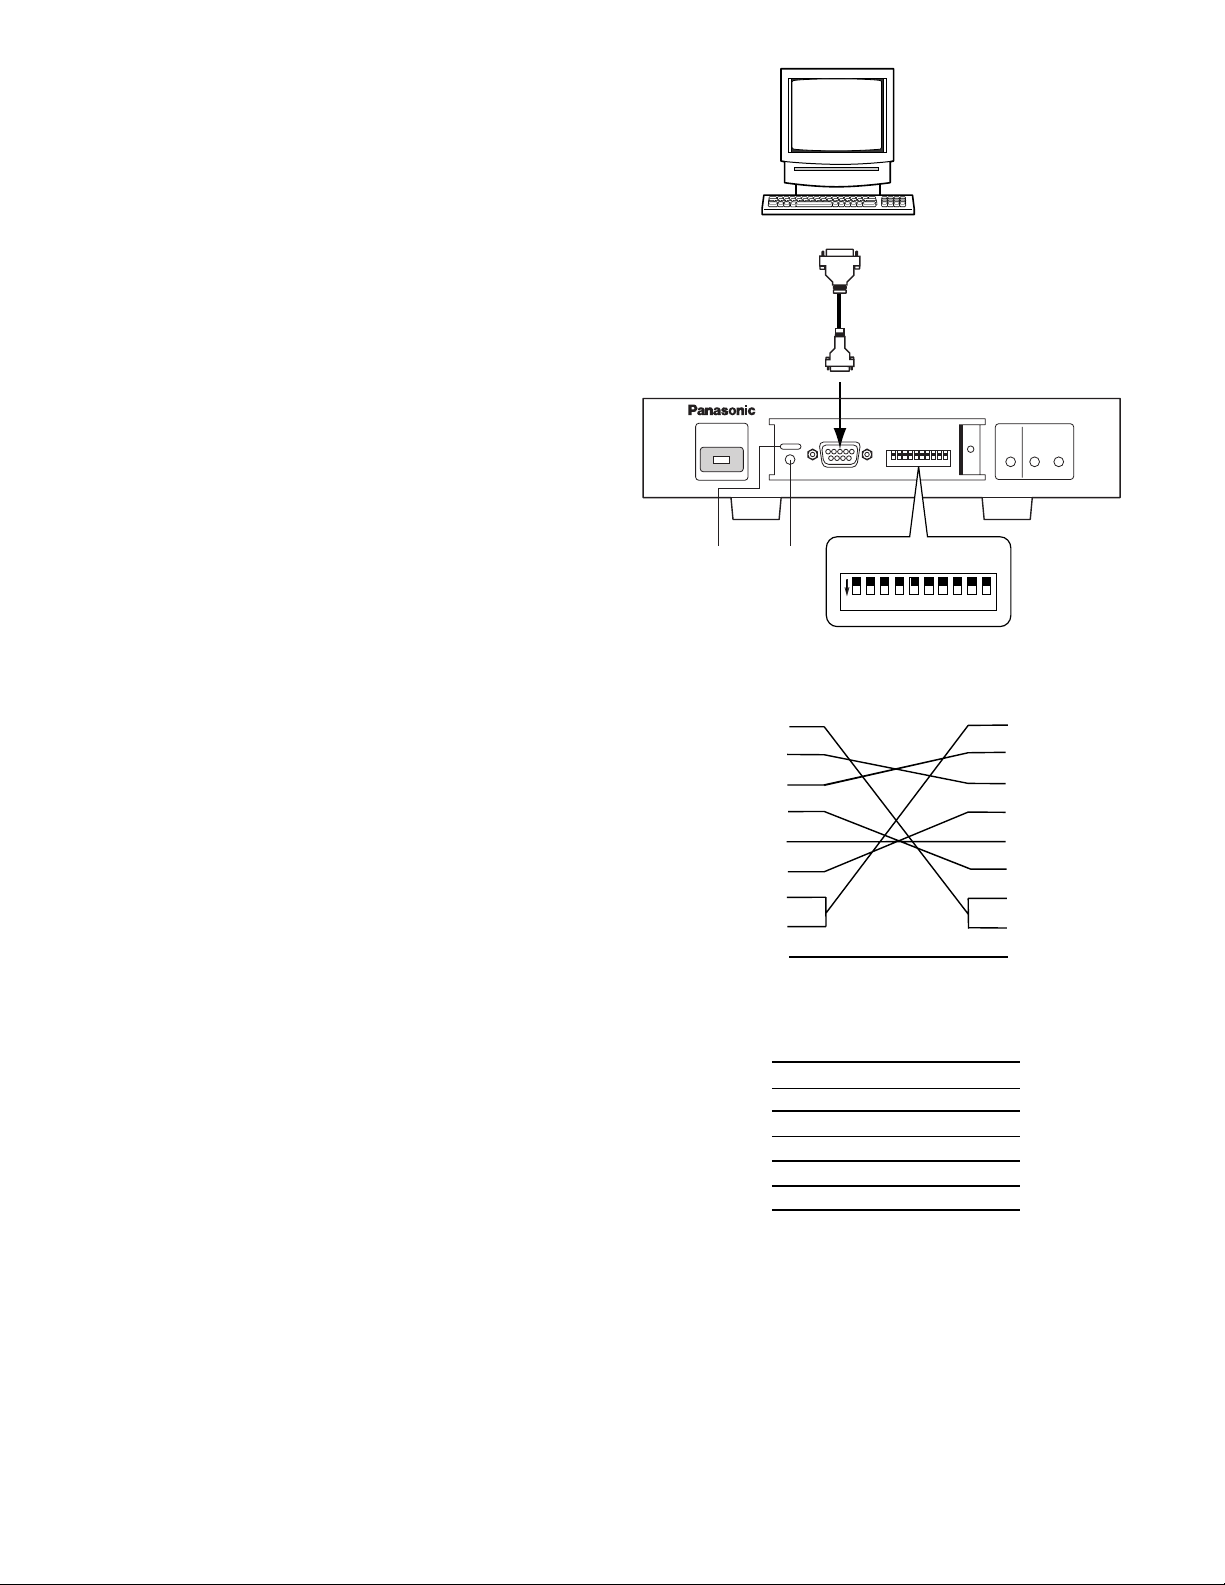
■ Preparation
Before installing the firmware, connect the RS-232C port on
the front of the Network Interface Unit and the RS-232C port
(COM1) of the PC as shown in the figure.
2
Copyrights
• MS-DOS is a registered trademark of Microsoft Corporation in the U.S.A. and other countries.
• Microsoft, Windows, and WindowsNT are either registered trademarks or trademarks of Microsoft Corporation in the United States of America
and/or other countries.
• Netscape Navigator is a trademark of Netscape Communications Corporation.
• Adobe Acrobat Reader is a trademark of Adobe Systems Incorporated.
• Other company names and product names appearing in the manual are registered trademarks or trademarks of the companies concerned.
D-sub9
D-sub25
D-sub9
OPERATE
Slit
WJ-NT104
Frame
WJ-NT104
DB9
2 (RXD)
3 (TXD)
4 (ER)
5 (GND)
6 (DR)
7 (RTS)
8 (CTS)
Personal Computer
or
RS232C
RESET
RESET
button
123 456 78910
ON
DB9
1
2
3
4
5
6
7
8
MODE
Network Interface Unit WJ-NT104
MODE
Shield
LINK RCV XMT
PC
DB9
1
2
3
4
5
6
7
8
Frame
PC
DB25
2 (TXD)
3 (RXD)
6 (DR)
7 (GND)
20 (ER)
5 (CTS)
4 (RTS)
Page 3

3
The following window will appear on the display.
3. Set bits #7 and #9 of the MODE selector to ON position
(leave the others on OFF), and then press the [RESET]
button on the front of the WJ-NT104.
4. Enter the KEY CODE into the boxes by pressing the
keyboard, then click the START button.
After the key code and unit status have been verified,
the following window will appear.
5. Set bits #7, #8 and #9 of the MODE selector to ON
position (leave the others on OFF), and then press the
[RESET] button on the front of the WJ-NT104.
From the slit above the [RESET] button, confirm that
two green LEDs are lit.
6. Specify the file path for the firmware.
Select the program on the CD-ROM (d: drive).
The factory default setting is A drive.
7. Click the RUN button in the window, then follow the onscreen directions until the program has been loaded.
• It takes about 5 minutes to load the program.
• The two LEDs start to blink rapidly. After 5 minutes,
the LEDs will blink at a slower rate one after another starting from the left, and then the fourth LED
(red) from the left will light up.
8. Click [OK] in the window to finish.
Remove the disc from the d: drive.
9. After updating the WJ-NT104 firmware, the system
needs to be initialized.
Set bits #1 and #2 of the MODE selector to ON position
(leave the others on OFF), and then press the [RESET]
button on the front of the WJ-NT104.
• The two green LEDs blink alternately, and then will
change to steady light.
10. Return all switches on the MODE selector to OFF position and then press the [RESET] button on the front of
the WJ-NT104.
This completes installation of the WJ-SNT104E
Upgrade Software.
■ Firmware Installation
Procedures
Install the firmware according to the following procedures.
● Firmware Uploader Installation
1. After the PC is powered up, the Windows start screen
will be displayed.
2. Insert the supplied disc into the computer CD-ROM
Drive. Here this disc drive is called the d: drive (for
example).
3. Double-click the My Computer icon on the desktop,
and then double-click the D: icon in the window.
4. Double-click the SETUP.EXE. icon on the supplied
disc to start the setup procedure. Then follow the onscreen directions.
Note: The software is normally installed in "C:\Program
Files" and “WJ-NT104 Utilities” is added to the programs in the taskbar.
● Firmware Installation
Caution: After updating the WJ-NT104 firmware, the
system needs to be initialized. As this will restore
setup data and customized html files to the factory
defaults, it is recommended that you back up this
data in advance.
• Backup your network data and customized html
files, if applicable.
At the MS-DOS level, enter "ftp>get netsetup.dat",
then "ftp>mget *.html" to store your data.
Install the firmware on the WJ-NT104 according to the
following procedure.
1. Power up the Network Interface Unit. Confirm that the
OPERATE indicator on the unit is on.
2. Click the Start button. In the Start menu, click
Programs. Point to the WJ-NT104 Utilities menu and
click FirmUpload to activate the program.
Page 4

● Uninstalling the Firmware Uploader
After all installations are completed, the firmware uploader
can be removed by the following procedure if desired.
1. Click the Start button, point to Settings, and then click
Control Panel in the menu. The Control Panel window
will appear.
2. Double-click the Add/Remove Programs icon in the
Control Panel window.
3. In the Add/Remove Programs Properties dialog box,
click the Install/Uninstall tab.
4. Specify “WJ-NT104 Utilities”, and then click the
Add/Remove button.
The system will start to uninstall the program. Follow
the on-screen directions.
NM1201-0 V8QA5935AN Printed in Japan
N 19
2001 © Matsushita Communication Industrial Co., Ltd. All rights reserved.
Matsushita Electric Industrial Co., Ltd.
Web Site : http://www.panasonic.co.jp/global/
 Loading...