

Page 1

WJ-ND400 Upgrade guide
Maintenance guide
1. Outline
This guide describes how to upgrade the rmware of the WJ-ND400 and WJ-HDE400 (hereinafter expressed as ND400 and HDE400)
including "Setup data backup", "Firmware loading" and "Setup data restore". The current conguration (setup data) of the recorder is not
initialized during the upgrade process. WJ-HDE400 (Extention unit) connected to the main unit is automatically upgraded when upgrading
the main unit (only when the rmware includes RAID rmware change).
2. Preparation
Following items are required for the upgrade.
1. PC with specied hardware/software: Refer to the "Operating instructions" for detail.
2. Network connection between the PC and the ND400:
Default IP address of the client port (100Mbps): 192.168.1.250, Use cross cable when directly connecting the PC.
Default IP address of the maintenance port (10Mbps): 192.168.2.250 Use straight cable when directly connecting the PC.
Note: When there is a communication error between the PC and ND400, try xed speed 10Mbps or 100Mbps.
3. ND400 rmware ND400.img, which is in the BIG-WEB site.
4. ND400 UID check tool "ND400UID.vbs", which is in the BIG-WEB site.
5. Ver1.03 upload enabler "ND400_V103_tool.zip", which is in the BIG-WEB site.
3. Setup data backup
The current conguration (setup data) of the recorder is not initialized during the upgrade process. However, it is recommended to backup the
setup data. Setup data canbe backed up in the ND400 itself (refer to the "Setup instructions") or in a PC as follows.
3.1 Preparation for FTP.
The FTP port is closed in the factory default setup. Open the FTP port as follows.
(1) Open the browser and connect the N400.
(2) Start the ND400UID.vbs by double ckick. A 1 to 5 digit UID (UID=XXXXX) will be displayed.
(3) Enter "http://"ND400 IP address"/cgi-bin/ftpservercontrol.cgi?SERVER=ON&UID=XXXXX" (XXXXX is the displayed UID).
(4) "200 OK" will be displayed in the browser and FTP connection becomes available.
(5) After upgrade prcedure is completed close the FTP port for security by entering "http://*****/cgi-bin/ftpservercontrol.
cgi?SERVER=OFF&UID=YYYYY" (YYYYY is new UID obtained by ND400UID.vbs).
3.2 Setup data backup by FTP.
(1) Open the DOS command window.
(2) Move to the directory where you would like to save the setup data by using cd command.
(3) Enter "FTP 192.168.2.250 (IP address of the ND400)".
(4) Enter the User Name and Password. The default User Name is "ADMIN", password is "12345".
(5) Enter "cd USER_DATA" to move to the directory. "250 CWD command successful" will be displayed when successful.
(6) Enter "bin" or "binary" to set FTP binary mode. "200 Type set to I." will be displayed when successful.
(7) Enter "get nd400set.bin" to download the setup data. The following message will be displayed when successful.
200 PORT command successful.
150 Opening BINARY mode data connection for 'ND400set.bin' (xxxxx bytes).
226 Transfer complete.
ftp: xxxxx bytes received in x.xxSeconds xxx.xxKbytes/sec.
Panasonic
1
ND400_UpgradeGuide_A
Page 2
WJ-ND400 Upgrade guide
(8) Check if the "nd400set.bin" is saved in the specied directory.
(9) Enter "bye" to nish the FTP session.
(10) Close the command prompt.
4. Preparation for Version 1.03.
This step is required only when the current rmware is version 1.03.
Prior to the operation, unzip the ND400_V103_tool.zip
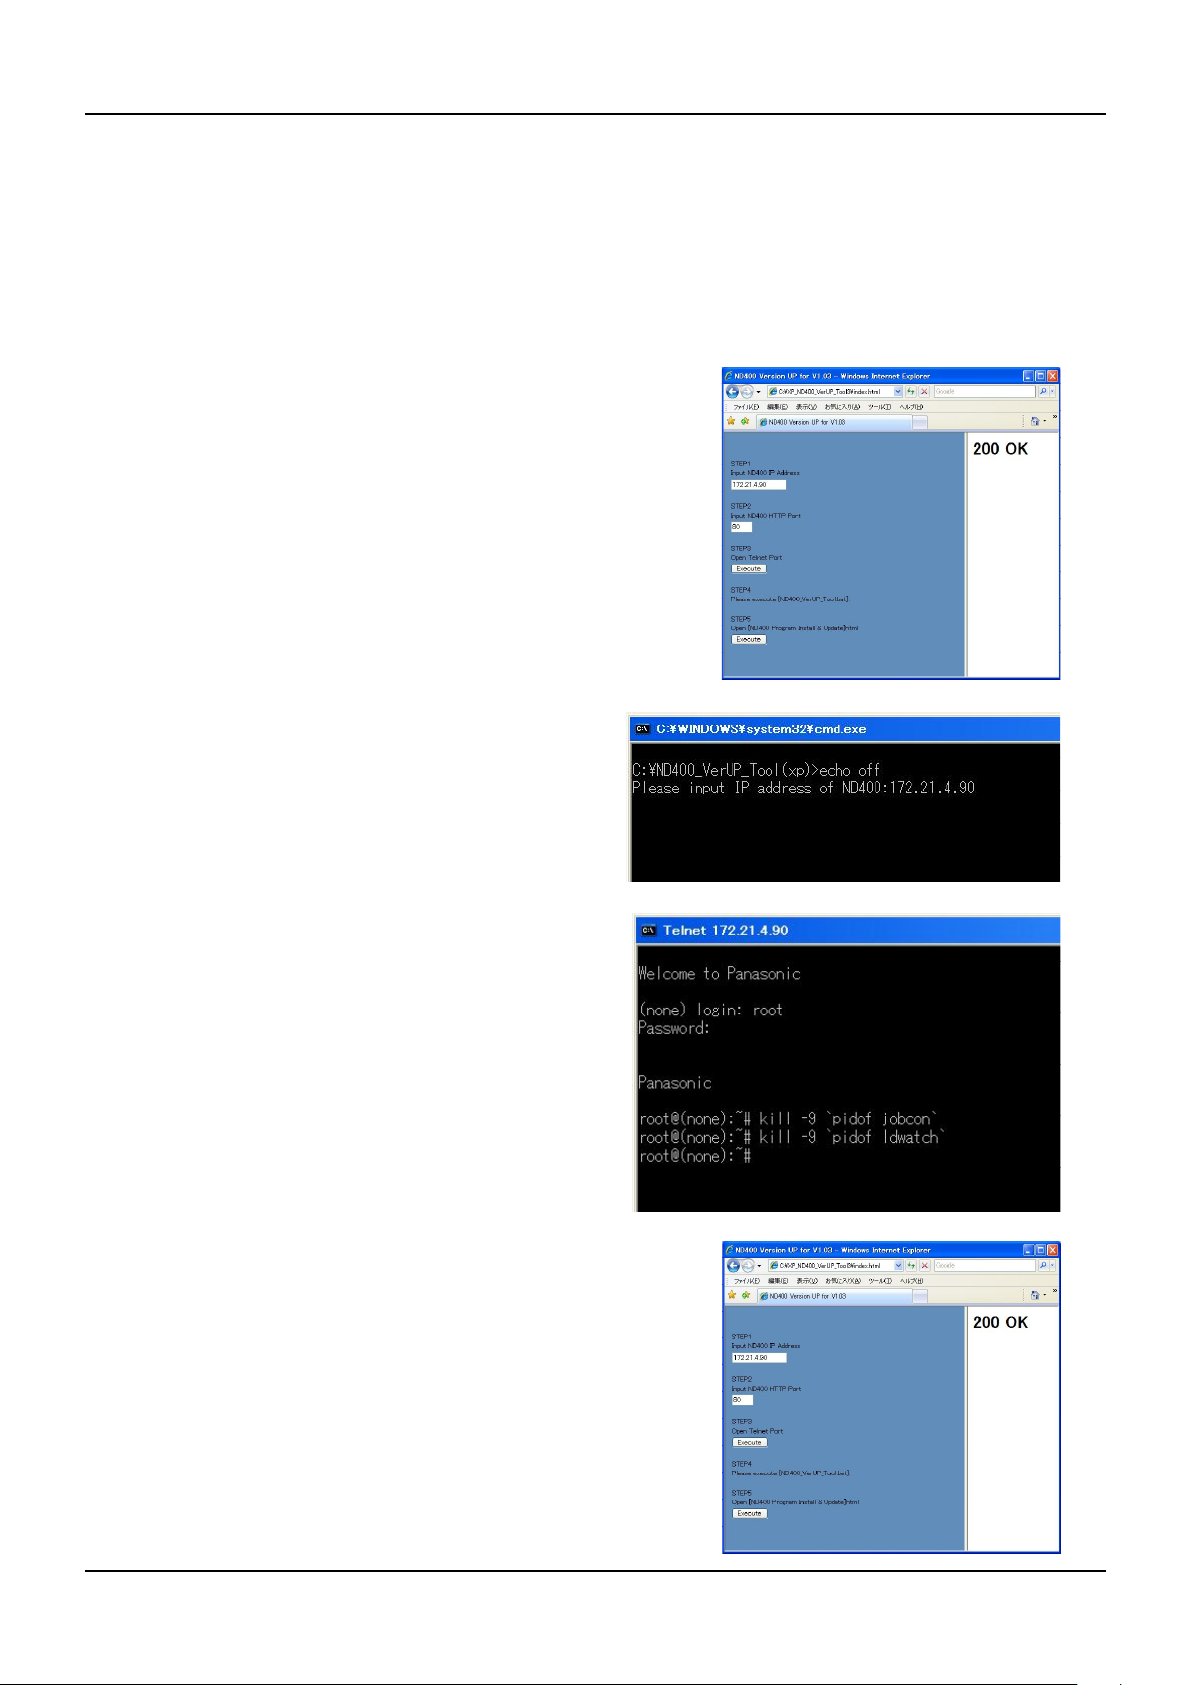
4.1 In case with Windoes XP
(1) Duble click the "index.html" in the "XP_ND400_VerUP_
Tool" folder. The page shown right is displayed.
(2) Enter the IP address and HTTP port number of the ND400 and
click "Execute". "200 OK" will be displayed in the right pane.
If not, click "Execute" again. If "200 OK" is not displayed,
reboot the ND400 and retry the procedure.
Maintenance guide
(3) Duble click the "ND400_VerUP_Tool.bat" in the "XP_
ND400_VerUP_Tool" folder. DOS command window is
displayed.
(4) Enter the IP address of the ND400, then press eneter key.
(5) When the DOS command operation is completed, the message
shown right is displayed. If not, retry the procedure. Enter
"exit" to close the window.
(6) Click "Execute" on the index.html. "WJ-ND400 Program
Install & Update" page will be displayed. If it is not displayed,
open it manually (refer to the section 5).
Panasonic
2
ND400_UpgradeGuide_A
Page 3

WJ-ND400 Upgrade guide
4.2 In case with Windows VISTA
(1) Duble click the "nd400tool.exe" in the "VISTA_ND400_
VerUP_Tool" folder. The window shown right is displayed.
(2) Enter the IP address and HTTP port number of the ND400,
then click "Start".
(3) When the operation is completed, the window shown righ is
displayed ,then "WJ-ND400 Program Install & Update" page
will automatically be displayed. If it is not displayed, open it
manually (refer to the section 5).
Maintenance guide
Panasonic
3
ND400_UpgradeGuide_A
Page 4

WJ-ND400 Upgrade guide
5. Uploading the firmware
This is made by using the browser GUI. Prior to the upload, stop the
recording by the "Setup/Basic/Rec setup menu" and suspend the
alarm by the alarm suspend button on the browser GUI.
(1) Enter "http://ND400 IP Address/cgi-bin/update.cgi in the
browser address bar. "WJ-ND400 Program Install & Update"
page will be displayed.
(2) Enter the ID for ADMIN and corresponding password.
Default: "ADMIN" for ID and "12345" for the password.
(3) Set ND400.img in the system le box by browsing your PC
directory. Check the "Initialize HTML" as it is required.
Maintenance guide
(4) Click "INSTALL" to start loading the rmware. "NOW
UPDATE..." is displayed during the upload. It takes about 15
minutes.
(5) When the upload is completed, the "update result" page is au-
tomatically displayed. Conrm if "Write success" is indicated
in the <<UPDATE FIRMWARE>> area as shown right.
(6) The mainu unit automatically reboots after the upload. If not,
reboot the unit manually. Extention unit should stay active.
(7) Check the updated rmware version on the "Setup/Mainte-
nance menu/Product information".
Software version1: Main rmware
Software version2: RAID rmware
When WJ-HDE400 is connected, also check the software ver-
sion of extention units (RAID rmware).
RAID rmware is upgraded only when applicable.
Note: Make sure the power and network connection not to loose
them during the upload. When the power or network connection
is lost, reboot the unit, open the upload page by entering "http://
ND400 IP Address" and retry the upload.
Panasonic
4
ND400_UpgradeGuide_A
Page 5

WJ-ND400 Upgrade guide
Maintenance guide
6. Setup data restore
This procedure is optional. Setup data can be restored as follows. This can also be used to copy setup data from another recorder
(same model).
6.1 Preparation for FTP.
The FTP port is closed in the factory default setup. Open the FTP port (refer to the section 3.1)
6.2 Setup data restore by FTP.
(1) Open the DOS command window.
(2) Move to the directory where you have saved the setup data by using cd command.
(3) Enter "FTP 192.168.2.250 (IP address of the ND400)".
(4) Enter the User Name and Password. The default User Name is "ADMIN", password is "12345".
(5) Enter "cd USER_DATA" to move to the directory. "250 CWD command successful" will be displayed when successful.
(6) Enter "bin" or "binary" to set FTP binary mode. "200 Type set to I." will be displayed when successful.
(7) Enter "put nd400set.bin" to upload the setup data. The following message will be displayed when successful.
200 PORT command successful.
150 Opening BINARY mode data connection for 'ND400set.bin' (xxxxx bytes).
226 Transfer complete.
ftp: xxxxx bytes received in x.xxSeconds xxx.xxKbytes/sec.
(8) Enter "bye" to nish the FTP session.
(9) Close the command prompt.
(10) Close the FTP port for security by entering "http://*****/cgi-bin/ftpservercontrol.cgi?SERVER=OFF&UID=YYYYY" (YYYYY is
new UID obtained by ND400UID.vbs).
Panasonic
5
ND400_UpgradeGuide_A
Page 6

WJ-ND400 Upgrade guide
Maintenance guide
7. In the case of safe mode
When "safe mode" is displayed on the LCD after the reboot, the update has not been completed propery and recovery operation is required.
7.1 IP address setup
(1) When the unit rebooted in the safe mode, IP address needs to be set again. Set the IP address as it was.
7.2 Cash clear
(1) Delete the cash les in the temporaly internet folder.
7.3 Firmware upload
(1) Enter "http://ND400 IP Address/, "WJ-ND400 Program Install
& Update" page will be displayed.
(2) Upload the rmware (refer to the section 5 step (2) onward).
+++++++++++++++++++++++++++++++++++++
End of the document
++++++++++++++++++++++++++++++++++++
Panasonic
6
ND400_UpgradeGuide_A
 Loading...