

PANASONIC WHADC0916H9E8 User Manual
Quick Menu Guide
Air-to-Water Hydromodule +
Tank
Model No.
Indoor Unit
WH-ADC0916H9E8
Outdoor Unit
WH-UD09HE8
WH-UD12HE8
WH-UD16HE8
WH-UX09HE8
WH-UX12HE8
WH-UX16HE8
Manufactured by:
Panasonic Appliances Air-Conditioning Malaysia Sdn. Bhd.
Lot 2, Persiaran Tengku Ampuan, Section 21,
Shah Alam Industrial Site, 40300 Shah Alam,
Selangor Darul Ehsan, Malaysia.
Quick Menu Guide
Air-to-Water Hydromodule + Tank
Installation Instructions attached.
Serial number and production year please refer to name plate.
Guía del menú rápido
Hydrokit Aire-Agua + Tanque
Instrucciones de instalación adjuntas.
Para saber el número de serie y el año de producción consulte
la placa indicadora.
Guida rapida dei menu
Idromodulo aria-acqua + serbatoio
Istruzioni per l’installazione allegate.
Per il numero di serie e l’anno di produzione, fare riferimento
alla targhetta di identifi cazione.
Handleiding snelmenu
Lucht-naar-water Hydromodule + Tank
De instructies voor installatie zijn bijgevoegd.
Voor het serienummer en jaar van fabricage zie de naamplaat.
Przewodnik po skróconym menu
Hydromoduł powietrze-woda + zbiornik
Załączono instrukcję instalacji.
Numer seryjny oraz rok produkcji znajdują się na tabliczce znamionowej.
Οδηγός Σύντομου Μενού
Υδρομονάδα Αέρα-Νερού + Δεξαμενή
Συνοδεύεται από Οδηγίες Εγκατάστασης.
Για τον αριθμό σειράς και έτος κατασκευής ανατρέξτε στην πινακίδα ενδείξεων.
Průvodce Rychlá nabídka
Hydromodul vzduch-voda + zásobník
Návod k instalaci je přiložen.
Výrobní číslo a rok výroby naleznete na typovém štítku.
Guide du menu rapide
Ballon + Module Hydraulique Air/Eau
Consignes d’installation jointes.
Numéro de série et année de production veuillez vous référer à
la plaque signalétique.
Schnellmenü-Anleitung
Luft/Wasser-Hydromodul + Warmwasserspeicher
Installationsanleitung liegt bei.
Auf dem Typenschild fi nden Sie Seriennummer und Baujahr.
Hızlı Menü Kılavuzu
Hava-Su Hidromodülü + Tank
Kurulum Kılavuzu Ektedir.
Seri numarası ve üretim yılı için, lütfen ürün etiketine bakın.
Snabbmenyguide
Luft-till-vatten hydromodul + Tank
Installationsinstruktioner medföljer.
Serienummer och tillverkningsår fi nns angivet på namnskylten.
Hurtigmenyveiledning
Luft-til-vann Hydromodul + Tank
Installasjonsinstruksjoner vedlagt.
Se navneskiltet for serienummer og produksjonsår.
Pikavalikko-opas
Ilma-vesikiertomoduuli + säiliö
Asennusohjeet mukana.
Sarjanumeron ja valmistusvuoden osalta ks. tiedot nimikilvessä.
Hurtig menuvejledning
Luft-til-vand hydromodul + Tank
Installationsvejledning vedhæftet.
For serienummer og produktionsår henvises der til typeskiltet.
2-7
8-13
14-19
20-25
26-31
32-37
38-43
44-49
50-55
56-61
62-67
68-73
74-79
80-85
English
Español
Italiano
Nederlands
Polski
Ελληνικά
Český
Français
Deutsch
Türkçe
Svenska
Norsk
Suomi
Dansk
ACXF55-04210
Before Use
This Quick Guide explains how to use the Quick Menu.
Please read the Operating Instructions thoroughly before using the Quick Menu.
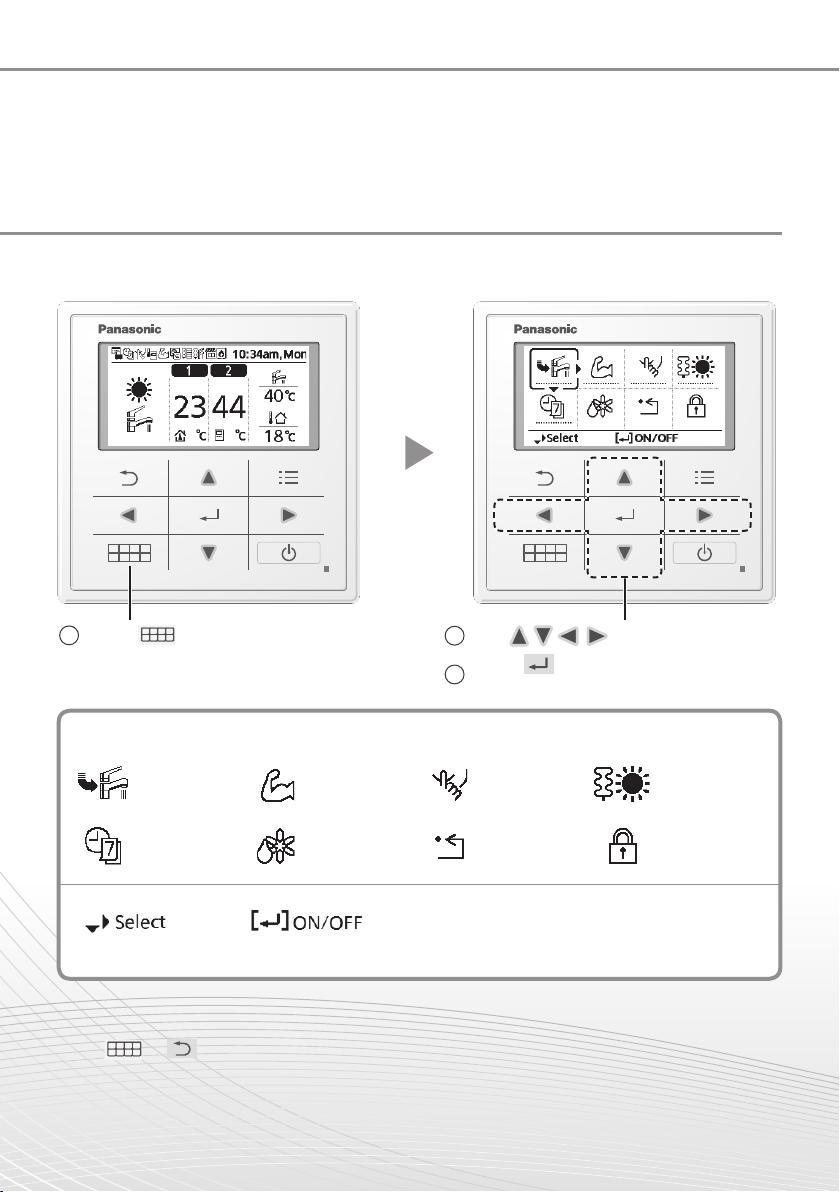
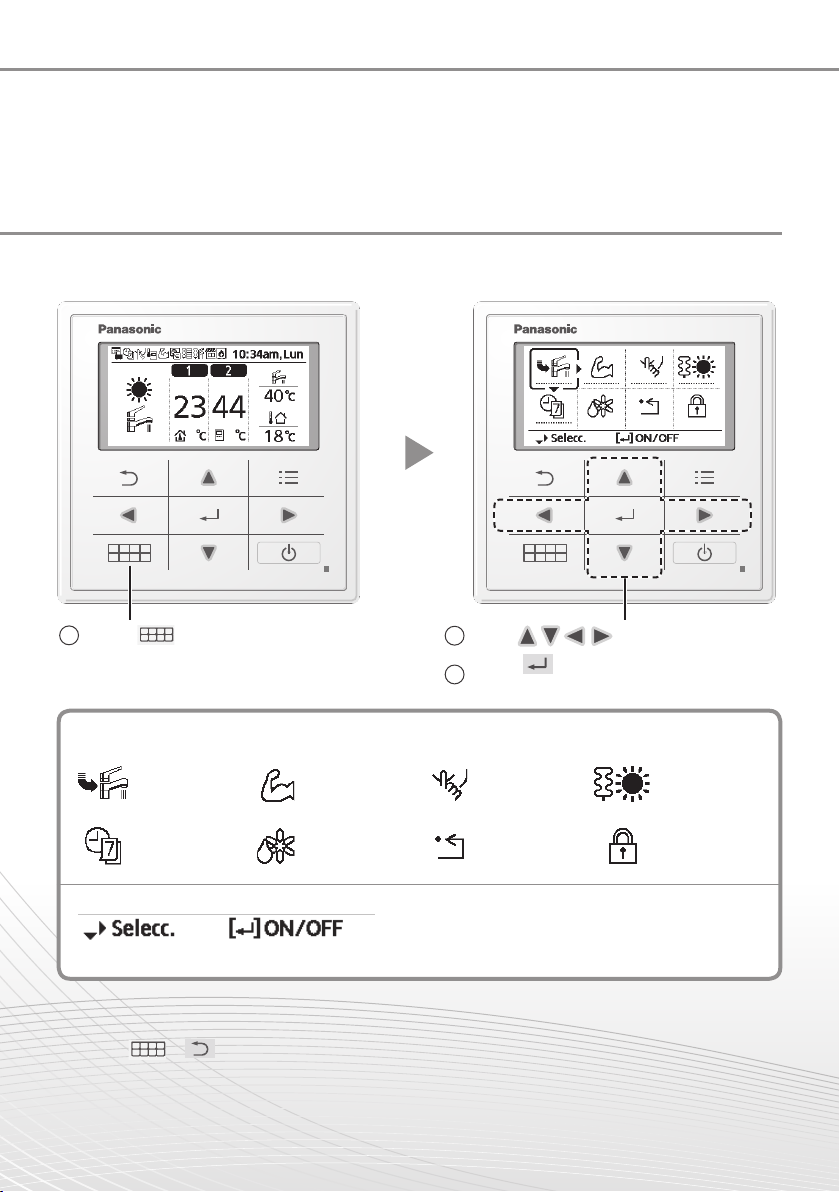
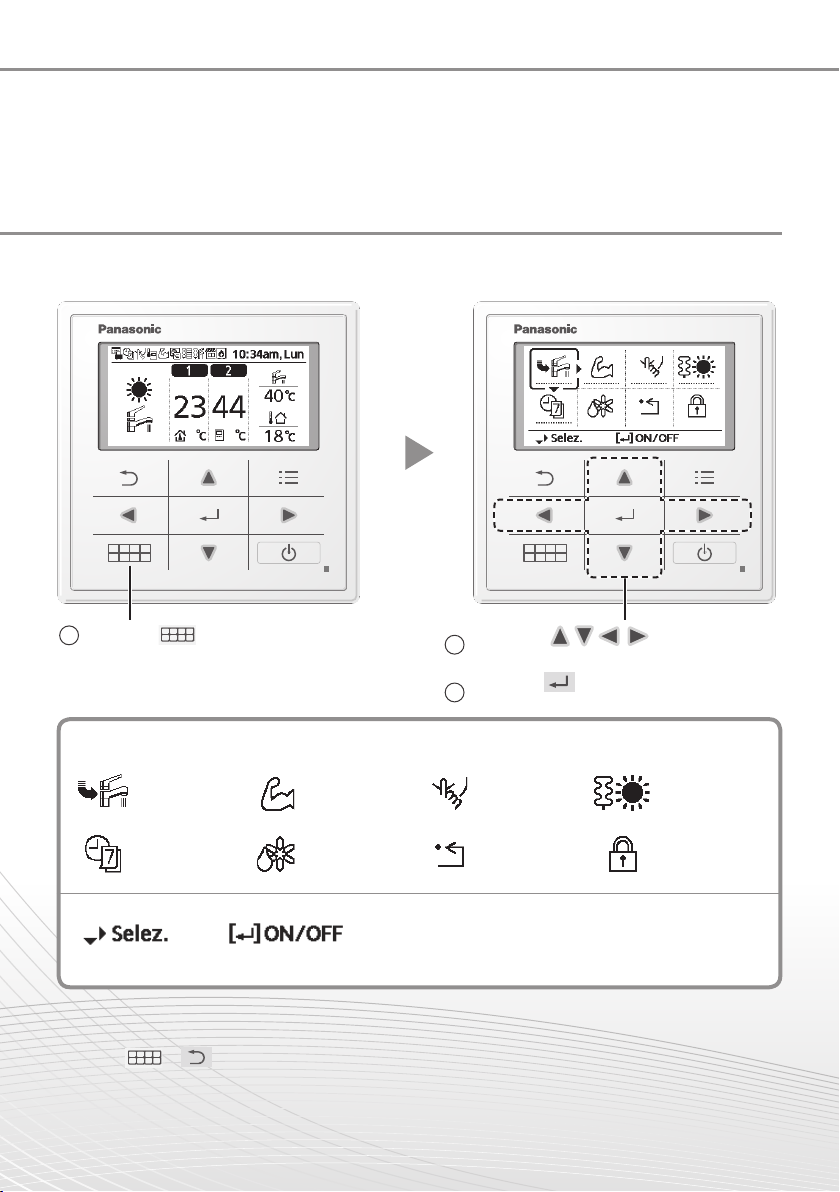
How to use the Quick Menu
After the initial settings have been completed, you can select a quick menu from the
following options and edit the setting.
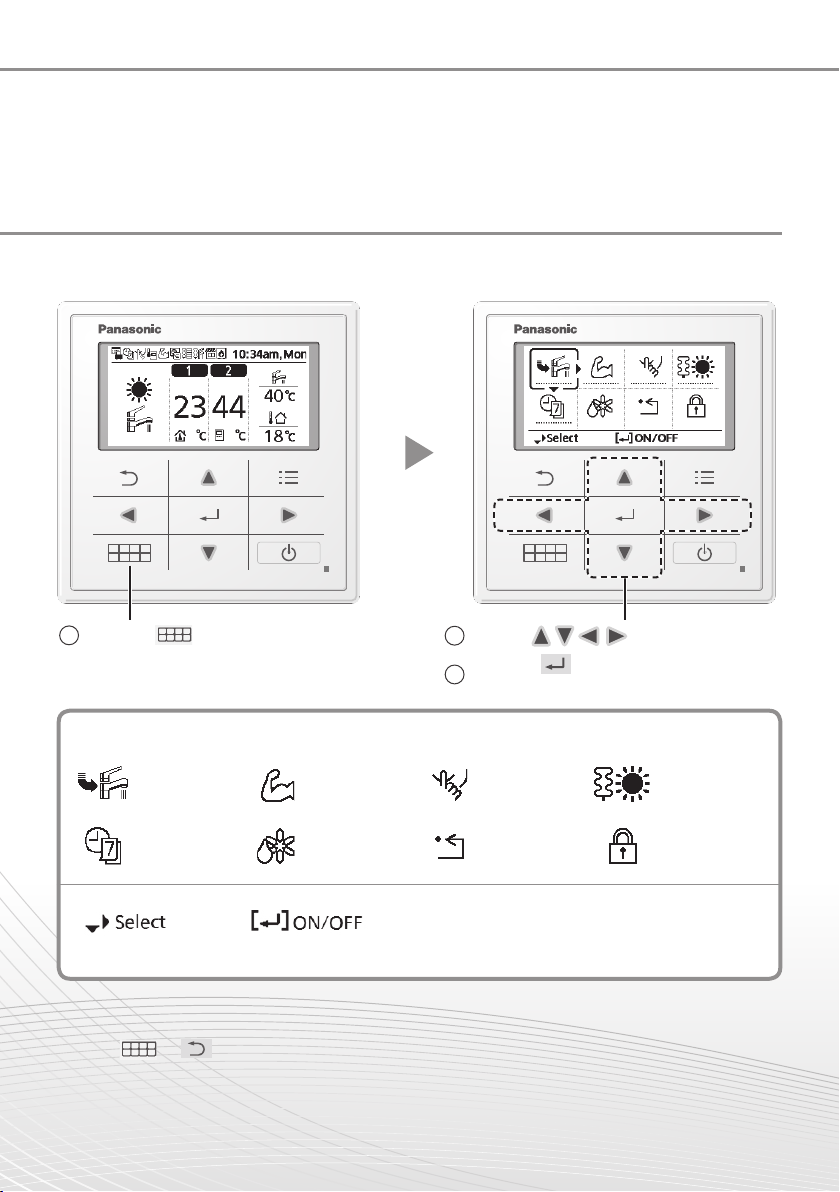
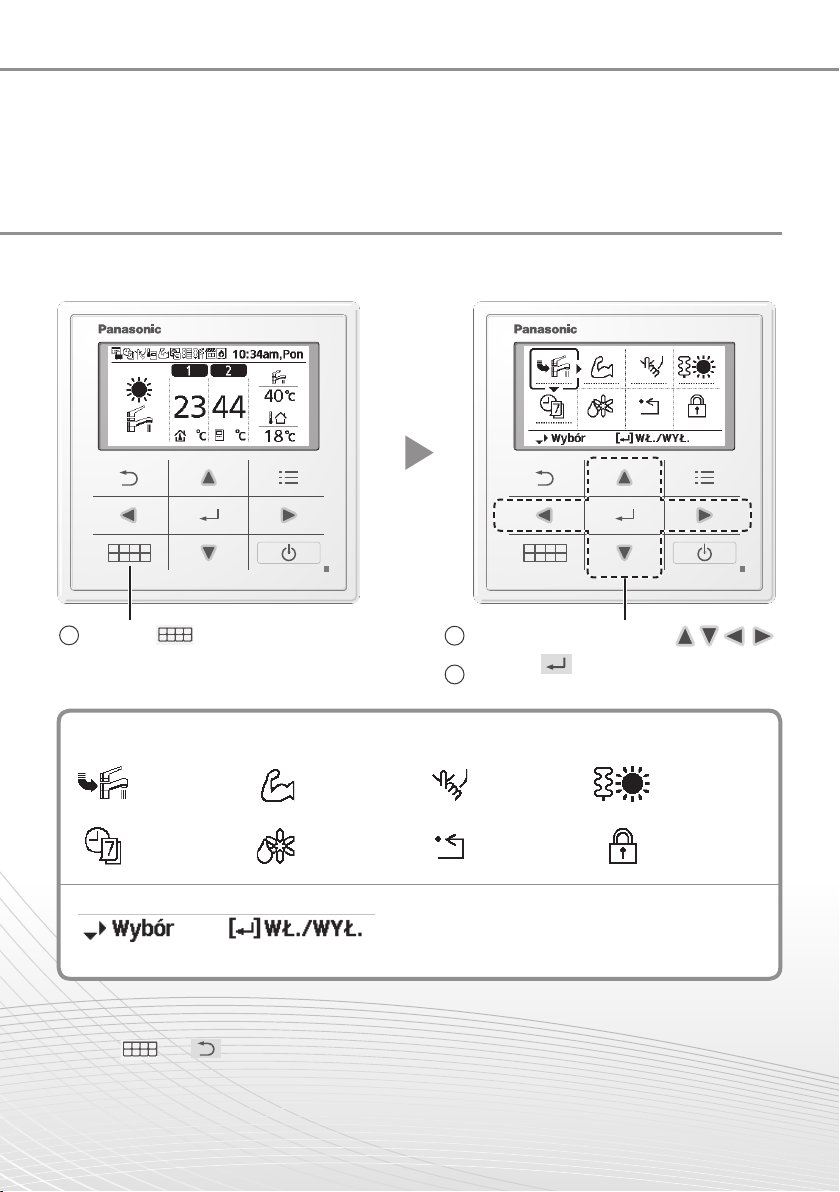
1
Press .
Quick Menu
Force DHW Powerful Quiet
Weekly
Timer
To return to the Main Screen,
Press or .
2
Force
Defrost
2
Use
to select menu.
Press
3
menu.
Error Reset R/C Lock
Select each setting and confi rm the setting
according to the instructions displayed at the
bottom of the screen. (The icons refer to each
selection key.)
to turn on/off the select
Force
Heater

How to use the Quick Menu
Notes on operation icon
Example:
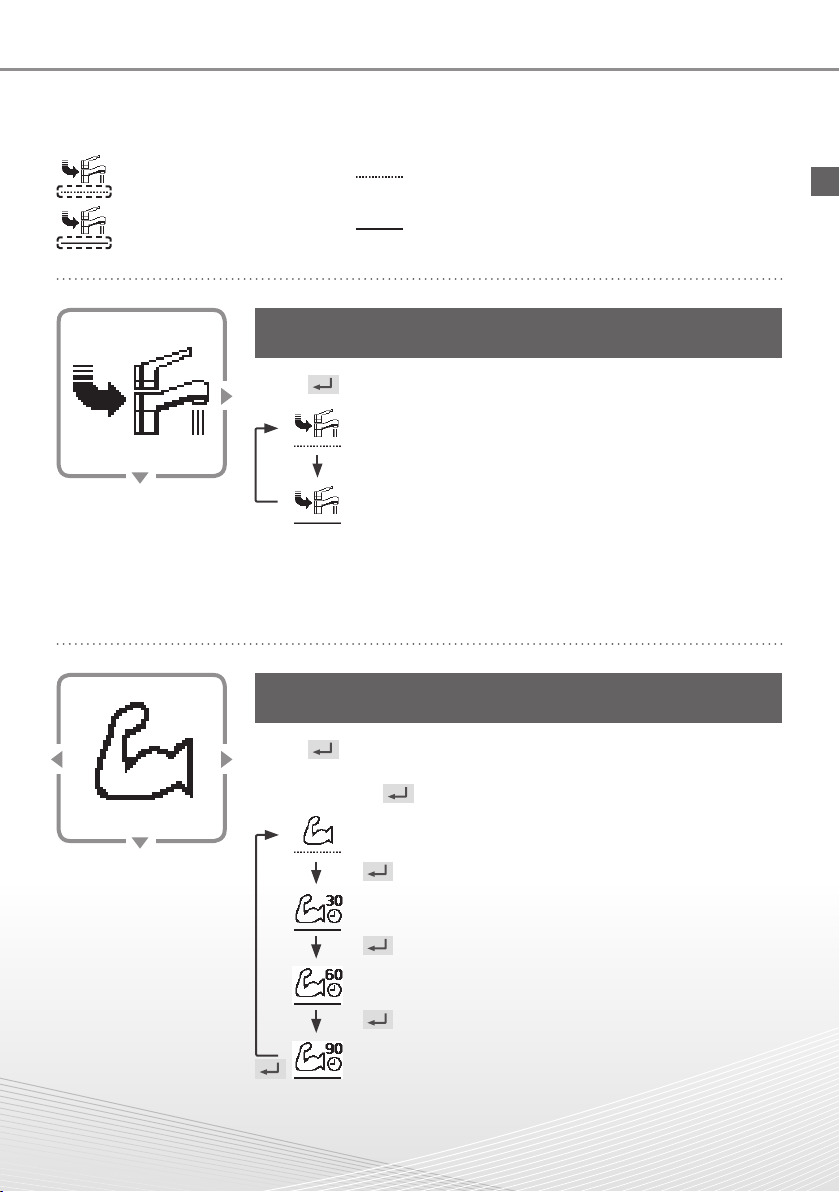
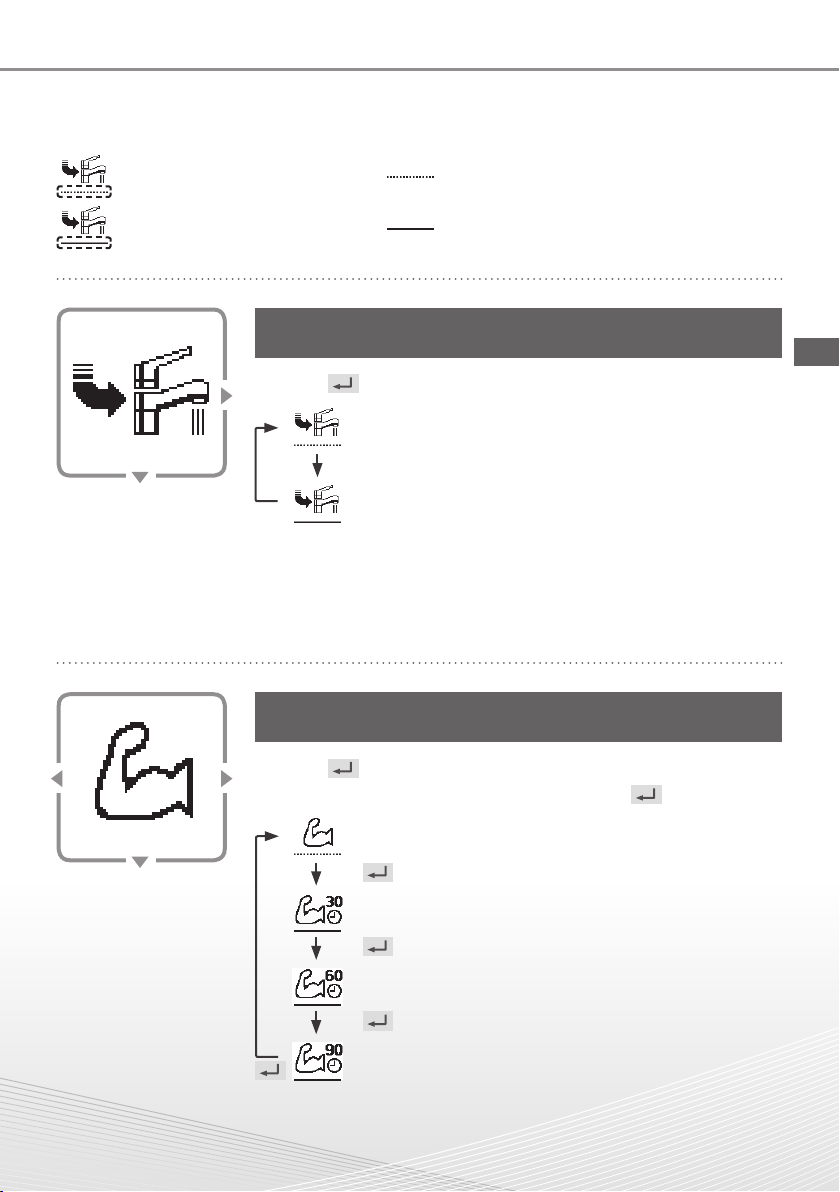
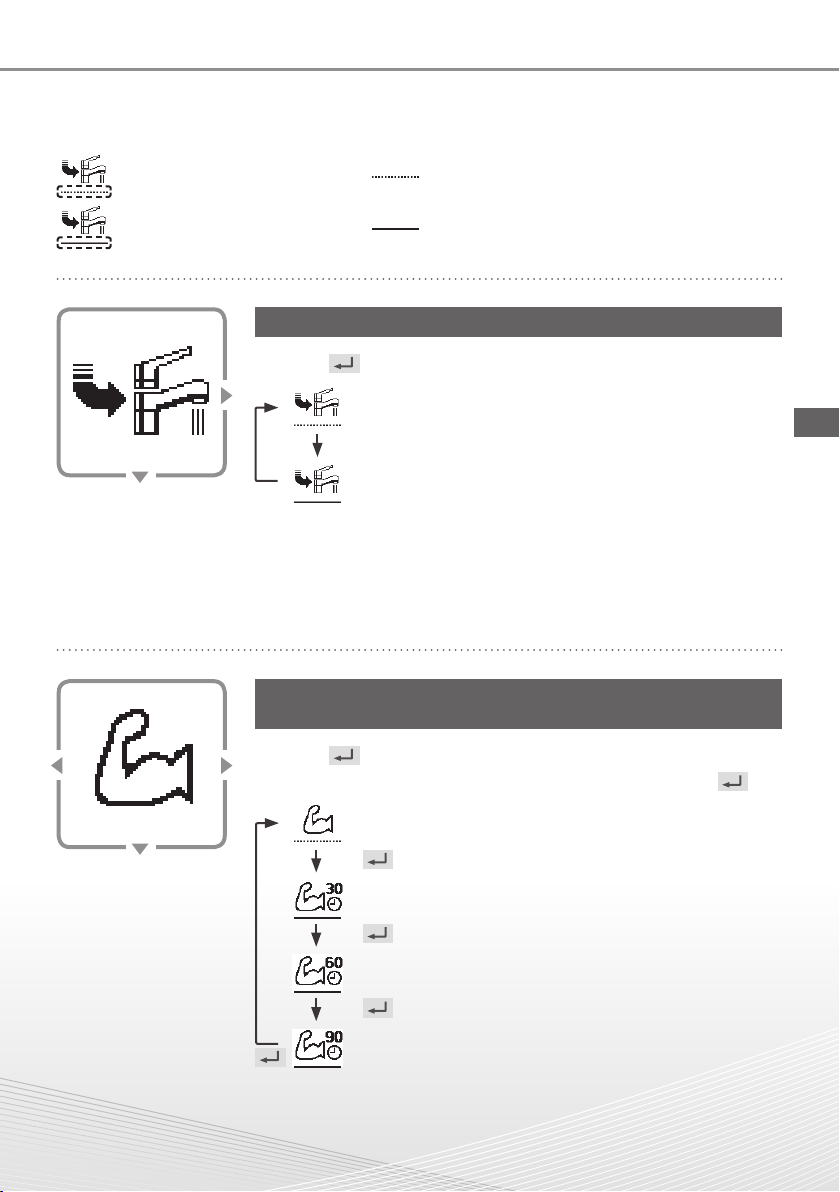
• Operation icon indicate with “ ” = OFF
• Operation icon indicate with “ ” = ON
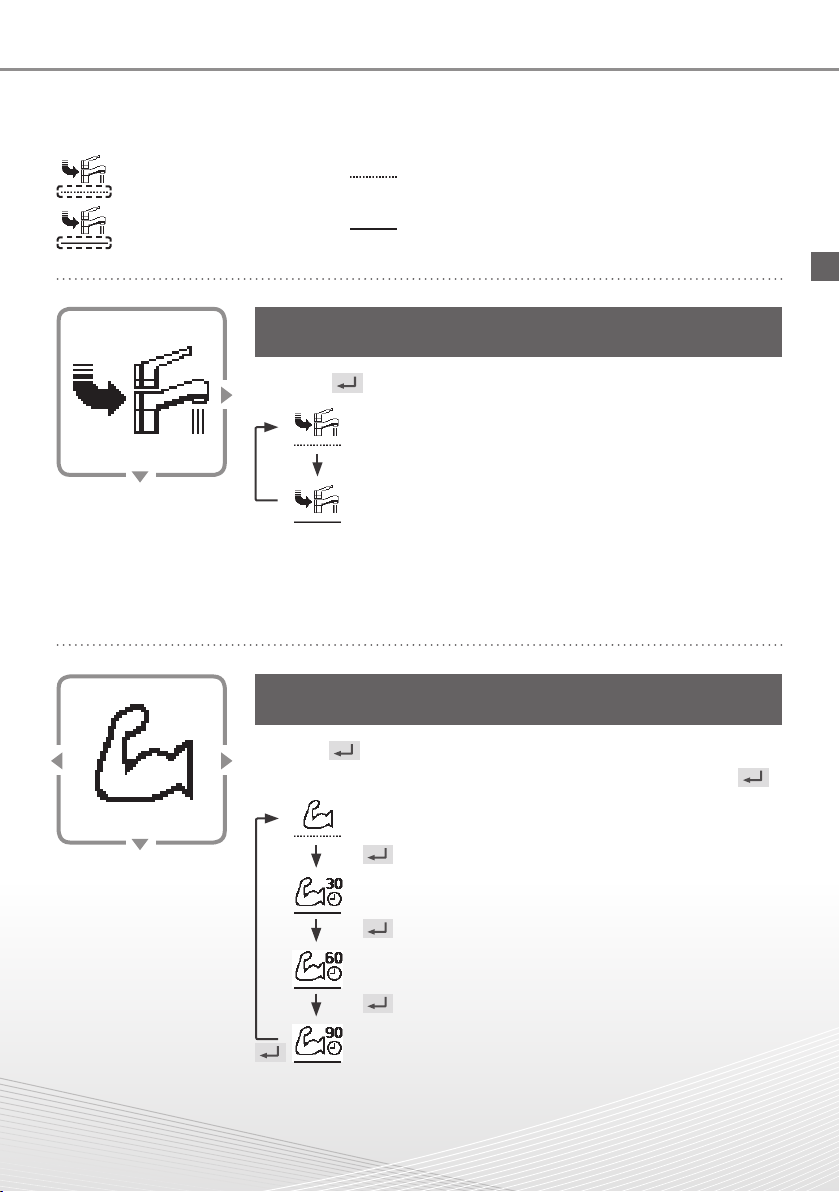
Select this icon to turn the Tank DHW on or off.
Press to confi rm your selection.
• Force DHW is turned off.
• Force DHW is turned on.
Force DHW
■ Note:
• Force DHW is disabled when Force Heater is turned on.
• When Force DHW is turned off, operation & mode should change back to
the previous memorized status.
English
Powerful
Select this icon to operate the heating/cooling system
powerfully.
Press to confi rm your selection.
(The powerful operation starts approximately 1 minute after is
pressed.)
• Powerful mode is set off.
• The Powerful mode operates for 30 minutes.
• The Powerful mode operates for 60 minutes.
• The Powerful mode operates for 90 minutes.
■ Note:
• Powerful is disabled when operation is turned OFF.
3
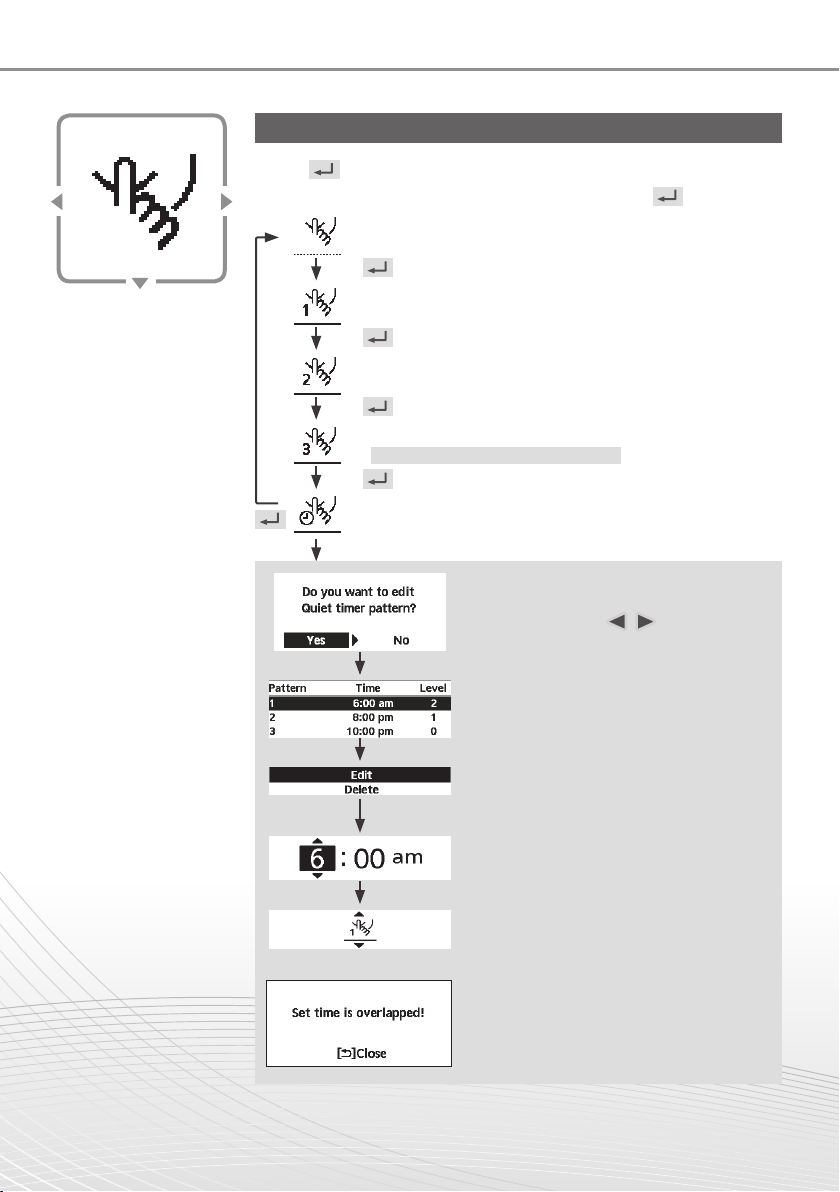
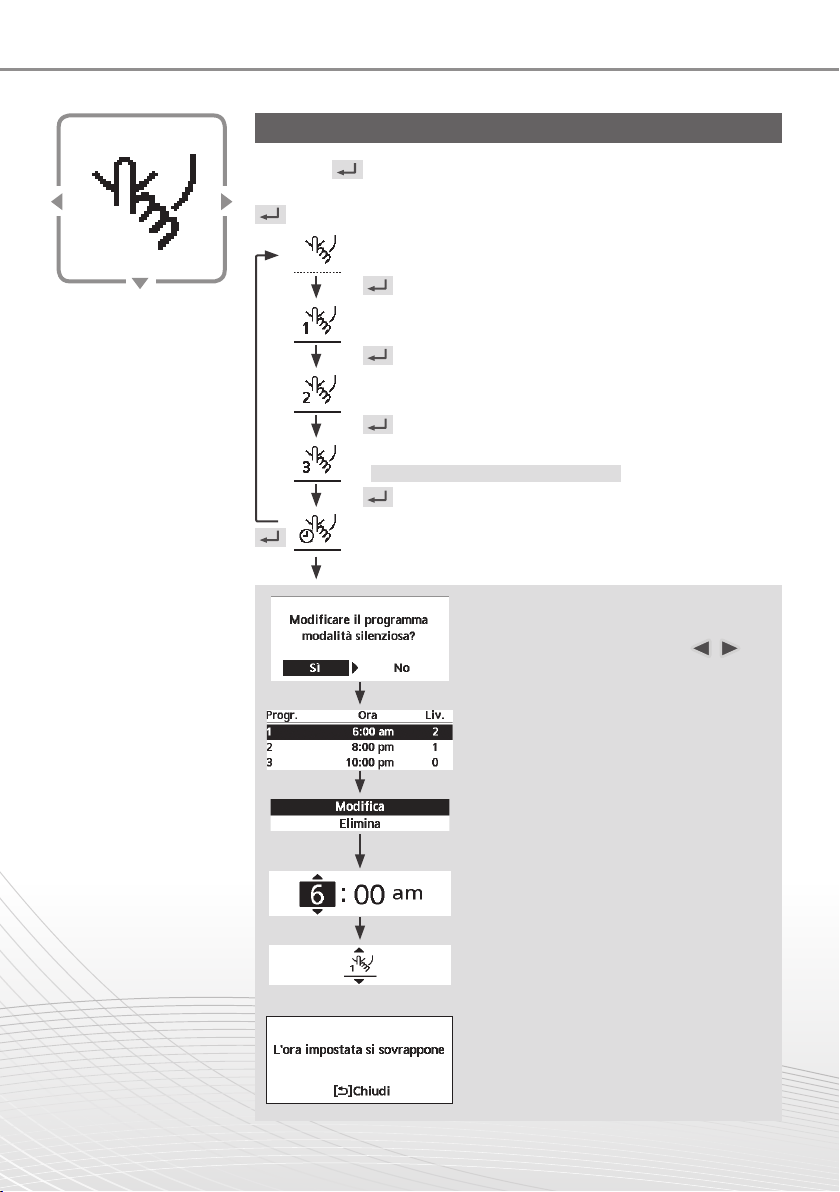
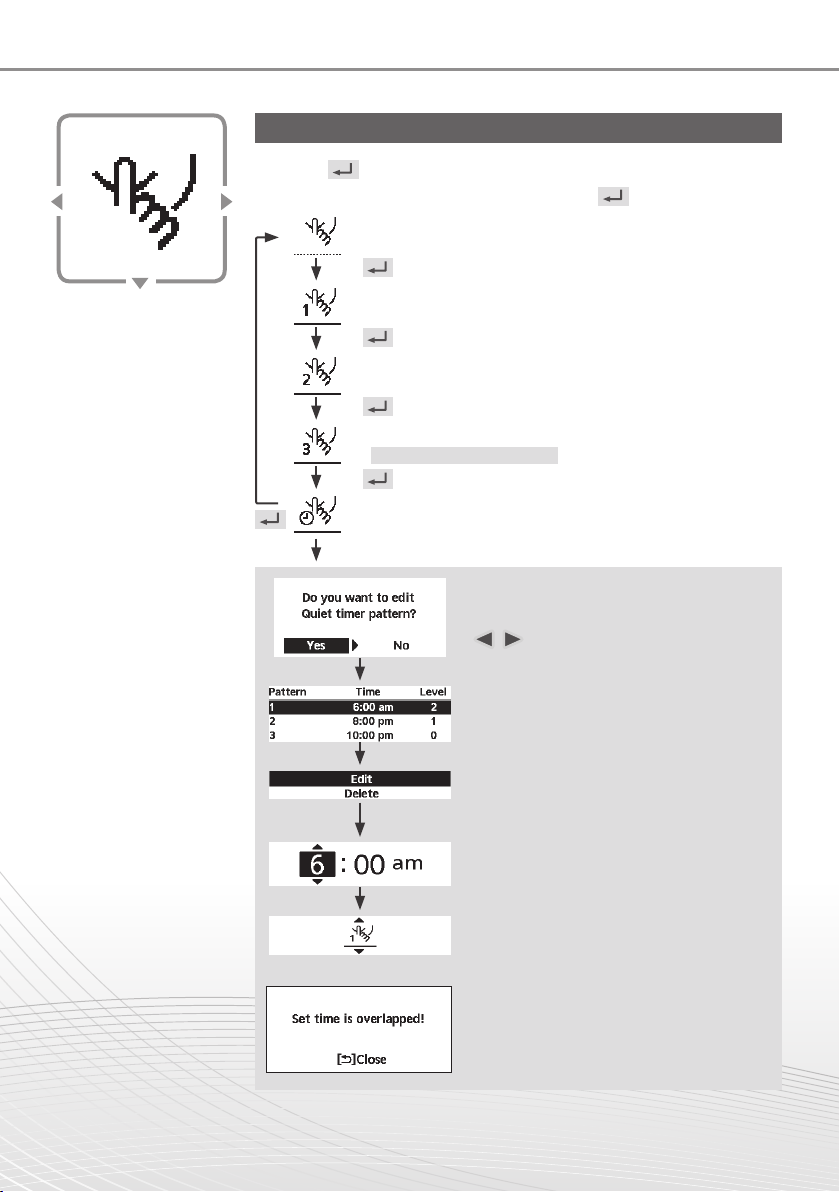
Select this icon to operate quietly.
Press to confi rm your selection.
(The quiet operation starts approximately 1 minute after is pressed.)
• Quiet mode is set off.
Quiet
• The Quiet mode operates at level 1.
• The Quiet mode operates at level 2.
• The Quiet mode operates at level 3.
Level 3 is the most quiet mode.
• Select this to set a timer for the Quiet mode operation.
After 1 sec delay.
Select “Yes”.
• Select “Yes” using
Select pattern “1” ~ “6”.
Select “Edit”.
• If you select “Delete”, the timer setting of
the selected pattern will be deleted.
Set the hour and minutes.
buttons.
Select the level of Quiet.
■ Note:
• If the time overlaps with another pattern,
"Set time is overlapped!" will appear on
the screen.
4
How to use the Quick Menu
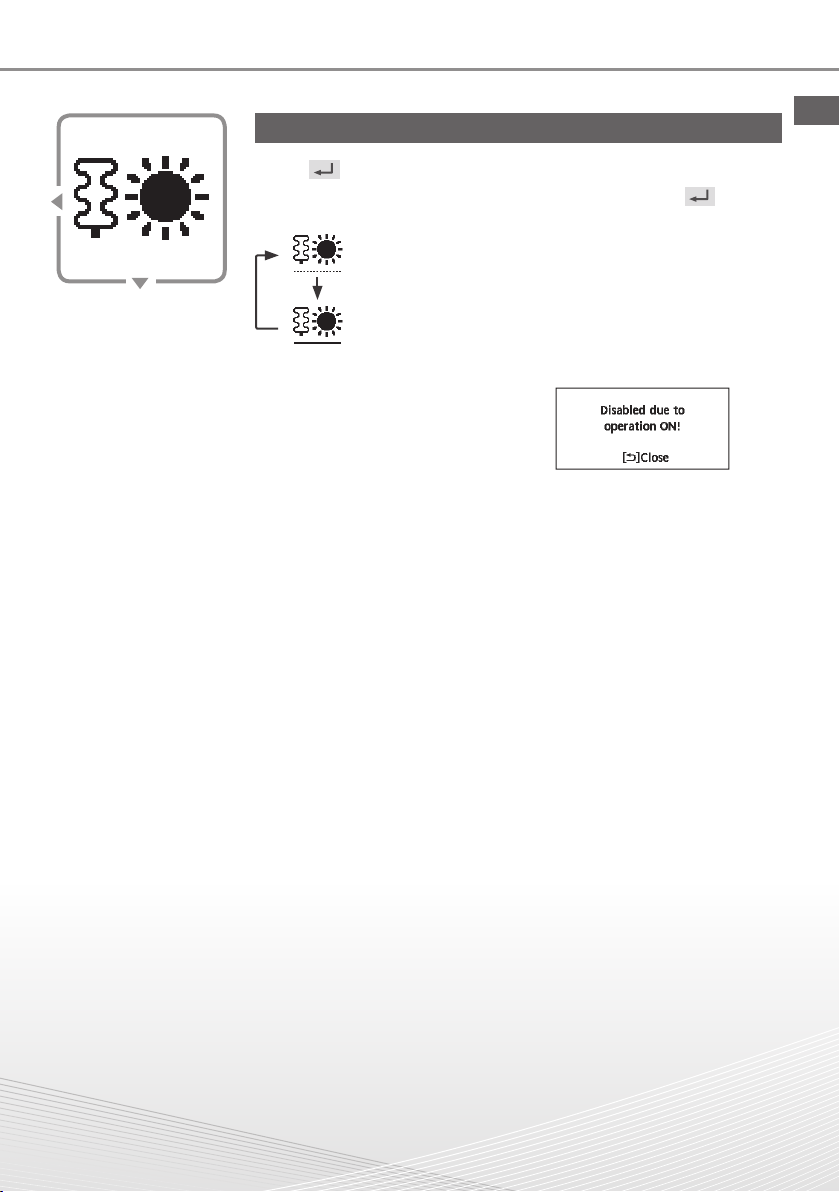
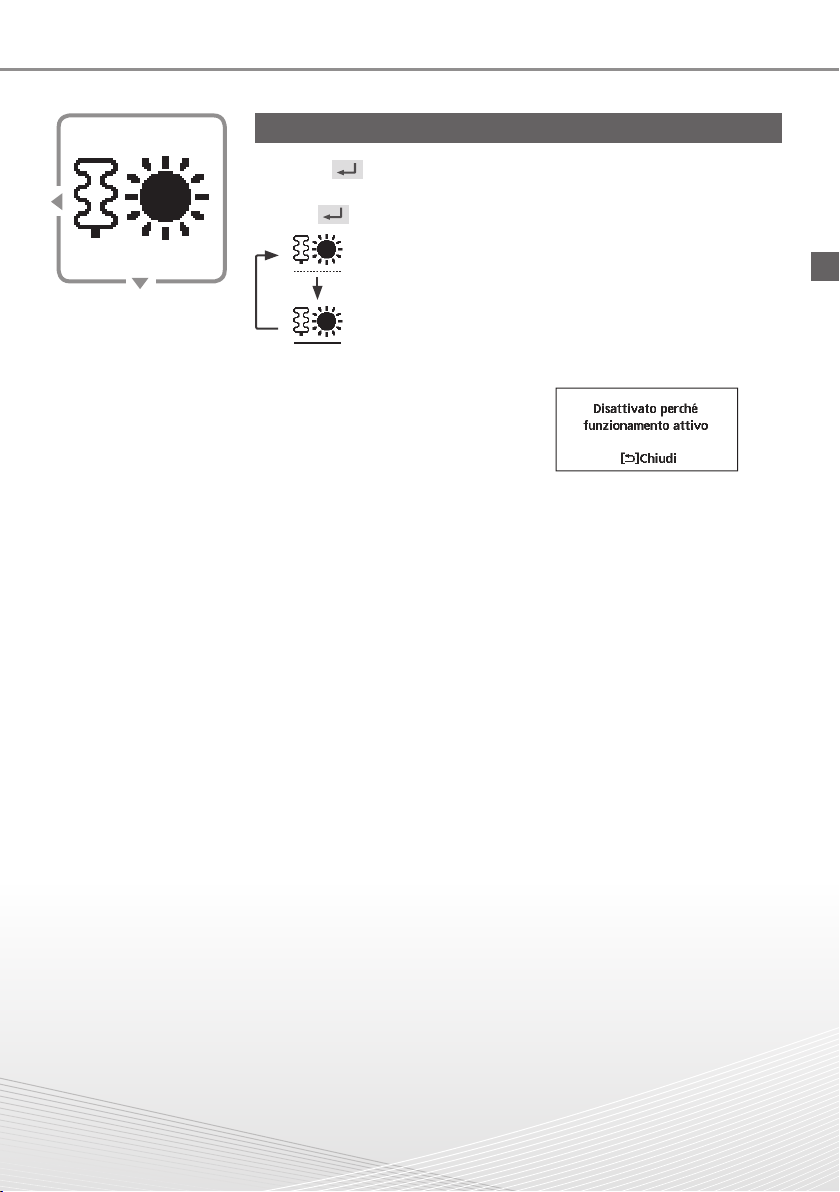
Select to force the Heater on.
Force
Heater
Press to confi rm your selection.
(The Force Heater mode starts approximately 1 minute after is
pressed.)
• Force Heater is turned off.
• Force Heater is turned on.
■ Note:
• Force Heater is disabled whenever
operation is already on and ‘Disabled
due to operation ON!’ will be
displayed.
English
5
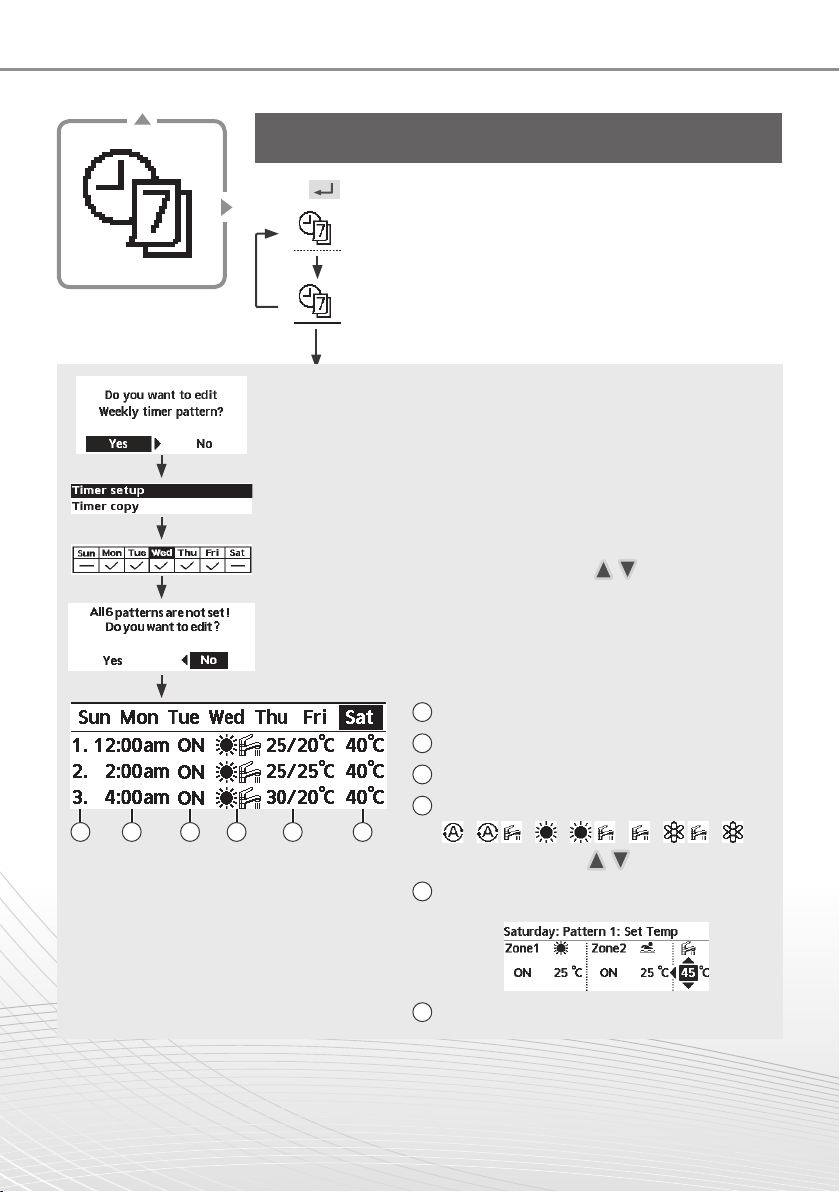
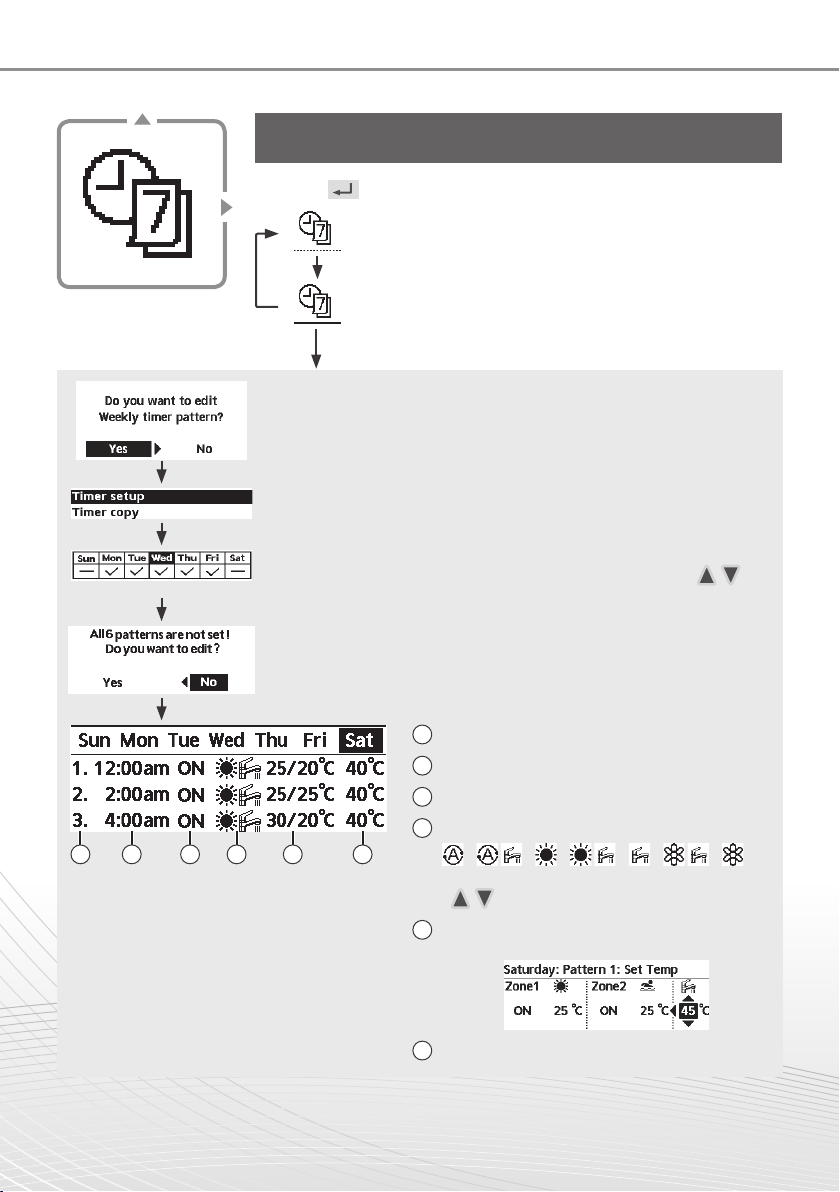
Select this icon to delete (cancel) or change the pre-set
Weekly Timer.
Press to confi rm your selection.
• Timer is not ON.
Weekly
Timer
Select “Yes”.
• If you select “No”, the screen will return to the Main Screen.
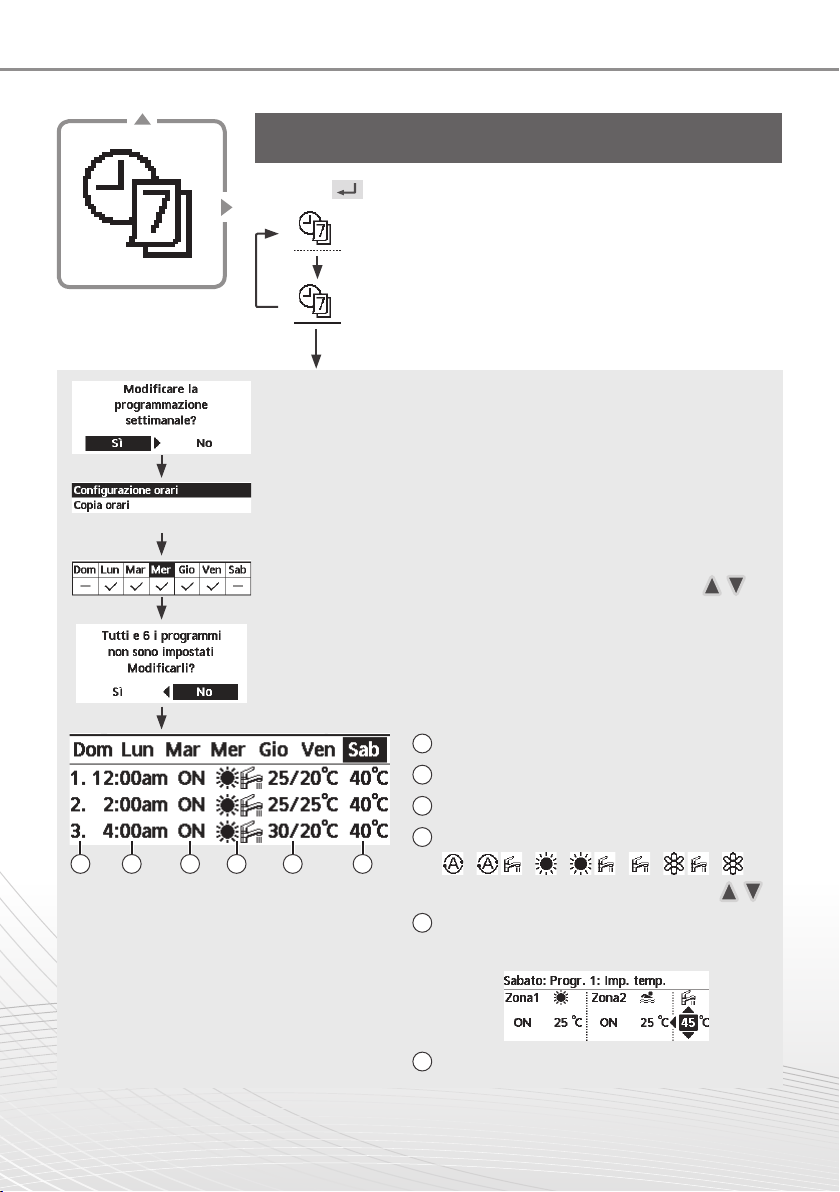
• Timer setup: Select Timer setup to edit the Weekly Timer.
• Timer copy: Select to copy a timer setting.
[Example of a Timer setup]
Select the day(s) which you wish to edit using buttons.
If all 6 patterns are not preset, this screen will be displayed.
1 2 3 4 5 6
• Timer is set.
After 1 sec delay.
1 Select pattern “1” ~ “6”.
2 Set the hour and minutes of the Timer.
3 Select ON/OFF of the Timer.
4 Select the operation mode.
5
/ / / / / /
• Select mode using buttons.
Set the temperature for both Zone 1 and 2
(if your system has the 2-Zone setting).
6 Set the Tank temperature.
■ Note:
• Timer is disabled when Force Heater is turned on or Heat-Cool SW is enabled.
• If you have preset the Weekly Timer on 2 zones, you must repeat the same procedure with Zone 2.
6
How to use the Quick Menu
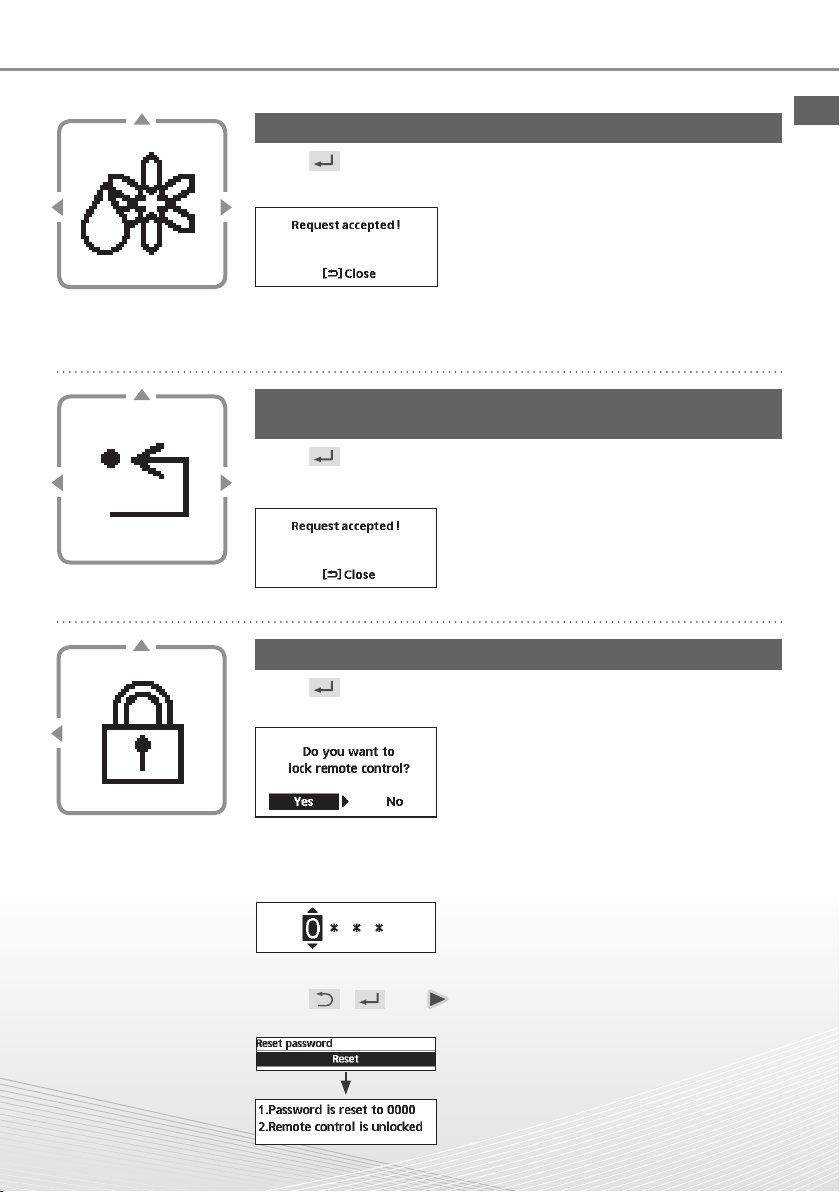
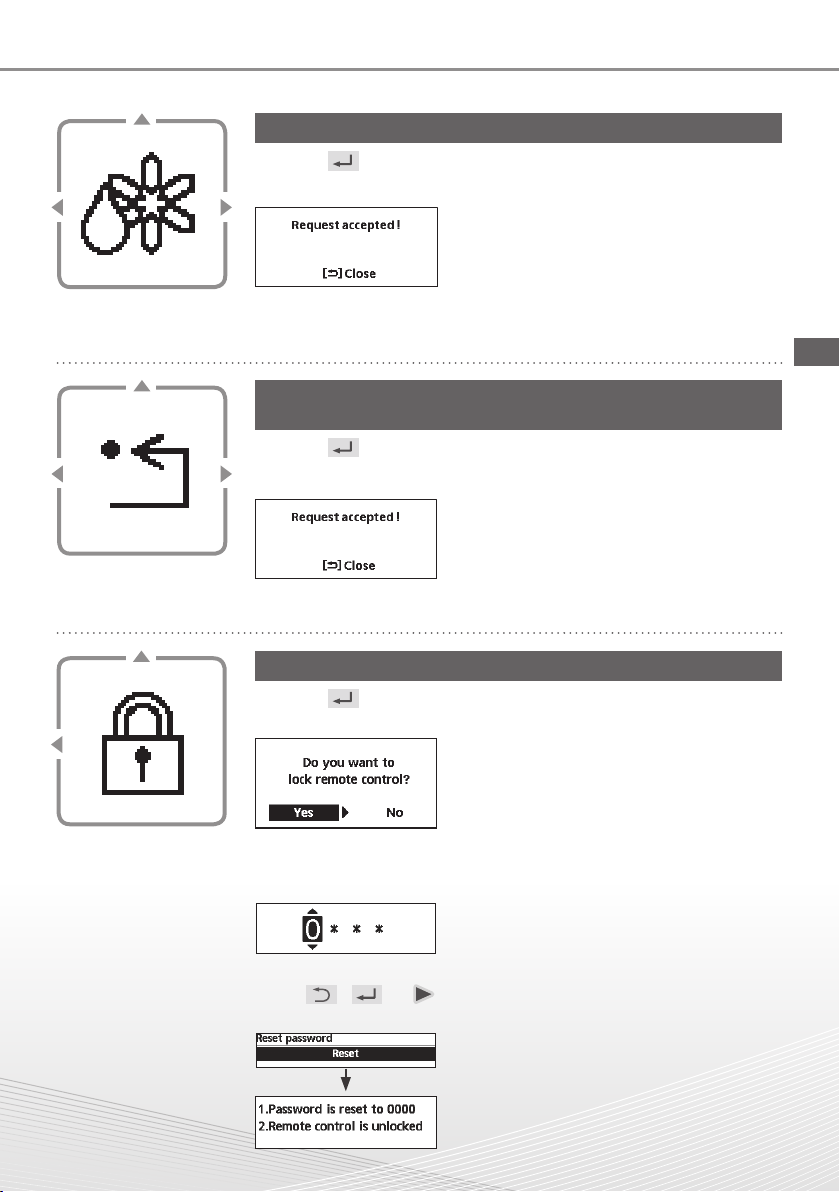
Select to defrost the frozen pipes.
Press to confi rm your selection.
(When the mode is accepted, below screen will be displayed.)
Force
Defrost
Select to restore the previous settings when error has
occurred.
Press to confi rm your selection.
(When the mode has been accepted, below screen will be displayed.)
• Make sure all units are turned off before
selecting this mode which restores the whole
system to the previous settings.
Error Reset
English
R/C Lock
Select to lock the Remote Controller.
Press to confi rm your selection.
(When the mode has been accepted, below screen will be displayed.)
Select “Yes”.
(The Main Screen will be locked.)
• If “No” is selected, the screen will return to the
Main Screen.
To unlock the Remote Controller
Press any key.
(When the mode has been accepted, below screen will be displayed.)
Enter any 4 digits of number (if the number is
correct, the screen will be unlocked).
To reset forgotten password (under operation OFF screen)
Press , and continuously for 5 seconds.
(When the mode has been accepted, below screen will be displayed.)
Select “Reset”.
(The screen will be off after 3 seconds.)
7
Antes de utilizar el sistema
Esta guía rápida describe cómo utilizar el menú rápido.
Por favor, lea detenidamente las instrucciones de manejo antes de usar el menú rápido.
Cómo utilizar el menú rápido
Una vez terminados los ajustes iniciales, es posible seleccionar un menú rápido para
editar los ajustes de cualquiera de las siguientes opciones.
1
Pulse .
Menú rápido
ACS forzado Potente Silencioso
Temporiz.
semanal
Para volver a la pantalla principal,
Presione o .
8
Descongelado
forzado
Seleccione cada opción y confi rme su confi guración
siguiendo las instrucciones mostradas en la
parte inferior de la pantalla. (Estos iconos hacen
referencia a cada una de las teclas de selección).
2
Utilice para seleccionar un menú.
Pulse
3
menú seleccionado.
Borrar
errores
para activar o desactivar el
Resistencia
forzada
Bloquear panel
de control
Cómo utilizar el menú rápido
Notas sobre el icono de funcionamiento
Ejemplo:
• Icono de funcionamiento con “ ” = OFF
• Icono de funcionamiento con “ ” = ON
Seleccione el siguiente icono para encender y apagar el
acumulador ACS.
Pulse para confi rmar su selección.
• ACS forzada desactivada.
Español
ACS forzado
Potente
• ACS forzada activada.
■Nota:
• Al conectar el calefactor forzado se deshabilita el ACS forzado.
• Cuando se desactiva el ACS forzada, el funcionamiento y el modo
recuperan el estado memorizado anterior.
Seleccione este icono para el funcionamiento potente en
frío o calor.
Pulse para confi rmar su selección.
(El funcionamiento potente se inicia aproximadamente 1 minuto después
de haber pulsado ).
• Se desactiva el funcionamiento potente.
• El modo potente funciona durante 30 minutos.
• El modo potente funciona durante 60 minutos.
• El modo potente funciona durante 90 minutos.
■Nota:
• El modo potente se desconecta al apagar el sistema.
9
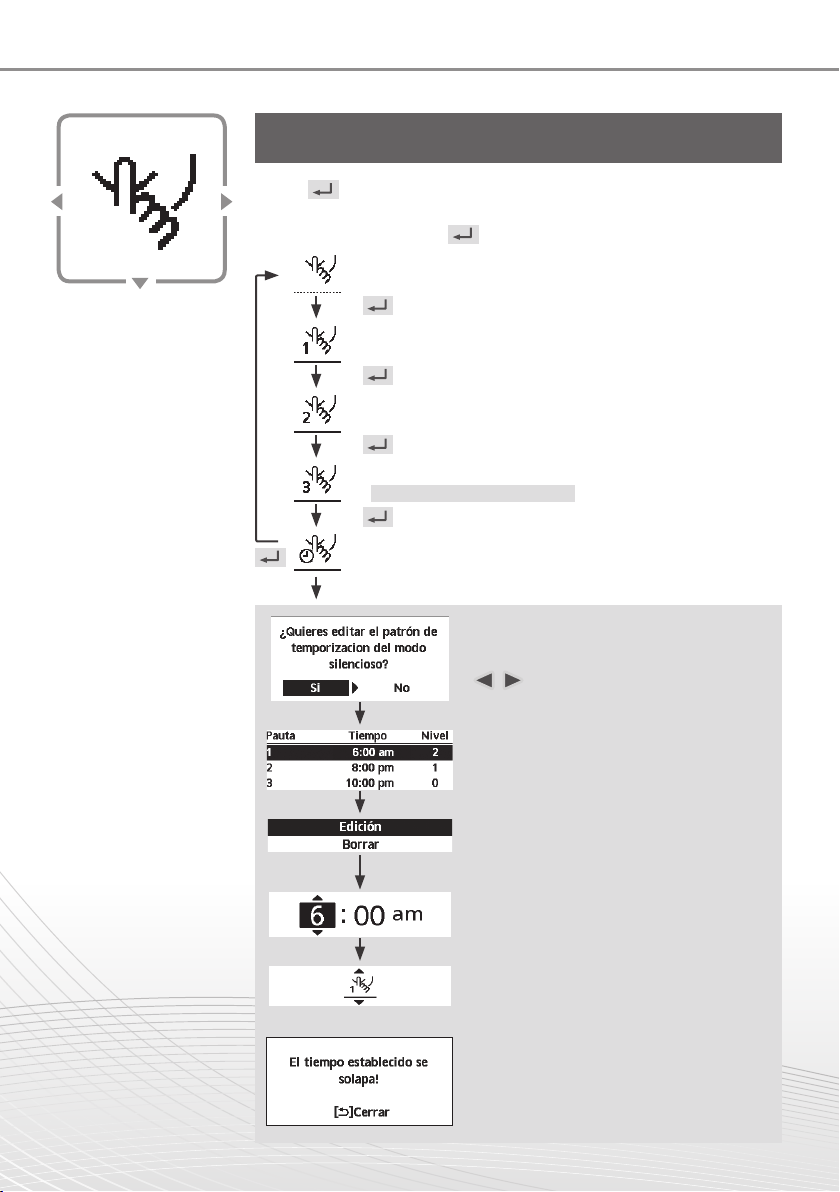
Silencioso
Seleccione este icono para activar el funcionamiento
silencioso.
Pulse para confi rmar su selección.
(El funcionamiento silencioso se inicia aproximadamente 1 minuto
después de haber pulsado ).
• Se desactiva el funcionamiento silencioso.
• Modo silencioso funcionando en nivel 1.
• Modo silencioso funcionando en nivel 2.
• Modo silencioso funcionando en nivel 3.
El nivel 3 es el más silencioso.
• Seleccione este icono para temporizar el modo de
funcionamiento silencioso.
Tras 1 segundo de retardo.
Seleccione “Sí”.
• Seleccione “Sí” mediante los botones
.
10
Seleccione el patrón “1” ~ “6”.
Seleccione “Edición”.
• En caso de seleccionar “Borrar”,
se borrará el ajuste del patrón del
temporizador que haya seleccionado.
Ajuste la hora y los minutos.
Seleccione el nivel de silencio.
■Nota:
• En caso de que coincida en el tiempo con
otro patrón, la pantalla mostrará
“El tiempo establecido se solapa!”.
Cómo utilizar el menú rápido
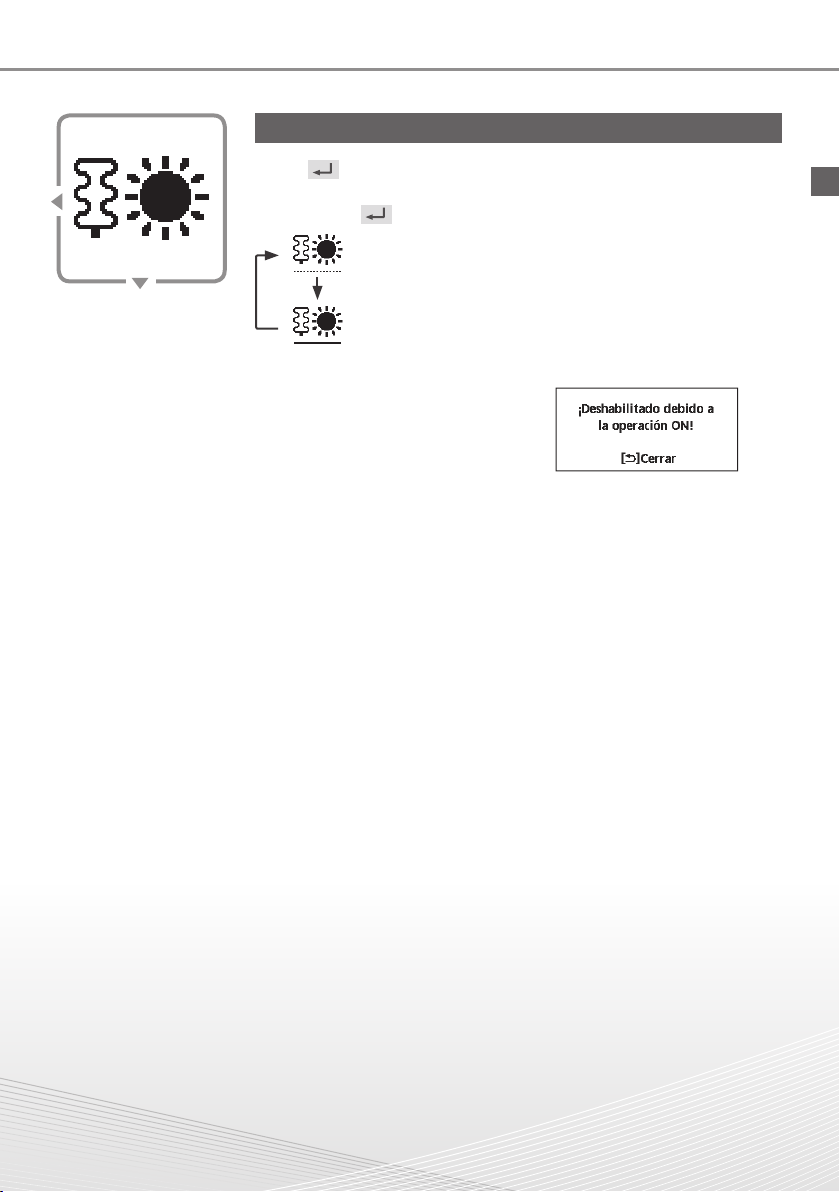
Seleccione este icono para activar el calefactor forzado.
Pulse para confi rmar su selección.
(El calefactor forzado se inicia aproximadamente 1 minuto después de
haber pulsado ).
Resistencia
forzada
• Calefactor forzado desactivado.
• Calefactor forzado activado.
■Nota:
• El calefactor forzado se deshabilita
siempre que el equipo esté en
funcionamiento y se mostrará
¡Deshabilitado debido a la
operación ON!
Español
11
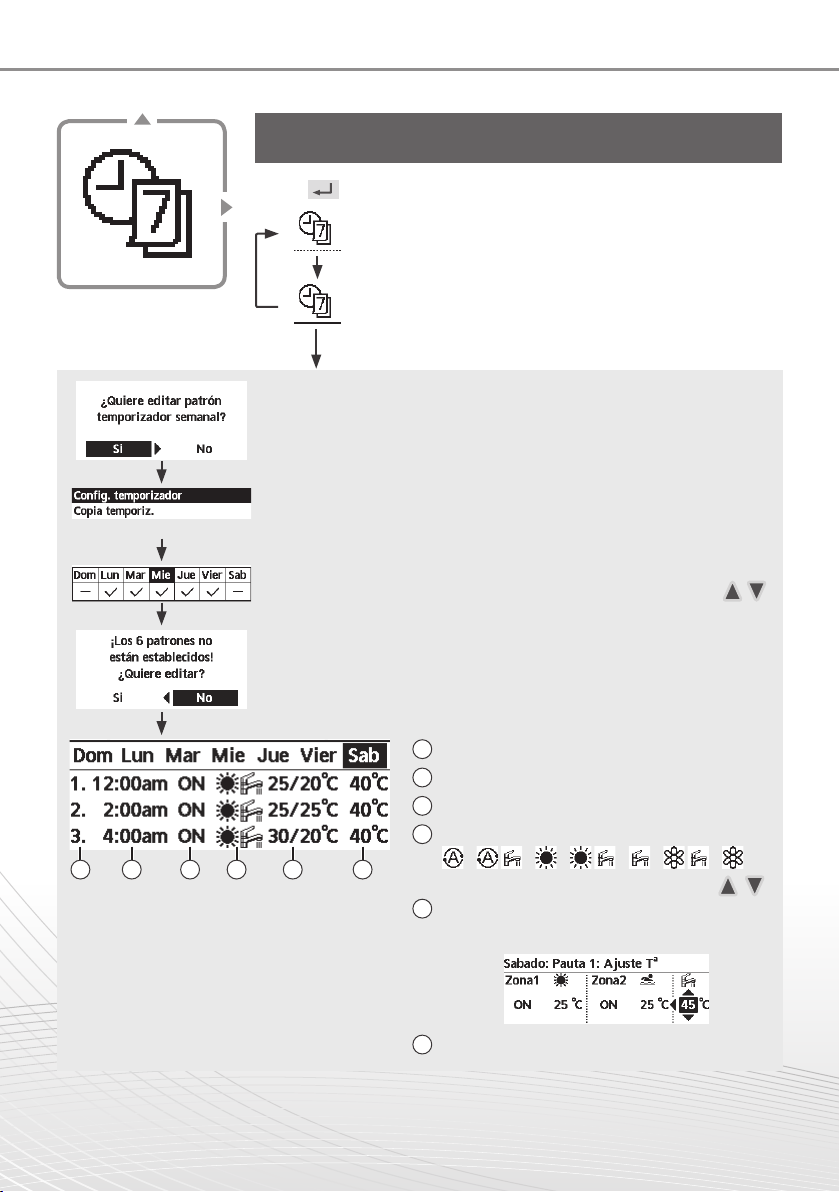
Seleccione este icono para borrar (cancelar) o cambiar el
temporizador semanal.
Pulse para confi rmar su selección.
• El temporizador no está activado.
Temporiz.
semanal
Seleccione “Sí”.
• Al seleccionar “No” volverá a la pantalla principal.
• Confi g. temporizador: Seleccione Confi g. temporizador para editar el
temporizador semanal.
• Copia temporiz.: Seleccione para copiar los ajustes de un temporizador.
[Ejemplo de los ajustes de un temporizador]
Seleccione el(los) día(s) que desee editar mediante los botones .
Si no ha ajustado ninguno de los 6 patrones se mostrará esta pantalla.
1 2 3 4 5 6
• El temporizador está ajustado.
Tras 1 segundo de retardo.
1 Seleccione el patrón “1” ~ “6”.
2
Establezca la hora y los minutos del programa.
3 Seleccione ON u OFF para el programa.
4 Seleccione el modo de funcionamiento.
/ / / / / /
• Seleccione el modo mediante los botones .
Establezca las temperaturas para las
5
zonas 1 y 2 (en caso de que su sistema
disponga de ajuste para 2 zonas).
6
Establezca la temperatura del acumulador ACS.
■Nota:
• El temporizador se deshabilita cuando se activa el calefactor forzado o se actúa sobre el interruptor frío-calor.
• En caso de haber seleccionado el temporizador semanal para dos zonas, deberá repetir el mismo
procedimiento para la zona 2.
12
Cómo utilizar el menú rápido
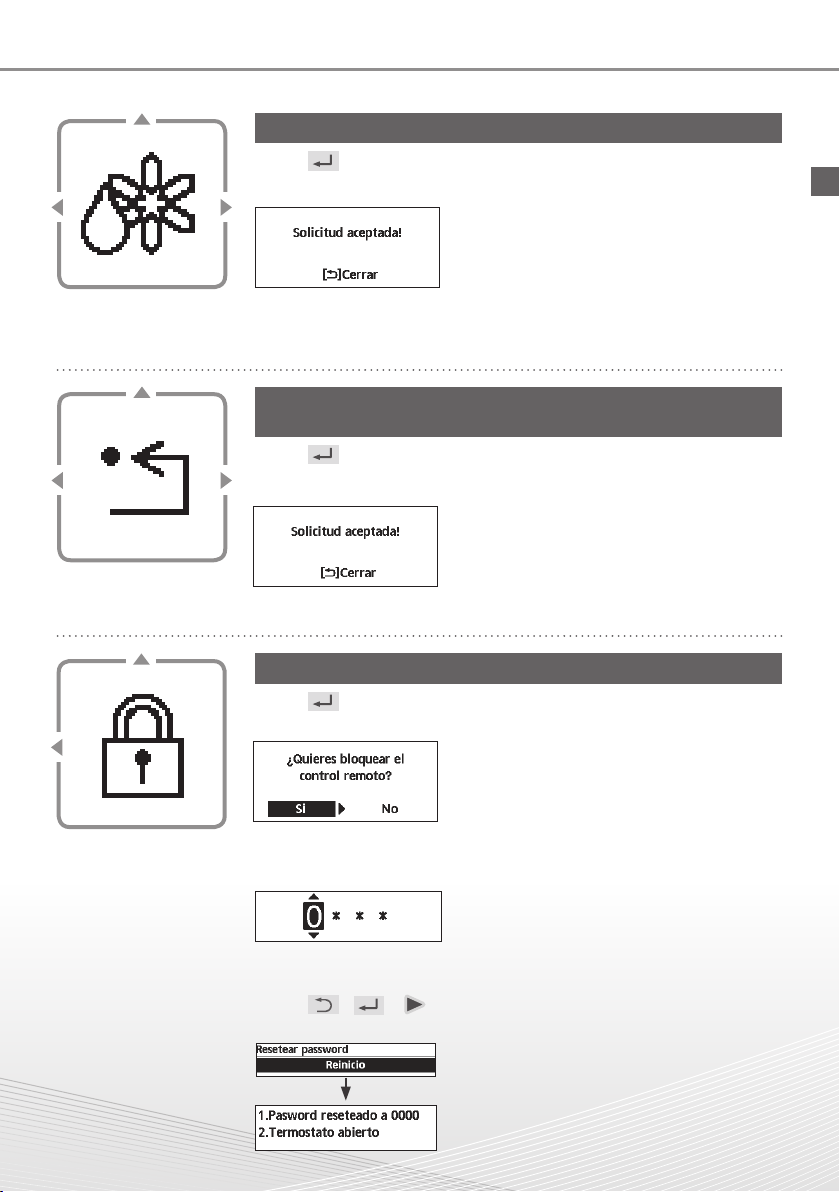
Seleccione este icono para descongelar las tuberías.
Pulse para confi rmar su selección.
(Al aceptar el modo se mostrará esta pantalla).
Descongelado
forzado
Seleccione este icono para recuperar la confi guración
anterior en caso de error.
Pulse para confi rmar su selección.
(Al aceptar el modo se mostrará esta pantalla).
• Cerciórese de que todas las unidades están
apagadas antes de seleccionar este modo,
ya que restaurará el sistema completo a la
confi guración anterior.
Borrar
errores
Español
Bloquear
panel de
control
Seleccionar para bloquear el mando a distancia.
Pulse para confi rmar su selección.
(Al aceptar el modo se mostrará esta pantalla).
Seleccione “Sí”.
(La pantalla principal quedará bloqueada).
• Si selecciona “No” se volverá a la pantalla
principal.
Para bloquear el mando a distancia.
Pulse cualquier tecla.
(Al aceptar el modo se mostrará esta pantalla).
Introduzca los 4 dígitos del código (La pantalla
se desbloquea al introducir el código correcto).
Para resetear una contraseña olvidada (en la pantalla de
desactivar funciones)
Pulse , y continuamente durante 5 segundos.
(Al aceptar el modo se mostrará esta pantalla).
Seleccione “Reinicio”.
(La pantalla se apagará después de
3 segundos.)
13
Prima dell’uso
Questa Guida rapida spiega come utilizzare il Menu rapido.
Leggere attentamente le istruzioni per l’uso prima di utilizzare il Menu rapido.
Come utilizzare il Menu rapido
Al termine delle impostazioni iniziali, è possibile selezionare un menu rapido dalle seguenti
opzioni e modifi care l’impostazione.
1
Premere .
Menu rapido
ACS forzato Powerful
Programma
settimanale
Per tornare alla schermata principale,
Premere o .
14
Sbrinamento
forzato
Utilizzare
2
il menu.
Premere
3
menu selezionato.
Modalità
silenziosa
Reset errore Blocco R/C
Selezionare ogni impostazione e verifi care
l’impostazione in base alle istruzioni visualizzate
nella parte inferiore della schermata. (Le icone si
riferiscono ad ogni tasto di selezione.)
per selezionare
per attivare/disattivare il
Resistenza
forzata
Come utilizzare il Menu rapido
Note sull’icona operativa
Esempio:
• Icona operativa indicata con “ ” = OFF
• Icona operativa indicata con “ ” = ON
ACS forzato
Powerful
Selezionare questa icona per attivare o disattivare la
funzione ACS forzata.
Premere per confermare la scelta.
• ACS forzato è disattivato.
• ACS forzato è attivato.
■Nota:
• ACS forzato è disattivato quando Resistenza forzata è attivata.
• Quando ACS forzato è disattivato, il funzionamento e la modalità tornano
allo stato precedentemente memorizzato.
Selezionare questa icona per azionare in a massima
potenza l’impianto di riscaldamento/raffreddamento.
Premere per confermare la scelta.
(Il funzionamento Powerful si avvia circa 1 minuto dopo la pressione di .)
• La modalità Powerful è disattivata.
• La modalità Powerful funziona per 30 minuti.
Italiano
• La modalità Powerful funziona per 60 minuti.
• La modalità Powerful funziona per 90 minuti.
■Nota:
• La modalità Powerful viene disabilitata quando si spegne il
funzionamento.
15
Selezionare questa icona per un funzionamento silenzioso.
Premere per confermare la scelta.
(Il funzionamento silenzioso si avvia circa 1 minuto dopo la pressione di
.)
• La modalità Silenz. è disattivata.
Modalità
silenziosa
• La modalità Silenz. funziona sul livello 1.
• La modalità Silenz. funziona sul livello 2.
• La modalità Silenz. funziona sul livello 3.
Il livello 3 è la modalità più silenziosa.
• Selezionare per impostare un timer per il funzionamento
in modalità silenziosa.
Dopo 1 sec. di ritardo.
Selezionare “Sì”.
• Selezionare “Sì” con i pulsanti
Selezionare il programma “1” ~ “6”.
Selezionare “Modifi ca”.
• Se si seleziona “Elimina”, l’impostazione
del timer del programma selezionato
viene eliminata.
Impostare ora e minuti.
.
16
Impostare il livello della modalità Silenz.
■Nota:
• Se l’ora si sovrappone con un altro
programma, sullo schermo viene
visualizzato “L’ora impostata si
sovrappone”.
Come utilizzare il Menu rapido
Selezionare per forzare l’attivazione della resistenza.
Premere per confermare la scelta.
(La modalità Resistenza forzata si avvia circa 1 minuto dopo aver
premuto .)
• Resistenza forzata è disattivato.
Resistenza
forzata
• Resistenza forzata è attivato.
■Nota:
• Resistenza forzata viene disabilitata
quando l’operazione è già attivata e
viene visualizzato “Disattivato perché
funzionamento attivo”.
Italiano
17
Selezionare questa icona per eliminare (annullare) o
passare a Progr. settimanale preimpostato.
Premere per confermare la scelta.
• Il timer non è attivato.
Programma
settimanale
Selezionare “Sì”.
• Se si seleziona “No”, si torna alla schermata principale.
• Confi gurazione orari: Selezionare Confi gurazione orari per modifi care
Progr. settimanale.
• Copia orari: Selezionare per copiare una confi gurazione orario.
[Esempio di Confi gurazione orari]
Selezionare il giorno in cui eseguire la modifi ca con i pulsanti .
Se non sono preimpostati tutti i 6 programmi, viene visualizzata questa
schermata.
1 2 3 4 5 6
• Timer impostato.
Dopo 1 sec. di ritardo.
1 Selezionare il programma “1” ~ “6”.
2 Impostare l’ora e i minuti del timer.
3 Selezionare ON/OFF del timer.
4 Selezionare la modalità operativa.
/ / / / / /
• Selezionare la modalità con i pulsanti .
Impostare la temperatura delle zone 1 e 2
5
(se il sistema dispone di impostazione di
2 zone).
6 Impostare la temperatura del serbatoio.
■Nota:
• Il timer viene disabilitato quando si attiva Riscaldatore forzato o si abilita SW risc./raff.
• Se si è preimpostato Progr. settimanale su 2 zone, si deve ripetere la stessa procedura sulla zona 2.
18
Come utilizzare il Menu rapido
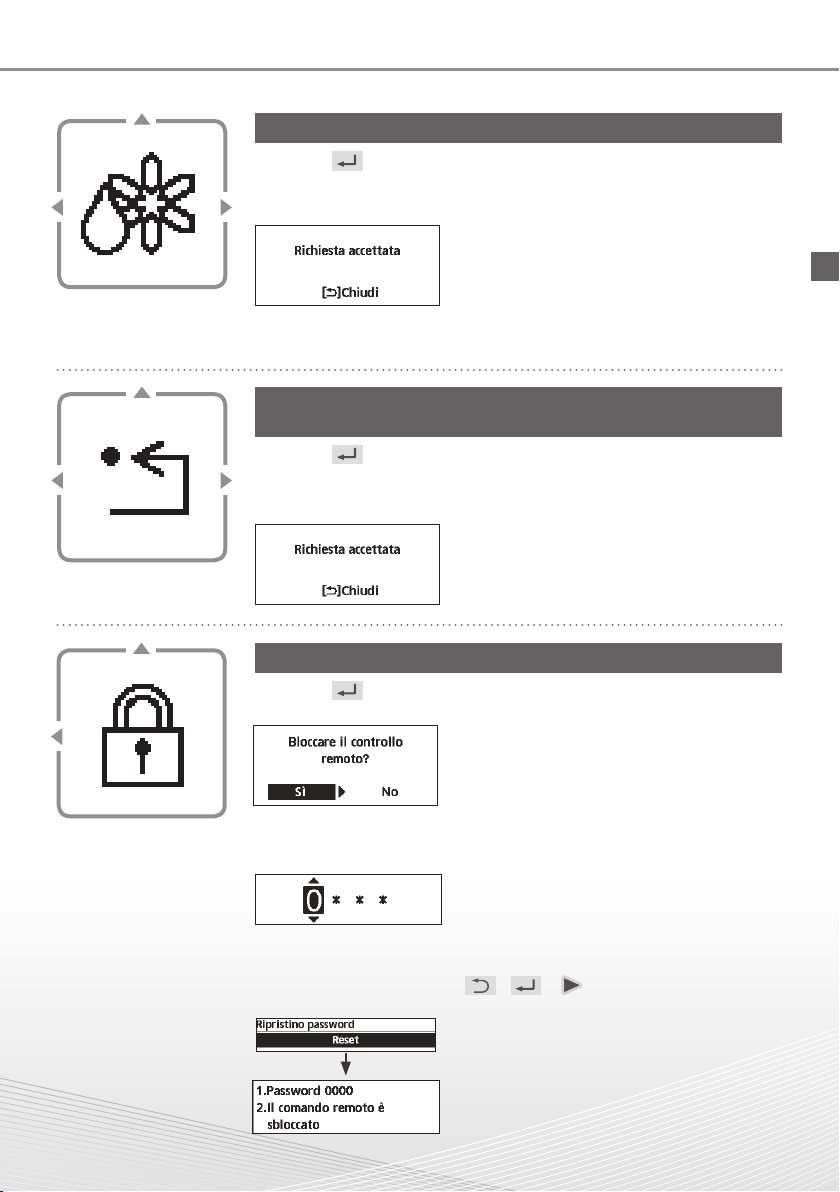
Selezionare per avviare la funzione sbrinamento.
Premere per confermare la scelta.
(Quando si accetta la modalità, viene visualizzata la seguente
schermata.)
Sbrinamento
forzato
Reset errore
Blocco R/C
Italiano
Selezionare per ripristinare le precedenti impostazioni
quando si verifi ca un errore.
Premere per confermare la scelta.
(Quando è stata accettata la modalità, viene visualizzata la seguente
schermata.)
• Assicurarsi che tutte le unità siano spente
prima di selezionare questa modalità che
ripristina le impostazioni predefi nite dell’intero
sistema.
Selezionare per bloccare il telecomando.
Premere per confermare la scelta.
(Quando è stata accettata la modalità, viene visualizzata la seguente schermata.)
Selezionare “Sì”.
(La schermata principale viene bloccata.)
• Se si seleziona “No”, si torna alla schermata
principale.
Per sbloccare il telecomando
Premere un tasto.
(Quando è stata accettata la modalità, viene visualizzata la seguente schermata.)
Immettere 4 cifre della password
(se la password è corretta, la schermata viene
sbloccata).
Per ripristinare la password dimenticata (nella schermata
di funzionamento OFF)
Premere continuamente , e per 5 secondi.
(Quando è stata accettata la modalità, viene visualizzata la seguente schermata.)
Selezionare “Reset”.
(Lo schermo si spegne dopo 3 secondi.)
19
Vóór ingebruikname
Deze beknopte handleiding legt het gebruik van het snelmenu uit.
Lees deze gebruikshandleiding zorgvuldig door voordat u het snelmenu gaat gebruiken.
Hoe gebruikt u het snelmenu
Nadat de eerste instellingen afgerond zijn, kunt u een snelmenu kiezen uit de volgende
opties en de instellingen bewerken.
1
Druk op .
Snelmenu
Forceren
warmtapwater
Week-timer
Om naar het hoofdscherm terug te gaan,
druk op of .
20
Extra
vermogen
Forceren
ontdooien
2
Gebruik om het menu te kiezen.
Druk op
3
menu aan/uit te zetten.
Stil
Reset
foutmelding
Selecteer elke instelling en bevestig deze in
overeenstemming met de instructies die onderin
het scherm worden weergegeven. (De icoontjes
verwijzen naar elke keuzeknop.)
om het geselecteerde
Forceren
verwarming
Vergrendel
bedieningsscherm
Hoe gebruikt u het snelmenu
Opmerkingen bij functie-icoontje
Voorbeeld:
• Functie-icoontje aangegeven met " " = UIT
• Functie-icoontje aangegeven met " " = AAN
Selecteer dit icoontje om de warmtapwatertank in of uit te
schakelen.
Druk op , om uw keuze te bevestigen.
• Forceren warmtapwater is uitgeschakeld.
Nederlands
Forceren
warmtapwater
Extra
vermogen
• Forceren warmtapwater is ingeschakeld.
■Opmerking:
• Forceren warmtapwater is niet beschikbaar als forceren verwarming
ingeschakeld is.
• Als forceren warmtapwater uitgeschakeld is, zullen werking en stand
teruggaan naar de vorige status in het geheugen.
Selecteer dit icoontje om de werking van het
verwarmings-/koelingssysteem krachtiger te maken.
Druk op , om uw keuze te bevestigen.
(De krachtige werking start ongeveer 1 minuut nadat is ingedrukt.)
• De stand extra vermogen is uitgeschakeld.
• De stand extra vermogen werkt ongeveer 30 minuten.
• De stand extra vermogen werkt ongeveer 60 minuten.
• De stand extra vermogen werkt ongeveer 90 minuten.
■Opmerking:
• Extra vermogen is niet beschikbaar als de werking UITgeschakeld is.
21
Selecteer dit icoontje voor een stille werking.
Druk op , om uw keuze te bevestigen.
(De stille werking start ongeveer 1 minuut nadat is ingedrukt.)
• De stille stand is uitgeschakeld.
Stil
• De stille stand werkt op niveau 1.
• De stille stand werkt op niveau 2.
• De stille stand werkt op niveau 3.
Niveau 3 is de stilste stand.
• Selecteer dit om een timer voor werking van de stille
stand in te stellen.
Na 1 sec. vertraging.
Selecteer "Yes".
• Selecteer "Yes" met gebruik van de
knoppen.
Selecteer schema "1" ~ "6".
Selecteer "Edit".
• Als u "Delete" selecteert, wordt de
timerinstelling van het gekozen schema
gewist.
Stel de uren en minuten in.
22
Selecteer het niveau van de stille stand.
■Opmerking:
• Als de tijd overlapt met een ander
schema wordt op het scherm "Set time is
overlapped!" weergegeven.

Hoe gebruikt u het snelmenu
Selecteer om de verwarming geforceerd aan te zetten.
Druk op , om uw keuze te bevestigen.
(De stand forceren verwarming start ongeveer 1 minuut nadat is
ingedrukt.)
• Forceren verwarming is uitgeschakeld.
Forceren
verwarming
• Forceren verwarming is ingeschakeld.
■Opmerking:
• Forceren verwarming is niet
beschikbaar als het apparaat al in
bedrijf is en "Niet beschikbaar, is al
in bedrijf!" wordt dan op het scherm
weergegeven.
Nederlands
23
Selecteer dit icoontje om de ingestelde week-timer te
verwijderen of te wijzigen.
Druk op , om uw keuze te bevestigen.
• Timer staat niet AAN.
Week-timer
Selecteer "Yes".
• Als u "No" selecteert, zal het scherm terugkeren naar het
hoofdscherm.
• Timer setup: Selecteer instelling timer om de week-timer te bewerken.
• Timer copy: Selecteer om een timerinstelling te kopiëren.
[Voorbeeld van een timerinstelling]
Selecteer de dag(en) die u wil bewerken met gebruik van de
knoppen.
Als niet alle 6 schema's ingesteld zijn, wordt dit scherm weergegeven.
1 2 3 4 5 6
• Timer is ingesteld.
Na 1 sec. vertraging.
1 Selecteer schema "1" ~ "6".
2 Stel de uren en minuten van de timer in.
3 Selecteer AAN/UIT van de timer.
4 Selecteer de gewenste stand.
/ / / / / /
• Selecteer de stand met gebruik van de
Stel de temperatuur in voor zowel zone 1 als 2
5
(als uw systeem de 2-zone instelling heeft).
knoppen.
6 Stel de temperatuur van de tank in.
■Opmerking:
• Timer is niet beschikbaar als forceren verwarming aan staat of Warmte-koude schakeling is ingeschakeld.
• Als u de week-timer in 2 zones hebt ingesteld, dan moet u dezelfde procedure voor zone 2 herhalen.
24
Hoe gebruikt u het snelmenu
Selecteer om bevroren leidingen te ontdooien.
Druk op , om uw keuze te bevestigen.
(Als de stand geactiveerd is, wordt het volgende scherm weergegeven.)
Forceren
ontdooien
Selecteer om de vorige instellingen te herstellen als er een
fout is opgetreden.
Druk op , om uw keuze te bevestigen.
(Als de stand geactiveerd is, wordt het volgende scherm weergegeven.)
• Zorg dat alle units uitstaan voordat u deze
stand selecteert, waarmee het hele systeem
teruggezet wordt naar de vorige instellingen.
Reset
foutmelding
Nederlands
Selecteer om de afstandsbediening te vergrendelen.
Druk op , om uw keuze te bevestigen.
(Als de stand geactiveerd is, wordt het volgende scherm weergegeven.)
Vergrendel
bedieningsscherm
Ontgrendeling van de afstandsbediening
Druk op een willekeurige knop.
(Als de stand geactiveerd is, wordt het volgende scherm weergegeven.)
Voor het resetten van vergeten wachtwoord (ook bij scherm UIT)
Houd , en 5 seconden lang ingedrukt.
(Als de stand geactiveerd is, wordt het volgende scherm weergegeven.)
Selecteer "Yes".
(Het hoofdscherm wordt vergrendeld.)
• Als "No" wordt geselecteerd, zal het scherm
terugkeren naar het hoofdscherm.
Geef de 4 cijfers van het wachtwoord in
(als het getal juist is, wordt het scherm
ontgrendeld).
Selecteer "Reset".
(Het scherm gaat na 3 seconden uit.)
25
Przed użyciem
Niniejszy skrócony przewodnik objaśnia korzystanie z menu podręcznego.
Przed użyciem menu podręcznego należy dokładnie przeczytać instrukcję obsługi.
Jak używać menu podręcznego
Po zakończeniu początkowej konfi guracji można wybrać menu podręczne spośród
poniższych opcji i dokonać edycji ustawień.
1
Naciśnij .
Menu podręczne
Wymuszenie
grzania c.w.u.
Harmonogram
tygodniowy
Aby powrócić do ekranu głównego,
naciśnij lub .
26
Tryb
intensywny
Wymuszenie
odszraniania
2
Wybierz menu za pomocą
Naciśnij
3
wybrane menu.
Praca cicha
Resetowanie
błędu
Wybierz odpowiednie ustawienia i potwierdź
je, wykonują instrukcje wyświetlone w
dolnej części ekranu. (Ikony odnoszą się do
poszczególnych klawiszy wyboru.)
, aby włączyć/wyłączyć
.
Wymuszenie
grzałki
Blokada
sterownika
Jak używać menu podręcznego
Uwagi na temat ikony działania
Przykład:
• Ikona działania ze wskazaniem „ ” = WYŁ.
• Ikona działania ze wskazaniem „ ” = WŁ.
Wybierz tę ikonę, aby włączyć lub wyłączyć grzanie c.w.u.
Naciśnij , aby potwierdzić swój wybór.
• Wymuszenie grzania c.w.u. jest wyłączone.
Wymuszenie
c.w.u.
Tryb
intensywny
• Wymuszenie grzania c.w.u. jest włączone.
■Uwaga:
• Wymuszenie grzania c.w.u. jest wyłączone, gdy włączone jest
wymuszone działanie grzałki.
• Gdy wymuszenie grzania c.w.u. jest wyłączone, działanie i tryb powinny
powrócić do poprzednio zapamiętanego stanu.
Wybierz tę ikonę, aby włączyć intensywny tryb działania
systemu grzania/chłodzenia.
Naciśnij , aby potwierdzić swój wybór.
(Intensywne działanie rozpocznie się ok. 1 minutę po naciśnięciu .)
• Tryb intensywny jest wyłączony.
• Tryb intensywny działa przez 30 minut.
• Tryb intensywny działa przez 60 minut.
• Tryb intensywny działa przez 90 minut.
Polski
■Uwaga:
• Tryb intensywny jest wyłączony, gdy wyłączone jest działanie.
27
 Loading...