

Page 1
Basic
Manual
Contents/
Getting Ready
Phone Call
Inputting
Characters
Address Book/
Pair Function
Mail
Camera
EZweb
EZ Navi
au Media Tuner
Other Functions
Troubleshooting/
Remote Ctrl Lock
Index
Page 2

Introduction
通話
アドレス帳/
ペア機能
メール
auMedia
Tuner
EZweb
EZナビ
その他機能
困ったときは/
遠隔ロック
English(英語)/
(中国語)
索引
目次/準備
カメラ
文字入力
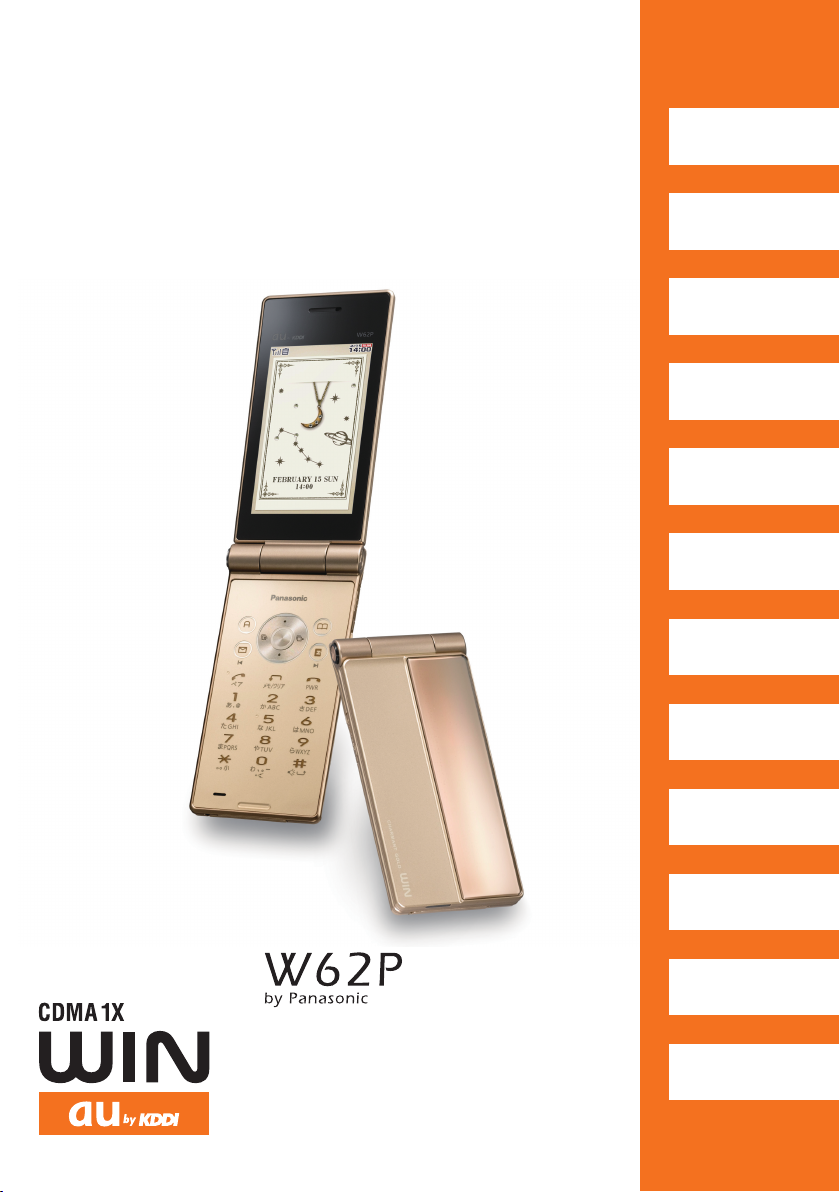
W62 P
by Panaso nic
取扱説明書
目次
ご利用の準備
auICカード
基本操作
ペア機能
メール
カメラ
データフォルダ
microSDTMカード
EZweb
EZナビ
EZアプリ
(BREW
®
)
EZFeliCa
LISMO
PCサイトビューアー
かんたんモード
ティーンズモード
便利な機能
赤外線通信
機能設定
auのネットワーク
サービス
付録/索引
クイックガイド
auMedia
Tuner
Thank you for purchasing the W62P.
Before using it for the first time, be sure to read the W62P Basic Manual (this PDF manual) so
as to know how to use it correctly. After you finish reading this manual, store it and the printed
materials that come with the phone in a safe place for future reference.
Printed Manuals for the W62P (Japanese)
The W62P comes with a Basic Manual and an Instruction Manual.
For information about basic
operation
W62P Basic Manual
Equivalent to this English PDF manual.
The following information is also available on the au website.
• To download the Basic Manual/Instruction Manual
• To access a keyword searchable au online manual
You can also access the au online manual using EZweb.
EZweb Access
→au one Top
→auお客さまサポート(au Customer Support)
→調べる(Information)
→オンラインマニュアル(Online Manual)
W62P Instruction Manual
English version not available.
(
http://www.au.kddi.com/torisetsu/index.html)
(
http://www.au.kddi.com/manual/index.html)
For detailed information
about each function
おしらせInfo
The typeface, fonts, and colors of the texts on the screens provided for explanatory purposes
in this manual may differ from the actual contents. Also, certain icons and the scroll bars
may be omitted.
Page 3

C
ellphone Etiquette
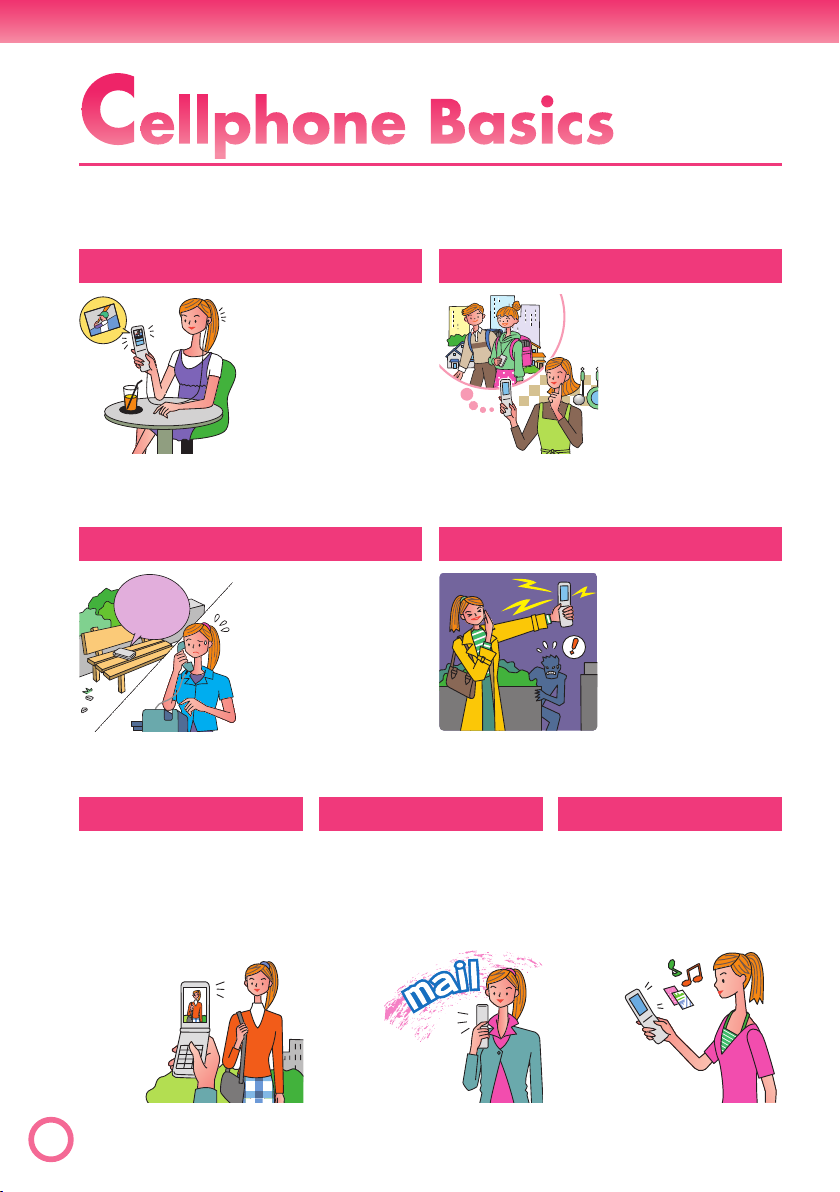
Mind your manners!
A cellphone always emits weak radio waves while it is turned
on. Enjoy operation of your cellphone without forgetting to be
considerate of those around you.
Some locations do not allow the use of
cellphones.
■
Using a cellphone while driving a car or a motorcycle
is dangerous and prohibited by Traffi c Control Law.
■
Using a cellphone in an aircraft is prohibited by
law. Be sure to turn off your cellphone.
Watch out where you use your cellphone, and
keep your voice down.
■
Do not make calls at cinemas, theaters, museums,
libraries, or other similar locations. Turn off the
cellphone or use Manner Mode to ensure that the
ring tone does not disturb others.
■
When in public, move to a location where you will
not be blocking traffi c.
■
On the Shinkansen, in a hotel lobby, or in other similar locations,
move to a location where you will not disturb others.
■
Take care to avoid talking on the phone in a loud voice.
■
Before taking the picture of others, be sure to obtain permissions fi rst.
Cellphone radio waves may interfere with
electrical medical equipment.
■
On a train or in other crowded locations, there is
always the possibility that someone nearby may
be wearing a pacemaker. Turn off your cellphone
when you are in a crowded area.
■
Follow the rules of hospitals and other medical facilities prohibiting the
use or possession of cellphones.
1
Page 4
C
ellphone Basics
Features
au Media Tuner
Enjoy using
Television (1Seg)
and EZ ChannelPlus.
Remote Ctrl Lock
Remote
Ctrl Lock
is set!
You lock the
W62P fr
remote location.
Those lock
function keeps
others from
using your W62P.
om a
Camera
page
page
EZ Navi
EZ Navi Walk,
Passenger Seat Navi,
Evacuate Navi and
Security Navi allow
you to get various
kinds of location
information. They are all built-in functions.
page
70
Safety Buzzer
Use W62P as
high-volume
emergency
buzzer by holding
down
0
about one second
on standby.
page
89
Mail
EZweb
68
for
85
Shoot photos, record
movies, and send
them by e-mail.
page
In addition to the functions covered in this page, your W62P also has the
2
following features. “Other Functions” (page 87)
Send mail messages
to other cellphones or
to PCs.
56
page
Download “Chaku-
®
Uta
”, wallpaper, and
other data.
46
page
60
Page 5

Manner Mode and Easy Voice Memo
Manner Mode
Use Manner Mode to turn off the
ring tone so as not to bother
others around you.
While the standby
screen is
displayed, hold
down
>
about one second.
for
page
32
Easy Voice Memo
If you cannot answer a call, Easy
Voice Memo plays an answering
message and records the caller’s
message.
While the standby
I cannot
answer
a call right
now...
screen is
displayed, hold
down
about one second.
r
for
page
Checking Power, Signal Strength, and Battery Level
Normally leave the phone turned on.
Power
on!
The phone needs to be turned on to make and receive
calls.
Hold down
After a while, W62P turns on with tone and the standby
screen appears.
for at least 1.5 seconds to turn on W62P.
h
page
33
12
You cannot talk on the phone if it is unable to receive a signal.
Signal strength is low in some areas, even if they
are within the service area.
indicates the current signal strength.
page
12
Keep an eye on the battery level.
The phone may not function properly if battery
power is low.
page
indicates the current battery level.
12
3
Page 6

Using a Cellphone While Driving is Prohibited!
Do not use the cellphone while
driving a car or riding a motorcycle/
bicycle. It may result in a traffi c
accident.
Using a cellphone while driving is
prohibited by law. Using a cellphone
while riding a bicycle may also be
punishable by law.
■
Turn off your cellphone or use Drive Mode while driving.
×
Reading mail or
looking at the
display.
×
Holding a
cellphone in your
hand to talk.
Drive Mode
In Drive Mode, the phone will play the message
ただいま車を運転しています。・・・
“
now...), and ask the caller to leave a message using
Easy Voice Memo.
While the standby screen is displayed, press
(ON). Next, press
1
(Drive Mode) to enter Drive Mode.
2
” (I am driving right
>
, and press
I am
driving right
now...
Beware of Spam and One-ring Calls!
How to Combat Spam
You can set up mail fi lters to block specifi c mail or
spoof e-mail.
Your cellphone has the following fi lters to block spam.
Blocks mail identifi ed as “
・
(Unsolicited advertisement)
Blocks specifi c mail
・
Blocks spoof e-mail
・
未承諾広告※
”
page
52
Beware of One-ring Calls!
A “one-ring call” (wan-giri in Japanese) rings your phone only once, in
an attempt to make you call back to a service that automatically bills you
very high charges.
The icon at the head of an incoming record indicates
that the call rang for only four seconds or less. This
indicates a possible “one-ring call”.
4
page
28
Page 7

Disaster Message Board
I’m
OK.
stopped
Service
Disaster Message Board
The Disaster Message Board lets you use EZweb to register
information about your well-being in case of a major disaster. The
information you register can be accessed from anywhere in Japan
over EZweb or the Internet.
●
When a major disaster strikes, you can use your
※
災害用伝言板
” (Disaster
Registering
the safety
information
Checking
the safety
information
au cellphone to access the “
Message Board) on EZweb and register your current
condition, comments, and other information about
your well-being.
●
After you register information, it can be sent by mail
to family, friends, and other individuals you have
registered as a recipient of your Disaster Message
Board information.
●
Disaster Message Board information can be accessed
by inputting the phone number of an individual over
EZweb or the Internet.
Disaster Message Board information can be
※
accessed from another type of cellphone, PHS, or
PC at http://dengon.ezweb.ne.jp/.
Disaster Message
Board top screen
How To
Access
Registration contents are retained for up to 72 hours.
※
You can register up to 10 entries per phone number. Registering a new
※
one while there are already 10, automatically overwrites the oldest.
You can view a Disaster Message Board demonstration at:
※
e
災害用伝言板
To view the Disaster Message Board in
※
English, select the
the Disaster Message Board top screen.
e
au one Top
au one Top
災害用伝言板
(Disaster Message Board)
http://dengon.ezweb.ne.jp/
auお客さまサポート
(デモ版)
(Disaster Message Board (Demo))
“English” option on
(au Customer Support)
5
Page 8

C
Contents
ontents
Cellphone Etiquette 1
Mind your manners! ...........................1
Cellphone Basics 2
Features ............................................2
Manner Mode and Easy Voice Memo
Checking Power, Signal Strength,
and Battery Level ............................3
Using a Cellphone
While Driving is Prohibited! .............4
Beware of Spam and
One-ring Calls! ................................4
Disaster Message Board Service ......5
Contents 6
Getting Ready 8
Checking the Contents
of the Package ................................8
Names of Parts ..................................9
Opening W62P by Using a Single Key
(One-push Open
Charging the Battery .......................10
Turning Power On ............................12
Initial Values .....................................12
Security Code and Passwords .........13
Selecting English as
the Display Language ...................14
Basic Operations .............................16
Display Indicators ............................17
Main Menu .......................................18
Initializing E-mail and EZweb ..........21
Checking Your Current Phone Number
and E-mail Address
6
Changing Your E-mail Address ........23
) ...........................10
........................22
Phone Call 25
Making a Call ...................................25
Making an International Call ............26
Answering a Call ..............................27
Redialing (Outgoing Records/
Incoming Records) ........................28
...3
One-ring Calls .................................28
Changing the Ring Tone ..................29
Adjusting the Ring Tone Volume ......31
Adjusting the Earpiece Volume
during a Call ..................................32
Turning On Manner Mode ................32
Turning On Easy Voice Memo .........33
Playing an Easy Voice Memo ..........34
Inputting Characters 35
Inputting an E-mail Address ............36
Inputting Pictographs and
Useful Sentences ..........................37
Address Book 39
Registering an Address Book ..........39
Editing an Address Book Record .....41
Adding Outgoing or Incoming
Record Data to the Address Book
Dialing from the Address Book ........43
Pair Function 44
Registering a Pair Partner ...............44
Making a Phone Call, or
Sending Mail to Pair Partner .........45
...42
Page 9

Contents
Mail 46
Using E-mail ....................................46
Creating and Sending
E-mail Messages ..........................47
Reading Received
E-mail Messages ..........................49
Reading an E-mail Message
with Attached Photos ....................50
Replying to a Received
E-mail Message ............................51
Avoiding Spam .................................52
Using C-mail ....................................53
Displaying the C-mail Menu .............53
Creating and Sending
C-mail Messages ..........................54
Reading Received
C-mail Messages ..........................55
Camera 56
Camera Features .............................56
Shooting a Photo .............................58
Viewing Photos ................................59
Attaching a Photo to
an E-mail Message .......................59
EZ Navi 68
EZ Navi Features .............................68
au Media Tuner 70
au Media Tuner Features .................70
Initializing au Media Tuner ...............71
Watching Television (1Seg) .............72
Ending au Media Tuner ....................74
Other Functions 75
Simple Mode ....................................75
Teens Mode .....................................83
Safety Buzzer ..................................85
One-push Open ...............................86
Troubleshooting 88
Remote Ctrl Lock 89
If You Lose Your W62P .....................89
Index 92
EZweb 60
Using EZweb ...................................60
Displaying the au one Top ...............61
Bookmarking Sites
You Frequently Access ..................62
Viewing a Bookmarked Site .............63
®
Downloading Chaku-Uta-Full
®
and Chaku-Uta
Checking Charges ...........................65
EZ News Flash ................................66
............................64
7
Page 10
All
set?
G
Getting Ready
Before using the W62P, check the contents of
the package comes with your W62P.
Be prepared to the basic operations such as;
how to charge the battery, how to turn the power on, etc.
etting Ready
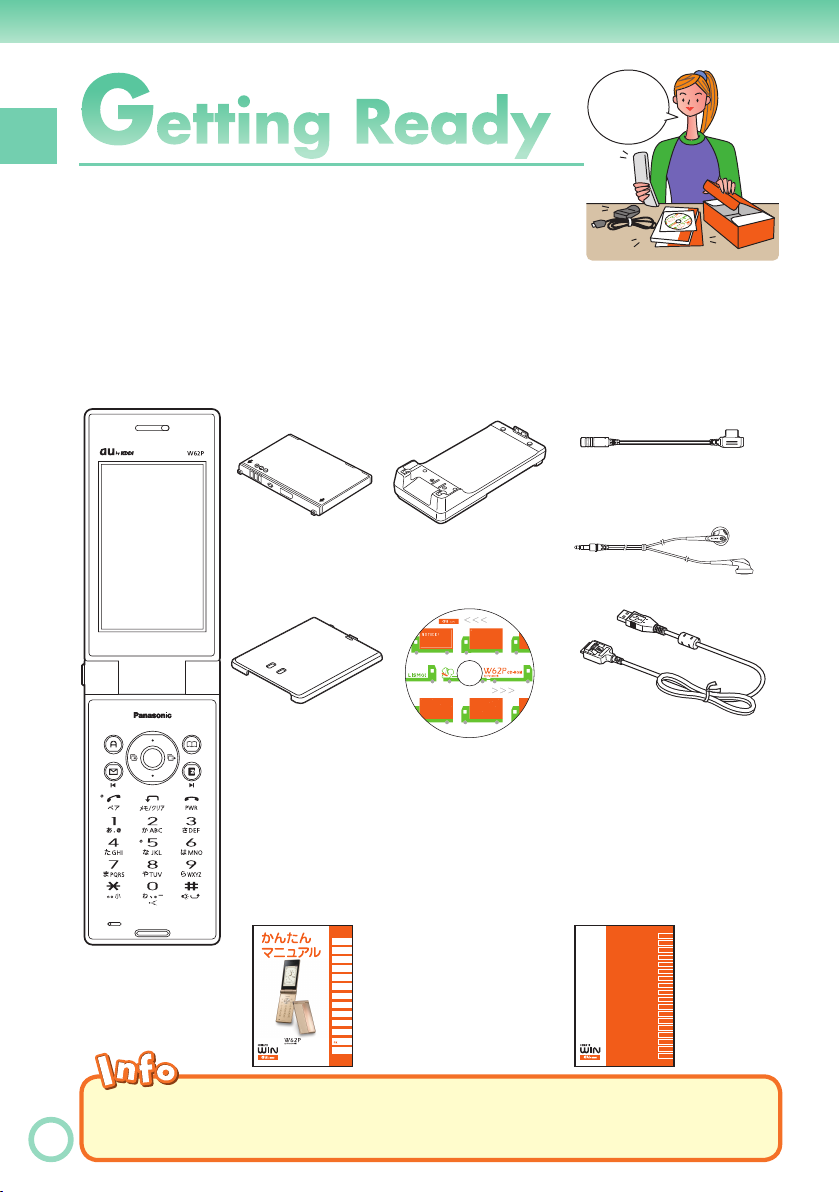
Checking the Contents of the Package
W62P
•
Battery pack
•
(61MAUAA)
Battery pack
•
Desktop holder
•
(61MAPUA)
CD-ROM (Japanese)
•
cover
Warranty (Japanese)
•
Osaifu-Keitai
•
®
Guide
(Japanese)
LISMO Install Guide
•
(au Music Port) (Japanese)
Basic Manual (Japanese)
•
目次/準備
通話
文字入力
アドレス帳/
ペア機能
メール
カメラ
EZweb
EZナビ
auMedia
Tuner
その他機能
困ったときは/
遠隔ロック
English(英語)/
(中国語)
索引
Matsushita round-type
•
earphone jack conversion
adaptor 02 (02MAQNA)
Stereo earphone
•
MDR-E0921(sample)
by SONY
USB cable (sample)
•
Operating Precautions
•
(Japanese)
Global Passport mobile
•
rental service Owner’s
Guide (Japanese Only)
Touch Message Operating
•
Precautions Fliers (Japanese)
Instruction Manual (Japanese)
•
W62P
by Panasonic
取扱説明書
目次
ご利用の準備
auICカード
基本操作
ペア機能
メール
カメラ
データフォルダ
microSDTMカード
EZweb
EZナビ
LISMO
EZアプリ
®
(BREW
)
EZFeliCa
auMedia
Tuner
PCサイトビューアー
かんたんモード
ティーンズモード
便利な機能
赤外線通信
機能設定
auのネットワーク
サービス
付録/索引
クイックガイド
◎
No microSD
◎
8
No AC adaptor is included. Please purchase a common AC adaptor 01/02 (option) if you have non.
TM
memory card is included.
Page 11

Names of Parts
■
Front
Optical
sensor
Main
display
Navigation
key
Application key
Mail key
Answer/
Pair key
Number keys
key
:
Microphone
Do not cover the built-in antenna
※
with your hand when using the
phone, using EZweb, watching
Television (1Seg), and when
accessing GPS information.
■
Earpiece
Built-in
antenna
Address book key
EZ key
Memo/Clear
key
Power/End key
#/Photo light/
Standby light
key
※
au IC-Card
Do not take out this
※
card if not necessary
as your number is
recorded on it.
Back
Charging terminals
※
Getting Ready
Indicator (LED)
Sub display
Speaker
Camera lens
Closeup
switch
Photo light/
Standby light
FeliCa mark
Battery pack/
cover
■
Side
Down key (side)
Camera/Easy Voice Memo key
earphone-microphone jack
Up key (side)
Manner key
Strap
eyelet
Infrared port
External connection jack
One-push Open key
microSD memory card slotFlat-type
9
Page 12
Opening W62P by Using a Single Key (One-push Open)
Getting Ready
You can open the W62P easily by pressing the key.
You can also open it manually
without using the key.
Press the One-push
1
Open key.
◎
Your W62P might not open fully, depending on its direction.
◎
Be careful not to drop it by its rebound when opening your W62P by
pressing the key.
◎
Be careful not to catch your fi ngers when opening your W62P.
◎
Your W62P needs to be closed manually. If it does not close, completely
open the W62P and try closing it again, without forcing it shut.
Charging the Battery
The battery pack that comes with the phone is not fully charged
when purchased. Be sure to charge the battery pack before using
the W62P for the fi rst time. Charging takes about 130 minutes. You
should recharge the battery pack whenever the battery level icon
shows
• Charging
: Charge indicator
(LED) lights red.
• Charging completed
: Charge indicator
(LED) goes out.
or .
3
2
-2
10
3
-1
You can also use the plug
by extending the prongs
like this.
1
Check the shape of
the connectors to
ensure they are aligned
correctly when you
connect them.
Page 13
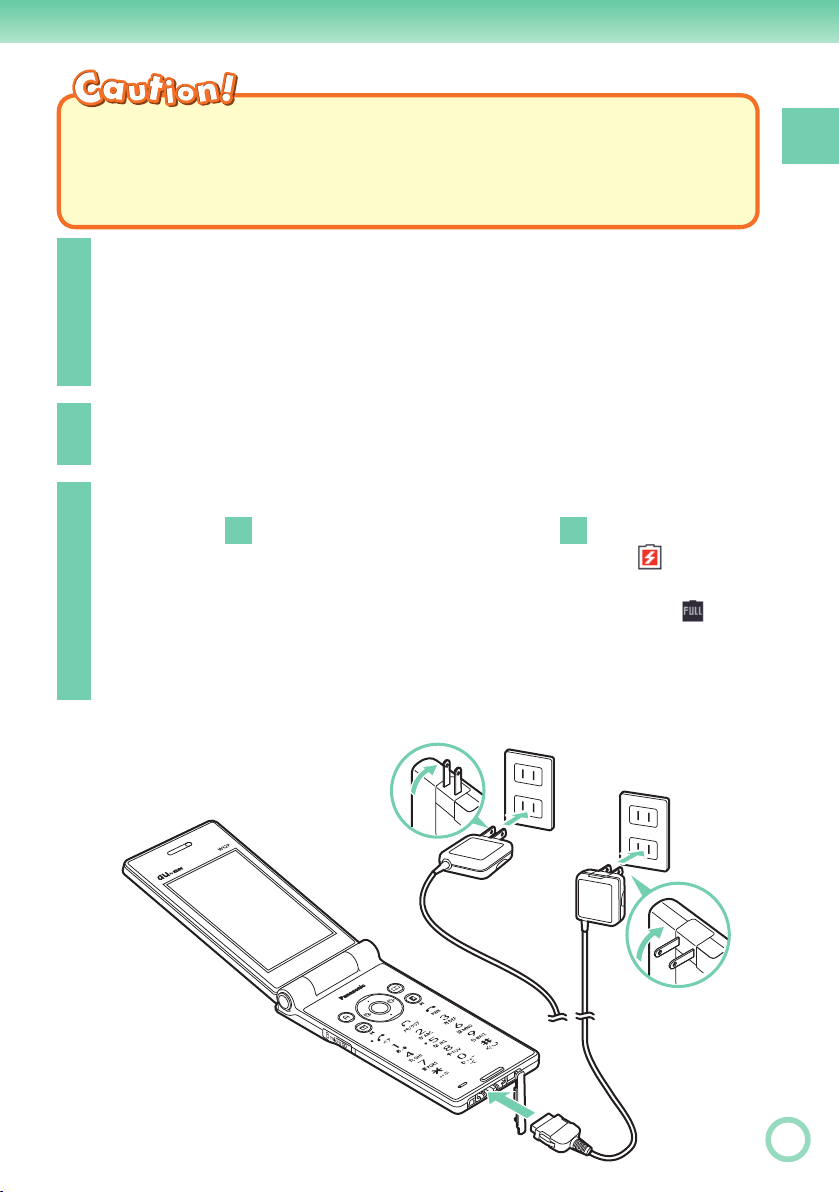
◎
You must purchase a common AC adaptor 01/02 (option) for charging. (Note that the
confi guration of the AC adaptor may be different from that shown in the illustration above.)
◎
Pull out the connector of the common AC adaptor 01/02 (option) straight so as to be
parallel to the W62P or the desktop holder connector terminal when you connect them.
Connect the common AC adaptor 01/02 (option) to
1
the desktop holder.
Check the shape of the connectors to ensure they are aligned
correctly before you connect.
Trying to force a connection may damage the connectors.
Fold out the power plug of the common AC adaptor
2
01/02 (option), and plug it into a 100V AC power outlet.
Insert the W62P into the desktop holder.
3
Firstly, align
This will cause the W62P LED indicator to light red, and
battery icon) to display.
When charging is completed, the battery level icon will show
the indicator will go out.
To disconnect your W62P, hold the desktop holder and repeat this
procedure in reverse.
, and insert in the direction of
-1
3
until it clicks.
-2
3
Getting Ready
(charging
and
You can connect the common AC adaptor 01/02 (option) to the
※
W62P directly to charge
the battery pack.
Check the shape of the connector
ends to ensure they are aligned
correctly (shown here) when
connecting.
11
Page 14

Turning Power On
Getting Ready
Hold down
1
1.5 seconds.
The standby screen appears.
Icon
Signal Strength Strong Medium Weak
Communication is not possible while the signal strength
・
icon is
Communication may not be possible while the signal
・
strength icon is
Icon
Battery Level
The battery level icon
・
■
Turning power off
Hold down
h
for at least
(Out of Range).
(Very Weak).
Fully
Charged
for at least 1.5 seconds.
h
High Medium Low
(Fully Charged) only shows during charging.
Very
Weak
Out of
Range
Fully
Discharged
Charging
Standby screen
During
Initial Values
The initial values are as follows.
Lock No. 1234
Teens Lock No. 1234 Input Middle
Caller ID ON Mail Char Middle
DispRcvingCaller ON EZweb Char Small
Profi le Blank Data Folder Char Middle
Font Size
12
Add Book Char Middle
Text Memo Char Middle
Page 15

Security Code and Passwords
The W62P lets you use the numbers and passwords described
below.
Do not forget your numbers and passwords. You will need them to
perform various operations and to access subscription services.
Security Code
For remote operation of the Voice Mail and Transfer Incoming from
①
Usage
Examples
Initial Values The 4-digit number you entered on your subscription contract
Lock No.
Usage Examples
Initial Values 1234
Teens Lock No.
Usage Examples
regular phones
For inquiries, applications, and service modifi cations using au
②
Customer Service Center voice guidance, au website, and EZweb
For changing settings by “Other Setup” of “E-mail Setup”
③
For modifying various phone settings
For modifying various phone settings in Teens Mode
Getting Ready
Initial Values 1234
EZ Password
Usage Examples
Initial Values The 4-digit number you entered on your subscription contract
For entering and canceling subscriptions for EZweb fee-based contents
Premium EZ Password
For entering and canceling subscriptions for EZweb fee-based
①
Usage
Examples
Initial Values The 4-digit number you entered on your subscription contract
contents paid for using “
Service)
For purchasing products from EZweb sites that use “
②
払い
” (au Collective Payment Service)
まとめてau支払い
” (au Collective Payment
まとめてau支
13
Page 16

Selecting English as the Display Language
Getting Ready
While the standby screen is
1
displayed, press
Use M to select
2
“
機能設定
press
c
” (settings), and
(OK).
c
.
14
Press
3
(ScreenSetup/
DisplayLighting).
3
(
画面表示/照明
)
Page 17
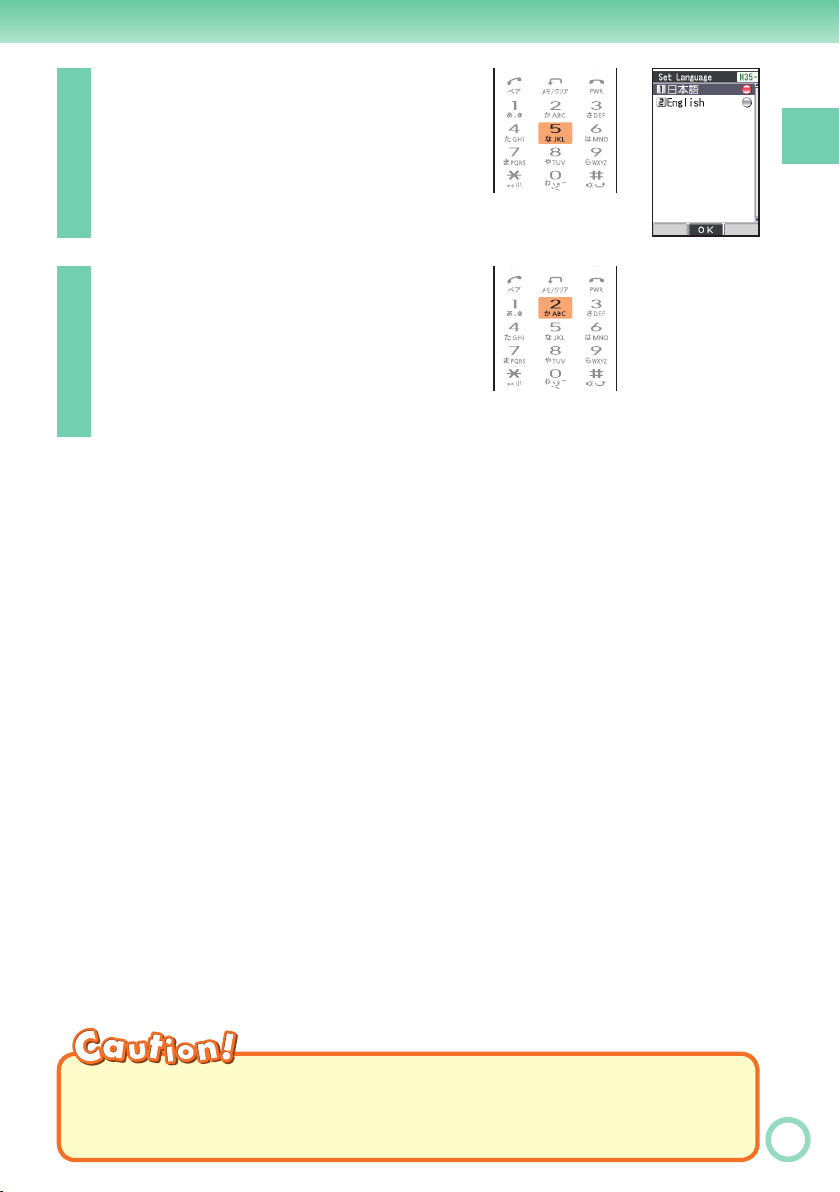
4
Press
5
(Set Language).
Getting Ready
Press
2
(English).
5
This selects English as the display
language.
◎
Even if English is selected as the display language, schedule and other
dates are displayed in the format year/month/day. Folder names inside of
the Data Folder are also displayed in year/month/day format.
15
Page 18

Basic Operations
■
Key functions
Getting Ready
Displays incoming records.
•
C
• Returns to the previous
menu screen.
• Selects an item.
• Displays the standby
X
shortcut icon.
• Selects EZ News Flash
telop/window.
• Selects an item.
• Displays the EZ apps
a
menu.
• E-mail
m
• C-mail (hold down for
about one second)
Dials/answers a phone call.
•
d
• Displays the Pair function.
• Memo
r
•
Toggles Easy Voice Memo
on and off (hold down for
about one second).
• Deletes a character.
• Returns to the previous
menu screen.
• Selects EZ News Flash
Z
telop/window.
• Displays the standby
shortcut icon.
• Selects an item.
Displays outgoing records.
•
V
• Scrolls forward one menu
screen.
• Selects an item.
• Displays the main menu.
c
• Applies an item.
Displays the address book.
•
p
• Creates a new address
book (hold down for
about one second).
Displays the EZweb menu.
•
e
Toggles power on and off (hold
•
h
down for about 1.5 seconds).
• Hangs up.
• Terminates a function.
•
Returns to the standby screen.
0 〜 9:;
• Inputs phone number.
• Inputs text character.
■
Side key functions
• Camera (While the standby screen is
<
• Shutter (Executing the camera)
• Easy Voice Memo (Receiving a call)
• Recording the caller (during a call)
• Page scroll at browser display.
◎
displayed, hold down for about one second)
If you lose track of where you are or if you make a mistake, press
scroll back to the previous, press
◎
When
0
◎
Holding down
is in the lower right corner of the photo or movie screen, pressing
will display key help.
c
on and off while W62P is folded. To cancel the side key’s disabling feature,
16
follow the procedure above with W62P opened.
• Toggles Manner Mode on and
>
• Page scroll at browser display.
to return to the standby screen.
h
off (hold down for about one
second).
to
r
for about one second toggles side key’s disabling feature
Page 19
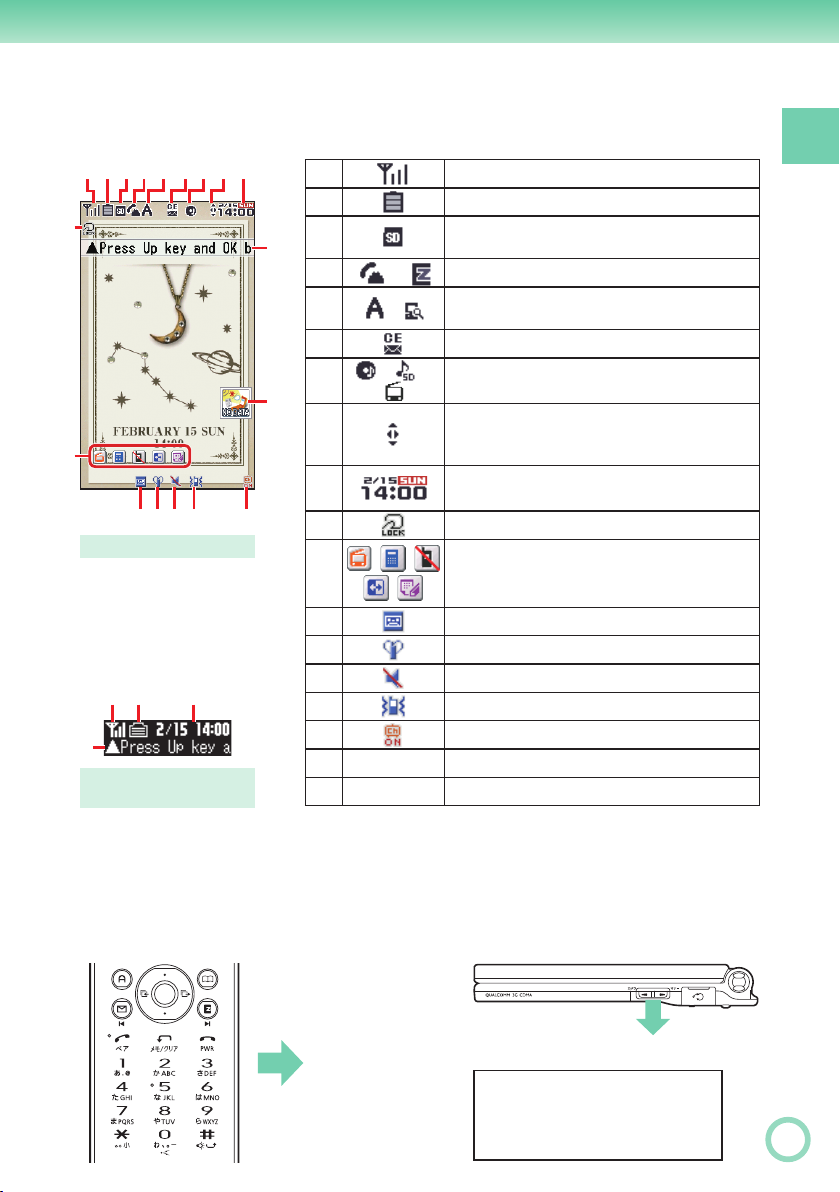
Display Indicators
The following explains the main icons that appear on the standby screen.
❶❷❸❹❺❻❼❽❾
❿
⓫
⓭⓮ ⓯ ⓰⓬
Main display
❶ ❷ ❾
⓱
Sub display
(When phone is folded)
⓱
⓲
❶
❷
❸
❹
❺
❻
❼
❽
❾
❿
⓫
⓬
⓭
⓮
⓯
⓰
⓱ ‑
⓲ ‑
※
/
/ /
A hyphen (-) may appear in place of the current date.
Signal strength
Battery level
A microSDTM memory card (commercial
item) is inserted into the cellphone.
Calling or EZweb browsing
/
EZ apps (BREW®)/PC Site Viewer on
Unread mail
au Music Player/SD-Audio Player/au Media
Tuner on
Key guidance on the EZweb screen(while
browsing) or the EZ Channel-Plusprogram
screen (while playback), etc.
Current time
The date and time are set automatically.
FeliCa Lock on
Selects the user defi ned icons such as
TV(1Seg), Calculator, Emission OFF, Mode
Setup, Note Pad 01 by pressing
Easy Voice Memo on
Manner Mode on
Ring tone off
Vibrator on
EZ Channel-Plus is in use.
EZ News Flash telop
EZ News Flash window
※
X
and
M
.
Getting Ready
■
Key symbols used in this manual
The keys in this manual are described with the key symbols
shown below
.
a
m
drh
123
456
789
:0;
c
p
e
or X key:
Z
or V key:
C
Z,X,C
<>
B
N
or V key:
M
17
Page 20

Main Menu
Pressing c while the standby screen is displayed, displays the
Getting Ready
main menu. Use
access the function associated with the item.
◎
The design and contents of the W62P’s “Main Menu” vary according to the
body color.
Items requiring little explanation are detailed as for “CHARMANT GOLD”
※
models in this manual.
■
Main menu of each body color
to select the item, and press c (OK) to
M
TV
camera
music alarm
PC site viewer
microSD
tools
alarm tools Ir Comm
TV/music photo
Shopping&
Auctions
data folder settings
data folder
Ir Comm
EZ FeliCa
Touch Message
settings
Community
Life&
18
Page 21
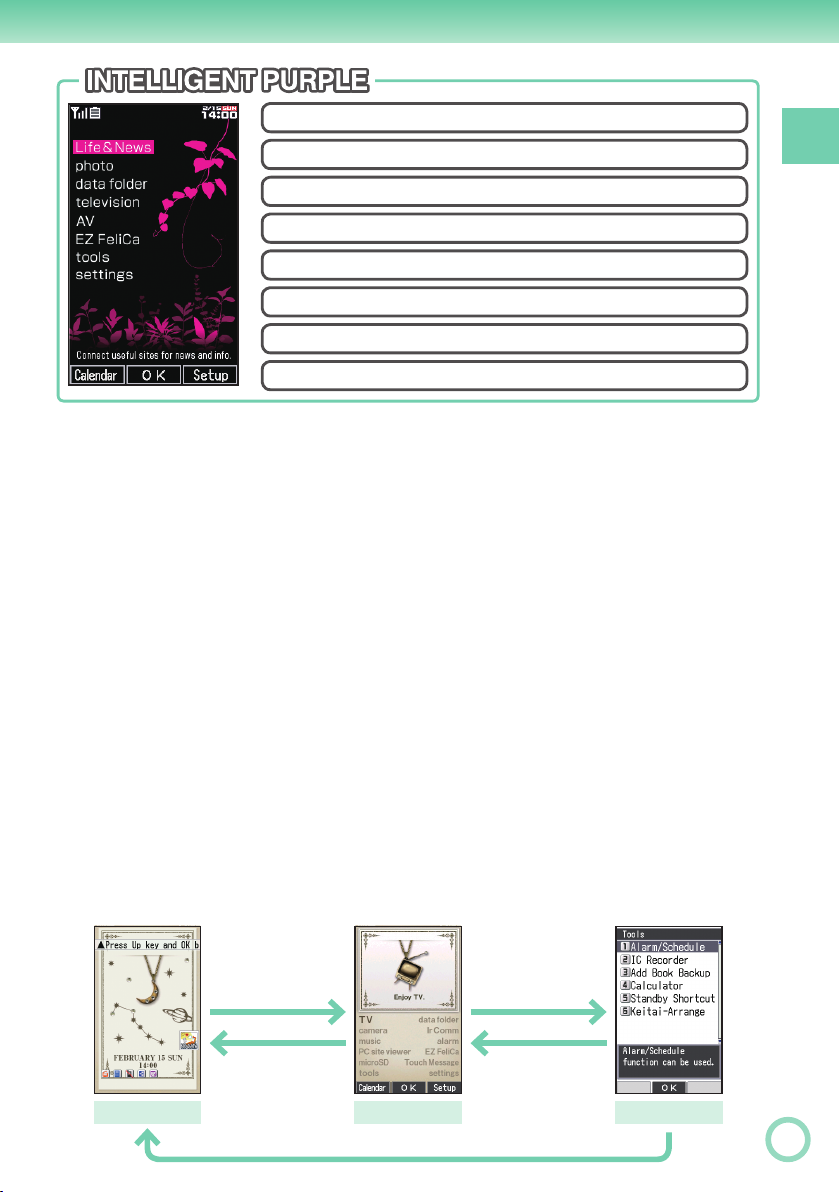
Life&News
TV
•
Enjoy TV.
data folder
•
Displays data in cellular phone.
camera
•
Camera related functions can be used.
Ir Comm
•
Various data can be received/sent via Ir.
music
•
Various music players can be used.
alarm
•
Notify current time by alarm tone.
PC site viewer
•
The Web site for PC can be seen.
EZ FeliCa
•
EZ FeliCa can be used/set.
microSD
•
Displays data in microSDTM memory card.
photo
data folder
television
AV
EZ FeliCa
tools
settings
Touch Message
•
Various data can be received/sent via
FeliCa.
tools
•
Various useful functions can be used.
settings
•
Various settings can be customized.
TV/music
•
AV
•
TV, Music can be enjoyed.
photo
•
Shooting a photo.
Life&Community
•
Connect info sites or community sites.
Shopping&Auctions
•
Shows shopping & auction sites.
Life&News
•
Connect useful sites for news and info.
television
•
Watch TV (1Seg) service.
Getting Ready
■
Using the main menu
Example: To display the tool screen from the main menu.
Press M to
select “tools”, and
press c (OK).
returns to the
r
previous screen.
Standby screen
c
returns to the
r
previous screen.
returns to the standby screen.
h
Main menu Tool screen
19
Page 22
■
Using soft keys
Soft keys are the keys you use to execute the functions along
Getting Ready
with the bottom of the screen.
The table belo
w explains how to assign the soft keys to the
on-screen functions. Note that the function of each soft key
depends on the currently displayed screen.
■
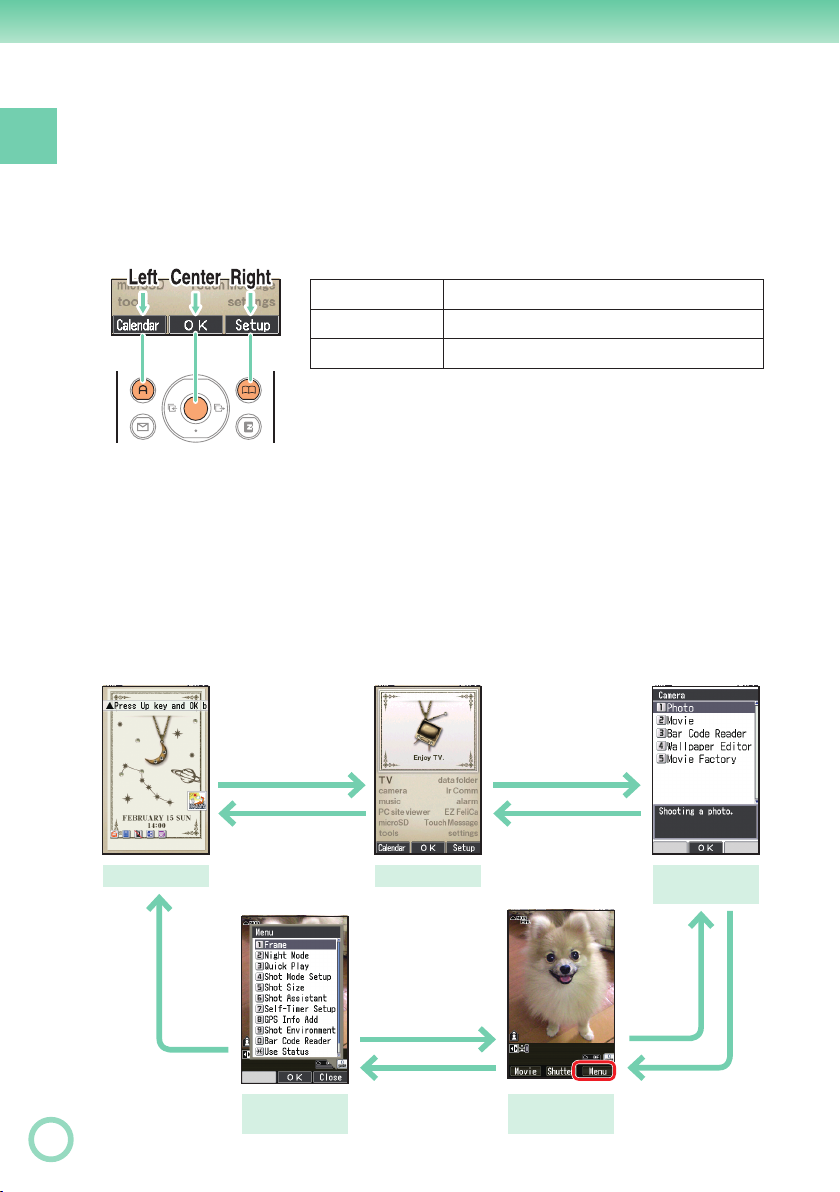
Using menus
Left soft key
Center soft key
Right soft key
Executes the function on the left.
a
Executes the function on the center.
c
Executes the function on the right.
p
Pressing the soft key that corresponds to the “Menu” at the
bottom of the display will display a men
u of various operations
related to the function you are currently using.
Example: To open the photo monitor menu screen from photo
monitor screen.
Press M, to select
“camera”, and
press c (OK).
returns to the
r
previous screen.
Camera menu
screen
r
returns to
the previous
screen.
Standby screen
c
returns to the
r
previous screen.
Main menu
returns to the
r
previous screen.
Or,
(Close)
p
closes the photo
monitor menu.
20
returns to
h
the standby screen.
Photo monitor
menu screen
p
(Menu)
Photo monitor
screen
1
(Photo)
Page 23

Initializing E-mail and EZweb
An EZweb subscription is required to use e-mail, EZweb and
other EZ services. If you did not subscribe when you purchased
your phone, contact your nearest au shop or the au Customer
Service Center.
You will be assigned an e-mail address automatically when you perform the
※
EZweb initialization procedure.
While the standby screen is
1
displayed, press
m
.
Press c (OK).
2
Wait until the phone connects to the
server for initialization.
After your automatically
3
assigned e-mail address
appears, press
c
(OK).
Getting Ready
◎
Pressing
e/a
also allows you to make initial settings.
21
Page 24

Checking Your Current
Phone Number and
Getting Ready
E-mail Address
While the standby screen is
1
displayed, press
Use M to select “settings”,
2
and press
c
c
(OK).
.
My phone
number and
mail address
22
Press
0
(Profi le).
3
Your current phone number and e-mail
address appear.
◎
Your phone number and e-mail address can be checked by pressing
and pressing
while the standby screen is displayed.
0
c
,
Page 25
Changing Your E-mail Address
E-mail address
@ezweb.ne.jp
△△△
Part you can change Domain name
While the standby screen is
1
displayed, press
Press
0
(E-Mail Setup).
m
2
Press
7
(Other Setup).
3
When the EZweb connection
confi rmation screen appears,
press
1
(Yes).
Getting Ready
.
Press
4
スの変更
Address).
1
(
Eメールアドレ
) (Change E-mail
Continued on the next page
23
Page 26

Enter your Security Code,
5
press
Getting Ready
select “
press
select “
and press
c
(OK), use B to
” (Send), and
送信
c
(Select). Use B to
承諾する
c
” (Accept),
(Select).
Use B to select the text
6
box, and press
c
(Edit).
Enter the e-mail address you
want, and press
To input an e-mail address
“Inputting an E-mail Address” (page 36)
c
(OK).
Use B to select
7
“
c
The e-mail address confi rmation
screen appears.
” (Send), and press
送信
(Select).
24
Press B to select “OK”,
8
and press
The message “Update is complete.”
appears to indicate that your e-mail
address has been changed.
◎
Your Security Code is the 4-digit number you entered on your subscription
contract. If the wrong Security Code is entered three times a day, the
setting operation will be disabled until the following day.
◎
If your e-mail address won’t change in step 7:
The new e-mail address you entered may be registered by someone else
already. Try entering a different address.
c
(Select).
Page 27

P
hone Call
Making a Call
While the standby screen is displayed,
1
use the number keys (
keypad to enter the phone number you
want to call.
When calling regular phones, you need to enter the
area code.
Press
d
.
0
to
9
) of the
2
After you fi nish a call, press
The caller always hears your voice even when you
※
cover the microphone with your hands.
Send Methods
Displayed when you press c (Call) in step 2.
※
Call : Your phone number is provided to the party you are calling
in accordance with the caller ID setting of your phone.
184 Add : Your phone number is not provided to the party you are
calling.
186 Add : Your phone number is provided to the party you are calling.
to hang up.
h
Phone Call
25
Page 28
Making an International Call
■
au International Call Service
Available without any additional application.
Phone Call
Ex: To call 212-123-
0053451212123
International access code Area code
※
• Calling charges for this service are added to monthly mobile phone calling
charges and billed together.
• Please check the Country code at the au Customer Service Center.
• For charges, please refer to the au MOBILE PHONE SERVICE GUIDE or
contact the au Customer Service Center.
■
001 KOKUSAI MOBILE TALK
Application required.
For inquiries, please contact the KDDI Customer Service Center.
(toll-free; open 9:00 to 20:00 everyday including weekends and national holidays)
Ex: To call 212-123-
0010101212123
△△△△
Country code (USA)
When the area code begins with “0”, leave this out when dialing.
in the USA
※
△△△△
Phone number
0077-7160
△△△△
in the USA
△△△△
Press d.
Press d.
26
KDDI international access code
Country code (USA)
When the area code begins with “0”, leave this out when dialing.
※
• Charges for 001 KOKUSAI MOBILE TALK are charged separately from
monthly au telephone charges.
• Please check the Country code at the au Customer Service Center.
• For charges, please refer to the au MOBILE PHONE SERVICE GUIDE or
contact the au Customer Service Center.
Area code
※
Phone number
Page 29

Answering a Call
Press
d
to answer an incoming call.
1
After you fi nish a call, press
◎
Open to Talk function
You can also answer the call just by opening W62P.
“To set Open to Talk” (page 86)
◎
Display for Incoming Calls
If the caller’s name is in your address book, it appears
on the display. If not, only the caller’s phone number is
displayed.
A message appears when the phone number of the caller
is not provided for some reason.
ID Unsent : The caller’s phone refused to send its phone
number.
Pay Phone : The call is from a pay phone.
Not Support : The call is from a phone that does not support
caller ID.
◎
Missed Call Notifi cation
The message “ Call X” appears on the display if you
did not answer one or more calls. Press c (OK) to check
incoming records (caller phone number, etc.).
To call back a number
“Redialing (Outgoing Records/Incoming Records)” (page 28)
to hang up.
h
Phone Call
27
Page 30

Redialing (Outgoing Records/ Incoming Records)
Phone Call
While the standby screen is
1
displayed, press
: Displays outgoing records.
V
: Displays incoming records.
C
Use B to select the record
2
whose number you want to
dial, and press
◎
The phone stores up to 50 records each for the outgoing records and
incoming records. When a record is created while there are already 50 in
memory, the oldest is deleted automatically to make room for the new one.
N
d
.
.
One-ring Calls
■
What is a “one-ring call”?
A “one-ring call” is an incoming call that rings your phone only once, which aims
it to be stored in your incoming records. If you call back to the number shown
in your incoming records, often you are connected to a dating service or some
other service that may bills you very high charges. Always keep in mind that it is
not a good idea to call back unfamiliar numbers.
■
One-ring call indicator
The icon indicates an incoming call you did not answer.
The
seconds or less, which may be one-ring call with high
possibility.
28
icon indicates an incoming call that rang for four
Page 31

Changing the Ring Tone
While the standby screen is
1
displayed, press
Use M to select “settings”,
2
and press
c
c
(OK).
.
Phone Call
3
4
Press
Press
2
(Sound/Vib/LED).
1
(Incoming Call).
Continued on the next page
29
Page 32

5
Phone Call
6
7
Press
Press
To hear the currently selected ring
tone, press a (Check).
2
(Melody).
1
(Fixed Sound).
Use B to select the ring
tone you want, and
press
The ring tone is set.
c
(OK).
30
◎
The initial setting is “Incoming Tone1”.
◎
You can also download a “Chaku-Uta
ring tone.
“Downloading Chaku-Uta-Full
®
” from the Internet and use it for your
®
and Chaku-Uta®” (page 64)
Page 33

Adjusting the
Beep
Ring Tone Volume
To adjust the ring tone volume, perform steps 1
through 3 under “Changing the Ring Tone” (page
29), and continue with the following steps.
Press
1
Press
2
To hear the ring tone at the current
volume setting, press a (Play).
Use B to adjust the ring
3
tone volume, and press
c
1
1
(OK).
(Incoming Call).
(Volume).
Beep
Beep
Phone Call
: Increases volume.
Z
: Decreases volume.
X
◎
Step-up : Ring tone volume gradually increases.
Step-down : Ring tone volume gradually decreases.
Mute : Ring tone does not sound.
To display the “Step-up” and “Step-down” settings, select volume level 5,
and press Z.
To display the “Mute” setting, select volume level 1, and press X.
31
Page 34

Adjusting the
Hello?
Earpiece Volume
during a Call
Phone Call
During a call, use B to
1
adjust the volume.
: Increases volume.
Z
You can adjust the earpiece volume (level 1-6).
When you set the maximum volume (level 6),
displayed on the screen.
: Decreases volume.
X
Turning On Manner Mode
While Manner Mode is on, the phone alerts
you to incoming calls by vibrating.
Hello?
Hello?
is
32
While the standby screen is
1
displayed, hold down
>
for about one second.
When Manner Mode is on, the icon appears on the display.
Turning on Manner Mode also turns on Easy Voice Memo,
which is indicated by
While Manner Mode is on, the phone vibrates without sounding its ring tone.
To turn off Manner Mode, hold down
◎
When the standby screen is displayed, pressing
“ON” enabled you to choose the type of Manner Mode. Holding down
>
restores the Manner Mode type selected here.
for about one second while the standby screen is displayed
on the display.
>
>
for about one second.
and selecting
Page 35

Turning On Easy Voice Memo
While the standby screen is
1
displayed, hold down
about one second.
When Easy Voice Memo is on, the
icon appears on the display.
W62P can store up to 4 Easy Voice Memos, each of which can
contain up to 20 seconds recording time.
If a new Easy Voice Memo is recorded when there are already
four in the memory, the oldest, unprotected, and has already been
played back is deleted automatically to make room for the new one.
Protected Easy Voice Memos are not deleted.
r
for
I cannot
answer
a call right
now...
Phone Call
To turn off Easy Voice Memo, hold down
◎
Using the Voice Mail
The Voice Mail allows callers, who could not reach you to leave voice
messages, when the phone is turned off, or when you are not in a location
within the range of the service with adequate signal strength.
for about one second.
r
33
Page 36

Playing an Easy Voice Memo
Phone Call
When Easy Voice Memos are stored
The messages “ Call” and “ EasyVoiceMemo”
appear on the standby screen.
Select “ Call”, and press
1
c
(OK).
The incoming records list appears.
34
Use B to select the record
2
with the
c
(Disp).
The incoming record detail screen
appears.
icon, and press
Use B to select
3
◎
EasyVoiceMemo”, and
“
press
The Easy Voice Memo plays back.
To delete an Easy Voice Memo, press
is displayed. Select the Easy Voice Memo you want to delete, press p (Menu),
and press
c
(Play).
(Delete). Next press
1
r41
(Delete One), and press
1
while the standby screen
1
(Yes).
Page 37

I
nputting Characters
Input characters using keypad keys
. The table below shows the characters each
9
0
through
key cycles through when you press it.
Number of Presses
Key
1
2
3
4
5
6
7
8
9
0
:
;
d
123456789
.@- _ / :
abcABC2
de fDEF3
gh i GHI 4
jklJKL5
mn oMNO6
pqr sPQRS7
tuvTUV8
wxyzWXYZ9
0 . @ - _
Toggles between upper case and lower case (Example: a ⇔ A).
Inputs “,” “.” “-” “~” “!” “?” “Space” where there is no character for case to be
toggled.
Returns to the previous character.
Undoes the last delete operation.
/:!?˜
()
*#+,^;<=>$¥%&
[]
˜
{|}
d
e
f
1
" Space Break lines
Inputting Characters
•
In order to input consecutive characters that are assigned to the same key, press V
to move the cursor (highlighted), then press the same key to input next character.
◎
Allowable Characters in Your E-mail Address
Your e-mail address (the part at the left of “@”) can contain up to 30
characters, including single-byte English lower case letters, hyphens (-),
periods (.) and underbars (_).
A period (.) or a zero (0) cannot be used as the fi rst character.
Characters and symbols that are shaded in the table above cannot be used
at the left of “@” in the address format “
◎
You can input a period (.) or “at” symbol (@) by pressing
@ezweb.ne.jp”.
△△△
1
.
35
Page 38

Inputting an E-mail Address
■
Inputting “david@ezweb.ne.jp”
In this example, we will input “david@ezweb.
ne.jp” for “〈E-Mail Add1〉”.
To input “〈E-Mail Add1〉”, perform steps 1
through 6 under “Registering an Address
Book” (page 39), and perform the following steps.
david@
......
Inputting Characters
Input “david”.
1
To input “d” : Press
To input “a” : Press
To input “v” : Press
To input “i” : Press
To input “d” : Press
once.
3
once.
2
three times.
8
three times.
4
once.
3
Press p (Menu).
2
Press
3
Sentence), and press
2
1
(Emoticon/Useful
(Useful Sentence).
36
B
Use
4
ne.jp”, and press
“david@ezweb.ne.jp” is inputted.
You could also input “@ezweb.ne.jp” by pressing
02
to select “@ezweb.
c
(OK).
.
Page 39

Inputting Pictographs and Useful Sentences
The following procedure shows how to input
pictographs and useful sentences into the body
text when creating a new e-mail message.
Press a (Char), and press
1
6
( ).
You can also select a pictograph by
pressing
Use M to select the
2
pictograph you want, and
press
Use m and e to scroll through the various
categories of pictographs.
To input consecutive pictographs, press p (Serial).
.
;
c
(Select).
Inputting Characters
Press p (Menu), press
3
(Emoticon/Useful Sentence),
2
and press
(Useful
1
Sentence).
B
Use
4
useful sentence you want,
and press
Here we will select “Happy birthday!”. You can also
input “Happy birthday!” by pressing
to select the
c
(OK).
17
.
37
Page 40

◎
The following shows the input screens for symbols (double-byte) and
emoticons.
Inputting Symbols (Double-byte)
In step 1 of the procedure above, press a (Char), and
press
symbol menu).
(&@) to display the “FullSym” (double-byte
5
Inputting Characters
Inputting Emoticons
In step 3 of the procedure above, press
in place of
menu.
(Useful Sentence) to display the emoticon
2
(Emoticon)
1
38
Page 41

A
ddress Book
Registering an Address Book
While the standby screen
1
is displayed, hold down
for about one second.
Select “ 〈Name〉”, and
2
press
Enter the name, and
3
press
c
c
(Edit).
(OK).
p
Address Book
The
automatically when you enter a name.
To input text
“Inputting Characters” (page 35)
Use B to select
4
“
press
Reading〉 is generated
〈
〈Phone Number1〉”, and
c
(Edit).
Continued on the next page
39
Page 42

Enter the phone number,
5
and press
When entering the number of regular
phones, be sure to include the area
code.
c
(OK).
Use B to select
6
〈E-Mail Add1〉”, and
“
press
c
(Edit).
Address Book
If you do not want to enter an e-mail address, jump to
step 8.
Enter the e-mail address,
7
and press
To input an e-mail address
Press p (Reg).
8
◎
The address book can contain up to 1,000 records.
◎
Address book records are numbered from 000 through 999. A new record
is automatically assigned to the lowest available unused record number.
◎
An address book record can also contain a website URL, street address,
birthday, and other personal information.
◎
To delete an address book record, press
displayed. Use M to select the address book you want to delete. Press
p
press
c
(OK).
“Inputting an E-mail Address”
(page 36)
(Menu), and press
(Yes).
1
(Delete). Next press
4
while the standby screen is
p
(Delete One), and
1
40
Page 43

Editing an Address
Address...
Birthday...
Book Record
Example: To edit the phone number of “Bob Jones”.
While the standby screen is
1
displayed, press
M
use
to select the record
you want to edit, and
press
p
(Menu).
p
,
Group...
Address Book
3
(Modify), and
1
(Overwrite).
2
Press
press
Use B to select
3
0900006XXXX”, and
“
press
c
(Edit).
Make the changes you want,
4
press
p
To delete characters, press
c
(Reg).
(OK), and press
r
.
41
Page 44

Adding Outgoing or Incoming Record Data to the Address Book
While the standby screen is
1
displayed, press
use
number you want to save,
Address Book
and press
V
C
B
to select the phone
p
: Displays outgoing records.
: Displays incoming records.
N
,
(Menu).
Press
2
Press
3
To enter the name
Use the procedure starting from
step 2 under “Registering an
Address Book”
4
(Reg Add Book).
1
(Reg New).
(page 39).
42
Page 45

Dialing from the Address Book
While the standby screen
1
is displayed, press
M
use
whose phone number you
want to dial.
Press c (Disp).
to select the record
2
The details screen of the record
appears.
p
, and
Hello?
Address Book
Use B to select the phone
3
number, and press
d
.
43
Page 46

P
air Function
You can save up to fi ve phone numbers (like
frequently used ones from the address book).
You can make calls or send mails with these saved numbers (called
Pair partners) more easily.
Registering a Pair Partner
While the standby screen is
1
Pair Function
displayed, press
If the Pair partner is not registered, the confi rmation
screen appears. Press
through 5 tab where you want to register the Pair partner.
Use B to select
2
“Register • Check”, and
press
c
(OK).
d
.
(OK). Use N to select the 1
c
44
Press
1
(Register).
3
Use M to select the address
4
book record for the person
you want to register as a Pair
partner, and press
When there is more than one phone number/e-mail
address registered in the address book, the Pair function
phone number/e-mail address selection screen will appear.
Press c (Reg).
c
(Select).
5
Page 47

Making a Phone Call, or Sending Mail to Pair Partner
While the standby screen is
1
displayed, press
Use N to select the Pair
2
partner.
Use B to select “Call”,
3
and press
Sending e-mail : After selecting “Send E-Mail” and pressing c (OK),
Sending C-mail : Selecting “Send C-Mail” and pressing c (OK), will
For the remainder of this procedure
“Creating and Sending E-mail Messages” (page 47) / “Creating and
Sending C-mail Messages”
c
d
.
(OK).
selecting “Create New” and pressing c (OK) will
display a screen for a composing and sending an
e-mail message.
display a screen for a composing and sending a
C-mail message.
(page 54).
Pair Function
◎
In order to register a person as a Pair partner, whose name, phone number,
and other information need to be registered in the address book beforehand.
Use the procedure under “Registering an Address Book” (page 39) to create
the required record before trying to register a person as a Pair partner.
45
Page 48

EZweb
subscription
required
EZweb
subscription
M
ail
required
Your W62P supports two types of mail:
e-mail and C-mail.
Using E-mail
To use e-mail, EZweb subscription is required. If you did not
subscribe when purchasing your phone, contact your nearest au
shop or the au Customer Service Center.
In addition to EZweb subscription, an initialization procedure is
needed before you can use e-mail. If you have not performed
initialization yet, refer to “Initializing E-mail and EZweb” (page 21).
E-mail service allows you to exchange e-mail messages with
other E-mail-enabled cellphones or e-mail addresses of PC.
You can send e-mail messages that contain up to 5,000 doublebyte characters (10,000 single-byte characters), and you can
attach photos and movies to e-mail messages.
The number of different addresses that may be selected for a single e-mail is
※
fi ve if “Add Num Rstr” is set to “ON”, and 30 if this is set to “OFF”.
You can send up to 1,000 e-mail messages (each addressee counts as a
※
separate message) per day.
Sending and receiving operations may take longer when an e-mail message has
※
attachment.
Sending and receiving mail requires a packet transmission fee according to the
※
amount of data.
page
47
46
Sent using e-mail addresses.
Example:
△△△
@ezweb.ne.jp
E-mail messages
can be sent to
other au cellphones
or those of other
cellphone carriers.
E-mail can be sent to PC.
Page 49

Creating and Sending E-mail Messages
While the standby screen
1
is displayed, press
press
1
(Create New).
m
, and
Select , and press
2
c
(Edit).
: Address to which the e-mail will
be sent.
Press
3
use
addressee, and press
c
You can select an addressee from
sending records, receiving records,
or My Address, or you can enter an
address.
Use B to select the e-mail
4
address you want to enter,
and press
1
(Address Book),
M
to select an
(Select).
c
(OK).
Mail
Continued on the next page
47
Page 50

Use B to select , and
5
press
Enter the subject, and press
6
c
c
(Edit).
: Subject of the e-mail message.
(OK). Use B to select
, and press c (Edit).
: Body of the e-mail message.
Mail
Enter the body text, and
7
press
Press a (Send) or
c
(OK).
8
The message “Sent.” appears on the
display after the e-mail message is
sent.
d
.
48
Page 51

Reading Received E-mail Messages
When you receive an e-mail
E-Mail” and appear
“
on the standby screen.
Received
e-mail icon
E-Mail”, and
c
(OK).
1
Select “
press
Press c (OK).
2
: Indicates an unread message.
: Indicates an already read message.
B
Use
3
e-mail you want to view, and
press
The received e-mail message appears. If all of the
message cannot be displayed, press X to scroll.
Use m and e to scroll between messages.
Press
to select the unread
c
(Disp).
to return to the e-mail message list.
r
Mail
◎
You can also enable to show the received e-mail message by opening W62P.
“To set Open to Disp New” (page 86)
49
Page 52

Reading an E-mail Message with Attached Photos
Use B to select the e-mail
1
message, and press
c
(Disp).
Mail
50
Use B to select the
2
attached data, and press
c
(Select).
Use B to select a fi le name,
3
and press
◎
Depending on the size of the attached data, it may not come in at the same
time as the mail message. If this happens, use B in step 3 to select the
fi le name, press c (Rcv), and then press c (Play).
◎
Sending and receiving operations may take longer when an e-mail
message has attachment.
◎
Certain signal conditions may also cause slow work sending/receiving
e-mails.
c
(Play).
Page 53

Replying to a Received E-mail Message
To reply to an e-mail message, perform steps
1 through 3 under “Reading Received E-mail
Messages” (page 49), and perform the following
steps.
Press a (Reply).
1
2
is prefi xed with “Re:”, and the
body text of the e-mail is quoted.
Press c (Edit), and enter
the body text.
For the remainder of this procedure
Perform the procedure starting from
step 7 under “Creating and Sending
E-mail Messages” (page 47).
Reply
Mail
51
Page 54

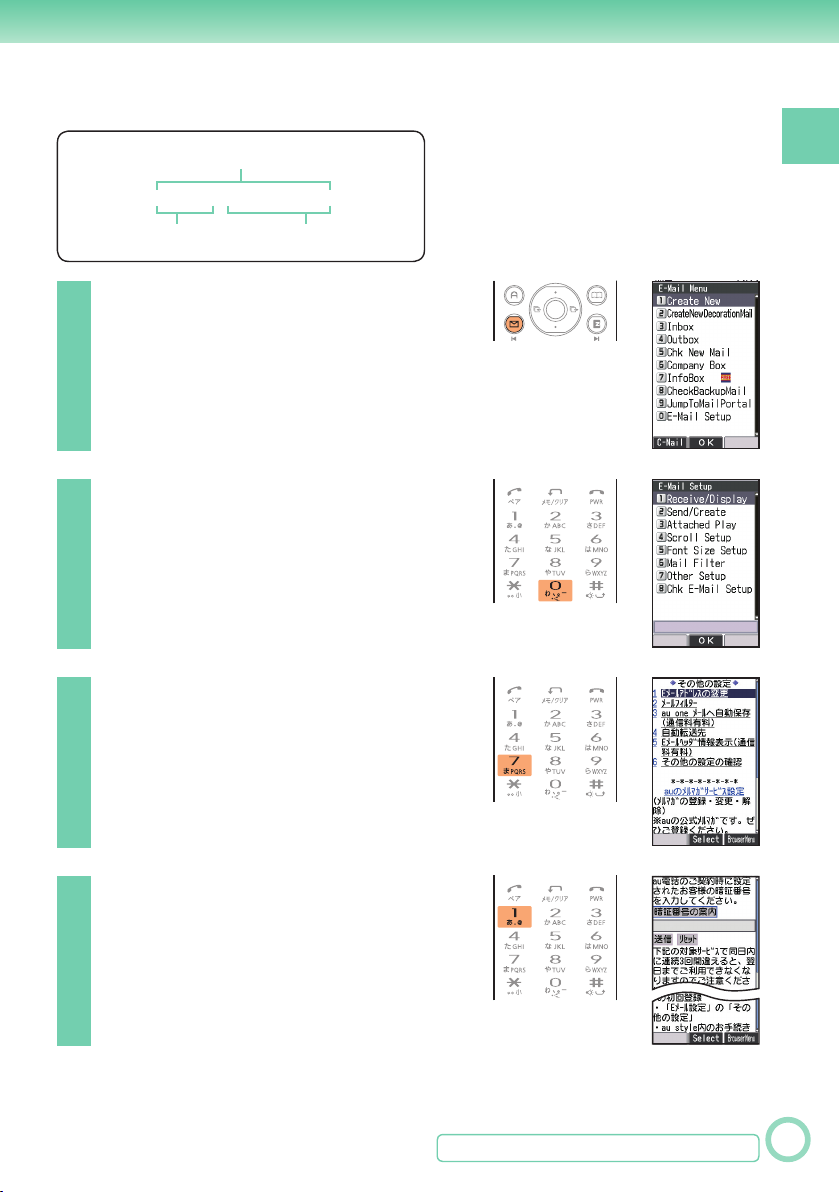
Avoiding Spam
It is recommended that you use our mail fi lter
function to block spam.
You can activate mail fi lter easily using
“Supportive settings” by answering questions that
appear on the display.
■
Activating mail fi lter
サポート設定
次へ
” (Next) and press c (Select).
” (Supportive settings).
(Mail Filter)
6
” (Simple Settings)
You can choose fi ltering options by answering our
questions.
It is recommendable for those who want to check
the fi ltering conditions one by one.
You can block all the incoming mails from PC.
It is recommendable for those who use only
cellphones to send/receive e-mails.
You can block the incoming e-mails containing “
諾広告※
and “
from specifi ed address.
It is recommendable for those who are bothered by
specifi ed spam senders.
You can block the incoming e-mails containing “
諾広告※
and “
It is recommendable for all e-mail users.
” (Unsolicited advertisement) in their titles,
なりすましメール
” (Unsolicited advertisement) in their titles,
なりすましメール
” (Spoof e-mail), and e-mails
” (Spoof e-mail).
Mail
Example: To access “
While the standby screen is displayed, press m.
①
Press
②
Use B to select “
③
Enter your Security Code, press c (OK).
④
Use B to select “送信” (Send) and press c (Select).
Use B to select the item and then press c (Select).
⑤
(E-Mail Setup)
0
Next, follow the instructions that appear on the display.
■
“
カンタン設定
サポート設定
“
(Supportive settings)
フィルターレベル(高)
“
(Filter level (Strict))
フィルターレベル(中)
“
(Filter level (Medium))
フィルターレベル(低)
“
(Filter level (Normal))
”
”
”
”
1
(Yes).
未承
未承
52
◎
You can prevent spam by changing your e-mail address. See “Changing
Your E-mail Address” (page 23) for information about how to change your
e-mail address.
Page 55

Using C-mail
C-mail is a mail service between compatible
au cellphones that uses telephone numbers.
You can send C-mail messages that contain
up to 50 double-byte characters (100 single-
page
byte characters).
C-mail sending fee is charged to send C-mail.
※
To the recipient’s phone number.
Example: 090-0001-XXXX
To your phone number.
Example: 090-0002-XXXX
54
Mail
C-mail can be sent to
other C-mail-enabled au
cellphones.
About C-mail Safety Block
C-mail Safety Block blocks C-mails that contain accessing URLs
・
(http://
C-mail Safety Block is activated by default. If you want to receive C-mails
containing accessing URLs or phone numbers in their body texts, you can
deactivate this function.
△△△
, https://
) or phone numbers in their body texts.
△△△
Displaying the C-mail Menu
While the standby screen is
1
displayed, hold down
about one second.
m
for
53
Page 56

Creating and Sending C-mail Messages
While the standby screen
1
is displayed, hold down
for about one second, and
press
1
(Create New).
m
Hold down
...
Mail
Select , and press
2
c
(Edit).
Press
3
use
an addressee, and press
c
You can also select a phone number
from sending/receiving records, or you
can enter an address.
Use B to select the phone
4
number you want to enter,
and press
1
(Address Book),
M
to select
(Select).
c
(OK).
54
Page 57

Use B to select , and
5
press
c
(Edit).
Enter the body text, and
press
c
(OK).
Press a (Send) or
6
When the C-mail reaches the other party,
the message “Completed.” appears, and
the message is stored in the Outbox.
d
.
Reading Received C-mail Messages
When you receive a C-mail
“
C-Mail” and appear on the
standby screen.
Select “
1
c
(OK).
: Indicates an unread message.
Use B to select the unread
2
C-mail you want to view, and
press
C-Mail”, and press
c
(Disp).
Received
C-mail icon
Mail
The received C-mail message appears. Use m and e
to scroll between messages. Press
C-mail message list.
◎
You can read C-mail even if you operate as follows.
While the standby screen is displayed, hold down m for about one second
(Inbox)Use B to select a C-mail
2
You can also enable to show the received C-mail message by opening W62P◎.
“To set Open to Disp New” (page 86)
to return to the
r
(Disp).
c
55
Page 58

C
amera
Your W62P comes with a built-in 2.1-megapixel, 2.07-million effective
pixels camera and various different functions for shoot photos.
You can attach the photos that you shot to e-mail messages.
Camera Features
■
Use your images for W62P functions
You can use photos you shot for the standby screen, for
the image that appears while the ring tone is sounding,
and in your address book.
■
Camera
Send images by e-mail
Within 500KB, you can send a photo as an
e-mail attachment.
Certain signal conditions may cause slow work
※
sending/receiving e-mails.
56
■
Print out images or use them on your computer
Save the photos you have taken to a
TM
microSD
print them via a printer or DPE shop, or to use
them on your computer.
memory card (commercial item) to
DPE SHOP
Page 59

Tips for Better Photos
Shooting Phone/Wallpaper size/etc. Images
Do not cover the lends or photo light with your
hands. Hold the camera securely with both hands.
Press c (Shutter) with your thumb.
Shooting 0.3M/1M/1.5M(Wide)/2M size Images
Do not cover the lends, photo light or
optical sensor with your hands. Hold the
camera securely with both hands.
Press
<
You can also shoot photos by pressing c (Shutter) with your thumb.
Tips for Avoiding Hand Movement
◎
Remain steady by keeping your arms lightly against your sides and standing
with your legs spread apart to about shoulder level. Having your arms away
from your side or extended in front of you can cause blurred images.
◎
When you press the shutter button, remain still until your shutter tone fi nishes
sounding. This is especially important when shooting where lighting is dim.
◎
Self-timer is also available for shooting photos. With the self-timer, you
do not need to press the shutter button to shoot a photo, so there is less
chance of a blurred image caused by accidental movement of the phone.
with your right index fi nger.
Camera
Photo Sizes
The following shows the sizes of the photos that can be
recorded with your W62P.
Photo sizes Where to save
Phone 120×160
“Photo Folder” in W62P’s Data FolderWallpaper 240×320
WideWallpaper 240×400
0.3M 640×480
1M 1280×960
1.5M (Wide) 1600×960
2M 1600×1200
“Normal Shot” is selected as the photo mode and “Wallpaper” as the photo size
※
when you purchase your phone.
The image sizes of “Coupling Shot”, “Updown Shot” and “Serial Shot” are same as
※
that of “Wallpaper”.
Photos are stored in the phone’s Data Folder regardless of photo size whenever
※
there is no microSD
TM
memory card loaded in the phone.
“Digicam Folder” in microSD
TM
Memory Card
57
Page 60

Shooting a Photo
While the standby screen is
1
displayed, hold down
for about one second.
Point the lens at the subject, and
2
Camera
3
press
The phone emits a shutter sound.
Note that the phone emits the shutter
sound even if Manner Mode is on.
Press c (Save).
The display shows the message “Saved
to data folder (Phone).”, and returns to the photo monitor screen.
Photos you shot are saved to the “Photo Folder”, which is in the Data
Folder.
c
(Shutter) or
<
<
.
58
■
When you fail in shooting good photos
If the shot photo is not what you want, press
procedure above.
Next, repeat step 2 to reshoot.
■
Meanings of the Photo Titles
Meanings of the Photo Titles in the “Photo Folder”, which is in the Data Folder.
Example of a Photo Title
Date: February 15, 2009
0902151400˜0001
Time: 14:00
or C in step 3 of the
r
Serial Number
Page 61

Viewing Photos
While the standby screen is
1
displayed, press
to select “data folder”, and press
Use B to select “Photo
2
Folder” and press
Selecting “All Data” displays a list of all
photos in the “Photo Folder”.
Use B to select the dated
3
folder, and press
Use M to select the photo
4
you want to display, and
press
The photo displays.
c
(Disp).
c
, use M
c
(Detail).
c
(Detail).
c
(OK).
Camera
Attaching a Photo to an E-mail Message
Perform the procedure from step 1 to 2 under “Shooting a Photo”
(page 58), and perform the following steps.
Press a (E-Mail), and press
1
1
(Attach).
Photos you shot are saved to the
“Photo Folder”, which is in the Data
Folder.
Perform the procedure starting from step 2 under
2
“Creating and Sending E-mail Messages” (page 47)
to create an e-mail message.
59
Page 62

EZweb
subscription
required
EZweb
subscription
EZ
web
required
Using EZweb
To use EZweb, EZweb subscription is required.
If you did not subscribe when purchasing your phone, contact
your nearest au shop or the au Customer Service Center.
In addition to EZweb subscription, an initialization procedure is
needed before you can use EZweb. If you have not performed
initialization yet, refer to “Initializing E-mail and EZweb” (page 21).
EZweb is an information service that allows you to simply enjoy
the internet with your cellphone. You can search for information
and access contents (information sites) such as Chaku-Uta
the latest news.
EZweb requires a packet transmission fee according to the amount of data you
※
send and received. Connect time is not related.
®
and
EZweb
60
While the
standby screen
is displayed
ec
(OK)
Weather
reports
Wallpaper
Chaku-
Uta
Games
Latest
news
Traffic
reports
Chaku-
®
Uta-Full
®
Page 63

Displaying the au one Top
While the standby screen is displayed,
1
press
press
e
, use N to select “EZweb”, and
1
(au one Top).
Search by keywords Provides information search function by keywords.
カテゴリ
(メニューリスト)
(Category (Menu List))
トップニュース
(Top News)
最新オススメ情報
(au Recommending
Information Updates)
天 気・乗 換・占 い・
テレビ・銀行
(Weather/
Transfer information/
Fortune-telling/
TV program/Bank)
Shopping
(
買う
(Tips)
知る
(Enjoys)
楽しむ
(Lifestyle)
暮らす
(Community)
集まる
メール
(Mail) Provides another e-mail address for PC usage.
マイページ
au style
とくする情報
(Valuable Information)
au
(au Customer Support)
au
(au Dog’s Room)
カンタンアクセス・
オープンサイト
(Simple Access and Open Site)
災害用伝言板
(Disaster Message Board)
ENGLISH Introduces English sites.
(My Page)
お客さまサポート
ワンちゃんの部屋
Provides a list of various content provider sites.
Provides the automatically-updating news.
Introduces up-to-date entertainment information,
lifestyle information and contents information.
Provides direct access to these Weather, Transfer
information, Fortune-telling, TV program and Bank
services.
Provides information about shopping malls where you can
)
purchase goods with your cellphone and the information
about the net auction where you can sell or buy easily.
Provides information on sports and stock prices, as
well as useful tools such as maps and dictionaries.
Provides the latest information about games,
music, e-books, hobby and entertainment trends.
Provides travel, restaurant and other useful
lifestyle information.
Provides the useful, amusing information that
make you feel like using such as SNS, blog.
Provides the various information, useful tools, or large storage
spaces, which are appropriate for your selection of the services.
Introduces au-recommending information and sites.
Provides gifts and useful information exclusively
for EZweb service subscribers for free.
Provides phone bills, procedures, au information,
and au online manuals.
Provides the au Dog’s contents.
Introduces Simple Access and Open Site.
To register/to check the safety information in
disasters.
EZweb
◎
The layout and contents of the EZweb screens are example. These are subject to change.
◎
Some sites may charge you for the contents in addition to call charges.
61
Page 64

Bookmarking Sites
Bookmark
You Frequently Access
Display favorite sites you
1
want to bookmark, and
press
p
(BrowserMenu).
it
2
EZweb
3
4
Press
※
Press p (Reg).
Use B to select a folder,
and press
The message “Registered.” appears
when completed.
1
(New bookmark).
You may not be able to bookmark
some sites.
c
(OK).
62
◎
You can have up to 100 sites bookmarked in the Bookmark(s).
Page 65

Viewing a Bookmarked Site
While the standby screen is
1
displayed, press
Use N to select “EZweb”,
2
and press
2
e
.
(Bookmark(s)).
g
s
’
t
o
e
L
r
e
e
!
h
EZweb
Use B to select a site or
3
folder, and press
If you selected a folder, use B to
select a site, and press c (OK).
c
(OK).
63
Page 66

Downloading ChakuUta-Full
To download a Chaku-Uta-Full® or Chaku-Uta®,
perform step 1 under “Displaying the au one Top”
(page 61), and perform the following steps.
®
and Chaku-Uta
Use B to select
1
“
カテゴリ(メニューリスト)
”
(Category (Menu List)),and
c
(OK).
” (Chaku-Uta-
®
/Video Clip) or “
®
), and press
(Select).
着うたフル・
着うた
”
2
EZweb
3
press
Use B to select “
ビデオクリップ
Full
(Chaku-Uta
c
Select the content (desired information site), and download it.
In order to use fee-based contents, you need to enter your EZ Password
or Premium EZ Password.
Initial Value: Any 4-digit number you entered on your subscription contract.
Input the required password according to the instructions that appear
on the display. To download information, follow the instructions that
appear on the display. Downloaded data is stored in the Data Folder.
®
64
◎
In addition to call charges, you will be charged according to the pricing policy of each site
to download Chaku-Uta-Full® or Chaku-Uta® and other contents from a fee-based site.
◎
Perform the same procedure to download wallpaper and use it for the
standby screen background.
◎
You also can access an information site where you can download ChakuUta-Full® by pressing e while the standby screen is displayed, using N
to select “LISMO”, and then pressing
(Jump to au one Music).
2
Page 67

Checking Charges
You can check call and transmission charges.
While the standby screen is
1
displayed, press
When the EZweb connection
confi rmation screen appears, press
(Yes).
1
Use B to select the item
2
you want to check, and
press
c
(Select).
c11
.
EZweb
65
Page 68

EZ News Flash
EZ News Flash is a free information service that sends the latest
news, weather, and horoscope information to your standby screen.
A telop is displayed on the standby screen with a continuous
stream of the latest news, which you can then select to browse
further information.
EZ News Flash can be used immediately with just a simple setting
after the EZweb initial settings (page 21). All information received
is free of charge.
Packet transmission fee may be incurred when manually updating information or
※
when connecting to EZweb sites. A confi rmation screen will be displayed in such
cases.
■
EZ News Flash features
Select the telop
Browsing News
EZweb
66
While the standby screen is
displayed, use B to select
the telop or window, and
press c (OK)
Select the window
Information is updated at regular intervals. ◎ is displayed during
information transmission.
◎
If you have made settings to use au one My Page (page 87), you can
confi rm My Page update details by selecting “My Page” from the EZ News
Flash top screen.
Browsing Weather
Page 69

■
Turning on EZ News Flash
You can use EZ News Flash by just making a simple setting (free).
Perfor
m steps 1 through 3 under “Initializing E-mail and EZweb”
(page 21), and perform the following steps.
While the standby screen is
1
displayed, use
telop, and press
Z
to select
c
(OK).
Select “
2
press
c
Select “OK”, and press
Setup is completed.
After completing, the message “Please wait for next
delivery.” will be displayed on the telop when you
return to the standby screen.
” (Yes), and
はい
(
) (Select).
選択
c
(Select).
Turning off EZ News Flash
Go through the follows steps to cancel the EZ News Flash service setting.
While the standby screen is displayed, use Z to select telop
①
Top screen appears.
メニュー
②p
(
Use B to select YES
Use B to select
(Select)
c
The setting will be canceled and no more news will be received.
) (Menu)
c
7
解除する
(Select)
サービス設定解除
(
選択
c
(
(Turning off)
) (Select)
c
) (Turning off)
(Select)
c
(OK).
Changing receiving settings
You can change sound, vibration and indicator (LED) settings for News
Flash update notifi cation.
While the standby screen is displayed, press
①
c25
.
EZweb
Volume and time are set separately.
②
Please set these to “Mute” and “OFF” respectively if you do not require
update notifi cation.
67
Page 70

EZweb
subscription
required
EZweb
subscription
EZ
Navi
required
EZ Navi uses global positioning system (GPS) information to
provide you with useful information.
EZ Navi Features
Press e.
Standby screen
1
“EZナビウォーク” (EZnaviwalk)
A menu of useful options you can use while you are out.
EZ Navi
The star symbol shows that you can use your voice to enter search terms.
This is called “Voice input” function.
※ You are charged a fee for some services.
現在地を調べる
“
ナビをする
(Navigation)
地図を見る
(View Map) (free)
乗換検索する
(Search Connection) (free※)
道路情報を見る
(View Traffi c Info)
もっとナビウォーク
(EZ Navi Walk)
インフォメーション
(Information)
★
”
EZweb menu
★
(Positioning Present Location)
Your initial location is indicated
. Changes in your
by
location are indicated in real
time by
.
68
Use N to select
EZnavi ”.
“
EZ Navi menu
Searchable source of a route guidance (voice navigation)
to your destination, shops, and facilities.
You can view a map of your current location or any other
location.
Searchable source of train transfer and timetable
★
information.
Check real-time traffi c information on the major roads all
over Japan.
Introduces explanations about each setting and service
that are available on PCs.
You can register for memberships or make inquiries.
3Dナビ
“
”
(3D Navi)
The display is switched to the
3D image at the guidance point
or a point near the destination.
Navigation engine by NAVITIME JAPAN
Map: Shobunsha Publications,Inc./
©
2008 ZENRIN CO., LTD./
Geographical Survey Institute
3D data: ©
2008 ZENRIN CO., LTD./GEO
Technical Laboratory Co., Ltd.
Z06A-No.2137
1
2
3
4
Page 71

2
Checking your route: “EZ助手席ナビ” (Passenger Seat Navi)
Passenger Seat Navi provides the person on the passenger seat with the
most suitable drive route to the destination by voice directions and maps.
3
When you check where your child is: “安心ナビ” (Security Navi)
“Security Navi” apps is composed of following three functions:
いつでも位置確認
“
•
•
“
エリア通知
These functions allow W62P to be used to check the location of other Security Navi-enabled au
cellphone, and have mails sent to a designated au cellphone when the person with W62P enter
(or are detected in) and leave (or are no longer detected in) a preset area at a preset time.
4
Check evacuation areas and routes home during natural disasters: “災害時ナビ” (Evacuate Navi)
” (Auto Position Search) (paid)
” (Area Message) (free)
•
“
位置確認メール
” (Position Search Mail) (free)
You can use map data already provided in your W62P’s Data
Folder to check for nearby evacuation areas and the direction
to your home (“Evacuate Area Map”).
You can also use the “Evacuate Navi” EZweb site to
download a variety of contents, such as a “Route Home Map”
that guides you through a route between two places of your
choice, such as “from work to home”.
To display the direction to your home, you must fi rst have registered
※
Evacuate Area Map
◎
Information displayed on screen is a guideline only – always follow any
Route Home Map
GPS information for your home in your au cellphone’s address book,
and set this as your destination.
You are charged a fee for some contents.
※
Map: Shobunsha Publications,Inc./Preparation: Asia Air Survey Co.,ltd.
instructions received from police, fi re services, or other authorities.
◎
When using “Evacuate Navi”, recognizing current location may take a little
time depending on the status of the GPS satellite.
◎
The display layout and contents are examples. These are subject to change.
◎
Map viewer may take a little time to activate, depending on the number of
records registered in the address book.
◎
You will be charged packet transmission fee when you use various EZ Navi
services. With some services, separate information fee may also be charged.
EZ Navi
69
Page 72

EZweb
subscription
required
EZweb
subscription
au
Media Tuner
required
You can enjoy Television (1Seg) or EZ Channel-Plus by au Media Tuner.
au Media Tuner Features
■
Television (1Seg)
You can watch the “1Seg” television service, which has begun broadcasting
digital terrestrial television in Japan to cellphones and portable devices.
Please see the following websites for more details on “1Seg”.
The Association for Promotion of Digital Broadcasting
From your PC : http://www.dpa.or.jp/
From your W62P : http://www.dpa.or.jp/1seg/k/
■
EZ Channel-Plus
You can use au Media Tuner to play programs registered with
EZ Channel-Plus/EZ Channel.
Antenna (TV signal receiver) for W62P
The TV antenna is installed inside the W62P unit.
Open your W62P to watch Television (1Seg).
We recommend holding your W62P with your right
hand as shown here when watching Television (1Seg).
au Media Tuner
70
◎
You need to perform an initialization procedure before you can use au Media Tuner. If you
have not performed initialization yet, refer to “Initializing E-mail and EZweb” (page 21).
◎
No call charges or packet transmission fee are incurred when using au
Media Tuner. However, packet transmission fee will be incurred when using
services such as program guide acquisition and song title search function.
◎
No call charges or packet transmission fee are incurred when viewing data broadcasts.
However, packet transmission fee will be incurred when using two-way services in
contents supplied in data broadcasting, and when accessing EZweb information sites.
au Media Tuner cannot be ◎activated
◎
The continuous watching time of Television (1Seg) are as follows.
Using
earphones
The fi gures vary according to the usage of data broadcasts.
Time measured under the conditions below.
Display : Full-screen Volume : 10 Brightness : 2 Caption : Off
◎
The display layout and contents are examples. These are subject to change.
DBEX ON : Approx. 4hrs 30min.
DBEX OFF : Approx. 4hrs 40min.
when battery level display appears as .
Using
speaker
DBEX ON : Approx. 4hrs 00min.
DBEX OFF : Approx. 4hrs 10min.
Page 73

Initializing au Media Tuner
Follow the procedure below to make settings when using au
Media Tuner for the fi rst time.
As steps vary according to the body color of your W62P, please
follow the appropriate steps for your model before proceeding.
INTELLIGENT PURPLE
1
While the standby
screen is displayed,
press
to select “TV”, and
press
Press
(Television), and
press
(1Seg)).
, use M
c
(OK).
c
2
1
1
(TV
While the standby
screen is displayed,
press
to select “TV/music”,
and press
Press
(Television), and
press
(1Seg)).
1
, use M
c
c
2
3
1
(OK).
(TV
1
While the standby
screen is displayed,
press
to select “television”,
and press
c
, use B
(OK).
c
Caution message appears.
Use B to check caution message, use B
to select “OK”, and press
This screen will not be displayed again if you select
以後表示しない
“OK (
) (Do not display again)”.
c
(
選択
) (Select).
Follow instructions on
1
screen to make settings.
Make initial settings for using au Media
Tuner. After completing settings, the
channel setting screen will be displayed.
Continued on the next page
au Media Tuner
71
Page 74

Use B to select
2
“
オート設定
and press
“
Select
if to make area setting manually.
マニュアル設定
” (Auto setting),
c
(
) (Select).
選択
(Manual setting)”
Use B to select “OK”, and
3
press
Reception area and channels are set automatically,
and the television screen is displayed. The confi rmation
screen will not be displayed the next time an application
connects to the network if you select “OK (
(Do not confi rm again)”.
c
(
) (Select).
選択
以降確認しない
Watching Television (1Seg)
As steps vary according to the body color of
your W62P, please follow the appropriate steps
for your model.
)
While the standby
screen is displayed,
press
au Media Tuner
to select “TV”, and
press
Press
(Television), and
press
(1Seg)).
※
72
c
c
1
1
You need to perform an initialization procedure before you can use au Media
Tuner. If you have not performed initialization yet, refer to “Initializing au Media
Tuner” (page 71).
1
, use M
(OK).
2
(TV
1
While the standby
screen is displayed,
press
to select “TV/music”,
and press
Press
(Television), and
press
(1Seg)).
, use M
c
2
3
1
c
(TV
(OK).
INTELLIGENT PURPLE
1
While the standby
screen is displayed,
press
to select “television”,
and press
, use B
c
c
(OK).
Page 75

Receipt of data broadcasting begins when you start up the Television
(1Seg). The screen will automatically switch to the data broadcast
operation display after a short while. When this screen is displayed,
press
display. You can also change the display format by pressing
a
(
テレビ操作
) (TV operation) to switch to the TV operation
.
d
Data broadcast
operation display
Normal display
d
or
a
(映像表示)
(View image)
Full screen display
d
a
(
テレビ操作
(TV operation)
a
(
データ操作
(Data broadcast
operation)
)
)
Normal display
d
TV operation
display
d
Horizontal full
screen display
d
Horizontal screen display
You can adjust the volume by pressing B/
In data broadcast operation display, B is used for moving the cursor and
※
scrolling.
■
Changing the channel
You can change the channel by pressing
</>
N/m/e
.
You can choose both Television (1Seg) and EZ Channel-Plus/
EZ Channel programs.
Television (1Seg)
1ch 12ch2ch
EZ Channel-Plus/EZ Channel
Program 1
Program 2
Program 16
.
au Media Tuner
73
Page 76

■
Watching Television (1Seg) during charge
You can watch Television (1Seg) while the battery is charged in
the desktop holder.
Keep y
holder.
our W62P open before you insert it into the desktop
Ending au Media Tuner
au Media Tuner
1
Press
2
(Stop).
h
, and press
74
Page 77

O
ther Functions
Simple Mode
Simple Mode lets you limit operations to the
telephone function, address book, camera,
e-mail, C-mail, EZweb, and other frequently
used functions.
■
Entering Simple Mode
While the standby screen
1
is displayed, press
M
to select “settings”, and
press
Press
2
and press
c
(OK).
5
(User Support),
4
(Mode Setup).
c
, use
Beep!
Beep!
Press
2
(Simple Mode).
3
◎
The lock No. is required when changing from Teens Mode to Simple Mode.
◎
When you enter Simple Mode, settings confi gured in Usual Mode are
automatically changed to those confi gured in Simple Mode.
Other Functions
75
Page 78

■
Exiting Simple Mode
While the standby screen
1
is displayed, press
Use B to select
2
“SETTINGS”, and press
c
(Select).
c
.
Press
3
Press
4
This returns to Usual Mode.
Other Functions
0
(SimpleModeOFF).
1
(Yes).
76
Page 79

■
Using the Simple Mode main menu
For composing
and reading
e-mail/C-mail
messages, and
for changing
e-mail addresses.
For checking
the latest news
information.
For viewing and
deleting data in
the Data Folder
TM
or microSD
memory card.
For changing the
incoming tone,
wallpaper, and
character size, for
turning Manner
Mode on and off,
and for turning
Simple Mode off.
For displaying
your current
phone number
and e-mail
address.
For using the
address book,
outgoing/
incoming
records, and for
registering data
in the address
book.
For selecting the
photo or movie
recording, and
the correction
method.
For using au
Media Tuner and
au Music Player,
etc.
For using
the calendar,
calculator, and
other tools.
◎
Simple Mode has its own main menu.
You can switch between the two available Simple Mode main menu styles
by pressing p (Switch).
Other Functions
77
Page 80

■
Registering an address book
in Simple Mode
While the standby screen is
1
displayed, press
press
press
2
(Register), and
c
(Fix).
Enter the name, and
2
press
To input text
c
(OK).
“Inputting Characters” (page 35)
p
,
Bob
090
...
Check the reading of the
3
name you inputted,
press
press
You can also select data in incoming records or outgoing
records. To go without saving the telephone number,
press
4
Other Functions
Enter the phone number,
4
and press
When entering the number of regular
phones, be sure to start with the area
code.
78
c
(OK), and
3
(Input by Myself).
(Not Input) and perform step 5.
c
(OK).
Page 81

Press
3
(Input by Myself).
5
You can also select data in sending
records or receiving records. To go
without saving e-mail address, press
(Not Input) and perform step 7.
4
Enter the e-mail address,
6
and press
To input an e-mail address
“Inputting an E-mail Address”
(page 36)
c
(OK).
Press
2
(Not Register).
7
Pressing c (OK) displays a
confi rmation screen.
Press c (Reg).
8
◎
In Simple Mode, you can only input “Name”, “Reading”, “Phone Number1”,
“E-Mail Add1”, and “Image” data into an address book record.
◎
You can press
Folder and assign it to the address book record.
◎
Pressing
step 2 from which you can edit the contents of the record.
p
(Register) in step 7 to select a photo etc. in the Data
1
(Reedit) in step 8, and pressing
(Change) returns to
1
Other Functions
79
Page 82

■
Using the address book
in Simple Mode
Example: To view a record in the address book.
While the standby screen
1
is displayed, press
press
1
(Look).
Use M to select the
2
address book record you
want to view, and
press
c
(Select).
p
, and
Press
3
The address book record appears.
Use B to select the phone number,
and press c (Call). You can make a
phone call. Use B to select the e-mail
address, and press c (E-Mail). You
can create an e-mail message.
Other Functions
80
You can make phone calls and send e-mails using the address
book. You can also edit address book record and send it via infrared
communication.
3
(Read Data).
Page 83

■
Creating and sending
e-mail messages in Simple Mode
While the standby screen is
1
displayed, press
1
(E-Mail), and press
1
(Create Mail).
1
(Address Book),
M
to select an
2
Press
use
addressee, and press
c
(Select) twice.
You can select an address from
sending/receiving records, or you can
manually enter an address.
m
, press
Beep!
Beep!
Press c (Fix), enter the
3
subject, and press
To input text
“Inputting Characters” (page 35)
Press c (Fix).
4
c
(OK).
Continued on the next page
Other Functions
81
Page 84

Enter the body text, and
5
press
To input text
c
(OK).
“Inputting Characters” (page 35)
Press
3
(Not Attach).
6
Pressing c (OK) displays a
confi rmation screen.
In case of attaching some data with
e-mail, operate the followings.
(Data Folder):
1
You can select a photo etc. saved in the Data Folder and attach
it to the e-mail message.
(microSD):
2
TM
You can select a photo etc. saved in the microSD
card and attach it to the e-mail message.
In Simple Mode, an e-mail message can have only one attachment.
After checking the content of
7
the e-mail, press
The message “E-Mail is sent.” appears on the display after the e-mail
message is sent.
c
(Send).
memory
Other Functions
◎
Pressing
from which you can edit the contents of the e-mail message.
82
(Reedit) instead of c (Send) in step 7 returns to step 2,
p
Page 85

Teens Mode
Teens Mode can be used to block spam, and
to block inadvertent access to phone numbers
and URLs included inside mail messages.
Teens Mode can also be used to restrict call time
and the number of sending mail.
■
Using Teens Mode
Teens Mode can be used to restrict mail reception and display contents.
When the sender is a
Pair partner
When the sender is
included in the address
book
When the sender is not
either of the above
Turning on “Teens Restrict” and Teens Mode makes it possible to restrict
call time and the number of sending mail.
●
Making Calls
To someone who is a
Pair partner
To someone who is not
a Pair partner
●
Sending Mail Messages
To someone who is a
Pair partner
To someone who is not
a Pair partner
Receipt is allowed.
Receipt is allowed.
However, the phone numbers, e-mail addresses or
URLs contained in the body of the mail message
can not be used.
E-mail: Only the sender’s name and subject are
received.
(Body text and attached data are not
received.)
C-mail: Not received.
No restriction.
Call time is restricted.
Further calling is not possible if the call time
exceeds the “Teens Restrict” setting.
No restriction.
The number of sendings is restricted.
Further mailing is not possible if the number of
sendings exceeds the “Teens Restrict” setting.
Other Functions
83
Page 86

■
Activating Teens Mode
While the standby screen
1
is displayed, press
M
use
and press
to select “settings”,
c
(OK).
c
,
Press
2
and press
Press
5
(User Support),
4
(Mode Setup).
3
(Teens Mode).
3
Press
4
Mode), and enter the lock
No., and press
1
(SwitchTeens
c
(OK).
Other Functions
◎
The lock No. is required when changing from Teens Mode to Usual Mode or
84
Simple Mode.
Page 87

Safety Buzzer
Setting Safety Buzzer allows you to use W62P
as high volume emergency buzzer by holding
down
standby screen is displayed.
■
0
for about one second while the
To turn on Safety Buzzer
While the standby screen is displayed, press
and press
■
To stop Safety Buzzer
(ON). Input the lock No
1
c532
., and press c (OK).
To stop Safety Buzzer, input the lock No., and press c (OK).
You cannot turn off W62P or perform any other operation while the Safety
※
Buzzer is sounding. The Safety Buzzer will continue to sound until you input
the lock No. or the battery fully discharges.
,
◎
While connected with Matsushita round-type earphone jack conversion
adaptor 02 and stereo earphone MDR-E0921 by SONY/fl at-type earphonemicrophone with switch (option)/fl at-type stereo earphone-microphone
(option), Safety Buzzer sounds through W62P speaker.
◎
Even with Manner Mode set, Safety Buzzer Sounds.
Other Functions
85
Page 88

One-push Open
You can answer the phone and show the receiving e-mail/C-mail
messages by opening W62P. Refer to “Opening W62P by Using
a Single Key (One-push Open)” (page 10) about how you open
W62P.
■
To set Open to Talk
While the standby screen is displayed,
press
2
“IncomingCont” : Continue incoming when opening
“IncomingAnswer” : Answer incoming call when opening phone.
■
To set Open to Disp New
c534
(IncomingAnswer).
phone.
, and press
While the standby screen is displayed,
press
Other Functions
◎
86
c533
Even if you open W62P, a new mail message is not displayed when “Auto
Lock” or “Mail Rstr” is effective.
, and press
1
(ON).
Page 89

In addition to the functions covered in this Basic Manual, your
W62P also has the following features.
GLOBAL PASSPORT GSM
W62P supports GLOBAL PASSPORT
GSM based on au IC-Card.
GLOBAL PASSPORT GSM is an
international roaming service for the
customers to use the phone replacing
its au IC-Card with GSM cellphone for
overseas use. No special application
procedure or daily/monthly fee are
needed, and the call charge is added up
to domestic call, so the pay procedure
is simple.
LISMO
You can use au Music Player to enjoy
a Chaku-Uta-Full
CD tracks. Also, you can download a
Chaku-Uta-Full
by accessing “au one Music”.
®
or your favorite
®
or purchase CD tracks
Barcode Reader & Maker
You can use the camera to read QR
codes and barcodes. Also, you can
create your own barcodes directly from
your address book entries and profi le.
EZ FeliCa
Simply by holding W62P over reader/
writer (external device), you can use
W62P for shopping by using e-money
or credit card or use it as member’s
cards, point cards, a discount coupon,
and so on.
EZ apps (BREW®)
Enjoy downloaded games and other
software.
PC Site Viewer
You can view the web sites just like
those you view with your personal
computer.
You can comfortably view the web sites
by high speed packet communication of
2.4 Mbps receiving at maximum.
Macro Mode (Photo and Movie)
Switching closeup switch allows you to
take close-up photos of food, and other
subjects (closest focusing distance:
about 10 cm).
au one My Page
You can upload and backup various
data in your W62P (in Data Folder,
Favorite, etc.) to au one My Page on
server to manage/check them.
Touch Message
You can exchange address book,
profi les, pictures, etc. by using EZ
FeliCa.
Infrared communication
You can exchange the data saved in
your address book, Schedule, Favorite,
Data Folder, etc. between au cellphones
supporting infrared communication.
Serial Shot (Photo)
You can shoot up to nine consecutive
images and store all of them or only
selected images in memory.
Recording a movie
You can record a movie.
You can view a recorded movie, or send
it as an e-mail attachment.
Post Recording/Telop (Movie)
After recording a movie, you can add
audio or text. You can select 24 colors
or 169 colors for text or background.
Other Functions
87
Page 90

T
roubleshooting
Symptom What to check What to do Page
The phone does
not turn on.
I can’t make
calls.
I can’t receive
calls.
Troubleshooting
Nothing
happens when I
press the keys.
The phone
emits a
warning tone,
and turns off.
The phone
answers calls
automatically.
I can’t hear
the caller.
If the battery level is very low, when the phone is turned on, “Now loading...” is
※
88
shown on the display, and after a while display disappear.
Is the battery pack
installed correctly?
Is the battery pack
charged?
Are you holding down
for at least 1.5
h
seconds?
Is (Out of Range)
on the display?
Did you input the area
code?
Is the phone turned
on?
Did you press d ?
Is Emission OFF
turned on?
(Out of Range)
Is
on the display?
Is the phone turned
on?
Is Emission OFF
turned on?
Is the phone turned
on?
Battery pack power is
low.
Is Easy Voice Memo
turned on?
Is Drive Mode turned
on?
Is the earpiece volume
level too low?
Is the earpiece
covered with your ear?
Correctly install the battery pack.
※
Charge the battery pack
Hold down h for at least 1.5
seconds to turn on the phone.
Wait until you are in a location
where
trying to make a call.
When making a call to regular
phones, you need to input the area
code.
Hold down h for at least 1.5
seconds to turn on the phone.
After inputting the phone number,
press
Turn off Emission OFF.
Move to a location where is not
on the display.
Hold down h for at least 1.5
seconds to turn on the phone.
Turn off Emission OFF.
Hold down h for at least 1.5
seconds to turn on the phone.
Charge the battery pack. P.10
Hold down r for about one
second to turn off Easy Voice Memo.
Hold down
second to turn off Drive Mode.
During a call, press Z to increase
earpiece volume.
Make sure to place the earpiece to
the center of your ear.
is not displayed before
to dial it.
d
>
. P.10
for about one
−
P.12
P.12
P.25
P.12
P.25
−
P.12
P.12
−
P.12
P.33
P. 4
P.32
−
Page 91

Remote
Ctrl Lock
R
emote Ctrl Lock
is set!
If You Lose Your W62P
When you set “Lock by Incoming” of
“Remote Ctrl Lock”, makes it possible for you to set Auto Lock and
FeliCa Lock on from a remote location. These lock function keeps
others from using your W62P.
■
Confi guring Lock by Incoming settings
You can set Auto Lock and FeliCa Lock on by making calls
sever
al times from the registered phone number to your W62P
within the specifi ed period of time.
While the standby screen
1
is displayed, press
c413
No., and press
, input the lock
c
(OK).
Press
2
and press
3
(Lock by Incoming),
4
(Caller ID List).
Continued on the next page
Remote Ctrl Lock
89
Page 92

Use B to select a
3
registration number, press
a
(Edit), input the phone
number, and press
You can also press p (Menu) before
inputting a phone number, and select
the number from the address book, outgoing records, or incoming
records, or you can specify a pay phone. You can register up to three
different phone numbers.
c
(Reg).
Press
Press
4
and press
Press
5
input the period you want to
specify, and press
Remote Ctrl Lock
You can set the time period (the time
intervals from the fi rst call to the last
call you should make to activate
Remote Ctrl Lock).
You can set the time period between 1 to 10 minutes.
Press
6
Incoming), input the number
twice and advance to the next step.
r
1
(ON/OFF Setup),
1
(ON).
2
(Specifi ed Time),
c
(OK).
3
(Num of
of calls you want to specify,
and press
c
(OK).
90
You can set how many times you
should repeat making a call to activate
Remote Ctrl Lock.
You can set it from 3 to 10 calls.
Page 93

■
Setting Auto Lock and FeliCa Lock on from a
remote location
Have a registered number call your W62P a set
1
number of times within the specifi ed period of time
as set in “Confi guring Lock by Incoming settings”
(page 89).
The guidance “
activated) will be played back, and Auto Lock and FeliCa Lock
will be set. When Remote Ctrl Lock is activated, the W62P will be
automatically turned off and then back on again.
◎
Remote Ctrl Lock cannot be activated if the W62P is not turned on or if it is
outside its service area, or when “Emission OFF (M57)” settings is “Emission
OFF”.
◎
When you purchase the W62P, its initial value in “Erase Data” setting is
“OFF”, and its initial value in “Rel Phone Lock” setting is “Invalid”.
■
Remote Ctrl Lock is activated by using the
遠隔ロックを設定しました
” (Remote Ctrl Lock
Security Lock Service
Even when Lock by Incoming settings have not been made in
advance, you can make Auto Lock and FeliCa Lock remotely
by calling the au Customer Service Center or by using your
computer.
The Security Lock Service is free.
Using the Security Lock Service
●
Turning Remote Ctrl Lock ON/OFF by calling au Customer Service Center
From au cellphones: 113 area code not required (toll free)
From cellphones except au, or regular phones:
This service is available 24 hours.
・
Follow the instructions of the voice guidance.
・
●
Turning Remote Ctrl Lock ON/OFF by PC
Login to au Customer Support (http://cs.kddi.com) using the internet, and
follow the procedure indicated on the screen.
Registration is required the fi rst time you use this service.
※
(This service can be used even if it registers after you lose your phone.)
0077-7-113 (toll free)
Remote Ctrl Lock
91
Page 94

I
ndex
A
Address book .................................... 39
Adding outgoing or incoming
record data to the address book ... 42
Deleting ........................................... 40
Dialing from the address book ......... 43
Editing .............................................. 41
Registering ...................................... 39
Adjusting the ring tone volume ....... 31
Answering a call ................................ 27
au IC-Card ............................................ 9
au Media Tuner .................................. 70
Ending ............................................. 74
Initializing ......................................... 71
Watching Television (1Seg) .............. 72
B
Basic operations ............................... 16
Battery level ....................................... 12
Battery pack ..................................... 8,9
C
Camera ............................................... 56
Attaching a photo to an e-mail message
Shooting a photo ............................. 58
Viewing photos ................................ 59
Changing the ring tone ..................... 29
Charging the battery ......................... 10
Checking charges ............................. 65
Checking your current phone number
C-mail ................................................. 53
C-mail Safety Block ......................... 53
Creating and sending C-mail messages
Reading received C-mail messages
Index
D
Desktop holder ............................... 8,11
Disaster Message Board Service ...... 5
Display indicators ............................. 17
Downloading Chaku-Uta-Full
and Chaku-Uta
Drive Mode ........................................... 4
92
®
.............................. 64
E
Earpiece volume................................ 32
Easy Voice Memo .............................. 33
Delete .............................................. 34
Playback .......................................... 34
Turning on ........................................ 33
E-mail ................................................. 46
Avoiding spam ................................. 52
Changing your e-mail address ......... 23
... 59
Checking your current e-mail address
Creating and sending e-mail messages
E-mail Setup .................................... 52
Initializing e-mail .............................. 21
Reading an e-mail message
with attached photos ..................... 50
Reading received e-mail messages
Replying to a received e-mail message ...
EZ Channel-Plus ............................... 70
EZ Navi ............................................... 68
EZ News Flash ................................... 66
EZweb ................................................ 60
au one Top ....................................... 61
Bookmarking sites ........................... 62
Downloading .................................... 64
EZ Password .................................... 64
Viewing a bookmarked site .............. 63
... 22
... 47
.. 49
51
I
Incoming records .............................. 28
... 22
... 54
... 55
®
Initial settings (e-mail and EZweb)
Initial values ...................................... 12
Inputting characters ......................... 35
Inputting an e-mail address ............. 36
Inputting pictographs ....................... 37
Inputting useful sentences ............... 37
International call ............................... 26
... 21
Page 95

K
Key functions .................................... 16
M
Mail
C-mail .............................................. 53
E-mail .............................................. 46
Mail fi lter ......................................... 4,52
Main menu .................................... 18,77
Making a call ...................................... 25
Manner Mode ..................................... 32
microSD™ memory card ............... 9,17
Mind your manners! ............................ 1
Missed call notifi cation .................... 27
N
Names of parts .................................... 9
Notify caller ID ................................... 25
O
One-push Open ............................ 10,86
One-ring calls ................................. 4,28
Other functions ................................. 75
Outgoing records .............................. 28
P
Pair function ...................................... 44
Making a phone call ......................... 45
Registering a Pair partner ................ 44
Sending mail .................................... 45
Phone call .......................................... 25
Photo
Sending a photo by e-mail ............... 59
Shooting a photo ............................. 58
Viewing photos ................................ 59
Playback
Easy Voice Memo ............................ 34
Photo ............................................... 59
R
Redialing
(outgoing/incoming records) ........ 28
Remote Ctrl Lock .............................. 89
S
Safety Buzzer .................................... 85
Security Code .................................... 13
Security Lock Service ....................... 91
Set Language .................................... 14
Signal strength .................................. 12
Simple Mode ...................................... 75
Creating and sending
e-mail messages ........................... 81
Entering Simple Mode ..................... 75
Exiting Simple Mode ........................ 76
Registering an address book ........... 78
Using the address book ................... 80
Using the main menu ....................... 77
Site ........................................... 61,62,63
Soft keys ............................................ 20
Spam ............................................... 4,52
Standby screen ................................. 12
T
Teens Mode ....................................... 83
Television (1Seg) ............................... 70
Troubleshooting ................................ 88
Turning power on .............................. 12
U
Unsolicited advertisement ............ 4,52
Using menus ..................................... 20
V
Vibrator .............................................. 32
Index
93
Page 96

For inquiries, call:
au Customer Service Center
From EZweb site:
Ho w to ac ce ss
EZ
→auoneTop→
(au Customer Support)
→お問い合わせ(Inquiries)
※Menu structure is subject to change without notice.
auお客さまサポート
For general information and charges
From regular phones:
0077-7-111
フリーコール
(toll free)
From au cellphones:
157
area code not required
(toll free)
For loss, thelf or damage and operation information
From regular phones:
0077-7-113
フリーコール
From au cellphones:
113
Pressing "zero" will connect you to an operator, after
calling "157" on your au cellphone.
area code not required
(toll free)
(toll free)
Cel lphone and P HS op erator s coll ect a nd
recy cle un used teleph ones, batter ies a nd
bat tery c harger s at s tores beari ng th e
log o rega rdless of br and a nd
manu factu rer to prote ct th e envir onment
and reuse valua ble re source s.
Sales: KDDI Corporation
Okinawa Cellular Telephone
Company
Manufactured by:
Mobile Communications Co., Ltd.
Panasonic
October 2008, 1
st
Edition
Read this to access to the
au online manual
 Loading...