

Page 1
Operating Instructions
SD Media Storage
Model No. VW-PT2
Before connecting, operating or adjusting this product, please read the
instructions completely.
For USA assistance, please call: 1-800-211-PANA(7262) or, contact us via the web at:
http://www.panasonic.com/contactinfo
For Canadian assi stance, please c all: 1-800-561-5505 or visit us at www.panaso nic.ca
PP
VQT1B03
Page 2

Dear Customer,
We would like to take this opportunity to thank you for purchasing this Panasonic SD
Media Storage. Please read these Operating Instructions carefully and keep them handy
for future reference.
¬ Information for your safety
WARNING:
TO REDUCE THE RISK OF FIRE, ELECTRIC SHOCK OR PRODUCT DAMAGE,
≥ DO NOT EXPOSE THIS APPARATUS TO RAIN, MOISTURE, DRIPPING OR
SPLASHING AND THAT NO OBJECTS FILLED WITH LIQUIDS, SUCH AS
VASES, SHALL BE PLACED ON THE APPARATUS.
≥ USE ONLY THE RECOMMENDED ACCESSORIES.
≥ DO NOT REMOVE THE COVER (OR BACK); THERE ARE NO USER
SERVICEABLE PARTS INSIDE. REFER SERVICING TO QUALIFIED SERVICE
PERSONNEL.
THE SOCKET OUTLET SHALL BE INSTALLED NEAR THE EQUIPMENT AND
SHALL BE EASILY ACCESSIBLE.
CAUTION
Danger of explosion if battery is incorrectly replaced.
Replace only with the same or equivalent type recommended by the manufacturer.
Dispose of used batteries according to the manufacturer’s instructions.
Battery
Battery pack (Lithium ion battery pack)
≥ Use the specified unit to recharge the battery pack.
≥ Do not use the battery pack with equipment other than the specified unit.
≥ Do not get dirt, sand, liquids, or other foreign matter on the terminals.
≥ Do not touch the plug terminals (i and j) with metal objects.
≥ Do not disassemble, remodel, heat or throw into fire.
If any electrolyte should come into contact with your hands or clothes, wash it off
thoroughly with water.
If any electrolyte should come into contact with your eyes, never rub the eyes.
Rinse eyes thoroughly with water, and then consult a doctor.
Warning
Risk of fire, explosion and burns. Do not disassemble.
Do not heat the batteries above the following temperatures or incinerate.
Battery pack 60 oC (140 oF)
2
VQT1B03
Page 3
THE FOLLOWING APPLIES ONLY IN THE U.S.A.
FCC Note:
This equipment has been tested and found to comply with the limits for a Class B
digital device, pursuant to Part 15 of the FCC Rules. These limits are designed to
provide reasonable protection against harmful interference in a residential installation.
This equipment generates, uses, and can radiate radio frequency energy and, if not
installed and used in accordance with the instructions, may cause harmful
interference to radio communications. However, there is no guarantee that
interference will not occur in a particular installation. If this equipment does cause
harmful interference to radio or television reception, which can be determined by
turning the equipment off and on, the user is encouraged to try to correct the
interference by one or more of the following measures:
≥ Reorient or relocate the receiving antenna.
≥ Increase the separation between the equipment and receiver.
≥ Connect the equipment into an outlet on a circuit different from that to which the
receiver is connected.
≥ Consult the dealer or an experienced radio/TV technician for help.
FCC Caution: To assure continued compliance, follow the attached installation
instructions and use only shielded interface cables with ferrite core
when connecting to computer or peripheral devices.
Any changes or modifications not expressly approved by the party
responsible for compliance could void the user’s authority to
operate this equipment.
Declaration of Conformity
Trade Name: Panasonic
Model No.: VW-PT2
Responsible party: Panasonic Corporation of North America
One Panasonic Way, Secaucus, NJ 07094
Support Contact: Panasonic Consumer Electronics Company
1-800-272-7262
This device complies with Part 15 of the FCC Rules. Operation is subject to the
following two conditions: (1) This device may not cause harmful interference, and (2)
this device must accept any interference received, including interference that may
cause undesired operation.
VW-PT2
3
VQT1B03
Page 4
AC adaptor
This AC adaptor operates on AC between 100V and 240 V.
But
≥ In the U.S.A. and Canada, the AC adaptor must be connected to a 120V AC power
supply only.
≥ When connecting to an AC supply outside of the U.S.A. or Canada, use a plug
adaptor to suit the AC outlet configuration.
≥ When connecting to a supply of greater than AC 125V, ensure the cord you use is
suited to the voltage of the AC supply and the rated current of the AC adaptor.
≥ Contact an electrical parts distributor for assistance in selecting a suitable AC plug
adaptor or AC cord set.
Marking sign is located on bottom of the unit.
-If you see this symbolInformation on Disposal in other Countries outside the
European Union
This symbol is only valid in the European Union.
If you wish to discard this product, please contact your local authorities or
dealer and ask for the correct method of disposal.
¬ Contents
Information for your safe ty ...................2
Before use...............................................4
Features..................................................6
Accessories............................................7
Parts identification and handling .........7
Charging the Battery..............................8
Inserting/Removing an SD car d............9
Turning the unit on/off......................... 10
About the HDD safety switch..............10
Copying data on an SD card to the HDD
Copying data on the HDD or SD car d to
a PC ...................................................12
Cautions for Use..................................14
Troubleshooting...................................17
Specifications.......................................19
4
VQT1B03
..11
¬ Before use
∫ Try out the SD Media Storage
After copying data from an SD Memory
Card/SDHC Memory Card to the HDD,
connect the unit to a PC and check that the
data was copied normally.
∫ Handling the HDD
The HDD is a very special device and
because of its high recording density and
high capacity for saving data it is easily
susceptible to damage. Be careful about
the following when using it.
The HDD is a device that is not built to
withstand vibration/shock or dust
Depending on the environment and
handling of the HDD, some content may
become damaged and in the worst case
copying and reading the data may no
longer be possible. In particular, do not
Page 5

subject it to vibration and shock or turn off
the power while using it.
Contact your dealer immediately if you
notice anything unusual with the HDD
If there are any defective parts inside the
HDD, there may be continuous noise
during copying, the sound may break up
etc. If you continue to use this unit, the
HDD will become worse and, in the worst
case, it may no longer be possible to use
the HDD. Contact your dealer immediately
in this kind of situation. If the HDD fails, the
data on it cannot be repaired.
Backup the HDD at fixed intervals
This product is a HDD device for temporary
storage. Copy important data to a PC to
prevent any losses of data caused by static
electricity, electromagnetic waves and
damage to or malfunction of this product.
≥ Panasonic will in no way be liable for any
damages sustained directly or indirectly
from the use or failure of this product.
Panasonic will also in no way be liable
for any losses of data caused by this
product.
∫ Carefully observe copyright laws
The materials that you record and create
can be used for your personal
entertainment only. Under copyright laws,
other materials cannot be used without
obtaining permission from the holders of
the copyrights.
≥ Injury or material damage resulting
from any kind of use that is not in
accordance with the operating
Instructions are the sole
responsibility of the user.
≥ The manufacturer shall in no event be
liable for the loss of recordings due to
malfunction or defect of this SD Media
Storage, its accessories or Memory
Card.
≥ The nameplate of the SD Media Storage
is fixed on the bottom of the battery
compartment.
∫ About the photographs and
illustrations in these operating
instructions
Please note that the actual controls and
components, etc. of your SD Media
Storage may look somewhat different from
those shown in the illustrations in these
Operating Instructions.
∫ Pages for reference
Pages that you should refer to are shown
as (P00).
∫ Use only the recommended
accessories.
≥ Do not use any other USB connection
cables except the supplied one.
∫ Cards that you can use with this
unit
You can use SD Memory Cards and SDHC
Memory Cards of the following capacity on
this unit.
SD Memory card
8 MB, 16 MB, 32 MB,
64 MB, 128 MB, 256 MB,
512MB, 1GB, 2GB
(Maximum)
SDHC
Memory card
4GB
(Maximum)
5
VQT1B03
Page 6
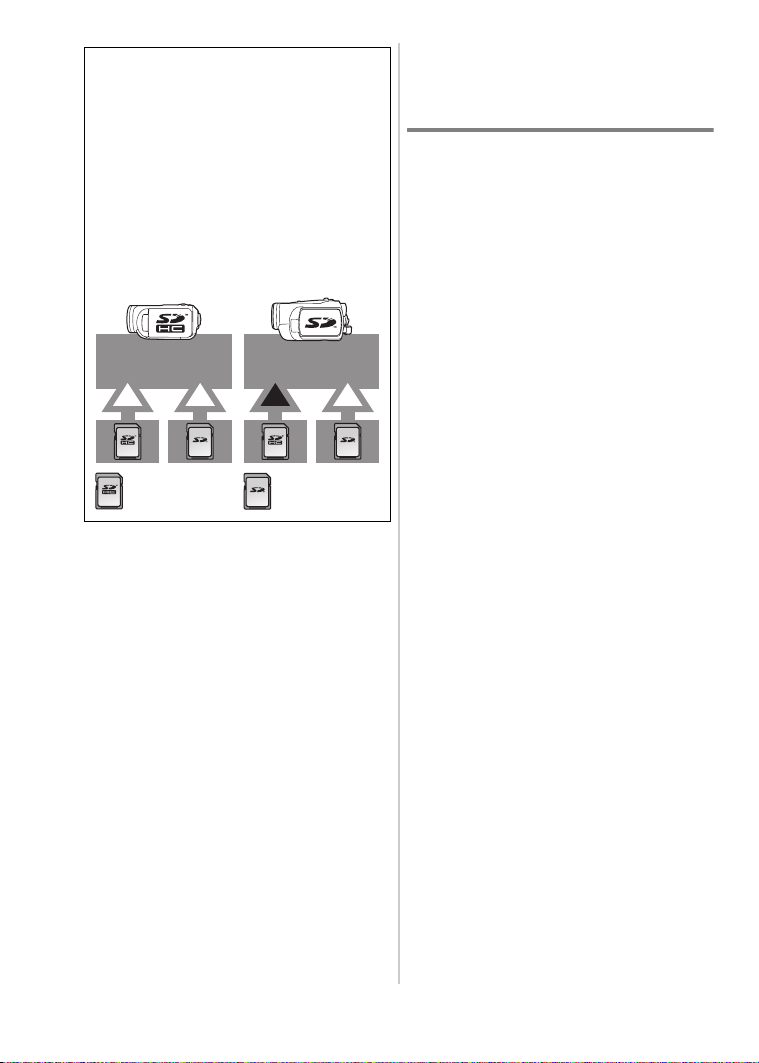
This unit is compatible with both SD
○○○ ×
Memory cards and SDHC Memory
cards. You can only use SDHC
Memory cards on devices that are
compatible with them. You cannot use
SDHC Memory cards on devices that
are only compatible with SD Memory
cards. (When using a SDHC Memory
card on another device, be sure to use
devices that are compatible with
SDHC Memory cards.)
(±: Available, —: Not available)
SDHC compatible
device
SDHC
Memory Card
For the purposes of these operating
instructions, the following cards are
referred to as “the SD card”.
–SD Memory Card
–S DHC Memory Card
≥ Please confirm the latest information on
the following website. (This website is in
English only.)
http://panasonic.co.jp/pavc/global/cs/
e_cam
≥ This unit supports SD Memory Cards
formatted in FAT12 system and FAT16
system based on SD Memory Card
Specifications and SDHC Memory Cards
formatted in FAT32 system.
≥ If you want to use a 4GB Memory Card,
only SDHC Memory Cards can be used.
≥ 4GB (or more) Memory Cards with no
SDHC logo are not based on SD
Memory Card Specifications.
≥ SDHC Logo is a trademark.
≥ miniSD Logo is a trademark.
SD compatible
device
SD Memory
Card
≥ We recommend that you use a
Panasonic brand SD card.
≥ A MultiMediaCard cannot be used on
this unit.
≥ Microsoft® and Windows® are either
registered trademarks or trademarks of
Microsoft Corporation in the United
States and/or other countries.
≥ Apple, Mac OS is either registered
trademarks or trademarks of Apple
Computer, Inc. in the United States and/
or other countries.
≥ IBM and PC/AT are registered
trademarks of International Business
Machines Corporation of the U.S.
≥ PowerPC is a trademark of International
Business Machines Corporation.
®
, Pentium® and Celeron® are
≥ Intel
registered trademarks or trademarks of
Intel Corporation in the United States
and other countries.
®
CoreTM Solo and Intel® CoreTM
≥ Intel
Duo are either registered trademarks or
trademarks of Intel Corporation in the
United States and/or other countries.
≥ Microsoft product screen shot(s)
reprinted with permission from Microsoft
Corporation.
≥ Other names of systems and products
mentioned in these instructions are
usually the registered trademarks or
trademarks of the manufacturers who
developed the system or product
concerned.
¬ Features
≥ You can save a lot of moving pictures
and still pictures to its small,
lightweight and portable high
capacity 40 GB HDD (hard disk).
≥ You can copy the data saved on the
HDD to a PC by connecting this unit
to the PC.
6
VQT1B03
Page 7
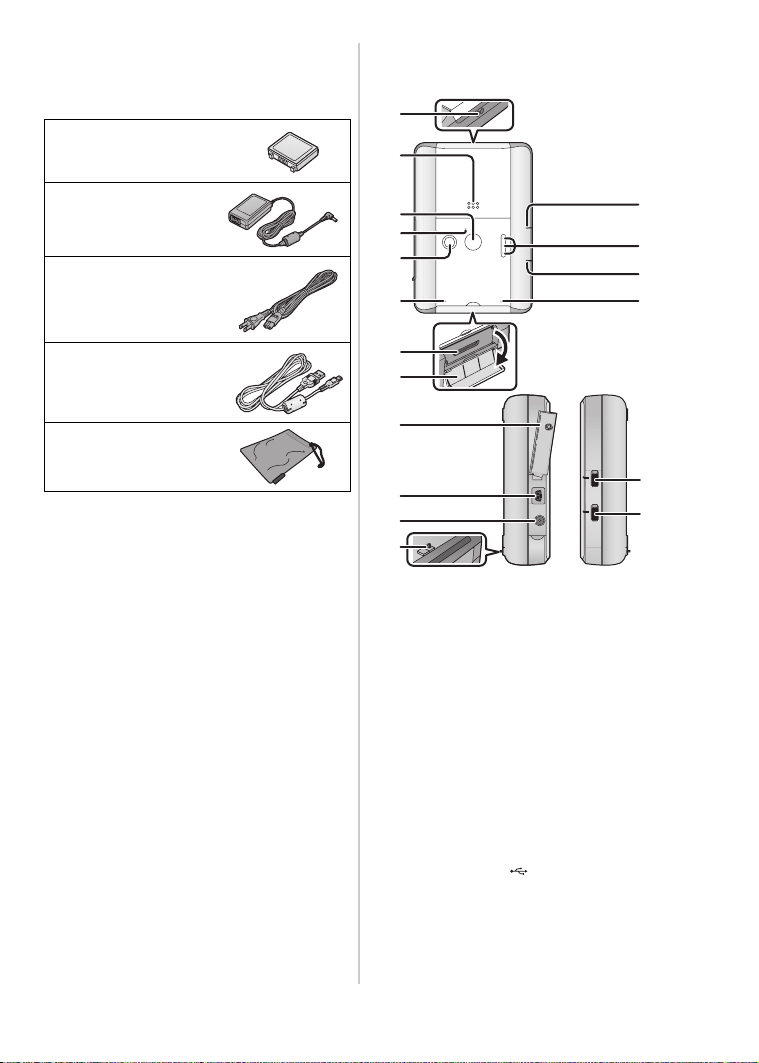
¬ Accessories
Check the accessories before using this
unit.
Battery pack
CGA-S303
¬ Parts identification and
handling
1
2
AC adaptor
VSK0681
AC cable
K2CA2CA00029
USB cable
K2KZ4CB00011
Carrying Case
VFC4228
≥ This unit is a precision instrument so turn
off the power and put it in the carrrying
case when carrying it. Also, be careful
not to shake, drop or subject it to a
shock.
≥ For the purposes of these operating
instructions, the battery pack is referred
to as “the battery”.
3
4
5
6
11
12
13
14
15
16
1 Strap fixture
2 Battery cover (P8)
3 Copy button [COPY] (P11)
4 Copy lamp (P11)
5 Cancel button [CANCEL] (P11)
6 Error display lamp [ERROR] (P18)
7 HDD SAFETY lamp (P10)
8 HDD capacity lamp
[FULL/75%/50%] (P11)
9 Status indicator (P8)
10 HDD/Card access lamp [ACCESS]
(P10)
11 Card slot (P9)
12 Card slot cover (P9)
13 Terminal cover
14 USB terminal [ ] (P12)
15 DC input terminal [DCIN 9.3V] (P8)
16 HDD SAFETY detection switch (P10)
17 HDD SAFETY switch [ON/OFF] (P10)
18 Power switch [ON/OFF] (P10)
7
8
9
10
17
18
7
VQT1B03
Page 8
¬ Charging the Battery
2
2
1
A
When this unit is purchased, the battery is
not charged. Charge the battery before
using this unit.
≥ Set the power switch to [OFF] before
charging. If you t urn on thi s uni t while
charging, the charging will stop.
≥ Always use genuine Panasonic batteries
(CGA-S303).
≥ If you use other batteries, we cannot
guarantee the quality of this product.
≥ Always use a genuine Panasonic AC
adaptor.
≥ Do not use any other AC adaptors
except the supplied one.
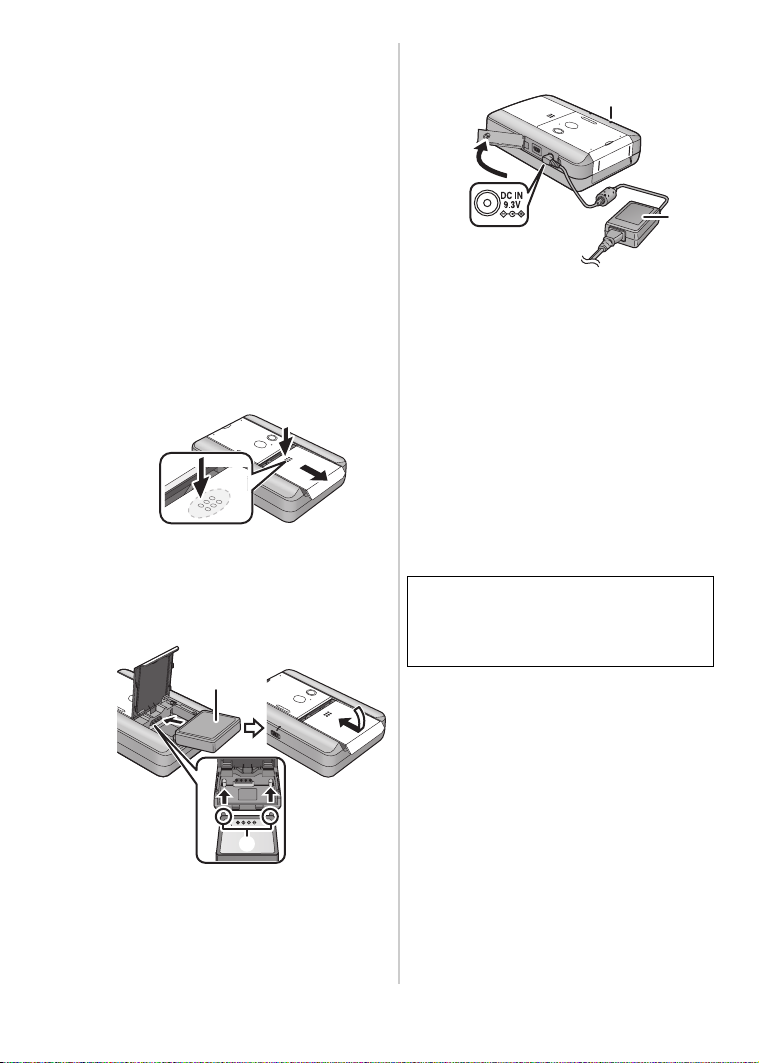
1 Set the power switch to [OFF].
2 Remove the battery cover.
1
2
A
While pushing the battery cover A,
1
2 slide it in the direction of the
arrow.
3 Insert the battery and then close the
battery cover.
1 3
B
2
C
1 Place the battery label side B up.
2 Insert the projecting parts C of the
battery in the holes on the unit.
3 Put the battery cover back in its
original place.
8
VQT1B03
4 Connect the AC adaptor (supplied)
D to this unit and the AC outlet.
E
3
4
1
2
1 Connect the AC cable to the AC
adaptor.
2 Connect the AC cable to the AC
outlet.
3 Open this unit’s terminal cover.
4 Connect the AC adaptor to this
unit’s DC input termina l
[DC IN 9.3V].
≥ The status indicator E blinks at
intervals of about 2 seconds and
charging starts. Charging is
completed when the status indicator
goes off.
≥ If the status indicator blinks faster,
refer to page 15.
The AC cable is for use with t his unit
only. Do not use it with other devices
or use the
with this unit.
≥ Charging is normally completed after
about 1 hour and 30 minutes when the
temperature is 25 oC (77 oF) and the
humidity is 60%. (The charging time will
differ depending on the operating
conditions.)
≥ The batterie heats up after use or
charging. The unit and the SD card also
heat up during use. This is not a
malfunction.
≥ Be sure to turn off the power [OFF] and
check that the status indicator has gone
out before removing the battery cover
and then removing the battery. Put the
AC cable for other devices
D
Page 9

battery cover back in its original place
A
after removing the battery.
∫ About the remaining battery
power
If the status indicator blinks at intervals of
about 1 second (blinks for about 0.5
seconds then goes off for about 0.5
seconds) when using the battery, the
remaining battery power has become low.
In this case, connect the AC adaptor or
charge the battery. If the battery is
completely discharged during copying, the
copying stops and the power automatically
turns off. You may not be able to playback
data that stopped being copied halfway.
Charge the battery sufficiently before
using the unit.
≥ Refer to page 19 for information about
the battery operation time.
∫ Connecting to the AC outlet
If you turn on this unit while charging the
battery using the AC adaptor, you can use
the power supplied from the AC outlet to
power the unit for use. (While it is in use,
the battery will not be charged.)
≥ You can also use this unit with the AC
adaptor only. However, we recommend
using the unit with the battery also
inserted when charging etc. to prevent
the power supply stopping.
¬ Inserting/Removing an
SD card
≥ Before inserting/removing an SD
card, be sure to turn the power [OFF].
If the SD card is inserted or removed with
the power turned on, this unit may
malfunction or the data recorded on the
SD card may be lost.
1 Set the power switch to [OFF].
OFF ON ONOFF
OFF ON
≥ Check that the status indicator A
has gone out.
2 Open the card slot cover.
3 Insert/remove the SD card into/from
the card slot.
A
B
≥ When inserting an SD card, face the
label side B towards you and press
it straight in with one stroke as far as
it goes.
≥ When removing the SD card, open
the card slot cover and press the
center of the SD card and then pull it
straight out.
4 Securely close the card slot cover.
9
VQT1B03
Page 10

∫ About the SD card
A
≥ We recommend that you use a
Panasonic brand SD card.
≥ The SD card has a write
protection switch
the switch is moved to
[LOCK], you cannot write
to the SD card, delete the
data on it or format it. If it is moved back,
you can.
≥ Do not touch the terminals on the back of
the SD card.
≥ Electrical noise, static electricity or the
failure of this unit or the SD card may
damage or erase the data stored on the
SD card. Also, save important data to a
PC etc.
C on it. If
C
4
∫ About the miniSD Card (optional)
≥
Be sure to insert miniSD Cards in the
dedicated card adaptor before use.
Inserting a card in this unit without the
adaptor ma y dam a ge th e un i t or th e car d.
≥ Do not insert an empty card adaptor in
this unit. Do not leave the adaptor in this
unit while inserting or removing miniSD
Cards. This may cause the unit to
malfunction.
¬ Turning the unit on/off
1 Insert the battery or
connect the AC adaptor.
≥ When connecting to a PC, we
recommend connecting the AC
adaptor and inserting the battery to
power the unit for use.
2
Place the unit on an even, stable surface
and then set the power switch to [ON].
OFF ON ONOFF
OFF ON
≥ The status indicator lights and the
power turns on.
3 Set the power switch to [OFF] to turn
off the power.
≥ The status indicator goes out and the
power turns off.
≥ If the unit has not been used for about 3
minutes when using the battery only, the
power is automatically turned off to save
the battery life. Turn off, then turn on the
power to resume using the unit.
Do not remove the battery or disconnect the
≥
AC adaptor while the unit is on. The unit may
malfunction or the data may be destroyed.
When the unit is not being used, set the
power switch to [OFF].
∫
About the HDD/Card access lamp
When the unit accesses the
HDD or an SD card, the
access lamp A lights up.
≥ Do not do the following operations when
the access lamp is lit. The HDD, the SD
card or the recorded data on the HDD or
the SD card may be damaged and this
unit may malfunction.
–Removing the SD card.
–Operating the [ON/OFF] switch.
–Removing the battery or AC adaptor.
–Disconnecting the USB cable.
¬
About the HDD safety switch
If the HDD safety switch is set to [ON], the
HDD is automatically stopped when the unit is
lifted or set on a surface that is not even and
stable. This protects the HDD from damage.
A B
≥
We recommend setting it to [ON] as the data
on the HDD may be destroyed if this unit is
mistakenly lifted and dropped while copying.
≥
If the HDD SAFETY detection switch A
on the unit is activated, the HDD SAFETY
B
lamp
stop. If this unit is placed on a level
surface, the operation will start again.
≥
Even if the HDD SAFETY switch is set to
[OFF] while copying, the HDD SAFETY
detection switch will be activated if this
unit is lifted.To protect the HDD, do not
move this unit while copying.
OFF ON ONOFF
OFF ON
will blink and the operation will
A
10
VQT1B03
Page 11

≥
123 4
If the HDD SAFETY detection switch is
activated while this unit is conn ec te d to a
PC, the operation may remain stopped, the
data being copied may be destroyed or an
error may occur on the PC. Be sure to place
this unit on a level surface.
¬ Copying data on an SD
card to the HDD
This is for copying data on an SD card to
the HDD on this unit.
1 Insert the SD card.
2 Set the power switch to [ON].
3
Check that the copy lamp lights green.
≥ The lamp lights green if the
remaining capacity of the HDD is
sufficient to copy all the data on the
SD card to it.
Depending on the operating
≥
conditions, it may take time for the
copy lamp to light after turning on the
power or disconnecting the USB cable.
The HDD is operating so do not move
this unit until the copy lamp lights.
4 Press the [COPY] button.
COPY
≥
Do not remove t he SD card wh ile co pying .
≥ The copy lamp flashes green at
intervals of about 2 seconds during
copying. Check that the copy lamp
lights green (copying has been
completed normally) and then
remove the SD card.
≥ We recommend copying the data to
the HDD again if you are not able to
verify on the PC that copying has
been completed normally.
∫ To cancel copying halfway
Press and hold the
[CANCEL] button for
2 or more seconds.
CANCEL
≥ If copying is canceled, the file being
copied will be erased. You cannot start
copying again until all the data has
finished being erased. Wait until the
COPY lamp lights green.
∫ About the HDD capacity lamp
The HDD capacity lamp lights to show an
approximation of the HDD capacity.
Lights green to show there is no free
FULL:
space on the HDD or the remaining
capacity of the HDD is insufficient to
copy the data on the inserted SD card.
75% :
Lights green when the remaining
capacity of the HDD is more than 75%.
50% :Lights green when the remaining
capacity of the HDD is more than
50% but less than 75%.
∫ About the folder structure
Each time data is copied from an SD card to the
HDD, a folder is automatically created and the
data on the SD card is copied to this folder. (
Folder structure
ROOT
PANA
070101_1
070101_2
070101_a
070101_b
Folder name (
070101_1
1year 2month 3day 4number
If the HDD SAFETY detection switch is
activated and the copying stops, the data
already copied just before the copying
stops will remain on the HDD. If the
operation starts again, the copying will
start again from the beginning as di fferent
data. A new folder will be created and all
the data will be copied to that folder.
The date and time that
the [PANA] folder is
created or updated is
always shown as
A
“2006 01 01 0:00:00”.
example)
The folder name becomes the
date that the newest data was
recorded on the SD card.
A
∫ Deleting data on the HDD
Delete unnecessary data on the HDD by
connecting this unit to a PC and then
deleting the data with Explorer (Windows)
or on the desktop (Macintosh). (P13, 13)
11
VQT1B03
)
Page 12

¬ Copying data on the
HDD or SD card to a PC
If you connect this unit to a PC using the
USB cable, it can be used as an external
drive on the PC.
≥ The [COPY] button and the [CANCEL]
button cannot be operated while this
unit is connected to a PC. Also, the
power will not turn off even if the
power switch is set to [OFF].
Disconnect the USB cable (P13, 13) and
then operate the unit or turn off its power.
≥ The HDD capacity lamp goes out while
this unit is connected to a PC.
≥ Even if you connect this unit to a PC it
will not be recognized by the PC while
copying data on an SD card to the HDD.
≥ Be sure to place this unit on a level
surface when the HDD SAFETY switch
is set to [ON]. (P10) If the HDD SAFETY
detection switch is activated, the copying
may remain stopped, the data being
copied may be destroyed or an error
may occur on the PC.
Important note
Do not format this unit’s HDD on a PC.
You will no longer be able to use the
HDD if you format it on a PC.
If using Windows
∫ Operating environment
Personal computer
IBM PC/AT compatible personal computer
OS
Microsoft Windows Me
Microsoft Windows 2000 Professional
Microsoft Windows XP Home Edition
Microsoft Windows XP Professional
Interface
USB port
Other requirements
Mouse or equivalent pointing device
≥ Use an OS standard driver for operation.
≥ Also, check the operating environment of
any software you are using.
12
VQT1B03
≥ Even if the system requirements
mentioned in these operating
instructions are fulfilled, some personal
computers cannot be used.
≥ This software is not compatible with
Microsoft Windows 3.1, Windows 95,
Windows 98/98SE and Windows NT.
≥ Operation is not guaranteed on an
upgraded OS.
≥ Operation on an OS other than the one
pre-installed is not guaranteed.
≥ When 2 or more USB devices are
connected to a PC, or when devices are
connected through USB hubs or by using
extension cables, proper operation is not
guaranteed.
When connecting the unit to a
≥
“Windows 2000” OS PC with the USB
cable, do not replace the SD card while
the unit and the PC are connec ted. The
information on the SD card ma y be
damaged. Disconnect the USB cable
before replacing the SD card.
Refer to “To disconnect the USB cable
safely” on page 13 when disconnecting
the USB cable.
1 Insert the ba ttery or connect this
unit to the AC adaptor.
≥ We recommend connecting the AC
adaptor and inserting the battery to
power the unit for use.
2 Connect this unit to the PC and then
turn on the power on this unit.
A
AUSB cable (supplied)
≥ The HDD is recognized as
a [Local disk] and the SD card is
recognized as a [Removable disk] on
[My Computer].
≥ Insert the plugs as far as they will go.
The unit and PC will not operate
properly if they are not inserted fully.
≥ Do not use any other USB
connection cables except the
supplied one.
Page 13

3 Double-click the
folder in [Lo c a l
Disk] (HDD) or
[Removable disk]
(SD card) containing the saved file.
4
Drag and drop the file onto the
destination folder (hard disk of the PC).
Copy the file to the PC by dragging and
dropping it.
≥ When deleting data on this unit’s
HDD, always copy the data to a PC
and then delete it.
∫
To disconnect the USB cable safely
If the USB cable is diconnected while the
HDD/Card access lamp is lit, this unit may
malfunction and the data may be lost.
1 Check that the HDD/Card access
lamp is not lit.
2
Double click the icon in task tray.
≥ Hardware disconnect dialogue
appears.
≥ Depending on your PC’s settings,
this icon may not be displayed.
3 Select [USB Mass Storage Device]
and click [Stop].
≥ This is displayed as [USB disk] in
Microsoft Windows Me.
4 Click [OK].
≥ Click [OK], and you can safely
disconnect the cable.
If using Macintosh
∫ Operating environment
Personal computer
Macintosh
CPU
PowerPC G3 (400 MHz or higher), G4, G5
Intel Core Duo, Intel Core Solo
OS
Mac OS X 10.3 to 10.4
Interface
USB port
≥ Use an OS standard driver for operation.
≥ Even if the system requirements
mentioned in these operating
instructions are fulfilled, some personal
computers cannot be used.
≥ Operation on an OS other than the one
pre-installed is not guaranteed.
≥ When 2 or more USB devices are
connected to a PC, or when devices are
connected through USB hubs or by using
extension cables, proper operation is not
guaranteed.
1 Insert the battery or connect this
unit to the AC adaptor.
≥ We recommend connecting the AC
adaptor and inserting the battery to
power the unit for use.
2 Connect this unit to the PC and then
turn on the p ower on this un it.
≥ Insert the plugs as far as they will go.
The unit and PC will not operate
properly if they are not inserted fully.
≥ Do not use any other USB
connection cables except the
supplied one.
3 Double-click [NO_NAME]
(HDD) or [Untitled] (SD card)
displayed on the desktop.
4
Drag and drop the folder or the file
containing the data that you want to
acquire to a different folder on the PC.
≥ When deleting data on this unit’s
HDD, always copy the data to a PC
and then delete it.
∫
To disconnect the USB cable safely
Drag [NO_NAME] or [Untitled] disk icon to the
[Trash] and then disconnect the USB cable.
13
VQT1B03
Page 14

¬ Cautions for Use
∫ About this unit
Be careful about the following as they may
cause the unit to fail or malfunction or the
data to be be destroyed or lost.
≥ The unit and SD card become warm
after long operation, but this is not a
malfunction.
Keep the unit away from magnetized
equipment/mobile phones, micro-wave
ovens, TVs and video game equipment.
≥
Recordings may be damaged, or images
may be distorted, by the strong magnetic
fields created by speakers or large motors.
≥ If the unit is affected by such equipment
and does not function properly, remove
the battery or disconnect the AC adaptor.
Then insert the battery again or connect
the AC adaptor again.
Make sure to use the supplied cords
and cables.
Do not extend the cords and the cables.
Do not spray insecticides or volatile
chemicals onto the unit.
≥ If the unit is sprayed with such
chemicals, its body may be marred and
the surface finish may peel off.
≥ Do not leave rubber or plastic products in
contact with the unit for a long time.
When you use the unit in a sandy or
dusty place such as a beach, do not let
sand or fine dust get into the body and
terminals of the unit.
Also, keep the unit away from sea water.
≥ Sand or dust may damage the unit.
(Care should be taken when inserting
and removing an SD card.)
≥ If sea water splashes onto the unit, wipe
off the water with a well wrung cloth.
Then wipe the unit again with a dry cloth.
Do not subject this unit to vibrations or
impacts, shake, drop or bump it, place
objects on top of it or drop objects on it.
If this unit is subjected to vibrations or
≥
strong shocks, the data may be lost or the
casing may break causing it to malfunction.
Do not use benzine, paint thinner or
alcohol for cleaning the unit.
≥ Before cleaning, detach the battery or
pull out the AC cable from the AC Jack.
≥ If you use a solvent, the casing may be
discoloured and the surface finish may
peel off.
Wipe the unit with a soft dry cloth to remov e
≥
dust and fingerprints. To remove stubborn
stains, thoroughly wring a cloth that has
been soaked in a neutral detergent diluted
with water and wipe the unit with it.
Afterwards, wipe it with a dry cloth.
≥ Do not use a chemical dust cloth.
Do not use the unit for surveillance
purposes or other business uses.
≥ If you use the unit for a long time, heat
will build up inside it and this may cause
a malfunction.
≥ The unit is not intended for business use.
When you are not going to use the unit
for an extended time
≥ When storing the unit in a cupboard or
cabinet, it is recommended that you put
a desiccant (silica gel) in with it.
∫ About the battery
The battery used in this unit is a rechargeable
lithium-ion battery. It is susceptible to
humidity and temperature and the effect
increases the mo r e the tempe rature r ises or
falls. In cold areas, the remaining battery
power may run down about 5 minutes after
starting use. At high temperatures, the
protection function may be triggered, making
it impossible to use the unit.
Be sure to detach the battery after use.
≥ If the battery is left inserted, a minute
amount of current continues to flow even
if the unit’s power is off. Keeping the unit
in this state may result in over discharge
of the battery. The battery may become
unusable after it is charged.
≥ The battery should be stored in the vinyl
bag so metal does not come into contact
with the terminals.
≥ The battery should be stored in a cool
place free from humi dity, with as constant
temperature as possib le. (Recommended
temperature: 15 oC to 25 oC
(59 oFto77oF), Recommended
humidity: 40% to 60%)
14
VQT1B03
Page 15

≥ Extremely high temperatures or low
temperatures will shorten the life of the
battery.
≥ If the battery is kept in high-temperature,
high-humidity, or oily-smoky places, the
terminals may rust and cause
malfunctions.
To store the battery for a long period of
≥
time, we recommend you charge it once
every year and store it again after you have
completely used up the charged capacity.
≥ Dust and other matter attached to the
battery terminals should be removed.
Prepare spare batteries when going out.
≥ The length of time that you can use the
battery becomes shorter in cold places
such as a ski resort.
≥ When you travel, do not forget to bring
an AC adaptor (supplied) so that you can
recharge the batteries at your
destination.
If you drop the battery accidentally,
check to see if the terminals are
damaged
≥ Attaching a battery with damaged
Do not throw old battery into fire.
≥ Heating a battery or throwing it into a fire
If the operating time is very short even
after the battery has been recharged,
the battery has worn out. Please
purchase a new battery.
.
terminals can damage the unit.
may result in an explosion.
∫ About the AC adaptor
≥ Be sure to use the supplied AC adaptor.
≥ If you use the AC adaptor near a radio,
radio reception may be disturbed. Keep
the AC adaptor 3.3 ft. (1 m) or more
away from the radio.
≥ When using the AC adaptor, it may
generate whirring sounds. However, this
is normal.
≥ After use, be sure to disconnect the AC
adaptor. (If it is left connected, about
0.1 W of current is consumed at most.)
≥ Always keep the electrodes of the AC
adaptor and battery clean.
Put this unit near the outlet to make it easy
for the interrupting device (plug)
.
it
If the battery has excessively discharged
or the battery temperature is extremely
high or low, it can be recharged. However,
in some cases it may take several hours
until charging commences correctly.
to reach
About charging errors
When the status indicator flashes
rapidly, one of the following situations
may be to blame.
When the status indicator flashes at
intervals of about 0.5 second (on for about
0.25 sec. and off for about 0.25 sec.):
≥ The battery has not been recharged.
Remove the battery from the unit, and try
charging it again.
The battery temperature or ambient
≥
temperature may be extremely high or low.
Wait until the appropriate temperature is
restored before charging the battery again.
When the status indicator is off:
≥ Charging is completed.
∫ About the SD card
≥ The memory capacity indicated on the
label of an SD Card is the total of the
capacity for copyright protection and
management and the capacity which can
be used on the unit, a PC etc.
≥ During prolonged use, the unit’s surfaces
and the SD card will heat up slightly: This
is normal.
When inserting or removing the SD card,
always set the [ON/OFF] switch to [OFF].
When the access lamp is illuminated
(During access to the SD card), do not
open the card slot cover to pull out the
SD card, turn off the power, or cause
any vibrations or impacts.
Do not leave the SD card in places w here
there is high temperature or direct
sunlight, or where electromagnetic waves
or static electricity are easily generated.
Moreover, do not fold or drop the SD card,
and do not strongly vibrate it.
≥ The SD card may break or the contents
of the card may be destroyed or erased.
15
VQT1B03
Page 16

After use, be sure to eject the SD card,
and store it away.
≥ After use, or when storing or carrying the
SD card, put it in the storage case.
≥ Do not allow dust, water, or foreign
substances to adhere to the terminals on
the back of the SD card. Moreover, do
not touch the terminals with your hand.
≥ Keep the Memory Card out of reach of
children to prevent swallowing.
∫ About condensation
Using this unit when condensation has
formed will scratch the HDD and cause this
unit to fail. Make every effort to ensure that
condensation does not form. If it does form,
take the actions described below.
Causes of condensation
Condensation takes place when the
ambient temperature or humidity is
changed as follows.
≥ When this unit is brought inside from the
cold (e.g. a ski slope) to a warm room.
≥ When this unit is moved from an
air-conditioned car to outside.
≥ When a cold room has been warmed up
quickly.
≥ When cool wind from an air conditioner
is directly blown onto this unit.
≥ After summer afternoon showers of rain.
≥ When this unit is in a very humid place
where the air is thick with steam. (e.g. a
heated swimming pool)
When this unit is taken to a location with
a significant temperature difference
such as from a cold place to a hot place.
If, for example, you ta ke th i s unit int o a
heated room after using it in a ski slope,
place the unit inside a plasti c bag, re move as
much of the air from insid e the bag as
possible, then seal the bag . Leave the un it for
about an hour in the room so the tempera ture
of the unit is close to the ambient
temperature of the room, then use it.
What to do when condensation forms
Remove the battery or disconnect the AC
adaptor and leave the unit for about 3 hour.
Check that the condensation disappeared
naturally when the unit became close to the
ambient temperature and then use the unit.
16
VQT1B03
Page 17

¬ Troubleshooting
Problem Check points
This unit cannot be
turned on.
This unit is turned off
automatically.
This unit does not stay
on long enough.
Battery runs down
quickly.
This unit cannot be
operated though
powered up.
This unit does not
operate normally.
Cannot copy although
power is supplied to this
unit and the SD card is
correctly inserted.
The data is not copied
correctly to the HDD.
If the SD card is inserted
in this unit, it is not
recognized.
If the SD card is inserted
in another device, it is
not recognized.
No operation can be
performed.
≥ Is the battery fully charged?
≥ If you do not use the unit for approximately 3 minutes, the
≥ Is the battery low?
≥ Is the battery fully charged?
≥ Are you using the battery in an extremely cold place?
≥ Has the battery worn out?
≥ Remove the battery or disconnect the AC adaptor, wait about 1
≥ Is there no more available memory on this unit?
≥ Is the HDD SAFETY detection switch activated?
≥ If you press the [CANCEL] button or the remaining battery
≥ Did you format the SD card on a PC?
≥ Check that the device is compatible with the capacity or type of
≥ Turn off the power to this unit . If the power can not b e tur ned off ,
> Charge the battery using the AC adaptor. (P8)
power is automatically tur ned off to conserve the battery
charge. (P10) Turn the power back on to use the unit again.
> If the status indicator blinks at intervals of about 1 second
(blinks for about 0.5 seco nds then goes off for about 0.5
seconds), the battery has ru n do wn. Ch arge th e bat tery . (P8 )
> Charge it with the AC adaptor. (P8)
> The battery is affected by ambient temperature. In cold
places, the operating time of the battery becomes sh orter.
The battery has a limited life. If the operating time is still too
>
short even after the battery is fully charged, depending on the
usage, the battery has worn out and can no longer be used.
minute , reinsert the battery or reconnect the AC adaptor and
then turn on the power again. (Conducting the above operation
when the HDD/card access lamp is on may destroy the data on
the SD card.)
If normal conditions are not restored yet, detach the connected
power and consult the dealer who you purchased this unit f rom.
If there is no more available memory, copy any important data to a
>
PC and then delete the data on this unit’s HD D using the PC.
> Place this unit on an even, stable surface.
power runs down during copying, the copying will stop. Copy
the data again.
> Format the SD card again on the video camera that you are
using.
SD card (SD Memory Card/ SDHC Memory Card) that you
inserted. (P5)
> Refer to the operating instructions of the device for details.
remove the battery or AC adaptor and then reattach it. After
that, turn on the power again.
17
VQT1B03
Page 18

Problem Check points
Even if connected by the
USB cable, this unit is
not recognized by the
PC.
When the USB cable is
disconnected, an error
message will appear on PC.
The error display lamp
[ERROR] blinks or
lights.
Cannot copy data on the
SD card to this unit.
Cannot copy from this
unit’s HDD to a PC.
The capacity of the HDD
displayed on a PC is
less.
A [PDUST.DAT] file etc.
has been created on the
HDD.
The PC will not start up.
≥ Select another USB terminal on the PC.
≥ Check the operating environment. (P12, 13)
≥ Turn on the power to this unit.
≥ Turn off then turn on the power to this unit and disconnect then
connect the USB cable.
≥ T o disconnect the USB cable safely, double-click the icon
in the task tray and follow the instructions
on the screen.
≥ Has the temperature of this unit become excessively high?
> Turn off the power and wa it until this unit ret urns t o a suitab le
temperature.
≥ An SD card with no recorded data is inserted in this unit. Insert
an SD card with recordings into this unit.
≥ An SD card that cannot be used or a broken SD card is inserted
in this unit.
≥ Is the available memory on the HDD insufficient?
> If there is insufficient available memory, [FULL] on the HDD
capacity lamp lights. Copy the data on the HDD to a PC and
then delete unnecessary data on the HDD.
It may no longer be possible to read the data in the following cases.
≥
–If you subject this unit to vibration or shock.
–If you turn off the power or remove the SD card during an
operation.
–If you disconnect the USB cable while copying data on the
HDD to a PC.
–If the HDD SAFETY detection switch activates and the
operation stops while this unit is connected to a PC.
Connect this unit to a PC and run check disk ([SCAN DISK] on
Windows ME). Refer to the operating instructions of the PC for
details on how to run check disk.
≥ Did you format this unit’s HDD on a PC?
> If you format this unit’s HDD on a PC it will no longer opera te
properly. Please confirm the latest support information on
the following website. (This website is in English only.)
http://panasonic.co.jp/pavc/global/cs/e_cam/faq/index.html
≥ The capacity of the HDD is usually disp layed as 1 gigabyte
equaling 1,000,000,000 bytes. However, 1 gigabyte is
displayed as equaling 1,073,7 41, 824 bytes (1, 02 4 k 1,024k 1,
024) on [My Computer] and some application sof tw are on a PC
so the value indicated becomes less.
≥ If the HDD SAFETY detection switch is activated or the
remaining battery power runs down du ring copying, the copying
will stop to protect the HDD. In this case, the file name of the
data that this unit stopped copying becomes [PDUST.DAT] or
the same name as the folder being copied.
≥ DId you connect this unit to the PC with the USB cable before
turning on the power to the PC?
> Start up the PC and then connect this unit to it.
18
VQT1B03
Page 19

¬ Specifications
SD Media Storage: Information for your safety
Power source: DC 9.3 V (AC adaptor)/7.4 V (Battery)
Power consumption: When copying from an SD card to the HDD:
2.5 W (AC adaptor)/2.4 W (Battery)
Compatible media SD Memory Card:
Internal HDD
capacity
PC interface Hi-Speed USB compliant (USB 2.0)
Dimensions 88 mm (W)k34 mm (H)k126 mm (D)
Mass Approx. 256 g (9.03 oz) (without SD card and supplied battery)
Mass in operation Approx. 296 g (10.44 oz) (with SD card and supplied battery)
Operating
temperature
Operating humidity 10% to 80%
Battery operation
time
Copy time 4 GB card: About 11 minutes
8 MB/16MB/32 MB/64 MB/128 MB/256 MB/512 MB/1 GB / 2 GB
(FAT12 and FAT16 format corresponding)
SDHC Memory Card: 4 GB (FAT32 format corresponding)
40 GB
Approx. 3 1/2 inch (W) k 1 3/8 inch (H) k 5 inch (D)
(excluding the projecting parts)
5 oCto40oC (41 oF to 104 oF)
4 GB card: Consecutive copying about 9 times
(when using a Panasonic SDHC Memory Card (4 GB) and
copying motion picture data)
(when using a Panasonic SDHC Memory Card (CLASS2, 4 GB)
and copying motion picture data)
AC adaptor: Information for your safety
Power source: AC 100 V to 240 V, 50/60 Hz
Input capacitance: 0.25 A
DC output: DC 9.3 V 1.0 A
Battery pack: Information for your safety
Maximum voltage: DC 8.4 V
Nominal voltage: DC 7.4 V
Rated ca pacitance: 760 mAh
19
VQT1B03
Page 20

¬ Limited Warranty (For USA Only)
Panasonic Consumer Electronics
Company, Division of Panasonic
Corporation of North America
One Panasonic Way, Secaucus, New
Panasonic Puerto Rico, Inc.
Ave. 65 de Infantería, Km. 9.5, San
Gabriel Industrial Park, Carolina, Puerto
Rico 00985
Jersey 07094
PANASONIC SD Products
Limited Warranty
Limited Warranty Coverage
If your product does not work properly because of a defect in materials or workmanship,
Panasonic Consumer Electronics Company or Panasonic Puerto Rico, Inc. (collectively
referred to as “the warrantor”) will, for the length of the period indicated on the chart
below, which starts with the date of original purchase (“warranty period”), at its option
either (a) repair your product with new or refurbished parts, or (b) replace it with a new or
a refurbished product. The decision to repair or replace will be made by the warrantor.
Product or Part Name Parts Labor
SD Multi AV Device, SD Mobile Printer (except items
listed below)
CCD Image Sensor
Rechargeable Battery Pack, SD Memory Card, AC
Adaptor, USB Reader-Writer (in exchange for
defective item)
One (1) year
Six (6) months
Ninety (90) days
During the “Labor” warranty period there will be no charge for labor. During the “Parts”
warranty period, there will be no charge for parts. You must carry-in or mail-in (prepaid)
your product during the warranty period. If non-rechargeable batteries are included, they
are not warranted. This warranty only applies to products purchased and serviced in the
United States or Puerto Rico. This warranty is extended only to the original purchaser of a
new product which was not sold “as is”.
A purchase receipt or other proof of the original purchase date is required for warranty
service.
Carry-In or Mail-In (Prepaid) Service
For Carry-In or Mail-In (prepaid) Service in the United States call 1-800-211-PANA(7262).
For assistance in Puerto Rico call Panasonic Puerto Rico, Inc.
(787)-750-4300 or fax (787)-768-2910.
Limited Warranty Limits And Exclusions
This warranty ONLY COVERS failures due to defects in materials or workmanship, and
DOES NOT COVER normal wear and tear or cosmetic damage. The warranty ALSO
DOES NOT COVER damages which occurred in shipment, or failures which are caused
by products not supplied by the warrantor, or failures which result from accidents, misuse,
abuse, neglect, bug infestation, mishandling, misapplication, alteration, faulty installation,
set-up adjustments, misadjustment of consumer controls, improper maintenance, power
line surge, lightning damage, modification, or commercial use (such as in a hotel, office,
restaurant, or other business), rental use of the product, service by anyone other than a
Factory Servicenter or other Authorized Servicer, or damage that is attributable to acts of
God.
Ninety (90) days
Ninety (90) days
Not Applicable
20
VQT1B03
Page 21

THERE ARE NO EXPRESS WARRANTIES EXCEPT AS LISTED UNDER “LIMITED
WARRANTY COVERAGE”. THE WARRANTOR IS NOT LIABLE FOR INCIDENTAL
OR CONSEQUENTIAL DAMAGES RESULTING FROM THE USE OF THIS PRODUCT,
OR ARISING OUT OF ANY BREACH OF THIS WARRANTY.
(As examples, this excludes damages for lost time, travel to and from the servicer, loss of
media or images, data or other memory content. The items listed are not exclusive, but
are for illustration only.)
ALL EXPRESS AND IMPLIED WARRANTIES, INCLUDING THE WARRANTY OF
MERCHANTABILITY, ARE LIMITED TO THE PERIOD OF THE LIMITED WARRANTY.
Some states do not allow the exclusion or limitation of incidental or consequential
damages, or limitations on how long an implied warranty lasts, so the exclusions may not
apply to you.
This warranty gives you specific legal rights and you may also have other rights which
vary from state to state. If a problem with this product develops during or after the
warranty period, you may contact your dealer or Servicenter. If the problem is not handled
to your satisfaction, then write to the warrantor's Consumer Affairs Department at the
addresses listed for the warrantor.
PARTS AND SERVICE WHICH ARE NOT COVERED BY THIS LIMITED WARRANTY
ARE YOUR RESPONSIBILITY.
21
VQT1B03
Page 22

¬ Customer Services Direct ory (For USA Only)
Obtain Product Information and Operating Assistance; locate your nearest Dealer
or Servicenter; purchase Parts and Accessories; or make Customer Service and
Literature requests by visiting our Web Site at:
http://www.panasonic.com/consumersupport
or, contact us via the web at:
http://www.panasonic.com/contactinfo
You may also contact us directly at:
1-800-211-PANA (7262),
Monday-Friday 9 am-9 pm; Saturday-Sunday 10 am-7 pm, EST
For hearing or speech impaired TTY users, TTY : 1-877-833-8855
Accessory Purchases
Purchase Parts, Accessories and Instruction Books online for all Panasonic Products
by visiting our Web Site at:
http://www.pasc.panasonic.com
or, send your request by E-mail to:
npcparts@us.panasonic.com
You may also contact us directly at:
1-800-332-5368 (Phone) 1-800-237-9080 (Fax Only)
Panasonic Services Company
20421 84th Avenue South,
Kent, WA 98032
(We Accept Visa, MasterCard, Discover Card, American Express, and Personal Checks)
For hearing or speech impaired TTY users, TTY : 1-866-605-1277
Product Repairs
MAIL TO:
Please carefully pack and ship, prepaid and insured, to the Elk Grove Village Centralized
Factory Servicenter.
Customer’s in Puerto Rico, please ship or carry in to location below (“Service in Puerto Rico”).
Centralized Factory Servicenter
Panasonic Camera and Digital Service Center
1590 Touhy Ave.
Elk Grove Village, IL 60007
Service in Puerto Rico
Panasonic Puerto Rico, Inc.
Ave. 65 de Infantería, Km. 9.5, San Gabriel Industrial Park,
Carolina, Puerto Rico 00985
Phone (787)750-4300, Fax (787)768-2910
(Monday – Friday 9 am to 9 pm, EST.)
As of November 2006
22
VQT1B03
Page 23

¬ Request for Service Notice (For USA Only)
Please photocopy this form when making a request for service notice, in the
unlikely event this product needs service.
Request for Service Notice:
•
Please include your proof of purchase.
(Failure to do so will delay your repair.)
•
To further speed your repair, please provide
an explanation of what is wrong with the unit
and any symptom it is exhibiting.
Mail this completed form and your Proof of Purchase along with your unit to:
Panasonic Camera and Digital Service Center
1590 Touhy Ave.
Elk Grove Village, IL 60007
23
VQT1B03
Page 24

¬ Warranty (For Canadian Customers)
Panasonic Canada Inc.
5770 Ambler Drive, Mississauga, Ontario L4W 2T3
PANASONIC PRODUCT – LIMITED WARRANTY
Panasonic Canada Inc. warrants this product to be free from defects in material and
workmanship and agrees to remedy any such defect for a period as stated below from the
date of original purchase.
Camcorder Product – One (1) year, parts and labour
LIMITATIONS AND EXCLUSIONS
This warranty does not apply to products purchased outside Canada or to any product
which has been improperly installed, subjected to usage for which the product was not
designed, misused or abused, damaged during shipping, or which has been altered or
repaired in any way that affects the reliability or detracts from the performance, nor does it
cover any product which is used commercially. Dry cell batteries are also excluded from
coverage under this warranty.
This warranty is extended to the original end user purchaser only. A purchase receipt or
other proof of date of original purchase is required before warranty service is performed.
THIS EXPRESS, LIMITED WARRANTY IS IN LIEU OF ALL OTHER WARRANTIES,
EXPRESS OR IMPLIED, INCLUDING ANY IMPLIED WARRANTIES OF
MERCHANTABILITY AND FITNESS FOR A PARTICULAR PURPOSE.
IN NO EVENT WILL PANASONIC CANADA INC. BE LIABLE FOR ANY SPECIAL,
INDIRECT OR CONSEQUENTIAL DAMAGES.
In certain instances, some jurisdictions do not allow the exclusion or limitation of
incidental or consequential damages, or the exclusion of implied warranties, so the above
limitations and exclusions may not be applicable.
WARRANTY SERVICE
FOR PRODUCT OPERATION ASSISTANCE, please contact:
Our Customer Care Centre:Telephone #: (905) 624-5505
FOR PRODUCT REPAIRS, please locate your nearest Authorized Servicentre at
www.panasonic.ca
Link: “Servicentres
:
TM
1-800 #: 1-800-561-5505
Fax #: (905) 238-2360
Email link: “Customer support” on www.panasonic.ca
locator” under “Customer support”
IF YOU SHIP THE PRODUCT TO A SERVICENTRE
Carefully pack and send prepaid, adequately insured and preferably in the original carton.
Include details of the defect claimed, and proof of date of original purchase.
24
VQT1B03
Page 25

25
VQT1B03
Page 26

Panasonic Consumer Electronics Company,
Division of Panasonic Corporation of North America
One Panasonic Way, Secaucus, NJ 07094
Panasonic Puerto Rico, Inc.
Ave. 65 de Infantería, Km. 9.5, San Gabriel Industrial Park,
Carolina, Puerto Rico 00985
C 2006 Matsushita Electric Industrial Co., Ltd.
P
 Loading...