

Page 1
Operating Instructions
Bedienungsanleitung
Mode d’emploi
Istruzioni d’uso
Instrucciones de funcionamiento
Kullanım Talimatları
DVD Burner
Model No. VW-BN2
Before use, please read these instructions completely.
Bitte lesen Sie diese Bedienungsanleitung vor der Inbetriebnahme des Gerätes
vollständig durch.
Lire intégralement ces instructions avant d’utiliser l’appareil.
Leggere completamente queste istruzioni prima dell’uso.
Antes del uso, lea completamente estas instrucciones.
Lütfen kullanmadan önce bu talimatları dikkatle okuyun.
E
LSQT1572 A
Page 2

Dear Customer,
We would like to take this opportunity to thank you for purchasing this Panasonic DVD
Burner. Please read these Operating Instructions carefully and keep them handy for
future reference.
Please note that the actual controls and components, etc. of your DVD Burner may look
somewhat different from those shown in the illustrations in these Operating Instructions.
¬ Information for your safety
∫ Caution for AC Mains Lead
(For United Kingdom)
For your safety, please read the following
text carefully.
This appliance is supplied with a moulded
three pin mains plug for your safety and
convenience.
A 5-ampere fuse is fitted in this plug.
Should the fuse need to be replaced please
ensure that the replacement fuse has a
rating of 5-ampere and that it is approved
by ASTA or BSI to BS1362.
Check for the ASTA mark Ï or the BSI
mark Ì on the body of the fuse.
If the plug contains a removable fuse cover
you must ensure that it is refitted when the
fuse is replaced.
If you lose the fuse cover the plug must not
be used until a replacement cover is
obtained.
A replacement fuse cover can be
purchased from your local dealer.
CAUTION!
IF THE FITTED MOULDED PLUG IS
UNSUITABLE FOR THE SOCKET
OUTLET IN YOUR HOME THEN THE
FUSE SHOULD BE REMOVED AND
THE PLUG CUT OFF AND DISPOSED
OF SAFELY.
THERE IS A DANGER OF SEVERE
ELECTRICAL SHOCK IF THE CUT
OFF PLUG IS INSERTED INTO ANY
13-AMPERE SOCKET.
If a new plug is to be fitted please observe
the wiring code as stated below.
If in any doubt please consult a qualified
electrician.
IMPORTANT
The wires in this mains lead are coloured in
accordance with the following code:
Blue: Neutral, Brown: Live.
As these colours may not correspond with
the coloured markings identifying the
terminals in your plug, proceed as follows:
The wire which is coloured Blue must be
connected to the terminal which is marked
with the letter N or coloured Black or Blue.
The wire which is coloured Brown must be
connected to the terminal which is marked
with the letter L or coloured Brown or Red.
WARNING: DO NOT CONNECT EITHER
WIRE TO THE EARTH TERMINAL
WHICH IS MARKED WITH THE LETTER
E, BY THE EARTH SYMBOL Ó OR
COLOURED GREEN OR GREEN/
YELLOW.
THIS PLUG IS NOT
WATERPROOF—KEEP DRY.
Before use
Remove the connector cover.
How to replace the fuse
The location of the fuse differ according to the
type of AC mains plug (figures A and B).
Confirm the AC mains plug fitted and follow
the instructions below.
Illustrations may differ from actual AC mains
plug.
2
LSQT1572
Page 3

Fuse cover
Figure A
Figure B
Fuse
(5 ampere)
Fuse
(5 ampere)
Figure A
Figure B
ENGLISH
1.Open the fuse cover with a screwdriver. 2.Replace the fuse and close or attach the
fuse cover.
WARNING:
TO REDUCE THE RISK OF FIRE, ELECTRIC SHOCK OR PRODUCT DAMAGE,
≥ DO NOT EXPOSE THIS APPARATUS TO RAIN, MOISTURE, DRIPPING OR
SPLASHING AND THAT NO OBJECTS FILLED WITH LIQUIDS, SUCH AS
VASES, SHALL BE PLACED ON THE APPARATUS.
≥ USE ONLY THE RECOMMENDED ACCESSORIES.
≥ DO NOT REMOVE THE COVER (OR BACK); THERE ARE NO USER
SERVICEABLE PARTS INSIDE. REFER SERVICING TO QUALIFIED SERVICE
PERSONNEL.
CAUTION!
≥ DO NOT INSTALL OR PLACE THIS UNIT IN A BOOKCASE, BUILT-IN CABINET
OR IN ANOTHER CONFINED SPACE. ENSURE THE UNIT IS WELL
VENTILATED. TO PREVENT RISK OF ELECTRIC SHOCK OR FIRE HAZARD
DUE TO OVERHEATING, ENSURE THAT CURTAINS AND ANY OTHER
MATERIALS DO NOT OBSTRUCT THE VENTILATION VENTS.
≥ DO NOT OBSTRUCT THE UNIT’S VENTILATION OPENINGS WITH
NEWSPAPERS, TABLECLOTHS, CURTAINS, AND SIMILAR ITEMS.
≥ DO NOT PLACE SOURCES OF NAKED FLAMES, SUCH AS LIGHTED CANDLES,
ON THE UNIT.
THE SOCKET OUTLET SHALL BE INSTALLED NEAR THE EQUIPMENT AND
SHALL BE EASILY ACCESSIBLE.
This product may receive radio interference caused by mobile telephones during use. If
such interference is apparent, please increase separation between the product and the
mobile telephone.
3
LSQT1572
Page 4
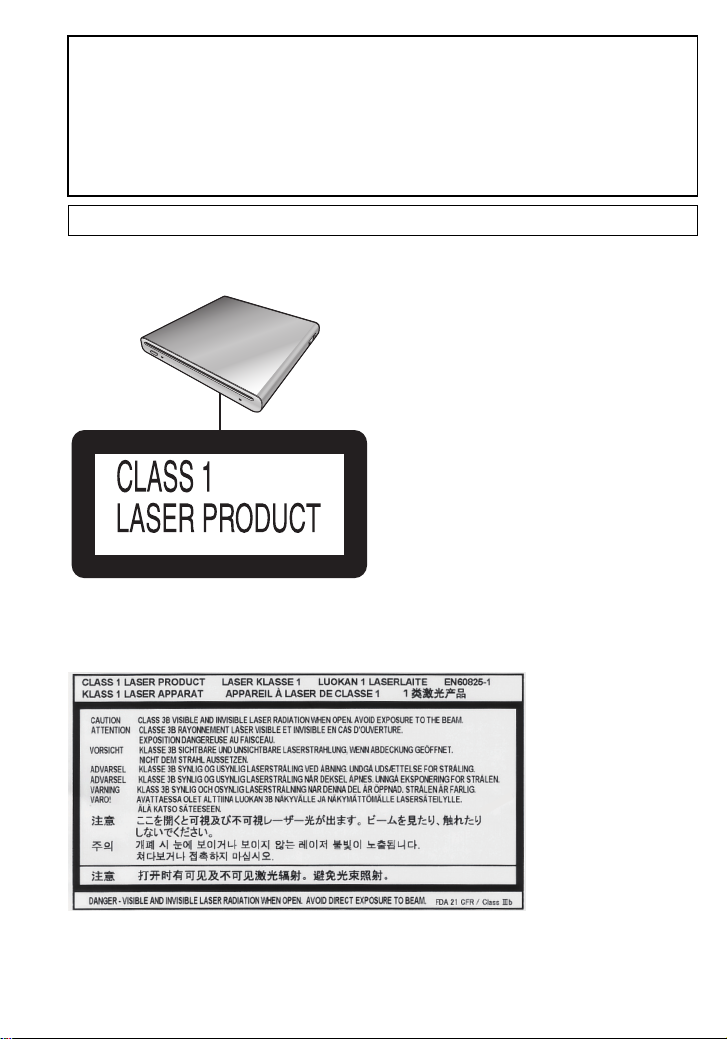
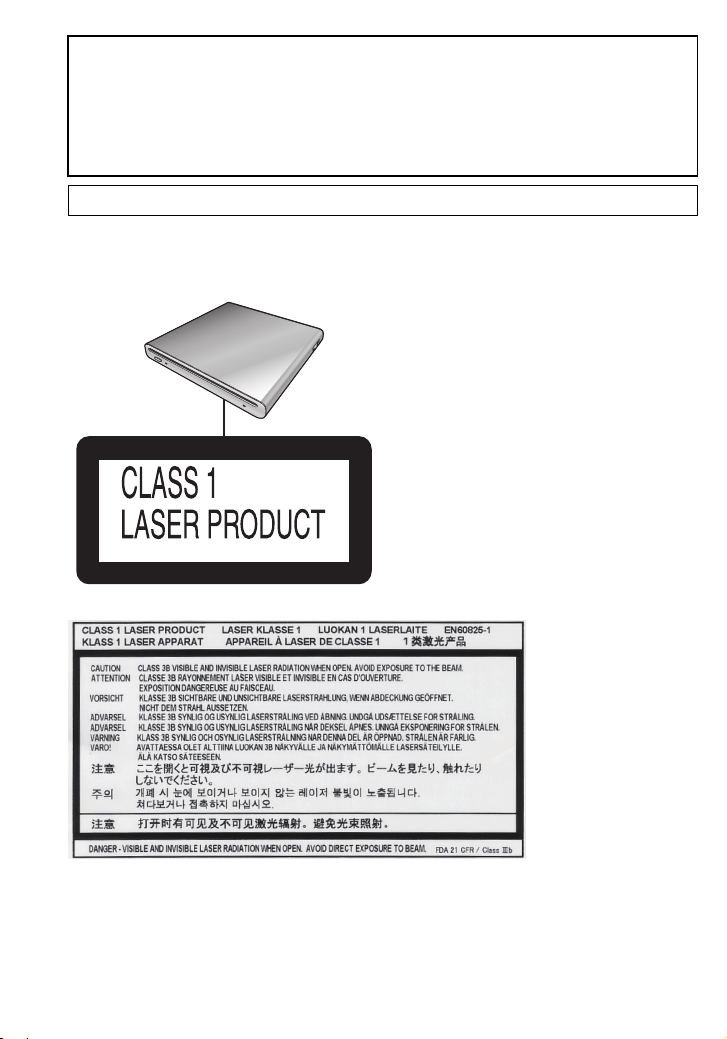
CAUTION!
LUOKAN 1 LASERLAITE
KLASS 1 LASER APPARAT
THIS PRODUCT UTILIZES A LASER.
USE OF CONTROLS OR ADJUSTMENTS OR PERFORMANCE OF PROCEDURES
OTHER THAN THOSE SPECIFIED HEREIN MAY RESULT IN HAZARDOUS
RADIATION EXPOSURE.
DO NOT OPEN COVERS AND DO NOT REPAIR YOURSELF. REFER SERVICING
TO QUALIFIED PERSONNEL.
Product Identification Marking is located on the bottom of units.
∫ EMC Electric and magnetic compatibility
This symbol (CE) is located on the rating plate.
(Bottom of product)
4
LSQT1572
(Inside of product)
(Produktets innside)
(Tuotteen sisällä)
Page 5

SUOMI
VAROITUS:
VÄHENNÄ TULIPALON, SÄHKÖISKUN TAI LAITTEISTON VAHINGOITTUMISEN
VAARAA
≥ TÄTÄ LAITETTA EI SAA ALTISTAA SATEELLE, KOSTEUDELLE, ROISKEILLE
TAI TIPPUVILLE NESTEILLE. LAITTEEN PÄÄLLE EI SAA MYÖSKÄÄN
ASETTAA MITÄÄN NESTEELLÄ TÄYTETTYÄ ESINETTÄ, KUTEN MALJAKKOA.
≥ KÄYTÄ VAIN SUOSITELTUJA LISÄVARUSTEITA.
≥ ÄLÄ IRROTA KANTTA (TAI TAUSTAA). SISÄLLÄ EI OLE KÄYTTÄJÄN
HUOLLETTAVISSA OLEVIA OSIA. HUOLLON SAA SUORITTAA VAIN
AMMATTITAITOINEN HENKILÖKUNTA.
VAROITUS!
≥ ÄLÄ ASENNA TAI LAITA TÄTÄ LAITETTA KABINETTITYYPPISEEN
KIRJAKAAPPIIN TAI MUUHUN SULJETTUUN TILAAN, JOTTA TUULETUS
ONNISTUISI. VARMISTA, ETTÄ VERHO TAI MIKÄÄN MUU MATERIAALI EI
HUONONNA TUULETUSTA, JOTTA VÄLTETTÄISIIN YLIKUUMENEMISESTA
JOHTUVA SÄHKÖISKU- TAI TULIPALOVAARA.
≥ ÄLÄ PEITÄ LAITTEEN TUULETUSAUKKOJA SANOMALEHDELLÄ,
PÖYTÄLIINALLA, VERHOLLA TAI MUULLA VASTAAVALLA ESINEELLÄ.
≥ ÄLÄ ASETA PALAVAA KYNTTILÄÄ TAI MUUTA AVOTULEN LÄHDETTÄ
LAITTEEN PÄÄLLE.
PISTORASIA TULEE ASENTAA LAITTEEN LÄHELLE HELPOSTI
SAAVUTETTAVAAN PAIKKAAN.
VAROITUS!
LAITTEEN KÄYTTÄMINEN MUULLA KUIN TÄSSÄ KÄYTTÖOHJEESSA
MAINITULLA TAVALLA SAATTAA ALTISTAA KÄYTTÄJÄN
TURVALLISUUSLUOKAN 1 YLITTÄVÄLLE NÄKYMÄTTÖMÄLLE
LASERSÄTEILYLLE.
5
LSQT1572
Page 6

NORSK
ADVARSEL:
FØLG NEDENSTÅENDE INSTRUKSER FOR Å REDUSERE RISIKOEN FOR
BRANN, ELEKTRISK STØT OG SKADE PÅ PRODUKTET:
≥ DETTE APPARATET MÅ IKKE UTSETTES FOR REGN, FUKTIGHET, DRYPP
ELLER SPRUT, OG INGEN VÆSKEFYLTE GJENSTANDER, SOM F.EKS.
VASER, MÅ PLASSERES PÅ APPARATET.
≥ BRUK KUN ANBEFALT TILBEHØR.
≥ IKKE FJERN DEKSELET (ELLER BAKSIDEN); APPARATET INNEHOLDER
INGEN DELER SOM KAN SKIFTES ELLER REPARERES AV BRUKEREN.
OVERLAT TIL KVALIFISERTE SERVICETEKNIKERE Å UTFØRE SERVICE.
ADVARSEL!
≥ APPARATET MÅ IKKE PLASSERES I EN BOKHYLLE, ET INNEBYGGET
KABINETT ELLER ET ANNET LUKKET STED HVOR
VENTILASJONSFORHOLDENE ER UTILSTREKKELIGE. SØRG FOR AT
GARDINER ELLER LIGNENDE IKKE FORVERRER
VENTILASJONSFORHOLDENE, SÅ RISIKO FOR ELEKTRISK SJOKK ELLER
BRANN FORÅRSAKET AV OVERHETING UNNGÅS.
≥ APPARATETS VENTILASJONSÅPNINGER MÅ IKKE DEKKES TIL MED AVISER,
BORDDUKER, GARDINER OG LIGNENDE.
≥ PLASSER IKKE ÅPEN ILD, SLIK SOM LEVENDE LYS, OPPÅ APPARATET.
KONTAKTUTTAKET MÅ INSTALLERES I NÆRHETEN AV UTSTYRET OG MÅ
VÆRE LETT TILGJENGELIG.
ADVARSEL!
DETTE PRODUKTET ANVENDER EN LASER.
BETJENING AV KONTROLLER, JUSTERINGER ELLER ANDRE INNGREP ENN DE
SOM ER BESKREVET I DENNE BRUKSANVISNING, KAN FØRE TIL FARLIG
BESTRÅLING.
DEKSLER MÅ IKKE ÅPNES, OG FORSØK ALDRI Å REPARERE APPARATET PÅ
EGENHÅND. ALT SERVICE OG REPARASJONSARBEID MÅ UTFØRES AV
KVALIFISERT PERSONELL.
6
LSQT1572
Page 7

-If you see this symbol-
Information on Disposal for Users of Waste Electrical & Electronic Equipment
(private households)
This symbol on the products and/or accompanying documents means that
used electrical and electronic products should not be mixed with general
household waste.
For proper treatment, recovery and recycling, please take these products to
designated collection points, where they will be accepted on a free of
charge basis. Alternatively, in some countries you may be able to return
your products to your local retailer upon the purchase of an equivalent new
Disposing of this product correctly will help to save valuable resources and prevent
any potential negative effects on human health and the environment which could
otherwise arise from inappropriate waste handling. Please contact your local authority
for further details of your nearest designated collection point.
Penalties may be applicable for incorrect disposal of this waste, in accordance with
national legislation.
For business users in the European Union
If you wish to discard electrical and electronic equipment, please contact your dealer
or supplier for further information.
Information on Disposal in other Countries outside the European Union
This symbol is only valid in the European Union.
If you wish to discard this product, please contact your local authorities or dealer and
ask for the correct method of disposal.
product.
¬ Contents
Information for your safety ................... 2
Features ..................................................7
Before use...............................................8
About the disc........................................8
Accessories..........................................11
Parts identification and handling .......11
Power supply........................................11
Inserting/removing a disc....................12
Copying from a video camera to a DVD
.................................................... 12
disc
Playing back a copied DVD disc on a
video camera ....................................13
Connecting to a PC for use ...............13
Cautions for Use ..................................14
Trouble shooting..................................16
Specifications....................................... 18
¬ Features
≥ This is a portable device with a thin,
lightweight and compact design. If
you connect this unit and a
compatible Panasonic video camera,
then the pictures recorded on the
connected video camera can be
easily copied to a DVD disc even at
your travel destination.
≥ You can also play back DVD discs
created on this unit if you connect
this unit and a compatible Panasonic
video camera.
≥ If you connect this unit and a PC
using the USB cable supplied with a
compatible Panasonic video camera,
you can copy pictures edited on a PC
etc. to a DVD disc.
≥ Operation is not guaranteed for any kind
of uses other than these mentioned
above.
7
LSQT1572
Page 8

¬ Before use
∫ Handling this unit
This unit is a high-precision device that is
not built to withstand vibration, shock or
dust. Depending on the environment and
handling of the unit, some content may
become damaged and in the worst case
reading the disc may no longer be possible.
In particular, do not subject this unit to
vibration and shock or disconnect the AC
mains lead during use.
≥ Panasonic will in no way be liable for any
damages sustained directly or indirectly
from the use or failure of this product.
Panasonic will also in no way be liable
for any losses of data caused by this
product.
≥ Injury or material damage resulting
from any kind of use that is not in
accordance with the operating
Instructions are the sole
responsibility of the user.
∫ When placing this unit
Place this unit on a flat, level surface while
using it.
≥ You cannot use this unit if it is placed
vertically.
∫ Carefully observe copyright laws
Recording of pre-recorded tapes or discs or
other published or broadcast material for
purposes other than your own private use
may infringe copyright laws. Even for the
purpose of private use, recording of certain
material may be restricted.
∫ Pages for reference
Pages that you should refer to are shown
as (P00).
≥ Microsoft®, Windows®, Windows Vista®
and DirectX
trademarks or trademarks of Microsoft
Corporation in the United States and/or
other countries.
®
are either registered
≥ IBM and PC/AT are registered
trademarks of International Business
Machines Corporation of the U.S.
®
, Core™, Pentium® and Celeron®
≥ Intel
are the registered trademarks or
trademarks of the Intel Corporation in the
United States and other countries.
≥ Microsoft product screen shot(s)
reprinted with permission from Microsoft
Corporation.
≥ Other names of systems and products
mentioned in these instructions are
usually the registered trademarks or
trademarks of the manufacturers who
developed the system or product
concerned.
¬ About the disc
∫ Discs that can be used on this
unit
Discs that can be used for copying when
you connect this unit and a compatible
Panasonic video camera are 12 cm
non-cartridge type DVD-RAM, DVD-RW,
DVD-R, DVD-R DL (dual layer on single
side), +RW, +R, +R DL (dual layer on
single side), CD-RW and CD-R.
≥ The discs that can be used with this
unit will differ depending on the video
camera that is connected. Read the
operating instructions of the video
camera for details.
Important Notice
If you copy pictures recorded in
AVCHD format to a disc, do not insert
this disc in devices which do not
support the AVCHD format. In some
cases the disc may get stuck in the
device. The disc will not play back on
devices that do not support the AVCHD
format.
≥ You cannot record or play continuously
from one side of the disc to the other
when using a double sided disc. You will
need to eject the disc and turn it over.
8
LSQT1572
Page 9
≥ Discs inserted in a holder, cartridge, or
caddy case cannot be used. Always
remove bare discs from these containers
prior to use.
It is recommended that you use
≥
Panasonic discs. Usually discs
compatible with the DVD standard can be
used for recording and playback with no
problems. However, some commercially
available discs do not meet the DVD
standard for quality and performance. If
you use one of these discs, you may not
be able to record or playback normally.
Refer to the following support site for
information about discs that have been
confirmed as compatible by Panasonic.
http://panasonic.jp/support/global/cs/
e_cam
(This website is in English only.)
≥ Discs recorded on this unit may not
be playable on other products. In
such cases, play back the disc on this
unit instead.
≥ When using DVD-RW, DVD-R, DVD-R
DL, +RW, +R or +R DL do not perform
the following as it may make the disc
unusable.
– Record on a disc with other products
after recording on it with this unit.
– Record on a disc with this unit after
recording on it with other products.
– Insert an un-finalized disc in any other
products.
∫ About DVD-R DL/+R DL
DVD-R DL or +R DL discs have two layers
of recording and playback surface on one
side. If a scene does not fit on the first layer
(L0), recording continues on the second
layer (L1) so one scene is recorded across
two layers. This unit automatically switches
layers during disc playback so you can play
the whole of the disc continuously like a
normal disc. However, the image or the
sound may momentarily stop at the point
where the layers switch.
∫ Examples of discs that cannot be
used on this unit
≥ Discs other than those with a 12 cm
diameter (You cannot use 8 cm discs
even if you insert them in a commercially
available adaptor.)
≥ 6X–12X high speed recording
compatible DVD-RAM
≥ BD media, etc.
≥ HD DVD media, etc.
∫ How to hold a disc
Do not touch the recorded surface.
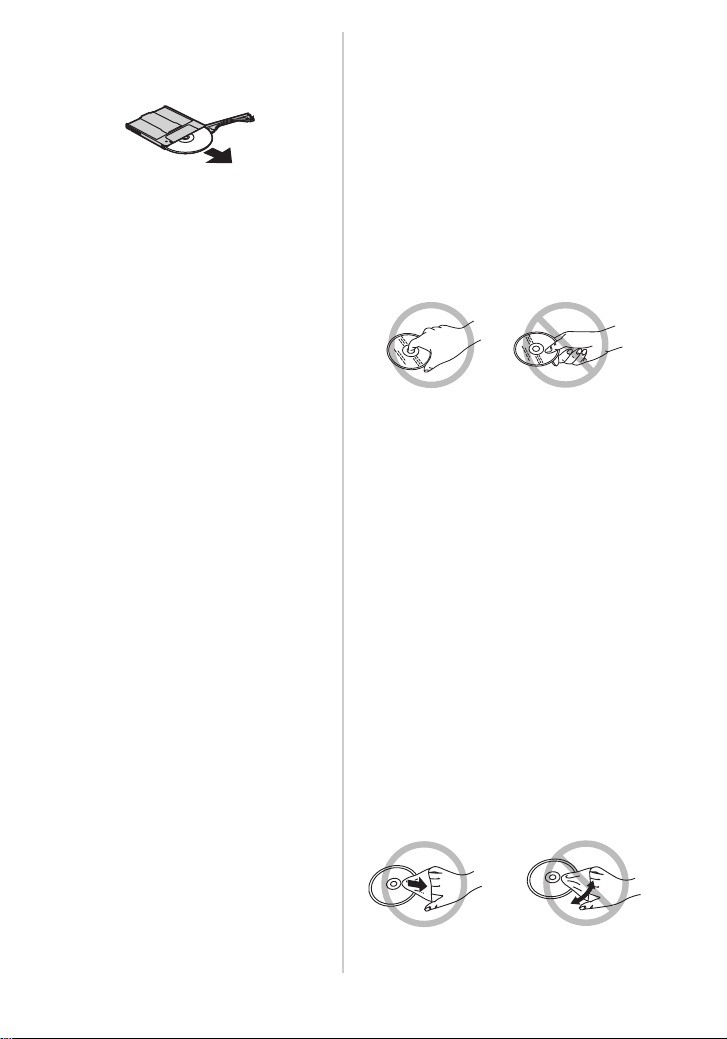
∫ When inserting/removing a disc
Do not allow fingerprints or dirt to get on
the recording/playback side of the disc.
≥ If there are scratches or dirt (e.g. dust or
fingerprints) on the recording/playback
side of the disc, normal recording/
playback may not be possible and the
following kind of phenomena may occur.
– Recording/playback is not possible.
– The image or the sound is interrupted
or stops momentarily.
– Noise appears on the image or the
sound.
∫ If there is dirt on the disc
≥ Clean it with the commercially available
disc cleaning cloth. Wipe the disc from
the centre to the outer edge to remove
the dirt. Do not use force when wiping
the disc as it may scratch it. Also, do not
use solvents (thinner, water, antistatic
agent, detergent etc.).
9
LSQT1572
Page 10

∫ Handling precautions
≥ Be careful about scratches and dirt.
≥ Do not attach labels or stickers to discs.
(This may cause disc warping and
un-balanced rotation, rendering it
unusable.)
≥ Write on the label side of the disc only
with a soft, oil-based felt pen. Do not use
ballpoint pens or other hard writing
implements.
≥ Do not use record cleaning sprays,
benzine, thinner, static electricity
prevention liquids or any other solvent.
≥ Do not use scratch-proof protectors or
covers.
≥ Do not drop, stack, or impact discs. Do
not place objects on them.
≥ Do not use the following discs:
– Discs with exposed adhesive from
removed stickers or labels.
– Discs that are badly warped or
cracked.
– Irregularly shaped discs, such as heart
shapes.
≥ Do not place in the following areas:
– In direct sunlight.
– In very dusty or humid areas.
– Near a heater.
– Locations susceptible to significant
difference in temperature
(condensation can occur).
– Where static electricity or
electromagnetic waves occur.
≥ To protect discs, return them to their
cases when you are not using them.
For the United Kingdom and Republic of
Ireland
∫ Sales and Support Information
Customer Care Centre
≥ For customers within the UK:
0844 844 3852
≥ For customers within the Republic of
Ireland: 01 289 8333
≥ Visit our website for product information
≥ E-mail: customer.care@panasonic.co.uk
Technical Support for AV Software
≥ For customers within the UK:
0844 844 3869
≥ For customers within the Republic of
Ireland: 01 289 8333
Direct Sales at Panasonic UK
≥ For customers: 0844 844 3856
≥ Order accessory and consumable items
for your product with ease and
confidence by phoning our Customer
Care Centre Monday – Thursday
9.00 a.m. – 5.30 p.m.,
Friday 9.30 a.m. – 5.30 p.m.
(Excluding public holidays)
≥ Or go on line through our Internet
Accessory ordering application at
www.panasonic.co.uk.
≥ Most major credit and debit cards
accepted.
≥ All enquiries transactions and distribution
facilities are provided directly by
Panasonic UK Ltd.
≥ It couldn’t be simpler!
≥ Also available through our Internet is
direct shopping for a wide range of
finished products, take a browse on our
website for further details.
Interested in purchasing an extended
guarantee?
Please call 0870 240 6284 or visit our
website www.panasonic.co.uk/guarantee
.
10
LSQT1572
Page 11
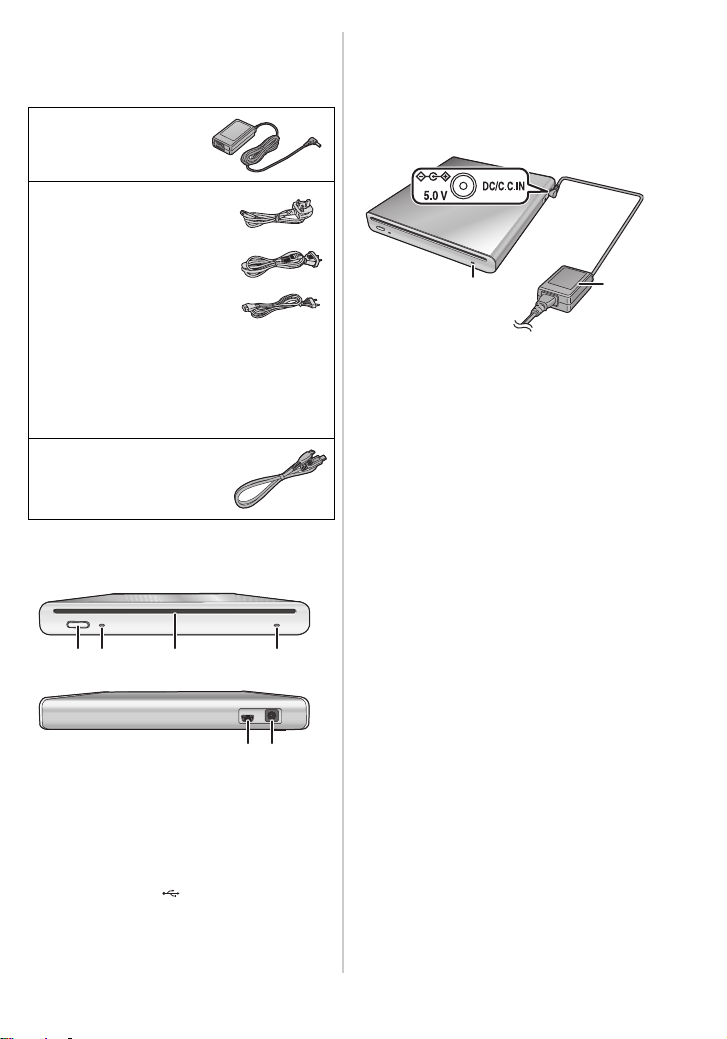
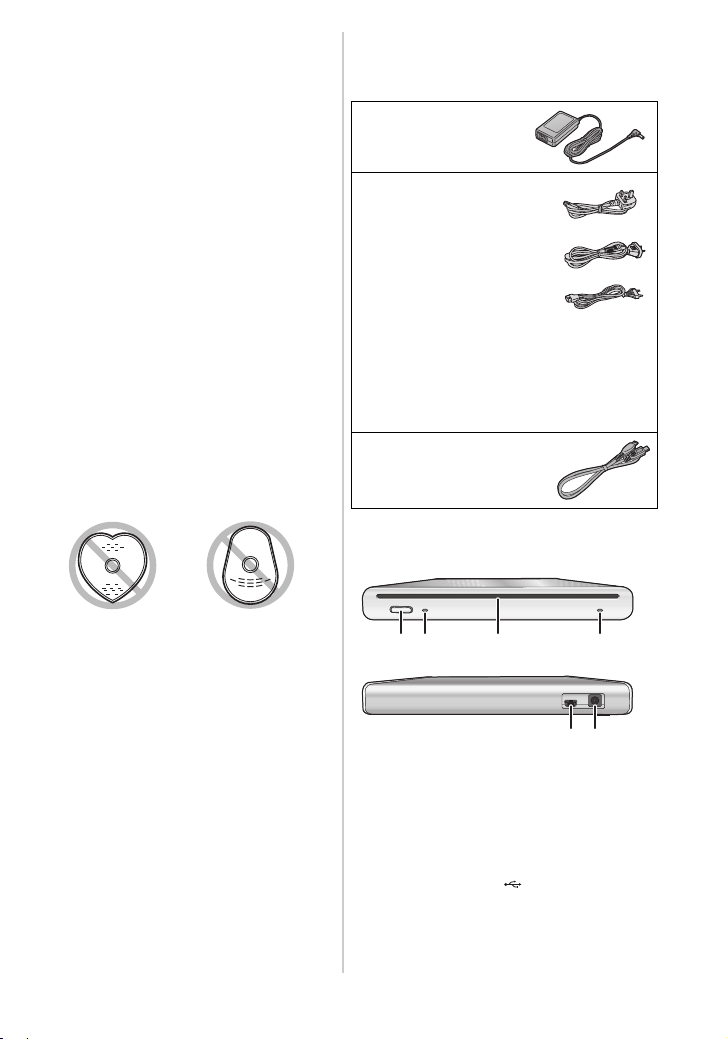
¬ Accessories
A
B
C
B
A
1
3
2
Check the accessories before using this
unit.
AC adaptor
VSK0692
AC mains lead
A K2CT3CA00004
United Kingdom,
Hong Kong Special
Administrative Region of
China and Saudi Arabia
B K2CJ2DA00011
Australia and New Zealand
C K2CR2DA00004
Areas Other than United Kingdom,
Hong Kong Special Administrative
Region of China, Australia,
New Zealand and Saudi Arabia
Mini AB USB
Connection Cable
K2KZ59B00002
¬ Parts identification and
handling
¬ Power supply
The unit is in the standby condition when
the AC adaptor is connected. The primary
circuit is always “live” as long as the AC
adaptor is connected to an electrical outlet.
1 Connect the AC mains lead to the
AC adaptor A.
2 Connect the AC mains lead to the
AC outlet.
3 Connect the AC adaptor to this
unit’s DC input terminal
[DC/C.C.IN 5.0 V].
≥ The power lamp B lights up.
≥ The AC mains lead is for use with this
unit only. Do not use it with other devices
or use the AC mains lead for other
devices with this unit.
≥ The unit and the disc heat up during use.
This is not a malfunction.
23 41
1 Eject button [<]
2 Access lamp [ACCESS] (P12)
3 Disc insertion slot
4 Power lamp [POWER]
≥ This indicator lights when the unit is
connected to the AC mains supply.
5 USB terminal [ ]
6 DC input terminal [DC/C.C.IN 5.0 V]
≥ Do not use any other AC adaptors
except the supplied one.
65
11
LSQT1572
Page 12

¬ Inserting/removing a
Insert label-up.
A
MiniA
MiniB
disc
≥ When inserting or removing the disc,
connect the AC adaptor to the unit.
You cannot insert or remove a disc
unless the unit is powered.
1 Connect this unit to the AC adaptor.
2 Inserting disc
Insert the disc in the disc insertion
slot.
Insert the disc with the recording/
playing side face down. The disc is
automatically loaded when the disc is
inserted all the way into the slot.
Removing disc
Press the [<] button.
≥ Be careful not to touch the recording/
playback side of the disc when inserting/
removing it.
∫ About the access lamp
When the unit accesses a disc, the access
lamp lights up.
≥ Do not do the following operations when
the access lamp is lit. The disc or the
recorded data on the disc may be
damaged and this unit may malfunction.
– Disconnect the AC adaptor.
– Disconnect the USB cable.
– Subject this unit to a strong shock or
vibration.
12
LSQT1572
¬ Copying from a video
camera to a DVD disc
If you connect this unit and a compatible
Panasonic video camera, you can copy
pictures recorded on the video camera to a
DVD disc.
≥ Use the Mini AB USB Connection Cable
to connect this unit and the compatible
Panasonic video camera.
≥ This function does not work if the video
camera is not compatible with this unit.
≥ Refer to the operating instructions of the
video camera about the available data
for copying.
≥ Connect this unit to the AC adaptor.
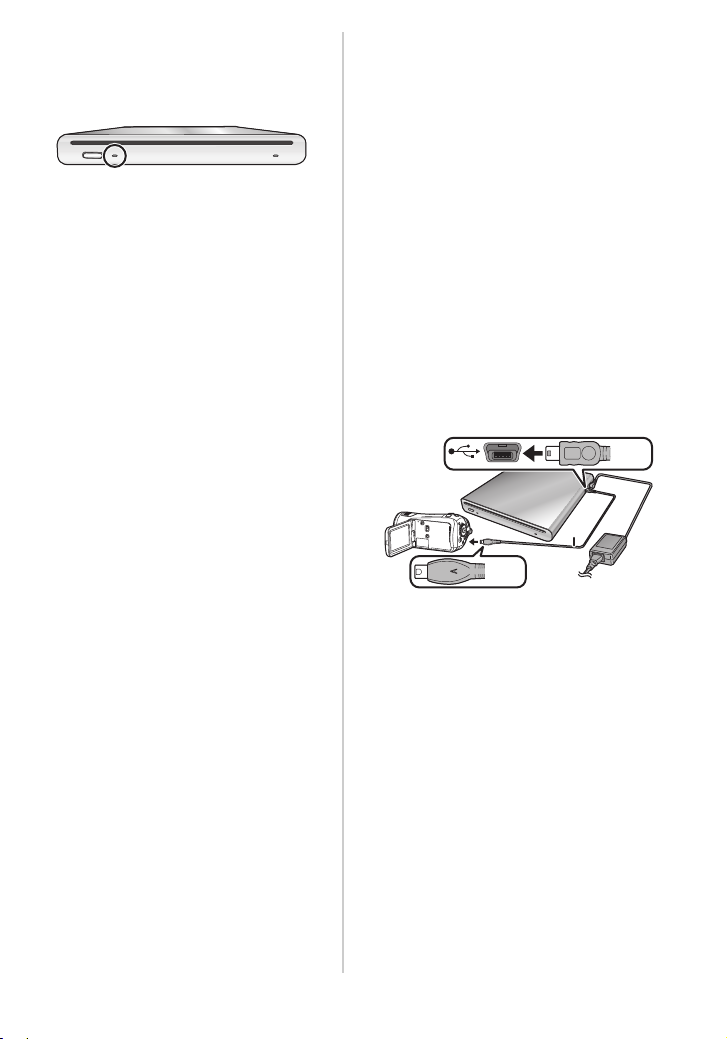
1 Connect this unit to the video
camera.
AMini AB USB Connection Cable
(supplied)
≥ Connect the miniA terminal to the
video camera and the miniB terminal
to this unit.
≥ Insert the plugs as far as they will go.
The unit and the video camera will
not operate properly if they are not
inserted fully.
≥ Do not use any other USB
connection cables except the
supplied one.
2 Start copying on the video camera.
≥ Read the operating instructions of
the video camera for information
about how to copy.
≥ If the compatible Panasonic video
camera supports copying to a CD-R and
a CD-RW, you can copy the still picture
data to a CD-R or a CD-RW. Read the
operating instructions of the video
camera for details.
Page 13

¬ Playing back a copied
DVD disc on a video
camera
If you connect this unit and a compatible
Panasonic video camera, you can play
back the DVD disc that you copied pictures
to.
≥ To play back the disc, connect the same
video camera that you connected when
copying to it.
≥ Use the Mini AB USB Connection Cable
to connect this unit and the compatible
Panasonic video camera.
≥ Connect this unit to the AC adaptor.
1 Connect this unit and the video
camera using the Mini AB USB
Connection Cable.
≥ Connect the miniA terminal to the
video camera and the miniB terminal
to this unit.
≥ Insert the plugs as far as they will go.
The unit and the video camera will
not operate properly if they are not
inserted fully.
≥ Do not use any other USB
connection cables except the
supplied one.
2 Start playback of the disc on the
video camera.
≥ Read the operating instructions of
the video camera for information
about how to play back.
¬ Connecting to a PC for
use
You can copy pictures recorded on a
Panasonic video camera and edited on a
PC to a DVD disc.
Use the software supplied with the
Panasonic video camera to copy the
pictures. You can also play back the DVD
disc that you copied the pictures to using
the same software.
≥ Use the USB cable supplied with a
Panasonic video camera compatible with
this unit to connect this unit and a PC.
≥ Depending on the software, the available
data for copying may vary.
If using Windows
∫ Operating environment
Personal computer
IBM PC/AT compatible personal computer
OS
The compatible OS will differ depending on
the software supplied with the video
camera. Please see the operating
environment of the software.
Interface
USB port
Other requirements
Mouse or equivalent pointing device
≥ Even if the system requirements
mentioned in these operating
instructions are fulfilled, some personal
computers cannot be used.
≥ Operation is not guaranteed on an
upgraded OS.
≥ Operation on an OS other than the one
pre-installed is not guaranteed.
≥ When 2 or more USB devices are
connected to a PC, or when devices are
connected through USB hubs or by using
extension cables, proper operation is not
guaranteed.
13
LSQT1572
Page 14
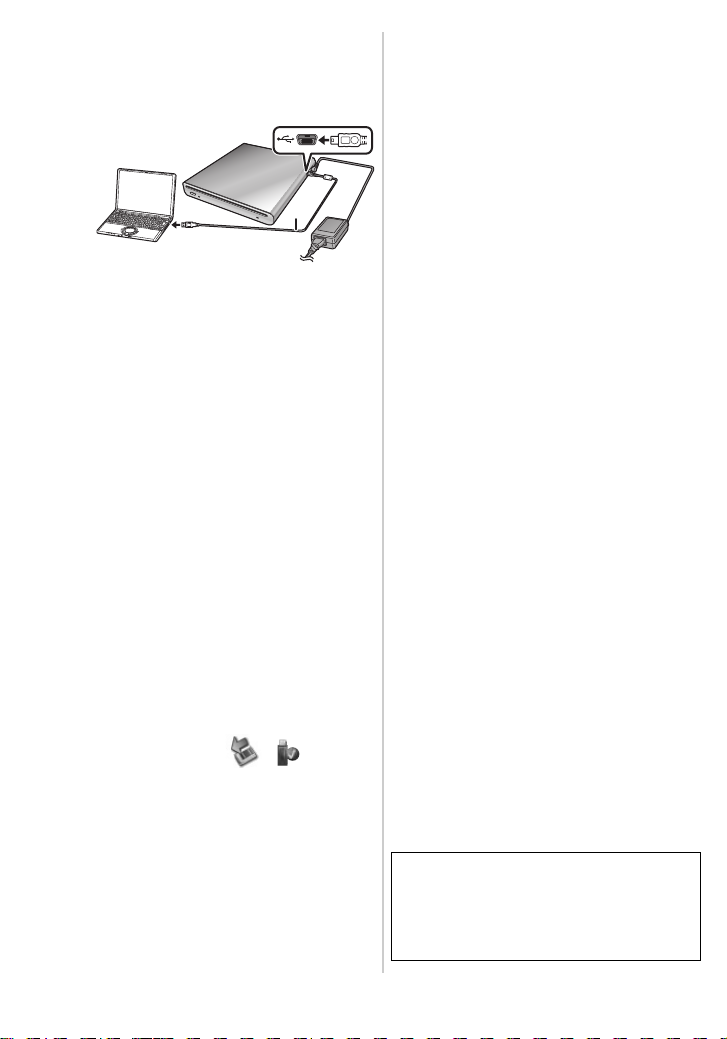
∫ Connection and recognition
A
AUSB cable
(supplied with the video camera)
procedures
≥ Connect this unit to the AC adaptor.
1 Connect this unit to the PC.
≥ This unit is recognised as a
[DVD-RAM Drive] on [My Computer].
≥ Insert the plugs as far as they will go.
The unit and PC will not operate
properly if they are not inserted fully.
≥ Be sure to use the USB cable
supplied with the video camera. (We
cannot guarantee operation if you
use a USB cable other than the one
supplied with the Panasonic video
camera.)
2 Start copying/playback.
≥ Use the software supplied with a
Panasonic video camera to copy/
play back the pictures.
≥ Read the operating instructions of
the software for information about
how to copy/play back.
∫
To disconnect the USB cable safely
If the USB cable is disconnected while the
access lamp is lit, this unit may malfunction
and the data may be lost.
1 Check that the access lamp is not lit.
2 Double click the ( ) icon in
task tray.
≥ Hardware disconnect dialogue
appears.
≥ Depending on your PC’s settings,
this icon may not be displayed.
3 Select [USB Mass Storage Device]
and click [Stop].
4 Click [OK].
≥ Click [OK], and you can safely
disconnect the cable.
¬ Cautions for Use
∫ About this unit
The unit and disc become warm after long
operation, but this is not a malfunction.
Keep the unit as far away as possible from
electromagnetic equipment (such as
microwave ovens, TVs, video games etc.).
≥ If you use the unit on top of or near a TV,
the pictures and sound on the unit may be
disrupted by electromagnetic wave
radiation.
≥ Do not use the unit near cell phones
because doing so may result in noise
adversely affecting the pictures and sound.
≥ Recorded data may be damaged, or
pictures may be distorted, by strong
magnetic fields created by speakers or large
motors.
≥ Electromagnetic wave radiation generated
by microprocessors may adversely affect
the unit, disturbing the pictures and sound.
≥ If this unit is adversely affected by
electromagnetic equipment and stops
functioning properly, disconnect the AC
adaptor and then connect it again.
Do not use the unit near radio
transmitters or high-voltage lines.
≥ If you record near radio transmitters or
high-voltage lines, the recorded pictures
and sound may be adversely affected.
Make sure to use the supplied cords
and cables.
Do not extend the cords and the cables.
Do not spray insecticides or volatile
chemicals onto the unit.
≥ If the unit is sprayed with such chemicals, its
body may be marred and the surface finish
may peel off.
≥ Do not leave rubber or plastic products in
contact with the unit for a long time.
Do not subject this unit to vibrations or
impacts, shake, drop or bump it, place
objects on top of it or drop objects on it.
≥ A strong impact can break the unit’s casing,
causing it to malfunction.
In particular, do not place a video camera
etc. on top of this unit during use. If this
unit is subjected to vibration during disc
reading or writing, the operation of the
video camera may be affected or the video
camera may fall.
14
LSQT1572
Page 15

Do not use benzine, paint thinner or
alcohol for cleaning the unit.
≥ Before cleaning, pull out the AC mains lead
from the AC mains socket.
≥ If you use a solvent, the casing may be
discoloured and the surface finish may peel
off.
≥ Wipe the unit with a soft dry cloth to remove
dust and fingerprints. To remove stubborn
stains, thoroughly wring a cloth that has
been soaked in a neutral detergent diluted
with water and wipe the unit with it.
Afterwards, wipe it with a dry cloth.
≥ Do not use a chemical dust cloth.
When you are not going to use the unit
for an extended time
≥ When storing the unit in a cupboard or
cabinet, it is recommended that you put a
desiccant (silica gel) in with it.
∫ About the AC adaptor
≥ Be sure to use the supplied AC adaptor.
≥ If you use the AC adaptor near a radio, radio
reception may be disturbed. Keep the AC
adaptor 1 m or more away from the radio.
≥ When using the AC adaptor, it may
generate whirring sounds. However, this is
normal.
≥ After use, be sure to disconnect the AC
adaptor. (If it is left connected, about 0.3 W
of current is consumed at most.)
≥ Always keep the electrodes of the AC
adaptor clean.
Put this unit near the outlet to make it
easy to reach for the interrupting device
(plug).
∫ About the disc
≥ If there is dust, a scratch, or dirt on
disc or if it is warped, the following
phenomena may occur:
– Block noise in playback image
– Momentary stop of playback image
– Sound interrupted during playback, or
abnormal sound
– Disc cannot correctly be recognised
– Delay between video and audio
When the ACCESS lamp is illuminated
(while accessing a disc), do not
disconnect the AC adaptor or the USB
cable or subject this unit to vibration
and shock.
DVD-R/DVD-R DL/+R/+R DL
≥
For optimum recording on DVD-R, DVD-R DL,
+R or +R DL discs, this unit writes control data
to a DVD-R, DVD-R DL, +R or +R DL used for
recording when it is being inserted and
ejected. If the disc has no area for control data
to be written, recording may not be possible.
To prevent this, do not insert a DVD-R,
DVD-R DL, +R or +R DL which has been
recorded on more than 50 times.
≥
Do not insert a DVD-R, DVD-R DL, +R or
+R DL recorded on this unit that has not been
finalized into a recordable device, such as a
DVD recorder. The recorded data may be
damaged.
∫ About condensation
Shortly after removing a chilled bottle from
the refrigerator in summer, you will see that
it is covered with tiny droplets of water. This
phenomenon is called condensation.
Using this unit when condensation has occurred
may cause it to malfunction. Make every effort to
ensure that condensation does not form. If it
does form, take the actions described below.
Causes of condensation
Condensation takes place when the
ambient temperature or humidity is
changed as follows.
≥ When this unit is brought inside from the
cold to a warm room.
≥ When this unit is moved from an
air-conditioned car to outside.
When a cold room has been warmed up quickly.
≥
≥ When cool wind from an air conditioner is
directly blown onto this unit.
≥ After summer afternoon showers of rain.
≥ When this unit is in a very humid place
where the air is thick with steam.
When this unit is taken to a location with
a significant temperature difference
such as from a cold place to a hot place.
Place the unit inside a plastic bag, remove as
much of the air from inside the bag as
possible, then seal the bag. Leave the unit for
about an hour in the room so the temperature
of the unit is close to the ambient temperature
of the room, then use it.
What to do when condensation forms
Disconnect the AC adaptor and leave the
unit for about 1 hour. Check that the
condensation disappeared naturally when
the unit became close to the ambient
temperature and then use the unit.
15
LSQT1572
Page 16

¬ Trouble shooting
Problem Check points
This unit cannot be
turned on.
This unit cannot be
operated even when
powered up.
This unit does not
operate normally.
The [<] button does not
work.
The disc cannot be read.
Copying stops.
The playback picture
breaks up for a moment.
Cannot copy although
power is supplied to this
unit and the disc is
correctly inserted.
≥ Is the AC adaptor connected?
> Connect the AC adaptor and the
≥ Disconnect the AC adaptor and then about 1 minute later
connect it again. (Conducting the above operation when the
access lamp is on may destroy the data on the disc.) If normal
conditions are not restored, detach from the connected power
source and consult the dealer who you purchased this unit from.
≥ The disc will not eject unless this unit is powered.
> Connect the AC adaptor.
≥ The [<] button may not work when copying from a connected
video camera to a disc is in progress.
> Wait until the copying is finished.
≥ In cases other than the above, detach from the connected
power source and consult the dealer who you purchased this
unit from.
≥ Is the disc scratched or dirty?
> Wipe off the dirt on the disc. (P9) If the disc is scratched,
≥ The internal temperature of this unit is high. Disconnect the AC
adaptor, wait a short while and then you will be able to use this
unit again.
≥ Discs recorded on other devices may not be correctly read or
played back on this device.
≥ Has the disc already been used for recording video and still
pictures?
> If the disc contains recorded material, it cannot be used
> DVD-RAM, DVD-RW, +RW or CD-RW discs recorded with
(P11)
AC mains lead correctly.
insert a new one.
again. Use a new disc.
any material can be reused after formatting the disc. Since all
data previously recorded on the disc will be deleted, confirm
contents of the disc carefully before reformatting it.
16
LSQT1572
Page 17

Problem Check points
Even if connected by the
USB cable, this unit is
not recognised by the
PC.
When the USB cable is
disconnected, an error
message will appear on
PC.
The PC will not start up.
A region code setting
screen appears when
trying to play a DVD
video.
≥ Select another USB terminal on the PC.
≥ Check the operating environment. (P13)
≥ Disconnect the AC adaptor and the USB cable and then
connect them again.
≥ To disconnect the USB cable safely, double-click the
( ) icon in the task tray and follow the instructions
on the screen.
≥ Did you connect this unit to the PC with the USB cable before
turning on the power to the PC?
> Start up the PC and then connect this unit to it.
≥ The region code is not set when this unit is purchased. Check
the setting contents and then click [OK]. Playback of the DVD
video will start after the setting is changed to the new region
code. You can change the setting 5 times. Be aware that you
cannot change the setting after the fifth time and the region
code is fixed to the last setting.
17
LSQT1572
Page 18
¬ Specifications
DVD Burner: Information for your safety
Power source: DC 5.0 V
Power consumption: 7.5 W (When writing to a disc)
Compatible media 12 cm DVD-RAM Ver.2.1
Interface Hi-Speed USB compliant (USB 2.0), USB terminal Type miniB
Buffer capacity 2MB
Dimensions 139 mm (W)k16.8 mm (H)k138.1 mm (D)
Mass Approx. 395 g (DVD burner only)
Operating temperature 5 oCto35oC
Operating humidity 10% to 80%
Data writing rate
Data reading rate
LASER specification Class 1 LASER Product (Pickup)
NORSK Bølgelengde: DVD 661 nm
12 cm DVD-RW Ver.1.1/2X-SPEED (2X/1X)
12 cm DVD-R for General Ver.2.0
12 cm DVD-R for DL Ver.3.0
12 cm +RW
12 cm +R
12 cm +R for DL
12 cm CD-R
12 cm CD-RW
(excluding the projecting parts)
DVD-RAM: Maximum 3X-SPEED
DVD-RW: Maximum 6X-SPEED
DVD-R: Maximum 8X-SPEED
DVD-R DL: Maximum 4X-SPEED
DVD-RAM: Maximum 3X-SPEED
DVD-RW: Maximum 8X-SPEED
DVD-R: Maximum 8X-SPEED
DVD-R DL: Maximum 6X-SPEED
Wave length: DVD 661 nm
Laser power:
No hazardous radiation is emitted with the safety protection
Laserstyrke: Ingen farlig stråling sendes ut
+RW: Maximum 8X-SPEED
+R: Maximum 8X-SPEED
+R DL: Maximum 4X-SPEED
CD-R: Maximum 24X-SPEED
CD-RW: Maximum 16X-SPEED
+RW: Maximum 8X-SPEED
+R: Maximum 8X-SPEED
+R DL: Maximum 6X-SPEED
CD-R: Maximum 24X-SPEED
CD-RW: Maximum 24X-SPEED
CD 783 nm
CD 783 nm
AC adaptor VSK0692: Information for your safety
Power source: AC 110 V to 240 V, 50/60 Hz
Input capacitance: 0.22 A
DC output: DC 5.0 V 1.6 A
Specifications may change without prior notice.
18
LSQT1572
Page 19

Sehr geehrter Kunde,
Wir möchten Ihnen danken, dass Sie sich für den Kauf dieses DVD-Brenners von
Panasonic entschieden haben. Lesen Sie Bitte die Bedienungsanleitung gründlich durch,
und bewaren Sie sie für zukünftige Konsultationen auf.
Bitte beachten Sie, dass die Bedienelemente und weitere Komponenten Ihres
DVD-Brenners etwas anders aussehen können als in den Abbildungen dieser
Bedienungsanleitung.
DEUTSCH
¬ Informationen zu Ihrer Sicherheit
WARNUNG:
ZUR REDUZIERUNG DER GEFAHR VON BRAND, ELEKTRISCHEM SCHLAG UND
BESCHÄDIGUNG:
≥ DIESES GERÄT SORGFÄLTIG VOR NÄSSE, FEUCHTIGKEIT, SPRITZ- UND
TROPFWASSER ZU SCHÜTZEN; BLUMENVASEN UND ANDERE MIT
FLÜSSIGKEITEN GEFÜLLTE BEHÄLTER DÜRFEN NICHT AUF DIESES GERÄT
GESTELLT WERDEN.
≥ AUSSCHLIESSLICH DAS EMPFOHLENE ZUBEHÖR VERWENDEN.
≥ AUF KEINEN FALL DIE ABDECKUNG (ODER RÜCKWAND) ABSCHRAUBEN; IM
GERÄTEINNEREN BEFINDEN SICH KEINE TEILE; DIE VOM BENUTZER
GEWARTET WERDEN KÖNNEN. REPARATURARBEITEN SIND
GRUNDSÄTZLICH DEM KUNDENDIENSTPERSONAL ZU ÜBERLASSEN.
ACHTUNG!
≥ INSTALLIEREN ODER BETREIBEN SIE DIESES GERÄT NICHT IN EINEM
BÜCHERREGAL, EINEM SCHRANK ODER EINER ANDEREN SCHLECHT
BELÜFTETEN UMGEBUNG. ACHTEN SIE AUF AUSREICHENDE BELÜFTUNG.
UM ELEKTRISCHE SCHLÄGE UND BRANDGEFAHR AUFGRUND VON
ÜBERHITZUNG AUSZUSCHLIESSEN, STELLEN SIE SICHER, DASS DIE
BELÜFTUNGSÖFFNUNGEN DES GERÄTS NICHT DURCH VORHÄNGE ODER
ANDERE DINGE BLOCKIERT WERDEN.
≥ BLOCKIEREN SIE DIE BELÜFTUNGSÖFFNUNGEN DES GERÄTS NICHT MIT
ZEITUNGEN, TISCHDECKEN, VORHÄNGEN UND ÄHNLICHEM.
≥ STELLEN SIE KEINE GEGENSTÄNDE, DIE OFFENE FLAMMEN PRODUZIEREN,
WIE BRENNENDE KERZEN, AUF DAS GERÄT.
DAS NETZTEIL SOLLTE IN DER NÄHE DES GERÄTES PLATZIERT WERDEN UND
LEICHT ZUGÄNGLICH SEIN.
Dieses Gerät kann beim Betrieb Hochfrequenzstörungen auffangen, die von einem in
der Nähe verwendeten Handy verursacht werden. Falls eine solche Störbeeinflussung
festgestellt wird, sollte das Handy in größerer Entfernung von diesem Gerät betrieben
werden.
19
LSQT1572
Page 20
WARNUNG!
DIESES PRODUKT ERZEUGT LASERSTRAHLUNG.
DURCHFÜHRUNG ANDERER VORGÄNGE ALS DER HIER ANGEGEBENEN KANN
ZU GEFÄHRLICHER STRAHLUNG FÜHREN.
REPARATUREN DÜRFEN NUR VON QUALIFIZIERTEM FACHPERSONAL
DURCHGEFÜHRT WERDEN.
Das Typenschild befindet sich an der Unterseite des Gerätes.
∫ EMV – Elektromagnetische Verträglichkeit
Auf dem Typenschild befindet sich das CE-Zeichen.
(Auf der Unterseite des Geräts)
20
LSQT1572
(Im Inneren des Geräts)
Page 21

-Bedeutung des nachstehend abgebildeten Symbols-
Benutzerinformationen zur Entsorgung von elektrischen und elektronischen
Geräten (private Haushalte)
Wertstoffsammelhöfen, die diese Geräte kostenlos entgegennehmen.
Die ordnungsgemäße Entsorgung dieses Produkts dient dem Umweltschutz und verhindert
mögliche schädliche Auswirkungen auf Mensch und Umwelt, die sich aus einer
unsachgemäßen Handhabung der Geräte am Ende Ihrer Lebensdauer ergeben könnten.
Genauere Informationen zur nächstgelegenen Sammelstelle bzw. Recyclinghof erhalten
Sie bei Ihrer Gemeindeverwaltung.
Für Geschäftskunden in der Europäischen Union
Bitte treten Sie mit Ihrem Händler oder Lieferanten in Kontakt, wenn Sie elektrische und
elektronische Geräte entsorgen möchten. Er hält weitere Informationen für sie bereit.
Informationen zur Entsorgung in Ländern außerhalb der Europäischen Union
Dieses Symbol ist nur in der Europäischen Union gültig.
Entsprechend der grundlegenden Firmengrundsätzen der Panasonic-Gruppe
wurde ihr Produkt aus hochwertigen Materialien und Komponenten entwickelt
und hergestellt, die recycelbar und wieder verwendbar sind.
Dieses Symbol auf Produkten und/oder begleitenden Dokumenten bedeutet,
dass elektrische und elektronische Produkte am Ende ihrer Lebensdauer vom
Hausmüll getrennt entsorgt werden müssen.
Bringen Sie bitte diese Produkte für die Behandlung, Rohstoffrückgewinnung
und Recycling zu den eingerichteten kommunalen Sammelstellen bzw.
¬ Inhalt
Informationen zu Ihrer Sicherheit ....... 19
Funktionen............................................ 21
Vor dem Gebrauch...............................22
Hinweise zur Disc.................................23
Zubehör.................................................25
Bedienelemente und Handhabung..... 25
Stromversorgung.................................26
Disc einlegen/herausnehmen .............26
Von einem Camcorder auf eine DVD
kopieren.............................................27
Wiedergabe einer kopierten DVD auf
einem Camcorder.............................28
An einen PC anschließen ....................28
Vorsichtsmaßnahmen zum Gebrauch
Fehlerbehebung...................................33
Technische Daten ................................35
... 30
¬ Funktionen
≥
Dieser DVD-Brenner ist ein tragbares,
besonders dünnes, leichtes und
kompaktes Gerät. Wenn Sie einen
kompatiblen Camcorder von Panasonic an
dieses Gerät anschließen, können Sie die
Aufnahmen auf dem angeschlossenen
Camcorder selbst auf Reisen ganz einfach
auf eine DVD kopieren.
≥ Sie können auch DVDs abspielen, die
auf diesem DVD-Brenner erstellt
wurden, wenn Sie das Gerät mit
einem kompatiblen Camcorder von
Panasonic verbinden.
≥ Wenn Sie das Gerät und einen PC mit
dem mitgelieferten USB-Kabel an
einen kompatiblen Camcorder von
Panasonic anschließen, können Sie
Aufnahmen, die Sie auf dem PC
bearbeitet bzw. gespeichert haben,
auf eine DVD kopieren.
≥
Der ordnungsgemäße Betrieb des Geräts
kann für andere Verwendungen als die
oben genannten nicht garantiert werden.
21
LSQT1572
Page 22

¬ Vor dem Gebrauch
∫ Handhabung dieses Geräts
Dieser DVD-Brenner ist ein
Hochpräzisionsgerät, das weder starken
Vibrationen noch Stößen oder Staub
ausgesetzt werden darf. Je nach der
Einsatzumgebung und Handhabung des
Geräts kann aufgezeichnetes Material
beschädigt werden, im ungünstigsten Fall
kann es sein, dass die Disc nicht mehr
gelesen werden kann. Achten Sie
besonders darauf, den DVD-Brenner
keinen Vibrationen oder Stößen
auszusetzen und das Gerät während des
Betriebs nicht von der Stromversorgung zu
trennen.
≥ Panasonic ist keinesfalls haftbar für
Schäden welche direkt oder indirekt aus
der Verwendung oder der Fehlfunktion
dieses Gerätes entstehen. Panasonic
haftet auch nicht für den durch dieses
Produkt hervorgerufenen Datenverlust.
≥ Für Verletzungen oder
Materialschäden welche aus einer
nicht mit der Bedienungsanleitung
übereinstimmenden Verwendung
herrühren, ist ausschließlich der
Benutzer haftbar zu machen.
∫ Aufstellen des Geräts
Stellen Sie das Gerät zur Verwendung auf
eine flache, ebene Unterlage.
≥ Das Gerät kann nicht verwendet
werden, wenn es vertikal aufgestellt
wird.
∫ Beachten Sie bitte die
Urheberrechtsbestimmungen
Das von Ihnen aufgenommene und
erstellte Material ist nur für die persönliche
Unterhaltung bestimmt. Material welches
den Bestimmungen des Urheberrechts
unterliegt, kann nicht ohne die Einwilligung
des Inhabers des Urheberrechts verwendet
werden.
∫ Referenzseiten
Seiten welche Sie konsultieren sollten,
werden als (S00) angezeigt.
≥ Microsoft®, Windows®, Windows Vista®
und DirectX
Warenzeichen oder Warenzeichen von
Microsoft Corporation in den USA und/
oder anderen Ländern.
IBM und PC/AT sind eingetragene
≥
Handelszeichen der International Business
Machines Corporation in den U.S.A.
≥ Intel®, Core™, Pentium® und Celeron®
sind eingetragene Warenzeichen oder
Warenzeichen von Intel Corporation in
den USA und anderen Ländern.
≥ Abdruck der Screenshots von
Microsoft-Produkten mit freundlicher
Genehmigung der Microsoft Corporation.
≥ Andere Namen von Systemen und
Produkten welche in dieser
Bedienungsanleitung genannt werden,
sind normalerweise eingetragene
Handelszeichen der Hersteller dieser
Systeme und Produkte.
®,
sind eingetragene
22
LSQT1572
Page 23

¬ Hinweise zur Disc
∫ Discs, die mit diesem Gerät
verwendet werden können
Beim Anschluss einer kompatiblen
Panasonic-Videokamera an dieses Gerät
können Sie folgende Disc-Typen zum
Kopieren verwenden: 12 cm DVD-RAM
ohne Cartridge, DVD-RAM, DVD-RW,
DVD-R, DVD-R DL (Dual Layer, einseitig),
+RW, +R, +R DL (Dual Layer, einseitig),
CD-RW und CD-R.
Welche Discs konkret auf diesem
≥
Gerät verwendet werden können,
unterscheidet sich je nach
angeschlossenem Camcorder.
Beachten Sie die Bedienungsanleitung
des Camcorders.
Wichtiger Hinweis
Wenn Sie Aufnahmen, die im Format
AVCHD aufgenommen wurden, auf eine
Disc kopieren, legen Sie diese Disc
keinesfalls in Geräte ein, die das
Format AVCHD nicht unterstützen. Die
Discs könnten unter Umständen nicht
mehr ausgeworfen werden. Die Discs
können mit Geräten, die das Format
AVCHD nicht unterstützen, nicht
abgespielt werden.
≥ Sie können bei doppelseitigen Discs
nicht kontinuierlich beide Seiten
aufnehmen oder wiedergeben. Sie
müssen die Disc auswerfen und
umdrehen.
≥ Discs in einem Halter, einer Cartridge
oder einem Caddy können nicht
verwendet werden. Nehmen Sie solche
Discs immer aus ihrem jeweiligen
Gehäuse, bevor Sie sie benutzen.
≥ Wir empfehlen Discs von Panasonic.
Discs, die der Norm entsprechen,
können in der Regel problemlos bespielt
und wiedergegeben werden. Manche der
im Handel erhältlichen Discs erfüllen die
DVD-Qualitäts- und Leistungsnorm
jedoch nicht. Bei Verwendung einer
solchen Disc kann es unter Umständen
zu Problemen bei Aufnahme oder
Wiedergabe kommen.
Beachten Sie die folgende
Support-Website. Sie finden hier
Informationen, welche Discs von
Panasonic als kompatibel bestätigt
wurden.
http://panasonic.jp/support/global/cs/
e_cam
(Nur in englischer Sprache.)
≥ Auf diesem Gerät aufgenommene
Discs können auf anderen Geräten u.
U. nicht wiedergegeben werden.
Spielen Sie die Disc in diesen Fällen
stattdessen mit diesem Gerät ab.
≥ Führen Sie bei der Verwendung von
Discs des Typs DVD-RW, DVD-R,
DVD-R DL, +RW, +R oder +R DL
keinesfalls die nachfolgend
genannten Schritte aus, da die Disc
sonst unbrauchbar werden könnte.
– Aufnahmen auf einer Disc mit anderen
Geräten, nachdem Sie auf der Disc
bereits Aufnahmen mit diesem Gerät
gemacht haben.
– Aufnahmen auf einer Disc mit diesem
Gerät, nachdem Sie auf der Disc
bereits Aufnahmen mit anderen
Geräten gemacht haben.
– Einlegen einer nicht finalisierten Disc in
andere Geräte.
23
LSQT1572
Page 24

∫ Hinweise zu DVD-R DL/+R DL
Discs des Typs DVD-R DL und +R DL
verfügen auf einer einzigen Seite über zwei
Aufzeichnungs- und Wiedergabeschichten.
Wenn eine Szene nicht vollständig auf die
erste Schicht (L0) passt, wird die
Aufzeichnung auf der zweiten Schicht (L1)
fortgesetzt, sodass sich eine Szene über
zwei verschiedene Schichten erstreckt.
Dieses Gerät schaltet bei der Wiedergabe
automatisch zwischen den Schichten um,
sodass Sie die gesamte Disc wie eine
normale Disc fortlaufend abspielen können.
Allerdings stoppen Bild oder Ton unter
Umständen kurzfristig an dem Punkt, an
dem zwischen den Schichten umgeschaltet
wird.
∫ Disc-Typen, die mit diesem Gerät
nicht verwendet werden können
≥
Discs mit anderen Durchmessern als
12 cm (DVDs mit 8 cm können nicht
verwendet werden, selbst wenn Sie sie in
einen handelsüblichen Adapter einlegen.)
≥ DVD-RAMs, die mit 6X- bis
12X-Hochgeschwindigkeitsaufnahmen
kompatibel sind
≥ BD-Medien usw.
≥ HD-DVDs usw.
∫ Discs richtig halten
Berühren Sie nicht die Aufzeichnungsseite.
∫ Discs einlegen/herausnehmen
Achten Sie darauf, dass die
Aufzeichnungs-/Wiedergabeseite der Disc
nicht durch Fingerabdrücke oder Schmutz
verunreinigt wird.
≥ Wenn sich Kratzer oder Schmutz (z.B.
Staub oder Fingerabdrücke) auf der
Aufzeichnungs-/Wiedergabeseite der
Disc befinden, kann die normale
Aufnahme oder Wiedergabe gestört
sein. Es können dann folgende Effekte
auftreten.
– Es ist keine Aufnahme/Wiedergabe
möglich.
– Das Bild oder der Ton ist unterbrochen
oder hat Aussetzer.
– Das Bild oder der Ton ist verrauscht.
∫ Verschmutzte Discs reinigen
≥ Reinigen Sie die Disc mit einem
handelsüblichen Disc-Reinigungstuch.
Wischen Sie die Disc von der Mitte
beginnend zum Rand hin ab und
entfernen Sie so den Schmutz. Drücken
Sie beim Abwischen der Disc nicht stark
auf, da Sie die Disc sonst zerkratzen
können. Verwenden Sie keinerlei
Lösungsmittel (Verdünner, Wasser,
Antistatikmittel, Reinigungsmittel usw.).
24
LSQT1572
∫ Vorsichtshinweise für die
Handhabung
≥ Achten Sie darauf, dass die Disc nicht
zerkratzt oder verschmutzt wird.
≥ Bringen Sie auf Discs keine Etiketten
und Aufkleber an. (Die Disc kann sich
dadurch verziehen und es können
Unwuchten entstehen, die Disc
unbrauchbar machen.)
Page 25
≥ Beschriften Sie ausschließlich die dafür
23 41
65
vorgesehene Seite der Disc und
verwenden Sie einen weichen
Filzschreiber auf Ölbasis. Verwenden
Sie keine Kugelschreiber oder andere
harte Schreibutensilien.
≥ Verwenden Sie keine
Schallplatten-Reinigungssprays, kein
Benzin, keinen Verdünner, keine
Antistatikflüssigkeiten und keine
sonstigen Lösungsmittel.
≥ Verwenden Sie keine kratzfesten
Schutzhüllen oder Abdeckungen.
≥ Lassen Sie Discs nicht fallen, stapeln Sie
sie nicht und setzen Sie sie keinen
Stößen aus. Legen Sie keine
Gegenstände auf Discs.
≥ Verwenden Sie folgende Discs nicht:
– Discs mit Klebstoffrückständen von
entfernten Etiketten oder Aufklebern.
– Stark verbogene Discs oder Discs mit
Rissen.
– Unregelmäßig geformte Discs, zum
Beispiel Discs in Herzform.
¬ Zubehör
Prüfen Sie das Zubehör, bevor Sie dieses
Gerät in Betrieb nehmen.
Netzteil
VSK0692
Netzkabel
A K2CT3CA00004
Vereinigtes Königreich,
Sonderverwaltungszone
Hongkong der
Volksrepublik China und
Saudi Arabien
B K2CJ2DA00011
Australien und Neuseeland
C K2CR2DA00004
Andere Gebiete als Vereinigte Königreich,
Sonderverwaltungszone Hongkong der
Volksrepublik China, Australien,
Neuseeland und Saudi Arabien
Mini-AB USB-Kabel
K2KZ59B00002
A
B
C
¬ Bedienelemente und
Handhabung
≥ Legen Sie sie nicht:
– In direktes Sonnenlicht.
– In sehr staubige oder feuchte
Umgebungen.
– In die Nähe einer Heizung.
– An Stellen, an denen starke
Temperaturschwankungen auftreten
können (da hier Kondensation
entstehen kann).
– An Stellen, an denen statische
Elektrizität oder elektromagnetische
Felder auftreten können.
≥ Um Discs zu schützen, legen Sie sie in
die entsprechende Hülle, wenn Sie sie
nicht verwenden.
1 Eject-Taste [<]
2 Zugriffsanzeige [ACCESS] (S27)
3 Disc-Schlitz
4 Ein-/Aus-Anzeigeleuchte [POWER]
≥ Diese Anzeige leuchtet, wenn das
Gerät an eine Netzsteckdose
angeschlossen ist.
5 USB Anschluss [ ]
6 Anschluss DC Eingang
[DC/C.C.IN 5.0 V]
≥ Verwenden Sie ausschließlich das
mitgelieferte Netzteil.
25
LSQT1572
Page 26

¬ Stromversorgung
B
A
1
3
2
Beschriftungsseite oben
Das Gerät befindet sich im
Bereitschaftszustand, wenn der
Netzadapter angeschlossen ist. Der
Primärstromkreis ist stets stromführend,
solange der Netzadapter an eine
Netzsteckdose angeschlossen ist.
1 Schließen Sie die Netzleitung an das
Netzteil A an.
2 Schließen Sie die Netzleitung an die
Steckdose an.
3 Schließen Sie das Netzteil an den
DC-Eingang dieses Geräts an
[DC/C.C.IN 5.0 V].
≥ Die Ein-/Aus-Anzeige B leuchtet auf.
≥ Das Netzkabel ist nur für die
Verwendung mit diesem Gerät
vorgesehen. Verwenden Sie es nicht mit
anderen Geräten und verwenden Sie
keine Netzkabel anderer Geräte mit
diesem Gerät.
≥ Das Gerät und die Disc erwärmen sich
während des Betriebs. Dies ist keine
Fehlfunktion.
¬ Disc einlegen/
herausnehmen
≥ Achten Sie darauf, dass vor dem
Einlegen oder Herausnehmen einer Disc
das Netzteil an dieses Gerät
angeschlossen ist.
Discs lassen sich nur einlegen oder
herausnehmen, wenn das Gerät mit
Strom versorgt wird.
1 Verbinden Sie dieses Gerät mit dem
Netzteil.
2 Disc einlegen
Legen Sie die Disc in den
Disc-Schlitz ein.
Schieben Sie die Disc mit der
Aufzeichnungs-/Wiedergabeseite nach
unten ein. Die Disc wird automatisch
geladen, wenn sie ganz in den Schlitz
eingeschoben wird.
Disc herausnehmen
Drücken Sie die Taste [<].
≥ Achten Sie darauf, die Aufnahme-/
Wiedergabeseite der Disc beim Einlegen
oder Herausnehmen nicht zu berühren.
26
LSQT1572
Page 27
∫ Informationen zur
A
MiniA
MiniB
Zugriffsanzeige
Während das Gerät auf eine Disc zugreift,
leuchtet die Zugriffsanzeige.
≥ Führen Sie die unten genannten Schritte
nicht aus, solange die Zugriffsanzeige
leuchtet. Die Disc oder die auf der Disc
aufgezeichneten Daten könnten
beschädigt werden und es könnte zu
Fehlfunktionen des Geräts kommen.
– Entfernen des Netzteils.
– Entfernen des USB-Kabels.
– Das Gerät Stößen oder Vibrationen
aussetzen.
¬ Von einem Camcorder
auf eine DVD kopieren
Wenn Sie einen kompatiblen Camcorder
von Panasonic an dieses Gerät
anschließen, können Sie Aufnahmen vom
Camcorder auf eine DVD kopieren.
≥ Verwenden Sie das Mini-AB USB-Kabel,
um dieses Gerät und den kompatiblen
Camcorder von Panasonic miteinander
zu verbinden.
≥ Diese Funktion ist nicht möglich, falls der
Camcorder nicht mit diesem
DVD-Brenner kompatibel ist.
≥ Informieren Sie sich in der
Bedienungsanleitung des Camcorders
darüber, welche Daten kopiert werden
können.
≥ Verbinden Sie dieses Gerät mit dem
Netzteil.
1 Verbinden Sie dieses Gerät mit dem
Camcorder.
AMini-AB USB-Kabel (mitgeliefert)
≥ Schließen Sie den miniA-Anschluss
an den Camcorder und den
miniB-Anschluss an dieses Gerät an.
≥ Stecken Sie die Stecker so weit wie
möglich ein. Der DVD-Brenner und
der Camcorder funktionieren nicht
ordnungsgemäß, wenn die Stecker
nicht vollständig eingesteckt sind.
≥ Verwenden Sie keine anderen USB
Kabel als das mitgelieferte.
2
Starten Sie das Kopieren am Camcorder.
≥ Informieren Sie sich in der
Bedienungsanleitung des
Camcorders über das Kopieren.
≥ Falls der kompatible Camcorder von
Panasonic auch das Kopieren auf
CD-Rs und CD-RWs unterstützt, können
Sie Fotodaten auf eine CD-R oder
CD-RW kopieren. Beachten Sie die
Bedienungsanleitung des Camcorders.
27
LSQT1572
Page 28

¬ Wiedergabe einer
kopierten DVD auf
einem Camcorder
Wenn Sie einen kompatiblen Camcorder
von Panasonic an dieses Gerät
anschließen, können Sie die DVD
wiedergeben, auf die Sie Aufnahmen
kopiert haben.
≥ Um die Disc wiederzugeben, schließen
Sie den gleichen Camcorder an, von
dem Sie die Aufnahmen kopiert haben.
≥ Verwenden Sie das Mini-AB USB-Kabel,
um dieses Gerät und den kompatiblen
Camcorder von Panasonic miteinander
zu verbinden.
≥ Verbinden Sie dieses Gerät mit dem
Netzteil.
1 Verbinden Sie dieses Gerät und die
Videokamera mit dem Mini-AB
USB-Kabel.
≥ Schließen Sie den miniA-Anschluss
an den Camcorder und den
miniB-Anschluss an dieses Gerät an.
≥ Stecken Sie die Stecker so weit wie
möglich ein. Der DVD-Brenner und
der Camcorder funktionieren nicht
ordnungsgemäß, wenn die Stecker
nicht vollständig eingesteckt sind.
≥ Verwenden Sie keine anderen USB
Kabel als das mitgelieferte.
2 Starten Sie die Wiedergabe der Disc
auf dem Camcorder.
≥ Informieren Sie sich in der
Bedienungsanleitung des
Camcorders über die Wiedergabe.
¬
An einen PC anschließen
Sie können Aufnahmen, die Sie auf einem
Camcorder von Panasonic aufgenommen
und auf einem PC bearbeitet haben, auf
eine DVD kopieren.
Verwenden Sie die Software aus dem
Lieferumfang des Camcorders von
Panasonic, um die Aufnahmen zu
kopieren. Mit der gleichen Software können
Sie auch die DVD wiedergeben, auf die Sie
die Aufnahmen kopiert haben.
≥ Verwenden Sie das USB-Kabel aus dem
Lieferumfang des kompatiblen
Camcorders, um dieses Gerät und den
PC miteinander zu verbinden.
≥ Je nach der Software kann es
unterschiedlich sein, welche Art von
Daten kopiert werden kann.
Bei der Verwendung von Windows
∫ Systemumgebung
Personalcomputer
IBM PC/AT kompatible Personalcomputer
BETRIEBSSYSTEM
Welche Betriebssysteme kompatibel sind,
hängt von der Software im Lieferumfang
des Camcorders ab. Informieren Sie sich
über die Systemvoraussetzungen für die
entsprechende Software.
Schnittstelle
USB Schnittstelle
Weitere Anforderungen
Maus oder vergleichbares Eingabegerät
≥ Auch wenn die in dieser
Bedienungsanleitungen aufgeführten
Systemvoraussetzungen erfüllt werden,
können einige Personalcomputer nicht
verwendet werden.
≥ Der Betrieb kann bei einem Upgrade des
Betriebssystems nicht garantiert werden.
≥ Der Betrieb mit einem anderen als dem
vorinstallierten Betriebssystem kann
nicht garantiert werden.
≥ Wenn 2 oder mehr USB Geräte an einen
PC angeschlossen sind, oder wenn die
Geräte über ein USB Hub oder ein USB
Erweiterungskabel angeschlossen sind,
wird die Funktion nicht garantiert.
28
LSQT1572
Page 29

∫ Anschluss- und
AUSB Kabel
(im Lieferumfang des Camcorders
enthalten)
Erkennungsprozeduren
≥ Verbinden Sie dieses Gerät mit dem
Netzteil.
1
Schließen Sie das Gerät an den PC an.
A
≥ Das Gerät wird als ein
[DVD-RAM Drive] unter
[My Computer] erkannt.
≥ Stecken Sie die Stecker so weit wie
möglich ein. Der DVD-Brenner und
der PC funktionieren nicht
ordnungsgemäß, wenn die Stecker
nicht vollständig eingesteckt sind.
≥ Verwenden Sie das USB-Kabel aus
dem Lieferumfang des Camcorders.
(Wir können den ordnungsgemäßen
Betrieb nicht garantieren, wenn Sie
ein anderes USB-Kabel als das im
Lieferumfang des Camcorders von
Panasonic enthaltene Kabel
verwenden.)
2 Starten Sie das Kopieren/die
Wiedergabe.
≥ Verwenden Sie die Software aus
dem Lieferumfang des Camcorders
von Panasonic, um die Aufnahmen
zu kopieren/wiederzugeben.
≥ Informieren Sie sich in der
Bedienungsanleitung der Software
über das Kopieren/die Wiedergabe.
∫ Das USB Kabel sicher entfernen
Falls das USB-Kabel entfernt wird,
während die Zugriffsanzeige leuchtet, kann
das zu Fehlfunktionen des Geräts führen
und es können Daten verloren gehen.
1 Stellen Sie sicher, dass die
Zugriffsanzeige nicht leuchtet.
2 Klicken Sie doppelt die Ikone
( ) in der Taskleiste.
≥ Der Dialog zur Entfernung der
Hardware erscheint.
≥ Abhängig von den Einstellungen
Ihres PC, könnte dieses Symbol
nicht angezeigt werden.
3 Wählen Sie [USB Mass Storage
Device] und klicken Sie [Stop].
4 Klicken Sie [OK].
≥ Klicken Sie [OK], dann können Sie
das Kabel sicher entfernen.
29
LSQT1572
Page 30

¬ Vorsichtsmaßnahmen
zum Gebrauch
∫ Zu diesem Gerät
Das Gerät und die Disc werden bei
längerem Betrieb warm. Dies ist jedoch
keine Fehlfunktion.
Dieses Gerät muss so weit wie möglich
von Geräten ferngehalten werden, die
elektromagnetische Felder erzeugen
(wie Mikrowellengeräte, Fernsehgeräte,
Videospielkonsolen usw.).
≥ Wenn Sie dieses Gerät auf einem
Fernsehgerät oder in dessen Nähe
verwenden, können die
elektromagnetischen Felder dieses
Gerät stören und Bild und Ton
unterbrechen.
≥ Verwenden Sie das Gerät nicht in der
Nähe von Mobiltelefonen. Es könnten
sonst Bild- und Tonstörungen auftreten.
≥ Durch starke, durch Lautsprecher oder
große Monitore erzeugte, Magnetfelder
können bereits aufgezeichnete Daten
und die entsprechenden Aufnahmen
beschädigt werden.
≥ Die elektromagnetische Strahlung von
Mikroprozessoren kann dieses Gerät
beeinträchtigen und zu Bild- und
Tonstörungen führen.
≥ Wenn dieses Gerät durch
elektromagnetische Felder gestört wird
und Fehlfunktionen auftreten, entfernen
Sie das Netzteil und schließen Sie es
dann wieder an.
Verwenden Sie dieses Gerät nicht in der
Nähe von Funksendern oder
Hochspannungsleitungen.
≥ Bei Aufnahmen in der Nähe von
Funksendern oder
Hochspannungsleitungen können Bildund Tonstörungen auftreten.
Verwenden Sie die mitgelieferten Kabel
und Leitungen.
Verlängern Sie nicht die Kabel und
Leitungen.
Sprühen Sie keine Insektizide oder
flüchtige Chemikalien auf den
DVD-Brenner.
≥ Durch solche Chemikalien kann das
Gehäuse des DVD-Brenners beschädigt
werden und die
Oberflächenbeschichtung kann
abblättern.
≥ Gegenstände aus Gummi oder
Kunststoff dürfen nicht für längere Zeit
mit dem DVD-Brenner in Berührung
kommen.
Setzen Sie das Gerät keinen Vibrationen
oder Stößen aus und Schütteln Sie es
nicht. Stellen oder werfen Sie keine
Gegenstände auf das Gerät.
≥ Durch starke Stöße kann das Gehäuse
des DVD-Brenners zerbrechen und es
kann zu Fehlfunktionen kommen.
Stellen Sie insbesondere keinen
Camcorder und ähnliche Geräte auf
dieses Gerät. Durch Vibrationen dieses
Geräts bei einem laufenden Lese- oder
Schreibvorgang kann der Betrieb des
Camcorders beeinträchtigt werden und er
könnte herunterfallen.
Für die Reinigung des DVD-Brenners
darf kein Waschbenzin, Farbverdünner
oder Alkohol verwendet werden.
≥ Ziehen Sie vor der Reinigung das
Netzkabel aus der Steckdose.
≥ Wenn Sie Lösungsmittel verwenden,
könnte die Farbe ausbleichen und das
Gehäusefinish könnte sich lösen.
30
LSQT1572
Page 31

≥ Staub und Fingerabdrücke lassen sich
mit einem weichen, trockenen Tuch vom
Gerät entfernen. Um hartnäckige
Flecken zu entfernen, tränken Sie ein
Tuch mit verdünntem, neutralem
Reinigungsmittel. Wringen Sie das Tuch
gründlich aus und wischen Sie das Gerät
damit ab. Trocknen Sie das Gerät
anschließend mit einem trockenen Tuch
ab.
≥ Verwenden Sie keine chemisch
behandelten Lappen.
Wenn Sie das Gerät längere Zeit nicht
verwenden
≥ Wenn Sie den DVD-Brenner in einem
Schrank oder Schubfach aufbewahren,
sollten Sie ein Trocknungsmittel
(Silikagel) beilegen.
∫ Zum Netzteil
≥ Verwenden Sie nur das mitgelieferte
Netzteil.
≥ Wenn Sie das Netzteil in der Nähe eines
Radios verwenden, könnte der Empfang
gestört werden. Halten Sie das Netzteil
1 m oder weiter von einem Radio
entfernt.
≥ Wenn das Netzteil verwendet wird,
könnten Brummgeräusche auftreten.
Dies ist jedoch normal.
≥ Entfernen Sie das Netzteil nach der
Verwendung. (Wenn es angeschlossen
bleibt, werden ca. 0,3 W Strom
verbraucht.)
≥ Halten Sie die Kontakte des Netzteils
stets sauber.
Stellen Sie das Gerät in der Nähe der
Steckdose auf, so dass Sie den
Netzstecker jederzeit leicht erreichen
können.
∫ Hinweise zur Disc
≥ Wenn die Disc staubig, zerkratzt,
verschmutzt oder wellig ist, kann es
zu folgenden Problemen kommen:
– Blockartige Störungen im
wiedergegebenen Bild
– Kurzzeitige
Wiedergabeunterbrechungen
– Tonunterbrechungen während der
Wiedergabe oder unnormaler Ton
– Disc kann nicht richtig erkannt werden
– Zeitversatz zwischen Bild und Ton
Wenn die Anzeigeleuchte für ACCESS
leuchtet (beim Zugriff auf eine Disc),
entfernen Sie weder das Netzteil noch
das USB-Kabel und setzen Sie den
DVD-Brenner keinen Vibrationen oder
Stößen aus.
DVD-R/DVD-R DL/+R/+R DL
≥ Zur optimalen Aufzeichnung auf Discs
des Typs DVD-R, DVD-R DL, +R und
+R DL schreibt dieses Gerät
Steuerdaten auf die zur Aufzeichnung
genutzte DVD-R, DVD-R DL, +R bzw.
+R DL, wenn die Disc eingeschoben und
ausgeworfen wird. Wenn auf der Disc
kein Speicherplatz mehr zum Schreiben
dieser Steuerdaten zur Verfügung steht,
ist eine Aufzeichnung unter Umständen
nicht möglich. Um dies zu verhindern,
schieben Sie keine DVD-R, DVD-R DL,
+R oder +R DL ein, auf die schon mehr
als 50-mal aufgezeichnet wurde.
≥ Wenn Sie mit diesem Gerät auf eine
DVD-R, DVD-R DL, +R oder +R DL
aufgezeichnet, die Disc aber nicht
finalisiert haben, dann legen Sie diese
Disc nicht in ein zur Aufzeichnung
geeignetes Gerät wie z. B. einen
DVD-Recorder ein. Die aufgezeichneten
Daten werden unter Umständen
unwiederherstellbar beschädigt.
31
LSQT1572
Page 32

∫ Bezüglich der Kondensation
Wenn Sie im Sommer eine gekühlte
Flasche aus dem Kühlschrank nehmen,
sehen sie dass sich sofort
Wassertröpfchen an ihr bilden. Dieses
Phänomen nennt man Kondensation.
Den DVD-Brenner zu verwenden, wenn es
zu Kondensatbildung gekommen ist, kann
zu Fehlfunktionen führen. Achten Sie
darauf, dass auf keinen Fall Kondensat
entsteht. Wenn es entsteht, ergreifen Sie
unten stehende Maßnahmen.
Gründe für Kondensation
Kondensation taucht auf, wenn sich die
Umgebungstemperatur oder
Luftfeuchtigkeit wie folgt ändert.
≥ Wenn das Gerät aus einer kalten
Umgebung in einen warmen Raum
gebracht wird.
≥ Wenn das Gerät aus einem
klimatisierten Auto nach draußen
gebracht wird.
≥ Wenn ein kalter Raum schnell
aufgewärmt wird.
≥ Wenn kalte Luft aus einer Klimaanlage
direkt auf das Gerät strömt.
≥ Bei nachmittäglichen Sommergewittern.
≥ Wenn sich das Gerät an einem sehr
feuchten Ort mit dampfgesättigter Luft
befindet.
Wenn das Gerät an einen Ort mit stark
unterschiedlicher Temperatur gebracht
wird, z. B. aus einem kalten in einen
sehr warmen Raum.
Legen Sie das Gerät in eine Plastiktüte,
drücken Sie soviel Luft wie möglich aus der
Tüte und verschließen Sie sie. Lassen Sie
das Gerät etwa eine Stunde lang im Raum
liegen, damit sich das Gerät an die
Umgebungstemperatur anpassen kann,
bevor Sie es verwenden.
Was ist beim Auftreten von
Kondensat zu tun
Entfernen Sie das Netzteil und lassen Sie
das Gerät etwa 1 Stunde ruhen.
Überprüfen Sie, dass das Kondensat
verschwunden ist, wenn das Gerät
Umgebungstemperatur erreicht hat und
verwenden Sie es erst dann.
32
LSQT1572
Page 33

¬ Fehlerbehebung
Problem Zu überprüfender Punkt
Das Gerät lässt sich
nicht einschalten.
Das Gerät lässt sich
nicht bedienen, obwohl
es eingeschaltet ist.
Das Gerät arbeitet nicht
ordnungsgemäß.
Die [<]-Taste
funktioniert nicht.
Die Disc kann nicht
gelesen werden.
Der Kopiervorgang
stoppt.
Die Wiedergabe bricht
kurzzeitig ab.
Es kann nicht kopiert
werden, obwohl das
Gerät mit Strom versorgt
wird und die Disc
ordnungsgemäß
eingelegt ist.
≥ Ist das Netzteil angeschlossen?
≥ Entfernen Sie das Netzteil und schließen Sie es ca. 1 Minute
≥ Die Disc lässt sich nicht auswerfen, wenn das Gerät nicht mit
≥ Die [<]-Taste funktioniert unter Umständen nicht, wenn gerade
≥ In anderen Fällen als den oben genannten trennen Sie das
≥ Ist die Disc zerkratzt oder verschmutzt?
≥ Die Temperatur im Geräteinneren ist zu hoch. Entfernen Sie
≥
≥ Wurde die Disc bereits zur Aufzeichnung von Videos und Fotos
Schließen Sie Netzteil und
>
später wieder an. (Dieser Schritt darf nicht durchgeführt werden,
wenn die Zugriffsanzeige leuchtet, da die Daten auf der Disc
zerstört werden könnten.) Wenn das Gerät dann noch immer
nicht ordnungsgemäß funktioniert, trennen Sie es vollständig
vom Netz und wenden Sie sich an den Händler, bei dem Sie
den DVD-Brenner gekauft haben.
Strom versorgt wird.
> Schließen Sie das Netzteil an.
ein Kopiervorgang von einem angeschlossenen Camcorder auf
eine Disc läuft.
> Warten Sie, bis der Kopiervorgang abgeschlossen ist.
Gerät vollständig vom Netz und wenden Sie sich an den
Händler, bei dem Sie den DVD-Brenner gekauft haben.
> Reinigen Sie die Disc von Verschmutzungen. (S24) Wenn
die Disc zerkratzt ist, legen Sie eine neue Disc ein.
das Netzteil und warten Sie eine Weile. Danach lässt sich das
Gerät wieder verwenden.
Discs, die auf anderen Geräten aufgenommen wurden, werden u.
U. auf diesem Gerät nicht korrekt gelesen oder wiedergegeben.
genutzt?
> Wenn die Disc bereits aufgezeichnetes Material enthält,
kann sie nicht erneut verwendet werden. Verwenden Sie
eine neue Disc.
> Discs des Typs DVD-RAM, DVD-RW, +RW oder CD-RW,
auf die bereits Material aufgezeichnet wurde, müssen
formatiert werden, um erneut verwendet werden zu können.
Da beim Formatieren alle vorher auf der Disc
aufgezeichneten Daten gelöscht werden, überprüfen Sie den
Inhalt der Disc sorgfältig und nehmen Sie unter Umständen
eine Sicherung vor, bevor Sie die Disc formatieren.
Netzkabel
ordnungsgemäß an. (S26)
33
LSQT1572
Page 34

Problem Zu überprüfender Punkt
Auch bei einer
Verbindung über das
USB-Kabel wird das
Gerät nicht vom PC
erkannt.
Wenn das USB Kabel
nicht angeschlossen ist,
erscheint eine
Fehlermeldung auf dem
PC.
Der PC startet nicht.
Beim Versuch, ein
DVD-Video
wiederzugeben, wird ein
Bildschirm zur
Regionalcode-Einstellung
angezeigt.
≥ Wählen Sie einen anderen USB Anschluss des PC.
≥ Überprüfen Sie die Betriebsumgebung. (S28)
≥ Entfernen Sie das Netzteil und das USB-Kabel und schließen
Sie sie dann wieder an.
≥ Um das USB Kabel sicher zu entfernen, klicken Sie das Symbol
( ) auf der Symbolleiste doppelt und folgen Sie den
angezeigten Anweisungen.
≥ Haben Sie das Gerät mit dem USB Kabel an den PC
angeschlossen bevor Sie den PC gestartet haben?
> Starten Sie den PC uns schließen Sie dann das Gerät an.
≥ Der Regionalcode ist bei Auslieferung des DVD-Brenners nicht
eingestellt. Prüfen Sie die Einstellungen und klicken Sie auf
[OK]. Die Wiedergabe des DVD-Videos startet nach der
Einstellung auf den Regionalcode. Sie können diese Einstellung
5 Mal ändern. Denken Sie daran, dass Sie die Einstellung nach
dem fünften Mal nicht mehr ändern können und der
Regionalcode fest auf der letzten Einstellung bleibt.
34
LSQT1572
Page 35

¬ Technische Daten
DVD-Brenner: Informationen zu Ihrer Sicherheit
Stromversorgung: DC 5,0 V
Leistungsaufnahme: 7,5 W (Beim Schreiben auf Discs)
Kompatible Medien 12 cm DVD-RAM Ver.2.1
Schnittstelle Hi-Speed USB kompatibel (USB 2.0), USB-Steckertyp miniB
Puffergröße 2MB
Abmessungen 139 mm (B)k16,8 mm (H)k138,1 mm (T)
Gewicht Ca. 395 g (Nur der DVD-Brenner)
Betriebstemperatur 5 oCbis35oC
Luftfeuchtigkeit 10% bis 80%
Datenrate beim
Schreiben
Datenrate beim Lesen DVD-RAM: Maximal 3x Speed
12 cm DVD-RW Ver.1.1/2X-SPEED (2X/1X)
12 cm DVD-R for General Ver.2.0
12 cm DVD-R for DL Ver.3.0
12 cm +RW
12 cm +R
12 cm +R for DL
12 cm CD-R
12 cm CD-RW
(ohne überstehende Teile)
DVD-RAM: Maximal 3x Speed
DVD-RW: Maximal 6x Speed
DVD-R: Maximal 8x Speed
DVD-R DL: Maximal 4x Speed
DVD-RW: Maximal 8x Speed
DVD-R: Maximal 8x Speed
DVD-R DL: Maximal 6x Speed
+RW: Maximal 8x Speed
+R: Maximal 8x Speed
+R DL: Maximal 4x Speed
CD-R: Maximal 24x Speed
CD-RW: Maximal 16x Speed
+RW: Maximal 8x Speed
+R: Maximal 8x Speed
+R DL: Maximal 6x Speed
CD-R: Maximal 24x Speed
CD-RW: Maximal 24x Speed
Netzteil VSK0692: Informationen zu Ihrer Sicherheit
Stromversorgung: AC 110 V bis 240 V, 50/60 Hz
Leistungsaufnahme: 0,22 A
Gleichstrom-Ausgang: DC 5,0 V 1,6 A
Änderung der technischen Daten ohne vorherige Ankündigung vorbehalten.
35
LSQT1572
Page 36

Cher client,
Nous désirons utiliser l’occasion qu’il nous est donné de vous remercier pour l’achat de
ce graveur DVD Panasonic. Veuillez lire le présent manuel d’utilisation soigneusement et
le garder à portée de main pour toute référence future.
Veuillez noter que les fonctions et composant réels, etc. de votre graveur DVD peuvent
sembler différents de ceux montrés dans les illustrations de ce mode d’emploi.
¬ Informations pour votre sécurité
AVERTISSEMENT:
POUR RÉDUIRE LES RISQUES D’INCENDIE, D’ÉLECTROCUTION OU DE
DOMMAGES AU PRODUIT,
≥ N’EXPOSEZ PAS CET APPAREIL À LA PLUIE, À L’HUMIDITÉ, À UNE CHUTE DE
GOUTTES OU À DES ÉCLABOUSSURES ET NE PLACEZ AUCUN RÉCIPIENT
CONTENANT UN LIQUIDE TEL QU’UN VASE AU-DESSUS.
≥ N’UTILISEZ QUE LES ACCESSOIRES RECOMMANDÉS.
≥ NE RETIREZ PAS LE COUVERCLE (OU L’ARRIÈRE); IL N’Y A AUCUNE PIÈCE
RÉPARABLE PAR L’UTILISATEUR À L’INTÉRIEUR. CONFIEZ TOUTE
INTERVENTION À UN PERSONNEL DE DÉPANNAGE QUALIFIÉ.
ATTENTION!
≥ NE PAS INSTALLER OU PLACER CETTE UNITÉ DANS UNE BIBLIOTHÈQUE,
PLACARD OU DANS UN AUTRE ESPACE CONFINÉ. S’ASSURER QUE CETTE
UNITÉ EST BIEN AÉRÉE. AFIN D’ÉVITER TOUS RISQUES DE CHOCS
ÉLECTRIQUES OU DE FEU CAUSÉS PAR UNE SURCHAUFFE, S’ASSURER
QU’AUCUNS RIDEAUX OU AUTRES MATÉRIAUX N’OBSTRUENT LES
BOUCHES DE VENTILATION.
≥ NE PAS OBSTRUER LES OUVERTURES DE VENTILATION DE L’UNITÉ AVEC
DU JOURNAL, DES COUVERTURES, DES RIDEAUX ET ÉLÉMENTS
SIMILAIRES.
≥ NE PAS PLACER D’OBJET ÉTANT SOURCE DE FEU, COMME DES BOUGIES
ALLUMÉES, SUR L’UNITÉ.
LA PRISE ÉLECTRIQUE DOIT ÊTRE INSTALLÉE À PROXIMITÉ DE L’APPAREIL
ET ÊTRE FACILEMENT ACCESSIBLE.
Ce produit peut être perturbé par les ondes des téléphones mobiles pendant
l’utilisation. Si vous constatez une telle interférence, éloignez le téléphone mobile du
produit.
36
LSQT1572
Page 37

FRANÇAIS
AVERTISSEMENT!
CET APPAREIL UTILISE UN LASER.
L’UTILISATION DE COMMANDES OU DE RÉGLAGES OU L’EXÉCUTION DE
PROCÉDURES AUTRES QUE CELLES SPÉCIFIÉES ICI PEUVENT PROVOQUER
UNE EXPOSITION À DES RADIATIONS DANGEREUSES.
NE PAS OUVRIR LES COUVERCLES NI ESSAYER DE RÉPARER SOI-MÊME.
CONFIER TOUT TRAVAIL D’ENTRETIEN À UN PERSONNEL QUALIFIÉ.
La plaque signalétique se trouve sur le dessous des appareils.
∫ Compatibilité électrique et magnétique EMC
Ce symbole (CE) est placé sur la plaque d’évaluation.
(Au fond de l’appareil)
(À l’intérieur de l’appareil)
37
LSQT1572
Page 38

-Si vous voyez ce symbole-
Informations relatives à l’évacuation des déchets, destinées aux utilisateurs
d’appareils électriques et électroniques (appareils ménagers domestiques)
Lorsque ce symbole figure sur les produits et/ou les documents qui les
accompagnent, cela signifie que les appareils électriques et électroniques
ne doivent pas être jetés avec les ordures ménagères.
Pour que ces produits subissent un traitement, une récupération et un
recyclage appropriés, envoyez-les dans les points de collecte désignés, où
ils peuvent être déposés gratuitement. Dans certains pays, il est possible
de renvoyer les produits au revendeur local en cas d’achat d’un produit
équivalent.
des ressources vitales et à la prévention des éventuels effets négatifs sur
l’environnement et la santé humaine qui pourraient survenir dans le cas contraire.
Afin de connaître le point de collecte le plus proche, veuillez contacter vos autorités
locales.
Des sanctions peuvent être appliquées en cas d’élimination incorrecte de ces
déchets, conformément à la législation nationale.
Utilisateurs professionnels de l’Union européenne
Pour en savoir plus sur l’élimination des appareils électriques et électroniques,
contactez votre revendeur ou fournisseur.
Informations sur l’évacuation des déchets dans les pays ne faisant pas partie
de l’Union européenne
Ce symbole n’est reconnu que dans l’Union européenne.
Pour vous débarrasser de ce produit, veuillez contacter les autorités locales ou votre
revendeur afin de connaître la procédure d’élimination à suivre.
En éliminant correctement ce produit, vous contribuerez à la conservation
¬ Table des matières
Informations pour votre sécurité........ 36
Caractéristiques...................................38
Avant l’utilisation .................................39
A propos des disques..........................40
Accessoires ..........................................42
Identification des pièces et manipulation
Source d’énergie..................................43
Insertion et retrait d’un disque ...........43
Copie à partir d’un caméscope sur un
DVD....................................................44
Lecture d’un DVD copié sur un
caméscope........................................45
Connexion à un ordinateur pour
utilisation ..........................................45
Précautions d’utilisation .....................47
Inconvénients et remèdes ................... 50
Spécifications.......................................52
38
LSQT1572
... 42
¬ Caractéristiques
≥ Il s’agit d’un appareil transportable au
design fin, léger et compact. Si vous
connectez cette unité avec un
caméscope Panasonic compatible,
alors les images enregistrées par le
caméscope connecté peuvent
facilement être copiées sur un DVD
même à votre destination de voyage.
≥ Vous pouvez également lire des DVD
créés sur cette unité en la connectant à
un caméscope Panasonic compatible.
≥ Si vous connectez cette unité à un
ordinateur à l’aide du câble USB fourni
avec le caméscope Panasonic
compatible, vous pouvez copier des
images montées sur un ordinateur etc.
sur un DVD.
≥ Le fonctionnement n’est pas garanti pour
toute autre utilisation que celles
mentionnées ci-dessus.
Page 39

¬ Avant l’utilisation
∫ Manipulation de cette unité
Cette unité est un appareil de haute
précision qui n’est pas conçu pour résister
aux vibrations, aux chocs ou à la
poussière. Selon l’environnement et la
manipulation de celle-ci, certains éléments
peuvent s’endommager et dans le pire des
cas la lecture des disques peut devenir
impossible. Plus précisément, ne
soumettez pas cette unité à des vibrations
ou à des chocs et ne débranchez pas le
cordon d’alimentation pendant l’utilisation.
≥ Panasonic se saurait en aucun cas être
tenu pour responsable en cas de
dommages directs ou indirects dus à
l’utilisation ou à un dysfonctionnement
de ce produit. Panasonic décline
également toute responsabilité
concernant toute perte de données
causée par ce produit.
≥ Les dommages corporels ou
matériels découlant d’une utilisation
non conforme au manuel d’utilisation
relèvent de la seule responsabilité de
l’utilisateur.
∫ Pour placer cette unité
Placez cette unité sur une surface plane
pendant son utilisation.
≥ Vous ne pouvez pas utiliser cette
unité si elle est placée verticalement.
∫ Il importe de respecter les droits
d’auteur
Les matériaux que vous enregistrez et
créez ne peuvent être utilisés que pour
votre divertissement personnel. Aux termes
de la législation sur le droit d’auteur, les
autres matériels ne peuvent être utilisés
sans permission des détenteurs des droits
correspondants.
∫ Pages de référence
Les pages auxquelles le manuel renvoie
sont indiquées sous la forme (P00).
≥ Microsoft®, Windows®, Windows Vista®
et DirectX
ou des marques commerce de Microsoft
Corporation aux États-Unis ou dans
d’autres pays.
≥ IBM et PC/AT sont des marques
déposées d’International Business
Machines Corporation, États-Unis.
≥ Intel
sont des marques déposées ou des
marques commerciales d’Intel
Corporation aux Etats-Unis et dans
d’autres pays.
≥ Les écrans des produits Microsoft sont
reproduit avec l’autorisation de Microsoft
Corporation.
≥ Les autres noms de systèmes et produits
mentionnés dans ce manuel d’utilisation
sont habituellement des marques
déposées ou des marques de commerce
des fabricants qui ont développé le
système ou le produit intéressé.
®
sont des marques déposées
®
, Core™, Pentium® et Celeron®
39
LSQT1572
Page 40

¬ A propos des disques
∫ Disques compatibles
Les disques qui ne sont pas utilisés pour la
copie si vous connectez cet appareil et un
caméscope Panasonic compatible sont des
disques de 12 cm sans cartouche de type
DVD-RAM, DVD-RW, DVD-R, DVD-R DL
(double couche sur une seule face), +RW,
+R, +R DL (double couche sur une seule
face), CD-RW et CD-R.
≥ Les disques qui peuvent être utilisés
avec cette unité peuvent différer
selon le caméscope qui est connecté.
Pour plus de détails, lisez le mode
d’emploi du caméscope.
Note importante
Si vous copiez des images au format
AVCHD sur un disque, n’introduisez
pas ce disque dans des appareils qui
ne prennent pas en charge le format
AVCHD. Dans certains cas, le disque
peut rester bloqué dans l’appareil. Le
disque ne pourra pas être lu avec des
appareils qui ne prennent pas en
charge le format AVCHD.
≥ Il n’est pas possible de lire ni
d’enregistrer sans interruption d’une face
à l’autre avec des disques double face. Il
est nécessaire d’éjecter le disque et de
le retourner.
≥ Les disques logés dans un support, une
cartouche ou un étui ne peuvent être
utilisés. Toujours retirer les disques de
leur contenant avant de les utiliser.
≥ Il est recommandé d’utiliser des disques
Panasonic. Normalement, les disques
compatibles avec la norme DVD peuvent
être utilisés pour l’enregistrement et la
lecture sans aucun problème.
Néanmoins, certains disques disponibles
dans le commerce ne correspondent pas
à la norme DVD en matière de qualité et
de performance. En utilisant l’un de ces
disques, il pourrait peut-être être
impossible d’enregistrer ou de lire
normalement.
Se référer au site de support suivant
pour obtenir des informations à propos
des disques qui ont été certifiés
compatibles par Panasonic.
http://panasonic.jp/support/global/cs/
e_cam
(Ce site est uniquement en anglais.)
≥ Les disques enregistrés avec cette
unité peuvent ne pas être lisibles par
d’autres appareils. Dans ce cas, lisez
le disque à l’aide de cette unité à la
place.
≥ Si un DVD-RW, DVD-R, DVD-R DL,
+RW, +R ou un +R DL est utilisé, ne
pas effectuer les opérations suivantes
car cela pourrait rendre les disques
inutilisables.
– Enregistrer au moyen d’autres
appareils sur un disque contenant des
enregistrements effectués au moyen
de cette unité.
– Enregistrer au moyen de cette unité sur
un disque contenant des
enregistrements effectués au moyen
d’autres appareils.
– Mettre en place un disque définalisé
dans d’autres appareils.
40
LSQT1572
Page 41

∫ A propos des DVD-R DL/+R DL
Les disques DVD-R DL ou +R DL offrent
deux couches de données
d’enregistrement et de lecture sur une face.
Si une scène ne peut pas être entièrement
contenue sur la première couche (L0),
l’enregistrement continue sur la seconde
couche (L1) ainsi la scène est enregistrée
sur les deux couches. L’appareil change
automatiquement de couche pendant la
lecture, de sorte que tout le disque est lu
en continu comme un disque ordinaire.
Mais il se peut que l’image ou le son
s’arrête momentanément au point de
commutation entre les couches.
∫ Exemples de disques qui ne
peuvent pas être utilisés avec
cette unité
≥ Disques d’un diamètre autre que 12 cm
(Vous ne pouvez pas utiliser de disques
de 8 cm même si vous les introduisez
dans un adaptateur disponible dans le
commerce.)
≥ DVD-RAM compatible 6X–12X gran
vitesse d’enregistrement
≥ Support BD, etc.
≥ Support DVD HD, etc.
∫ Comment tenir un disque
Ne pas toucher la surface enregistrée.
∫ Pour insérer/retirer un disque
Ne pas mettre d’empreintes de doigt ou de
saletés sur la face d’enregistrement/lecture
du disque.
≥ S’il y a des rayures ou de la saleté (ex.
poussière ou empreintes de doigt) sur la
face d’enregistrement/lecture du disque,
l’enregistrement/lecture normal pourrait
être impossible et le genre de
phénomène suivant peut survenir.
– L’enregistrement/lecture est
impossible.
– L’image ou le son est coupé ou arrêté
momentanément.
– Des parasites de l’image ou du son
apparaissent.
∫ S’il y a de la saleté sur le disque
≥ Le nettoyer avec un chiffon de nettoyage
de disque disponible dans le commerce.
Essuyer le disque en partant du centre
vers les bords pour retirer la saleté. Ne
pas appuyer trop fort en essuyant le
disque car cela pourrait l’érafler. De
même, ne pas utiliser de solvants
(diluant, eau, agent antistatique,
détergent, etc.).
∫ Précautions de manipulation
≥ Prendre soin de ne pas rayer le disque et
de le protéger contre la poussière et la
saleté.
≥ Ne pas apposer d’étiquettes ni
d’autocollants sur les disques. (Cela
pourrait entraîner la voilure du disque et
une rotation déséquilibrée susceptible de
rendre le disque inutilisable.)
≥ Écrire sur la surface imprimée du disque
avec un crayon feutre à base d’huile. Ne
pas utiliser de stylo à bille ou tout autre
instrument d’écriture à pointe dure.
41
LSQT1572
Page 42

≥ Ne pas utiliser de nettoyeur en
A
B
C
23 41
65
vaporisateur, de benzène, de diluant
pour peinture, de liquide de prévention
d’électricité statique ni aucun autre
solvant.
≥ Ne pas utiliser de protecteur ni de
couvercle anti-éraflure.
≥ Ne pas faire tomber, empiler ni heurter
les disques. Ne placer aucun objet sur
un disque.
≥ Ne pas utiliser les disques suivants:
– Disques avec des restes de colle
laissés par d’anciens autocollants ou
étiquettes.
– Disques gondolés ou fissurés.
– Disques de forme irrégulière (en forme
de cœur par exemple).
≥ Ne pas placer les disques dans les
endroits suivants:
– Sous les rayons directs du soleil.
– Dans des lieux très poussiéreux ou
humides.
– Près d’une source de chaleur.
– Dans des lieux où peuvent survenir de
brusques changements de température
(pouvant entraîner la formation de
condensation).
– En présence d’électricité statique ou
d’ondes électromagnétiques.
≥ Pour protéger les disques, toujours les
ranger dans leur étui après usage.
¬ Accessoires
Contrôlez les accessoires avant d’utiliser
l’appareil.
Adaptateur CA
VSK0692
Câble CA
A K2CT3CA00004
Royaume-Uni,
Région administrative
spéciale de Hong Kong
et Arabie Saoudite
B K2CJ2DA00011
Australie et
Nouvelle-Zélande
C K2CR2DA00004
Territoires autre que le Royaume-Uni,
la Région administrative spéciale de
Hong Kong, l’Australie,
la Nouvelle-Zélande et l’Arabie Saoudite
Câble de connexion
USB mini AB
K2KZ59B00002
¬ Identification des pièces
et manipulation
42
LSQT1572
1 Bouton d’éjection [<]
2 Indicateur d’accès [ACCESS] (P44)
3 Fente d’insertion du disque
4 Témoin d’alimentation [POWER]
≥ Ce témoin s’allume lorsque l’appareil
est raccordé au secteur.
5 Prise USB [ ]
6 Prise d’entrée CC [DC/C.C.IN 5.0 V]
≥ N’utilisez pas d’autre adaptateur
secteur que celui qui est fourni.
Page 43

¬ Source d’énergie
Insérez étiquette vers le haut.
L’appareil est en mode d’attente quand
l’adaptateur secteur est raccordé.
Le circuit primaire est toujours “sous
tension” tant que l’adaptateur secteur reste
branché dans une prise secteur.
3
B
1
2
1 Connectez le cordon secteur à
l’adaptateur CA A.
2 Connectez le cordon secteur à la
prise secteur.
3 Connectez l’adaptateur CA à la prise
d’entrée CC [DC/C.C.IN 5.0 V] de
cette unité.
≥ Le témoin d’alimentation B s’allume.
≥ Le fil d’alimentation CA est destiné à être
utilisé avec cet appareil uniquement. Ne
l’utilisez pas avec d’autres dispositifs ou
n’utilisez pas le fil d’alimentation CA
d’autres dispositifs avec cet appareil.
≥ L’ unité et les disques chauffent pendant
l’utilisation. Ce n’est pas un
dysfonctionnement.
A
¬ Insertion et retrait d’un
disque
≥ En introduisant ou en retirant le disque,
connectez l’adaptateur CA à l’unité.
Vous ne pouvez introduire ou retirer un
disque que si l’unité est sous tension.
1 Brancher l’appareil à l’adaptateur
CA.
2 Insertion du disque
Introduisez le disque dans la fente
d’insertion du disque.
Introduisez le disque avec la face
d’enregistrement/lecture vers le bas.
Le disque est automatiquement chargé
lorsqu’il est introduit dans la fente.
Retrait du disque
Appuyez sur le bouton [<].
≥ Attention à ne pas toucher la face
d’enregistrement/lecture du disque en
l’insérant/retirant.
43
LSQT1572
Page 44

∫ A propos de l’indicateur d’accès
A
MiniA
MiniB
Lorsque l’unité accède à un disque,
l’indicateur d’accès s’allume.
≥ N’effectuez aucune des opérations
suivantes lorsque l’indicateur d’accès
s’allume. Le disque ou les données
enregistrées sur le disque peut être
endommagé et cette unité peut mal
fonctionner.
– Débrancher l’adaptateur CA.
– Débrancher le câble USB.
– Soumettre cette unité à un choc ou des
vibrations importantes.
44
LSQT1572
¬ Copie à partir d’un
caméscope sur un DVD
Si vous connectez cette unité et un
caméscope Panasonic compatible, vous
pouvez copier les images enregistrées
avec le caméscope sur un DVD.
≥ Utilisez le câble de connexion USB Mini
AB pour connecter cette unité et le
caméscope Panasonic compatible.
≥ Cette fonction ne marche pas si le
caméscope n’est pas compatible avec
cette unité.
≥ Se référer au mode d’emploi du
caméscope à propos des données
disponibles pour la copie.
≥ Brancher l’appareil à l’adaptateur CA.
1 Branchez cette unité au caméscope.
ACâble de connexion USB Mini AB
(fourni)
≥ Connectez la prise miniA au
caméscope et la prise miniB à cette
unité.
≥ Insérez les fiches à fond. L’appareil
et le caméscope ne fonctionneront
pas correctement si ce n’est pas le
cas.
≥ N’utilisez pas d’autres câbles de
connexion USB à l’exception de
celui fourni.
2 Démarrez la copie sur le caméscope.
Lisez le mode d’emploi du
≥
caméscope pour avoir des
informations sur la manière de copier.
≥ Si le caméscope Panasonic compatible
prend en charge la copie sur CD-R et
CD-RW, vous pouvez copier des photos
sur CD-R ou CD-RW. Lisez le mode
d’emploi pour avoir plus de détails.
Page 45

¬ Lecture d’un DVD copié
sur un caméscope
Si vous connectez cette unité et un
caméscope Panasonic compatible, vous
pouvez lire le DVD sur lequel vous avez
copié les images.
≥ Pour lire le disque, connectez le même
caméscope que vous avez utilisé pour
effectuer la copie.
≥ Utilisez le câble de connexion USB Mini
AB pour connecter cette unité et le
caméscope Panasonic compatible.
≥ Brancher l’appareil à l’adaptateur CA.
1 Connectez cette unité et le
caméscope en utilisant le câble de
connexion USB Mini AB.
≥ Connectez la prise miniA au
caméscope et la prise miniB à cette
unité.
≥ Insérez les fiches à fond. L’appareil
et le caméscope ne fonctionneront
pas correctement si ce n’est pas le
cas.
≥ N’utilisez pas d’autres câbles de
connexion USB à l’exception de
celui fourni.
2 Démarrez la lecture du disque sur le
caméscope.
≥ Lisez le mode d’emploi du
caméscope pour avoir des
informations sur la manière de lire.
¬ Connexion à un
ordinateur pour
utilisation
Vous pouvez copier des images
enregistrées sur un caméscope Panasonic,
les monter sur un ordinateur et les copier
sur un DVD.
Utilisez le logiciel fourni avec le caméscope
Panasonic pour copier les images. Vous
pouvez également lire le DVD sur lequel
vous avez copié les images avec le même
logiciel.
≥ Utilisez le câble USB fourni avec le
caméscope Panasonic compatible avec
cette unité pour connecter cette unité et
un ordinateur.
≥ Selon le logiciel, les données disponibles
pour la copie peuvent être différentes.
Sous Windows
∫ Configuration requise
Ordinateur personnel
Ordinateur personnel PC/AT compatible IBM
S.E.
Le SE compatible sera différent selon le
logiciel fourni avec le caméscope. Veuillez
contrôler l’environnement d’utilisation du
logiciel.
Interface
Port USB
Autres conditions requises
Souris ou dispositif de pointage équivalent
≥ Même si la configuration décrite dans le
présent manuel est présente, certains
ordinateurs personnels pourraient ne
pas pouvoir être utilisés.
≥ Le fonctionnement sous un S.E. mis à
niveau n’est pas garanti.
≥ Le fonctionnement sous un S.E. autre
que le S.E. pré-installé n’est pas garanti.
≥ Lorsque plusieurs dispositifs USB sont
branchés à un PC, ou lorsque des
dispositifs sont branchés au moyen de
hubs USB ou en utilisant une rallonge, le
fonctionnement correct n’est pas garanti.
45
LSQT1572
Page 46

∫ Procédures de connexion et
A
ACâble USB
(fourni avec le caméscope)
reconnaissance
≥ Brancher l’appareil à l’adaptateur CA.
1 Connectez cette unité à l’ordinateur.
≥ Cette unité est reconnue
comme [DVD-RAM Drive] dans
[My Computer].
≥ Insérez les fiches à fond. L’appareil
et PC ne fonctionneront pas
correctement si ce n’est pas le cas.
≥ Soyez sûr d’utiliser le câble USB
fourni avec le caméscope. (Nous ne
pouvons pas garantir le
fonctionnement si vous utilisez un
câble USB autre que celui fourni
avec le caméscope Panasonic.)
2 Démarrez la copie/lecture.
≥ Utilisez le logiciel fourni avec le
caméscope Panasonic pour copier/
lire les images.
≥ Lisez le mode d’emploi du logiciel
pour avoir des informations sur la
manière de copier/lire.
∫ Pour débranchez le câble USB de
façon sûre
Si le câble USB est débranché tandis que
l’indicateur d’accès est allumé, cette unité
peut mal fonctionner et les données
peuvent être perdues.
1 Vérifiez que l’indicateur d’accès
n’est pas allumé.
2 Double-cliquez sur l’icône
( ) sur le plateau des tâches.
≥ La boîte de dialogue de suppression
de matériel apparaît.
≥ Selon les paramétrages de votre PC,
cette icône pourrait ne pas s’afficher.
3 Sélectionnez [USB Mass Storage
Device] et cliquez sur [Stop].
4 Cliquez sur [OK].
≥ Cliquez sur [OK], et vous pouvez
débrancher le câble de façon sûre.
46
LSQT1572
Page 47

¬ Précautions
d’utilisation
∫ A propos de l’appareil
L’appareil et le disque peuvent dégager de
la chaleur après une utilisation prolongée;
toutefois, cela n’est le signe d’aucune
anomalie.
Garder l’appareil aussi loin que possible
de l’équipement électromagnétique (tels
que les fours à micro-ondes, les
téléviseurs, les jeux vidéo etc.).
≥ Si vous utilisez l’unité sur ou à proximité
d’un téléviseur, les images et le son de
l’unité peuvent être perturbés par des
ondes électromagnétiques.
≥ Ne pas utiliser l’appareil à proximité de
téléphones portables car cela pourrait se
traduire par des parasites affectant les
images et le son.
≥ Les données enregistrées pourraient
être endommagées, ou les images
déformées par les puissants champs
magnétiques créés par les haut-parleurs
ou les gros moteurs.
≥ Les ondes électromagnétiques générées
par les microprocesseurs peuvent avoir
des effets négatifs sur l’appareil, en
perturbant les images et le son.
≥ Si l’appareil est affecté de façon négative
par un appareil électromagnétique et
cesse de fonctionner correctement,
déconnecter l’adaptateur
reconnectez-le de nouveau.
CA et
Ne pas utiliser l’appareil près
d’émetteurs radio ou de lignes à haute
tension.
≥ Si un enregistrement est effectué près
d’émetteurs radio ou de lignes à haute
tension, les images ou les sons
enregistrés pourraient en être affectés.
Veillez à utiliser les cordons et câbles
fournis.
N’utilisez pas de rallonges avec les
cordons et les câbles.
Ne pulvérisez pas d’insecticides ou de
produits chimiques volatils sur
l’appareil.
≥ Si l’on pulvérise l’appareil au moyen de
produits chimiques de ce genre, son
corps pourrait être abîmé et la finition de
surface pourrait s’écailler.
≥ Ne laissez pas des produits en
caoutchouc ou en plastique au contact
de l’appareil pendant un temps prolongé.
Ne soumettez pas l’appareil à des
vibrations ou des impacts, secousses,
chutes ou chocs, ne posez et ne faites
pas tomber d’objets sur l’appareil.
≥ Un choc pourrait briser le boîtier de
l’appareil et entraîner son
dysfonctionnement.
Plus précisément, ne placez pas de
caméscope etc. sur cette unité pendant
son utilisation. Si cette unité est soumise à
des vibrations pendant la lecture ou
l’écriture d’un disque, le fonctionnement
du caméscope peut en être affecté ou bien
celui-ci peut tomber.
47
LSQT1572
Page 48

N’utilisez pas de benzène, de diluant
pour peinture ou d’alcool pour nettoyer
l’appareil.
≥ Avant le nettoyage, retirez le cordon
d’alimentation
≥ Si vous utilisez un solvant, le boîtier
pourrait se décolorer et la surface
s’écailler.
≥ Essuyez l’appareil avec un chiffon doux
et sec pour enlever la poussière et les
traces de doigt. Pour enlever les taches
résistantes, bien essorer un chiffon
imbibé de produit nettoyant neutre dilué
avec de l’eau et essuyez l’appareil avec.
Ensuite, essuyez-le avec un chiffon sec.
≥ N’utilisez pas de chiffons à poussière
imbibés de produits chimiques.
Lorsque vous prévoyez de ne pas
utiliser l’appareil pendant longtemps
≥ Quand vous rangez l’appareil dans un
placard ou une armoire, nous vous
conseillons de mettre un produit
déshydratant (gel de silice).
CA de la prise électrique.
∫ Au sujet de l’adaptateur CA
≥ Veillez à utiliser l’adaptateur CA fourni.
≥ Si vous utilisez l’adaptateur CA près d’un
poste de radio, la réception radio pourrait
être perturbée. Tenez l’adaptateur CA à
1 m de la radio.
≥ L’utilisation de l’adaptateur CA peut
générer des vrombissements. Toutefois,
ceci est normal.
≥ Après utilisation, veillez à débrancher
l’adaptateur CA. (S’il reste branché, cela
consomme environ 0,3 W de courant.)
≥ Garder toujours les électrodes de
l’adaptateur
propreté.
Placer cet appareil près de la prise pour
faciliter le branchement de la prise.
CA dans un bon état de
∫ À propos des disques
≥ Si la surface d’un disque contient de
la poussière, des rayures, des saletés
ou si elle est déformée, les
phénomènes suivants risquent de se
produire:
– Des parasites en forme de blocs
risquent d’apparaître sur les images de
lecture
– Interruption momentanée des images
de lecture
– Son coupé pendant la lecture ou son
anormal
– La reconnaissance du disque ne peut
être faite correctement
– Délai entre l’image et le son
Lorsque l’indicateur ACCESS est allumé
(pendant l’accession à un disque), ne
débranchez pas l’adaptateur CA ou le
câble USB et ne soumettez cette unité à
aucun choc ni vibration.
DVD-R/DVD-R DL/+R/+R DL
≥ Pour l’enregistrement optimal des
disques DVD-R, DVD-R DL, +R ou
+R DL, cette unité inscrit des données
de contrôle sur le disque de manière à
effectuer automatiquement des
ajustements au moment de son insertion
ou de son retrait. Si le disque ne
comporte pas de zone sur laquelle
inscrire ces données de contrôle, il se
peut qu’aucun enregistrement ne soit
possible. Pour prévenir une telle
éventualité, ne pas utiliser de DVD-R,
DVD-R DL, +R ou +R DL sur lequel plus
de 50 enregistrements ont été faits.
≥ Ne pas insérer dans un enregistreur
DVD un DVD-R, DVD-R DL, +R ou
+R DL enregistré sur cet appareil qui n’a
pas été finalisé; cela pourrait en effet
endommager les données enregistrées.
48
LSQT1572
Page 49

∫ À propos de la condensation
Un peu après enlevé une bouteille glacée
d’un réfrigérateur, en été, vous pouvez voir
qu’elle est couverte de gouttelettes d’eau.
Ce phénomène s’appelle condensation.
L’utilisation de cette unité lors de
l’apparition de condensation peut causer
un mauvais fonctionnement. Mettez tout en
œuvre pour éviter la formation de buée. Si
elle se forme, adoptez les mesures décrites
ci-dessous.
Causes de condensation
De la condensation se produit quand la
température ambiante ou l’humidité
changent de la façon suivante.
≥ Lorsque l’appareil est porté d’un endroit
froid dans une pièce chaude.
≥ Lorsque l’appareil est
climatisée à l’extérieur.
≥ Lorsqu’une pièce froide a été chauffée
rapidement.
≥ Lorsque de l’air froid provenant d’un
climatiseur souffle directement sur
l’appareil.
≥ Après une averse en été.
≥ Lorsque l’appareil est dans un endroit
très humide dont l’air est saturé de
vapeur.
Lorsque cet appareil est porté dans un
lieu présentant une différence de
température significative, par exemple
d’un endroit froid à un endroit chaud.
Placez l’appareil dans un sac en plastique,
videz l’air présent dans le sac autant que
faire se peut, puis fermez hermétiquement
le sac. Laissez l’appareil pendant environ
une heure dans la pièce de telle sorte que
la température de l’appareil soit proche de
celle de la température ambiante de la
pièce, puis utilisez-le.
porté
d’une voiture
Que faire en cas de formation de
buée
Débranchez l’adaptateur CA et laissez
l’appareil pendant environ 1 heure.
Assurez-vous que la buée a disparu
spontanément quand l’appareil s’approche
de la température ambiante puis utilisez
l’appareil.
49
LSQT1572
Page 50

¬ Inconvénients et remèdes
Problème Points de contrôle
L’appareil ne s’allume
pas.
L’appareil ne fonctionne
pas même s’il est sous
tension.
L’appareil ne fonctionne
pas normalement.
Le bouton [<] ne
fonctionne pas.
Le disque ne peut pas
être lu.
La copie s’arrête.
L’image de lecture
s’interrompt un
moment.
Je ne peux pas copier
alors que l’alimentation
est correctement fournie
cette unité et que le
à
disque est correctement
introduit.
≥ Est-ce que l’adaptateur CA est connecté?
> Connectez l’adaptateur CA et le cordon d’alimentation
correctement. (P43)
≥ Déconnectez l’adaptateur CA et environ 1 minute plus tard
reconnectez-le. (Effectuer les opérations ci-dessus pendant que
l’indicateur d’accès est allumé peut détruire les données du
disque.) Si les conditions normales ne sont pas restaurées,
débranchez la source d’alimentation et consultez le vendeur
chez qui vous avez acheté cette unité.
≥ Le disque ne sera pas éjecté sauf si l’unité est en marche.
> Connecter l’adaptateur CA.
≥ Le bouton [<] peut ne pas fonctionner lorsque la copie à partir
d’un caméscope connecté vers un disque est en cours.
> Attendez que la copie finisse.
≥ Dans des cas autres que ceux cités ci-dessus, débranchez la
source d’alimentation et consultez le vendeur chez qui vous
avez acheté cette unité.
≥ Le disque est-il éraflé ou sale?
> Essuyer la saleté présente sur le disque. (P41) Si le disque
est éraflé, en insérer un nouveau.
≥ La température interne de cette unité est élevée. Débranchez
l’adaptateur CA, attendez un court instant et vous devriez être
capable d’utiliser cette unité de nouveau.
≥ Des disques enregistrés sur d’autres appareils peuvent ne pas
être lus correctement sur cette unité.
≥ Est-ce que le disque a déjà été utilisé pour l’enregistrement d’un
film ou de photos?
> Si le disque contient un enregistrement, il ne peut plus être
utilisé. Utilisez un nouveau disque.
> Les disques DVD-RAM, DVD-RW, +RW ou CD-RW
enregistrés avec n’importe quel appareil peuvent être
réutilisés après un formatage. Puisque toutes les donnés
précédemment enregistrées sur le disque seront effacées,
vérifiez attentivement celui-ci avant de le formater.
50
LSQT1572
Page 51

Problème Points de contrôle
Même s’il est branché au
moyen du câble USB,
l’appareil n’est pas
reconnu par le PC.
Lorsque le câble USB est
débranché, un message
d’erreur apparaîtra sur
l’ordinateur.
Le PC ne démarre pas.
L’écran de configuration
du code zone apparaît
lorsque vous essayez de
lire un DVD vidéo.
≥ Sélectionnez une autre prise USB sur le PC.
≥ Contrôlez la configuration requise. (P45)
≥ Déconnectez l’adaptateur CA et le câble USB puis
reconnectez-les de nouveau.
≥ Pour débrancher le câble USB en toute sécurité, double-cliquez
sur l’icône ( ) dans la barre des tâches et suivez les
instructions présentes à l’écran.
≥ Avez-vous connecté l’appareil au PC avec le câble USB avant
d’allumer le PC?
> Démarrez le PC puis connectez l’appareil.
≥ Le code zone n’est pas configuré lorsque vous achetez cette
unité. Vérifiez le contenu de configuration puis cliquez sur [OK].
La lecture du DVD vidéo démarrera après que le code zone a
été changé. Vous pouvez changer le réglage 5 fois. Attention
car vous ne pourrez plus changer le réglage après la cinquième
fois et le code zone sera fixé sur le dernier réglage.
51
LSQT1572
Page 52

¬ Spécifications
Graveur DVD: Informations pour votre sécurité
Source d’alimentation: CC 5,0 V
Puissance absorbée: 7,5 W (Pour écrire sur un disque)
Supports compatibles 12 cm DVD-RAM Ver.2.1
12 cm DVD-RW Ver.1.1/2X-SPEED (2X/1X)
12 cm DVD-R for General Ver.2.0
12 cm DVD-R for DL Ver.3.0
12 cm +RW
12 cm +R
12 cm +R for DL
12 cm CD-R
12 cm CD-RW
Interface Conforme Hi-Speed USB (USB 2.0), port USB Type miniB
Taille tampon 2Mo
Dimensions 139 mm (L)k16,8 mm (H)k138,1 mm (P)
Poids Env. 395 g (Graveur DVD uniquement)
Température de
fonctionnement
Humidité de
fonctionnement
Vitesse d’écriture des
données
Vitesse de lecture des
données
Adaptateur CA VSK0692: Informations pour votre sécurité
Source d’alimentation: CA 110 V à 240 V, 50/60 Hz
Capacité d’entrée: 0,22 A
Sortie CC: CC 5,0 V 1,6 A
(exclure les parties projetées)
5 oCà35oC
10% à 80%
DVD-RAM: 3X-SPEED maximum
DVD-RW: 6X-SPEED maximum
DVD-R: 8X-SPEED maximum
DVD-R DL: 4X-SPEED maximum
DVD-RAM: 3X-SPEED maximum
DVD-RW: 8X-SPEED maximum
DVD-R: 8X-SPEED maximum
DVD-R DL: 6X-SPEED maximum
+RW: 8X-SPEED maximum
+R: 8X-SPEED maximum
+R DL: 4X-SPEED maximum
CD-R: 24X-SPEED maximum
CD-RW: 16X-SPEED maximum
+RW: 8X-SPEED maximum
+R: 8X-SPEED maximum
+R DL: 6X-SPEED maximum
CD-R: 24X-SPEED maximum
CD-RW: 24X-SPEED maximum
Les spécifications peuvent changer sans préavis.
52
LSQT1572
Page 53

Gentile Cliente,
Desideriamo cogliere questa opportunità per ringraziarvi di aver acquistato questo
masterizzatore DVD Panasonic. La invitiamo a leggere con attenzione le presenti
Istruzioni d’uso e a tenerle sempre a portata di mano per futura consultazione.
Tenete conto che i comandi e i componenti del vostro masterizzatore DVD possono
risultare leggermente diversi rispetto alle figure contenute in queste istruzioni.
ITALIANO
¬ Informazioni sulla sicurezza
ATTENZIONE:
PER RIDURRE IL RISCHIO D’INCENDIO, SCOSSE ELETTRICHE O DANNI AL
PRODOTTO,
≥ NON ESPORLO ALLA PIOGGIA, UMIDITÀ, GOCCIOLAMENTI O SPRUZZI ED
EVITARE DI METTERVI SOPRA OGGETTI PIENI DI LIQUIDI, COME VASI.
≥ USARE SOLTANTO GLI ACCESSORI CONSIGLIATI.
≥ NON RIMUOVERE IL COPERCHIO (O RETRO); ALL’INTERNO NON CI SONO
PARTI RIPARABILI DALL’UTENTE. PER LE RIPARAZIONI, RIVOLGERSI AL
PERSONALE DI ASSISTENZA QUALIFICATO.
ATTENZIONE!
≥ NON INSTALLATE O COLLOCATE QUESTA UNITÀ IN UNA LIBRERIA, IN UNA
NICCHIA O IN UN ALTRO SPAZIO RISTRETTO. ASSICURATEVI CHE L’UNITÀ
SIA BEN VENTILATA. PER EVITARE IL RISCHIO DI FOLGORAZIONE O IL
PERICOLO DI INCENDI CAUSATI DAL SURRISCALDAMENTO, NON OSTRUITE
CON TENDE O ALTRI MATERIALI LE GRIGLIE DI VENTILAZIONE.
≥ NON OSTRUITE LE APERTURE DI VENTILAZIONE DELL’UNITÀ CON
GIORNALI, TOVAGLIE, TENDE E OGGETTI ANALOGHI.
≥ NON COLLOCATE SULL’UNITÀ FONTI DI FIAMME NUDE, COME CANDELE
ACCESE.
LA PRESA DI CORRENTE DOVRÀ ESSERE FACILMENTE ACCESSIBILE E
LOCALIZZATA VICINO ALL’APPARECCHIO.
Durante l’uso, questo prodotto potrebbe essere soggetto all’interferenza radio causata
dal cellulare. Se si dovesse verificare tale interferenza, aumentare la distanza tra
questo prodotto e il cellulare.
53
LSQT1572
Page 54

ATTENZIONE!
QUESTO APPARECCHIO UTILIZZA UN LASER.
L’USO DI APPARECCHI DI CONTROLLO O DI REGOLAZIONE, O PROCEDURE DI
UTILIZZAZIONE DIVERSE DA QUELLE INDICATE IN QUESTO MANUALE DI
ISTRUZIONI, POSSONO CAUSARE L’ESPOSIZIONE A RADIAZIONI PERICOLOSE.
NON APRIRE I COPERCHI E NON CERCARE DI RIPARARE DA SOLI. PER
QUALSIASI RIPARAZIONE RIVOLGERSI A PERSONALE QUALIFICATO.
La marcatura d’identificazione del prodotto si trova sul fondo delle unità.
∫ EMC Conformità alle norme elettromagnetiche
Il simbolo (CE) si trova sulla piastrina d’identificazione.
(Parte inferiore del prodotto)
54
LSQT1572
(All’interno del prodotto)
Page 55

-Se vedete questo simbolo-
Informazioni per gli utenti sullo smaltimento di apparecchiature elettriche ed
elettroniche obsolete (per i nuclei familiari privati)
Uno smaltimento corretto di questo prodotto contribuirà a far risparmiare preziose
risorse ed evitare potenziali effetti negativi sulla salute umana e sull'ambiente, che
potrebbero derivare, altrimenti, da uno smaltimento inappropriato. Per ulteriori
dettagli, contattare la propria autorità locale o il punto di raccolta designato più vicino.
In caso di smaltimento errato di questo materiale di scarto, potrebbero venire
applicate delle penali, in base alle leggi nazionali.
Per gli utenti aziendali nell'Unione Europea
Qualora si desideri smaltire apparecchiature elettriche ed elettroniche, contattare il
rivenditore o il fornitore per ulteriori informazioni.
Informazioni sullo smaltimento in nazioni al di fuori dell'Unione Europea
Questo simbolo è valido solo nell'Unione Europea.
Qualora si desideri smaltire questo prodotto, contattare le autorità locali o il rivenditore
e chiedere informazioni sul metodo corretto di smaltimento.
Questo simbolo sui prodotti e/o sulla documentazione di
accompagnamento significa che i prodotti elettrici ed elettronici usati non
devono essere mescolati con i rifiuti domestici generici.
Per un corretto trattamento, recupero e riciclaggio, portare questi prodotti ai
punti di raccolta designati, dove verranno accettati gratuitamente. In
alternativa, in alcune nazioni potrebbe essere possibile restituire i prodotti
al rivenditore locale, al momento dell'acquisto di un nuovo prodotto
equivalente.
¬ Indice
Informazioni sulla sicurezza ............... 53
Caratteristiche......................................55
Prima dell’uso.......................................56
Informazioni sul disco ......................... 57
Accessori..............................................59
Identificazione delle parti e trasporto
Alimentazione.......................................60
Inserimento/rimozione dei dischi....... 60
Copia da una videocamera a un disco
DVD....................................................61
Riproduzione di un disco DVD copiato
su una videocamera.........................62
Collegamento a un PC per l’utilizzo ... 62
Precauzioni per l’uso ...........................64
Risoluzione dei problemi.....................67
Caratteristiche tecniche ......................69
....59
¬ Caratteristiche
≥
Questo è un apparecchio portatile
sottile, leggero e compatto.
Collegando questa unità a una
videocamera Panasonic compatibile,
potrete poi copiare facilmente su un
disco DVD le immagini registrate sulla
videocamera connessa, anche nella
località di destinazione del viaggio.
≥ Collegando questa unità a una
videocamera Panasonic compatibile
potrete anche riprodurre dischi DVD
creati su questa unità.
Collegando questa unità a un PC
≥
tramite il cavo USB in dotazione a una
videocamera Panasonic compatibile,
potrete copiare su un disco DVD le
immagini modificate con un PC.
≥ In caso di utilizzo diverso da quelli sopra
citati, il funzionamento non è garantito.
55
LSQT1572
Page 56

¬ Prima dell’uso
∫ Manipolazione dell’unità
Questa unità è un dispositivo di alta
precisione, e non è costruita per resistere a
vibrazioni, urti o polvere. In determinate
condizioni, è possibile che alcuni contenuti
vengano danneggiati, e nel peggiore dei
casi può risultare impossibile leggere il
disco. In particolare, evitate di esporre
questa unità a vibrazioni e urti, o di
interrompere l’alimentazione di rete CA
durante l’uso.
≥ Panasonic declina ogni responsabilità
per qualunque tipo di danno diretto o
indiretto derivante dall’utilizzo del
presente prodotto o dovuto ad alcun
difetto del prodotto stesso.
Panasonic declina inoltre ogni
responsabilità per eventuali perdite di
dati causate dall’utilizzo del presente
prodotto.
≥ Eventuali ferite o danni materiali
dovuti a un utilizzo discordante
rispetto a quello indicato dalle
Istruzioni d’uso, saranno di sola
responsabilità dell’utente.
∫ Scelta della collocazione per
questa unità
Durante l’uso, collocate questa unità su
una superficie uniformemente piana.
≥ Non è possibile utilizzare questa unità
se la si colloca in verticale.
∫ Rispettare le leggi sui diritti
d’autore
I materiali creati e registrati dall’utente
possono essere utilizzati solo a fini di
intrattenimento personale. La registrazione
di detto materiale può essere proibita,
anche per uso esclusivamente privato.
∫ Pagine di riferimento
Le pagine cui fare riferimento sono indicate
nel seguente modo (P00).
≥ Microsoft®, Windows®, Windows Vista®
e DirectX
marchi di Microsoft Corporation negli
Stati Uniti e/o in altri paesi.
≥ IBM e PC/AT sono marchi registrati della
International Business Machines
Corporation degli Stati Uniti.
≥ Intel
sono marchi registrati o marchi di Intel
Corporation negli Stati Uniti e in altri
paesi.
≥ Le schermate dei prodotti Microsoft sono
state riprodotte con il permesso di
Microsoft Corporation.
≥ Gli altri nomi di sistemi o prodotti
menzionati nelle presenti istruzioni sono
generalmente marchi registrati o marchi
depositati dei produttori che hanno
sviluppato detti sistemi o prodotti.
®
sono marchi registrati o
®
, Core™, Pentium® e Celeron®
56
LSQT1572
Page 57

¬ Informazioni sul disco
∫ Dischi utilizzabili con questa
unità
I dischi che possono essere utilizzati per
eseguire una copia quando si collega
questa unità a una videocamera Panasonic
compatibile sono DVD-RAM da 12 cm non
di tipo a cartuccia, DVD-RW, DVD-R,
DVD-R DL (doppio layer su singolo lato),
+RW, +R, +R DL (doppio layer su singolo
lato), CD-RW e CD-R.
≥ I dischi utilizzabili con questa unità
variano a seconda della videocamera
collegata. Per maggiori informazioni
consultate le istruzioni d’uso della
videocamera.
Nota importante
Se copiate su un disco delle immagini
registrate in formato AVCHD, non
inserite tale disco in apparecchi che
non supportano il formato AVCHD. In
qualche caso il disco può rimanere
incastrato nell’apparecchio. Non è
possibile riprodurre il disco su
dispositivi che non supportano il
formato AVCHD.
≥ Quando utilizzate dischi a doppio lato,
non potrete eseguire la registrazione o la
riproduzione in modo continuo da un lato
del disco all’altro. Sarà necessario
espellere il disco e girarlo.
≥ Non è possibile utilizzare dischi inseriti in
un contenitore, una cartuccia o una
custodia. Rimuovete sempre i dischi da
tali contenitori prima dell’uso.
≥ Si consiglia di utilizzare i dischi
Panasonic. In genere, è possibile
utilizzare senza problemi i dischi
compatibili con lo standard DVD per la
registrazione e la riproduzione. Tuttavia,
alcuni dischi disponibili in commercio
non soddisfano lo standard DVD in
relazione a qualità e prestazioni. Se si
utilizza uno di questi dischi, può non
essere possibile registrare o riprodurre
normalmente.
Per informazioni sui dischi riconosciuti
come compatibili da Panasonic, visitate il
seguente sito di assistenza.
http://panasonic.jp/support/global/cs/
e_cam
(Questo sito Web è solo in lingua
inglese.)
≥ Può non essere possibile riprodurre
su altri prodotti i dischi registrati su
questa unità. In tal caso, riproducete il
disco su questa unità.
≥ Quando si utilizzano DVD-RW, DVD-R,
DVD-R DL, +RW, +R o +R DL, non
eseguire le seguenti operazioni,
poiché il disco potrebbe diventare
inutilizzabile.
– Registrare su un disco con altri prodotti
dopo avere eseguito la registrazione
con questa unità.
– Registrare su un disco con questa
unità dopo avere eseguito la
registrazione con altri prodotti.
– Inserire un disco definalizzato in
qualsiasi altro prodotto.
57
LSQT1572
Page 58

∫ Informazioni su DVD-R DL/+R DL
I dischi DVD-R DL o +R DL dispongono di
due layer di registrazione e riproduzione su
un lato. Se una scena non entra nel primo
layer (L0), la registrazione continua sul
secondo layer (L1). In tal caso, la scena
continua da un layer all'altro. L'unità passa
automaticamente da un layer all'altro
durante la riproduzione del disco, pertanto
è possibile riprodurre tutto il disco senza
soluzione di continuità, come un disco
normale. Tuttavia, l'immagine o il suono
possono interrompersi temporaneamente
nel punto di passaggio da un layer all'altro.
∫ Esempi di dischi non utilizzabili
su questa unità
≥ Dischi diversi da quelli con diametro di
12 cm (Non è possibile utilizzare dischi
da 8 cm anche se li si inserisce in un
adattatore disponibile in commercio.)
≥ DVD-RAM compatibile con la
registrazione 6X–12X ad alta velocità
≥ Supporti BD, ecc.
≥ Supporti HD DVD, ecc.
∫ Come tenere un disco
Non toccate la superficie registrata.
∫ Quando inserite/rimuovete un
disco
Fate attenzione a non lasciare ditate o
sporcizia sul lato del disco riservato alla
registrazione/riproduzione.
≥ Se vi sono graffi o sporcizia (come
polvere o ditate) sul lato del disco
riservato alla registrazione/riproduzione,
è possibile che non si riesca a eseguire
normalmente la registrazione/
riproduzione; inoltre possono verificarsi i
seguenti fenomeni.
– Totale impossibilità di eseguire la
registrazione/riproduzione.
– Interruzione temporanea delle
immagini o dell’audio.
– Comparsa di disturbi delle immagini o
dell’audio.
∫ Se è presente sporcizia sul disco
≥ Pulite il disco con l’apposito panno
disponibile in commercio. Passate il
panno dal centro del disco verso
l’esterno per rimuovere lo sporco. Non
strofinate il disco con forza, poiché può
graffiarsi. Inoltre, non utilizzate solventi
(diluenti, acqua, agenti antistatici,
detergenti e così via).
58
LSQT1572
Page 59

∫ Precauzioni sull’utilizzo
23 41
65
≥ Prestate attenzione a graffi e sporcizia.
≥ Non apponete etichette o adesivi sui
dischi. (Il disco potrebbe piegarsi e la
rotazione sbilanciarsi, rendendo il disco
inutilizzabile.)
≥ Scrivete sul lato etichetta del disco solo
con un pennarello indelebile a punta
morbida. Non utilizzate penne a sfera o
altri strumenti con punta dura.
≥ Non utilizzate spray, benzina, liquidi
antistatici o altri solventi per la pulizia dei
dischi.
≥ Non utilizzate dispositivi o coperchi di
protezione dai graffi.
≥ Non lasciate cadere i dischi, non
accatastateli e non urtateli. Non
posizionate oggetti sopra di essi.
≥ Non utilizzate i seguenti dischi:
– Dischi con adesivi esposti a seguito
della rimozione di adesivi o etichette.
– Dischi molto piegati o graffiati.
– Dischi con forma irregolare, ad
esempio a forma di cuore.
¬ Accessori
Prima di utilizzare la presente unità verificare
che siano presenti i seguenti accessori.
Alimentatore CA
VSK0692
Cavo di alimentazione CA
A K2CT3CA00004
Regno Unito,
Regione Amministrativa
Speciale di Hong Kong
della Repubblica Popolare
Cinese e Arabia Saudita
B K2CJ2DA00011
Australia e Nuova Zelanda
C K2CR2DA00004
Altre aree oltre a Regno Unito, Regione
Amministrativa Speciale di Hong Kong
della Repubblica Popolare Cinese,
Australia, Nuova Zelanda e Arabia Saudita
Cavo di collegamento
USB Mini AB
K2KZ59B00002
A
B
C
¬ Identificazione delle
parti e trasporto
≥ Non collocate i dischi nelle seguenti
aree:
– Alla luce diretta del sole.
– In luoghi molto polverosi o umidi.
– Vicino a una fonte di calore.
– Luoghi soggetti a notevoli escursioni
termiche (può formarsi della
condensa).
– Luoghi in cui sono presenti elettricità
statica o onde elettromagnetiche.
≥ Per proteggere i dischi, riponeteli nelle
apposite custodie quando non li
utilizzate.
1 Pulsante di espulsione [<]
2 Spia di accesso [ACCESS] (P61)
3 Slot di inserimento disco
4 Lampada di alimentazione [POWER]
≥ Si accende quando l’unità è collegata
alla presa di corrente.
5 Terminale USB [ ]
6 Terminale ingresso CC [DC/C.C.IN 5.0 V]
≥ Non utilizzare adattatori CA diversi da
quello fornito in dotazione.
59
LSQT1572
Page 60

¬ Alimentazione
B
A
1
3
2
Inserire con l’etichetta
rivolta verso l’alto.
L’apparecchio si trova nella condizione di
attesa quando si collega l’adattatore c.a. Il
circuito primario è sempre sotto tensione
per tutto il tempo che l’adattatore c.a.
rimane collegato ad una presa di corrente.
1 Collegare il cavo di alimentazione
CA all’alimentatore CA A.
2 Collegare il cavo di alimentazione
CA alla presa CA.
3 Collegate l’alimentatore CA al
terminale di ingresso CC di questa
unità [DC/C.C.IN 5.0 V].
≥ La spia dell’alimentazione B si accende.
≥ Il cavo di alimentazione CA è da
utilizzarsi solo con la presente unità. Non
utilizzarlo con altri dispositivi né utilizzare
il cavo di alimentazione CA di altri
dispositivi con questa unità.
≥ L’unità e il disco si scaldano durante
l’uso.
¬ Inserimento/rimozione
dei dischi
≥ Quando inserite o rimuovete il disco,
collegate l’alimentatore CA all’unità.
Non è possibile inserire o rimuovere un
disco se l’unità non è alimentata.
1 Collegare l’unità all’alimentatore CA.
2 Inserimento del disco
Inserite il disco nell’apposito slot.
Inserire il disco con il lato di
registrazione/riproduzione rivolto verso
il basso. Il disco viene caricato
automaticamente quando lo si
inserisce fino in fondo nello slot.
Rimozione del disco
Premete il pulsante [<].
≥ Fate attenzione a non toccare il lato di
registrazione/riproduzione del disco
durante l’inserimento/la rimozione.
60
LSQT1572
Page 61

∫
Informazioni sulla spia di accesso
Quando l’unità accede a un disco, la spia di
accesso si illumina.
≥ Non eseguite le seguenti operazioni
quando la spia di accesso è illuminata. In
caso contrario il disco o i dati registrati su
di esso possono essere danneggiati, e
l’unità può funzionare in modo non
corretto.
– Scollegare l’alimentatore CA.
– Scollegare il cavo USB.
– Esporre l’unità a urti violenti o forti
vibrazioni.
¬
Copia da una videocamera
a un disco DVD
Collegando questa unità a una
videocamera Panasonic compatibile,
potete copiare su un disco DVD le
immagini registrate sulla videocamera.
≥ Utilizzate il cavo di collegamento USB
Mini AB per collegare l’unità alla
videocamera Panasonic compatibile.
≥ Questa funzione non è disponibile se la
videocamera non è compatibile con
questa unità.
≥ Fare riferimento alle istruzioni operative
della videocamera riguardo ai dati
disponibili per la copia.
≥ Collegare l’unità all’alimentatore CA.
1 Collegate l’unità alla videocamera.
MiniB
A
MiniA
ACavo di collegamento USB Mini AB
(in dotazione)
≥ Collegate il terminale miniA alla
videocamera e il terminale miniB a
questa unità.
≥ Inserite gli spinotti fino a fine corsa.
Se non sono stati inseriti
completamente l’unità e la
videocamera non funzioneranno
correttamente.
≥ Non utilizzare cavi USB diversi da
quello fornito in dotazione.
2 Avviate la copia sulla videocamera.
≥ Per informazioni sulla procedura di
copia leggete le istruzioni d’uso della
videocamera.
≥ Se la videocamera Panasonic
compatibile supporta la copia su un
CD-R e un CD-RW, potete copiare i dati
delle immagini fisse su un CD-R o un
CD-RW. Per maggiori informazioni
leggete le istruzioni d’uso della
videocamera.
61
LSQT1572
Page 62

¬ Riproduzione di un
disco DVD copiato su
una videocamera
Collegando questa unità a una
videocamera Panasonic compatibile,
potete copiare il disco DVD su cui avete
copiato le immagini.
≥ Per riprodurre il disco, collegate l’unità
alla stessa videocamera utilizzata
durante la copia.
≥ Utilizzate il cavo di collegamento USB
Mini AB per collegare l’unità alla
videocamera Panasonic compatibile.
≥ Collegare l’unità all’alimentatore CA.
1 Collegate l’unità alla videocamera
utilizzando il Cavo di collegamento
USB Mini AB.
≥ Collegate il terminale miniA alla
videocamera e il terminale miniB a
questa unità.
≥ Inserite gli spinotti fino a fine corsa.
Se non sono stati inseriti
completamente l’unità e la
videocamera non funzioneranno
correttamente.
≥ Non utilizzare cavi USB diversi da
quello fornito in dotazione.
2 Avviate la riproduzione del disco
sulla videocamera.
≥ Per informazioni sulla procedura di
riproduzione leggete le istruzioni
d’uso della videocamera.
62
LSQT1572
¬ Collegamento a un PC
per l’utilizzo
Potete copiare su un disco DVD le
immagini registrate su una videocamera
Panasonic e modificate su un PC.
Utilizzate il software in dotazione alla
videocamera Panasonic per copiare le
immagini. Potete anche riprodurre il disco
DVD su cui avete copiato le immagini
utilizzando lo stesso software.
≥ Utilizzate il cavo USB in dotazione a una
videocamera Panasonic compatibile con
questa unità per collegare l’unità a un
PC.
≥ A seconda del software, i dati disponibili
per la copia possono variare.
Se si usa un computer con
Windows
∫ Ambiente operativo
Personal computer
Personal computer IBM PC/AT compatibile
SO
I sistemi operativi compatibili differiscono a
seconda del software in dotazione alla
videocamera. Informatevi sull’ambiente
operativo del software.
Interfaccia
Porta USB
Altri requisiti
Mouse o dispositivo di puntamento
equivalente
≥ Anche se tutti i requisiti di sistema qui
illustrati vengono soddisfatti, è possibile
che su alcuni personal computer non si
riesca a utilizzare questo prodotto.
≥ Non è garantito il funzionamento su
sistemi operativi sui quali sia stato
eseguito un upgrade.
≥ Non è garantito il funzionamento su
sistemi operativi diversi da quello
preinstallato sul personal computer.
≥ Non è garantito il funzionamento nel
caso in cui 2 o più dispositivi USB siano
connessi su un singolo PC, o nel caso in
cui vi siano dispositivi connessi tramite
un hub USB o una prolunga USB.
Page 63

∫ Procedure di collegamento e
A
ACavo USB
(in dotazione alla videocamera)
rilevamento
≥ Collegare l’unità all’alimentatore CA.
1 Collegate questa unità al PC.
≥ Questa unità viene riconosciuta
come [DVD-RAM Drive] in
[My Computer].
≥ Inserite gli spinotti fino a fine corsa.
Se gli spinotti non sono stati spinti
bene nei terminali l’unità e il PC non
funzioneranno correttamente.
≥ Ricordatevi di utilizzare il cavo USB
in dotazione alla videocamera. (Il
funzionamento non è garantito se si
utilizza un cavo USB diverso da
quello in dotazione alla videocamera
Panasonic.)
2 Avviate la copia/la riproduzione.
≥ Utilizzate il software in dotazione a
una videocamera Panasonic per
copiare/riprodurre le immagini.
≥ Per informazioni sulla procedura di
copia/riproduzione leggete le
istruzioni d’uso del software.
∫ Come scollegare il cavo USB
senza correre rischi
Se si scollega il cavo USB mentre la spia di
accesso è illuminata, è possibile che
questa unità non funzioni correttamente e
che dei dati vadono persi.
1 Controllate che la spia di accesso
non sia illuminata.
2 Fare doppio clic sull’icona
nella barra delle applicazioni.
()
≥ Appare la finestra di dialogo per la
rimozione hardware.
≥ A seconda delle impostazioni del
PC, è possibile che questa icona non
venga visualizzata.
3 Selezionare [USB Mass Storage
Device] e fare clic su [Stop].
4 Fare clic su [OK].
≥ Fare clic su [OK] e si potrà
disconnettere il cavo senza alcun
rischio.
63
LSQT1572
Page 64

¬ Precauzioni per l’uso
∫ Informazioni su questo modello
L’unità e il disco possono riscaldarsi dopo
un utilizzo prolungato. Non si tratta di un
difetto.
Tenete l’unità quanto più lontano
possibile da apparecchi
elettromagnetici (come forni a
microonde, TV, videogiochi, ecc.).
≥ Se utilizzate l’unità sopra o vicino a un
apparecchio TV, le immagini e i suoni
dell’unità potrebbero essere disturbati
dalle onde elettromagnetiche.
≥ Non utilizzate l’unità vicino a telefoni
cellulari perché ciò potrebbe essere
causa di disturbi alle immagini e ai suoni.
≥ I forti campi magnetici creati da
altoparlanti o grandi motori possono
danneggiare seriamente i dati registrati o
distorcere le immagini.
≥ Le onde elettromagnetiche generate da
un microprocessore possono avere
effetti negativi sull’unità, causando
disturbi a immagini e suoni.
≥ Se questa unità viene disturbata da
apparecchiature elettromagnetiche e
cessa di funzionare correttamente,
scollegate l’alimentatore CA, quindi
collegatelo nuovamente.
Non utilizzate l’unità vicino a
trasmettitori radio o linee ad alta
tensione.
≥ Se registrate immagini vicino a
trasmettitori radio o linee dell’alta
tensione, le immagini e i suoni registrati
potrebbero risultare disturbati.
Accertarsi che i cavi e collegamenti
utilizzati siano quelli in dotazione.
Non utilizzare prolunghe per cavi e
collegamenti.
Non spruzzare insetticidi o altri agenti
chimici vicino all’unità.
≥ Il contatto dell’unità con questi agenti
chimici potrebbe deformarne il corpo e
creare spaccature sulla superficie
esterna.
≥ Non lasciare prodotti in plastica o
gomma a contatto con l’unità per periodi
di tempo prolungati.
Non sottoporre questa unità a vibrazioni o
impatti, contraccolpi, cadute o urti, non
mettere alcun oggetto sopra l’unità e non
lasciar cadere alcun oggetto sull’unità.
≥ Un impatto forte potrebbe rompere la
custodia esterna dell’unità causandone il
malfunzionamento.
In particolare, non collocate una
videocamera o apparecchi analoghi sopra
questa unità durante l’uso. Se questa unità
viene esposta a vibrazioni durante la
lettura o la scrittura del disco, il
funzionamento della videocamera può
esserne negativamente influenzato, o la
videocamera può cadere.
Non usare benzene, diluenti o alcol per
la pulizia dell’unità.
≥ Prima di procedere alla pulizia, staccate
il cavo di rete CA dalla presa di rete.
≥ Se si utilizza un solvente, il corpo
esterno potrebbe perdere il colore e si
potrebbero creare spaccature sulla
finitura della superficie.
64
LSQT1572
Page 65

≥ Pulite l’unità con un panno soffice e
asciutto per rimuovere polvere e
impronte. Per rimuovere macchie
resistenti, strizzate bene un panno
imbevuto in un detergente neutro diluito
con acqua e usatelo per pulire l’unità.
Asciugate quindi con un panno asciutto.
≥ Non utilizzare panni antipolvere di tipo
chimico.
Se avete intenzione di non utilizzare
l’unità per un periodo di tempo
prolungato
≥ Quando riponete l’unità in un armadio o
stipetto, è consigliabile mettere
all’interno anche un prodotto anti
essiccazione (gel di silice).
∫ Informazioni sull’alimentatore
CA
≥ Verificare che l’alimentatore CA in uso
sia quello fornito in dotazione.
≥ Se l’alimentatore CA viene utilizzato
vicino a una radio, la ricezione della
radio potrebbe essere disturbata. Tenete
l’alimentatore CA ad almeno 1 m di
distanza dalla radio.
≥ Quando viene utilizzato, l’alimentatore
CA può emettere un leggero ronzio. Ciò
è normale.
≥ Dopo l’uso ricordatevi di scollegare
sempre l’alimentatore CA. (Se viene
dimenticato connesso il consumo
massimo sarà di 0,3 W.)
≥ Tenete sempre puliti gli elettrodi
dell’alimentatore CA.
Posizionare l’unità vicino alla presa per
poter raggiungere facilmente il
dispositivo di interruzione (dalla presa).
∫ Informazioni sul disco
≥ Se il disco è polveroso, graffiato,
sporco oppure deformato, possono
verificarsi i seguenti fenomeni:
– Immagini distorte durante la
riproduzione
– Interruzione temporanea dell’immagine
riprodotta
– Suono interrotto durante la
riproduzione o suono anomalo
– Impossibile rilevare correttamente il
disco
– Ritardo tra video e audio
Quando la spia ACCESS è illuminata
(mentre è in corso l’accesso al disco),
non scollegate l’alimentatore CA o il
cavo USB, e non esponete questa unità
a vibrazioni e urti.
DVD-R/DVD-R DL/+R/+R DL
≥ Per assicurare la registrazione ottimale
su dischi DVD-R, DVD-R DL, +R o
+R DL, i dati di controllo vengono scritti
sui dischi DVD-R, DVD-R DL, +R o
+R DL utilizzati per la registrazione
quando questi vengono inseriti o espulsi.
Se nel disco non è presente un’area per
controllare i dati da scrivere, può non
essere possibile eseguire la
registrazione. Per evitare questo
problema, non inserire dischi DVD-R,
DVD-R DL, +R o +R DL registrati più di
50 volte.
≥ Non inserire nell’unità dischi DVD-R,
DVD-R DL, +R o +R DL finalizzati in un
dispositivo registrabile, quale un
masterizzatore DVD. I dati registrati
potrebbero danneggiarsi.
65
LSQT1572
Page 66

∫ Note sulla condensa
Quando in estate si toglie una bottiglia
d’acqua dal frigo e la si lascia all’esterno, si
formano delle gocce d’acqua sulla
superficie esterna. Questo fenomeno è
denominato condensa.
L’utilizzo di questa unità quando si è
formata della condensa può causare un
malfunzionamento. Fare quindi tutto il
possibile per evitare la formazione della
condensa. Se ciò dovesse avvenire, fare
quanto descritto di seguito.
Cause della condensa
La condensa si forma in situazioni in cui
la temperatura e umidità dell’ambiente
cambiano come illustrato dagli esempi
di seguito.
≥ Quando l’unità viene spostata da un
ambiente esterno freddo a un ambiente
interno caldo.
≥ Quando l’unità viene spostata da una
macchina con l’aria condizionata
all’esterno.
≥ Quando un ambiente freddo viene
riscaldato rapidamente.
≥ Quando l’aria fredda di un
condizionatore arriva direttamente
sull’unità.
≥ Dopo un acquazzone pomeridiano
d’estate.
≥ Quando l’unità si trova in un luogo molto
umido con presenza di vapore.
Quando l’unità viene portata in un luogo
con una forte differenza di temperatura,
come nel caso del passaggio dal freddo
al caldo.
Collocate l’unità all’interno di una busta di
plastica, rimuovete il più possibile l’aria
dall’interno della busta, quindi chiudetela a
tenuta. Lasciate l’unità nella stanza per
circa un’ora, in modo che la temperatura
dell’unità si avvicini il più possibile a quella
dell’ambiente, quindi utilizzatela
nuovamente.
Cosa fare se si forma la condensa
Scollegate l’alimentatore CA e lasciate
l’unità così per circa 1 ora. Controllare che
la condensa scompaia naturalmente dopo
aver lasciato l’unità a temperatura
ambiente e quindi utilizzarla.
66
LSQT1572
Page 67

¬ Risoluzione dei problemi
Problema Controlli
Non è possibile
accendere l’unità.
Non è possibile utilizzare
l’unità anche quando è
stata accesa.
L’unità non funziona
normalmente.
Il pulsante [<] non
funziona.
Impossibile leggere il
disco.
La copia si interrompe.
L’immagine riprodotta si
interrompe per un
momento.
Non è possibile eseguire
la copia anche se questa
unità è alimentata e il
disco è inserito
correttamente.
≥ L’alimentatore CA è collegato?
> Collegate correttamente l’alimentatore CA e il cavo di rete
CA. (P60)
≥ Scollegate l’alimentatore CA e dopo circa 1 minuto ricollegatelo.
(Se eseguite l’operazione sopra descritta quando è accesa la
spia d’accesso potete danneggiare i dati presenti sul disco.) Se
non viene ripristinato il normale funzionamento, togliete
l’alimentazione e consultate il rivenditore dal quale avete
acquistato l’unità.
≥ Il disco non verrà espulso se non viene fornita alimentazione.
> Collegate un alimentatore CA.
≥ Il pulsante [<] potrebbe non funzionare quando è in corso la
copia da una videocamera collegata ad un disco.
> Attendete che la copia sia terminata.
≥ Se non è questo il caso, togliete l’alimentazione e consultate il
rivenditore dal quale avete acquistato l’unità.
≥ Il disco è graffiato o sporco?
> Rimuovete la sporcizia presente sul disco. (P58) Se il disco
è graffiato, inseritene uno nuovo.
≥ La temperatura interna di questa unità è elevata. Scollegate
l’alimentatore CA; dopo qualche tempo potrete nuovamente
utilizzare questa unità.
≥ È possibile che i dischi registrati su altri dispositivi non vengano
letti o riprodotti correttamente su questo apparecchio.
≥ Il disco è già stato utilizzato per registrare video e immagini
fisse?
> Se il disco contiene del materiale registrato, non può essere
riutilizzato. Utilizzare un disco nuovo.
> I dischi DVD-RAM, DVD-RW, +RW o CD-RW su cui è già
stato registrato del materiale possono essere riutilizzati dopo
aver formattato il disco. Poiché tutti i dati precedentemente
registrati sul disco verranno eliminati, controllare
attentamente il contenuto del disco prima di riformattarlo.
67
LSQT1572
Page 68

Problema Controlli
Anche se è collegata
tramite il cavo USB,
questa unità non viene
riconosciuta dal PC.
Quando il cavo USB è
scollegato, sul PC
apparirà un messaggio
di errore.
Il PC non si avvia.
Quando si tenta di
riprodurre un video DVD,
viene visualizzata una
schermata di
impostazione del codice
regionale.
≥ Selezionare un altro terminale USB sul PC.
≥ Verificare l’ambiente operativo. (P62)
≥ Scollegate l’alimentatore CA e il cavo USB, quindi ricollegateli.
≥ Per scollegare in sicurezza il cavo USB, fare doppio clic
sull’icona ( ) nella barra delle applicazioni e seguire le
istruzioni su schermo.
≥ Questa unità è stata collegata al PC con il cavo USB prima di
accendere il PC?
> Avviare il PC e dopo collegare questa unità al PC.
≥ Al momento dell’acquisto, il codice regionale non è impostato
su questa unità. Controllate il contenuto dell’impostazione,
quindi fate clic su [OK]. La riproduzione del video DVD inizierà
dopo che è stato impostato il nuovo codice regionale. Potete
cambiare l’impostazione 5 volte. Ricordatevi che dopo la quinta
volta non potete più cambiare l’impostazione, che rimarrà fissa
sull’ultimo valore.
68
LSQT1572
Page 69

¬ Caratteristiche tecniche
Masterizzatore DVD: Informazioni sulla sicurezza
Alimentazione: CC 5,0 V
Consumo: 7,5 W (Quando si scrive su disco)
Supporti compatibili 12 cm DVD-RAM Ver.2.1
12 cm DVD-RW Ver.1.1/2X-SPEED (2X/1X)
12 cm DVD-R for General Ver.2.0
12 cm DVD-R for DL Ver.3.0
12 cm +RW
12 cm +R
12 cm +R for DL
12 cm CD-R
12 cm CD-RW
Interfaccia Hi-Speed USB conforme (USB 2.0),
Capacità del buffer 2MB
Dimensioni 139 mm (W)k16,8 mm (H)k138,1 mm (D)
Massa Circa 395 g (solo masterizzatore DVD)
Temperatura
operativa
Umidità tollerata Da 10% a 80%
Velocità di scrittura
dati
Velocità di lettura dati
Alimentatore CA VSK0692: Informazioni sulla sicurezza
terminale USB terminal tipo miniB
(escluse parti sporgenti)
Da 5 oCa35oC
DVD-RAM: Massima 3X-SPEED
DVD-RW: Massima 6X-SPEED
DVD-R: Massima 8X-SPEED
DVD-R DL: Massima 4X-SPEED
DVD-RAM: Massima 3X-SPEED
DVD-RW: Massima 8X-SPEED
DVD-R: Massima 8X-SPEED
DVD-R DL: Massima 6X-SPEED
+RW: Massima 8X-SPEED
+R: Massima 8X-SPEED
+R DL: Massima 4X-SPEED
CD-R: Massima 24X-SPEED
CD-RW: Massima 16X-SPEED
+RW: Massima 8X-SPEED
+R: Massima 8X-SPEED
+R DL: Massima 6X-SPEED
CD-R: Massima 24X-SPEED
CD-RW: Massima 24X-SPEED
Alimentazione: CA 110 V a 240 V, 50/60 Hz
Capacitanza in entrata:0,22 A
Uscita CC: CC 5,0 V 1,6 A
Le specifiche tecniche possono cambiare senza preavviso.
69
LSQT1572
Page 70

Querido Cliente,
Aprovechamos de la ocasión para agradecerle el haber comprado este quemador de
DVD de Panasonic. Lea atentamente este Manual de Instrucciones y téngalo a mano
para futuras referencias.
Repare en que los mandos reales y las piezas de su quemador de DVD pueden diferir un
poco de las que están mostradas en las figuras de estas Instrucciones de
funcionamiento.
¬ Información para su seguridad
ADVERTENCIA:
PARA REDUCIR EL RIESGO DE INCENDIOS, DESCARGAS ELÉCTRICAS O
DAÑOS EN EL PRODUCTO,
≥ NO EXPONGA ESTE APARATO A LA LLUVIA, HUMEDAD, GOTEO O
SALPICADURAS, Y NO COLOQUE ENCIMA DEL MISMO OBJETOS CON
LÍQUIDOS COMO, POR EJEMPLO, FLOREROS.
≥ UTILICE SOLAMENTE LOS ACCESORIOS RECOMENDADOS.
≥ NO QUITE LA CUBIERTA (O EL PANEL TRASERO); EN EL INTERIOR NO HAY
PIEZAS QUE PUEDA REPARAR EL USUARIO. SOLICITE LAS REPARACIONES
AL PERSONAL DE SERVICIO CUALIFICADO.
PRECAUCIÓN!
≥ NO INSTALE NI COLOQUE ESTA UNIDAD EN UNA LIBRERÍA, ARMARIO
INCORPORADO U OTRO ESPACIO LIMITADO. ASEGÚRESE DE QUE ESTA
UNIDAD ESTÉ BIEN VENTILADA. PARA EVITAR EL RIESGO DE UN CHOQUE
ELÉCTRICO O INCENDIO DEBIDO A UN SOBRECALENTAMIENTO,
ASEGÚRESE DE QUE CORTINAS U OTRO MATERIAL NO VAYA A ATASCAR
LOS RESPIRADEROS DE VENTILACIÓN.
≥ NO ATASQUE LAS ABERTURAS DE VENTILACIÓN DE LA UNIDAD CON
PERIÓDICOS, MANTELES, CORTINAS O ELEMENTOS PARECIDOS.
≥ NO COLOQUE EN LA UNIDAD FUENTES DE LLAMAS DESNUDAS, COMO
VELAS ENCENDIDAS.
LA TOMA DE CORRIENTE TIENE QUE ESTAR CERCA DEL EQUIPO Y TIENE QUE
SER DE FÁCIL ACCESO.
Este producto puede tener interferencias causadas por teléfonos móviles durante su
utilización. Si tales interferencias resultan evidentes, aumente la separación entre el
producto y el teléfono móvil.
70
LSQT1572
Page 71

ESPAÑOL
¡ADVERTENCIA!
ESTE APARATO UTILIZA UN LÁSER.
EL USAR LOS CONTROLES, HACER LOS REGLAJES O LOS PASOS
REQUERIDOS EN FORMA DIVERSA DE LA AQUÍ EXPUESTA PUEDE REDUNDAR
EN EXPOSICIÓN PELIGROSA A LA RADIACIÓN.
NO ABRA LAS TAPAS NI HAGA REPARACIONES USTED MISMO. EN CASO DE
PRODUCIRSE ANOMALÍAS SOLICITE AYUDA DE PERSONAL CUALIFICADO.
La marca de identificación del producto se encuentra en la parte inferior de las
unidades.
∫ EMC Compatibilidad eléctrica y magnética
Este símbolo (CE) se encuentra en la placa indicadora.
(Parte inferior del aparato)
(Parte interior del aparato)
71
LSQT1572
Page 72

-Si ve este símbolo-
Información sobre la eliminación para los usuarios de equipos eléctricos y
electrónicos usados (particulares)
La aparición de este símbolo en un producto y/o en la documentación
adjunta indica que los productos eléctricos y electrónicos usados no deben
mezclarse con la basura doméstica general.
Para que estos productos se sometan a un proceso adecuado de
tratamiento, recuperación y reciclaje, llévelos a los puntos de recogida
designados, donde los admitirán sin coste alguno. En algunos países
existe también la posibilidad de devolver los productos a su minorista local
Si desecha el producto correctamente, estará contribuyendo a preservar valiosos
recursos y a evitar cualquier posible efecto negativo en la salud de las personas y en
el medio ambiente que pudiera producirse debido al tratamiento inadecuado de
desechos. Póngase en contacto con su autoridad local para que le informen
detalladamente sobre el punto de recogida designado más cercano.
De acuerdo con la legislación nacional, podrían aplicarse multas por la eliminación
incorrecta de estos desechos.
Para empresas de la Unión Europea
Si desea desechar equipos eléctricos y electrónicos, póngase en contacto con su
distribuidor o proveedor para que le informe detalladamente.
Información sobre la eliminación en otros países no pertenecientes a la Unión
Europea
Este símbolo sólo es válido en la Unión Europea.
Si desea desechar este producto, póngase en contacto con las autoridades locales o
con su distribuidor para que le informen sobre el método correcto de eliminación.
al comprar un producto nuevo equivalente.
¬ Índice
Información para su seguridad...........70
Características .....................................72
Antes del uso........................................73
Acerca de los discos ........................... 74
Accesorios............................................ 76
Identificación de las piezas y manejo
Alimentación.........................................77
Insertar/extraer un disco .....................77
Copiar de una videocámara a un
disco DVD ........................................78
Reproducir en una videocámara un
disco DVD copiado........................... 79
Conexión a un ordenador para el uso
Precauciones de uso ...........................81
Solución de problemas........................84
Especificaciones .................................. 86
72
LSQT1572
..... 76
.........79
¬ Características
≥ Éste es un dispositivo portátil de
diseño delgado, de poco peso y
compacto. Si conecta esta unidad a una
videocámara de Panasonic compatible,
entonces las imágenes grabadas en la
videocámara conectada pueden
copiarse fácilmente en un disco DVD
incluso al destino de su viaje.
≥ Puede también reproducir discos DVD
creados en esta unidad si conecte ésta
última a una videocámara compatible
de Panasonic.
≥ Si conecta esta unidad a un ordenador
usando un cable USB suministrado
junto con una videocámara compatible
de Panasonic, puede copiar las
imágenes editadas en un ordenador PC
etc. a un disco DVD.
≥ El funcionamiento no está garantizado
para clases de utilización que sean
diferentes de las citadas arriba.
Page 73

¬ Antes del uso
∫ Manejar esta unidad
Esta unidad es un dispositivo de alta
precisión que no está fabricado para
resistir a vibraciones, golpes o polvo.
Según sea el ambiente y se maneje la
unidad, algún contenido puede dañarse y
en el peor de los casos podría ya no ser
posible leer el disco. Sobre todo, no
someta la unidad a vibración o golpes ni la
desconecte de la red eléctrica de CA
durante el uso.
≥ En ningún caso, Panasonic será
responsable de cualquier daño que
derive directamente o indirectamente del
uso de este producto ni de cualquier
problema causado por el mismo.
Además, en ningún caso, Panasonic
será responsable de cualquier pérdida
de datos causada por este producto.
≥ Las heridas o los daños materiales
resultantes de cualquier tipo de uso
no conforme con las instrucciones de
funcionamiento, están únicamente
bajo la responsabilidad del usuario.
∫ Cuando coloca esta unidad
Cuando la utiliza coloque esta unidad en
una superficie llana y nivelada.
≥ No puede utilizar esta unidad por si
está colocada verticalmente.
∫ Respete los derechos de autor
Los materiales que graba y crea se pueden
utilizar solo para su entretenimiento
personal. Debido a las leyes de los
derechos de autor, los demás materiales
no se pueden utilizar sin obtener el
permiso de los titulares de los derechos de
autor.
∫ Páginas de referencia
Las páginas que puede consultar se
muestran como (P00).
≥ Microsoft®, Windows®, Windows Vista®
y DirectX
registradas o marcas comerciales de
Microsoft Corporation en los Estados
Unidos y/u otros países.
≥ IBM y PC/AT son marcas registradas de
International Business Machines
Corporation en los Estados Unidos.
≥ Intel
marcas comerciales registradas o
marcas comerciales de Intel Corporation
en los Estados Unidos y otros países.
≥ Foto/s de pantalla de producto Microsoft
reimpresa/s con la autorización de
Microsoft Corporation.
≥ Por lo general, los demás nombres de
sistemas y productos mencionados en
estas instrucciones son las marcas
registradas de los fabricantes que han
desarrollado el sistema o el producto en
cuestión.
®
son marcas comerciales
®
, Core™, Pentium® y Celeron® son
73
LSQT1572
Page 74

¬ Acerca de los discos
∫ Discos que pueden utilizarse en
esta unidad
Los discos que se pueden usar cuando
conecta este dispositivo con una
videocámara Panasonic compatible son los
de 12 cm sin cartucho de tipo DVD-RAM,
DVD-RW, DVD-R, DVD-R DL (doble capa
en una cara), +RW, +R, +R DL (doble capa
en una cara), CD-RW y CD-R.
≥ Los discos que pueden utilizarse con
esta unidad difieren según la
videocámara que está conectada.
Para más detalles, lea el manual de
instrucciones de funcionamiento de
la videocámara.
Aviso importante
Si va a copiar en un disco imágenes
grabadas en formato AVCHD, no
inserte el disco en dispositivos que no
soportan el formato AVCHD. En
algunos casos el disco podría
bloquearse en el dispositivo. El disco
no reproducirá en dispositivos no
compatibles con el formato AVCHD.
≥ Al utilizar un disco de doble cara, no es
posible grabar o reproducir
ininterrumpidamente de una cara del
disco a la otra. Deberá expulsar el disco
y darle vuelta.
≥ No es posible utilizar discos insertados
en un portadiscos, cartucho o caja.
Extraiga siempre los discos de sus
contenedores antes de utilizarlos.
≥ Se recomienda utilizar discos
Panasonic. Normalmente los discos
compatibles con el estándar DVD se
pueden utilizar para grabar y reproducir
sin problemas. Sin embargo, algunos
discos disponibles en el comercio no
cumplen el estándar DVD para calidad y
rendimiento. Si utiliza uno de estos
discos, es posible que no pueda grabar
o reproducir normalmente.
Para obtener información acerca de los
discos que Panasonic ha confirmado
son compatibles, consulte la página
web.
http://panasonic.jp/support/global/cs/
e_cam
(Este sitio web sólo está disponible en
inglés.)
≥ Los discos grabados en esta unidad
podrían no reproducirse en otros
productos. En estos casos, en
cambio, reproduzca el disco con esta
unidad.
≥ Cuando use DVD-RW, DVD-R, DVD-R
DL, +RW, +R o +R DL no haga lo
siguiente ya que el disco podría
volverse inservible.
– Grabar en un disco con otros
productos después de grabar en él con
esta unidad.
– Grabar en un disco con esta unidad
después de grabar en él con otros
productos.
– Insertar un disco no finalizado en otros
productos.
74
LSQT1572
Page 75

∫ Acerca de DVD-R DL/+R DL
Los discos DVD-R DL o +R DL tienen dos
capas de grabación y superficie de
reproducción en una cara. Si una escena
no encaja en la primera capa (L0), la
grabación continúa en la segunda (L1) por
lo que una escena se graban en dos
capas. Este dispositivo cambia de capa
automáticamente durante la reproducción
del disco de modo que puede reproducir
todo el disco de forma continuada como un
disco normal. Sin embargo, la imagen y el
sonido pueden detenerse
momentáneamente en el punto en que se
cambia de capa.
∫ Ejemplos de discos que no se
pueden utilizar en esta unidad
≥ Discos cuyo diámetro no sea 12 cm
(No puede usar discos de 8 cm aunque
los inserta en un adaptador disponible a
la venta.)
≥ DVD-RAM compatible con la
grabaciónde alta velocidad de 6X–12X
≥ Soportes BD, etc.
≥ Soportes HD DVD, etc.
∫ Cómo agarrar un disco
No toque la superficie grabada.
∫ Cuando inserta/extrae un disco
No deje que huellas dactilares o suciedad
vayan a tocar la cara de grabación y
reproducción del disco.
≥ Si hay rayas o suciedad (por ejemplo o
huellas dactilares) en la cara de
grabación y reproducción del disco,
puede no ser posible grabar ni
reproducir normalmente y pueden tener
lugar los fenómenos a continuación.
– No es posible grabar ni reproducir.
– Se interrumpe la imagen o el sonido o
éstos se detienen momentáneamente.
– Aparece ruido en la imagen o el
sonido.
∫ Si el disco está sucio
≥ Límpielo con una paño para limpieza de
discos disponible a la venta. Limpie el
disco desde el centro hacia el borde
exterior para remover la suciedad. No
limpie el disco con fuerza pues podría
rayarlo. Tampoco utilice solventes
(disolventes, agua, agentes
antiestáticos, detergentes, etc.).
∫ Precauciones
≥ Evite la suciedad y tenga cuidado de no
rayar los discos.
≥ No pegue etiquetas o autoadhesivos en
los discos. (Esto puede hacer que el
disco se doble y que gire de manera
irregular, dejándolo inutilizable.)
≥ Si tiene que escribir en el disco,
asegúrese de hacerlo en el lado de la
etiqueta y solamente con lápiz con punta
de fieltro suave a base de aceite. No
utilice bolígrafos u otros implementos de
escritura de punta dura.
≥ No utilice pulverizadores para discos,
bencina, diluyente, líquidos antiestática
ni ningún otro tipo de disolvente.
75
LSQT1572
Page 76

≥ No utilice protectores o cubiertas a
A
B
C
23 41
65
prueba de rayas.
≥ No deje caer los discos y no los apile ni
los someta a impactos. No coloque
objetos sobre los discos.
≥ No utilice los siguientes discos:
– Discos en que haya quedado
pegamento de autoadhesivos o
etiquetas.
– Discos que estén severamente
doblados o agrietados.
– Discos de forma irregular como, por
ejemplo, discos con forma de corazón.
≥ No deje los discos en los siguientes
lugares:
– Lugares expuestos a la luz directa del
sol.
– Lugares muy húmedos o donde haya
mucho polvo.
– Cerca de un calefactor.
– Lugares que sean objeto de cambios
significativos de temperatura (puede
ocurrir condensación).
– Lugares donde haya electricidad
estática u ondas electromagnéticas.
≥ Para proteger los discos, guárdelos en
sus fundas cuando no los utiliza.
¬ Accesorios
Controle los accesorios antes de utilizar la
unidad.
Adaptador de CA
VSK0692
Cable principal CA
A K2CT3CA00004
Reino Unido,
Hong Kong, una región
administrativa especial
de China, y Arabia Saudí
B K2CJ2DA00011
Australia y Nueva Zelanda
C K2CR2DA00004
Áreas distintas del Reino Unido,
Hong Kong, una región administrativa
especial de China, Australia,
Nueva Zelanda y Arabia Saudí
Cable de conexión USB
Mini AB
K2KZ59B00002
¬ Identificación de las
piezas y manejo
76
LSQT1572
1 Botón de expulsión [<]
2 Lámpara de acceso [ACCESS] (P78)
3 Ranura para insertar el disco
4 Lámpara de alimentación [POWER]
Este indicador se encenderá cuando la
≥
unidad esté conectada a la red de CA.
5 Terminal USB [ ]
6 Terminal de entrada CC
[DC/C.C.IN 5.0 V]
≥ No utilice ningún otro adaptador de
CA distinto del suministrado.
Page 77

¬ Alimentación
Introducir con la
etiqueta hacia arriba.
El aparato estará en la condición de espera
cuando el adaptador de CA esté
conectado. El circuito primario estará
siempre con corriente cuando el adaptador
de CA esté conectado a un tomacorriente.
3
B
1
2
1 Conecte el cable de la red CA al
adaptador CA A.
2 Conecte el cable de la red CA a la
toma CA.
3 Conecte el adaptador CA al terminal
de entrada CC de esta unidad
[DC/C.C.IN 5.0 V].
≥ Se enciende la lámpara de alimentación
B.
≥ El alambre de la red eléctrica de CA sólo
sirve para el uso con esta unidad. No lo
utilice con otros dispositivos ni utilice con
esta unidad el alambre de red eléctrica
de CA de otros dispositivos.
≥ La unidad y el disco se calientan durante
el uso. No se trata de una avería.
A
¬ Insertar/extraer un
disco
≥ Cuando inserta o quita el disco, conecte
el adaptador de CA a la unidad.
No puede insertar ni quitar un disco si la
unidad no está alimentada.
1 Conecte esta unidad al adaptador de
CA.
2 Insertar un disco
Inserte el disco en la respectiva
ranura.
Introduzca el disco con la cara de
grabación/reproducción mirando hacia
abajo. El disco se carga
automáticamente al insertarlo en la
ranura.
Extraer un disco
Pulse el botón [<].
≥ Tenga cuidado de no tocar la cara de
grabación/reproducción del disco
cuando lo inserte o lo quite.
77
LSQT1572
Page 78

∫ Acerca de la lámpara de acceso
A
MiniA
MiniB
Cuando la unidad accede a un disco, se
enciende la lámpara de acceso.
≥ No haga lo siguiente cuando esté
encendida la lámpara de acceso. El
disco o los datos grabados en él pueden
dañarse y la uniad podría funcionar mal.
– Desconectar el adaptador de CA.
– Desconectar el cable USB.
– Someter esta unidad a fuertes golpes o
vibración.
78
LSQT1572
¬
Copiar de una videocámara
a un disco DVD
Si conecta esta unidad y una videocámara
compatible de Panasonic, puede copiar las
imágenes grabadas en la videocámara a
un disco DVD.
≥ Utilice el cable de conexión USB Mini AB
para conectar esta unidad y la
videocámara compatible de Panasonic.
≥ Esta función no funciona si la
videocámara no es compatible con esta
unidad.
≥ Refiérase a las instrucciones de
funcionamiento de la videocámara por lo
que respecta a los datos disponibles
para copiar.
Conecte esta unidad al adaptador de CA.
≥
1
Conecte esta unidad a la videocámara.
ACable de conexión USB Mini AB
(suministrado)
≥ Conecte el terminal miniA a la
videocámara y el terminal miniB a
esta unidad.
≥ Inserte las clavijas hasta el fondo. La
unidad y la videocámara no
funcionará correctamente si no
están insertadas hasta el fondo.
≥ No utilice ningún otro cable USB
aparte el suministrado.
2 Inicie a copiar en la videocámara.
≥ Para más información sobre cómo
copiar, lea el manual de
instrucciones de funcionamiento de
la videocámara.
≥ Si la videocámara compatible de
Panasonic soporta la copia en un CD-R
y un CD-RW, puede copiar datos de
imagen fija en un CD-R o un CD-RW.
Para más detalles, lea el manual de
instrucciones de funcionamiento de la
videocámara.
Page 79

¬ Reproducir en una
videocámara un disco
DVD copiado
Si conecta esta unidad y una videocámara
compatible de Panasonic, puede
reproducir el disco DVD en el que copió las
imágenes.
≥ Para reproducir el disco, conecte la
misma videocámara que conectó
cuando copió en él.
≥ Utilice el cable de conexión USB Mini AB
para conectar esta unidad y la
videocámara compatible de Panasonic.
≥ Conecte esta unidad al adaptador de
CA.
1 Conecte esta unidad y el video
usando el cable de conexión USB
Mini AB.
≥ Conecte el terminal miniA a la
videocámara y el terminal miniB a
esta unidad.
≥ Inserte las clavijas hasta el fondo. La
unidad y la videocámara no
funcionará correctamente si no
están insertadas hasta el fondo.
≥ No utilice ningún otro cable USB
aparte el suministrado.
2 Inicie la reproducción del disco en la
videocámara.
≥ Para más información sobre cómo
reproducir, lea el manual de
instrucciones de funcionamiento de
la videocámara.
¬ Conexión a un
ordenador para el uso
Puede copiar a un disco DVD imágenes
grabadas en una videocámara de
Panasonic y editadas en un ordenador.
Para copiar las imágenes utilice el software
suministrado junto con la videocámara de
Panasonic. Utilizando el mismo software
puede también reproducir los discos DVD
en los que copió las imágenes.
≥ Utilice el cable USB suministrado junto
con una videocámara de Panasonic
compatible con esta unidad para
conectar ésta a un ordenador.
≥ Según el software, pueden variar los
datos disponibles para copiar.
Cuando se utiliza Windows
∫ Entorno operativo
PC
PC IBM compatible con PC/AT
SO
El sistema operativo compatible diferirá
según el software suministrado con la
videocámara. Lea el entorno operativo del
software.
Interfaz
Puerto USB
Otros requisitos
Ratón o dispositivo de puntero equivalente
≥ Incluso si se satisfacen los requisitos de
sistema mencionados en este manual de
instrucciones, algunos PC no pueden
utilizarse.
≥ No está garantizado el funcionamiento
en un SO actualizado.
≥ No está garantizado el funcionamiento
en un SO distinto del pre-instalado.
≥ Si al PC hay conectados 2 o más
dispositivos USB, o si los dispositivos
están conectados a través de un
concentrador USB o utilizando un
alargador, no se garantiza el correcto
funcionamiento.
79
LSQT1572
Page 80

∫ Procedimientos de conexión y
A
AUn cable USB
(suministrado con la videocámara)
detección
≥ Conecte esta unidad al adaptador de
CA.
1 Conecte esta unidad al ordenador.
≥ Esta unidad se reconoce como un
[DVD-RAM Drive] en [My Computer].
≥ Inserte las clavijas hasta el fondo.
La unidad y el ordenador no
funcionarán correctamente si no se
insertan completamente.
≥ Tenga cuidado de utilizar el cable
USB suministrado con la
videocámara. (No podemos
garantizar el funcionamiento si utiliza
un cable USB que sea diferente del
suministrado con la videocámara de
Panasonic).
2 Inicie a copiar/reproducir.
≥ Para copiar/reproducir las imágenes
utilice el software suministrado junto
con la videocámara de Panasonic.
≥ Para más información sobre cómo
copiar/reproducir, lea el manual de
instrucciones de funcionamiento del
software.
∫ Para desconectar el cable USB
sin peligro
Si desconecta el cable USB mientras está
encendida la lámpara de acceso, podría
funcionar mal esta unidad y podrían
perderse los datos.
1 Compruebe que no esté encendida
la lámpara de acceso.
2 Haga doble clic en el icono
( ) de la barra de tareas.
≥ Aparece el cuadro de diálogo para
desconectar el hardware.
≥ Dependiendo de la configuración de
su PC, este icono podría no
visualizarse.
3 Seleccione [USB Mass Storage
Device] y haga clic en [Stop].
4 Haga clic en [OK].
≥ Haga clic en [OK] y podrá
desconectar el cable sin peligro.
80
LSQT1572
Page 81

¬ Precauciones de uso
∫ Acerca de esta unidad
La unidad y el disco se calientan después
de una larga operación, pero esto no es un
funcionamiento defectuoso.
Mantenga la unidad lo más alejada
posible de equipos electromagnéticos
(como hornos de microondas,
televisores, juegos de vídeo, etc.).
≥ Si utiliza la unidad encima o cerca de un
televisor, la imagen y el sonido de la
unidad pueden ser afectados por la
radiación de ondas electromagnéticas.
≥ No utilice la unidad cerca de teléfonos
móviles, ya que esto puede producir
ruido que afectará adversamente a la
imagen y el sonido.
≥ Los campos magnéticos fuertes creados
por altavoces o motores grandes pueden
dañar los datos grabados o distorsionar
las imágenes.
≥ La radiación de ondas
electromagnéticas generada por
microprocesadores puede tener un
efecto adverso sobre la unidad,
causando perturbaciones en las
imágenes y el sonido.
≥ Si un aparato electromagnético afecta
negativamente esta unidad y ésta deja
de funcionar correctamente, desconecte
el adaptador de CA y, luego, vuelva a
conectarlo.
No utilice la unidad cerca de
transmisores de radio o cables de alta
tensión.
≥ Si graba cerca de transmisores de radio
o líneas de tensión, las imágenes o los
sonidos grabados pueden ser afectados
negativamente.
Tenga cuidado de utilizar los
conductores y los cables suministrados.
No extienda los conductores ni los cables.
No rocíe insecticidas o productos
químicos volátiles sobre la unidad.
≥ Si rocía la unidad con este tipo de
productos, el cuerpo podría sufrir daños
y la superficie podría despegarse.
≥ No permita que productos de goma o
plástico permanezcan en contacto con la
unidad durante un tiempo prolongado.
No someta esta unidad a vibraciones o
choques, sacudidas, caídas o golpes,
no coloque ningún objeto encima de
ella ni deje caer ningún objeto en ella.
≥ Un impacto fuerte puede romper la
cubierta de la unidad y causar mal
funcionamiento.
No coloque, sobre todo, una videocámara
etc. encima de esta unidad durante el uso.
Si somete esta unidad a vibraciones
mientras se va leyendo o escribiendo el
disco, el funcionamiento de la
videocámara podría quedar afectado o
ésta podría caerse.
No utilice bencina, diluyente de pintura
ni alcohol para limpiar la unidad.
≥ Antes de limpiar, extraiga del toma
corriente el alambre de la red eléctrica
de CA.
≥ Si utiliza un solvente, el revestimiento
podría descolorarse y el acabado de la
superficie podría despegarse.
≥ Para quitar el polvo y las huellas
digitales, limpie la unidad con un paño
suave y seco. Para quitar las manchas
más difíciles, utilice un paño remojado
en un detergente neutro diluido con
agua, bien escurrido, para limpiar la
unidad. Luego, seque la unidad con otro
paño.
≥ No utilice un paño químico para el polvo.
81
LSQT1572
Page 82

Cuando no vaya a utilizar la unidad
durante un período prolongado de
tiempo
≥ Si va a guardar la unidad en un armario
u otro mueble, le recomendamos que
meta un desecante (gel de sílice).
∫ Acerca del adaptador CA
≥ Asegúrese de utilizar el adaptador CA
suministrado.
≥ Si utiliza el adaptador CA cerca de una
radio, la recepción de la radio podría
verse afectada. Mantenga el adaptador
CA a 1 m o más de distancia de la radio.
≥ Cuando usa el adaptador de CA, puede
escuchar un cierto ruido. Pero esto es
normal.
≥ Después del uso, asegúrese de
desconectar el adaptador CA. (Si se deja
conectado, como máximo se gasta
aprox. 0,3 W de corriente.)
≥ Mantenga siempre limpios los electrodos
del adaptador de CA.
Sitúe la unidad cerca del tomacorriente
para que sea fácil de alcanzarla con el
dispositivo de interrupción (clavija).
∫ Acerca de los discos
≥ Si el disco tiene polvo, rayas o
suciedad, o si está doblado, pueden
ocurrir los siguientes fenómenos:
– Ruido de bloque en la imagen de
reproducción
– Interrupción momentánea de la imagen
de reproducción
– Interrupción del sonido durante la
reproducción o sonido anormal
– El disco no puede reconocerse
correctamente
– Retardo en entre el vídeo y el audio
Cuando se ilumina la lámpara ACCESS
(mientras se está accediendo al disco),
no desconecte el adaptador de CA ni el
cable USB ni someta esta unidad a
vibración o choques.
DVD-R/DVD-R DL/+R/+R DL
≥ Para grabar de forma óptima en discos
DVD-R, DVD-R DL, +R o +R DL, este
dispositivo escribe datos de control en
un disco DVD-R, DVD-R DL, +R o
+R DL usado para grabar cuando se
introduce y retira. Si el disco no tiene
espacio para escribir los datos de
control, tal vez no pueda grabar. Para
evitar esto, no introduzca un disco
DVD-R, DVD-R DL, +R o +R DL en el
que ha grabado más de 50 veces.
≥ No introduzcas un disco DVD-R,
DVD-R DL, +R o +R DL grabado en este
dispositivo que no se ha finalizado en un
dispositivo grabable, como una
grabadora de DVD. Los datos grabados
pueden dañarse.
82
LSQT1572
Page 83

∫ Acerca de la condensación
Después de sacar una botella fría de la
nevera en verano, verá que se cubrirá de
pequeñas gotitas de agua. A este
fenómeno se le llama condensación.
El hecho de usar esta unidad cuando haya
condensación podría causar un
funcionamiento defectuoso. Haga todo lo
posible por asegurar que la condensación
no se forme. Si tuviera que formarse, tome
las medidas descritas a continuación.
Causas de la condensación
La condensación se forma cuando la
temperatura ambiente o la humedad
cambia de la siguiente manera.
≥ Cuando lleva esta unidad de un local frío
a uno caliente.
≥ Cuando se traslada la unidad desde el
interior de un coche con aire
acondicionado al exterior.
≥ Cuando una habitación fría se calienta
rápidamente.
≥ Cuando el aire frío de un acondicionador
de aire llega directamente a la unidad.
≥ Después de los chubascos de las tardes
veraniegas.
≥ Cuando la unidad se encuentra en un
lugar muy húmedo, con vapor en el aire.
Cuando se traslada la unidad a un lugar
con una diferencia de temperatura
significativa como, por ejemplo, desde
un lugar frío a uno caliente.
Meta la unidad dentro de una bolsa de
plástico, quite lo más posible de aire de su
interior, luego cierre la bolsa. Deje la
unidad durante aproximadamente una hora
en la habitación, hasta que la temperatura
de la unidad sea similar a la de la
habitación; luego, utilice la unidad.
Qué hacer cuando se forma la
condensación
Desconecte el adaptador de CA y deje la
unidad durante aproximadamente 1 hora.
Compruebe que la condensación
desaparece naturalmente cuando la
temperatura de la unidad está cerca de la
temperatura ambiente y luego utilice la
unidad.
83
LSQT1572
Page 84

¬ Solución de problemas
Problema Puntos de control
No se puede encender la
unidad.
No se puede hacer
funcionar esta unidad a
pesar de que está
encendida.
Esta unidad no funciona
normalmente.
El botón [<] no funciona.
No es posible leer el
disco.
La copia se para.
La imagen de
reproducción se
interrumpe durante
algunos instantes.
No se puede copiar
aunque a esta unidad se
suministre alimentación
y el disco esté
correctamente insertado.
≥ ¿Está conectado el adaptador de CA?
> Conecte correctamente el adaptador de CA y el alambre de
la red eléctrica de CA. (P77)
≥ Desconecte el adaptador de CA y, luego, conéctelo de nuevo
después de 1 minuto. (El hecho de llevar a cabo la operación
antedicha cuando esté encendida la lámpara de acceso puede
hacer destruir los datos en el disco.) Si no se restablecen las
condiciones normales, sepárelo de la fuente de alimentación y
consulte a la tienda donde adquirió este producto.
≥ El disco no se expulsará si esta unidad no está alimentada.
> Conecte el adaptador de CA.
≥ El botón [<] no funciona cuando está en proceso la copia en un
disco desde una videocámara conectada.
> Espere hasta que la copia esté terminada.
≥ En casos diferentes del antedicho, sepárelo de la fuente de
alimentación y consulte a la tienda donde adquirió este
producto.
≥ ¿Está el disco rayado o sucio?
> Quite la suciedad del disco. (P75) Si el disco está rayado,
inserte uno nuevo.
≥ La temperature interna de esta unidad es alta. Desconecte el
adaptador de CA, espere un rato, luego podrá volver a usar la
unidad.
≥ Los discos grabados con otros dispositivos no pueden leerse o
reproducirse en este dispositivo.
≥ ¿Ya ha usado el disco para grabar vídeo e fotografías?
> Si el disco contiene material grabado, no se puede usar otra
vez. Use un disco nuevo.
> Los discos DVD-RAM, DVD-RW, +RW o CD-RW grabados
con cualquier material pueden volver a usarse tras haberlos
formateado. Todos los datos previamente grabados en el
disco se borrarán, por lo que debe verificar cuidadosamente
el contenido del disco antes de formatearlo.
84
LSQT1572
Page 85

Problema Puntos de control
Aunque esté conectada
por medio del cable USB,
esta unidad no se
reconoce por el
ordenador.
Cuando está
desconectado el cable
USB, va a aparecer un
mensaje de error en el
PC.
El PC no se enciende.
Aparece la pantalla de
ajuste del código
regional cuando intenta
reproducir un video
DVD.
≥ Seleccione otro terminal USB en el PC.
≥ Compruebe el entorno operativo. (P79)
≥ Desconecte el adaptador de CA y el cable USB, luego
conéctelos de nuevo.
≥ Para desconectar el cable USB sin peligro, haga doble clic en
el icono ( ) en la barra de tareas y siga las
instrucciones que aparecen en la pantalla.
≥ ¿Ha conectado esta unidad al PC con un cable USB antes de
encender el PC?
> Encienda el PC y luego conectes esta unidad con él.
≥ El código regional no se ajusta cuando se compra esta unidad.
Verifique el contenido del ajuste, luego haga clic en [OK]. La
reproducción del vídeo DVD iniciará después de cambiar el
ajuste al nueco código regional. Puede cambiar el ajuste
5 veces. Tenga presente que no puede cambiar el ajuste más
allá de la quinta vez y el código regional está fijado al último
ajuste.
85
LSQT1572
Page 86

¬ Especificaciones
Quemador de DVD: Información para su seguridad
Fuente de alimentación: CC 5,0 V
Consumo de corriente: 7,5 W (Cuando escribe en un disco)
Dispositivo compatible 12 cm DVD-RAM Ver.2.1
Interfaz Compatible con Hi-Speed USB (USB 2.0),
Capacidad del búfer 2MB
Dimensiones 139 mm (W)k16,8 mm (H)k138,1 mm (D)
Peso Aprox. 395 g (Sólo el quemador de DVD)
Temperatura de
funcionamiento
Humedad de
funcionamiento
Velocidad de escritura
de datos
Velocidad de lectura de
datos
Adaptador CA
VSK0692: Información para su seguridad
12 cm DVD-RW Ver.1.1/2X-SPEED (2X/1X)
12 cm DVD-R for General Ver.2.0
12 cm DVD-R for DL Ver.3.0
12 cm +RW
12 cm +R
12 cm +R for DL
12 cm CD-R
12 cm CD-RW
terminal USB Tipo miniB
(excluidas las partes salientes)
5 oCa35oC
10% a 80%
DVD-RAM:
Máxima VELOCIDAD 3X
DVD-RW:
Máxima VELOCIDAD 6X
DVD-R:
Máxima VELOCIDAD 8X
DVD-R DL:
Máxima VELOCIDAD 4X
DVD-RAM:
Máxima VELOCIDAD 3X
DVD-RW:
Máxima VELOCIDAD 8X
DVD-R:
Máxima VELOCIDAD 8X
DVD-R DL:
Máxima VELOCIDAD 6X
+RW:
Máxima VELOCIDAD 8X
+R:
Máxima VELOCIDAD 8X
+R DL:
Máxima VELOCIDAD 4X
CD-R:
Máxima VELOCIDAD 24X
CD-RW:
Máxima VELOCIDAD 16X
+RW:
Máxima VELOCIDAD 8X
+R:
Máxima VELOCIDAD 8X
+R DL:
Máxima VELOCIDAD 6X
CD-R:
Máxima VELOCIDAD 24X
CD-RW:
Máxima VELOCIDAD 24X
Fuente de alimentación: CA de 110 V a 240 V, 50/60 Hz
Capacitancia de entrada: 0,22 A
Salida de CC: CC 5,0 V 1,6 A
Las especificaciones están sujetas a cambios sin previo aviso.
86
LSQT1572
Page 87

Değerli Müşterimiz,
Panasonic DVD Yazıcı'yı satın aldığınız için teşekkür ederiz. Kullanım Talimatlarını
dikkatlice okuyun ve ileride yararlanmak için elinizde bulundurun.
DVD Yazıcınızın gerçek düğme, bileşen, vb.'sinin bu Kullanım Talimatları'nda gösterilen
resimlerdekinden farklı olabileceğini unutmayın.
TÜRKÇE
¬ Güvenlik bilgileri
UYARI:
YANGIN, ELEKTRİK ÇARPMASI VEYA ÜRÜNÜN ZARAR GÖRME RİSKİNİ
AZALTMAK İÇİN,
≥ BU CİHAZI YAĞMURDAN, NEMDEN, SU DAMLAMASI VEYA SIÇRAMASINDAN
KORUYUN VE CİHAZIN ÜSTÜNE VAZO GİBİ İÇİ SUYLA DOLU CİSİMLERİ
KOYMAMAYA ÖZEN GÖSTERİN.
≥ YALNIZCA ÖNERİLEN AKSESUARLARI KULLANIN.
≥ KAPAĞI (VEYA ARKA KISMI) ÇIKARMAYIN; İÇİNDE KULLANICININ TAMİR
EDEBİLECEĞİ PARÇALAR YOKTUR. SERVİS VE ONARIM İÇİN YETKİLİ SERVİS
PERSONELİNE DANIŞIN.
DİKKAT!
≥ BU CİHAZI KİTAPLIK, GÖMME DOLAP VEYA ETRAFI ÇEVRİLİ DAR BİR YERDE
KURMAYIN. İYİ HAVALANDIĞINDAN EMİN OLUN. AŞIRI ISINMADAN
KAYNAKLANABİLECEK ELEKTRİK ÇARPMASI VE YANGIN TEHLİKESİNE
SEBEP OLABİLECEĞİ İÇİN PERDE VEYA DİĞER MATERYALLERİN
HAVALANDIRMA DELİKLERİNİ TIKAMAMASINA ÖZEN GÖSTERİN.
≥ HAVALANDIRMA DELİKLERİNİ GAZETE, MASA ÖRTÜSÜ, PERDE VB.
MADDELERLE TIKAMAYIN.
≥ KAMERANIN ÜZERİNE MUM GİBİ ÇIPLAK ATEŞ KAYNAĞI KOYMAYIN.
ELEKTRİK PRİZİ EKİPMANIN YAKININA KURULMALI VE ERİŞİMİ KOLAY
OLMALIDIR.
Ürün, kullanım sırasında cep telefonlarının neden olduğ
etkilenebilir. Böyle bir parazit çok belirginse, lütfen ürün ile cep telefonu arasındaki
mesafeyi arttırın.
u radyo parazitlerinden
LSQT1572
87
Page 88

DİKKAT!
BU ÜRÜNDE LAZER KULLANILMAKTADIR.
DÜĞMELERİN BURADA BELİRTİLENLER DIŞINDA KULLANILMASI VEYA
AYARLARIN VEYA İŞLEMLERİN BURADA BELİRTİLENLER DIŞINDA YAPILMASI
TEHLİKELİ BOYUTTA RADYASYONA MARUZ KALINMASINA NEDEN OLABİLİR.
KAPAKLARI AÇMAYIN VE TEK BAŞINIZA TAMİR ETMEYİN. SERVİS İÇİN YETKİLİ
PERSONELE BAŞVURUN.
Ürün Tanımlama İşareti ürünün altındadır.
∫ EMC Elektrik ve manyetik uyumluluğu
Bu sembol (CE) elektrik özellik çizelgesinde bulunur.
(Ürünün alt kısmı)
88
LSQT1572
(Ürünün iç kısmı)
Page 89

-Bu sembol varsa-
Kullanılmayan Elektrikli ve Elektronik Aletlerin Elden Çıkarılmasına İlişkin Bilgi
(bireysel kullanıcılar)
Ürünün doğru bir şekilde elden çıkarılması, değerli kaynakları korumaya yardımc
olacak ve yanlış biçimde atık gidermenin insan sağlığına ve çevreye verebileceği olası
negatif etkileri önleyecektir. Çevrenizdeki en yakın toplama noktasına ilişkin daha
ayrıntılı bilgi almak için lütfen yerel yetkililere başvurun.
Ürünlerin uygun biçimde elden çıkarılmaması durumunda, ilgili ülkenin yasal
düzenlemelerine bağlı olarak cezalar uygulanabilir.
Avrupa Birliği dahilindeki kurumsal kullanıcılar için
Elektrikli ve elektronik aletlerinizi elden çıkarmak istiyorsanız, ayrıntılı bilgi için lütfen
satıcınıza veya tedarikçinize başvurun.
Avrupa Birliği dışındaki ülkelerde atık gidermeye ilişkin bilgi
Bu simge yalnızca Avrupa Birliği sınırları içerisinde geçerlidir.
Bu ürünü elden çıkarmak istiyorsanız, lütfen yerel yetkililere veya satı
ve uygun atık giderme yöntemi konusunda bilgi alın.
Ürünlerde ve/veya ürünle birlikte gelen dökümanlarda yer alan bu simge,
ömrü sona ermiş elektrikli ve elektronik ürünlerin genel ev çöpüne
karıştırılmaması gerektiğini ifade eder.
Uygun biçimde toplanmaları, işlenmeleri ve geri dönüştürülmeleri için lütfen
bu tür ürünleri, bunlar için öngörülen ve ücretsiz olarak kabul edilen toplama
noktalarına götürün. Ayrıca bazı ülkelerde eski ürününüzü, yeni eşdeğer bir
ürün satın aldığınız yerel satıcınıza teslim edebilirsiniz.
ı
cınıza başvurun
¬ İçindekiler
Güvenlik bilgileri ..................................87
Özellikler...............................................89
Kullanmadan önce............................... 90
Disk hakkında.......................................91
Aksesuarlar...........................................93
Parça tanımları ve kullanımı................93
Güç kaynağı..........................................93
Diskin takılıp çıkarılması .....................94
Video kameradan DVD diskine
kopyalama......................................... 95
Kopyalanmış bir DVD diskini video
kamerada oynatma........................... 95
Kullanım için bilgisayara bağlama ...96
Kullanım Uyarıları.................................98
Sorun giderme.................................... 100
Teknik özellikler .................................102
¬ Özellikler
≥ Bu DVD yazıcı ince, hafif ve kompakt
tasarımlı taşınabilir bir cihazdır. Bu
ürünü uyumlu bir Panasonic video
kameraya bağlarsanız, ürüne bağlı
video kameradaki kayıtlı görüntüleri
seyahat halindeyken bile bir DVD
diskine kolayca kopyalayabilirsiniz.
≥ Ayrıca, ürünü uyumlu bir Panasonic
video kameraya bağladığınızda,
üründe oluşturulan DVD disklerini
oynatabilirsiniz.
≥ Ürünü uyumlu bir Panasonic video
kamerayla verilmiş USB kablosu
kullanarak bilgisayara bağlarsanız,
bilgisayar vb.’de düzenlenmiş
resimleri DVD diskine
kopyalayabilirsiniz.
≥ Yukarıda belirtilenler dışındaki
kullanımlarda işlemin gerçekleştirilmesi
garanti edilmez.
89
LSQT1572
Page 90

¬ Kullanmadan önce
∫ Ürünün kullanımı
Bu ürün, titretişim, şok ve toza karşı dirençli
olmayan hassas bir cihazdır. Ortama ve
ürünün kullanımına bağlı olarak, bazı
içerikler hasar görebilir ve en kötüsü diskin
okunması mümkün olmayabilir. Özellikle,
kullanım süresince ürünü titreşime veya
şoka maruz bırakmayın ve AC kablosunu
çıkarmayın.
≥ Panasonic, doğrudan veya dolaylı olarak
ürünün kullanımından veya
arızalanmasından kaynaklanan
hasarlardan sorumlu değildir. Panasonic
ayrıca, ürünün sebep olduğu herhangi
bir veri kaybından da hiçbir şekilde
sorumlu tutulamaz.
≥ Kullanım Kılavuzunda belirtilenlere
aykırı bir kullanımdan doğan
yaralanmanın veya hasarın
sorumluluğu yalnızca kullanıcıya
aittir.
∫ Ürünü yerleştirirken
Kullanım sırasında ürünü düz bir yüzeye
yerleştirin.
≥ Dikey olarak yerleştirdiğiniz takdirde
ürünü kullanamazsınız.
∫ Telif hakkı yasalarını dikkatle
inceleyin
Kaydettiğiniz ve oluşturduğunuz
materyaller yalnızca kişisel amaçlarınız için
kullanılabilir. Telif hakkı yasaları gereğince,
diğer materyaller telif hakkı sahiplerinin izni
olmaksızın kullanılamaz.
∫ Referans sayfaları
Başvurmanız gereken sayfalar aşağıda
belirtilmiştir (P00).
≥ Microsoft®, Windows®, Windows Vista®
ve DirectX
Amerika Birleşik Devletleri ve/veya diğer
ülkelerdeki tescilli ticari markaları ya da
ticari markalarıdır.
≥ IBM ve PC/AT ABD'deki International
Business Machines Corporation’ın
tescilli ticari markalarıdır.
≥ Intel
Intel Corporation’ın Amerika Birleşik
Devletleri’nde ve/veya diğer ülkelerdeki
tescilli ticari markaları ya da ticari
markalarıdır.
≥ Microsoft ürünlerinin ekran örneği
(örnekleri), Microsoft Corporation'ın
izniyle kullanılmıştır.
≥ Bu talimatlarda adı geçen diğer sistem
ve ürünler, söz konusu sistemi veya
ürünü geliştiren kurumun tescilli ticari ya
da ticari markalarıdır.
®
Microsoft Corporation'ın
®
, Core™, Pentium®, ve Celeron®
90
LSQT1572
Page 91

¬ Disk hakkında
∫ Bu ürünle kullanılabilecek diskler
Bu ürünü uyumlu bir Panasonic video
kameraya bağladığınızda kopyalamak için
kullanabileceğiniz diskler 12 cm'lik
kartuşsuz DVD-RAM, DVD-RW, DVD-R,
DVD-R DL (tek taraflı çift katmanlı), +RW,
+R, +R DL (tek taraflı çift katmanlı),
CD-RW ve CD-R'dir.
≥ Bu ürünle kullanılabilecek diskler,
bağlandığı video kameraya bağlı
olarak değişmektedir. Ayrıntılı bilgi
için video kameranın kullanım
talimatlarını okuyun.
Önemli Uyarı
AVCHD formatında kaydedilmiş
görüntüleri diske kopyalarken, diski
AVCHD formatını desteklemeyen
cihazlara yerleştirmeyin. Bazı
durumlarda disk sıkışarak cihazın
içinde kalabilir. Disk AVCHD formatını
desteklemeyen cihazlarda oynatılamaz.
≥ Çift taraflı disk kullanırken, diskin bir
yüzünden diğer yüzüne sürekli kayıt ya
da görüntüleme işlemini yapamazsınız.
Diski çıkarıp çevirmeniz gerekecektir.
≥ Bölme, kartuş veya kutu içine
yerleştirilmiş diskler kullanılmaz.
Kullanmadan önce boş diskleri bu
haznelerden mutlaka ç
ıkarın.
≥ Panasonic disklerini kullanmanız önerilir.
DVD standardıyla uyumlu disklerde kayı t
ve oynatma işlemleri genellikle sorunsuz
bir şekilde gerçekleştirilir. Ancak,
piyasada bulunan bazı diskler gerek
kalite gerekse performans açısından
DVD standardını karşılamamaktadır. Bu
diskleri kullanmanız halinde, düzgün bir
kayıt yapmanız veya kayıtlı içeriği
görüntülemeniz mümkün olmayabilir.
Panasonic tarafından uyumlu olduğu
onaylanan diskler hakkında bilgi almak
için aşağıdaki destek sitesini ziyaret
ediniz.
http://panasonic.jp/support/global/cs/
e_cam
(Bu web sitesi yalnızca İngilizce'dir.)
≥ Bu üründe kaydedilen diskler diğer
ürünlerde oynatılamayabilir. Bu gibi
durumlarda diski bu üründe oynatın.
≥ Diski kullanılamaz hale getirebileceği
için DVD-RW, DVD-R, DVD-R DL,
+RW, +R veya +R DL kullanırken
aşağıdaki i
dikkat edin.
– Bu ürünle kaydettikten sonra diske
başka cihazlar ile kayıt yapma.
–Diski diğer cihazlarda kaydettikten
sonra bu üründe de kaydetme.
–Diğer ürünlerde sonlandırılmamış bir
disk takma.
şlemleri uygulamamaya
∫ DVD-R DL/+R DL ile ilgili önemli
notlar
DVD-R DL ve +R DL disklerin tek tarafta
çift katmanlı kaydetme ve oynatma yüzeyi
vardır. Görüntü ilk katmana (L0) sığmazsa
kayıt ikinci katmanda (L1) devam eder,
böylece görüntü her iki katmana da
kaydedilir. Disk oynatılırken kameranın
katmanlar arasında otomatik olarak geçiş
yapması sayesinde diskin tümünü normal
bir disk gibi sürekli oynatabilirsiniz. Ancak,
katmanlar arası geçiş noktalarında görüntü
veya ses kısa süreliğine durabilir.
91
LSQT1572
Page 92

∫ Bu ürünle kullanılamayan diskler
≥ 12 cm çapında olmayan diskler
(Piyasada bulunan bir adaptöre taksanız
bile 8 cm'lik diskleri kullanamazsınız.)
≥ 6X–12X yüksek hızda kayıt uyumlu
DVD-RAM
≥ BD medyası vs.
≥ HD DVD medyası vs.
∫ Diskin tutulması
Kayıt yüzeyine dokunmayın.
∫ Diski takıp çıkarırken
Diskin kayıt/oynatma yüzünde parmak izi
veya toz olmamasına dikkat edin.
≥ Diskin kayıt/oynatma yüzünde çizik veya
kir (örneğin toz veya parmak izi) olması
halinde normal kayıt/oynatma işlemleri
yapılamaz ve aşağıdaki durumlar
meydana gelebilir.
–Kayıt/oynatma yapılamaz.
– Görüntü veya ses kesintiye uğrar veya
bir an için durur.
– Görüntü veya seste parazitler oluşur.
∫ Disk üzerinde toz varsa
≥ Piyasada bulunan bir disk temizleme
beziyle silin. Kiri temizlemek için diski
ortasından dışa doğru silin. Diski aşırı
güç kullanmadan silin; aksi takdirde disk
çizilebilir. Ayrıca tiner, su, antistatik
madde, deterjan gibi çözücüleri
kullanmayın.
∫ Kullanım sırasında dikkat
edilmesi gereken noktalar
≥ Çizik ve toz olmamasına dikkat edin.
≥ Disklere bandrol veya etiket
yapıştırmayın. (Bu durum diskin
bükülmesine, dengesiz dönmesine ve
kullanılmaz hale gelmesine neden
olabilir.)
≥ Diskin etiketli tarafına yumuşak uçlu,
keçeli kalem kullanarak yazın.
Tükenmez kalem veya diğer sert yazma
gereçlerini kullanmayın.
≥ Kayıt temizleme spreyi, benzin, tiner,
statik elektrik önleyici sıvıları veya diğer
çözücüleri kullanmayın.
≥ Çizilmeye karşı dayanıklı zarf ve kutu
kullanmayın.
≥ Diskleri düşürmeyin, üst üste dizmeyin
veya darbeye maruz bırakmayın.
Üstlerine herhangi bir nesne koymayın.
≥ Aşağıdaki diskleri kullanmayın:
–Çıkarılan bandrol ve etiketlerden dolayı
yüzeyi yapışkan olan diskler.
– Bükülmüş veya çizilmiş diskler.
– Kalp şeklindeki diskler gibi standart
şekillerin dışındaki diskler.
≥ Aşağıdaki ortamlarda bırakmayın:
–Doğrudan güneş ışığı alan yerlerde.
– Çok tozlu veya nemli yerlerde.
–Isıtıcı yanında.
– Önemli ısı değişikliklerinin olabileceği
yerlerde (yoğunlaşma oluşabilir).
– Statik elektrik ve elektromanyetik
dalgaların oluştuğu yerlerde.
≥ Diskleri korumak için kullanmadığınız
zamanlarda kutularında saklayın.
92
LSQT1572
Page 93

¬ Aksesuarlar
A
B
C
B
A
1
3
2
Ürünü kullanmadan önce aksesuarları
kontrol edin.
AC adaptörü
VSK0692
AC güç kablosu
A K2CT3CA00004
Birleşik Krallık,
Çin Hong Kong Özel
İdare Bölgesi ve Suudi
Arabistan
B K2CJ2DA00011
Avustralya ve Yeni Zelanda
C K2CR2DA00004
Birleşik Krallık, Çin Hong Kong Özel
İdari Bölgesi, Avustralya,
Yeni Zelanda ve Suudi Arabistan
Dışındaki Bölgeler
Mini AB tipi USB
Bağlantı Kablosu
K2KZ59B00002
¬ Parça tanımları ve
kullanımı
23 41
¬ Güç kaynağı
AC adaptörüne bağlıyken ürün bekleme
modundadır. AC adaptörü elektrik çıkışına
bağlıyken birincil devrede elektrik
bulunmaktadır.
1 AC güç kablosunu AC adaptörüne
bağlayın A.
2 AC güç kablosunu AC çıkışına
bağlayın.
3 AC adaptörünü ürünün DC giriş
terminaline bağlayın
[DC/C.C.IN 5.0 V].
≥ Güç lambası B yanar.
≥ AC güç kablosu yalnızca ürünle birlikte
kullanılabilir. Kabloyu diğer cihazlarla
kullanmayın veya bu üründe diğer
cihazlar için tasarlanmış AC güç kablosu
kullanmayın.
≥ Kullanım sırasında ürün ve disk ısınır. Bu
bir arıza değildir.
1Çıkarma tuşu [<]
2Erişim lambası [ACCESS] (P94)
3 Disk yerleştirme yuvası
4Güç lambası [POWER]
≥ Ürün AC güç kablosuna
bağlandığında bu gösterge yanar.
5 USB terminali [ ]
6 DC giriş terminali [DC/C.C.IN 5.0 V]
≥ Ürünle birlikte verilen dışındaki AC
adaptörlerini kullanmayın.
65
93
LSQT1572
Page 94

¬ Diskin takılıp çıkarılması
Etiketi yukarı gelecek
şekilde yerleştirin.
≥ Diski takıp çıkarırken, AC adaptörünü
ürüne bağlayın.
DVD yazıcıyı açmadan disk takı p
çıkaramazsınız.
1 DVD yazıcıyı AC adaptörüne
bağlayın.
2 Diskin takılması
Diski, disk yerleştirme yuvasına
yerleştirin.
Diski kayıt/oynatma tarafı aşağıya
gelecek şekilde yerleştirin. Disk
tamamen yuvasına yerleştiğinde
otomatik olarak yüklenir.
Diskin çıkarılması
[<] tuşuna basın.
∫ Erişim lambası hakkında
DVD yazıcı bir diske eriştiğinde, erişim
lambası yanar.
≥ Erişim lambası yanarken aşağıdaki
işlemleri yapmayın. Disk veya diskte
kayıtlı veri zarar görmüş olabilir; bu
durum ürünün arızalanmasına neden
olabilir.
– AC adaptörünü çıkarmayın.
– USB kablosunu çıkarmayın.
– Ürünü güçlü bir darbeye veya titreşime
maruz bırakmayın.
≥ Diski takıp çıkarırken kayıt/oynatma
yüzüne dokunmamaya dikkat edin.
94
LSQT1572
Page 95

¬ Video kameradan DVD
A
MiniA
MiniB
diskine kopyalama
Bu ürünü uyumlu bir Panasonic video
kameraya bağladığı nızda, video kamerada
kayıtlı görüntüleri DVD diskine
kopyalayabilirsiniz.
≥ Ürünü uyumlu Panasonic video
kameraya bağlamak için Mini AB tipi
USB Bağlantı Kablosu kullanın.
≥ Video kamera ürünle uyumlu değilse bu
fonksiyon çalışmaz.
≥ Kopyalanabilecek veri için video
kameranın kullanma talimatlarına bakın.
≥ Ürünü AC adaptörüne bağlayın.
1 Ürünü video kameraya bağlayın.
AMini AB tipi USB Bağlantı Kablosu
(ürünle birlikte verilir)
≥ MiniA terminalini video kameraya,
miniB terminalini ise bu ürüne
bağlayın.
≥ Jakları yuvasına tam olarak
yerleştirin. Jaklar tam olarak
yerleştirilmezse, ürün ve video
kamera düzgün şekilde çalışmaz.
≥ Ürünle birlikte verilen dışında başka
USB kablosu kullanmayın.
2 Video kameraya kopyalamaya
başlayın.
≥ Kopyalama hakkında bilgi edinmek
için video kameranın kullanım
talimatlarını okuyun.
≥ Uyumlu Panasonic video kamera CD-R
ve CD-RW'ye kopyalamayı
destekliyorsa, fotoğrafları CD-R veya
CD-RW'ye kopyalayabilirsiniz. Ayrıntılı
bilgi için video kameranın kullanım
talimatlarını okuyun.
¬ Kopyalanmış bir DVD
diskini video kamerada
oynatma
Bu ürünü uyumlu bir Panasonic video
kameraya bağladı ğınızda, fotoğrafları
kopyaladığınız DVD diskini oynatabilirsiniz.
≥ Diski oynatmak için, kopyalarken
kullandığınız aynı video kameraya
bağlayın.
≥ Ürünü uyumlu Panasonic video
kameraya bağlamak için Mini AB tipi
USB Bağlantı Kablosu kullanın.
≥ Ürünü AC adaptörüne bağlayın.
1 Mini AB tipi USB Bağlantı
Kablosunu kullanarak ürünü video
kameraya bağlayın.
≥ MiniA terminalini video kameraya,
miniB terminalini ise bu ürüne
bağlayın.
≥ Jakları yuvasına tam olarak
yerleştirin. Jaklar tam olarak
yerleştirilmezse, ürün ve video
kamera düzgün şekilde çalışmaz.
≥ Ürünle birlikte verilen dışında başka
USB kablosu kullanmayın.
2 Video kamerada diski oynatmaya
başlayın.
≥ Oynatma hakkında bilgi edinmek için
video kameranın kullanım
talimatlarını okuyun.
95
LSQT1572
Page 96

¬ Kullanım için
AUSB kablosu
(video kamerayla birlikte verilir)
bilgisayara bağlama
Panasonic video kameraya kaydedilmiş ve
bilgisayarda düzeltilmiş resimleri bir DVD
diskine kopyalayabilirsiniz.
Resimleri kopyalamak için Panasonic video
kamerayla birlikte verilen yazılımı kullanın.
Üzerine resim kopyaladığınız DVD diskini
aynı yazılımı kullanarak oynatabilirsiniz.
≥ Ürünü bilgisayara bağlamak için, bu
ürünle uyumlu bir Panasonic video
kamera ile birlikte verilen USB kablosunu
kullanın.
≥ Kopyalanabilecek veri yazılıma bağlı
olarak değişebilir.
Windows kullanıyorsanız
∫ Çalışma ortamı
Kişisel bilgisayar
IBM PC/AT uyumlu kişisel bilgisayar
OS (İşletim Sistemi)
Uyumlu OS, video kamera ile birlikte
verilen yazılıma bağlı olarak farklılık
gösterecektir. Yazılımın işletim ortamına
bakınız.
Arayüz
USB portu
Diğer gereklilikler
Fare veya benzer işaret aygıtı
≥ Bazı kişisel bilgisayarlar kullanma
talimatlarında belirtilen sistem
gerekliliklerini karşılasa da
kullanılamazlar.
≥ Yükseltilmiş bir işletim sisteminde
kullanım garanti edilemez.
≥ Ön kurulumlu olmayan bir işletim
sisteminde kullanım garanti edilemez.
≥ Bilgisayara 2 veya daha fazla USB aygıtı
bağlandığında ya da aygıtlar USB
kablosuyla veya ek kablolar kullanılarak
landığında ürünün düzgün çalışması
bağ
garanti edilemez.
∫ Bağlantı ve tanıma işlemleri
≥ Ürünü AC adaptörüne bağlayın.
1 Ürünü bilgisayara bağlayın.
A
≥ Ürün, [My Computer] üstünde
bir [DVD-RAM Drive] olarak tanınır.
≥ Jakları yuvasına tam olarak
yerleştirin. Jaklar tam olarak
yerleştirilmezse, ürün ve bilgisayar
düzgün şekilde çalışmaz.
≥ Mutlaka video kamerayla birlikte
verilen USB kablosunu kullanın.
(Panasonic video kamera ile birlikte
verilen dışında bir USB kablosu
kullandığınız takdirde işlem
yapmanızı garanti edemiyoruz.)
2 Kopyalamayı/oynatmayı başlatın.
≥ Görüntüleri kopyalamak/oynatmak
için Panasonic video kamerayla
birlikte verilen yazılımı kullanın.
≥ Kopyalama/oynatma hakkında bilgi
edinmek için yazılımın kullanım
talimatlarını okuyun.
96
LSQT1572
Page 97

∫
USB kablosunu güvenli bir şekilde
çıkarmak için
Erişim lambası yanarken USB kablosunu
çıkardığınız takdirde, ürün arızalanabilir ya
da veri kaybedilebilir.
1 Erişim lambasının yanıp
yanmadığını kontrol edin.
2 Bildirim alanındaki ( )
ikonuna çift tıklayın.
≥ Donanım bağlantısı kesilsin mesajı
belirir.
≥ Bilgisayarınızın ayarlarına bağlı
olarak bu ikon görüntülenmeyebilir.
3 [USB Mass Storage Device]'ı seçin
ve [Stop]'a tıklayın.
4 [OK]'ye tıklayın.
≥ [OK]'ye tıklayın; artık kabloyu
emniyetli bir şekilde çıkarabilirsiniz.
97
LSQT1572
Page 98

¬ Kullanım Uyarıları
∫ Ürün hakkında
Ürün ve disk uzun süre kullanıldığında
ısınır; ancak bu bir arıza değildir.
Ürünü elektromanyetik ekipmanlardan
(mikrodalga fırın, TV, video oyunları,
vb.) mümkün olduğunca uzak tutun.
≥ Ürünü TV üzerinde veya yanında
kullanırsanız, kayıtlı görüntü ve sesler
elektromanyetik dalga ışıması
dolayısıyla zarar görebilir.
≥ Ürünün yanında cep telefonu
kullanmayın. Aksi takdirde, çıkan parazit
sesi, görüntü ve sesi olumsuz
etkileyebilir.
≥ Hoparlörler veya büyük motorların
yarattığı güçlü manyetik alanlar kayıtlı
veriye zarar verebilir ya da resimlerin
biçimini bozabilir.
≥ Mikroişlemci tarafından üretilen
elektromanyetik dalga ışıması görüntü
ve seslerin kesilmesine yol açarak ürünü
olumsuz olarak etkileyebilir.
≥ Bu ürün elektromanyetik ekipmandan
olumsuz yönde etkilenir ve düzgün bir
şekilde çalışmazsa, AC adaptörünü
çıkarıp tekrar takın.
Ürünü radyo vericisi veya yüksek
gerilim hatlarının yanında kullanmayın.
≥ Radyo vericisi veya yüksek-gerilim
hatlarının yanında kayıt yaptığınız
takdirde, kayıtlı görüntü ve ses olumsuz
yönde etkilenebilir.
Mutlaka ürünle birlikte verilen kordon ve
kabloları kullanın.
Kordon ve kabloları uzatmayın.
Ürüne böcek öldürücü ilaç ya da uçucu
kimyasal maddeler püskürtmeyin.
≥ Ürüne bu gibi kimyasallar püskürtülürse,
ürün gövdesi deforme olabilir ve yüzey
kaplaması soyulabilir.
≥ DVD yazıcıyı lastik veya plastik ürünlerle
uzun süre temas ettirmeyin.
Ürünü titreşimlere, darbelere, sarsıntıya,
düşmeye veya çarpmaya maruz
bırakmayın; üstüne nesne koymayın
veya üstüne nesne düşürmeyin.
≥ DVD yazıcı güçlü bir darbe alırsa,
gövdesi kırılabilir veya ar
Özellikle, kullanım sırasında ürünün
üstüne video kamera, vb. yerleştirmeyin.
Ürün disk okuma ya da yazma sırasında
titreşime maruz kalırsa, video kameranın
işleyişi etklenebilir veya video kamera
düşebilir.
Ürünü temizlerken benzin, boya inceltici
veya alkol kullanmayın.
≥ Temizleme işleminden önce AC güç
kablosunu AC soketinden çıkarın.
≥ Herhangi bir çözücü kullandığınız
takdirde, ürün gövdesinin rengi solabilir
ve yüzey kaplaması soyulabilir.
Toz ve parmak izlerini çıkarmak için
≥
yumuşak ve kuru bir bezle silin. İnatçı
lekeleri çıkarmak için, sulandırılmış doğal
deterjana batırılmış bir bezi iyice sıkın ve
ürünü
bu bezle silin. Daha sonra kuru bir
bezle silin.
≥ Kimyasal maddeler içeren bez
kullanmayın.
Ürünü uzun süre kullanmayacaksanız
≥ Ürünü bir dolap veya kutuya koyarken
kabın içine kurutucu madde (silika jel)
koymanız önerilir.
ızalanabilir.
ürünü
∫ AC adaptörü hakkında
≥ Mutlaka ürünle birlikte verilen AC
adaptörünü kullanın.
≥ AC adaptörünü bir radyonun yakınında
kullandığınız takdirde, radyoya gelen
sinyaller bozulabilir. AC adaptörünü
radyodan 1 m veya daha fazla
uzaklıktaki bir mesafede tutun.
≥ AC adaptörü kullanım sırasında arı gibi
sesler çıkarabilir. Ancak bu durum
normaldir.
98
LSQT1572
Page 99

≥ Kullandıktan sonra AC adaptörünü
mutlaka çıkarın. (Adaptörü
çıkarmadığınız takdirde, yaklaşı k en
fazla 0,3 W elektrik tüketilir.)
≥ AC adaptörünün elektrotlarını daima
temiz tutun.
Ürünü elektrik prizinin yanına koyun;
böylece fişe ulaşmak kolaylaşır.
∫ Disk hakkında
≥ Diskte toz, çizik ve kir varsa ya da
disk bükülmüşse aşağıdaki sorunlar
meydana gelebilir:
– Görüntü oynatılırken ses bozukluğu
oluşması
– Görüntülerin kısa süreliğine durması
– Oynatma sırası nda sesin kesilmesi
veya anormal ses çıkması
– Diskin doğru olarak tanınmaması
– Görüntü ve sesin eş zamanlı
çıkmaması
ACCESS lambası yandığında (diske
erişirken), AC adaptörünü veya USB
kablosunu çıkarmayın; ürünü titreşim ve
şoka maruz bırakmayın.
DVD-R/DVD-R DL/+R/+R DL
≥ DVD-R, DVD-R DL, +R veya +R DL
disklerde en iyi kaydı yapmak için
DVD-R, DVD-R DL, +R veya +R DL
takılıp çıkarıldığında kamera kontrol
veriyi DVD-R veya DVD-R DL’a yazar.
Diskte kontrol verisi yazacak yer yoksa
kayıt yapılamayabilir. Bu durumu
engellemek için 50’den fazla kay
yapılmış DVD-R, DVD-R DL, +R veya
+R DL kullanmayın.
≥ Bu kamerada kaydedilmiş ancak
sonlandırılmamış DVD-R, DVD-R DL,
+R veya +R DL’yi DVD kaydedici gibi
herhangi bir kayıt cihazına takmayın.
Kayıtlı veri zarar görebilir.
ıt
∫ Yoğunlaşma hakkında
Yazın buzlu şişeyi buzdolabından
çıkardıktan hemen sonra, şişenin küçük su
damlalarıyla kaplandığını görürsünüz. Bu
olaya yoğunlaşma denir.
Yoğunlaşma meydana geldiğinde bu ürünü
kullanmak arızaya neden olabilir.
Yoğunlaşmanın meydana gelmemesi için
elinizden geleni yapın. Yoğunlaşma
meydana gelirse, aşağıda belirtilen
işlemleri uygulayın.
Yoğunlaşmanın nedenleri
Yoğunlaşma, ortam sıcaklığı ya da nem
oranı aşağıdaki gibi değiştiğinde
meydana gelir.
≥ Ürün soğuk bir ortamdan sıcak bir yere
getirildiğinde.
≥ Ürün klimalı bir arabadan dışarı ya
çıkarıldığında.
≥ Soğuk bir oda hızlı şekilde ısındığında.
≥ Klima soğuk havayı doğrudan ürüne
üflediğinde.
≥ Yaz yağmurundan sonra.
≥ Ürün havanın buhar nedeniyle yoğun
olduğu nemli yerlerde kullanıldığında.
Ürün önemli sıcaklık değişikliklerinin
yaşandığı bir yere götürüldüğünde
(soğuk bir yerden sıcak bir yere geçmek
gibi).
Ürünü plastik bir çantaya koyun, çantanın
içindeki havayı mümkün olduğunca alın ve
çantanın ağzını sıkıca kapayın. Ürünü,
ortamın ısı seviyesine ulaşması için oda
sıcaklığında yaklaşık bir saat beklettikten
sonra kullanın.
Yoğunlaşma meydana geldiğinde
yapılması gerekenler
AC adaptörünü çıkarın ve ürünü yaklaşık
1 saat bekletin. Ürünün sıcaklığı ortam
sıcaklığına yakın bir seviyeye geldiğinde
yoğunlaşmanın doğal bir şekilde kaybolup
kaybolmadığını kontrol edin, daha sonra
ürünü kullanın.
99
LSQT1572
Page 100

¬ Sorun giderme
Problem Kontrol noktaları
Ürün açılmıyor.
Ürüne enerji
geldiğindebile
çalışmıyor.
Ürün normal
çalışmıyor.
[<] tuşu çalışmıyor.
Disk okunamıyor.
Kopyalama işlemi
durdu.
Görüntü bir anlığına
bozuluyor.
Ürüne güç verildiği ve
disk düzgün bir şekilde
yerleştirildiği halde
kopyalama
yapılamıyor.
≥ AC adaptörü bağlı mı?
> AC adaptörü ile AC güç kablosunu düzgün şekilde
bağlayın. (P93)
≥ AC adaptörünü çıkarın ve yaklaşık 1 dakika sonra tekrar
bağlayın. (Yukarıdaki işlemi erişim lambası açıkken
yapmak diskteki veriye zarar verebilir.) Ürün normal şekilde
çalışmaya başlamazsa, bağlı olduğu güç kaynağından
çıkarın ve ürünü aldığınız satıcıya başvurun.
≥ Ürün açılmazsa disk çıkmaz.
> AC adaptörünü bağlayın.
≥ Bağlı bir video kameradan diske kopyalama işlemi
yapılırken [<] tuşu çalışmayabilir.
> Kopyalama işlemi bitinceye kadar bekleyin.
≥ Yukarıda belirtilenler dışında bir durum meydana gelirse,
ürünü güç kaynağından çıkarın ve aldığınız satıcıya
danışın.
≥ Disk çizik veya kirli mi?
> Diskteki tozu silin. (P92) Disk çizilmişse yenisini takın.
≥ Ürünün iç sıcaklığı yüksek. AC adaptörünü çıkarın, kısa bir
süre bekleyin; ürünü tekrar kullanabilirsiniz.
≥ Diğer cihazlarda kaydedilmiş diskler bu cihazda düzgün bir
şekilde okunup oynatılamayabilir.
≥ Disk hem video hem fotoğraf kaydı için mi kullanıldı?
> Diske kayıt yapılmışsa, tekrar kullanılamayabilir. Yeni bir disk
kullanın.
> Kayıtlı veri içeren DVD-RAM, DVD-RW, +RW veya CD-RW
diskler biçimlendirildikten sonra tekrar kullanılabilir. Diskte
kayıtlı tüm veri silineceğinden, biçimlendirmeden önce disk
içeriğini dikkatle kontrol edin.
100
LSQT1572
 Loading...