

Page 1
Operating Instructions
Plasma Television
Model No.
TX-P42GT50E
TX-P50GT50E
Thank you for purchasing this Panasonic product.
Please read these instructions carefully before operating this product and
retain them for future reference.
The images shown in this manual are for illustrative purposes only.
Please refer to Pan European Guarantee Card if you need to contact your
local Panasonic dealer for assistance.
English
TQB0E2213U-1
Page 2
Do not display any still part of the image for a long period
In such cases the still part of the image remains dimly on the plasma screen (“image retention”). This is not
considered a malfunction and is not covered by the warranty.
Typical still image parts:
●
Channel number, channel logo and other logos
●
Still or moving pictures viewed in 4:3 or 14:9 aspect ratio
●
Video games
●
Images from PC
o avoid image retention, the contrast is lowered automatically and the screen becomes dim after a few minutes if
T
no signals are sent or no operations are performed. (p. 112)
Notice for DVB / Data broadcasting / IPTV functions
●
This TV is designed to meet the standards (as of August, 2011) of DVB-T (MPEG2 and MPEG4-AVC(H.264)) digital
terrestrial services, DVB-C (MPEG2 and MPEG4-A
MPEG4-AVC(H.264)) digital satellite services.
Consult your local dealer for availability of DVB-T or DVB-S services in your area.
Consult your cable service provider for availability of DVB-C services with this TV.
●
This TV may not work correctly with the signal which does not meet the standards of DVB-T, DVB-C or DVB-S.
●
Not all the features are available depending on the country, area, broadcaster, service provider, satellite and network
environment.
●
Not all CI modules work properly with this TV. Consult your service provider about the available CI module.
●
This TV may not work correctly with CI module that is not approved by the service provider.
●
Additional fees may be charged depending on the service provider.
●
The compatibility with future services is not guaranteed.
●
Check the latest information on the available services at the following website. (English only)
http://panasonic.jp/support/global/cs/tv/
VC(H.264)) digital cable services and DVB-S (MPEG2 and
2
Page 3
Panasonic does not guarantee operation and performance
of peripheral devices made by other manufacturers; and we
disclaim any liability or damage arising from operation and/
or performance from usage of such other maker’s peripheral
devices.
The recording and playback of content on this or any
other device may require permission from the owner of the
copyright or other such rights in that content. Panasonic has
no authority to and does not grant you that permission and
explicitly disclaims any right, ability or intention to obtain
such permission on your behalf. It is your responsibility to
ensure that your use of this or any other device complies with
applicable copyright legislation in your country. Please refer
to that legislation for more information on the relevant laws
and regulations involved or contact the owner of the rights in
the content you wish to record or playback.
This product is licensed under the AVC patent portfolio
license for the personal and non-commercial use of a
consumer to (i) encode video in compliance with the AVC
Standard (“AVC Video”) and/or (ii) decode AVC Video that
was encoded by a consumer engaged in a personal and
non-commercial activity and/or was obtained from a video
provider licensed to provide AVC Video. No license is granted
or shall be implied for any other use.
Additional information may be obtained from MPEG LA, LLC.
See http://www.mpegla.com.
Rovi Corporation and/or its subsidiaries and related affiliates
are not in any way liable for the accuracy or availability of the
program schedule information or other data in the GUIDE
Plus+/Rovi Guide system and cannot guarantee service
availability in your area. In no event shall Rovi Corporation
and/or its related affiliates be liable for any damages in
connection with the accuracy or availability of the program
schedule information or other data in the GUIDE Plus+/Rovi
Guide system.
“Full HD 3D Glasses™” Logo indicates compatibility between
TV products and 3D Eyewear which are compliant with the
“Full HD 3D Glasses™” format, and does not indicate picture
quality of TV products.
Contents
Be Sure to Read
Safety Precautions ···············································4
Quick Start Guide
Accessories / Options ···········································6
Identifying Controls ·············································10
Basic Connection················································ 12
Auto Setup ··························································15
Enjoy your TV!
Basic
Using “VIERA Connect” ······································19
Watching TV ·······················································20
Using TV Guide ·················································· 24
Viewing Teletext ·················································· 27
Watching External Inputs ····································29
Viewing 3D images ·············································31
How to Use VIERA TOOLS ································36
How to Use Menu Functions ······························37
Advanced
Retuning from Setup Menu································· 48
Tuning and Editing Channels ·····························52
Timer Programming ············································56
Child Lock ···························································59
Using Data Service Application ··························60
Using Common Interface ····································61
Shipping Condition ·············································62
Updating the TV Software ··································63
Advanced Picture Settings ·································64
USB HDD Recording ··········································66
Using Media Player ············································70
Using Network Services (DLNA / VIERA Connect)
············································································81
Link Functions (Q-Link / VIERA Link) ·················92
External Equipment ··········································100
Others
Technical Information········································103
FAQs································································· 112
Maintenance ····················································· 115
Licence ····························································· 116
Specifications ··················································· 118
3
Page 4
Safety Precautions
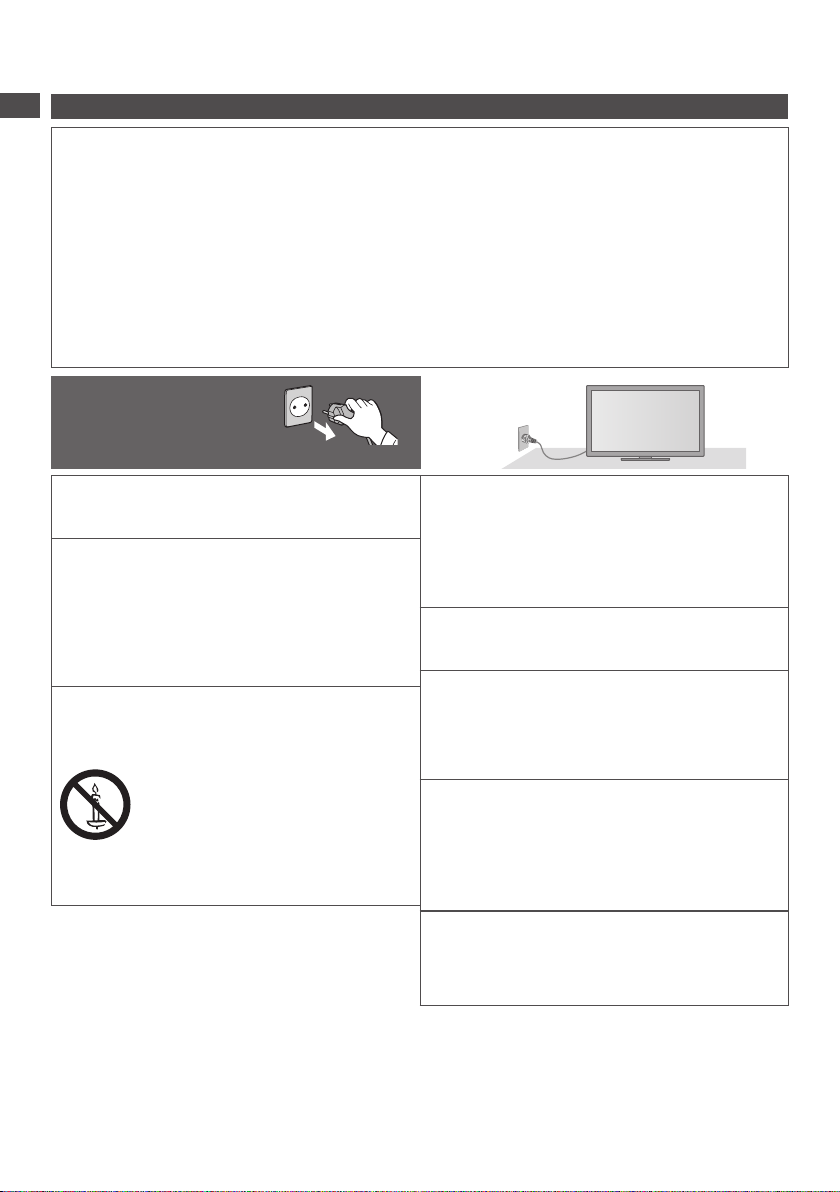
Warning
Safety Precautions
Handling the mains plug and lead
●
Insert the mains plug fully into the socket outlet. (If the mains plug is loose, it could generate heat and cause fire.)
●
Ensure that the mains plug is easily accessible.
●
Ensure the earth pin on the mains plug is securely connected to prevent electrical shock.
An apparatus with CLASS I construction shall be connected to a mains socket outlet with a protective earthing
•
connection.
●
Do not touch the mains plug with a wet hand. (This may cause electrical shock.)
●
Do not use any mains lead other than that provided with this TV. (This may cause fire or electrical shock.)
●
Do not damage the mains lead. (A damaged lead may cause fire or electrical shock.)
Do not move the TV with the lead plugged in the socket outlet.
•
Do not place a heavy object on the lead or place the lead near a high-temperature object.
•
Do not twist the lead, bend it excessively or stretch it.
•
Do not pull on the lead. Hold onto the mains plug body when disconnecting the lead.
•
Do not use a damaged mains plug or socket outlet.
•
If you find any abnormality,
remove the mains plug
immediately!
Power source
●
This TV is designed to operate on AC 220-240 V,
50 / 60 Hz.
Do not remove covers and NEVER
modify the TV yourself
●
Do not remove the rear cover as live parts are
accessible when it is removed.
serviceable parts inside. (High-voltage components
may cause serious electrical shock.)
●
Have the TV checked, adjusted, or repaired at your
local Panasonic dealer.
There are no user
Do not expose to direct sunlight and
other sources of heat
●
Avoid exposing the TV to direct sunlight and other
sources of heat.
To prevent the spread
of fire, keep candles
or other open flames
away from this product
at all times
AC 220-240 V
50 / 60 Hz
Do not expose to rain or excessive
moisture
●
To prevent damage which might result in electric shock
or fire, do not expose this
moisture. This TV must not be exposed to dripping or
splashing water and objects filled with liquid, such as
vases, must not be placed on top of or above the TV.
TV to rain or excessive
Do not insert foreign objects into the TV
●
Do not allow any objects to drop into the TV through
the air vents. (Fire or electrical shock may result.)
Do not place the TV on sloped or
unstable surfaces, and ensure that the
TV does not hang over the edge of the
base
●
The TV may fall off or tip over.
Use only the dedicated pedestals /
mounting equipment
●
Using an unapproved pedestal or other fixtures may
make the
your local Panasonic dealer to perform setup.
●
Use approved pedestals (p. 7) / wall-hanging brackets
(p. 6).
TV unstable, risking injury. Be sure to ask
Do not allow children to handle SD Card
●
As with any small object, SD Cards can be
swallowed by young children. Please remove SD
Card immediately after use and store out of reach of
children.
4
Page 5
Radio waves
●
Do not use the TV in any medical institutions or locations with medical equipment. Radio waves from the TV may
interfere with the medical equipment and cause accidents due to the malfunction.
●
Do not use the TV near any automatic control equipment such as automatic doors or fire alarms. Radio waves
TV may interfere with the automatic control equipment and cause accidents due to the malfunction.
from the
●
Keep the distance at least 22 cm from the built-in wireless LAN part when you have a cardiac pacemaker. Radio
waves from the part may interfere with the operation of the pacemaker.
●
Do not disassemble or alter the built-in wireless LAN in any way.
Caution
When cleaning the TV, remove the mains
plug
●
Cleaning an energized TV may cause electrical shock.
When the TV is not going to be used for
a long period of time, remove the mains
plug
●
This TV will still consume some power even in the Off
mode, as long as the mains plug is still connected to a
live socket outlet.
Transport only in upright position
●
Transporting the TV with its display panel facing upward
or downward may cause damage to the internal circuitry
Allow sufficient space around the TV for
Do not block the rear air vents
●
Blocked ventilation by newspapers, table cloths,
curtains, etc. may cause overheating, fire or electrical
shock.
Do not expose your ears to excessive
volume from the headphones
●
Irreversible damage can be caused.
Do not apply strong force or impact to the
display panel
●
This may cause damage resulting in injury.
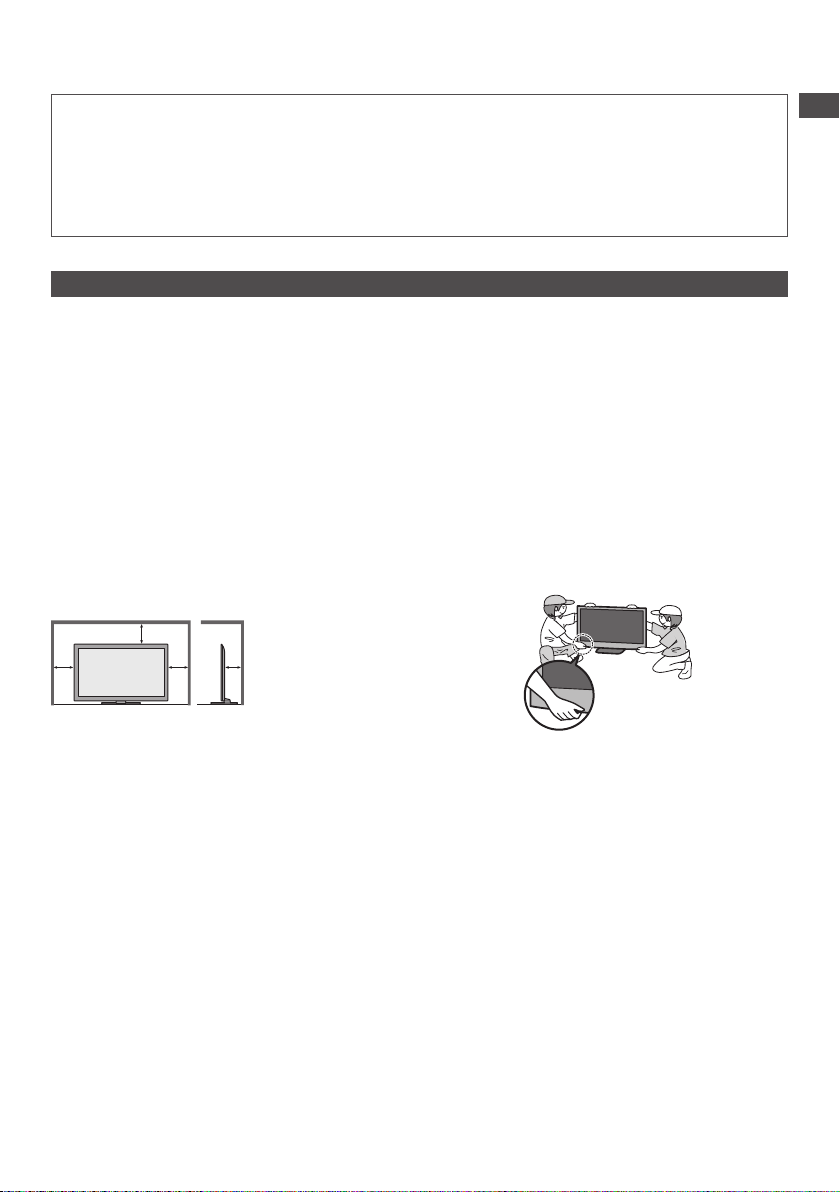
The TV is heavy. Handle the TV by 2 or
.
more people. Support as shown to avoid
injury by the TV tipping or falling.
radiated heat
Minimum distance
10
10
10
●
When using the
pedestal, keep the
space between the
bottom of the TV and
7
the surface where the
TV is set.
●
In case of using
(cm)
Wall-hanging bracket,
follow the manual of it.
Safety Precautions
Built-in wireless LAN
●
To use the built-in wireless LAN, an access point needs to be obtained.
●
Do not use the built-in wireless LAN to connect to any wireless network (SSID∗) for which you do not have usage
rights. Such networks may be listed as a result of searches. However
∗
SSID is a name for identifying a particular wireless network for transmission.
●
Do not subject the built-in wireless LAN to high temperatures, direct sunlight or moisture.
●
Data transmitted and received over radio waves may be intercepted and monitored.
●
The built-in wireless LAN uses 2.4 GHz and 5 GHz frequency bands. To avoid malfunctions or slow response caused
by radio wave interference, keep the TV away from the devices such as other wireless LAN devices, microwaves,
mobile phones and the devices that use 2.4 GHz and 5 GHz signals when using the built-in wireless LAN.
●
When noises occur due to the static electricity, etc., the TV might stop operating for the protection of the devices. In
this case, turn the TV off with Mains power On / Off switch, then turn it on again.
●
Additional information for built-in wireless LAN and access point may be on the following website. (English only)
http://panasonic.jp/support/global/cs/tv/
Bluetooth® wireless technology
●
The TV uses the 2.4 GHz radio frequency ISM band (Bluetooth
by radio wave interference, keep the TV away from the devices such as other wireless LAN devices, other Bluetooth
devices, microwaves, mobile phones and the devices that use 2.4 GHz signal.
, using them may be regarded as illegal access.
®
). To avoid malfunctions or slow response caused
5
Page 6
Accessories / Options
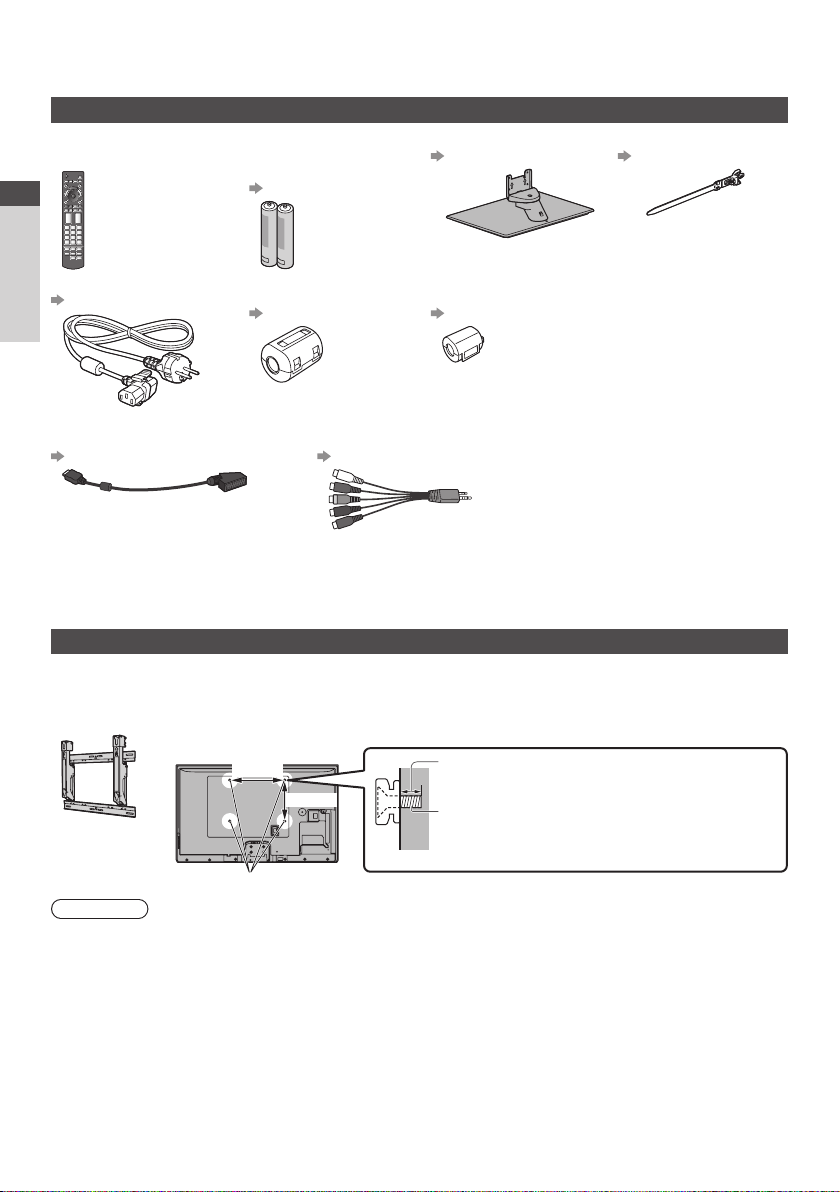
Standard accessories
Remote Control
●
N2QAYB000715
Quick Start Guide
Mains lead
(p. 12)
Accessories / Options
Terminal adaptors
●
AV1 (SCART) adaptor
(p. 13)
●
Accessories may not be placed all together. Take care not to throw them away unintentionally.
●
This product contains possibly dangerous parts (such as plastic bags), that can be breathed in or swallowed by
young children accidentally
Optional accessories
Please contact your local Panasonic dealer to purchase the recommended optional accessories. For additional details,
please read the manual of the optional accessories.
Wall-hanging bracket
●
TY-WK4P1RW● Tilting angle for this TV: 0 (vertical) to 20 degrees (TX-P42GT50E) / 10 degrees (TX-P50GT50E)
Rear of the TV
Holes for wall-hanging bracket installation
Warning
●
Using other wall-hanging brackets, or installing a wall-hanging bracket by yourself have the risk of personal injury and
product damage. In order to maintain the unit’
licensed contractor to secure the wall-hanging brackets. Any damage caused by installing without a qualified installer
will void your warranty.
●
Carefully read the instructions accompanying optional accessories, and be absolutely sure to take steps to prevent
the TV from falling off.
●
Handle the TV carefully during installation since subjecting it to impact or other forces may cause product damage.
●
Take care when fixing wall brackets to the wall. Always ensure that there are no electrical cables or pipes in the wall
before hanging bracket.
●
To prevent fall and injury, remove the TV from its fixed wall position when it is no longer in use.
Batteries for the
Remote Control (2)
●
R6
(p. 7)
Ferrite core (2)
(Large size)
(p. 14)
Use the Ferrite cores to comply with the EMC standard.
●
AV2 (COMPONENT / VIDEO) adaptor
(p. 100, 101)
. Keep these parts out of reach of young children.
400 mm
300 mm
s performance and safety, be absolutely sure to ask your dealer or a
Pedestal
(p. 7)
Ferrite core
(Small size)
(p. 101)
Depth of screw: minimum 10 mm,
Diametre: M8
Screw for fixing the TV onto the wall-hanging bracket
(not supplied with the TV)
(View from the side)
Clamper
(p. 14)
Operating Instructions
Pan European Guarantee
Card
maximum 16 mm
6
Page 7
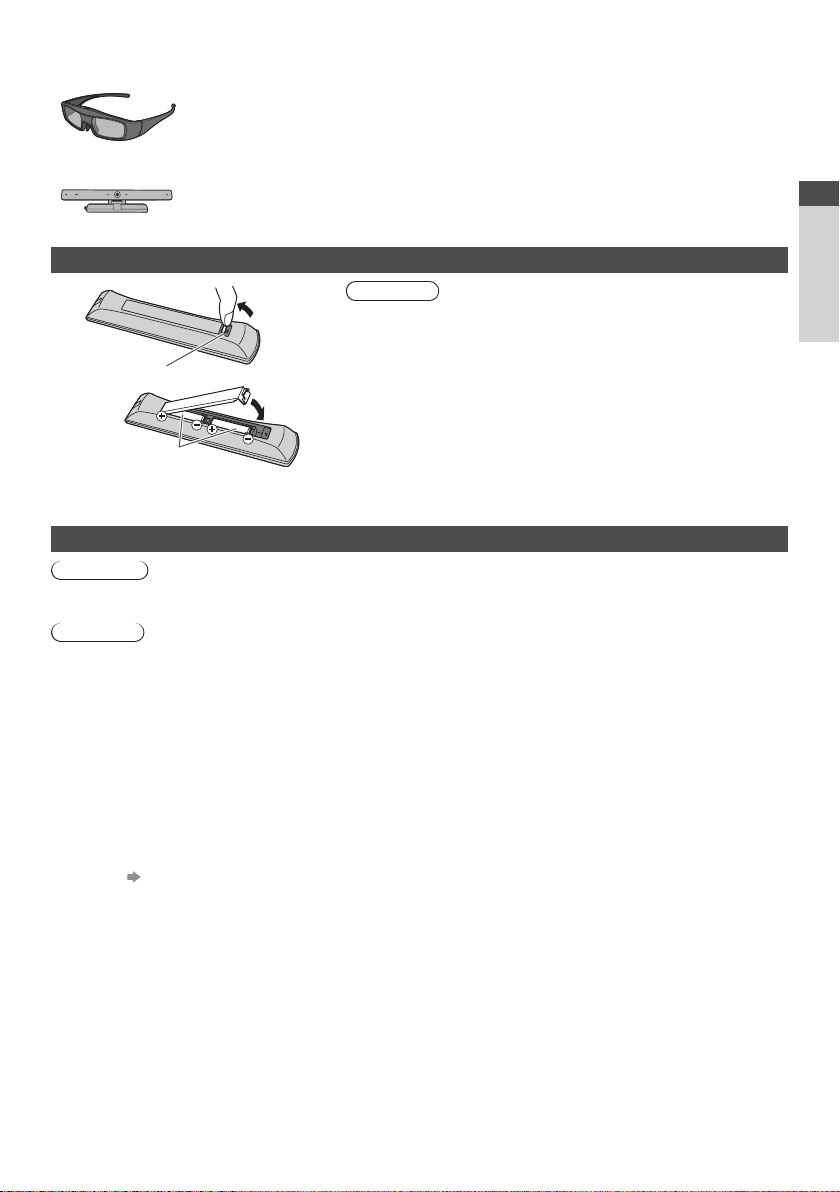
3D Eyewear
●
TY-ER3D4ME
●
TY-ER3D4SE
Communication Camera
●
TY-CC20W
●
If you need 3D Eyewears, please purchase this optional accessory.
●
Use Panasonic 3D Eyewear supporting Bluetooth wireless technology.
●
For more information (English only):
http://panasonic.net/avc/viera/3d/eu.html
●
This camera can be used on VIERA Connect (p. 19, 82).
●
Depending on the area, this optional accessory may not be available.
For details, consult your local Panasonic dealer
.
Installing / removing remote’s batteries
1
2
Note the correct
polarity (+ or -)
Pull open
Hook
Close
Caution
●
Incorrect installation may cause battery leakage and corrosion,
resulting in damage to the remote control.
●
Do not mix old and new batteries.
●
Do not mix different battery types (such as alkaline and manganese
batteries).
●
Do not use rechargeable (Ni-Cd) batteries.
●
Do not burn or break up batteries.
Batteries must not be exposed to excessive heat such as sunshine,
fire or the like.
●
Do not disassemble or modify the remote control.
Attaching / removing the pedestal
Warning
Do not disassemble or modify the pedestal.
●
Otherwise the TV may fall over and become damaged, and personal injury may result.
Caution
Do not use any pedestal other than the one provided with this TV.
●
Otherwise the TV may fall over and become damaged, and personal injury may result.
Do not use the pedestal if it becomes warped or physically damaged.
●
If you use the pedestal while it is physically damaged, personal injury may result. Contact your local Panasonic
dealer immediately.
During set-up, make sure that all screws are securely tightened.
●
If insufficient care is taken to ensure screws are properly tightened during assembly, the pedestal will not be strong
enough to support the TV, and it might fall over and become damaged, and personal injury may result.
Ensure that the TV does not fall over.
●
If the TV is knocked or children climb onto the pedestal with the TV installed, the TV may fall over and personal injury
may result.
Two or more people are required to install and remove the TV.
●
If two or more people are not present, the TV may be dropped, and personal injury may result.
When removing the pedestal from the TV, do not remove the pedestal by the methods other than the specified
procedure. (p. 9)
●
Otherwise the TV and / or pedestal may fall over and become damaged, and personal injury may result.
Quick Start Guide
Accessories / Options
7
Page 8
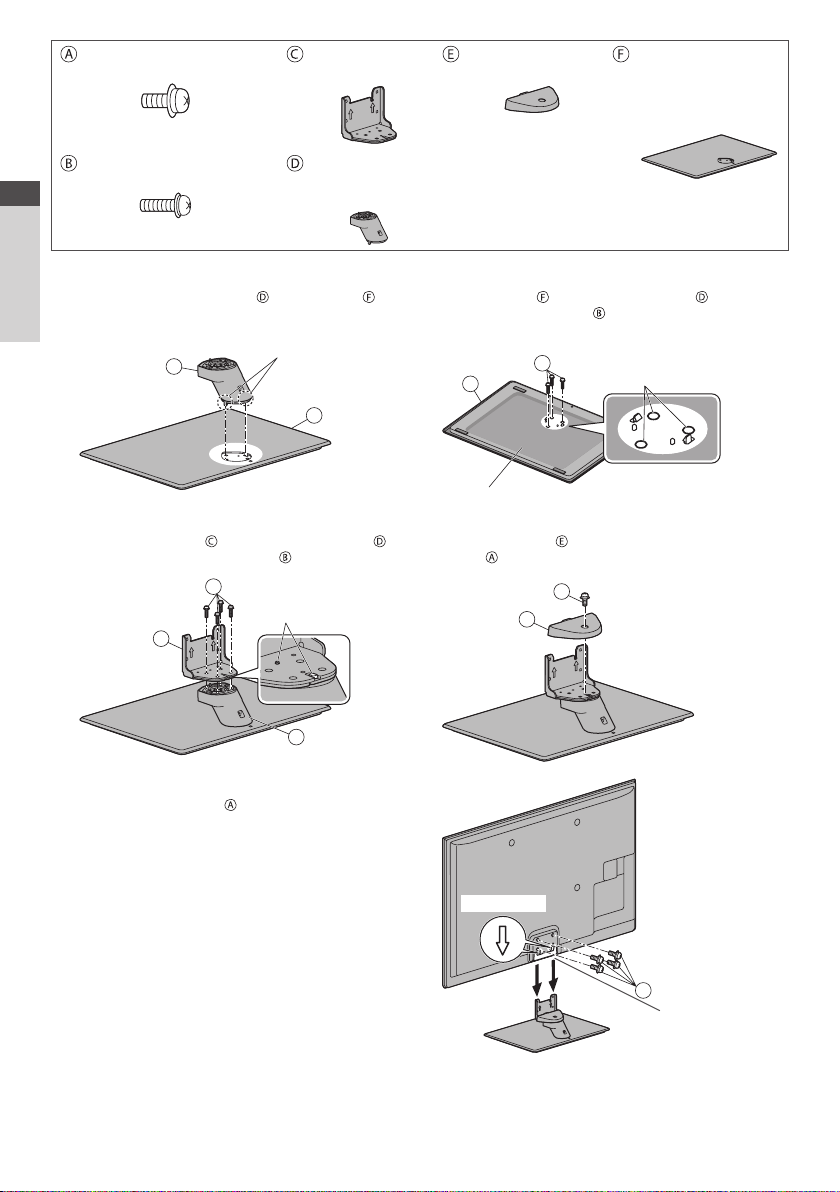
Assembly screw (5)
(black)
M4 × 10
Assembly screw (7)
(silver)
Quick Start Guide
M5 × 16
■ Assembling the pedestal
Insert the tabs of the neck into the base
1
firmly
Accessories / Options
D
Bracket
●
TBL5ZA3254
Neck
●
TXFBL5Z0100 (TX-P42GT50E)
●
TXFBL5Z0084 (TX-P50GT50E)
2
Tabs (bottom)
F
Cover
●
TXFBL5Z0092
Turn the base over and fix the neck securely
with assembly screws
●
Do not hold the neck when turning over the base.
B
F
Base
●
TBL5ZX0312
(TX-P42GT50E)
●
TBL5ZX0243
(TX-P50GT50E)
Screw hole
Attach the bracket to the tabs of the neck
3
and fix with assembly screws
B
Tabs (top)
C
D
■ Securing the TV
Use the assembly screws to fasten securely.
●
Tighten the four assembly screws loosely at first, then
tighten them firmly to fix securely
●
Carry out the work on a horizontal and level surface.
.
Back of the base
Attach the cover and fix securely with assembly
4
screw
A
E
Arrow mark
A
Hole for pedestal
installation
8
Page 9
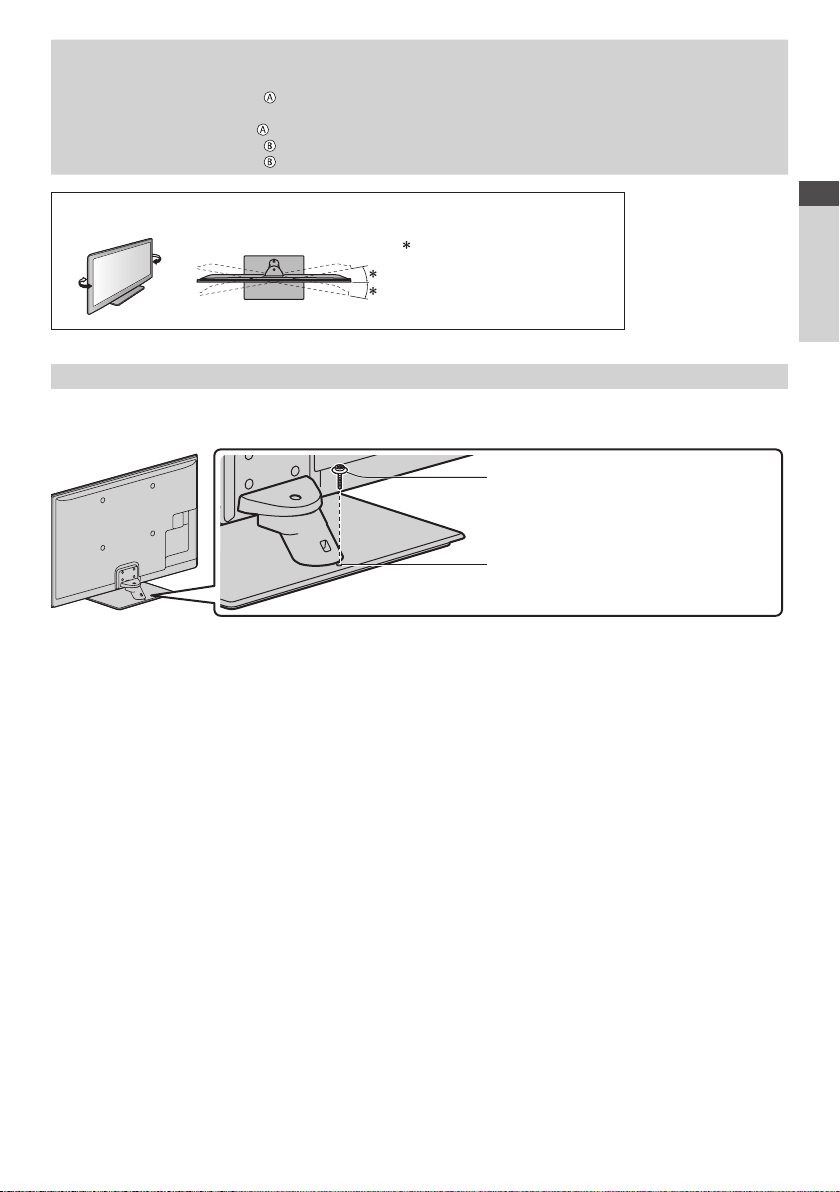
Removing the pedestal from the TV
Be sure to remove the pedestal in the following way when using the wall-hanging bracket or repacking the TV.
1 Remove the assembly screws
2 Pull out the pedestal from the TV.
3 Remove the assembly screw from the cover.
4 Remove the assembly screws from the bracket.
5 Remove the assembly screws from the back of the base and pull out the neck.
from the TV.
Adjusting the panel to your desired angle
●
Do not place any objects within the full rotation range.
(View from the top)
TX-P42GT50E: 15°
TX-P50GT50E: 10°
Preventing the TV from falling over
Using the fall-prevent screw hole and a screw (commercially available), securely fix the body of the pedestal to the
installation surface.
●
The place where the pedestal is to be fixed should be thick enough and made of hard material.
Screw (not supplied)
Diametre: 3 mm
Length: 25 - 30 mm
Screw hole
Quick Start Guide
Accessories / Options
9
Page 10
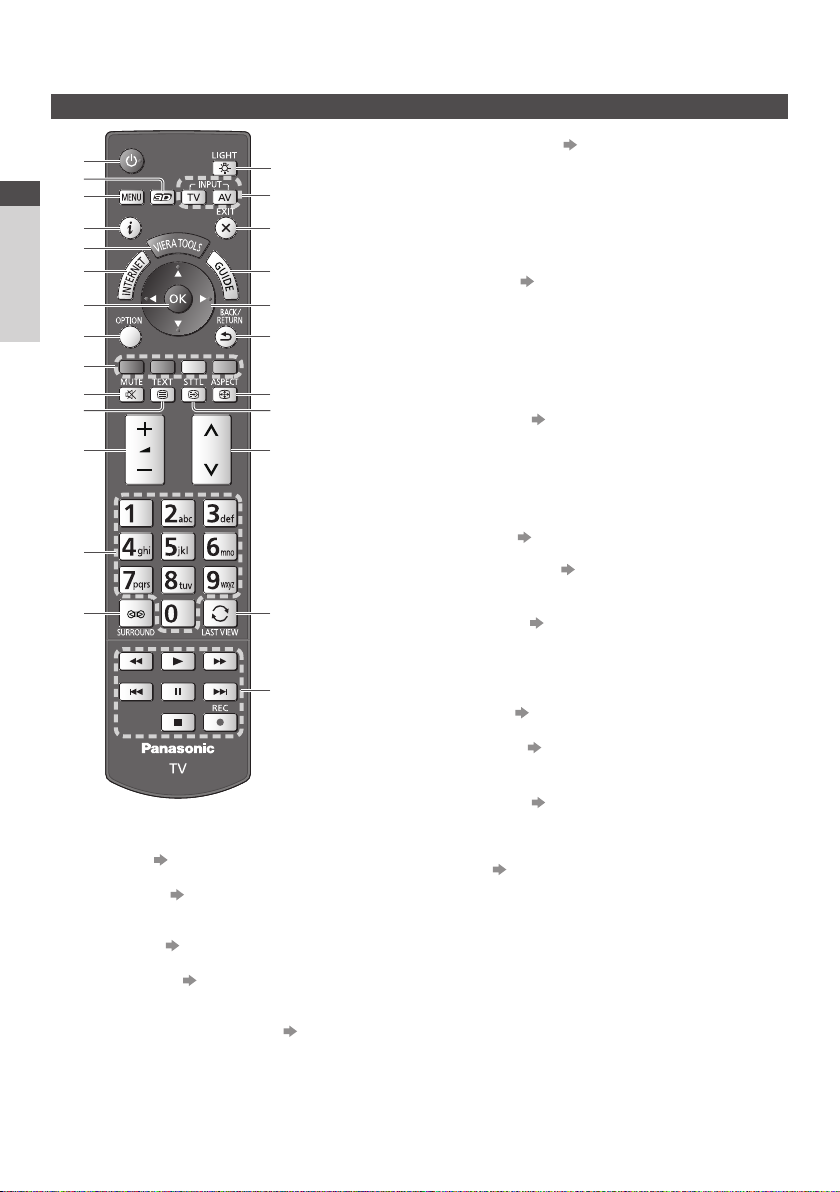
Identifying Controls
Remote Control
1
2
3
Quick Start Guide
4
5
6
7
8
Identifying Controls
9
10
11
12
13
14
Standby On / Off switch
1
●
Switches TV on or off standby.
3D button (p. 33)
2
●
Switches the viewing mode between 2D and 3D.
[Main Menu] (p. 37)
3
●
Press to access Picture, Sound, Network, Timer
and Setup Menus.
Information (p. 21)
4
●
Displays channel and programme information.
VIERA TOOLS (p. 36)
5
●
Displays some special feature icons and accesses
easily.
INTERNET ([VIERA Connect]) (p. 19, 82)
6
●
Displays VIERA Connect home screen.
OK
7
●
Confirms selections and choices.
●
Press after selecting channel positions to quickly
change channel.
●
Displays the Channel List.
15
16
17
18
19
20
21
22
23
24
25
[Option Menu] (p. 22)
8
●
Easy optional setting for viewing, sound, etc.
Coloured buttons
9
(red-green-yellow-blue)
●
Used for the selection, navigation and operation of
various functions.
Sound Mute
10
●
Switches sound mute on or off.
Teletext (p. 27)
11
●
Switches to teletext mode.
Volume Up / Down
12
Numeric buttons
13
●
Changes channel and teletext pages.
●
Sets characters.
●
When in Standby mode, switches TV on (Press for
about 1 second).
Surround (p. 41)
14
●
Switches surround sound setting.
Light
15
●
Lights the buttons for about 5 seconds (except the
buttons “25”).
Input mode selection
16
●
TV - switches DVB-S / DVB-C / DVB-T / Analogue
mode. (p. 20)
●
AV - switches to AV input mode from Input
Selection list. (p. 29)
Exit
17
●
Returns to the normal viewing screen.
TV Guide (p. 24)
18
Cursor buttons
19
●
Makes selections and adjustments.
Return
20
●
Returns to the previous menu / page.
Aspect (p. 23)
21
●
Changes aspect ratio.
Subtitles (p. 21)
22
●
Displays subtitles.
Channel Up / Down
23
Last view (p. 23)
24
●
Switches to previously viewed channel or input
mode.
Operations for contents, connected equipment,
25
etc. (p. 30, 69, 71, 88, 98)
10
Page 11
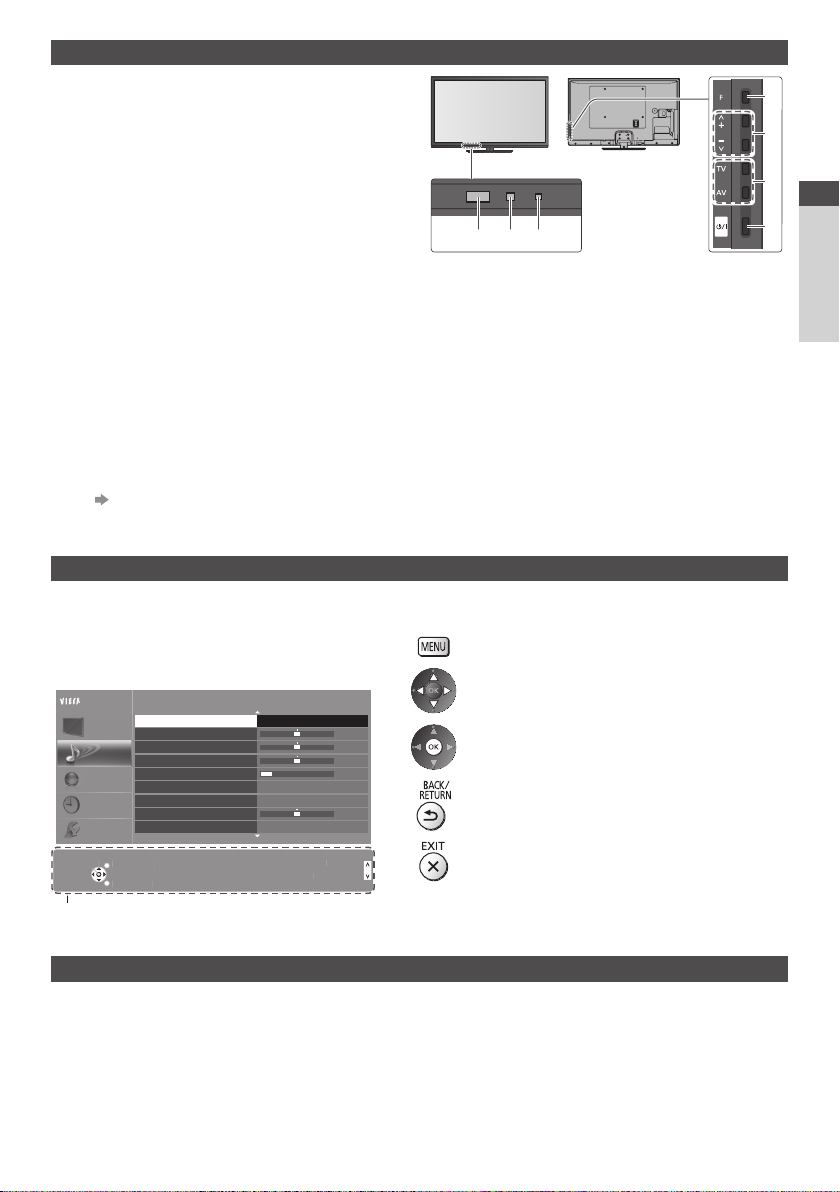
Indicator / Control panel
S
t
T
S
mode
p
C
ge
RETURN
n
Function select
1
●
[Volume] / [Contrast] / [Brightness] / [Colour] /
[Sharpness] / [T
int] (NTSC signal) / [Bass]∗ /
[Treble]∗ / [Balance] / [Auto Setup] (p. 48 - 51)
∗ [Music] or [Speech] mode in the Sound Menu
Channel Up / Down, Value change (when using the
2
F button), Switching the TV on (press either button
for about 1 second when in Standby mode)
Changes the input mode
3
Mains power On / Off switch
4
●
Use to switch the mains power.
5 6 7
If you turned the TV off during Standby mode
by the remote control last time, the TV will be
in Standby mode when you turn the TV on with
Mains power On / Off switch.
When pressing the control panel button (1 - 4), the
control panel guide appears on the right side of the
screen for 3 seconds to highlight the pressed button.
Remote control signal receiver
5
●
Do not place any objects between the TV remote
control signal receiver and remote control.
C.A.T.S. (Contrast Automatic Tracking System)
6
sensor
●
Senses brightness to adjust picture quality when
[Eco Mode] in the Picture Menu is set to [On].
(p. 39)
Power and Timer LED
7
Red: Standby
Green: On
Orange: Timer Programming On
Orange (flash):
Recording of Timer Programming, Direct
TV Recording or One Touch Recording in
progress
Red with orange flash:
Standby with Timer Programming On, Direct
TV Recording or One Touch Recording
●
The LED blinks when the TV receives a command
from the remote control.
Using the On Screen Displays - Operation guide
Many features available on this TV can be accessed via the On Screen Display menu.
■ Operation guide
Operation guide will help you to operate by using the
remote control.
Example: [Sound Menu]
Main Menu
Picture
Sound
Network
Timer
Setup
Select
elec
EXIT
EXI
Change
han
RETURN
Operation guide
Mode Music
Bass
T
reble
Balance
Headphone Volume
Surround
Auto Gain Control
Volume Correction
Speaker Distance to Wall
Selects your favourite sound
elects your favourite sound
mode.
.
Off
Off
Over 30cm
Page up
Page u
Page down
Page dow
1/2
11
■ How to use remote control
Open the main menu
Move the cursor / select from a range of options /
select the menu item (up and down only) / adjust
0
0
0
0
levels (left and right only)
Access the menu / store settings after adjustments
have been made or options have been set
Return to the previous menu
Exit the menu system and return to the normal
viewing screen
Rear side of the
1
2
3
Quick Start Guide
4
TV
Identifying Controls
Auto power standby function
The TV will automatically go into Standby mode in the following conditions:
No signal is received and no operation is performed for 30 minutes in Analogue TV mode.
•
[Off Timer] is active in the Timer Menu. (p. 22)
•
No operation is performed for the period selected in [Auto Standby] (p. 42).
•
●
This function does not affect the recording of Timer Programming, Direct TV Recording and One Touch Recording.
11
Page 12
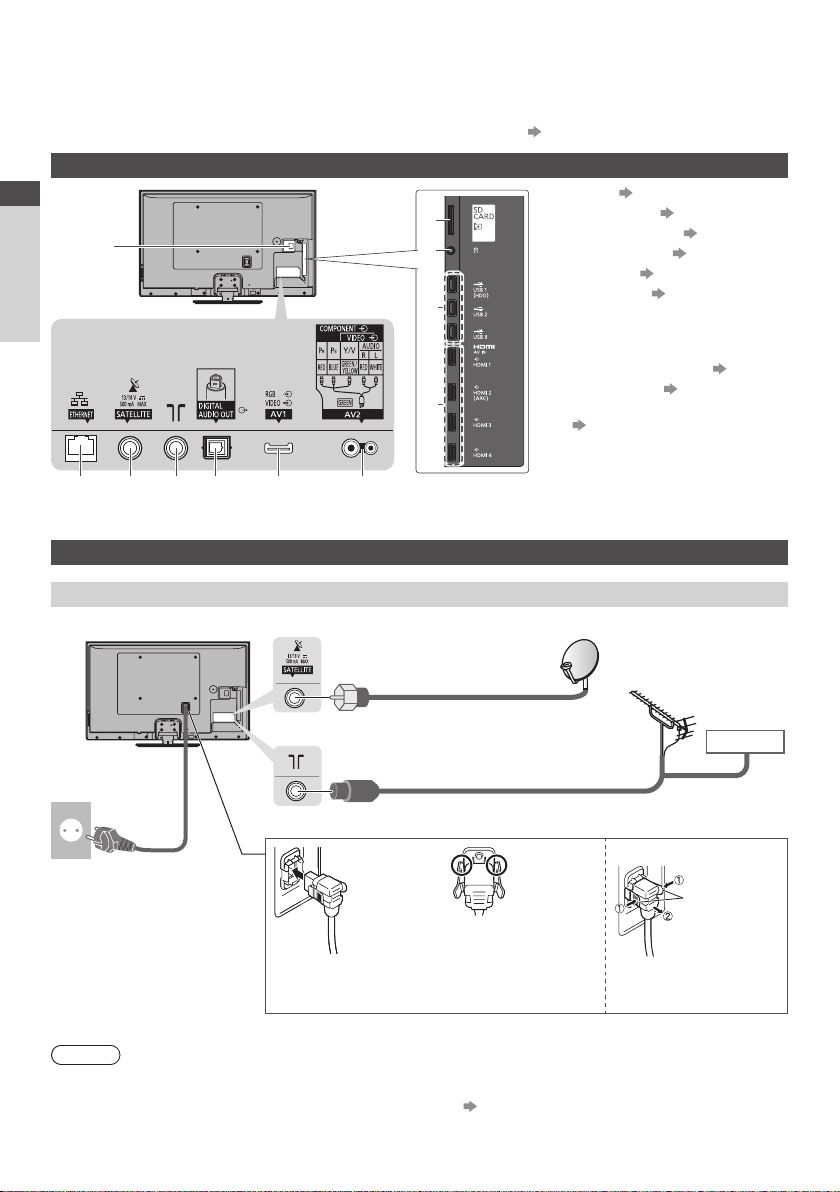
Basic Connection
External equipment and cables shown are not supplied with this TV.
Please ensure that the unit is disconnected from the mains socket before attaching or disconnecting any leads.
There are some restrictions on placement for viewing 3D images. For details (p. 31, 32)
Terminals
CI slot (p. 61)
Quick Start Guide
1
Basic Connection
2
3
4
5
1
SD Card slot (p. 70)
2
Headphone jack (p. 101)
3
USB 1 - 3 port (p. 66, 70, 100)
4
HDMI1 - 4 (p. 13, 100)
5
ETHERNET (p. 14)
6
Satellite terminal (see below)
7
Terrestrial / cable terminal
8
(see below)
DIGITAL AUDIO OUT (p. 101)
9
AV1 (SCART) (p. 13)
10
AV2 (COMPONENT / VIDEO)
11
(p. 100)
6 8 7 9
10 11
Connections
Mains lead, satellite dish and aerial
■ DVB-S
Satellite cable
■ DVB-C, DVB-T, Analogue
Mains lead
RF cable
■ Mains lead
AC 220-240 V
50 / 60 Hz
Make sure that
Push until both side
tabs click
Note
To ensure your satellite dish is correctly installed, please consult your local dealer.
●
Also please consult the received satellite broadcasting companies for details.
●
Selectable satellites and dish alignment to tune DVB-S channels (p. 49)
the mains lead is
securely fixed.
Satellite dish
Terrestrial aerial
Cable
To remove from the TV:
tabs
Press both tabs and pull
on mains connector to
release
12
Page 13
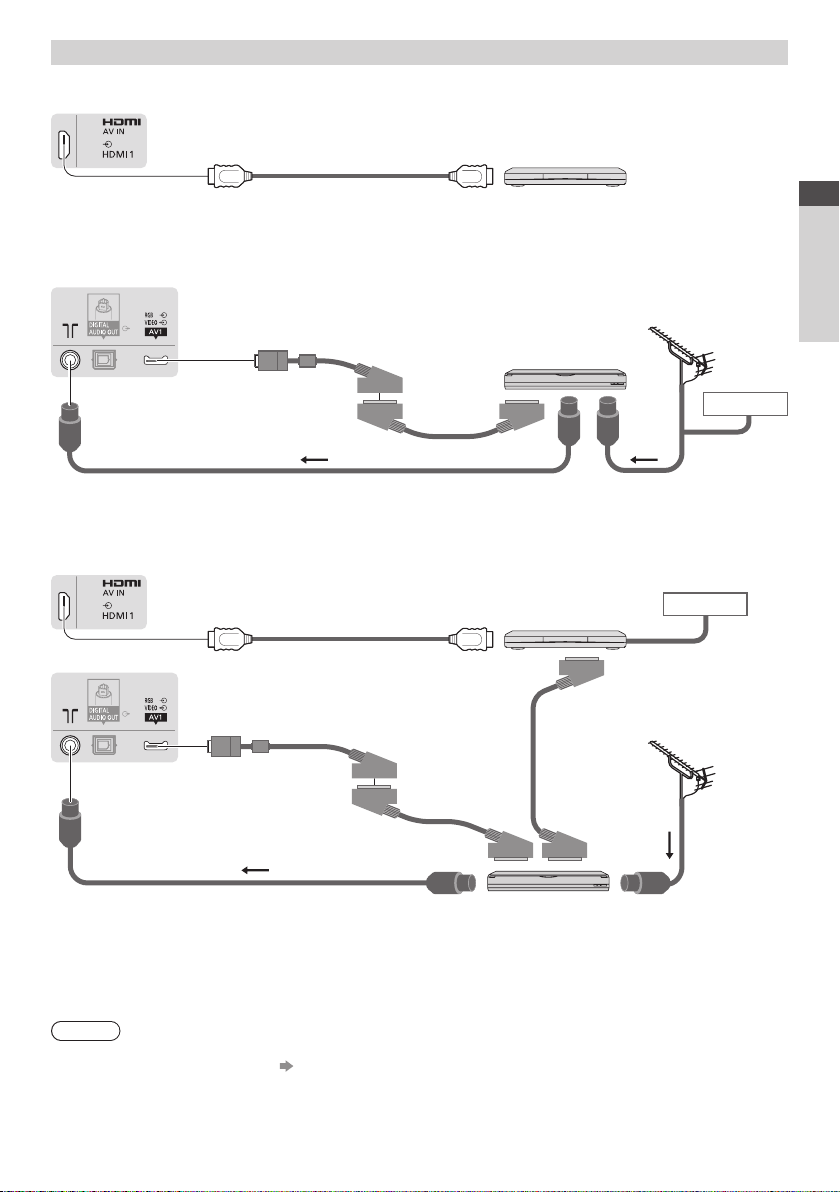
AV devices
■ Player / 3D compatible player
TV
Player /
3D-compatible player
■ DVD Recorder / VCR
TV
AV1 (SCART)
adaptor
RF cable
■ DVD Recorder / VCR and Set top box
TV
TV
AV1 (SCART)
adaptor
HDMI cable
∗
HDMI cable
∗
SCART cable
DVD Recorder / VCR
RF cable
Set top box
SCART cable
Terrestrial
aerial
Cable
Cable
Terrestrial
aerial
Quick Start Guide
Basic Connection
SCART cable
RF cable
DVD Recorder / VCR
∗
Supplied with this TV
Note
●
Connect to the TV’s AV1 for a DVD Recorder / VCR supporting Q-Link (p. 94).
●
Q-Link and VIERA Link connection
●
Please also read the manual of the equipment being connected.
●
Keep the TV away from electronic equipment (video equipment, etc.) or equipment with an infrared sensor.
Otherwise, distortion of image / sound may occur or operation of other equipment may be interfered.
●
When using a SCART or HDMI cable, use the fully wired one.
●
Check the type of terminals and cable plugs are correct when connecting.
(p. 92, 93)
RF Cable
13
Page 14
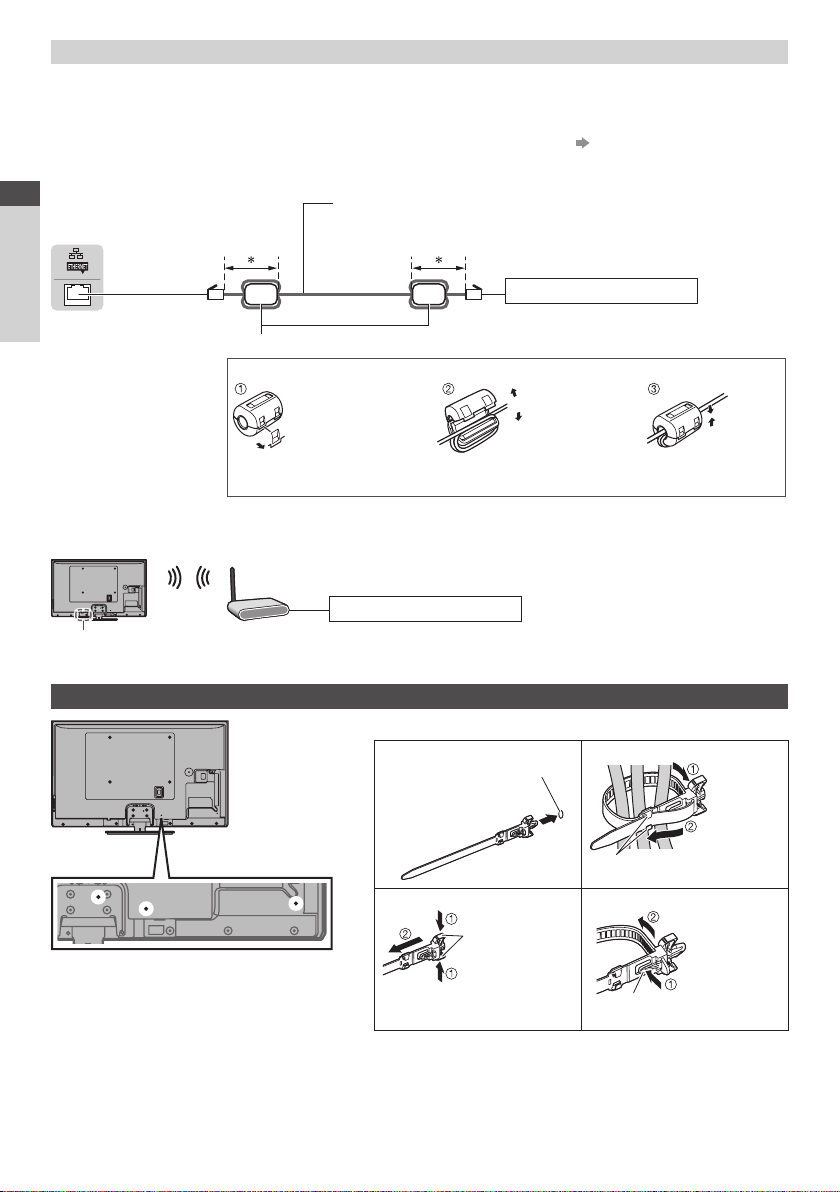
Network
To enable the network service functions (VIERA Connect, etc.), you need to connect the TV to a broadband network
environment.
●
If you do not have any broadband network services, please consult your retailer for assistance.
●
Prepare the internet environment for wired connection or wireless connection.
●
Setup of the network connection will start after the tuning (when first using the TV). (p. 16 - 18)
■ Wired connection
Quick Start Guide
TV
LAN cable (Unshielded)
●
Use the Unshielded Twist Pair (UTP) LAN cable.
∗
Less than 10 cm
Internet environment
Basic Connection
Ferrite core - Large size (supplied)
Installing the Ferrite core
Pull back the tabs
(in two places)
■ Wireless connection
Access point
Built-in wireless LAN
Using clamper
●
Do not bundle the Satellite cable, RF cable
and mains lead together (could cause distorted
image).
●
Fix cables with clampers as necessary.
●
When using the optional accessory, follow the
s assembly manual to fix cables.
option’
Wind the cable twice Close
Internet environment
■ Clamper (Standard accessory)
Attach the clamper Bundle the cables
Insert the
clamper in a hole
To remove from the TV: To loosen:
snaps
Keep pushing
both side snaps
hole
hooks
knob
Set the tip in
the hooks
Keep pushing
the knob
14
Page 15
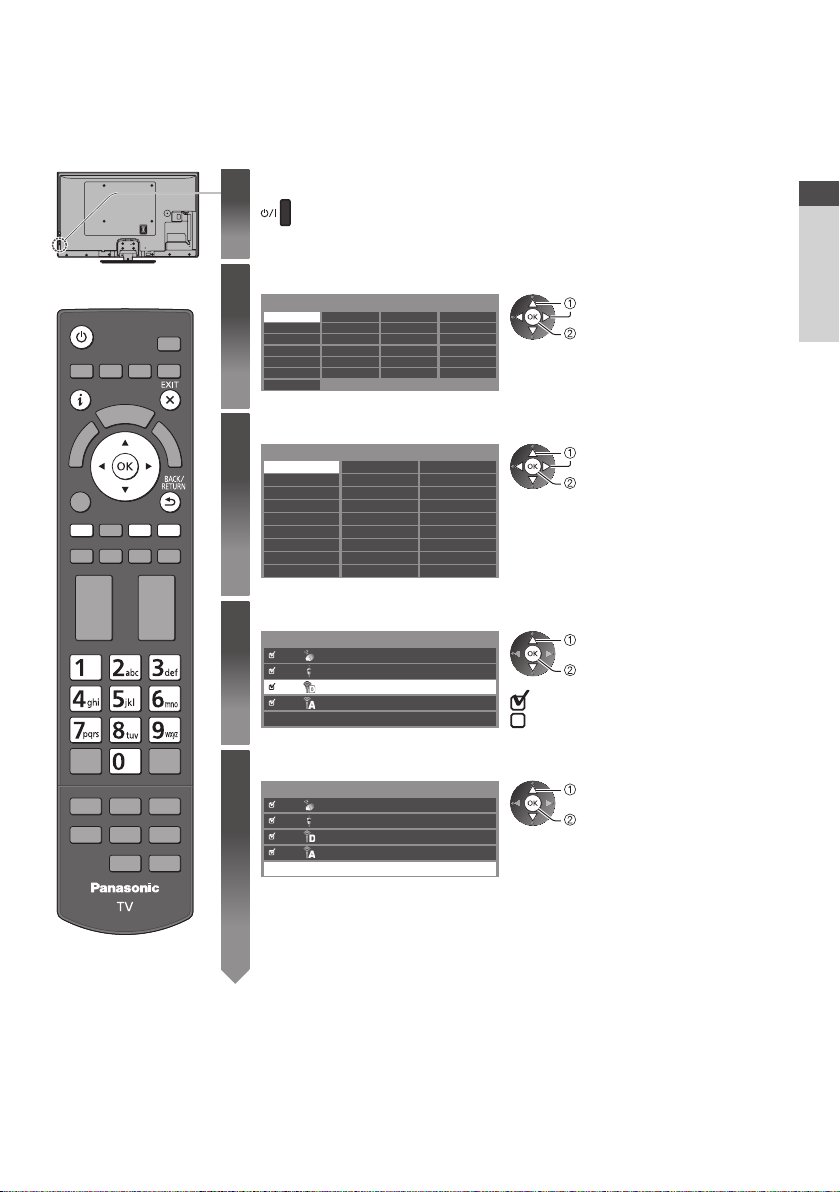
Auto Setup
Search and store TV channels automatically.
●
These steps are not necessary if the setup has been completed by your local dealer.
●
Please complete connections (p. 12 - 14) and settings (if necessary) of the connected equipment before starting Auto
Setup. For details of settings for the connected equipment, read the manual of the equipment.
Plug the TV into mains socket and switch on
1
2
3
4
●
Takes a few seconds to be displayed.
●
If the red LED shows on the TV, press the Standby On / Off switch on the
remote control for about 1 second.
Select the language
Menüsprache
Deutsch Dansk Polski Srpski
English Svenska čeština Hrvatski
Français Norsk Magyar Slovenščina
Italiano Suomi Slovenčina Latviešu
Español Türkçe Български eesti keel
Português Еλληνικά Română Lietuvių
Nederlands
select
set
Select your country
Country
Germany
Austria
France Norway Hungary
Italy Finland Slovakia
Spain Luxembourg Slovenia
Portugal Belgium Croatia
Switzerland Netherlands Estonia
Malta Turkey Lithuania
Andorra Greece Others
Denmark
Sweden Czech
Poland
select
set
●
Depending on the country you select,
select your Region or store the Child LockPIN number (“0000” cannot be stored) by
following the on-screen instructions.
Select the mode to tune
TV Signal Selection
DVB-S
DVB-C
DVB-T
Analogue
Start Auto Setup
select
tune / skip tuning
: tune (search for the available channels)
: skip tuning
Quick Start Guide
Auto Setup
Select [Start Auto Setup]
5
TV Signal Selection
DVB-S
DVB-C
DVB-T
Analogue
●
Auto Setup will start to search for TV channels and store them.
The stored channels and sorted channel order vary depending on the country, area,
broadcasting system and conditions of signal reception.
Auto Setup screen varies depending on the country you select.
Start Auto Setup
select
access
15
Page 16
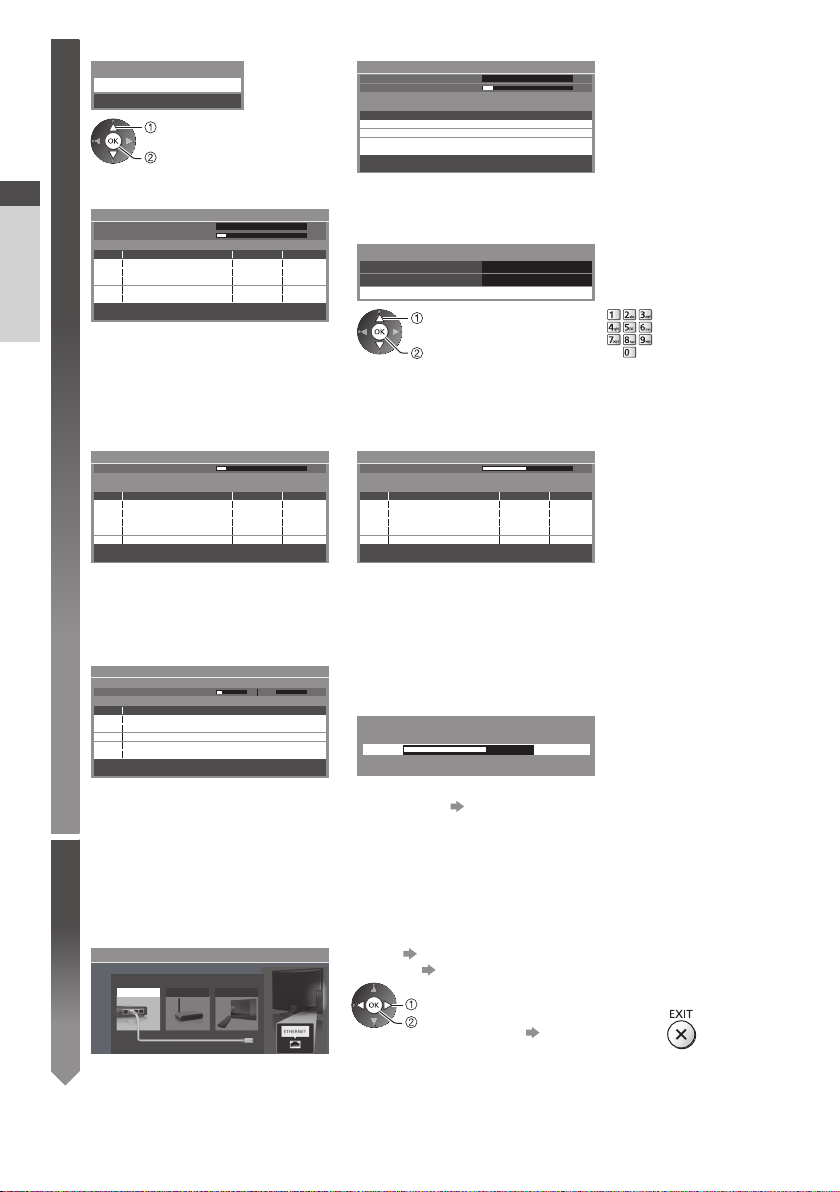
1 DVB-S Search Mode 2 DVB-S Satellite Search
5
Search Mode
Quick Start Guide
3 [DVB-S Auto Setup]
DVB-S Auto Setup
Satellite
Progress
This will take about 30 minutes.
No. Channel Name Type
1
2
3
Free TV
: 3 Pay TV: 0 Radio: 0
Auto Setup
5 [DVB-C Auto Setup] 6 [DVB-T Auto Setup]
DVB-C Auto Setup
Progress
This will take about 3 minutes.
No. Channel Name Type
1
2
3
Free TV
: 3 Pay TV: 0 Radio: 0
7 [Analogue Auto Setup] 8 Preset Download
Analogue Auto Setup
Scan
This will take about 3 minutes.
CH Channel Name
CH 29
CH 33 BBC1
Analogue: 2
Free Channels
All Channels
select
set
CBBC Channel
BBC Radio Wales
E4
CBBC Channel
BBC Radio Wales
E4
Astra 19.2° E
0% 100%
100
Free TV
100
Free TV
100
Free TV
Searching
0% 100%
Free TV
100
Free TV
100
Free TV
100
Searching
CH 2 78 41CC 1
Searching
Quality
Quality
DVB-S Auto Setup
Satellite
Progress
This will take up to 40 minutes.
Satellite
Astra 19.2°E
Hot Bird 13°E
Press EXIT to skip Satellite installation
Checking LNB2
0% 100%
Searching Satellite
4 [DVB-C Network Settings]
●
Depending on the country you select, select your cable provider
beforehand by following the on-screen instructions.
DVB-C Network Settings
Frequency Auto
Network ID
select [Start Auto Setup]
access
Normally set [Frequency] and [Network ID] to [Auto].
If [Auto] is not displayed or if necessary, enter [Frequency] and
[Network ID] specified by your cable provider with numeric buttons.
DVB-T Auto Setup
Progress
This will take about 3 minutes.
CH Channel Name Type
CBBC Channel
62
BBC Radio Wales
62
E4
62
62 100Cartoon Nwk
Free TV
: 4 Pay TV: 0 Radio: 0
●
Depending on the country you select, the channel selection screen
will be displayed after DVB-T
the same logical channel number. Select your preferred channel or
exit the screen for automatic selections.
If Q-Link, VIERA Link or similar technology (p. 94, 95) compatible
recorder is connected, channel, language and country / region
settings are automatically downloaded to the recorder.
Sending Preset Data
Please wait!
0% 100%
Remote control unavailable
●
If downloading has failed, you can download later through the
Setup Menu.
Auto
Start Auto Setup
CH 5 69
Free TV
Free TV
Free TV
Free TV
Searching
[Download] (p. 43)
Quality
100
100
100
Auto Setup if multiple channels have
16
Setup the network connection
6
Setup the network connection to enable the network service functions such as VIERA Connect, etc. (p. 19, 82).
●
Please note that this TV does not support wireless public access points.
●
Ensure the network connections (p. 14) and network environment are completed before starting setup.
Select the network type
Network Setup
Select Wired or Wireless
Wired Wireless Set later
[Wired] “Wired connection” (p. 14)
[Wireless] “Wireless connection” (p. 14)
●
select
access
To setup later on or skip this step
Select [Set later] or
Page 17
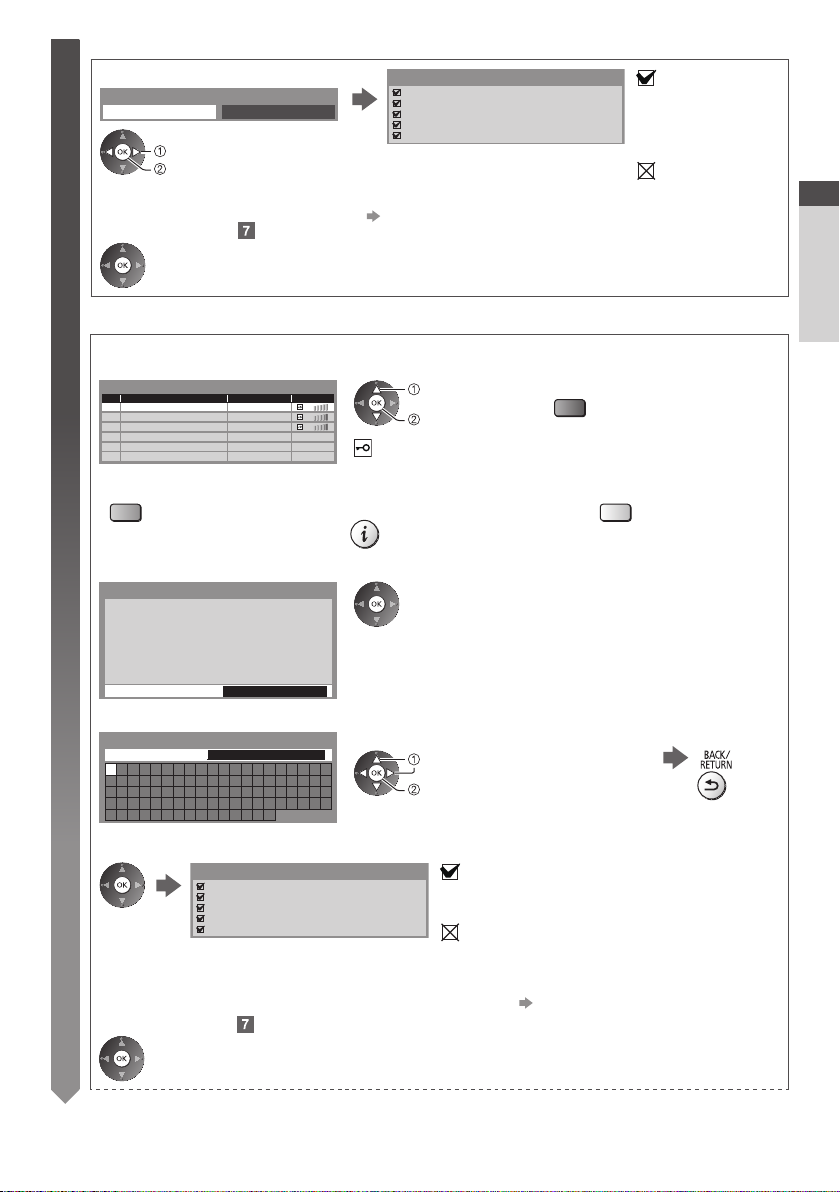
■ [Wired]
6
1. Select [Auto]
Acquire IP Address
Auto Manual
select
access
2. Go to the next step
Automatically setup is done and the test of the
network connection starts.
●
To set manually, select [Manual] and set each item.
For details (p. 85)
Connection Test
Check network cable connection.
Check acquired IP address.
Check for devices using same IP address.
Check gateway connection.
Check server connection.
(Press twice)
■ [Wireless]
Access points found automatically are listed.
1. Select your desired access point
Available Wireless Networks
No. Network Name(SSID) Status Wireless type
1
2
3
Access Point A
Access Point B
Access Point C
11n(2.4GHz)
11n(5GHz)
11n(5GHz)
●
To search access points again
(blue)
●
2. Access the encryption key input mode
Encryption Key Setting
Connection will be made with the following settings: Network Name(SSID) : Access Point A
Security type : WPA-PSK
Encryption type : TKIP
Please input the encryption key.
Encryption key
3. Enter the encryption key of the access point
Wireless Network Settings
Encryption key
A B C D E F G H I J K L M N O P Q R S T
U V W X Y Z 0 1 2 3 4 5 6 7 8 9 ! : #
a b c d e f g h i j k l m n o p q r s t
u v w x y z ( ) + - . * _ @ / “ ‘ % & ?
, ; = $ [ ] ~ < > { } | ` ^ \
4. After the access point setting is finished, perform the connection test
Connection Test
Check wireless network connection.
Check acquired IP address.
Check for devices using same IP address.
Check gateway connection.
Check server connection.
5. Go to the next step
select
access
: Encrypted access point
For the information of the highlighted
access point
●
If the selected access point is not encrypted, the confirmation
screen will be displayed. It is recommended to select the encrypted
access point.
Set characters
select
set
●
You can set characters by using numeric
buttons.
: succeeded
The test is successful
and the TV is
connected to the
network.
: failed
Check the settings and
connections. And then
select [Retry].
●
For [WPS(Push button)] (p. 18)
(red)
●
To set manually (p. 87)
(yellow)
Store
: succeeded
The test is successful and the TV is connected to the
network.
: failed
Check the settings and connections. And then select
[Retry].
●
To set manually, select [Manual] and set each item.
For details
(p. 85)
Quick Start Guide
Auto Setup
(Press twice)
17
Page 18
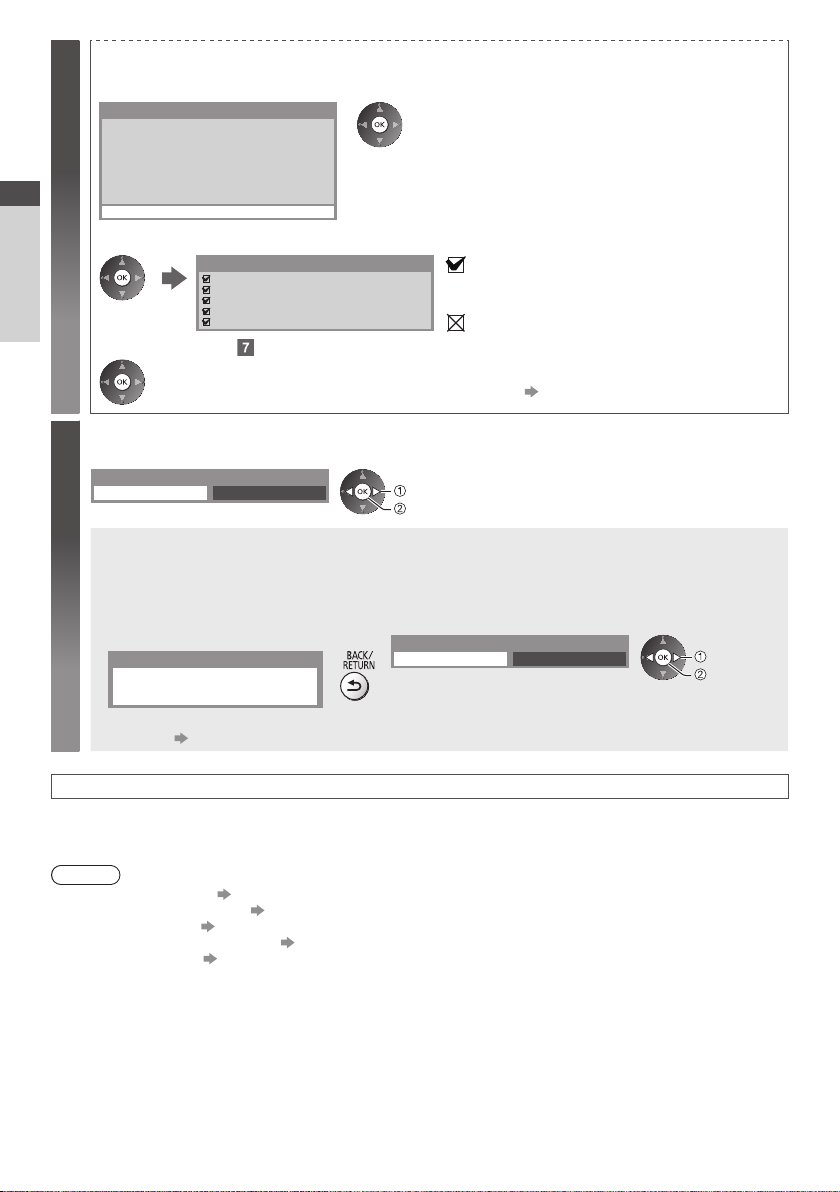
[WPS(Push button)]
6
1. Press the WPS button on the access point until the light flashes
2. Connect the TV with the access point
WPS(Push button)
1) Please press the ‘WPS’ button on the wireless
access point until its light flashes.
2) When the light is flashing select ‘Connect’ on
TV.
If you are unsure, please check the instruction
Quick Start Guide
manual of the wireless access point.
3. After the access point setting is finished, perform the connection test
Auto Setup
4. Go to the next step
Select [Home]
7
Select [Home] viewing environment to use in your home environment.
Please select your viewing environment.
■ [Shop] viewing environment (for shop display only)
[Shop] viewing environment is the demonstration mode to explain main features of this TV.
Select [Home] viewing environment to use in your home environment.
●
You can return to viewing environment selection screen at the stage of Shop confirmation screen.
1 Return to viewing environment
selection screen
Shop
To change viewing environment later on, you will need to initialise all settings by accessing Shipping
Condition. [Shipping Condition] (p. 62)
Connect
Connection Test
Check wireless network connection.
Check acquired IP address.
Check for devices using same IP address.
Check gateway connection.
Check server connection.
(Press twice)
Home Shop
You have selected shop mode
●
Ensure that your access point supports WPS for this setup.
●
WPS: Wi-Fi Protected Setup™
●
If the connection has failed, check the settings and positions of
your access point.
And then, follow the on-screen instructions.
: succeeded
The test is successful and the TV is connected to the
network.
: failed
Check the settings and connections. And then select
[Retry].
●
To set manually, select [Manual] and set each item.
For details
(p. 85)
select
set
2 Select [Home]
Please select your viewing environment.
Home Shop
select
set
Auto Setup is now complete and your TV is ready for viewing.
If tuning has failed, check the connection of the Satellite cable, RF cable, and then, follow the on-screen
instructions.
Note
●
To check the channel list
●
To edit or hide (skip) channels “Tuning and Editing Channels” (p. 52 - 55)
●
To retune all channels [Auto Setup] (p. 48 - 51)
●
To add the available TV mode later [Add TV Signal] (p. 44)
●
To initialise all settings [Shipping Condition] (p. 62)
“Using TV Guide” (p. 24)
18
Page 19
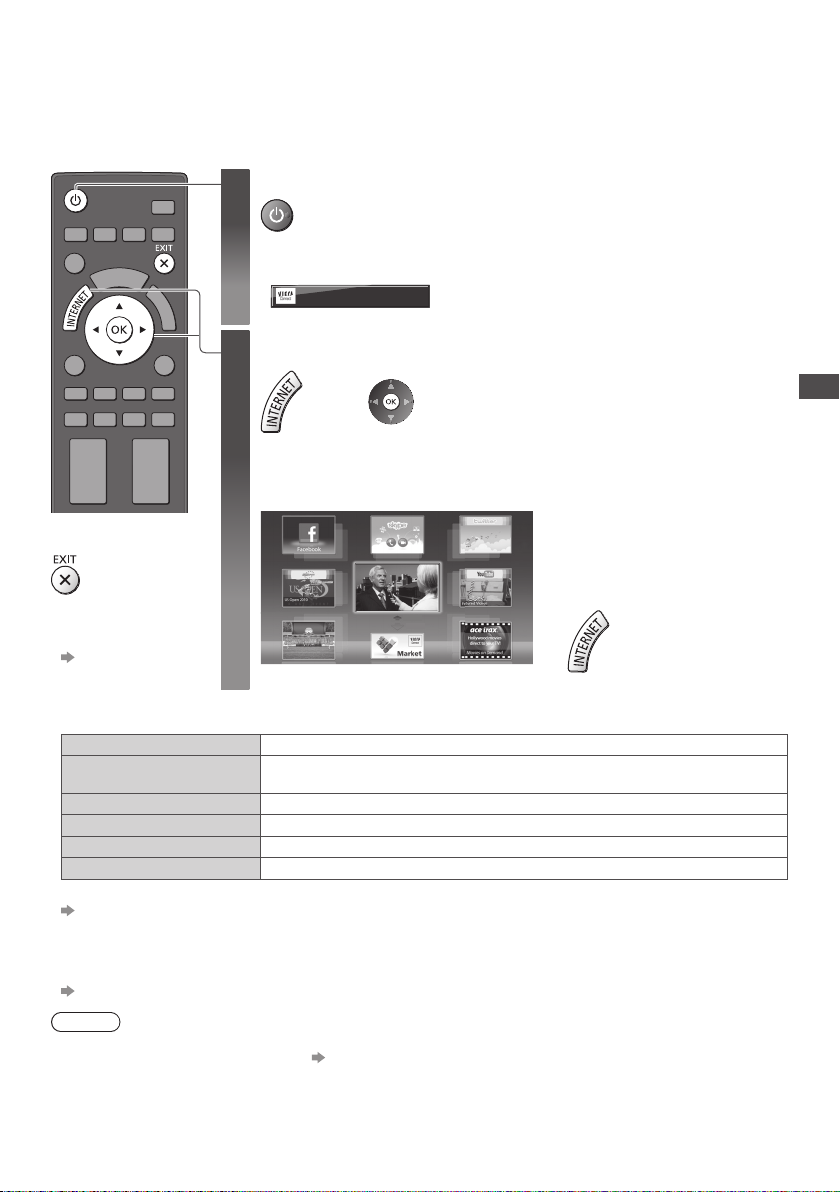
Using “VIERA Connect”
VIERA Connect is a gateway to the internet services unique to Panasonic.
VIERA Connect allows you to access some specific websites supported by Panasonic, and enjoy internet contents
such as videos, games, communication tools, etc. from VIERA Connect home screen.
●
This TV does not support full web browser function and some features of the websites may not be available.
Turn power on
1
●
Every time you turn on the TV, VIERA Connect introduction banner appears. The
banner is subject to change.
Enjoy selected internet content with VIERA Connect.
Simply press the OK / INTERNET button
Access VIERA Connect
2
While the banner is displayed
●
Press for about 1 second.
●
Mains power On / Off switch should be on.
1)
(p. 1
or
●
Depending on the usage conditions, it may take a while to read all the data.
●
Messages might be displayed before VIERA Connect home screen.
Please read these instructions carefully and follow the on-screen instructions.
Example: VIERA
■
To exit from
VIERA Connect
●
To set the VIERA
Connect introduction
banner display of
[VIERA Connect
Banner] (p. 45)
●
Setup menu (Items in [Setup] may change without notice.)
Customize HomeScreen Changes the position of each services on VIERA Connect home screen
My Account
Lock Sets to restrict access to some services
Restrictions Sets to restrict reveal of the restricted services
Beep Sets beep sound On or Off when operating VIERA Connect
Notices Displays the information of VIERA Connect
●
Video communication (for example Skype™) requires an exclusive Communication Camera TY-CC20W.
“Optional accessories” (p. 7)
For details, read the manual of the Communication Camera.
●
You can connect a keyboard and a gamepad for character input and playing games in VIERA Connect. You can also
operate the TV with a keyboard or a gamepad other than VIERA Connect features.
For more information
“USB connection” (p. 109), “Bluetooth Setup” (p. 109), “Operations from Keyboard / Gamepad” (p. 110)
f
Confirms or removes the account information of the TV you entered on VIERA
Connect
Connect home screen
MORE
BACK
●
To go to the next level, select
[MORE].
●
To back to the previous level,
select [BACK].
●
To return to VIERA Connect home
screen
Note
●
If you cannot access VIERA Connect, check the network connections (p. 14) and settings (p. 16 - 18).
●
For more information of VIERA Connect
(p. 82)
Using “VIERA Connect”
19
Page 20
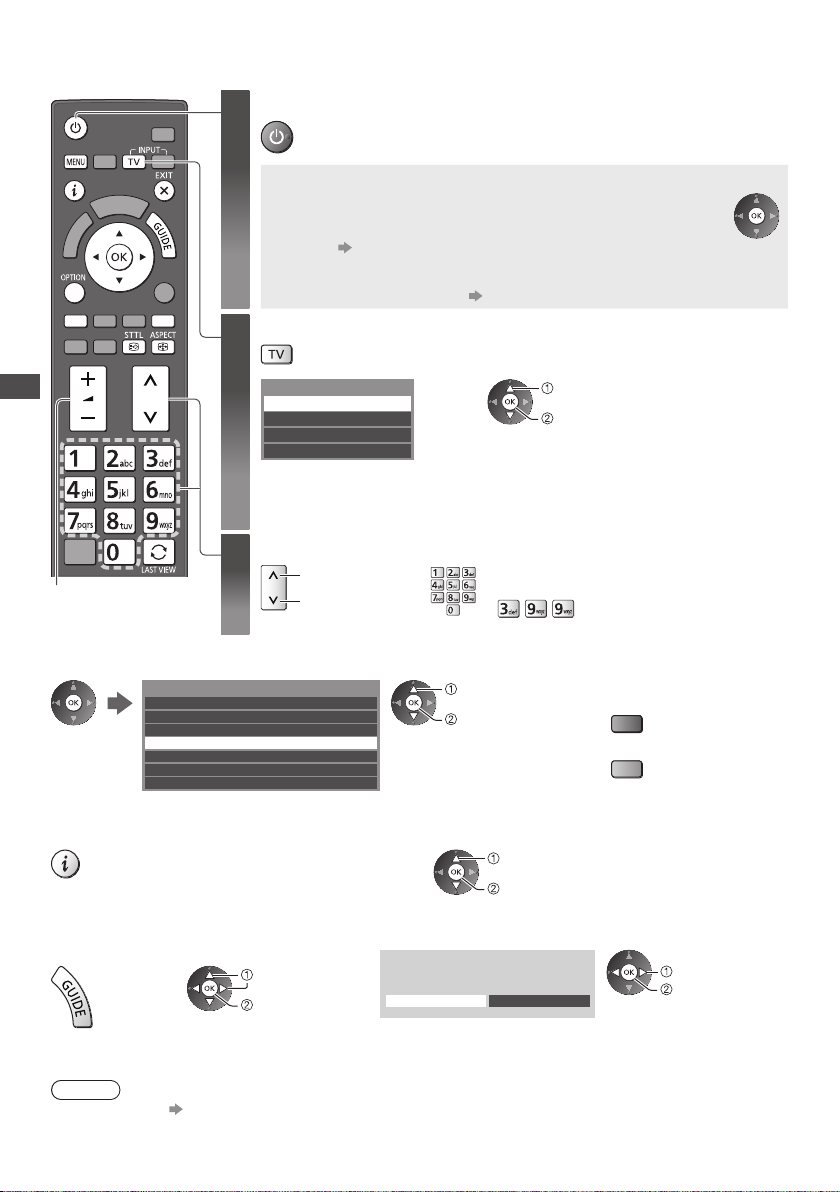
Watching TV
Watching TV
Volume
Turn power on
1
Select the mode
2
Select a channel
3
●
Press for about 1 second.
●
Mains power On / Off switch should be on. (p. 11)
■ VIERA Connect introduction banner appears
Every time you turn on the TV, this banner appears at the bottom of the
screen.
You can access to VIERA Connect easily and enjoy the various
contents. (p. 19)
●
To remove this banner, leave for about 5 seconds or press any
buttons (except the buttons to access VIERA Connect).
●
To set this banner display off [VIERA Connect Banner] (p. 45)
●
The selectable modes vary depending on the
stored channels (p. 15).
TV Selection
DVB-S
DVB-C
DVB-T
Analogue
up
down
or
select
access
●
You can also select the mode pressing the TV
button repeatedly on the remote control or the
TV (p. 11).
●
If [TV Selection] menu is not displayed, press
the TV button to switch the mode.
●
To select a more than two-digit channel
position number
, e.g. 399
■ To select from the Channel List
●
All DVB-T Channels
6 Cartoon Nwk
7 BBC Radio Wales
8 BBC Radio Cymru
1 BBC ONE Wales
2 BBC THREE
3 BBCi
4 CBBC Channel
Sorting 123...
select channel
watch
To sort channel names in
alphabetical order
(red)
●
To change the category
(blue)
■ To select a channel using Information banner (p. 21)
1 Display Information banner if it is not displayed
2 While the banner is displayed, select the channel
select channel
watch
■ To select a channel using TV Guide (p. 24)
1 Display TV
Guide
●
The postcode entry or update may be required depending on the country you select (p. 15). Follow the on-screen
instructions.
Note
●
To watch pay-TV
20
2 Select the current
programme or channel
select
access
“Using Common Interface” (p. 61)
3 Select [View] (DVB)
Das Erste
19:30- 20:00
View Timer Programming
select
watch
Page 21
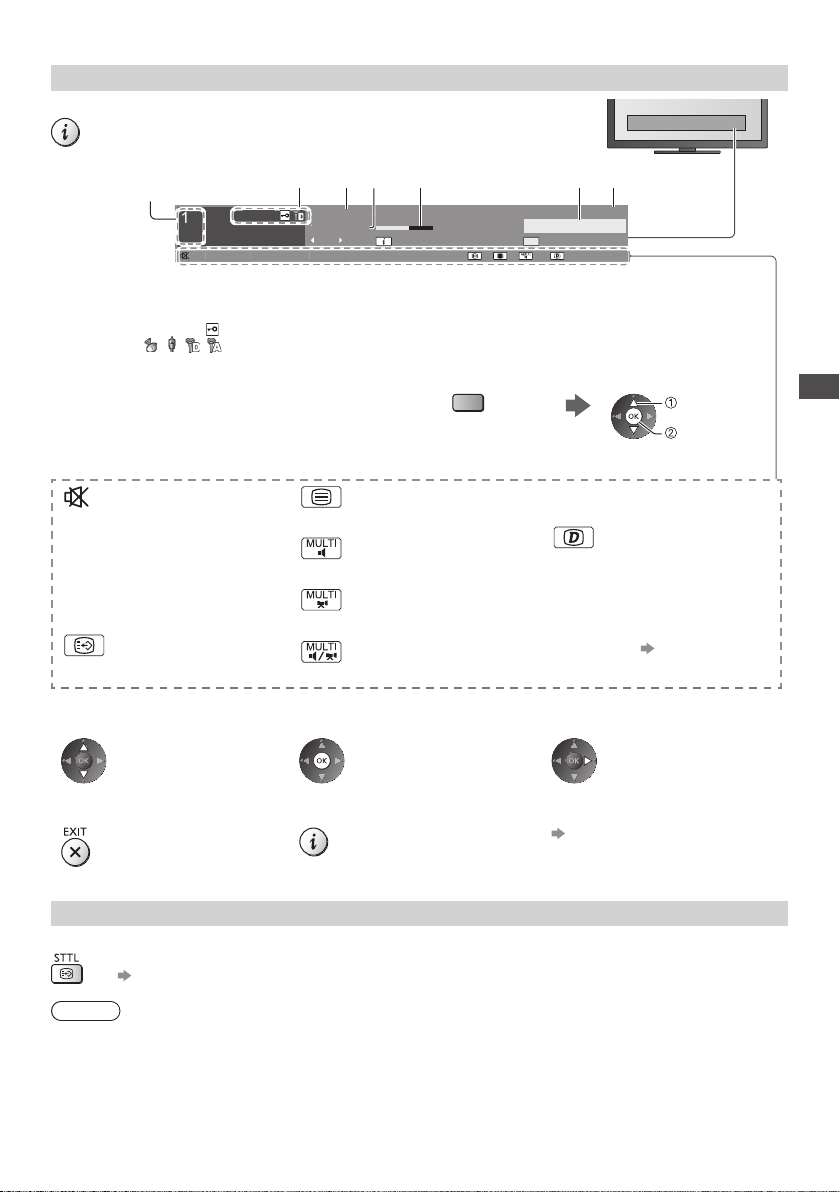
Other useful functions
5
C
Display Information banner
Display Information banner
●
Features available / Message meanings
Also appears when changing a channel.
1
Example: DVB
1
ZDF
2 3 6 7 4 5
HDTV
Channel position and name
1
Channel type ([Radio], [Data], [HDTV], etc.) /
2
Encrypted channel ( ) /
TV mode ( , , , )
Programme
3
Current time
4
Sound mute on
[Bad signal]
Poor TV signal quality
[Dolby D+], [Dolby D], [HE-AAC]
Dolby Digital Plus, Dolby Digital or
HE-AAC audio track
Subtitle service available
Coronation Street
20:00 - 20:55
Now
Dolby D+Bad signal
Dolby D+ Bad signal
Programme Start / Finish time (DVB)
5
Channel number, etc. (Analogue)
Progress time indicator of the selected programme
6
(DVB)
Category
7
●
To change the category (DVB)
(blue)
Teletext service available
Multiple audio available
Multiple video available
Multiple audio and video available
All DVB-T Channels
Change category Info
20:35
45
4
select
set
[Stereo], [Mono]
Audio mode
Data service (Hybrid Broadcast
Broadband TV application)
available (p. 60)
1 - 90
Off Timer remaining time
●
For settings
(p. 22)
Watching TV
●
To confirm another tuned channel
name
●
To hide
Display subtitles
Display / hide subtitles (if available)
●
To change the language for DVB (if available)
[Preferred Subtitles] (p. 44)
●
●
Note
If you press this button in Analogue mode, it switches to teletext service and calls up a favourite page (p. 27). Press
button to return to TV mode.
the EXIT
Subtitles may not be displayed properly in 3D images.
●
To watch the channel listed in the
banner
●
Extra information (DVB)
(Press again to hide the banner)
●
Information on the next programme
(DVB)
●
To set display timeout
[Banner Display Timeout] (p. 45)
21
Page 22
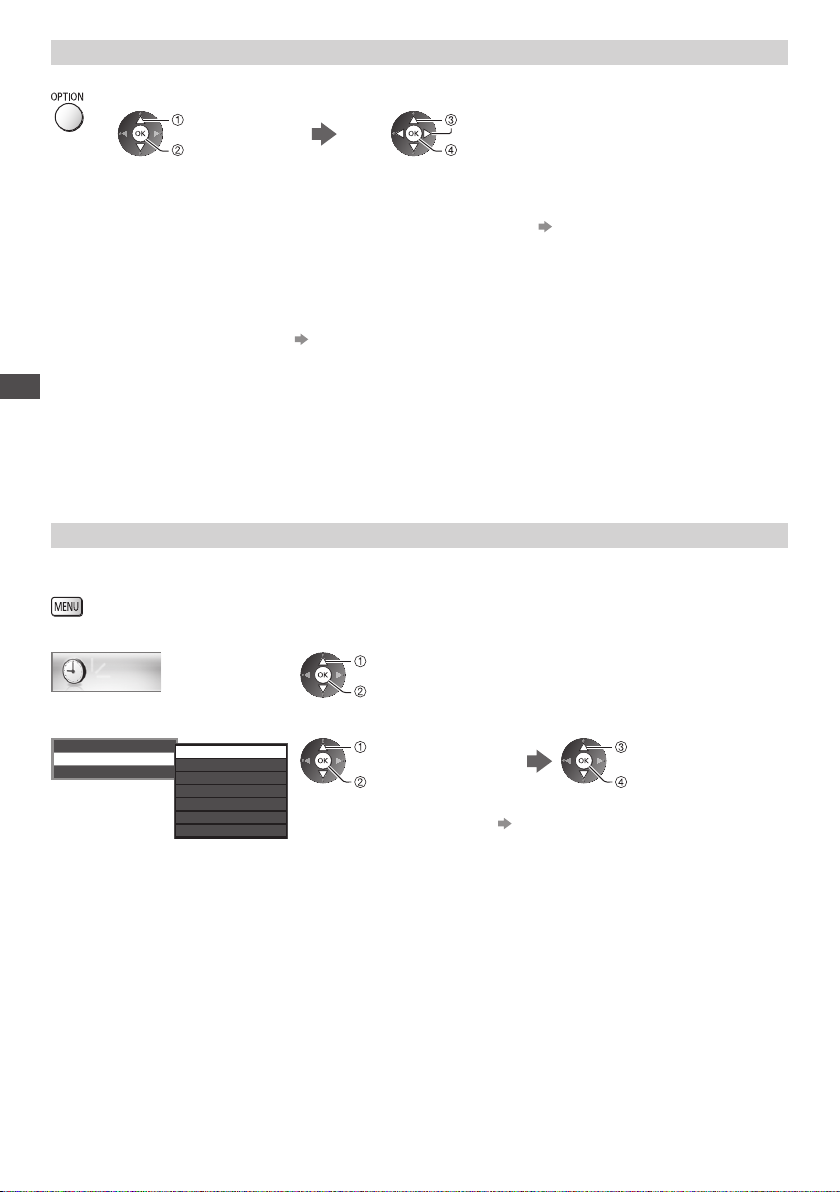
Display the selectable settings for the current status
Confirm or change the current status instantly
●
To change
[Multi Video] (DVB)
Selects from a group of multiple
videos (if available)
●
This setting is not memorised
and it will return to the default
setting once you exit the current
programme.
[Multi Audio] (DVB)
Selects between alternative
language for sound tracks (if
available)
●
This setting is not memorised
and it will return to the default
setting once you exit the current
Watching TV
programme.
select
access
[Sub Channel] (DVB)
Selects the multifeed programme sub channel (if available)
[Subtitle Language] (DVB)
Selects the language in which
subtitles should appear (if available)
eletext Character Set]
[T
Sets the teletext language font
(p. 45)
[Teletext Language] (DVB)
Selects between alternative
language for teletext (if available)
[Dual Audio] (DVB)
Selects stereo / monaural (if
available)
Off Timer
Turn the TV to Standby mode automatically after a fixed period
1 Display the menu
2 Select [Timer]
Timer
select
access
3 Select [Off Timer] and set the time in 15-minute increments
imer Programming
T
Off Timer
Auto Standby
Off
15
30
45
60
75
90
minutes
minutes
minutes
minutes
minutes
minutes
select [Off Timer]
access
●
To cancel, set to [Off] or turn the TV off.
●
To confirm the remaining time
●
When the remaining time is within 3 minutes, the remaining time will flash on
the screen.
select / change
store
[MPX] (Analogue)
Selects multiplex sound mode (if
available)
(p. 41)
[Volume Correction]
Adjusts volume of individual channel or
input mode
[Safely remove USB]
Takes this operation to remove the
connected USB device safely from the
TV
“Display Information banner” (p. 21)
select the time
store
22
Page 23
Aspect
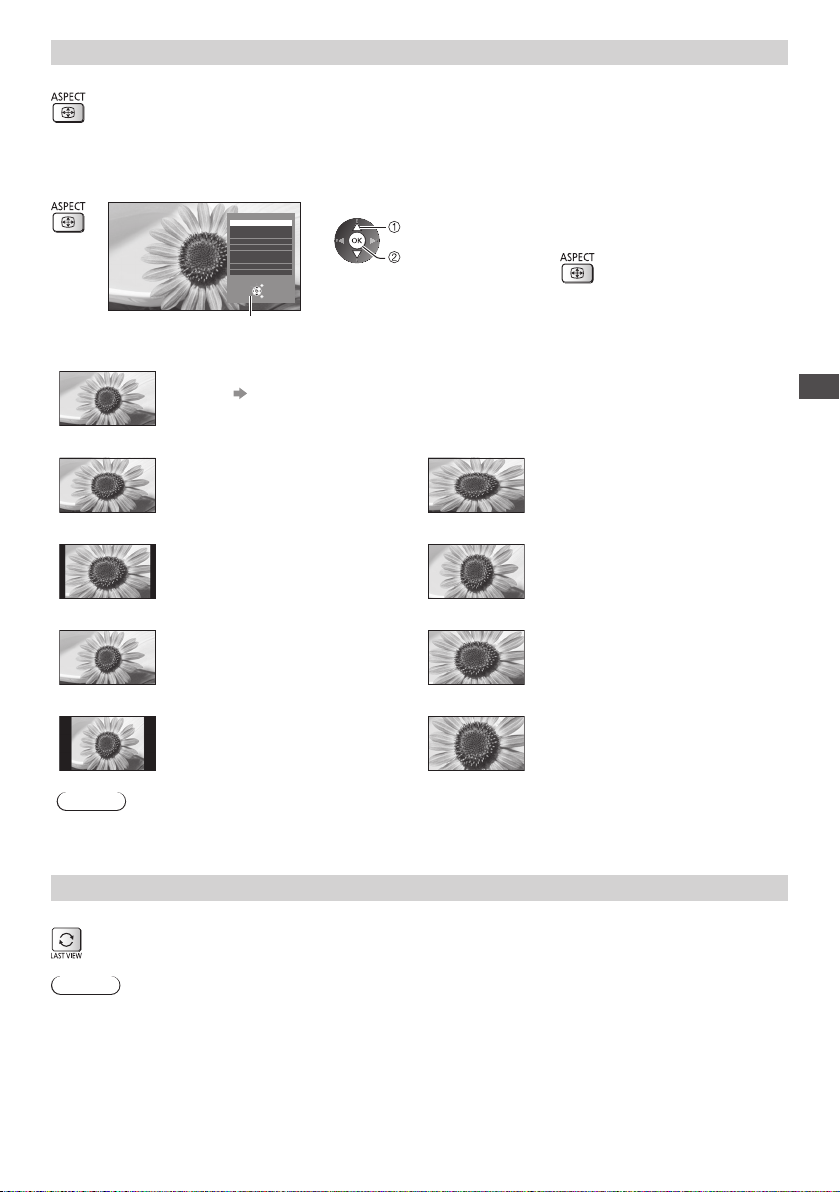
Change the aspect ratio (image size)
Enjoy viewing the image at its optimum size and aspect.
Programmes usually contain an “Aspect Control Signal” (Widescreen signal, etc.), and the TV will choose the
aspect ratio automatically according to the “Aspect Control Signal” (p. 103).
■ To change the aspect ratio manually
1 Display Aspect Selection list
Aspect Selection
Auto
16:9
14:9
Just
4:3
4:3 Full
Zoom1
Zoom2
Zoom3
Change
Aspect Selection list
Select
EXIT
RETURN
2 While the list is displayed,
select the mode
select
store
[Auto]
The best ratio is chosen and the image expanded to fill the screen.
For details (p. 103)
[16:9] [4:3 Full]
Directly displays the image at 16:9
without distortion (anamorphic).
[14:9] [Zoom1]
Displays the image at the standard
14:9 without distortion.
[Just] [Zoom2]
Displays a 4:3 image full-screen.
Stretching is only noticeable at the left
and right edges.
[4:3] [Zoom3]
Displays the image at the standard 4:3
without distortion.
Note
●
Aspect cannot be changed in teletext service and 3D mode.
●
Aspect mode can be memorised separately for SD (Standard definition) and HD (High definition) signals.
●
You can also change the mode only
using the
ASPECT button.
(Press repeatedly until you
reach the desired mode.)
Displays a 4:3 image enlarged
horizontally to fit the screen.
Displays a 16:9 letterbox or 4:3 image
without distortion.
Displays a 16:9 letterbox (anamorphic)
image full-screen without distortion.
Displays a 2.35:1 letterbox (anamorphic)
image full-screen without distortion.
At 16:9, displays the image at its
maximum (with slight enlargement).
Watching TV
Last view
Switch to previously viewed channel or input mode easily
●
Press again to return to the current view.
Note
●
Switching channel is not available while the recording of Timer Programming, Direct TV Recording or One Touch
Recording is in progress.
●
Watching less than 10 seconds is not regarded as the previously viewed channel or input mode.
23
Page 24
Using TV Guide
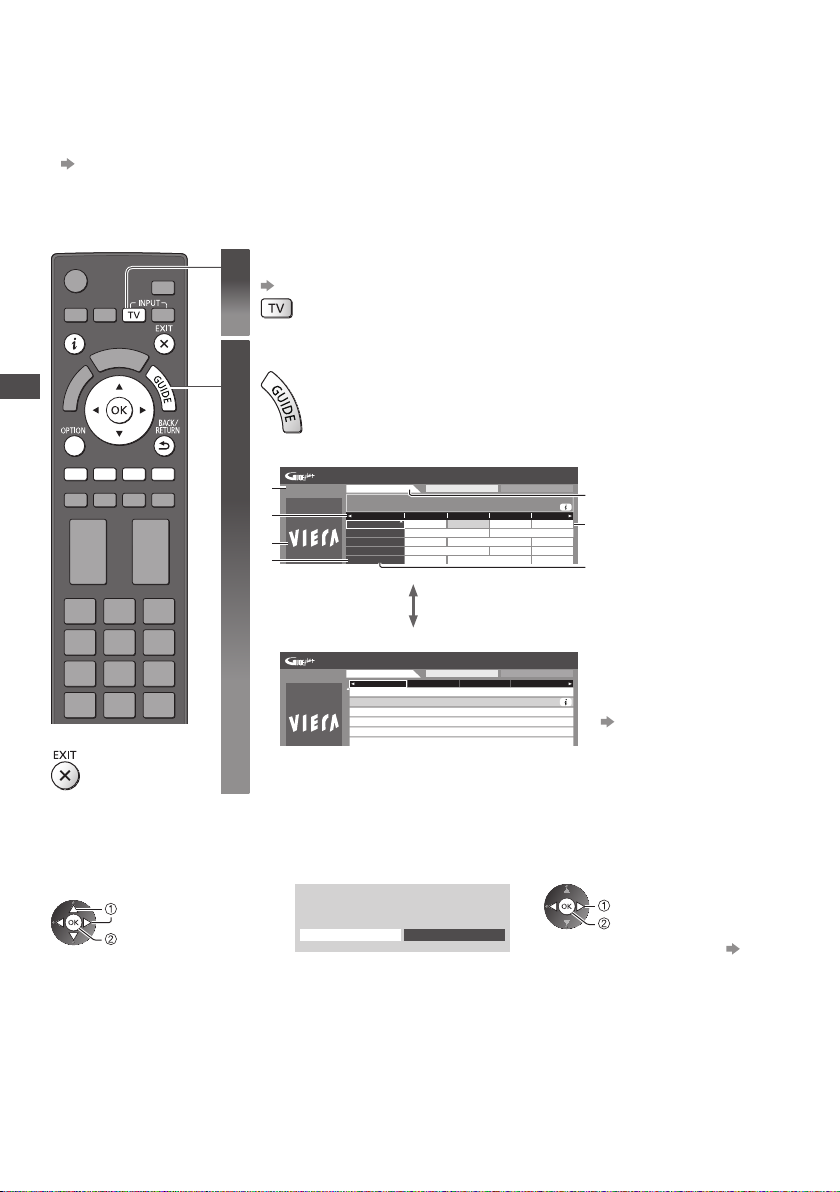
TV Guide - Electronic Programme Guide (EPG) provides an on-screen listing of the programmes currently broadcast
and the forthcoming broadcasts over the next seven days (depending on the broadcasters).
●
This function varies depending on the country you select (p. 15).
●
The postcode entry or update may be required to use the GUIDE Plus+ system depending on the country you select.
“View advertisement” (p. 25)
●
DVB-T and Analogue channels are displayed on the same TV Guide screen. [D] and [A] may be displayed to
distinguish DVB-T
●
When this TV is turned on for the first time, or the TV is switched off for more than a week, it may take some time
before
TV Guide is completely shown.
Using TV Guide
■
To return to TV
and Analogue channels. There will be no programme listings for Analogue channels.
Select the mode
1
(p. 20)
View TV Guide
2
●
Press again to change the layout ([Landscape] / [Portrait]).
iew [Landscape] to see several channels.
V
View [Portrait] to see one channel by time.
Example: [Landscape]
Wed 26.10.2011
1
10:46
3
5
7
Example: [Portrait]
Wed 26.10.2011
10:46
TV Guide: Landscape
Wed 26.10.2011 All Types All Channels
1 BBC ONE
20:00 - 20:30 DIY SOS : We open in the Battersbys
19:30 20:00 20:30 21:00
Time:
Das Erste DIY SOS The Bill Red Cap
D
BBC ONE
1
Hot Wars Holiday Program
D
BBC THREE
7
Emmerdal.
10 O’ clock News BBC
Das Erste
DIY SOS
The Bill
Red Cap
Live junction
POP 100
Coronation Street
Pepsi Char.
ypes All Channels
D
E4
14
D
BBC FOUR
70
D
BBC 2W
72
TV Guide: Portrait
Wed 26.10.2011 All T
D BBC ONE1 D BBC THREE7DE414 D BBC FOUR70
19:30-20:00
20:00-20:30
20:30-21:00
21:00-22:00
22:00-23:00
23:00-23:30
The Bill
Good bye
CoastSpring watchPanorama
Current date and time
1
2
TV Guide date
2
4
TV Guide time
3
Programme
4
6
Advertisement
5
Channel position and
6
name
[D]: DVB-T
7
[A]: Analogue
Depending on the country
you select, you can select
the TV Guide type
[Default Guide] (p. 45)
If you select [Channel List],
the channel list will appear
when the GUIDE button is
pressed.
■ To watch the programme
1 Select the current programme
or channel
select
access
24
2 Select [View] (DVB)
Das Erste
19:30- 20:00
View Timer Programming
select
watch
●
To use Timer Programming
(p. 26)
Page 25
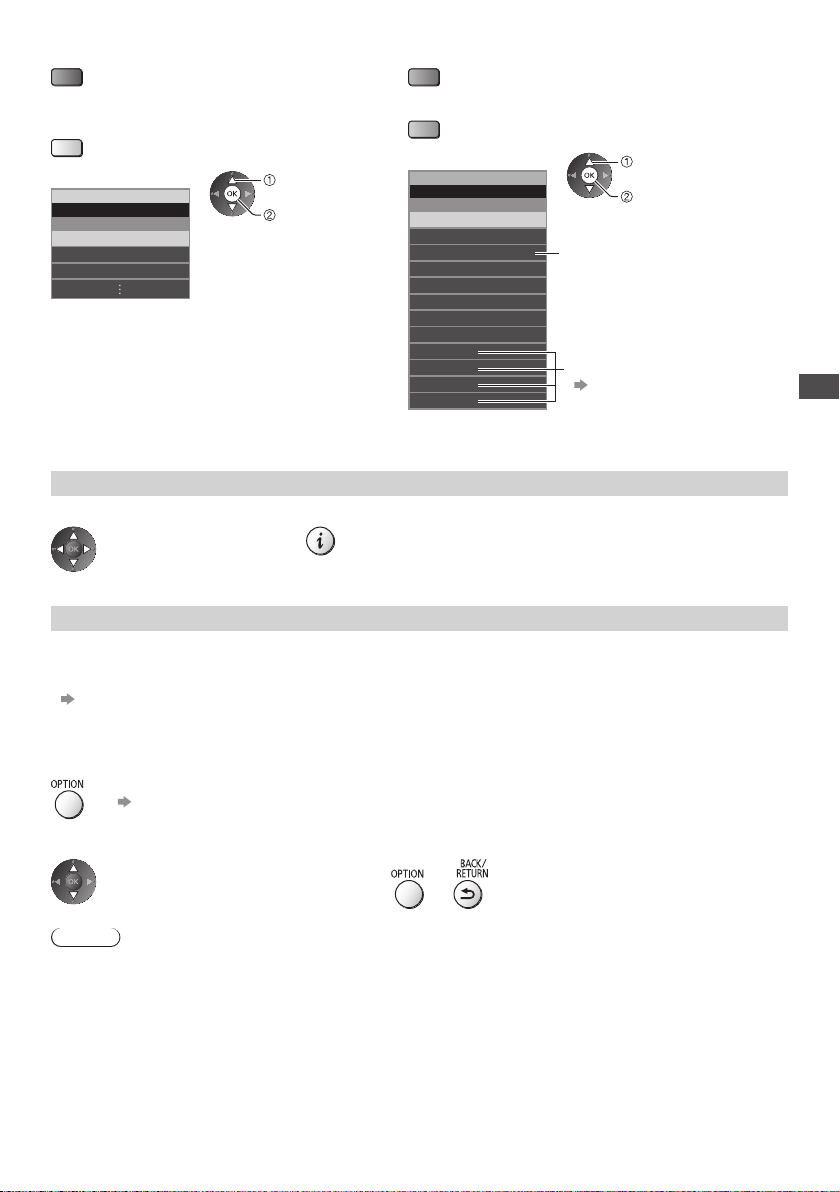
■ To the previous day (DVB)
(red)
■ To view a channel list of the selected type
(DVB)
(yellow)
All Types
Movie
News
(Type list)
Prog.Type
All Types
select type
view
■ To the next day (DVB)
(green)
■ To view a channel list of the selected category
(blue)
(Category list)
Category
All Channels
All Channels
All DVB-T Channels
All Analogue
Free TV
Pay TV
HDTV
Free Radio
Pay Radio
Favourites1
Favourites2
Favourites3
Favourites4
Channels
select category
view
Only Analogue channels are listed
●
To list favourite channels
(p. 52)
Other useful functions
View details of the programme (DVB)
Select the programme 2 View details
1
●
Press again to return to TV Guide.
View advertisement
Depending on the country you select, this TV supports the GUIDE Plus+ system in DVB-T or Analogue mode
The postcode entry or update is required. Follow the on-screen instructions.
●
You can also setup manually from the Setup Menu.
[Update] / [Postcode] in [GUIDE Plus+ Settings] (p. 46)
●
Enter your postcode when using this function for the first time. If you enter an incorrect postcode for your area, or no
postcode is entered, advertisements may not be displayed correctly.
Using TV Guide
Display advertisement information
●
To display the latest advertisement
[Update] in [GUIDE Plus+ Settings] (p. 46)
■ To change advertisements ■ To return to TV Guide
Note
●
To update the information continuously, the TV must be left in Standby mode.
or
25
Page 26
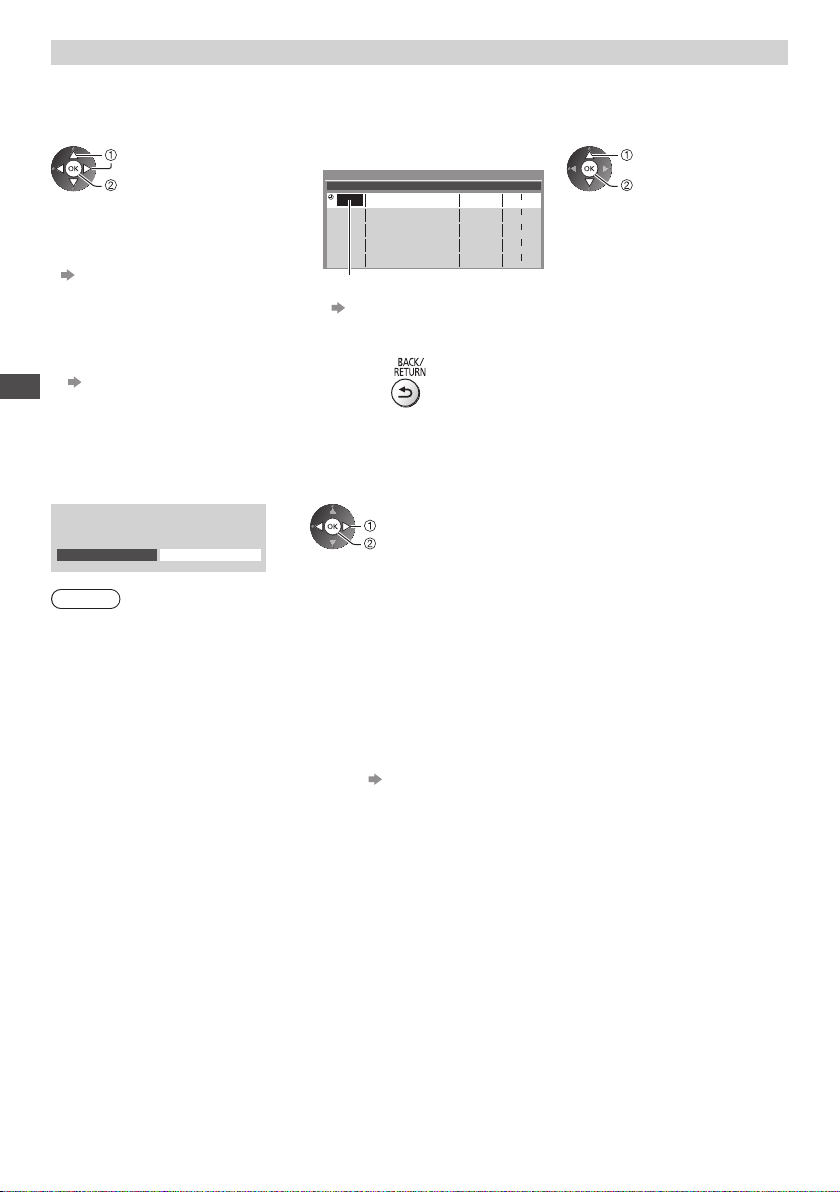
Timer Programming (DVB)
The Timer Programming menu allows you to choose programmes that you want to remind watching or record to the
external recorder or the USB HDD. At the correct time, the TV will tune to the correct channel even if the TV is in
Standby mode.
1 Select the forthcoming programme 2 Select the function ([Ext Rec.], [USB HDD Rec.] or [Reminder])
select
set
●
LED will turn to orange if
Timer Programming is set.
(Orange LED will flash if the recording
of Timer Programming is in progress.)
“Indicator / Control panel” (p. 11)
(Timer Programming screen)
Timer Programming
Function No. Channel Name Date Start End
Ext Rec.
<TIMER>
--- --/-- --:-- --:-----
--- --/-- --:--
---
--- --/-- --:-- --:-----
--- --/-- --:-- --:-----
Wed 26.10.2011 10:46
Wed 26.10.2011
20:00D 12 BBC ONE
(30 min.)
(--- min.)
(--- min.)
(--- min.)
(--- min.)
20:30
--:--
[Ext Rec.] / [USB HDD Rec.] / [Reminder]
“Set timer programming event details” (p. 57)
select
store
■ To check / change / cancel a timer
■ To return to TV Guide
programming event
“Timer Programming” (p. 56 - 58)
Using TV Guide
■ If you select the current programme
A confirmation screen asking whether you want to watch or record the programme appears.
Select [Timer Programming] and set [Ext Rec.] or [USB HDD Rec.] to record from the time you finish the timer
programming event setting.
Das Erste
19:30- 20:00
View Timer Programming
Note
●
This function is not available in Analogue mode.
●
Timer Programming only works reliably if correct time information is received via the signal from the broadcaster or
service provider
●
No other channel can be selected while the recording of Timer Programming is in progress.
●
When recording programmes to the external recorder, be sure to make the proper settings on the recorder connected
to the TV.
If a compatible recorder with Q-Link, VIERA Link or similar technologies is connected to the TV (p. 94, 95) and [Link
Settings] (p. 43) are completed, no setting of the recorder is required. Also read the manual of the recorder.
●
When recording programmes to the USB HDD, be sure to format the USB HDD and enable it to record in [Recording
Setup] (p. 66).
●
For more information of the USB HDD Recording (p. 66, 107)
.
select
access
26
Page 27
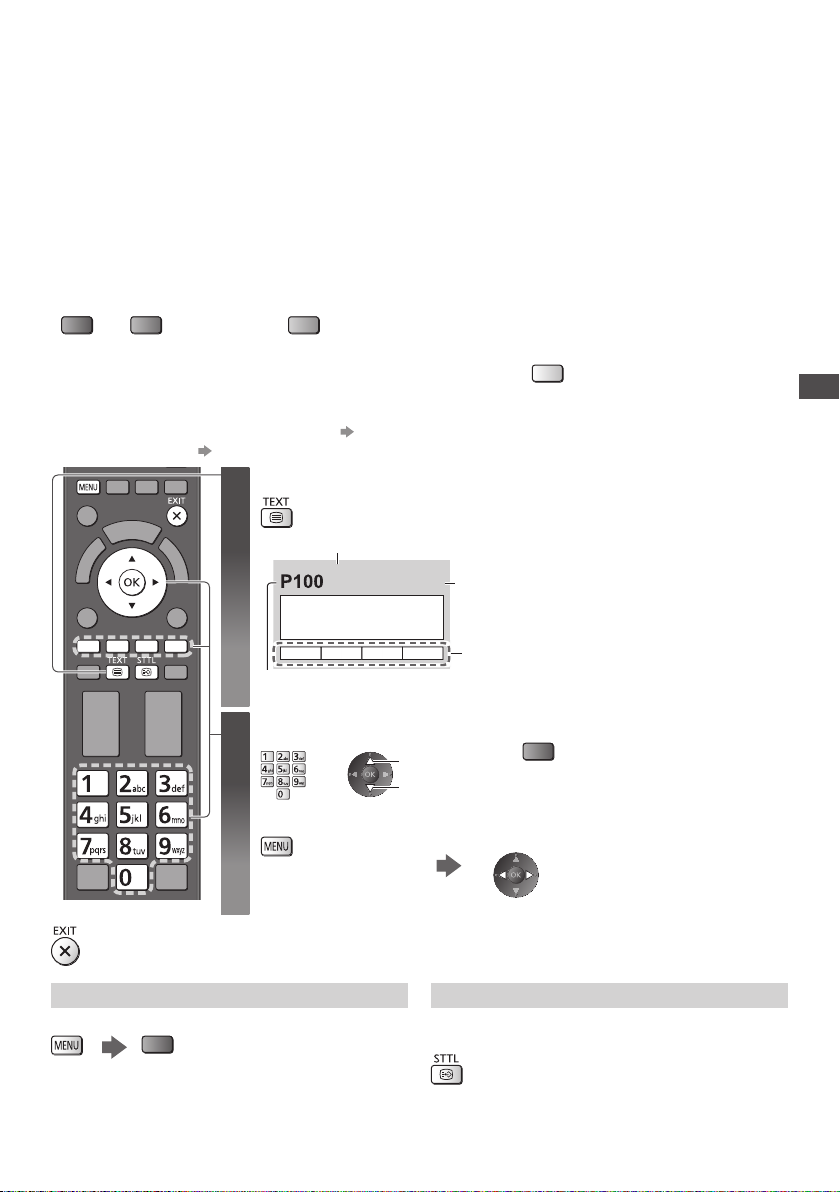
Viewing Teletext
Teletext services are the text information provided by the broadcasters.
The features may vary depending on the broadcasters.
What is FLOF (FASTEXT) mode?
In FLOF mode, four differently coloured subjects are situated at the bottom of the screen. To access more information
about one of these subjects, press the appropriate coloured button. This facility enables fast access to information on
the subjects shown.
What is TOP mode? (in case of TOP text broadcasting)
TOP is a particular improvement of the standard teletext service that results in an easier search and effective guide.
●
Fast overview of the teletext information available
●
Easy to use step-by-step selection of the topical subject
●
Page status information at the bottom of the screen
●
Available page up / down
(red) (green)
What is List mode?
In List mode, four differently coloured page numbers are situated at the bottom of the screen. Each of these numbers
can be altered and stored in the TV’s memory.
■ To change mode [Teletext] (p. 45)
●
To select among subject blocks
(blue)
“Store frequently viewed pages” (p. 28)
Switch to Teletext
1
Sub page number
<< 01 02 03 04 05 06 07 >>
TELETEXT
INFORMATION
Current page number
17:51 28 Feb
●
Time / date
Colour bar
●
To select next subject within the subject
block
(After the last subject, it moves to the
next subject block.)
(yellow)
Displays the index page (content varies
depending on the broadcasters).
Viewing Teletext
Select the page
2
or
■ To adjust contrast
(Press three times)
■
To return to TV
Reveal hidden data
Reveal hidden words e.g. quiz page answers
(red)
●
Press again to rehide.
up
down
Coloured button
or
(Corresponds to the colour bar)
As the blue bar is displayed
Call up a favourite page
View a favourite page stored
Call up the page stored on the blue button (List mode).
●
Factory setting is “P103”.
27
Page 28
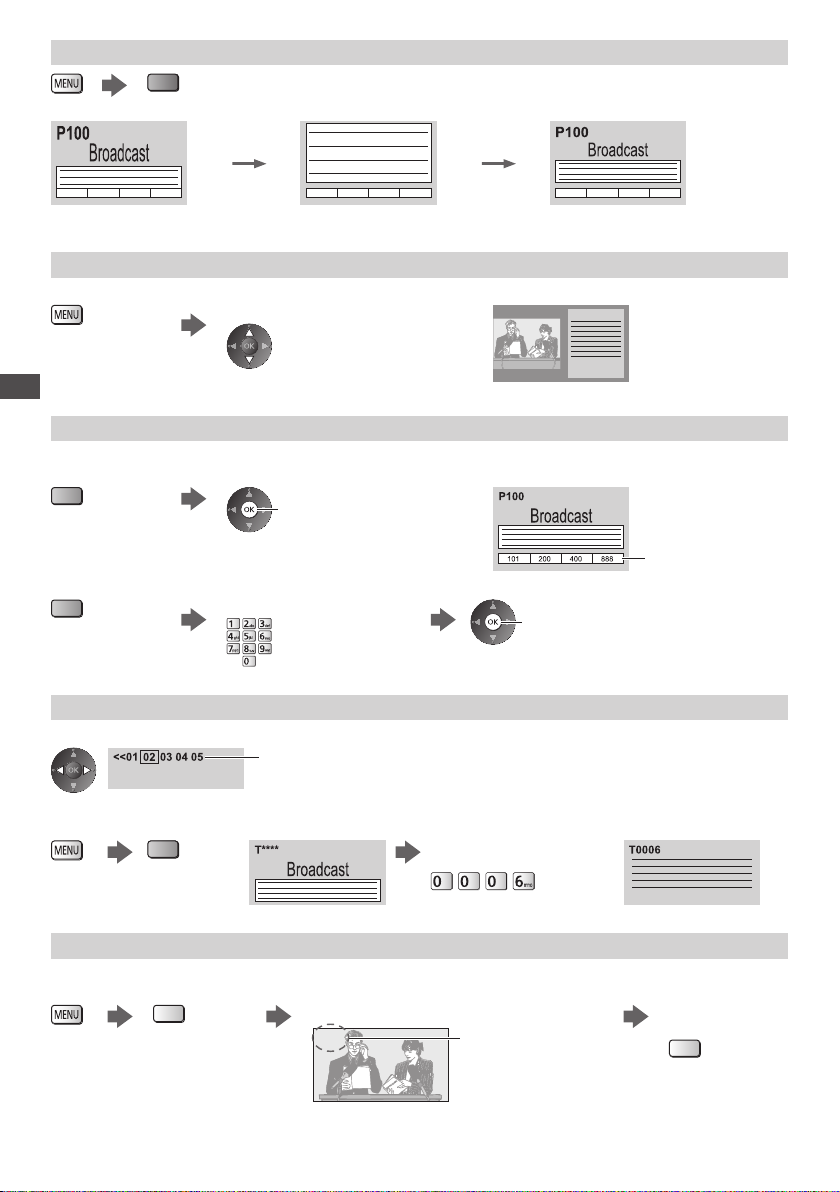
FULL / TOP / BOTTOM
(green)
(TOP) (BOTTOM) Normal (FULL)
(Expand the TOP half) (Expand the BOTTOM half)
View in multi window
Watch TV and Teletext in two windows at once
(Press twice)
●
Operations can be made only in teletext screen.
Viewing Teletext
Select [Picture and text] On or Off
Store frequently viewed pages
Store frequently viewed pages in the colour bar (List mode only)
As page is displayed
(Corresponding
coloured button)
press and hold
■ To change stored pages
Coloured button
you want to change
View sub page
View sub page (Only when Teletext is more than one page)
Enter new page number
Appears at top of the
screen
■ To view specific sub page
(blue)
●
The number of sub pages varies depending on the
broadcasters (up to 79 pages).
●
It may take some time for searching, during which
time you can watch
Enter the 4-digit number
Example: P6
press and hold
TV.
The number changes
to white.
Watch TV while waiting for update
View the TV picture while searching for a teletext page
Teletext automatically updates itself when new information becomes available.
(yellow)
●
The news page provides a function that indicates arrival of the latest news (“News Flash”).
Changes to TV screen temporarily
P108
(You cannot change the channel.)
Appears when
updating is completed
28
View the updated
page
(yellow)
Page 29
Watching External Inputs
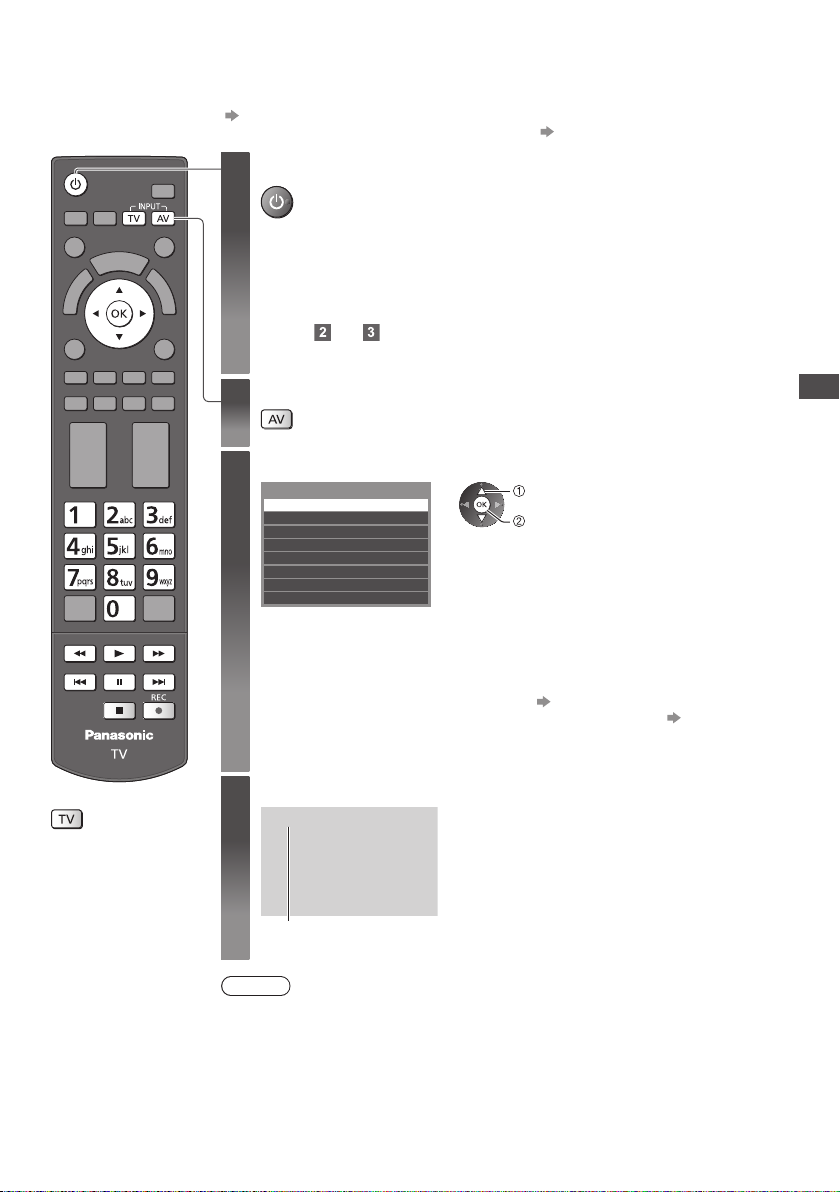
Connect the external equipment (VCRs, DVD equipment, etc.) and you can watch through the input.
●
To connect the equipment (p. 12 - 14, 100 - 102)
The remote control is capable of operating the contents or external equipment.
Turn the TV on
1
When connecting with SCART (p. 13)
Receives input signals automatically when playback starts
●
Input signals are automatically identified by the SCART (pin 8) terminal.
●
This function is also available for HDMI connections (p. 100).
If input mode is not switched automatically
Perform and
●
Check the setup of the equipment.
(p. 30)
■
To return to TV
Display the input selection menu
2
Select the input mode connected to the equipment
3
Input Selection
AV1
AV2
HDMI1
HDMI2
HDMI3
HDMI4
TV
SD Card/USB
●
You can also select the input using the AV button on the remote control or the TV
(except [SD Card/USB]).
Press the button repeatedly until the desired input is selected.
●
To switch between [COMPONENT] and [VIDEO] in [AV2], move the indicator by
pressing left and right cursor button.
●
[SD Card/USB]: Switches to Media Player.
●
You can label or skip each input mode (except [SD Card/USB]). “Input Labels”
(p. 45)
Skipped inputs will not be displayed when the AV button is pressed.
View
4
AV1
Displays the selected mode
select
watch
“Using Media Player” (p. 70)
Note
●
If the external equipment has an aspect adjustment function, set it to “16:9”.
●
For details, read the manual of the equipment or ask your local dealer.
Watching External Inputs
29
Page 30
Operating the contents or equipment with the TV remote control
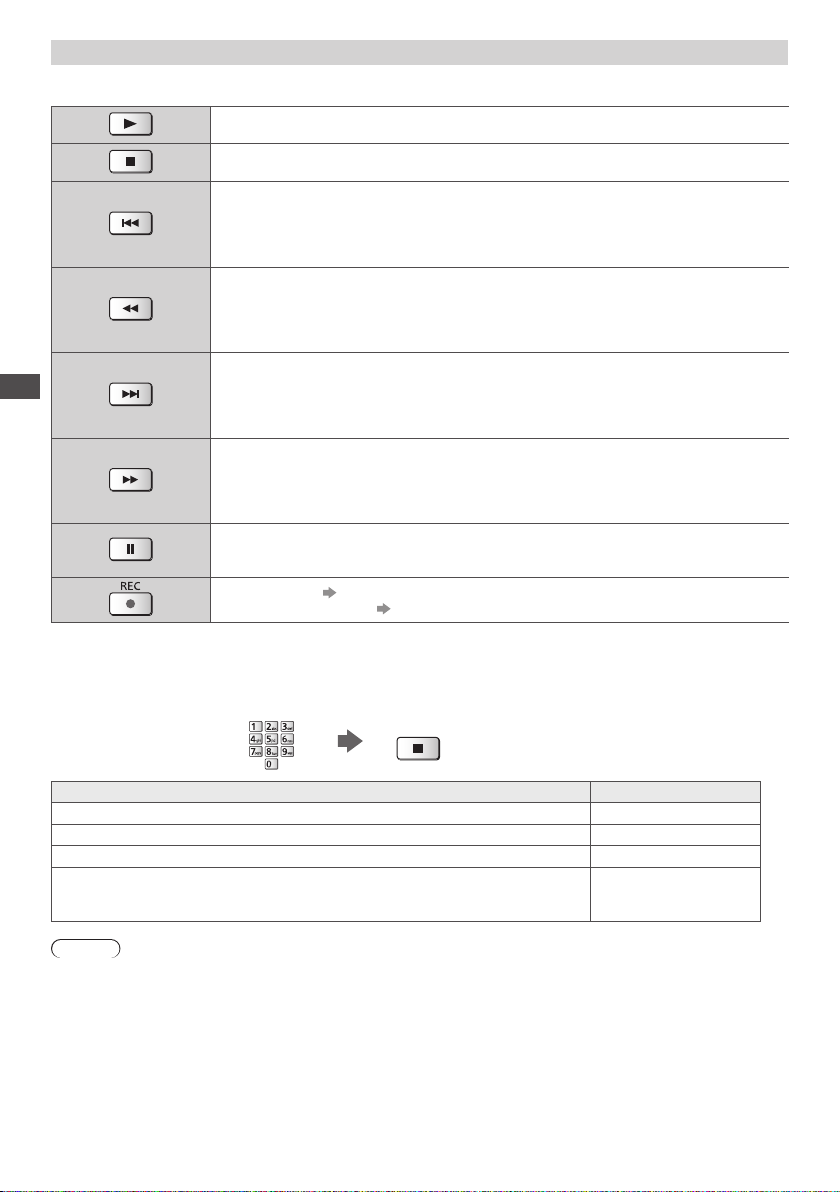
You can operate the contents in Media Player / media servers, recording functions or the connected equipment with
the below buttons of this TV remote control.
Watching External Inputs
Play
Playback videocassette / DVD / video content
Stop
Stop the operations
Rewind / Skip
VCR:
Rewind, view the picture rapidly in reverse
DVD / video content:
Skip to the previous track, title or chapter
Rewind / Search
VCR:
Rewind, view the picture rapidly in reverse
DVD / video content:
Search backward
Fast-forward / Skip
VCR:
Fast-forward, view the picture rapidly forward
DVD / video content:
Skip to the next track, title or chapter
Fast-forward / Search
VCR:
Fast-forward, view the picture rapidly forward
DVD / video content:
Search forward
Pause
Pause / Resume
DVD: Press and hold to play at slow speed
[Direct TV Rec] (p. 94, 96)
[One Touch Recording] (p. 68)
How to change the code
Each type of the Panasonic equipment has its own remote control code.
Change the code according to the equipment you want to operate.
Press and hold Standby On / Off switch during the following operations
Enter the appropriate code,
see table below
Type of the equipment, features Code
DVD Recorder, DVD Player, Blu-ray Disc Player 70
Player theatre, Blu-ray Disc theatre 71
VCR 72
Using in USB HDD Recording (p. 68), Media Player (p. 71),
DLNA features (p. 88) or Direct TV Recording (p. 94, 96)
Equipment using in VIERA Link (p. 97)
Press
Note
●
Confirm if the remote control works correctly after changing the code.
●
The codes may be reset to default values if batteries are replaced.
●
Some operations may not be possible on some equipment models.
30
73 (default)
Page 31
Viewing 3D images
You can enjoy viewing 3D images with contents or programmes corresponding to the 3D effect by wearing the 3D
Eyewear. “Optional accessories” (p. 7)
This TV supports [Frame Sequential]
∗
1: The 3D format that the images for the left and right eyes are recorded with the high definition quality and alternately
played back.
∗
2, ∗3: Other available 3D formats
●
How to view the 3D images
Caution
To use 3D Eyewear safely and comfortably, please read these instructions fully.
Viewing 3D Content
●
Do not use the 3D Eyewear if you have a history of over-sensitivity to light, heart problems, or have any other existing
medical conditions.
●
Please stop using the 3D Eyewear immediately, if you feel tired, are not feeling well or experience any other
uncomfortable sensation. When you set the ef
images varies among different individuals.
●
Take an appropriate break after viewing a 3D movie.
●
Take a break of between 30 - 60 minutes after viewing 3D content on interactive devices such as 3D games or
computers.
●
Be careful not to strike the TV screen or other people unintentionally. When using the 3D Eyewear the distance
between the user and screen can be misjudged.
●
The 3D Eyewear must only be worn when viewing 3D content.
●
Use the 3D Eyewear where there is no interference from other devices with Bluetooth signal.
●
If you suffer from any eyesight problems (short / far-sighted, astigmatism, eyesight differences in left and right),
please ensure to correct your vision before using the 3D Eyewear
●
Stop using the 3D Eyewear if you can clearly see double images when viewing 3D content.
●
Do not use the 3D Eyewear at a distance less than the recommended distance.
The recommended viewing distance is at least 3 times of the image height.
TX-P42GT50E: 1.6 m or more
TX-P50GT50E: 1.9 m or more
When the top and bottom area of the screen is blackened, such as movies, view the screen at a distance at least 3
times of the height of the actual image. (That makes the distance closer than above recommended figure.)
3D Eyewear Use
●
Pay special attention when children are using the 3D Eyewear.
3D Eyewear should not be used by children younger than about 5 - 6 years old, as a guideline.
fully supervised by parents or guardians who must ensure their safety and health throughout the using 3D Eyewear.
●
Before using the 3D Eyewear, ensure no breakable objects surrounding the user to avoid any accidental damage or
injury.
●
Remove the 3D Eyewear before moving around to avoid falling or accidental injury.
●
Use the 3D Eyewear only for the intended purpose and nothing else.
●
Do not use 3D Eyewear in the condition of high temperature.
●
Do not use if the 3D Eyewear is physically damaged.
●
Do not use devices (such as mobile phones or personal transceivers) that emit strong electromagnetic waves near
the 3D Eyewear as this may cause the 3D Eyewear to malfunction.
●
Stop using the 3D Eyewear immediately if a malfunction or fault occurs.
●
Stop using the 3D Eyewear immediately if you experience any redness, pain, or skin irritation around the nose or
temples.
●
In rare cases, the materials used in the 3D Eyewear may cause an allergic reaction.
(p. 33)
1
∗
2
, [Side by Side]
∗
and [Top and Bottom]
fect by using [3D Adjustment], take into account that the vision of 3D
.
3
∗
3D formats.
All children must be
Viewing 3D images
31
Page 32
3D Eyewear (optional)
●
Use the Panasonic 3D Eyewear that has this logo and supports
®
“Full HD 3D Glasses™” logo indicates products that are compatible with the active shutter 3D
glasses technology standards licensed by the Full HD 3D Glasses Initiative. The RF mark on
the logo means the wireless system (Bluetooth
Eyewear and the TV that have the same mark together.
Bluetooth
Note
●
Use the 3D Eyewear within approximately 3.2 m from the TV. You cannot view the 3D images with the 3D Eyewear
too far from the
●
The range may be shortened depending on the obstacles between the TV and the 3D Eyewear, or the surrounding
environment.
●
There are differences in the viewing range of the 3D Eyewear among individuals.
●
The 3D Eyewear may not operate correctly at the outside of the viewing range.
TV, because of the difficulty of receiving radio waves from the TV.
Viewing 3D images
wireless technology.
®
wireless technology), and you can use the 3D
32
Page 33
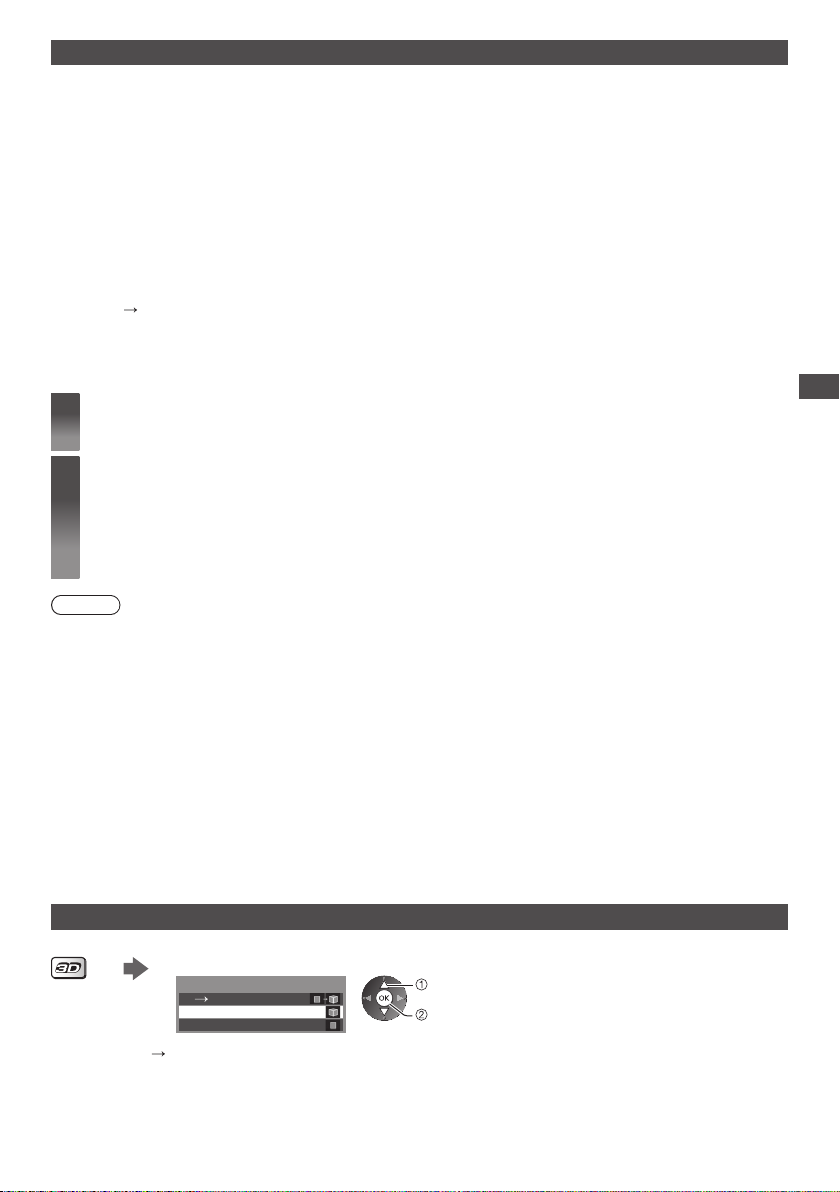
To view the 3D images
You can enjoy the 3D images in a variety of ways.
(Frame Sequential, Side by Side and Top and Bottom are the supported 3D format.)
■ Playing back 3D-compatible Blu-ray disc (Frame Sequential format)
●
Connect the 3D-compatible player via a fully wired HDMI compliant cable.
●
If input mode is not switched automatically, select the input mode connected to the player. (p. 29)
●
If you use the non 3D-compatible player, the images will be displayed on 2D mode.
■ 3D-supported broadcast
●
Please consult the suppliers of contents or programmes for availability of this service.
■ 3D photos and 3D videos taken by 3D-compatible Panasonic products
●
Available in Media Player (p. 70) and Network services (p. 88)
■ 2D images converted to 3D
●
Set to [2D
Preparations
Perform the First Registration when the 3D Eyewear is used for the first time. For details, read the manual of the 3D
Eyewear.
3D] mode in [3D Mode Selection]. (p. 34)
Turn the 3D Eyewear on and put it on
1
●
Connection status and battery status are displayed on the bottom right of the screen.
View the 3D images
2
●
Safety precautions will be displayed when you first watch the 3D image. Select [Yes] or [No] to continue to view
3D images.
If you select [Y
switch is next turned on. Select [No] if you do not want to display this message again.
●
Turn off the 3D Eyewear after using it.
es], this message will be displayed again in the same condition after Mains power On / Off
Note
●
3D Eyewear is not included. Please purchase as necessary. (p. 7)
●
For more detail about using and wearing the 3D Eyewear, read the manual of the 3D Eyewear.
●
The 3D image or 3D effect may not be available in the following conditions:
VIERA Connect home screen (p. 19) is displayed.
•
[Ext Rec.] or [LT1] / [LT2] of Timer Programming (p. 56) is in progress.
•
[LT1] / [LT2] of One Touch Recording (p. 68) is in progress.
•
Direct TV Recording (p. 94, 96) is in progress.
•
As for the contents of the Frame Sequential format and Side by Side (Full), no images will be displayed in these
conditions.
●
If light appears to flicker under fluorescents or dimmers when using the 3D Eyewear, change the setting of [3D
Refresh Rate]. (p. 39)
●
3D content will not be correctly visible if the 3D Eyewear is worn upside down or back-to-front.
●
Do not wear the 3D Eyewear when watching anything other than 3D images. Liquid crystal displays (such as
computer screens, digital clocks or calculators, etc.) may be difficult to see while wearing the 3D Eyewear.
●
Do not use the 3D Eyewear as sunglasses.
●
3D effects may be perceived differently depending on the person.
Changing 2D - 3D mode
You can easily change the viewing mode between 2D and 3D using the 3D button.
[3D] / [2D] / [2D
Displays the appropriate image that you desire without selecting 3D format.
●
This mode may not work properly depending on the source image format. In this case, select the appropriate 3D
format manually
Select the mode
3D Mode Selection
2D3D3D
2D
3D]:
.
●
select
set
Items of [3D Mode Selection] vary
depending on the condition.
Viewing 3D images
33
Page 34
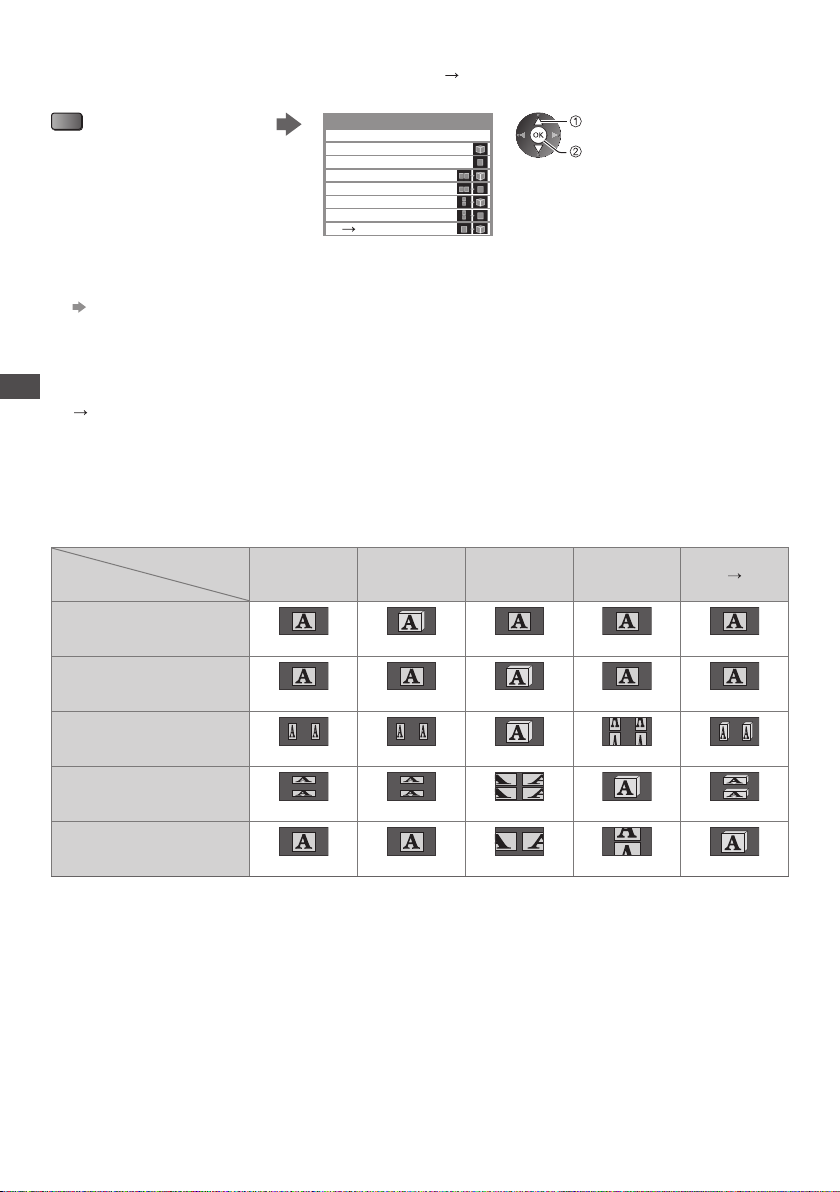
■ To change 3D format manually
When the image is not changed properly using [3D], [2D] or [2D 3D] mode, use this manual setting.
During the above operation Select the mode
(red)
3D Mode Selection (Manual)
Original
Frame Sequential - 3D
Frame Sequential - 2D
Side by Side - 3D
Side by Side - 2D
Top and Bottom - 3D
Top and Bottom - 2D
2D 3D
[Original]:
Displays the source image as it is.
●
Use to identify the format type of the source image.
“Table of images that can be seen for each [3D Mode Selection (Manual)] and the source image format”
(see below)
[Frame Sequential - 3D] / [Frame Sequential - 2D] / [Side by Side - 3D] / [Side by Side - 2D] /
[Top and Bottom - 3D] / [Top and Bottom - 2D]:
Displays the mode you select.
●
Not valid on Analogue and AV mode
Viewing 3D images
[2D
3D]:
Converts 2D images into 3D.
●
Please note the 3D images appear slightly different from the originals.
●
Using this function for profit-making purposes, or publically showing images converted from 2D to 3D in places
such as shops or hotels etc. may infringe on the rights of the copyright holder protected under copyright law
Table of images that can be seen for each [3D Mode Selection (Manual)] and the source image format
If the picture appears to be abnormal, refer to the table below to choose the correct 3D mode.
Source
[3D Mode Selection]
image format
[Original]
[Frame
Sequential
- 3D]
[Side by Side
- 3D]
select
set
[Top and
Bottom - 3D]
.
[2D 3D]
Frame Sequential
Side by Side (Full)
Side by Side
Top and Bottom
Normal format (2D)
∗
1: When selecting [Frame Sequential - 2D], [Side by Side - 2D] or [Top and Bottom - 2D], the images will be displayed
without 3D effect.
●
Depending on the player or broadcasts, the image may be different from the above illustrations.
Normal 3D
1
∗
1
Normal 3D
Normal 3D
∗
1
∗
Normal 3D
1
∗
34
Normal 3D
Page 35
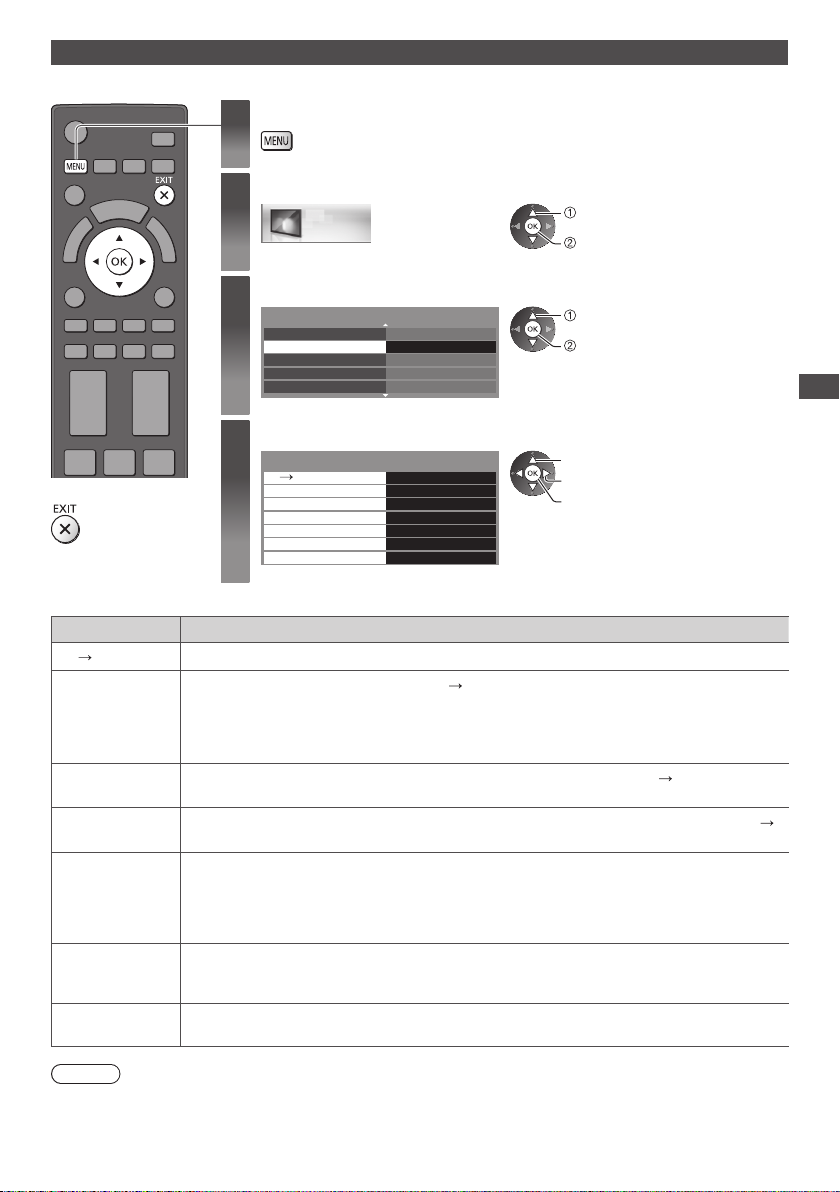
3D Settings
If the 3D images are not displayed correctly or seem unusual, adjust and setup the 3D settings.
Display the menu
1
Select [Picture]
■
To return to TV
2
3D Depth
Picture
Access
On
Mid
Access
Normal
Off
On
On
Access
2/2
Select [3D Settings]
3
P-NR Off
3D Settings
Screen Display
Advanced Settings
Reset to Defaults
Select one of the following functions and set
4
3D Settings
2D
3D Adjustment
Picture Sequence
Edge Smoother
3D Detection
3D Signal Message
Safety Precautions
select
access
select
access
select
adjust
access / store
Item Adjustments / Configurations (alternatives)
2D 3D Depth
3D Adjustment
Picture
Sequence
Edge Smoother
3D Detection
3D Signal
Message
Safety
Precautions
Selects a level of 3D-image depth for viewing converted 2D images [Min] / [Mid] / [Max]
Adjustment of the 3D effect (except in [2D
●
Set to [On] to enable [Effect] setting.
●
When setting to [On], a safety precaution message will appear. Read it carefully and press the
BACK/RETURN button to go to [Effect] setting.
[Effect]: Adjusts the 3D depth according to the contents or to your preference.
Select [Reverse] if you feel that the sense of depth is unusual (except in [2D
[Normal] / [Reverse]
Set to [On] if you feel the contoured parts of an image are not smooth enough (except in [2D
3D] mode) [Off] / [On]
Automatically detects the 3D format signals [Off] / [On] / [On (Advance)]
[On (Advance)]: Detects all the 3D format signals and displays the 3D image automatically.
[On]: Detects the particular 3D format signals (Frame Sequential, etc.) and displays the 3D
image automatically.
●
To view 3D images without any notifications and operations, set to [On (Advance)].
Selects whether to give a notification message when a signal of 3D format is found [Off] / [On]
●
For DVB, Component and HDMI input
●
This function is not available when [3D Detection] is set to [On (Advance)].
Displays the precautions for viewing 3D images
3D] mode) [Off] / [On]
Viewing 3D images
3D] mode)
Note
●
[3D Adjustment] and [Picture Sequence] will not be memorised when changing the input mode or channel.
35
Page 36
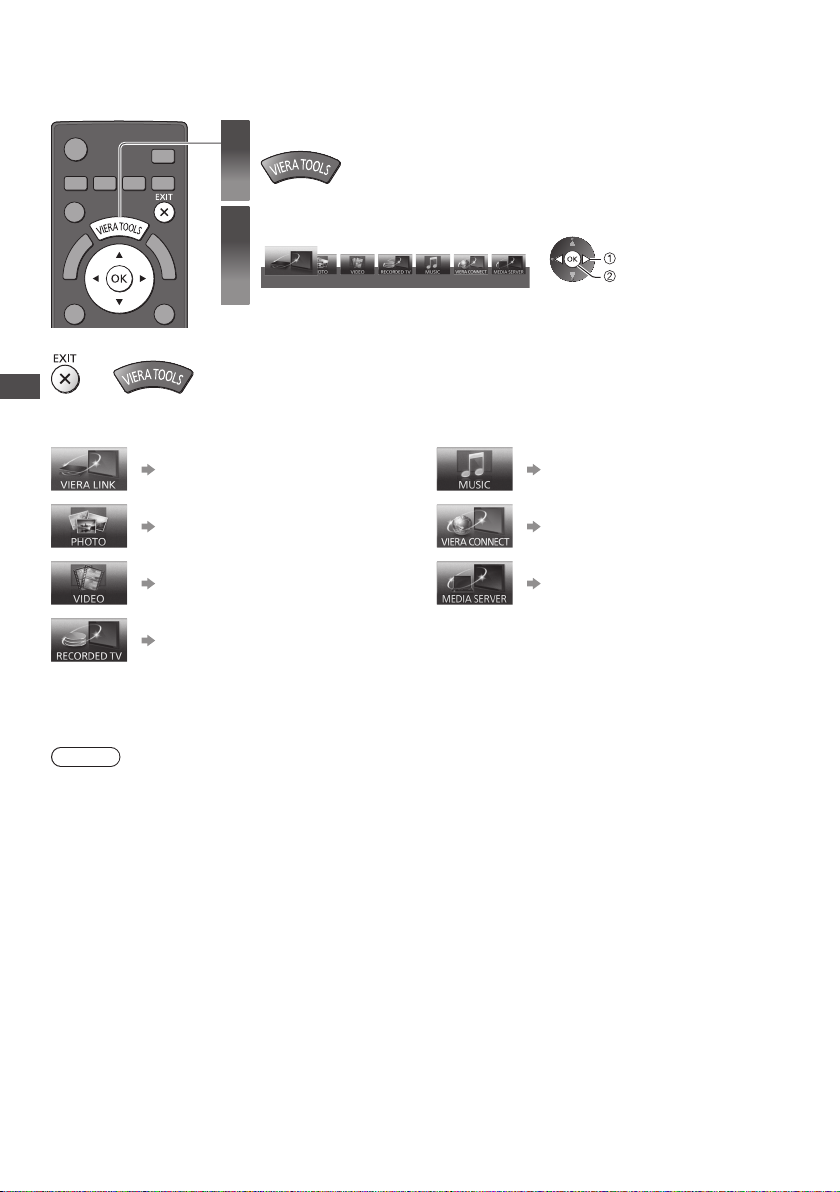
How to Use VIERA TOOLS
You can access some special features easily by using the VIERA TOOLS function.
Display icons of the feature
1
Select a feature
2
VIERA Link
■
To return to TV
or
How to Use VIERA TOOLS
■ Follow the operations of each feature
∗
When two or more available devices are connected, a selection screen will be displayed.
Please select the correct description and access.
[VIERA Link]
(p. 96 - 99)
∗
[Photo]
(p. 72)
∗
[Video]
(p. 76)
[Recorded TV]
(p. 77)
∗
select
access
∗
[Music]
(p. 80)
[VIERA Connect]
(p. 19, 82)
[Media Server]
(p. 88)
∗
Note
●
If the selected feature is not available, the demonstration to explain how to use it can be displayed. Press the OK
button to view the demonstration after selecting the unavailable feature.
36
Page 37
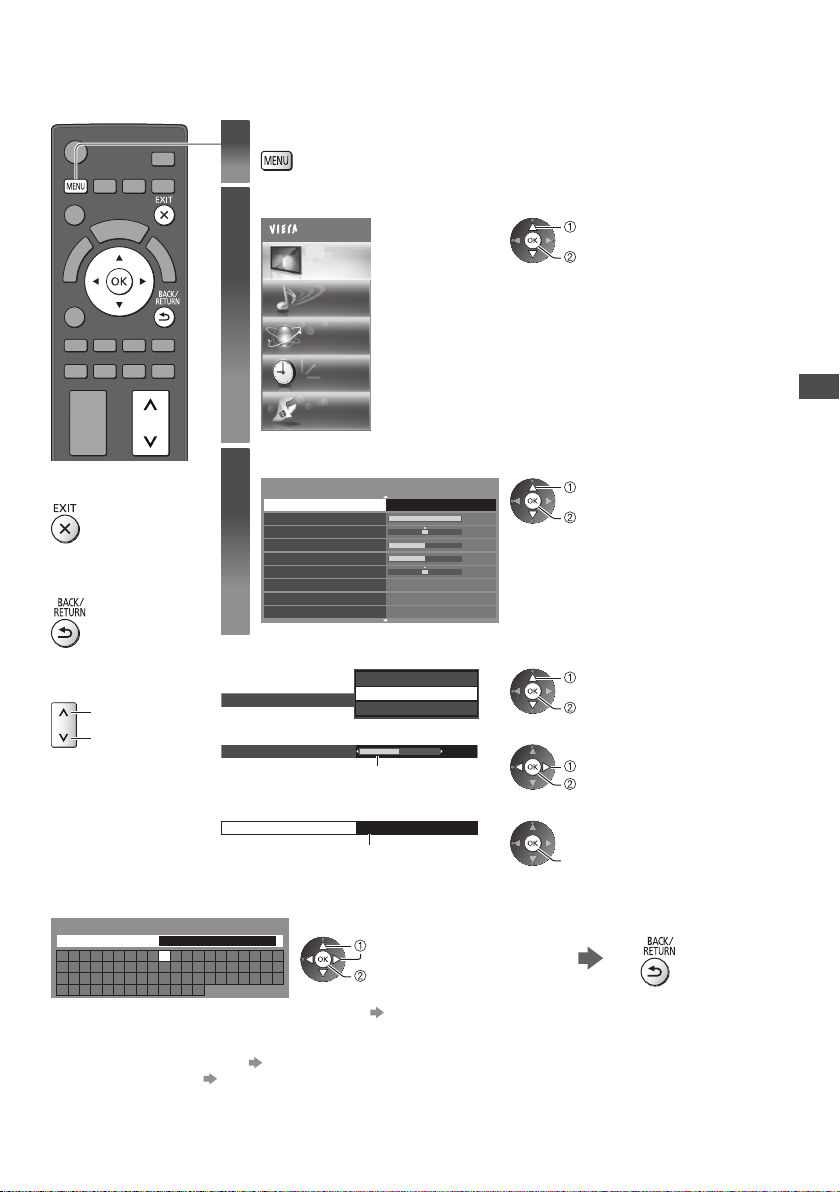
How to Use Menu Functions
Various menus allow you to make settings for the picture, sound, and other functions.
Display the menu
1
2
■
To return to TV at
any time
■
To return to the
previous screen
■
To change menu
pages
up
down
■ Enter characters by free input menu
You can enter names or numbers freely for some items.
User input
Name
A B C D E F G H I J K L M N O P Q R S T
U V W X Y Z 0 1 2 3 4 5 6 7 8 9 ! : #
a b c d e f g h i j k l m n o p q r s t
u v w x y z ( ) + - . * _
●
You can set characters by using numeric buttons.
■ To reset the settings
●
Picture or sound settings only
●
To initialise all settings
3
■ Choose from among alternatives
Colour Balance
■ Adjust using the slide bar
Sharpness
■ Go to the next screen
Child Lock Access
[Shipping Condition] (p. 46)
●
Displays the functions that can be set (varies according to the input signal).
Select the menu
Main Menu
Picture
Network
Sound
imer
T
Setup
select
access
Select the item
Viewing Mode Dynamic
Contrast
Brightness
Colour
Sharpness
T
int
Colour Balance
Vivid Colour
Eco Mode Off
Displays the next screen
Set characters one by one
[Reset to Defaults] in the Picture Menu (p. 40) or Sound Menu (p. 42)
Warm
Off
Cool
Normal
arm
W
Moved
select
set
“Characters table for numeric buttons” (p. 110)
1/2
60
0
30
5
0
5
select
access
select
store
change
store
access
How to Use Menu Functions
Store
37
Page 38
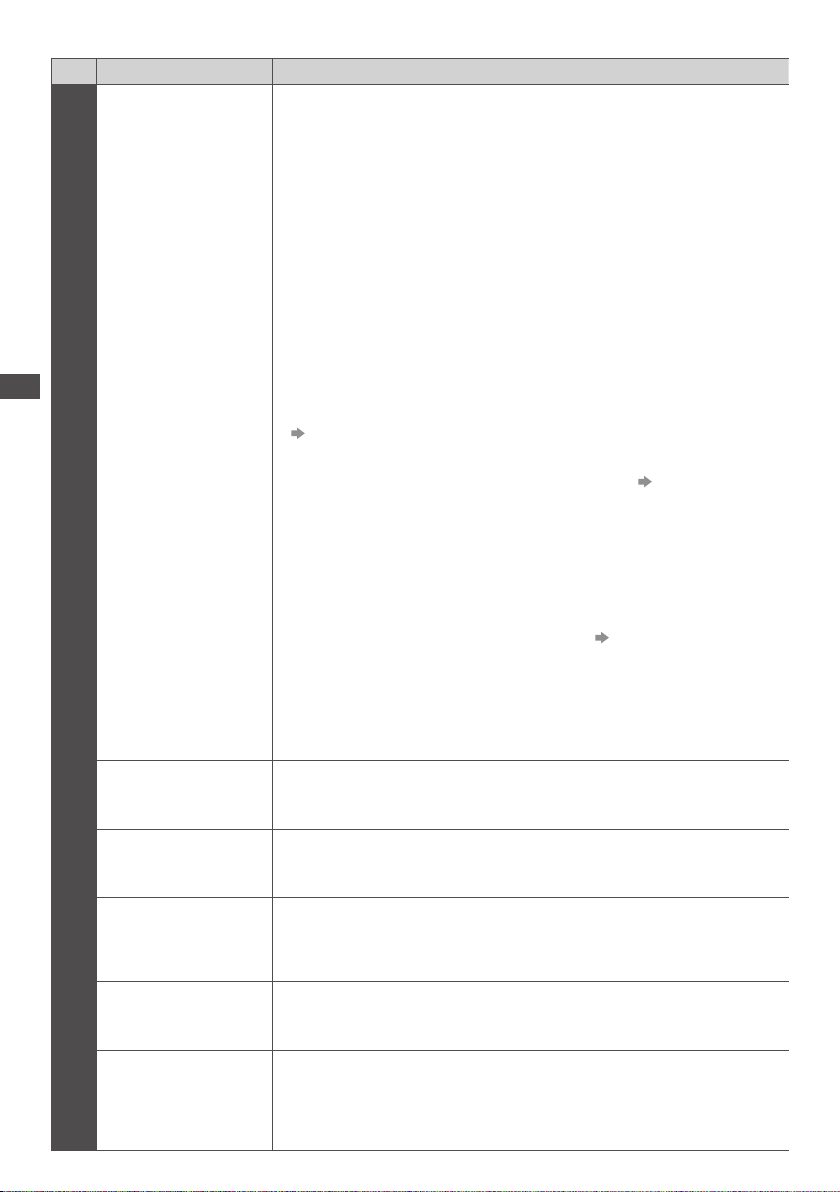
Menu list
Menu
How to Use Menu Functions
Viewing Mode
Item Adjustments / Configurations (alternatives)
Picture
Selects your favourite picture mode for each input
[Dynamic] / [Normal] / [Cinema] / [THX Cinema] / [THX Bright Room] /
[Game] / [Professional1] / [Professional2]
[Dynamic]:
Improves contrast and sharpness for viewing in a bright room.
[Normal]:
Normal use for viewing in a normal lighting condition.
[Cinema]:
Improves the performance of contrast, black and colour reproduction for
watching movies in a darkened room.
[THX Cinema]∗:
Reproduces the original image quality precisely in a darkened room.
●
[THX3D Cinema] is displayed instead of [THX Cinema] in 3D mode.
[THX Bright Room]∗:
Reproduces the original image quality precisely in a bright room.
●
Not valid on 3D mode
[Game]:
Provides suitable images for fast response signal when playing games.
●
Not valid on TV mode
●
To display a continuous record of time spent using Game mode
[Playing Time Display] (p. 45)
[Professional1 / 2]:
Allows you to set the professional picture settings in [Advanced Settings],
[Colour Gamut], [Lock Settings] and [Copy Adjustment]. (p. 64)
●
This mode is available only when [Advance(isfccc)] in the Setup Menu is set to
[On].
●
If the certified professional dealer sets these modes, [Professional1] and
[Professional2] may be displayed as [isf Day] and [isf Night].
In each Viewing Mode, [Contrast], [Brightness], [Colour], [Sharpness], [Tint],
[Colour Balance], [Vivid Colour], [Colour Remaster], [Eco Mode], [P-NR] and
[3D-COMB] can be adjusted and stored for each input.
Additionally, you can adjust and setup the detailed settings when
[Advance(isfccc)] in the Setup Menu is set to [On].
●
You can set [Viewing Mode] in 2D and 3D mode for each.
∗
THX modes are used to mirror the picture settings used by professional
filmmakers, faithfully reproducing the image quality of THX Certified movies.
THX Certified movies have the THX logo on the disc.
THX modes are not available in the mode of Media Player (photo /music) and
network service operations.
(p. 46)
38
Contrast, Brightness,
Colour, Sharpness
Tint
Colour Balance
ivid Colour
V
Colour Remaster
Adjusts the levels of these options according to your personal preference
Adjusts the picture hue to suit your taste
●
For NTSC signal reception
Sets the overall colour tone of the picture [Cool] / [Normal] / [W
●
Not valid when [Viewing Mode] is set to THX modes, [Professional1] or
[Professional2]
Automatically adjusts colours to vivid ones [Off] / [On]
●
Not valid when [Viewing Mode] is set to [Professional1] or [Professional2]
Displays the vivid images with the expanded colour gamut [Off] / [On] / [Auto]
●
For HDMI input or video contents of Media Player (when [Viewing Mode] is set
to [Dynamic], [Normal] or [Cinema])
●
Set to [Auto] to use this function effectively.
arm]
Page 39
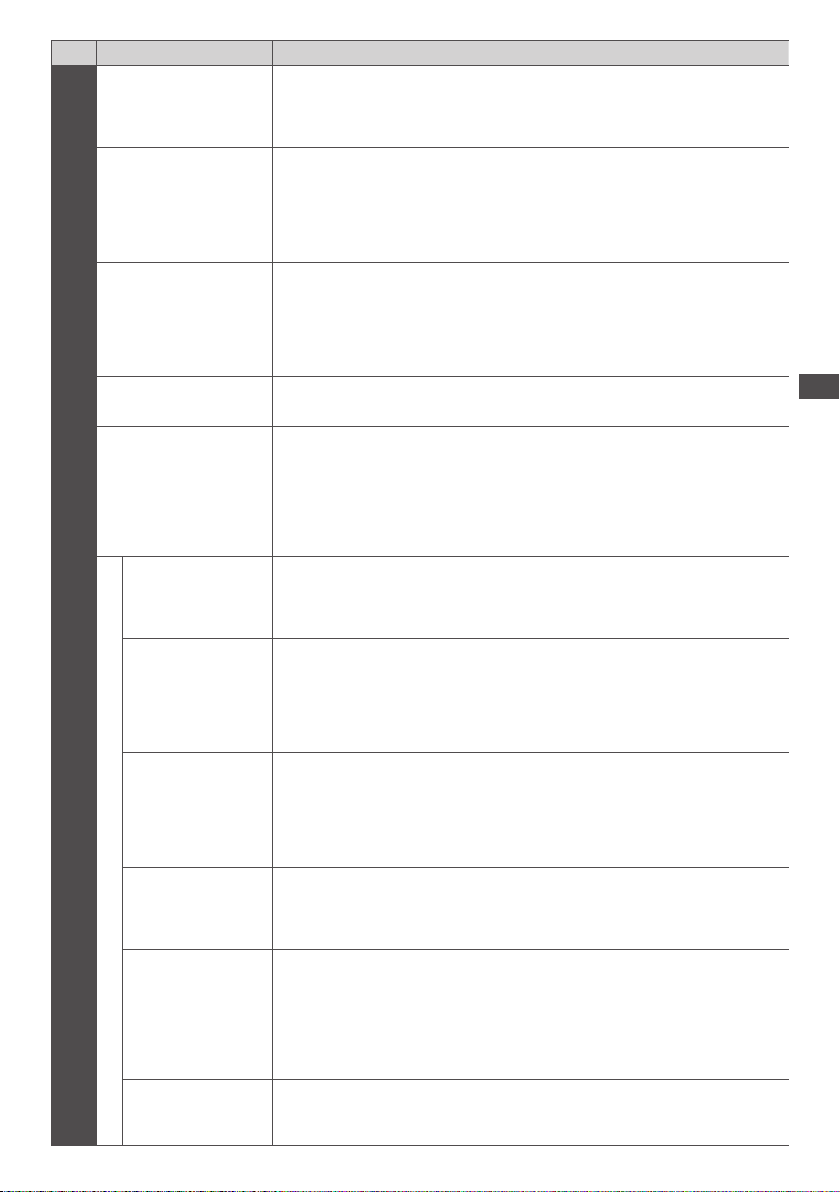
Menu
Item Adjustments / Configurations (alternatives)
Eco Mode
P-NR
3D-COMB
3D Settings Adjusts and sets to view 3D images (p. 35)
Screen Display
Picture
1080p Pure Direct
Intelligent Frame
Creation
Automatic Brightness Control function
Adjusts picture settings automatically depending on ambient lighting conditions
[Off] / [On]
Picture Noise Reduction
Reduces unwanted picture noise and flicker noise in the contoured parts of a
picture [Off] / [Min] / [Mid] / [Max] / [Auto]
●
Not valid when [Viewing Mode] is set to [Game] or [1080p Pure Direct] is set to
[On]
Makes still or slow moving pictures more vivid [Off] / [On]
●
Occasionally, while viewing still or slow moving pictures, colour patterning may
be seen. Set to [On] to display sharper and more accurate colours.
●
For PAL / NTSC signal reception in TV mode or from composite (except 3D
mode)
urns the screen off when you select [Off]
T
[Off] / [On]
●
The sound is active even if the screen turns off.
●
Press any buttons (except Standby) to turn the screen on.
●
This function is effective in reducing power consumption when listening to the
sound without watching the
Reproduces the original image quality in detail for 1080p (HDMI) input signal
[Off] / [On]
●
Not valid on 3D mode
Automatically compensates the picture frame rate and removes juddering
movements to make the images smooth [Off] / [Min] / [Mid] / [Max]
●
Depending on the contents, images may be noisy. To prevent the noise, change
the setting.
●
Not valid when [Viewing Mode] is set to [Game]
How to Use Menu Functions
TV screen.
Advanced Settings
24p Smooth Film
Film Cadence
Detection
3D Refresh Rate
Side Panel
Automatically compensates the picture frame rate to make the 24p source movie
images smooth [Off] / [Min] / [Mid] / [Max]
●
This is available only for 24p signal input and displayed instead of [Intelligent
Frame Creation].
●
Not valid when [Viewing Mode] is set to [Game]
Improves vertical resolution for movie images [Off] / [On]
●
This function is available for the interlaced signal (except in VIERA Connect or
iewing Mode] is set to [Game]).
when [V
Reduces juddering and flicker noises of the 3D images when using the 3D
Eyewear [Auto] / [100Hz] / [120Hz]
[100Hz]:
If light appears to flicker under fluorescents (or dimmers) of 50 Hz.
[120Hz]:
If light appears to flicker under fluorescents (or dimmers) of 60 Hz.
Adjusts the brightness of the side panel [Off] / [Low] / [Mid] / [High]
●
The recommended setting is [High] to prevent panel “image retention”.
39
Page 40
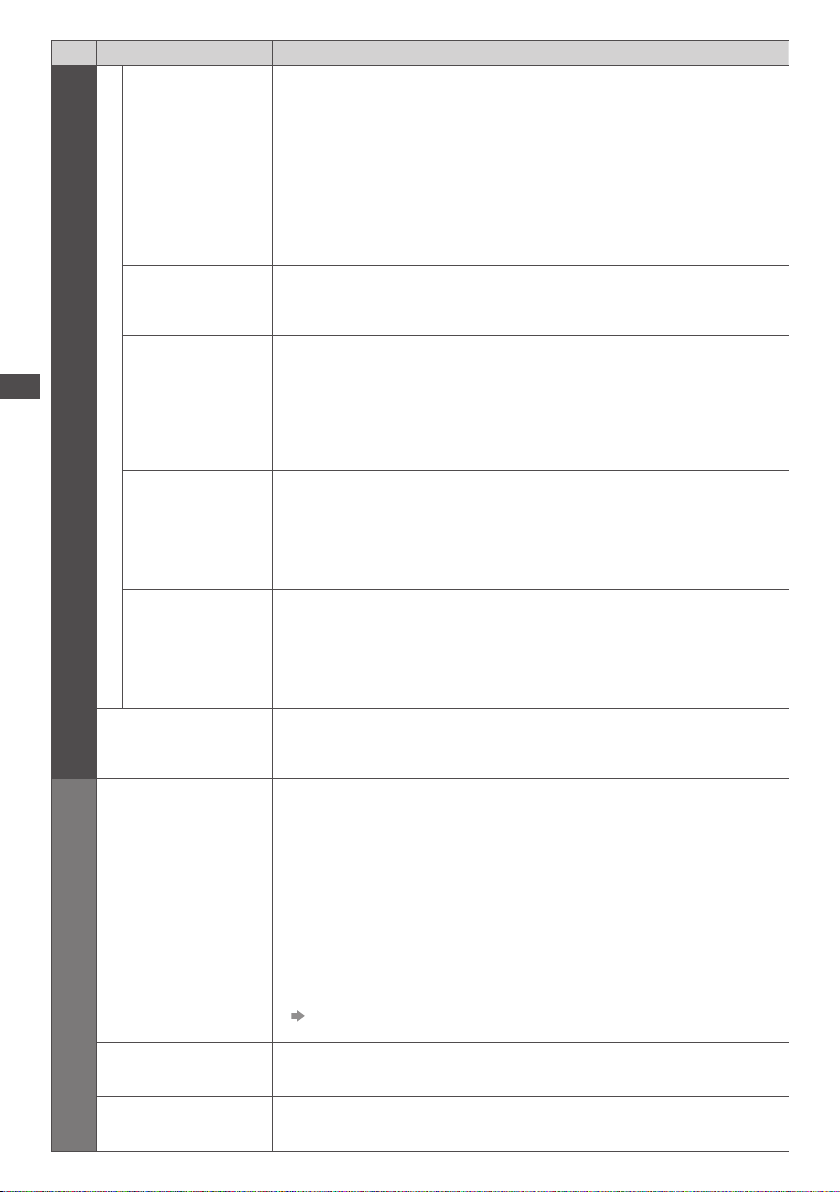
Menu
Item Adjustments / Configurations (alternatives)
Selects the screen area displaying the image [Off] / [On]
[On]:
Enlarges the image to hide the edge of the image.
[Off]:
16:9 Overscan
Displays the image in the original size.
●
Set to [On] if noise is generated on the edge of the screen.
●
This function is available when aspect is set to [Auto] (16:9 signal only) or [16:9].
●
This function can be memorised separately for SD (Standard definition) and HD
(High definition) signals.
●
Not valid on VIERA Connect
A
V Colour System
Advanced Settings
Picture
How to Use Menu Functions
DVI Input Setting
Pixel Orbiter
Scrolling Bar
Reset to Defaults
Mode
Sound
Selects optional colour system based on video signals in AV mode
[Auto] / [PAL] / [SECAM] / [M.NTSC] / [NTSC]
Changes the black level of the image for HDMI input mode with DVI input signal
manually [Normal] / [Full]
●
When the DVI input signal from the external equipment (especially from PC) is
displayed, the black level may not be suitable. In this case, select [Full].
●
The black level for HDMI input signal will be adjusted automatically.
●
For HDMI input mode with DVI input signal
Selects the mode for wobbling of the image to prevent panel “image retention”
[Auto] / [On]
[Auto]:
Automatically works only for the appropriate images and you rarely recognise
the wobbling.
Displays scrolling bar pattern to assist elimination of panel “image retention”
●
Press the OK button to start scrolling and press any buttons (except Standby) to
exit this mode.
●
For positive effect to eliminate “image retention”, it may be necessary to display
for a long time.
Press the OK button to reset the current Picture V
input to the default settings
Selects your favourite sound mode [Music] / [Speech] / [User]
●
The selected mode affects all input signals.
[Music]:
Improves sound quality for watching music videos, etc.
[Speech]:
Improves sound quality for watching news, drama, etc.
●
In Music and Speech modes, you can adjust [Bass] and [Treble] settings, and
those settings will be stored for each mode.
[User]:
Adjusts the sounds manually by using the equaliser to suit your favourite sound
quality.
●
For the User mode, [Equaliser] will appear on the Sound Menu instead of [Bass]
and [Treble]. Select [Equaliser] and adjust the frequency.
[Equaliser] (p. 41)
iewing Mode of the selected
40
Bass Adjusts level to enhance or minimise lower, deeper sound output
Treble Adjusts level to enhance or minimise sharper, higher sound output
Page 41
Menu
Equaliser
Balance Adjusts volume level of right and left speakers
Item Adjustments / Configurations (alternatives)
Adjusts the frequency level to suit your favourite sound quality
●
This function is available when [Mode] is set to [User].
●
Select the frequency and change the frequency level by using the cursor button.
●
To enhance the bass sound, raise the level of the lower frequency. To enhance
the treble sound, raise the level of the higher frequency.
●
To reset the levels of each frequency to the default settings, select [Reset to
Defaults] by using the cursor button, and then press the OK button.
Headphone V
Surround
Auto Gain Control
Volume Correction Adjusts the volume of individual channel or input mode
olume Adjusts the volume of the headphones
Surround sound settings [Off] / [V-Audio] / [V-Audio Surround]
[V-Audio]:
Provides a dynamic enhancer of width to simulate improved spatial effects.
[V-Audio Surround]:
Provides a dynamic enhancer of width and depth to simulate improved spatial
effects.
●
Switching is also possible by the SURROUND button on the remote control
(p. 10).
Automatically regulates large sound level dif
inputs [Off] / [On]
Sound
Compensates for the low frequency sound due to the distance between the
speakers and the wall [Over 30cm] / [Up to 30cm]
Speaker Distance to
Wall
MPX
Audio Preference
●
If the back space between the TV and wall is over 30 cm, [Over 30cm] is
recommended.
●
If the back space between the TV and wall is within 30 cm, [Up to 30cm] is
recommended.
Selects multiplex sound mode (if available)
[Stereo]: Use this normally
[Mono]: When stereo signal cannot be received.
[M1] / [M2]: Available while mono signal is transmitted.
●
For Analogue mode
Selects the initial setting for audio tracks
[Auto] / [Multichannel] / [Stereo] / [MPEG]
●
Selectable options vary depending on the country you select.
[Auto]: Automatically selects the audio tracks if programme has more than two
[Multichannel]: The priority is given to multi-channel audio track.
[Stereo]: The priority is given to stereo (2ch) audio track.
[MPEG]: The priority is given to MPEG.
●
Dolby Digital Plus and Dolby Digital are the methods of coding digital signals
developed by Dolby Laboratories. Apart from stereo (2ch) audio, these signals
can be multi-channel audio.
●
HE-AAC is a perceptual coding method used to compress digital audio for
efficient storage and transmission.
●
MPEG is an audio compression method that compresses audio to the smaller
size without any considerable loss of audio quality
●
Dolby Digital Plus and HE-AAC are the technologies for HD (High definition)
programmes.
●
For DVB mode
The priority is given in the following order - Dolby Digital Plus, HE-
tracks.
AAC, Dolby Digital, MPEG.
.
How to Use Menu Functions
ferences between channels and
.
41
Page 42
Menu
Audio Type
SPDIF Selection
Item Adjustments / Configurations (alternatives)
Sound
How to Use Menu Functions
HDMI1 / 2 / 3 / 4 Input
Narration settings for visually impaired users (only available in some countries)
[Standard] / [Visual Impaired]
●
Set to [Visual Impaired] to activate the narration sound track when available on
the broadcast.
●
For DVB mode
SPDIF:
A standard audio transfer file format
Selects the initial setting for digital audio output signal from DIGITAL AUDIO OUT
and HDMI2 (ARC function) terminals [Auto] / [PCM]
[Auto]: Dolby Digital Plus, Dolby Digital and HE-AAC multi-channel are output as
Dolby Digital Bitstream. MPEG is output as PCM.
[PCM]: Digital output signal is fixed to PCM.
●
For DVB mode or video contents of Media Player / Network services (p. 79, 91)
●
ARC (Audio Return Channel): A function of digital audio output using HDMI
cable
Selects to fit the input signal [Digital] / [Analogue] (p. 108)
[Digital]: When sound is carried via the HDMI cable connection
[Analogue]: When sound is not carried via the HDMI-DVI adaptor cable
●
For HDMI input
connection
SPDIF Delay
Reset to Defaults
Connection Test,
Network Connection,
Wireless Network
Settings, IP/DNS
Settings
Adjusts the delay time of the sound output from DIGIT
(ARC function) terminals if the sound does not synchronise the image
●
For DVB mode
Press the OK button to reset the current Sound Mode, [Balance], [Headphone
olume] and [Surround] to the default settings
V
Sets the network setting to use in your network environment (p. 85, 86)
AL AUDIO OUT and HDMI2
Network
Network Link Settings Sets to control the TV with the devices connected to the network (p. 84)
Software Update Checks for available software updates from the Panasonic website
New Software Message
Network Status Displays the network status (MAC Address, current network settings, etc.)
Timer Programming
Off Timer
Timer
Auto Standby
Selects whether to give a notification message when new software is found via
network [Off] / [On]
Sets a timer to record or remind forthcoming programmes (p. 56)
●
For DVB mode
Sets the duration of time until the TV automatically goes into Standby mode
[Off] / [15] / [30] / [45] / [60] / [75] / [90] (minutes) (p. 22)
Sets the duration of time that the TV will remain on when no operation is
performed [Off] / [2] / [4] (hours)
●
Starting Timer Programming automatically does not affect this function.
●
Automatic input switching with the connected equipment affects this function
and time-count will be reset.
●
The notification message will appear 3 minutes before going into Standby mode.
42
Page 43
Menu
Eco Navigation
Recording Setup Settings for the recording feature of the USB HDD (p. 66)
Bluetooth Setup Settings for the specific devices supporting Bluetooth wireless technology (p. 109)
Link Settings
Setup
Item Adjustments / Configurations (alternatives)
Automatically sets the TV to the most suitable energy-saving mode
●
If you press the OK button, the following items are set as below:
[Eco Mode], [VIERA Link], [Power off Link], [Standby Power Save],
[Power Save]
[Intelligent Auto Standby] [On (No reminder)]
[Auto Standby] [2 hours]
VIERA Link Sets to use VIERA Link functions [Off] / [On] (p. 95)
Automatically adjusts the picture settings according to the received HDMI content
via HDMI cable [Off] / [Auto]
●
HDMI Content Type
AV1 out
Power on Link Sets to use Power on Link function [Off] / [On] (p. 94, 95)
This function is available if the connected equipment supports HDMI Content
ype.
T
●
The content type information will be displayed for several seconds when this
function works.
Chooses the signal to be transmitted from the TV to Q-Link
[TV] / [AV2] / [Monitor]
[Monitor]: Image displayed on screen
●
Component and HDMI signals cannot be output.
[On]
How to Use Menu Functions
Power off Link Sets to use Power of
Standby Power
Save
Intelligent Auto
Standby
Download
Child Lock Applies access control for channels or inputs to prevent unwanted access (p. 59)
Tuning Menu
Favourites Edit
Channel List Skips the unwanted channels or edits channels (p. 53)
∗
Auto Setup Automatically searches for the receivable channels (p. 48 - 51)
Controls the connected equipment to reduce power consumption in Standby
[Off] / [On] (p. 96)
●
This function is available when [VIERA Link] is set to [On] and [Power off Link]
is set to [On].
Makes non-watched or non-used connected equipment go into Standby mode to
reduce the power consumption
[Off] / [On (W
●
This function is available when [VIERA Link] is set to [On].
Downloads channel, language and country / region settings to Q-Link or
Link compatible equipment connected to the TV
VIERA
●
DVB-S and DVB-C channel settings cannot be downloaded.
Creates a list of favourite channels (p. 52)
●
Not valid on Analogue mode
f Link function [Off] / [On] (p. 94, 95)
ith reminder)] / [On (No reminder)] (p. 96)
43
Page 44
Menu
Item Adjustments / Configurations (alternatives)
Manual Tuning Searches for the channels manually (p. 54)
Update Channel
List
Favourite Network
New Channel
Message
How to Use Menu Functions
Setup
Service
Replacement
Tuning Menu
Signal Condition
∗
Antenna System
LNB Configuration
Attenuator
Updates the channel list while keeping your settings (p. 55)
●
For DVB mode
Selects your favourite network for each broadcasters (only available in some
countries)
●
For DVB-C or DVB-T mode
Selects whether to give a notification message when a new channel is found
[Off] / [On] (p. 55)
●
For DVB mode
Set to [On] to enable a message to switch to the available service (only available
in some countries) [Off] / [On]
●
For DVB-C mode
Checks the signal condition (p. 55)
●
Not valid on Analogue mode
Sets the antenna system to use plural LNBs for receiving several satellites
[One LNB] / [MiniDiSEqC] / [DiSEqC 1.0] / [Single Cable] (p. 48)
●
This TV supports DiSEqC Version 1.0.
●
For DVB-S mode
Selects the satellite for each LNB (p. 48)
●
For DVB-S mode
Automatically reduces the DVB-C signal to avoid the interference [Off] / [On]
●
If the DVB-C signal is too strong, the interference may occur. In this case set to
[On] to reduce the signal automatically
.
44
Adds the TV mode
●
Add TV Signal
OSD Language Changes language for on-screen displays
Preferred Audio
1 / 2
Language
Preferred Subtitles
1 / 2
Preferred Teletext
This function is available if you skip any modes to tune in [Auto Setup] for first
using the
●
To operate, refer to the “Auto Setup” operations for first using the TV (p. 15).
Selects the first and second preferred language for DVB multi audio (depending
on the broadcaster)
Selects the first and second preferred language for DVB subtitles (depending on
the broadcaster)
●
To display subtitles
Selects the preferred language for DVB teletext service (depending on the
broadcaster)
TV.
(p. 21)
Page 45
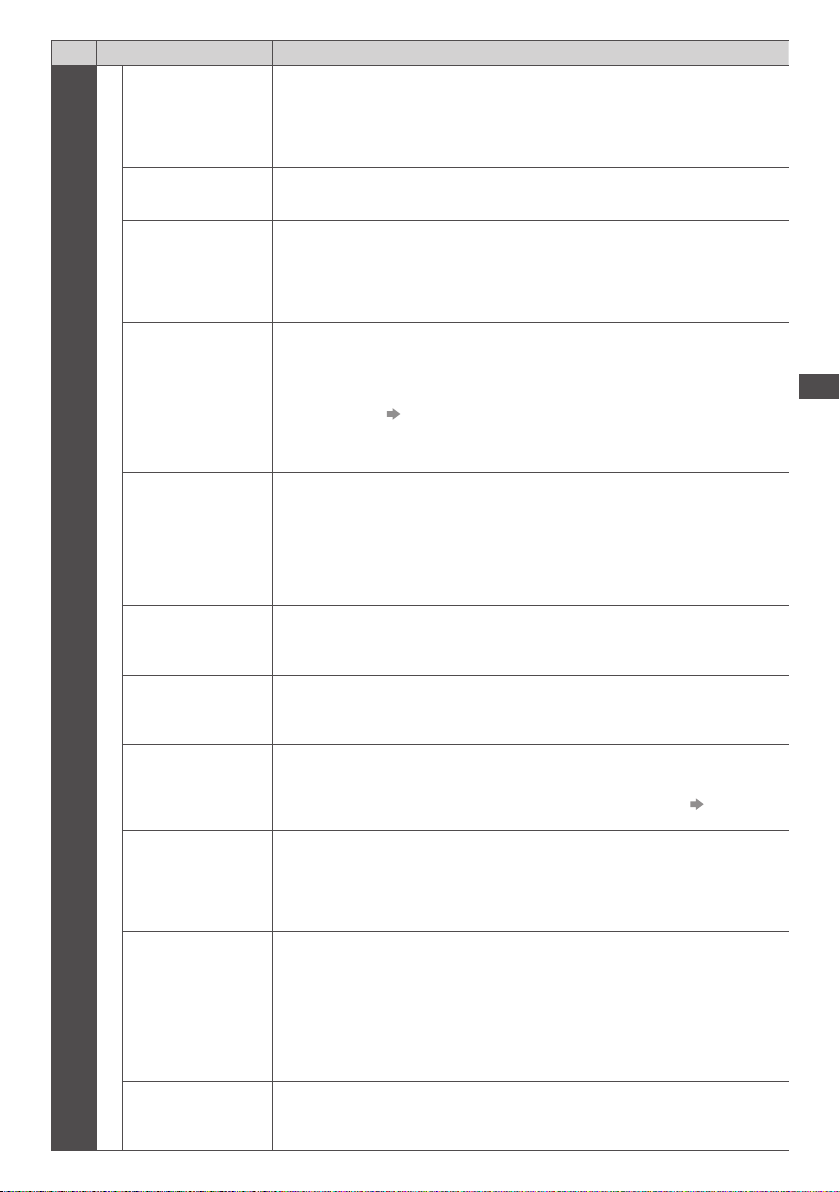
Menu
Item Adjustments / Configurations (alternatives)
Selects the preferred subtitle type [Standard] / [Hard of Hearing]
Preferred Subtitle
Type
Teletext Teletext display mode [TOP (FLOF)] / [List] (p. 27)
●
[Hard of Hearing] provides aids in understanding and enjoyment with DVB
subtitles (depending on the broadcaster).
●
[Preferred Subtitles 1 / 2] in [Language] are given priority.
Display Settings
Setup
Teletext Character
Set
Default Guide
Input Labels
Banner Display
imeout
T
VIERA Connect
Banner
Playing Time
Display
Selects teletext language font [West] / [East1] / [East2]
[West]: English, French, German, Greek, Italian, Spanish, Swedish, Turkish, etc.
[East1]: Czech, English, Estonian, Lettish, Rumanian, Russian, Ukrainian, etc.
[East2]: Czech, Hungarian, Lettish, Polish, Rumanian, etc.
Selects the default TV Guide type when the GUIDE button is pressed (only
available in some countries) [Channel List] / [TV Guide]
[TV Guide]:
Electronic Programme Guide (EPG) is available.
●
To use EPG
[Channel List]:
The channel list will appear instead of EPG.
Accesses the input labels list to select the label of each input mode or set to skip
unconnected one for easier identification and selection in [TV Selection] (p. 20),
[Input Selection] (p. 29) or banner
●
To name each input mode freely, select [User input] and set characters
(maximum 10 characters).
●
To skip the input mode, select [Skip].
Sets how long the Information banner stays on screen
[0 (No display)] / [1] / [2] / [3] / [4] / [5] / [6] / [7] / [8] / [9] / [10] (seconds)
Sets the VIERA Connect introduction banner display [Off] / [On] (p. 19, 20)
Set to [On] to display a continuous record of time spent using Game mode in the
top right of the screen every 30 minutes [Off] / [On]
●
This function is available when [Viewing Mode] is set to [Game].
(p. 24)
(p. 38)
How to Use Menu Functions
Data Service
Application
Radio Mode
Channel T
Effect
ransition
Sets to use Hybrid Broadcast Broadband TV application (depending on the
selected country and broadcaster) [Off] / [Auto Start Off] / [Auto Start On]
(p. 60)
●
For DVB mode
Sets the timer for turning of
selected [Off] / [5] / [10] / [15] / [20] (seconds)
●
The sound is active even if the screen turns off. This function is effective in
reducing power consumption when listening to a radio channel.
●
Press any buttons except Standby, Volume Up / Down and MUTE buttons to
turn the screen on.
●
Not valid on Analogue mode
Enables the transition effect when changing channels [Off] / [On]
f the screen automatically when a radio channel is
45
Page 46
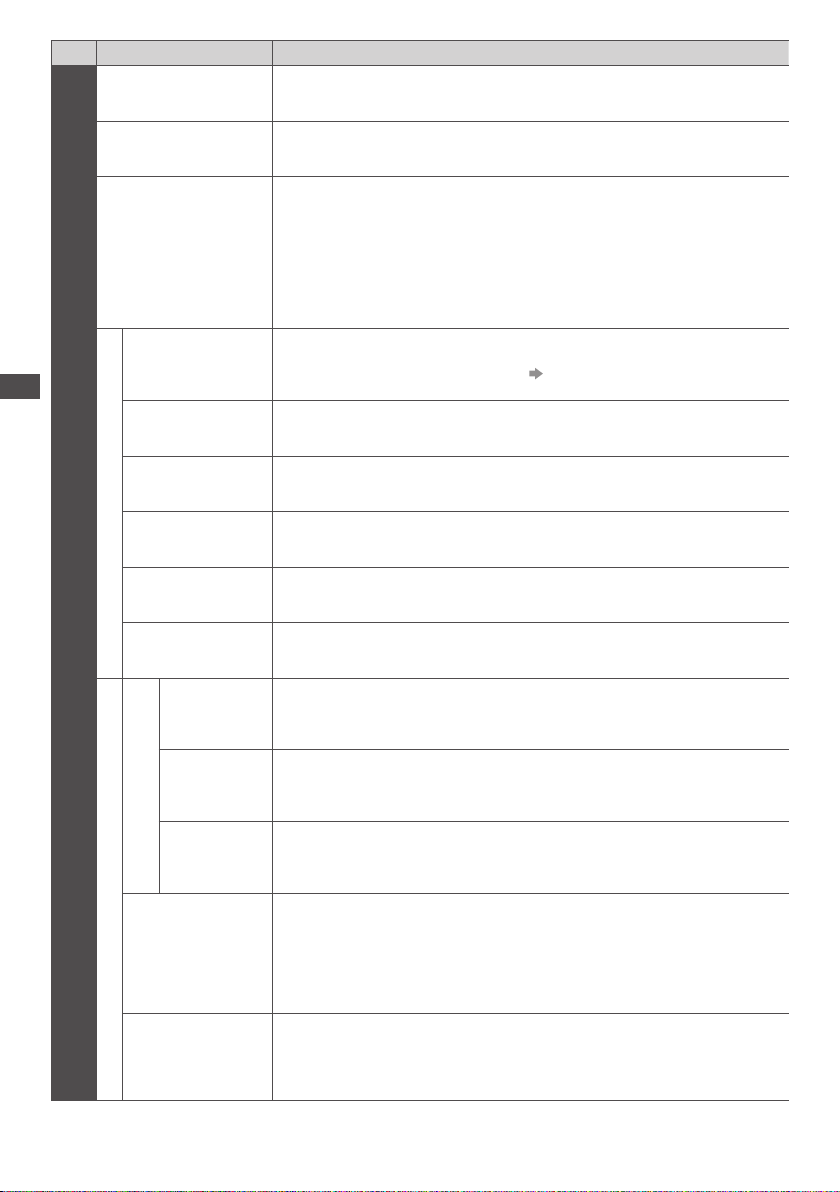
Menu
Common Interface Sets to watch encrypted channels, etc. (p. 61)
DivX® VOD Displays DivX VOD registration code (p. 106)
Advance(isfccc)
Item Adjustments / Configurations (alternatives)
Enables the advanced picture settings [Off] / [On]
●
Set to [On] to display the advanced items in the Picture Menu - [Advanced
Settings], [Lock Settings] and [Copy
displayed when [Viewing Mode] is set to [Professional1] or [Professional2].
(p. 64)
●
[isfccc] is the picture setting for the certified professional dealer. For details,
consult your local dealer.
Adjustment]. [Copy Adjustment] will be
Keyboard Layout
How to Use Menu Functions
Shipping Condition Resets all settings to the original condition (p. 62)
System Menu
System Update Downloads new software to this TV (p. 63)
Setup
Software Licence Displays the software licence information
System Information Displays the system information of this TV
Device Information Displays the device information of this TV
GUIDE Plus+ Settings
Update
Postcode
Other Settings
System
Information
Power on
Preference
Selects the language that your USB or Bluetooth Keyboard supports
●
For the information of using Keyboard (p. 110)
Performs the update of the GUIDE Plus+ schedule and advertising information for
the GUIDE Plus+ system (only available in some countries) (p. 25)
Sets your postcode to display advertisements in the GUIDE Plus+ system (only
available in some countries) (p. 25)
Displays the system information of the GUIDE Plus+ system (only available in
some countries)
Automatically selects the input when the TV is turned on [TV] / [AV]
●
Set to [TV] to view picture from TV tuner. Set to [AV] to view input from the
external equipment connected to the
●
The external equipment must be switched on and sending a control signal for
automatic switching at power on to occur
AV1 or HDMI1 terminal, e.g. set top box.
.
46
USB Charge in
Standby
Enables to supply the power from the USB port in Standby mode [Off] / [On]
●
Available for charging the rechargeable 3D Eyewear (optional)
●
This function is available when in Standby mode.
Page 47
Menu
Item Adjustments / Configurations (alternatives)
Power Save
Other Settings
Reduces brightness of the picture to economise on power consumption
[Off] / [On]
Setup
Time Zone
Exchange Channel
List
∗
The settings in [Tuning Menu] are applicable only for the selected TV mode. The menu name varies depending on the
TV mode. ([DVB-S Tuning Menu] / [DVB-C Tuning Menu] / [DVB-T Tuning Menu] / [Analogue Tuning Menu])
●
A different menu will be displayed when [Advance(isfccc)] in the Setup Menu is set to [On] or in the mode of Media
Player / network service operations. (p. 64, 71 - 80, 88 - 91)
●
Only available items can be selected.
Adjusts the time data
●
The time data will be corrected based on GMT.
Exports / Imports DVB-S Channel List settings using the SD Card to share the
same settings with VIERA
which has the same function
How to Use Menu Functions
47
Page 48
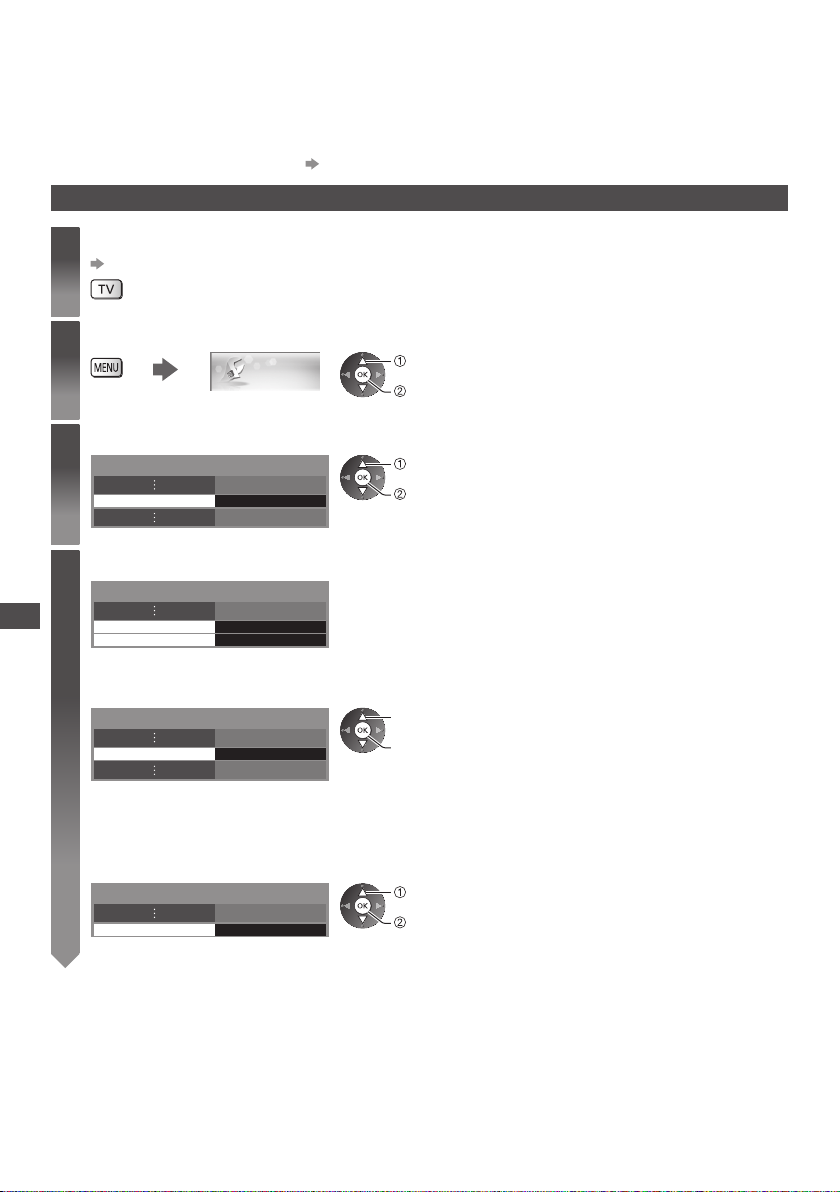
Retuning from Setup Menu
Automatically retune the channels received in the area.
●
This function is available if channel tuning is already performed.
●
Only the selected mode is retuned. All the previous tuning settings are erased.
●
If Child Lock PIN number (p. 59) has been set, the PIN number is required.
●
If tuning has not been done completely [Manual Tuning] (p. 54)
DVB-S channels
Select DVB-S
1
(p. 20)
Display the menu and select [Setup]
2
Select [DVB-S Tuning Menu]
3
Set [Antenna System] and [LNB Configuration]
4
DVB-S Tuning Menu Access
DVB-S Tuning Menu
Setup
select
access
select
access
Retuning from Setup Menu
Antenna System DiSEqC 1.0
LNB Configuration Access
1 Select [Antenna System] and set
You can receive several satellites if you have DiSEqC control antenna system.
DVB-S Tuning Menu
Antenna System DiSEqC 1.0
[One LNB]: Compatible with single LNB.
[MiniDiSEqC]: Up to 2 LNBs can be controlled.
[DiSEqC 1.0]: Up to 4 LNBs can be controlled.
[Single Cable]: When using the Single Cable router
2 Select [LNB Configuration]
DVB-S Tuning Menu
LNB Configuration Access
48
select
access / store
●
This TV supports DiSEqC Version 1.0.
, up to 8 user bands are available.
select
access
Page 49
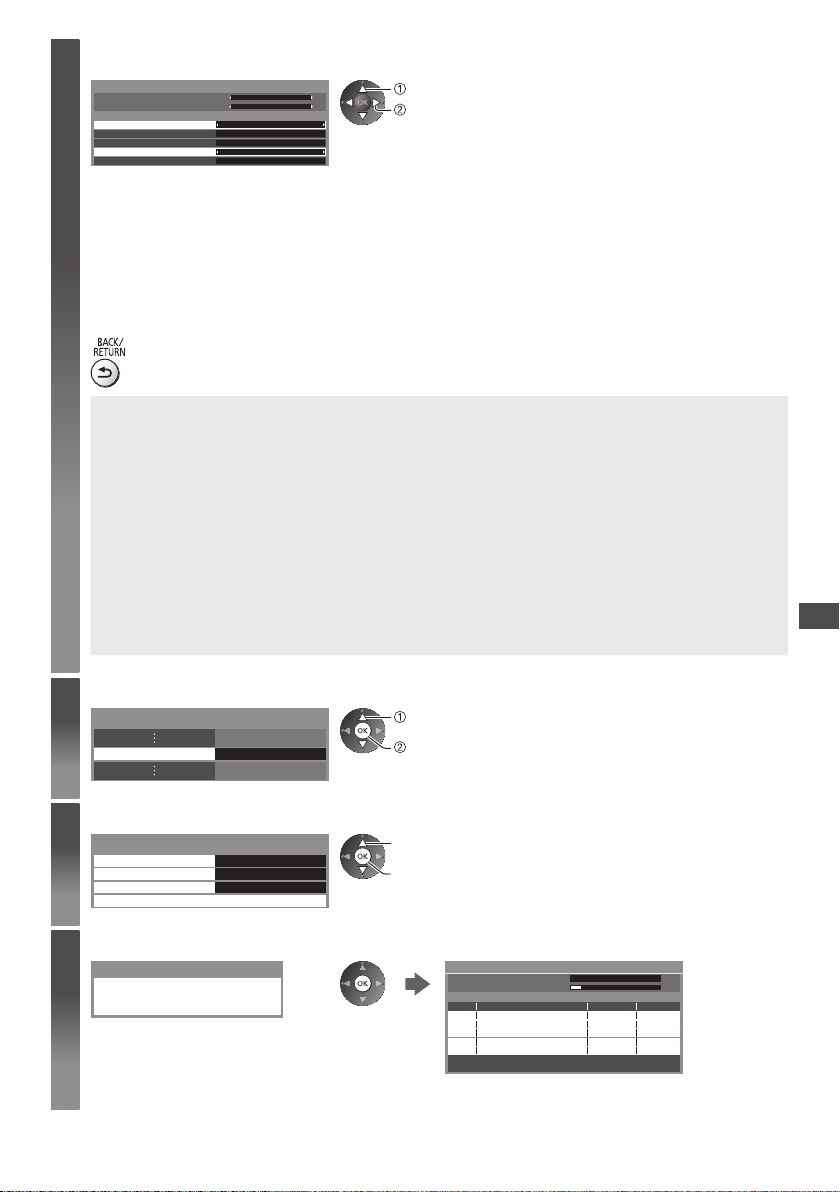
3 Set [LNB] and [Satellite]
4
Set [LNB] first, then set [Satellite] for the selected LNB.
LNB Configuration
Signal Quality
Signal Strength
LNB
LNB Low Band Frequency
LNB High Band Frequency
Satellite
Test Transponder Frequency
010
010
AA
9750 MHz
10600 MHz
Astra 19.2° E
10744 MHz
select
set
[LNB]:
●
If you set to [One LNB], [LNB] is not
selectable.
●
If you set to [MiniDiSEqC] or [Single Cable],
select from LNB
●
If you set to [DiSEqC 1.0], select from LNB
AA and AB.
AA, AB, BA and BB.
[Satellite]:
●
Select [No Satellite] if you do not know the connected satellite (available satellite will be searched in Auto
Setup).
●
Select [User defined] to set [Test Transponder Frequency] manually.
●
If you set to [Single Cable], additional settings are required. Set [User Band], [User Band Frequency] and [PIN]
(depending on the Single Cable router you use).
For details, read the manual of the Single Cable router
.
4 Store
■ Selectable satellites and dish alignment to tune DVB-S channels:
Intelsat at 85.2°East
•
ABS 1 at 75°East
•
Express at 53° East
•
Intelsat at 45° East
•
Turksat at 42° East
•
Express at 40° East
•
Hellas at 39° East
•
Eutelsat at 36° East
•
Eurobird at 33° East
•
Astra at 28.2° East
•
Arabsat at 26° East
•
Eurobird at 25.5° East
•
●
To ensure your satellite dish is correctly installed, please consult your local dealer.
●
Also please consult the received satellite broadcasting companies for details.
Astra at 23.5° East
•
Eutelsat at 21.5° East
•
Astra at 19.2° East
•
Eutelsat at 16° East
•
Hot Bird at 13° East
•
Eutelsat at 10° East
•
Eurobird at 9° East
•
Eutelsat at 7° East
•
Astra at 4.8° East
•
Thor at 0.8° West /
•
Intelsat at 1° West
Amos at 4° West
•
Atl. Bird at 5° West
•
Atl. Bird at 7° West
•
Atl. Bird at 8° West
•
Atl. Bird at 12.5° West
•
Telstar at 15° West
•
NSS at 22° West
•
Intelsat at 24.5° West
•
Hispasat at 30° West
•
Retuning from Setup Menu
Select [Auto Setup]
5
DVB-S Tuning Menu
Access Auto Setup
select
access
Set the satellite, search mode and scan mode
6
DVB-S Auto Setup Settings
Satellite
Search Mode
Scan Mode
Start Auto Setup (Settings are made automatically)
7
DVB-S Auto Setup
All DVB-S tuning data will be erased
Start scan
Astra 19.2° E
Free Channels
Quick
select
access / store
●
After settings, select [Start scan].
[Full]: Scans the whole frequency range.
[Quick]: Scans the suitable frequency for
the selected satellite.
DVB-S Auto Setup
Satellite
Progress
This will take about 20 minutes.
No. Channel Name Type
CBBC Channel
1
BBC Radio Wales
2
E4
3
Free TV
: 3 Pay TV: 0 Radio: 0
Astra 19.2° E
0% 100%
Searching
When the operation is completed, the channel at the lowest position will be displayed.
Free TV
Free TV
Free TV
Quality
100
100
100
49
Page 50
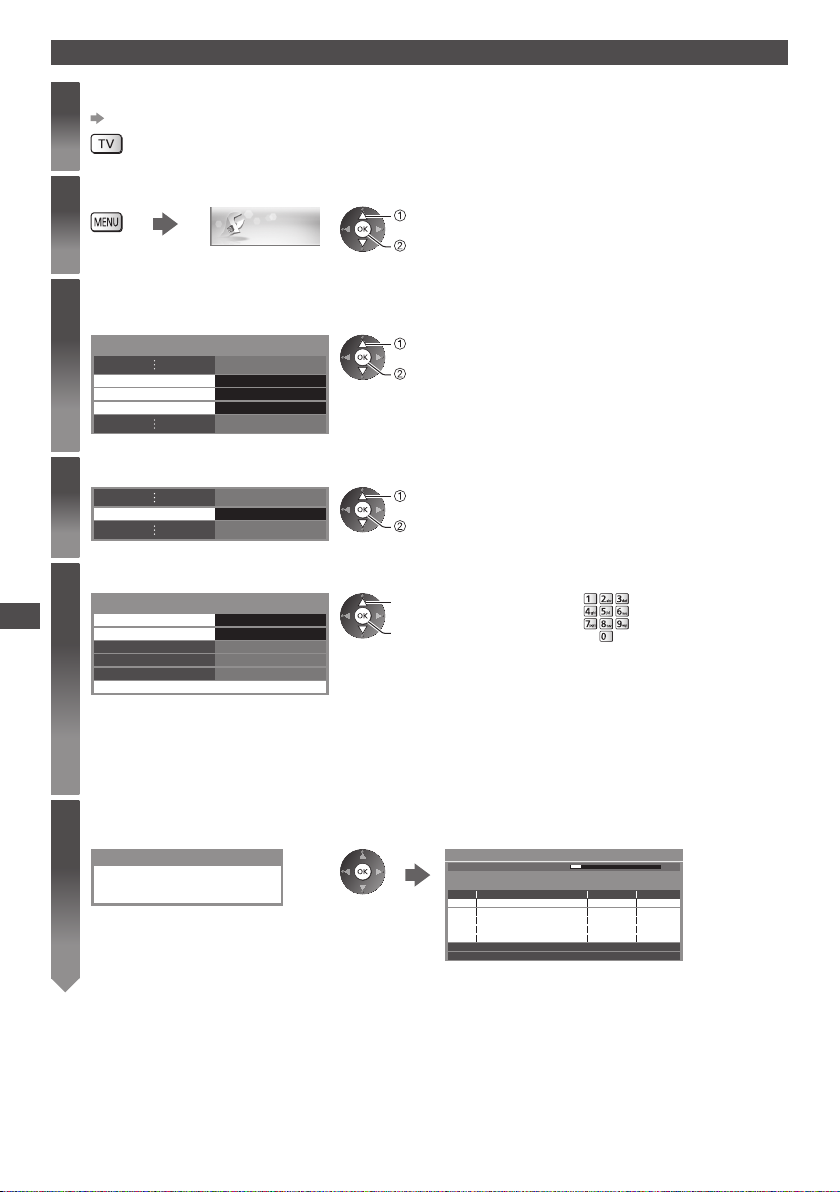
DVB-C, DVB-T, Analogue channels
Select DVB-C, DVB-T or Analogue
1
(p. 20)
Display the menu and select [Setup]
2
Select [DVB-C Tuning Menu], [DVB-T Tuning Menu] or [Analogue
3
Tuning Menu]
Select [Auto Setup]
4
Set the Auto Setup settings (DVB-C)
5
Retuning from Setup Menu
●
●
DVB-C Tuning Menu Access
DVB-T Tuning Menu Access
Analogue Tuning Menu Access
Auto Setup Access
DVB-C Auto Setup Settings
Search Mode Free Channels
Scan Mode
Frequency
Symbol Rate
Network ID
Start scan
Quick
Auto
Auto
Auto
[Scan Mode]
[Full]: Scans the whole frequency range.
[Quick]: Scans the suitable frequency in your country.
Normally set [Frequency], [Symbol Rate] and [Network ID] to [Auto].
If [Auto] is not displayed or if necessary, enter the value specified by your cable provider with numeric buttons.
Setup
select
access
select
access
select
access
select
access / store
●
After settings, select [Start scan].
50
Start Auto Setup (Settings are made automatically)
6
DVB-C:
DVB-C Auto Setup
All DVB-C tuning data will be erased
DVB-C Auto Setup
Progress
This will take about 3 minutes.
No. Channel Name Type
CBBC Channel
1
BBC Radio Wales
2
E4
3
Free TV
: 3 Pay TV: 0 Radio: 0
0% 100%
Free TV
100
Free TV
100
Free TV
100
Searching
Quality
Page 51
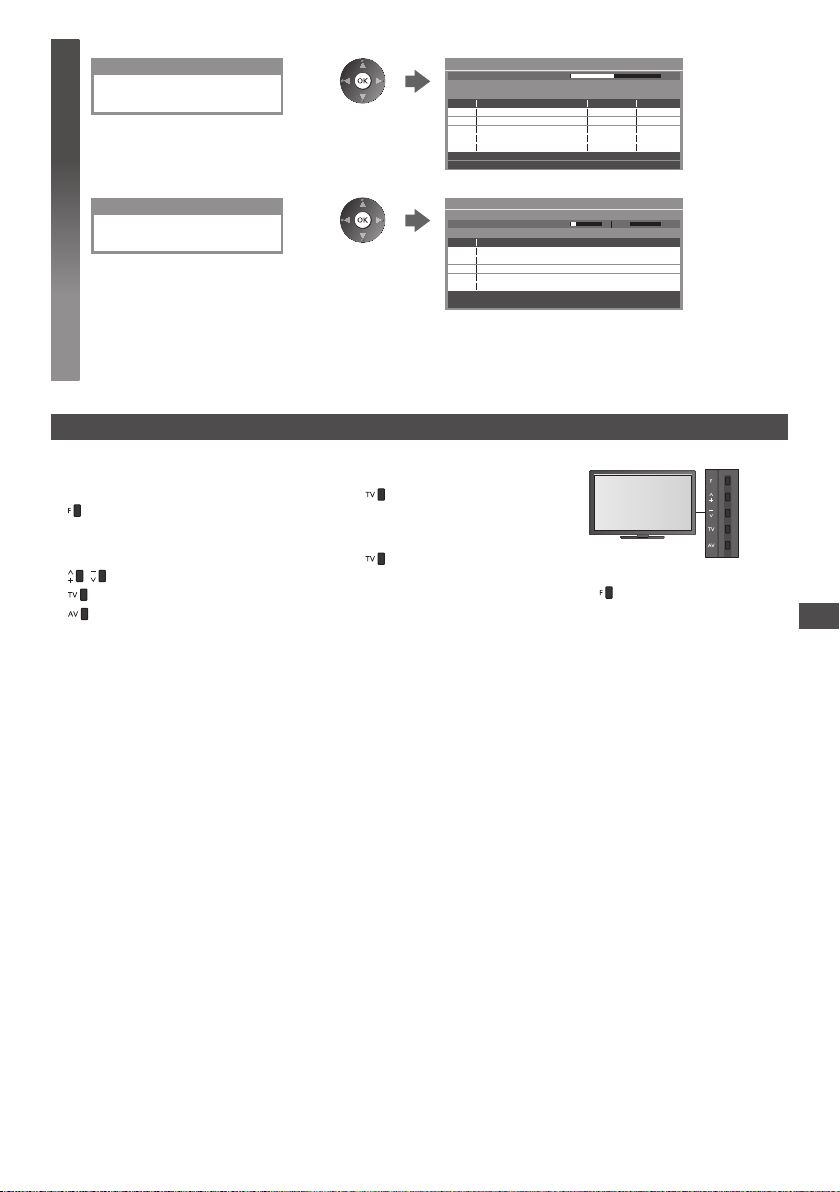
DVB-T:
DVB-T Auto Setup
6
All DVB-T tuning data will be erased
Analogue:
Analogue Auto Setup
All analogue tuning data will be erased
DVB-T Auto Setup
Progress
This will take about 3 minutes.
CH Channel Name Type
CBBC Channel
62
BBC Radio Wales
62
E4
62
62 100Cartoon Nwk
Free TV
: 4
Analogue Auto Setup
Scan
This will take about 3 minutes.
CH Channel Name
CH 29
CH 33 BBC1
CH 5 69
Free TV
Free TV
Free TV
Pay TV: 0
Free TV
Searching
CH 2 78 41CC 1
Radio: 0
Quality
100
100
100
Analogue: 2
●
The channel, language and country / region settings are downloaded to Q-Link or VIERA Link compatible
equipment connected to the
TV.
Searching
When the operation is completed, the channel at the lowest position will be displayed.
Auto setup using the buttons on the TV
For Auto Setup, using the buttons on the TV (p. 11)
1 Press the F button repeatedly until [Auto
Setup] appears
3 Set the search mode and scan mode
(DVB-S, DVB-C)
(select the item)
(set)
(store)
2 Access [Auto Setup]
4 Start [Auto Setup]
●
To return to TV
●
Control panel OSD appears
when pressing the control
panel button.
Retuning from Setup Menu
51
Page 52
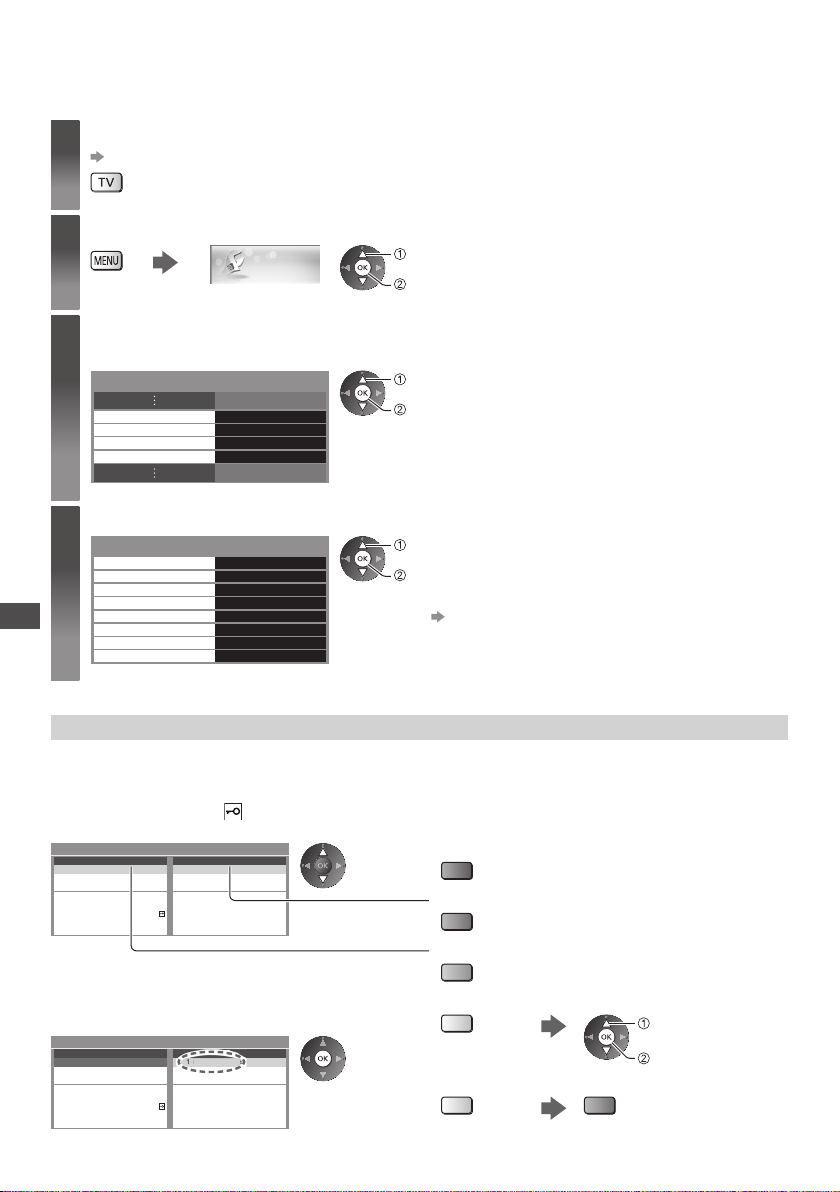
Tuning and Editing Channels
e Wale
es1
You can retune channels or make your favourite channel lists, skip unwanted channels, etc.
Select the mode
1
(p. 20)
Display the menu and select [Setup]
2
Select [DVB-S Tuning Menu], [DVB-C Tuning Menu], [DVB-T Tuning
3
Menu] or [Analogue Tuning Menu]
Select one of the following functions
4
Tuning and Editing Channels
DVB-C Tuning Menu Access
DVB-T Tuning Menu Access
Analogue Tuning Menu Access
DVB-C Tuning Menu
Favourites Edit
Channel List
Auto Setup
Manual T
uning
Update Channel List
New Channel Message
Signal Condition
Attenuator Off
Access DVB-S Tuning Menu
Access
Access
Access
Access
Access
On
Access
Setup
select
access
select
access
●
The displayed item depends on the selected mode.
select
access
●
The function items vary depending on the country you select (p. 15).
●
[Auto Setup]
“Retuning from Setup Menu” (p. 48 - 51)
List favourite DVB channels [Favourites Edit]
Create your favourite channel lists from various broadcasters (up to 4: [Favourites]1 to 4).
The DVB Favourites lists are available from “Category” in the Information banner (p. 21) and the TV Guide screen
(p. 24).
1 Select a channel to list ( : Encrypted channel)
Example: DVB-C
DVB-C Favourites Editor
All DVB-C Channels Favourites1
1 BBC One Wales
7 BBC THREE
14 E4
CBBC Channel70
72 Cartoon Nwk
BBCi
105
BBC Radio Wales
719
BBC Radio Cymru
720
Sorting 123...
2 Add it to the Favourites list
Example: DVB-C
DVB-C Favourites Editor
All DVB-C Channels Favourites1
1 BBC One Wales
7 BBC THREE
14 E4
CBBC Channel70
72 Cartoon Nwk
BBCi
105
BBC Radio Wales
719
BBC Radio Cymru
720
Sorting 123...
Favourit
1 BBC One Wales
BBC On
●
To sort channel names in alphabetical order
(red)
●
To display other Favourites
(green)
●
To change the category
(blue)
●
To add continuous block of channels to the list at once
(yellow)
●
To add all channels to the list
(yellow)
make the block
add
(green)
52
Page 53
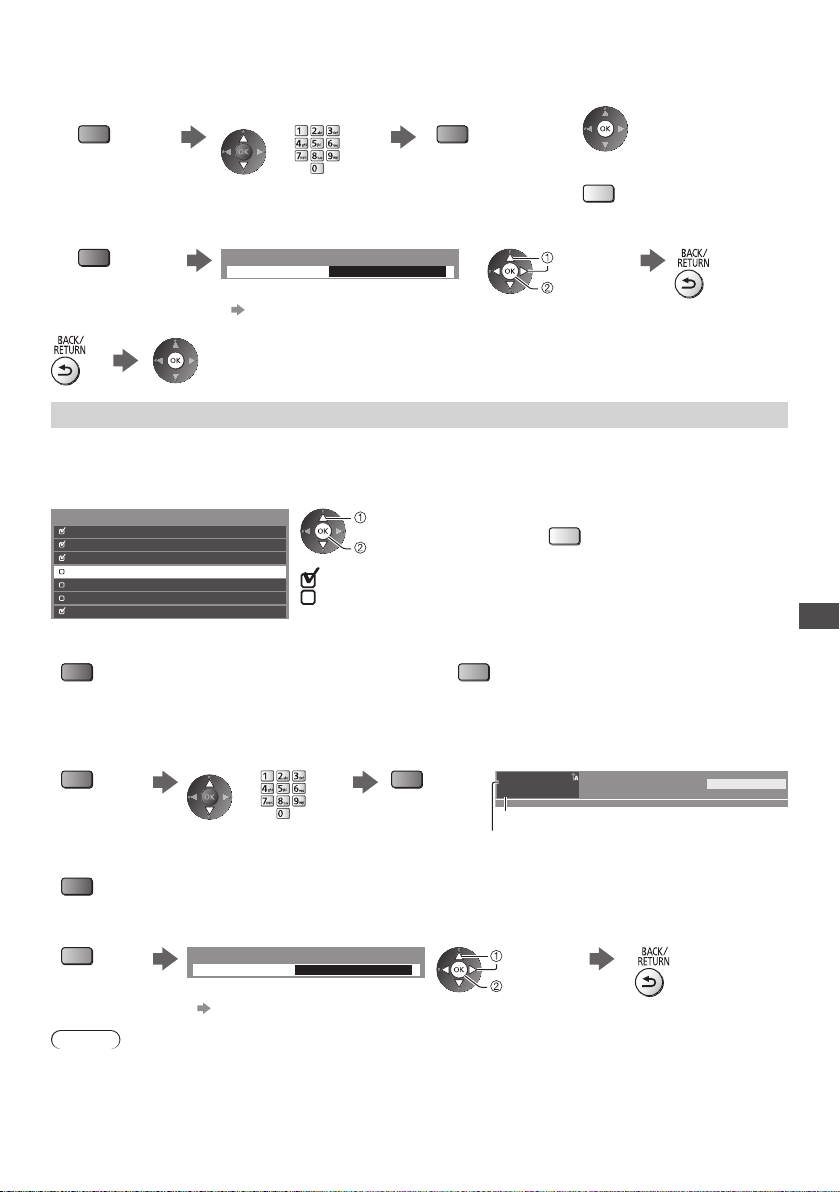
■ To edit Favourites list
While the cursor is in the Favourites field to edit
●
To move the channel
(green)
●
To name the Favourites
(red)
3 Store
Skip unwanted channels, Edit Channels [Channel List]
You can hide (skip) unwanted channels.
The hidden channels cannot be displayed except in this function.
Select a channel and reveal / hide
Example: DVB-C
All DVB-C Channels
70 CBBC Channel
72 Cartoon Nwk
105 BBCi
719 BBC Radio Wales
720 BBC Radio Cymru
1 BBC ONE Wales
7 BBC THREE
●
To sort channel names in alphabetical order (DVB)
(red)
Select the new position Store
or
(green)
Set characters (maximum 10 characters) Store
User input
Name
●
To use numeric buttons
(p. 110)
Sorting 123...
: [Reveal]
select
[Reveal] / [Hide]
: [Hide] (skip)
●
To change the category (DVB)
(blue)
●
To delete the channel
●
To delete all channels
(yellow)
select
set
●
To reveal all channels
(yellow)
Tuning and Editing Channels
■ To edit channels
●
To swap / move the channel position (if available)
(green)
●
To retune each channel ([Manual Tuning] (p. 54)) (Analogue)
(red)
●
To rename the channel name (Analogue)
(blue)
Select the new position Store
or
(green)
Set characters (maximum 5 characters) Store
Edit channel name
Name
●
To use numeric buttons
(p. 110)
Note
●
If a VCR is connected only with the RF cable in Analogue mode, edit [VCR].
Example: Analogue
Channel position
select
set
1
ITV
Channel name
CH23 SC1
23:35
All Analogue Channels
53
Page 54
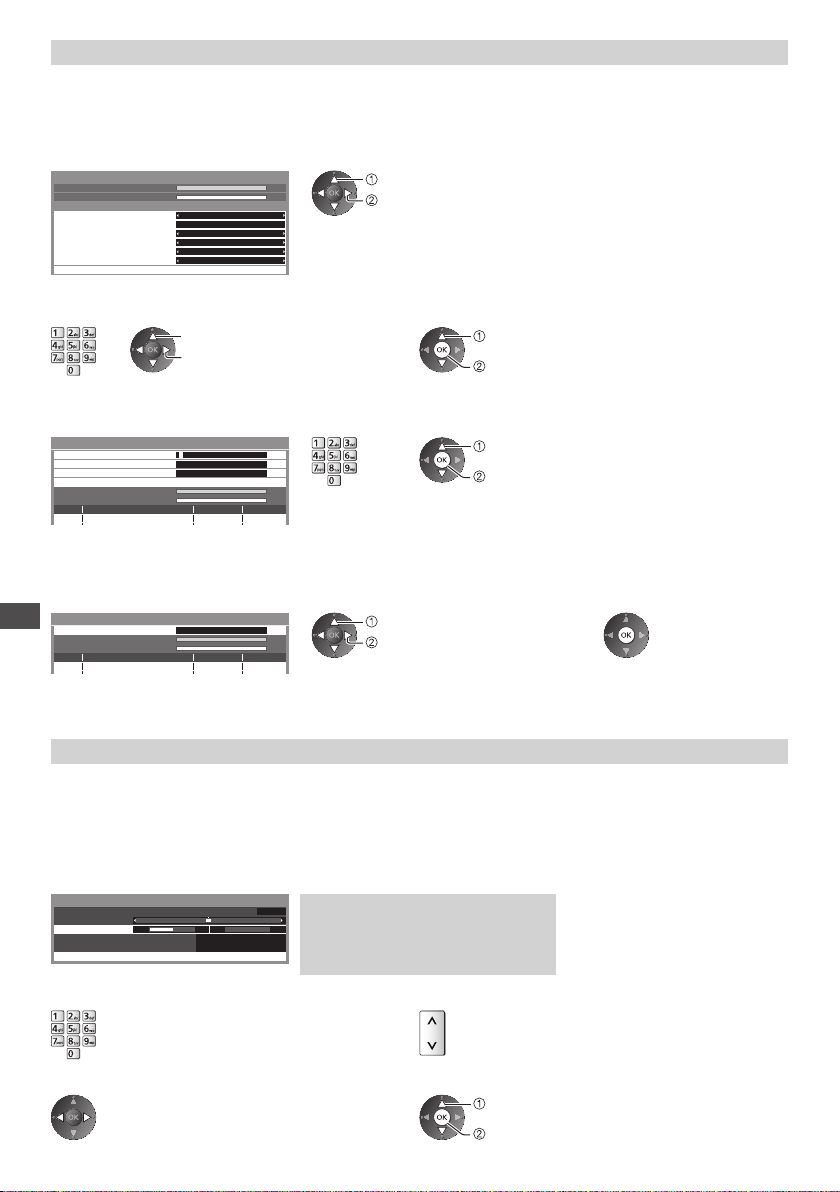
Set DVB channel manually [Manual Tuning]
Normally use [Auto Setup] or [Update Channel List] to retune DVB channels.
If tuning has not been done completely or for adjusting the direction of the aerial or dish, use this function.
●
All channels found will be added to the Channel List.
DVB-S:
1 Set the satellite
DVB-S Manual Tuning
Signal Quality
Signal Strength
Satellite
T
ransponder Frequency
Symbol Rate
Polarisation
Modulation
Service ID
Start scan
Astra 19.2° E
10847 MHz
Auto
Horizontal
Auto
Auto
100%
100%
2 Set [Transponder Frequency], [Symbol Rate],
[Polarisation], [Modulation] and [Service ID]
select
change
DVB-C:
select
set
●
Please consult the received satellite broadcasting companies for the
setting.
3 Select [Start scan]
select
access
1 Enter the frequency 2 Select [Start scan]
DVB-C Manual Tuning
Frequency
Service ID
Signal Quality
Signal Strength
Channel Name Type New
No.
●
Normally set [Symbol Rate] and [Service ID] to [Auto].
:
DVB-T
Start scan
74,00 MHz4
Auto Symbol Rate
Auto
100%
100%
select
access
1 Adjust frequency for each channel 2 Search
DVB-T Manual Tuning
Frequency
Tuning and Editing Channels
Signal Quality
Signal Strength
No. Channel Name Type New
●
Set where the level of [Signal Quality] becomes the maximum.
[CH21]
474,00 MHz
100
100%
%
select channel
adjust frequency
Set Analogue channel manually [Manual Tuning]
[Fine Tuning]:
Use to make small adjustments to the tuning of an individual programme (affected by weather conditions, etc.).
[Manual Tuning]:
Set Analogue channel manually after Auto Setup.
●
Set [Sound System] and [Colour System], and then perform this function. Normally set [Colour System] to [Auto].
●
If a VCR is connected only with the RF cable, select channel position [0].
Analogue Manual Tuning
Fine Tuning
Manual Tuning
Sound System
Colour System
278 411
Store
SC1
Auto
CH331 BBC1
SC1: PAL B, G, H / SECAM B, G
SC2: PAL I
SC3: PAL D, K / SECAM D, K
F: SECAM L, L’
1 Select the channel position 2 Select the channel
3 Search 4 Select [Store]
select
store
54
Page 55
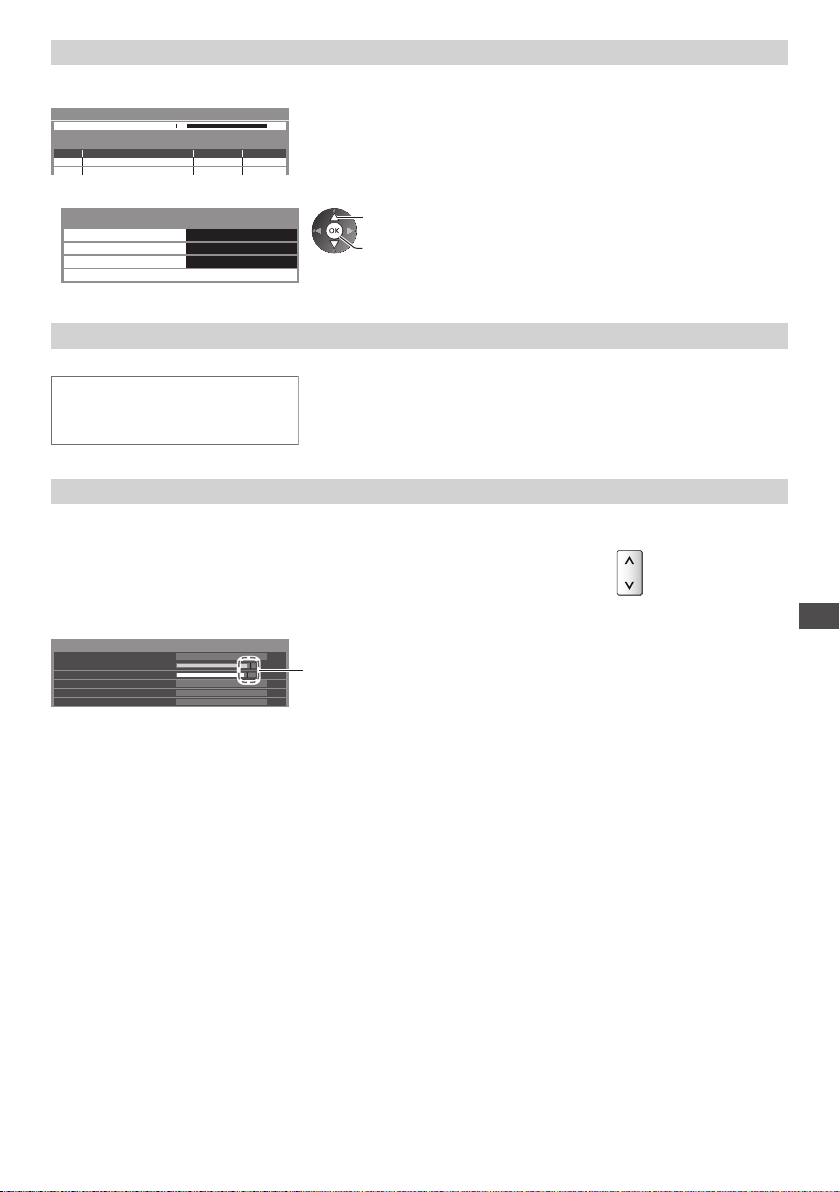
Update DVB channel automatically [Update Channel List]
8
You can add new channels, delete removed channels, update channel name and position automatically to the channel
list.
DVB-T Update Channel List
Progress
This will take about 3 minutes.
CH
CH 5 69
Channel Name Type Quality
●
The channel list is updated while keeping your settings in [Favourites Edit],
[Channel List], [Child Lock], etc.
●
Depending on the signal condition, the update may not work properly.
●
To update DVB-S channels, set [Satellite], [Search Mode] and [Scan Mode] before updating.
DVB-S Update Channel List Settings
Satellite
Search Mode
Scan Mode
Start scan
Astra 19.2° E
Free Channels
Quick
select
access / store
●
After settings, select [Start scan].
Display a notification message [New Channel Message] (DVB)
Selects whether to give a notification message when a new DVB channel is found.
New channels found!
Press OK to update channel list.
Press EXIT to ignore.
●
Selecting OK will perform [Update Channel List].
Check DVB signal [Signal Condition]
Selects a channel and checks the DVB signal condition.
A good Signal Strength is not an indication of suitable signal for DVB reception.
Use the Signal Quality indicator as follows.
●
Green bar: Good
●
Yellow bar: Poor
●
Red bar: Bad (Check the Terrestrial aerial, cable or Satellite dish)
Example:
DVB-C Signal Condition
Channel Name
Signal Quality
Signal Strength
Bit Error Rate
Network Name
Parameter
70 CBBC Channel
0.00E+00
Wenvoe
802,00 MHz, 64 QAM, 6940 kS/s
9080%
These bars show the maximum signal value of the selected
%
channel.
●
To change the channel
Tuning and Editing Channels
55
Page 56
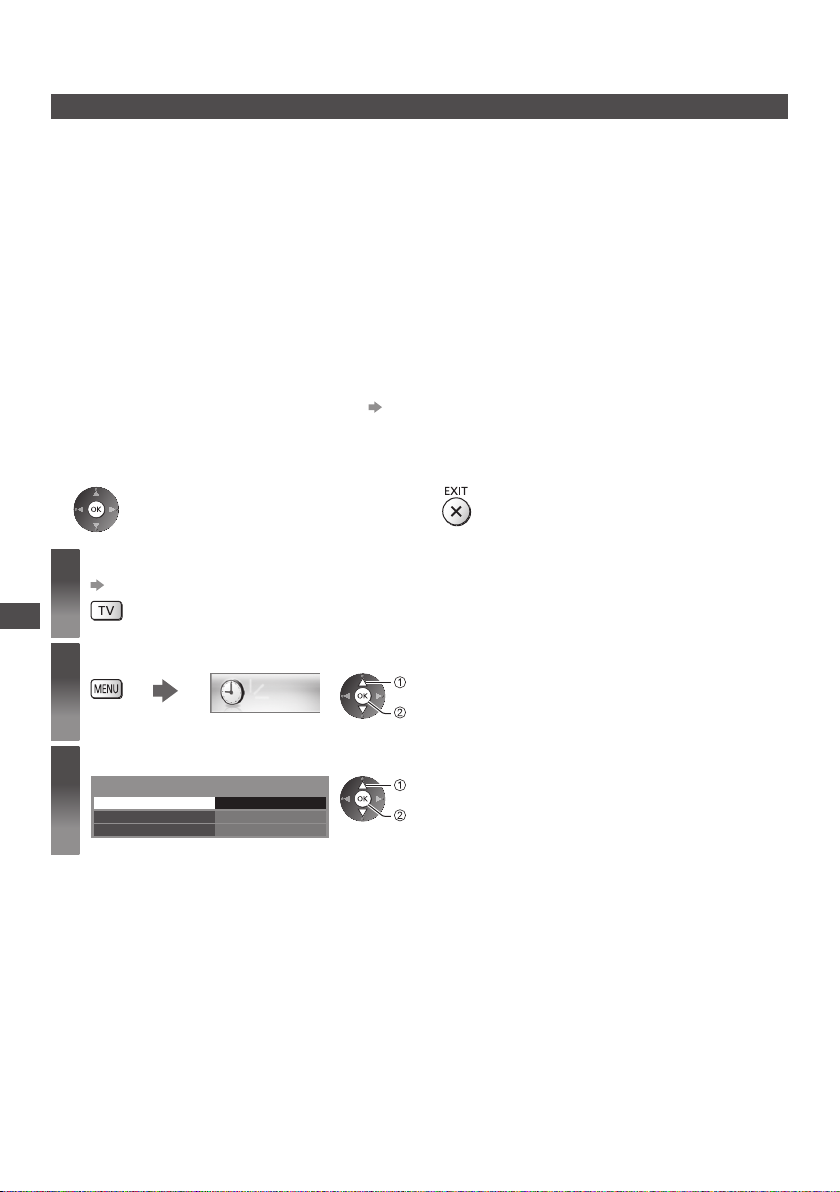
Timer Programming
Timer Programming from Menu
The Timer Programming menu allows you to choose programmes that you want to remind watching or record to the
external recorder or the USB HDD. At the correct time, the TV will tune to the correct channel even if the TV is in
Standby mode.
TV Guide may also be used to set timer programming event (p. 26).
●
This function is not available in Analogue mode.
●
Timer Programming can store up to 15 events.
●
Timer Programming only works reliably if correct time information is received via the signal from the broadcaster or
service provider
●
For recording using Timer Programming, the TV must be either on or in Standby. For reminders to be displayed, the
TV must be on.
●
No other channel can be selected while the recording of Timer Programming is in progress.
●
Recording an encrypted (copy-protected) programme may not be possible.
●
When recording programmes to the external recorder, be sure to make the proper settings on the recorder connected
to the
and [Link Settings] (p. 43) are completed, no setting of the recorder is required. Also read the manual of the recorder.
●
If the recorder is not compatible with Q-Link, VIERA Link or similar technologies, make timer programming of the
recorder. For preparations of a recorder, read the manual of the recorder.
●
For more information of the USB HDD Recording (p. 66, 107)
●
Recording to the external equipment via SCART is always in standard definition (composite video), even if the
original programme is in high definition.
●
2 minutes before the starting time, a reminder message appears if you are watching TV.
To remove the message and start the programming
•
.
TV. If a recorder compatible with Q-Link, VIERA Link or similar technologies is connected to the TV (p. 94, 95)
To cancel the programming
•
Select DVB-S, DVB-C or DVB-T
1
(p. 20)
Timer Programming
Display the menu and select [Timer]
2
Select [Timer Programming]
3
Off Timer
Auto Standby
Access Timer Programming
Of
Off
Timer
f
select
access
select
access
56
Page 57
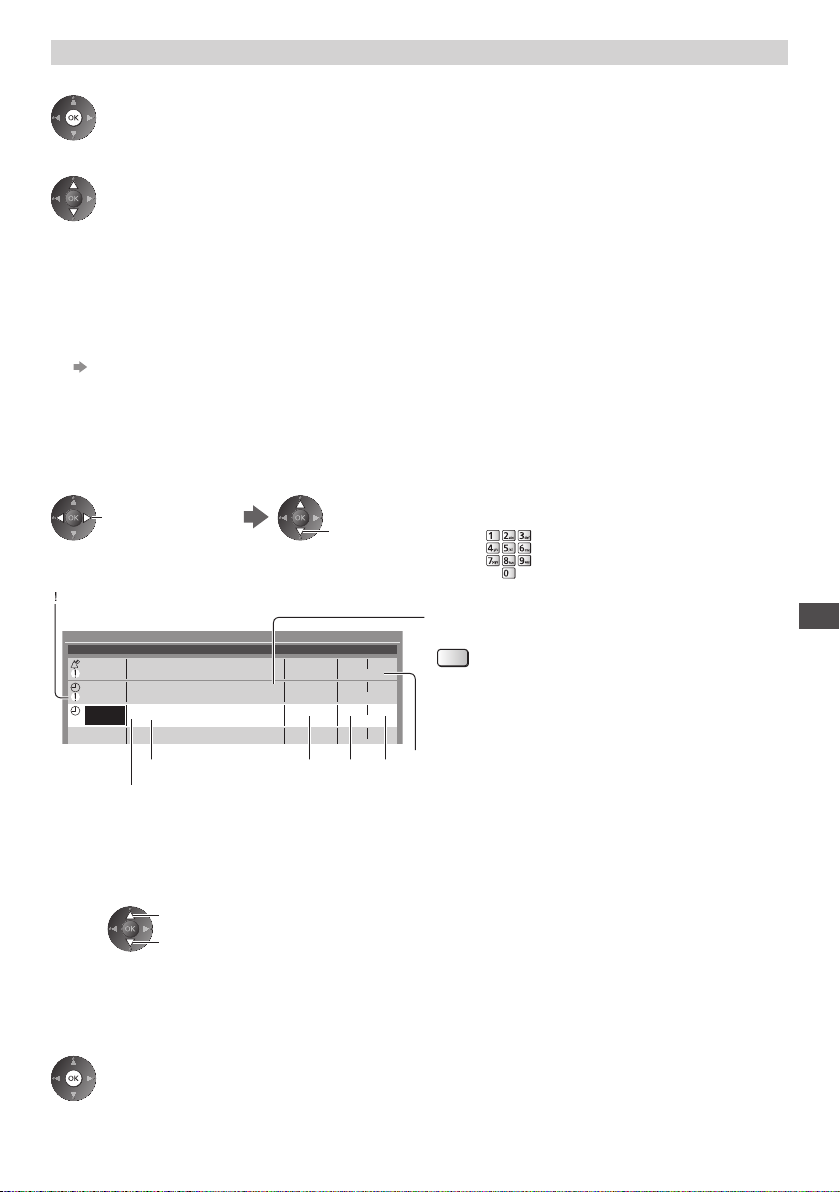
Set timer programming event details
Start making the settings
1
2 Select the function ([Ext Rec.], [USB HDD Rec.] or [Reminder])
[Ext Rec.] / [USB HDD Rec.]:
Records the programme to the external recorder or the USB HDD.
When the start time comes, the channel will be switched automatically and the video and audio signals will be
output. 2 minutes before the starting time, a reminder message appears if you are watching TV.
For [USB HDD Rec.], you can select a recording mode:
[DR]: Direct recording (normal mode)
[LT1]: Long time recording
[LT2]: Extra long time recording
“Recording time for the USB HDD” (p. 107)
[Reminder]:
Reminds you to watch the programme.
When you are watching TV, a reminder message appears 2 minutes before the start time.
Press the OK button to switch to the programmed channel.
3 Set the channel, date and time (repeat the operations as below)
Set items in the order of 1 to 4.
select the item
: Overlapped timer programming events
Timer Programming
Function No. Date Start End Channel Name
Reminder
D 7 BBC7 17:00 18:30
Ext Rec.
Ext Rec.
<TIMER>
D 1 BBC1 STTL 18:00 20:00
<TIMER>
C 3 ITV1
<TIMER>
------
1
[S]: DVB-S
[C]: DVB-C
[D]: DVB-T
●
You cannot change the mode within the menu.
Channel number
1
Date
2
one day ahead
daily or weekly (press repeatedly)
●
[Daily Sun-Sat]: Sunday to Saturday
●
[Daily Mon-Sat]: Monday to Saturday
●
[Daily Mon-Fri]: Monday to Friday
●
[Weekly Sat/Fri/Thu/Wed/Tue/Mon/Sun]: Same time on the same day every week
Wed 26.10.2011 10:46
Wed 26.10.2011
Wed 26.10.2011
Thu 27.10.2011
2 3 4
set
21:30 22:30
--:----:-- --:--
(90 min.)
(120 min.)
(60 min.)
Duration (automatic display)
●
1, 3 and 4 can also be entered with numeric
buttons.
Records with subtitles (if available)
●
To indicate this
(yellow)
(Press again to remove subtitles)
Starting time
3
Ending time
4
4 Store
Timer Programming
57
Page 58
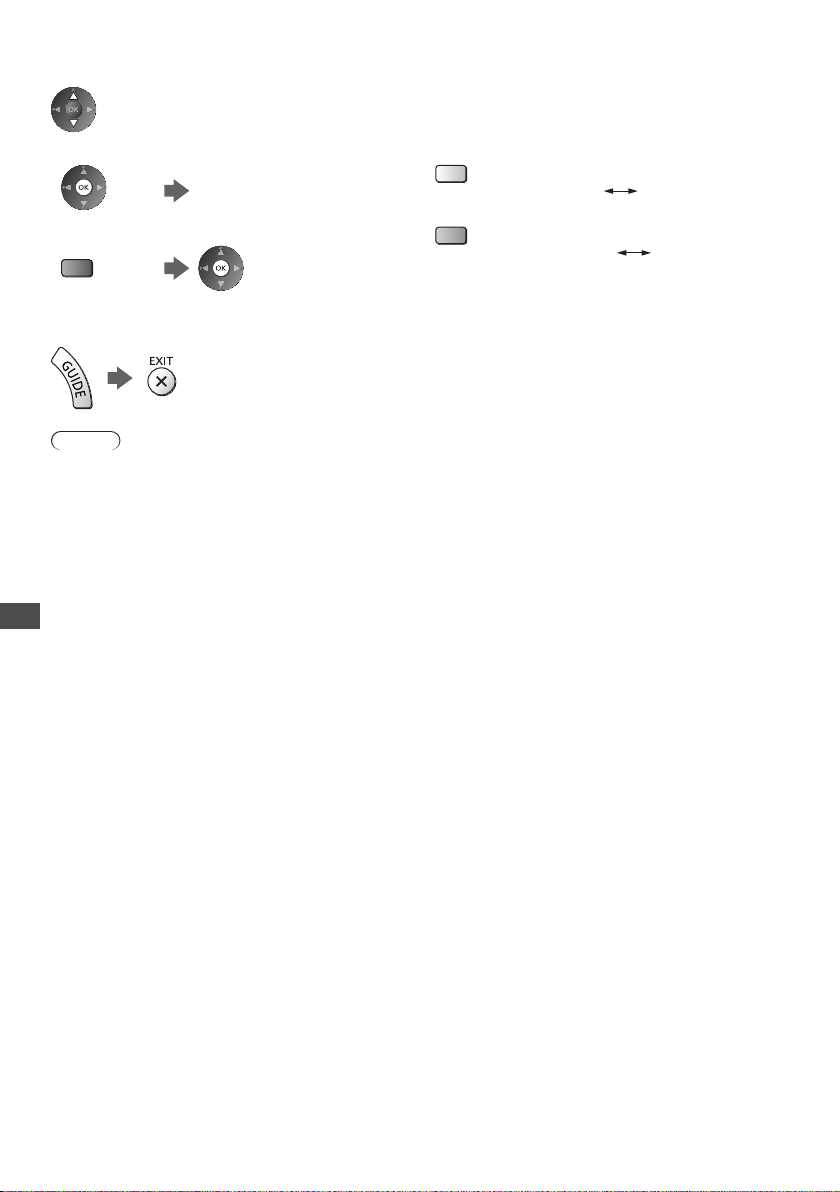
■ To edit a timer programming event
Select the event
●
To change a timer programming event
Correct as necessary (p. 57)
●
To delete a timer programming event
(red)
●
To record with subtitles (if available)
(yellow)
●
To cancel a timer programming event temporarily
(blue)
Each time pressed:
•
auto
Each time pressed:
•
cancel
off
stop cancelling
■ To unlock the tuner and stop recording
Note
●
Check that the LED is orange. If not, timer programming events are not active or not stored.
●
Timer Programming reminder messages will remain displayed until one of the following occurs:
You press the OK button to view the programme or the EXIT button to cancel the reminder.
•
The timer programming event that the reminder is set for ends.
•
●
“!” identifies that two or more timer programming events are overlapped. [Ext Rec.] and [USB HDD Rec.] are given
priority over [Reminder]. As for the overlapped recording events, the first event starts and finishes as programmed.
The next event can then start.
●
The recording of Timer Programming will automatically change to the programmed channel a few seconds before the
start time.
●
To stop recording the timer programming event, it may be necessary to stop the recorder manually.
●
The recording of Timer Programming will be performed even if the TV is in [REW LIVE TV] recording (p. 69) or
Timer Programming
[Pause Live TV] recording (p. 97). In this case, [REW LIVE TV] recording or [Pause Live TV] recording will be
cancelled.
58
Page 59
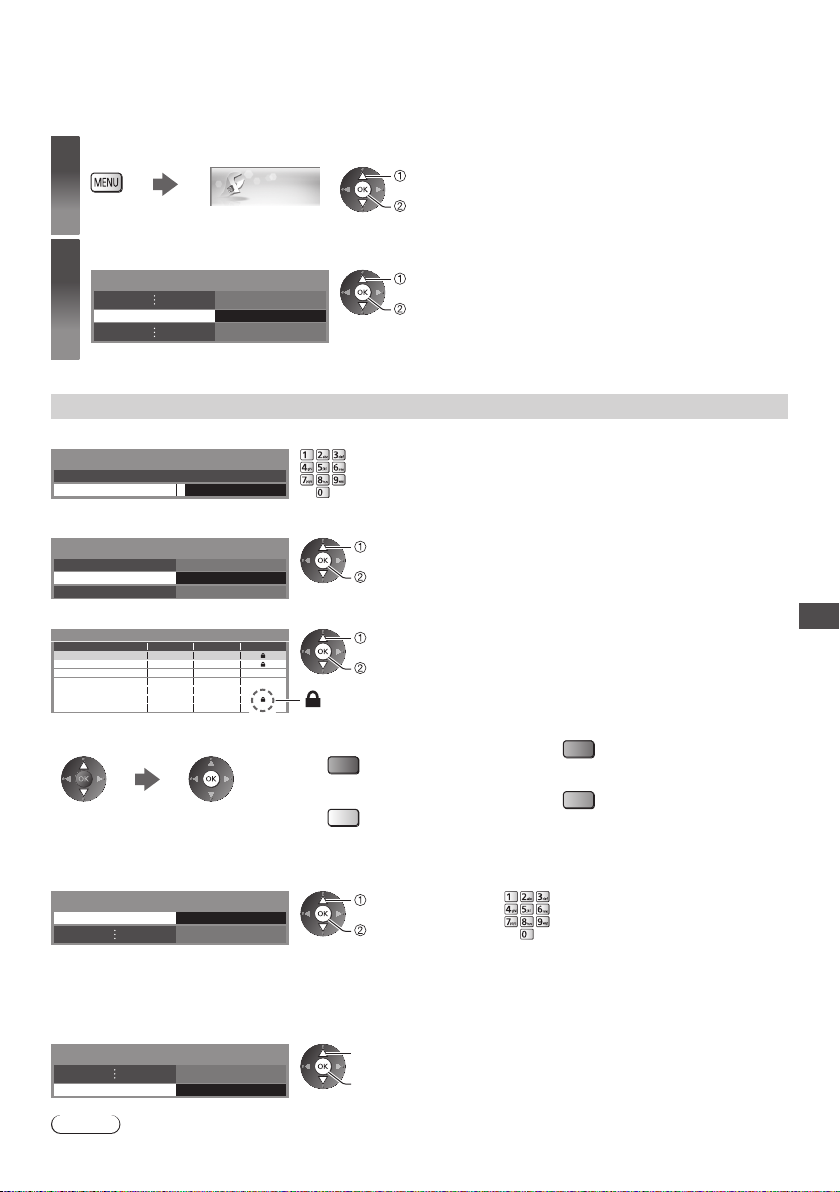
Child Lock
You can lock specific channels / AV input terminals and control who watches them.
When the locked channel / input is selected, a message appears. Enter the PIN number to watch.
Display the menu and select [Setup]
1
Select [Child Lock]
2
Control channel audience [Child Lock]
Enter the PIN number (4 digits)
1
Child Lock-PIN Entry
Please enter new PIN
PIN
2 Select [Child Lock List]
Child Lock
Change PIN
Child Lock List
Parental Rating
3 Select the channel / input to be locked
Child Lock List - TV and AV Sorting 123...
Name Input
101 BBC 1 Wales
7 BBC THREE
14 E4C
VCR
1 BBC1
*****2
AV1 AV
●
To cancel
Select the locked channel / input
Child Lock Access
* * * *
Access
No limit
Type
Free TV
DVB-C
Free TV
DVB-T
Free TV
DVB-T
Analogue
Analogue
Analogue
Analogue
Analogue
Analogue
External
Setup
Lock
: Appears when the channel / input is locked
●
To sort channel names in
alphabetical order
(red)
●
To cancel all locks
select
access
select
access
●
Enter the PIN number twice at first setting.
●
Make a note of the PIN number in case you forget it.
●
“0000” may be stored as the default PIN number which depends on
the country you select (p. 15).
select
access
select
lock
●
To lock all
(green)
●
To jump to the top of the next input
(blue)
(yellow)
Child Lock
■ To change the PIN number
1. Select [Change PIN] 2. Enter a new PIN number twice
Child Lock
Change PIN
Access
select
access
■ To set Parental Rating
To watch the DVB programme that has the rating information over the selected age, enter the PIN number to watch
(depending on the broadcaster).
Select [Parental Rating] and set an age for the restriction of programmes.
Child Lock
Parental Rating
No limit
select
access / store
Note
●
Setting [Shipping Condition] (p. 62) erases the PIN number and all settings.
●
The availability of this function depends
on the country you select (p. 15).
59
Page 60
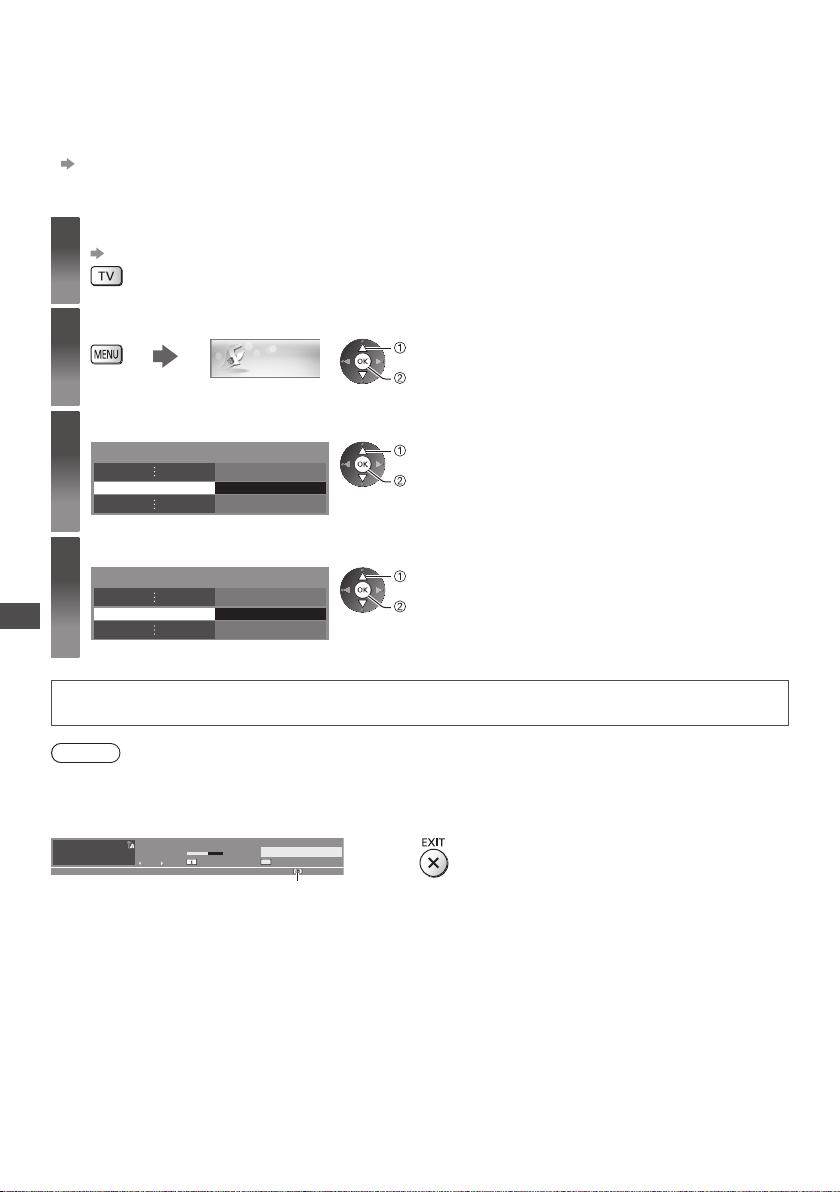
Using Data Service Application
You can enjoy Hybrid Broadcast Broadband TV application that is one of the interactive data services for digital
broadcasting.
●
To use Hybrid Broadcast Broadband TV application fully, you need a broadband network environment.
Ensure the network connections and network settings are completed.
“Network connections” (p. 83), “Network Setup” (p. 84 - 87)
●
Not all the data service are available depending on the country, area and broadcaster.
●
Depending on the connection environment, the internet connection may be slow or may not be successful.
Select DVB-S, DVB-C or DVB-T
1
(p. 20)
Display the menu and select [Setup]
2
3
4
Using Data Service Application
Setup
Select [Display Settings]
Access Display Settings
Select [Data Service Application] and set to [Auto Start On]
Display Settings
Data Service Application Auto Start On
select
access
select
access
select
access / set
Notification message will appear when the application is available. Follow the onscreen instructions.
Note
●
Operations may vary depending on the broadcaster. Follow the on-screen instructions.
●
On-screen instructions may not correspond to the remote control buttons.
■ To check the availability of the application
1
BBC ONE WALES
Coronation Street
20:00 - 20:55
Now Info
“D” is displayed if programme has Hybrid
Broadcast Broadband TV application
All DVB-T Channels
Change category
20:35
■ To stop the application
60
Page 61
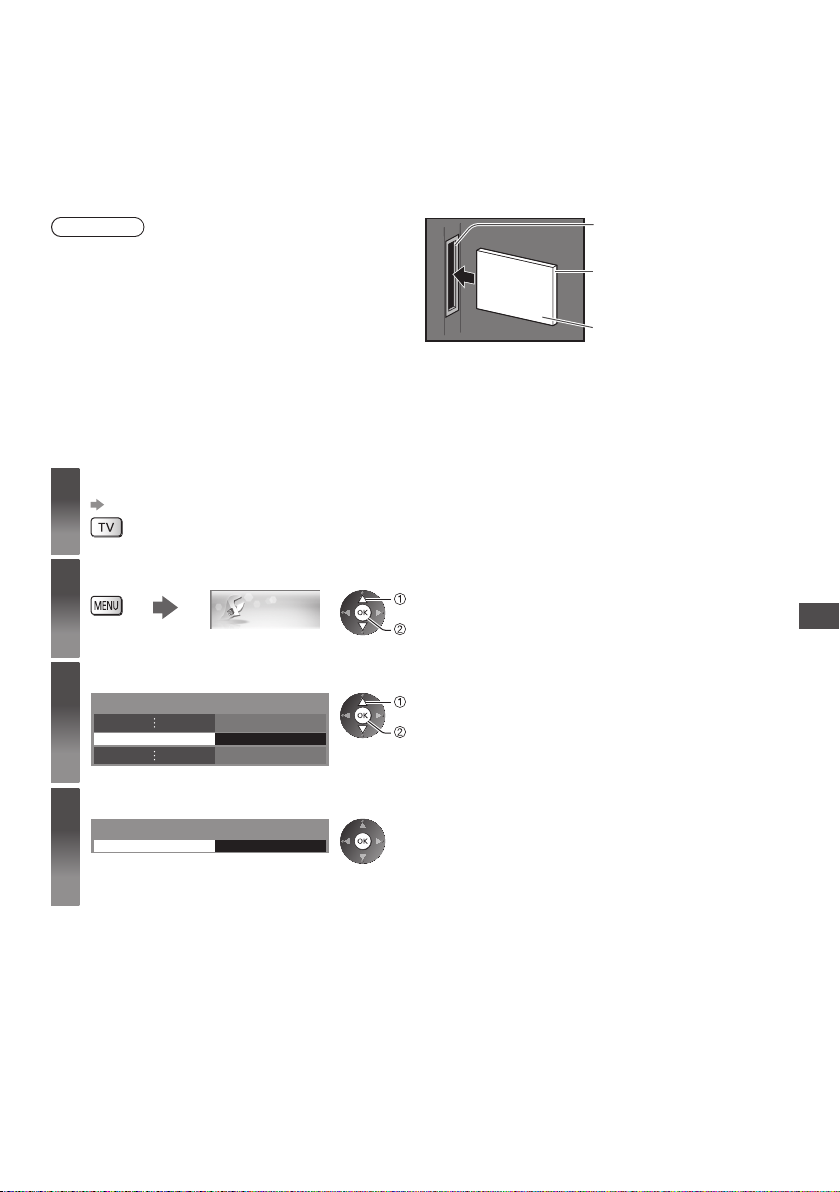
Using Common Interface
The Common Interface Module menu provides access to software contained on Common Interface (CI) Modules.
●
This function may not be available in some countries or regions.
●
Video and audio signals may not be output depending on broadcasts or services.
Although CI module may enable you to view some services, this TV does not guarantee all services (e.g. encrypted
pay-TV channels).
Please use only the approved CI module by the broadcaster.
Consult your local Panasonic dealer or broadcasters for more information and conditions of the services.
Caution
●
Turn off Mains power On / Off switch whenever inserting
or removing the CI module.
●
If a view card and a card reader come as a set, first
insert the card reader
card reader.
●
Insert the module in the correct direction.
Insert the CI module (optional)
●
The features that appear on screen are dependent on the contents of the selected CI module.
●
Normally encrypted channels will appear. Follow the on-screen instructions.
If encrypted channel does not appear, perform below.
●
For more details, read the manual of the CI module, or check with the broadcaster.
Select DVB-S, DVB-C or DVB-T
1
(p. 20)
Display the menu and select [Setup]
2
, then insert the view card into the
Setup
Rear of the TV
select
access
CI slot
Insert or remove completely
CI module
Using Common Interface
Select [Common Interface]
3
Common Interface Access
Access Common Interface and follow the on-screen instructions
4
Common Interface
Slot 1:
●
On-screen instructions may not correspond to the remote control buttons.
Module inserted
select
access
61
Page 62
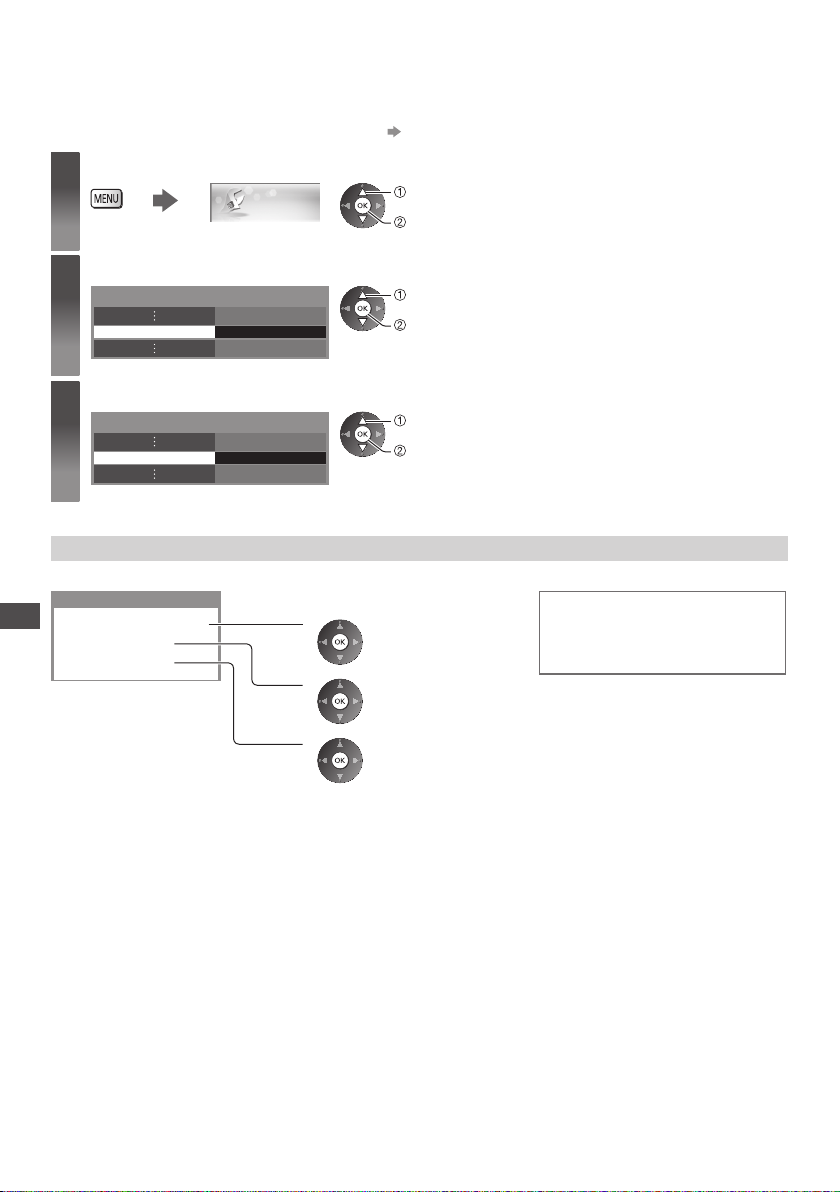
Shipping Condition
Resets the TV to its original condition, i.e. no channels tuned in.
All settings other than [USB HDD Setup] are reset (channels, picture, sound settings, etc.).
●
To retune TV channels only, e.g. after moving house
Display the menu and select [Setup]
1
Select [System Menu]
2
Select [Shipping Condition]
3
System Menu Access
System Menu
Shipping Condition Access
Setup
Restore Settings [Shipping Condition]
Check the message and initialise 2 Follow the on-screen instructions
1
Shipping Condition
All tuning data will be erased
Shipping Condition
Are you sure ?
Are you sure ?
1
2
3
“Retuning from Setup Menu” (p. 48 - 51)
select
access
select
access
select
access
Reset to Factory Shipping Condition
(Confirm)
(Confirm)
(Start [Shipping Condition])
●
[Auto Setup] will automatically start.
(p. 15)
Completed.
TV will automatically restart.
Do not turn off
62
Page 63
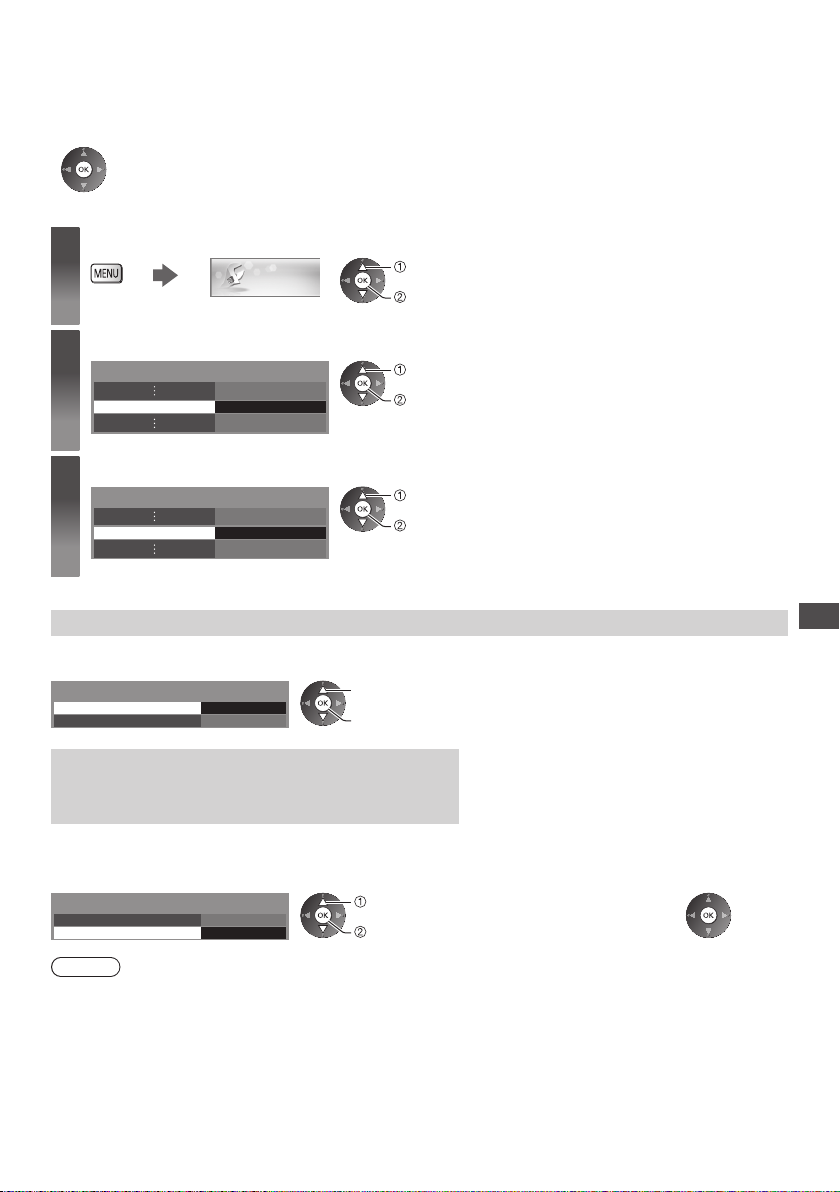
Updating the TV Software
A new version of software may be released for download to enhance the performance or operations of the TV.
If there is an update available, a notification message is displayed when the channel has the update information.
●
To download
(Press the EXIT button not to download)
You can update new software automatically or update manually.
Display the menu and select [Setup]
1
Select [System Menu]
2
Select [System Update]
3
System Menu Access
System Menu
System Update Access
Setup
select
access
select
access
select
access
Update TV’s software system [System Update]
■ To update automatically
Select [Auto Update Search in Standby]
System Update
Auto Update Search in Standby
System Update Search Now
If System Update is performed, the software will be
updated (it may change TV functions).
If you do not want to do so, set [Auto Update Search in
Standby] to [Off].
Off
select
access / store
●
Every time you set, the TV automatically
performs a search in Standby and downloads an
update, if any software updates are available.
●
The automatic updating is performed under the
following conditions:
Standby (TV turned off with the remote control)
•
Recording of Timer Programming, Direct TV
•
Recording or One Touch Recording is not in
progress.
■ To update immediately
1 Select [System Update Search Now] 2 Searches for an update (for
System Update
Auto Update Search in Standby
System Update Search Now
Off
Access
select
access
Note
●
Download may take for about 60 minutes.
●
During software download and update, DO NOT switch off the TV.
●
The notification message might be a reminder. In this case, the schedule information (the date that the new version
can be used) will appear
. You can set the reservation for update. The update will not start when the TV is off.
several minutes) and displays a
corresponding message if any
3 Download
Updating the TV Software
63
Page 64
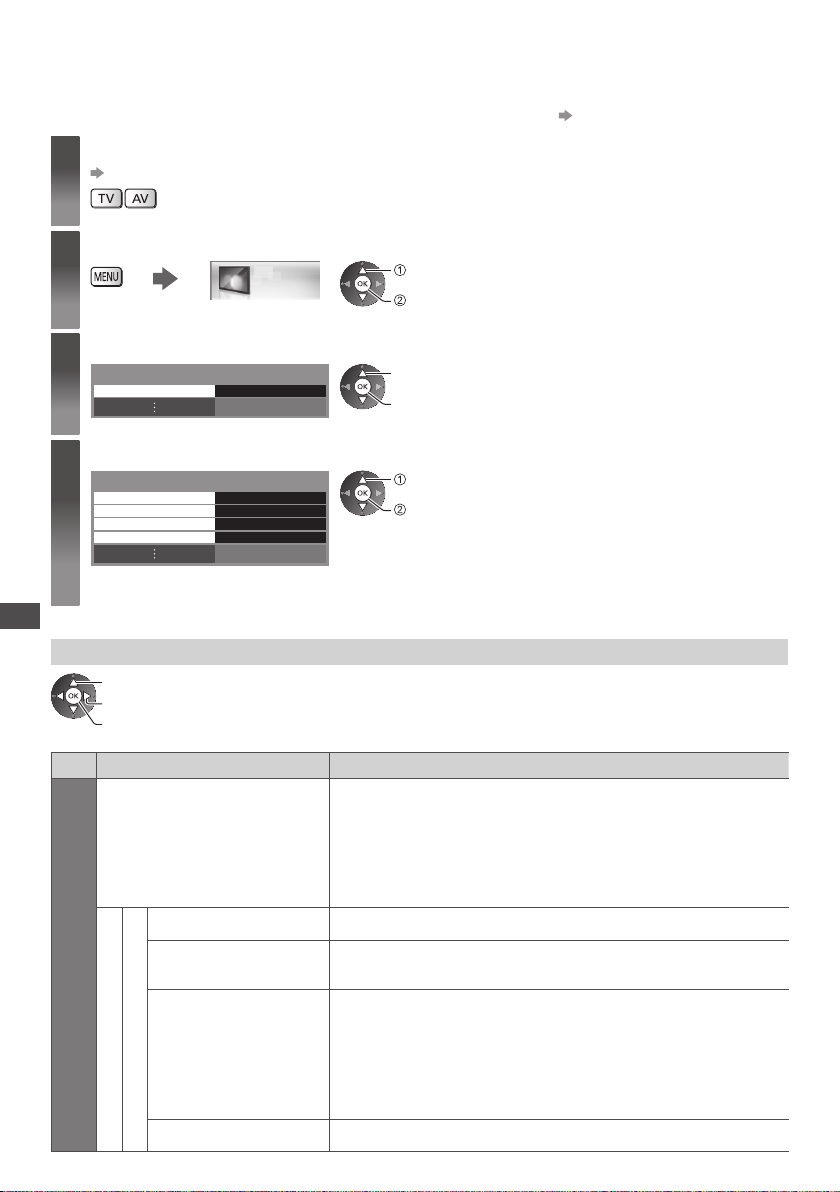
Advanced Picture Settings
You can adjust and setup the detailed picture settings for each input and Viewing Mode.
●
To use this function completely, set [Advance(isfccc)] to [On] in the Setup Menu. (p. 46)
Select the input mode to adjust and setup
1
(p. 20, 29)
Display the menu and select [Picture]
2
Select [Viewing Mode] and set the mode
3
Select one of the following functions
4
Advanced Picture Settings
Adjust the detailed picture settings [Colour Gamut], [Advanced Settings]
Viewing Mode Dynamic
Colour Gamut
Advanced Settings
Lock Settings
Copy Adjustment
select
adjust
access / store
Remaster
Access
Access
Access
Picture
●
[Colour Management] is available when [Viewing Mode] in the Picture Menu is
set to [Professional1] or [Professional2].
select
access
select
access / store
select
access
●
[Colour Gamut] is available when [Viewing Mode] is set to
[Professional1] or [Professional2]. (For HDMI input or video contents
of Media Player)
●
[Copy Adjustment] is available when [Viewing Mode] is set to
[Professional1] or [Professional2].
64
Menu
Colour Gamut
Picture
Advanced Settings
Item Adjustments / Configurations (alternatives)
Reproduces image colour precisely according to the colour gamut
standards [Remaster] / [Rec. 709] / [SMPTE-C] / [EBU]
[Remaster]: Displays deep colours by expanding the colour gamut at a
[Rec. 709]: Standard for HD (High definition)
[SMPTE-C]: Standard for NTSC
[EBU]: Standard for PAL
R-Gain, G-Gain, B-Gain Adjusts the white balance of bright red / green / blue area
R-Cutoff, G-Cutoff,
B-Cutoff
White Balance
More Detailed
Adjustment
Reset to Defaults Press the OK button to reset to the default White Balance
Adjusts the white balance of dark red / green / blue area
Adjusts more detailed White Balance items
[Input Signal Level]:
Adjusts the input signal level.
[R-Gain] / [G-Gain] / [B-Gain]:
Adjusts the detailed white balance of bright red / green / blue area.
[Reset to Defaults]:
Press the OK button to reset to the default detailed White Balance.
maximum.
Page 65
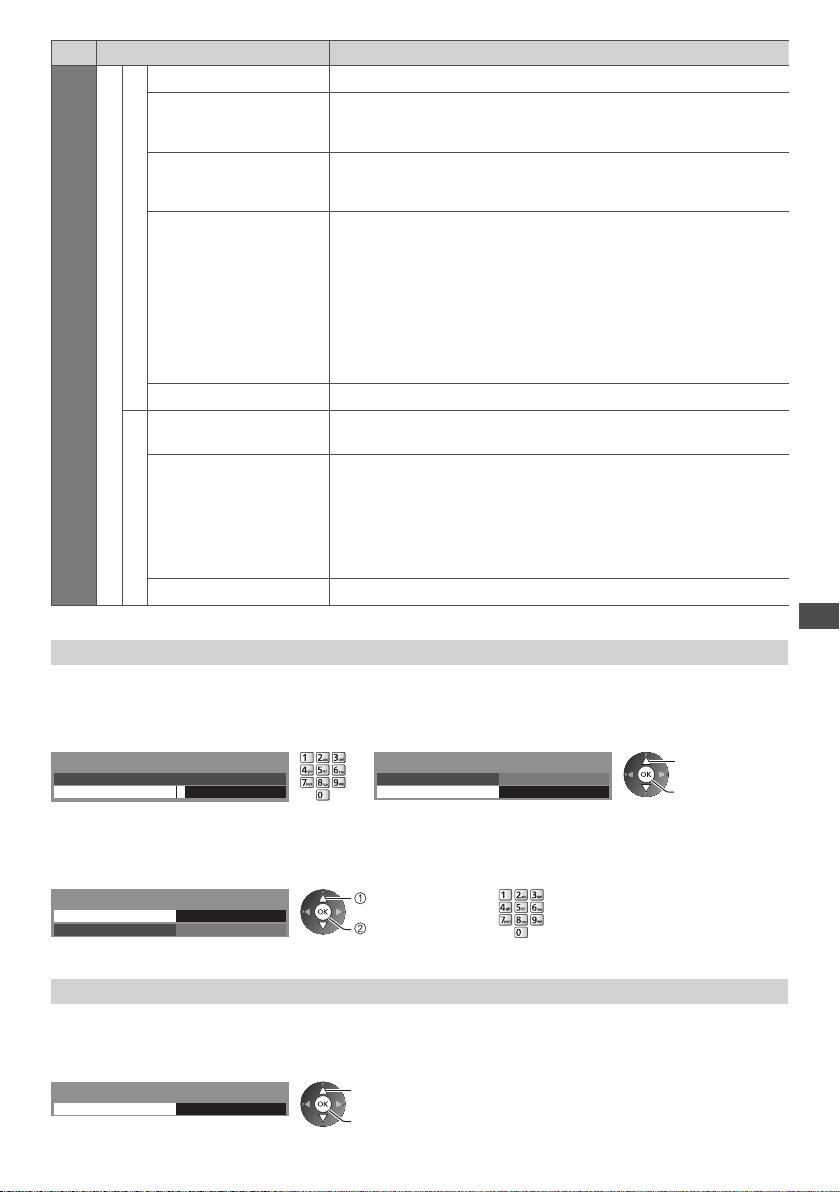
Menu
Advanced Settings
Picture
Item Adjustments / Configurations (alternatives)
R-Hue, G-Hue, B-Hue Adjusts the picture hue of red / green / blue area
R-Saturation,
G-Saturation,
B-Saturation
R-Luminance,
Colour Management
G-Luminance,
B-Luminance
More Detailed
Adjustment
Reset to Defaults Press the OK button to reset to the default Colour Management
Gamma
Gamma
More Detailed
Adjustment
Reset to Defaults Press the OK button to reset to the default Gamma
Adjusts the saturation of red / green / blue area
Adjusts the luminance of red / green / blue area
Adjusts more detailed Colour Management items
[Y-Hue] / [C-Hue] / [M-Hue]:
Adjusts the picture hue of yellow / cyan / magenta area.
[Y-Saturation] / [C-Saturation] / [M-Saturation]:
Adjusts the saturation of yellow / cyan / magenta area.
[Y-Luminance] / [C-Luminance] / [M-Luminance]:
Adjusts the luminance of yellow / cyan / magenta area.
[Reset to Defaults]:
Press the OK button to reset to the default detailed Colour
Management.
Switches the gamma curve [S Curve] / [1.8] / [2.0] / [2.2] / [2.4] / [2.6]
●
Please note the numerical values are reference for the adjustment.
Adjusts more detailed Gamma items
[Input Signal Level]:
Adjusts the input signal level.
[Gain]:
Adjusts the gain of gamma for selected signal level.
[Reset to Defaults]:
Press the OK button to reset to the default detailed Gamma.
Lock the picture setting [Lock Settings]
[White Balance] and [Gamma] can be locked for each Viewing Mode and each input.
Additionally, [Contrast], [Brightness], [Colour], [Sharpness], [Tint], [Colour Gamut], [Colour Management] and [Reset
to Defaults] in the Picture Menu can be locked for [Professional1] and [Professional2].
1 Enter the PIN number (4 digits) 2 Select [Adjustment Lock] and set to [On]
Lock Settings-PIN Entry
Please enter new PIN
PIN
●
Enter the PIN number twice at first setting.
●
Make a note of the PIN number in case you forget it.
* * * *
Lock Settings
Change PIN
select
On Adjustment Lock
access / store
■ To change the PIN number
1. Select [Change PIN] 2. Enter a new PIN number twice
Lock Settings
Change PIN
Adjustment Lock
Access
On
Copy the settings to the other input [Copy Adjustment]
You can copy the selected [Professional1] or [Professional2] settings to that of the other input.
The settings of [Contrast], [Brightness], [Colour], [Sharpness], [Tint], [Colour Gamut], [White Balance], [Colour
Management] and [Gamma] will be copied.
Select the destination to copy to
Copy Adjustment
Destination All
select
access
select
access / store
●
You cannot copy to the locked mode.
Advanced Picture Settings
65
Page 66
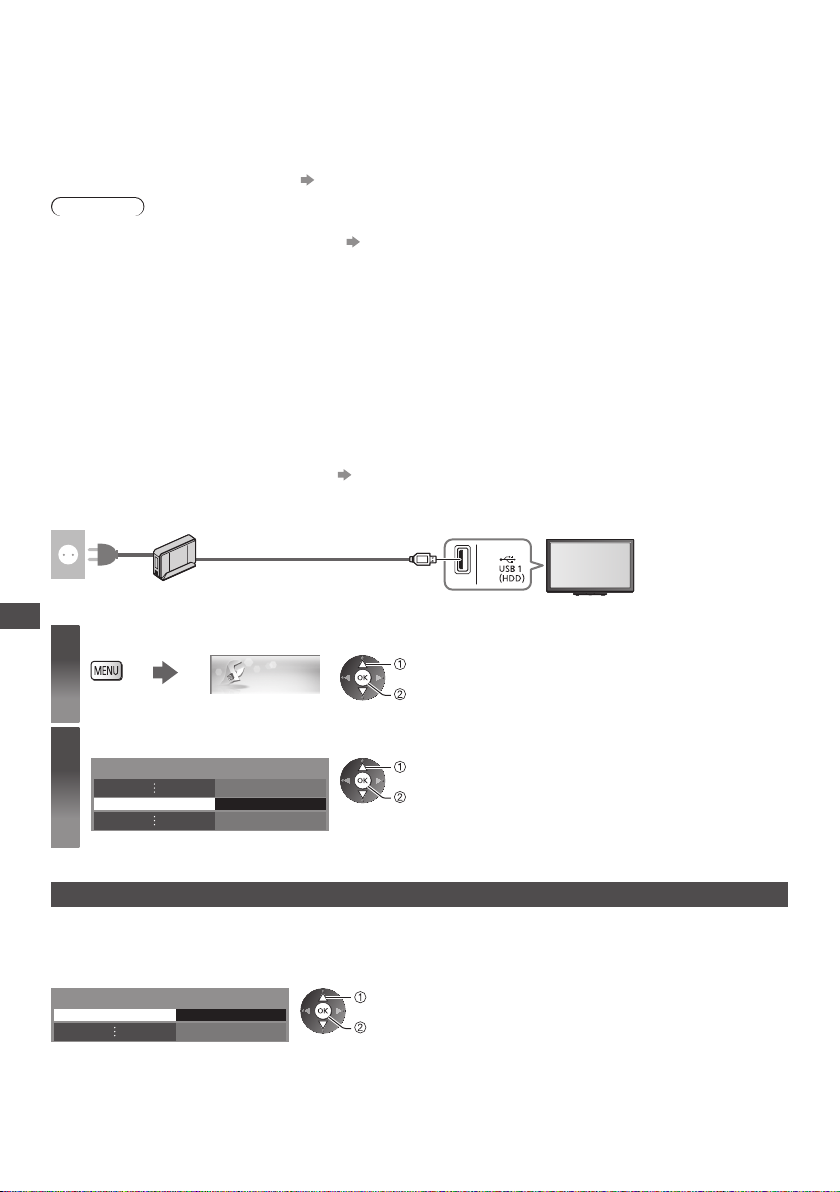
USB HDD Recording
You can record the digital TV programmes to the connected USB HDD and enjoy playing back in various ways.
●
Analogue TV programme cannot be recorded on the USB HDD.
●
The data broadcasting (MHEG, etc.), radio broadcasting and the periods without any signal will not be recorded.
●
Not all the programmes can be recorded depending on the broadcaster and service provider.
●
You cannot copy the recorded contents of the USB HDD.
●
For more information of the USB HDD (p. 107)
Caution
●
All data in the USB HDD will be erased in the following cases:
When formatting the USB HDD with this TV “Setting for USB HDD” (see below)
•
When formatting the USB HDD to use on PC, etc.
•
●
When the TV is repaired due to a malfunction, you may have to format the USB HDD again with this TV to use it. (All
data will be erased when formatting.)
●
In order to use the USB HDD with your PC after recording with this TV, format it again on your PC. (Special
operations or tools may be necessary to format on your PC. For details, read the manual of the USB HDD.)
●
The data recorded on the USB HDD with this TV can only be played back on this TV. You cannot play back its
contents with another TV (including the TV of the same model number) or any equipment.
●
Do not turn the TV off, pull out the mains plug or remove the USB HDD during operation (formatting, recording, etc.).
It may cause malfunction of the device or damage the recorded data. (Also when the electric outage occurs.)
■ Preparation for USB HDD
Connect the USB HDD to the USB 1 port with the USB cable.
●
Be sure to connect the USB HDD to the socket outlet.
●
To remove the USB HDD safely from the TV (p. 22, 67)
●
Check the type of terminals and cable plugs are correct when connecting.
socket outlet
USB cable
USB HDD Recording
1
USB HDD
Display the menu and select [Setup]
Setup
select
access
Select [Recording Setup]
2
Recording Setup Access
select
access
Setting for USB HDD
Format and setup the USB HDD with this TV in order to use it for recording.
●
Before the settings, connect the USB HDD (see above) and be sure to turn on the USB HDD.
●
Prepare the USB HDD for the exclusive use of recording with this TV.
Select [USB HDD Setup] and set
Recording Setup
USB HDD Setup
Access
select
access
66
Page 67
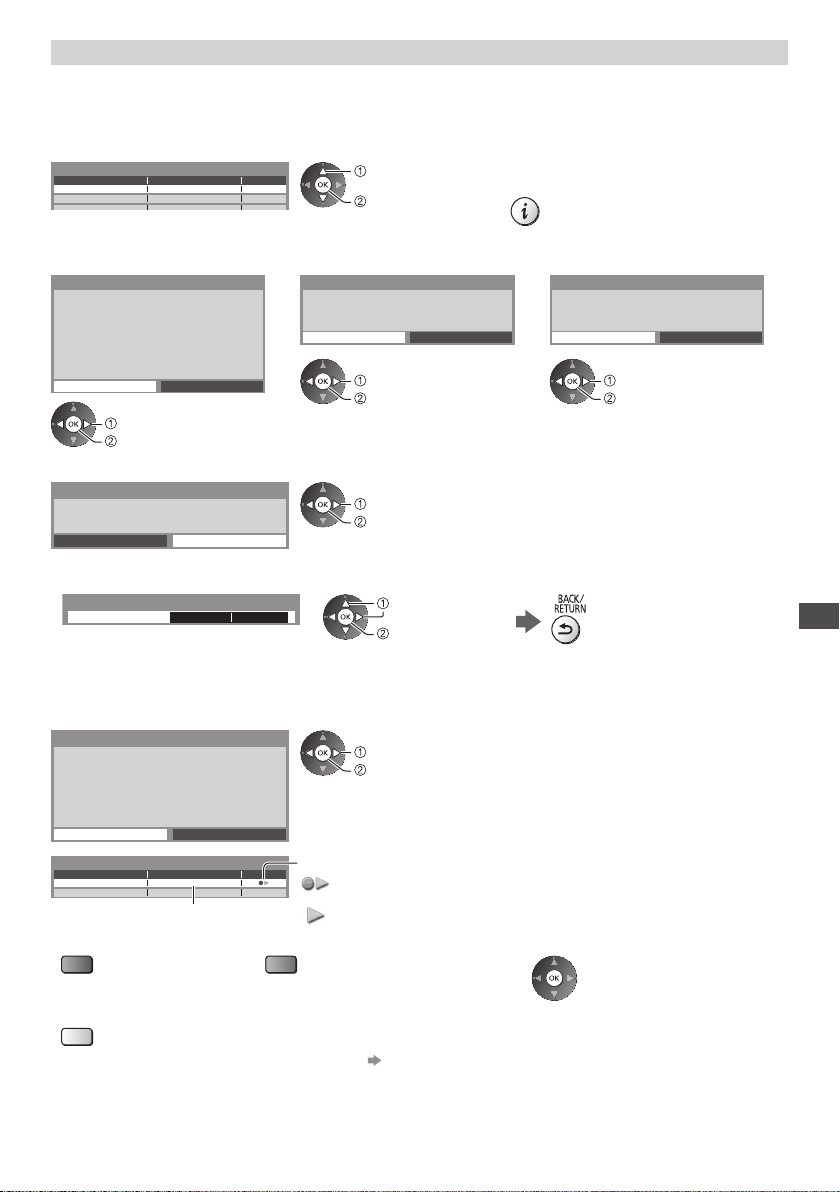
Setup the USB HDD [USB HDD Setup]
All the USB devices recognised as a mass storage device will be listed.
●
You can only choose one USB HDD for recording at a time.
●
You cannot change the settings for the USB HDD while recording is in progress.
●
Please note that USB HDD will be formatted and all data in it will be erased after this setup.
1 Select the USB HDD for recording and start setup
USB HDD Setup
Product Name
USB Drive A
USB Flash Disk
select
access
●
Some USB HDD may not be displayed.
●
For the information of the highlighted device
2 Caution and confirmation of using USB HDD
Select [Yes] to proceed
USB HDD Formatting
The data recorded to the USB HDD with this TV can only
be played back on this TV.
You cannot playback it with other TV (including the TV
of the same model number) or any PCs.
If your TV is repaired due to a malfunction, the USB
HDD may not be available with your repaired TV.
Continue?
Yes No
select [Yes]
set
USB HDD Formatting
To use this device for recording,
it must be formatted first.
Yes No
select [Yes]
set
Continue?
USB HDD Formatting
This device will be formatted and
all contents deleted.
Yes No
select [Yes]
set
Are you sure?
3 Confirmation of USB HDD name
USB HDD Formatting
Name : USB Drive A
Edit name?
Yes No
The name for the USB HDD is created automatically. If you want to edit the name, select [Yes].
Set characters Store
USB HDD
Name
●
You can set characters by using
USB HDD 1
numeric buttons.
select
set
select
set
4 Confirmation to enable USB HDD for recording
If the formatted USB HDD for recording already exists, this confirmation screen will be displayed to switch to enable
this USB HDD for recording.
USB HDD Formatting
Do you want to enable this
device now for recording?
When disconnecting any USB device,
always use the "Safely Remove USB" function
in the USB HDD Device Setup menu to avoid
any corruption of recorded content.
Yes No
USB HDD Setup
Product Name
USB Drive A
USB Flash Disk
USB HDD name is displayed
●
To format
(red)
●
To remove the USB HDD safely from the TV
USB HDD 1
●
To edit USB HDD name
(green)
(yellow)
To set “Safely remove USB” in other conditions (p. 22)
•
select [Yes]
set
Mode
The USB HDD is available for recording / playing back.
:
Only one USB HDD on the list is available for recording.
:
The USB HDD is available for playing back.
●
To change the mode
USB HDD Recording
67
Page 68
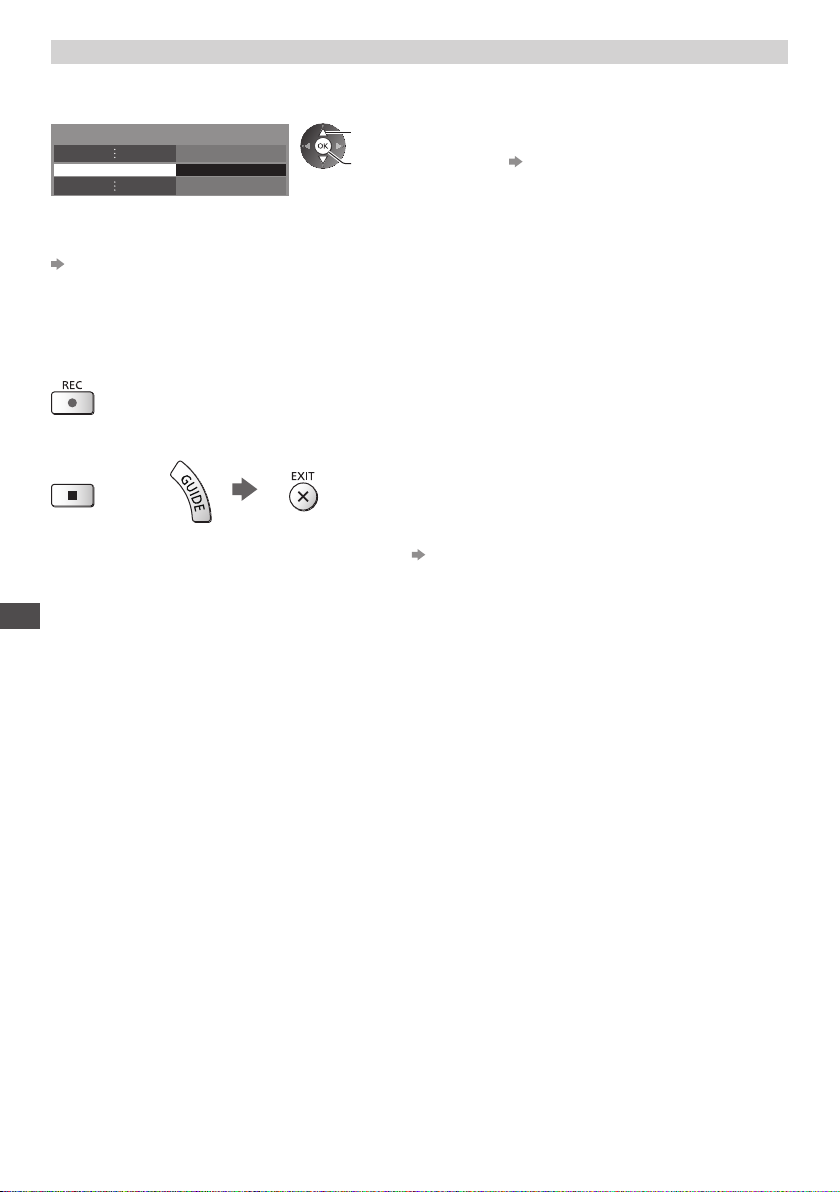
One touch direct TV recording - What you see is What you record [One Touch Recording]
Records the current programme in the USB HDD immediately.
●
Confirm the code of the remote control is “73” (p. 30).
Select the maximum recording time [30] / [60] / [90] / [120] / [180] (minutes)
Recording Setup
One Touch Recording 180 minutes
select
access / store
●
LED will turn to orange (flash) while One
ouch Recording is in progress.
T
“Indicator / Control panel” (p. 11)
■ Default REC Mode
You can select default recording mode for [One Touch Recording].
“Recording time for the USB HDD” (p. 107)
[DR]: Direct recording (normal mode)
[LT1]: Long time recording
[LT2]: Extra long time recording
■ To start One Touch Recording
Start
●
No other channel can be selected while the recording is in progress.
■ To stop recording on the way
or
■ To play back or delete the recorded contents “Recorded TV mode” (p. 77)
●
Even if One Touch Recording is in progress, you can play back all the contents. (Depending on the USB HDD, it may
not be available or the recording may not work properly while playback.)
USB HDD Recording
68
Page 69
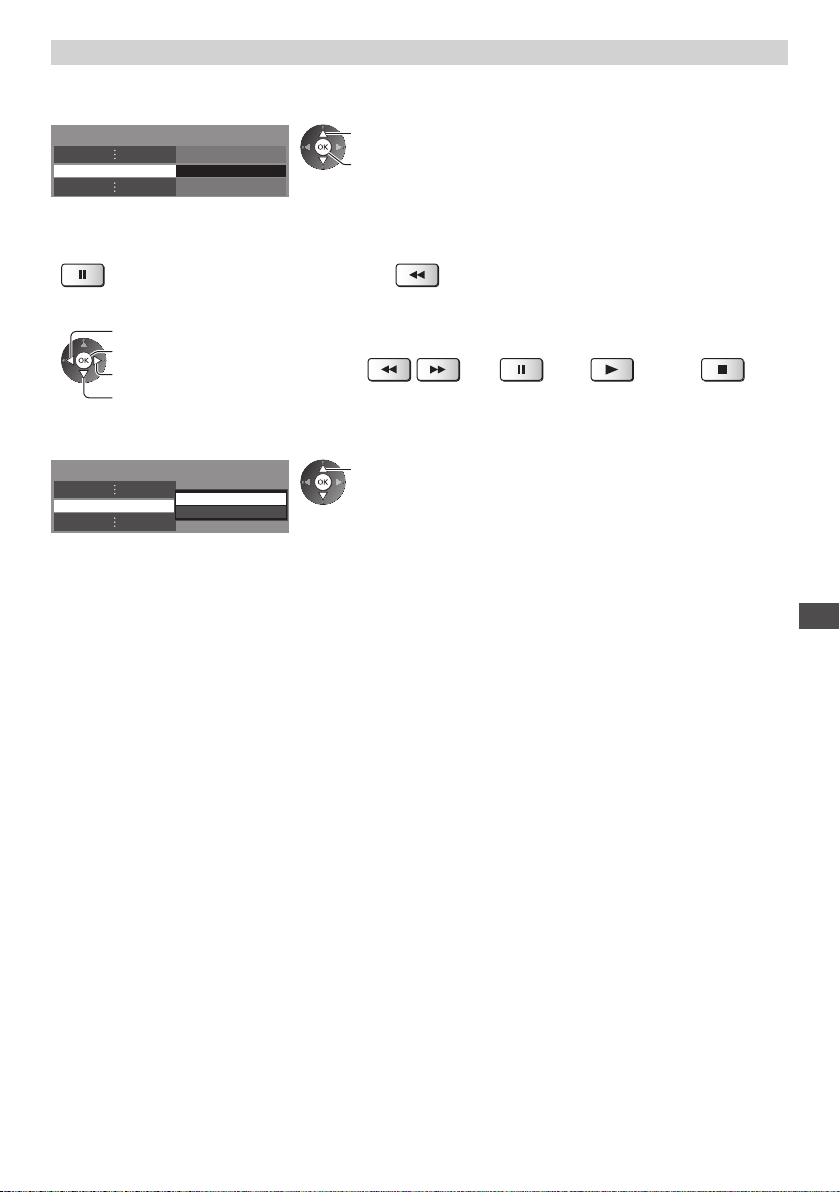
Record constantly [REW LIVE TV]
Records the current programme constantly.
●
Confirm the code of the remote control is “73” (p. 30).
Select [Auto] to start [REW LIVE TV]
●
Recording Setup
REW LIVE TV Auto
select
access / store
When you select [Auto], the recording will
start automatically
●
This recording will not start if the other
recording is in progress,
is bad or any images are not displayed.
■ To operate [REW LIVE TV]
●
To pause
●
After pausing or searching backward, the following buttons are available to operate.
Search backward
Playback / Pause
Search forward
Return to the current programme
●
To search backward (up to 90 minutes)
Search backward /
forward
Pause /
Playback
.
Playback
TV signal condition
Return to the
current programme
■ To stop [REW LIVE TV]
●
Recording Setup
REW LIVE TV
Off
Auto
select [Off]
●
[REW LIVE TV] will be stopped and the recorded content deleted automatically in the following conditions:
(Even if [REW LIVE TV] stops for the following conditions, as long as the setting is [Auto], the new recording will start
automatically in a condition that makes the recording available.)
Selected other channels
•
Selected locked channel
•
Selected invalid channel
•
No TV signal
•
When the other recording starts
•
When the TV is turned to Standby or off
•
If you stop [REW LIVE TV], the recorded
content for [REW LIVE
TV] will be deleted.
USB HDD Recording
69
Page 70
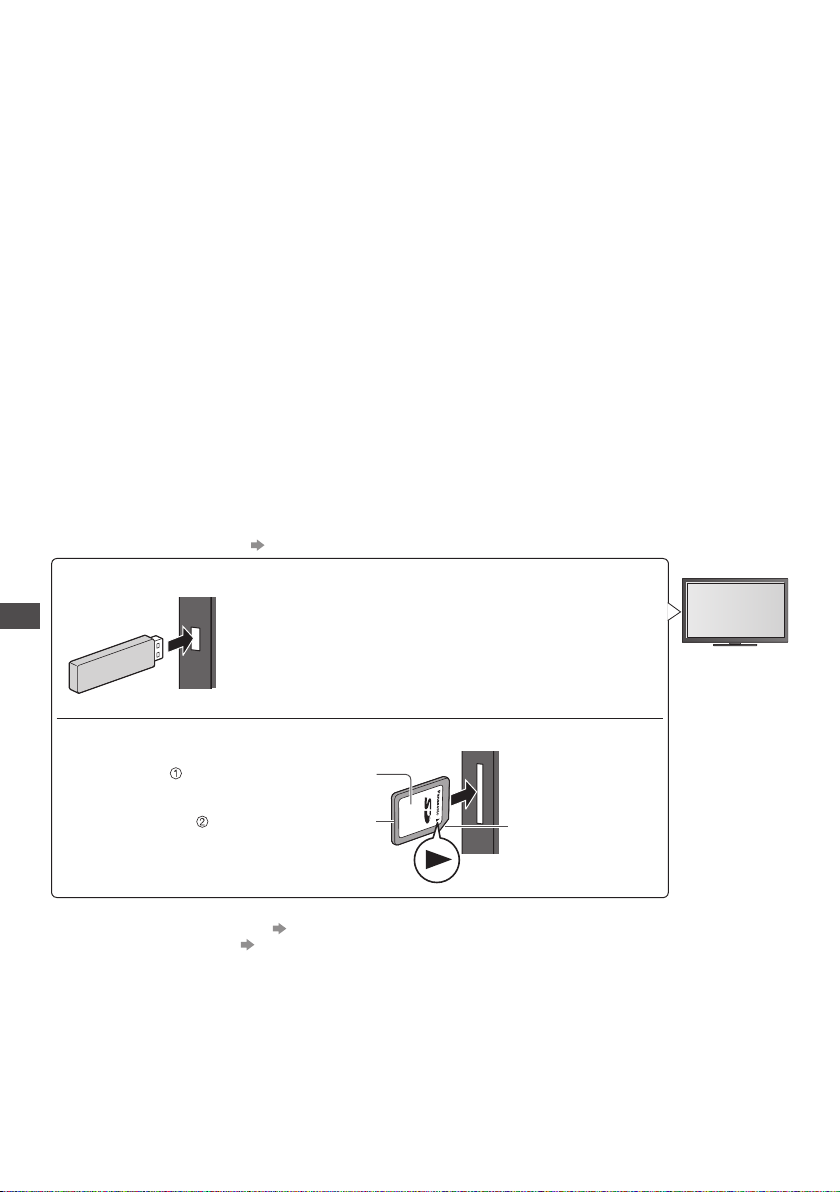
Using Media Player
Media Player allows you to enjoy photo, video or music recorded on an SD Card and a USB Flash Memory, and
contents recorded with this TV on the formatted USB HDD.
VIERA IMAGE VIEWER is the function of the easy viewing for photos or videos recorded on an SD Card on the TV
screen by simply inserting into the SD Card slot.
Photo mode:
Still pictures recorded by digital cameras will be displayed.
Video mode:
(For SD Card or USB Flash Memory) Moving pictures recorded by digital video cameras will be played back.
Recorded TV mode:
(For exclusive USB HDD) TV programmes recorded on the USB HDD with this TV will be played back.
Music mode:
Digital music data will be played back.
●
During the operation, audio signal is output from AV1, DIGITAL AUDIO OUT and HDMI2 (ARC function) terminals.
But no video signals are output.
To use HDMI2 with ARC function, connect an amplifier that has ARC function (p. 93) and set to use theatre speakers
(p. 99).
●
[Date] shows the date on which the recording was made by the recording equipment. The file without record of the
date is shown “**/**/****”.
●
The picture may not appear correctly on this TV depending on the recording equipment used.
●
Display may take some time when there are many files and folders.
●
Partly degraded files might be displayed at a reduced resolution.
●
Picture setting may not work depending on the conditions.
●
The folder and file names may be different depending on the digital camera or digital video camera used.
■ To insert or remove the SD Card / USB Flash Memory
●
For the USB HDD Connection
USB Flash Memory
Using Media Player
AV1 can output audio signal if [AV1 out] is set to [Monitor] in the Setup Menu (p. 43).
(p. 66)
●
Insert or remove straightly and completely.
●
Before removing the USB Flash Memory, ensure to perform
“Safely remove USB” (p. 22).
●
Connect the USB Flash Memory to the USB 1, 2 or 3 port.
SD Card
Gently insert the SD Card with
the label surface facing front.
Push until a click is heard.
To remove, push it again.
●
Check the type of terminals and devices are correct when connecting.
●
For the information of the devices
●
For the supported file format
“Devices for recording or playing back” (p. 107)
“Supported file format in Media Player and media servers” (p. 104, 105)
70
Cutout
Page 71
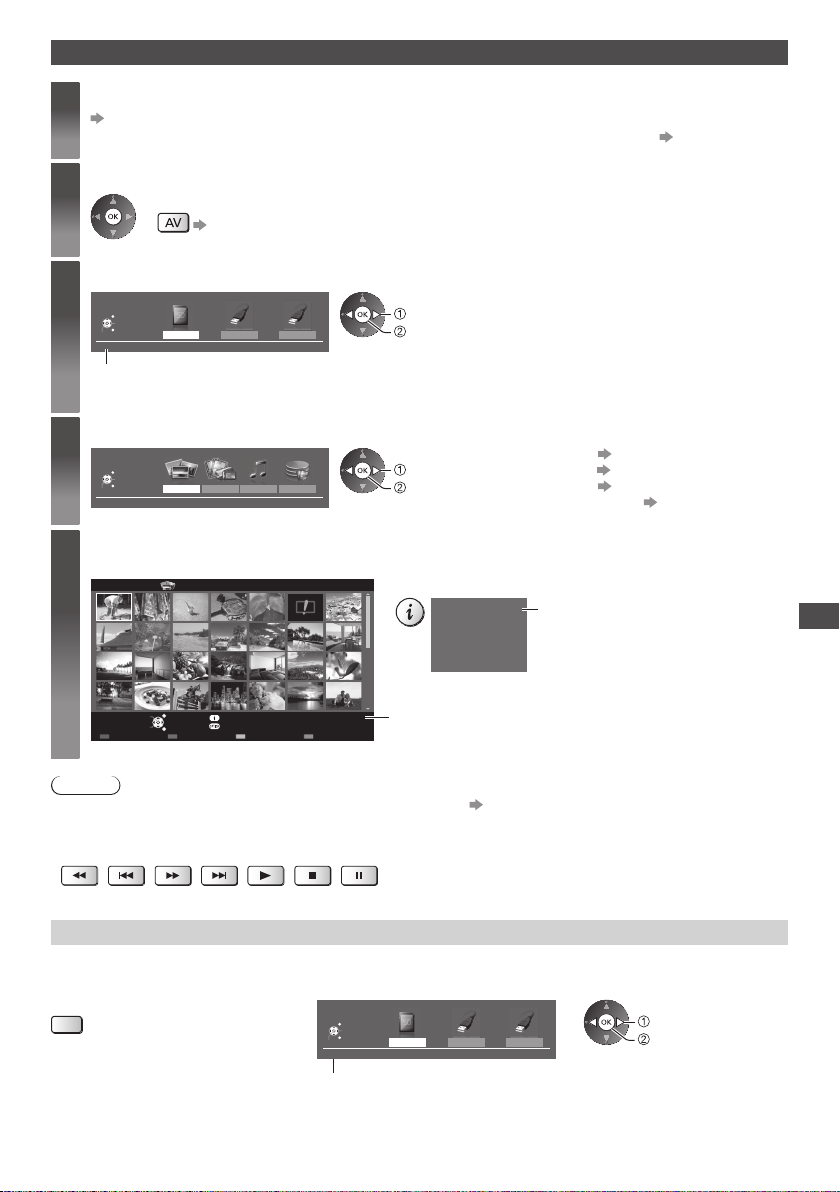
Starting Media Player
Insert the SD Card or USB Flash Memory to the TV
1
(p. 70)
●
To play back contents in the USB HDD, check the connection and settings are completed.
Confirm the message and start Media Player
2
3
4
5
●
You can also start by pressing following button.
“Watching External Inputs” (p. 29)
Select the device to access
Drive Select
EXIT
Select
RETURN
Access
SD Card
Selected device name
SD Card
USB HDD1 USB Flash...
●
If two or more devices are not connected, this step will be skipped.
Select the content
Contents Select
EXIT
Select
RETURN
Access
SD Card
Photo Video Music
Recorded TV
Enjoy Media Player
Example: Thumbnail - [All photos]
Media Player Photo All photos
select
access
select
access
●
To display the information of the highlighted content
File name
Date
Pixel
p1010001.JPG
23/10/2011
1600X1200
[Photo] (p. 72)
[Video] (p. 76)
[Music] (p. 80)
[Recorded TV] (p. 77)
1/48
File number / Total file number
(p. 66, 67)
Using Media Player
EXIT
RETURN
Info
Option Menu
View
Select
Slideshow View Select Drive Select Contents Select
SD Card
Selected device name
Note
●
You can also access each mode directly by using VIERA TOOLS.
●
[Recorded TV] is available for contents recorded with this TV on the USB HDD.
●
Select the appropriate device and content for playing back each file.
●
You can use the following buttons during playback. Confirm the code of the remote control is “73” (p. 30).
(p. 36)
Change the device
You can change to the other device directly in the same mode if two or more devices are connected.
1 While the thumbnail is displayed,
display the device selection
(yellow)
2 Select the device to access
Drive Select
EXIT
Select
RETURN
Access
SD Card
Selected device name
SD Card
USB HDD1 USB Flash...
select
access
71
Page 72
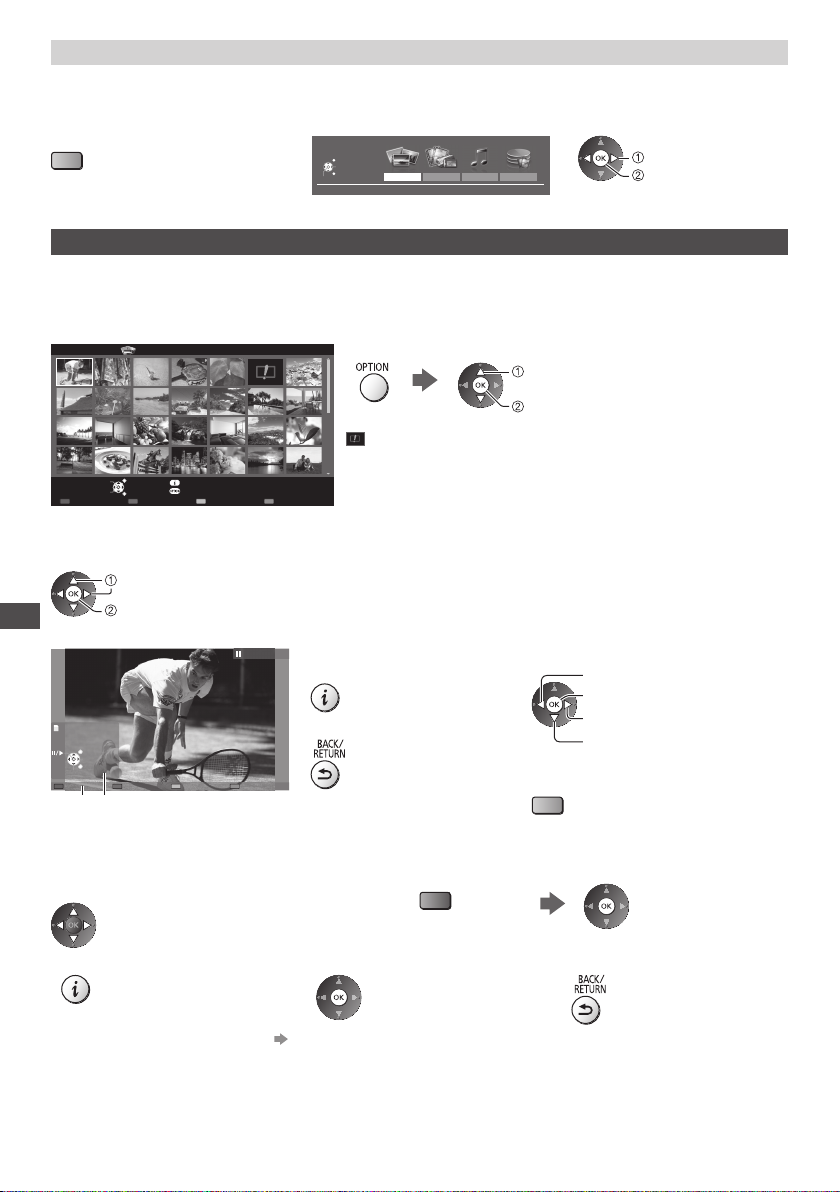
Change the contents
You can switch to the other mode of Media Player from the thumbnail view.
●
The mode can be switched in the current device.
1 While the thumbnail is displayed,
display the contents selection
(blue)
2 Select the contents
Contents Select
EXIT
Select
RETURN
Access
SD Card
Photo Video Music
Recorded TV
select
access
Photo mode
Photo mode will read all “.jpg” extension files and supports “.mpo” extension files in the SD Card or USB Flash
Memory.
The thumbnail of all the photos in the SD Card or USB Flash Memory will be displayed.
Example: Thumbnail - [All photos]
Media Player Photo All photos
●
To change the size of photos on a thumbnail screen
select [Change Size]
change
: Error display
EXIT
RETURN
Info
Option Menu
View
Select
Slideshow View Select Drive Select Contents Select
SD Card
[Single view] - Photos are displayed one at a time.
Select the file from the thumbnail of photos to be viewed
select
access
Using Media Player
Example:
Single view
●
To display / hide the operation
●
To operate Single view
guide
●
Single view
EXIT
Select
RETURN
Stop
Operation guide
Rotate
To return to thumbnail
●
To rotate 90°
(blue)
[Slideshow] - Slideshow completes when all photos are viewed within the current thumbnail.
1 Select the file from the thumbnail of photos
for the first view
●
To display / hide the operation guide
●
To change the back ground music
●
To pause (return to Single view)
“Photo Settings” (p. 74)
2 Start Slideshow
(red)
●
To the previous photo
Slideshow
To the next photo
Stop
(return to thumbnail)
To return to thumbnail
72
Page 73
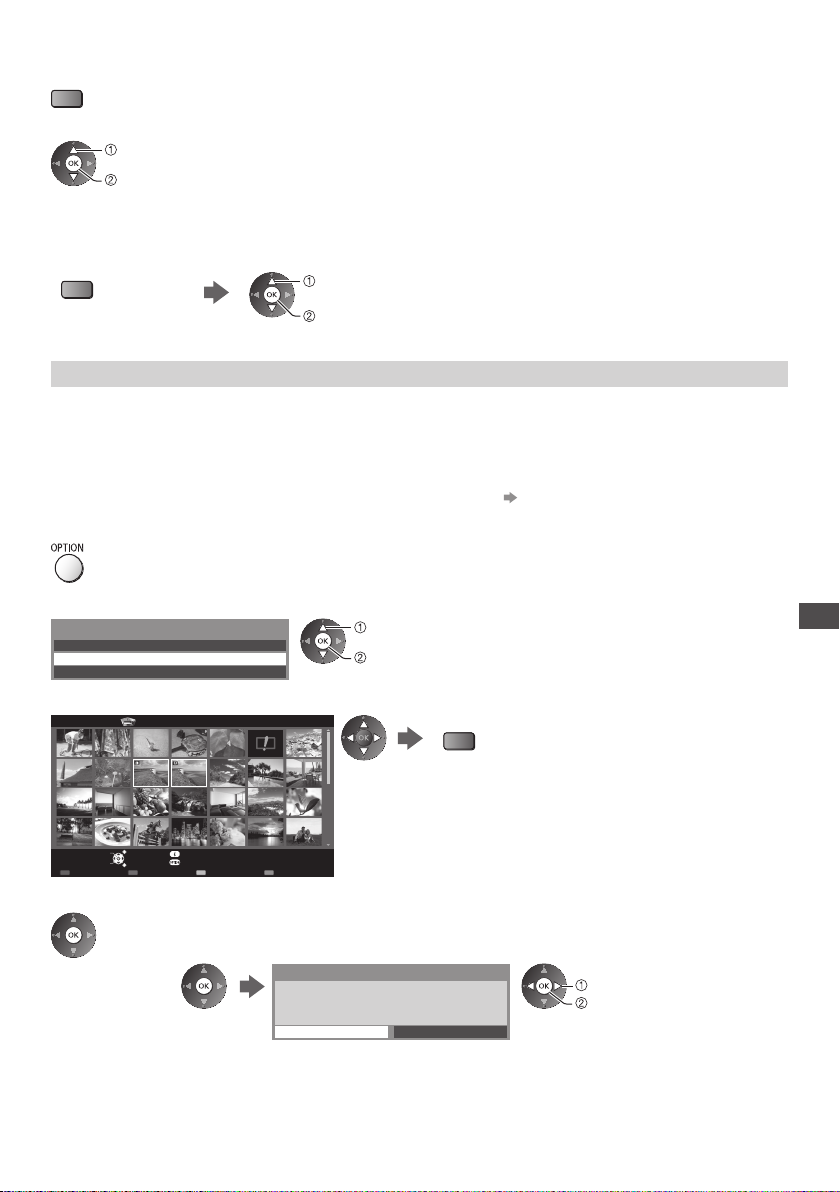
■ To sort by folder, recorded date or recorded month
1 Display the view selection in the thumbnail view
(green)
2 Select the sort type
select
access
●
To return to the thumbnail of all photos
(green)
Multi Shot 3D
This TV can create the 3D photo using a pair of photos in the SD Card and save it into the same SD Card.
●
This TV can also create the 3D photo from photos in the USB Flash Memory, but cannot save it.
●
This function is available with photos recorded by digital cameras.
●
Depending on the photos you select, the created 3D photo may not be suitable or the 3D photo creation may not
be possible. It is recommended to take a photo (for L) and then move your camera to the right about 5 cm and take
another photo (for R).
●
To view the created 3D photo with 3D effect, you need the 3D Eyewear “Optional accessories” (p. 7)
1 Display the option menu in the thumbnail view
2 Select [Multi Shot 3D]
Option Menu
Slideshow Settings
Multi Shot 3D
Change Size
3 Select two photos for L (left) and R (right)
Media Player Photo Multi Shot 3D All photos
View
EXIT
Select
RETURN
Select
4 Create the 3D photo
[Folder view]:
Displays the thumbnail grouped by folder.
●
The files which are not into a folder will be collected to the folder named “/”.
[Sort by Date] / [Sort by Month]:
Displays the thumbnail grouped by the same date or month.
●
The group of the photos without a recorded date is shown as [Unknown].
select [All photos]
access
select
access
●
You can only select photos of the same recorded date and same
pixels.
●
You may not be able to view the created 3D photo properly if you
select the photos for L
Info
Option Menu
●
If your selected photos are not suitable for the 3D photo, the error message will be displayed and
will return to the photo selection screen (step 3).
●
To save the 3D photo in the SD Card
SD Card
The 3D image will be saved onto your media.
Continue?
(red)
and R oppositely.
No Yes
select [Yes]
save
After finishing saving the photo, the photo selection screen will be displayed (step 3). Select
photos again to create another 3D photo or exit from [Multi Shot 3D] mode.
Using Media Player
73
Page 74
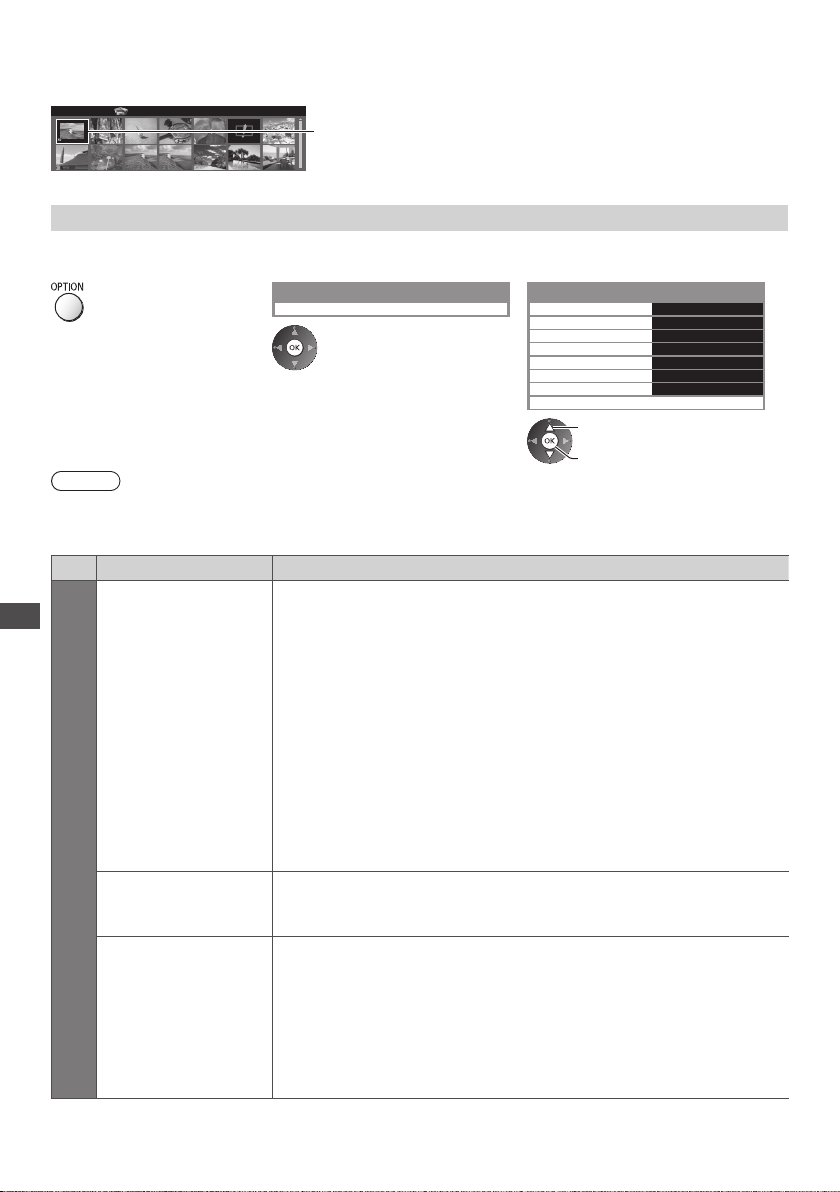
■ To enjoy the saved 3D photos
Saved 3D photos are displayed in the Thumbnail screen. Wear the 3D Eyewear and enjoy the 3D photos.
Example: Thumbnail
Media Player Photo All photos
Saved 3D photo
Photo Settings
Setup the settings for Photo mode.
1 Display the option menu
Note
●
Picture quality may become lower depending on the slideshow settings.
●
Picture setting may not work depending on the slideshow settings.
2 Select [Slideshow Settings]
Option Menu
Slideshow Settings
3 Select the items and set
Slideshow Settings
Frame Off
Colour Effect
T
ransition Effect
Screen Mode
Burst Playback
Interval
Repeat
Back Ground Music
select
access / store
Off
Fade
Normal
Off
5 seconds
On
Menu
Using Media Player
Frame
Slideshow Settings
Colour Effect
ransition Effect
T
Item Adjustments / Configurations (alternatives)
Selects the frame type of the slideshow
[Off] / [Multi] / [Collage] / [Drift (+ calendar)] / [Drift] / [Gallery (+ calendar)] /
[Gallery] / [Cinema]
[Multi]:
9 photos are displayed orderly at once.
[Collage]:
Each photo is displayed at a random position and random scale.
[Drift (+ calendar)] / [Drift]:
Photos are displayed like flow images.
●
You can select to display the calendar or not. The month of calendar is turned
by pressing the left or right cursor button.
[Gallery (+ calendar)] / [Gallery]:
The various sizes of photos in the frame are displayed.
●
You can select to display the calendar or not. The month of calendar is turned
by pressing the left or right cursor button.
[Cinema]:
Photos are displayed like old films (sepia tone).
Selects the colour effect of photos on Single view and Slideshow
[Off] / [Sepia] / [Gray scale]
●
This function is not available when [Frame] is set to [Drift], [Gallery] or [Cinema].
Selects the transition effect for switching the photo during the slideshow
[Off] / [Fade] / [Slide] / [Dissolve] / [Motion] / [Random]
[Fade]: The next photo fades in gradually.
[Slide]: The next photo slides and appears from the left side.
[Dissolve]: Each photo is dissolved when switching to the next photo.
[Motion]: Each photo is displayed with an effect of enlarging, reducing, moving
[Random]: Each transition is selected at random.
●
up or moving down.
This function is available when [Frame] is set to [Off].
74
Page 75
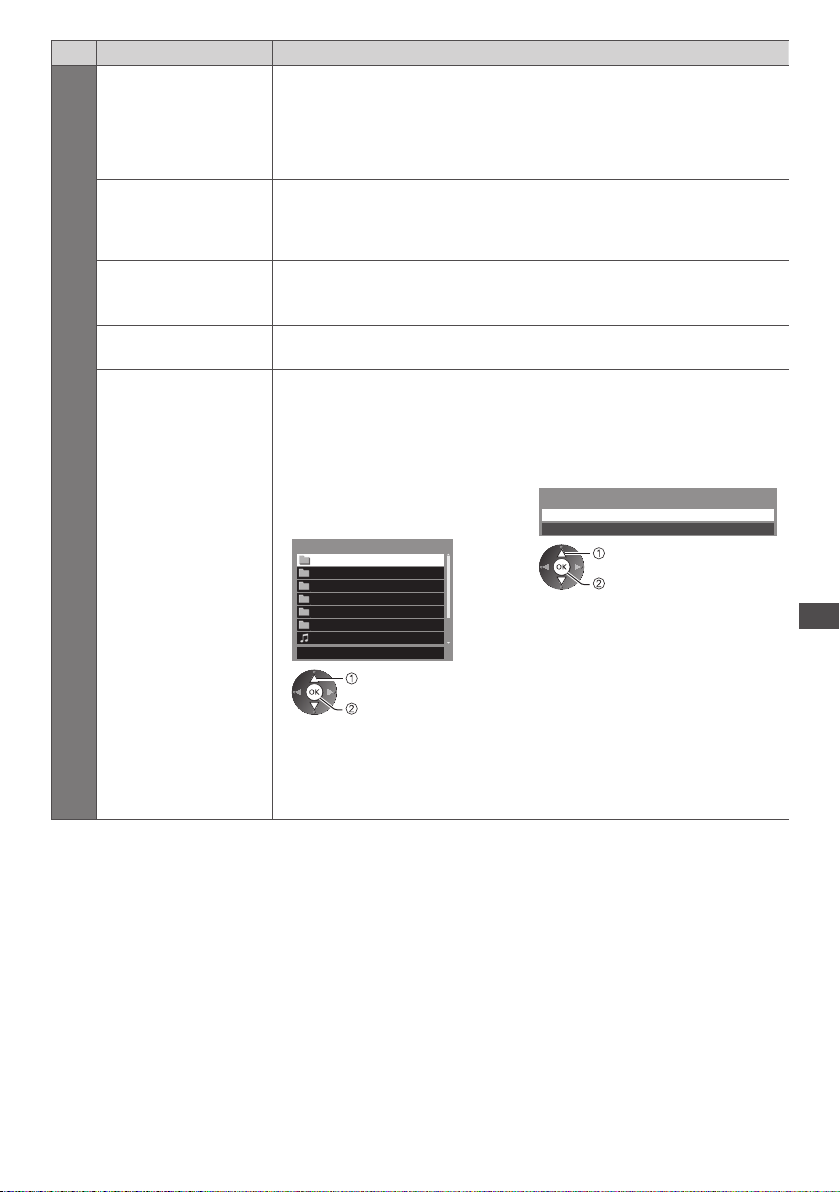
Menu
Item Adjustments / Configurations (alternatives)
Selects enlarged or normal viewing on Single view and Slideshow
[Normal] / [Zoom]
●
Screen Mode
This function is not available when [Frame] is set to [Collage], [Drift], [Gallery] or
[Cinema] or when [T
●
Depending on the photo size, it may not be fully enlarged to fill the screen, e.g.
portrait style picture.
Selects whether to display burst photos in a fast-paced slideshow mode
Burst Playback
[Off] / [On]
●
This function is not available when [Frame] is set to [Drift], [Gallery] or [Cinema]
or when [T
Selects slideshow interval [5] / [10] / [15] / [30] / [60] / [90] / [120] (seconds)
Interval
●
This function is not available when [Frame] is set to [Drift], [Gallery] or [Cinema]
or when [T
Repeat Slideshow repeat [Off] / [On]
Slideshow Settings
Selects the back ground music during Photo mode
[Off] / [Type1] / [Type2] / [Type3] / [Type4] / [Type5] / [User] / [Auto]
●
[Type1 - 5] are the fixed music each installed in this TV.
[User]: Music data in the device registered by yourself will be played back.
o register the music
T
1. Select the music file
Depending on the condition of the
device, select folders until you reach
the desired music file.
Back Ground Music
PRIVATE
DCIM
Back Ground Music
MISC
001photo
002photo
003music
01 song.mp3
Type1
select
access
●
If no music has been registered or the device which has the registered music
is removed, no sound will be produced.
[Auto]: Music data stored in the root folder of the current device will be played
back randomly
●
If there is no available music data, no sound will be produced.
ransition Effect] is set to [Motion].
ransition Effect] is set to [Motion].
ransition Effect] is set to [Motion].
2. Select [File] or [Folder]
Register Slideshow BGM?
[File]: The selected music file will be
[Folder]: All the music in the folder
.
File
Folder
select
set
registered.
which contains the selected
music file will be registered.
Using Media Player
75
Page 76
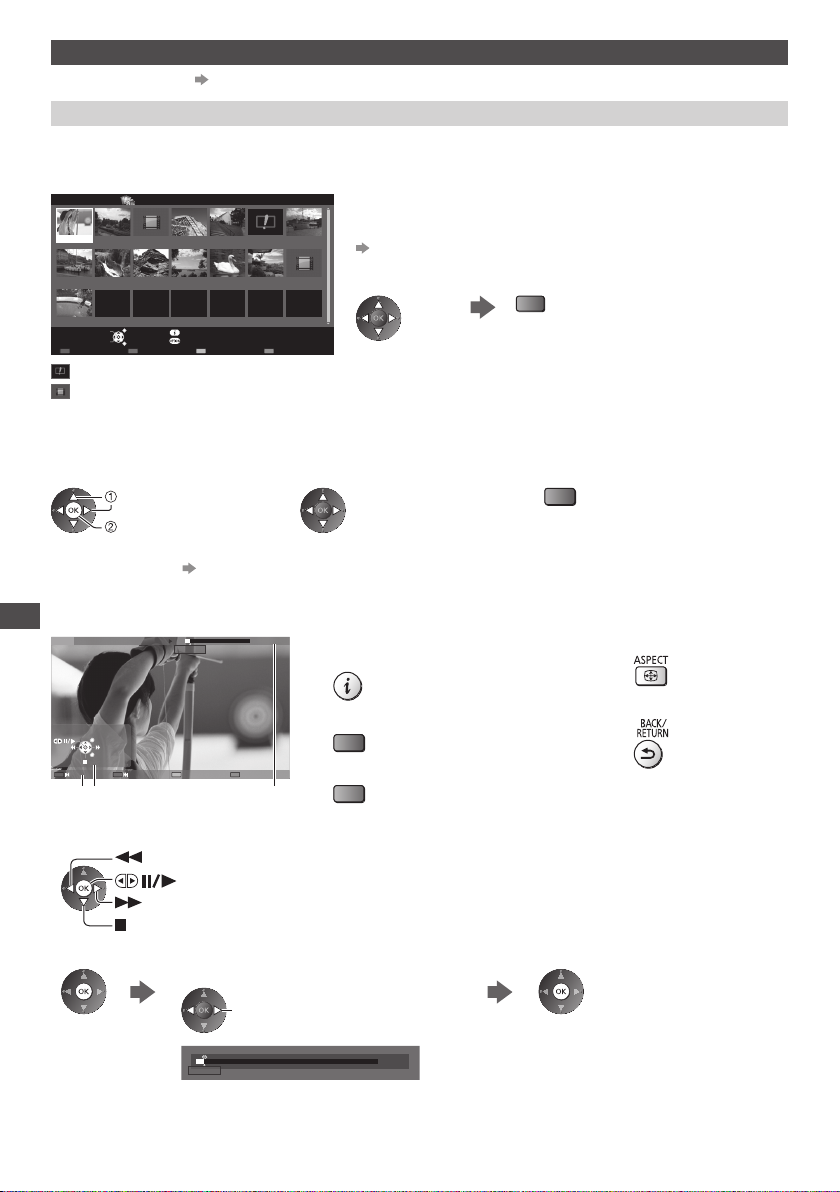
Video and Recorded TV mode
●
Supported file format
(p. 104, 105)
Video mode
(For SD Card or USB Flash Memory)
The thumbnail of video titles in the SD Card or USB Flash Memory will be displayed.
Example: Thumbnail - [Title view]
Media Player Video Title view
Trip1 Trip2 Trip3 Trip4 Trip5 Room
2011_4
2011_9
Access
Select
Play Contents Select
: Error display
: The file does not support thumbnail view.
EXIT
RETURN
Info
Option Menu
Drive Select
The preview will start when the title / scene is highlighted if it supports
a preview.
●
Nature1
2011_7Nature2 Nature3 Nature4 Nature5 Nature6
SD Card
To turn off the preview
“Video Setup” (p. 77)
●
To play back the selected title
Select the title
Start playback
(red)
●
If you stopped the last playback on the
, the confirmation screen is displayed
way
to select whether to start from where you
stopped last time or from the beginning.
■ Playback from the selected scene in the title (SD-Video or AVCHD)
Playback of the selected scene will start to the end of the title.
1 Select the title 2 Select the scene 3 Start playback
select
access
●
The structure of titles and scenes may vary depending on the digital video camera used.
●
To repeat playback
“Video Setup” (p. 77)
(red)
■ How to operate in the playback
Example: Playback
Using Media Player
SD 19/02/2011 11:21 00:15:39
EXIT
RETURN
00:02:05
Operation guide Information banner
●
To operate the playback
Rewind
Pause (displays the time seek bar) / Playback
Fast forward
●
To jump to the specified time point
Stop
While the time seek bar is displayed
Press: Search about 10 seconds
Press and hold: Search rapidly
00:02:05
●
To display / hide the operation guide and
information banner
●
To the previous title / scene
(red)
●
To the next title / scene
(green)
00:15:39
●
To change aspect
●
To return to thumbnail
76
Page 77
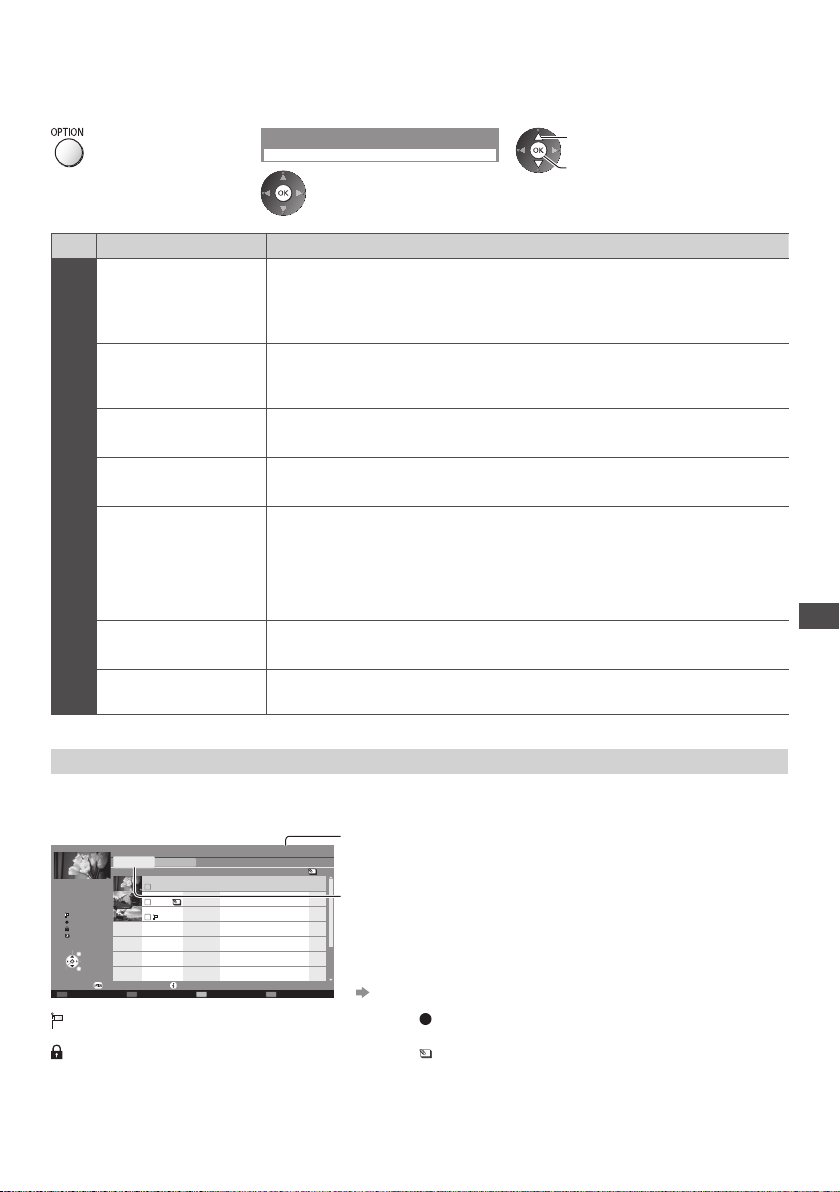
■ Video Setup
Setup the settings for Video mode.
●
Menu items and selectable options vary depending on the content.
1 Display the option menu 2 Select [Video Setup]
Option Menu
Video Setup
3 Select the items and set
select
access / store
Menu
Video Setup
Item Adjustments / Configurations (alternatives)
Sets to start the preview of the title or scene in the thumbnail view [Off] / [On]
●
Video Preview
Multi Audio,
Dual Mono Audio
Subtitle
Subtitle T
ext
Image may not be displayed for an instant in the thumbnail view. Set the preview
[Off] to resolve this.
●
Only available in the thumbnail view
Selects between selectable sound tracks (if available)
●
It may take several seconds to change the sound.
●
Only available during playback
Subtitles On / Of
●
Only available during playback
Selects the font type to display subtitles correctly (if available)
●
Only available during playback
[Aspect1]: Displays the content enlarged without distortion.
[Aspect2]: Displays the content full-screen.
Aspect Change
Repeat
itle Selects from a group of titles (if available)
T
[Original]: Displays the content original size.
●
You can also change the aspect using the ASPECT button.
●
Aspect change may not work depending on the content.
●
Only available during playback
Playback repeat within the title or selected file (depending on the content)
[Off] / [On]
Recorded TV mode
(For exclusive USB HDD)
Contents list of the selected device will be displayed.
Example: Contents list
Duration
00:20
Not Viewed
Recording now
Protected
Grouped
Select
EXIT
Select
RETURN
Play
Option Menu
Delete
: Content not played back yet (Once you play back the
content, this icon will disappear.)
: Protected content cannot be deleted.
Media Player
All
BBC 1
ITV
BBC 2
Recorded TV
Not V
Channel
iewed
Thu 27/10
Info
Remaining Capacity 500GB (50%)
Date
Das Erste
12:00
News
Mon 12/1
13:30
Cinema
Sat 17/1
13:50
Chapter List Select
Title
Remaining capacity of the selected device
(This value may not be accurate depending on the condition.)
1
3
[All]:
1
All the recorded contents are listed.
[Not Viewed]:
Contents not played back yet are listed.
●
USB HDD 1
You can also access the contents list directly by using VIERA TOOLS.
f (if available)
(p. 36)
Using Media Player
: Content under recording (You can play back this
content even if under recording.)
: Two or more contents are grouped.
77
Page 78
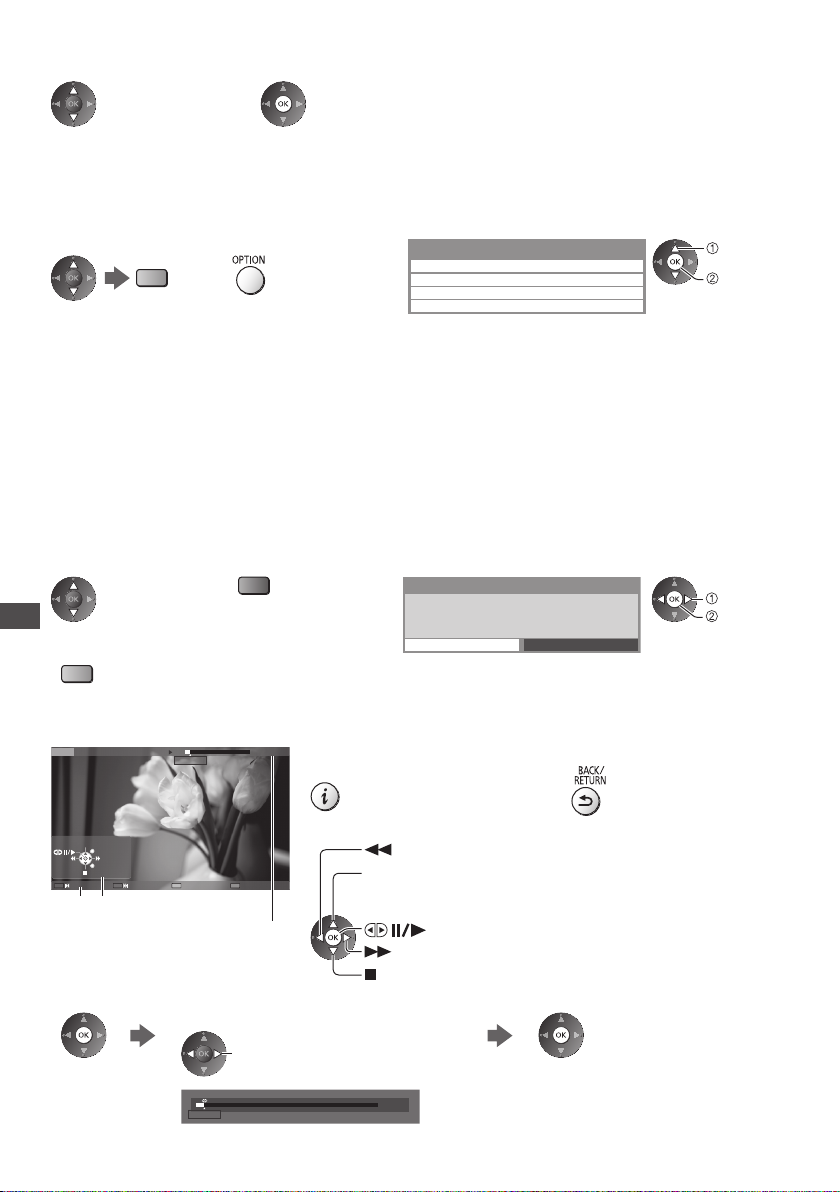
■ Playback from the list
1 Select the content
2 Start playback
●
If you stopped the last playback on the way, the confirmation screen is
displayed to select whether to start from where you stopped last time or
from the beginning.
●
If the content has multiple programmes with the different parental ratings,
the highest restriction is valid for the content. Once you unlock the
restriction, all the programmes in the content can be played back.
■ To edit recording content
1 Select and tick the
content to edit
(blue)
[Create Group]:
Two or more contents can be grouped. Select and tick all the desired contents, and then select [Create Group].
[Release Group]:
Select the created group to release, and then select [Release Group]. (To release several groups at once, tick all the
desired groups.)
[Exclude from Group]:
Select the group and press the OK button to display the grouped contents. To exclude only the specific content from
the group, tick it and then select [Exclude from Group]. (To exclude several contents at once, tick all the desired
contents.)
[Change Protect Status]:
Select the content to protect from deletion, and then select [Change Protect Status]. Perform the same way to cancel
the protection. (To change the status of several contents at once, tick all the desired contents.)
2 Display the option
menu
3 Select the item and edit
Option Menu
Create Group
Release Group
Exclude from Group
Change Protect Status
■ To delete the selected content
1 Select the content
●
Using Media Player
To select two or more
contents
(blue)
2 Delete the content
(red)
3 Confirm
Delete
Are you sure you want to delete?
Yes
No
select
edit
select
set
■ How to operate in the playback
Example: Playback
Das ErsteUSB 00:15:39
Manual skip
EXIT
RETURN
Operation guide
●
To jump to the specified time point
78
00:02:05
Chapter List A-B repeat
Information banner
While the time seek bar is displayed
00:02:05
●
To display / hide the operation guide
and information banner
●
To operate the playback
Rewind
[Manual skip]
●
Press to skip forward about 30 seconds.
●
Press and hold to skip backward about 15 seconds.
Fast forward
Stop
Press: Search about 10 seconds
Press and hold: Search rapidly
00:15:39
●
To return to list
Pause (displays the time seek bar) / Playback
Page 79
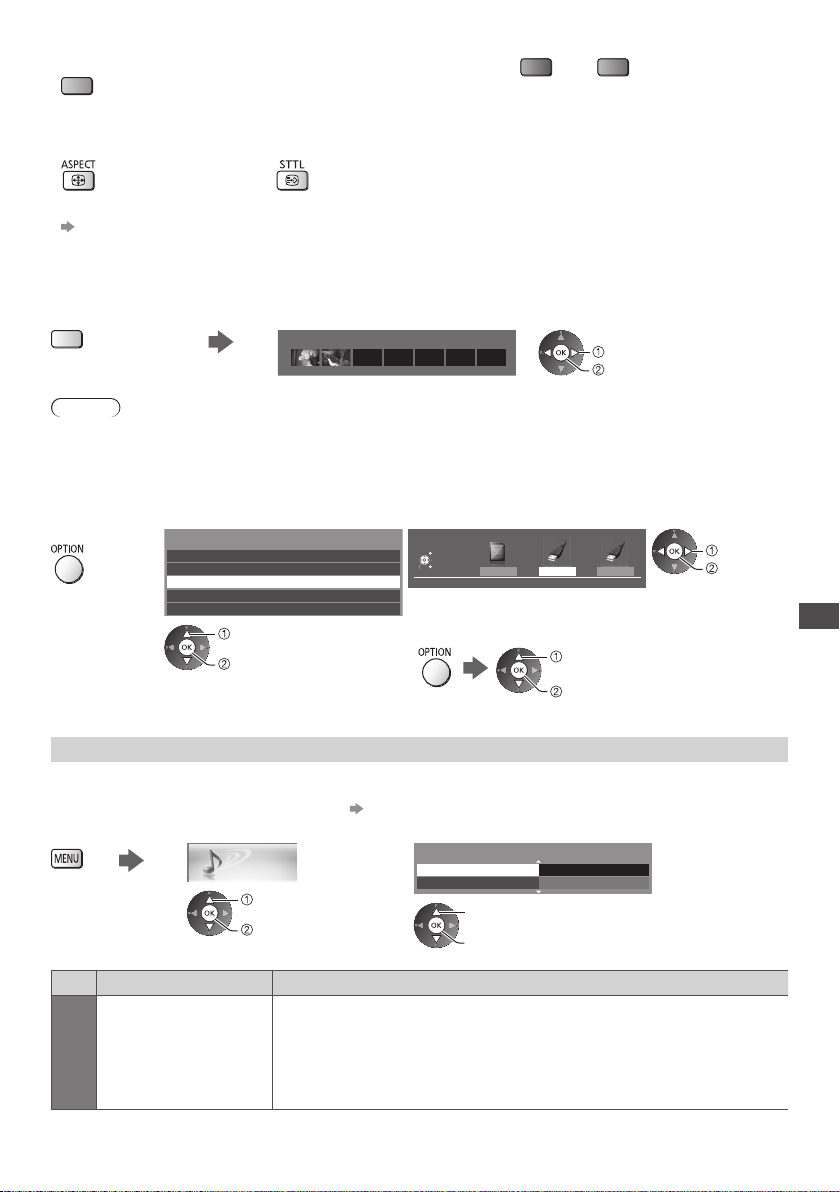
●
To repeat between the starting point “A” and finishing point “B”
Set “A” and “B” in order
The points will be reset by pressing this button
(blue)
●
To change aspect
•
again or other operations.
●
To display the subtitle (if available)
●
To the previous / next chapter
(red) / (green)
A recorded content is automatically
•
divided into chapters (about 5 minutes
for each).
●
To confirm or change the current status (if available)
“Display the selectable settings for the current status” (p. 22)
■ Chapter List
You can start playback from the chapter list you select.
●
The chapter list is not displayed while the selected content is being recorded.
To play back from the chapter list
(yellow)
Chapter List
00:00:00 00:05:00
select
playback
Note
●
Depending on the recorded programmes, some playback operations may not work properly.
■ To change the device
You can change to the other device directly in the same mode if two or more devices are connected.
1 Display the
option menu
2 Select [Drive Select]
Option Menu
Create Group
Release Group
Drive Select
Contents Select
Change Protect Status
select
access
Audio output Settings
You can enjoy the multi-channel sound via an amplifier connected to DIGITAL AUDIO OUT or HDMI2 (ARC function)
terminal.
●
To confirm or change the current sound status (p. 77)
1 Display the menu and Select [Sound]
Sound
select
access
3 Select the device to access
Drive Select
Access
USB HDD1
EXIT
Select
RETURN
SD Card
USB HDD1 USB Flash...
select
access
If you select the device to play back photos, videos or music,
change to the appropriate content.
●
To change the content
select [Contents Select]
access
2 Select [SPDIF Selection] and set
SPDIF Selection
Reset to Defaults
select
access / store
Auto
Reset
2/2
Using Media Player
Menu
Sound
Item Adjustments / Configurations (alternatives)
SPDIF Selection
SPDIF: A standard audio transfer file format
Selects the initial setting for digital audio output signal from DIGITAL AUDIO OUT
and HDMI2 (ARC function) terminals [Auto] / [PCM]
[Auto]: Dolby Digital Plus, Dolby Digital and HE-AAC multi-channel are output as
Dolby Digital Bitstream. DTS is output as DTS. MPEG is output as PCM.
[PCM]: Digital output signal is fixed to PCM.
79
Page 80
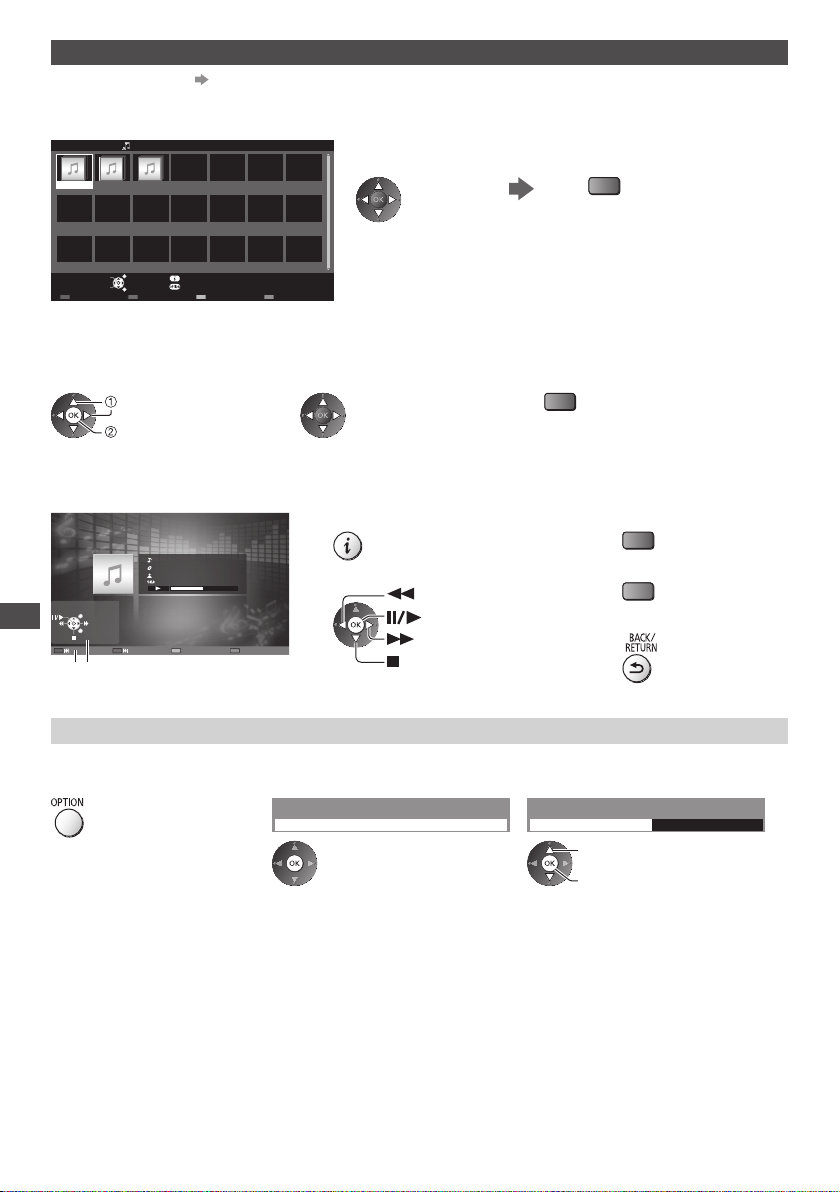
Music mode
●
Supported file format
The thumbnail of music folders in the SD Card or USB Flash Memory will be displayed.
Example: Thumbnail - [Folder view]
Media Player Music Folder view
My Music_1 My Music_2 My Music_3
(p. 105)
●
To play back the selected folder
Select the folder
Start playback
(red)
Access
Select
Play Folder Contents Select
EXIT
RETURN
Info
Option Menu
Drive Select
SD Card
■ Playback from File view
Selected file will be played back.
1 Select the folder 2 Select the file 3 Start playback
select
access
(red)
■ How to operate in the playback
Example: Playback
My Song_9
My Favourite
My Music_1
00:02.43 / 00:05.44
EXIT
Using Media Player
RETURN
Operation guide
Music Setup
Setup the setting for Music mode (only available in the thumbnail view).
1 Display the option menu
●
To display / hide the operation guide
●
To operate the playback
Rewind
Fast forward
Stop
2 Select [Music Setup]
Option Menu
Music Setup
Pause / Playback
3 Set
Music Setup Menu
Repeat One
[Folder]: Playback repeat within the
[One]: Playback repeat of the selected
one file
●
To the previous track
(red)
●
To the next track
(green)
●
To return to thumbnail
select
access / store
selected folder
80
Page 81

Using Network Services (DLNA / VIERA Connect)
®
DLNA
This TV is a DLNA Certified™ product.
DLNA (Digital Living Network Alliance) is a standard that makes DLNA Certified digital electronics easier and more
convenient to use on a home network. To learn more, visit www.dlna.org.
●
To enable this function, connect this TV to your home network.
“Network connections” (p. 83), “Network Setup” (p. 84)
■ Playback of sharing contents stored in the media server
Store photos, videos or music contents into the DLNA Certified media server (for example, PC with Windows 7
installed, DIGA Recorder, etc.) connected to your home network. And then you can enjoy these contents on this TV.
●
For watching and operating contents on this TV (p. 88)
●
For the supported file format (p. 104, 105)
To use a PC as a media server
Prepare the PC with Windows 7 or ensure the server software is installed on the PC.
“Windows 7” and “TwonkyMedia server 6 (installed on the PC with Windows 7, Windows Vista or Windows XP)” are
the server software that has been tested for compatibility with this TV (as of January, 2011). Any other server software
have not been tested with this TV, therefore compatibility and performance cannot be assured.
●
Windows 7
The setup for homegroup settings of Windows 7 is required. For details, refer to the help functions of Windows 7.
●
TwonkyMedia server
wonkyMedia server” is the product of PacketVideo Corporation.
“T
To obtain the Installation Guides for installing and setting “TwonkyMedia server”, visit the website of TwonkyMedia.
Additional fees may be charged to obtain server software.
Note
●
For more information about the server software, please consult each software company.
●
When server software for the media server is installed on the PC, the data may be at risk of being accessed by other
people. Please take care of the settings and connections under the network circumstances at the of
at home when not using a router.
●
AVCHD and DivX files are not supported by DLNA functions of this TV, but can be played by Media Player (p. 70).
To use a DLNA compatible DIGA Recorder as a media server
By connecting a DLNA compatible DIGA Recorder to your home network, you can enjoy and control it as one of the
media servers.
●
Please read the manual of your DIGA Recorder to confirm whether the recorder is compatible with DLNA.
fice, hotel or even
Using Network Services (DLNA / VIERA Connect)
■ Playback of sharing contents on this TV with the DMC (Digital Media Controller) network
equipment
You can enjoy contents stored in the media server by controlling with the DMC network equipment (PC with Windows 7
installed, smartphone, etc.) connected to your home network.
●
To use this function with Windows 7, set [DLNA Remote Control] and [DLNA Remote Volume] of this TV to [On].
(p. 84)
●
“Windows 7” is the OS that has been tested for compatibility of this TV (as of January, 2011). For the operations, refer
to the help functions of Windows 7.
●
To use this function with your smartphone, set [Network Remote Control] of this TV to [On]. (p. 84)
And you need to install the application for controlling VIERA in your smartphone. For the information of the
application (English only):
http://panasonic.jp/support/global/cs/tv/
For the operations, refer to the support information of the application.
81
Page 82
■ Sharing the TV programme or contents of this TV with the other network equipment
You can enjoy the current digital TV programme or the contents
1
∗
of this TV on the other DLNA Certified VIERA
smartphone, etc. connected to your home network.
For example, watching the continuation of the current programme on your smartphone in the other room, etc.
●
To use this function, set [DLNA Server Settings] of this TV.
●
To use this function with the other VIERA, select a name or MAC Address of this TV from the DLNA server list of the
other VIERA, and then select the content to operate. Also refer to the manual of the other VIERA.
●
To use this function with your smartphone, you need to install the application for controlling VIERA in your
(p. 84)
smartphone. For the information of the application (English only):
http://panasonic.jp/support/global/cs/tv/
For the operations, refer to the support information of the application.
∗
1: Available contents:
Contents that can be played back by Media Player of this TV and other network equipment
•
TV programmes recorded on the USB HDD with this TV
•
∗
2: DLNA Certified VIERA of before the year 2009 may not be available. The compatibility with future products is not
guaranteed.
Note
●
When using this function, this TV must be on.
●
This function is available only with 1 piece of other equipment.
●
You may be able to control this TV for turning off the screen and muting the sound from your smartphone. For details,
refer to the support information of the application.
●
This function may not be available in the following conditions of this TV:
While the recording is in progress.
•
While Video mode or Recorded TV mode in Media Player.
•
When in VIERA Connect.
•
When accessing the media server.
•
When the data service is active.
•
When watching encrypted (copy-protected) programmes.
•
When the broadcast prohibits the output of video and audio.
•
VIERA Connect
VIERA Connect is a gateway to the internet services unique to Panasonic.
VIERA Connect allows you to access some specific websites supported by Panasonic, and enjoy internet contents
such as videos, games, communication tools, etc. from VIERA Connect home screen.
Using Network Services (DLNA / VIERA Connect)
●
To enable this function, connect this TV to a broadband network environment.
“Network connections” (p. 83), “Network Setup” (p. 84)
●
For details about VIERA Connect operation
Note
●
VIERA Connect home screen is subject to change without notice.
●
This TV does not support full web browser function and some features of the websites may not be available.
●
Be sure to update the software when a software update notice is displayed on the TV screen. If the software is not
updated, you will not be able to use VIERA
You can update the software later manually. [Software Update] in [Network] (p. 87)
●
The services through VIERA Connect are operated by their respective service providers, and service may be
discontinued either temporarily or permanently without notice. Therefore, Panasonic will make no warranty for the
content or the continuity of the services.
●
Some content may be inappropriate for some viewers.
●
Some content may only be available for specific countries and may be presented in specific languages.
●
Depending on the connection environment, the internet connection may be slow or may not be successful.
●
During the operation, audio signal is output from AV1, DIGITAL AUDIO OUT and HDMI2 (ARC function) terminals.
But no video signals are output. AV1 can output audio signal if [AV1 out] is set to [Monitor] in the Setup Menu (p. 43).
To use HDMI2 with ARC function, connect an amplifier that has ARC function (p. 93) and set to use theatre speakers
(p. 99).
●
You can restrict access to VIERA Connect. [Child Lock] (p. 59)
●
VIERA Connect is not available while the recording of Timer Programming, Direct TV Recording or One Touch
Recording is in progress.
(p. 19)
Connect.
2
∗
, your
82
Page 83
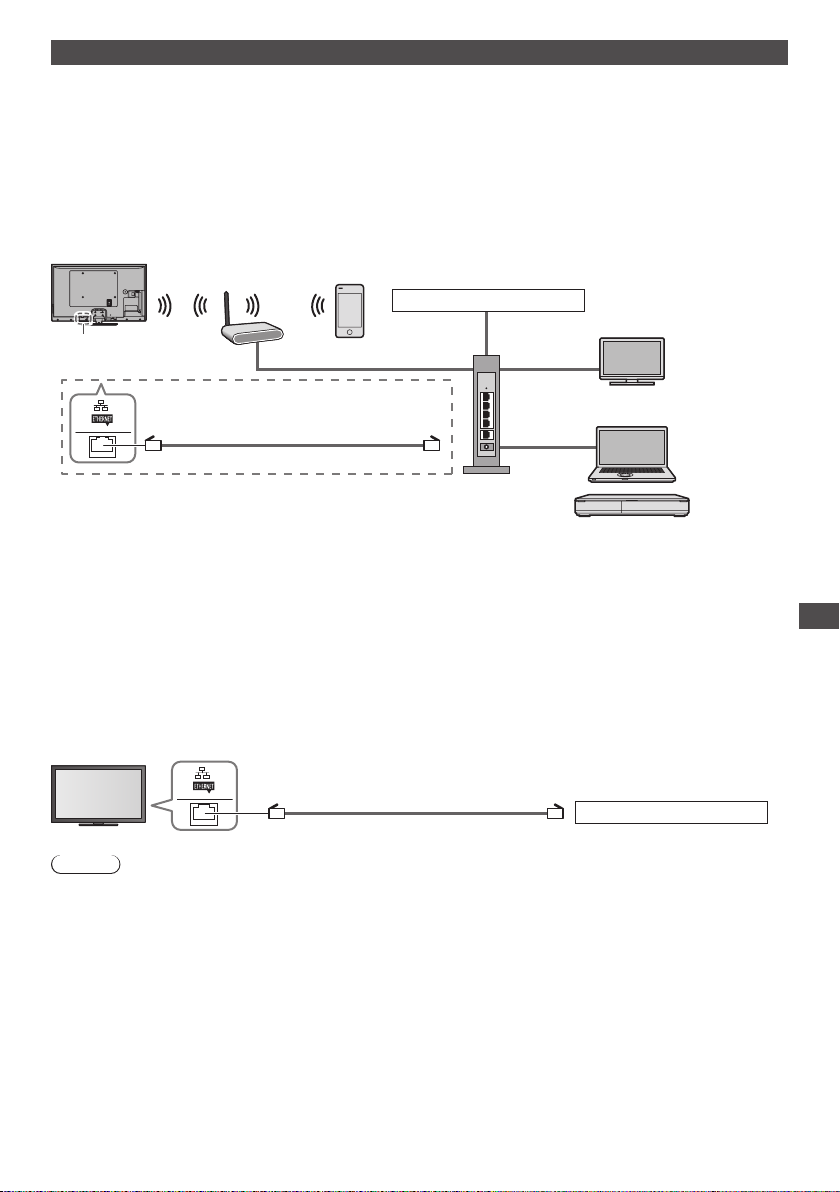
Network connections
To use only DLNA features, you need a home network environment and you can operate the features without
broadband network environment.
To use VIERA Connect features, you need a broadband network environment.
●
If you do not have any broadband network services, please consult your retailer for assistance.
●
Dial-up internet connections cannot be used.
●
Required speed (effective): at least 1.5 Mbps for SD and 6 Mbps for HD picture quality, respectively. If the transfer
speed is not enough, contents may not be played back properly.
Example 1
(For DLNA and VIERA Connect)
Wireless connection
Access point
Internet environment
Built-in wireless LAN
Wired connection
LAN cable (Unshielded)
●
Ensure to use a LAN straight cable for this connection.
●
Set up and connect any equipment required for the network environment. You cannot make settings for the
equipment on this
●
If your modem has no broadband router functions, use a broadband router.
●
If your modem has broadband router functions but there are no vacant ports, use a hub.
●
Ensure that the broadband routers and hubs are compatible with 10BASE-T / 100BASE-TX.
●
If you use the equipment compatible only with 100BASE-TX, category 5 LAN cables are required.
TV. Read the manual of the equipment.
Smartphone
DLNA Certified VIERA
Hub or Router
DLNA Certified media server
(for example, PC, DIGA
Recorder, etc.)
Example 2
(For VIERA Connect)
You can connect this TV and the telecommunication equipment directly to use VIERA Connect features.
LAN cable (Unshielded)
Note
●
Contact your Internet Service Provider (ISP) telecommunications company for further assistance regarding the
network equipment.
●
Confirm the terms and conditions of the contracts with your Internet Service Provider (ISP) or telecommunications
. Depending on the contracts, additional fees may be charged or multiple connections to the internet may be
company
impossible.
●
Turn the TV off, and then on again when changing or reconnecting the network connection.
Internet environment
Using Network Services (DLNA / VIERA Connect)
83
Page 84
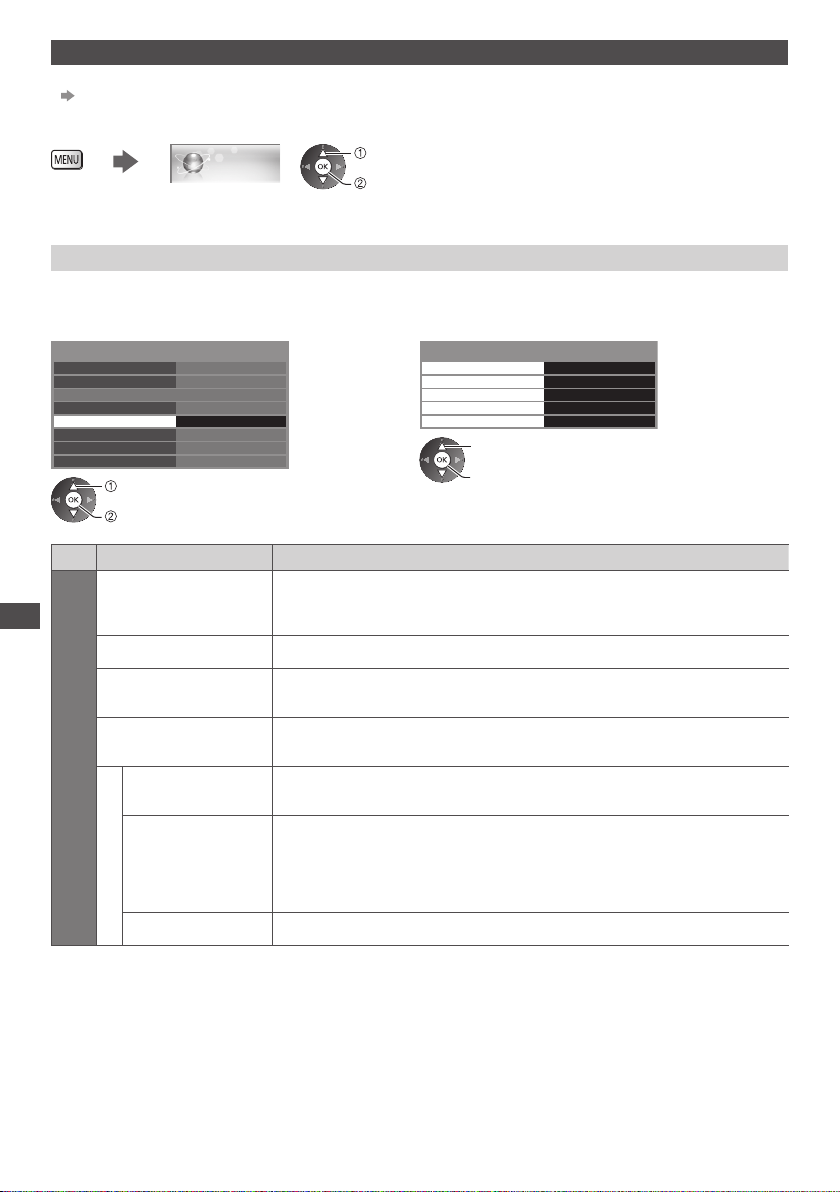
Network Setup
●
Ensure the connections are completed before starting Network Setup.
“Network connections” (p. 83)
Display the menu and select [Network]
Network
select
access
Network Link settings
Sets the link settings to access and control this TV from the network equipment (PC with Windows 7 installed,
smartphone, DLNA Certified VIERA, etc.) via the network.
1 Select [Network Link Settings]
Connection Test
Network Connection Wired
Wireless Network Settings
IP/DNS Settings
Network Link Settings
Software Update
New Software Message
Network Status
select
access
Access
On
2 Select the items and set
Network Link Settings
VIERA Name
DLNA
Remote Control
DLNA Remote Volume
Network Remote Control
DLNA Server Settings Access
select
access / store
VIERA
On
On
On
Menu
VIERA Name
Using Network Services (DLNA / VIERA Connect)
DLNA Remote Control Enables to control the TV using Windows 7 via the network [Off] / [On]
Network Link Settings
DLNA Remote Volume
Network Remote
Control
DLNA Server Settings
Item Adjustments / Configurations (alternatives)
Sets your favourite name for this TV
●
This name will be used as the name of this TV on the screen of the other
network equipment.
Enables to control the volume of the TV using Windows 7 via the network
[Off] / [On]
∗
DLNA Server
Enables to control the TV from the network equipment (smartphone, etc.)
[Off] / [On]
Enables to share the TV programme or contents of this TV with the network
equipment (DLNA Certified VIERA, smartphone, etc.) [Off] / [On]
Selects whether to restrict the access to this TV for each equipment on the home
network [Auto] / [Manual]
Registration Type
[Auto]: All the available equipment on the home network are accessible.
(maximum 16 equipment)
[Manual]: Sets the restrictions for each equipment in the [Remote Device List].
∗
Remote Device List Lists the accessible equipment to this TV on the home network
∗
Depending on the area, this function may not be available. For details, consult your local Panasonic dealer.
84
Page 85
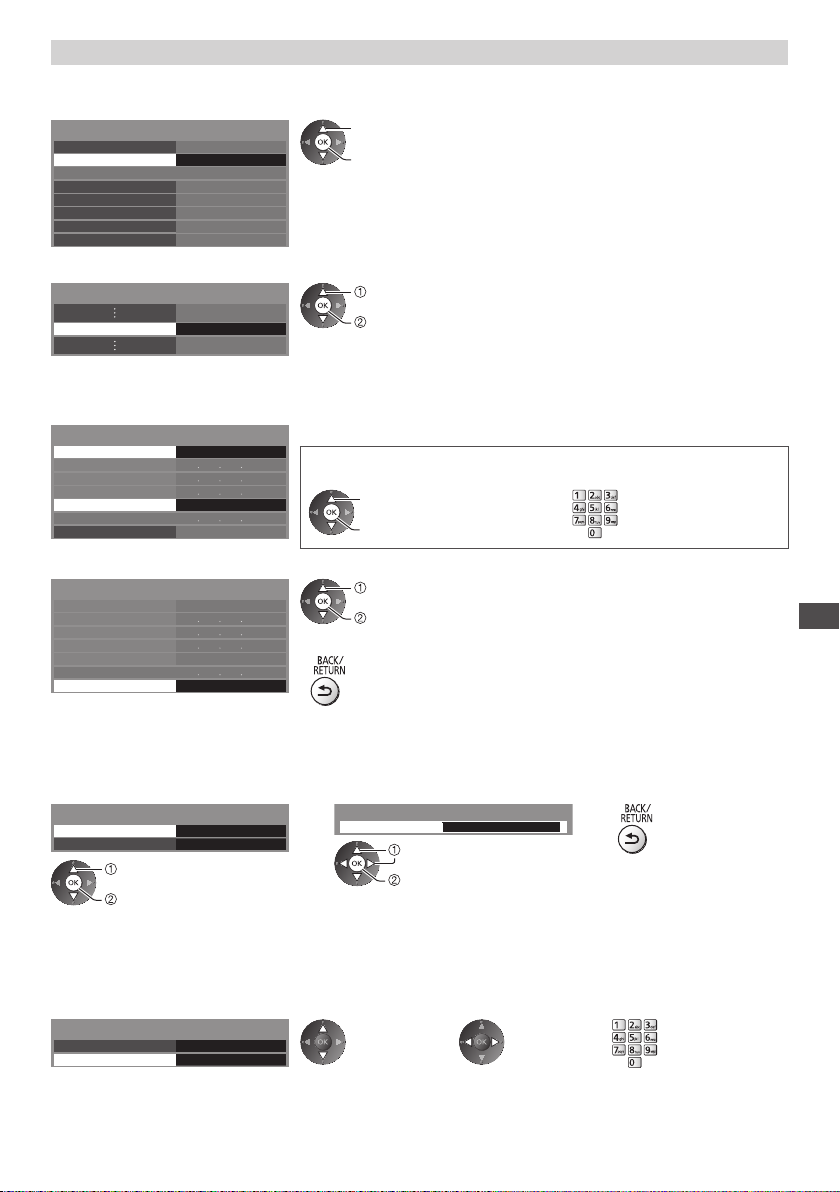
Wired connection settings
This setting is for the network connection by using the LAN cable.
1 Select [Network Connection] and set to [Wired]
Connection Test
Network Connection
Wireless Network Settings
IP/DNS Settings
Network Link Settings
Software Update
New Software Message
Network Status
Wired
On
select
access / store
2 Select [IP/DNS Settings] and set the items
select
IP/DNS Settings Access
access
■ [Acquire IP Address] / [Acquire DNS Address]
Sets [IP Address], [Subnet Mask], [Default Gateway] and [DNS Address].
Select [Acquire IP Address] / [Acquire DNS Address] and set to [Auto] (recommended).
●
IP/DNS Settings
Acquire IP Address Auto
IP Address
Subnet Mask
Default Gateway
Acquire DNS Address
DNS Address
Proxy Settings
Auto
The available settings are displayed automatically.
Manual settings
Address], [Subnet Mask], [Default Gateway], [DNS Address])
([IP
select
access / store
3 Select [Proxy Settings] and set the items
IP/DNS Settings
Acquire IP Address
IP Address
Subnet Mask
Default Gateway
Acquire DNS Address
DNS Address
Proxy Settings
Auto
Auto
Access
select
access
●
After settings, return to the previous menu.
■ [Proxy]
Sets Proxy address.
●
This is the address of the relay server that is connected to the target server instead of the browser and sends data to
the browser. Setting is required if specified by the provider.
1. Select [Proxy] 2. Enter the address
Proxy Settings
Proxy
Proxy Port
select
access
0
Proxy
Host
select
set
●
You can set characters by using numeric
buttons.
3. Store
■ [Proxy Port]
Sets Proxy port number.
●
This number is also specified by the provider with the Proxy address.
1. Select [Proxy Port]
Proxy Settings
Proxy
Proxy Port
0
2. Move the cursor and enter the number
Using Network Services (DLNA / VIERA Connect)
85
Page 86
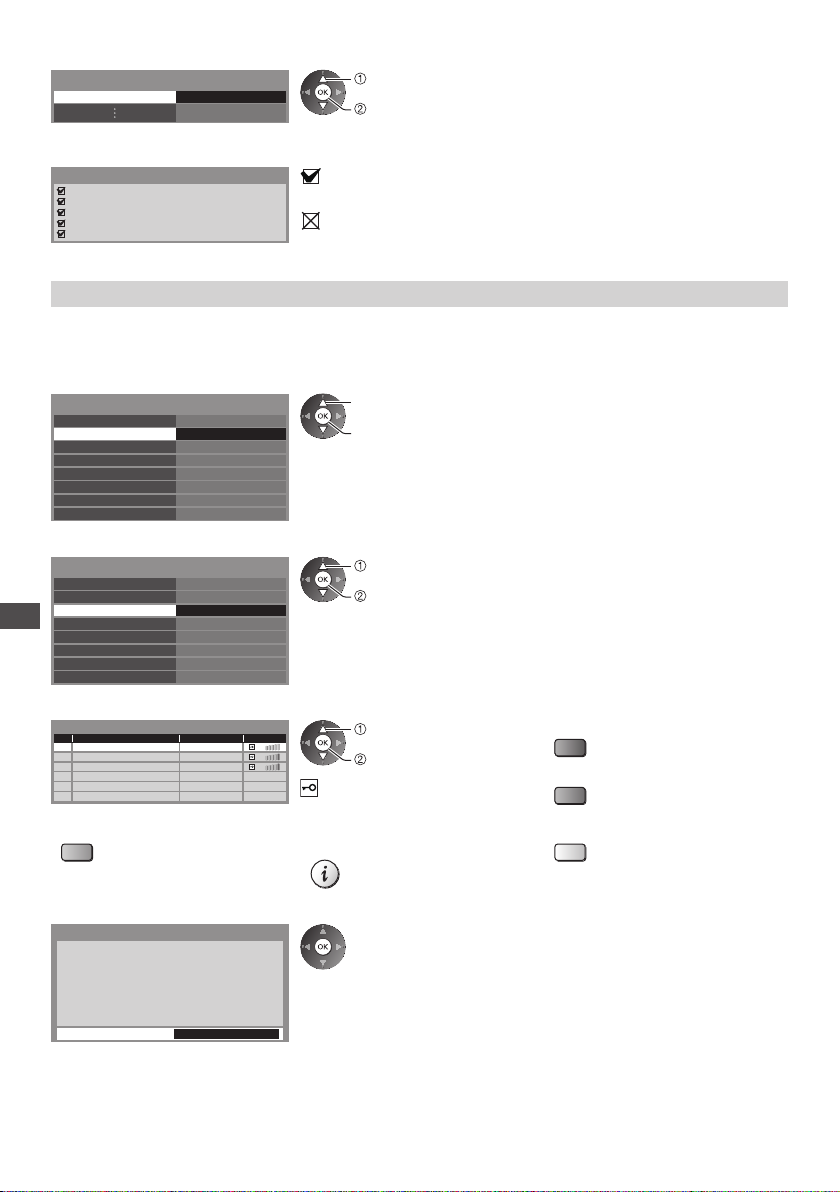
4 Select [Connection Test] and access to test
Connection Test Access
Connection Test
Check network cable connection.
Check acquired IP address.
Check for devices using same IP address.
Check gateway connection.
Check server connection.
select
access
●
Performs automatic testing of the network connection for the TV. (It takes a
while to test.)
: succeeded
The test is successful and the TV is connected to the network.
: failed
Check the settings and connections. And then try again.
Wireless connection settings
This setting is for the wireless network connection.
●
Confirm the encryption key, settings and positions of your access point before starting setup. For details, read the
manual of the access point.
1 Select [Network Connection] and set to [Wireless]
Connection Test
Network Connection
Wireless Network Settings
IP/DNS Settings
Network Link Settings
Software Update
New Software Message
Network Status
Wireless
On
select
access / store
2 Select [Wireless Network Settings]
Connection Test
Network Connection
Wireless Network Settings
IP/DNS Settings
Using Network Services (DLNA / VIERA Connect)
Network Link Settings
Software Update
New Software Message
Network Status
Wireless
Access
On
select
access
●
When the access point is already set, [Current Settings] screen will be
displayed.
To change the settings, select [No] on this screen and go to the next step.
3 Select your desired access point
●
Available Wireless Networks
No. Network Name(SSID) Status Wireless type
1
2
3
Access Point A
Access Point B
Access Point C
11n(2.4GHz)
11n(5GHz)
11n(5GHz)
●
To search access points again
(blue)
select
access
: Encrypted access point
●
For the information of the
highlighted access point
For [WPS(Push button)] (p. 18)
(red)
●
For [WPS(PIN)] (p. 87)
(green)
●
To set manually (p. 87)
(yellow)
4 Access the encryption key input mode
Encryption Key Setting
Connection will be made with the following settings: Network Name(SSID) : Access Point A
Security type : WPA-PSK
Encryption type : TKIP
Please input the encryption key.
Encryption key
●
If the selected access point is not encrypted, the confirmation screen will be
displayed. It is recommended to select the encrypted access point.
86
Page 87
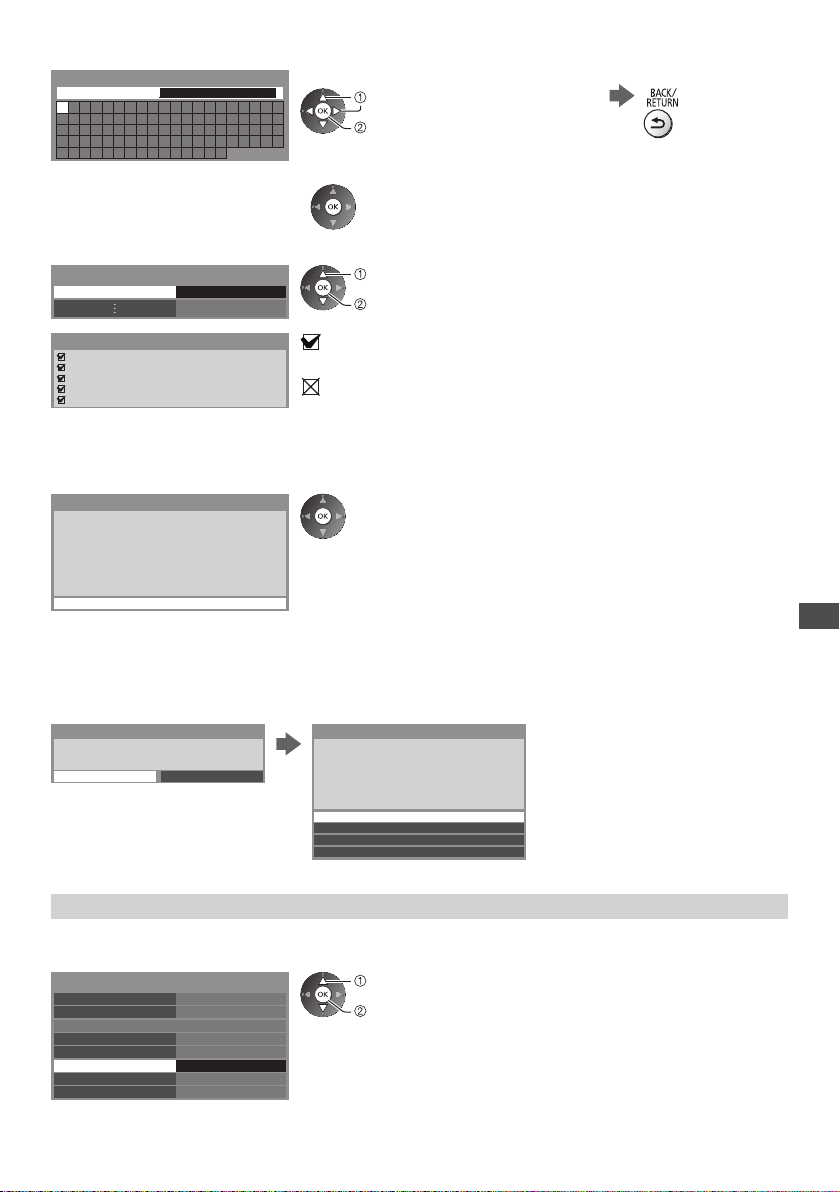
5 Enter the encryption key of the access point
Wireless Network Settings
Encryption key
A B C D E F G H I J K L M N O P Q R S T
U V W X Y Z 0 1 2 3 4 5 6 7 8 9 ! : #
a b c d e f g h i j k l m n o p q r s t
u v w x y z ( ) + - . * _ @ / “ ‘ % & ?
, ; = $ [ ] ~ < > { } | ` ^ \
Set characters
select
set
●
You can set characters by using numeric buttons.
●
After settings, return to the previous menu.
Store
6 Select [Connection Test] and access to test
●
Connection Test Access
Connection Test
Check wireless network connection.
Check acquired IP address.
Check for devices using same IP address.
Check gateway connection.
Check server connection.
select
access
: succeeded
The test is successful and the TV is connected to the network.
: failed
Check the settings and connections. And then try again.
Performs automatic testing of the network
connection for the
TV. (It takes a while
to test.)
If you continue to have difficulty, please contact your internet service provider.
■ [WPS(PIN)]
Enter the PIN code to the access point, and then select [Connect]
WPS(PIN)
Please register the following PIN codes on the
wireless access point.
PIN code : 12345678
Select ‘Connect’ after entering and saving the
settings on the wireless access point.
Connect
■ [Manual]
You can setup SSID, security type, encryption type, and encryption key manually.
Follow the on-screen instructions and set manually.
●
When you use 11n (5 GHz) for the wireless system between the built-in wireless LAN and access point, select [AES]
for the encryption type.
Network Name(SSID) Setting
Please input the network name(SSID).
Network Name(SSID)
XXXXXXX
Security Type Settings
Connection will be made with the following settings: Network Name(SSID) : XXXXXXX
Please select the security type.
Using Network Services (DLNA / VIERA Connect)
WPA2-PSK
WPA-PSK
Shared key
Open
Update TV’s software
Accesses the specific website to update TV’s software and search if any software updates are available.
Select [Software Update]
Connection Test
Network Connection
Wireless Network Settings
IP/DNS Settings
Network Link Settings
Software Update
New Software Message
Network Status
Wired
Access
On
select
access
●
Follow the on-screen instructions.
87
Page 88
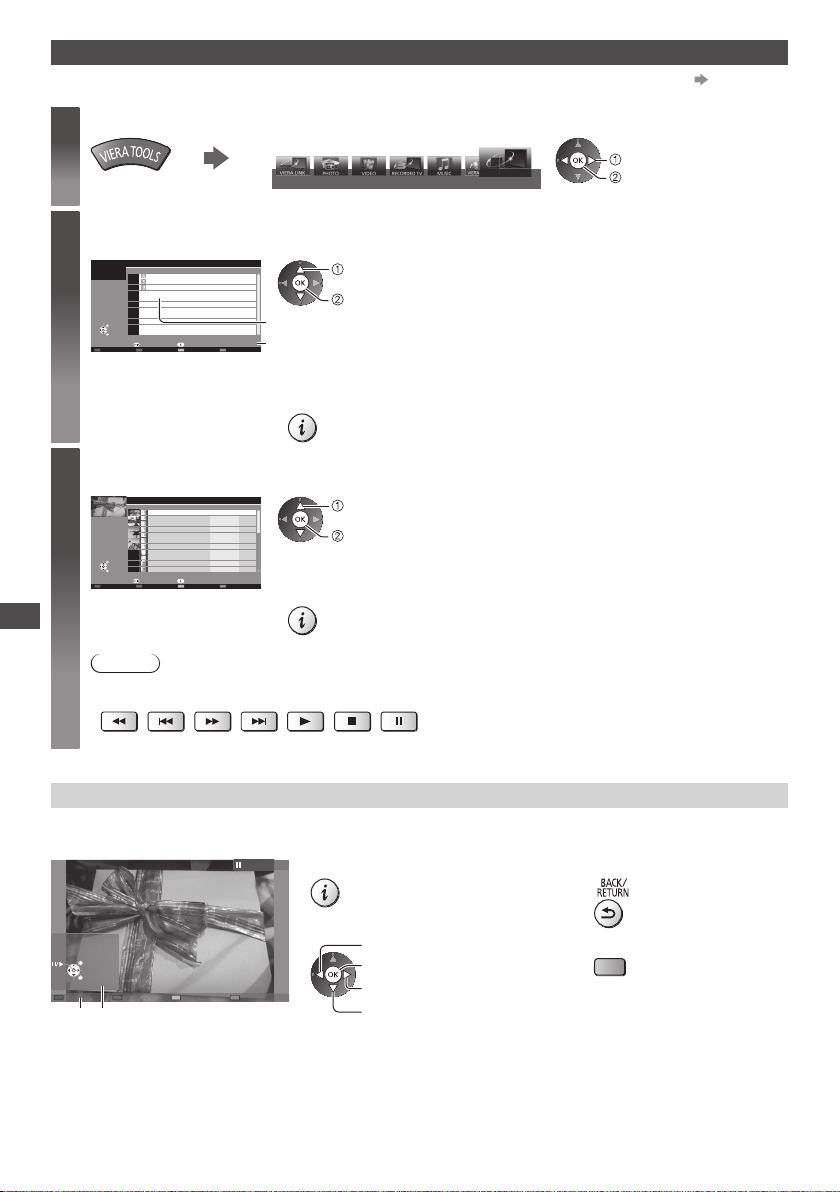
Using DLNA® features
●
Ensure the preparation of the media server, network connections and network settings are completed.
Display [VIERA TOOLS] and select [Media Server]
1
2
3
Using Network Services (DLNA / VIERA Connect)
Select one of the media servers to access
Example: Media server list
Media Server
Select
EXIT
RETURN
Access
Select the file
Example: File list
Media Server
SERVER1
Pixel
3648x2736
Format
JPEG
Select
EXIT
RETURN
View
Option Menu
Slideshow
Note
●
Non-playable files are also listed but cannot be selected.
●
You can use the following buttons during playback. Confirm the code of the remote control is “73” (p. 30).
SERVER1
SERVER2
SERVER3
DIGA
Info Option Menu
P000102 2011-10-05 09:54
P000135
P000180
P000214
P000251
P000276
P000293
V100025
V100042
M10054
M10078
2011-11-20 13:18
2011-12-07 11:31
2011-12-10 15:20
2011-12-19 12:39
2011-12-25 14:06
2012-01-06 13:52
2012-01-12 15:56
2012-01-20 10:08
2012-01-28 14:48
2012-02-09 19:58
Info
Media Server
select
access
Available media servers
4
Total listed number
●
For the operations to access the other TV, select a name or MAC Address of the
TV from this list.
other
●
To display the information of the highlighted media server
select
access
●
Depending on the condition of media server, you may need to select the folder
before selecting the file.
28
●
To display the information of the highlighted file
select
access
(p. 81 - 87)
For photo file
[Single view]
Example:
Single view
Stop
Operation guide
88
EXIT
Select
RETURN
- Photos are displayed one at a time.
Single view
●
To display / hide the operation guide
●
To operate Single view
To the previous photo
Slideshow
To the next photo
Stop
(return to list)
Rotate
●
To return to list
●
To rotate 90°
(blue)
Page 89
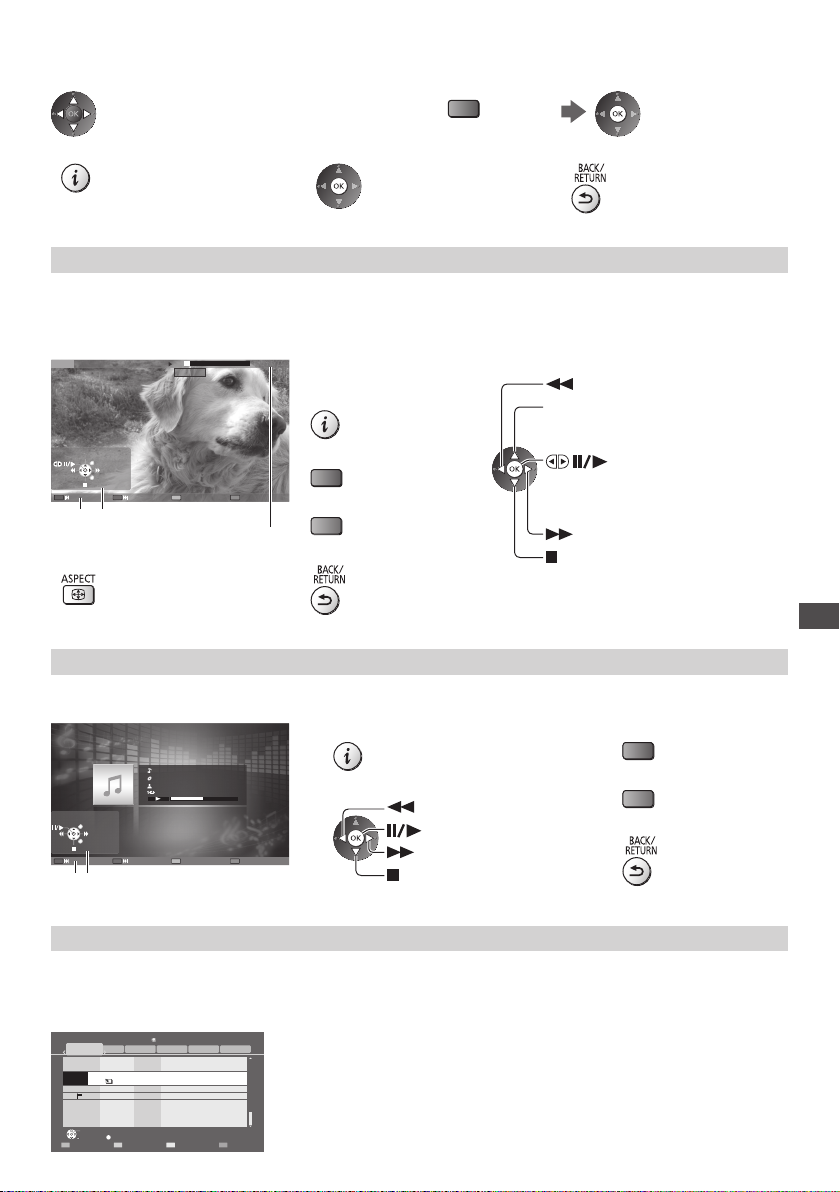
[Slideshow] - Slideshow completes when all photos are viewed within the list.
1 Select the photo file from the list for the first view 2 Start Slideshow
●
To display / hide the operation guide
(red)
●
To pause (return to Single view)
●
To return to list
For video file
Playback
If you stopped the last playback on the way, the confirmation screen is displayed to select whether to start from where
you stopped last time or from the beginning.
Example: Playback
MEDIA SERVER
Manual skip
Operation guide
●
To change aspect
- Playback will start.
19/02/2011 11:21 00:15:39
EXIT
RETURN
00:02:05
Information banner
●
To display / hide the
operation guide and
information banner
●
To the previous content
(red)
●
To the next content
(green)
●
To return to list
●
To operate the playback
Rewind
[Manual skip]
●
Press to skip forward about 30
seconds.
Pause (displays the time seek bar) /
Playback
Fast forward
Stop
For music file
Playback
Example: Playback
Operation guide
- Playback will start.
EXIT
RETURN
My Song_9
My Favourite
My Music_1
00:02.43 / 00:05.44
●
To display / hide the operation guide
●
To operate the playback
Rewind
Pause / Playback
Fast forward
Stop
●
To the previous track
(red)
●
To the next track
(green)
●
To return to list
Using Network Services (DLNA / VIERA Connect)
For DIGA Recorder
Control the DIGA Recorder
The screen of the DIGA Recorder will be displayed. You can control the functions of the DIGA Recorder with this TV
remote control according to the operation guide.
Example:
DIRECT NAVIGATOR (Grouped Titles)
All
Bibel TV Bibel TV das Gespräch
OK
RETURN
HDD
Liberty TV FR Journal Télévisé / Météo
19.08(Wed)
AV1
19.08(Wed)
19.08(Wed) Start Time 11:01 Titles 27
WDR aktuell
WDR Aachen
18.08(Tue)
WDR aktuell
WDR Wuppertal
18.08(Tue)
OPTION
Time Remaining 36:17 (DR)
Video (AVCHD)SportsSocial/EconomyMovieNot Viewed
Page 005/005
Delete TitleSelect
●
Before operating, register this TV on the DIGA Recorder.
●
For details, read the manual of the DIGA Recorder.
89
Page 90
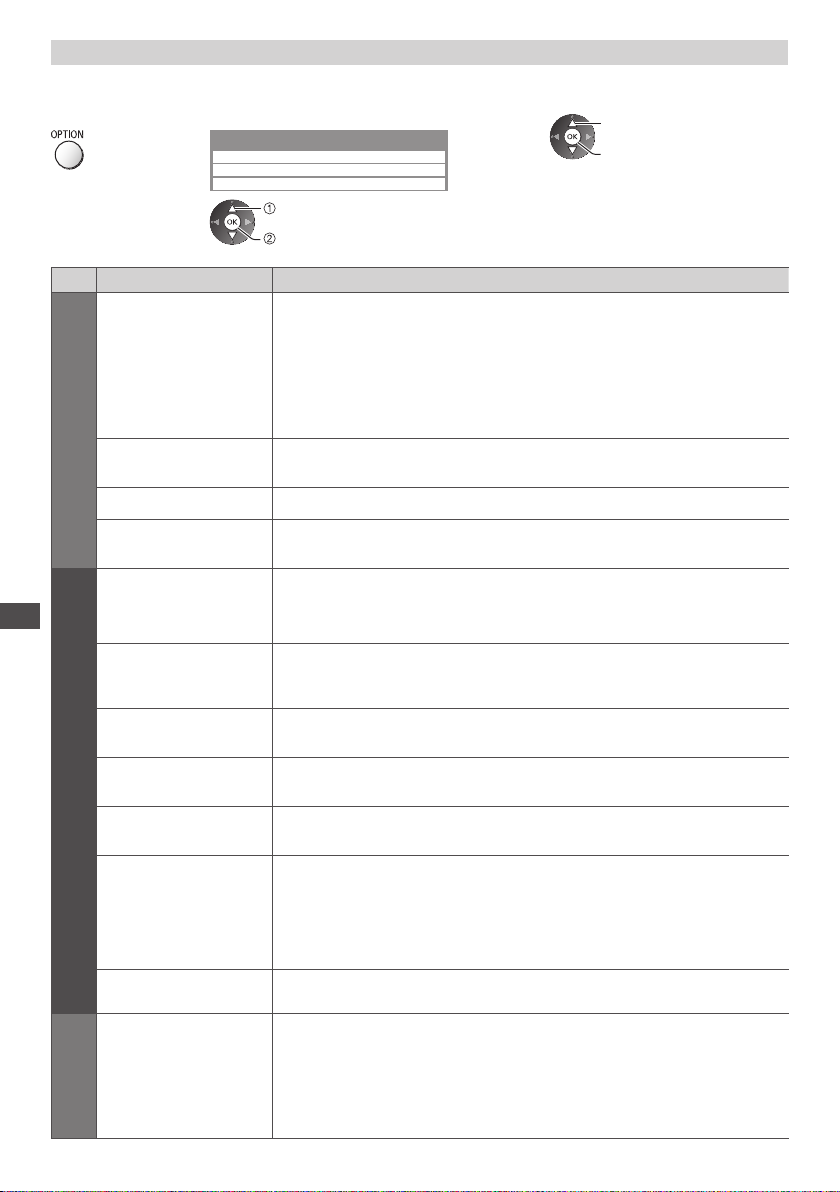
Option menu for each content
Setup the settings for Photo, Video and Music file operations on this TV.
1 Display the
option menu
2 Select [Slideshow Settings], [Video Setup]
or [Music Setup]
Option Menu
Slideshow Settings
Video Setup
Music Setup
select
access
3 Select the items and set
select
access / store
Menu
Slideshow Settings
Transition Effect
Interval
Repeat Slideshow repeat [Off] / [On]
Back Ground Music
Video Preview
Using Network Services (DLNA / VIERA Connect)
Multi Audio,
Dual Audio,
Dual Mono Audio
Subtitle
Video Setup
Subtitle T
Subtitle Language
Aspect Change
Item Adjustments / Configurations (alternatives)
Selects the transition effect for switching the photo during the slideshow
[Off] / [Fade] / [Slide] / [Dissolve] / [Motion] / [Random]
[Fade]: The next photo fades in gradually.
[Slide]: The next photo slides and appears from the left side.
[Dissolve]: Each photo is dissolved when switching to the next photo.
ext
[Motion]: Each photo is displayed with an effect of enlarging, reducing, moving
[Random]: Each transition is selected at random.
Selects slideshow interval [5] / [10] / [15] / [30] / [60] / [90] / [120] (seconds)
●
Selects the back ground music during Photo mode
[Off] / [T
Sets to start the preview of the title or scene in the thumbnail screen [Off] / [On]
●
Selects between selectable sound tracks (if available)
●
●
Subtitles On / Off (if available)
●
Selects the font type to display subtitles correctly (if available)
●
Selects the language in which subtitles should appear (if available)
●
[Aspect1]: Displays the content enlarged without distortion.
[Aspect2]: Displays the content full-screen.
[Original]: Displays the content original size.
●
●
●
up or moving down.
This function is not available when [Transition Effect] is set to [Motion].
ype1] / [Type2] / [Type3] / [Type4] / [Type5]
Image may not be displayed for an instant in the thumbnail screen. Set the
preview [Off] to resolve this.
It may take several seconds to change the sound.
Only available during playback
Only available during playback
Only available during playback
Only available during playback
You can also change the aspect using the ASPECT button.
Aspect change may not work depending on the content.
Only available during playback
90
Repeat Playback repeat within the selected file [Off] / [On]
Music Setup
Repeat
Playback repeat [Off] / [Folder] / [One]
[Folder]: Playback repeat within the selected folder.
[One]: Playback repeat of the selected one file.
Page 91
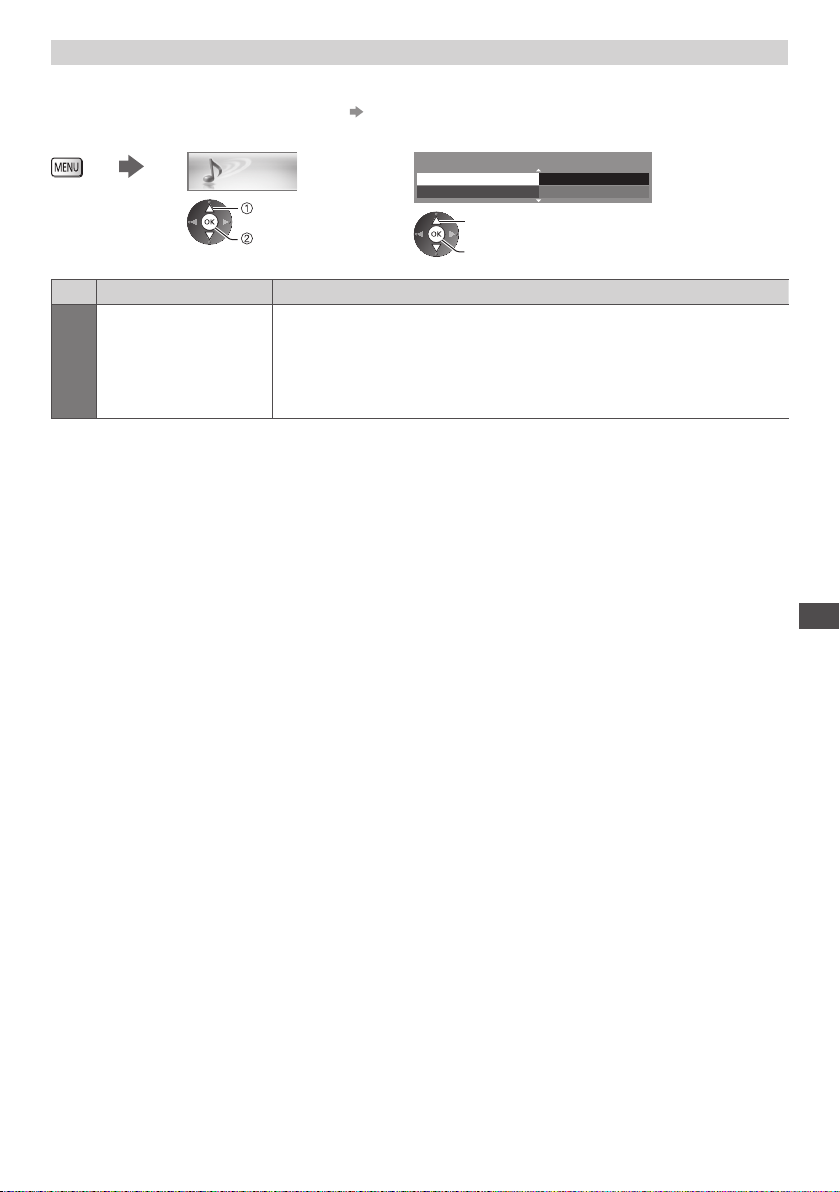
Audio output settings (for video contents)
You can enjoy the multi-channel sound via an amplifier connected to DIGITAL AUDIO OUT or HDMI2 (ARC function)
terminal.
●
To confirm or change the current sound status (p. 77)
1 Display the menu and Select [Sound]
Sound
select
access
2 Select [SPDIF Selection] and set
SPDIF Selection
Reset to Defaults
select
access / store
Auto
Reset
2/2
Menu
Sound
Item Adjustments / Configurations (alternatives)
SPDIF Selection
SPDIF: A standard audio transfer file format
Selects the initial setting for digital audio output signal from DIGITAL AUDIO OUT
and HDMI2 (ARC function) terminals [Auto] / [PCM]
[Auto]: Dolby Digital Plus, Dolby Digital and HE-AAC multi-channel are output as
Dolby Digital Bitstream. DTS is output as DTS. MPEG is output as PCM.
[PCM]: Digital output signal is fixed to PCM.
Using Network Services (DLNA / VIERA Connect)
91
Page 92
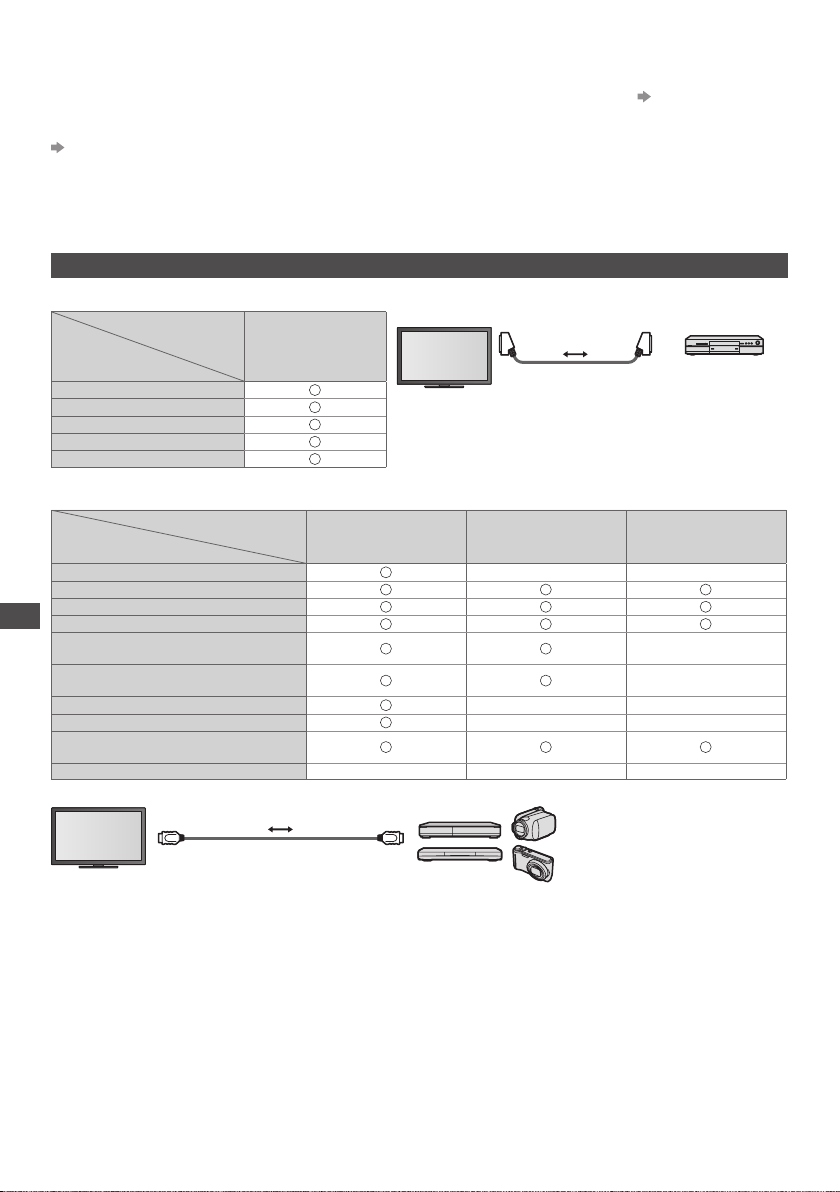
Link Functions (Q-Link / VIERA Link)
Q-Link connects the TV and DVD Recorder / VCR, and enables easy recording, playback, etc. (p. 94)
VIERA Link (HDAVI Control™) connects the TV and the equipment with VIERA Link function, and enables easy control,
convenient recording, playback, energy saving, creating home theatre, etc., without complicated setting.
(p. 95 - 99)
You can use Q-Link and VIERA Link functions together.
●
This TV supports “HDAVI Control 5” function. But available features are depending on the connected equipment’s
version of HDA
●
VIERA Link features may be available even with other manufacturers’ equipment supporting HDMI CEC.
Summary of Q-Link and VIERA Link features
Q-Link (SCART connection)
Features
Preset download
Easy playback
Power on link
Power off link
Direct TV Recording
VIERA Link (HDMI connection)
Features
Preset download
Easy playback
Power on link
Power off link
Link Functions (Q-Link / VIERA Link)
Reduce unnecessary power
consumption in Standby
Auto standby for unnecessary
equipment
Pause Live TV programme
Direct TV Recording
Control the menu of the connected
equipment by VIERA remote control
Speaker control – – –
Connection
VI Control. Please read the manual of the equipment to confirm the version.
Connected equipment
DVD Recorder /
Connection
VCR with Q-Link
function
Connected equipment
DIGA Recorder with
VIERA Link function
●
Use fully wired SCART cable.
●
Connect the DVD Recorder / VCR supporting Q-Link to the
s AV1 terminal via a SCART cable.
TV’
DVD Player / Blu-ray
Disc Player with
5
∗2 ∗
VIERA Link function
3
∗
3
∗
4
∗2 ∗
2
∗
1
∗
HDMI cable
SCART cable
DVD Recorder /
VCR with Q-Link
function
HD Video Camera /
LUMIX Camera with
VIERA Link function
– –
3
∗
3
∗
–
–
– –
– –
1
∗
DIGA Recorder / DVD Player /
Blu-ray Disc Player /
HD Video Camera / LUMIX Camera
with VIERA Link function
∗
1
●
Use fully wired HDMI compliant cable.
●
Connect the equipment supporting VIERA Link to the TV’s HDMI1, HDMI2, HDMI3 or HDMI4 terminal via an HDMI
cable.
●
About HDMI cable for connecting Panasonic HD Video Camera or LUMIX Camera, read the manual of the
equipment.
92
Page 93
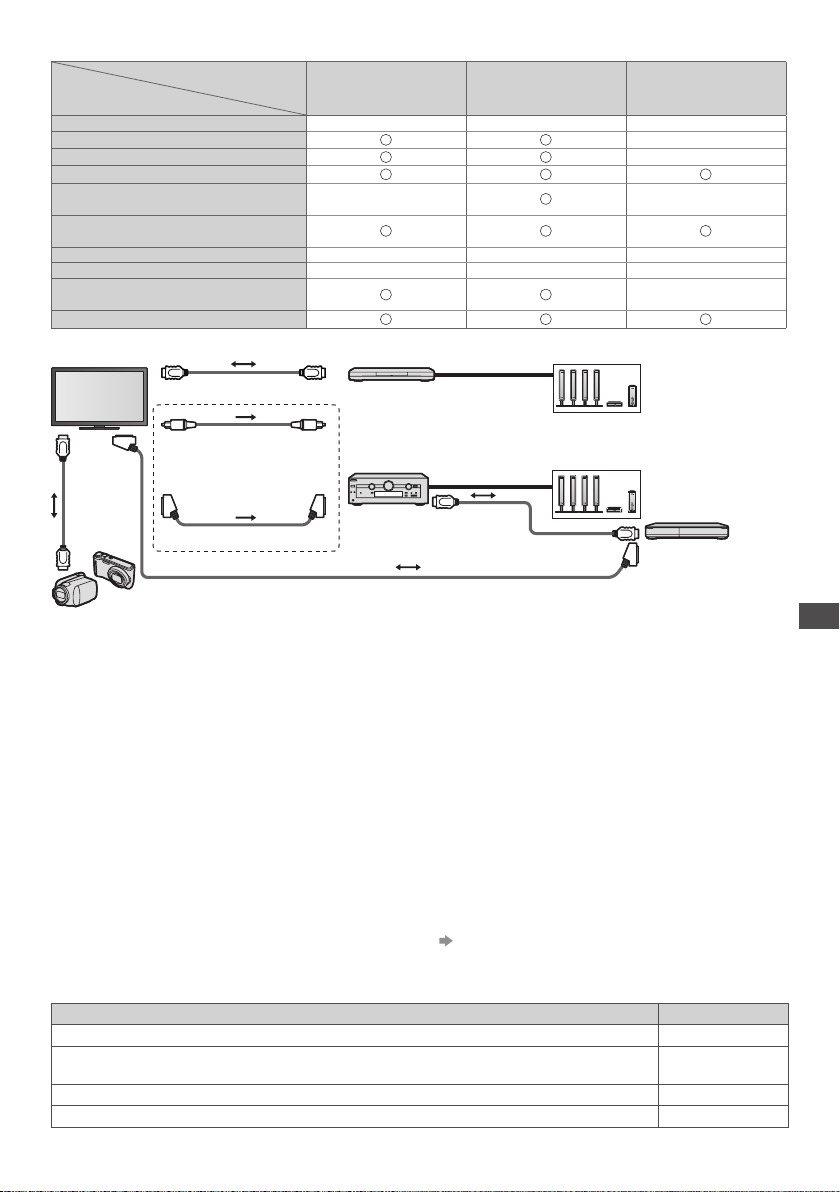
VIERA Link (HDMI and Audio out connections)
Connected equipment
Features
Preset download – – –
Easy playback
Power on link
Power off link
Reduce unnecessary power
consumption in Standby
Auto standby for unnecessary
equipment
Pause Live TV programme – – –
Direct TV Recording – – –
Control the menu of the connected
equipment by VIERA remote control
Speaker control
Connection
HDMI cable
Player theatre with
VIERA Link function
6
∗
–
7
∗3 ∗
1
∗
●
To use Player theatre / Blu-ray Disc theatre
Player theatre / Blu-ray Disc
theatre with VIERA Link
function
●
To use Amplifier
Amplifier with
VIERA Link function
8
∗
HDMI
cable
Optical digital
audio cable
or
SCART cable
SCART cable
HD Video Camera / LUMIX Camera with VIERA Link function
●
Use fully wired HDMI compliant cable.
●
Connect the equipment supporting VIERA Link to the TV’s HDMI2, HDMI3 or HDMI4 terminal via an HDMI cable.
●
Use fully wired SCART cable.
●
If you use a SCART cable for audio output, connect the equipment supporting VIERA Link to the TV’s AV1 terminal
and set [A
●
Use the optical digital audio cable or SCART cable for audio output from the TV.
∗
1: Available with the equipment which has “HDAVI Control 2
∗
2: Available with the equipment which has “HDAVI Control 3
∗
3: Available with the equipment which has “HDAVI Control 4
∗
4: Available with a DIGA Recorder which has HDD.
∗
5: This function is available regardless of the version of
V1 out] to [Monitor] in the Setup Menu (p. 43).
or later” function.
or later” function.
or later” function.
HDAVI Control when the recorder supports Q-Link and is
connected via SCART cable.
Blu-ray Disc theatre
with VIERA Link
function
6
∗
Amplifier with
VIERA Link function
–
–
3
∗
7
∗3 ∗
1
∗
–
3
∗
–
Speaker system
Speaker system
HDMI cable
DIGA Recorder with
VIERA Link function
∗
6: While playing a disc.
∗
7: Except for watching a disc.
∗
8: If the connected equipment has “HDAVI Control 5”
function, you do not have to use this audio cable
(Optical digital audio cable or SCART cable).
In this case, connect the equipment to the TV’s
HDMI2 terminal via an HDMI cable.
Link Functions (Q-Link / VIERA Link)
VIERA Link Control of compatible equipment [VIERA Link Control] (p. 97)
●
Table below displays maximum number of compatible equipment that can be controlled by VIERA Link Control. This
includes connections to equipment already connected to the
For example, DIGA Recorder connected to Amplifier which is connected to the TV via an HDMI cable.
Type of the equipment Maximum number
Recorder (DIGA Recorder, etc.) 3
Player (DVD Player, Blu-ray Disc Player, HD Video Camera, LUMIX Camera, Digital Camera,
Player theatre, Blu-ray Disc theatre, etc.)
Audio system (Player theatre, Blu-ray Disc theatre, Amplifier, etc.) 1
Tuner (Set top box, etc.) 4
TV.
3
93
Page 94
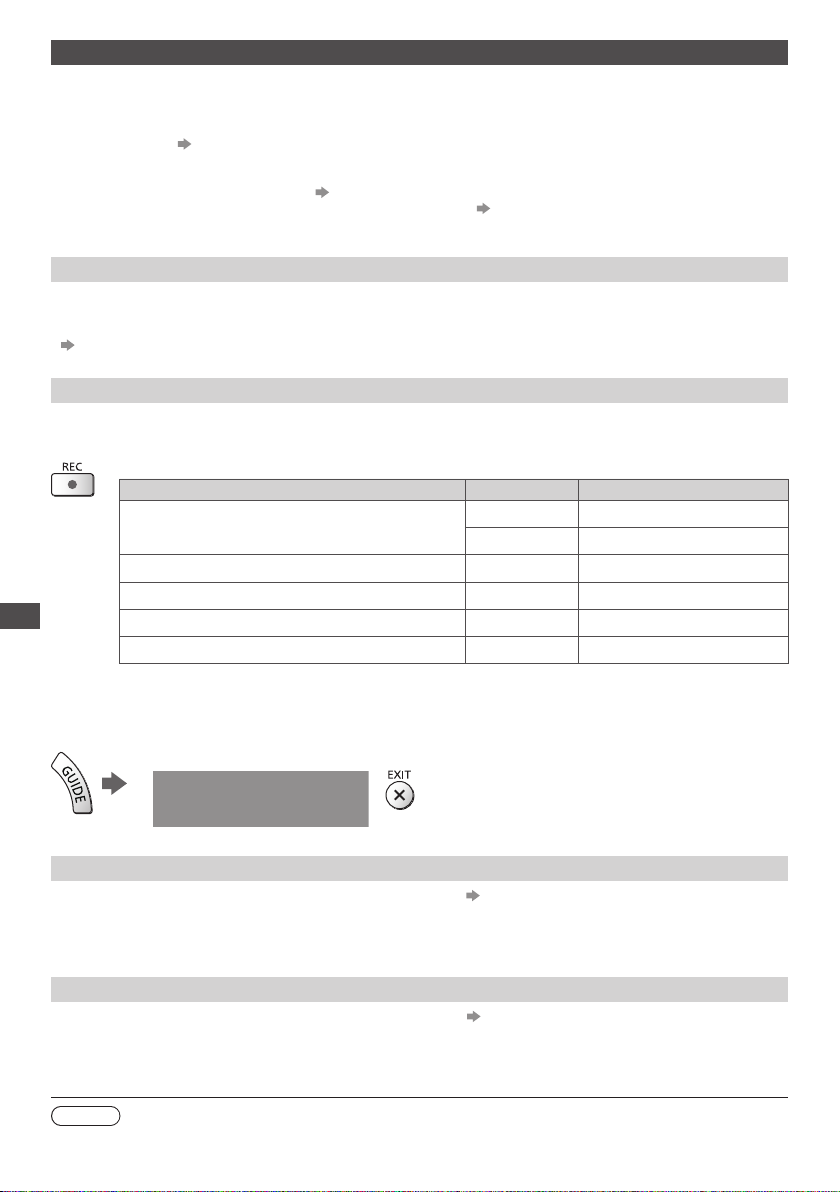
Q-Link
Preparations
●
Connect the DVD Recorder / VCR with the following logos:
“Q-Link”, “NEXTVIEWLINK”, “DA
Corporation)”, “Megalogic (a trademark of Grundig Corporation)”, “SMARTLINK (a trademark of Sony Corporation)”
●
Q-Link connection
●
Use fully wired SCART cable.
●
Set up the DVD Recorder / VCR. Read the manual of the recorder.
●
Q-Link terminal setup in the Setup Menu [AV1 out] (p. 43)
●
Download preset - channel, language and country / region settings
Features available
(p. 92)
TA LOGIC (a trademark of Metz Corporation)”, “Easy Link (a trademark of Philips
“Preset download” (see below)
Preset download
Channel, language and country settings can be downloaded to the recorder.
●
DVB-S and DVB-C channel settings cannot be downloaded.
●
To download settings
[Download] (p. 43), [Auto Setup] (p. 15, 16, 48)
Direct TV Recording - What you see is What you record
Records the current programme in DVD Recorder / VCR immediately. (When USB HDD for recording is connected in
DVB mode, [One Touch Recording] starts.)
●
Confirm the code of the remote control is “73” (p. 30).
●
Available conditions:
Picture source Mode Recording from
TV TV monitor out
AV Recorder’s tuner
Link Functions (Q-Link / VIERA Link)
Analogue
DVB (USB HDD for recording is not connected) TV TV monitor out
AV (watching recorder’s tuner) AV Recorder’s tuner
AV (watching recorder’s external input) AV Recorder’s external input
AV (watching TV’s external input) AV TV monitor out
●
When Direct TV Recording is performed, the recorder is automatically turned on if it is in Standby mode.
●
You can change channel or turn the TV off while the recorder is recording from its own tuner.
●
Changing channel is not available while the recorder is recording from the TV tuner.
■ To stop recording
Unlock the tuner
Press EXIT to unlock and stop recording
Tuner Locked
Power on link and Easy playback
Set Power on Link [On] in the Setup Menu to use this function [Power on Link] (p. 43)
When DVD Recorder / VCR starts playback or direct navigator / function menu for the equipment are activated, the
TV is turned on and input mode is switched automatically so that you can view the content. (Only when the TV is in
Standby mode.)
Power off link
Set Power off Link [On] in the Setup Menu to use this function [Power off Link] (p. 43)
When TV is set to Standby mode, the recorder is also automatically set to Standby. (Only when the videocassette or
disc is not active.)
●
This function works even if the TV enters Standby mode automatically by auto power standby function.
Note
●
Some recorders are not applicable. Read the manual of the recorder.
94
Page 95
VIERA Link “ ”
∗
Enjoy additional HDMI Inter-Operability with Panasonic products which have “HDAVI Control” function.
This TV supports “HDAVI Control 5” function.
Connections to the equipment (DIGA Recorder, HD Video Camera, Player theatre, Amplifier, etc.) with HDMI and
SCART cables allow you to interface them automatically (p. 92, 93).
These features are limited to models incorporating “HDAVI Control” and “VIERA Link”.
●
Some functions are not available depending on the equipment’s version of HDAVI Control. Confirm the connected
equipment’
●
VIERA Link “HDAVI Control”, based on the control functions provided by HDMI which is an industry standard known
as HDMI CEC (Consumer Electronics Control), is a unique function that we have developed and added.
As such, its operation with other manufacturers’ equipment that supports HDMI CEC cannot be guaranteed.
●
Please refer to individual manuals for other manufacturers’ equipment supporting VIERA Link function.
●
About applicable Panasonic equipment, consult your local Panasonic dealer.
Preparations
●
Connect the equipment supporting VIERA Link.
●
VIERA Link connection
●
Use fully wired HDMI compliant cable. Non-HDMI-compliant cables cannot be utilised.
Recommended Panasonic’s HDMI cable part number:
●
Use fully wired SCART cable.
●
Set up the connected equipment. Read the manual of the equipment.
●
For optimal recording, the settings of the recorder may need to be changed. For details, read the manual of the
recorder.
●
Download preset - channel, language and country / region settings “Preset download” (see below)
●
Set [VIERA Link] to [On] in the Setup Menu. [VIERA Link] (p. 43)
●
Set up the TV.
After connection, turn the equipment on and then switch the TV on.
Select the input mode from HDMI1, HDMI2, HDMI3 or HDMI4 (p. 29), and make sure that an image is displayed
correctly.
Features available
s version of HDAVI Control.
(p. 92, 93)
RP-CDHS15 (1.5 m)
•
This setup should be done each time when the following conditions occur:
for the first time
•
when adding or reconnecting equipment
•
when changing setup
•
RP-CDHS30 (3.0 m)
•
∗
RP-CDHS50 (5.0 m)
•
Preset download
Channel, language and country / region settings can be downloaded to the recorder.
●
DVB-S and DVB-C channel settings cannot be downloaded.
●
To download settings
[Download] (p. 43), [Auto Setup] (p. 15, 16, 48)
Link Functions (Q-Link / VIERA Link)
Easy playback
Automatic input switching - When the connected equipment is operated, input mode is switched automatically. When it
is stopped operating, input mode is returned.
Power on link
Set Power on Link [On] in the Setup Menu to use this function [Power on Link] (p. 43)
When the connected equipment starts playback or direct navigator / function menu for the equipment are activated, the
TV is automatically turned on. (Only when the TV is in Standby mode.)
Power off link
Set Power off Link [On] in the Setup Menu to use this function [Power off Link] (p. 43)
When the TV is set to Standby mode, the connected equipment is also automatically set to Standby.
●
This function will work even if the TV enters Standby mode automatically by auto power standby function.
95
Page 96
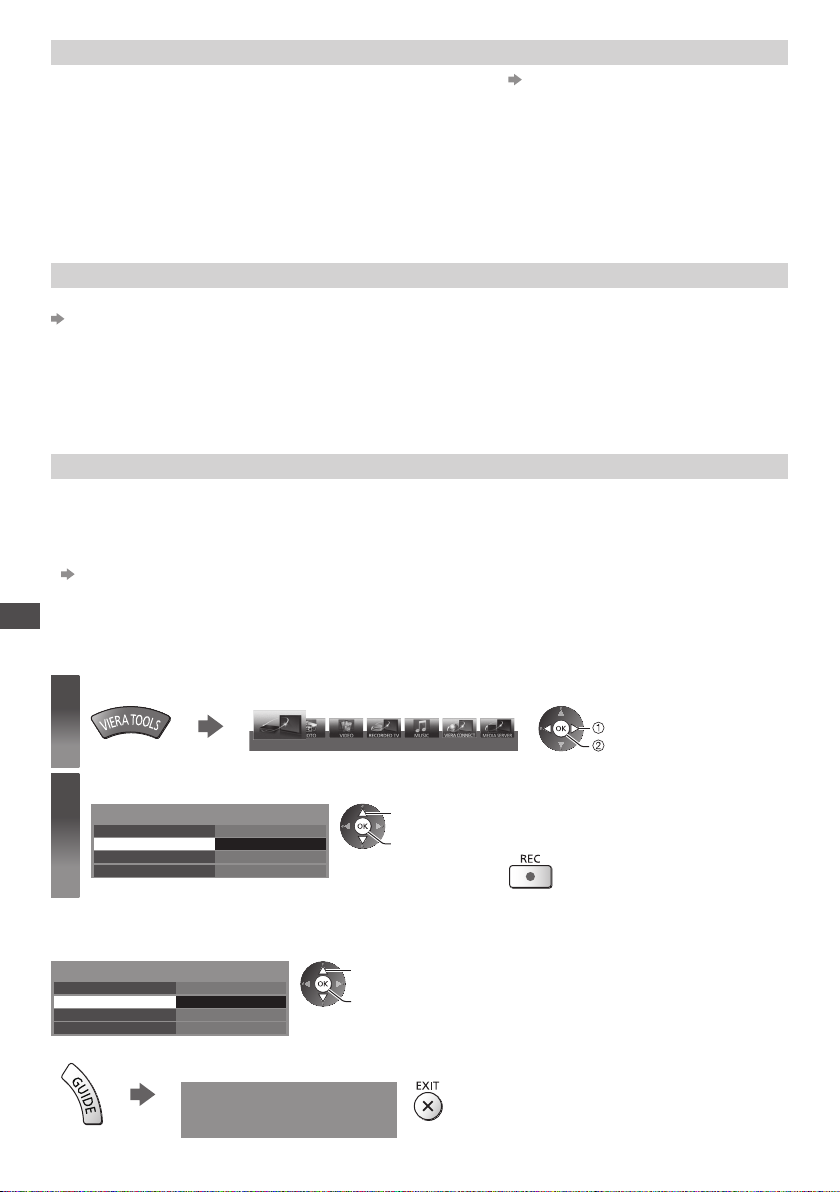
Reduce unnecessary power consumption in Standby [Standby Power Save]
Set Standby Power Save [On] in the Setup Menu to use this function [Standby Power Save] (p. 43)
The power consumption in Standby mode of the connected equipment is controlled higher or lower in synchronisation
with the TV on / off state to reduce the consumption.
When the TV is set to Standby mode, the connected equipment is automatically set to Standby and the power
consumption of the connected equipment is automatically minimised.
When the TV is turned on, the connected equipment is still in Standby mode, but the power consumption is increased
to make startup time fast.
●
This function is effective if the connected equipment can change the power consumption in Standby mode and is set
to higher consumption.
●
This function works when [Power off Link] is set to [On].
Auto standby for unnecessary equipment [Intelligent Auto Standby]
Set Intelligent Auto Standby [On (With reminder)] or [On (No reminder)] in the Setup Menu to use this function
[Intelligent Auto Standby] (p. 43)
When the TV is on, non-watched or non-used connected equipment goes into Standby mode automatically to reduce
the power consumption. For example, when the input mode is switched from HDMI or when Speaker Selection is
changed to [TV] (except for watching a disc).
●
If you select [On (With reminder)], the on-screen message will be displayed before the connected equipment turns to
standby.
●
This function may not work properly depending on the connected equipment. If required, set to [Off].
Direct TV Recording - What you see is What you record [Direct TV Rec]
Records the current programme in the DIGA Recorder immediately.
●
If you connect a variety of recorders including other manufacturers’ recorders at the same time, connect the DIGA
Recorder to the TV’s lower HDMI terminal number. For example, if you use HDMI1 and HDMI2 for two recorders,
connect the DIGA Recorder to HDMI1.
●
If you cannot operate, check the settings and the equipment.
“Summary of Q-Link and VIERA Link features” (p. 92, 93), “Preparations” (p. 95)
●
To record the programme which DIGA Recorder does not support, SCART connection is required and the programme
is recorded by Q-Link function (p. 94).
●
Depending on the programme, SCART connection may be required to record.
Link Functions (Q-Link / VIERA Link)
●
You can change channel or turn the TV off while the recorder is recording from its own tuner.
●
You can not change channel while the recorder is recording from the TV tuner.
Display [VIERA TOOLS] and select [VIERA Link]
1
Select [Direct TV Rec] and start recording
2
VIERA Link Menu
Pause Live TV
Direct TV Rec
VIERA Link Control
Speaker Selection
■ To stop recording
Select [Stop] in [Direct TV Rec]
VIERA Link Menu
Pause Live TV
Direct TV Rec
VIERA Link Control
Speaker Selection
●
You can also stop recording directly.
96
Start
Stop
Recorder
Home Cinema
Unlock the tuner
Press EXIT to unlock and stop recording
VIERA Link
Start
Start
Recorder
Home Cinema
Tuner Locked
select
access / stop
select
access / start
select
access
●
You can also start recording directly when
the code of the remote control is “73”
(p. 30).
(When USB HDD for recording
is connected in DVB mode, [One
Touch Recording] starts.)
Page 97
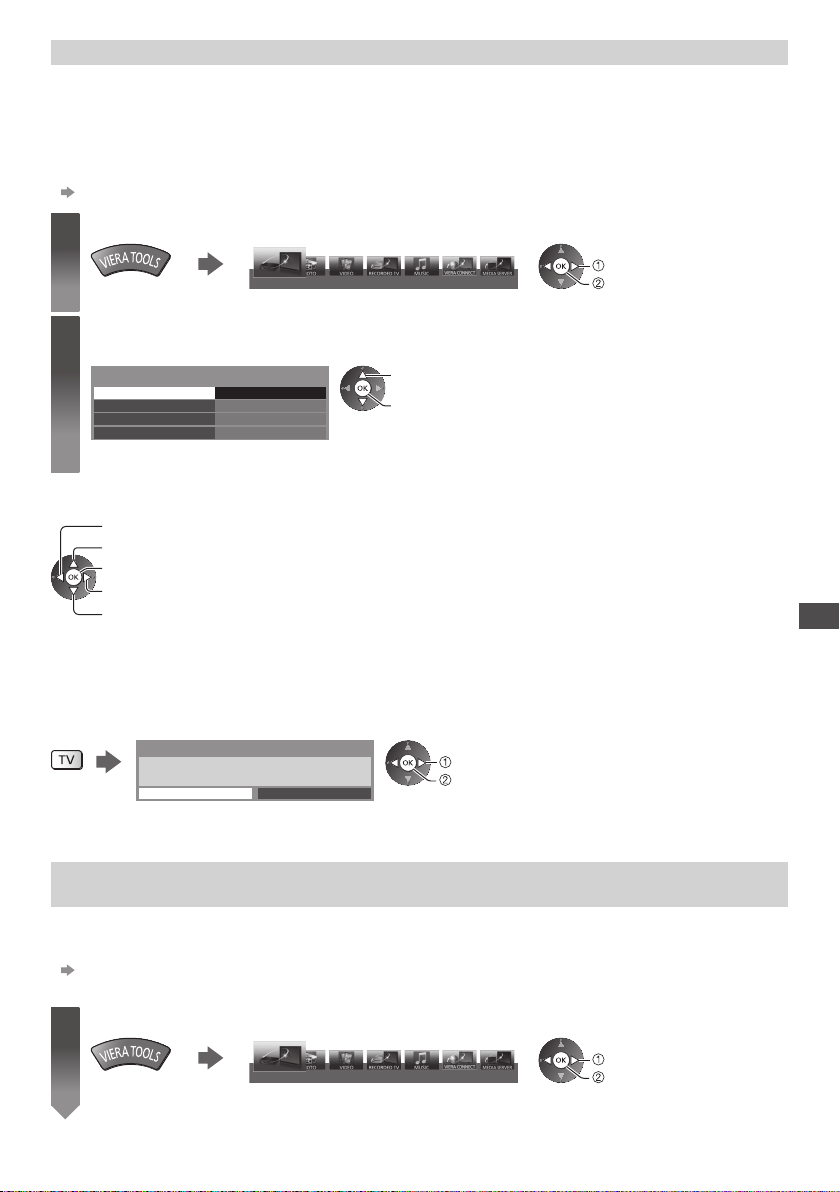
Pause Live TV programme [Pause Live TV]
You can pause the current TV programme and resume later.
The current TV programme will be recorded on HDD of the connected DIGA Recorder.
●
This function is available with a DIGA Recorder which has HDD.
●
If you connect a variety of recorders including other manufacturers’ recorders at the same time, connect the DIGA
Recorder which has HDD to the TV’s lower HDMI terminal number. For example, if you use HDMI1 and HDMI2 for
two recorders, connect the DIGA Recorder which has HDD to HDMI1.
●
If you cannot operate, check the settings and the equipment.
“Summary of Q-Link and VIERA Link features” (p. 92, 93), “Preparations” (p. 95)
Display [VIERA TOOLS] and select [VIERA Link]
1
Select [Pause Live TV] and pause
2
The TV picture will be paused.
VIERA Link Menu
Pause Live TV
Direct TV Rec
VIERA
Link Control
Speaker Selection
Start
Start
Recorder
Home Cinema
VIERA Link
select
access / pause
●
●
●
select
access
The current TV programme is recorded
on HDD from where it was paused.
If the paused TV picture disappears after
a few minutes, press OPTION button to
restore the pause picture.
Follow the operation guide to operate
[Pause Live TV] function.
■ To operate [Pause Live TV]
●
Operations may vary depending on the recorder. In this case,
follow the operation guide or read the manual of the recorder
Search backward
Pause
Playback
Search forward
Stop
●
If you stop playback, the recorded
programme will be deleted from
HDD.
■ To return to current TV (Stop playback of [Pause Live TV] / cancel pause)
Select [Yes]
Pause Live TV
Stop Pause Live TV?
Yes
No
●
If you stop playback or cancel pause, the recorded programme will be deleted from HDD.
Control the menu of the connected equipment by VIERA remote control
[VIERA Link Control]
You can control some functions of the connected equipment with this TV remote control pointing at the TV’s signal
receiver.
●
If you cannot operate, check the settings and the equipment.
“Summary of Q-Link and VIERA Link features” (p. 92, 93), “Preparations” (p. 95)
●
For details of the operations for the connected equipment, read the manual of the equipment.
Display [VIERA TOOLS] and select [VIERA Link]
1
VIERA Link
select
stop
select
access
.
Link Functions (Q-Link / VIERA Link)
97
Page 98
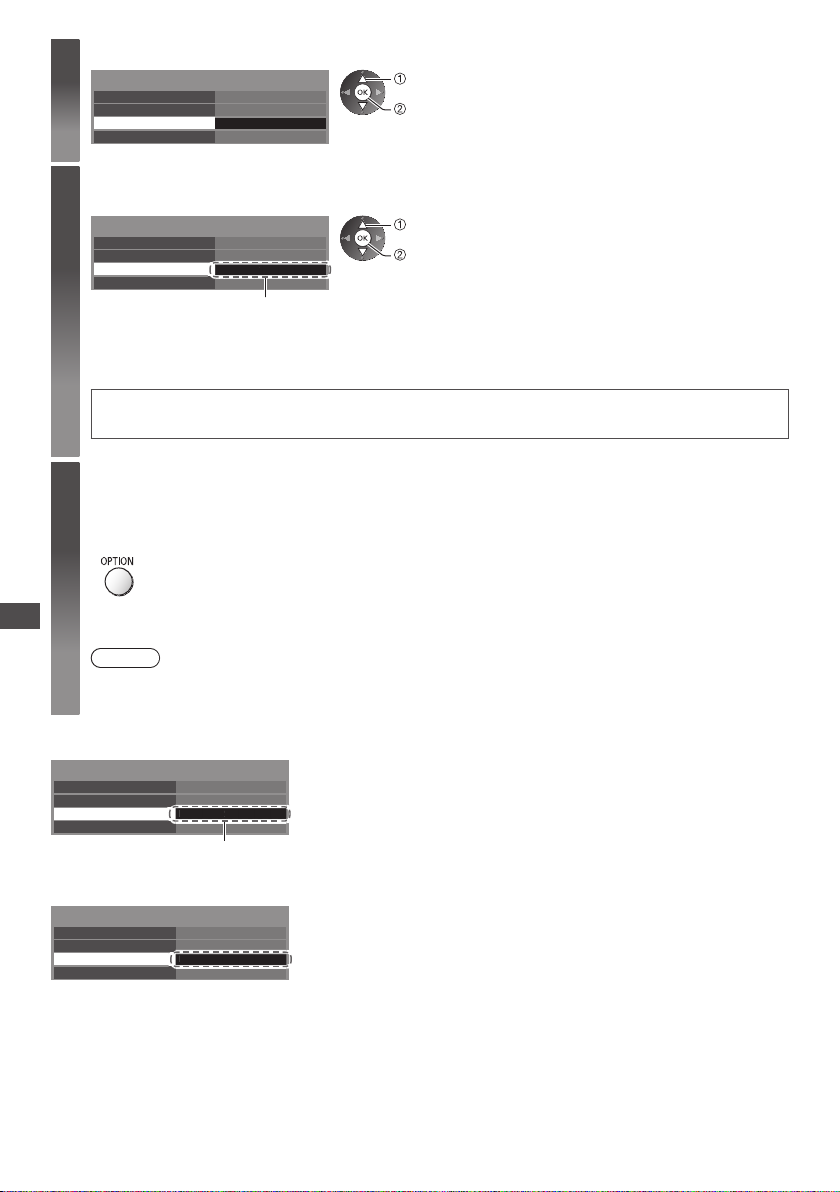
Link Functions (Q-Link / VIERA Link)
2
Select [VIERA Link Control]
2
VIERA Link Menu
Pause Live TV
Direct TV Rec
VIERA Link Control
Speaker Selection
Select the equipment to access
3
Select the type of the connected equipment and access.
VIERA Link Menu
Pause Live TV
Direct TV Rec
VIERA Link Control
Speaker Selection
[Recorder] / [Player] / [Home Cinema] / [Video Camera] / [LUMIX] / [Digital Camera] / [Other]
●
The displayed item may vary depending on the connected equipment.
●
[Home Cinema] means Player theatre, Blu-ray Disc theatre or Recorder theatre.
●
[Other] means Tuner set top box.
Start
Start
Recorder
Home Cinema
Start
Start
Recorder
rder
Home Cinema
select
access
select
access
The menu of the accessed equipment will be displayed.
(Input mode will be changed automatically)
Operate the menu of the equipment
4
●
Confirm the code of the remote control is “73” (p. 30).
Follow the operation guide
●
To display the operation guide
If other manufacturers’ equipment is accessed, Setup / Contents Selection menu may be displayed.
●
Available VIERA remote control buttons depend on the connected equipment.
Note
●
Some operations may not be available depending on the equipment. In this case use its own remote control to
operate the equipment.
■ If multiple recorders or players are connected
VIERA Link Menu
Pause Live TV
Direct TV Rec
VIERA Link Control
Speaker Selection
Start
Start
Recorder2
rder
Home Cinema
[Recorder1-3 / Player1-3]
The number is given from the TV’s lower number of HDMI terminal connected
to the same type equipment. For example, two recorders to HDMI2 and
HDMI3, the recorder connected to HDMI2 is displayed as [Recorder1], and the
recorder connected to HDMI3 is displayed as [Recorder2].
■ If you access non-VIERA Link equipment
The type of the connected equipment is displayed.
Although you can access the connected equipment, you cannot operate it.
Use its own remote control to operate the equipment.
98
VIERA Link Menu
Pause Live TV
Direct TV Rec
VIERA Link Control
Speaker Selection
Start
Start
Recorder
rder
Home Cinema
Page 99
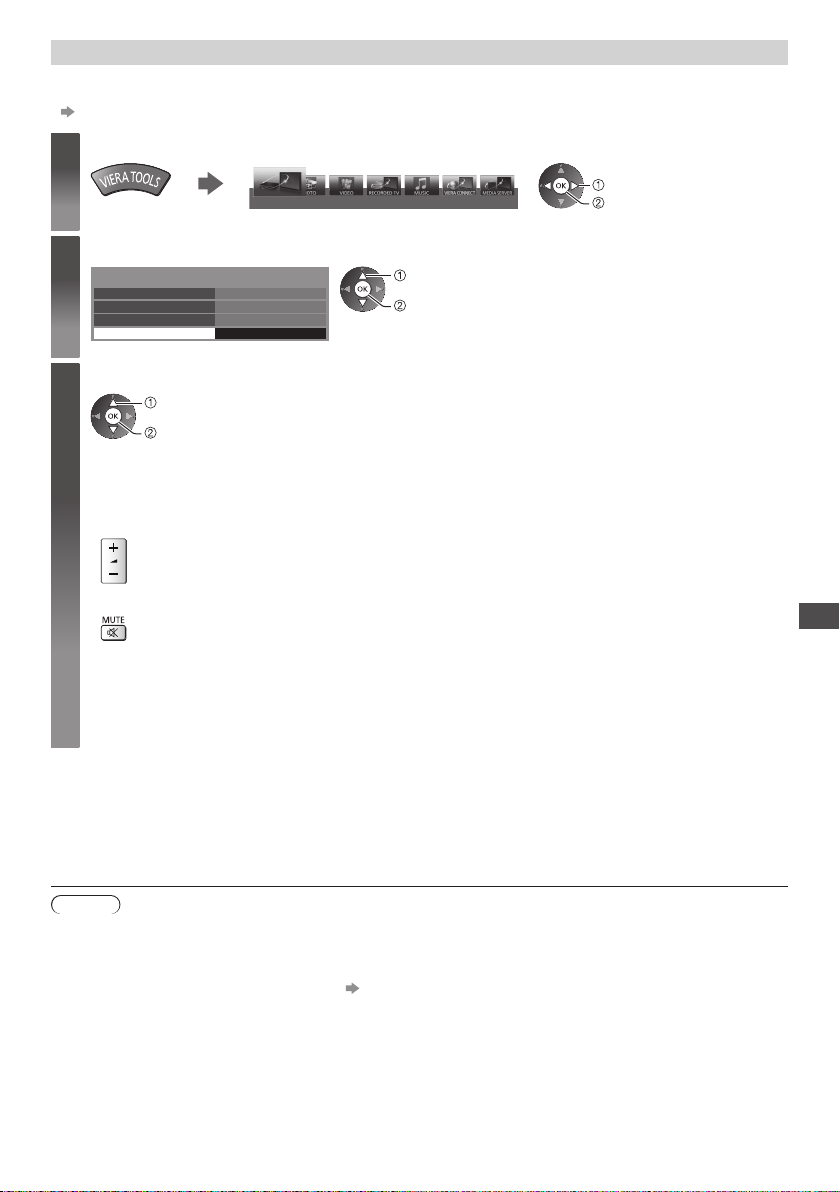
Speaker control [Speaker Selection]
You can control the theatre speaker with this TV remote control pointing at the TV’s signal receiver.
●
If you cannot operate, check the settings and the equipment.
“Summary of Q-Link and VIERA Link features” (p. 92, 93), “Preparations” (p. 95)
Display [VIERA TOOLS] and select [VIERA Link]
1
Select [Speaker Selection]
2
VIERA Link Menu
Pause Live TV
Direct TV Rec
VIERA Link Control
Speaker Selection
Set to [Home Cinema] or [TV]
3
[Home Cinema]:
The sound is from theatre speakers. Player theatre, Blu-ray Disc theatre or Amplifier will be automatically turned
on if it is in Standby mode.
●
Volume up / down
●
Mute
●
The sound of TV speakers is mute.
●
When the equipment is turned off, TV speakers will be active.
[TV]:
TV speakers are active.
select
store
Start
Start
Recorder
Home Cinema
VIERA Link
select
access
select
access
Link Functions (Q-Link / VIERA Link)
Multi-channel sound
If you want to enjoy the multi-channel sound (e.g. Dolby Digital 5.1ch) via an Amplifier, connect it with HDMI cable and
Optical digital audio cable (p. 93), and then select [Home Cinema]. If your Amplifier has “HDAVI Control 5” function,
you only need to connect it with HDMI cable to the TV’s HDMI2 terminal.
To enjoy the sound from the DIGA Recorder in multi-channel sound, connect an HDMI cable from the DIGA Recorder
to the Amplifier (p. 93).
Note
●
These functions may not work properly depending on the connected equipment.
●
Image or sound may not be available for the first few seconds when input mode is switched.
●
“HDAVI Control 5” is the newest standard (as of November, 2011) for HDAVI Control compatible equipment. This
standard is compatible with conventional HDA
●
To confirm this TV’s version of HDAVI Control [System Information] (p. 46)
VI equipment.
99
Page 100
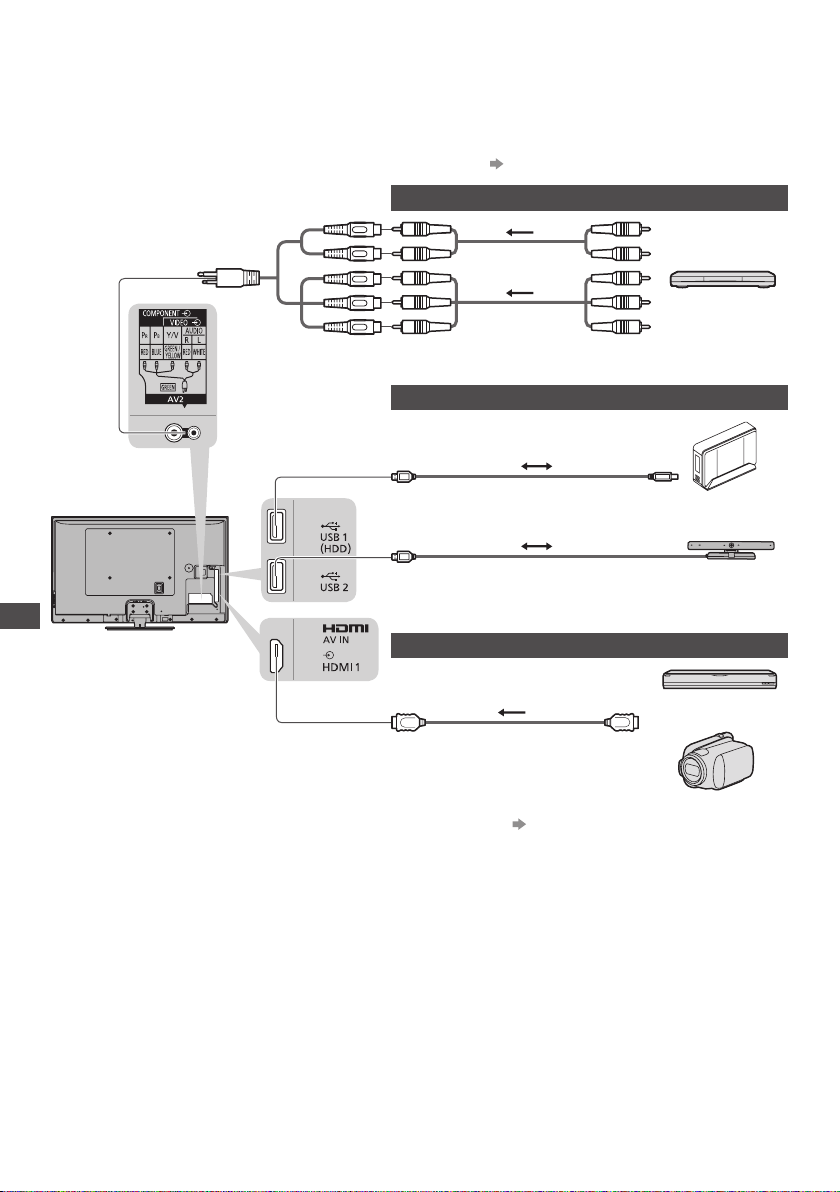
External Equipment
These diagrams show our recommendations for connection of your TV to various pieces of equipment.
For other connections, consult the instructions for each piece of equipment, the basic connection (p. 12 - 14), the table
(p. 102), and the specifications (p. 118, 119).
●
Check the type of terminals and cable plugs are correct when connecting.
●
To use the specific devices supporting Bluetooth wireless technology
To watch DVDs
“Bluetooth Setup” (p. 109)
(Listening)
Rear of the TV
External Equipment
(COMPONENT / VIDEO)
AV2
adaptor (supplied)
(Viewing)
USB devices
HDMI equipment
Fully wired HDMI
compliant cable
●
HDMI connection
USB cable
(p. 108)
DVD Player
USB HDD
Communication
Camera
Recorder / Player
Camcorder
100
 Loading...