

Panasonic TX-28PS10D, TX-32PS10D User Manual
nasonic¡Panasonic¡Panasonic¡Panasonic¡Panasonic¡Pana
sonic¡Panasonic¡Panasonic¡Panasonic¡Panasonic¡Panaso
nic¡Panasonic¡Panasonic¡Panasonic¡Panasonic¡Panasoni
c¡Panasonic¡Panasonic¡Panasonic¡Panasonic¡Panasonic¡
Panasonic¡Panasonic¡Panasonic¡Panasonic¡Panasonic¡Pa
nasonic¡Panasonic¡Panasonic¡Panasonic¡Panasonic¡Pana
sonic¡Panasonic¡Panasonic¡Panasonic¡Panasonic¡Panaso
nic¡Panasonic¡Panasonic¡Panasonic¡Panasonic¡Panasoni
c
¡Panasonic¡Panasonic¡Panasonic¡Panasonic¡Panasonic¡
Panasonic¡Panasonic¡Panasonic¡Panasonic¡Panasonic¡Pa
nasonic¡Panasonic¡Panasonic¡Panasonic¡Panasonic¡Pana
sonic¡Panasonic¡Panasonic¡Panasonic¡Panasonic¡Panaso
nic¡Panasonic¡Panasonic¡Panasonic¡Panasonic¡Panasoni
c¡Panasonic¡Panasonic¡Panasonic¡Panasonic¡Panasonic¡
Panasonic¡Panasonic¡Panasonic¡Panasonic¡Panasonic¡Pa
nasonic¡Panasonic¡Panasonic¡Panasonic¡Panasonic¡Pana
sonic¡Panasonic¡Panasonic¡Panasonic¡Panasonic¡Panaso
nic
¡Panasonic¡Panasonic¡Panasonic¡Panasonic¡Panasoni
c¡Panasonic¡Panasonic¡Panasonic¡Panasonic¡Panasonic¡
Panasonic¡Panasonic¡Panasonic¡Panasonic¡Panasonic¡Pa
nasonic¡Panasonic¡Panasonic¡Panasonic¡Panasonic¡Pana
sonic¡Panasonic¡Panasonic¡Panasonic¡Panasonic¡Panaso
nic¡Panasonic¡Panasonic¡Panasonic¡Panasonic¡Panasoni
c¡Panasonic¡Panasonic¡Panasonic¡Panasonic¡Panasonic¡
Panasonic¡Panasonic¡Panasonic¡Panasonic¡Panasonic¡Pa
nasonic¡Panasonic¡Panasonic¡Panasonic¡Panasonic¡Pana
sonic
¡Panasonic¡Panasonic¡Panasonic¡Panasonic¡Panaso
nic¡Panasonic¡Panasonic¡Panasonic¡Panasonic¡Panasoni
c¡Panasonic¡Panasonic¡Panasonic¡Panasonic¡Panasonic¡
Panasonic¡Panasonic¡Panasonic¡Panasonic¡Panasonic¡Pa
nasonic¡Panasonic¡Panasonic¡Panasonic¡Panasonic¡Pana
TX---32PS10D
sonic¡Panasonic¡Panasonic¡Panasonic¡Panasonic¡Panaso
nic¡Panasonic¡Panasonic¡Panasonic¡Panasonic¡Panasoni
c¡Panasonic¡Panasonic¡Panasonic¡Panasonic¡Panasonic¡
Panasonic¡Panasonic¡Panasonic¡Panasonic¡Panasonic¡Pa
TX---28PS10D
nasonic
sonic¡Panasonic¡Panasonic¡Panasonic¡Panasonic¡Panaso
nic¡Panasonic¡Panasonic¡Panasonic¡Panasonic¡Panasoni
c¡Panasonic¡Panasonic¡Panasonic¡Panasonic¡Panasonic¡
Panasonic¡Panasonic¡Panasonic¡Panasonic¡Panasonic¡Pa
nasonic¡Panasonic¡Panasonic¡Panasonic¡Panasonic¡Pana
sonic¡Panasonic¡Panasonic¡Panasonic¡Panasonic¡Panaso
nic¡Panasonic¡Panasonic¡Panasonic¡Panasonic¡Panasoni
c¡Panasonic¡Panasonic¡Panasonic¡Panasonic¡Panasonic¡
Panasonic
nasonic¡Panasonic¡Panasonic¡Panasonic¡Panasonic¡Pana
sonic¡Panasonic¡Panasonic¡Panasonic¡Panasonic¡Panaso
nic¡Panasonic¡Panasonic¡Panasonic¡Panasonic¡Panasoni
c¡Panasonic¡Panasonic¡Panasonic¡Panasonic¡Panasonic¡
Panasonic¡Panasonic¡Panasonic¡Panasonic¡Panasonic¡Pa
nasonic¡Panasonic¡Panasonic¡Panasonic¡Panasonic¡Pana
sonic¡Panasonic¡Panasonic¡Panasonic¡Panasonic¡Panaso
nic¡Panasonic¡Panasonic¡Panasonic¡Panasonic¡Panasoni
this is an unapproved issue --- for information only
c¡
Panasonic¡Panasonic¡Panasonic¡Panasonic¡Panasonic¡Pa
¡Panasonic¡Panasonic¡Panasonic¡Panasonic¡Pana
Colour television
¡Panasonic¡Panasonic¡Panasonic¡Panasonic¡Pa
Operating Instructions
English
TQB8E3812eng ---S
Panasonic¡Panasonic¡Panasonic¡Panasonic¡Panasonic¡

WELCOME
Dear Panasonic Customer,
Welcome to the Panasonic family of customers. We hope that you have many years of enjoyment from your
new colour television. This is a very advanced television; however, the Quick Start Guide will tell you how to
have the TV operating quickly. You can then read the instructions completely and retain them for future
reference.
CONTENTS
Warnings and Precautions 2.......................
Accessories 3....................................
Quick Start Guide 4...............................
Basic Controls 6..................................
Using the On Screen Displays 7....................
Aspect controls 8.................................
Still Control 10...................................
Picture and Text 10...............................
Picture Menu 11..................................
Sound Menu 12...................................
Setup Menu 13...................................
Tuning Menu 14..................................
Tuning Menu -- Programme edit 15.................
WARNINGS AND PRECAUTIONS
D This TV set is designed to operate on A.C. 220 -- 240V, 50Hz.
D T oprevent damage which might result in electricshock orfire,
do not expose this TV setto rain or excessivemoisture. This TV
must not be exposed to dripping or splashing water and
objects filled with liquid, suchas vases, must not be placed on
top of or above the TV.
D WARNING : HIGH VOLTAGE !!!
Donotremovetherearcoveraslivepartsareaccessiblewhen
it is removed. There are no user serviceable parts inside.
D Avoid exposing the TV settodirect sunlightand othersources
of heat. To prevent fire, never place any type of candle or
naked flame on top of, or near the TV set.
D The On/Off switch on this model does not fully disconnect the
TV from the mains supply. Remove the mains plug from the
wall socket when the TV set is not used for aprolonged period
of time.
D CABINET AND PICTURE TUBE CARE
Remove the mains plug from the wall socket. The cabinet and
picture tube can be cleaned with a soft cloth moistened with
mild detergent and water. Do not use solutions containing
benzol or petroleum. TV sets can produce static electricity,
care must be taken whenever touching the TV screen.
2
Tuning Menu -- Auto Setup 18......................
Tuning Menu -- Manual tuning 19...................
OSD Language 20................................
Q-- Link 21........................................
VCR/DVD Operation 22............................
Teletext Operation 23.............................
Audio / Video (AV) Connections 25.................
AV Select and Setups 25............................
Front sockets 25...................................
Rear sockets 26...................................
Tro ub l es ho ot i ng 27...............................
SCART and S -- Video Terminal Information 28........
Specifications 28.................................
D Adequate ventilation is essential to prevent failure of electrical
components, we recommend that a gap of at least 5cm is left
all around thistelevision receiver even when it is placed inside
a cabinet or between shelves.
H TV GAMES / HOME COMPUTERS
Extended use of TV games or home computers with any television
set can cause a permanent ‘shadow’ on the screen. This type of
irreversible picture tube damage, can be limited by observing the
following points:
D Reduce the brightness and contrast levels to a minimum
viewing level.
D Do not operate the television set for a continuous period of
time while using TV games or home computers.
D This type of picture tube damage, is not an operating
defect, and as such is not covered by the Panasonic
warranty.
H SLEEP FEATURE
If the set is not switched off when the TV station stops
transmitting , it will automatically go to standby mode after 30
minutes. This function will not operate when the TV is in AV
mode.

ACCESSORIES
Check that you have the accessories and items shown
Operating Instruction book
Remote Control Transmitter EUR511212A
Batteries for the Remote Control Transmitter.
(2 x R6 (UM3) size)
n
Remote control batteries
D Make sure that thebatteries are fitted
the correct way round.
D Do not mix old batteries with new
batteries. Remove old, exhausted
batteries immediately.
D Do not mix different battery types, i.e.
Alkaline and Manganese or use
rechargeable (Ni--- Cad) batteries.
3

QUICK START GUIDE
Plug in aerial and connect ancillary equipment.
1
AV1
AV2
OR
VCR / DVD
2
3
First, ensure that the VCR is in Standby mode.
Plug in TV and switch on.
Select your country.
Press the red button
SATELLITE RECEIVER
AV1
AV2
4
If you are installing a new Q ---Link compatible VCR, you can now switch it ON. Downloaded tuning data will match the
5
television’s.
If you are installing a new
See the VCR handbook for details.
D If the VCR has not accepted download data from the TV, you may need to select the Download option from the VCR’s menu.
D If Q---Link is not operating correctly, check it is connected to the television’s AV2 socket,the SCART lead is a “full function” type,and
the VCR is compatible with Q --- Link,
D For further information on Q --- Link and connecting equipment, see pages 21, 25 and 26.
NEXTVIEWLINK compatible VCR, you will need to initiate download manually.
NEXTVIEWLINK or similar technologies. Ask your dealer for further details.
Auto setup will begin, your stations will be located and stored.
Use the Programme Edit menu to delete unwanted stations
(see page 15).
Press the TV/AV button to exit.
TV/AV
4
QUICK START GUIDE
We recommend that as soon as the Auto setup feature is completed, the picture
6
controls are reset to normal viewing levels. To do this, press the ”N” button, found
under the remote control’s pull down flap.
7
Slight tilting of the picture may be noticeable or coloured patches may sometimes
appear at the corners of the screen (colour purity). The Geomagnetic Correction
feature can be used to eliminate them, if necessary:
First, ensure the ATP and Q--- Link download procedu res are complete. The screen
should not be showing any On ---Screen Display menus.
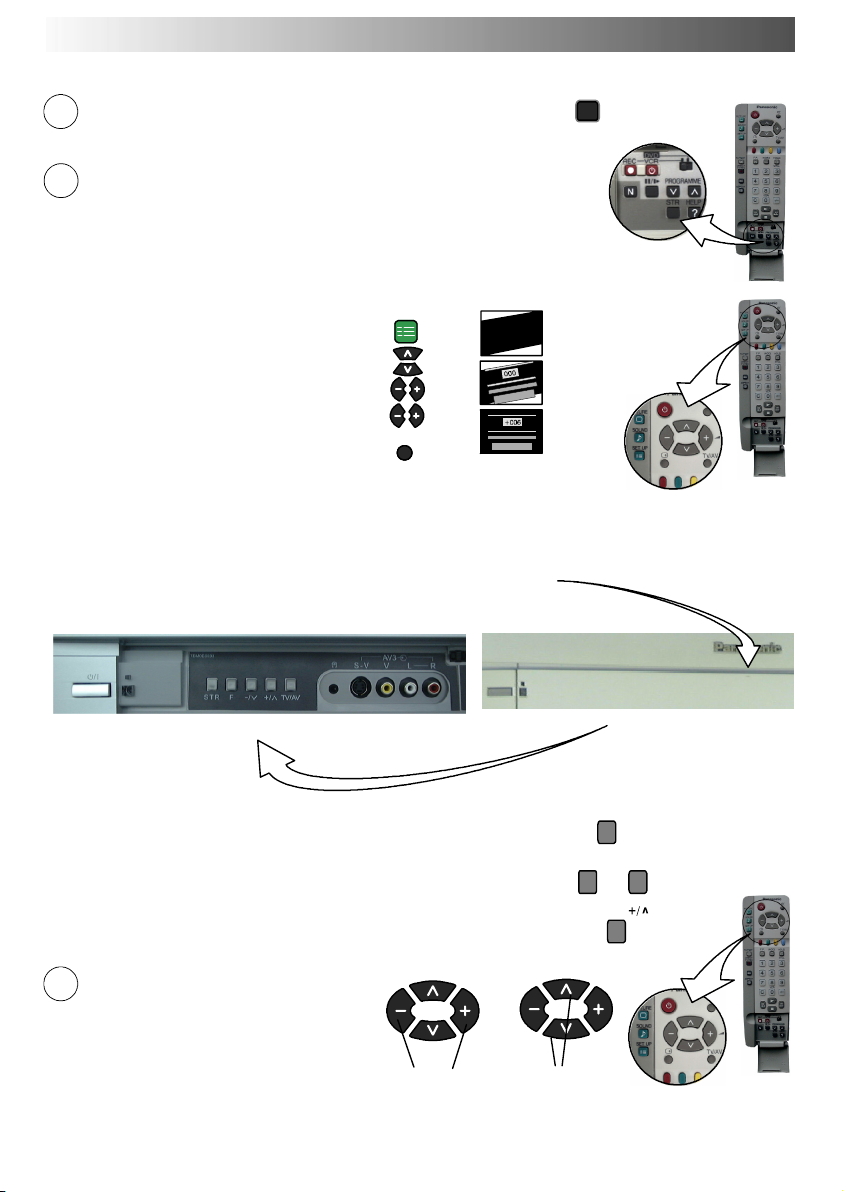
Using the remote control keys indicated, access the Geomagnetic Correction menu
option and follow the procedure below (for a full explanation of the On Screen
Display menu system see page 7) :
Press the SETUP menu button
Move to the Geomagnetic menu option
Access the Geomagnetic menu
Adjust the picture tilt as necessary
Press the TV/AV button to exit the SETUP menu
SET UP
TV/AV
N
The function ’geomagn etic correction’ is also ac cessible from the front panel.
Pressandreleaseheretoopenflap
Press the F button repeatedly until the Geomagnetic Correction feature is displayed.
Press the + or --- buttons repeatedly until the picture appears to be level.
Press the F button again to return to normal viewing. Close the flap to prevent damage.
8
You are now ready to begin viewing programmes
The cursor controls provide the two basic functions:
Adjust Volume
Change Programme
F
--- /v
F
5
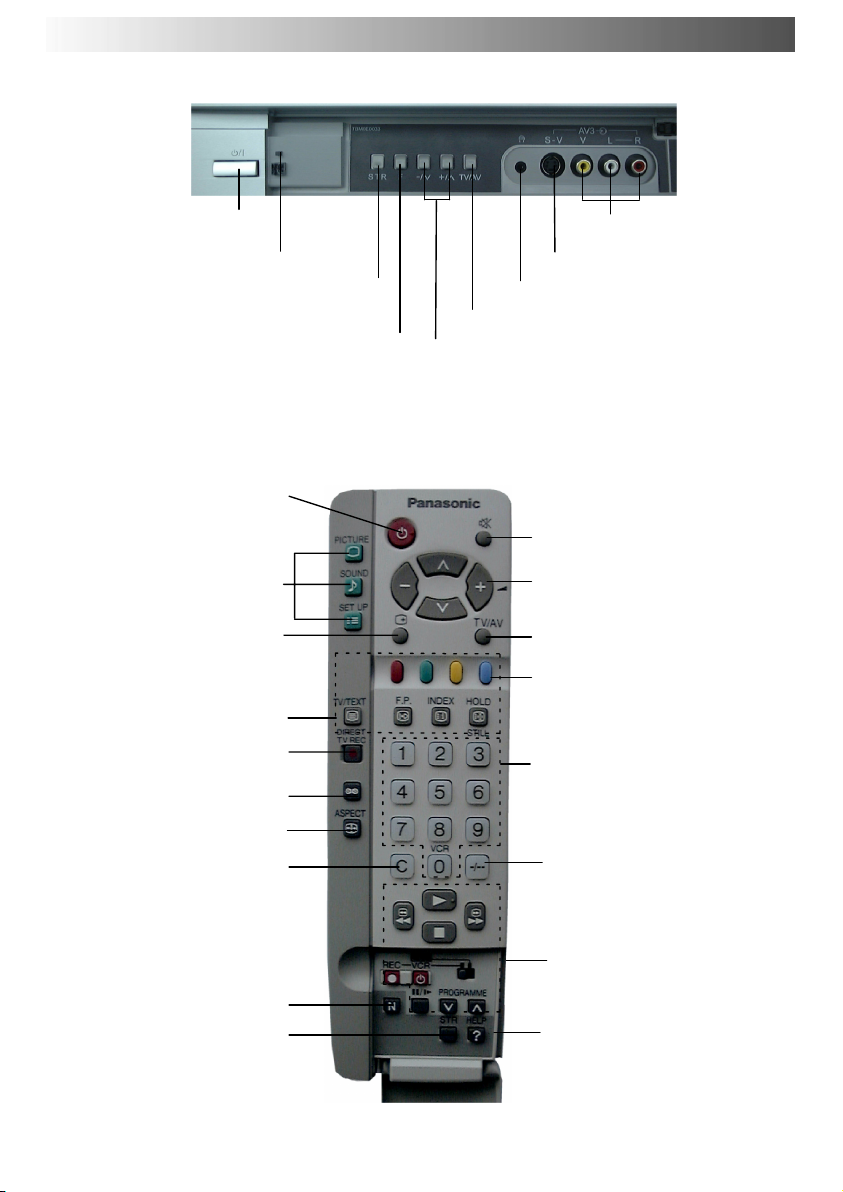
BASIC CONTROLS : FRONT PANEL AND REMOTE CONTROL
Power On/Off switch
Red light indicates Standby mode.
Used to store tuning and other function settings
Displays the On Screen Display functions, use repeated ly to
select fro m the available functions - Volume, Contrast,
Brightness, Colour, Sharpness, Tint (in NTSC mode), Bass,
Press to d isplay programme position,
programme name, channel number,
Treble, Balance, Tuning mode and Geomagnetic
Standby ON/OFF switch
Switches TV On or Off standby
Press to access the Picture, Sound
and Setup menus (see page 7).
TV system, time stereo mode
and programme table.
Teletext buttons (see page 23)
Direct TV Record button
Aspect control button (see pa ge 8)
During normal TV viewing or when
in the Tuning, Programme edit or
Manual tuning m enus, press and
then enter channel number using
Direct Channel Access
The N button will recall settings
STR (Normalisation store)
MAINS
STR (Normalisation store)
F (Function select)
Correction.
Menu buttons
Status button
(see page 21)
Ambience on/off
the numeric buttons.
stored with STR.
RCA Audio/Video sockets
(page 25)
S---VHSsocket(seepage25)
Headphonesocket(seepage25)
TV/AV switch (see page 25)
Increases or decreases the programme position by one.
When a function is already displayed, press to increase
or decrease the selected function.
Sound mute On/Off
Cursor buttons to make selections and
adjustments.
Switch between viewing TV or AV input
(see page 25)
Coloured buttons used for
Programme Edit functions (see pag e 15)
Teletext functions (see page 23)
AVselection(seepage25)
Programme / channel change
buttons (0 - 9) and Teletext page
buttons (see page 23)
Programme position for selection of
two digit programmes (10 - 99) using
numeric buttons.
P r e ss t h e “ C ” a nd “ --- / --- --- ” b u t t o n s f o r
Direct Channel Access in hyperband.
VCR / DVD buttons
(see page 22)
The Help button provides a
demonstrationofOnScreen
Display menus
6
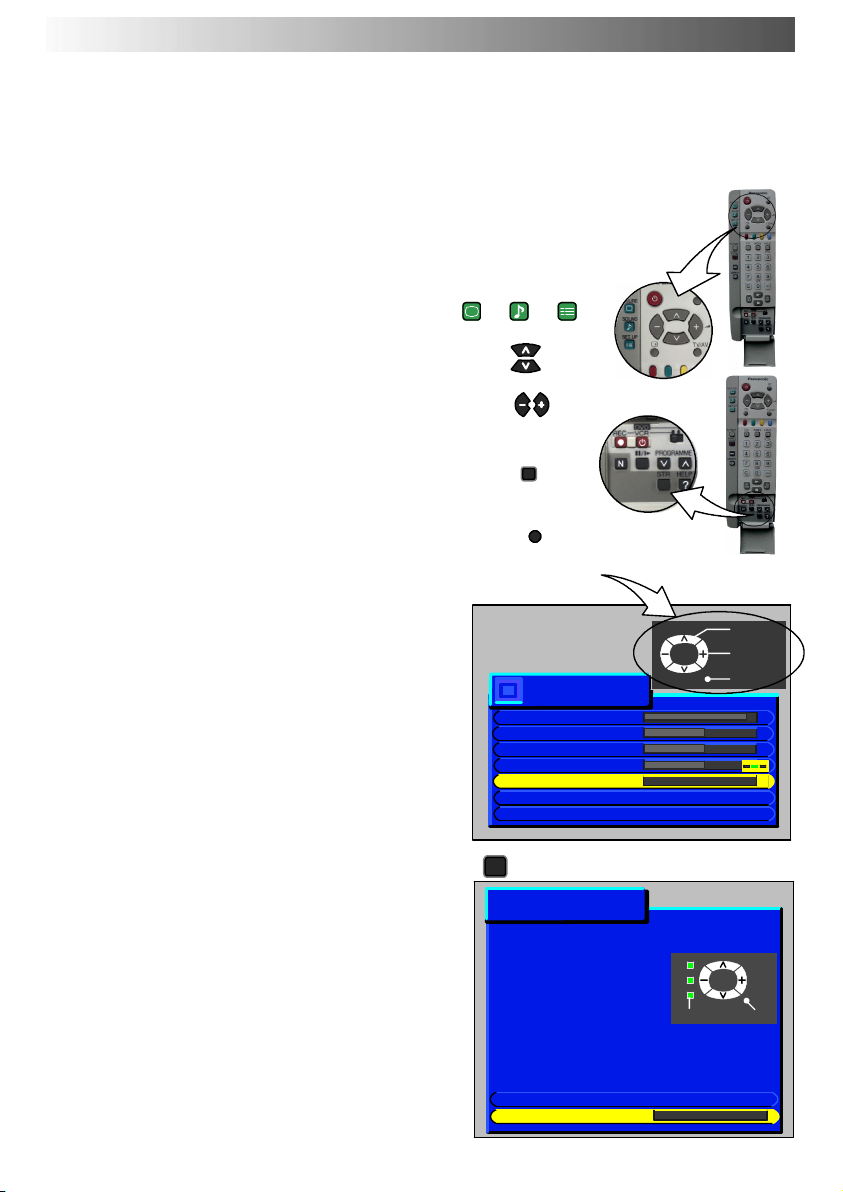
USING THE ON SCREEN DISPLAYS
This TV has a comprehensive system of On Screen Display menus to access adjustments and
options
Some selections, for example, Contrast, Brightness, Colour and Sharpness will allow you to increase or decrease their level.
Some selections, for example, Off timer, allow a choice to be made.
Some selections, for example Tuning menu, will lead to a further menu.
The PICTURE, SOUND and SET UP buttons are used to open the
main menus and also to return to the previous menu.
The up and down cursor buttons are used to move the cursor up and
down the menus.
The left and right cursor buttons are used to access menus, adjust
levels or to select from a range of options.
The STR button is used to store settings after adjustments have
been made or options hav e been set.
The TV/AV button is used to exit the menu system and return to
the normal viewing screen.
An On Screen Help box is displayed whenever a menu is displayed
on the TV. This Help box indicates which keys on the remote control
are used to navigate the menu shown, see above for descriptions of
button functions.
Note:
D If the HELP button is pressed while a menu is displayed, the
’Instructions’ box will be hidden from view. Press the HELP
button again to show the ’Instructions’ box.
D The Help box is not shown in the menu pictures in this
instruction book due to space limitations.
The HELP button runs a demonstration of the menus available.
∧∨buttons and select one of the options
Press
Last Position Memory
Certain functions have a last position memory, i.e. the setting at the
time of switch-- off will be the setting used when the receiver is switched
on again:
PICTURE SOU ND
ON SCREEN HELP
’Instructions’ box
SET UP
STR
TV/AV
Picture menu
Contrast
Brightness
Colour
Sharpness
Colour balance Normal
P-NR Off
AI On
HELP
?
Help menu
HOW TO USE THE MENUS
Press the MENU keys to
open or close the menus
Use the ∨∧ keys on the
remote to move between
menu options
Use the + - keys to
adjust the chosen option or
to access the chosen menu
Press the TV/AV key to
go back to watching TV
External Connection
Menu demonstration Access
Select
Change
TV/AV
Exit
MENU TV/AV
7

ASPECT CONTROLS
The widescreen TV will allow you to enjoy viewing the picture at its optimum size and aspect,
Press the ASPECT button repeatedly to move through the seven aspect options: Panasonic Auto, 16:9, Just,
including widescreen ‘cinema format’ pictures.
4:3, Zoom1,Zoom2 and Zoom3.
OR
Press the ASPECT button then use the RED or GREEN buttons to move in either direction through the seven
aspect options.
ASPECT
Panasonic Auto
Panasonic Auto determines the best aspect ratio to use to display the picture you
are viewing. It does this using a four step
process to determine if the picture being
viewed is a widescreen picture.
If Panasonic Auto detects a widescreen
signal it switches into 16:9 widescreen
mode. If Panasonic Auto does not detecta
widescreen signal then this advanced TV
set enhances the picture for optimum viewing pleasure.
The text shown on the screen indicates how Panasonic Auto determined which ratio to use:
’WIDE’ appears in the top left of the screen if a widescreeen identification signal (WSS) is found or a signal is found through a Scart
socket. Panasonic Auto switches into 16:9 widescreen ratio.
’Panasonic Auto’ appears in the top left of the screen if black stripes above and below the picture are detected. Panasonic Auto
chooses the best ratio and expands the picture to fill the screen. This process can take several minutes, depending how dark the
picture is.
Equally, you may prefer to select one of the other modes available to view the picture.
Notes:
D If, in Panasonic Auto mode, you experience problems with the screen display size when playing back widescreen format recordings
from your VCR then it is possible that the tracking control of your VCR requires adjustment (your VCR instruction book will contain
adjustment details).
D The widescreen aspect ratios of different films and programmes can vary .If these are wider than a standard 16:9 aspect picture then a
black band may be visible at the top and bottom of the screen.
Panasonic Auto
<< >>
16:9
16:9 will display a true 16:9 (anamorphic)
picture with no aspect distortions.
14:9
14:9 will display a true 14:9 picture with no
aspect distortions.
8
16:9
<< >>
16:9 (Full)
14:9
<< >>
14:9

ASPECT CONTROLS
Just
Use this mode when you wish to expand a
4:3 picture to fill the whole screen (rather
than watching a programme with black
stripes down the left and right sides of the
picture). The 4:3 picture will be stretched
horizontally so that the image fills the
screen, this is done in such a way that the
stretching is only obvious at the left and right
edges of the screen.
4:3
4:3 will display a 4:3 picture at its standard
4:3 size with no aspect distortions.
Zoom1
Zoom1 will display 16:9 letterbox or 4:3
pictures with no aspect distortions
Just
<< >>
Just
4:3
<< >>
4:3
Zoom1
Zoom2
Zoom2 will display 16:9 anamorphic
letterbox pictures as a full screen display
with no aspect distortions
<< >>
Zoom 1
Zoom2
<< >>
Zoom 2
9
 Loading...