

Page 1

22lt2f.html
Table Of Contents
COVER
1 Safety Precautions
1.1 General Guidelines
1.2 Touch-Current Check
2 Prevention of Electro Static Discharge (ESD) to Electrostatically Sensitive (ES) Devices
3 About lead free solder (PbF)
4 Self Check
5 Chasis Board Layout
6 Servicing method
6.1 Removing tilt base
6.2 Removing rear panel
6.3 Removing speaker unit
6.4 Removing chassis
6.5 Removing A-Board
6.6 Removing B-Board (with tuner assembly)
6.7 Removing DG-Board
6.8 Removing H1-Board and H2-Board
6.9 Removing P1-Board
6.10 Removing P2-Board
6.11 Removing K-Board
6.12 Removing V-Board
6.13 A-Board servicing
7 Service Mode Function
7.1 How to enter SERVICE 1
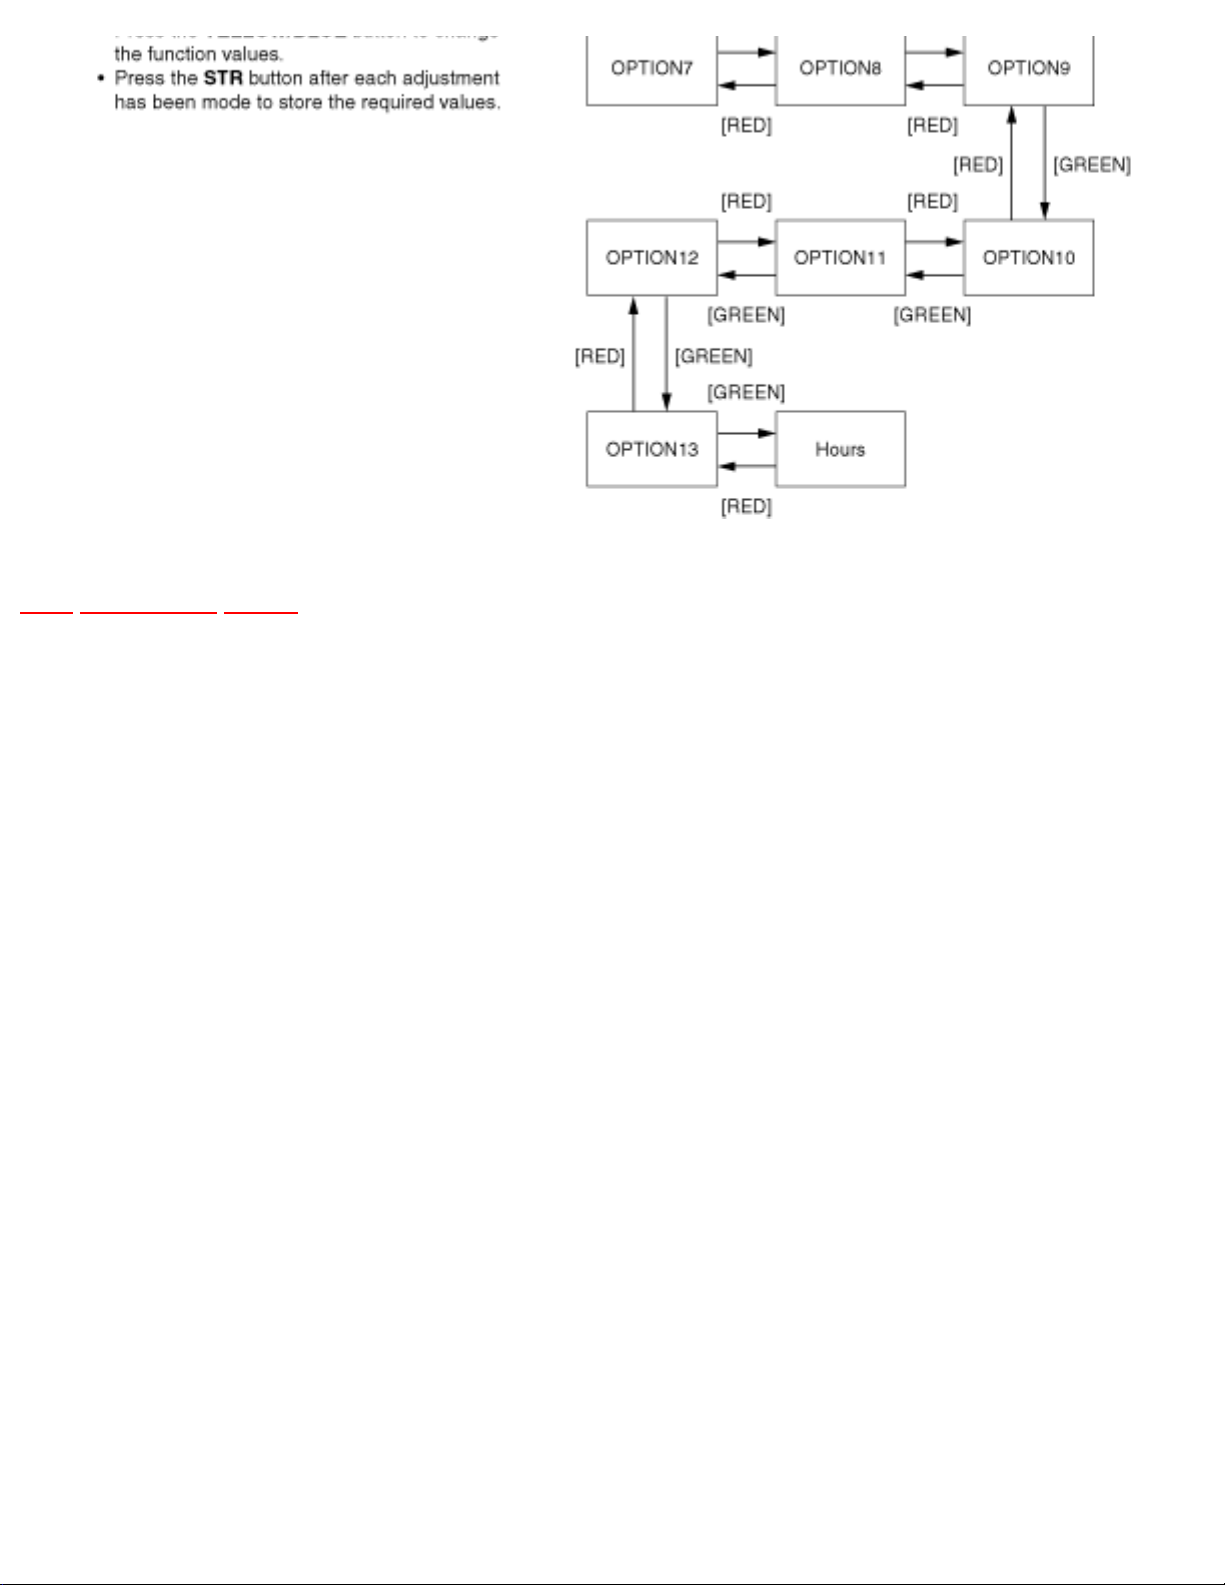
7.2 How to enter SERVICE 2
7.3 Option Description
8 Conductor Views
8.1 A-Board
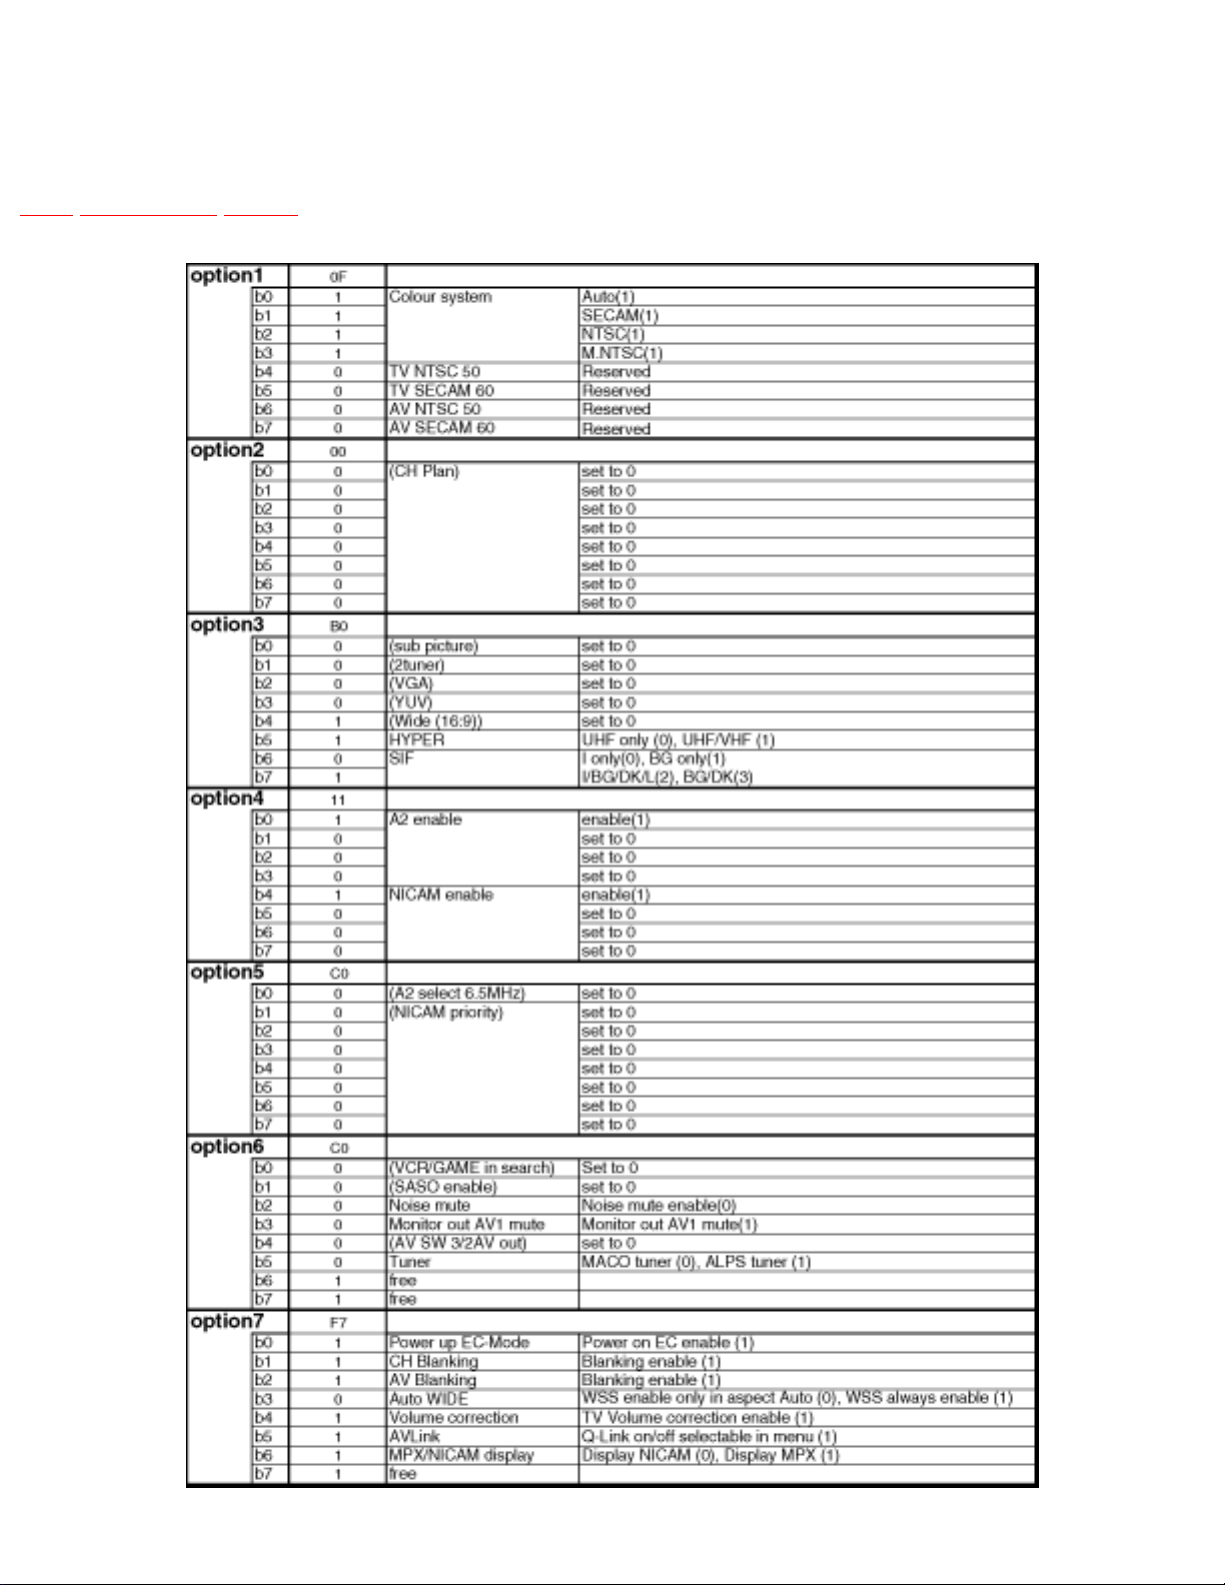
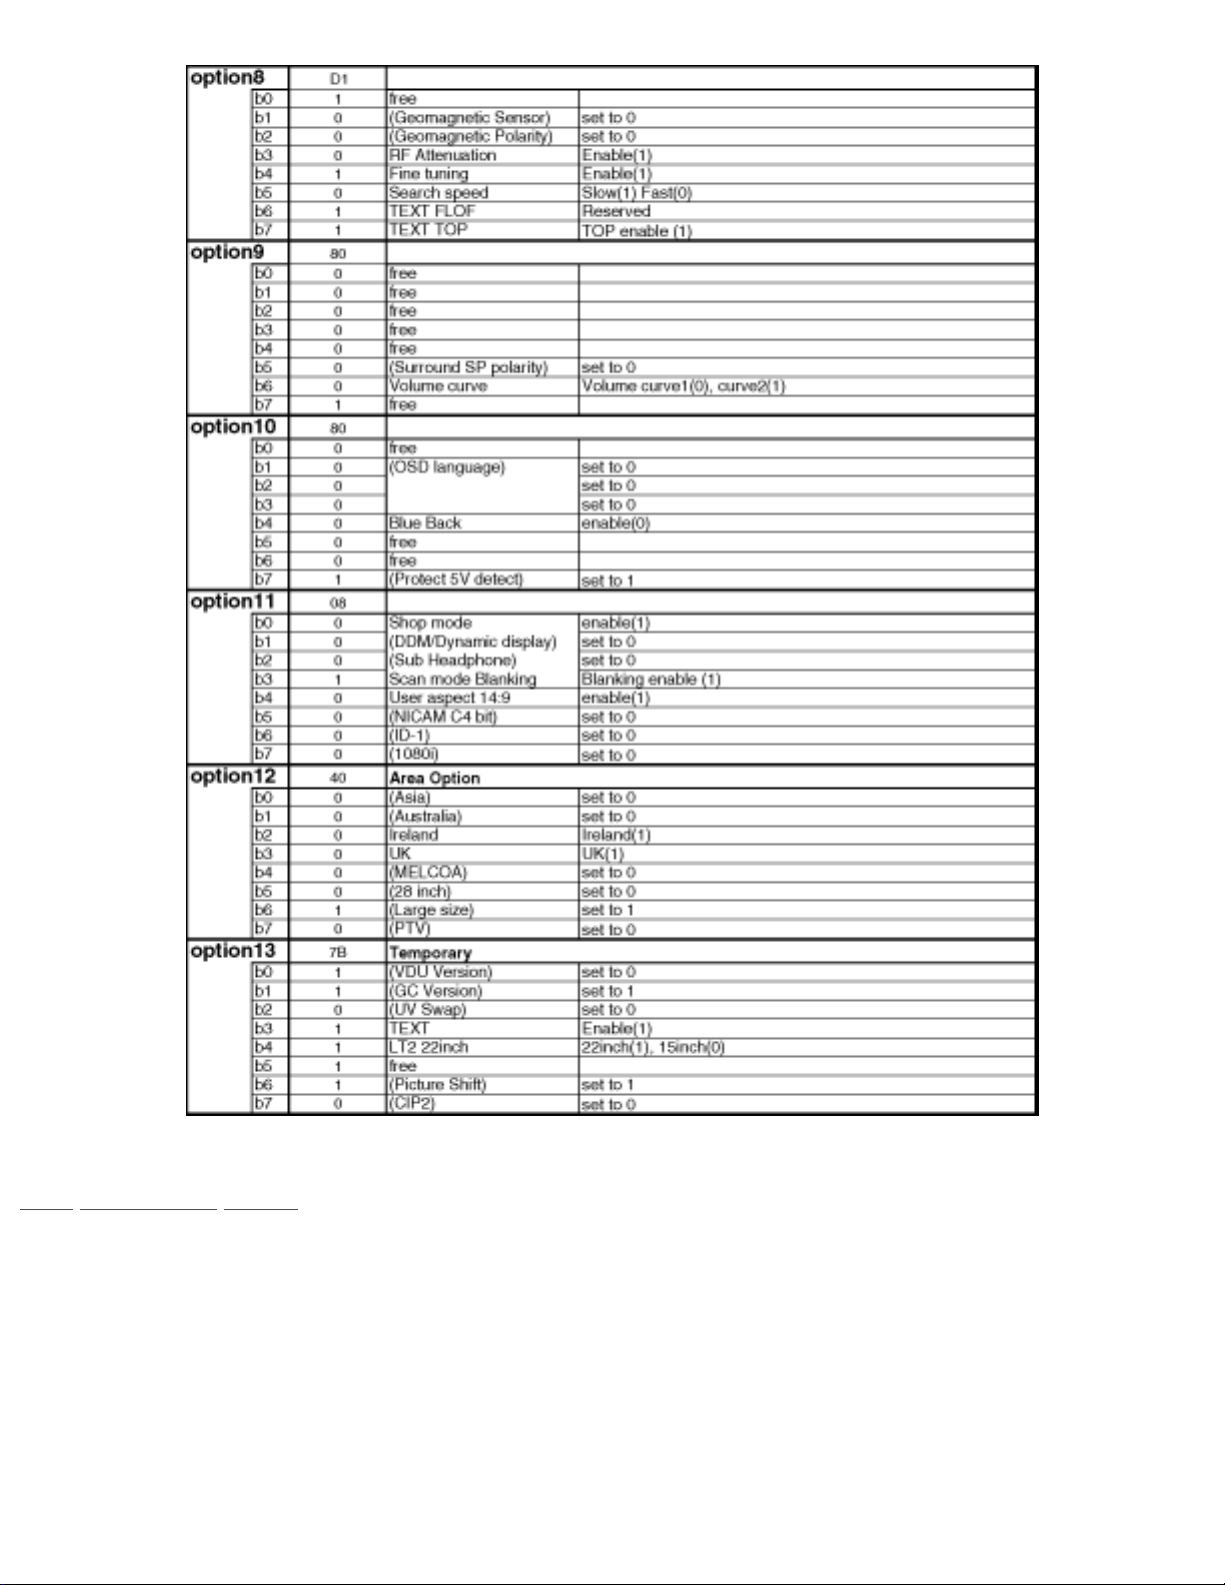
8.2 B, H1, H2, K, P1 and P2-Board
8.3 DG-Board
9 Block and Schematic Diagrams
9.1 Schematic Diagram Notes
9.2 Power Block Diagram
9.3 Signal Block Diagram
9.4 Interconnection Schematic Diagram
9.5 A-Board (1 of 7) and H1-Board Schematic Diagram
9.6 A-Board (2 of 7) and H2-Board Schematic Diagram
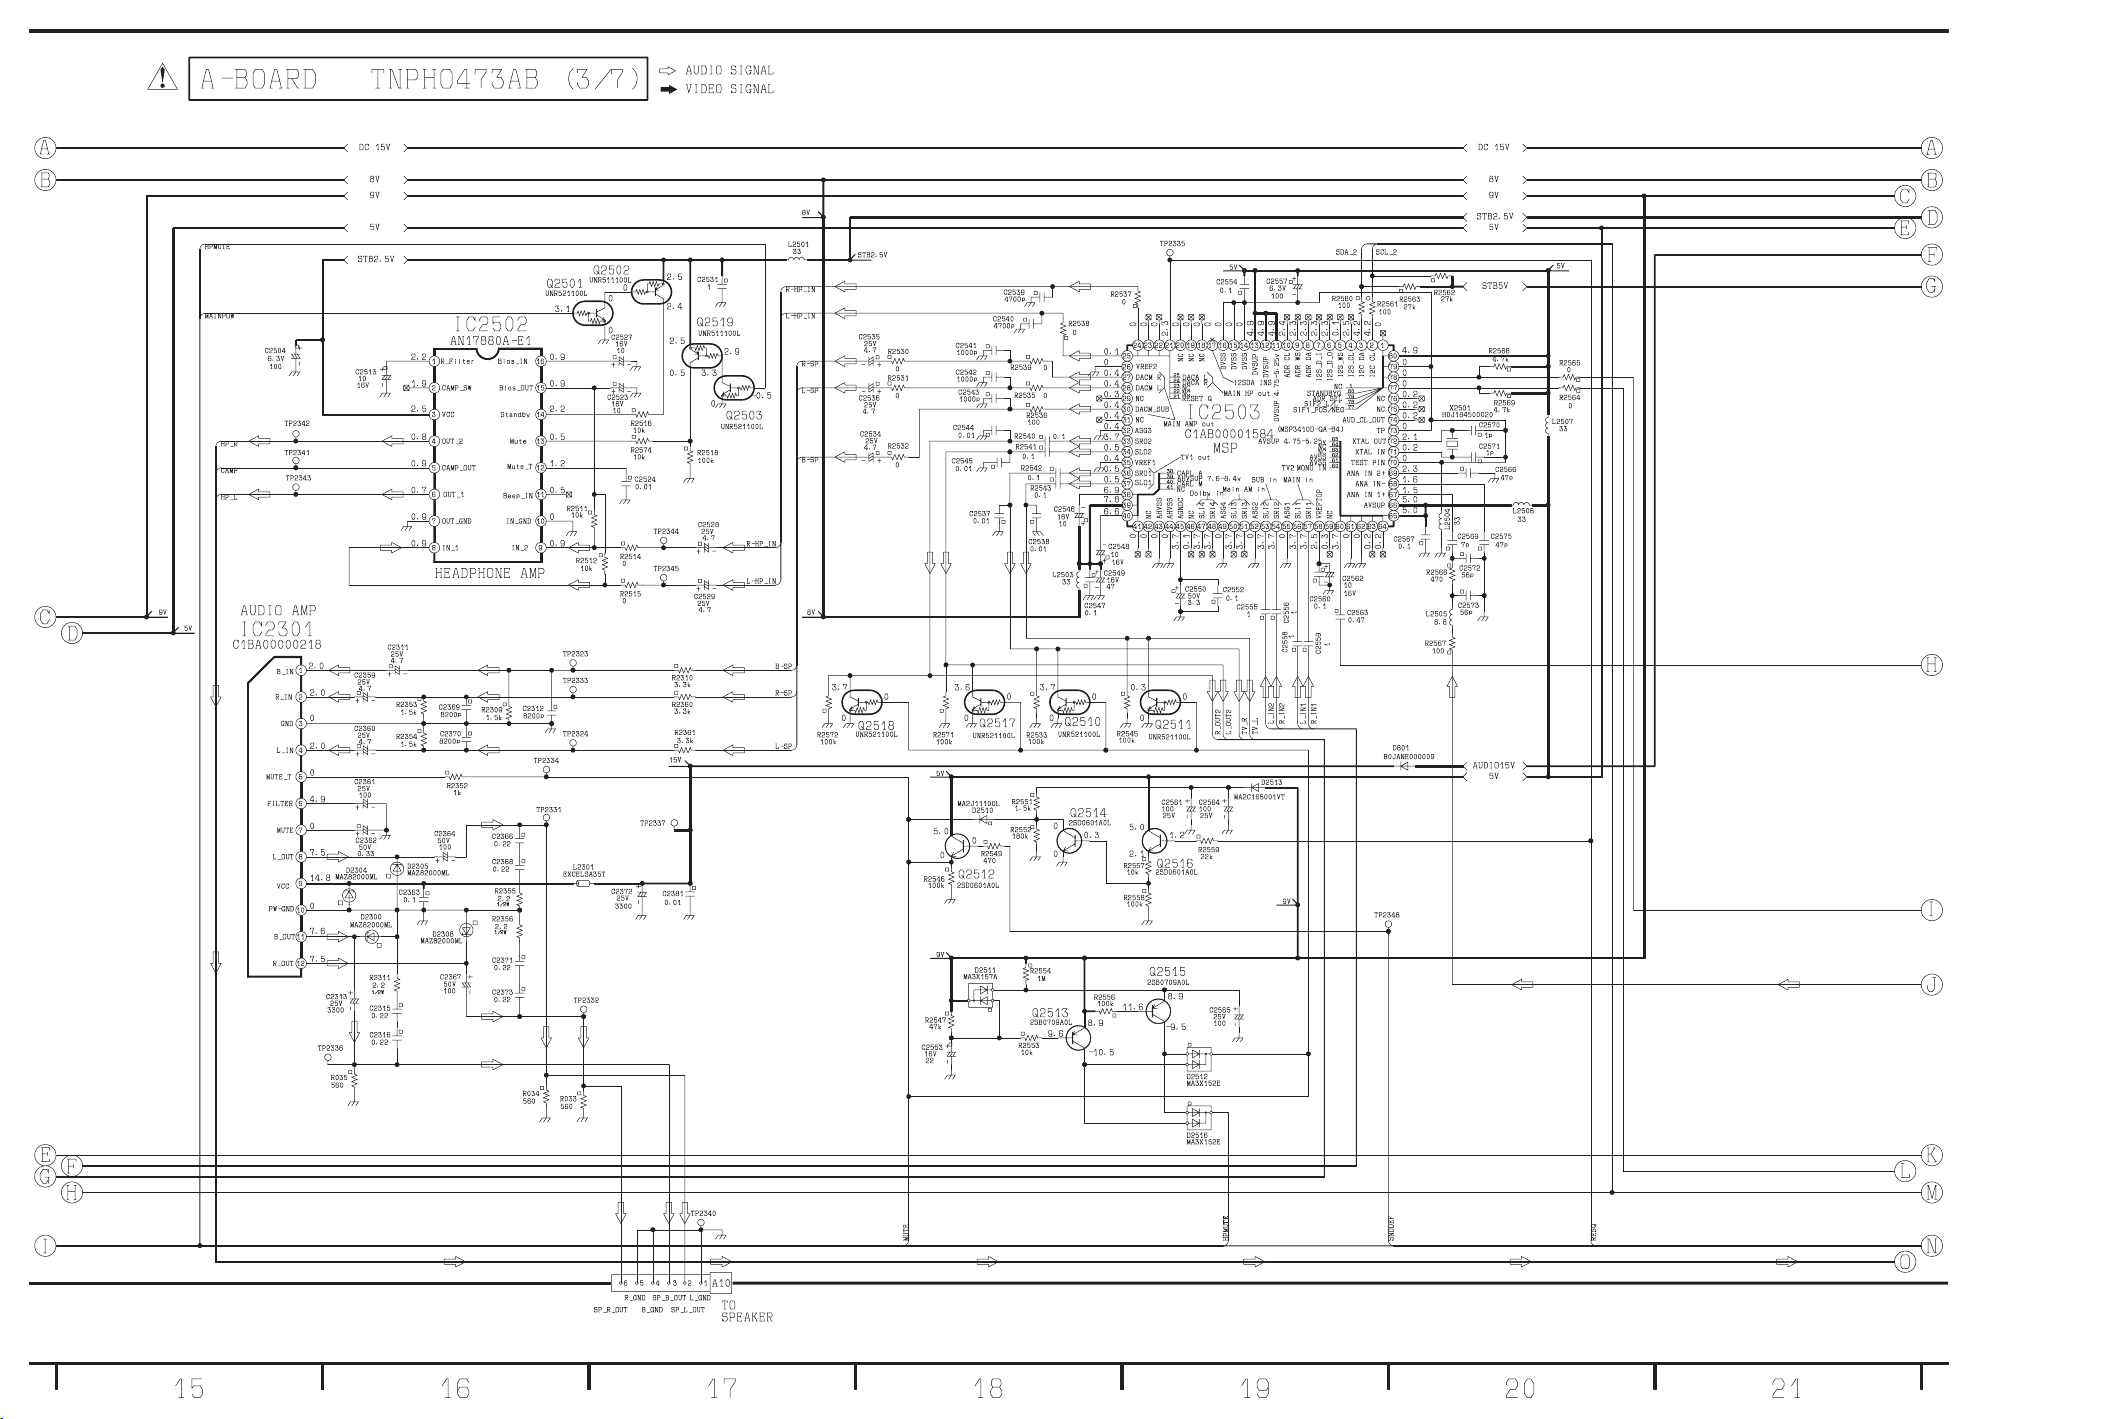
9.7 A-Board (3 of 7) Schematic Diagram
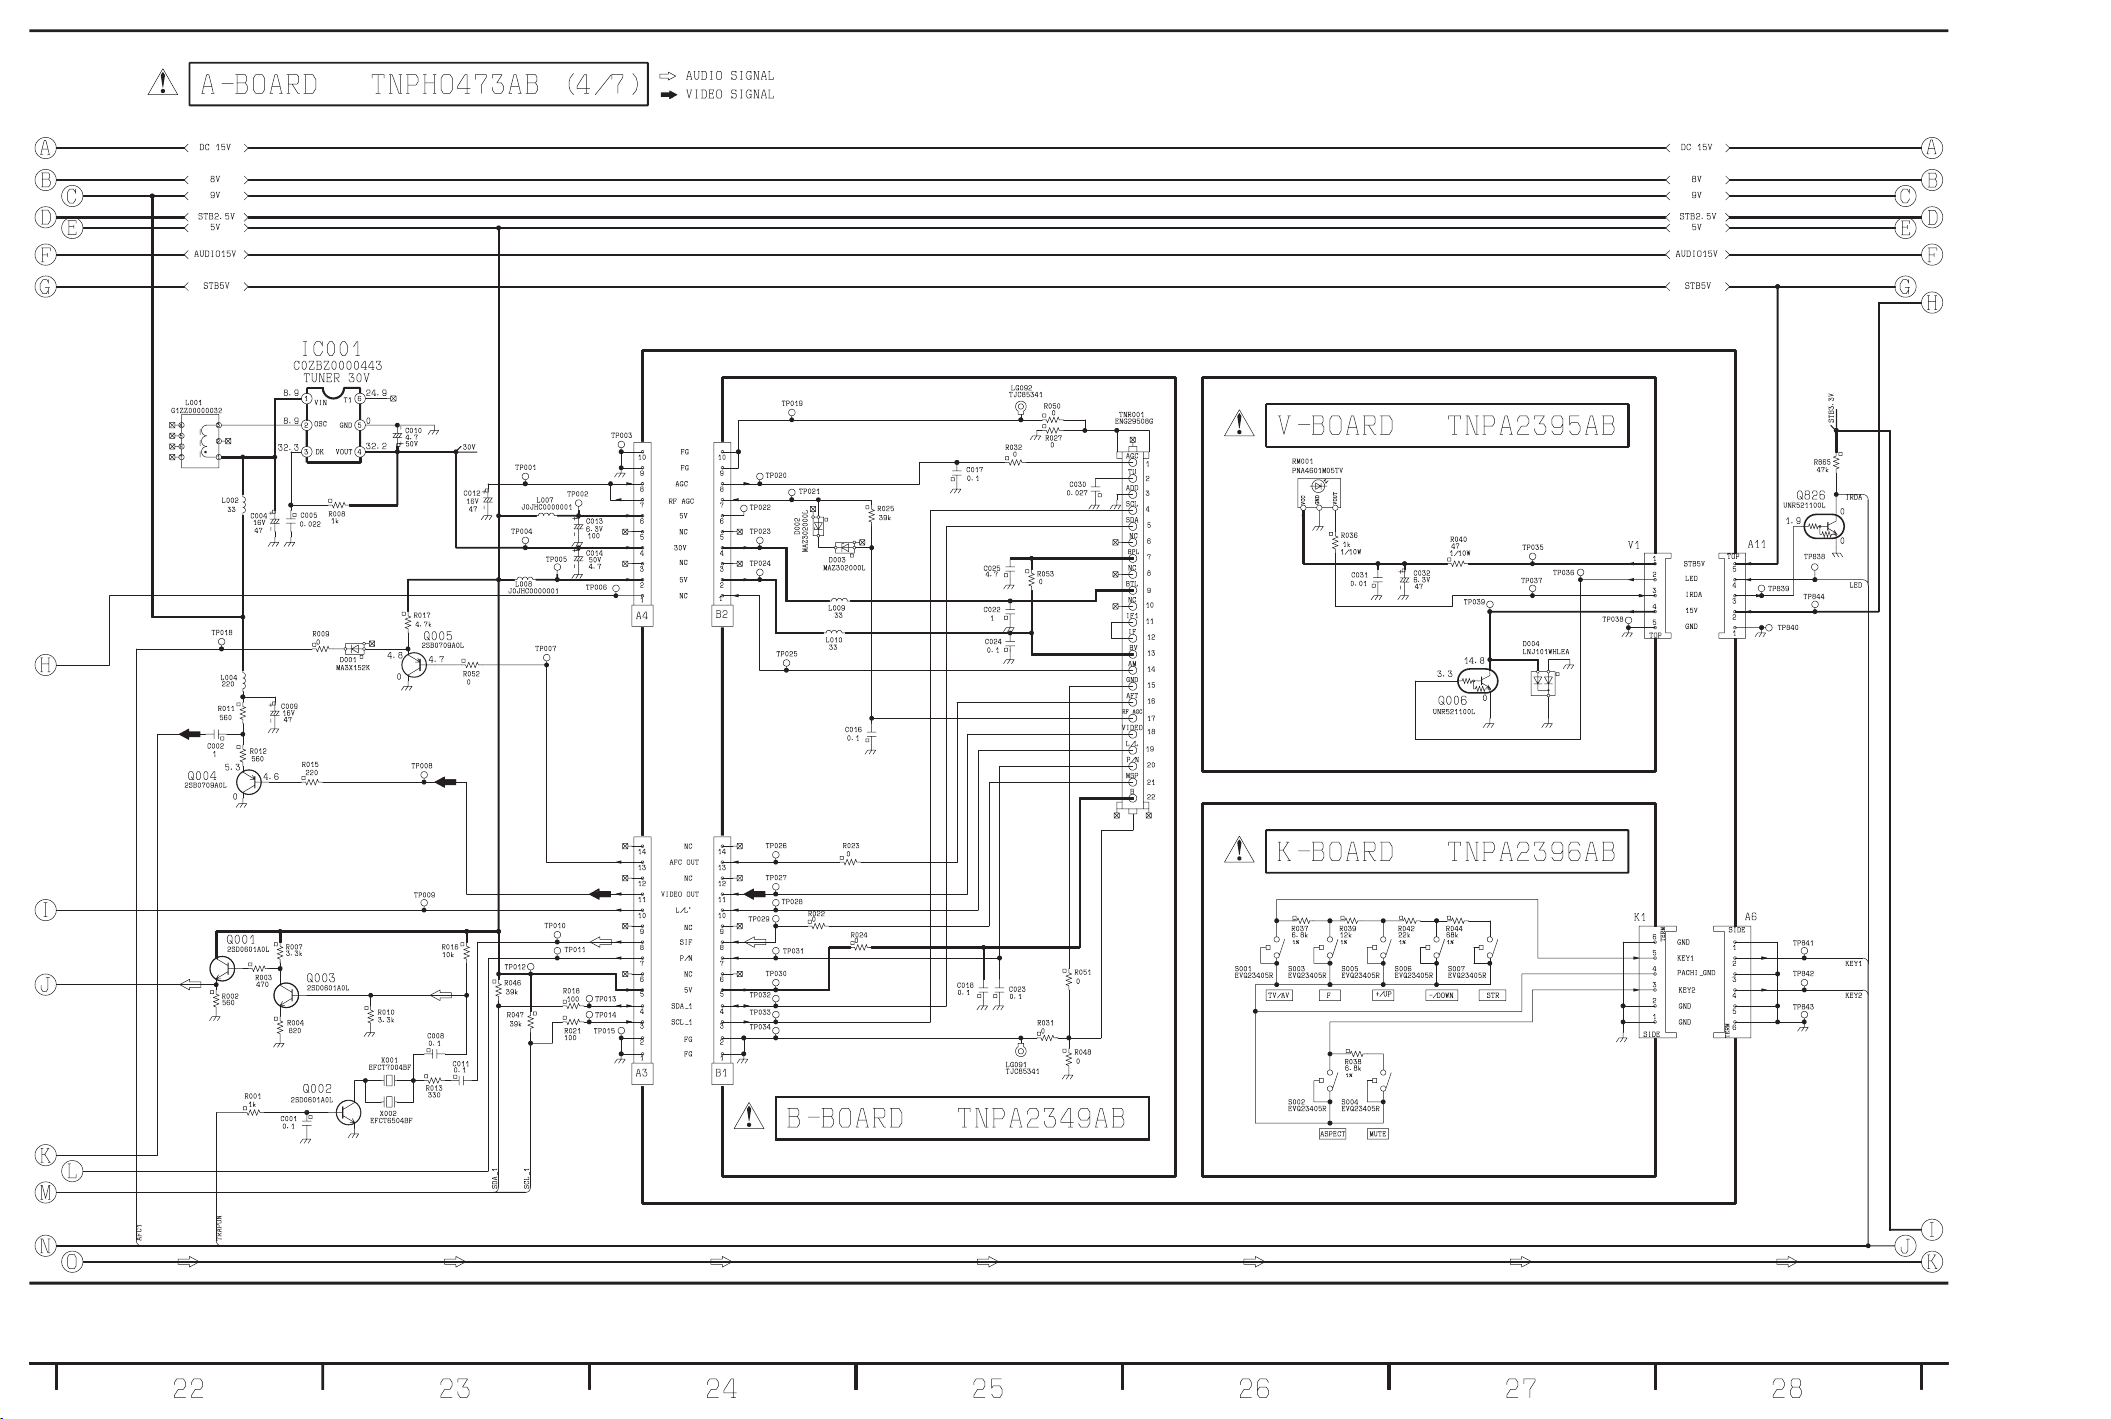
9.8 A-Board (4 of 7), B-Board, K-Board and V-Board Schematic Diagram
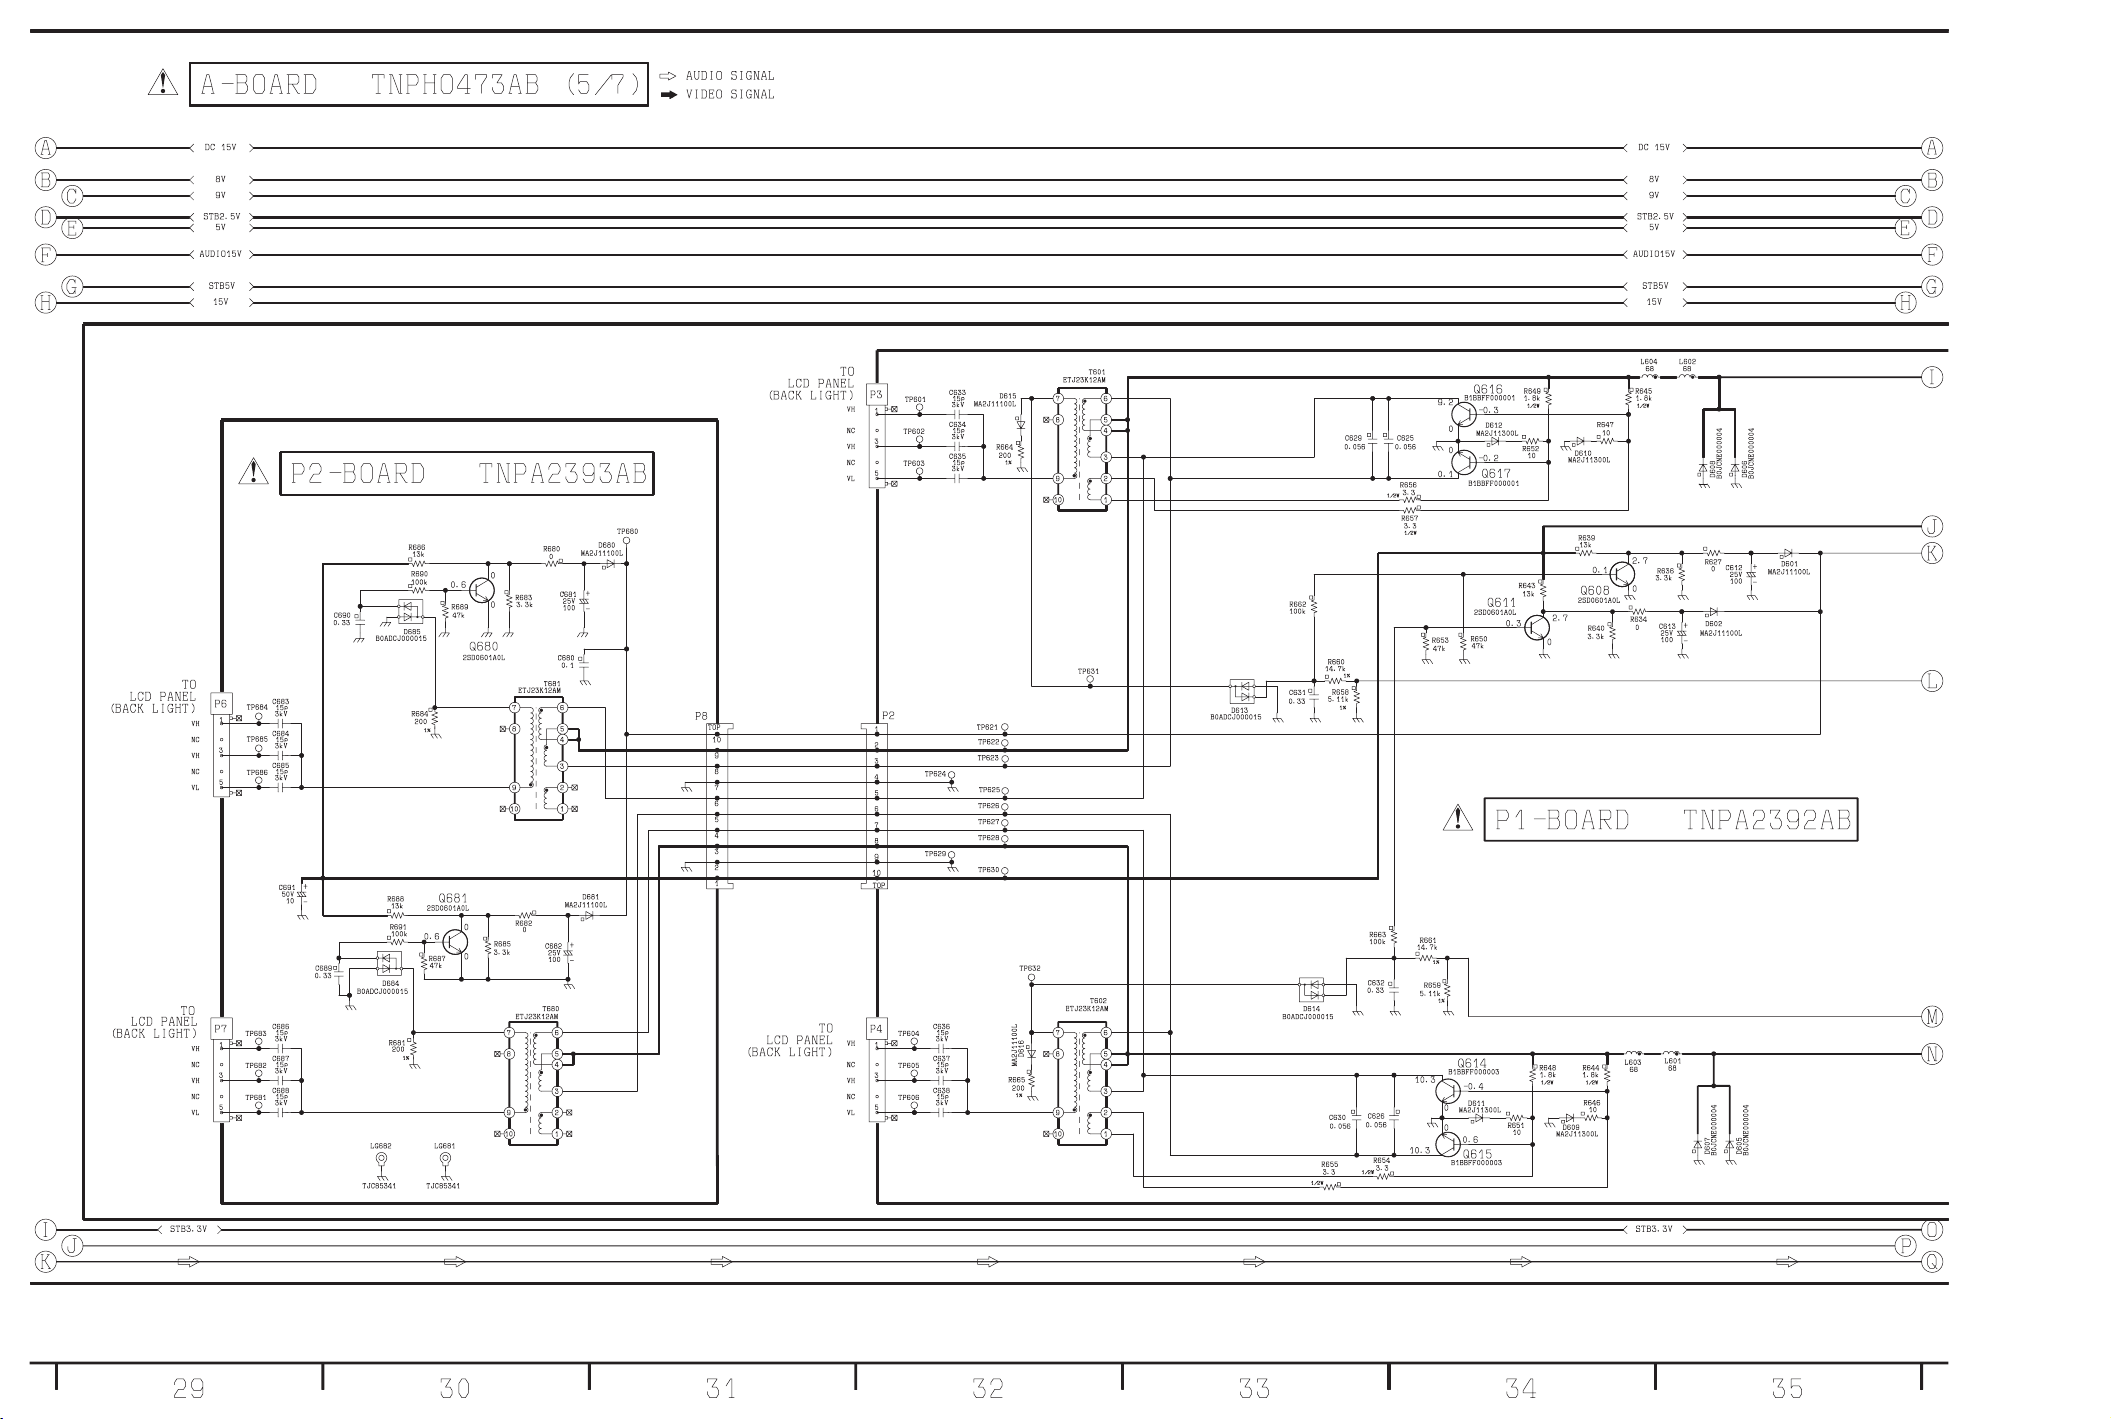
9.9 A-Board (5 of 7), P1-Board and P2-Board Schematic Diagram
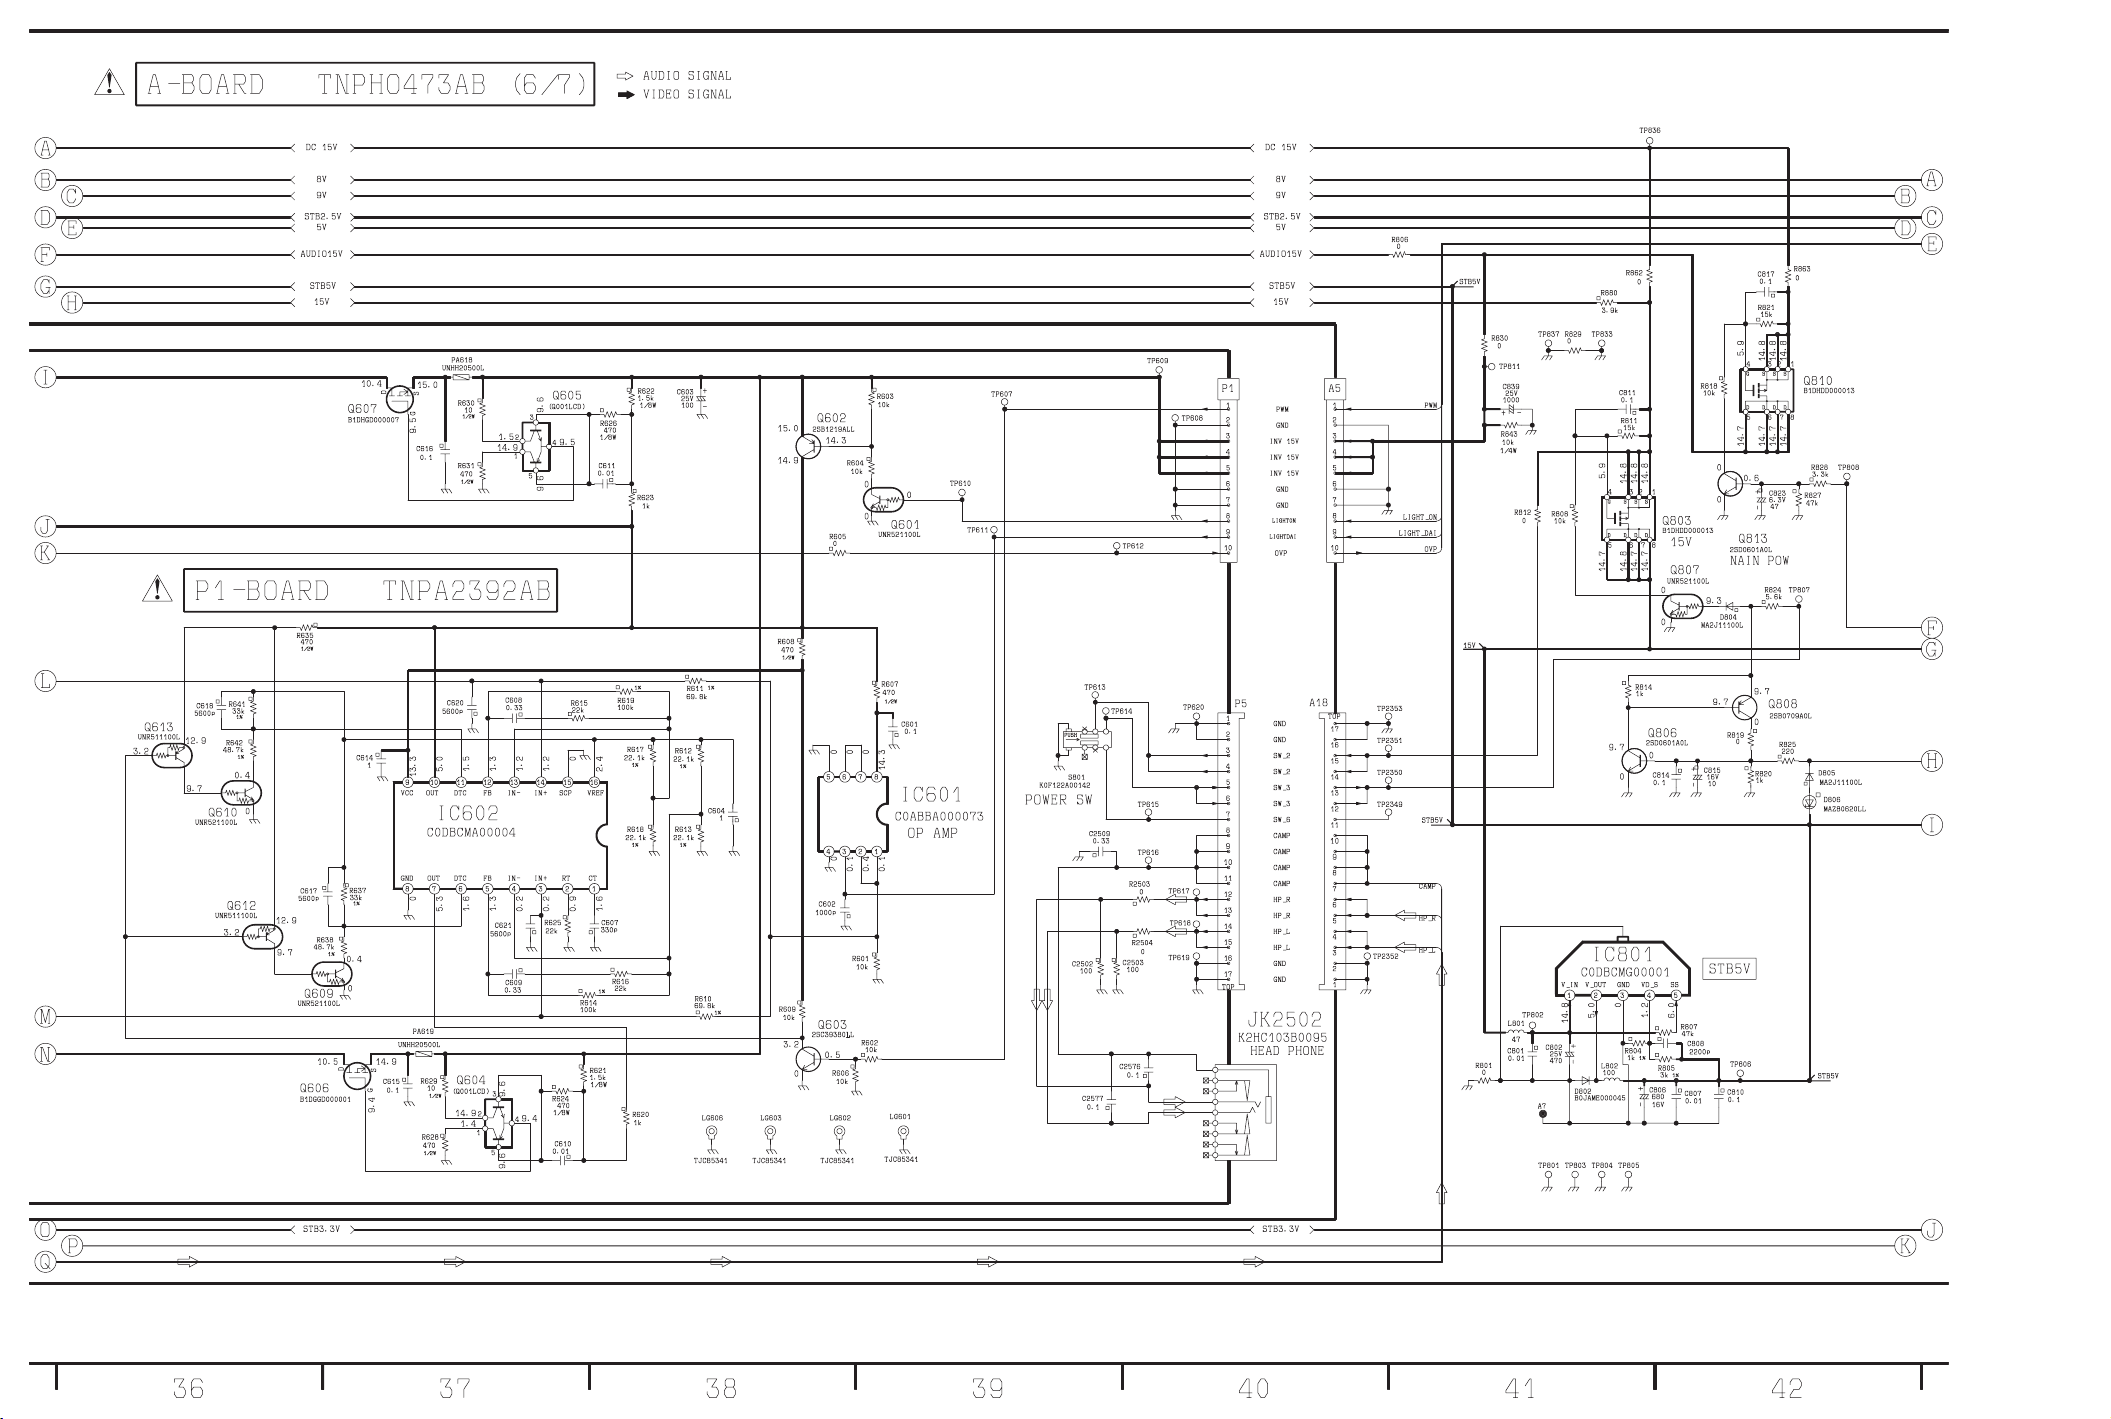
9.10 A-Board (6 of 7) and P1-Board Schematic Diagram
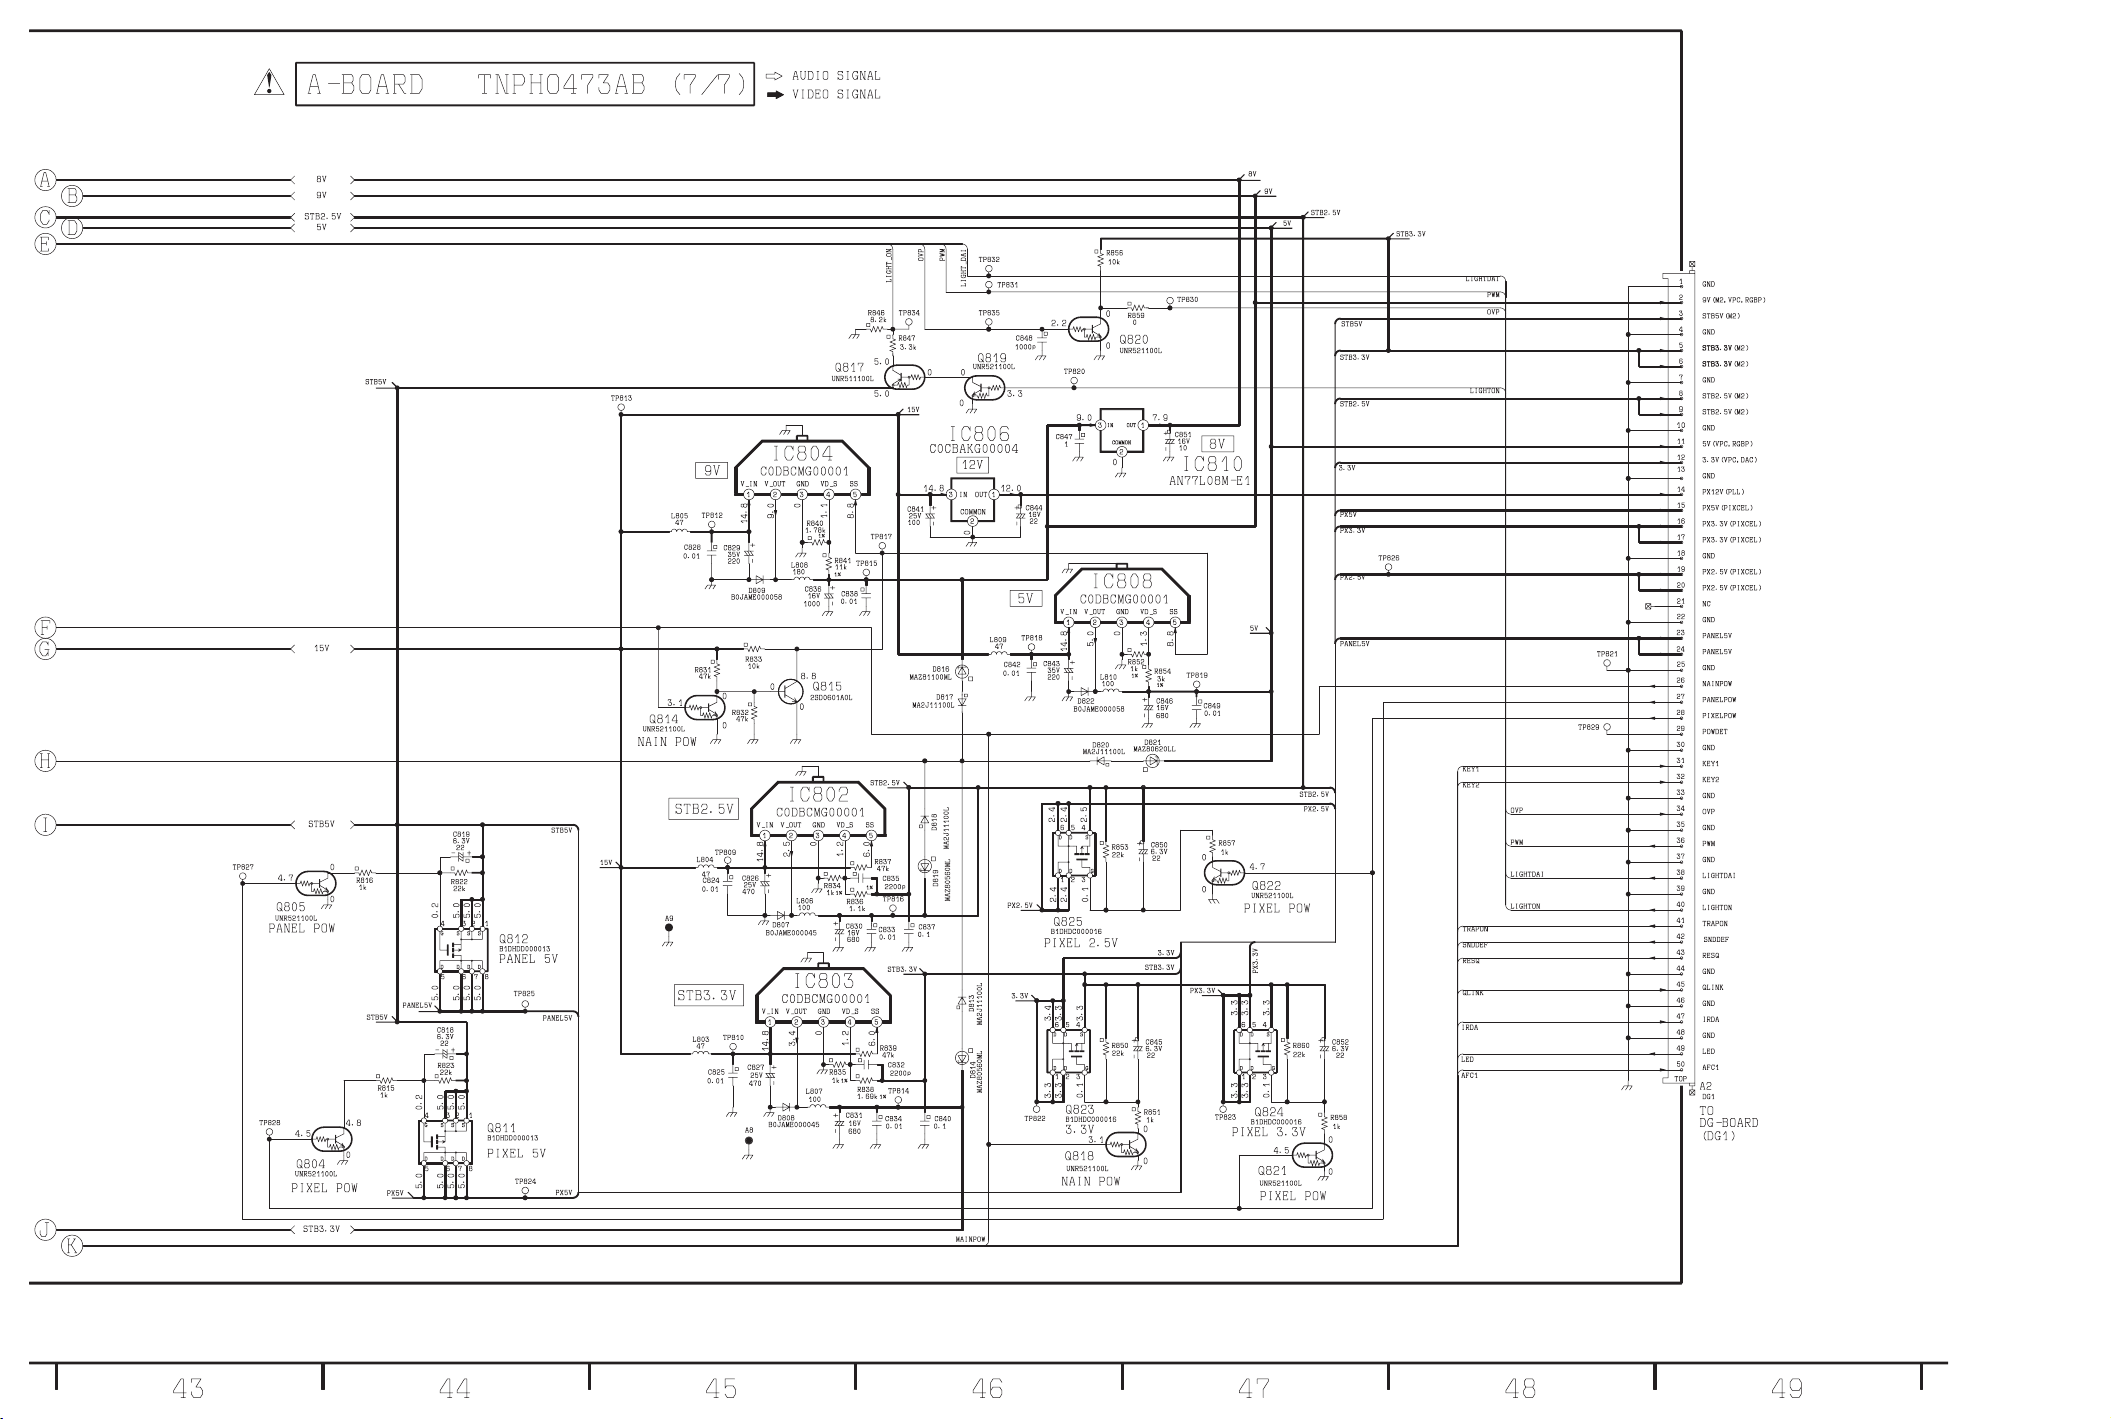
9.11 A-Board (7 of 7) Schematic Diagram
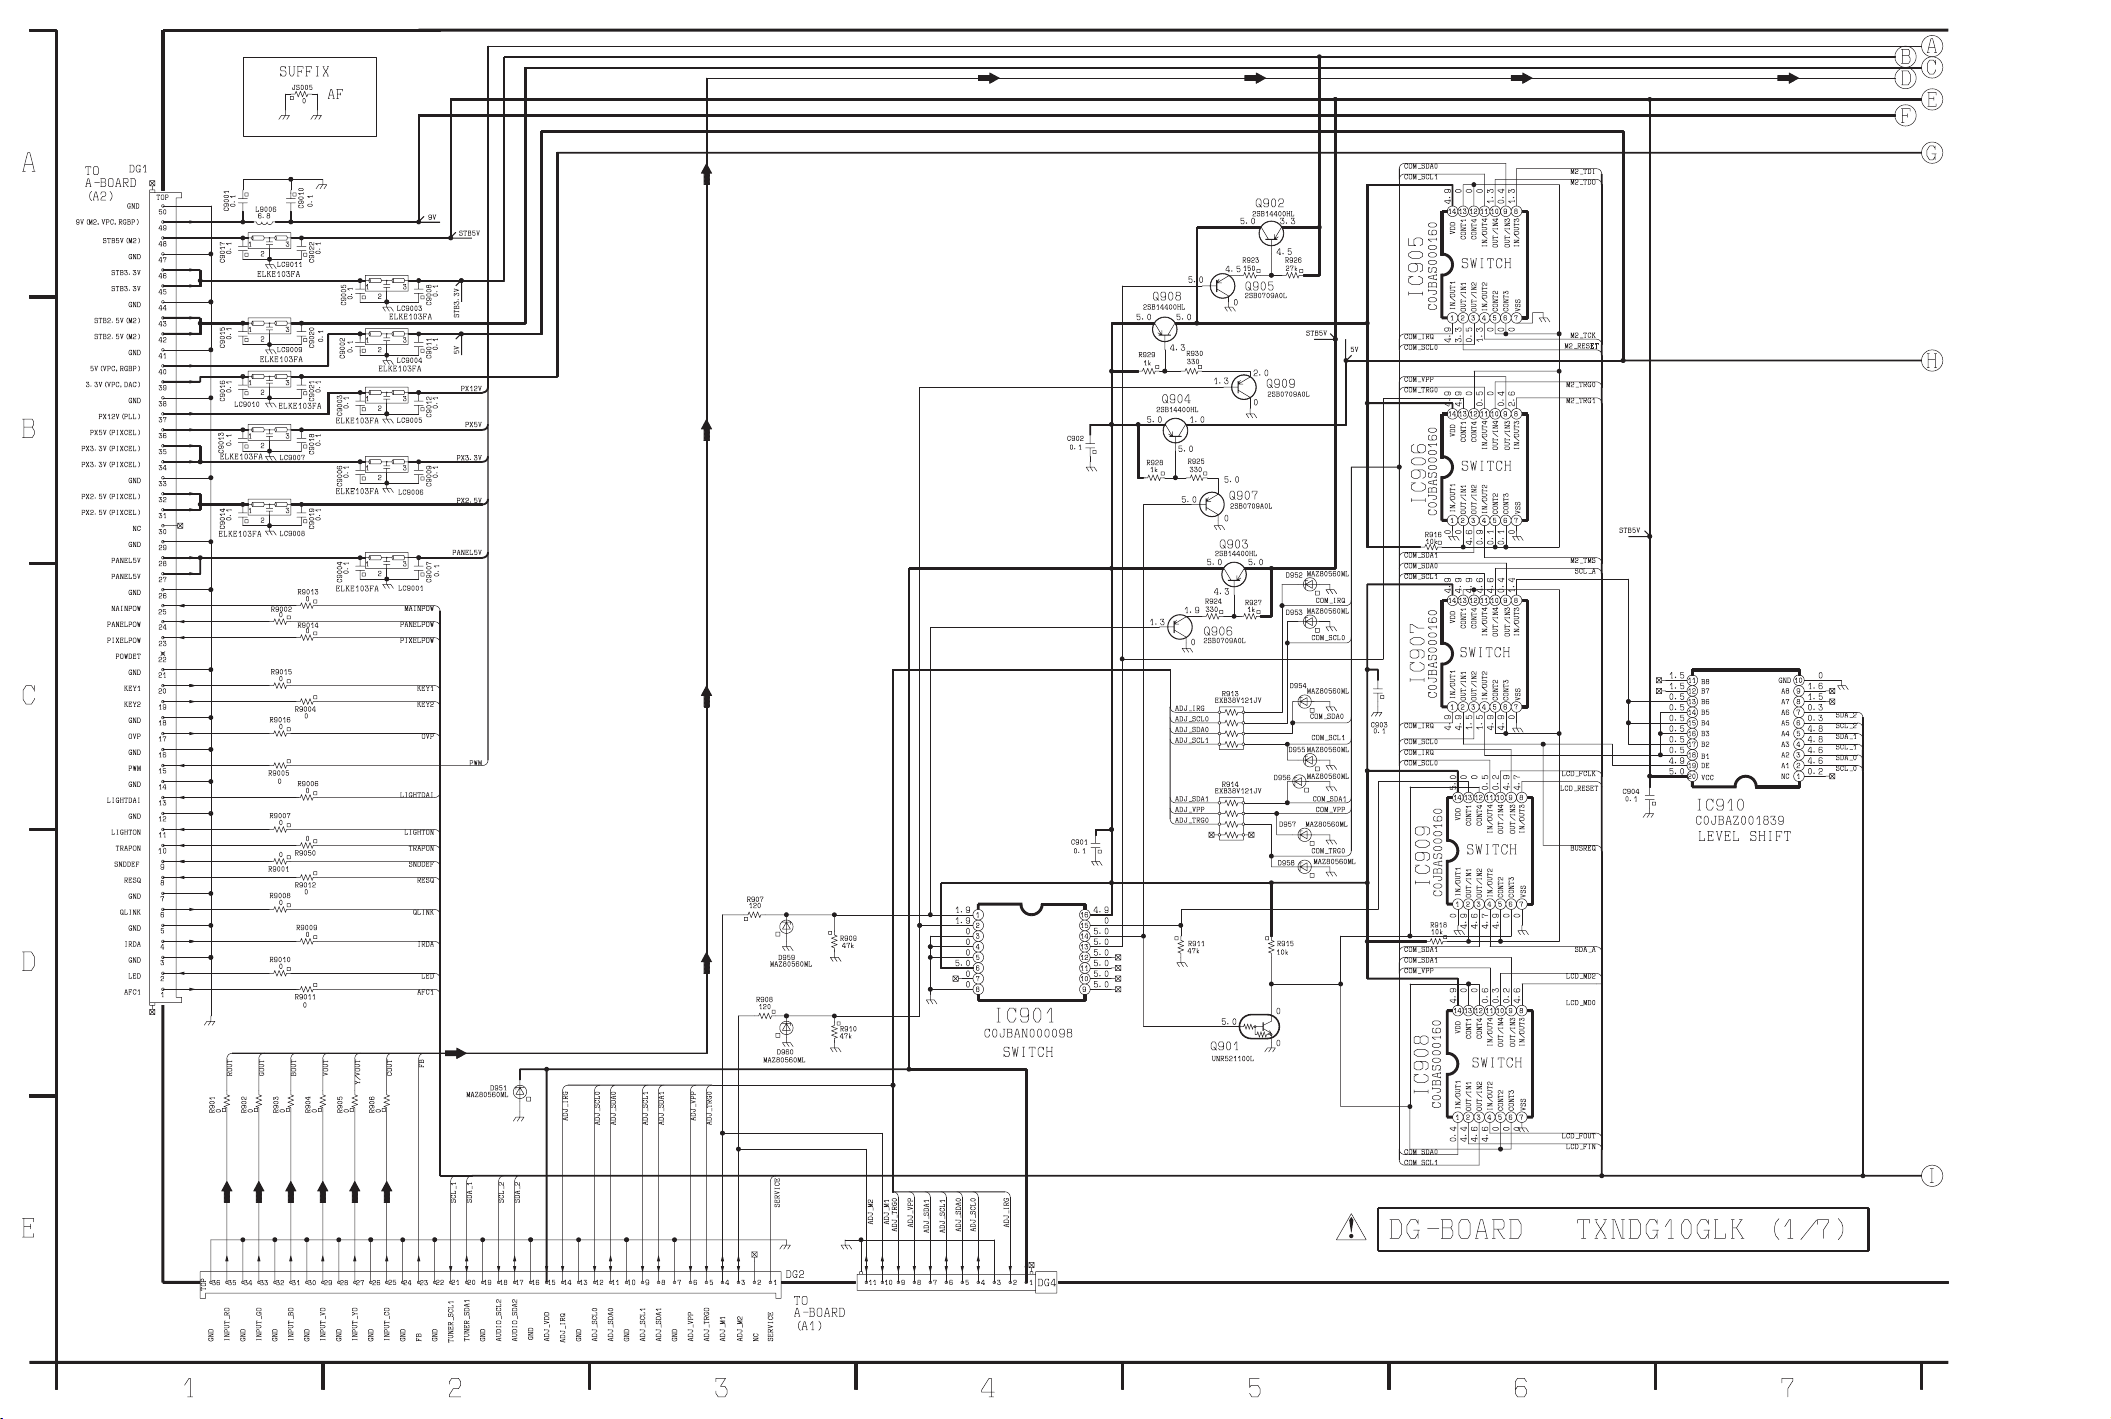
9.12 DG-Board (1 of 7) Schematic Diagram
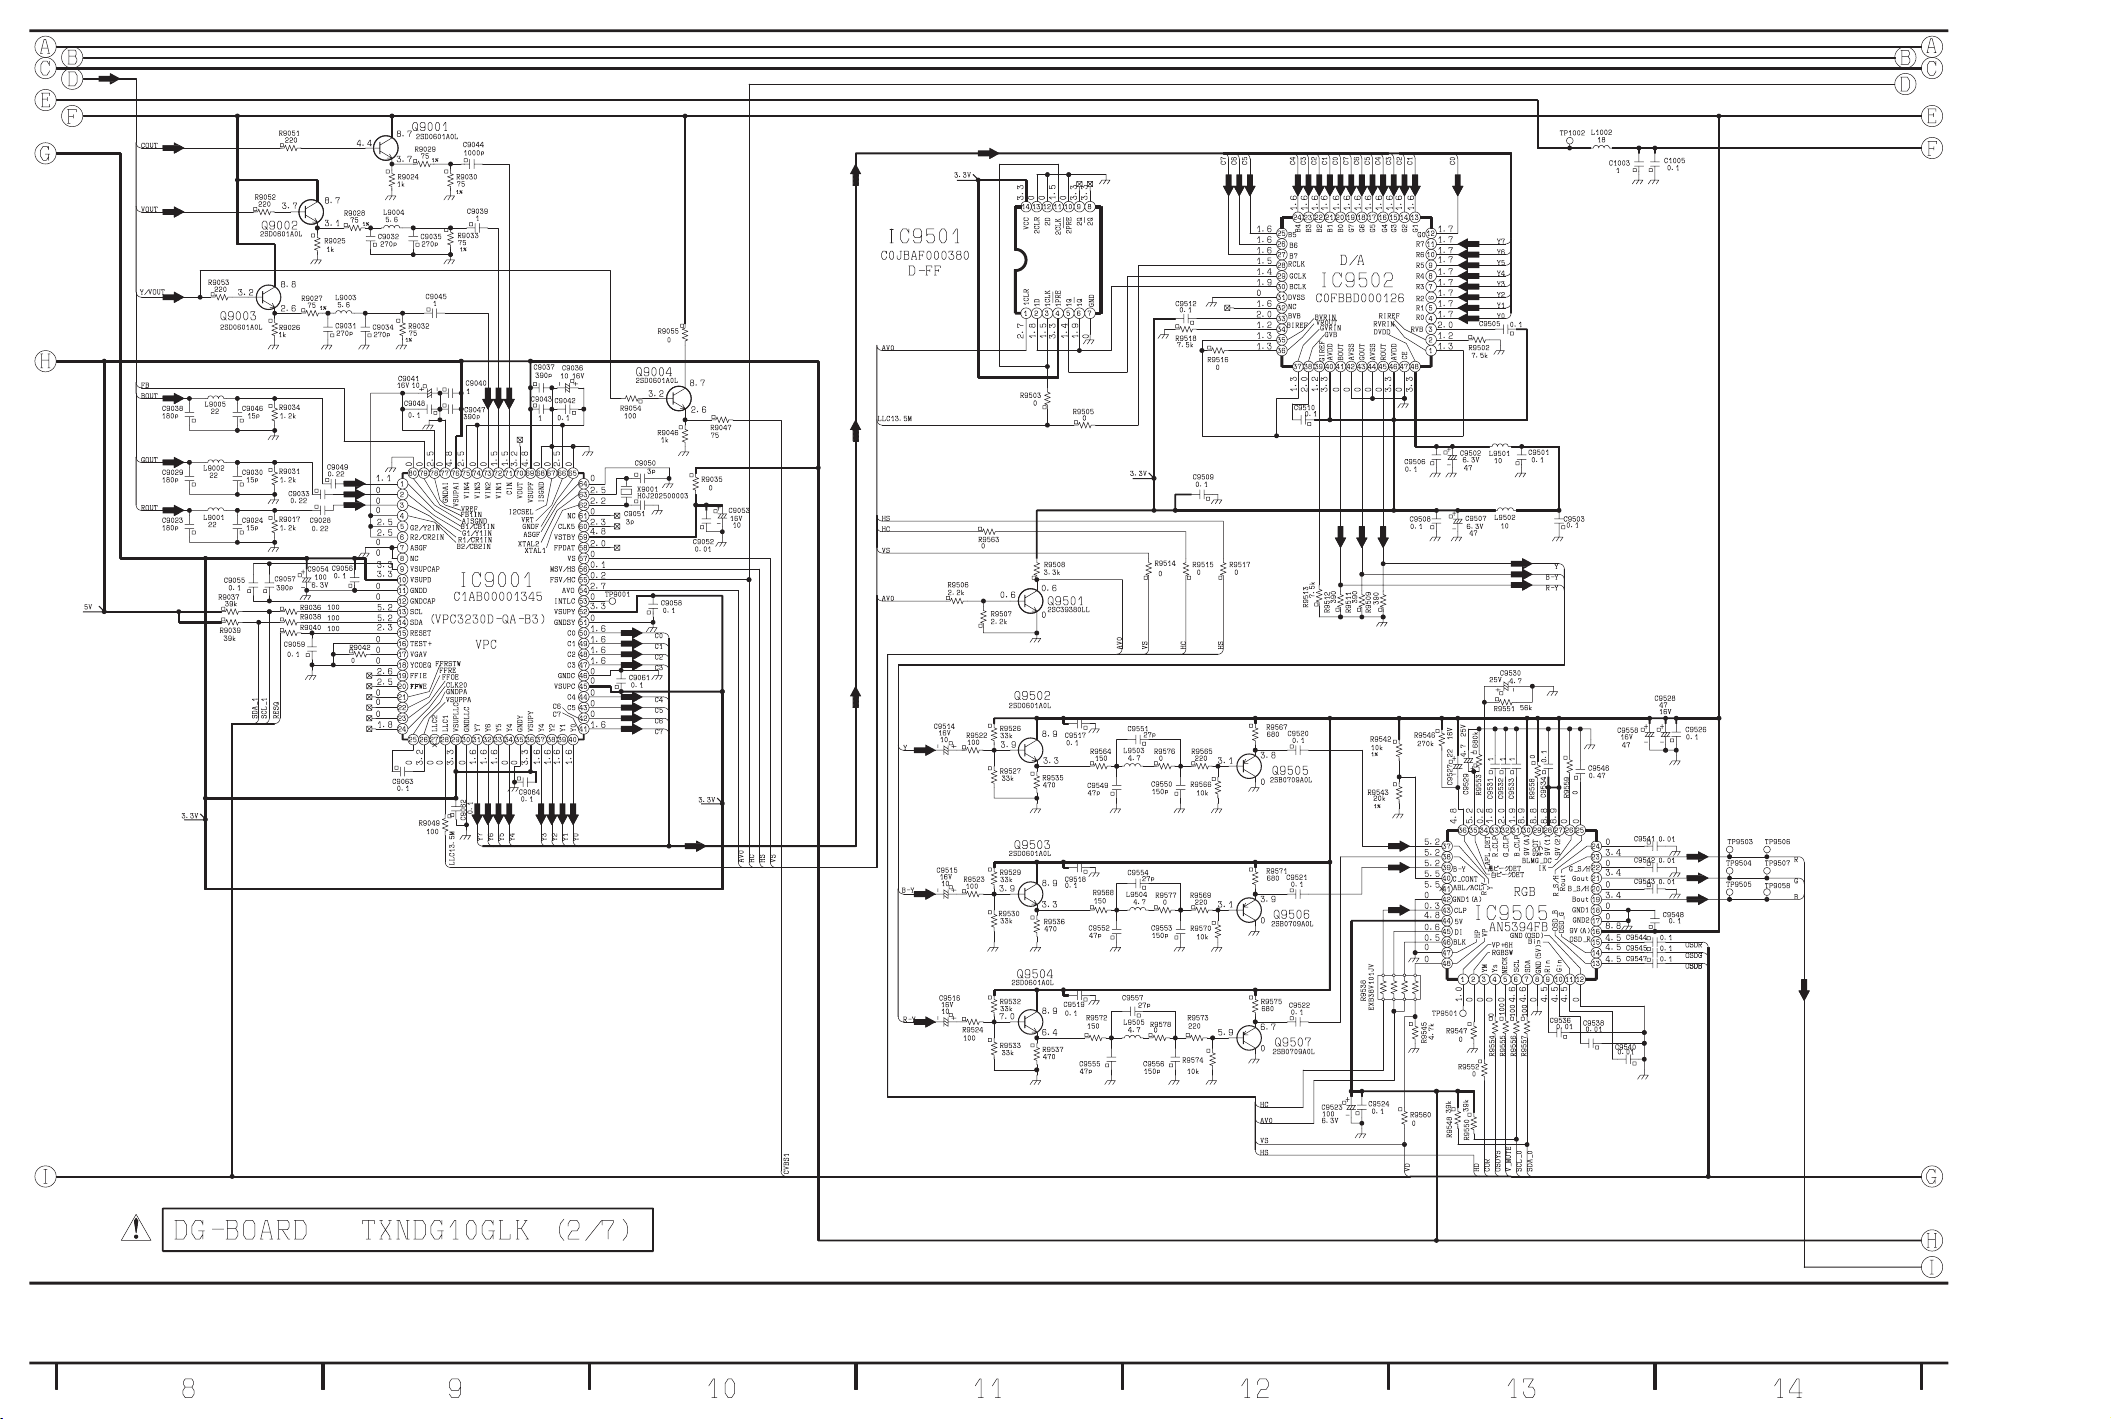
9.13 DG-Board (2 of 7) Schematic Diagram
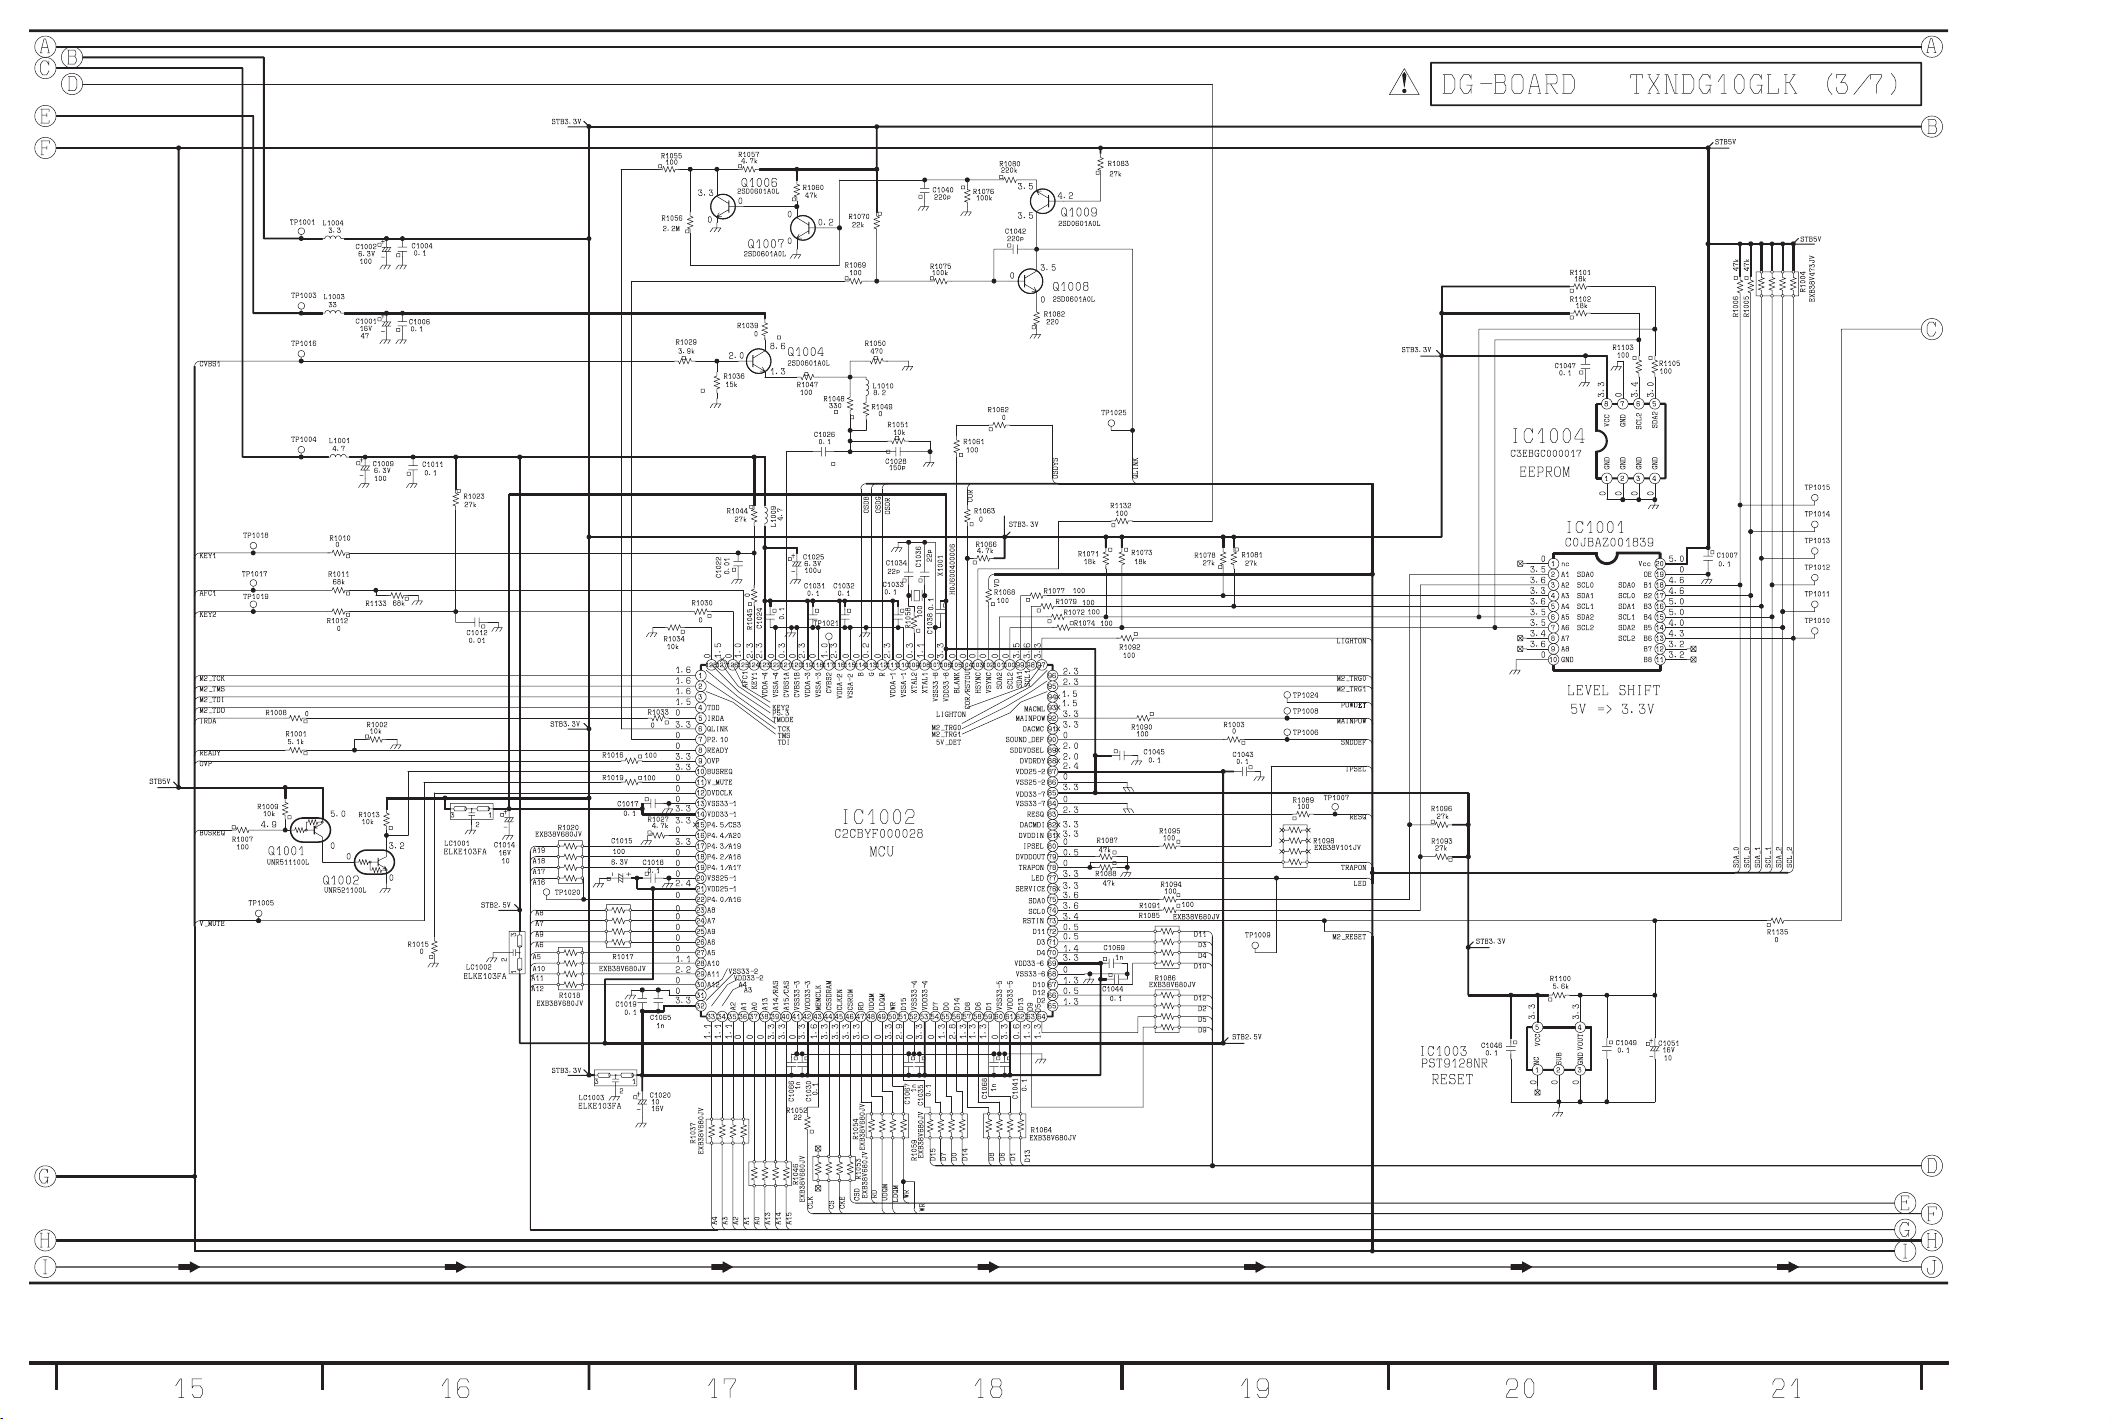
9.14 DG-Board (3 of 7) Schematic Diagram
9.15 DG-Board (4 of 7) Schematic Diagram
9.16 DG-Board (5 of 7) Schematic Diagram
9.17 DG-Board (6 of 7) Schematic Diagram
9.18 DG-Board (7 of 7) Schematic Diagram
10 Parts Location & Mechanical Replacement Parts List
Service Manual
TOP NEXT
ORDER NO. ITD0203006C2
22” Diagonal LCD TV
● TX-22LT2F
LH4 Chassis
Specifications
Power Source
AC 100~240V, 50/ 60Hz
Power Consumption
Average use: 67W
Stand-by condition: 5W
TV set: DC 15V, 4.1 A max.
LCD
22-inch(558mm), 16:9 aspect ratio LCD panel
Screen Size
19.17-inch (486.7mm)(W) x 10.77-inch (273.6mm)(H) x
22-inch (558mm)(Diagonal)
Sound
Speaker
Tweeter (4 x 7cm 2pcs, 8Ω ), Woofer (Ø 5cm 2pcs, 4Ω )
Audio Output
9W (2.5W+ 2.5W+ 4.0W (Woofer)), 10% THD
Headphones
M3(3.5 mm) Jack x 1 8Ω impedance
FEATURES
Aero-Hammer ® Double Woofer System (2Way 4Speaker System)
file:///C|/Documents and Settings/eDOK/Рабочий стол/LH4 Ch_TX-22LT2F.htm (1 of 3)29.01.2008 8:40:48
Page 2

22lt2f.html
10.1 Parts Location
10.2 Packing Exploded View
10.3 Mechanical Replacement Parts List
11 Replacement Parts List
11.1 Replacement Parts List Notes
11.2 Electrical Replacement Parts List
12 Schematic Diagram for printing with A4 size
Receiving Systems/ Band name
PAL B,G,H, SECAM B,G SECAM L/ L’
VHF E2-E12 VHF H1-H2 (ITALY)
VHF A-H (ITALY) UHF E21-E69
CATV (S01-S05) CATV S1-S10 (M1-M10)
CATV S11-S20
(U1-U10)
CATV S21-S41 (Hyperband)
PAL 525/ 60
Playback of NTSC tape from some PAL video recorders (VCR)
M.NTSC
Playback from M.NTSC Video recorders (VCR)
NTSC
Playback from NTSC Video recorders (VCR)
(AV INPUT ONLY)
Aerial-Rear
UHF-VHF
Operating Conditions
Temperature: 41° F-95° F(5-35° C)
Humidity: 5% -90% RH (non-condensing)
Connection Terminals
AV1
21Pin socket (Audio/ Video in, TV out, RGB in)
AV2
21Pin socket (Audio/ Video in, Audio/ Video out, S-Video, Q-Link)
AV3
VIDEO
RCA PIN Type x 1
S-VIDEO
Mini DIN 4-pin
AUDIO L-R
RCA PIN Type x 2
Dimensions (W x H x D)
Including TV Stand
586mm x 424mm x 240mm
TV Set Only
586mm x 388mm x 67mm
Weight (Mass)
11.5kg Net
Note:
Design and Specifications are subject to change without notice. Weight and Dimensions shown are approximate.
© 2002 Matsushita Electric Industrial Co., Ltd. All rights reserved. Unauthorized copying and distribution is a violation of
law.
file:///C|/Documents and Settings/eDOK/Рабочий стол/LH4 Ch_TX-22LT2F.htm (2 of 3)29.01.2008 8:40:49
Page 3

http://202.224.189.179/view_new/EU/TX-22LT2F/SVC/s0100000000x.html
1 Safety Precautions
TOP PREVIOUS NEXT
1.1 General Guidelines
1.2 Touch-Current Check
TOP PREVIOUS NEXT
http://202.224.189.179/view_new/EU/TX-22LT2F/SVC/s0100000000x.html29.01.2008 8:41:45
Page 4

http://202.224.189.179/view_new/EU/TX-22LT2F/SVC/s0101000000.html
1.1 General Guidelines
TOP PREVIOUS NEXT
1. When servicing, observe the original lead dress. If a short circuit is found, replace all parts which
have been overheated or damaged by the short circuit.
2. After servicing, see to it that all the protective devices such as insulation barriers, insulation
papers shields are properly installed.
3. After servicing, make the following leakage current checks to prevent the customer from being
exposed to shock hazards.
TOP PREVIOUS NEXT
http://202.224.189.179/view_new/EU/TX-22LT2F/SVC/s0101000000.html29.01.2008 8:41:48
Page 5

http://202.224.189.179/view_new/EU/TX-22LT2F/SVC/s0102000000.html
1.2 Touch-Current Check
TOP PREVIOUS NEXT
1. Plug the AC cord directly into the AC outlet. Do not use an isolation transformer for this check.
2. Connect a measuring network for touch currents between each exposed metallic part on the set
and a good earth ground such as a water pipe, as shown in Figure 1.
3. Use Leakage Current Tester (Simpson 228 or equivalent) to measure the potential across the
measuring network.
4. Check each exposed metallic part, and measure the voltage at each point.
5. Reserve the AC plug in the AC outlet and repeat each of the above measure.
6. The potential at any point (TOUGH CURRENT) expressed as voltage U1 and U2, does not
exceed the following values:
For a. c.: U1 = 35 V (peak) and U2 = 0.35 V (peak);
For d. c.: U1 = 1.0 V,
Note:
The limit value of U2 = 0.35 V (peak) for a. c. and U1 = 1.0 V for d. c. correspond to the values
0.7 mA (peak) a. c. and 2.0 mA d. c.
The limit value U1 = 35 V (peak) for a. c. correspond to the value 70 mA (peak) a. c. for
frequencies greater than 100 kHz.
7. In case a measurement is out of the limits specified, there is a possibility of a shock hazard, and
the equipment should be repaired and rechecked before it is returned to the customer.
Figure 1
http://202.224.189.179/view_new/EU/TX-22LT2F/SVC/s0102000000.html (1 of 2)29.01.2008 8:41:58
Page 6

http://202.224.189.179/view_new/EU/TX-22LT2F/SVC/s0102000000.html
TOP PREVIOUS NEXT
http://202.224.189.179/view_new/EU/TX-22LT2F/SVC/s0102000000.html (2 of 2)29.01.2008 8:41:58
Page 7

http://202.224.189.179/view_new/EU/TX-22LT2F/SVC/s0200000000x.html
2 Prevention of Electro Static Discharge (ESD) to Electrostatically Sensitive
(ES) Devices
TOP PREVIOUS NEXT
Some semiconductor (solid state) devices can be damaged easily by static electricity. Such components commonly are called Electrostatically Sensitive (ES) Devices.
Examples of typical ES devices are integrated circuits and some field-effect transistorsand semiconductor "chip" components. The following techniques should be
used to help reduce the incidence of component damage caused by electro static discharge (ESD).
1. Immediately before handling any semiconductor component or semiconductor-equipped assembly, drain off any ESD on your body by touching a known earth
ground. Alternatively, obtain and wear a commercially available discharging ESD wrist strap, whichshould be removed for potential shock reasons prior to
applying power to the unit under test.
2. After removing an electrical assembly equipped with ES devices, place the assembly on a conductive surface such as alminum foil, to prevent electrostatic
charge buildup or exposure of the assembly.
3. Use only a grounded-tip soldering iron to solder or unsolder ES devices.
4. Use only an anti-static solder removal device. Some solder removal devices not classified as "anti-static (ESD protected)" can generate electrical charge
sufficient to damage ES devices.
5. Do not use freon-propelled chemicals. These can generate electrical charges sufficient to damage ES devices.
6. Do not remove a replacement ES device from its protective package until immediately before you are ready to install it. (Most replacement ES devices are
packaged with leads electrically shorted together by conductive foam, alminum foil or comparableconductive material).
7. Immediately before removing the protective material from the leads of a replacement ES device, touch the protective material to the chassis or circuit assembly
into which the device will be installed.
Caution
Be sure no power is applied to the chassis or circuit, and observe all other safety precautions.
8. Minimize bodily motions when handling unpackaged replacement ES devices. (Otherwise hamless motion such as the brushing together of your clothes fabric
or the lifting of your foot from a carpeted floor can generate static electricity (ESD) sufficient todamage an ES device).
http://202.224.189.179/view_new/EU/TX-22LT2F/SVC/s0200000000x.html (1 of 2)29.01.2008 8:42:08
Page 8

http://202.224.189.179/view_new/EU/TX-22LT2F/SVC/s0200000000x.html
TOP PREVIOUS NEXT
http://202.224.189.179/view_new/EU/TX-22LT2F/SVC/s0200000000x.html (2 of 2)29.01.2008 8:42:08
Page 9

http://202.224.189.179/view_new/EU/TX-22LT2F/SVC/s0300000000x.html
3 About lead free solder (PbF)
TOP PREVIOUS NEXT
Note: Lead is listed as (Pb) in the periodic table of elements.
In the information below, Pb will refer to Lead solder, and PbF will refer to Lead Free Solder.
The Lead Free Solder used in our manufacturing process and discussed below is (Sn+Ag+Cu).
That is Tin (Sn), Silver (Ag) and (Cu) although other types are available.
This model uses Pb Free solder in it’s manufacture due to environmental conservation issues. For
service and repair work, we’d suggest the use of Pb free solder as well, although Pb solder may be used.
PCBs manufactured using lead free solder will have the PbF within a leaf Symbol
stamped on the back of PCB.
Caution
● Pb free solder has a higher melting point than standard solder. Typically the melting point is 50 ~
70 °F (30~40°C) higher. Please use a high temperature soldering iron and set it to 700 ± 20 °F
(370 ± 10 °C).
● Pb free solder will tend to splash when heated too high (about 1100 °F or600°C).
If you must use Pb solder, please completely remove all of the Pb free solder on the pins or solder
area before applying Pb solder. If this is not practical, be sure to heat the Pb free solder until it
melts, before applying Pb solder.
● After applying PbF solder to double layered boards, please check the component side for excess
solder which may flow onto the opposite side. (see figure below)
http://202.224.189.179/view_new/EU/TX-22LT2F/SVC/s0300000000x.html (1 of 2)29.01.2008 8:42:16
Page 10

http://202.224.189.179/view_new/EU/TX-22LT2F/SVC/s0300000000x.html
Suggested Pb free solder
There are several kinds of Pb free solder available for purchase. This product uses Sn+Ag+Cu (tin,
silver, copper) solder. However, Sn+Cu (tin, copper), Sn+Zn+Bi (tin, zinc, bismuth) solder can also
beused.
TOP PREVIOUS NEXT
http://202.224.189.179/view_new/EU/TX-22LT2F/SVC/s0300000000x.html (2 of 2)29.01.2008 8:42:16
Page 11

http://202.224.189.179/view_new/EU/TX-22LT2F/SVC/s0400000000x.html
4 Self Check
TOP PREVIOUS NEXT
1. Self-Check is used to automatically check the bus lines and hexadecimal code of the TV set.
2. To get into the Self -Check mode press the Down (
) button on the customer controls at the front of the set, at the same time pressing the Recall
button on the remote control, andthe screen will show :
If the CCU ports have been checked and found to be incorrect or not located then “--” will appear in
place of “O.K.”.
TOP PREVIOUS NEXT
http://202.224.189.179/view_new/EU/TX-22LT2F/SVC/s0400000000x.html29.01.2008 8:42:25
Page 12

http://202.224.189.179/view_new/EU/TX-22LT2F/SVC/s0500000000x.html
5 Chasis Board Layout
TOP PREVIOUS NEXT
http://202.224.189.179/view_new/EU/TX-22LT2F/SVC/s0500000000x.html (1 of 2)29.01.2008 8:42:32
Page 13

http://202.224.189.179/view_new/EU/TX-22LT2F/SVC/s0500000000x.html
TOP PREVIOUS NEXT
http://202.224.189.179/view_new/EU/TX-22LT2F/SVC/s0500000000x.html (2 of 2)29.01.2008 8:42:32
Page 14

http://202.224.189.179/view_new/EU/TX-22LT2F/SVC/s0600000000x.html
6 Servicing method
TOP PREVIOUS NEXT
6.1 Removing tilt base
6.2 Removing rear panel
6.3 Removing speaker unit
6.4 Removing chassis
6.5 Removing A-Board
6.6 Removing B-Board (with tuner assembly)
6.7 Removing DG-Board
6.8 Removing H1-Board and H2-Board
6.9 Removing P1-Board
6.10 Removing P2-Board
6.11 Removing K-Board
6.12 Removing V-Board
6.13 A-Board servicing
TOP PREVIOUS NEXT
http://202.224.189.179/view_new/EU/TX-22LT2F/SVC/s0600000000x.html29.01.2008 8:42:37
Page 15
http://202.224.189.179/view_new/EU/TX-22LT2F/SVC/s0601000000.html
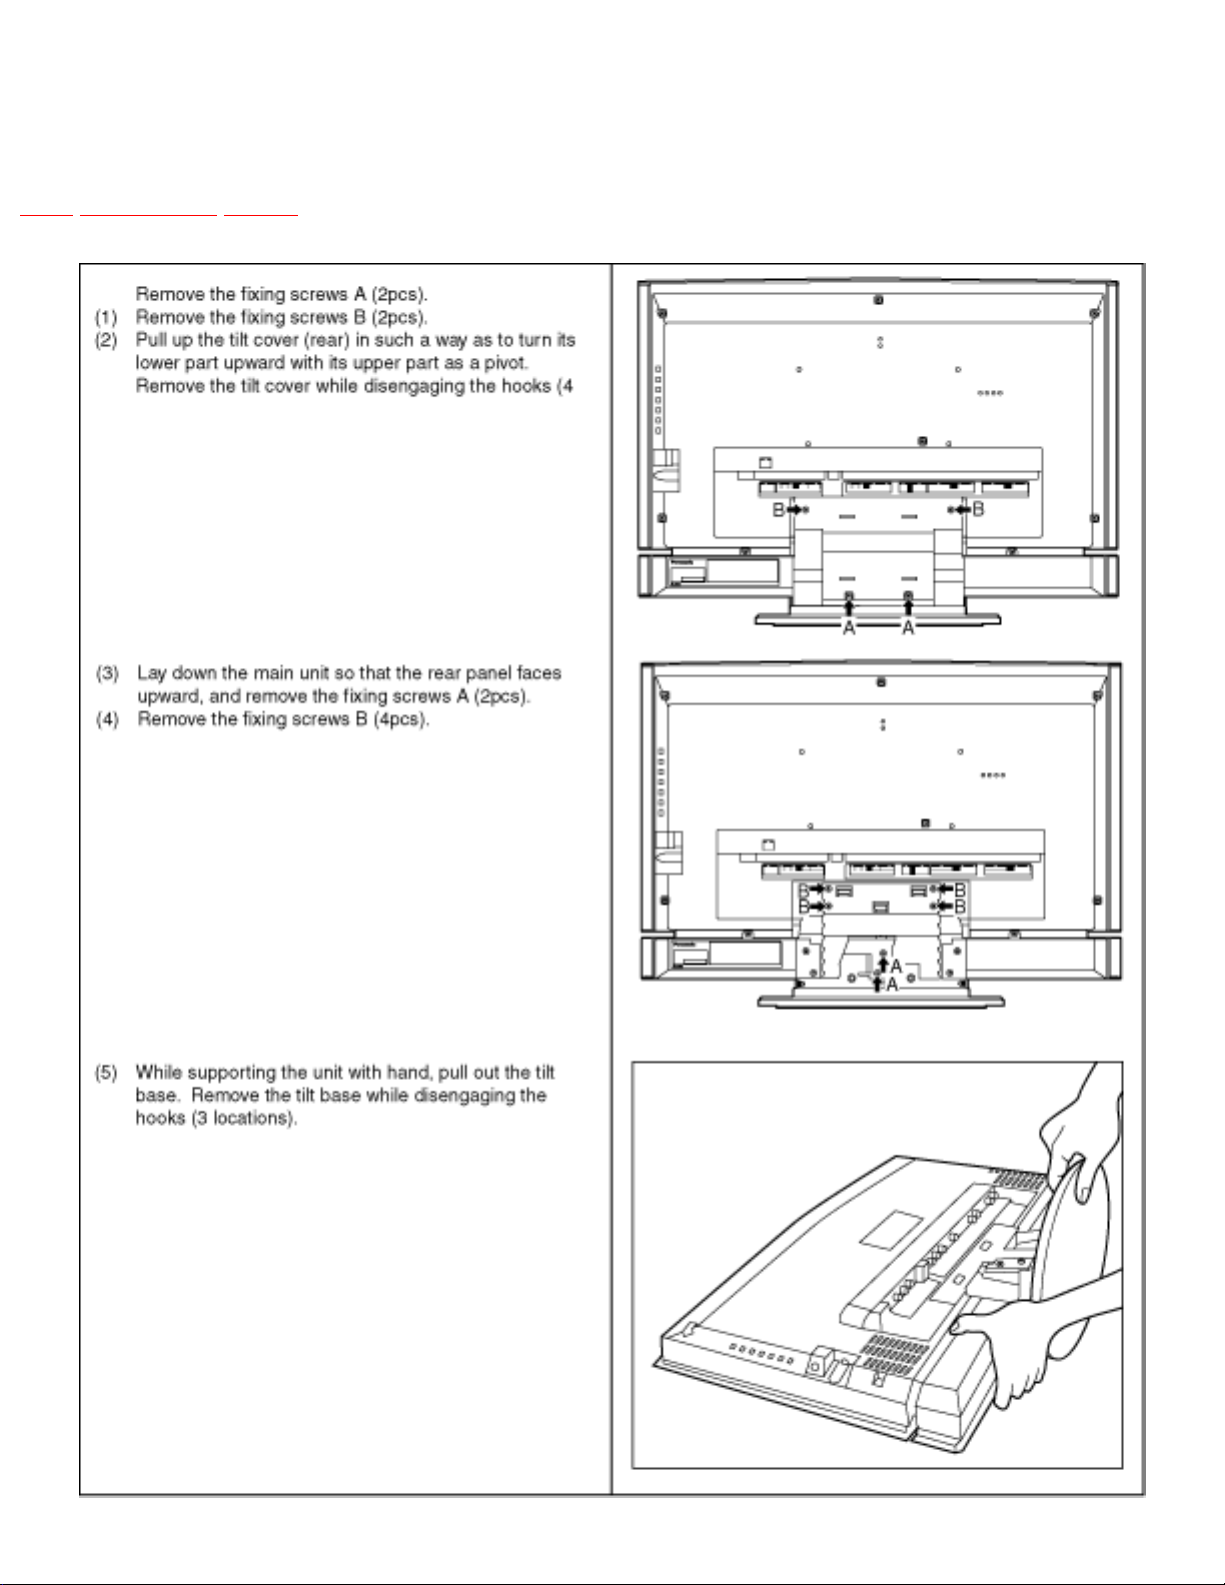
6.1 Removing tilt base
TOP PREVIOUS NEXT
http://202.224.189.179/view_new/EU/TX-22LT2F/SVC/s0601000000.html (1 of 2)29.01.2008 8:42:40
Page 16

http://202.224.189.179/view_new/EU/TX-22LT2F/SVC/s0601000000.html
TOP PREVIOUS NEXT
http://202.224.189.179/view_new/EU/TX-22LT2F/SVC/s0601000000.html (2 of 2)29.01.2008 8:42:40
Page 17

http://202.224.189.179/view_new/EU/TX-22LT2F/SVC/s0602000000.html
6.2 Removing rear panel
TOP PREVIOUS NEXT
TOP PREVIOUS NEXT
http://202.224.189.179/view_new/EU/TX-22LT2F/SVC/s0602000000.html29.01.2008 8:42:46
Page 18

http://202.224.189.179/view_new/EU/TX-22LT2F/SVC/s0603000000.html
6.3 Removing speaker unit
TOP PREVIOUS NEXT
TOP PREVIOUS NEXT
http://202.224.189.179/view_new/EU/TX-22LT2F/SVC/s0603000000.html29.01.2008 8:42:51
Page 19

http://202.224.189.179/view_new/EU/TX-22LT2F/SVC/s0604000000.html
6.4 Removing chassis
TOP PREVIOUS NEXT
http://202.224.189.179/view_new/EU/TX-22LT2F/SVC/s0604000000.html (1 of 2)29.01.2008 8:42:56
Page 20

http://202.224.189.179/view_new/EU/TX-22LT2F/SVC/s0604000000.html
TOP PREVIOUS NEXT
http://202.224.189.179/view_new/EU/TX-22LT2F/SVC/s0604000000.html (2 of 2)29.01.2008 8:42:56
Page 21

http://202.224.189.179/view_new/EU/TX-22LT2F/SVC/s0605000000.html
6.5 Removing A-Board
TOP PREVIOUS NEXT
http://202.224.189.179/view_new/EU/TX-22LT2F/SVC/s0605000000.html (1 of 2)29.01.2008 8:43:02
Page 22

http://202.224.189.179/view_new/EU/TX-22LT2F/SVC/s0605000000.html
TOP PREVIOUS NEXT
http://202.224.189.179/view_new/EU/TX-22LT2F/SVC/s0605000000.html (2 of 2)29.01.2008 8:43:02
Page 23

http://202.224.189.179/view_new/EU/TX-22LT2F/SVC/s0606000000.html
6.6 Removing B-Board (with tuner assembly)
TOP PREVIOUS NEXT
TOP PREVIOUS NEXT
http://202.224.189.179/view_new/EU/TX-22LT2F/SVC/s0606000000.html29.01.2008 8:43:06
Page 24

http://202.224.189.179/view_new/EU/TX-22LT2F/SVC/s0607000000.html
6.7 Removing DG-Board
TOP PREVIOUS NEXT
TOP PREVIOUS NEXT
http://202.224.189.179/view_new/EU/TX-22LT2F/SVC/s0607000000.html29.01.2008 8:43:10
Page 25
http://202.224.189.179/view_new/EU/TX-22LT2F/SVC/s0608000000.html
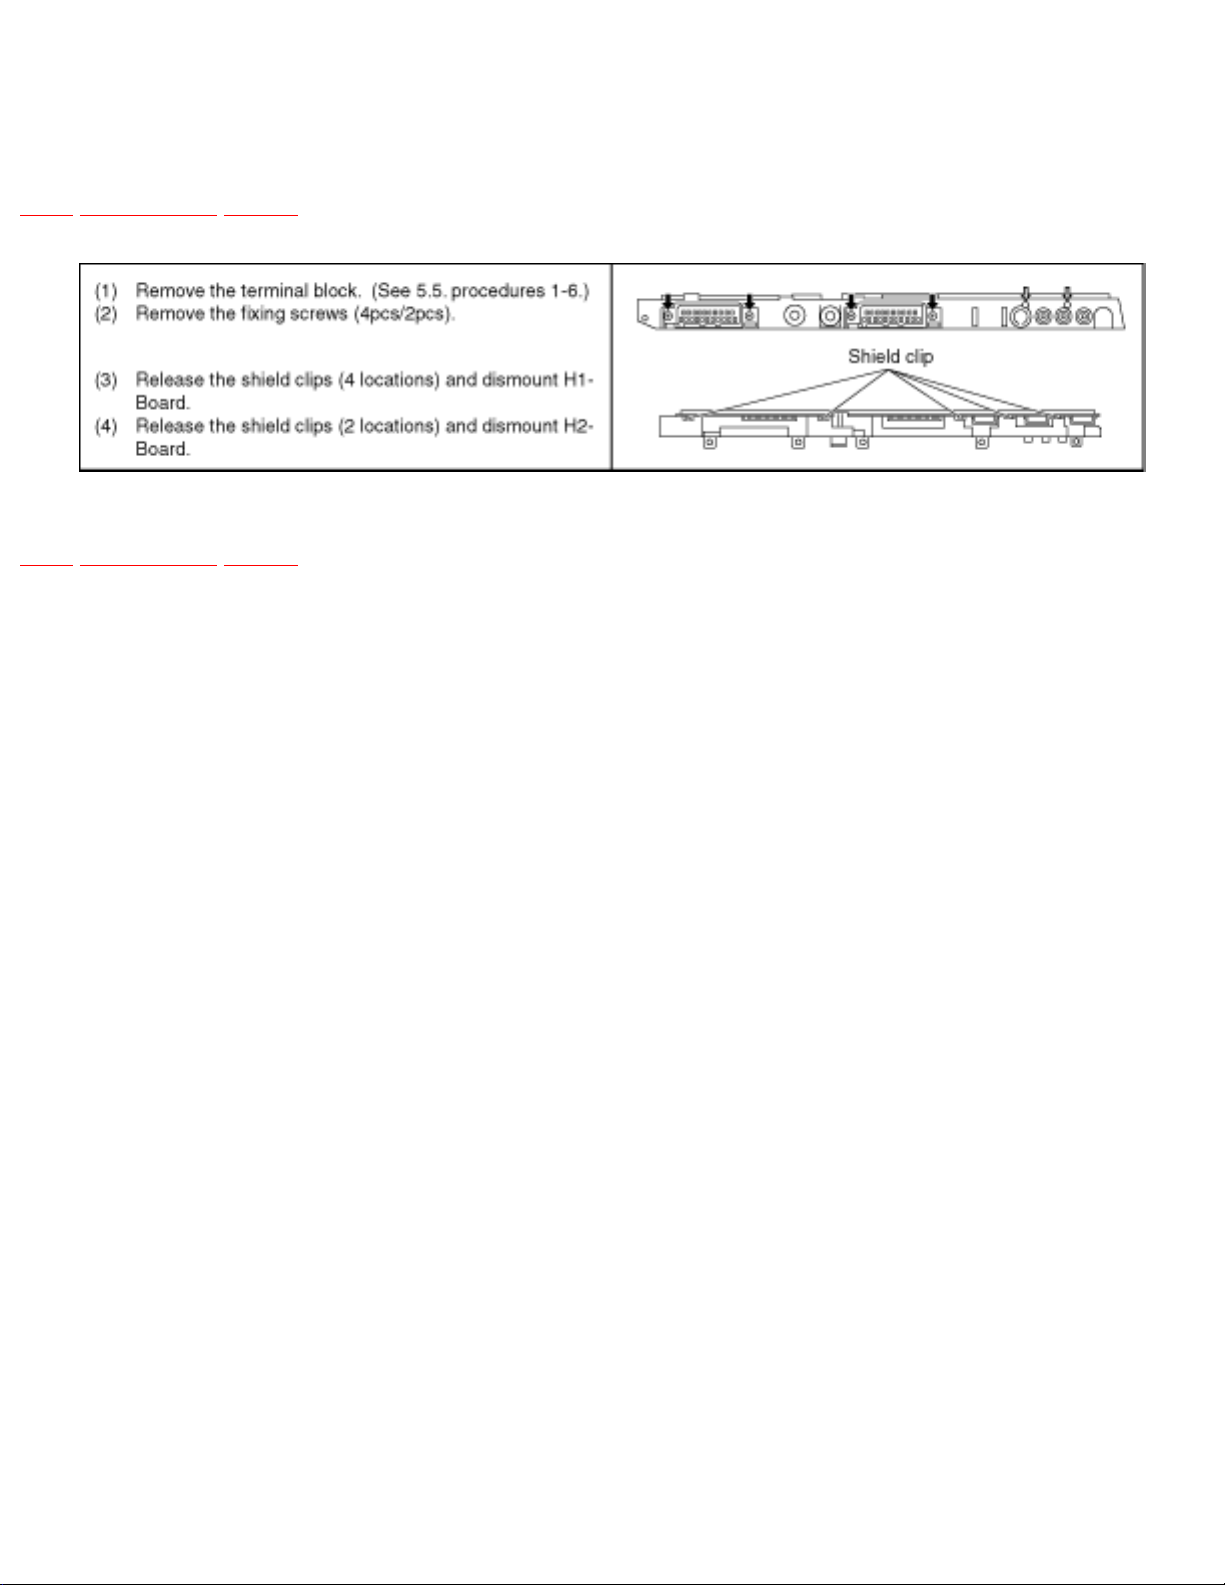
6.8 Removing H1-Board and H2-Board
TOP PREVIOUS NEXT
TOP PREVIOUS NEXT
http://202.224.189.179/view_new/EU/TX-22LT2F/SVC/s0608000000.html29.01.2008 8:43:14
Page 26

http://202.224.189.179/view_new/EU/TX-22LT2F/SVC/s0609000000.html
6.9 Removing P1-Board
TOP PREVIOUS NEXT
TOP PREVIOUS NEXT
http://202.224.189.179/view_new/EU/TX-22LT2F/SVC/s0609000000.html29.01.2008 8:43:18
Page 27

http://202.224.189.179/view_new/EU/TX-22LT2F/SVC/s0610000000.html
6.10 Removing P2-Board
TOP PREVIOUS NEXT
TOP PREVIOUS NEXT
http://202.224.189.179/view_new/EU/TX-22LT2F/SVC/s0610000000.html29.01.2008 8:43:22
Page 28

http://202.224.189.179/view_new/EU/TX-22LT2F/SVC/s0611000000.html
6.11 Removing K-Board
TOP PREVIOUS NEXT
TOP PREVIOUS NEXT
http://202.224.189.179/view_new/EU/TX-22LT2F/SVC/s0611000000.html29.01.2008 8:43:27
Page 29

http://202.224.189.179/view_new/EU/TX-22LT2F/SVC/s0612000000.html
6.12 Removing V-Board
TOP PREVIOUS NEXT
TOP PREVIOUS NEXT
http://202.224.189.179/view_new/EU/TX-22LT2F/SVC/s0612000000.html29.01.2008 8:43:31
Page 30

http://202.224.189.179/view_new/EU/TX-22LT2F/SVC/s0613000000.html
6.13 A-Board servicing
TOP PREVIOUS NEXT
TOP PREVIOUS NEXT
http://202.224.189.179/view_new/EU/TX-22LT2F/SVC/s0613000000.html29.01.2008 8:43:35
Page 31

http://202.224.189.179/view_new/EU/TX-22LT2F/SVC/s0700000000x.html
7 Service Mode Function
TOP PREVIOUS NEXT
MPU controls the functions switching for each IICs through IIC bus in this chassis. The following
setting and adjustment can be adjusted by remote control in Service Mode.
7.1 How to enter SERVICE 1
7.2 How to enter SERVICE 2
7.3 Option Description
TOP PREVIOUS NEXT
http://202.224.189.179/view_new/EU/TX-22LT2F/SVC/s0700000000x.html29.01.2008 8:43:41
Page 32
http://202.224.189.179/view_new/EU/TX-22LT2F/SVC/s0701000000.html
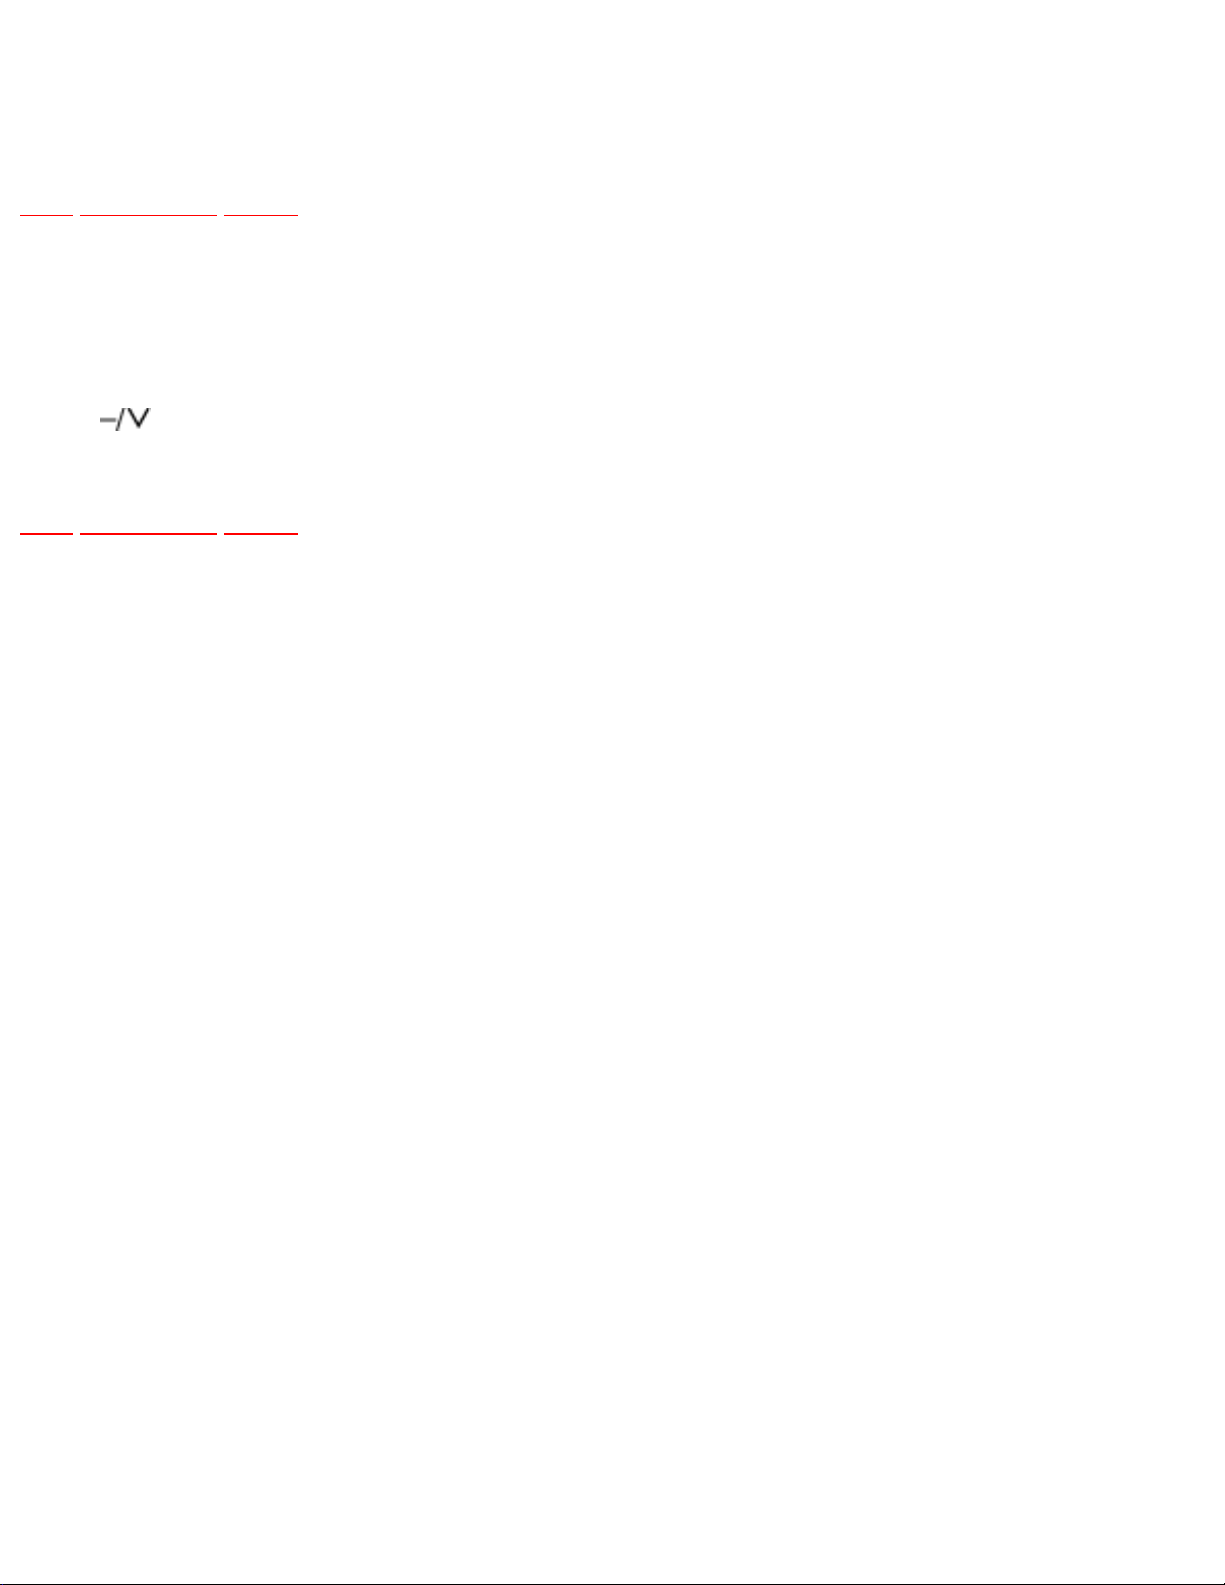
7.1 How to enter SERVICE 1
TOP PREVIOUS NEXT
1. In sound menu, set BASS to MAX/MUM, and set TREBLE to MINIMUM.
2. Simultaneously press INDEX button on remote control and DOWN button [
] on the TV set.
TOP PREVIOUS NEXT
http://202.224.189.179/view_new/EU/TX-22LT2F/SVC/s0701000000.html29.01.2008 8:43:44
Page 33
http://202.224.189.179/view_new/EU/TX-22LT2F/SVC/s0702000000.html
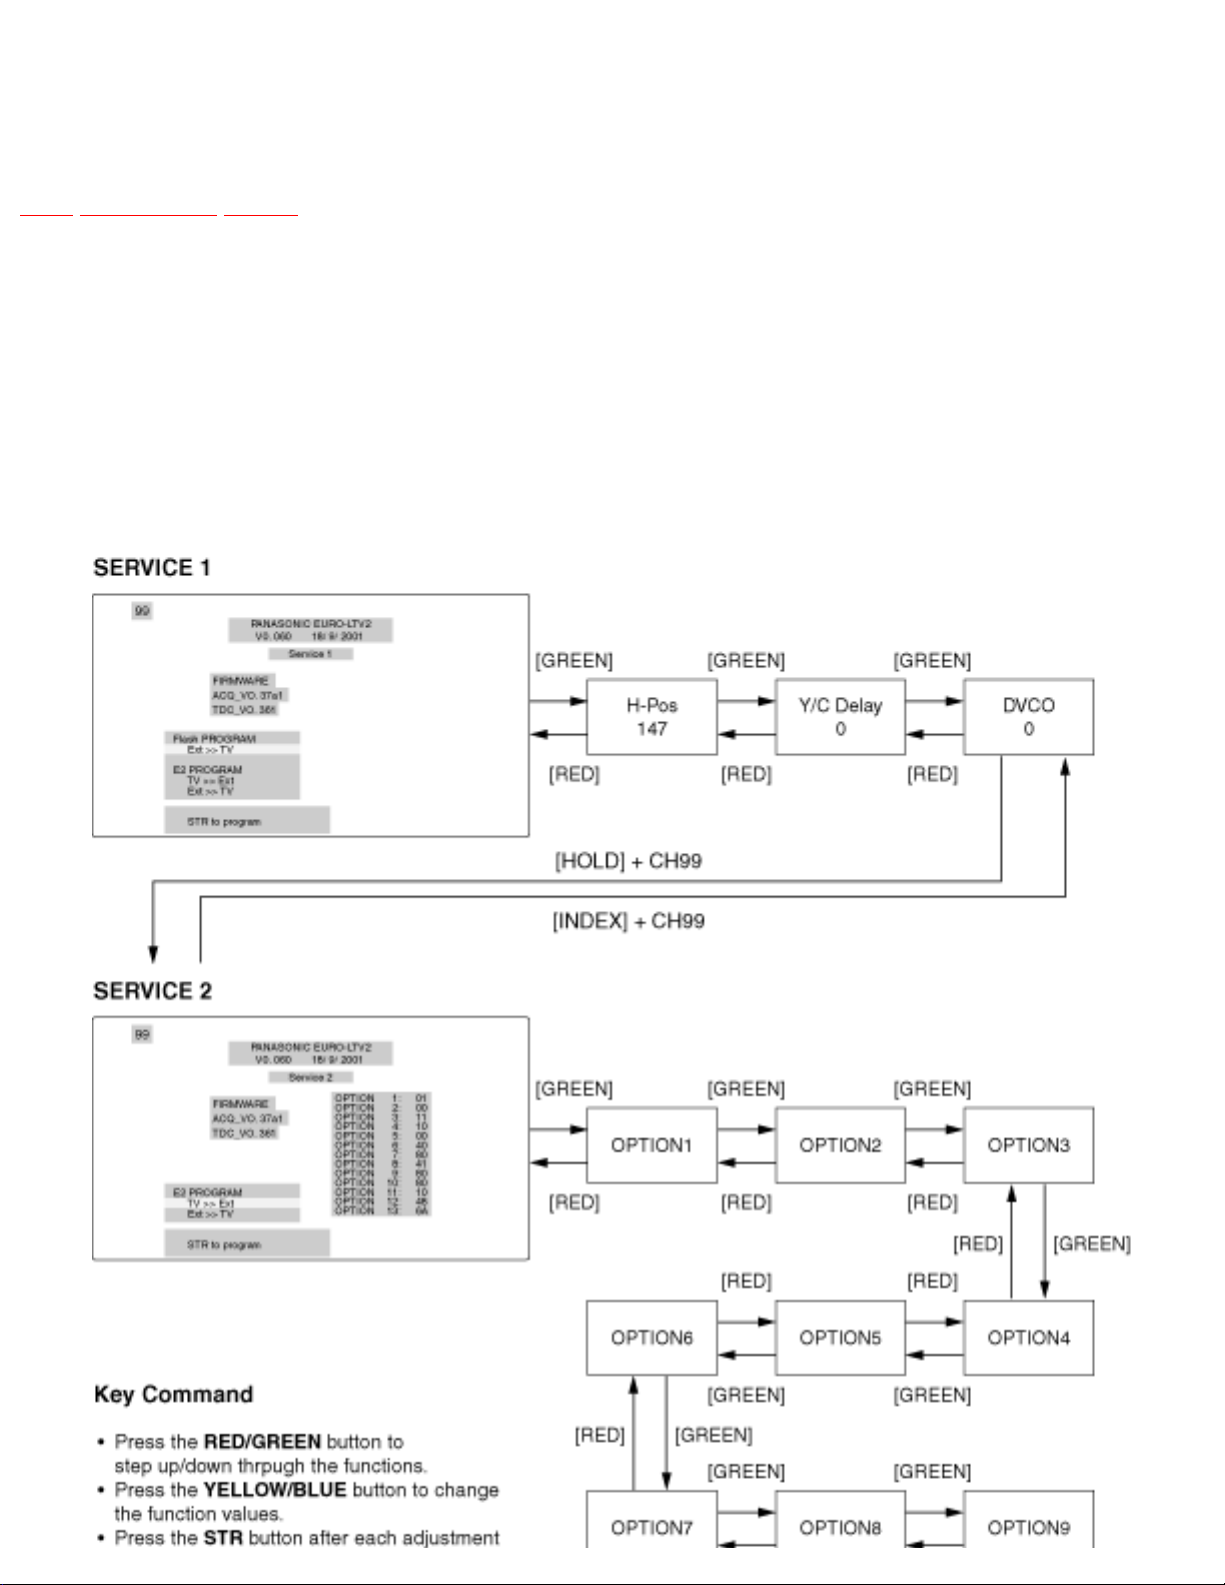
7.2 How to enter SERVICE 2
TOP PREVIOUS NEXT
1. Set the channel to CH99.
2. Press HOLD button on remote control.
Note:
To exit to Service mode, press N or Power button on remote control.
http://202.224.189.179/view_new/EU/TX-22LT2F/SVC/s0702000000.html (1 of 2)29.01.2008 8:43:51
Page 34
http://202.224.189.179/view_new/EU/TX-22LT2F/SVC/s0702000000.html
TOP PREVIOUS NEXT
http://202.224.189.179/view_new/EU/TX-22LT2F/SVC/s0702000000.html (2 of 2)29.01.2008 8:43:51
Page 35
http://202.224.189.179/view_new/EU/TX-22LT2F/SVC/s0703000000.html
7.3 Option Description
TOP PREVIOUS NEXT
http://202.224.189.179/view_new/EU/TX-22LT2F/SVC/s0703000000.html (1 of 2)29.01.2008 8:43:56
Page 36
http://202.224.189.179/view_new/EU/TX-22LT2F/SVC/s0703000000.html
TOP PREVIOUS NEXT
http://202.224.189.179/view_new/EU/TX-22LT2F/SVC/s0703000000.html (2 of 2)29.01.2008 8:43:56
Page 37

http://202.224.189.179/view_new/EU/TX-22LT2F/SVC/s0800000000x.html
8 Conductor Views
TOP PREVIOUS NEXT
8.1 A-Board
8.2 B, H1, H2, K, P1 and P2-Board
8.3 DG-Board
TOP PREVIOUS NEXT
http://202.224.189.179/view_new/EU/TX-22LT2F/SVC/s0800000000x.html29.01.2008 8:44:03
Page 38

http://202.224.189.179/view_new/EU/TX-22LT2F/SVC/s0801000000.html
8.1 A-Board
TOP PREVIOUS NEXT
TOP PREVIOUS NEXT
http://202.224.189.179/view_new/EU/TX-22LT2F/SVC/s0801000000.html29.01.2008 8:44:06
Page 39
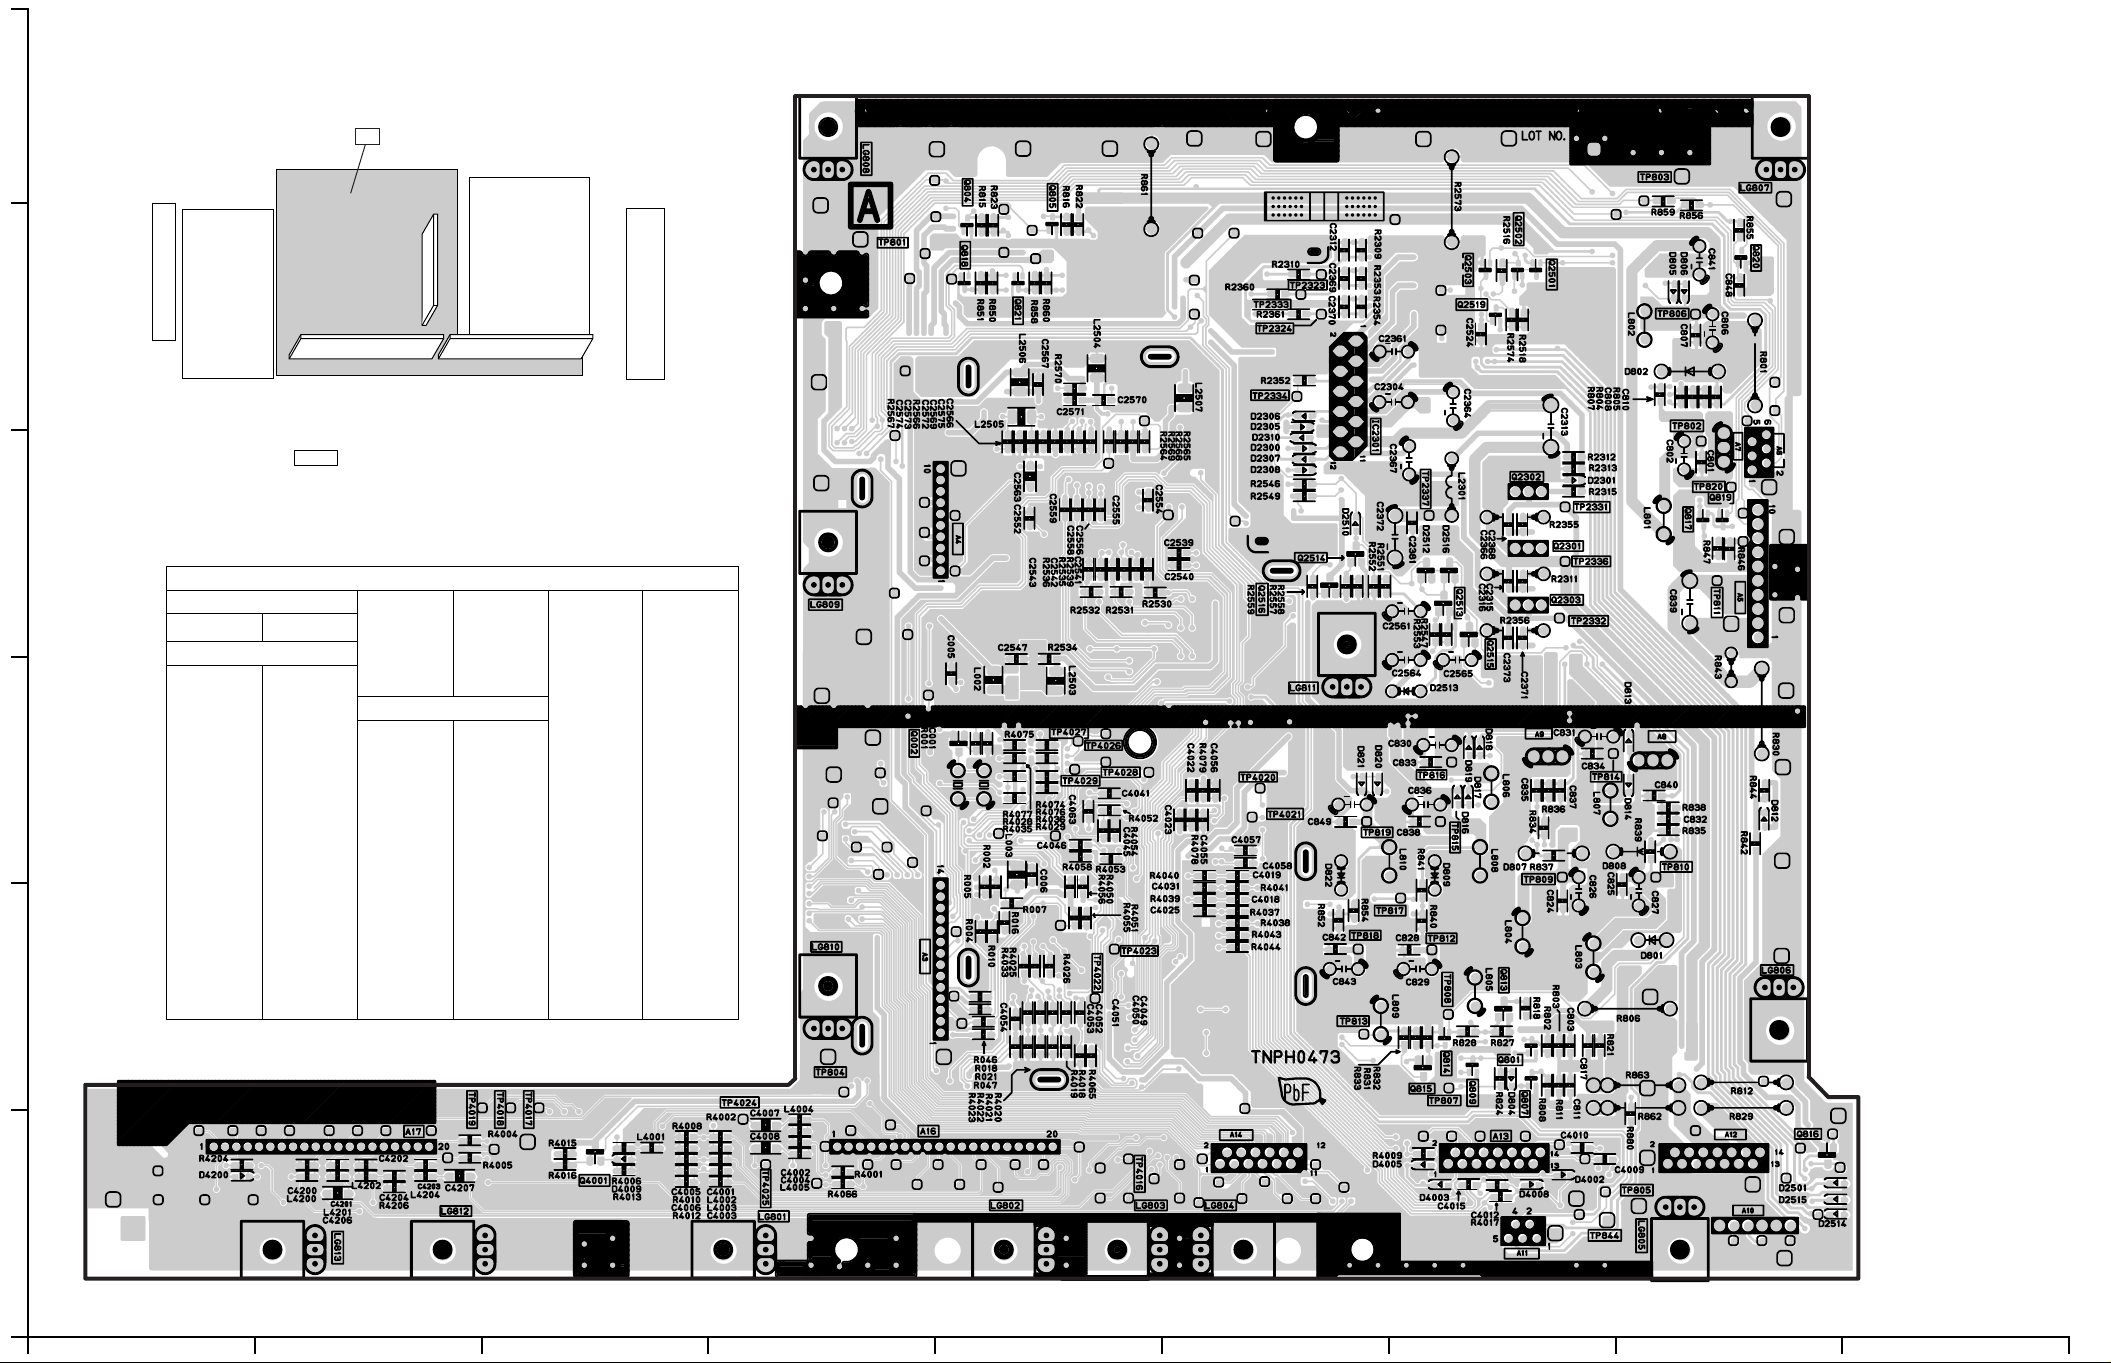
A-BOARD (FOIL SIDE)
TNPH0473AB
6
A
5
4
Parts Location
A-BOARD (FOIL SIDE)
IC
IC2301 G-4
TRANSISTOR
Q002 D-3
Q801 G-2
Q804 E-6
Q805 E-6
Q807 G-2
3
2
Q809 G-2
Q813 G-2
Q814 G-2
Q815 G-2
Q816 H-1
Q817 H-4
Q818 E-5
Q819 H-4
Q820 H-5
Q821 E-5
Q2301 G-4
Q2302 G-4
Q2303 G-4
Q2501 G-5
Q2502 G-5
Q2503 G-5
Q2513 G-4
Q2514 F-4
Q2515 G-4
Q2516 F-4
Q2519 G-5
Q4001 C-1
TP
TP801 D-5
TP802 H-5
TP803 H-6
TP804 D-2
TP805 H-1
TP806 H-5
TP807 G-2
TP808 G-2
TP809 G-3
TP810 H-3
TP811 H-4
TP812 G-2
TP813 F-2
TP814 H-3
TP815 G-3
TP816 G-3
TP817 G-2
TP818 F-2
TP819 G-3
TP820 H-4
TP844 G-1
TP2323 F-5
TP2324 F-5
TP2331 G-4
TP2332 G-4
TP2333 F-5
TP2334 F-5
TP2336 G-4
TP2337 G-4
TP4016 E-1
TP4017 C-2
TP4018 C-2
TP4019 B-2
TP4020 F-3
TP4021 F-3
TP4022 E-2
TP4023 E-2
TP4024 D-2
TP4025 D-1
TP4026 E-3
TP4027 E-3
TP4028 E-3
TP4029 E -3
1
A
C E GIBDFH
Page 40
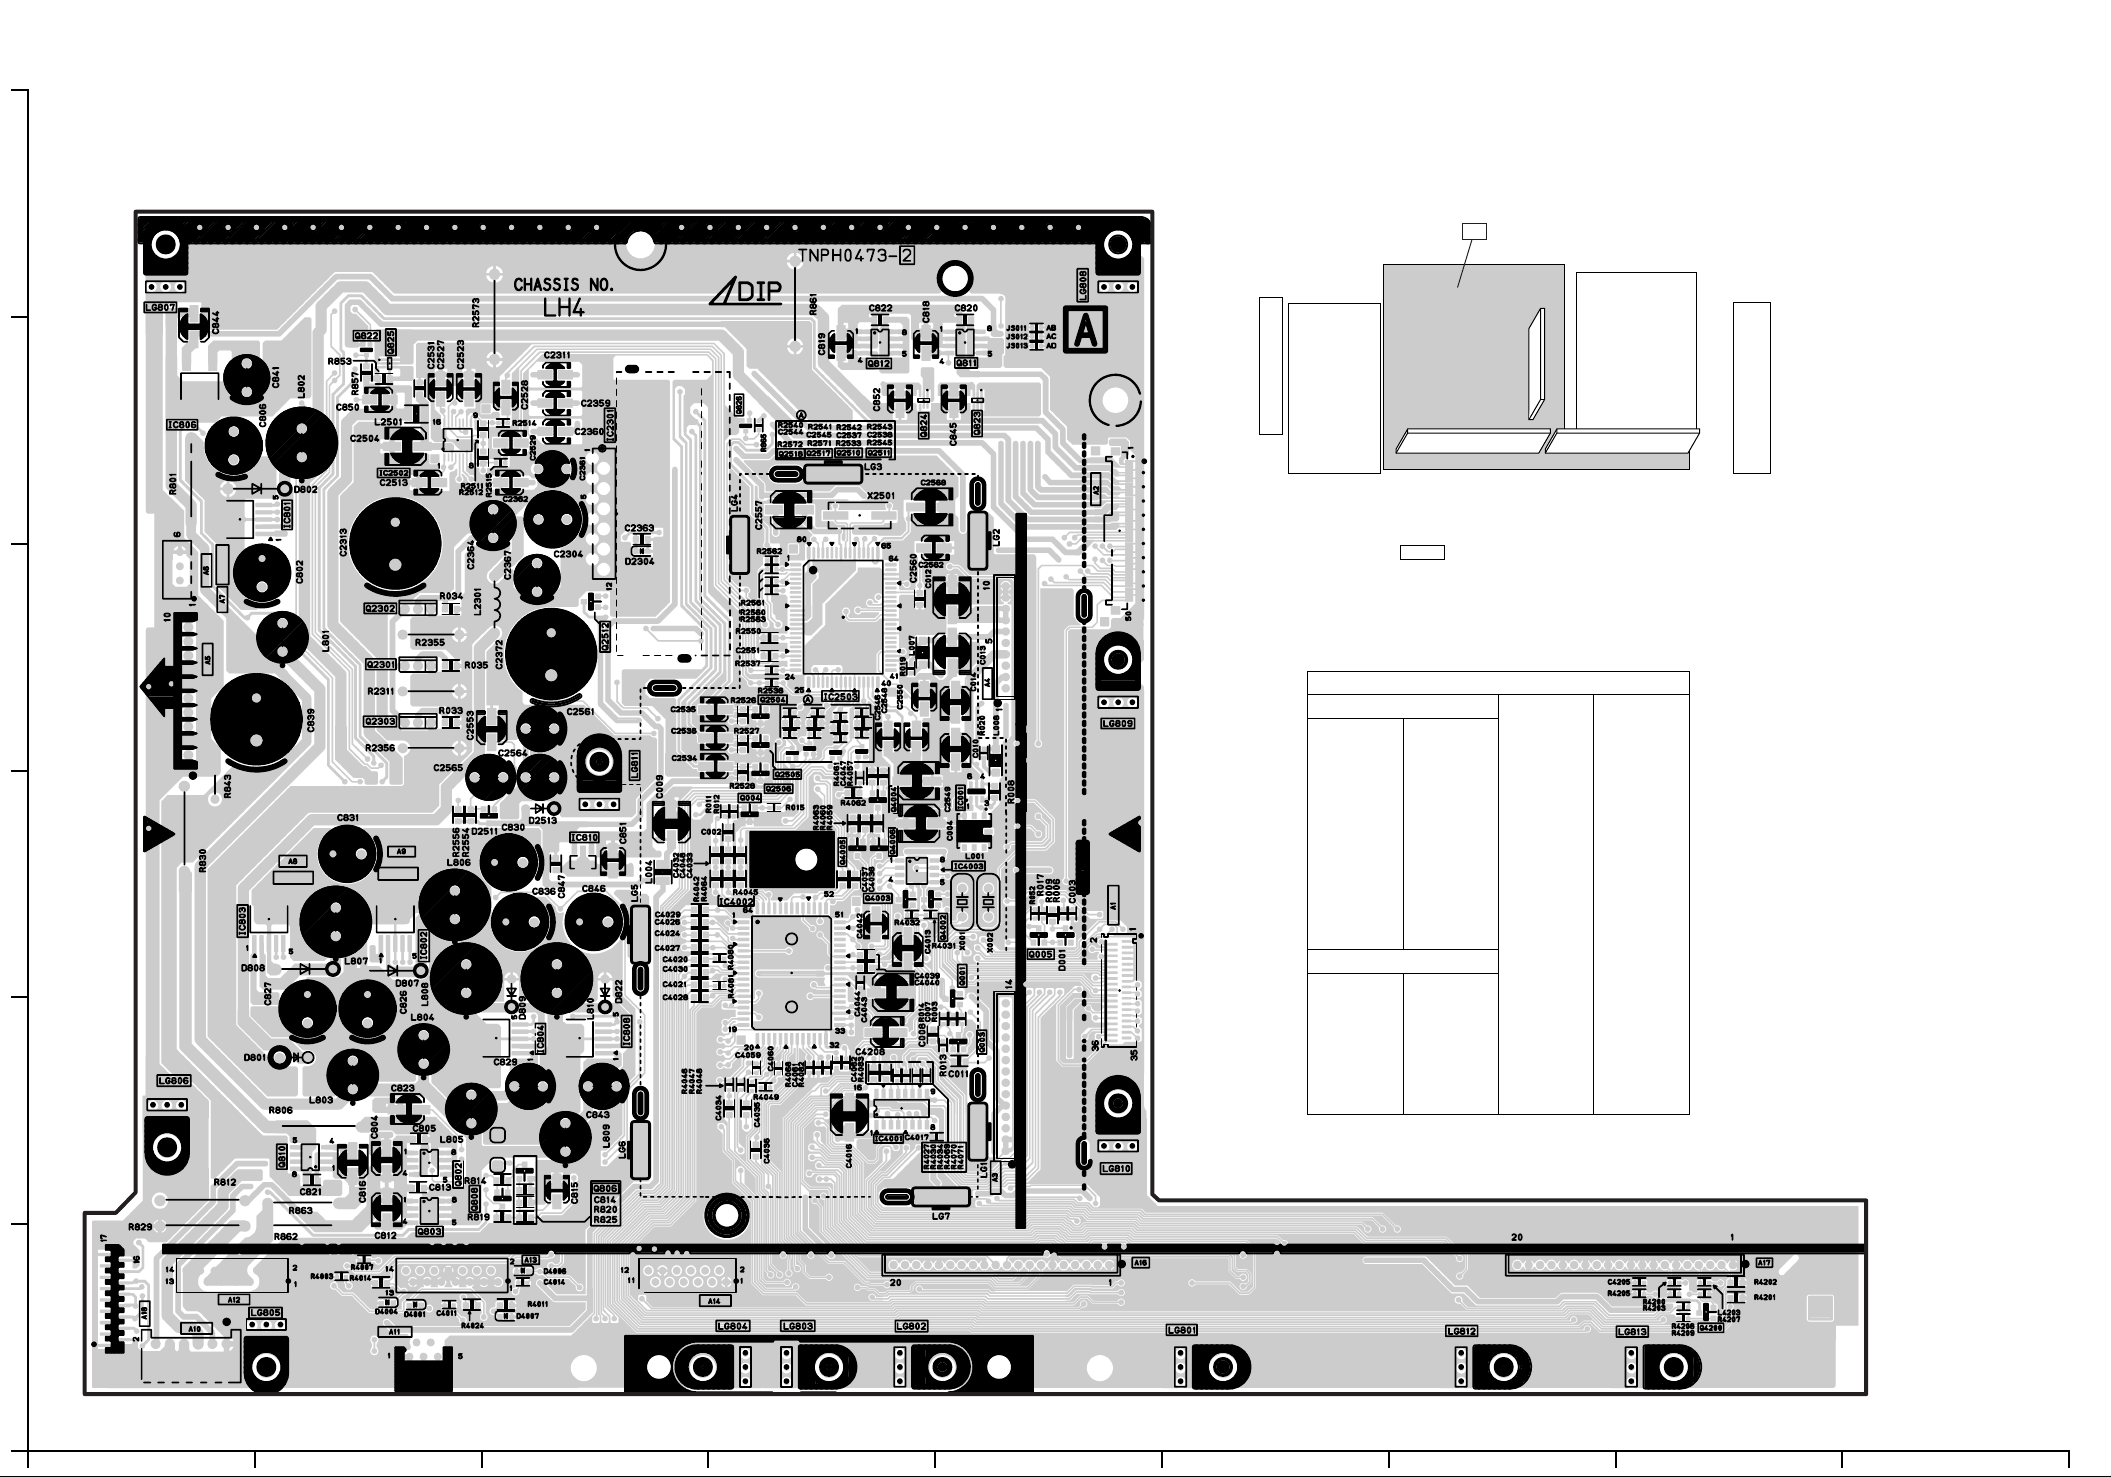
A-BOARD (COMPONENT SIDE)
TNPH0473AB
6
A
5
4
Parts Location
A-BOARD (COMPONENT SIDE)
IC
IC001 E-3 IC801 B-5 IC802 B-3 IC803 A-3 IC804 C-2 IC806 A-5 IC808 C-2 IC810 C-3 IC2301 C-5
3
IC2502 B-5 IC2503 D-4 IC4001 D-2 IC4002 D-3 IC4003 E-3
TRANSISTOR
Q001 E-3
Q003 E-2
Q004 D-3
Q005 E-3
Q802 B-2
Q803 B-1
Q806 C-2
2
Q808 B-2
Q810 B-2
Q811 E-5
Q812 D-5
Q822 B-5
Q823 E-5
Q824 D-5
Q825 B-5
Q826 D-5
Q2301 B-4
Q2302 B-4
Q2303 B-4
Q2504 D-4
Q2505 D-3
Q2506 D-3
Q2510 D-5
Q2511 D-5
Q2512 C-4
Q2517 D-5
Q2518 D-5
Q4002 E-3
Q4003 D-3
Q4004 D-3
Q4005 D-3
Q4006 D-3
Q4200 H-1
1
A
C E GIBDFH
Page 41

http://202.224.189.179/view_new/EU/TX-22LT2F/SVC/s0802000000.html
8.2 B, H1, H2, K, P1 and P2-Board
TOP PREVIOUS NEXT
TOP PREVIOUS NEXT
http://202.224.189.179/view_new/EU/TX-22LT2F/SVC/s0802000000.html29.01.2008 8:44:29
Page 42
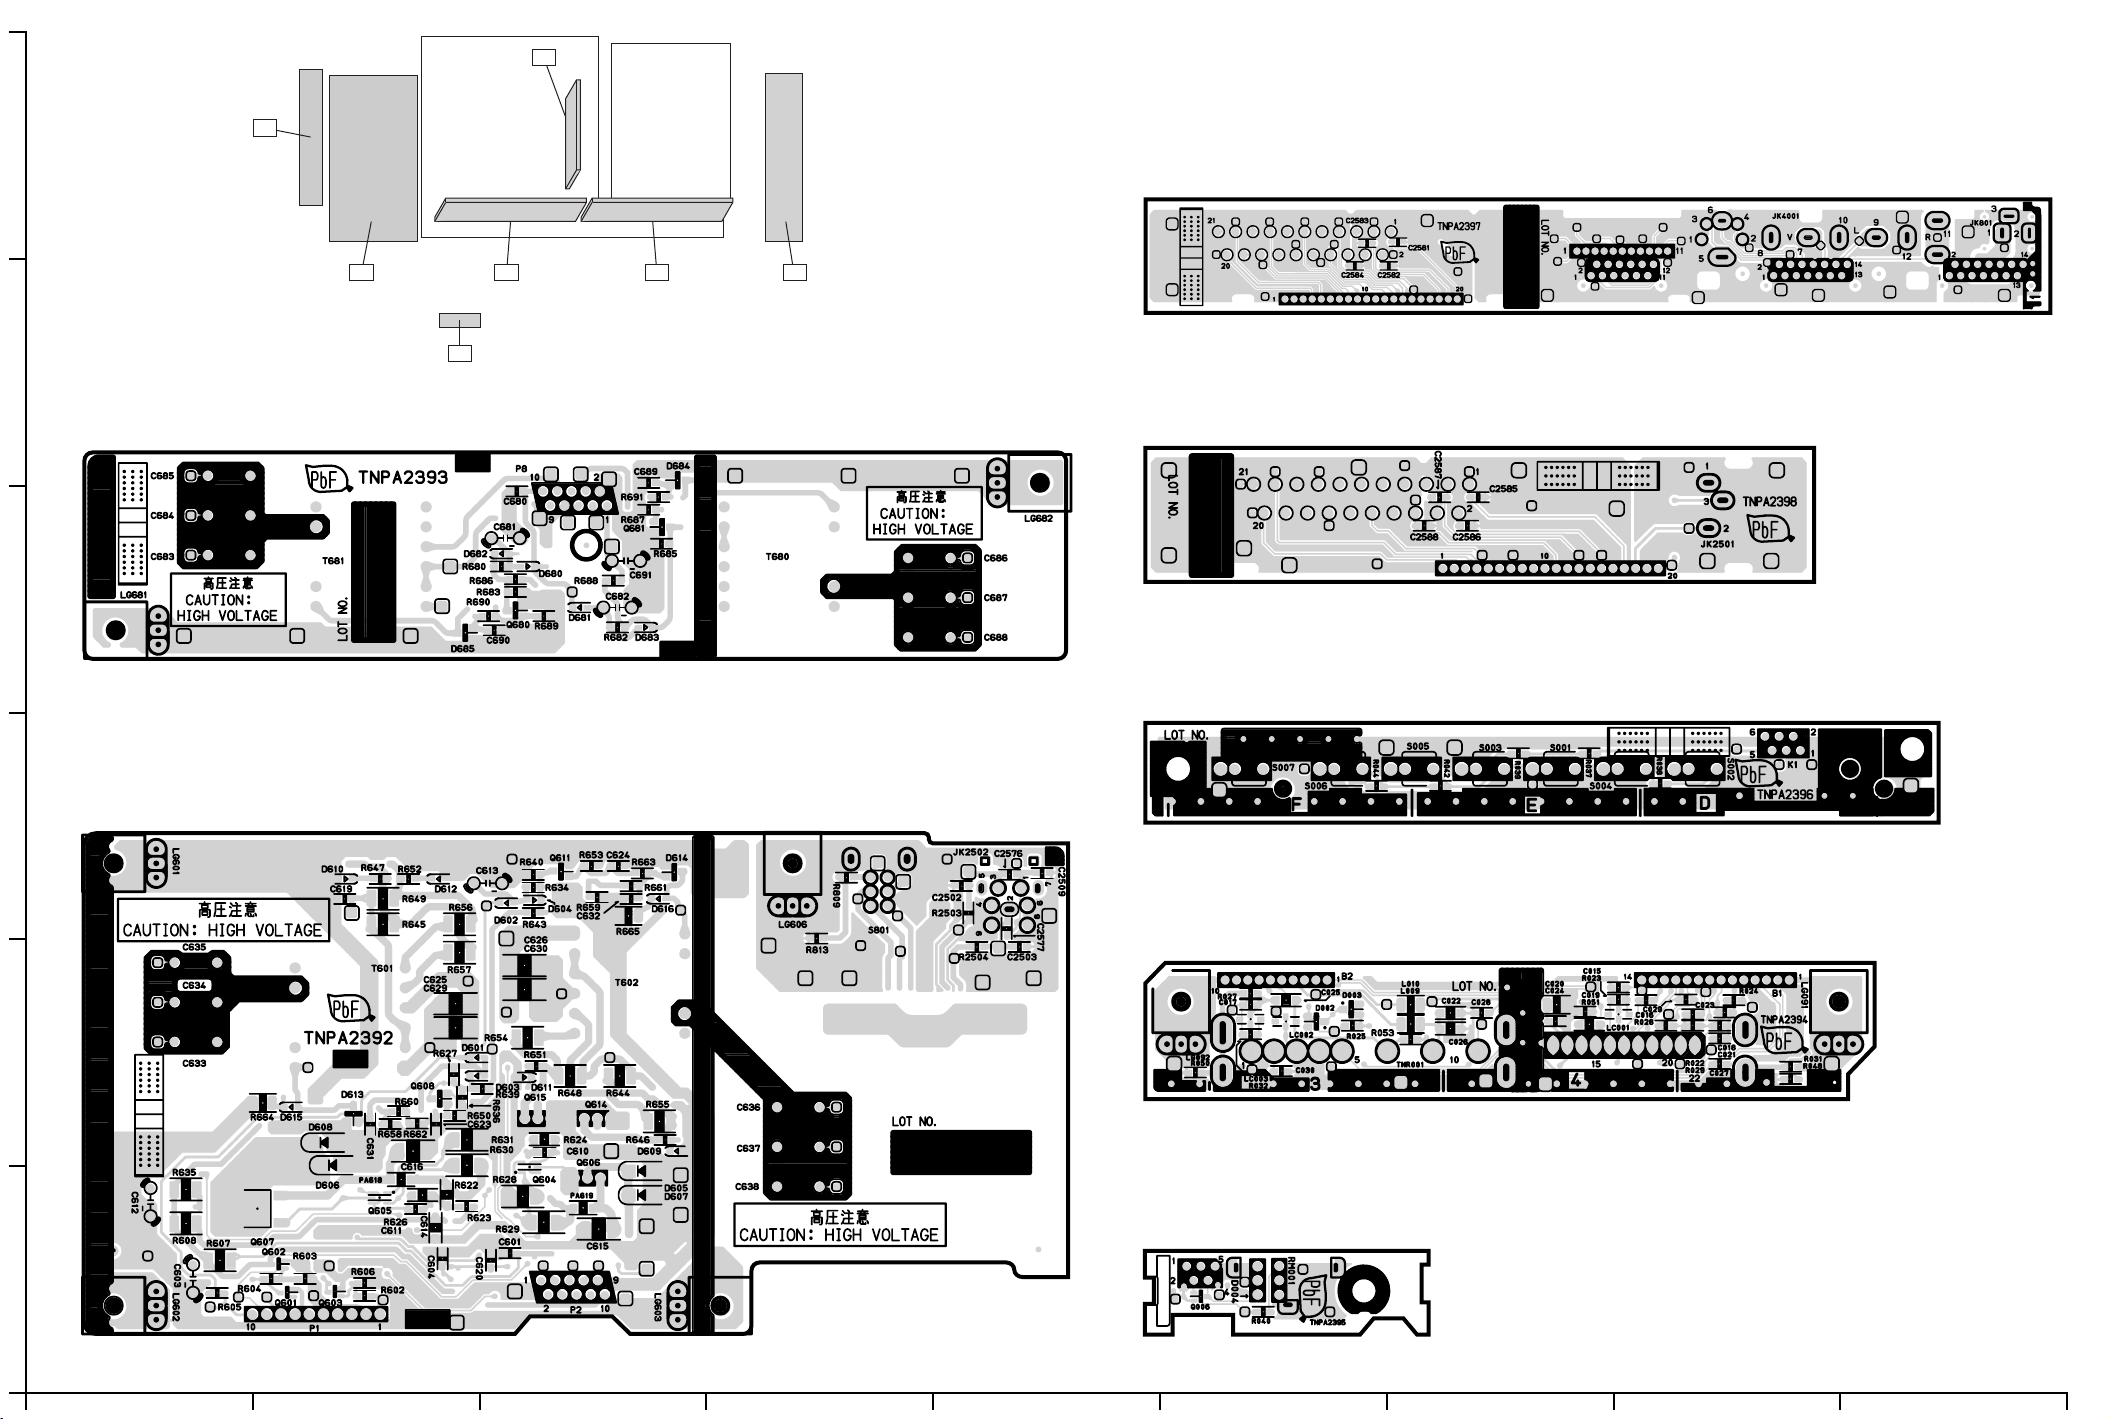
B
6
K
H1-BOARD (FOIL SIDE)
TNPA2397AB
H1
5
V
P2-BOARD (FOIL SIDE)
TNPA2393AB
4
H2
P2P1
H2-BOARD (FOIL SIDE)
TNPA2398AB
K-BOARD (FOIL SIDE)
TNPA2396AB
P1-BOARD (FOIL SIDE)
TNPA2392AB
3
B-BOARD (FOIL SIDE)
TNPA2394AB
2
V-BOARD (FOIL SIDE)
TNPA2395AB
1
A
C E GIBDFH
Page 43
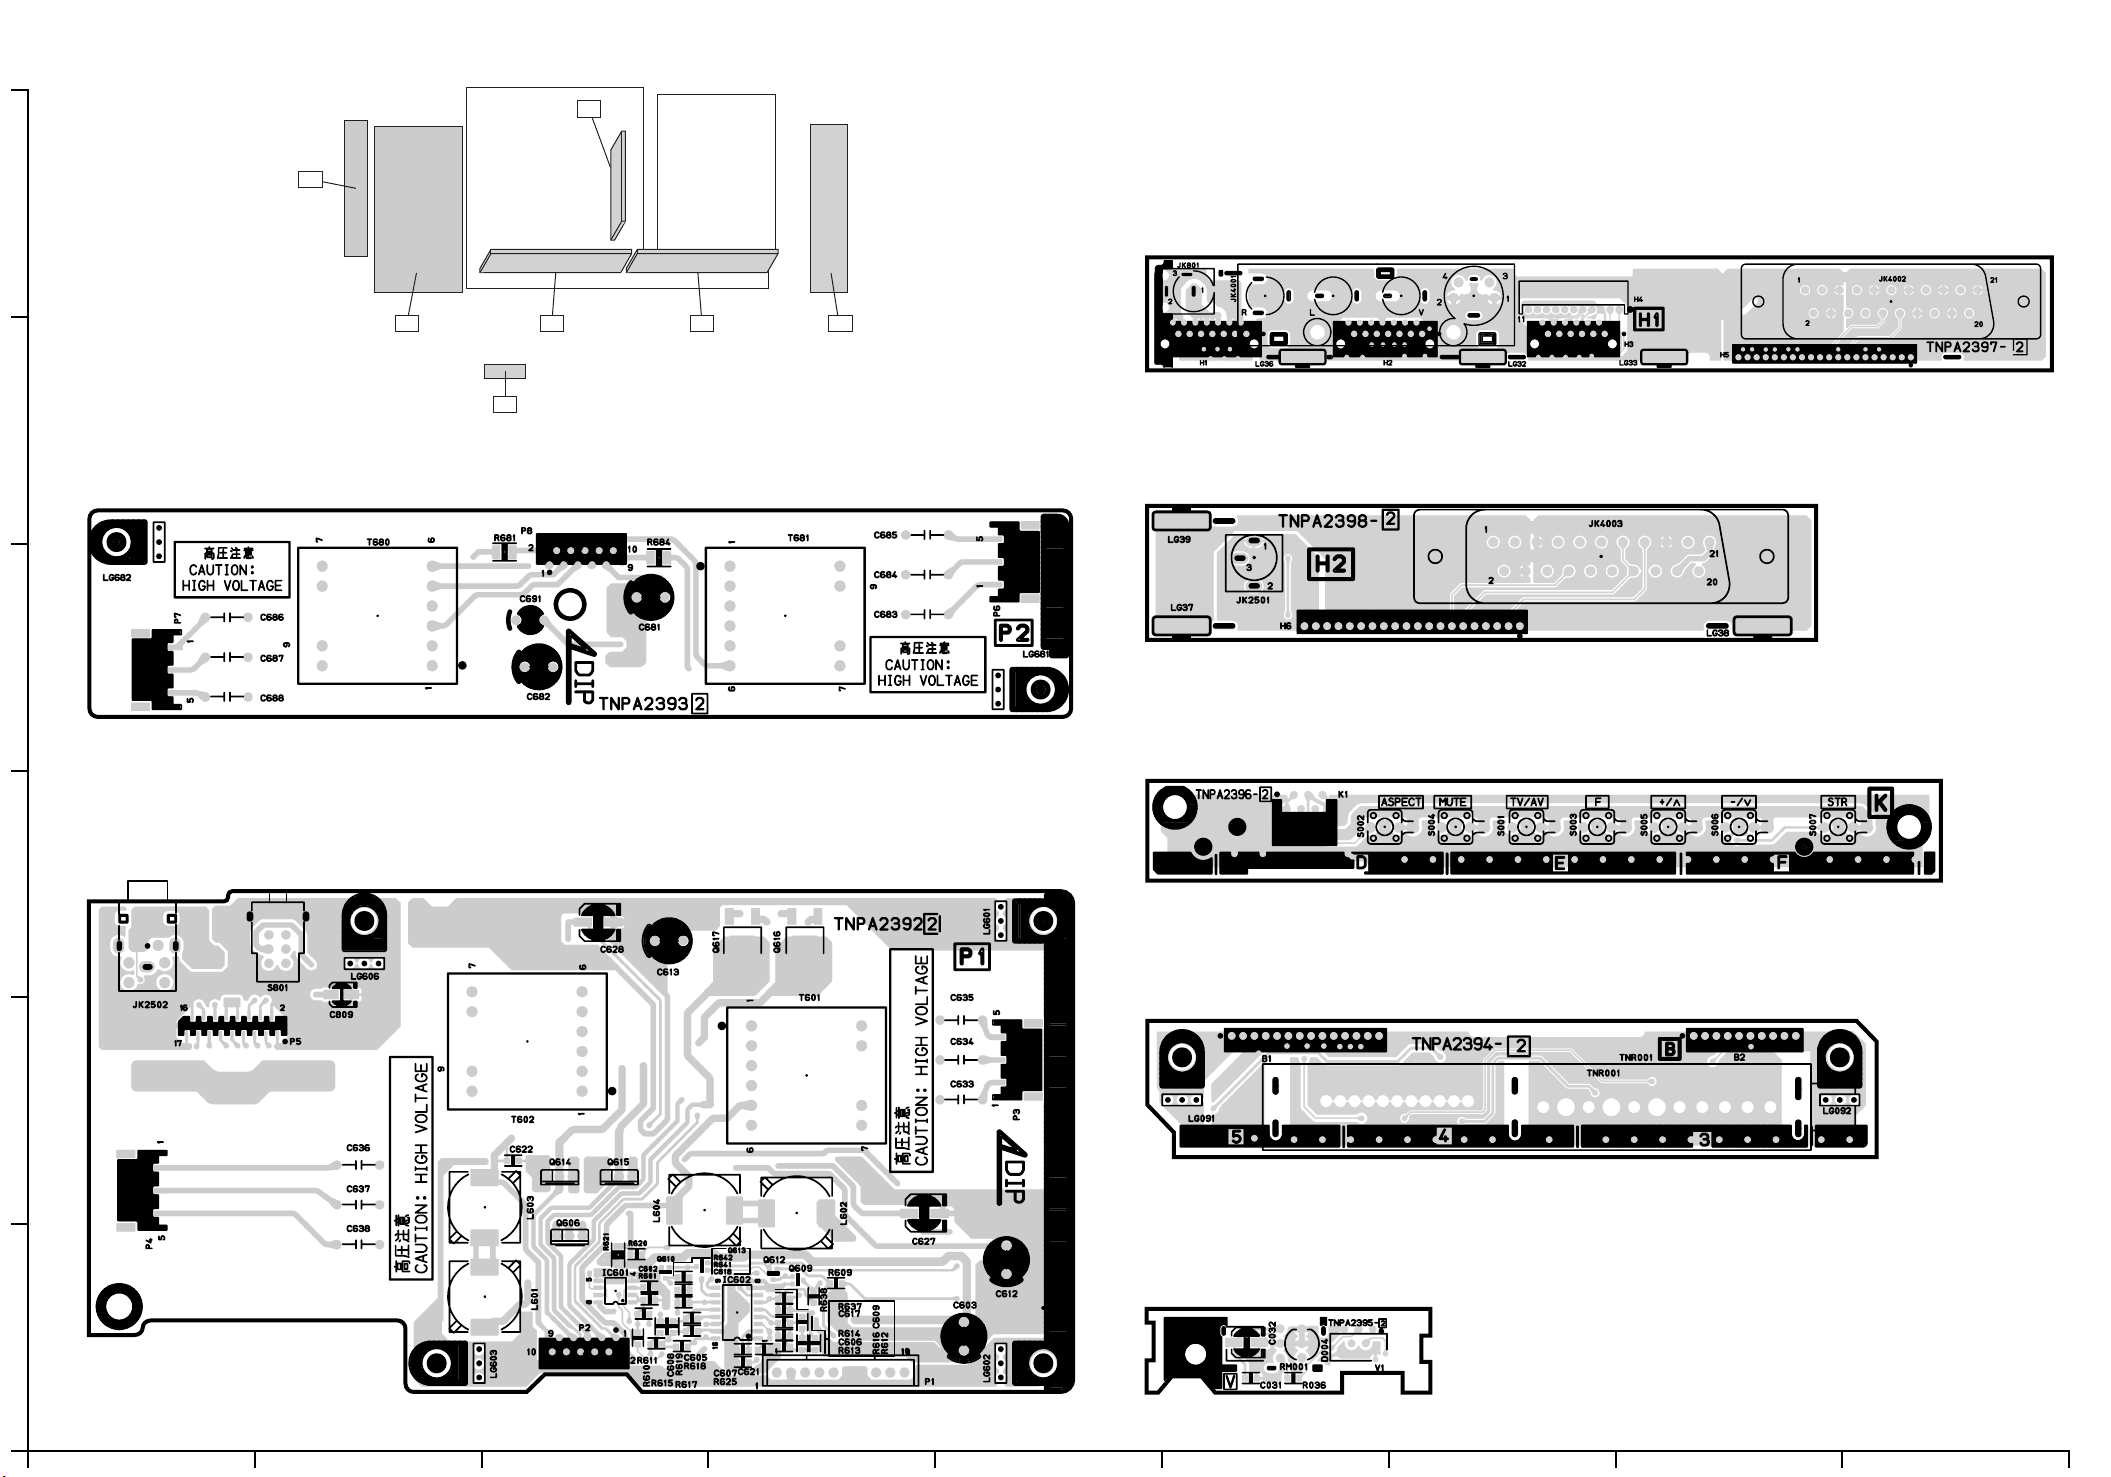
B
K
6
H1-BOARD (COMPONENT SIDE)
TNPA2397AB
H1
V
5
P2-BOARD (COMPONENT SIDE)
TNPA2393AB
4
H2
P2P1
H2-BOARD (COMPONENT SIDE)
TNPA2398AB
K-BOARD (COMPONENT SIDE)
TNPA2396AB
P1-BOARD (COMPONENT SIDE)
TNPA2392AB
3
B-BOARD (COMPONENT SIDE)
TNPA2394AB
2
V-BOARD (COMPONENT SIDE)
TNPA2395AB
1
A
C E GIBDFH
Page 44
http://202.224.189.179/view_new/EU/TX-22LT2F/SVC/s0803000000.html
8.3 DG-Board
TOP PREVIOUS NEXT
TOP PREVIOUS NEXT
http://202.224.189.179/view_new/EU/TX-22LT2F/SVC/s0803000000.html29.01.2008 8:44:47
Page 45
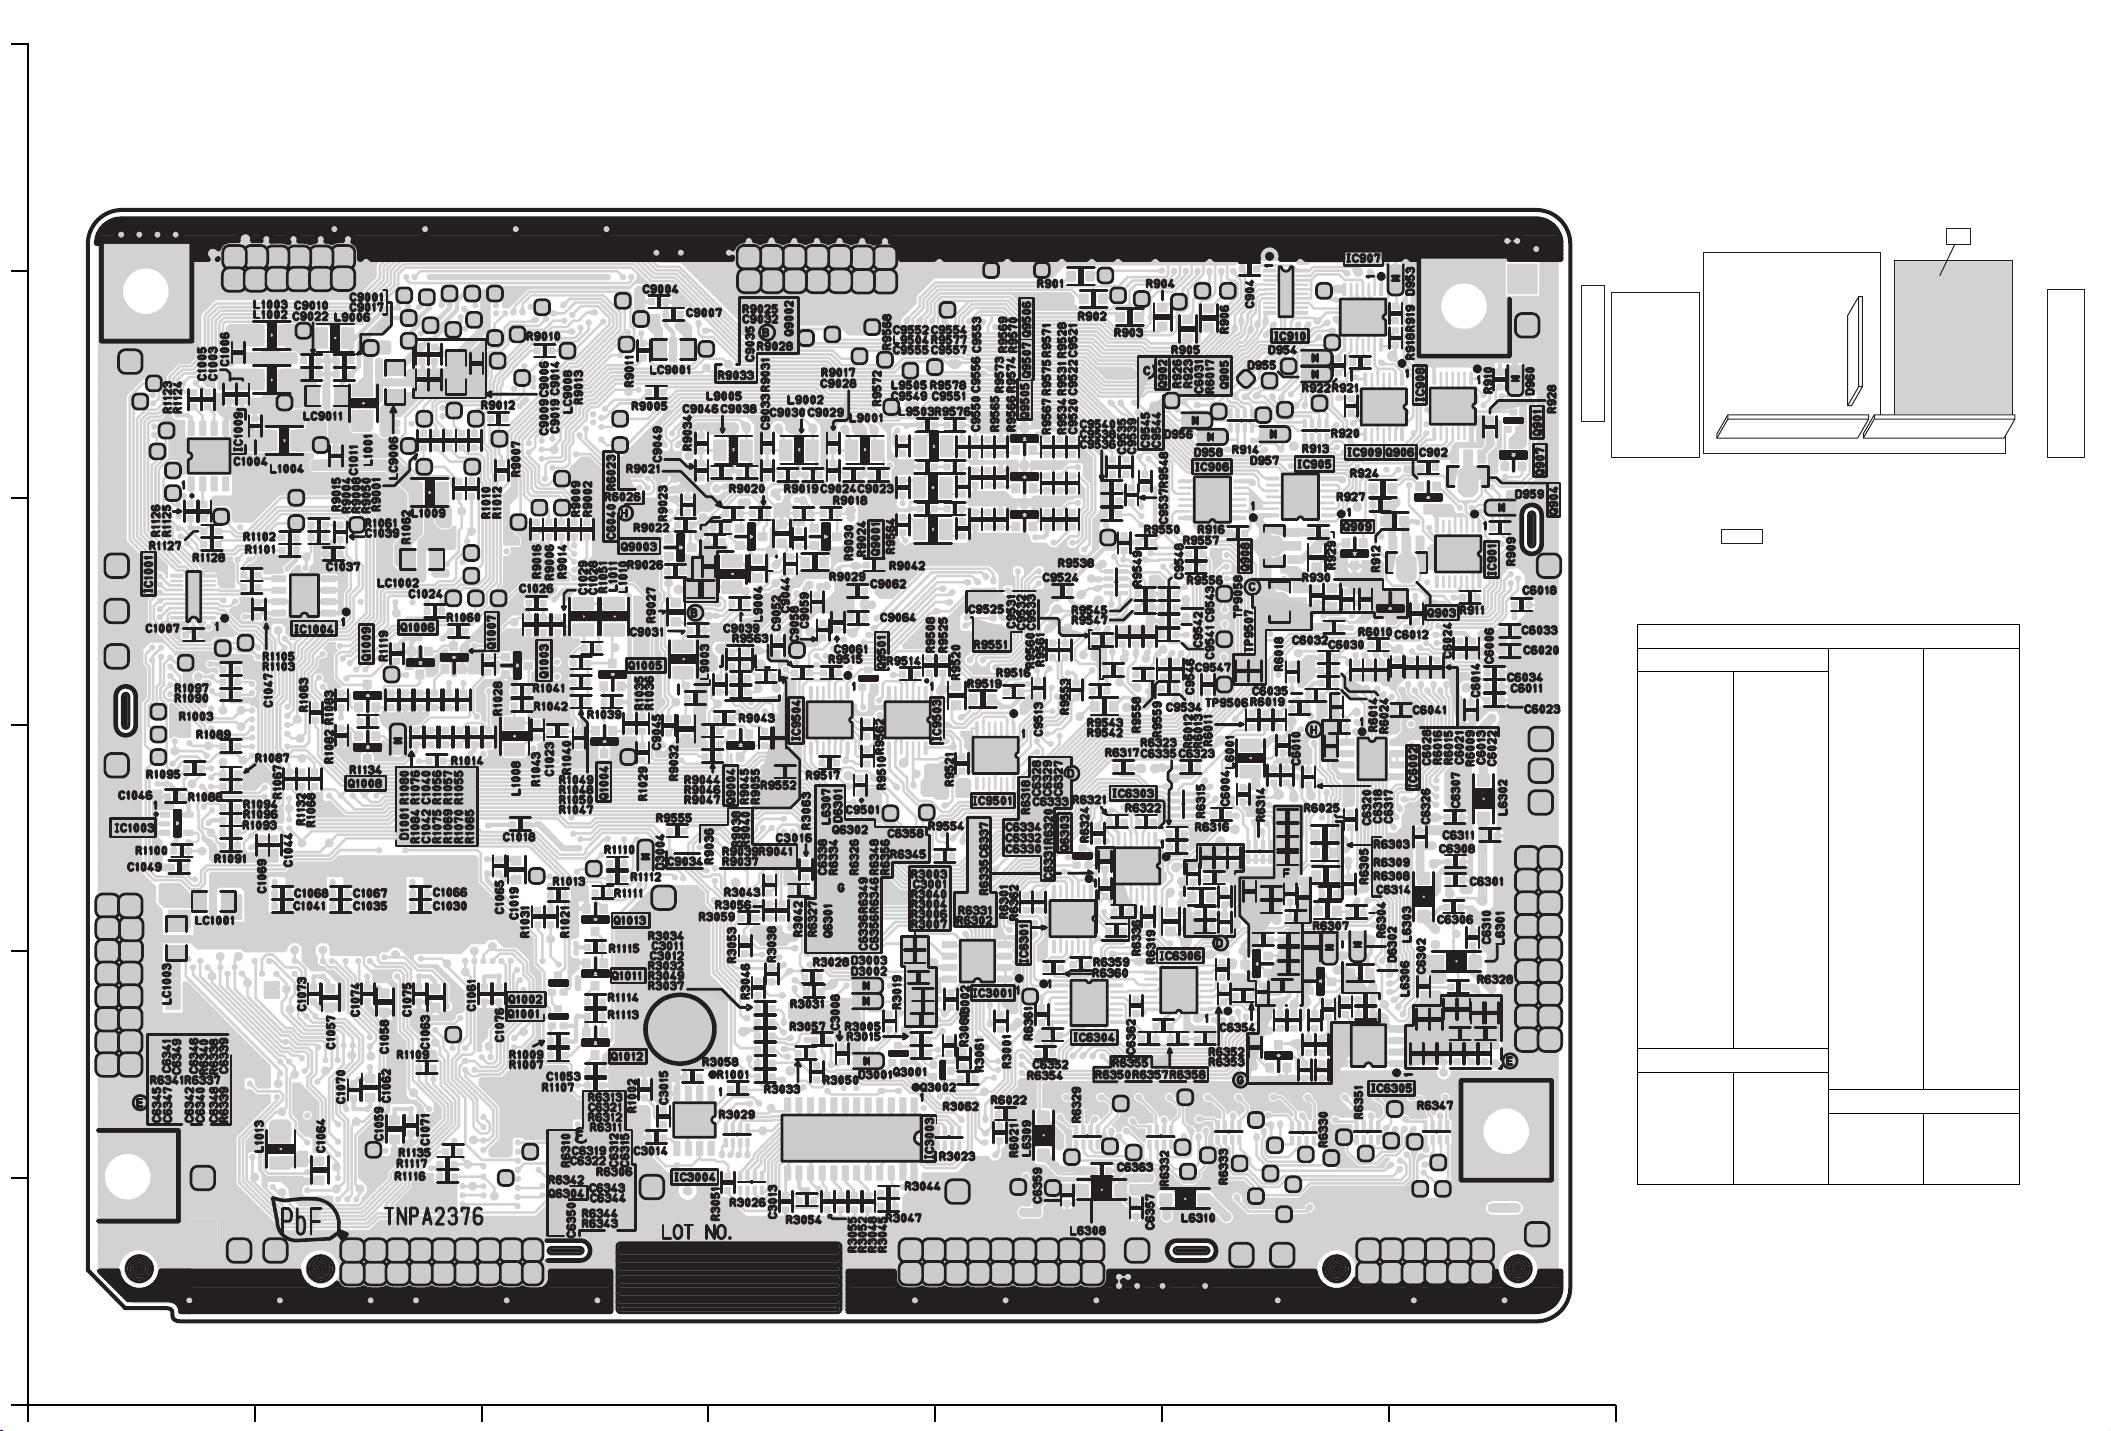
DG-BOARD (FOIL SIDE)
6
5
TXNDG10GLK
DG
4
Parts Location
DG-BOARD (FOIL SIDE)
IC
IC901 G-4 IC905 F-5 IC906 F-5 IC907 F-6 IC908 G-5 IC909 F-5 IC910 F-5 IC1001 A-4 IC1003 A-3
3
2
IC1004 B-4 IC1009 A-5 IC3001 E-2 IC3003 D-2 IC3004 C-2 IC6002 G-3 IC6301 E-3 IC6303 E-3 IC6304 E-2 IC6305 F-2 IC6306 F-2 IC9501 E-3 IC9503 D-4 IC9504 D-4
TRANSISTOR
Q901 G-5
Q902 F-5
Q903 G-4
Q904 G-4
Q905 F-5
Q906 F-5
Q907 G-5
Q908 F-4
Q909 F-4
Q1001 C-2
Q1002 C-2
Q1003 C-4
Q1004 C-3
Q1005 C-4
Q1006 B-4
Q1007 C-4
Q1008 B-3
Q1009 B-4
Q1011 C-2
Q1012 C-2
Q1013 C-3
Q6301 D-3
Q6302 D-3
Q6303 E-3
Q6304 C-1
Q9001 D-4
Q9002 D-5
Q9003 C-4
Q9004 D-3
Q9501 D-4
Q9505 E-5
Q9506 E-5
Q9507 E-5
TP
TP9058 F-4
TP9506 F-4
TP9507 F-4
1
A
C EGBDF
Page 46
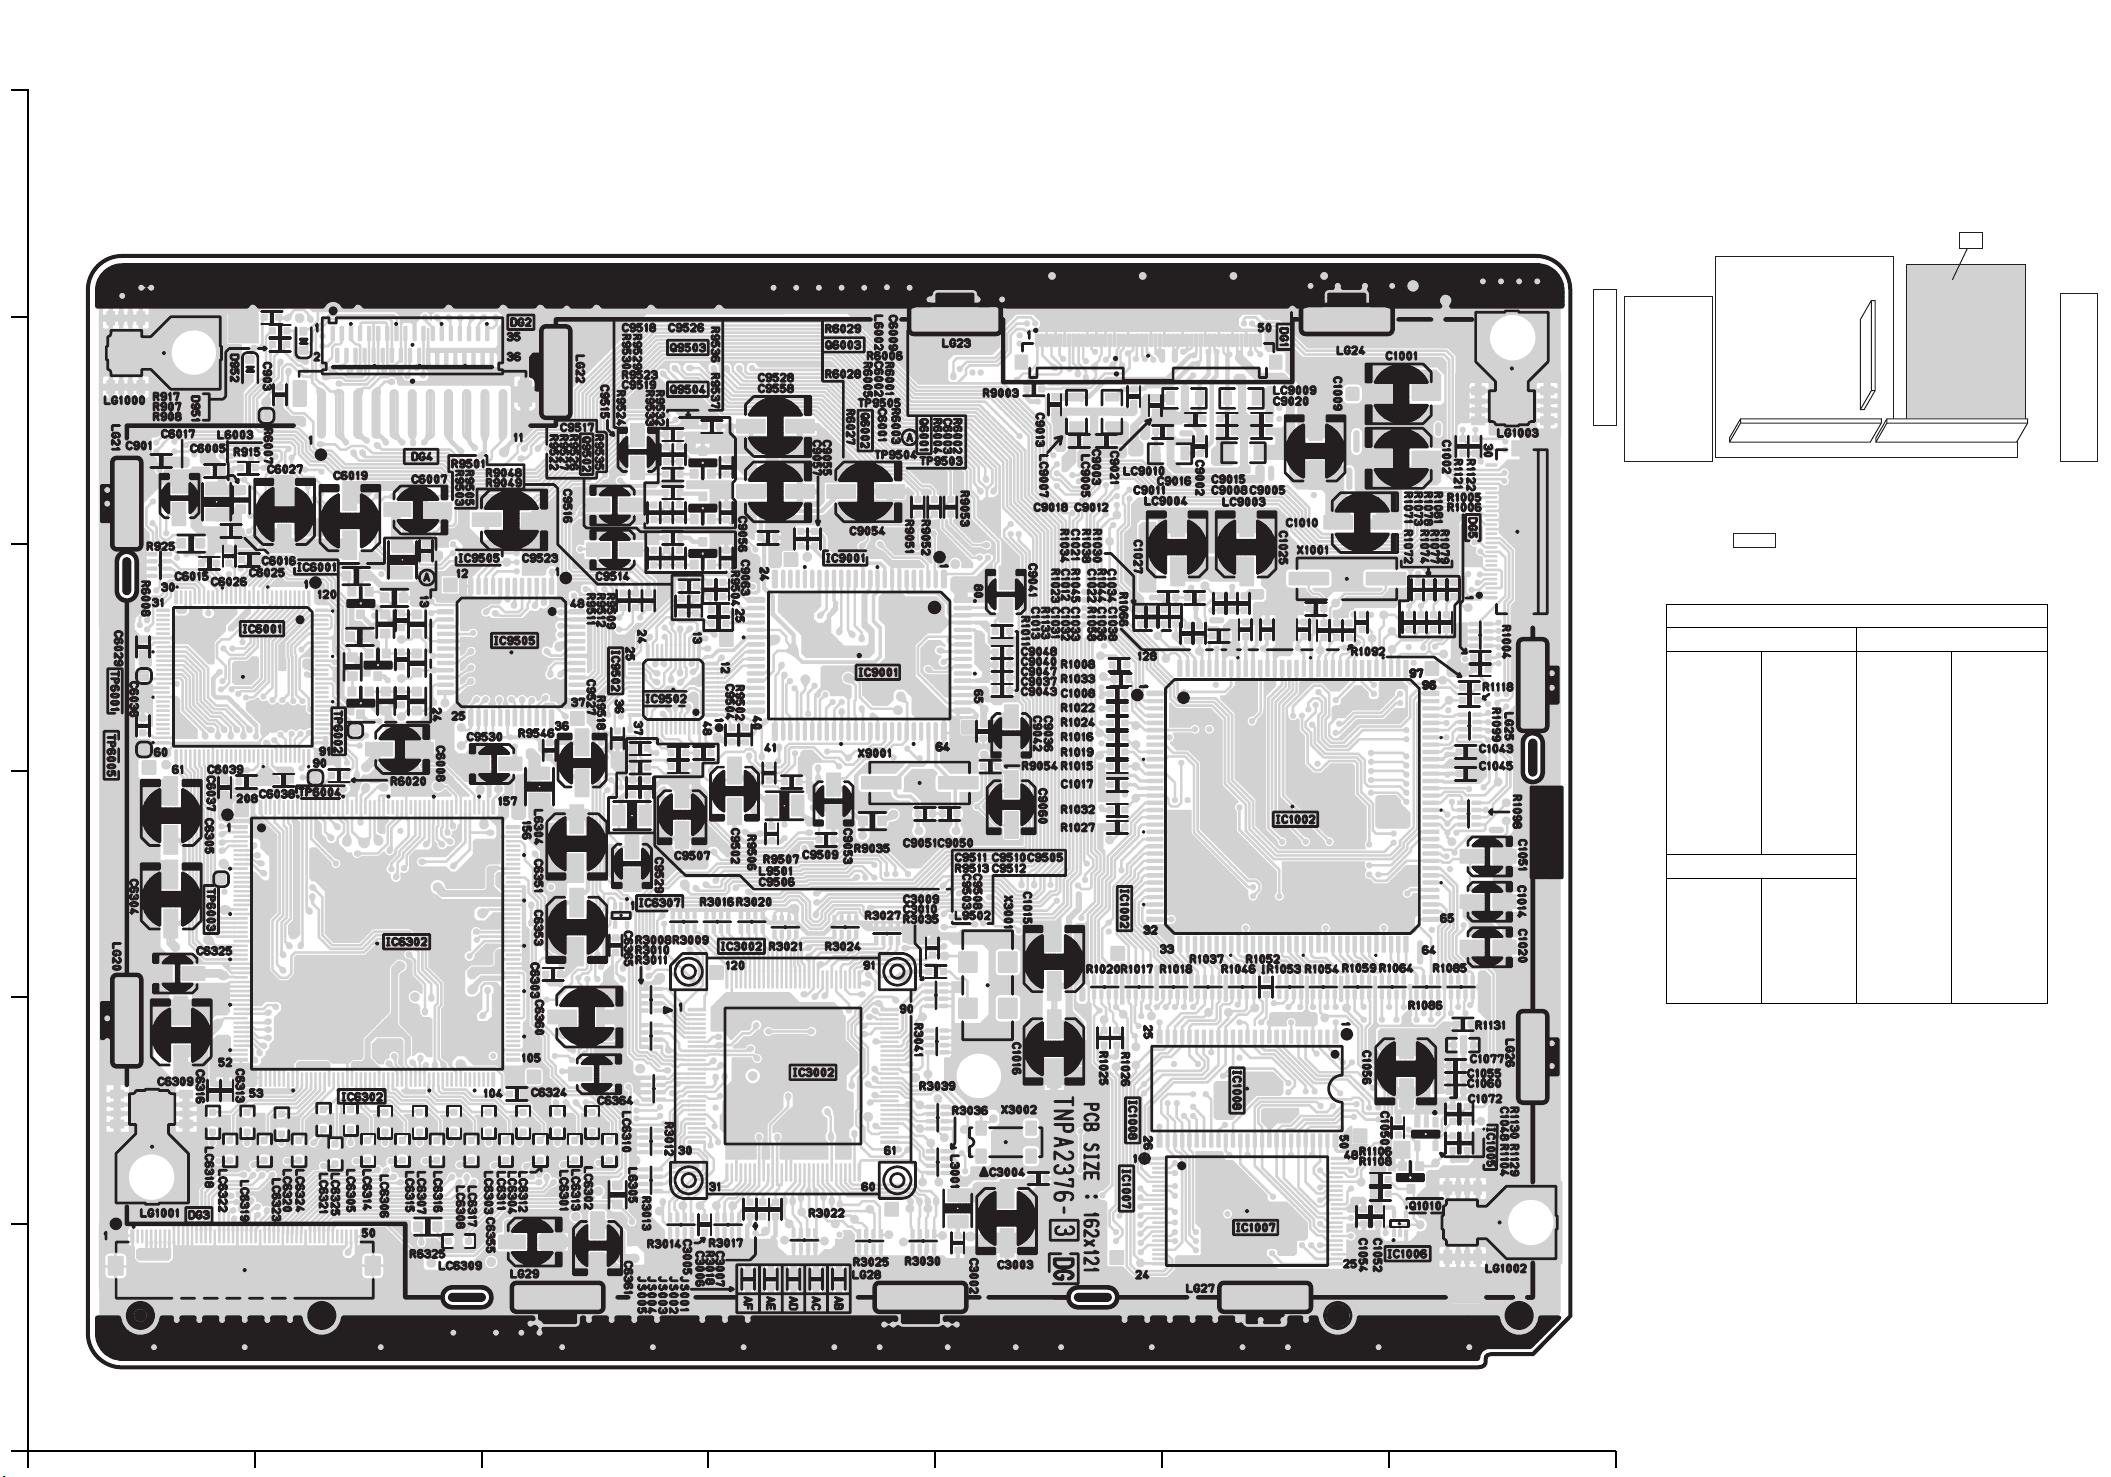
DG-BOARD (COMPONENT SIDE)
6
5
4
3
TXNDG10GLK
Parts Location
DG-BOARD (COMPONENT SIDE)
IC
IC1002 E-3 IC1005 G-2 IC1006 G-1 IC1007 E-2 IC1008 E-2 IC3002 D-3 IC6001 B-4 IC6302 B-2 IC6307 C-3 IC9001 D-4 IC9502 C-4 IC9505 C-4
TRANSISTOR
Q1010 G-2
Q6001 D-5
Q6002 D-5
Q6003 D-5
Q9502 C-5
Q9503 C-5
Q9504 C-5
TP
TP6001 A-4
TP6002 B-4
TP6003 A-3
TP6004 B-3
TP6005 A-4
TP9503 E-5
TP9504 D-5
TP9505 D-5
DG
2
1
A
C EGBDF
Page 47

http://202.224.189.179/view_new/EU/TX-22LT2F/SVC/s0900000000x.html
9 Block and Schematic Diagrams
TOP PREVIOUS NEXT
9.1 Schematic Diagram Notes
9.2 Power Block Diagram
9.3 Signal Block Diagram
9.4 Interconnection Schematic Diagram
9.5 A-Board (1 of 7) and H1-Board Schematic Diagram
9.6 A-Board (2 of 7) and H2-Board Schematic Diagram
9.7 A-Board (3 of 7) Schematic Diagram
9.8 A-Board (4 of 7), B-Board, K-Board and V-Board Schematic Diagram
9.9 A-Board (5 of 7), P1-Board and P2-Board Schematic Diagram
9.10 A-Board (6 of 7) and P1-Board Schematic Diagram
9.11 A-Board (7 of 7) Schematic Diagram
9.12 DG-Board (1 of 7) Schematic Diagram
9.13 DG-Board (2 of 7) Schematic Diagram
9.14 DG-Board (3 of 7) Schematic Diagram
9.15 DG-Board (4 of 7) Schematic Diagram
9.16 DG-Board (5 of 7) Schematic Diagram
9.17 DG-Board (6 of 7) Schematic Diagram
http://202.224.189.179/view_new/EU/TX-22LT2F/SVC/s0900000000x.html (1 of 2)29.01.2008 8:45:07
Page 48

http://202.224.189.179/view_new/EU/TX-22LT2F/SVC/s0900000000x.html
9.18 DG-Board (7 of 7) Schematic Diagram
TOP PREVIOUS NEXT
http://202.224.189.179/view_new/EU/TX-22LT2F/SVC/s0900000000x.html (2 of 2)29.01.2008 8:45:07
Page 49
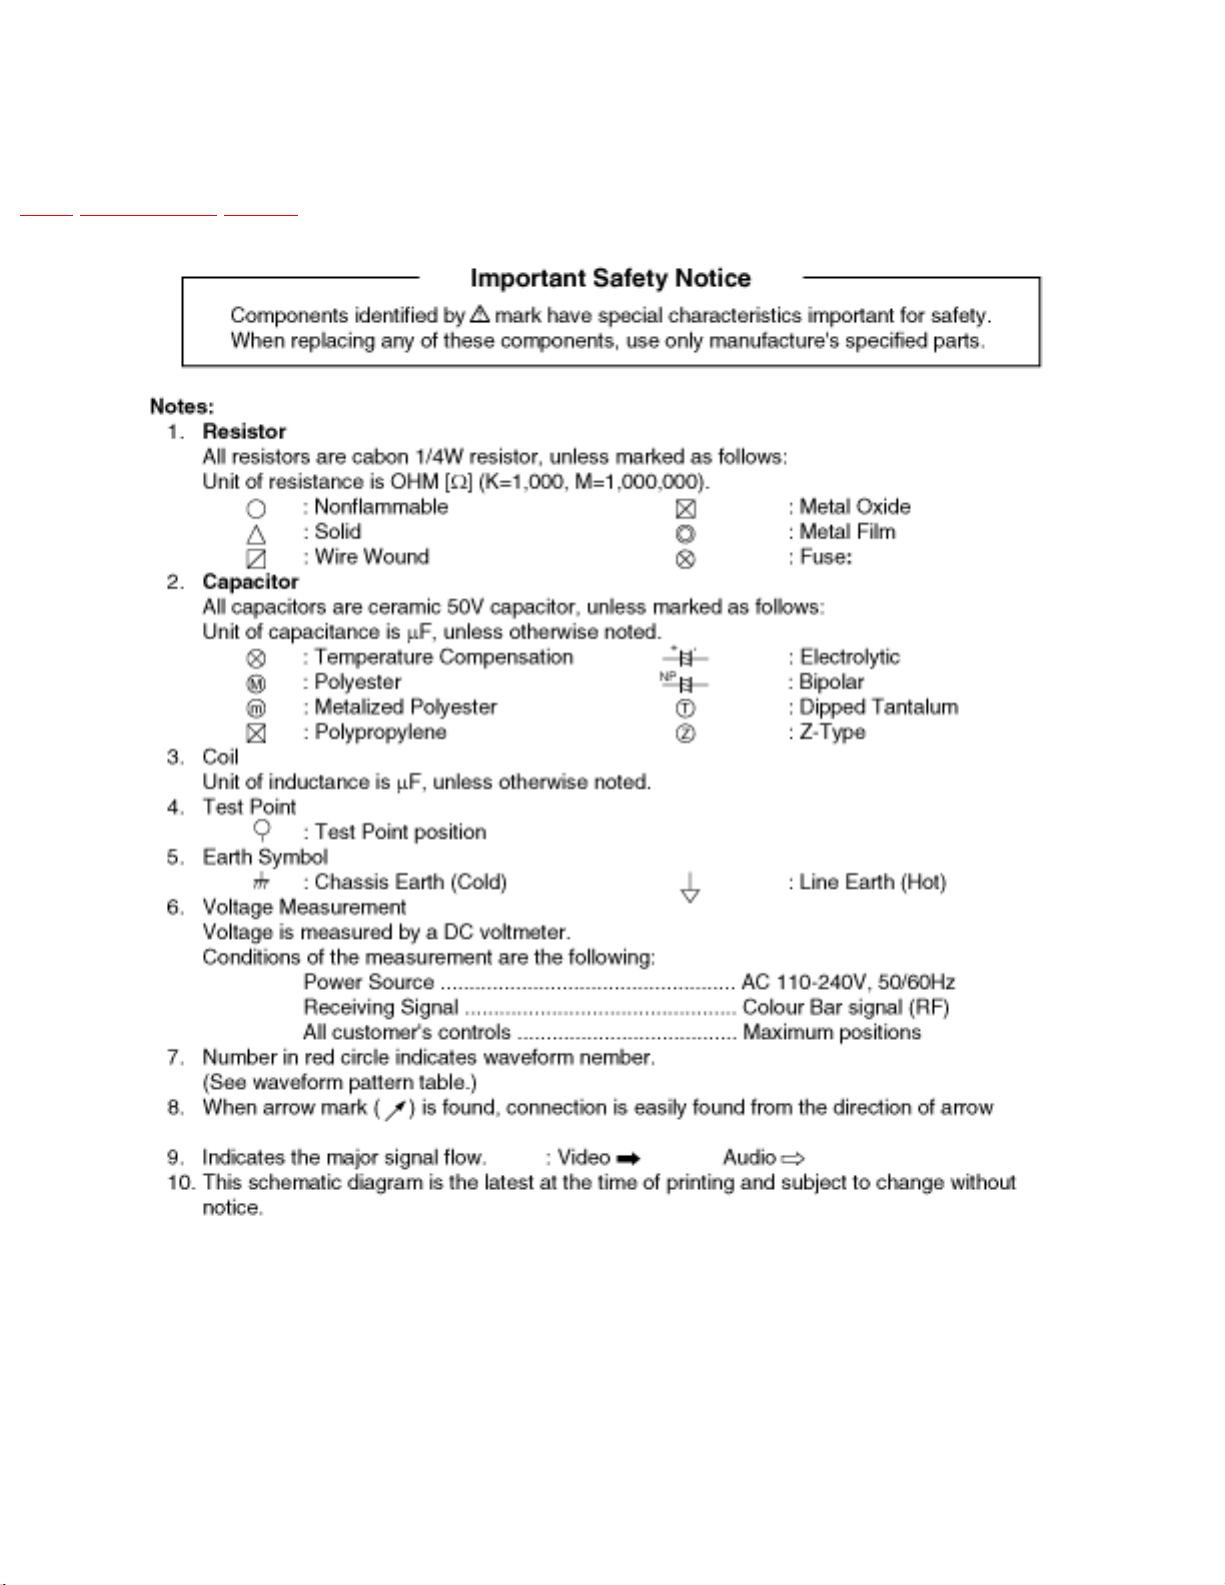
http://202.224.189.179/view_new/EU/TX-22LT2F/SVC/s0901000000.html
9.1 Schematic Diagram Notes
TOP PREVIOUS NEXT
http://202.224.189.179/view_new/EU/TX-22LT2F/SVC/s0901000000.html (1 of 2)29.01.2008 8:45:11
Page 50
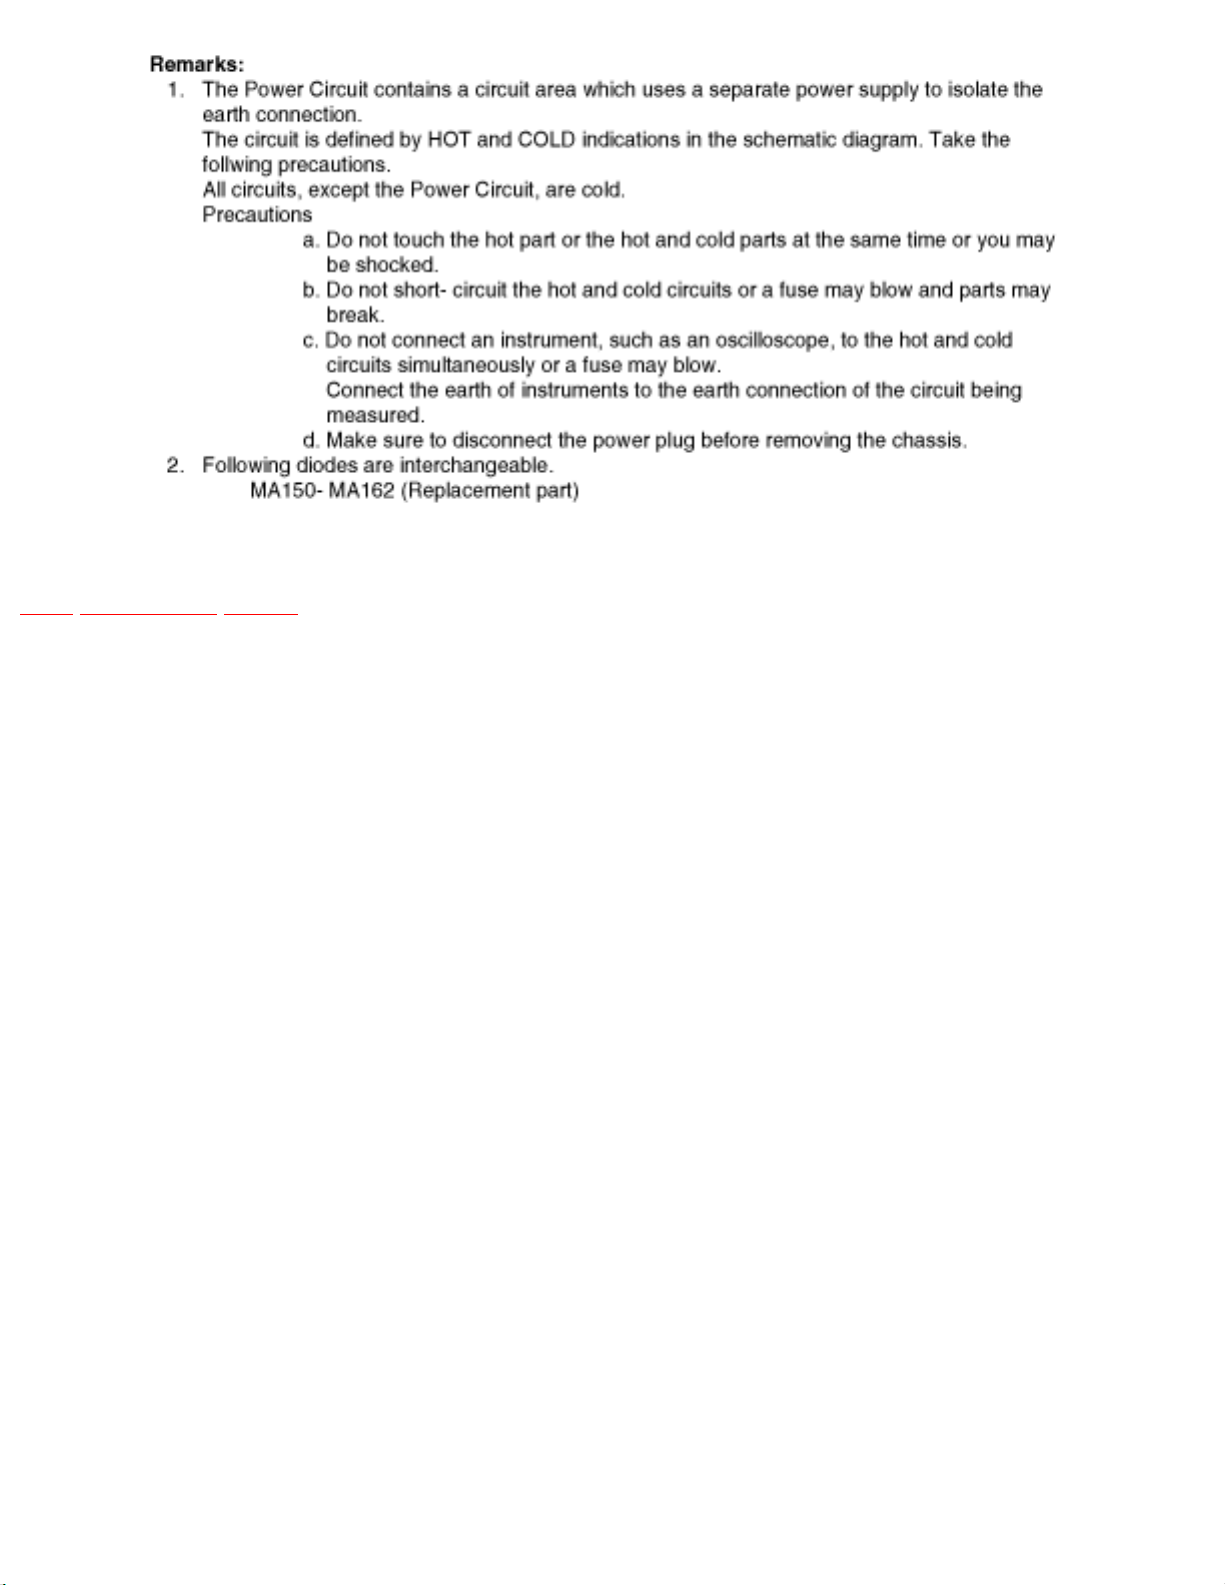
http://202.224.189.179/view_new/EU/TX-22LT2F/SVC/s0901000000.html
TOP PREVIOUS NEXT
http://202.224.189.179/view_new/EU/TX-22LT2F/SVC/s0901000000.html (2 of 2)29.01.2008 8:45:11
Page 51
http://202.224.189.179/view_new/EU/TX-22LT2F/SVC/s0902000000.html
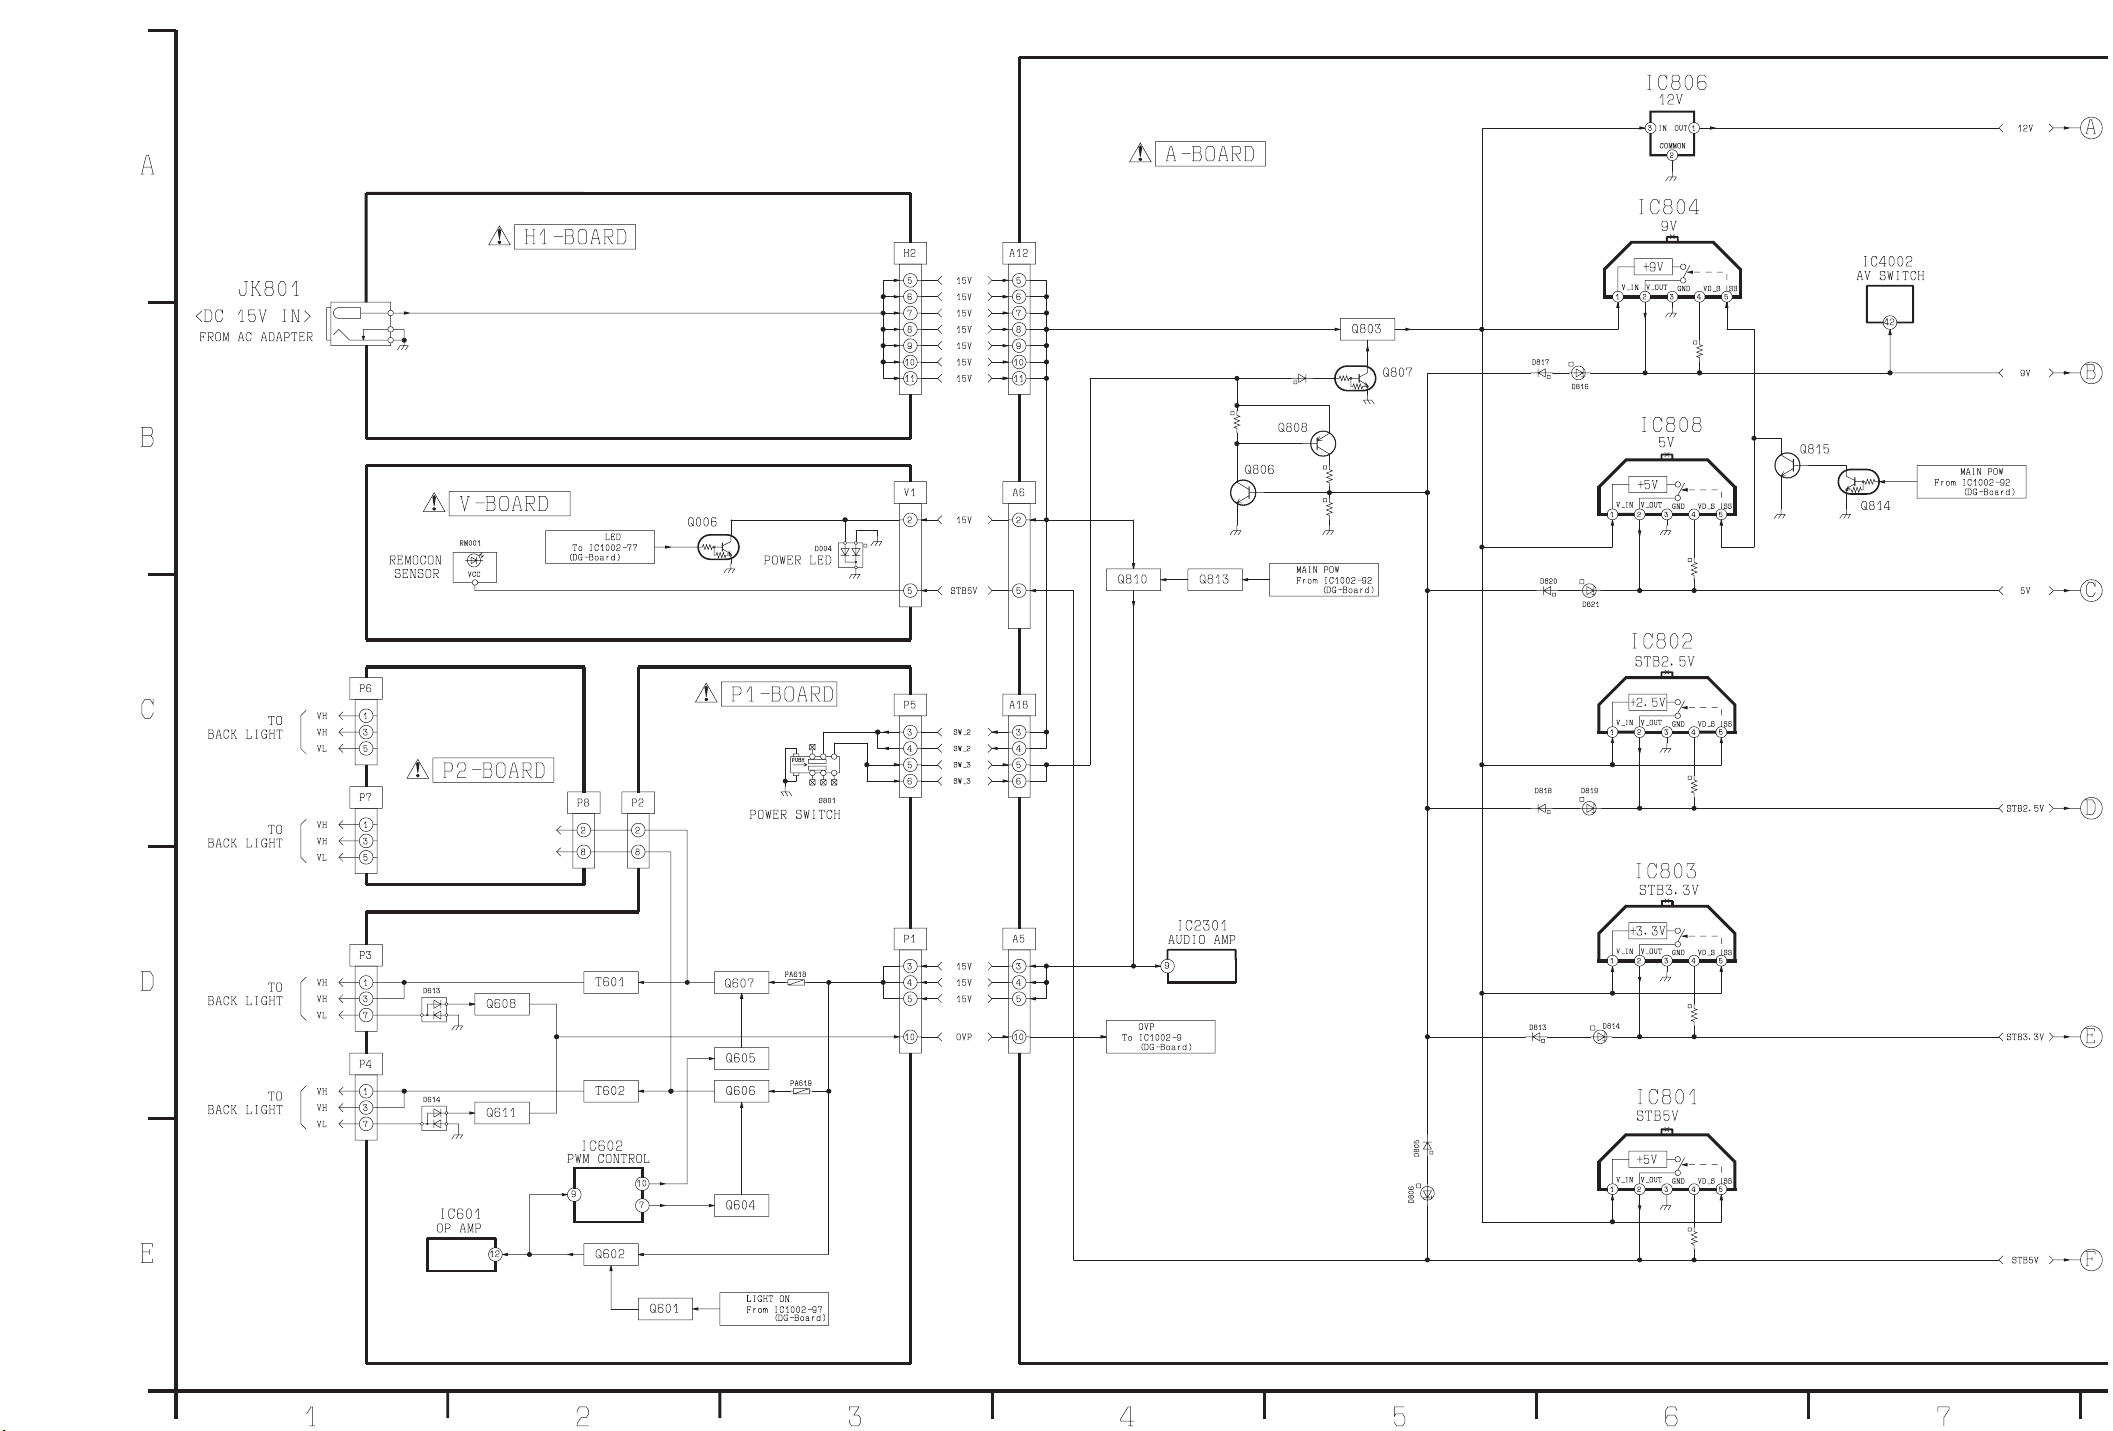
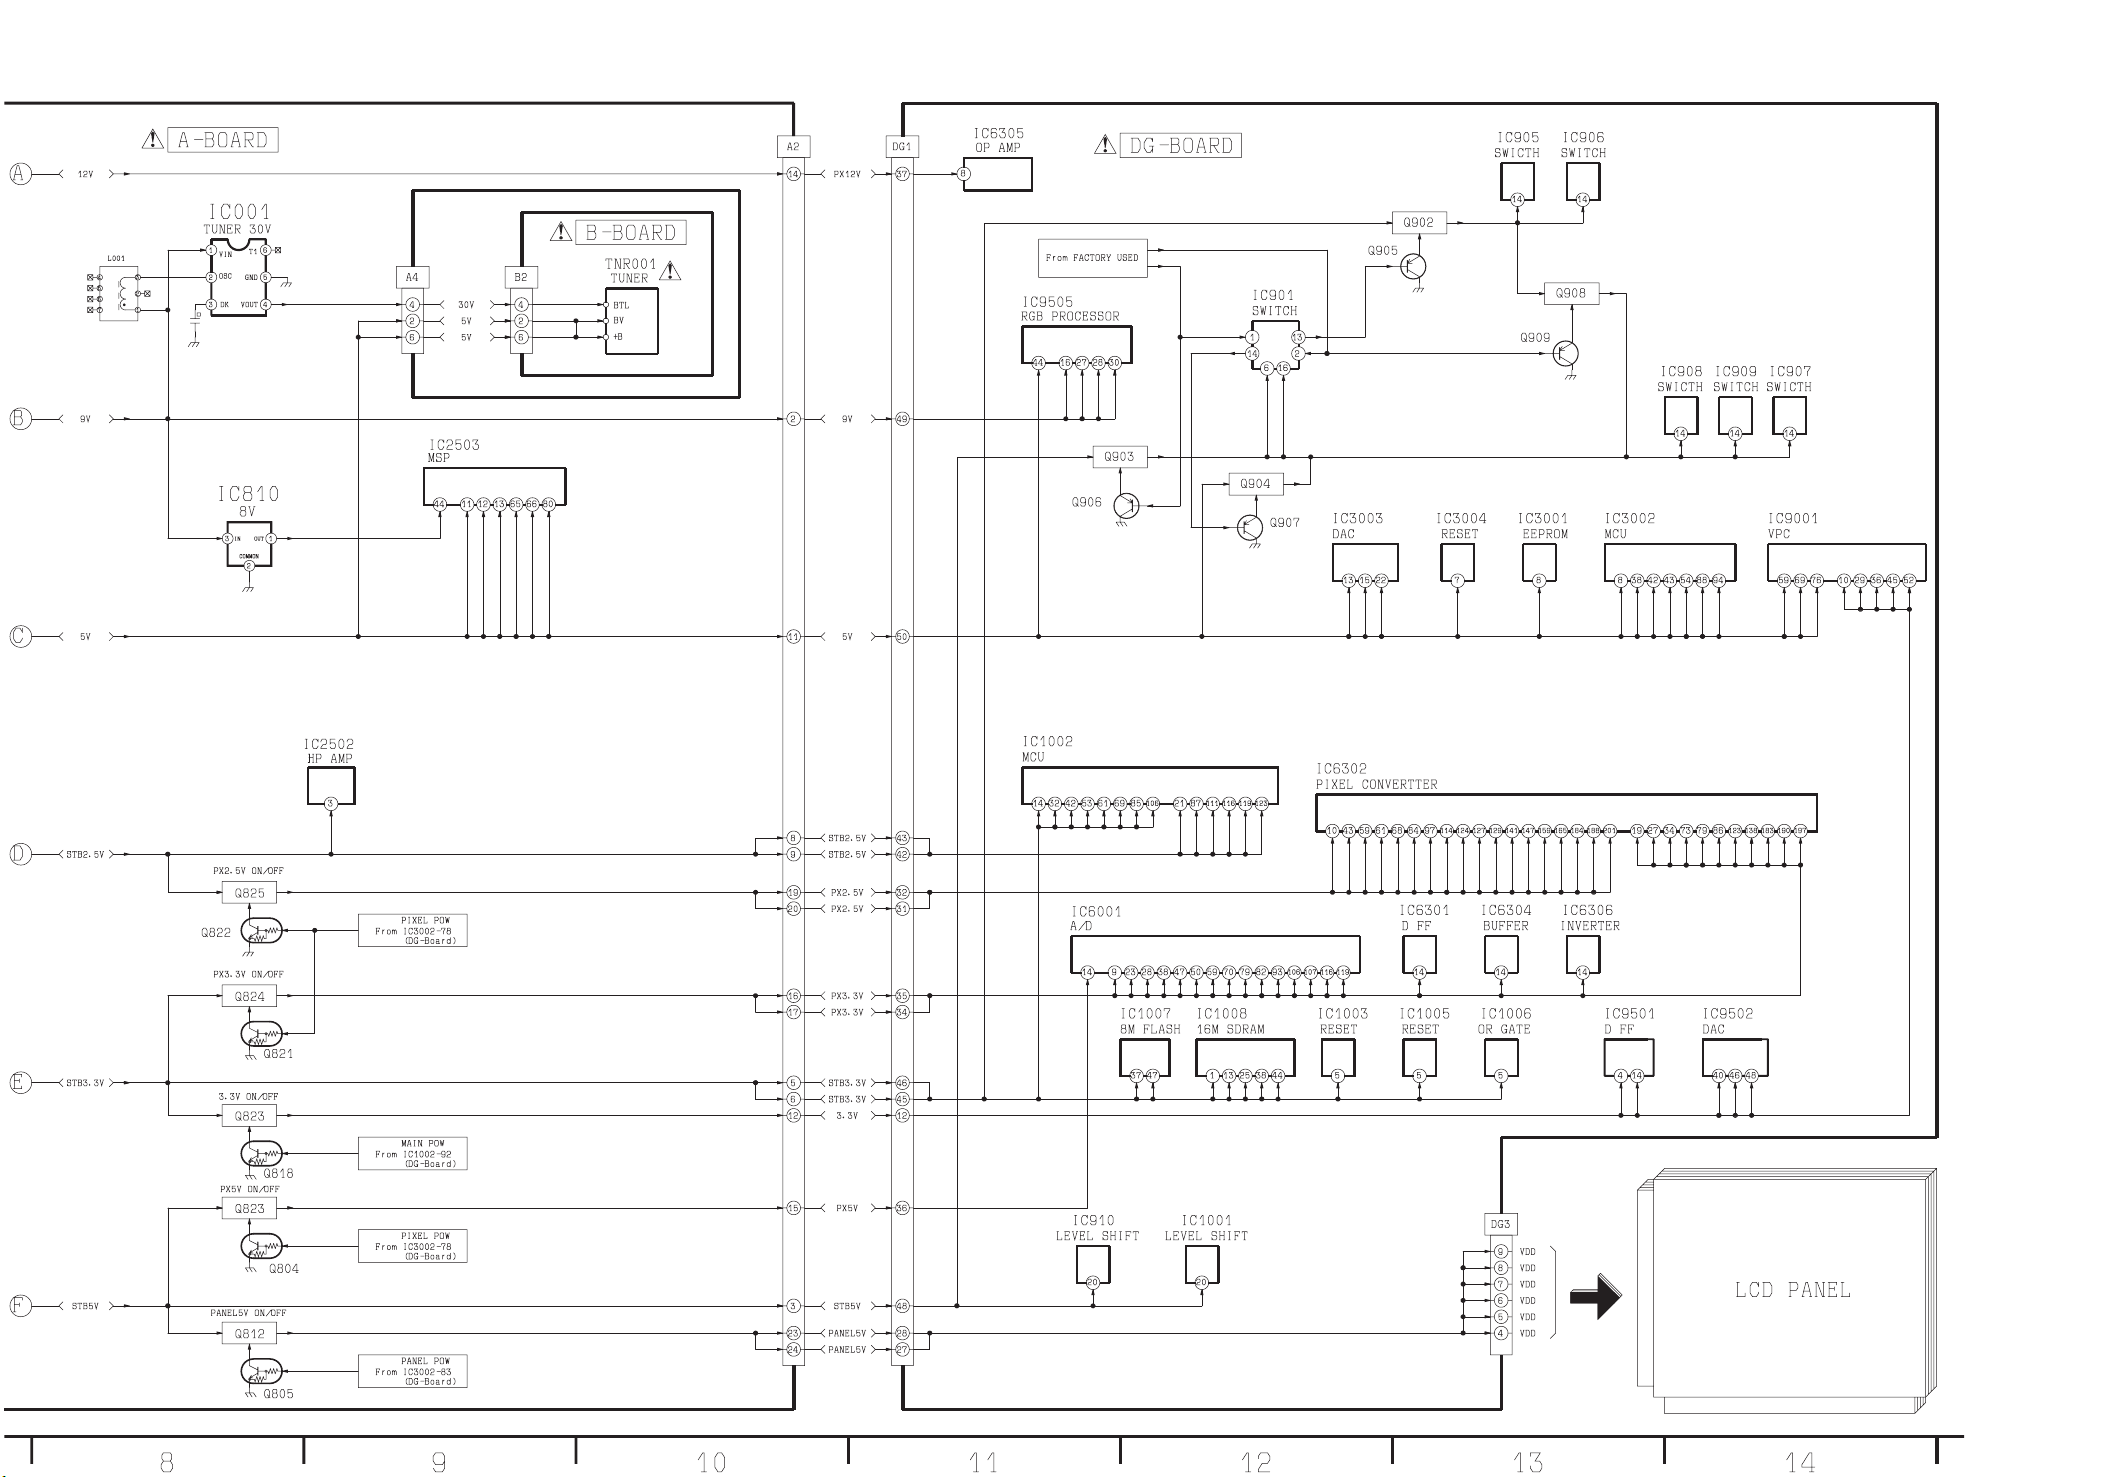
9.2 Power Block Diagram
TOP PREVIOUS NEXT
TOP PREVIOUS NEXT
http://202.224.189.179/view_new/EU/TX-22LT2F/SVC/s0902000000.html29.01.2008 8:45:17
Page 52
Page 53
Page 54

http://202.224.189.179/view_new/EU/TX-22LT2F/SVC/s0903000000.html
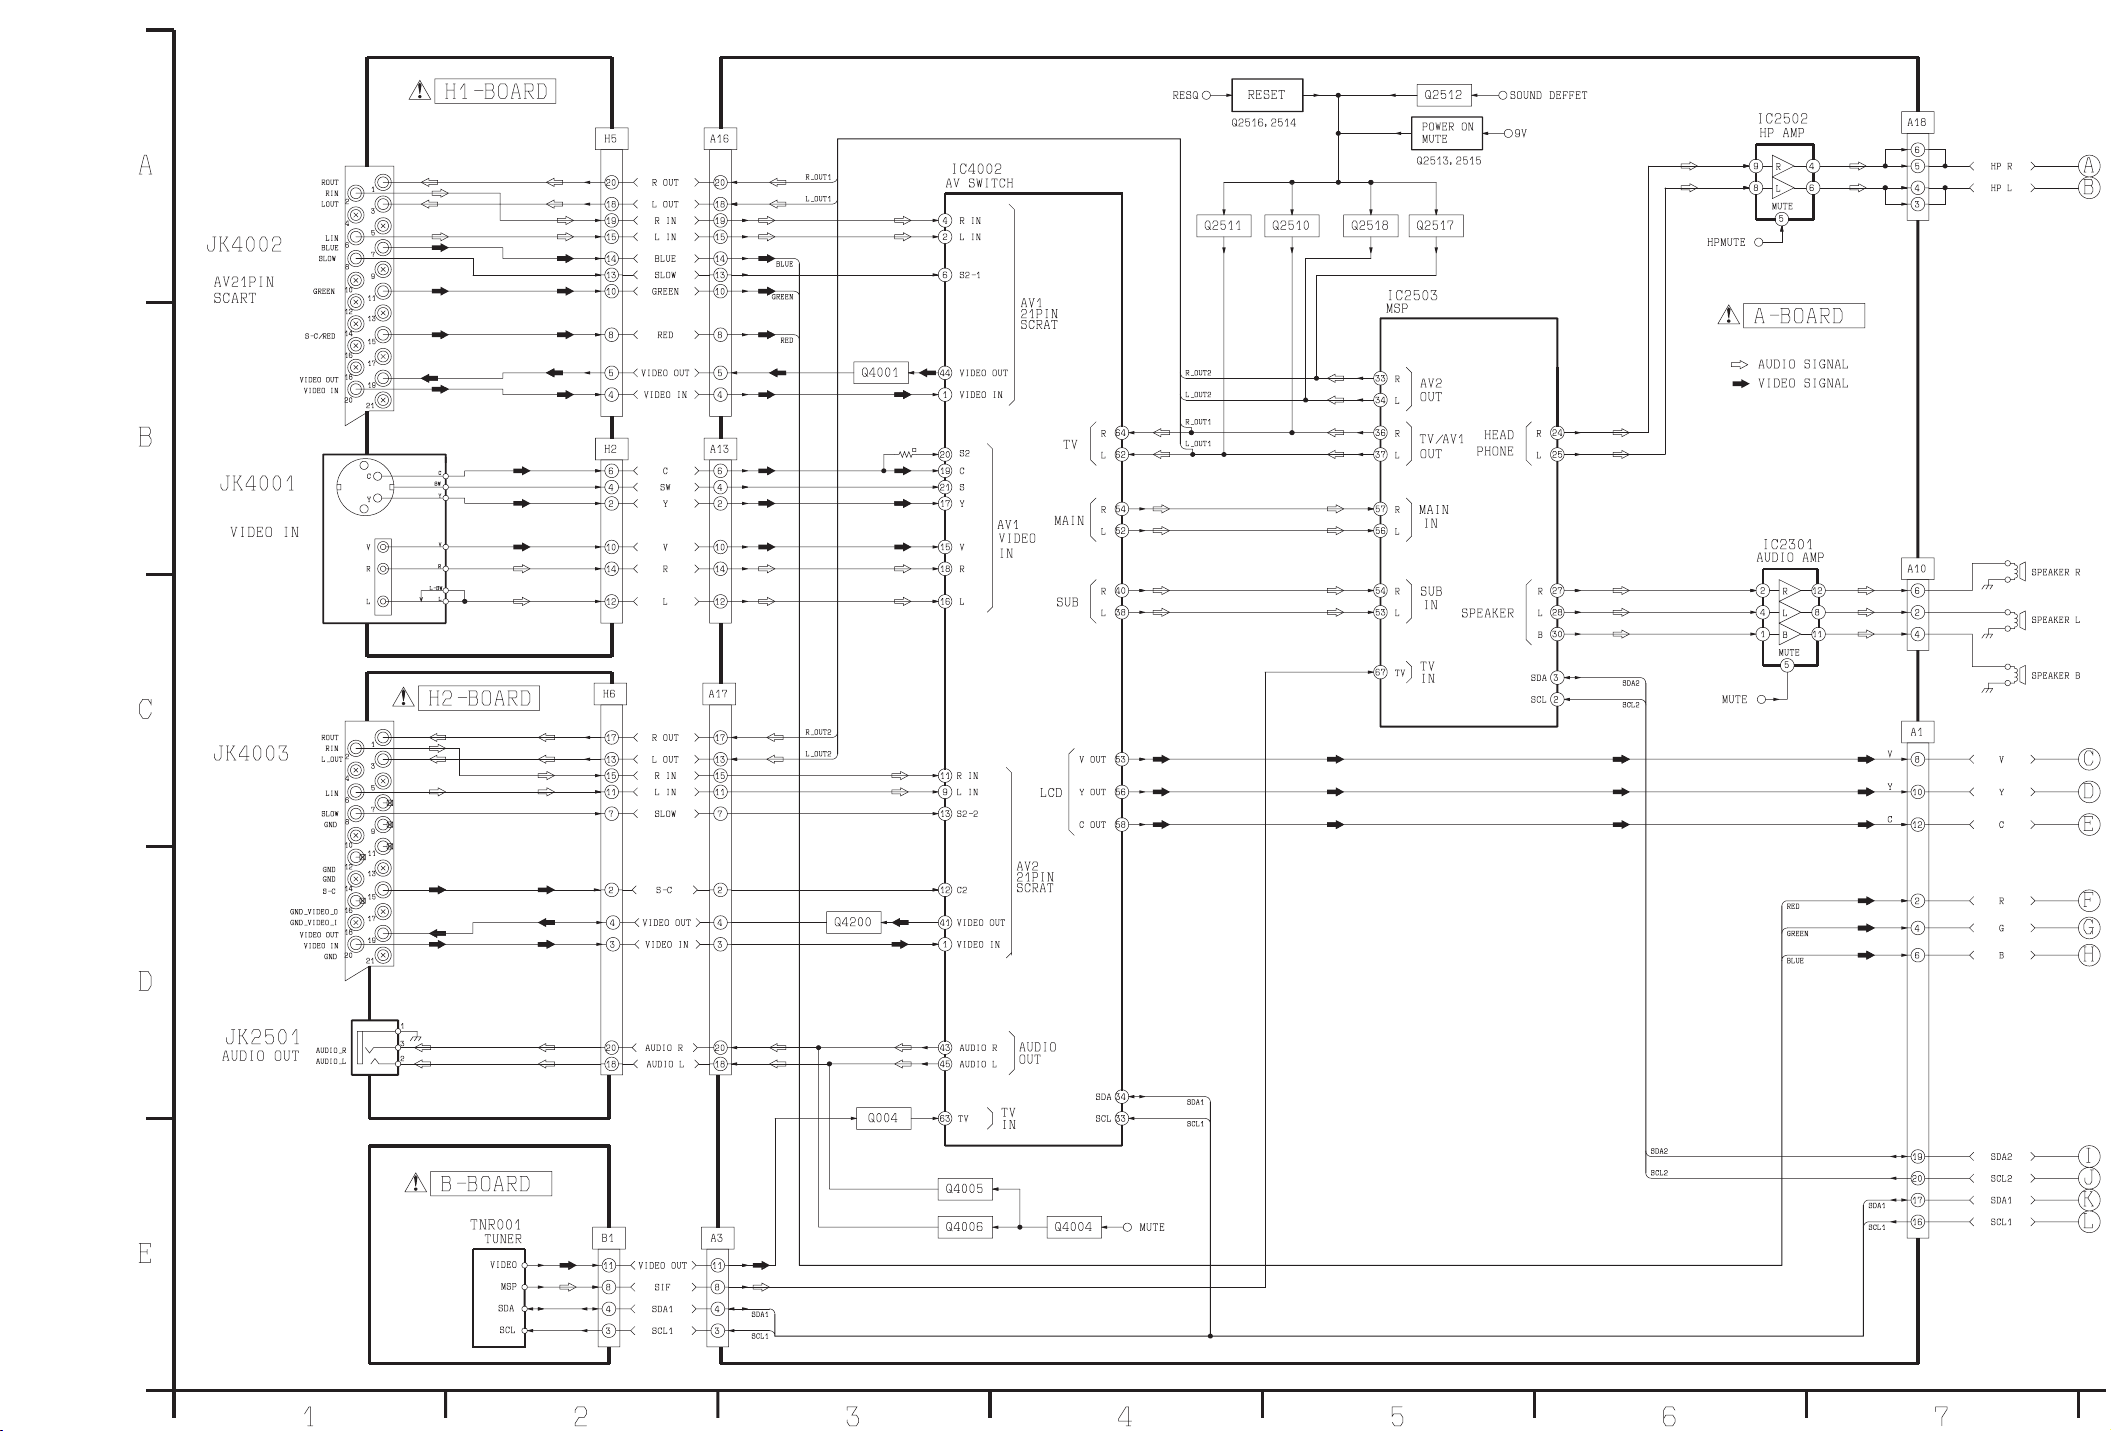
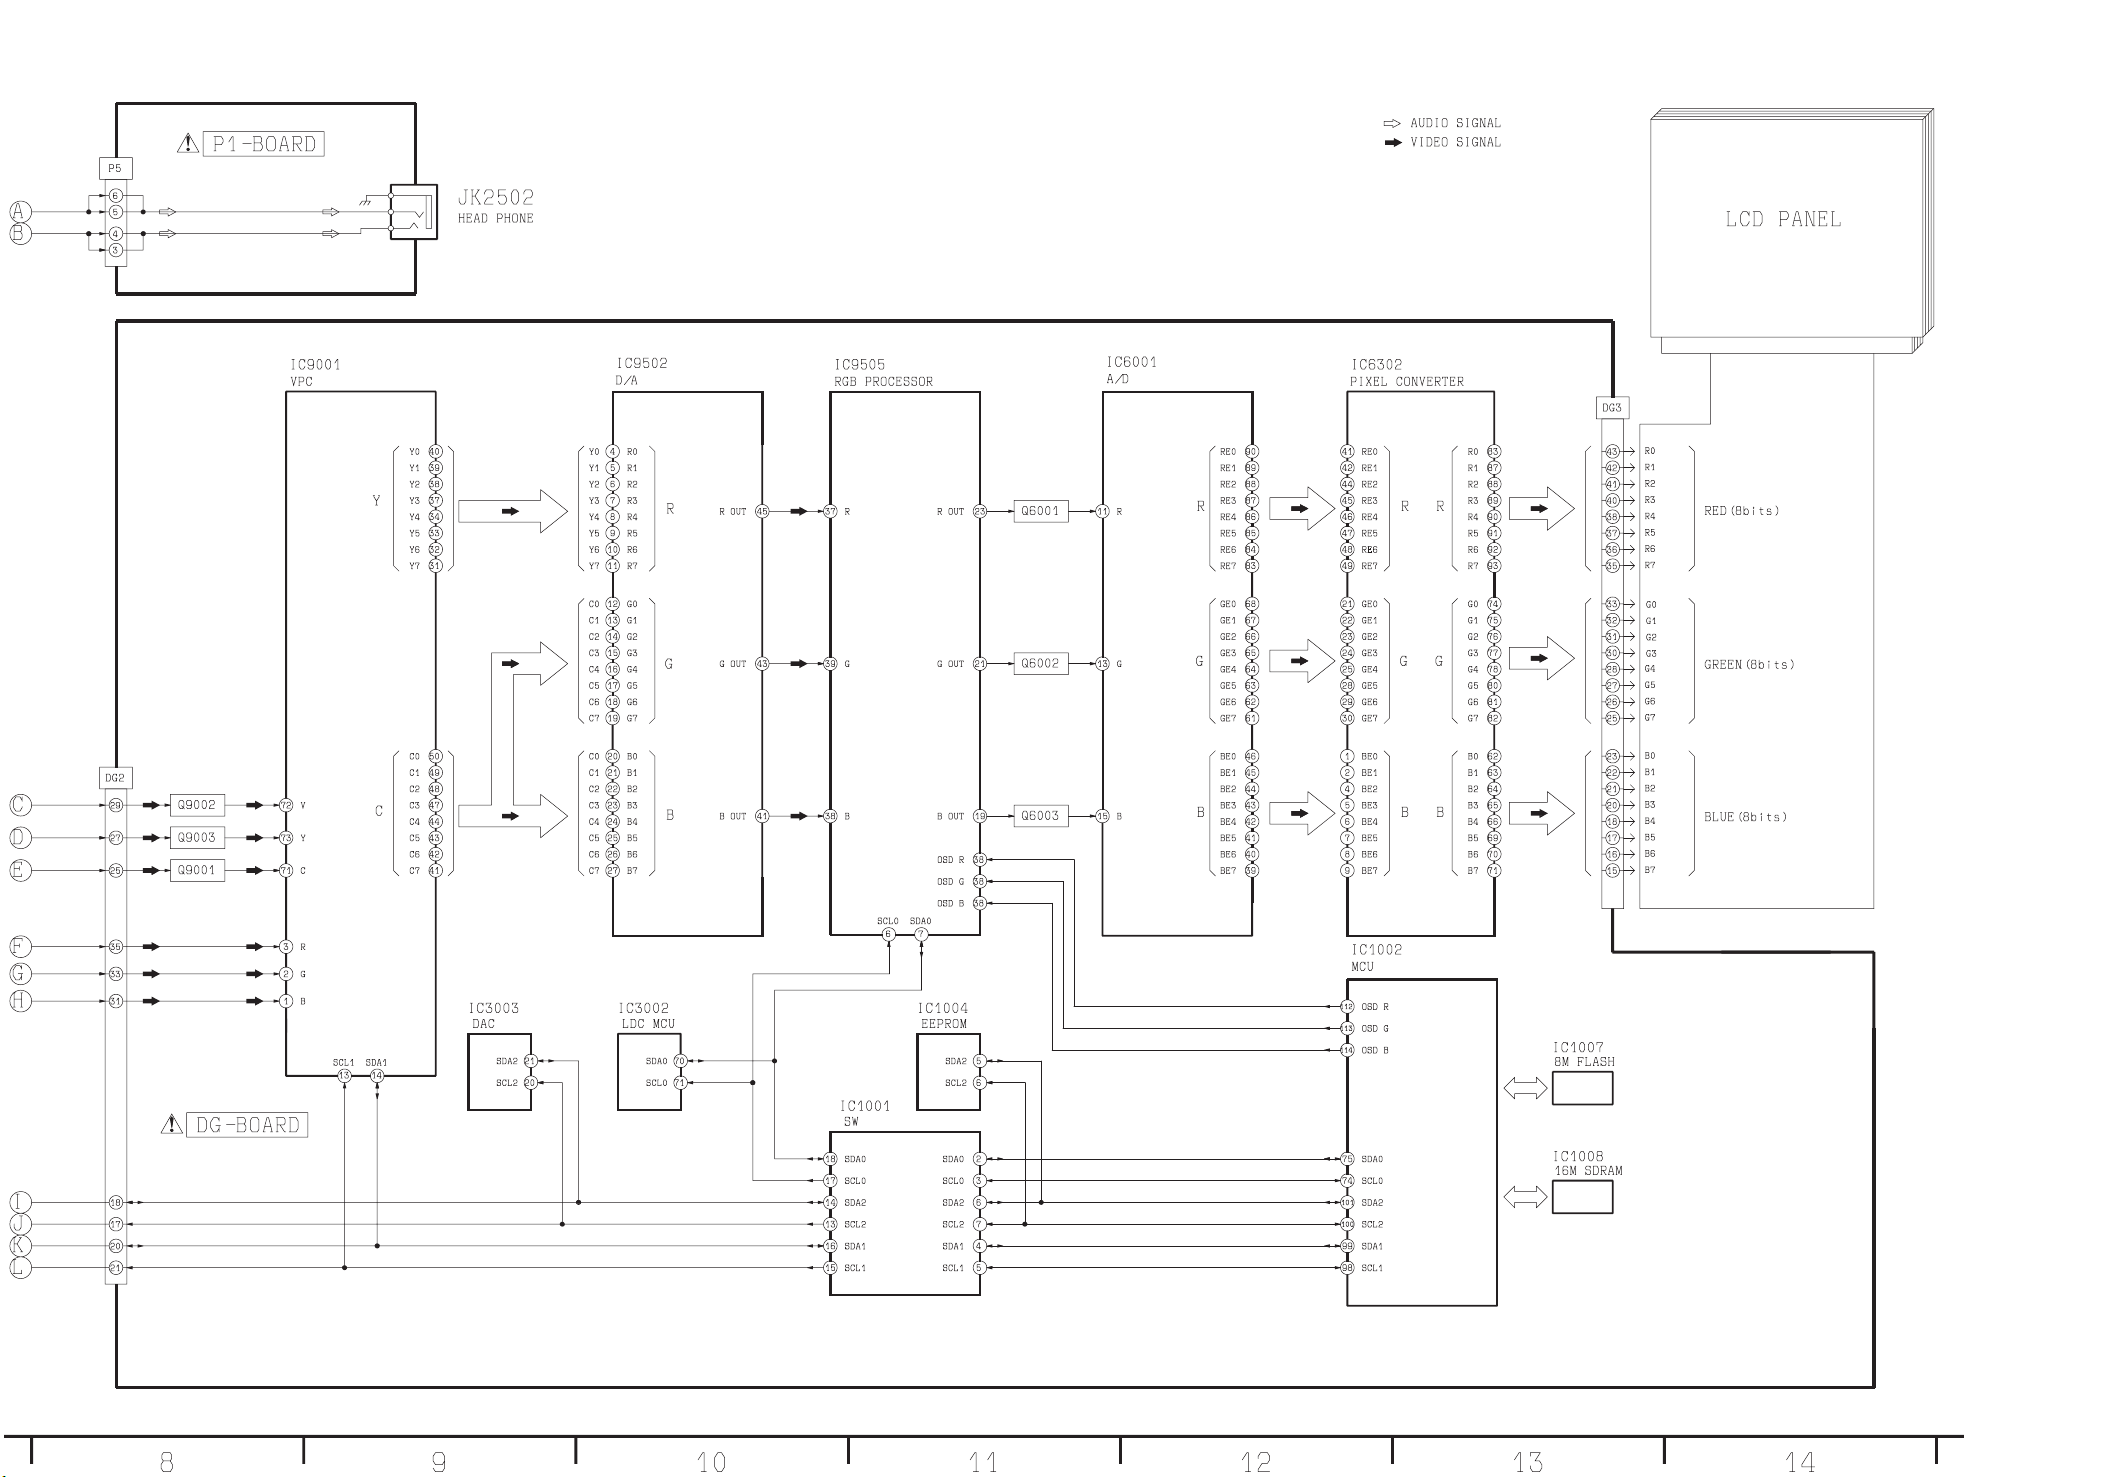
9.3 Signal Block Diagram
TOP PREVIOUS NEXT
TOP PREVIOUS NEXT
http://202.224.189.179/view_new/EU/TX-22LT2F/SVC/s0903000000.html29.01.2008 8:45:32
Page 55
Page 56
Page 57

http://202.224.189.179/view_new/EU/TX-22LT2F/SVC/s0904000000.html
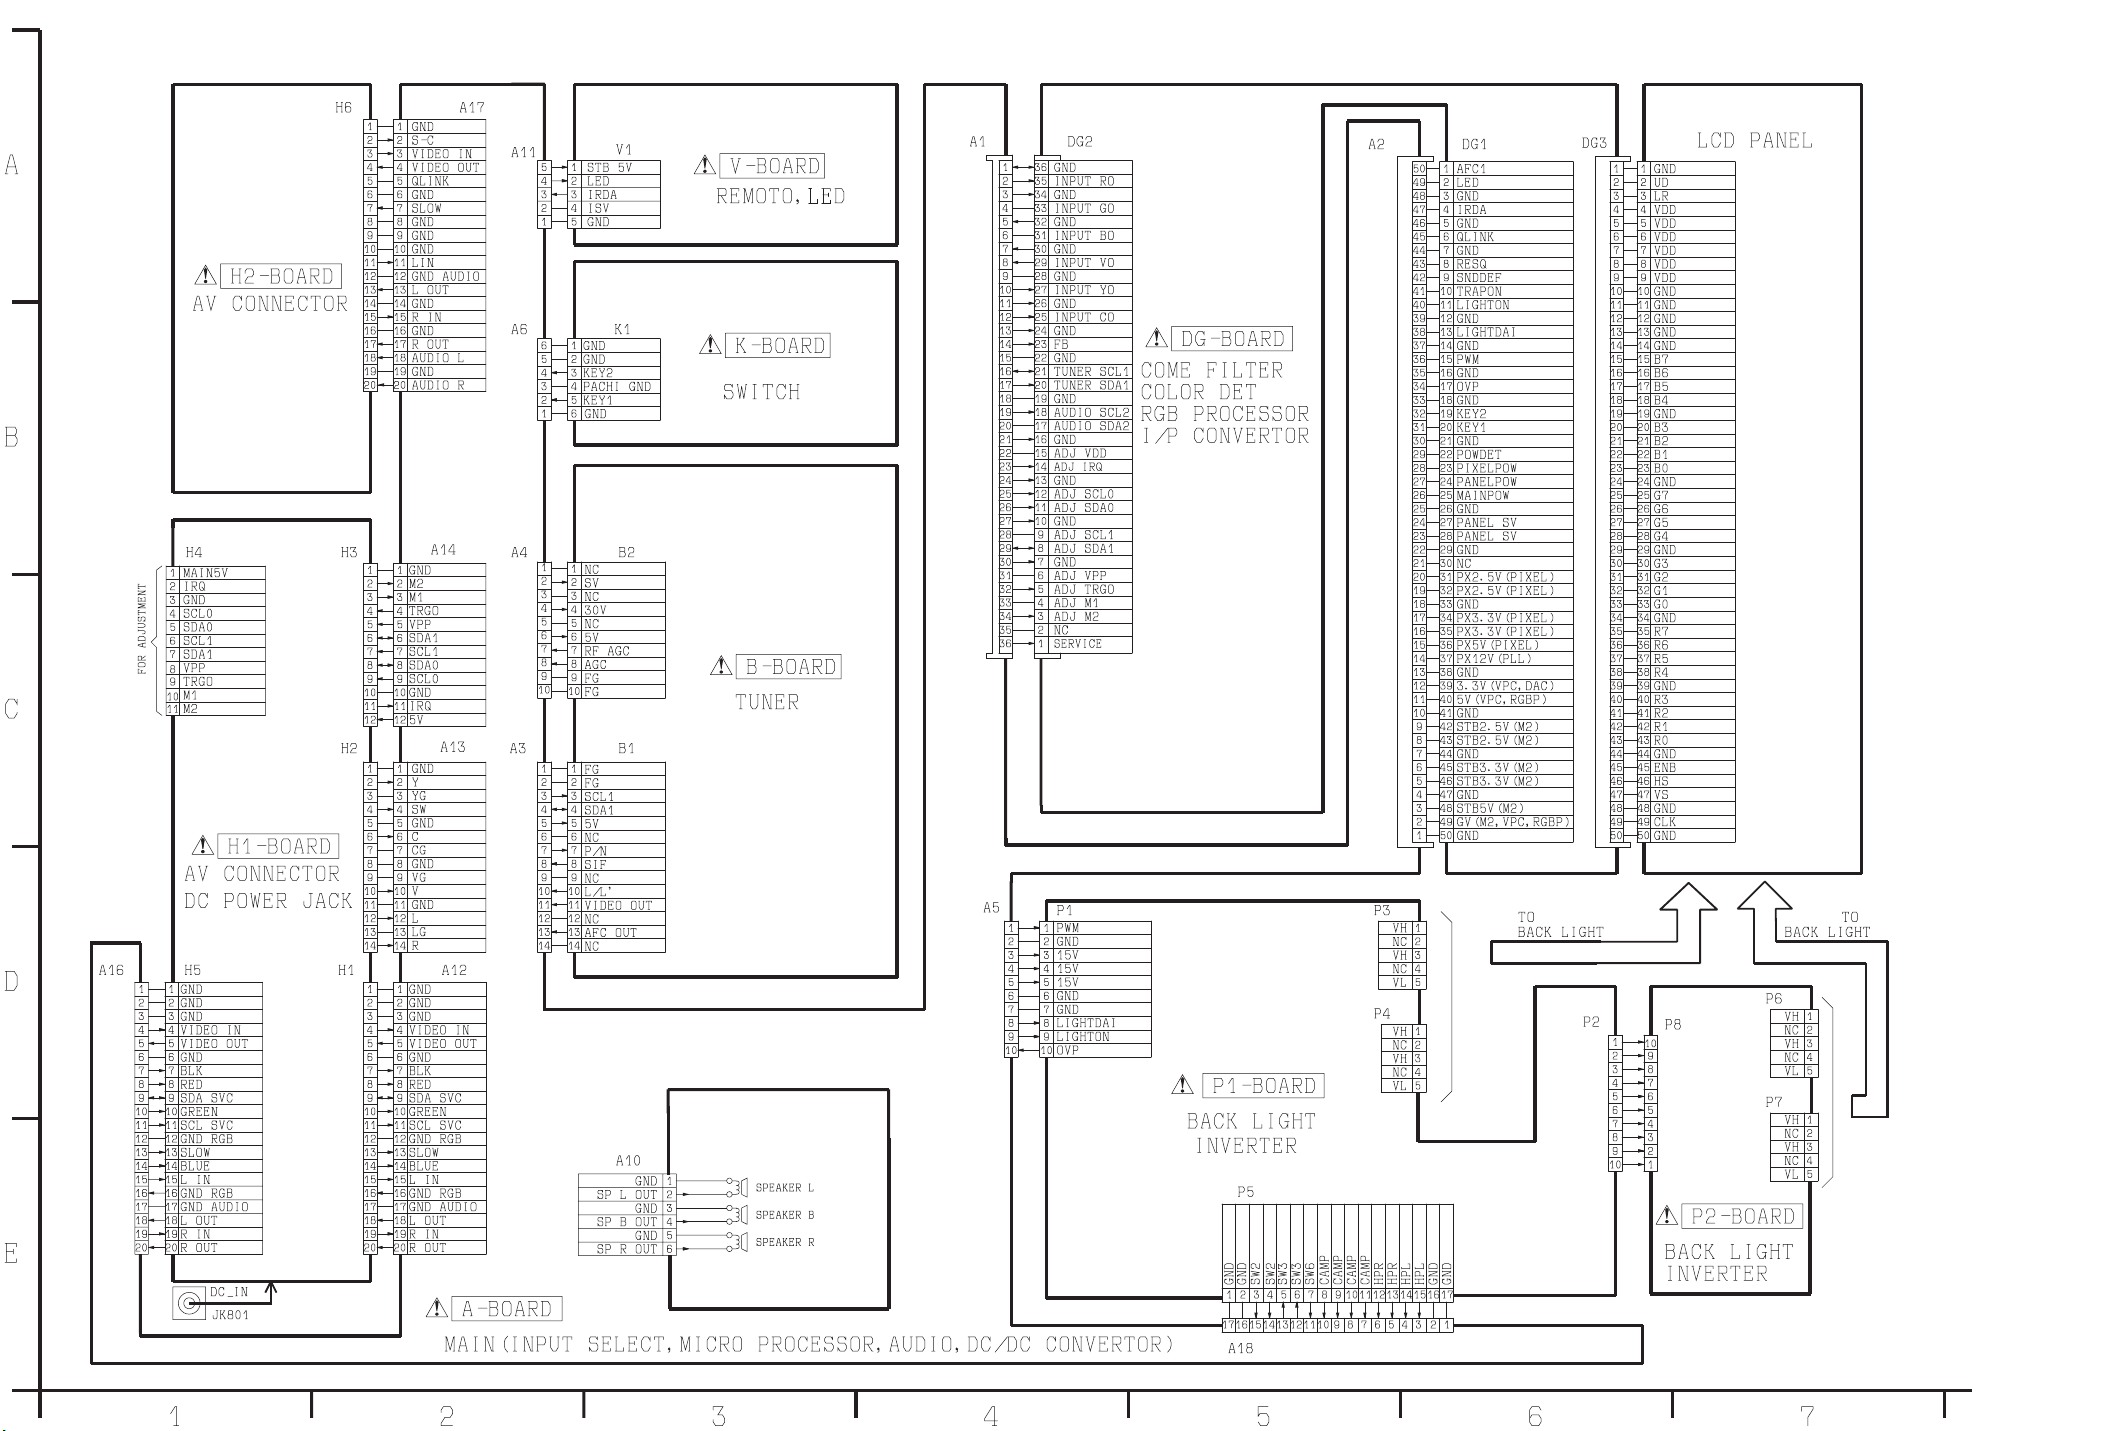
9.4 Interconnection Schematic Diagram
TOP PREVIOUS NEXT
TOP PREVIOUS NEXT
http://202.224.189.179/view_new/EU/TX-22LT2F/SVC/s0904000000.html29.01.2008 8:45:47
Page 58
Page 59

http://202.224.189.179/view_new/EU/TX-22LT2F/SVC/s0905000000.html
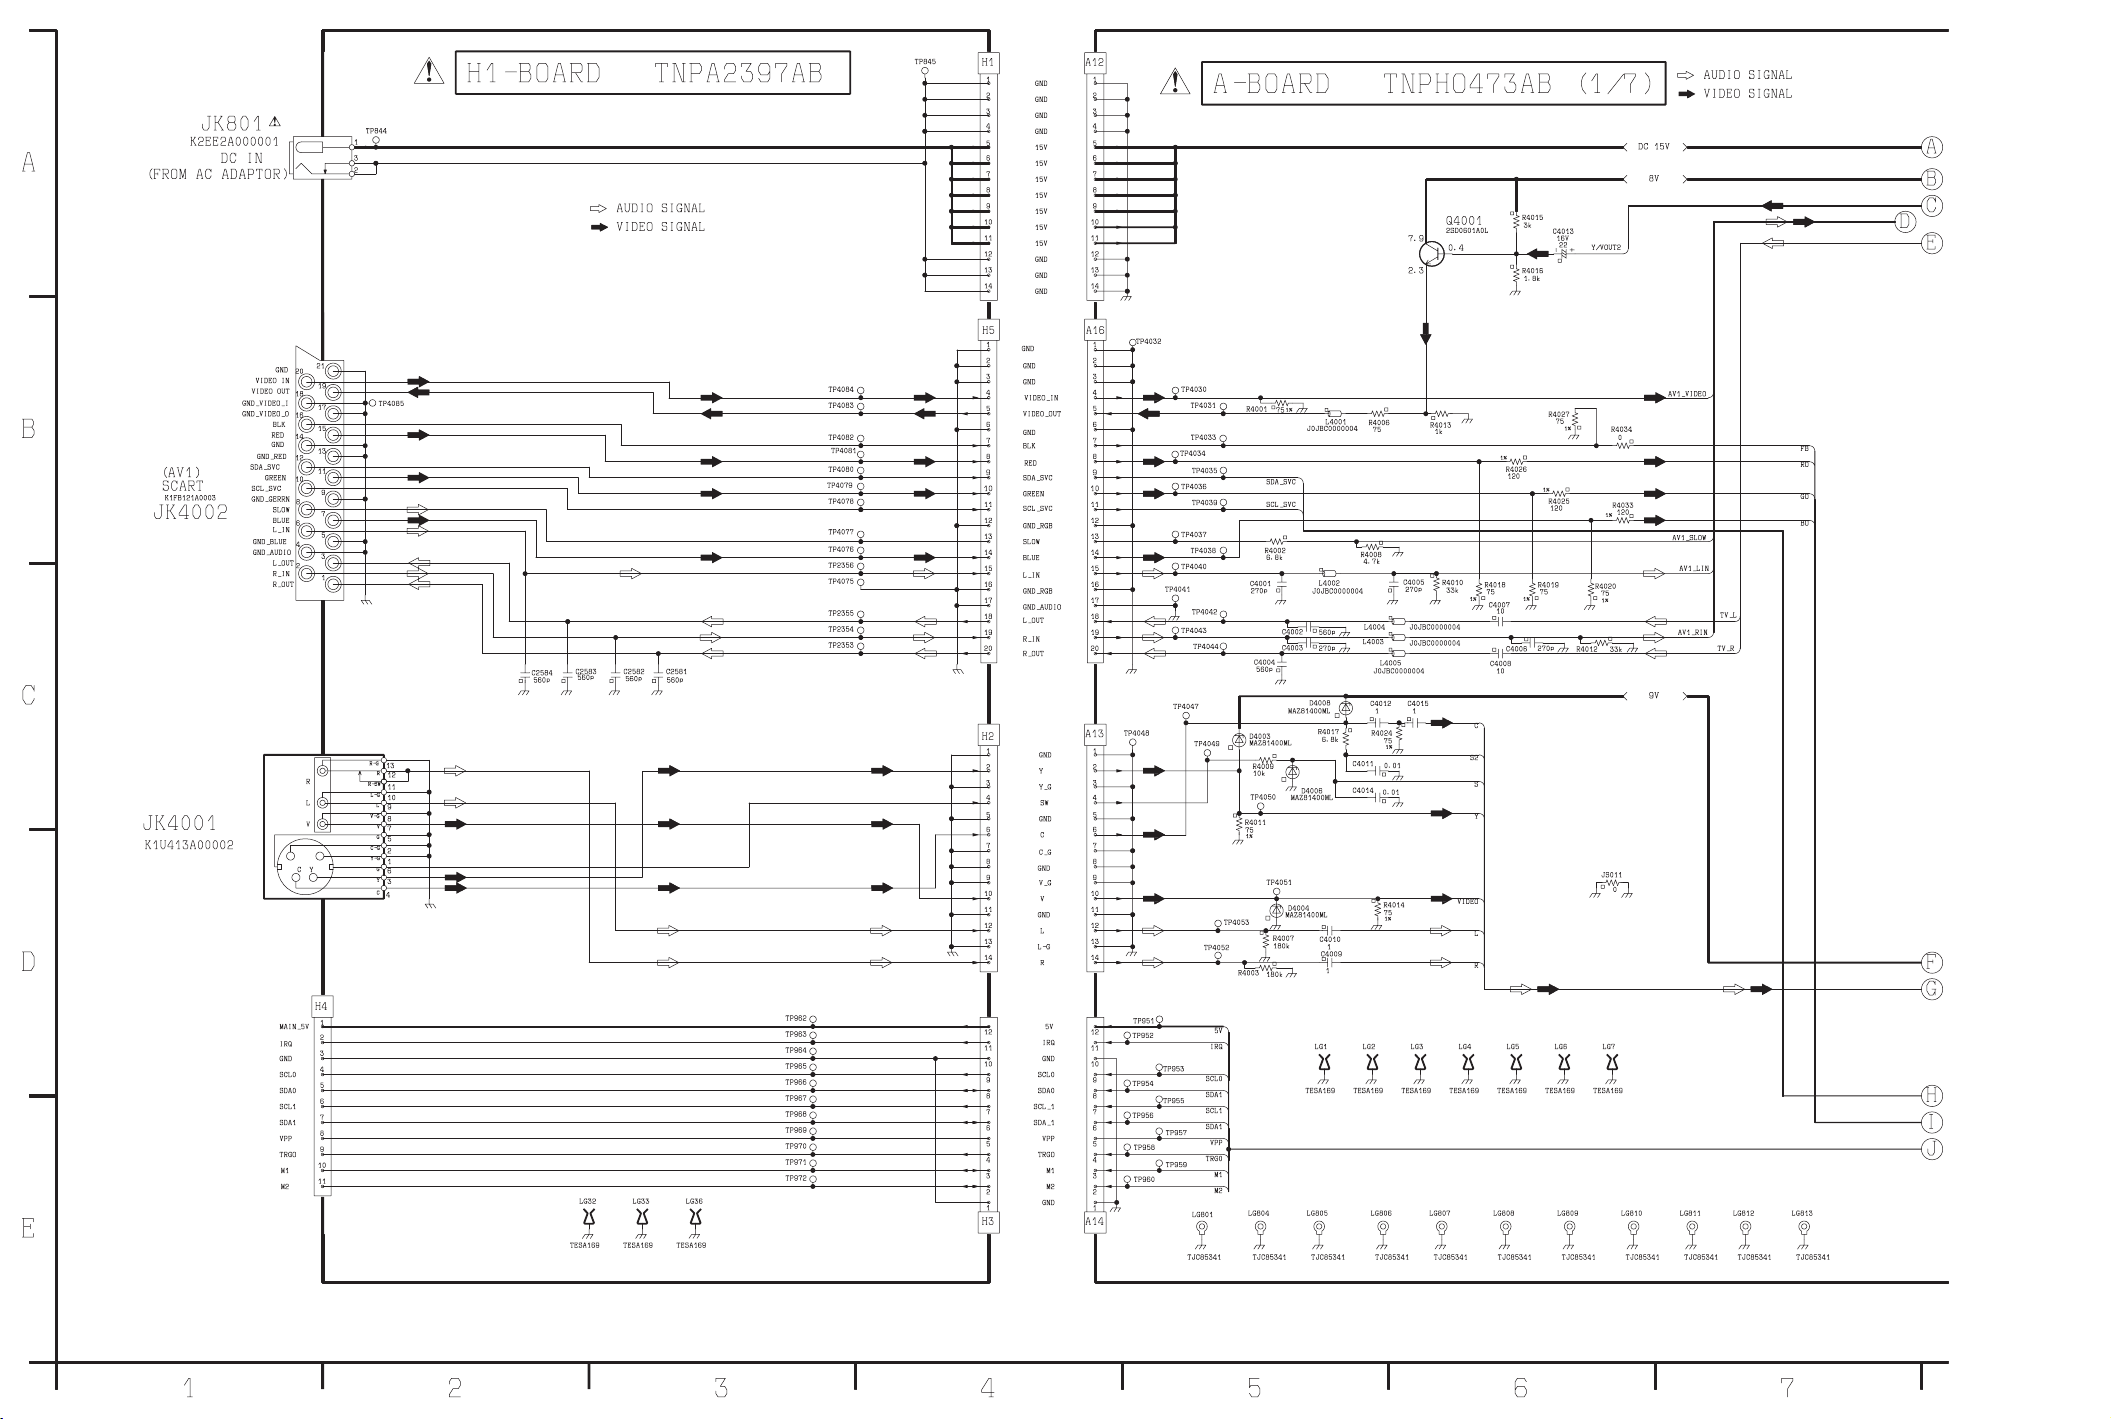
9.5 A-Board (1 of 7) and H1-Board Schematic
Diagram
TOP PREVIOUS NEXT
TOP PREVIOUS NEXT
http://202.224.189.179/view_new/EU/TX-22LT2F/SVC/s0905000000.html29.01.2008 8:45:56
Page 60
Page 61

http://202.224.189.179/view_new/EU/TX-22LT2F/SVC/s0906000000.html
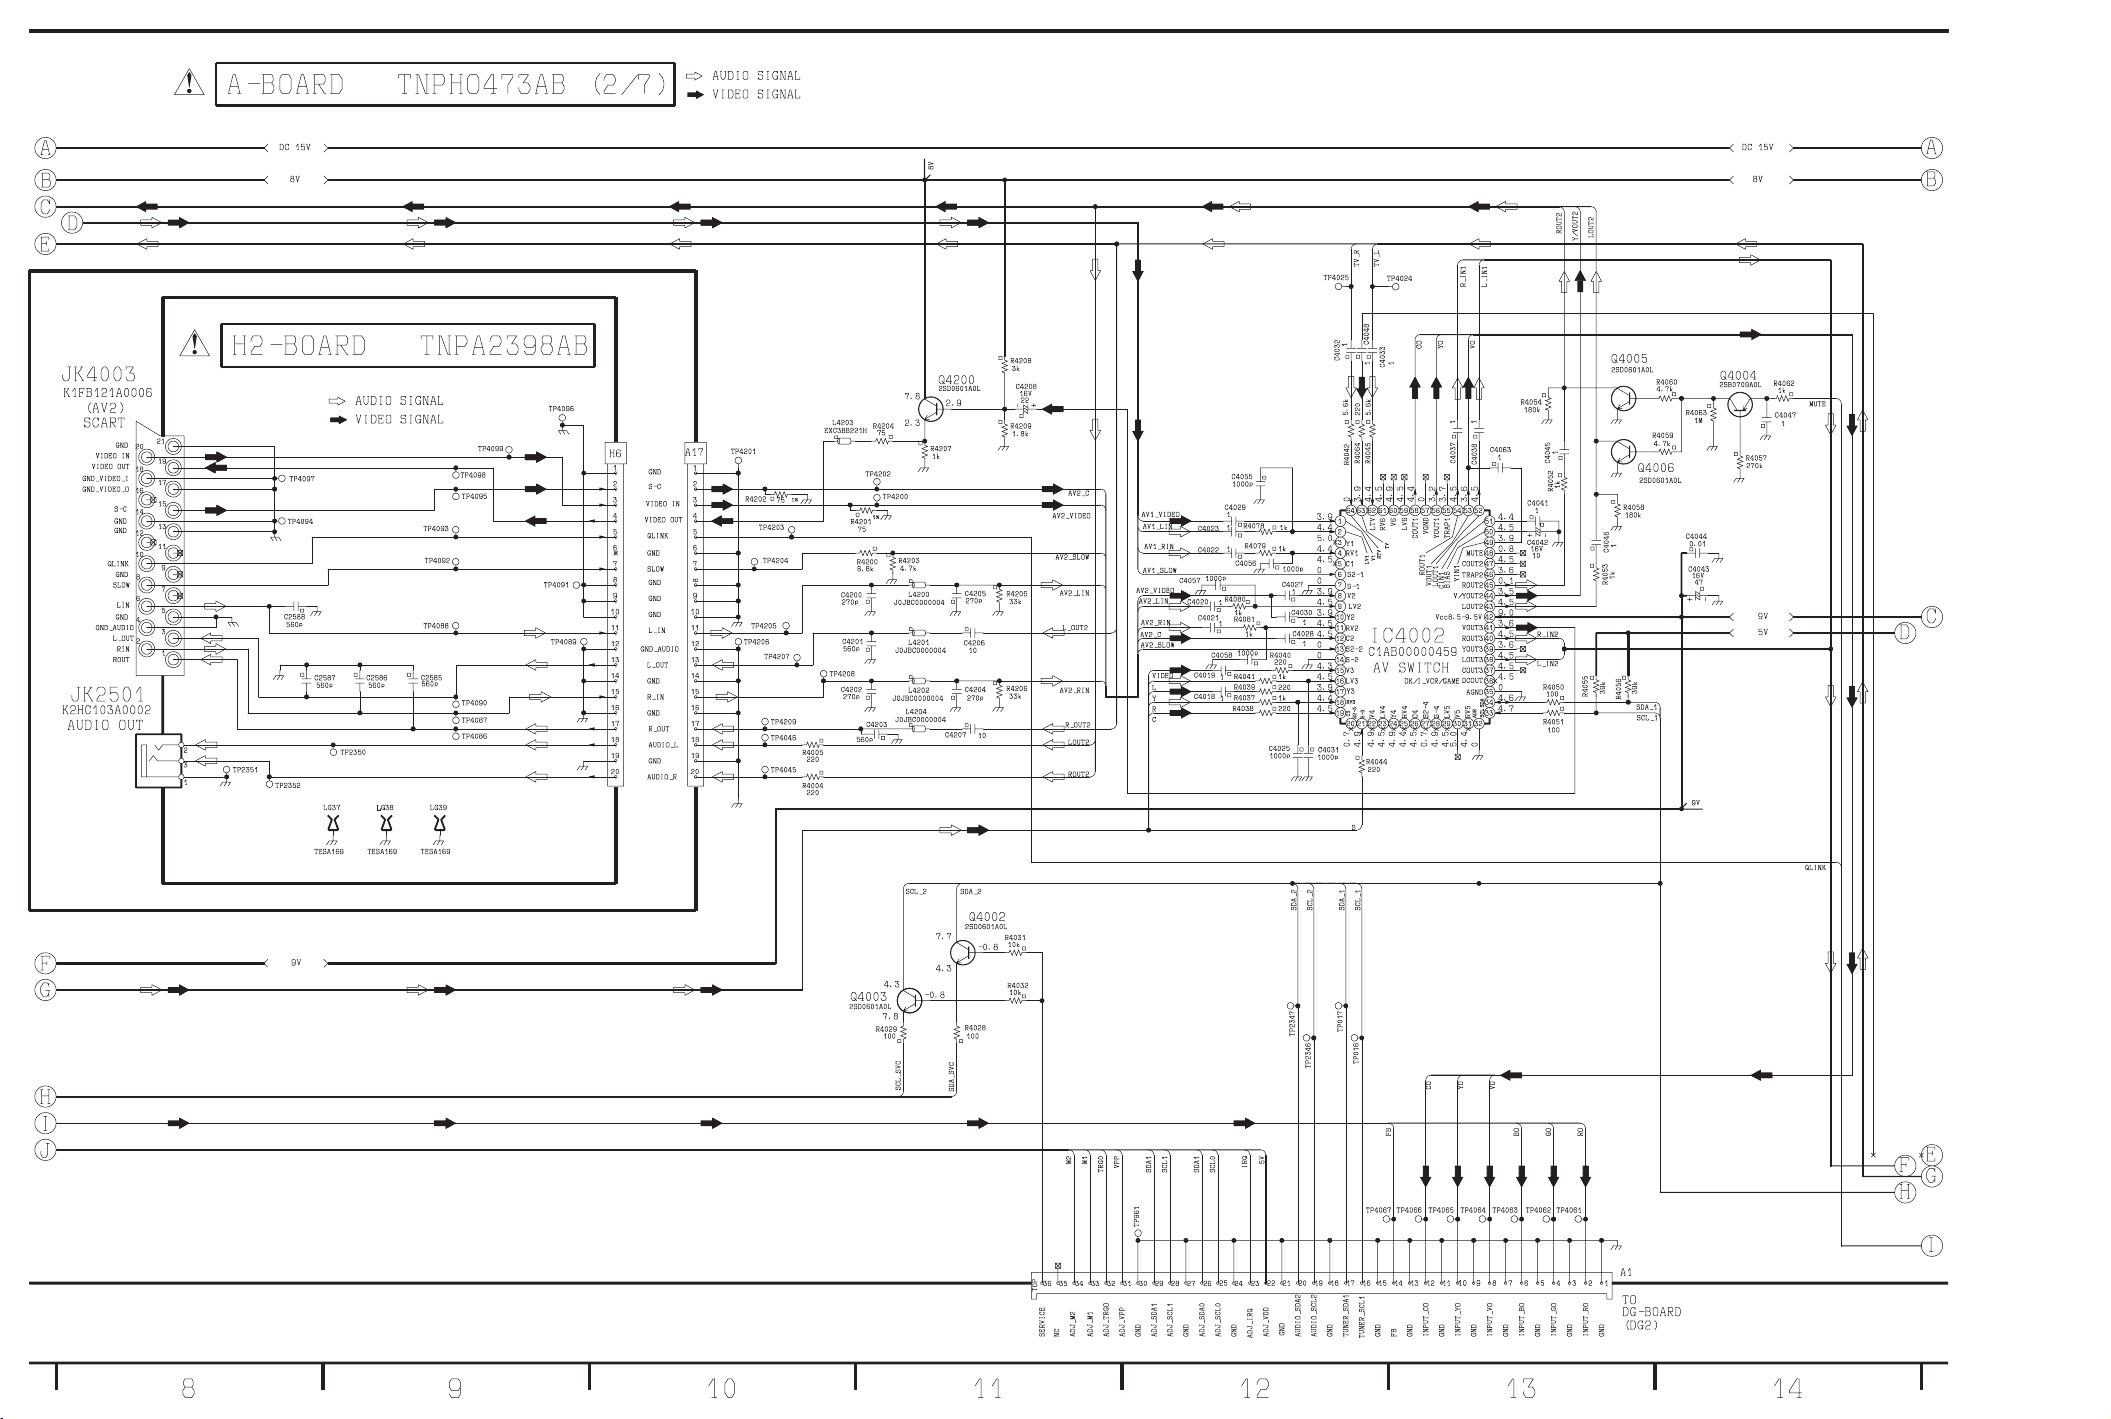
9.6 A-Board (2 of 7) and H2-Board Schematic
Diagram
TOP PREVIOUS NEXT
TOP PREVIOUS NEXT
http://202.224.189.179/view_new/EU/TX-22LT2F/SVC/s0906000000.html29.01.2008 8:46:05
Page 62
Page 63

http://202.224.189.179/view_new/EU/TX-22LT2F/SVC/s0907000000.html
9.7 A-Board (3 of 7) Schematic Diagram
TOP PREVIOUS NEXT
TOP PREVIOUS NEXT
http://202.224.189.179/view_new/EU/TX-22LT2F/SVC/s0907000000.html29.01.2008 8:46:19
Page 64
Page 65

http://202.224.189.179/view_new/EU/TX-22LT2F/SVC/s0908000000.html
9.8 A-Board (4 of 7), B-Board, K-Board and VBoard Schematic Diagram
TOP PREVIOUS NEXT
TOP PREVIOUS NEXT
http://202.224.189.179/view_new/EU/TX-22LT2F/SVC/s0908000000.html29.01.2008 8:46:39
Page 66
Page 67

http://202.224.189.179/view_new/EU/TX-22LT2F/SVC/s0909000000.html
9.9 A-Board (5 of 7), P1-Board and P2-Board
Schematic Diagram
TOP PREVIOUS NEXT
TOP PREVIOUS NEXT
http://202.224.189.179/view_new/EU/TX-22LT2F/SVC/s0909000000.html29.01.2008 8:46:50
Page 68
Page 69

http://202.224.189.179/view_new/EU/TX-22LT2F/SVC/s0910000000.html
9.10 A-Board (6 of 7) and P1-Board Schematic
Diagram
TOP PREVIOUS NEXT
TOP PREVIOUS NEXT
http://202.224.189.179/view_new/EU/TX-22LT2F/SVC/s0910000000.html29.01.2008 8:47:00
Page 70
Page 71

http://202.224.189.179/view_new/EU/TX-22LT2F/SVC/s0911000000.html
9.11 A-Board (7 of 7) Schematic Diagram
TOP PREVIOUS NEXT
TOP PREVIOUS NEXT
http://202.224.189.179/view_new/EU/TX-22LT2F/SVC/s0911000000.html29.01.2008 8:47:10
Page 72
Page 73

http://202.224.189.179/view_new/EU/TX-22LT2F/SVC/s0912000000.html
9.12 DG-Board (1 of 7) Schematic Diagram
TOP PREVIOUS NEXT
TOP PREVIOUS NEXT
http://202.224.189.179/view_new/EU/TX-22LT2F/SVC/s0912000000.html29.01.2008 8:47:20
Page 74
Page 75

http://202.224.189.179/view_new/EU/TX-22LT2F/SVC/s0913000000.html
9.13 DG-Board (2 of 7) Schematic Diagram
TOP PREVIOUS NEXT
TOP PREVIOUS NEXT
http://202.224.189.179/view_new/EU/TX-22LT2F/SVC/s0913000000.html29.01.2008 8:47:39
Page 76
Page 77

http://202.224.189.179/view_new/EU/TX-22LT2F/SVC/s0914000000.html
9.14 DG-Board (3 of 7) Schematic Diagram
TOP PREVIOUS NEXT
TOP PREVIOUS NEXT
http://202.224.189.179/view_new/EU/TX-22LT2F/SVC/s0914000000.html29.01.2008 8:48:03
Page 78
Page 79

http://202.224.189.179/view_new/EU/TX-22LT2F/SVC/s0915000000.html
9.15 DG-Board (4 of 7) Schematic Diagram
TOP PREVIOUS NEXT
TOP PREVIOUS NEXT
http://202.224.189.179/view_new/EU/TX-22LT2F/SVC/s0915000000.html29.01.2008 8:48:17
Page 80
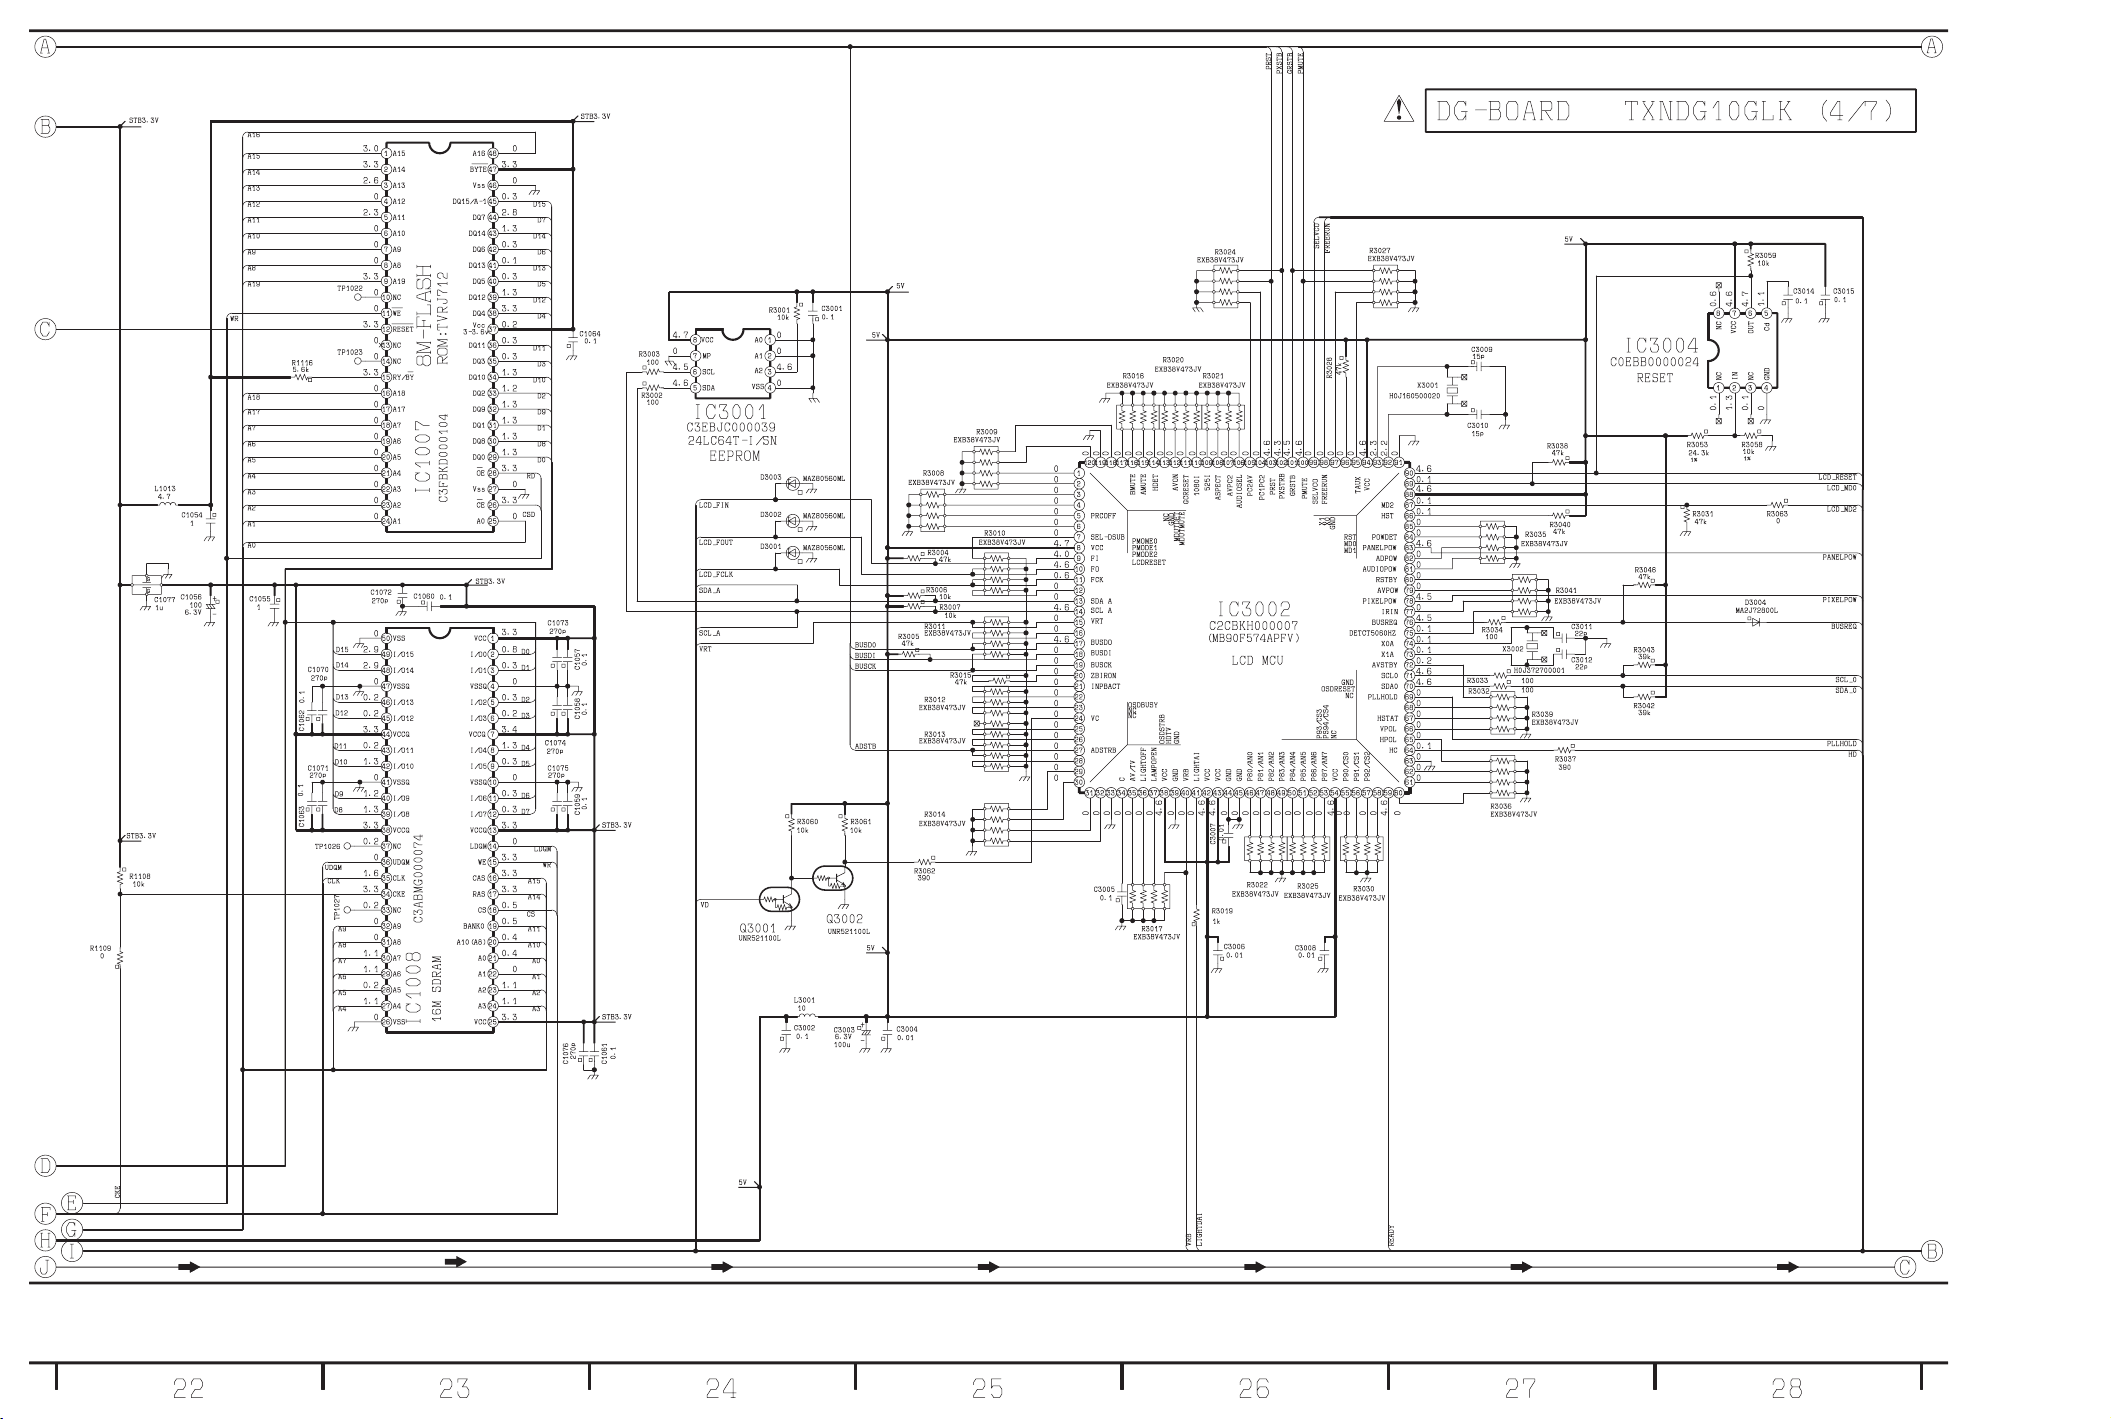
Page 81

http://202.224.189.179/view_new/EU/TX-22LT2F/SVC/s0916000000.html
9.16 DG-Board (5 of 7) Schematic Diagram
TOP PREVIOUS NEXT
TOP PREVIOUS NEXT
http://202.224.189.179/view_new/EU/TX-22LT2F/SVC/s0916000000.html29.01.2008 8:48:34
Page 82
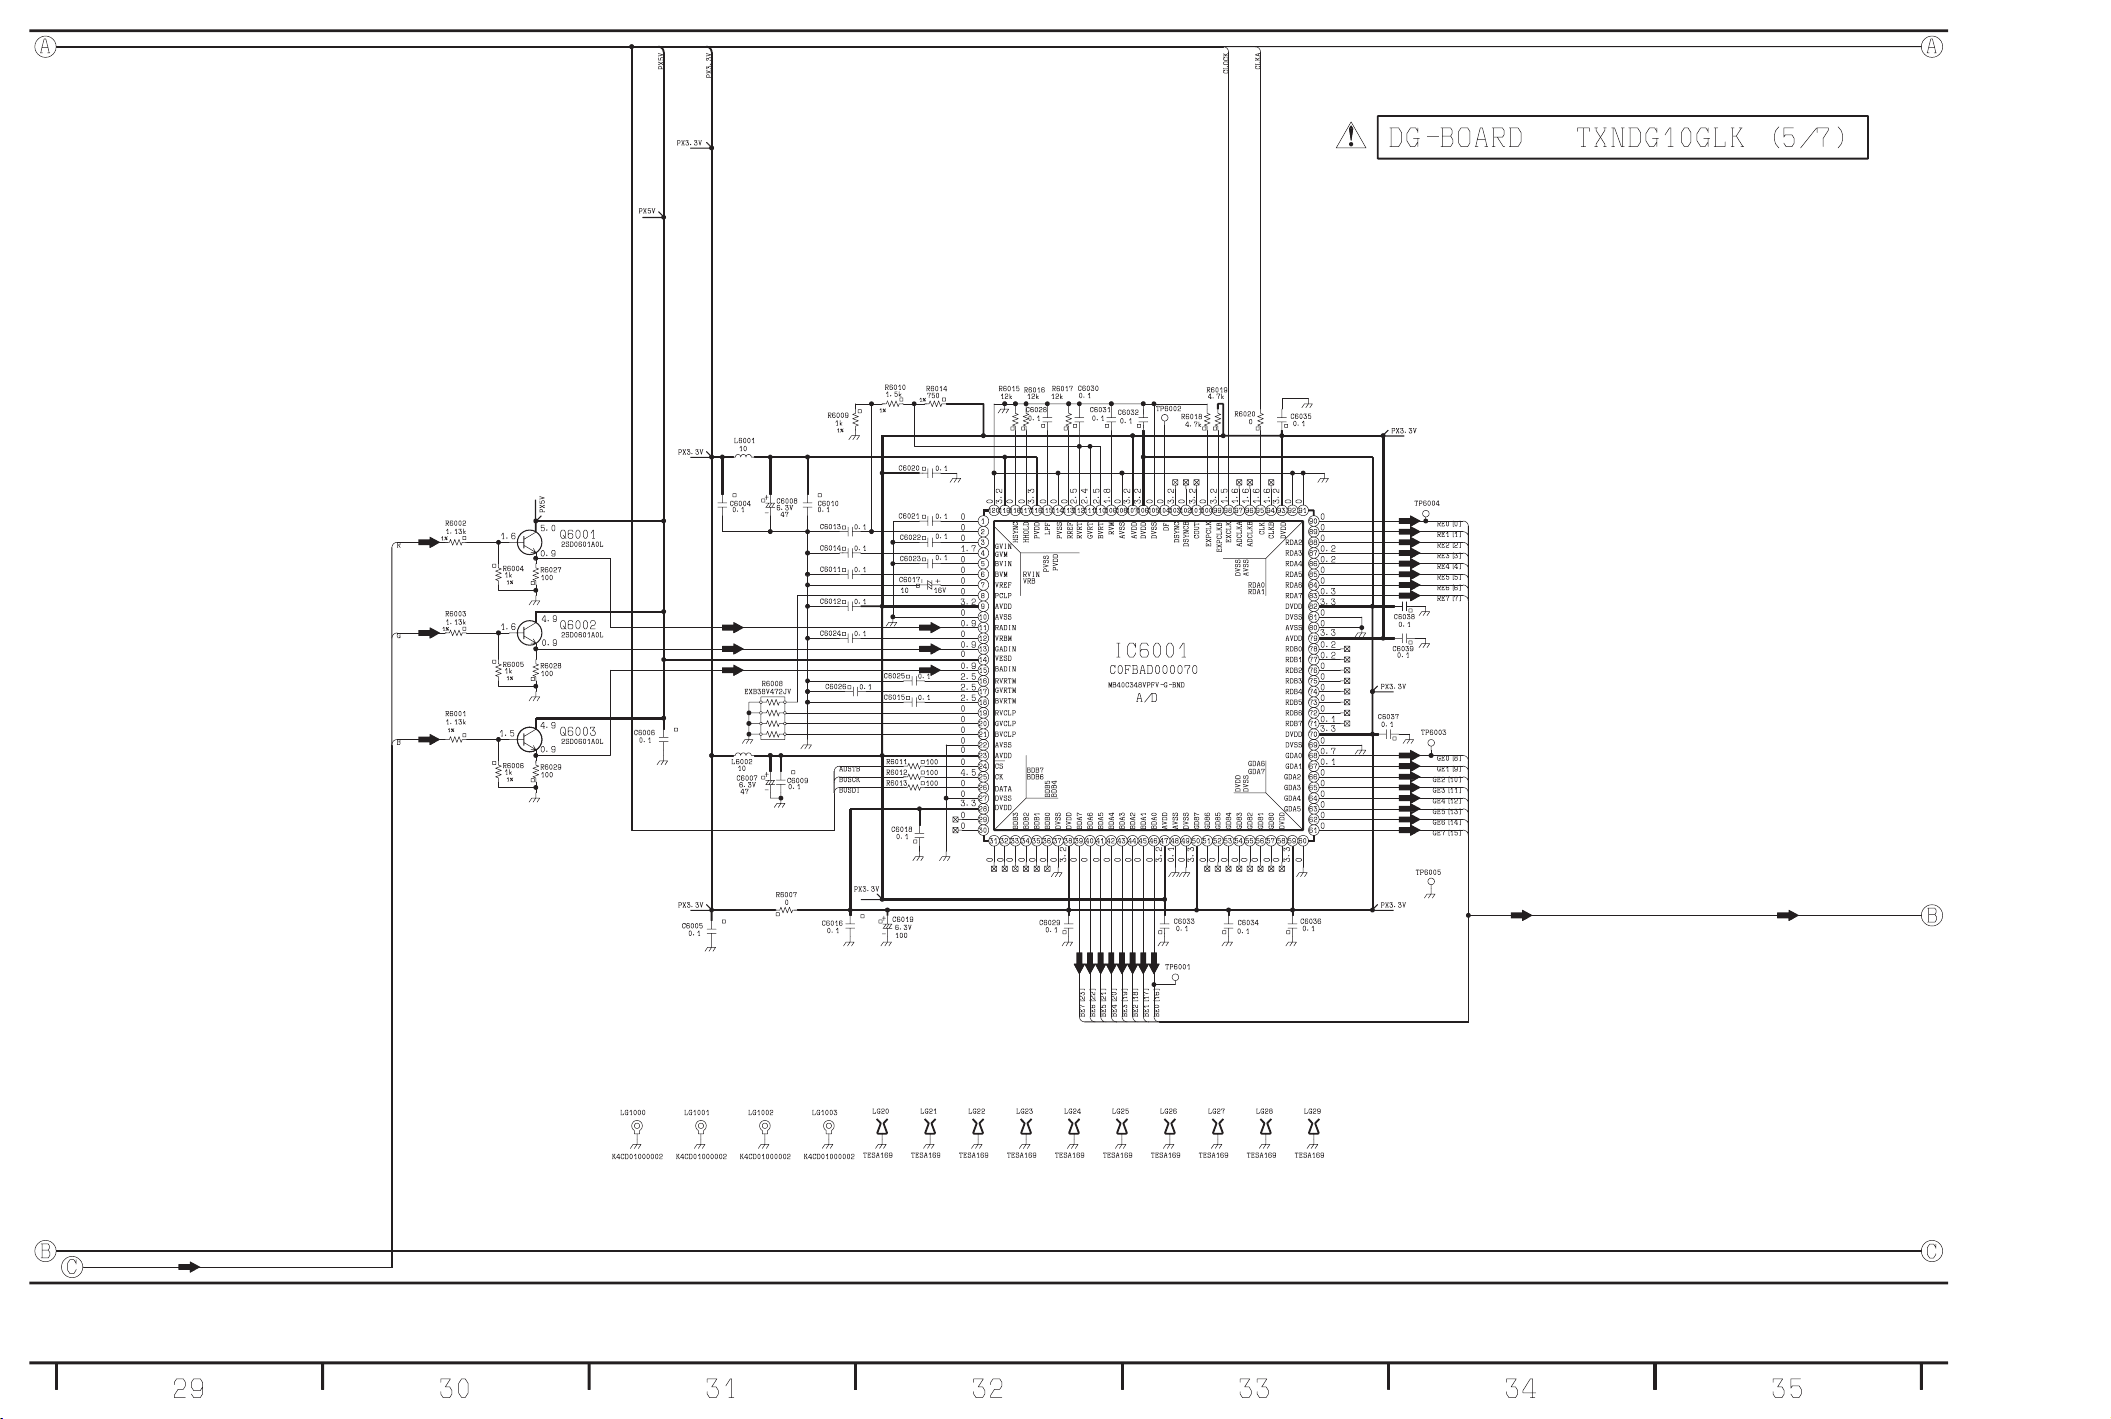
Page 83

http://202.224.189.179/view_new/EU/TX-22LT2F/SVC/s0917000000.html
9.17 DG-Board (6 of 7) Schematic Diagram
TOP PREVIOUS NEXT
TOP PREVIOUS NEXT
http://202.224.189.179/view_new/EU/TX-22LT2F/SVC/s0917000000.html29.01.2008 8:48:46
Page 84
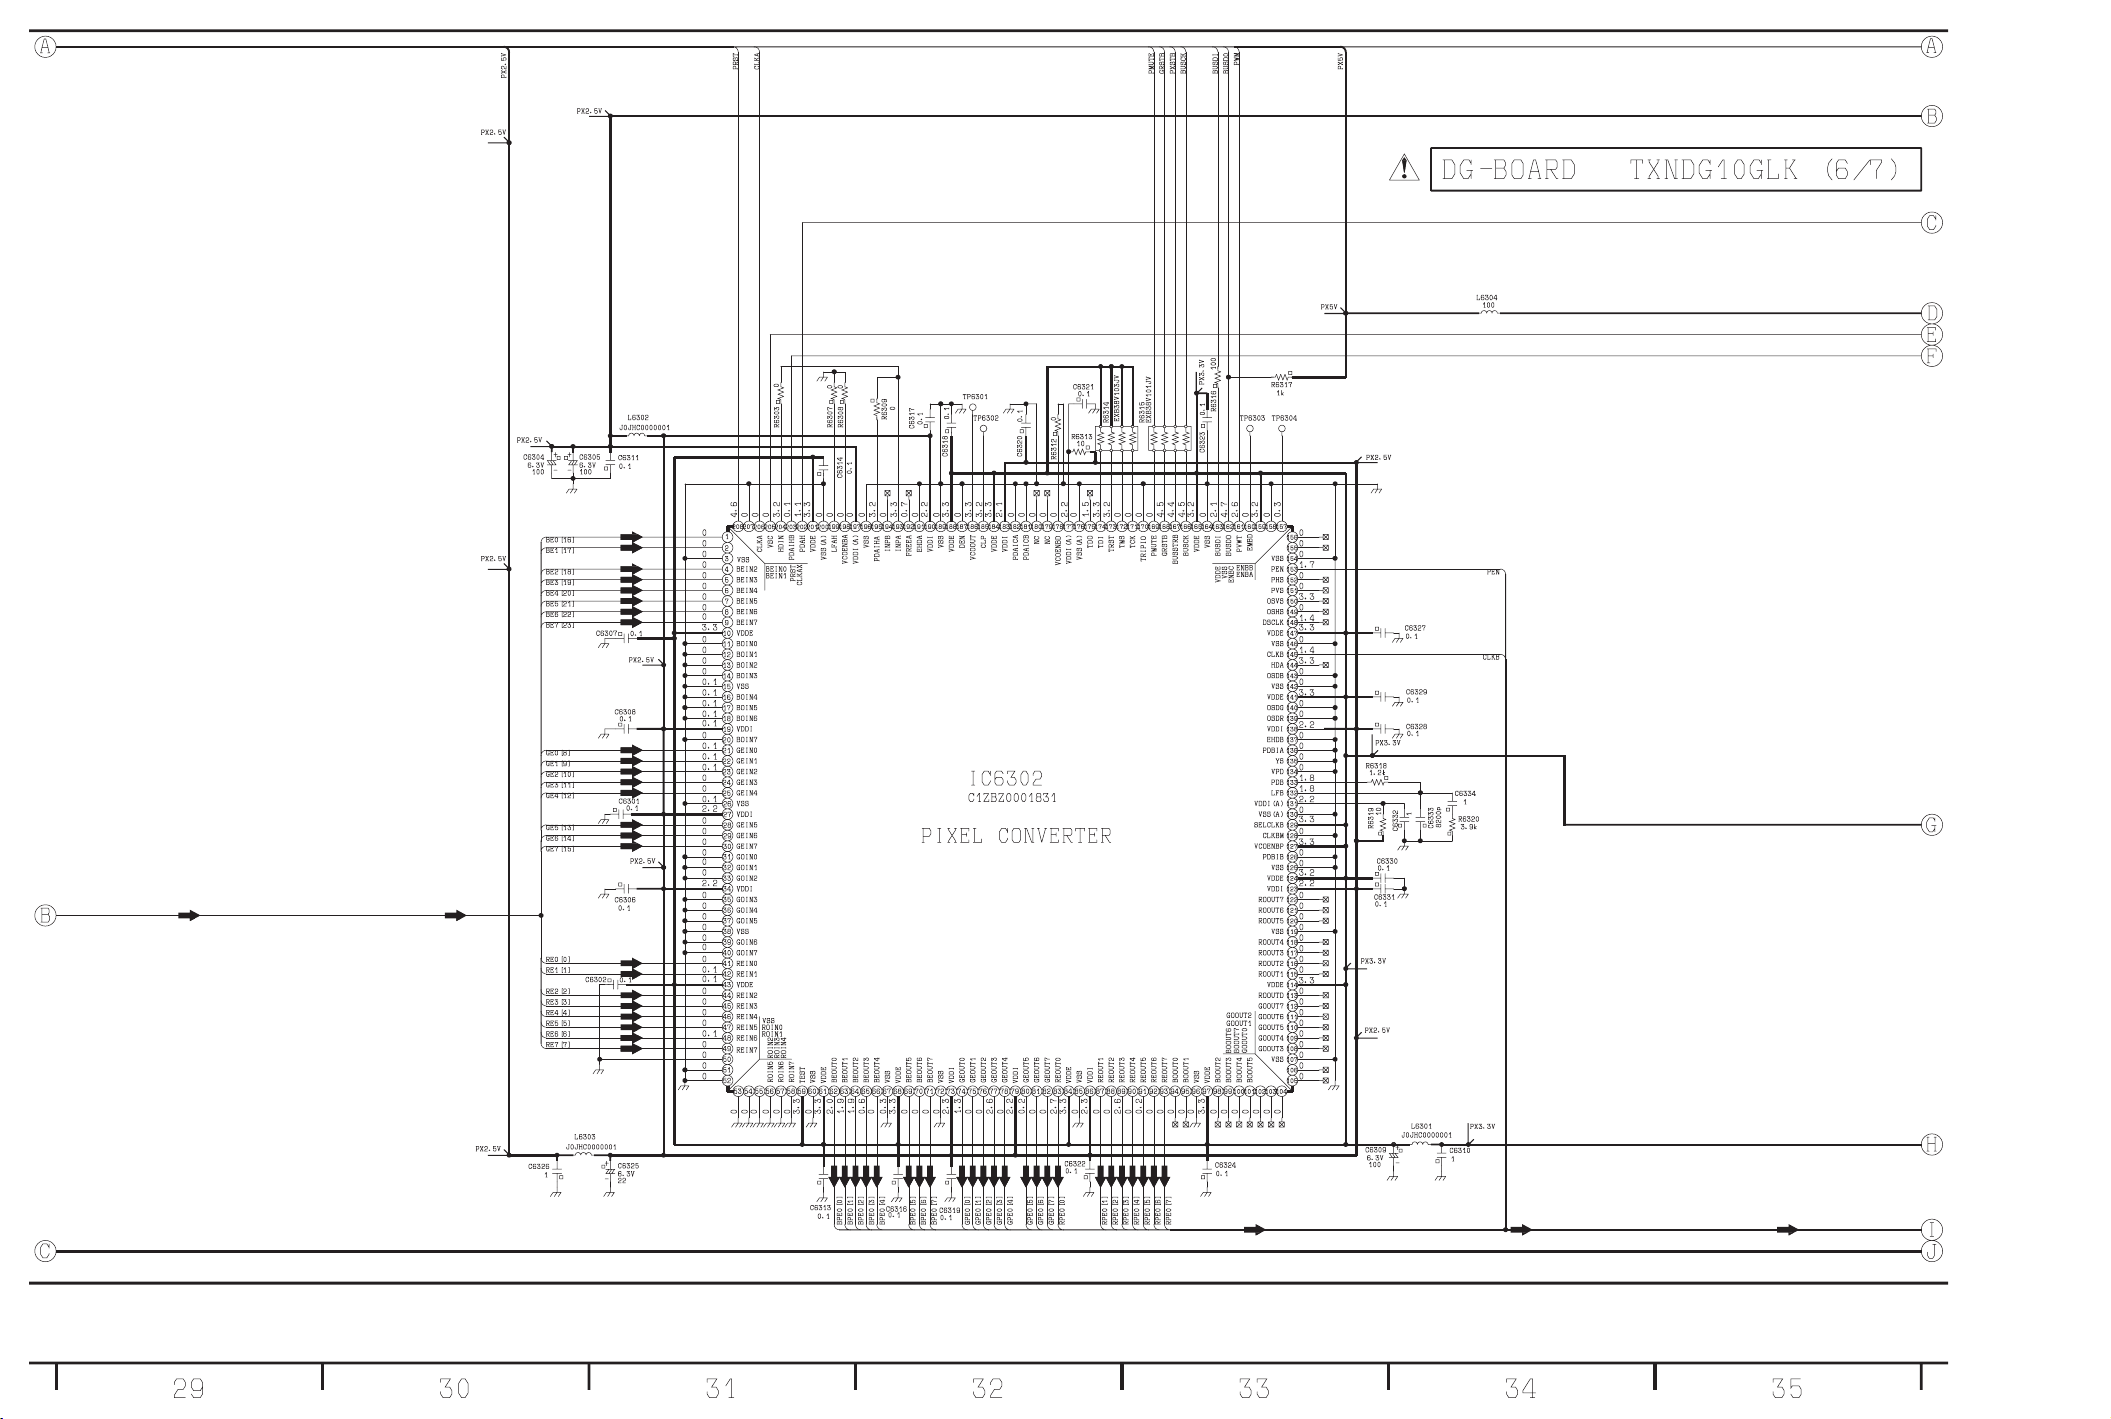
Page 85

http://202.224.189.179/view_new/EU/TX-22LT2F/SVC/s0918000000.html
9.18 DG-Board (7 of 7) Schematic Diagram
TOP PREVIOUS NEXT
TOP PREVIOUS NEXT
http://202.224.189.179/view_new/EU/TX-22LT2F/SVC/s0918000000.html29.01.2008 8:49:03
Page 86
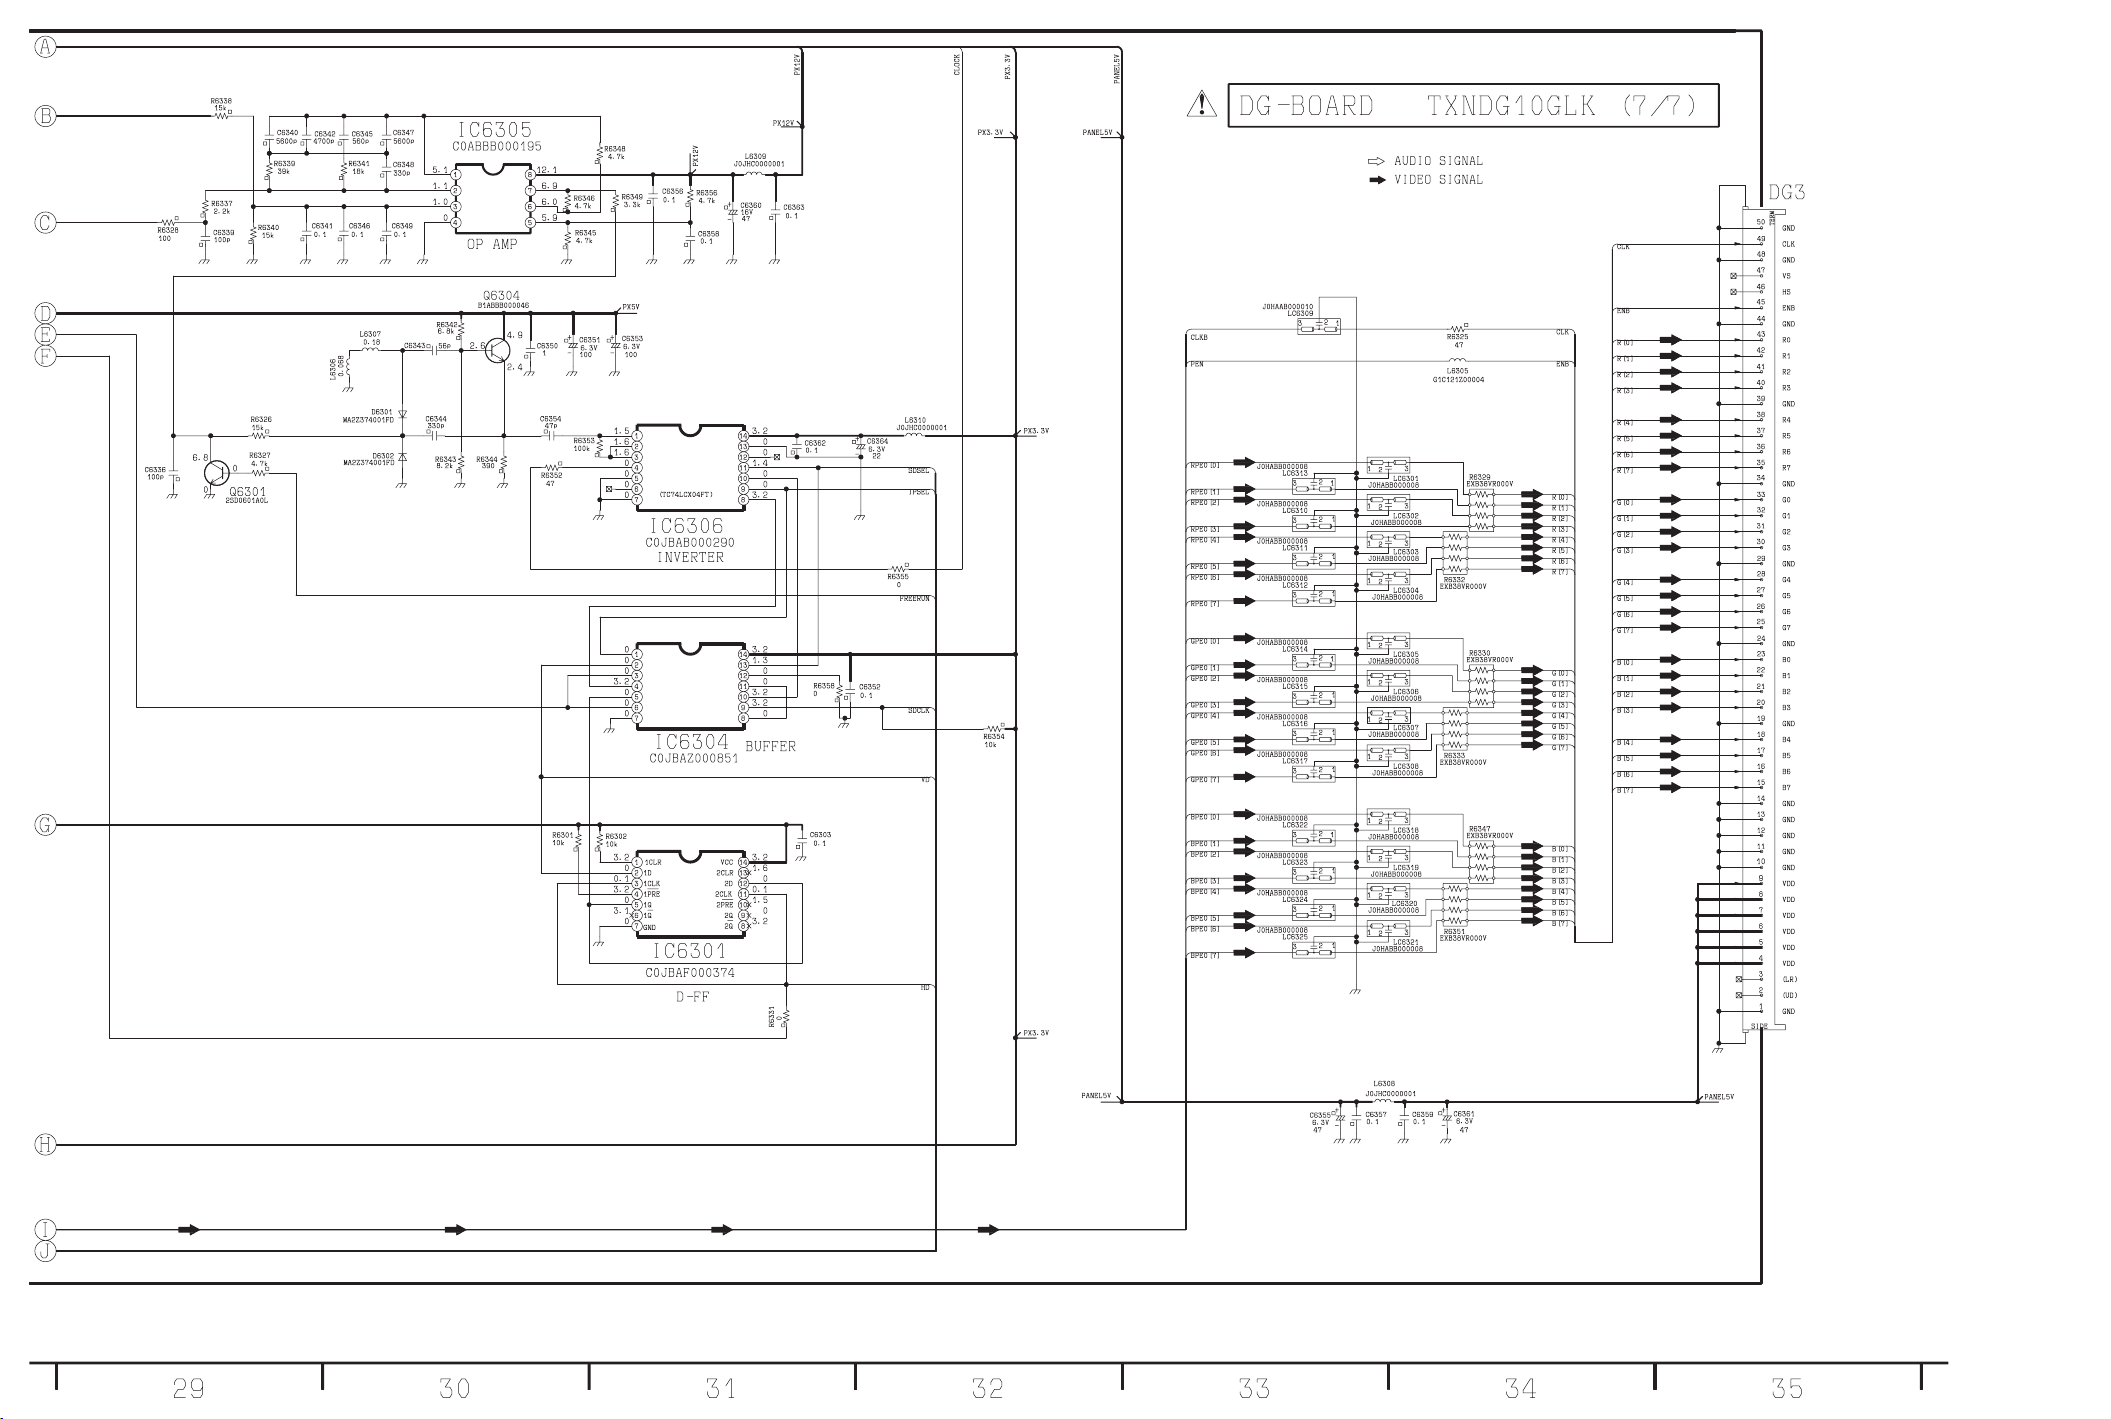
Page 87

http://202.224.189.179/view_new/EU/TX-22LT2F/SVC/s1000000000x.html
10 Parts Location& Mechanical Replacement
Parts List
TOP PREVIOUS NEXT
10.1 Parts Location
10.2 Packing Exploded View
10.3 Mechanical Replacement Parts List
TOP PREVIOUS NEXT
http://202.224.189.179/view_new/EU/TX-22LT2F/SVC/s1000000000x.html29.01.2008 8:49:18
Page 88

http://202.224.189.179/view_new/EU/TX-22LT2F/SVC/s1001000000.html
10.1 Parts Location
TOP PREVIOUS NEXT
TOP PREVIOUS NEXT
http://202.224.189.179/view_new/EU/TX-22LT2F/SVC/s1001000000.html29.01.2008 8:49:21
Page 89
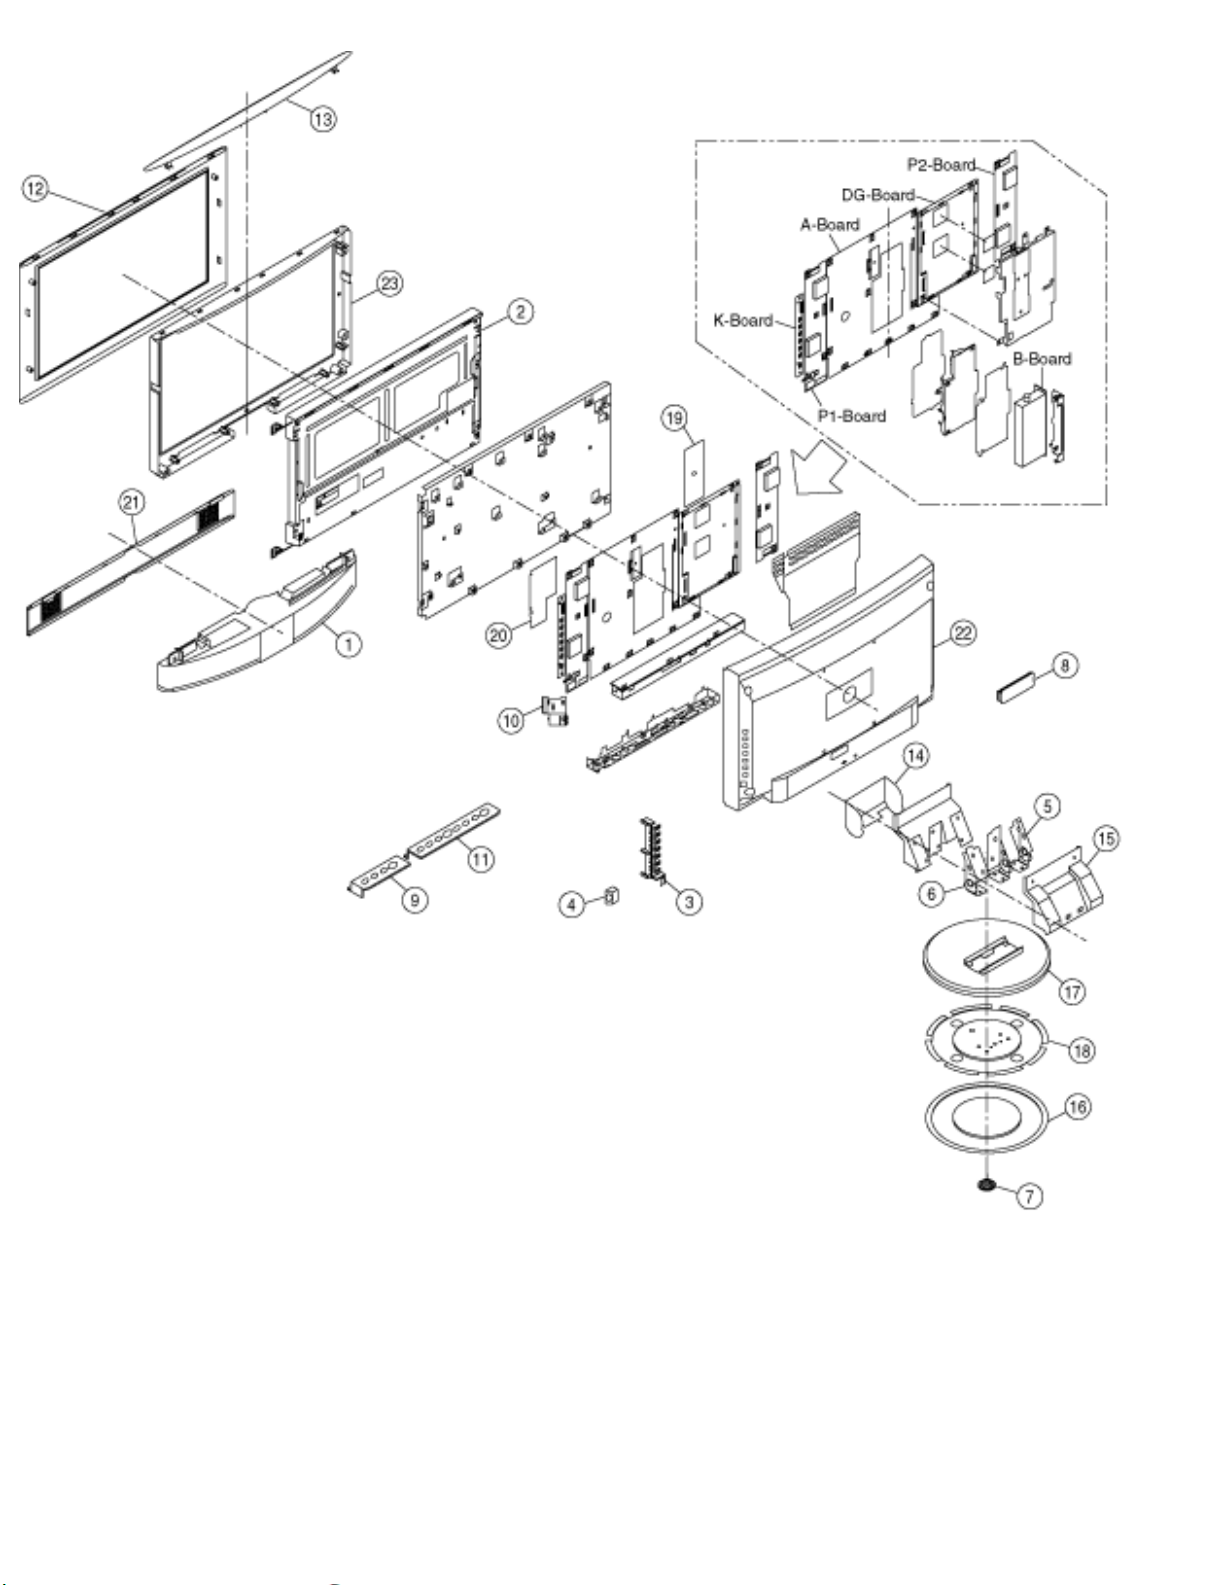
http://202.224.189.179/view_new/EU/TX-22LT2F/SVC/t10_01.gif
http://202.224.189.179/view_new/EU/TX-22LT2F/SVC/t10_01.gif29.01.2008 8:49:23
Page 90

http://202.224.189.179/view_new/EU/TX-22LT2F/SVC/s1002000000.html
10.2 Packing Exploded View
TOP PREVIOUS NEXT
TOP PREVIOUS NEXT
http://202.224.189.179/view_new/EU/TX-22LT2F/SVC/s1002000000.html29.01.2008 8:49:28
Page 91
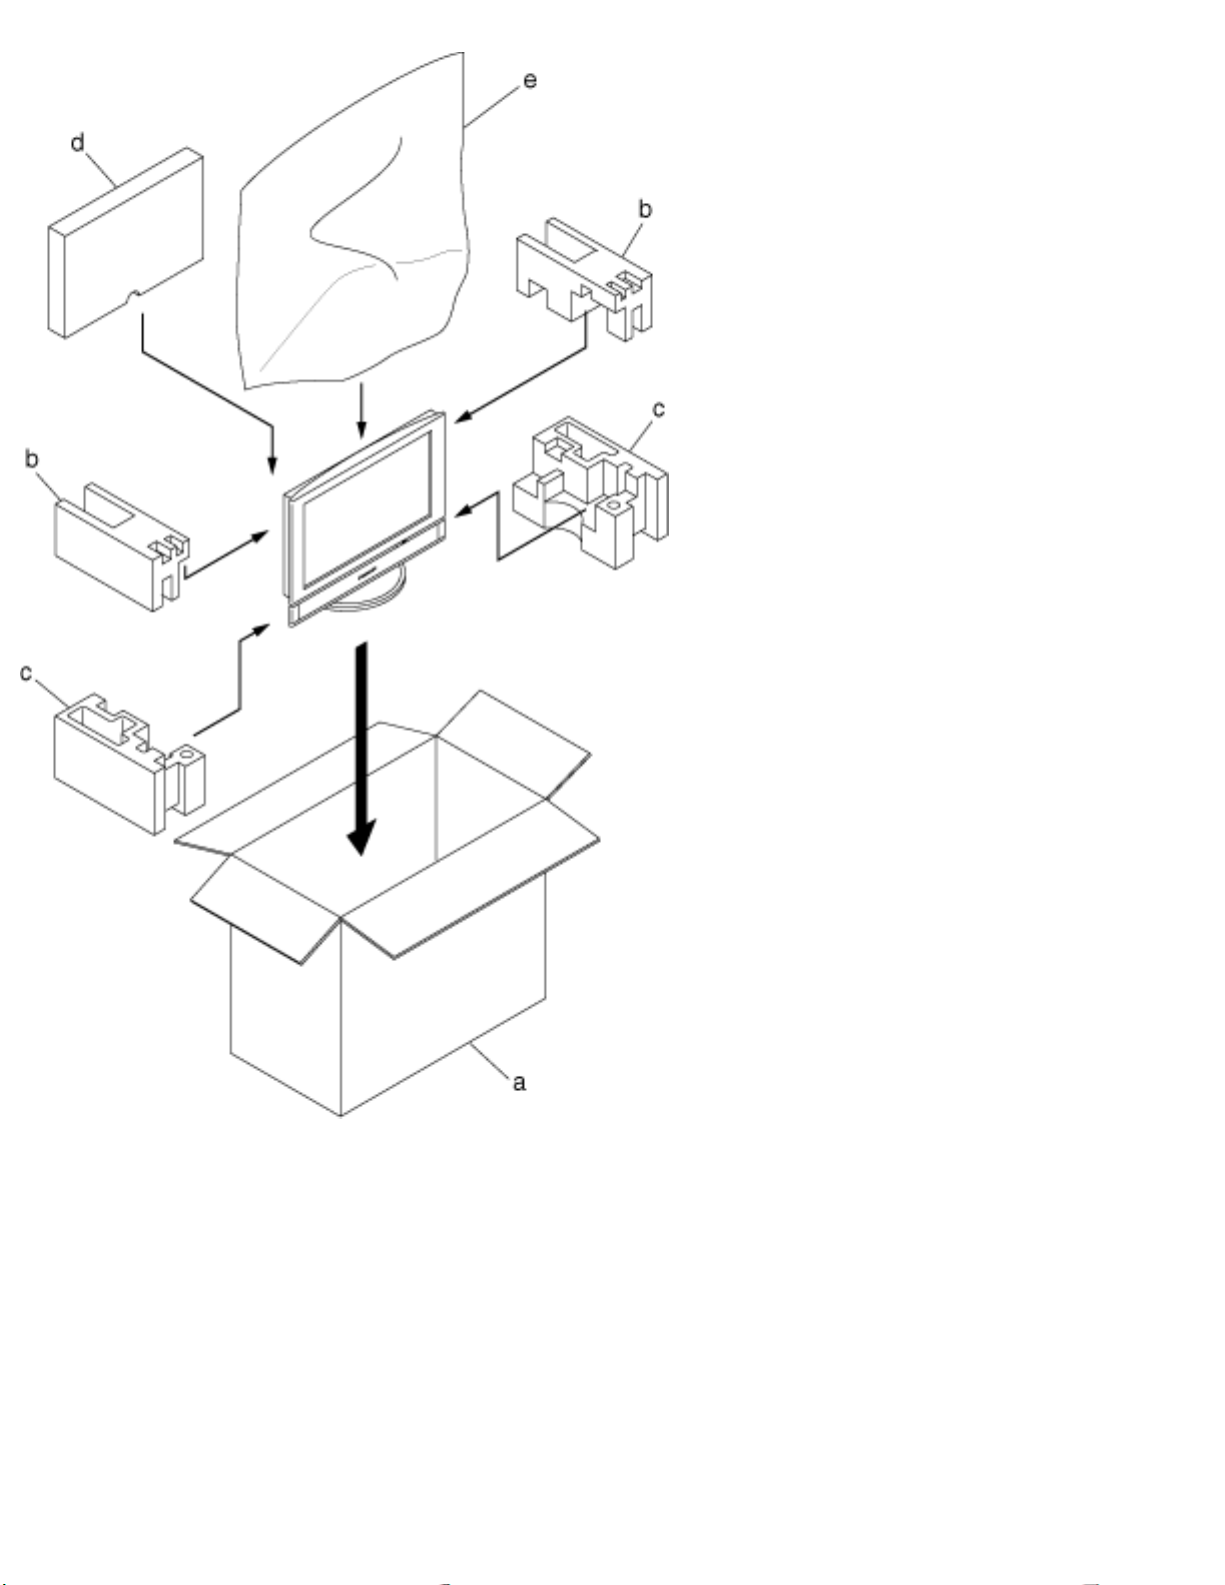
http://202.224.189.179/view_new/EU/TX-22LT2F/SVC/t10_02.gif
http://202.224.189.179/view_new/EU/TX-22LT2F/SVC/t10_02.gif29.01.2008 8:49:30
Page 92
http://202.224.189.179/view_new/EU/TX-22LT2F/SVC/s1003000000.html
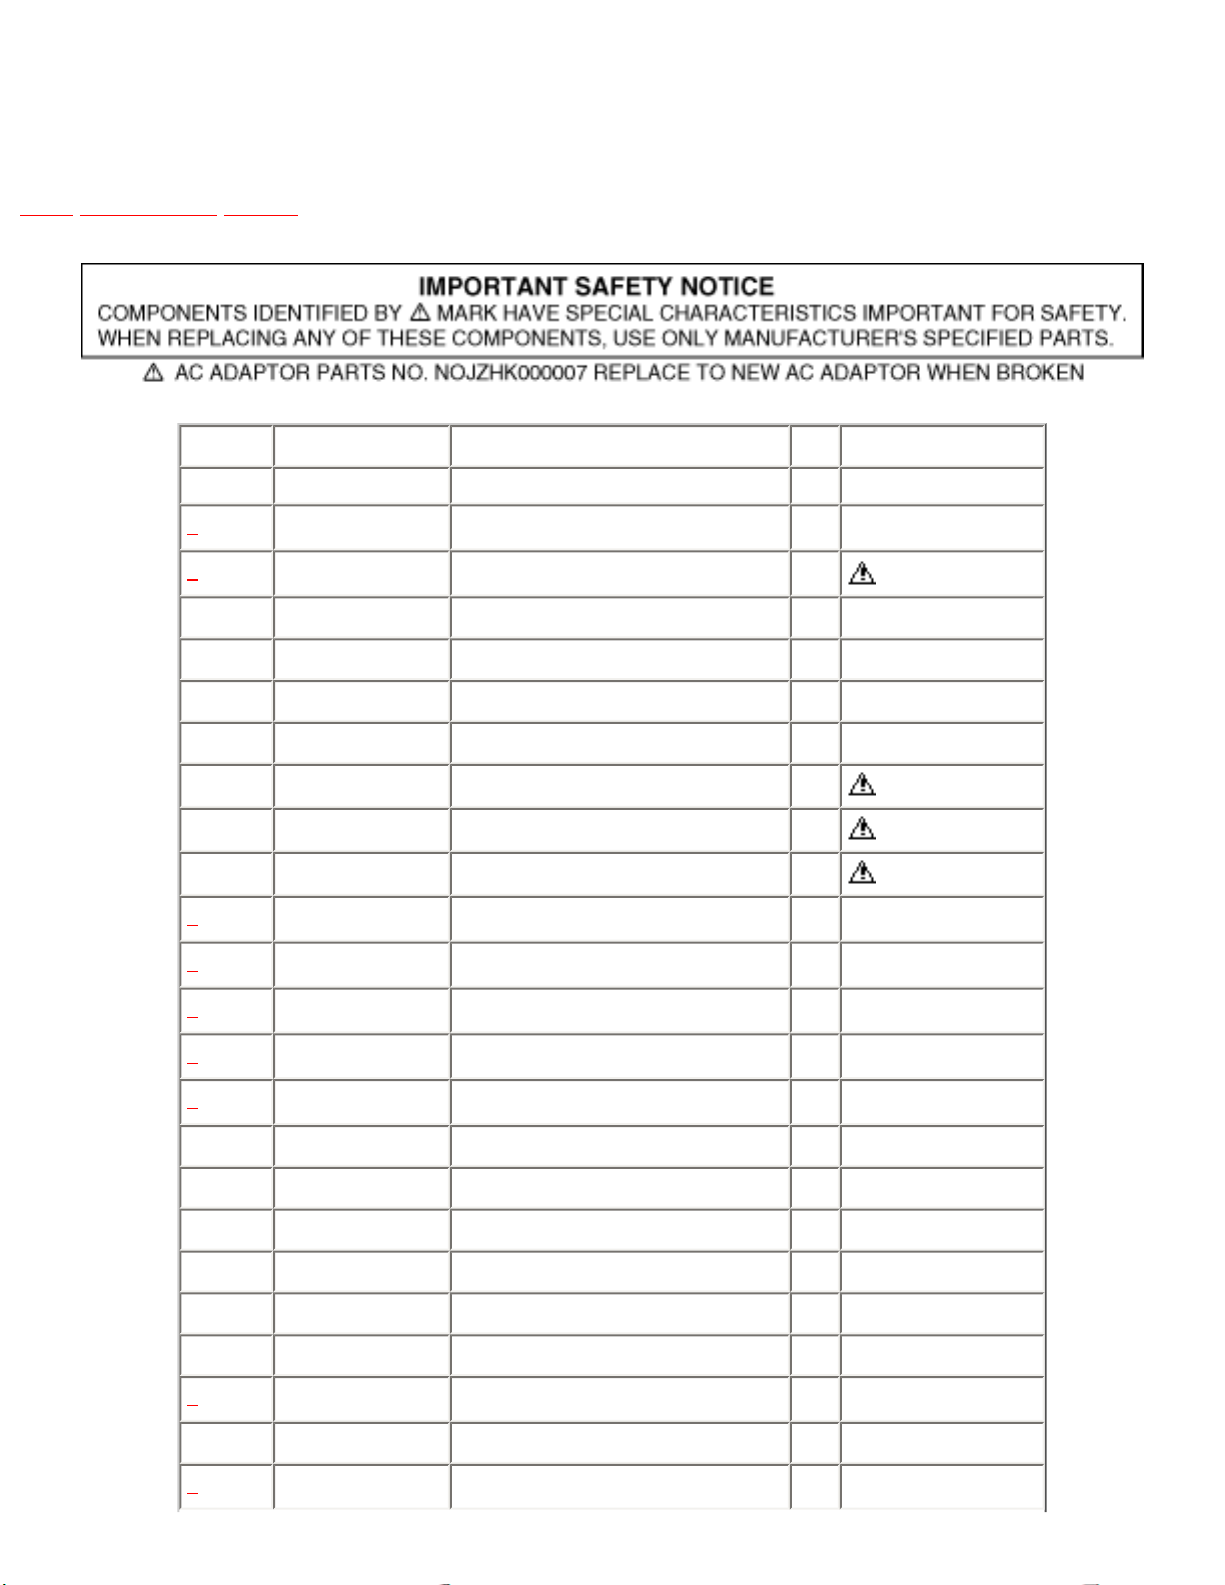
10.3 Mechanical Replacement Parts List
TOP PREVIOUS NEXT
Ref. No. Part No. Part Name & Description Pcs Remarks
1 EAB719A0 SPEAKER UNIT 1
2 EDTCF08QAFZ4 LCD PANEL 1 EDTCF08QAFZ2
EUR511252 REMOCON TRANSMITTER 1
J0KD00000056 EMI FILTER 1
K1SZBDBA0002 Aerial Connector 1
K1TZA9D00090 IF CABLE 1
K2CR2DA00006 AC CORD 1
N0JZHK000007 AC ADAPTER 1
TBME643 MODEL NAME PLATE 1
3 TBXA27802 CONTROL BUTTON 1
4 TBXA29402 POWER BUTTON 1
5 TEJA033 CHILD SHAFT(LEFT) 1
6 TEJA034 CHILD SHAFT(RIGHT) 2
7 TEJF016 SHAFT 1
TESA140 SPRING 2
TESA172 SPRING 1
THTA025 SCREW 4
THTF002U SCREW 4
THW70035Y WASHER for Aerial Connector 1
TKKC5104 LED TREND SHAFT 1
8 TKKL5141-1 CONNECTOR COVER 1
TKKL5142 RECEIVER COVER 1
9 TKKL5145 TERMINAL COVER(RIGHT) 1
http://202.224.189.179/view_new/EU/TX-22LT2F/SVC/s1003000000.html (1 of 4)29.01.2008 8:49:38
Page 93
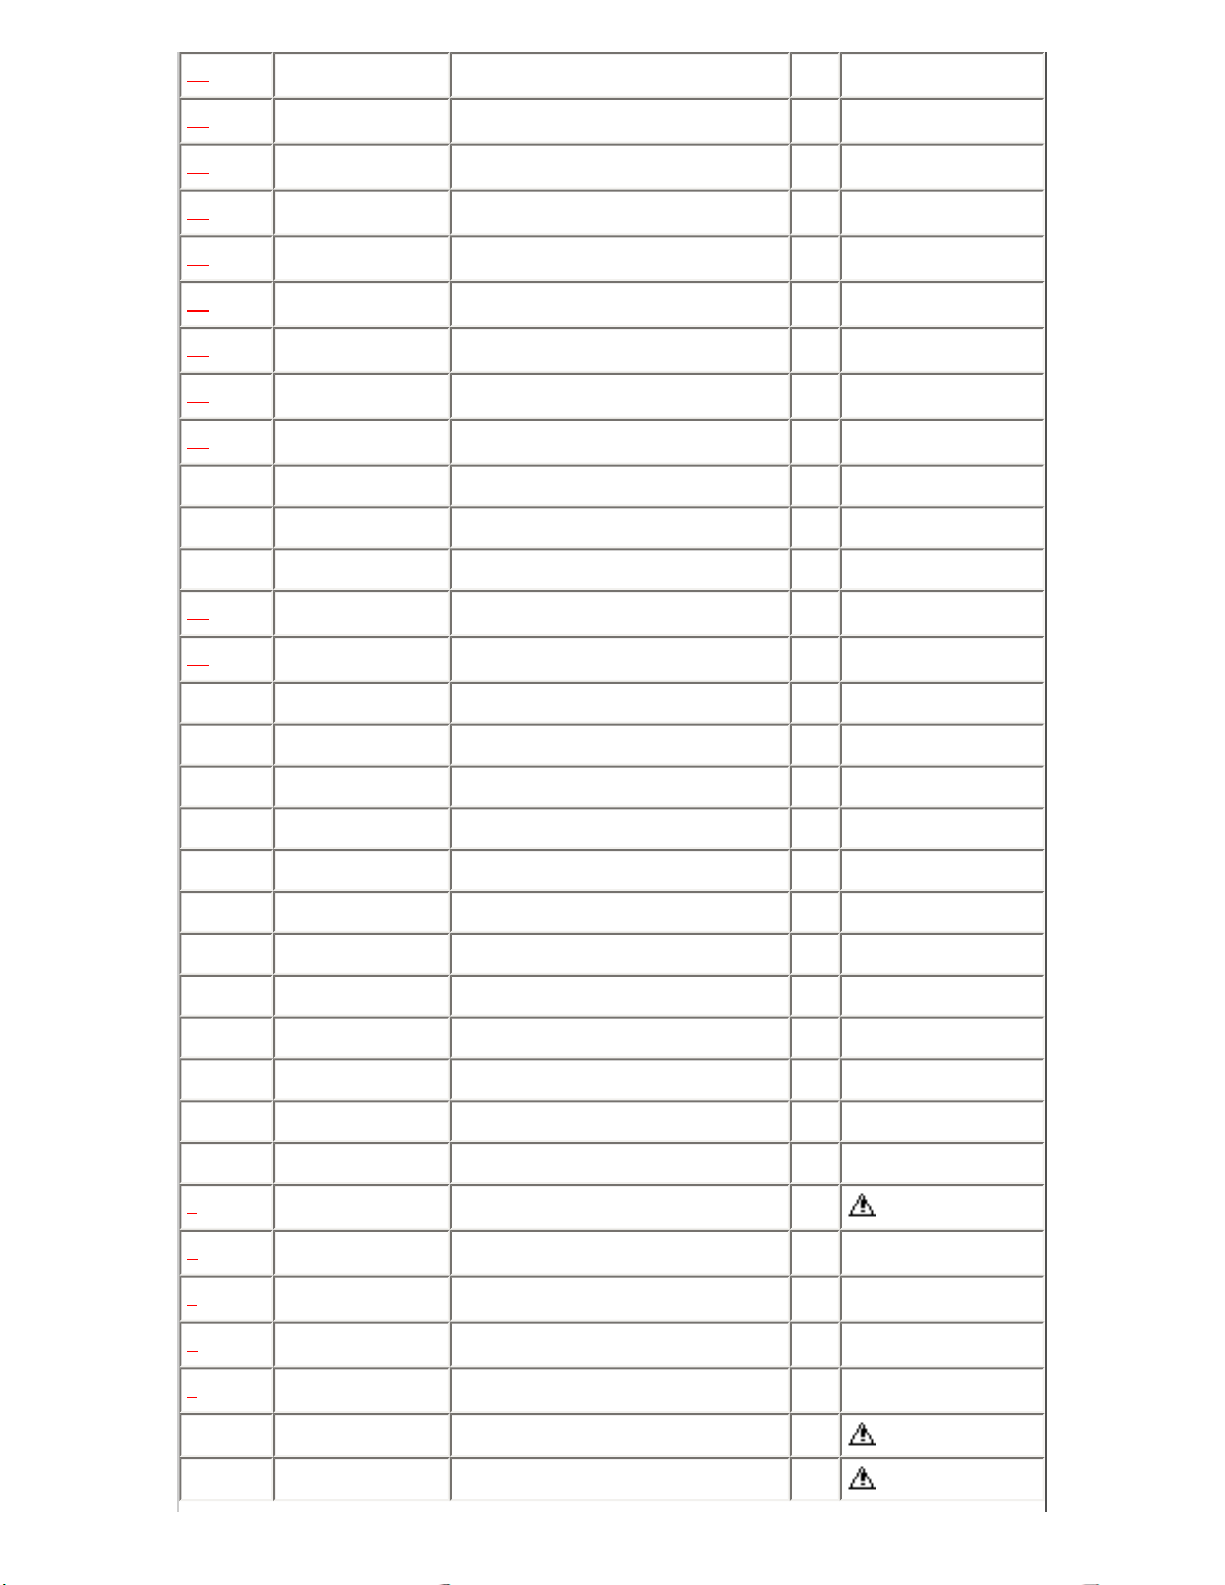
http://202.224.189.179/view_new/EU/TX-22LT2F/SVC/s1003000000.html
10 TKKL5147-1 JACK BRACKET 1
11 TKKL5210 TERMINAL COVER(LEFT) 1
12 TKPA46006 FRONT PANEL 1
13 TKPA46201 TOP COVER 1
14 TKXA10101 CHILD COVER(FRONT) 1
15 TKXA10202 CHILD COVER 1
16 TKXA10301 PLATE 1
17 TKXA10401 COVER 1
18 TKZG5025 CHILD BASE 1
TMKA202 CUSHION 2
TMKA202 CUSHION 1
TMKE161 INSULATOR 1
19 TMKE163 INSULATOR(RIGHT) 1
20 TMKE164 INSULATOR(LEFT) 1
TMKG254 CUSHION 2
TMKG255 CUSHION 1
TMKG321 RUBBER SPACER 1
TMKK039-1 SET LEG 6
TMKK096 SPACER 1
TMKX291 INSULATOR 1
TMKX364 INSULATOR 1
TMME149 CLAMPER 4
TMME149 CLAMPER 1
TMME150 INSULATOR 1
TMME157 CLAMPER 2
TMWJ023 BRACKET 1
a TPCB06406 CARTON BOX 1
b TPDA0479 CUSHION(TOP) 1
c TPDA0480 CUSHION(BOTTOM) 1
d TPDF0551 ACCESSORY BOX 1
e TPE814109-3 SET COVER 1
TQBC0388 INSTRUCTION BOOK(ENGLISH) 1
TQBC0389 INSTRUCTION BOOK(GERMAN) 1
http://202.224.189.179/view_new/EU/TX-22LT2F/SVC/s1003000000.html (2 of 4)29.01.2008 8:49:38
Page 94
http://202.224.189.179/view_new/EU/TX-22LT2F/SVC/s1003000000.html
TQBC0390 INSTRUCTION BOOK(FRENCH) 1
TQBC0391 INSTRUCTION BOOK(ITALIAN) 1
TQBC0392 INSTRUCTION BOOK(SPANISH) 1
TQBC0393 INSTRUCTION BOOK(DUTCH) 1
TQBC0394 INSTRUCTION BOOK(DANISH) 1
TQBC0395 INSTRUCTION BOOK(SWEDISH) 1
TQE8513-2 POLY BAG 1
TSXL155 CABLE(6P) 1
TSXL158 CABLE(5P) 1
TSXL160 CABLE(10P) 1
TSXL161 CABLE(50P) 1
TSXL195 CABLE(36P) 1
TSXL196 CABLE(50P) 1
TSXL197 CABLE(17P) 1
21 TTPA0159-2 SPEAKER PANEL ASS’Y 1
22 TXFKU010GLK REAR COVER ASS’Y 1
23 TXFKY010GCK FRONT CABINET ASS’Y 1
XNHTHN2943-1 F TERMINAL NUT 1
XTB4+10F SCREW 1
XTB4+12J SCREW 2
XTB4+12JFY SCREW 2
XTB4+16J SCREW 4
XTB4+20JFY SCREW 5
XTB4+30JFY SCREW 4
XTN3+8J SCREW 4
XTN3+8JFY SCREW 6
XTS3+10AFY SCREW 5
XTV3+10G SCREW 4
XTV3+8J SCREW 2
XTW3+6T SCREW 2
XTW3+6T TAPPING SCREW 29
XYN4+F12 SCREW 6
XZBT6506 POLY BAG 1
http://202.224.189.179/view_new/EU/TX-22LT2F/SVC/s1003000000.html (3 of 4)29.01.2008 8:49:38
Page 95

http://202.224.189.179/view_new/EU/TX-22LT2F/SVC/s1003000000.html
TOP PREVIOUS NEXT
http://202.224.189.179/view_new/EU/TX-22LT2F/SVC/s1003000000.html (4 of 4)29.01.2008 8:49:38
Page 96

http://202.224.189.179/view_new/EU/TX-22LT2F/SVC/s1100000000x.html
11 Replacement Parts List
TOP PREVIOUS NEXT
11.1 Replacement Parts List Notes
11.2 Electrical Replacement Parts List
TOP PREVIOUS NEXT
http://202.224.189.179/view_new/EU/TX-22LT2F/SVC/s1100000000x.html29.01.2008 8:49:47
Page 97
http://202.224.189.179/view_new/EU/TX-22LT2F/SVC/s1101000000.html
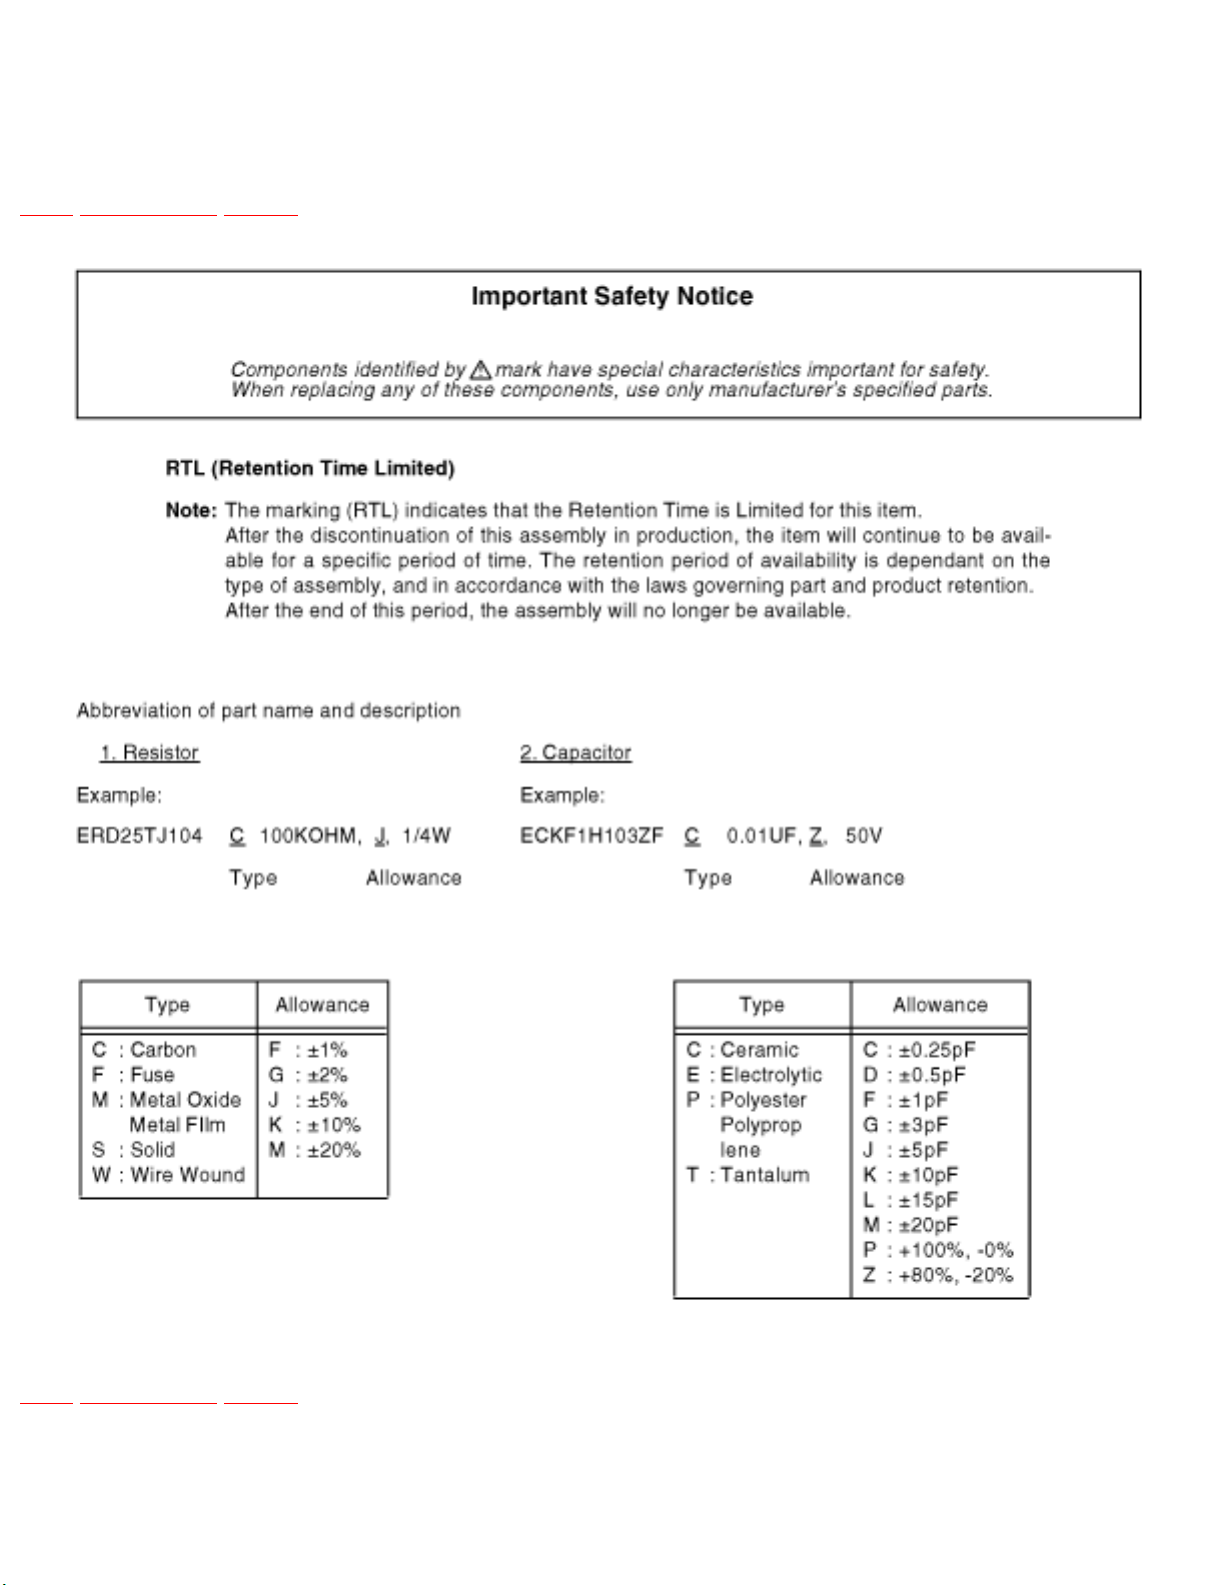
11.1 Replacement Parts List Notes
TOP PREVIOUS NEXT
TOP PREVIOUS NEXT
http://202.224.189.179/view_new/EU/TX-22LT2F/SVC/s1101000000.html29.01.2008 8:49:51
Page 98

http://202.224.189.179/view_new/EU/TX-22LT2F/SVC/s1102000000.html
11.2 Electrical Replacement Parts List
TOP PREVIOUS NEXT
Ref. No. Part No. Part Name & Description Pcs Remarks
A1 K1MN36A00006 36P CONNECTOR 1
A2 K1MN50A00005 50P CONNECTOR 1
A3 K1KA14A00127 14P CONNECTOR 1
A4 K1KA10A00263 10P CONNECTOR 1
A5 TJS5A9180 10P CONNECTOR 1 K1KA10A00215
A6 K1MN06A00002 6P CONNECTOR 1
A7-A9 K4ZZ01000128 TERMINAL 3
A10 TJS1A8120 6P CONNECTOR 1 K1KA06B00049
A11 K1MN05B00031 5P CONNECTOR 1
A12,13 K1KB14A00041 14P CONNECTOR 2
A14 K1KB12A00074 12P CONNECTOR 1
A16,17 K1KA20A00202 20P CONNECTOR 2
A18 K1MN17A00028 17P CONNECTOR 1
B1 K1KB14B00026 14P CONNECTOR 1
B2 K1KB10B00042 10P CONNECTOR 1
C001 ECJ2VF1C104Z C 0.1UF, Z, 16V 1
C002 ECJ2VF1C105Z C 1UF, Z, 16V 1
C004 EEVHB1C470 E 47UF, 16V 1 EEVHB1C470P
C005 ECJ2VF1H223Z C 0.022UF, Z, 50V 1
C008 ECJ2VB1C104K C 0.1UF, K, 16V 1
C009 EEVHB1C470 E 47UF, 16V 1 EEVHB1C470P
C010 EEVHB1H4R7 E 4.7UF, 50V 1
C011 ECJ2VB1C104K C 0.1UF, K, 16V 1
C012 EEVHB1C470 E 47UF, 16V 1 EEVHB1C470P
C013 EEVHB0J101 E 100UF, 6.3V 1 EEVHB0J101P
C014 EEVHB1H4R7 E 4.7UF, 50V 1
http://202.224.189.179/view_new/EU/TX-22LT2F/SVC/s1102000000.html (1 of 31)29.01.2008 8:50:07
Page 99
http://202.224.189.179/view_new/EU/TX-22LT2F/SVC/s1102000000.html
C016-18 ECJ2VF1C104Z C 0.1UF, Z, 16V 3
C022 F1K1H1050002 C 1UF, Z, 50V 1
C023,24 ECJ2VF1C104Z C 0.1UF, Z, 16V 2
C025 F1K1C4750010 C 47UF, Z, 50V 1
C030 ECJ2VB1H273K C 0.027UF, K, 50V 1
C031 ECJ2VF1H103Z C 0.01UF, Z, 50V 1
C032 EEVHB0J470 E 47UF, 6.3V 1
C601 ECJ2VF1H104Z C 0.1UF, Z, 50V 1
C602 ECJ2XF1H102Z C 1000PF, Z, 50V 1
C603 ECA1EHG101 E 100UF, 25V 1
C604 ECJ2VF1C105Z C 1UF, Z, 16V 1
C607 ECJ2XC1H331J C 330PF, J, 50V 1
C608,09 ECJ2XB1C334K C 0.33UF, K, 16V 2
C610,11 ECJ2XB1H103K C 0.01UF, K, 50V 2
C612 ECA1EHG101 E 100UF, 25V 1
C613 F2A1E1010030 E 100UF 25V 1
C614 ECJ3XF1E105Z C 1UF, Z, 25V 1
C615,16 ECHU1H104JC9 P 0.1UF. 50V 2
C617,18 ECJ2XB1H562K C 5600PF, K, 50V 2
C620,21 ECJ2XB1H562K C 5600PF, K, 50V 2
C625,26 ECHU1H563JC9 P 0.056UF. 50V 2
C629,30 ECHU1H563JC9 P 0.056UF. 50V 2
C631,32 ECJ2XF1C334Z C 0.33UF, Z, 16V 2
C633-38 F1A3F1500001 E 15UF, 3KV 6
C680 ECJ2VF1C104Z C 0.1UF, Z, 16V 1
C681,82 F2A1E1010030 E 100UF 25V 2
C683-88 F1A3F1500001 E 15UF, 3KV 6
C689,90 ECJ2XF1C334Z C 0.33UF, Z, 16V 2
C691 F2A1H100A126 E 10UF, 50V 1
C801 ECJ2XB1H103K C 0.01UF, K, 50V 1
C802 ECA1EHG471 E 470UF, 25V 1
C806 F2A1C6810005 E 680UF, 16V 1
C807 ECJ2VF1H103Z C 0.01UF, Z, 50V 1
C808 ECJ2XB1H222K C 2200PF, K, 50V 1
http://202.224.189.179/view_new/EU/TX-22LT2F/SVC/s1102000000.html (2 of 31)29.01.2008 8:50:07
Page 100
http://202.224.189.179/view_new/EU/TX-22LT2F/SVC/s1102000000.html
C810 ECJ2XB1H104K C 0.1UF, K, 50V 1
C811 ECJ2VF1H104Z C 0.1UF, Z, 50V 1
C814 ECJ2XB1H104K C 0.1UF, K, 50V 1
C815 EEVHB1C100 E 10UF, 16V 1
C817 ECJ2VF1H104Z C 0.1UF, Z, 50V 1
C818,19 EEVHB0J220 E 22UF 6.3V 2
C823 EEVHB0J470 E 47UF, 6.3V 1
C824,25 ECJ2XB1H103K C 0.01UF, K, 50V 2
C826,27 ECA1EHG471 E 470UF, 25V 2
C828 ECJ2XB1H103K C 0.01UF, K, 50V 1
C829 ECA1VHG221 E 220UF, 35V 1
C830,31 F2A1C6810005 E 680UF, 16V 2
C832 ECJ2XB1H222K C 2200PF, K, 50V 1
C833,34 ECJ2XB1H103K C 0.01UF, K, 50V 2
C835 ECJ2XB1H222K C 2200PF, K, 50V 1
C836 F2A1C102A123 E 1000UF,@ 16V 1
C837 ECJ2XB1H104K C 0.1UF, K, 50V 1
C838 ECJ2XB1H103K C 0.01UF, K, 50V 1
C839 F2A1E1020019 E 1000UF, 25V 1
C840 ECJ2XB1H104K C 0.1UF, K, 50V 1
C841 ECA1EHG101 E 100UF, 25V 1
C842 ECJ2XB1H103K C 0.01UF, K, 50V 1
C843 ECA1VHG221 E 220UF, 35V 1
C844 EEVHB1C220 E 22UF, 16V 1 EEVHB1C220R
C845 EEVHB0J220 E 22UF 6.3V 1
C846 F2A1C6810005 E 680UF, 16V 1
C847 ECJ2VF1C105Z C 1UF, Z, 16V 1
C848 ECJ2XB1H102K C 1000PF, K, 50V 1
C849 ECJ2XB1H103K C 0.01UF, K, 50V 1
C850 EEVHB0J220 E 22UF 6.3V 1
C851 EEVHB1C100 E 10UF, 16V 1
C852 EEVHB0J220 E 22UF 6.3V 1
C901-04 ECJ1VF1C104Z C 0.1UF, Z, 16V 4
C1001 EEVHB1C470 E 47UF, 16V 1 EEVHB1C470P
http://202.224.189.179/view_new/EU/TX-22LT2F/SVC/s1102000000.html (3 of 31)29.01.2008 8:50:07
 Loading...