

Page 1
English
Nederlands
Dansk
Español
Model No.
TH-42PF50E
TH-50PF50E
Operating Instructions
High Defi nition Plasma Display
For more detailed instructions, refer to the Operating
Instructions on the CD-ROM.
Contents
Important Safety Notice .............................2
•
Safety Precautions .....................................3
•
Accessories ................................................8
•
Connections ...............................................9
•
Power On / Off .........................................12
•
Basic Controls ..........................................14
•
Specifi cations ...........................................16
•
Please read these instructions before operating your set
and retain them for future reference.
Page 2
Important Safety Notice
IMPORTANT: THE MOULDED PLUG
WARNING
English
1) To prevent damage which may result in fi re or shock hazard, do not expose this appliance to dripping
or splashing.
Do not place containers with water (fl ower vase, cups, cosmetics, etc.) above the set. (including on
shelves above, etc.)
No naked fl ame sources, such as lighted candles, should be placed on / above the set.
2) To prevent electric shock, do not remove cover. No user serviceable parts inside. Refer servicing to qualifi ed
service personnel.
3) Do not remove the earthing pin on the power plug. This apparatus is equipped with a three pin earthing-type
power plug. This plug will only fi t an earthing-type power outlet. This is a safety feature. If you are unable to
insert the plug into the outlet, contact an electrician.
Do not defeat the purpose of the earthing plug.
4) To prevent electric shock, ensure the earthing pin on the AC cord power plug is securely connected.
CAUTION
This appliance is intended for use in environments which are relatively free of electromagnetic fi elds.
Using this appliance near sources of strong electromagnetic fi elds or where electrical noise may overlap with the
input signals could cause the picture and sound to wobble or cause interference such as noise to appear.
To avoid the possibility of harm to this appliance, keep it away from sources of strong electromagnetic fi elds.
IMPORTANT: THE MOULDED PLUG
FOR YOUR SAFETY, PLEASE READ THE FOLLOWING TEXT CAREFULLY.
This display is supplied with a moulded three pin mains plug for your safety and convenience. A 10 amp fuse is
fi tted in this plug. Shall the fuse need to be replaced, please ensure that the replacement fuse has a rating of 10
amps and that it is approved by ASTA or BSI to BS1362.
Check for the ASTA mark
If the plug contains a removable fuse cover, you must ensure that it is refi tted when the fuse is replaced.
If you lose the fuse cover the plug must not be used until a replacement cover is obtained.
A replacement fuse cover can be purchased from your local Panasonic dealer.
Do not cut off the mains plug.
Do not use any other type of mains lead except the one supplied with this display.
The supplied mains lead and moulded plug are designed to be used with this display to avoid
interference and for your safety.
If the socket outlet in your home is not suitable, get it changed by a qualifi ed electrician.
If the plug or mains lead becomes damaged, purchase a replacement from an authorized dealer.
WARNING : — THIS DISPLAY MUST BE EARTHED.
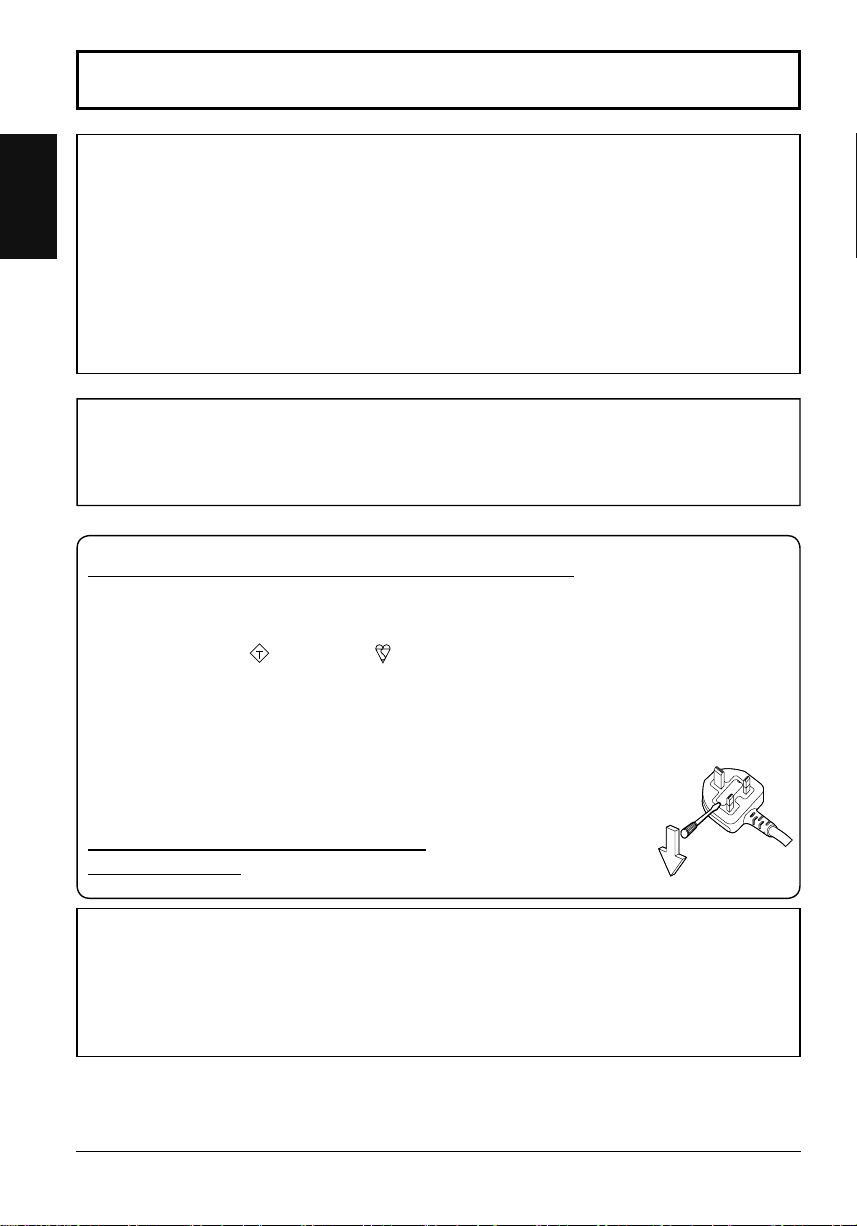
How to replace the fuse.
or the BSI mark on the body of the fuse.
ASA
Open the fuse compartment with a screwdriver and replace the fuse.
Trademark Credits
• VGA is a trademark of International Business Machines Corporation.
• Macintosh is a registered trademark of Apple Inc., USA.
• SVGA, XGA, SXGA and UXGA are registered trademarks of the Video Electronics Standard Association.
Even if no special notation has been made of company or product trademarks, these trademarks have been fully respected.
• HDMI, the HDMI Logo, and High-Defi nition Multimedia Interface are trademarks or registered trademarks of HDMI
Licensing LLC in the United States and other countries.
• “RealD 3D” is a trademark of RealD.
Note:
Do not allow a still picture to be displayed for an extended period, as this can cause a permanent image retention
to remain on the Plasma Display.
Examples of still pictures include logos, video games, computer images, teletext and images displayed in 4:3 mode.
2
Page 3

Safety Precautions
WARNING
Setup
This Plasma Display is for use only with the following optional accessories. Use with any other type of optional
accessories may cause instability which could result in the possibility of injury.
(All of the following accessories are manufactured by Panasonic Corporation.)
• Speakers ........................................................................ TY-SP42P8W-K (for TH-42PF50E),
TY-SP50P8W-K (for TH-50PF50E)
• Pedestal ......................................................................... TY-ST20-K, TY-ST42P50
• Mobile stand ................................................................... TY-ST58PF20
• Wall-hanging bracket (vertical) ....................................... TY-WK42PV20
• Wall-hanging bracket (angled) ....................................... TY-WK42PR20
• Ceiling-hanging bracket ................................................. TY-CE42PS20
• BNC Dual Video Terminal Board .................................... TY-FB9BD
• HD-SDI Terminal Board .................................................. TY-FB9HD
• HD-SDI Terminal Board with audio ................................ TY-FB10HD
• Dual Link HD-SDI Terminal Board .................................. TY-FB11DHD
• Dual HDMI Terminal Board ............................................ TY-FB10HMD
• DVI-D Terminal Board .................................................... TY-FB11DD
• AV Terminal Box ............................................................. TY-TB10AV
• 3D IR TRANSMITTER ................................................... TY-3D30TRW
• Touch Panel ................................................................... TY-TP42P30K (for TH-42PF50E),
TY-TP50P30K (for TH-50PF50E)
• 3D Eyewear .................................................................... TY-EW3D3SE, TY-EW3D3ME, TY-EW3D3LE
• Wireless Module ............................................................. ET-WM200E
Always be sure to ask a qualifi ed technician to carry out set-up.
Small parts can present choking hazard if accidentally swallowed. Keep small parts away from young children. Discard
unneeded small parts and other objects, including packaging materials and plastic bags/sheets to prevent them from
being played with by young children, creating the potential risk of suffocation.
Do not place the Plasma Display on sloped or unstable surfaces, and ensure that the Plasma Display does
not hang over the edge of the base.
• The Plasma Display may fall off or tip over.
Do not place any objects on top of the Plasma Display.
• If water is spills onto the Plasma Display or foreign objects get inside it, a short-circuit may occur which could result
in fi re or electric shock. If any foreign objects get inside the Plasma Display, please consult your local Panasonic
dealer.
Transport only in upright position!
• Transporting the unit with its display panel facing upright or downward may cause damage to the internal
circuitry.
Ventilation should not be impeded by covering the ventilation openings with items such as newspapers, table
cloths and curtains.
For suffi cient ventilation;
If using the pedestal (optional accessory), leave a space of 10 cm or more at the top, left and right, and 7 cm
or more at the rear, and also keep the space between the bottom of the display and the fl oor surface.
If using some other setting-up method, follow the manual of it. (If there is no specifi c indication of installation
dimension in the installation manual, leave a space of 10 cm or more at the top, bottom, left and right, and 7 cm
or more at the rear.)
When installing the Plasma Display vertically;
Turn up the power switch for the upward direction when you install the Plasma Display vertically.
And set “Display orientation” to “Portrait” in Setup menu.
English
3
Page 4

Safety Precautions
When using the Plasma Display
English
The Plasma Display is designed to operate on 220 - 240 V AC, 50/60 Hz.
Do not cover the ventilation holes.
• Doing so may cause the Plasma Display to overheat, which can cause fi re or damage to the Plasma Display.
Do not stick any foreign objects into the Plasma Display.
• Do not insert any metal or fl ammable objects into the ventilations holes or drop them onto the Plasma Display, as
doing so can cause fi re or electric shock.
Do not remove the cover or modify it in any way.
• High voltages which can cause severe electric shocks are present inside the Plasma Display. For any inspection,
adjustment and repair work, please contact your local Panasonic dealer.
Ensure that the mains plug is easily accessible.
An apparatus with CLASS I construction shall be connected to a mains socket outlet with a protective earthing connection.
Do not use any power supply cord other than that provided with this unit.
• Doing so may cause fi re or electric shocks.
Securely insert the power supply plug as far as it will go.
• If the plug is not fully inserted, heat may be generated which could cause fi re. If the plug is damaged or the wall
socket is loose, they shall not be used.
Do not handle the power supply plug with wet hands.
• Doing so may cause electric shocks.
Do not do anything that may damage the power cable. When disconnecting the power cable, pull on the plug body, not the cable.
• Do not damage the cable, make any modifi cations to it, place heavy objects on top of it, heat it, place it near any
hot objects, twist it, bend it excessively or pull it. To do so may cause fi re and electric shock. If the power cable is
damaged, have it repaired at your local Panasonic dealer.
If the Plasma Display is not going to be used for any prolonged length of time, unplug the power supply plug
from the wall outlet.
To prevent the spread of fi re, keep candles or other open fl ames away from this product at all times.
If problems occur during use
If a problem occurs (such as no picture or no sound), or if smoke or an abnormal odour starts to come out
from the Plasma Display, immediately unplug the power supply plug from the wall outlet.
• If you continue to use the Plasma Display in this condition, fi re or electric shock could result. After checking that
the smoke has stopped, contact your local Panasonic dealer so that the necessary repairs can be made. Repairing
the Plasma Display yourself is extremely dangerous, and shall never be done.
If water or foreign objects get inside the Plasma Display, if the Plasma Display is dropped, or if the cabinet
becomes damages, disconnect the power supply plug immediately.
•
A short circuit may occur, which could cause fi re. Contact your local Panasonic dealer for any repairs that need to be made.
4
Page 5
CAUTION
Safety Precautions
When using the Plasma Display
Do not bring your hands, face or objects close to the ventilation holes of the Plasma Display.
• Heated air comes out from the ventilation holes at the top of Plasma Display will be hot. Do not bring your hands
or face, or objects which cannot withstand heat, close to this port, otherwise burns or deformation could result.
Be sure to disconnect all cables before moving the Plasma Display.
• If the Plasma Display is moved while some of the cables are still connected, the cables may become damaged,
and fi re or electric shock could result.
Disconnect the power supply plug from the wall socket as a safety precaution before carrying out any
cleaning.
• Electric shocks can result if this is not done.
Clean the power cable regularly to prevent it becoming dusty.
• If dust built up on the power cord plug, the resultant humidity can damage the insulation, which could result in fi re.
Pull the power cord plug out from the wall outlet and wipe the mains lead with a dry cloth.
Do not burn or breakup batteries.
• Batteries must not be exposed to excessive heat such as sunshine, fi re or the like.
This Plasma Display radiates infrared rays, therefore it may affect other infrared communication equipment.
Install your infrared sensor in a place away from direct or refl ected light from your Plasma Display.
Cleaning and maintenance
The front of the display panel has been specially treated. Wipe the panel surface gently using only a cleaning
cloth or a soft, lint-free cloth.
• If the surface is particularly dirty, wipe with a soft, lint-free cloth which has been soaked in pure water or water in
which neutral detergent has been diluted 100 times, and then wipe it evenly with a dry cloth of the same type until
the surface is dry.
• Do not scratch or hit the surface of the panel with fi ngernails or other hard objects, otherwise the surface may
become damaged. Furthermore, avoid contact with volatile substances such as insect sprays, solvents and thinner,
otherwise the quality of the surface may be adversely affected.
If the cabinet becomes dirty, wipe it with a soft, dry cloth.
• If the cabinet is particularly dirty, soak the cloth in water to which a small amount of neutral detergent has been
added and then wring the cloth dry. Use this cloth to wipe the cabinet, and then wipe it dry with a dry cloth.
• Do not allow any detergent to come into direct contact with the surface of the Plasma Display. If water droplets get
inside the unit, operating problems may result.
• Avoid contact with volatile substances such as insect sprays, solvents and thinner, otherwise the quality of the
cabinet surface may be adversely affected or the coating may peel off. Furthermore, do not leave it for long periods
in contact with articles made from rubber or PVC.
English
5
Page 6

Safety Precautions
3D Safety Precautions
WARNING
English
Small Parts
3D Eyewear contains small parts (battery and specialised band, etc.) and must be kept out of reach of small
children to avoid accidental ingestion.
Disassembly
Do not disassemble or modify the 3D Eyewear.
CAUTION
To enjoy 3D images safely and comfortably, please read these instructions fully.
Use for commercial applications and public viewing
Someone in authority should responsibly convey the precautions for use of the 3D Eyewear to the user.
3D Eyewear (sold separately)
Do not drop, exert pressure on, or step on the 3D Eyewear.
Be careful of the tips of the frame when putting on the 3D Eyewear.
Be careful not to trap a fi nger in the hinge section of the 3D Eyewear.
Pay special attention when children are using the 3D Eyewear.
3D Eyewear should not be used by children younger than 5 - 6 years old, as a guideline.
All children must be fully supervised by parents or guardians who must ensure their safety and health
throughout the using 3D Eyewear.
6
Page 7

Safety Precautions
Viewing 3D Content
Content for 3D viewing includes commercially available Blu-ray discs, 3D broadcasts, etc.
When preparing your own 3D content, ensure that it is properly produced.
Do not use the 3D Eyewear if you have a history of over-sensitivity to light, heart problems, or have any other
existing medical conditions.
Please stop using the 3D Eyewear immediately, if you feel tired, are not feeling well or experience any other
uncomfortable sensation.
Take an appropriate break after viewing a 3D movie.
Take a break of between 30 - 60 minutes after viewing 3D content on interactive devices such as 3D games
or computers.
Be careful not to strike the screen or other people unintentionally. When using the 3D Eyewear the distance
between the user and screen can be misjudged.
The 3D Eyewear must only be worn when viewing 3D content.
If you do not look toward the screen for a while when viewing 3D images, the 3D Eyewear may be turned off
automatically.
If you suffer from any eyesight problems (short / far-sighted, astigmatism, eyesight differences in left and
right), please ensure to correct your vision before using the 3D Eyewear.
Stop using the 3D Eyewear if you can clearly see double images when viewing 3D content.
Do not use the 3D Eyewear at a distance less than the recommended distance.
View from at least the recommended distance (3 times the effective height of the screen).
Recommended distance
TH-42PF50E: 1.6 m
TH-50PF50E: 1.9 m
When the top and bottom area of the screen is blackened, such as movies, view the screen at a distance
3 times further than the height of the actual image. (That makes the distance closer than above recommended
fi gure.)
3D Eyewear (sold separately) Use
Before using the 3D Eyewear, ensure no breakable objects surrounding the user to avoid any accidental
damage or injury.
Remove the 3D Eyewear before moving around to avoid falling or accidental injury.
Use the 3D Eyewear only for the intended purpose and nothing else.
Do not use 3D Eyewear in the condition of high temperature.
Do not use if the 3D Eyewear is physically damaged.
Do not use any devices that emit the infrared signals near the 3D Eyewear, as this may cause the 3D Eyewear
false operations.
Do not use devices (such as mobile phones or personal transceivers) that emit strong electromagnetic waves
near the 3D Eyewear as this may cause the 3D Eyewear to malfunction.
Stop using the 3D Eyewear immediately if a malfunction or fault occurs.
Stop using the 3D Eyewear immediately if you experience any redness, pain, or skin irritation around the nose
or temples.
In rare cases, the materials used in the 3D Eyewear may cause an allergic reaction.
English
7
Page 8
Accessories
English
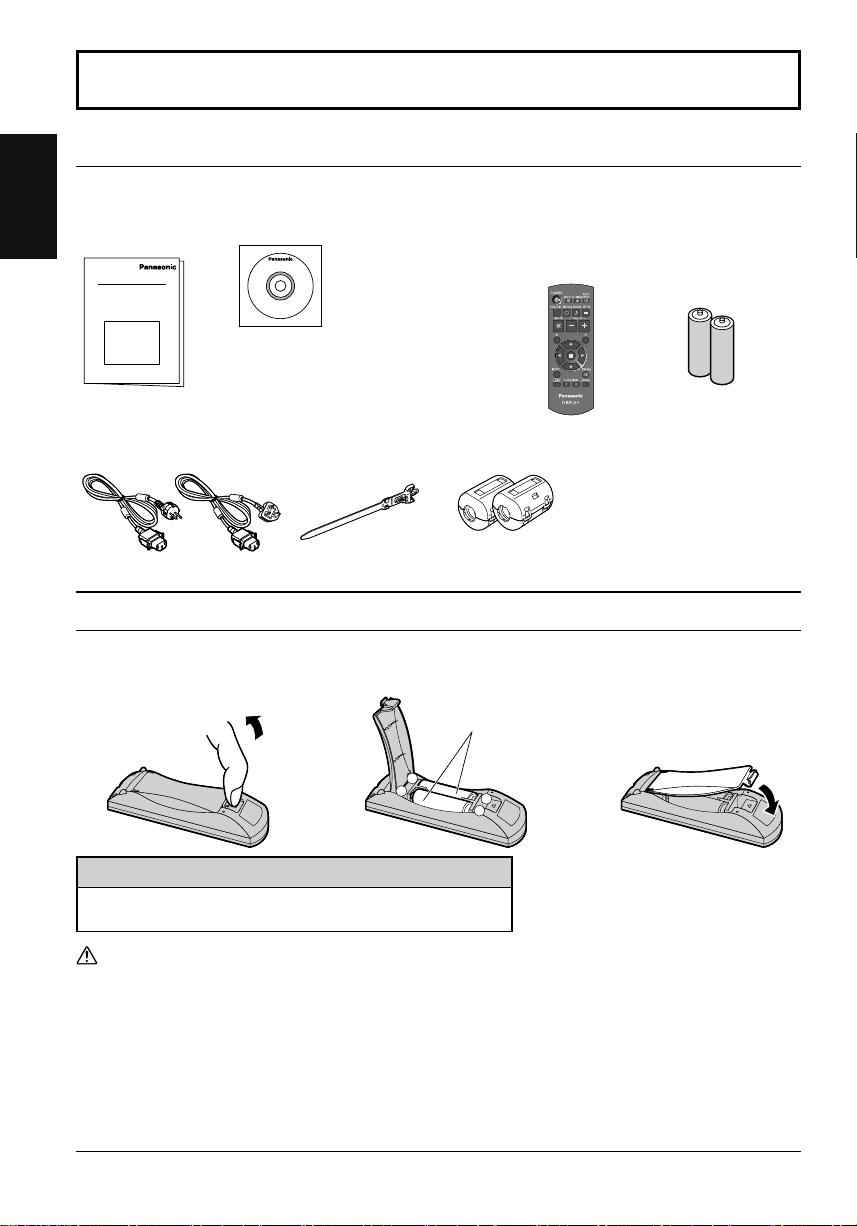
Accessories Supply
Check that you have the accessories and items shown
Operating
Instruction book
Power supply cord Clamper × 1
CD-ROM × 1
Remote Control Batteries
Requires two R6 batteries.
1. Pull and hold the hook, then open
the battery cover.
• Operating Instructions
Display Operations
Network Operations
• Software license statements
GNU GENERAL PUBLIC
LICENSE
GNU LESSER GENERAL
PUBLIC LICENSE
TMME289
2. Insert batteries - note correct
polarity ( + and -).
Ferrite core × 2
J0KG00000014
Use the Ferrite cores to comply with the EMC standard.
(See page 11)
“R6 (UM3)” size
Remote Control
Transmitter
N2QAYB000691
3. Replace the cover.
Batteries for the Remote
Control Transmitter
(R6 (UM3) Size × 2)
-
+
+
-
Helpful Hint:
For frequent remote control users, replace old batteries with Alkaline
batteries for longer life.
Precaution on battery use
Incorrect installation can cause battery leakage and corrosion that will damage the remote control transmitter.
Disposal of batteries should be in an environment-friendly manner.
Observe the following precaution:
1. Batteries shall always be replaced as a pair. Always use new batteries when replacing the old set.
2. Do not combine a used battery with a new one.
3. Do not mix battery types (example: “Zinc Carbon” with “Alkaline”).
4. Do not attempt to charge, short-circuit, disassemble, heat or burn used batteries.
5.
Battery replacement is necessary when remote control acts sporadically or stops operating the Plasma Display set.
6. Do not burn or breakup batteries.
7. Batteries must not be exposed to excessive heat such as sunshine, fi re or the like.
8
Page 9

Connections
Speaker connection
When connecting the speakers, be sure to use only the optional accessory speakers.
Refer to the speaker’s Installation Manual for details on speaker installation.
Speakers (Optional accessories)
1
Red
Black
While pressing the lever,
insert the core wire.
2
AC cord connection (see page 12)
Speaker
terminal
Black
Return the lever.
Red
AC cord connection and fi xing, cable fi xing
AC cord fi xing
Unplug the AC cord
Plug the AC cord into the display unit.
Plug the AC cord until it clicks.
Note:
Make sure that the AC cord is locked on
both the left and right sides.
When using the Wall-hanging bracket (vertical)
Note:
When using the Wall-hanging bracket (vertical)(TY-WK42PV20), use the holes
and to secure the cables. If the clamper is used on the hole , the cables may
be caught by the wall-hanging bracket.
Using the clamper
Secure any excess cables with clamper as required.
Note:
One clamper is supplied with this unit. In case of securing cables at three positions, please purchase it separately.
Unplug the AC cord pressing the
two knobs.
Note:
When disconnecting the AC cord, be
absolutely sure to disconnect the AC
cord plug at the socket outlet fi rst.
English
Attach the clamper
1
Insert the clamper
in a hole.
hole
To remove from the unit:
snaps
Keep pushing
both side
snaps
Bundle the cables
2
hooks
Set the
tip in the
hooks
To loosen:
knob
Keep
pushing
the knob
9
Page 10
Connections
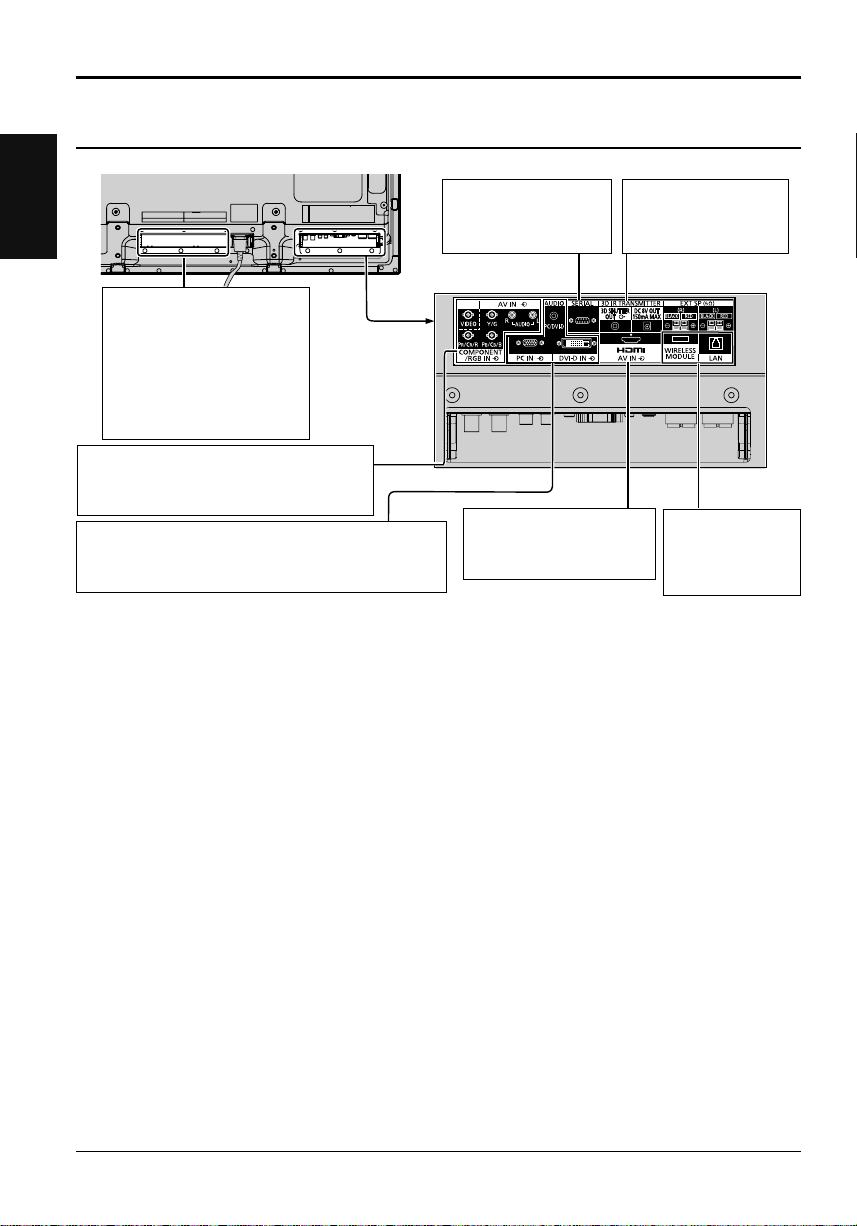
Video equipment connection
English
SLOT: Terminal board (optional
accessories) insert slot
(see page 3)
Note:
The right side slot is for
terminal board with 2-slot width.
The terminal board with 1-slot
width does not function when
installed in the right side slot.
AV IN (VIDEO): Composite Video Input
COMPONENT/RGB IN:
DVI-D IN: DVI-D Input Terminal
PC IN:
Terminal
Component/RGB Video
Input Terminal
PC Input Terminal
Connect to video terminal of PC or equipment with Y,
PB(CB) and PR(CR) output.
Terminals are on the bottom side of the Plasma Display.
SERIAL: Control the
Plasma Display
by connecting
to PC
AV IN (HDMI): HDMI Input
Terminal
Connect to video equipment
such as VCR or DVD player.
3D IR TRANSMITTER:
Connect the 3D IR
TRANSMITTER
(optional accessory).
WIRELESS
MODULE, LAN:
(refer to “Operating
Instructions, Network
Operations”)
10
Page 11

Connections
Example of Network Connection (Wired LAN)
COMPUTER
Less
than
10 cm
LAN cable
(not supplied)
Ferrite core
(supplied)
Hub or broadband router
Notes:
• Make sure the broadband router or hub supports 10BASE-T/100BASE-TX.
• To connect a device using 100BASE-TX, use “category 5” LAN cable.
• Touching the LAN terminal with a statically charged hand (body) may cause damage due to its discharge.
Do not touch the LAN terminal or a metal part of the LAN cable.
• For instructions on how to connect, consult your network administrator.
Less
than
10 cm
Ferrite core
(supplied)
Installing the Ferrite core
Pull back the tabs
(in two places)
Display (main unit, rear)
Open
Wind the cable
twice
Press the cable
through and close
Connecting Wireless Module (Wireless LAN)
To use the wireless function, the wireless module (ET-WM200E) (sold separately) is necessary.
When connecting the wireless module to the
display, remove the protective fi lm and cap.
English
Connecting procedure
Hold the wireless module with its LED on the near
side and connect it to the wireless module connection
terminal.
Note:
Do not connect any other device than the wireless
module (ET-WM200E).
ET-WM200
LED
11
Page 12
Power On / Off
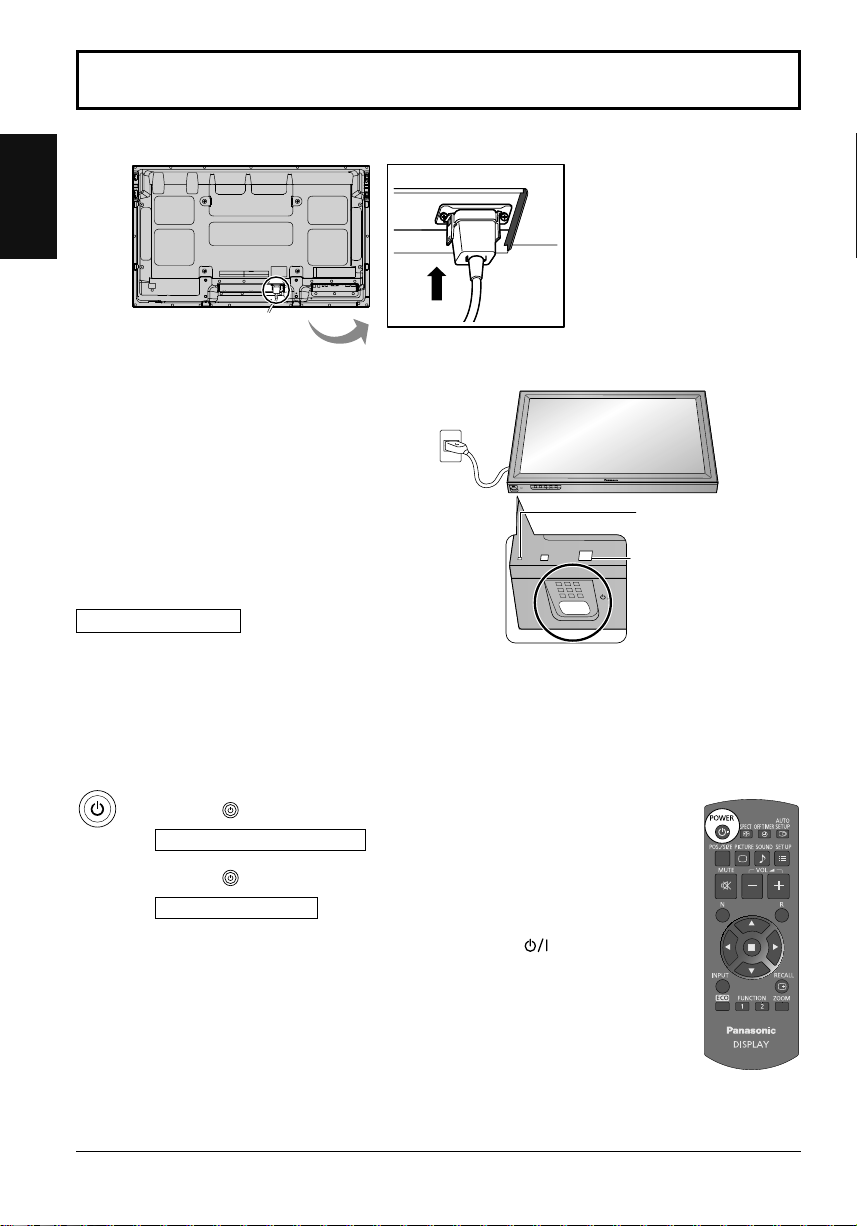
Connecting the AC cord plug to the Plasma Display.
English
Connecting the plug to the Wall Outlet
Notes:
• Main plug types vary between countries. The power
plug shown at right may, therefore, not be the type
fi tted to your set.
• When disconnecting the AC cord, be absolutely
sure to disconnect the AC cord plug at the socket
outlet fi rst.
Press the Power switch on the Plasma Display to
turn the set on: Power-On.
Power Indicator: Green
[Starting up the network]
It takes some time for the network to start up just
after the power is turned on.
During that time, “Network Setup” in the “Setup” menu
is grayed out and cannot be set.
INPUT MENU ENTER/+/VOL-/
Power Indicator
Remote Control Sensor
12
Press the button on the remote control to turn the Plasma Display off.
Power Indicator: Red (standby)
Press the button on the remote control to turn the Plasma Display on.
Power Indicator: Green
Turn the power to the Plasma Display off by pressing the switch on the
unit, when the Plasma Display is on or in standby mode.
Note:
During operation of the power management function, the power indicator turns
orange in the power off state.
Page 13

Power On / Off
When fi rst switching on the unit
Following screen will be displayed when the unit is turned on for the fi rst time.
Select the items with the remote control. Unit buttons are invalid.
OSD Language Day/Time Setup Display orientation
OSD Language
English (UK)
ENGLISH (US)
Deutsch
Français
Italiano
Español
SetSelect
1
Select the
language.
2
Set.
Day/Time Setup
Set
Day
Time
Day/Time Setup
Set
Day
Time
Time MON 99:99
MON
99:99
Time MON 99:99
TUE
10:00
1
Select “Day” or
“Time”.
2
Setup “Day” or
“Time”.
1
Select “Set”.
2
Set.
Notes:
• Once the items are set, the screens won't be displayed when switching on the unit next time.
• After the setting, the items can be changed in the following menus.
OSD Language
Day/Time Setup
Display orientation
Power ON warning message
The following message may be displayed when turning the unit power ON:
3D Safety Precautions
When 3D images will be viewed by unspecifi ed number of
people or used for commercial applications, someone in
authority should convey the following precautions.
These precautions should be followed in the home as well.
3D Viewing/ 3D Content/ Viewing distance/ 3D Eyewear
recommendations
- To enjoy 3D images safely and comfortably, please
read the Operating Instructions fully.
Activate 3D Safety Precautions if you deliver 3D images to unspecifi ed audiences for business or other purposes.
If “3D Function” in “3D Settings” is set to “On”, a warning message is displayed every time the power is
turned ON.
No activity power off Precautions
’No activity power off’ is enabled.
If “No activity power off” in Setup menu is set to “Enable”, a warning message is displayed every time
the power is turned ON.
These message displays can be set with the following menu: Options menu
Display orientation
Landscape
Portrait
3D Safety Precautions
Power On Message
1
For vertical installation,
select “Portrait”.
2
Set.
English
13
Page 14
English
INPUT MENU ENTER/
+
/VOL-/
Basic Controls
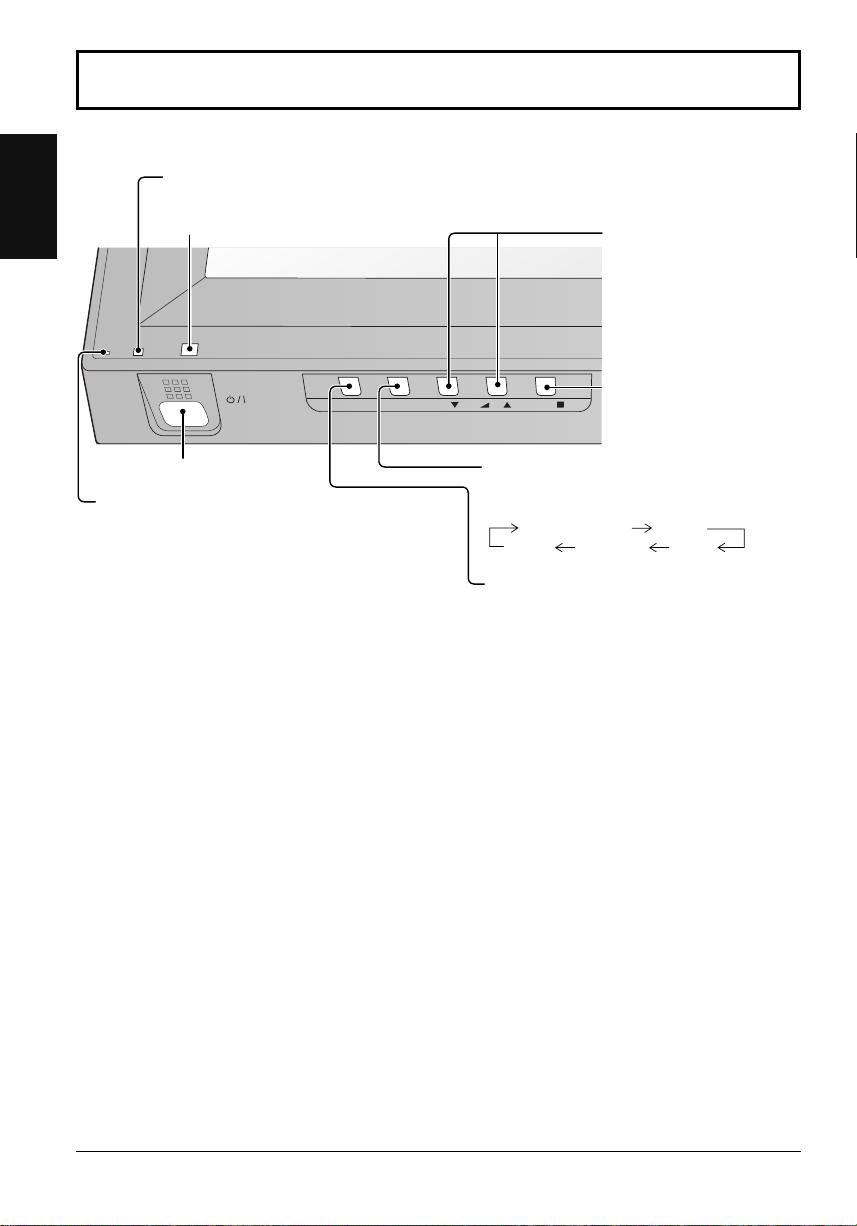
Main Unit
Brightness Sensor
Detects the brightness in the viewing environment
Remote control sensor
Volume Adjustment
Volume Up “+” Down “–”
When the menu screen is
displayed:
“+” : press to move the cursor
up
“–” : press to move the cursor
down
Enter / Aspect button
Main Power On / Off Switch
Power Indicator
The Power Indicator will light.
• Power-OFF .... Indicator not illuminated (The unit will
• Standby ........Red
• Power-ON ......Green
• PC Power management (DPMS)
........................ Orange (With PC input signal.)
• DVI-D Power management
........................Orange (With DVI input signal.)
• No Signal power off
........................Red
still consume some power as long as
the power cord is still inserted into the
wall outlet.)
Orange (When “Slot power” is set to
“On”.)
Orange (Depending on the type of the function board installed, when the power is supplied to
the slot)
Orange (When “Control I/F Select” is set to “LAN” or “WEB Control” is set to “On”. Refer to
“Operating Instructions, Network Operations”)
When this function is set to ON, it operates under the following conditions to turn the power on
or off automatically.
When no pictures (HD/VD sync signals) are detected for 30 or so seconds during PC signal
input:
→ Power is turned off (standby); the power indicator lights up orange.
When pictures (HD/VD sync signals) are subsequently detected:
→ Power is turned on; the power indicator lights up green.
Equipment power supply is turned OFF when there is no signal.
When this is set to “Enable”, the power supply of the unit goes Off 10 minutes after the input
signals stop.
MENU Screen ON / OFF
Each time the MENU button is pressed, the menu
screen will switch.
Normal Viewing Picture
Sound Pos./Size
INPUT button
(INPUT signal selection)
Setup
14
Page 15
Basic Controls
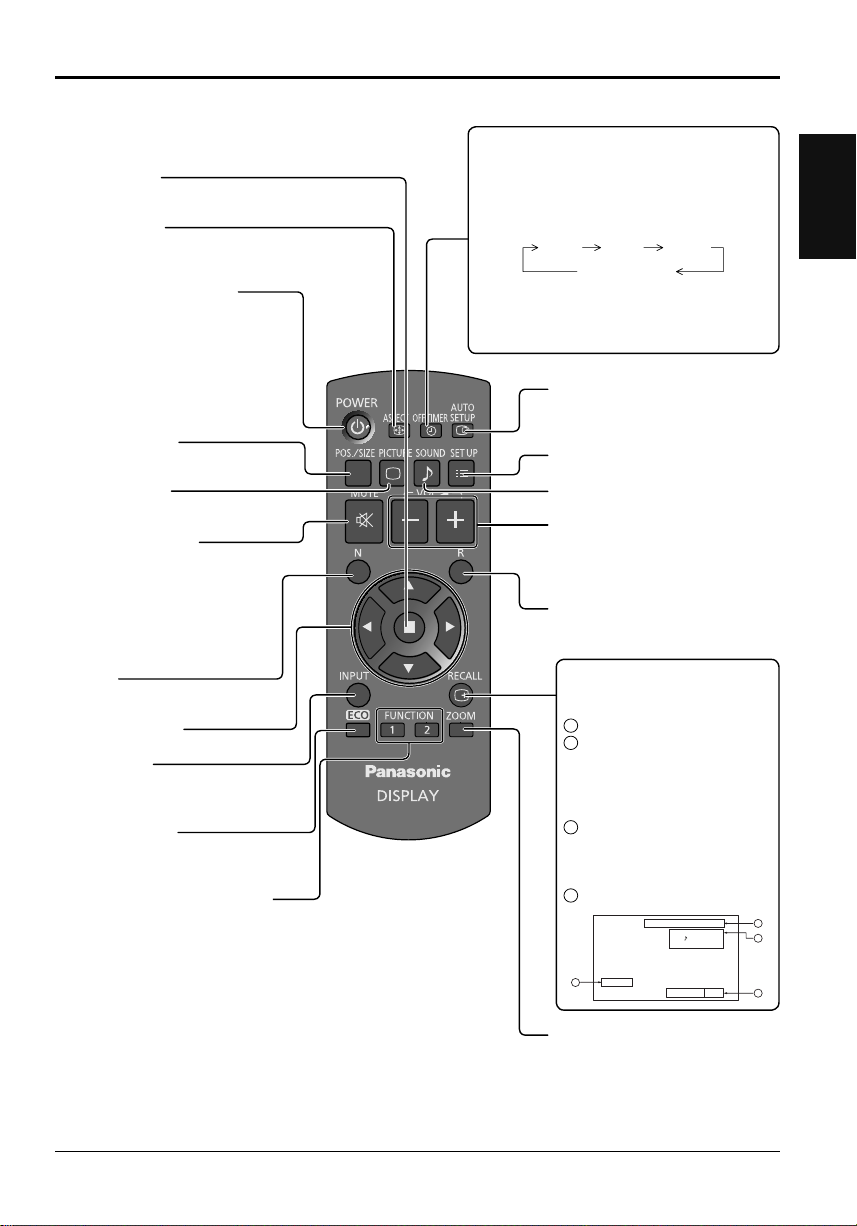
Remote Control Transmitter
ACTION button
Press to make selections.
ASPECT button
Press to adjust the aspect.
Standby (ON / OFF) button
The Plasma Display must fi rst be
plugged into the wall outlet and turned
on at the power switch (see page 12).
Press this button to turn the Plasma
Display On, from Standby mode.
Press it again to turn the Plasma
Display Off to Standby mode.
POS./SIZE button
PICTURE button
Sound mute On / Off
Press this button to mute the
sound.
Press again to reactivate sound.
Sound is also reactivated when
power is turned off or volume level
is changed.
N button
POSITION buttons
INPUT button
Press to select Input signal
sequentially.
ECO MODE (ECO)
Press to change the ECO MODE
setup status.
FUNCTION buttons (FUNCTION)
OFF TIMER button
The Plasma Display can be preset to switch to
stand-by after a fi xed period. The setting changes
to 30 minutes, 60 minutes, 90 minutes and 0
minutes (off timer cancelled) each time the button
is pressed.
30 min 60 min
90 min
0 min (Cancel)
When three minutes remain, “Off timer 3 min”
will fl ash.
The off timer is cancelled if a power interruption
occurs.
AUTO SETUP button
Automatically adjusts the position/
size of the screen.
SET UP button
SOUND button
Volume Adjustment
Press the Volume Up “+” or Down “–”
button to increase or decrease the
sound volume level.
R button
Press the R button to return to
previous menu screen.
RECALL button
Press the “RECALL” button to display
the current system status.
Input label
1
Aspect mode
2
During 3D images
Audio input
Profi le name
NANODRIFT Saver operating
Off timer
3
The off timer indicator is
displayed only when the off
timer has been set.
Clock display
4
PC
COMPONENT
Memory name: MEMORY2
1
4:33D
2
NANODRIFT
English
10:00
4
Digital Zoom
Off timer
90min
3
15
Page 16

Specifi cations
Power Source 220 - 240 V AC, 50/60 Hz
English
Power Consumption
Plasma Display panel Drive method : AC type
Screen size 921 mm (W) × 518 mm (H)
Operating condition
Applicable signals
Connection terminals
Dimensions (W × H × D) 1,020 mm × 610 mm × 89 mm 1,210 mm × 724 mm × 89 mm
Mass (weight)
Power on 365 W 445 W
Stand-by condition 0.5 W 0.5 W
Power off condition 0.3 W 0.3 W
(No.of pixels) 2,073,600 (1,920 (W) ×1,080 (H))
Temperature 0 °C - 40 °C
Humidity 20 % - 80 %
Colour System NTSC, PAL, PAL60, SECAM, Modifi ed NTSC
Scanning format 525 (480) / 60i · 60p, 625 (575) / 50i · 50p, 750 (720) / 60p · 50p, 1125 (1080) / 60i · 60p · 50i ·
PC signals VGA, SVGA, XGA, SXGA
AV IN VIDEO
COMPONENT/RGB IN
DVI-D IN
PC IN
3D IR TRANSMITTER for 3D IR TRANSMITTER (TY-3D30TRW)
WIRELESS MODULE for Wireless module (ET-WM200E)
AUDIO L-R
HDMI TYPE A Connector
P
P
AUDIO L-R
AUDIO
AUDIO
SERIAL External Control Terminal
3D SHUTTER OUT
DC 8V OUT Center plus, for EIAJ 4mm plug
LAN RJ45 10BASE-T/100BASE-TX, compatible with PJLink™
EXT SP Speaker Terminal 6 Ω, 16 W [8 W + 8 W] (10 % THD)
main unit only approx. 25.0 kg net approx. 33.0 kg net
with speakers approx. 29.0 kg approx. 38.0 kg
50p · 24p · 25p · 30p · 24sF, 1250 (1080) / 50i
BNC
RCA Pin jack × 2
BNC
Y/G
BNC
B/CB/B
BNC
R/CR/R
RCA Pin jack × 2
DVI-D 24 Pin
Content Protection
Stereo mini jack (M3) × 1
High-Density Mini D-sub 15 Pin
Stereo mini jack (M3) × 1
D-sub 9 Pin RS-232C compatible
M3 jack × 1
TH-42PF50E TH-50PF50E
42-inch, 16:9 aspect ratio
× 1,057 mm (diagonal)
Horizontal scanning frequency 15 - 110 kHz
Vertical scanning frequency 48 - 120 Hz
[5,760 × 1,080 dots]
UXGA ···· (compressed)
1.0 Vp-p (75 Ω)
0.5 Vrms, Shared with COMPONENT/RGB IN
with sync 1.0 Vp-p (75 Ω)
0.7 Vp-p (75 Ω)
0.7 Vp-p (75 Ω)
0.5 Vrms, Shared with VIDEO
Compliance with DVI Revision 1.0
Compatible with HDCP 1.1
0.5 Vrms, Shared with PC IN
Y or G with sync 1.0 Vp-p (75 Ω)
Y or G without sync 0.7 Vp-p (75 Ω)
P
P
HD/VD: 1.0 - 5.0 Vp-p (high impedance)
0.5 Vrms, Shared with DVI-D IN
Drive method : AC type
50-inch, 16:9 aspect ratio
1,105 mm (W) × 622 mm (H)
× 1,268 mm (diagonal)
B/CB/B: 0.7 Vp-p (75 Ω)
R/CR/R: 0.7 Vp-p (75 Ω)
Notes:
• Design and specifi cations are subject to change without notice. Mass and dimensions shown are approximate.
• This equipment complies with the EMC standards listed below.
EN55022, EN55024, EN61000-3-2, EN61000-3-3.
16
Page 17
Information for Users on Collection and Disposal of Old Equipment and used Batteries
These symbols on the products, packaging, and/or accompanying documents mean that used
electrical and electronic products and batteries should not be mixed with general household waste.
For proper treatment, recovery and recycling of old products and used batteries, please take them to
applicable collection points, in accordance with your national legislation and the Directives
2002/96/EC and 2006/66/EC.
By disposing of these products and batteries correctly, you will help to save valuable resources and
prevent any potential negative effects on human health and the environment which could otherwise
arise from inappropriate waste handling.
For more information about collection and recycling of old products and batteries, please contact your
local municipality, your waste disposal service or the point of sale where you purchased the items.
Penalties may be applicable for incorrect disposal of this waste, in accordance with national
legislation.
For business users in the European Union
If you wish to discard electrical and electronic equipment, please contact your dealer or supplier for
further information.
[Information on Disposal in other Countries outside the European Union]
These symbols are only valid in the European Union. If you wish to discard these items, please
contact your local authorities or dealer and ask for the correct method of disposal.
Note for the battery symbol (bottom two symbol examples):
This symbol might be used in combination with a chemical symbol. In this case it complies with the
requirement set by the Directive for the chemical involved.
English
17
Page 18
English
Customer’s Record
The model number and serial number of this product can be found on its rear panel. You should note this serial
number in the space provided below and retain this book, plus your purchase receipt, as a permanent record of
your purchase to aid in identifi cation in the event of theft or loss, and for Warranty Service purposes.
Model Number Serial Number
TQB0E2287U-G
Web Site : http://panasonic.net
© Panasonic Corporation 2012 Printed in Czech Republic
Page 19

Nederlands
Model No.
TH-42PF50E
TH-50PF50E
Gebruiksaanwijzing
High-defi nition plasmascherm
Raadpleeg de Bedieningsinstructies op de cd-rom voor meer
gedetailleerde instructies.
INHOUD
Belangrijke veiligheidsinformatie ................2
•
Veiligheidsmaatregelen ..............................3
•
Accessoires ................................................8
•
Aansluitingen ..............................................9
•
In / uitschakelen .......................................12
•
Basisbediening .........................................14
•
Specifi caties....................................... ......16
•
Lees de gebruiksaanwijzing voordat u het toestel in
gebruik neemt.
Bewaar de gebruiksaanwijzing voor eventuele naslag.
Page 20

Belangrijke veiligheidsinformatie
WAARSCHUWING
1) Stel om beschadiging die kan leiden tot elektrische schokken of brand te voorkomen, dit toestel niet
bloot aan regen of vocht.
Plaats geen voorwerpen met water erin (bloemenvazen, bekers met drank, cosmetica e.d.) boven het
apparaat. (en ook niet op planken e.d. erboven)
Plaats geen voorwerpen met open vuur, zoals brandende kaarsen, op/boven het toestel.
2) Ter voorkoming van elektrische schokken de omkasting niet verwijderen. In het interne gedeelte zijn geen
Nederlands
onderdelen aanwezig die door de gebruiker zelf gerepareerd kunnen worden. Laat een reparatie over aan
deskundige technici.
3) Dit toestel is voorzien van een netsnoer met randaarde stekker. In verband met installatie/veiligheidsvoorschriften,
dient het toestel uitsluitend op een degelijk geaard stopcontact te worden aangesloten.
4) Om een elektrische schok te voorkomen, moet u ervoor zorgen dat de aardingspen van de netstekker stevig
is aangesloten.
OPGELET
Dit apparaat is bestemd voor gebruik in een omgeving die relatief vrij is van elektromagnetische velden.
Gebruik van dit apparaat in de nabijheid van bronnen met sterke elektromagnetische velden of op plaatsen waar
elektrische storingen de ingangssignalen kunnen overlappen, kan instabiliteit van beeld en geluid veroorzaken
of storing zoals ruis doen ontstaan.
Om mogelijke schade aan dit apparaat te voorkomen, dit niet in de buurt van bronnen met sterke elektromagnetische
velden te gebruiken.
Handelsmerken
• VGA is een handelsmerk van International Business Machines Corporation.
• Macintosh is een wettig gedeponeerd handelsmerk van Apple Inc., USA.
• SVGA, XGA, SXGA en UXGA zijn wettig gedeponeerd handelsmerken van de Video Electronics Standard
Association.
Andere ondernemingen en productnamen zijn de handelsmerken of wettig gedeponeerde handelsmerken vande
betreffende ondernemingen.
• HDMI, het HDMI logo en High-Defi nition Multimedia Interface zijn handelsmerken of gedeponeerde handelsmerken
van HDMI Licensing LLC in de Verenigde Staten en andere landen.
• “RealD 3D” is een handelsmerk van RealD.
Opmerking:
Laat niet langdurig achtereen een stilstaand beeld op het scherm staan, want dat zou een permanent nabeeld
kunnen inbranden op uw plasmascherm.
Voorbeelden van stilstaande beelden zijn logo's, videospelletjes, computerbeelden, teletekst en beelden
weergegeven in de 4:3 gebruiksstand.
2
Page 21
Veiligheidsmaatregelen
WAARSCHUWING
Setup
Deze plasmascherm is uitsluitend bestemd voor gebruik met de volgende als optie verkrijgbare accessoires.
Gebruik met enige andere dan als optie verkrijgbare accessoires kan instabiliteit veroorzaken, hetgeen de
kans op schade en letsel tot gevolg kan hebben.
• Luidsprekers ............................................................... TY-SP42P8W-K (voor TH-42PF50E),
• Vloerstandaard ........................................................... TY-ST20-K, TY-ST42P50
• Mobiele standaard ...................................................... TY-ST58PF20
• Muurbevestigingssteun (vertikaal) ............................. TY-WK42PV20
• Muurbevestigingssteun (schuin) ................................ TY-WK42PR20
• Plafondbevestigingsbeugel ........................................ TY-CE42PS20
• BNC dual-video-aansluitingenkaart ............................ TY-FB9BD
• HD-SDI-aansluitingenkaart ........................................ TY-FB9HD
• HD-SDI-aansluitingenkaart met geluid ....................... TY-FB10HD
• Dual Link HD-SDI-aansluitingenkaart ........................ TY-FB11DHD
• Dual HDMI-aansluitingenkaart ...................................TY-FB10HMD
• DVI-D-aansluitingenkaart ........................................... TY-FB11DD
• AV aansluitkast ........................................................... TY-TB10AV
• 3D IR-ZENDER .......................................................... TY-3D30TRW
• Aanraakpaneel ........................................................... TY-TP42P30K (voor TH-42PF50E),
• 3D-bril ......................................................................... TY-EW3D3SE, TY-EW3D3ME, TY-EW3D3LE
• Draadloze adapter ...................................................... ET-WM200E
Vraag altijd een deskundige installateur om het toestel te installeren.
Kleine onderdelen houden het risico op verstikking in wanneer ze per ongeluk worden ingeslikt. Houd kleine onderdelen uit de
buurt van kleine kinderen. Verwijder onnodige kleine onderdelen en andere objecten, met inbegrip van het verpakkingsmateriaal en
plastic zakken/bladen om te vermijden dat kleine kinderen ermee spelen zodat een potentieel risico op verstikking ontstaat.
Plaats het plasmascherm niet op een schuin afl opende of onstabiele ondergrond. Zorg er ook voor dat het
plasmascherm niet over de rand van de ondergrond hangt of uitsteekt.
• De kans bestaat dat de plasmascherm dan valt of kantelt.
Plaats geen voorwerpen bovenop de plasmascherm.
• Als er water gemorst wordt op de plasmascherm of als er vreemde voorwerpen in het toestel terecht komen, bestaat
de kans dat er zich een elektrische kortsluiting voordoet, het tot brand of elektrische schokken kan leiden. Neem
contact op met uw Panasonic dealer als er vreemde voorwerpen binnen in de plasmascherm zijn gekomen.
Vervoer alleen rechtop!
• Als u het toestel met het scherm omhoog of omlaag vervoert, kunnen de interne circuits beschadigd raken.
Let op dat de ventilatie niet wordt verhinderd door ventilatieopeningen met voorwerpen zoals b.v. kranten,
tafelkleden en/of gordijnen af te dekken.
Voor voldoende ventilatie;
Laat bij gebruik van een standaard (los verkrijgbare accessoire) een tussenruimte van tenminste 10 cm
open aan de boven-, linker- en rechterzijde en tenminste 7 cm aan de achterzijde. Zorg ook voor ruimte
tussen de onderkant van het scherm en de vloer.
Volg bij gebruik van een andere installatiemethode de bijbehorende handleiding.
(Als de installatiehandleiding geen installatie-afmetingen voorschrijft, laat u in elk geval tenminste 10 cm
ruimte er boven, onder, links en rechts, en tenminste 7 cm ruimte aan de achterkant.)
Wanneer het plasmascherm verticaal wordt geïnstalleerd;
Draai de voedingsschakelaar omhoog voor de opwaartse richting wanneer u het plasmascherm verticaal installeert.
Stel “Display orientation” in op “Portrait” in het menu Setup.
(Alle onderstaande accessoires zijn vervaardigd door Panasonic Corporation.)
Nederlands
TY-SP50P8W-K (voor TH-50PF50E)
TY-TP50P30K (voor TH-50PF50E)
3
Page 22
Veiligheidsmaatregelen
Gebruik van de plasmascherm
De plasmascherm is bestemd voor gebruik op 220 - 240 V, 50/60 Hz wisselstroom.
De ventilatieopeningen niet afdekken.
• Dit kan oververhitting van de plasmascherm tot gevolg hebben, hetgeen kan leiden tot brand of beschadiging van
de plasmascherm.
Steek geen vreemde voorwerpen in de plasmascherm.
Nederlands
• Geen metalen voorwerpen of brandbare voorwerpen in de ventilatieopeningen steken of op de plasmascherm laten
vallen, daar dit brand of elektrische schokken tot gevolg kan hebben.
De omkasting niet verwijderen of deze op enigerlei wijze veranderen.
• Binnen in de plasmascherm zijn hoge spanningen aanwezig die ernstige elektrische schokken kunnen veroorzaken.
Neem voor inspectie, afstelling en reparatie altijd contact op met uw Panasonic dealer.
Zorg voor een makkelijke toegang naar de stekker van de voedingskabel.
Een apparaat met KLASSE I-constructie moet met een geaarde stekker op een geaard stopcontact worden aangesloten.
Gebruik geen ander voedingssnoer dan alleen het bij dit toestel geleverd netsnoer.
• Gebruik van een ander snoer zou brand of een elektrische schok kunnen veroorzaken.
Steek de stekker geheel in de contactdoos.
• Als de stekker niet volledig in de contactdoos is gestoken, bestaat de kans dat er hitte wordt opgewekt waardoor
brand kan ontstaan. Als de stekker beschadigd is of de afdekplaat van het stopcontact los zit, mogen deze niet
worden gebruikt.
De stekker van het netsnoer niet met natte handen vastnemen.
• Dit kan elektrische schokken tot gevolg hebben.
Wees voorzichtig het netsnoer niet te beschadigen. Bij het losnemen van het netsnoer, de stekker vasthouden
en niet de kabel.
• De kabel niet beschadigen, er geen wijzigingen in aanbrengen, er geen zware voorwerpen bovenop plaatsen, niet
verhitten, niet in de buurt van hete voorwerpen plaatsen, niet ineendraaien, overmatig buigen of er aan trekken.
Dit kan brand of elektrische schokken tot gevolg hebben. Als het netsnoer beschadigd is, dient deze door uw
Panasonic dealer gerepareerd te worden.
Als u de plasmascherm gedurende een langere tijd niet gebruikt, de stekker uit het stopcontact nemen.
Laat om brand te voorkomen nooit kaarsen of een andere bron van open vuur in de nabijheid van dit
product komen.
Als er zich tijdens het gebruik problemen voordoen
Als er zich problemen voordoen met bijvoorbeeld beeld of geluid, als er rook of een abnormale geur uit de
plasmascherm komt, onmiddellijk de stekker uit het stopcontact nemen.
• Als u de plasmascherm in deze status blijft gebruiken, kan dit brand of elektrische schokken tot gevolg hebben.
Nadat u gecontroleerd heeft of er geen rookontwikkeling meer aanwezig is, contact opnemen met uw Panasonic
dealer zodat de nodige reparaties uitgevoerd kunnen worden. Zelf de plasmascherm proberen te repareren is
gevaarlijk en mag dus nooit gedaan worden.
Als er water of vreemde voorwerpen in de plasmascherm gevallen zijn, als de plasmascherm is komen te vallen
of als de omkasting beschadigd is, onmiddellijk de stekker uit het stopcontact nemen.
• Er kan kortsluiting ontstaan, welke brand kan veroorzaken. Neem voor alle eventueel uit te voeren reparaties
contact op met uw Panasonic dealer.
4
Page 23

Veiligheidsmaatregelen
OPGELET
Gebruik van de plasmascherm
Breng uw handen, gezicht of voorwerpen niet te dicht in de buurt van de ventilatieopeningen van de
plasmascherm.
• Er komt hete lucht uit de ventilatieopeningen en de bovenzijde van de plasmascherm kan heet worden. Breng uw
handen of voorwerpen, die niet warmtebestendig zijn, niet in de buurt van deze opening, aangezien anders de
kans bestaat op brandwonden of materiaal vervorming.
Zorg er altijd voor om eerst alle kabels los te maken, alvorens de plasmascherm te verplaatsen.
• Als de plasmascherm wordt verplaatst terwijl er nog kabels aangesloten zijn, bestaat de kans dat de kabels
beschadigd worden, hetgeen brand of elektrische schokken tot gevolg kan hebben.
Verwijder bij wijze van veiligheidsmaatregel de stekker uit het stopcontact, alvorens met het reinigen te
beginnen.
• Wanneer dit niet gebeurt bestaat de kans op elektrische schokken.
Het netsnoer regelmatig reinigen om te voorkomen dat dit met stof bedekt raakt.
• Als er zich stof op de stekker van het netsnoer verzamelt, kan dat de isolatie aantasten. Dit kan brand tot gevolg
kan hebben. Neem de stekker uit het stopcontact en veeg dit met een droge doek af.
Houd batterijen niet in het vuur en haal ze niet uit elkaar.
• Batterijen mogen niet aan bovenmatige hitte zijn blootgesteld, zoals de zon, het vuur en derg.
Dit plasmascherm stuurt infraroodstralen uit en kan daarom de werking verstoren van apparatuur die werkt
op basis van infraroodstralen.
Zorg dat de infraroodsensor van uw apparatuur uit de buurt is van de directe of gerefl ecteerde lichtstralen
van uw plasmascherm.
Nederlands
Reiniging en onderhoud
De voorzijde van het displaypaneel is met een speciaal materiaal behandeld. Veeg de buitenzijde van het paneel
voorzichtig schoon met uitsluitend net dijgeleverde schoonmaakdoek of met een zachte, stofvrije doek.
• Als het oppervlak erg vuil is, veegt u het af met een zachte, niet-pluizende doek die bevochtigd is met schoon water
of een 100-voudig verdunde zeepoplossing, en dan veegt u het naderhand droog met een al even zachte droge
doek, totdat het oppervlak helemaal droog is.
• De buitenzijde van het paneel niet bekrassen of er met harde voorwerpen tegen stoten, aangezien de buitenzijde
daardoor beschadigd kan worden. Vermijd bovendien contact met vluchtige stoffen, zoals insectensprays,
wasbenzine en terpentijn, aangezien de kwaliteit van het materiaal oppervlak daardoor aangetast wordt.
Als de behuizing vuil geworden is, deze met een zachte, droge doek schoonvegen.
• Als de behuizing bijzonder vuil geworden is, de doek bevochtigen met water waaraan een kleine hoeveelheid
neutraal schoonmaakmiddel is toegevoegd en vervolgens de doek uitwringen. Gebruik deze doek om de behuizing
schoon te vegen en veeg deze vervolgens met een droge doek goed droog.
• Zorg er voor dat geen schoonmaakmiddel in directe aanraking komt met de plasmascherm. Als er waterdruppels
binnen in het apparaat terechtkomen, bestaat de kans op storingen en defecten.
• Vermijd contact met vluchtige stoffen, zoals insectensprays, wasbenzine en terpentijn, aangezien de materiaal
kwaliteit van de buitenzijde van de behuizing daardoor aangetast wordt. Ook kan de buitenste laag van de omkasting
daardoor gaan afschilferen. Zorg er verder voor dat de behuizing gedurende een langere tijd niet in aanraking komt
met voorwerpen die gemaakt zijn van rubber of PVC.
5
Page 24

Veiligheidsmaatregelen
3D-veiligheidsmaatregelen
WAARSCHUWING
Kleine onderdelen
De 3D-bril bevat kleine onderdelen (batterijen, gespecialiseerde band, enz.) en moet buiten het bereik van
kleine kinderen worden gehouden om te voorkomen dat het per ongeluk wordt ingeslikt.
Demontage
Nederlands
U mag de 3D-bril niet demonteren of aanpassen.
OPGELET
Lees deze instructies volledig door om in alle veiligheid en comfort te genieten van 3D-beelden.
Gebruik voor commerciële toepassing en in het openbaar
Een bevoegd persoon dient op verantwoorde wijze instructies te geven voor het gebruik van 3D-brillen.
3D-bril (los verkrijgbaar)
Zorg dat u de 3D-bril niet laat vallen, overmatige druk erop uitoefent, of erop trapt.
Let op de hoeken van de montuur wanneer u de 3D-bril opzet.
Zorg dat u geen vinger knelt in het scharniergedeelte van de 3D-bril.
Let bijzonder op wanneer kinderen de 3D-bril gebruiken.
De 3D-bril mag in de regel niet worden gebruikt door kinderen die jonger zijn dan 5 - 6 jaar.
Wanneer kinderen de 3D-bril gebruiken, moeten ze voortdurend onder toezicht blijven van een ouder of voogd
die moet zorgen voor hun veligheid en gezondheid.
6
Page 25

Veiligheidsmaatregelen
3D-inhoud weergeven
Tot de inhoud voor 3D-weergave behoren ook in de handel verkrijgbare Blu-ray-discs, 3D-uitzendingen, enz.
Zorg voor een ordentelijke productie als u zelf 3D-materiaal maakt.
Gebruik de 3D-bril niet als u overgevoelig bent aan licht, hartproblemen hebt of als er een andere bestaande
medische toestand is die het gebruik niet toelaat.
Stop het gebruik van de 3D-bril onmiddellijk als u zich moe of misselijk voelt of als u een ander onaangenaam
gevoel gewaarwordt.
Neem een aangepaste pauze na het bekijken van een 3D-fi lm.
Neem een pauze van 30 tot 60 minuten na het bekijken van 3D-inhoud op interactieve apparaten, zoals 3D-games
of -computers.
Zorg dat u niet per ongeluk op het scherm of op andere mensen slaat. Tijdens het gebruik van de 3D-bril kan
de afstand tussen de gebruiker en het scherm verkeerd worden beoordeeld.
De 3D-bril mag alleen worden gedragen tijdens het bekijken van 3D-inhoud.
Als u gedurende korte tijd niet naar het scherm kijkt terwijl u 3D-beelden bekijkt, kan de 3D-bril automatisch
worden uitgeschakeld.
Als u gezichtsproblemen hebt (bijziend/verziend, astigmatisme, verschil in het gezichtsvermogen links en
rechts), moet u uw gezichtsvermogen corrigeren voordat u de 3D-bril gebruikt.
Stop het gebruik van de 3D-bril als u duidelijk dubbele beelden ziet wanneer u 3D-inhoud bekijkt.
Gebruik de 3D-bril niet dichterbij dan de aanbevolen afstand.
Neem bij weergave de aanbevolen afstand in acht (3 keer de effectieve hoogte van het scherm).
Aanbevolen afstand
TH-42PF50E: 1,6 m
TH-50PF50E: 1,9 m
Wanneer het bovenste en onderste gebied van het scherm zwart is, zoals bij vilms, moet u het scherm bekijken
op een afstand die 3 keer verder is dan de hoogte van het werkelijke beeld. (Dit betekent dat de afstand kleiner
is dan de hogervermelde aanbevolen waarde.)
De 3D-bril (los verkrijgbaar) gebruiken
Voordat u de 3D-bril gebruikt, moet u zorgen dat er geen breekbare objecten rond de gebruiker aanwezig zijn
om schade of letsels te voorkomen.
Zet de 3D-bril af voordat u gaat rondlopen om te vermijden dat u valt en letsels oploopt.
Gebruik de 3D-bril alleen voor het beoogde doel en niets anders.
Gebruik de 3D-bril niet bij hoge temperaturen.
Gebruik de 3D-bril niet als deze beschadigd is.
Gebruik geen apparaten die infraroodsignalen uitzenden in de buurt van de 3D-bril omdat hierdoor een verkeerde
werking van de 3D-bril kan worden veroorzaakt.
Gebruik geen apparaten (zoals mobiele telefoons of persoonlijke zendontvangers) die sterke elektromagnetische
golven uitzenden in de buurt van de 3D-bril omdat dit storingen in de werking van de 3D-bril kan veroorzaken.
Stop het gebruik van de 3D-bril onmiddellijk als een storing of defect optreedt.
Stop het gebruik van de 3D-bril onmiddellijk als u roodheid, pijn of irritatie van de huid rond de neus of slapen
gewaarwordt.
In zeldzame gevallen kunnen de materialen die in de 3D-bril worden gebruikt, een allergische reactie
veroorzaken.
Nederlands
7
Page 26

Accessoires
Bijgeleverde accessoires
Gebruiksaanwijzing
Nederlands
Controleer dat u de hier afgebeelde accessoires en onderdelen in bezit heeft
Cd-rom × 1
Afstandbediening
• Gebruiksaanwijzing
Bediening van het scherm
Gebruik van het netwerk
• Softwarelicentie
GNU GENERAL PUBLIC LICENSE
GNU LESSER GENERAL PUBLIC LICENSE
N2QAYB000691
Batterijen voor de
afstandsbediening
(R6 (UM3) formaat × 2)
Netsnoer Kabelbinder × 1
TMME289
Ferrietkern × 2
J0KG00000014
Gebruik de ferrietkernen om te voldoen aan de
EMC-standaard.
(
Zie pagina 11
)
Batterijen van de afstandsbediening
De afstandsbediening werkt op twee R6-formaat batterijen.
1. Trek aan het haakje, houd het
vast en open het klepje van het
batterijcompartiment.
Handige tip:
Bij veelvuldig gebruik van de afstandsbediening verdient het aanbeveling de batterijen door
alkalibatterijen te vervangen wanneer deze leeg zijn, want deze hebben een langere levensduur.
Belangrijke informatie betreffende de batterijen
Wanneer de batterijen verkeerd aangebracht zijn, kan batterijlekkage of -corrosie optreden met beschadiging van de
afstandsbediening tot gevolg. Houd bij verwijdering van batterijen rekening met het milieu.
Neem de volgende punten in acht:
1. Vervang altijd beide batterijen tegelijk. Gebruik altijd nieuwe batterijen wanneer u de oude vervangt.
2. Steek niet tegelijk een nieuwe en een oude batterij in de afstandsbediening.
3. Gebruik niet tegelijk verschillende typen batterijen (bijvoorbeeld: “zink-koolstof” met “alkaline”).
4. De batterijen nooit opladen, kortsluiten, demonteren, verhitten of verbranden.
5.
Vervang de batterijen wanneer de afstandsbediening soms uitvalt of helemaal niet meer gebruikt kan worden voor de
bediening van het plasmascherm.
6.
Houd batterijen niet in het vuur en haal ze niet uit elkaar.
7.
Batterijen mogen niet aan bovenmatige hitte zijn blootgesteld, zoals de zon, het vuur en derg.
8
2. Plaats de batterijen op de juiste
manier (+ en -).
Batterijen, R6 (UM3) formaat
-
+
+
-
3. Plaats het klepje weer terug.
Page 27

Aansluitingen
Aansluiting luidspreker
Gebruik uitsluitend de los verkrijgbare luidsprekers die voor dit apparaat zijn ontworpen.
Zie de installatiehandleiding van de luidsprekers voor nadere bijzonderheden betreffende de installatie van de luidsprekers.
Luidsprekers (los verkrijgbaar accessoire)
1
Rood
Zwart
Stop de kerndraad door de
hendel terwijl u erop drukt.
Nederlands
2
Luidsprekeraansluiting
Aansluiten van het netsnoer (zie pagina 12)
Zwart
Plaats de hendel terug.
Rood
Aansluiting en bevestiging wisselstroomkabel, kabelbevestiging
Bevestigen van het netsnoer
Haal de wisselstroomkabel er weer uit
Plug de wisselstroomkabel in de displayunit.
Plug de wisselstroomkabel in tot u een
klik hoort.
Opmerking:
Let op dat het netsnoer zowel aan de linker
als de rechterkant stevig vast zit.
Wanneer u de muurbevestigingssteun (verticaal) gebruikt
Opmerking:
Wanneer u de muurbevestigingssteun gebruikt (verticaal) (TY-WK42PV20), moet u de
gaten en gebruiken om de kabels vast te maken. Als de kabelbinder wordt
De kabelbinder gebruiken
Maak alle overtollige kabels vast met een kabelbinder, zoals vereist.
Opmerking:
Bij dit toestel wordt één kabelbinder geleverd. Als u de kabels op drie plaatsen samenbindt, moet u de bijkomende kabelbinders zelf aanschaffen.
Bevestig de kabelbinder
1
opening
gebruikt op opening , kunnen de kabels verstrikt raken in de muurbevestigingssteun.
Van het apparaat verwijderen:
ontgrendelknoppen
Bundel de kabels
2
Verwijder de wisselstroomkabel door
te drukken op de twee knoppen.
Opmerking:
Bij het losmaken van het netsnoer
dient u absoluut altijd eerst de stekker
uit het wandstopcontact te trekken.
Losmaken:
Steek de kabelbinder in
de opening.
Houd beide
ontgrendelknoppen
ingedrukt
geleiders
Schuif de
punt onder
de geleiders
knop
Houd
de knop
ingedrukt
9
Page 28

Aansluitingen
Aansluiting videoapparatuur
De aansluitingen bevinden zich op de onderkant van het plasmascherm.
SERIAL: Bedien het
plasmascherm
door het aan te
sluiten op de pc
3D IR TRANSMITTER
Aansluiting voor de 3D
IR-ZENDER (optionele
accessoire).
Nederlands
SLOT: Insteeksleuf aansluitingenkaart
(optionele accessoires)
(zie pagina 3)
Opmerking:
De sleuf aan de rechterzijde is voor de
aansluitingenkaart met een breedte van 2
sleuven. De aansluitingenkaart met de breedte
van 1 sleuf werkt niet wanneer deze in de sleuf
aan de rechterzijde wordt geïnstalleerd.
AV IN (VIDEO):
COMPONENT/RGB IN: Component/RGB
DVI-D IN:
PC IN
: Pc-ingangsaansluiting
Composiet video-ingang
video-ingang
DVI-D-ingang
Aansluiten op de video-aansluiting van de PC
of op apparatuur met Y-, P
uitgang.
B(CB)- en PR(CR)-
AV IN (HDMI): HDMI-ingang
Aansluiten op videoapparatuur zoals
een videorecorder of dvd-speler.
WIRELESS
MODULE, LAN:
(raadpleeg
“Gebruiksaanwijzing,
Gebruik van het
netwerk”)
10
Page 29

Aansluitingen
Voorbeeld van netwerkverbinding (bekabeld netwerk)
COMPUTER
Minder
dan
10 cm
Netwerkkabel
(niet meegeleverd)
Ferrietkern
(meegeleverd)
Hub of breedbandrouter
Opmerkingen:
• Zorg voor een breedbandrouter of hub die geschikt is voor 10BASE-T/100BASE-TX.
• Voor aansluiting van een apparaat met 100BASE-TX moet een netwerkkabel van categorie 5 of hoger gebruikt
worden.
• Als u de netwerkaansluiting aanraakt met uw hand (of ander lichaamsdeel), kan ontlading van statische
elektriciteit schade veroorzaken.
Raak niet de netwerkaansluiting en metalen delen van de netwerkkabel aan.
• Neem contact op met uw netwerkbeheerder voor aanwijzingen over de aansluiting.
Minder
dan
10 cm
Ferrietkern
(meegeleverd)
De ferrietkern installeren
Trek de lipjes achteruit
(op twee plaatsen)
Scherm (hoofdapparaat, achter)
Openen
Wind de kabel
twee keer op
Trek de kabel door
en sluit de klem
Aansluiten van de draadloze adapter (draadloos netwerk)
Voor gebruik van de draadloze functie is de draadloze adapter (ET-WM200E, afzonderlijk verkrijgbaar) vereist.
Nederlands
Verwijder de beschermfolie en het deksel om
de draadloze adapter op het scherm aan te
sluiten.
Aansluiten
Houd de draadloze adapter met de led in uw
richting en sluit het aan op het aansluitpunt voor de
draadloze adapter.
Opmerking:
Sluit geen ander apparaat aan dan de draadloze adapter
(ET-WM200E).
ET-WM200
LED
11
Page 30

In / uitschakelen
Zie de onderstaande afbeelding voor het aansluiten van het netsnoer op het plasmadisplay.
Nederlands
Aansluiten van de stekker op het stopcontact
Opmerkingen:
•
De netstekker verschilt afhankelijk van het land
van gebruik. Het is daarom mogelijk dat de rechts
hiernaast afgebeelde stekker niet hetzelfde is als
de stekker van het netsnoer van uw apparaat.
• Bij het losmaken van het netsnoer dient u absoluut
altijd eerst de stekker uit het wandstopcontact te
trekken.
Druk op de POWER schakelaar van het plasmascherm
om het apparaat in te schakelen.
Netspanningsindicator: Groen
[De netwerkverbinding starten]
Na het inschakelen duurt het even voordat de
netwerkverbinding opgestart is.
Tijdens het activeren van het netwerk is “Network
Setup” in het menu “Setup” uitgeschakeld en niet
beschikbaar.
INPUT MENU ENTER/+/VOL-/
Netspanningsindicator
Afstandsbedieningssensor
12
Druk op de
schakelen.
Netspanningsindicator: Rood (standby)
Druk nogmaals op de toets van de afstandsbediening om het plasmascherm
weer in te schakelen.
Netspanningsindicator: Groen
Schakel het plasmascherm uit door op de schakelaar op het apparaat te
drukken, wanneer het plasmascherm aan is of in de STANDBY modus staat.
Opmerking:
Wanneer de stroombeheerfunctie (power management) is geactiveerd, zal het
lampje oranje oplichten wanneer het apparaat is uitgeschakeld.
toets van de afstandsbediening om het plasmascherm uit te
Page 31

In / uitschakelen
Wanneer u het apparaat voor het eerst inschakelt
Bij de eerste keer inschakelen verschijnt het volgende scherm.
Kies de onderdelen met de afstandsbediening. De toetsen op het toestel zelf kunnen hiervoor niet gebruikt
worden.
OSD Language (taal voor
de schermaanduidingen)
OSD Language
English (UK)
Deutsch
Français
Italiano
Español
ENGLISH (US)
SetSelect
1
Kies een
taal.
2
Stel in.
Opmerkingen:
• Wanneer de onderdelen eenmaal zijn ingesteld, zal er voortaan bij inschakelen geen instelscherm meer
verschijnen.
• Na het instellen zijn deze onderdelen nog te wijzigen via de volgende menu’s.
OSD Language
Day/Time Setup
Display orientation
Waarschuwingsbericht bij het inschakelen
Wanneer u het toestel aanzet, wordt mogelijk het volgende bericht getoond:
3D-veiligheidsinstructies
When 3D images will be viewed by unspecifi ed number of
people or used for commercial applications, someone in
authority should convey the following precautions.
These precautions should be followed in the home as well.
3D Viewing/ 3D Content/ Viewing distance/ 3D Eyewear
recommendations
- To enjoy 3D images safely and comfortably, please
read the Operating Instructions fully.
Schakel de weergave van 3D-veiligheidsinstructies in als u 3D-beelden wilt weergeven voor een niet nader
bepaald publiek voor zakelijke of andere doeleinden.
Als u “3D Function” in “3D Settings” instelt op “On”, wordt iedere keer als u het toestel inschakelt een
waarschuwingsbericht weergegeven.
Waarschuwing voor No activity power off
’No activity power off’ is enabled.
Als “No activity power off” in het menu Setup is ingesteld op “Enable”, wordt iedere keer als het toestel
wordt ingeschakeld een waarschuwing weergegeven.
In het volgende menu kunt u instellen of deze meldingen weergegeven worden: menu Options
Day/Time Setup
(Dag/tijd instellen)
Day/Time Setup
Set
Day
Time
Day/Time Setup
Set
Day
Time
Time MON 99:99
Time MON 99:99
1
Selecteer “Day” of
“Time”.
2
Stel het onderdeel
“Day” of “Time” in.
1
Selecteer “Set”.
2
Stel in.
MON
99:99
TUE
10:00
Display orientation
(oriëntering beeldscherm)
Display orientation
Landscape
Portrait
1
Voor een verticale installatie
selecteert u “Portrait”.
2
Stel in.
3D Safety Precautions
Power On Message
Nederlands
13
Page 32

Apparaat
INPUT MENU ENTER/
+
/VOL-/
Nederlands
Basisbediening
Helderheidsensor
Detecteert de helderheid van de omgeving van het scherm
Afstandsbedieningssensor
Volumeafstelling
Volume Omhoog “+” en Omlaag “–”
Wanneer het menuscherm wordt
weergegeven:
“+”: druk hierop om de cursor
naar boven te verplaatsen
“–”: druk hierop om de cursor naar
beneden te verplaatsen
Netspannings-schakelaar
Aan / Uit
Netspanningsindicator
De netspanningsindicator licht op.
Netspanning-UIT
•
• Standby ......... Rood
•
Apparaat-AAN
• PC Power management (DPMS)
..........................
• DVI-D Power management
..........................
• No activity power off
..........................Rood
... Indicator brandt niet (Zolang het netsnoer
op een stopcontact is aangesloten,
zal het apparaat een weinig stroom
verbruiken.)
Oranje (als “Slot power” is ingesteld
op “On”.)
Oranje (afhankelijk van het type functiekaart dat is gemonteerd, als de sleuf wordt voorzien van
voeding)
Oranje (Als “Control I/F Select” is ingesteld op “LAN” of “WEB Control” is ingesteld op “On”.
Raadpleeg “Gebruiksaanwijzing, Gebruik van het netwerk”)
.... Groen
Oranje (Met pc-ingangssignaal.)
Wanneer deze functie is ingesteld op On, werkt deze onder de volgende omstandigheden om de
voeding automatisch in of uit te schakelen.
Wanneer er gedurende ca. 30 seconden geen beelden (synchronisatiesignaal) worden
gedetecteerd tijdens de DVI-signaalingang:
→ De voeding wordt uitgeschakeld (stand-by); de voedingsindicator licht oranje op.
Wanneer beelden (synchronisatiesignaal) achteraf worden gedetecteerd:
→ De voeding wordt ingeschakeld; de voedingsindicator licht groen op.
Oranje (met DVI-ingangssignaal.)
De stroomvoorziening wordt uitgeschakeld wanneer er geen signaal is.
Wanneer dit onderdeel op “Enable” wordt gezet, wordt de stroomvoorziening van het apparaat
uitgeschakeld 10 minuten nadat het ingangssignaal stopt.
Invoer- / beeldverhoudingtoets
MENU scherm AAN / UIT
Bij herhaald indrukken van de MENU toets wordt er
tussen de menuschermen omgeschakeld.
Normal Viewing
(Normale beeld)
INPUT toets
(Selectie ingangssignaal)
Picture (Beeld)
Pos./Size
SetupSound (Geluid)
14
Page 33

Basisbediening
Afstandsbediening
ACTION toets
Druk op deze toets om selecties en instellingen
vast te leggen.
ASPECT toets
Druk op deze toets voor het oproepen van
het ASPECT instelmenu.
Standby (Aan / Uit) toets
Het plasmascherm dient eerst bij het
stopcontact en de netspanningsschakelaar
ingeschakeld te worden (zie pagina 12).
Druk op deze toets om het plasmascherm
in te schakelen vanuit de standbymodus.
Druk nogmaals op deze toets om het
plasmascherm uit te schakelen (de
standbymodus te activeren).
POS./SIZE toets
PICTURE toets
Geluidsdemping Aan/Uit
Druk op deze toets om het geluid te
dempen.
Druk nogmaals op de toets om het
oorspronkelijke geluid te herstellen.
Bij het uitschakelen van het apparaat
of als de volume-instelling wordt
gewijzigd, komt de dempingsfunctie
automatisch te vervallen.
N toets
POSITION toetsen
INPUT toets
Indrukken om de invoersignalen
achtereenvolgens te selecteren.
ECO MODE (ECO)
Druk op deze toets om de instelling
ECO MODE te wijzigen.
FUNCTION toetsen (FUNCTION)
OFF TIMER toets
Het plasmascherm kan worden voorgeprogrammeerd
voor het overschakelen naar standby na een bepaalde
tijdsperiode. De instelling verandert naar 30 minuten, 60
minuten, 90 minuten en 0 minuten (Uit timer geannuleerd),
telkens wanneer op de toets gedrukt wordt.
30 min 60 min
90 min
0 min (Annuleren)
Wanneer er drie minuten resteren, zal “Off timer 3 min”
gaan knipperen.
Bij een netspanningsonderbreking zal de instelling van
de Uit timer komen te vervallen.
Nederlands
AUTO SETUP-toets
Past de positie/grootte van het
scherm automatisch aan.
SET UP toets
SOUND toets
Volumeafstelling
Druk op de Volume Omhoog “+” of
Omlaag “–” toets om het volumeniveau
van het geluid te verhogen of te
verlagen.
R toets
Druk op de R toets om terug te keren
naar het vorige menuscherm.
RECALL toets
Druk op de “RECALL” toets om de
huidige status van het systeem op
het scherm te laten verschijnen.
Ingangsaanduiding
1
Aspect modus
2
Tijdens weergave van 3Dbeelden
Audio-ingang
Profi elnaam
Bediening NANODRIFT Saver
Uit timer
3
De Uit timer indicator zal alleen
op het scherm verschijnen
wanneer de Uit timer is
ingesteld.
Klokweergave
4
PC
COMPONENT
Memory name: MEMORY2
1
4:33D
2
NANODRIFT
10:00
4
Digitale Zoom
Off timer
90min
3
15
Page 34

Specifi caties
Stroombron 220 – 240 V wisselstroom, 50/60 Hz
Stroomverbruik
Normaal gebruik 365 W 445 W
Standby toestand 0,5 W 0,5 W
Stroomtoevoer-uit toestand
Plasmadisplaypaneel Wisselstroom type
Schermformaat 921 mm (B) × 518 mm (H) ×
Nederlands
(Aantal pixels) 2.073.600 (1.920 (B) ×1.080 (H)) [5.760 × 1.080 kleurstippen]
Gebruiksomstandigheden
Bruikbare signalen
Verbindingsaansluitingen
Afmetingen (L × H × B) 1.020 mm × 610 mm × 89 mm 1.210 mm × 724 mm × 89 mm
Massa (Gewicht)
Temperatuur 0 °C - 40 °C
Vochtigheid 20 % - 80 %
Kleursysteem NTSC, PAL, PAL60, SECAM, Gemodifi ceerde NTSC
Scanningformaat 525 (480) / 60i · 60p, 625 (575) / 50i · 50p, 750 (720) / 60p · 50p, 1125 (1080) / 60i · 60p · 50i ·
PC signalen VGA, SVGA, XGA, SXGA
AV IN VIDEO
COMPONENT/RGB IN
DVI-D IN
PC IN
3D IR TRANSMITTER Voor 3D IR-ZENDER (TY-3D30TRW)
WIRELESS MODULE Voor draadloze adapter (ET-WM200E)
alleen hoofdapparaat ca. 25,0 kg netto ca. 33,0 kg netto
AUDIO L-R
HDMI TYPE A-aansluiting
P
P
AUDIO L-R
AUDIO
AUDIO
SERIAL Aansluiting externe besturing
3D SHUTTER OUT
DC 8V OUT Midden plus, voor EIAJ 4mm-plug
LAN RJ45 10BASE-T/100BASE-TX, compatibel met PJLink™
EXT SP Luidsprekeraansluiting 6 Ω, 16 W [8 W + 8 W] (10 % THD)
with speakers ca. 29,0 kg ca. 38,0 kg
50p · 24p · 25p · 30p · 24sF, 1250 (1080) / 50i
BNC
RCA-pinstekker × 2
BNC
Y/G
BNC
B/CB/B
BNC
R/CR/R
RCA-pinstekker × 2
DVI-D 24 pins
Inhoudsbescherming
Stereo ministekker (M3) × 1
Mini D-sub 15 pins hoge densiteit
Stereo ministekker (M3) × 1
D-sub 9 pins RS-232C-compatibel
M3-aansluiting × 1
TH-42PF50E TH-50PF50E
0,3 W 0,3 W
42-inch, 16:9 aspectverhouding
1.057 mm (diagonaal)
UXGA ···· (samengedrukt)
Horizontale scanningfrequentie 15 - 110 kHz
Verticale scanningfrequentie 48 - 120 Hz
50-inch, 16:9 aspectverhouding
1.105 mm (B) × 622 mm (H) ×
1,0 Vp-p (75 Ω)
0,5 Vrms, Gedeeld met COMPONENT/RGB IN
Met sync 1,0 Vp-p (75 Ω)
0,7 Vp-p (75 Ω)
0,7 Vp-p (75 Ω)
0,5 Vrms
Naleving van DVI revisie 1.0
Compatibel met HDCP 1.1
0,5 Vrms, Gedeeld met PC IN
Y of G met sync 1,0 Vp-p (75 Ω)
Y of G zonder sync 0,7 Vp-p (75 Ω)
P
B/CB/B: 0,7 Vp-p (75 Ω)
P
R/CR/R: 0,7 Vp-p (75 Ω)
HD/VD: 1,0 - 5,0 Vp-p (hoge impedantie)
0,5 Vrms, Gedeeld met DVI-D IN
Wisselstroom type
1.268 mm (diagonaal)
,
Gedeeld met VIDEO
Opmerkingen:
• Ontwerp en specifi caties kunnen zonder voorafgaande kennisgeving worden gewijzigd. Aangegeven massa en
afmetingen zijn bij benadering.
• Deze apparatuur voldoet aan de hieronder aangegeven EMC normen.
EN55022, EN55024, EN61000-3-2, EN61000-3-3.
16
Page 35

Informatie voor gebruikers betreffende het verzamelen en verwijderen van oude uitrustingen en lege batterijen
Deze symbolen op de producten, verpakkingen, en/of begeleidende documenten betekenen dat gebruikte
elektrische en elektronische producten en batterijen niet met het algemene huishoudelijke afval gemengd
mogen worden.
Voor een correcte behandeling, recuperatie en recyclage van oude producten en lege batterijen
moeten zij naar de bevoegde verzamelpunten gebracht worden in overeenstemming met uw nationale
wetgeving en de Richtlijnen 2002/96/EC en 2006/66/EC.
Door deze producten en batterijen correct te verwijderen draagt u uw steentje bij tot het beschermen van
waardevolle middelen en tot de preventie van potentiële negatieve effecten op de gezondheid van de mens
en op het milieu die anders door een onvakkundige afvalverwerking zouden kunnen ontstaan.
Voor meer informatie over het verzamelen en recycleren van oude producten en batterijen, gelieve
contact op te nemen met uw plaatselijke gemeente, uw afvalverwijderingsdiensten of de winkel waar u
de goederen gekocht hebt.
Voor een niet-correcte verwijdering van dit afval kunnen boetes opgelegd worden in overeenstemming
met de nationale wetgeving.
Nederlands
Voor zakengebruikers in de Europese Unie
Indien u elektrische en elektronische uitrusting wilt vewijderen, neem dan contact op met uw dealer
voor meer informatie.
[Informatie over de verwijdering in andere landen buiten de Europese Unie]
Deze symbolen zijn enkel geldig in de Europese Unie. Indien u wenst deze producten te verwijderen,
neem dan contact op met uw plaatselijke autoriteiten of dealer, en vraag informatie over de correcte
wijze om deze producten te verwijderen.
Opmerking over het batterijensymbool (beneden twee voorbeelden):
Dit symbool kan gebruikt worden in verbinding met een chemisch symbool. In dat geval wordt de eis,
vastgelegd door de Richtlijn voor de betrokken chemische producten vervuld.
17
Page 36

Nederlands
In te vullen door de eigenaar
Het modelnummer en serienummer van dit produkt kunt u vinden op de achterkap. U dient dit serienummer te
noteren in de hieronder bestemde ruimte en dit boekje plus uw bewijs van aankoop te bewaren als een permanent
bewijs van uw aankoop als hulp bij identifi catie in het geval van diefstal of verlies, alsmede bij aanspraak op de
garantie/service verlenen.
Modelnummer Serienummer
TQB0E2287B-G
Web Site : http://panasonic.net
© Panasonic Corporation 2012 Gedrukt in de Tsjechische Republiek
Page 37

Dansk
Modelnummer
TH-42PF50E
TH-50PF50E
Betjeningsvejledning
Højdefi nitions plasmaskærm
Se brugsvejledningen for CD-ROM’en angående mere
detaljerede instruktioner.
Indhold
VIGTIGE SIKKERHEDSREGLER .............2
•
Sikkerhedsforanstaltninger ........................3
•
Tilbehør ......................................................8
•
Tilslutninger ................................................9
•
Tænd og sluk for strømmen .....................12
•
Grundlæggende betjeningsfunktioner ......14
•
Specifi kationer .........................................16
•
Læs venligst denne betjeningsvejledning, før De anvender
Deres nye apparat, og gem brugsanvisningen til brug i
fremtiden.
Page 38

VIGTIGE SIKKERHEDSREGLER
ADVARSEL!
1) Produktet må ikke udsættes for dryp eller tilsprøjtning, da dette kan medføre brand eller elektrisk
stød.
Anbring ikke beholdere med væske (blomstervaser, kopper, kosmetik el.lign.) oven på apparatet. (heller
ikke på hylder osv. over apparatet)
Kilder til åben ild, f.eks. stearinlys, må ikke placeres på eller over apparatet.
2) Fjern ikke afskærmningen, da denne beskytter mod elektrisk stød. Der fi ndes ingen komponenter bag
afskærmningen, som du selv kan reparere. Service bør udføres af kvalifi cerede fagfolk.
3) Fjern ikke jordbenet i netstikket. Dette apparat er forsynet med et trefaset jordforbundet netstik. Dette stik kan
kun tilsluttes en jordforbundet stikkontakt. Denne konstruktion er valgt ud fra sikkerhedsmæssige hensyn. Hvis
du ikke kan sætte stikket i stikkontakten, bør du kontakte en elinstallatør.
Det frarådes at omgå formålet med jordbenet.
4) For at forebygge elektrisk stød skal det sikres, at jordbenet på netledningens netstik er sikkert forbundet.
FORSIGTIG!
Dansk
Dette apparat er beregnet til brug i miljøer, som er relativt frie for elektromagnetiske felter.
Hvis apparatet anvendes i nærheden af kilder med kraftige elektromagnetiske felter eller på steder, hvor elektrisk
støj overlapper indgangssignalerne, kan det medføre billed-/lydforstyrrelser eller interferens, f.eks. støj.
For at undgå skader på apparatet bør det ikke opstilles i nærheden af kilder, der frembringer kraftige
elektromagnetiske felter.
Varemærker
• VGA er et varemærke tilhørende International Business Machines Corporation.
• Macintosh er et indregistreret varemærke tilhørende Apple Inc., USA.
• SVGA, XGA, SXGA og UXGA er registrerede varemærker for Video Electronics Standard Association.
Selv om der ikke er foretaget speciel fremhævning af fi rma- eller produktvaremærker i teksten, er disse varemærker
fuldt ud blevet respekteret.
• HDMI, HDMI-logoet og High-Defi nition Multimedia Interface er varemærker eller registrerede varemærker
tilhørende HDMI Licensing LLC i USA og i andre lande.
• “RealD 3D” er et varemærke tilhørende RealD.
Bemærk:
Lad ikke et stillbillede vises i længere tid, da dette kan bevirke, at en permanent billedbibeholdelse efterlades på
plasmaskærmen.
Som eksempler på stillbilleder kan nævnes logoer, videospil, computerbilleder, teletekst og billeder, der vises i
4:3 format.
2
Page 39

Sikkerhedsforanstaltninger
ADVARSEL!
Setup
Plasmaskærmen er udelukkende beregnet til brug sammen med følgende ekstratilbehør. Hvis produktet
bruges sammen med andre typer ekstratilbehør, mister skærmen muligvis den fornødne stabilitet med risiko
for personskader til følge.
• Højttalere ........................................................................ TY-SP42P8W-K (til TH-42PF50E),
• Hylde .............................................................................. TY-ST20-K, TY-ST42P50
• Rullebord ........................................................................ TY-ST58PF20
• Vægbeslag (lodret) ......................................................... TY-WK42PV20
• Vægbeslag (vinkel) ........................................................ TY-WK42PR20
• Ceiling-hanging bracket ................................................. TY-CE42PS20
• BNC dobbelt video terminalkort ..................................... TY-FB9BD
• HD-SDI-terminalkort ....................................................... TY-FB9HD
• HD-SDI-terminalkort med lyd ......................................... TY-FB10HD
• Dobbelt Link HD-SDI-terminalkort .................................. TY-FB11DHD
• Dobbelt HDMI-terminalkort ............................................. TY-FB10HMD
• DVI-D terminalkort .......................................................... TY-FB11DD
• AV-terminalboks ............................................................. TY-TB10AV
• INFRARØD 3D-SENDER ............................................... TY-3D30TRW
• Berøringspanel ............................................................... TY-TP42P30K (til TH-42PF50E),
• 3D-briller ......................................................................... TY-EW3D3SE, TY-EW3D3ME, TY-EW3D3LE
• Trådløst modul ............................................................... ET-WM200E
Sørg altid for at få en fagmand til at udføre installationen.
Små produktdele kan give risiko for kvælning, hvis de sluges ved et uheld. Sørg for, at børn ikke kommer i nærheden
af disse smådele. Smid unødvendige smådele og andre ting som f.eks. emballering, plastikposer og plastfolie ud, så
du undgår, at børn leger med det og på den måde risikerer kvælning.
Anbring ikke plasmaskærmen på skrå eller ustabile flader, og sørg for, at plasmaskærmen ikke hænger over
basens kant.
• Skærmen kan falde ned eller vippe forover.
Anbring ikke andre objekter oven på plasmaskærmen.
• Hvis der spildes vand på plasmaskærmen, eller der kommer fremmedlegemer ind i den, er der risiko for en
kortslutning, der kan medføre brand eller elektrisk stød. Kontakt din lokale Panasonic-forhandler, hvis der kommer
fremmedlegemer ind i plasmaskærmen.
Må kun transporteres i opretstående stilling!
• Hvis apparatet transporteres med dets skærmpanel vendende op eller ned, kan det interne kredsløb lide skade.
Udluftning må ikke forhindres med overdækning af udluftningsåbninger med genstander som f.e. aviser,
bordduger og forhænger.
For tilstrækkelig ventilation;
Hvis du anvender hylden (ekstraudstyr), skal du sørge for, at der er en fri plads på 10 cm eller mere i toppen, til venstre
og til højre, og 7 cm eller mere i bunden og der skal desuden være en fri plads mellem bunden af skærmen og gulvfl aden.
Hvis du anvender en anden opsætningsmetode, skal du følge instruktionerne for denne. (Hvis der ikke er nogen
bestemt angivelse af installationsmålene i installationsmanualen, skal der laves et mellemrum på 10 cm eller
mere øverst, nederst, til venstre og til højre og 7 cm eller mere ved bagsiden.)
Ved lodret installation af plasmaskærmen;
Skub strømafbryderen opad, når du installerer plasmaskærmen lodret.
Og indstil “Display orientation” til “Portrait” i menuen Setup.
(Alt det følgende tilbehør er fremstillet af Panasonic Corporation.)
TY-SP50P8W-K (til TH-50PF50E)
TY-TP50P30K (til TH-50PF50E)
Dansk
3
Page 40

Sikkerhedsforanstaltninger
Brug af plasmaskærmen
Plasmaskærmen er konstrueret til 220-240 V AC, 50/60 Hz.
Dæk ikke ventilationshullerne til.
• Det kan føre til overophedning af plasmaskærmen, hvilket kan forårsage brand eller beskadige skærmen.
Stik ikke fremmedlegemer ind i plasmaskærmen.
• Stik ikke metaldele eller brændbare dele ind i ventilationshullerne. Læg heller ikke sådanne dele oven på skærmen,
da dette kan medføre brand eller elektrisk stød.
Lad være med at fjerne eller ændre afskærmningen på nogen måde.
• Plasmaskærmen indeholder dele med høj spænding, som kan give alvorlige elektriske stød. Kontakt din lokale
Panasonic-forhandler, når skærmen skal efterses, justeres og repareres.
Sørg for en nem adgang til strømforsynings kilde.
Et apparat med KLASSE I-konstruktion skal sluttes til en stikkontakt i væggen med en beskyttende jordtilslutning.
Dansk
Anvend ikke andre netledninger end den, der følger med dette apparat.
• Dette kan medføre brand og elektriske stød.
Sørg for at sætte netstikket helt ind.
• Hvis stikket ikke er sat helt i, kan det genereres høj varme, som kan forårsage brand. Hvis stikket er defekt, eller
stikkontakten sidder løst, bør delene ikke anvendes.
Rør ikke ved netstikket med våde hænder.
• Dette kan medføre elektrisk stød.
Undgå handlinger, der kan beskadige netkablet. Hold fast i stikket, ikke ledningen, når netledningen trækkes ud.
• Undgå at beskadige netledningen, foretag ingen form for ændringer af den, anbring ikke tunge genstande oven
på den, udsæt den ikke for varme, placer den ikke i nærheden af varme genstande, vrid den ikke, bøj den ikke
overdrevent, og træk ikke i den. Anbring den ikke i nærheden af varme genstande. Undgå at vride den. Undgå at
bøje den for meget. Undgå at trække i den. I modsat fald er der risiko for brand eller elektrisk stød. Hvis netledningen
bliver beskadiget, bør den repareres på et autoriseret servicecenter.
Hvis plasmaskærmen ikke skal bruges i længere tid, bør netstikket trækkes ud af stikkontakten.
For at forhindre brand skal stearinlys og anden åben ild altid holdes væk fra produktet.
I tilfælde af problemer under brug
Hvis der opstår et problem (for eksempel manglende billede eller lyd), eller hvis der kommer røg eller en
unormal lugt fra plasmaskærmen, skal netstikket omgående trækkes ud.
• Hvis du forsætter med at anvende plasmaskærmen i denne tilstand, er der risiko for brand og elektrisk stød. Når
du er sikker på at røgudviklingen er standset, bør du kontakte din lokale Panasonic-forhandler, så de nødvendige
reparationer kan blive foretaget. Det er yderst farligt selv at forsøge at reparere plasmaskæmen, og ethvert
uautoriseret indgreb medfører bortfald af enhver garanti plasmaskærmen.
Hvis vand eller fremmedlegemer trænger ind i plasmaskærmen, hvis den tabes på jorden eller gulvet, eller
hvis kabinettet bliver beskadiget, skal netstikket trækkes ud med det samme.
• Der er risiko for kortslutning, hvilket kan medføre brand. Kontakt din lokale Panasonic-forhandler i tilfælde af
nødvendige reparationer.
4
Page 41

Sikkerhedsforanstaltninger
FORSIGTIG!
Brug af plasmaskærmen
Anbring ikke dine hænder, dit ansigt eller genstande tæt på plasmaskærmens ventilationshuller.
• Der kommer varm luft ud af ventilationshullerne og toppen af plasmaskærmen er varm. Anbring ikke dine hænder
eller dit ansigt eller andre objekter, som ikke kan tåle varme, på dette sted, da det kan medføre forbrændinger eller
deformation.
Sørg for at trække alle kabler ud, inden plasmaskærmen fl yttes.
• Hvis plasmaskærmen fl yttes, mens nogle kabler stadig er tilsluttet, kan disse kabler blive beskadiget, hvilket kan
medføre brand og elektrisk stød.
Træk for en sikkerheds skyld stikket ud, før du foretager nogen form for rengøring.
• I modsat fald er der risiko for elektrisk stød.
Rengør netledningen med jævne mellemrum, så den ikke bliver helt støvet.
• Hvis der samler sig støv på netstikket, kan den deraf følgende fugtighed beskadige isoleringen, hvilket kan medføre
brand. Træk netstikket ud, og tør det af med en tør klud.
Lad være med at brænde og skille batterier ad.
• Batterier må ikke udsættes for kraftig varme som f.eks. solskin, ild eller lignende.
Denne plasmaskærm udsender infrarøde stråler, og kan derfor påvirke andet kommunikationsudstyr, der
udnytter infrarøde stråler.
Anbring sensorer for infrarøde stråler på et sted, hvor de ikke er udsat for direkte eller refl ekteret lys fra
plasmaskærmen.
Rengøring og vedligeholdelse
Dansk
Forsiden af skærmpanelet har fået en special overfl adebehandling. Tør forsigtigt panelets overfl ade af med
en blød, fnugfri klud.
• Hvis apparatets ydre er særligt snavset, skal det tørres af med en blød, fnugfri klud, som er dyppet i rent vand eller
vand, i hvilket et neutralt rengøringsmiddel er fortyndet 100 gange, og tør derefter godt efter med en tør klud af
den samme type, indtil apparatets ydre er tørt.
• Undgå at ridse eller ramme panelets overfl ade med fi ngernegle eller andre hårde genstande, da du ellers kan
komme til at beskadige overfl aden. Undgå desuden at overfl aden kommer i kontakt med fl ygtige kemikalier, som
for eksempel insektsprøjtemidler, opløsningsmidler og fortynder, da overfl aden ellers kan blive beskadiget.
Hvis kabinettet bliver tilsmudset, kan du tørre det af med en blød, tør klud.
• Hvis kabinettet er meget beskidt, kan du vride kluden op i vand iblandet en smule neutralt rengøringsmiddel og
bruge den til at tørre kabinettet af med. Brug derefter en tør klud til at gøre overfl aden tør.
• Sørg for, at der ikke kommer rengøringsmidler i direkte kontakt med plasmaskærmsen overfl ade. Hvis der kommer
dråber ind i enheden, kan det give problemer under brug.
• Undgå kontakt med fl ygtige kemikalier, som for eksempel insektsprøjtemidler, opløsningsmidler og fortynder,
da kabinettets overfl ade ellers kan blive beskadiget, eller belægningen kan skalle af. Lad heller ikke kabinettets
overfl ade være i kontakt med artikler lavet af gummi eller PVC i længere tid.
5
Page 42

Sikkerhedsforanstaltninger
3D-sikkerhedsforanstaltninger
ADVARSEL!
Små dele
3D-briller indeholder små dele (batteri og specielt bånd, osv.) og skal holdes uden for børns rækkevidde for
at forhindre, at de sluger dem.
Adskilning
3D-brillerne må ikke adskilles eller ændres.
FORSIGTIG!
Læs disse anvisninger omhyggeligt for at få anvende disse 3D-briller på en sikker og behagelig måde.
Brug til kommercielle anvendelser og offentlig fremvisning
Dansk
En myndighedsperson bør viderebringe forholdsreglerne for brugen af 3D-briller til brugeren.
3D-briller (sælges separat)
Undlad at tabe, udøve tryk på eller træde på 3D-brillerne.
Pas på stellets spidser, når De tager 3D-brillerne på.
Pas på, De ikke får en fi nger i klemme i 3D-brillernes hængselsområde.
Man bør være særligt opmærksom, når børn bruger 3D-brillerne.
3D-briller bør som retningslinje ikke bruges af børn, der er under 5 - 6 år.
Forældre eller værger skal holde fuldt opsyn med børn, og de skal sikre deres sikkerhed og helbred under
hele brugen af 3D-brillerne.
6
Page 43

Sikkerhedsforanstaltninger
Visning af 3D-indhold
Indhold til 3D-visning inkluderer kommercielt tilgængelige Blu-ray-disks, 3D-udsendelser, osv.
Når du forbereder dit eget 3D-indhold, bør du sikre dig, at det er korrekt fremstillet.
De bør ikke bruge 3D-brillerne, hvis De tidligere har haft problemer med overfølsomhed over for lys,
hjerteproblemer, eller hvis De på nuværende tidspunkt har andre medicinske lidelser.
De bør straks holde op med at bruge 3D-brillerne, hvis De er træt, føler Dem utilpas eller oplever en eller anden
form for ubehag.
Hold en passende pause efter at have set en 3D-fi lm.
Hold en pause på mellem 30 - 60 minutter efter at have set 3D-indhold på interaktive enheder, som for eksempel
3D-spil eller computere.
Pas på, du ikke rammer skærmen eller andre personer utilsigtet. Når De bruger 3D-brillerne, kan afstanden
mellem brugeren og skærmen fejlbedømmes.
De må kun have 3D-brillerne på, når De ser 3D-indhold.
Hvis du ikke kigger på skærmen i et stykke tid, mens der vises 3D-billeder, kan 3D-brillerne muligvis blive
slukket automatisk.
Hvis De lider af en eller anden type synsproblemer (nær-/langsynet, astigmatisme, synsforskelle i venstre og
højre), bedes De venligst korrigere Deres syn, inden De bruger 3D-brillerne.
Hold op med at bruge 3D-brillerne, hvis De tydeligt kan se dobbeltbilleder, når der vises 3D-indhold.
3D-brillerne må ikke bruges på en afstand, der er mindre end den anbefalede afstand.
Se skærmen som minimum fra den anbefalede afstand (3 gange skærmens effektive højde).
Anbefalet afstand:
TH-42PF50E: 1,6 m
TH-50PF50E: 1,9 m
Når det øverste og nederste område af skærmen bliver sort, som for eksempel fi lm, skal De se skærmen på
en afstand, der er 3 gange fjernere end højden af det aktuelle billede. (Dette gør afstanden tættere på end det
herover anbefalede tal.)
3D-briller (sælges separat) Brug
Inden De bruger 3D-brillerne, skal De sikre Dem, at ikke er genstande omkring brugeren, der kan gå i stykker,
så De undgår utilsigtede beskadigelser eller personskader.
Fjern 3D-brillerne, inden De bevæger Dem rundt, så De ikke falder eller kommer ud for en personskade.
3D-brillerne må kun bruges til det beregnede formål og intet andet.
3D-brillerne må ikke bruges ved høje temperaturer.
3D-brillerne må ikke bruges, hvis de er fysisk beskadigede.
Undlad at bruge nogen form for enheder, der udsender infrarøde signaler nær 3D-brillerne, da disse kan få
3D-brillerne til at fungere forkert.
Undlad at bruge enheder (som for eksempel mobiltelefoner eller personlige transceivere), der udsender stærke
elektromagnetiske bølger nær 3D-brillerne, da disse kan forårsage funktionsfejl af 3D-brillerne.
Hold straks op med at bruge 3D-brillerne, hvis der opstår en funktionsfejl eller en fejl.
Hold straks op med at bruge 3D-brillerne, hvis De oplever nogen form for rødme, smerte eller hudirritation
omkring næsen eller tindingerne.
I sjælne tilfælde kan materialerne, der bruges i 3D-brillerne, forårsage en allergisk reaktion.
Dansk
7
Page 44

Tilbehør
Medfølgende tilbehør
Kontrollér, at du har fået det tilbehør og de dele, der er vist
Betjeningsvejledning
Dansk
Netledning Spændet × 1
Batterier til fjernbetjeningen
CD-ROM × 1
• Betjeningsvejledning
Betjening af skærmen
Netværksoperationer
•
Erklæringer vedr. softwarelicenser
GNU GENERAL PUBLIC LICENSE
GNU LESSER GENERAL PUBLIC LICENSE
TMME289
Ferritkerne × 2
J0KG00000014
Brug ferritkernerne til at overholde EMC standarden.
(Se side 11)
Fjernbetjening
N2QAYB000691
Batterier til fjernbetjening
(R6 (UM3)-størrelse × 2)
Kræver to R6 batterier.
1. Træk i og hold krogen, og åbn
derefter batteridækslet.
2. Sæt batterierne i – vær opmærksom
på den rigtige polaritet (+ og -).
“R6 (UM3)”-størrelse
-
+
+
-
3. Sæt dækslet tilbage på plads.
Godt råd:
Hvis man bruger fjernbetjeningen meget, kan det anbefales at udskifte
de gamle batterier med alkaliske batterier, der holder længere.
Advarsler i forbindelse med brug af batterier
Forkert installation kan medføre udsivning af batterivæske og ætsning, som vil beskadige fjernbetjeningen.
Bortskaffelse af batterier skal ske på en miljømæssigt forsvarlig måde.
Overhold følgende forholdsregler:
1. Batterier skal altid udskiftes parvis. Brug altid nye batterier, når det gamle par udskiftes.
2. Brug ikke et gammelt batteri sammen med et nyt.
3. Bland ikke batterityperne (f.eks.: “Zinc Carbon” med “Alkaline”).
4. Forsøg ikke at oplade, kortslutte, adskille, opvarme eller brænde brugte batterier.
5.
Udskiftning af batterierne er påkrævet, når fjernbetjeningen kun virker sporadisk, eller ikke længere kan anvendes til
at betjene plasmaskærmen.
6. Lad være med at brænde og skille batterier ad.
7. Batterier må ikke udsættes for kraftig varme som f.eks. solskin, ild eller lignende.
8
Page 45

Tilslutninger
Højttalertilslutning
Når der tilsluttes højttalere, må der kunne anvendes de specielle ekstratilbehørshøjttalere.
Se betjeningsvejledningen til højttalerne for detaljer om installation af disse.
Højttalere (ekstratilbehør)
Højttalerterminal
Tilslutning af netledning (se side 12)
Netledningstilslutning og fastgørelse, kabel-fastgørelse
Fastgøringsbånd til netledning
1
Sort
Indsæt kernetråden, mens
du trykker på grebet.
2
Sort
Træk grebet tilbage.
Træk netledningen ud
Rød
Rød
Dansk
Sæt netledningen i displayenheden.
Sæt netledningen i, indtil den klikker på plads.
Bemærk:
Sørg for, at netledningen er låst på både
venstre og højre side.
Ved brug af vægbeslaget (lodret)
Bemærk:
Ved brug af vægbeslaget (lodret)(TY-WK42PV20) skal du bruge hullerne
at fastgøre kablerne. Hvis spændet bruges på hullet , sætter kablerne sig måske
Brug af spændet
Fastgør eventuelle overskydende kabler med spændet efter behov.
Bemærk:
Der følger en klemme med denne enhed. Ved fastgørelse af kablet tre steder bør de købes separat.
Monter spændet
1
hul
Sæt spændet ind
i et hul.
fast i vægbeslaget.
For at fjerne fra enheden:
låse
Blive ved med at
trykke på låsen
på begge sider
Bind kablerne sammen
2
kroge
Træk netledningen ud ved at trykke
på de to knapper.
Bemærk:
Når du tager netledningen ud af forbindelse,
skal du sørge for at tage den ud af forbindelse
ved stikkontakten først.
Frigørelse:
Sæt
spidsen i
krogene
knap
og til
Bliv ved med
at trykke på
knappen
9
Page 46

Tilslutninger
Tilslutning af videoudstyr
SLOT: Holdere til isætning af
terminalkort (ekstraudstyr)
(se side 3)
Bemærk:
Holderen til højre er til terminalkort
med en bredde på 2-slot.
Terminalkortet med en bredde på
1-slot fungerer ikke, når det sættes i
Dansk
holderen til højre.
AV IN (VIDEO): Terminal til komposit-
COMPONENT/RGB IN:
DVI-D IN: DVI-D-indgangsterminal
PC IN:
video-indgang
PC-indgangsterminal
Slut til videoterminalen på PC’en eller udstyret med
Y, PB(CB) og PR(CR)-udgang.
Terminal til komponent/
RGB-video-indgang
SERIAL: Kontrollér
plasmaskærmen
ved at slutte
den til PC
AV IN (HDMI):
HDMI-indgangsterminal
Slut til videoudstyr som f.eks.
videobåndoptager eller DVDafspiller.
Terminaler er på bunden af plasmaskærmen.
3D IR TRANSMITTER:
Tilslut den INFRARØD
3DSENDER (ekstraudstyr).
WIRELESS
MODULE, LAN:
(se “Betjeningsvejledning,
Netværksoperationer”)
10
Page 47

Tilslutninger
Eksempel på netværksforbindelse (kablet LAN)
COMPUTER
Mindre
end
10 cm
LAN-kabel
(medfølger ikke)
Ferritkerne
(medfølger)
Hub eller bredbåndsrouter
Bemærk:
• Sørg for, at din bredbåndsrouter eller hub understøtter 10BASE-T/100BASE-TX.
• Tilslut en enhed ved brug af 100BASE-TX med et LAN-kabel af typen “kategori 5”.
• Tryk på LAN-terminalen med en statisk ladet hånd (legeme) kan forårsage skader pga. afl adningen.
Berør ikke LAN-terminalen eller en metaldel af LAN-kablet.
• Du kan få instruktioner vedr. tilslutning hos din netværksadministrator.
Mindre
end
10 cm
Ferritkerne
(medfølger)
Installation af ferritkernen
Træk hakkerne tilbage
(på to steder)
Skærm (hovedenhed, bagside)
Åbn
Omvikl kablet to
gange
Skub kablet
igennem, og luk
Forbindelse til trådløst modul (trådløst LAN)
Før du kan bruge den trådløse funktion, er det rådløse modul (ET-WM200E) (ekstraudstyr) nødvendigt.
Når du forbinder det trådløse modul til
skærmen, skal du fjerne beskyttelsesfi len og
hætten.
Dansk
Forbindelsesprocedure
Hold det trådløse modul, således at LED-indikatoren
vender mod dig, og forbind det til det trådløse moduls
tilslutningsterminal.
Bemærk:
Forbind ikke andre enheder end det trådløse modul
(ET-WM200E).
ET-WM200
LED
11
Page 48

INPUT MENU ENTER/+/VOL-/
Tænd og sluk for strømmen
Tilslutning af netledningen til plasmaskærmen.
Sæt netstikket i en stikkontakt i væggen
Bemærk:
Dansk
• Formen på netstik varierer fra land til land.
Netstikket, der er vist til højre, er derfor muligvis
af samme type som det, der sidder på dit apparat.
• Når du tager netledningen ud af forbindelse, skal
du sørge for at tage den ud af forbindelse ved
stikkontakten først.
Tryk på afbryderen på plasmaskærmen for at
tænde for apparatet.
Statuslampe: Grøn
[Opstart af netværket]
Det tager lidt tid, før netværket starter op, umiddelbart
efter at strømmen er blevet tændt.
I løbet af dette tidsrum er “Network Setup” i menuen
“Setup” nedtonet og kan ikke justeres.
Statuslampe
Fjernbetjeningssensor
12
Tryk på
Statuslampe: Rød (standby)
Tryk på
Statuslampe: Grøn
Sluk for strømmen til plasmaskærmen ved at trykke på
når plasmaskærmen er tændt eller i Standby-indstilling.
Bemærk:
Mens den strømbesparende funktion Power management er i drift, lyser statuslampen
Orange, når apparatet er i afbrudt tilstand.
afbryderknappen på fjernbetjeningen for at slukke plasmaskærmen.
afbryderknappen på fjernbetjeningen for at tænde plasmaskærmen.
-kontakten på apparatet,
Page 49

Tænd og sluk for strømmen
Når der tændes for apparatet for første gang
Nedenstående skærm vil komme frem, når der tændes for apparatet for første gang.
Vælg posterne med fjernbetjeningen. Knapperne på selve apparatet kan ikke
anvendes.
OSD Language
(skærmmenusprog)
OSD Language
English (UK)
Deutsch
Français
Italiano
Español
ENGLISH (US)
SetSelect
1
Vælg sproget.
2
Indstil.
Bemærk:
• Når posterne først er indstillet, vil skærmene ikke komme frem, når der næste gang tændes for apparatet.
• Efter indstillingen kan posterne ændres i de følgende menuer.
OSD Language (skærmmenusprog)
Day/Time Setup (Indstilling af KLOKKESLÆT)
Display orientation (Skærmretning)
Advarselsmeddelelse for Strøm til
Følgende meddelelse vises eventuelt, når der tændes for enheden:
3D sikkerhedsforholdsregler
When 3D images will be viewed by unspecifi ed number of
people or used for commercial applications, someone in
authority should convey the following precautions.
These precautions should be followed in the home as well.
3D Viewing/ 3D Content/ Viewing distance/ 3D Eyewear
recommendations
- To enjoy 3D images safely and comfortably, please
read the Operating Instructions fully.
Slå 3D sikkerhedsforholdsreglerne til, hvis du leverer 3D-billeder til et uspecifi ceret publikum i
forretningsøjemed eller til andet formål.
Hvis “3D Function” i “3D Settings” er indstillet til “On”, vises der en advarselsmeddelelse, hver gang der
tændes for strømmen.
Forholdsregler for No activity power off
’No activity power off’ is enabled.
Hvis “No activity power off” i Setup-menuerne står på “Enable”, vises der en advarselsmeddelelse, hver
gang strømmen tændes.
Visningen af disse meddelelser kan indstilles med følgende menu:
Day/Time Setup (indstilling af
dato/klokkeslæt)
Day/Time Setup
Set
Day
Time
Day/Time Setup
Set
Day
Time
Time MON 99:99
MON
99:99
Time MON 99:99
TUE
10:00
1
Vælg “Day” eller
“Time”.
2
Indstil “Day” eller
“Time”.
1
Vælg “Set”.
2
Indstil.
Display orientation
(Skærmretning)
Display orientation
Landscape
Portrait
1
Vælg “Portrait” i tilfælde
af lodret installation.
2
Indstil.
Menuen Options
3D Safety Precautions
Power On Message
Dansk
13
Page 50

INPUT MENU ENTER/
+
/VOL-/
Grundlæggende betjeningsfunktioner
Hovedapparatet
Lysstyrkesensor
Registrerer lysstyrken i visningsmiljøet
Fjernbetjeningssensor
Dansk
Hovedafbryder
Statuslampe
Statuslampen lyser.
• Slukket ...........Statuslampen lyser ikke (Enheden bliver
ved med at forbruge en smule strøm,
så længe netledningener sat i en tændt
stikkontakt.)
• Standby .........Rødt
Orange (Når “Slot power” er indstillet
til “On”.)
Orange (Afhængigt af den type funktionskort, der er installeret, når der tændes for strømmen til
slottet)
Orange (Når “Control I/F Select” er indstillet til “LAN” eller “WEB Control” er indstillet til “On”. Se
“Betjeningsvejledning, Netværksoperationer”)
• Tændt ............. Grøn
• PC Power management (DPMS)
..........................Orange (Med PC-indgangssignal.)
Når funktionen står på On, betjenes den under følgende forhold for at tænde og slukke
automatisk for strømmen.
Når der ikke registreres billeder (sync signal) i ca. 30 sekunder under DVI-signalindgang:
→ Strømmen slukkes (standby); strømindikatoren lyser orange.
Når billeder (sync signal) detekteres efterfølgende:
→ Strømmen tændes; strømindikatoren lyser grønt.
• DVI-D-strømbesparing
..........................Orange (Med DVI-indgangssignal.)
• No activity power off
..........................Rødt
Apparatets strømforsyning afbrydes, når der ikke er noget signal.
Når denne er indstillet på “Enable”, slukkes strømforsyningen for enheden, 10 minutter efter
indgangssignalerne stopper.
Lydstyrkeregulering
Lydstyrke Op “+” Ned “–”
Når menuskærmen er vist:
“+”: Tryk for at fl ytte markøren
op
“–”: Tryk for at fl ytte markøren
ned
Knappen Enter / Aspect
MENU-skærmen TÆND / SLUK
Menuskærmen tændes eller slukkes, hver gang der
trykkes på MENU-knappen.
Normal visning Picture (Skærmbillede)
Sound (Lyd) Pos./Size
INPUT-knap
(Valg af indgangssignal)
Setup
14
Page 51

Grundlæggende betjeningsfunktioner
Fjernbetjeningssender
ACTION-knap
Tryk for af foretage valg.
ASPECT-knap
Tryk for at vise ASPECTmenuen.
Standby-knap (TÆND / SLUK)
Plasmaskærmens netledning skal først sættes
i en stikkontakt, og derefter skal der tændes
på hovedafbryderen på skærmen, før denne
knap virker efter dens hensigt (se side 12).
Tryk på denne knap for at tænde for
plasmaskærmen fra Standby-indstilling.
Tryk på knappen igen for at slukke for
plasmaskærmen til Standby-indstilling.
Knappen POS./SIZE
(position/størrelse)
PICTURE-knap
Lyd til/fra (mute)
Tryk på denne knap for at koble
lyden ud.
Tryk igen for at få lyden til at vende
tilbage. Lyden aktiveres også igen,
når der slukkes for strømmen, eller
lydstyrken reguleres.
N-knap
POSITION-knapper
INPUT-knap
Tryk for at vælge indgangssignal
sekventielt.
ECO MODE (ECO)
Tryk for at skifte opsætningsstatus
ECO MODE.
FUNCTION-knapper (FUNCTION)
OFF TIMER-knap
Du kan indstille plasmaskærmen til at skifte til
standby efter et bestemt tidsrum. Ved at trykke på
knappen gentagne gange kan du skifte mellem
30 minutter, 60 minutter, 90 minutter og 0 minutter
(funktionen er deaktiveret).
30 min
60 min
90 min
0 min (Annullér)
Når der er 3 minutter tilbage før et tidsrum udløber,
vil teksten “Off timer 3 min” begynde at blinke.
I tilfælde af et strømsvigt deaktiveres funktionen.
AUTO SETUP-knap
Justerer automatisk skærmens
position/størrelse.
SET UP-knap
SOUND-knap
Lydstyrkeregulering
Tryk på knapperne lydstyrke op “+”
eller lydstyrke ned “–” for hhv. at
hæve og sænke lydstyrken.
R-knap
Tryk på R knappen for at vende tilbage
til den foregående menuskærm.
RECALL-knap
Tryk på knappen “RECALL” for at få
vist systemets aktuelle status.
1
Indgangssignalangivelse
2
Aspect-tilstand
Under 3D-billeder
Lydinput
Profi lnavn
Betjening af NANODRIFT
Saver
3
Off timer
Off timer-indikatoren vises
kun, når off timer er blevet
aktiveret.
4
Urdisplay
PC
COMPONENT
Memory name: MEMORY2
1
4:33D
2
NANODRIFT
Dansk
10:00
4
Digital Zoom
Off timer
90min
3
15
Page 52

Specifi kationer
Strømkilde 220 - 240 V AC, 50/60 Hz
Effektforbrug
Understøttede signaler Drevmetode : Vekselstrømstype
Skærmstørrelse 921 mm (B) × 518 mm (H)
Driftsbetingelser
Anvendelige signaler
Dansk
Tilslutningsbøsninger
Dimensioner (B × H × D) 1.020 mm × 610 mm × 89 mm 1.210 mm × 724 mm × 89 mm
Masse (Vægt)
Normal brug 365 W 445 W
I standby-tilstand 0,5 W 0,5 W
I slukket tilstand 0,3 W 0,3 W
(Antal pixel) 2.073.600 (1.920 (B) ×1.080 (H))
Temperatur 0 °C - 40 °C
Fugtighed 20 % - 80 %
Farvesystem NTSC, PAL, PAL60, SECAM, modifi cerede NTSC
Scanningsformat 525 (480) / 60i · 60p, 625 (575) / 50i · 50p, 750 (720) / 60p · 50p, 1125 (1080) / 60i · 60p · 50i ·
PC-signaler VGA, SVGA, XGA, SXGA
AV IN VIDEO
COMPONENT/RGB IN
DVI-D IN
PC IN
3D IR TRANSMITTER til INFRARØD 3D-SENDER (TY-3D30TRW)
WIRELESS MODULE til trådløst modul (ET-WM200E)
AUDIO L-R
P
P
AUDIO L-R
AUDIO
AUDIO
SERIAL Ekstern kontrolterminal
3D SHUTTER OUT
DC 8V OUT Center plus til EIAJ 4mm stik
LAN RJ45 10BASE-T/100BASE-TX, kompatibelt med PJLink™
EXT SP Højttalerterminal 6 Ω, 16 W [8 W + 8 W] (10 % THD)
hovedenhed alene cirka 25,0 kg netto cirka 33,0 kg netto
med højttalere cirka 29,0 kg cirka 38,0 kg
50p · 24p · 25p · 30p · 24sF, 1250 (1080) / 50i
BNC
RCA stikben × 2
HDMI TYPE A-stikforbindelse
BNC
Y/G
BNC
B/CB/B
BNC
R/CR/R
RCA stikben × 2
DVI-D 24 ben
Indholdsbeskyttelse
Stereo mini-stik (M3) × 1
Mini D-sub med høj tæthed 15 ben
Stereo mini-stik (M3) × 1
D-sub 9 ben RS-232C-kompatibel
M3-stik × 1
TH-42PF50E TH-50PF50E
42-inch, 16:9 aspektforhold
× 1.057 mm (diagonalt)
Vandret scanningsfrekvens 15 - 110 kHz
Vertikal scanningsfrekvens 48 - 120 Hz
[5.760 × 1.080 punkter]
UXGA ···· (komprimeret)
Drevmetode : Vekselstrømstype
50-inch, 16:9 aspektforhold
1.105 mm (B) × 622 mm (H)
× 1.268 mm (diagonalt)
1,0 Vp-p (75 Ω)
0,5 Vrms, Delt med COMPONENT/RGB IN
med synk 1,0 Vp-p (75 Ω)
0,7 Vp-p (75 Ω)
0,7 Vp-p (75 Ω)
0,5 Vrms, Delt med VIDEO
Overensstemmelse med DVI Revision 1.0
Kompatibel med HDCP 1.1
0,5 Vrms, Delt med PC IN
Y eller G med synk 1,0 Vp-p (75 Ω)
Y eller G uden synk 0,7 Vp-p (75 Ω)
P
B/CB/B: 0,7 Vp-p (75 Ω)
P
R/CR/R: 0,7 Vp-p (75 Ω)
HD/VD: 1,0 – 5,0 Vp-p (høj impedans)
0,5 Vrms, Delt med DVI-D IN
Bemærk:
• Designet og specifi kationerne kan ændres uden forudgående varsel. Masse og dimensioner er cirka-angivelser.
• Dette produkt opfylder de EMC-standarder, der er anført nedenfor.
EN55022, EN55024, EN61000-3-2, EN61000-3-3.
16
Page 53

Brugerinformation om indsamling og bortskaffelsse af elektronikskrot og brugte batterier
Disse symboler på produkter, emballage og/eller ledsagedokumenter betyder, at brugte elektriske og
elektroniske produkter og batterier ikke må smides ud som almindeligt husholdningsaffald.
Sådanne gamle produkter og batterier skal indleveres til behandling, genvinding resp. recycling i
henhold til gældende nationale bestemmelser samt direktiverne 2002/96/EF og 2006/66/EF.
Ved at bortskaffe sådanne produkter og batterier på korrekt vis hjælper du med til at beskytte
værdifulde ressourcer og imødegå de negative påvirkninger af det menneskelige helbred og miljøet,
som vil kunne være følgen af usagkyndig affaldsbehandling.
Ønsker du mere udførlig information om indsamling og recycling af gamle produkter og batterier, kan
du henvende dig til din kommune, deponeringsselskabet eller stedet, hvor du har købt produkterne.
Usagkyndig bortskaffelse af elektronikskrot og batterier kan eventuelt udløse bødeforlæg.
For kommercielle brugere i Den Europæiske Union
Når du ønsker at kassere elektriske eller elektroniske apparater, bedes du henvende dig til din
forhandler eller leverandør for nærmere information.
[Information om bortskaffelse i lande uden for Den Europæiske Union]
Disse symboler gælder kun inden for Den Europæiske Union. Ønsker du at kassere sådanne
produkter, bedes du forhøre dig hos din forhandler eller kommune med henblik på en hensigtsmæssig
bortskaffelse.
Information om batterisymbol (to eksempler nedenfor):
Dette symbol kan optræde sammen med et kemisk symbol. I så fald opfylder det kravene for det
direktiv, som er blevet fastlagt for det pågældende kemikalie.
Dansk
17
Page 54

Dansk
Kunderegistrering
Produktets modelnummer og serienummer står på bagbeklædningen. Disse numre bør du notere på linierne
nedenfor og gemme denne vejledning samt din kvittering som permanent bevis på at du har købt produktet. Det
vil hjælpe dig i tilfælde af tyveri eller tab samt garantikrav.
Modelnummer Serienummer
TQB0E2287K-G
Web Site : http://panasonic.net
© Panasonic Corporation 2012 Trykt i Tjekkiet
Page 55

Español
Número de modelo
TH-42PF50E
TH-50PF50E
Manual de instrucciones
Pantalla de plasma de alta defi nición
Para obtener instrucciones más detalladas, consulte las
instrucciones de manejo contenidas en el CD-ROM.
Indice
Advertencias importantes para su seguridad
•
Precauciones para su seguridad ...............3
•
Accesorios ..................................................8
•
Conexiones ................................................9
•
Encendido/apagado de la alimentación ...12
•
Controles básicos ....................................14
•
Especifi caciones ......................................16
•
...2
Antes de utilizar este producto, lea cuidadosamente este
manual de instrucciones y consérvelo para futuras consultas.
Page 56

Advertencias importantes para su
ADVERTENCIA
1) Para evitar daños que pudieran conducir a un incendio o a una descarga eléctrica, no exponga este
aparato a goteos ni salpicaduras.
No ponga recipientes con agua (fl oreros, tazas, cosméticos, etc.) encima del aparato. (incluyendo los
estantes que estén encima de él, etc.)
No coloque fuentes de llama, como velas encendidas, en el aparato.
2) Para evitar descargas eléctricas, no desmonte la cubierta. No hay piezas que el usuario pueda reparar por sí
mismo. Acuda a un técnico de servicio cualifi cado para cualquier problema de servicio.
3) No desmonte la patilla de tierra del enchufe eléctrico. Este aparato tiene un enchufe eléctrico de tipo tres patillas
con conexión a tierra. Este enchufe sólo puede conectarse en tomas con conexión a tierra. Es un detalle para
su seguridad, si no puede conectar este enchufe en su tomas, consulte con un electricista.
No elimine la protección del enchufe con conexión a tierra.
4) Para impedir las descargas eléctricas, asegúrese de que la patilla de puesta a tierra de la clavija del cable de
alimentación de CA esté fi rmemente conectada.
PRECAUCIÓN
Este aparato fue diseñado para utilizar en ambientes relativamente libres de campos electromagnéticos.
El uso de este aparato cerca de fuentes de campos electromagnéticos fuertes o donde el ruido eléctrico puede
superponerse a las señales de entrada, puede hacer que la imagen y el sonido oscilen o tengan interferencias
tales como ruidos.
Para evitar la posibilidad de dañar el aparato, manténgalo alejado de fuentes de campos electromagnéticos
fuertes.
Español
seguridad
Marcas comerciales y registradas
• VGA es una marca comercial de International Business Machines Corporation.
• Macintosh es una marca registrada de Apple Inc., EE.UU.
• SVGA, XGA, SXGA y UXGA son marcas registradas de Video Electronics Standard Association.
Aunque no se mencionen especialmente marcas comerciales de compañías o productos, tales marcas
comerciales están plenamente reconocidas.
• HDMI, el logotipo HDMI y High-Defi nition Multimedia Interface son marcas comerciales o marcas comerciales
registradas de HDMI Licensing LLC en Estados Unidos y otros países.
• “RealD 3D” es una marca comercial de RealD.
Nota:
No permita que se visualice una imagen fi ja durante un periodo de tiempo prolongado, ya que esto puede causar
una retención de imagen permanente en la pantalla de plasma.
Los ejemplos de imágenes fi jas incluyen logotipos, videojuegos, imágenes de computadora, teletexto e imágenes
mostradas en el formato 4:3.
2
Page 57

Precauciones para su seguridad
ADVERTENCIA
Instalación
Esta la pantalla de plasma puede utilizarse sólo con los siguientes accesorios opcionales. El uso con cualquier
otro tipo de accesorios opcionales puede causar inestabilidad y terminar provocando daños.
• Altavoces ........................................................................ TY-SP42P8W-K (para TH-42PF50E),
• Pedestal ......................................................................... TY-ST20-K, TY-ST42P50
• Pedestal móvil ................................................................ TY-ST58PF20
• Abrazadera de suspensión de pared (vertical) ............... TY-WK42PV20
• Abrazadera de suspensión de pared (angular) .............. TY-WK42PR20
• Abrazadera de suspensión de techo .............................. TY-CE42PS20
• Tarjeta de terminales de vídeo dual BNC ....................... TY-FB9BD
• Tarjeta de terminales HD-SDI ......................................... TY-FB9HD
• Tarjeta de terminales HD-SDI con audio ........................ TY-FB10HD
• Tarjeta de terminales HD-SDI Dual Link ......................... TY-FB11DHD
• Tarjeta de terminales HDMI doble .................................. TY-FB10HMD
• Placa de terminal DVI-D ................................................. TY-FB11DD
• Caja de terminales de AV ............................................... TY-TB10AV
• TRANSMISOR IR DE 3D ............................................... TY-3D30TRW
• Panel Táctil ..................................................................... TY-TP42P30K (para TH-42PF50E),
• Gafas 3D ........................................................................ TY-EW3D3SE, TY-EW3D3ME, TY-EW3D3LE
• Módulo inalámbrico ........................................................ ET-WM200E
Solicite ayuda de un técnico cualifi cado para realizar la instalación.
Las partes pequeñas pueden presentar un peligro ya que la persona puede atorarse si dichas partes se tragan
accidentalmente. En consecuencia, mantenga estas partes fuera del alcance de los niños pequeños. Tire las
partes pequeñas y objetos, incluyendo materiales para embalaje y bolsas/papeles de plástico, para que los niños
pequeños no jueguen, ya que si lo hicieran corren un riesgo potencial de sofocación.
No instale la pantalla de plasma sobre superfi cies inclinadas o poco estables y asegúrese de que no
sobresale de la base.
• La pantalla de plasma puede caerse o darse vuelta.
No coloque objetos encima de la pantalla de plasma.
• Si se derrama agua en la pantalla de plasma o entran objetos extraños en su interior, se puede provocar un
cortocircuito que causará fuego o descarga eléctrica. Si entran objetos extraños en el interior de la pantalla de
plasma, consulte con su tienda local de Panasonic.
¡Transporte solamente en posición vertical!
• Transportar la unidad con su pantalla hacia arriba o hacia abajo puede dañar el sistema de circuitos interno.
No se debe impedir la ventilación cubriendo las bocas de ventilación con objetos como pueden ser por
ejemplo periódicos, manteles y cortinas.
Para una ventilación sufi ciente;
Si utiliza el pedestal (accesorio opcional), deje un espacio de 10 cm o más por las partes superior, derecha e
izquierda, y 7 cm o más por la parte posterior, y deje también un espacio entre la parte inferior de la pantalla y
la superfi cie del suelo.
Si sigue algún otro método de instalación, siga las instrucciones del manual correspondiente. (Si en el manual
de instalación no se ofrece una indicación específi ca de las dimensiones de instalación, deje un espacio de 10
cm o más por la parte superior, inferior, derecha e izquierda, y 7 cm o más por la parte trasera.)
Al instalar la pantalla de plasma en posición vertical;
Cuando instale la pantalla de plasma en posición vertical, colóquela de forma que el interruptor de alimentación quede
en el lado superior.
Y ajuste “Instalación de pantalla” a “Vertical” en el menú Confi guración.
(Panasonic Corporation fabrica todos los accesorios siguientes.)
TY-SP50P8W-K (para TH-50PF50E)
TY-TP50P30K (para TH-50PF50E)
Español
3
Page 58

Precauciones para su seguridad
Cuando utilice la pantalla de plasma
La pantalla de plasma fue diseñada para funcionar con una CA de 220 - 240 V, 50/60 Hz.
No cubra los orifi cios de ventilación.
• La pantalla de plasma puede calentarse excesivamente provocando fuego o daños en la pantalla de plasma.
No introduzca materias extrañas en el interior de la pantalla de plasma.
• No introduzca objetos de metal o infl amables por los orifi cios de ventilación ni los deje caer encima de la pantalla
de plasma ya que pueden provocar fuego o una descarga eléctrica.
No desmonte o modifi que la cubierta.
• Hay alta tensión eléctrica en el interior del aparato que puede provocar una fuerte descarga eléctrica. Para cualquier
trabajo de inspección, ajuste o reparación, llame a su tienda local de Panasonic.
Asegure que haya un acceso fácil hacia el enchufe del cable de alimentación.
Un aparato de fabricación clase I deberá conectarse a una toma de corriente que disponga de una conexión
a tierra de protección.
Con esta unidad no utilice ningún otro cable eléctrico que no sea el suministrado.
• De lo contrario podría producirse un incendio o descargas eléctricas.
Inserte completamente el enchufe del cable eléctrico.
• Si el enchufe no ha entrado completamente puede generar calor y ser el origen de un incendio. Si el enchufe está
Español
dañado o la toma de corriente está fl oja, no los utilice.
No toque el enchufe del cable eléctrico con las manos mojadas.
• Puede recibir una descarga eléctrica.
No haga nada que pueda dañar el cable eléctrico. Cuando desenchufe el cable eléctrico, sujete del enchufe y no el cable.
• No dañe el cable eléctrico, no lo modifi que ni coloque objetos pesados encima, ni coloque cerca de objetos que
desprendan calor, no tuerza ni tire excesivamente del mismo. Esto puede provocar un fuego o descarga eléctrica.
Si el cable eléctrico está dañado, solicite la reparación en su tienda local de Panasonic.
Si no se utiliza la pantalla de plasma durante un largo período de tiempo, desenchufe el cable eléctrico de
la toma de corriente.
Para impedir un incendio, no deje velas u otras fuentes de llama abierta cerca de este aparato.
Si se producen problemas durante el uso
Si se produce un problema (por ejemplo falta la imagen o sonido), o si sale humo o hay olores no normales
de la pantalla de plasma, desenchufe inmediatamente el cable eléctrico de la toma de corriente.
• Si sigue utilizando la pantalla de plasma en estas condiciones, puede provocar un fuego o descarga eléctrica.
Después de comprobar que ha dejado de salir humo, llame a su tienda local de Panasonic para solicitar las
reparaciones necesarias. No repare la pantalla de plasma por su cuenta ya que es muy peligroso.
Si entra agua o materias extrañas en el interior de la pantalla de plasma, si se ha caído la pantalla de plasma
o si el mueble exterior está dañado, desenchufe inmediatamente el cable eléctrico.
• Puede provocar un cortocircuito que inicie un incendio. Llame a su tienda local de Panasonic para hacer las
reparaciones necesarias.
4
Page 59

Precauciones para su seguridad
PRECAUCIÓN
Cuendo utilice la pantalla de plasma
No acerque sus manos, rostro u otros objetos cerca de los orifi cios de ventilación de la pantalla de plasma.
• El aire que sale de los orifi cios de ventilación y de la parte superior de la pantalla de plasma está caliente. No
acerque sus manos, cara u objetos que no puedan soportar el calor, a estos orifi cios porque puede quemarse.
Desconecte todos los cables antes de mover la pantalla de plasma.
• Si fuera necesario mover la pantalla de plasma a otro lugar y se dejan algunos cables conectados, éstos pueden
dañarse, provocar un incendio o una descarga eléctrica.
Desenchufe el cable eléctrico de la toma de corriente como medida de seguridad antes de realizar una
limpieza.
• Puede sufrir una descarga eléctrica si no lo hace.
Limpie el cable eléctrico a intervalos regulares para evitar que se cubra por el polvo.
• Si hay acumulación de polvo en el enchufe del cable eléctrico, la humedad puede acumularse y dañar el aislamiento,
provocando un incendio. Desenchufe el cable eléctrico de la toma de corriente y limpie con un paño seco.
No queme ni rompa las pilas.
• No exponga las baterías al calor excesivo como radiación solar, fuego o similares.
Esta pantalla de plasma radia rayos infrarrojos, y por lo tanto puede afectar a otros equipos de comunicación
por infrarrojos.
Instale su sensor de infrarrojos en un lugar alejado de la luz directa de su pantalla de plasma o de la luz
refl ejada por ella.
Limpieza y mantenimiento
Español
El frente del panel de la pantalla ha recibido un tratamiento especial. Limpie suavemente la superfi cie del
panel utilizando el paño de pulido o un paño suave.
• Si la superfi cie está particularmente sucia, límpiela pasando un paño blando y sin pelusa que haya sido humedecido
en agua pura o en agua en la que se haya diluido detergente neutro 100 veces, y luego pase uniformemente un
paño seco del mismo tipo hasta que quede seca la superfi cie.
• No raye o golpee la superfi cie del panel con sus uñas u otros objetos duros ya que la superfi cie puede dañarse.
Además, evite el contacto con sustancias volátiles tales como rociadores de insecticida, disolventes y diluyentes
de pintura, de lo contrario puede verse afectada la calidad de la superfi cie.
Si el mueble se ensucia, limpie con un paño suave y seco.
• Si el mueble está muy sucio, empape el paño en agua mezclada con una pequeña cantidad de detergente
neutro y escurra el paño hasta eliminar el agua. Utilice el paño para limpiar el mueble y seque frotando con un
paño seco.
• No permita que el detergente entre en contacto directo con la superfi cie de la pantalla de plasma. Si las gotas de
agua entran en el interior del aparato, pueden surgir problemas en el funcionamiento.
• Evite el contacto con sustancias volátiles tales como rociadores de insecticida, disolventes y diluyentes de pintura
debido a que puede verse afectada la superfi cie del mueble y puede desprenderse el revestimiento. Tampoco deje
la superfi cie por mucho tiempo en contacto con artículos de caucho o PVC.
5
Page 60

Precauciones para su seguridad
Precauciones de seguridad de 3D
ADVERTENCIA
Piezas pequeñas
Las gafas 3D contienen piezas pequeñas (batería y cinta especializada, etc) y deben mantener fuera del alcance
de los niños pequeños para evitar una ingestión accidental.
Desmontaje
No desmonte o modifi que las gafas 3D.
PRECAUCIÓN
Para disfrutar de las imágenes en 3D de una forma segura y cómoda, le rogamos lea completamente estas
instrucciones.
Utilización para aplicaciones comerciales y proyección pública.
Una persona con autoridad debería se responsable de comunicar al usuario las precauciones sobre el uso
de las gafas 3D.
Gafas 3D (se venden por separado)
No deje caer, ejerza presión o pise las gafas 3D.
Tenga cuidado con las puntas de la montura al ponerse las gafas 3D.
Español
Tenga cuidado de no atraparse un dedo en la sección de la bisagra de las gafas 3D.
Tenga especial cuidado cuando sean niños los que utilicen las gafas 3D.
Como norma, las gafas 3D no deben ser utilizadas por niños menores de 5 - 6 años de edad.
Todos los niños deber ser supervisados en todo momento por los padres o guardianes, quienes deben
asegurarse de su seguridad y salud durante el uso de las gafas 3D.
6
Page 61

Precauciones para su seguridad
Visualización del contenido 3D
El contenido disponible para las imágenes en 3D incluye discos Blu-ray, transmisiones 3D, etc. disponibles
por separado.
Si va a preparar su propio contenido en 3D, asegúrese de que se haya producido correctamente.
No utilice las gafas 3D si tiene antecedentes de hipersensibilidad a la luz, problemas de corazón o ha sido
diagnosticado con cualquier otra enfermedad.
Deje de utilizar de las gafas 3D inmediatamente, si se siente cansado, no se encuentra bien, o experimenta
cualquier otra sensación incómoda.
Tómese un periodo de descanso adecuado después de ver una película en 3D.
Tómese un descanso de entre 30 - 60 minutos después de ver contenido en 3D en dispositivos interactivos,
como juegos en 3D, o en ordenadores.
Tenga cuidado de no golpear la pantalla ni a otras personas de forma involuntaria. Cuando se utilizan las
gafas 3D, la distancia entre el usuario y la pantalla puede que se calcule incorrectamente.
Las gafas 3D sólo se deben utilizar para visualizar contenido en 3D.
Si no mira hacia la pantalla durante un periodo de tiempo durante la visualización de las imágenes en 3D,
puede que las gafas 3D se apaguen de forma automática.
Si tiene problemas con la vista (miopía, hipermetropía, astigmatismo, diferencias de visión entre el ojo
izquierdo y derecho) asegúrese de corregir su vista antes de utilizar las gafas 3D.
Deje de utilizar las gafas 3D si puede ver claramente imágenes dobles al visualizar contenido en 3D.
No utilice las gafas 3D a una distancia menor a la recomendada.
Visualícelo como mínimo a la distancia recomendada (3 veces la altura efectiva de la pantalla).
Distancia recomendada
TH-42PF50E: 1,6 m
TH-50PF50E: 1,9 m
Cuando la parte superior e inferior de la pantalla se ha oscurecido, como en las películas, sitúese a una
distancia de la pantalla 3 veces mayor a la altura de la imagen real. (Siendo la distancia menor al valor
recomendado anteriormente.)
Uso de las gafas 3D (se venden por separado)
Antes de utilizar las gafas 3D, asegúrese de que no haya objetos que se puedan romper rodeando al
usuario para evitar cualquier daño o lesión accidental.
Quítese las gafas 3D antes de ponerse en movimiento para evitar caerse o cualquier lesión accidental.
Utilice las gafas 3D únicamente para el propósito que se han destinado y no para otra cosa.
No utilice las gafas 3D si la temperatura es alta.
No utilice las gafas 3D si presentan daños físicos.
No utilice otro dispositivo que emita señales de rayos infrarrojos cerca de las gafas 3D, ya que podría
provocar un falso funcionamiento en las gafas 3D.
No utilice dispositivos (como teléfonos móviles o transceptores personales) que emiten fuertes ondas
electromagnéticas cerca de las gafas 3D, ya que podrían provocar problemas de funcionamiento en las
gafas 3D.
Deje de utilizar las gafas 3D inmediatamente si se produjera un problema de funcionamiento o una avería.
Deje de utilizar las gafas 3D inmediatamente, si experimenta enrojecimiento, dolor o irritación en la piel
alrededor de la nariz o las sienes.
En casos aislados, los materiales utilizados en las gafas 3D pueden causar una reacción alérgica.
Español
7
Page 62

Accesorios
Accesorios suministrados
Compruebe que ha recibido todos los accesorios indicados
Manual de
instrucciones
CD-ROM × 1
• Manual de instrucciones
Operaciones con la pantalla
Operaciones de red
• Declaraciones de licencia de software
GNU GENERAL PUBLIC LICENSE
GNU LESSER GENERAL PUBLIC
LICENSE
Transmisor del
mando a distancia
N2QAYB000691
Pilas para el transmisor
de mando a distancia
(tamaño R6 (UM3) × 2)
Cable de CA Abrazadera × 1
TMME289
Español
Núcleo de ferrita × 2
J0KG00000014
Utilice el núcleo de ferrita para cumplir la norma EMC.
(Vea la página 11)
Pilas del mando a distancia
Se necesitan dos pilas R6.
1. Tire del gancho para abrir la tapa
de las pilas.
Consejo útil:
Para las personas que utilizan el mando a distancia con frecuencia, se
recomienda reemplazar las pilas usadas por pilas alcalinas que duran más.
Precaución relacionada con el uso de las pilas
La instalación mal hecha puede causar fugas de electrólito y corrosión, lo que estropeará el transmisor de mando a
distancia. Las pilas deben desecharse por medios ecológicos.
Tome las precauciones siguientes:
1. Las pilas deberán reemplazarse siempre juntas. Cuando reemplace pilas usadas, utilice siempre pilas nuevas.
2. No mezcle una pila usada con una nueva.
3. No mezcle distintos tipos de pilas (por ejemplo: pilas de carbón de zinc con alcalinas).
4. No intente cargar, cortocircuitar, desarmar, calentar o quemar las pilas usadas.
5.
El reemplazo de las pilas es necesario cuando el mando a distancia funciona esporádicamente o no puede controlar la pantalla de plasma.
6. No queme ni rompa las pilas.
7. No exponga las baterías al calor excesivo como radiación solar, fuego o similares.
2.
Coloque las pilas correctamente con
las polaridades (+) y (–) indicadas.
Tamaño “R6 (UM3)”
-
+
+
-
3. Vuelva a colocar la tapa.
8
Page 63

Conexiones
Conexión al altavoz
Cuando conecte los altavoces, asegúrese de utilizar solamente los altavoces opcionales recomendados.
Consulte el manual de instalación de los altavoces para conocer detalles acerca de la instalación.
Altavoces (Accesorios opcionales)
Terminal de
altavoz
Conexión del cable de alimentación de CA (vea la página 12)
1
Negro
Inserte el núcleo de
alambre tensado a la vez
que presiona la palanca.
2
Negro
Devuelva la palanca a su lugar.
Rojo
Rojo
Cable de conexión a CA y elemento de fi jación, elemento de fi jación para el cable
Fijación del cable de alimentación de CA
Desenchufe el cable de CA
Conecte el cable de CA a la unidad de pantalla.
Al conectar el cable de CA, presione hasta que suene click.
Nota:
Asegúrese de que el cable de alimentación de CA esté
sujetado en ambos lados, el derecho y el izquierdo.
Al utilizar la abrazadera de suspensión de pared (vertical)
Nota:
Cuando utilice la abrazadera de suspensión de pared (vertical)(TY-WK42PV20), utilice
los orifi cios y para sujetar los cables. Si el fi jador se utiliza en el orifi cio , los
Utilización de la abrazadera
Sujete el exceso de los cables con una abrazadera según sea necesario.
Nota:
Con esta unidad se suministra una abrazadera. Para fi jar los cables en tres posiciones, adquiérala por separado.
Coloque la abrazadera
1
agujero
Inserte la abrazadera
en el agujero.
cables podrían quedar atrapados por la abrazadera de soporte en pared.
Para retirar de la unidad:
cierres
Mantenga empujados
los cierres de ambos
lados
Ate los cables
2
ganchos
Desenchufe el cable de CA presionando los dos ganchos.
Nota:
Cuando desconecte el cable de alimentación de
CA, asegúrese absolutamente de desconectar
primero la clavija del cable de alimentación de
CA de la toma de corriente.
Para afl ojar:
Ponga la
punta en los
ganchos
perilla
Mantenga
empujada
la perilla
Español
9
Page 64

Conexiones
Conexión al equipo de vídeo
SLOT: Ranura de inserción de la
tarjeta de terminales (accesorios
opcionales) (vea la página 3)
Nota:
La ranura del lado derecho es para la tarjeta
de terminales de 2 ranuras de ancho. La
tarjeta de terminales de 1 ranura de ancho
no funciona cuando se instala en la ranura
del lado derecho.
AV IN (VIDEO):
COMPONENT/RGB IN:
DVI-D IN: Terminal de entrada DVI-D
PC IN: Terminal de entrada de PC
Español
Terminal de entrada de vídeo
compuesto
Terminal de entrada de
vídeo componente/RGB
Conecte al terminal de vídeo del PC o equipo con
la salida Y, PB(CB) y PR(CR).
Los terminales se encuentran en el extremo inferior de la pantalla de plasma.
SERIAL:
Control de
la pantalla
de plasma a
través de una
conexión a PC
AV IN (HDMI):
entrada HDMI
Conecte a un equipo de vídeo,
como una videograbadora o
reproductor de DVD.
Terminal de
3D IR TRANSMITTER:
Conecte el
TRANSMISOR IR DE 3D
(accesorio opcional).
WIRELESS
MODULE, LAN:
(
consulte el “Manual
de instrucciones,
Operaciones de
red”)
10
Page 65

Conexiones
Ejemplo de conexión de red (Conectar Lan)
ORDENADOR
Menos
de
10 cm
Cable LAN
(no
suministrado)
Núcleo de ferrita
(suministrado)
Concentrador o router de banda ancha
Notas:
• Asegúrese de que router de banda ancha o concentrador sea compatible con 10BASE-T/100BASE-TX.
• Para conectar un dispositivo que utilice 100BASE-TX, utilice un LAN cable de “categoría 5”.
• Si toca la terminal LAN con una mano (o cuerpo) cargada de energía estática, se pueden producir daños debido a
la descarga.
No toque el terminal LAN o la parte de metal de el cable LAN.
• Para más instrucciones sobre como realizar la conexión, consulte su administrador de red.
Menos
de
10 cm
Núcleo de
ferrita
(suministrado)
Instalación del núcleo de ferrita
Retire las lengüetas
(en los dos lugares)
Pantalla (unidad principal, parte trasera)
Abrir
Enrolle el cable
dos veces
Prense el cable
y cierre
Conexión del módulo inalámbrico (Lan Inalambrica)
Para usar la función inalámbrica, se necesita el módulo inalámbrico (ET-WM200E), de venta por separado.
Retire la película protectora y la tapa al
conectar el módulo inalámbrico a la pantalla.
Español
Método de conexión
Sostenga el módulo inalámbrico con el LED mirando
hacia usted y conéctelo al terminal de conexión del
módulo inalámbrico.
Nota:
No conecte ningún otro dispositivo que no sea el módulo
inalámbrico (ET-WM200E).
ET-WM200
LED
11
Page 66

Encendido/apagado de la alimentación
Conexión de la clavija del cable de alimentación de CA a la pantalla de plasma.
Conexión de la clavija a una toma de corriente
Notas:
• Los tipos de clavijas cambian según los países. La
clavija de alimentación mostrada a la derecha puede,
por lo tanto, no ser la misma que se encuentra en su
aparato.
• Cuando desconecte el cable de alimentación de CA,
asegúrese absolutamente de desconectar primero la
clavija del cable de alimentación de CA de la toma de
Español
corriente.
Presione el interruptor principal de la pantalla de plasma
para encender el aparato.
Piloto de encendido: Verde
[Inicio de la red]
La red tarda un tiempo en iniciarse después de haber
encendido la alimentación.
Durante ese tiempo, la “Confi guración de red” en el
menú de “Confi guración” está atenuada y no se puede
ajustar.
INPUT MENU ENTER/+/VOL-/
Piloto de encendido
Sensor de control remoto
12
Presione la tecla de espera
de plasma.
Piloto de encendido: Rojo (espera)
Presione la tecla de espera del mando a distancia para encender la pantalla
de plasma.
Piloto de encendido: Verde
Desconecte la alimentación de la pantalla de plasma presionando el
interruptor
modo de espera.
Nota:
Durante la operación de gestión de la alimentación, el indicador de la
alimentación se pone naranja en el estado de alimentación desconectada.
de la unidad si la pantalla de plasma está encendida o en
del mando a distancia para apagar la pantalla
Page 67

Encendido/apagado de la alimentación
Cuando encienda por primera vez la unidad
Cuando encienda la unidad por primera vez se visualizará la pantalla siguiente.
Seleccione los elementos con el mando a distancia. Los botones de la unidad no sirven.
Idioma de OSD Puesta de HORA ACTUAL Instalación de pantalla
Idioma de OSD
English (UK)
ENGLISH (US)
Deutsch
Français
Italiano
Español
AjustarSeleccionar
1
Seleccione
el idioma.
2
Ajuste.
Puesta de HORA ACTUAL
Puesta de HORA ACTUAL
HORA ACTUAL Lu 99:99
Ajustar
Día de la semana
HORA ACTUAL
HORA ACTUAL Lu 99:99
Ajustar
Día de la semana
HORA ACTUAL
1
Seleccione “Día de la
semana” o “HORA ACTUAL”.
2
Ponga “Día de la semana” o
“HORA ACTUAL”.
1
Seleccione “Ajustar”.
2
Ajuste.
Lu
99:99
Ma
10:00
Notas:
•
Una vez establecidos los elementos, la pantalla no se visualizará cuando se encienda la unidad la próxima vez.
• Después de hacer el ajuste, los elementos podrán cambiarse en los menús siguientes.
Idioma de OSD
Puesta de HORA ACTUAL
Instalación de pantalla
Mensaje de advertencia de encendido
Al encender la unidad, puede aparecer el mensaje siguiente:
Precauciones de seguridad de 3D
Cuando las imágenes 3D sean vistas por un número sin
especifi car de personas o usadas comercialmente, alguien
autorizado deberá comunicar las precauciones siguientes.
Estas precauciones también deberán tomarse en casa.
Recomendaciones para ver 3D/contenido 3D/distancia de
visión/gafas 3D
- Para disfrutar imágenes 3D en forma segura, por favor
lea el Manual de instrucciones completamente.
Active las precauciones de seguridad de 3D si va a emitir imágenes en 3D para un público no especifi cado
con un objetivo comercial o con cualquier otro propósito.
Si la opción “Función 3D” en “Ajustes 3D” está establecida en “Encendido”, cada vez que encienda la
unidad se mostrará un mensaje de advertencia.
Precauciones con la opción Apagado si no hay actividad
“Apagado si no hay actividad” está activado.
Si en la opción “Apagado si no hay actividad” de los menús de Confi guración selecciona “Activar”, se
mostrará un mensaje de advertencia cada vez que encienda la pantalla.
Las visualizaciónes de este mensaje se puede confi gurar mediante el siguiente menú: Menú Options
Instalación de pantalla
Horizontal
Vertical
1
Para la instalación vertical,
seleccione “Vertical”.
2
Ajuste.
3D Safety Precautions
Power On Message
Español
13
Page 68

Controles básicos
INPUT MENU ENTER/
+
/VOL-/
Unidad principal
Sensor de luminosidad
Detecta la luminosidad del entorno de visualización
Sensor de control remoto
Ajuste de volumen
Subida “+” y bajada “–” del volumen
Cuando se visualice la pantalla
del menú:
“+”: presione para mover el
cursor hacia arriba
“–”: presione para mover el
cursor hacia abajo
Botón de introducción/
aspecto
Interruptor principal
Piloto de encendido
Se enciende el piloto de funcionamiento.
Desconectado
Español
•
• Espera ..........Rojo
• Conectado ...... Verde
• PC Energía monitor (DPMS)
.......................Naranja (Con la señal de entrada de PC.)
• DVI-D Energía monitor
..........................Naranja (Con la señal de entrada DVI.)
• Apagado si no hay actividad
..........................Rojo
. .. El indicador está apagado (La unidad
consume algo de energía siempre
que el cable de alimentación se
mantiene conectado a la toma de
corriente.)
Naranja (Cuando “Slot power”
se ha ajustado en “On”.)
Naranja (Dependiendo del tipo de tarjeta de función instalada, cuando se suministra
alimentación de corriente a la ranura)
Naranja (Cuando “Seleccionar interfaz de control” está ajustado como “LAN” o Cuando “Control
de WEB” está ajustado como “Encendido”. consulte el “Manual de instrucciones, Operaciones
de red”)
Cuando se pone esta función en Encendido, la función se activa bajo las condiciones siguientes
para conectar o desconectar la alimentación automáticamente.
Cuando no se detectan imágenes (señales de sincronización) durante unos 30 segundos
durante la entrada de señales DVI:
→ La alimentación se desconecta (se pone en espera); el indicador de la alimentación se
enciende en color naranja.
Cuando se detectan imágenes (señales de sincronización) posteriormente:
→ La alimentación se conecta; el indicador de la alimentación se enciende en color verde.
El suministro de alimentación al equipo se desconecta cuando no hay señal.
Cuando esté en “Activar”, la alimentación de la unidad se pondrá en Off 10 minutos después de
detenerse las señales de entrada.
Encendido/Apagado de la pantalla MENÚ
Cada vez que se pulsa el botón MENU, la pantalla
de menú se conmuta.
Visión normal Imagen
Sonido Pos./Tamaño
Tecla INPUT
(Selección de la señal de entrada)
Confi guración
14
Page 69

Transmisor del mando a distancia
Tecla de ACTION
Presiónelo para seleccionar y hacer ajustes.
Tecla ASPECT
Presione para ajustar el aspecto.
Tecla de espera (Encendido/Apagado)
La pantalla de plasma debe conectarse
primero en el tomacorriente y con el
interruptor principal (vea la página 12).
Pulse este botón para encender la pantalla de
plasma estando ésta en el modo de espera.
Pulse de nuevo el botón para apagar la pantalla
de plasma y ponerla en el modo de espera.
Controles básicos
Tecla OFF TIMER
La pantalla de plasma puede programarse para
cambiar al modo de espera después de un intervalo
predeterminado. El ajuste cambia a 30 minutos,
60 minutos, 90 minutos y 0 minutos (se cancela el
temporizador) cada vez que se presiona la tecla.
60 min
30 min
0 min (Cancelación)
Cuando quedan tres minutos, destella
“Temporizador 3 min”.
El temporizador queda cancelado cuando se
produce un corte eléctrico.
Tecla AUTO SETUP
Ajusta automáticamente la posición
y el tamaño de la pantalla.
90 min
Tecla POS./SIZE
Tecla PICTURE
Silenciamiento de sonido
Presione esta tecla para silenciar el sonido.
Presiónela de nuevo para reactivar el
sonido. El sonido se reactiva también
cuando se apaga la alimentación o se
cambia el nivel del sonido.
Tecla N
Teclas de posición
Tecla INPUT
Presione para seleccionar la señal de
entrada de forma secuencial.
Modo ECO (ECO)
Pulse para cambiar el estado de
confi guración de Modo ECO.
Botones FUNCTION (FUNCTION)
Tecla SET UP
Tecla SOUND
Ajuste de volumen
Presione la tecla de volumen
arriba “+” o abajo “–” para hacer
subir o bajar el nivel de volumen
del sonido.
Tecla R
Presione el botón R para volver a
la pantalla de menú anterior.
Tecla de RECALL
Presione la tecla de “RECALL” para que
aparezca el estado del sistema actual.
Etiqueta de entrada
1
Modo de relación de ASPECT
2
Durante las imágenes en 3D
Entrada de audio
Nombre del perfi l
Funcionamiento del Protector
NANODRIFT
Apagado de temporizador
3
El indicador del temporizador
aparece sólo cuando se ha
seleccionado el temporizador.
Visualización del reloj
4
NANODRIFT
90min
1
4:33D
2
3
PC
COMPONENT
Memory name: MEMORY2
10:00
4
Temporizador
Español
Zoom digital
15
Page 70

Especifi caciones
Fuente de alimentación 220 - 240 V CA, 50/60 Hz
Fuente de consumo
Panel de pantalla de plasma Tipo CA con método directo
Tamaño de pantalla
Condiciones de funcionamiento
Señales aplicables
Terminales de conexión
Español
Dimensiones (An. × Al. × Prof.)
Masa (Peso)
Máximo 365 W 445 W
Estado de espera 0,5 W 0,5 W
Estado de corriente
desconectada
42 pulg., relación de aspecto de 16:9
(Número de pixeles) 2.073.600 (1.920 (W) ×1.080 (H))
Temperatura 0 °C - 40 °C
Humedad 20 % - 80 %
Sistema de color NTSC, PAL, PAL60, SECAM, NTSC modifi cado
Formato de exploración 525 (480) / 60i · 60p, 625 (575) / 50i · 50p, 750 (720) / 60p · 50p, 1125 (1080) / 60i · 60p · 50i ·
Señales PC VGA, SVGA, XGA, SXGA
AV IN VIDEO
COMPONENT/RGB IN
DVI-D IN
PC IN
3D IR TRANSMITTER para el TRANSMISOR IR de 3D (TY-3D30TRW)
WIRELESS MODULE Para el módulo inalámbrico (ET-WM200E)
unidad principal solamente
AUDIO L-R
HDMI Conector Tipo A
P
B/CB/B
P
R/CR/R
AUDIO L-R
AUDIO
AUDIO
SERIAL Terminal de control exterior
3D SHUTTER OUT
DC 8V OUT Centro positivo, para clavija EIAJ de 4 mm
LAN RJ45 10BASE-T/100BASE-TX, compatible con PJLink™
EXT SP Terminal de altavoces 6 Ω, 16 W [8 W + 8 W] (10 % THD)
con altavoces Aprox. 29,0 kg Aprox. 38,0 kg
921 mm (An.) × 518 mm (Al.) × 1.057 mm (diagonal) 1.105 mm (An.) × 622 mm (Al.) × 1.268 mm (diagonal)
50p · 24p · 25p · 30p · 24sF, 1250 (1080) / 50i
BNC
Toma de patilla RCA × 2
BNC
Y/G
BNC
BNC
Toma de patilla RCA × 2
DVI-D de 24 contactos
Protección del contenido
Miniclavija estéreo (M3) × 1
Alta densidad, conector Mini D-sub de 15
contactos
Miniclavija estéreo (M3) × 1
Conector D-sub de 9 contactos Compatible con RS-232C
Clavija M3 × 1
TH-42PF50E TH-50PF50E
0,3 W 0,3 W
Tipo CA con método directo
50 pulg., relación de aspecto de 16:9
[5.760 × 1.080 puntos]
Frecuencia de exploración horizontal 15 - 110 kHz
Frecuencia de exploración vertical 48 - 120 Hz
1.020 mm × 610 mm × 89 mm 1.210 mm × 724 mm × 89 mm
Aprox. 25,0 kg net Aprox. 33,0 kg net
UXGA ···· (comprimido)
1,0 Vp-p (75 Ω)
0,5 Vrms, Compartida con COMPONENT/RGB IN
con sincronización 1,0 Vp-p (75 Ω)
0,7 Vp-p (75 Ω)
0,7 Vp-p (75 Ω)
0,5 Vrms, Compartida con VIDEO
Cumple con DVI Revisión 1.0
Compatible con HDCP 1.1
0,5 Vrms, Compartida con PC IN
Y o G con sincronización 1,0 Vp-p (75 Ω)
Y o G sin sincronización 0,7 Vp-p (75 Ω)
P
B/CB/B: 0,7 Vp-p (75 Ω)
P
R/CR/R: 0,7 Vp-p (75 Ω)
HD/VD: 1,0 - 5,0 Vp-p (alta impedancia)
0,5 Vrms, Compartida con DVI-D IN
Notas:
• El diseño y especifi caciones están sujetos a cambios sin previo aviso. El Masa y dimensiones son aproximados.
• Este equipo cumple con las normas EMC en la lista a continuación.
EN55022, EN55024, EN61000-3-2, EN61000-3-3.
16
Page 71

Información para Usuarios sobre la Recolección y Eliminación de aparatos viejos y baterías usadas
Estos símbolos en los productos, embalajes y/o documentos adjuntos, significan que los aparatos
eléctricos y electrónicos y las baterías no deberían ser mezclados con los desechos domésticos.
Para el tratamiento apropiado, la recuperación y el reciclado de aparatos viejos y baterías usadas,
por favor, observe las normas de recolección aplicables, de acuerdo a su legislación nacional y a las
Directivas 2002/96/CE y 2006/66/CE.
Al desechar estos aparatos y baterías correctamente, Usted estará ayudando a preservar recursos
valiosos y a prevenir cualquier potencial efecto negativo sobre la salud de la humanidad y el medio
ambiente que, de lo contrario, podría surgir de un manejo inapropiado de los residuos.
Para mayor información sobre la recolección y el reciclado de aparatos y baterías viejos, por favor,
contacte a su comunidad local, su servicio de eliminación de residuos o al comercio donde adquirió
estos aparatos.
Podrán aplicarse penas por la eliminación incorrecta de estos residuos, de acuerdo a la legislación
nacional.
Para usuarios empresariales en la Unión Europea
Si usted desea descartar aparatos eléctricos y electrónicos, por favor contacte a su distribuidor o
proveedor a fin de obtener mayor información.
[Informacion sobre la Eliminación en otros Países fuera de la Unión Europea]
Estos símbolos sólo son válidos dentro de la Unión Europea. Si desea desechar estos objetos, por favor
contacte con sus autoridades locales o distribuidor y consulte por el método correcto de eliminación.
Nota sobre el símbolo de la bateria (abajo, dos ejemplos de símbolos):
Este símbolo puede ser usado en combinación con un símbolo químico. En este caso, el mismo
cumple con los requerimientos establecidos por la Directiva para los químicos involucrados.
Español
17
Page 72

Español
Registro del cliente
El número de modelo y número de serie de este producto están en la cubierta trasera. Debe anotar este número
de serie en el espacio a continuación y guardar este libro junto con el recibo de compra como registro permanente
de su compra para ayudar a identifi carlo en el caso de robo o pérdida y para el servicio bajo garantía.
Número de modelo Número de serie
Sitio Web : http://panasonic.net
© Panasonic Corporation 2012 Impreso en la República Checa
TQB0E2287E-G
 Loading...