

Page 1

Operating Instructions
LED TV
Model No.
Australia
New Zealand
TH-50A430A TH-50A430Z
English
Thank you for purchasing this Panasonic product.
Please read these instructions carefully before operating
this product and retain them for future reference.
The images shown in this manual are for illustrative
purposes only.
Some illustrations are presented as conceptual images
and may be different from the actual products.
Illustrations shown may be different between models
and countries.
Transport only in upright position
CMQ
TQB4GC1209-1
Page 2

Manufactured under license
from Dolby Laboratories. Dolby
and the double-D symbol
are trademarks of Dolby
Laboratories.
Manufactured under license under U.S. Patent Nos:
5,956,674; 5,974,380; 6,487,535 & other U.S. and
worldwide patents issued & pending. DTS, the Symbol,
& DTS and the Symbol together are registered
trademarks & DTS 2.0+Digital Out is a trademark of
DTS, Inc. Product includes software. © DTS, Inc.
All Rights Reserved.
HDMI, the HDMI Logo, and High-Definition Multimedia
Interface are trademarks or registered trademarks of
HDMI Licensing LLC in the United States and other
countries.
This product is licensed under the AVC patent portfolio
license for the personal and non-commercial use of a
consumer to (i) encode video in compliance with the
AVC Standard (“AVC Video”) and/or (ii) decode AVC
Video that was encoded by a consumer engaged in
a personal and non-commercial activity and/or was
obtained from a video provider licensed to provide AVC
Video. No license is granted or shall be implied for any
other use.
Additional information may be obtained from MPEG LA,
LLC.
See http://www.mpegla.com.
Panasonic does not guarantee operation and
performance of peripheral devices made by other
manufacturers; and we disclaim any liability or damage
arising from operation and/or performance from usage of
such other maker’s peripheral devices.
Contents
Safety Precautions ·································· 3
Setting Up the TV ···································· 4
Connecting the TV ··································6
Initial Setup ············································ 8
Operating the TV ·····································8
Using TV Guide / Freeview Guide ············ 10
Watching External Inputs ······················· 10
Using Media Player ······························· 11
Using the Menu Functions ····················· 13
Additional Information ··························· 18
Troubleshooting ··································· 20
Maintenance ········································· 21
Specifications······································· 21
Warranty (Australia) ······························ 23
Warranty (New Zealand) ························· 24
Even if no special notation has been made of company
or product trademarks, these trademarks have been fully
respected.
2
Page 3
Safety Precautions
To help avoid risk of electrical shock, fire, damage or
injury, please follow the warnings and cautions below:
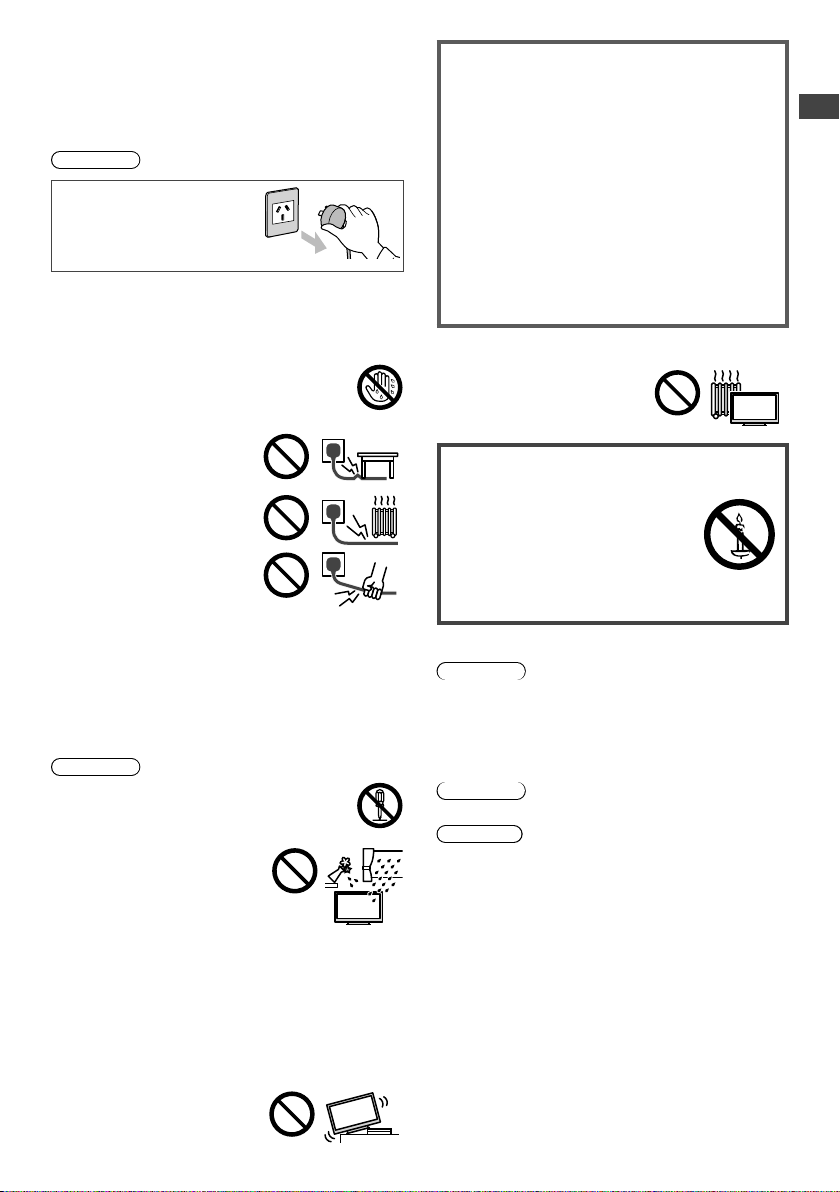
■ Mains plug and lead
Warning
If you detect anything
unusual, immediately
remove the mains plug.
●
Mains plug types vary
between countries.
●
This TV is designed to operate on AC 220 - 240 V,
50/60 Hz
●
Insert the mains plug fully into the socket outlet.
●
Ensure that the mains plug is easily accessible.
●
Disconnect the mains plug when cleaning the TV.
●
Do not touch the mains plug with wet hands.
●
Do not damage the mains lead.
• Do not place a heavy object
on the lead.
• Do not place the lead near a
high temperature object.
• Do not pull on the lead. Hold
onto the mains plug body
when disconnecting the plug.
• Do not move the TV with the lead plugged into a
socket outlet.
• Do not twist the lead, bend it excessively or stretch it.
• Do not use a damaged mains plug or socket outlet.
• Ensure the TV does not crush the mains lead.
●
Do not use any mains lead other than that provided
with this TV.
■ Take care
Warning
●
Do not remove covers and never modify
the TV yourself as live parts are accessible
when they are removed. There are no user
serviceable parts inside.
●
Do not expose the TV to rain
or excessive moisture. This TV
must not be exposed to dripping
or splashing water and objects
filled with liquid, such as vases,
must not be placed on top of or
above the TV.
●
Do not insert foreign objects into the TV through the
air vents.
●
Do not use an unapproved pedestal / mounting
equipment. Be sure to ask your local Panasonic dealer
to perform the setup or installation of approved wallhanging brackets.
●
Do not apply strong force or impact to the display
panel.
●
Do not place the TV on sloped
or unstable surfaces, and
ensure that the TV does not
hang over the edge of the base.
Important information
If the TV is not positioned in a sufficiently stable
location, it can be potentially hazardous due to
falling. Many injuries, particularly to children, can be
avoided by taking simple precautions such as:
●
Using cabinets or stands recommended by the
manufacturer of the TV.
●
Only using furniture that can safely support the TV.
●
Ensuring the TV is not overhanging the edge of the
supporting furniture.
●
Not placing the TV on tall furniture (for example,
cupboards or bookcases) without anchoring both
the furniture and the TV to a suitable support.
●
Not standing the TV on cloth or other materials
placed between the TV and supporting furniture.
●
Educating children about the dangers of climbing on
furniture to reach the TV or its controls.
●
This TV is designed for indoor use.
●
This TV is designed for table-top use.
●
Do not expose the TV to direct
sunlight and other sources of
heat.
To prevent the
spread of fire, keep
candles or other
open flames away
from this product at
all times
■ Dangerous part / Small object
Warning
●
This product contains possibly dangerous parts such
as plastic bags, that can be breathed in or swallowed
by young children accidentally. Keep these parts out of
reach of young children.
■ Pedestal
Warning
●
Do not disassemble or modify the pedestal.
Caution
●
Do not use any pedestal other than the one provided
with this TV.
●
Do not use the pedestal if it becomes warped or
physically damaged. If this occurs, contact your
nearest Panasonic dealer immediately.
●
During setup, make sure that all screws are securely
tightened.
●
Ensure that the TV does not suffer any impact during
installation of the pedestal.
●
Ensure that children do not climb onto the pedestal.
●
Install or remove the TV from the pedestal with at least
two people.
●
Install or remove the TV by the specified procedure.
Safety Precautions
3
Page 4
■ Ventilation
Caution
Allow sufficient space around the TV in order to help
prevent excessive heat, which could lead to early failure
of some electronic components.
Minimum distance (cm)
10
10
●
Ventilation should not be
impeded by covering the
ventilation openings with
items such as newspapers,
tablecloths and curtains.
●
Whether you are using a pedestal or not, always
Safety Precautions | Setting Up the TV
ensure the vents at the bottom of the TV are not
blocked and there is sufficient space to enable
adequate ventilation.
10
10
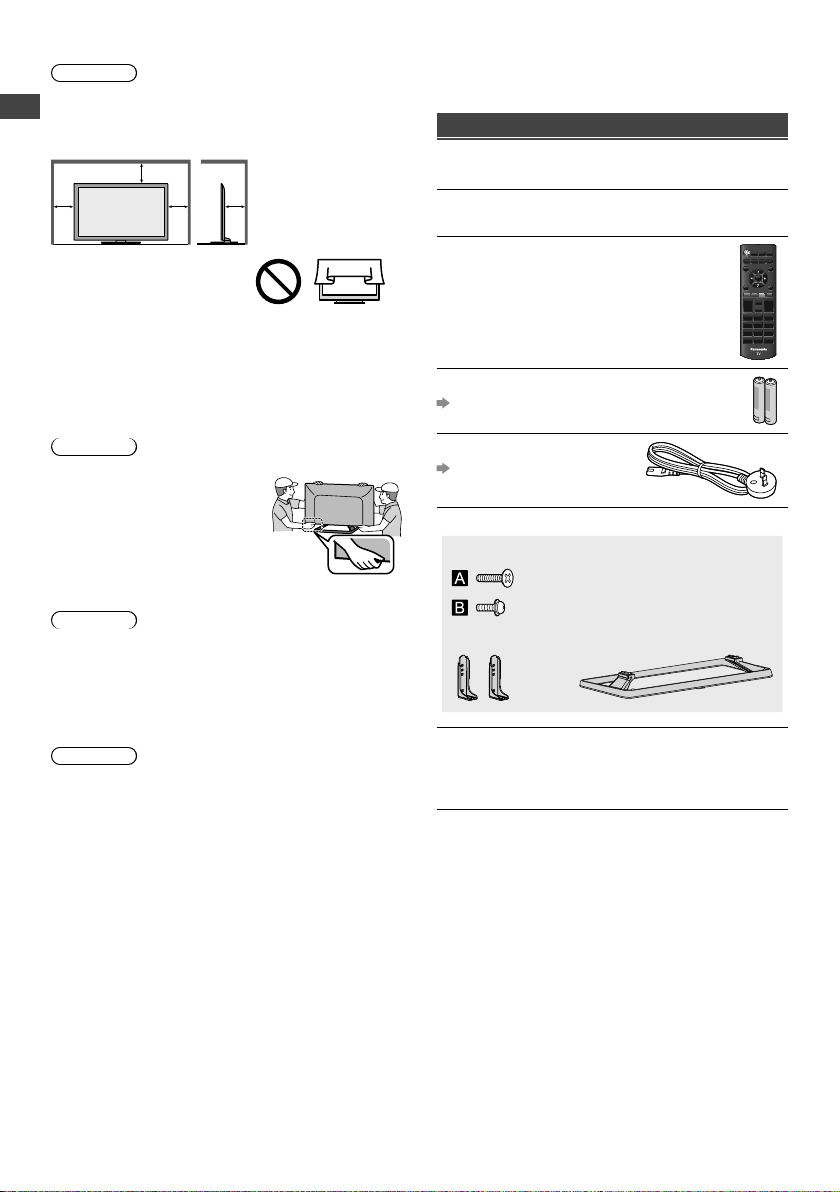
■ Moving the TV
Caution
Before moving the TV, disconnect all cables.
●
Move the TV with at least two
people. Support as shown to
avoid injury by the TV tipping
or falling.
■ When not in use for a long time
Caution
This TV will still consume some power even in the Off
mode, as long as the mains plug is still connected to a
live socket outlet.
●
Remove the mains plug from the wall socket when the
TV is not in use for a prolonged period of time.
■ Battery for the Remote Control
Caution
●
Incorrect installation may cause battery leakage,
corrosion and explosion.
●
Replace only with the same or equivalent type.
●
Do not mix old and new batteries.
●
Do not mix different battery types (such as alkaline and
manganese batteries).
●
Do not use rechargeable batteries (Ni-Cd, etc.).
●
Do not burn or break up batteries.
●
Do not expose batteries to excessive heat such as
sunshine, fire or the like.
●
Make sure you dispose of batteries correctly.
Setting Up the TV
Supplied accessories
Accessories may not be placed all together. Take care
not to throw them away unintentionally.
Operating Instructions with Warranty
statement
Remote Control
●
N2QAYB000818
or
N2QAYB000976
Batteries (R6) × 2
(p. 6)
Mains Lead
(p. 6)
Pedestal
●
Assembly screws
(M5 × 15 mm) × 4
(M4 × 12 mm) × 4
●
Bracket
Fall-prevention parts
●
Screw
●
Wood screw
●
Band
●
Base
4
Page 5
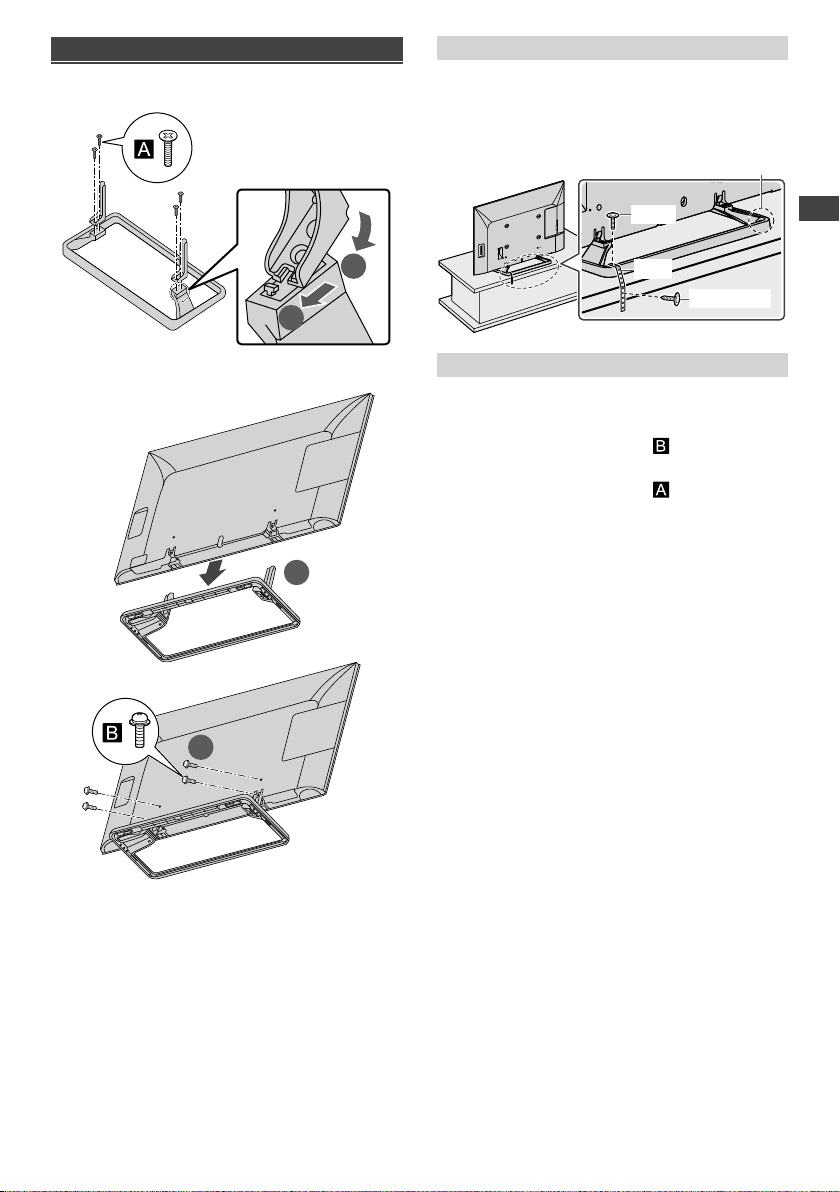
Attaching the pedestal
1 Assemble the pedestal
Preventing the TV from falling over
It is recommended to secure the pedestal to a furniture
as shown to prevent the TV from falling over.
●
This information is designed to reduce the risk of
injuries caused by the TV falling over. However, no
measure can guarantee protection in all cases.
Optional position for installation
Screw
1
2 Attach the TV to the pedestal
1
2
2
Removing the pedestal from the TV
Be sure to remove the pedestal in the following way
when using the wall-hanging bracket or repacking the
TV.
1 Remove the assembly screws from the TV.
2 Pull out the pedestal from the TV.
3 Remove the assembly screws from the bracket.
Band
Wood screw
Setting Up the TV
5
Page 6
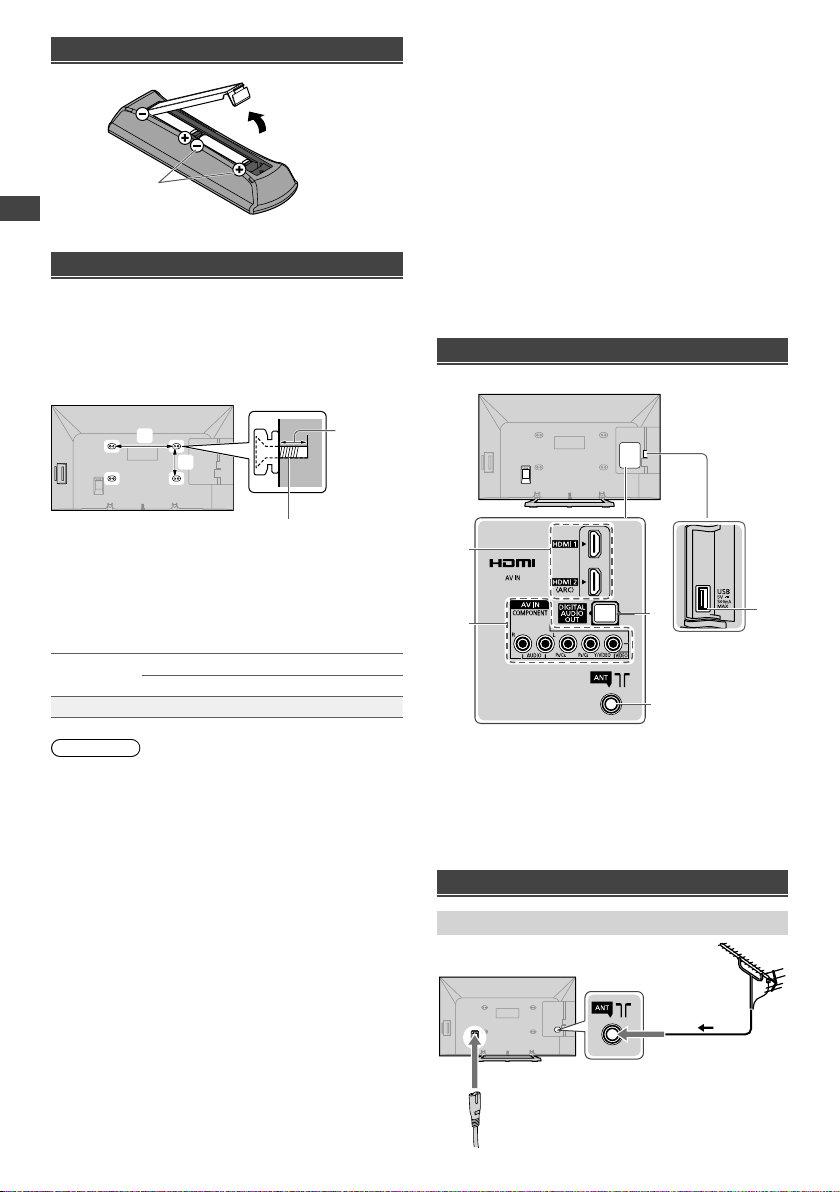
Inserting remote’s batteries
Press the hook and
lift the cover
Note the correct
polarity (+ or -)
Wall mounting the TV (optional)
Choosing to wall mount the TV shall be done at the
owner’s risk and expense. Always use a qualified
installer to perform a TV wall bracket installation.
Incorrect installation may cause TV to fall, resulting in
personal injury and product damage that is not covered
by warranty.
Rear of the TV
(View from the side)
Connecting the TV
●
Please ensure the TV is disconnected from the mains
socket / power point before attaching or disconnecting
any RF / AV leads.
●
External equipment and cables are for illustrative
purposes only and not supplied with this TV.
●
Check the type of terminals and cable plugs are
correct when connecting.
●
When using an HDMI cable, use the fully wired one.
●
Keep the TV away from electronic equipment (video
equipment, etc.) or equipment with an infrared sensor.
Otherwise, distortion of image / sound may occur or
operation of other equipment may be interfered.
●
Also read the manual of the equipment being
connected.
Terminals
Rear of the TV
Setting Up the TV | Connecting the TV
a
b
Screw for fixing the TV onto the
wall-hanging bracket (not supplied)
Depth of
screw
■ Holes for wall-hanging bracket installation
a: 400 mm
b: 200 mm
■ Screw specification
Type
M6 11 mm 28 mm
Warning
●
When optional accessories such as wall brackets etc.
are used, always read and follow the manufacturer
installation and usage instructions.
●
Do not mount the unit directly below ceiling lights (such
as spotlights or halogen lights) which typically give
off high heat. Doing so may warp or damage plastic
cabinet parts.
●
When installing wall brackets you must ensure the wall
bracket is not electrically grounded to metal wall studs.
Always ensure that there are no electrical cables,
pipes etc. in the wall before you begin the wall bracket
installation.
●
To prevent fall and injury, remove the TV from its fixed
wall position when it is no longer in use.
Depth of screw
Minimum Maximum
1
2
HDMI 1 - 2
1
2 AV IN
3 Aerial terminal
4 DIGITAL AUDIO OUT
5 USB port
Connections
Aerial and mains lead
4
5
3
Aerial
RF cable
Mains lead
(supplied)
6
Page 7
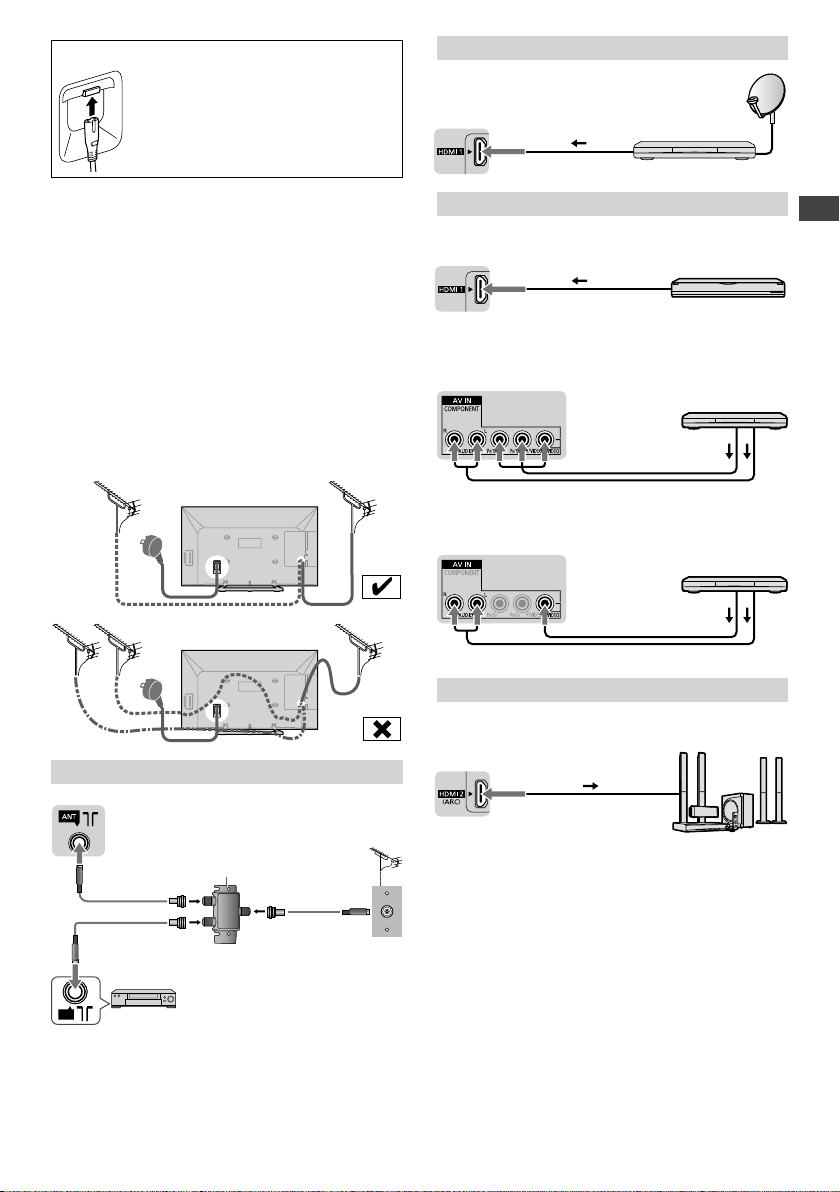
Insert the mains plug firmly into place.
●
When disconnecting the mains lead, be
absolutely sure to disconnect the mains
plug at the socket outlet first.
●
To minimise DTV impulse noise pickup, please ensure
there is separation between mains lead and RF cable.
●
Do not place the RF cable under the TV.
●
An aerial, correct cable (75 coaxial) and correct
terminating plug are required to obtain optimum quality
picture and sound.
●
If a communal aerial system is used, you may require
the correct connection cable and plug between the wall
aerial socket and the TV.
●
Your local Television Service Centre or dealer may be
able to assist you in obtaining the correct aerial system
for your particular area and the accessories required.
●
Any matters regarding aerial installation, upgrading
of existing systems or accessories required, and
the costs incurred, are the responsibility of you, the
customer.
●
If the aerial is placed in the wrong location, interference
might happen.
Set top box
Satellite dish
TV
HDMI cable
Set top box
AV / Game equipment
■ Using HDMI terminal
TV
HDMI cable
●
You can also make similar connection via HDMI 2.
Equipment
■ Using COMPONENT terminals
TV
Component
video cable
Audio cable
Equipment
■ Using COMPOSITE terminals
TV
Video cable
Audio cable
Equipment
Connecting the TV
DTV Recorder / PVR / VCR
TV
RG6Q Fly Lead
RG6Q Fly Lead
ANT
DTV Recorder / PVR / VCR
●
To maintain optimum antenna signal quality, use an “F”
type TV signal splitter (as illustrated) when connecting
two or more devices to the same antenna socket.
“F” type Antenna Splitter
RG6Q Fly Lead
Out
In
Antenna Socket
Wall Plate
Speaker system
Amplifier with
speaker system
TV
HDMI cable
●
Use HDMI 2 for connecting an amplifier that has ARC
(Audio Return Channel) function.
For an amplifier without ARC function, use DIGITAL
AUDIO OUT.
●
To enjoy the sound from the external equipment in
multi-channel sound (e.g. Dolby Digital 5.1ch), connect
the equipment to the amplifier. For the connections,
read the manuals of the equipment and amplifier.
7
Page 8
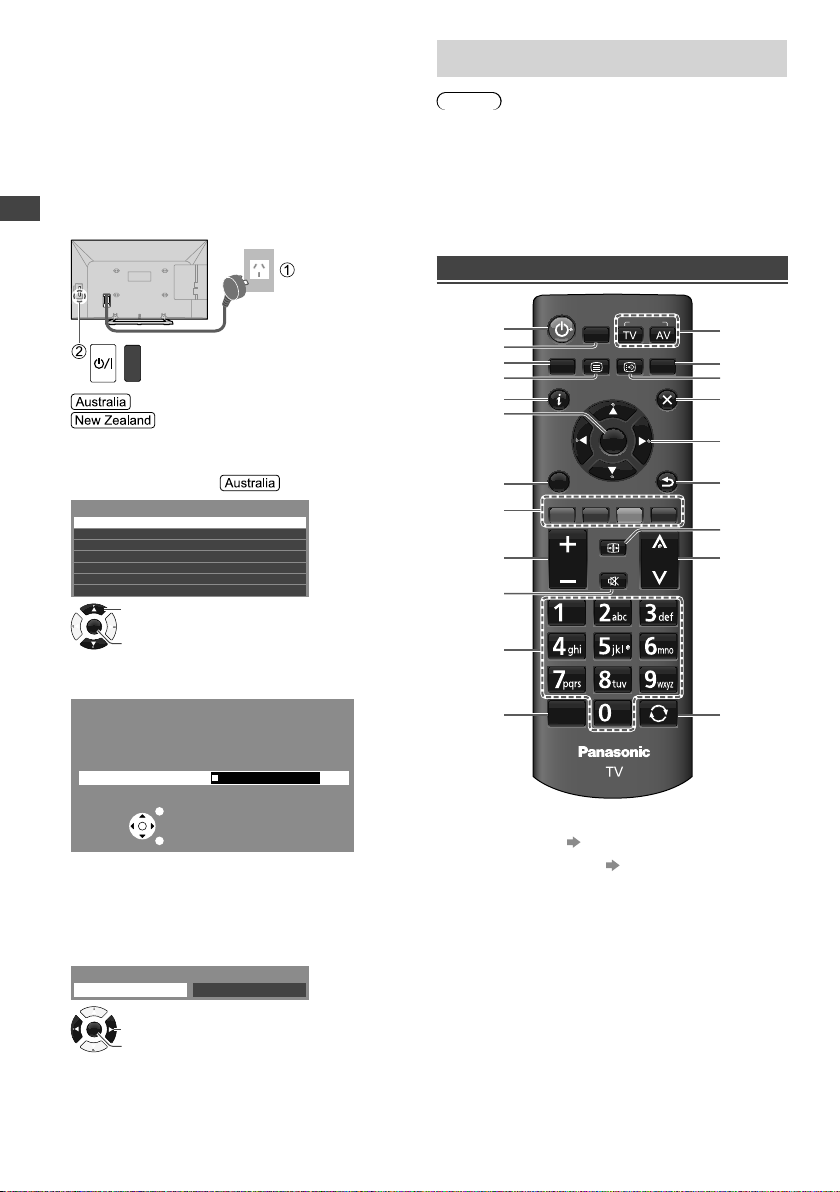
Initial Setup
K
When you first turn on the TV, a series of steps will popup to guide you to setup your TV.
●
These steps are not necessary if the setup has been
completed by your local dealer.
1 Plug the mains plug into the socket
outlet and turn on the TV.
It may take a few seconds before the screen is
displayed.
Setup is now complete and your TV is ready for
viewing.
Note
●
If tuning has failed, check the connection of the RF
cable, then follow the on-screen instructions.
Operating the TV
Using the remote control
AC 220 - 240 V,
50/60 Hz
Initial Setup | Operating the TV
Proceed to steps 2, 3 and 4.
Scanning starts automatically when
you turn on the TV (step 3). After scanning is
completed, proceed to step 4.
2 Select your area.
Select State/Territory
New South Wales/Australian Capital Territory
OK
Select
Victoria
Queensland
South Australia
Western Australia
Northern Territory
Tasmania
Access
3 Scanning starts.
Automatic Channel Search
Searching channels...
Analogue : 0
Digital : 1
Scan
EXIT
RETURN
●
This function searches and stores TV channels.
●
The stored channels and sorted channel order vary
depending on the area, broadcasting system and
conditions of signal reception.
4 Select [Home].
Please select your viewing environment.
Home Shop
OK
Change
Confirm
●
[Shop] is for shop display.
●
To change the viewing environment later on, you
need to initialise all settings by accessing [Shipping
Condition] (p. 16).
POWER
MEDIA
INPUT
1
2
3
4
5
6
7
8
9
PLAYER
MENU
TEXT
STTL/AD
INFO
OK
OPTION
RGY B
ASPECT
VOL
MUTE
GUIDE
EXIT
RETURN
CH
13
14
15
16
17
18
19
20
10
11
12
5%
STILL
LAST VIEW
21
1 Switches the TV On / Standby
2 MEDIA PLAYER (p. 11)
3 Displays [Main Menu] (p. 13)
4 Switches to Teletext mode
5 Displays Information banner
6 OK
●
Confirms selections.
●
Press after selecting channel positions to quickly
change channel.
●
Displays the [Channel List].
7 Displays [Option Menu]
●
Shortcut to subtitle language / sound settings.
●
Follow the operation guide to select / change the
settings.
8 Coloured buttons
●
Performs multiple operations which correspond to
the operation guide displayed on the menu screen.
8
Page 9

9 Volume Up / Down
10 Sound Mute On / Off
11 Numeric buttons
●
Changes channel / teletext pages.
●
Sets characters.
●
When in Standby mode, switches TV On.
12 Freezes / unfreezes picture
13 Input mode selection
●
TV - switches to Digital TV / Analogue TV.
●
AV - displays [Input Selection] screen (p. 10) or
press repeatedly to select the input mode.
14 TV Guide (p. 10)
Freeview Guide (p. 10)
15 Displays subtitles / audio description
Displays favourite page in teletext mode
16 Exits to the TV viewing screen
17 Cursor buttons
●
Makes selections or adjustments.
18 Returns to the previous menu / page
19 ASPECT
●
Displays the [Aspect Selection] screen. Follow the
operation guide to select the mode. [16:9] / [14:9] /
[Just] / [4:3] / [4:3 Full] / [Zoom1] / [Zoom2] /
[Zoom3] (p. 18)
●
You can also press the button repeatedly to select
the mode.
20 Channel Up / Down
21 Returns to the last viewed channel
About operation guide
When operating the TV with the remote control, follow
the operation guide available at the bottom of the screen
to perform the operation you want.
Example: [Aspect Selection]
Aspect Selection
16:9
14:9
Just
Select
Change
Referring to the operation guide:
●
To select the mode
EXIT
RETURN
OK OK
Operation guide
●
To change to the selected
mode
Using the TV controls
Indicators on the TV
56 7
1 Changes the input mode
Displays [Main Menu] when press and hold for
3 seconds
●
Press again and hold for 3 seconds to return to the
previous screen from submenus / exit from main
menu page.
2 Channel Up / Down
Cursor Up / Down
●
Makes selections in the menu system.
3 Volume Up / Down
Cursor Left / Right
●
Makes selections and / or adjustments when in the
menu system.
4 Mains power On / Off switch
●
Use to switch the mains power.
5 Remote control signal receiver
6 C.A.T.S. (Contrast Automatic Tracking System)
sensor
●
Senses brightness to adjust picture quality when
[Eco Mode] in the [Picture] menu is set to [On].
(p. 13)
7 Power LED
●
Red: Standby
Green: On
●
The LED blinks when the TV receives a command
from the remote control.
1
2
3
4
Operating the TV
●
To return to the previous
menu
RETURN EXIT
●
To exit from the menu
9
Page 10

Using TV Guide /
E
A
Freeview Guide
The TV Guide / Freeview Guide - Electronic Programme
Guide (EPG), shows a list of broadcasts for several days
(depending on the broadcasters).
●
When this TV is turned on for the first time, or switched
off for more than a week, it may take some time before
the TV Guide / Freeview Guide is completely shown.
●
This function varies depending on the area you select
(p. 8).
●
Digital and Analogue channels are displayed on the
same TV Guide screen. There will be no programme
listings for Analogue channels.
●
TV mode only.
Display the TV Guide.
GUIDE
Example:
TV Guide Tuesday, 6-December-2013 13:10:28
06/12/2013
2
NDR FS NDS
8:00 - 8:30 Schleswig-Holstein Magazin
Time:
3
A
117 NDR FS NDS
A
118 NDR FS HH
A
119 NDR FS SH
A
120 NDR FS MV
A
122 MDR Sachsen
A
123 MDR S-Anhalt
A
124 MDR Thüringen
5
1
Current date and time
8:00 9:00
Schleswig-Holst...
buten un binnen... Hallo Niedersac... Das Beste aus E...
Schleswig-Holst...
buten un binnen...
Schleswig-Holst...
buten un binnen...
Schleswig-Holst...
buten un binnen...
Haral... Rucksack artour Leben für 4... MDR...
Haral... Rucksack artour Leben für 4... MDR...
Haral... Rucksack artour Leben für 4... MDR...
Select
EXIT
Programme
RETURN
Information
Next day Type filter
2 TV Guide date
3 TV Guide time
Using TV Guide / Freeview Guide | Watching External Inputs
4 Programme
5 Channel position and name
Follow the operation guide to operate the TV
Guide.
Note
●
It may be slow to response when pressing the UP/
DOWN cursor button for TV program guide. This is due
to program data downloading.
[Type filter]
Lets you view a channel list of the selected type filter.
B
(Press again to return to TV Guide.)
(Type list)
Type
MOVIE
NEWS
Select [Type]
OK
Add/Remove
NEWS
Hallo Niedersac... Das Beste aus E...
Hallo Niedersac... Das Beste aus E...
Hallo Niedersac... Das Beste aus E...
Page up
Page down
Display the Freeview Guide.
GUIDE
(Each press will toggle the screen between the
Freeview Guide Listing and What’s on Now /
Next.)
Example: Freeview Guide Listing
5
20:30 Lost
21:30 Dirty Sexy Money
22:30 The Knights Of
22:55 Entourage
23:30 Reality Bites:
Prog
OK
Watch TV
Prosperity
Bodyshock - Half Ton...
Wed 6 Apr
Next WeekChnl Next Day
EPG/Guide
Now/Next
Sayid confronts Ben's spy on the
freighter, and Ben urges daughter
Alex to flee Locke's camp in order
to survive an impending attack.
Parental Rating captioning Information
1 Current day and date
2 Current programme
3 Programme description
4 Parental rating and captioning information
5 Current channel’s programme listing
1
Follow the operation guide to operate the
Freeview Guide.
4
Note
●
The Freeview Guide screen and operations are subject
to change without notice.
Watching External
Inputs
1 Connect the external equipment.
(p. 6 - 7)
2 Display the [Input Selection] menu,
then select the input of the connected
equipment.
Input Selection
TV
AV1
HDMI 1
HDMI 2
Note
●
You can label or skip each input mode.
[Input Labels] (p. 15)
Skipped inputs will not be displayed when the AV
button is pressed.
●
If the external equipment has an aspect adjustment
function, set it to “16:9”.
1
2
TV ONE, 20:00
3
4
10
Page 11

Using Media Player
Media Player allows you to enjoy photo, music or video
recorded on a USB Flash Memory.
●
During the operation, audio signal is output from
DIGITAL AUDIO OUT or HDMI 2 (ARC function)
terminals. To use HDMI 2 with ARC function, connect
an amplifier that has ARC function and set to use
theatre speakers (p. 7).
●
The picture may not appear correctly on this TV
depending on the digital cameras used.
●
Display may take some time when there are many files
and folders in the USB Flash Memory.
●
Partly degraded files might be displayed at a reduced
resolution.
●
The folder and file names may be different depending
on the digital camera used.
Inserting / Removing the USB Flash
Memory
TV
●
Insert or remove
straight and
completely.
Starting Media Player
1 Insert the USB Flash Memory.
2 Start Media Player.
MEDIA
PLAYER
3 Select the mode.
OK
Select
Access
[Photo]: Displays the thumbnail of all photos in the
[Music]: Displays the thumbnail of music folders in
[Movie]: Displays the thumbnail of video titles in the
[Contents Select]
Switching between modes
When you are in the thumbnail view of any mode,
you can change to the other mode by accessing the
[Contents Select] screen.
B
[Drive Select]
For USB with partition, you can change to the other
partition directly in the same mode.
Y
USB Flash Memory.
the USB Flash Memory.
USB Flash Memory.
Follow the operation guide to perform
available operations in each mode.
INFO
●
Displays the information of the highlighted
content.
●
Displays / hides the operation guide.
Photo mode
Media Player Photo All photos
EXIT
View
Select
Slideshow View Select Drive Select Contents Select
: Error display
Info
Option Menu
RETURN
Operation guide
USB
[View]
Enters Single view mode to view photo one at a time.
[Slideshow]
Lets you view all photos in the slideshow mode.
[View Select]
Lets you toggle between all photos view and folder view.
G
[All photos]: Displays all photos.
[Folder view]: Displays the thumbnails grouped by
folder.
[Option Menu]
■ [Slideshow Settings]
– [Transition Effect]: Effect for photo switching during
slideshow. [None] / [Dissolve] / [Wipe right] / [Wipe
left] / [Wipe up] / [Wipe down] / [Box in] / [Box out] /
[Random]
– [Screen Mode]: Screen mode for Single view and
Slideshow. [Normal] / [Zoom]
• In [Normal] screen mode, depending on the photo
size, it may not be fully enlarged to fill the screen.
E.g.: portrait style picture.
– [Interval]: Slideshow interval. [5] / [10] / [15] / [30] /
[60] / [90] / [120] (seconds)
– [Repeat]: Slideshow repeat. [Off] / [On]
– [Back Ground Music]: Background music during
photo viewing. [Off] / [Type1] / [Type2] / [Type3]
Note
●
Picture quality may become lower depending on the
slideshow settings.
Using Media Player
11
Page 12

Music mode
E
C
Media Player Music Folder view
Movie mode
Media Player Movie Title view
My Music_1
Play Folder Contents Select
Access
Select
My Music_2
My Music_3
EXIT
RETURN
Info
Option Menu
Drive Select
Operation guide
[Play Folder]
Playbacks all music in the selected folder.
R
■ To playback the selected file only
Select the folder. Select the file.
Select
OK
Using Media Player
Access
OK
[Option Menu]
■ [Music Setup Menu]
– [Repeat]
• [One]: Playback repeat on the selected one file.
• [Folder]: Playback repeat within the selected folder.
• [Off]: Playback repeat off.
USB
Select
Play
My Movie_1
Play Folder Contents Select
Access
Select
My Movie_2
My Movie_3
EXIT
RETURN
Info
Option Menu
Drive Select
USB
Operation guide
[Play Folder]
Playbacks all movies in the selected folder.
R
■ To playback the selected file only
Select the folder. Select the file.
Select
OK
Access
Select
OK
Play
[Option Menu]
■ [Video Setup Menu]
– [Multi Audio]: Selects the sound tracks (if available)
during video playback.
– [Subtitle]: Selects the subtitle (if available) during
video playback.
– [Aspect Change]: Selects the aspect mode during
video playback. [16:9] / [14:9] / [Just] / [4:3] / [4:3
Full] / [Zoom1] / [Zoom2] / [Zoom3]
• You can also change the aspect by pressing the
ASPECT button repeatedly.
– [Repeat]: Playback repeat options. [Off] / [On]
12
Page 13

Using the Menu
S
t
Page upC
ge
RETURN
Page down
P
e
Sound
Timer
Setup
Mode
Bass
Menu
e
ce
n
S
eferred Audio
1
S
n
Music
Off
Off
Functions
1 Display the menu.
MENU
Example:
Menu Item Setting
Sound Menu
Sound
Main Menu
Main Menu
Mode
Picture
ictur
Bass
Treble
Trebl
Sound
Balan
Balance
Surround
Timer
Auto Gain Control
Auto Gain Control
Volume Correction
Volume Correctio
Setup
Speaker Distance to Wall
peaker Distance to Wall
Preferred Audio 1
Pr
SPDIF Selection
PDIF Selectio
Select
elec
han
Change
RETURN
Operation guide
2 Select the menu.
3 Select the item.
4 Change the setting.
Example:
●
Change the setting option
●
Adjust the intensity bar
●
Access the submenu
●
Only available items can be selected.
Select
OK
Access
Select
OK
Change / Adjust / Access / Reset
Surround
Bass
Child Lock Access
On
Off
Note
Picture
[Viewing Mode]
Sets the picture mode for each input. [Dynamic] /
[Normal] / [Cinema] / [True Cinema] / [Game]
[Dynamic]: Improves contrast and sharpness for
viewing in a bright room.
[Normal]: For viewing in a normal lighting condition.
[Cinema]: Improves the performance of contrast,
black and colour reproduction for watching movies in a
darkened room.
[True Cinema]: Reproduces the original image quality
precisely without any revision.
Music
[Game]: Gives fast response signal for playing games.
– Not available in TV mode.
– To display a continuous record of time spent using
Off
Off
Over 30cm
English
PCM
PCM
Game mode [Playing Time Display] (p. 15).
In each [Viewing Mode], the settings for [Backlight],
[Contrast], [Brightness], [Colour], [Sharpness], [Tint],
[Colour Balance], [Eco Mode], [P-NR] and [3D-COMB]
can be adjusted and stored for each input.
[Backlight], [Contrast], [Brightness],
Page up
Page down
[Colour], [Sharpness]
Increases or decreases the levels of these options
according to your personal preference.
[Tint]
Adjusts the picture hue to suit your taste.
●
For NTSC signal reception.
[Colour Balance]
Selects the colour temperature of the picture.
[Cool] / [Normal] / [Warm]
●
Not available when [Viewing Mode] is set to [True
Cinema].
Using the Menu Functions
[Channel Colour Set]
Adjusts the suitable colour density from 3 levels for each
channel.
●
Select the channel to adjust and set this function.
[Eco Mode]
Automatically adjusts picture settings depending on
ambient lighting conditions. [Off] / [On]
[P-NR]
Select
OK
Access
Picture noise reduction function which reduces
unwanted picture noise and flicker noise in the
contoured parts of a picture. [Off] / [Min] / [Mid] / [Max]
[3D-COMB]
Makes still or slow moving pictures more vivid.
[Off] / [On]
●
OK
Adjust
Set to [On] to improve the colours if patterning is seen
while watching still or slow moving pictures.
●
For PAL / NTSC signal reception in TV mode or from
composite input.
[Colour Matrix]
OK
Access
Adjusts suitable colour parameters for [SD] (standard
definition) or [HD] (high definition).
[SD]: Input signal is a normal TV system.
[HD]: Input signal is a high definition system.
●
Available only with 480p or 576p input on video signals
in a natural colour from digital equipment connected to
COMPONENT or HDMI terminal.
13
Page 14

[Colour System]
Selects optional colour system based on video signals
in AV mode. [Auto] / [PAL] / [SECAM] / [M.NTSC] /
[NTSC]
[FRC]
Frame Rate Control. For picture quality control in order
to obtain smooth scene transition. [Off] / [Min] / [Mid] /
[Max]
[16:9 Overscan]
Selects the screen area displaying the image for 16:9
aspect. [Off] / [On]
[On]: Enlarges the image to hide the edge of the
image.
[Off]: Displays the image in the original size.
●
Set to [On] if noise is generated on the edge of the
screen.
●
This function can be memorised separately for SD
(Standard definition) and HD (High definition) signals.
[Reset to Defaults]
Resets the current picture settings to defaults.
Sound
[Mode]
Sets your favourite sound mode. [Music] / [Speech] /
[User]
●
The selected mode affects all input signals.
[Music]: Improves sound quality for watching music
videos, etc.
Using the Menu Functions
[Speech]: Improves sound quality for watching news,
drama, etc.
In [Music] and [Speech] modes, you can adjust the
[Bass] and [Treble] settings, and those settings will be
stored for each mode.
[User]: Adjusts the sound manually by using the
equaliser.
– When you select [User] mode, [Equaliser] is active
instead of [Bass] and [Treble]. Select [Equaliser] and
adjust the frequency. (below)
[Bass]
Adjusts level to enhance or minimise lower, deeper
sound output.
[Treble]
Adjusts level to enhance or minimise sharper, higher
sound output.
[Equaliser]
Adjusts the frequency level to suit your favourite sound
quality.
●
This function is available when [Mode] is set to [User].
●
Select the frequency and change the frequency level
by using the cursor buttons.
●
To enhance the bass sound, raise the level of the lower
frequency. To enhance the treble sound, raise the level
of the higher frequency.
●
To reset the levels of each frequency to the default
settings, select [Reset to Defaults] by using the cursor
button, and then press the OK button.
[Balance]
Adjusts volume level of right and left speakers.
14
[Surround]
Surround sound settings. [Off] / [On]
[Auto Gain Control]
Automatically regulates large sound level differences
between channels and inputs. [Off] / [On]
[Volume Correction]
Adjusts the volume of individual channel or input mode.
[Speaker Distance to Wall]
Compensates for the low frequency sound due to the
distance between the speakers and the wall.
[Over 30cm] / [Up to 30cm]
●
If the distance between the TV and wall is over 30 cm,
[Over 30cm] is recommended.
●
If the distance between the TV and wall is within
30 cm, [Up to 30cm] is recommended.
[Preferred Audio 1]
Selects the preferred language for Digital TV multi audio
(depending on the broadcaster).
[MPX]
Selects multiplex sound mode (if available).
[Stereo]: Use this normally.
[Mono]: When stereo signal cannot be received.
[M1] / [M2]: Available while mono signal is transmitted.
●
For Analogue TV only.
[SPDIF Selection]
SPDIF: A standard audio file transfer format.
Selects the initial setting for digital audio output signal
from DIGITAL AUDIO OUT and HDMI 2 (ARC function)
terminals. [Auto] / [PCM]
[Auto]: Dolby Digital is output as Dolby Digital
Bitstream. HE-AAC and MPEG are output as PCM.
[PCM]: Digital output signal is fixed to PCM.
●
For Digital TV or video contents of Media Player.
[MPEG Optical Level]
Adjusts the audio level output from DIGITAL AUDIO
OUT terminal as the initial setting.
[-12 / -10 / -8 / -6 / -4 / -2 / 0 dB]
●
Normally, PCM sound is higher comparing with the
other types of audio track.
[HDMI 1/2 Input(HDMI)]
Selects to fit the input signal (p. 19).
[Digital] / [Analogue]
[Digital]: When sound is carried via the HDMI cable
connection.
[Analogue]: When sound is not carried via the HDMIDVI adaptor cable connection.
●
For HDMI input only
[SPDIF Delay]
Adjusts the time delay for the sound output from
DIGITAL AUDIO OUT or HDMI 2 (ARC function)
terminals if the sound does not synchronise with the
image. [0] / [10] / [20 to 200] (msec)
[Downmix Mode]
Selects the output mode for listening to compressed
music. [Surround] / [Stereo] / [Dual1] / [ Dual2]
Page 15

[Type]
Narration settings for impaired users (only available
in some countries). [Normal] / [Hearing Impaired] /
[Visually Impaired]
[Hearing Impaired]: Provides aids in understanding
and enjoyment with Digital TV subtitles (depending on
the broadcaster).
[Visually Impaired]: Activates the narration sound
track when available on the broadcast.
●
For Digital TV only.
[Visually Impaired] (below) is available after you have
selected this option.
[Visually Impaired]
■ [Speaker]
Narration sound track is output to the TV speakers.
[Off] / [On]
■ [Volume]
Adjusts the volume of the narration sound track.
■ [Pan and Fade]
Sets the audio pan and fade effect. [Off] / [On]
[Off]: Main Audio program.
[On]: Controls the level of the Main Audio Program
and the pan of the Associated Audio Program.
[Reset to Defaults]
Resets the current sound settings to defaults.
Timer
[Off Timer]
Sets the duration until the TV automatically goes to
Standby mode.
[Off] / [15 / 30 / 45 / 60 / 75 / 90 minutes]
[Region Selection]
Selects the region where you live to adjust the standard
time. [NSW/ACT] / [Victoria] / [Queensland] /
[South Australia] / [Western Australia] / [Northern
Territory] / [Tasmania]
[Daylight Saving]
Selects the time offset from the standard time for
Summer. [Auto] / [Off] / [1/2 hour] / [1 hour]
[Auto Standby]
Enables the TV to turn into Standby mode automatically
if no operation is performed after the selected period.
[Off] / [2 hours] / [4 hours]
●
Automatic input switching with the connected
equipment affects this function and time-count will be
reset.
Setup
[Link Settings]
■ [CEC]
When set to [On], the TV will automatically switch
to the appropriate HDMI input whenever an HDMI
connected equipment is initially turned on and play
mode is selected. [Off] / [On]
■ [Power off Link]
When set to [On], all HDMI connected equipment will
be turned off automatically by turning off the TV.
[Off] / [On]
– A Panasonic DVD Recorder will not turn off if it is still
in the Rec mode.
– The TV remains on even if all the HDMI connected
equipment are turned off.
[Child Lock] (p. 17)
[Tuning Menu] (p. 16 - 17)
[Display Settings]
■ [Preferred Subtitles 1]
Selects the preferred subtitle language for digital
channels (depending on the broadcaster).
■ [Preferred Subtitle Type]
Selects the preferred subtitle type for digital channels
(depending on the broadcaster). [Normal] / [Hearing
Impaired]
■ [Input Labels]
Accesses the input labels list to select the label of
each input mode or set to skip unconnected one for
easier identification and selection in [Input Selection]
(p. 10) or banner.
– To skip the input mode, select [Skip].
■ [Banner Display Timeout]
Sets how long the Information banner stays on screen
(p. 8). [0 (No display)] / [1 second] /
[2 - 10 (seconds)]
■ [Playing Time Display]
Set to [On] to display a continuous record of time spent
using [Game] mode in the top right of the screen every
30 minutes. [Off] / [On]
– This function is available when [Viewing Mode] is set
to [Game].
(p. 13)
■ [Radio Mode]
Sets the timer to turn off the screen automatically when
a radio channel is selected.
[Off] / [5 / 10 / 15 / 20 seconds]
– The sound is active even when the screen is off.
This function could reduce power consumption when
listening to a radio channel.
– Press any button except Standby, Volume Up / Down
and Sound Mute buttons to turn on the screen.
– Not available in Analogue TV mode.
Using the Menu Functions
15
Page 16

[System Menu]
O
O
O
O
■ [Shipping Condition]
Resets all settings, including tuning data, to the original
condition.
– Access this function and follow the on-screen
instructions to complete the procedures.
– Initial Setup (p. 8) will automatically start after
[Shipping Condition] completes.
■ [System Update] (p. 18)
■ [Software Licence]
Displays the software licence information.
■ [System Information]
Displays the software version.
[Power Save]
Reduces brightness of picture to economise on power
consumption. [Off] / [On]
Using the [Tuning Menu]
Use the [Tuning Menu] to retune the TV automatically or
manually, add new channels, check signal conditions,
create your favourite channel lists, skip unwanted
channels, etc.
[Automatic Channel Search]
(TV mode only)
Retunes the channels received in your area
automatically.
●
Automatically searches and adds available channels to
Using the Menu Functions
the memory.
●
After the scan is complete, all previously saved
channels will be erased.
Automatic Channel Search
Searching channels...
Analogue : 0
Digital : 1
Scan
EXIT
RETURN
●
When the operation is completed, the channel at the
lowest position will be displayed.
●
If tuning has not been done completely, perform
[Analogue Manual Tuning].
[Scan]
Adds new channels automatically to the channel list.
Example: Antenna
Scan
Searching channels...
Analogue : 0
Digital : 1
Scan
5%
5%
[Analogue Manual Tuning]
Sets analogue channel manually.
Example: Antenna
Analogue Manual Tuning
Searching Channels
Start Frequency (MHz) 48.00
Scan up
Scan down
1 Enter the frequency to start scanning.
2 Select the scanning method.
Select
OK
• [Scan up]: Scans ascendingly from the entered
frequency to higher frequencies.
• [Scan down]: Scans descendingly from the entered
frequency to lower frequencies.
[DVB-T Signal Condition]
Shows the Digital TV signal condition.
Example:
DVB-T Signal Condition
Channel
Signal Level
Signal Condition
Bit Error Rate 0.00E-06
901
96
96
These bars show the maximum signal value of the
selected channel.
[DVB-T Manual Tuning]
Searches for the Digital TV channels manually.
All channels found will be added to the Channel List.
Select a channel position, then start tuning.
DVB-T Manual Tuning
Antenna
Scan
Channel 901
Signal Level
Signal Condition
OK
Change
0%
96
96
Access
[Favourites Edit]
Creates favourite channel lists from various
broadcasters.
Select a channel to add or remove from the list.
(
: Encrypted channel)
Favourites Edit
4
Digital
40
Digital
901
902
OK
Analog
Analog
Select
Add / Remove
: Add
: Remove
16
Page 17

[Skip]
Skips or hides unwanted channels.
Select a channel, then reveal / hide.
Skip
4
Digital
40
Digital
901
902
Analog
Analog
Select
OK
: Hide (skip)
: Reveal
Access
[Sort]
Sorts channels.
1 Select a channel
Sort
4
Digital
40
Digital
901
Analog
902
Analog
: Selected
Select
OK
: Unselected
Access
2 Swap the channel position (if available).
Select
OK
Access
[Channel List Edit]
Edits channel settings.
1 Select a channel.
Channel List Edit
Digital
4
40
Digital
Analog
901
902
Analog
Select
OK
Access
2 Edit the channel settings.
Channel List Edit
Network Name
Channel
Channel Name
Frequency (MHz)
Colour System
Sound System B/G
• You cannot change the [Network Name].
• [Frequency], [Colour System] and [Sound System]
edit are available for Analogue channels only.
Select an
item.
OK
Enter the new
settings.
Auto
40
48.25
or
Change the
settings.
OK
• You can set the characters by using the numeric and
cursor buttons as follows:
0
J K L 5
. ! : # 1 M N O 6
A B C 2 P Q R S 7
OK
D E F 3 T U V 8
G H I 4 W X Y Z 9
Backspace
[Clear block]
Clears the entire channel list.
Select [OK] to clear.
Are you sure?
OK Cancel
Setting [Child Lock]
You can lock specific channels / AV input terminals.
When the locked channel / input is selected, a message
appears. Enter the PIN number to watch.
Enter the PIN number (4 digits).
Child Lock-PIN Entry
Please enter new PIN
PIN
●
Enter the PIN number twice at first setting.
●
Write your PIN number here in case you forget it.
Child Lock
Change PIN
Child Lock List
Parental Rating
* * * *
Access
No Block
■ To lock channels or inputs
1 Select [Child Lock List].
2 Select a channel / input, then lock it.
Child Lock List - TV and AV
Name Input Type Lock
101 BBC 1 Wales
7 BBC THREE
14 E4C
Select
Lock
TV TV
TV TV
TV TV
EXIT
RETURN
Lock all Unlock all
Page up
Page down
( : Locked input / channel)
■ To change the PIN number
1 Select [Change PIN].
2 Enter a new PIN number twice.
■ To set parental rating
To watch the Digital TV programme that has rating
information over the selected age, enter the PIN
number (depending on the broadcaster).
The availability of this function depends on the area
you select
1 Select [Parental Rating].
2 Select the block setting.
Note
●
Setting [Shipping Condition] (p. 16) erases the PIN
number and all settings.
(p. 8).
Using the Menu Functions
17
Page 18

Performing [System Update]
BBC
To update automatically
Set [Auto Download] and [Auto Install] to [Yes].
Setup
Manual OAD Download
Auto Download
Auto Install
●
Once you have set the option, the TV automatically
performs a search and download any available update.
●
The automatic update can also perform when the TV
is in Standby
If [System Update] is performed, the software will
be updated (it may change TV functions).
If you do not want to do so, set [Auto Install] to
[No].
Ye
s
Yes
.
To update immediately
1
Select [Manual OAD Download].
Setup
Manual OAD Download
Auto Download
Auto Install
The TV searches for an update (several minutes) and
displays a corresponding message, if any.
Access
No
No
2 Download the update.
Note
●
Download may take more than 10 minutes.
●
During software download and update, DO NOT switch
f the TV.
of
●
The notification message might be a reminder. In this
case, the schedule information (the date that the new
version can be used) will appear. You can set the
reservation for update.
Using the Menu Functions | Additional Information
Additional
Information
Auto power standby function
The TV will automatically go into Standby mode in the
following conditions:
●
No signal is received and no operation is performed for
30 minutes in Analogue TV mode.
●
[Off Timer] is active in the [Timer] menu (p. 15).
●
No operation is performed for the period selected in
[Auto Standby] (p. 15).
Information banner
Example : Digital TV
4
BBC
1 Channel position and name
2 Programme details
3 Channel type ([Radio], [Data], etc.) /
Encrypted channel ( ) / TV mode ( , )
4 Programme
5 Programme Start / Finish time (Digital TV)
Channel number, etc. (Analogue TV)
6 Input signal
7 Current time
Icon / Message Meaning
[Encrypted] Scrambled programme
[Dolby Digital] Dolby Digital audio track
STTL
TTX
[ST], [Dual],
[Mono]
1 - 90 Off Timer remaining time
3214 756
Coronation Street
20:00-21:00
◄ Now ►
Sound mute On
Subtitle service available
Teletext service available
Audio mode
Exit info
1080i HD
Dolby Digital - 3/2, ST
■ To display extra information (Digital TV)
INFO
(Press again to hide the banner.)
Aspect
■ [16:9]
Directly displays the image at 16:9 without distortion
(anamorphic).
■ [14:9]
Displays the image at the standard 14:9 without
distortion.
■ [Just]
Displays a 4:3 image full-screen. Stretching is only
noticeable at the left and right edges.
■ [4:3]
Displays the image at the standard 4:3 without
distortion.
■ [4:3 Full]
Displays a 4:3 image enlarged horizontally to fit the
screen.
– For HD (High definition) signals only
■ [Zoom1]
Displays a 16:9 letterbox or 4:3 image without
distortion.
■ [Zoom2]
Displays a 16:9 letterbox (anamorphic) image fullscreen without distortion.
■ [Zoom3]
Displays a 2.35:1 letterbox (anamorphic) image fullscreen without distortion. At 16:9, displays the image at
its maximum (with slight enlargement).
20:05
18
Page 19

Note
●
Aspect is fixed to [16:9] when [Viewing Mode] is set to
[Game] in the [Picture] menu.
Input signal that can be displayed
Signal name COMPONENT HDMI
525 (480) / 60i, 60p
625 (576) / 50i, 50p
750 (720) / 60p, 50p
1,125 (1,080) / 60i, 50i
1,125 (1,080) / 60p, 50p, 24p
Mark : Applicable input signal
●
Signals other than above may not be displayed
properly.
●
The above signals are reformatted for optimal viewing
on your display.
Supported file format in Media Player
■ Photo
JPEG (.jpg, .jpeg)
– Supported resolution: 8 × 8 to 30,719 × 17,279
– DCF and EXIF standards
– Sub-sampling: 4:4:4, 4:2:2, 4:2:0
– Progressive JPEG is not supported.
■ Music
MP3 (.mp3) / AAC (.m4a)
LPCM (.wav) / FLAC (.flac)
/ WMA (.wma)
/
■ Video
AVI (.avi)
MP4 (.f4v, .m4v, .mp4) / FLV (.flv) / 3GPP (.3gp,
.3g2) / TS (.mts, .m2ts, .tp, .trp, .ts, .tts) / PS (.mod,
.mpg, .mpeg, .vob, .vro)
Copy-protected files cannot be played back.
WMA Pro and WMA Lossless are not supported.
Some subtitles or chapter functions may not be
available.
This TV supports this container recorded with
Panasonic products. For details, read the manual of
the products.
/ MKV (.mkv) / ASF (.asf, .wmv)
■ Subtitles
MicroDVD, SubRip, TMPlayer (.srt, .sub, .txt)
– The video file and subtitles text file are inside the
same folder, and the file names are the same except
for the file extensions.
– If there are more than one subtitles text file inside
the same folder, they are displayed in the following
order of priority: “.srt”, “.sub”, “.txt”.
Note
●
Even if these conditions are fulfilled, some files may
not play depending on how they are encoded.
●
Do not use two-byte characters or other special codes
for data.
●
Connected devices may become unusable with this TV
if the file or folder names are changed.
HDMI connection
This TV incorporates HDMI™ technology. HDMI
(high-definition multimedia interface) is the world’s first
complete digital consumer AV interface complying with
a non-compression standard.
HDMI allows you to enjoy high-definition digital images
and high-quality sound by connecting the TV and the
equipment.
■ Applicable HDMI features
●
Input audio signal:
2ch Linear PCM (sampling frequencies - 48 kHz,
44.1 kHz, 32 kHz)
●
Input video signal:
“Input signal that can be displayed” (p. 19)
Match the output setting of the digital equipment.
●
Audio Return Channel
(HDMI 2 terminal only)
■ DVI connection
If the external equipment has only a DVI output, connect
to the HDMI terminal via a DVI to HDMI adaptor cable.
When the DVI to HDMI adaptor cable is used, connect
the audio cable to the audio input terminal (use AV IN
AUDIO terminals).
Note
●
Audio settings can be made on [HDMI 1/2
Input(HDMI)] in the [Sound] menu.
●
These HDMI connectors are “type A”.
●
These HDMI connectors are compatible with HDCP
(High-Bandwidth Digital Content Protection) copyright
protection.
●
Equipment having no digital output terminal may be
connected to the input terminal of component or video
to receive analogue signals.
Audio Return Channel (ARC) is a function to send
/
digital sound signals via an HDMI cable.
USB Flash Memory
For playing back in Media Player
Format: FAT16, FAT32
Compliance:
Supports only USB1.1 or USB2.0 standard.
Maximum USB capacity supported is 16GB.
USB Hub or card adapter is not supported.
Note
●
Data modified with a PC may not be displayed.
●
Do not remove the device while the TV is accessing
data. Otherwise this can damage the device or TV.
●
Do not touch the pins on the device.
●
Insert the device in the correct direction. Otherwise this
can damage device or TV.
●
Electrical interference, static electricity, or erroneous
operation may damage the data or device. Panasonic
is not liable for any deterioration or damage of data or
device during operations with the TV.
●
It is recommended to connect the USB Flash Memory
directly to the TV’s USB port.
●
Some USB devices or USB HUB may not be used with
this TV.
●
You cannot connect any devices by using USB card
reader.
●
Additional information for USB devices may be on the
following website. (English only)
http://panasonic.jp/support/global/cs/tv/
Additional Information
19
Page 20

Troubleshooting
Before requesting service or assistance, please follow
these simple guides to resolve the problem.
If an error message appears, follow the message’s
instructions.
If the problem still persists, please contact your local
Panasonic dealer for assistance.
Screen
Red, blue, green or black spots on the
screen.
This is the characteristic of liquid crystal panels. The
liquid crystal panel is built with very high precision
technology. Occasionally, a few non-active pixels
may appear on the screen as points of red, green,
blue or black. This does not affect the performance
of your TV and it is not a quality problem.
Chaotic image, noisy.
Set [P-NR] in the [Picture] menu to remove noise
(p. 13).
Check nearby electrical products (car, motorcycle,
fluorescent lamp).
No image is displayed.
Check the settings of [Contrast], [Brightness] or
[Colour] in the [Picture] menu (p. 13).
Check the TV is in AV mode. If the TV is in AV mode,
check the selected input mode match the output of
the external equipment (p. 10).
Blurry or distorted image.
(No sound or low volume.)
Reset channels. (p. 16)
Unusual image is displayed.
Turn the TV off with Mains power On / Off switch
(p. 9), then turn it on again. If the problem
persists, initialise all settings. [Shipping
Condition] (p. 16)
Pictures from equipment connected via
HDMI are unusual.
Check the HDMI cable is connected properly.
Turn the TV and equipment off, then turn them on
again.
Check an input signal from the equipment (p. 19).
Use equipment compliant with EIA/CEA-861/861D.
Sound
No sound is produced.
Check the sound mute setting (p. 9) and volume.
Low level or distorted sound.
Sound signal reception may be deteriorated.
Sound output via HDMI connection is
unusual.
Set the sound setting of the connected equipment to
“2ch L.PCM”.
Check the [HDMI 1/2 Input(HDMI)] setting in the
[Sound] menu (p. 14).
If digital sound connection has a problem, select
analogue sound connection (p. 19).
General
The TV goes into Standby mode.
This TV is equipped with auto power standby
function (p. 18).
The remote control does not work or is
intermittent.
Replace the batteries (p. 6).
Point the remote control directly at the remote
control signal receiver of the TV (within about 7 m
and 30 degree angle).
Situate the TV away from sunshine or block sources
of bright light from shining on the remote control
signal receiver of the TV.
Parts of the TV become hot.
Even if the temperature of parts of the front, top and
rear panels has risen, these temperature rises do
not cause any problems in terms of performance or
quality.
The TV panel moves slightly when it is
pushed with a finger.
Clattered sound might be heard.
There is some flexibility around the panel to prevent
damage. This is not a malfunction.
Overcurrent error message appears.
The connected USB device might cause this error.
Remove the device and turn the TV off with Mains
power On / Off switch, then turn it on again.
Check foreign objects are not inside the USB port.
Troubleshooting
20
Page 21

Maintenance
Specifications
First, remove the mains plug from the socket
outlet.
Regular care
●
Gently wipe the surface of the display panel, cabinet
and pedestal by using a soft cloth.
●
Wipe the mains plug with a dry cloth at regular
intervals. Moisture and dust may lead to fire or
electrical shock.
For stubborn dirt
First clean the dust on the surface. Dampen a soft cloth
with clean water or diluted neutral detergent (1 part
detergent to 100 parts water). Wring the cloth and wipe
the surface. Finally, wipe away all the moisture.
Caution
●
Do not use a hard cloth or rub the surface too hard as
this could scratch the surface.
●
Do not subject the TV’s surfaces to water or detergent.
Liquid inside the TV could lead to product failure.
●
Do not subject the surfaces to insect repellent, solvent,
thinner or other volatile substances. This may degrade
surface quality or cause peeling of the paint.
●
The surface of the display panel is specially treated
and may be easily damaged. Take care not to tap or
scratch the surface with your fingernail or other hard
objects.
●
Do not allow the cabinet and pedestal to make contact
with a rubber or PVC substance for a long time. This
may degrade surface quality.
Model no.
TH-50A430A
TH-50A430Z
Power
Rating
AC 220 - 240 V, 50/60 Hz 0.47 A
Normal (Home) mode
58 W
Standby power consumption
0.20 W
Display panel
Panel
LCD panel (LED backlight)
Visible screen size (diagonal)
126 cm
Display resolution
1,920 (W) × 1,080 (H)
Dimensions (W × H × D)
1,126 mm × 697 mm × 260 mm (With Pedestal)
1,126 mm × 652 mm × 53 mm (TV only)
Mass
16.0 (With Pedestal)
(TV only)
15.0
Connection terminals
AV IN (COMPONENT / VIDEO)
VIDEO
RCA PIN Type × 1, 1.0 V[p-p] (75 )
AUDIO L - R
RCA PIN Type × 2, 0.5 V[rms]
Y
1.0 V[p-p] (including synchronisation)
P
B, PR
±0.35 V[p-p]
HDMI 1 / 2 input
TYPE A Connectors
USB
USB 2.0 TYPE A Connectors
DC 5 V, Max. 500 mA
DIGITAL AUDIO OUT
PCM / Dolby Digital / DTS, Fibre optic
Maintenance | Specifications
21
Page 22

Sound
h
u
a
h
e
u
h
s
f
u
o
h
)
c
o
)
o
T
f
S
d
N
n
-
h
e
c
x
e
a
v
e
d
a
e
P
T
R
Audio output
20 W (10 W + 10 W)
Receiving systems / Band name
Digital TV
7 MHz VHF / UHF (Australia) free-to-air
TV broadcast reception
8 MHz UHF (New Zealand) free-to-air
TV broadcast reception
PAL B / G
Reception of Off air broadcasts
PAL 60 Hz
Playback of NTSC tape from some PAL Video
recorders (VCR)
M.NTSC
Playback from M.NTSC Video recorders (VCR)
NTSC
Playback from NTSC Video recorders (VCR)
Aerial input
Operating conditions
Temperature
0 °C - 35 °C
Humidity
20 % - 80 % RH (non-condensing)
Note
●
Design and Specifications are subject to change
without notice. Mass and Dimensions shown are
approximate.
Standard Belling & Lee connector
VHF / UHF
This product incorporates the following software:
(1) the software licensed under the GNU General
Public License, Version 2.0 (GPL V2.0) and/or,
(2) open sourced software other than the software
licensed under the GPL.
The software categorized as (1) - (2) are distributed
in the hope that it will be useful, but WITHOUT
ANY WARRANTY, without even the implied
warranty of MERCHANTABILITY or FITNESS FOR
A PARTICULAR PURPOSE. Please refer to the
detailed terms and conditions thereof shown in the
“Software License” menu on this product.
At least three (3) years from delivery of this product,
Panasonic Corporation will give to any third party who
contacts us at the contact information provided below,
for a charge no more than our cost of physically
performing source code distribution, a complete
machine-readable copy of the corresponding source
code covered under GPL V2.0 or the other licenses
with the obligation to do so, as well as the respective
copyright notice thereof.
Contact Information: cdrequest@unipf.jp
The source code and the copyright notice are also
available for free in our website below.
http://www.unipf.jp/dl/DTV13ET/
Specifications
22
Page 23

ytnarraW
1. The product is warranted for 12 months from the date of purchase. Subject to the conditions of this warranty Panasonic or its
Authorised Service Centre will perform necessary service on the product without charge for parts or labour, if in the opinion of
Panasonic, the product is found to be faulty within the warranty period.
2.
This warranty only applies to Panasonic products purchased in Australia and sold by Panasonic Australia or its Authorised Distributors or
Dealers and only where the products are used and serviced within Australia or it's territories. Warranty cover only applies to service carried
out by a Panasonic Authorised Service Centre and only if valid proof of purchase is presented when warranty service is requested.
3. This warranty only applies if the product has been installed and used in accordance with the manufacturer’s recommendations (as noted
in the operating instructions) under normal use and reasonable care (in the opinion of Panasonic). The warranty covers normal domestic
use only and does not cover damage, malfunction or failure resulting from use of incorrect voltages, incorrect installation, accident,
misuse, neglect, build-up of dirt or dust, abuse, maladjustment of customer controls, mains supply problems, thunderstorm activity,
infestation by insects or vermin, tampering or repair by unauthorised persons (including unauthorised alterations), introduction of sand,
humidity or liquids, commercial use such as hotel, office, restaurant, or other business or rental use of the product, exposure to abnormally
corrosive conditions or any foreign object or matter having entered the product.
4. This warranty does not cover the following items unless the fault or defect existed at the time of purchase:
(b) Video or Audio Tapes (f) Video / Audio Heads from wear and tear in normal use
(c) SD cards or USB devices (g) Information stored on Hard Disk Drive, USB stick or SD card
(d) User replaceable Batteries (h) DTV reception issues caused by TV Aerial / Cabling / Wall socket(s)
etc
5. Some products may be supplied with Ethernet connection hardware. The warranty is limited on such products and will not cover
(a) Internet and or DLNA connection / setup related problems
(b) Access fees and or charges incurred for internet connection
(c) The use of incompatible software or software not specifically stipulated in the product operations manual; and
(d) Any indirect or consequential costs associated with the incorrect use or misuse of the hardware, its connection to the internet or
any other device.
6. To claim warranty service, when required, you should:
Telephone Panasonic’s Customer Care Centre on 132600 or visit our website referred to below and use the Service Centre Locator
for the name/address of the nearest Authorised Service Centre.
Send or take the product to a Panasonic Authorised Service Centre together with your proof of purchase receipt as a proof of purchase
date. Please note that freight and insurance to and / or from your nearest Authorised Service Centre must be arranged by you.
Note that home or pick-up/delivery service is available for the following products in the major metropolitan areas of Australia or the
normal operating areas of the nearest Authorised Service Centres:
- Plasma/LCD televisions / displays (screen size greater than 103 cm)
7. The warranties hereby conferred do not extend to, and exclude, any costs associated with the installation, de-installation or
re-installation of a product, including costs related to the mounting, de-mounting or remounting of any screen, (and any other ancillary
activities), delivery, handling, freighting, transportation or insurance of the product or any part thereof or replacement of and do not
extend to, and exclude, any damage or loss occurring by reason of, during, associated with, or related to such installation,
de-installation, re-installation or transit.
Panasonic Authorised Service Centres are located in major metropolitan areas and most regional centres of Australia, however, coverage
will vary dependant on product. For advice on exact Authorised Service Centre locations for your product, please telephone our Customer
Care Centre on 132600 or visit our website and use the Service Centre Locator.
In addition to your rights under this warranty, Panasonic products come with consumer guarantees that cannot be excluded under the
Australian Consumer Law. If there is a major failure with the product, you can reject the product and elect to have a refund or to have the
product replaced or if you wish you may elect to keep the goods and be compensated for the drop in value of the goods. You are also entitled
to have the product repaired or replaced if the product fails to be of acceptable quality and the failure does not amount to a major failure.
If there is a major failure in regard to the product which cannot be remedied then you must notify us within a reasonable period by contacting
the Panasonic Customer Care Centre. If the failure in the product is not a major failure then Panasonic may choose to repair or replace the
product and will do so in a reasonable period of time from receiving notice from you.
scsiD elbadroceR ro ,yar-ulB ,DVD )e( )s(traP tenibaC )a(
THIS WARRANTY CARD AND THE PURCHASE DOCKET (OR SIMILAR PROOF OF PURCHASE)
SHOULD BE RETAINED BY THE CUSTOMER AT ALL TIMES
If you require assistance regarding warranty conditions or any other enquiries, please visit the
Panasonic Australia website www.panasonic.com.au or contact by phone on 132 600
If phoning in, please ensure you have your operating instructions available.
Panasonic Australia Pty. Limited
ACN 001 592 187 ABN 83 001 592 187
PRO-031-F11 Issue: 4.0 01-01-2011
1 Innovation Road, Macquarie Park NSW 2113
23
Page 24

WARRANTY - New Zealand only
NEW ZEALAND
Distributed in New Zealand by Panasonic New Zealand Limited
350 Te Irirangi Drive East Tamaki, Private Bag 14911, Panmure Auckland
Tel. 09 272 0100
Customer Care Center
Email: Customerservice@nz.panasonic.com
www.panasonic.co.nz
Information on Disposal in other Countries
outside the European Union
This symbol is only valid in the European
Union. If you wish to discard this product,
please contact your local authorities or
dealer and ask for the correct method of
disposal.
Web Site: http://panasonic.net
© Panasonic Corporation 2014
Customer’s Record
The model number and serial number of this product
may be found on its rear panel. You should note this
serial number in the space provided below and retain
this book, plus your purchase receipt, as a permanent
record of your purchase to aid in identification in
the event of theft or loss, and for Warranty Service
purposes.
Model Number
Serial Number
F0214-1044
Printed in Malaysia
 Loading...