

Page 1

2012 Plasma TV Troubleshooting Guide
2012-Plasma FHD TV – ST Series (15
Applies to models:
TC-P50ST50
TC-P50UT50
th
Generation)
National Training Department
Panasonic Consumer Marketing
Company Of North America
TTG120313CP120417
Page 2

Important Information
• To avoid the unnecessary replacement of multiple PC boards, please read this before
beginning to repair this unit.
• Do not use any service documentation oth er than the one designed for this particular model.
• Techniques used on previous models may not necessarily apply to the model you are
working on.
• For accurate diagnosis during troubleshooting, do not skip or alter the order of steps on the
guide.
Slide 2
Page 3

SOS Precautions
When an abnormality occurs in the unit, the “SOS Detect” circuit is triggered and the TV shuts down.
The power LED on the front panel will flash a pattern indicating the circuit that has failed.
Cautions:
If the power LED continues to blink even after the TV is unplugged, press and hold the power switch
on the TV for a few seconds until the LED turns off.
Some steps require removal of connectors and sometimes PC boards removal. Do not allow the TV to
run for more than 30 seconds while connectors or boards are disconnected.
NOTE: When taking voltage reading, place your meter’s probe on the test point or pin indicated before
connecting the TV to the AC line. The voltage you intent to measure may only appear for a brief
moment.
Warning: The Vsus line has large capacitors that hold the charge for some time even after the TV has been turned off and
unplugged. When disconnecting P2/SC2 or P11/SS1, bleed the remaining charge of the Vsus before reconnecting the cable.
Use a 500 ohms/ 5W (At least) resistor to discharge the Vsus line before reconnecting P2/SC2 or P11/SS11.
Slide 3
Page 4
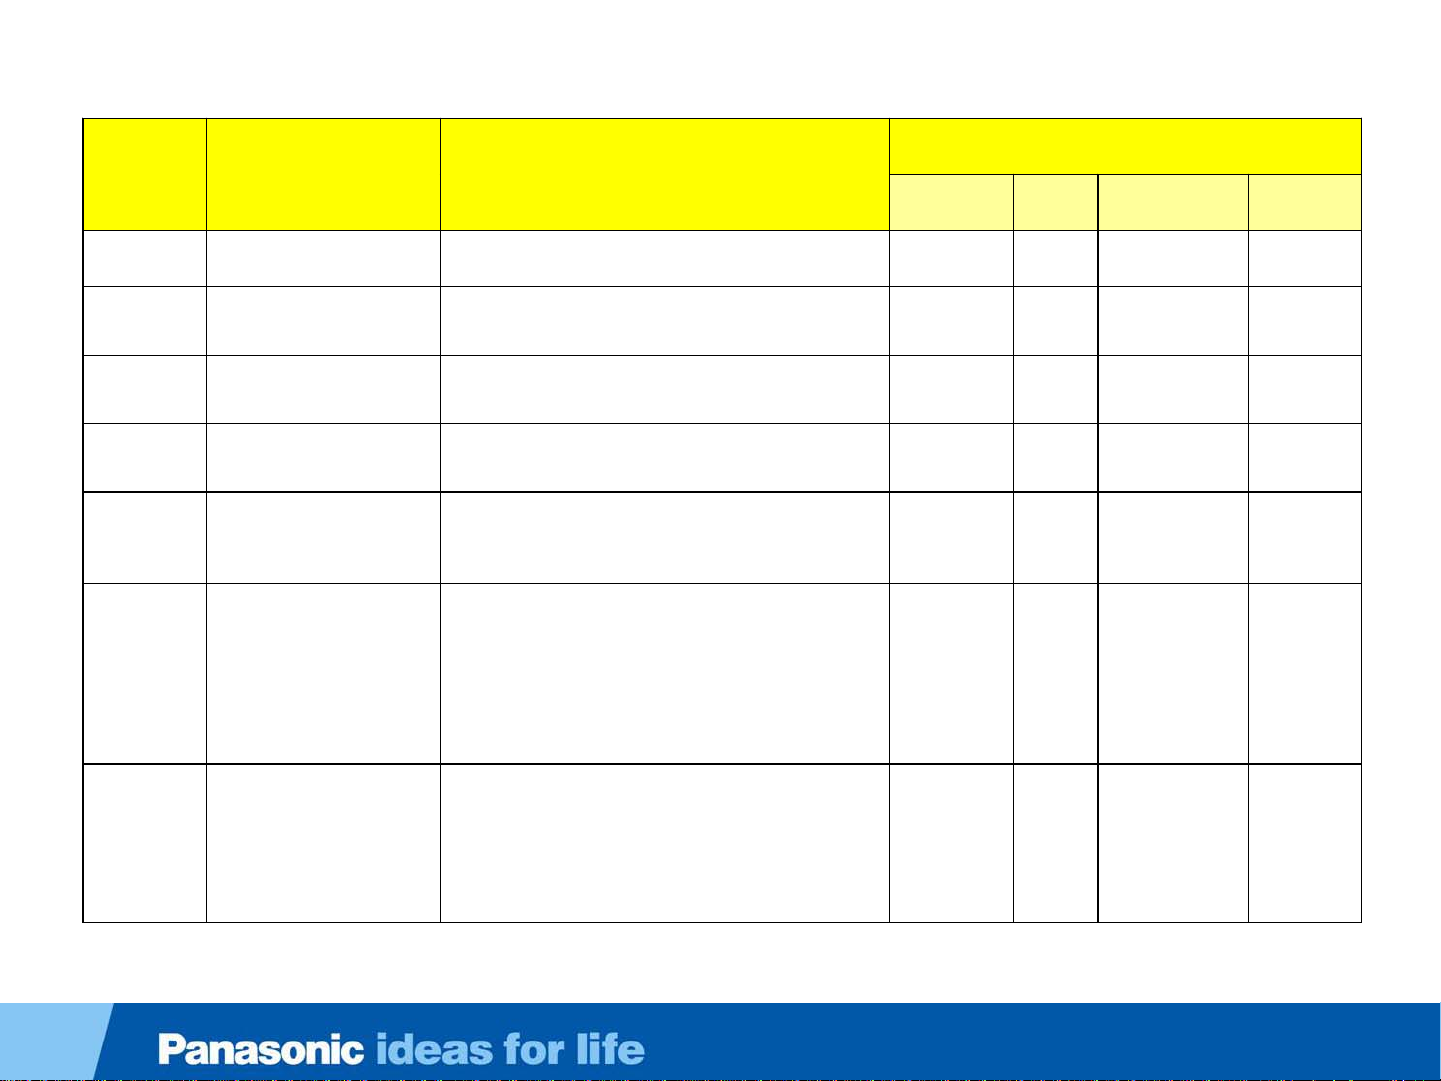
Power LED Error Code Definition (1 of 2)
POWER LED
ERROR
CODE
1 BLINK
2 BLINKS P15V form the P board
3 BLINKS
4 BLINKS
6 BLINKS SC Energy Recovery Circuit
7 BLINKS
8 BLINKS
CIRCUIT MONITORED
Panel Information SOS
Incomplete or interrupted
Boot Program execution of
PEAKS IC (IC8000).
Power Supply output
voltages
Scan Drive Circuit and
Connection between the SC
board and the SC board.
Sustain Drive Circuit and
Connection between the SS
board and the Panel.
CONDITIONS TRIGGERING
THE SHUTDOWN
Communication problem A
Missing P15V
P15V is not been generated by the P board.
Wrong diagnostic by the A board
Shorted P15V
Missing F15V
Wrong diagnostic by the A board
Vsus Over Voltage Condition.
P15V Shorted while in operation.
Wrong diagnostic by the A board
An increase or reduction of the Energy Recovery Circuit
output (MID).
Shorted SUB5V.
Wrong diagnostic by the A board.
Missing or shorted Vsus.
Abnormality of the scan circuit output, the 15V_F, the
scn_pro, and Vscn circuit.
Loose or open Connection between the SC board and the
SC board (SC41, SC42, SC46).
Open or loose connection between connectors SC2/P2
Wrong diagnostic by the A board
Defective panel
Abnormality of the sustain drive circuit.
Open or loose connection between the SS/SS2 Boards.
and FPCs from the panel (SS52 – SS54 – SS55 – SS57).
Open or loose connection between connectors C10/C20 or
C26/C36.
Wrong diagnostic by the A board
LIST OF BOARDS POSSIBLY CASUSING THE FAILURE
#1 Suspect #2 # 3 Occasionally
P A
A P
P A
SC A C
SU/SD SC SS A/Panel
SS A C3 Panel
Not Often
#4
Slide 4
Page 5
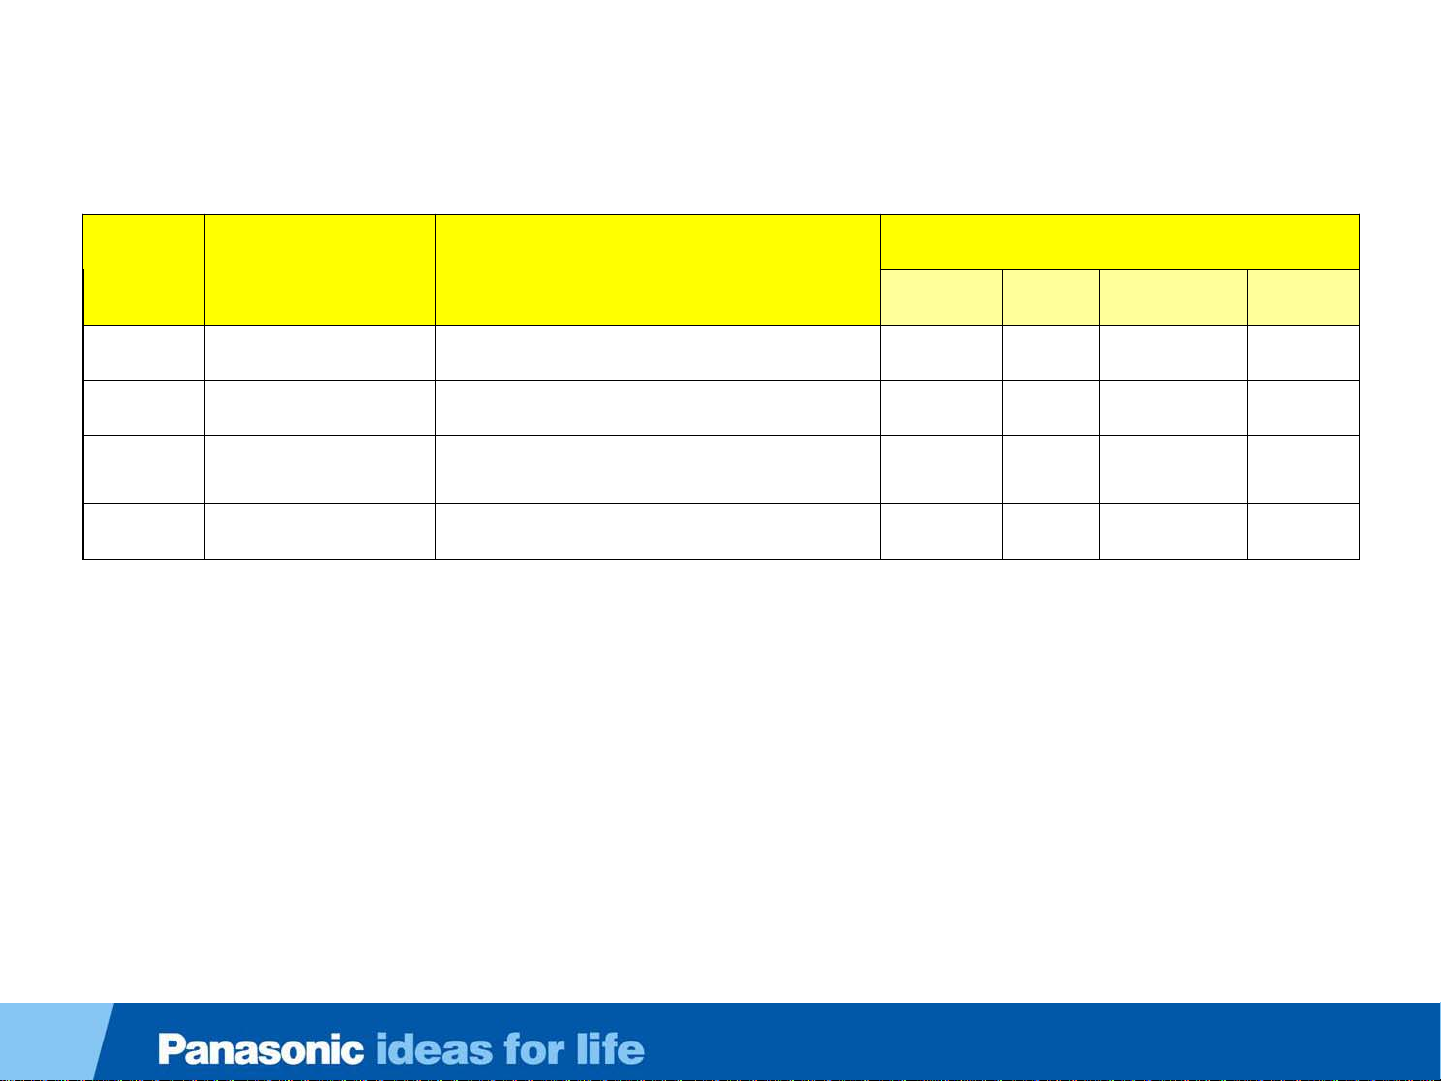
Power LED Error Code Definition (2 of 2)
POWER LED
ERROR
CODE
9 BLINKS
10 BLINKS SUB3.3V_Sense (OVP)
12 BLINKS Audio Amp. Circuit
13 BLINKS
CIRCUIT MONITORED
Discharge Control Circuit
DDC (IC9300)
IC8000 Internal
Communication
CONDITIONS TRIGGERING
THE SHUTDOWN
Failure of IC9300
Wrong diagnostic by the A board
Over Voltage Condition of SUB5V or SUB3.3V
Wrong diagnostic by the A board.
Defective Speaker/Subwoofer
Pinched Speaker Wire
Wrong diagnostic by the A board
Defective A board A
LIST OF BOARDS POSSIBLY CASUSING THE FAILURE
#1 Suspect #2 # 3 Occasionally
A
A
A
Speakers/
Subwoofer
Not Often
#4
Slide 5
Page 6
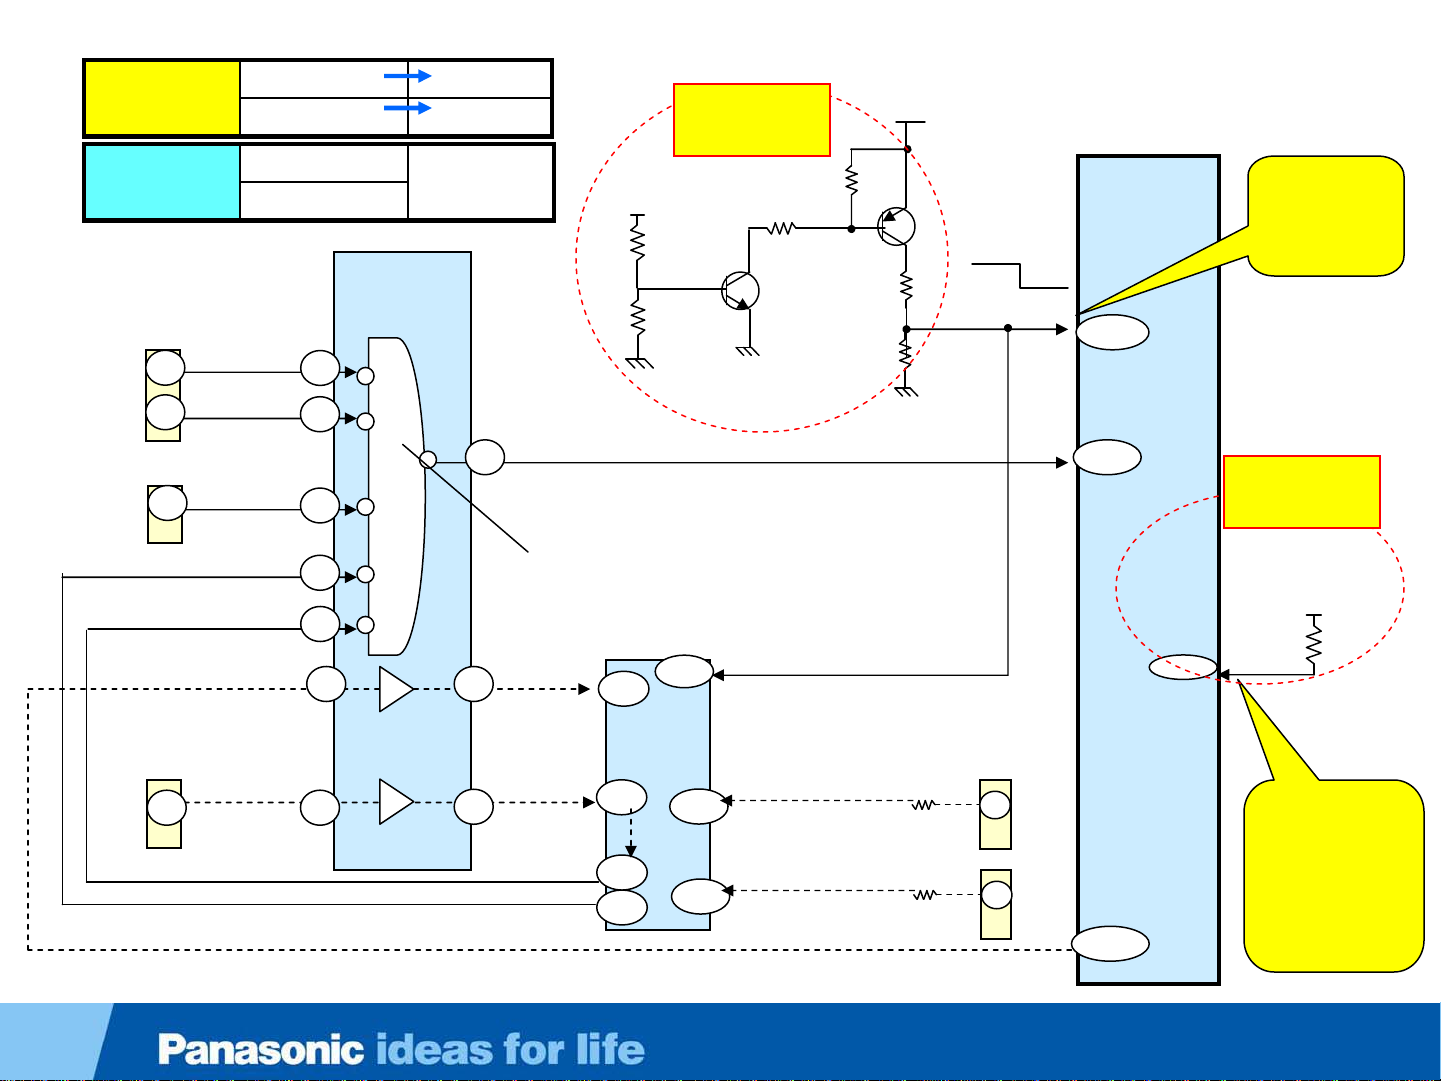
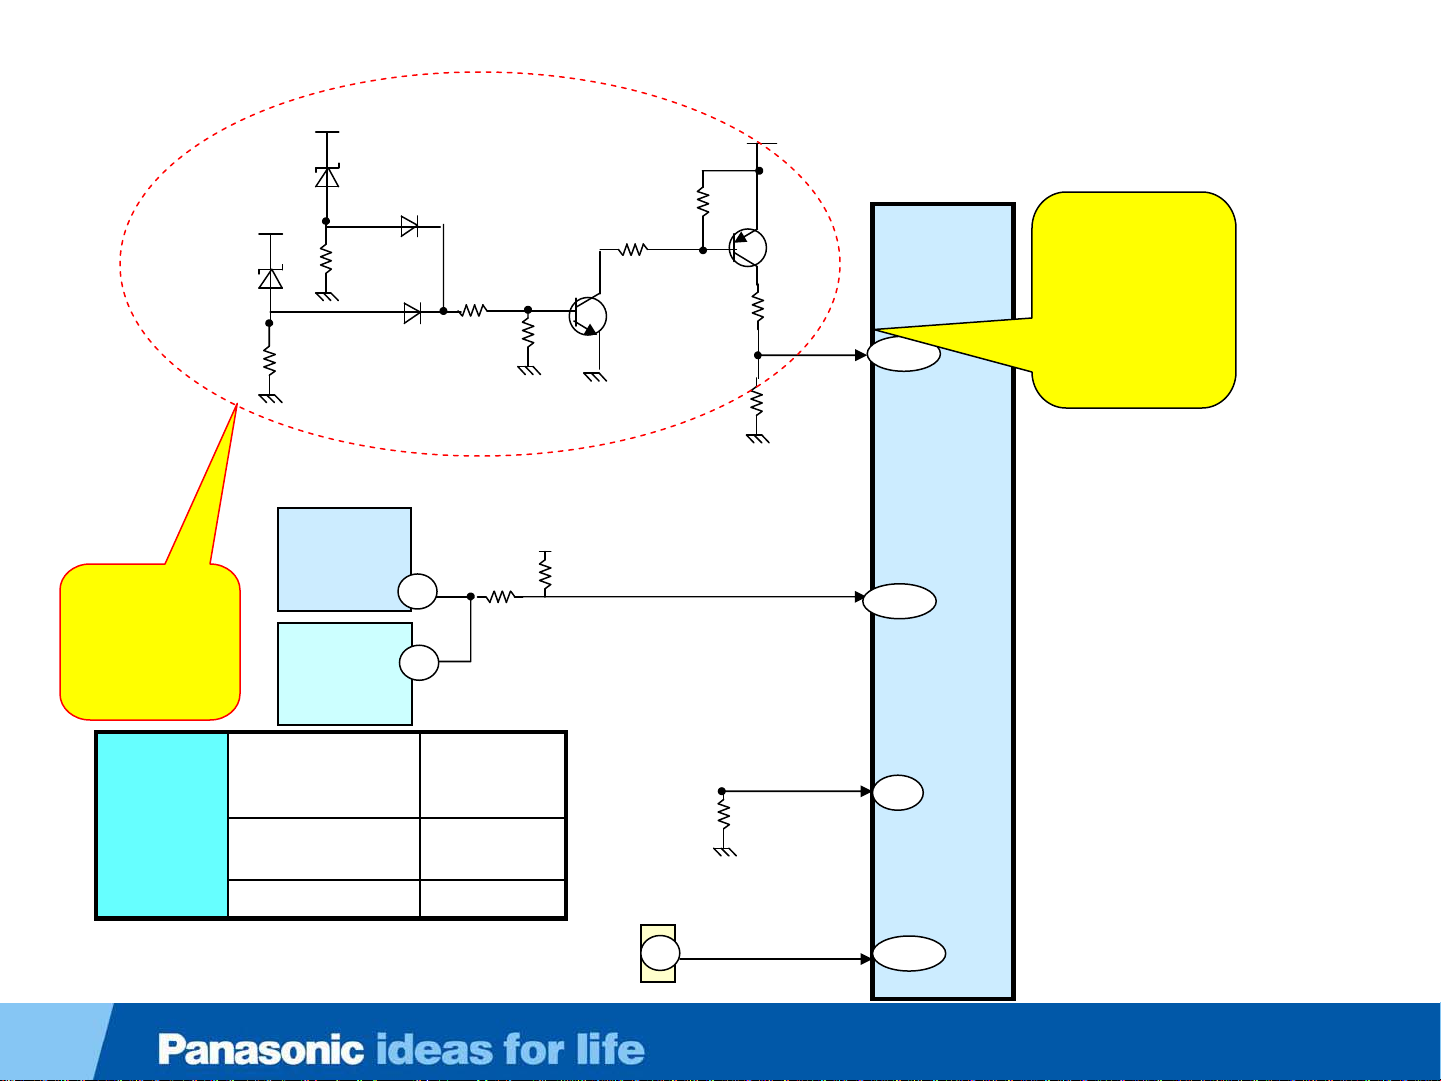
Protection Circuit Block Diagram 1 of 2 (TC-P50ST50)
P15V
SUB3.3V
A20
SC_SOS6
3
SC
SS
FFC_OFF_DET(6)
SC
SC_SOS7
6
A33
SS_SOS8
5
SOS_DCC_S (9)
A20
SC_UHZ
Missing 2 Blinks
Shorted 3 Blinks
Missing 3 Blinks
Shorted
At plug-in
IC5000
REG
(STB3.3V)
RESET
9
11
12
10
8
7
1314
(If no signal,
Discharge Reset
6/8 blinks)
:
179
18
P15V
Det. Circuit
P15V
Q9201
(Analog output)
6 – 9 blinks
Normal : all input = “L”
(output = “L” )
DRVRST
D_UHZ
C24
M28
T4
IC9300
W3
N2
AG3
W28
P3.3V
Q9201
N
2 blinks
SOS
PANEL_SOS
(If no 3.3V in C1/C2-PCB,
Discharge Reset
6/8 blinks)
:
3.3V_DET
A31
55
A32
1
PDP_DRVRST
SOS
C
TC-P**ST50/UT50
AE20
IC8000-1
AD15
Peaks
LD4
AD16
Standby
uCOM
System
uCOM
AF16
(TNPH0989**)
2 Blinks
if P15 is
missing
SUB3.3V
Det. Circuit
SUB3.3V
3 blinks
3 Fast
Blinks
At plug-in
if SUB3.3
is missing
Slide 6
Page 7
Blink Code/Voltage Condition (TC-P50ST50 - TC-P50UT50)
No. of Blinks
Voltage Condition
TC-P50UT50 TC-P50ST50
Missing 2 Blinks 2 Blinks
P15V
SUB3.3V
SUB5V
No power. The LED turns o n
Shorted
Missing 3 Fast Blinks at Plug-in 3 Fast Blinks a t Plug-in
Shorted 3 Fast Blinks at Plug-in 3 Fast Bli nks at Plug -in
Over Voltage
Missing 3 Fast Blinks at Plug-in 3 Fast Blinks a t Plug-in
Shorted 6 Blinks After 11sec. 6 Blinks After 11sec.
Over Voltage
briefly and then it goes off
immediately
Dead. Power LED never
turns on
Dead. Power LED never
turns on
3 Fast Blinks
10 Blinks
10 Blinks
Slide 7
Page 8
Protection Circuit Block Diagram 2 of 2 (TC-P50ST50)
SUB5V &
SUB3.3V
OV Det.
Circuit
SUB5V
SUB3.3V
IC4900
IC4901
Audio
AMP
Audio
AMP
22
22
SUB3.3V
Normal=“H”
Q8771
STB3.3V
Q8771
10 blinks
SOUND_SOS
12blinks
TC-P**ST50/UT50
(TNPH0989**)
10 Blinks if
SUB5V or
SUB3.3V is
too high
AA15
SOS
IC8000-2
Peaks
LD4
AD19
Standby
uCOM
SUB5V
Missing 3 Fast
Shorted 6 blinks
after 11 sec.
Over Voltage 10 blinks
Emergency : 13 blinks
IROM error : quickly 3 blinks
blinks at
plug-in
P
FAN_SOS
(11blinks)
A6
ALL_OFF(P_SOS4)
4
4 blinks
System
H6
uCOM
AE15
Slide 8
Page 9
Troubleshooting 1 -9 -10 - 13 Blinks Failure
Blink
List of boards likely to cause this symptom
Code
No.1 No.2 No.3 No.4
1 A Board
9 Blinks A Board
10 Blinks A Board
13 Blinks A Board
When 1, 9, 10, or 13 blinks occur, replace the A board
Slide 9
Page 10
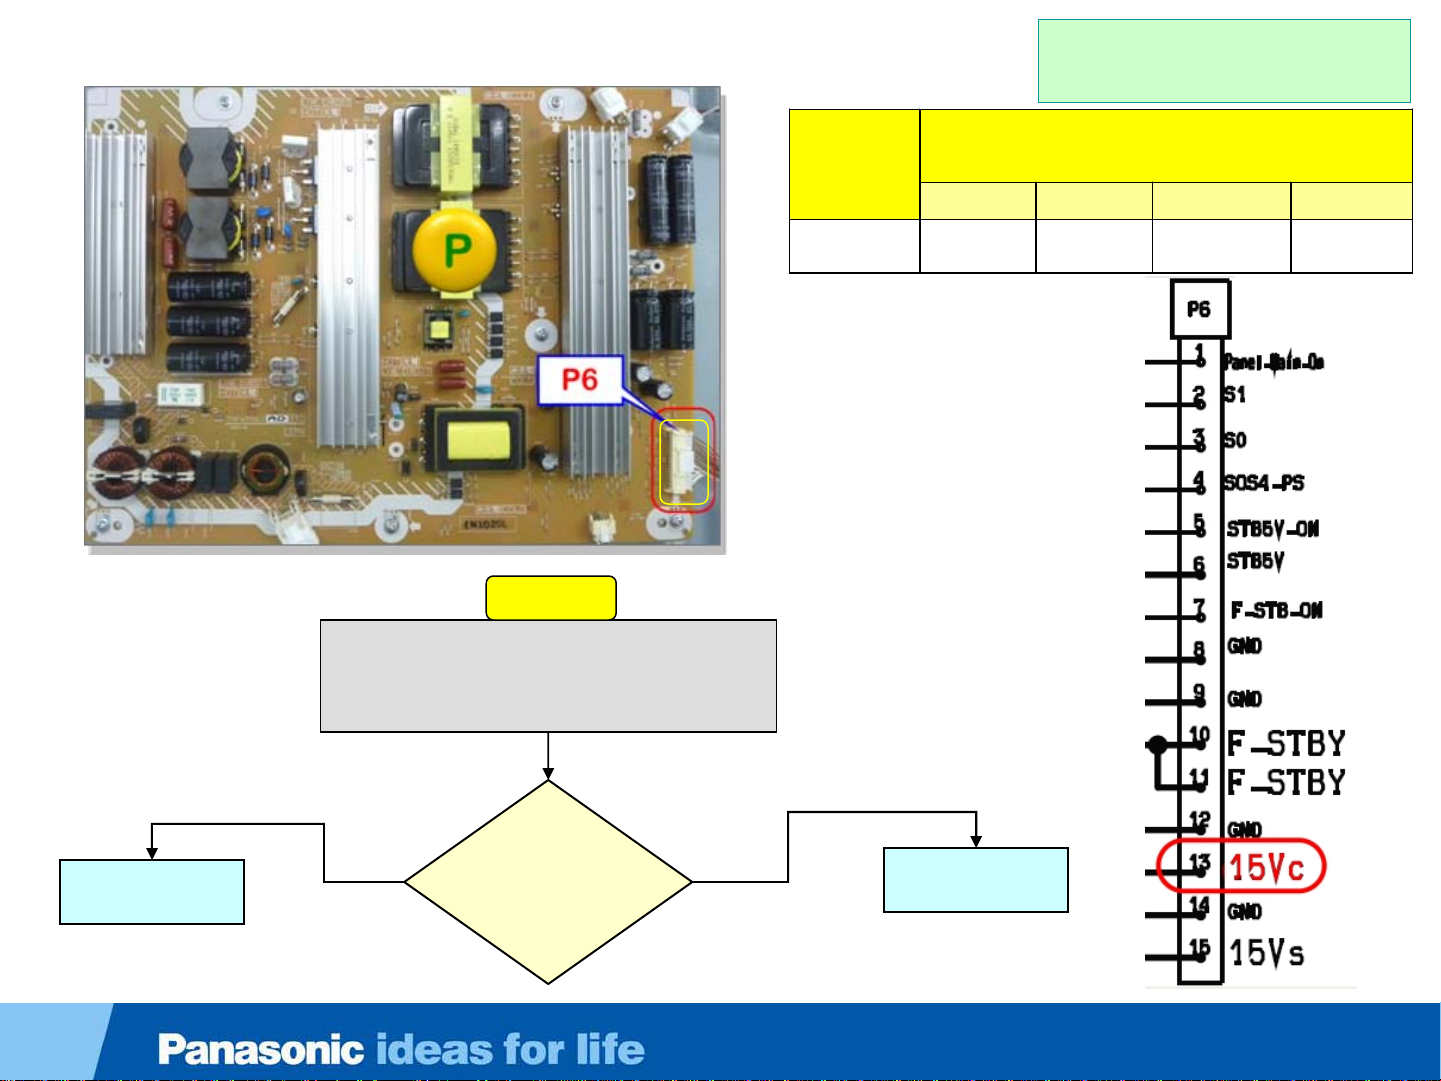
Troubleshooting 2 Blinks Failure (TC-P50ST50)
Find information for TC-
P50UT50 on the next slide)
Start Here
Place the positive lead of a voltmeter at pin 13
of connector P6 while the black lead is
connected to ground (Chassis ground). Plug in
the TV and turn it on
Blink
List of boards likely to cause this
symptom.
Code
No.1 No.2 No.3 No.4
2 Blinks P A
Replace the A
board
Yes
Does 15V
appears
momentarily
on pin13 of
CN P6?
No
Replace the P
board
Slide 10
Page 11
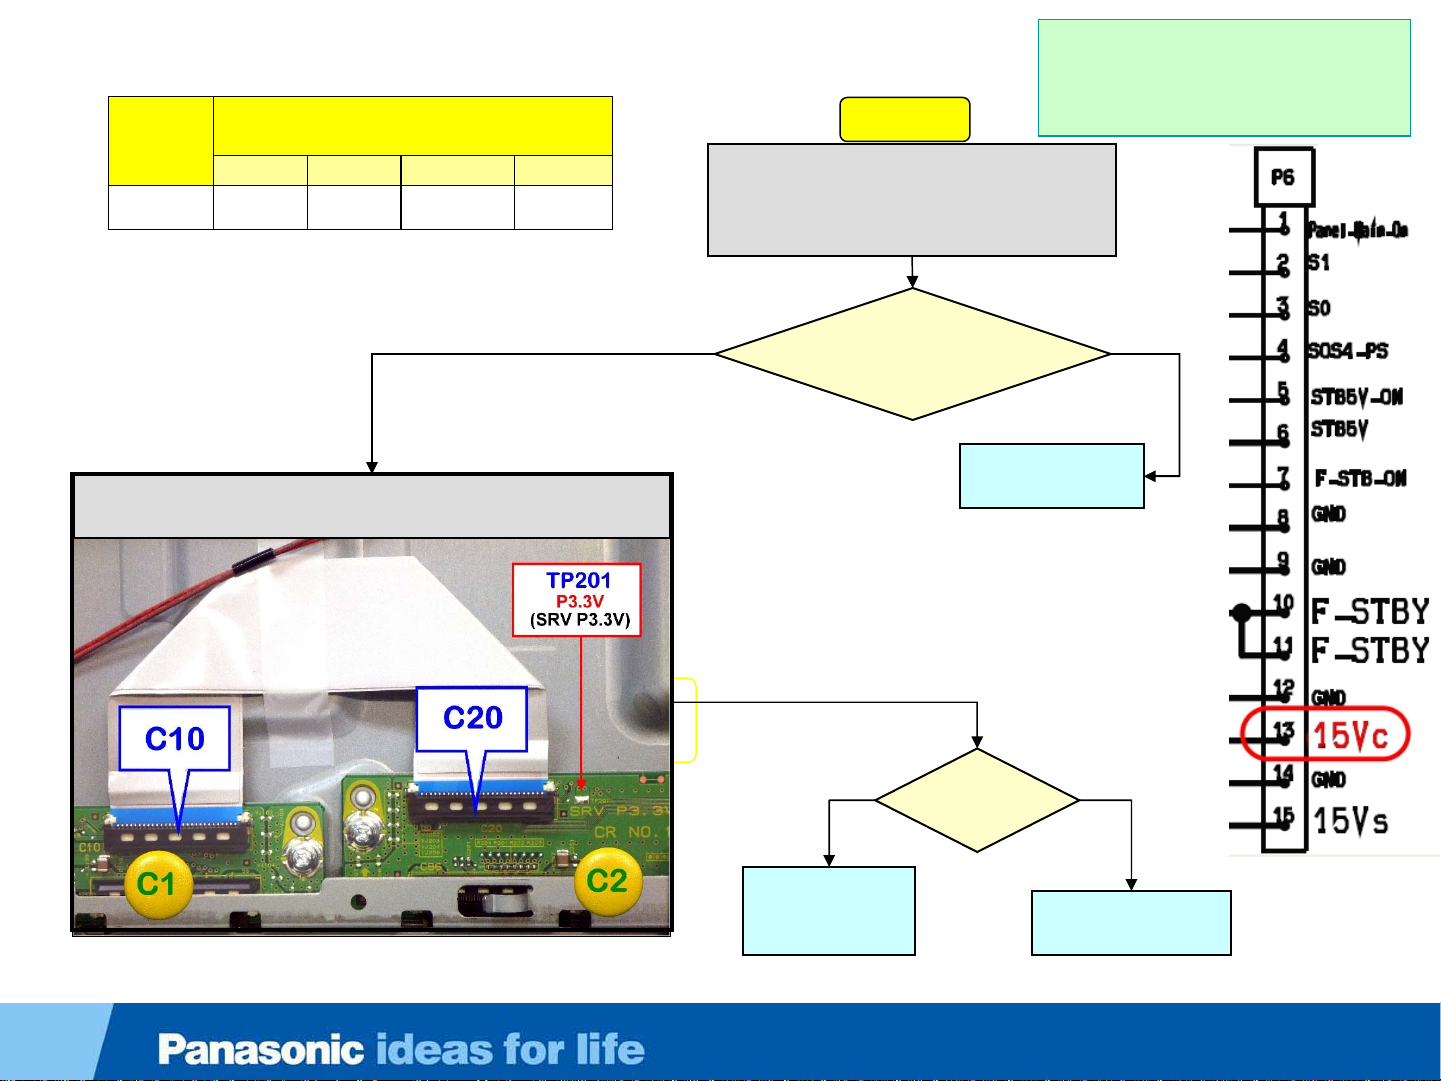
Troubleshooting 2 Blinks Failure (TC-P50UT50)
Blink
Code
List of boards likely to cause this
symptom.
No.1 No.2 No.3 No.4
2 Blinks P A Panel/C2
Place the positive lead of a voltmeter at
pin 13 of connector P6 while the black lead
is connected to ground (Chassis ground).
Plug in the TV and turn it on
Start Here
Find information for TC-
P50ST50 on the previous
slide)
Unplug the TV. Check the resistance between TP201 (P3.3V)
on the C2 board and chassis ground.
Yes
Does 15V appears
momentarily on
pin13 of CN P6?
Yes No
Defective
Panel and/or
C2 board
No
Replace the P
board
Is there a
short
circuit?
Replace the A
board
Slide 11
Page 12

Troubleshooting 3 Fast Blinks Failure (TC-P50ST50)
List of boards likely to cause this symptom. Blink
Code
3 Blinks A P SS/SC
No.1 No.2 No.3 No.4 No.5
Bluetooth
Module
With the TV still disconnected, remove connector
A6 from the A board and perform the same
resistance check on pin 13 of connector P6.
Is there a short circuit
or a resistance lower
than 1 Kilo-ohm?
Yes
Reconnect SS33 and remove connector
A31 and A32 from the A board and
check for short circuit or low resistanc e
on pin 13 of connector P6.
Replace the P
board
No
than 1 Kilo-ohm?
Replace the SS
board
Yes
Is there a short
circuit or a
resistance lower
Start Here
Unplug the TV. Check for short circuit or low
Panel
resistance between pin 13 of connector P6
and ground (Chassis ground).
Is there a short
Yes
circuit or a
resistance
lower than 1
Kilo-ohm?
No
Reconnect SC20 and remove
connector SS33 from the SS board
and check for short circuit or low
resistance on pin 13 of connector P6.
Unplug the blue-
tooth module. If the
blinking stops,
change the blue-
tooth module
No
Reconnect A6 and remove connector SC20
from the SC board and check for short circuit
or low resistance on pin 13 of connector P6.
Yes
short circuit or
a resistance
lower than 1
Replace the A
board
Is there a
No
Kilo-ohm?
Replace the A
board
Yes
Is there a
short circuit or
a resistance
lower than 1
Kilo-ohm?
No
If no short
circuit is found
on any of the C
boards, change
the panel
Replace the SC
board
Slide 12
Page 13

Troubleshooting 3 Fast Blinks Failure At Plug-in (TC-P50UT50)
List of boards likely to cause this symptom. Blink
Code
3 Blinks A P K
No.1 No.2 No.3 No.4 No.5
Bluetooth
Module
Unplug the TV and remove connector K1 from the A board.
Plug in the TV and press the power switch on the TV.
Replace the K
board
Defective Panel or/and the C3 board.
Does the TV turn
on and stays on?
C3/Panel
Start Here
Unplug the TV. Connect the negative (Black
lead) of your DC volt- meter on chassis
ground. Place the positive lead of on pin 10 of
connector P6 on the power supply. While
observing the display on your meter, plug-in
the TV.
Yes
Does 15V
appear briefly?
NoYes
Unplug the TV and reconnect K1. Disconnect
connectors A31 and A32 from the A board.
Plug-in the TV.
Unplug the blue-
tooth module. If the
blinking stops,
change the blue-
tooth module
No
Replace the P
board
To time it takes to isolate the C3 board from the
panel is approx. 30 minutes.
To isolate the C3 board, reconnect A3 1 and A32
and remove the metal bracket over the C
boards. Disconnect connector s CB12~CB15
from the C3 board and plug-in the TV. If the
power LED stops blinking at plug-in, then the
Panel is defective. If the LED blinks 3 times,
then the C3 board is defective.
8 Times
Is the power
LED blinking
3 or 8 times?
3 times
Replace the A
board
Slide 13
Page 14

Troubleshooting 3 Fast Blinks Failure At Power-On (TC-P50UT50)
( 1 of 2)
Start Here
1. Unplug the TV.
2. Remove any residual charge from the Vsus and Vda lines. Use a 5W 500ohms resistor.
3. Measure the resistance between chassis ground and pin 1 of connector P11 on the P board. Also measure the
resistance between chassis ground and pin 1 of connector P35 on the P board. (See the picture below for
connectors’ location.) Note: A dead short or a reading lower than 1K indicates a shorted or partially shorted line.
POWER SUPPLY
No
Replace the A
board
Is there a short
circuit of the
Vsus or Vda,?
Yes
Shorted
Vsus
Continue on
next slide (A)
Shorted
Vda
Continue on
next slide (B)
Slide 14
Page 15
( 2 of 2)
From previous
slide (A)
From previous
slide (B)
Unplug connectors P2 and P11, on the P
board. Measure the resistance between pin
1 of connector P11 and ground (Chassis)
Yes
Replace the P
board
Replace the
SS
Replace the
SC board
Is there a
short
circuit?
No
No
No
With P2 and P11 disconnected,
measure the resistance between
pin1 of connector SC2 on the SC
board and ground (Chassis).
Is there a
short
circuit?
Is there a
short
circuit?
Yes
Yes
With P2 and P11 disconnected,
measure the resistance between
pin1 of connector SS11 on the
SS board and ground (Chassis).
Shorted
Vsus
Shorted
Vda
Replace the
SS and the
SC boards
Replace the Panel (Check
the C boards first for
shorted Vda).
No
Is there a
short
circuit ?
Yes
Unplug the TV and remove
connector P35. Check the
resistance between pin 1 of
connector P35 on the P
board and ground (Chassis).
Replace the P
board
Slide 15
Page 16

Troubleshooting 4 Blinks Failure
Blink
Code
No.1 No.2 No.3 No.4
4 Blinks P A
Start Here
Place the positive lead of a voltmeter at pin 4 of connector P6 while the black lead is connected to
ground (Chassis ground). Plug in the TV and turn it on
List of boards likely to cause this
symptom.
Replace the A
board
No
Is there 2V to 3V
(Approx.) momentarily
on pin 4 of CN P6?
Yes
Replace the P
board
Slide 16
Page 17

Troubleshooting 6 Blinks Failure
Blink
List of boards likely to cause this
Code
No.1 No.2 No.3 No.4
6 Blinks SC A
Start Here
Verify that all the cables on the SC board are properly seated. Also check the ribbon cables and connectors on the A
and C boards. Unplug the TV and disconnect connector SC20 on the SC board. Plug in the TV and turn it on
symptom.
Replace the A
board
6 Blinks
No
Did the
number of
blinks change
to 8 blinks?
Yes
Replace the SC
board
Slide 17
Page 18

Troubleshooting 7 Blinks (SOS 7)
A 7 blinks shutdown can be caused by a failure of any or a combination of the following boards:
SU/SD, SC, A, or the Panel. Is also possible for the SS board to cause 7 blinks shutdown on this model.
nd
2
Most Likely.
“SU or SD”
most
common.
“SC”
Possibly,
but not
common
“A”
SS
1 2 3
Note: This page indicates the order in which these boards are likely to fail. This information alone is not
enough to diagnose which board is defective. To determine the cause of a 7 blinks failure, follow the
troubleshooting procedure on the following pages.
Order of Failure
Slide 18
Page 19

Code
Blinks
Troubleshooting 7 Blinks Failure (TC-P50ST50)
List of boards likely to cause this symptom. Blink
No.1 No.2 No.3 No.4 No. 5 No. 6
SU SC SS A Panel 7
SD
Start Here
Check the wires between connector P2 on the P board and
SC2 on the SC board. Make sure they are properly seated. If
the problem persists, unplug the TV and remove connector
SS11 from the SS board. Plug-in the TV and turn it on.
Find information for TC-P50UT50 on slides 23~26
7 Times
Unplug the TV and reconnect SS11.
Remove SC20 from the SC board.
Plug-in the TV and turn it on.
8 Times
Unplug the TV. Reconnect SC20
and follow step #1 of the next slide.
Is the power
LED blinking 7
or 8 times?
Is the power
LED blinking 7
or 8 times?
Continue on the page after next
8 Times
7 Times
Replace the SS
board
Replace the A
board
Slide 19
Page 20

From before the previous page
Troubleshooting 7 Blinks Failure (F5V/TPSC Resistance Check)
Disconnect the AC prior to making any disconnection or connection. Wait at least 2 minutes before the removal of any connector.
Using any of the VFG screws (Floating ground screws)
1 2
Step Step
as ground, measure the resistance of pin 2 and pin 6 of
either SU41/SC41or SD42/SC42.
If a short circuit is found, proceed with step 2.
If no short circuit is found, isolate the SU and SD boards
as illustrated on the next slide.
A short circuit indicates the failure of the
board where it was found.
Unplug SU41 and SD42. Using any of the
VFG Screws (Floating ground screws) as
ground, measure the resistance of pin 2 and
pin 6 of bothSU41 and SD42.
Continue on the next page
Note: Change the SU and SD boars together
even if only one is found to be defective.
Slide 20
Page 21

From previous page
Yes
Unplug the TV and follow step 2 of the
previous slide.
Yes
SU/SD are Defective.
To find out if the SC board is also defective, follow
the procedure to on the next slide to isolate the SU
and SD boards. Plug in the TV and press the
power switch.
Is there still a
short circuit?
Is there a
short circuit?
No
No
Replace the SC
board
Follow the procedure on
the next slide to isolate
the SU and SD boards.
Plug in the TV and press
the power switch.
No
Replace the SC,
SU, and SD
boards
Does the TV
turn on and
stay on ?
(Black screen)
Yes
Replace both
the SU and SD
boards
No
Replace the SC
board
Does the TV
turn on and
stay on with
black screen?
Yes
Replace both
the SU and SD
boards
Slide 21
Page 22

Troubleshooting 7 Blinks Failure (SU/SD Boards Isolation Procedure)
Warning:
When performing this procedure, isolate the SU and SD boards
together at the same time. Do not attempt to isolate the SU or the
SD boards individually. This could cause further damages to the TV
Procedure:
1. Remove the 4 VFG screws from the SU and SD
boards. (See picture on the left side.)
2. Remove SC41, SC42, and SC46 from the SC
board.
3. Install the SC50 Jig or just jump pins 1 and 2 of
connector SC50 on the SC board.
Actual SC50 Jig
P/N:TZSC09187
4. Plug-in the TV and turn it on.
Note: Remove the jig or the jumper after
completing the isolation procedure.
Slide 22
Page 23

Code
Blinks
Troubleshooting 7 Blinks Failure (TC-P50UT50)
List of boards likely to cause this symptom. Blink
No.1 No.2 No.3 No.4 No. 5 No. 6
SU SC A Panel 7
SD
Check the wires between connector P2 on the P board and
SC2 on the SC board. Make sure they are properly seated. If
the problem persists, unplug the TV and remove connector
SC20 from the SC board. Plug-in the TV and turn it on.
7 Times
Find information for TC-P50ST50 on slides 19~22
Start Here
Is the power
LED blinking 7
or 8 times?
8 Times
Replace the A
board
Unplug the TV and follow step #1 of
the next slide.
Continue on the page after next
Slide 23
Page 24

From before the previous page
Troubleshooting 7 Blinks Failure (F5V/TPSC Resistance Check)
Disconnect the AC prior to making any disconnection or connection. Wait at least 2 minutes before the removal of any connector.
Using any of the VFG screws (Floating ground screws)
1 2
Step Step
as ground, measure the resistance of pin 2 and pin 6 of
either SU41/SC41or SD42/SC42.
If a short circuit is found, proceed with step 2.
If no short circuit is found, isolate the SU and SD boards
A short circuit indicates the failure of the
board where it was found.
Unplug SU41 and SD42. Using any of the
VFG Screws (Floating ground screws) as
ground, measure the resistance of pin 2 and
pin 6 of bothSU41 and SD42.
Continue on the next page
Note: Change the SU and SD boars together
even if only one is found to be defective.
Slide 24
Page 25

From previous page
Yes
Unplug the TV and follow step 2 of the
previous slide.
Yes
SU/SD are Defective.
To find out if the SC board is also defective, follow
the procedure to on the next slide to isolate the SU
and SD boards. Plug in the TV and press the
power switch.
Is there still a
short circuit?
Is there a
short circuit?
No
No
Replace the SC
board
Follow the procedure on
the next slide to isolate
the SU and SD boards.
Plug in the TV and press
the power switch.
No
Replace the SC,
SU, and SD
boards
Does the TV
turn on and
stay on ?
(Black screen)
Yes
Replace both
the SU and SD
boards
No
Replace the SC
board
Does the TV
turn on and
stay on with
black screen?
Yes
Replace both
the SU and SD
boards
Slide 25
Page 26

Troubleshooting 7 Blinks Failure (SU/SD Boards Isolation Procedure)
Warning:
When performing this procedure, isolate the SU and SD boards
together at the same time. Do not attempt to isolate the SU or the
SD boards individually. This could cause further damages to the TV
Procedure:
1. Remove the 4 VFG screws from the SU and SD
boards. (See picture on the left side.)
2. Remove SC41, SC42, and SC46 from the SC
board.
3. Install the SC50 Jig or just jump pins 1 and 2 of
connector SC50 on the SC board.
Actual SC50 Jig
P/N:TZSC09187
4. Plug-in the TV and turn it on.
Note: Remove the jig or the jumper after
completing the isolation procedure.
Slide 26
Page 27

Troubleshooting 8 Blinks Failure (TC-P50ST50)
Blink
Code
List of boards likely to cause this
symptom.
Find information for TC-
P50UT50 on the next slide)
No.1 No.2 No.3 No.4
8 Blinks SS A SS2 Panel
Start Here
Check all the cables between the SS/SS2 boards (SS52, SS54 ~SS57) and the panel. Make sure
they are properly seated in the connectors. Unplug the TV and disconnect SS33 on the SS board.
Plug in the TV and turn it on
6 or 8
No
blinks
If all connections between the
SS/SS2 boards are confirmed
OK, replace the A board
Does the TV
turn on and
stay on?
Yes
Unplug the TV. Check for continuity between
pins 1 and 2 of connector SS52 on the SS
board. Do not plug in the TV.
Is
continuity
ok?
YesNo
SS52
SS
SS54
Check connections between
the SS board and the panel.
Check also connections
between the SS2 and the SS
board and the panel. If ok,
then replace the panel
No
Is continuity
ok in all the
connectors?
Check for continuity between pins 1 and
2 of connectors SS54 ~SS57on the SS2
board. Do not plug in the TV.
Yes
Replace the
SS2 board
SS2
Slide 27
Page 28

Troubleshooting 8 Blinks Failure (TC-P50UT50)
Blink
Code
List of boards likely to cause this
symptom.
No.1 No.2 No.3 No.4
8 Blinks SS A Panel
8 Blinks
Start Here
Check all the cables between the SS board (SS52 ~SS57) and the panel.
Make sure they are properly seated in the connectors. Unplug the TV and
disconnect SS33 on the SS board. Plug in the TV and turn it on.
No
Does the TV
turn on and
stay on?
Find information for TC-
P50ST50 on the previous slide)
Yes
Unplug the TV. Check the resistance between
TP101 on the C1 board and chassis ground.
Yes No
Defective
Panel
Is there a
short
circuit?
Replace the A
board
6 Blinks
Replace the A
board
Check connections between
the SS board and the panel. If
ok, then replace the panel
Unplug the TV. Check for continuity
between pins 1 and 2 of connectors
SS52 ~SS57on the SS board. Do not
plug in the TV.
No
Is continuity
OK in all the
connectors?
Yes
Replace the SS
board
Slide 28
Page 29

Troubleshooting 12 Blinks Failure
List of boards likely to cause this symptom. Blink
Code
12
Blinks
No.1 No.2 No.3 No.4
A
Speaker/
Subwoofer
TC-P50ST50
Start Here
Unplug the TV and remove connector A12 from the A board. Plug in the TV and turn it on
Disconnect the speakers
one at a time to
determine which one is
bad
No
Is the TV still
shutting down
with 12 blinks?
Yes
Replace the A
board
Slide 29
Page 30

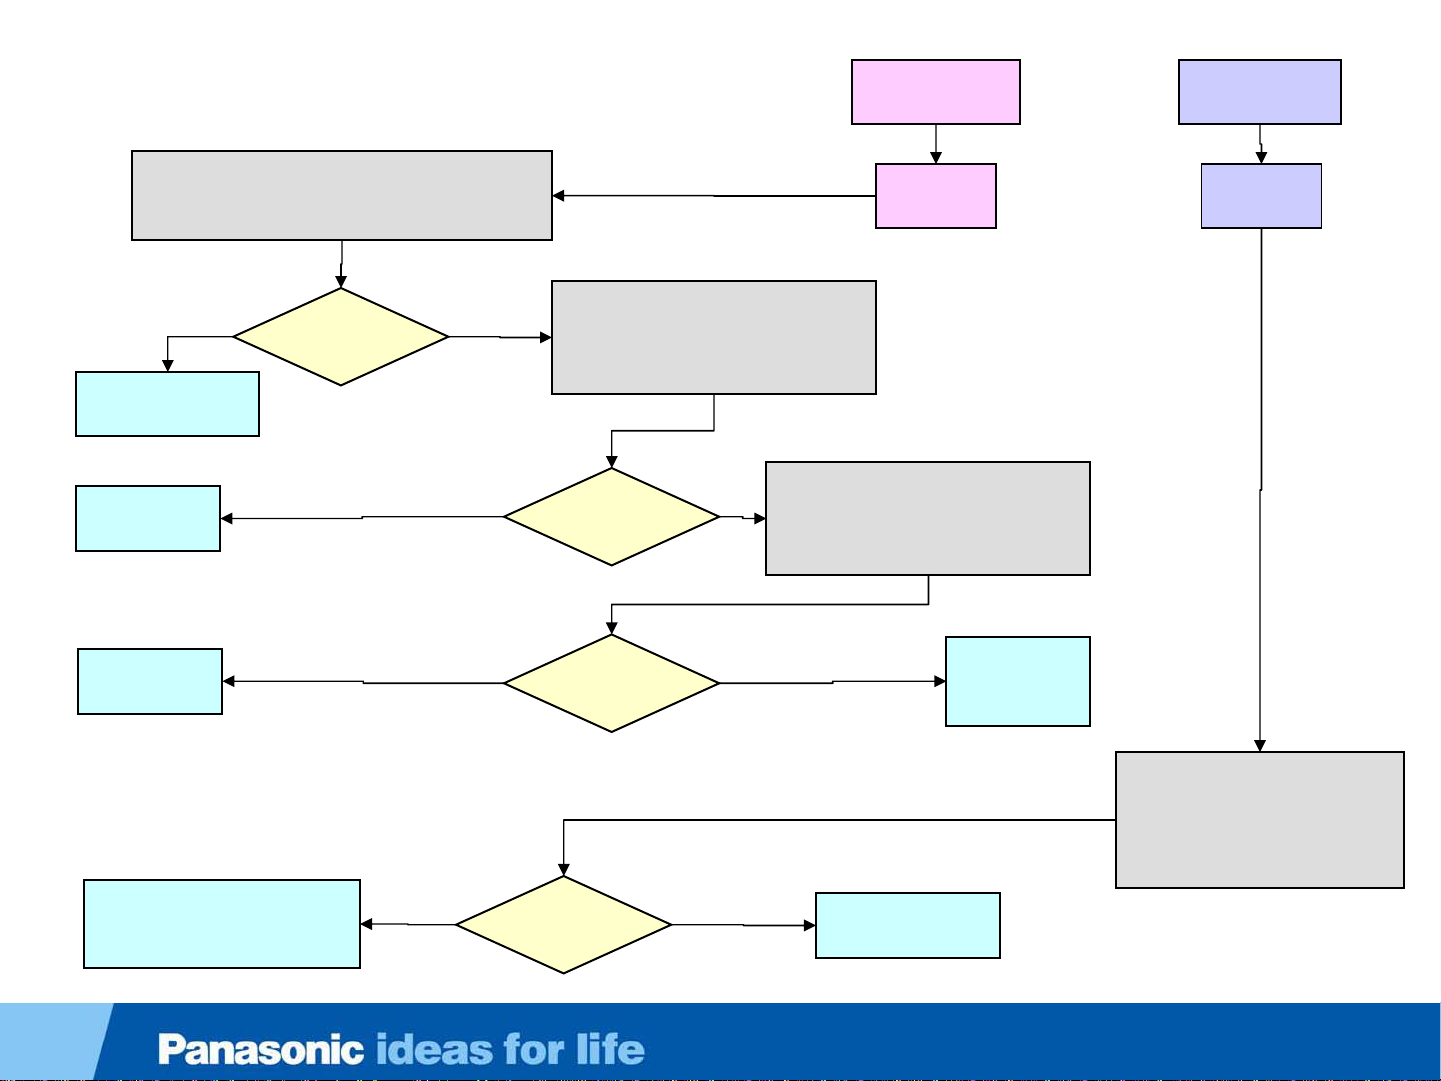
Troubleshooting No Power/Dead Unit (Power LED is Off)
Make sure the connectors on the P board are properly seated. Plug-in the TV but do not turn the power on.
Unplug the TV and place your
volt-meter on pin 6 of
connector P6. Plug in the TV
But do not turn the power on
Start Here
NO
Does the AC relay
clicks after the TV is plugged
into the AC line?
Yes
Unplug the TV.
Place your volt-
meter on pin 1 of
connector P6. Plug
in the TV and press
the power switch
Yes
Replace
the A board
Is there 5V present
when the TV is plugged into
the AC line?
Unplug the TV and disconnect
A1 on the A board. Plug in the
TV but do not turn the power on
Does the relay
click now?
YesNO
NO
Replace
The P board.
(Check the AC Cord)
Replace
The K board (Check
Wires between A1
and S1)
NO
Unplug the TV and disconnect
A1 on the A board. Plug in the
TV press the power switch on
the TV (Not the remote
control).
Yes
Is the TV turning On
Is there
present when
the power
button is
pressed?
NO
2 – 3V
Yes
Replace
The P board
Replace
the A board
Slide 30
Page 31

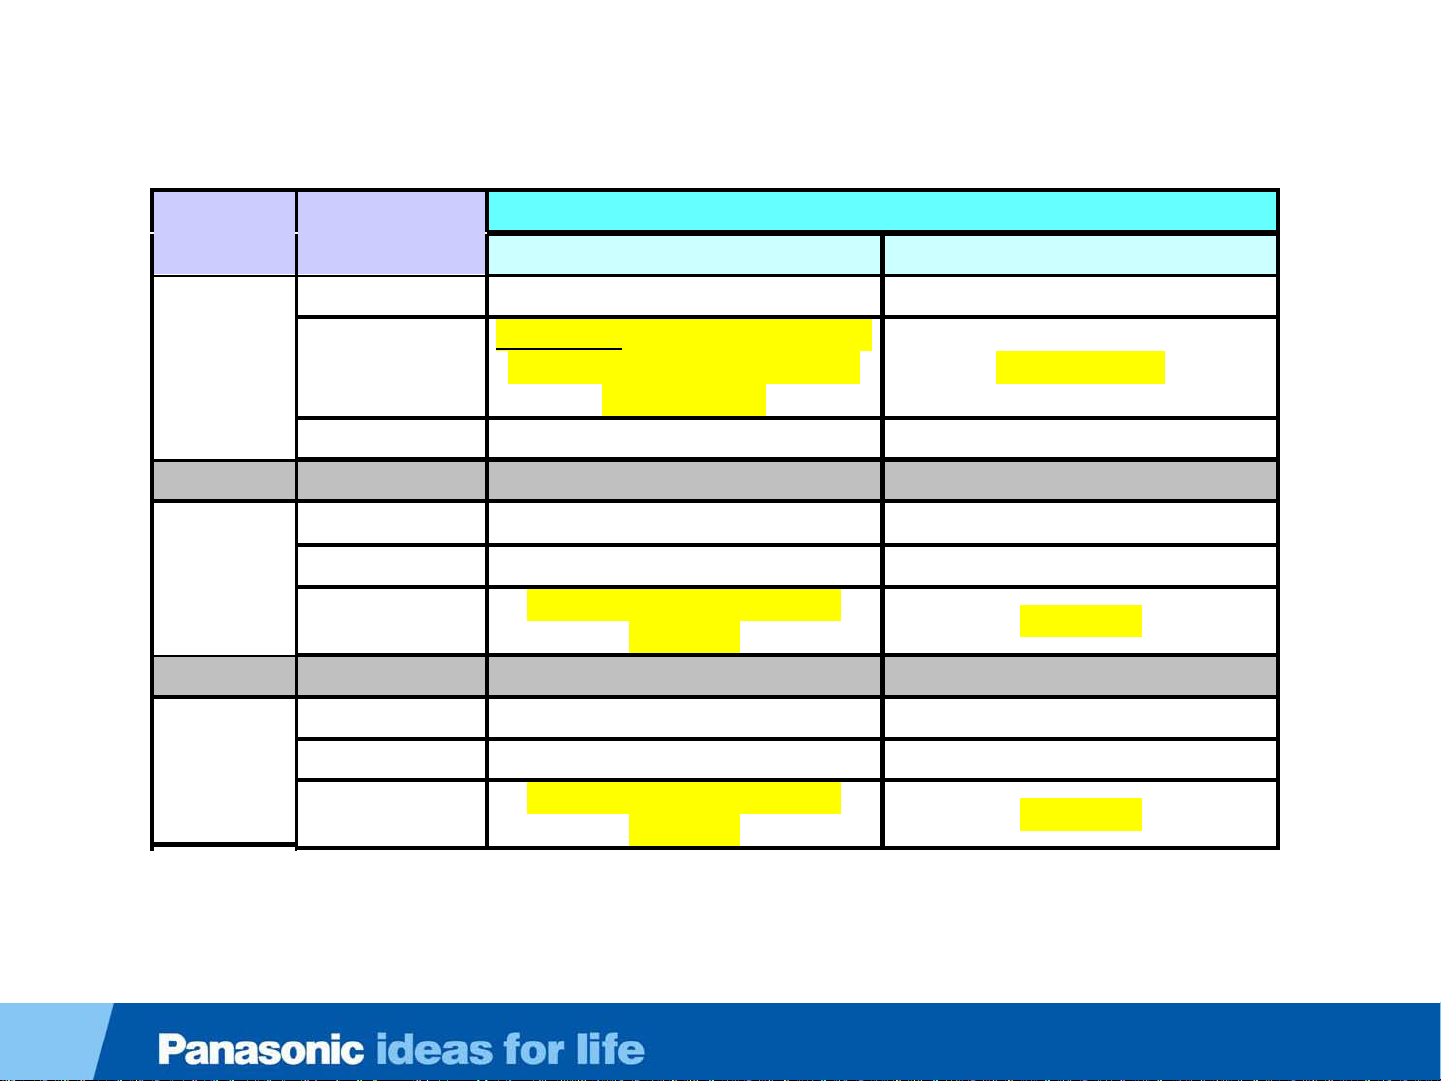
2012 Plasma TV’s Behavior After Connectors Removal
TV Behavior When Connectors are Removed on the SC and SS boards
TC-P50ST50
Connector on
The SC Board
SC2
SC20 8 Blinks 8 Blinks
SS11 8 Blinks 8 Blinks
SS33
SC2 SC20 8 Blinks 8 Blinks
SC2
SC2
SC20 SS11
SC20
SS11
SC2 SC20 SS11
SC2 SC20
SC2 SC20 SS11 SS33
SC20 SS11 SS33
SC2
Connector on
The SS Board
7 Blinks 7 Blinks
SS11 3 Fast Blinks 7 Blinks
SS33
SS33
SS33
SS33
SS11 SS33
TC-P50ST50 TC-P50UT50
The TV stays on with
black screen.
3 Fast Blinks 7 Blinks
8 Blinks 8 Blinks
6 Blinks After 11 Sec. of
Being on.
The TV Stays on With
Black Screen
3 Fast Blinks 8 Blinks
6 Blinks After 11 Sec. of
Being on.
3 Fast Blinks
6 Blinks After 11 Sec. of
Being on.
3 Fast Blinks 7 Blinks
The TV stays on with
black screen.
6 Blinks After 11 Sec. of
The TV Stays on With
Black Screen
6 Blinks After 11 Sec. of
6 Blinks After 11 Sec. of
6 Blinks After 11 Sec. of
Being on.
Being on.
Being on.
Being on.
Any Combination of A20 – A31 and A32
8 Blinks
Slide 31
Page 32

Behavior Comparison Between 2010 and 2011 Models
When the TV Fail with Shorted Vsus, Vda, or P15V
Behavior Comparison Between 2011 and 2012 Models When The TV Fails With Shorted Vsus, Vda, or P15V
Year
Series
X – S – ST GT - VT30 TC-P50UT50 TC-P50ST50 --
Vsus 7 Blinks
2011 2012
Shorted
Vda
P15
Locked Solid
Red LED
Locked Solid
Red LED
(14 Blinks, If TV is
Turned On After the 2nd
Relay Click)
7 Blinks 3 Fast Blinks
The TV
does not
turn on.
The TV does not
shut down. It tries
to turn on (the LED
briefly turns on),
then it goes off.
The TV does
not turn on.
The TV does not shut
down. It tries to turn
on (the LED briefly
turns on), then it
goes off.
No SOS. The
TV stays on
with black
screen.
3 Fast Blinks
Slide 32
Page 33

Video/Lines Troubleshooting
Slide 33
Page 34

Troubleshooting Picture Distortions
Slide 34
Page 35

Troubleshooting Picture Distortions
Slide 35
Page 36

SC
SC
Troubleshooting Horizontal Line Problem
PDP panel
SU
SU
・・・
SCAN
DRIVE
・・・ ・・・
SS,SS2
SS,SS2
IC
SD
SD
When FFC is damaged, it is needed to
replace the panel The FFC is bonded
to the panel directly.
Scan Drive:
Pulse timing is shifted each horizontal electrode.
1 line abnormal
If horizontal line is showed, it is possible that defect
of one pin of scan drive IC or failure of connection to
the panel or damage of electrode on the panel.
Sustain Drive:
All the lines are same waveform.
All the lines are connected mutually.
SS board doesn't cause
horizontal lines problems. All
the electrodes on SS board are
common.
Slide 36
Page 37

Test Patterns
Slide 37
Page 38

Defective Panel Drive IC
Slide 38
Page 39

The End
Slide 39
 Loading...