

Page 1

ET5 series
M0212-0
Page 2

Watching TV
2
Cable / Satellite / Fiber with a box
Initial setting 11
Antenna / Cable service without a box
Initial setting 12
Select channels 13
Favorite channels (Set) 14
Favorite channels (Display) 15
Closed caption 16
SAP 17
Other 18
Blu-ray, DVD, Game Console, etc.
Connecting and viewing (1) 19
Connecting and viewing (2) 20
HDMI connection notice 21
HDMI connection caution 22
Input signal 23
For best picture
Picture mode 24
Auto brightness (ECO) 25
Aspect 26
Aspect info. 27
For best audio
Basic adjustments 28
Advanced audio 29
3D
Page 3

Notice 30
3
Viewing 3D 31
Change 3D ⇔ 2D
Adjust 3D images 33
3D settings (1) 34
3D settings (2) 35
Computer on TV
Display PC screen 36
PC adjustments (1) 37
PC adjustments (2) 38
Input signal 39
Internet services "VIERA Connect"
Connect to network
32
Network connections (1) 40
Network connections (2) 41
Network connections (3) 42
Network connections (4) 43
Network settings
Setting menu 44
Connection test 45
Network connection 46
Wireless network settings 47
IP address/DNS settings 48
Proxy settings 49
Network link (1) 50
Network link (2) 51
Page 4

Software update 52
4
New software notice 53
Network status 54
How to use
Operate 55
Home network "DLNA"
Get started
Information 56
Connect to network
Network connections (1) 57
Network connections (2) 58
Network connections (3) 59
Network connections (4) 60
Network settings
Setting menu 61
Connection test 62
Network connection 63
Wireless network settings 64
IP address/DNS settings 65
Proxy settings 66
Network link (1) 67
Network link (2) 68
Software update 69
New software notice 70
Network status 71
Photos
Viewing Photos 72
Page 5

Photo view 73
5
Options menu 74
Using slideshow 75
Slideshow settings 76
Videos
Viewing Videos 77
Video view 78
Options menu 79
Music
Playing Music 80
Music view 81
Options menu 82
Data information
Compatible Data format (1) 83
Compatible Data format (2) 84
Compatible Data format (3) 85
Notice 86
Media player
Get started
Information 87
Media warning messages 88
SD card handling cautions 89
Photos
Viewing Photos 90
Photo view 91
Sort the photos 92
Options menu 93
Page 6

Multi shot 3D / Thumbnails size 94
6
Using slideshow 95
Slideshow settings 96
Soundtrack settings 97
Videos
Viewing Videos 98
Video view 99
Options menu 100
Music
Playing Music 101
Music view 102
Options menu 103
Data information
Compatible Data format (1) 104
Compatible Data format (2) 105
Compatible Data format (3) 106
Notice 107
Convenience features
Using VIERA TOOLS
Using VIERA TOOLS 108
Timer
Setting menu 109
Sleep (Off timer) 110
Timer (On/Off timer) 111
Lock (parental control)
Setting menu 112
Lock (1) 113
Page 7

Using USB Keyboard / Gamepad
Lock (2) 114
7
Password setting 115
Parental control ratings (1) 116
Parental control ratings (2) 117
Parental control ratings (3) 118
Closed caption
Setting menu 119
Closed caption (1) 120
Closed caption (2) 121
Closed caption notice 122
VIERA Link ™ "HDAVI Control ™"
Basic feature 123
Connecting note (1) 124
Connecting note (2) 125
VIERA Link connections (1) 126
VIERA Link connections (2) 127
VIERA Link connections (3) 128
VIERA Link settings 129
VIERA Link settings feature (1) 130
VIERA Link settings feature (2) 131
VIERA Link settings feature (3) 132
VIERA Link 133
VIERA Link menu (1) 134
VIERA Link menu (2) 135
Control by smartphone, etc.
Smartphone remote 136
Page 8

Keyboard 137
8
Gamepad 138
All settings
Picture
Setting menu 139
Basic settings (1) 140
Basic settings (2) 141
Aspect adjustments 142
PC adjustments (1) 143
PC adjustments (2) 144
HDMI settings 145
Advanced picture (1) 146
Advanced picture (2) 147
Audio
Setting menu 148
Basic settings 149
Advanced audio 150
DTV language and SAP settings 151
DIGITAL AUDIO OUT terminal 152
Network
Network settings (1) 153
Network settings (2) 154
Network settings (3) 155
Network settings (4) 156
Network settings (5) 157
Timer
Setting menu 158
Page 9

Sleep (Off timer) 159
9
Timer (On/Off timer) 160
Lock (parental control)
Setting menu 161
Lock (1) 162
Lock (2) 163
Password setting 164
Parental control ratings (1) 165
Parental control ratings (2) 166
Parental control ratings (3) 167
Setup
Setting menu 168
3D settings (1) 169
3D settings (2) 170
ANT/Cable setup (1) 171
ANT/Cable setup (2) 172
Closed caption (1) 173
Closed caption (2) 174
Closed caption notice 175
VIERA Link settings (1) 176
VIERA Link settings (2) 177
ECO/energy saving (1) 178
ECO/energy saving (2) 179
Advanced setup 180
Other settings (1) 181
Other settings (2) 182
Page 10
Support / FAQ
FAQ
10
Picture - Viewing 183
Picture - Snowy / none 184
Picture - Distortion 185
Picture - Continue 186
Sound - none 187
Sound - Unusual 188
Networking 189
Software update 190
3D - Viewing 191
3D - Format 192
Other 193
Menu - Gray-out 194
Reset to default 195
Care and Cleaning
Display panel 196
Cabinet 197
Pedestal / Power cord 198
3D Eyewear 199
Meaning of signs :
Press the Remote control button
INFO Letters in box : Remote control button
MENU Letters in Cyan : Menus on screen display
Page 11
Watching TV
11
Cable / Satellite / Fiber with a box
Initial setting
Connecting
1.
Select the wiring method connecting your box to the TV, AV IN or
Antenna/Cable in.
Tip: HDMI will provide the best HD picture
2. Change INPUT
INPUT
Press the INPUT button to select the proper connection. Wait 2 seconds.
3. Power on your Cable , Satellite or Fiber box
Use the box's remote control to change channels.
* If the box is connected to the TV using a COAX cable (Antenna/Cable in), then
set the TV channel to CH3 or CH4. Note that the picture will not be in HD.
* CC/SAP is not available when watching TV with a Cable or Satellite box
connected via HDMI.
* If your box is a high definition, then check that it is outputting 720p or 1080i
signal.
Tip: press the TV's INFO button to verify.
* Check your box "aspect" or "format" settings. It should be set to 16:9,
Widescreen or FULL.
* If the audio volume is too low, check the box's audio settings.
* Contact your Cable or Satellite provider for instructions on any box settings.
Page 12
Watching TV
12
Antenna / Cable service without a box
Initial setting
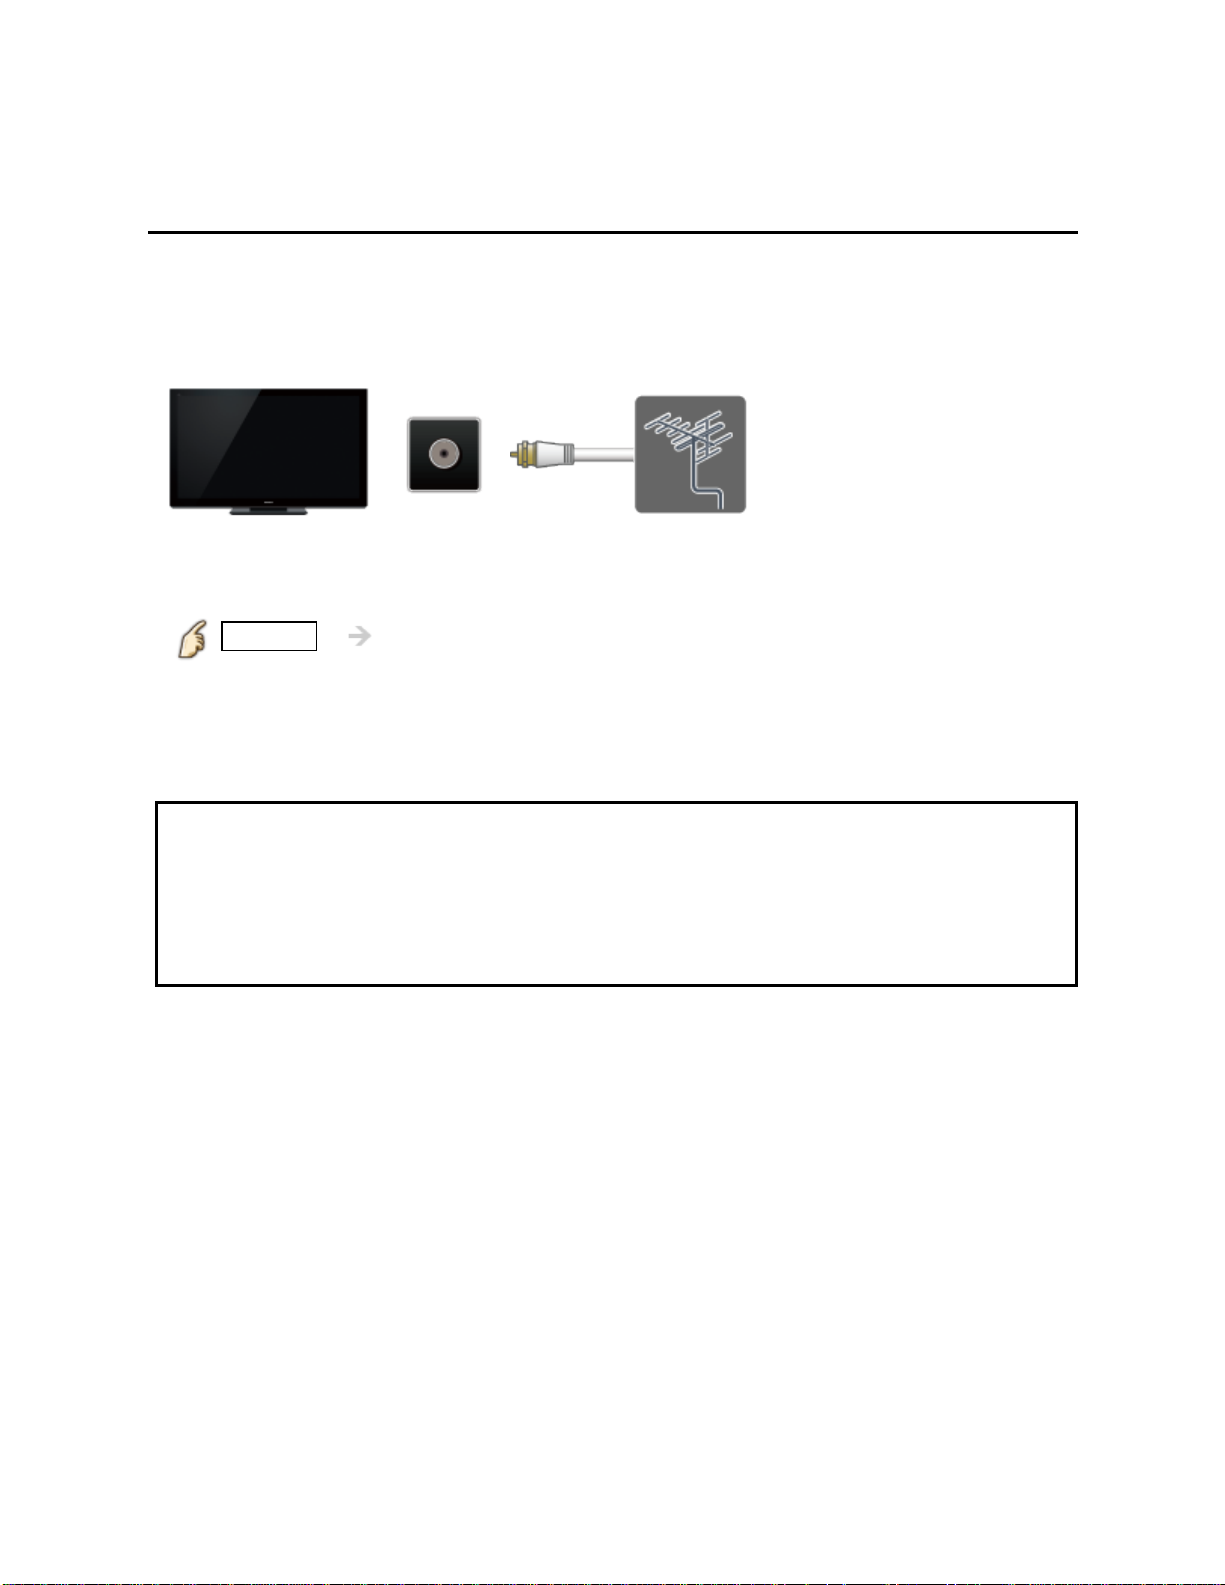
Connect coax
1.
Connect a COAX wire from either an antenna or Basic Cable service to the TV's
"ANTENNA/CABLE IN" screw terminal.
ANTENNA/
TV
CABLE IN
2. Scan the channel
MENU Setup > ANT/Cable setup > ANT in, Auto program
1. Select Programming source Cable or Antenna in Ant in.
2. Select Auto program and select scan mode
(All channels / Analog only / Digital only).
3. Start scanning.
Antenna
* If at the end of the scanning no channels are found, then check:
Antenna's position - or Availability of Cable service.
Cable, Satellite or Fiber services with a box are typically connected to the TV's
A/V inputs, preferably HDMI, for best HD picture. In such a case, the channel
scanning is not needed (set ANT IN to Not used).
Page 13
Watching TV
13
Antenna / Cable service without a box
Select channels
Select desired channel
or
CH buttons are also available on the TV.
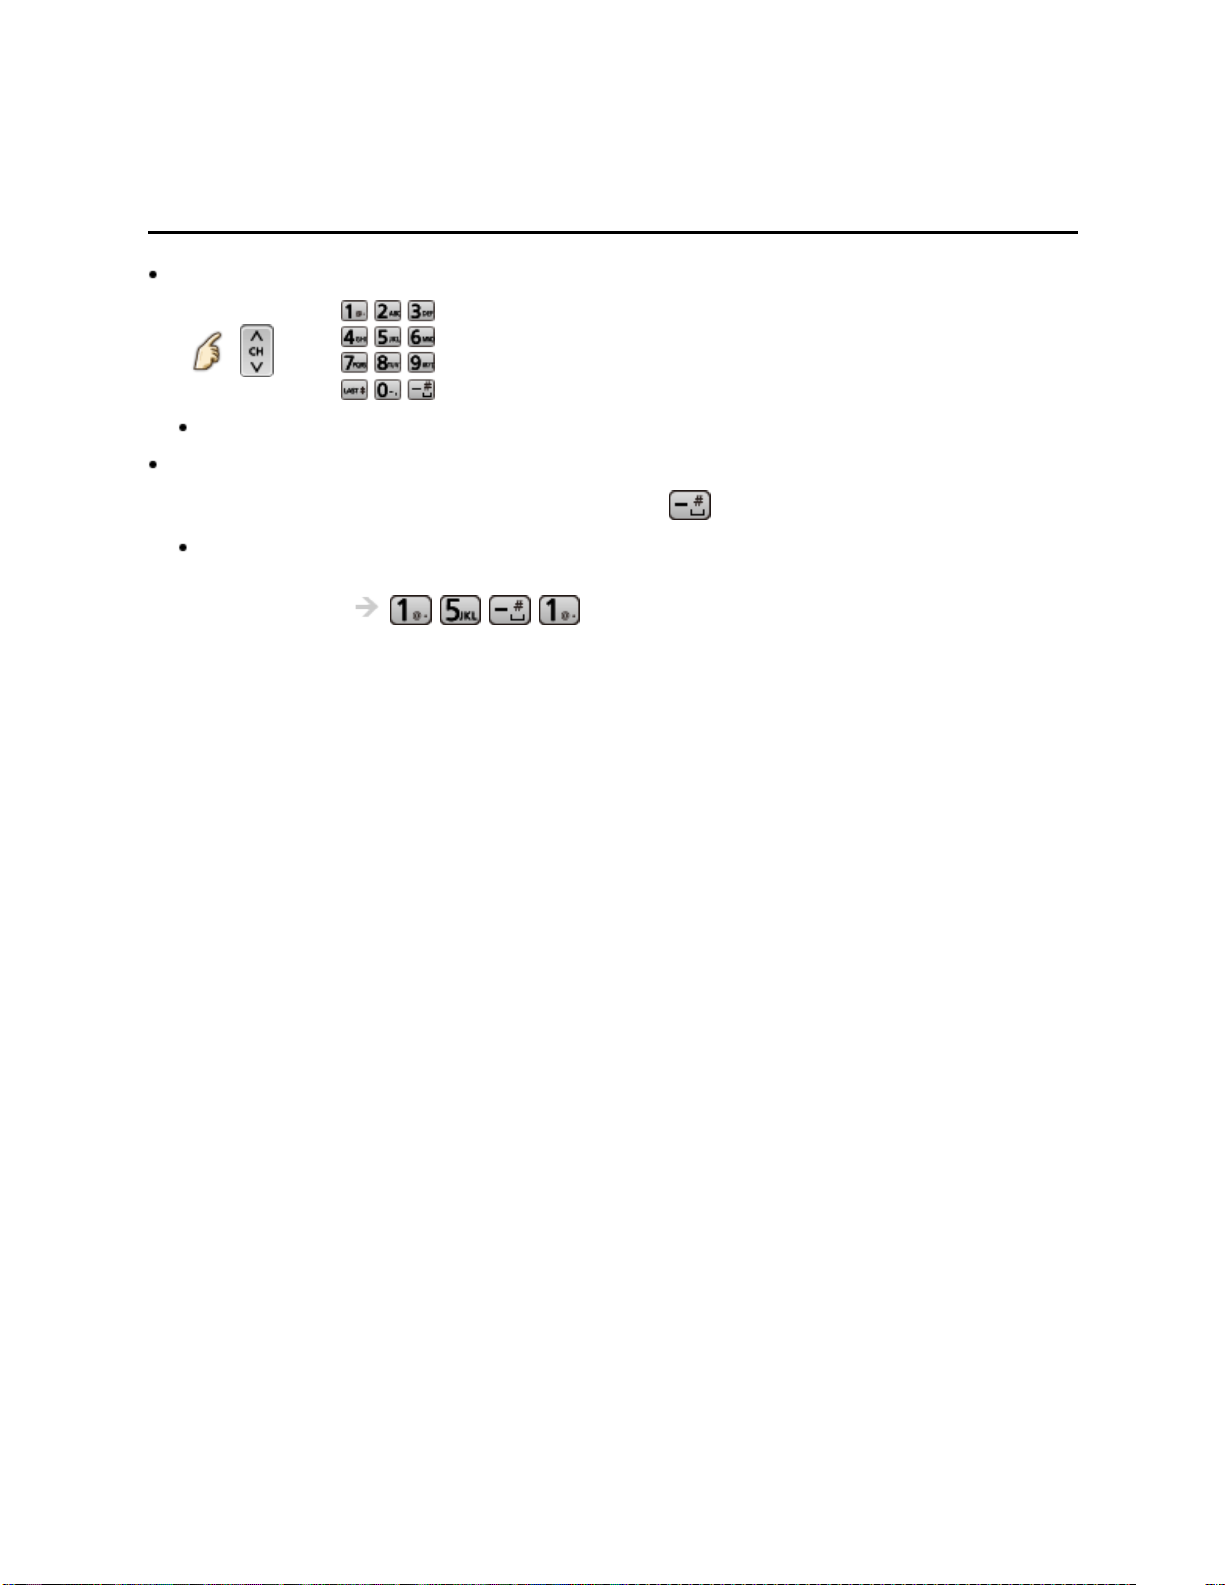
Select desired digital channel
To directly enter a digital channel number use
When turning to a digital channel, press the button to enter the minor number in a
compound channel number.
(e.g. CH15-1 )
Page 14
Watching TV
14
Antenna / Cable service without a box
Favorite channels (Set)
Channel numbers registered in Favorite are displayed on the favorite tune screen.
Select the desired broadcast station with the cursor or use the number buttons.
Favorite channels cannot be set when using Cable or Satellite box
Set the Favorite channel
OPTION Options menu > Set favorite
Select the list number using / and or directly to save the
displayed channel.
Delete a Favorite channel
OPTION Options menu > Set favorite
Select the list number using
* To change the page in Set favorite
FAVORITE or / repeatedly
/ and (press and hold) to delete.
Page 15
Watching TV
15
Antenna / Cable service without a box
Favorite channels (Display)
Channel numbers registered in Favorite are displayed on the favorite tune screen.
Select the desired broadcast station with the cursor or use the number buttons.
Favorite channels cannot be set when using Cable or Satellite box.
To display a Favorite channel
FAVORITE Favorite channels
Select the list number using / and or directly to displayed
on favorite screen.
* To change the page in Favorite channels
FAVORITE or / repeatedly
Page 16

Watching TV
16
Antenna / Cable service without a box
Closed caption
Viewing with Closed caption
CC
Switches the Closed caption mode.
( Closed caption Off / Closed caption On / Closed caption On mute )
* CC is not available when watching TV with a Cable or Satellite box connected
via HDMI.
* Contact your Cable or Satellite operator for instructions on enabling CC with
their box.
* The TV's CC button does not operate the Satellite or Cable box's CC function.
* For viewing the CC of digital broadcasting, set the aspect to FULL (If viewing
with H-FILL, JUST, ZOOM or 4:3; characters might be cut off).
* If the CC is set to On on both the receiver and TV when the signal is 480i
(except for the HDMI connection), the CC may overlap on the TV.
* If a digital program is being output in analog format, the CC data will also be
output in analog format.
* If the recorder or output monitor is connected to the TV, the CC needs to be set
up on the recorder or output monitor.
Page 17
Watching TV
17
Antenna / Cable service without a box
SAP
Listen with SAP (Secondary Audio Programming)
SAP is not available when watching TV with a Cable or Satellite box connected
via HDMI.
Contact your Cable or Satellite operator for instructions on enabling SAP with
their box.
The TV's SAP button does not operate the Satellite or Cable box's SAP
function.
Select the Audio mode for watching TV.
SAP
Digital mode: Select available audio service when receiving a digital channel.
Audio track is automatically selected as DTV language and SAP settings in
Audio menu.
Menu > Audio > DTV language and SAP settings
* If you change the audio settings with the
SAP settings will not change.
Audio track 1 of 7 Track number / Number of tracks
English (Main
Audio)
English audio Audio service information
(example)
Analog mode: Select the desired Audio mode. ( Stereo / SAP / Mono )
Current audio track information (language, audio
type)
SAP button, the DTV language and
Page 18
Watching TV
18
Antenna / Cable service without a box
Other
Information banner
1.
Displays TV status information. Also, when watching programs via the
Antenna/Cable input, INFO will include the channel banner.
INFO
Channel / Station identifier / Program title / Closed caption / SAP /
Rating level / Signal resolution / Picture mode / Aspect ratio /
Sleep timer remaining time / Clock
2. Options menu
This menu consists of shortcuts to convenient functions.
OPTION
Channel surf mode: Specify favorites or type of channels to view when
pressing the channel up/down button.
Set favorite: Set favorite channel
Edit CH caption: Edit the channel identifier
Signal meter: Check the antenna's signal strength
* Options menu is only available when the TV is using the Antenna/Cable input,
not when using Cable or Satellite box.
Page 19

Watching TV
19
Blu-ray, DVD, Game Console, etc.
Connecting and viewing (1)
Connect device
1.
Verify that the device is connected to the TV properly and connect to desired
terminal. Note which terminal the device is connected to (HDMI 1, HDMI 2,...
Component or Video)
Component and Composite (Video) in terminals are shared.
Please be careful not to confuse the connection when you use Component or
Video.
Page 20
Watching TV
20
Blu-ray, DVD, Game Console, etc.
Connecting and viewing (2)
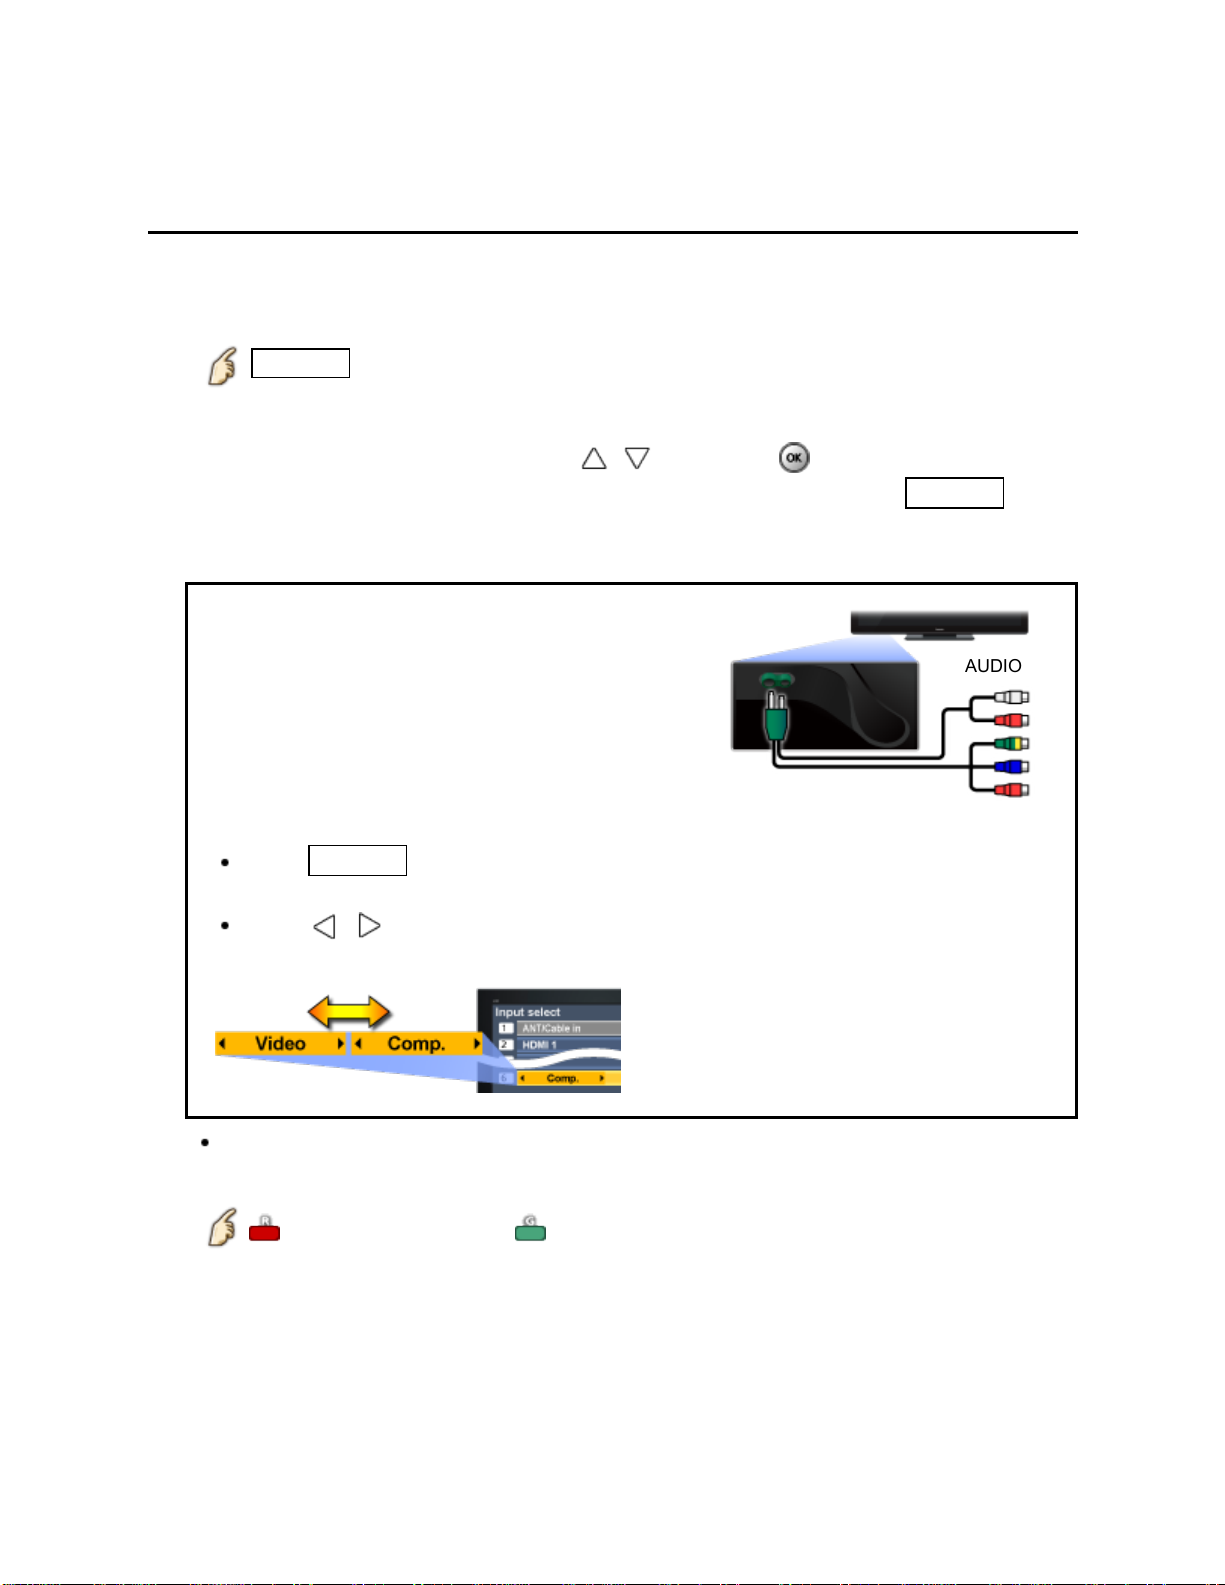
Select Input
2.
1. Display Input select menu (With the connected equipment turned ON)
INPUT
2. Select the input used in step 1
Select correct input source, using / and press
You can also press the corresponding NUMBER button or press INPUT
repeatedly to cycle through the available inputs. If you are unsure which input to
select, wait 2 seconds between each selection.
Component and Composite (Video) IN
terminals are shared and must be connected
using the supplied adapter.
NOTE: One red connector is for video and the
other audio.
AUDIO
You need to select Video or Component.
(Default: Video)
Press INPUT and select Video <->
Comp.
Press / to choose Video or
Component.
For your convenience, you can edit the inputs with labels that are easy to
remember.
Edit Labels Set ANT/Cable in
3. Operate using your device's remote control.
VIDEO
Page 21
Watching TV
21
Blu-ray, DVD, Game Console, etc.
HDMI connection notice
HDMI (high-definition multimedia interface) allows you to enjoy high-definition digital
images and high-quality sound by connecting the TV unit and HD devices.
HDMI-compatible equipment (*1) with an HDMI or DVI output terminal, such as a
Cable or Satellite box or a DVD player, can be connected to the HDMI connector using
an HDMI compliant (fully wired) cable.
HDMI is the world's first complete digital consumer AV interface complying with a
non-compression standard.
If the external equipment has only a DVI output, connect to the HDMI terminal via a
DVI to HDMI adapter cable (*2).
When the DVI to HDMI adapter cable is used, connect the audio cable to the audio
input terminal.
Audio settings can be made on the HDMI in menu screen. Applicable audio signal
sampling frequencies (L.PCM): 48 kHz, 44.1 kHz, 32 kHz
(*1): The HDMI logo is displayed on an HDMI-compliant device.
(*2): Inquire at your local digital equipment retailer shop.
Page 22

Watching TV
22
Blu-ray, DVD, Game Console, etc.
HDMI connection caution
Caution
The HDMI terminals on this TV were not specifically designed for use with a PC.
If the connected device has an aspect adjustment function, set the aspect ratio to
"16:9".
The HDMI connectors are "type A".
The HDMI connectors are compatible with HDCP (High-Bandwidth Digital Content
Protection) copyright protection.
Devices with no digital output terminal may be connected to the input terminal of
either "COMPONENT IN", or "VIDEO IN" to receive analog signals.
The HDMI input terminal can be used only with the following video signals: 480i,
480p, 720p, 1080i and 1080p. Ensure that the device being connected to the TV
can produce one of these video signals.
Page 23
Watching TV
23
Blu-ray, DVD, Game Console, etc.
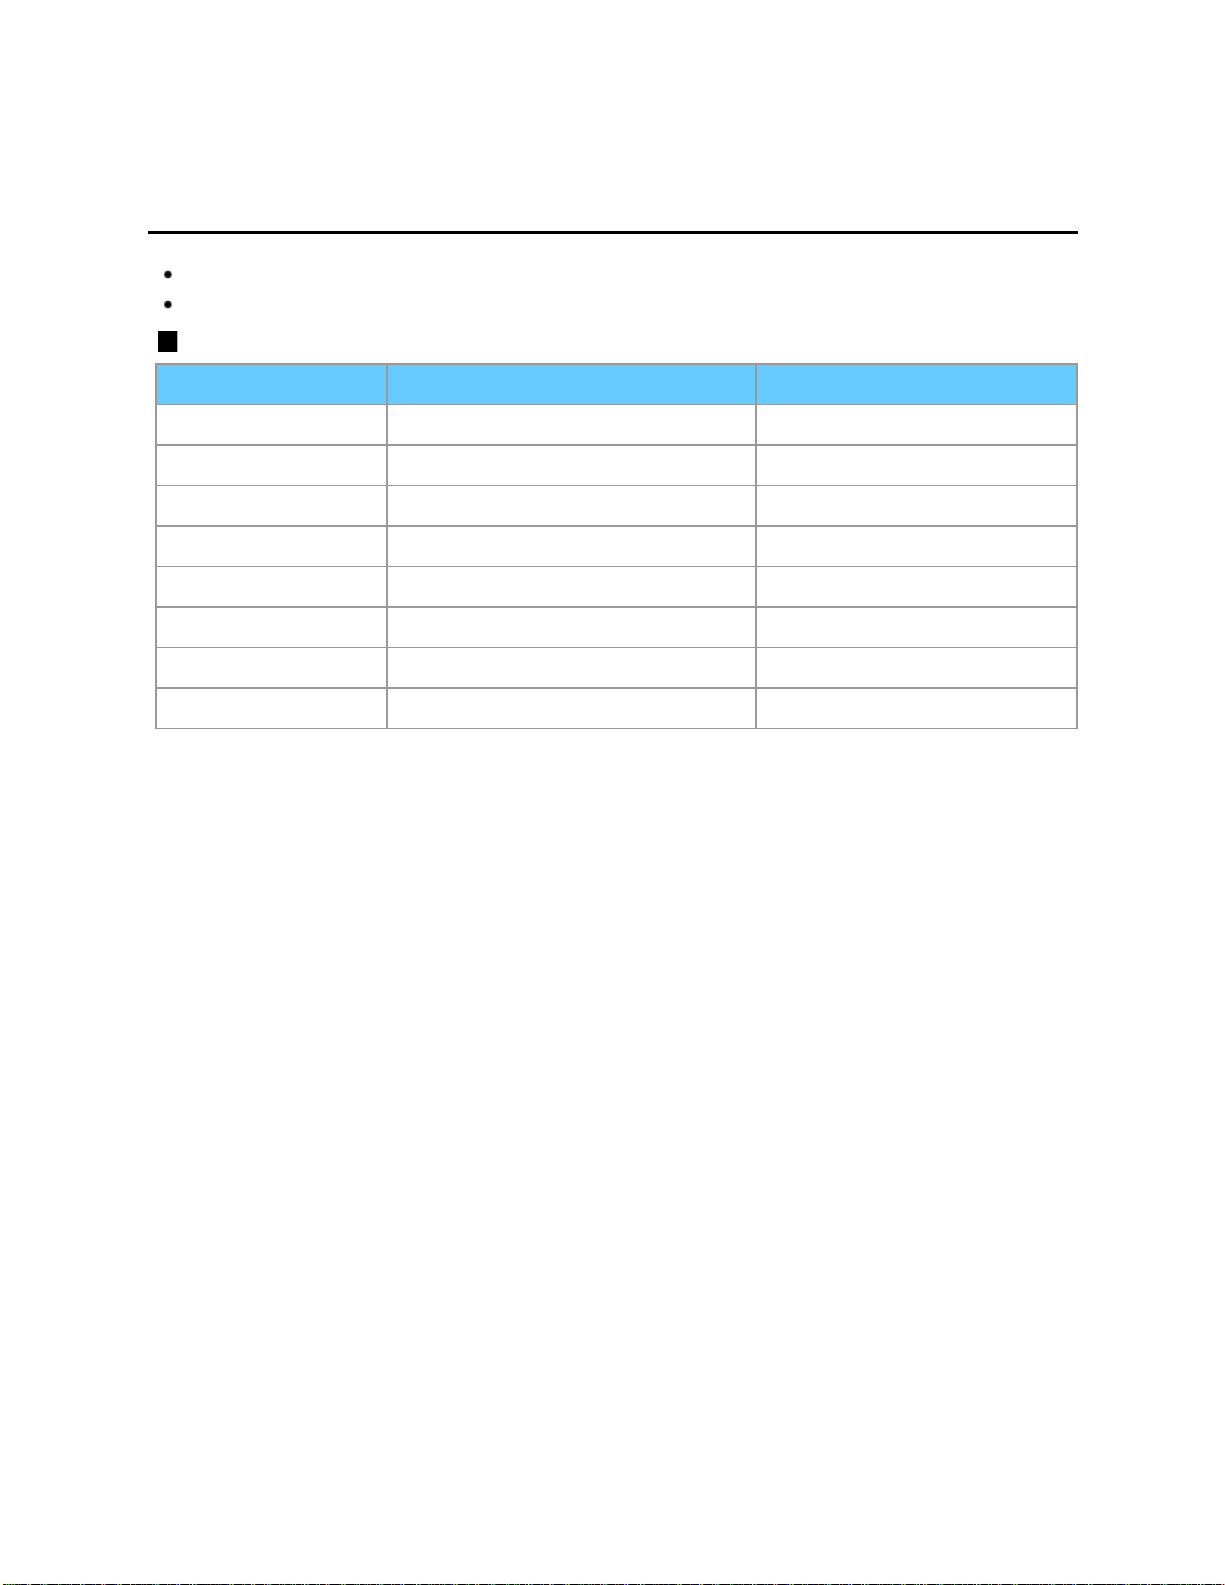
Input signal
Signals other than below may not be displayed properly.
The signals are reformatted for optimal viewing on your display.
Component and HDMI (* HDMI only)
Input signal Horizontal frequency (kHz) Vertical frequency (Hz)
525 (480) / 60i 15.73 59.94
525 (480) /60p 31.47 59.94
750 (720) /60p 45.00 59.94
1,125 (1,080) /60i 33.75 59.94
1,125 (1,080)/60p 67.43 59.94
1,125 (1,080)/60p 67.50 60.00
1,125 (1,080)/24p * 26.97 23.98
1,125 (1,080)/24p * 27.00 24.00
Page 24
Watching TV
24
For best picture
Picture mode
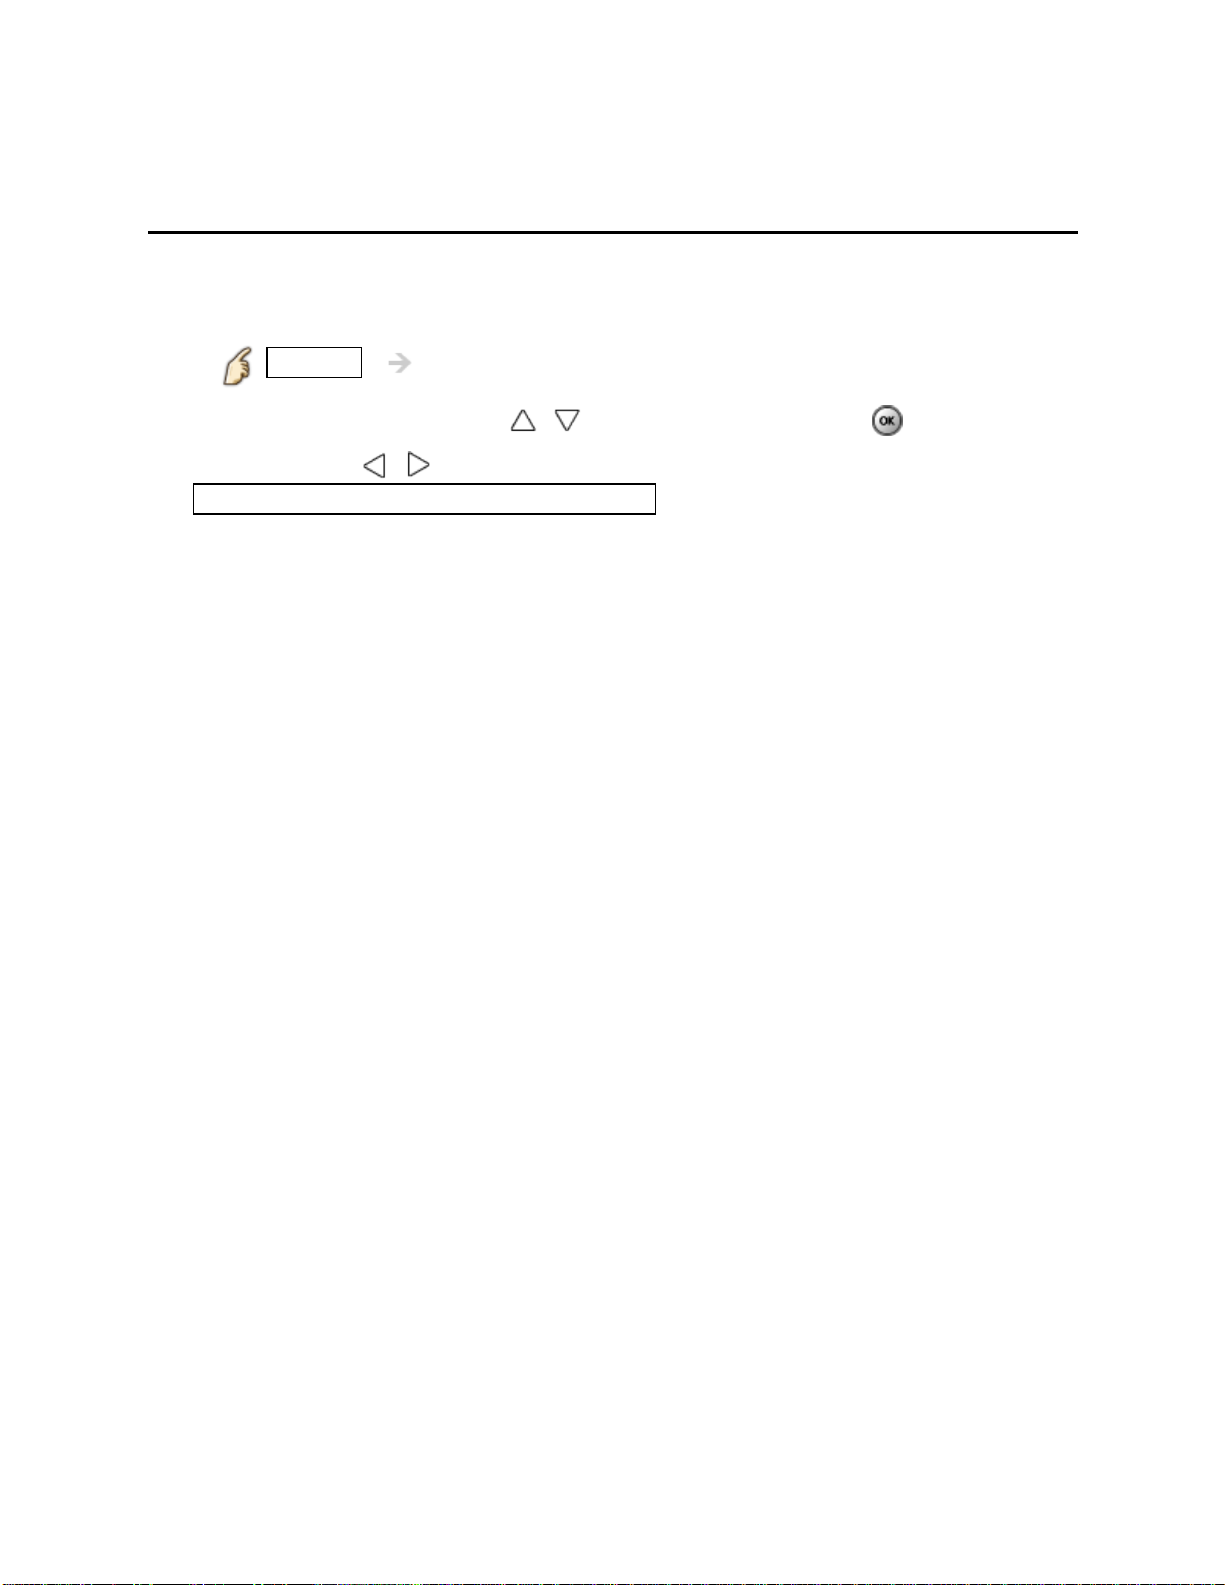
Change picture mode to suite your settings and taste
1.
1. Select Picture mode
MENU Menu > Picture > Picture mode
Select desired menu using
2. Adjust using /
Tip: HDMI will provide the best HD picture
2. Picture mode type
Vivid: Provides enhanced picture contrast and sharpness for viewing
in a well-lit room.
Standard: Recommended for normal viewing conditions with subdued
room lighting.
Cinema: For watching movies in a darkened room. It provides a soft,
film-like picture.
Game: For playing video games.
Custom: Customizes each item according to your taste.
Photo is displayed in JPEG menu.
/ from menu bar and press
Page 25

Watching TV
25
For best picture
Auto brightness (ECO)
Contrast Automatic Tracking System (C.A.T.S.) adjusts the screen brightness and
contrast according to the room's ambient light conditions. This ECO feature
automatically dims the brightness of the screen when the room lighting is lowered.
C.A.T.S. features a built-in delay when the lighting conditions change. The adjustment
happens gradually.
If you prefer a consistent brightness, disable C.A.T.S. by:
Menu > Picture > scroll down to C.A.T.S. and turn it off.
Or
Menu > Picture > Picture mode then select viewing mode such as Custom.
* Standard picture mode automatically sets C.A.T.S. to On.
Page 26
Watching TV
26
For best picture
Aspect
Use FORMAT button to change the aspect ratio
1.
Use when the picture has bars (sides or top/bottom) and to zoom.
FORMAT ( to cycle through the aspect modes )
480i, 480p: FULL/JUST/4:3/ ZOOM
1080p, 1080i, 720p: FULL/H-FILL/JUST/4:3/ZOOM
* Use when the picture does not fill the whole screen or portions of the picture
are trimmed.
* Some content, such as film-based movies, are available in extra-wide format.
Top and bottom bars are unavoidable.
* Connected devices, such as Cable/Satellite box, DVD/Blu-ray players and
game consoles have their own aspect (format) settings. Adjust the device's
aspect settings.
Page 27
Watching TV
27
For best picture
Aspect info.
FULL: Enlarges the 4:3 image horizontally to the screen's side edges.
(Recommended for anamorphic picture)
JUST: Stretches to justify the 4:3 image to the four corners of the screen.
(Recommended for normal TV broadcast)
H-FILL: Enlarges the 4:3 image horizontally to the screen's side edges. The side
edges of the image are cut off.
4:3: Standard (Note that "Image retention" of the side bar may occur from
displaying it for a long time.)
ZOOM: Enlarges the 4:3 image to the entire screen.
(Recommended for Letter Box)
Zoom adjustments
Vertical image position and size can be adjusted in "ZOOM"
Select Zoom adjustments in the Picture menu.
MENU Picture > Aspect adjustments > Zoom
adjustments
V-position: Vertical position adjustment
Adjust using / to desired position.
V-size: Vertical size adjustment
Adjust using / to desired size.
* Press OK to reset
Page 28
Watching TV
28
For best audio
Basic adjustments
Change the basic audio settings
1.
1. Select desired audio menu
MENU Menu > Audio
Select desired menu using / from menu bar and press
2. Adjust
Adjust using
Settings Description
Reset to defaults
Bass
Treble
Balance
/
Resets Bass, Treble, and Balance adjustments to factory
default settings.
Increases or decreases the bass response.
Increases or decreases the treble response.
Emphasizes the left / right speaker volume.
Page 29
Watching TV
29
For best audio
Advanced audio
MENU Menu > Audio > Advanced audio
Settings Options Description
A.I. sound Off/On
Surround Off/On
Bass boost Off/On Enhances bass sound and provides powerful
Volume leveler Minimizes volume disparity after switching to
TV speakers Off/On Enables the TV's built-in speakers.
HDMI in Digital/
Comp./Video
Equalizes overall volume levels across all
channels and external inputs.
Enhances audio L/R response when listening
to stereo. Ideal for music and action movies.
sound.
external inputs.
Switches to "Off" when using external
speakers.
"A.I. sound", "Surround", "Volume leveler", and
"Distance to wall" do not work if "Off" is selected.
The default setting is "Digital" for the HDMI
connection. (Digital input signal)
Select audio input terminal when a DVI cable is
connected along with an analog audio input
signal.
Page 30
Watching TV
30
3D
Notice
The following 3D content can be enjoyed on this TV:
A 3D Blu-ray disc, played on 3D capable Blu-ray player/recorder that is connected
via HDMI cable
3D TV broadcast (program)
3D Photo and 3D Movie taken by LUMIX/Camcorder.
3D game played on 3D capable video game console, connected via HDMI cable.
2D 3D (Simulated 3D)
About 2D 3D
* You can watch content in simulated 3D from photo and all video sources except
the PC input.
* This function converts standard 2D images and displays them in 3D. For this
reason, the 3D images appear slightly different from the originals. Please bear this
in mind when using this function.
* Using this function for profit-making purposes, or publically showing images
converted from 2D to 3D in places such as coffee shops or hotels etc. may infringe
on the rights of the copyright holder protected under the Copyright Act.
Page 31

Watching TV
31
3D
Viewing 3D
Put on the 3D Eyewear
1.
2. View
When the TV receives a 3D signal, it also tries to detect the 3D mode (format). 3D
images are automatically displayed according to the signal. If the 3D images are
not displayed correctly or the images cause discomfort, the images can be
adjusted by 3D format select or 3D settings.
Page 32
Watching TV
32
3D
Change 3D ⇔ 2D
Simply switches 3D 2D images (Auto mode)
3D 3D format select
Switch 3D or 2D using
Change 3D format (Manual mode)
/ and press
1. Display 3D format select (Manual)
3D format select (Manual)
2. Select 3D format
3D Cycle through the 3D format
(Native/Frame sequential (3D)/Frame sequential (2D)/Side by
side (3D)/Side by side (2D)/Top and bottom (3D)/Top and
bottom (2D)/2D 3D)
Page 33
Watching TV
33
3D
Adjust 3D images
Select 3D settings
1.
MENU Menu > Setup > 3D settings
2. Select the item and set
Select desired menu using / and adjust the settings with /
* The perceived three dimensional effects of the 3D Eyewear differ from person-
to-person.
* If a signal received from an external device is different from the 3D setting of the
TV, such as 2D signal when the TV is set to 3D mode, the images may not be
displayed correctly.
Page 34
Watching TV
34
3D
3D settings (1)
MENU Menu > Setup > 3D settings
Settings Options Description
Auto detect 3D Off/
Auto 2
3D signal
notification
2D
depth
3D
Off/
Minimum/
Medium/
Maximum
Auto 1/
On On: Displays a message according to the
Auto 1: Switches to 3D display when 3D
indication is available (HDMI (3D), AVCHD file,
etc.)
Auto 2: Same as Auto 1. Also detects 3D signal
by identifying similar image in side-by-side or topand-bottom 3D formats.
Note: Choose 3D mode manually when auto
detection is not available.
signal received by the Auto detect 3D.
Adjusts 3D depth. Available only when 2D
3D is selected in 3D format select.
Available only when 3D content is displayed.
Page 35
Watching TV
35
3D
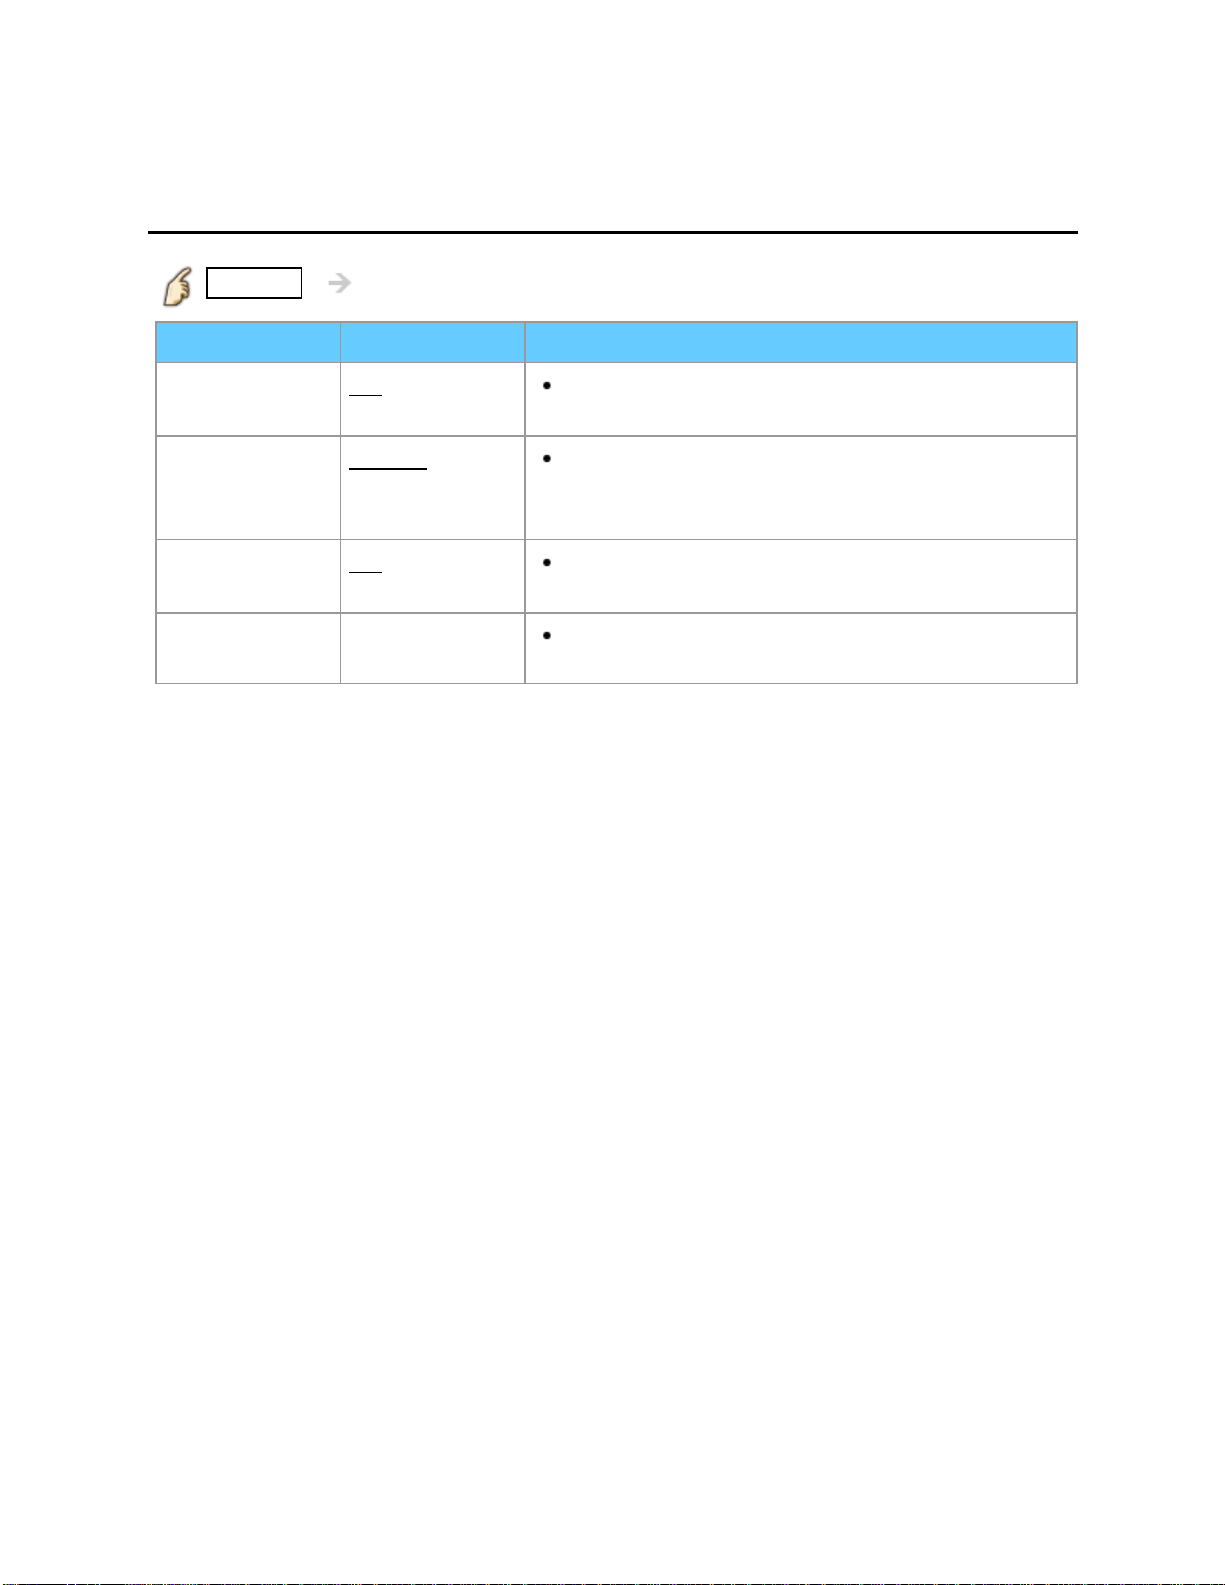
3D settings (2)
MENU Menu > Setup > 3D settings
Settings Options Description
3D adjustment
Left/Right swap
Diagonal line
filter
Safety
precautions
Off/On Changes 3D depth by adjusting left-right
parallax. Set to On to adjust Effect (-3 to +3).
Normal/
Swapped
Off/On On: Resolves discomfort caused by receiving a
Change this to Swapped when the phases
are reversed (When there is an unusual sense of
depth).
quincunx matrix signal.
Displays message for viewing 3D images.
Page 36
Watching TV
36
Computer on TV
Display PC screen
Connect PC
1.
Connect the PC's video output to the PC terminal of this TV with PC cable.
To listen to the PC sound, connect an audio cable between the computer and the
TV.
2. Select Input and display
1. Display Input select menu (With the connected equipment turned On)
INPUT
2. Select the PC input
Select PC input using
3. Display PC screen
/ and press
Page 37
Watching TV
37
Computer on TV
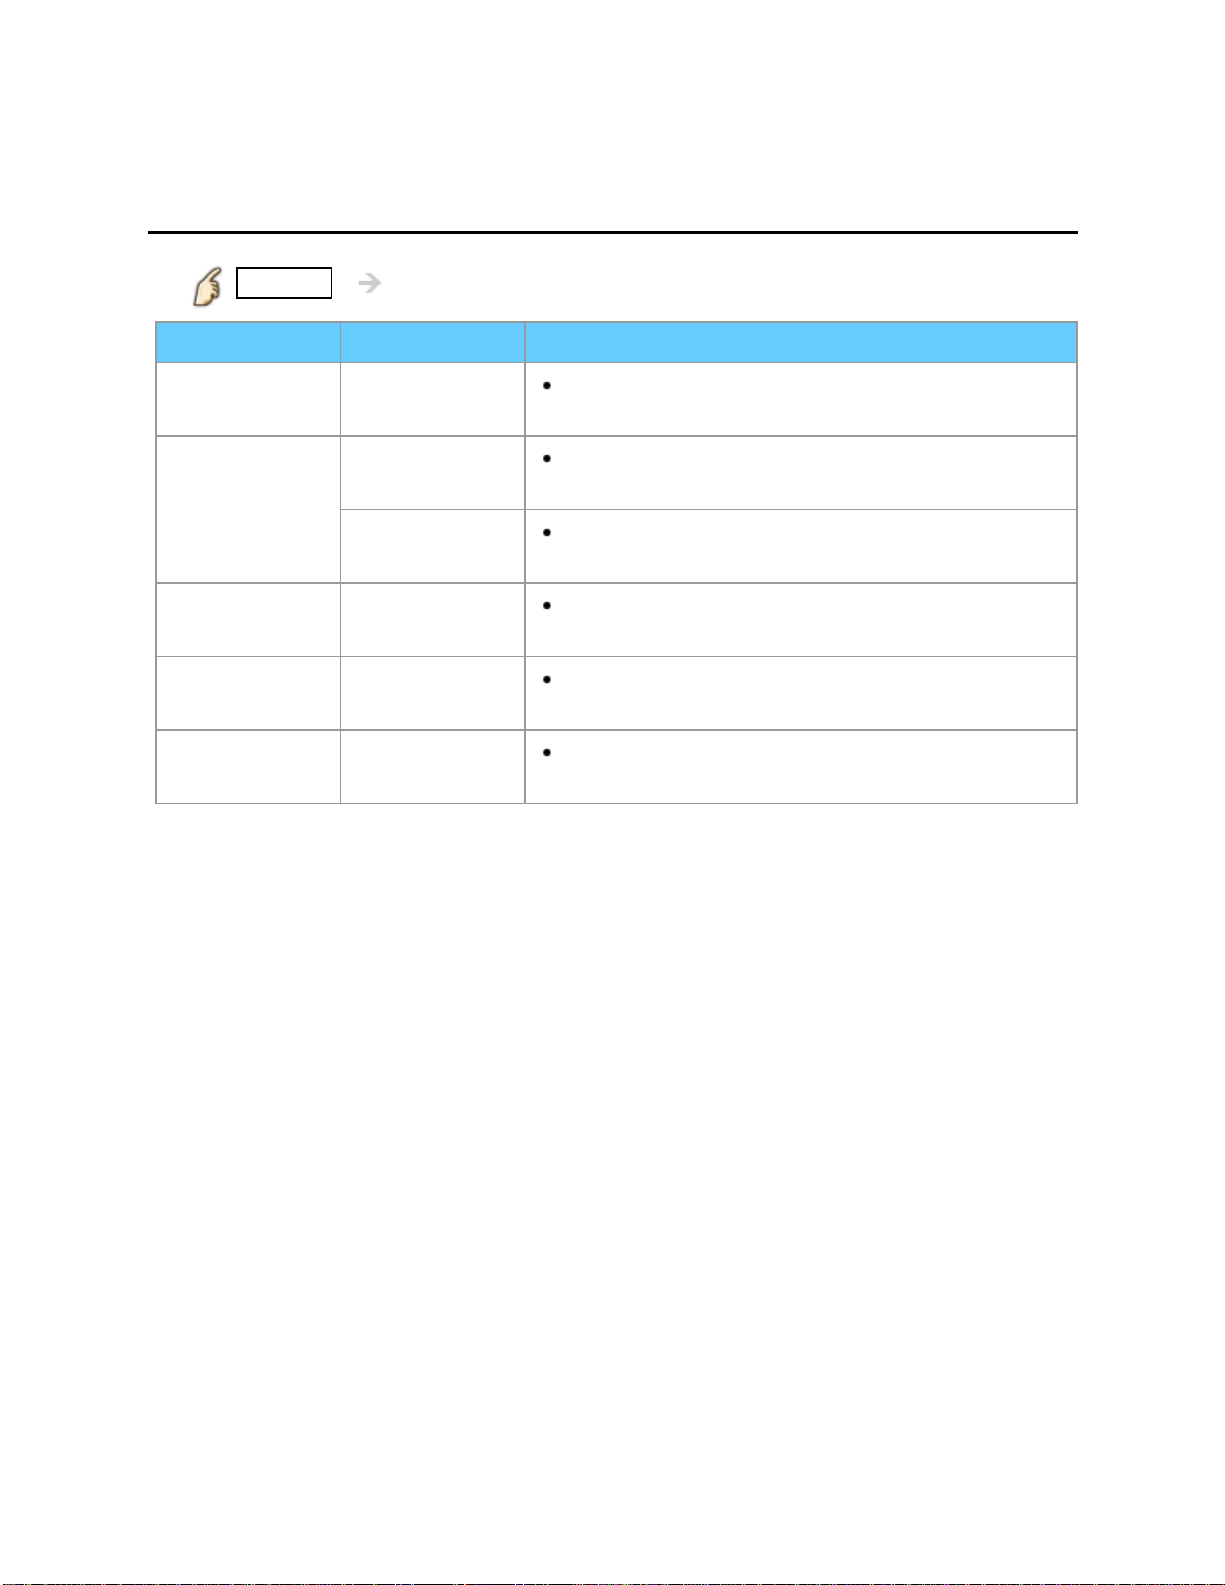
PC adjustments (1)
MENU Menu > Picture > PC adjustments
Settings Options Description
Reset to
defaults
Sync H & V
Dot clock
H-position
V-position
On green
Resets all PC adjustments to factory default
settings.
The H and V sync signals are input from the
HD/VD connector.
Uses a synchronized signal on the Video G
signal, which is input from the G connector.
Alleviates the problem if a picture appears to
be vertically-striped, flickers partially or is blurred.
Adjusts the horizontal position using left/right
cursor button.
Adjusts the vertical position using left/right
cursor button.
Page 38
Watching TV
38
Computer on TV
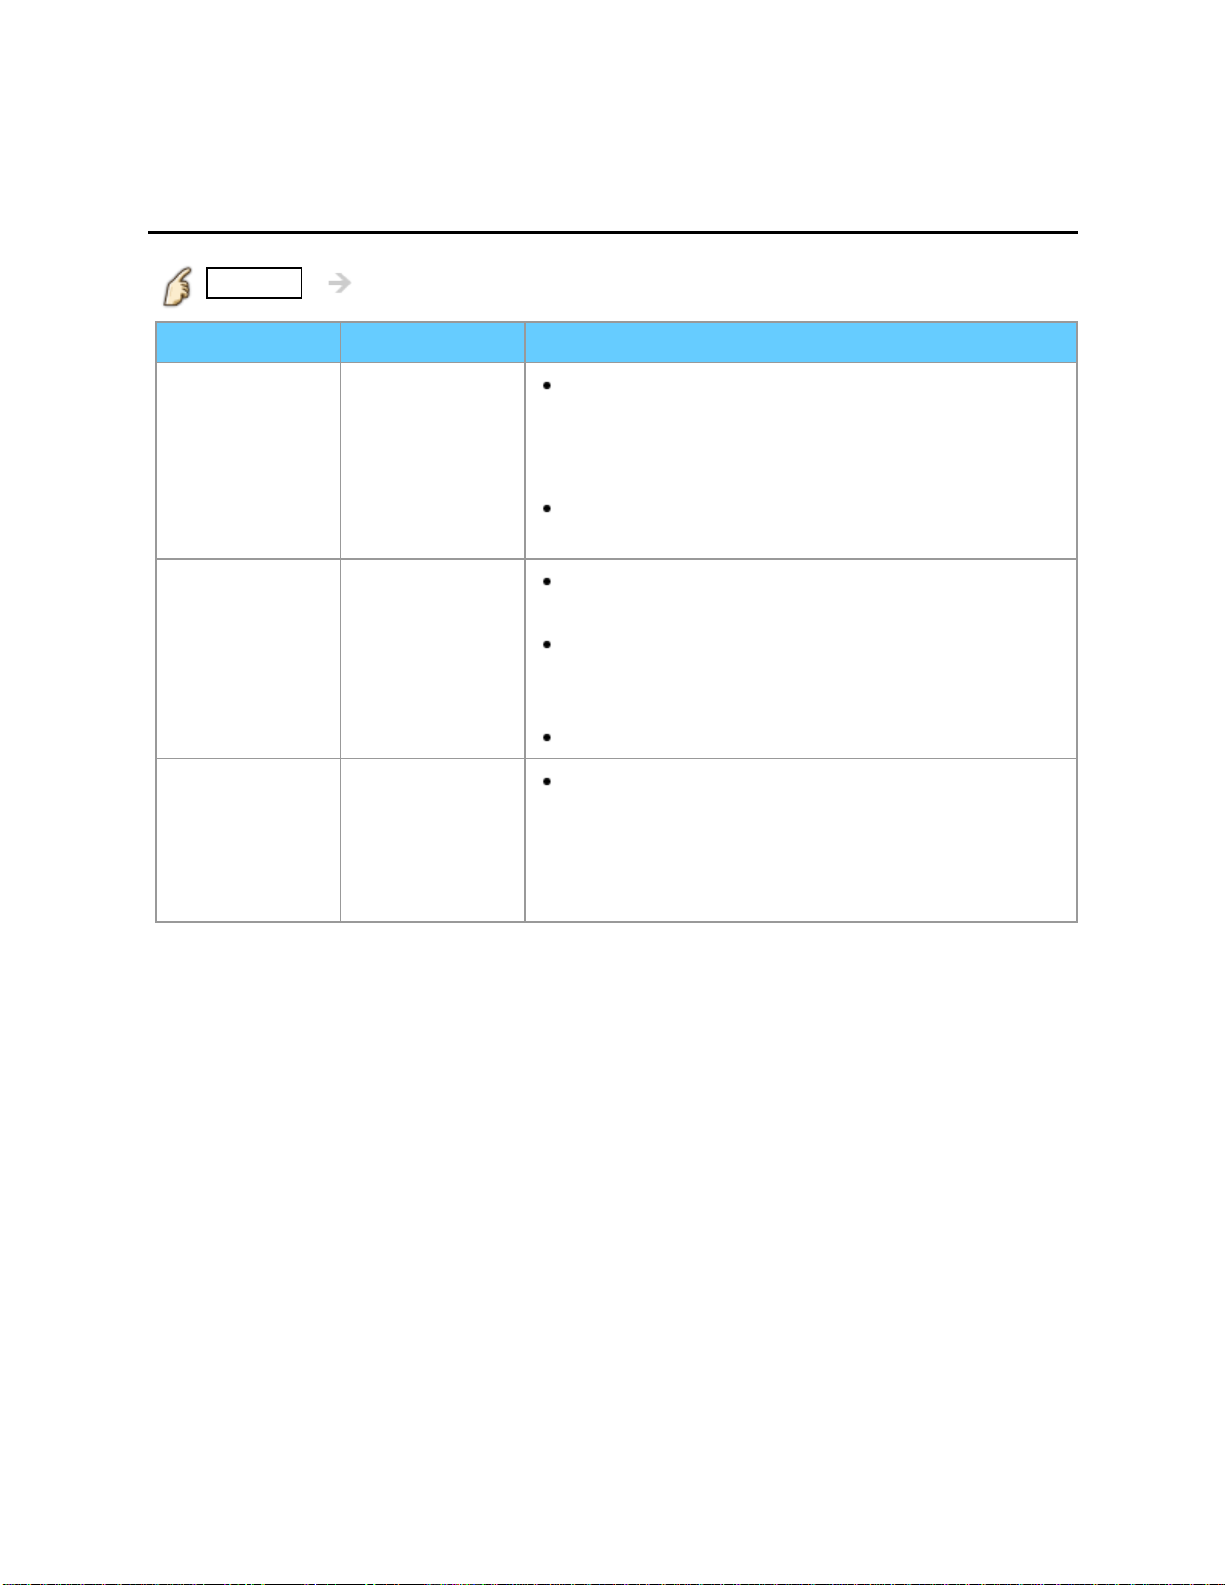
PC adjustments (2)
MENU Menu > Picture > PC adjustments
Settings Options Description
Clock phase
Input
resolution
H-frequency
V-frequency
Alleviates the problem if the whole picture
appears to flicker or is blurred. First adjust the Dot
Clock to get the best possible picture, then adjust
the Clock phase so that a clear picture appears.
It may not be possible to display a clear picture
due to poor input signals.
Switches to wide display and selects the
appropriate screen resolution.
VGA (640 x 480 pixels), WVGA (852 x 480
pixels), XGA (1,024 x 768 pixels), WXGA (1,280 x
768 pixels)
Options change depending on signals.
Displays the H (Horizontal)/V (Vertical)
frequencies.
Display range
Horizontal: 15 - 110 kHz
Vertical: 48 - 120 Hz
Page 39
Watching TV
39
Computer on TV
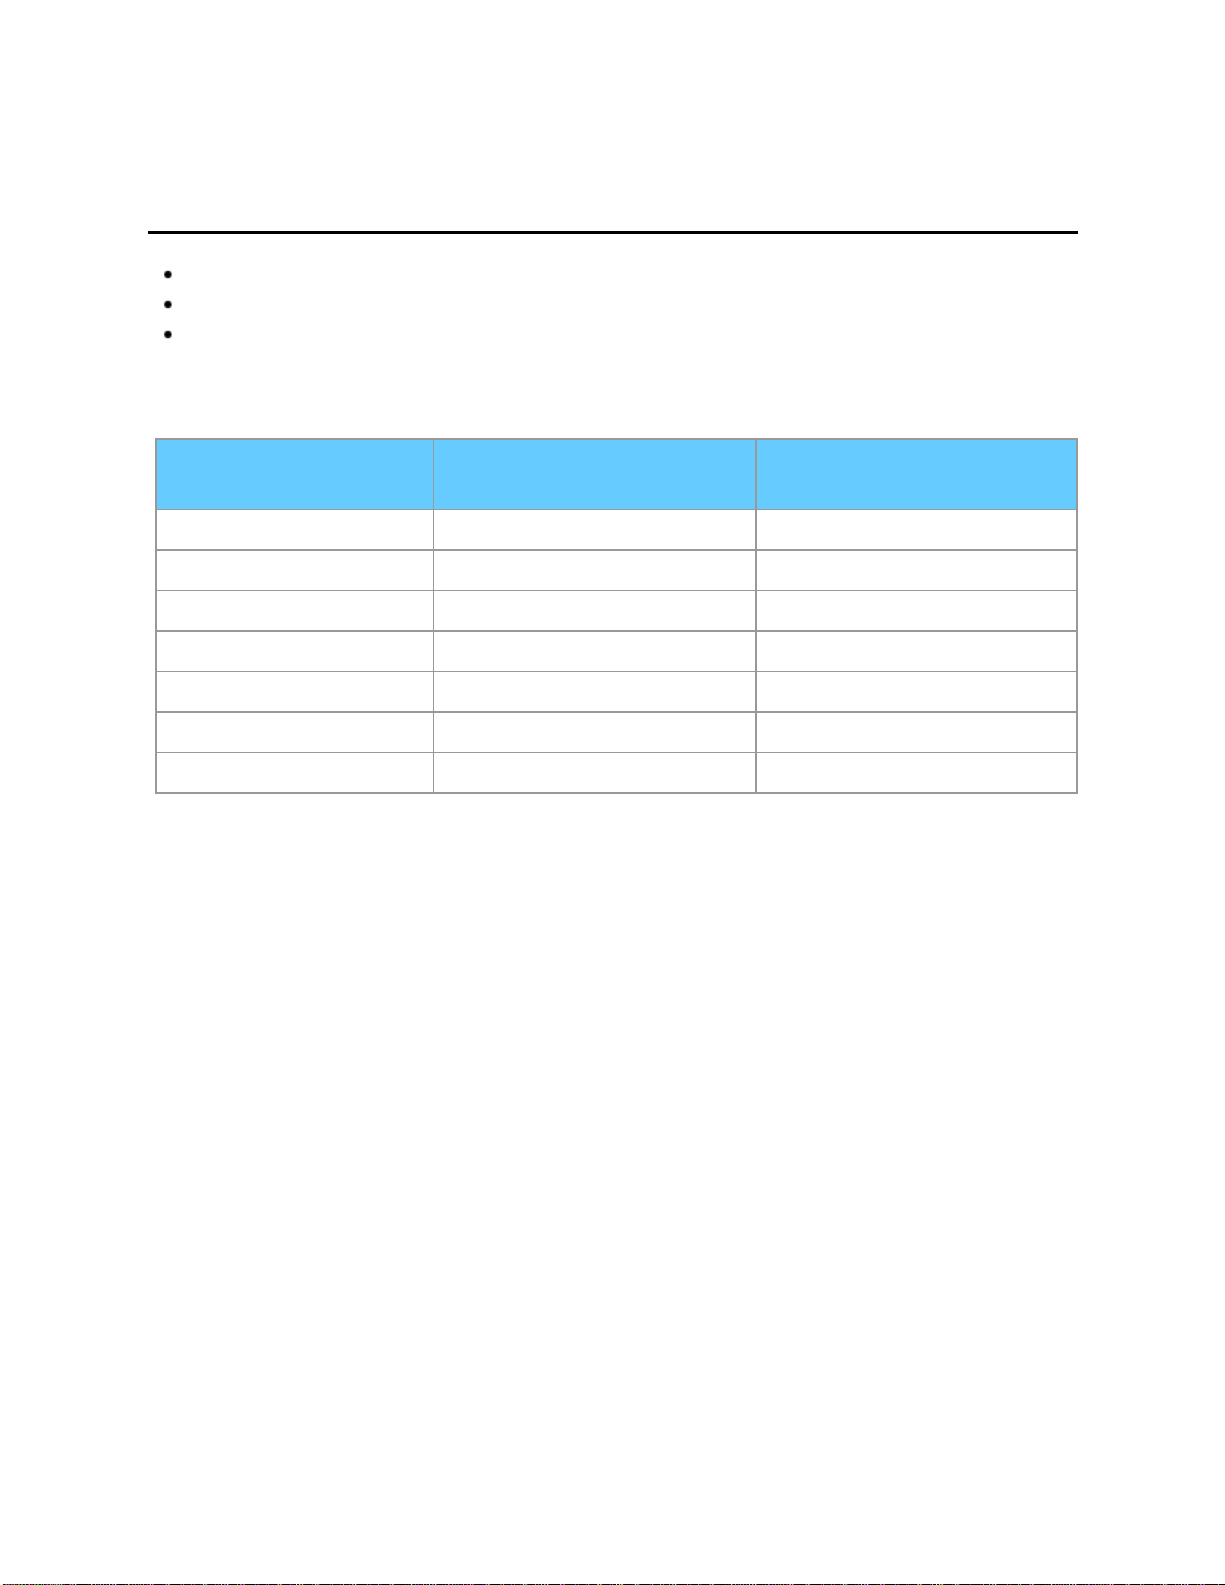
Input signal
Signals other than below may not be displayed properly.
The signals are reformatted for optimal viewing on your display.
Computer signals which can be input are those with a horizontal scanning
frequency of 15 to 110 kHz and vertical scanning frequency of 48 to 120 Hz.
(However, the image will not be displayed properly if the signals exceed 1,200 lines.)
Input signal Horizontal frequency
(kHz)
640 x 480 @60 31.47 59.94
852 x 480 @60 31.44 59.89
800 x 600 @60 37.88 60.32
1,024 x 768 @60 48.36 60.00
1,280 x 768 @60 47.78 59.87
1,280 x 1,024 @60 63.98 60.02
1,366 x 768 @60 48.39 60.04
Vertical frequency
(Hz)
Page 40

Internet services "VIERA Connect"
40
Connect to network
Network connections (1)
Contact your Broadband service provider
1.
If you don't have Internet service from your local provider, please order a highspeed Internet service at no less than the connection speed below. If you already
have this service, make sure that the connection speed exceeds the following:
Required speed (effective): at least 1.5 Mbps for SD and 6 Mbps for HD picture
quality, respectively.
Dial-up Internet service cannot be used for VIERA Connect.
2. Select wired or wireless connection
If the Cable/DSL modem is close to the TV and you have only one TV set, you may
choose a wired connection.
If the Cable/DSL modem is far from the TV and/or you have more TVs in the
house, you may want to use a wireless network.
Page 41
Internet services "VIERA Connect"
41
Connect to network
Network connections (2)
Connecting to the Internet
3.
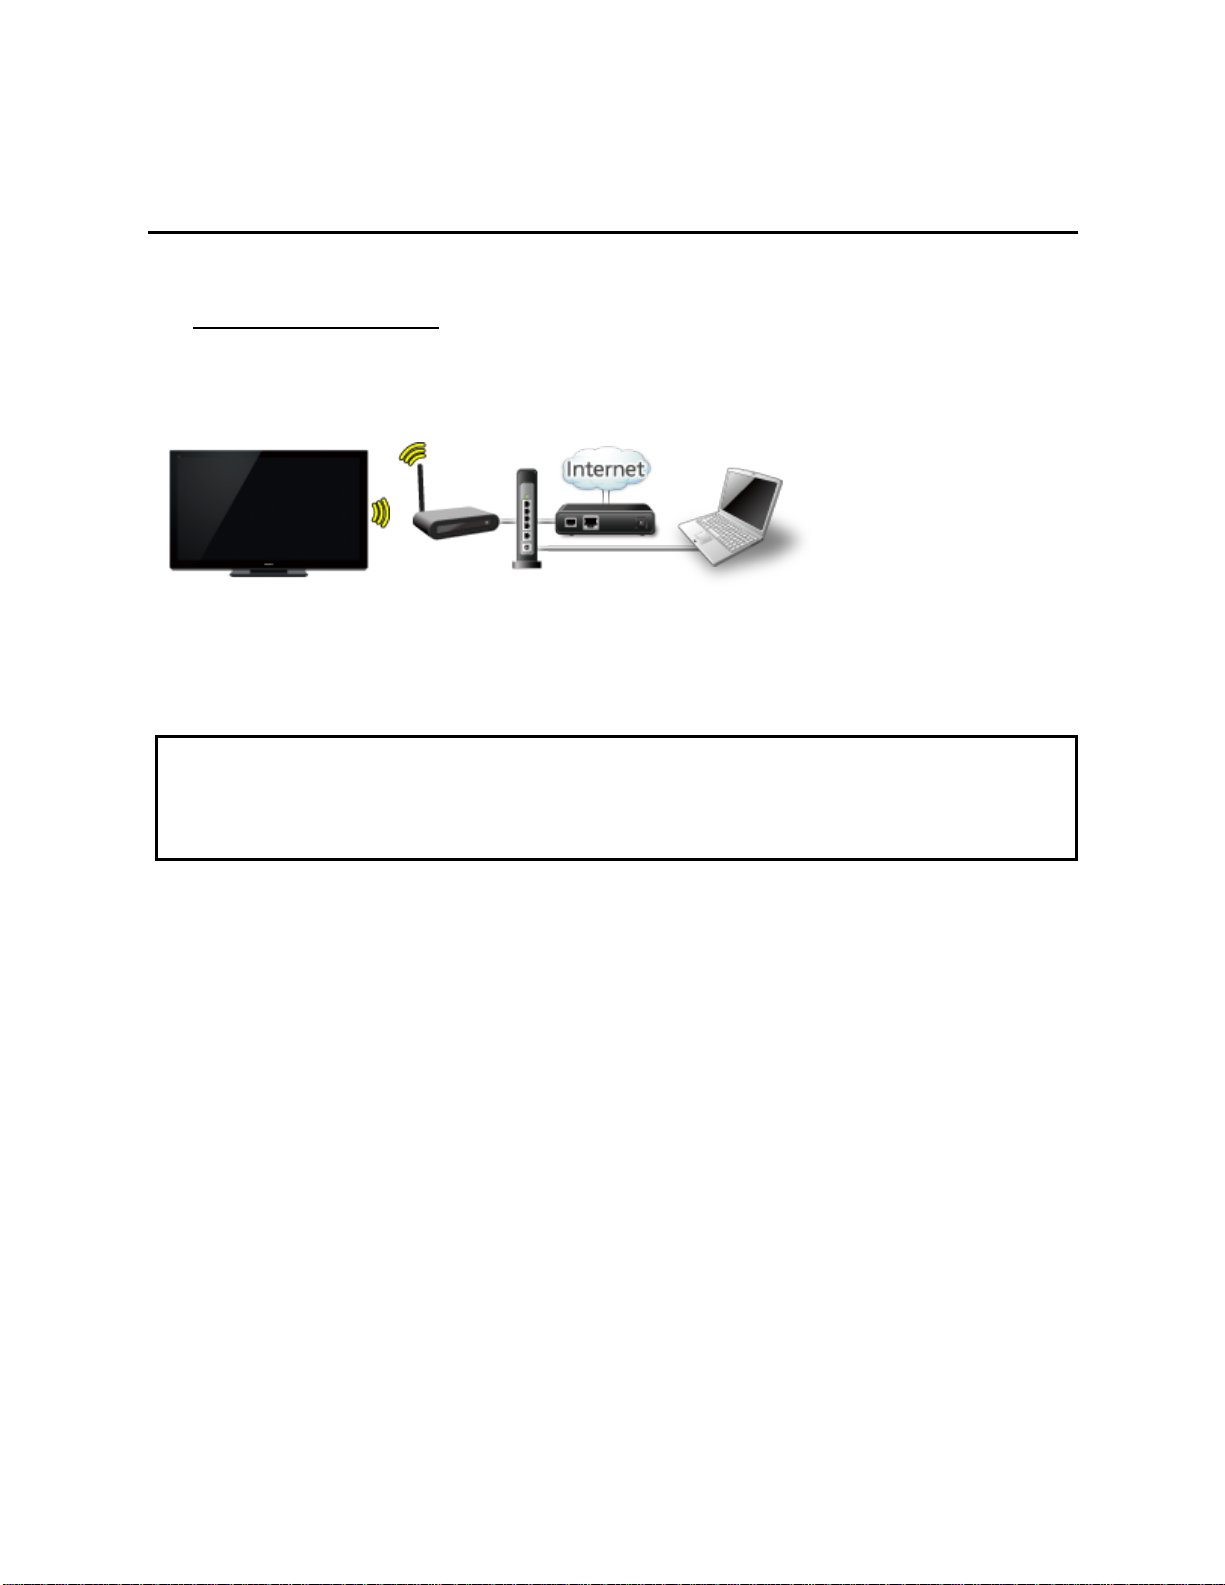
A. Wireless connection
If you are using the network for connecting various pieces of equipment and want
to connect the TV, you could also use a Wireless LAN and Access point to connect
the TV to the Internet.
Access
TV
(Built-in Wireless LAN)
point
- Hub, Router
- Modem
- DLNA Certified media server
(for example, PC, etc.)
* To use only DLNA features, you can operate the features without Broadband
network environment.
You can just connect the TV directly to the equipment with a LAN cross cable.
Page 42
Internet services "VIERA Connect"
42
Connect to network
Network connections (3)
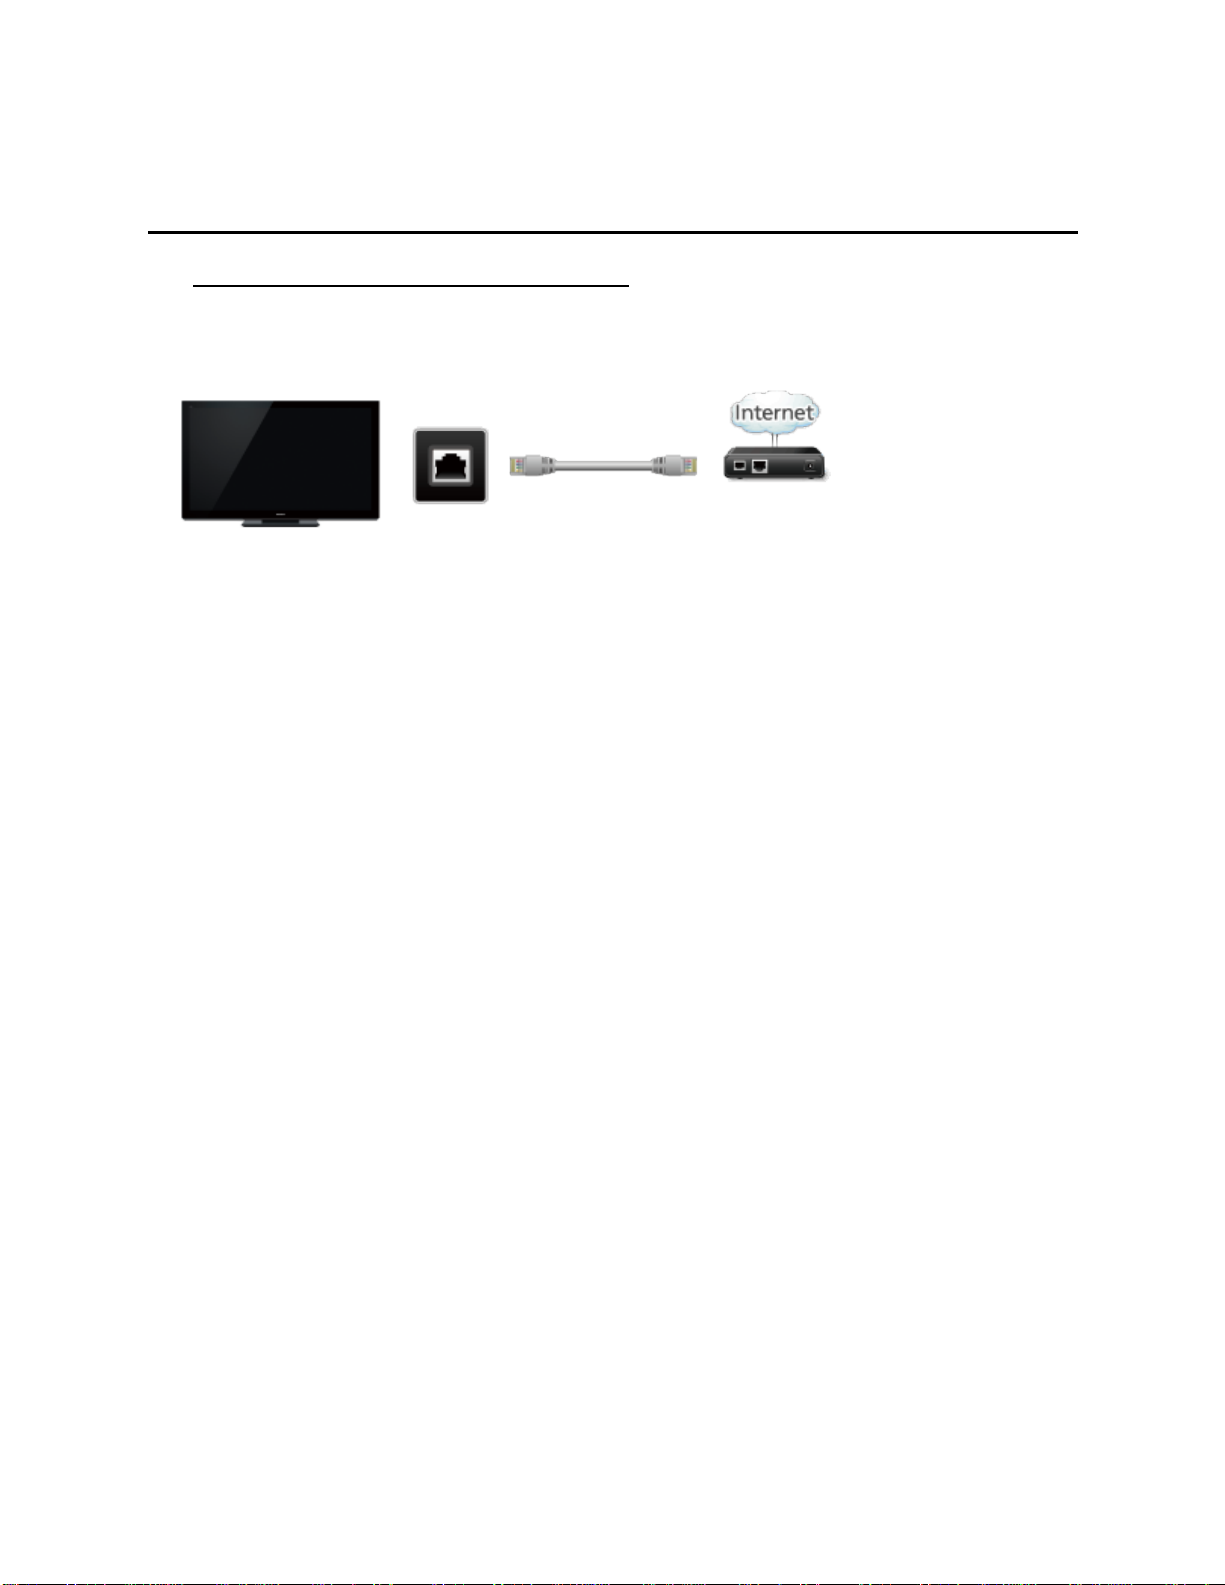
B. Wired connection (Directly connected)
If you are not using the network for connecting anything else but the TV, you can
just connect the TV directly to the Cable/DSL Ethernet modem with LAN cable.
TV
ETHERNET LAN cable
Modem
Page 43
Internet services "VIERA Connect"
43
Connect to network
Network connections (4)
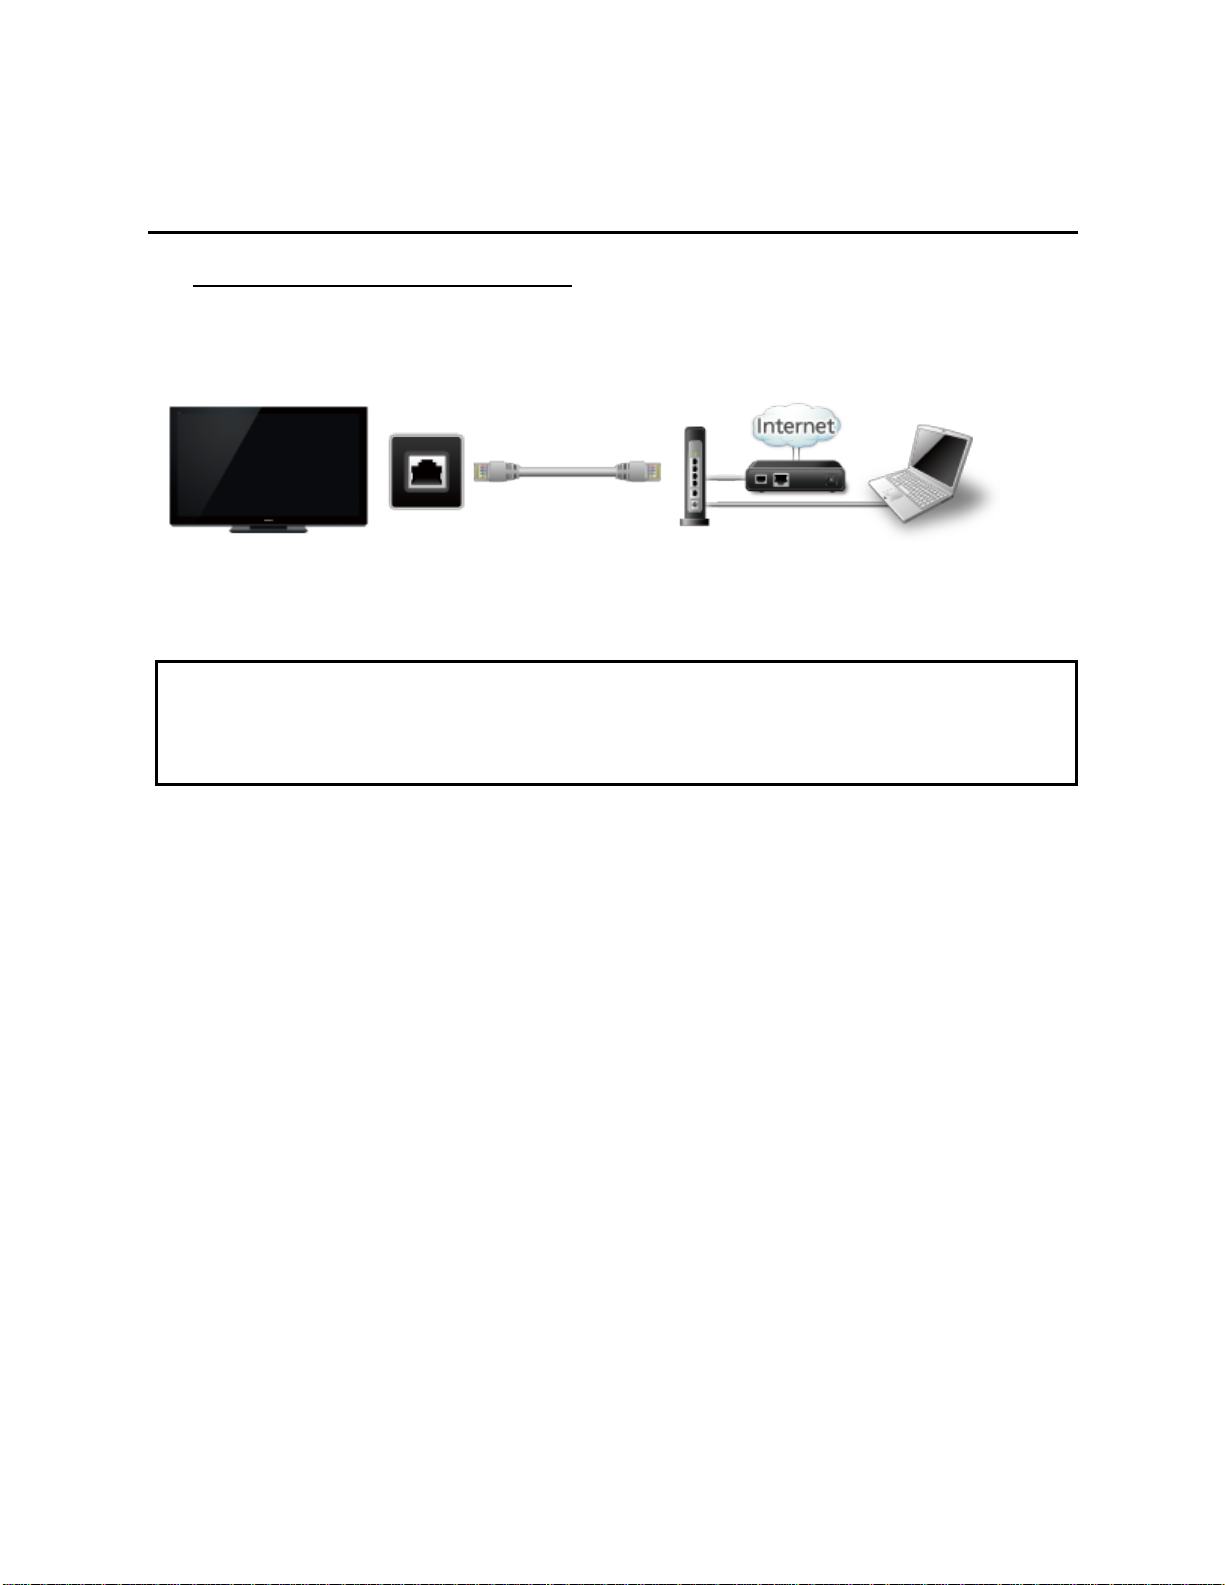
C. Wired connection (Using Router)
If you are using the network for connecting various pieces of equipment and want
to connect the TV, you should use a router to connect the TV to the Internet with
LAN straight cable.
ETHERNET
TV
LAN cable
- Hub, Router
- Modem
- DLNA Certified media server
(for example, PC, etc.)
* To use only DLNA features, you can operate the features without Broadband
network environment.
You can just connect the TV directly to the equipment with a LAN cross cable.
Page 44
Internet services "VIERA Connect"
44
Network settings
Setting menu
This menu is used for connecting to a Broadband environment.
1. Display the Menu and select Network
MENU Menu > Network
Select Network using
2. Select the options and set
(Connection test/Network connection/Wireless network settings/
IP address/DNS settings/Network link/Software update/
New software notice/Network status)
/ from menu bar and press
Page 45

Internet services "VIERA Connect"
45
Network settings
Connection test
Connection test
Check that the all Network settings, and then start Connection test
Select Connection test using / and press
(It takes a while to cancel the test.)
Displayed Connection test screen
Check mark appears at front of each check item's box when check has
been finished successfully.
Complete Connection test
Success
Error Follow the directions on screen to complete the setting.
If you perform the Proxy settings, check the Proxy address and the Proxy port
number.
Completion screen is displayed.
Page 46
Internet services "VIERA Connect"
46
Network settings
Network connection
Network connection
Select Network connection using /
Select Network type (Ethernet cable/Wireless (WiFi)) with /
Page 47
Internet services "VIERA Connect"
47
Network settings
Wireless network settings
Wireless network settings
Select Wireless network settings with / and press
Display Wireless networks and select access point.
Or select connection method (below) with color key and follow the
directions on screen to complete the setting.
WPS (push button):
You can connect to the access point by pressing a connection button.
WPS (PIN):
Set the PIN code that is displayed on the TV on the access point.
Manual settings:
Manually set SSID, security type, and encryption type to match the settings
of the access point to which to connect.
Search again:
Search again an available wireless network within the range.
* Wi-Fi Protected Setup is an easy setting of the Wi-Fi Alliance's certification.
* For more details on setting of an access point, please refer to operating manual
for the access point.
* When connecting by 11n (5 GHz), select "AES" as the encryption type for the
wireless LAN.
Page 48
Internet services "VIERA Connect"
48
Network settings
IP address/DNS settings
IP address/DNS settings
Select IP address/DNS settings using / and press
Displayed IP address/DNS settings
Select IP setting mode / DNS setting mode using / and select
Automatic with /
Each IP address is acquired automatically
If you are using a Broadband router, IP automatic acquisition in DHCP can be
used under normal circumstances. If you are not sure, check with the person
who installed the equipment, or check the instructions for each device.
Manual setting
On above, Select IP setting mode / DNS setting mode
using / and select Manual with /
Select the item
Check the specifications of the Broadband router and enter each IP address.
Or Enter each IP address as specified by the provider.
Page 49
Internet services "VIERA Connect"
49
Network settings
Proxy settings
Proxy settings
Set only if specified by the provider. It is not required for normal household use.
Select IP address/DNS settings using / and press
Select Proxy setting using / and press
Select the item and press
Enter address or port number and press
Proxy address
This is the address of the relay server that is connected to the target server instead
of the browser and sends data to the browser. Setting is only required if specified
by the provider.
Proxy port
This number is specified by the provider together with the Proxy address.
Page 50
Internet services "VIERA Connect"
50
Network settings
Network link (1)
Network link
Select Network link using / and press
Displayed Network link
Select the item and set
Edit the name of this TV
Sets your favorite name for this TV. This name will be displayed on the screen of
the other Network compatible equipment.
Select VIERA network name using / and press
Enter name and press
Enabling DLNA remote control
Select DLNA remote control using
Enable with /
Volume setting in DMR operation
Select DLNA remote volume control using
or Enable with /
Available only when Enable is selected in DLNA remote control above.
/ and switches Disable or
/ and switches Disable
Page 51

Internet services "VIERA Connect"
51
Network settings
Network link (2)
Enabling Network remote control
(network device such as a smartphone.)
Select Network remote control using
Enable with /
/ and switches Disable or
Page 52
Internet services "VIERA Connect"
52
Network settings
Software update
Software update
Select Software update using / and press
Press OK to start the Software update screen
Software update
Follow directions on the screen
Make sure to set Clock before the update starts.
Page 53
Internet services "VIERA Connect"
53
Network settings
New software notice
New software notice
Displays new software update information when TV is turned on.
Select New software notice using /
Switches Off or On with /
Page 54
Internet services "VIERA Connect"
54
Network settings
Network status
Network status
Displayed Current settings and status screen.
Select Network status using / and press
Display Network status screen
* Displayed items differ depending on the type of network connection.
Page 55
Internet services "VIERA Connect"
55
How to use
Operate
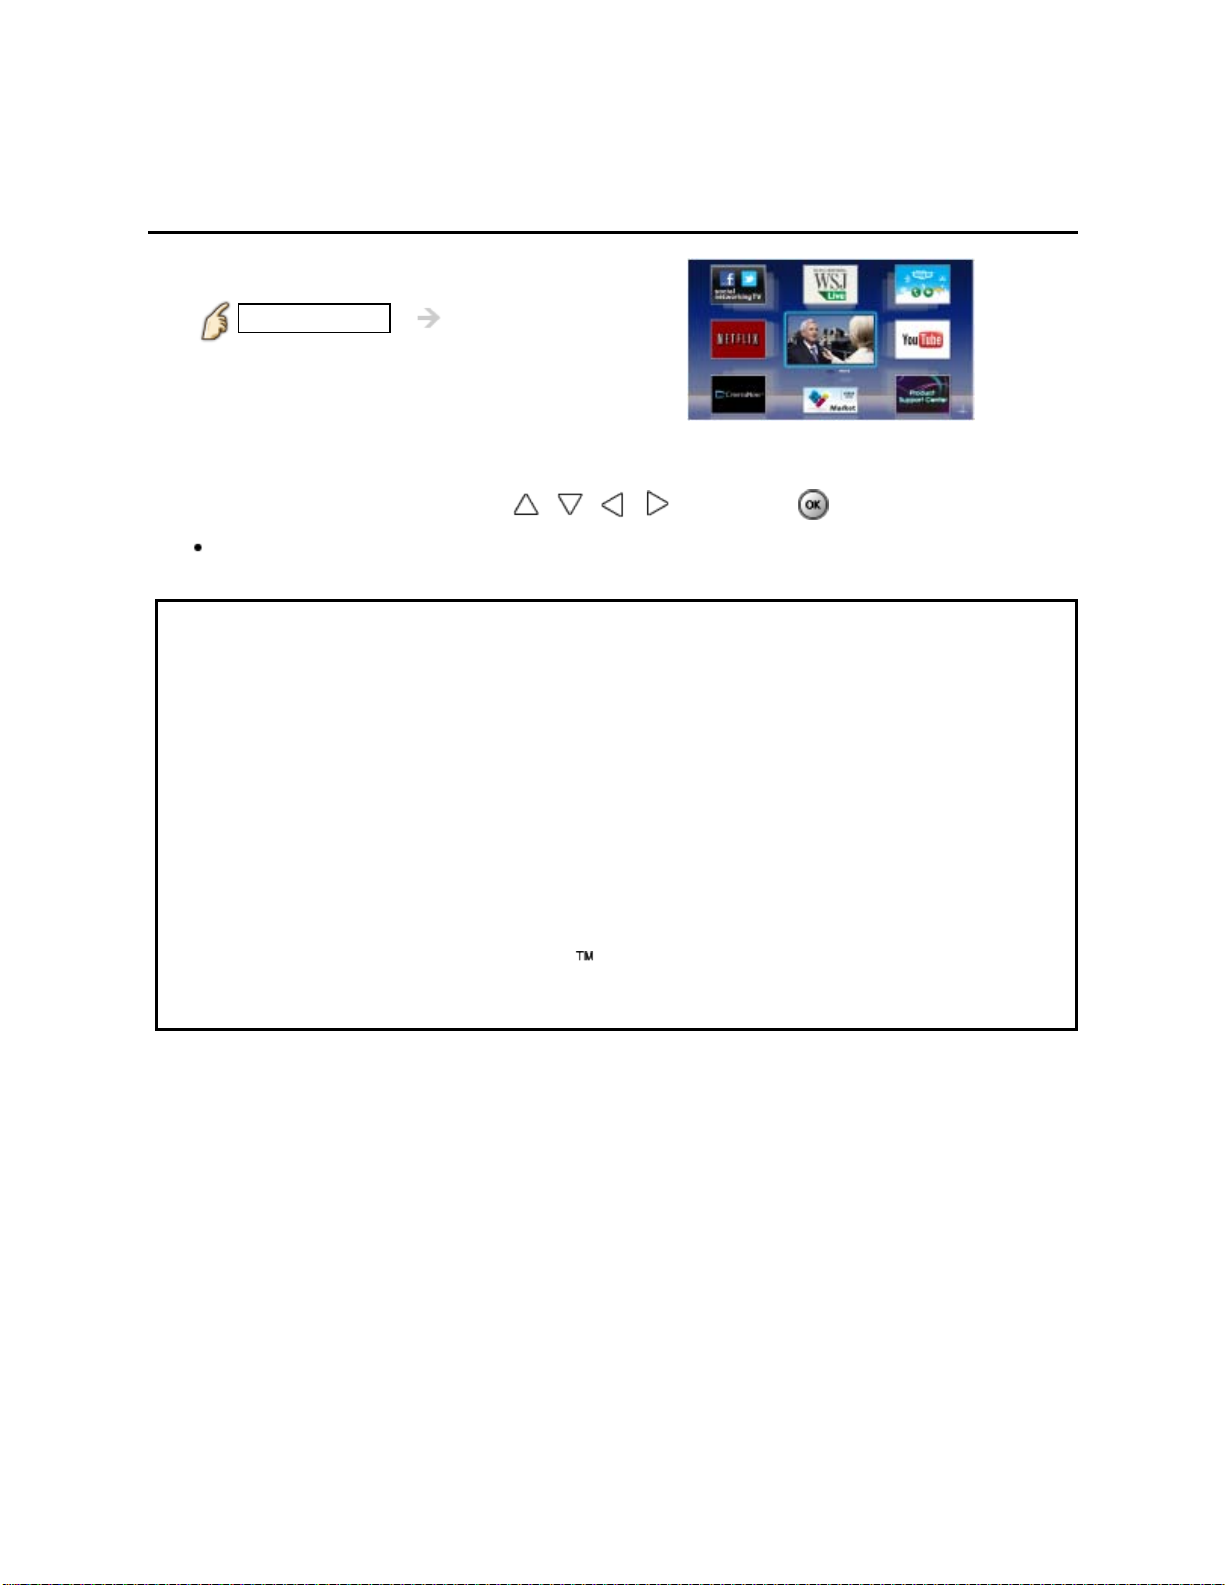
Access to VIERA Connect
1.
INTERNET VIERA Connect
2. Select and Enjoy Internet Service
Select the desired item using / / / and press
USB keyboard is available. Set Keyboard type in Setup menu.
(Game pad is also available.)
* You need a Broadband environment to use this service.
* Please confirm Network connections and Network settings before use
this function.
* Depending on the usage conditions, it may take a while to download all the
data.
* Internet services available in VIERA Connect are subject to change without
notice.
* Not all VIERA Connect contents are available depending on the country and
area.
* 3D images are not displayed on center of the home screen depending on the
signal.
* Video communication (e.g. Skype ) requires an exclusive Communication
Camera TY-CC20W.
(example)
Page 56
Home network "DLNA"
56
Get started
Information
You can share the contents (Photo, Video, Music etc.) stored in DLNA Certified media
server with your home network system.
Please confirm Network connection and Network menu settings before
use this function.
This TV is a DLNA Certified product.
DLNA (Digital Living Network Alliance) is a standard that makes DLNA Certified
digital electronics easier and more convenient to use on a home network. To learn
more, visit www.dlna.org. It allows you to share photos, videos and music stored in
the DLNA Certified media server (for example, PC with Windows 7 installed, etc.)
connected to your home network, and enjoy the contents on the TV screen.
Media server
Store photos, videos or music into the DLNA Certified media server, and then you
can enjoy them on the TV.
To use a PC as a media server
Prepare the PC with Windows 7 or ensure the server software is installed on the
PC. "Windows 7" is the server software that has been tested for compatibility with
this TV (as of January, 2011). Any other server software have not been tested with
this TV, therefore compatibility and performance cannot be assured.
Windows 7
The setup for homegroup settings of Windows 7 is required. For details, refer to the
help functions of Windows 7.
Page 57

Home network "DLNA"
57
Connect to network
Network connections (1)
Contact your Broadband service provider
1.
If you don't have Internet service from your local provider, please order a highspeed Internet service at no less than the connection speed below. If you already
have this service, make sure that the connection speed exceeds the following:
Required speed (effective): at least 1.5 Mbps for SD and 6 Mbps for HD picture
quality, respectively.
Dial-up Internet service cannot be used for VIERA Connect.
2. Select wired or wireless connection
If the Cable/DSL modem is close to the TV and you have only one TV set, you may
choose a wired connection.
If the Cable/DSL modem is far from the TV and/or you have more TVs in the
house, you may want to use a wireless network.
Page 58
Home network "DLNA"
58
Connect to network
Network connections (2)
Connecting to the Internet
3.
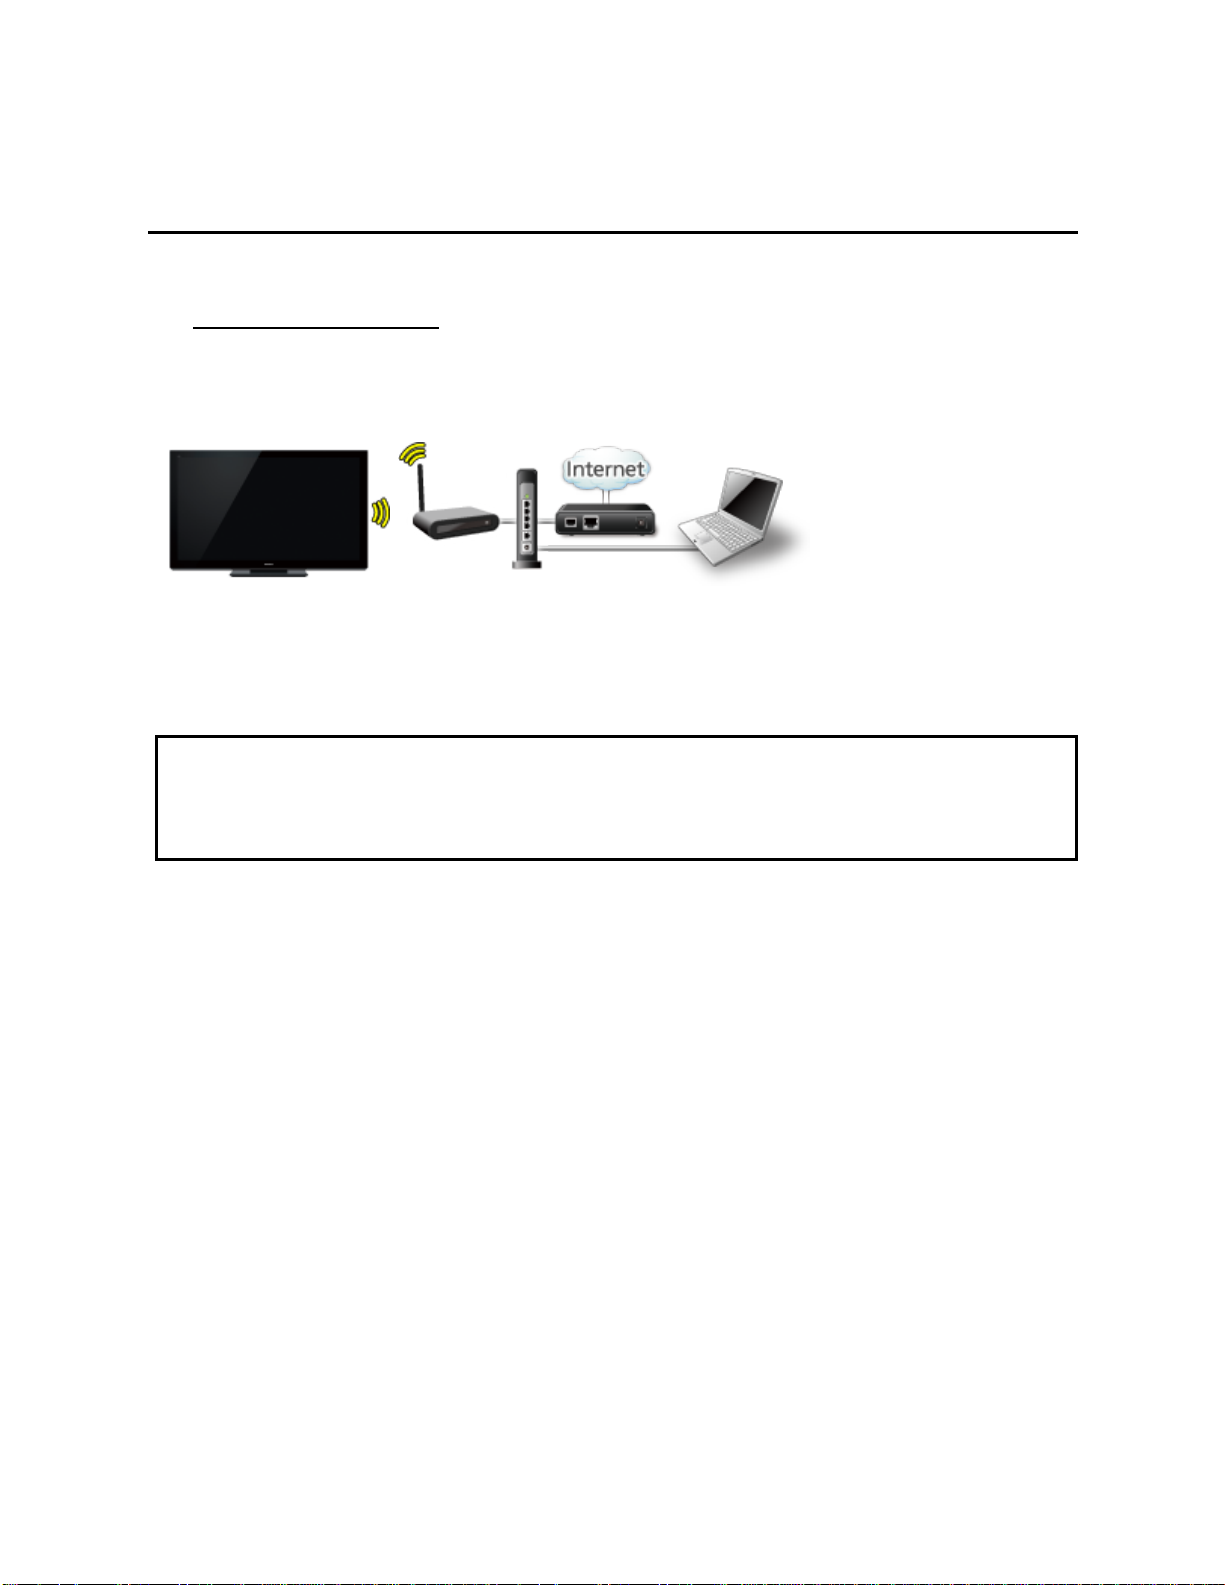
A. Wireless connection
If you are using the network for connecting various pieces of equipment and want
to connect the TV, you could also use a Wireless LAN and Access point to connect
the TV to the Internet.
Access
TV
(Built-in Wireless LAN)
point
- Hub, Router
- Modem
- DLNA Certified media server
(for example, PC, etc.)
* To use only DLNA features, you can operate the features without Broadband
network environment.
You can just connect the TV directly to the equipment with a LAN cross cable.
Page 59
Home network "DLNA"
59
Connect to network
Network connections (3)
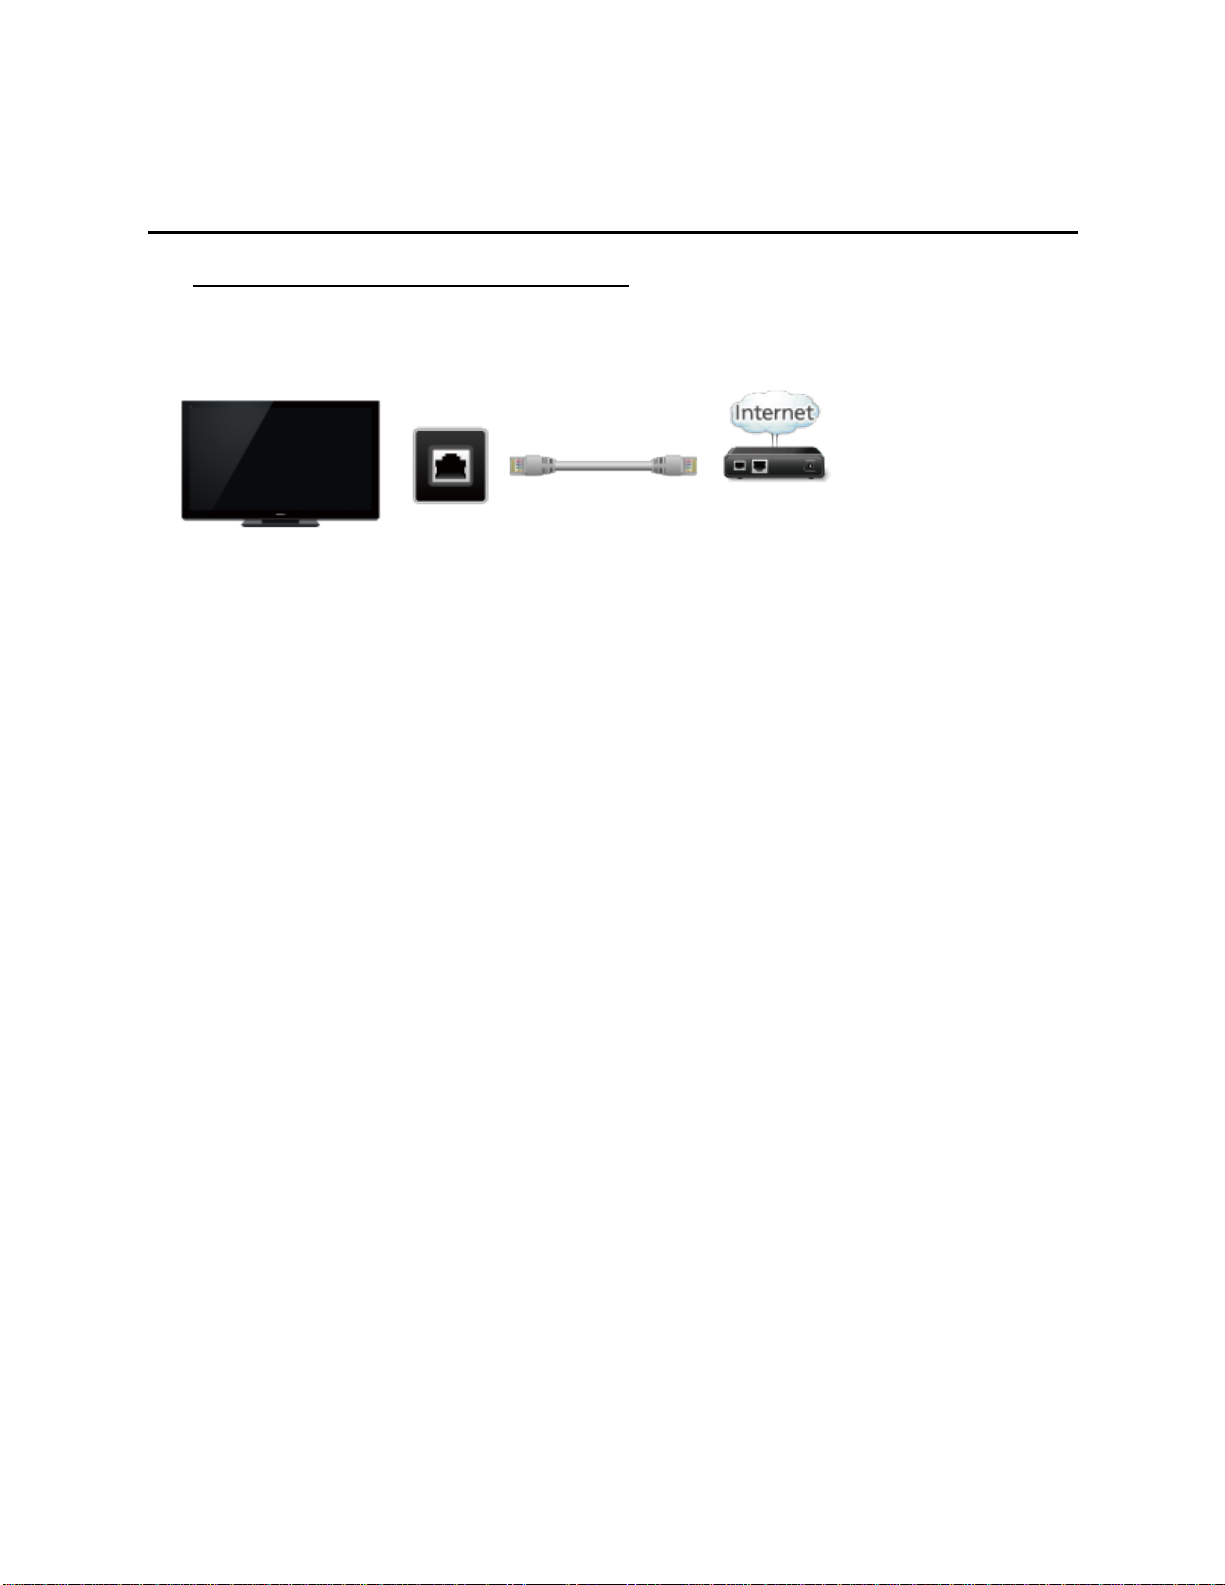
B. Wired connection (Directly connected)
If you are not using the network for connecting anything else but the TV, you can
just connect the TV directly to the Cable/DSL Ethernet modem with LAN cable.
TV
ETHERNET LAN cable
Modem
Page 60
Home network "DLNA"
60
Connect to network
Network connections (4)
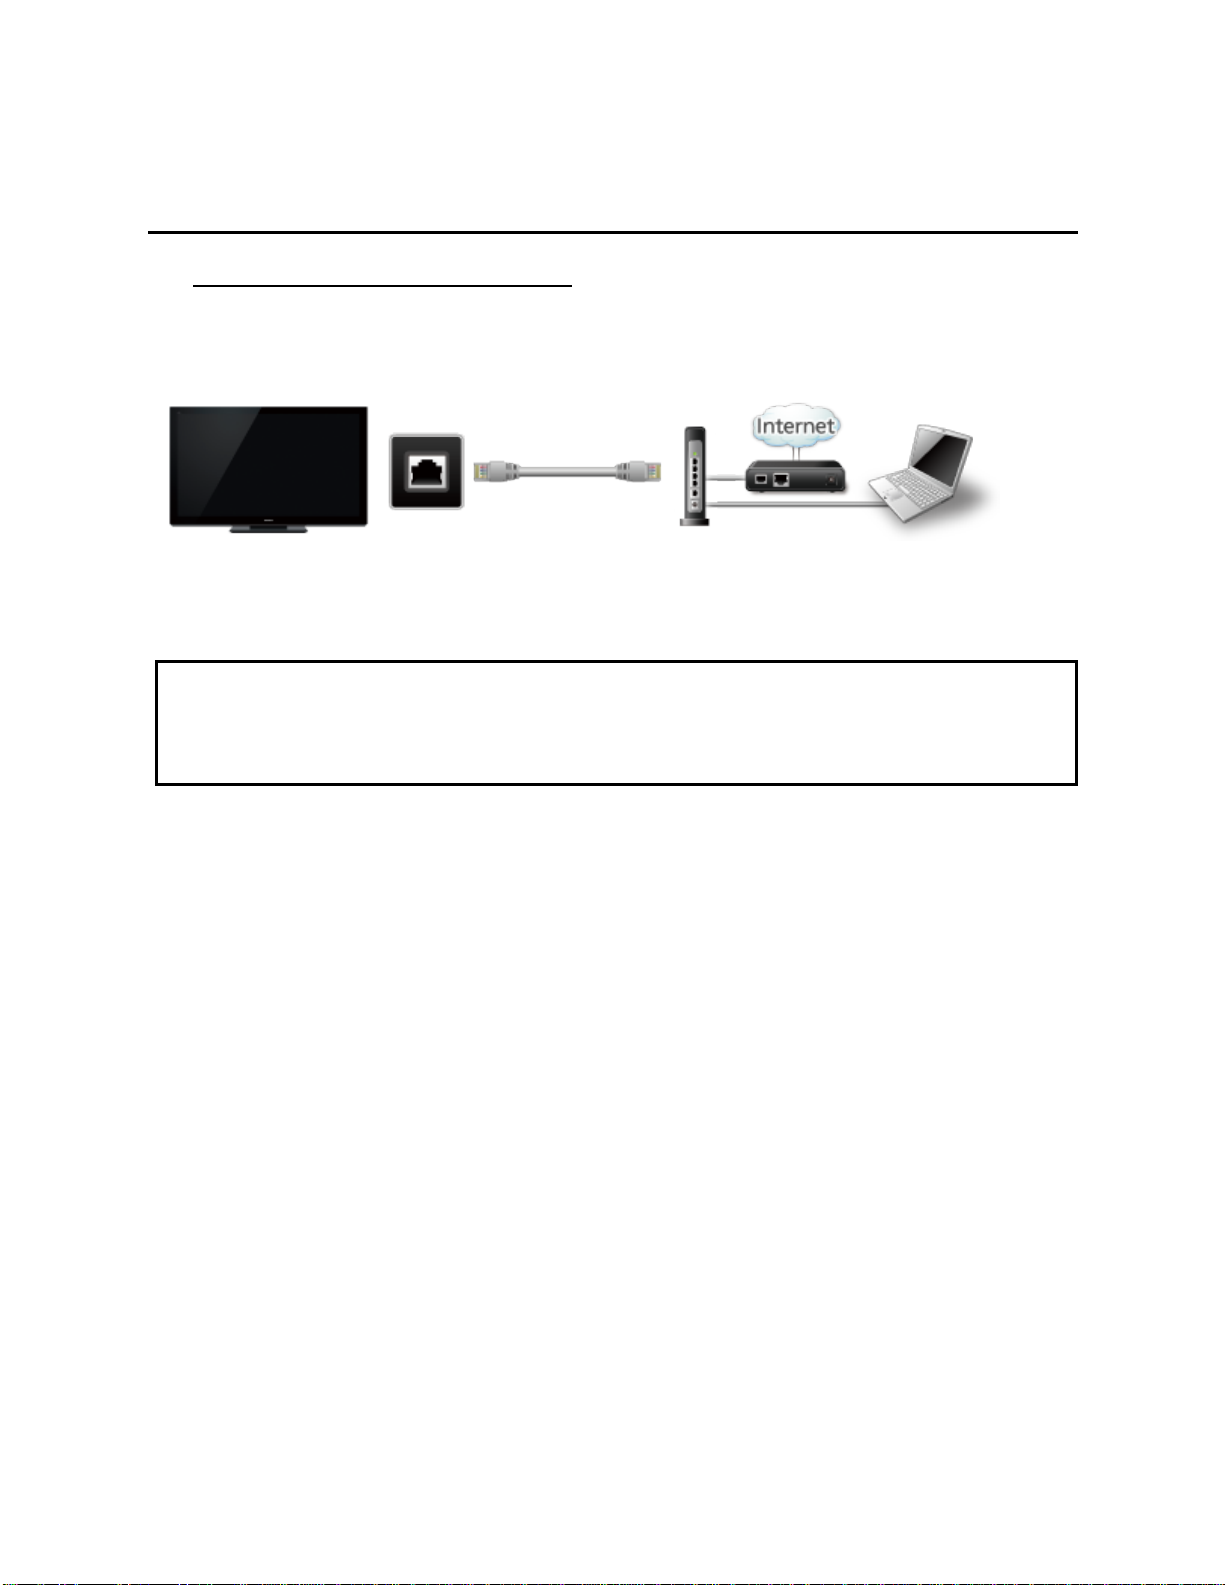
C. Wired connection (Using Router)
If you are using the network for connecting various pieces of equipment and want
to connect the TV, you should use a router to connect the TV to the Internet with
LAN straight cable.
ETHERNET
TV
LAN cable
- Hub, Router
- Modem
- DLNA Certified media server
(for example, PC, etc.)
* To use only DLNA features, you can operate the features without Broadband
network environment.
You can just connect the TV directly to the equipment with a LAN cross cable.
Page 61
Home network "DLNA"
61
Network settings
Setting menu
This menu is used for connecting to a Broadband environment.
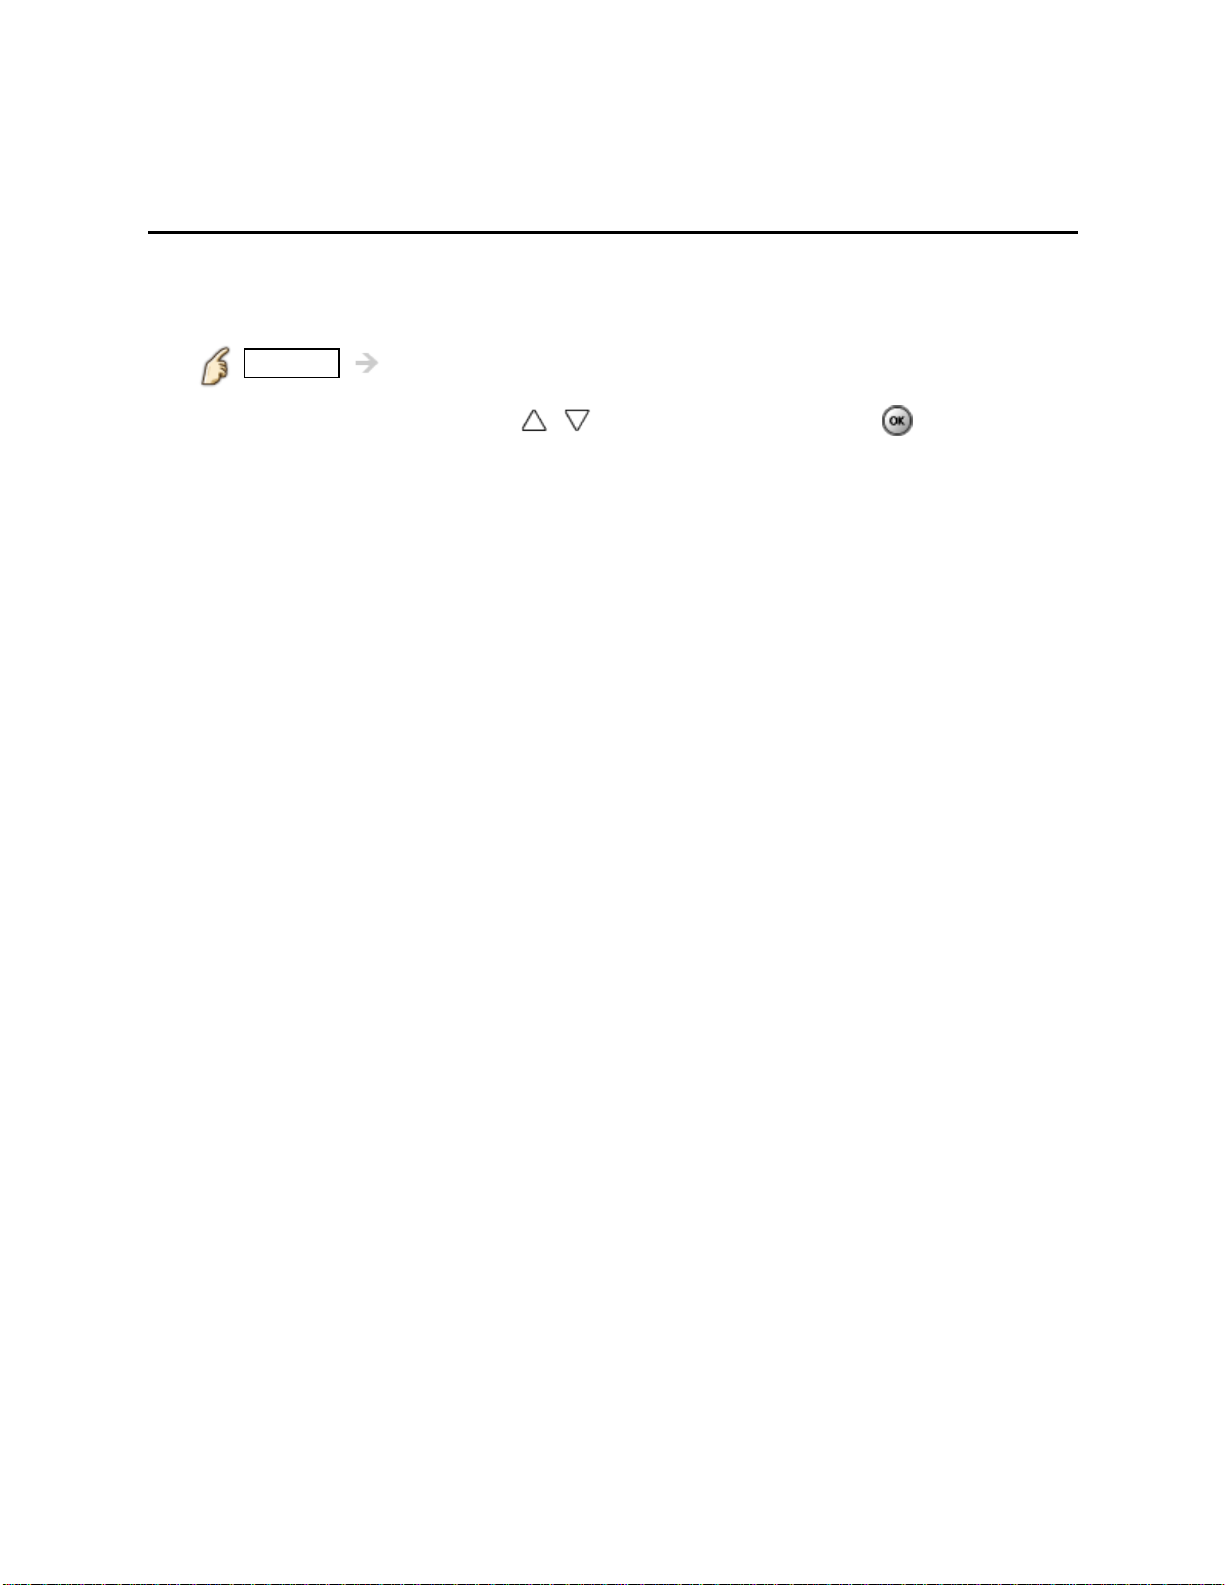
1. Display the Menu and select Network
MENU Menu > Network
Select Network using
2. Select the options and set
(Connection test/Network connection/Wireless network settings/
IP address/DNS settings/Network link/Software update/
New software notice/Network status)
/ from menu bar and press
Page 62

Home network "DLNA"
62
Network settings
Connection test
Connection test
Check that the all Network settings, and then start Connection test
Select Connection test using / and press
(It takes a while to cancel the test.)
Displayed Connection test screen
Check mark appears at front of each check item's box when check has
been finished successfully.
Complete Connection test
Success
Error Follow the directions on screen to complete the setting.
If you perform the Proxy settings, check the Proxy address and the Proxy port
number.
Completion screen is displayed.
Page 63
Home network "DLNA"
63
Network settings
Network connection
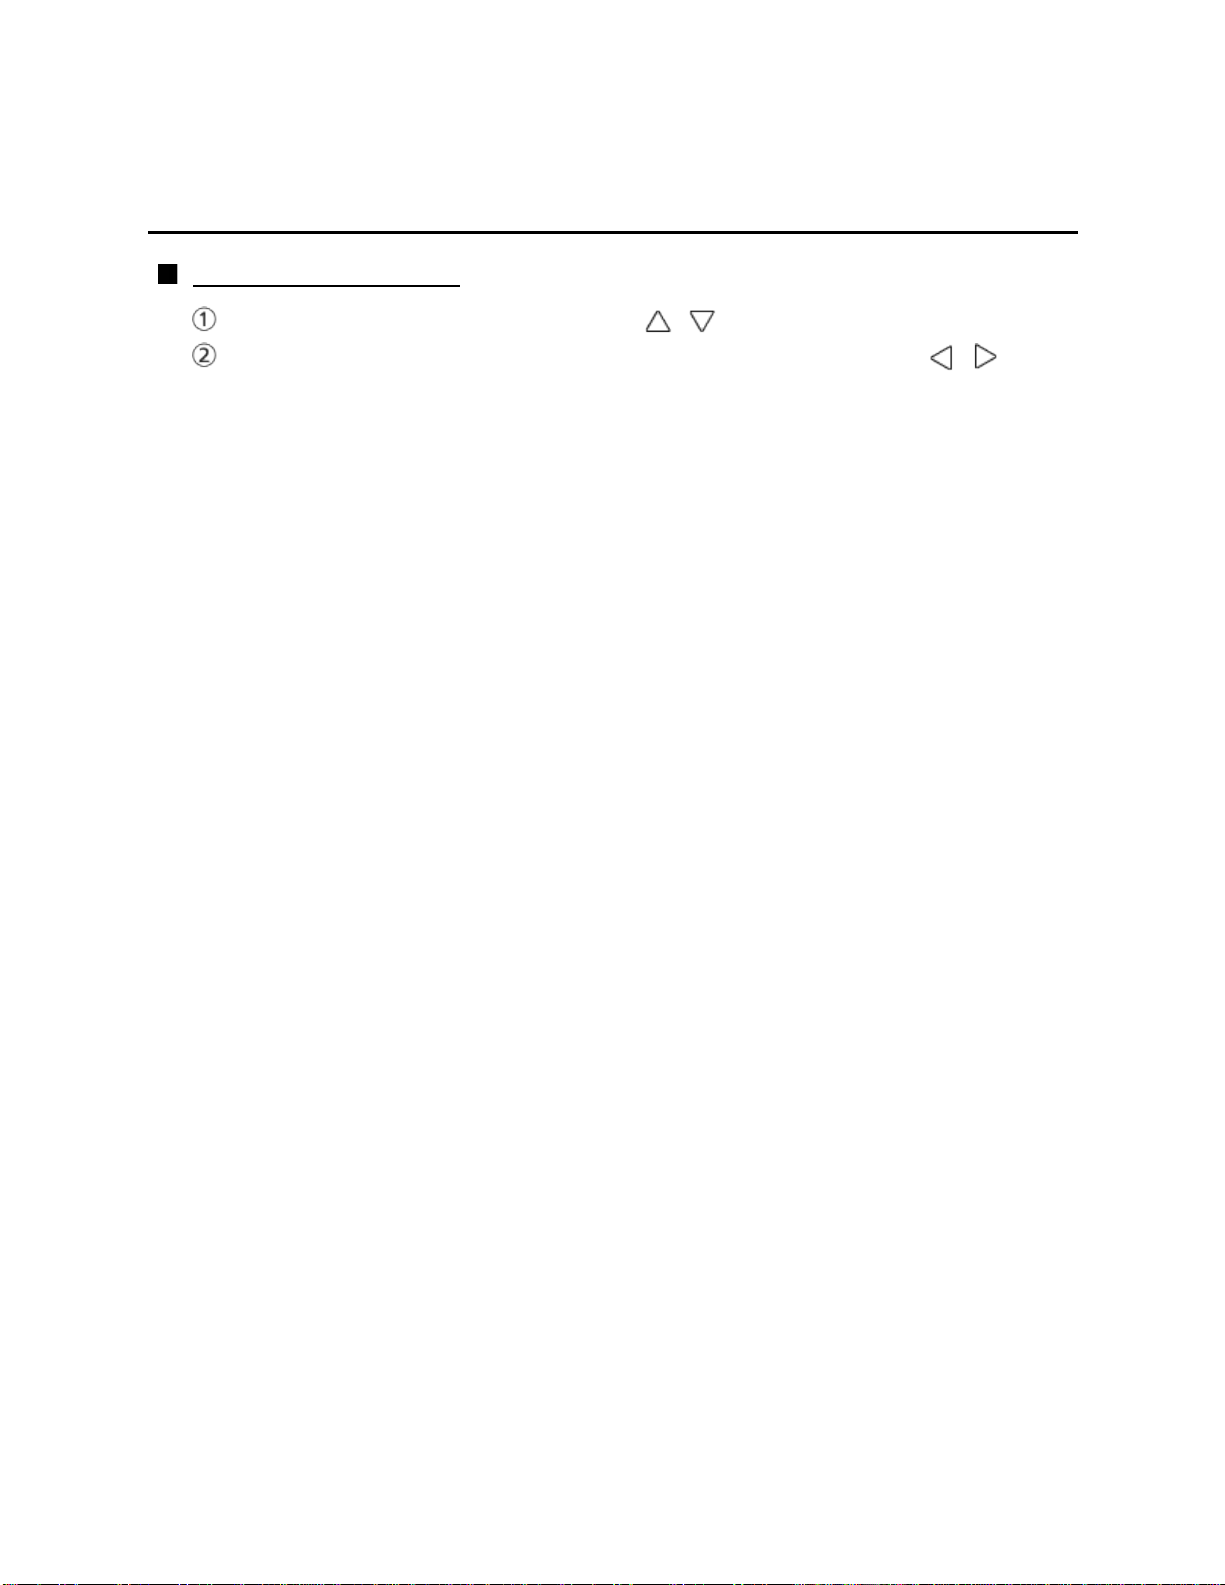
Network connection
Select Network connection using /
Select Network type (Ethernet cable/Wireless (WiFi)) with /
Page 64
Home network "DLNA"
64
Network settings
Wireless network settings
Wireless network settings
Select Wireless network settings with / and press
Display Wireless networks and select access point.
Or select connection method (below) with color key and follow the
directions on screen to complete the setting.
WPS (push button):
You can connect to the access point by pressing a connection button.
WPS (PIN):
Set the PIN code that is displayed on the TV on the access point.
Manual settings:
Manually set SSID, security type, and encryption type to match the settings
of the access point to which to connect.
Search again:
Search again an available wireless network within the range.
* Wi-Fi Protected Setup is an easy setting of the Wi-Fi Alliance's certification.
* For more details on setting of an access point, please refer to operating manual
for the access point.
* When connecting by 11n (5 GHz), select "AES" as the encryption type for the
wireless LAN.
Page 65
Home network "DLNA"
65
Network settings
IP address/DNS settings
IP address/DNS settings
Select IP address/DNS settings using / and press
Displayed IP address/DNS settings
Select IP setting mode / DNS setting mode using / and select
Automatic with /
Each IP address is acquired automatically
If you are using a Broadband router, IP automatic acquisition in DHCP can be
used under normal circumstances. If you are not sure, check with the person
who installed the equipment, or check the instructions for each device.
Manual setting
On above, Select IP setting mode / DNS setting mode
using / and select Manual with /
Select the item
Check the specifications of the Broadband router and enter each IP address.
Or Enter each IP address as specified by the provider.
Page 66
Home network "DLNA"
66
Network settings
Proxy settings
Proxy settings
Set only if specified by the provider. It is not required for normal household use.
Select IP address/DNS settings using / and press
Select Proxy setting using / and press
Select the item and press
Enter address or port number and press
Proxy address
This is the address of the relay server that is connected to the target server instead
of the browser and sends data to the browser. Setting is only required if specified
by the provider.
Proxy port
This number is specified by the provider together with the Proxy address.
Page 67
Home network "DLNA"
67
Network settings
Network link (1)
Network link
Select Network link using / and press
Displayed Network link
Select the item and set
Edit the name of this TV
Sets your favorite name for this TV. This name will be displayed on the screen of
the other Network compatible equipment.
Select VIERA network name using / and press
Enter name and press
Enabling DLNA remote control
Select DLNA remote control using
Enable with /
Volume setting in DMR operation
Select DLNA remote volume control using
or Enable with /
Available only when Enable is selected in DLNA remote control above.
/ and switches Disable or
/ and switches Disable
Page 68

Home network "DLNA"
68
Network settings
Network link (2)
Enabling Network remote control
(network device such as a smartphone.)
Select Network remote control using
Enable with /
/ and switches Disable or
Page 69
Home network "DLNA"
69
Network settings
Software update
Software update
Select Software update using / and press
Press OK to start the Software update screen
Software update
Follow directions on the screen
Make sure to set Clock before the update starts.
Page 70
Home network "DLNA"
70
Network settings
New software notice
New software notice
Displays new software update information when TV is turned on.
Select New software notice using /
Switches Off or On with /
Page 71
Home network "DLNA"
71
Network settings
Network status
Network status
Displayed Current settings and status screen.
Select Network status using / and press
Display Network status screen
* Displayed items differ depending on the type of network connection.
Page 72
Home network "DLNA"
72
Photos
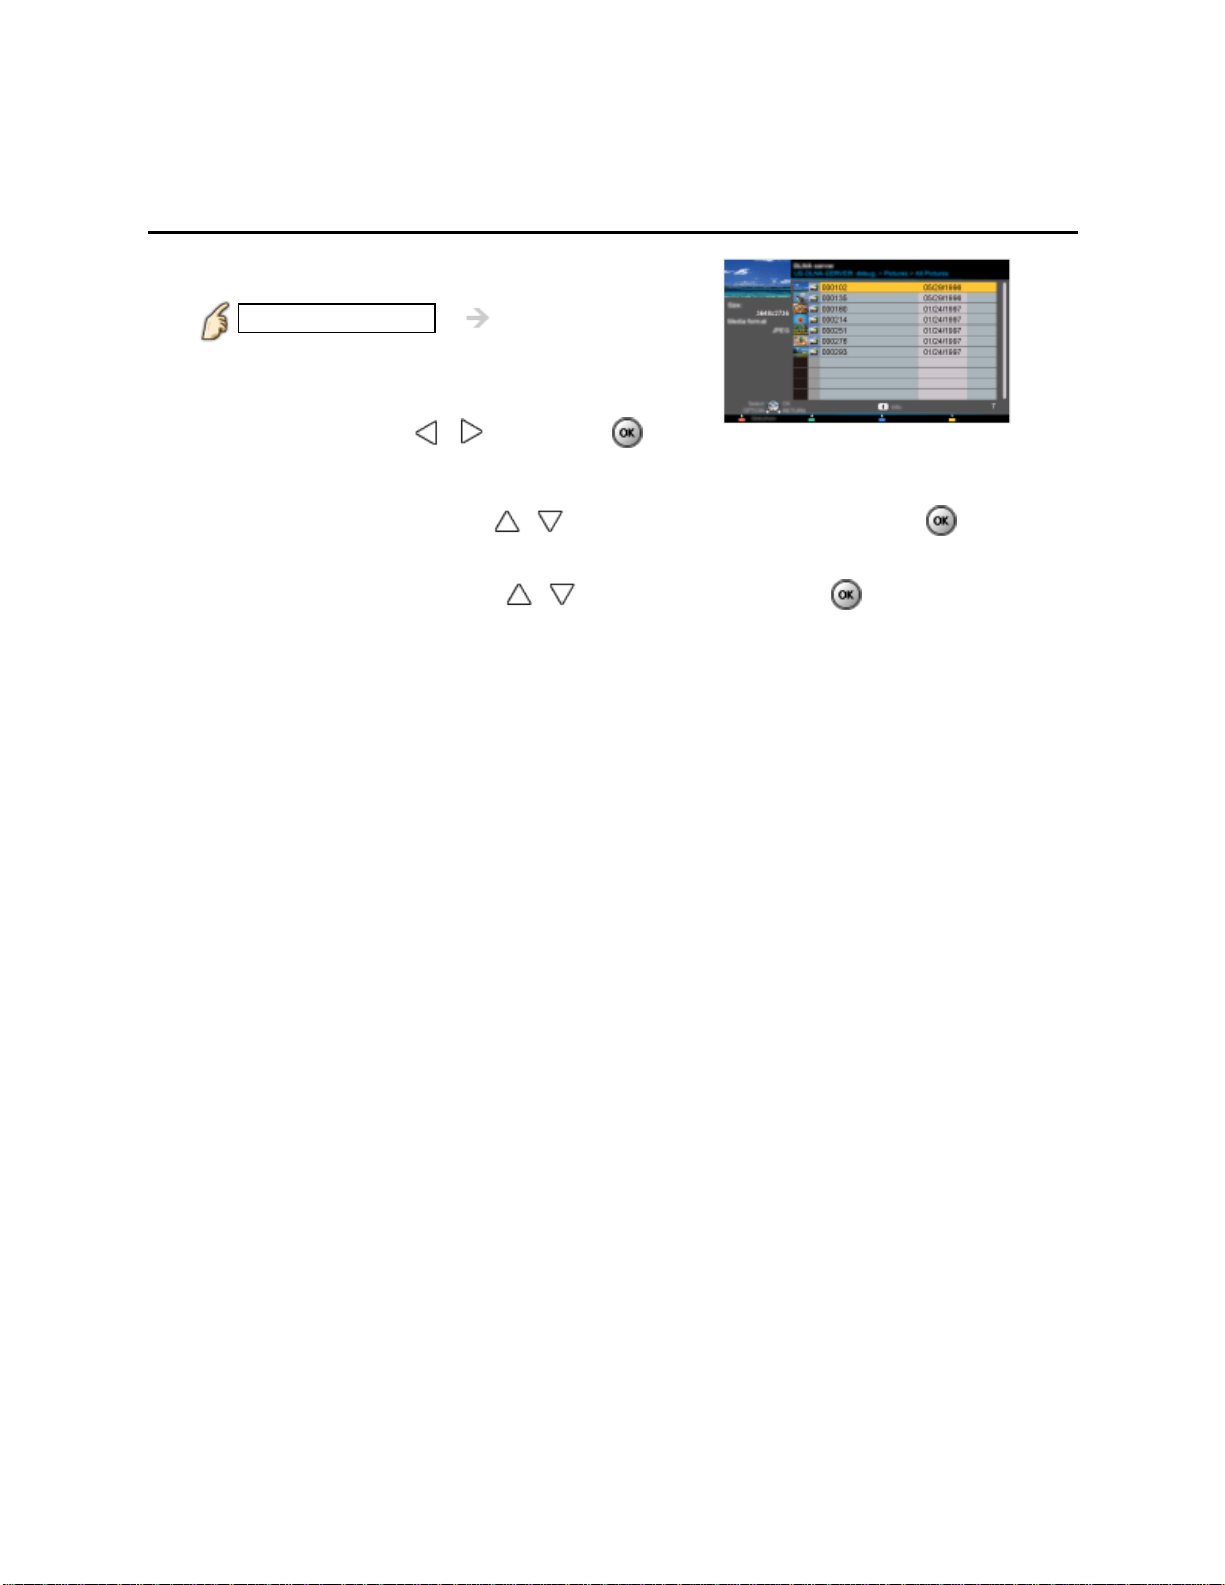
Viewing Photos
Display VIERA TOOLS
1.
VIERA TOOLS VIERA TOOLS
2. Display DLNA server
Select DLNA using / and press
3. Select server (Available DLNA servers are displayed).
Select desired server using / from DLNA server list and press
4. Select photo (Thumbnail and Contents type are displayed ).
Select desired content using / from file list and press
5. View
Follow the Navigation and guide to operate.
* Displayed navigation and guide will be different depending on data type.
Page 73
Home network "DLNA"
73
Photos
Photo view
Thumbnail view
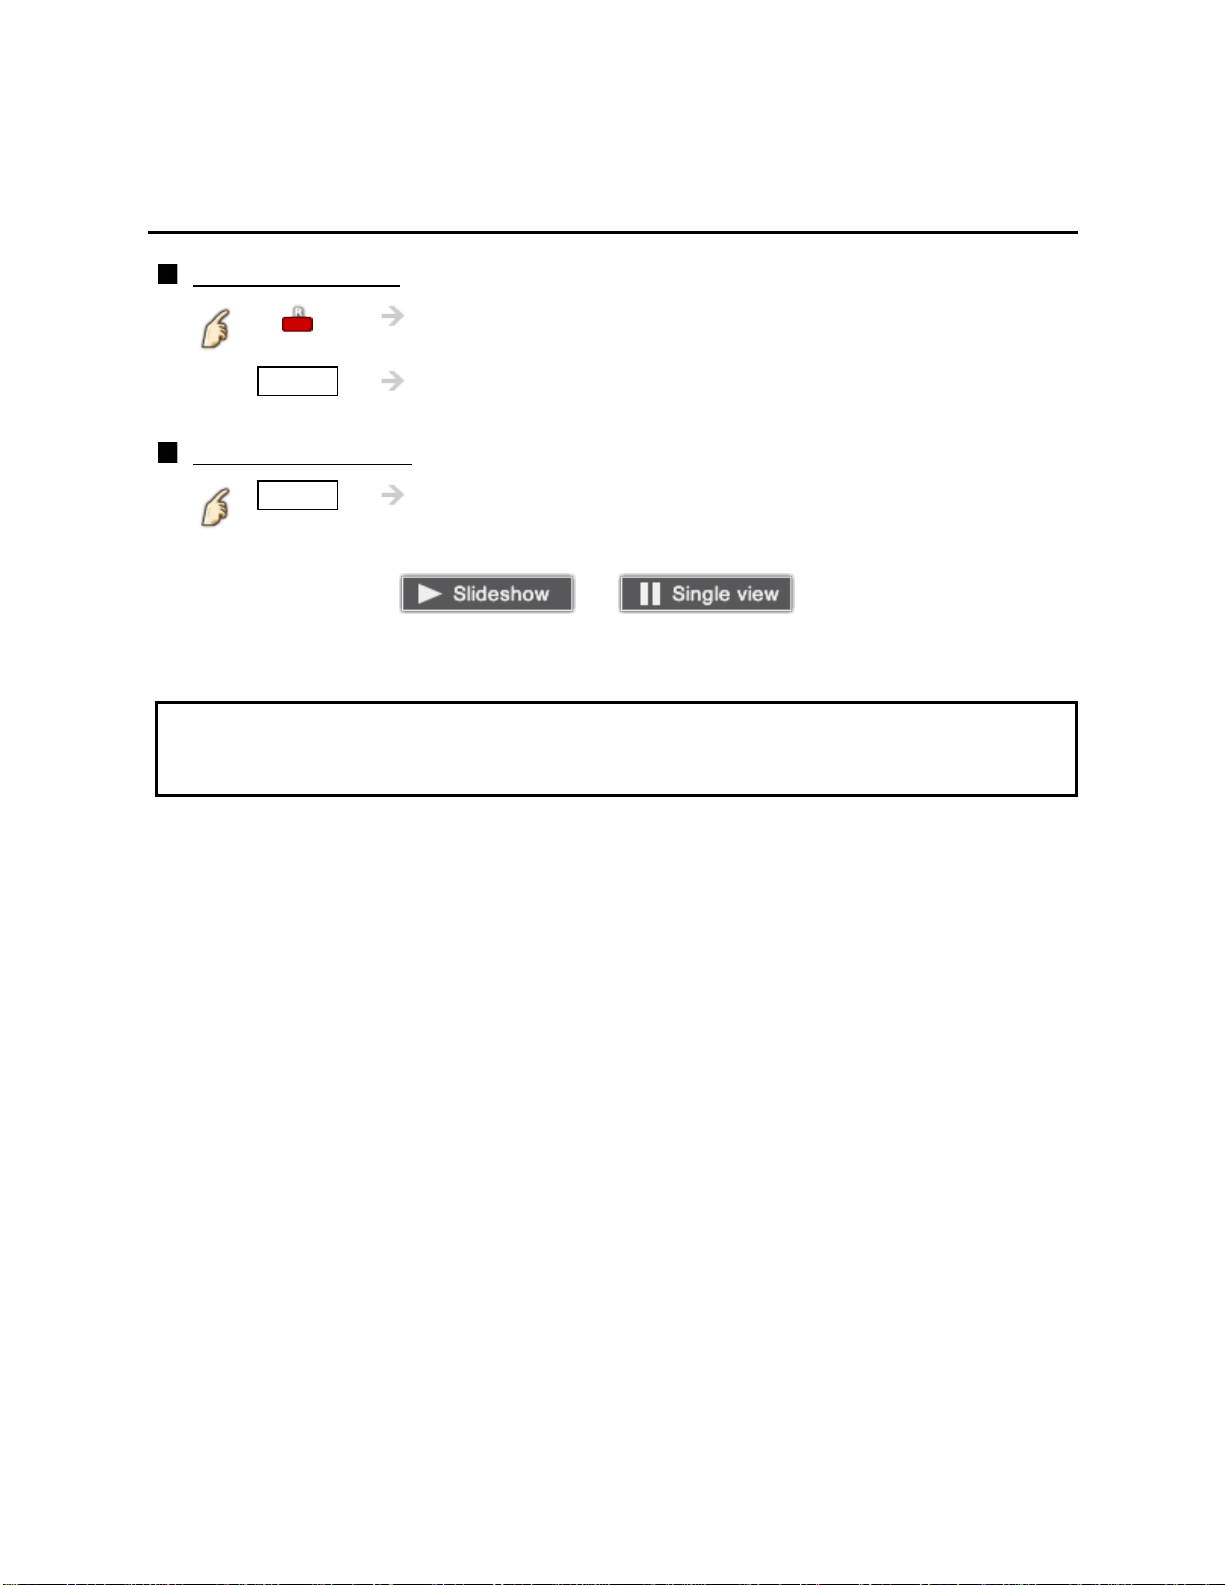
Display Slideshow settings
Playback screen
* In DMR mode, Slideshow is not available.
* In DMR mode, OK/Next/Prev. are not available.
INFO Information panel (File name, Date, and Size etc.)
* Information differs depending on selected data.
INFO Display/hide Guide and Banner
Photo status: Shows current photo status
or
2D/3D status: Shows current 2D/3D status
Navigation Guide: Shows available functions.
Page 74
Home network "DLNA"
74
Photos
Options menu
In Photo view, some optional menus are available pressing OPTION button.
1. Display Options menu
OPTION Options menu
2. Select the item
Select the desired menu using / and press
(Slideshow settings)
* Available menus are displayed on Options menu depending on data
condition and situation.
Page 75
Home network "DLNA"
75
Photos
Using slideshow
Display Slideshow settings
1.
Slideshow settings
2. Adjust items
Select the item by
Picture quality may deteriorate depending on the slideshow settings.
Picture setting may not work depending on the slideshow settings.
3. Start Slideshow
After adjusting each setting, select Start slideshow with / and press
/ and adjust the settings using /
RETURN Stop in mid-cycle
Page 76
Home network "DLNA"
76
Photos
Slideshow settings
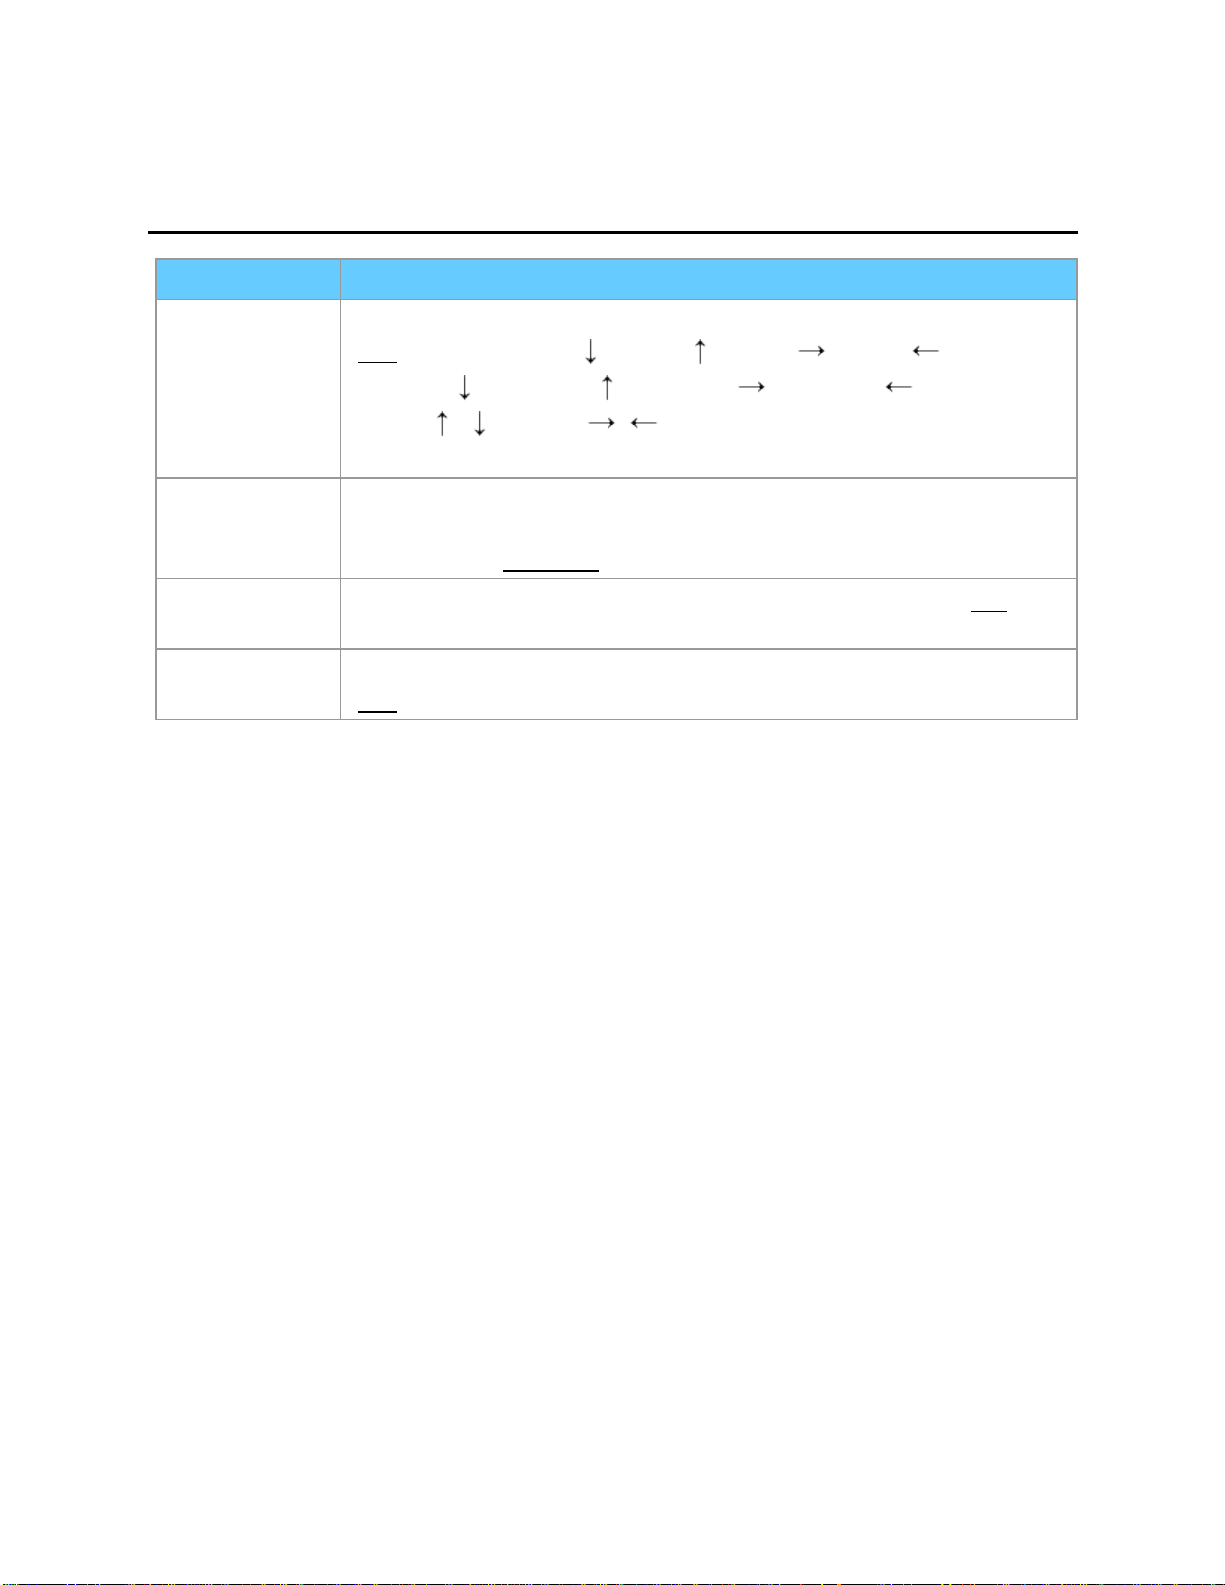
Item Description
Transition
effect
Display
interval
Repeat
playback
Soundtrack
settings
Select the Transition effect shown between photos.
(
Off/Fade in/Wipe /Wipe /Wipe /Wipe /
Slide in /Slide in /Slide in /Slide in /Zoom in/
Comb /Comb /Dissolve/Checker wipe/
Motion/Random)
Display interval sets the time each image is displayed in the
Slideshow mode.
(Short/Fast/
Turn the Slideshow Repeat (cycle) function on or off. (Off/
Select the music.
Off/Music 1/Music 2/Music 3/Music 4/Music 5)
(
Normal/Slow/Very slow)
On)
Page 77
Home network "DLNA"
77
Videos
Viewing Videos
Display VIERA TOOLS
1.
VIERA TOOLS VIERA TOOLS
2. Display DLNA server
Select DLNA using / and press
3. Select server (Available DLNA servers are displayed).
Select desired server using / from DLNA server list and press
4. Select video (Thumbnail and Contents type are displayed ).
Select desired content using / from file list and press
5. Play
Follow the Navigation and guide to operate.
* Displayed navigation and guide will be different depending on data type.
Page 78
Home network "DLNA"
78
Videos
Video view
Thumbnail view
INFO Information panel (File name, Date, and Size etc.)
* Information differs depending on selected data.
Playback screen
INFO Display/hide Guide and Banner
Movie banner: Shows current Video status
(Drive type (SD/USB/DLNA), Date and time or File name and
Elapsed time.)
2D/3D status: Shows current 2D/3D status
Navigation Guide: Shows available functions.
* In DMR mode, Next skip/Prev. skip are not available.
Forward/Reverse: Five level of speed 1 to 5 (x2, x5, x30, x70, x100) are
available.
In DMR mode, Resume playback is not available
Subtitles are not supported in MKV format.
Page 79
Home network "DLNA"
79
Videos
Options menu
In Video view, some optional menus are available pressing OPTION button.
1. Display Options menu
OPTION Options menu
2. Select the item
Select the desired menu using / and press
(Video options)
Repeat playback
Set play repeat function (Off/On)
* Available menus are displayed on Options menu depending on data
condition and situation.
Page 80
Home network "DLNA"
80
Music
Playing Music
Display VIERA TOOLS
1.
VIERA TOOLS VIERA TOOLS
2. Display DLNA server
Select DLNA using / and press
3. Select server (Available DLNA servers are displayed).
Select desired server using / from DLNA server list and press
4. Select music (Thumbnail and Contents type are displayed ).
Select desired content using / from file list and press
5. Play
Follow the Navigation and guide to operate.
* Displayed navigation and guide will be different depending on data type.
Page 81
Home network "DLNA"
81
Music
Music view
Thumbnail view
INFO Information panel (File name, Date, and Size etc.)
* Information differs depending on selected data.
Playback screen
INFO Display/hide Guide and Banner
Music Guide: Shows current Music status
(Artist name/Album name/Song name, Elapsed time)
Navigation Guide: Shows available functions.
Forward/Reverse: Five levels of speed 1 to 5 (x2, x5, x30, x70, x100) are
available.
* In DMR mode, Next skip/Prev. skip/User BGM settings are not available.
Page 82
Home network "DLNA"
82
Music
Options menu
In Music view, some optional menus are available pressing OPTION button.
1. Display Options menu
OPTION Options menu
2. Select the item
Select the desired menu using / and press
(Music options)
Repeat playback
Set play repeat function (Off/Repeat folder/One song)
* Available menus are displayed on Options menu depending on data
condition and situation.
Page 83
Home network "DLNA"
83
Data information
Compatible Data format (1)
Compatible Data format for Media player
(SD card/USB flash memory)/DLNA
Media Compatible format
Photo
JPEG files (DCF and EXIF standards)
Sub-sampling - 4:4:4, 4:2:2 and 4:2:0
Image resolution - 8 x 8 to 30,719 x 17,279 pixels
Page 84
Home network "DLNA"
84
Data information
Compatible Data format (2)
Media Compatible format
Videos SD-Video files (SD-Video Standard Ver.1.31)
Modified data with a PC may not be displayed correctly.
AVCHD files
AVCHD Standard Ver.2.0 (AVCHD 3D, AVCHD Progressive)
Modified data with a PC may not be displayed correctly.
MotionJPEG files (taken with LUMIX)*
MP4 files
Video codec H.264/MPEG1/MPEG2
Audio codec MPEG Audio/MP3/AAC/HE-AAC/AC3/E-AC3
MKV files
Video codec H.264/MPEG1/MPEG2
Audio codec MPEG Audio/MP3/AAC/HE-AAC/AC3/E-AC3
FLV files
Video codec H.264
Audio codec MP3/AAC
3GPP files
Video codec H.264/MPEG1/MPEG2
Audio codec AAC/HE-AAC
PS files
Video codec H.264*/MPEG1/MPEG2
Audio codec MPEG Audio/MP3*/AAC*/HE-AAC*/AC3/
E-AC3*/LPCM
TS files
Video codec H.264/MPEG1/MPEG2
Audio codec MPEG Audio/MP3*/AAC/HE-AAC/AC3/E-AC3
* for Media player only
Page 85
Home network "DLNA"
85
Data information
Compatible Data format (3)
Media Compatible format
Music MP3 files (MP3)
AAC files (AAC)
FLAC files (FLAC)
Page 86

Home network "DLNA"
86
Data information
Notice
Format the card with the recording equipment.
The picture may not appear correctly on this TV depending on the recording
equipment used.
Some files may not be played back even if they fulfill these conditions.
Depending on how you make SD Card, USB Flash Memory or the media server,
files and folders may not be displayed in the order you numbered.
Depending on how you create the files and the structure of folders, the files and
folders may not be displayed.
When there are many files and folders, operation may take time to complete or
some files may not be displayed or playable.
The function cannot display still images that are not DCF formatted (i.e. TIFF,
BMP).
Data modified with a PC may not be displayed.
Images imported from a PC must be compatible with EXIF 2.0, 2.1 and 2.2.
Partly degraded files might be displayed at a reduced resolution.
All ".JPG" extension data in the SD card and USB flash memory will be read in
Photo Viewer Mode.
The folder and file names may be different depending on the digital camera used.
Do not use two-byte characters or other special codes.
The card may become unusable with this TV if file or folder names are changed.
For the suitable SD Memory Cards, please confirm the latest information on the
following website.
http://panasonic.jp/support/global/cs (This site is in English only)
Page 87
Media player
87
Get started
Information
You can view still and motion images and play music saved on a USB flash memory
and an SD card.
SD card
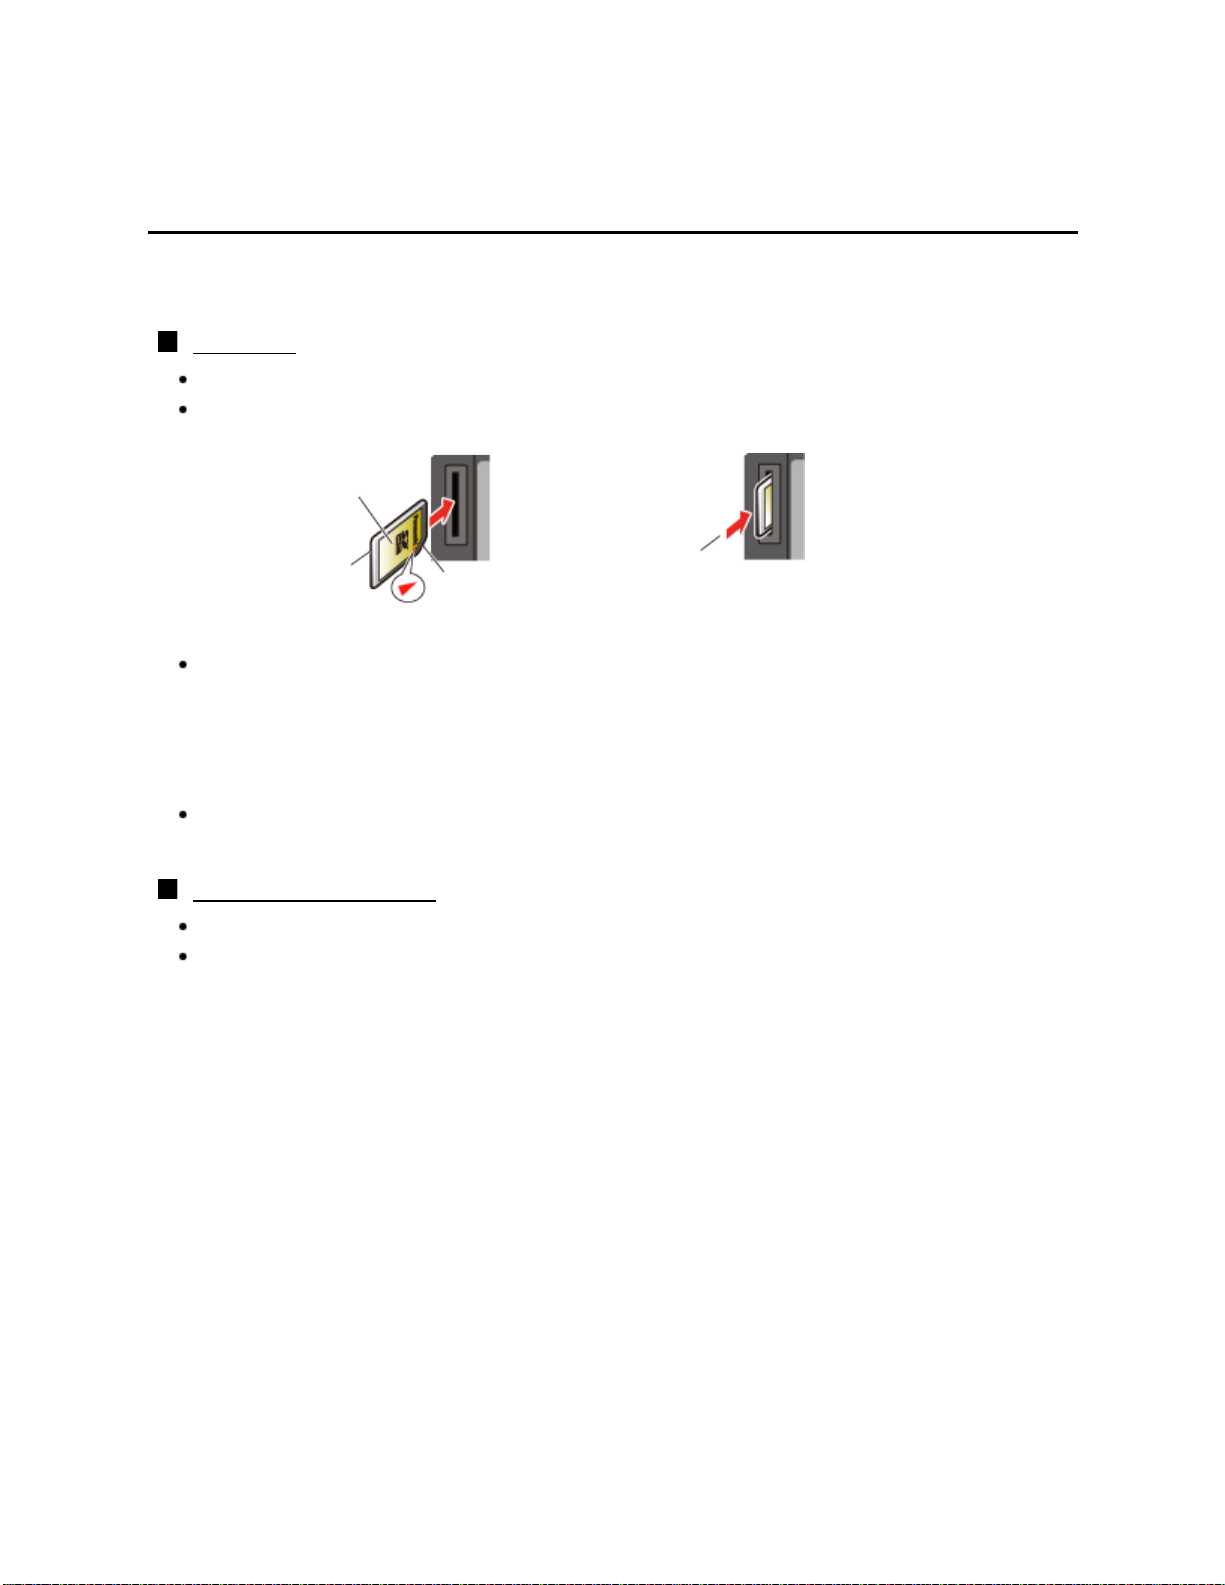
When you use an SD card, gently insert with label surface facing front.
When you remove the SD card, press in lightly then release.
Label surface
Press in lightly
Push until a
click is heard
Cutout
Compliant card type (maximum capacity):
SDXC Card (64 GB), SDHC Card (32 GB), microSDHC Card (32 GB), SD Card
(2 GB), miniSD Card (2 GB), microSD Card (2 GB)
(requiring microSDHC Card/miniSD Card/microSD Card/ adapter)
on SD Card,
then release.
If a microSDHC Card, miniSD Card or microSD Card is used, insert / remove it
together with the adapter.
USB flash memory
When you use a USB device, insert straight in and pull straight out.
Media player only supports USB Mass storage class devices.
Page 88
Media player
88
Get started
Media warning messages
Message Meaning
No media. Please insert an SD memory
card or USB storage device.
No media. Device removed.
No photos/No movies/
No music files to play/
No playable media
Cannot read file
The device is not inserted.
The device is removed.
The device has no data or this type of
data is not supported.
The file is broken or unreadable.
The TV does not support the format.
Page 89
Media player
89
Get started
SD card handling cautions
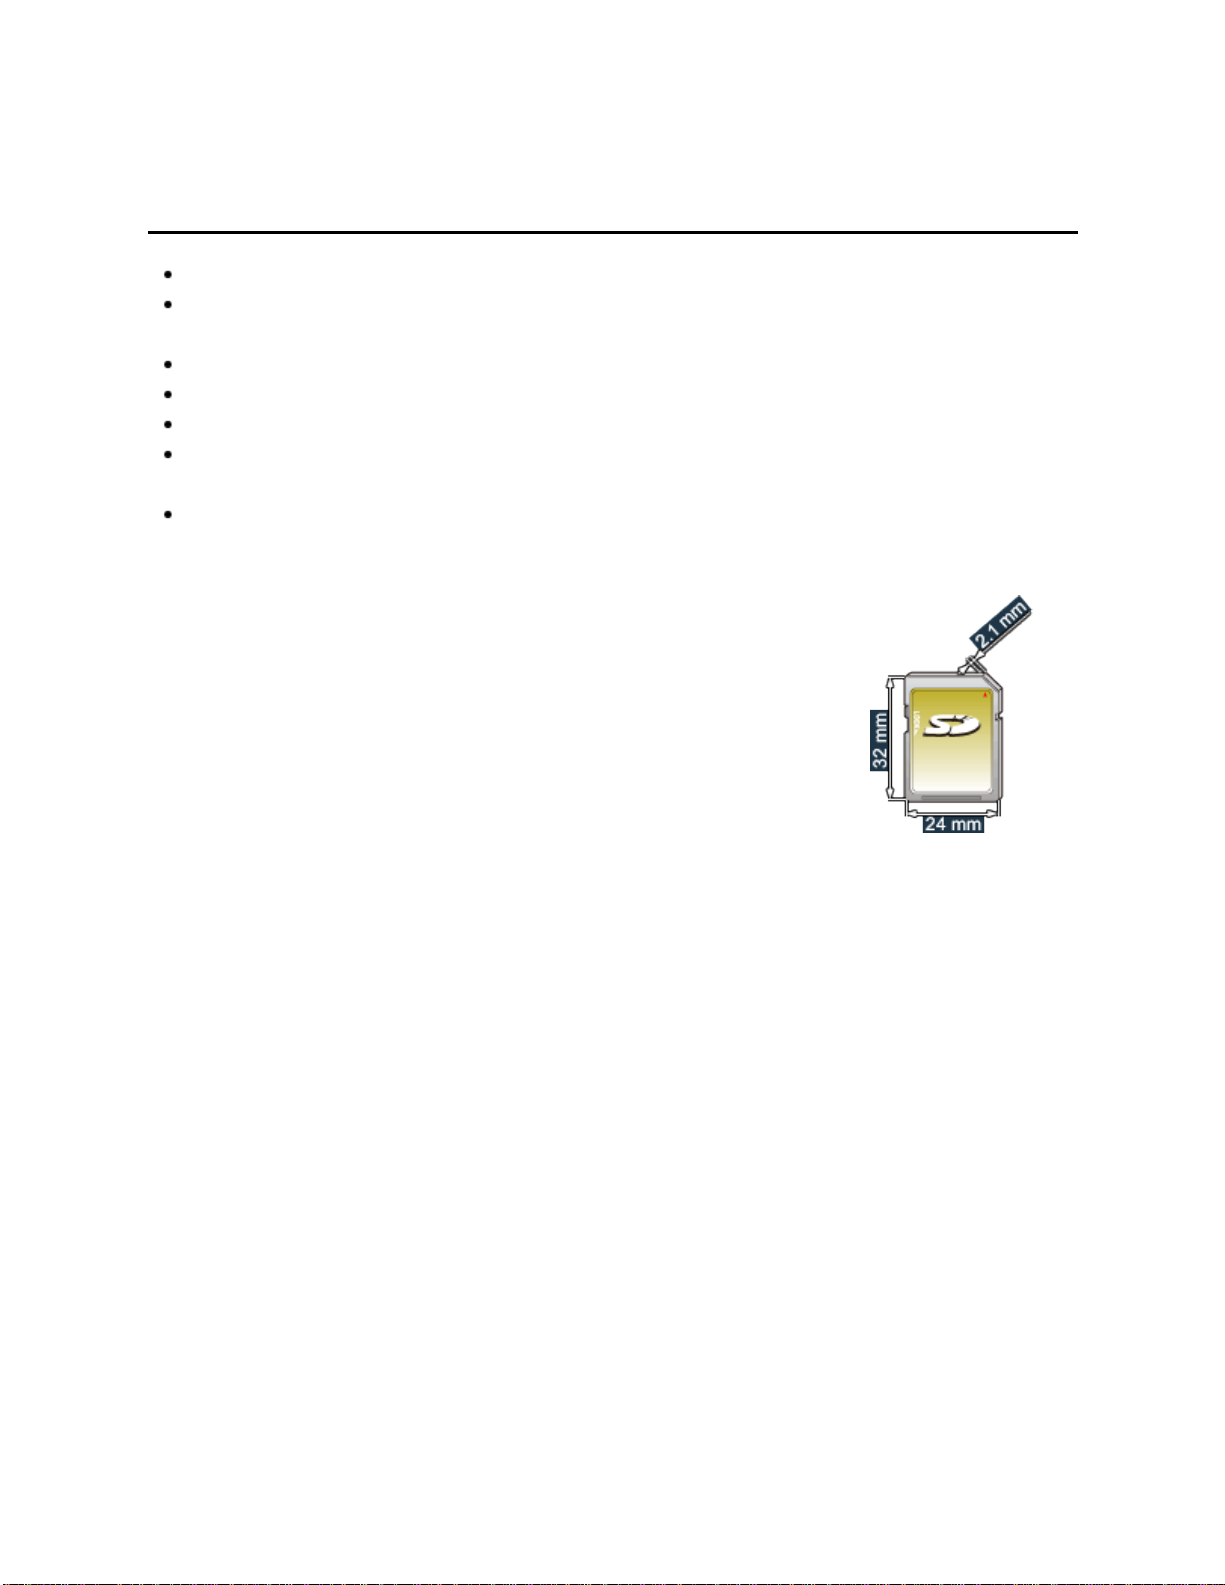
Use an SD Card meeting SD standards. If not, it may cause the TV to malfunction.
Do not remove the card while the unit is accessing data (this can damage card or
unit).
Do not touch the terminals on the back of the card.
Do not subject the card to high pressure or impact.
Insert the card in the correct direction (otherwise, card or unit may be damaged).
Electrical interference, static electricity or erroneous operation may damage the
data or card.
Back up the recorded data at regular intervals in case of deteriorated or damaged
data or erratic operation of the unit. (Panasonic is not liable for any deterioration or
damage of recorded data.)
Page 90
Media player
90
Photos
Viewing Photos
Insert Media (SD card or USB flash memory)
1.
2. Display Media player
VIERA TOOLS VIERA TOOLS > Media player
3. Select the SD/USB in Drive select (Displays connected drive)
Select the drive using / and press
4. Select the Photos in Media select
Select the drive using / and press
5. Select the photo in thumbnail view
Select the data using / / / and
* How data is displayed differs depending on data storage conditions.
6. View
Follow the Navigation and guide to operate.
* Displayed navigation and guide may differ depending on data type.
Other settings
Some basic menus are available after pressing the
MENU Menu > Picture/Audio/3D settings/VIERA Link
MENU button.
Page 91
Media player
91
Photos
Photo view
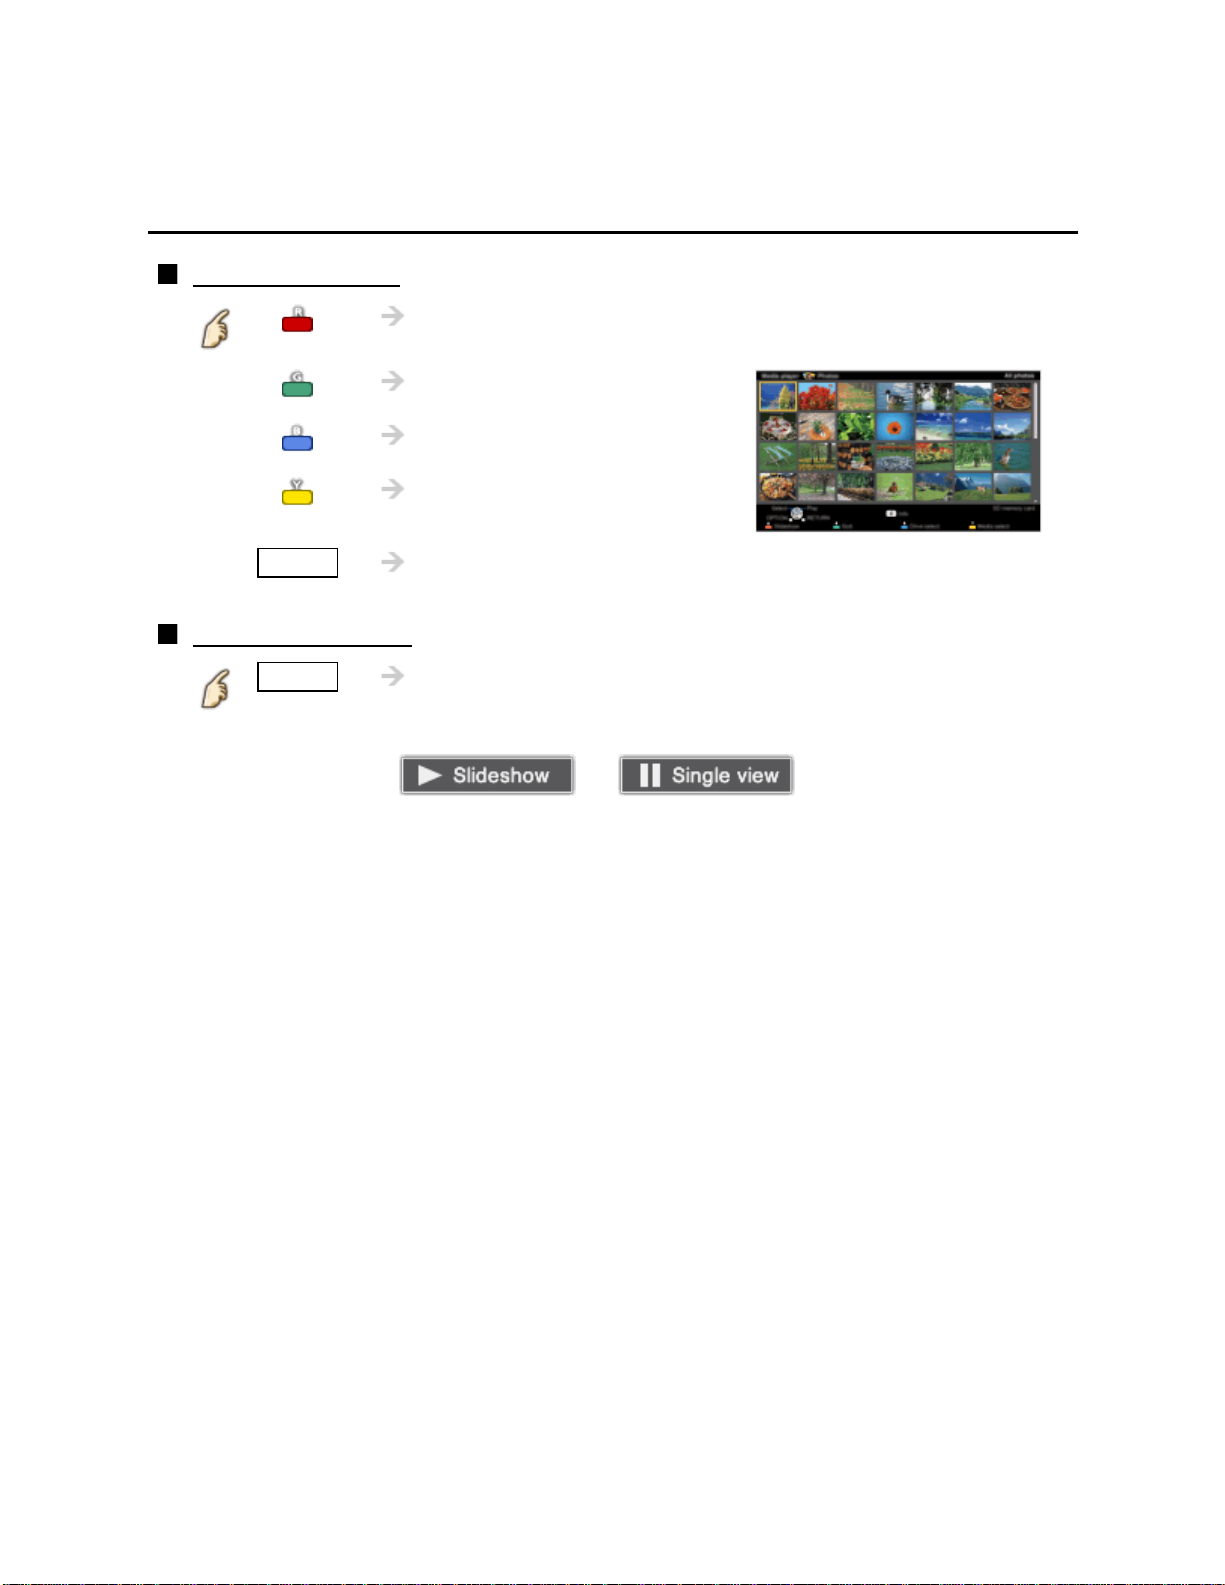
Thumbnail view
Display Slideshow settings
Display Drive select
Display Media select
Playback screen
INFO Information panel (File name, Date, and Size etc.)
INFO Display/hide Guide and Banner
Photo status: Shows current photo status
2D/3D status: Shows current 2D/3D status
Navigation Guide: Shows available functions.
Display Sort
* Information differs depending on selected data.
or
Page 92
Media player
92
Photos
Sort the photos
Display Sort select menu
1.
Sort select menu (Folders / Sort by date / Sort by month)
2. Select the sort type
Select the type using
/ and press
3. Displayed each screen
Folders: ascending order of numeric/alphabetical
Sort by month: ascending order of the month
Sort by date: ascending order of the day
Page 93
Media player
93
Photos
Options menu
In Photo view, some optional menus are available after pressing the OPTION
button.
1. Display Options menu
OPTION Options menu
2. Select the item
Select the desired menu using
(Slideshow settings/Multi shot 3D/Thumbnails size)
* Available menus are displayed on Options menu depending on data
condition and situation.
/ and press
Page 94
Media player
94
Photos
Multi shot 3D / Thumbnails size
Multi shot 3D
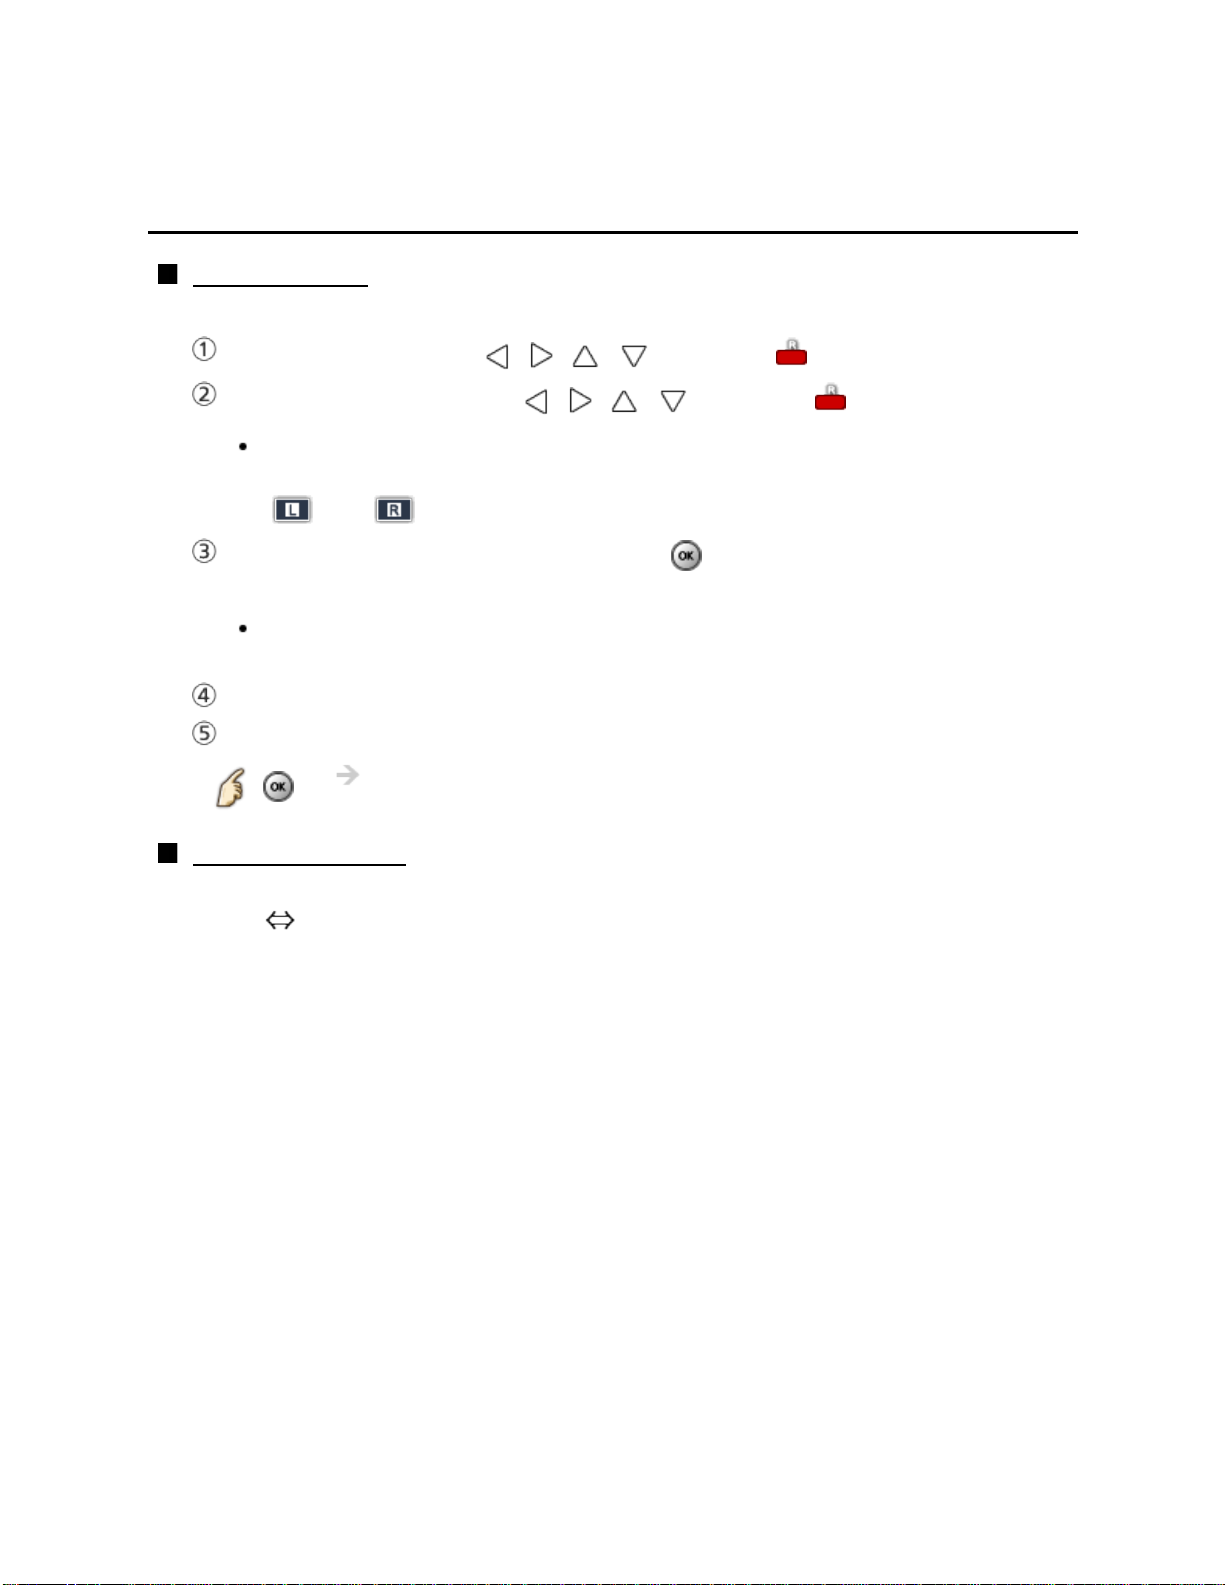
3D images can be created by selecting 2 photos in thumbnail view.
Select first photo using / / / and press
Select second photo using / / / and press
To select the second image, the size and date must be the same as the first
image.
and are displayed at the top left-hand corner of selected photos.
Start Conversion processing by pressing
Conversion processing message will be displayed.
Error message will be displayed if first and second picture have no relation,
or for other reasons. (e.g. size / date is different)
3D photo is created
Save the 3D image generated by the above steps to the original drive.
Thumbnails size
To change the number of photos on a thumbnail screen at a time.
(7 x 4
10 x 6)
Confirmation message will be displayed and select Yes to save
the data. (SD card only)
Page 95
Media player
95
Photos
Using slideshow
Display Slideshow settings
1.
Slideshow settings
2. Adjust items
Select the item by / and adjust the settings using /
Picture quality may become lower depending on the slideshow settings.
Picture setting may not work depending on the slideshow settings.
3. Start Slideshow
After adjusting each of the settings, select Start slideshow with / and
press
RETURN Stop in mid-cycle
Page 96
Media player
96
Photos
Slideshow settings
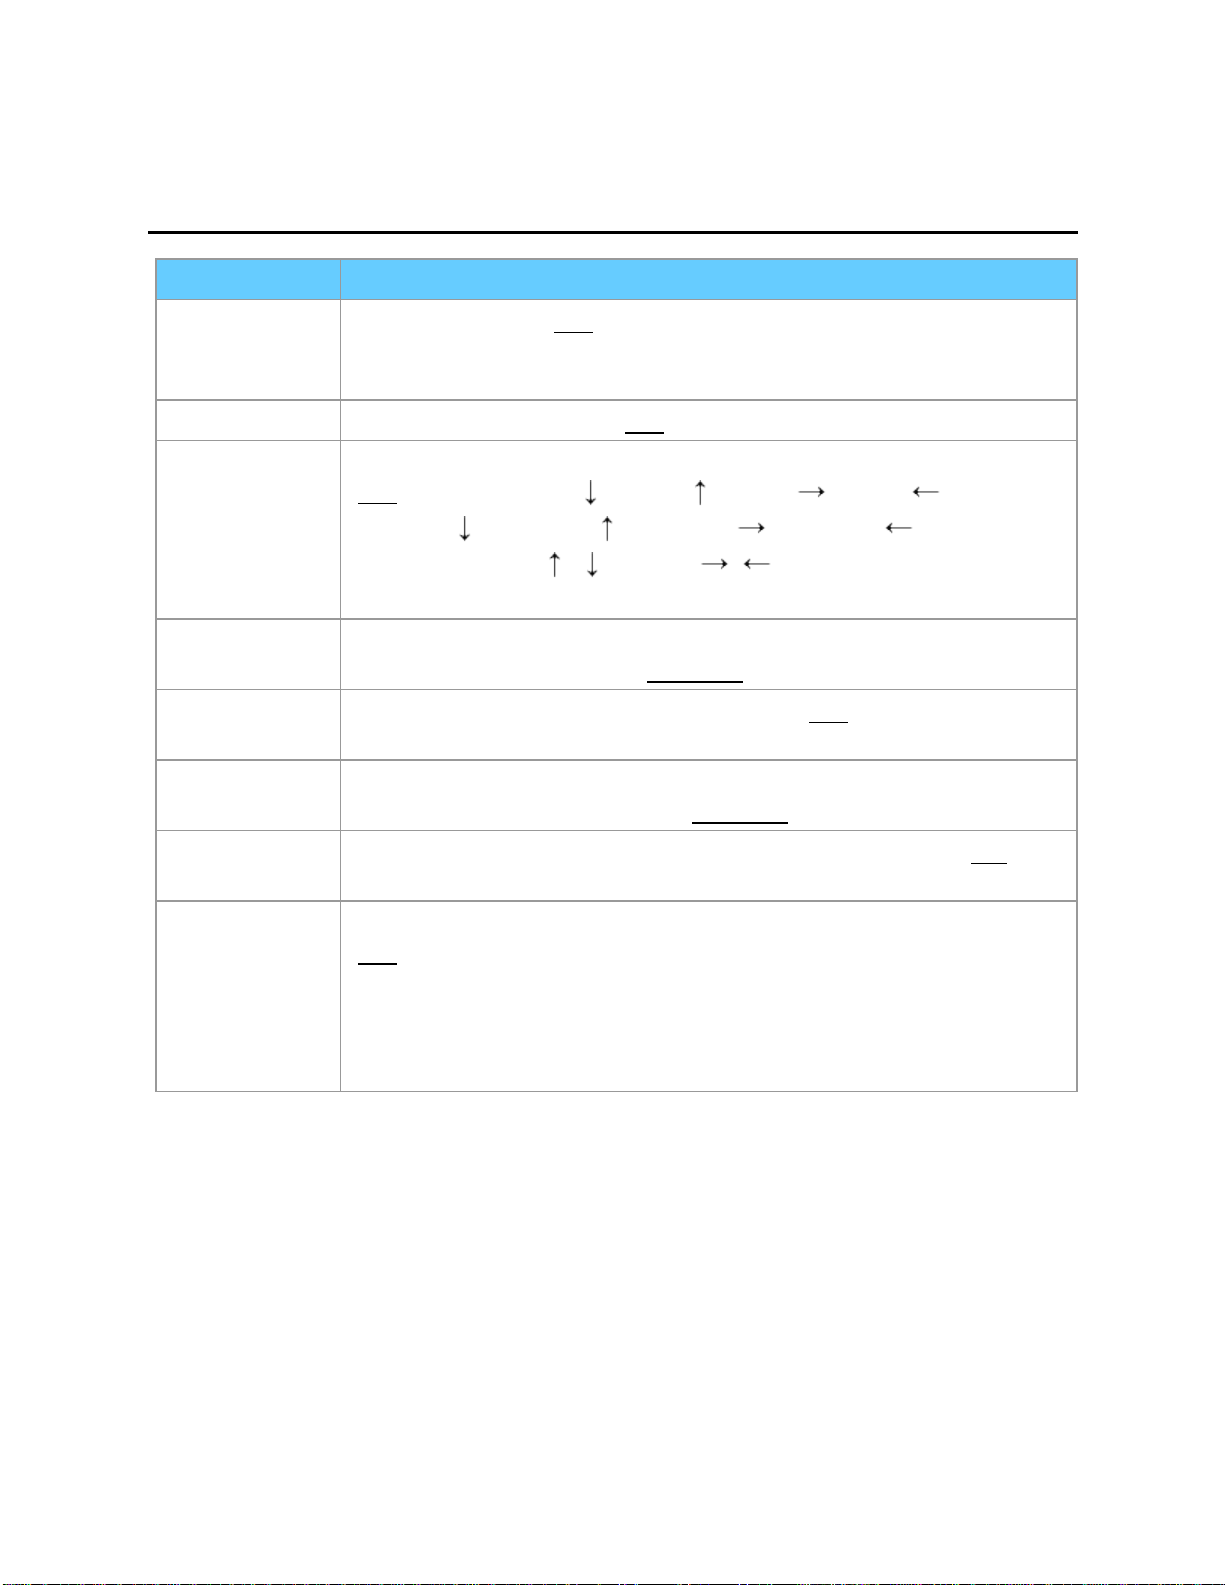
Item Description
Frame Select the Frame. (
calendar)/Drift/Gallery (with calendar) / Gallery /
Cinema)
Photo effect Select the display effect. (
Transition
effect
Photo size Removes the black borders that are added according to the size of
Burst
playback
Display
interval
Repeat
playback
Select the Transition effect shown between photos.
(
Off/Fade in/Wipe /Wipe /Wipe /Wipe /
Slide in /Slide in /Slide in /Slide in /
Zoom in/Comb /Comb /Dissolve/
Checker wipe/Motion/Random)
the photo being displayed. (
Continuously plays photos that were shot. (
Display interval sets the time each image is displayed in the
Slideshow mode. (Short/Fast/
Turn the Slideshow Repeat (cycle) function on or off. (Off/
Off/Array/Collage/Drift (with
Off/Sepia/Gray scale)
Normal/Zoom)
Off/On)
Normal/Slow/Very slow)
On)
Soundtrack
settings
Select the music.
Off/Music 1/Music 2/Music 3/Music 4/Music 5/
(
User selected/Auto)
User selected: Plays the soundtrack registered in the
Soundtrack settings menu.
Auto: Plays the songs on the SD card or USB flash memory.
Page 97
Media player
97
Photos
Soundtrack settings
You can register the favorite songs as soundtracks
Select Soundtrack settings in Slideshow settings using /
Select User selected using /
Displays Soundtrack popup menu, then select the desired song with
/ and press to register
This song: Register current music
All songs in folder: Register the music in a folder
Picture setting may not work depending on the slideshow settings.
Page 98
Media player
98
Videos
Viewing Videos
Insert Media (SD card or USB flash memory)
1.
2. Display Media player
VIERA TOOLS VIERA TOOLS > Media player
3. Select the SD/USB in Drive select (Displays connected drive)
Select the drive using / and press
4. Select the Videos in Media select
Select the drive using / and press
5. Select the video in thumbnail view
Select the data using / / / and
* How data is displayed differs depending on data storage conditions.
6. Play
Follow the Navigation and guide to operate.
* Displayed navigation and guide will be different depending on data type.
Other settings
Some basic menus are available after pressing the
MENU Menu > Picture/Audio/3D settings/VIERA Link
MENU button.
Page 99
Media player
99
Videos
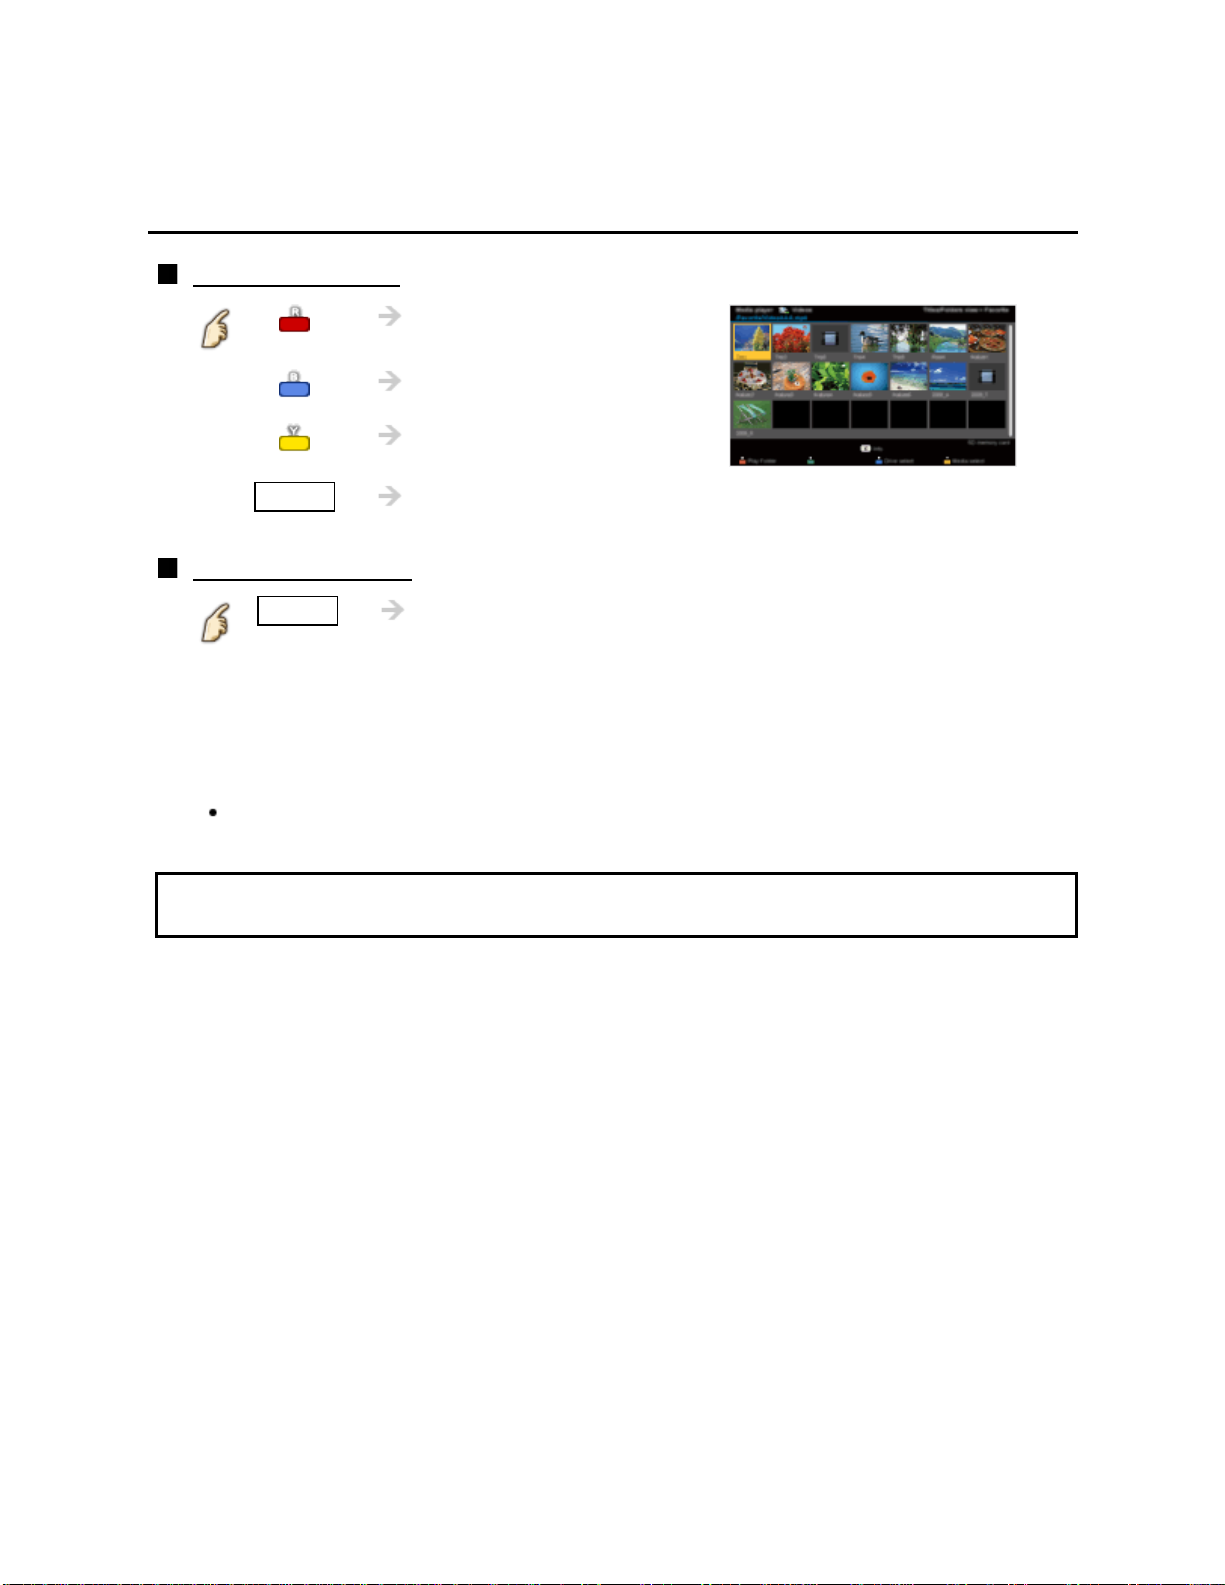
Video view
Thumbnail view
Play the video
Display Drive select
Display Media select
Playback screen
* Subtitles are not supported in MKV format.
INFO Information panel (File name, Date, and Size etc.)
*Information differs depending on selected data.
INFO Display/hide Guide and Banner
Movie banner: Shows current Video status
(Drive type (SD/USB/DLNA), Date and time or File name and
Elapsed time.)
2D/3D status: Shows current 2D/3D status
Navigation Guide: Shows available functions.
Forward/Reverse: Five levels of speed 1 to 5 (x2, x5, x30, x70, x100) are
available.
Page 100
Media player
100
Videos
Options menu
In Video view, some optional menus are available by pressing the OPTION button.
1. Display Options menu
OPTION Options menu
2. Select the item
Select the desired menu using / and press
(Video options)
Repeat playback
Set play repeat function (On/Off)
* Available menus are displayed on Options menu depending on data
condition and situation.
 Loading...