

Page 1

LCD TV / DVD-Recorder Combination
Operating Instructions
Model No. TC-22LR30
Getting Started TV Operation Disc / Card Operation
• Initial Setup and Connection Procedures are on page 21.
MULTI FORMAT PLAYBACK
* Ability to play back may depend on
recording conditions.
As an ENERGY STAR® Partner, Matsushita Electric Corporation of
America has determined that this product or product model meets the
ENERGY STAR
Please read these instructions carefully before attempting to connect, operate, or
adjust this product. Please save this manual.
Spanish Quick Use Guide is included.
(Guía para rápida consulta en español está incluida.)
®
guidelines for energy efficiency.
Information
LSQT0853 A
Page 2

Before Using
Congratulations
On your purchase of one of the most sophisticated and reliable
products on the market today. Used properly, it will bring you and
your family years of enjoyment. Please fill in the information below.
The serial number is on the tag located on the back of your unit.
Date of Purchase __________________________________
Dealer Purchased From _____________________________
Dealer Address ___________________________________
Dealer Phone No. __________________________________
Model No. _______________________________________
Serial No. ________________________________________
Accessories
Please check and identify the supplied accessories.
Use numbers indicated in parentheses when asking for
replacement parts.
To order accessories, call toll free 1-800-332-5368.
1 Remote Control (EUR7624060)
Installation
Receiver Location
Locate for comfortable viewing. Avoid placing where sunlight or
other bright light (including reflections) will fall on the screen. Use
of some types of fluorescent lighting can reduce Remote Control
transmitter range.
Adequate ventilation is essential to prevent internal component
failure. Keep away from areas of excessive heat or moisture.
Optional External Equipment
The Video / Audio connection between components can be made
with shielded video and audio cables. For best performance,
antenna cables should utilize 75 Ω coaxial shielded wire. Cables
are available from your dealer or electronic supply store. Before you
purchase any cables, be sure you know what type of output and
input connectors your various components require. Also determine
the length of cable you’ll need.
For optimum quality picture
When the LCD is exposed to light from outdoors or lighting fixtures,
high-contrast pictures may not be displayed clearly. Turn off
florescent lamps near the LCD and place in a location not exposed
to outdoor light.
Adjust viewing position
The LCD screen can be tilted up to 10° rearward.
2 Batteries “AA”
1 F-Type Antenna
Connector (for 4C-2V)
(K1RKZBA00001)
About LCD Panel
The red, blue, and green dots on the screen are a characteristic of
the LCD panel and not a malfunction.
• Please note that extremely high precision technology is employed to
produce the LCD Monitor screen resulting in a 99.99 % pixel effective rate.
This leaves only 0.01 % pixels inactive or always lit.
2
For assistance, please call : 1-800-211-PANA(7262) or, contact us via the web at:http://www.panasonic.com/contactinfo
Page 3

Table of Contents
Getting
Started
TV
Operation
Disc / Card
Operation
Before Using ........................................................................................................ 2
Important Safety Instructions ............................................................................. 4
Information ........................................................................................................... 8
Location of Controls ......................................................................................... 12
Connections ....................................................................................................... 15
Initial Setup –Ready to Play– ........................................................................... 21
Tuning TV ........................................................................................................... 22
TV Operation ...................................................................................................... 25
TV Settings ......................................................................................................... 28
Before Using the Disc or Card ......................................................................... 34
DVD/SD Functions Windows and Status Messages ...................................... 35
Function List ...................................................................................................... 36
Recording ........................................................................................................... 38
Timer Recording ................................................................................................ 40
Various Recording............................................................................................. 42
Playing Discs ..................................................................................................... 44
Various Playback ............................................................................................... 45
Using On-screen Menus ................................................................................... 49
Editing the Recorded Programs (Using the Direct Navigator) ...................... 51
Editing and Playing Still Pictures (Using the Direct Navigator) .................... 54
Using Play List ................................................................................................... 57
Disc Setting / Card Setting ............................................................................... 60
Entering Text ...................................................................................................... 63
Transferring (Dubbing) Still Pictures ............................................................... 64
Changing the Unit’s Settings ........................................................................... 67
Getting Started
TV Operation Disc / Card Operation Information
Information
Glossary ............................................................................................................. 70
Helpful Hints ...................................................................................................... 71
Specifications .................................................................................................... 77
Limited Warranty ............................................................................................... 78
Customer Services Directory ........................................................................... 79
Guía rápida de uso en español ........................................................................ 80
Index ................................................................................................................... 90
3
Page 4

Important Safety Instructions
The lightning flash with arrow
head within a triangle is
intended to tell the user that
parts inside the product are a
risk of electric shock to persons.
The exclamation point within a
triangle is intended to tell the
user that important operating and
servicing instructions are in the
papers with the appliance.
Note to CATV System Installer:
This reminder is provided to direct the CATV system installer’s attention to Article 820–40 of the NEC that provides guidelines for proper
grounding and, in particular, specifies that the cable ground shall be connected to the grounding system of the building, as close to the
point of cable entry as practical.
Important Safety Instructions for this unit
1) Read these instructions.
All the safety and operating instructions should be read before
the appliance is operated.
2) Keep these instructions.
The safety and operating instructions should be retained for
future reference.
3) Heed all warnings.
All warnings on the appliance and in the operating instructions
should be adhered to.
4) Follow all instructions.
All operating and use instructions should be followed.
5) Do not use this apparatus near water.
For example, near a bathtub, wash bowl, kitchen sink, or
laundry tub, in a wet basement, or near a swimming pool, and
the like.
6) Clean only with dry cloth.
Do not use liquid cleaners or aerosol cleaners. Use a dry cloth
for cleaning.
7) Do not block any ventilation openings. Install in accordance
with the manufacturer’s instructions.
Slots and Openings in the cabinet are provided for ventilation
and to ensure reliable operation of the product and to protect
it from overheating. The openings should never be blocked
by placing the product on a bed, sofa, rug, or other similar
surface.
8) Do not install near any heat sources such as radiators, heat
registers, stoves, or other apparatus (including amplifiers) that
produce heat.
This product should not be placed in a built-in installation such
as a bookcase or rack unless proper ventilation is provided or
the manufacturer’s instructions have been adhered to.
9) Do not defeat the safety purpose of the polarized or groundingtype plug. A polarized plug has two blades with one wider
than the other. A grounding type plug has two blades and
a third grounding prong. The wide blade or the third prong
are provided for your safety. If the provided plug does not fit
into your outlet, consult an electrician for replacement of the
obsolete outlet.
10) Protect the power cord from being walked on or pinched
particularly at plugs, convenience receptacles, and the point
where they exit from the apparatus.
11) Only use attachments / accessories specified by the
manufacturer.
12) Use only with the cart, stand, tripod, bracket,
or table specified by the manufacturer, or sold
with the apparatus. When a cart is used, use
caution when moving the cart / apparatus
combination to avoid injury from tip-over.
Quick stops, excessive force, and uneven
surfaces may cause the appliance and cart
combination to overturn.
13) Unplug this apparatus during lightning storms or when unused
for long periods of time.
This will prevent damage to the product due to lightning and
power-line surges.
14) Refer all servicing to qualified service personnel. Servicing
is required when the apparatus has been damaged in any
way, such as power-supply cord or plug is damaged, liquid
has been spilled or objects have fallen into the apparatus, the
apparatus has been exposed to rain or moisture, does not
operate normally, or has been dropped.
15) To prevent electric shock, ensure the grounding pin on the AC
cord power plug is securely connected.
16) If an outside antenna is connected to the television equipment,
be sure the antenna system is grounded so as to provide some
protection against voltage surges and built up static charges.
In the U.S. Selection 810-21 of the National Electrical Code
provides information with respect to proper grounding of the
mast and supporting structure, grounding of the lead-in wire
to an antenna discharge unit, size of grounding conductors,
location of antenna discharge unit, connection to grounding
electrodes, and requirements for the grounding electrode.
ANTENNA
LEAD IN
WIRE
ANTENNA
DISCHARGE UNIT
(NEC SECTION 810-20)
GROUNDING CONDUCTORS
(NEC SECTION 810-21)
GROUND CLAMPS
POWER SERVICE GROUNDING
ELECTRODE SYSTEM
(NEC ART 250, PART H)
ELECTRIC
SERVICE
EQUIPMENT
NEC
- NATIONAL ELECTRICAL CODE
GROUND
CLAMP
4
For assistance, please call : 1-800-211-PANA(7262) or, contact us via the web at:http://www.panasonic.com/contactinfo
Page 5

17) An outside antenna system should not be located in the vicinity
of overhead power lines or other electric light or power circuits,
or where it can fall into such power lines or circuits. When
installing an outside antenna system extreme care should be
taken to keep from touching such power lines or circuits as
contact with them might be fatal.
18) Unplug this unit from the wall outlet, and refer servicing to
qualified service personnel under the following conditions:
a. When the power cord or plug is damaged or frayed.
b. If liquid has been spilled into the unit.
c. If the unit has been exposed to rain or water.
d. If the unit does not operate normally by following the
operating instructions. Adjust only those controls that
are covered by the operating instructions as improper
adjustment of other controls may result in damage and will
often require extensive work by a qualified technician to
restore the unit to normal operation.
NOTE:
• This equipment is designed to operate in the U.S.A. and other countries where the broadcasting system and AC house current is exactly the same as in
the U.S.A..
• The marking or retained image on the LCD panel resulting from fixed image use is not an operating defect and as such is not covered by Warranty. This
product is not designed to display fixed image patterns for extended periods of time.
e. If the unit has been dropped or the cabinet has been
damaged.
f. When the unit exhibits a distinct change in performance
- this indicates a need for service.
19) When replacement parts are required, be sure the service
technician uses replacement parts specified by the
manufacturer that have the same characteristics as the original
part. Unauthorized substitutions may result in fire, electric
shock, or other hazards.
20) WARNING: TO REDUCE THE RISK OF FIRE OR ELECTRIC
SHOCK, DO NOT EXPOSE THIS APPARATUS TO RAIN OR
MOISTURE.
DO NOT PLACE LIQUID CONTAINERS (FLOWER VASES,
CUPS, COSMETICS, ETC.) ABOVE THE SET. (INCLUDING
ON SHELVES ABOVE, ETC.)
21) CAUTION: TO PREVENT ELECTRIC SHOCK DO NOT USE
THIS PLUG WITH A RECEPTACLE OR OTHER OUTLET
UNLESS THE BLADES CAN BE FULLY INSERTED TO
PREVENT BLADE EXPOSURE.
Getting Started
Important Information Regarding Use of Video Games, Captions or Other Fixed Image Displays.
The extended use of fixed image program material can cause a permanent “shadow image” on the LCD panel. This background image
is viewable on normal programs in the form of a stationary fixed image. This type of irreversible LCD panel deterioration can be limited
by observing the following steps:
A. Reduce the brightness / contrast setting to a minimum viewing level.
B. Do not display the fixed image for extended periods of time.
C. Turn the power off when not in actual use.
This product utilizes tin-lead solder, and has a fluorescent lamp containing a small amount of mercury.
Disposal of these materials may be regulated in your community due to environmental considerations.
For disposal or recycling information please contact your local authorities, or the Electronics Industries
Alliance: www.eiae.org.
5
Page 6

CAUTION:
UNIT IS A CLASS I LASER PRODUCT.
HOWEVER THIS UNIT USES A VISIBLE LASER BEAM WHICH COULD CAUSE HAZARDOUS RADIATION EXPOSURE IF
DIRECTED. BE SURE TO OPERATE THE UNIT CORRECTLY AS INSTRUCTED.
WHEN THIS UNIT IS PLUGGED TO THE WALL OUTLET, DO NOT PLACE YOUR EYES CLOSE TO THE OPENING OF THE DISC
TRAY AND OTHER OPENINGS TO LOOK INTO THE INSIDE OF THIS UNIT.
USE OF CONTROLS OR ADJUSTMENTS OR PERFORMANCE OF PROCEDURES OTHER THAN THOSE SPECIFIED HEREIN MAY
RESULT IN HAZARDOUS RADIATION EXPOSURE.
DO NOT OPEN COVERS AND DO NOT ATTEMPT TO REPAIR THE UNIT YOURSELF. REFER SERVICING TO QUALIFIED
PERSONNEL.
CAUTION:
LASER RADIATION WHEN OPEN. DO NOT STARE INTO
BEAM.
(Inside of product)
Apparatus Claims of U.S. Patent Nos. 4,631,603, 4,577,216, 4,819,098, 4,907,093, and 6,516,132 licensed for limited viewing uses only.
This product incorporates copyright protection technology that is protected by U.S. Patents and other intellectual property rights. Use of
this copyright protection technology must be authorized by Macrovision, and is intended for home and other limited viewing uses only
unless otherwise authorized by Macrovision. Reverse engineering or dis as sem bly is prohibited.
ATTENTION:
RAYONNEMENT LASER EN CAS D’OUVERTURE.
NE PAS REGARDER DANS LE FAISCEAU.
WARNING
AS WITH ANY SMALL OBJECT, SD CARS CAN BE SWALLOWED BY YOUNG CHILDREN. DO NOT ALLOW
CHILDREN TO HANDLE THE SD CARD.
6
For assistance, please call : 1-800-211-PANA(7262) or, contact us via the web at:http://www.panasonic.com/contactinfo
Page 7

Dear Panasonic Customer
Welcome to the Panasonic family of customers.
We hope that you will have many years of enjoyment from your new LCD TV/DVD-Recorder.
To obtain maximum benefit from your set, please read these instructions before making any adjustments, and retain them for
future reference.
Retain your purchase receipt, and record the model number and serial number of your set in the space provided on the rear
cover of these instructions.
For assistance, please call : 1-800-211-PANA (7262)
or send e-mail to : consumerproducts@panasonic.com
or visit us at www.panasonic.com/contactinfo
For assistance, please call : 787-750-4300
or visit us at www.panasonic.com/contactinfo
Federal Communication Commission Information
This equipment has been tested and found to comply with the limits for a TV Broadcast Receiver, pursuant to Part 15 of the FCC Rules.
These limits are designed to provide reasonable protection against harmful interference in a residential installation. This equipment
generates, uses and can radiate radio frequency energy and, if not installed and used in accordance with the instructions, may cause
harmful interference to radio communications. However, there is no guarantee that interference will not occur in a particular installation. If
this equipment does cause or receive interference, which can be determined by turning equipment off and on, the user is encouraged to try
to correct the interference by one or more of the following measures:
Reorient or relocate the TV antenna.
Increase the separation between TV and other equipment.
Connect TV into separate outlet from other equipment.
Consult the dealer or an experienced radio / TV technician for help.
(U.S.A.)
(Puerto Rico)
Getting Started
FCC Caution: Pursuant to 47CFR, Part 15.21 of the FCC rules, any changes or modifications not expressly approved by Matsushita
Electric Corporation of America could result in harmful interference and would void the user’s authority to operate this equipment.
HDMI, the HDMI logo and High-Definition Multimedia Interface are trademarks or registered
trademarks of HDMI Licensing LLC.
SD Logo is a trademark.
Portions of this product are protected under copyright low and are provided under license by ARIS/
SOLANA/4C.
VCR Plus+ and PlusCode are registered trademarks of Gemstar Development
Corporation. The VCR Plus+ system is manufactured under license from
Gemstar Development Corporation.
Pats. 5,307,173; 5,335,079; 4,908,713; 4,751,578; and 4,706,121
“DTS” and “DTS2.0 + Digital Out” are trademarks of Digital Theater Systems, Inc.
Manufactured under license from Dolby Laboratories. “Dolby,” “Pro Logic,” and the
double-D symbol are trademarks of Dolby Laboratories.
MPEG Layer-3 audio decoding technology licensed from Fraunhofer IIS and
Thomson multimedia.
7
Page 8

Information
Information (Unit) Information (Disc)
Loading the Batteries
1 Open the cover.
2 Insert batteries as marked.
3 Close the cover.
• Slide in direction of “ ” mark until cover
snaps shut.
• Insert so the poles (+ and - ) match those in the Remote Control.
• Do not use rechargeable type batteries.
Do not:
• Mix old and new batteries.
• Use different types at the same time.
• Heat or expose to flame.
• Take apart or short circuit.
• Attempt to recharge alkaline or manganese batteries.
• Use batteries if the covering has been peeled off.
Mishandling of batteries can cause electrolyte leakage which can
damage items the fluid contacts and may cause a fire.
Remove if the Remote Control is not going to be used for a long
period of time. Store in a cool, dark place.
DST (Daylight Saving Time)
Unit auto adjusts clock for DST (Daylight Saving Time.)
■ Spring (First Sunday in April)
DST: ON ➞ Sets clock ahead one hour.
■ Autumn (Last Sunday in October)
DST: ON ➞ Turns clock back one hour.
• If your area does not observe Daylight Saving Time, select DST : OFF
(refer to “Manual Clock Setting” on page 23).
• Keep these time changes in mind when pro gram ming the unit for timer
recording.
Play-only discs
Disc type Disc Logo Instructions
DVD-Audio
DVD-Video
Video-CD
Audio-CD
• The producer of the material can control how DVD-Video and Video CDs
are played. This means that you may not be able to control play of a disc
with some operations described in these operating instructions. Read the
disc’s instructions carefully.
• This unit can play CD-R/CD-RW (audio recording disc) recorded with
CD-DA (digital audio), video CD (video CD format 2.0 or above) or MP3.
Finalize* the disc after recording.
* A process that allows play on compatible equipment.
• This unit cannot record onto CD-R or CD-RW.
Discs that cannot be played
• 2.6 and 5.2 GB DVD-RAM, 12 cm (5˝)
• 3.95 and 4.7 GB DVD-R for Authoring
• Unfinalized DVD-R recorded on other equipment (refer to “Finalize” on
page 70)
• PAL discs (you can still play the audio on DVD-Audio)
• DVD-Video with a region number other than “1” or “ALL”
DVD-ROM, DVD-RW, +R, +RW, CD-ROM, CDV, CD-G, Photo CD, CVD,
SVCD, SACD, MV-Disc, PD , Divx Video Disc, etc.
High fidelity music discs
• Played on this unit in
2 channels.
High quality movie and
music discs
Music and video
recorded (including
CD-R/RW)
Music and audio
recorded (including
CD-R/RW)
CD-R and CD-RW with
music recorded in MP3
(p. 47)
Indication in
these operating
instructions
DVD-A
DVD-V
VCD
CD
(CD-DA)
or
MP3
(MP3)
DVD-Video
You can play discs with these symbols.
Dolby Digital:
This unit can play Dolby Digital in stereo (2 channels).
Connect an amplifier with a built-in Dolby Digital
decoder to enjoy surround sound.
DTS Digital Surround:
Connect this unit to equipment that has a DTS decoder
to enjoy DVDs with this mark.
8
CD-R and CD-RW discs
This unit can play finalized* CD-R/CD-RW (audio recording disc)
recorded in CD-DA (digital audio), Video CD or MP3 format. Some
CD-R or CD-RW may not be played due to the condition of the
recording.
* A process that allows play on compatible equipment.
For assistance, please call : 1-800-211-PANA(7262) or, contact us via the web at:http://www.panasonic.com/contactinfo
Page 9

Discs you can use for recording and play
Disc type Disc Logo
DVD-R
Indication in these operating
instructions
DVD-R
Discs or Card you can use
Possible operations*
Type
A
B
Getting Started
C
D
E
DVD-RAM
RAM
Notes:
• We recommend using Panasonic discs. DVD-R from other manufacturers
may not be recorded or played due to the condition of the recording.
• This unit cannot record to discs containing both PAL and NTSC signals.
Play of discs recorded with both PAL and NTSC on another unit is not
guaranteed.
• Some parts of the disc, for example where one program ends and another
begins, may not play smoothly.
DVD-RAM discs
Re-writable discs
• You can record up to 16 hours [in EP (8 H) mode on double-sided disc.
You cannot record or play continuously on two sides]. (Refer to “Recording
modes and approximate recording times” on page 39.)
• You can perform chasing playback (p. 42).
• Scratch and dust resistant cartridge discs and large capacity double sided
discs (9.4 GB) are commercially available.
• You can record digital broadcasts that allow “One time only recording”
when using CPRM (Content Protection for Recordable Media) compatible
discs (p. 70).
Capacity
Protection (Cartridge discs)
With the write-protect tab in the protect position, you cannot
record to, edit, or erase from the disc.
Play automatically starts when inserted in the
unit.
DVD-R discs
One time recording discs (recordable until the disc is full)
• You can record up to 8 hours [in EP (8 H) mode].
• By finalizing the disc, you can play it in a DVD player as DVD-Video
(Play only) (pp. 62, 70).
• You cannot record digital broadcasts that allow “One time only recording”.
• This unit is compatible with 1×-4× recording speed discs.
Capacity
• 12 cm (5″) 9.4 GB (double-sided) and 4.7 GB (single-sided)
• 8 cm (3″) 2.8 GB (double-sided)
4#%4/20
• 12 cm (5″) 4.7 GB, 8 cm (3″) 1.4 GB for General Ver. 2.0
• 4.7 GB, 12 cm (5″) for General Ver. 2.0 / 4× - SPEED
DVD-R Revision 1.0
DVD-RAM
DVD-R
DVD-Audio
DVD-Video
Audio-CD
Video-CD
Card
* Possible operations (○: enable, × : unable)
A
Recording
:
B
Playback
:
C
Title erase/Entering text
:
D
Creating play lists
:
E
Selecting audio
:
** The remaining capacity of the disc will not be increased even if erased.
RAM
Before
Finalizing
DVD-R
After
Finalizing
DVD-V
DVD-A
DVD-V
CD-DA
Format
CD
MP3
Format
MP3
VCD
SD
○○○○○
○○○** ××
× ○ ×××
× ○ ××○
× ○ ××○
× ○ ×××
× ○ ×××
× ○ ××○
× ○○*** ××
*** Only titles in folders can be input.
9
Page 10

Disc Composition Examples
Disc Type Disc Composition
DVD-
RAM
DVD-R
RAM
Before
Finalizing
DVD-R
After
Finalizing
DVD-V
Title
(Program)
Play List Chapter 1
Note:
• You can create chapters for your recorded title/
Title
(Program)
Title Title 1 Title 2
Chapter Chapter 1 Chapter 2 Chapter 3 Chapter 1 Chapter 2
Title 1
(Program 1)
(Scene 1)
program. And, you can arrange created chapters
into a desired scene list (Play List).
Title 1
(Program 1)
Title 2
(Program 2)
Chapter 2
(Scene 2)
Title 2
(Program 2)
Title 3
(Program 3)
Chapter 3
(Scene 3)
Title 3
(Program 3)
Title 4
(Program 4)
Chapter 4
(Scene 4)
Title 4
(Program 4)
Title 5
(Program 5)
Chapter 5
(Scene 5)
Title 5
(Program 5)
Region Management Information
This unit is designed and manufactured to respond to the Region
Management Information that is recorded on a DVD disc. If the
Region number described on the DVD disc does not correspond to
the Region number of this unit, this unit cannot play this disc.
For U.S.A. and Canada
• The region number of this player is “1”.
• The player will play DVD-Video marked with labels bearing “1” or “ALL”.
Example:
!,,
Disc Handling
How to hold a disc
Do not touch the recorded surface.
DVD-
Audio
DVD-
Video
Audio-
CD
Video-
CD
DVD-A
DVD-V
CD-DA
Format
CD
MP3
Format
MP3
VCD
Group Group 1 Group 2
Track Track 1 Track 2 Track 3 Track 1 Track 2
Title Title 1 Title 2
Chapter Chapter 1 Chapter 2 Chapter 3 Chapter 1 Chapter 2
Track Track 1 Track 2 Track 3 Track 4 Track 5
Group Group 1 Group 2
Track 1 2 3 1 2 3
Total
Track
Track Track 1 Track 2 Track 3 Track 4 Track 5
123456
Which should I use, DVD-RAM or DVD-R?
The following chart indicates the differences. Select based upon
what you require.
DVD-RAM DVD-R
Re-writable YES NO
YES
NO
NO
*1
*3
*4
*6
Edit YES YES
YES
YES
*2
*4
*5
Play on other players YES
Recording both Main and SAP of
MTS broadcast
Recording broadcasts that allow
one copy
Recording 16:9 aspect picture YES YES
*1
You can erase, enter name and change thumbnail. Available space does
not increase after erasing.
*2
Only on DVD-RAM compatible players.
*3
After finalizing the disc (pp. 62, 70).
*4
Only one is recorded (“Select MTS” on page 69).
*5
CPRM (p. 70) compatible discs only.
*6
The picture is recorded in 4:3 aspect.
If there is dirt or condensation on the disc
RAM DVD-R
• Clean with an optional DVD-RAM/PD Disc cleaner
(LF-K200DCA1, where available).
• Do not use cleaners for CDs or cloths.
DVD-A DVD-V VCD
CD
Wipe with a damp cloth and then wipe dry.
Handling precautions
• Do not attach labels or stickers to discs. (This may cause disc
warping and un-balanced rotation, rendering it unusable.)
• Do not write on the label side with a ball-point pen or other
writing instrument.
• Do not use record cleaning sprays, benzine, thinner, static
electricity prevention liquids or any other solvent.
• Do not use scratch-proof protectors or covers.
• Do not use the following discs:
- Disc with exposed adhesive from removed stickers or labels
(rented discs, etc.).
- Discs that are badly warped or cracked.
- Irregularly shaped discs, such as heart shapes.
• Do not place in the following areas:
- In direct sunlight.
- In very dusty or humid areas.
- Near a heater.
10
For assistance, please call : 1-800-211-PANA(7262) or, contact us via the web at:http://www.panasonic.com/contactinfo
Page 11

Information (Card)
Cards capable of displaying and saving
Still picture folder structure
The following can be displayed on this unit.
Getting Started
Card type Card Logo
SD Memory Card
MultiMediaCard
• Use a genuine SD Memory Card or MultiMediaCard.
(We recommended using a Panasonic SD card.)
• You cannot use SD cards that exceed 2 GB.
• Compatible with: FAT 12 or FAT 16
• Use this unit to format a memory card when using for the first time (p. 61).
Note that the memory card may no longer be usable on other equipment
once formatted on this unit.
• This unit operates in accordance with the DPOF (Digital Print Order
Format) (p. 56). (Card only)
• Only use the memory cards recommended above.
Indication in these
operating instructions
SD
SD Memory Card Write Protection
You can protect valuable images, etc. from
accidental erasure.
1
Move switch to LOCK : erase/edit not possible.
Move switch back : erase/edit possible.
2
1
2
Card Handling
Do not touch terminal side of card.
Still Pictures
• The unit can play DCF* compliant JPEG and TIFF files taken on a digital
camera.
* Design rule for Camera File system: unified standard established by Japan
Electronics and Information Technology Industries Association (JEITA).
• Picture definition:
Compatible in the range 34 × 34 – 6 144 × 4 096 (sub sampling is 4:2:2 or
4:2:0)
• This unit can handle a maximum of 300 folders (including header
folders) and 3 000 files. Files and folders with numbers which exceed the
maximum cannot be displayed, copied or erased.
• Audio, video and still pictures (MOTION JPEG etc.) that are not compliant
with the DCF standard and still pictures other than JPEG and TIFF cannot
be displayed.
• Still pictures created or edited on a computer may not be playable.
• TIFF is compatible with uncompressed RGB chunky formats. Other types
of TIFF files cannot be played.
• When playing TIFF files, it may take time for them to be displayed.
• When there are a lot of folders and files, it may take a long time to display,
copy or erase.
• Folder titles that were input on equipment other than this unit may not be
displayed properly.
Notes:
• JPEG and TIFF files on a CD-R/CD-RW cannot be played back.
• JPEG and TIFF files on a DVD-RAM can played back.
*
*
* Folders can be created on other equipment. However, these folders
cannot be selected as a transferring (dubbing) destination.
• The folder cannot be displayed if the numbers are all “0” (e.g., DCIM000
etc).
• If a folder name or filename has been input using other equipment, the
name may not be displayed properly or you may not be able to play or edit
the data.
Information (MP3)
Tips for making MP3 discs
• Discs must conform to ISO9660 level 1 or 2 (except for extended formats).
• Compatible compression rate:
between 32 kbps and 320 kbps
• Compatible sampling rate:
16 kHz, 22.05 kHz, 24 kHz, 32 kHz, 44.1 kHz and 48 kHz
• Maximum number of tracks and groups recognizable: 999 tracks and
99 groups
• This unit is compatible with multi-session.
• This unit is not compatible with ID3 tags or packet writing.
• Depending on the recording, some items may not be playable.
• Reading or play of the disc may take time if there are a lot of still pictures
or sessions.
• The display order may differ from how the order is displayed on a
computer.
Note:
• MP3 recordings on a DVD-RAM or DVD-R cannot be played back.
Naming folders and files
• MP3 files must have the extension
“.MP3” or “.mp3”.
• At the time of recording, give folder
and file names a 3-digit numeric
prefix in the order you want them to
play (this may not work at times).
• English alphabets and Arabic
numerals are displayed correctly.
Other characters may not be
displayed correctly.
Root
001
003 group
Order of play
(folder=group)
001
001track.mp3
002track.mp3
003track.mp3
002 group
001track.mp3
002track.mp3
003track.mp3
004track.mp3
001track.mp3
002track.mp3
003track.mp3
(file=track)
11
Page 12

Location of Controls
Remote Control Buttons
1
2
3
4
5
6
7
8
9
10
11
12
13
14
15
16
17
18
19
20
No. Part Name Description Page
1
INPUT Changes input mode. 25
2
POWER Turns power on and off. 21
3
OPEN/CLOSE Opens/closes disc tray. 34
4
NUMBER keys Directly inputs numerical data. 25
5
R-TUNE
CANCEL
6
ADD/DLT
7
SKIP Ι◄◄ /►►Ι
8
STOP
9
PAUSE Pauses playback/recording. 38, 44
DIRECT
10
NAVIGATOR
Displays the last channel you were
watching.
Cancels input data.
Adds/deletes channels in unit
memory.
Skips to previous/next chapter or
track.
Stops playback, cancels resume,
and stops recording.
Displays Direct Navigator
when playing a DVD-RAM and
non-finalized DVD-R. Displays Disc
Menu when playing a DVD Video
and finalized DVD-R.
21
22
23
24
25
26
27
28
29
30
31
32
33
34
35
36
37
38
39
25
63
22
45
38, 44
45, 51, 54
No. Part Name Description Page
Use to move cursor for item
11
▲▼◄►
12
SUB MENU
13
DVD SETUP Use to perform initial DVD setup. 67
14
PROG/CHECK
15
VCR Plus+
16
ERASE Erases recording content. 47
17
AUDIO Switches the Audio mode. 27, 48
18
PICTURE MODE
19
ASPECT Changes display aspect ratio. 26
20
CHAPTER Records the playback position. 48
DRIVE SELECT-
21
DVD
DRIVE SELECT-
22
SD
23
MUTE Places unit in Mute mode. 26
24
SLEEP Sets the sleep timer. 25
25
CH ▲▼ Changes channels. 25, 38
26
VOL +/- Adjusts volume. 25
SLOW/SEARCH
27
◄◄ /►►
28
PLAY/×1.3
29
MENU Displays TV menu. 22
30
ENTER Uses when finalizing menu entries. 22
31
RETURN
32
TIME SLIP
33
CM SKIP
34
REC Begins recording. 38
35
REC MODE Sets to DVD Record mode. 38
36
F REC Sets Flexible Recording. 39
37
AUDIO MODE
38
DISPLAY Displays operation status. 27, 35, 54
39
PLAY SETUP
selection in menu and operation
screens.
During a paused picture, ◄ΙΙ / ΙΙ►
operates Frame Advance.
Displays sub menu while using
Direct Navigator or Play list for
editing.
Use when programming a timer
recording and when displaying timer
recording information.
Makes setting timer recordings
quick and easy.
Changes picture adjust mode.
(STANDARD, CINEMA, VIVID)
Selects DVD drive. 34
Selects SD (card) drive. 34
Searches for previous/next scene.
Pressing during pause mode starts
slow motion playback. Pressing
◄◄ or ►► to change slow motion
direction.
Begins playback. Holding down for
1 second switches to fast playback.
Uses when returning to the normal
screen from a menu.
Uses when returning to the previous
screen during setup.
Skips over a specified time on the
disc.
During playback, skips ahead
1 minute.
Changes audio adjust mode.
(AUTO, STANDARD, DYNAMIC)
Changes the initial playback settings
during play.
22
46
51, 56, 58
41
40, 41
32
45, 46
44
22
42, 46
45
31
49
12
For assistance, please call : 1-800-211-PANA(7262) or, contact us via the web at:http://www.panasonic.com/contactinfo
Page 13

Unit Buttons
Front View
Getting Started
1
2
Top View
16 17 18 19
3
45
6 7 8 9 10 11
1312
20 21
14 15
22
23
24
25
No. Part Name Description Page
1
Remote Sensor
2
POWER Indicator
3
Built-in Speaker Equipped with a front speaker. –
4
Disc Tray Place compatible discs here. 34
5
SD Card Slot Place compatible cards here. 34
6
DVD Indicator Lights when in DVD mode. 34
7
SD Indicator Lights when in SD mode. 34
8
SD Indicator
Timer Recording
9
display
10
Disc Type* Displays Disc media being used. –
TIME SLIP
11
Indicator
12
Recording mode
Receives infrared signal from
Remote Control.
Lights when power is on.
Standby: Red
On: Green
On: When a card is set in this unit.
Flashes: When a card is being
read or written.
On: When timer recording is on
standby.
Flashes: When the unit couldn’t go
to timer recording standby.
Lights when simultaneously
playing and recording a DVD.
Recording Mode Displays Disc of
recording.
(When FR is selected all lights go
out.)
–
–
34
40, 41
42
39
No. Part Name Description Page
13
Channel
Main display
14
section
Disc operation
15
status
16
POWER Turn the unit on or off. 21
17
INPUT Changes Input position. 25
18
VOLUME +/- Adjusts volume. 25
19
CHANNEL ▲▼ Changes channels. 25, 38
20
OPEN/CLOSE Opens/closes disc tray. 34
DRIVE SELECT
21
DVD/SD
22
PLAY/×1.3
23
REC Begins recording. 38
24
SKIP Ι◄◄ /►►Ι
25
STOP
Displays channel.
Displays title number during
playback.
Recording and play counter, and
other miscellaneous messages.
Displays condition of playback/
recording.
Select the drive. 34
Begins playback. Holding down
for 1 second switches to fast
playback.
Skips to previous/next chapter or
track.
Stops playback, cancels resume,
and stops recording.
38
38, 44
38, 44
44
45
38, 44
* D. MIX (Multi-channel DVD-Audio only)
On: Down-mixed audio is played. (p. 70)
Off: The disc prevents down-mixing so only the two front channel can be played.
13
Page 14
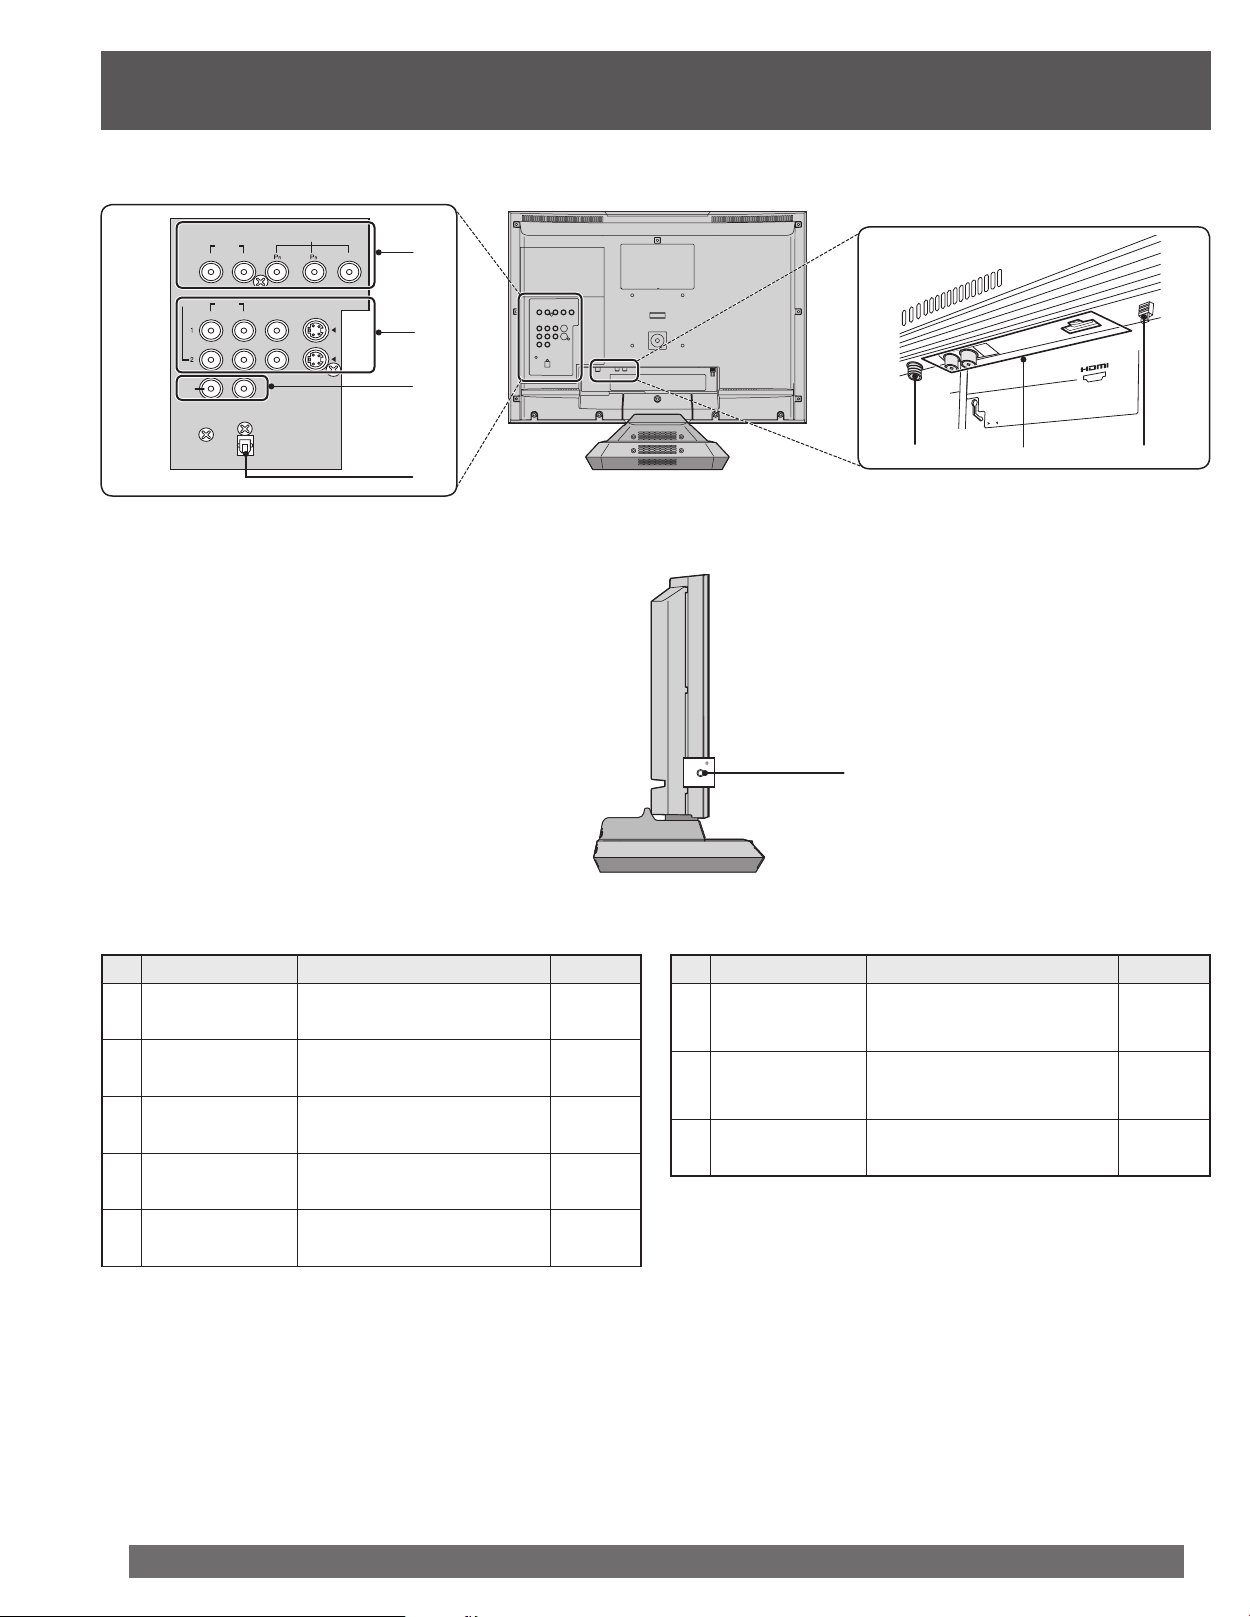
Rear View
COMPONENT VIDEO INPUT
AUDIO
RL
IN
AUDIO
RL
OUT
Left Side View
VIDEO
VIDEO S VIDEO
DIGITAL AUDIO OUT
PCM/BITSTREAM
OPTICAL
Y
1
2
3
5
-
"
4
4
%
0
6).
!
56 7
4
8
No. Part Name Description Page
Component signal
1
Input connector
Video Input 1, 2
2
connector
Audio Out
3
connector
Input the Component signal (Y,
PB, PR) from other equipment.
16
Connect from other equipment. 16
Outputs audio signal. (Analog) 19
Optical digital
4
Audio Out
Outputs audio signal. (Digital) 18
connector
VHF/UHF Antenna
5
Input terminal
Input terminal for an antenna or
cable box signal.
15
No. Part Name Description Page
HDMI Input
6
terminal
Connect the HDMI cable.
(For analog, also connect the
audio cables.)
17
When plugged into an AC outlet,
7
AC Power Plug
this unit consumes 0.8 W of
–
electric power in OFF condition.
8
Phones Jack (M3) Connect a Headphones. 20
14
For assistance, please call : 1-800-211-PANA(7262) or, contact us via the web at:http://www.panasonic.com/contactinfo
Page 15
Connections
Notes on connections
• Turn off the power supply for all components before making any connections.
• If the cables necessary for connecting a component to the system are not included with the component or available as an option, you may need to
fashion a cable to suit the component concerned.
• Read the instruction manual for each system component carefully before connecting it.
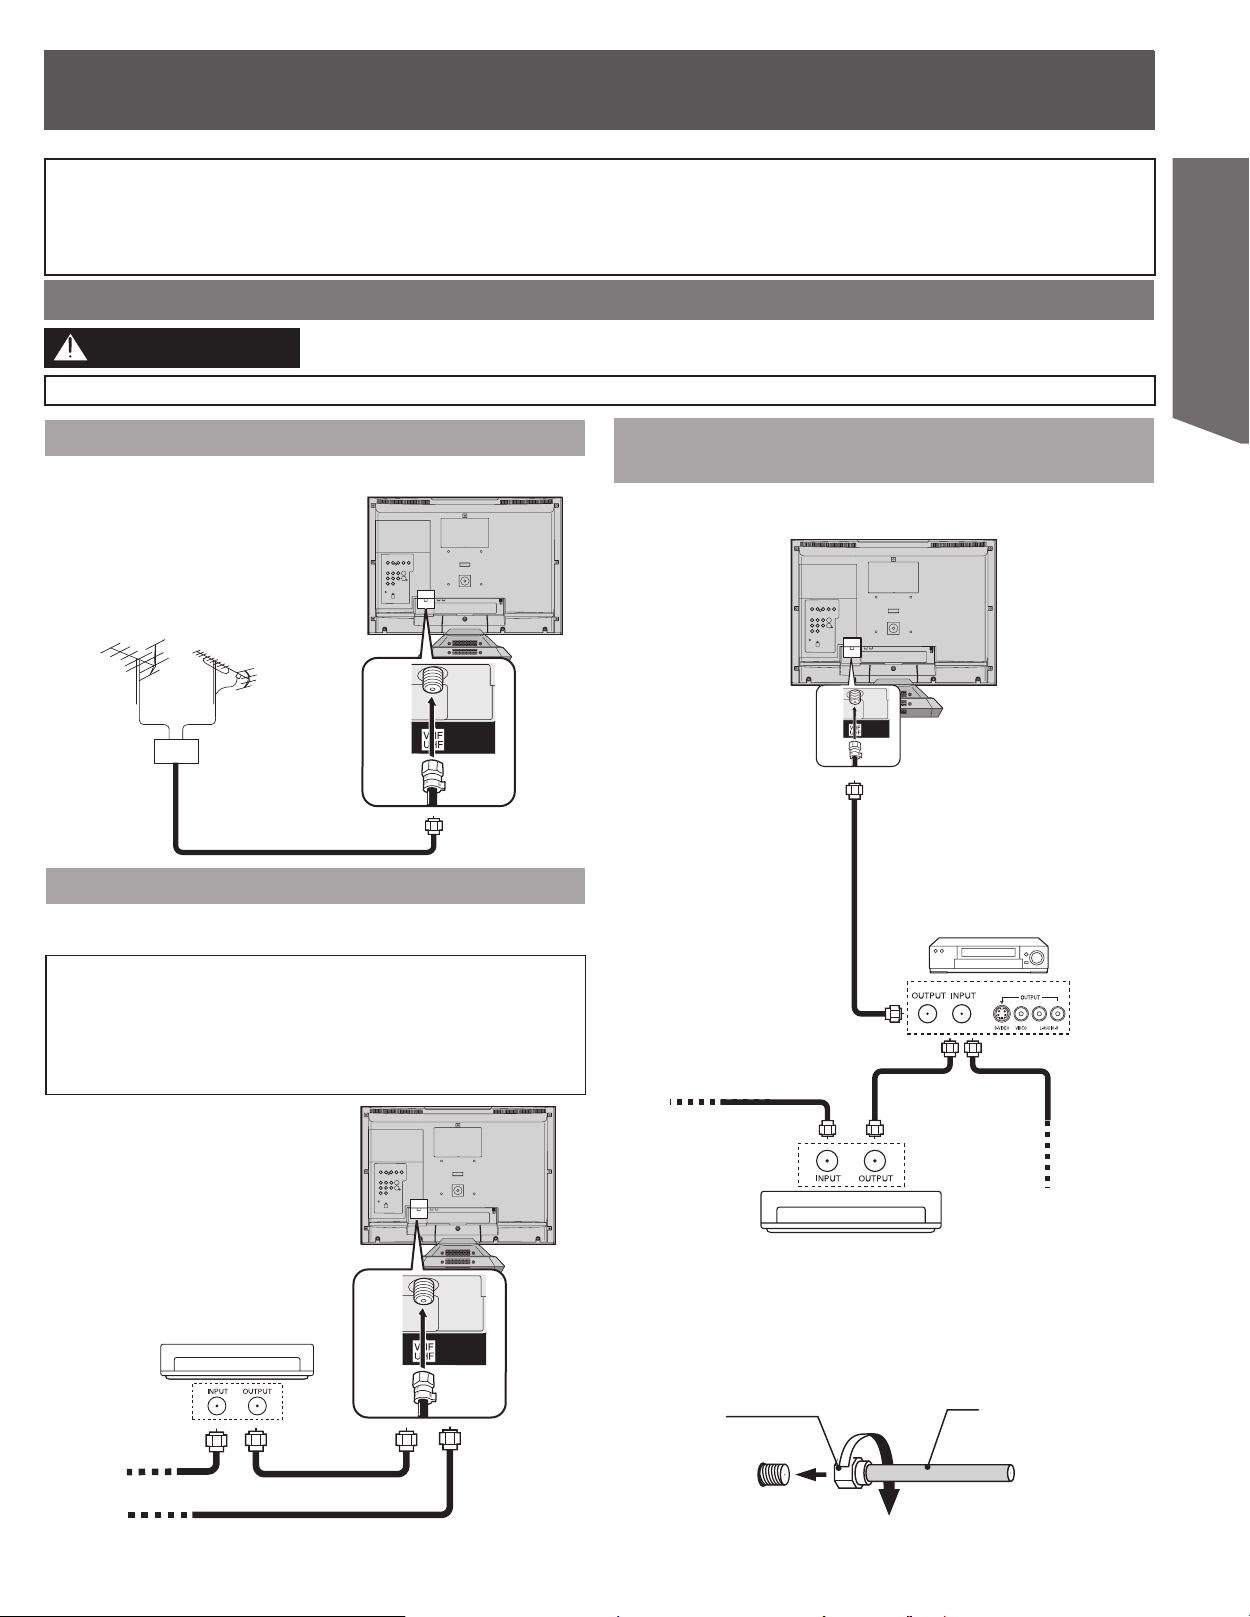
Connecting the RF in Terminal
CAUTION
Overtightening “Nut type” RF coaxial cables may damage jacks. Finger tighten only.
Getting Started
Antenna Connection
Connect the cable from Antenna to the VHF/UHF terminal on the
unit.
VHF
Antenna
Mixer
UHF
Antenna
Cable Connection
Connect the cable supplied by your local cable company to VHF/
UHF terminal on the unit.
Note to CABLE system installer:
This re mind er is pro vid ed to call the CABLE (Cable TV) System
Installer’s at ten tion to Article 820-40 of the NEC that pro vides
guide lines for proper grounding and, in par tic u lar, specifies that
the cable ground shall be con nect ed to the ground ing system of
the build ing, as close to the point of cable entry as practical.
Connecting the Antenna / Cable to the RF IN
Terminal (VCR)
Use this configuration when connecting the LCD TV Antenna and
Cable TV system using VCR.
Connect the cable from the Output
terminal on the back of the Cable
Box or antenna/cable system to the
Antenna input terminal on the back
of the VCR.
VCR
In from cable
↑ TO VCR
Or
↑ TO VCR
In from CABLE
Cable Box
Or
TERMINAL ON THE
BACK OF THE CABLE
BOX
CABLE BOX
Note:
• When the RF coaxial cable is connected to the projection display VHF/
UHF terminal via a cable box or VCR, set the TV channel to CH3 or CH4.
This does not apply when signal is input from VIDEO INPUT.
Cable / Antenna Connection
F-Type Antenna
Connector
Antenna
Terminal on the
Back of the TV
Incoming Cable from
Antenna or Cable TV System
Incoming 75Ω Cable from
Home Antenna / Cable
Company
15
Page 16

VIDEO S VIDEO
IN
AUDIO
R
L
VIDEO S VIDEO
IN
AUDIO
R
L
Connecting the “1, 2” AV Input Terminals
Y
COMPONENT VIDEO INPUT
AUDIO
VIDEO
R
L
Connects VCRs and other peripheral equipment
VHS VCR
S-VHS VCR
*
AUDIO
VIDEO
AUDIO
S-VIDEO
* Similar connections are available at the INPUT 1, 2 input terminals.
Notes:
• When connecting video cables, priority is given to the S-Video cable when both the S-VIDEO input terminal and the VIDEO input terminal are connected.
• Please make inquiries to video game manufacturers concerning component cables to connect with video game console.
• Select the desired VIDEO input position by pressing the INPUT button. (p. 25)
Connecting the COMPONENT VIDEO Input Terminals
Because each Y, PB, and PR signal is input independently, the Component signal allows for more accurate color reproduction.
The Component signal output terminal indication will differ according to the output device (Y, P
Please read the operating instructions included with the output device.
Notes:
• Select the desired COMPONENT VIDEO INPUT position by pressing the
INPUT button. (p. 25)
• Component video signals that can be input are 480i, 480p, 720p, and
1 080i.
• You cannot record the programs using this connection.
B, PR).
*
16
DVD Player
Component Signals (Y, PB, PR) that can be Input
Signal data
Mode type
No. of dots
(H × V)
Horizontal
frequency
(kHz)
Vertical
frequency
(Hz)
480i 664 × 485 15.73 29.97 480 i
480p 720 × 483 31.47 59.94 480 p
*720p 1 280 × 720 45.00 60.00 720 p
Signals
DTV Format
1 080i 1 920 × 1 080 33.75 30.00 1 080 i
AUDIO
• Input signals, other than those listed with a * mark, will give you a
beautiful, stable picture.
COMPONENT VIDEO
For assistance, please call : 1-800-211-PANA(7262) or, contact us via the web at:http://www.panasonic.com/contactinfo
Information
menu
display
Page 17
!
6)
.
0
%
4
4
"
-
5
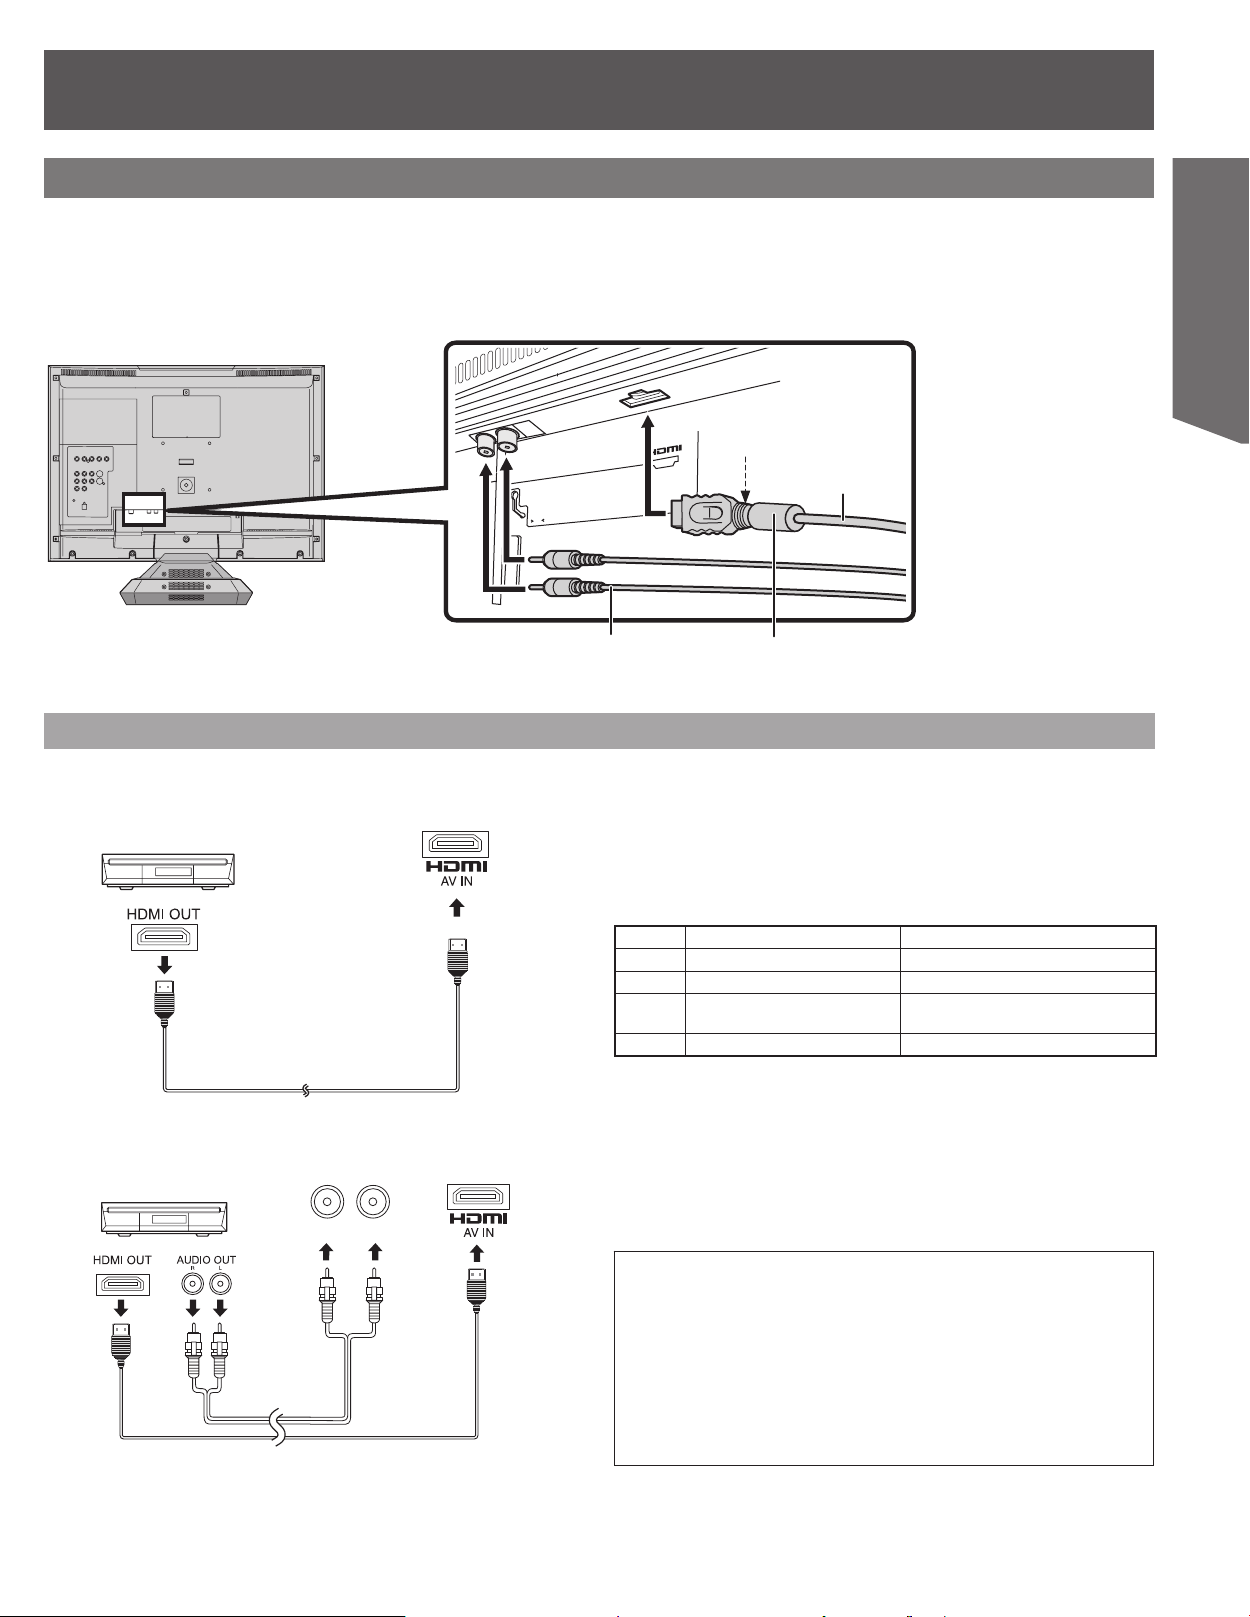
HDMI Connection
HDMI*1 (High Definition Multimedia Interface) is the first all digital consumer electronics A/V interface that supports uncompressed standard.
The HDMI terminal supports both video and audio information.
You can connect an EIA / CEA-861 / 861B
output terminal to the HDMI*1 input terminal.
Input a High-bandwidth Digital Content Protection (HDCP) high-definition picture source to this HDMI terminal, so you can display highdefinition pictures on this TV in the digital form.
*2
compliant consumer electronic device, such as a Set Top Box or DVD player with HDMI or DVI
Attach just beside the
connector.
HDMI cable
(not supplied)
Getting Started
Connection diagram
Follow the diagram below to connect the unit to a set top box or a
DVD player.
When audio signal input is digital
Set Top Box
The connector on the unit is HDMI Type A
connector.
When audio signal input is analog
Set Top Box
AUDIO IN
R
L
The connector on the unit is HDMI Type A
connector.
Audio cable
(not supplied)
Ferrite core (small size)
(not supplied)
Notes:
• If the external device has DVI output only, use a DVI to HDMI adapter
cable*3 to connect to the HDMI terminal.
• Connect the audio cables to the AUDIO IN terminals for HDMI.
• Select the audio setting in HDMI IN. (p. 32)
• You cannot record the programs using this connection.
Compatible VIDEO Signal
No. of dots (H × V) Vertical scanning frequency (Hz)
1080i 1 920 × 1 080i 59.94 / 60
720p 1 280 × 720p 59.94 / 60
480p
720 × 480p
640 × 480p
59.94 / 60
59.94 / 60
480i 720 (1 440) × 480i 59.94 / 60
This input terminal is not intended for use with computers.
Compatible sampling frequency of AUDIO signal
(L.PCM) : 48 kHz / 44.1 kHz / 32 kHz
Notes:
• This HDMI connector is Type A.
• If you connect an equipment without a digital output terminal, connect to
the COMPONENT VIDEO, S-VIDEO or VIDEO input terminal on the TV so
you can enjoy an analog signal.
*1
HDMI, the HDMI logo and High-Definition Multimedia
Interface are trademarks or registered trademarks of HDMI
Licensing LLC.
*2
EIA / CEA-861 / 861B profiles compliance covers profiles for
transmission of uncompressed digital video including high
bandwidth digital content protection.
*3
HDMI-DVI conversion cable (TY-SCHO3DH): available on
Panasonic website (www.panasonic.com). Consult your
consumer electronics dealer for availability details.
17
Page 18

Connecting the Audio Output Terminal
Enjoy the powerful movie theater and hall-like sound available with multiple channel audio found on DVDs by connecting an amplifier and
speakers. There are two types of connection, digital and analog.
Note:
• It is outputted in DVD playback only.
Digital connection
Firmly connect the cable to
the connector.
Connect an AV amplifier with Dolby Digital or
DTS decoders
Enjoy “Dolby Digital” or “DTS” surround sound.
OPTICAL
Amplifier with built in Dolby Digital
or DTS decoders.
Speakers (example)
Please see amplifier
manual for speaker
requirements.
Connect a Digital amplifier
Smart one-line connection is possible.
OPTICAL
18
For assistance, please call : 1-800-211-PANA(7262) or, contact us via the web at:http://www.panasonic.com/contactinfo
Page 19

Getting Started
Analog connection
Connect an analog amplifier to enjoy high-quality stereo sound.
AUDIO
R
OUT
L
IMPORTANT NOTE:
Caution for optical digital audio output connector:
• Be sure to refer to pages 67~69 regarding output settings of Dolby Digital,
dts, and PCM.
• CDs can be played as usual.
• Audio from the Digital Audio Out terminal is only output during playback.
• When connecting an amplifier which contains the Dolby Digital or dts
decoder, be sure to select “Bitstream”. When connecting an amplifier
which does not contain the Dolby Digital or dts decoder, be sure to select
“PCM”. (pp. 67~69) Otherwise, attempting to play a DVD may cause such
a high level of noise that it may harm your hearing and damage your
speakers.
Notes:
• Some dts decoders which do not support DVD-dts Interface may not work
properly with the unit.
• Avoid bending/ twisting the optical digital cable when connecting.
For your reference:
• Dolby Digital is a digital sound compression technique developed by
the Dolby Laboratories Licensing Corporation. Supporting 5.1-channel
surround sound, as well as stereo (2-channel) sound, this technique
enables a large quantity of sound data to be efficiently recorded on a disc.
• LPCM is a signal recording format used in CDs. While CDs are recorded in
44.1 kHz/16 bit, DVDs are recorded in 48 kHz/16 bit up to 96 kHz/24 bit.
• If you have a Dolby Pro Logic Surround decoder, you will obtain the
full benefit of Pro Logic from the same DVD movies that provide full
5.1 channel Dolby Digital soundtracks, as well as from titles with the Dolby
Surround mark. For information on Panasonic or Technics Dolby Pro Logic
Surround Sound Decoders please contact your local dealer.
Manufactured under license from Digital Theater Systems, Inc.
US Pat. No’s. 5,451,942, 5,956,674, 5,974,380, 5,978,762,
6,487,535 and other U.S. and world-wide patents issued and
pending. “DTS” and “DTS 2.0 + Digital Out” are trademarks
of Digital Theater Systems, Inc. Copyright 1996, 2003 Digital
Theater Systems, Inc. All Rights Reserved.
19
Page 20

Connecting the Headphones / Earphones Jack
(Not supplied)
M3 plug
Left side of the TV
20
For assistance, please call : 1-800-211-PANA(7262) or, contact us via the web at:http://www.panasonic.com/contactinfo
Page 21

Initial Setup –Ready to Play–
POWER
▲▼
Top view
POWER
CH ▲▼
ENTER
1 Press POWER.
• For remote POWER button
to function, unit POWER
must be ON.
Seleccione la Lengua
élection de Langue
S
2 Press ▲▼ to select
the language and
press ENTER.
Appuyer sur ENTER
3 Press ENTER.
Connect antenna cable and if you use a
cable box tune it to your local PBS CH
4 Press ENTER to start
Auto Channel Setting.
• The unit then proceeds with Auto Clock Setting. The time is
displayed when finished.
• If “No Channels found...” is displayed, press ENTER again.
AUTO CH SETTING
In “AUTO CH SETTING”
CHANNEL 35
Select Language
English
Espa
ñol
Fran
çais
Press ENTER
Pulse ENTER
Auto Channel Setting
then...
Please press the ENTER key.
MENU
STOP
Auto Clock Setting
TV Operation
Initial Setup (Ready to Play)
After plugging the unit into your household AC outlet and pressing
POWER to turn the unit on for the first time, the unit assists you
to set the on-screen language, and automatically tunes in all the
channels it can receive and sets the clock.
The unit automatically determines the type of transmission
(airwaves or cable) and puts them into channels as follows.
Band Channel
TV Mode
(Airwaves)
CATV Mode
(Cable)
Preparation
• Turn on the television and select the appropriate video input to suit the
connections to this unit.
• Confirm that the antenna is connected correctly.
VHF 2-13
UHF 14-69
VHF 2-13
CATV LOW BAND 95-99
CATV MID/SUPER BAND 14-36
CATV HYPER BAND 37-65
ULTRA BAND
SPECIAL CATV CHANNEL 1
66-94
100-125
Auto Clock Setting is complete.
4/4/2004 12:15 AM
DST---------------ON
TIME ZONE----EST
• DST, Daylight Saving Time, shows the summertime setting.
• TIME ZONE shows the time difference from Greenwich meantime
(GMT).
EST (Eastern Standard Time) = GMT –5
CST (Central Standard Time) = GMT –6
MST (Mountain Standard Time) = GMT –7
PST (Pacific Standard Time) = GMT –8
AST (Alaska Standard Time) = GMT –9
HST (Hawaii Standard Time) = GMT –10
For other areas: xx hr
5 Press ENTER.
If the clock is an hour slower or faster than the
actual time
Select “–1” or “+1” in “Time Zone Adjust” in the SETUP menu.
(p. 23)
If the unit couldn’t set the clock automatically
Set the time manually. (Refer to “Manual Clock Setting” on page
23.)
To start Auto Channel Setting again (after
relocation, for example)
Reset the unit. (Refer to “Reset all unit Memory Functions” on
page 24.)
Antenna system and VCR Plus+ guide channel settings all
revert to the default values.
21
Page 22

Tuning TV
NUMBER keys
ADD/DLT
▲▼◄►
CH ▲▼
MENU
ENTER
RETURN
5 Press ▲▼ to select “TV” or “CATV” and press
ENTER.
PROGRAM
CHANNEL
Antenna System
TV
CATV
6 Press ▲▼ to select “Auto Channel Setting” and
press ENTER.
PROGRAM
CHANNEL
Antenna System CATV
Auto Channel Setting
VCR Plus+ CH Setting
7 Press ENTER.
• Auto Channel Setting starts. This takes a few minutes.
• Channels will automatically advance until all channels have been
scanned. Channel numbers with video signal received will be stored
in the Channel Memory.
Top view
VOL-
Automatic Channel Setting
1 Press MENU.
2 Press ◄► to select “SET UP.”
3 Press ▲▼ to select “PROGRAM CH” and press
ENTER.
MENU
ADJ. SET UP FUNC.
LANGUAGE
PROGRAM CH
CLOCK
LOCK
CLOSED CAPTION
INPUT LABEL
OTHER ADJUST
OK
PAGE
RETURN
SELECT
4 Press ▲▼ to select “Antenna System” and press
ENTER.
PROGRAM
CHANNEL
Antenna System CATV
Auto Channel Setting
VCR Plus+ CH Setting
8 Press ENTER.
To exit the screen
Press RETURN.
Notes:
• After Auto Channel Setting finishes, the lowest channel number added will
be displayed.
• When there are no receivable channels, channel 69 (for TV) or channel
125 (for cable TV) is displayed.
Adding and deleting channels
Add or delete channels if necessary channels are not set or
unnecessary channels are set.
1 Press NUMBER keys to select a channel.
e.g., 5: [0] → [5]
15: [1] → [5]
115: [1] → [1] → [5]
• You also use CH ▲▼ when you are going to delete a channel.
2 Press ADD/DLT.
CHANNEL 12 ADDED
CHANNEL 12 DELETED
22
For assistance, please call : 1-800-211-PANA(7262) or, contact us via the web at:http://www.panasonic.com/contactinfo
Page 23

Clock Settings
1 Press MENU.
2 Press ◄► to select “SET UP.”
3 Press ▲▼ to select “CLOCK” and press ENTER.
MENU
ADJ. SET UP FUNC.
LANGUAGE
PROGRAM CH
CLOCK
LOCK
CLOSED CAPTION
INPUT LABEL
OTHER ADJUST
OK
PAGE
RETURN
SELECT
Time Zone Adjust
Adjust the time zone (-1 or +1) if it was not set correctly with auto
clock setting.
4 Press ▲▼ to select “Time Zone Adjust” and press
ENTER.
CLOCK
Auto Clock Setting
Manual Clock Setting
Time Zone Adjust
0
Auto Clock Setting
4 Press ▲▼ to select “Auto Clock Setting” and press
ENTER.
CLOCK
Auto Clock Setting
Manual Clock Setting
Time Zone Adjust
0
5 Press ENTER.
• Auto Setting starts. This can take some time, up to a few hours in
some cases. The following screen appears when setting is complete.
CLOCK
• DST, Daylight Saving Time, shows the summertime setting.
• TIME ZONE shows the time difference from Greenwich meantime
(GMT).
EST (Eastern Standard Time) = GMT –5
CST (Central Standard Time) = GMT –6
MST (Mountain Standard Time) = GMT –7
PST (Pacific Standard Time) = GMT –8
AST (Alaska Standard Time) = GMT –9
HST (Hawaii Standard Time) = GMT –10
For other areas: xx hr
Auto Clock Setting
Auto Clock Setting is complete.
4/4/2004 12:15 AM
DST---------------ON
TIME ZONE----EST
5 Press ▲▼ to select “-1” or “+1” and press ENTER.
CLOCK
Manual Clock Setting
Time Zone Adjust
-1
0
+1
4 Press ▲▼ to select “Manual Clock Setting” and
press ENTER.
CLOCK
Auto Clock Setting
Manual Clock Setting
Time Zone Adjust
0
5 Press ◄► to select the item you want to change
and press ▲▼ to change the setting.
• DST (Daylight Saving Time): ON or OFF
If you select “ON”, the clock is advanced one hour starting at 2 a.m.
on the first Sunday in April and ending at 2 a.m. on the last Sunday
in October.
• Time Zone (see above)
CLOCK
Manual Clock Setting
MONTH DAY YEAR HOUR MINUTE
1 // THU
:PM12 001 2004
DST TIME ZONE
OFF EST
TV Operation
6 Press ENTER.
To cancel partway
Press RETURN.
6 Press ENTER.
• The clock starts.
To return to the previous screen
Press RETURN.
23
Page 24

VCR Plus+ guide channel Settings
Set these guide channels so you can use the VCR Plus+
programming number for timer recording. Before starting the
settings, prepare a chart showing the channels, station names, and
guide channels.
e.g.,
Station name
Guide
channel
CBS 04 04 Unnecessary
HBO 33 15
Nickelodeon 38 20
Look up the guide channels for the
stations in magazines.
Note:
• If you have connected a cable TV box or satellite receiver, the VCR Plus+
system does not work so you do not have to set the guide channels.
Preparation
• Complete Auto Channel Setting. (pp. 21, 22)
Channel
number
Channel setting
Enter channel 15 next to
Guide Channel 33.
Enter channel 20 next to
Guide Channel 38.
Write down all the stations you can
receive.
• When selecting the guide channel, press and hold ▲▼ to scroll the
screen up and down.
PROGRAM
CHANNEL
VCR Plus+ CH Setting
Guide Channel CATV Channel
4
- - -
5
- - -
- - -
6
7
- - -
8
- - -
6 Press ▲▼ to select the channel corresponding to
the guide channel and press ◄.
• To delete a number, press CANCEL.
• Repeat steps 5 and 6 to enter other channels.
7 Press ENTER.
To exit the screen
Press RETURN.
1 Press MENU.
2 Press ◄► to select “SET UP.”
3 Press ▲▼ to select “PROGRAM CH” and press
ENTER.
MENU
ADJ. SET UP FUNC.
LANGUAGE
PROGRAM CH
CLOCK
LOCK
CLOSED CAPTION
INPUT LABEL
OTHER ADJUST
OK
PAGE
RETURN
SELECT
4 Press ▲▼ to select “VCR PLUS+ CH Setting” and
press ENTER.
PROGRAM
CHANNEL
Antenna System CATV
Auto Channel Setting
VCR Plus+ CH Setting
5 Press ▲▼ to select the guide channel you want to
set and press ►.
PROGRAM
CHANNEL
VCR Plus+ CH Setting
Guide Channel CATV Channel
125
- - -
1
- - -
2
- - -
3
- - -
Change Language Setting
1 Press MENU.
2 Press ◄► to select “SET UP.”
3 Press ▲▼ to select “LANGUAGE” and press
ENTER.
MENU
ADJ. SET UP FUNC.
LANGUAGE
PROGRAM CH
CLOCK
LOCK
CLOSED CAPTION
INPUT LABEL
OTHER ADJUST
OK
PAGE
RETURN
SELECT
4 Press ◄► to select Language.
LANGUAGE
LANGUAGE ENGLISH
CHANGE
RETURN
5 Press RETURN twice to exit.
Reset all unit Memory Func tions
Returns to factory setting. Use if relocating unit, or if Initial Setup
needs to be redone.
• Make sure a disc is not inserted in unit.
1 Turn the unit Power on.
2 Press MENU.
3 Press ◄► to select “SET UP.”
4 Press ▲▼ to select “LOCK” and press ENTER.
5 Hold down both MUTE on the Remote Control and
VOL- on the unit.
• The power will shut off.
24
6 Perform “Initial Setup” on page 21.
For assistance, please call : 1-800-211-PANA(7262) or, contact us via the web at:http://www.panasonic.com/contactinfo
Page 25

TV Operation
INPUT
NUMBER keys
▲▼◄►
SLEEP
MUTE
CH ▲▼
VOL +/R-TUNE
MENU
ENTER
TUNER:
Signal of source connected to VHF/UHF terminal is displayed.
VIDEO 1:
Signal of source connected to AV Input terminal 1 is displayed.
VIDEO 2:
Signal of source connected to AV Input terminal 2 is displayed.
COMPONENT:
Signal of source connected to COMPONENT Input terminal is
displayed.
HDMI:
Signal of source connected to HDMI Input terminal is displayed.
AUDIO
ASPECT
Top view
INPUT
Selecting Input Mode
Method 1
1 Press CH ▲▼.
• The display will change as follows.
Notes:
• The diagram at right is an example.
• TV CH 2 and CABLE CH 1 represent the
lowest channels in memory, while TV CH
69 and CABLE CH 125 represent the
highest channels in memory.
* If SKIP is set as the INPUT LABEL setting,
the mode will not be changed. (p. 28)
DISPLAY
VOL +/-
CHANNEL ▲▼
(TV)
CH2
(CABLE)
CH1
(TV)
CH69
(CABLE)
CH125
HDMI*
COMPONENT*
VIDEO2*
VIDEO1*
Using the CH/VOL Button
Select desired channel:
Press CH ▲▼ or NUMBER keys.
Adjust desired volume level:
Press VOL + or VOL –.
Using the NUMBER keys
When selecting CABLE channels 100 to 125 with the NUMBER
keys.
Example 1:
To select channel 125, first press the 1 key, then 2, then 5.
Example 2:
To select channel 12, first press the 1 key, then 2.
Example 3:
To select channel 2, first press the 0 key, then 2.
Rapid Tune
1 Press R-TUNE to display the last channel you were
watching.
Sleep Timer
This unit can be set for auto power off.
1 Press SLEEP repeatedly to select the desired time.
30 60
0 90
TV Operation
Method 2
1 Press INPUT.
• The display will change as follows.
TUNER*
HDMI*
* If SKIP is set as the INPUT LABEL setting, the mode will not be changed.
(p. 28)
VIDEO1*
COMPONENT*
VIDEO2*
90
• To cancel, press SLEEP repeatedly until “0” appears.
2 The indication goes off a few seconds after the
adjustment is finished.
• Pressing DISPLAY with sleep timer set displays remaining time.
• From 3 minutes prior to power off, 3, then 2, then 1 flashes
on-screen.
25
Page 26

ASPECT Controls
This feature allows you to enjoy viewing the picture at its maximum
size, including wide screen cinema format picture.
1 Press ASPECT to select the screen mode.
NORMALFULLZOOMJUST
• When a 1080i or 720p signal is being received, the mode is set to FULL,
and aspect is not possible.
• This feature does not work during SD mode.
• The aspect setting is stored separately for TV, VIDEO1, VIDEO2,
COMPONENT, HDMI and DVD/SD.
Mode Picture Explanation
JUST mode will display a 4:3
picture at its maximum size
but with aspect correction
applied to the sides of the
screen so that elongation is
only apparent at the left and
right edges of the screen. The
size of the picture will depend
on the original signal.
ZOOM mode magnifies the
central section of the picture.
JUST
ZOOM
4
4
JUST
3
ZOOM
3
3 Press ▲▼ to select “POSITION/SIZE” and press
ENTER.
For “ZOOM” mode (See left)
POSITION:
Press ▲▼ to move the picture up or down.
• Press ENTER to return to the original position.
SIZE:
Press ◄► to shrink the picture vertically [by 15 steps: 15
(original setting) down to 1].
• Press ENTER to return to the original setting.
ZOOM
POSITION/SIZE
NORMAL
NORMALIZE
SIZE
1
RETURN
ZOOM
4
FULL
FULL
3
FULL will display the picture
at its maximum size but with
slight elongation.
4
NORMAL
NORMAL
3
NORMAL mode will display a
4:3 picture at its standard 4:3
size without any stretching.
Notes:
• However, if the mode selected does not match the aspect ratio of the input
signal, the original picture quality may be affected.
• If a normal (4:3) picture is projected in wide screen, distortion may occur
around the edges so that part of the picture may no longer be visible. We
recommend viewing in 4:3 mode so you can enjoy the picture as it was
intended to be seen.
Position/Size
1 Press MENU.
2 Press ◄► to select “ADJ.”.
MENU
ADJ. SET UP FUNC.
PICTURE
PICTURE ADJUST
POSITION/SIZE
AUDIO
AUDIO ADJUST
OK
PAGE
RETURN
SELECT
For “NORMAL” and “JUST" mode (See left)
SIZE:
Press ◄► to select the size.
Size 1: reduces black bar.
Size 2: widens black bar.
• Press ENTER to return to the original position.
Size1
Size2
Audio Mute
1 Press MUTE to instantly mute the sound. Press
again to restore the previous sound level.
26
For assistance, please call : 1-800-211-PANA(7262) or, contact us via the web at:http://www.panasonic.com/contactinfo
Page 27

TV Status & Clock Display
1 Press DISPLAY to display or remove the overlay.
12
JUST 12:34PM CH 12
30
1
Picture (Aspect) Mode
2
Current Time
3
Channel
4
Receivable Broadcast Types (see right)
5
Sleep Timer time remaining
STEREO
SAP
MONO
Channel & Aspect Display
When you change channels or picture (aspect) mode, the
channel number or picture mode will be displayed.
NORMAL
FULL 12:34PM COMPONENT
3
4
5
Receivable Broadcast Types
The following are possible audio broadcast types and on-screen
displays.
1 Press DISPLAY to display the broadcast signal
being received.
MTS Stereo broadcast:
Multi-channel Television Sound Stereo broadcast. Select
STEREO audio mode.
• If stereo broadcast is weak and the display flickers, select
MONO audio mode for possible improvement.
JUST 12:34PM CH 12
STEREO
SAP broadcast:
Secondary Audio Program (sub language).
Select SAP audio mode for the sub language.
JUST 12:34PM CH 12
STEREO
SAP
MONO
SAP
MONO
TV Operation
Audio Mode for TV Viewing
Equipped with -TV Noise Reduction for true MTS
reproduction.
stereo separation and audio fidelity.
trademark, and is licensed by
-TV Noise Reduction is required for good
is a registered
Technology Licensing.
1 Press AUDIO to select the desired audio mode as
described above.
• Each press of AUDIO will change the audio mode as shown below.
< Example >
STEREO SAP MONO
STEREO SAP MONO
MTS Stereo and SAP broadcast:
Multi-channel Television Sound Stereo (main language) and
Secondary Audio Program (sub language) broadcasts are being
received simultaneously. Select the STEREO or SAP audio
mode.
JUST 12:34PM CH 12
MONO broadcast:
Normal monaural sound broadcast.
JUST 12:34PM CH 12
STEREO
SAP
MONO
STEREO
SAP
MONO
STEREO SAP MONO
27
Page 28

TV Settings
INPUT
NUMBER keys
▲▼◄►
Top view
INPUT
MUTE
MENU
ENTER
V-Chip Control Features
In the United States, the V-CHIP consists of two rating systems,
which are MPAA (MOTION PICTURE) and TV PARENTAL
GUIDELINES. Its function is to block programs by the rating data
in the XDS data packets sent from broadcasting stations. The user
can select which rating programs should be blocked by the LOCK
MENU options.
1 Press MENU.
2 Press ◄► to select “SET UP.”
3 Press ▲▼ to select “LOCK” and press ENTER.
MENU
ADJ. SET UP FUNC.
LANGUAGE
PROGRAM CH
CLOCK
LOCK
CLOSED CAPTION
INPUT LABEL
OTHER ADJUST
OK
PAGE
RETURN
SELECT
4 Press NUMBER keys to input 4-digit code.
• To clear the numbers while entering the code, press ▲▼.
• You will need the code to enter the LOCK menu.
• After entering your password for the first time, ENTER CODE FIRST
will change to CHANGE CODE.
LOCK
BLOCK PROGRAMS:
U.S. MOVIES
STATUS OFF ON
CHANGE SETTING
ENTER CODE FIRST
_ _ _
RETURN
RETRY
Input Label
You can change the video input labels displayed on the screen to
match the connected device (VCR, DVD player etc.).
1 Press MENU.
2 Press ◄► to select “SET UP”.
3 Press ▲▼ to select “INPUT LABEL” and press
ENTER.
MENU
ADJ. SET UP FUNC.
LANGUAGE
PROGRAM CH
CLOCK
LOCK
CLOSED CAPTION
INPUT LABEL
OTHER ADJUST
OK
PAGE
RETURN
SELECT
4 Press ▲▼ to select the video input, then press ◄►
to select the INPUT LABEL.
(VIDEO1/VIDEO2/COMPONENT/HDMI, VCR, LD, GAME, DVD, DTV,
[BLANK] and SKIP*)
* Select to SKIP unused video input when pressing INPUT button.
INPUT LABEL
VIDEO1 VIDEO1
VIDEO2 VIDEO2
COMPONENT COMPONENT
HDMI HDMI
CHANGE
RETURN
SELECT
Notes:
• Use a code that is easy to remember and record it in a safe place.
• If you forget your secret code, refer to “Reset all unit Memory Functions”
on page 24.
5 Press ▲▼ to select “BLOCK PROGRAMS.”
6 Press ◄► to select “U.S. MOVIES,” “U.S.
TV PROGRAMS,” “CANADIAN ENGLISH,” or
“CANADIAN FRENCH.”
LOCK
BLOCK PROGRAMS:
U.S. TV PROGRAMS
STATUS OFF ON
CHANGE SETTING
CHANGE CODE
_ _ _ _
CHANGE
RETURN
SELECT
7 Press ▲▼ to select “STATUS” and press ◄► to
select “ON” or “OFF.”
LOCK
BLOCK PROGRAMS:
U.S. TV PROGRAMS
STATUS OFF ON
CHANGE SETTING
CHANGE CODE
_ _ _ _
CHANGE
RETURN
SELECT
28
For assistance, please call : 1-800-211-PANA(7262) or, contact us via the web at:http://www.panasonic.com/contactinfo
Page 29

8 Press ▲▼ to select “CHANGE SETTING” and press
ENTER to enter the next menu.
LOCK
BLOCK PROGRAMS:
U.S. TV PROGRAMS
STATUS OFF ON
CHANGE SETTING
CHANGE CODE
_ _ _ _
OK
RETURN
SELECT
9 Press ▲▼ to select “VIEW NR PROGRAMS?” and
press ◄► to select “NO” or “YES.”
NO: Cannot view programs with NR signals.
YES: Can view programs with NR signals.
U.S. TV PROGRAMS
VIEW NR PROGRAMS?
NO YES
SETTING BASIC
TV-Y
TV-Y7 FV
TV-G
TV-PG V S L D
TV-14 V S L D
TV-MA V S L
U.S. TV PROGRAMS only
10
Press ▲▼ to select “SETTING” and press ◄► to
select “BASIC” or “DETAILED.”
BASIC:
You can select the titles.
DETAILED:
You can select the titles and options.
U.S. TV PROGRAMS
VIEW NR PROGRAMS?
NO YES
SETTING BASIC
TV-Y
TV-Y7 FV
TV-G
TV-PG V S L D
TV-14 V S L D
TV-MA V S L
11
Press ▲▼ to select the rating.
• When a title field is selected, all ratings below this rating are
selected.
• When options within an option field are selected, ratings below this
rating within the same field are selected.
12
Press ◄► to lock or unlock the rating.
Lock (Red): Cannot view programs with NR signals.
Unlock (Green): Can view programs with NR signals.
U.S. MOVIES RATINGS
G General audience
PG Parental guidance suggested
PG-13 Parental guidance needed under 13 years old
R Restricted
NC-17 No one under 17 is admitted
X Pornography
CHANGE
RETURN
SELECT
CHANGE
RETURN
SELECT
U.S. TV PROGRAMS RATINGS
1. Ratings for children: Divided into ranks as follows.
TV-Y
TV-Y7 FV TV-Y TV-Y7 TV-Y7-FV
2. Ratings for teenagers: Created out of these major categories
to form various combinations. These combinations are
described in the below diagram. Ratings for all ages are on top
and ratings for adults are on the bottom.
TV-G
V
S
L
S
L
S
L
Chart 1
Age-based
Group
Age-based
Ratings
NR (Not Rated) TV-NR
TV-Y
Youth
TV-Y7
TV-G
TV-PG
Guidance
TV-14
TV-MA
Chart 2
TV-NR Not Rated.
All Children. The themes and elements in this program are
TV-Y
specifically designed for a very young audience including
children from ages 2-6.
Directed to older children. Themes and elements in this program
TV-Y7
may include mild physical or comedic violence or may frighten
children under the age of 7.
General Audience. It contains little or no violence, no strong
TV-G
language, and little or not sexual dialogue or situations.
Parental guidance suggested. The program nay contain
TV-PG
infrequent coarse language, limited violence, some suggestive
sexual dialogue and situations.
Parents strongly cautioned. This program may contain
TV-14
sophisticated themes, sexual content, strong and explicit sexual
content.
Mature Audiences only. This program may contain mature
TV-MA
themes, profane language, graphic violence and explicit sexual
content.
TV-PG
TV-14
TV-MAVV
Possible Content Selections
• Viewable
• Blocked
• Viewable
• Blocked
• FV (Fantasy Violence)
• Viewable
• Blocked
• Viewable
• Blocked
• D, L, S, V (all selected)
• Any combination of D, L, S, V
• D, L, S, V (all selected)
• Any combination of D, L, S, V
• L, S, V (all selected)
• Any combination of L, S, V
D
D
TV Operation
(Continued on next page.)
29
Page 30

Chart 3
FV Fantasy-Cartoon Violence.
V Violence
S Sex
L Offensive Language
D Dialogue with sexual content.
CANADIAN ENGLISH RATINGS
Exempt - Exempt programming includes: news, sports,
E
documentaries and other information programming, talk shows,
music videos, and variety programming.
Programming intended for children under age 8. No offensive
C
language, nudity or sexual content.
Programming generally considered acceptable for children 8
C8+
years and over. No profanity, nudity or sexual content.
G General programming, suitable for all audiences.
Parental Guidance suggested. Some material may not be
PG
suitable for children.
Programming contains themes or content which may not be
suitable for viewers under the age of 14. Parents are strongly
14+
cautioned to exercise discretion in permitting viewing by preteens and early teens.
18+ years old. Programming restricted to adults. Contains
18+
constant violence or scenes of extreme violence.
CANADIAN FRENCH RATINGS
E Exempt - Exempt programming.
General - Programming intended for audience of all ages.
G
Contains no violence, or the violence content is minimal or is
depicted appropriately.
8+ General - Not recommended for young children.
8ANS+
Programming intended for a broad audience but contains light
or occasional violence. Adult supervision recommended.
Programming may not be suitable for children under the age
13ANS+
of 13 - Contains either a few violent scenes or one or more
sufficiently violent scenes to affect them. Adult supervision
strongly suggested.
16ANS+
18ANS+
Programming may not be suitable for children under the age of
16 - Contains frequent scenes of violence or intense violence.
18+ years old. Programming restricted to adults. Contains
constant violence or scenes of extreme violence.
Blocking Message
<When V-Chip Control is activated>
If a program or movie exceeds the ratings you have set, a message
will appear on a black background and sound is muted.
To View a Blocked Program/Movie
■ Temporarily Deactivate V-Chip Control
Press NUMBER keys to enter your secret code in the Blocking
Message screen.
• V-Chip Control is reactivated when power is turned off or power
failure occurs.
PROGRAM RATING EXCEEDED
ACCESS CODE _ _ _ _
■ Deactivate V-Chip Control
1 Enter your secret code. (p. 28)
2 Then, set US MOVIES and/or US TV PROGRAMS
and/or CANADIAN ENGLISH LANGUAGE and/or
CANADIAN FRENCH LANGUAGE to “OFF” using
▲▼ and SET. (Ratings set on pages 28~30 are
retained and will be in effect when V-Chip Control is
activated again.)
LOCK
BLOCK PROGRAMS:
U.S. MOVIES
STATUS OFF ON
CHANGE SETTING
CHANGE CODE
_ _ _ _
<US Rating>
CHANGE
RETURN
SELECT
LOCK
BLOCK PROGRAMS:
CANADIAN ENGLISH
STATUS OFF ON
CHANGE SETTING
CHANGE CODE
_ _ _ _
<Canadian Rating>
Closed Caption System
This unit has a built in decoder that provides a visual depiction
of the audio portion of a television program in the form of written
words across the screen (white or colored letters on a black
background). It allows you to read the dialog of a television program
or other information.
Notes:
• This feature is available only with the 480i input signal and with the
programs including the closed caption.
• The closed caption is not displayed when using HDMI connection (p. 17) or
when you set the aspect to “ZOOM” (p. 26).
• When a disc supporting closed captions is used, the subtitle and the
closed caption may overlap. In this case, turn the subtitle or caption mode
off. (p. 49)
CHANGE
RETURN
SELECT
30
1 Press MENU.
2 Press ◄► to select “SET UP.”
PROGRAM RATING EXCEEDED
ACCESS CODE _ _ _ _
For assistance, please call : 1-800-211-PANA(7262) or, contact us via the web at:http://www.panasonic.com/contactinfo
3 Press ▲▼ to select “CLOSED CAPTION” and press
ENTER.
MENU
ADJ. SET UP FUNC.
LANGUAGE
PROGRAM CH
CLOCK
LOCK
CLOSED CAPTION
INPUT LABEL
OTHER ADJUST
OK
PAGE
RETURN
SELECT
Page 31

CC
ON MUTE
Displays the On-Screen Closed Caption when the MUTE button
is pressed. To delete the closed caption, press the MUTE button
again.
4 Press ▲▼ to select “
CC
ON MUTE.”
5 Press ◄► to select “NO (OFF)”, “C1” or “C2”.
CLOSED CAPTION
ON MUTE NO
MODE OFF
NO:
A narration will not be displayed when MUTE button is
pressed for silence.
C1 or C2:
A narration of selected TV programs is displayed when
MUTE button is pressed for silence.
Note:
• To activate this feature, set CC MODE to OFF.
CC
MODE
Displays the On-Screen Closed Caption.
4 Press ▲▼ to select “
CC
MODE”.
CHANGE
RETURN
SELECT
C2C1NO
5 Press ◄► to select “OFF”, “C1” or “C2”.
CLOSED CAPTION
ON MUTE NO
MODE OFF
OFF:
Recommended mode when Closed Caption is not being
used.
C1:
For video related information that can be displayed (up to 4
lines of script strategically placed on the television screen
so that it does not obstruct relevant parts of the picture).
C2:
Another mode used for video related information.
CHANGE
RETURN
SELECT
C2C1OFF
Audio Adjust
1 Press MENU.
2 Press ◄► to select “ADJ.”
3 Press ▲▼ to select “AUDIO ADJUST” and press
ENTER.
MENU
ADJ. SET UP FUNC.
PICTURE
PICTURE ADJUST
POSITION/SIZE
AUDIO
AUDIO ADJUST
OK
PAGE
RETURN
SELECT
4 Press ▲▼ to select the sub-menu.
5 Press ◄► to select the setting listening the sound.
AUDIO ADJUST PAGE 1/2
NORMAL
MODE STANDARD
BASS 0
TREBLE 0
BALANCE 0
SURROUND OFF ON
D.ENHANCER OFF ON
STEREO SAP MONO
HDMI IN AUTO
AUDIO ADJUST PAGE 2/2
NORMAL
AUDIO LEVELER 0
NORMAL/NORMALIZE
Select “NORMALIZE” and press ENTER to return each MODE to
the factory default setting.
Notes:
• “NORMAL” means the MODE is in the factory default setting. “NORMAL”
changes to “NORMALIZE” when you change the setting of BASS,
TREBLE, BALANCE, SURROUND, D.ENHANCER or AUDIO LEVELER.
• You can normalize each MODE separately.
MODE
You can also change “MODE” by pressing AUDIO MODE on the
Remote Control.
AUTO Automatically adjusts for a wide Dynamic Range.
STANDARD Emits the original sound.
DYNAMIC Gives contrast to sound.
CHANGE
RETURN
SELECT
ADJUST
RETURN
SELECT
TV Operation
Recording and Playing Back a Closed
Caption Program
Record:
Record normally. Closed Caption signal, if present, is recorded
automatically.
Playback:
Start playback. Perform steps to select desired caption mode.
BASS, TREBLE, BALANCE, SURROUND,
D.ENHANCER
You can change the level of each sub-menu (BASS, TREBLE,
BALANCE, SURROUND, D.ENHANCER) for each MODE
(AUTO, STANDARD and DYNAMIC) according to your personal
preference.
BASS Adjusts low frequencies.
TREBLE Adjusts high frequencies.
BALANCE Adjusts left and right volume.
SURROUND To enjoy a concert hall effect.
D.ENHANCER
The volume of the center channel is raised to make
dialog easier to hear. (DVD playback only)
(Continued on next page.)
31
Page 32

STEREO / SAP / MONO
• Red display : With signal
White display : No signal
White display (All modes) : MONO
• To change the mode using AUDIO button.
STEREO Two channel Audio reception.
SAP
MONO Use when stereo signal is weak.
Second Audio Programming (typically used for bilingual
audio).
7 Press ▼ to display the sub-menu.
ADVANCED ADJUST
NORMALIZE
EDGE TRANS. MID
GRAY EMPHASIS MID
GAMMA ADJUST MID
BLACK EXTENSION + 8
WHITE CHAR CORR + 8
ADJUST
RETURN
SELECT
HDMI
When using HDMI connection (p. 17), this feature will let you
switch between Analog Input and Digital Input.
AUTO Automatically selects Analog / Digital signal.
DIGITAL Digital Input only.
ANALOG Analog Input only.
AUDIO LEVELER
You can adjust the volume level for each of the input mode (TV,
VIDEO1, VIDEO2, COMPONENT, HDMI and DVD/SD mode).
Picture Adjust
1 Press MENU.
2 Press ◄► to select “ADJ.”
3 Press ▲▼ to select “PICTURE ADJUST” and press
ENTER.
MENU
ADJ. SET UP FUNC.
PICTURE
PICTURE ADJUST
POSITION/SIZE
AUDIO
AUDIO ADJUST
OK
PAGE
RETURN
SELECT
4 Press ▲▼ to select the sub-menu.
• “ADVANCED ADJUST” is
displayed only when PIC MODE is
set to CUSTOM.
PICTURE ADJUST PAGE 1/2
NORMAL
PIC MODE VIVID
BACK LIGHT 0
PICTURE 0
BRIGHTNESS 0
COLOR 0
TINT 0
SHARPNESS 0
AI PICTURE OFF ON
PICTURE ADJUST PAGE 2/2
COLOR TEMP
COOL
ADVANCED ADJUST
OFF ON
CHANGE
RETURN
SELECT
CHANGE
RETURN
SELECT
5 Press ◄► to adjust the setting watching the picture
behind the menu.
NORMAL/NORMALIZE
Select “NORMALIZE” and press ENTER to return each PIC
MODE to the factory default setting.
Notes:
• “NORMAL” means the PIC MODE is in the factory default setting.
“NORMAL” changes to “NORMALIZE” when you change the setting of
BACK LIGHT, PICTURE, BRIGHTNESS, COLOR, TINT, SHARPNESS, AI
PICTURE, COLOR TEMP or ADVANCED ADJUST.
• You can normalize each PIC MODE separately.
PIC MODE
You can also change “PIC MODE” by pressing PICTURE MODE
on the Remote Control.
STANDARD Displays a standard image.
CINEMA Ideal for watching movies in a dark room.
VIVID Displays a clear image with high contrast.
CUSTOM
• PIC MODE setting is stored separately for TV, VIDEO1, VIDEO2,
COMPONENT, HDMI and DVD/SD mode.
You can customize the picture settings to suit your
preference. (Refer to “ADVANCED ADJUST” on page
33.)
BACK LIGHT, PICTURE, BRIGHTNESS, COLOR,
TINT, SHARPNESS, AI PICTURE, COLOR TEMP
You can change the level of each Item (BACK LIGHT, PICTURE,
BRIGHTNESS, COLOR, TINT, SHARPNESS, AI PICTURE and
COLOR TEMP) for each MENU (STANDARD, CINEMA, VIVID
and CUSTOM) according to your personal preference.
Sub-menu Function
BACK LIGHT Luminance of the back light is adjusted.
PICTURE
BRIGHTNESS
COLOR Adjusts the level of color.
TINT Adjusts for flesh tone color.
SHARPNESS Adjusts the degree of sharpness.
AI PICTURE
COLOR TEMP
(Color temperature)
Selects proper brightness and density for the
room.
Adjusts for easier viewing of dark pictures such
as night scenes.
Displays black and white more accurately when
turned ON.
Increases or decreases WARM (red) and COOL
(blue) colors to suit personal preference.
ADVANCED ADJUST
6 Press ▲▼ to select “ADVANCED ADJUST” and
press ◄► to select “ON.”
32
For assistance, please call : 1-800-211-PANA(7262) or, contact us via the web at:http://www.panasonic.com/contactinfo
Page 33

ADVANCED ADJUST
(Only when you selected CUSTOM in PIC MODE)
Item Function
EDGE TRANS.
GRAY EMPHASIS
GAMMA ADJUST
BLACK EXTENSION Contrast level will be improved.
WHITE CHAR CORR It makes white characters brighter.
Improves edges in the background to reduce
overshooting and improve the sense of depth.
Emphasizes the sharpness in density of many
color differences.
Increases the brightness of the center ranges to
improve detail and contrast in dark scenes.
Other Adjust
1 Press MENU.
2 Press ◄► to select “SET UP.”
3 Press ▲▼ to select “OTHER ADJUST” and press
ENTER.
MENU
ADJ. SET UP FUNC.
LANGUAGE
PROGRAM CH
CLOCK
LOCK
CLOSED CAPTION
INPUT LABEL
OTHER ADJUST
OK
PAGE
RETURN
SELECT
4 Press ▲▼ to select the item.
5 Press ◄► to select the setting.
OTHER ADJUST PAGE 1/2
VIDEO NR
OFF ON
MPEG NR
OFF ON
3D Y/C
OFF ON
COLOR MATRIX
SD HD
CHANGE
RETURN
SELECT
MPEG NR
Noise unique to DVD, STB, etc. will be reduced.
ON Reduces noise in the picture.
OFF Set to OFF if picture appears unnatural.
• PIC MODE setting is stored separately for TV, VIDEO1, VIDEO2,
COMPONENT, HDMI and DVD/SD mode.
3D Y/C
Minimizes noise and cross color in the picture. Not available for
COMPONENT VIDEO INPUT, HDMI and DVD/SD mode input.
ON Usually set to ON.
OFF Set to OFF if picture appears unnatural.
COLOR MATRIX
Displays input signals (480p signals) in a natural color.
Automatically adjusts color parameters for HD (high definition)
and SD (standard definition).
SD When the input signal is a normal TV system (NTSC).
HD When the input signal is a High-definition system (HD).
POWER SAVE
The POWER SAVE mode is suitable for watching television at
night. Power consumption will be reduced.
STANDARD
SAVING
Set to STANDARD normally. The peak brightness is not
reduced and you can view normal lighting transitions in
the picture.
The peak brightness of the brightest scenes is reduced
conserving power while giving you a natural picture.
FRONT DISPLAY
The Front Display brightness is adjustable. To display the clock
even when power is off, please select DIM or BRIGHT.
AUTO
BRIGHT Display is always bright.
DIM Display is always dim.
OFF Display is always off.
Display is bright only when power is ON. Display goes
out when power is OFF, but lights dimly during recording,
etc.
TV Operation
OTHER ADJUST PAGE 2/2
POWER SAVE
SAVING
FRONT DISPLAY
AUTO
VIDEO NR
In the event of weak signal conditions, the VIDEO NR circuitry
reduces noise in the luminance channel. It is important to note
that VIDEO NR should remain OFF for maximum picture detail
when receiving a strong signal or viewing high-quality video.
ON When signal is noisy.
OFF When signal is high-quality.
• PIC MODE setting is stored separately for TV, VIDEO1, VIDEO2,
COMPONENT, HDMI and DVD/SD mode.
CHANGE
RETURN
SELECT
33
Page 34

Before Using the Disc or Card
DRIVE SELECT
–DVD
DRIVE SELECT
OPEN/CLOSE
–SD
Front view
DVD
Indicator
SD
Indicator
Display
Disc Tray SD Card SlotFront
Before using Disc/Card Functions
Cartridge disc
Disc tray
Notes:
• Load double-sided discs so the label for the side you want to record/play is
facing up.
• When using 8 cm (3˝) DVD-RAM, remove the disc from the cartridge and
insert it, making sure you align it with the groove.
Insert inside the tray’s guide.
Insert label-up with the
arrow facing in.
Inserting/Removing the Card
Only insert or remove the card after turning
the unit off.
When the “SD” indicator on the unit display is flashing, the card is
being read from or written to. Do not turn off the power or remove
the card. Such action may result in malfunction or loss of the
card’s contents.
Inserting the Card
1 Confirm that disc or card is inserted.
2 Press DVD or SD to select the drive.
• The “DVD” or “SD” indicator flashes on the Front Display.
• The DVD or SD indicator on the unit lights.
Or
3 Each operation is carried out.
Inserting a Disc
1 Press OPEN/CLOSE on the unit to open the tray and
insert a disc.
• Press the button again to close the tray.
Non-cartridge disc
Insert label-up.
cropped corner
Insert the Card (labeled side up, cropped corner
right) and hold in place until you here a click.
Removing the Card
Press the center of the Card and then pull it
straight out.
34
For assistance, please call : 1-800-211-PANA(7262) or, contact us via the web at:http://www.panasonic.com/contactinfo
Page 35

DVD/SD Functions Windows and Status Messages
e.g., DVD-RAM
The same operation with
Remote Control Button
The same operation with
Remote Control Button
Pages
Pages
ENTER
MENU
▲▼◄►
RETURN
DISPLAY
Function
DIRECT NAVIGATOR DIRECT NAVIGATOR 45, 51~53
TIMER RECORDING PROG/CHECK 40~41
DUBBING 64~66
FLEXIBLE RECORDING F REC 39
PLAY LIST 57~59
SET UP DVD SETUP 67~69
DISC SETTING 60~62
e.g., SD CARD
Function
DIRECT NAVIGATOR DIRECT NAVIGATOR 54~56
TIMER RECORDING PROG/CHECK 40~41
DUBBING 64~66
COPY ALL PICTURES 66
SET UP 67~69
CARD SETTING 60~61
Front view
Disc Tray SD Card Slot
DVD/SD Functions Window
DVD-A VCD CDDVD-R DVD-VRAM MP3
By using the DVD/SD Functions window you may access the main
functions quickly and easily.
1 Press MENU in Stop mode, then press ◄► to select
“FUNC.”
2 Press ENTER.
• Opening the DVD/SD Functions Window automatically places unit
into DVD mode.
MENU
ADJ. SET UP FUNC.
DVD/SD
OK
PAGE
RETURN
3 Press ▲▼◄► to select an item and press ENTER.
• Functions displayed depend on the type of disc.
e.g., DVD-RAM
DVD
DVD-RAM
Play back
Record
Dubbing
/ Edit
Set up
DISC PROTECTION OFF
SD
CARTRIDGE PROTECTION OFF
DIRECT NAVIGATOR
TIMER RECORDING
DUBBING
PLAY LIST
SETUP
FLEXIBLE RECORDING
DISC SETTING
To exit the DVD/SD Functions window
Press RETURN.
Status messages (Disc)
Status messages appear on the television when you operate the
unit to show the condition of the unit.
• About Still Picture, refer to “To display information about the Still Pictures”
on page 54.
1 Press DISPLAY in play mode.
• The display changes each time you press the button.
No display
DVD-RAM
REC
PLAY
L R
Recording mode Available recording time and
Date and time
T2 0:05.14 XP
T1 0:00.10 SP
Elapsed play time
Elapsed recording time
Disc indication
Recording or play status/input
channel
Selected audio type
recording mode
Remain
Play position
0:50 XP6/8 10:15 PM
Disc / Card Operation
35
Page 36

Function List
Disc Type Available Function Page
RAM
Start from a selected item
(using NUMBER keys)
Fast forward and rewind (Search) 45
Skip a program or track 45
Quick View 46
Slow-motion playback 46
Frame-by-frame viewing 46
Playback
Skip a minute forward (CM Skip) 45
Display the television image as a picture-in-
picture
Skip the specified time (Time Slip) 46
Repeat playback 50
Create Chapters 48
Select subtitle on/off 49
Change audio during play 48
Erase a program that is being played back 47
Navigator/Play List
Play the recorded programs
Play with Direct
(DIRECT NAVIGATOR)
Play the created chapters
(DIRECT NAVIGATOR)
Play Still Pictures (DIRECT NAVIGATOR) 54
Play the created play lists (PLAY LIST) 57
Play the created chapters of Play List
(PLAY LIST)
Timer Recording 40~41
Recording
Flexible Recording 39
Play from the beginning of the title you are
recording (Chasing playback)
Simultaneous Recording and Play 42
Review the recorded images while recording
(Time Slip)
Erase or Edit a program with Direct Navigator/
Erase the selected programs 52
Display information about the recorded date/
time/channel, etc.
Enter a title name to a program 52
Protect the title from accidental erasure 52
Select and erasing unnecessary parts of the
Play List
programs
Change an image to be shown as a thumbnail
picture in the Title View
Select a point at which to divide the title into
two.
Edit chapters in the DIRECT NAVIGATOR 53
Create play lists 57~58
Edit play lists 58~59
Edit chapters in the PLAY LIST 59
Playback Still
Display still pictures one by one with constant
Pictures
interval (Slide Show)
Rotate a still picture 55
46
46
45, 51
51
58
42
42~43
52
52
53
53
56
Disc Type Available Function Page
Erase or Edit Still
RAM
DVD-R
Erase still pictures 55
Pictures
Display information about the still picture 54
Change a folder name 56
Protect the still picture from accidental erasure 56
Transfer (dubbing) still pictures
(Card ↔ DVD-RAM)
Disc Setting
Enter the Disc name 60
Protect the Disc from accidental erasure 60
Erase all titles or play lists 60~61
Format a Disc 61
Start from a selected item
(using NUMBER keys)
Fast forward and rewind (Search) 45
Skip a program or track 45
Slow-motion playback 46
Playback
Frame-by-frame viewing 46
Skip a minute forward (CM Skip) 45
Display the television image as a picture-in-
picture
Skip the specified time (Time Slip) 46
Repeat playback 50
Select subtitle on/off 49
Erase a program that is being played back 47
Play with Direct
Navigator
Play the recorded programs
(DIRECT NAVIGATOR)
Recording
Timer Recording 40~41
Flexible Recording 39
Erase or Edit a program
with Direct Navigator
Erase the selected programs 52
Display information about the recorded date/
time/channel, etc.
Enter a title name to a program 52
Change an image to be shown as a thumbnail
picture in the Title View
Enter the Disc name 60
Disc Setting
Select whether to show the top menu after
finalizing the disc
A process that makes play of a recorded
DVD-R possible on equipment that can play
such media. (Finalize)
64~66
46
46
45, 51
52
53
61
62
36
Enlarge a still picture (Zoom in/Zoom out) 55
For assistance, please call : 1-800-211-PANA(7262) or, contact us via the web at:http://www.panasonic.com/contactinfo
Page 37

Disc Type Available Function Page
DVD-A
DVD-V
CD
MP3
VCD
Start from a selected item
(using NUMBER keys)
Fast forward and rewind (Search) 45
Skip a program or track 45
Playback
Slow-motion playback 46
Frame-by-frame viewing 46
Repeat playback 50
Change the sound track language 49
Select subtitle language 49
Select the angle 49
Start from a selected item
(using NUMBER keys)
Fast forward and rewind (Search) 45
Skip a program or track 45
Playback
Slow-motion playback 46
Frame-by-frame viewing 46
Repeat playback 50
Change the sound track language 49
Select subtitle language 49
Select the angle 49
Start from a selected item
(using NUMBER keys)
Playback
Fast forward and rewind (Search) 45
Skip a program or track 45
Play MP3 files recorded on CD-R/RW with a
computer. (MP3 only)
Repeat playback 50
Start from a selected item
(using NUMBER keys)
Fast forward and rewind (Search) 45
Playback
Skip a program or track 45
Slow-motion playback 46
Frame-by-frame viewing 46
Repeat playback 50
Playback Control on/off 49
Change audio during play 48
46
46
46
47
46
Disc Type Available Function Page
Playback Still
SD
Display still pictures one by one with constant
Pictures
interval (Slide Show)
Rotate a still picture 55
Enlarge a still picture (Zoom in/Zoom out) 55
Erase or Edit Still Pictures
Erase still pictures 55
Display information about the still picture 54
Change a folder name 56
Protect the still picture from accidental
erasure
Set the number of images to be printed
(DPOF)
Transfer (dubbing) still pictures
(Card ↔ DVD-RAM)
Setting
Card
Format a Card 61
56
56
56
64~66
Disc / Card Operation
37
Page 38

Recording
2 Press CH ▲▼ or NUMBER keys to select the
channel.
OPEN/CLOSE
NUMBER keys
STOP
▲▼◄►
AUDIO
Front view
CH ▲▼
PAUSE
ENTER
RETURN
REC MODE
REC
F REC
e.g., When you select
channel 4
To select with the NUMBER keys:
e.g., 5: [0] → [5]
15: [1] → [5]
115: [1] → [1] → [5]
3 Press REC MODE to select the recording mode. (See
next page.)
e.g., When you
select “XP”
XP*
* To record sound using LPCM (possible only in XP mode):
Select “LPCM” in “Audio for XP Recording” (the picture quality may
go down slightly). (p. 69)
SP
LP EP
4 Press REC to start recording.
Front Display
Recording television programs
DVD-RRAM
• It is not possible to record continuously from one side of a double sided
disc to the other. You will need to eject the disc and turn it over.
• When using 8 cm (3″) DVD-RAM, remove the disc from the cartridge.
• You can record up to 99 titles on one disc.
• You can record digital broadcasts that allow “one time only recording”
when using CPRM (p. 70) compatible DVD-RAM discs. And you cannot
record digital broadcasts that allow “one time only recording” when using
DVD-R.
• DVD-RAM/DVD-R have limitations on recording (pp. 8~10).
• Recording will take place on open space on the disc. Data will not be
overwritten.
• If there is no space left on the recording disc, you will need to erase
unwanted titles (pp. 47, 52) or use a new disc.
• You cannot record on finalized DVD-R discs.
Preparation
• Release protection before proceeding:
- Cartridge (p. 9)
- Disc (p. 60)
RAM
RAM
1 Press OPEN/CLOSE on the unit to open the tray and
insert a disc. (p. 34)
• Press the button again to close the tray.
RAM
•
When using a DVD-RAM for the first time with this unit,
format it to ensure accurate recording. (Refer to “Format Disc” on
page 61.)
• You cannot change the channel or recording mode during recording.
• You can change the audio being received by pressing AUDIO during
recording.
To specify a time to stop recording
During recording
Press REC on the unit or the Remote Control to select the
recording time.
Each time you press the button:
OFF 0:30 1:00 1:30
2:004:00 3:00
• This does not work during timer recordings (pp. 40~41) or while
using Flexible Recording (p. 39).
• Recording stops and the set time is cleared if you press STOP.
• The set time is cleared if you change the recording mode or
channel while recording is paused.
To stop recording
Press STOP.
• Recorded as 1 title until the position where stopped.
DVD-R
•
It takes about 30 seconds for the unit to complete
recording management information after recording finishes.
To pause recording
Press PAUSE.
Press again to restart recording.
38
For assistance, please call : 1-800-211-PANA(7262) or, contact us via the web at:http://www.panasonic.com/contactinfo
Page 39

• When appears on the screen while a button is being pressed, it means that the corresponding operation is prohibited by
the unit or the disc.
Recording modes and approximate recording
times
Depending on the content being recorded, the recording times may
become shorter than indicated.
Disc
Recording
Mode
XP (High quality) 12
SP (Normal) 24
LP (Long play) 48
EP (Extra long play) 8 (6
XP
SP
LP
EP (6 H)
EP (8 H)
Picture quality
*1
Recording time of double-sided disc is sum total of both sides of disc.
*2
When “Recording time in EP mode” (p. 68) is set to “EP (6 H)” in the
SETUP menu. The sound quality is better when using “EP (6 H)” than
when using “EP (8 H)”.
*2
Recording time
Single-sided
DVD-RAM
(4.7 GB)
*2
) 16*1 (12
Double-sided
(9.4 GB)
*1
*1
*1
*1*2
) 8 (6*2)
(Unit: hour)
DVD-R
(4.7 GB)
1
2
4
Note:
• When recording to DVD-RAM using “EP (8 H)” mode, play may not be
possible on DVD players that are compatible with DVD-RAM. In this case
use “EP (6 H)” mode.
FR (Flexible Recording Mode) (See right)
The unit automatically selects a recording rate between XP and EP
(8 H) that will enable the recordings to fit in the available recording
time on the disc with the best possible recording quality.
• You can set when programming timer recordings.
• All the recording modes from XP to EP appear in the display.
Selecting audio to record
DVD-RRAM
Select whether to record the main or secondary audio type (SAP)
when recording to DVD-R or DVD-RAM. (You cannot change
secondary audio when recording audio to DVD-R or DVD-RAM
from an external source.) (p. 69)
Flexible Recording (FR)
DVD-RRAM
The unit calculates a recording rate that enables the recording to fit
in the time you set (within the remaining time on the disc) with the
best picture quality.
e.g., DVD-RAM
Recorded Remain
45 minutes in
SP mode
60 minutes
Program to be recorded
Perfectly fit!
Recording rate
between SP and LP
Preparation
• Select the channel to record.
1 Press F REC in Stop mode.
• You can also select “FLEXIBLE RECORDING” on the DVD/SD
Functions Window. (p. 35)
FLEXIBLE REC
Record in FR mode
Maximum rec time 3 Hour 00 Min.
Set recording time 3 Hour 00 Min.
Start Cancel
2 Press ◄► to select “Hour” and “Min.” and press
▲▼ to set the recording time.
• You can also set the recording time with the NUMBER keys.
• Maximum recording time is 8 hours.
3 Press ▲▼◄► to select “Start” and press ENTER to
start recording.
• Recording starts.
• The recording mode becomes FR mode.
Note:
• It is not possible to change channel or recording mode while Flexible
Recording is paused.
Disc / Card Operation
To exit the screen without recording
Press RETURN.
To stop recording partway
Press STOP.
39
Page 40

Timer Recording
NUMBER keys
CANCEL
STOP
ENTER
▲▼◄►
RETURN
PROG/CHECK
VCR Plus +
Front view
REC MODE
2 Press NUMBER keys to enter the VCR Plus+
number.
• Press ◄ to move back to correct a digit.
3 Press ENTER.
TIMER
RECORDING
OFFONCHANNEL DATE
5:10 PM4:20 PM3/29 MON 39 SP
• When “XP” is displayed in the unit’s display, the recording mode
automatically changes to “FR” in order to prevent loss of recording
when there is not enough space. Change to “XP” mode if you want to
set the timer recording using “XP” mode.
• Confirm the program and make corrections if necessary using
▲▼◄►. (See step 3 on next page.)
• You can also press REC MODE to change the recording mode.
• To enter the title of the program
Press ◄► to select “Enter Name” and press ENTER. (p. 63)
4 Press ENTER.
• The setting are stored.
TIMER
RECORDING
NO
01 3/29 MON
Check to make sure “OK”
is displayed.
OFFONCHANNEL DATE
39
New Timer Program
5:10 PM4:20 PM SP
1:58 SPRemaining Recording Time
3/29 MON 12:53 PM
MODE
Enter Name
1:58 SPRemaining Recording Time
3/29 MON 12:53 PM
MODE
CHECK
OK
Front Display
DVD-RRAM
Caution for Timer recording
Timer recording automatically starts at the set time.
• Timer recording can be started whether the unit is turned on
or off. When the unit is turned off, the sound and the video
cannot be outputted to the TV.
You can enter up to 16 programs up to a month in advance.
• When connecting a cable TV box or satellite receiver, the VCR Plus+
system does not work. Program the timer recording manually. (pp. 40~41)
Preparation
• Release protection before proceeding:
- Cartridge (p. 9)
- Disc (p. 60)
• Insert a disc (p. 34) and confirm there is sufficient empty space for
recording on it (p. 35). You can also confirm the disc information. (p. 60)
RAM
RAM
Using VCR Plus+ system
Entering VCR Plus+ number is an easy way of timer recording. You
can find these codes in TV listings in newspapers and magazines.
1 Press VCR Plus+.
1:58 SPVCR Plus+ Remaining Recording Time
3/29 MON 12:53 PM
• Repeat steps 1~4 to program other recordings.
5 Press RETURN.
• “ ” lights on the Front Display to indicate timer recording standby
has been activated.
To cancel recording when recording has already
begun
Hold down STOP for a few seconds.
Manually programming
You can enter up to 16 programs up to a month in advance.
(Each daily or weekly program is counted as one program.)
• When connecting a cable TV box or satellite receiver, select the channel
on the cable TV box or satellite receiver before timer recording starts.
1 Press PROG/CHECK.
2 Press ▲▼ to select “New Timer Program” and press
ENTER.
Highlighted line is ready for
programming.
TIMER
RECORDING
NO
01 3/29 MON
64
New Timer Program
Press ENTER or VCR Plus+ to
store new program.
MODE
OFFONCHANNEL DATE
5:10 PM4:20 PM SP
1:58 SPRemaining Recording Time
3/29 MON 12:53PM
CHECK
OK
40
Enter the PLUS CODE with the numbered buttons.
No.
09
For assistance, please call : 1-800-211-PANA(7262) or, contact us via the web at:http://www.panasonic.com/contactinfo
Page 41

• When appears on the screen while a button is being pressed, it means that the corresponding operation is prohibited by
the unit or the disc.
3 Press ► to move through the items and change the
items with ▲▼.
TIMER
RECORDING
OFFONCHANNEL DATE
8:00 PM7:00 PM4/5 MON64
• Press and hold ▲▼ to alter the Start (Start time) and Stop (Finish
time) in 30-minute increments.
• You can also set CHANNEL (Program Position/TV Station Name),
DATE (See below), ON (Start time), and OFF (Finish time) with the
NUMBER keys.
• You can also press REC MODE to change the recording mode.
• Date
Date
Daily timer
Weekly timer
Current date up to one month later
minus on day
SUN-SAT→MON-SAT→MON-FRI
WEEKLY SUN→---→WEEKLY SAT
• Enter Name:
Press ◄► to select “Enter Name” and press ENTER. (p. 63)
1:58 SPRemaining Recording Time
3/29 MON 12:53 PM
MODE
SP
Enter Name
4 Press ENTER.
Check to make sure “OK”
is displayed.
MODE
OFFONCHANNEL DATE
1:58 SPRemaining Recording Time
3/29 MON 12:53 PM
CHECK
OK
OK
TIMER
RECORDING
NO
01 3/29 MON
64
02 4/5 MON
64 8:00 PM7:00 PM SP
5:10 PM4:20 PM SP
New Timer Program
• Repeat steps 2~4 to program other recordings.
5 Press RETURN.
• “ ” lights on the Front Display to indicate timer recording standby
has been activated.
To cancel recording when recording has already
begun
Hold down STOP for a few seconds.
Notes:
• “ ” flashes when the unit cannot go to timer recording standby (e.g., a
recordable disc is not in the disc tray). Check the disc carefully.
• The actual time recorded may be longer than the program itself when
television programs are recorded using VCR Plus+ system.
• When you program successive timer recordings to start immediately
one after the other, the unit cannot record the part at the beginning of
the later programs (a few seconds when recording with DVD-RAM and
approximately 30 seconds when recording with DVD-R).
• If you DST (Daylight Saving Time) to On when manually setting the clock
(p. 23), timer recording may not work when summer switches to winter and
vice versa.
• When the unit is carrying out a timer recording:
- You may utilize playback.
• When the disc is not inserted, the disc is full or a non-recordable disc
is inserted, the warning message appears because Timer Recording is
disabled.
• During Timer Recording, dubbing and editing are disabled.
• Timer recordings are automatically placed in order of DATE → ON (Start
Time).
• If timer recording times overlap, the program with the earliest start time
is recorded first. The overlapped portion of the later program will not be
recorded.
Check, change or delete a program
1 Press PROG/CHECK.
Icons
This program is currently recording.
The times overlap those in another program. Recording of the
program with the later start time starts when the earlier program
finishes recording.
You stopped a weekly or daily timer recording. The icon
disappears the next time the timer starts recording.
The disc was full so the program failed to record.
The material was copy-protected so it was not recorded.
The program did not complete recording because the disc is dirty
or some other reason.
MODE
OFFONCHANNEL DATE
1:58 SPRemaining Recording Time
3/29 MON 12:53 PM
CHECKNO
TIMER
RECORDING
New Timer Program
Press ENTER or VCR Plus+ to
store new program.
Message displayed in the CHECK line
OK: Displayed if the recording can fit in the remaining space.
→ (Date): For recordings made daily or weekly, the display will show
until when recordings can be made (up to a maximum
of one month from the present time) based on the time
remaining on the disc.
! : It may not be possible to record because:
• the disc is write-protected
• there is not enough space left
• the number of possible titles has reached its maximum.
To change a program
Press ▲▼ to select the program and press ENTER.
Press ◄► to move through the items and change the items with
▲▼, then press ENTER.
To delete a program
Press ▲▼ to select the program and press CANCEL.
• You cannot delete programs that are currently recording.
To put the unit on timer recording standby
Press RETURN.
” lights on the Front Display to indicate timer recording
• “
standby has been activated.
2 Press RETURN.
• The timer recording list disappears.
Notes:
• Programs that failed to record are displayed gray. They are automatically
deleted from the timer recording list at 4 a.m. two days later.
• During timer recording, you can change the end time as long as the
recording mode is not “FR”.
Disc / Card Operation
41
Page 42

V
Various Recording
INPUT
Simultaneous Recording and Play
RAM
You can start play of the title you are recording or play a title
previously recorded.
NUMBER keys
PLAY/×1.3
STOP
DIRECT
NAVIGATOR
▲▼◄►
REC MODE
PAUSE
ENTER
RETURN
TIME SLIP
REC
Front view
TIME SLIP Indicator
Playing while you are recording
Preparation
• Select the channel to record.
• Release protection before proceeding:
- Cartridge (p. 9)
- Disc (p. 60)
RAM
RAM
Chasing playback
RAM
You can start play from the beginning of the title while continuing to
record it.
1 Press PLAY/×1.3 while recording or timer recording.
• TIME SLIP Indicator on the unit lights.
To stop play
Press STOP.
To stop recording
Press STOP. Wait 2 seconds, press STOP again.
To stop timer recording
Press STOP. Wait 2 seconds, hold down STOP for a few
seconds.
Notes:
• Sound is not output while fast-forwarding.
• Play cannot be started until at least 2 seconds after recording starts.
1 Press DIRECT NAVIGATOR while recording or timer
recording.
2 Press ▲▼◄► to select a title and press ENTER.
• TIME SLIP Indicator on the unit lights.
e.g.,
You want to watch the movie you
recorded yesterday (title 07) while
recording sport (title 08).
Title 07 is played back while title 08 is
being recorded.
DIRECT NAVIGATOR Title View
Selecting title 07
To stop play
Press STOP.
To exit the DIRECT NAVIGATOR screen
Press DIRECT NAVIGATOR.
To stop recording
First, press STOP to stop play. Then, exit DIRECT NAVIGATOR,
wait 2 seconds, and press STOP again.
To stop timer recording
First, press STOP to stop play. Then, exit DIRECT NAVIGATOR,
wait 2 seconds, and hold down STOP for a few seconds.
Notes:
• Sound is not output while fast-forwarding.
• During simultaneous recording and play, you cannot edit or erase with the
Direct Navigator or play lists.
• If you start play while the unit is on standby for timer recording, recording
starts when the time you set is reached.
Time Slip
RAM
You can play the title being recorded to check that it is being
recorded correctly. You can also check parts that were recorded
previously.
●: Currently recording
DVD-RAM
07 08
10 10/27 Mon 8 10/27 Mon
- - - - -
1 Press TIME SLIP while recording or timer recording.
• TIME SLIP Indicator on the unit lights.
• Play starts from 30 seconds previous to that moment. What is
currently being recorded appears as a picture-in-picture and you will
hear the playback audio.
• Time Slip becomes unavailable if any V-Chip setting is made in the
LOCK item of the SET UP.
Play starts from
30 seconds previous.
The current recording
images.
PLAY
0 min
REC
-
42
For assistance, please call : 1-800-211-PANA(7262) or, contact us via the web at:http://www.panasonic.com/contactinfo
Page 43

VIDEO S VIDEO
IN
AUDIO
R
L
• When appears on the screen while a button is being pressed, it means that the corresponding operation is prohibited by
the unit or the disc.
2 Press ▲▼ to select the time and press ENTER.
• The time indicator will go off after about 5 seconds, but will turn on
again when you set the indicator.
• Press ▲▼ to alter in 1-minute units. Press and hold ▲▼ to alter in
10-minute units.
PLAY
-5 min
REC
To show the play images in full
Press TIME SLIP.
• Press TIME SLIP to return to the picture-in-picture screen.
Note:
• The image on the small screen may be distorted or flicker depending on
the scene. However, this does not affect the image recorded.
To stop play
Press STOP.
To stop recording
Press STOP. Wait 2 seconds, press STOP again.
To stop timer recording
Press STOP. Wait 2 seconds, hold down STOP for a few
seconds.
Almost all videos and DVD software on sale have been
treated to prevent illegal copying. Any software that has
been so treated cannot be recorded using this unit.
e.g., Connecting the L2 input terminals
This unit
Red White
Yellow
Disc / Card Operation
Recording from a video cassette
recorder
DVD-RRAM
Preparation
• Connect a video cassette recorder to this unit’s input terminals.
Notes:
• When recording using this unit’s input terminals, only the sound received
at the time of recording will be recorded. As long as secondary audio that
is recorded on the video cassette is not output on the unit in play, it is not
recorded.
• Recording cannot be done when input is Component or HDMI.
1 Press INPUT to select the input channel for the
equipment you have connected in Stop mode.
2 Press REC MODE to select the recording mode (XP,
SP, LP or EP).
• Using Flexible Recording (p. 39), you can save content of a video
cassette to 1 disc with the best possible quality of recording without
wasting disc space.
3 Start play on the other equipment.
4 Press REC.
• Recording starts.
To skip unwanted parts
Press PAUSE to pause recording. (Press again to restart
recording.)
To stop recording
Press STOP.
Audio/Video cable
Other video equipment
If the audio output of the other equipment is monaural, connect to
L/MONO.
* The S-VIDEO terminal achieves a more vivid picture than the VIDEO
terminal.
S-Video cable*
43
Page 44

Playing Discs
OPEN/CLOSE
NUMBER keys
STOP
TOP MENU
▲▼◄►
SUB MENU
Front view
PAUSE
PLAY/×1.3
To stop play
Press STOP.
DVD-V DVD-A
•
Press STOP again to return to the television screen.
• When “PLAY” flashes on the Front Display, resume function is
active. (See below.)
• The screen saver may appear when you stop play. Press
STOP again and you can use this unit’s tuner to watch
television.
CD
VCD
MP3
To pause play
Press PAUSE.
• Press again to restart play.
When a menu screen appears on the
television
DVD-A DVD-V
Front Display Disc Tray
DVD-A VCD CDDVD-R DVD-VRAM MP3
• It is not possible to play continuously from one side of a double sided disc
to the other. You will need to eject the disc and turn it over.
• When using 8 cm (3″) DVD-RAM, remove the disc from the cartridge.
1 Press OPEN/CLOSE on the unit to open the tray and
insert a disc. (p. 34)
• Press the button again to close the tray.
2 Press PLAY/×1.3.
• The unit takes some time to read the disc before play starts.
RAM DVD-R
•
Play starts from the most recently recorded title.
DVD-V DVD-A VCD
•
Play starts from the beginning of the disc.
Notes:
•
•
•
•
DVD-V
Depending on the disc, playback may start automatically.
when you close the tray.
If an interactive Disc is used, the DVD Main Menu appears.
tree view. (p. 47)
DVD-A
RAM
If cartridge protection is activated (p. 9), play begins automatically
DVD-A
DVD-V
If a menu screen is used, it is possible to playback looking at disc
MP3
VCD
VCD
CD MP3
1 Press ▲▼◄► to select the item and press ENTER.
• Some items can also be selected using the NUMBER keys.
VCD
1 Press NUMBER keys to select the item.
e.g., 5: [0] → [5] 15: [1] → [5]
To return to the menu screen
DVD-A
: Press TOP MENU.
DVD-V
: Press TOP MENU or SUB MENU.
VCD
: Press RETURN.
Notes:
• If “ ” appears on the screen, the operation is prohibited by the unit or
disc.
• The operation is different by disc. Please follow the guidance of the
screen.
Starting play from where you stopped
it (Resume Function)
DVD-A VCD CDDVD-R DVD-VRAM MP3
1 Press STOP during play.
• “PLAY” flashes on the unit’s display (Normal play only). The unit
memorizes the position.
2 Press PLAY/×1.3.
• Play starts from where you stopped it.
To cancel the resume function (Normal play only)
Press STOP while the unit remembers the position. (The position
is also cleared when you turn the unit off.)
44
For assistance, please call : 1-800-211-PANA(7262) or, contact us via the web at:http://www.panasonic.com/contactinfo
Page 45

Various Playback
NUMBER keys
SKIP
STOP
DIRECT
NAVIGATOR/
TOP MENU
▲▼◄►
SUB MENU
ERASE
AUDIO
SLOW/SEARCH
PLAY/×1.3
PAUSE
ENTER
FRAME
RETURN
CM SKIP
TIME SLIP
To stop play
Press STOP.
To erase a title during play (p. 52)
Press ERASE.
Press ◄► to select “Erase” and press ENTER.
To edit
See pages 51~53.
To exit the screen
Press RETURN or DIRECT NAVIGATOR.
DIRECT NAVIGATOR screen icons
Title protected.
:
Title that was not recorded due to recording protection (Digital
:
broadcasts etc.)
Title cannot be played because data is damaged.
:
Currently recording.
:
CHAPTER
Top view
PLAY/×1.3
Ι◄◄ /►►Ι
Preparation
• Insert a disc that has been recorded on.
Selecting recorded programs (titles) to
play
DVD-RRAM
1 Press DIRECT NAVIGATOR.
DIRECT NAVIGATOR Title View
DVD-RAM
07 08
10 10/27 Mon 8 10/27 Mon
- - - - - -
VIDEO PICTURE
- -
Fast forward and rewind (Search)
DVD-A VCD CDDVD-R DVD-VRAM MP3
1 Press ►► FF/SLOW or ◄◄ REW/SLOW during play.
• On the unit, hold down ►►Ι or Ι◄◄ .
• The speed increases up to 5 steps.
• Press PLAY/×1.3 to restart play.
• Sound is output only in the first level of fast forward. In the case of
DVD-A (except moving picture parts), CD and MP3, it is output in all
levels.
• You can turn off the sound during search. (Refer to “Search Audio &
PLAY ×1.3” on page 69.)
• Press PLAY/×1.3 to return to normal speed.
Skipping
DVD-A VCD CDDVD-R DVD-VRAM MP3
1 Press SKIP ►►Ι or SKIP Ι◄◄ during play or while
paused.
• On the unit, press ►►/►►Ι or Ι◄◄ /◄◄ .
• Each press increases the number of skips.
• Pressing Ι◄◄ or ►►Ι while the playback control feature on Video
CDs (p. 70) is working may take you to a menu screen.
Disc / Card Operation
SUB MENU
02/02
Select
Previous Next
Play
2 Press ▲▼◄► to select the title and press ENTER.
• You can also select titles with the NUMBER keys.
e.g., 5: [0] → [5] 15: [1] → [5]
• If you enter a number larger than the total number of titles, the last
title is selected.
Skipping a minute forward (CM Skip)
DVD-RRAM
1 Press CM SKIP during play.
• Play restarts from approximately a minute later.
Note:
• If the start of the next program is within one minute of the point you
skipped from, play restarts from the beginning of that program.
45
Page 46

Starting from a selected item
Frame-by-frame viewing
DVD-A VCD CDDVD-R DVD-VRAM MP3
Starting play from a selected title, chapter or track.
1 Press NUMBER keys to select the item during play
or while stopped.
e.g., 5: [0] → [5]
15: [1] → [5]
MP3
e.g., 5: [0] → [0] → [5]
15: [0] → [1] → [5]
115: [1] → [1] → [5]
Notes:
• This may not work with some discs.
• This works only when stopped (screen saver is displayed on the television)
with some discs.
DVD-A
•
- A group number can be specified while the screen saver is displayed.
e.g., 5: [5]
- Playing bonus groups
Some discs contain bonus groups. If a password screen appears after
selecting a group, enter the password with the NUMBER keys and press
ENTER. Refer also to the disc’s jacket.
Slow-motion playback
RAM
DVD-V
DVD-R
VCD
DVD-A
(Motion picture parts only)
1 Press ►► FF/SLOW or ◄◄ REW/SLOW while
paused.
• On the unit, hold down ►►Ι or Ι◄◄ .
• When slow motion play is continued for about 5 minutes it pauses
automatically.
To return to normal speed
Press PLAY/×1.3.
Notes:
• The speed increases up to 5 steps.
• Press PLAY to restart play.
VCD
•
Backward slow-motion (◄◄ ) does not work.
RAM
DVD-V
DVD-R
VCD
DVD-A
(Motion picture parts only)
1 Press FRAME ΙΙ► or FRAME ◄ΙΙ while paused.
To return to normal speed
Press PLAY/×1.3.
Notes:
• Each press shows the next frame.
• Press PLAY to restart play.
VCD
•
• Whether pictures are advanced by “Frame” or “Field” is selected
Backward frame-by-frame (◄ΙΙ) does not work.
automatically. (pp. 68, 70)
Displaying the television image as a
picture-in-picture
DVD-RRAM
1 Press TIME SLIP during play.
• The unit displays the television image as a picture-in-picture.
• You will hear the playback audio.
• Press TIME SLIP again to cancel.
• Time Slip becomes unavailable if any V-Chip setting is made in the
LOCK item of the SET UP.
Play images
Current receiving images
• You can change the channel being
received by pressing CH ▲▼.
• You cannot change the channel being
received while recording.
To show the play images in full
Press TIME SLIP.
Skipping the specified time (Time Slip)
PLAY
CH8
0 min
Quick View
RAM
(Only with Dolby Digital)
The play speed can be increased without distorting the audio.
1 Press and hold PLAY/×1.3 during play.
To return to normal speed
Press PLAY/×1.3.
Notes:
• Output is in PCM when using a digital connection. (p. 18)
• This is cancelled when you perform skip, pause, or when play reaches a
point where a program recorded in sound other than Dolby Digital starts.
• This does not work if the setting is “Off” in “Search Audio & PLAY ×1.3”.
(p. 69)
• This does not work when recording is in XP or FR mode during
simultaneous recording and play. (p. 42).
46
For assistance, please call : 1-800-211-PANA(7262) or, contact us via the web at:http://www.panasonic.com/contactinfo
DVD-RRAM
1 Press TIME SLIP during play.
PLAY
0 min
2 Press ▲▼ to select the time while the indication is
displayed.
• The time indicator will go off after about 5 seconds, but will turn on
again when you set the indicator.
• Press ▲▼ to alter in one-minute units. Press and hold ▲▼ to alter
in 10-minute units.
3 Press ENTER.
• Play skips the specified time.
Note:
•
Time Slip is not possible during recording.
DVD-R
Page 47

• When appears on the screen while a button is being pressed, it means that the corresponding operation is prohibited by
)
the unit or the disc.
Using menus to play MP3
MP3
This unit can play MP3 files recorded on CD-R/RW with a
computer. Files are treated as tracks and folders are treated as
groups.
1 Press TOP MENU during stop or play.
G: Group no.
T: Track no. in the group
TOTAL: Track no./Total track no. in all groups
Selected group
MENU
G 1
T 1
TOTAL
1
No.
0 9
No. GROUP
1 : My favorite
TOTAL TRACK
001 Both Ends Freezing
1
002 Lady Starfish
2
/
111
003 Life on Jupiter
3
004 Metal Glue
4
005 Paint It Yellow
5
006 Pyjamamama
6
007 Shrimps from Mars
7
008 Starperson
8
009 Velvet Cuppermine
9
010 Ziggy Starfish
10
Prev. Next
TREE
Using the tree screen to find a group
2 Press ► to display the tree screen while the file list
is displayed. Press ▲▼◄► to select a group and
press ENTER.
• The file list for the group appears.
Note:
• Press ◄► to jump layers in the tree screen.
Selected group no. /Total group no.
If the group has no track, “– –” is displayed as
group number.
MENU
G 8
T 14
TOTAL
40
/
111
No.
0 9
You cannot select groups that contain
no compatible files.
TREE
MP3 music
001 My favorite
001 Brazilian pops
002 Chinese pops
003 Czech pops
004 Hungarian pops
005 Liner notes
006 Japanese pops
007 Mexican pops
008 Philippine pops
009 Swedish pops
001 Momoko
002 Standard number
001 Piano solo
002 Vocal
G 7/25
Using the tree screen to find a track
2 Press ▲▼ to select the track and press ENTER.
• Play continues to the last track in the last group.
• “
” indicates the track currently playing.
• You can also select the track with the NUMBER keys.
e.g., 5: [0] → [0] → [5]
15: [0] → [1] → [5]
115: [1] → [1] → [5]
To show other pages
Press ▲▼◄► to select “Prev.” or “Next” and press ENTER.
• After listing all the tracks in one group, the list for the next
group appears.
Notes:
• Reading or play of the disc may take time if there are a lot of still pictures
or sessions.
• The display order may differ from how the order is displayed on a
computer.
• A folder which has no MP3 files is indicated in black. You cannot select
groups with no MP3 files.
Root
001
001track.mp3
002track.mp3
003track.mp3
003 group
001track.mp3
002track.mp3
Order of Play
003track.mp3
(folder = group)
(file = track
002 group
001track.mp3
002track.mp3
003track.mp3
004track.mp3
Naming folders and files
At the time of recording, give
folder and file names a 3-digit
numeric prefix in the order
you want them to play (this
may not work at times).
Extension
001track.mp3
(Or .MP3)
• For other notes concerning the MP3, see page 11.
To erase a program that is being
played back
DVD-RRAM
You can erase titles while playing.
Since the program, and play lists (p. 57) created from it are
erased irretrievably by this procedure, you should be certain
you wish to erase before carrying it out.
1 Press ERASE during play.
• A confirmation screen will be displayed.
Erase
Time remaining after erase 2:40(EP)
Corresponding play list chapters will be erased.
Erase Cancel
2 Press ◄► to select “Erase” and press ENTER.
Notes:
RAM
•
•
• If the confirmation screen disappears before you complete the operation,
• It is not possible to erase a title that is in the process of being recorded.
It is not possible to erase the program when you are carrying out
simultaneous recording and play. (p. 42)
DVD-R
The amount of space remaining on the disc does not increase
even if you erase programs.
start from the beginning again.
Disc / Card Operation
To exit the screen
Press RETURN or TOP MENU.
47
Page 48

Create chapters
Changing audio during play
RAM
1 Press CHAPTER during play.
• “CHAPTER” lights on the Front Display for a few seconds.
• Press SKIP ►►Ι or SKIP Ι◄◄ to skip to the start of a chapter.
• You cannot activate this function when recording and playing at the
same time.
Notes:
• You can play and edit the created chapters. (pp. 51~53, 57~59)
• For other notes concerning the chapter, see page 51.
DVD-A VCDDVD-VRAM
You can change the audio being received or played.
1 Press AUDIO.
• How the type changes depends on when you press the button.
While playing DVD-RAM or Video CD
LR L R
e.g., DVD-RAM “LR”
is selected
RAM
•
Notes:
• The audio cannot be changed while Time Slip is used.
•
If it is a recording of an SAP broadcast, each time you press
AUDIO:
MAIN ↔ SAP
You may be unable to change the audio when you have connected
RAM
the unit to an AV receiver through the DIGITAL AUDIO OUT terminal and
“Dolby Digital” is set to “Bitstream”. If this occurs:
- Change “Dolby Digital” to “PCM” or “Bitstream”. (p. 69)
- Connect also with an audio cable (pp. 18~19) and change the input on
the receiver.
While playing DVD-Audio or DVD-Video
You can change the audio channel number each time you press
the button. This allows you to change things like the soundtrack
language.
DVD-RAM
PLAY
LR
Soundtrack
DVD-V
e.g.,
1 ENG Digital 3/2.1ch
English is selected language.
48
For assistance, please call : 1-800-211-PANA(7262) or, contact us via the web at:http://www.panasonic.com/contactinfo
Page 49

Using On-screen Menus
NUMBER keys
ENTER
▲▼◄►
RETURN
Disc menu
DVD-A VCDDVD-R DVD-VRAM
Not available when playing CDs and MP3 discs.
ON
Disc
Play
RAM
Sound track
Subtitle
Audio channel
DVD-A
DVD-V
DVD-R DVD-A
DVD-V
OFF
DVD-V
1
e.g., DVD-RAM
Sound track language
See A below.
Sound track
Audio attribute
See B on next page.
Karaoke vocal, on and off
Solo:
Digital 2/0 ch
OFF
LR
PLAY SETUP
Front view
Common procedures
1 Press PLAY SETUP in play mode.
e.g., DVD-RAM
Disc
Play
Menu Item Setting
Sound track
Subtitle
Audio channel
1
2 Press ▲▼ to select the menu and press ►.
3 Press ▲▼ to select the item and press ►.
4 Press ▲▼ to select the setting.
Digital 2/0 ch
OFF
Duet:
Subtitle language
See A below.
• Changing the subtitle language is only possible with discs on which
Subtitle
two or more subtitle languages are recorded.
• Any change must be made from the menu recorded on the disc.
(Not available on all discs.)
Subtitle on/off
Turn the Subtitle ON or OFF.
Angle number
Angle
• Changing the angle is only possible with discs on which two or
more angles are recorded.
• Any change must be made from the menu recorded on the disc.
(Not available on all discs.)
STILL-P
Page
LR
Slide
Show
Audio channel
Audio channel
Select the audio channel. (p. 48)
PBC
Playback control on/off
Indicates whether menu play (playback control) is on or off.
OFF
Still picture number
• When “Return” is displayed:
Select “Return” and press ENTER to return to the
default page.
• When “RANDOM” is displayed:
Select “RANDOM” and press ENTER, the picture
changes randomly each time you press ENTER.
Plays according to the default order on the disc.
RAM
DVD-A
RAM
DVD-A
V1+V2
DVD-V
DVD-R
DVD-V
VCD
VCD
DVD-A
V1 V2
DVD-V
DVD-A
Disc / Card Operation
DVD-A
To clear the on-screen menus
Press RETURN.
Notes:
• The screens depend on the disc contents.
• Depending on the disc contents, there are some items that you cannot
select or change.
A
Sound track/subtitle language
ENG: English SVE: Swedish CHI: Chinese
FRA: French NOR: Norwegian KOR: Korean
DEU: German DAN: Danish MAL: Malay
ITA: Italian POR: Portuguese VIE: Vietnamese
ESP: Spanish RUS: Russian THA: Thai
NLD: Dutch JPN: Japanese *: Others (pp. 67~69)
(Continued on next page.)
49
Page 50

B
Sound track/subtitle language
LPCM/PPCM/ Digital/DTS/MPEG: Signal type
k (kHz): Sampling frequency
b (bit): Number of bits
ch (channel): Number of channels
e.g., 3/2 .1ch
.1: Subwoofer signal (not displayed if there is no
subwoofer signal)
0:
No surround
1:
Mono surround
2:
Stereo surround (left/right)
1:
Center
2:
Front left + Front right
3:
Front left + Front right + Center
Notes:
• When playing back recordings of SAP broadcasts, “1+1 ch” will be
displayed.
• You can only select subtitles, soundtracks, and angles if they are recorded
on the disc.
• Some discs allow changes to soundtracks, subtitles, and angles only by
using the disc’s menus.
• If the subtitles overlap closed captions recorded on discs, turn the subtitles
off.
Play menu
DVD-A VCD CDDVD-R DVD-VRAM MP3
e.g., DVD-RAM
Each time you press ▲▼:
•
•
Repeat play
•
• While playing a play list:
Select “OFF” to cancel.
RAM
VCD
DVD-A
RAM
Title
Track
Track
PL (Play list)
DVD-V
CD
MP3
Disc
Play
DVD-R
Chapter OFF
All OFF
Group OFF
Repeat play
OFF
OFF
Notes:
• You cannot use repeat play to repeat an entire DVD-Audio, DVD-Video,
MP3 discs or all the play lists on a DVD-RAM.
• Repeat play does not work if the disc’s elapsed play time is not shown on
the unit’s display.
• ERASE does not work while in repeat play mode.
If the Video CD has playback control
1. While stopped (the screen saver is on the television), press
the NUMBER keys to select a track. (p. 46)
2. Select the repeat mode.
50
For assistance, please call : 1-800-211-PANA(7262) or, contact us via the web at:http://www.panasonic.com/contactinfo
Page 51

Editing the Recorded Programs (Using the Direct Navigator)
Preparation
• Release protection before proceeding:
SKIP
DIRECT
NAVIGATOR
▲▼◄►
SUB MENU
PAUSE
PLAY/×1.3
ENTER
RETURN
- Cartridge (p. 9)
- Disc (p. 60)
RAM
•
When the title is protected (p. 52), you can only access
“Properties” and “Cancel Protection”. Release the protection to access
other items.
Editing titles/chapters and playing
chapters
1 Press DIRECT NAVIGATOR.
•
RAM
press ▲▼◄► to select “PICTURE”. (p. 54)
2 Press ▲▼◄► to select the title.
• You can also select a title by entering a 2-digit number with the
numeric buttons.
e.g., 5: [0] → [5]
15: [1] → [5]
• If you enter a number larger
than the total number of titles,
the last title is selected.
RAM
RAM
Press ▲▼◄► to select “VIDEO”. If you play still pictures,
DIRECT NAVIGATOR Title View
DVD-RAM
07 08
10 10/27 Mon 8 10/27 Mon
- - - - - -
VIDEO PICTURE
- -
Top view
PLAY/×1.3
Ι◄◄ /►►Ι
DVD-RRAM
Title/Chapter
Programs are recorded as a single title consisting of one
chapter.
Start End
RAM
You can divide a title into multiple chapters. (See
“Create Chapter” on page 48, “Divide Chapter” on page 53.)
Chapter Chapter Chapter Chapter
RAM
You can change the order of chapters and create a
play list.
DVD-R
•
Titles are divided into about 5-minute chapters after
finalizing. (p. 62)
The maximum number of items on a disc:
• Titles: 99
• Chapters: Approximately 1 000 (Depends on disc contents.)
Notes:
• Once erased or partially erased, it cannot be restored to its original state.
Make certain before proceeding.
• You cannot edit during recording.
Title
Chapter
Title
SUB MENU
02/02
Select
Previous Next
Play
To show other pages
Press ▲▼◄► to select “Previous” or “Next” and press ENTER.
• You can also press SKIP ►►Ι or SKIP Ι◄◄ to show other
pages.
Multiple editing
Select with ▲▼◄► and press (PAUSE). (Repeat.)
A check mark appears. Press (PAUSE) again to cancel.
3 Press SUB MENU, then ▲▼ to select the operation
and press ENTER.
• If you select “Edit”, press ▲▼ to select the operation and press
ENTER.
Enter Name
Erase
Properties
Edit
Chapter View
Set up Protection
Cancel Protection
Shorten
Change Thumbnail
Divide Title
Refer to “Title
operations”.
If you select “Chapter View”.
4 Press ▲▼◄► to select the chapter.
• You can also select a chapter by entering a 3-digit number with the
numeric buttons.
e.g., 5: [0] → [0] → [5]
15: [0] → [1] → [5]
115: [1] → [1] → [5]
• If you enter a number larger
than the total number of
chapters, the last chapter is
selected.
To start play
Press ENTER.
To edit
Go to Step 5 on next page.
• To show other pages/Multiple editing (see above)
DIRECT NAVIGATOR Chapter View
DVD-RAM
08 8 10/27 Mon
- - - - - - - -- - - -
0001
- - - - - - - -- - - -- - - -
- - - - - - - -- - - -- - - -
Previous Next
Play
SUB MENU Select
VIDEO PICTURE
01/01
(Continued on next page.)
Disc / Card Operation
51
Page 52

5 Press SUB MENU, then ▲▼ to select the operation
and press ENTER.
Erase Chapter
Divide Chapter
Combine Chapters
Title View
You can go back to the Title View.
To exit the screen
Press DIRECT NAVIGATOR.
To return to the previous screen
Press RETURN.
Refer to “Chapter
operations”.
Edit → Set up Protection/Cancel Protection
(Multiple editing is possible. (p. 51))
RAM
If set, this will protect the title from accidental erasure.
2 Press ◄► to select “Yes” and press ENTER.
• The lock symbol “ ” appears when the title is protected.
DIRECT NAVIGATOR Title View
DVD-RAM
07 08
10 10/27 Mon 8 10/27 Mon
- - - - - -
Previous Next
Note:
• Titles will be erased even if they are protected if you format the disc with
DISC SETTING. (p. 61)
Set up Protection
Set title protection.
Yes No
02/02
VIDEO PICTURE
- -
DIRECT NAVIGATOR Title View
DVD-RAM
07 08
10 10/27 Mon 8 10/27 Mon
- - - -
Title operations
1 Do Steps 1~3 on page 51.
Erase
DVD-RRAM
The title is irretrievably erased when you use this procedure and
cannot be retrieved. Check the title carefully before erasing to
ensure it isn’t one you want to keep.
(Multiple editing is possible. (p. 51))
2 Press ◄► to select “Erase” and press ENTER.
DIRECT NAVIGATOR Title View
DVD-RAM
07 08
Dinosaur
Time remaining after erase 2:40(EP)
10 10/27 Mon 8 10/27 Mon
Corresponding play list chapters will be erased.
- - - - - -
Erase Cancel
Previous Next
Notes:
• The disc’s available recording time may not increase after erasing short
titles.
• The available recording time on DVD-R does not increase when you erase
titles.
Properties
DVD-RRAM
Information (e.g., recording time) is shown.
DIRECT NAVIGATOR Title View
DVD-RAM
07 08
Dinosaur
10 10/27 Mon 8 10/27 Mon
No. 01
Date 6/23/2004 Wed
- - - - - -
CH 4
Previous Next
Edit → Enter Name
DVD-RRAM
Refer to “Entering text” on page 63.
Note:
• The full name is shown in the “Properties” screen, but if you enter a long
name, only part of it is shown in the title list.
Erase
02/02
Properties
Start 10:00 AM
Rec time 2:15(SP)
02/02
VIDEO PICTURE
- -
VIDEO PICTURE
- -
Edit → Shorten
RAM
You can remove unnecessary parts of the recording such as
commercials.
• The program segment, and play list scenes created from it, are erased
irretrievably when you use this procedure. Check carefully before
proceeding.
2 Press ENTER at the start point and end point of the
section you want to erase.
• See “For quicker editing” on page 53.
3 Press ▲▼ to select “Exit” and press ENTER.
• Select “Next” and press ENTER to erase other
sections.
DIRECT NAVIGATOR Shorten
DVD-RAM
Start
- - : - - . - -
PLAY08
VIDEO PICTURE
Start
End
Next
Exit
0:43.21
End
- - : - - . - -
4 Press ▲◄ to select “Erase” and press ENTER.
DIRECT NAVIGATOR Shorten
DVD-RAM
08
Dinosaur
Time remaining after erase 1:33(EP)
Corresponding play list chapters will be erased.
Erase Cancel
Start
- - : - - . - -
To erase another part of the same title
After storing the point in “Start” and “End”, select “Next” in Step 2
and perform Step 4, then repeat Steps 2~4.
Notes:
• You may not be able to specify start and end points within 3 seconds of
each other.
• You cannot specify start and end points if the picture recorded is stilled.
• The unit pauses when the title reaches its end during this procedure.
• The disc’s available recording time may not increase after erasing short
parts of titles.
Shorten
VIDEO PICTURE
Start
End
Next
Exit
0:43.21
End
- - : - - . - -
52
For assistance, please call : 1-800-211-PANA(7262) or, contact us via the web at:http://www.panasonic.com/contactinfo
Page 53

• When appears on the screen while a button is being pressed, it means that the corresponding operation is prohibited by
the unit or the disc.
Edit → Change Thumbnail
DVD-RRAM
You can change an image to be shown as a thumbnail picture in
the Title View.
2 Press PLAY/×1.3 to start play.
3 Press ENTER when the image you want to use as a
thumbnail is shown.
• See “For quicker editing” below.
• To change to another point in the same title:
Select “Change” with ▲▼ and press PLAY/×1.3, and then repeat
Steps 3~4.
4 Press ▲▼ to select “Exit” and press ENTER.
• The displayed scene is changed at this point.
DIRECT NAVIGATOR Change Thumbnail
DVD-RAM
08
Change
00:00.01
Edit → Divide Title
RAM
You can divide a selected title into two. You must make sure when
dividing a title because it cannot be recovered after the procedure.
VIDEO PICTURE
Change
Exit
0:00.01
Chapter operations
1 Do Steps 1~5 on pages 51~52.
Erase Chapter
(Multiple editing is possible. (p. 51))
RAM
2 Press ◄► to select “Erase” and press ENTER.
• Even if you erase the chapter, the original title is not erased.
DIRECT NAVIGATOR Chapter View
DVD-RAM
08 8 10/27 Mon
- - - - - - - -- - - -
0001
Corresponding play list chapters will be erased.
- - - - - - - -- - - -- - - -
Erase Cancel
- - - - - - - -- - - -- - - -
Previous Next
VIDEO PICTURE
Erase Chapter
01/01
Divide Chapter
RAM
2 Press ENTER at the point you want to divide.
• See “For quicker editing” below.
• Repeat this step to divide at other points.
DIRECT NAVIGATOR Divide Chapter
DVD-RAM
08 PLAY
VIDEO PICTURE
Divide
Exit
0:00.01
Disc / Card Operation
2 Press ENTER at the point you want to divide the
title.
• See “For quicker editing” below.
• To confirm the division point:
Press ▲▼ to select “Preview” and press ENTER. (Play will begin
from a point 10 seconds prior to and after the division point.)
• To change the division point:
Press ▲▼ to select “Divide” and press ENTER at the point you want
to change.
DIRECT NAVIGATOR Divide Title
DVD-RAM
08 PLAY
Divide
- - : - - . - -
VIDEO PICTURE
Preview
Divide
Exit
0:00.01
3 Press ▲▼ to select “Exit” and press ENTER.
4 Press ◄► to select “Divide” and press ENTER.
• The title is divided at the point.
Notes:
• The divided titles retain the name of the original title. They also retain the
CPRM property (p. 70) of the original.
• Use search and slow-motion to find the points.
• It is not possible to carry out “Divide” in the following cases:
- When the resulting part(s) are extremely short.
- When the total number of titles is more than 99.
DIRECT NAVIGATOR Divide Title
DVD-RAM
08
Divide Title
Dinosaur
Once divided, this title cannot be
recombined.
Divide Cancel
Divide
- - : - - . - -
VIDEO PICTURE
Preview
Divide
Exit
0:00.01
3 Press ▲▼ to select “Exit” and press ENTER.
• A little portion of the recording directly preceding the division point
may be lost.
Notes:
• The divided chapters retain the name of the original title. They also retain
the CPRM property (p. 70) of the original.
• It is not possible to carry out “Divide”, when the resulting part(s) are
extremely short.
Combine Chapters
RAM
2 Press ◄► to select “Combine” and press ENTER.
• The selected chapter and next chapter are combined.
DIRECT NAVIGATOR Chapter View
DVD-RAM
08 8 10/27 Mon
- - - - - - - -- - - -
0001
Combine Chapters
Selected Chapter Following Chapter
001 002
- - - - - - - -- - - -- - - -
Combine chapters.
- - - - - - - -- - - -- - - -
Combine Cancel
Previous Next
For quicker editing
• Use search (p. 45), Time Slip (p. 46) or slow-motion (p. 46) to find the
desired point.
• Press SKIP ►►Ι or SKIP ׀◄◄ to skip to the end of a title.
VIDEO PICTURE
01/01
53
Page 54

Editing and Playing Still Pictures (Using the Direct Navigator)
4 Press ▲▼◄► to select the still picture and press
ENTER.
• You can also select titles with the NUMBER keys.
e.g., 5: [0] → [0] → [0] → [5]
15: [0] → [0] → [1] → [5]
115: [0] → [1] → [1] → [5]
1115: [1] → [1] → [1] → [5]
• Press ◄► to display the previous or next picture.
• Useful functions during still picture play. (p. 55)
To stop playing
Press STOP.
To exit the screen
Press DIRECT NAVIGATOR.
To select the sill pictures in another
folder
NUMBER keys
SKIP
STOP
DIRECT
NAVIGATOR
▲▼◄►
SUB MENU
ERASE
DVD
SD
PAUSE
ENTER
RETURN
DISPLAY
Front view
Disc Tray SD Card Slot
RAM SD
Playing still pictures on the Card or
DVD-RAM
1 Insert a DVD-RAM or Card. (p. 34)
2 Press SD or DVD to select the drive.
3 Press DIRECT NAVIGATOR.
•
e.g., DVD-RAM
Press ▲▼◄► to select “PICTURE” tab and press ENTER.
RAM
DIRECT NAVIGATOR Title View
DVD-RAM
07 08
10 10/27 Mon 8 10/27 Mon
- - - - - -
Previous Next
Play
SUB MENU
02/02
Select
e.g., Card
VIDEO PICTURE
- -
DIRECT NAVIGATOR Picture(JPEG) View
SD CARD
Folder 100_PANA
0002
00030001 0004
0006 0007 00080005
- - - - - - - -- - - -- - - -
Previous Next
Play
001/001
SUB MENU Select
DIRECT NAVIGATOR Picture(JPEG) View
DVD-RAM
Folder 100_PANA
0002
0006 0007 00080005
- - - - - - - -- - - -- - - -
Previous Next
Play
001/001
SUB MENU Select
00030001 0004
PICTURE
VIDEO PICTURE
5 Press ▲▼◄► to select “Folder” then press ENTER.
DIRECT NAVIGATOR Picture(JPEG) View
SD CARD
Folder 100_PANA
0002
00030001 0004
0006 0007 00080005
- - - - - - - -- - - -- - - -
Previous Next
001/001
PICTURE
6 Press ▲▼ to select the folder, and press ENTER.
• You can also select titles with the NUMBER keys.
e.g., 5: [0] → [0] → [5]
15: [0] → [1] → [5]
115: [1] → [1] → [5]
DIRECT NAVIGATOR Select Folder
SD CARD
\
DCIM
\
DCIM\100_PANA
001 100_PANA
002 101_PANA
003 102_PANA
- - -
- - -
- - -
- - -
- - Previous Next
SUB MENU Select
01/01
Picture 0022 File 0023
PICTURE
• If there is a multiple number of higher folders recognizable, you can switch
them using ◄►.
To display information about the Still
Pictures
1 Press DISPLAY twice while in still picture display.
• If “SD Card” or “DVD-RAM” is displayed at the upper right, press
DISPLAY once.
Shooting data
6/10 1:03 PM Folder-Picture No.100-0841
Date 12/25/2004
No. 10/ 22
To exit the picture properties screen
Press DISPLAY.
Note:
• Still pictures cannot be played during recording.
Folder number
File number
54
For assistance, please call : 1-800-211-PANA(7262) or, contact us via the web at:http://www.panasonic.com/contactinfo
Page 55

Useful functions during still picture
play
RAM SD
Rotate
1 Press ▲▼◄► to select a picture in the DIRECT
NAVIGATOR screen and press ENTER.
• The selected picture is displayed in full screen.
2 Press SUB MENU.
Rotate RIGHT
Rotate LEFT
3 Press ▲▼ to select “Rotate RIGHT” or “Rotate
LEFT,” and press ENTER.
• Rotate RIGHT:
Picture is rotated 90° clockwise.
• Rotate LEFT:
Picture is rotated 90° counterclockwise.
e.g., When you select
“Rotate RIGHT”
Erase
1 Press ERASE during play.
2 Press ◄► to select “Erase” and press ENTER.
(p. 56)
• Once erased, the recorded contents are lost and cannot be restored.
Make certain before proceeding.
Editing Still Pictures
RAM SD
Preparation
• Release protection before proceeding:
- Cartridge (p. 9)
- Disc (p. 60)
- Write Protect (p. 11)
• When the picture is protected (p. 56), you can only access “Properties”
and “Cancel Protection”. Release the protection to access other items.
RAM
RAM
SD
1 Press SD or DVD to select the drive.
2 Press DIRECT NAVIGATOR.
•
Press ▲▼◄► to select “PICTURE” tab and press ENTER.
RAM
e.g., Card
DIRECT NAVIGATOR Picture(JPEG) View
SD CARD
Folder 100_PANA
0002
00030001 0004
0006 0007 00080005
- - - - - - - -- - - -- - - -
Previous Next
Play
001/001
SUB MENU Select
PICTURE
Disc / Card Operation
Note:
• Rotation information will not be stored.
Zoom in/Zoom out
(Only for a still picture with a low pixel count)
1 Press ▲▼◄► to select a picture in the DIRECT
NAVIGATOR screen and press ENTER.
• The selected picture is displayed in full screen.
2 Press SUB MENU.
Rotate RIGHT
Rotate LEFT
Zoom in
3 Press ▲▼ to select “Zoom in” and press ENTER.
• To return the picture to its original size, press ▲▼ to select “Zoom
out” in step 3 and press ENTER.
• When zooming in, the picture may be cut off.
• The enlargement information will not be stored.
3 Press ▲▼◄► to select the picture.
• The selected picture is marked with a frame.
To show other pages
Press ▲▼◄► to select “Previous” or “Next” and press ENTER.
• You can also press SKIP ►►Ι or SKIP Ι◄◄ to show other
pages.
Multiple editing
Select with ▲▼◄► and press (PAUSE). (Repeat.)
A check mark appears. Press (PAUSE) again to cancel.
To select the still pictures in another folder
See page 54.
4 Press SUB MENU, then ▲▼ to select the operation
and press ENTER.
Erase Picture
Set up Protection
Cancel Protection
DPOF
Start Slide Show
Slide Interval
To exit the screen
Press DIRECT NAVIGATOR.
To return the previous screen
Press RETURN.
Refer to “Picture and
folder operations” on
next page.
55
Page 56

E
E
Editing still pictures folders
Set up Protection/Cancel Protection
1 Do Steps 1~2 (see “Editing Still Pictures”) on page
55.
2 Press ▲▼◄► to select “Folder” and press ENTER.
DIRECT NAVIGATOR Picture(JPEG) View
SD CARD
Folder 100_PANA
0002
00030001 0004
0006 0007 00080005
- - - - - - - -- - - -- - - -
Previous Next
Play
001/001
SUB MENU Select
PICTURE
3 Press ▲▼ to select the Folder.
• To show other pages/Multiple editing. (p. 55)
4 Press SUB MENU, then press ▲▼ to select the
operation and press ENTER.
• To select another higher folder. (p. 54)
Erase Whole Folder
Folder Name
Set Protection
Cancel Protection
DPOF
Refer to “Picture and
folder operations”
below.
To exit the screen
Press DIRECT NAVIGATOR.
To return the previous screen
Press RETURN.
Picture and folder operations
1 Do Steps 1~4 on page 55 to edit still picture or do
Steps 1~4 above to edit folder.
Erase Picture/Erase Whole Folder
RAM SD
You can delete still pictures (JPEG) from a Card or DVD-RAM.
(Multiple editing is possible. (p. 55))
2 Press ◄► to select “Erase” and press ENTER.
DIRECT NAVIGATOR Picture(JPEG) View
SD CARD
Folder 100_PANA
Previous Next
Erase Picture
0002
Erase the picture(JPEG)?
0006 0007 00080005
Erase Cancel
- - - - - - - -- - - -- - - -
001/001
Notes:
• The locked picture cannot be erased.
• Once erased, the recorded contents are lost and cannot be restored. Make
certain before proceeding.
• When erasing a folder, even the files not containing still pictures will also
be erased if they are inside the folder. (This does not apply to folders
under the folder concerned.)
PICTURE
00030001 0004
RAM SD
(Multiple editing is possible. (p. 55))
If set, this will protect the still picture from accidental erasure.
2 Press ◄► to select “Yes” and press ENTER.
• The lock symbol “ ”appears when the still picture is protected.
DIRECT NAVIGATOR Picture(JPEG) View
SD CARD
Folder 100_PANA
0002
Set up Protection
Set up protection to the picture(JPEG).
0006 0007 00080005
Yes No
- - - - - - - -- - - -- - - -
001/001
Previous Next
00030001 0004
PICTURE
DIRECT NAVIGATOR Picture(JP
SD CARD
Folder 100_PANA
0001
0002
00060005
Note:
• Even if the protection setting is used by this unit to protect a folder, the
folder may be erased by another unit.
DPOF
(Multiple editing is possible. (p. 55))
SD
You can select a whole folder or individual pictures for printing and
specify the number of prints to be made. “DPOF” means Digital
Print Order Format.
2 Press ◄► to select number of print (0 to 9) and
press ENTER.
• “ ” mark is displayed.
• This appears on the still pictures inside a folder when you make the
DPOF setting for the folder.
DIRECT NAVIGATOR Picture(JPEG) View
SD CARD
Folder 100_PANA
0002
Set up DPOF on the picture(JPEG).
The contents set with other units will be erased.
0006 0007 00080005
Number of prints 1
Press ENTER to comfirm.
- - - - - - - -- - - -- - - -
001/001
Previous Next
To cancel the print setting
Set the number of print to “0”.
Notes:
• When this is set by this unit, any settings established by other units will be
released.
• Print settings (DPOF) made using this unit may not be viewable on other
equipment.
• Settings cannot be made for folders and files not in accordance with DCF
standards or if there is no remaining space on the card.
Start Slide Show/Slide Interval
RAM SD
You can display still pictures one by one with constant interval.
To change the display timing
Press ▲▼ to select “Slide Interval” and press ENTER.
Press ◄► to select the desired timing (0–30 seconds) and
press ENTER.
• To cancel Slide Show, press STOP.
Folder Name
RAM SD
You can give names to still picture folders.
• Refer to “Entering text” on page 63.
• Folder names inputted using this unit may not be displayed on other
equipment.
00030001 0004
DPOF
PICTURE
DIRECT NAVIGATOR Picture(JP
SD CARD
Folder 100_PANA
0001
0002
1
00060005
56
For assistance, please call : 1-800-211-PANA(7262) or, contact us via the web at:http://www.panasonic.com/contactinfo
Page 57

Using Play List
2 Press ENTER.
MENU
ADJ. SET UP FUNC.
DVD/SD
OK
PAGE
RETURN
NUMBER keys
SKIP
STOP
PAUSE
MENU
▲▼◄►
SUB MENU
ENTER
RETURN
ERASE
Top view
STOP
Ι◄◄ /►►Ι
RAM
You can create a play list by gathering your favorite chapters
(p. 51) from your recordings. You can also edit the created play
list.
Chapter Chapter Chapter
Title
Title
Chapter Chapter
3 Press ▲▼◄► to select “PLAY LIST” and press
ENTER.
DVD
DVD-RAM
Play back
Record
Dubbing
/ Edit
Set up
DISC PROTECTION OFF
SD
CARTRIDGE PROTECTION OFF
DIRECT NAVIGATOR
TIMER RECORDING
DUBBING
PLAY LIST
SETUP
FLEXIBLE RECORDING
DISC SETTING
4 Press ▲▼◄► to select “Create” and press ENTER.
PLAY LIST Play List View
DVD-RAM
- - - -
Create
- - - - - -
Previous Next
- -
01/01
5 Press ◄► to select the source title and press ▼.
When you want to select all chapters in the title:
• Press ◄► to select the source title and press ENTER, then
skip to Step 7.
• Repeat Steps 5~7 to add other titles or chapters.
PLAY LIST Create
DVD-RAM
08 8 10/27 Mon
Source Title 01/01
Source Chapter
001 002
Chapters in PLAY LIST
- - - - - -
- -
0201
- -
001/001
- - -
003
- - -
001/001
- - -
Disc / Card Operation
Play list
Chapter Chapter
• Editing play lists doesn’t modify the recording data.
• Play lists are not recorded separately so this doesn’t use much capacity.
The maximum number of items on a disc:
• Play lists: 99
• Chapters in play lists: Approximately 1 000 (Depends on disc contents.)
Preparation
• Release protection before proceeding:
- Cartridge (p. 9)
- Disc (p. 60)
• Press DVD to select the DVD drive.
Creating play lists
1 Press MENU in Stop mode, then press ◄► to select
“FUNC.”
SUB MENU Press RETURN to exit.
6 Press ◄► to select the chapter you want to add to a
play list and press ENTER.
• Press ▲ to cancel.
PLAY LIST Create
DVD-RAM
08 8 10/27 Mon
Source Title 01/01
001 002
Chapters in PLAY LIST
- - - - - -
SUB MENU Press RETURN to exit.
• You can also create a new chapter from the source title. Press
SUB MENU to select “Divide Chapter” and press ENTER. (Refer to
“Divide Chapter” on page 53.)
(Continued on next page.)
- -
0201
- -
001/001Source Chapter
- - -
003
- - -
001/001
- - -
57
Page 58

7 Press ◄► to select the position to insert the
chapter and press ENTER.
PLAY LIST Create
DVD-RAM
08 8 10/27 Mon
Source Title 01/01
001 002
Chapters in PLAY LIST
- - - - - -
• Repeat steps 6~7 to add other chapters.
• Press ▲ to select other source titles.
0201
- -
- -
- - -
003
- - -
- - -
Press RETURN to exit.
001/001Source Chapter
001/001
8 Press RETURN.
To stop partway through
Press RETURN.
To clear the play list screen
Press RETURN.
Note:
• You may not be able to specify start and end points if the material is still
pictures recorded on other equipment.
Playing play lists
Preparation:
• Create play lists first. (p. 57)
1 Press MENU in Stop mode, then press ◄► to select
“FUNC.”
2 Press ENTER.
MENU
ADJ. SET UP FUNC.
DVD/SD
OK
PAGE
RETURN
PLAY LIST Play List View
DVD-RAM
07
10/27 Mon 0:30
- - - - - -
Play
- -
Create
Previous Next
SUB MENU Select
- -
01/01
To show other pages
Press ▲▼◄► to select “Previous” or “Next” and press ENTER.
• You can also press SKIP ►►Ι or SKIP Ι◄◄ to show other
pages.
To stop play list play
Press STOP. (The play list appears.)
To erase a play list during play (p. 59)
Press ERASE.
Press ◄► to select “Erase” and press ENTER.
Using play list to edit play list/chapters
• You can use fast-forward, rewind, pause, and slow-motion while playing
chapters just as you can during normal play.
Multiple editing
Select with ▲▼◄► and press (PAUSE). (Repeat.)
A check mark appears. Press (PAUSE) again to cancel.
5 Press SUB MENU, then ▲▼ to select the operation
and press ENTER.
• If you select “Edit”, press ▲▼ to select the operation and press
ENTER.
Erase
Properties
Edit
Chapter View
Create
Copy
Enter Name
Change Thumbnail
Refer to
“Play list
operations”.
3 Press ▲▼◄► to select “PLAY LIST” and press
ENTER.
DVD
DVD-R AM
Play back
Record
Dubbing
/ Edit
Set up
DISC PROTECTION OFF
SD
CARTRIDGE PROTECTION OFF
DIRECT NAVIGATOR
TIMER RECORDING
DUBBING
PLAY LIST
SETUP
4 Press ▲▼◄► to select the play list and press
ENTER.
• You can also select a play list from the play list view by entering a
2-digit number with the numeric buttons.
e.g., 5: [0] → [5]
15: [1] → [5]
• Whenever a number greater than the total number of play lists is
entered, “Create” is selected.
58
For assistance, please call : 1-800-211-PANA(7262) or, contact us via the web at:http://www.panasonic.com/contactinfo
FLEXIBLE RECORDING
DISC SETTING
If you select “Chapter View”
6 Press ▲▼◄► to select the chapter.
• You can also select a chapter by entering a 3-digit number with the
numeric buttons.
e.g., 5: [0] → [0] → [5]
15: [0] → [1] → [5]
115: [1] → [1] → [5]
• If you enter a number larger
than the total number of
chapters, the last chapter is
selected.
To play a chapter
Press ENTER.
To stop chapter play
Press STOP. (The chapter view appears.)
To erase a chapter
Press ERASE.
Press ◄► to select “Erase” and press ENTER.
• To show other pages/Multiple editing (see above)
PLAY LIST Chapter View
DVD-RAM
08 10/27 Mon 0:30
001
002
- - - - - -- - -- - -
- - - - - -- - -- - -
Previous Next
Play
01/01
SUB MENU Select
- - -- - -
Page 59

• When appears on the screen while a button is being pressed, it means that the corresponding operation is prohibited by
the unit or the disc.
7 Press SUB MENU, then ▲▼ to select the operation
and press ENTER.
Add Chapter
Move Chapter
Divide Chapter
Combine Chapters
Erase Chapter
Play List View
Refer to “Chapter
operations”.
You can go back to PLAY LIST View.
To exit the screen
Press RETURN.
To return to the previous screen
Press RETURN.
Play list operations
1 Do Steps 1~5 on page 58.
Erase
(Multiple editing is possible. (p. 58))
RAM
2 Press ◄► to select “Erase” and press ENTER.
• The play list is erased.
• Once a play list has been erased, it is irretrievable. Check carefully
before proceeding.
PLAY LIST Play List View
DVD-RAM
07
10/27 Mon 0:30
- - - - - -
- -
Create
Erase Cancel
Previous Next
Erase
Erase Play List?
01/01
- -
Edit → Copy
(Multiple editing is possible. (p. 58))
RAM
2 Press ◄► to select “Copy” and press ENTER.
PLAY LIST Play List View
DVD-RAM
07
10/27 Mon 0:30
Create
- - - - - -
Copy Cancel
Previous Next
- -
Copy
Copy this Play List?
01/01
- -
Edit → Enter Name
RAM
Refer to “Entering text” on page 63.
Note:
• The full name is shown in the “Properties” screen, but if you enter a long
name, only part of it is shown in the play list screen.
Edit → Change Thumbnail
RAM
Refer to “Change Thumbnail” on page 53.
Chapter operations
1 Do Steps 1~7 on pages 58~59.
Add Chapter
RAM
Refer to “Creating Play lists”, Step 5~8 on pages 57~58.
Move Chapter
RAM
Disc / Card Operation
Properties
RAM
Play list information (e.g., time and date) is shown.
PLAY LIST Play List View
DVD-RAM
07
Dinosaur
10/27 Mon 0:30
No. 01
Chapters 001
- - - - - -
Previous Next
Edit → Create
RAM
Refer to “Creating play lists” on pages 57~58.
- -
Create
Properties
01/01
- -
Date 6/23/2004 Wed
Time 2:26.40
2 Press ▲▼◄► to select the position to insert the
chapter and press ENTER.
• The chapter is moved and inserted before the highlighted chapter.
PLAY LIST Move Chapter
DVD-RAM
Divide Chapter
RAM
Refer to “Divide Chapter“ on page 53.
Combine Chapters
RAM
Refer to “Combine Chapters“ on page 53.
Erase Chapter
(Multiple editing is possible. (p. 58))
RAM
Refer to “Erase Chapter“ on page 53.
08 10/27 Mon 0:30
001
002
- - - - - -- - -- - -
- - - - - -- - -- - -
Previous Next
01/01
- - -- - -
59
Page 60

O
C
Disc Setting / Card Setting
▲▼◄►
Top view
DVD
SD
MENU
ENTER
RETURN
4 Press ▲▼ to select the operation and press ENTER.
• After this operation, follow the desired operation.
e.g., DVD-RAM
DISC SETTING
DVD-RAM
Titles 11
Used 0:22
Disc Name
Disc Protection
Erase all titles
Format disc
Free 5:38(EP)
On
To stop partway
Press RETURN.
Disc Name
DVD-RRAM
1 Press ▲▼ to select “Disc Name” and press ENTER
in Step 4 above.
2 Refer to “Entering text” on page 63.
• The disc name is displayed in the DVD Functions window.
DVD
DVD-RAM
Play back
SD
DOCUMENTARY
DISC PROTECTION
CA
RTRIDGE PROTE
DIRECT NAVIGATOR
DVD/SD
DVD-RRAM SD
Preparation
• Press SD or DVD to select the drive.
• Release protection before proceeding:
- Cartridge (p. 9)
- Disc (p. 60)
- Write Protect (p. 11)
RAM
RAM
SD
1 Press MENU in Stop mode, then press ◄► to select
“FUNC.”
2 Press ENTER.
MENU
ADJ. SET UP FUNC.
DVD/SD
OK
PAGE
RETURN
3 Press ▲▼◄► to select “DISC SETTING” or “CARD
SETTING” and press ENTER.
e.g., DVD-RAM
DVD
DVD-R AM
Play back
Record
Dubbing
/ Edit
Set up
DISC PROTECTION OFF
SD
CARTRIDGE PROTECTION OFF
DIRECT NAVIGATOR
TIMER RECORDING
DUBBING
PLAY LIST
SETUP
FLEXIBLE RECORDING
DISC SETTING
Disc Protection
RAM
This allows you to protect discs from accidental erasure.
1 Press ▲▼ to select “Disc Protection” and press
ENTER in Step 4 above.
2 Press ◄► to select “Yes” and press ENTER.
DISC SETTING
DVD-RAM
Titles 11
Used 0:22
Free 5:38(EP)
Disc Protection
Disc Name
Set up Disc Protection.
Disc Protection
Erase all titles
Format disc
Yes No
On
The lock symbol “ ”appears closed when
the disc is write-protected.
Erase all titles
RAM
• All titles and play lists created from them will be erased irretrievably when
you use this procedure. Check carefully before proceeding.
DISC SETTING
DVD-RAM
Titles 11
Used 0:22
Disc Protection
Erase all titles
Disc Name
Format disc
Free 5:38(EP)
On
1 Press ▲▼ to select “Erase all titles” and press
ENTER in Step 4 above.
60
For assistance, please call : 1-800-211-PANA(7262) or, contact us via the web at:http://www.panasonic.com/contactinfo
Page 61

• When appears on the screen while a button is being pressed, it means that the corresponding operation is prohibited by
the unit or the disc.
2 Press ◄► to select “Yes” and press ENTER.
DISC SETTING
DVD-RAM
Titles 11
Used 0:22
All titles and play lists will be erased.
Are you sure you want to continue?
Free 5:38(EP)
Erase all titles
Disc Name
Disc Protection
Erase all titles
Format disc
Yes No
On
3 Press ◄► to select “Start” and press ENTER.
DISC SETTING
• All titles and play lists are erased.
Notes:
• Computer data and still pictures (JPEG, TIFF) cannot be erased.
• Erase does not work if one or more programs are protected.
Format Disc/Format Card
RAM SD
(Refer to “Formatting” on page 70.).
Notes:
• Formatting erases all contents on the disc, including computer data. Check
carefully before proceeding.
• Some DVD-RAM are unformatted. Format them before using them in this
unit. Formatting also allows you to erase the entire contents of a disc.
DVD-RAM
Titles 11
Used 0:22
All titles and play lists will be
completely erased.
Are you sure you want to continue?
Free 5:38(EP)
Erase all titles
Disc Name
Disc Protection
Erase all titles
Format disc
Start Cancel
On
1 Press ▲▼ to select “Format disc” or “Format ”and
press ENTER in Step 4 on page 60.
2 Press ◄► to select “Yes” and press ENTER.
e.g., DVD-RAM
DISC SETTING
DVD-RAM
Titles 11
Used 0:22
Formatting the disc will erase all contents.
This will take approximately 1 minute.
Are you sure you want to continue?
Free 5:38(EP)
Format disc
Disc Name
Disc Protection
Erase all titles
Format disc
Yes No
On
To stop formatting
Press RETURN.
(You can cancel formatting if it takes more than 2 minutes. The
disc or card must be reformatted if you do this.)
Notes:
• Do not turn the unit off or disconnect the AC power supply cord while
the message “Formatting the disc” is on the TV. This can render
the disc unusable. (This can take up to max. 70 minutes (DVD-RAM).
If it takes more than 2 minutes, you can cancel formatting by pressing
RETURN. The disc must be reformatted if you do this.)
• All data on the disc or card is erased when it is formatted, including
recordings made with this unit. Data written to the disc or card by a
computer is also erased.
• When a disc or card has been formatted using this unit, it may not be
possible to use it on any other equipment.
• The disc cannot be formatted if the write protect tab (p. 9) is switched to
“PROTECT”. Release the protection to continue.
• The SD Card cannot be formatted if the write protection (p. 11) is switched
to “LOCK”. Release the protection to continue.
• The message “Unable to format” appears when trying to format discs this
unit cannot use.
• DVD-R and CD-R/RW cannot be formatted.
Select First play
DVD-R
Select whether to show the top menu after finalizing the disc. Do
this before finalizing the disc.
1 Press ▲▼ to select “Select First play” and press
ENTER in Step 4 on page 60.
2 Press ▲▼ to select “Top Menu” or “Title 1” and
press ENTER.
DISC SETTING
DVD-R
Top Menu: The top menu appears first.
Title 1: The disc content is played without displaying the top
menu.
Titles 11
Used 0:22
Disc Name
Disc Protection
Erase all titles
Format disc
Free 5:38(EP)
Select First play
Top Menu
Title 1
On
Disc / Card Operation
3 Press ◄► to select “Start” and press ENTER.
e.g., DVD-RAM
• A message appears when formatting is finished.
DISC SETTING
DVD-RAM
Titles 11
Used 0:22
Format disc
Disc Name
All contents of this disc will be
Disc Protection
completely erased.
Do you want to continue?
Erase all titles
Format disc
Start Cancel
Free 5:38(EP)
4 Press ENTER.
On
(Continued on next page.)
61
Page 62

Finalize
DVD-R
(Refer to “Finalize” on page 70.)
You can play DVD-R on compatible DVD players by finalizing
them on this unit, effectively making them into DVD-Video that
complies with DVD-Video standards.
(DVD-R recorded on this unit only)
1 Press ▲▼ to select “Finalize” and press ENTER in
Step 4 on page 60.
2 Press ◄► to select “Yes” and press ENTER.
Before finalizing After finalizing
Disc display on this unit DVD-R DVD-V
Recording/Editing/ Entering
name
Play on other players
○ ×
× ○
DVD-R finalized on this unit may not be playable on other players due to
the condition of the recording.
DISC SETTING
DVD-R
Titles 11
Used 0:22
This will take approximately ×× minutes.
Do you want to continue?
Free 5:38(EP)
Finalize
Disc Name
Disc Protection
Erase all titles
Format disc
Yes No
On
3 Press ◄► to select “Start” and press ENTER.
• Finalizing starts.
• A message appears when finalizing is finished.
DISC SETTING
DVD-R
Titles 11
Used 0:22
You will be unable to record on this disc
one it is finalized.
Are you sure you want to continue?
Free 5:38(EP)
Finalize
Disc Name
Disc Protection
Erase all titles
Format disc
Start Cancel
On
4 Press ENTER.
Notes:
• Do not disconnect the AC power supply cord while the message
“Finalizing the disc” is on the television. This will render the disc
unusable.
• Finalizing takes up to 15 minutes.
• You can only finalize DVD-R that were recorded on this unit.
• You cannot record on DVD-R that have been finalized.
• After finalizing
- The disc becomes play-only and you can no longer record or edit it.
- DVD-R finalized on this unit may not be playable on other players due to
the condition of the recording.
- There is a pause of several seconds between titles.
- Titles are divided into about 5-minute* chapters.
* This time varies greatly depending on the condition and mode of recording.
• Visit Panasonic’s homepage for more information about DVDs.
http://www.panasonic.com/playDVD-R
62
For assistance, please call : 1-800-211-PANA(7262) or, contact us via the web at:http://www.panasonic.com/contactinfo
Page 63

Entering Text
NUMBER keys
1 Show Enter Name screen.
This feature allows you to enter a name/title Page
Title 52
Title (timer recording) 40~41
Play list 59
Disc 60
Folder (Still pictures) 56
CANCEL
STOP (SET)
PAUSE (ERASE)
ENTER
▲▼◄►
RETURN
Top view
DVD/SD
DVD-RRAM SD
You can give names to recorded titles, etc.
The maximum number of characters:
RAM
Title 64 (44*)
Play list 64
Disc 64
Folder Name (Still pictures) 36
* Title name for timer recording
DVD-R
Title 44
Disc 40
SD
Folder Name (Still pictures) 36
• If a name is long, parts of it may not be shown in some screens.
Preparation
• Press SD or DVD to select the drive.
• Release protection before proceeding:
- Cartridge (p. 9)
- Disc (p. 60)
- Write Protect (p. 11)
RAM
RAM
SD
Characters
Characters
Characters
2 Press ▲▼◄► to select a character and press
ENTER.
Enter Name
Name field:
Shows the text you have entered
_
ERASE
SET
0 --
4
3
2
1
1
C
B
2
A
F
E
3
D
I
H
4
G
L
K
5
J
O
N
6
M
R
S
Q
7
P
V
U
8
T
Y
Z
X
9
W
?
,
0
.
*
!
6
5
b
a
e
d
g
h
j
k
m
n
p
q
u
t
w
x
"
SPACE
8
7
9
0
+
c
–
*
%
/
f
=
&
#
i
$
@
<
l
>
_
[
]
o
)
s
(
r
¯
v
{
}
y
|
z
\
:
;
^
'
`
• Repeat this step to enter other characters.
To erase a character
Press ▲▼◄► to select the character in the name field and
press PAUSE.
• You can also erase characters by selecting “ERASE” and
pressing ENTER.
Using the NUMBER keys to enter characters
e.g., entering the letter “R”
a. Press 7 to move to the 7th row.
b. Press 7 twice to highlight “R”.
c. Press ENTER.
To enter a space
Press CANCEL and press ENTER.
5
J
K
L
7 7
7
6
M
N
O
P
7
Q
RVS
T
8
U
3 Press STOP.
• You can also finish entering the title by selecting “SET” and pressing
ENTER.
• Returns to the previously displayed screen.
To end partway
Press RETURN.
• Text is not saved.
Notes:
• The full title is shown in the Properties screen (pp. 52, 59), but if you enter
a long title, only part of it is shown in the program list or play list screen.
•
• Still picture folder titles:
• Titles are saved in the “TITLE.DVD” folder and can only be displayed on
• Input is not possible if the destination lacks sufficient space or has
• The title may not appear correctly if input was done using other equipment.
If you enter a long title, only part of it is shown in the menu screen
DVD-R
after finalization.
this unit.
exceeded the maximum number of allowable files.
Disc / Card Operation
63
Page 64

H
s
d
Transferring (Dubbing) Still Pictures
3 Press ▲▼◄► to select “DUBBING” and press
ENTER.
e.g., Card
SKIP
DVD
SD
PAUSE
DVD
Play back
Record
Dubbing
/ Edit
Set up
SD
SD CARD
DIRECT NAVIGATOR
TIMER RECORDING
DUBBING
SETUP
WRITE PROTECTION OFF
COPY ALL PICTURES
CARD SETTING
MENU
▲▼◄►
SUB MENU
ENTER
RETURN
Top view
DVD/SD
RAM SD
You can copy the recorded still pictures on the Card to the
DVD-RAM.
You can copy the recorded still pictures on the DVD-RAM to the
Card.
Preparation
• Press SD or DVD to select the drive.
• Release protection before proceeding:
- Cartridge (p. 9)
- Disc (p. 60)
- Write Protect (p. 11)
RAM
RAM
Ι◄◄ /►►Ι
SD
1 Press MENU in Stop mode, then press ◄► to select
“FUNC.”
2 Press ENTER.
MENU
ADJ. SET UP FUNC.
DVD/SD
OK
PAGE
RETURN
4 Press ▲▼ to select “Dubbing direction” and press
►.
• If you are not going to change the registered list press ▼ several
times. (See step 7.)
Cancel all
ancel all
direction
High speed
ist 0
ncel all
irection
High speed
t 0
Set the dubbing direction.
Source SD card
Destination DVD
Set the dubbing direction.
DVD
SD card
Set the dubbing direction.
DVD
SD card
Dubbing
Dubbing direction
1
SD card DVD
Mode
2
Picture High speed
Create List 0
3
Start dubbing
To select Source
Press ▲▼ to select “Source” and press ENTER. Press ▲▼ to
select the drive and press ENTER.
Set the dubbing direction.
ancel all
direction
High speed
ist 0
Source SD card
Destination DVD
Press ENTER to change the setting.
To select Destination
Press ▲▼ to select “Destination” and press ENTER. Press ▲▼
to select the drive and press ENTER.
• The same drive as the transfer (dubbing) source can be
selected.
Set the dubbing direction.
ncel all
irection
igh speed
t 0
Source SD card
Destination DVD
Press ENTER to change the setting.
To confirm
Press ◄.
To cancel all registered transferring (dubbing)
setting and lists
Press ▲▼ to select “Cancel All” and press ENTER. Press ◄►
to select “Yes” and press ENTER.
• The settings and lists may be cancelled in the following
situations.
– When a still picture or folder has been recorded or erased at
the transfer (dubbing) source
– When steps have been taken, for instance, to turn off the
unit, remove the card, open the tray, change the transfer
(dubbing) direction, etc.
64
For assistance, please call : 1-800-211-PANA(7262) or, contact us via the web at:http://www.panasonic.com/contactinfo
Page 65

• When appears on the screen while a button is being pressed, it means that the corresponding operation is prohibited by
the unit or the disc.
5 Press ▲▼ to select “Create list” and press ►.
• Select the transferring (dubbing) items and register on the list.
Dubbing
Cancel all
Dubbing direction
1
SD card DVD
Mode
2
Picture High speed
Create List 0
3
Start dubbing
Dubbing
Cancel all
Dubbing direction
1
SD card DVD
Mode
2
Picture High speed
Create List
3
Start dubbing
To register individual still pictures
Press ▲▼ to select “New entry” and press ENTER. Press
▲▼◄► to select the still picture and press ENTER.
• To select a multiple number of items together, press PAUSE
to add the check mark and press ENTER. (Refer to “Multiple
editing” on page 66.)
• To show other pages (p. 66)
• To select the still pictures in another folder (see right)
• To edit the transferring (dubbing) list (see right)
To register on a folder by folder basis
a. Press ▲▼ to select “Picture/Folder” and press ENTER.
Dubbing
Cancel all
Dubbing direction
1
SD card DVD
Mode
2
Picture High speed
b. Press ▲▼ to select “Folder” and press ENTER.
c. Press ▲▼ to select “New item” and press ENTER.
d. Press ▲▼ to select the folder and press ENTER.
• To select a multiple number of items together, press PAUSE
to add the check mark and press ENTER. (Refer to “Multiple
editing” on page 66.)
• To show other pages (p. 66)
• To switch another higher folder (see right)
• To edit the transferring (dubbing) list (see right)
Still pictures and folders cannot be registered on the same list.
Create a dubbing list.
Picture/Folder Picture
Space on destination 797MB
No. Capacity Name
New entry
Previous Next
SET
Create a dubbing list.
Picture/Folder Picture
Space on destination 797MB
No. Capacity Name
New entry
Previous Next
SET
Create a dubbing list.
Picture/Folder Picture
Space on destination 797MB
No. Capacity Name
New entry
To select another folder
a. Press ▲▼◄► to select “Folder” and press ENTER.
b. Press ▲▼ to select the folder and press ENTER.
DIRECT NAVIGATOR Picture(JPEG) View
01/01
SD CARD
Folder 100_PANA
0002
00030001 0004
0006 0007 00080005
• The still pictures of different folders cannot be registered on the
same list.
PICTURE
• If there is a multiple number of higher folders recognizable, you
can switch them using ◄►. (Folders whose higher folders are
different cannot be registered on the same list.)
DIRECT NAVIGATOR Select Folder
SD CARD
\
DCIM
\
DCIM\100_PANA
001 100_PANA
002 101_PANA
003 102_PANA
01/01
To edit the transferring (dubbing) list
Select the item.
Press SUB MENU.
Press ▲▼ to select the operation and press ENTER.
• Multiple editing is possible. (p. 66)
Dubbing
Cancel all
Dubbing direction
1
SD card DVD
Mode
2
Picture High speed
Create List
Erase all:
Add:
Erase :
3
All currently registering folders are erased.
A folder is added in the desired location (before the
selected folder).
The selected folder is erased.
Erase all
Start dubbing
Erase
6 Press ▲▼ to select “Set” and press ENTER.
• The transferring (dubbing) list is registered.
7 Press ▲▼ to select “Start dubbing” and press
ENTER.
Dubbing
Cancel all
Dubbing direction
1
SD card DVD
Mode
2
Picture High speed
Create List 2
3
Start dubbing
DIRECT NAVIGATOR Select Folder
SD CARD
\
DCIM
\
DCIM\100_PANA
001 100_PANA
002 101_PANA
003 102_PANA
- - -
Create a dubbing list.
Picture/Folder Picture
Space on destination 797MB
No. Capacity Name
100-0832
01
100-0833
02
New entry
Previous Next
Add
Start dubbing.
SET
Press ENTER.
PICTURE
Disc / Card Operation
01/01
• For individual still pictures only
When specifying another folder as the transferring (dubbing)
destination, select “Folder”. Press ◄► to select “Yes” and press
ENTER to start transferring (dubbing).
Dubbing
Cancel all
Folder New folder
Dubbing direction
1
Do you want to create a new folder and copy to it?
SD card DVD
Mode
2
Picture High speed
Start dubbing.
Press ENTER.
Create list Select pictures
SD CARD
Folder 100_PANA
0002
0006 00070005
(Continued on next page.)
00030001
65
Page 66

To stop transferring (dubbing)
Press and hold RETURN for 3 seconds.
To return to the previous screen
Press RETURN.
To show other pages
Press ▲▼◄► to select “Previous” or “Next” and press ENTER.
• You can also press SKIP ►►Ι or SKIP Ι◄◄ to show other pages.
Multiple editing
Select with ▲▼◄► and press
• A check mark appears. Press (PAUSE) again to cancel.
(PAUSE). (Repeat.)
Copy All Pictures
RAMSD
You can copy the whole contents of the Card to DVD-RAM.
(Maximum of 300 folders, 3 000 files)
Preparation
• Press SD or DVD to select the drive.
• Release protection before proceeding:
- Cartridge (p. 9)
- Disc (p. 60)
- Write Protect (p. 11)
RAM
RAM
SD
1 Press SD to select SD drive.
2 Press MENU in Stop mode, then press ◄► to select
“FUNC.”
3 Press ENTER.
MENU
ADJ. SET UP FUNC.
DVD/SD
OK
PAGE
RETURN
4 Press ▲▼◄► to select “COPY ALL PICTURES” and
press ENTER.
DVD
Play back
Record
Dubbing
/ Edit
Set up
SD
WRITE PROTECTION OFF
SD CARD
DIRECT NAVIGATOR
TIMER RECORDING
DUBBING
SETUP
COPY ALL PICTURES
CARD SETTING
6 Press ▲▼◄► to select “Copy” and press ENTER.
• All still pictures are copied. Follow the on-screen instructions.
Copy All Pictures(JPEG)
Copy from SD card
\
DCIM
Copy to DVD
\
JPEG\DCIM001
Copy all pictures(JPEG) in the card.
Copy Cancel
To stop transferring (dubbing)
Press and hold RETURN for 3 seconds.
To return to the previous screen
Press RETURN.
To continue copying all pictures when copying is
completed
Press RETURN.
To finish copying all pictures when dubbing is
completed
Press ENTER.
Notes:
• When transferring (dubbing) the still pictures on a folder by folder or card
by card basis, files other than the still picture files inside the folder will
also be transferred (dubbed). (This does not apply to the lower folders
contained inside the folders.)
• If still pictures are already contained inside the transfer (dubbing)
destination folder, the new still pictures are recorded following the existing
still pictures.
• If the space on the destination drive runs out or the number of files/folders
to be transferred (dubbed) exceeds the maximum (p. 11), transferring
(dubbing) will stop partway through.
• When a name has been input by this unit for the transfer (dubbing)
source folder, the folder name will be reflected in the transfer (dubbing)
destination folder.
• Print number setting (DPOF) is not transferred (dubbed).
• The sequence in which the still pictures are registered on the transfer
(dubbing) list may not be reflected at the transfer (dubbing) destination.
Only if there are multiple selectable folders on
the Card
5 Press ▲▼ to select “Copy from” and press ◄► to
select the dubbing source folder.
Press ▲▼ to select “Copy to” and press ◄► to
select the dubbing target folder.
Copy All Pictures(JPEG)
Copy from SD card
\
DCIM
Copy to DVD
\
JPEG\DCIM001
Copy all pictures(JPEG) in the card.
Copy Cancel
66
For assistance, please call : 1-800-211-PANA(7262) or, contact us via the web at:http://www.panasonic.com/contactinfo
Page 67

Changing the Unit’s Settings
4 Press ▲▼ to select the Menus tab and press ◄►.
POWER
Menus tab
SET UP
Disc
Video
Audio
Language
Ratings
Recording Time in EP Mode
Play DVD-Audio in Video Mode
Level 8
EP (8H)
Off
MENU
▲▼◄►
ENTER
RETURN
DVD SETUP
Front view
Disc Tray SD Card Slot
Procedure
If necessary, refer to “Summary of settings” on next page.
1 Press MENU in Stop mode, then press ◄► to select
“FUNC.”
2 Press ENTER.
MENU
ADJ. SET UP FUNC.
DVD/SD
OK
PAGE
RETURN
5 Press ▲▼ to select the Items and press ENTER.
Items
SET UP
Disc
Video
Audio
Language
Ratings
Recording Time in EP Mode
Play DVD-Audio in Video Mode
6 Press ▲▼ to select an Option and press ENTER.
• Some options require different operations. Follow the displayed
instructions.
SET UP
Options
Disc
Video
Audio
To return to the previous screen
Press RETURN. Even if you have changed an option, the
change is not activated until you press ENTER.
To exit the screen
Press RETURN several times.
Note:
• The settings remain intact even if you switch the unit to standby.
Recording Time in EP Mode
EP (6H)
EP (8H)
Level 8
EP (8H)
Off
Disc / Card Operation
3 Press ▲▼◄► to select “SETUP” and press ENTER.
• You can also press DVD SETUP to enter the setup mode.
e.g., DVD-RAM
If you change “Recording Time
in EP Mode”.
DVD
DVD-RAM
Play back
Record
Dubbing
/ Edit
Set up
DISC PROTECTION OFF
SD
CARTRIDGE PROTECTION OFF
DIRECT NAVIGATOR
TIMER RECORDING
DUBBING
PLAY LIST
SETUP
FLEXIBLE RECORDING
DISC SETTING
67
Page 68

Summary of settings
See page 67 for details on menu operation.
The settings remain intact even if you switch the unit to standby.
Menus tab Items
Disc Languages
Choose the language for audio, subtitle and disc menus.
Press ENTER to display the menu.
Audio Language
Subtitle Language ● Automatic:
Menu Language
Ratings
Set a ratings level to limit DVD-Video play.
Follow the on-screen instructions. Enter a 4-digit password with
the NUMBER keys when the password screen is shown.
● Do not forget your password.
Recording time in EP mode
Select the maximum number of hours for recording in EP mode.
(Refer to “Recording modes and approximate recording times”
on page 39.)
Play DVD-Audio in Video Mode
Select “Video (On)” to play DVD-Video content on some
DVD-Audio.
Video 3-D Y/C Separation
Allows high quality recording of the received picture.
Hybrid VBR Resolution
The picture recorded to a DVD-RAM can be smoothed out.
(Refer to “VBR” on page 70.)
Still Mode
Select the type of picture shown when you pause play.
(Refer to “Frames and fields” on page 70.)
Seamless Play
Plays chapters in the play list in a continuous playback method.
● Seamless Play does not work with programs recorded in
LPCM or when using Quick View.
Line-in NR
Reduces video tape noise while dubbing.
● When noise reduction is on, “3-D Y/C Separation” (see above)
does not work regardless of the setting.
Black Level Control
Select normal, lighter or darker for adjusting the black level control to the desired setting for picture enhancement.
Record level
Adjusts the black level of the signal recorded to a DVD.
Playback level
Adjusts the black level of the DVD playback signal.
(Underlined items are the factory presets.)
Options
● Enter a code (p. 69) when you select “Other
DVD-V
● Some discs start in a certain language despite any changes you make
here.
● English ● French ● Spanish
● Original: The original language of each disc will be selected.
● Other
****
If the language selected for “Audio Language” is not available, subtitles of
that language will automatically appear if available on that disc.
● English ● French ● Spanish ● Other
● English ● French ● Spanish ● Other
● 8 No Limit: All DVD-Video can be played.
● 1 to 7: Prohibits play of DVD-Video with corresponding ratings
● 0 Lock All: Prohibits play of all DVD-Video.
Changing ratings (When level 0-7 is selected)
● Unlock Recorder ● Change Password
● Change Level ● Temporary Unlock
● EP (6 H): You can record for 6 hours on an unused 4.7 GB disc.
● EP (8 H): You can record for 8 hours on an unused 4.7 GB disc.
● Video (On): The setting returns to “Audio (Off)” when you change
● Audio (Off)
● On: High quality recording is achieved by precise separation
● Off: Set to OFF to reduce ghost images when recording
● Automatic: Resolution is adjusted automatically to match the
● Fixed: Recording is performed with fixed resolution. This
● Automatic
● Field: Select if jittering occurs when “Automatic” is selected.
● Frame: Select small text or fine patterns cannot be seen clearly
● On: Enables smoother playback. (Does not function during
● Off: Playback can be done with greater precision, but
● Automatic: Noise reduction only works on input picture from a video
● On: Noise reduction works for any input video.
● Off: Noise reduction is off. Select when you want to record
● Lighter ● Darker
● Lighter ● Normal ● Darker
recorded on them.
the disc or turn the unit off.
of the Y (luminance) and C (color) of the received
picture signal.
pictures with fast motion. Does not work with S-Video
input pictures.
picture when recording and noise is reduced over the
RAM
block.
allows smoother recording of fast moving pictures, etc.
when “Automatic” is selected.
Quick View and when the audio of chapters varies.
Also, playback position may change.)
continuous play may be momentarily halted.
tape.
input as is.
****
”
****
****
68
For assistance, please call : 1-800-211-PANA(7262) or, contact us via the web at:http://www.panasonic.com/contactinfo
Page 69

• When appears on the screen while a button is being pressed, it means that the corresponding operation is prohibited by
the unit or the disc.
Menus tab Items
Audio Search Audio & PLAY ×1.3
You may hear sound regardless of this setting with some discs.
D.Range Compression
(Dolby Digital only)
Change the dynamic range for late night viewing.
Select MTS
Select whether to record the main or secondary audio type
(SAP) when recording to DVD-R or DVD-RAM. (You cannot
change secondary audio when recording audio to DVD-R or
DVD-RAM from an external source.)
Digital Audio Output
Change the settings when you have connected equipment through this unit’s DIGITAL AUDIO OUT terminal. (p. 18)
● Press ENTER to show the menu.
PCM Down Conversion
Select how to output audio with a sampling frequency of
96 kHz or 88.2 kHz.
● Signals are converted to 48 kHz or 44.1 kHz despite the
above settings if the signals have a sampling frequency of
over 96 kHz or 88.2 kHz, or the disc has copy protection.
Dolby Digital
DTS
DVD-V
Select how to output the signal, to output
“Bitstream” so the connected equipment
decodes the signal, or to decode on
this unit and output the signal as “PCM”
(2 channel).
Note:
● Not making the proper settings may result
in noise, possibly damage your hearing
and speakers, and digital recording may
not work properly.
(Underlined items are the factory presets.)
Options
● On: Audio is heard during first level search forward.
● Off: Audio is not heard during search. Quick View (p. 46)
does not work.
● On: ● Off:
● Main: ● SAP:
● On: Signals are converted to 48 kHz or 44.1 kHz. (Choose
when the connected equipment cannot process signals
with a sampling frequency of 96 kHz or 88.2 kHz.)
● Off: Signals are output as 96 kHz or 88.2 kHz. (Choose
when the connected equipment can process signals
with a sampling frequency of 96 kHz or 88.2 kHz.)
● Bitstream: When connecting to equipment displaying the Dolby
Digital logo.
● PCM: When connecting to equipment not displaying the Dolby
Digital logo.
● Bitstream: When connecting to equipment displaying the DTS logo.
Disc / Card Operation
● PCM: When connecting to equipment not displaying the DTS
logo.
Audio for XP Recording
Choose the audio type when recording with XP mode.
● Sound recordings made using LPCM require more
information than usual. Consequently the picture quality of
LPCM recordings may be less than that of normal XP mode
recordings.
• Dolby Digital
(p. 70)
• LPCM (p. 70)
Language Code List
Press NUMBER keys to enter the code.
Abkhazian: 6566 Chinese: 9072 Hausa: 7265 Lithuanian: 7684 Romanian: 8279 Telugu: 8469
Afar: 6565 Corsican: 6779 Hebrew: 7387 Macedonian: 7775 Russian: 8285 Thai: 8472
Afrikaans: 6570 Croatian: 7282 Hindi: 7273 Malagasy: 7771 Samoan: 8377 Tibetan: 6679
Albanian: 8381 Czech: 6783 Hungarian: 7285 Malay: 7783 Sanskrit: 8365 Tigrinya: 8473
Ameharic: 6577 Danish: 6865 Icelandic: 7383 Malayalam: 7776 Scots Gaelic: 7168 Tonga: 8479
Arabic: 6582 Dutch: 7876 Indonesian: 7378 Maltese: 7784 Serbian: 8382 Turkish: 8482
Armenian: 7289 English: 6978 Interlingua: 7365 Maori: 7773 Serbo-Croatian: 8372 Turkmen: 8475
Assamese: 6583 Esperanto: 6979 Irish: 7165 Marathi: 7782 Shona: 8378 Twi: 8487
Aymara: 6588 Estonian: 6984 Italian: 7384 Moldavian: 7779 Sindhi: 8368 Ukrainian: 8575
Azerbaijani: 6590 Faroese: 7079 Japanese: 7465 Mongolian: 7778 Singhalese: 8373 Urdu: 8582
Bashkir: 6665 Fiji: 7074 Javanese: 7487 Nauru: 7865 Slovak: 8375 Uzbek: 8590
Basque: 6985 Finnish: 7073 Kannada: 7578 Nepali: 7869 Slovenian: 8376 Vietnamese: 8673
Bengali;Bangla: 6678 French: 7082 Kashmiri: 7583 Norwegian: 7879 Somali: 8379 Volapük: 8679
Bhutani: 6890 Frisian: 7089 Kazakh: 7575 Oriya: 7982 Spanish: 6983 Welsh: 6789
Bihari: 6672 Galician: 7176 Kirghiz: 7589 Panjabi: 8065 Sundanese: 8385 Wolof: 8779
Breton: 6682 Georgian: 7565 Korean: 7579 Pashto, Pushto: 8083 Swahili: 8387 Xhosa: 8872
Bulgarian: 6671 German: 6869 Kurdish: 7585 Persian: 7065 Swedish: 8386 Yiddish: 7473
Burmese: 7789 Greek: 6976 Laothian: 7679 Polish: 8076 Tagalog: 8476 Yoruba: 8979
Byelorussian: 6669 Greenlandic: 7576 Latin: 7665 Portuguese: 8084 Tajik: 8471 Zulu: 9085
Cambodian: 7577 Guarani: 7178 Latvian, Lettish: 7686 Quechua: 8185 Tamil: 8465
Catalan: 6765 Gujarati: 7185 Lingala: 7678
Rhaeto-Romance:
8277 Tatar: 8484
69
Page 70

Glossary
Bitstream
This is the digital form of multi-channel audio data (e.g., 5.1 channel) before
it is decoded into its various channels.
CPRM (Content Protection for Recordable Media)
CPRM is technology used to protect broadcasts that are allowed to be
recorded only once. Such broadcasts can be recorded only with CPRM
compatible recorders and discs.
Decoder
A decoder restores the coded audio signals on DVDs to normal. This is
called decoding.
Dolby Digital
This is a method of coding digital signals developed by Dolby Laboratories.
Apart from stereo (2-channel) audio, these signals can also be multichannel
audio. A large amount of audio information can be recorded on one disc
using this method.
Dolby Pro Logic
A surround system where a 4-channel audio track is recorded as 2 channels
and then is restored to 4 channels for play. The surround channel is
monaural and can reproduce up to 7 kHz.
Down-mixing
This is the process of remixing the multi-channel audio found on some discs
into two channels for stereo output. It is useful when you want to listen to the
5.1-channel audio recorded on DVDs through your television’s speakers.
Some discs prohibit down-mixing and this unit can then only output the front
two channels.
DPOF (Digital Print Order Format)
DPOF is the standard printing format for still picture data. It is used by
photo developing stores to print out the still picture data taken from a digital
camera and other equipment or when printing from your home printer.
DTS (Digital Theater Systems)
This surround system is used in many movie theaters around the world.
There is good separation between the channels, so realistic sound effects
are possible.
Dynamic range
Dynamic range is the difference between the lowest level of sound that can
be heard above the noise of the equipment and the highest level of sound
before distortion occurs. Dynamic range compression means reducing the
gap between the loudest and softest sounds. This means you can listen at
low volumes but still hear dialog clearly.
Film and video
DVD-Videos are recorded using either film or video. This unit can determine
which type has been used, then uses the most suitable method of
progressive output.
• Film is 24 or 30 frames per second, with motion picture film generally
being 24 frames per second.
• Video is 60 fields per second (two fields making up one frame).
Finalize
A process that makes play of a recorded CD-R, CD-RW or DVD-R etc.
possible on equipment that can play such media. You can finalize DVD-R on
this unit.
You cannot record onto or edit finalized discs.
Formatting
Formatting is the process of making media such as DVD-RAM recordable
on recording equipment. You can format the DVD-RAM on this unit.
Formatting erases irrevocably all recordings on the disc.
Frames and fields
Frames refer to the single images that constitute the video you see on your
television. Each frame consists of two fields.
• A frame still shows two fields, so there may be some blurring, but picture
quality is generally better.
• A field still shows less picture information so it may be rougher, but there is
no blurring.
=
+
Frame Field Field
JPEG (Joint Photographic Experts Group)
This is a system used for compressing/decoding color still pictures. If you
select JPEG as the storage system on digital cameras etc., the data will
be compressed to 1/10–1/100 of its original size. The special quality of this
standard is that there is little deterioration in picture quality in comparison to
the degree of compression.
LPCM (Linear pulse code modulation)
These are uncompressed digital signals. This unit outputs linear PCM sound
in 2 channels from the DIGITAL AUDIO OUT terminal. LPCM sound is
available when recording in XP mode.
MP3 (MPEG Audio Layer 3)
An audio compression method that compresses audio to approximately one
tenth of its size without any considerable loss of audio quality. You can play
MP3 you have recorded onto CD-R and CD-RW.
Playback control (PBC)
If a Video CD has playback control, you can select scenes and information
with menus.
Progressive/Interlace
NTSC, the video signal standard, has 480 interlaced (I) scan lines, whereas
progressive scanning uses twice the number of scan lines. This is called
480P.
Using progressive output, you can enjoy the high-resolution video recorded
on media such as DVD-Video.
Your television must be compatible to enjoy progressive video.
Protection
You can prevent accidental erasure by setting writing protection or erasure
protection.
Sampling frequency
Sampling is the process of converting the heights of sound wave (analog
signal) samples taken at set periods into digits (digital encoding). Sampling
frequency is the number of samples taken per second, so larger numbers
mean more faithful reproduction of the original sound.
Subtitles
When dialogue which appears at the bottom of the screen.
TIFF (Tag Image File Format)
A still picture data standard A common format for storing high quality images
on digital camera’s and other devices.
VBR (Variable bitrate)
This is a method of video recording that adjusts the bit rate according to
video signal.
70
For assistance, please call : 1-800-211-PANA(7262) or, contact us via the web at:http://www.panasonic.com/contactinfo
Page 71

Helpful Hints
Warning and Instruction Displays
These displays will alert you to a missed operation or provide further instructions.
OSD CAUTION Page
ERROR HAS OCCURRED
PLEASE PRESS ENTER.
NO DISC
THIS IS
NON-RECORDABLE DISC
THIS DISC (CARD) IS NOT
FORMATTED PROPERLY
PLEASE FORMAT THE DISC
IN DISC SETTING TO RECORD
CANNOT FINISH RECORDING
COMPLETELY
CANNOT RECORD
DISC IS FULL
CANNOT RECORD
MAXIMUM NUMBER OF TITLES
EXCEEDED
CANNOT READ
PLEASE CHECK THE DISC
CANNOT PLAY • You inserted an incompatible disc (Discs recorded in PAL video etc.). 8
PLEASE CHANGE THE DISC
NO SD CARD
NO VALID SD CARD
NO FOLDER • There is no compatible folder in this unit. 11
CANNOT WRITE
NO READ
UNSUPPORT • You have inserted a disc the unit cannot play or record on. 8~9
U14
U99
SLF CHECK
• A serious, but temporary error has occurred and one of the unit's safety devices has activated.
Press ENTER. The unit switches to the standby mode. Press POWER to turn the unit on again.
• You haven’t inserted a disc. Correctly insert a disc that this unit can use. 9, 34
• The disc is upside down. If it is a single-sided disc, insert it so the label is facing up. 34
• The unit cannot record on the disc you inserted. Insert a DVD-RAM or unfinalized DVD-R. 9
• You inserted an unformatted DVD-RAM or Card. Format the disc or card with this unit. 61
• The program was copy-guarded. –
• No space left on the disc.
→ Create space by erasing any unwanted programs.
→ Use a new disc.
• Recording was not completed for some other reason. –
• No space left on the disc.
→ Create space by erasing any unwanted programs.
→ Use a new disc.
• The operation is prohibited by the unit or disc. 44
• The disc is dirty. –
• There may be a problem with the disc. Press OPEN/CLOSE to remove it and check it for
scratches or dirt. (The unit turns off automatically after you open the tray.)
• The card is not inserted. If this message is displayed with a compatible card already inserted,
turn off the power, remove and then re-insert the card.
• The card format does not match. 11
• The card inserted is not compatible. 11
• The card is currently protected → Release the write protection. 11
• There is no space remaining. → Erase any unwanted files (still pictures). 55, 56
• The disc is dirty or badly scratched.
→ Clean the disc if it is dirty.
→ The disc cannot be played if it is scratched and this display doesn’t disappear.
• The unit cannot read the disc. –
• You have used a DVD-RAM/PD lens cleaner and it has finished. 76
• The unit is hot.
→ The unit switches to standby automatically for safety reasons and you cannot operate it.
Wait for about 30 minutes for the service number to disappear.
→ Select a position with good ventilation when installing the unit.
→ Do not block the cooling fan on the rear of the unit.
• The unit fails to operate properly. Press POWER to switch the unit to standby. Now press
POWER again to turn the unit on.
• There was a power failure or the AC plug was disconnected while the power was on. The unit is
carrying out its recovery process. Wait until the message disappears.
RAM
RAM
DVD-R
DVD-R
RAM
RAM
–
52
52
–
34
10
–
–
–
Information
71
Page 72

Before Requesting Service
Check the following points once again if you are having trouble with your unit.
Power
No power...
Cannot operate the DVD...
Cannot operate the SD (Card)...
The unit is on but cannot be operated...
Operation
Cannot eject a disc...
Remote
Control
The Remote Control doesn’t work...
The images from this unit do not appear on
the television...
Picture flickers...
Picture is not sharp...
Picture
Spots appear on screen, the screen flickers
...
The top and bottom parts of the screen are
blank...
Using Zoom or Just causes top and bottom
of screen to disappear...
There is a lot of after-image when playing
video...
PROBLEM CORRECTION Page
• Insert the AC power supply cord securely into a known active AC outlet. 15
• Set POWER to ON. 12, 13
• Press DVD when operating DVD. 34
• Some operations may be prohibited by the disc. 36~37
• Press SD when operating card. 34
• Recording drive or playback drive have not been selected properly. 34
• Some operations may be prohibited by the disc. 36~37
• The unit is hot (“U14” appears on the display). Wait until “U14” disappears. 71
• One of the unit’s safety devices may have been activated.
Reset the unit as follows:
(1) Press POWER on the main unit to switch to standby. If the unit doesn’t switch to
standby, press and hold POWER on the main unit for about 10 seconds. The unit
is forcibly switched to standby. Alternatively, disconnect the AC power supply cord,
wait 1 minute, then reconnect it.
(2) Press POWER to turn the unit on.
• The Disc Tray can be locked/unlocked.
[Lock]
1 Turn the unit Power ON.
2 Simultaneously press STOP on the unit and POWER on the Remote Control.
[Unlock]
Repeat above steps to unlock.
• If the steps above do not work, there may be a unit malfunction. With unit in OFF
condition, hold down both STOP and CH ▲ buttons on the unit for about 5 seconds.
Remove disc. Contact your retailer.
• The batteries are depleted. Replace them with new ones. 8
• Point the Remote Control at the Remote Control sensor on the main unit.
• Remove obstacles between the Remote Control and main unit. –
• Make sure your antenna system (TV or CABLE) is correctly set. 15
• Make sure the antenna location, direction or connection. 15
• The unit may be receiving influence, such as electromagnetic wave interference or
induced electromagnetic wave from geomagnetism or external forces (automobile,
electric train, power lines, neon light, motor, magnetized metal framework of a building,
metal shutters, etc.).
• Using picture media wider than 16:9, such as cinema vision size media, etc. may
produce blank portions at the top and bottom of the screen.
• The screen position may be out of adjustment.
→ Adjust the screen position.
• Select “MPEG NR” in the OTHER ADJUST menu to “OFF”. 33
–
–
–
–
26
72
For assistance, please call : 1-800-211-PANA(7262) or, contact us via the web at:http://www.panasonic.com/contactinfo
Page 73

PROBLEM CORRECTION Page
No sound...
Low volume...
Distorted sound...
Cannot hear the desired audio type...
Sound
Cannot switch audio...
Cannot record...
Recording, Timer Recording
A part or whole of a recorded title has been
lost...
Timer recording does not work properly...
VCR Plus+ system does not work properly...
Timer recording does not stop even when
STOP is pressed...
The timer program remains even after
recording finishes...
Strip-shaped black noise is recorded...
Cannot record video or sound from the
external device...
• Make sure your antenna system (TV or CABLE) is correctly set. 15
• Check the connections. Check the input mode on the amplifier if you have connected
one.
• Turn SURROUND off if it causes distortion. 31
• Press AUDIO to select the desired audio type. 48
• If “D.MIX” does not appear in the display when playing multi-channel DVD-Audio, audio
output will be the front two speakers only.
• You cannot change the DVD-Audio audio type if the software producer has restricted
play in stereo.
• Turn off SURROUND in the following cases.
- When using discs that do not have surround sound effects such as Karaoke discs.
- When playing MTS broadcast programs.
• You have used digital connection. Set “Dolby Digital" to “PCM" or connect to other
equipment using audio cables (analog connection).
• It is not possible to switch the audio when the recording mode is XP and “LPCM” has
been selected in the SETUP menu, “Audio for XP Recording”.
→ Select “MAIN” or “SAP” from “Select MTS” in the Audio menu before recording.
• There are discs which audio cannot be changed because of how the disc was created. –
• You haven’t inserted a disc or the disc you inserted cannot be recorded on. Insert a disc
the unit can record onto.
• The disc is unformatted. Format the disc.
• The write-protect tab on the cartridge is set to “PROTECT” or the disc is protected with
“DISC SETTING”.
• Some programs have limitations on the number of times they can be recorded (CPRM). 38
• The disc is full or nearly full. Erase unneeded titles or use another disc. 55
• You cannot record on finalized DVD-R discs. –
• If you repeatedly insert discs or turn this unit on and off 50 times or more, the recording
or editing of DVD-R may be disabled.
• The material you are trying to record is copy-guarded. –
• Timer recording will not be activated when in editing or transfer (dubbing). Timer
recording will begin after the editing/transfer (dubbing) is finished.
• You cannot record the COMPONENT and HDMI signals. 16, 17
• If the power shuts down or the plug is disconnected from the household AC outlet while
recording or editing, the program may be lost or the disc may become unusable.
→ We cannot offer any guarantee regarding lost titles or discs. You will have to format
the disc ([RAM]) or use a new disc.
• When connected to cable TV box or satellite receiver, the VCR Plus+ system does not
work.
• The timer program is incorrect or different timer program times overlap. Correct the
program.
• The clock is not correct. Set the clock. 23
• Correct the guide channels with “VCR Plus+ CH Setting” in the PROGRAM CHANNEL
menu.
• The same guide channel is set to 2 or more channel positions. Set the guide channel
correctly or delete unnecessary channels.
• Timer recording will not be activated during formatting, transfer (dubbing) and other
such operations which should not be interrupted when they are being carried out.
• Press and hold STOP for a few seconds to turn “
• The timer program remains if set to daily or weekly. 41
• The device in playback is interfered with by the TV because the device is too close to
the TV. Move the device away from the TV.
• The external device is not correctly connected. 16~20
• The proper external input channel (L1 or L2) is not selected. 43
RAM
” off. Recording stops.
16~20
13
–
31
18, 69
69
9
61
9, 61
–
–
–
–
41
24
24
–
40, 41
–
Information
73
Page 74

PROBLEM CORRECTION Page
Play fails to start even when PLAY is
pressed...
Play starts but then stops immediately...
DVD-Video is not played...
Picture distorted during search...
Alternative sound track and subtitles cannot
be selected...
No subtitles...
Playback
Angle cannot be changed...
You have forgotten your ratings password...
Quick View does not work...
Play stops for a moment during Quick
View...
The resume play function does not work...
Discs recorded on this unit cannot be played
on other equipment...
Cannot format...
Cannot create chapters...
Cannot mark the start point or the end point
during “Shorten” operation...
Edit
Cannot erase chapters...
The available recording time doesn’t
increase even after erasing recordings on
the disc...
Cannot create a play list...
The contents of the card cannot be read...
Still pictures
Transferring (dubbing), erasing and setting
protection takes a long time...
The tray won’t open/close...
Cannot display Direct Navigator screen...
Cannot edit or format a card...
• Insert the disc correctly with the label facing up. 34
• You tried to play a blank DVD-RAM/DVD-R, or discs unplayable on this unit. 8
• When recording to DVD-RAM using EP (8H) mode, play may not be possible on DVD
players that are compatible with DVD-RAM. In this case use EP (6H) mode.
• Some DVD-Video cannot be played when you change the ratings level. 68
• Some distortion is normal. –
• The languages are not recorded on the disc. –
• You may have to use the disc’s own menus to select languages. –
• When progressive output is on, closed captions cannot be displayed. –
• Subtitles are not recorded on the disc. –
• Turn the Subtitles ON. 49
• This function depends on software availability. Even if disc has multiple angles, they
may be recorded for specific scenes only.
• Reset all DVD initial settings to ex-factory condition. 67
• This does not work if the setting is “Off” in “Search Audio & PLAY ×1.3”. 69
• This does not work when audio is other than Dolby Digital. –
• This does not work when recording is in XP or FR mode. –
• Play may stop where two play lists join, but this is malfunction. –
• This function only works when “PLAY” is flashing in the unit’s display. 44
• Memorized positions are canceled when the unit is turned off or when the tray is
opened. The memorized position on the play list is also canceled when the play list and
title are edited.
• Discs recorded on this unit must be finalized in order to play them on other equipment.
• You tried formatting a disc that is not compatible with this unit. 8~9
• If disc is dirty, purchase a special disc cleaner (LF-K200DCA1, where available) and
format after disc is cleaned.
• The unit writes the chapter division information to the disc when you turn it off or
remove the disc. The information is not written if there is an interruption in the power
before this.
• These operations are not possible with still pictures. –
• You cannot set points if they are too close to each other. You cannot set an end point
before a start point.
• When the chapter is too short to erase, use “Combine Chapters” to make the chapter
longer.
• Available recording space on the DVD-R does not increase even after erasing
previously recorded titles.
• You cannot select all the chapters at once in a title if the title also includes still pictures.
Select them individually.
• The memory card format is not compatible with the unit.
→ Format using FAT 12 or FAT 16 with other equipment or format the memory card
with this unit.
• The unit tried to display still picture files that were in a folder level that is not compatible. 11
• The still picture file is not JPEG or TIFF.
→ This unit displays still pictures (JPEG and TIFF) that are in accordance with DCF
standard.
• Turn off and then turn on the unit again. –
• When there are a lot of folders and files, it may sometimes take a few hours. –
• When repeating copying or erasing, it may sometimes take a long time. Format the disc
or memory card.
• The tray cannot be opened or closed while the still pictures are played back and editing
screen is being displayed. Press RETURN a few times to clear the screen.
• This screen cannot be displayed during recording or transfer (dubbing) or while the unit
is standing by for linked timer recording with external equipment.
• Release the card’s protection setting. (With some cards, the “Write protection Off”
message sometimes appears on the screen even when protection has been set.)
68
–
–
10, 76
–
–
53
–
–
61
11
61
–
–
11
74
For assistance, please call : 1-800-211-PANA(7262) or, contact us via the web at:http://www.panasonic.com/contactinfo
Page 75

PROBLEM CORRECTION Page
The display is dim...
“12:00” is flashing on the unit’s display...
Displays
The recording time display, the transfer
(dubbing) process display and the displayed
recording time of MP3 are different from the
actual time...
• Change “FRONT DISPLAY” in the OTHER ADJUST menu. 33
• Set the clock. 23
• The time on the unit’s display and the remaining recording time on the screen may be
indicated less or more than the actual value.
• In DVD-R, the remaining capacity does not increase even if programs are erased. –
–
Miscellaneous
TV sometimes makes a cracking sound...
The main unit is hot.
Poor Video...
(Snow noise, no picture, picture runs, etc.)
HDMI
Poor Audio...
• If you repeat recording or editing 200 times or more, the remaining capacity of the
DVD-R is reduced and then recording or editing may be disabled.
• The time during fast forward and rewind, or the process during transfer (dubbing) may
not be displayed accurately.
• If there is no problem with picture or audio, this sound is a result of normal cabinet
shrinkage due to changes in room temperature. This will not effect performance, etc.
• The main unit radiates heat and some of the parts may become hot. This is not a
problem for performance or quality. Set up at a location with good ventilation. Do not
cover the ventilation holes of the TV with a tablecloth etc., and do not place on top of
other equipment.
• HDMI cable is not connected securely. 17
• Turn the power supply of the TV set and connected equipment OFF then turn on. 17
• Check compatibility of input signal from the connected equipment. 17
• The connected equipment must be EIA/CEA-861/861B compliant. 17
• Change the audio setting of the connected equipment to L.PCM. –
• Check the setting of HDMI INPUT. 17
• If the problem is due to the digital audio connection, change to the analog audio
connection.
–
–
–
–
18
If you cannot resolve the problem, please call the Customer Satisfaction Center for product assistance at 1-800-211-PANA(7262).
To locate an authorized servicenter call toll free 1-800-211-PANA(7262)
or, contact us via the web at:http://www.panasonic.com/contactinfo
Information
75
Page 76

Q & A
Question Answer
I want to enjoy 5.1 Ch surround sound of Dolby
digital, DST, etc. What equipment do I need?
Can I play DVD-Video, DVD-Audio and Video
CDs purchased abroad?
Can a DVD-Video that does not have a region
number be played?
Can I use DVD-R and DVD-RW in this unit?
Can I use CD-R and CD-RW in this unit?
Can I record from a video or outside DVD
source?
Can I play DVD-Rs recorded on this unit on
other machines?
Can I record digital audio signals on this unit? • This is not possible.
How many times can I rewrite a DVD-RAM? • A This varies based on conditions of usage, but they can be rewritten up to about 100 000 times.
Can I record from a commercially purchased
video cassette or DVD?
Can a digital audio signal during DVD playback
be recorded to other equipment?
• A This unit alone is not enough. You will need 6 speakers and, if a digital connection, an amp
equipped with Dolby digital or DST recorder. (DVD playback only)
• You can play them if the video standard is NTSC.
• A Only if the regional code includes “ALL” or “1”. Check the package.
• The DVD-Video region number indicates the disc conforms to a standard. You cannot play discs that
do not have a region number.
• A Only a DVD-R that has been finalized can be used. DVD-RW cannot be used.
• This unit also record and plays 1×-4× recording speed DVD-R discs.
• A CD-R and CD-RW recorded with finalized MP3 music will play. However, this unit does not allow
CD-R and CD-RW recording.
• A Most video tape and DVD titles on the market are copy protected. In this case, recording is not
possible.
• A Once a DVD-R recorded on this unit is finalized, it can be played on other DVD-R compatible
machines. (It is not guaranteed to work with all machines.) It may not play depending on recording
conditions.
• Most commercially sold video cassettes and DVD are copy protected; therefore, recording is usually
not possible.
• You can record if using the PCM signal. When recording DVD, change the “Digital Audio Output”
settings to the following from the SETUP menu.
- PCM Down Conversion: On
- Dolby Digital: PCM
- DTS: PCM
However, only
- As long as digital recording from the disc is permitted.
- As long as the recording equipment is compatible with a sampling frequency of 48 kHz.
You cannot record MP3 signals.
Maintenance
The precision parts in this unit are readily affected by the environment, especially temperature, humidity, and dust. Cigarette
smoke also can cause malfunction or breakdown.
To clean this unit, wipe with a soft, dry cloth.
• Never use alcohol, paint thinner or benzine to clean this unit.
• Before using chemically treated cloth, read the instructions for the cloth carefully.
• Use eyeglass cleaner to remove stubborn dirt from the LCD.
Observe the following points to ensure continued listening and viewing pleasure.
Dust and dirt may adhere to the unit’s lenses over time, possibly making it impossible to record or play discs.
Use the recommended DVD-RAM/PD Lens cleaner (LF-K123LCA1) about once every year, depending on frequency of use and the
operating environment.
Read the lens cleaner’s instructions carefully before use.
CAUTION :
If water or other liquid enters the monitor through the display panel surface, a malfunction may occur.
76
For assistance, please call : 1-800-211-PANA(7262) or, contact us via the web at:http://www.panasonic.com/contactinfo
Page 77

Specifications
Unit
Power Supply 120 V AC, 50/60 Hz
Power Consumption
Broad cast Channels VHF 2 ~ 13, UHF 14 ~ 69
CA BLE Channels
LCD 22-inch, 16:9 aspect ratio LCD panel
Screen size
(W × H × diagonal)
Speaker 8 W (4 W + 4 W)
INPUT
Connection Terminals
COMPONENT VIDEO
INPUT
HDMI INPUT
OUTPUT
Headphones/Earphones Stereo (M3 plug)
Optical digital output
Operating Temperature 5 °C ~ 35 °C (41 °F ~ 95 °F)
Power On: 116 W
Power Off: 0.8 W (Unit)
0.9 W (Remote Control)
Midband A through I (14 ~ 22)
Superband J through W (23 ~ 36)
Hyperband AA ~ EEE (37 ~ 64)
Lowband A-5 ~ A-1 (95 ~ 99)
Special CABLE channel 5A (01)
Ultraband 65 ~ 94, 100 ~ 125
488 mm × 274 mm × 560 mm
VIDEO (RCA PIN Type × 1) × 2:
1.0 Vp-p (75 Ω)
S-VIDEO (MINI DIN 4pin × 1) × 2:
Y: 1 Vp-p (75 Ω)
C: 0.286 Vp-p (75 Ω)
AUDIO L-R (RCA PIN Type × 2) × 2:
0.5 Vrms
Y × 1:
1.0 Vp-p (including synchronization)
PB/PR × 1:
±0.35 Vp-p
AUDIO L-R (RCA PIN Type × 2) × 1:
0.5 Vrms
HDMI type A Connector
AUDIO L-R (RCA PIN Type × 2) × 1:
0.5 Vrms
AUDIO L-R (RCA PIN Type × 2) × 1:
0.5 Vrms
Optical connector: only for DVD/CD
× 1
DVD
Recording system
Recordable discs
Recording time
Discs played
DVD video recording standards
(DVD-RAM),
DVD video standards (DVD-R)
12 cm (5˝) 4.7 GB DVD-RAM discs
12 cm (5˝) 9.4 GB DVD-RAM discs
8 cm (3˝) 2.8 GB DVD-RAM discs
12 cm (5˝) 4.7 GB DVD-R discs (for
General Ver. 2.0)
8 cm (3˝) 1.4 GB DVD-R discs (for
General Ver. 2.0)
Max. 8 hours (using 4.7 GB disc)
XP: 60 minutes
SP: 120 minutes
LP: 240 minutes
EP: 480 minutes
12 cm (5˝) 4.7 GB DVD-RAM discs
12 cm (5˝) 9.4 GB DVD-RAM discs
8 cm (3˝) 2.8 GB DVD-RAM discs
12 cm (5˝) 4.7 GB DVD-R discs
(for General Ver. 2.0)
8 cm (3˝) 1.4 GB DVD-R discs
(for General Ver. 2.0)
DVD-VIDEO discs
CD-Audio discs (CD-DA)
Video CD discs
DVD-AUDIO discs
CD-R/CD-RW discs (CD-DA, Video
CD, MP3 formatted discs)
SD
SD Card Slot SD Memory Card Slot
Compatible media SD Memory Card, MultiMediaCard
Format FAT12 or FAT16
JPEG conforming to DCF (Design rule
Image format
Number of pixels 320 × 240 to 6 144 × 4 096
• Designs and specifications are subject to change without notice.
for Camera File system)
(sub sampling; 4:2:2 or 4:2:0)
TIFF (Uncompressed RGB chunky)
DPOF Compatible
Operating Humidity 10 % ~ 75 %
Weight 13.3 kg
Dimensions
(W × H × D)
592 mm × 518 mm × 294 mm
Information
77
Page 78

Limited Warranty
PANASONIC CONSUMER ELECTRONICS COMPANY, DIVISION OF
MATSUSHITA ELECTRIC CORPORATION OF AMERICA
One Panasonic Way Secaucus, New Jersey 07094
PANASONIC SALES COMPANY, DIVISION OF MATSUSHITA ELECTRIC
OF PUERTO RICO, INC.,
AVE. 65 de Infantería, Km. 9.5 San Gabriel Industrial Park, Carolina, Puerto
Rico 00985
Panasonic/Quasar Video Products
Limited Warranty
Limited Warranty Coverage
If your product does not work properly because of a defect in materials or workmanship, Panasonic Consumer Electronics Company or Panasonic Sales
Company (collectively referred to as “the warrantor”) will, for the length of the period indicated on the chart below, which starts with the date of original
purchase (“warranty period”), at its option either (a) repair your product with new or refurbished parts, or (b) replace it with a new or a refurbished product.
The decision to repair or replace will be made by the warrantor.
Product Parts Labor Service Contact Number
Camcorder
DVD/VCR Deck,
A/V Mixer
TV/VCR, TV/DVD,
TV/DVD/VCR Combination
LCD TV/DVD-Recorder
Combination
TV/HDR Combination
Rechargeable Batteries
(in exchange for defective item)
Tape, DVD-RAM disc
(in exchange for defective item)
Memory Cards (in exchange for
defective item)
During the “Labor” warranty period there will be no charge for labor. During the “Parts” warranty period, there will be no charge for parts. You must carry-in or
mail-in your product or arrange for in-home service, as applicable, during the warranty period.
If non-rechargeable batteries are included, they are not warranted. This warranty only ap plies to products purchased and serviced in the United States or
Puer to Rico. This warranty is extended only to the original purchaser of a new product which was not sold “as is”. A purchase receipt or other proof of the
original purchase date is required for warranty service.
One (1) Year (except CCD Image
Sensor)
CCD Image Sensor - 6 (Six) Months
One (1) Year Ninety (90) Days Carry-In or Mail-In 1-800-211-PANA(7262)
One (1) Year (except CRT)
CRT - Two (2) Years
One (1) Year One (1) Year In-Home or Mail-In 1-800-211-PANA(7262)
One (1) Year (except CRT)
CRT - Two (2) Years
Ten (10) Days Not Applicable Carry-In or Mail-In 1-800-211-PANA(7262)
Five (5) Days Not Applicable Carry-In or Mail-In 1-800-211-PANA(7262)
Ninety (90) Days Not Applicable Carry-In or Mail-In 1-800-211-PANA(7262)
Ninety (90) Days
Ninety (90) Days
Ninety (90) Days
Ninety (90) Days
Ninety (90) Days
Ninety (90) Days
Carry-In or Mail-In 1-800-211-PANA(7262)
Carry-In: 21″ CRT and Smaller
In-Home or Carry-In: 22″ CRT and
Larger
In-Home or Carry-In 1-888-843-9788
1-800-211-PANA(7262)
Carry-In, Mail-in or In-Home Service
For Carry-In, Mail-In or In-Home Service (as applicable) in the United States call toll free contact number listed above or visit Panasonic Web Site:
http://www.panasonic.com
For assistance in Puerto Rico call Panasonic Sales Company (787)-750-4300 or fax (787)-768-2910.
In-Home service, if applicable, requires clear, complete and easy access to the product by the authorized servicer and does not include removal or reinstallation of an installed product. It is possible that certain in-home repairs will not be completed in-home, but will require that the product, or parts of the
product, be removed for shop diagnosis and/or repair and then re turned.
Limited Warranty Limits And Exclusions
This warranty ONLY COVERS failures due to defects in materials or workmanship, and DOES NOT COVER normal wear and tear or cosmetic damage, nor
does it cover markings or retained images on the picture tube or LCD panel resulting from viewing fixed images (including, among other things, letterbox
pictures on standard 4:3 screen TV’s, or non-expanded standard 4:3 pic tures on wide screen TV’s, or onscreen data in a stationary and fixed location).
The warranty ALSO DOES NOT COVER damages which occurred in shipment, or failures which are caused by products not supplied by the warrantor, or
failures which result from accidents, misuse, abuse, neglect, mishandling, misapplication, alteration, faulty installation, set-up ad just ments, misadjustment
of consumer controls, improper maintenance, power line surge, lightning damage, modification, or commercial use (such as in a hotel, office, restaurant, or
other business), rental use of the product, service by anyone other than a Factory Servicenter or other Authorized Servicer, or damage that is attributable to
acts of God.
THERE ARE NO EXPRESS WARRANTIES EXCEPT AS LISTED UNDER “LIMITED WARRANTY COVERAGE”. THE WARRANTOR IS NOT LIABLE
FOR INCIDENTAL OR CONSEQUENTIAL DAMAGES RESULTING FROM THE USE OF THIS PRODUCT, OR ARISING OUT OF ANY BREACH OF
THIS WARRANTY. (As examples, this excludes damages for lost time, cost of having someone remove or re-install an installed unit if applicable, or travel to
and from the servicer, loss of media or images, data or other memory or recorded content. The items listed are not exclusive, but are for illustration only.)
ALL EXPRESS AND IMPLIED WARRANTIES, INCLUDING THE WARRANTY OF MERCHANTABILITY, ARE LIMITED TO THE PERIOD OF THE
LIMITED WARRANTY.
Some states do not allow the exclusion or limitation of incidental or consequential damages, or limitations on how long an implied warranty lasts, so the
exclusions may not apply to you.
This warranty gives you specific legal rights and you may also have other rights which vary from state to state. If a problem with this product develops during
or after the warranty period, you may contact your dealer or Servicenter. If the problem is not handled to your satisfaction, then write to the warrantor’s
Consumer Affairs Department at the addresses listed for the warrantor.
PARTS AND SERVICE (INCLUDING COST OF AN IN-HOME SERVICE CALL, WHERE APPLICABLE) WHICH ARE NOT COVERED BY THIS LIMITED
WARRANTY ARE YOUR RESPONSIBILITY.
78
For assistance, please call : 1-800-211-PANA(7262) or, contact us via the web at:http://www.panasonic.com/contactinfo
Page 79

Customer Services Directory
Obtain Product Information and Operating Assistance; locate your nearest Dealer or Servicenter; purchase Parts and
Accessories; or make Customer Service and Literature requests by visiting our Web Site at:
http://www.panasonic.com/support
or, contact us via the web at:
http://www.panasonic.com/contactinfo
You may also contact us directly at:
1-800-211-PANA (7262),
Monday-Friday 9 am-9 pm; Saturday-Sunday 10 am-7 pm, EST.
For hearing or speech impaired TTY users, TTY : 1-877-833-8855
Accessory Purchases
Purchase Parts, Accessories and Instruction Books online for all Panasonic Products by visiting our Web Site at:
http://www.pasc.panasonic.com
or, send your request by E-mail to:
npcparts@panasonic.com
You may also contact us directly at:
1-800-332-5368 (Phone) 1-800-237-9080 (Fax Only) (Monday – Friday 9 am to 8 pm, EST.)
Panasonic Services Company
20421 84th Avenue South,
Kent, WA 98032
(We Accept Visa, MasterCard, Discover Card, American Express, and Personal Checks)
For hearing or speech impaired TTY users, TTY : 1-866-605-1277
Service in Puerto Rico
Matsushita Electric of Puerto Rico, Inc. Panasonic Sales Company
Factory Servicenter:
Ave. 65 de Infantería, Km. 9.5, San Gabriel Industrial Park, Carolina, Puerto Rico 00985
Phone (787)750-4300 Fax (787)768-2910
As of October 2003
Information
79
Page 80

Guía rápida de uso en español
VIDEO S VIDEO
IN
AUDIO
RL
VIDEO S VIDEO
IN
AUDIO
R
L
Y
COMPONENT VIDEO INPUT
AUDIO
VIDEO
RL
Conexión
Notas sobre las conexiones
• Desconecte la alimentación de todos los componentes antes de
realizar cualquier conexión.
• Si los cables necesarios para conectar un componente al sistema no
están incluidos con el componente o disponibles opcionalmente, quizás
deba adoptar un cable para que se adecue al componente involucrado.
• Consulte cuidadosamente el manual de instrucciones de cada
componente del sistema antes de conectarlo.
Conexión del terminal de entrada RF
PRECAUCIÓN
Apretar demasiado los cables coaxiales RF “tipo tuerca”
podría dañar los conectores. Asegúrelos solamente con los
dedos.
Conexión de la
antena
Conecte el cable de la
antena al terminal VHF/
Antena
VHF
UHF de la unidad.
Mezclador
Conexión del cable
Conecte el cable
suministrado por la
compañía de cable local
al terminal VHF/UHF de
la unidad.
Entrada del
CABLE
Nota para el instalador del sistema de CABLE:
Este recordatorio tiene la finalidad de llamar la atención a los
instaladores del sistema de CABLE (televisión por cable) sobre
el artículo 820-40 de NEC que brinda pautas para una conexión
a tierra apropiada y, en particular, especifica que la tierra del
cable se deberá conectar al sistema de tierra del edificio, tan
cerca del punto de ingreso del cable como sea práctico.
Conexión del terminal de entrada AV
Conecta videograbadores y otros equipos periféricos
Se usa el terminal Video Se usa el terminal S-Video
Antena
UHF
Caja de cables
O
O
Conexión de los terminales de entrada
COMPONENT VIDEO
La señal de componente permite una reproducción del color
más precisa porque cada una de las señales Y, P
B y PR se
reciben por separado.
La indicación del terminal de salida de la señal de componente
diferirá según el dispositivo de salida (Y, P
B, PR).
Lea las instrucciones de funcionamiento suministradas con el
dispositivo de salida.
Reproductor DVD
AUDIO
COMPONENT VIDEO
Señales de componente (Y, PB, PR) que pueden
recibirse
Tipo de
modo
Señales de
formato DTV
• Las señales de entrada que no sean las que aparecen marcadas con un
asterisco * en la lista, le proporcionarán una imagen estable y hermosa.
Nº de puntos
(H × V)
480i 664 × 485 15.73 29.97 480 i
480p 720 × 483 31.47 59.94 480 p
*720p 1 280 × 720 45.00 60.00 720 p
1 080i 1 920 × 1 080 33.75 30.00 1 080 i
Datos de señal
Frecuencia
horizontal
(kHz)
Frecuencia
vertical (Hz)
Exhibición
del menú de
información
Conexión HDMI
HDMI*1 (High Definition Multimedia Interface) es la primera interfaz
A/V de toda la electrónica digital de consumo que soporta el
estándar no comprimido. El terminal HDMI soporta tanto los datos
de vídeo como los de audio.
Puede conectar un dispositivo electrónico de consumo conforme
con la norma EIA / CEA-861 / 861B
Top Box (caja de conexión a Internet) o reproductor de DVD con
terminal de salida HDMI o DVI al terminal de entrada HDMI
Ingrese una fuente de imagen de alta definición con protección
de contenidos digitales de gran ancho de banda (HCDP) a este
terminal HDMI, para poder exhibir en este televisor imágenes de
alta definición en formato digital.
*1
HDMI, el logotipo HDMI y High-Definition Multimedia
Interface son marcas comerciales o marcas comerciales
registradas de HDMI Licensing LLC.
*2
La conformidad de los estándares EIA / CEA-861 /
861B cubre perfiles para la transmisión de video digital
no comprimido, incluyendo la protección de contenidos
digitales de gran ancho de banda.
*2
, como por ejemplo un Set
*1
.
80
For assistance, please call : 1-800-211-PANA(7262) or, contact us via the web at:http://www.panasonic.com/contactinfo
Page 81

Cuando la entrada de señales de audio es
digital
Set Top Box (caja de conexión a Internet)
El conector de la unidad es un conector HDMI de Tipo A.
O
Cuando la entrada de señales de audio es
analógica
Set Top Box (caja de conexión a Internet)
AUDIO IN
R
L
El conector de la unidad es un conector HDMI de Tipo A.
Señal de VÍDEO compatible
Núm. de puntos (H × V) Frecuencia vertical de barrido (Hz)
1080i 1 920 × 1 080i 59.94 / 60
720p 1 280 × 720p 59.94 / 60
480p
720 × 480p
640 × 480p
59.94 / 60
59.94 / 60
480i 720 (1 440) × 480i 59.94 / 60
Este terminal de entrada no está pensado para que se use con
computadoras.
Funcionamiento del televisor
Configuración inicial (listo para reproducir)
Tras enchufar la unidad en la toma de CA de su casa y presionar
POWER para encender la unidad por primera vez, la unidad
le asistirá para configurar el idioma de pantalla, sintonizará
automáticamente todos los canales que puede recibir y ajustará el
reloj.
La unidad determina automáticamente el tipo de transmisión
(ondas de radio o cable) y sintoniza los canales de la siguiente
manera:
Banda Canal
Modo TV
(Ondas de radio)
Modo CATV
(Cable)
VHF 2-13
UHF 14-69
VHF 2-13
CATV LOW BAND 95-99
CATV MID/SUPER BAND 14-36
CATV HYPER BAND 37-65
ULTRA BAND
66-94
100-125
SPECIAL CATV CHANNEL 1
Operaciones preliminares
• Encienda el televisor y seleccione la entrada de vídeo correspondiente
para conformar las conexiones a esta unidad.
• Compruebe que la antena esté conectada correctamente.
1 Presione POWER.
• Para que funcione el botón a distancia POWER, la alimentación
POWER debe estar activada.
Select Language
2 Presione ▲▼ para
seleccionar el idioma del
menú y presione ENTER.
3 Presione ENTER.
Seleccione la Lengua
élection de Langue
S
English
Espa
ñol
Fran
çais
Press ENTER
Pulse ENTER
Appuyer sur ENTER
Ajuste automático canal / reloj
Conectar el cable de antena y si se usa una
caja cable, sintonizarla a su CA local PBS
luego...
Pulsar la tecla ENTER.
4 Presione ENTER para iniciar la configuración
automática de canal.
Ajus. automát
En “Ajus. automát”
Canal 35
MENU
PARAR
• Luego, la unidad procede al ajuste automático del reloj. El
temporizador se visualiza cuando finaliza.
• Si se exhibe “Canal no encontrado...”, presione ENTER de nuevo.
Ajuste automático del reloj
Ajuste automático del reloj terminado.
4/4/2004 12:15 AM
HL---------------ACT
HUSO H.------HHO
• La opción HL, (horario de ahorro de luz diurna), exhibe la
configuración de la hora de verano.
• HUSO.H exhibe la diferencia horaria respecto a la hora de
Greenwich (GMT).
HHO (Hora estándar del Este) = GMT –5
HHC (Hora estándar central) = GMT –6
HHM (Hora estándar de las Rocosas) = GMT –7
HHP (Hora estándar del Pacífico) = GMT –8
HHA (Hora estándar de Alaska) = GMT –9
HHH (Hora estándar de Hawai) = GMT –10
Para otras zonas: xx hr
5 Presione ENTER.
Information
81
Page 82

Si la unidad no ha podido ajustar el reloj
automáticamente
Fije la hora manualmente.
Cómo agregar y borrar canales
Agregue o borre canales, si no tiene ajustados los necesarios o
tiene fijados canales que no necesite.
1 Presione las teclas NUMBER para seleccionar un
canal.
p. ej. 5: [0] → [5]
15: [1] → [5]
115: [1] → [1] → [5]
• Puede también usar CH ▲▼ cuando vaya a borrar un canal.
2 Presione ADD/DLT.
VCR Plus+ guide channel Settings
Ajuste estos canales de guía de manera que se pueda usar el
sistema VCR Plus+ para la grabación temporizada. Antes de
proceder a los ajustes, prepare el papel que muestra los canales,
los nombres de las estaciones y los canales de guía.
por ej.,
Nombre de la
estación
CBS 04 04 Innecesario
HBO 33 15
Nickelodeon 38 20
Mire en los canales de guía para las
estaciones en revistas.
Canal de
guía
Número del
canal
Apunte todas las estaciones que
puede recibir.
Ajuste del canal
Introduzca el canal 15
sucesivo al canal de guía 33.
Introduzca el canal 20
sucesivo al canal de guía 38.
PROGRAM
5 Presione ▲▼ para
CHANNEL
seleccionar el canal de
guía que quiere ajustar y
presione ►.
• Cuando seleccione el canal
guía, presione y mantenga
presionado ▲▼ para
desplazarse por la pantalla
hacia arriba y hacia abajo.
PROGRAM
CHANNEL
6 Presione ▲▼ para seleccionar el canal
correspondiente al de guía y presione ◄.
• Para borrar un número, presione CANCEL.
• Repita los pasos 5 y 6 para introducir otros canales.
7 Presione ENTER.
Para salir de la pantalla
Presione RETURN.
Selección del modo de entrada
Método 1:
1 Presione CH ▲▼.
• La exhibición cambiará de la
siguiente manera.
(TV)
CH2
(CABLE)
CH1
VCR Plus+ Ajuste canal
Canal de guía Canal CATV
125
- - -
1
- - -
2
- - -
3
- - -
VCR Plus+ Ajuste canal
Canal de guía Canal CATV
4
- - -
5
- - -
- - -
6
7
- - -
8
- - -
HDMI*
Componente*
Nota:
• Si ha conectado una caja TV de cable o un receptor de satélite, sistema
VCR Plus+ no funciona como no ha ajustado los canales de la guía.
1 Presione MENU.
2 Presione ◄► para
seleccionar “Config.”
3 Presione ▲▼ para
seleccionar “Prog.
MENU
Aj. Config. Func.
Idioma
Prog.Canales
RELOJ
Bloqueo
Subtítulos
Ponga Títulos
Otro Ajuste
Si
PAJINA
VUELVE
ELIJA
Canales” y presione
ENTER.
4 Presione ▲▼ para
seleccionar “VCR PLUS+
Ajuste canal” y presione
PROGRAM
CHANNEL
Sistema de la antena CATV
Ajus. automát. del canal
VCR Plus+ Ajuste canal
ENTER.
(TV)
Video 2*
CH69
(CABLE)
CH125
Video 1*
Método 2
1 Presione INPUT.
• La exhibición cambiará de la siguiente manera.
Sintonizador*
HDMI*
Sintonizador: Se exhibe la señal de fuente conectada al terminal
VHF/UHF.
Video 1: Se exhibe la señal de fuente conectada al terminal 1 de
entrada AV.
Video 2: Se exhibe la señal de fuente conectada al terminal 2 de
entrada AV.
Componente: Se exhibe la señal de fuente conectada al terminal de
entrada COMPONENT.
HDMI: Se exhibe la señal de fuente conectada al terminal de
entrada HDMI.
Video 1*
Componente*
Video 2*
82
For assistance, please call : 1-800-211-PANA(7262) or, contact us via the web at:http://www.panasonic.com/contactinfo
Page 83

Uso del botón CH/VOL
Seleccione el canal que desee:
Presione las teclas CH ▲▼ o NUMBER.
Ajuste el nivel de volumen que desee:
Presione VOL + o VOL –.
Uso de la tecla Number
Cuando esté seleccionando canales de CABLE del 100 al 125 con
las teclas NUMBER.
Ejemplo 1:
Para seleccionar el canal 125, primero presione la tecla 1, luego
2, luego 5.
Ejemplo 2:
Para seleccionar el canal 12, primero presione la tecla 1, luego
2.
Ejemplo 3:
Para seleccionar el canal 2, primero presione la tecla 0, luego 2.
Sintonización rápida
1 Presione R-TUNE para exhibir el último canal que
estaba mirando.
Apagado del audio
1 Presione MUTE para apagar instantáneamente el
sonido. Presione de nuevo para restaurar el sonido
a su nivel anterior.
Controles ASPECT
Esta función le permite poder ver la imagen en su tamaño máximo,
incluyendo la imagen panorámica de formato de cine.
Funcionamiento del disco / tarjeta de
memoria
Discos que sólo se pueden reproducir
Tipo de disco
DVD-Audio
DVD-Vídeo
Vídeo CD
Audio CD
Logotipo
del disco
Instrucciones
Discos de música de alta
fidelidad
• Reproducidos en esta
unidad en 2 canales.
Discos de películas y
música de alta calidad
Música y video grabados
(incluyendo CD-R/RW)
Audio y música
grabados (incluyendo
CD-R/RW)
CD-R y CD-RW con
música grabada en MP3
(pág. 88)
Discos que pueden grabarse y reproducirse
Tipo de disco
DVD-R
Logotipo del
disco
Indicación en estas
instrucciones de
funcionamiento
Indicación
en estas
instrucciones de
funcionamiento
DVD-A
DVD-V
VCD
CD
(CD-DA)
o
MP3
(MP3)
DVD-R
1 Presione ASPECT para seleccionar el modo de
pantalla.
NORMALCOMPLETOZOOMJUSTO
Modo Imagen Explicación
En el modo JUSTO una
imagen 4:3 se exhibirá en
su tamaño máximo pero
con una corrección de
aspecto aplicada a los lados
de la pantalla de modo
que el alargamiento sólo
se percibirá en los bordes
izquierdo y derecho de la
pantalla. El tamaño de la
imagen dependerá de la
señal original.
En el modo ZOOM la sección
central de la imagen se
ampliará.
En el modo COMPLETO la
imagen se exhibirá en su
tamaño máximo pero con un
ligero alargamiento.
En el modo NORMAL una
imagen 4:3 se exhibirá en
su tamaño estándar 4:3 sin
alargamiento.
JUSTO
ZOOM
COMPLETO
NORMAL
4
4
NORMAL
JUSTO
3
ZOOM
3
COMPLETO
3
4
3
DVD-RAM
• Finalice* el disco después de grabarlo.
*Proceso que permite reproducir discos en equipos compatibles.
RAM
Tarjetas capaces de exhibir y guardar
Tipo de tarjeta Logotipo de tarjeta
Tarjeta de
Meemoria SD
MultiMediaCard
Indication in these
operating instructions
SD
Introducción de un disco
1 Presione OPEN/CLOSE en la unidad para abrir la
bandeja e introducir un disco.
• Presione el botón de nuevo para cerrar la bandeja.
Disco sin cartucho
Introduzca el disco con la
etiqueta en el lado superior.
Disco con cartucho
Introduzca el disco en la guía
de la bandeja.
O
Bandeja del disco.
Introduzca el disco con la etiqueta en el
lado superior, con la flecha señalando
interior.
hacia el
Information
83
Page 84

Insertar/sacar la tarjeta
4 Presione REC para iniciar la grabación.
Sólo inserte o saque la tarjeta tras haber
apagado la unidad.
Cuando parpadea el indicador “SD” en la pantalla de la unidad,
quiere decir que se está leyendo de la tarjeta o escribiendo en
ella. No corte la alimentación ni saque la tarjeta, pues hacerlo
podría ocasionar un funcionamiento erróneo o pérdida del
contenido de la tarjeta.
Insertar una tarjeta
esquina
recortada
Inserte la tarjeta (con la etiqueta cara
arriba y la esquina recortada a la
derecha) y manténgala en su lugar
hasta que oiga un clic.
Sacar la tarjeta
Presione el centro de la tarjeta y a
continuación tire de ella y sáquela.
Grabación de programas de televisión
DVD-RRAM
• En los discos de dos caras, no es posible grabar de manera continua
desde una cara a la otra. Deberá expulsar el disco y darle la vuelta.
• Cuando utilice DVD-RAM de 8 cm, saque el disco del cartucho.
• Podrá grabar hasta 99 títulos en un solo disco.
• Es posible grabar emisiones digitales que permiten “grabación única” al
utilizar discos DVD-RAM compatibles con CPRM. Y no será posible grabar
emisiones digitales que permitan “grabación única” al utilizar DVD-R.
• Los DVD-RAM/DVD-R tienen limitaciones de grabación.
• La grabación se realizará en el espacio disponible del disco. Los datos no
se sobrescribirán.
• Si no queda espacio en el disco de grabación, debe borrar títulos que no
desee o usar un nuevo disco.
• No se pueden grabar discos DVD-R finalizados.
Para especificar una hora para detener la
grabación
Durante la grabación
Presione REC en la unidad o en el control remoto para
seleccionar la hora de grabación.
Cada vez que presione el botón:
OFF 0:30 1:00 1:30
2:004:00 3:00
Para detener la grabación
Presione STOP.
• Se grabará como un título hasta la posición donde se detiene.
DVD-R
•
DVD-R la unidad tardará aproximadamente
30 segundos en completar la información de gestión de la
grabación cuando ésta haya finalizado.
Para realizar una pausa durante la grabación
Presione PAUSE.
Presione PAUSE de nuevo para reanudar la grabación.
Modos de grabación y tiempo aproximado
de grabación
Según el contenido a ser grabado, los tiempos de grabación
pueden salir más cortos que los señalados.
Disc
Recording
Mode
XP (Alta calidad) 12
SP (Normal) 24
LP (Larga duración) 48
EP (Reproducción de
muy larga duración)
De un solo lado
DVD-RAM
(4,7 GB)
*2
8 (6
) 16*1 (12
Doble lado
(9,4 GB)
*1
*1
*1
*1*2
(Unidad: hora)
DVD-R
(4,7 GB)
)8 (6
1
2
4
*2
)
1 Presione OPEN/CLOSE en la unidad para abrir la
bandeja e introducir un disco.
2 Presione las teclas CH ▲▼ o las teclas numéricas
para seleccionar el canal.
Para seleccionar con las teclas numéricas
(NUMBER):
p. ej., 5: [0] → [5]
15: [1] → [5]
115: [1] → [1] → [5]
3 Presione REC MODE para seleccionar el modo de
grabación (XP, SP, LP o EP).
84
XP*
* Para grabar sonido usando LPCM (solo es posible en modo XP):
Seleccione “LPCM” en “Modo Audio para grab. XP” (la calidad de la
imagen puede disminuir ligeramente).
For assistance, please call : 1-800-211-PANA(7262) or, contact us via the web at:http://www.panasonic.com/contactinfo
SP
LP EP
XP
SP
LP
EP (6 H)
EP (8 H)
Calidad de imagen
*1
El tiempo de grabación de un disco a doble cara es la suma total de las
dos caras del disco.
*2
Cuando en el menú SETUP se ha ajustado a “EP (6H)” el “Tiempo de
grab. en el modo EP”. La calidad del sonido se baja, en comparación con
otros modos de grabación, cuando se usa “EP (8H)”.
*2
Tiempo de la grabación
Nota:
• Cuando se graba en DVD-RAM usando el modo EP (8H), la reproducción
puede no ser posible en unidades DVD que sean compatibles con DVDRAM. En este caso utilice el modo EP (6H).
Page 85

Grabacione con temporizador
DVD-RRAM
Precauciones en la grabación temporizada
Cuando llega el tiempo que se definió, la grabación
temporizada inicia automáticamente.
• La grabación temporizada puede iniciar mientras la unidad
está tanto apagada como encendida. Cuando la unidad está
apagada, el sonido y el vídeo no salen en el televisor.
Puede introducir hasta 16 programas con un adelanto de un mes.
Uso del sistema VCR Plus+
Una forma fácil de grabar con temporitzador es ingresando
número de VCR Plus+. Puede encontrar estos códigos en las
programaciones televisivas de periódicos y revistas.
1:58 SPVCR Plus+ Tiempo grabación restante
1 Presione VCR Plus+.
3/29 LUN 12:53 PM
3 Presione ► para desplazar y cambiar los detalles
con ▲▼.
• FECHA
Fecha
Temporizador diario
Temporizador semanal
4 Presione ENTER.
Fecha actual hasta un mes más tarde
menos un día
DOM–SAB→ LUN–SAB → LUN–VIE
DOM SEMANAL →---→ SAB SEMANAL
GRABACION
TEMP.
GRABACION
TEMP.
64 5:10 PM4:20 PM SP
01 3/29 LUN
64 8:00 PM7:00 PM SP
02 4/5 LUN
8:00 PM7:00 PM4/5 LUN64
Nuevo programa
DESACTCANAL FECHA
DESACTCANAL FECHA
3/29 LUN 12:53 PM
MODO
SP
Intr.ir nomb.
3/29 LUN 12:53 PM
MODO
VERIFN°
Habilitar
Habilitar
1:58 SPTiempo grabación restante
1:58 SPTiempo grabación restante
Introducir el número de código PLUS
2 Presione las teclas
NUMBER para introducir
el número PlusCode.
• Presione ◄ para volver a la cifra
GRABACION
TEMP.
utilizando la tecla 0-9.
N°
09
DESACTCANAL FECHA
5:10 PM4:20 PM3/29 LUN 39 SP
1:58 SPTiempo grabación restante
3/29 LUN 12:53 PM
MODO
Intr.ir nomb.
correcta.
3 Presione ENTER.
DESACTCANAL FECHA
5:10 PM4:20 PM SP
1:58 SPTiempo grabación restante
3/29 LUN 12:53 PM
MODO
VERIF
Habilitar
GRABACION
TEMP.
4 Presione ENTER.
• Se almacena la configuración.
N°
01 3/29 LUN
39
• Repita los pasos 1~4 para programar otras grabaciones.
Nuevo programa
5 Presione RETURN.
• “ ” se iluminará en el panel delantero para indicar que se ha
activado el modo de espera de la grabación con temporizador.
• Para cancelar la grabación una vez que ya ha comenzado la
grabación, mantenga presionado el STOP durante unos pocos
segundos.
Programación manual
1 Presione PROG/CHECK.
2 Presione ▲▼ para seleccionar “Nuevo programa” y
presione ENTER.
La línea resaltada
estará preparada para la
programación.
GRABACION
TEMP.
01 3/29 LUN
64
Nuevo programa
DESACTCANAL FECHA
5:10 PM4:20 PM SP
1:58 SPTiempo grabación restante
3/29 LUN 12:53 PM
MODO
VERIFN°
Habilitar
• Repita los pasos 2~4 para programar otras grabaciones.
5 Presione RETURN.
• “ ” se iluminará en el panel delantero para indicar que se ha
activado el modo de espera de la grabación con temporizador.
• Para cancelar la grabación una vez que ya ha comenzado la
grabación, mantenga presionado el STOP durante unos pocos
segundos.
Controle, cambie o borre el programa
1 Presione PROG/CHECK.
Para cambiar un programa
Presione ▲▼ para seleccionar el programa y luego presione
ENTER.
Presione ◄► para desplazarse por las opciones y cambiarlas
con ▲▼, y a continuación presione ENTER.
Para borrar un programa
Presione ▲▼ para seleccionar el programa y a continuación
presione CANCEL.
• No puede borrar programas que se estén grabando en este
momento.
Para poner la unidad en el modo de espera de
grabación con temporizador
Presione RETURN.
• “ ” se iluminará en el panel delantero para indicar que se ha
activado el modo de espera de la grabación con temporizador.
2 Presione RETURN.
• La lista de grabación con temporizador desaparece.
Information
Pulsar ENTER o VCR Plus+ para
introducir un nuevo programa.
85
Page 86

Reproducción durante la grabación
RAM
Reproducción seguida
Es posible empezar la reproducción desde el comienzo de un
título mientras lo sigue grabando.
1 Presione PLAY/×1.3 durante la grabación o la
grabación temporizada.
Grabación y reproducción simultáneas
Es posible comenzar la reproducción del título que se está
grabando o reproducir un título grabado anteriormente.
1 Presione DIRECT NAVIGATOR durante la grabación
o la grabación temporizada.
2 Presione ▲▼◄► para seleccionar el título y
presione ENTER.
Time Slip
Es posible reproducir el título que se está grabando para
controlar su correcta grabación. Es también posible controlar las
partes grabadas anteriormente.
1 Presione TIME SLIP durante la grabación o la
grabación temporizada.
• La reproducción comienza a partir de los 30 segundos anteriores
a ese momento. Lo que se esté grabando en este momento
aparecerá como una imagen incrustada; asimismo oirá el audio de la
reproducción.
Iniciar la reproducción desde el punto en que
se detuvo (función de reanudación)
DVD-A VCD CDDVD-R DVD-VRAM MP3
1 Presione STOP durante la reproducción.
• El mensaje “PLAY” parpadea en la pantalla de la unidad (únicamente
en la reproducción normal). La unidad memorizará la posición.
2 Presione PLAY/×1.3
• La reproducción se iniciará desde el punto en que se detuvo.
Para cancelar la función de reanudación (sólo en
reproducción normal)
Presione STOP mientras la unidad recuerda la posición. (La
posición también se borrará cuando apague la unidad o abra la
bandeja del disco.)
Selección de programas grabados (títulos)
para reproducirlos
DVD-RRAM
DIRECT NAVIGATOR Vista titulo
1 Presione DIRECT
NAVIGATOR.
DVD-RAM
07 08
10 10/27 Lun 8 10/27 Lun
- - - - - -
SUB MENU
02/02
Ant. Sig.
Repr.
- -
Seleccionar
2 Presione ▲▼ para seleccionar el tiempo y presione
ENTER.
Reproducción de discos
DVD-A VCD CDDVD-R DVD-VRAM MP3
1 Presione OPEN/CLOSE en la unidad para abrir la
bandeja e introducir un disco.
• Presione el botón de nuevo para cerrar la bandeja.
2 Presione PLAY/×1.3
• La unidad tardará un cierto tiempo en leer el disco antes de iniciar la
reproducción.
Detener la reproducción
Presione STOP.
• Presione STOP de nuevo para volver a la pantalla de
televisión.
DVD-V DVD-A
• Cuando el mensaje “PLAY” parpadee en la pantalla delantera,
la función de reanudación estará activada.
• El protector de pantalla puede aparecer cuando se detiene
la reproducción. Presione STOP de nuevo y podrá utilizar el
sintonizador de esta unidad para ver televisión.
Pausar la reproducción
Presione PAUSE.
• Presione PAUSE de nuevo para reanudar la reproducción.
CD
VCD
MP3
2 Presione ▲▼◄► para seleccionar el título y
presione ENTER.
• También puede seleccionar títulos con las teclas de número.
p.ej., 5: [0] → [5] 15: [1] → [5]
• Si introduce un número mayor que el número total de títulos, se
seleccionará el último título.
Para detener la reproducción
Presione STOP.
Para salir de la pantalla
Presione RETURN o DIRECT NAVIGATOR.
Iconos de la pantalla de DIRECT NAVIGATOR
Título protegido.
:
Título que no se grabó durante la protección de grabación (emisiones
:
digitales, etc.).
Título que no puede reproducirse porque los datos están dañados.
:
Grabando actualmente.
:
Avance rápido y rebobinado (búsqueda)
DVD-A VCD CDDVD-R DVD-VRAM MP3
1 Presione ►► FF/SLOW o ◄◄ REW/SLOW durante la
reproducción.
• Presione los botones ►►Ι o Ι◄◄ de la unidad y manténgalos presionados.
• La velocidad se incrementará hasta un máximo de 5 pasos.
• Presione PLAY/×1.3 para volver a la velocidad normal.
86
For assistance, please call : 1-800-211-PANA(7262) or, contact us via the web at:http://www.panasonic.com/contactinfo
Page 87

Saltar pistas
Visualización fotograma a fotograma
DVD-A VCD CDDVD-R DVD-VRAM MP3
1 Presione SKIP ►►Ι o SKIP Ι◄◄ durante la
reproducción o en el modo de pausa.
• En la unidad, presione ►►Ι o Ι◄◄ .
• Cada vez que presione estos botones, el número de saltos se
incrementará.
Avanzar un minuto (salto CM)
DVD-RRAM
1 Presione CM SKIP durante la reproducción.
• La reproducción se reanudará al cabo de aproximadamente un
minuto.
Nota:
• Si el inicio del programa siguiente está dentro de un minuto desde el
punto en que saltó, la reproducción se reiniciará desde el principio de ese
programa.
Inicio desde un elemento seleccionado
DVD-A VCD CDDVD-R DVD-VRAM MP3
Iniciar la reproducción desde un título, capítulo o pista
seleccionados.
1 Presione las teclas NUMBER para seleccionar el
elemento durante la reproducción o cuando esté
detenida.
p.ej., 5: [0] → [5]
15: [1] → [5]
MP3
p.ej., 5: [0] → [0] → [5]
15: [0] → [1] → [5]
115: [1] → [1] → [5]
Reproducción en cámara lenta
RAM
DVD-V
DVD-R
VCD
DVD-A
(Sólo partes de imagen animada)
1 Presione ►► FF/SLOW o ◄◄ REW/SLOW con la
reproducción en pausa.
•
Presione los botones ►►Ι o Ι◄◄ de la unidad y manténgalos presionados.
• Cuando la reproducción en cámara lenta continúa durante
aproximadamente 5 minutos, se pondrá en pausa automáticamente.
Para volver a la velocidad normal
Presione PLAY/×1.3.
Vista rápida
RAM
(Sólo con Dolby Digital)
La velocidad de reproducción puede incrementarse sin distorsionar
el audio.
1 Presione PLAY/x1.3 y manténgalo presionado
durante la reproducción.
Para volver a la velocidad normal
Presione PLAY/×1.3.
RAM
DVD-V
DVD-R
VCD
DVD-A
(Sólo partes de imagen animada)
1 Presione FRAME ΙΙ► o FRAME ◄ΙΙ con la
reproducción en pausa.
Para volver a la velocidad normal
Presione PLAY/×1.3.
Exhibición de la imagen de televisión como
imagen incrustada
DVD-RRAM
1 Presione TIME SLIP durante la reproducción.
• La unidad exhibe la imagen del televisor como imagen incrustada
• Oirá el audio de la reproducción.
• Presione TIME SLIP de nuevo para cancelar.
Para mostrar las imágenes reproducidas
completas
Presione TIME SLIP.
Saltar hasta la hora especificada (Time Slip)
DVD-RRAM
1 Presione TIME SLIP
durante la reproducción.
REPR.
0 min
2 Presione ▲▼ para seleccionar la hora mientras se
muestra la indicación.
• El indicador de tiempo se apagará al cabo de 5 segundos, pero se
volverá a encender cuando configure el indicador.
• Presione ▲▼ para cambiar el tiempo en unidades de un minuto.
Presione ▲▼ y manténgalos presionados para cambiar el tiempo en
unidades de 10 minutos.
3 Presione ENTER.
• La reproducción saltará hasta la hora especificada.
Para borrar un programa que se esté
reproduciendo
DVD-RRAM
Puede borrar títulos mientras se están reproduciendo.
1 Presione ERASE durante la reproducción.
• Se exhibirá una pantalla de confirmación.
Borrar
Tiempo grabación restante 2:40(EP)
Se borrará el respectivo capítulo
de la LISTA DE REPRODUCCION.
Borrar Cancelar
2 Presione ◄►para seleccionar “Borrar” y luego
presione ENTER.
Information
87
Page 88

Utilizar menús para reproducir MP3
MP3
Esta unidad puede reproducir archivos MP3 grabados en CD-R/RW
con un computador. Los archivos tratados como pistas y carpetas
se tratarán como grupos.
1 Presione TOP MENU durante la reproducción o el
modo detenido.
G: Grupo n.°
T: n.° de pista en el grupo
TOTAL: n.° de pista./n.° total de pistas
en todos los grupos
Utilizar la pantalla con estructura de árbol para encontrar un
grupo
Grupo seleccionado
MENU
G 1
T 1
TOTAL
1
0 9
N° GRUPO
1 : Mis favoritos
TOTAL PISTA
1
2
/
111
3
4
N°
5
6
7
8
9
10
Ant. Sig.
001 Ambos extremos congelados
002 Estrella de mar
003 Vida en Júpiter
004 Pegamento metálico
005 Píntalo de amarillo
006 Pyjamamama
007 Camarones de Marte
008 Starperson
009 Velvet Cuppermine
010 Estrella de mar Ziggy
ARBOL
2 Presione ► para visualizar la pantalla con estructura
de árbol mientras se muestra la lista de archivos.
Presione ▲▼◄► para seleccionar un grupo y
presione ENTER.
• Aparecerá la lista de archivos del grupo.
Nº de grupos seleccionado/nº total
de grupos.
Si el grupo no tiene ninguna pista,
se mostrará “_ _” como número de
grupo.
MENU
G 8
T 14
TOTAL
40
/
111
N°
0 9
No podrá seleccionar grupos que
contengan archivos no compatibles.
Utilizar la pantalla con estructura de árbol para encontrar una
pista.
ARBOL
música MP3
001 Mis favoritos
001 Pop brasileño
002 Pop chino
003 Pop checo
004 Pop húngaro
005 Notas de línea
006 Pop japonés
007 Pop mexicano
008 Pop filipino
009 Pop sueco
001 Momoko
002 Número estándar
001 Solo de piano
002 Vocal
G 7/25
2 Presione ▲▼ para seleccionar la pista y presione
ENTER.
• La reproducción seguirá hasta la última pista en el último grupo.
• “
” indica la pista que se está reproduciendo.
• También puede seleccionar la pista con las teclas numéricas.
p.ej., 5: [0] → [0] → [5] 15: [0] → [1] → [5]
Para mostrar otras páginas
Presione ▲▼◄► para seleccionar “Ant.” o “Sig.” y presione
ENTER.
• Después de especificar en una lista todas las pistas de un
grupo, aparecerá la lista del grupo siguiente.
Para salir de la pantalla
Presione RETURN o TOP MENU.
Reproducción de imágenes fijas de la tarjeta
o DVD-RAM
RAM SD
1 Inserte un DVD-RAM o una tarjeta.
2 Presione SD o DVD para seleccionar la unidad.
3 Presione DIRECT NAVIGATOR.
•
Presione ▲▼◄► para seleccionar la pestaña “IMAGEN” y a
RAM
continuación presione ENTER.
p.ej., Tarjeta
DIRECT NAVIGATOR Vista de im.(JPEG)
SD CARD
Carpeta 100_PANA
0002
00030001 0004
0006 0007 00080005
- - - - - - - -- - - -- - - -
Ant. Sig.
Repr.
001/001
SUB MENU Seleccionar
IMAGEN
4 Presione ▲▼◄►para seleccionar la imagen fija y
presione ENTER.
• Puede también seleccionar títulos con las teclas NUMBER.
p.ej., 5: [0] → [0] → [0] → [5]
15: [0] → [0] → [1] → [5]
115: [0] → [1] → [1] → [5]
1115: [1] → [1] → [1] → [5]
Para detener la reproducción
Presione STOP.
Para salir de la pantalla
Presione DIRECT NAVIGATOR.
Para seleccionar las imágenes fijas de otra
carpeta
DIRECT NAVIGATOR Vista de im.(JPEG)
5 Presione ▲▼◄► para
seleccionar “Carpeta” y
presione ENTER.
SD CARD
Carpeta 100_PANA
0002
00030001 0004
0006 0007 00080005
- - - - - - - -- - - -- - - -
Ant. Sig.
Repr.
001/001
SUB MENU Seleccionar
IMAGEN
6 Presione ▲▼ para seleccionar la carpeta y presione
ENTER.
• Puede también seleccionar títulos con las teclas NUMBER.
p.ej., 5: [0] → [0] → [5]
15: [0] → [1] → [5]
115: [1] → [1] → [5]
Funciones útiles durante la reproducción de
imágenes fijas
RAM SD
Girar
1 Presione ▲▼◄►para seleccionar una imagen en
la pantalla DIRECT NAVIGATOR y a continuación
presione ENTER.
• La imagen seleccionada se exhibe en la pantalla completa.
2 Presione SUB MENU.
3 Presione ▲▼ para seleccionar “Girar a DERECHA”
o “Girar a IZQUIERDA” y presione ENTER.
Acercar con zoom/Alejar con el zoom
(Sólo para imagen fija con número bajo de píxeles)
1 Presione ▲▼◄►para seleccionar una imagen en la
pantalla DIRECT NAVIGATOR y presione ENTER.
2 Presione SUB MENU.
3 Presione ▲▼ para seleccionar “Acercar con zoom”
y presione ENTER.
• Para devolver a la imagen su tamaño original, presione ▲▼ para
seleccionar “Alejar con el zoom” en el paso 3 y a continuación
presione ENTER.
88
For assistance, please call : 1-800-211-PANA(7262) or, contact us via the web at:http://www.panasonic.com/contactinfo
Page 89

Formatear un disco/Formatear una tarjeta
Finalizar un disco
RAM SD
Notas:
• El formateo borra todo el contenido de un disco, incluyendo los datos del
computador. Compruébelos cuidadosamente antes de formatear.
• Algunos DVD-RAM no tienen formato. Formatéelos antes de utilizarlos en
esta unidad. El formateo también le permite borrar todo el contenido de un
disco.
1 Presione MENU en modo de detención y a
continuación presione ◄► para seleccionar “Func.”
2 Presione ENTER.
3 Presione ▲▼◄► para seleccionar “CONF. DISCO”
o “AJUSTE TARJETA” y presione ENTER.
e. pj., DVD-RAM
4 Presione ▲▼ para
seleccionar “Formateo
del disco” o “Formatear”
y presione ENTER.
DVD
DVD-R AM
Reproducir
Grabar
Copiado
/ Editar
Configurar
CONF. DISCO
DVD-RAM
PROTECCIÓN DEL DISCO DES
SD
LENGÜETA DE PROTECCIÓN DES
DIRECT NAVIGATOR
GRABACION TEMP.
COPIA
LISTA REPR.
SETUP
Títulos 11
Usado 0:22
Formatear el disco borrará los contenidos.
Este proceso durará 1 minuto aprox.
¿ Iniciar formateo del disco ?
GRABACION FLEX.
CONF. DISCO
Espacio 5:38(EP)
Formateo del disco
5 Presione ◄► para
seleccionar “Sí” y
presione ENTER.
6 Presione ◄► para
seleccionar “Iniciar” y
presione ENTER.
• Aparecerá un mensaje cuando
haya finalizado el formateo.
CONF. DISCO
DVD-RAM
Sí No
Títulos 11
Usado 0:22
Todos los contenidos del disco se borrarán.
¿ Iniciar formateado del disco ?
Espacio 5:38(EP)
Formateo del disco
Iniciar Cancelar
7 Presione ENTER.
Para detener el formateo
Presione RETURN.
Notas:
• No apague la unidad ni desconecte el cable de alimentación de CA
mientras el mensaje “Formateando el disco” aparezca en el televisor.
Si lo hace, es posible que el disco no pueda utilizarse. (Este proceso
puede tardar hasta un máximo de 70 minutos (DVD-RAM). Si tarda más
de 2 minutos, puede cancelarlo pulsando RETURN. En este caso, el disco
deberá formatearse de nuevo).
• Todos los datos del disco se borrarán cuando se formatee, incluyendo
grabaciones realizadas con esta unidad. Los datos escritos en el disco
mediante un computador también se borrarán.
• Cuando un disco se ha formateado mediante esta unidad, es posible que
no sea posible utilizarlo en ningún otro equipo.
• El disco no podrá formatearse si la lengüeta de protección contra escritura
está en la posición protegida (PROTECT). Retire la protección para
continuar.
• La tarjeta SD no puede formatearse si la protección contra escritura se
cambia a “LOCK”. Quite la protección para continuar.
• Si se intenta formatear discos que esta unidad no puede usar, aparecerá
el mensaje “Formateo imposible.
• Los DVD-R y los CD-R/RW no pueden formatearse.
DVD-R
(Únicamente para DVD-R grabados en esta unidad)
Puede reproducir DVD-R en reproductores DVD compatibles
finalizándolos en esta unidad y convirtiéndolos en DVD de
vídeo que cumplan con los estándares de DVD de vídeo.
1 Presione MENU en modo de detención y a
continuación presione ◄► para seleccionar “Func.”
2 Presione ENTER.
3 Presione ▲▼◄► para seleccionar “CONF. DISCO”
y presione ENTER.
4 Presione ▲▼ para
seleccionar “Cerrar” y
presione ENTER.
5 Presione ◄► para
seleccionar “Sí” y
CONF. DISCO
DVD-R
Títulos 11
Usado 0:22
Este proceso durará xx minutos aprox.
¿ Es correcto cerrar el disco ?
Espacio 5:38(EP)
Cerrar
Sí No
presione ENTER.
6 Presione ◄► para
seleccionar “Iniciar” y
presione ENTER.
• La finalización se iniciará.
• Cuando la finalización haya
terminado, aparecerá un
mensaje.
CONF. DISCO
DVD-R
Títulos 11
Usado 0:22
Si se cierra el disco,
sólo podrá reproducirse.
¿ Es correcto cerrar el disco ?
Espacio 5:38(EP)
Cerrar
Iniciar Cancelar
7 Presione ENTER.
Notas:
• No desconecte el cable de alimentación de la CA mientras el mensaje
“Finalizando el disco” aparezca en el televisor. Si lo hace, el disco no
podrá utilizarse.
• El proceso de finalización puede tardar hasta 15 minutos.
• Sólo podrá finalizar DVD-R que se hayan grabado en esta unidad.
• No podrá grabar en DVD-R que se hayan finalizado
• Después de la finalización
- El disco sólo podrá reproducirse y ya no podrá grabar en él ni editarlo.
- Los DVD-R finalizados en esta unidad no pueden reproducirse en otros
reproductores DVD debido a la condición de la grabación.
- Se producirá una pausa de varios segundos entre los títulos.
- Los títulos se dividen en capítulos de unos 5 minutos*.
• Este tiempo puede variar en gran medida en función de la condición y el
modo de la grabación.
• Visite la página principal de Panasonic para obtener más información
acerca de los DVD.
Para EEUU: http://www.panasonic.com/playDVD-R
Para Canadá: http://www.panasonic.ca
Antes de la
finalización
Pantalla del disco en esta
unidad
Grabación/edición/introducción
de nombres
Reproducción en otros
reproductores DVD
Es posible que los DVD-R finalizados en esta unidad no puedan leerse en
otros reproductores DVD debido a la condición de la grabación.
DVD-R DVD-V
○ ×
× ○
Después de la
finalización
Information
89
Page 90

Index
A
About LCD Panel ............................................................................2
Accessories .................................................................................... 2
AC Power Plug .............................................................................14
Adding and deleting channels ......................................................22
ASPECT Controls ......................................................................... 26
Audio Adjust .................................................................................31
AUDIO LEVELER ....................................................................32
BASS, TREBLE, BALANCE, SURROUND, D.ENHANCER .... 31
HDMI ........................................................................................ 32
MODE ...................................................................................... 31
STEREO / SAP / MONO .......................................................... 32
Audio Mode for TV Viewing .......................................................... 27
Receivable Broadcast Types ...................................................27
Audio Mute ...................................................................................26
Audio Out connector .....................................................................14
Automatic Channel Setting ........................................................... 22
B
Before Requesting Service ...........................................................72
Before using Disc/Card Functions ................................................ 34
Blocking Message ........................................................................30
C
Change Language Setting ............................................................24
Changing audio during play ..........................................................48
Changing the unit’s settings .........................................................67
To Return to the Factory Settings ............................................ 67
Chapter operations (Direct Navigator) ..........................................53
Combine Chapters ................................................................... 53
Divide Chapter .........................................................................53
Erase Chapter .......................................................................... 53
Chapter operations (Play list) .......................................................59
Add Chapter ............................................................................. 59
Combine Chapters ................................................................... 59
Divide Chapter .........................................................................59
Erase Chapter .......................................................................... 59
Move Chapter ..........................................................................59
Clock Settings .............................................................................. 23
Auto Clock Setting ...................................................................23
Manual Clock Setting ............................................................... 23
Time Zone Adjust ..................................................................... 23
Closed Caption System ................................................................ 30
Common procedures .................................................................... 49
Disc menu ................................................................................ 49
Play menu ................................................................................ 50
Component signal Input connector ...............................................14
Connecting the “1, 2” AV Input Terminals ....................................16
Connecting the Audio Output Terminal ........................................18
Connecting the COMPONENT VIDEO Input Terminals ............... 16
Connecting the Headphones / Earphones Jack ...........................20
Connecting the RF in Terminal .....................................................15
Copy All Pictures ..........................................................................66
Create chapters ............................................................................ 48
Creating play lists .........................................................................57
Customer Services Directory ........................................................ 79
D
Disc setting/Card setting .............................................................. 60
Disc Name ...............................................................................60
Disc Protection ......................................................................... 60
Erase all titles ...........................................................................60
Finalize .....................................................................................62
Format Disc/Format Card ........................................................61
Select First play .......................................................................61
Displaying the television image as a picture-in-picture ................ 46
DVD/SD Functions Window ......................................................... 35
E
Editing Still Pictures ...................................................................... 55
Editing still pictures folders ........................................................... 56
Editing titles/chapters and playing chapters .................................51
Entering text .................................................................................63
F
Fast forward and rewind (Search) ................................................45
Finalize ......................................................................................... 62
Flexible Recording (FR) ............................................................... 39
Format Disc/Format Card ............................................................. 61
Frame-by-frame viewing ............................................................... 46
G
Glossary ....................................................................................... 70
H
HDMI Connection .........................................................................17
HDMI Input connector .................................................................. 14
I
Important Safety Instructions ..........................................................4
Information (Card) ........................................................................11
Card Handling .......................................................................... 11
SD Memory Card Write Protection ...........................................11
Still Pictures .............................................................................11
Still picture folder structure ......................................................11
Information (Disc) ...........................................................................8
Discs or Card you can use ......................................................... 9
Discs you can use for recording and play .................................. 9
Disc Composition Examples ....................................................10
Disc Handling ........................................................................... 10
Play-only discs ........................................................................... 8
Region Management Information .............................................10
Which should I use, DVD-RAM or DVD-R? .............................10
Information (MP3) ......................................................................... 11
Naming folders and files ..........................................................11
Tips for making MP3 discs ....................................................... 11
Information (Unit) ............................................................................ 8
DST (Daylight Saving Time) ......................................................8
Loading the Batteries ................................................................. 8
Initial Setup (Ready to Play) ......................................................... 21
Input Label ....................................................................................28
Inserting/Removing the Card ........................................................34
Inserting a Disc ............................................................................. 34
Installation ...................................................................................... 2
90
L
Language Code List .....................................................................69
Limited Warranty ..........................................................................78
For assistance, please call : 1-800-211-PANA(7262) or, contact us via the web at:http://www.panasonic.com/contactinfo
Page 91

M
Maintenance ................................................................................. 76
O
Optical digital Audio Out connector ..............................................14
Other Adjust ................................................................................. 33
3D Y/C .....................................................................................33
COLOR MATRIX ......................................................................33
FRONT DISPLAY ....................................................................33
MPEG NR ................................................................................33
POWER SAVE ......................................................................... 33
VIDEO NR ................................................................................33
S
Selecting audio to record ..............................................................39
Selecting Input Mode ....................................................................25
Selecting recorded programs (titles) to play ................................. 45
Skipping ........................................................................................ 45
Skipping a minute forward (CM Skip) ........................................... 45
Skipping the specified time (Time Slip) ........................................46
Sleep Timer ..................................................................................25
Slow-motion playback .................................................................. 46
Specifications ............................................................................... 77
Starting from a selected item ........................................................46
Status messages (Disc) ............................................................... 35
P
Phones Jack ................................................................................. 14
Picture Adjust ...............................................................................32
ADVANCED ADJUST .............................................................. 33
BACK LIGHT, PICTURE, BRIGHTNESS, COLOR, TINT,
SHARPNESS, AI PICTURE, COLOR TEMP ........................... 32
PIC MODE ...............................................................................32
Picture and folder operations ....................................................... 56
DPOF ....................................................................................... 56
Erase Picture/Erase Whole Folder ...........................................56
Folder Name ............................................................................56
Set up Protection/Cancel Protection ........................................ 56
Start Slide Show/Slide Interval .................................................56
Playing discs ................................................................................ 44
Starting play from where you stopped it (Resume Function) ... 44
When a menu screen appears on the television ...................... 44
Playing play lists ........................................................................... 58
Playing still pictures on the Card or DVD-RAM ............................54
Playing while you are recording ................................................... 42
Chasing playback .....................................................................42
Simultaneous Recording and Play ........................................... 42
Time Slip .................................................................................. 42
Play list operations .......................................................................59
Edit → Change Thumbnail ....................................................... 59
Edit → Copy ............................................................................. 59
Edit → Create ..........................................................................59
Edit → Enter Name .................................................................. 59
Erase ........................................................................................59
Properties .................................................................................59
Position/Size ................................................................................. 26
Q
Quick View ................................................................................... 46
Q & A ............................................................................................ 76
R
Rapid Tune ................................................................................... 25
Recording and Playing Back a Closed Caption Program ............. 31
Recording from a video cassette recorder ................................... 43
Recording television programs ..................................................... 38
Recording modes and approximate recording times ...............39
Remote Control Buttons ...............................................................12
Reset all unit Memory Functions ..................................................24
T
Table of Contents ...........................................................................3
Timer Recording ........................................................................... 40
Check, change or delete a program .........................................41
Manually programming ............................................................40
Using VCR Plus+ system .........................................................40
Title operations (Direct Navigator) ................................................52
Edit → Change Thumbnail ....................................................... 53
Edit → Divide Title ...................................................................53
Edit → Enter Name .................................................................. 52
Edit → Set up Protection/Cancel Protection ............................52
Edit → Shorten .........................................................................52
Erase ........................................................................................52
Properties .................................................................................52
To display information about the Still Pictures ............................. 54
To erase a program that is being played back .............................47
To View a Blocked Program/Movie ..............................................30
Transferring (dubbing) still pictures ..............................................64
TV Status & Clock Display ........................................................... 27
U
Unit Buttons .................................................................................. 13
Useful functions during still picture play .......................................55
Erase ........................................................................................55
Rotate ...................................................................................... 55
Zoom in/Zoom out .................................................................... 55
Using menus to play MP3 ............................................................ 47
Using the CH/VOL Button ............................................................ 25
Using the NUMBER keys .............................................................25
V
V-Chip Control Features ...............................................................28
VCR Plus+ guide channel Settings ..............................................24
VHF/UHF Antenna Input terminal .................................................14
Video Input 1, 2 connector ........................................................... 14
VIDEO NR ....................................................................................33
W
Warning and Instruction Displays ................................................. 71
Information
91
Page 92

LSQT0853 A
Panasonic Consumer Electronics Company,
Division of Matsushita Electric Corporation of America
One Panasonic Way Secaucus, New Jersey 07094
Panasonic Sales Company (“PSC”),
Division of Matsushita Electric of Puerto Rico, Inc.
Ave. 65 de Infantería, Km. 9.5
San Gabriel Industrial Park, Carolina, Puerto Rico 00985
P
Printed in Japan
LSQT0853 A
S0904-0
 Loading...