

Page 1
KEYBOARD
SX-KC611
QQTG0588AENGLISH
Page 2
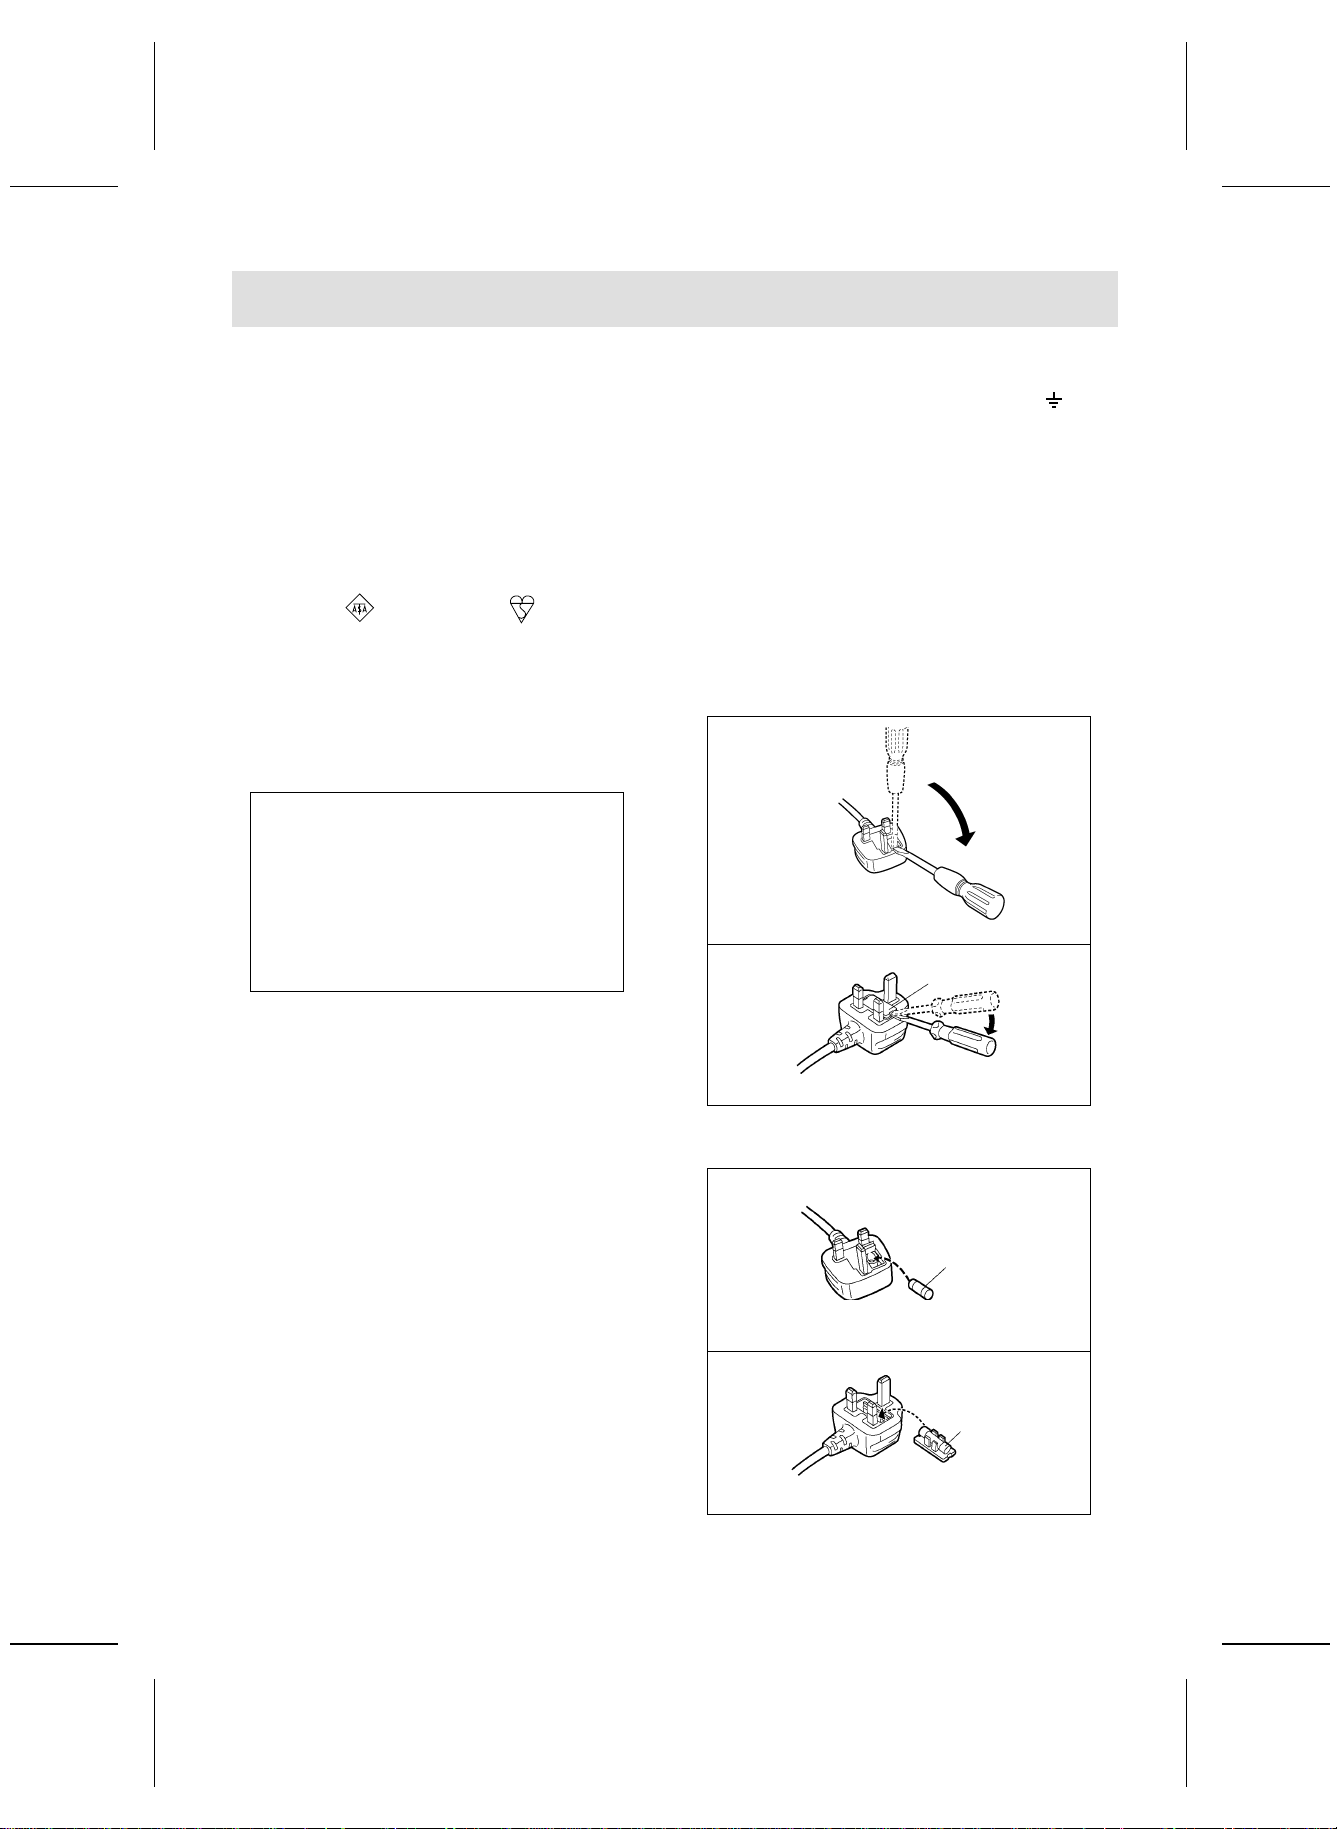
Caution for AC Mains Lead
(For the types a s shown in fig ures A
and B)
For your safety, please read the followi ng text carefully.
This appliance is s up plied with a mo ulded three pin
mains plug for your sa fety and conven ience. A 5ampere fuse is fitted in this plug. Sho uld the fuse
need to be replaced please ensure that the replacement fu se has a rating of 5-ampere an d that it is
approved by ASTA or BSI to BS1362. Check for the
ASTA mark or the BSI mark on the body
of the fuse.
If the pl ug cont ains a remov abl e fuse c over y ou mu st
ensure that it is re fitted when the fu se is rep laced.
If you lo se the fuse cover the plug must not be used
until a re plac ement c over is ob tained.
A replacement fuse cover can be purcha sed from
your local dealer.
CAUTION!
IF THE FITTED MOULDED PLUG IS
UNSUITABLE FOR THE SOCKET OUTLET IN
YOUR HOME THEN THE FUSE SHOULD BE
RE-MOVED AND THE PLUG CUT OFF AND
DIS-POSED OF SAFELY. THERE IS A
DANGER OF SEVERE ELECTRICAL SHOCK
IF THE CUT OFF PLUG IS INSERTED INTO
ANY 13-AMPERE SOCKET.
WARNING: DO NOT CONNECT EITHER WIRE TO
THE EARTH TERMINAL WHICH IS MARKED WITH
THE LETTER E, BY THE EART H SYMBOL O R
COLOURED GREEN OR GREEN/ YELLOW.
THIS PLUG IS NOT WATERPROOF
—KEEP DRY.
Before use
Remo ve th e conne ctor cover .
How to replace the fuse
The location of the fuse di ffer according to the type
of AC mains plug (figures A and B). C onfirm the A C
mains plug fitted and follow the instructions below.
Illustrations may differ from actual AC mains plug.
1.Open the fuse cover with a screwdriver.
Figure A
Figure B
Fuse cover
If a new plu g i s t o be fi tt ed plea se o bser v e th e w ir ing
code as stated below. If in any doubt please consul t
a quali fied elec trician.
IMPORTANT
The wires in th is mains lead are coloured in accordance with the following code:
Blue: Neutral, Brown: Live.
As thes e colo urs m ay not corre spond with t he co loured markings identifying the terminals in your
plug, p roceed a s follo ws:
The wire which is colour ed B lue mu st be connec te d
to the t erminal which is marke d with th e le tter N or
coloure d Blac k or Blue .
The wire which is coloured Brown must be connected to the terminal which is marked with the letter
L or coloured Brown or Red.
2.Replace the fuse an d close or att ach the fuse
cover.
Figure A
Fuse
(5 ampere)
Figure B
Fuse
(5 ampere)
2
QQTG0588
Page 3
OWNER’S MANUAL
Caution
Voltage (exc ept North Ameri ca, Mexico, Euro pe, Australia, New Zealand, Ch ina and
Russia)
Be sure the v oltage adj uster loca ted on the AC ada ptor is in accordanc e with local voltage
in your area before using this unit. U se a screwdri ver to set the volt age adjus ter to the loc al
voltage.
(for Canad a)
CAUTION:
TO PREVENT ELECTRIC SHOCK MATCH
WIDE BLADE OF PLUG TO WIDE SLOT,
FULLY INSERT.
WARNING: TO RE DUCE THE RI SK OF FIRE OR E LECTRIC SHOCK , DO NOT
EXPOSE THIS PRODUCT TO RAIN OR MOISTURE.
BEFORE YOU PLAY, PLEASE READ THE CAUTIONARY COPY APPEARING ON
PAGE 4.
Before you play
For long and pleasurable use of this instrument, and to gain a thorough understanding of your KC611
Keyboard, it is strongly recommended that you read through this Owner’s Manual once.
The Owner’s Manual is comprised of the f ollowing parts.
BASIC FUNCTIONS
This part includes an explanation of basic procedures and points you should be aware of for
proper operation of your instrument.
PRACTICAL APPLIC ATIONS
This part comprises a detailed explanation of sound, effect, rhythm, Recording, Disk Drive and
Setting functions.
REFERENCE GUIDE (separate booklet)
Reference guide for the contents of the Sound Li st, Drum Kits, MIDI Implementation Chart.
QQTG0588
3
Page 4

Cautions for safest use of this unit
Installation location
1. A well-ventilated place.
Take care not to us e this un it in a place whe re it
will not rec eive suf ficient v entilatio n, and n ot to permit the ventilation holes to be covered by curtains,
or any similar materials.
2. Place a way fro m dire ct sunlig ht and e xcessiv e heat
from heating equipment.
3. A place where humidity, vibration and dust are minimized.
Power source
1. For the power source, use ONLY the included AC
adaptor. Use of a diffe rent A C adapt or may r esult i n
malfunct ion or ev en dam age to t he equ ipment.
2. If the unit is not to be used for some time, rem ove
the AC adaptor from th e wall socket.
Handling the power cord
1. Nev er touc h the po wer cor d, or i ts plu g, with wet
hands.
2. Don’t pull the power cord.
Metal items inside the unit may result in electric shock or damage.
Do not permit m etal article s to get inside the unit.
Be especia lly caref ul with re gard to th is point if child-
ren are near this unit. They should be warned never
to try to put an ything inside.
If, neverthele ss, some such a rticle does ge t inside, disconnect t he po wer cord plug f rom the e lectric al outle t,
and contact the store where the unit was purchased.
If water gets into the unit
Disconnect the power cord plug from the electrical outlet, and cont act the s tore w here i t was pur chased .
As a prec autio n, it is sugg ested th at fl ower va ses and
other containers which hold liquids not be placed on
the top of this un it.
If operation seems abnormal
Immediately turn off the power, disconnect the power
cord plu g from the elec trical outle t, and contact the
store where it was purchased.
Discontinue using the unit at once. Failure to do so
may resul t in ad dition al dama ge or som e other unexpected damage or accident.
•Be cause t he powe r sourc e is lo cated in side t he unit,
it is normal for the cabinet to become warm.
A word about the power cord
If the power cord is scarred, is partially cut or broken,
or has a bad co ntact, it may cause a fire or serio us
electrical shoc k if used. NEVER use a dam aged
power cord for any appliance. Moreover, the power
cord should never be forcibly bent.
Don’t touch the inside parts of this unit.
Some pl aces ins ide this unit hav e high vo ltage potential. Never try to remove the top or back panels of this
unit, or to touc h ins ide part s by ha nd or wit h tool s.
Contact someone who is qualified in order to inspect
the inside, or to replace a fuse, if such becomes necessary. Never attem pt to do these thin gs yourself.
Maintenance
The foll owing s uggest ions wi ll assist you in ke eping
the unit in top condition.
•Be sure to switch the inst rument off afte r use, and
do not s witch th e unit on and o ff in q uick suc cession, as this places an undue load on the electronic
components.
•To keep th e lust er of th e surfa ce and b utton s,
simply use a clean, damp cloth; polish with a soft,
dry cloth . Polis h may be used bu t do n ot use th inners or pe tro- chemic al-based polishe s.
•A w ax-bas ed polis h may be used on the c abinet, al-
though you will find that rubbing with a soft cloth will
suffi ce.
4
QQTG0588
Marking si gn is locat ed on bottom of the unit.
SERVICE MUST BE CARRIED OUT BY DEALER
OR OTHER QUALIFIED PERSON
Page 5
Contents
Cautions for sa fes t us e o f this un it . . . . . . . . . . . . . . . . . . . . . . . . . . . . . . . . . . . . . . . . 4
Controls and f unc ti on s . . . . . . . . . . . . . . . . . . . . . . . . . . . . . . . . . . . . . . . . . . . . . . . . . .6
BASIC FUNCTIONS
Getting started . . . . . . . . . . . . . . . . . . . . . . . . . . . . . . . . . . . . . . . . . . . . . . . . 8
Playing . . . . . . . . . . . . . . . . . . . . . . . . . . . . . . . . . . . . . . . . . . . . . . . . . . . . . . 9
Listen to the demonstration . . . . . . . . . . . . . . . . . . . . . . . . . . . . . . . . . . . .11
Add an automatic accompaniment . . . . . . . . . . . . . . . . . . . . . . . . . . . . . .12
Play back the included Song Disk . . . . . . . . . . . . . . . . . . . . . . . . . . . . . . .14
Record your performance . . . . . . . . . . . . . . . . . . . . . . . . . . . . . . . . . . . . . . 15
Beat Master . . . . . . . . . . . . . . . . . . . . . . . . . . . . . . . . . . . . . . . . . . . . . . . . .16
PRACTICAL APPL ICATIO NS
About the display . . . . . . . . . . . . . . . . . . . . . . . . . . . . . . . . . . . . . . . . . . . . . 19
Part I Sounds and eff ects
Sound . . . . . . . . . . . . . . . . . . . . . . . . . . . . . . . . . . . . . . . . . . . . . . . . . . . . . . 20
Conductor . . . . . . . . . . . . . . . . . . . . . . . . . . . . . . . . . . . . . . . . . . . . . . . . . . 21
Solo Piano . . . . . . . . . . . . . . . . . . . . . . . . . . . . . . . . . . . . . . . . . . . . . . . . . .22
Effects . . . . . . . . . . . . . . . . . . . . . . . . . . . . . . . . . . . . . . . . . . . . . . . . . . . . .22
Transpose . . . . . . . . . . . . . . . . . . . . . . . . . . . . . . . . . . . . . . . . . . . . . . . . . .23
Harmony . . . . . . . . . . . . . . . . . . . . . . . . . . . . . . . . . . . . . . . . . . . . . . . . . . . .24
Part II Playing the rhythm
Rhythm . . . . . . . . . . . . . . . . . . . . . . . . . . . . . . . . . . . . . . . . . . . . . . . . . . . . . 25
Synchro Start . . . . . . . . . . . . . . . . . . . . . . . . . . . . . . . . . . . . . . . . . . . . . . . .26
Tempo . . . . . . . . . . . . . . . . . . . . . . . . . . . . . . . . . . . . . . . . . . . . . . . . . . . . .26
Rhythm performance . . . . . . . . . . . . . . . . . . . . . . . . . . . . . . . . . . . . . . . . .27
Auto Play Chord . . . . . . . . . . . . . . . . . . . . . . . . . . . . . . . . . . . . . . . . . . . . .28
One Touch Play . . . . . . . . . . . . . . . . . . . . . . . . . . . . . . . . . . . . . . . . . . . . . .30
Panel Memory . . . . . . . . . . . . . . . . . . . . . . . . . . . . . . . . . . . . . . . . . . . . . . . 31
Party Pads . . . . . . . . . . . . . . . . . . . . . . . . . . . . . . . . . . . . . . . . . . . . . . . . . . 32
Part III Recording
Record your performance . . . . . . . . . . . . . . . . . . . . . . . . . . . . . . . . . . . . . . 33
Playing back your recorded song . . . . . . . . . . . . . . . . . . . . . . . . . . . . . . .34
Store a chord progression . . . . . . . . . . . . . . . . . . . . . . . . . . . . . . . . . . . . .34
Part IV Disk Drive
Parts of the floppy disk drive . . . . . . . . . . . . . . . . . . . . . . . . . . . . . . . . . . . 36
Playing the included Song Disk . . . . . . . . . . . . . . . . . . . . . . . . . . . . . . . . .36
Playback of commercial disks (Direct Play) . . . . . . . . . . . . . . . . . . . . . . . 37
Save your recorded song . . . . . . . . . . . . . . . . . . . . . . . . . . . . . . . . . . . . . .38
Part V M enu
Outline of the procedure . . . . . . . . . . . . . . . . . . . . . . . . . . . . . . . . . . . . . . .41
Setting menus . . . . . . . . . . . . . . . . . . . . . . . . . . . . . . . . . . . . . . . . . . . . . . .42
Symptoms w hic h a ppe ar to be signs of tr oub le . . . . . . . . . . . . . . . . . . . . . . . . . . . .45
Connections . . . . . . . . . . . . . . . . . . . . . . . . . . . . . . . . . . . . . . . . . . . . . . . . . . . . . . . . . . .46
Separately sold option . . . . . . . . . . . . . . . . . . . . . . . . . . . . . . . . . . . . . . . . . . . . . . . . . . 46
Index . . . . . . . . . . . . . . . . . . . . . . . . . . . . . . . . . . . . . . . . . . . . . . . . . . . . . . . . . . . . . . . . .47
Specifications . . . . . . . . . . . . . . . . . . . . . . . . . . . . . . . . . . . . . . . . . . . . . . . . . . . . . . . . . 48
Demo Perf orma nce L ist . . . . . . . . . . . . . . . . . . . . . . . . . . . . . . . . . . . . . . . . . . . . . . . . .49
Supplied ac cessories
Please ch eck t he supp lied a ccesso ries.
Music sta nd
AC adaptor
SONG BOOK
SONG DISK
QQTG0588
5
Page 6
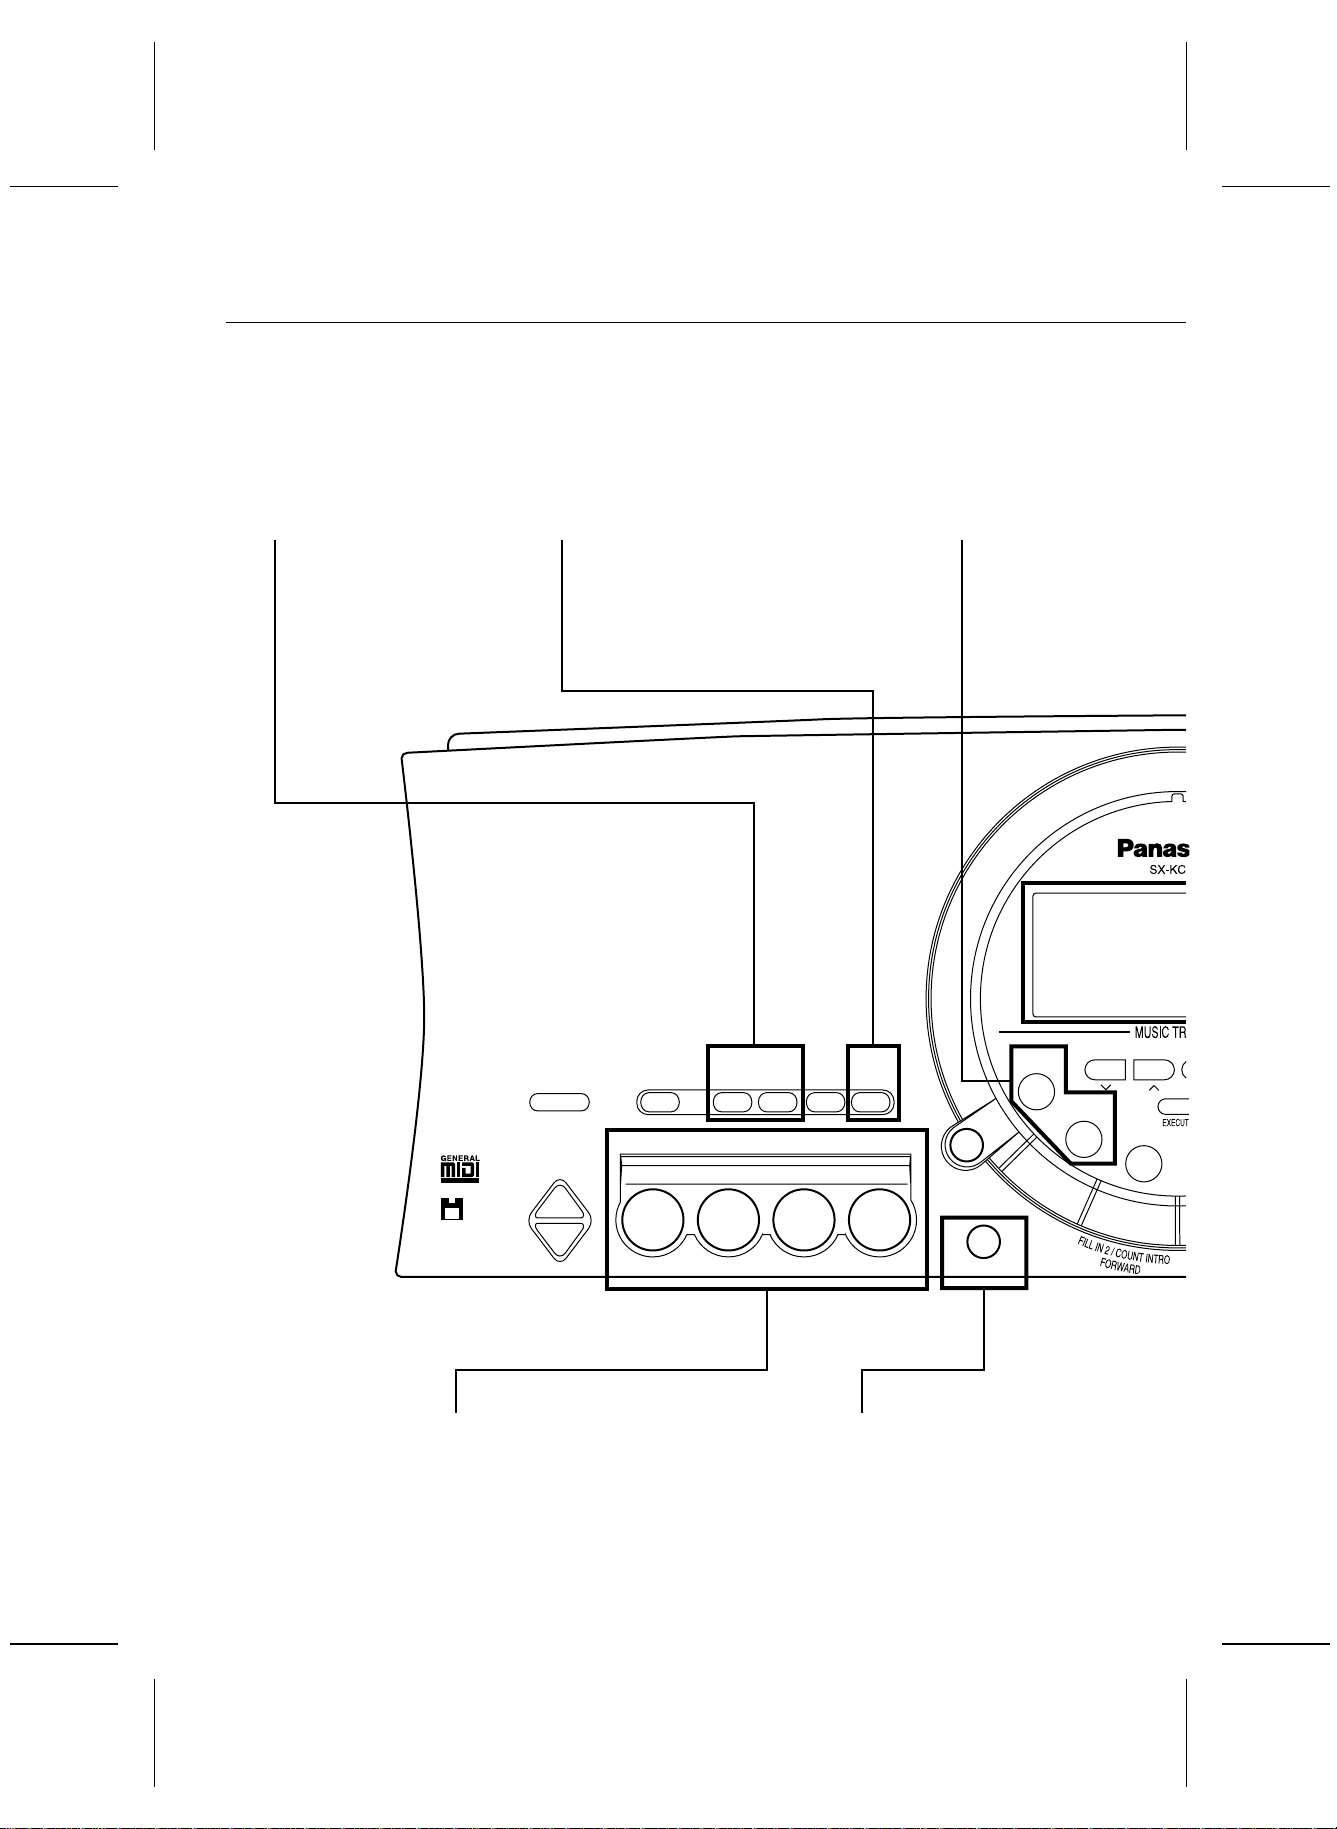
Controls and functions
SONG
Record and play back
your performance. (Refer
to page 33.)
AUTO PLAY CHORD
An automatically accompaniment is
added to your playing merely by
specifying a chord. (Refer to page 28.)
BEAT MASTER
A fun wa y to de velop y our se nse
of rhythm. (Refer to page 16.)
XBC
APC
COUNT
INTRO/ENDING
SYNCHRO
6
QQTG0588
DEMO
e
1234
3.5 inch
Disk Drive
PLAY
OFF/ON
MAIN VOLUME
UP
DOWN
PARTY PADS/BEAT MASTER
Just pr ess a pa d but ton to add a f un soun d effe ct to
your play ing. Yo u can al so tap the pad butto ns in
time wi th the beat. (Refer to page s 16, 3 2.)
AUTO PLAY
SONG
PARTY PADS / BEAT MASTER
APC/SONG
VOLUME
RECPLAY
ONE TOUCH PLAY
An approp riat e combi nation o f soun ds,
etc. for your selected rhythm are
automatically s et up for the aut omatic
accompaniment. (Refer to page 30.)
CHORD
BEAT MASTER
PARTY PADS
BANK
RESET
ONE TOUCH PLAY
TRAINING
FILL IN 1
PROGRAM
BEAT MASTER
CHALLENGE
TEMPO
CHORD
FINDER
Page 7
Display
Displays the status of your
instrument and is also used
for setting th e various
functions. (Refer to page 19.)
MUSIC TRAINER
The MUSIC TRAINER function incorporated in this instrument can
be a helpful aid to improving your performance.
Example
BEAT MASTER, to develop your sense of rhythm.
CHORD FINDER, to teac h you ho w to pla y chords .
MINUS ONE lets you pra ctice the melody pa rt while listening to
the othe r song parts.
The display shows a visual illustration of the keys and notes
you play .
CONDUCTOR
Specify the pe rforma nce part s of
the keyboard. (Refer to page 21.)
TRANSPOSE
PROGRAM
MINUS
SOLO
PIANO
ONE
INTRO/ENDING
DISK SONG
Play back song data
from a fl oppy dis k.
(Refer to page 36.)
TOUCH
SUSTAIN
REVERB
CHORUS
HARMONY
DISK
SONG
START/STOP
PLAY/PAUSE
SYNCHRO START
DISK
MENU
VARIATION
TOUCH
MENU
RHYTHM
SOUND
0 1 2 3
+ 4 5 6
CANCEL
– 7 8 9
Number butt ons
Specify the de sired sounds
and rhythms etc. by
number.
SUSTAIN
REVERB CHORUS
CONDUCTOR
LEFT RIGHT 2
PANEL MEMORY
HARMONY
RIGHT 1
PANEL MEMORY
Store th e curre nt ins trume nt set tings f or easy
recall la ter. ( Refer to page 31 .)
QQTG0588
7
Page 8
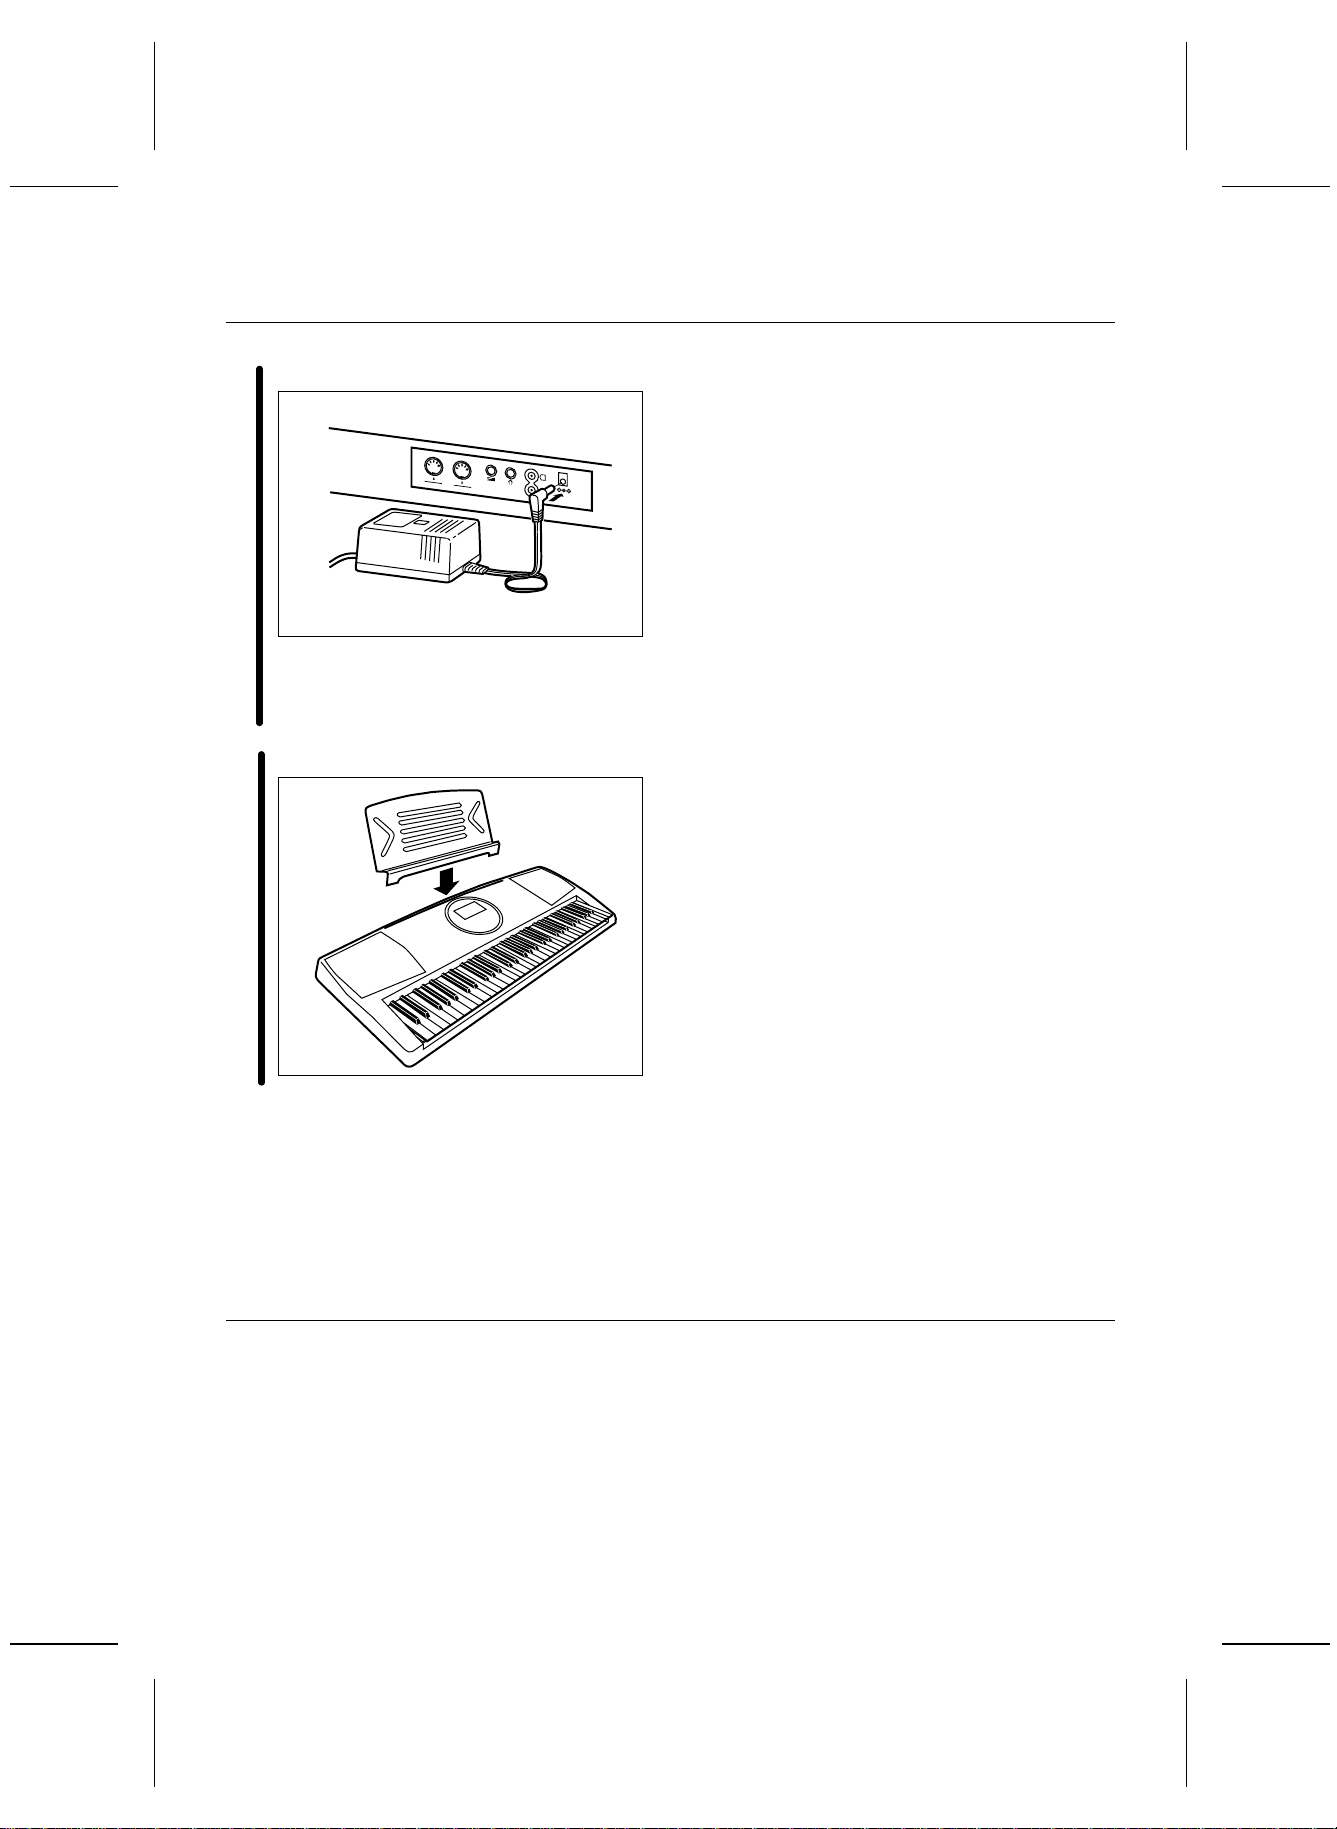
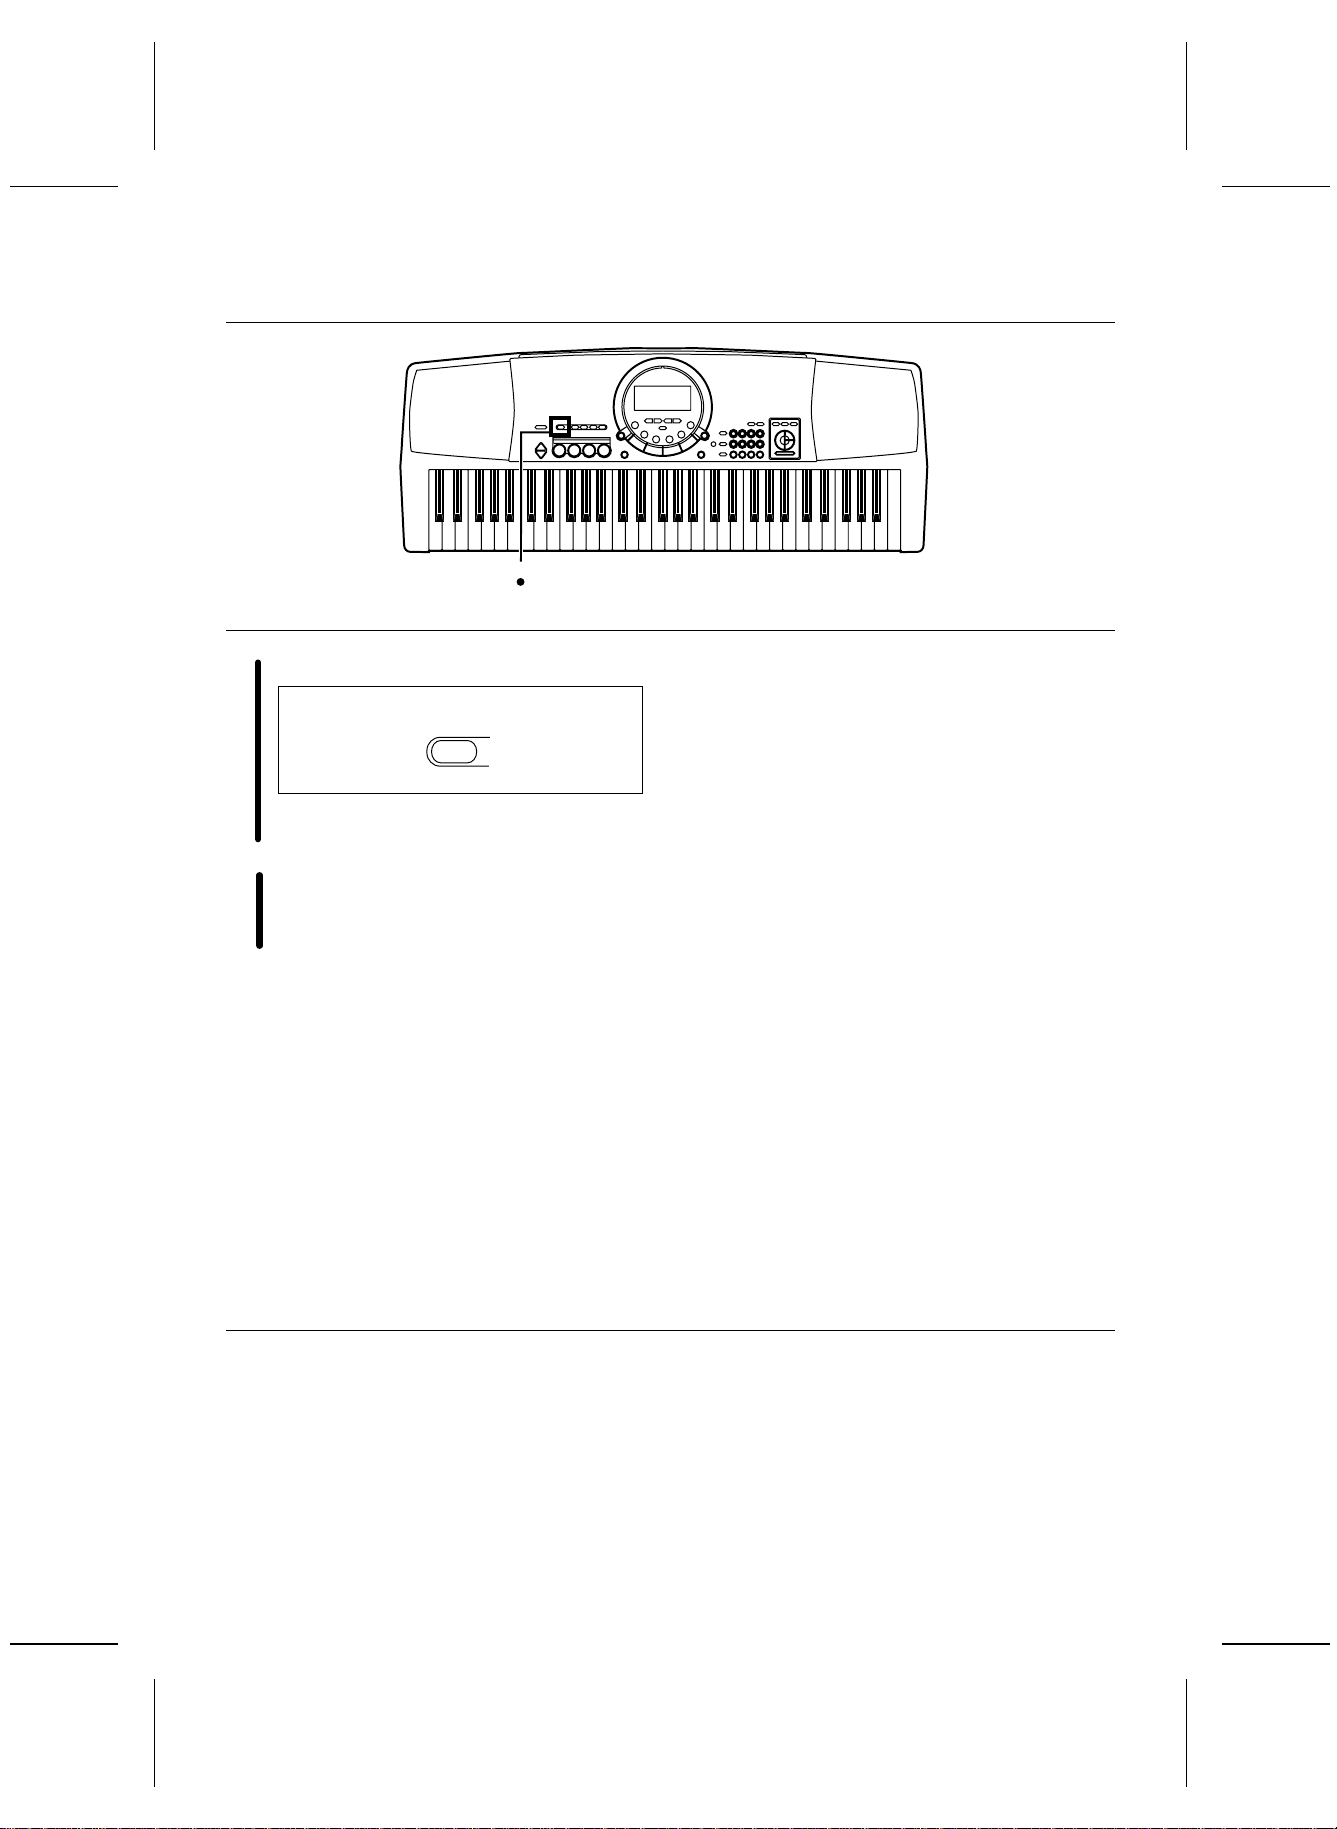
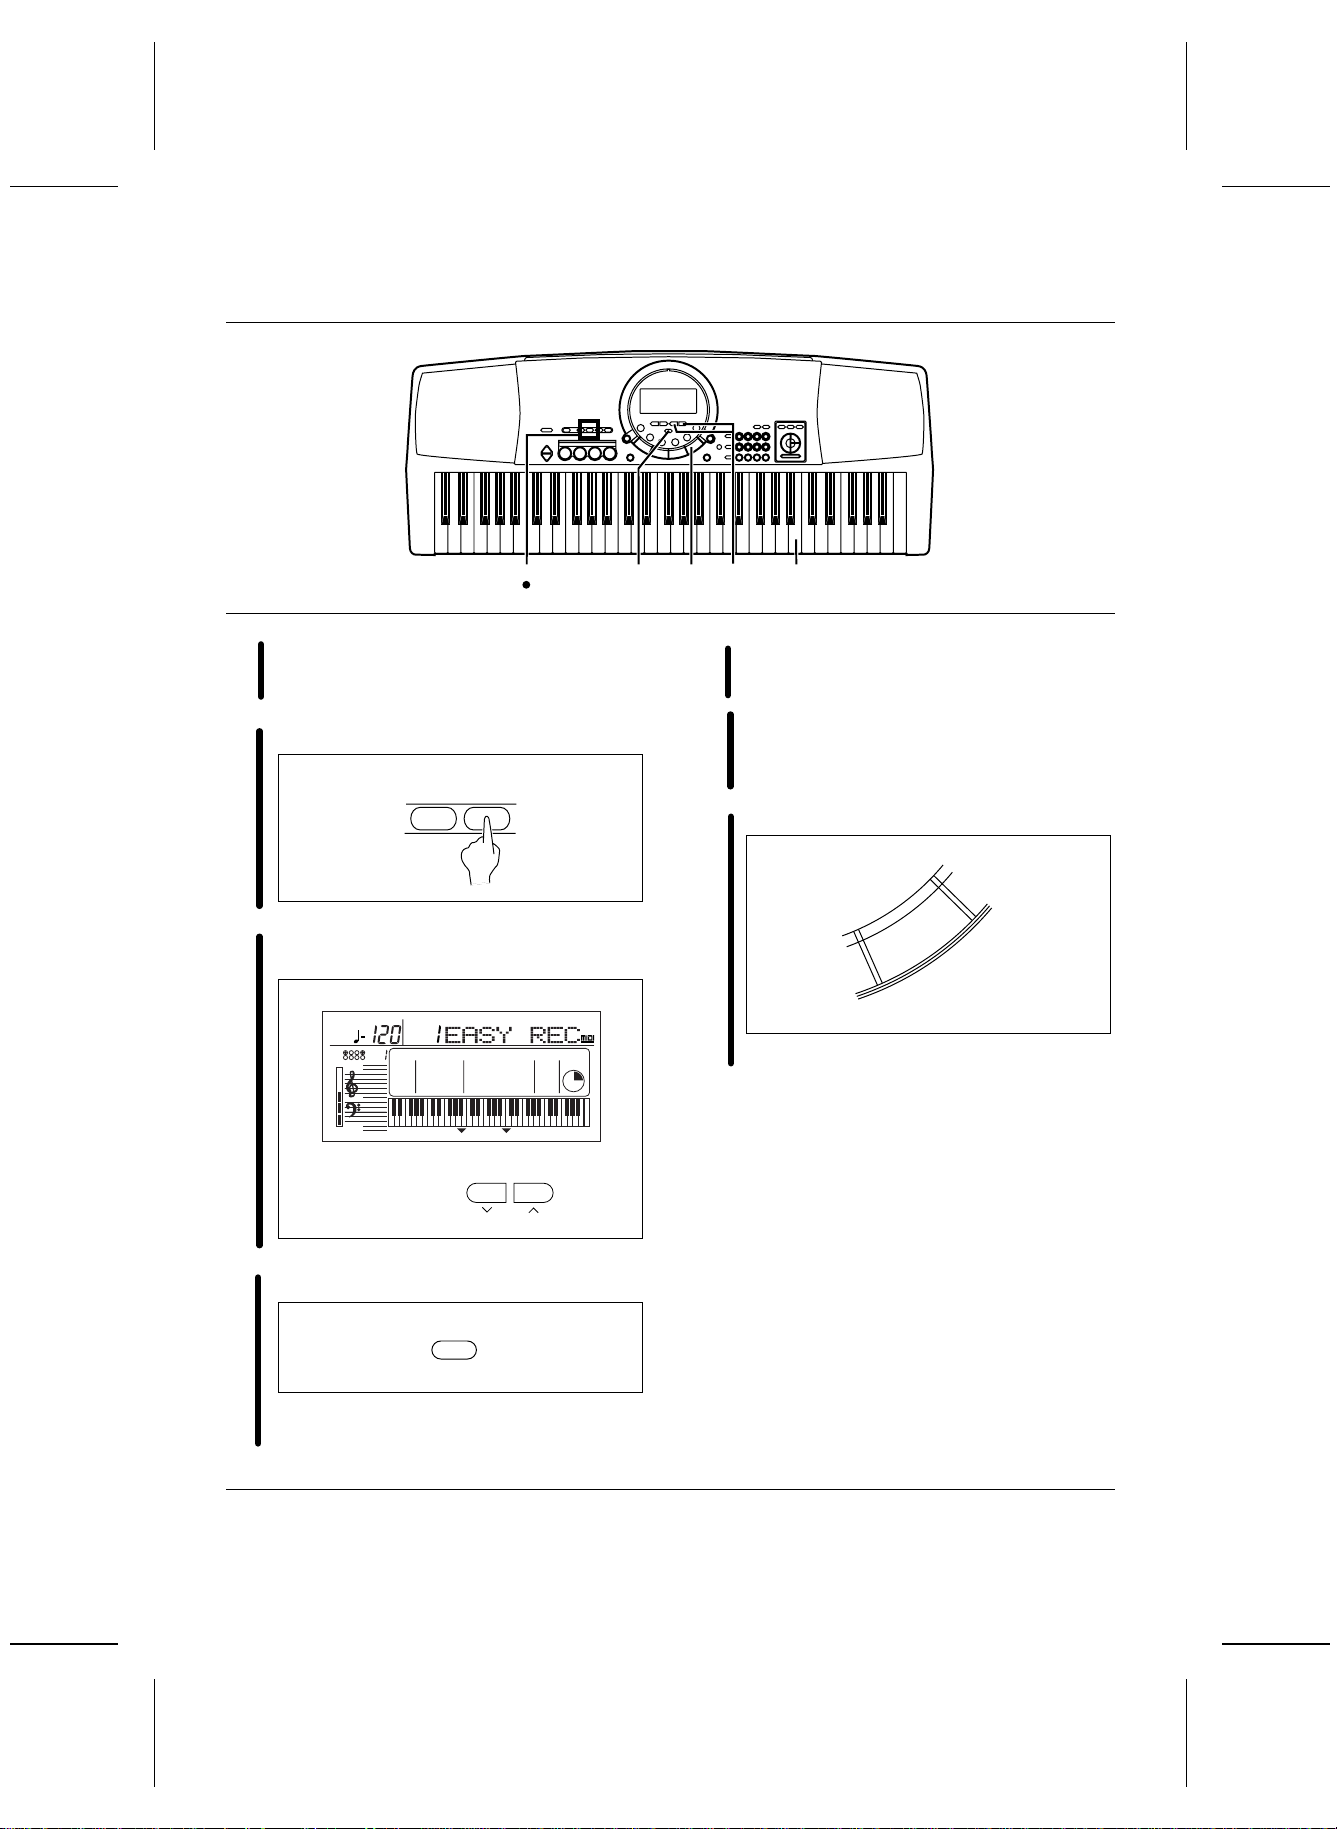
Getting started
Connec t the AC a dapto r (inclu ded).
1
L
OUT
IN
MIDI
FOOT
PHONES/
SW
LINE OUT
DC IN
12V
AUX IN
R
(Rear panel)
• Do not di sconne ct and connec t the AC adaptor when the PLAY but ton is on , as doin g so
may cause the the programmed settings and
recorded cont ents t o be dele ted.
Affix t he mu sic st and as s hown.
2
• The unit is in the standby condition when the AC
adapto r is conne cted. The prim ary circ uit is alw ays
“live” as l ong as th e AC ada ptor is connec ted to an
electric al out let.
• When leaving the p roduct unused for a long time ,
turn off the PLAY bu tton of the unit and p ull the AC
adapto r out of the so cket for powe r savi ng. (Th e product co nsumes a powe r of 2 W e ven wi th the PLAY
button of the uni t turned off.)
8
QQTG0588
Page 9
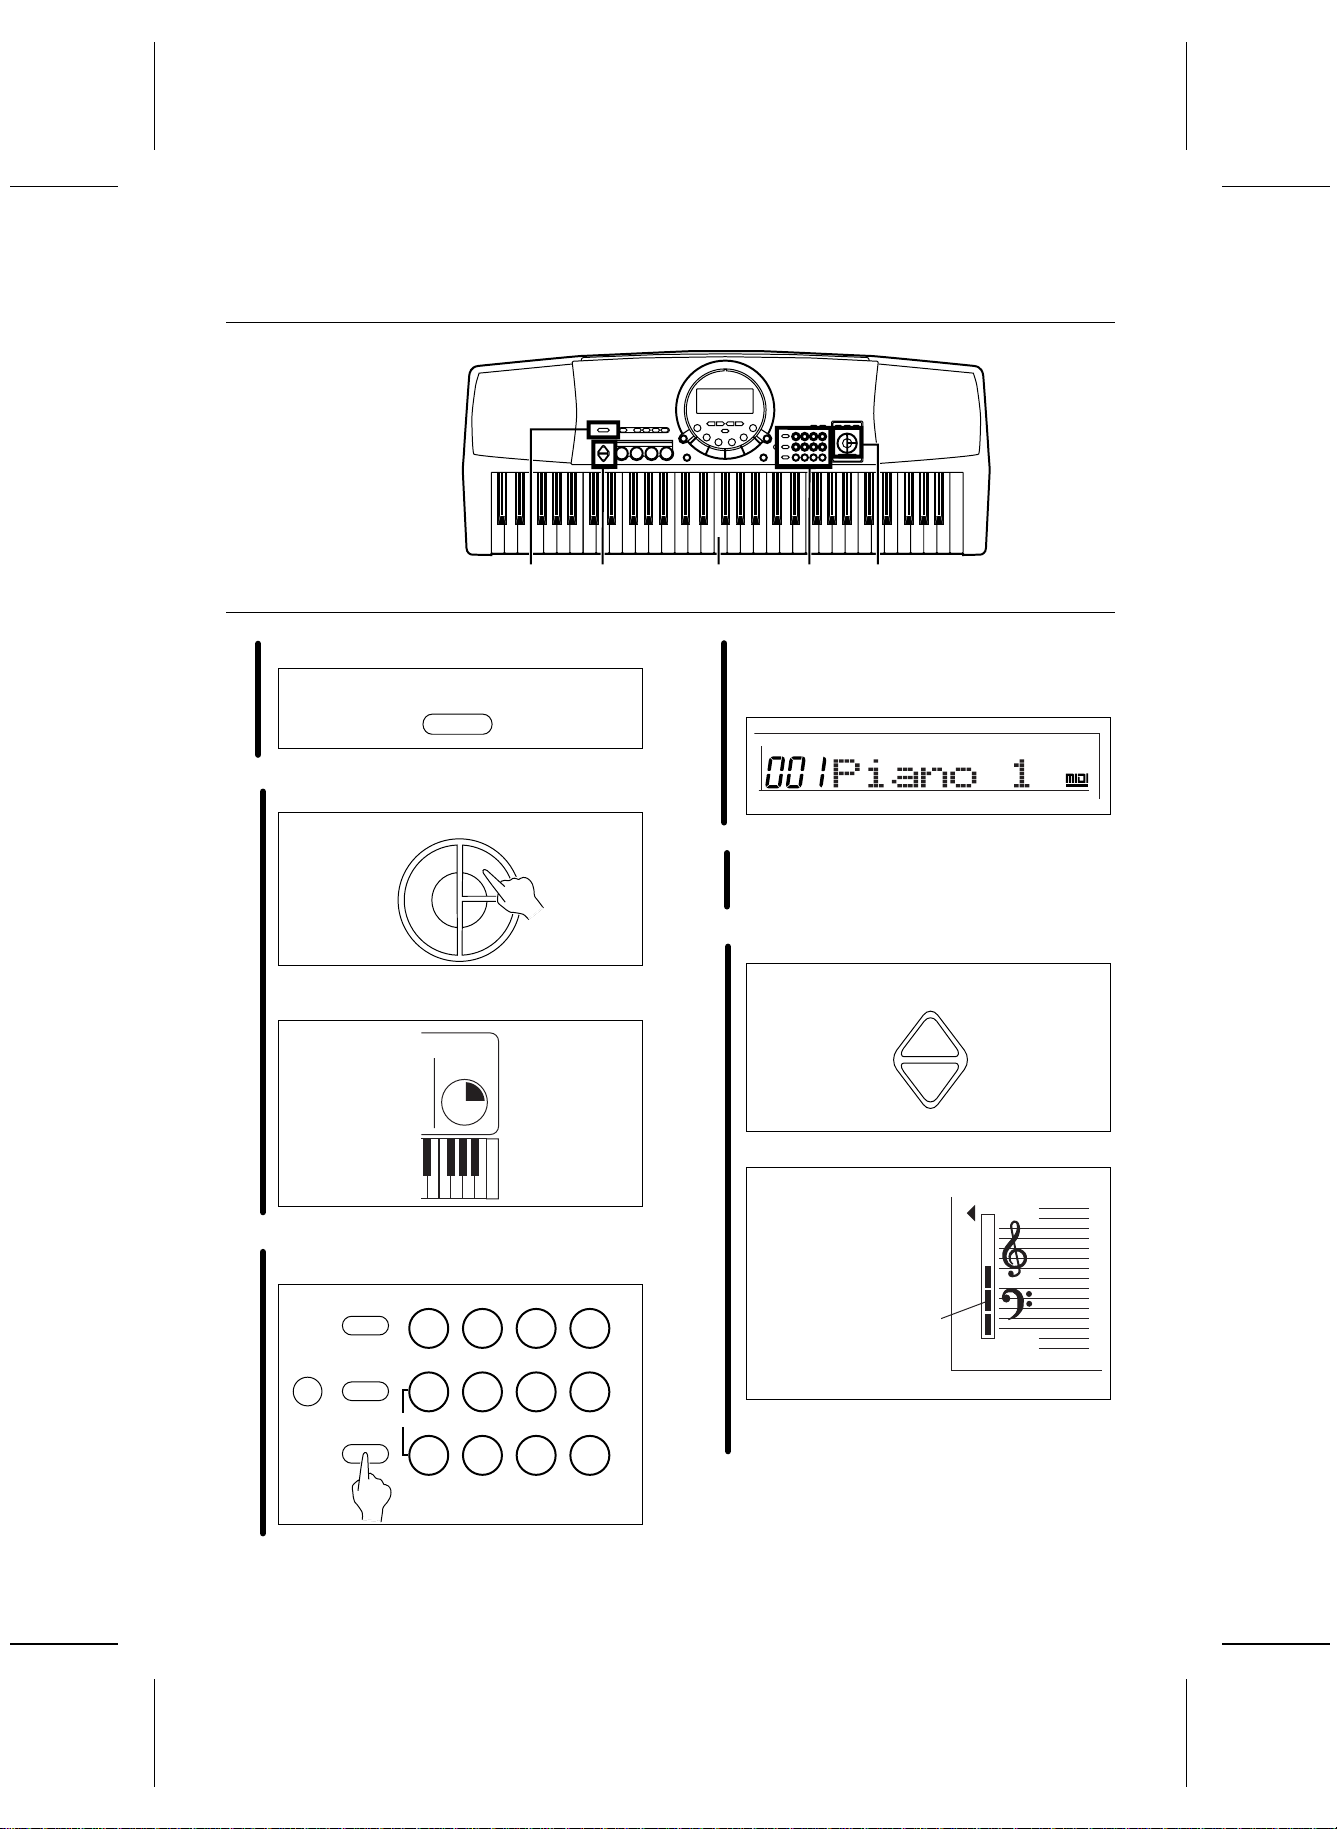
Playing
1 5 4 3 2
Press the PLAY button to turn it on.
1
Press the RIGHT 1 button in the CONDUCTOR.
2
• The CONDUCTOR stat us is sho wn on t he dis-
play like t his:
PLAY
OFF/ON
CONDUCTOR
LEFT RIGHT 2
CONDUCTOR
RIGHT 1
R1
• The l ist of SOUNDS is found near the right
side of t he pa nel.
• The name and number of the selected sound
are show n on th e disp lay.
SOUND
Play the keyboard.
4
Set the MAIN VOLUME to an appropr iate lev el.
5
• The v olum e settin g is show n on th e disp lay.
MAIN VOLUME
UP
DOWN
GENERAL
Press the SOUND button, a nd use t he nu mber
button s to se lect a sound n umber (three digit s).
3
MENU
RHYTHM
VARIATION
SOUND
0 1 2 3
+ 4 5 6
CANCEL
— 7 8 9
Volume settin g
VOLUME
• Ea ch gra duation repr esents t wo deg rees o f
volume chan ge.
9
QQTG0588
Page 10

A B
PARTY PADS
Press on e of th e PARTY PAD but tons while
you play.
A
PARTY PADS / BEAT MASTER
1234
• Ea ch of t he butt ons pla ys a fun soun d effe ct.
SOLO PIANO
Press the SOLO PIANO butto n.
B
SOLO
PIANO
• The i nstrum ent set tings automa tically c hange
to those appropriate for performing with piano
sounds .
• Ha ve fun with m ore so und ef fects by sele cting
anothe r PARTY PAD bank. (Refer to page 32.)
10
QQTG0588
• The p itch o f this ins trume nt can b e adjust ed, fo r example, when p laying wit h othe r instr umen ts. (Refe r
to page 44.)
• For detaile d informa tion abo ut select ing sound s,
refer to page 20 .
Page 11
Listen to the demonstration
1 2
Press the DEMO button.
1
DEMO
e
• The d emons tration perfo rmance b egin s.
• The two demo tunes are playing continuously.
When yo u are f inished listen ing to t he dem onstrat ion per forma nces, p ress th e DEMO button
2
again.
• So me of the butto ns do no t wor k during t he de monstrati on per forma nce.
11
QQTG0588
Page 12
Add an automatic accompaniment
N
2 14 3
C F G
C F G
Press the RHYTHM button, and u se the nu mber
buttons to select a rhythm number (three digits).
1
MENU
RHYTHM
VARIATION
SOUND
0 1 2 3
+ 4 5 6
CANCEL
— 7 8 9
• The l ist of RHYTHMS is shown near the left
end of th e pan el.
• The r hythm numbe r and n ame are s hown o n
the di splay.
RHYTHM
GENERAL
7
7
C
C
Use the T RANSPOSE/PROGRAM buttons to
show “1 Finger” on the display.
3
TEMPO
TRANSPOSE
C
L
XBS
APC
COUNT
TRO / ENDING
SYNCHRO
VOLUME
R1R2
CHORD
PROGRAM
TRANSPOSE
PROGRAM
• Per form this operatio n while the PROGRAM in dication is flashing on the display.
Press the ONE TOUCH PLAY button.
4
ONE TOUCH PLAY
GENERAL
CONDUCTOR
R1
TOUCH
SUSTAIN
REVERB
CHORUS
HARMONY
Press the AUTO PLAY CHORD button.
2
AUTO PLAY
CHORD
• The s ounds, etc. a pprop riate fo r the sele cted
rhythm are automatically set up.
12
QQTG0588
Page 13
5 6
Play the chord with your left hand, and the
melody with your right hand.
5
C3
Chord
• Wh en you p lay th e keybo ard wit h your l eft
hand, th e aut omatic a ccomp animen t starts
(SYNCHRO START).
• For examp le, whe n you pre ss a C key , an
automatic ac companime nt in the C ma jor
chord be gins to play.
C chord
Melody
G7 chord
When yo u are f inish ed playi ng the song, p ress
the START/STOP button.
6
START/STOP
PLAY/PAUSE
• The a utom atic acc ompan iment stops.
• To en d your perfo rmance wi th the automa tic
accompaniment, press the AUTO PLAY
CHORD button a gain.
F chord
• For informa tion about selecting rhythm s, refer to
page 25 .
• For informa tion a bout the autom atic ac compan iment,
refer to page 28 .
13
QQTG0588
Page 14
Play back the included Song Disk
3 4 2
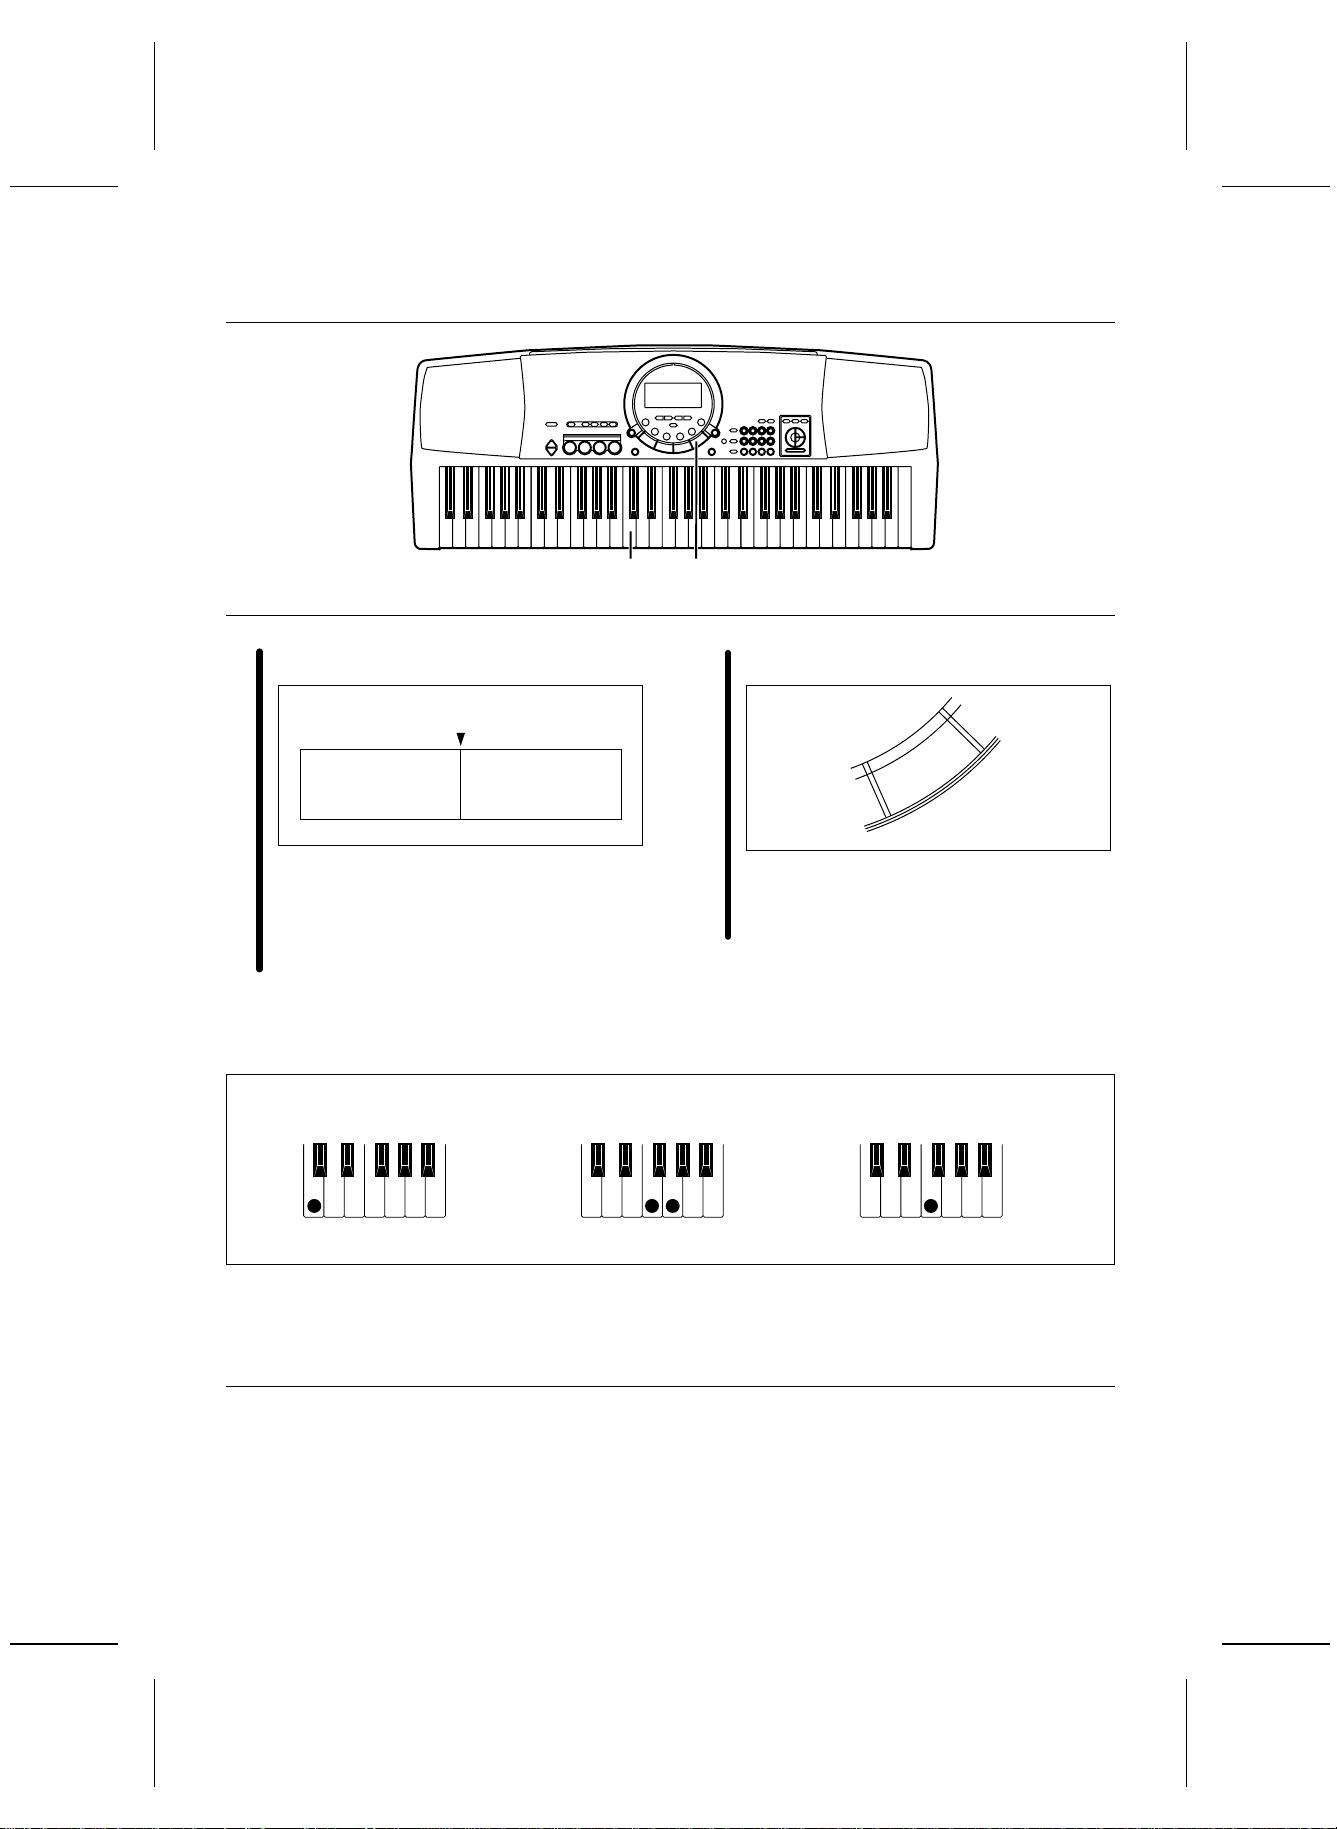
Inser t the i ncluded SONG DI SK into t he Di sk
Drive slot.
1
• In sert th e flop py disk correc tly orie nted w ith
the label s ide up. Pu sh it all th e way in unti l it
clicks i nto pl ace.
Use the n umb er butt ons to select a song number (3 digits).
2
0 1 2 3
+ 4 5 6
CANCEL
— 7 8 9
Press the EXECUTE button.
3
EXECUTE
• When the data has been loaded to this instrument, “COMPLETE” appears on the display.
Press the PLAY/PAUSE (START/ STOP) button.
4
START/STOP
PLAY/PAUSE
• The s elect ed song is playe d back.
An illustrati on of a flo ppy disk a ppears on th e display whe n dat a is bein g loaded from o r save d to a
disk. To prevent data loss, do not remove the disk
from the Disk Driv e or turn off the p ower while this
illustra tion is show n.
Disk illustra tion
• The s ong n umbers can be fo und o n the se parate mus ic scor e provid ed.
• The s elec ted song numbe r and a bbreviat ed
song na me are s hown o n the dis play.
SONG
• For playing back co mmer cial son g disks , refer t o
page 37 .
14
QQTG0588
GENERAL
• For detailed information about playing back the
SONG DIS K, refer to page 36.
Page 15
Record your performance
2 6 34 7 5
Select the desired sounds and rhythm.
• Yo u can als o recor d a per formanc e tha t has
1
an auto matic ac compa niment.
In the SONG sect ion, press t he REC button.
2
SONG
RECPLAY
Use the T RANSPOSE/PROGRAM buttons to
select EASY REC.
3
TRANSPOSE
REC
XBS
APC
COUNT
TRO / ENDING
SYNCHRO
VOLUME
TEMPO
C
L
R1R2
SOUND
CHORD
EXECUTE
TRANSPOSE
PROGRAM
PROGRAM
GENERAL
CONDUCTOR
R1
TOUCH
SUSTAIN
REVERB
CHORUS
HARMONY
Play the song on the keyboard.
5
When your performance is finished, press the
REC button, in the SONG section, again .
6
• Th e recor ding ca n also be ende d by pr essing
the START/STOP butto n.
Press the PLAY/PAUSE (START/ STOP) button.
7
START/STOP
PLAY/PAUSE
• Your recorded performance is played back.
Press the EXECUTE button.
4
EXECUTE
• All the pre viously record ed cont ents a re
erased.
• For more inf ormation about SONG, ref er to pa ge 33. • To pl ay a nor mal rhy thm per forman ce aft er playin g
back your recorded performance, press the PLAY
button i n the SONG se ction to turn it o ff.
QQTG0588
15
Page 16
Beat Master
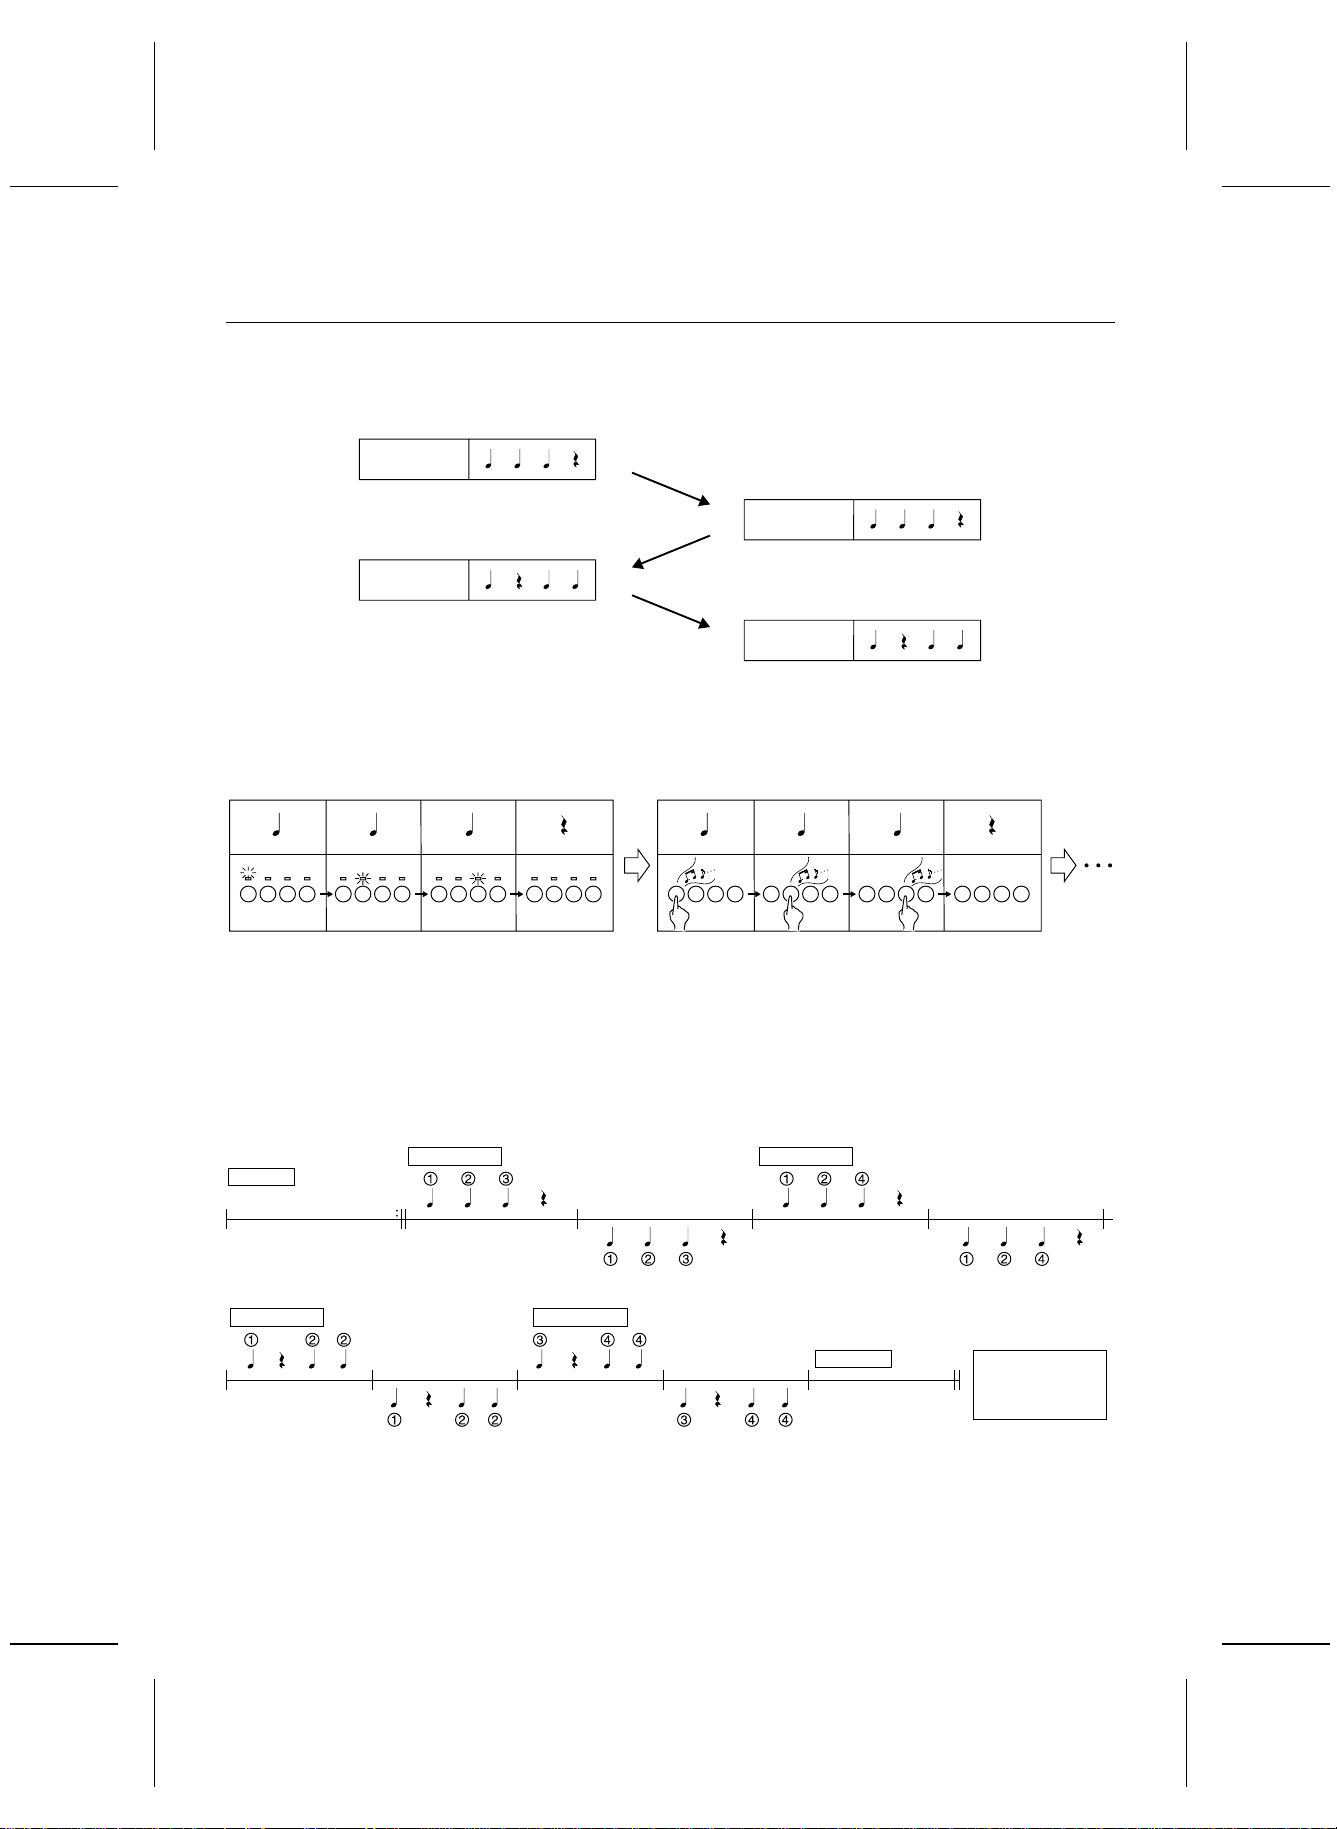
BEAT MASTER is a fun feature that helps you develop your sense of rhythm while you enjoy playing, just like competing with a fri end in a game .
Think of yourself as the student, and the instrument your teacher. First, the teacher “claps” out the rhythm, and
then yo u try t o mim ic it.
Teacher
Student
Teacher
Student
Your rhythm lesson uses the four pad buttons. As the instrument models the rhythm, the corresponding pad indicators l ight. T hen you try t o tap the same pad but tons, with yo ur fi ngers, using th e same timin g.
But it’ s more th an just a rhythm lesson —as you tap the p ad bu ttons, a m elody i s played in time w ith you r rhyth m!
With BEAT MASTER yo u play a g ame of music al Quest ions & A nswers w ith th e instr ument.
LISTEN PLAY
Melody
The BEAT MASTER has two levels to choose from: TRAINING (begin ner) an d CHALLENGE (advan ced).
To learn how to use the BEAT MASTER, begin with the TRAINING song “1:War m Up”. The st ructure of thi s song is
shown b elow, s o take a m inut e to look it ove r before starti ng the lesson (follow ing) .
Number: Pad number
Note: Beat timing
PHRASE 1 PHRASE 2
INTRO
PLAY PLAY
LISTEN LISTEN
PHRASE 3 PHRASE 4
PLAY PLAY
ENDING
Evaluation of
your
LISTEN LISTEN
performance
16
QQTG0588
Page 17

21 34 5
Press the BEAT MASTER TRAINING or CHALLENGE button.
1
BEAT MASTER
TRAINING
BEAT MASTER
CHALLENGE
• Selec t TRAINING if you are a beg inner, or
CHALLENGE to improve yo ur skill.
• A BGM is heard and the pad indicators light
up.
Use the T RANSPOSE/PROGRAM buttons to
select a song number.
2
TRANSPOSE
XBS
APC
COUNT
TRO / ENDING
SYNCHRO
VOLUME
TEMPO
C
L
R1R2
BEAT MASTER
SONG
CHORD
PROGRAM
TRANSPOSE
PROGRAM
GENERAL
CONDUCTOR
R1
TOUCH
SUSTAIN
REVERB
CHORUS
HARMONY
Press the START/STOP button.
3
START/STOP
PLAY/PAUSE
• The tune begins to play.
• Listen to the intro.
The Question phrase is played. Watch the
timing of the pad indi cators and t ry to rem em-
4
ber it.
1234
• Du ring this t ime, the dis play loo ks like this :
BEAT MASTER
LISTEN
• Se lect a nu mber f rom 1 t o 4 (TRAINING)/C1
to C7 (CHALLENGE). The hi gher t he num ber,
the more difficul t the tune.
• Us e the CHALLENGE but ton to select n umber
C8 to play back a song loaded from the disk.
If data h as not been lo aded fr om a disk,
“EMPTY” is shown on the di splay .
Mimic the Questi on ph rase by ta pping th e same
pad buttons in the same order and timing.
5
1234
• An evaluat ion of each ph rase y ou repr oduce
is shown as “Bravo!”, “Good”,“Poor.”
17
QQTG0588
Page 18

86 7
• Du ring this t ime, the dis play loo ks like this :
BEAT MASTER
The next Quest ion phras e is then play ed. Cont inue in the same manner.
6
After the ending plays, you will see an evaluation of y our pe rforma nce on t he dis play.
7
• Yo ur tota l perfo rmance i s assesse d as
“Master!”, “Good”, “Fair” or “Practice.”
• To t ry the same le sson ag ain, pr ess the
START/STOP butto n. Or you can try an
anothe r song .
To turn off the BEAT MASTER, press the s ame
BEAT MASTER button that you selected in
8
step 1.
Playback of BEAT MASTER
songs on the disk
• BEAT MASTER s ongs are record ed on t he incl uded
disk.
(1) Insert the disk with the BEAT MASTER song da ta
into the Dis k Drive.
(2)Press either BEAT MASTER button.
(3)Press the DISK SONG button.
(4)Use the TRANSPOSE/PROGRAM button t o
specif y the file number to load from t he disk.
• No te tha t the cur rent SO NG data is del eted wh en
the BEAT MASTER data has been loaded.
(5)Press the EXECUTE button.
• When the data has been loaded to this instrument,
“COMPLETE” appears on the display.
(6)Press the START/STOP button.
• If the tempo is too f ast, use the TEM PO butto ns
below the display to adjust it.
18
QQTG0588
• Note that in some songs the Question and Answer
phrases are one m easure long a nd in oth ers th ey
are two measure s long. En joy th e challe nge!
• There is an INTERLUDE (bridge) section (when
there ar e no Ques tion a nd Answer s) in t he midd le of
the son gs so you can catch your br eath ! (Some
songs have no INTERLUDE section.)
Page 19

About the display
Y
The display shows the statu s of this in strum ent, the playe d keys, etc ., and is also used for setting the vario us functio ns .
Normal display
Sound n umber
Sound name
Tempo
TEMPO
TRANSPOSE
C
L
R1R2
XBS
APC
COUNT
INTRO / ENDING
SYNCHRO
Volume
▲
•A or mark ne xt to the f unction name to the
▼
VOLUME
left o r right of the display i ndicates that the corre sponding button is ON. (In the example above, the XBS
function is On.)
•The readability (LCD CONTRAST) of the display can
be adju sted. (Refer t o page s 41 and 44.)
Setting display example
Example: PART VOLUME
TRANSPOSE
PROGRAM
MENU
GENERAL
CONDUCTOR
R1
TOUCH
SUSTAIN
REVERB
CHORUS
HARMONY
TRANSPOSE
XBS
APC
COUNT
INTRO / ENDING
SYNCHRO
VOLUME
R1R2
TEMPO
C
L
CHORD
PROGRAM PROGRAM
TEMPO
PROGRAM
SOUND
CHORD
m
GENERAL
CONDUCTOR
TOUCH
R1
7
SUSTAIN
REVERB
CHORUS
HARMONY
Chord name
CONDUCTOR status
Perfo rmance d ata
EXECUTE
When it is nec es sary to confirm that yo u wish to execut e
a function, press the EXECUTE button.
•If necessary , the EXECU TE indicati on on the d isplay
will flash.
TEMPO
TRANSPOSE
XBS
APC
COUNT
INTRO / ENDING
SYNCHRO
VOLUME
C
L
R1R2
CHORD
EXECUTE
GENERAL
CONDUCTOR
R1
•At t h is t im e if y ou wish to ca nc el t he pr oc ed ur e instead
of exec uting it , press the bu tton t hat you t o sele ct the
function (MENU butto n or DISK MENU bu tton, etc.).
•The display illustrations used throughout this manual
are for purposes of explanati on and may differ from the
actual dis play you se e w h en y ou are usin g y our instru ment.
TOUCH
SUSTAIN
REVERB
CHORUS
HARMON
EXECUTE
The TRANSPOSE/PROGRAM buttons and
TEMPO/PROGRAM buttons below the display, as well
as the number buttons and + and – bu ttons, are used to
select the va rious funct ions a nd spec ify va lues, etc.
•When the TRANSPOSE/PROGRAM buttons or
TEMPO/PROGRAM buttons are used to set a function,
the corr espon ding PRO GRAM ind icati on flash es.
•The number buttons are convenient for entering num-
bers direc tly, and the TRANSPOSE/ PROGRAM buttons or the + and – numbe r but ton s ar e conv enie nt fo r
selecti ng the mod es, et c. while viewin g the displ ay.
19
QQTG0588
Page 20

Part I Sounds and effects
There are 250 different sounds permanently stored in this instrument to enhance your playing enjoyment.
Sound
Select t he sou nds for the t hree p arts yo u can pl ay on t he keyb oard.
1.In the CONDUCTOR, select a part (RIGHT 1, RIGHT
2 or LEFT).
CONDUCTOR
LEFT RIGHT 2
• The CONDUCTOR indication on the display shows the
selected part(s).
RIGHT 1
CONDUCTOR
R1
2.Press the SOUND button. Use the number buttons to
select a sound number (three digits).
MENU
RHYTHM
0 1 2 3
+ 4 5 6
3.Play the key board .
• N on-pit ched ( percu ssion) so unds ar e also avail able.
• For DRUM KITS sounds, percussion instrument
sounds corresponding to the illustration are played
with t he ke yboar d keys.
• You can use the CONDUCTOR to assign different
parts to the keyboard.
About the number buttons
The nu mber butt ons are conv enient for selecting f unctions with assigned numbers, such as sounds and
rhythms, MENU functions, d isk so ngs, etc.
• The + and – buttons can be used to increase or
decrea se th e numb er. Wh en a bu tton i s presse d and
held, t he nu mbers ch ange qu ickly.
• If you wish to cancel the number you are in the midst
of entering, press the + and – buttons at the same
time. If you pause in the midst of entering a number,
the entry may automatically be canceled after a few
seconds.
VARIATION
• The list of SOUNDS is pri nted on the up per rig ht porti on
of the panel.
• The selected sound number and sound name are
shown on the display.
SOUND
• E nter t hree digits t o sp ecify th e soun d. Fo r exa mple,
for soun d numb er 003, press 0, 0, 3. For sou nd numb er
030, press 0, 3, 0.
SOUND
CANCEL
— 7 8 9
GENERAL
20
QQTG0588
Page 21

Part I Sound and effects
Conductor
The CONDUCTOR bu ttons are used to assig n sou nds to th e keybo ard in many di fferen t ways. For exa mple, y ou can
assign two sounds to the entire keyboard so that playing one key will produce two sounds. You can even split the
keyboard into right and left sections (SPLIT), and a ssig n a diff erent sound to each section .
CONDUCTOR settings How sounds are assigned to the keyboard
All keys pr oduce t he RIGHT 1 sound.
R1
All keys pr oduce t he RIGHT 2 sound.
R2
All keys pr oduce b oth the RIGHT 1 sound and the RI GHT 2 sound.
R1
R2
The le ft ke ys produce t h e LEFT sound and the right keys produce the RIGHT
1 sound and the RIGHT 2 sound.
R1
L
R2
The le ft ke ys produce t h e LEFT sound and the right keys produce the RIGHT
1 sound.
R1
L
LEFT
RIGHT 1
RIGHT 2
RIGHT 1 + RIGHT 2
RIGHT 1 + RIGHT 2
RIGHT 1LEFT
The le ft ke ys produce t h e LEFT sound and the right keys produce the RIGHT
2 sound.
L
R2
RIGHT 2LEFT
• The volum e of e ach pa rt can b e adjus ted in depend ently. (Refer to page 42 .)
• Whe n t he ke yboa rd is divid ed in to lef t and righ t par ts, t he init ial ized s plit po int is at C3 (the t hird C fr om th e bott om,
or left end of the keyboard), but you can change the location of the split point. (Refer to page 44.)
• The follo wing cond ition s are in ef fect w hen the AUTO PLAY CHORD is used.
— 1 Finger mode: The LEFT part does not sound.
— 1 Finger, Fingered mode: You cannot assign the RIGHT part soun d to th e whole keyb oard.
— Pianist m ode: The key board ca nnot b e split.
21
QQTG0588
Page 22

I
Part I Sound and effects
Solo Piano
Press the SOLO PIANO butto n for a s olo pian o perf orman ce with out h aving t o make compli cated setti ngs.
⇒Press th e SOLO PIANO button. • The appropriate settings for a piano performance i s
automatically set.
SOLO
PIANO
• N ote that the se ttings that were in effe ct immediatel y
before this button is pressed will be lost.
Effects
Add various effects to give expression to the sounds.
CHORUS
This effect gives the sound richness and breadth.
1.Use the CONDUCTOR buttons to select the part to
which this effec t will be applied .
2.Pres s the CHORUS button to turn it on.
CHORUS
SUSTAIN
SUSTAIN is the gradual fading out of musical tones after
the key is released .
1.Use the CONDUCTOR buttons to select the part to
which this effec t will be applied .
2.Pres s the SUSTAIN bu tton t o turn i t on.
SUSTAIN
• The mark next to the CHORUS indication on the
▼
right side of t he displa y in di cates that th is e ffe ct is on .
• The display looks s imilar to t he foll owing.
TEMPO
TRANSPOSE
XBS
APC
COUNT
NTRO / ENDING
SYNCHRO
VOLUME
C
L
R1R2
PROGRAM
CHORD
GENERAL
CONDUCTOR
R1
TOUCH
SUSTAIN
REVERB
CHORUS
HARMONY
• If necessary, use the TEMP O/PR OGRAM butto ns to
adjust the depth of the effect (0–99).
• Perform this operation while the PROGRAM indication
is flashing on the display. After a few seconds, the
display returns to the previous display.
• Thi s effect can be set to on or off for e ach part.
22
QQTG0588
• The mark next to the SUSTA IN indic ation on th e
▼
right side of t he displa y in di cates that th is e ffe ct is on .
• Thi s effect can be set to on or off for e ach part.
Page 23

Part I Sound and effects
REVERB
REVERB applies a reverberation effect to the sound.
⇒Press th e REVERB button to turn it on.
REVERB
• The mark next to the REVERB indica tion on the
• The display looks s imilar to t he foll owing.
INTRO / ENDING
• If necessary, use the TEMP O/PR OGRAM butto ns to
• Perform this operation while the PROGRAM indication
▼
right side of t he displa y in di cates that th is e ffe ct is on .
TEMPO
TRANSPOSE
XBS
APC
COUNT
SYNCHRO
VOLUME
C
L
R1R2
PROGRAM PROGRAM
CHORD
GENERAL
CONDUCTOR
R1
TOUCH
SUSTAIN
REVERB
CHORUS
HARMONY
adjust the depth of the effect (0–99), and the TRANSPOSE/PROGRAM buttons to select th e type of reverb
(Room1 , 2, Pl ate 1, 2, Conce rt 1, 2).
is flashing on the display. The display returns to the
previous display a few seconds after you have
changed the setting.
TOUCH
You can add dy nam ics to th e sou nd by va rying t he keyboard to uch.
• The initializ ed setti ng is ON.
⇒Press th e TOUCH button to turn it on.
TOUCH
• The mark next to the TOUCH indication on the
• The display looks s imilar to t he foll owing.
INTRO / ENDING
• If necessary, the TRANSPOSE/PROGRAM buttons
• Perform this operation while the PROGRAM indication
▼
right side of t he displa y in di cates that th is e ffe ct is on .
TEMPO
XBS
APC
COUNT
SYNCHRO
TRANSPOSE
C
L
R1R2
VOLUME
CHORD
PROGRAM
GENERAL
CONDUCTOR
R1
TOUCH
SUSTAIN
REVERB
CHORUS
HARMONY
can be used to to sel ect the mode (Hea vy, Normal,
Light).
is flashing on the display. After a few seconds, the
display returns to the previous display.
Transpose
The TRANSPOSE buttons are used to change the key of the entire instrument in semitone steps across an entire
octave.
Suppose you learn to play a song—in the key of C, for example—and decide you want to sing it, only to find that it’s
either too high or too low for your voice. Your choice is to either learn the song all over again in a different key, or to
use the TRANSPOSE feat ure.
⇒Adjust the key with the TRANSPOSE ∧ an d ∨ buttons.
Key
SOUND
TRANSPOSE
PROGRAM
GENERAL
CONDUCTOR
R1
TOUCH
SUSTAIN
REVERB
CHORUS
HARMONY
Transp ose il lustrat ion
TRANSPOSE
XBS
APC
COUNT
INTRO / ENDING
SYNCHRO
VOLUME
TEMPO
C
L
R1R2
23
QQTG0588
Page 24

Part I Sound and effects
• Each press of the ∧ button raises the key in semitone
steps, and each press of the ∨ butto n l ower s the k ey
in sem itone steps ( G – C – F#).
<Examp le: tran sposed to D>
Played keys: C major
• If t he two buttons are pressed at the same time, the
key returns to C.
• When the TRANSPOSE functi on is active, the tr ans-
pose illustration is shown on the display.
• When PROGRAM is shown on the display above the
buttons, these buttons are used for various settings
and ca nnot be used for TRANSPOSE. To acce ss the
Note s that so und: D major
TRANSPOSE function in this case, first exit the setting
mode.
Harmony
This function automatically adds harmony to the single-note melody you play in the right part, based on the chord you
specify in th e left part .
1.Spli t the keybo ard into rig ht and le ft sections . (Refer
to page 21.)
2.Pres s the HARMONY bu tton t o turn i t on.
HARMONY
• The m ark next to the H AR M O NY in dic ation on th e
• The display looks s imilar to t he foll owing.
INTRO / ENDING
• If necessary, the TRANSPOSE/PROGRAM buttons
• If the “Octave”, “Hard Rock” or “Fanfare” type is
• Perform this operation while the PROGRAM indication
▼
right side of t he displa y in di cates that th is e ffe ct is on .
TEMPO
XBS
APC
COUNT
SYNCHRO
TRANSPOSE
C
L
R1R2
VOLUME
CHORD
PROGRAM
GENERAL
CONDUCTOR
R1
TOUCH
SUSTAIN
REVERB
CHORUS
HARMONY
can be used to select the t ype of ha rmon y.
selected, HARMONY is adde d even when yo u do not
specify the chords.
is flashing on the display. After a few seconds, the
display returns to the previous display.
24
QQTG0588
Page 25

Part II Playing the rhythm
There ar e 10 0 rh ythm s sto red in the me mory of t his in stru men t. An addit ion al VARIATION patterns for each rhythm is
available.
Rhythm
1.Pres s the RHYTHM button. Use the number buttons
to selec t a rhyt hm nu mber ( three d igits ).
MENU
RHYTHM
VARIATION
SOUND
• The list of RHYTHMS is shown near t he left end of
the pa nel.
• The rhyth m num ber an d name are sho wn on the di splay.
• Enter three digits to specify the rhythm. For example,
for rhythm number 003, press 0, 0, 3. For rhythm
number 030, press 0, 3, 0.
• The + and – buttons can be used to increase or
decrea se th e numb er. Wh en a bu tton i s presse d and
held, t he nu mbers ch ange qu ickly.
• To cancel a number you are entering, press the + and
– buttons at the same ti me (CANCEL).
0 1 2 3
+ 4 5 6
CANCEL
— 7 8 9
RHYTHM
GENERAL
VARIATION
When you press the VARIATION button, the rhythm
chang es t o t he variat ion pattern f or the select ed rh ythm.
RHYTHM
VARIATION
• “VARI” is shown on the display when the variation
pattern is selected.
RHYTHM
VARI
GENERAL
• During a rhythm performance, you can switch between
the normal pattern and the variation pattern by
pressi ng the VARIATION button.
• There is no VARIATION pat tern for the METRONOME
rhythm.
2.Pres s the START/STOP button.
START/STOP
PLAY/PAUSE
• The selected rhythm pattern begins to play.
• You can stop the rhy thm by p res sing t he START/STOP
button again t o turn it off.
• Since there is no DRUM part for the 091 CLASSIC
BALLAD rhythm, the pa ttern does not sound unless
the AUTO PLAY CHORD is used.
25
QQTG0588
Page 26

Part II Playing the rhythm
Synchro Start
With t he sync hronized start feat ure, th e rhyt hm pat tern b egins to play when y ou press a key on the ke yboar d.
1.Sele ct a rh ythm .
3.Play a key to the left of th e keyboard split p oint.
• The rhythm pattern begins to play.
2.Pres s the SYNCHRO START butto n to turn it on .
• You can use the synchronized start feature even when
the keyboard is not divided into left and right sections.
To start the rhythm, press a key to the left of the
specif ied spli t point ( C3 in th e initial ized s tate).
SYNCHRO START
• The mark next to the SYNCHRO indication on th e
▲
left side of the display indicates that this function is
on.
Tempo
The tempo of the rhythm pattern is adjusted with the TEMPO buttons.
⇒Press th e right button for a fas ter tem po, an d the left
button for a s lower t empo (q =40 – 300).
Beat indication
TEMPO
Tempo indication
TRANSPOSE
XBS
APC
COUNT
INTRO / ENDING
SYNCHRO
VOLUME
C
L
R1R2
RHYTHM
CHORD
GENERAL
CONDUCTOR
R1
TOUCH
SUSTAIN
REVERB
CHORUS
HARMONY
• Press both buttons at the same time to reset the tempo
to the standard q=120.
• The tempo is shown on the display.
• The beat is indicated above the displayed tempo.
• When “PROGRAM” appears on the display above the
buttons, these buttons are used for various settings
and cannot be used to adjust the TEMPO. To adjust
the TEMPO in this case, you must first ex it th e sett ing
mode.
26
QQTG0588
TEMPO
PROGRAM
Page 27

Part II Playing the rhythm
Rhythm performance
Intro, fill-in and ending patterns are available for each rhythm.
INTRO
Begin th e rhyth m per formanc e with a n intro patte rn.
1.Pres s the INTRO/ENDING bu tton t o turn i t on.
• The mark next to the INTRO/ENDING indication
▲
on the le ft sid e of the di splay i ndi cates tha t thi s func tion
is on.
2.Pres s the START/STOP butt on to start th e rhythm.
START/STOP
PLAY/PAUSE
• An intro pattern is played, after which the normal
rhythm pattern begins.
COUNT INTRO
You can begin the rhythm performance with a onemeasure count.
FILL IN
You can insert a fill-in pattern any time during the rhythm
performance. Choose from two different fill-in patterns.
1.Sele ct a rh ythm an d pres s the START/STOP button.
2.Pres s the F ILL IN 1 or 2 button.
FILL IN 1
RESET
• A fill- i n pa tte r n is he ard imm ed ia tely for the remaind er
of the m easur e.
• Whe n a FILL IN button is pressed on the last beat of
the meas ur e , th e fill-in patt er n co nti nu es to the end of
the fol lowing measur e.
ENDING
Finish the rhythm performance with an ending pattern.
1.Sele ct a rh ythm an d pres s the START/STOP button.
2.Pres s the INTRO/ENDING bu tton t o turn i t on.
1.Press the FILL IN 2/COUNT INTRO button to turn it
on.
• The mark next to the COUNT indica tio n on the le ft
▲
side of th e display indi cates that t his functio n is on.
2.Pres s the START/STOP butt on to start th e rhythm.
• A one-measure count is played, after which the normal
rhythm pattern begins.
• An ending pattern is produced, and then the rhythm
performance stops.
• I f y ou accidentally press an INTRO/ENDING bu tt o n i n
the middle of the tune, you can press the FILL IN 1
or 2 button. The ending pattern stops, and a fill-in
pattern is produced, after which the normal rhythm
performance continues.
27
QQTG0588
Page 28

Part II Playing the rhythm
Auto Play Chord
Simply by pl ay ing a chor d o n t he ke yboa rd, th e AUTO PLAY CHORD function automatically plays an accompaniment
pattern which matches perfectly the selected rhythm. With a real accompaniment as a background, you can concentrate
on play ing the m elody.
⇒Choose from three ways of playing chords.
One Finger (1 Finger) mode
In the One Finger mode, a major chord can be played
just by pressing the k ey for i ts root note.
Example: C chord
Minor, seventh and minor seventh chords ar e also eas ily
produced.
minor c hord sevent h chord minor s eventh chord
Play the root note plus a black key
to the left of it.
Example: Cm Example: C7 Example: Cm7
Fingered mode
In the Fi ngere d mode, you s pecify th e chor d by play ing
all the notes in the chord.
• Play at least three notes to specify the chord.
• If the CHORD FINDER procedure is used, you can
see the types of chords that can be specified and the
keys you press to play t hem. (Refer t o page 30.)
Play the root note plus a white key
to the left of it.
Pianist mode
In the P iani st mo de , the e nti re k eybo ard ca n be used to
speci fy c ho rds ( Fi ng ere d mode ) for t he aut om ati c ac com paniment; a RIGHT part is assigned to all the keys, and
the key board do es not s plit.
• If the CHORD FINDER procedure is used, you can
see the types of chords that can be specified and the
keys you press to play t hem. (Refer t o page 30.)
• Whe n specify ing chords, if you press a key a perfect
5th or more below the lowest note of the chord, the
BASS part becomes a patte rn based on that not e.
Play the root note plus a black key
and a whit e key to t he lef t of it.
28
QQTG0588
Page 29

Part II Playing the rhythm
How to use the AUTO PLAY CHORD
1.Select the desired rhythm and sound(s), and set the
tempo.
2.Pres s the AUTO PLAY CHORD button to turn it on.
AUTO PLAY
CHORD
• The mark next to the APC indicati on on the left
• The display looks s imilar to t he foll owing.
3.Use the TRANSPOSE/PROGRAM buttons to select
• Perform this operation while the PROGRAM indication
▲
side of th e display indi cates that t his functio n is on.
GENERAL
the chord mode (1 Finger, Fingered, Pianist).
TRANSPOSE
PROGRAM
is flashing on the display. After a few seconds, the
display returns to the previous display.
• The AUTO PLAY CHORD is c ompri sed of f ive pa rts
(ACCOMP [ACP] 1, 2 and 3, BASS and DRUMS), the
volume bal anc e f or ea ch of w hi ch c an be ad just e d wi t h
the PART VOLUME function. (Refer to pages 41 and
42.)
• In the 1 Finger or Fingered mode, if you specify a
chord w ithout s tarting t he rhythm, the root ba ss note
(R.BS) and the chord not es (CHRD) will sound. The
volumes of these parts can be adjusted with the PART
VOLUME f uncti on. (R efer to page s 41 and 42.)
• There is no automatic accompaniment pattern for the
METRONOME rhythm.
APC/SONG VOLUME
You ca n lowe r the volume of th e aut omatic accomp animent to balance it with the volume of the sounds you
play.
• This setting also functions for the song playback
volume.
1.Pres s the APC/SONG VOLUME bu tton t o turn i t on.
APC/SONG
VOLUME
• The display looks s imilar to t he foll owing.
GENERAL
4.Start the rhythm.
5.Specify a chord.
• If the 1 Finger or Fingered mode was selected, specify
the chord on the keyboard section to the left of the
split point (C3 ).
• The split point ca n be changed. (Refer to pages 41
and 44.)
• An accompaniment pattern in the specified chord is
autom atically played .
• The specified chord is shown in the CHORD section
on the display.
• When you use the fill-in, intro and ending patterns, the
automatic accompaniment is also used in these patterns.
• Once a chord is specified, it continues to play even
when the keys are released, until you specify another
chord.
6.To stop the automatic accompaniment, press the
START/STOP button.
2.Use the TEMPO/PROGRAM buttons to adjust the
volume (0 to 10).
• A setting of 10 is the normal volume.
• Perform this operation while the PROGRAM indication
is flashing on the display. After a few seconds, the
display returns to the previous display.
• After the volume setting is changed, the volumes of
all th e parts ot her than t he one yo u are playing (for
example, BEAT MASTER, etc .) are a lso ch anged.
29
QQTG0588
Page 30

H
U
O
Part II Playing the rhythm
CHORD FINDER
This feature shows you the keys to press for a specific
chord. You may find t his co nveni ent whe n you don’ t know
how to pl ay cert ain c hor ds ind icate d i n the s heet mu sic.
1.Select the chord mode. (Refer to page 29.)
• Select Fingered or Pianist.
2.Pres s the CHORD FINDER bu tton to turn it on .
CHORD
FINDER
• The display looks s imilar to t he foll owing.
TEMPO
TRANSPOSE
R1R2
XBS
APC
COUNT
INTRO / ENDING
SYNCHRO
VOLUME
C
L
PROGRAM PROGRAM
CHORD
M
FINDER
7
GENERAL
CONDUCTOR
R1
TOUC
SUSTA
REVER
CHOR
HARM
3.Use the TEMPO/PROGRAM buttons to specify the
chord’s root note, and the TRANSPOSE/PROGRAM
buttons to specify the chord type.
• On the disp la y, the ke ys y ou p r ess t o play t he sp ec ifi ed
chord a re ind icate d on the k eyboard illus tration .
• If yo u press the EXECUTE button, the selected chord
will sound.
4.Press the CHORD FINDER butto n again to turn this
function off.
One Touch Play
ONE TOUCH PLAY automatically sets the sounds, etc. that match your chosen rhythm. Just by pressing a button you
can imme diatel y perfor m using t he au tomatic accomp animen t.
• Note that when the automatic settings are executed, the previous settings are canceled.
1.With the rhythm stopped, select a rhythm pattern.
2.Pres s the ONE TOUCH PLAY button.
ONE TOUCH PLAY
• Sounds and effects, tempo, etc. that match your
selec ted r hyth m are a uto mati ca lly se t, and t he AUTO
PLAY CHORD and SYNCHRO START are turned on.
3.Play the key board .
• When you specify a chord, the automatic rhythm
begin s to play immedi ately.
30
QQTG0588
Page 31

Part II Playing the rhythm
Panel Memory
This function lets you store up to ten combinations of panel settings for easy recall at any time.
How to store the panel settings
The set tings are stored in but tons 0 to 9.
1.Set u p the desired pan el settings (sou nds, rhythms,
etc.).
2.While pressing the PANEL MEMORY button, press
one of th e numbe r butt ons (0 to 9).
REVERB CHORUS
0 1 2 3
+ 4 5 6
CANCEL
— 7 8 9
• “COMPLETE” appears on the display, and the current
panel settings will be stored in the selected number.
CONDUCTOR
LEFT RIGHT 2
PANEL MEMORY
HARMONY
RIGHT 1
Recall the panel setup
1.Pres s the PANEL MEMORY bu tton.
2.Pres s the d esire d numbe r butto n.
• The panel setup changes to the one stored in the
specified memory.
• When you press the PANEL MEMORY button, the P.
MEMOR Y indica tion appear s in t he uppe r part of t he
display for a few seconds. Press the desired number
button while t his indic ation is shown .
• Y ou can then chan ge the sound setti ngs, etc.; how ever, t he memor y itself rem ains unch anged until you
store it again.
31
QQTG0588
Page 32

Part II Playing the rhythm
Party Pads
You can insert fun so und-ef fect s just by press ing th e pad bu ttons .
Pad performance
You can use the four pad buttons to produce four different
sound effects.
PARTY PADS / BEAT MASTER
1234
• P layback wil l stop if yo u press the same pad bu tton
again.
Select a bank
Four banks have been prepared so that you can play
sound effects that match the selected theme.
⇒Press th e PARTY PADS BANK button to select the
desired bank on the display.
PARTY PADS
BANK
• The display looks s imilar to t he foll owing.
MENU
GENERAL
• Each time the button is pressed, the bank number
changes in order from 1 to 4.
• The list of PARTY PADS BANKS is found o n t he p an el
above the pad buttons.
• After a few seco nds, th e displ ay retu rns to the p revio us
display .
• Each pad prod uces a phra se th at mat ches the sel ected
bank.
32
QQTG0588
Page 33

Part III Recording
Use the SO NG function to record your performance.
Record your performance
Recor d your pe rform ance ju st as you play ed it o n the ke yboa rd.
1.Set the sounds, effects, rhythms, etc. for the parts you
are going to rec ord.
• In th e CONDUCTOR, turn on the parts that you want
to record.
2.In the SONG section, press the REC button.
SONG
RECPLAY
• The display looks s imilar to t he foll owing.
SOUND
GENERAL
3.Use the TRANSPOSE/PROGRAM buttons to select
the recording mode.
1 EASY REC: Your performance, including the automatic
accompan imen t, is re corde d.
• All the previously recorded contents are erased.
2 MELODY: Your performance of those parts selected in
the CONDUCTOR is recorded.
3 APC REAL: The automa tic accompaniment (spe cified
chords) only is recorded.
• Be sure to turn on the AUTO PLAY CHORD button
before beginning recording. Also note that recording
in this m ode should be comp leted before star ting to
record in the MELODY mode.
4 APC STEP: The chord progression is recorded one
chord at a time . (Ref er to pa ge 34.)
4.Pres s the EXECUTE bu tton.
• On the display, a flashing ● mark in the REC line
indicates the part that you selected to record.
TEMPOTRANSPOSE
REC indication
REC
XBS
R1 R2
C
L
• A fl ashing ● mark in both the REC line and the PLAY
line means that you have selected a part that has
already been recorded. If you record this part again,
the pre vious co nten ts will be o verwr itten (d eleted) .
5.Pres s the START/STOP button.
START/STOP
PLAY/PAUSE
• The recording begins. Play the keyboard to record your
perfor manc e.
• If you record a performance without the rhythm, begin
your pe rforma nce with out pre ssing t he START/STOP
button . Reco rding begins immed iately when yo u play
the ke yboa rd.
• The measure number is shown on the display.
TEMPOTRANSPOSE
measure numbe r
REC
XBS
R1 R2
C
L
6.When you have finished recording, press the
START/STOP button.
• On the display, a ● mark in the PLAY line indicates
the part that you recorded .
TEMPOTRANSPOSE
PLAY indication
PLAY
XBS
• If you press the START/STOP button at this time, your
recorded performance will be played back.
You can record your performance using four tracks—
RIGHT 1 (R1), RIGHT 2 (R2), LEFT (L) and CHORD
(C).
R1 R2
C
L
33
QQTG0588
Page 34

Part III Recording
Multiplex recording
Multiplex recording of the MELODY mode and APC
REAL mode is p ossible by repea ting s teps 1 to 6.
• In multiplex recording, recording cannot be started by
playing the keyboard. You must press the
START/STOP button to begin recording.
Playing back your recorded song
1. In the SONG section, press the PLAY button.
SONG
RECPLAY
• Thi s step is no t necessary if the PLAY indic ation already appears on the display.
2.Press the PLAY/PAUSE (START/STOP) butto n.
• Y our rec orded pe rform ance is played back.
• For information about the function of each button
during playbac k, refe r to pa ge 37 .
• If you wish to play back the rhythm, turn the PLAY
button off.
Store a chord progression
Store th e chord progressio n for the AUTO PLAY CHORD in the track for the CHORD part. Then, when the AUTO
PLAY CHORD is used during playback, even if you do not specify the chords with your left hand, the chords change
automatica lly.
• The chord length is specified with the CHORD STEP RECORD keys on th e keybo ard.
Correct ion ke ys
Move back one step.
▲
Move forward one step.
▼
Press to end the chord-storing procedure and
to specify automatic repeat playback of the
stored progression.
DELETE
&
eq
q.
wh.h
Repeat key
Note va lue keys
w Whol e note
h. Dotted half-note
h Half-note
q. Do tted quarter-not e
q Quarter-note
e Eighth-note
Reset key
Press to begin storing from the beginning.
&
End key
Press af ter th e whol e chord progre ssion ha s
been stored.
DELETE key
DELETE Press to erase data.
• To e rase all the da ta from the curr ent track, while
pressing the DELETE key, press the End key
().
• Note that executing this procedure will delete the recorded APC REAL data.
34
QQTG0588
Page 35

Part III Recording
1.In the SONG section, press the REC button .
2.Use the TRANSPOSE/PROGRAM buttons to select 4:
APC STEP.
SOUND
GENERAL
3.Pres s the EXECUTE bu tton.
4.While playing a chord with your left hand, press the
desired note value key with your right hand to specify
the chord length. Repeat this step to store all the
chords.
• When a note value key is pressed, a “beep” tone
indicates that the chord has been stored.
• Store a rest by pressing a note value key without
speci fying a chord.
• The disp lay durin g cho rd reco rding:
Measur e numb er
TEMPO
TRANSPOSE
REC
L
R1R2
XBS
APC
COUNT
RO / ENDING
SYNCHRO
VOLUME
C
Chord name
Beat number
CHORD
m
7
PROGRAM
GENERAL
CONDUCTOR
R1
TOUCH
SUSTAIN
REVERB
CHORUS
HARMONY
• To make corrections to the recorded chord progression, use the and keys or TRANSPOSE/PRO-
▲
▼
GRAM button to display th e cho rd you wis h to modify .
Next, press the DELETE key to erase the stored chord
and th en store a ne w chord. Wh en you use the DE-
LETE k ey to er ase a chor d, th e rec ord ed conte nt s that
follow are shifted forward by the note value of the
deleted chord.
• To go to the end of the chord progression, while
pressing the Reset key ( ), press the key.
&
▼
• The CHORD FI NDER feature, which shows you how
to finger a specified chord, is available. (Refer to page
30.)
5.At the end of the chord progression, press the End
key ( ).
• The instru ment ex its th e recor ding mo de.
• If you wish automatic repeat playback of the chord
progr es si on, press the Repe at key ( ) instead of
the End key ( ).
• To s tore chor ds using th e 1 Finger m ode, selec t this
mode before beginning the recording procedure.
(Refer to page 29.)
• The beat numb er is in dicat ed in i ncremen ts of e. For
example, “B3.5” indicates 3-1/2 beats.
• Y ou can press the INTRO [INTR], FILL IN [FI L 1/2] or
ENDING [ENDG] button to store the corresponding
pattern. (An INTRO or COUNT INTRO can be sto red
only at the beginning.) When storing a pattern or
searching for a pattern, the abbreviated name is shown
within square bracke ts [ ].
Note
• When the r ec ording proc edure is pe r for m e d, t h e pr e vio usly reco r de d contents and song da ta loaded fr o m a song
disk as well as BEAT MASTER data are erased.
• Y ou cann ot reco rd mo re than 999 me asure s.
• The total recording capacity of all tracks combined is approximately 4500 notes.
• When “MEM FULL” appears on the display, no more data can be stored and recording ends automatically.
• You cannot begin recording from the middle of a song.
• The play back vo lume ca n be adju sted . (Refer to page 29.)
• Specific tracks can be muted so they are not played back. (Refer to pages 41 and 43.)
• If you wish to keep your recorded performance, save it to a floppy disk. (Refer to page 38.)
• If you record in the MELODY mode on top of the chord track (C) in which the ending pattern is stored, recording
will autom atically en d at that poi nt.
QQTG0588
35
Page 36

Part IV Disk Drive
A 3.5 i nch disk dri ve is b uilt into t his inst rumen t, so yo u ca n play b ack the incl uded di sk and comme rcially s old son g
disks, as well as sto re your record ed per forma nces on flopp y disks and play them back.
Parts of the floppy disk drive
Disk slot
• An illu strati on o f a flop py d isk appe ars on the d ispla y
when data is bei ng loade d f r om or s aved to a d isk. To
prevent data loss, do not remove the disk from the
Disk Dri ve or turn of f the power w hile this ill ustration
is shown.
Lights wh en th e powe r is on
Eject button
Press to remove the disk
from the Disk Drive.
Disk illustr ation
Playing the included Song Disk
Data fo r 100 song s is stored on the inc luded SONG DI SK for you to en joy. These son gs corresp ond to the se parat e
music sc ore pro vided.
• Note that recorded song data in the instrument memory will be deleted when a song on the disk is played back.
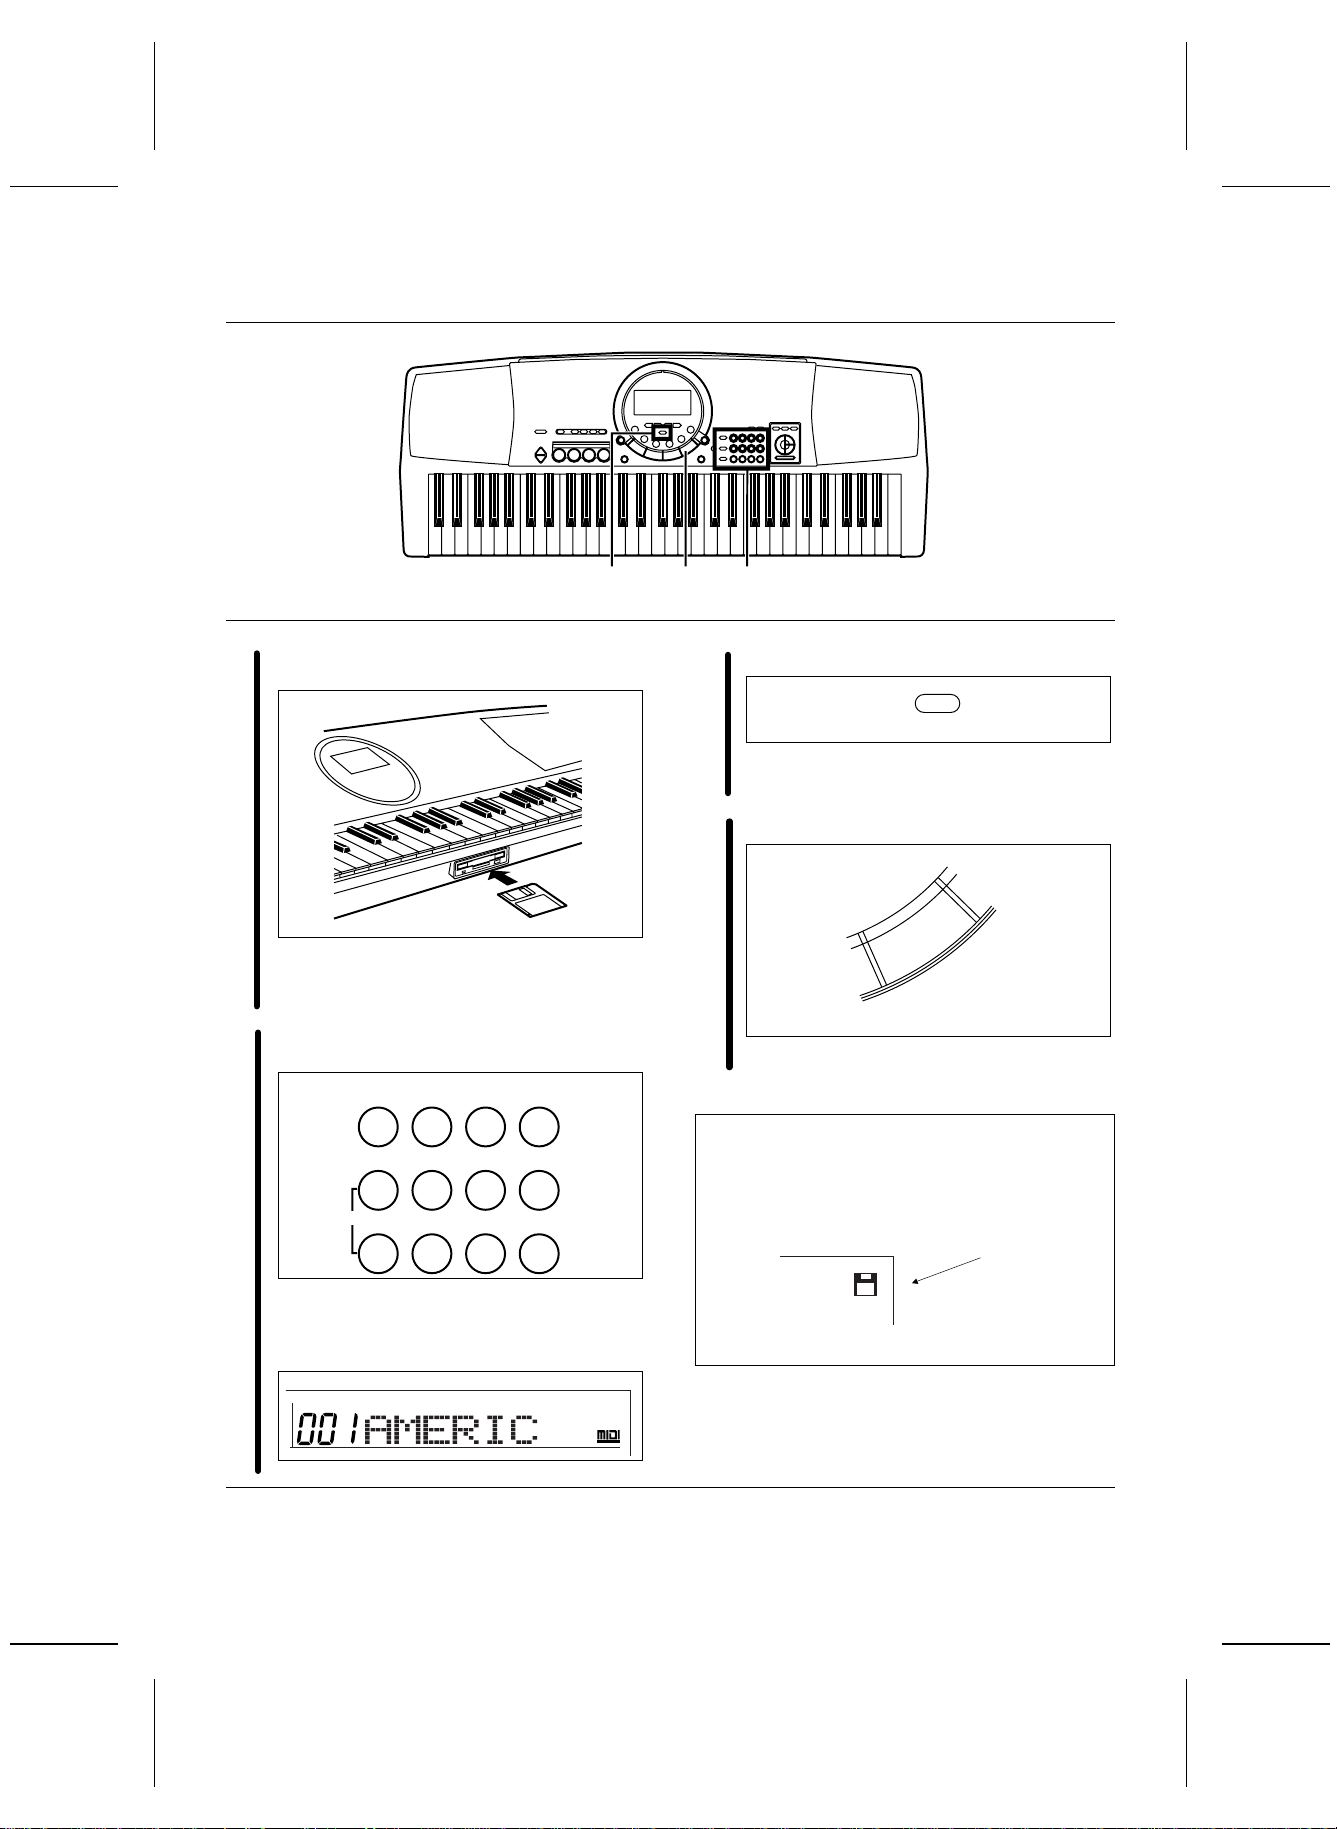
1.Insert the SONG DISK into the Disk Drive.
2.Use the number buttons to select a song number (3
digits).
0 1 2 3
+ 4 5 6
CANCEL
— 7 8 9
• I nsert t he f lop py disk cor rect ly ori ented w ith the labe l
side up . Pus h it all th e wa y in until it clicks into p la ce .
• The display ch ange s to show the so ng name . If i t does
not ch ange, press t he DISK SONG but ton.
DISK
SONG
36
QQTG0588
• The song numbe rs can be found on th e separ ate m usic
score p rovided .
• The selected son g number and abbre viated so ng name
are shown on the display.
SONG
GENERAL
• The TRANSPOSE/PROGRAM buttons and the + and
– buttons can also be used to select the song.
• If 000 MEDLEY is selected, the entire contents of the
disk are played back repeatedly.
Page 37

Part IV Disk Drive
3.Pres s the EXECUTE bu tton.
EXECUTE
• The selected song data is loaded into this instrument’s
memor y. “COMP LETE” ap pears on the d ispla y.
• Thi s step is not ne cessar y if MED LEY was selecte d.
Function of each button during playback
4.Pres s the PLAY/PAUSE (START/STOP) butt on.
Return to top
(durin g stop) Stop (p ause)
START/STOP
PLAY/PAUSE
• P layback begins .
• Playback ends at the end of the song. Use the same
procedure to play other songs.
• If the APC/SONG VOLUME button is pressed, the
playback volume can be adjusted. This is useful when
playin g the keybo ard along wit h a song on the disk.
(Refer to page 29.)
• If the PLAY/PAUSE button is pressed during MEDLEY
playback, the MEDLEY is canceled.
• If th e SON G TRACK MUTE fun ct ion is used , playbac k
of a desired track is muted, allowing you to perform
that part on the keyboard. (Refer to pages 41 and 43.)
• When the MINUS ONE button is pressed, the melody
(RIGHT 1) part is muted so that you can try playing it
yoursel f. Pres s the MINUS ONE butto n a gai n t o ca nc el
the mute.
Playback of commercial disks
Fast forwa rd
(during stop; by
measure)
(Direct Play)
You can enjoy immediat e playback of disks with th e GM (General MIDI) mark as well as SMF (Sta ndard MIDI File ;
FORMAT 0/1) song disks.
• Note that recorded song data in the instrument memory will be deleted when a song on the disk is played back.
• D uring t he dire ct play, MIDI do es not functio n.
1.Insert the song data disk into the Disk Drive.
• The display ch ange s to show the so ng name . If i t does
not ch ange, press t he DISK SONG but ton.
2.Use the TRANSPOSE/PROGRAM buttons or the num-
ber butt ons to s elect a s ong.
• The song number and song name (file name) are
shown on the display.
• When using the number buttons, be sure enter 3 digits
for the song number.
• If 000 MEDLEY is selected, the entire contents of the
disk are played back repeatedly.
• If both SONG data and SMF (Standard MIDI File) data
are stored on the same disk, followi ng the TYPE indication, the display changes to the select display. In
this case, use the TRANSPOSE/PROGRAM buttons
to select 02 SMF. Press the EXECUTE button.
3.Pres s the PLAY/PAUSE (START/STOP) butt on.
• P layback begins .
• The RESET/FORWARD button can also be used
during playback.
• The APC/SONG VOLUME button ca n also be used.
(Refer to page 29.)
37
QQTG0588
Page 38

O
R
Part IV Disk Drive
MINUS ONE
You can mute a specified part of the song data. When
you wish to play the keyboard in time with the song, you
can mute one pa rt, and the oth er parts be come your ba ckground when th e song d ata is played back.
1.Pres s the MINUS ONE button.
MINUS
ONE
2.Use the TRANSPOSE/PROGRAM buttons to specify
the part number (it flashes) of the part you wish to
mute .
• After a few seco nds, th e displ ay retu rns to the p revio us
display .
• To cancel the mute functi on, press th e MINUS ONE
button agai n.
• The display looks s imilar to t he foll owing.
TEMPO
TRANSPOSE
XBS
APC
COUNT
INTRO / ENDING
SYNCHRO
VOLUME
R1R2
DIRECT
PLAY
1 2 3 4 5 6 7 8
C
L
9
10 11 12 13 14 15 16
CHORD
PROGRAM
MINUS
ONE
GENERAL
CONDUCTOR
R1
TOU
SUS
REV
CH
HA
Save your recorded song
The recorded contents of this instrument’s SONG memory can be stored on a floppy disk. Only one song can be
recor ded in th is inst rument’ s memo ry, but seve ral songs can be s aved in one fl oppy dis k.
SONG SAVE
The SONG recorde d conten ts, PANEL MEMORY stored
settings, and the current panel settings, etc. are all stored
when yo u sav e a song to a di sk.
• If you attempt to save a song to an unformatted disk,
“UNFORMAT” is shown on the display. Follow the
DISK FORMAT procedure to format the disk. (Refer
to page 40.)
1.Record your performance with the SONG function.
2.Pres s the DISK MENU button.
DISK
MENU
3.Use the TRANSPOSE/PROGRAM buttons to select 1:
SONG SAVE.
DISK
GENERAL
38
QQTG0588
4.Pres s the EXECUTE bu tton.
EXECUTE
• The display looks s imilar to t he foll owing.
DISK
GENERAL
5.If necessa ry, as sign a son g nam e (u p to 6 ch ara ct e rs) .
• Use the TEMPO/PROGRAM buttons to specify the
character position, and the TRANSPOSE/PROGRAM
button s to s ele ct th e alph anum eri c ch ara cte r. Repe at
these steps to enter the whole name.
• If you wish to erase all the characters, press both
TRANSPOSE/PROGRAM buttons at the same time.
6.Pres s the EXECUTE bu tton.
7.Use the TRANSPOSE/PROGRAM buttons to specify
the song (file) numbe r to sa ve to (0 01 to 100).
Page 39

Part IV Disk Drive
8.Pres s the EXECUTE bu tton.
• The SAVE operation begins. “COMPLETE” appears
on the display.
• If y ou atte mpt t o save so ng data to a so ng number i n
which data is already stored, “SURE?” appears on the
display. Press the EXECUTE button t o overwrit e the
existing song data, or press the DISK MENU button if
you wish to cancel the procedure.
• The num ber of song s th at can be saved to on e flo ppy
disk is lim ited.
About playback
The m ethod t o pla y ba ck a so ng yo u sa ve d is t he sam e
as that to play back a song on the included disk. (Refer
to page 37.)
• If both SONG data and SMF (Standard MIDI File) data
are stored on the same disk, followi ng the TYPE indication, the display changes to the select display. In
this case, use the TRANSPOSE/PROGRAM buttons
to select 01 SONG. Pre ss the EXECUTE button.
• During MEDL EY playback, playback will stops at a file
that has no song data.
SONG DELETE
You can de lete songs tha t you no longer w ant to keep
from the disk.
1.Pres s the DISK MENU button.
2.Use the TRANSPOSE/PROGRAM buttons to select 2:
SONG DEL.
DISK
GENERAL
3.Pres s the EXECUTE bu tton.
• The display looks s imilar to t he foll owing.
DISK
GENERAL
4.Use the TRANSPOSE/PROGRAM buttons select the
song nu mber you wish to delet e.
5.Pres s the EXECUTE bu tton.
• “SURE?” appears on the display.
6.Pres s the EXECUTE bu tton a gain.
• “COMPLETE” appe ars on the di spla y, and the s elect ed
song is deleted.
39
QQTG0588
Page 40

Part IV Disk Drive
DISK FORMAT
It may be necessar y to forma t a floppy di sk for savin g
songs when you first use it. Also, this is a convenient
way to erase all the data stored on a disk.
• Thi s proc edure clears th e enti re con tents of the disk .
• Reformat a disk if it cannot be saved to or loaded from
properly because of exposure to a magnetic field.
• Y ou can us e 3.5 inch 2DD (72 0KB) or 2HD (1.4 4MB)
floppy disk s.
• Be su re to spec ify the type of f orm at whi ch is suita bl e
for the disk.
• H ow to di sting uish the two d isk type s:
2HD2DD
No hole
• Although 2HD floppy disks can hold more data and
are convenient for quick loading and saving, some
models may be ab le to r ead on ly 2DD d isks . Th erefo re,
you may not be ab le to use yo ur 2HD di sk data with
other musical instrument models.
• To format the floppy disk, the write-protect window
must be closed, as illustrated.
Hole
Storag e is not
possible
Storage is
possible
1.Insert the floppy disk to be formatted into the Disk
Drive.
2.Pres s the DISK MENU button.
DISK
MENU
3.Use the TRANSPOSE/PROGRAM buttons to select 3:
FORMAT.
DISK
GENERAL
4.Pres s the EXECUTE bu tton.
• The display returns to the previous display.
DISK
GENERAL
5.Use the TRANSPOSE/PRO GRAM b utt ons to s el ect a
disk type (2DD or 2HD).
• B e sure to sele ct the t ype wh ich i s the sam e as yo ur
disk type.
Open
Closed
6.Pres s the EXECUTE bu tton.
• “SURE?” appears on the display.
7.Pres s the EXECUTE bu tton a gain.
• Disk format begins. After a few minutes, “COMPLETE”
appears on the display and formatting is completed.
• N o sound is gener ated eve n if you pla y the keyb oard
during formatting. If the keyboard is played during
formatting, sound may be produced when formatting
is completed.
40
QQTG0588
Page 41

Part V Menu
Various settings that enhance the functions of this instrument are accessed through the MENU function.
Outline of the procedure
1.Pres s the MENU button.
MENU
RHYTHM
VARIATION
SOUND
0 1 2 3
+ 4 5 6
CANCEL
— 7 8 9
2.Use the number buttons to enter the menu number of
the set ting yo u wish to disp lay ( two di gits).
• The + and – buttons and the TRANSPOSE/ PRO-
GRAM butto ns can also be used t o select the menu
number.
MENU list:
[ ] indicates the name s hown on the display.
01: XBS [XBS]
ON/OFF settin g for the EXTRA BASS SYSTEM
(empha size s low- range soun d).
02: PART VOLUME [PT VOL]
Volume settings for each part.
03: PART SOUND [PT SOUND]
Sound settings for each part.
04: PART PANPOT [PT PAN]
Stereo setting for each part.
05: PART REVERB SEND [PT REV]
Depth settings fo r the REVERB for ea ch pa rt.
06: PART CHORUS SEND [PT CHORS]
Depth settings fo r the CHORUS of each part .
07: PART MIDI CHANNEL [PT MIDI]
MIDI channel settings for each part
08: PART LOCAL SETTING [PT LOCA L]
MIDI LOCAL CONTROL settings for each part.
09: SONG TRACK MUTE [TR MUTE]
Mute setting fo r each track of a SONG.
10: SONG ALL CLEAR [SONG CLR]
Clear all SONG tracks.
11: SONG TRACK CLEAR [TR CLEAR]
Clear specified SONG tracks.
12: MIDI CLOCK [MIDI CLK]
MIDI CLOCK mode settings.
13: MIDI REALTIME COMMAND [MIDI RTC]
Setting to enable or disable the transmission/reception of MIDI REALTIME COMMAND data.
14: SPLIT POINT [SPLIT]
Change the sp lit point on the keyboa rd.
15: MASTER TUNING [TUNING]
Fine ad justmen t of th e tuning for the whole i nstrument.
16: FOOT SWITCH ASSIGN [FOOT SW]
Assign a functio n to th e Foot S witch (s old sepa rately).
17: LCD CONTRAST [CONTRAST]
Adjust th e read ability o f the d isplay.
18: DEMO LED [DEMO LED]
ON/OFF settin gs for the LED li ghting of th e pad
buttons during a DEMO performance.
19: ALL INITIAL [AL L INIT]
Reset this ins trument to th e original sett ings.
3.Pres s the EXECUTE bu tton.
• The display changes to the setting display for the
selected MENU.
4.Use the TEMPO/PROGRAM buttons, the TRANS-
POSE/PROGRAM buttons, or the EXECUTE button to
adjust th e settin gs in the selecte d menu.
0 1 2 3
TEMPO
PROGRAM
EXECUTE
TRANSPOSE
PROGRAM
+ 4 5 6
CANCEL
— 7 8 9
5.When you have finished making the settings, press
the MENU button a gain.
• If you execute a setting, there is also a menu to exit
the setting mode.
41
QQTG0588
Page 42

Part V Menu
Setting menus
XBS
MENU
GENERAL
Use the TRANSPOSE/PROGRAM butt on s to set the XB S
to ON or OFF.
ON: Low-range sound is emphasized.
OFF: Low-range sound is not emphasized.
• When XBS is on, a mark on the display appears
next to the XBS in dicatio n.
▲
PART VOLUME
MENU
GENERAL
1.Use the TRANSPOSE/PROGRAM buttons to select
the part you wish to se t.
• RT is the abbreviation for RIGHT, PT for part and ACP
for ACCOMP.
• For an explanation of CHRD and R.BS, refer to page
28.
2.Use the TEMPO/PROGRAM buttons to adjust the
volume ( 0 to 127) .
• Repeat these steps for each part as necessary.
PART PANPOT
MENU
GENERAL
1.Use the TRANSPOSE/PROGRAM buttons to select
the part you wish to se t.
2.Use the TEMPO/PROGRAM buttons to adjust the
stereo midpoi nt (0 to 127).
• At 0 the center is all the way to the left, at 64 the
cente r is midway b etween ri ght and lef t, and at 1 27
the center is all the way to the right.
PART REVERB SEND
MENU
GENERAL
1.Use the TRANSPOSE/PROGRAM buttons to select
the part you wish to se t.
2.Use the TEMPO/PROGRAM buttons to adjust the
depth of the REVERB (0 to 127).
PART CHORUS SEND
PART SOUND
MENU
GENERAL
1.Use the TRANSPOSE/PROGRAM buttons to select
the part you wish to se t.
2.Use the TEMPO/PROGRAM buttons or the number
buttons to select a sou nd for the part.
42
QQTG0588
MENU
GENERAL
1.Use the TRANSPOSE/PROGRAM buttons to select
the part you wish to se t.
2.Use the TEMPO/PROGRAM buttons to adjust the
depth of the CHORUS (0 to 127).
PART MIDI CHANNEL
MENU
GENERAL
1.Use the TRANSPOSE/PROGRAM buttons to select
the part you wish to se t.
2.Use the TEMPO/PROGRAM buttons to set the channel
(OFF, 01 to 16).
Page 43

Part V Menu
PART LOCAL SETTING
MENU
GENERAL
1.Use the TEMPO/PROGRAM buttons to select the part
you wish to set.
2.Use the TRANSPOSE/PROGRAM buttons to set the
LOCAL CONTROL setting (ON or OFF).
• When set to OFF, the performance for the part is
transmitted as MIDI data but does not sound from this
instrument.
SONG TRACK MUTE
MENU
GENERAL
1.Use the TEMP O/PROGRAM buttons to select the track
you wish to mute.
• R is the abbreviation for RIGHT and L for LEFT. C
indicates the CHORD part.
2.Use the TRANSPOSE/PROGRAM buttons to display
the MUTE in dication .
• “– – –” indicates that the MUTE function is turned off
for the track.
SONG CLEAR
TRACK CLEAR
MENU
GENERAL
1.Use the TRANSPOSE/PROGRAM buttons to select
the track you wish to clear.
• R is the abbreviation for RIGHT and L for LEFT. C
indicates the CHORD part.
2.Pres s the EXECUTE bu tton.
• “ CLEAR? ” appear s on the disp lay.
3.Pres s the EXECUTE bu tton a gain.
• “COMPLETE” appears on the display, and the
specified track is cleared.
MIDI CLOCK
MENU
GENERAL
Use the TRANSPO SE/PROGRAM buttons to sel ect the
MIDI CLOCK mode.
INT: This in stru m ent’s in tern al cl ock is used to con-
trol th e conne cted MI DI equi pmen t.
EXT: The clo ck of the connect e d M ID I equipmen t is
used to contr ol th is i nstr ume nt. (Th e te mpo i s dis played as “q= – – –”.)
• For i nfo rmati on ab ou t MIDI co nnec tio ns, refer to p age
46.
• The setting is always set to INT when the power to
this instr ument is turned on.
GENERAL
Press the EXECUTE button.
• “COMPLETE” appears on the display, and all the
tracks of the SONG are clea red.
MIDI REALTIME COMMAND
MENU
GENERAL
Use the TRANSPO SE/PROGRAM buttons to enable or
disable the transmission/reception of MIDI REALTIME
COMMAND data.
ON: REALTIME COMMAND (START/STOP, CON-
TINUE) da ta are t ransm itted /receive d.
OFF: REALTIME COMMAND data are not trans-
mitted/received.
43
QQTG0588
Page 44

Part V Menu
SPLIT POINT
MENU
GENERAL
Press th e keyboa r d key to s pecify the desir e d s plit pos ition.
• The name of t he spe cif ied note i s sh own on the displ ay.
• The initializ ed setti ng is at C3 .
• The key at the split point is the lowest note of the right
keyboard section.
MASTER TUNING
MENU
GENERAL
Use the TRANSPOSE/PROGRAM buttons t o adjust th e
tuning value (–38 – Center – +39).
FOOT SWITCH ASSIGN
MENU
GENERAL
Use the TRANSPOSE/PROGRAM buttons to select a
function to assign to the Foot Switch (separately sold
option).
• Sele ct from SUSTAIN, START/STOP [ST/STO P] and
GLIDE.
• In cases where the switch polarity is reversed, select
a function name that is preceded by a “–” indication.
• Pressing the Foot Switch will turn the assigned function
on.
• GLIDE “bends” the pitch down by about one semitone.
• For information about connecting a Foot Switch, refer
to page 46.
LCD CONTRAST
DEMO LED
MENU
GENERAL
Use the TRANSPOSE/PROGRAM buttons to specify
whether or not the pad button LEDs light during a DEMO
performance.
ON: The pad button LEDs ligh t also during a DEMO
perfor m ance.
OFF: The p ad butt on LEDs do no t light du ring the
DEMO perform ance.
ALL INITIAL
GENERAL
Press the EXECUTE button.
• “ COMPL ETE” appe ars on th e disp lay , and a ll th e settings of the instrument (except for MAIN VOLUME)
are reset to the factory-preset status. Note that the
SONG and PANEL MEMORY contents are cleared
with this procedure.
• You can also reset the instrument with the following
procedure: While pressing the TEMPO ∧ and ∨ at
the same time, turn on the power to the instrument.
With this me thod, the MAIN VOLUME setting is also
initial ized.
Memory function
The various settings and memory contents of this instrument are maintain ed as long as the AC ad aptor is connected to thi s inst rument and p lugge d into an out let. In
additio n, the set tin gs a re pre serve d for abou t on e week
after the AC adaptor is unplugged.
• The memory function does not function until the power
has be en on fo r abou t 10 minu tes.
• It is recom men ded th at you save your SONG pe rf orm -
ances on flopp y disks . (Ref er to pa ge 38.)
MENU
GENERAL
Use the TRANSPOSE/PROGRAM buttons t o adjust th e
readab ility of th e displa y (1 to 10).
44
QQTG0588
Page 45

Symptoms which appear to be signs of trouble
The following cha nges in performan ce may occur in the Keyboar d but do not indicat e trouble.
Phenomenon Remedy
The button s, keys, etc. mal function . •Turn off the PLAY button once, then turn it on aga in.
No sound is prod uced when the key s are pressed. • The MAIN VOLUME is at th e minimum setting. Adjust
Only percussive instrument sounds are produced
Sounds and effects
when the keyboar d is played.
The sound you he ar is different from the sound you
selected.
The rhythm does no t start. •The PLAY button in the SONG section is on . When
Rhythm
No sound is produced for the automatic accompaniment.
If this procedure is not successful, turn off th e PLAY
button once. Th en, while press ing the TEMPO ∧ and
∨ buttons at the same time, turn the PLAY button on
again. (Note that, in this case, all programmable
settings, functions and memories return to their factorypreset st atus.)
the volume with the MAIN VOLUME control.
•The volumes for the selected parts are set to the
minimum levels. Set the volumes of the relevant parts
to appropriate leve ls. (Refer to pa ges 41 and 42.)
•The LOCAL CONTROL for a part performed on the
keyboard is set to O FF. Set the LO CAL CONTROL to
ON. (Refer to p ages 4 1 and 43 .)
•A DRUM KITS sound is s elected.
•This sometimes occurs when you play back SONG
data which w as cr eated on a diffe re nt m odel, or when
MIDI data is received from a connected instrument.
Select the desired so unds again.
you are not playing back the SONG per f orm ance, turn
off the PLAY button.
•The DRUMS volume is set to the minimum leve l. Use
the balance butto ns to set the DRUMS volume to an
appropriate leve l. (Refer to the pa ge 42.)
•The 091 CLASSIC BALLAD rhythm is selected. This
rhythm does not sound unless the AUTO PLAY
CHORD is used.
•MIDI CLOCK is set to EXT. Set CLOCK to INT. (Refer
to pages 41 and 43.)
•The APC/SONG VOLUME is set to the minimum
setting. Set it to a suit able level. (Refer to page 29. )
CHORD
AUTO PLAY
Storage is not pos sible. •The remaining memory capacity of the SONG is 0.
Follow the SONG CLEAR or T RACK CLEAR procedure
SONG
The Disk D rive produces a noise during recording
or playback.
When the procedur e to listen to a song on the disk
is performed, the conten ts of the key board m emory
are erased.
Disk Drive
to erase the memor y. (Refer to pages 41 and 43)
•This occurs when the Disk Drive is readin g a disk. It
does not indicate a pr oblem.
•When perfor min g t he pr oce dure to listen t o a song on
the disk, the keyboar d memo ry changes to t hat of the
data loaded fr om the disk. If you wish to preserve a
song which is s tored in the keyboard m emory, save it
on a disk before performing the load procedure. (Refer
to page 38.)
45
QQTG0588
Page 46

Phenomenon Remedy
Noise from a radio or TV can be he ard. •This sometimes occurs when electrical equipment such
Other
The cabin et beco mes w arm d uring use. • This instrument has a power source that heats the
Connections
(Rear panel)
as a radio or TV is used near the instrument. Try moving
such electrical equipment further away from the
instrument.
•The sound may be coming fr om a nearby broadca st
station or amateur radio station. If the sound is
bothersome, cons ult your dealer or service center.
cabinet to some deg ree. This is not an indication of
trouble.
OUT
IN
MIDI
MIDI OUT
Used for transmit ting MIDI data. Connect the other end
of the MIDI cable to the MIDI IN terminal of another
instrument. This terminal is used, for example, to generate
sound from a connected instrument by playing this instrument.
MIDI IN
Used for receiving MIDI da ta. Connect th e other end of
the MIDI cabl e to the MIDI OUT terminal of another instrument. This ter min al is use d, for e xam ple, to generate
sound from this instrument by playing a connected instrument.
AUX IN (stereo pin cord)
Connect to th e LINE OUT term inal of anot her instrum ent
to this t erminal. The soun d from a c onne cted CD p layer,
for example, can be output from this instrument’s
speakers.
L
AUX IN
FOOT
PHONES/
LINE OUT
SW
FOOT SW
An optional SZ-P1 Foot Switch (so ld separately ) can be
connected to this terminal to control various functions.
(Refer to page s 41 and 44.)
PHONES/LINE OUT (output level 1.5 Vrms, 16 Ω)
Headphones, a keybo ard amplifier, or stereo eq uipment
can be connected to this terminal. When another apparatus is conne cted to this termina l, the speaker syst em is
automatically switched off, and sound is heard only
through the co nnected device.
R
DC IN
12V
Separately sold option
SZ-P 1 Foot Switch
46
QQTG0588
Page 47

Index
A
ALL INITIAL . . . . . . . . . . . . . . . . . . . . . . . . . . . . . . . 44
APC/SOUND VOLUME . . . . . . . . . . . . . . . . . . . . . . . 29
AUTO PLAY CHORD . . . . . . . . . . . . . . . . . . . . . . . . 28
AUX IN . . . . . . . . . . . . . . . . . . . . . . . . . . . . . . . . . . . 46
B
BEAT MASTER . . . . . . . . . . . . . . . . . . . . . . . . . . . . . 16
C
CANCEL . . . . . . . . . . . . . . . . . . . . . . . . . . . . . . . . . . 20
CHORD FINDER . . . . . . . . . . . . . . . . . . . . . . . . . . . . 30
CHORD STEP RECORD . . . . . . . . . . . . . . . . . . . . . 34
CHORUS . . . . . . . . . . . . . . . . . . . . . . . . . . . . . . . . . 22
CLOCK (MIDI) . . . . . . . . . . . . . . . . . . . . . . . . . . . . . . 43
CONDUCTOR . . . . . . . . . . . . . . . . . . . . . . . . . . . . . . 21
Connections . . . . . . . . . . . . . . . . . . . . . . . . . . . . . . . 46
COUNT INTRO . . . . . . . . . . . . . . . . . . . . . . . . . . . . . 27
D
DEMO . . . . . . . . . . . . . . . . . . . . . . . . . . . . . . . . . . . . 11
DIRECT PLAY . . . . . . . . . . . . . . . . . . . . . . . . . . . . . . 37
Disk Drive . . . . . . . . . . . . . . . . . . . . . . . . . . . . . . . . . 36
DISK FORMAT . . . . . . . . . . . . . . . . . . . . . . . . . . . . . 40
DISK SONG . . . . . . . . . . . . . . . . . . . . . . . . . . . . . . . 36
DISK MENU . . . . . . . . . . . . . . . . . . . . . . . . . . . . . . . 39
Display . . . . . . . . . . . . . . . . . . . . . . . . . . . . . . . . . . . 19
E
EASY REC . . . . . . . . . . . . . . . . . . . . . . . . . . . . . 15, 33
ENDING . . . . . . . . . . . . . . . . . . . . . . . . . . . . . . . . . . 27
EXECUTE . . . . . . . . . . . . . . . . . . . . . . . . . . . . . . . . . 19
F
FILL IN . . . . . . . . . . . . . . . . . . . . . . . . . . . . . . . . . . . 27
FINGERED . . . . . . . . . . . . . . . . . . . . . . . . . . . . . . . . 28
FOOT SW . . . . . . . . . . . . . . . . . . . . . . . . . . . . . . 44, 46
Foot Switch . . . . . . . . . . . . . . . . . . . . . . . . . . . . . . . . 46
FORWARD . . . . . . . . . . . . . . . . . . . . . . . . . . . . . . . . 37
G
GLIDE . . . . . . . . . . . . . . . . . . . . . . . . . . . . . . . . . . . . 44
H
HARMONY . . . . . . . . . . . . . . . . . . . . . . . . . . . . . . . . 24
Headphones . . . . . . . . . . . . . . . . . . . . . . . . . . . . . . . 46
I
INTRO/ENDING . . . . . . . . . . . . . . . . . . . . . . . . . . . . 27
L
LCD CONTRAST . . . . . . . . . . . . . . . . . . . . . . . . . . . 44
LINE OUT . . . . . . . . . . . . . . . . . . . . . . . . . . . . . . . . . 46
LOCAL (MIDI) . . . . . . . . . . . . . . . . . . . . . . . . . . . . . . 43
M
MAIN VOLUME . . . . . . . . . . . . . . . . . . . . . . . . . . . . . . 9
MASTER TUNING . . . . . . . . . . . . . . . . . . . . . . . . . . 44
MENU . . . . . . . . . . . . . . . . . . . . . . . . . . . . . . . . . . . . 41
MIDI . . . . . . . . . . . . . . . . . . . . . . . . . . . . . . . . . . . . . . 46
MIDI CLOCK . . . . . . . . . . . . . . . . . . . . . . . . . . . . . . . 43
MIDI REALTIME COMMAND . . . . . . . . . . . . . . . . . . 43
MINUS ONE . . . . . . . . . . . . . . . . . . . . . . . . . . . . . . . 38
Music stand . . . . . . . . . . . . . . . . . . . . . . . . . . . . . . . . . 8
MUTE . . . . . . . . . . . . . . . . . . . . . . . . . . . . . . . . . . . . 43
O
ONE FINGER . . . . . . . . . . . . . . . . . . . . . . . . . . . . . . 28
ONE TOUCH PLAY . . . . . . . . . . . . . . . . . . . . . . . . . . 30
Options . . . . . . . . . . . . . . . . . . . . . . . . . . . . . . . . . . . 46
P
PAN . . . . . . . . . . . . . . . . . . . . . . . . . . . . . . . . . . . . . . 42
PANEL MEMORY . . . . . . . . . . . . . . . . . . . . . . . . . . . 31
PART SETTING . . . . . . . . . . . . . . . . . . . . . . . . . . . . . 42
PARTY PADS . . . . . . . . . . . . . . . . . . . . . . . . . . . . . . 32
PIANIST . . . . . . . . . . . . . . . . . . . . . . . . . . . . . . . . . . . 28
PLAY . . . . . . . . . . . . . . . . . . . . . . . . . . . . . . . . . . . . . 34
PLAY OFF/ON . . . . . . . . . . . . . . . . . . . . . . . . . . . . . . . 9
R
REC . . . . . . . . . . . . . . . . . . . . . . . . . . . . . . . . . . . . . . 33
RESET . . . . . . . . . . . . . . . . . . . . . . . . . . . . . . . . . . . . 37
REVERB . . . . . . . . . . . . . . . . . . . . . . . . . . . . . . . . . . 23
RHYTHM . . . . . . . . . . . . . . . . . . . . . . . . . . . . . . . . . . 25
S
SAVE . . . . . . . . . . . . . . . . . . . . . . . . . . . . . . . . . . . . . 38
SMF . . . . . . . . . . . . . . . . . . . . . . . . . . . . . . . . . . . . . . 37
SOLO PIANO . . . . . . . . . . . . . . . . . . . . . . . . . . . . . . . 22
SONG . . . . . . . . . . . . . . . . . . . . . . . . . . . . . . . . . . . . 33
SONG CLEAR . . . . . . . . . . . . . . . . . . . . . . . . . . . . . . 43
SONG SAVE . . . . . . . . . . . . . . . . . . . . . . . . . . . . . . . 38
SOUND . . . . . . . . . . . . . . . . . . . . . . . . . . . . . . . . . . . 20
Specifications . . . . . . . . . . . . . . . . . . . . . . . . . . . . . . . 48
SPLIT POINT . . . . . . . . . . . . . . . . . . . . . . . . . . . . . . . 44
Standard MIDI File . . . . . . . . . . . . . . . . . . . . . . . . . . . 37
START/STOP . . . . . . . . . . . . . . . . . . . . . . . . . . . . . . 25
SUSTAIN . . . . . . . . . . . . . . . . . . . . . . . . . . . . . . . . . . 22
SYNCHRO START . . . . . . . . . . . . . . . . . . . . . . . . . . 26
T
TEMPO . . . . . . . . . . . . . . . . . . . . . . . . . . . . . . . . . . . 26
TEMPO/PROGRAM . . . . . . . . . . . . . . . . . . . . . . 19, 26
TOUCH . . . . . . . . . . . . . . . . . . . . . . . . . . . . . . . . . . . 23
TRACK CLEAR . . . . . . . . . . . . . . . . . . . . . . . . . . . . . 43
TRANSPOSE . . . . . . . . . . . . . . . . . . . . . . . . . . . . . . . 23
TRANSPOSE/PROGRAM . . . . . . . . . . . . . . . . . . . . . 19
Troubleshooting . . . . . . . . . . . . . . . . . . . . . . . . . . . . . 45
V
VARIATION . . . . . . . . . . . . . . . . . . . . . . . . . . . . . . . . 25
X
XBS . . . . . . . . . . . . . . . . . . . . . . . . . . . . . . . . . . . . . . 42
47
QQTG0588
Page 48

Specifications
SX-KC611
KEYBOARD 61 KEYS (WITH INITIAL TOUCH)
SOUND GENERATOR PCM
MAX. POLYPHONY 32 NOTES
SOUNDS 250 SOUNDS
EFFECT TOUCH, SUSTAIN, REVERB, CHORUS
HARMONY 14 TYPES
TRANSPOSE G – C – F#
RHYTHMS 100 RHYTHMS WITH VARIATION
RHYTHM CONTROLS SYNCHRO START, START/STOP, INTRO/ENDING, COUNT INTRO,
XBS o
PARTY PADS 4 PADS, 4 BANKS
PANEL MEMORY 10 MEMORIES
AUTO PLAY CHORD MODE: ONE FINGER, FINGERED, PIANIST
MUSIC TRAINER BEAT MASTER (TRAINING/CHALLENGE), CHORD FINDER, PI ANO
SONG PLAY, REC
DISK DRIVE 3.5 inch FLOPPY DISK DRIVE for 2HD (1.44MB), 2DD (720 KB)
CONTROLS MAIN VOLUME, APC/SONG VOLUME, ONE TOUCH PLAY, EXECUTE,
DISPLAY CUSTOM LCD (WITH BACKLIGHT)
DEMO o
TERMINALS MIDI IN, MIDI OUT, FOOT SW, PHONES/ LINE OUT, AUX IN
OUTPUT 10 W (5W × 2)
SPEAKERS 12 cm × 2
POWER REQUIREMENT DC IN 12 V (WITH EXCLUSIVE AC ADAPTOR)
POWER CONSUMPTION 6.6 W (WHEN POWER IS OFF BY THE PLAY BUTTON: 2 W)
DIMENSIONS (W × H × D) 96.0 cm × 14.6 cm × 37.8 cm (37-25/32’’ × 5-3/ 4’’ × 14-7/8’’)
NET WEIGHT 5.9 kg (13.0 lbs)
ACCESSORIES AC ADAPTOR, MUSIC STAND, SONG BOOK, SONG DISK
• Design and specifications are subject to change without notice.
FILL IN1, FILL IN 2, TEMPO
STYLIST, SOLO PIANO,
MINUS ONE, DISK SONG
4 TRACKS: RIGHT1, RIGHT 2, LEFT, CHORD
STORAGE CAPACITY: APPROX. 4500 NOTES
4 MODES: EASY REC, MELODY, APC REAL, APC STEP
DIRECT PLAY (GM/SMF), SONG LOAD/SAVE, DEL ETE, FORMAT
MENU, CONDUCTOR
EXCLUSIVE AC ADAPTOR
PART NO. REGION VOLTAGE
QFAG028A NORTH AMERICA, MEXICO 120 V
QFAG029A UNITED KINGDOM 230 – 240 V
QFAG030A EUROPE, SOUTH AFRICA 230 V
QFAG031A AUSTRALIA, NEW ZEALAND 230 – 240 V
QFAG032A TAIWAN, MALAYSIA, SINGAPORE, ETC. 120/220/230/240 V
QFAG038B SAUDI ARABIA, KUWAIT, HONG KONG 120/220/ 230/240 V
QFAG039B ARGENTINA 120/220/230/240 V
48
QQTG0588
Page 49

Demo Performance List
Axel F
Cool Gig
Theme from the p aramount Motio n Picture BEVERLY
HILLS COP by Harold Faltermeyer
Copyri tght© 19 84, 1985 by Famo us Mus ic Corpo ration
Internationa l Copyright Secured
All Rights Reserved
Techni cs Ori ginal
49
QQTG0588
Page 50

50
QQTG0588
Page 51

51
QQTG0588
Page 52

Matsushita Electric Industrial Co., Ltd.
Central P.O. Box 288, Osaka 530-91, Japan
ENGLISH
QQTG0588A
Se0101S0
 Loading...