

Page 1
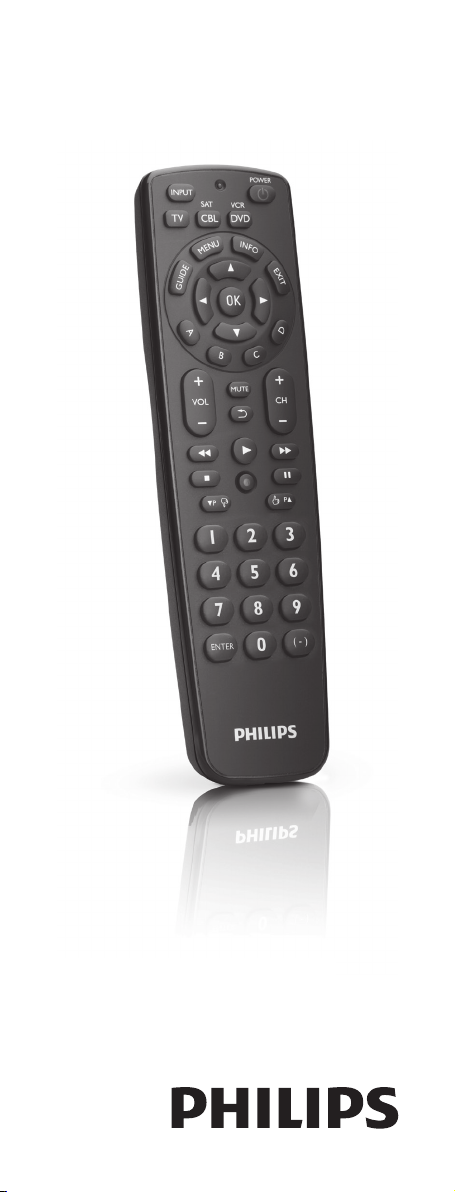
Register your product
and get support at
www.philips.com/welcome
SRP2003/27
EN User Manual
Page 2
Tableofcontents
1
2
9
3
4
5
6
8
1 YourSRP2003................................................. 3
2 Gettingstarted........................................... 4-8
2.1 Inserting the batteries ....................................4
2.2 Setting up the universal remote
control ................................................................4-8
3 Usingtheuniversalremote
control........................................................8-10
3.1 Buttons and functions ..............................8-10
3.2 Resetting a button to its original
function ................................................................10
4 Serviceandsupport..............................11-13
4.1 Frequently asked questions ...............11-13
4.2 Need help? ........................................................ 13
FCC Compliancy .....................................13-14
Notice for Canada ........................................ 14
Helpline ...............................................................15
Brand list ......................................................16-28
Informationtotheconsumer....................29
Compliance with EMF .................................29
Recycling and disposal .................................29
1
YourSRP2003
Congratulations on your purchase of the Philips
SRP2003 universal remote control. After setting
up the remote control you can operate up to 3
different devices with it.
YourSRP2003 English
SimpleSetup
7
2 3EN
Improved with Philips patented (pending)
Simple Setup technology, the SRP2003 can be
set up easily for TV, DVD player / recorder and
all common Cable, Satellite and other set top
boxes, such as DirecTV, Comcast, AT&T, Verizon,
Time Warner, Scientific Atlanta, Tivo and many
more.
Simply follow the instructions in chapter 2.2 to
set up the remote control for your devices.
To fully benefit from the support that Philips
offers, register your product at
www.philips.com/welcome.
Page 3
2
5-60 SEC
.
Gettingstarted
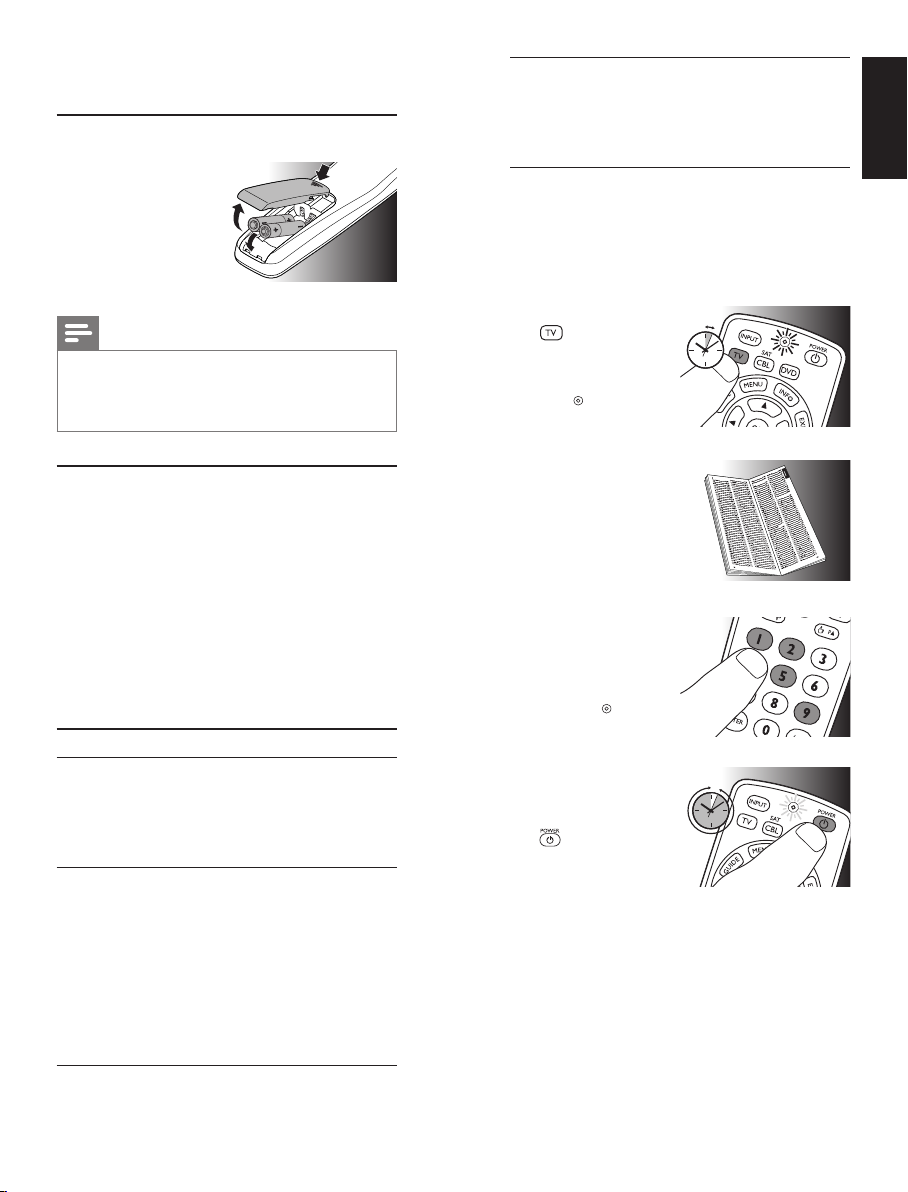
2.1 Insertingthebatteries
• Insert 2 AAA type
batteries, noting the
+ and -
configuration in the
battery
compartment.
Note
When replacing the batteries, all user settings
will be retained in the remote control
memory for 5 minutes.
2.2 Settinguptheuniversalremote
control
The example below instructs you how to set up
your universal remote control for your TV.
You can repeat the same steps for other devices
(
DVD player/recorder and Cable/Satellite box
which you want to operate, using the SRP2003.
The remote control can be set up to operate
any 3 of the following devices:
Devicename Description
TV Traditional TV, at screen
TV and projection TV, TV
part of TV / VCR, TV / VCR
/ DVD and TV / DVD
combos
DVD DVD player / recorder
(DVDR), DVD / Hard
Disk Drive combination
(DVDR-HDD), Blu-Ray
player, High Denition
DVD player (HD-DVD),
DVD part of TV / DVD, TV
/ VCR / DVD and VCR /
DVD combos
)
CBL/SAT Cable box, satellite
receiver, Internet Protocol
TV (IPTV), Free To Air TV,
High Denition Television
decoder (HDTV) and Tivo
Example:settinguptheuniversalremote
controltooperateyourTV:
1 SwitchON the TV manually or use the
original remote control for this. Tune to
channel 1.
2 Press and hold the
device selection
button for 5 seconds
until the red Setup
light
remains lit .
The remote control
is now in setup mode.
5sec.
3 Look up the 4-digit
code for your brand
in the
brand list
the back of this user
manual.
A 4-digit code is
shown for each brand.
Use the digit
buttons to enter the
code for your brand.
• If the red Setup
light
an invalid code
was entered. In this case, try again.
4 Aim the remote
control at the TV.
Press and hold the
button. Release
it immediately as
soon the TV
switches off.
• This step normally takes between
5 and 60 seconds. In extreme
circumstances this step can take up to
15 minutes.
at
turns off,
5-60sec.
Gettingstarted English
4 EN 5EN
Page 4
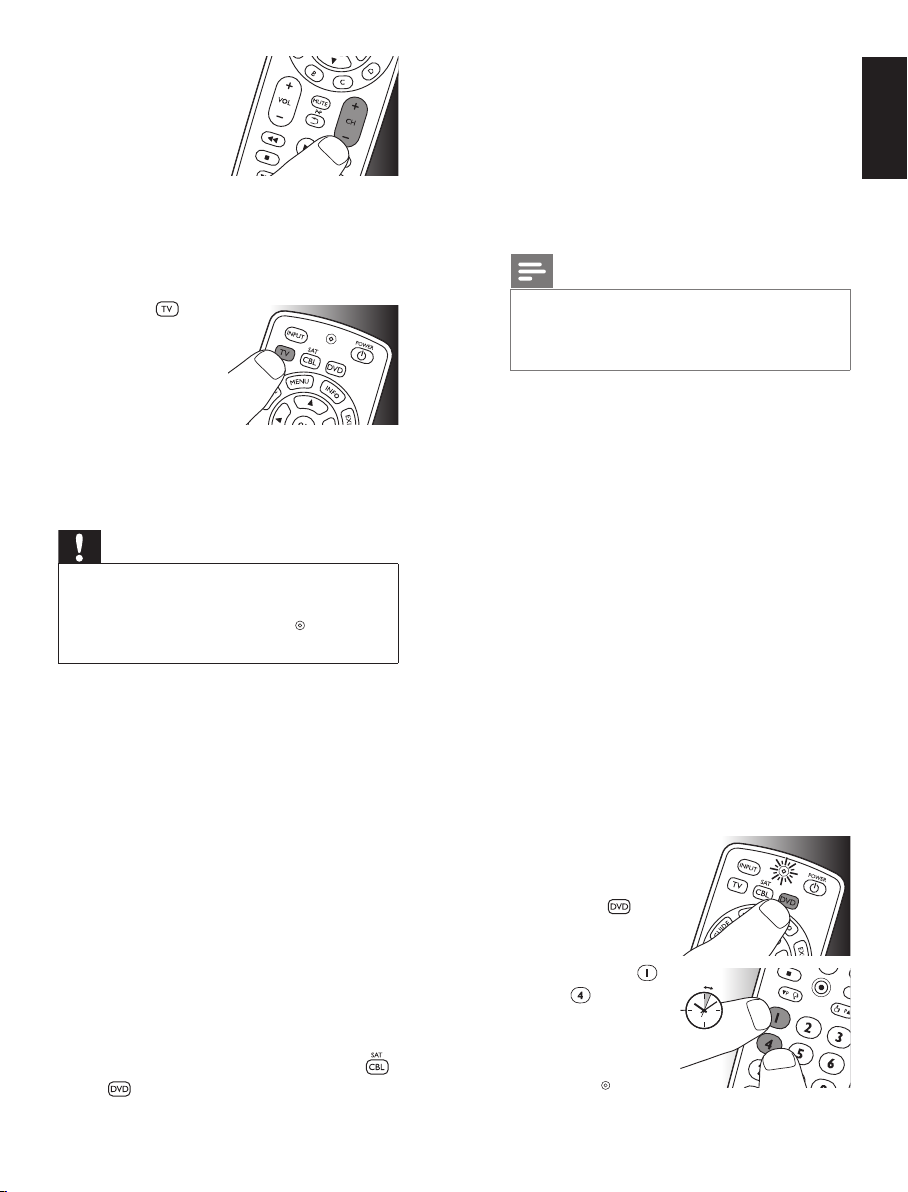
5 SwitchON the TV.
Try out the buttons
you need for
operating it. Try, for
example, if the - CH
+ and digit buttons
function properly.
• If a button does not work as expected, press
and hold that button. Release it immediately
as soon as it works. For more information,
see chapter 2.2.2.
6 Press the
device selection
button twice to
finish setup.
•
When no
button is
pressed for 5 minutes or more, the
remote control will exit setup mode,
automatically saving all your settings.
Important
If you made a mistake:
• Press the device selection button twice to
exit setup. The red Setup light
•
Restart from the beginning.
• If the device does not respond at all or not to
all of the button commands or if you cannot
find the code for your brand, enter ‘9, 9, 9, 9’ in
step 3 and continue with step 4. The remote
control will now search its full database for a
code that works with your TV. Full database
search may take up to 15 minutes.
2.2.1 Settinguptheremotecontrolfor
otherdevices(
and Cable/Satellite box
2x
turns off.
DVD player/recorder
)
1 Make sure the device is switched on and
operational. E.g. insert a disc in the DVD
player / recorder or a video cassette in the
VCR.
2 Then follow steps 2 to 6 of ‘Setting up the
remote control for your TV’. Make sure to
use the correct device selection button:
or
.
6 EN 7EN
2.2.2 Improvingbuttons
When correctly set up, the remote control
should be able to operate all your devices.
However, when using the remote control for the
first time it might occur that some buttons do
not yet function as expected.
In this case you can have the remote control
search for alternatives.
Note
Improving buttons is not possible when the
code was found during full database search
(with code ‘9, 9, 9, 9’).
During initial setup
1 Make sure the receiving device is able to
respond. E.g. when you try to repair the Play
button for your DVD player, make sure to
insert a DVD into the DVD player otherwise
the Play button is not able to function.
2 Press the button that does not function,
keep it pressed and immediately release it
when the device responds. Repeat this for
every button that does not function.
• If the button still does not function as
expected, tr y pressing it again for a longer
period of time.
After initial setup
1 Make sure the receiving device is able to
respond. E.g. when you try to repair the Play
button for your DVD player, make sure to
insert a DVD into the DVD player otherwise
the Play button is not able to function.
2 Select the device
that you wish to
operate
(e.g. DVD).
Press the device
selection button to
select DVD.
3 Keep buttons
and
simultaneously for 5
seconds.
• The red Setup
light
up. The remote control is now in setup
mode.
pressed
lights
5sec.
English
Gettingstarted
Page 5
4
Press and hold the button that does not
function and immediately release it when
the device responds.
• If the button still does not function as
expected, tr y pressing it again for a longer
period of time.
5 Press the
device selection
button twice to save
your settings and
exit setup mode.
•
When no
button is pressed for 5 minutes or more,
the remote control will exit setup mode,
automatically saving all your settings.
2x
3Usingtheuniversal
remotecontrol
4
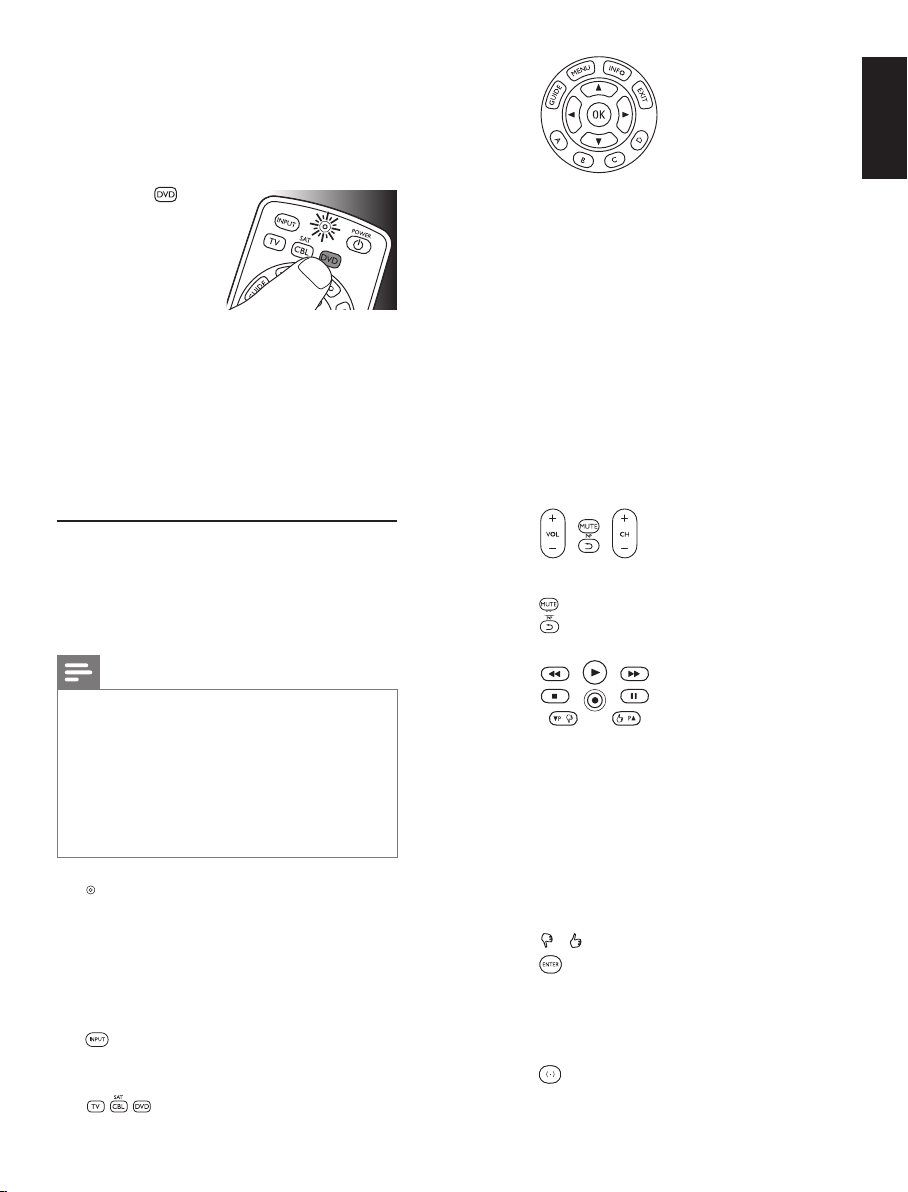
GUIDE ....................... electronic program guide.
MENU ........................ menu on / off.
INFO........................... on-screen channel
information.
EXIT ............................ exits / clears on-screen
menu displays.
3 4 1 2 ............... cursor up, down, left, right
in a menu.
OK ............................... confirms your selection.
A,B,C,D ..................
5
Context sensitivity buttons,
ordered following the
requirements for cable
boxes.
A - Yellow, B - Blue, C - Red,
D - Green.
3.1 Buttonsandfunctions
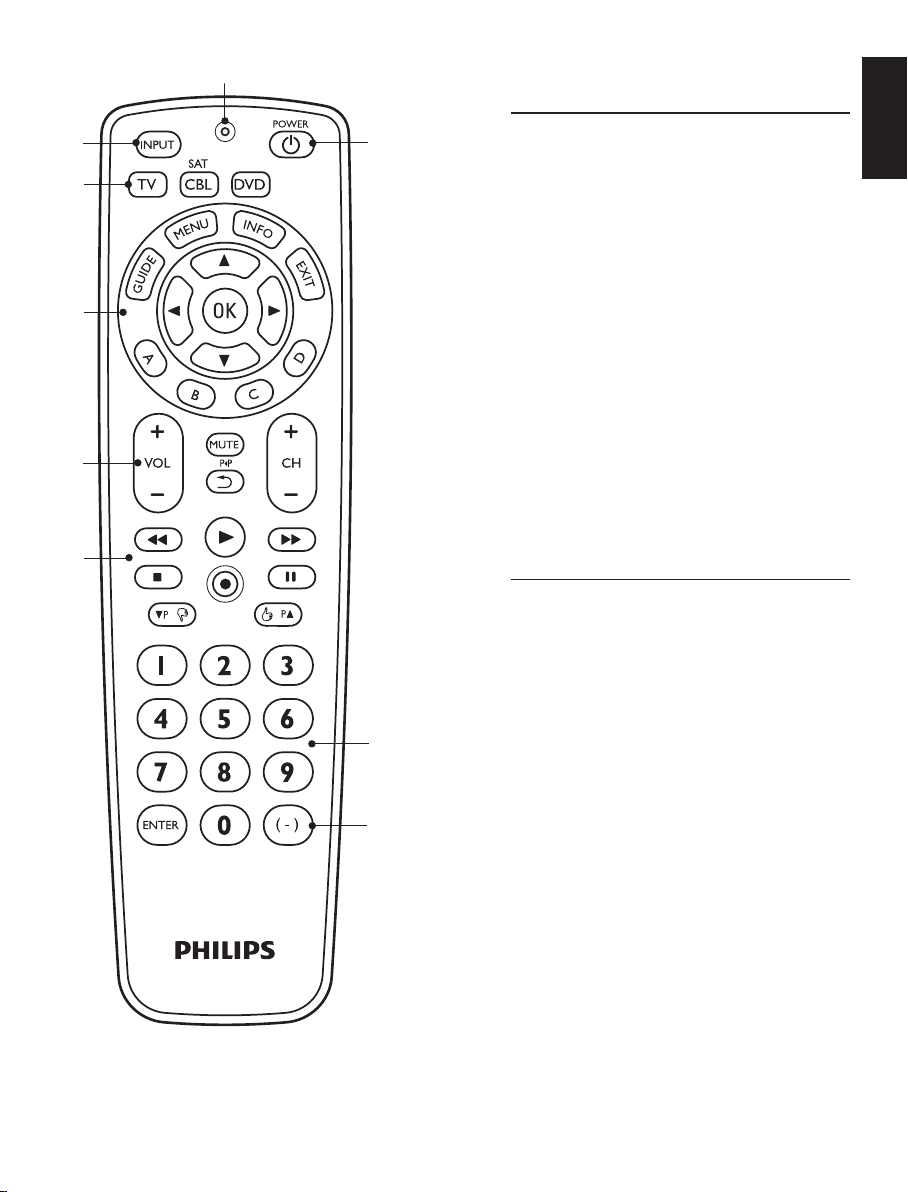
The illustration on page 2 gives an overview of
all buttons on the remote control. Try out the
buttons you need for operating your devices.
Notes
• Buttons having the same functions as the
buttons on your original remote control
may have different namings on the
SRP2003 (e.g. Info / Display).
• Only functions that are available on your
original remote control can be used for
operating your devices with the SRP2003.
1
.................................... Setup light.
• lights up red when the
remote control is in
setup mode.
• lights up red when
a remote control
command is being sent.
2
............................... selects available source
inputs (antenna, cable,
etc.).
3
8 EN 9EN
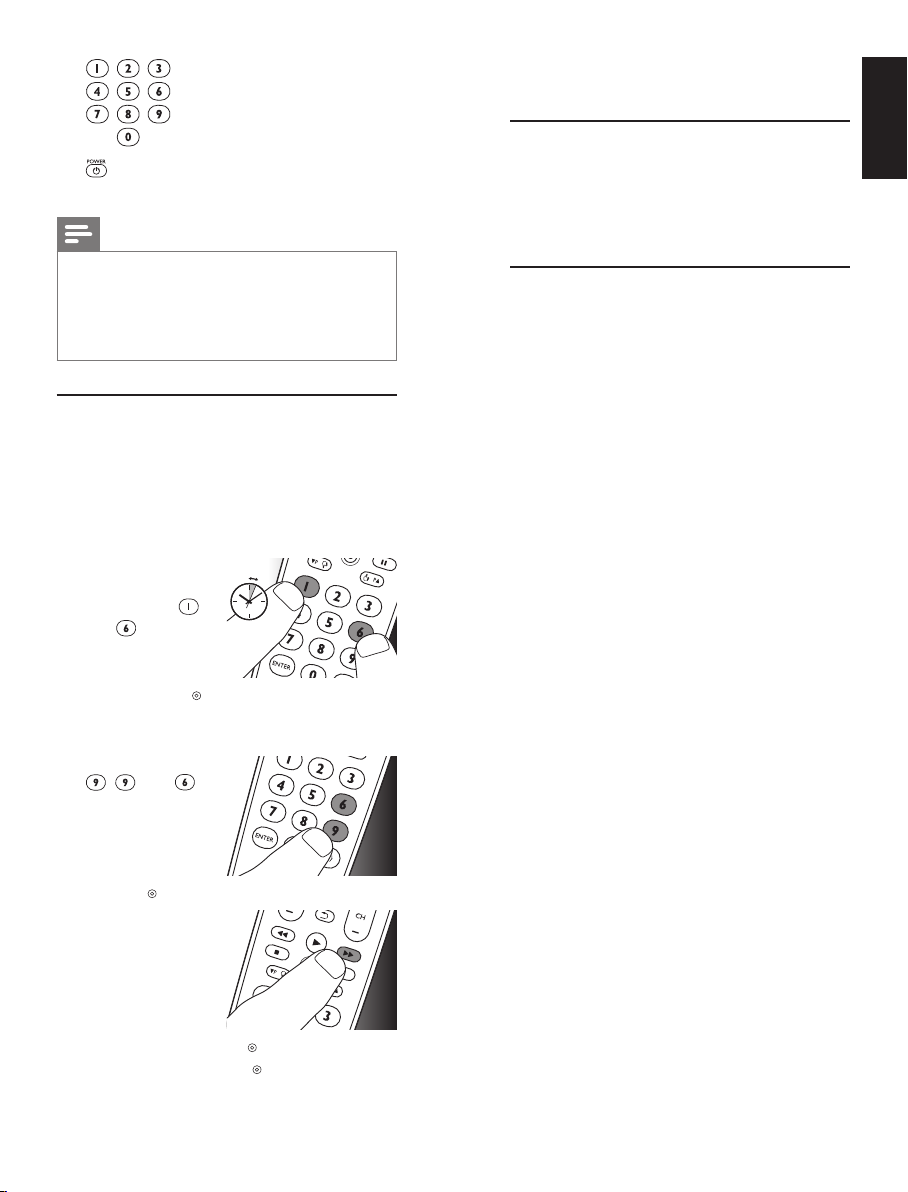
.................. device selection buttons.
Select the device to be
operated.
+VOL- ...................... adjusts TV volume.
................................ mutes TV sound.
................................ previous program / Last.
+CH- ....................... previous / next channel.
6
5 .................................. rewind.
2 .................................... play.
6 .................................. fast forward.
9 .................................... stop.
0 ................................... record.
; ..................................... pause.
4P3P ........................ previous (4P) / next
(3P) page / track in
various modes.
/ ....................... set your Thumb ratings.
7
................................ used after direct channel
selection. Some devices
require ENTER to be
pressed after channel
selection.
..........................selects between one
and two-figure channel
numbers.
English
Usingtheuniversalremotecontrol
Page 6
8 ............ digit buttons for direct
channel / track selection.
9
................................ switches the selected
Note
For some TV brands / types, this button will
only turn off the TV. You will have to press a
digit button (direct channel selection) to turn
on the TV again.
device on / off.
3.2 Resettingabuttontoits
originalfunction
If an improved button (
does not function as expected, you can always
reset the button to its original function.
1
In the current
device mode, keep
digit buttons
and
pressed
simultaneously for 5
seconds,
until the
red Setup light
• The remote control is now in setup
mode.
2
Press digit buttons
, , and , in
that order.
• After each
button press
the red Setup
light
blinks once.
3
Press the button
that
you wish to
reset twice. E.g. the
22 button.
• After each
button press
the red Setup light
• The red Setup light
more time to confirm that the button
was succesfully reset to its original
function.
10 EN 11EN
see chapter 2.2.2) still
5sec.
lights up.
blinks once.
will blink one
2x
4Serviceandsupport
4.1 Frequentlyaskedquestions
In this chapter you will find answers to the most
frequently asked questions about your universal
remote control.
4.1.1 Setup
Icannotentersetupmode.
Battery level too low or battery lifetime came
to an end.
• Replace the batteries. See chapter 2.1.
After replacing the batteries, test if the
remote control still operates your devices. If
it does not, you have to set up the remote
control again. For this refer to chapter 2.2.
Thebrandcodeformydeviceismissinginthe
‘Shortlistofbrands’intheQuickStartGuide.
The ‘Shortlist of brands’ only mentions the most
common TV, DVD and CBL/SAT brands.
• You will find a complete brand list on page
16-28 of this user manual.
•
Use ‘9999’ as 4-digit code in case you cannot
find your brand in the complete brand list.
Note that using ‘9999’ may result in a long
setup (up to 15 minutes).
MyTVswitchesOFFinstep4butdoesnot
switchONagaininstep5.
TVs of some brands (e.g. Panasonic) only
switch ON after a long press on one of the
digit buttons. After a long button press in setup
mode the remote control will start trying to
improve the button (see chapter 2.2.2) instead
of switching ON the TV.
• In this case, switch ON the TV manually
or use the original remote control for this.
Continue with step 6. After successfully
completing setup, the remote control will
switch ON the TV with a long button press
on one of the digit buttons, just as your
original remote control.
English
Usingtheuniversalremotecontrol
Page 7
Aftersetup,notallbuttonsworkalexpected.
• Try improving the
2.2.2.
HowdoIsettheremotecontrolformyTV/
DVDcombo?
Some combo devices require you to set up two
different source selection buttons to control
both parts of the combo device. If you have a
TV / DVD combo, you might need to set up
the remote control for both TV and DVD to
operate your TV / DVD combo.
button(s)
. See chapter
4.1.3 Batteries
WillmysettingsbedeletedwhenIreplacethe
batteries?
No.
All user settings will be retained in the
remote control memory in the remote control
memory for 5 minutes.
Warning
The batteries should not be exposed to
excessive heat such as sunshine, fire or the
like.
English
Serviceandsupport
4.1.2 Operation
Theremotecontroldoesnotwakeup
anymore.
Battery level too low or battery lifetime came
to an end.
• Replace the batteries. See chapter 2.1.
After replacing the batteries, test if the
remote control still operates your devices. If
it does not, you have to set up the remote
control again. For this refer to chapter 2.2.
ThedeviceIwanttooperatedoesnotrespond
atall/doesnotrespondtoallofthebutton
commands.
• Check if the buttons you press are available
on the original remote control of the device.
• Try improving
Wrong code selected during setup.
• Set up the remote control again for the
device. Always test if the device responds,
before leaving setup mode.
It may be that the buttons that you are trying
to use have a different naming on the original
remote control.
• Try out all buttons to find the one(s) you
need.
buttons
. See chapter 2.2.2.
4.2 Needhelp?
We advise you to first read this user manual
carefully. It is provided to help you set up and
use the remote control.
If, however, you require extra information or
have additional questions about setup, usage,
spare parts, warranty, etc. of the SRP2003, you
can always contact us.
When calling our helpline, make sure to have
the SRP2003 at hand when you call, so that our
operators can help you determine whether the
SRP2003 is working properly.
You will find our contact details at the end of this
user manual.
The model number of your Philips universal
remote control is SRP2003/27.
Date of purchase:
......../ ......../ ........
(day/month/year)
For onlinesupport go to:
www.philips.com/welcome.
• Click ‘Support’ and follow the on-screen
instructions.
FCCCompliancy
This device complies with Part 15 of the FCC
Rules. Operation is subject to the following two
conditions:
• This device may not cause harmful interference.
• This device must accept any interference
received, including interference that may cause
undesired operation.
12 EN 13EN
Page 8
Note
3 Helpline
This equipment has been tested and found
to comply with the limits for a Class B digital
device, pursuant to part 15 of the FCC Rules.
These limits are designed to provide
reasonable protection against harmful
interference in a residential installation.
This equipment generates, uses and can
radiate radio frequency energy and, if not
installed and used in accordance with the
instructions, may cause harmful interference to
radio communications.
However, there is no guarantee that
interference will not occur in a particular
installation.
If this equipment does cause harmful
interference to radio or television reception,
which can be determined by turning the
equipment off and on, the user is encouraged
to try to correct the interference by one or
more of the following measures:
• Reorient or relocate the receiving
antenna.
• Increase the separation between the
equipment and receiver.
• Connect the equipment into an outlet on
a circuit different from that to which the
receiver is connected.
•
Consult the dealer or an experienced
radio/TV technician for help.
Country Phonenumber
United States of America /
Canada 001-888-744-5477
Helpline
Caution
User changes or modifications not expressly
approved by the party responsible for
compliance could void the user’s authority to
operate the equipment.
NoticeforCanada
This class B digital apparatus complies with
Canadian ICES-003.
14 EN 15
Page 9

888 .....................0006
A
A.R. Systems .0012
ABC ..................0013
Abex ................0014
ABS ................... 0016
Accele Vision 4194
Access HD....3554
Accurian ......... 0022
Acer ..................0028
Acura ...............0036
ADC ................. 0040
Addison .......... 0043
Adelphia .........4195
Admiral ........... 0046
Advent ............0054
Adventura ..... 0055
Adyson ............ 0058
Agashi .............. 0063
Agazi ................. 3522
AGB .................. 0064
Aiko .................. 0069
Aim ...................0070
Aiwa .................0072
Akai ...................0074
Akiba ................0078
Akira .................0079
Akito.................0082
Akura ...............0083
Alaron .............. 0085
Alba ..................0086
Albatron .........0087
Alco ..................0092
Alienware ...... 0099
Allegro ............. 0103
Alleron ............ 0104
Allorgan .......... 0105
Allstar ............... 0108
Alpha Digital 4014
AlphaStar .......0113
Alpine .............. 0114
America Action
.............................0123
American High
.............................0125
Americast ...... 0127
Amphion Media
Works..............0135
(DB1)
Amplivision ... 0138
Ampro ............. 0139
Amstrad ......... 0140
AMTC .............4015
Amtron ...........0141
AMW...............0143
Anam ............... 0146
Anam National
.............................0147
Anglo ...............0151
Anitech ...........0154
Ansonic ........... 0156
(DB1)
Antronix .........0159
AOC ................. 0165
Aolinpiya ........ 4089
Apache ............ 0169
Apex ................3691
Apex Digital .0170
Apple ............... 0172
Arcam .............. 0179
(DB1)
Archer ............. 0180
Archos ............. 0181
Ardem .............0184
Aristona ..........0192
Arrgo ............... 0197
Arris ..................4931
Artec ................ 4016
(DB1)
Asberg .............0205
Asha .................. 0209
Aspire .............. 4233
Astar ................. 0218
Asuka ............... 0227
AT&T ............... 3453
Atlantic ............ 0233
Atori ................. 0237
Audio Dynamics
.............................0248
Audiosonic .... 0264
Audioton .......0266
Audiovox .......0268
Autovox ......... 0280
Aventura ........ 0287
Awa ..................0296
Axion ............... 0299
(DB1)
(DB1)
(DB1)
B
Baihua .............. 4092
Baird .................0311
Bang & Olufsen
.............................0314
Baohuashi ...... 0316
Basic Line .......0325
Bastide ............. 0327
Baur ..................0331
Bazin ................. 0335
BBT ...................0338
Beaumark ...... 0340
Beijing ..............0345
Beko .................0346
Belcor ..............0348
BELL .................4376
Bell & Howell
.............................0350
Bell ExpressVu
.............................0352
Bell South ...... 0353
BenQ ...............0359
Beon .................0361
Best ................... 0364
Bestar ...............0368
Bestar-Daewoo
.............................0369
Binatone ......... 0378
Black Star ....... 0386
Blacktron ........3526
Blackway .........0388
Blaupunkt ....... 0390
Blue Parade .. 0394
Blue Sky ..........0395
Blue Star ......... 0396
Bondstec ........ 0403
Boots ................ 0405
BOSS ................ 4197
BPL ....................0413
Bradford ......... 0414
Brandt ..............0416
Brillian .............. 0422
Brinkmann ..... 0423
Brionvega .......0424
Britannia .........0425
Brockwood ...0430
Broksonic .......
BskyB
0432
................ 0436
BTC ..................0439
Bush ..................0445
(DB1)
Byd:sign ........... 0448
C
Cable Star.......0454
(DB1)
Cabletenna ....0456
Cableview.......0458
Cablevision ....4238
Caihong ...........0462
Caixing .............4093
California Audio
Labs ....................0467
Calix ..................0468
Candle ..............0480
Canon ...............0481
(DB1)
Capsonic .........0486
Captive Works
..............................0487
Carad ................0488
(DB1)
Carena..............0489
Carnivale .........0491
Carrefour ........0492
Carver ..............0494
Cascade ...........0496
Casio .................0499
Catha ................4094
Cathay ..............0501
CCE ...................0504
Celebrity .........0509
Celera ...............0510
Centurion .......0520
Century ...........0521
CGE ...................0523
Changcheng ..0526
Changfei ..........0527
Changfeng ......0528
Changhai .........0529
Changhong ....0530
Channel Master
..............................0531
Chaparral ........0533
Ching Tai ..........0541
Chun Yun ........0545
Chunfeng ........0546
Chung Hsin....0547
Chunlan ...........4097
Chunsun ..........0549
Cimline .............0552
CineVision ......0562
Brandlist
(DB1)
(DB1)
(DB1)
(DB1)
16
17
Page 10

Citizen ..............0567
City .....................0569
Clarion .............0575
Clarivox ...........0576
Clatronic .........0581
Clearmaster ..0583
ClearMax ........0584
CMS ...................0590
CMS Hightec 0591
Coby..................0597
Colortyme .....0601
Colour Voice .0602
Colt ....................0603
Comcast ..........3456
Commercial
Solutions .........0615
Comtronics ...0623
Concerto ........0625
Concorde .......0626
Condor ............0627
Conrowa .........0634
Contec .............0635
Contec/Cony 4199
Coolmax .........0642
Coolsat ............0643
Coship ..............0646
Cosmel.............0647
COX .................4200
Craig ..................0650
Crosley .............0655
Crossdigital ....0656
Crown ..............0658
CS Electronics
..............................0663
CTC ...................0664
CTX ...................0665
Curtis Mathes
..............................0667
CXC ..................0670
CyberHome ..0672
Cybernex........0673
CyberPower ..0674
Cybertron ......0675
Cytron ..............0680
D
Daeryung ........0691
Daewoo ..........0692
Danichi .............3914
Dansai ...............0699
Dantax .............0702
Davidson .........4202
Dawa .................0707
Daytron ...........0710
DBX ..................0712
Decca................0718
Deitron ............0722
Dell.....................0725
Denon ..............0731
Denver .............0733
Desay ................0737
Desmet ............0738
Diamant ...........0746
Diamond .........0747
Diamond Vision
..............................0748
Digatron ..........0751
Digi .....................0754
Digiline .............0759
Digital Stream
..............................3809
Dimensia .........3569
Director ...........0793
DirecTV ...........0794
Dish Network
System ..............0799
Dishpro ............0800
Disney ..............0803
Dixi.....................0807
Dongda ............0820
Donghai ...........0821
Drake ................0825
Drean ................0832
DSE ....................0833
DTS ...................0837
Dual ...................0838
Dual-Tec ..........3528
Dumont ...........0840
Durabrand .....0842
Dux ....................0843
DVD2000 .......0844
D-Vision ..........0684
Dwin..................0848
Dynatech ........0854
Dynatron ........0855
Dynex ...............3476
E
Eastern .............0859
ECHOSPHERE
..............................4396
Echostar ...........0866
Eclipse ...............0867
Eiki ......................0874
Elbe ....................0880
Elbe-Sharp ......3529
Elcit .....................0883
Electroband ...0888
Electrograph .0889
Electrohome .0890
Electrophonic
..............................0893
Elektra ..............0896
Element ...........3477
ELG ....................0900
Elin ......................0902
Elite ....................0903
Elmak.................0907
Elta ......................0910
Emerson ..........0917
Emperor ..........0921
Emprex ............0922
Enterprise .......0931
Envision ............0933
Epson ................0937
Erres ..................0942
ESA ....................0943
ESC ....................0945
Ether ..................0948
Etron .................0949
Eurofeel ...........0954
EuroLine ..........0955
Euroman..........0956
Europa ..............0957
Europhon ........0959
Everquest ........0971
Expressvu .......0977
Exquisit .............0978
F
Fagor Life ........4102
Feilang ...............0990
Feilu ...................0991
Feiyan ................0992
Feiyue ...............0993
Fenmenti .........4103
Fenner ..............0994
Ferguson .........0996
Fidelity ..............0998
(DB1)
Filsai ...................1000
Finlandia ...........1003
Finlux .................1004
Firstar ................1007
Firstline .............1008
Fisher .................1009
Flint ....................1014
FNR ...................1016
Focus .................1017
Formenti .........1023
Formenti-Phoenix
..............................1024
Fraba .................1030
Friac ...................1040
Frontech ..........1042
Fuji ......................1047
Fujitsu ................1052
(DB1)
Fujitsu General
..............................1053
Funai ..................1056
Furi .....................1057
FUTEC .............3960
Futuretech ......1064
G
Galaxi ................1068
Galaxis ..............1069
Garrard ............1075
Gateway ..........1076
GBC ...................1078
GC Electronics
(DB1)
..............................1080
GE .......................1081
GEC ...................1083
Gehua ...............1086
Geloso ..............1087
Gemini..............1089
General Instrument
..............................1093
General Technic
..............................1095
Genexxa .........1097
GFM ...................3820
(DB1)
Giant..................1113
Gibralter ..........1114
Go Video.........1126
Brandlist
(DB1)
18 19
Page 11

GOI ....................1130
GoldHand ......1136
Goldline ...........1138
GoldStar ..........1140
Goodmans .....1142
Goodmind .....1143
GPM ..................1149
Gradiente .......1151
Graetz ..............1152
Granada ...........1154
Grandin............1156
Greenhill .........1157
Gronic ..............1160
Grundig ...........1162
Grunpy .............1165
H
Haier .................1175
Haihong ...........1176
Haiyan...............1177
Halifax ..............1179
Hallmark ..........1180
Hamlin ..............1182
Hampton ........1183
Hankook .........1188
Hanseatic ........1190
Hantarex .........1192
Hantor ..............1193
Harley Davidson
..............................1197
Harman/Kardon
..............................1198
Harvard ...........1202
Harwood ........1204
Hauppauge ....1206
Havermy..........1208
HCM .................1210
Headquarter .1214
Hello Kitty ......1221
Hema ................1222
Hemmermann
..............................1223
Hewlett Packard
..............................1229
Higashi ..............1234
Highline ............1236
Hikona ..............1237
HiLine ...............3533
Hinari ................1243
Hisawa ..............1247
Hisense ............1249
Hitachi ..............1251
Hitachi Fujian 1252
Hiteker .............1255
Hitsu ..................1257
Hoeher ............1262
Hongmei .........1272
Hongyan ..........1274
Hornyphon ....1277
Hoshai ..............1278
Howard
Computers ....1281
HP .......................1283
HTS ....................1285
Huafa.................1287
Huanghaimei .1288
Huanghe ..........1289
Huanglong ......1290
(DB1)
Huangshan .....1291
Huanyu ............1292
Huaqiang .........1293
Huari .................1294
Hughes .............4205
Hughes Network
Systems ............1296
Humax .............1298
Hush ..................1304
Hygashi ............1308
Hyper ................1309
Hypson ............1312
Hytex ................1314
Hyundai ...........1315
I
Iberia .................1320
iBUYPOWER
..............................1322
ICE ......................1324
ICeS ...................1325
Illico ....................4206
iLo .......................1341
iLuv .....................4234
Ima ......................1342
Imperial ............1346
Imperial Crown
..............................1347
Indiana ..............1350
Infinity ...............1352
(DB1)
(DB1)
(DB1)
InFocus .............1353
Ingelen ..............1354
Ingersol ............1355
Initial ..................1356
Inno Hit ...........1358
Innova ...............1359
Innovation ......1360
Insignia ..............1368
Instant Replay
..............................3580
Integra ..............1370
Inteq ..................1373
Interbuy ...........1376
Interfunk ..........1377
Internal .............1379
International ..1380
Intervision.......1386
IR .........................4110
Irradio ...............1396
Isukai ..................1402
iSymphony .....3755
ITC .....................1404
ITS ......................1405
ITT ......................1406
ITV ......................1408
J
Janeil ..................1414
Jasco...................1415
JBL .......................1420
JC Penney .......4208
JCB......................1421
JCL ......................4209
Jean ....................1424
Jensen ...............1429
Jerrold ...............1431
Jiahua .................1435
JiaLiCai ..............1436
Jinque ................1440
Jinta ....................1441
Jinxing ................1442
Juhua ..................1461
JVC .....................1464
jWin ...................1465
K
Kaige ..................1470
Kaisui .................1471
Kamp .................1475
Kanghua ...........1477
Kangli .................1478
Kangyi................1479
Karcher.............1484
Kawa ..................1487
Kawasaki ..........1488
Kawasho ..........1489
Kaypani .............1490
KEC ....................1496
Kendo ...............1500
Kenwood ........1507
KIC......................1512
Kingsley ............1520
Kioto ..................1523
Kiton ..................1525
KLH ....................1529
Kloss Novabeam
..............................4210
Kneissel ............1535
Kodak ................1540
Kolin ...................1541
Kolster ..............1543
Kongque ..........1545
Konig .................1547
Konka ................1548
Korpel ...............1552
Korting .............1554
Kosmos ............1557
Koss ...................1558
KTV ....................1572
Kuaile.................1573
Kunlun ..............1578
Kyoshu ..............1583
Kyoto .................1585
L
(DB1)
L&S Electronic
(DB1)
..............................1588
(DB1)
Landel ...............1593
(DB1)
Lasonic .............1600
Layco .................4117
(DB1)
Lecson ..............1606
Lenco ................1615
Lenoir ...............1617
Lenoxx .............1618
Lesa ....................1622
(DB1)
Lexicon ............1625
Leyco ................1627
LG .......................1628
(DB1)
(DB1)
Brandlist
(DB1)
(DB1)
(DB1)
20 21
Page 12

LG/Goldstar ..3536
Liesenk .............3537
Liesenk & Tter
..............................1630
Liesenkotter ..1631
Life ......................3538
Lifetec ...............1633
Linksys ..............1640
Linsay ................1642
Liquid Video ..1644
LiteOn ..............1645
Lloyd’s ...............1648
Local India TV
..............................1653
Loewe...............1660
Loewe Opta .3540
Logik ..................1661
Longjiang .........1664
Luma .................1674
Lumatron ........1676
Lux May ...........1680
Luxman ............1682
Luxor ................1683
LXI ......................1686
M
M & S ................1687
Madison ...........1698
Magnadyne ....1702
Magnafon ........1703
Magnasonic ....1704
Magnavox .......1706
Magnin ..............1708
Magnum ..........1709
Majestic ............1713
Mandor ............1717
Manesth ...........1718
Manhattan ......1719
Marantz ............1724
Mark ..................1731
Marta ................1735
Masuda .............1744
Matsui ...............1750
Matsushita ......1751
Maxent .............1757
Media Center PC
..............................1777
Mediator .........1784
Medion .............1787
(DB1)
Medison ...........1788
(DB1)
MegaCable .....4211
Megapower ...1791
Megatron ........1795
MEI .....................1796
(DB1)
Meile ..................1797
MeiShi ...............4118
Melectronic ...3654
Memorex ........1800
Memphis .........1802
Mercury ...........1804
Metz ..................1810
MGA .................1811
MGN Technology
..............................1812
MicroGEM......4024
Micromaxx .....1822
(DB1)
Microsoft .........1826
Microstar .........1827
Midland ............1831
Minato ..............1835
Mind ..................1837
Minerva ...........1838
Minoka .............1840
Minolta .............1841
Mintek ..............1845
Minutz ...............1847
Mitsubishi ........1855
Mivar .................1857
MoDeng ..........4120
Monivision ......1872
Montgomery
Ward .................4212
Morgans ..........3970
Motorola .........1878
(DB1)
Movie Time ....1880
MTC ..................1889
MTlogic ............1892
Mudan ..............1896
Multistandard
..............................1904
Multisystem ...4121
Multitec ............1906
Multitech .........1907
MultiVision .....1909
Murphy ............1911
Musikland ........1915
(DB1)
(DB1)
(DB1)
(DB1)
(DB1)
(DB1)
N
NAD .................1926
Naiko ................1930
Nakamichi ......1932
Nakimura ........1933
Nanbao ............1934
Nansheng .......1935
National Panasonic
..............................4661
NEC ...................1950
Neckermann .1951
NEI .....................1952
Nesa ..................1959
Nesco ...............1960
Net Brazil .......1962
Netsat ...............1966
NetTV ..............1967
Neufunk ..........1970
New Tech .......1979
New World ...1980
Newave ...........1981
Next Base ......1983
Next Level .....1984
Nexus ...............1989
NexxTech .......1990
Nicamagic .......1994
Nikkai ................1998
Nikko ................2000
Niveus Media
..............................2012
Noblex .............2013
Nobliko ............2014
Nokia ................2017
Norcent ...........2020
Nordic ..............2021
Nordmende ..2022
Nordvision .....3543
Normerel .......2024
Northgate ......2027
Noshi ................2030
Nova Vision ...2032
Novaplex ........2034
Novatronic .....2035
NSC ...................2042
NTC ..................2045
O
Oak ....................2059
Okana ...............4122
Okano ..............2065
Olevia ...............2067
(DB1)
Olympus..........2071
(DB1)
Onimax ............2082
Onkyo ..............2085
Onwa ................2087
Opera ...............2090
Oppo ................2092
Optimus ..........2095
Optoma ..........2097
Optonica .........2099
Orbit .................2103
Orion ................2111
Oritron ............2112
Orline ...............2113
Ormond ..........2114
Orsowe ...........2116
Osaki .................2118
Osio ...................2121
Oso ....................2122
Osume .............2123
Otto Versand 2126
P
Pace ...................2134
Pacific ................2135
Pael .....................2140
Palladium .........2145
Palsonic ............2147
Panama ............2149
Panasonic ........2153
Panavision .......2154
Panda ................2155
(DB1)
Pansat ...............2158
Panther.............2160
Paragon ............2161
Pathe Cinema
..............................2168
Pausa .................2171
Paysat ................2173
PCT ....................4213
Penney ..............2182
Pentax ...............2183
Perdio ...............2185
Perfekt ..............2186
Philco ................2192
Brandlist
(DB1)
22 23
Page 13

Philharmonic
..............................2194
Philips ................2195
Philips Magnavox
..............................3715
Phoenix ............2199
Phonola............2201
Phonotrend ...2202
Pilot ....................2207
Pioneer ............2212
Pionier ..............2213
Plantron ...........2219
Plasmsync .......4230
Playsonic ..........2224
Polaroid............2230
Polk Audio ......2232
Poppy ................2236
Popular Mechanics
..............................2237
Portland ...........2238
Powerpoint ....2241
Prandoni Prince
..............................4125
Precision ..........2244
Prelude .............2247
Priceclub .........2252
Prima .................2253
Primestar.........2257
Princeton ........2258
Prinz ...................2260
Prism .................2261
Proceed ...........2267
Profekt ..............4126
Profex ...............2269
Profilo ...............2272
Profitronic .......2273
Proline ..............2274
Proscan ............2279
Prosonic ..........2282
Protech ............2284
Proton ..............2288
Protron ............2289
Proview ............2290
ProVision ........2291
Pulsar.................2296
Pye ......................2302
Pymi ...................2304
Q
Qingdao ..........2308
Quarter ...........2318
Quartz .............2319
Quasar .............2320
Quelle ...............2322
Questa .............2324
Qwestar ..........2326
R
Radialva ............2329
Radio .................4128
Radio Shack/
Realistic ............4214
Radiola .............2330
Radiomarelli ..2331
RadioShack ....2333
Radiotone .......2334
Radix .................2335
Randex .............2343
RCA ..................2351
Realistic ............2354
Recor ................2359
Recoton ...........2361
Rectiligne ........2362
Redstar .............2366
Reflex ................2368
Regal ..................2370
Regency ...........2371
Regent ..............2372
Rembrandt.....2375
Reoc ..................2379
ReplayTV ........2380
Revox ................2383
(DB1)
Rex .....................2385
RFT .....................2386
Rhapsody ........2387
Ricavision ........2388
Rio ......................2393
R-Line ...............2327
Roadstar ..........2398
Rogers ..............4215
Rotel ..................2414
Rowa .................2416
Runco ...............2423
(DB1)
S
Saba ...................2429
SageTV .............4981
Saisho ................2437
Saivod ...............2439
Salora ................2443
Sambers ..........2445
Sampo ..............2446
Samsung ..........2448
Sandra ..............2454
Sanjian ..............2455
Sanky .................2456
Sansui ................2458
Sanyo ................2462
Sanyuan ...........2464
SBR .....................2492
Sceptre .............2498
Schaub Lorenz
..............................2500
Schneider ........2501
Scientific Atlanta
..............................2503
Scimitsu ............2505
Scotch ...............2506
Scott ..................2508
Sears ..................2514
SEG ....................2522
SEI .......................2524
Sei-Sinudyne .2525
Seleco ...............2528
Sencora............2531
Sensory Science
..............................2533
Sentra ...............2534
Serino ...............2539
Shancha ...........2546
Shanghai ..........2547
Shaofeng .........2549
Sharp .................2550
Sharper Image
..............................2551
Shen Ying ........2552
Shencai .............2553
Sheng Chai .....3922
Shenyang .........2555
Sherwood .......2557
Shinco ...............2560
Shinsonic .........2562
Shintoshi ..........2564
Shivaki ...............2567
Shogun .............2568
(DB1)
Siam
...................2572
Siarem ..............2573
Siemens ...........2574
Siera ...................2576
Sierra .................3549
Sigma Designs
..............................2579
Signal .................2581
(DB1)
Signature .........2582
Silva ....................2591
Silva Schneider
..............................2592
Silver ..................2594
Simpson ...........2598
Sindyne ............4510
Singer ................2599
Sinudyne ..........2601
SKY .....................2610
Skygiant ............2618
Skyworth ........2631
SL Marx ...........2633
Sogera ..............2649
Solavox.............2654
Sonawa ............2663
Sonic Blue.......2667
Sonicview .......3954
Soniko ...............2669
Sonitron ...........2671
Sonneclair .......2673
Sonoko .............2675
Sontec ..............2677
Sony ...................2679
Sound & Vision
(DB1)
..............................2680
Soundesign ....2684
Soundwave ....2689
Sowa..................2691
Squareview ....2703
Srypton ............4138
SSS ......................2708
Stack ..................4218
Standard ..........2713
Standard
Components 2714
Star Choice....2716
Starcom ...........2722
Stargate............2723
Brandlist
(DB1)
(DB1)
(DB1)
24 25
Page 14

Starlite ..............2728
Starquest .........2732
StarSight ..........2734
Stenway ...........2739
Strato ................2745
STS .....................2749
STS1 ..................4219
STS2 ..................4220
STS3 ..................4221
STS4 ..................4222
Studio Experience
..............................2750
Stylandia ..........2752
Sungale .............2761
Sunkai ...............2762
Sunstar .............2768
Sunwood ........2772
Supercable .....2778
Superla .............2782
Supermax .......2783
Superscan .......2786
SuperTech ......2789
Supervision ....2791
Supra .................2792
Supre-Macy ...2794
Supreme ..........2795
Sutron ...............2798
SVA ....................2800
Sydney ..............2808
Sylvania ............2809
Symphonic .....2810
Synco ................2811
Syntax ...............2814
Syntax-Brillian
..............................4231
Sysline ...............2815
Systemax .........2817
Sytong ...............2820
T
Tacico ................2823
Tagar Systems
..............................2831
Tai Wah ............4139
Taishan ..............2835
Tandy .................2843
Tashiko .............2850
Tatung ...............2852
TCL ....................2856
TCM ..................2857
Teac ....................2860
Teachimagen .4140
Tec ......................2861
Tech Line ........2863
Technema .......2866
Technica ...........2868
Technics ...........2869
Technika...........2870
Techview .........2883
Techwood ......2884
Teco ...................2886
Tedelex ............2889
Teknika .............2895
TeleCaption ...2902
Telecor .............2910
Telefunken ......2914
Telefusion........2915
Telegazi ............2917
Telemeister ....2924
Telesonic .........2930
Telestar.............2931
Teletech ...........2934
Teleton .............2935
Televideon ......2938
Teleview ..........2939
Tennessee .......2952
Tensai ................2954
Tenson ..............2955
Terapin .............2958
Tevion ...............2962
Texet .................2963
Texscan ............2965
TFC ....................2967
Theta Digital .2970
Thomas ............2971
Thomson ........2972
Thorn ................2974
Thorn-Ferguson
..............................2976
Time Warner 3518
Timeless ..........2985
Tivax ..................3956
(DB1)
Tivo ....................2991
TMK ...................2994
TNCi .................2996
Tobo ..................2999
Tocom ..............3000
(DB1)
Tokai ..................3001
(DB1)
(DB1)
(DB1)
Tokyo ................3004
Tomashi ...........3006
Tongguang ......3008
Torx ...................3020
Toshiba .............3021
Totevision .......3024
Touch ................3025
Towada ............3028
Toyoda..............3030
Trakton ............3036
Trans Continens
..............................3037
Trans PX .........3038
Transfec ...........4143
Transonic ........3041
Transtec ...........3042
Tredex ..............3045
Trident ..............3054
Tristar ................3057
Triumph ...........3058
TruTech ............3467
TS ........................3063
Tuntex ..............3069
Tusa ....................3073
TV86 .................3076
TView ...............3079
TVS ....................3081
U
Uher ..................3089
UltimateTV ....3091
Ultravox...........3095
Unic Line .........3100
Uniden .............3101
Unika .................3102
Unitech ............3105
United ..............3106
United Artists
..............................3107
United Cable 3108
Universal .........3113
Universum .....
Univ
ox ..............3116
3115
Urban Concepts
..............................3121
US Digital .......3122
US Electronics
..............................3123
US Logic ..........3124
V
V2 .......................3128
(DB1)
Vector ...............3136
Vector Research
..............................3137
Venturer ..........3143
Verizon .............3146
Vestel ................3148
Vexa ...................3149
Victor ................3155
Video Concepts
..............................3157
Videologic.......3165
Videologique 3166
Videosonic .....3171
VideoSystem .3172
Videotechnic .3173
Videotron .......3175
Vidikron ...........3178
Vidtech .............3179
Viewmaster ...3182
ViewSat ............3185
Viewsonic .......3186
Viewstar ..........3187
Viking ................3188
Villain .................3189
Viore .................3192
Visco ..................4232
Visiola................3197
Vision ................3198
Vizio ...................3211
Vocopro ..........3213
Voodoo ...........3215
Voom ................3216
Vortec ..............3217
Vortex View ..3218
Voxson .............3220
W
Waltham .........3230
Wards ...............3231
Watson ............3233
Watt Radio ....3234
Waycon ...........3237
Wega .................3238
Wegavox .........3239
Weltblick .........3245
Westinghouse
..............................3249
Brandlist
2726
Page 15
Wharfedale ....3255
OIO DB1
White Westinghouse
..............................3258
Windstar .........3266
Winegard ........3268
X
Xbox .................3295
Xiahua ..............3299
Xiangyang .......3301
Xiangyu ............3302
Xihu ...................3303
Xinaghai ...........3304
Xingfu ...............3305
Xinghai .............3306
XR-1000 .........3316
Xrypton ...........3317
Xuelian .............3320
Y
Yamaha ............3326
Yamishi .............3328
Yapshe ..............3329
Yokan ................3335
Yoko ...................3336
Yorx ...................3340
Yuhang ..............3345
(DB1)
Z
Zanussi .............3349
(DB1)
Zenith ...............3356
(DB1)
Zentech ...........4031
Zentek ..............3361
ZhuHai .............3364
ZT Group ......3370
(DB1)
EN Informationtotheconsumer
CompliancewithEMF
Koninklijke Philips Electronics N.V. manufactures
and sells many products targeted at consumers,
which, like any electronic apparatus, in
general have the ability to emit and receive
electromagnetic signals.
One of Philips’ leading Business Principles is to
take all necessary health and safety measures for
our products, to comply with all applicable legal
requirements and to stay well within the EMF
standards applicable at the time of producing the
products.
Philips is committed to develop, produce and
market products that cause no adverse health
effects. Philips confirms that if its products are
handled properly for their intended use, they
are safe to use according to scientific evidence
available today.
Philips plays an active role in the development of
international EMF and safety standards, enabling
Philips to anticipate further developments
in standardization for early integration in its
products.
(DB1)
28
Brands only available from version DB1
onwards. You can find the DB version on
the sticker inside the battery compar tment.
IOIOIOOII
IOIOIOOII
IOOIIOIOIII OIO DB1
IOOIIOIOIII OIO DB1
DB1
IIOI OIO OOIIOI
IIOI OIO OOIIOI
OOIOII IO OIIIOII
OOIOII IO OIIIOII
IIOOIIOIIIOO
OIOIOIIOIIIOIOIO
IO
IO
IOII
IOII
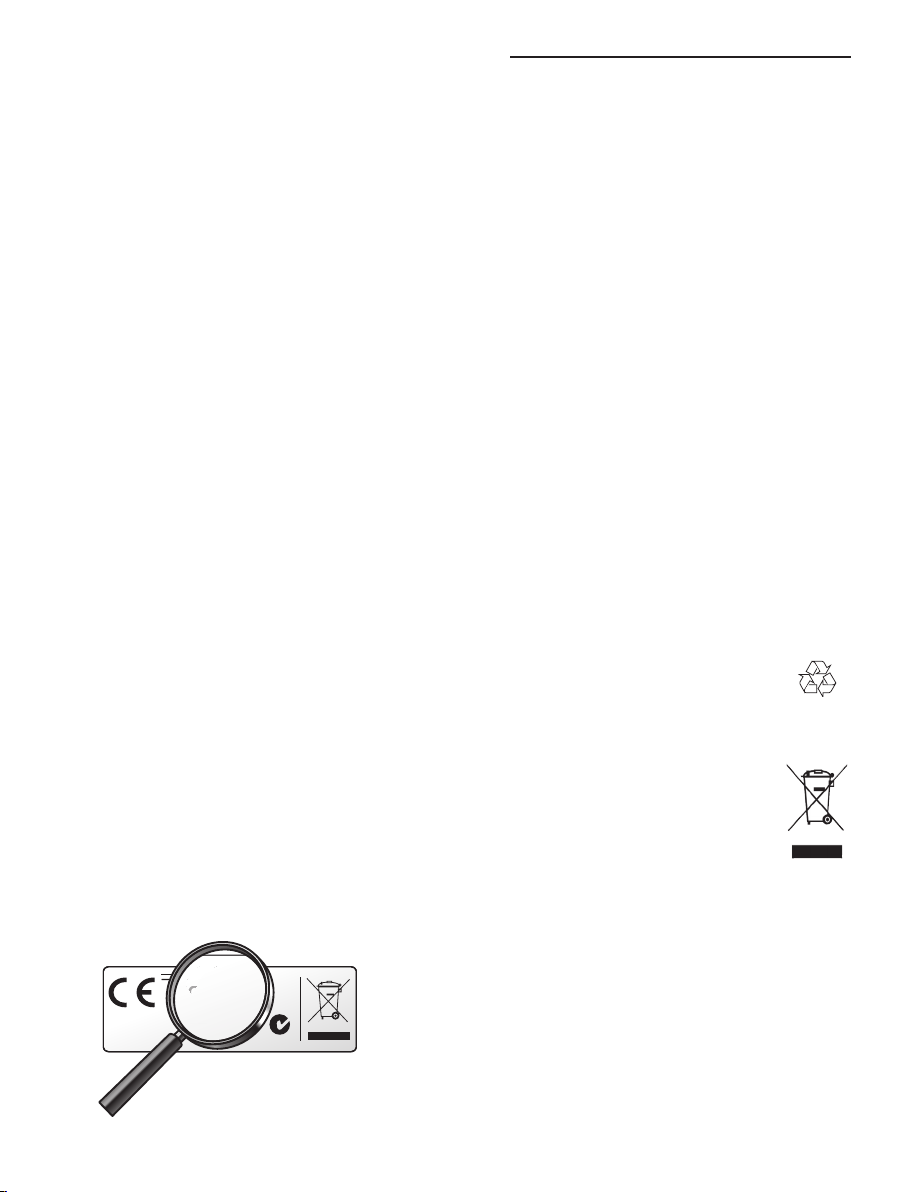
Recyclinganddisposal
Your product is designed and
manufactured withhigh quality materials
and components, which can be recycled
and reused.
When this crossed-out wheeled bin
symbol isattached to aproduct it
means the product is covered by the
European Directive 2002/96/EC:
Never dispose of your product with
other household waste. Please inform yourself
about the local separate collection system
for electrical and electronic products. Please
act according to your local rules and do not
dispose of your old products with your normal
household waste. The correct disposal of your
old product will help prevent potential negative
consequences for the environment and human
health.
29
Page 16

© 2011 Koninklijke Philips Electronics N.V.
All rights reserved. Reproduction in whole or in par t
is prohibited without the prior written consent of the
copyright owner.
The information presented in this document does not
form part of any quotation or contract, is believed to
be accurate and reliable and may be changed without
notice. No liability will be accepted by the publisher
for any consequence of its use. Publication there of
does not convey nor imply any license under patentor other industrial or intellectual property rights.
Document order number: 3139 235 5260 4
November 2011
www.philips.com
RTP/4811
 Loading...