

Page 1
Technics
Portable CD Player
SL-XP700
OPERATING INSTRUCTIONS
X ^
T
J‘.y-
s;yJ'S&8i
DIGIT/IL
COMPACT
Q
DIGITAL AUDIO
EB GN
Notes:
•Specifications differ according to the area code.
•The “EB” area code, for example, indicates United
Kingdom specifications.
•The “EB" indication is shown on the packing case and
serial number tag.
Before connection, operating or adjusting this product, please read these instructions completely.
Page 2
^€4Z^ ^ajv
We want to thank you for selecting this
product and to welcome you to the growing
family of satisfied Technics product own
ers around the world.
We feel certain you will get maximum
enjoyment from this new addition to your
Contents
•Accessories
•Precautions .........................
•Power Source
•Connections . —
•Pane! Controls
•Operation
..........................
.....................
........
.........
....................
............................
...............
................ 4
................ 5
................ 8
................ 9
................ 10
2 •Remote Control
home.
Please read these operating instructions
carefully, and be sure to keep them handy
for convenient reference.
(Stereo Earphones)
•Maintenance................................
•Operation Notes
•Troubleshooting Guide................
•About Compact Discs ...............
•Specifications
.......................
.............................
................
.
........
........
........
........
........
........
15
16
17
18
18
19
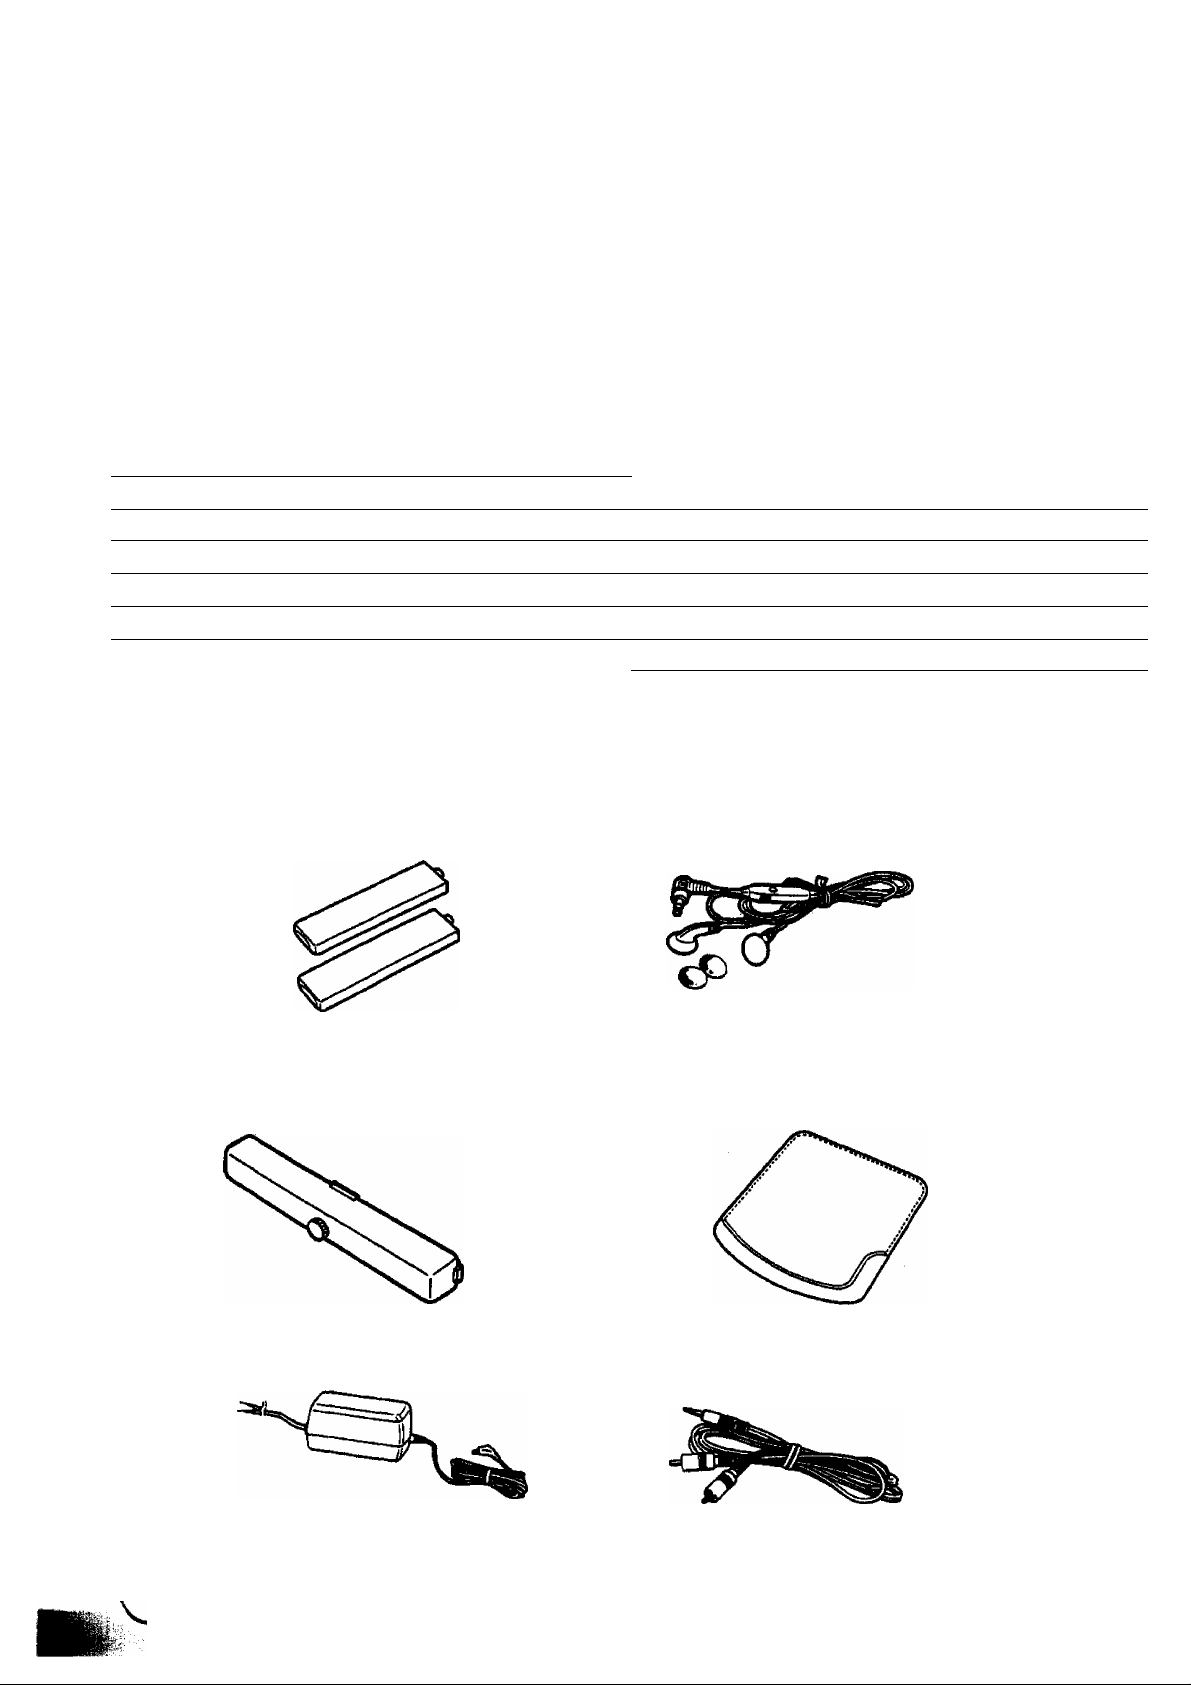
Accessories
Rechargeable Batteries
(2 pieces)
Battery case
Stereo Earphones
(with remote controller)
Soft case
AC Adaptor
The shapes of the AC adaptor and plug
may differ according to the area.
Stereo Connection Cable
Page 3
For United Kingdom
Important
THE WIRES IN THIS MAINS LEAD ARE COLOURED IN ACCORDANCE WITH THE
FOLLOWING CODE.
BLUE: NEUTRAL
BROWN: LIVE
As the colours of the wires in the mains lead of this apparatus may not correspond with
the coloured markings identifying the terminals in your plug proceed as follows. The wire
which is coloured BLUE must be connected to the terminal which is marked with the
letter N or coloured BLACK.
The wire which is coloured BROWN must be connected to the terminal which is marked
with the letter L or coloured RED.
Under no circumstances must either of the above wires be connected to the earth
terminal of a three pin plug.
This apparatus was produced to BS 800.
Marking sign is located on bottom of the unit.
CAUTION!
THIS PRODUCT UTILIZES A LASER.
USE OF CONTROLS OR ADJUST
MENTS OR PERFORMANCE OF
PROCEDURES OTHER THAN
THOSE SPECIFIED HEREIN MAY
RESULT IN HAZARDOUS RADIA
TION EXPOSURE.
DO NOT OPEN COVERS AND DO
NOT REPAIR YOURSELF. REFER
SERVICING TO QUALIFIED PER
SONNEL.
r
Bottom of the product
WARNING:
TO REDUCE THE RISK OF FIRE OR
ELECTRIC SHOCK, DO NOT EX
POSE THIS APPLIANCE TO RAIN
OR MOISTURE.
OANGER'Invisible laser
radiation when open
and interlock defeated.
AVOID DIRECT EX
POSURE TO BEAM.
(Bottom of the product)
CLASSI
LASER PRODUCT
J
Page 4

Precautions
•The batteries supplied with this unit
are designed for Technics brand port
able audio products only. Use in other
products could cause damage or per
sonal injury.
• If the set is not used for a long period
of time or is used only from an AC
power source, remove all the batteries
for battery life and to prevent poten
tial damage due to possible battery
leakage.
• Do not mix batteries (old and new) or
types (Ni-Cd, alkaline and carbon).
•Avoid using or placing this unit near sour
ces of heat. Do not leave it in an au
tomobile exposed to direct sunlight for a
long time with the doors and windows
closed as this may deform the cabinet.
•When not in use, disconnect the AC
adaptor from the AC power outlet.
Page 5
Power Source
This unit may be used with the included rechargeable batteries, the optional two LR6 type
alkaline batteries, the included AC Adaptor or the optional Car Adaptor (SH-CDC6, optional).
M Rechargeable batteries opera
tion
For its initial use after purchasing or after a
long time interval (more than three
months), make sure to recharge the
rechargeable batteries. Normally 1 hour
recharging will give approximately 1.5
hours and 3'hours recharging wilt give
approximately 2 hours play.
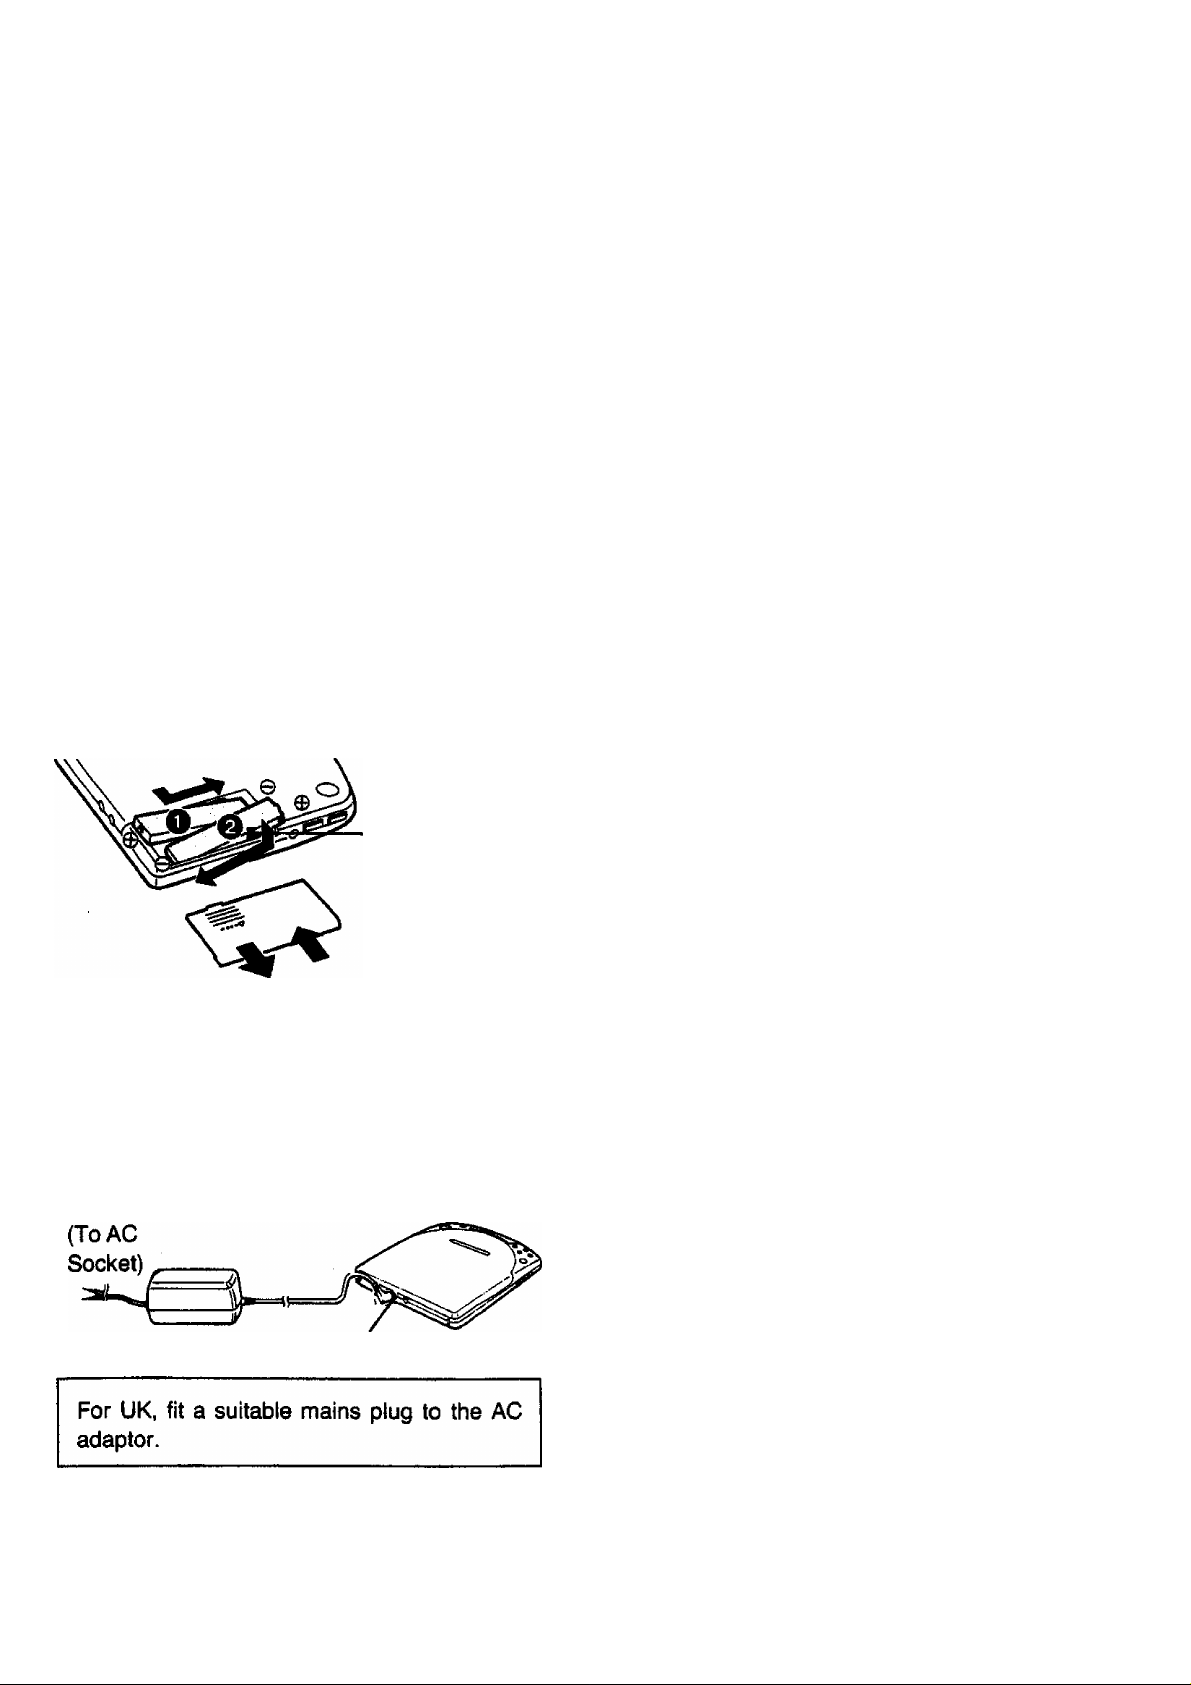
1. Open the battery compartment cover
and insert the rechargeabie batteries
into the battery compartment, mak
ing sure that the proper polarities
are maintained.
Fabric
Band
►The Charge Indicator will begin flashing.
When the indicator lights, playing for
approximately 1.5 hours can be oper*
ated. The indicator will turn off, when the
charging is finished.
n
I
^3S8
Charge Indicator
3. Disconnect the AC Adaptor.
•The unit can be turned on with the AC
Adaptor while the battery is being re
charged. in this case, the recharging time
will be longer than the specified time.
•Before inserting the rechargeable batter
ies to charge, be sure to turn off the unit.
Battery removal
Pull the fabric band to remove battery 0.
And press battery O toward the © battery
terminal and remove it.
2. Ciose the cover and connect the AC
Adaptor as shown in the figure.
DC In Jack
Rechargeable battery life
•This rechargeable battery can be
recharged about 300 times. Over 300
times, its operation time will become
shortened. That’s time for replacing the
rechargeable batteries with new ones
(RP-BP61/62).
•Battery condition can be checked by the
Battery Check Indicator on the display.
When the batteries are weak, the Battery
Check Indicator begins to flash on and
off, and then the unit will automatically
shut off.
T WS-S8
Battery Check Indicator
The shapes of the AC adaptor and plug
may differ according to the area.
Page 6
Power Source
(continued)
■ Optional LR6 type battery opera
tion
Two LR6 type alkaline batteries can be
inserted into the battery compartment.
Use of alkaline batteries will give ap
proximately 4 hours play.
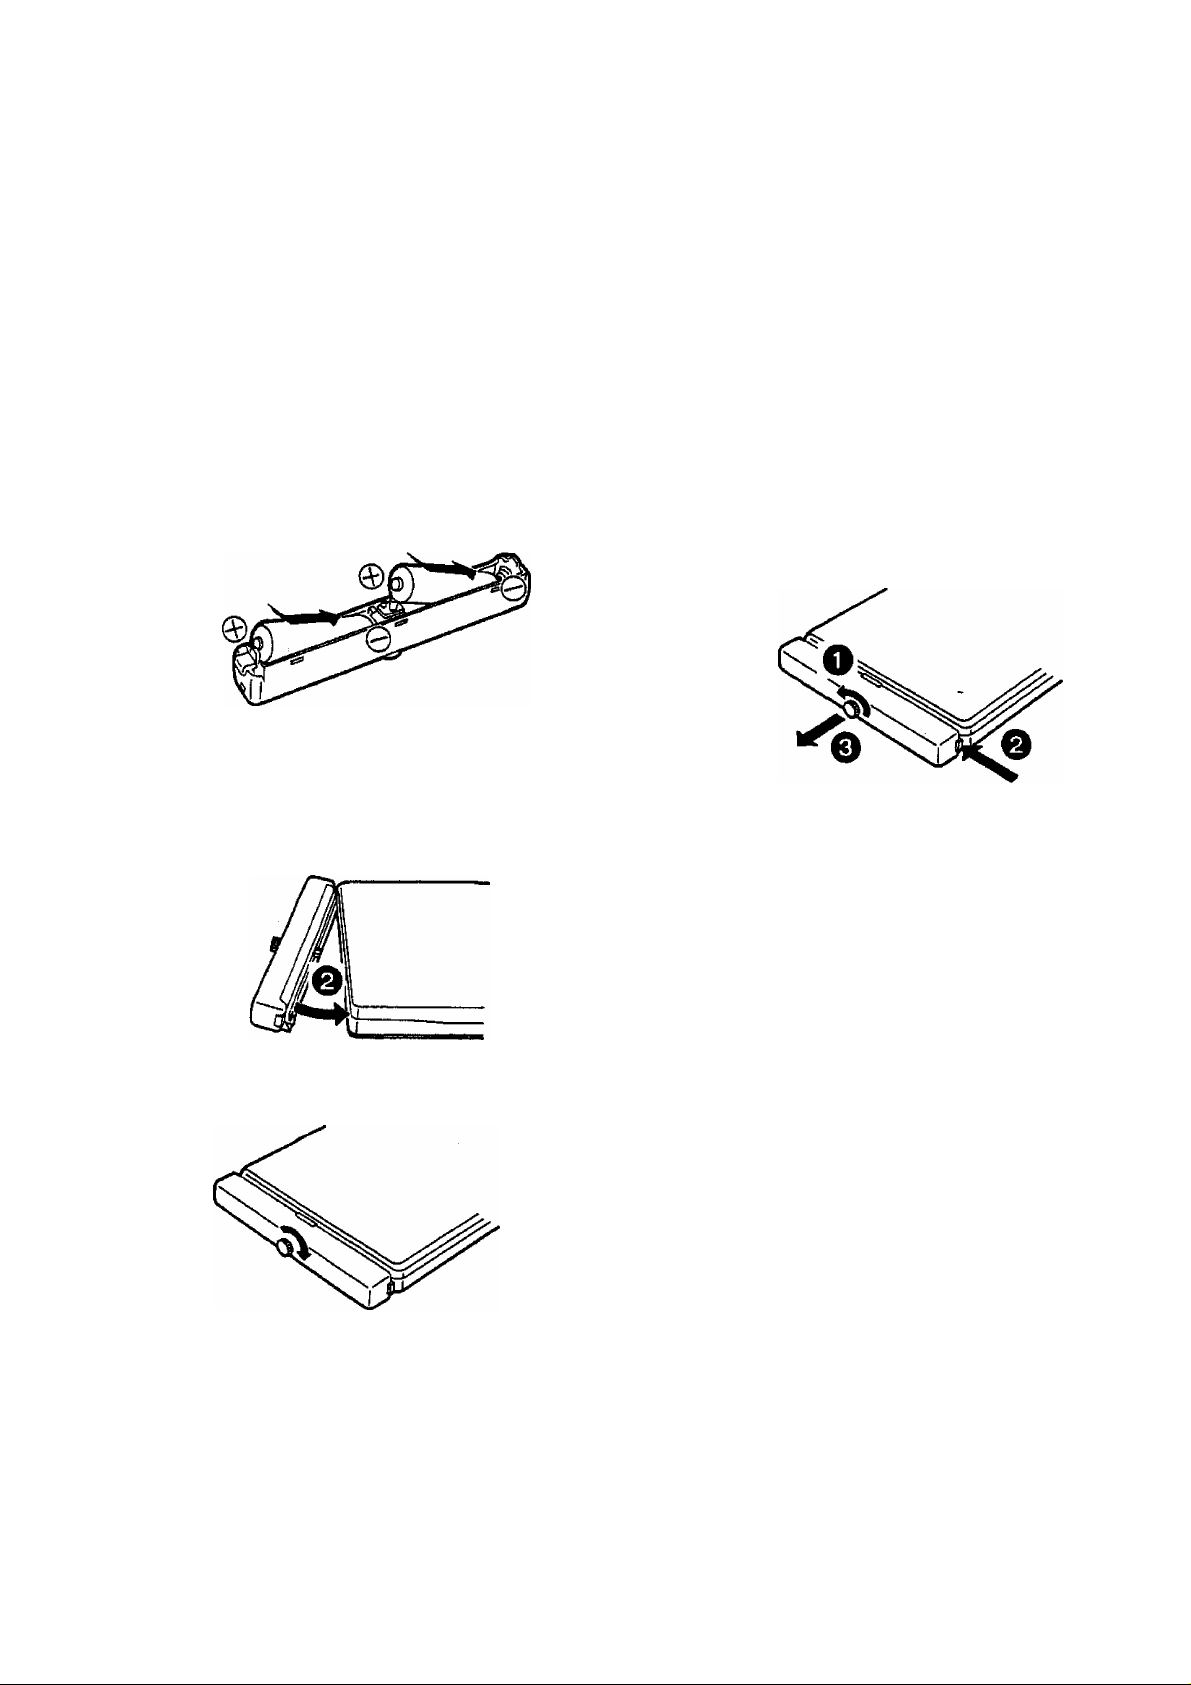
1. Open the Battery Case Cover.
2. Insert the “LR6*’ batteries
(Panasonic UM-3 or equivalent, not
included) into the battery case.
►Battery condition can be also checked by
the Battery Check Indicator. The indica
tor begins flashing on and off at a half
consumption of the battery life.
1 WS-Sfi
Battery Check Indicator
How to detach the case (as
shown in the figure)
3. Close the Battery Case Cover.
4, Attach the Battery Case to the unit.
5. Fasten the screw until it locks.
1. Release the screw.
2. Push In the direction of the arrow.
3. Detach the Battery Case.
■ To extend the playback time
Install both types of batteries (recharge
able and LR6) to the unit.
-R-
Page 7

Notes:
• Batteries installed with incorrect polarities
may leak and damage this unit.
• Do not mix batteries (old and new) or types
(Ni-Cd, alkaline and carbon).
• If the set is not used for a long period of
time or is used only from an AC power
source, remove all the batteries for battery
life and to prevent potential damage due to
possible battery leakage.
■ Car battery operation
Follow the operating instructions of the op
tional Car Adaptor.
The rechargeable battery can be re
charged with the Car Adaptor,
CAUTION:
Use only car adaptor, Model: SHCDC6, manufactured by Matsushita
Electric Industrial Co., Ltd.
CAUTION
Non-rechargeable batteries must be
removed before the AC adaptor is
plugged into the unit.
m AC power operation
Use only the included AC Adaptor with this
unit.
1. Insert the plug, at the end of the AC
Adaptor cord, Into the DC In Jack.
2. Plug the AC Adaptor into your
household AC power outlet.
CAUTION:
Do not use the included AC Adaptor for
other products.
Note:
To operate on battery power, unplug the AC
Adaptor from the household AC Power Outlet
and the DC In Jack on the unit.
Notes:
• The batteries supplied with this unit are
designed for Technics brand portable audio
products only. Use in other products could
cause damage or personal injury.
• Use only the included AC Adaptor or op
tional Car Adaptor when recharging.
• During recharging, the AC Adaptor and
rechargeable batteries may get warm. This
is normal.
• On its initial use after purchasing or its use
after a long time interval, 3 hours recharg
ing may not provide normal operation time.
But the repeat of recharging will recover the
normal operation time.
• Avoid recharging or placing the recharge
able battery near sources of heat or humid
ity. Recharging should be performed at
0“C-40"C (32T-104T).
• Do not attempt to recharge LR6/R6 type
alkaline or carbon batteries.
• Do not use a rechargeable battery mixed
with the other type (carbon or alkaline).
• Do not allow metal objects to touch the ter
minals. (A hazardous short circuit may
result.)
• Do not incinerate the battery or bring it near
a fire or open flame.
• If a battery leak should occur and the
electrolyte comes into contact with skin or
clothes, flush with water immediately.
If the internal parts of the battery become
visible because of damage to the battery,
discard it immediately.
Page 8
Connections
■ Listening through an audio
system
Use the Stereo Connection Cable (includ
ed) to connect this unit to a receiver or a
stereo cassette recorder,
• Switch OFF the power to the receiver or
stereo radio cassette recorder before
connecting this unit.
• Do not connect this unit to the PHONO
terminals of the receiver or stereo radio
cassette recorder.
Back Panel
f-—BtWW
I LINE OUT-C & jO/
Line Out Jack
Stereo Connection Cable
(included)
I
L (white) To “CD”
=*“—'0 or
=>--•0 “AUX”
R (red) terminals
Back panel of audio
system
■ Listening through the stereo
earphones or headphones
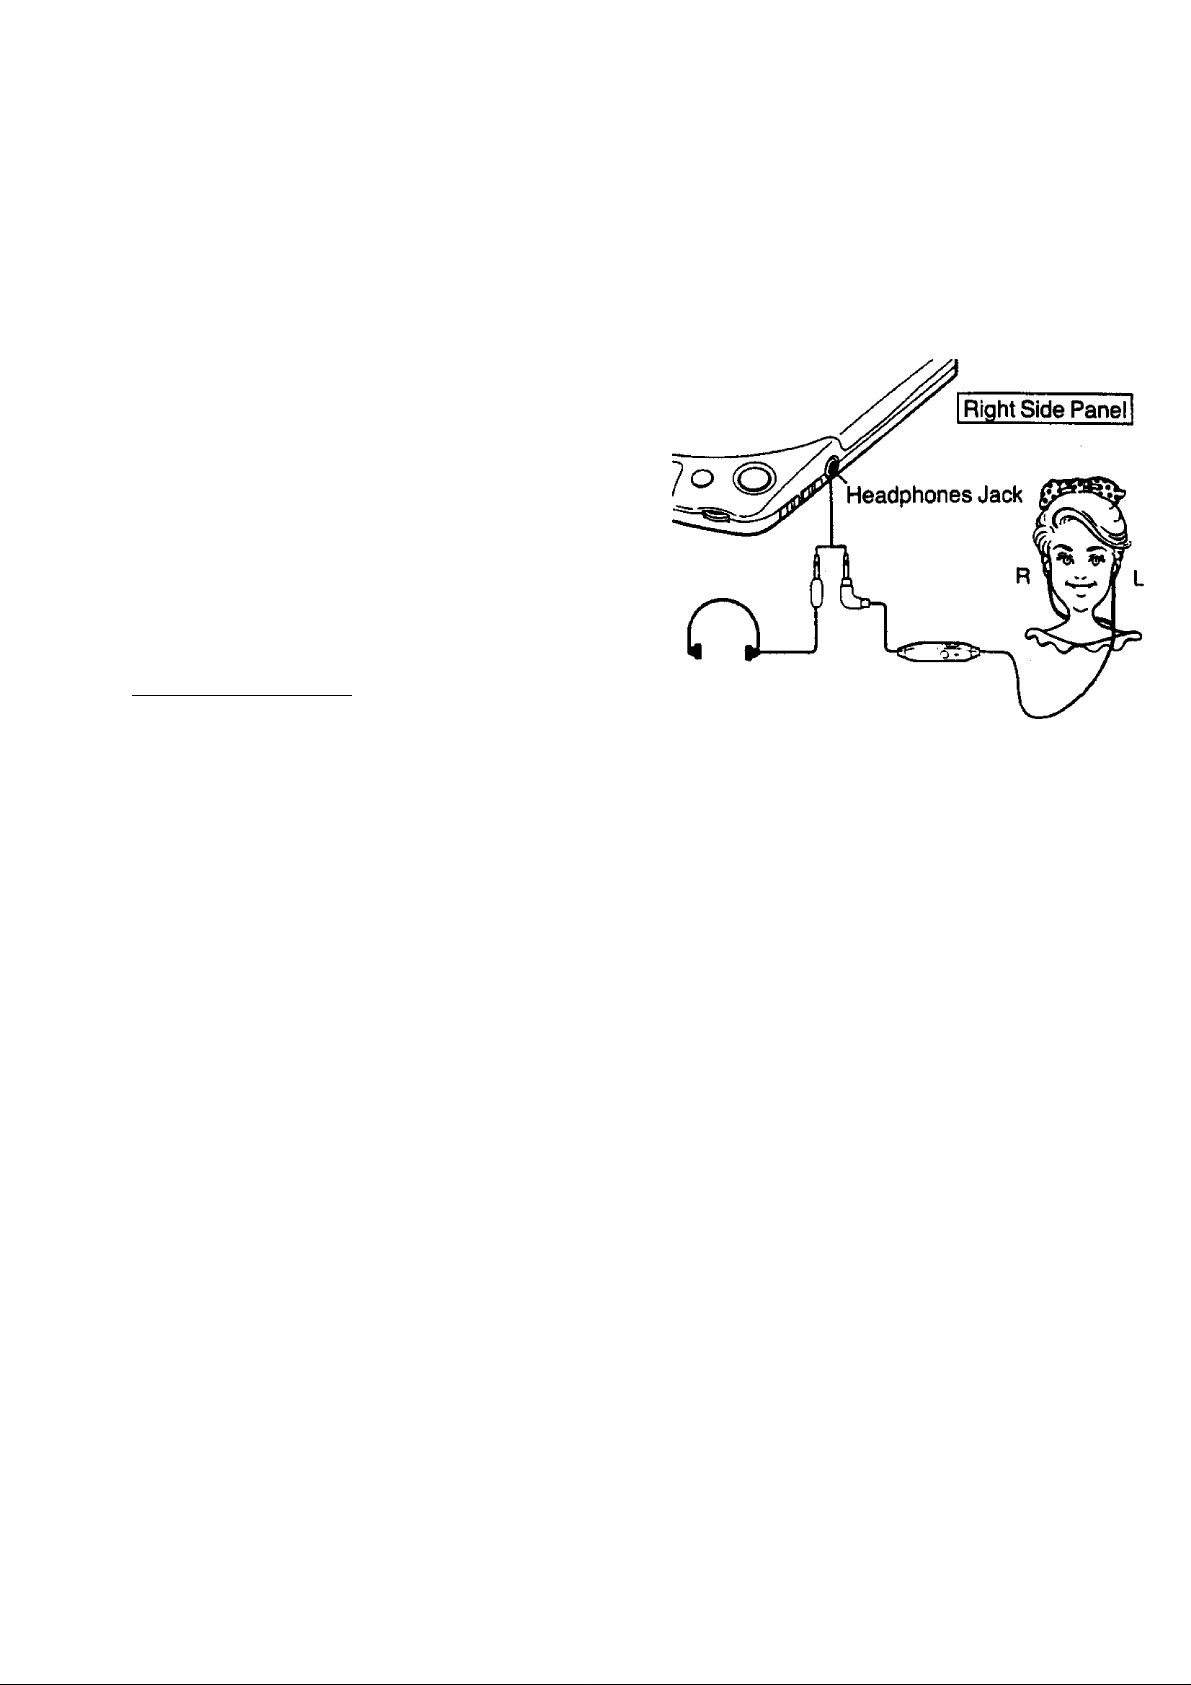
Connect the plug of the Stereo Earphones
(included) or headphones (option) to the
Headphones Jack.
Headphones
(option)
Note for stereo earphones:
The right earphone cord is longer than
the left and is adjustable for your con
venience.
Stereo Earphones
(included)
Precautions for Listening with the Headphones
•Do not play your headset at a high volume. Hearing experts advise against
continuous extended play.
•If you experience a ringing in your ears, reduce volume or discontinue use.
•Do not use while operating a motorized vehicle. It may create a traffic hazard and is
illegal in many areas.
•You should use extreme caution or temporarily discontinue use in potentially
hazardous situations.
•Even if your headset is an open-air type designed to let you hear outside sounds,
don’t turn up the volume so high that you can’t hear what’s around you.
Page 9
Panel Controls
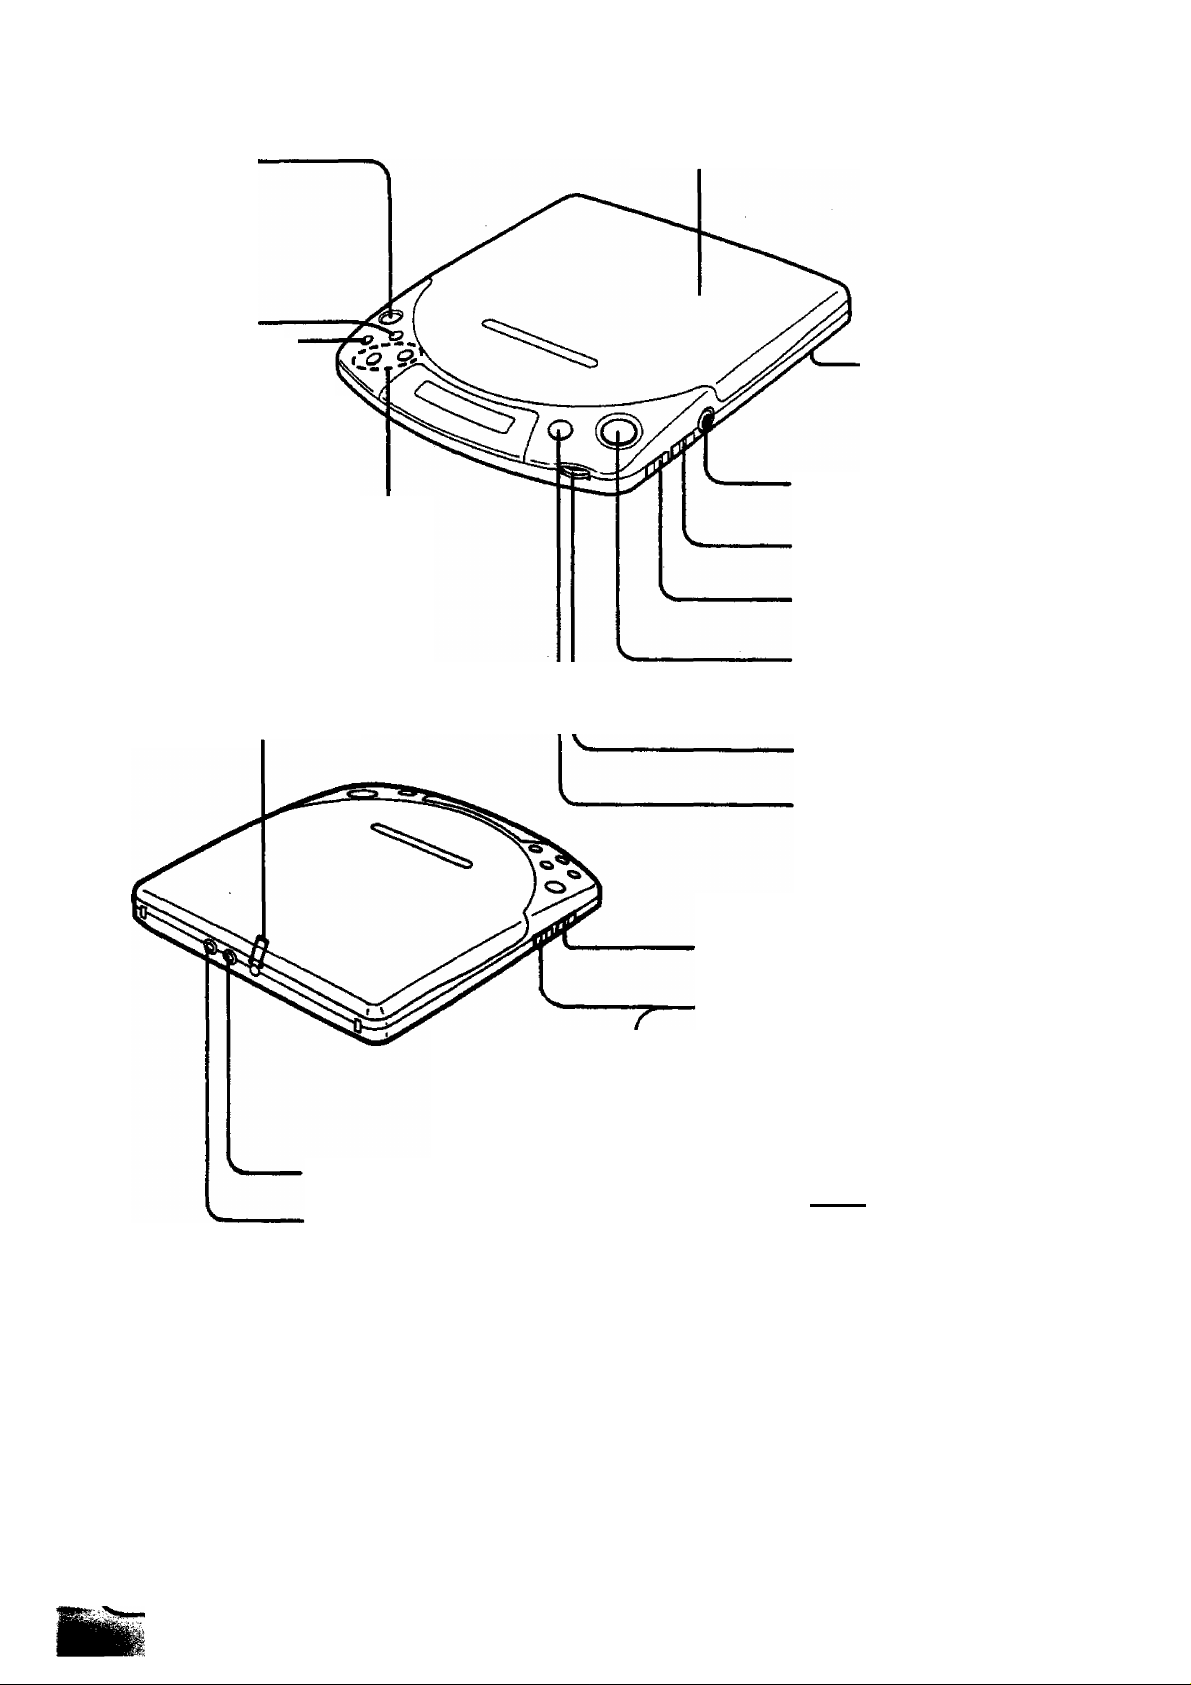
Open Button
(PUSH OPEN)
Repeat Button
(REPEAT) p
Memory/Recall Button
(MEMORY/RECALL)
Skip/Search Buttons
(\4< -SKIP/—SEARCH )
Connection Terminal
For Battery Case
Disc Holder
Battery
Compartment
Cover [bottom]
Headphones Jack ( f))
S-XBS Selector (S-XBS)
ASC Selector (ASC)
Play/Pause Button
(►IIPLAY/PAUSE)
Volume Control (VOLUME)
Stop/Operation Off Button
(■STOP/OPROFF)
Mode Selector
(MODE)
Hold Switch (HOLD)
Before operating the front panel button, be
sure to release the hold state.
HOLD
I
DC IN Jack (DC IN 3 V)
\mm
Line Out Jack
(LINE OUT)
Disolav I adaptor or Car adaptor, the \
" ^ \ backlight of the display will be turned on. /
-------------
r
Track Display Time Display
i
¡RANDOM!;
Mode Indicator
Memory Indicator
/
Charge Indicator
otX]
Repeat Indicator Battery Check Indicator
-9-
Page 10
Operation
The following explanation is for a disc containing 7 tracks having a total playing time of 49
minutes and 58 seconds.
Q] Normal Play
(To play a disc from the first track to the end of the disc)
First, set the Mode Selector to “NORMAL" position. (The Mode Indicator has no display.)
•To listen through Stereo Earphones or
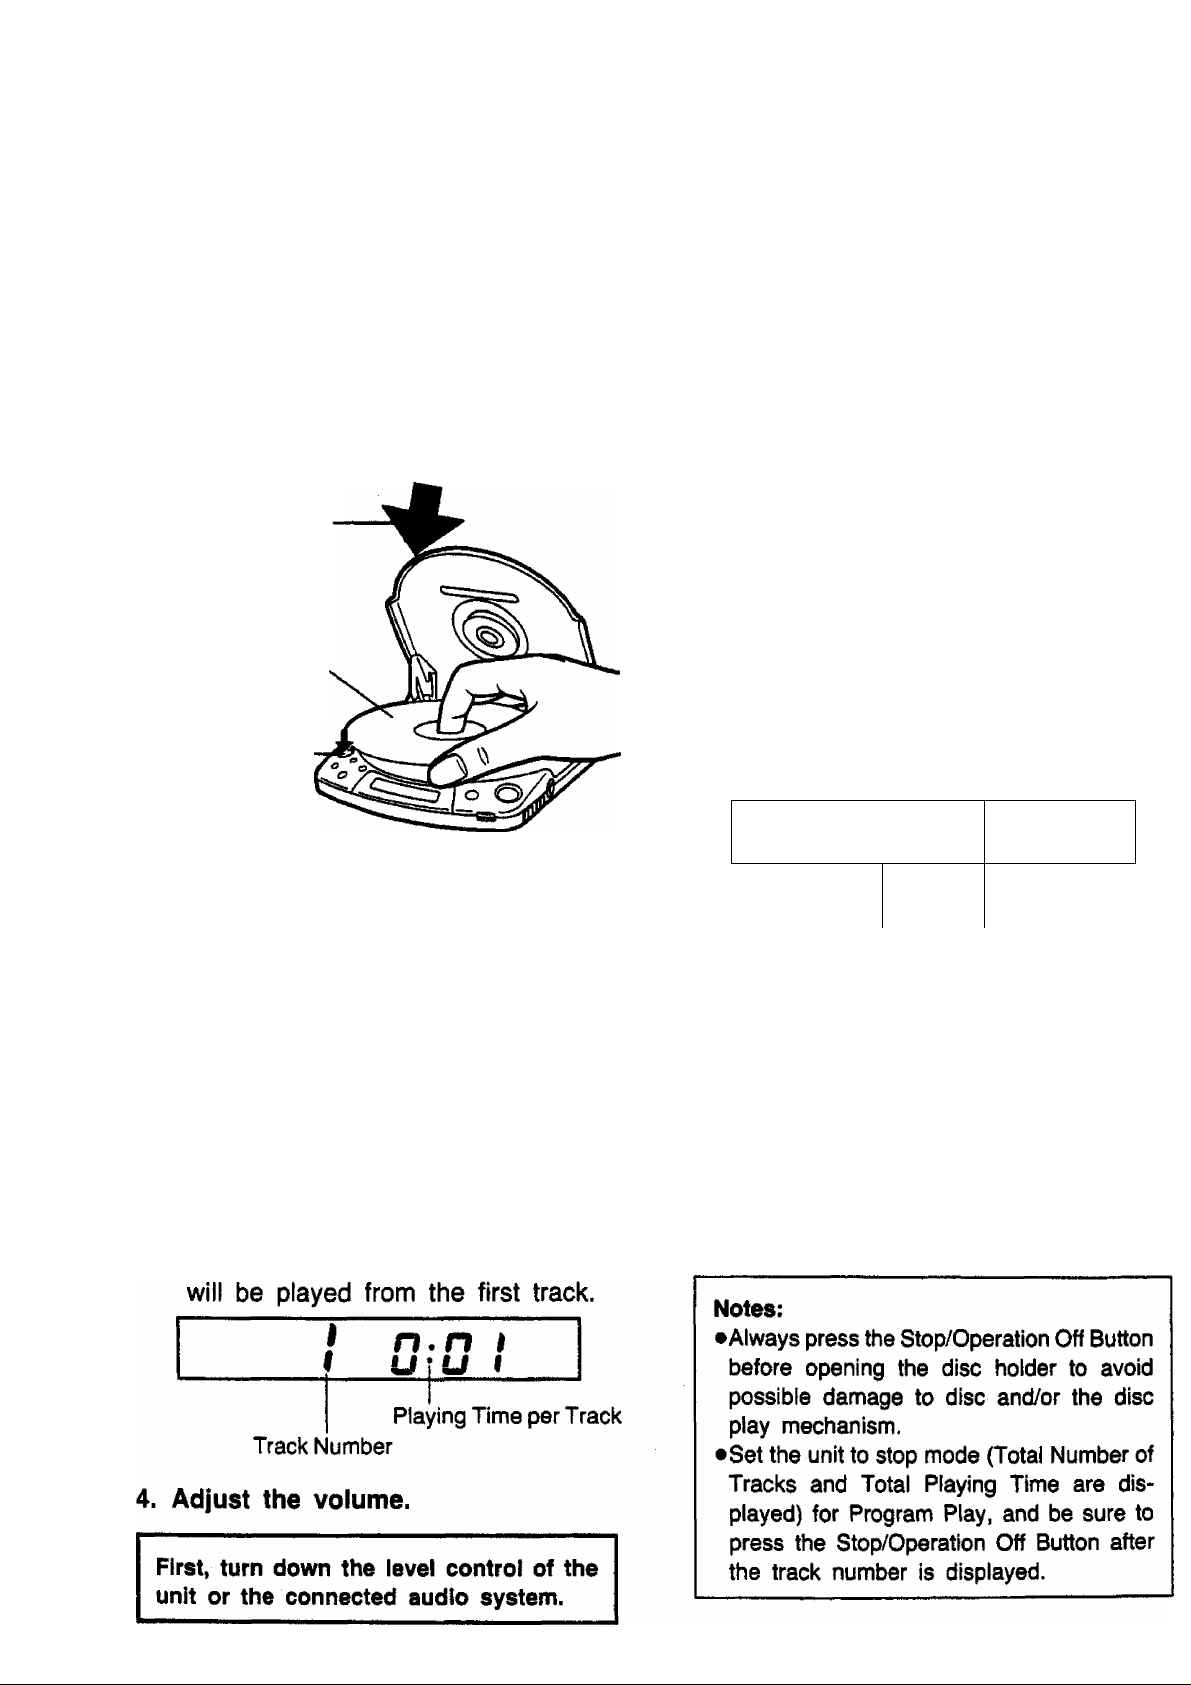
1. Insert a disc.
O Close the Cover
pressing in the
direction of the
arrow.
Headphones, adjust the phones level by
the phones level control of the unit.
•To listen through an audio system, adjust
the output level on the amplifier or re
ceiver.
Q Label must face
upward.
0 Push the
Open Button.
8 cm size discs can be used without adaptor,
2. Release the hold state.
Functional buttons except for Open
Button cannot be activated in the hold
state.
•The Remote Controller on the Stereo
Earphones also has the Hold Switch.
•Before operation, be sure to release
the hold state of whichever (the unit or
the Remote Controller) you use.
3. Press the Play/Pause Button.
•The unit will be turned on and the disc
5. To stop disc play, press the Stop/
Operation Off Button.
•The disc will stop rotating, and the
total number of tracks and total play
ing time will be displayed.
•S8
al Playing Time
To
Total Number of Tracks
•When all tracks have been played, the
disc will automatically stop.
6. Press the Stop/Operation Off Button
again to turn the unit off.
•The unit will be turned off automatical
ly after about 4 minutes in the stop
mode.
-10-
Page 11

ASC/S-XBS Selector (Earphones Only)
Set the S-XBS Selector to “ON” to boost the low frequency range.
Setting the ASC Selector to “MILD” will make the more amenity sound possible.
Also it wilt lessen the leaking noisy high sound disturbing the people around you in
public places and reduce the strain of listening for a long time.
[USkip play (To start disc play from a specific track)
Before use, release the hold state of the unit.
1. Press the Button (SKIP/
SEARCH) in the stop mode to spe
cify the desired track.
•Each time you press this button, the
pickup will advance by one track. If
you go past the desired track, return
the pickup using the [4< Button.
•To cancel, press the Stop/Operation
Off Button.
2. Press the Play/Pause Button.
•Disc play will start from the specified
track, and continue to the last track.
3
For example, to play a disc
from the track 3, press the ►N
Button 3 times.
n Skip play during disc play
By pressing the Skip/Search Button ( or ) during disc play or when disc play is
paused, you can easily move the pickup to the beginning of the track being played or a track
before or after it.
•Forward skip
Each time the ►W Button is pressed, the
Track Number on the display will skip
forward and disc play will resume.
For example, to skip from the track 3 to
the track 5...
(Press the Button twice.)
i" o s
-11 -
•Backward skip
The first time the button is pressed,
the unit skips back to the beginning of the
track in play. Then it skips back one track
for each additional press.
For example, to skip from the track 5 to
the track 3...
(Press the [« Button 3 times quickly.)
hM • —I
Zi
I
Page 12

Operation (continued)
Resume play
(To play a disc from the track last played)
Before use, release the hold state of the unit.
1. Set the Mode Selector to “RESUME”
In the stop mode.
RESUME
Resume Indicator
2. Press the Play/Pause Button.
3. Press the Stop/Operation Off Button
to stop disc play (for example, while
the track 5 is being played.)
4. Press the Stop/Operation Off Button
again to turn the unit off.
5. Press the Play/Pause Button.
•The disc will be played from the
beginning of the track 5.
RESUME
n
b
r
^3S8
n. n
Repeat Indicator
I
I cp
•Automatic Repeat Function
When the unit is in the resume mode, the
unit will be automatically in the repeat
mode.
•To cancel the repeat mode, press the
Repeat Button or press the Stop/
Operation Off Button.
Notes;
•The disc may be played from the next track
when disc play has been stopped near the
end of the track.
•Changing a disc confuses the resume play
operation.
•Resume play cannot be performed when
using the disc contained only one program.
• Program memory can not be resumed. If
the unit has been turned off during program
play, last track being played will resume
only.
• Resume play mode can be set during play
without turning off the unit.
[^Random play (To play a disc In random order)
The unit’s microcomputer selects the sequence of play in random order until all of the tracks
on the disc have been played.
Before use, release the hold state of
1. Set the Mode Selector “RANDOM” In
the stop mode.
RANDOM
Random Indicator
2. Press the Play/Pause Button.
•The disc wilt be played in the random
srir order.
n 1^0 ;CQ
the unit.
•The first Track Number can be se
lected by pressing the ►M Button In
the stop mode.
•When all tracks have been played in
random order, the disc will automati
cally stop.
Note:
Program play cannot be performed in the
random mode.
Page 13

[U Program play (To play a disc in a certain order)
A maximum of 24 selections can be programmed. First, set the Mode Selector to “NORMAL”
position (The Play Mode Indicator has no display).
Before use, release the hold state of the unit.
* For example, to play track 3, track 5,
track 1 In that order...
1. Press the Button 3 times in the
stop mode.
3
2. Press the Memory/Recall Button.
• •HIM
• • U I
4
Track Number
Program Order
•If the Memory/Recall Button is press
ed repeatedly, the same track is prog
ramed.
Memory
Indicator
•To clear the program, press the Stop/
Operation Off Button before Program
play.
•If the program time is over 24 times,
the following display appears.
Z M
/
^ark
Full
4. Press the Play/Pause Button.
•The disc will be played in the pro
gramed order.
n.n I M
3
•When all programed tracks have been
played, the disc will automatically
stop.
U*U I
3. Repeat procedure 1 and 2 according
to your program selections.
O Press the Button twice.
M
S
@ Press the Memory/Recall Button.
S -- oг“
0 Press the \« Button 4 times.
1
1
O Press the Memory/Recall Button.
! - - ngw
I “ " UJ
M
Note:
All programs memorized will be cancelled
when the Stop/Operation Off Button is press
ed during program play. If the Play/Pause
Button is pressed during program play, the
program is not cancelled.
-13-
Page 14

Operation (continued)
•Recall function
By pressing the Memory/Recall Button
once during program play, the program can
be easily recalled.
^ n i M
3 -
U I
4^
no M
b --
uC
no
M
UJ
■ Pause function
if the Play/Pause Button is pressed white a
disc is being piayed, disc play wilt stop
briefly.
.....
I
I
-ii35 -
7^
Time display flashes
•When this button is pressed once again,
disc play will continue from where it
stopped.
■ Automatic operation off func
restored initial display
■ Repeat play
If the Repeat Button is pressed, the Repeat
Indicator will appear, and the disc will be
played repeatedly. Pressing the Repeat
Button again or pressing the Stop/
Operation Off Button will cancel the repeat
function.
3 .’ OS
Repeat Indicator
'During program play, only the memorized
tracks will be played repeatedly in the
memorized sequence.
tion
The unit will be turned off automatically
after about 4 minutes in the stop or pause
mode for battery life.
■ Search function
if the ►M Button (or Button) is
pressed and held during disc play, sound
from the disc can be heard as the pickup
moves at high speed in the forward (re
verse) direction (the output level at this
time is about Va of the level during normal
play). Release the button when the pickup
reaches the desired portion of the disc.
Notes:
• During program play or random play, you
can only search within the track being
played.
• If you release the button immediately, the
unit will go into the skip play.
Page 15
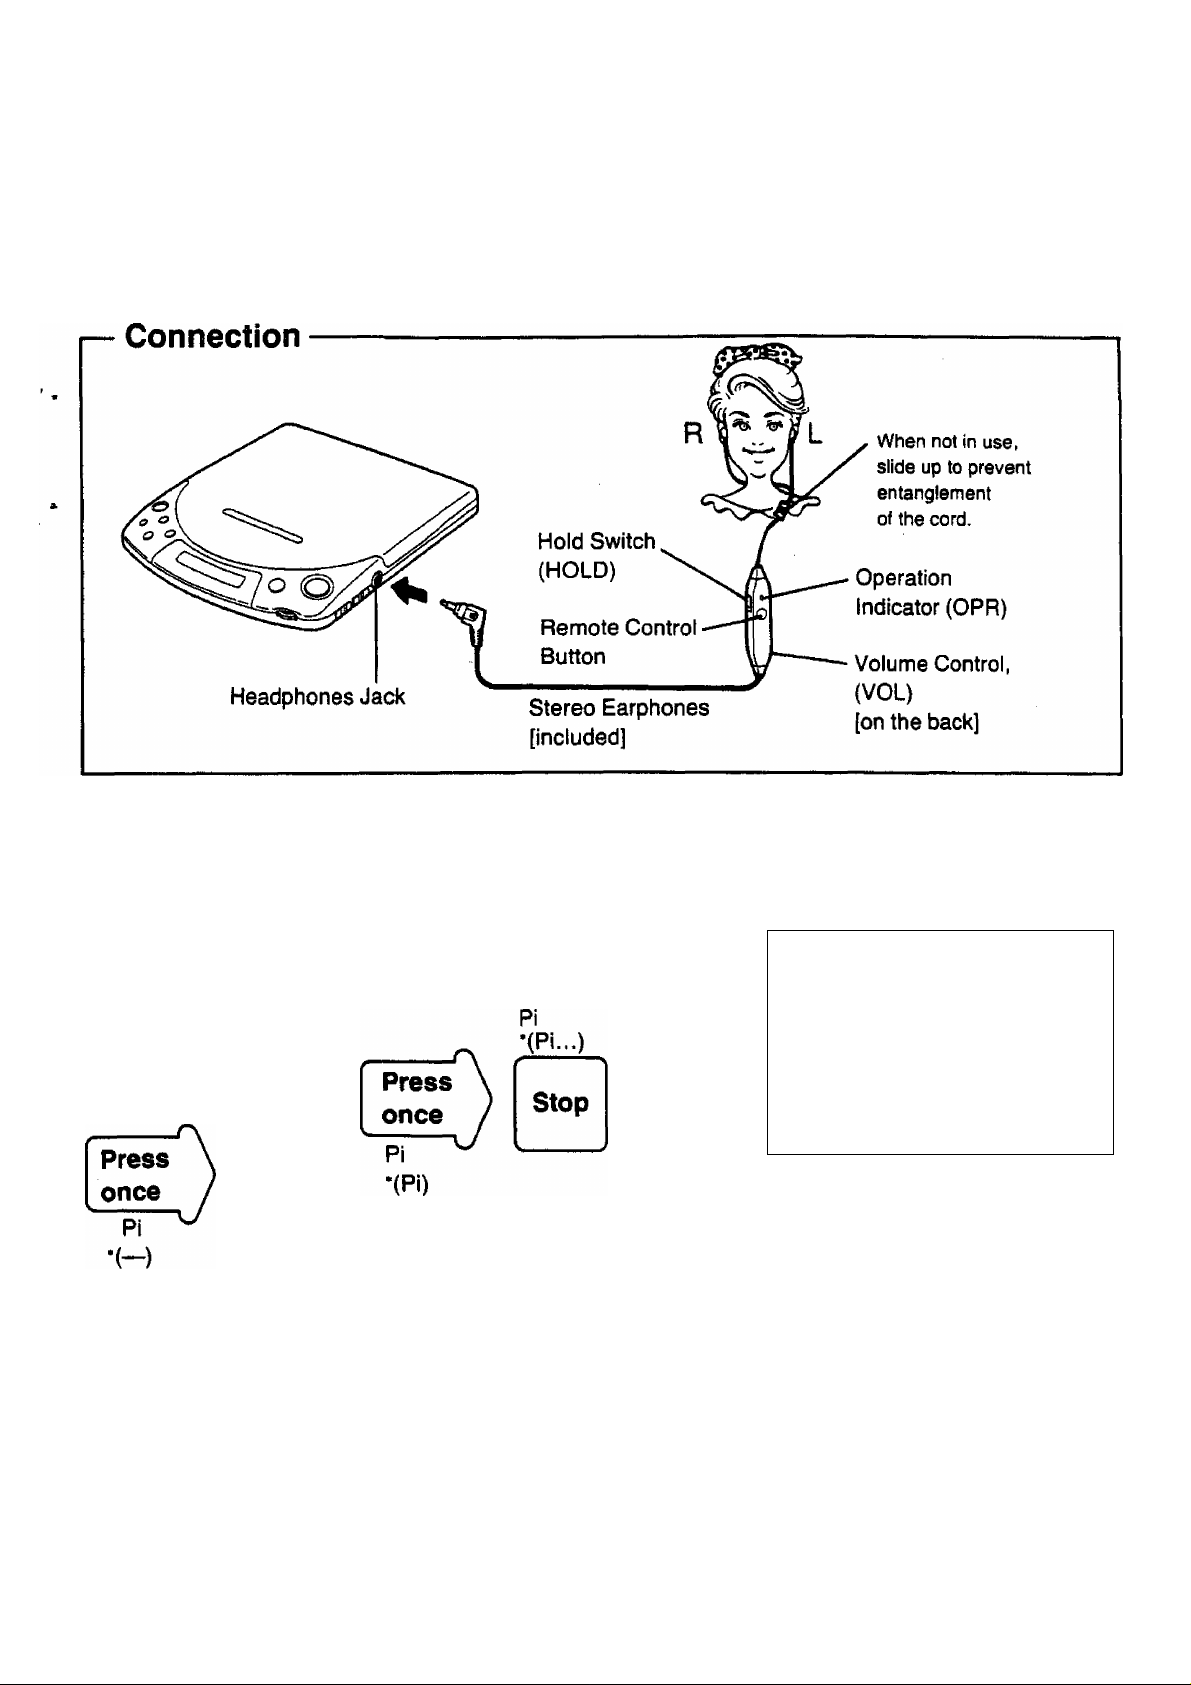
Remote Control (Stereo Earphones)
The following operation can be performed with the included Stereo Earphones, without press
ing the operation buttons on the unit.
•play •stop •operation off •skip •volume control (earphones level)
Operation
Before performing the remote control operation, be sure to release the hold state by
sliding the Hold Switch up.
—V
Press and hold for more
than 1.5 seconds
Operation off
Press
and
hold
Pi
•(Pi...)
Skip to the next track
:>
Skip to the beginning of
the track being played
:>
*( ):
Confirmation
beep
Play
Press twice
PiPi
•(PiPi)
Press three times
PiPiPi
*(PiPiPi)
The beep (pi) will be emitted each time the Remote Control Button is pressed.
Also, confirmation beeps will be emitted after pressing to confirm the proper operation.
1-S-
Page 16
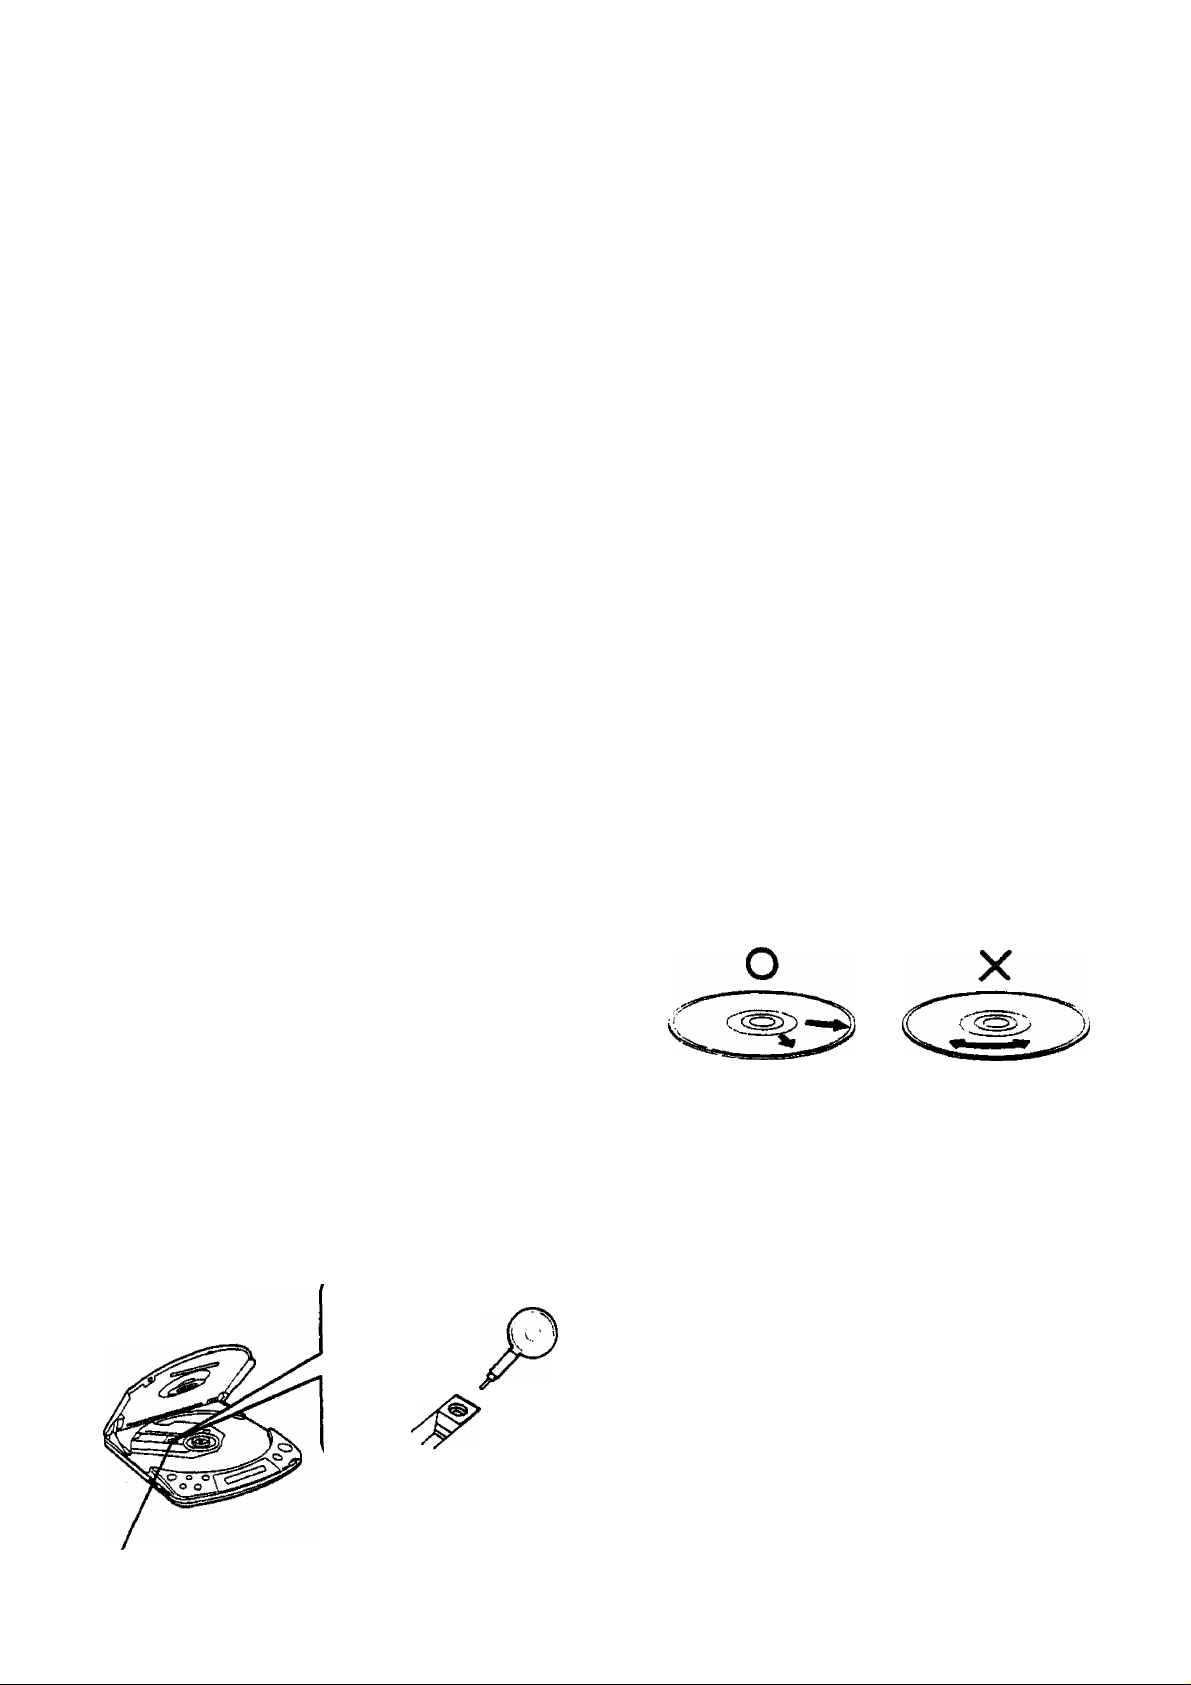
Remote Control (Stereo Earphones)
•When pressing the button twice or three times in succession, press it within one second and
at equal intervals.
•Volume can be controlled v^/ithin the main levels of the unit. Make sure to adjust the phones
level control of the unit to 5-7 position.
•The Operation Indicator lights during playing and flashes in the stop mode. (The indicator is
turned off in a power off condition.)
(continued)
Hold switch
If setting the hold state by sliding down the Hold switch, the Remote control button can not be
pressed. This prevents the Remote control button is pressed by mistake.
Maintenance
(Be sure to switch operation “OFF” first. If
you are using the AC adaptor, disconnect it
before cleaning.)
■ If the lens is dirty...
A dirty lens will cause sound skipping and,
if the lens is very dirty, disc play may not be
possible. Open the disc holder and clean
the lens as shown in the figure.
Cleaning kit (option)
Part number; SZZP1038C
For dust on
the lens
Air blower for
camera lens
■ If discs are dirty...
Clean with a soft, damp cloth, and wipe dry.
Always from the
center outward.
Scratches caused by
wiping in this direction
can create noise.
■ If the cabinet is dirty...
Wipe with a soft cloth. If the cabinet is very
dirty, dampen the cloth with a weak solu
tion of neutral detergent and water, and
then wipe clean.
Lens
• Use a cotton swab
to clean away
fingerprints, etc.
on the lens.
Page 17
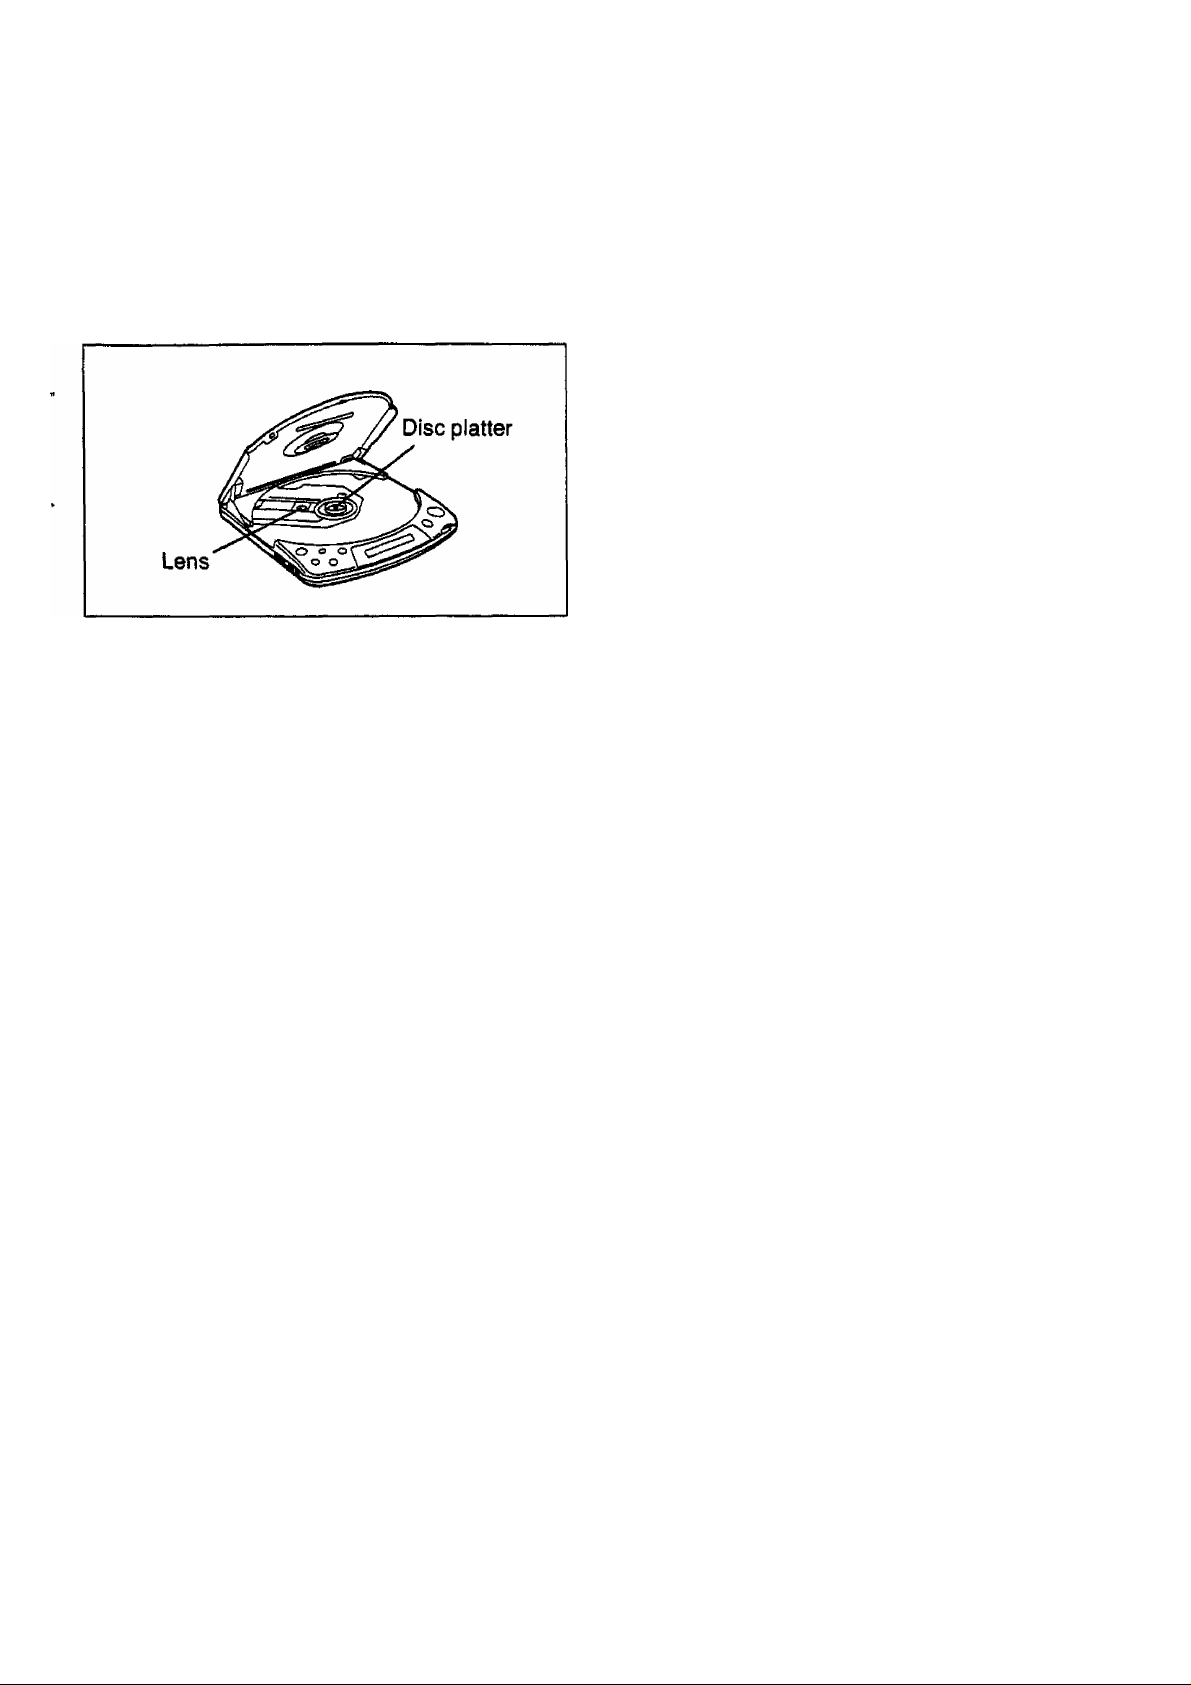
Operation Notes
■ Keep dust out.
Always be sure to close the disc holder to
keep dust away from the lens. Also be
careful never to touch the lens or disc
platter.
■ Open the disc holder carefully.
When opening the disc holder, hold the unit
horizontally so that the disc won’t fall out.
■ Moisture may form on the lens in
the following cases...
• Immediately after a heater has been
turned on.
• In a steamy or very humid room.
•When the unit is suddenly moved from a
cold environment to a warm one.
If moisture forms inside this unit, it may not
operate properly. To correct this problem,
wait about one hour for the moisture to
evaporate.
■ Do not place near a tuner or
television.
This unit uses high-frequency signals and
can cause interference with radio and
television reception. Should this occur relo
cate this unit away from them. If this does
not help, switch off the operation to this
unit when listening to the radio or watching
TV.
When this unit is turned on with the AC
Adaptor, disconnect the AC Adaptor.
■ Keep away from tapes.
The magnet used in this unit might erase
the contents of nearly tapes.
■ About the play time display...
You may notice that there Is a slight dif
ference (a few seconds) between the time
displayed for each tune and the time shown
in the notes included with the disc. This is
because the displayed time includes the
time between tracks.
m Set to “HOLD” before trans
porting.
When transporting the unit, make sure to
set to “HOLD" to avoid accidental play
start.
■ Be careful of the volume level.
Compared to ordinary analog records, the
music recorded on compact discs includes
very little noise. Before listening always
turn down the volume control. (Especially
when it is connected to other audio sys
tems, an extremely high output will be
emitted from the amplifier, and might dam
age the speakers.)
- 17-
Page 18
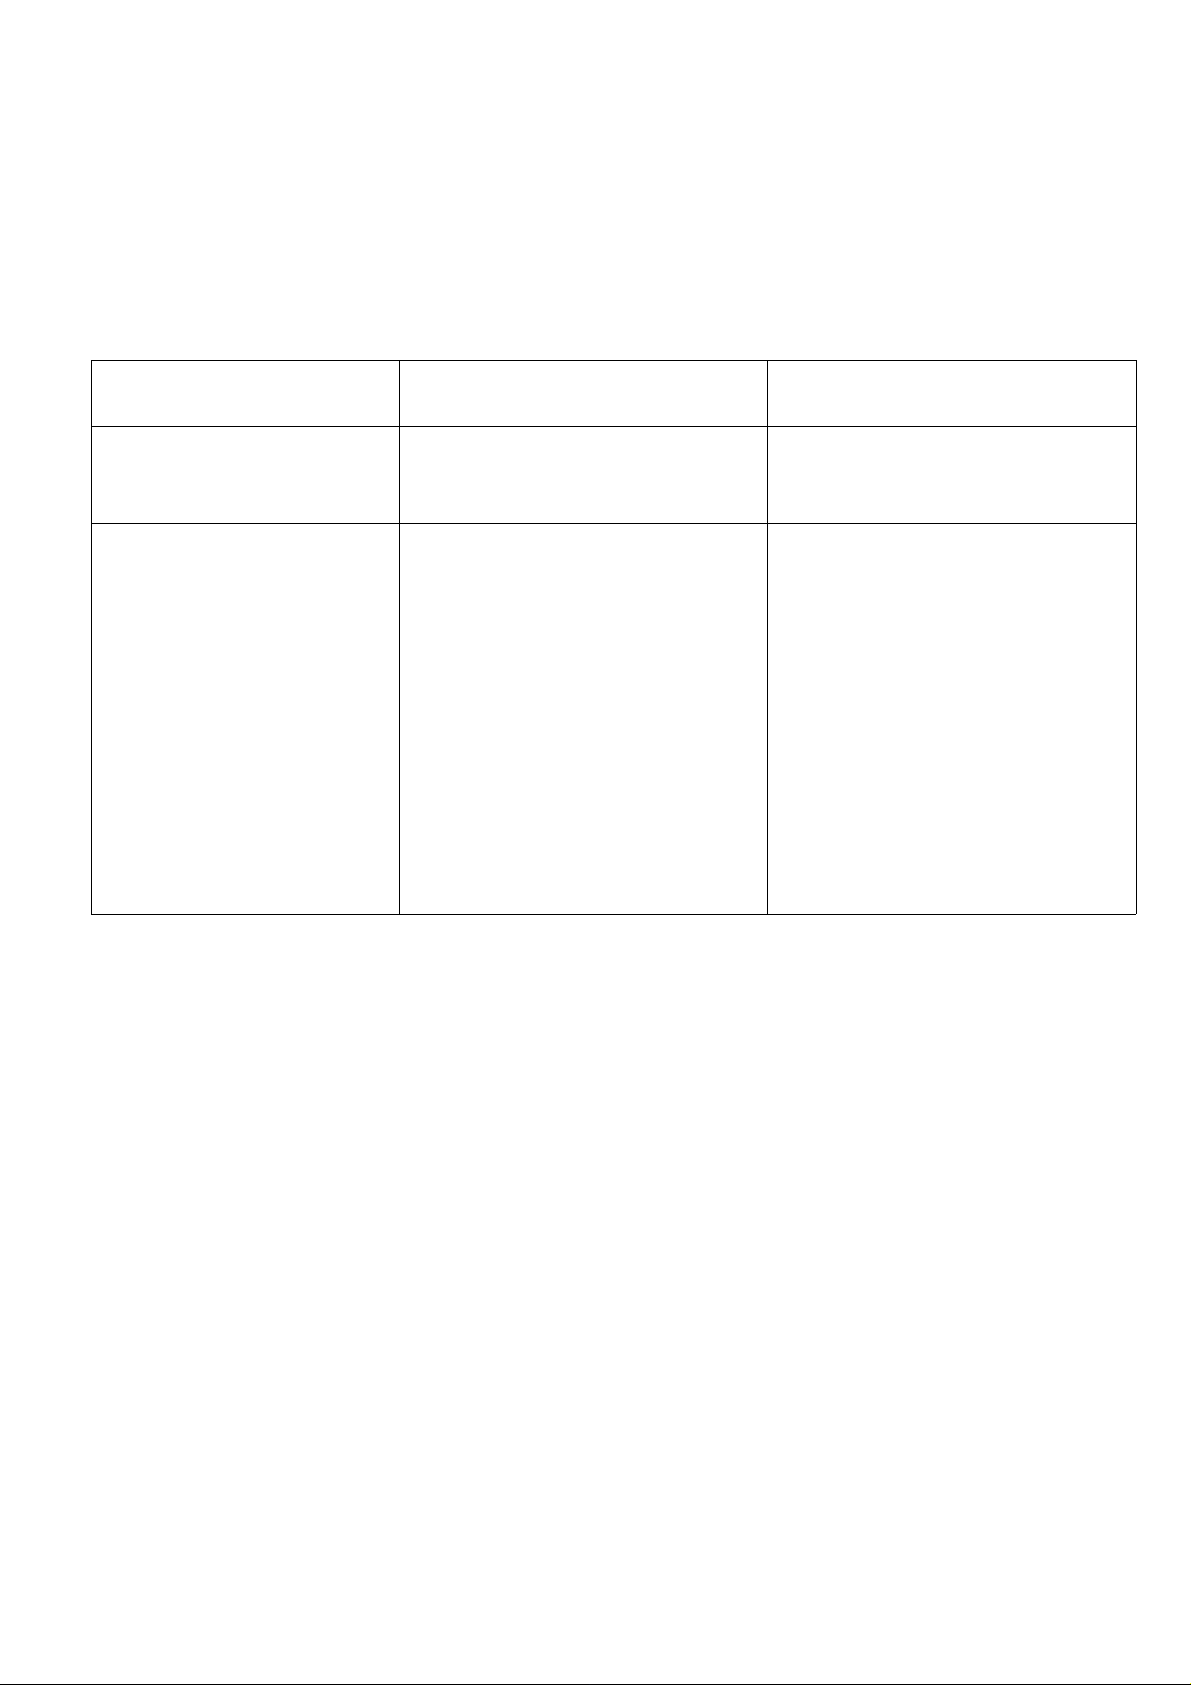
T roubleshooting Guide
If the unit does not operate properly, check all of the following points, as well as connections
and the control positions of all components to this unit, before requesting professional servic
ing. This table does not include checks for mistaken connections or incorrect settings of other
components. If the problem is not solved by this table or is not included in the problems listed
below, contact your Technics dealer for assistance.
Problem
Disc holder cannot
be closed.
Disc is inserted but
number of tracks and
playing time are not
displayed.
Causes
•The disc is not properly
inserted.
•The Hold Switch is set to
“HOLD” position.
•Disc is inserted upside
down.
•Disc is dirty.
•Disc is scratched.
•Disc is seriously warped.
•A non-standard disc is
inserted.
•Dew has formed inside
the player.
Remedy
•Take it out and insert it
again.
• Release the hold state.
• Insert disc again properly.
•Wipe clean with soft cloth.
• Use a new disc.
• Use a new disc.
• Use only discs with the
mark.
•Wait about 1 hour, then
turn on again.
About Compact Discs
Noise can result if the disc is dirty,
scratched, warped, etc. Please note the fol
lowing points.
Compact disc identification...
I
COMPACT
Use only compact discs
DIGITAL AUDIO
■ Handling notes
•Be careful not to scratch the surface with
fingernails or other sharp objects.
• Do not bend the disc.
• Do not dry discs with a hair dryer.
•Do not write on the label side with a ball
point pen, hard pencil or other hard writ
ing utensil.
bearing this mark.
•Do not attach any type of paper, label,
etc. to the disc.
• If moisture forms on the disc, wipe it off
with a soft, dry, lint-free cloth before using
the disc.
■ Storage hints
Store the disc only in its own case.
Keep discs away from...
• Locations exposed to direct sunlight.
• Heating equipment and places where the
temperature is high.
•Places where there is high humidity or
excessive dust.
• In the glove compartment or rear ledge of
an automobile.
Page 19

Specifications
■ Audio
No. of channels:
Output voltage:
Frequency
response;
Dynamic range:
S/N ratio:
Digital filter:
Phones output:
2 channels (stereo)
1.0 V (50 kQ)
20-20000 Hz
(+0.5 dB, -1.5 dB) Wavelength:
more than 94 dB
more than 96 dB
8 times
oversampling
max. 15 mW/16Q
(adjustable)
■ Signal Format
Correction system: Technics New
Super Decoding
Algorithm
■ Pickup
Type:
Light source:
Lens:
Fine-focus, one
beam
Semiconductor
laser
780 nm
Glass pressed lens
■ General
Power supply:
Power consumption;
AC adaptor;
Battery;
Dimensions
(WxHxD):
Weight:
Specifications are subject to change without
notice.
Weight and dimensions are approximate.
DC3V
3W
0.65W(DC3V)
128x17.9x145 mm
348 g with batteries
-19-
Page 20

Matsushita Electric Industriai Co., Ltd.
Central P.O. Box 288, Osaka 530-91, Japan
it«d in Japan
RQT0896-B
F0291t0
 Loading...