

Page 1
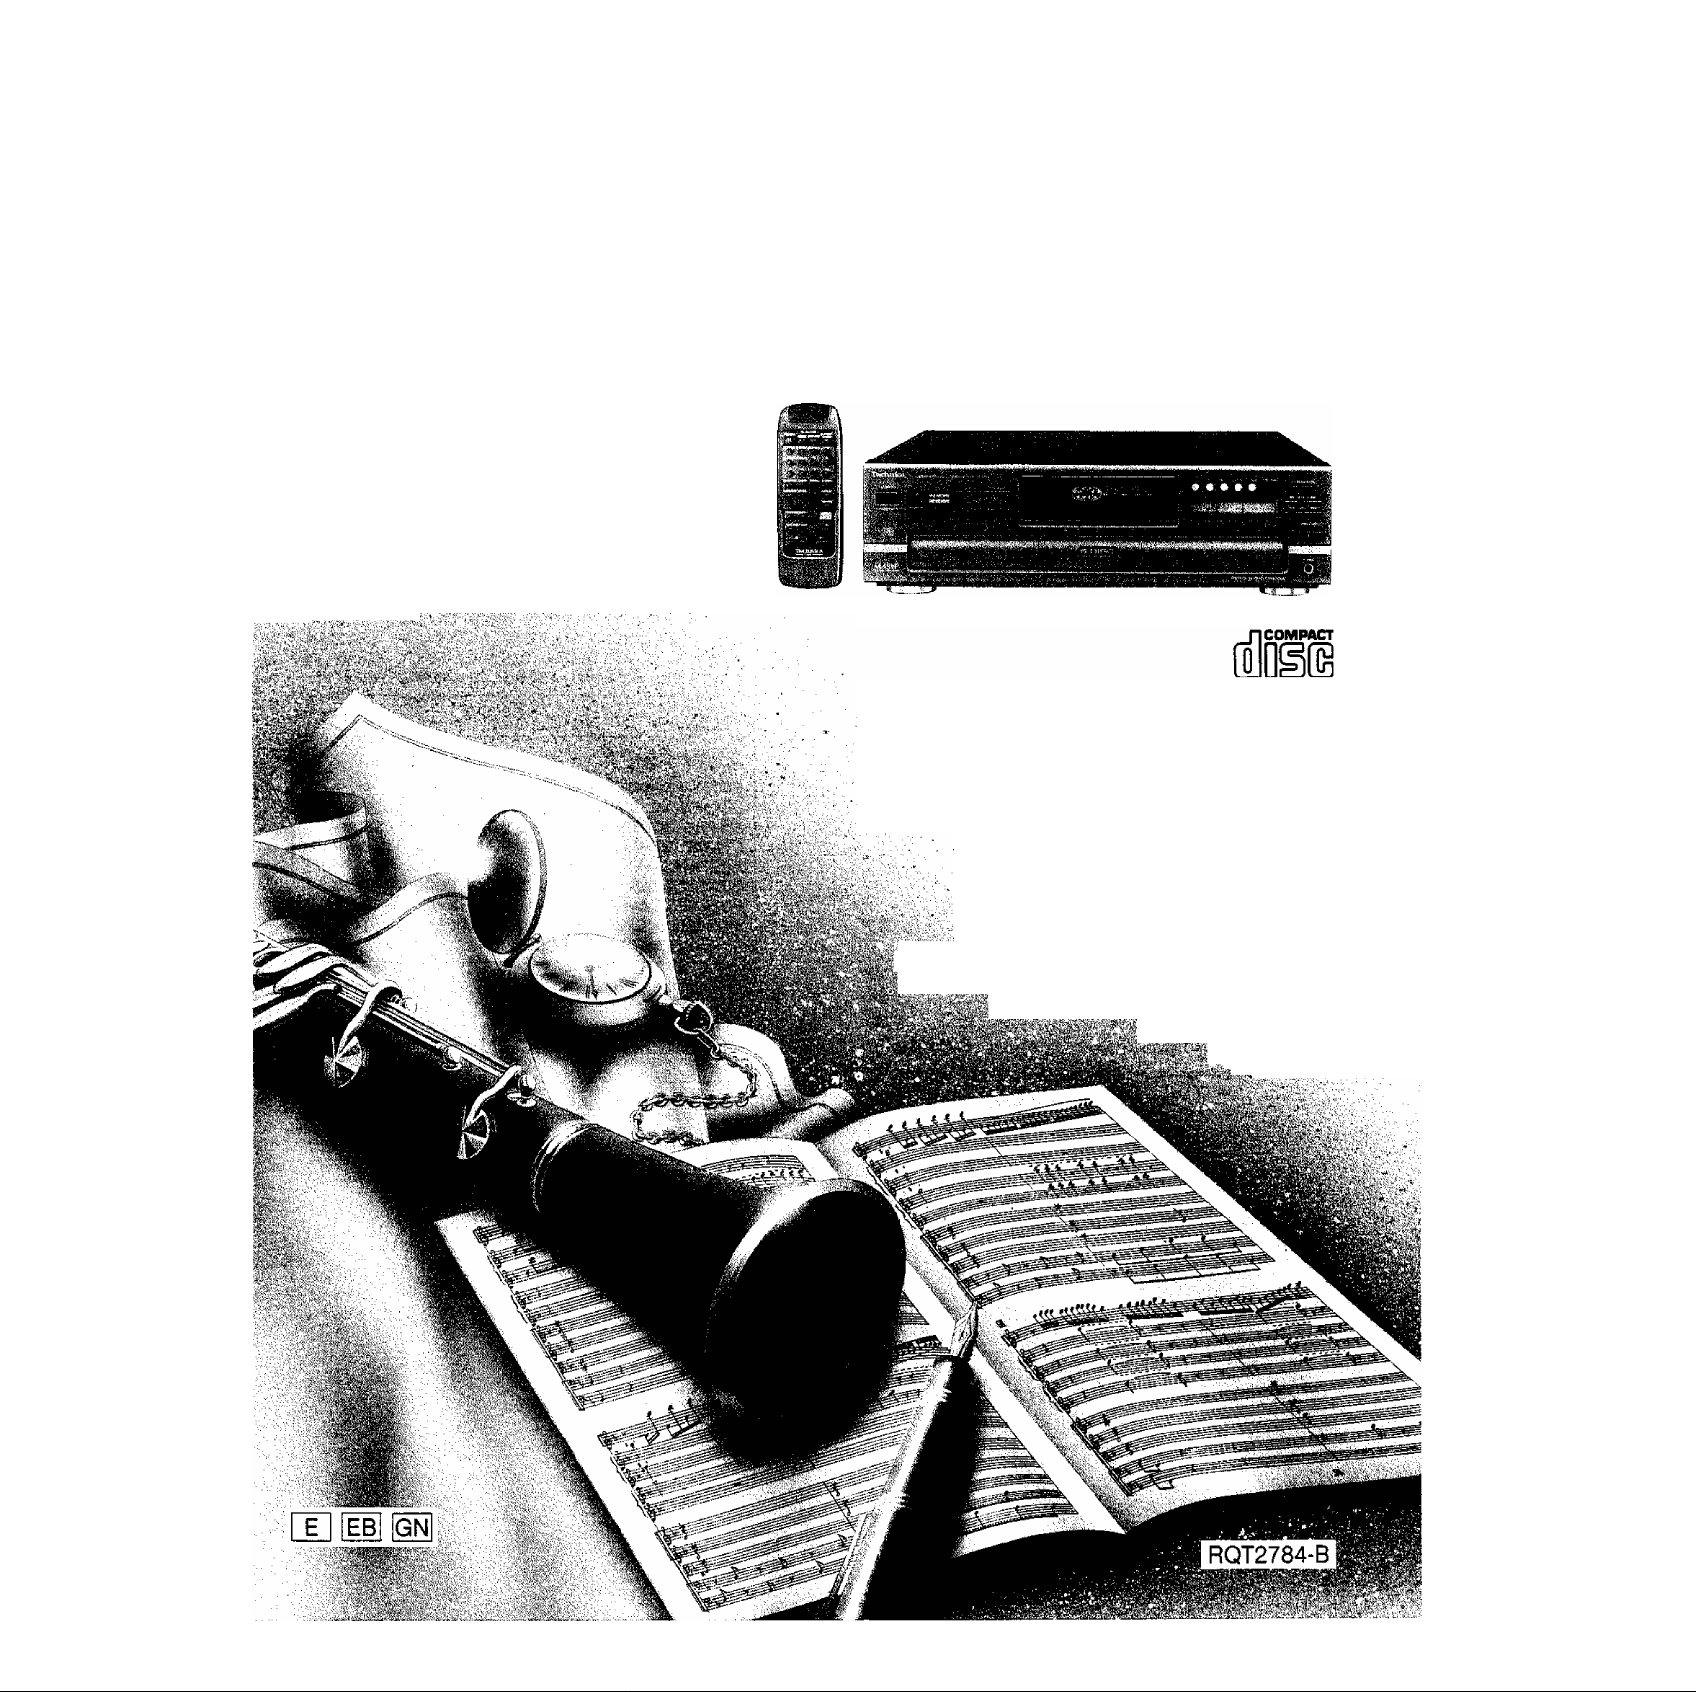
Teclmics
Compact Disc Changer
SL-PD1010
Operating Instructions
DIGITAL AUDIO
Note;
The "EB” indication shown on the packing case indicates United
Kingdom.
Before -connecting, operating or adjusting this product, please
read these instructions completeiy.
'-il.'':-' ' '' •
....
........
i. ...'
Page 2
Dear Customer
Thank you for purchasing this Technics product.
For optinnum performance and safety, please read
these instructions carefully.
CAUTION!
THIS PRODUCT UTILIZES A LASER.
USE OF CONTROLS OR ADJUSTMENTS OR PER
FORMANCE OF PROCEDURES OTHER THAN THOSE
SPECIFIED HEREIN MAY RESULT IN HAZARDOUS
RADIATION EXPOSURE.
DO NOT OPEN COVERS AND DO NOT REPAIR YOUR
SELF. REFER SERVICING TO QUALIFIED PERSONNEL.
Contents
Caution for AC mains lead
(For United Kingdom)............................................................... 3
Suggestions for safety........................................ 4
Front panel controls
Connections......................................................... 6
Concerning the remote control.......................... 7
Basic operations
Program play......................................................11
Random play.......................................................12
Delete play...........................................................13
Spiral play
........................................................
ID scan function
Search function
Skip function.......................................................16
Repeat function
Auto cue function
Edit guide function.............................................18
Time mode selection
Quick reference table of remote
control operation................................................20
Cautions concerning the moving
of this unit
...........................................................
Concerning compact discs
Troubleshooting guide.......................................23
Technical specifications.................... Back cover
...........................................
.................................................
..................................................
..................................................
..................................................
...............................................
..........................................
...............................
5
8
14
IS
15
17
17
19
22
22
OANSK
BEMÆRK!
I DETTE APPARAT ANVENDES EN LASER.
BRUG AF BETJENINGSKNAPPER ELLER REGULERINGER ELLER FREMGANGSMÂDER UDOVER DE I
DENNEBETJEN1NGSVEJLEDNINGANGIVNE,KANMEDF0RE FARE FOR BESTRÂLING. ÀBN IKKE KABINETTET OG FORS0G IKKE AT UDF0RE REPARATIONER SELV. REPARATtONER MÂ KUN FORETAGES
AF KVALIFICEREDE TEKNIKERE.
SUOMI
VAROITUS!
LAITTEEN KÄYTTÄMINEN MUULLA KUIN TÄSSÄ
KÄYTTÖOHJEESSA MAINITULLA TAVALLA SAATTAA
ALTISTAA KÄYTTÄJÄN TURVALLISUUSLUOKAN 1
YLITTÄVÄLLE NÄKYMÄTTÖMÄLLE LASERSÄTEILYLLE.
NORSK
ADVARSEL!
DETTE PRODUKTET ANVENDER EN LASER.
BETJENING AV KONTROLLER, JUSTERINGER ELLER
ANDRE INNGREP ENN DE SOM ER BESKREVENT I
DENNE BRUKSANVISNING, KAN FORE TIL FARLIG
bestrAling.
DEKSLER MA IKKE ApNES, OG FORS0K ALDRI A
REPARERE APPARATET PA EGENHAND.
ALT SERVICE OG REPARASJONSARBEID MA UTFORES
AV KVALIFISERT PERSONELL.
INViaBLE LASER fWDtATION WHEN OPEN.
DANG®
AVOID DIRECT EXPOSURE TD KAM.
USmiG lASEFtSTRlLHGVEDABNINGL 5IKffi!HEDSA№DSIE
ADVARSEL
EBlKIEAFFlMaiDH URDGitUBSfnElSEFOflSmtllNG.
AVATTAtSSAJflSllOJALUKlIUS OHtTETTtfSSAOtTAlTTIKtt
VARO!
NÄKTMirÖHTÄlASEBSilElLYlii ÄUMTSOSiTEESEN.
osvNUG lasersirAlning när de nnaoel a roppnao och
VARNtNG
SPARREN Ar URKOPPIAD. SETRAKTA Ej STDALEN.
USTNUGLA5ERSIRALINGNilR0EltSaAP№0GSIKI!B№)9^
ADVARSEL
BRYtES. UNHCAEKSPONERINGFIMSmAlEN.
UHSICHTBME IASERS1RAHL
VORSICHT
NCHTDEMSTRAHAUSSEIZEN
№№#1
ABDECKUNG GEÖFFNET.
(Inside of product)
(Indersiden at apparatet)
(Tuotteen sisätlä)
(Apparotens insida)
(Produktets Innside)
(Im Inneren des Garâtes)
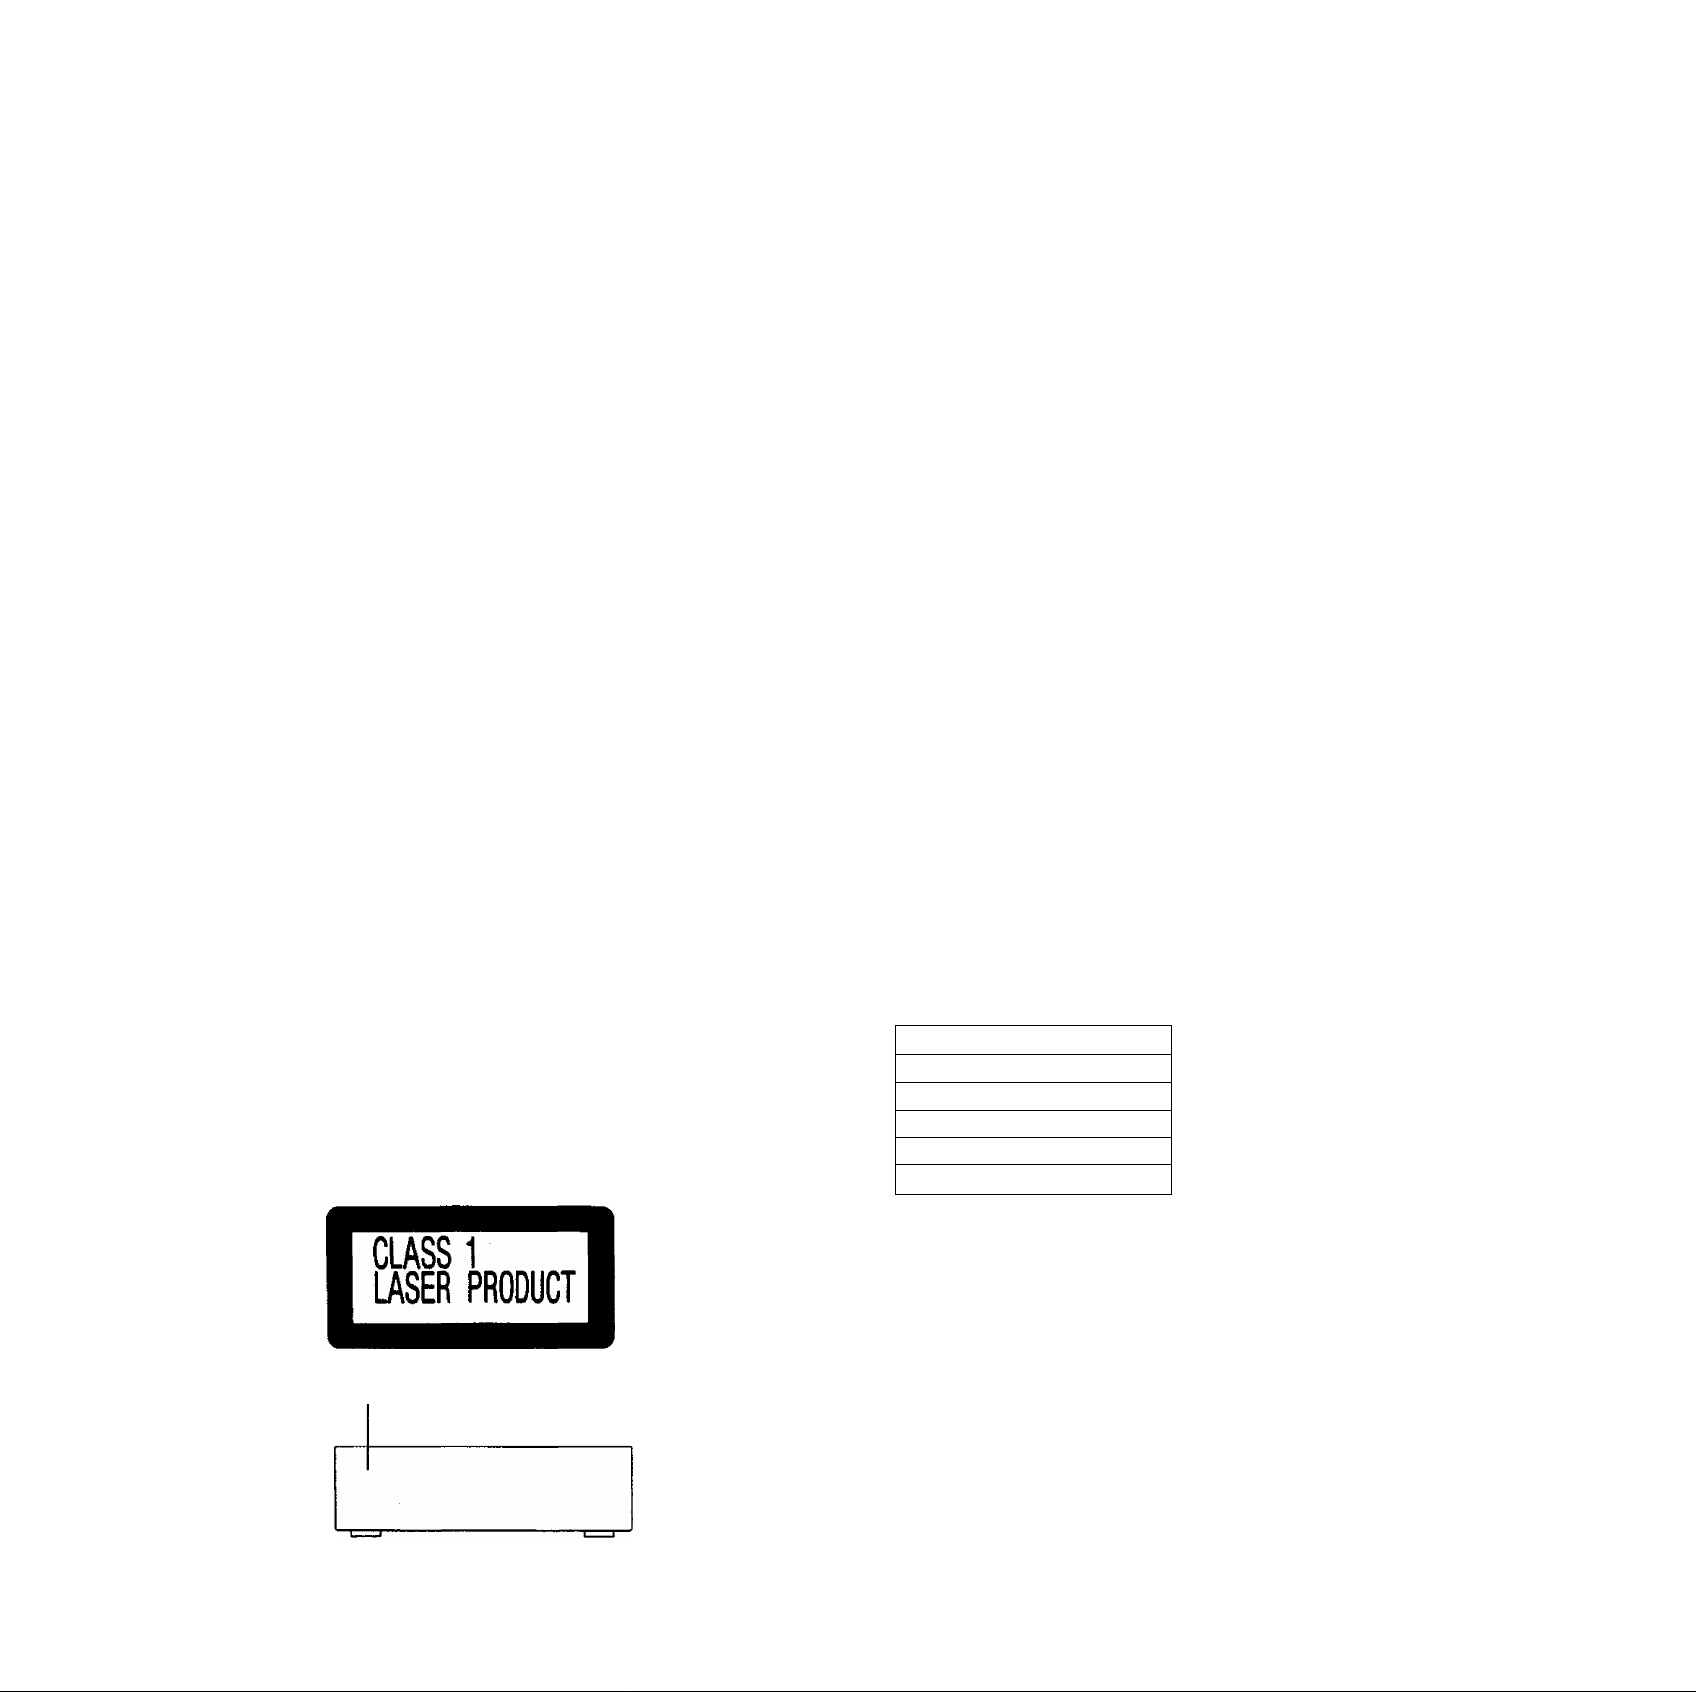
LUOKAN1 LASERLAITE KLASS 1 LASER APPARAT
{Back of product)
¡Kompanentens bagstde)
(Produktets bakstde)
Page 3
Caution W
(For United Kingdom)
(“EB” area code model only)
For your safety, please read the following text carefully.
This appliance Is supplied with a moulded three pin
mains plug for your safety and convenience.
A 5-ampere fuse is fitted in this plug.
Should the fuse need to be replaced please ensure
that the replacement fuse has a rating of 5-ampere and
that it is approved by ASIA or BSI to BS1362.
Check for the ASIA mark <$> or the BSI mark ^ on the
body of the fuse.
If the plug contains a removable fuse cover you must
ensure that it is refitted when the fuse is replaced.
If you lose the fuse cover the plug must not be used
until a replacement cover is obtained.
A replacement fuse cover can be purchased from your
local dealer.
CAUTION!
IF THE FITTED MOULDED PLUG IS UNSUIT
ABLE FOR THE SOCKET OUTLET IN YOUR
HOME THEN THE FUSE SHOULD BE RE
MOVED AND THE PLUG CUT OFF AND DIS
POSED OF SAFELY.
THERE IS A DANGER OF SEVERE ELECTRI
CAL SHOCK IF THE CUT OFF PLUG IS IN
SERTED INTO ANY 13-AMPERE SOCKET.
WARNING: DO NOT CONNECT EITHER WIRE TO
THE EARTH TERMINAL WHICH IS MARKED WITH
THE LETTER E, BY THE EARTH SYMBOL i OR
COLOURED GREEN OR GREEN/YELLOW.
THIS PLUG IS NOT WATERPROOF—KEEP DRY.
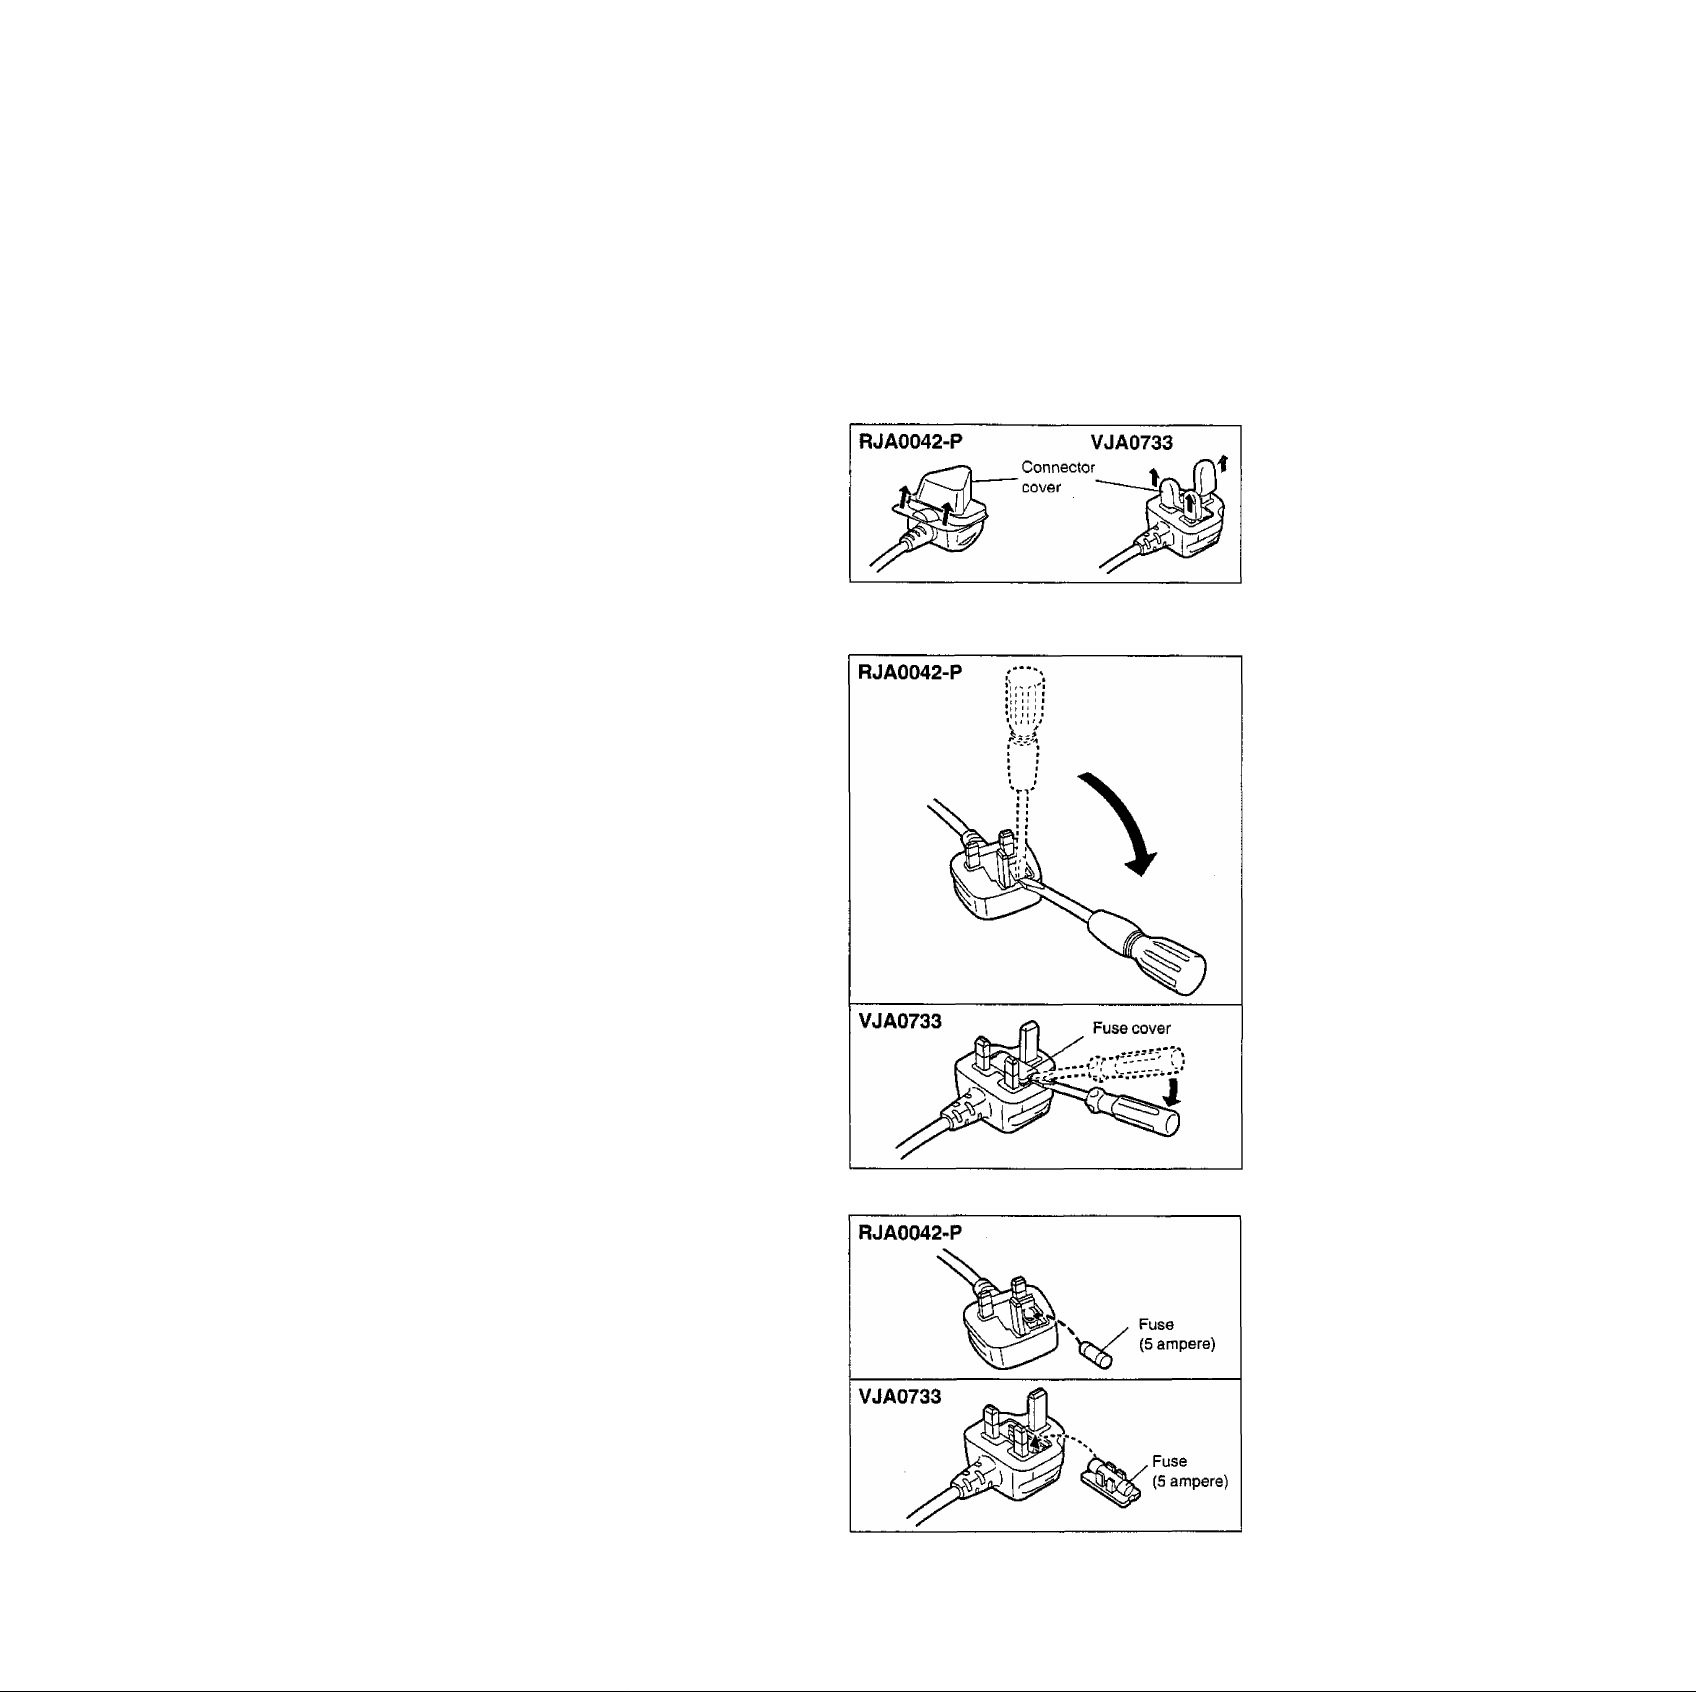
Before use
Remove the connector cover as follows.
How to replace the fuse
1. open the fuse cover with a screwdriver.
If a new plug is to be fitted please observe the wiring
code as shown below.
If in any doubt please consult a qualified electrician.
IMPORTANT
The wires in this mains lead are coloured in accor
dance with the following code;
Blue: Neutral, Brown; Live.
As these colours may not correspond with the coloured
markings identifying the terminals in your plug, proceed
as follows:
The wire which is coloured Blue must be connected to
the terminal which is marked with the letter N or col
oured Black or Blue.
The wire which is coloured Brown must be connected
to the terminal which is marked with the letter L or
coloured Brown or Red,
2. Replace the fuse and close or attach the fuse cover.
Page 4

for mí^ff
Placement
Avoid placing the unit in areas of:
• direct sunlight
• high temperature
• high humidity
• excessive vibration
• uneven surfaces. {Place the unit on a flat leve! surface).
Such conditions might damage the cabinet and/or other compo
nent parts and thereby shorten the unit's service life.
Ventilation
Place the unit in a weii ventilated position at least 10 cms away
from wall surfaces etc.
Stacking
Never place heavy items on top of the unit or the power cord.
Voltage
• It is very dangerous to use an AC power source of high voltage
such as for an air conditioner.
A fire might be caused by such a connection,
• A DC power source can not be used.
Be sure to check the power source carefully, especially on a
ship or other place where DC is used.
Power cord protection
• Avoid cuts, scratches or poor connection of the AC mains cord,
as this may resuit in fire or electric shock hazard.
Excessive bending, pulling or slicing of the cord should also be
avoided.
• Do not pull on the cord when you are disconnecting the power,
as this could cause an electric shock. Grasp the plug firmly
when you disconnect the power supply.
• Never touch the plug with wet hands or a serious electric shock
could result.
Maintenance
Clean the cabinet, panel and controls with a soft cloth lightly
moistened with mild detergent solution.
Do not use any type of abrasive pad, scouring powder or solvent
such as aicchol or benzine.
Service
• Never attempt to repair, disassemble or reconstruct the unit if
there seems to be a problem.
A serious electric shock could result if you ignore this precau
tionary measure,
• If a problem occurs during operation (the sound is interrupted,
indicators fail to illuminate, smoke is detected, etc) contact
your dealer or Authorised Service Center immediately.
• Disconnect the power supply if the unit will not be used for a
long time. Otherwise the operation life could be shortened.
ЕШШЕШ
Avoid places such as the following:
• Near any equipment or device that generates
magnetism.
• On any heat-generating equipment or device, or in any place
where the temperature is high (35° C or higher).
• Extremely cold place (5°C or below).
• Near a tuner or TV (It may cause noise in the broadcast, or
disturbance of the TV picture.).
When carrying or storing the unit, handle it with care so it is not subjected to any strong bumps.
Always remove the discs before storing the unit for any period of
time.
To avoid problems due to vibration.
• Do not place a book or similar object under this unit.
• Do not route the connection cables (of this or other units)
across the operation panel, across the top, or under the unit.
strong
Foreign materials
• Ensure that no foreign objects, such as needles, coins,
screwdrivers etc, accidentally fall into the unit or through the
ventilation holes.
Otherwise, a serious electric shock or malfunction could occur,
• Be extremely careful about spilling water or liquid on/into the
unit, as a fire or electric shock could occur.
(Disconnect the power plug and contact your dealer immediate
ly if this occurs.)
• Avoid spraying insecticides onto the unit as they contain flam
mable gases which can be ignited.
•In secticides, alcohol, paint thinner and similar chemicals
should never be used to clean the unit as they can cause flaking
or cloudiness to the cabinet finish.
Moisture may form on the lens in the following
cases...
• Immediately after a heater has been turned on.
• In a steamy or very humid room.
• When the unit is suddenly moved from a cold environment to a
warm one.
If moisture forms inside this unit, it may not work properly. In this
case, turn on the power and wait about one hour for the moisture
to evaporate.
Page 5
'A-'-
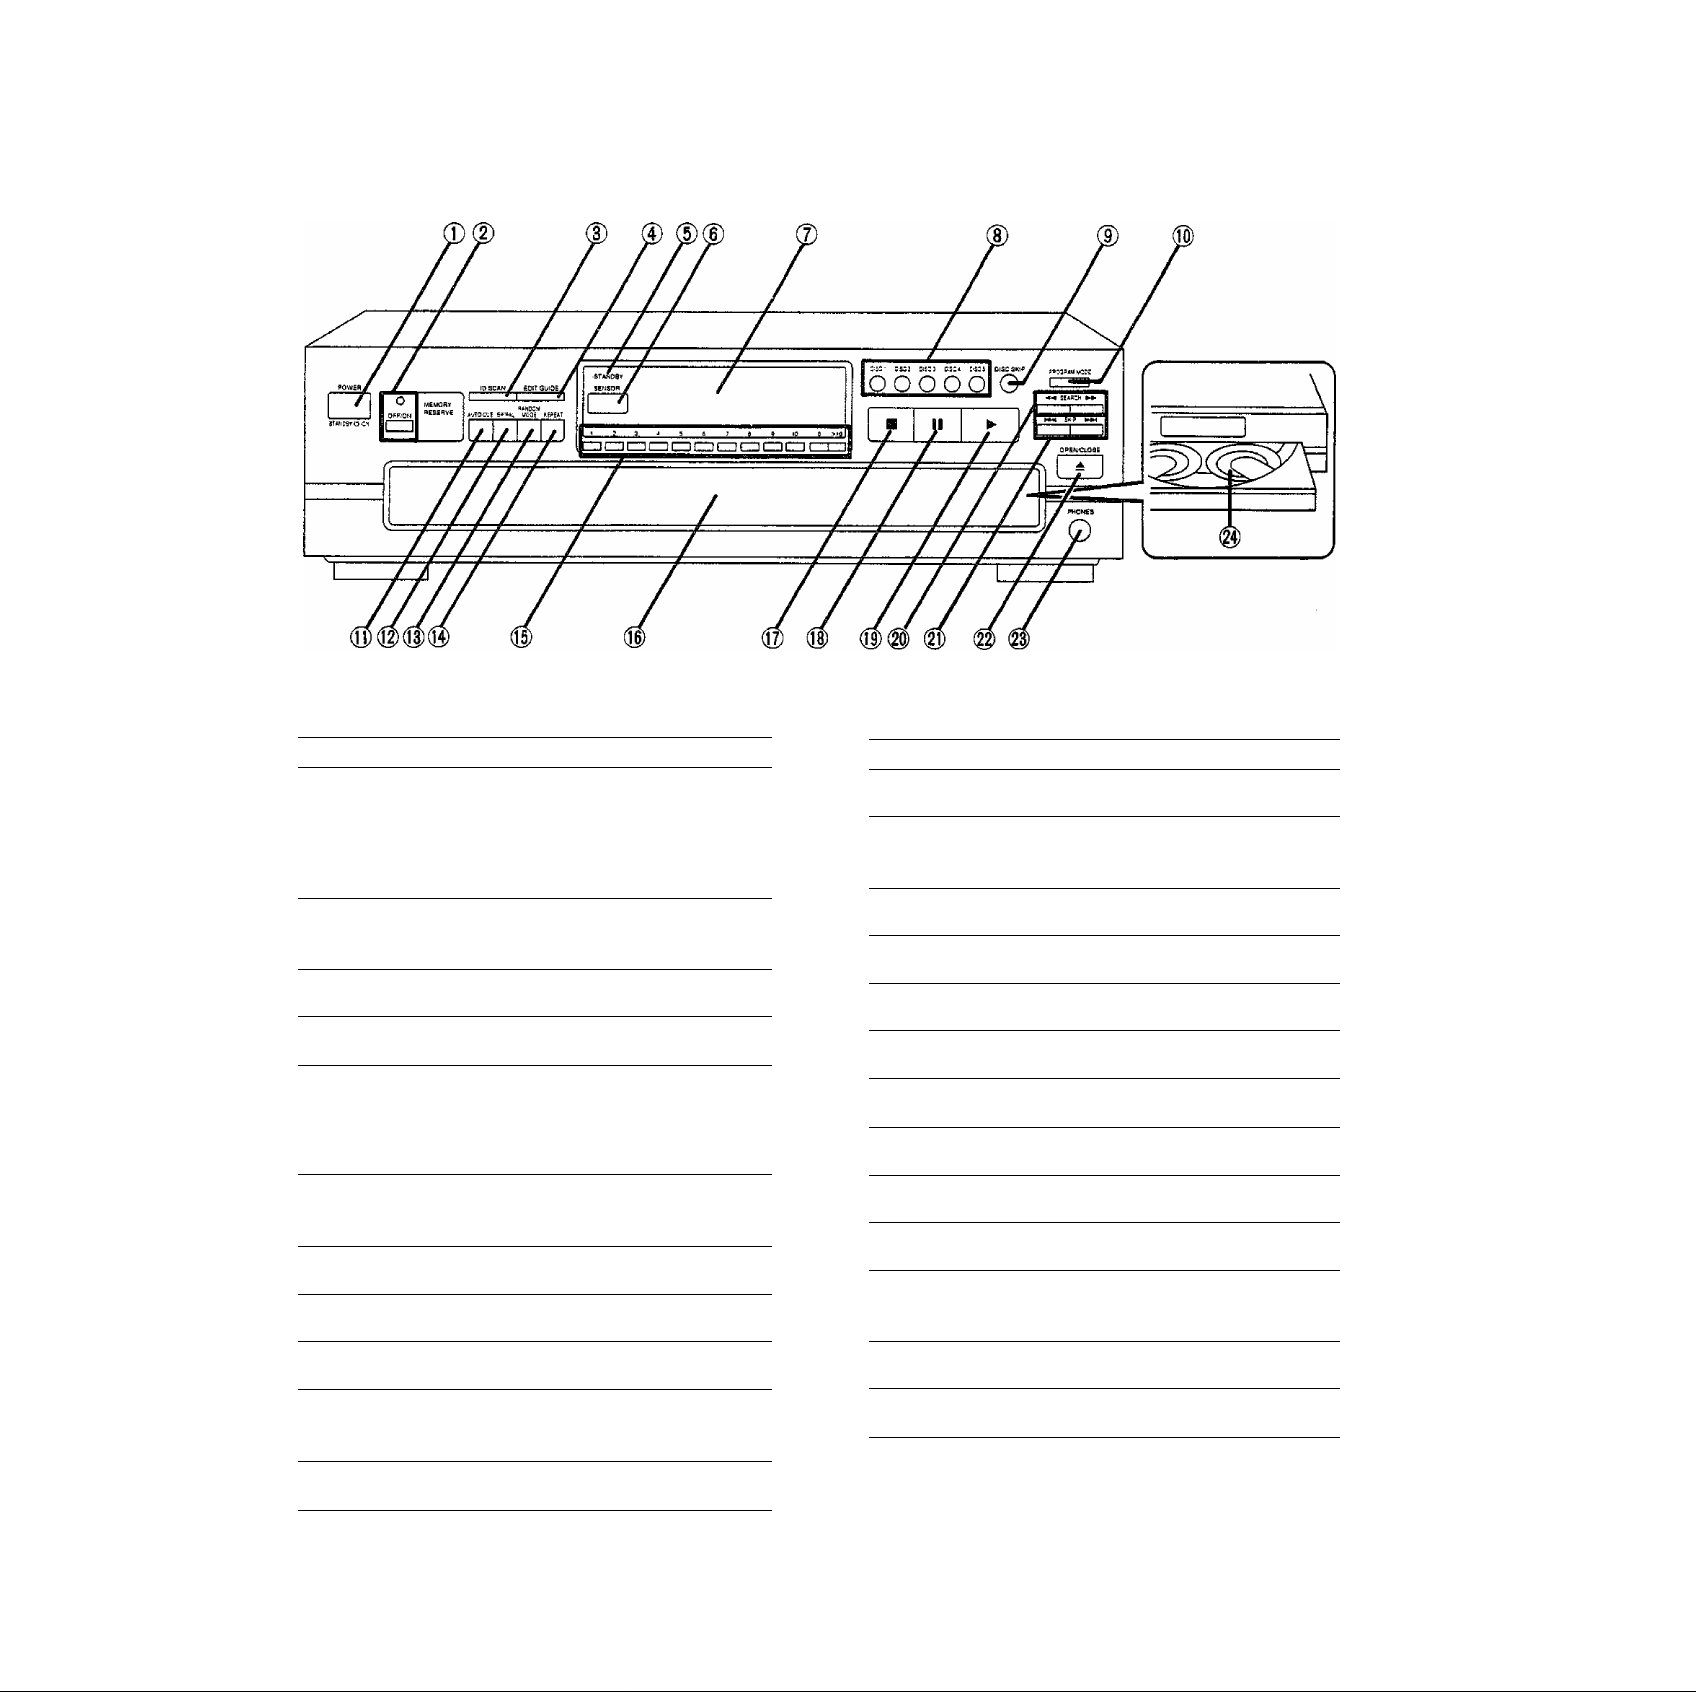
No. Name
Ref. page
© Power “STANDBY 6 /ON” switch
(POWER, STANDBY 6/ON) 8
Press to switch the unit from on to standby mode or vice
versa, in standby mode, the unit is stiii consuming a smalt
amount of power.
Q) Memory reserve button/indicator
(OFF/ON)
(D ID scan button (ID SCAN)
0 Edit guide button (EDIT GUIDE)
(D “STANDBY” Indicator (STANDBY)
When the unit is connected to the AC mains supply, this in
dicator tights up in standby mode and goes out when the unit
is turned on.
(g) Remote control signal sensor
(SENSOR) 7
© Display
(D Disc buttons (DISC 1-5)
10
15
18
—
No. Name Ret.
® Spiral button (SPIRAL)
page
14
® Random mode button
(RANDOM MODE)
0 Repeat button (REPEAT)
® Numeric buttons (1-10, 0, >10)
® Loading drawer
0 Stop button (■)
® Pause button (II)
(]|) Play button (^)
® Search buttons SEARCH ►N
@ Skip buttons (N^4 SKIP ^N)
17
9
8
9
9
9
15
16
® Loading drawer open/close button
8
(AQPEN/CLOSE)
8
©) Disc skip button (DISC SKIP)
® Program mode button
(PROGRAM MODE)
(!]) Auto cue button (AUTO CUE)
8,16
11,13
17
® Headphones jack (PHONES)
10
@ Disc trays (1 -5) 8
Page 6
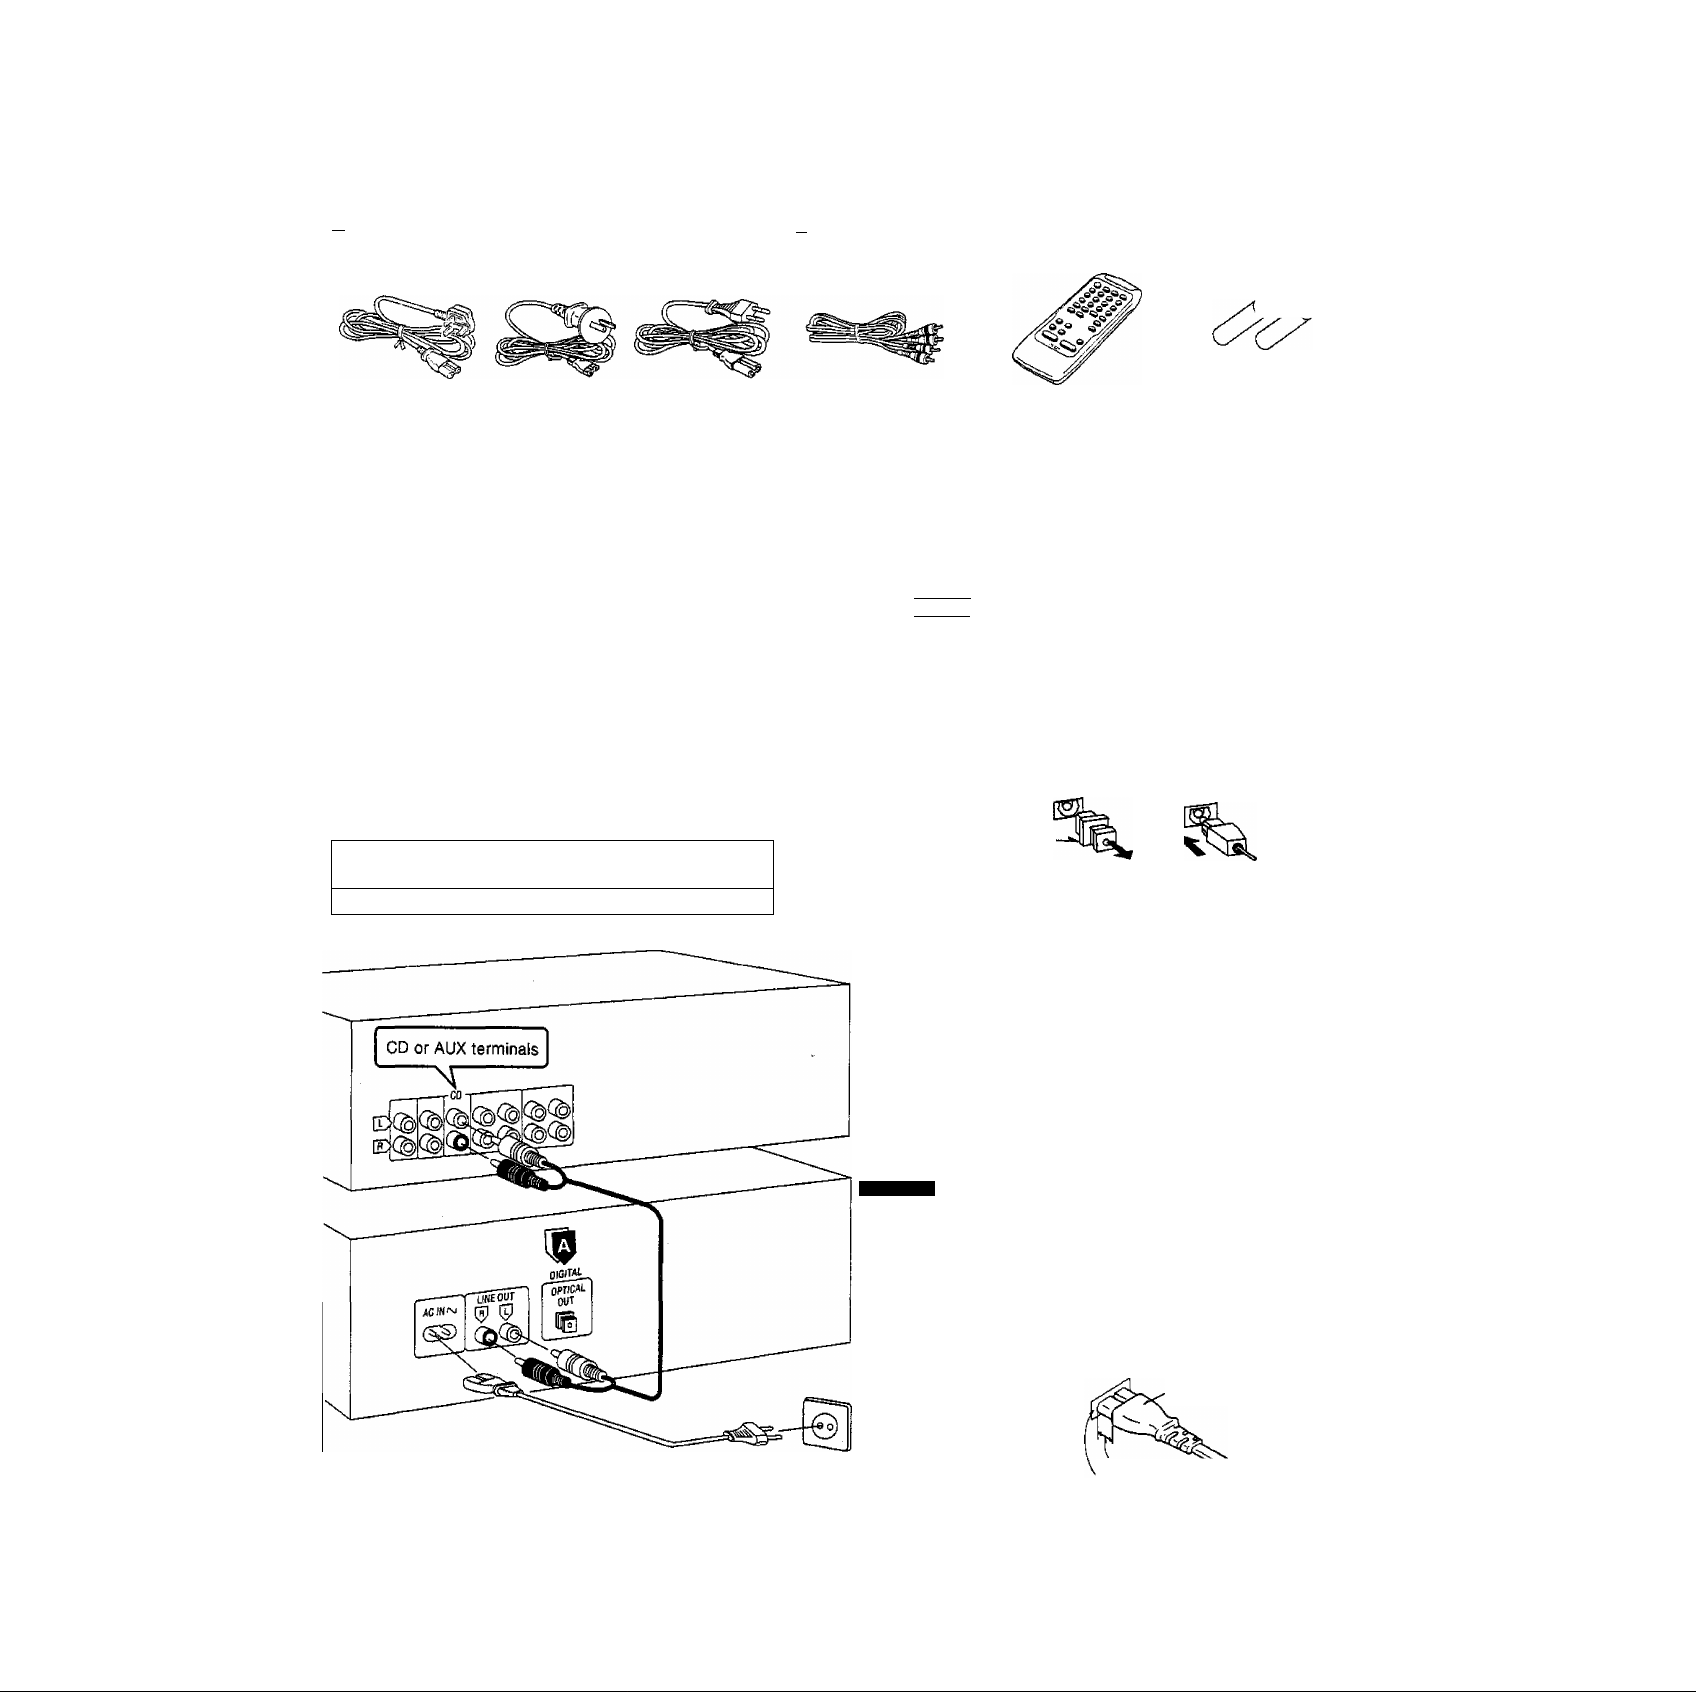
Please check and identify the supplied accessories
Use numbers indicated in parentheses when asking for
replacemnet parts.
I I AG power supply cord [t]
(For United (For Australia (For others)
Kingdom) and N.Z.)
(VJA0733 or
RJA0042-P)
(For United Kingdom only)
{RJA0036-K) (RJA0019-2K)
BE SURE TO READ THE CAUTION FOR AC
POWER SUPPLY CORD ON PAGE 3
BEFORE THE FOLLOWING CONNEC
TIONS.
Before connecting the changer to your audio system, make
sure that the power of the changer and ail other system com
ponents is turned off.
• Although the figure below shows the AC power supply cord
being connected to a household AC outlet, if the amplifier
(or receiver) is equipped with an AC outlet, connect the cord
to that outlet.
• The configuration of the AC outlet differs according to area.
I I
Stereo connection
cable [1] transmitter [1]
(SJP2249-3)
Q]
Remote control
(RAK-SL122WH) (UM-4, “AAA”, R03)
“DIGITAL OPTICAL OUT” terminal
This unit can be connected to the "OPTICAL IN" terminal
of a digital compact cassette (DCC) player. DAT deck or
digital amplifier using an optical fiber cable (not included).
fWSICT
When the memory reserve function is on, no sound will be
output from the "DIGITAL OPTICAL OUT” terminal at the
rear of this unit. Make sure that the memory reserve in
dicator is off when making a digital recording.
(See page 10.)
Optical fiber cable connections
I I
Batteries
[2]
^Stereo connection cable
White (L) =aiIK
Red (R)
Dust protectioncap
• Never force the optical fiber cables to bend ex
cessively.
•Store the dust protection cap securely, and
replace it whenever cables are not connected to
the terminals.
Amplifier
or receiver
This unit
(For areas except Australia and N.Z.)
Insertion of Connector
Even when the connector is perfectly in
serted, depending on the type of inlet used,
the front part of the connector may jut out
as shown in the drawing.
However there is no problem using the unit.
Connector
Household
AC outlet
Approx. 6 mm
'Appliance iniet
Page 7
mili
sm
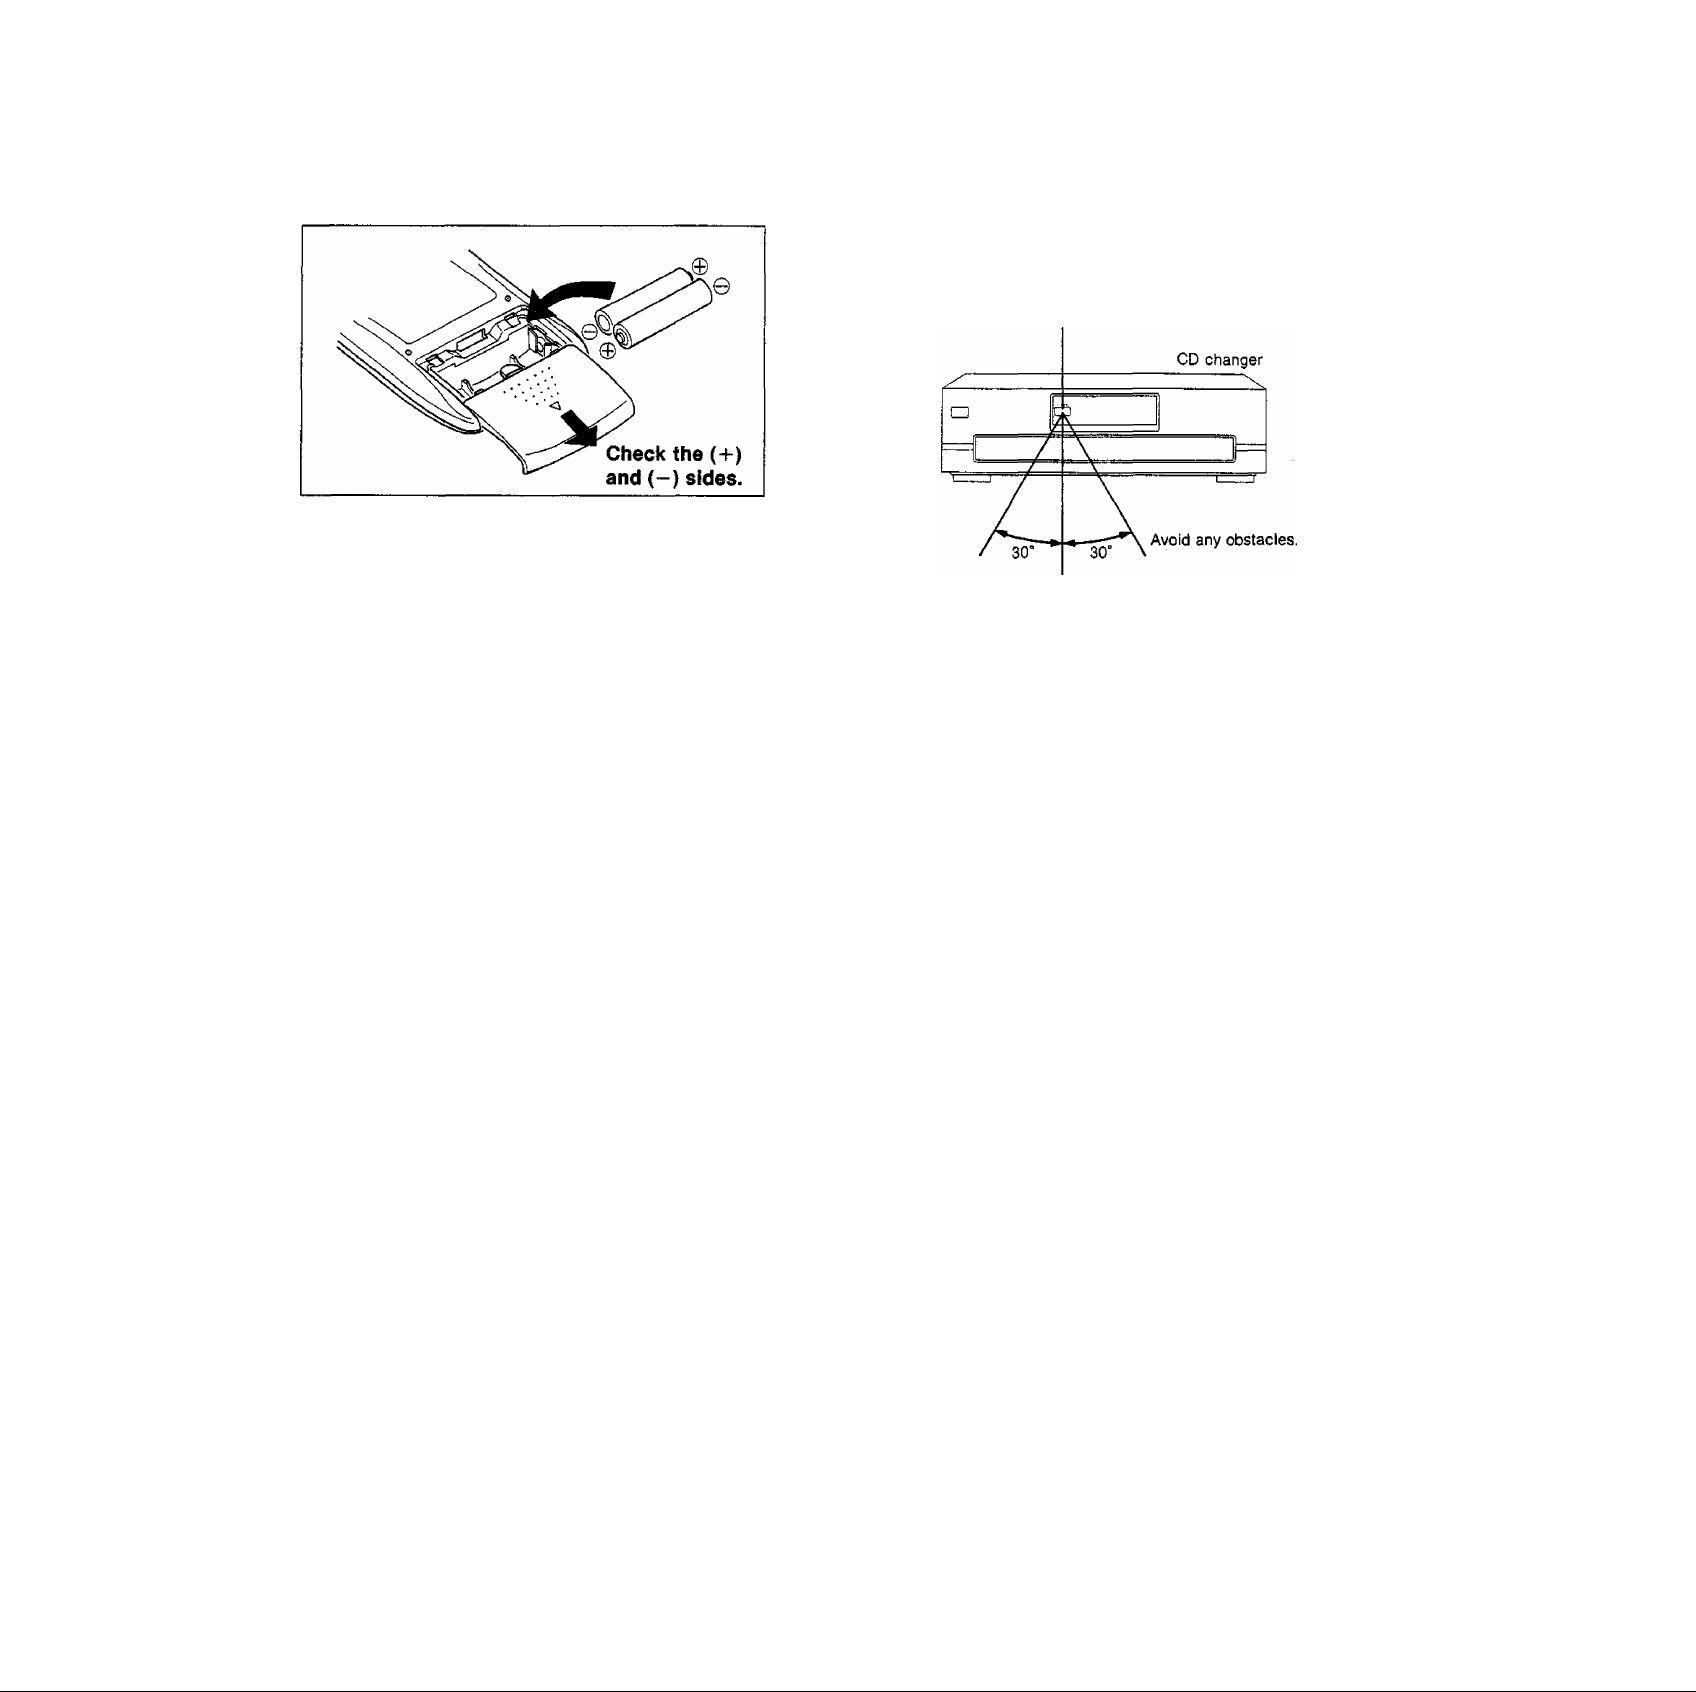
Battery installation Method for use
Insert the batteries included with this unit as shown below.
When you need to replace these batteries
Use two UM-4 "AM”, lEC R03 (1.5 V) or equivalent batteries.
Battery notes
Do not mix old and new batteries, or batteries of different types
(carbon and alkaline, etc.).
Always remove old, weak or worn-out batteries promptly and
dispose of them properly.
Use the remote control within 60 degrees and within 7 meters (23
ft.) facing directly toward the changer’s remote control signal sen
sor.
Remote control signal sensor
About 7 meters in front of
o o o|o
3”5' 6
■S'a a
------
the sensor. (The actual
range will depend on the
angle at which the remote
0
control is used.)
s
V
The average battery life is about one year.
Although the battery life varies depending on how often the
device is used, you should generally replace the batteries about
once a year.
The batteries should be repiaced if commands from the remote
control transmitter do not operate the unit even when the
transmitter is held close to the front panel.
Never subject batteries to excessive heat or flame; do not at
tempt to disassemble them; and be sure they are not short-cir
cuited.
If you will not use the remote control for a long period of time,
remove the batteries and store them in a cool, dark place.
if a battery leaks, remove all batteries and dispose of them pro
perly. Thoroughly clean the battery compartment before inser
ting new batteries.
If the leaking electrolyte comes into contact with skin or clothes,
flush with water immediately.
Keep batteries out of reach of children.
Do not use rechargeable (nickel-cadmium) type batteries.
Do not attempt to recharge alkaline or carbon batteries.
Do not dispose of used batteries in household rubbish.
Be sure the transmission window and the unit’s sensor are free
from dust. Excessive dust might affect performance.
The operation may not be correct if direct sunlight or another
strong light source strikes the receiving sensor of this unit, if
there is a problem, place the unit away from the light source.
Page 8

Sequential play
Al! of the discs will be played, beginning from track 1 on the
seiected disc.
The explanation below is an example of operation in the case
where ali five disc trays in the changer are holding CDs.
POWER
Press POWER.
The unit will switch on.
opo^E Press OPEN/CLOSE again
> I to close the loading drawer.
№EN/cLosE Press OPEN/CLOSE to open
\U
- ' the loading drawer.
Indicates that the loading drawer is
open.
Numbers of the trays in which discs
are loaded.
Load the dlsc(s) on the disc tray(s).
The discs can be ioaded two at a time by pressing
DISC SKIP to rotate the carousel.
Do not load 8 cm and 12 cm discs on the same disc
tray.
CAUTION
Do not touch the loading drawer and carouse! while they are
in motion, and do not attempt to rotate the carousel by hand;
doing so could result in incorrect operation of the unit and/or
damage to the discs.
Do not attempt to close the drawer by
hand.
Current play position (The numeral illumi
nates with a red color.)
illuminates when a disc is in the disc tray. If
there is no disc in the disc tray, the indication
disappears when the disc tray comes to the
play position.
Press the desired disc but
ton <1 - 5).
O O O O O If a disc is not on the selected disc
Play will begin from the selected disc.
\ j next number.
The illumination of a disc button indicates that there
is a disc in the corresponding tray. During play, the il
lumination color wilt change to green.
The changer plays all the tracks on all the discs in order and
stops automatically when the last track on the last disc finishes
playing. The first disc will then be at the playing position.
tray, the changer plays the disc at the
Disc number in play Elapsed play time
/
0:0 I
C:7V
Track number in play Play indicator
/tb«*
8
Page 9

\ : \ II■"■’'i-■ ' ;-'■ ■■■ :■' ".i''"- ■■■ ■
OPEN/CLOSE
5::;:
To directly access a desired track
)JL,ri-, ^^pO-,^Press the numeric button(s) to
select the track.
Track number
i
IJ
_/t,
To select a track between 1 and 10:
Press the corresponding number on the
numeric button.
To select a two-digit track number over 10:
First press >10, and then press the numbers
for the two digits.
For example; number 20:
Press >10, then 2, and then 0.
/ Í • / / I
U • U I
MN SEC
To exchange discs during play
While playing a disc, it is possible to change the other discs
without interrupting piay.
d) Press OPEN/CLOSE to open the loading drawer.
Current disc
To temporarily stop play
To resume piay
Press
To stop play
Press ■.
The display wiil show the total number of
tracks and the total playing time of the current
disc.
Total number of tracks
Current discj^ Total playing time
I „ I OBc MM sec
<:7>y
Illuminates
1,-Tl '10:03
(D Press DISC SKIP to rotate the disc trays and exchange
the discs.
The carousel will move by one disc tray. Pressing again
moves the carousel in the opposite direction by two disc
trays.
(D Press OPEN/CLOSE to close the loading drawer.
If you play a disc with the ioading drawer open, discs other
than the current disc cannot be played.
The total playing time displayed includes the
silent sections between tracks. For this
reason, it may be a few seconds longer than
the playing time indicated on the disc.
To redstart play
Press
CAUTION
Do not move this changer with a compact disc inside the unit,
if a disc comes off the disc tray, it might be scratched or the
changer might become incapable of playing.
(Refer to “Cautions concerning the moving of this unit" on
page 22.)
_________________
Page 10

Memory reserve function
It is possible to reduce the length of the silent intervals which
occur in between the changing of discs.
This is done by storing the sound which is taken from the disc in a
memory for several seconds before it is actuaily output.
This means that sound continues to be heard for several seconds
even after disc changing has started. It also has the function of
cutting out silent sections at the end of the last track to be played
before the disc is changed. This provides the overall impression
that you are listening to only a single disc, even if there are actual
ly numerous discs being played.
SwitchjDg to memory reserve mode
o
OFF/ON
Press OFF/ON.
The memory reserve indicator above the but
ton will illuminate.
Memory reserve indicator
Illuminates when memory reserve mode is on.
Illuminates when the memory becomes full dur
ing playback.
Flashes when playback starts to indicate that
the sound is being loaded into memory. After
about 10 seconds, the memory becomes fuil
and the indicator illuminates steadily.
Flashes at high speed (for several seconds)
when the playback sound is coming only from
the memory and the amount of sound stored in
memory is starting to decrease (for example,
when loading of sound into the memory is be
ing interrupted because the disc is being
changed).
For your reference:
The effects of memory reserve can still be obtained even when
carrying out an ID scan. (Refer to "Parade scan” on page 15.)
When playing back two consecutive tracks from the same disc,
there is no reduction in the length of the silent interval between
the tracks.
When operating the disc changer manually using the DISC SKIP
or DISC buttons, the effect of memory reserve cannot be obtain
ed.
It is recommended that you set the memory reserve mode to
be on at all times.
When the memory reserve mode is set to be on, this setting
will be maintained even after the unit is switched off, unless
the unit is not being used for a long time and the power cord is
removed from the wall outlet.
To cancel memory reserve mode:
o
OFF/ON Press OFF/ON.
The memory reserve indicator wilt go out.
To listen through headphones
Connect the headphones (not Included) to the headphones jack.
Plug type: 1/4 inch phone plug, stereo type,
Avoid listening for prolonged periods of time to prevent hearing
damage.
If a search or skip operation is carried out while the memory is
full, loading of sound into memory will start again from the posi
tion reached by the respective operation.
EH33
When the memory reserve function is on, no sound will be out
put from the "DIGITAL OPTICAL OUT” terminal at the rear of
this unit. Make sure that the memory reserve indicator is off
when making a digital recording.
10
Page 11

You can program up to 32 selections from the five discs in any
order as you desire.
Repeat steps 2 and 3 until you have
completed the desired entry.
if you enter non-existing disc(s) or track(s) soon after
the loading drawer is closed or when it is open, the
corresponding indicator Illuminates and the entry is
included in the count, in the play mode, the changer
will cancel the non-existing entry.
PROGRAM MODE [In the stop mode]
S7
Press PROGRAM MODE so
that the ‘TGM” Indicator
illuminates.
Each time the button is pressed, the
display will change in the following
order:
PGM DEL ^ (off),
t
____________
Illuminates
Press the desired disc but
ton (1-5).
DiKi MCI DISC3 EHK4 »scs Fof exaiTiple!
O O O O O To select disc 3, press DISC 3.
I I
i
If you attempt a 33rd selection, the" - F" (full) indica
tion will be displayed.
J J
, JL
rDUCt №.
Press ^ to start play.
To enter additional selections during
play, repeat steps 2 and 3.
!
To clear the entire programmed contents
[In the stop mode]
Press ■.
The "AL” indication shows that all the tracks
on the disc are selected.
To program by means of disc numbers only,
repeat the above operation. (The count will in
crease by one for each operation.)
M
^ ^ For example:
0 >10 to specify the track number.
Specified disc number
Press the numeric button(s)
To select track number 20, press
>10, then 2, and then 0.
1 1
Specified track number Programmed
1
TRACK №.
order
To cancel program mode
PROGRAM MODE
[In the stop mode]
Press PROGRAM MODE twice.
The changer will return to sequential play
mode.
The programmed contents will remain stored in the memory until
they are cleared, even after the program mode is canceled.
Therefore, after using program play, it is possible to cancel the
program mode and use another play mode (except delete play)
and then still use the same program play again at a later time.
In addition, if the disc is replaced with another one, program play
will be carried out using the new disc. If non-existing entries oc
cur at this time, they will be canceled.
For your reference:
The program mode and the programmed contents will remain
stored in the memory even after the unit is switched off.
However, if the power cord is unplugged or the power supply is
otherwise interrupted for an extended length of time, the con
tents of the memory will be erased.
11
Page 12

i^O^eunplity
Using the remote control
transmitter
To confirm the programmed contents
RECALL
Press RECALL.
Each time you press RECALL, the display
shows the programmed disc and track number
in the sequence you have entered.
/ 1
3,-
( * . J DISC
PGM
Programmed Programmed
track order
Uimf, No.
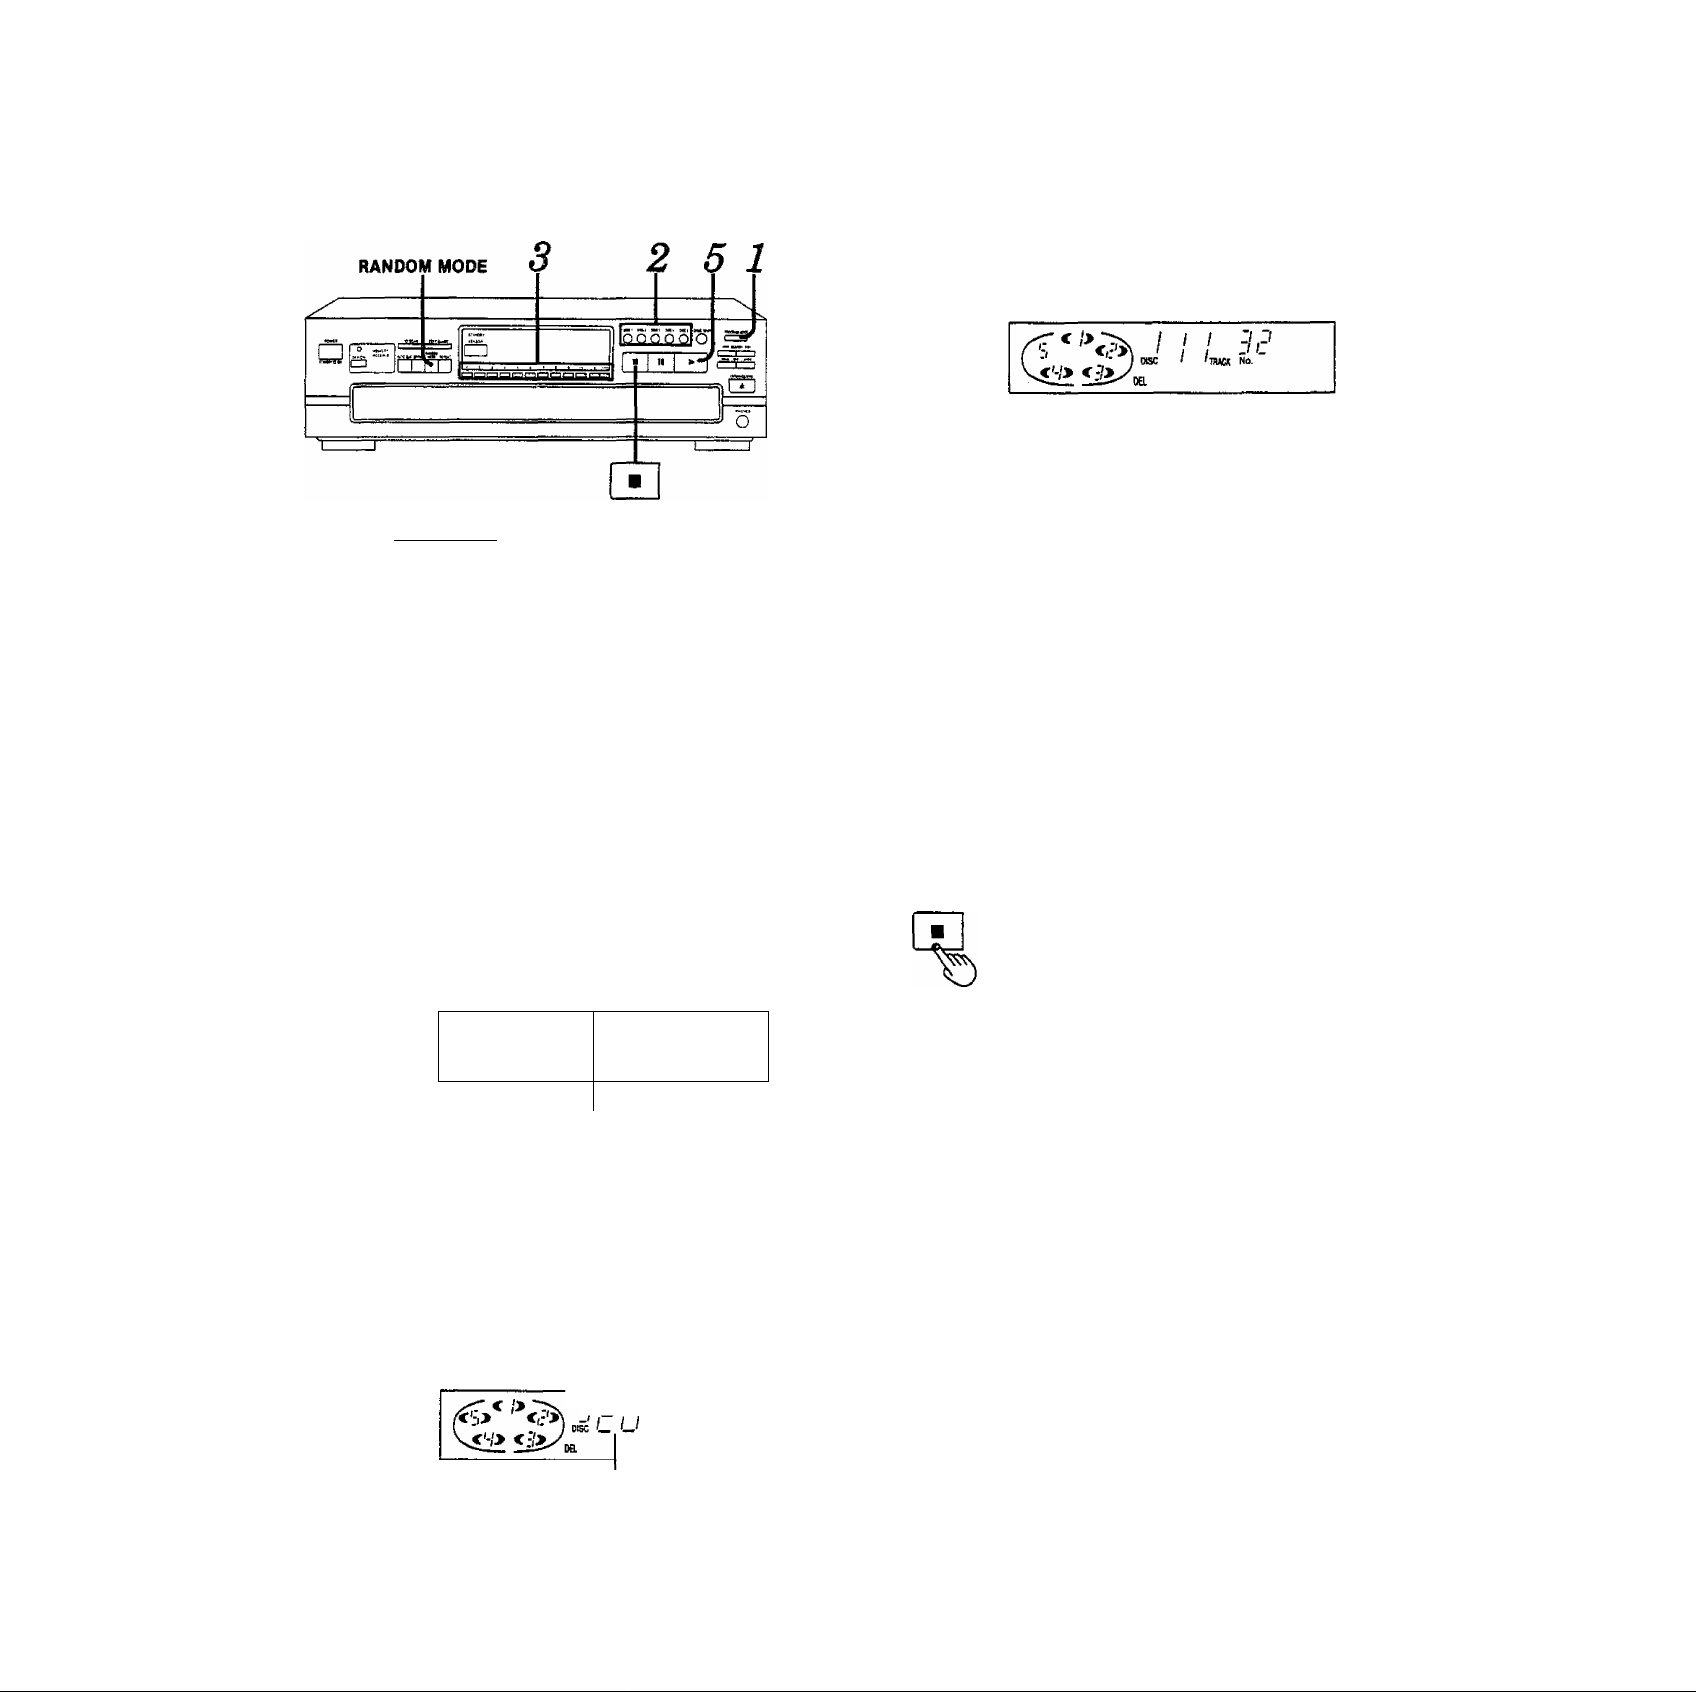
All of the tracks will be played one time each in random order.
There are two types of random play as described below.
RANDOM
MODE
One disc random play
The changer will play all tracks on the current disc In a random
order. Then it will choose a new disc randomly, excluding the
discs already played, and play all tracks on that disc In a random
order.
RANDOM
MODE
1
[In the stop or play mode]
Press RANDOM MODE so that the
“1 DISC RND” indicator illumi
nates.
Each time the button is pressed, the display
will change in the following order: 1 DISC RND
— FULL RND ^ (off).
----------^----------------------< /> / /
/ /1 ■ 1
/ U-U 1
m
SC RND
____
nates
Ilium
MM SEC
1
To clear a single item of the programmed
contents
CLEAR
Press CLEAR.
Each time you press CLEAR, you will cancel
last entry in the order you have entered.
To clear an entry in the middle of the program
sequence, press RECALL repeatedly until the
display shows the selection to be cleared, and
then press CLEAR within three seconds after
the last press.
Full random play
Each track to be played back Is selected randomly from all of the
tracks on all of the discs, excluding the tracks that have already
been played.
RANDOM
MODE
The changer will stop automatically when all the tracks on all
discs have been played once.
To cancel random play mode
[In the stop or play mode]
Press RANDOM MODE so that the
“FULL RND” indicator illuminates.
Each time the button is pressed, the display
will change in the following order: 1 DISC RND
— FULL RND - (off).
Illuminates
Press ■.
The “1 DISC (or FULL) RND" indicator will go
out.
12
Page 13
You can select up to 32 selections that you do not want to hear
and put them in the changer's memory. Then you can enjoy se
quential, one disc random, or full random play of only your
favorite tracks.
Repeat steps 2 and 3 until you have
W
completed the desired entry.
If you enter non-existing disc(s) or track(s) soon after
the loading drawer is closed or when It Is open, the
corresponding indicator illuminates and the entry is
included in the count. In the play mode, the changer
will cancel the non-existing entry.
If you attempt a 33rd selection, the “ -F" (full) indica
tion wilt be displayed.
PROGRAM MODE [[p, Stop mode]
W
Press PROGRAM MODE
twice so that the “DEL” in
dicator illuminates.
Each time the button is pressed, the
display will change in the following
order;
PGM ^ DEL - (off).
t
I I
[ ’ * ) DISC
Illuminates
(_(tp
Press the disc button (1 -5).
W
'disci DSC! D(sc3 DISCI oscsTo del6te dlsc 3, pfess DISC 3.
For example:
ooooo
O/ /
1 1 L. Tfl»C* No.
Specified cisc number
The "AL" indication shows that all the tracks
on the disc are selected.
To delete by means of disc numbers only,
repeat the above operation. (The count will in
crease by one for each operation.)
Press the numeric button(s)
CDCD )SCDC=I
^ ^ to specify the track number.
For example:
To delete track number 20. press
>10, then 2, and then 0.
13 n
Specified track number Order you have
entered
0
Press ^ to start play.
17
To enter additional selections to be
deleted during play, repeat steps 2
and 3.
For random play while deleting unwanted tracks
[Proceed through step 4 above, and then;]
To activate one disc random play, press RANDOM MODE.
To activate full random play, press RANDOM MODE twice.
To clear the entire contents to be deleted
[In the stop mode]
Press ■.
To cancel delete mode
PROGRAM MODE
The contents to be deleted will remain stored in the memory until
they are cleared, even after the delete mode is canceled.
Therefore, after using delete play, it is possible to cancel the
delete mode and use another play mode (except program play)
and then still use the same delete play again at a later time.
In addition, if the disc is replaced with another one, delete play
will be carried out using the new disc. If non-existing entries oc
cur at this time, they will be canceled.
I
For your reference:
The delete mode and the contents to be deleted will remain
stored in the memory even after the unit is switched off.
However, if the power cord is unplugged or the power supply is
otherwise interrupted for an extended length of time, the con
tents of the memory will be erased.
[In the stop mode]
Press PROGRAM MODE.
The changer will return to sequential play
mode.
13
Page 14

lil
I'
Using the remote control
transmitter
To confirm the selections to be deleted
RECALL
Press RECALL.
Each time you press RECALL, the display
shows the selected disc and track number In
the sequence you have entered.
The changer plays the first tracks on all the loaded discs in se
quence, followed by the second tracks on all the discs, and so on.
(Refer to the illustration below.)
SPIRAL
Example: When starting from disc 1
C% * 3',-
Track to be deleted Order you have
To clear a selection to be deleted
CLEAR
Press CLEAR.
Each time you press CLEAR, you will cancel
last entry In the order you have entered.
To clear a selection in the middle of the se
quence, press RECALL repeatedly until the
display shows the selection to be cleared, and
then press CLEAR within three seconds after
the last press.
if 1
Mo.
entered
/
SPIRAL
[In the stop or play mode]
Press SPIRAL.
spiral play will begin with the first track on the
T)
The changer will stop automatically when all the tracks on all
discs have been played once.
disc situated at the playing position.
Illuminates
For your réference:
When a disc with fewer tracks finishes playing, that disc will be
skipped and the changer will continue playing the remaining
track on the other discs in spiral sequence.
To cancel spiral play mode
SPIRAL
Press SPIRAL again.
The "SPIRAL" indicator will go out.
14
The changer will return to sequential play
mode from the current track on the current
disc which is playing.
Page 15
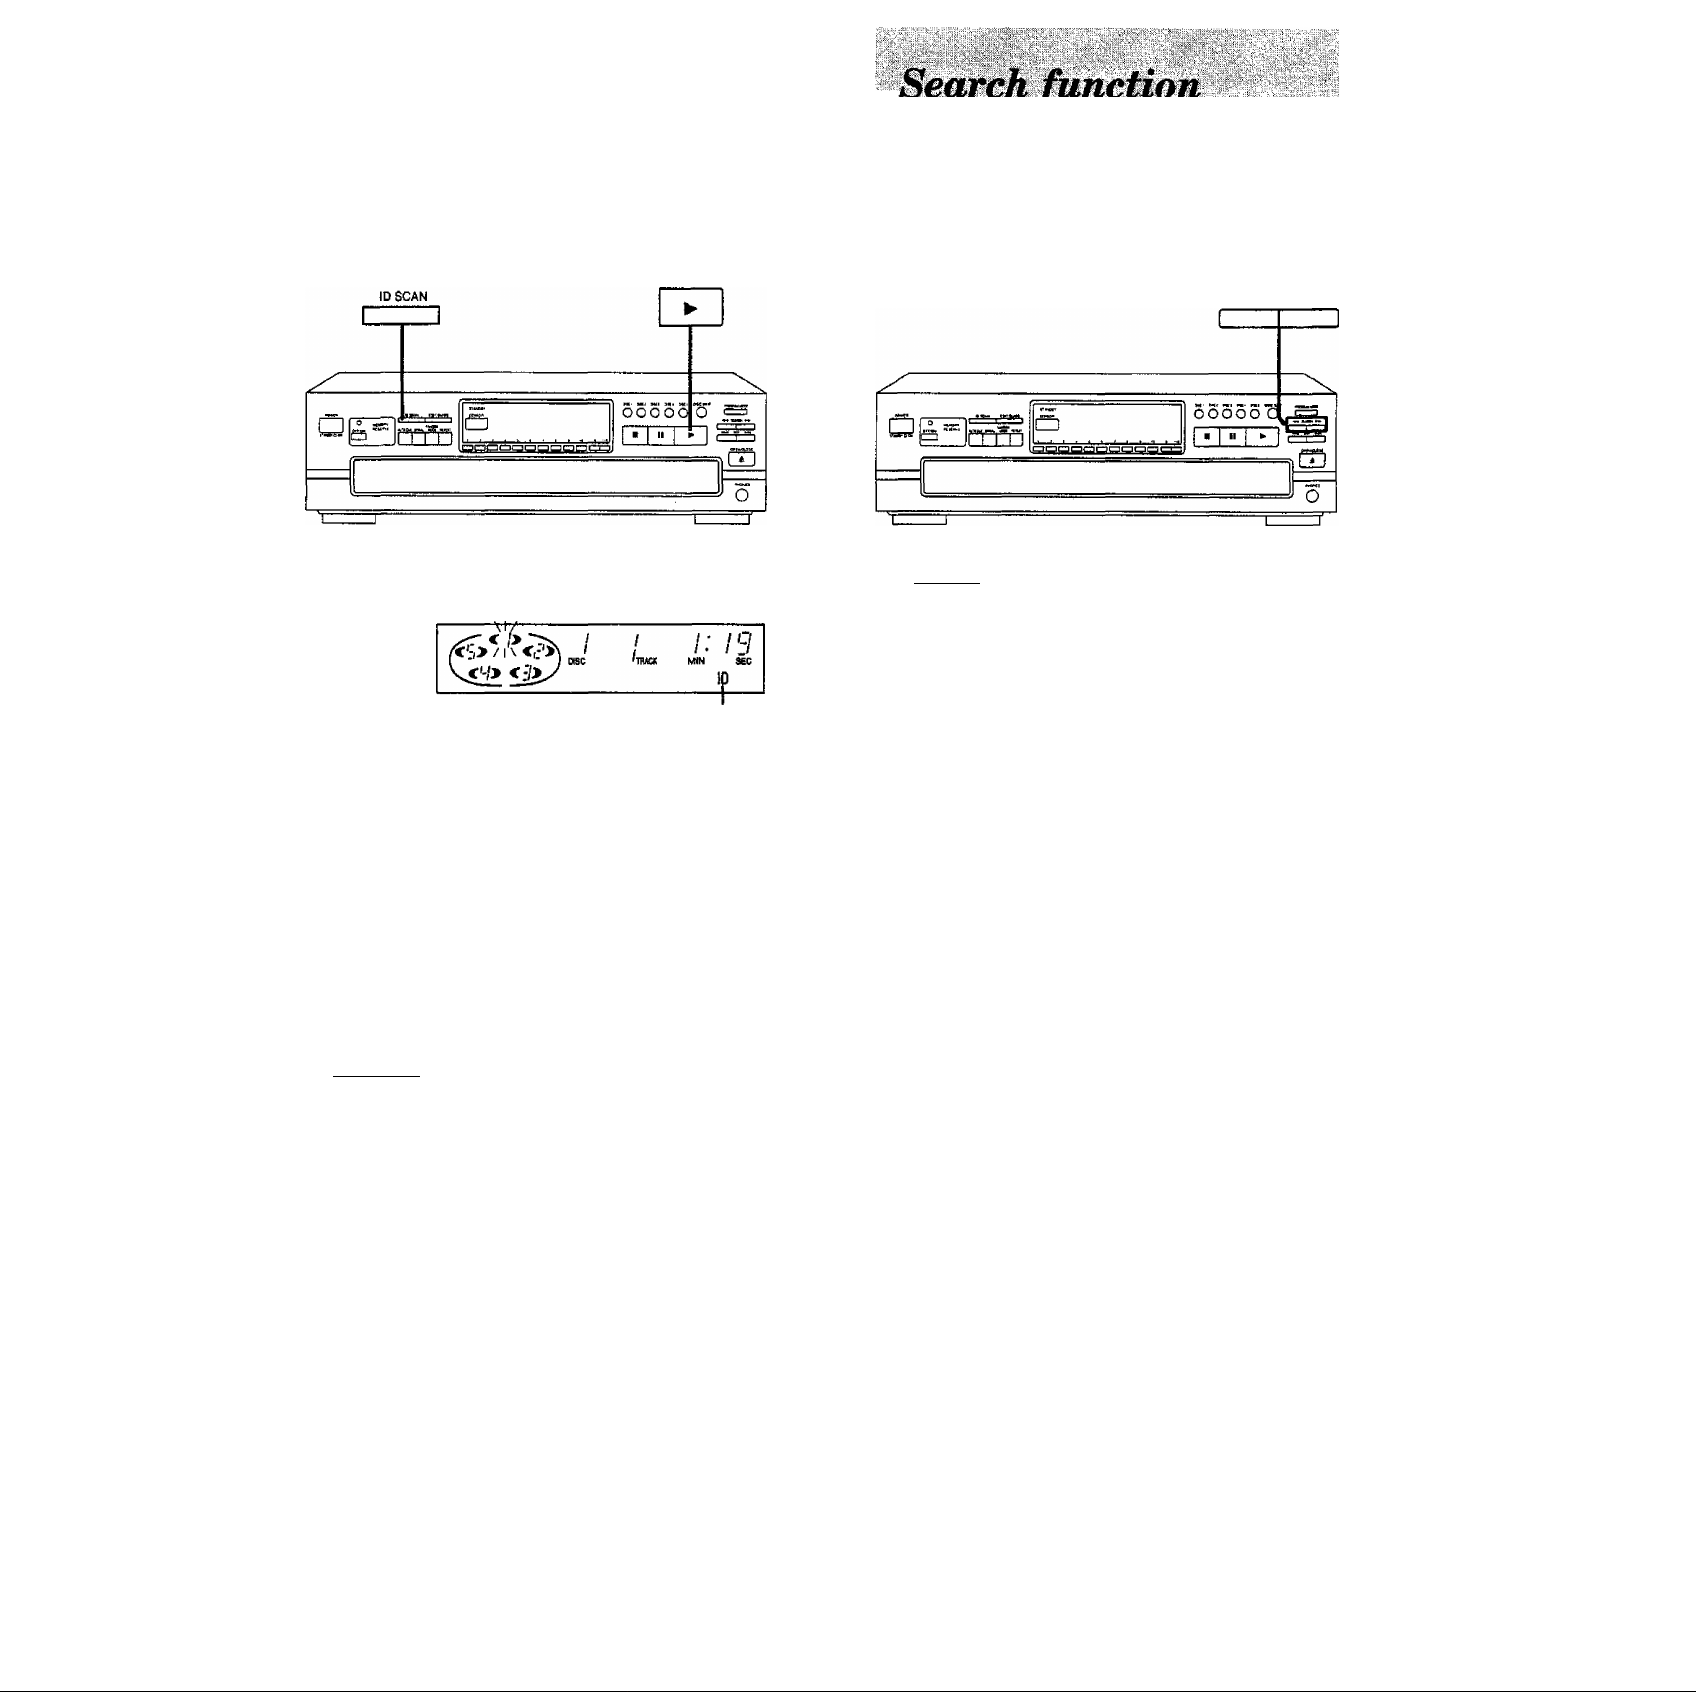
This function is convenient to use when searching for a desired
track.
The function wiil search from the beginning of the track for a loud
section, and will play 10 seconds of the track centering around
that point.
The order of scanning is the same as for play mode.
You can search rapidly forward or backward on the disc for
specific sections,
SEARCH
10 SCAN
Press ID SCAN.
ID scan will start.
Illuminates
When the desired track has been found:
Press
The changer will play the track from the begin
ning.
To cancel ID scan
^ ^ Press ID SCAN while this function
Is In operation.
The “ID” indicator will go out.
The changer will continue to play from the track being played.
SEARCH [In the play or pause mode]
Press and hold MM or
|: You can search backward.
-: You can search forward.
Release the button when you reach the
desired point.
The changer will return to the previous mode
(play or pause).
In sequential play mode:
You can search forward over discs and backward within the cur
rent disc.
In other play modes:
You can search forward or backward only within the current
track.
For your reference:
The search function will begin slowly, and then, if the button Is
held pressed for longer than 3 seconds, it will change to high
speed search.
in the play mode, the sound level decreases by 12 dB (1/4).
Parade scan
Parade scan means an ID scan which is carried out in
memory reserve mode. It lets you play a number of tracks in
succession without playback being stopped in between
tracks, and also adds fade-in and fade-out effects. It is thus
possible to obtain the overall effect of listening to a hit-parade
of songs.
15
Page 16

-^. -кг-
То skip discs
Use this function to skip discs when selecting a disc to which you
wish to listen, and when loading and unloading the discs.
DISC SKIP
You can use this function in stop, sequential play, one disc ran
dom play and delete play modes.
□ISC SKIP
Press DISC SKIP to rotate the disc
tray.
■'> ,J
<4>y
/7/7 [ionjo
(_'ТПАСК MIN S£C
To skip tracks
Use this function to skip tracks when selecting a track to which
you wish to listen.
SKIP »-M
/'t'*¿
obooo C
О
“/ n • n 1
- и • и 1
р'ПШ MW SEC
N•4 SKIP
0 IH*
e ™
й“ш
toragpogcjcDraciga
,
Press either SKiP (ЫМ or untli you reach the desired track.
You can skip backward.
: You can skip forward.
---------------TtT
-------------------:-----------
4<^
Track number at the playing position
Disc number at the playing position
In stop mode:
When the loading drawer is closed, pressing DISC SKIP changes
the disc tray to the next one.
When the loading drawer is open, pressing DISC SKIP moves the
carouse! by two disc trays.
In play mode:
When the loading drawer is closed, pressing DISC SKIP changes
the disc and the changer plays the tracks on the next disc.
If a disc is not on the selected disc tray, the changer plays the
disc at the next number.
When the loading drawer is open, pressing DISC SKIP moves the
carousel by one disc tray. Pressing again moves the carousel in
the opposite di rection so that you can change all discs except the
one being played.
In sequentlal/program/delete play mode:
In sequential play mode, you can skip only within the current disc.
In program play mode, you can skip from one track to another in
the programmed sequence.
In delete play mode, you can skip tracks only within the current
disc excluding the tracks to be deleted.
You can skip to the beginning of the track being played. If
you press this button again quickly, you can skip to the
beginning of the previous track.
Remember that in a backward skip, the current track is in
cluded in the count.
►►I: You can skip as many tracks as the number of times you
press the button.
in random play mode:
You can skip to the beginning of the current track.
►W : You can skip to the beginning of a next track in random
order.
In spiral play mode:
You can skip to the beginning of the current track.
►►I: You can skip to the beginning of the track on the next disc.
You can also skip tracks when the changer is in the stop mode or
pause mode.
16
Page 17

Èmù
Play will continue endlessly in accordance with the specific play
mode selected.
REPEAT
REPEAT
[Before or during play]
Press REPEAT.
t . . ) ose 'TRAtt
< 1> 1 n n
Illuminates
n n ■ n n
IJ IJ • U LI
SEC
The auto cue function allows the unit to wait in a standby condition at the beginning of each track so as to start play right when
you are ready.
When each track finishes playing, the unit skips to the beginning
of the next track and switches to the play standby mode.
AUTO CUE
Press AUTO CUE.
^ )l A.(jUE
lini n n ■ n n
\ ' / / / u U • U LI
Illuminates
In sequential play mode:
All tracks of all discs will be played repeatedly.
In program play mode:
The changer plays only the programmed selections in the pro
grammed sequence repeatedly.
In delete play mode:
The changer plays the discs and tracks excluding the selections
to be deleted repeatedly.
In random play mode:
When the changer has played all the tracks on all the loaded
discs. It will select a new random sequence and play continuous
ly. The sequence differs each time.
In spiral play mode:
The changer plays all tracks of all discs repeatedly in the se
quence of spiral play.
To cancel repeat mode
REPEAT
Press REPEAT again.
The “ o " indicator will go out.
Press
17
T>
The changer switches to the play
standby mode at the beginning of the
track.
Press ^ again to start play.
W
Press ► at the beginning of each
track.
To cancel auto cue mode
AUTO CUE
Press AUTO CUE.
The "A.CUE" indicator will go out.
EB3
The auto cue function may not cause the unit to wait exactly at
the beginning of a track if the track begins with a very soft
passage or if there is a tot of background noise.
17
Page 18

When recording, the changer will automatically program the
tracks for tape sides A and B in accordance with the length of the
tape so that none of the tracks will be interrupted before they are
completed.
In addition, the program will also include a silent interval of ap
proximately 4 seconds between tracks.
Example; Recording from a disc containing seven tracks on
to a 60-minute tape.
S/
Prepare the tape deck for recording.
Set the Dolby NR, reverse mode, recording level,
etc., as instructed in the Operating Instructions for
the tape deck.
Set so that recording is possible from the beginning
of the tape.
Side A (30 min)
Track 1 1
Side B (30 min)
Track 5 1
Silent interval between tracks
(approx. 4 seconds)
Track 2 1 Track 3 f Track 4
1 Tracks 1 Track?
EDIT GUIDE
W
Press EDIT GUIDE to select
□
the tape length.
Each time you press the button, the
display showing the tape length
changes as follows. Choose the length
of the tape you will use.
*
^ C-46 C-60 cO C-90 cD C
f >*-15^ S
\ ) CISC
More precise time settings are also
possible.
(Refer to the instructions at right.)
The display shows the data of the tracks to be recorded as
follows:
Number of tracks Tracks to be
to be recorded ‘ recorded
1 -
L
LI C
1 O
MIN
ENT II
Illuminates
-------
1
18
Number of tracks Tracks to be
to be recorded recorded
1
------
1
Dts^Kip Press DISC SKIP to select
W
the disc to be recorded.
I
__
In this example, disc 5 can be recorded with tracks 1 -4 on side
A and tracks 5—7 on side B of the cassette tape.
Page 19

: ;'У:'У ■ :■.! -•■;:'’. ': ,>'.'■ ''' У
Шт
у--■
■ уУ :■ у Л:' ■ J' ■'-■ "У : у ■; ‘ ^■ ;-'i ■ i - ^ ■'■ ■ у -' ^
[Start recording on the tape deck and
5/
When the last track set for recording on side A is finished, the
changer wilt enter the pause mode. Set the tape to the position
from which recording will begin on side B, and then perform step
4 once again.
When ail the programmed tracks on the specified disc finish play
ing, the changer will automatically stop. The edit guide mode will
be canceled at the same time,
then immediately:]
Press ►.
To enter a desired recording time other than 46, 60 or 90 minutes:
1. Select "C—" in step 3.
2. Enter the total recording time in minutes (1-99) using the
numeric buttons.
For example;
To use 52-minute tape, press 5 then 2.
You can also specify the tape length pressing the SKIP button.
Press eitheror from each step C-46, C-60, C-90 or C--.
For example:
To use 52-minute tape, select C-46 and then press and hold ►W
until the display shows "52".
(Only available from the remote control.)
The various time information of the current disc can be
displayed.
TIME MODE
[In the play or pause mode]
Press TIME MODE.
The information will change (as described
below) each time you press the button.
-(i) Track number and elapsed play time of the
current track
The maximum allowable playing time for editing is 99 minutes.
To stop recording
Press ■ and then press the stop button on the tape deck.
Depending on the disc, a little of the beginning of the next track
may be recorded onto the end of the track.
For your reference:
When this unit is in memory reserve mode, this mode will be
canceled when EDIT GUIDE is pressed. After finishing recording,
press OFFyON again if you wish to reset the unit to memory
reserve mode.
0. ¡:'-l0
_'nuci MIN WC
►
® Total remaining time on the disc
<'/> i
® Track number and remaining time of the
current track
l .. 1 RSC
® Total elapsed play time on the disc
/^5 \\ /
1 - } D(8C
4^
In all play modes:
When track number 21 or greater is playing, display (3) shows
In program/delate/random/spiral mode:
The displayed information will alternate between displays 0 and
(D
each time the button is pressed.
During operation of the edit guide function:
The remaining play time on side A or side 8 will be shown in
display (I), and the elapsed play time for side A or side B will be
shown in display®.
-EilJ: IB
Mm SEC
►
1- i:03
_'ш1Ж MIN sec
►
3-Ч1
MIN SEC
►
When you stop playing and then start play again, the display will
return to display ®.
19
Page 20

ISiftii
iliili
Basic operation
Bii
To turn OFF/ON the main unit
POWER
O
O o O O
lOISCi 2C\SCi 30ISCJ
o o o
4DISC1 40ISC4 9
otsca»'
o o o
6 O O
PWQStWWOH CLEAR
o o
MMDftMilXE iPKM.
o o
\
o o
M4 5№ »M
o o
dD
B“
RECUL Q9CM
o o
I **
P
Cd
>10
o
o
6
o
twCmok
O
To open/close the loading drawer
To rotate the carousel
To select the desired disc number
To select the desired track number
To start play
To stop play temporarily
AOPENi
"CLOSE
DISC SKIP
o
^ ^ ^ -I0ISC4 5 DISCS
1 DISCI Z DISC 2 3 DISCS
O O O
4 DISC 4 S DISC 5 6
O O O
O number over 10:
^ ^ First press >10, and then
CZD
II
Press ► button to resume play.
O
1DISCI iOISC2 30ISC3
^ O O O
o o
>to To select a track between 1
Q and 10:
0 Press the corresponding
number on the keypad.
To select a two-digit track
press the numbers for the two
digits.
To stop play
(ZZ)
20
Page 21

Program/delete play
' POWER
чШ» CUSCSKtP
о о
О
■ DISC 9 2DISCS ЭПЗСЭ
ООО
4 DISC 4 5 DISCS 6
О О О
7 8В
ООО
mOlilUUUOOC RECALL
ООО
«MttWMODE SPlRM.
о о
•т SEARCH
\
о 0
о о
iOft*
>10
О
О
10
0
ID5CM
О
терелт
О
riMtMQce
О
/
II
о
с ) г
L
____
J
To start program/delete play
To check the entered contents
To clear a single item ot the entered contents
0 PHOGRAMMODE Select program or delete mode.
Q__) Each time the button is pressed, the
program/delete mode wilt change in the
following order:
I
Program I | Delete! (off)
t_ _ _ _ _ _ _ _ _ _ _ _ _ _ _ _ _ _ I
IDISCt ZOISCS 30SC3
^ ^ Select the disc
' ^ —' number.
V
___
4 DISC 4 S DISCS
О О
(3) toisci ;asca зшсз
ООО
40ISC4 Ь DISC 5 в
ООО о_
7 8 9
ООО
(4) ► Start Diav.
dZ)
C
C
The selections entered are displayed one by
__
) one each time this button is pressed.
CLEAR Qpiy selection which is currently
__
} displayed is cleared.
>10
Select the track number.
о
Repeat steps (5) and (D un-
0
til you have completed the
desired entry.
10
о
Other functions
To clear all entered contents
To cancel
program/delete mode
To Skip discs
To skip tracks
To search for a desired
place
To start ID scan
To repeat play
(In the stop mode)
■
CZD
(in the stop mode)
pfiOGRAMMOOE p|,ggg jj^ program mode.
C__) Press once In delete mode.
DISC SKIP
dD
M SKIP
o o
(In the play or pause mode)
-ee SEARCH ^
o o
tD SCAN
^ To cancel ID scan, press this button again.
C ) again.
To cancel repeat mode, press this button
To select time mode
TIME MODE
o
21
Page 22

ÒaÉfiòB^
tt^ nmvinig óf this unit
CAUTION
Before moving the changer to another location, be sure to carry
out the “Preparations for moving the unit" described beiow/.
Concerning compact discs
With this changer, you can only piay compact
discs having this mark:
Handling precautions
To open the compact disc case, gentiy press the sides of the top
and pul! up.
To remove the disc from the case, press the center holder and iift
the disc, holding by the edges.
Center holder
—
CHGITAI лито
Failure to do so will expose the compact discs and the changer to
the risk of severe damage.
Preparations for moving the unit
Ail of the discs must be removed so that the trays are compietely
empty.
Use the following procedure.
0 Press POWER to switch off the unit.
(D Press POWER to switch on the unit.
(If there is a disc in the play section, it will be returned to the
disc tray at this time.)
(0 Press OPEN/CLOSE to open the ioading
drawer.
0 Press DISC SKIP to rotate the disc trays and
remove the discs from ali disc trays,
depress OPEN/CLOSE to close the ioading
drawer.
(|) Press POWER to switch off the unit.
If you have pressed a wrong button by mistake, return to step (D.
POWER DISC SKIP
-
---------
To return the disc to the case, insert the disc with the label facing
up and press downward at the center.
Hold compact discs by the edges so as not to soil the surface
with fingerprints. Fingerprints, dirt and scratches can cause skip
ping and distortion.
Î rf/ojw
Do not use record cleaning sprays, benzine, thinner, static elec
tricity prevention liquids or any other solvent on a disc.
If the surface is soiled, wipe gently with a soft, damp (water only)
cloth.
Always move the cloth directly outward from the center of the
disc, not in a circular motion as with standard phonograph
records.
JY
/ f\ \
/ ''
22
О
1
□□ □ O □ □ a a гза
О
ООООО"^!
1
If you are taking the disc from a cold to a warm environment,
a
moisture may form on the disc. Wipe this off with a soft, dry, lintfree cloth before using the disc.
Do not write on the label side with a bail-point pen or other writing
Instrument.
OPEN/CLOSE
Storage precautions
Be sure to store discs in their cases to protect them from dust,
scratches, and warping.
Do not place or store discs in the following places;
1) Locations exposed to direct sunlight
2) Humid or dusty locations
3) Locations directly exposed to a heat vent or heating appliance
4) In the glove compartment or on the rear deck of an
automobile
Page 23

Before requesting service for this unit, check the chart below tor
a possible cause of the problem you are experiencing. Some sim
ple checks or a minor adjustment on your part may eliminate the
problem and restore proper operation.
Problem Probable cause(s) Suggested remedy
If you are in doubt about some of the check points, or if the
remedies indicated in the chart do not solve the problem, refer to
the directory of Authorized Service Centers (enclosed with this
unit) to locate a convenient service center, or consult your
Technics dealer for instructions.
Changer will not play.
The disc in the changer
does not play.
Play stops before changing
to the next disc.
A certain music passage
can’t be played correctly.
There is noise from the
tuner or disturbance on the
TV screen.
When program play Is
started, an error message
(-E) appears on the
display.
An error message (- E)
appears on the display, and
the changer stops
operating.
The loading drawer stops In
the middle of opening.
Remote control does not
operate correctly.
A disc(s) or other foreign object{s) has fallen
inside the changer,
Moisture has collected in the changer.
The disc is upside down. • Make sure the label is facing upward.
The disc is dirty. • Wipe the disc with a soft cloth.
The disc is scratched. • Replace the disc with a new one.
The disc is warped.
The disc is not within specified standards.
The loading drawer is open.
The disc is dirty.
The disc is scratched. • Replace the disc with a new one.
Caused by high-frequency signals from this
changer.
Play was started without a track being
programmed.
The mechanism of the changer has been
improperly adjusted.
The batteries have run out.
There is an obstruction between the remote
control and the changer.
The batteries are inserted incorrectly.
[The (+) and (-) polarities are reversed.]
• Open the loading drawer, and then remove the
object.
• Switch on and allow the changer to dry out for about
one hour before using it.
• Press the OPEN/CLOSE button to close the loading
drawer.
• Wipe the disc with a soft cloth.
• Use the changer further away from the tuner or TV.
• If the tuner or TV's antenna is the indoor type, use an
outdoor one.
• Program a track.
• Turn the unit off and then back on again.
However, if the loading drawer is fully open, take out
the compact disc(s) at the front position and then turn
the unit off and then back on again.
• Replace batteries with new ones.
• Remove the obstruction.
• Reinsert batteries so that the polarities are correct.
23
Page 24

■ AUDIO
No. of channels
Frequency response
Output voltage
Dynamic range
S/N
Total harmonic distortion
Wow and flutter
DA converter
Output impedance
Load impedance
Headphones output level
■ PICKUP
Wavelength
2 {(eft and right, stereo}
2-20,000 Hz, ±1 dB
2 V {at 0 dB)
92 dB
100 dB
0.007% (1 kHz, 0 dS)
Below measurable limit
MASH (1 bit)
Approx. 1 kQ
More than 10 kO
3 mW max. 32 Cl
780 nm
■ GENERAL
Power consumption
Power supply
Dimensions (W x H x D)
Weight
Note:
Specifications are subject to change without notice.
Weight and dimensions are approximate.
For United Kingdom
This apparatus was produced to BS 800.
MASH is a trademark of NTT.
AC 50/60 Hz, 230-240 V
430 X 125 X 372 mm
16 W
4.6 kg
Matsushita Electric Industrial Co., Ltd.
Central P.O. Box 288, Osaka 530-91, Japan
Printed in Japan
RQT2784-B
H0295H0
 Loading...