

Panasonic SL-DZ1200 User Manual

Operating Instructions
Direct Drive Digital Turntable
Model No.
SL-DZ1200
This manual was printed with soy based ink.
PP
Before connecting, operating or adjusting this product, please read these
instructions completely.
Please keep this manual for future reference.
RQT7114-Y
Dear customer
Parts and supplied accessories
Thank you for purchasing this product.
For optimum performance and safety, please read these instructions
carefully.
Parts and supplied accessories ................................................. 2
Product service ............................................................................. 2
Listening caution .......................................................................... 3
IMPORTANT SAFETY INSTRUCTIONS ....................................... 4
Main features ................................................................................ 5
Component part names ............................................................... 6
Platter setup .................................................................................. 7
Before use
Setup .............................................................................................. 7
Connections .................................................................................. 8
Inserting-removing a disc or SD Memory Card ...................... 10
Display indicator ......................................................................... 11
Playing a CD or SD Memory Card (basic play) ....................... 12
Basic function settings .............................................................. 14
Platter operations ....................................................................... 15
Changing tempo and direction of play .................................... 16
Playing from memory ................................................................. 17
Changing the sound ................................................................... 20
Saving to a SD Memory Card, Recalling .................................. 21
Using with other equipment ...................................................... 23
Unit’s initialize memory function .............................................. 24
Glossary ...................................................................................... 24
Handling SD Memory Cards ...................................................... 25
Concerning CDs ......................................................................... 25
Q&A (Frequently asked questions) .......................................... 26
Troubleshooting guide............................................................... 26
Error messages .......................................................................... 27
Maintenance ................................................................................ 27
Specifications ............................................................................. 27
Warranty (U.S.A.) ......................................................... Back cover
2
RQT7114
Table of contents
Before use
Connecting with the DJ mixer .................................................... 8
Connecting the control terminals for relay play ......................... 9
Connecting with the stereo amplifier (Not using the DJ mixer) ...........
Connecting to equipment with digital input terminals................ 9
Basic operations
Selecting TURNTABLE mode or CD PLAYER mode .............. 14
Instant play (INSTANT CHANGE) ........................................... 14
Using the FREE WHEEL mode ............................................... 14
Adjusting the platter brake ....................................................... 14
Adjusting the auto cue level ..................................................... 14
Advanced operations
Changing play with your hand ................................................. 15
Basic play for DJs .................................................................... 15
Changing tempo ....................................................................... 16
Locking the pitch ...................................................................... 16
Reverse play (Reversing the platter) ....................................... 16
Setting the auto cue point ........................................................ 17
Setting the cue point at any point ............................................ 17
Play from the stored point ........................................................ 17
Storing to the CUE PADS and playing .................................... 18
Store desired points to memory and play (loop play) ............. 18
Recording to the SAMPLE PADS and playing ........................ 19
Erasing cue pad, sample pad, loop play data ......................... 19
Changing sound to simulate analog ........................................ 20
Change sound with combined performance ............................ 20
Editing the SAMPLE PADS...................................................... 20
Other functions
Saving to a SD Memory Card .................................................. 21
Formatting the SD Memory Card ............................................. 22
Recalling (loading) data saved on a SD Memory Card ........... 22
Regarding MP3 albums and SD audio .................................... 22
Start play using the mixer’s fader ............................................ 23
Using two units for relay play ................................................... 23
Using the amplifier and other equipment ................................ 23
Linking different tracks ............................................................. 24
Initializing this unit’s memory ................................................... 24
Reference
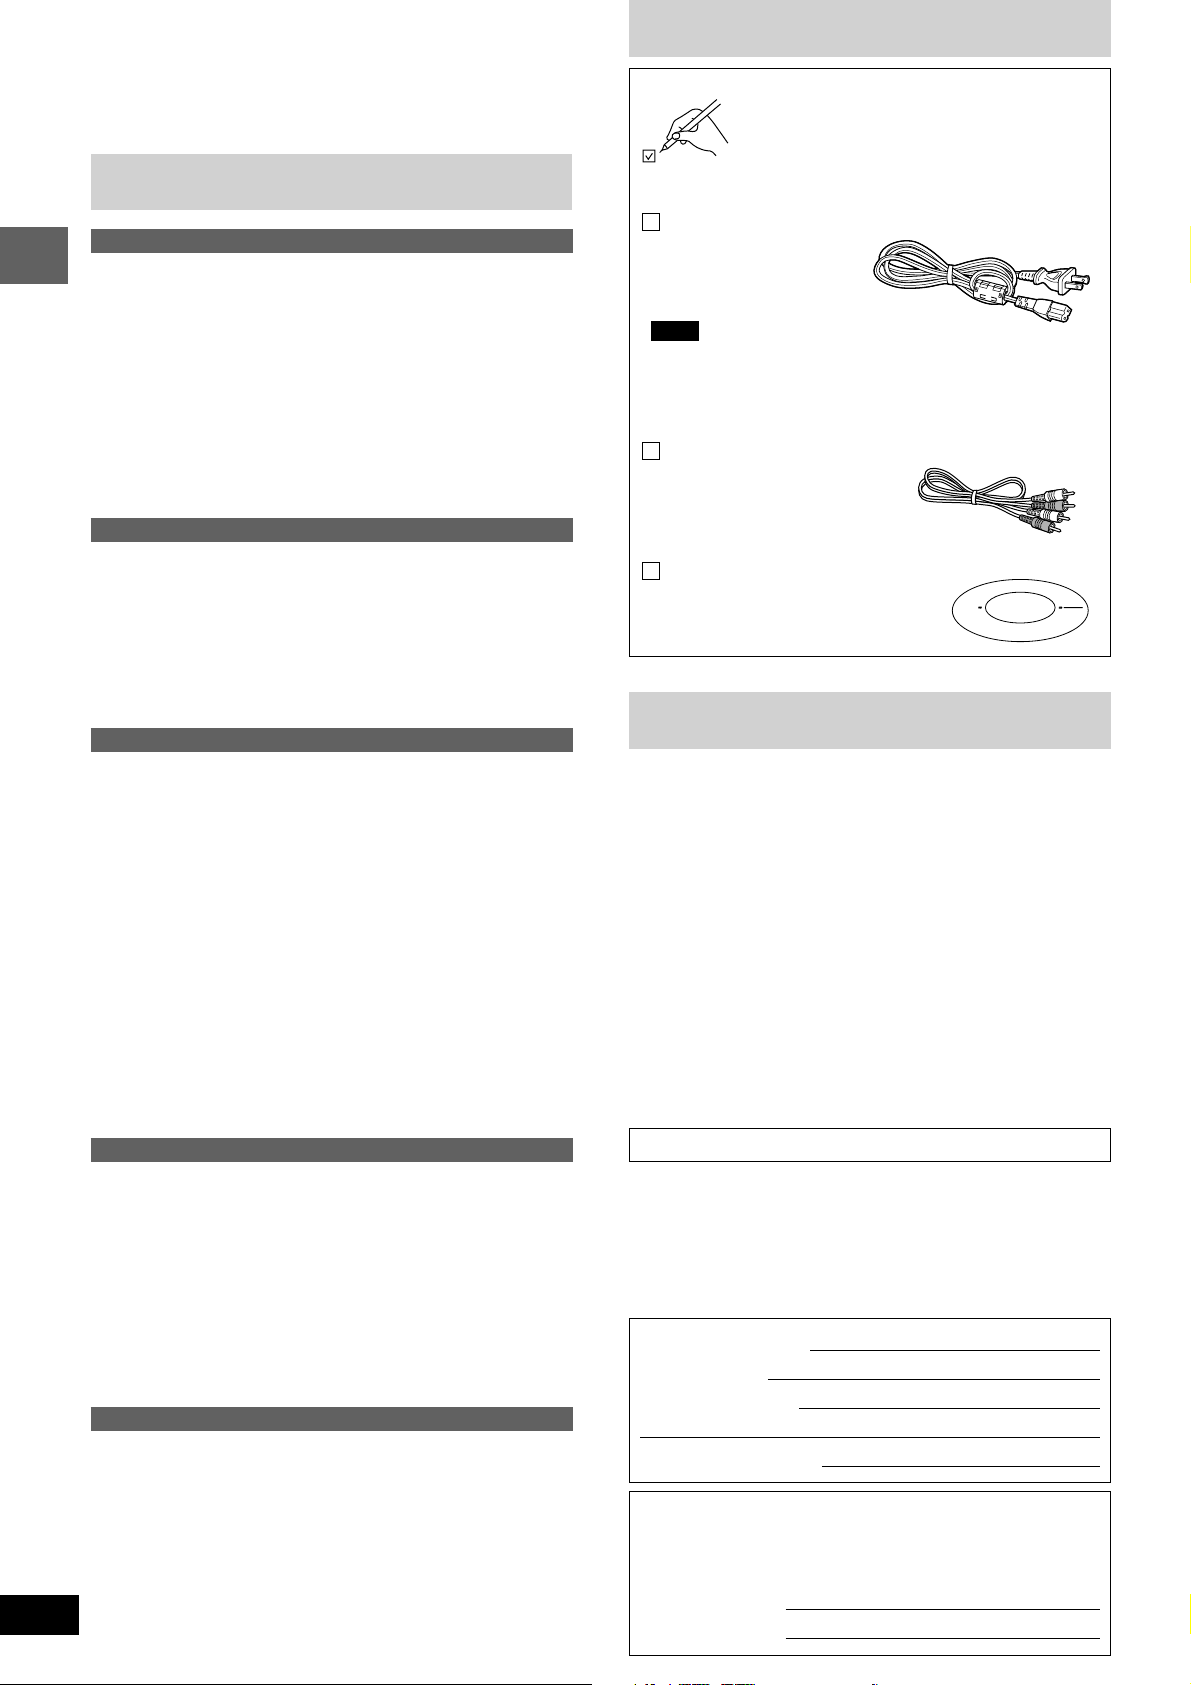
Please check and identify the parts and supplied accessories.
Use numbers indicated in parentheses when
asking for replacements parts.
In U.S.A. to order accessories, refer to “Accessory Purchases” on back cover.
AC power supply cord (REZ1619) ................................. 1
Note
The included AC power supply cord is for use with this unit only.
Do not use it with other equipment.
Do not use an AC power supply cord from any other type of
equipment with this unit.
Stereo connection cable (SFDHBD2N01) ..................... 1
9
Slip surface (RGK1704-S2) ............................................ 1
Product service
1. Damage requiring service— The unit should be serviced by
qualified service personnel if:
(a) The AC power supply cord or AC adaptor has been
damaged; or
(b) Objects or liquids have gotten into the unit; or
(c) The unit has been exposed to rain; or
(d) The unit does not operate normally or exhibits a marked
change in performance; or
(e) The unit has been dropped or the cabinet damaged.
2. Servicing— Do not attempt to service the unit beyond that
described in these operating instructions. Refer all other servicing to authorized servicing personnel.
3. Replacement parts— When parts need replacing ensure the
servicer uses parts specified by the manufacturer or parts that
have the same characteristics as the original parts. Unauthorized
substitutes may result in fire, electric shock, or other hazards.
4. Safety check—After repairs or service, ask the servicer to
perform safety checks to confirm that the unit is in proper
working condition.
Product information
For product information or assistance with product operation:
In the U.S.A., refer to “Customer Services Directory” on back cover.
In Canada, contact the Panasonic Canada Inc. Customer Care Centre at 905-624-5505, or visit the website (www.panasonic.ca), or an
authorized Servicentre closest to you.
User memo:
DATE OF PURCHASE
DEALER NAME
DEALER ADDRESS
TELEPHONE NUMBER
The model number and serial number of this product can be found
on either the back or the bottom of the unit.
Please note them in the space provided below and keep for future
reference.
MODEL NUMBER
SERIAL NUMBER
SL-DZ1200
CLASS 1
E
L
E
C
T
R
O
N
I
C
I
N
D
U
S
T
R
I
E
S
•
A
S
S
O
C
I
A
T
I
O
N
•
EST. 1924
LASER PRODUCT
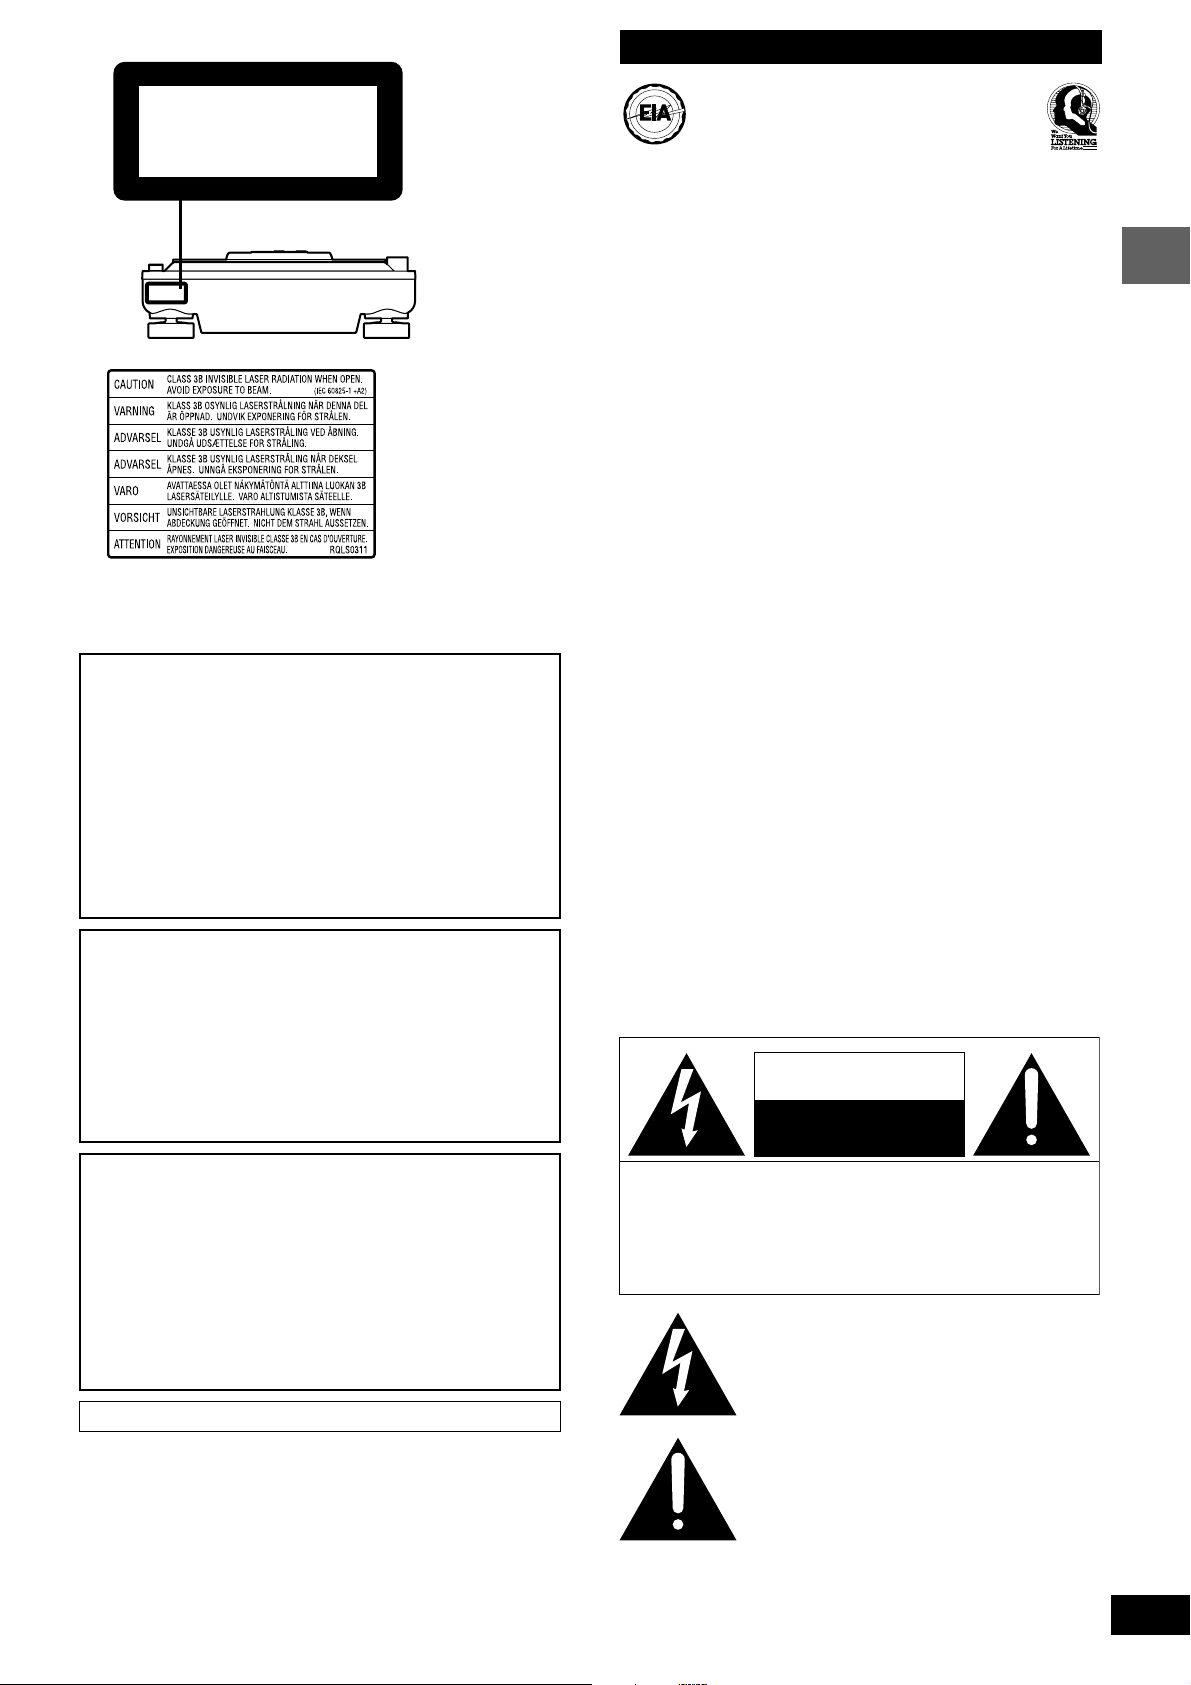
(Back of product)
Listening caution
Selecting fine audio equipment such as the unit you’ve just purchased is only the start of your musical enjoyment. Now it’s time
to consider how you can maximize the fun and excitement your
equipment offers. This manufacturer and the Electronic Industries
Association’s Consumer Electronics Group want you to get the
most out of your equipment by playing it at a safe level. One that
lets the sound come through loud and clear without annoying
blaring or distortion—and, most importantly, without affecting your
sensitive hearing.
(Inside of product)
CAUTION!
THIS PRODUCT UTILIZES A LASER.
USE OF CONTROLS OR ADJUSTMENTS OR
PERFORMANCE OF PROCEDURES OTHER
THAN THOSE SPECIFIED HEREIN MAY
RESULT IN HAZARDOUS RADIATION
EXPOSURE.
DO NOT OPEN COVERS AND DO NOT REPAIR
YOURSELF. REFER SERVICING TO QUALIFIED
PERSONNEL.
WARNING:
TO REDUCE THE RISK OF FIRE, ELECTRIC
SHOCK OR PRODUCT DAMAGE, DO NOT
EXPOSE THIS APPARATUS TO RAIN,
MOISTURE, DRIPPING OR SPLASHING AND
THAT NO OBJECTS FILLED WITH LIQUIDS,
SUCH AS VASES, SHALL BE PLACED ON THE
APPARATUS.
We recommend you to avoid prolonged exposure to excessive
noise.
Sound can be deceiving. Over time your hearing “comfort level”
adapts to higher volumes of sound. So what sounds “normal” can
actually be loud and harmful to your hearing.
Guard against this by setting your equipment at a safe level
BEFORE your hearing adapts.
To establish a safe level:
¡Start your volume control at a low setting.
¡Slowly increase the sound until you can hear it comfortably and
clearly, and without distortion.
Once you have established a comfortable sound level:
¡Set the dial and leave it there.
Taking a minute to do this now will help to prevent hearing
damage or loss in the future. After all, we want you listening for a
lifetime.
The following mark and symbols are located on bottom of the unit.
CAUTION
RISK OF ELECTRIC SHOCK
DO NOT OPEN
Before use
CAUTION!
DO NOT INSTALL OR PLACE THIS UNIT IN A
BOOKCASE, BUILT-IN CABINET OR IN
ANOTHER CONFINED SPACE. ENSURE THE
UNIT IS WELL VENTILATED. TO PREVENT
RISK OF ELECTRIC SHOCK OR FIRE HAZARD
DUE TO OVERHEATING, ENSURE THAT
CURTAINS AND ANY OTHER MATERIALS DO
NOT OBSTRUCT THE VENTILATION VENTS.
Marking sign is located on bottom of the unit.
CAUTION: TO REDUCE THE RISK OF ELECTRIC
SHOCK, DO NOT REMOVE SCREWS.
NO USER-SERVICEABLE PARTS
INSIDE.
REFER SERVICING TO QUALIFIED
SERVICE PERSONNEL.
The lightning flash with arrowhead symbol, within
an equilateral triangle, is intended to alert the user
to the presence of uninsulated “dangerous voltage”
within the product’s enclosure that may be of sufficient magnitude to constitute a risk of electric shock
to persons.
The exclamation point within an equilateral triangle
is intended to alert the user to the presence of
important operating and maintenance (servicing)
instructions in the literature accompanying the
appliance.
3
RQT7114

IMPORTANT SAFETY INSTRUCTIONS
Read these operating instructions carefully before using the unit. Follow the safety instructions on the unit and the applicable safety instructions
listed below. Keep these operating instructions handy for future reference.
1) Read these instructions.
2) Keep these instructions.
3) Heed all warnings.
4) Follow all instructions.
5) Do not use this apparatus near water.
6) Clean only with dry cloth.
7) Do not block any ventilation openings. Install in accordance with
Before use
the manufacturer’s instructions.
8) Do not install near any heat sources such as radiators, heat registers, stoves, or other apparatus (including amplifiers) that produce heat.
9) Do not defeat the safety purpose of the polarized or groundingtype plug. A polarized plug has two blades with one wider than
the other. A grounding-type plug has two blades and a third
grounding prong. The wide blade or the third prong are provided
for your safety. If the provided plug does not fit into your outlet,
consult an electrician for replacement of the obsolete outlet.
10) Protect the power cord from being walked on or pinched particularly at plugs, convenience receptacles, and the point where
they exit from the apparatus.
11) Only use attachments/accessories specified by the manufacturer.
12) Use only with the cart, stand, tripod, bracket, or
table specified by the manufacturer, or sold with
the apparatus. When a cart is used, use caution
when moving the cart/apparatus combination to
avoid injury from tip-over.
13) Unplug this apparatus during lightning storms or when unused
for long periods of time.
14) Refer all servicing to qualified service personnel. Servicing is
required when the apparatus has been damaged in any way,
such as power-supply cord or plug is damaged, liquid has been
spilled or objects have fallen into the apparatus, the apparatus
has been exposed to rain or moisture, does not operate normally, or has been dropped.
THE FOLLOWING APPLIES ONLY IN THE U.S.A.
CAUTION:
This equipment has been tested and found to comply with
the limits for a Class B digital device, pursuant to Part 15 of
the FCC Rules.
These limits are designed to provide reasonable protection
against harmful interference in a residential installation.
This equipment generates, uses and can radiate radio
frequency energy and, if not installed and used in
accordance with the instructions, may cause harmful
interference to radio communications. However, there is no
guarantee that interference will not occur in a particular
installation. If this equipment does cause harmful
interference to radio or television reception, which can be
determined by turning the equipment off and on, the user is
encouraged to try to correct the interference by one or more
of the following measures:
¡Reorient or relocate the receiving antenna.
¡Increase the separation between the equipment and re-
ceiver.
¡Connect the equipment into an outlet on a circuit different
from that to which the receiver is connected.
¡Consult the dealer or an experienced radio/TV technician
for help.
Any unauthorized changes or modifications to this
equipment would void the user’s authority to operate this
device.
4
RQT7114
This device complies with Part 15 of the FCC Rules.
Operation is subject to the following two conditions: (1) This
device may not cause harmful interference, and (2) this
device must accept any interference received, including
interference that may cause undesired operation.
Main features
This direct drive digital turntable is designed for DJs to play digital media (CDs and SD audio) giving an analog-like feeling. Having the feeling of an
analog turntable, this unit delivers digitally robust functions and performance realizing a new style of play.
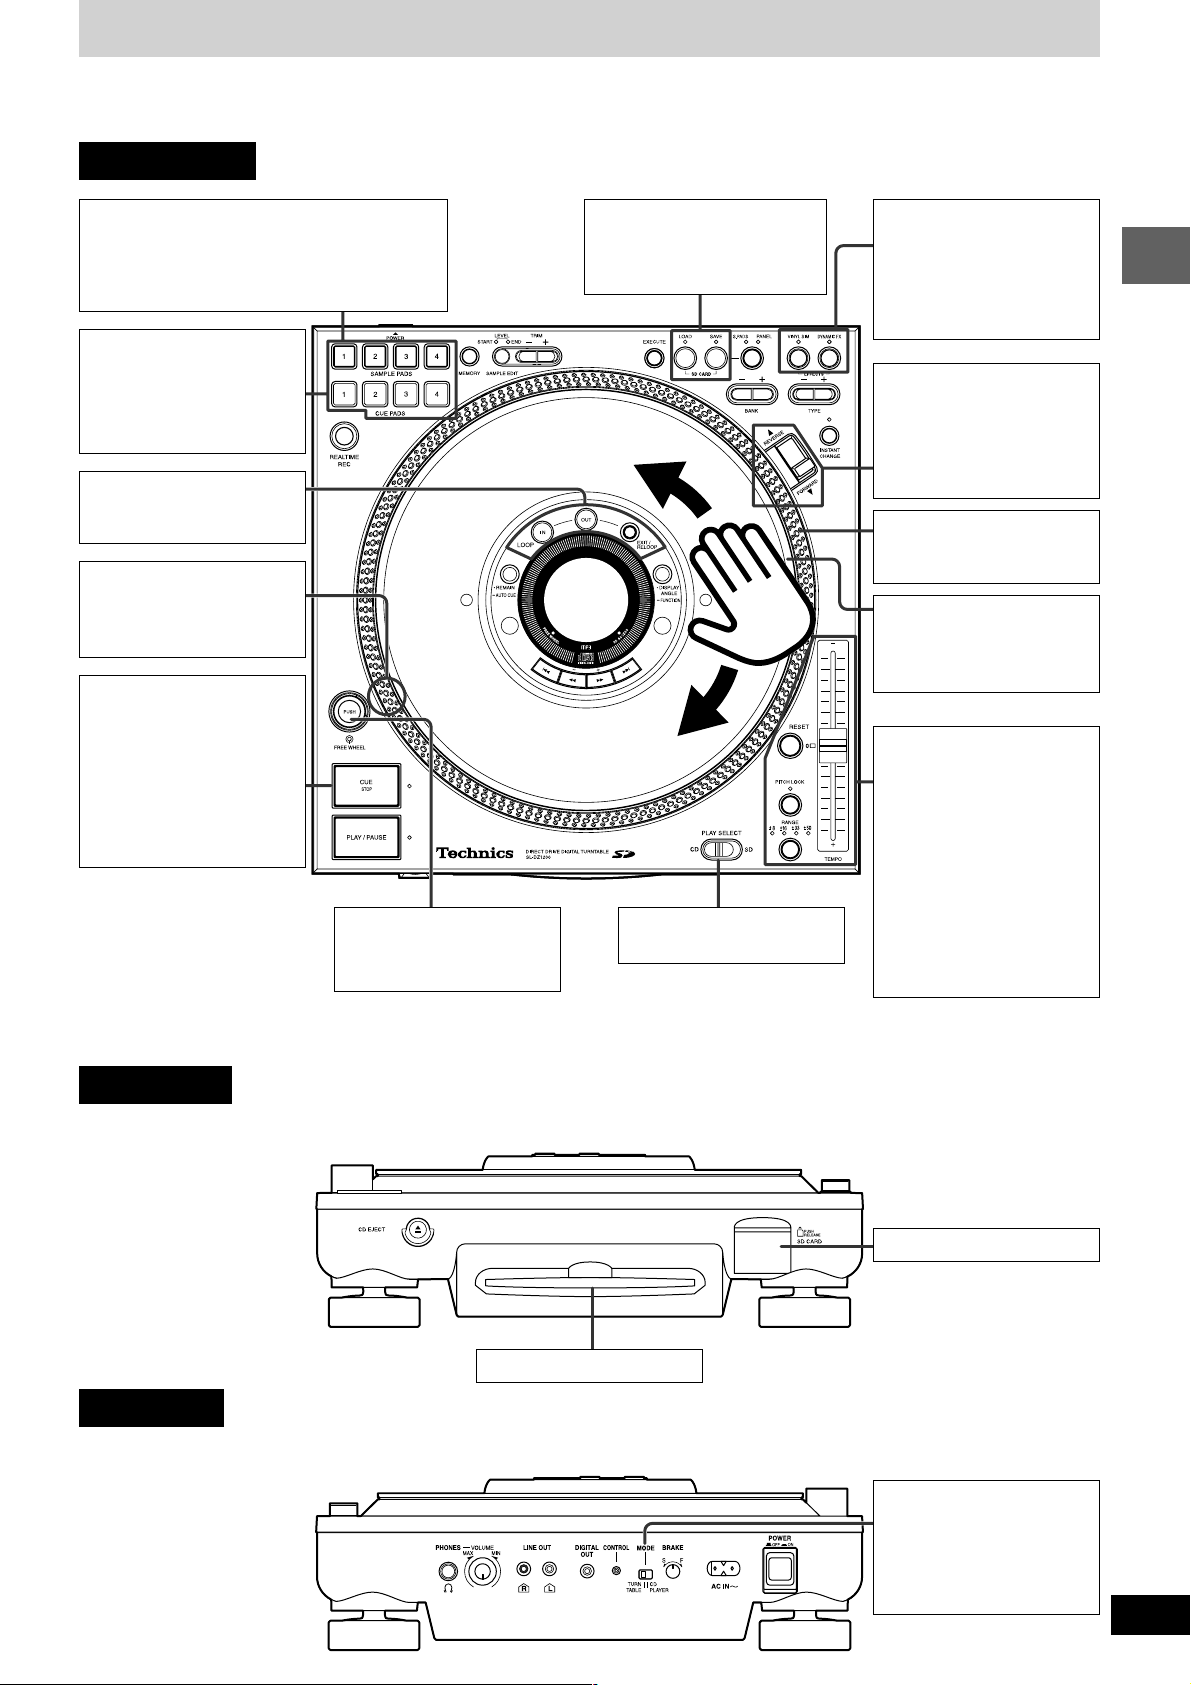
Control panel
SAMPLE PADS
•You can store up to 4 audio segments to memory.
•You can use for dual play for up to 2 sample pads,
and use for switching between one shot and loop
play.
CUE PADS
You can store 4 cue points to
memory. Play can be started instantly from one of those cue
points.
LOOP play
You can set the IN and OUT
points and play as a loop.
Strobo Dot Reflectors
You can use the red strobo illuminator to check changes in
tempo.
CUE
•Setting the cue point
Store the cue point to
memory.
•Back cue
During play you can instantly
return to the set cue point
and the unit waits in the
pause state.
FREE WHEEL
You can switch the platter to
freewheel.
SD CARD LOAD and SAVE
You can SAVE and LOAD sample
pad, cue point panel data etc. to
the SD Memory Card.
PLAY SELECT
Selects CD or SD play.
VINYL SIM
You can simulate sound similar to an analog player.
DYNAMIC FX
You can transform sound by
using the platter.
FORWARD and REVERSE
The rotation direction of the
platter can be reversed by
switching the play direction
switch to REVERSE or FORWARD.
Platter
Play media is synchronized
with platter movement.
Platter slip surface
Use your hand to turn the platter slip surface for scratch,
brake and spin DJ play.
TEMPO
•You can control the play speed
(tempo).
•You can adjust the tempo to
4 levels of settings between
± 8 and ± 50 using the
RANGE button.
•You can instantly return to
normal playing speed using
the RESET button.
•By using the PITCH LOCK
button the pitch is held even
if the tempo is changed.
Before use
Front panel
Rear panel
SD Memory Card slot
CD slot (Slot in type)
TURNTABLE
Mode for DJ play.
CD PLAYER
Mode for use as an audio
player.
5
RQT7114

Component part names
The unshaded numbers etc, correspond to the numbered illustrations. The shaded numbers etc, are reference pages.
Control panel
Before use
6
RQT7114
Sampling data record, play, and erase button, lamp
(1-4 SAMPLE PADS) .........................................
Sample pad play mode, edit memory button (MEMORY)
Play mode and edit item select button (SAMPLE EDIT)
...........................................................................
Start point (START) lamp, end point (END) lamp,
level (LEVEL) lamp ..................................................
Modify data button (– + TRIM) ................................
Loop play button (LOOP) ........................................
Start of loop play point setting, erase button, lamp (IN)
End of loop play point setting, erase button, lamp (OUT)
Play or cancel loop play button (EXIT/RELOOP)
Execute button (EXECUTE) ...................................
Load SD Memory Card data button, lamp (LOAD)
Save SD Memory Card data button, lamp (SAVE)
SD Memory Card save mode select button, lamp
(S.PADS, PANEL) .....................................................
Analog player simulation button, lamp (VINYL SIM)
Special effects button, lamp (DYNAMIC FX) .........
Simulation, effect type select button (– + TYPE) ....
Cue bank, file number select button (
Instant play select button, lamp (INSTANT CHANGE)
Play direction switch (REVERSE, FORWARD)......
Display angle setting, function setting button
(•DISPLAY ANGLE –FUNCTION)......................
SD Memory Card access indicator (SD ACCESS)
Normal tempo button, lamp (RESET) ....................
Tempo, pitch control slider (TEMPO) ....................
Fixed pitch play button, lamp (PITCH LOCK) .......
Tempo variation range button, lamp (RANGE) .....
Media play select switch (PLAY SELECT) .............
Platter slip surface ..................................................
– +
BANK)
,
,
,
,
Track skip, search, setting buttons
, , , ) ............................................. ,
(
Platter .......................................................................
Strobo dot reflectors ...............................................
Play pause button, lamp (PLAY/PAUSE) ...............
Cue setting, load and stop button, lamp (CUE STOP)
...........................................................................
Strobo illuminator ...................................................
Platter free wheel setting button (PUSH) ..............
Platter free wheel indicator (FREE WHEEL) .........
Display ......................................................................
Remaining time display, auto cue setting button
(•REMAIN –AUTO CUE) ....................................
Cue point, pad memory button (REALTIME REC)
.....................................................................
Cue memory, play and erase button, lamp
(1-4 CUE PADS)........................................................
Front panel
CD eject button ( CD EJECT) ..............................
CD slot ......................................................................
Power lamp ..............................................................
SD Memory Card slot (SD CARD) ..........................
Rear panel
Headphone terminal (PHONES) .............................
Headphone volume control knob (VOLUME) ........
Output terminal (LINE OUT) ...................................
Digital output terminal (DIGITAL OUT) ..................
Digital turntable control terminal (CONTROL) ......
Turntable, CD player select switch (MODE) ..........
Platter brake control (BRAKE) ...............................
AC input terminal (AC IN ) ...................................
Power button (POWER OFF ON) .................
,
,
, ,
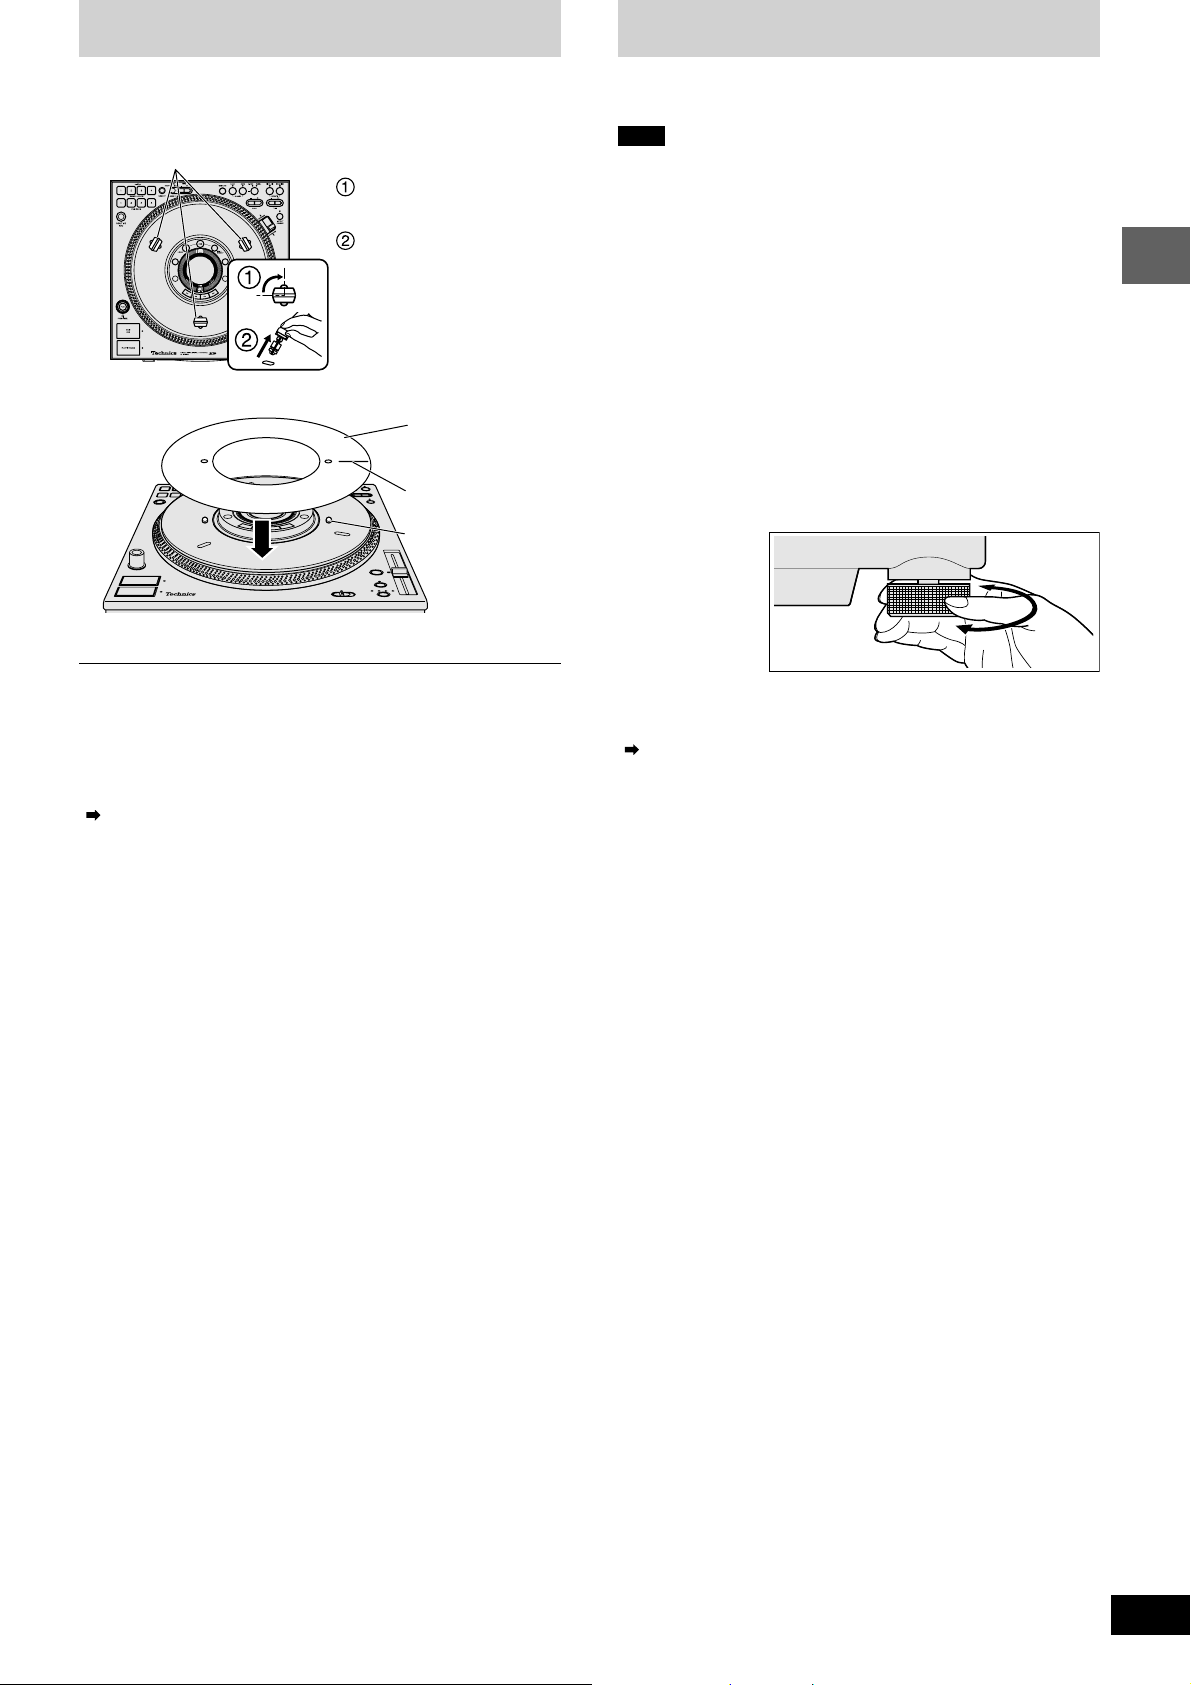
Platter setup
Setup
The stoppers are used to lock the platter, protecting the unit from
shock during shipping.
1. Remove the 3 platter lock stoppers from the platter
Platter lock stoppers
Turn the platter lock stop-
pers approximately 90°
Pull the platter lock stop-
pers out
•Pull out the platter lock stoppers
once they are aligned with the
release hole.
2. Attach the slip surface (included)
Slip surface
Marker
Mounting pin
•With the marker on the slip surface facing up, attach onto the 2
mounting pins.
Store the 3 platter lock stoppers in a safe place after removal.
Adjusting the platter brake
You can adjust the platter brake speed using the BRAKE control on
the rear of the unit. After connecting, adjust to the desired brake speed.
( page 14)
Place the unit on a flat and stable surface that is not subject to
vibrations or movement.
Note
•Do not place this unit on top of amplifiers emitting hot air or place
near spot lights and use for any long duration. This may affect the
unit or disc causing problems.
•Create space around this unit in order to assist heat release.
•Place the unit away from televisions and tuners to avoid interfer-
ence. Interference will affect picture and sound quality.
•Placing the unit near speakers may result in undesired sound in an
environment that requires elevated volume. In this case move the
unit further away from the speaker(s) or turn the volume down.
•Place stereo connection cables, AC power supply cord and panel
in a location that will not be affected by movement or vibration
during play.
Undesirable sounds may result if there are movements or vibrations affecting the unit with exception of the legs.
Adjusting the height of the main unit
After placing the unit in the desired location for use, adjust the insulator so the main unit is flat and secure.
Changing the display angle
Change display angle corresponding to position of the main unit.
( page 11)
Before use
When transporting the unit
Make sure to re-attach the 3 platter lock stoppers.
1. Remove the slip surface
•Pack in a way to avoid bending the slip surface.
2. Insert the 3 platter lock stoppers
1. Align the platter holes with the chassis holes inside at the same
position used to remove the stoppers above in step 1.
2. Insert the platter lock stoppers into the holes
•Move the platter to fully insert the stoppers.
3. Turn the platter lock stoppers approximately 90° to lock
7
RQT7114
Connections
When connecting for
fader start play
( page 23)
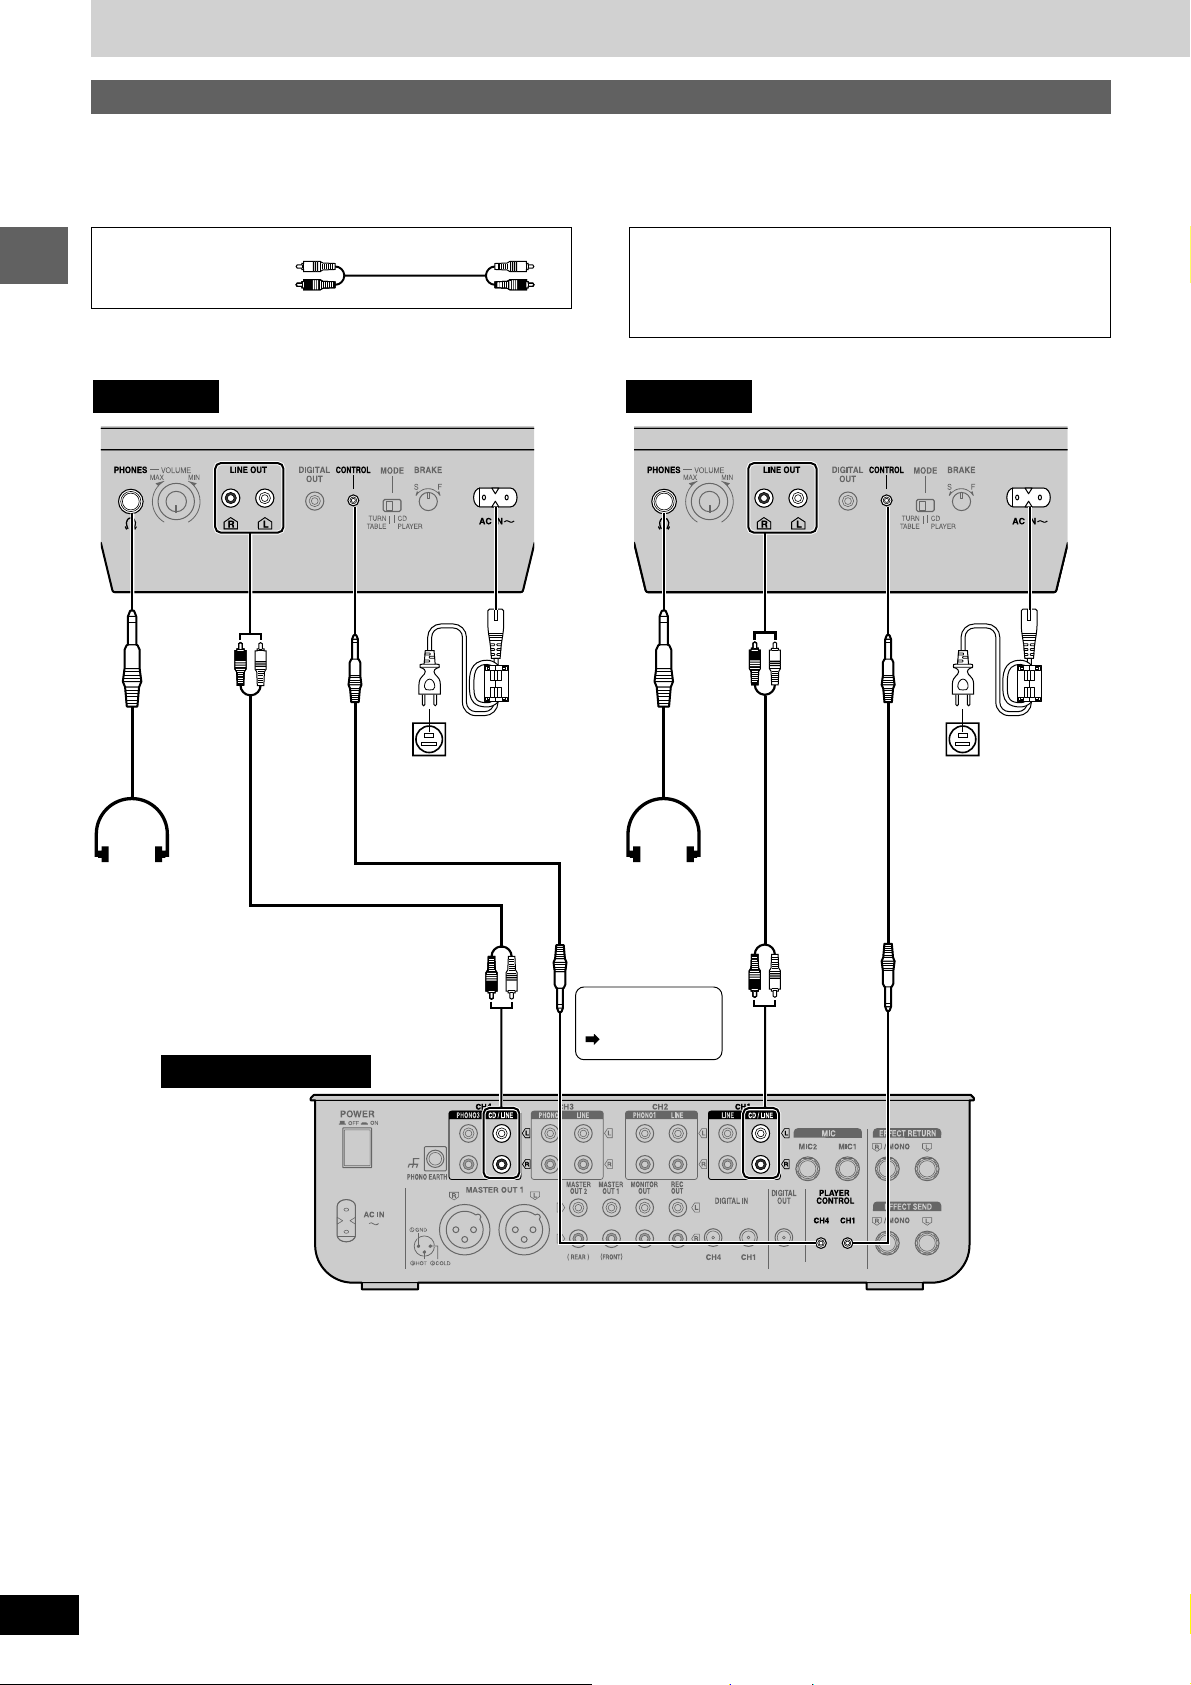
Connecting with the DJ mixer
This example indicates a connection with the SH-MZ1200 DJ mixer (not included) and two digital turntables. Use the stereo connection cable
(supplied accessories) and control cable (not included) to connect the main unit with the DJ mixer. Turn off all power when connecting component
equipment.
Connect the AC power supply cord after all other connections have been connected.
Stereo connection cable
White (L)
Red (R)
Before use
Rear panel
Type: 6.3 mm
(1/4 in.) stereo
Direct drive digital turntable 2
Connects to DJ mixer CH4.
Household
AC outlet
AC power supply
cord (supplied
accessories)
Connection to the SL-DZ1200 rear panel CONTROL terminal
Only the direct drive digital turntable or the separately sold
DJ Mixer can be operated.
Connecting to control terminals of other manufacturer’s products
may result in incorrect operation or other equipment problems.
Rear panel
Type: 6.3 mm
(1/4 in.) stereo
Direct drive digital turntable 1
Connects to DJ mixer CH1.
Household
AC outlet
AC power
supply cord
(supplied
accessories)
Headphone
(not included)
Headphone
(not included)
Control cable
(not included)
Type:
3.5 mm (1/8 in.) stereo
Control cable
(not included)
Type:
3.5 mm (1/8 in.) stereo
DJ mixer rear panel
Connecting with other mixers
Do not connect with the PHONO terminal. Connecting will result in excessive sound being generated and may result in serious damage
to your equipment.
Connect the main unit’s LINE OUT terminal with the mixers LINE input terminal or AUX input terminal.
Listening with the headphones
•When connecting the headphones, reduce the volume using the phones VOLUME control.
•Avoid listening for prolonged periods of time to prevent hearing damage.
8
RQT7114
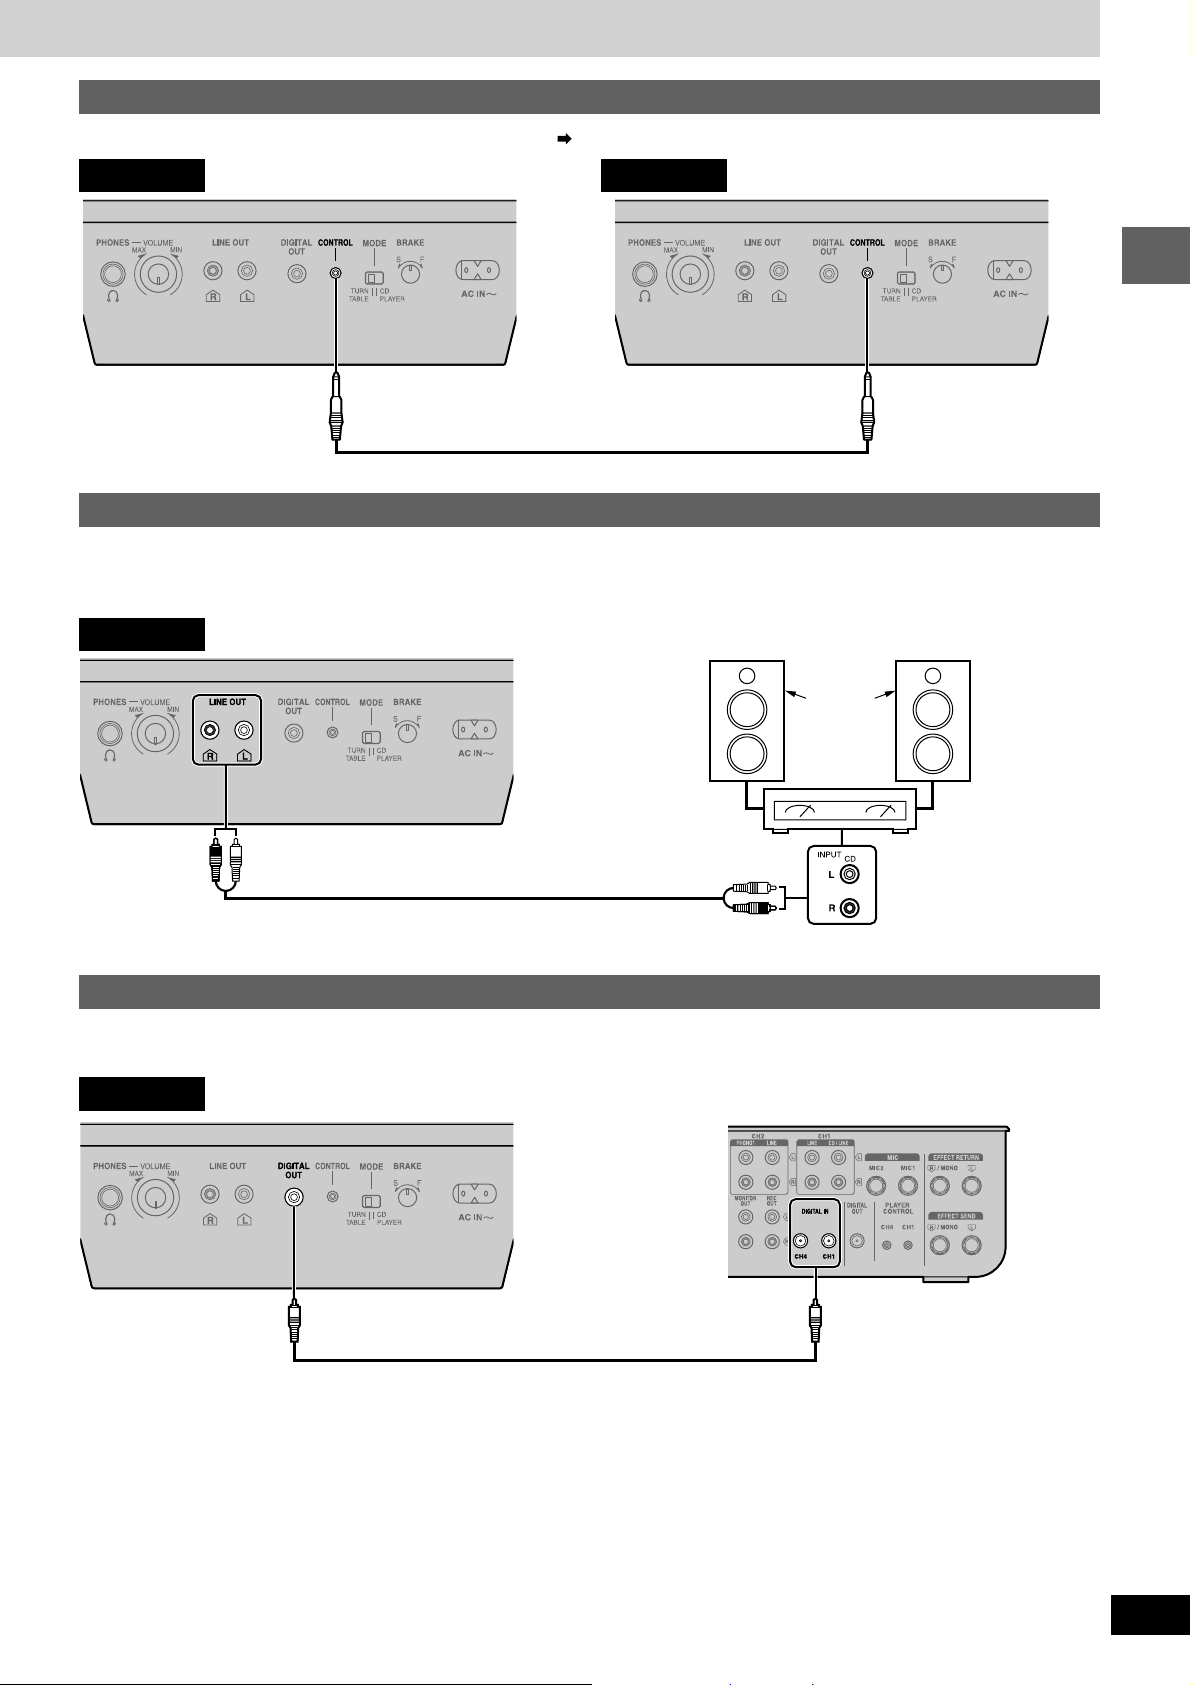
Connecting the control terminals for relay play
Use the control terminals of the two units to connect for relay play. ( page 23)
Rear panel
Direct drive digital turntable 2
Control cable (not included)
Type: 3.5 mm (1/8 in.) stereo
Rear panel
Direct drive digital turntable 1
Connecting with the stereo amplifier (Not using the DJ mixer)
Do not connect with the PHONO terminal. Connecting will result in excessive sound being generated and may result in serious damage
to your equipment.
Connect with the amplifier's CD or AUX input terminal.
Rear panel
Speaker
(not included)
Amplifier
(not included)
Before use
Stereo connection cable (Supplied accessories)
Connecting to equipment with digital input terminals
Connect to the digital input terminal on the DJ mixer or amplifier with digital input terminals using the connection cables (not included).
•SD Audio cannot be output from this unit's digital out terminals.
Rear panel
Connection cable (not included)
Type: RCA coaxial
DJ mixer etc. (not included)
9
RQT7114
 Loading...