

Page 1
Operating Instructions
Designed for Panasonic DVD Home Theater Sound Systems
compatible with the SH-FX80.
Wireless 2nd-Room
Audio System
Enjoy your home theater unit’s audio
in any room.
page
2
page
3
Powerful Stand-Alone
Audio Amplifier
Connect your MP3 player or other
digital audio device.
page
4
Compatible with
Panasonic SH-FX60
Easily pair two wireless audio systems
for convenient tandem use.
1 pocket-type cradle
(RGQX0033-H)
1 stand-type cradle
(RGPX0257-H)
Wireless Sound System
Model No. SH-FX80
Dear customer
Thank you for purchasing this product. For optimum performance and safety, please read
these instructions carefully.
Before connecting, operating or adjusting this product, please read the
instructions completely. Please keep this manual for future reference.
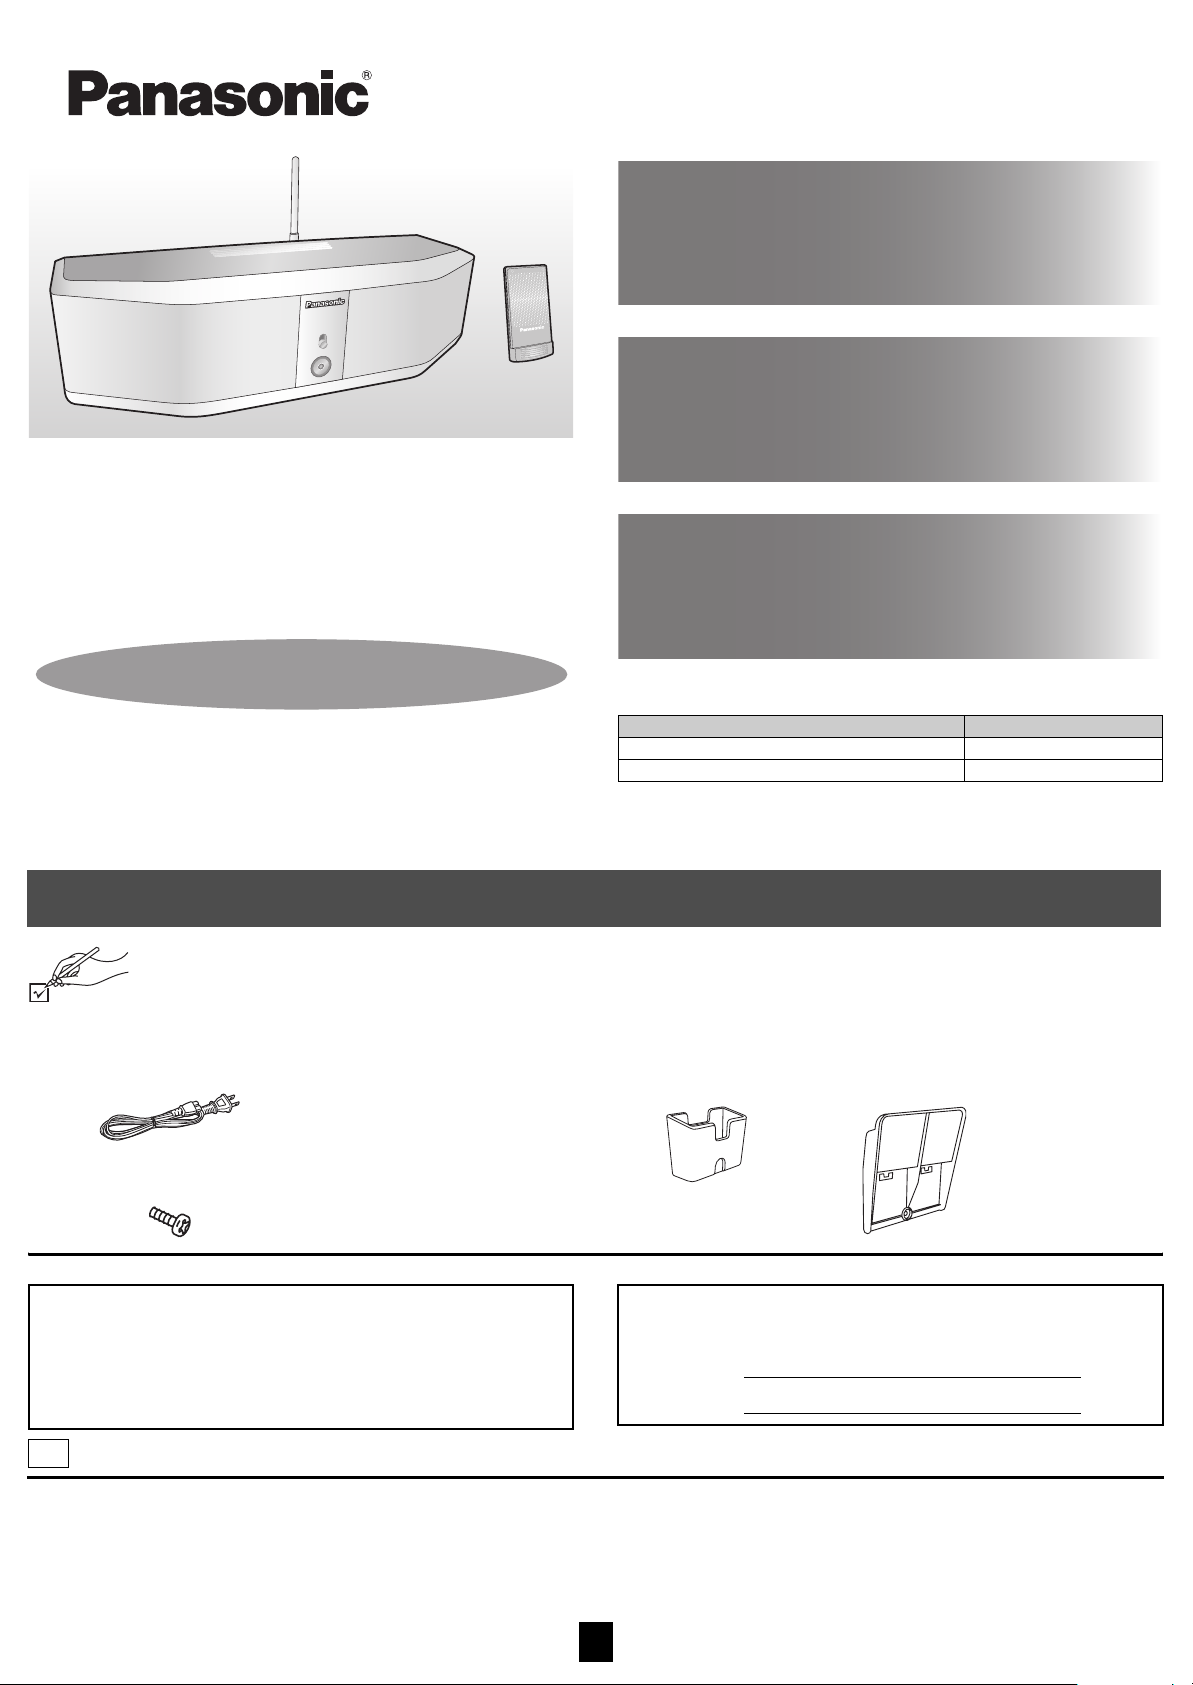
Accessories
Please check and identify the supplied accessories. Use numbers indicated in parentheses when asking for replacement parts.
(Product numbers correct as of April 2006. This may be subject to change.)
To order accessories, refer to “Accessory Purchases” on page 5.
∏ 1 AC power supply cord (K2CB2CB00018)
For use with this unit only. Do not use it with other equipment.
Also, do not use cords for other equipment with this unit.
∏ 1 Cradle screw (XTB3+8GFJ)
User memo:
DATE OF PURCHASE _______________________________________________
DEALER NAME ____________________________________________________
DEALER ADDRESS _________________________________________________
__________________________________________________________________
TELEPHONE NUMBER ______________________________________________
p
P
Panasonic Consumer Electronics Company, Division of Panasonic
Corporation of North America
One Panasonic Way Secaucus,
New Jersey 07094
http://www.panasonic.com
C 2006 Matsushita Electric Industrial Co., Ltd.
System SH-FX80
Digital Transceiver SH-FX80T
Wireless Sound System SB-FX80
∏ 2 Cradles for external digital audio players
The model number and serial number of this product can be found on either the back
or the bottom of the unit. Please note them in the space provided below and keep for
future reference.
MODEL NUMBER SH-FX80
SERIAL NUMBER
RQT8661-1Y
F0406KN1046
Panasonic Puerto Rico, Inc.
Ave. 65 de Infantería, Km. 9.5
San Gabriel Industrial Park, Carolina,
Puerto Rico 00985
Printed in Malaysia
1
Page 2
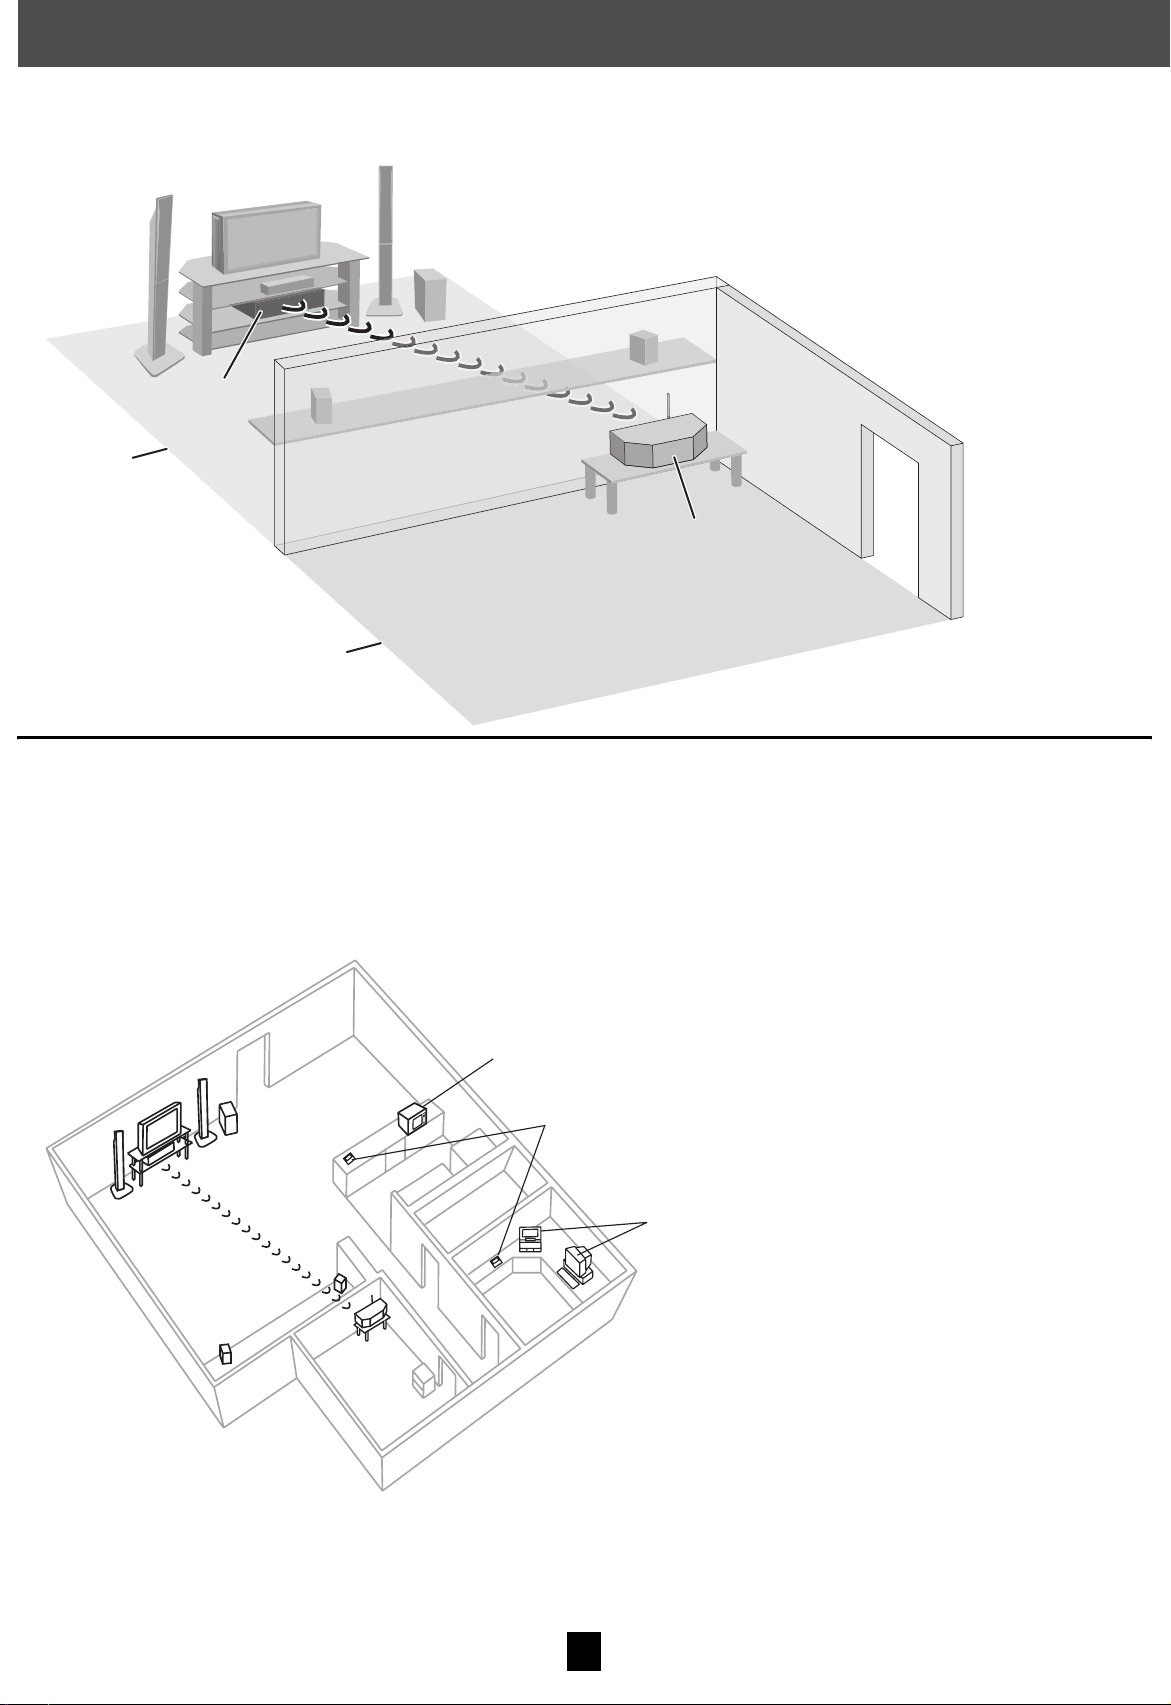
Setup
Home theater unit
(with digital transceiver)
Wireless sound system
Place within approximately 15 m (49 ft)
from the home theater unit.
e.g.
Main room
Second room
2.4GHz-band microwave oven
2.4GHz-band cordless phone
personal computer with 2.4GHzband wireless LAN
e.g.
Preparation
≥ Turn off all equipment before connection and read the appropriate operating instructions.
≥Connect the AC power supply cord after all other connections are complete.
∫ Wireless setup diagram
[Note[
≥ Do not use the wireless sound system and digital transceiver in a metal cabinet or bookshelf.
≥
When using the wireless sound system in a separate room, thick or dense walls may reduce the 15 m (49 ft) operating range. If you experience an intermittent link (e.g. sound cutting out),
try moving the wireless sound system to a different location nearer to your home theater unit.
∫ Avoiding interference
To avoid possible interference, do not place the wireless sound system near any of the following devices.
The wireless sound system uses the same radio frequencies as other devices that may be present in your home.
The wireless sound system will automatically seek a clear channel if any of these other devices interfere with its communication. When this happens, the wireless link indicator (e.g. “
LED) flashes on your home theater unit, and there is a brief interruption in audio coming from the wireless sound system.
This is the normal operation of the product working to assure the best possible performance of your Home Theater System.
If the interference persists, try moving the other devices to another location outside the range of the wireless sound system.
2
[W]
” or
Page 3
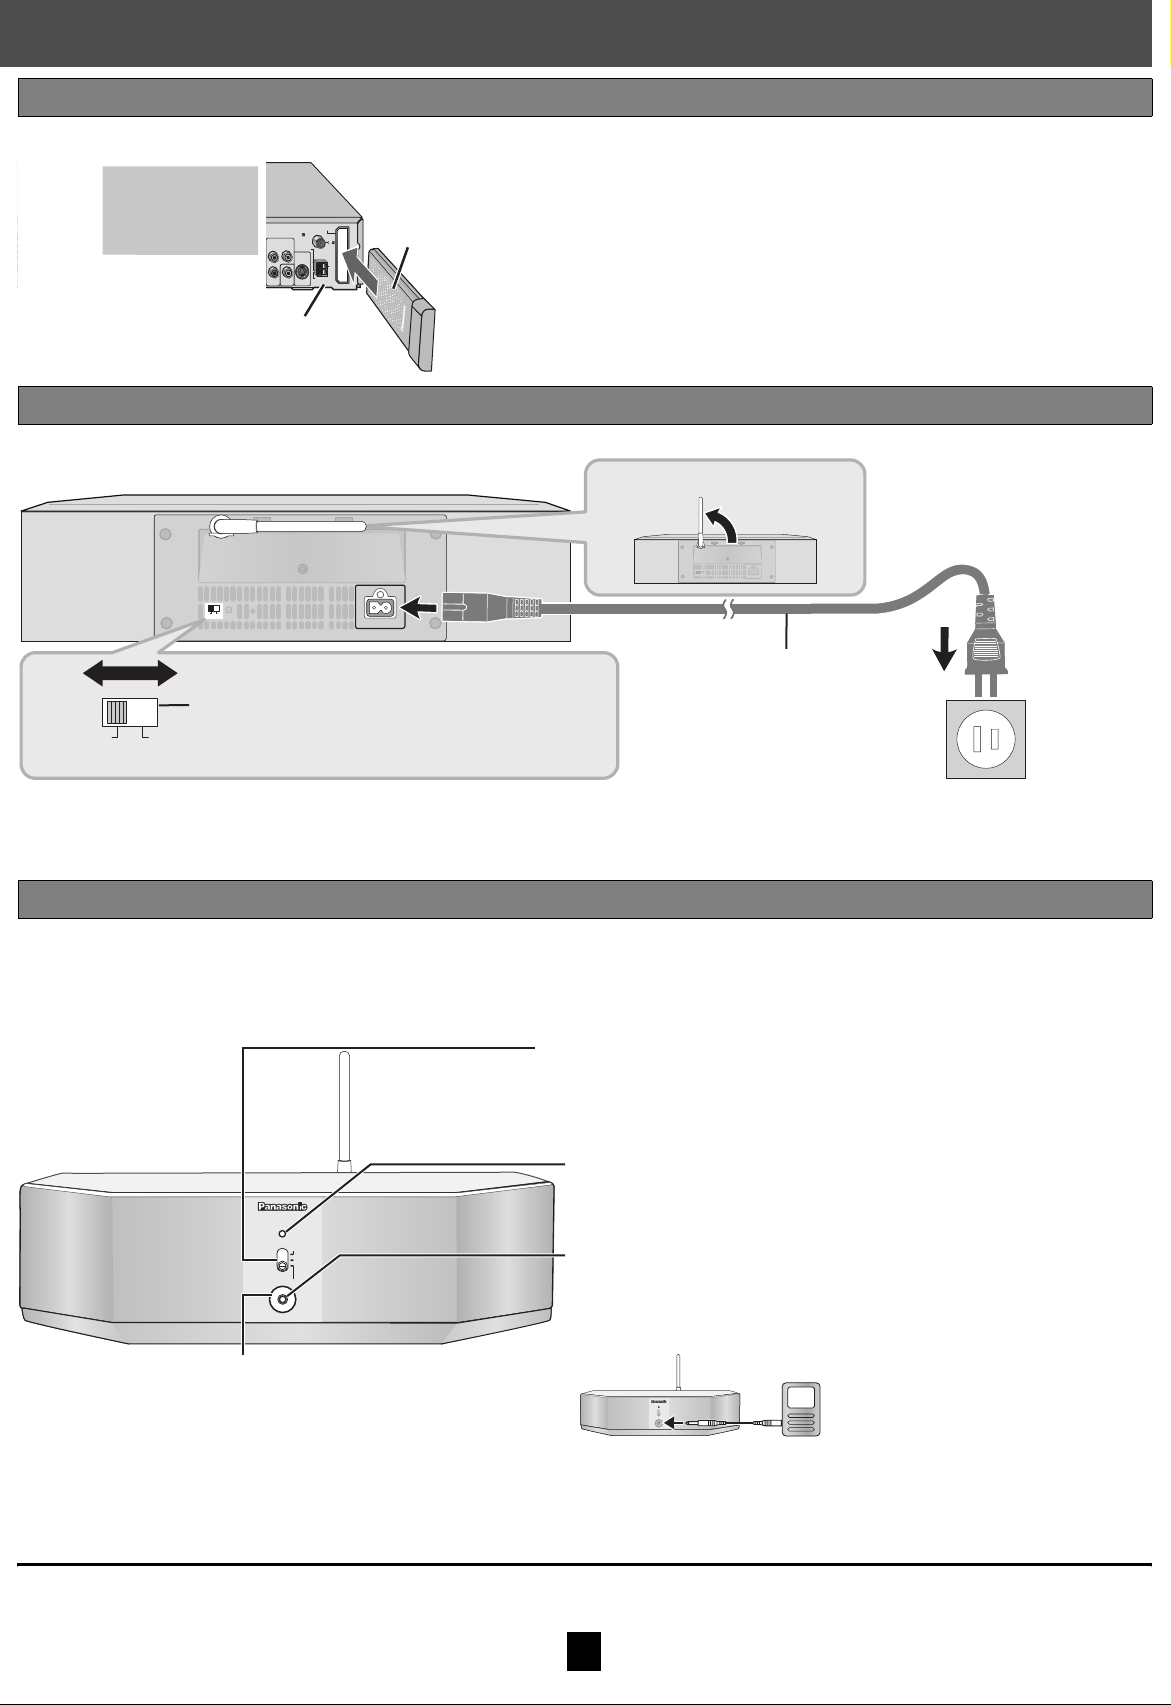
Connecting the digital transceiver
DIGITAL
TRANSMITTER
FM ANT
75
RLRL
6
5
214
3
AV OUT
COMPONENT VIDEO OUT
VIDEO
S-VIDEO
OUT
AM
ANT
EXT
LOOP
YP
B
R
P
SUBWOOFER
CENTER
FRONT SURROUND
OUT
Digital transceiver
§
Insert fully until you hear a click.
Rear of the home theater unit
Do not insert or
remove while the
home theater unit
is on.
e.g.
§
For SH-FX60 users, do not remove the SH-FX60T transceiver card from the
home theater unit. Refer to page 4, “Pairing your SB-FX80 wireless sound
system with the SH-FX60 wireless system (not included)”.
To household AC outlet
(AC 120 V, 60 Hz)
AC power supply cord
Soft Loud
The primary sound level can be set here.
≥ You can set the switch to “Hi” to boost the overall volume of an
external device (e.g. MP3 player) that has low output power when
connected to the MUSIC PORT on the wireless sound system.
Raise the antenna mast for best reception.
Insert the digital transceiver into the slot of your home theater unit.
Connecting the AC cord and setting the sound level
Connect the AC cord to the wireless sound system.
Hi
SOUNDLoI/D SET
AC IN
~
Hi
SOUNDLoI/D SET
~
AC IN
Lo Hi
SOUND
Making the wireless link
Refer also to the operating instructions for your home theater unit.
Turn on your home theater unit.
1
≥ Ensure the wireless sound system is plugged into the AC outlet.
Select “MAIN SET” or “MUSIC PORT” on the wireless sound system.
2
AC IN
SELECTOR
MAIN SET
POWER OFF
MUSIC PORT
Lighting Ring
The light goes out when the unit is in
standby mode, or turned off.
SELECTOR
MAIN SET: Select to enjoy audio from your home theater unit.
POWER OFF: Select to turn off the wireless sound system.
to enjoy
MUSIC PORT: Select
audio from the MUSIC PORT on the wireless sound system.
Power indicator [AC IN]
This indicator lights when the unit is plugged into the AC outlet.
MUSIC PORT
Allows you to connect and enjoy music from an external device (e.g. MP3 player).
≥ Set the selector on the wireless sound system to MUSIC PORT.
≥ To avoid distorted sound, make sure that any equalizer function of your external device
is turned off.
≥ Plug type: ‰3.5 mm (
1
/8 z) stereo mini plug
e.g.
External device (not included)
Reduce the volume before connecting.
Check the wireless link indicator on the home theater unit.
3
The wireless link indicator (e.g. “ [W] ” or LED) should light up on the home theater unit.
≥ If the indicator is flashing, refer to page 8, Troubleshooting guide.
Start play on the home theater unit.
4
Conserving power
The wireless sound system consumes a small amount of power when it is in standby mode.
To save power when the unit is not to be used for a long time, unplug it from the household AC outlet.
3
Page 4

Setup (continued)
Stand-type cradle attachment
Pocket-type cradle attachment
SB-FX80 wireless
sound system (included)
SH-FX60 wireless
system (not included)
e.g.
Back of the SB-FX80 wireless sound system
Attaching the external digital audio player cradle
(included)
The wireless sound system can be used as a stand-alone audio amplifier when an
external device (e.g. MP3 player) is connected to its MUSIC PORT. To conveniently hold
the external device, you can attach the included pocket-type or stand-type cradle.
Unplug the AC cord and disconnect the external device before attaching
the cradle.
1 Hang the cradle on the back of the wireless sound system.
≥ Ensure the antenna mast is raised.
2 Secure the cradle with the screw.
1
2
1
∫ Wireless setup diagram for pairing with the SH-FX60
wireless system
≥ Your wireless sound system can be used in tandem with the SH-FX60 wireless system.
≥ To avoid possible interference, refer also to page 2 “Avoiding interference”.
[Note[
Your wireless sound system can also be used in tandem with the SC-HT640W home
2
theater system. For pairing, you can follow the same procedure as shown below for the
SH-FX60 wireless system.
Pairing your SB-FX80 wireless sound system with the SH-FX60 wireless system (not included)
Preparation
≥ The following steps are to be performed after setting up the SH-FX60 wireless system. For proper setup, refer to its operating instructions.
≥Do not remove the SH-FX60T transceiver card from the home theater unit.
≥ Store your SH-FX80T transceiver card in a cool dry place for later use.
Unplug the SH-FX60 wireless system from the AC outlet.
1
Move the SB-FX80 wireless sound system next to your home
2
theater unit.
≥ After pairing is completed, you can move the SB-FX80 wireless sound system to
the desired location.
Select “MAIN SET” on the SB-FX80 wireless sound system (➜page 3).
3
≥ Ensure the SB-FX80 wireless sound system is plugged into the AC outlet.
Reduce the volume on your home theater unit.
4
[For[HT[models] (e.g. SC-HT740)
5
Press and hold [SURROUND MUSIC] on your home theater unit
until “P” lights in the display.
≥ Ensure the “REAR MUSIC P.” source is not selected.
While “P” is displayed
6
Using a pointed object, press [I/D SET] on the back of
wireless sound system.
≥ During pairing, the lighting ring will temporarily light up for a short period of time.
Hi
SOUNDLoI/D SET
Plug the SH-FX60 wireless system back into the AC outlet.
7
≥ After the SH-FX60 wireless system and SB-FX80 wireless sound system lighting
rings both light up, pairing is completed.
≥ When paired, the SB-FX80 wireless sound system is linked to your home theater
system only when the SH-FX60 wireless system is also linked.
Start play on your home theater unit.
8
~
AC IN
Lo Hi
SOUND
the SB-FX80
I/D SET
[For[RT[models] (e.g. SC-RT50)
1 Press [AUX] on your remote control to select “AUX”.
2 Press and hold [∫] (Stop) on your home theater unit.
≥Do not release the button.
3 Wait at least 5 seconds, and then press [MUTING] on your
4 Release [∫] (Stop).
remote control.
“P” lights in the display.
∫ To cancel pairing, or to use the SB-FX80 wireless
sound system without the SH-FX60 wireless system
1 Turn off your home theater unit.
Swap the SH-FX60T transceiver card with the SH-FX80T transceiver card.
2
3 Turn on your home theater unit.
(
4 Follow steps 2 through 6
≥ Pairing is canceled when the lighting ring lights up. The SB-FX80 wireless sound
system can now be used without the SH-FX60 wireless system.
4
➜ above).
Page 5

Limited Warranty
Panasonic Consumer Electronics Company,
Division of Panasonic Corporation of North America
One Panasonic Way Secaucus, New Jersey 07094
Panasonic Audio Products Limited Warranty
Limited Warranty Coverage
If your product does not work properly because of a defect in materials or workmanship,
Panasonic Consumer Electronics Company or Panasonic Puerto Rico, Inc. (collectively
referred to as “the warrantor”) will, for the length of the period indicated on the chart below, which starts
with the date of original purchase (“warranty period”), at its option either (a) repair your product with
new or refurbished parts, or (b) replace it with a new or a refurbished product. The decision to repair or
replace will be made by the warrantor.
Product or Part Name Parts Labor
Audio Products (except items listed below) One (1) year One (1) year
USB Reader-Writer, Personal Computer Card
Adapters
(in exchange for defective item)
Accessories: Headphones, Cartridges, Microphones,
Adapters
Rechargeable Batteries, DVD-R/-RAM Discs
(in exchange for defective item)
SD Memory Cards, Rechargeable Battery Packs
(in exchange for defective item)
During the “Labor” warranty period there will be no charge for labor. During the “Parts” warranty period,
there will be no charge for parts. You must carry-in or mail-in your product during the warranty period.
If non-rechargeable batteries are included, they are not warranted. This warranty only applies to
products purchased and serviced in the United States or Puerto Rico. This warranty is extended only to
the original purchaser of a new product which was not sold “as is”. A purchase receipt or other proof of
the original purchase date is required for warranty service.
One (1) year Not Applicable
Ninety (90)
days
Ten (10) days Not Applicable
Ninety (90)
days
Ninety (90)
days
Not Applicable
Panasonic Puerto Rico, Inc.
Ave. 65 de Infantería, Km. 9.5
San Gabriel Industrial Park, Carolina, Puerto Rico 00985
Carry-In or Mail-In Service
For Carry-In or Mail-In Service in the United States call 1-800-211-PANA (1-800-211-7262) or visit
Panasonic web site: http://www.panasonic.com
For assistance in Puerto Rico call Panasonic Puerto Rico, Inc. (787)-750-4300 or fax
(787)-768-2910.
Limited Warranty Limits And Excl usions
This warranty ONLY COVERS failures due to defects in materials or workmanship, and DOES NOT
COVER normal wear and tear or cosmetic damage. The warranty ALSO DOES NOT COVER damages
which occurred in shipment, or failures which are caused by products not supplied by the warrantor, or
failures which result from accidents, misuse, abuse, neglect, mishandling, misapplication, alteration,
faulty installation, set-up adjustments, misadjustment of consumer controls, improper maintenance,
power line surge, lightning damage, modification, or commercial use (such as in a hotel, office,
restaurant, or other business), rental use of the product, service by anyone other than a Factory
Servicenter or other Authorized Servicer, or damage that is attributable to acts of God.
THERE ARE NO EXPRESS WARRANTIES EXCEPT AS LISTED UNDER “LIMITED WARRANTY
COVERAGE”. THE WARRANTOR IS NOT LIABLE FOR INCIDENTAL OR CONSEQUENTIAL
DAMAGES RESULTING FROM THE USE OF THIS PRODUCT, OR ARISING OUT OF ANY BREACH
OF THIS WARRANTY. (As examples, this excludes damages for lost time, travel to and from the
servicer, loss of media or images, data or other memory content. The items listed are not exclusive, but
are for illustration only.) ALL EXPRESS AND IMPLIED WARRANTIES, INCLUDING THE
WARRANTY OF MERCHANTABILITY, ARE LIMITED TO THE PERIOD OF THE LIMITED
WARRANTY.
Some states do not allow the exclusion or limitation of incidental or consequential damages, or
limitations on how long an implied warranty lasts, so the exclusions may not apply to you.
This warranty gives you specific legal rights and you may also have other rights which vary from state to
state. If a problem with this product develops during or after the warranty period, you may contact your
dealer or Servicenter. If the problem is not handled to your satisfaction, then write to the warrantor’s
Consumer Affairs Department at the addresses listed for the warrantor.
PARTS AND SERVICE WHICH ARE NOT COVERED BY THIS LIMITED WARRANTY ARE YOUR
RESPONSIBILITY.
Customer Services Directory
Obtain Product Information and Operating Assistance; locate your nearest Dealer or Servicenter; purchase Parts and
Accessories; or make Customer Service and Literature requests by visiting our Web Site at:
http://www.panasonic.com/consumersupport
or, contact us via the web at:
http://www.panasonic.com/contactinfo
You may also contact us directly at:
1-800-211-PANA (7262),
Monday-Friday 9 am-9 pm; Saturday-Sunday 10 am-7 pm, EST.
For hearing or speech impaired TTY users, TTY : 1-877-833-8855
Accessory Purchases
Purchase Parts, Accessories and Instruction Books online for all Panasonic Products by visiting our Web Site at:
http://www.pasc.panasonic.com
or, send your request by E-mail to:
npcparts@us.panasonic.com
You may also contact us directly at:
1-800-332-5368 (Phone) 1-800-237-9080 (Fax Only) (Monday – Friday 9 am to 8 pm, EST.)
Panasonic Services Company
20421 84th Avenue South, Kent, WA 98032
(We Accept Visa, MasterCard, Discover Card, American Express, and Personal Checks)
For hearing or speech impaired TTY users, TTY : 1-866-605-1277
Service in Puerto Rico
Panasonic Puerto Rico, Inc.
Ave. 65 de Infantería, Km. 9.5, San Gabriel Industrial Park, Carolina, Puerto Rico 00985
Phone (787)750-4300, Fax (787)768-2910
5
F1104
Page 6

WARNING:
TO REDUCE THE RISK OF FIRE, ELECTRIC SHOCK OR
PRODUCT DAMAGE, DO NOT EXPOSE THIS APPARATUS TO
RAIN, MOISTURE, DRIPPING OR SPLASHING AND THAT NO
OBJECTS FILLED WITH LIQUIDS, SUCH AS VASES, SHALL
BE PLACED ON THE APPARATUS.
CAUTION!
DO NOT INSTALL OR PLACE THIS UNIT IN A BOOKCASE,
BUILT-IN CABINET OR IN ANOTHER CONFINED SPACE.
ENSURE THE UNIT IS WELL VENTILATED. TO PREVENT RISK
OF ELECTRIC SHOCK OR FIRE HAZARD DUE TO
OVERHEATING, ENSURE THAT CURTAINS AND ANY OTHER
MATERIALS DO NOT OBSTRUCT THE VENTILATION VENTS.
The socket outlet shall be installed near the equipment and easily accessible. The
mains plug of the power supply cord shall remain readily operable.
To completely disconnect this apparatus from the AC Mains, disconnect the power
supply cord plug from AC receptacle.
CAUTION
RISK OF ELECTRIC SHOCK
DO NOT OPEN
CAUTION: TO REDUCE THE RISK OF ELECTRIC SHOCK,
DO NOT REMOVE SCREWS. NO USER-SERVICEABLE
PARTS INSIDE.
REFER SERVICING TO QUALIFIED SERVICE PERSONNEL.
The lightning flash with arrowhead symbol, within an
equilateral triangle, is intended to alert the user to the
presence of uninsulated “dangerous voltage” within the
product’s enclosure that may be of sufficient magnitude to
constitute a risk of electric shock to persons.
The exclamation point within an equilateral triangle is
intended to alert the user to the presence of important
operating and maintenance (servicing) instructions in the
literature accompanying the appliance.
FCC Note:
This equipment has been tested and found to comply with the limits for a Class B digital device, pursuant to Part 15 of the FCC Rules.
These limits are designed to provide reasonable protection against harmful interference in a residential installation. This equipment generates, uses and can radiate radio frequency
energy and, if not installed and used in accordance with the instructions, may cause harmful interference to radio communications.
However, there is no guarantee that interference will not occur in a particular installation. If this equipment does cause harmful interference to radio or television reception, which can
be determined by turning the equipment off and on, the user is encouraged to try to correct the interference by one or more of the following measures:
≥ Reorient or relocate the receiving antenna.
≥ Increase the separation between the equipment and receiver.
≥ Connect the equipment into an outlet on a circuit different from that to which the receiver is connected.
≥ Consult the dealer or an experienced radio/TV technician for help.
FCC caution: To maintain compliance with FCC regulations, shielded interface cables must be used with this equipment. Operation with non-approved equipment or unshielded cables
may result in interference to radio and TV reception. Any changes or modifications not approved by the party responsible for compliance could void the user’s authority to operate this
equipment.
This device complies with Part 15 of the FCC Rules. Operation is subject to the following two conditions:
(1) This device may not cause har mful interference, and
(2) this device must accept any interference received, including interference that may cause undesired operation.
Responsible Party:
Panasonic Corporation of North America
One Panasonic Way
Secaucus, NJ 07094
Telephone No.: 1-800-211-7262
WARNING:
To satisfy FCC RF exposure requirements for mobile transmitting devices, a separation distance of 20 cm or more should be maintained between the antenna of this device and
persons during device operation. To ensure compliance, operations at closer than this distance is not recommended. The antenna used for this transmitter must not be co-located in
conjunction with any other antenna or transmitter.
This device complies with Part 15 of the FCC Rules. Operation is subject to the following two conditions:
(1) This device may not cause har mful interference,
(2) This device must accept any interference received, including interference that may cause undesired operation.
6
Page 7

IMPORTANT SAFETY INSTRUCTIONS
Read these operating instructions carefully before using the unit. Follow the safety instructions on the unit and the applicable safety instructions listed below. Keep these operating
instructions handy for future reference.
1) Read these instructions.
2) Keep these instructions.
3) Heed all warnings.
4) Follow all instructions.
5) Do not use this apparatus near water.
6) Clean only with dry cloth.
7) Do not block any ventilation openings. Install in accordance with the manufacturer’s
instructions.
8) Do not install near any heat sources such as radiators, heat registers, stoves, or
other apparatus (including amplifiers) that produce heat.
9) Do not defeat the safety purpose of the polarized or grounding-type plug. A
polarized plug has two blades with one wider than the other. A grounding-type plug
has two blades and a third grounding prong. The wide blade or the third prong are
provided for your safety. If the provided plug does not fit into your outlet, consult an
electrician for replacement of the obsolete outlet.
10) Protect the power cord from being walked on or pinched particular ly at plugs,
convenience receptacles, and the point where they exit from the apparatus.
11) Only use attachments/accessories specified by the manufacturer.
12) Use only with the cart, stand, tripod, bracket, or table specified by
the manufacturer, or sold with the apparatus. When a cart is
used, use caution when moving the cart/apparatus combination
to avoid injury from tip-over.
13) Unplug this apparatus during lightning storms or when unused
for long periods of time.
14) Refer all servicing to qualified service personnel. Servicing is required when the
apparatus has been damaged in any way, such as power-supply cord or plug is
damaged, liquid has been spilled or objects have fallen into the apparatus, the
apparatus has been exposed to rain or moisture, does not operate normally, or has
been dropped.
- If you see this symbol-
Information on Disposal in other Countries outside the European Union
This symbol is only valid in the European Union.
If you wish to discard this product, please contact your local
authorities or dealer and ask for the correct method of disposal.
Product service
1. Damage requiring service — The unit should be serviced by qualified service personnel if:
(a) The AC power supply cord or AC adaptor has been damaged; or
(b) Objects or liquids have gotten into the unit; or
(c) The unit has been exposed to rain; or
(d) The unit does not operate normally or exhibits a marked change in performance; or
(e) The unit has been dropped or the cabinet damaged.
2. Servicing— Do not attempt to service the unit beyond that described in these operating instructions. Refer all other servicing to authorized servicing personnel.
3. Replacement parts— When parts need replacing ensure the servicer uses parts specified by the manufacturer or parts that have the same characteristics as the original parts.
Unauthorized substitutes may result in fire, electric shock, or other hazards.
4. Safety check— After repairs or service, ask the servicer to perform safety checks to confirm that the unit is in proper working condition.
The servicer will require all components to service your system.
Therefore, should service ever be necessar y, be sure to bring the entire system.
Product information
For product information or assistance with product operation:
Refer to “Customer Services Directory” on page 5.
Maintenance
Clean this unit with a soft, dry cloth.
≥ Never use alcohol, paint thinner or benzine to clean this unit.
≥ Before using chemically treated cloth, carefully read the instructions that came with the cloth.
7
Page 8

Troubleshooting guide
Before requesting service, make the following checks. If you are in doubt about some of the check points, or if the solutions indicated in the table do not solve the problem, refer to the
“Customer Services Directory” on page 5.
On your home theater unit
The wireless link indicator (e.g. “ [W] ” or LED)
does not light.
The wireless link indicator (e.g. “ [W] ” or LED)
is flashing.
There is no sound when the selected source
on the home theater unit is “REAR MUSIC P.”.
The wireless link indicator (e.g. “ [W] ” or LED)
is lit, but there is no sound from the SB-FX80
wireless sound system.
The wireless link indicator (e.g. “ [W] ” or LED)
is lit, but there is no sound from the SH-FX60
wireless system.
After pairing the SB-FX80 wireless sound
system with the SH-FX60 wireless system,
audio output is erratic.
≥ Ensure that the digital transceiver is fully inserted into the slot of the home theater unit.
≥ Check that the home theater unit is turned on.
≥ There is no link between the home theater unit and the wireless sound system. Check that the wireless sound system is plugged
into the AC outlet.
≥ Ensure that the selector on the wireless sound system is set to MAIN SET.
≥ Ensure that the wireless sound system is within 15 m (49 ft) of the home theater unit.
≥ When the SH-FX60 wireless system is paired with the SB-FX80 wireless sound system, ensure that the SH-FX60 is plugged into
the AC outlet.
≥ The “REAR MUSIC P.” source is not available for the SH-FX80 wireless sound system.
To play audio from an external device through your home theater unit, connect to the MUSIC PORT on the home theater unit and
select “FRONT MUSIC P.” as the source. (Refer also to your home theater unit’s operating instructions.)
≥ When using the wireless sound system as a stand-alone audio amplifier, ensure that the selector on the wireless sound system is
set to MUSIC PORT.
≥
When playing from a 2-channel audio source (e.g. AM/FM station, music CD, etc.), tur n on one of the surround sound effects of
your home theater system (e.g. SURROUND MUSIC) in order to utilize all audio channels.
operating instructions.)
≥ When using the wireless sound system as a stand-alone audio amplifier, ensure that the selector on the wireless sound system is
set to MUSIC PORT.
When the SH-FX60 wireless system is paired with the SB-FX80 wireless sound system, the wireless link indicator on your home
≥
theater unit (e.g. “
1. Check that the SB-FX80 is plugged into the AC outlet.
2. Ensure that the selector on the SB-FX80 is set to MAIN SET.
3. Ensure that the SB-FX80 is within 15 m (49 ft) of the home theater unit.
4. Adjust the volume of your home theater unit.
5. If there is still no sound, repeat the pairing procedure on page 4.
≥
When playing from a 2-channel audio source (e.g. AM/FM station, music CD, etc.), tur n on one of the surround sound effects of
your home theater system (e.g. SURROUND MUSIC) in order to utilize all audio channels.
operating instructions.)
≥
The wrong transceiver card has been inserted into the home theater unit. (The SH-FX80T transceiver card cannot be used with the
SH-FX60 wireless system.)
1. Turn off your home theater system, remove the SH-FX80T transceiver card, and insert the SH-FX60T transceiver card.
2. Turn on your home theater system, and then follow the pairing procedure on page 4.
3. Adjust the volume of your home theater unit.
≥ Ensure that the SH-FX60 wireless system is unplugged, and then repeat the pairing procedure on page 4.
[W]
” or LED) will light when there is a link with the SH-FX60, even when there is no link with the SB-FX80.
(Refer also to your home theater unit’s
(Refer also to your home theater unit’s
Specifications
AMPLIFIER SECTION
Output power
RMS output power stereo mode
Surround Ch (both ch driven) 65 W per channel (4 ≠), 1 kHz, 10 % THD
Total RMS stereo mode power 130 W
FTC output power stereo mode
Surround Ch (both ch driven) 40 W per channel (4 ≠), 120 Hz–20 kHz, 1 % THD
Total FTC stereo mode power 80 W
SPEAKER SECTION
[Surround\speakers\SB-FX80]
Typ e 1 way, 1 speaker system (Bass reflex)
Speaker unit(s) Impedance 4 ≠
Full range 6.5 cm (2
Input power (IEC) 90 W
Output sound pressure 80 dB/W (1.0 m)
Frequency range 100 Hz–25 kHz (j16 dB)
(L and R ch in one box)
1
/2z) Cone type
§
(Max)
115 Hz–22 kHz (j10 dB)
RF SECTION
Wireless module
Frequency range 2.436 to 2.458 GHz
RF output power 19 dBm (Max)
MUSIC PORT terminal
Input sensitivity 100 mV
Input impedance 4.7 k≠
Terminal Stereo, 3.5 mm (
1
/8z) jack
GENERAL
Power supply AC 120 V, 60 Hz
Power consumption Digital transceiver 0.85 W
Dimensions (WtHtD)
Digital transceiver 97 mmk47.5 mmk8.5 mm (3
Wireless sound system 430 mmk197.5 mmk174.5 mm (16
Mass
Digital transceiver 0.03 kg (0.07 Ibs)
Wireless sound system 2.7 kg (6 Ibs)
Operating temperature range r5 oC to r35 oC (r41 oF to r95 oF)
Operating humidity range 5% to 90% RH (no condensation)
Power consumption in standby mode 3W
§
Rating with low-cut filter equipped amplifier
[Note]
1. Specifications are subject to change without notice.
Mass and dimensions are approximate.
2. Total harmonic distortion is measured by a digital spectrum analyzer.
Wireless sound system 30 W
13
/16zk17/8
15
zk11/32z)
/16zk725/32zk67/8z)
8
 Loading...