

Panasonic SDR-SW20PC User Manual
Operating Instructions
SD Video Camera
Model No. SDR-SW20P/PC
Before connecting, operating or adjusting this product, please read the instructions completely.
Spanish Quick Use Guide is included.
Guía para rápida consulta en español está incluida.
For USA assistance, please call: 1-800-211-PANA(7262) or, contact us via the web at:
http://www.panasonic.com/contactinfo
For Canadian assistance, please call: 1-800-561-5505 or visit us at www.panasonic.ca
VQT1M21
Things You Should Know
Thank you for choosing
Panasonic!
You have purchased one
of the most sophisticated
and reliable products on the
market today. Used properly,
we’re sure it will bring you
and your family years of
enjoyment. Please take time
to fill in the information on the
right. Be sure to retain this
manual as your convenient
camera information source.
Date of Purchase
Dealer Purchased From
Dealer Address
Dealer Phone No.
Model No.
Serial No.
Safety Precautions
WARNING:
TO REDUCE THE RISK OF FIRE, ELECTRIC SHOCK OR PRODUCT
DAMAGE,
• DO NOT EXPOSE ACCESSORIES (AC ADAPTOR, AC CABLE,
BATTERY PACK, SD MEMORY CARD AND ETC.) TO RAIN, MOISTURE,
DRIPPING OR SPLASHING AND THAT NO OBJECTS FILLED WITH
LIQUIDS, SUCH AS VASES, SHALL BE PLACED ON THEM.
• USE ONLY THE RECOMMENDED ACCESSORIES.
• DO NOT REMOVE THE COVER (OR BACK); THERE ARE NO USER
SERVICEABLE PARTS INSIDE. REFER SERVICING TO QUALIFIED
SERVICE PERSONNEL.
CAUTION!
DO NOT INSTALL OR PLACE THIS UNIT IN A BOOKCASE, BUILT-IN
CABINET OR IN ANOTHER CONFINED SPACE. ENSURE THE UNIT IS
WELL VENTILATED. TO PREVENT RISK OF ELECTRIC SHOCK OR
FIRE HAZARD DUE TO OVERHEATING, ENSURE THAT CURTAINS
AND ANY OTHER MATERIALS DO NOT OBSTRUCT THE VENTILATION
VENTS.
WARNING
• AS WITH ANY SMALL OBJECT, SD CARDS CAN BE SWALLOWED BY
YOUNG CHILDREN. DO NOT ALLOW CHILDREN TO HANDLE THE SD
CARD.
2 VQT1M21
THE FOLLOWING APPLIES ONLY IN THE U.S.A.
FCC Note: This equipment has been tested and found to comply with the
limits for a Class B digital device, pursuant to Part 15 of the FCC Rules.
These limits are designed to provide reasonable protection against harmful
interference in a residential installation. This equipment generates, uses,
and can radiate radio frequency energy and, if not installed and used in
accordance with the instructions, may cause harmful interference to radio
communications. However, there is no guarantee that interference will
not occur in a particular installation. If this equipment does cause harmful
interference to radio or television reception, which can be determined by
turning the equipment off and on, the user is encouraged to try to correct the
interference by one or more of the following measures:
• Reorient or relocate the receiving antenna.
• Increase the separation between the equipment and receiver.
• Connect the equipment into an outlet on a circuit different from that to
which the receiver is connected.
• Consult the dealer or an experienced radio/TV technician for help.
FCC Caution: To assure continued compliance, follow the attached
installation instructions and use only shielded interface cables with ferrite
core when connecting to computer or peripheral devices.
Any changes or modifications not expressly approved by the party
responsible for compliance could void the user’s authority to operate this
equipment.
Declaration of Conformity
Trade Name: Panasonic
Model No.: SDR-SW20P
Responsible party: Panasonic Corporation of North America
One Panasonic Way, Secaucus, NJ 07094
Support Contact: Panasonic Consumer Electronics Company
1-800-211-PANA (7262)
This device complies with Part 15 of the FCC Rules. Operation is subject
to the following two conditions: (1) This device may not cause harmful
interference, and (2) this device must accept any interference received,
including interference that may cause undesired operation.
SDR-SW20P
THE FOLLOWING APPLIES ONLY IN CANADA
This Class B digital apparatus complies with Canadian ICES-003.
3VQT1M21

IMPORTANT SAFETY
INSTRUCTIONS
Read these operating instructions carefully before using the unit. Follow the
safety instructions on the unit and the applicable safety instructions listed below.
Keep these operating instructions handy for future reference.
1) Read these instructions.
2) Keep these instructions.
3) Heed all warnings.
4) Follow all instructions.
5) Do not use accessories near water.
6) Clean only with dry cloth.
7) Do not block any ventilation openings. Install in accordance with the
manufacturer’s instructions.
8) Do not install near any heat sources such as radiators, heat registers,
stoves, or other apparatus (including amplifiers) that produce heat.
9) Do not defeat the safety purpose of the polarized or grounding-type plug.
A polarized plug has two blades with one wider than the other. A groundingtype plug has two blades and a third grounding prong. The wide blade or
the third prong are provided for your safety. If the provided plug does not fit
into your outlet, consult an electrician for replacement of the obsolete outlet.
10) Protect the power cord from being walked on or pinched particularly at
plugs, convenience receptacles, and the point where they exit from the
apparatus.
11) Only use attachments/accessories specified by the manufacturer.
12) Use only with the cart, stand, tripod, bracket, or the table specified by the
manufacturer, or sold with the apparatus. When a cart
is used, use caution when moving the cart/apparatus
combination to avoid injury from tip-over.
13) Unplug this apparatus during lightning storms or when
unused for long periods of time.
14) Refer all servicing to qualified service personnel.
Servicing is required when the apparatus has been damaged in any way,
such as power-supply cord or plug is damaged, liquid has been spilled or
objects have fallen into the apparatus, the apparatus has been exposed to
rain or moisture, does not operate normally, or has been dropped.
4 VQT1M21
Battery
Battery pack (Lithium ion battery pack)
• Use the specified unit to recharge the battery pack.
• Do not use the battery pack with equipment other than the specified unit.
• Do not get dirt, sand, liquids, or other foreign matter on the terminals.
• Do not touch the plug terminals (+ and ) with metal objects.
• Do not disassemble, remodel, heat or throw into fire.
If any electrolyte should come into contact with your hands or clothes, wash
it off thoroughly with water.
If any electrolyte should come into contact with your eyes, never rub the
eyes. Rinse eyes thoroughly with water, and then consult a doctor.
Warning
Risk of fire, explosion and burns. Do not disassemble, heat above 60 °C
(140 °F) or incinerate.
AC adaptor
This AC adaptor operates on AC between 110 V and 240 V.
But
• In the U.S.A. and Canada, the AC adaptor must be connected to a 120 V
AC power supply only.
• When connecting to an AC supply outside of the U.S.A. or Canada, use a
plug adaptor to suit the AC outlet configuration.
• When connecting to a supply of greater than AC 125 V, ensure the cord
you use is suited to the voltage of the AC supply and the rated current of
the AC adaptor.
• Contact an electrical parts distributor for assistance in selecting a suitable
AC plug adaptor or AC cord set.
The socket outlet shall be installed near the equipment and easily
accessible. The mains plug of the power supply cord shall remain readily
operable. To completely disconnect this apparatus from the AC Mains,
disconnect the power supply cord plug from AC receptacle.
U.S.A./CANADA CONSUMERS: ATTENTION:
A lithium ion/polymer battery that is recyclable powers the
product you have purchased. Please call 1-800-8-BATTERY for
information on how to recycle this battery.
5VQT1M21

PRECAUTIONS
USE & LOCATION
WARNING
TO AVOID SHOCK HAZARD…
Accessories (AC adaptor, AC cable, battery pack, SD memory card and etc.)
should not be exposed to rain or moisture. Do not connect the power supply
if it gets wet. Your camera has been designed for outdoor use, however
accessories are not designed to sustain direct exposure to water, rain, sleet,
snow, sand, dust, or a direct splashing from a pool or even a cup of coffee.
This action could permanently damage the internal parts. Do not attempt to
disassemble this unit. There are no user serviceable parts inside. Unplug your
camera from the power supply before cleaning.
CAUTION
DO NOT AIM YOUR CAMERA AT THE SUN OR OTHER BRIGHT OBJECTS
DO NOT EXPOSE YOUR CAMERA TO EXTENDED HIGH
TEMPERATURE…
Such as, in direct sunlight, inside a closed car, next to a heater, etc... This
action could permanently damage the internal parts of your camera.
AVOID SUDDEN CHANGES IN TEMPERATURE…
If the unit is suddenly moved from a cold place to a warm place, moisture may
form on the SD card and inside the unit.
DO NOT LEAVE YOUR CAMERA OR THE POWER SUPPLY TURNED ON
WHEN NOT IN USE.
STORAGE OF YOUR CAMERA…
Store and handle your camera in a manner that will not subject it to
unnecessary movement (avoid shaking and striking). Your camera contains
a sensitive pick-up device which could be damaged by improper handling or
storage.
CARE
TO CLEAN YOUR CAMERA…
Do not use strong or abrasive detergents when cleaning your camera body.
TO PROTECT THE LENS…
Do not touch the surface of the lens with your hand. Use a commercial
camera lens solution and lens paper when cleaning the lens. Improper
cleaning can scratch the lens coating.
TO PROTECT THE FINISH OF YOUR CAMERA…
Before handling your camera, make sure your hands and face are free from
any chemical products, such as suntan lotion, as it may damage the finish.
Camera and SD card (sold separately) temperature
After use and battery charging, the battery will be hot. Also, during use,
although the unit’s body and SD card become hot, there is nothing wrong with
the unit.
6 VQT1M21
IMPORTANT
Carefully observe copyright laws
Whatever you have recorded and created can be used for your personal
entertainment only. Under copyright laws, other materials cannot be used
without obtaining permission from the holders of the copyrights.
Indemnity concerning recording content
The manufacturer shall in no event be liable for the loss of recordings due to
malfunction or defect of this unit, its accessories or recordable media.
For the purposes of these operating instructions
SD Memory Card and SDHC Memory Card are referred to as the “SD card”.
LCD monitor
Due to limitations in LCD production technology, there may be some tiny bright
or dark spots on the LCD monitor screen. However, this is not a malfunction
and does not affect the recorded picture.
-If you see this symbolInformation on Disposal in other Countries outside the
European Union
This symbol is only valid in the European Union.
If you wish to discard this product, please contact your local
authorities or dealer and ask for the correct method of disposal.
• SDHC Logo is a trademark.
• miniSD Logo is a trademark.
• Manufactured under license from Dolby Laboratories.
Dolby and the double-D symbol are trademarks of Dolby Laboratories.
®
• Microsoft
trademarks of the Microsoft Corporation in the United States and/or other
countries.
• IBM and PC/AT are registered trademarks of International Business Machines
Corporation of the U.S.
• Celeron
trademarks or trademarks of the Intel Corporation in the United States and
other countries.
• Apple and MacOS are trademarks of Apple Inc.
• Microsoft product screen shot(s) reprinted with permission from Microsoft
Corporation.
• Other names of systems and products mentioned in these instructions are
usually the registered trademarks or trademarks of the manufacturers who
developed the system or product concerned.
, Windows® and DirectX® are either registered trademarks or
®
, Intel®, Intel® Core™ Solo and Pentium® are the registered
7VQT1M21

(IMPORTANT) Water resistance
Water resistance
The water-resistance and dustproofing of this unit comply with IP58 of IEC
60529 “Degrees of protection provided by enclosures (IP Code)”. The unit
passed water-resistance tests (IEC 60529), in which it was submerged to a
depth of 1.5 m (5 feet) for 30 minutes, and dustproof tests (IP Code: IP58) in
accordance with Panasonic standards, but this does not guarantee that the unit
will not be destroyed or damaged by contact with water and dust.
Observe the following precautions and avoid use in water pressure above the
guaranteed performance level and in very dusty environments. (Accessories
are not water-resistant.)
The penetration of water into the unit due to mishandling by the user is not
covered by the guarantee given for the unit’s water resistance performance. If
water should penetrate the unit, stop using the unit, and consult the dealer from
whom you purchased the unit.
Underwater use
• Use the unit at depths no deeper than 1.5 m (5 feet) in water of 0 °C to
40 °C (32 °F to 104 °F). Do not use it underwater for 30 continuous minutes
or longer. After use underwater, wipe off adhering water and dry in a wellventilated location before using the unit underwater again.
• Do not open the card/battery door or the terminal cover underwater.
• Do not impact the unit against anything underwater. (Impacts may lead to
water infiltration.)
• Do not dive or jump into water with the unit in your hands. Also, do not use
the unit in swift currents, waterfalls or other places where exposed to high
water pressure. (Doing so may subject the unit to high water pressure levels
which may lead to damage.)
• Securely attach the strap when submerging in water so as not to lose hold
of the unit.
Care after underwater use
• Promptly wipe off any detergent, soap, hot spring water, bath liquids, suntan
oil, sun block, medicines or other chemicals that splash on the unit. (The
unit’s water-resistance is effective only in fresh and saltwater.)
• After use in water or near the sea, swish in fresh water (in a shallow
container) with the LCD monitor open and closed to rinse off salt water,
sand and other matter, then let soak for 30 minutes or less. After that, wipe
off water with a dry cloth. (Washing the unit in soap or neutral detergents
or leaving the unit with salt water adhering to it can cause corrosion,
discoloring and degrade water-resistant performance.)
After rinsing, set the unit with the drain port facing downward in a wellventilated shady place to dry.
Drying with the hot air of a hairdryer or other device can cause deformation
and degrade water-resistant performance.
Water may run from the drain port (P.17) if the unit is not dry on the inside.
8 VQT1M21
Handling
•
Avoid impacting the unit against anything, for example, when carrying it by the strap.
Strong impacts can deform the unit’s body and degrade water-resistant performance.
The unit’s water resistance performance will no longer be guaranteed in the
event that the unit has been dropped or otherwise subjected to strong impact
Do not leave the unit where exposed to low temperatures of 0 °C (32 °F) and
•
below or high temperatures of 40 °C (104 °F) and above. (Extreme temperatures
can degrade water-resistant performance.) In particular, do not leave the unit
sitting on sandy beaches. (The unit can become hot and sand can adhere to it.)
• Do not insert pointed objects into the microphone or speaker holes. (The
internal water-resistant sheet can be damaged and compromise waterresistant performance.)
• Do not plug the unit in or unplug it with wet hands.
.
Replacing the water-resistant packing
The performance of the unit’s water-resistant packing degrades over the
course of 18 months or more. It is recommended to have your dealer replace
this packing (you will be charged for this) at least once every 18 months.
Card/Battery door and terminal cover
• Slide the lock to the OPEN side and lift the projection with a finger to open.
• When closing, be careful that sand, hair, dust and other foreign matter are
not trapped in the door and the cover, and press [
closed, to prevent water infiltration. (Check that the red marker of the lock is
no longer visible.)
OK NG
] until hearing them snap
Check that the red
marker of the lock is
no longer visible.
OPEN OPEN
OPEN
Projection
Press
here.
Press here.
• Do not open and close the card/battery door and terminal cover with wet
hands or when in or near water.
• If the unit is wet, wipe off water before opening the card/battery door and
terminal cover.
• If water gets inside the compartments, wipe completely dry before closing
the covers.
OPEN
Projection
Lens, microphone and speaker
• Wipe water and dirt from the lens with a cleaning cloth before recording.
• The sound may be muffled or distorted by water droplets on the microphone
or speaker. In such a case, wipe off water and dry the unit before using it.
9VQT1M21

Contents
Before using
PRECAUTIONS ........................... 6
(IMPORTANT) Water resistance
Quick guide ............................... 12
Accessories .............................. 16
Parts identification and
handling..................................... 16
Using the 2-way hand strap
(supplied) ................................. 18
Using the LCD monitor ............. 19
Applicable SD cards
(sold separately) ....................... 20
.. 8
Setup
Charging .................................... 22
Charging time, recordable time
and Remaining battery capacity
indication................................... 24
Inserting/Removing SD cards
(sold separately) ....................... 25
Turning power ON/OFF
(Selecting modes)..................... 26
Quick starts .............................. 27
Setting from the menu ............. 28
Setting the date and time,
changing the display language
and adjusting the LCD monitor
.. 30
Zoom/avoid jitter/maintain
picture brightness in dark
locations .................................... 38
Other recording options .......... 40
Fade-in/Fade-out ...................... 41
Backlight compensation
function ..................................... 42
Self-timer .................................. 42
Soft skin mode ......................... 43
MagicPix function ..................... 43
Recording manually
(motion/still pictures) ............... 44
Adjusting focus manually
(manual focus adjustment) ....... 44
Using situation-specific settings
(scene mode) ........................... 45
Achieve natural colors
(white balance) ......................... 46
Adjusting shutter speed
(shutter speed) ......................... 48
Adjusting brightness
(iris/gain) .................................. 49
Useful functions ....................... 50
Recording dates and times at
travel destinations
(set world time) ......................... 50
View slants and composition
(guide lines) .............................. 51
Recording
Before recording....................... 32
Basic stance ............................. 32
Taking pictures underwater ...... 32
Automatic recording
(motion pictures) ...................... 34
Recording mode and recording
times ......................................... 35
Automatic recording
(still pictures) ............................ 36
Picture quality ........................... 37
10 VQT1M21
Avoid wind noise
(wind noise reduction function)
.. 51
Playback
Viewing motion pictures .......... 52
Displaying thumbnails by date
Fast forward/rewind playback .. 54
Slow-motion playback .............. 54
Frame-by-frame playback ........ 54
Resuming the previous playback
Viewing still pictures ................ 55
.. 53
.. 54

Editing
Deleting motion/still pictures .. 56
Deleting one picture at a time .. 56
Deleting all pictures .................. 57
Selecting and deleting multiple
pictures ..................................... 57
Preventing accidental deletion
of motion/still pictures
Formatting cards ...................... 58
Setting DPOF for still pictures
.. 59
Others
Menus ........................................ 82
Recording menu ....................... 82
Playback menu ......................... 82
SETUP menu ........................... 84
LCD monitor displays .............. 86
When recording ........................ 86
During playback ....................... 87
Messages .................................. 88
Troubleshooting ...................... 90
Cautions for use ....................... 96
Before usingSetupRecordingPlaybackEditingWith other
With other products
Playback on TV ......................... 60
Copying to video recorders or
DVD recorders .......................... 61
Printing pictures from
PictBridge printers ................... 62
Using DVD burners
(sold separately) ....................... 64
With a computer
Software on the CD-ROM ......... 70
End User License Agreement .. 71
Operating environment ............ 72
Installing MotionSD STUDIO ... 74
Using MotionSD STUDIO ......... 76
Using this unit as an external
drive (Mass storage)................. 78
Specifications ......................... 100
Optional accessories ............. 102
Accessory Order Form
(For USA Customers) ................. 103
Request for Service Notice
(USA Only)................................. 104
Customer Services Directory
Limited Warranty
(For USA Customers) ................. 106
Warranty
(For Canadian Customers) ......... 108
Index ........................................ 109
Spanish Quick Use Guide/
Guía española para el uso
rápido....................................... 110
.. 105
products
Checking the connections ....... 80
Connecting to a Macintosh
computer ................................... 81
With a
computer
Others
11VQT1M21

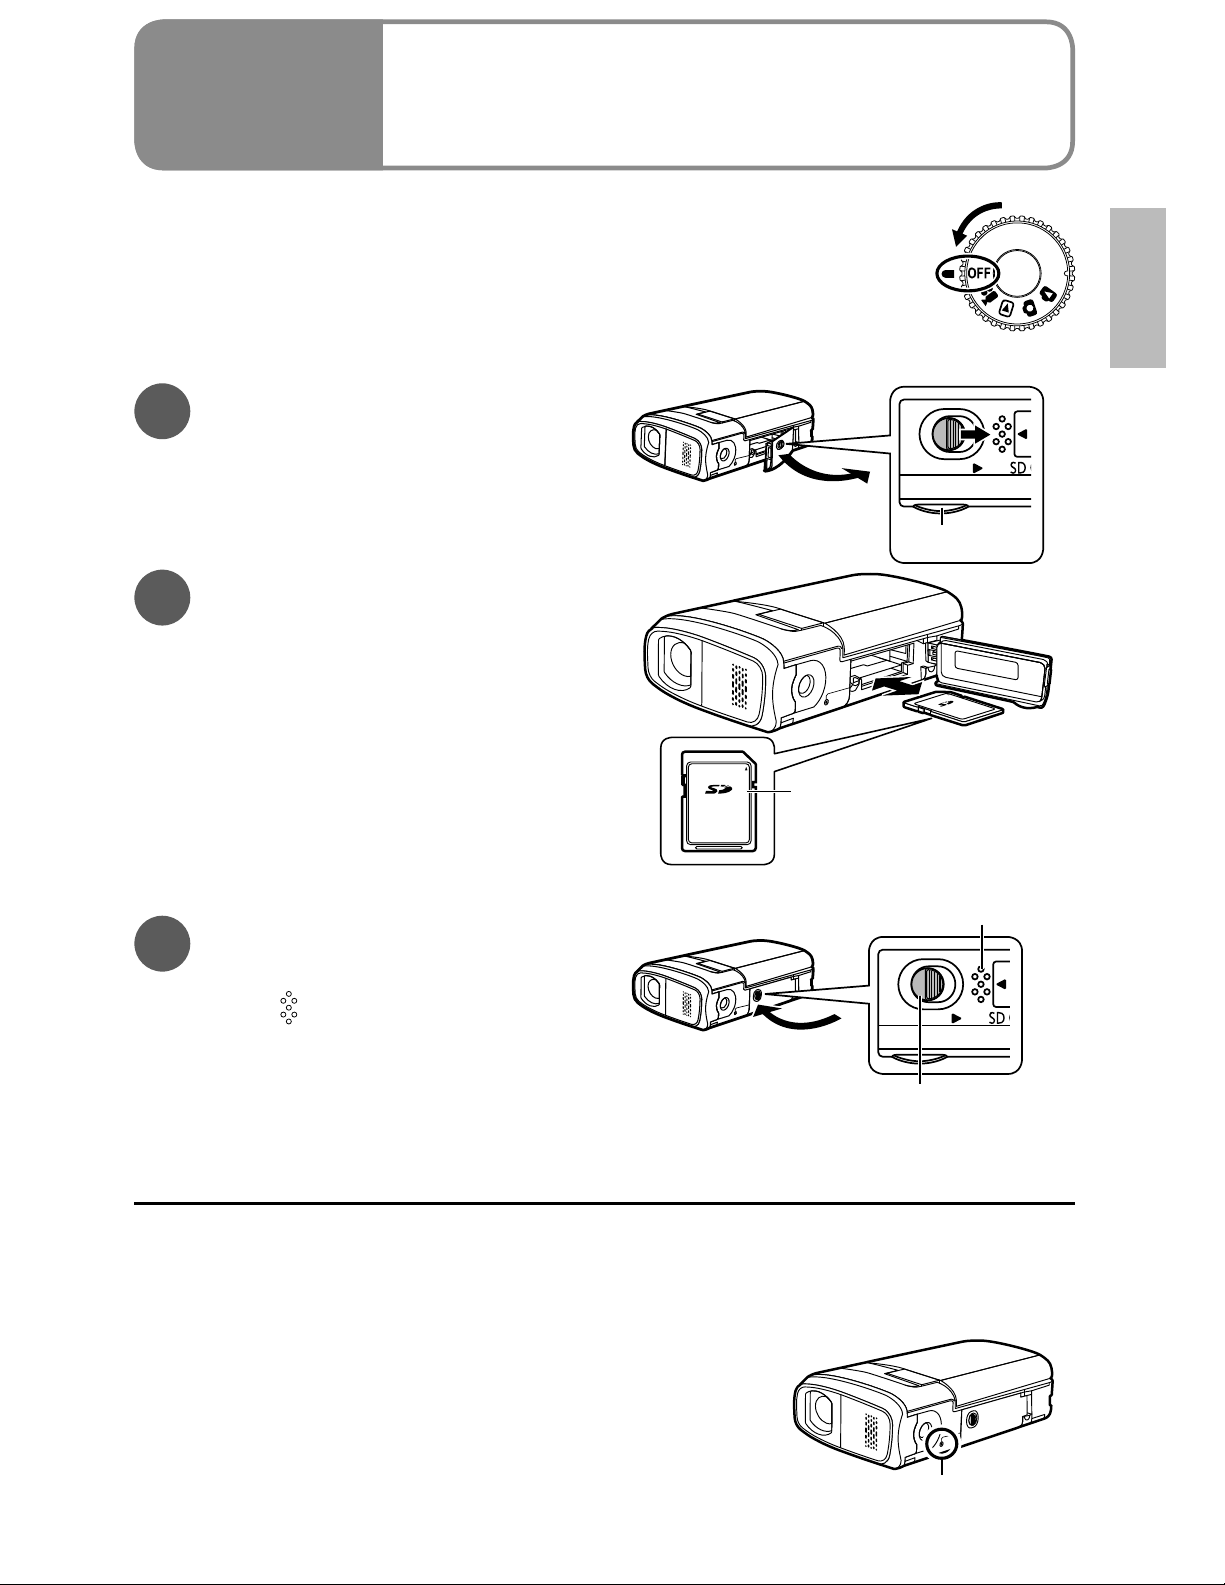
Quick guide
Charging
Set the mode dial to
1
[OFF].
Open the card/battery
2
door.
Slide the lock to the OPEN side and
lift the projection with a finger to
open.
Insert the battery.
3
OPEN
Projection
Inserting SD cards
(sold separately)
Place label upwards.
Slide straight in until hearing card catch.
Close the card/battery
4
door.
Press [ ] until hearing the door
snap closed.
Connect the AC adaptor
5
(supplied).
Lever
Press until hearing lever lock.
Press here.
OPEN
Check that the red marker of the lock is
no longer visible.
To AC outlet
12 VQT1M21
AC adaptor
AC cable
Small gap here.
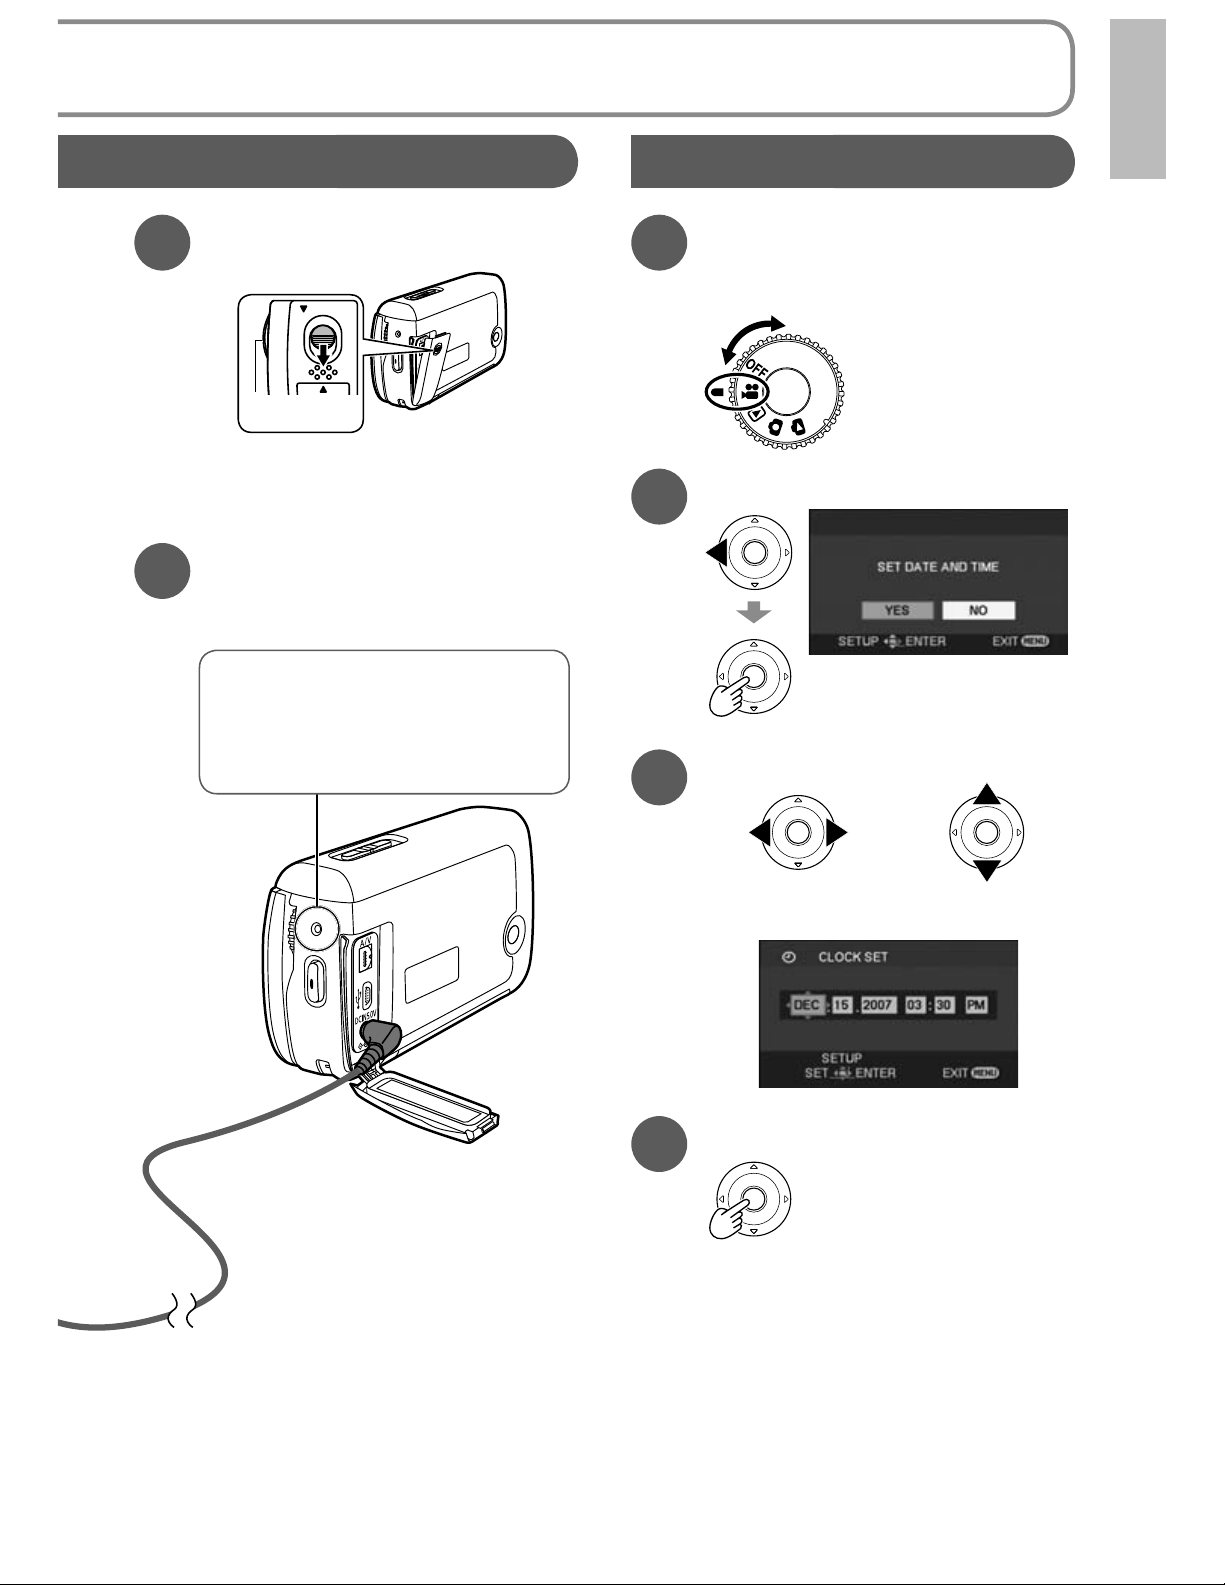
Setting the date and time
Open the terminal cover.
6
OPEN
Projection
Slide the lock to the OPEN side
and lift the projection with a finger
to open.
Plug the DC plug into the
7
DC input terminal on the
unit.
Status indicator
Flashing red: Charging in
progress
Off: Charging complete
Set the mode dial to
1
a position other than
[OFF].
Select [YES].
2
Set the date and time.
3
To select settings To change
numerical values
Enter the date and time.
4
• This procedure is for setting the
date and the time the very first
time. For the setting procedure for
the second and subsequent times
(P.30).
13VQT1M21
Quick guide (cont.)
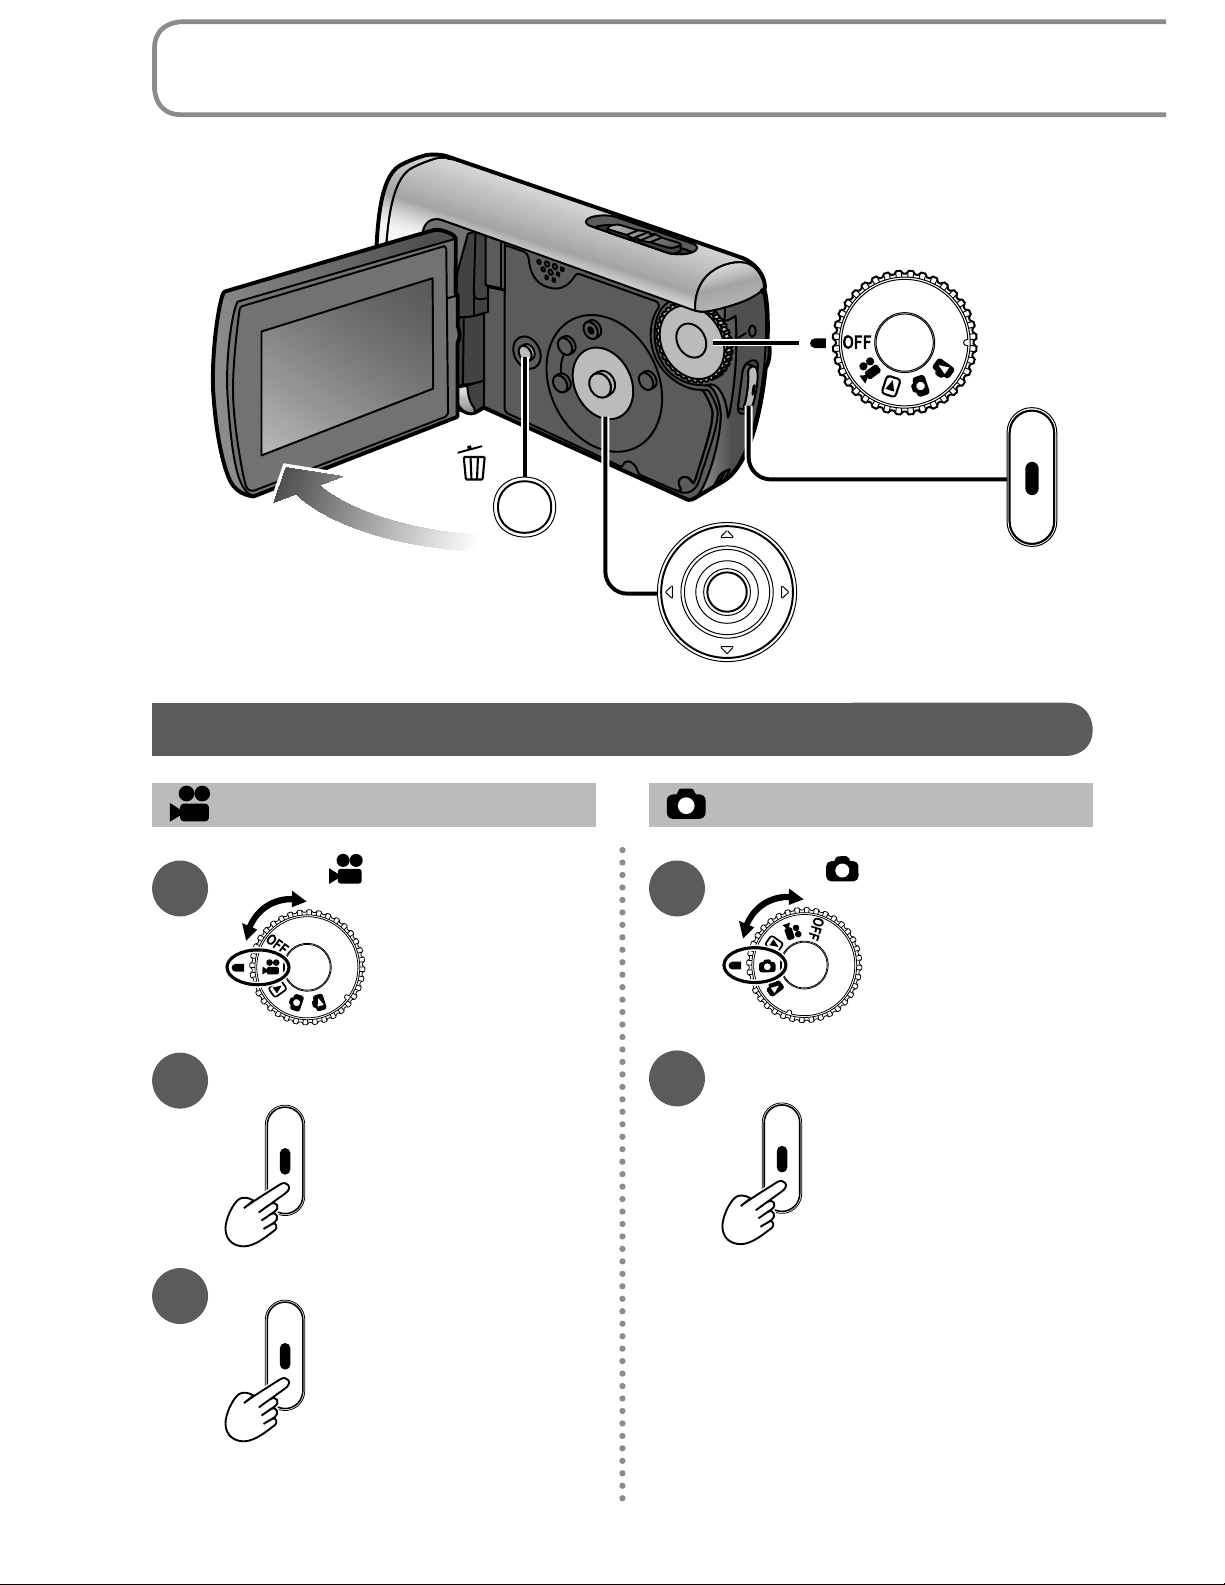
Recording
Motion pictures Still pictures
Set to [ ].
1
Start recording.
2
Stop recording.
Set to [ ].
1
Take picture.
2
3
14 VQT1M21
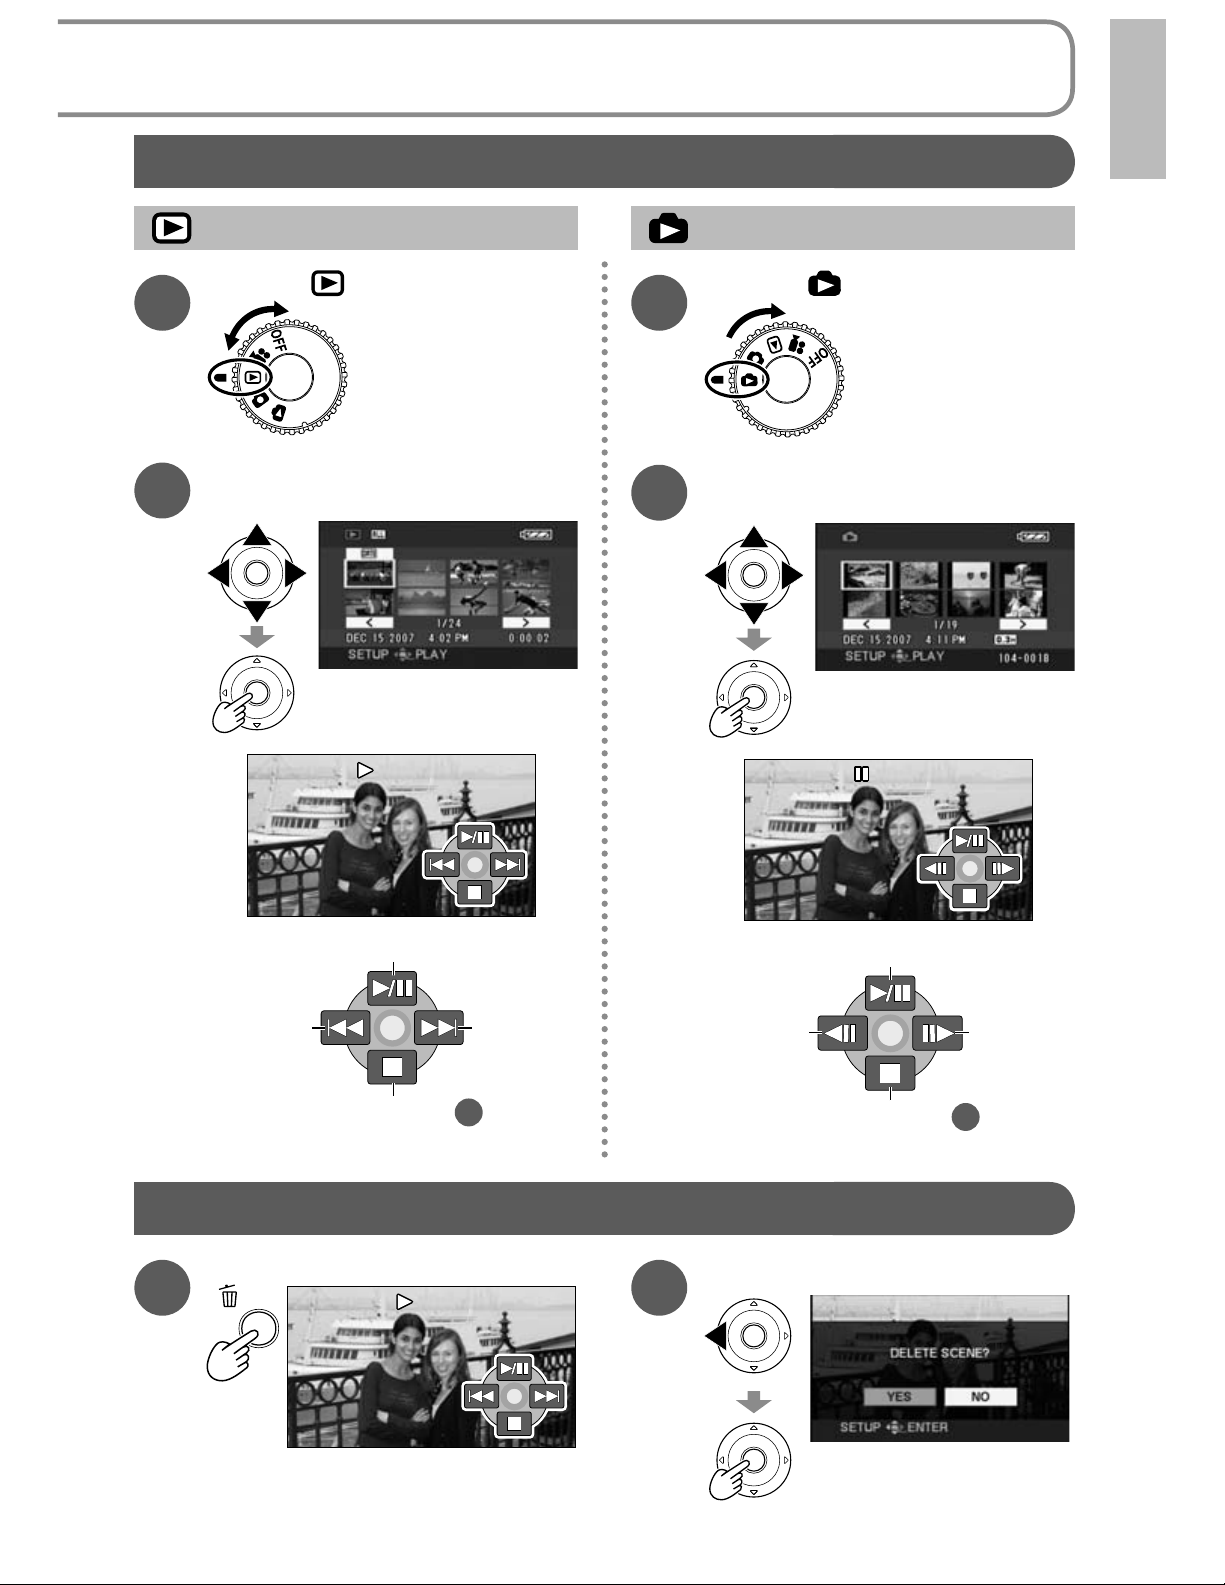
Playback
Motion pictures Still pictures
Set to [ ].
1
Select and enter the
2
picture to view.
Set to [ ].
1
Select and enter the
2
picture to view.
Play/Pause
Back
Return to step
Deleting pictures
During playback
1
(LCD monitor display in
motion picture viewing)
Next
2
Select [YES].
2
Slideshow start/pause
NextBack
Return to step
2
15VQT1M21
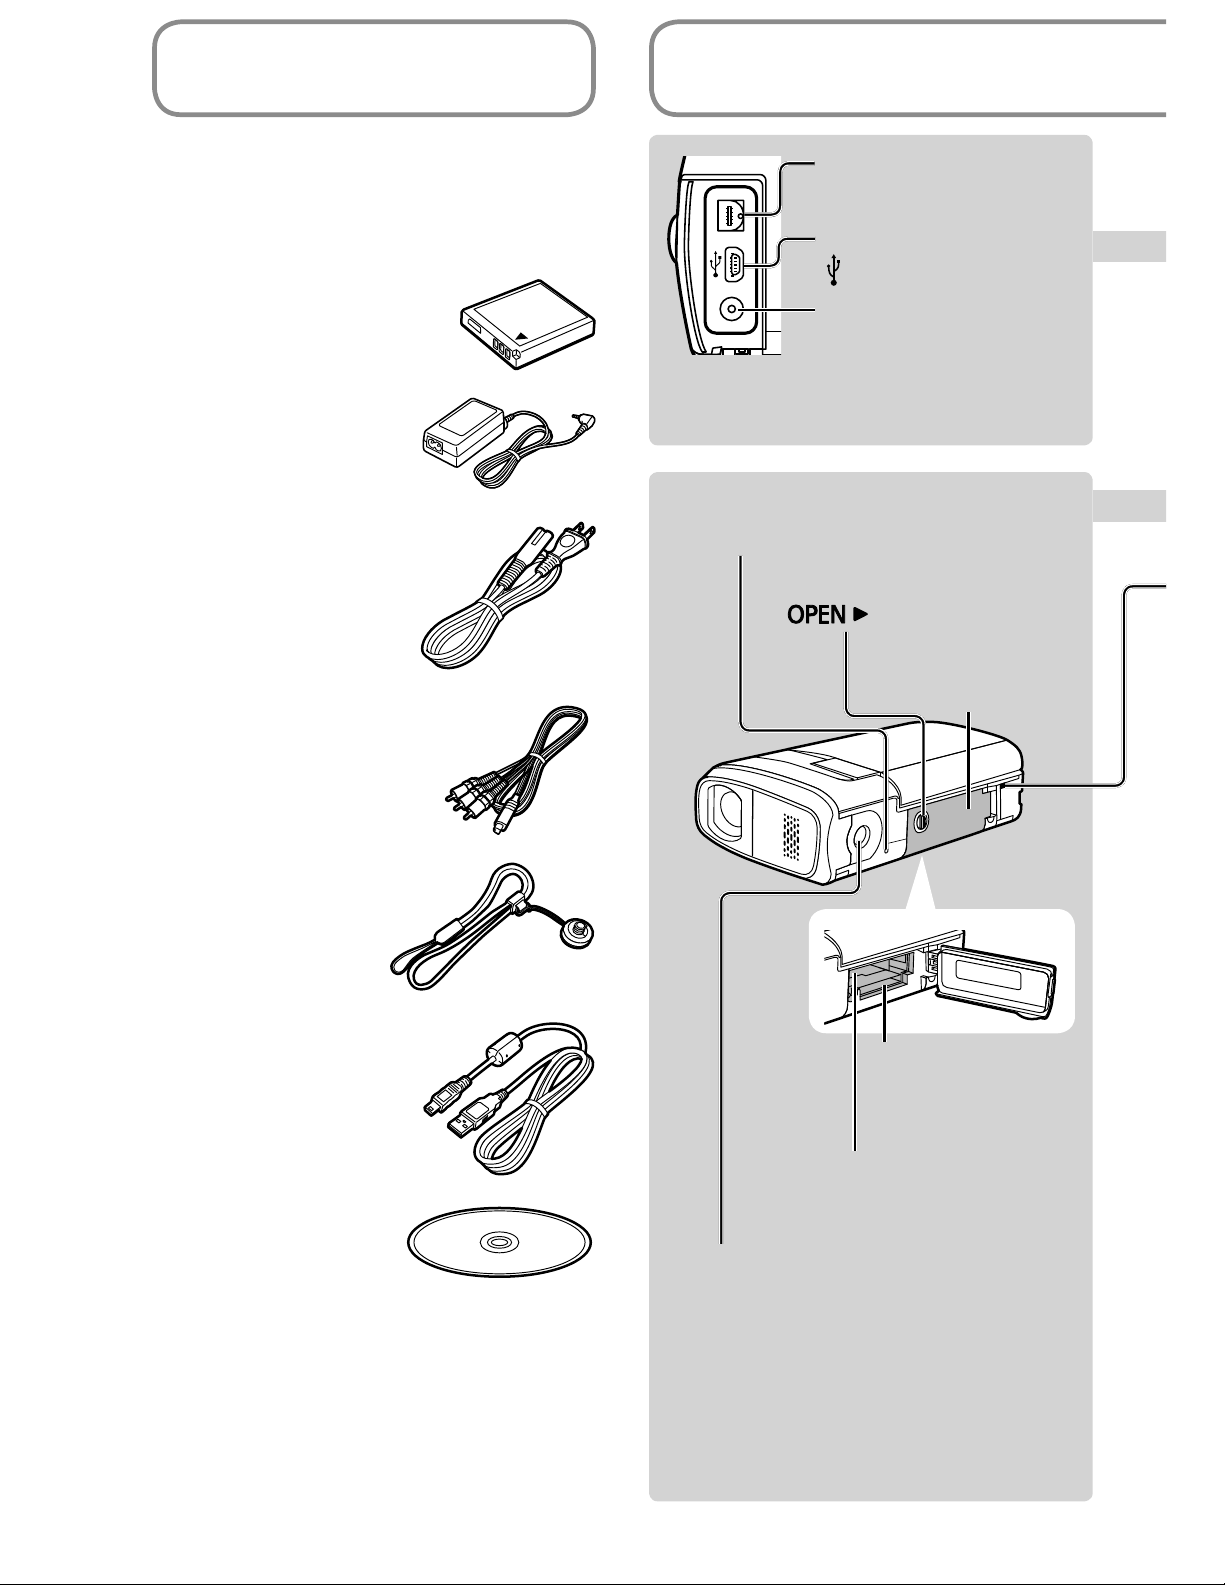
Accessories
Parts identification
Make sure all of the following
accessories were included in the
product package.
(Accessories are not water-resistant.)
• Battery pack
VW-VBJ10
• AC adaptor
VSK0694
• AC cable
K2CA2CA00025
• AV cable
K2KZ9CB00002
Audio-video output
terminal [A/V] (P.60, 61)
USB terminal
] (P.62, 65, 76)
[
DC input terminal
[DC IN 5.0 V] (P.23)
•Do not use any other AC adaptors
except the supplied one.
Card access lamp
[ACCESS] (P.25, 33)
Card/Battery door lock
[
] (P.9, 22, 25)
Card/Battery door
(P.9, 22, 25)
• 2-way hand strap
VFC4295
• USB cable
K2KZ4CB00011
• CD-ROM
Card slot
[SD CARD]
(P.25)
Battery slot
[BATTERY] (P.22)
Tripod mounting hole
For tripod (sold separately) mounting
instructions, see the user’s guide of the
tripod. (With some tripods, the card/
battery door cannot be opened when
the unit is mounted on the tripod. In
such case, insert the SD card and
battery before mounting the unit on the
tripod.)
16 VQT1M21
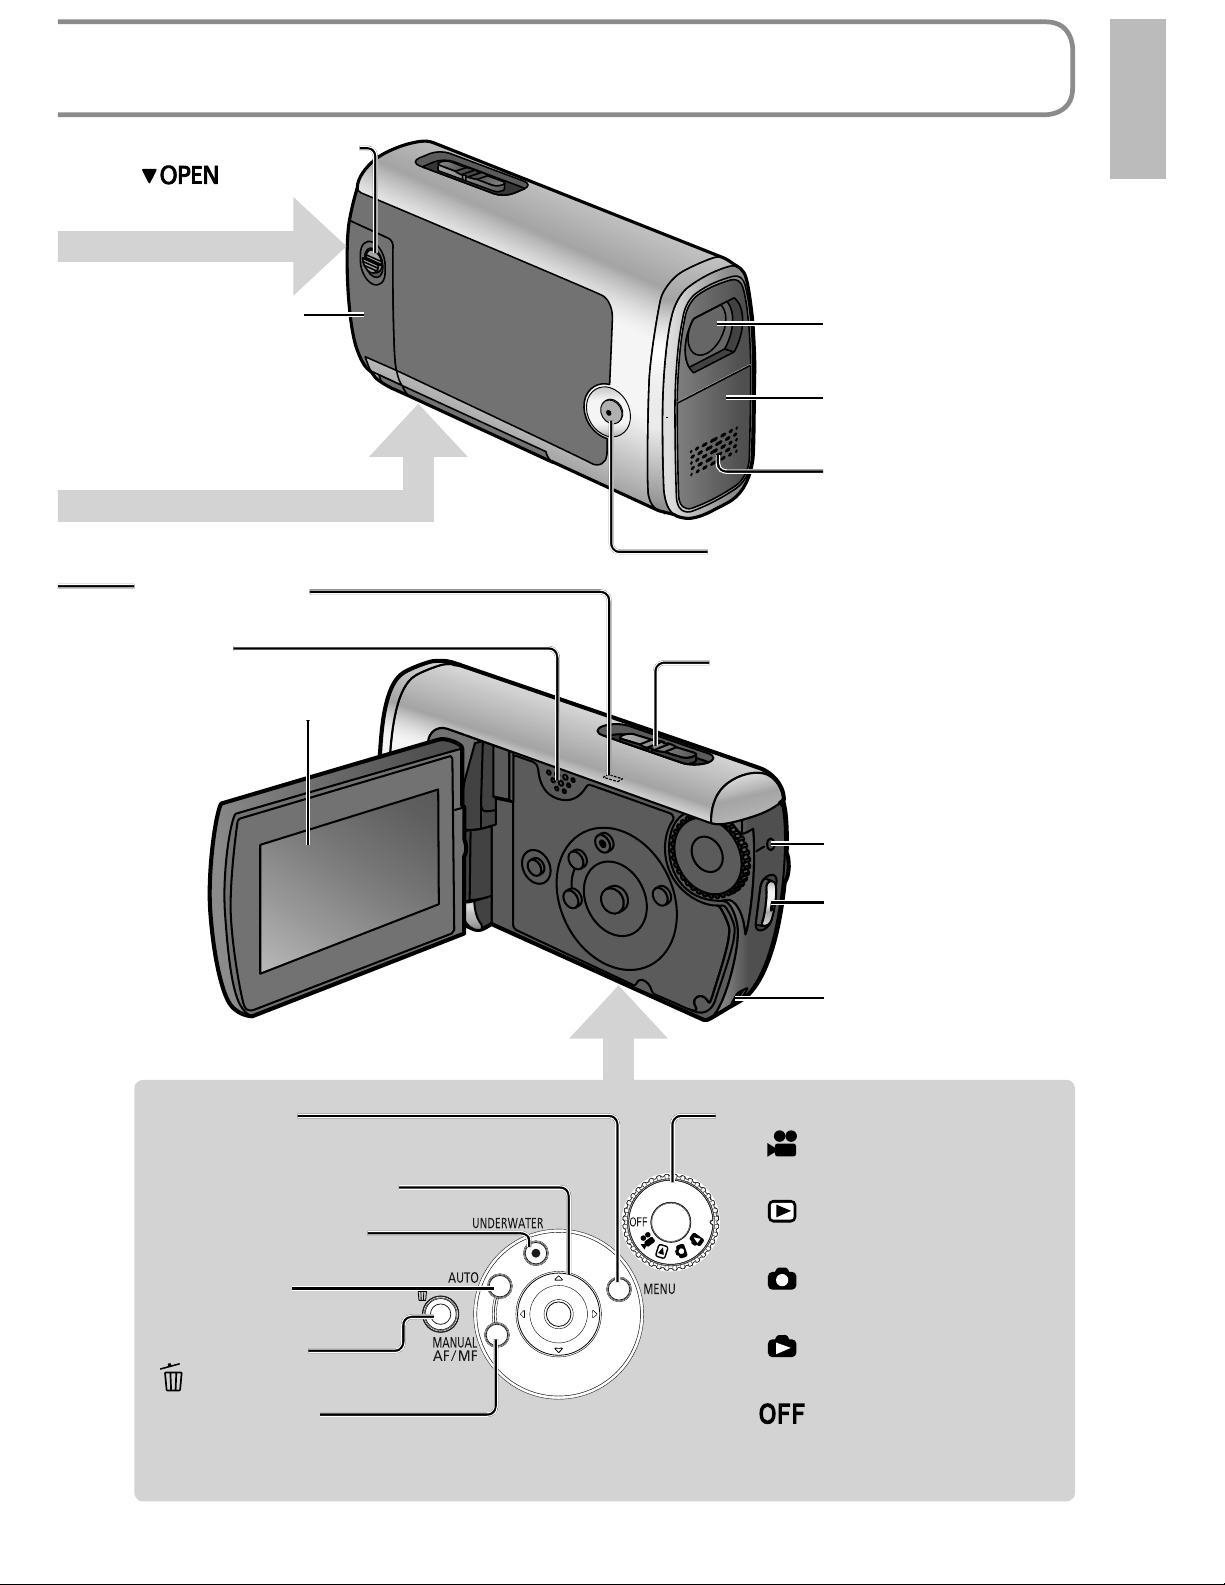
and handling
Terminal cover lock
[
] (P.9, 23)
Terminal cover
(P.9, 23)
Drain port (P.8)
Speaker
LCD monitor (P.19)
Lens
White balance sensor
(P.32)
Microphone
(built-in, stereo)
Sub record button (P.32)
(Same as record button)
When recording: Zoom button
[T/W] (P.38)
During playback: Volume button
[+VOL–] (P.52)
Status indicator
(P.23, 26, 27)
Record button
(P.34, 36)
Menu button
[MENU] (P.28)
Cursor buttons (P.28)
Underwater button
[UNDERWATER] (P.47)
Auto button
[AUTO] (P.44)
Delete button
] (P.56)
[
Manual button
[MANUAL AF/MF] (P.44)
Strap fixture (P.18)
Mode dial (P.26)
: Motion picture
recording (P.34)
: Motion picture
playback (P.52)
: Still picture recording
(P.36)
: Still picture playback
(P.55)
: Power OFF (P.26)
17VQT1M21
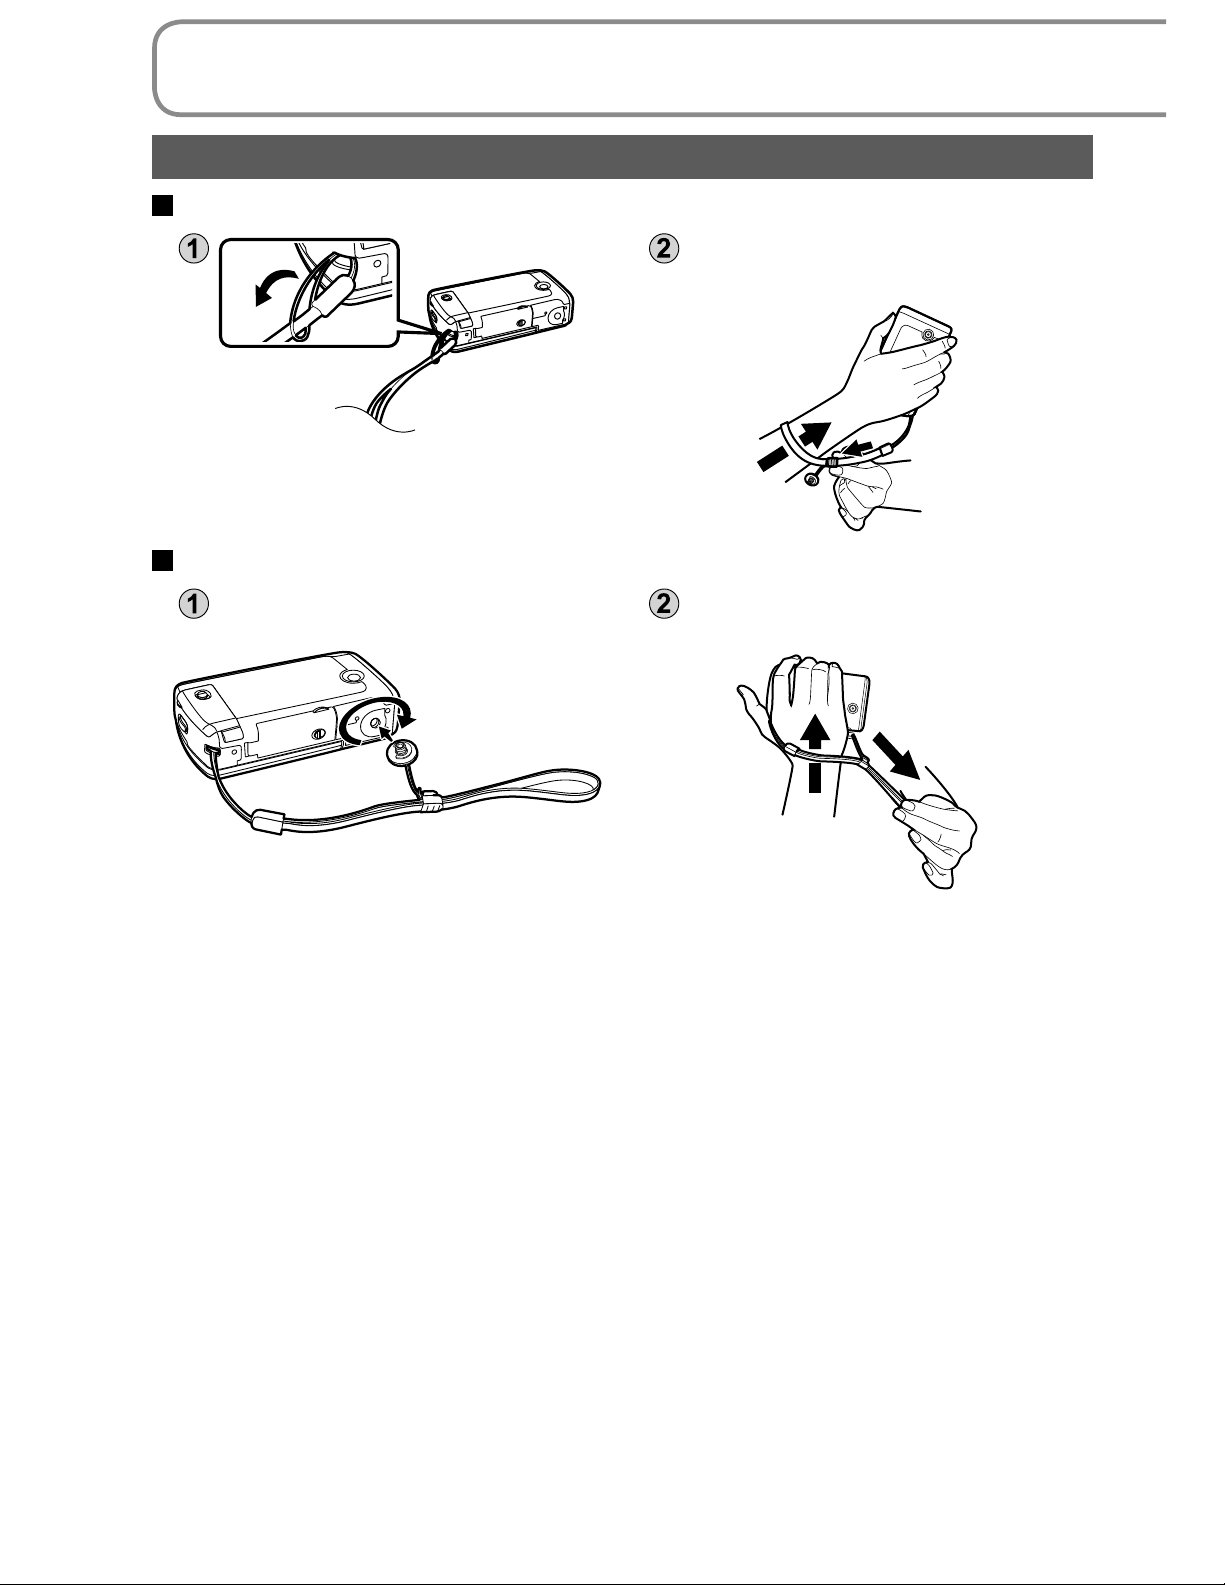
Parts identification and handling (cont.)
Using the 2-way hand strap (supplied)
Using as strap
Fit over your wrist and adjust the
length of the strap.
Using as a grip belt
Screw the adaptor hanging from
the strap into the tripod hole.
Fit over your hand and adjust the
length of the strap.
18 VQT1M21
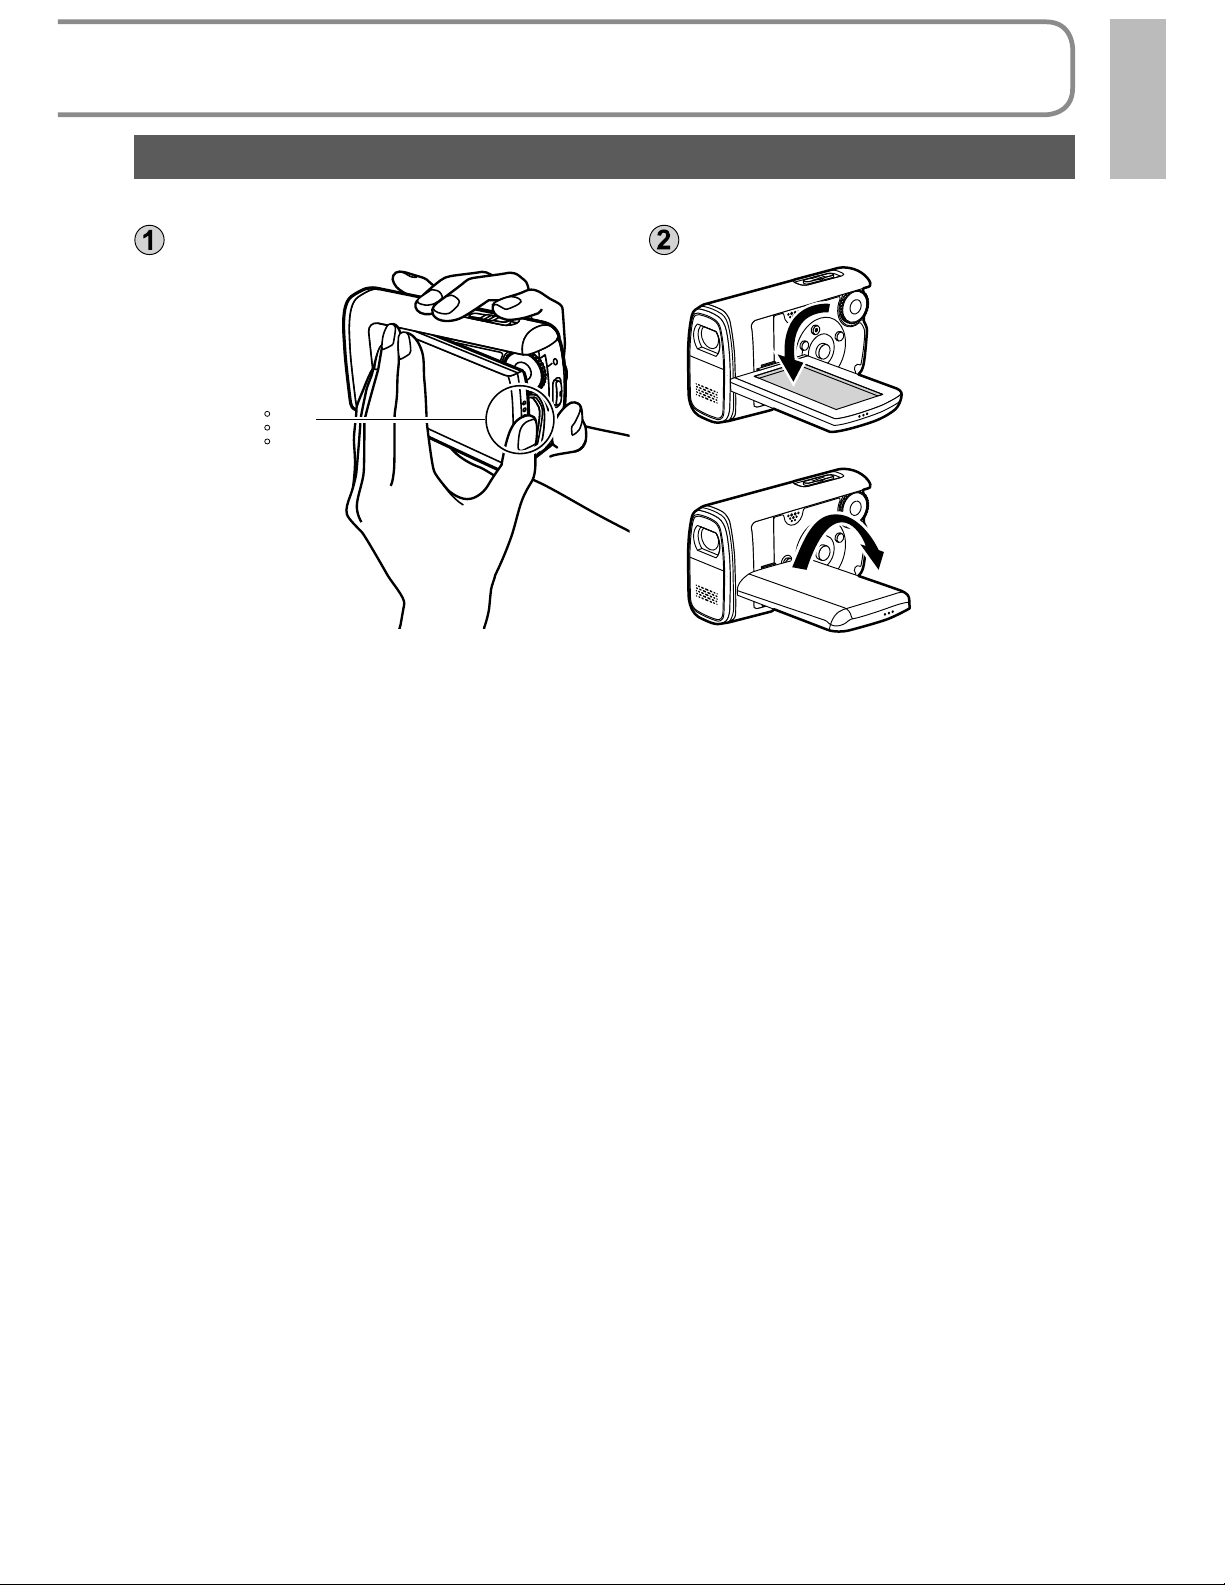
Using the LCD monitor
Images can be checked on the LCD monitor when recording.
Open the LCD monitor. Adjust the angle.
Up to 90 ˚
Hold [ ] to
open.
Up to 90 ˚
Opening the LCD monitor beyond the mechanical limit or turning it more than
90 ˚ may allow water to infiltrate and damage the mechanism.
Brightness and color density can be adjusted. (P.31)
19VQT1M21
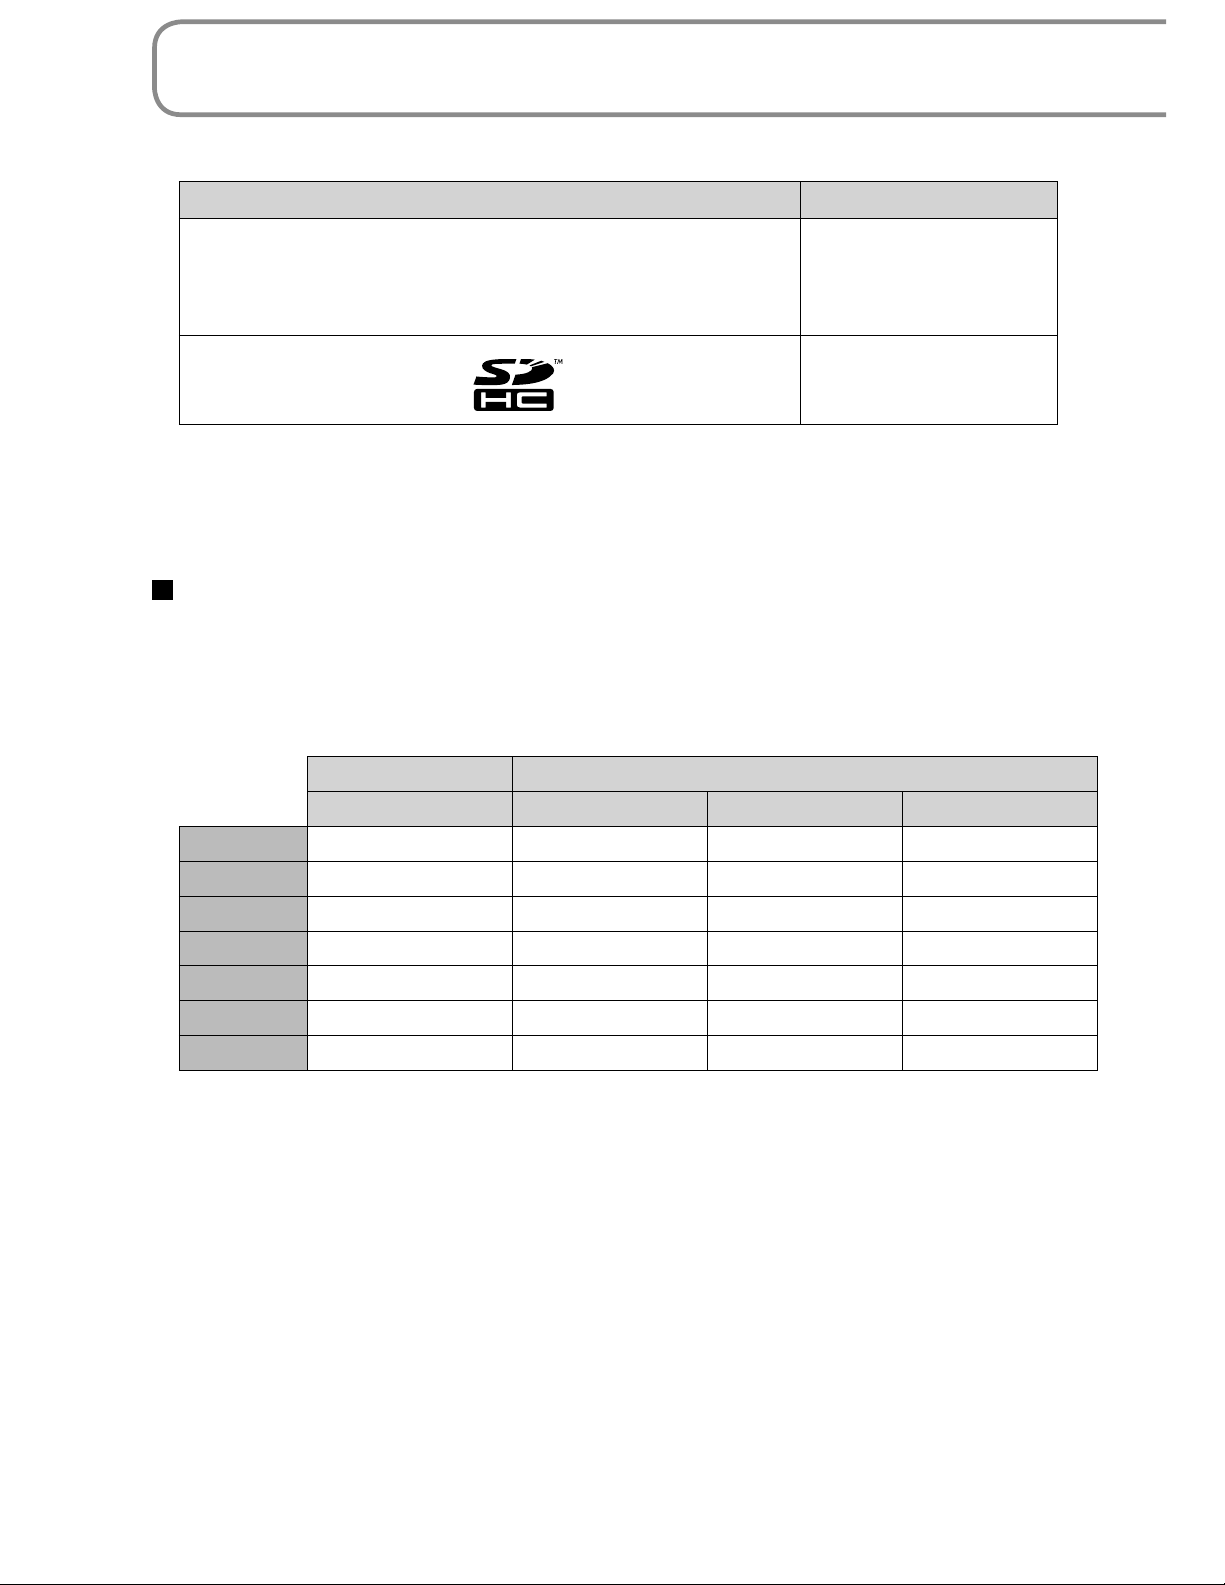
Applicable SD cards (sold separately)
The following SD and SDHC Memory Cards can be used.
Type of card Capacity
256 MB
SD Memory Card
(SD speed Class 2 or higher recommended)
SDHC Memory Card
(Use cards bearing the
• 8 MB and 16 MB SD Memory Cards are for still picture recording only.
• With 32 MB, 64 MB and 128 MB SD Memory Cards, still pictures can be
recorded, but motion picture recording may stop during use.
• Multimedia cards cannot be used.
logo.)
Recommended Panasonic SD/SDHC Memory Cards
(as of December 2007)
512 MB
1 GB
2 GB
4 GB
8 GB
16 GB
The following Panasonic SD/SDHC Memory Cards and SD speed Class 2 or
higher Memory Cards are recommended for this unit. With other types of SD
cards, motion picture recording may stop during use.
SD Memory Card SD/SDHC Memory Card
High Speed Class 2 Class 4 Class 6
256 MB RP-SDH256 RP-SDR256
512 MB RP-SDK512 RP-SDR512
1 GB RP-SDH01G RP-SDR01G RP-SDV01G
2 GB RP-SDK02G RP-SDR02G RP-SDM02G RP-SDV02G
4 GB RP-SDR04G RP-SDM04G RP-SDV04G
8 GB RP-SDV08G
16 GB RP-SDV16G
20 VQT1M21
Precautions in handling
• Do not touch the terminals on the back of the card. Also, prevent dirt, water
and foreign matter from adhering to terminals.
• Do not leave cards in the following areas:
· Where exposed to direct sunlight
· Humid or dusty places
· Near heaters and sources of heat
· Where subjected to sharp temperature changes (condensation can occur)
· Where exposed to static electricity or electromagnetic waves
• After use, return cards to their pouch or case.
• SD card data may be corrupted or lost due to electrical noise, static
electricity, damage to the unit or card, etc. Save important data on a PC
using the supplied USB cable, MotionSD STUDIO, etc. (P.76)
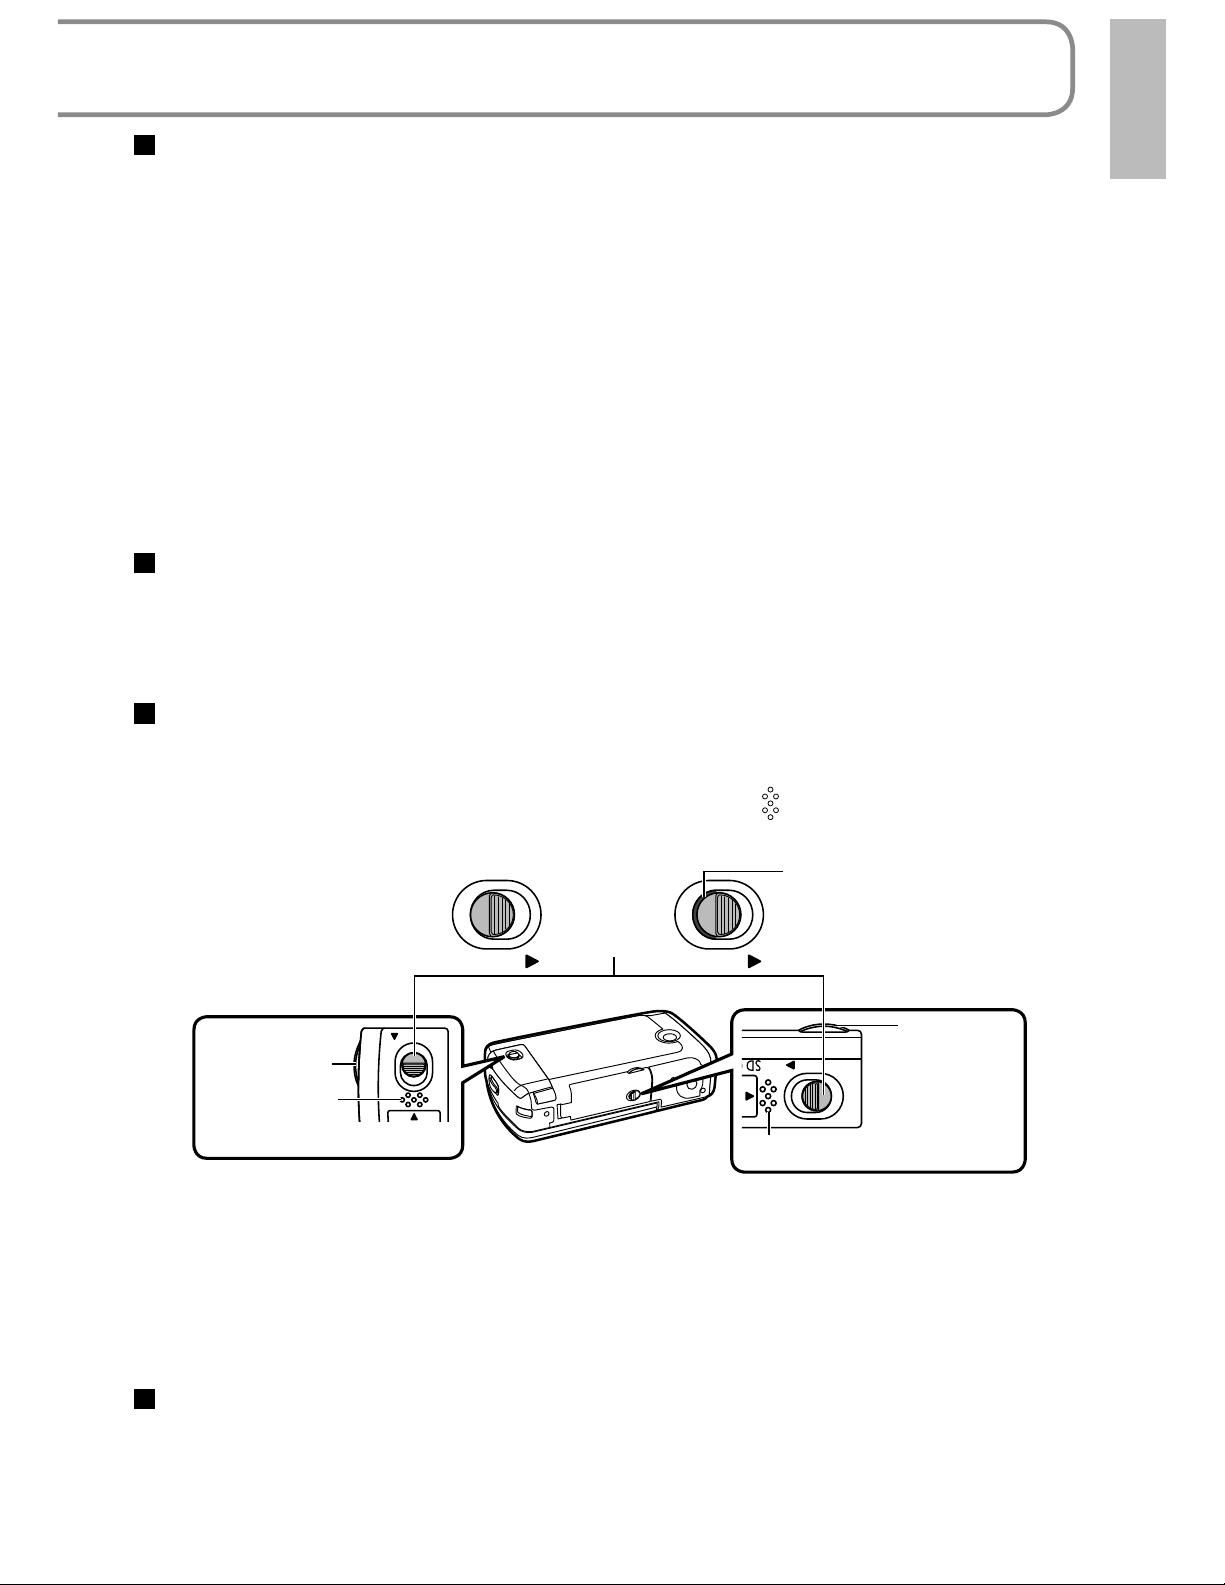
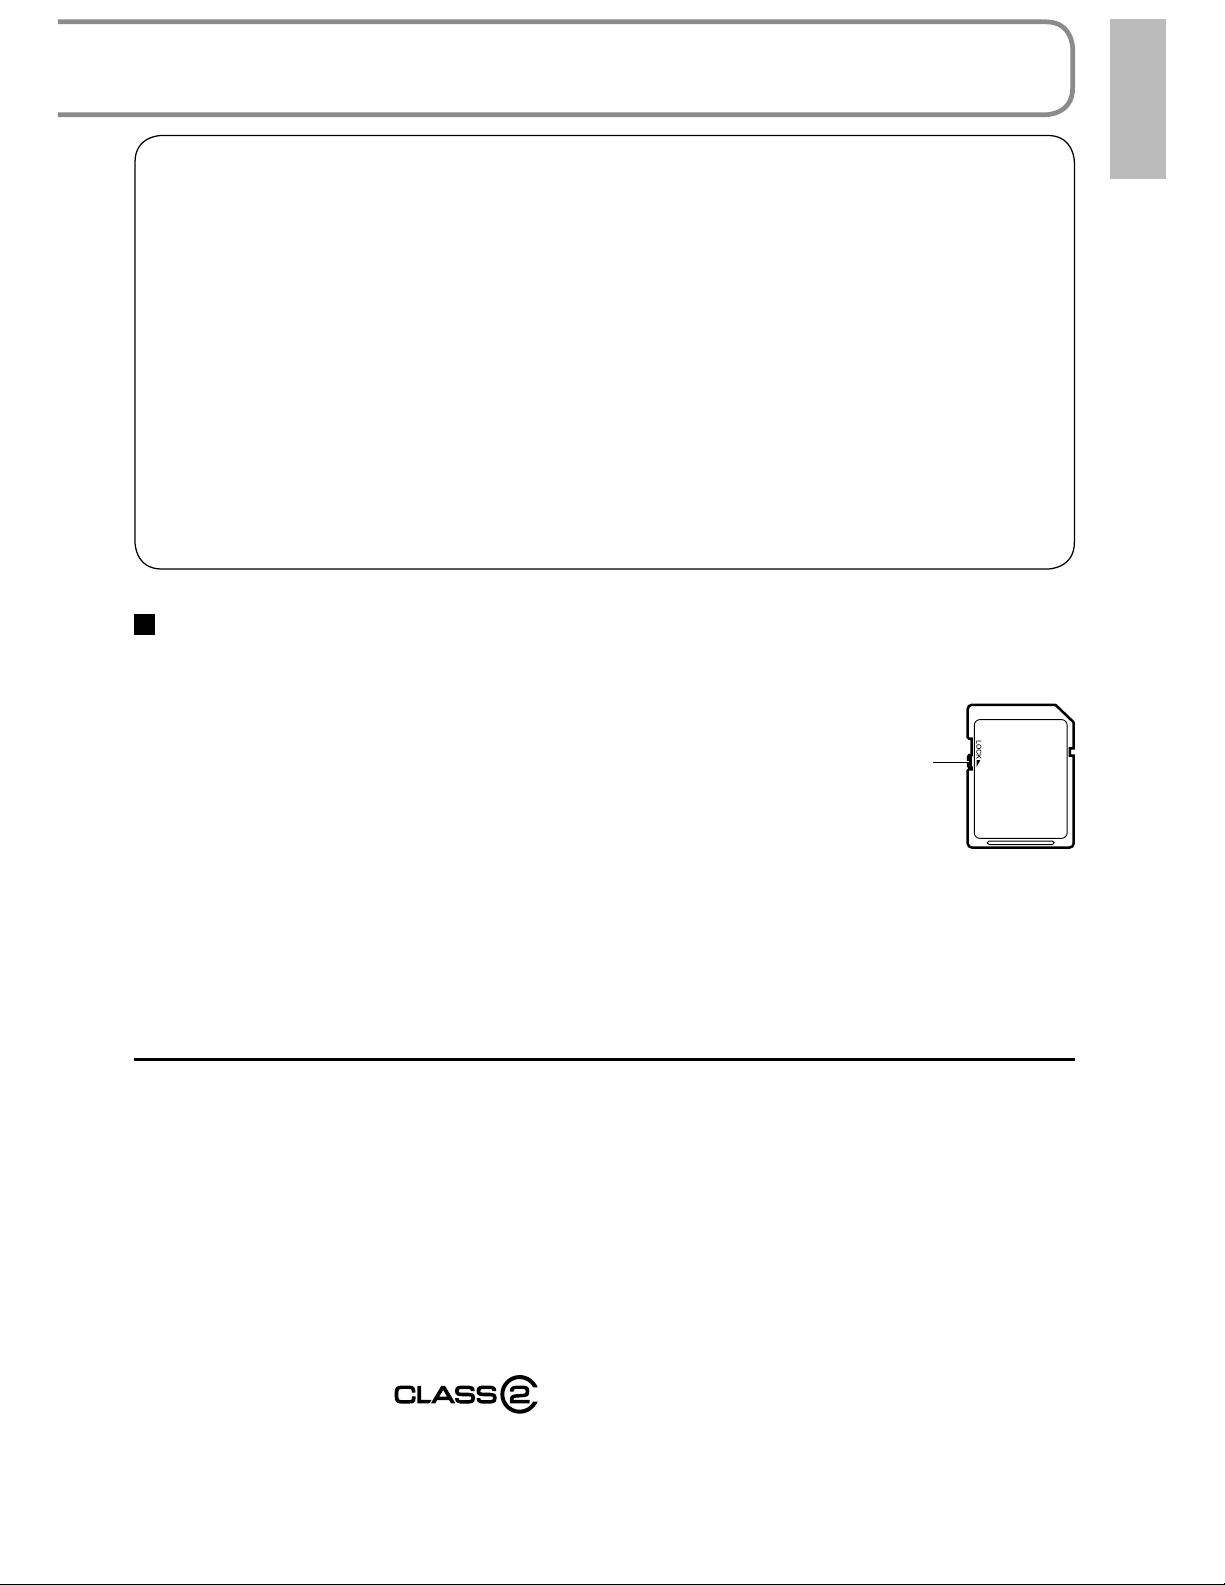
Write-protecting cards
When the write-protect switch on the SD card is set to the LOCK position,
data cannot be written onto or deleted from the card, and the card cannot be
formatted.
Write-protect switch
SDHC Memory Cards can be used only with SDHC devices.
Be careful when sharing cards between devices.
Be sure to format SD cards with this unit only.
If cards are formatted on a PC or other device, recording may take time and
the card may become unusable with the unit.
Before using an SD card from another device, copy the data onto a PC or
other storage device and then format the card with this unit.
Keep the Memory Card out of reach of children to prevent swallowing.
This unit supports SD Memory Cards formatted to FAT12 or FAT16 file
systems and SDHC Memory Cards formatted to a FAT32 file system.
SD speed Class 2
Class 2 speed standard for SD cards. This and higher types of SD cards
operate stably in devices for which Class 2 or higher SD cards are
recommended such as this unit.
21VQT1M21
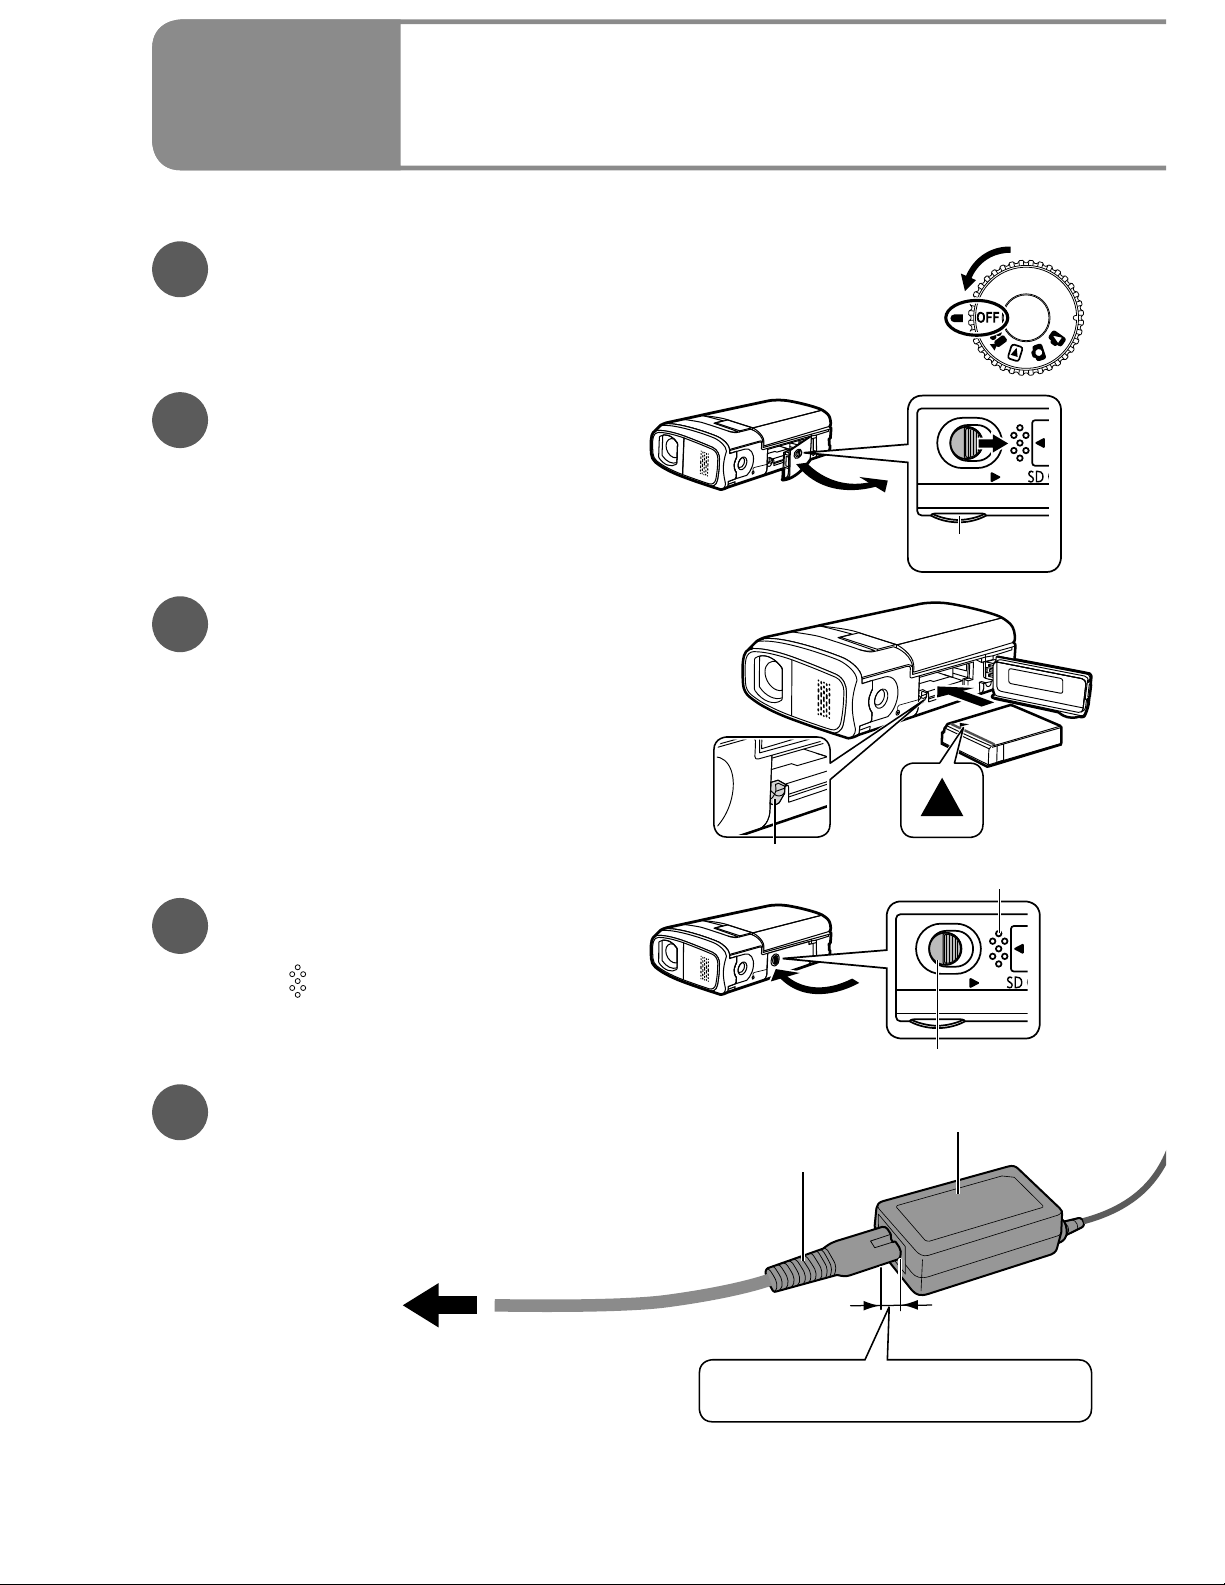
Setup
1
Insert the battery into the unit and charge it.
Charging
Set the mode dial to [OFF].
1
The unit runs on AC power (status indicator lit red) and
the battery cannot be charged when the mode dial is set
to any position other than [OFF].
Open the card/battery
2
door.
Slide the lock to the OPEN side and
lift the projection with a finger to
open.
Insert the battery.
3
Ensure that battery is oriented
correctly, and push it into the
compartment in the direction of the
[] until it snaps into place and it is
locked by the lever.
(To remove the battery,
press the lever downward.)
Lever
OPEN
Projection
Press here.
Close the card/battery
4
door.
Press [ ] until hearing the door
snap closed.
Check that the red marker of the lock is
Connect the AC adaptor
5
(supplied).
Connect the AC cable to the AC
adaptor and then to an AC outlet.
To AC outlet
*Do not use the AC cable and AC adaptor of this unit with other devices. Also, do not use
the AC cables and AC adaptors of other devices with this unit.
no longer visible.
AC cable
Small gap here.
*
OPEN
AC adaptor
22 VQT1M21

The battery is not charged at the time of purchase. Be sure to charge it
before use.
For charging time (P.24)
We recommend using Panasonic batteries. (VW-VBJ10)
If you use other batteries, we cannot guarantee the quality of this product.
CAUTION
Danger of explosion if battery is incorrectly replaced. Replace only with the
same or equivalent type recommended by the manufacturer. Dispose of used
batteries according to the manufacturer's instructions.
Open the terminal cover.
6
Slide the lock to the OPEN side and
lift the projection with a finger to open.
Plug the DC plug into the
7
DC input terminal on the
unit.
Status indicator
Flashing red at approx. 1 second
intervals: Charging in progress
Off: Charging complete
OPEN
Projection
If the status indicator does the following:
Does not flash:
Remove and reinsert the battery, and disconnect and reconnect the AC adaptor.
If the status indicator still does not flash, contact your dealer.
Flashes rapidly at approx. 0.25 seconds intervals:
The battery cannot be charged. Try doing the following.
• Remove and reinsert the battery, and try recharging the battery.
• The battery temperature or surrounding temperature is too high/low, therefore wait until
the unit and the battery are at suitable temperatures and try recharging the battery.
If battery charging still does not commence, contact your dealer.
Flashes slowly at approx. 3 seconds intervals:
Charging requires time for the following reasons:
• The battery has been excessively discharged.
• The battery temperature or ambient temperature is too high/low.
If power to the unit is activated while the battery is charging, the AC power
supply will be used and charging interrupted.
23VQT1M21

Setup
Charging time and recordable time
Times are given for a temperature of 25 ˚C (77 ˚F) and humidity of 60 %.
The charging time shown in the table are approximations. In high or low
temperatures, charging requires more time.
Supplied battery VW-VBJ10 (3.6 V, 1000 mAh)
Charging time Approx. 2 hours 15 minutes
2
Remaining battery capacity indication
Charging time, recordable time and
Maximum continuously
Recordable time
Actual recordable time includes recording and stopping, power ON/OFF
switching, zooming and other operations.
Recordable time varies according to conditions of use. For example, the
recordable time shortens when the [POWER LCD] setting is on while
recording.
The recordable time shortens in some environments (i.e., low temperatures,
etc.), therefore it is recommended to charge a spare battery.
Remaining battery capacity indication
The battery indication changes, as the remaining battery power decreases.
High Low
recordable time
Approx. 1 hour 10 minutes Approx. 40 minutes
Actual recordable time
24 VQT1M21
Flashing (Charge battery.)
Setup
Inserting/Removing SD
3
SD cards are sold separately.
Preparations: Set the mode dial to [OFF].
(Check that the status indicator is out.)
Inserting or removing an SD card with the power ON may
damage the unit and destroy data on the card.
Open the card/battery
1
door.
Slide the lock to the OPEN side and
lift the projection with a finger to
open.
Insert/Remove the SD
2
card.
• To insert:
Face the label upwards and slide
the card in straight until hearing it
catch.
• To remove:
Press the center of the SD card and
pull the card out straight.
cards (sold separately)
Place label upwards.
OPEN
Projection
Press here.
Close the card/battery
3
door.
•Press [ ] until hearing the door
snap closed.
•If the door does not close
completely, remove the SD card,
check its orientation and reinsert it
into the slot.
While the card access lamp is lit, reading, recording, playback, deletion
or other processing is being executed. Performing the following
operations while the lamp is lit may damage the SD card and its content
and the unit may not function properly.
• Switching off power
• Removing battery or AC adaptor
• Opening card/battery door and removing SD card
• Rotating the mode dial
• Shaking or impacting the unit
Check that the red marker of
the lock is no longer visible.
OPEN
Card access lamp
25VQT1M21
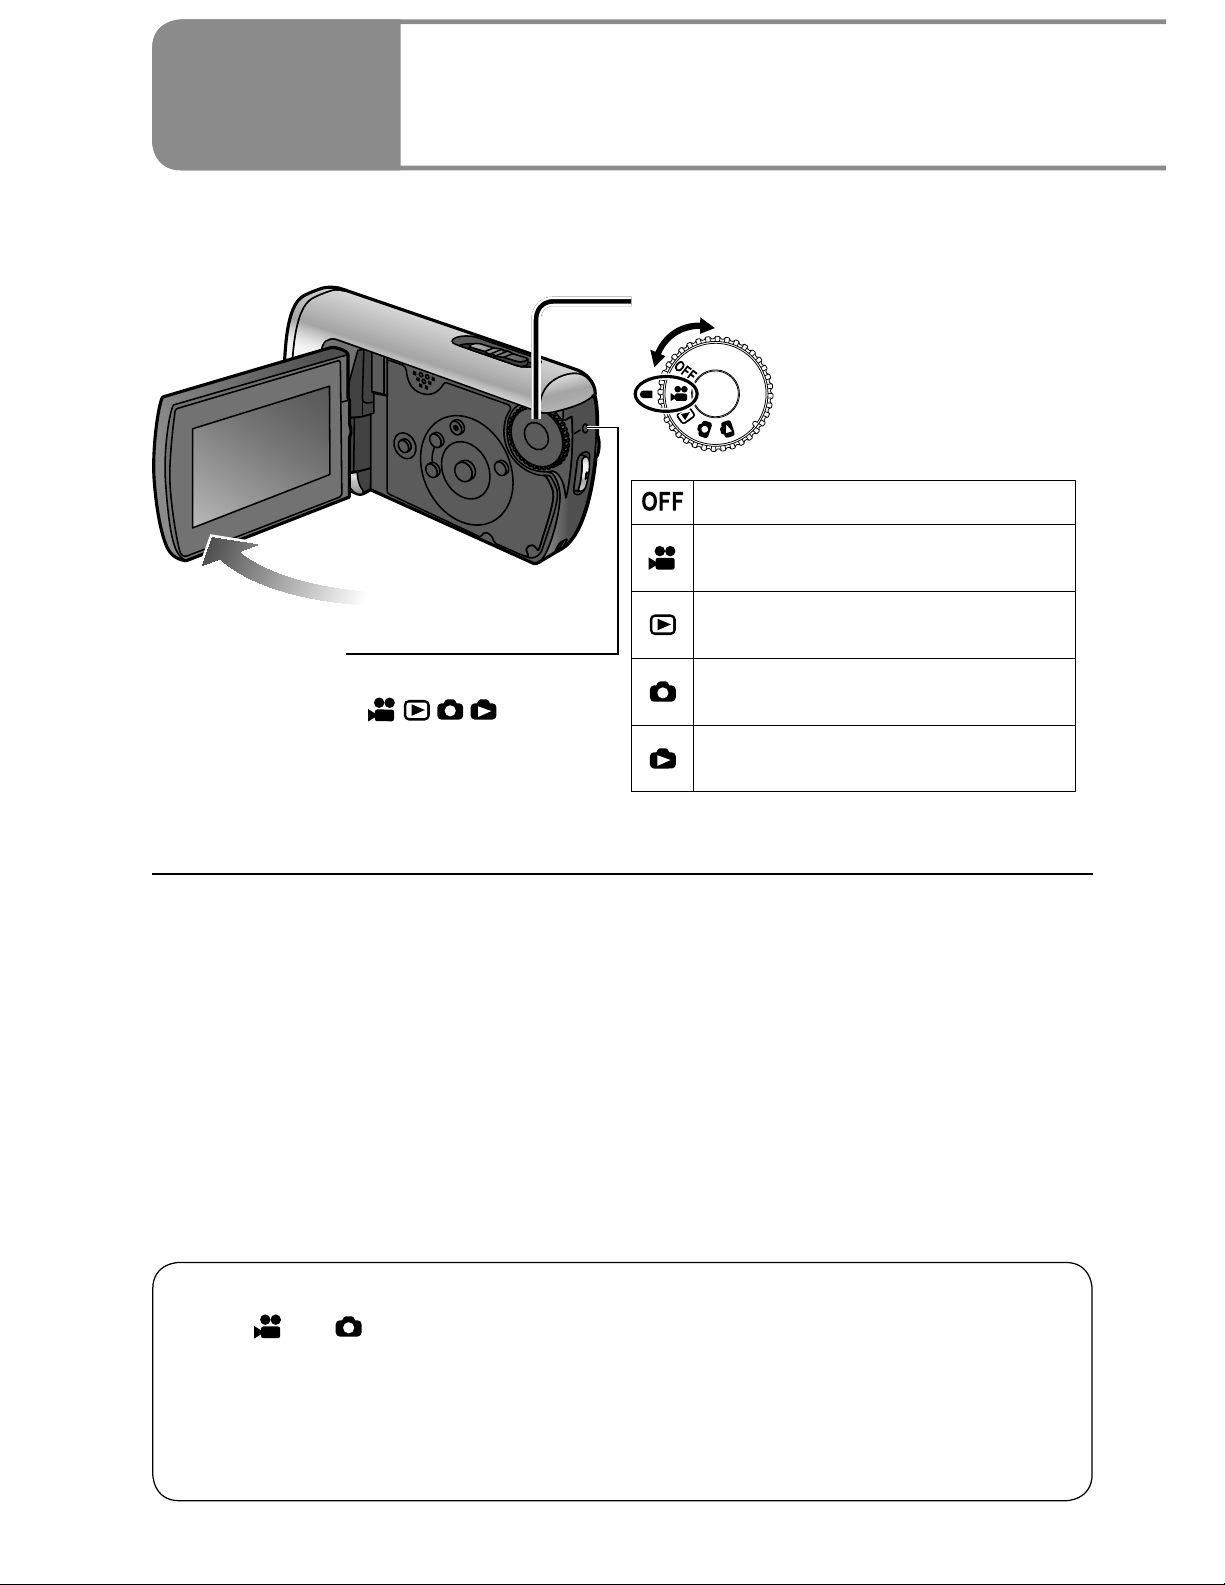
Setup
Rotate the mode dial slowly but surely to the desired position without turning it
recklessly.
Status indicator
• When power is ON: Lit red
(When selecting
• When power is OFF: Off
4
(Selecting modes)
Set to icon of desired mode.
Power OFF
Motion picture recording mode
(P.34)
Motion picture playback mode
(P.52)
Still picture recording mode
)
(P.36)
Still picture playback mode
(P.55)
Turning power ON/OFF
The very first time that power is turned ON, a message appears prompting
you to set the date and time. (P.30)
Turning power ON/OFF from the LCD monitor
When [ ] or [ ] is selected, power turns ON when the LCD monitor is
opened and OFF when it is closed. (During motion picture recording, power
does not turn OFF when the LCD monitor is closed.)
• When [QUICK START] (next page) is [ON], the unit goes on quick start
standby when the LCD monitor is closed.
• When not in use, set the mode dial to [OFF].
26 VQT1M21

Rotate the mode dial to motion picture recording/playback, still picture
recording/playback or power OFF.
Quick starts
Quick starts are available when the mode is set to [ ] and [ ].
When [QUICK START] is [ON], the unit responds as follows to LCD monitor
operations:
LCD monitor
operation
When opened Shooting can start in approx. 0.6 second. Lit red
When closed
* The unit consumes about half as much power as when recording is stopped.
The unit goes on quick start standby
Unit response
indicator
*
.
Flashing green
Setting [QUICK START]
Make settings from the
menus. (P.28)
[SETUP][QUICK
START][ON]
(To turn OFF, select [OFF].)
• [QUICK START] is [ON] at the time of purchase.
Status
The quick start standby is canceled and power shuts OFF (status indicator
out) in the following situations.
• When quick start standby mode continues for more than about 5 minutes
• When the mode dial is rotated
When white balance is set to [
source differs from that prior to quick starting, because automatic adjustments
are performed. (However, automatic adjustments are not performed when
using the MagicPix function.)
Starting may require more time than usual if the unit is impacted.
Zoom magnification becomes 1x after quick starts.
If [POWER SAVE] (P.84) is set to [5 MINUTES] and the unit automatically
goes on quick start standby, close and reopen the LCD monitor.
], quick starts require more time if the light
27VQT1M21
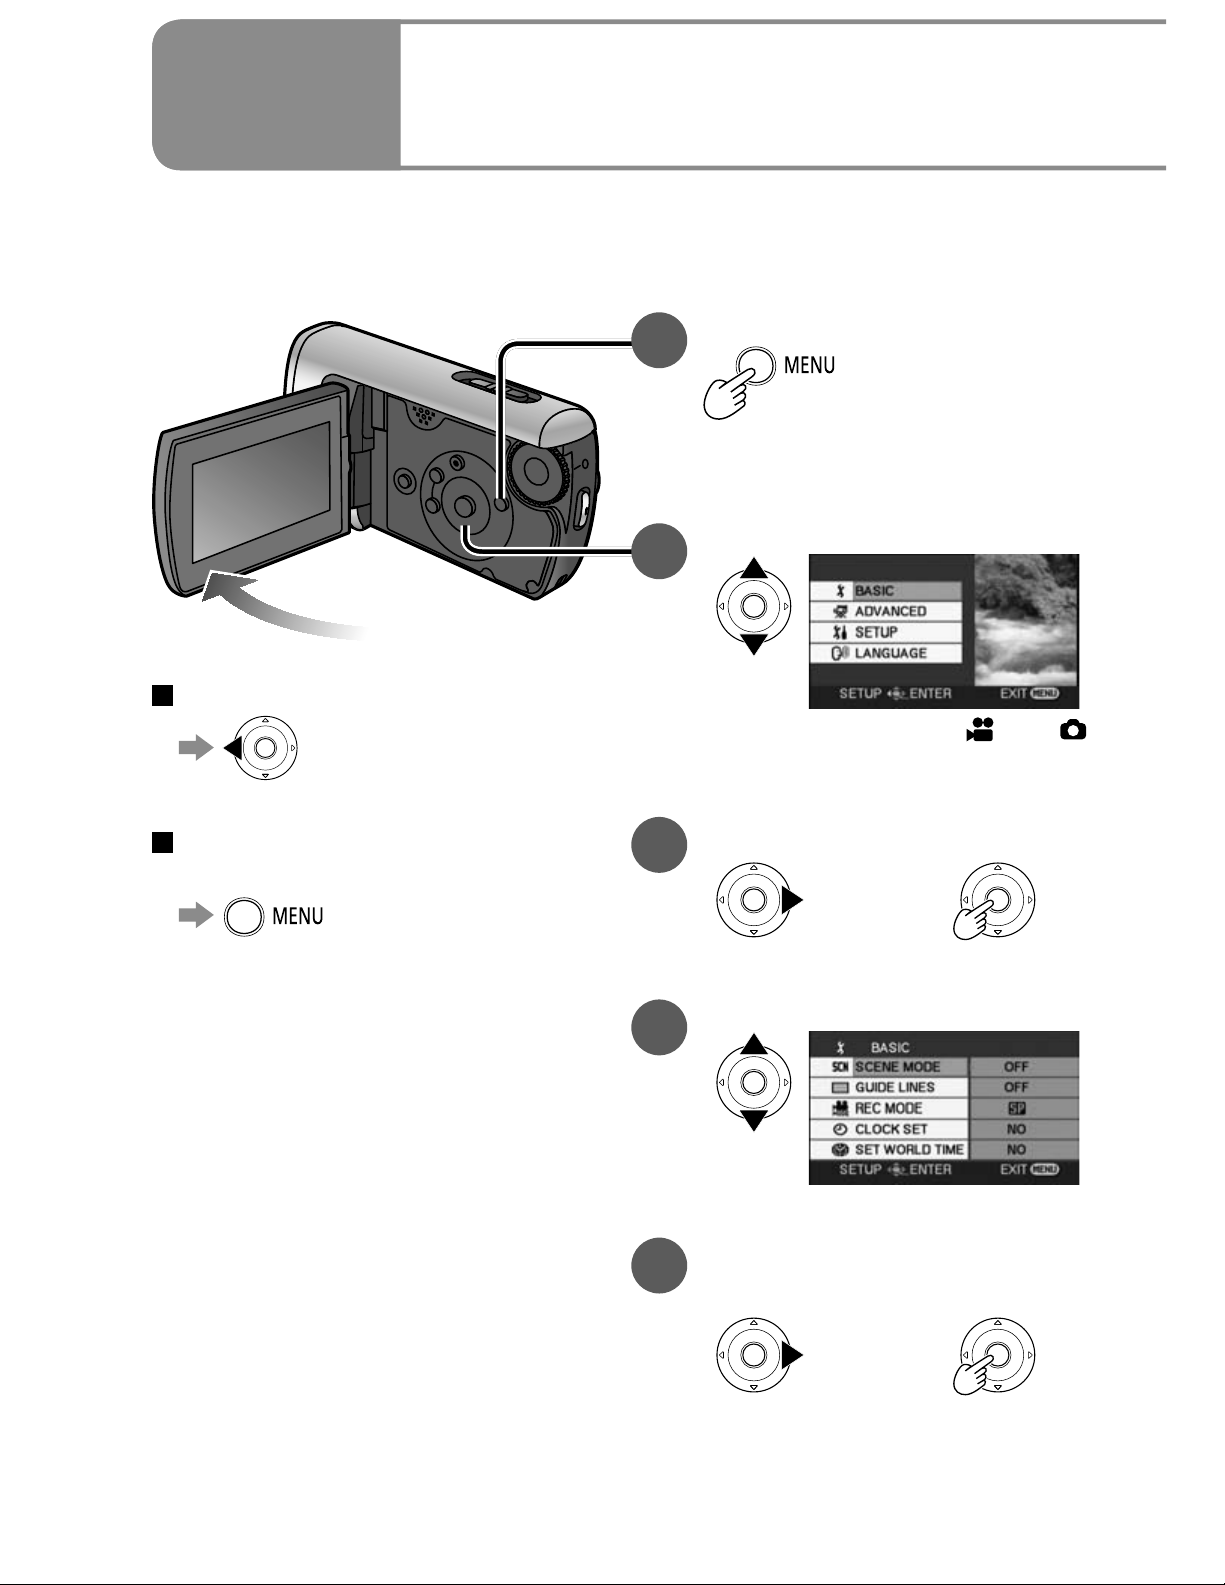
Setup
5
The menu cannot be displayed during recording or playback.
For menu items (P.82 “Menu List”)
Setting from the menu
Display the menu.
1
The menu displayed differs
according to mode.
Select the top menu.
2
To return to the previous screen
To quit an operation halfway
through
(Top menu for [ ] and [ ]
modes)
Enter the top menu.
3
Select a submenu.
4
Enter the selected
5
submenu.
or
28 VQT1M21
or
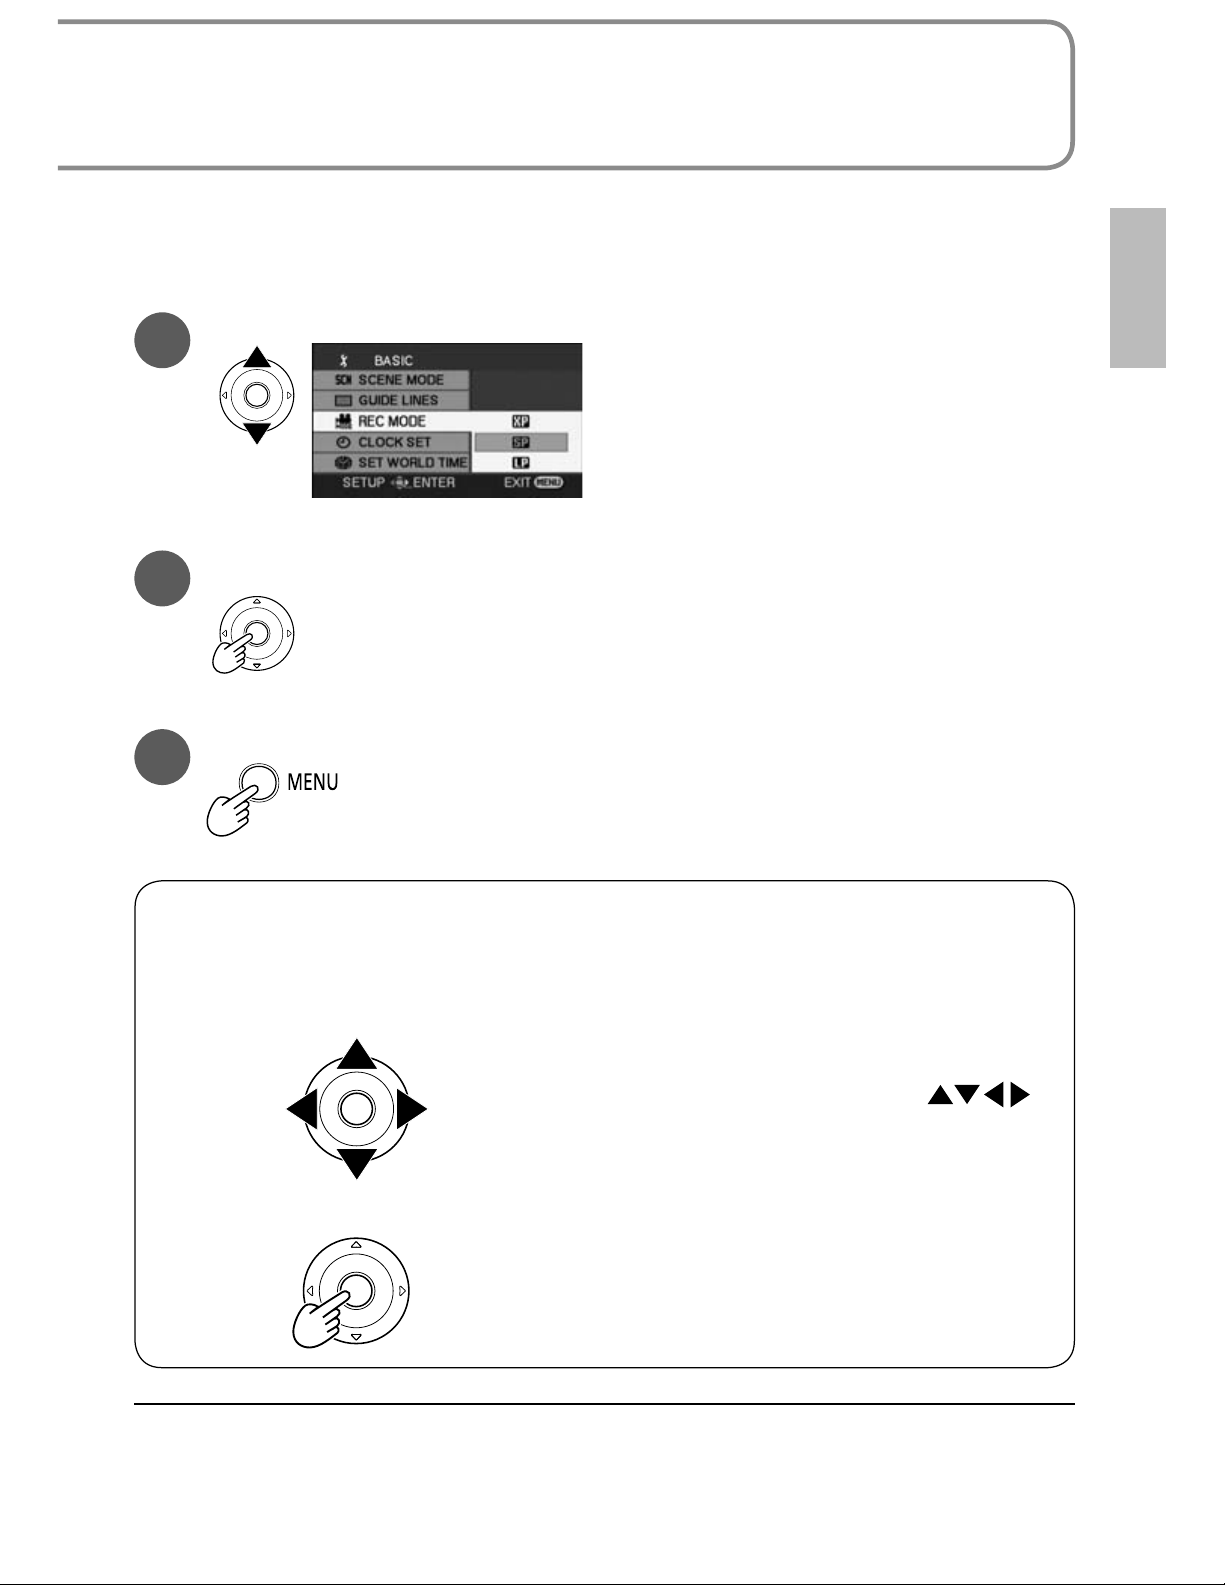
The cursor buttons are used to select functions, execute operations and
make menu settings.
Select an item.
6
Enter the selected item.
7
Close the menu.
8
Using the cursor buttons
The cursor buttons are used to select and enter items on menus or
thumbnail displays.
Upwards
Left Right
Downwards
To move the cursor
The cursor moves in the direction of
the respective cursor buttons
when pressed.
Pressing the center enters the selection.
Do not rotate the mode dial while menus appear on the LCD monitor.
You cannot record or perform other operations while menus appear on the
LCD monitor.
29VQT1M21

Setup
Setting the date and time
Before recording, check that the date and time have been set.
The very first time that power is turned ON, a message appears prompting you
to set the date and time. Select [YES], press the center of the cursor buttons
and proceed to step
6
changing the display language
.
3
Set to [ ] or [ ].
1
Setting the date and time,
Select the desired menu.
2
[BASIC]
To change the date and time
display
To change an item
[SETUP]
[DATE/TIME]
[OFF] : Date and time are not
displayed.
[D/T] : Date and time are
displayed.
[DATE] : Only the date is displayed.
To change the date format
[SETUP]
[DATE FORMAT]
[CLOCK SET][YES]
Set the date and time.
3
To select settings To change
numerical values
The year is displayed up to 2099
and the 12-hour system is used
to display the time.
Enter the date and time.
4
Format
indication
[Y/M/D] 2007.DEC.15
[M/D/Y] DEC.15.2007
[D/M/Y] 15.DEC.2007
30 VQT1M21
Appearance on
LCD monitor
• The clock function starts at [00]
seconds.
• After pressing the [MENU]
button and closing the menu,
check the date and time
displays.
 Loading...