

Panasonic SDR-H85P, SDR-H85PC, SDR-S50P, SDR-S50PC, SDR-T50P Operating Instruction
...
Operating Instructions
For USA and Puerto Rico assistance, please call: 1-800-211-PANA(7262) or,
contact us via the web at: http://www.panasonic.com/contactinfo
For Canadian assistance, please call: 1-800-561-5505 or visit us at www.panasonic.ca
SD Video Camera
Model No. SDR-S50P/PC
SD/HDD Video Camera
Model No. SDR-H85P/PC
SDR-T55P/PC
SDR-T50P/PC
Before connecting, operating or adjusting this product, please read the instructions completely.
Spanish Quick Use Guide is included.
Guía para rápida consulta en español está incluida.
VQT2L14

Things You Should
Know
Thank you for choosing Panasonic!
You have purchased one of th e most
sophisticated and reliable products on
the market today. Used properly, we’re
sure it will bring you and your family
years of enjoyment. Pleas e take time to
fill in the information on the right.
The serial number is on the tag loca te d
on the back of your camera. Be sure to
retain this manual as your convenient
camera information source.
Date of Purchase
Dealer Purchased From
Dealer Address
Dealer Phone No.
Model No.
Serial No.
Safety Precautions
WARNING:
TO REDUCE THE RISK OF FIRE, ELECTRIC SHOCK OR PRODUCT DAMAGE,
≥ DO NOT EXPOSE THIS APPARATUS TO RAIN, MOISTURE, DRIPPING OR
SPLASHING AND THAT NO OBJECTS FILLED WITH LIQUIDS, SUCH AS VASES,
SHALL BE PLACED ON THE APPARATUS.
≥ USE ONLY THE RECOMMENDED ACCESSORIES.
≥ DO NOT REMOVE THE COVER (OR BACK); THERE ARE NO USER SERVICEABLE
PARTS INSIDE. REFER SERVICING TO QUALIFIED SERVICE PERSONNEL.
CAUTION!
DO NOT INSTALL OR PLACE THIS UNIT IN A BOOKCASE, BUILT-IN CABINET OR IN
ANOTHER CONFINED SPACE. ENSURE THE UNIT IS WELL VENTILATED. TO
PREVENT RISK OF ELECTRIC SHOCK OR FIRE HAZARD DUE TO OVERHEATING,
ENSURE THAT CURTAINS AND ANY OTHER MATERIALS DO NOT OBSTRUCT THE
VENTILATION VENTS.
2
VQT2L14
THE FOLLOWING APPLIES ONLY IN THE U.S.A.
SDR-S50P SDR-T55P
SDR-T50P
SDR-H85P
FCC Note:
This equipment has been tested and found to comply with the limits for a Class B digital
device, pursuant to Part 15 of the FCC Rules. These limits are designed to provide
reasonable protection against harmful interference in a residential installation. This
equipment generates, uses, a nd can radia te radio fr equenc y energy and, if not inst alled and
used in accordance with the instructions, may cause harmful interference to radio
communications. However, there is no guarantee that interference will not occur in a
particular installa tion. If this equipment does cause harmful interf erence to radio or
television recept ion, whic h ca n be determin ed b y tur ning th e eq uipment off and on, the user
is encouraged to try to correct the interference by one or more of the following measures:
≥ Reorient or relocate the receiving antenna.
≥ Increase the separation between the equipment and receiver.
≥ Connect the equipment into an outlet on a circuit different from that to which the receiver
is connected.
≥ Consult the dealer or an experienced radio/TV technician for help.
FCC Caution: To assure continued complianc e, follow the attached installation
instructions and use only shielded interface cables with ferrite
core when connecting to computer or peripheral devices.
Any changes or modifications not expressly approved by the party responsible for
compliance could void the us er’s authority to operate this equ ipment.
Declaration of Conform ity
Trade Name: Panasonic
Model No.: SDR-S50P/SDR-T55P/SDR-T50P/SDR-H85P
Responsible party: Panasonic Corporation of North Amer ica
One Panasonic Way, Secaucus, NJ 07094
Support Contact: Panasonic Consumer Electronics Company
1-800-211-PANA (7262)
This device complies with Part 15 of the FCC Rules. Operation is subject to the following
two conditions: (1) This dev ice may not c ause harmf ul interfer ence, and (2) this device mus t
accept any interference received, including interference that may cause undesired
operation.
THE FOLLOWING APPLIES ONLY IN CANADA.
This Class B digital apparatus complies with Canadian ICES-003.
VQT2L14
3
Battery pack (Lithium ion battery pack)
≥ Use the specified unit to recharge the battery pack.
≥ Do not use the battery pack with equipment other than the specified unit.
≥ Do not get dirt, sand, liquids, or ot her foreign matter on the termina ls.
≥ Do not touch the plug terminals (i and j) with metal objects.
≥ Do not disassemble, remodel, heat or throw into fire.
If any electrolyte should come int o con tac t wit h yo ur hands or cl othes, wash i t off th oroughly
with water.
If any electrolyte should come into contact with your eyes, never rub the eyes. Rinse eyes
thoroughly with water, and then consult a doctor.
Warning
Risk of fire, explosion and burns. Do not disassemble, heat above 60 oC (140 oF) or
incinerate.
AC adaptor
This AC adaptor operates on AC between 110 V and 240 V.
But
≥ In the U.S.A. and Canada, the AC adaptor must be connected to a 120 V AC power
supply only.
≥ When connecting to an AC supply out side of th e U.S .A. or Canada , use a plu g ada ptor to
suit the AC outlet configuration.
≥ When connecting to a supply of greater than AC 125V, ensure the cord you use is suited
to the voltage of the AC supply and the rated current of the AC adaptor.
≥ Contact an electrical parts dis tributor for assistance in selecting a suitable AC plug
adaptor or AC cord set.
The socket outlet shall be installed near the equipment and easily acc essible. The mains
plug of the power supply cord shall remain readily operable. To completely disconnect this
apparatus from the AC Mains, disconnect the power supply cord plug from AC receptacle.
Product Identificat ion Marking is located on the bottom of units.
U.S.A./CANADA CONSUMERS: ATTENTION:
A lithium ion/polymer battery that is recyclable powers the product
you have purchased. Please call 1-800-8-BATTERY for information
on how to recycle this battery.
<For USA-California only>
This product contains a CR Coin Cell Lithium Battery which contains Perchlorate Material –
special handling may apply.
See www.dtsc.ca.gov/haz ardouswaste/perchlorate
4
VQT2L14
.

IMPORTANT SAFETY
INSTRUCTIONS
Read these operating instructions carefully before using th e unit. Follow the safety
instructions on the unit and the applicable safety instructions list ed below. Keep these
operating instructions handy for future reference.
1) Read these instructions.
2) Keep these inst ructions.
3) Heed all warnings.
4) Follow all instructions.
5) Do not use this apparatus near water.
6) Clean only with dry cloth.
7) Do not block any ventilat i on openings.
Install in accordance with the
manufacturer’s instructions.
8) Do not install near any heat sources
such as radiators, heat registers,
stoves, or other apparatus (including
amplifiers) that produce heat.
9) Do not defeat the safety purpose of the
polarized or grounding-type plug. A
polarized plug has two blades with one
wider than the other. A grounding-type
plug has two blades and a third
grounding prong. The wide blade or the
third prong are provided fo r your safety.
If the provided plug does not fit into your
outlet, consult an electrician for
replacement of the obsolete outlet.
11) Only use attachme nts/ a ccessories
specified by the manufacturer.
12) Use only with the
cart, stand, tripod,
bracket, or table
specified by the
manufacturer, or
sold with the
apparatus. When a
cart is used, use caution when moving
the cart/apparatus combination to avoid
injury from tip-over.
13) Unplug this apparatus during lightning
storms or when unused for long periods
of time.
14) Refer all servicing to qualified service
personnel. Servicing is required when
the apparatus has been damage d in any
way, s uc h as power-supply cord or plug
is damaged, liquid has been spilled or
objects have fallen into the apparatus,
the apparatus has been exp osed to rain
or moisture, does not operate normally,
or has been dropped.
10) Protect the power cord from being
walked on or pinched particularly at
plugs, convenience recept acles, and the
point where they exit fr om the
apparatus.
VQT2L14
5
Precautions
WARNING
CAUTION
USE & LOCATION
device which could be damaged by
improper handling or storage.
≥ TO AVOID SHOCK HAZARD ... Your
camera and power supply shoul d not be
exposed to rain or moisture. Do not
connect the power supply or operate your
camera if it gets wet. Your camera has
been designed for outdoor use, howeve r it
is not designed to sust ain direct exposure
to water, rain, sleet, snow, sand, dust, or a
direct splashing fro m a pool or even a cup
of coffee. This action could permanently
damage the internal parts of your camera.
Do not attempt to disassemble this unit.
There are no user serviceable parts
inside. Unplug your camera from the
power supply before cleaning.
≥ AS WITH ANY SMALL OBJECT, SD
CARDS CAN BE SWALLOWED BY
YOUNG CHILDREN. DO NOT ALLOW
CHILDREN TO HANDLE THE SD CARD.
≥ DO NOT AIM YOUR CAMERA AT THE
SUN OR OTHER BRIGHT OBJECTS
≥ DO NOT EXPOSE YOUR CAMERA TO
EXTENDED HIGH TEMPERATURE ...
Such as, in direct sunlight, inside a closed
car, ne xt to a heater, etc... This action
could permanently damage the i nternal
parts of your camera.
≥ AVOID SUDDEN CHANGES IN
TEMPERATURE ... If the unit is suddenly
moved from a cold place to a warm place,
moisture may form on the SD card and
inside the unit.
≥ DO NOT LEAVE YOUR CAMERA OR
THE POWER SUPPLY TURNED ON
WHEN NOT IN USE.
≥ STORAGE OF YOUR CAMERA ... Store
and handle your camera in a manner that
will not subject it to unnecessary
movement (avoid shaking and striking).
Your camera contains a sensitiv e pick-up
CARE
≥ TO CLEAN YOUR CAMERA ... Do not
use strong or abrasive detergents when
cleaning your camera body.
≥ TO PROTECT THE LENS ... Do not touch
the surface of the lens with your hand.
Use a commercial camera lens solution
and lens paper when cleaning the lens.
Improper cleaning can scratch the lens
coating.
≥ TO PROTECT THE FINISH OF YOUR
CAMERA ... Before handling your
camera, make sure your hands and face
are free from any chemical prod ucts , su ch
as suntan lotion, as it may damage the
finish.
-If you see this symbolInformation on Disposal in other
Countries outside the European Union
This symbol is only valid
in the European Union.
If you wish to discard this
product, please contact your
local authorities or dealer
and ask for the correct
method of disposal.
6
VQT2L14
∫ Indemnity about recorded
SDR-T55
SDR-T50
content
Panasonic does not accept any
responsibility for damages directly or
indirectly due to any type of problems that
result in loss of recording or edited content,
and does not guarantee any cont ent if
recording or editing does not work properly.
Likewise, the above also applies in a case
where any type of repair is made to the unit
(including any other non-built-in memory/
HDD related component).
∫ For the purposes of these
operating instructions
≥ SD Memory Card, SDHC Memory Card
and SDXC Memory Card are referred to
as the “SD card”.
≥ Functions that can be used for motion
picture recording/motion picture playback
are indica te d b y in th ese
operating instructions.
≥ Functions that can be used for still pictur e
recording/still picture playback are
indicated by in these operating
instructions.
≥ Pages for reference are indicated by an
arrow, for example: l 00
∫ Handling of built-in memory
[SDR-T55]/[SDR-T50]
This unit is equipped with the built-in 8 GB
memory. When using this component, pay
attention to the following points.
This unit is equipped with the built-in 4 GB
memory. When using this component, pay
attention to the following points.
Back up data periodically.
The built-in memory is temporary storag e. In
order to avoid erasing dat a due to static
electricity, electromagnetic wav es,
breakage, and fa ilures, b ack up the da ta t o a
PC or DVD disc. (l 79, 86)
≥ Access lamp [ACCESS] (l 16)
illuminates while the SD card or built-in
memory is being accessed (initial ization,
recording, playback, de leting etc.). Do not
perform the following ope rati ons whe n th e
lamp illuminates. It may damage the builtin memory or cause a malfunction in the
unit.
jTurn off the powe r ( r emove the battery)
jInsert and remove the USB cable
jExpose th e un i t to vibrations or sho c k
≥ About disposing of or giving a way this unit .
(l 111)
∫ Handling of HDD [SDR-H85]
This unit is equipped with the built-in 80 GB
HDD. While the HDD is capable of storing a
large amount of data, there are a few things
to look out for. When using this component,
pay attention to the following points.
Do not expose the HDD to vibrations and
shocks.
Due to the environment and handling
conditions, the HDD may be subject to
partial damages or may not be able to read,
record, and play back data. Do not expose
the unit to vibrations or shock, and do not
turn off the power during recording or
playback.
If the unit is used in a plac e with loud
sounds, such as a club or similar venue,
the recording may stop due to sound
vibrations. Recording data on an SD card
is recommended in these pl aces.
Back up data periodically.
The HDD is temporary storage. In order to
avoid erasing data due t o static electricity,
electromagnetic waves, breakage, and
failures, back up the data to a PC or DVD
disc. (l 79, 86)
If the HDD experiences any abnormality,
back up data immediately.
Failure in the HDD may produce continuous
noise or choppy sound during recording or
playing back. Continuous use will cause
further deterioration, and may eventually
disable the HDD. If these phenomena are
observed, copy the data on the HDD to a
PC, a DVD disc etc. immediately and
contact consumer support. (l 124, 125)
VQT2L14
7

Once the HDD is out of order, data cannot
SDR-T55
SDR-T50
SDR-H85
SDR-S50
be restored.
Operation may stop in hot or cold
environments.
The unit is disabled in order to pr otect the
HDD.
Do not use the unit in low atmospheric
pressures.
The HDD may fail if it is used at altitudes of
3000 m (9800 feet) or higher above sea
level.
Transportation
When the unit is transported, turn off the
power and be careful not to shake, drop, or
cause impact to the unit .
Falling detection
[ ] is indicated on the screen when it
G
detects a falling state (a weightless state). If
the falling state is detected repeatedly, the
unit may stop the recording or playb ac k
operation in order to protect the HDD.
≥ HDD access lamp [ACCESS HDD] (l 18)
illuminates while the HDD is being
accessed (initialization, rec ording,
playback, deleting etc.). Do not perform
the following operations when the lamp
illuminates. It may damage the HDD or
cause a malfunction in the unit.
jTurn off the power (remove the battery)
jInsert and remove the USB cable
jExpose the unit to vibrations or shock
≥ About disposing of or giving awa y this unit.
(l 111)
IMPORTANT
∫ Carefully observe copyright
laws
Whatever you have r ecorde d and cre ated
can be used for your personal
entertainment only. Under copyright
laws, other materials cannot be used
without obtaining permission from the
holders of the copyrights.
These operating instructions are designed
for use with models ,
8
VQT2L14
SDR-S50
, and
different from the original.
≥ The illustrations used in these operat i ng
instructions show model ,
however, parts of the explanation refer to
different models.
≥ Depending on the model, some functions
are not availa bl e .
≥ Features may vary, so please read
carefully.
. Pictures may be slightly
∫ Cards that you can use with
this unit
SD Memory Card, SDHC Memory Card
and SDXC Memory Card
≥ 4 GB (or more) Memory Cards that do not
have the SDHC logo or 48 GB (or more)
Memory Cards that d o not have t he S DXC
logo are not based on SD Memory Card
Specifications.
≥ Refer to page 23 for more details on SD
cards.
∫ Licenses
≥ SDXC Logo is a trademark of SD-3C,
LLC.
≥ U.S. Patent Nos. 6,836,549; 6,381,747;
7,050,698; 6,516,13 2; and 5,583,936.
This product incorporates copyright
protection technology that is protected by
U.S. patents and other intellec t u al
property rights. Use of this copyright
protection technology must be authorized
by Macrovision, and is intended for home
and other limited viewing uses only unle ss
otherwise authorized by Macrovision.
Reverse engineering or disassembly is
prohibited.
≥ Manufactured under license from Dolby
Laboratories.
Dolby and the double-D symbol are
trademarks of Dolby Laboratories.
≥ Microsoft
Vista
trademarks of the Microsof t Corporat ion in
the United States and/or other countries.
≥ Microsoft product screen shot(s) reprinted
with permission from Microsoft
Corporation.
®
, Windows® and Windows
®
are either registered trad emarks or

≥ IBM and PC/AT ar e re gis tered tr adema rks
of International Busine ss Machines
Corporation of the U.S.
®
≥ Intel
, Core™, Pentium® and Celeron® are
the registered trademarks or trademarks
of the Intel Corporation in the United
States and other countries.
≥ iMovie and Mac are trademarks of
Apple Inc., registered in the U.S. and
other countries.
≥ PowerPC is a trademark of International
Business Machines Corporation.
≥ YouTube and Picasa are trademarks of
Google, Inc.
≥ Other names of systems and pro ducts
mentioned in these instructions are
usually the registered trademarks or
trademarks of the manufacturers who
developed the system or product
concerned.
This product is licensed under the AVC
patent portfolio l icense for the personal and
non-commercial use of a consu mer to (i)
encode video in compliance with the AVC
Standard (“AVC V i deo”) and/or (ii) decode
AVC Vi deo that was encoded by a consumer
engaged in a personal and non-commercial
activity and/or was obtained from a video
provider licensed to provide AVC Video. No
license is granted or shall be implied for any
other use. Additional information may be
obtained from MPEG LA, LLC.
See http://www.mpegla.com
.
VQT2L14
9

Contents
Accessories............................................12
Quick Guide....... ... .. ... ................. ... ... .. ....13
Preparation
Before using
[1] Parts identification and
handling .......................................16
Setup
[1] Power supply............. ... .............. 19
Inserting the battery ..................... 19
Charging the battery .................... 20
Charging and re co rd in g ti m e........ 21
[2] Recording to a card ................... 23
Cards that you can use with
this unit......................................... 23
Inserting/removing an SD card
[3] Turning the unit on/off ............... 25
Turning the power on and off
with the power button................... 25
Turning the power on and off
with the LCD monitor ................... 25
[4] Selecting a mode ....................... 26
[5] Using the menu screen ............. 27
Language selection...................... 28
Menu list....................................... 28
[6] Setting date and time................. 32
World time setting
(Displaying the time of the travel
destination) .................................. 33
[7] Adjusting LCD monitor.............. 34
LCD monitor adjustment .............. 34
Recording Yourself....................... 34
..... 24
Recording
Recording (Basic)
[1] Before recording........................ 35
Intelligent Auto Mode................... 36
Quick start.................................... 38
Quick power on............................ 38
[2] Recording motion pictures ....... 39
Selecting a media to record
[SDR-T55]/[SDR-T50]/
[SDR-H85] ................................... 40
Recording in long recording mode
Recording modes/approximate
recordable time ............................ 42
Audio recording modes................ 44
Shooting guide............................. 44
[3] Recording still pictures............. 45
Picture size ...... ............................ 46
Simultaneous recording
(recording still pictures while
recording motion pictures)........... 46
Number of recordable pictures
[4] Recording functions.................. 47
Enhanced optical zoom............... 47
Digital zoom function ..... ... ........... 47
Image stabilizer function.............. 48
[5] AF/AE tracking .... ... ... ................. 49
Recording (Advanced)
[1] Recording functions of
operation icons ...... .....................50
Operation icons............................ 50
[2] Recording functions of
menus ..........................................54
[3] Manual recording functions...... 58
White balance .......... ... ... .............. 59
Manual shutter speed/
iris adjustment.............................. 60
Recording with Manual focus....... 61
.... 41
..... 46
10
VQT2L14

Playback
Playback
[1] Motion picture playback............ 62
Creating still picture from motion
picture .......................................... 64
Time frame index ................. ... ..... 65
Playing back motion pictures
by date ......................................... 65
Repeat playba ck ............... ........... 66
Resuming the previous
playback....................................... 66
[2] Still picture playback ................. 67
Playing back still pictur es
by date ......................................... 69
Changing th e pl a y b a c k s et t ing and
playing back the slide show ......... 69
Editing
[1] Deleting scenes/still pictures ... 70
Protecting scenes/still pictures..... 71
[2] Dividing a scene to partially
delete............................................72
[3] DPOF setting ................... ........... 73
[4]
Copying between SD card and
Built-in Memory/HDD .....................74
Copying [SDR-T55]/[SDR-T50]/
[SDR-H85].................................... 75
[5] Formatting .................................. 76
With a TV
[1] Watching Video/Pictures on
your TV. ... ... ..................................7 7
Backup
With other products
[1]
Connecting a DVD burner to
copy to/play back a disc ...............79
Preparing for copying/
playing back ................................. 79
Copying to discs........................... 81
Playing back the copied d i sc........ 83
Managing the copied disc ............ 84
[2] Dubbing images onto other
video devices ..............................85
With a PC
Before using
[1] What you can do with a PC....... 86
End User License Agreement...... 88
[2] Operating environment ............. 89
Setup
[1] Installation.................................. 92
[2] Connecting to a PC.................... 94
About the PC display................... 96
Using with a PC
[1] Starting VideoCam Suite 3.0..... 97
Reading the operating instructions
of the software applications ......... 97
Upload to YouTube...................... 98
[2] If using Mac ................................ 99
Others
Indications
[1] Indications................................ 100
[2] Messages.................................. 103
About recovery........... ................ 104
Helpful hints
[1] Functions that cannot be used
simultaneously..........................105
[2] Troubleshooting....................... 106
Cautions for use ..................................110
Specifications ......................................116
Optional accessories ................. .........120
Accessory Order Form
(For USA and Puerto Rico
Customers) ................................ 122
Limited Warranty
(ONLY FOR U.S.A. AND
PUERTO RICO).....................................123
Warranty
(For Canadian Cust o me rs ) .. ... ... ..........125
Index .....................................................126
Spanish Quick Use Guide/
Guía española para el uso rápido ......128
PreparationRecordingPlaybackBackupWith a PCOthers
11
VQT2L14
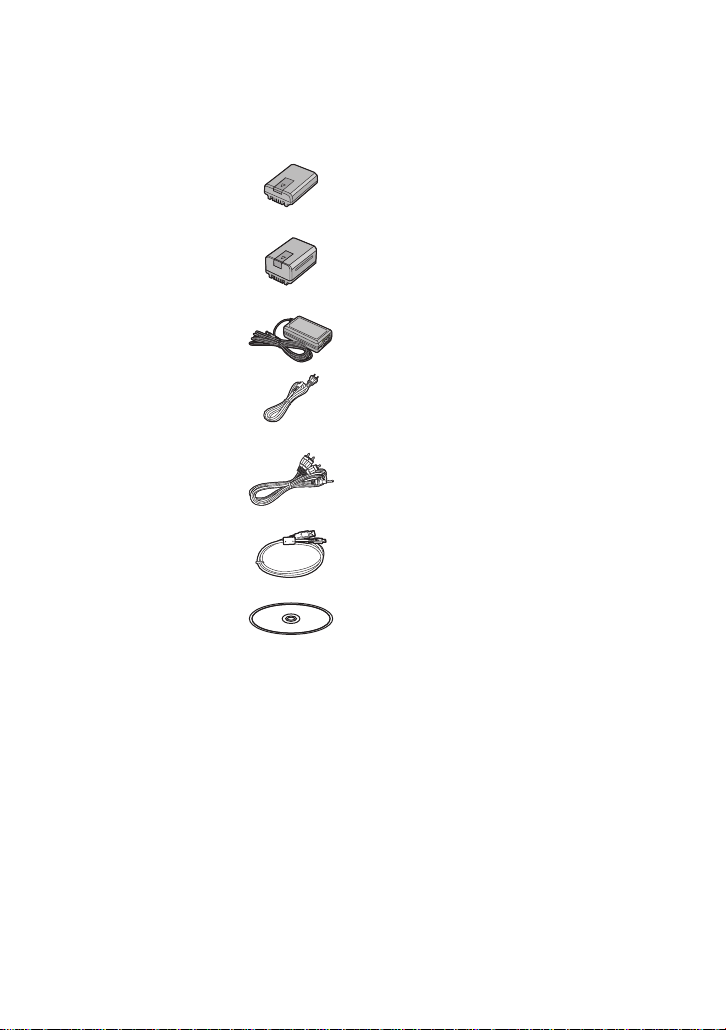
Accessories
Check the accessories before using this unit.
Product numbers correct as of December 2009. These may be subject to c hange.
Battery pack
VW-VBL090
(SDR-S50)
(SDR-T55/SDR-T50)
Battery pack
VW-VBK180
(SDR-H85)
AC adaptor
VSK0711
AC cable
K2CA2CA00025
AV cable
K2KYYYY00054
USB cable
K1HY04YY0032
CD-ROM
Software
12
VQT2L14
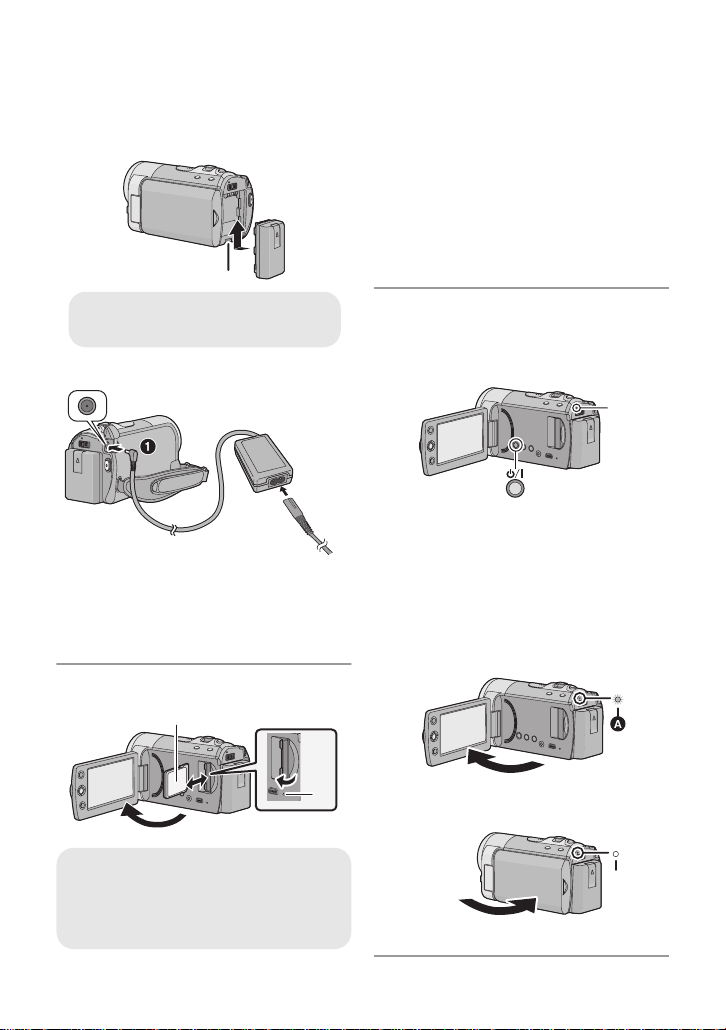
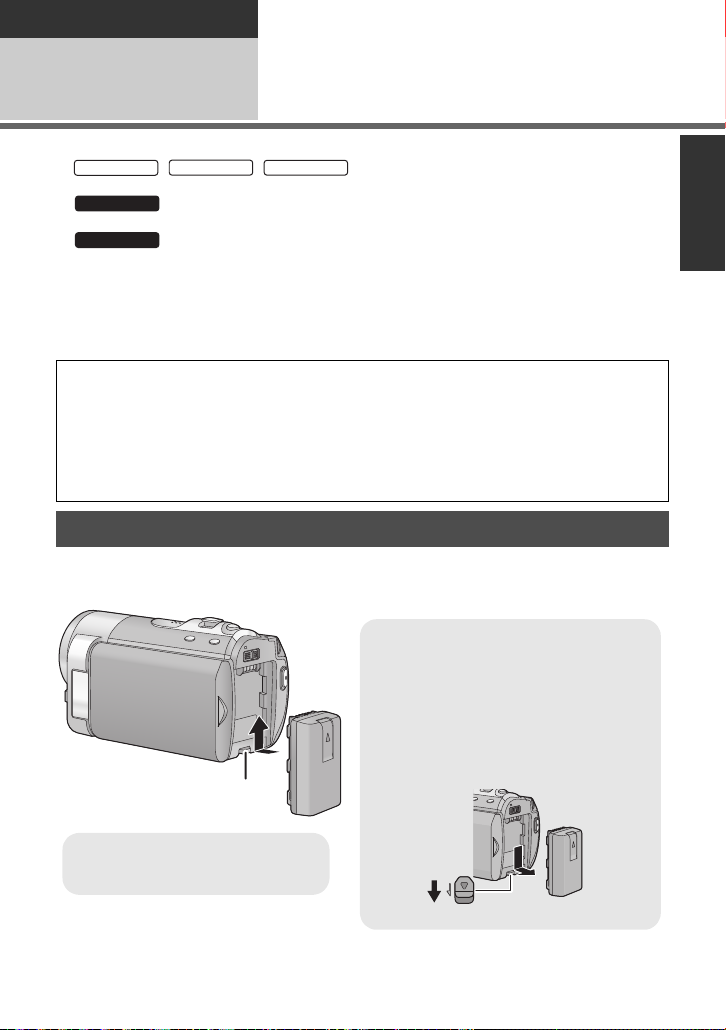
Quick Guide
A Insert the battery until it clicks and
locks.
∫ Inserting the battery
Install the battery by inserting it in the
direction shown in the figure.
∫ Charging the battery
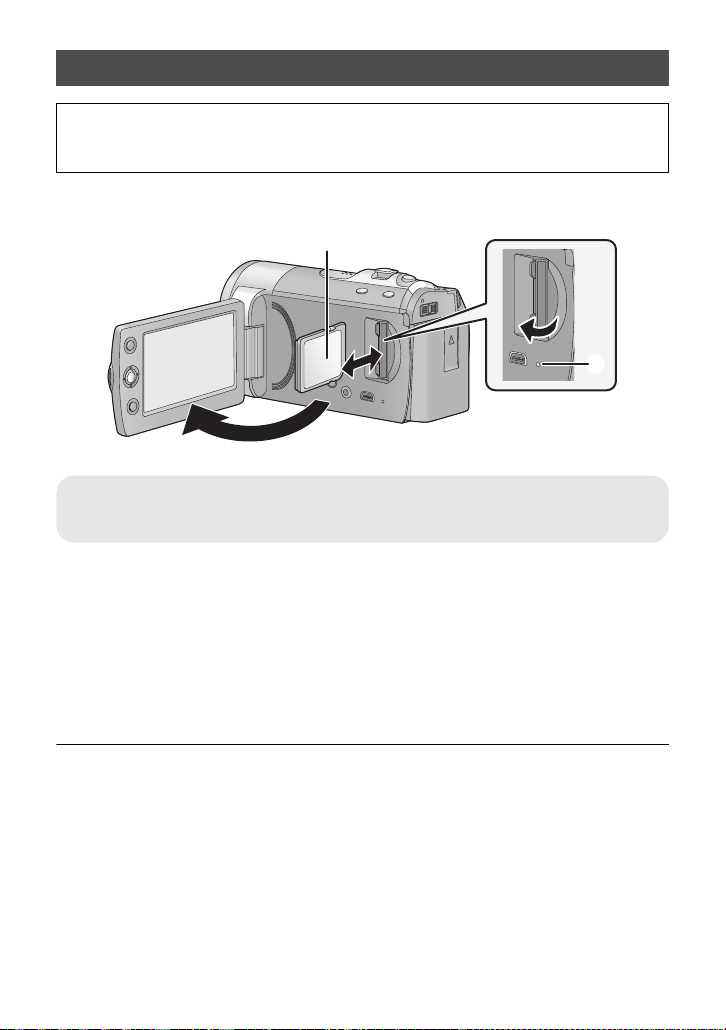
1) Open the LCD monitor.
2) Open the SD card cover and insert
(remove) the SD card into (from) the
card slot.
≥ Face the label side B in the direction
shown in the illustration and press it
straight in as far as it will go.
≥ Press the center of the SD card and then
pull it straight out.
3) Securely close the SD card cover.
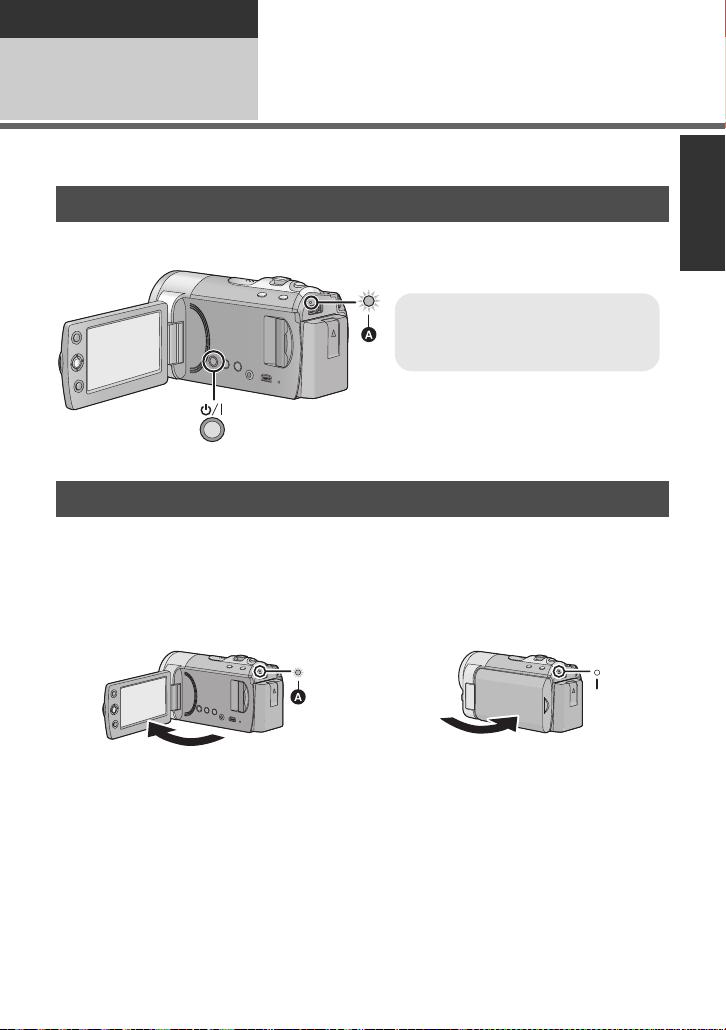
∫ How to turn on the power
Turning the power on and off with the
power button
Press the power button to turn on the power.
1 Connect the AC adaptor to this unit’s
DC input terminal.
2 Connect the AC cable to the AC
adaptor, then the AC outlet.
≥ For the AC cable, plug in 2 and then 3.
∫ Inserting/removing an SD card
Access lamp [ACCESS] A
≥ When this unit is accessing the SD
card or built-in memory, the access
lamp lights up.
A The status indicator lights.
≥ To t urn of f the p ower, hold down the power
button until the status indicator goes off.
Turning the power on and off with the
LCD monitor
Power is turned on when the LCD monitor is
opened, and power is turned off when it is closed.
∫ To turn on the power
A The status indicator lights.
∫ To turn off the power
B The status indicator goes off.
13
VQT2L14
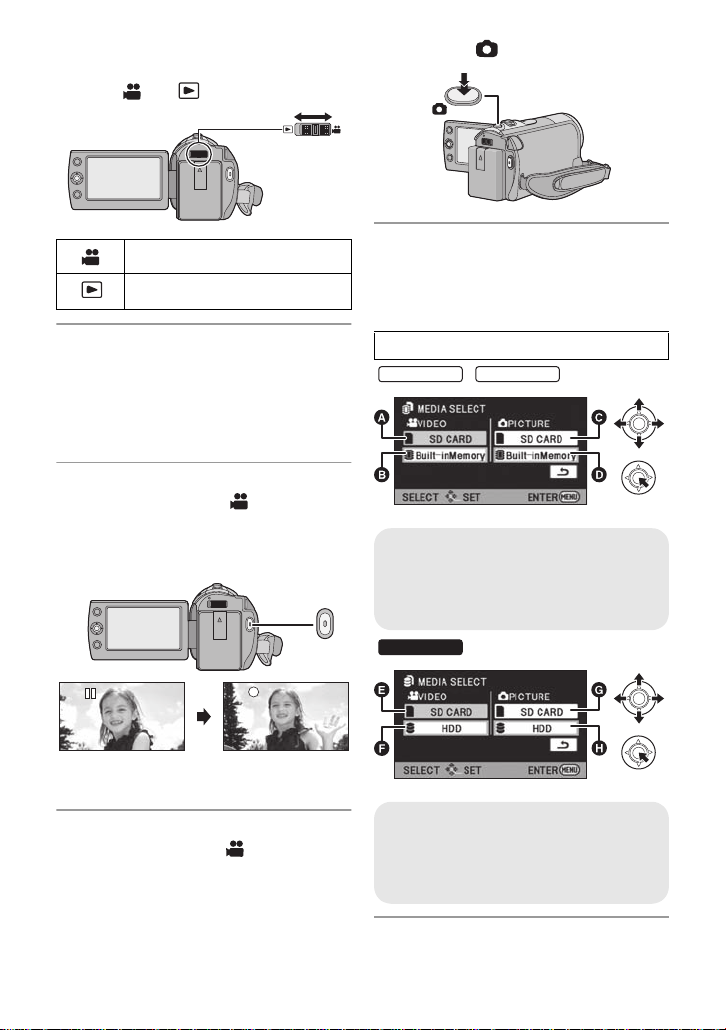
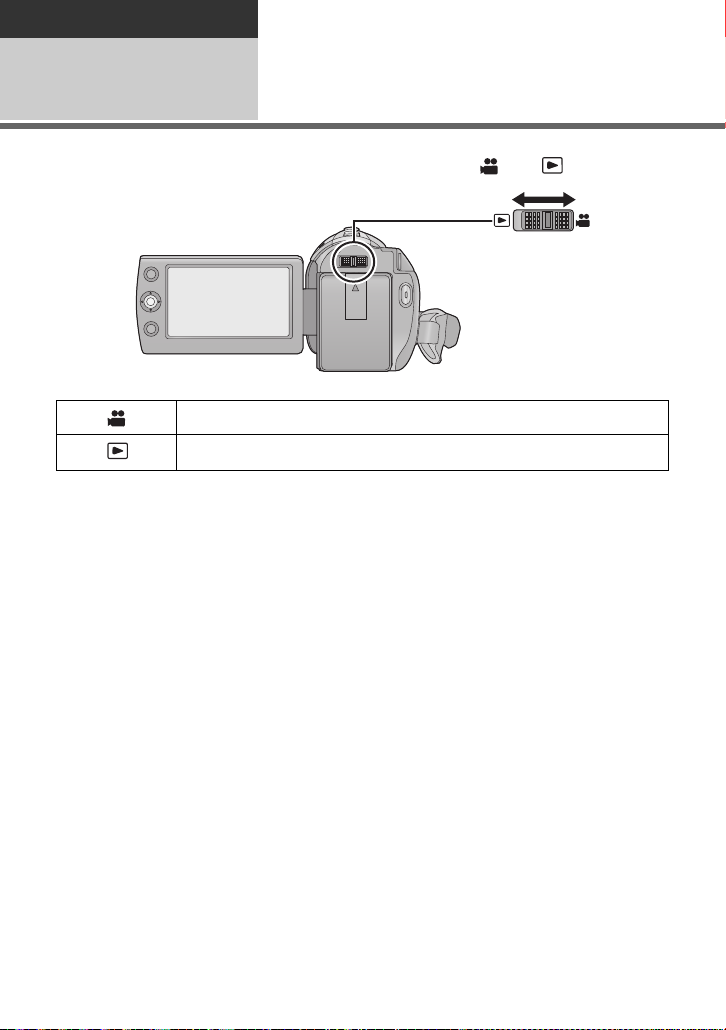
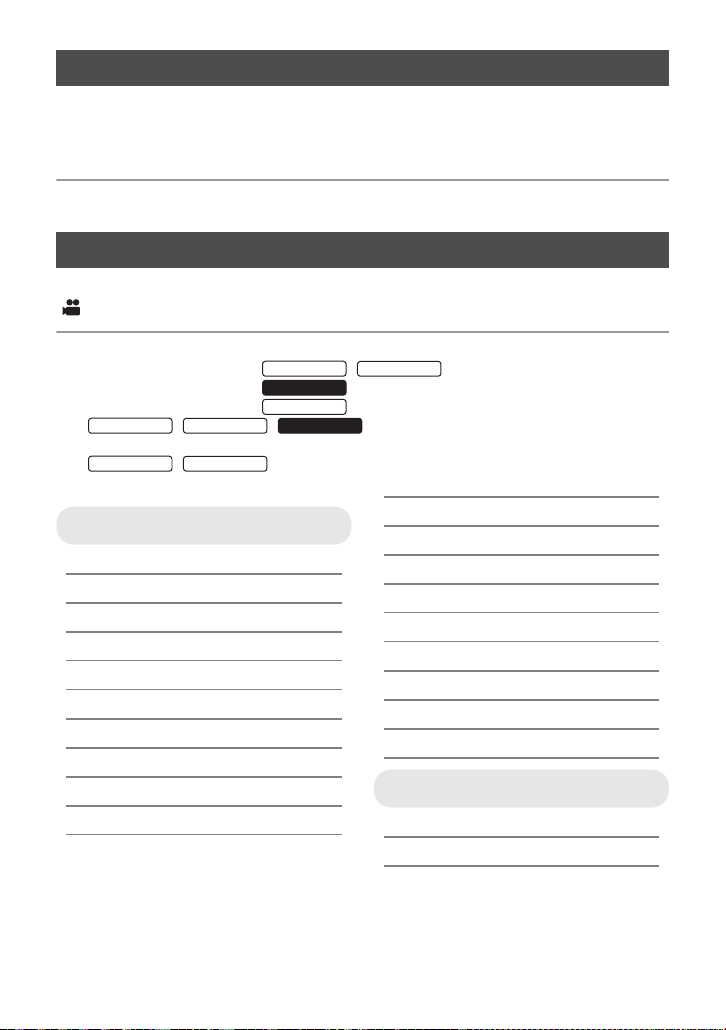
∫ Selecting a mode
SDR-T55
SDR-T50
SDR-H85
Operate the mode switch to change the
mode to or .
2) Press the button.
Recording mode (l 39, 45)
Playback mode (l 62, 67)
∫ Language selection
1) Press the MENU button, then select
[SETUP] # [LANGUAGE] and press th e
joystick.
2) Select [English] and the press the
joystick.
∫ Recording motion pictures
1) Change the mode to and open the
LCD monitor.
2) Press the recording start/stop button t o
start recording.
≥ When you begin recording, ; changes to
¥.
∫ Recording still pictures
1) Change the mode to and open the
LCD monitor.
∫ When selecting media to
record from the menu
[SDR-T55/SDR-T50/SDR-H85]
Select the menu. (l 27)
[MEDIA SELECT]
/
A VIDEO/SD CARD
B VIDEO/Built-inMemory
C PICTURE/SD CARD
D PICTURE/Built-inMemory
E VIDEO/SD CARD
F VIDEO/HDD
G PICTURE/SD CARD
H PICTURE/HDD
14
VQT2L14
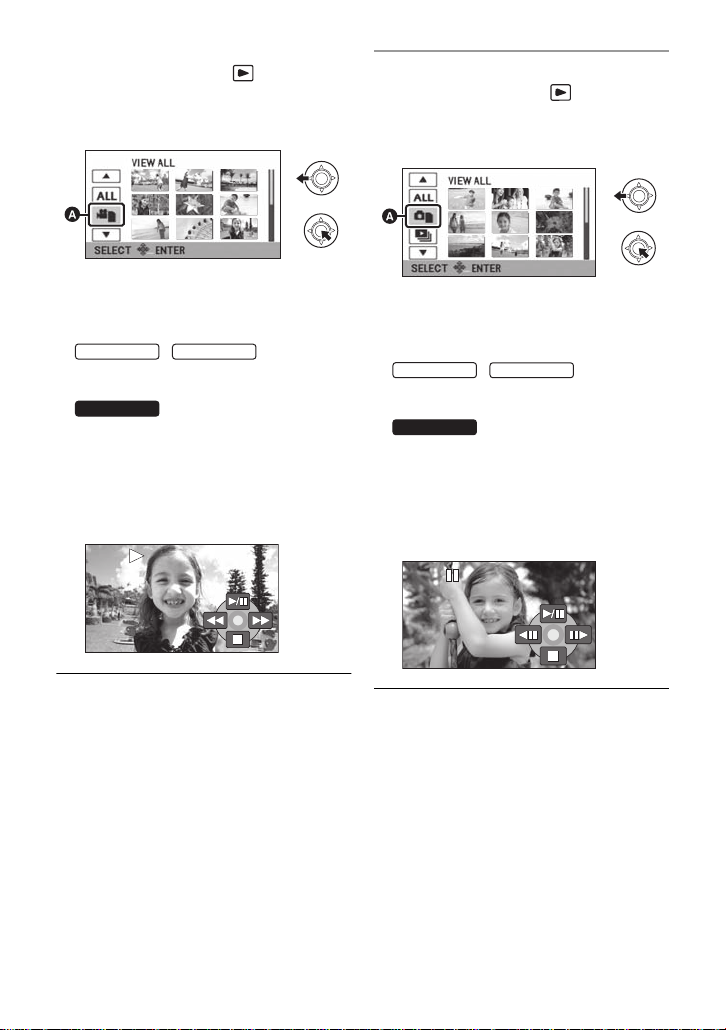
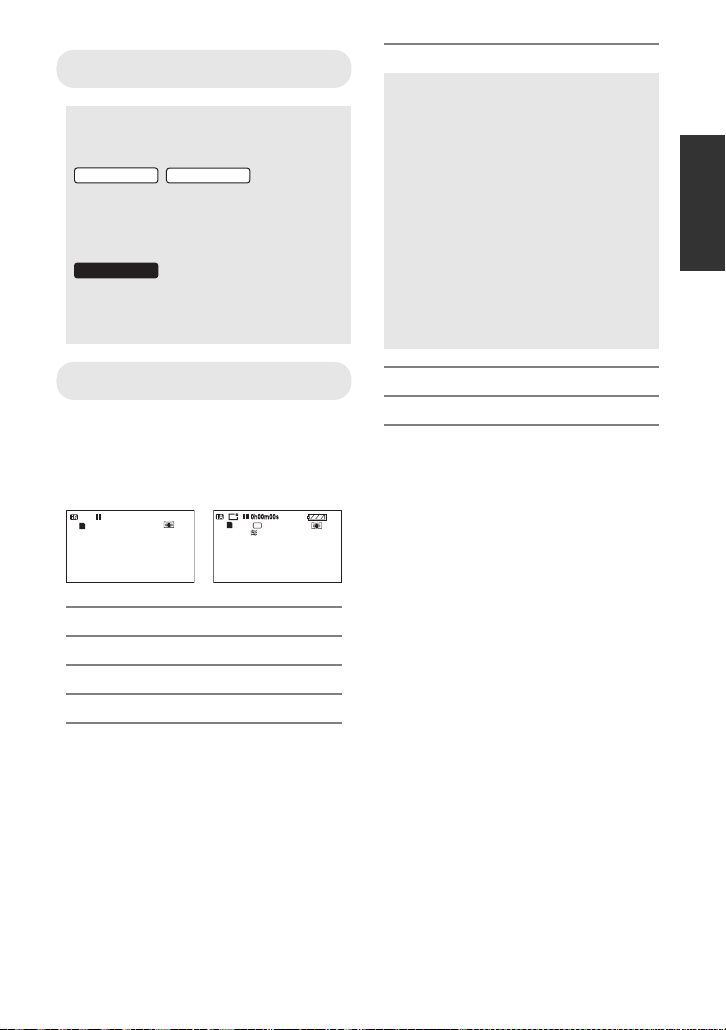
∫ Motion picture playback
SDR-T55
SDR-H85
0h00m00s0h00m00s0h00m00s
SDR-T55
SDR-T50
SDR-H85
1) Change the mode to .
2) Use the joystick to sele ct t he Play Mode
Select icon A, then press the center of
the joystick.
∫ Still picture playback
1) Change the mode to .
2) Use the joystick to s elec t the P lay Mode
Select icon A, then press the center of
the joystick.
3) Select the media you wish to play back,
then press the center of the joystick.
≥ Select [VIDEO/SD CARD] to play back the
SD card.
Select [VIDEO/Built-inMemory] to play
back the built-in memory.
Select [VIDEO/HDD] to play back the
HDD.
4) Select the scene t o be played back,
then press the joystick.
5) Select the playbac k operation with the
joystick.
1/;: Playback/Pause
6: Rewind playback
5: Fast forward playback
∫: Stops the playback and shows
/
SDR-T50
the thumbnails.
3) Select the media yo u wish to play back,
then press the center of th e joystick.
≥ Select [PICTURE/SD CARD] to play back
the SD card.
/
Select [PICTURE/ Bu i lt- i nMe m o r y] to play
back the built-in memory.
Select [PICTURE/HDD] to play back the
HDD.
4) Select the still picture to be played back,
then press the joystick.
5) Select the playback operation with the
joystick.
1/;: Slide show (playback of th e still
pictures in numerical order) start/
pause.
2;: Plays back the previous picture.
;1: Plays back the next picture.
∫: Stops the playback and shows
the thumbnails.
15
VQT2L14
Preparation
1 23
456789
10
11
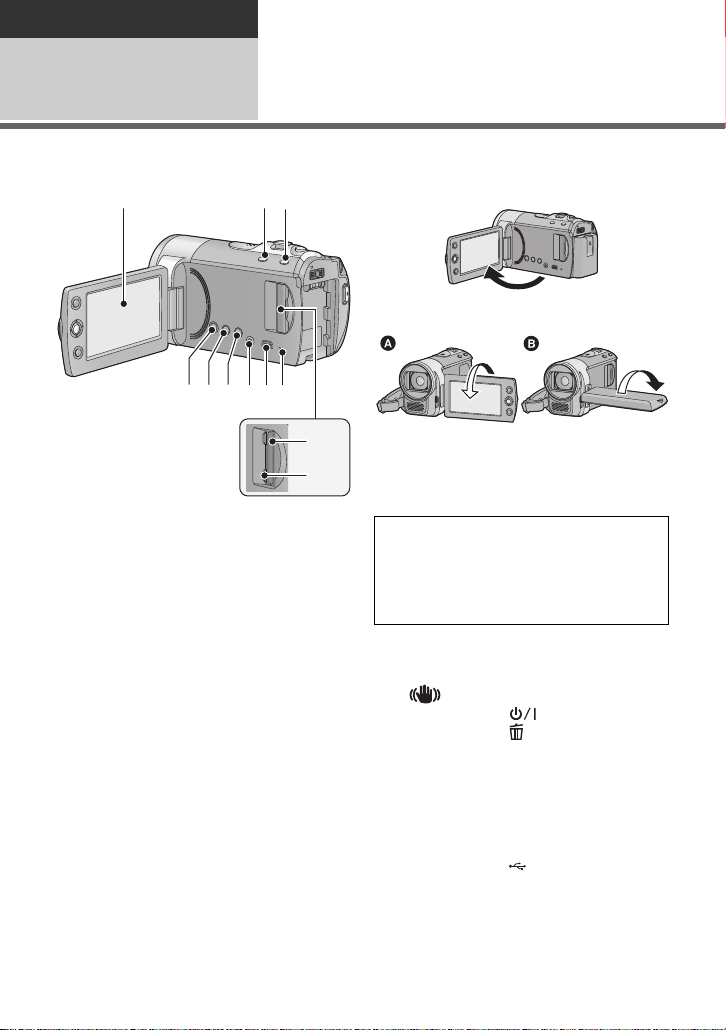
Before using
1
Parts identification and
handling
1 LCD monitor
≥ Pull the LCD monitor out in the directio n of
the arrow with your fingers.
≥ It can open up to 90o.
≥ It can rotate up to 180o A towards the lens
or 90o B towards the opposite direction.
≥ The brightness and color level of the LCD
monitor can be adjusted. (l 34)
Due to limitations in LCD production
technology , t here may be some ti ny bright
or dark spots on th e L CD monit or scr een.
However, t his is not a malfunction and
does not affect the recorded picture.
2 Intelligent auto/Manual button
[iA/MANUAL] (l 36)
3 Optical image stabilizer button
[ , O .I.S.] (l 48)
4 Power button [ ] (l 25)
5 Delete button [ ] (l 70)
6 Long recording button [LONG REC.]
(l 41)
7 Audio-video output terminal [A/V]
(l 77, 85)
≥ Use the AV cable (only the supplied
cable).
8 USB terminal [ ] (l 80, 94)
9 Access lamp [ACCESS] (l 24)
10 SD card slot (l 24)
11 SD card cover [SD CARD] (l 24)
16
VQT2L14
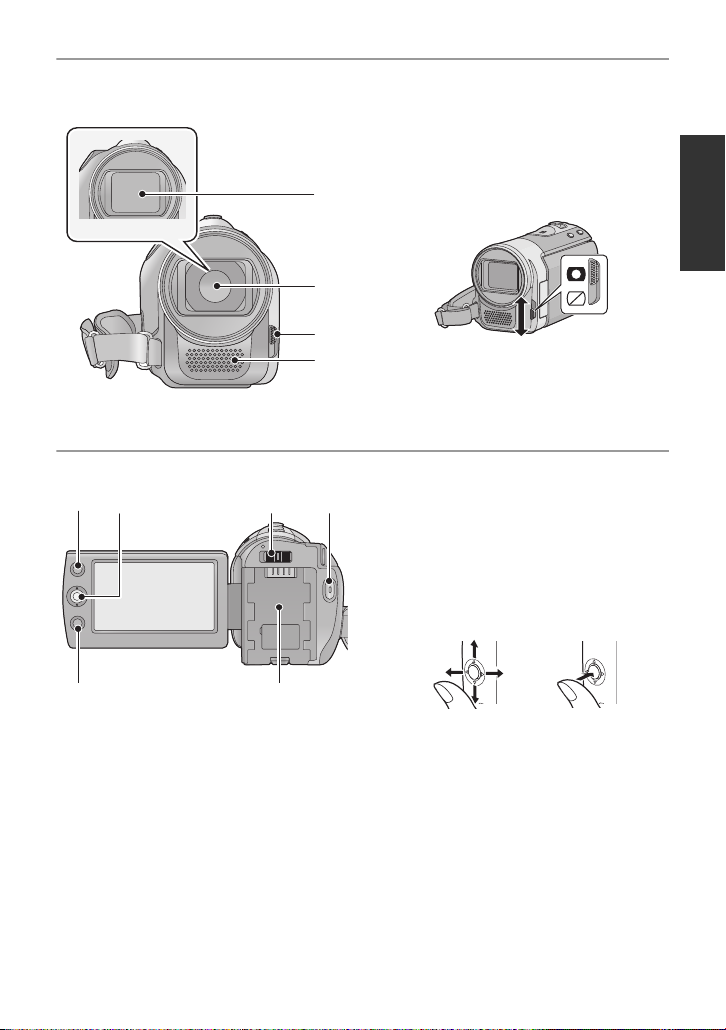
12 Lens cover
13
14
15
12
16 17 18 19
20
21
13 Lens
14 Open/close switch f or the lens cover
For the lens protection, be sure to close the
lens cover when not in use.
Slide open/close switch for the lens
cover.
15 Microphone (built-in, stereo)
16 AF/AE button [AF/AE] (l 49)
17 Joystick
Use the joystick to select the recording
functions and playback operations, and to
operate the menu screen.
Move the joystick up, down, left, or right
to select a setting or scene and then
press the joystick to set it.
1 Select by moving up, down, left or right.
2 Set by pressing the center.
≥ Menu screen operations (l 27)
≥ To select the recording functions (l 50)
≥ To adjust manually (l 58)
≥ Playback operations (l 62, 67)
18 Mode switch (l 26)
19 Recording start/stop button (l 39)
20 Menu button [MENU] (l 27)
21 Battery holder (l 19)
VQT2L14
17
24
29 30
25
2322
26
27
28
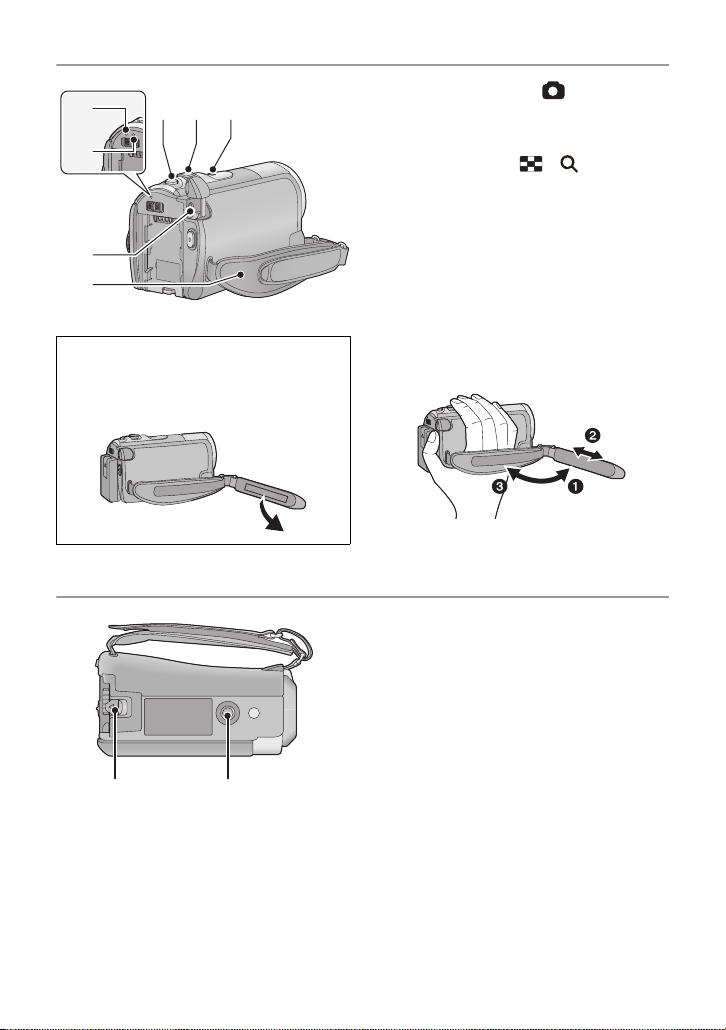
(U.S.A. onl y ):
When this unit is purchased, a sens or tag
is attached to the grip belt. Remove the
tag before use.
22 Photoshot button [ ] (l 45)
23 When recording: Zoom lever [W/T]
(l 47)
When playing back: Thumbnail
display switch [ / ] (l 63)/
Vo lume lever [sVOLr] (l 64)
24 Speaker
25 Status indicator (l 25)
26 HDD access lamp [ACCESS HDD]
(SDR-H85) (l 8)
27 DC input terminal [DC IN] (l 20)
≥ Do not use any other AC adaptors except
the supplied one.
28 Grip belt
Adjust the belt length and the pad
position.
1 Flip the belt.
2 Adjust the length.
3 Replace the belt.
29 Battery release lever [BATTERY]
(l 19)
30 Tripod receptacle
18
VQT2L14
Preparation
SDR-S50
SDR-T55
SDR-T50
SDR-H85
SDR-H85
Removing the battery
Be sure to hold down the power button
until the status indicator goes off. Then
remove the battery while support i ng the
unit to prevent it from dropping.
Move the battery release lever in the
direction indicated by the arrow and
remove the battery when unlocked.
BATTERY
A Insert the battery until it clicks
and locks.
Setup
Power supply
1
∫ About batteries that you can use with this unit
The battery that can be used with this unit is VW-VBL090/VW-VBK180/VW-VBK360.
//
The battery that can be used with this unit is VW-VBK180/VW-VBK360.
≥
safely, and only dedicated batteries (VW-VBK180/VW-VBK360) support this function.
Only batteries which are genuine Panasonic products and batteries from other
companies certified by Panasonic can be used. (Only batteries which support this
function can be used) Note that Panasonic can only guarantee the quality, performance
or safety of genuine Panasonic batteries and not those made by other companies.
It has been found that counterfeit battery packs which look very similar to the genuine
product are made available to purchase in some markets. Some of these battery packs
are not adequately protected with internal protection to meet the requirements of
appropriate safety standards. There is a possibility that these battery packs may lead
to fire or explosion. Please be advised that we are not liable for any ac cident or failure
occurring as a result of use of a counterfeit battery pack. To ensure that safe products
are used we would recommend that a genuine Panasonic battery pack is used.
The unit has a function for judging whether the battery can be used
Inserting the battery
≥ Press the power button to turn off the power. (l 25)
Install the battery by inserting it in the direction shown in the figure.
19
VQT2L14
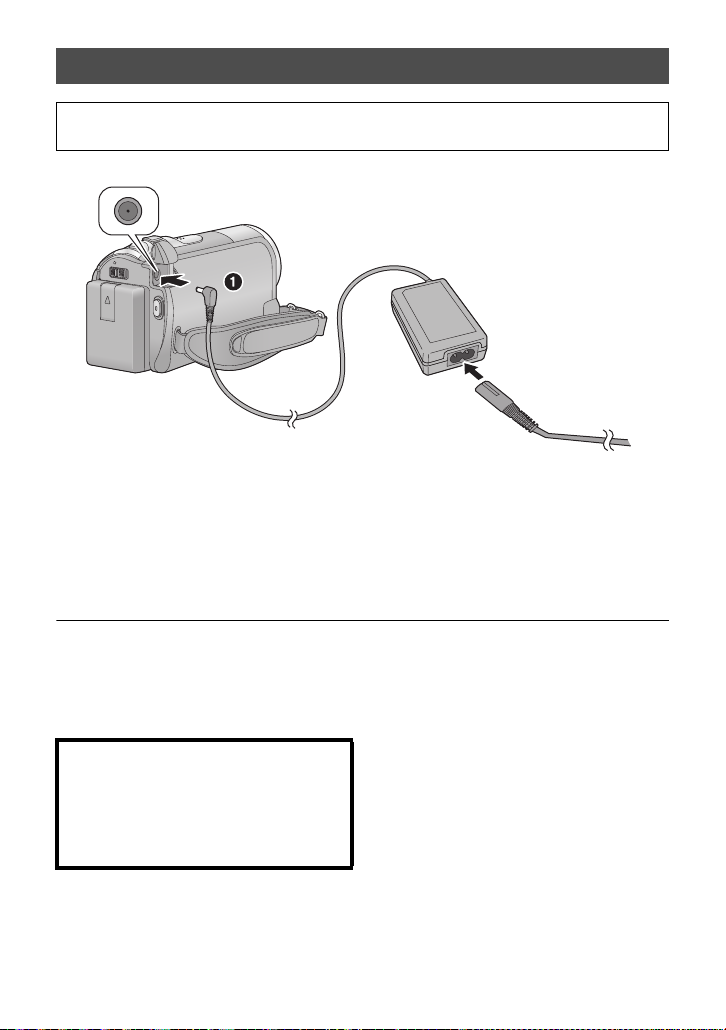
Charging the battery
When this unit is purchased, the battery is not charged. Charge the batter y b efo re
using this unit for the first time.
≥ The battery will not be charged if the power is turned on.
1 Connect the AC adaptor to this unit’s DC input terminal.
2 Connect the AC cable to the AC adaptor, then the AC outlet.
≥ For the AC cable, plug in 2 and then 3.
≥
The status indi cator will flas h red at an interval of 2 seconds, indicati ng that charging has begun.
∫ Connecting to the AC outlet
If you turn on this unit while charging the battery using the AC adapt or, you can use the
power supplied from the AC outlet to power the unit for use.
≥ Refer to page 113 when status indicator flashes either rapidly or slowly.
≥ We recommend using Panasonic batteries (l 12, 21, 120).
≥ If you use other batteries, we cannot guarantee the quality of this product.
≥ Do not heat or expose to flame.
≥ Do not leave the battery(ies) in an automobile ex posed to direct sunlight for a long period
of time with doors and windows closed.
CAUTION
Danger of explo sion if battery is i ncorrectly
replaced. Rep l ac e only with the same or
equivalent ty pe recommended by the
manufacturer. Dispose of used batteries
according to th e manu fac ture r’s in str uc tions .
20
VQT2L14
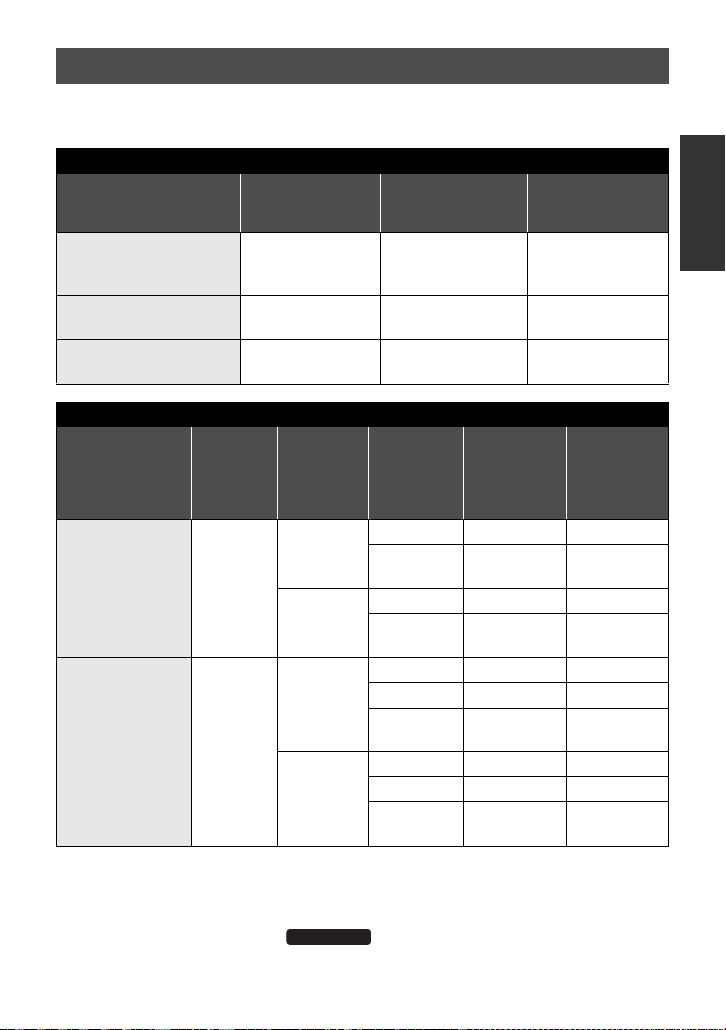
Charging and recording time
∫ Charging/Recording time
≥ Temperature: 25 oC (77 oF)/humidity: 60%
SDR-S50/SDR-T55/SDR-T50
Battery model number
[Voltage/Capacity
(minimum)]
Supplied battery/
VW-VBL090 (optional)
[3.6 V/895 mAh]
VW-VBK180 (optional)
[3.6 V/1790 mAh]
VW-VBK360 (optional)
[3.6 V/3580 mAh]
Battery model
number
[Voltage/
Capacity
(minimum)]
Supplied ba ttery/
VW-VBK180
(optional)
[3.6 V/1790 mAh]
VW-VBK360
(optional)
[3.6 V/3580 mAh]
≥ These times are approximations.
≥ The indicated charging time is f or when the batter y has been disc harged compl etely.
Charging time and recordable time vary depending on the usage conditions such as
high/low temperature.
≥ VW-VBL090 is not available for .
2h50min
4h50min
Charging
time
Charging time
2h20min 1h20min 40min
2h50min 2h55min 1h30min
4h50min 6h 3h10min
SDR-H85
Recording
destination
HDD
SD
HDD
SD
SDR-H85
Maximum
continuously
recordable time
Maximum
Recording
mode
XP 2h30min 1h15min
SP/LP/LXP/
LSP/LLP
XP/SP 2h35min 1h20min
LP/LXP/
LSP/LLP
XP 5h 2h40min
SP 5h5min 2h40min
LP/LXP/
LSP/LLP
XP 5h15min 2h45min
SP 5h20min 2h50min
LP/LXP/
LSP/LLP
continuously
recordable
time
2h30min 1h20min
2h40min 1h25min
5h10min 2h45min
5h25min 2h50min
Actual
recordable time
Actual
recordable
time
21
VQT2L14

≥ The actual recordable time refers to the recorda ble t ime when repeat ed ly st art ing/s toppin g
SDR-H85
recording, turning the unit on/off, moving the zoom leve r etc .
≥ The batteries heat up after use or charging. This is not a malfunction.
Battery capacit y indica tion
≥ The display changes as the battery capacity reduces.
≥ The remaining battery capacity is displayed when using the Panasonic battery that you
≥ If the actual remaining time exceeds 9 hours 59 minutes, the indication will st ay green
≥ When using the AC adaptor or batteries made by other companies, the remaining
####
If there is less than 3 minutes remaining, then will become red. If the battery
discharges, then ( ) will flash.
can use for this unit. It may take time to display the remaining battery capacity. The
actual time can vary depending on your actual use.
and will not change until the remaining time fa lls below 9 hours 59 minutes.
battery capacity will not be shown.
22
VQT2L14
Preparation
64
Setup
Recording to a card
2
The unit can record still pictures or motion pictures to an SD card, built -in memory, or HDD.
To record to an SD card, read the following.
This unit (an SDXC compatible device) is compatible with SD Memory Cards, SDHC
Memory Cards and SDXC Memory Cards. When using an SDHC memory card/SDXC
memory card with other equipment, ch eck the equipment is compatible with thes e
memory cards.
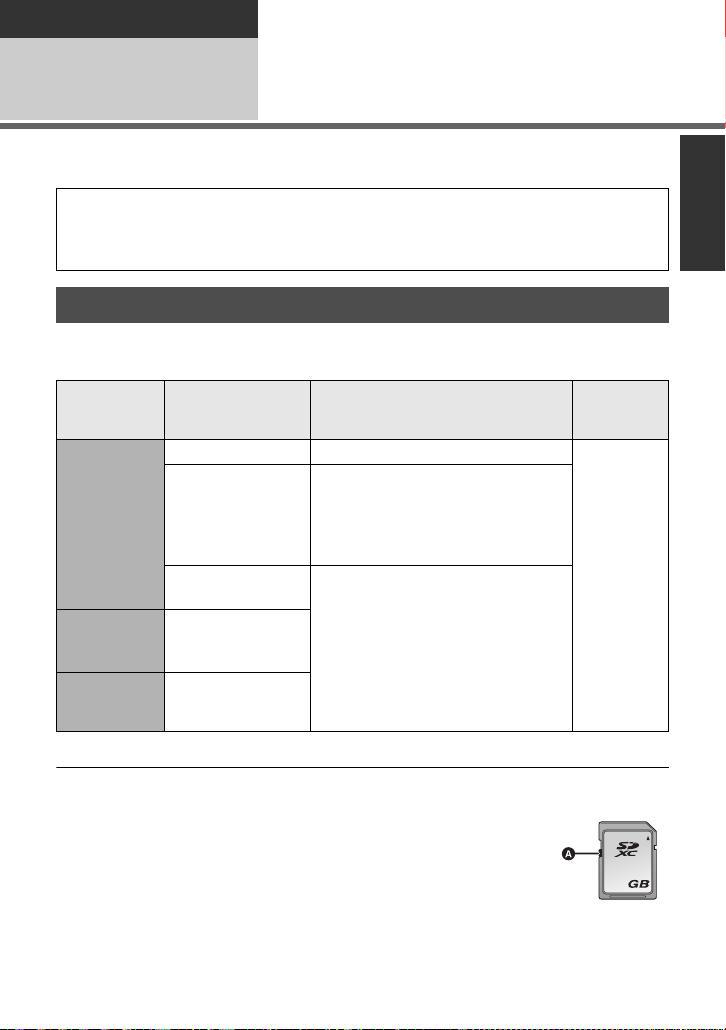
Cards that you can use with this unit
Use SD cards conforming to Class 2 or higher of the SD Speed Class Rating* for
motion picture record ing.
Still
Card type Capacity Motion picture recording
8 MB/16 MB Cannot be used.
Cannot be guaranteed in operation.
SD Memory
Card
SDHC
Memory
Card
SDXC
Memory
Card
* The SD Speed Class Rating is the speed standard for successive writes.
32 MB/64 MB/
128 MB/256 MB
512MB/1GB/
2GB
4GB/6GB/8GB/
12 GB/16 GB/
24 GB/32 GB
48 GB/64 GB
The recording may suddenly stop
during motion picture recording
depending on the SD card you use.
(l 107)
Can be used.
picture
recording
Can be
used.
≥ 4 GB or more Memory Cards that do not have the SDHC logo or 48 GB or more Memory
Cards that do not have the SDXC logo are not based on SD Memory Card Specifications.
≥ When the write-protect switch A on SD card is locked, no recording,
deletion or editing will be possible on th e card.
≥ Keep the Memory Card out of reach of children to prevent swallowing.
23
VQT2L14
Inserting/removing an SD card
When using an SD card not from Pana sonic, or one previously used on other equipment,
for the first time on this unit, format the SD card. (l 76) When the SD card is formatte d, all
of the recorded data is deleted. Once the data i s deleted, it cannot be restor ed.
Caution:
Check that the access lamp has gone off.
Access lamp [ACCESS] A
≥ When this unit is accessing the SD card or built-in memory, the access lamp lights up.
1 Open the LCD monitor.
2 Open the SD card cover and insert (remove) the SD card into (from)
the card slot.
≥ Face the label side B in the direction shown in the illustr ati on and press it s traigh t in as f ar
as it will go.
≥ Press the center of the SD card and then pull it straight out.
3 Securely close the SD card cover.
≥ Do not touch the terminals on the back of the SD card.
≥ See page 113 for details on handling the SD card.
24
VQT2L14
Preparation
To turn off the power
Hold down the power but ton un til th e
status indicato r goes off.
Setup
Turning the unit on/off
3
Y ou ca n turn t he p ower on and of f us in g the powe r but ton or by open ing and c losing th e LCD
monitor.
Turning the power on and off with the power button
Press the power button to turn on the power.
A The status indicator lights.
Turning the power on and off with the LCD monitor
Power is turned on when the LCD monitor is opene d, and power is turned off when it is
closed.
During normal use, opening and closing of the LCD monitor can be conveniently used
to turn the power on/off.
∫ To turn on the power
∫ To turn off the power
A The status indicator lights.
≥ In the following cases, opening the LCD monitor does not turn on the power. Press the
power button to turn on the power.
jWhen the unit is purchased
jWhen you have turned off the power using the power button
≥ The power will not turn off while recording motion pictures even if the LCD monitor is
closed.
B The status indicator goes off.
VQT2L14
25
Preparation
Setup
Selecting a mode
4
Change the mode to recording or pl ayback.
Operate the mode switch to change the mode to or .
Recording mode (l 39, 45)
Playback mode (l 62, 67)
26
VQT2L14
Preparation
MENU
ENTER
Setup
Using the menu screen
5
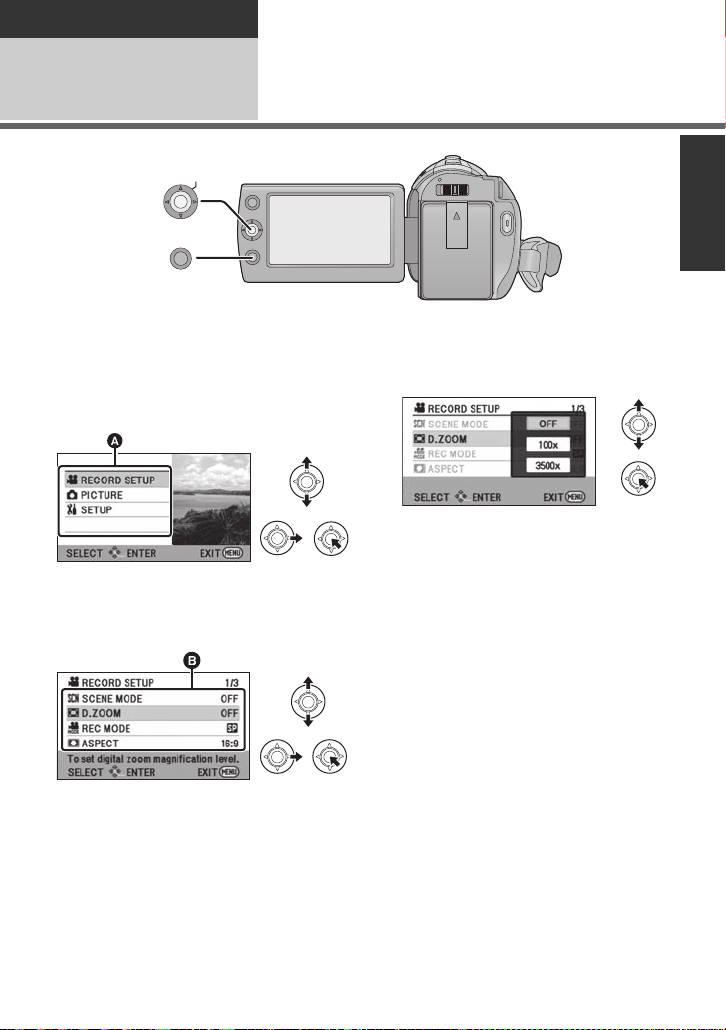
1 Press the MENU button.
2 Select the desired top menu A,
then move the joystick right or
press the joystick.
3 Select the submenu item B,
then move the joystick right or
press the joystick.
≥ Descriptions of submenus and current
settings on menus are displayed
scrolling at the bottom of the screen.
4 Select the desired setting, then
press the joystick to enter the
selection.
To get back to the previous screen
Move the joystick left.
To exit the menu screen
Press the MENU button.
27
VQT2L14
Language selection
SDR-T55
SDR-T50
SDR-H85
SDR-S50
SDR-T50
SDR-T55
SDR-T50
You can select the language on the screen display and the menu screen.
1 Press the MENU button, then select [SETUP] # [LANGUAGE] and
press the joystick.
2 Select [English] and press the joystick.
Menu list
Part of the menu will not be used depending on the used functions. (l 105)
Recording mode
*1 It is not displayed when the Intelligent auto mode is on.
*2 These menus are only for / .
*3 These menus are only for .
*4 These menus are only for .
*5 / / It will be displayed only when the [MEDIA
SDR-T55
SELECT] is set to [SD CARD].
*6 / It will be displayed only when the [MEDIA SELECT] is s et to
[Built-inMemory].
RECORD SETUP
[SCENE MODE] (l 54)
[D.ZOOM] (l 47)
[REC MODE] (l 42)
[RELAY REC]
[ASPECT] (l 55)
[FACE FRAMING] (l 55)
[GUIDE LINES] (l 52)
[WEB MODE] (l 51)
[FADE] (l 51)
[FADE C OLOR] (l 51)
[AUTO SLOW SHTR]
*6
*1
SDR-H85
(l 55)
(l 55)
[BACKLIGHT COMPENS.] (l 51)
[INTELLIGENT CONTRAST]*1(l 52)
[SOFT SKIN MODE]
[COLOR NIGHT REC]
[SHOOTING GUIDE] (l 44)
[WIND NOISE CANCELER]
[ZOOM MIC]
[WB ADJUST]
[MF ASSIST]
*1
*1
*1
*1
*1
*1
(l 53)
(l 53)
(l 56)
(l 56)
(l 56)
(l 61)
PICTURE
[SELF TIMER] (l 57)
[SHTR SOUND] (l 57)
28
VQT2L14
MEDIA SELECT
SDR-T55
SDR-T50
SDR-H85
NOV 15 2010
SP
NOV 15 2010
R 1h20m
A
*2*3
Recording media may be set
independently for both still pictures and
motion pictures.
/
When recording to the SD card, select
[SD CARD]. When re co rdi n g to the
built-in memory, select
[Built-inMemory]. (l 40, 62, 67)
When recording to the SD card, select
[SD CARD]. When re co rdi n g to the
HDD, select [HDD]. (l 40, 62, 67)
[ECONOMY]
[OFF]:
The power saving function is not
activated.
[5 MINUTES]:
When about 5 minutes have passed
without any operation, this unit
automatically turns off to s av e battery
life.
≥ The power save function will not
activate when:
jconnected to AC adaptor
jusing the USB cable for PC, DVD
burner etc.
jPRE-REC is used
SETUP
[DISPLAY]
The screen indications are selected as
shown in the illustration below.
[OFF] [ON]
[EXT. DISPLAY] (l 78)
[CLOCK SET] (l 32)
[SET WORLD TIME] (l 33)
[DATE/TIME] (l 32)
[DATE FORMAT] (l 32)
[QUICK POWER ON] (l 38)
[QUICK START] (l 38)
[AUDIO REC]
*5
(l 44)
VQT2L14
29

[ALERT SOUND]
SDR-T50
SDR-H85
Starti ng and stopping of recording and
power on/off can be conf irmed with this
sound.
2 Beeps for 4 times
When an error occurs. Check the
sentence displayed on the scr een.
(l 103)
[POWER LCD] (l 34)
[LCD SET] (l 34)
[TV ASPECT ] (l 78)
[INITIAL SET]
Set to [YES] for changing the menu
settings back to the default condition.
(Settings for [MEDIA SELECT]
*2*3
,
[CLOCK SET] and [LANGUAGE] will
not be changed.)
*4
*2*3
(l 76)
(l 76)
[FORMA T MEDIA]
[FORMAT CARD]
[DEMO MODE]
This item is used to start the unit
demonstration.
(Only when the mode is at the
position)
SDR-S50
If [DEMO MODE] is switched to [ON]
when there is no SD card inserted, the
demonstration automatically starts.
SDR-T55
//
If [DEMO MODE] is switched to [ON]
when there is no SD card inserted and
while this unit is conn e c te d to the AC
adaptor, the demonstration
automatically starts.
If any operation takes place, the
demonstration is canceled. Howev er if
no operations take place for approx.
10 minutes, the demonstration
automatically starts again. To stop the
demonstration, set [DEMO MODE] to
[OFF] or insert an SD card.
[LANGUAGE] (l 28)
You can select the language on the
screen display and the menu screen.
30
VQT2L14
 Loading...