

Page 1
Operating Instructions
offset printing
Bedienungsanleitung
Mode d’emploi
Istruzioni per l’uso
Instrukcja obsługi
Návod k obsluze
CD Stereo System
CD-Stereoanlage
Chaîne stéréo avec
lecteur CD
Sistema stereo CD
Zestaw stereo z CD
Stereosystém s CD
Model No. SC-MAX4000
Thank you for purchasing this product.
For optimum performance and safety, please read these
instructions carefully.
Please keep this manual for future reference.
Wir möchten Ihnen dafür danken, dass Sie sich für dieses
Gerät entschieden haben.
Um eine optimale Leistung und Sicherheit zu
gewährleisten, lesen Sie bitte diese Bedienungsanleitung
sorgfältig durch.
Bewahren Sie diese Anleitung auf, um sie später zum
Nachschlagen griffbereit zu haben.
Nous vous remercions pour votre achat de cet appareil.
Pour en obtenir des performances optimales et pour
votre sécurité, veuillez lire attentivement le présent
manuel.
Conservez ce manuel.
E
La ringraziamo per aver acquistato questo prodotto.
Per ottenere le prestazioni migliori e per la sicurezza,
leggere attentamente queste istruzioni.
Conservare questo manuale per future consultazioni.
Dziękujemy za zakupienie tego produktu.
Proszę dokładnie zapoznać się z tą instrukcją obsługi,
aby jak najlepiej wykorzystać to urządzenie i zapewnić
jego bezpieczne użytkowanie.
Prosimy o zachowanie niniejszej instrukcji obsługi.
Děkujeme za zakoupení tohoto výrobku.
Pro dosažení optimálního výkonu a z bezpečnostních
důvodu si pečlivě přečtěte tyto pokyny.
Uschovejte si prosím tento návod k obsluze.
RQT0A38-D
Page 2
Your system and the illustrations can look differently.
offset printing
These operating instructions are applicable to the
following system.
System SC-MAX4000
Main unit SA-MAX4000
Speakers SB-MAX4000
Back of product
Recording and playback of content on this or any other
devices may require permission from the owner of the
copyright or other such rights of that content.
Panasonic has no authority to and does not grant you
that permission and explicitly disclaims any right, ability
or intention to obtain such permission on your behalf. It
is your responsibility to ensure that your use of this or
any other devices complies with applicable copyright
legislation in your country. Please refer to that
legislation for more information on the relevant laws and
regulations involved or contact the owner of the rights
of the content you wish to record or playback.
Table of contents
Safety precautions . . . . . . . . . . . . . . . . . . . . . . . . . . . . . 2
Caution for AC mains lead . . . . . . . . . . . . . . . . . . . . . . . 3
Sales and Support Information . . . . . . . . . . . . . . . . . . . . 3
Supplied accessories . . . . . . . . . . . . . . . . . . . . . . . . . . . 3
Placement of speakers . . . . . . . . . . . . . . . . . . . . . . . . . . 4
Preparing the remote control . . . . . . . . . . . . . . . . . . . . . 4
Making the connections . . . . . . . . . . . . . . . . . . . . . . . . . 5
Overview of controls . . . . . . . . . . . . . . . . . . . . . . . . . . . . 6
Preparing media . . . . . . . . . . . . . . . . . . . . . . . . . . . . . . . 8
Media playback . . . . . . . . . . . . . . . . . . . . . . . . . . . . . . . 9
Radio. . . . . . . . . . . . . . . . . . . . . . . . . . . . . . . . . . . . . . . 11
Recording . . . . . . . . . . . . . . . . . . . . . . . . . . . . . . . . . . . 12
Sound and illumination effects . . . . . . . . . . . . . . . . . . . 13
DJ functions . . . . . . . . . . . . . . . . . . . . . . . . . . . . . . . . . 14
Using a microphone . . . . . . . . . . . . . . . . . . . . . . . . . . . 15
Clock and timers. . . . . . . . . . . . . . . . . . . . . . . . . . . . . . 15
External equipment. . . . . . . . . . . . . . . . . . . . . . . . . . . . 16
Others . . . . . . . . . . . . . . . . . . . . . . . . . . . . . . . . . . . . . . 17
Maintenance . . . . . . . . . . . . . . . . . . . . . . . . . . . . . . . . . 17
Troubleshooting . . . . . . . . . . . . . . . . . . . . . . . . . . . . . . 18
Specifications . . . . . . . . . . . . . . . . . . . . . . . . . . . . . . . . 20
RQT0A38
About Bluetooth
2
Licenses . . . . . . . . . . . . . . . . . . . . . . . . . . . . . . . . . . . . 21
2
®
. . . . . . . . . . . . . . . . . . . . . . . . . . . . . 21
Safety precautions
WARNING!
Unit
• To reduce the risk of fire, electric shock or product
damage,
– Do not expose this unit to rain, moisture, dripping or
splashing.
– Do not place objects filled with liquids, such as
vases, on this unit.
– Use only the recommended accessories.
– Do not remove covers.
– Do not repair this unit by yourself. Refer servicing to
qualified service personnel.
– Do not let metal objects fall inside this unit.
CAUTION!
Unit
• To reduce the risk of fire, electric shock or product
damage,
– Do not install or place this unit in a bookcase, built-in
cabinet or in another confined space. Ensure this
unit is well ventilated.
– Do not obstruct this unit’s ventilation openings with
newspapers, tablecloths, curtains, and similar items.
– Do not place sources of naked flames, such as
lighted candles, on this unit.
• This unit is intended for use in moderate climates.
• This unit may receive radio interference caused by
mobile telephones during use. If such interference
occurs, please increase separation between this unit
and the mobile telephone.
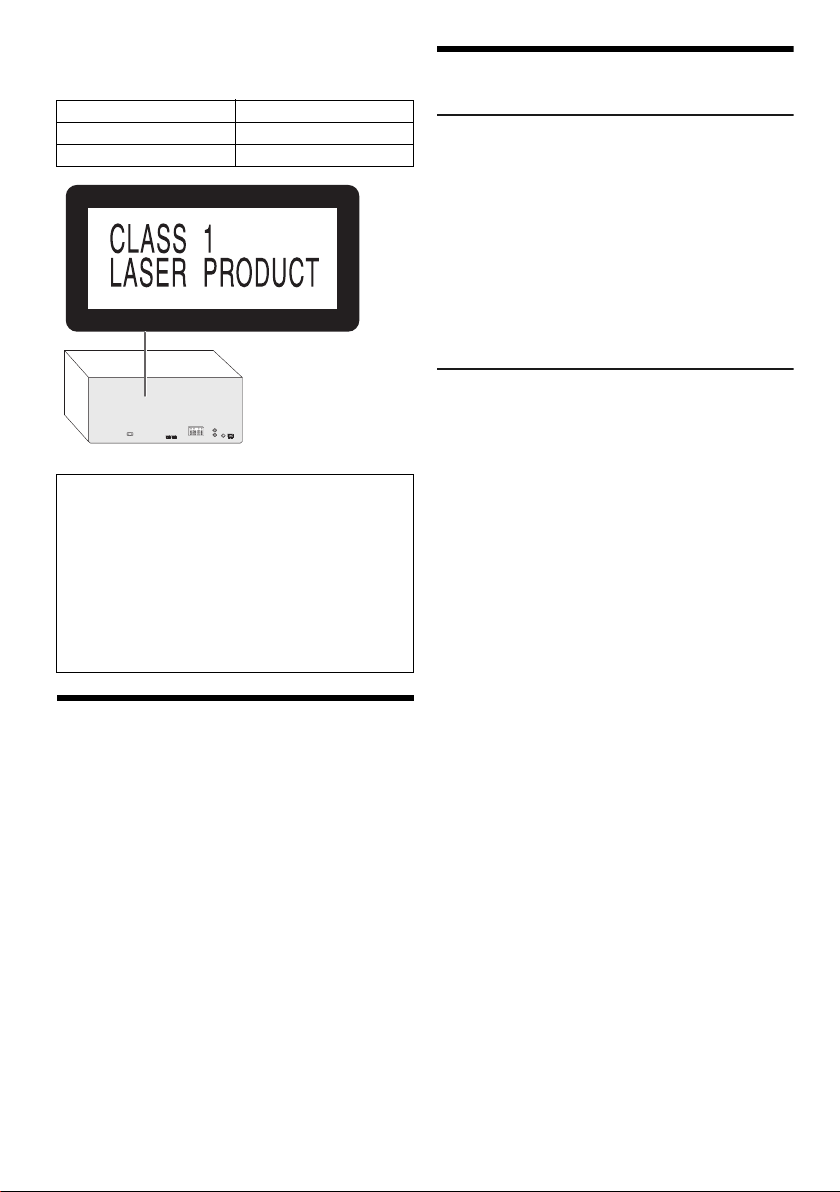
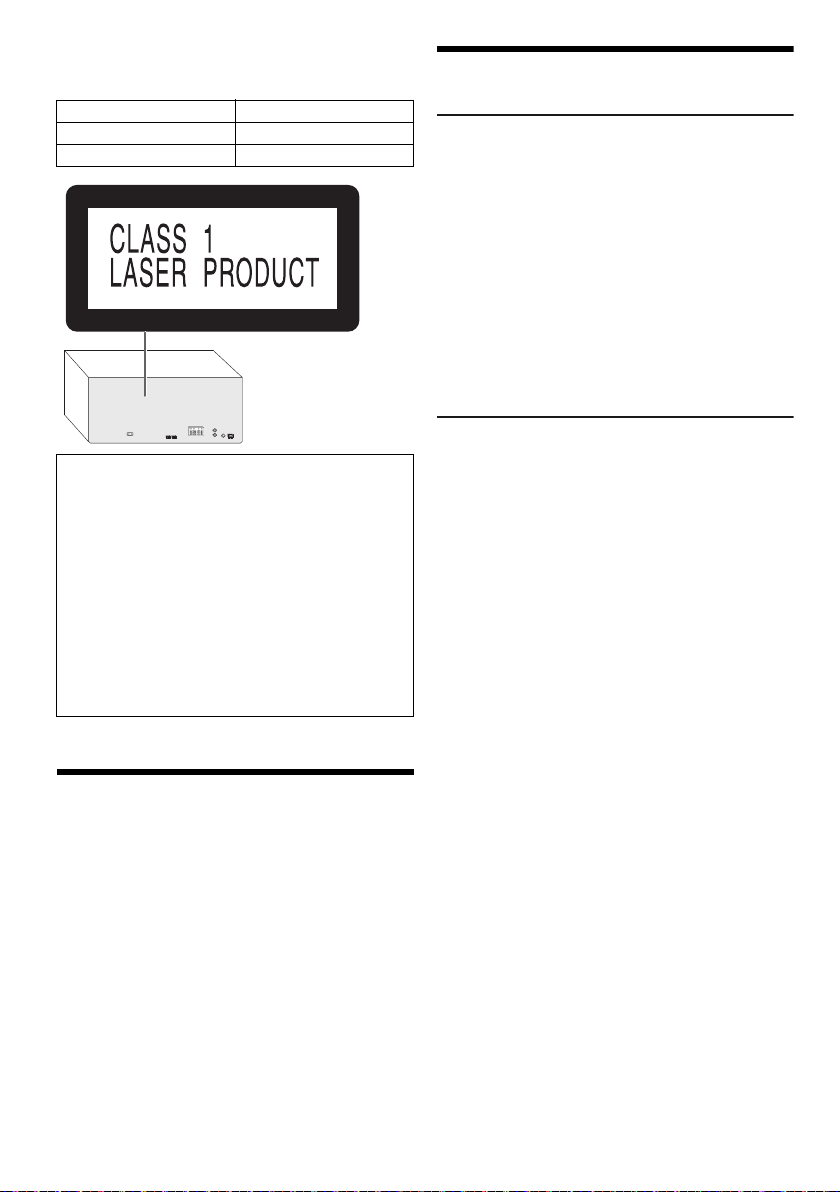
• This unit utilizes a laser. Use of controls or adjustments
or performance of procedures other than those
specified herein may result in hazardous radiation
exposure.
• Set the unit up on an even surface away from direct
sunlight, high temperatures, high humidity, and
excessive vibration.
• The mains plug is the disconnecting device. Install this
unit so that the mains plug can be unplugged from the
socket outlet immediately.
Battery
• Danger of explosion if battery is incorrectly replaced.
Replace only with the type recommended by the
manufacturer.
• When disposing of the batteries, please contact your
local authorities or dealer and ask for the correct
method of disposal.
• Do not heat or expose to flame.
• Do not leave the battery(ies) in a car exposed to direct
sunlight for a long period of time with doors and
windows closed.
• Do not break open or short-circuit the battery.
• Do not charge the alkaline or manganese battery.
• Do not use the battery if the cover has peeled off.
• Remove the battery if you do not use the remote
control for a long period of time. Keep in a cool, dark
area.
Page 3
Caution for AC mains lead
Fuse cover
Fuse (5 ampere)
Fuse (5 ampere)
ENGLISH
offset printing
(For the AC mains plug of three pins)
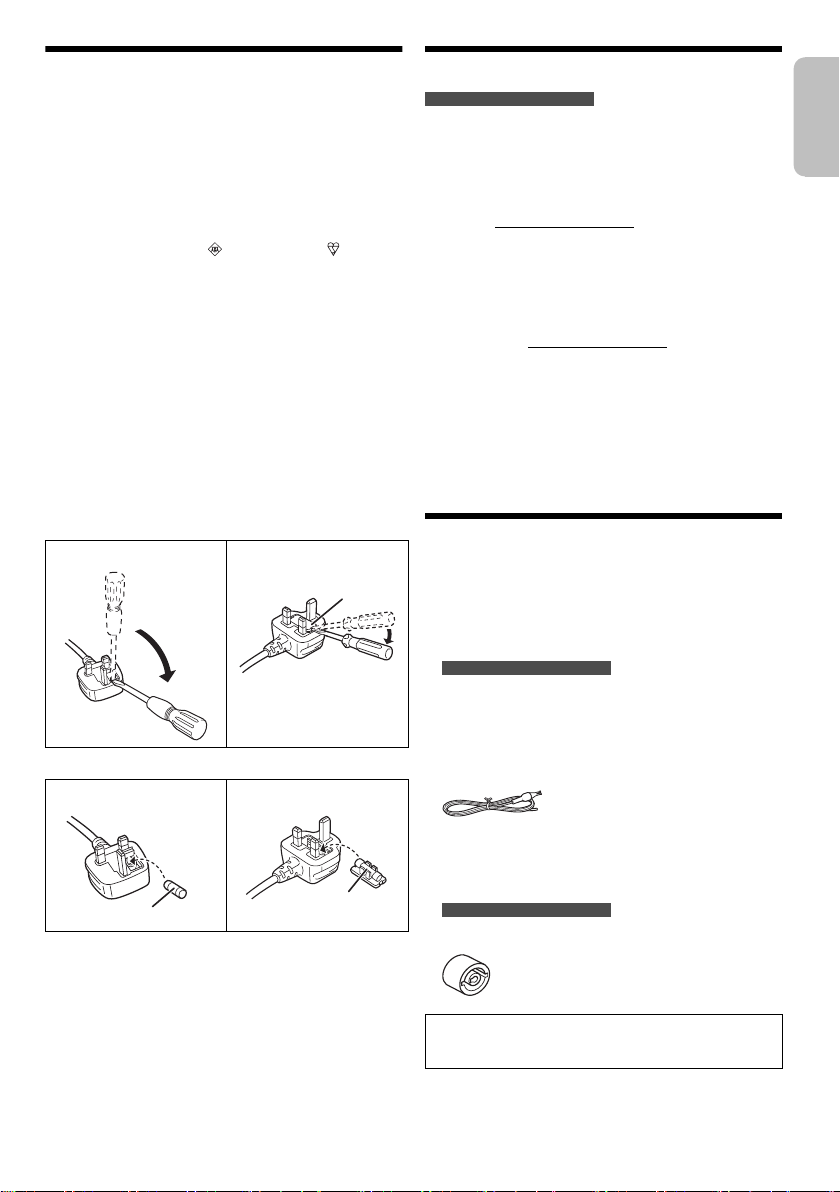
For your safety, please read the following text carefully.
This appliance is supplied with a moulded three pin
mains plug for your safety and convenience.
A 5-ampere fuse is fitted in this plug.
Should the fuse need to be replaced please ensure that
the replacement fuse has a rating of 5-ampere and that it
is approved by ASTA or BSI to BS1362.
Check for the ASTA mark or the BSI mark on the
body of the fuse.
If the plug contains a removable fuse cover you must
ensure that it is refitted when the fuse is replaced.
If you lose the fuse cover the plug must not be used until
a replacement cover is obtained.
A replacement fuse cover can be purchased from your
local dealer.
Before use
Remove the connector cover.
How to replace the fuse
The location of the fuse differ according to the type of AC
mains plug (figures A and B). Confirm the AC mains plug
fitted and follow the instructions below.
Illustrations may differ from actual AC mains plug.
1. Open the fuse cover with a screwdriver.
Figure A Figure B
2. Replace the fuse and close or attach the fuse cover.
Figure A Figure B
Sales and Support Information
For the United Kingdom and Ireland
Customer Communications Centre
• For customers within the UK: 0344 844 3899
• For customers within Ireland: 01 289 8333
• Monday – Friday 9:00am – 5:00pm (Excluding public
holidays).
• For further support on your product, please visit our
website: www.panasonic.co.uk
Direct Sales at Panasonic UK
• Order accessory and consumable items for your
product with ease and confidence by phoning our
Customer Communications Centre Monday – Friday
9:00am – 5:00pm (Excluding public holidays).
• Or go on line through our Internet Accessory ordering
application at www.pas-europe.com
• Most major credit and debit cards accepted.
• All enquiries transactions and distribution facilities are
provided directly by Panasonic UK.
• It couldn’t be simpler!
• Also available through our Internet is direct shopping
for a wide range of finished products. Take a browse
on our website for further details.
.
Supplied accessories
Check and identify the supplied accessories.
Use numbers indicated in parentheses when asking for
replacement parts. (Product numbers correct as of
May 2015. These may be subject to change.)
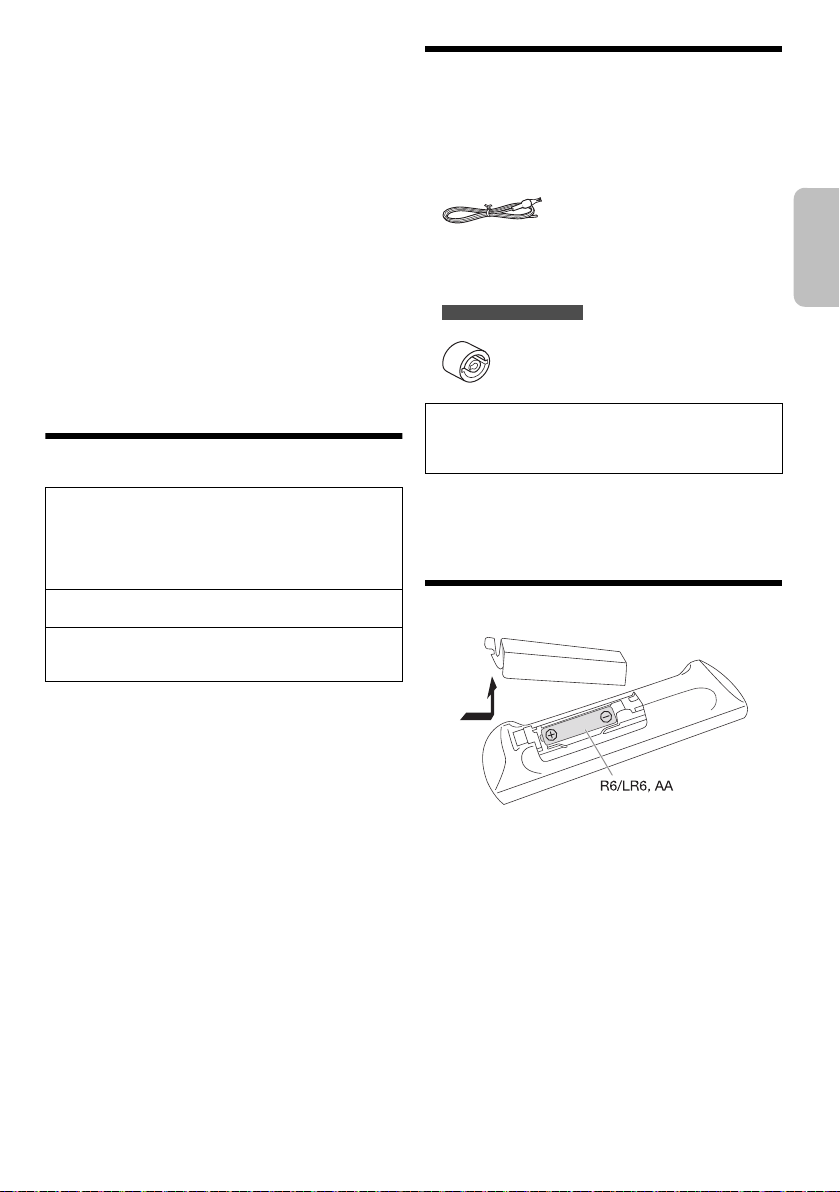
2 AC mains leads
For the United Kingdom and Ireland
(K2CT2YY00097)
1 AM loop antenna
(N1DYYYY00011)
1 FM indoor antenna
(RSAX0002)
1 Remote control
(N2QAYB001022)
1 Remote control battery
For the United Kingdom and Ireland
1 Antenna plug adaptor
(K1YZ02000013)
CAUTION!
Keep the antenna plug adaptor out of reach of children
to prevent swallowing.
Note:
Use the AC mains lead that is suitable for your household
mains socket.
RQT0A38
3
3
Page 4
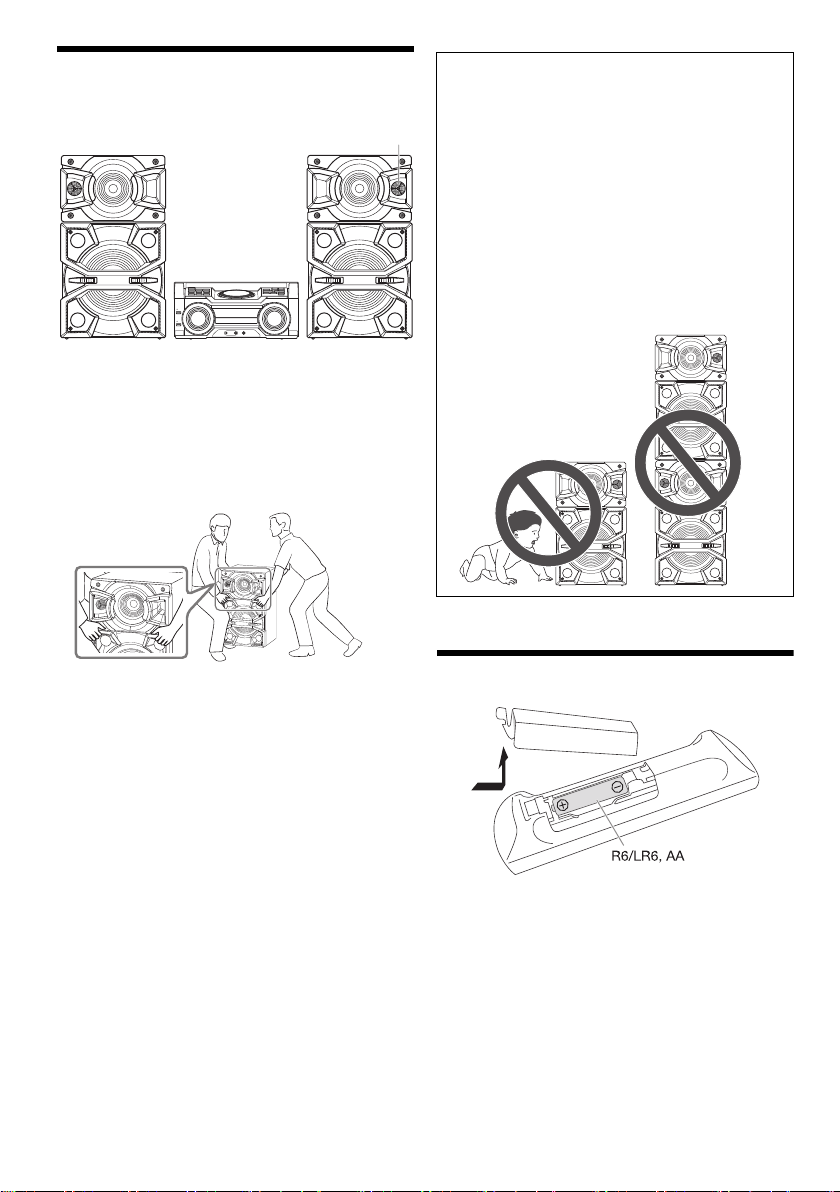
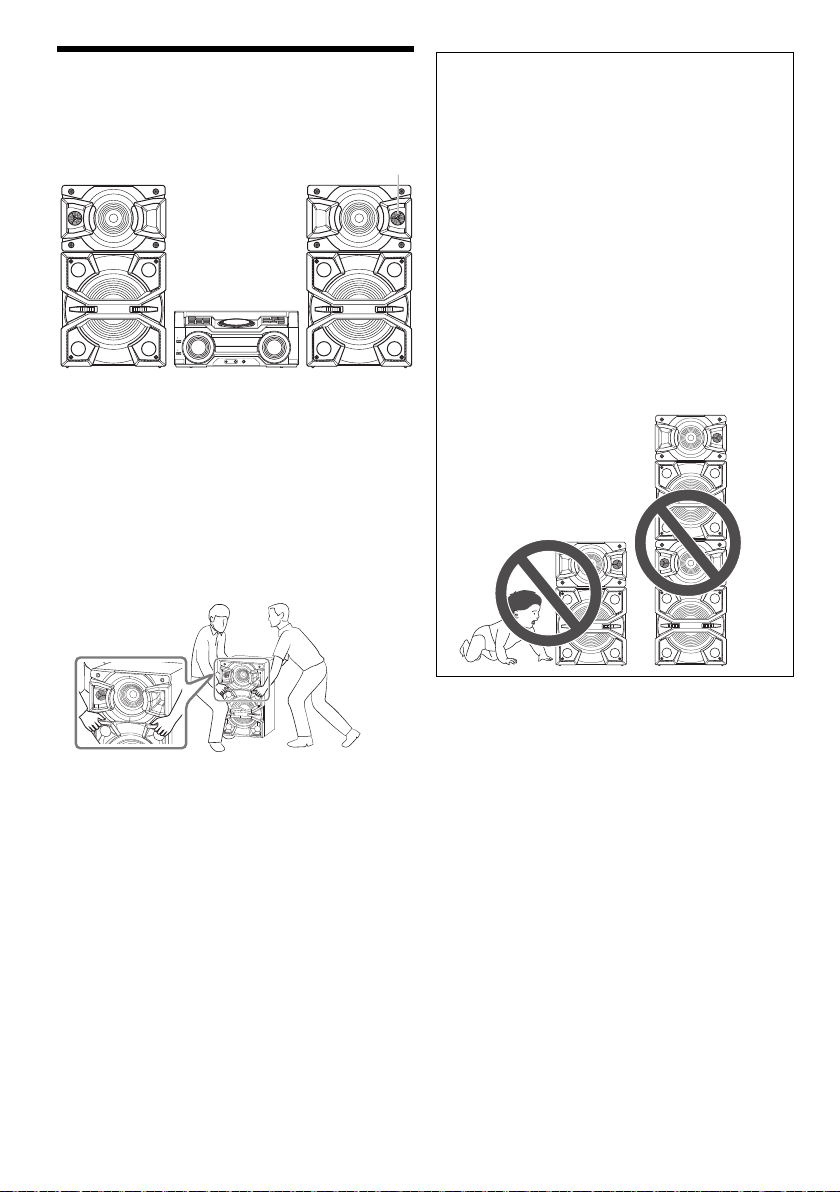
Placement of speakers
Tweeter
offset printing
Put the speakers so that the tweeter is on the outside.
Use only the supplied speakers.
You can cause damage to the system and decrease the
sound quality if you use other speakers.
Note:
• Keep your speakers more than 10 mm from the main unit
for ventilation.
• Put the speakers on a flat safe surface.
• More than one person is required to move, tilt or carry the
speakers.
CAUTION!
• Use the speakers only with the recommended
system. If not, you can cause damage to the
amplifier and speakers and can cause a fire.
Consult an approved service personnel if damage
occurs or if there is a sudden apparent change in
performance.
• Do not modify the speaker or speaker wires as
this can cause damage to the system.
• Do the procedures included in these instructions
when you attach the speakers.
• Do not touch the speaker cone’s reverberating
surfaces:
– This may damage the speaker cone.
– The speaker cone may be hot.
• Be careful when babies or children are near.
• Do not stack the speakers.
• These speakers do not have magnetic shielding. Do not put
them near TVs, PCs or other equipment easily influenced
by magnetism.
• When you play at high levels for a long period, it can cause
damage to the speakers and decrease the life of the
speakers.
• Decrease the volume in these conditions to prevent
damage:
– When the sound is distorted.
– When you adjust the sound quality.
RQT0A38
4
4
Preparing the remote control
Use alkaline or manganese battery.
Install the battery so that the poles (+ and –) align with
those in the remote control.
Page 5
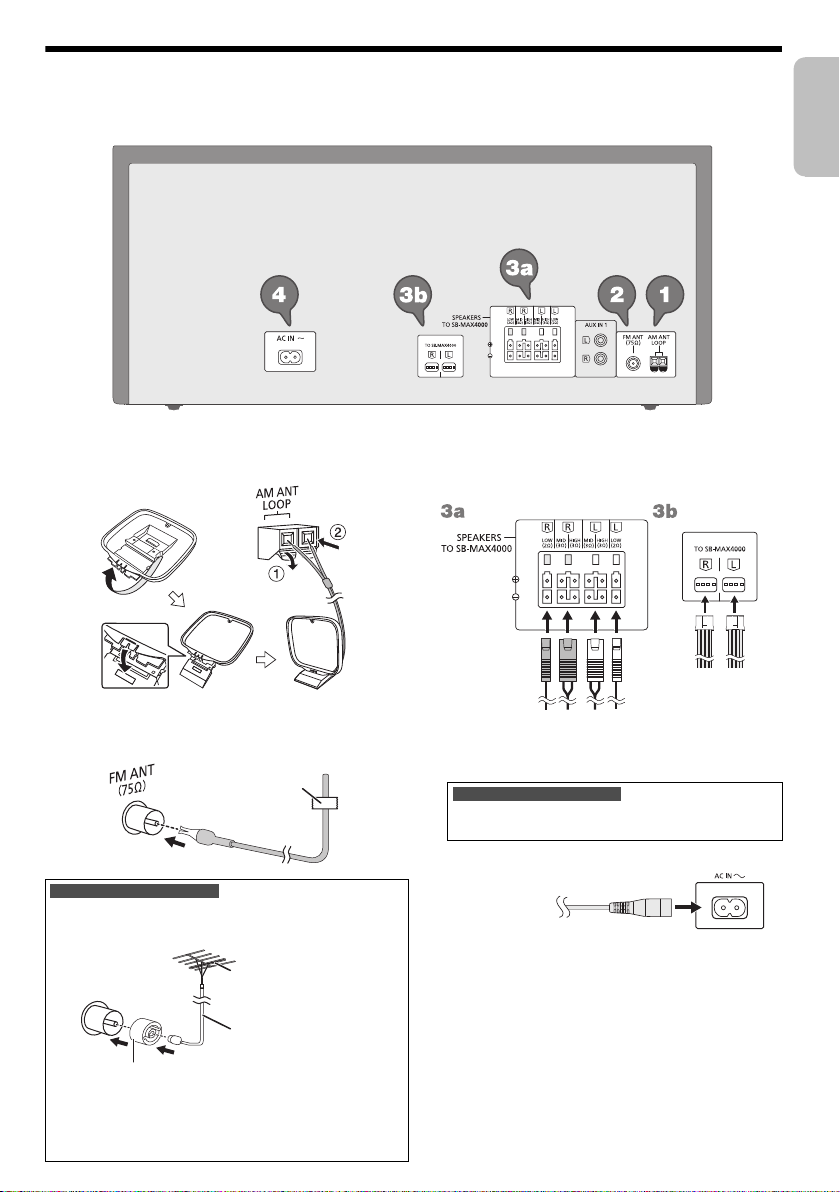
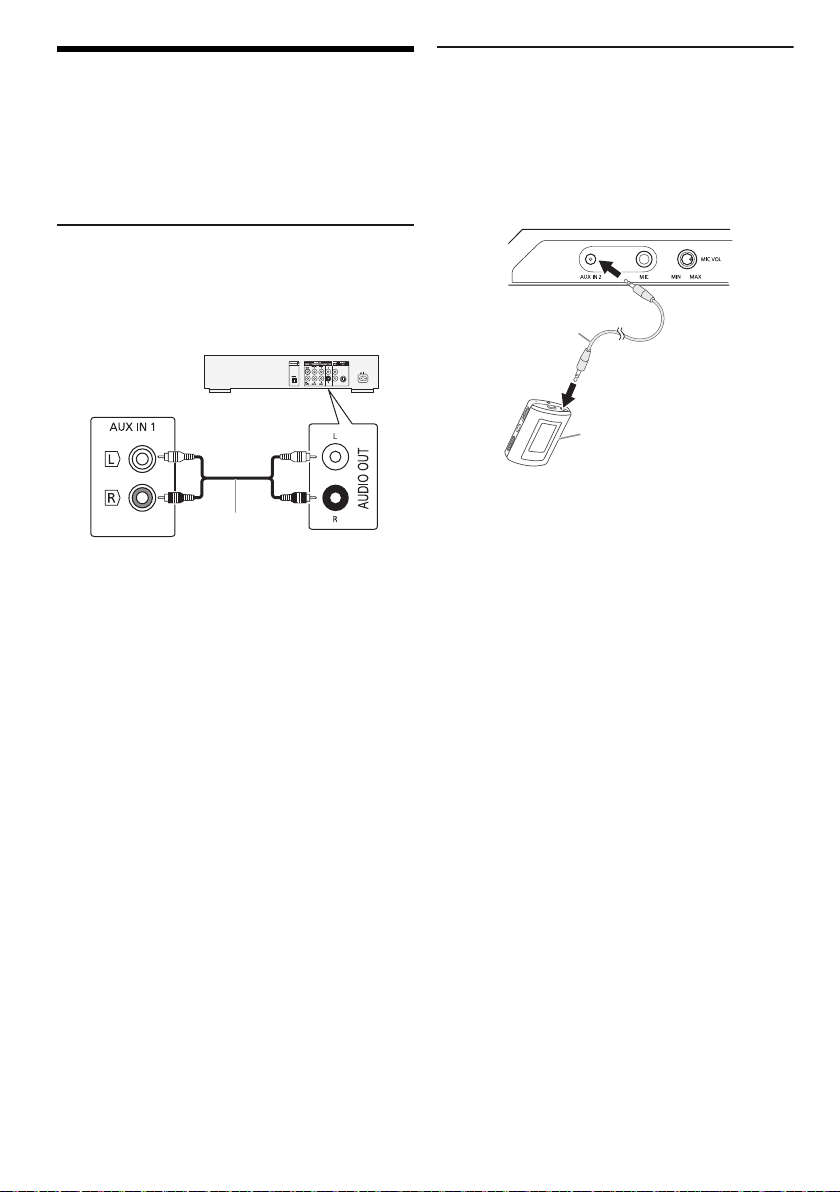
Making the connections
Adhesive tape
(not supplied)
FM outdoor antenna
(not supplied)
75 Ω coaxial cable
(not supplied)
Antenna plug adaptor
To household
mains socket
ENGLISH
offset printing
Connect the AC mains lead only after all the other connections have been made.
1 Connect the AM loop antenna.
Stand the antenna up on its base until it clicks.
2 Connect the FM indoor antenna.
Put the antenna where reception is best.
For the United Kingdom and Ireland
Connect the FM outdoor antenna.
Use an outdoor antenna if the reception is poor.
Note:
• Do not use the outdoor antenna during a lightning storm.
• Disconnect the outdoor antenna if you do not use the
system.
3 Connect the speakers.
Connect the speaker cables to the terminals of the
same colour.
4 Connect the AC mains lead.
For the United Kingdom and Ireland
READ THE “Caution for AC mains lead” BEFORE
CONNECTION.
Do not use an AC mains lead from other equipment.
Conserving power
The system consumes a small amount of power even
when it is in standby mode. Disconnect the power
supply if you do not use the system.
Some settings will be lost after you disconnect the
system. You have to set them again.
RQT0A38
5
5
Page 6
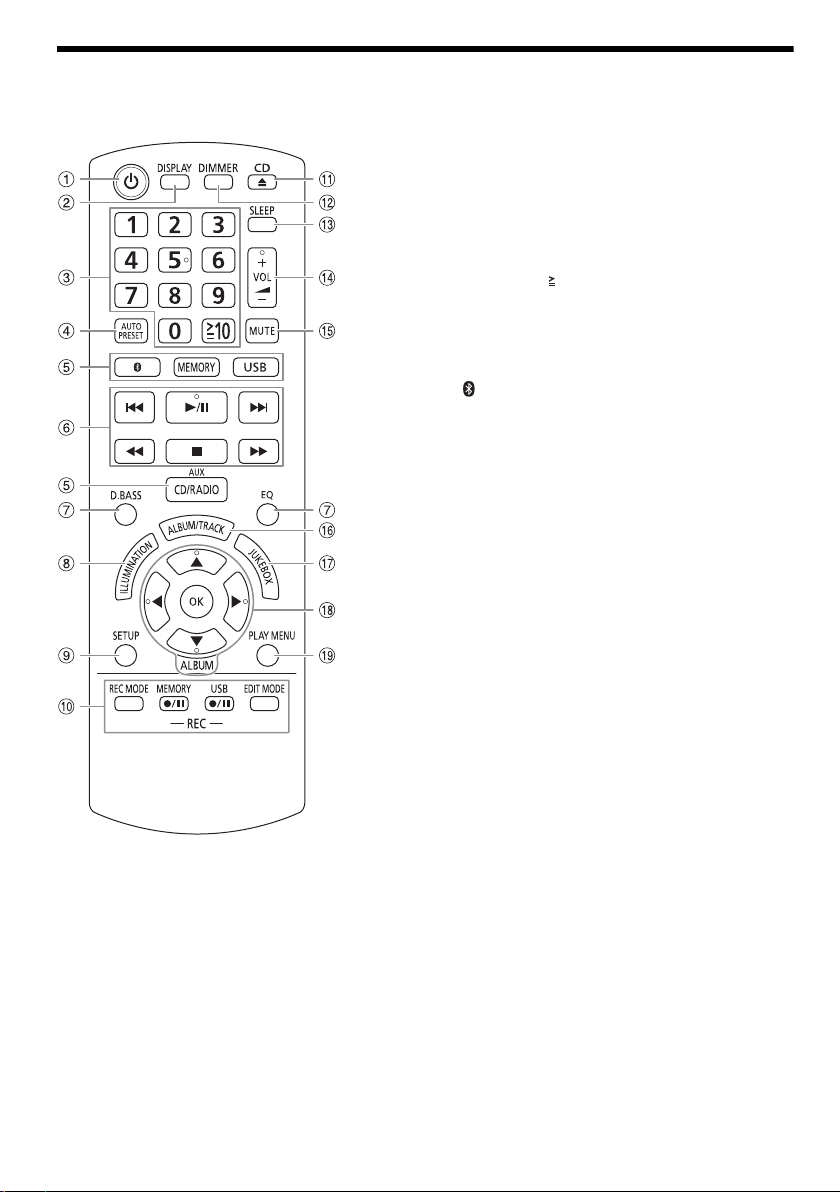
Overview of controls
offset printing
Do the procedures with the remote control. You can also use the buttons on the main unit if they are the same.
A Standby/on switch [`], [1]
Press to switch the unit from on to standby mode or
vice versa. In standby mode, the unit is still
consuming a small amount of power.
B View the content information
C Numeric buttons
To select a 2-digit number
Example: 16: [ 10]=[1]=[6]
D Auto preset the radio station
E Select the audio source
On the main unit:
To start Bluetooth
[ –PAIRING].
F Basic playback control
G Select the sound effects
H Select the illumination effects
I View the setup menu
J Recording operation control
K Open or close the disc tray
L Decrease the brightness of the display panel
To cancel, press the button again.
M Set the sleep timer
N Adjust the volume level
O Mute the sound
To cancel, press the button again.
“MUTE” is also cancelled when you adjust the volume
or when you switch off the system.
P Select MP3 album or track
Q Select DJ jukebox
R Select or confirm the option
S View the play menu
®
pairing, press and hold
RQT0A38
6
6
Page 7
T DJ function direct buttons
Top View
Front View
ENGLISH
offset printing
Press [DJ JUKEBOX], [DJ SAMPLER] or [DJ EFFECT]
to switch on the DJ function.
Press [DJ1] to [DJ6] on the main unit to select the
desired function.
To cancel, press the selected [DJ1] to [DJ6] again.
U Switch on the DJ function
To cancel, press the button again.
V Select MP3 album or track
Press [ALBUM/TRACK] to select album or track.
Browse tracks or albums
Turn [MULTI CONTROL] to browse.
To start playback from the selection, press [4/9].
W Turntable for DJ and multi control
X Remote control sensor
Distance: Within approximately 7 m
Angle: Approximately 20° up and down,
30° left and right
Y Display panel
Z USB A
USB port ( )
USB status indicator
Play MP3 tracks.
a USB B
USB port ( )
USB status indicator
Play MP3 tracks.
Record sound or music tracks.
b NFC touch area
c AUX IN 2 jack
d Microphone jack
e Adjust the microphone volume level
f Disc tray
RQT0A38
7
7
Page 8

Preparing media
offset printing
Disc
1 Press [CD x] (main unit: [x OPEN/CLOSE]) to
open the disc tray.
Put in a disc with the label facing up.
Press again to close the disc tray.
2 Press [CD/RADIO/AUX] to select “CD”.
USB
Preparation
Before you connect a USB device to the system, make
sure you do a backup of the data.
1 Decrease the volume and connect the USB device
to the USB port.
Hold the main unit when connecting or disconnecting
the USB device.
2 Press [USB] (main unit: [MEMORY/USB]) to select
“USB A” or “USB B”.
USB status indicator lights up in red when selected.
Note:
Do not use a USB extension cable. The system cannot
recognise USB device connected through a cable.
Bluetooth
You can connect and play an audio device wirelessly
through Bluetooth
Preparation
• Switch on the Bluetooth
the device near the system.
• Read the operating instructions of the device for
details.
█ Pairing a device
Preparation
If this system is connected to a Bluetooth
disconnect it (Z“Disconnecting a device”).
1 Press [ ].
If “PAIRING” is shown, continue with step 4.
2 Press [PLAY MENU] to select “PAIRING”.
3 Press [Y, U] to select “OK? YES” and then press
[OK].
“PAIRING” is shown.
To cancel, select “OK? NO”.
4 Select “SC-MAX4000” from the Bluetooth
of the device.
If prompted for a passkey, input “0000”.
The device connects with this system automatically
after pairing is complete.
The name of the connected device is shown for a few
seconds.
RQT0A38
8
8
®
®
.
®
feature of the device and put
®
device,
®
menu
Using the main unit
1 Press and hold [ –PAIRING] until “PAIRING” is
shown.
2 Select “SC-MAX4000” from the Bluetooth
of the device.
Note:
You can pair up to 8 devices with this system. If a 9th device
is paired, the device that has not been used for the longest
time will be replaced.
®
menu
█ Connecting a device
Preparation
If this system is connected to a Bluetooth
disconnect it (Z“Disconnecting a device”).
®
device,
1 Press [ ].
“BLUETOOTH READY” is shown.
2 Select “SC-MAX4000” from the Bluetooth
of the device.
The name of the connected device is shown for a few
seconds.
®
menu
3 Start playback on the device.
Note:
• A device must be paired to connect.
• This system can only connect to one device at a time.
• When “BLUETOOTH” is selected as the source, this
system will automatically try to connect to the last
connected device. (“LINKING” is shown during this
process.)
█ Disconnecting a device
1 Press [ ].
2 Press [PLAY MENU] to select “DISCONNECT?”.
3 Press [Y, U] to select “OK? YES” and then press
[OK].
“BLUETOOTH READY” is shown.
To cancel, select “OK? NO”.
Using the main unit
Press and hold [ –PAIRING] until “PAIRING” is
shown.
Note:
A device is disconnected when you:
• Select a different source.
• Move the device out of the maximum range.
• Disable the Bluetooth
• Switch off the system or the device.
®
transmission of the device.
Page 9
█ One-Touch Connection (NFC)
Bluetooth® device
(not supplied)
ENGLISH
offset printing
For NFC-compatible Bluetooth® devices (Android™
devices) only
Simply by touching an NFC (Near Field Communication)compatible Bluetooth
complete all preparations, from registering a Bluetooth
device to establishing a connection.
Android device version lower than 4.1 requires the
installation of the “Panasonic MAX Juke” app (free of
charge).
®
device on the system, you can
®
A Enter “Panasonic MAX Juke” in the search box of
Google Play™ to search and then select “Panasonic
MAX Juke”.
B Start the app.
– Follow the instructions to complete the settings.
– Make sure to use the latest version of the app.
Preparation
Switch on the NFC feature of the device.
1 Press [ ].
2 Touch and hold the device on the NFC touch area
of the main unit [ ].
Media playback
The following marks indicate the availability of the
feature.
CD :
USB :
BLUETOOTH :
MEMORY :
Basic playback
CD USB BLUETOOTH MEMORY
Play Press [4/9].
Stop Press [8].
Pause Press [4/9].
Skip Press [2] or [6] (main unit: [2/3]
Search Press and hold [3] or [5] (main unit:
Note:
Depending on the Bluetooth
not work.
CD-R/RW in CD-DA format or with MP3 files.
USB device with MP3 files.
Bluetooth
2 GB internal memory (refer to “Recording”
for adding tracks to the internal memory).
®
device.
USB MEMORY
The position is memorised.
“RESUME” is shown.
Press again to stop fully.
Press again to continue playback.
or [5/6]) to skip track.
CD USB MEMORY
Press [R, T] to skip MP3 album.
[2/3] or [5/6]).
®
device, some operations may
– Hold the device until it beeps, vibrates or displays a
pop-up window, and then move the device away
from the system.
– Once the registration and connection of the device
is complete, the name of the connected device is
shown on the system for a few seconds.
– When the connection is not established even if the
device has touched the NFC touch area, change its
touching position. The connection may improve if
you use the “Panasonic MAX Juke” app.
3 Start playback on the device.
Note:
• While connected, you can connect another device by
touching and holding it on the NFC touch area of the main
unit. The previous device will be disconnected
automatically.
• Depending on the device:
– The one-touch connection may not work.
– The position of the NFC touch area of the device may be
different.
– When the connection is established, playback may start
automatically.
Viewing available information
CD USB BLUETOOTH MEMORY
You can view the available information, such as MP3
album and track number, on the display panel.
Press [DISPLAY].
Note:
• Maximum characters that can be shown: Approximately 32
• This system supports ver. 1.0, 1.1 and 2.3 ID3 tags.
• Text data that the system does not support can show
differently.
RQT0A38
9
9
Page 10
Play menu
offset printing
CD USB MEMORY
1 Press [PLAY MENU].
2 Press [Y, U] to select the setting and then press
[OK].
OFF
PLAYMODE
1-TRACK
1
1-ALBUM
1
RANDOM
RND
1-ALBUM
RANDOM
1 RND
ALL REPEAT Repeat all tracks.
1-TRACK
REPEAT
1
1-ALBUM
REPEAT
1
RANDOM
REPEAT
RND
1-ALBUM
RANDOM
REPEAT
1 RND
Note:
• During random playback, you cannot skip to tracks which
have been played.
• The setting is cancelled when you open the disc tray.
Cancel the setting.
Play one selected track.
Press the numeric buttons to select the
track.
Play one selected MP3 album.
Press [R, T] to select the MP3 album.
Play all tracks randomly.
Play all tracks in one selected MP3
album randomly.
Press [R, T] to select the MP3 album.
Repeat 1-TRACK.
Repeat 1-ALBUM.
Repeat random playback.
Repeat 1-ALBUM RANDOM.
█ Note on disc
• This system can play CD-R/RW with CD-DA or MP3
format content.
• Before playback, finalise the disc on the device it was
recorded on.
• Some CD-R/RW cannot be played because of the
condition of the recording.
█ Note on USB device
• This system does not guarantee connection with all
USB devices.
• This system supports USB 2.0 full speed.
• This system can support USB devices of up to 32 GB.
• Only FAT 12/16/32 file system is supported.
█ Note on MP3 file
• Files are defined as tracks and folders are defined as
albums.
• Tracks must have the extension “.mp3” or “.MP3”.
• Tracks will not necessarily be played in the order you
recorded them.
• Some files can fail to work because of the sector size.
MP3 file on disc
• This system can access up to:
– 255 albums (including root folder)
–999 tracks
– 20 sessions
• Disc must conform to ISO9660 level 1 or 2 (except for
extended formats).
MP3 file on USB device
• This system can access up to:
– 800 albums (including root folder)
– 8000 tracks
– 999 tracks in one album
Link mode
BLUETOOTH
You can change the link mode to suit the connection
type.
Preparation
If this system is connected to a Bluetooth
disconnect it (Z“Disconnecting a device”).
1 Press [PLAY MENU] to select “LINK MODE”.
2 Press [Y, U] to select the mode and then press
[OK].
MODE 1 Emphasis on connectivity.
MODE 2 Emphasis on sound quality.
Note:
Select “MODE 1” if the sound is interrupted.
RQT0A38
10
10
®
device,
Page 11
Radio
ENGLISH
offset printing
Preparation
Press [CD/RADIO/AUX] to select “FM” or “AM”.
Manual tuning
Press [3] or [5] to tune in to the station.
To tune automatically, press and hold the button until the
frequency starts changing quickly.
“STEREO” is shown when a stereo broadcast is being
received.
Using the main unit
1 Press [TUNE MODE] to select “MANUAL”.
2 Press [2/3] or [5/6] to tune in to the
station.
Memory presetting
You can preset up to 30 FM and 15 AM stations.
█ Automatic presetting
1 Press [AUTO PRESET] to select “LOWEST” or
“CURRENT”.
LOWEST Tuning begins from the lowest
CURRENT Tuning begins from the current
2 Press [OK] to start presetting.
The tuner presets all the stations it can receive into
the channels in ascending order.
To cancel, press [8].
frequency.
frequency.
Improving the sound quality
When “FM” is selected
1 Press [PLAY MENU] to select “FM MODE”.
2 Press [Y, U] to select “MONO” and then press
[OK].
To cancel, select “STEREO”.
“MONO” is also cancelled when you change the
frequency.
To memorise the setting
Continue with step 2 of “Manual presetting”.
When “AM” is selected
1 Press [PLAY MENU] to select “BEATPROOF”.
2 Press [Y, U] to select the setting that provides the
best reception and then press [OK].
AM allocation setting
By main unit only
This system can also receive AM broadcasts allocated in
10 kHz steps.
1 Press [CD/RADIO/AUX] to select “FM” or “AM”.
2 Press and hold [CD/RADIO/AUX].
After a few seconds, the display panel shows the current
minimum radio frequency. Release the button when the
minimum frequency changes.
• To go back to the initial setting, do the above steps
again.
• Preset frequencies are erased after you change the
setting.
█ Manual presetting
1 Press [3] or [5] (main unit: [2/3] or
[5/6]) to tune in to the station.
2 Press [OK].
3 Press the numeric buttons to select a preset
number.
Do steps 1 through 3 again to preset more stations.
The new station replaces any station that occupies
the same preset number.
█ Selecting a preset station
Press the numeric buttons, [2] or [6] to select
the preset station.
Using the main unit
1 Press [TUNE MODE] to select “PRESET”.
2 Press [2/3] or [5/6] to select the preset
station.
11
11
RQT0A38
Page 12
Recording
offset printing
This system can record up to 800 folders (maximum 999
tracks in an album) or a total of 8000 tracks, depending
on the available storage capacity of the internal memory
or the USB device in
To check storage space
In the stop mode, press [DISPLAY].
• “UPDATE” is shown when the system is reading the
device.
• “NO DEVICE” is shown if there is no USB device
connected to
Note:
• All recordings are in “.mp3” format.
• You cannot do recording when you are using random
playback mode.
• The DJ function is switched off during recording.
• Repeat playback mode is cancelled during recording.
• A new album is added each time you do a recording.
• The sequence of album may change after the recording.
• The recordings are kept in a folder named “REC_DATA” in
the USB device or the internal memory.
• USB status indicator blinks in red during USB recording.
Basic recording
1 Select the source you want to record.
CD-DA
Prepare the disc playback mode.
Record all
tracks
Record a
specified
track
Make sure the disc is stopped.
Radio
Tune in to the radio station.
External equipment
Connect and play the equipment
(Z“External equipment”).
2 Press [MEMORY REC 7/9] or [USB REC 7/9] to
start recording.
The name of the folder that keeps the recording is
shown.
Stop recording Press [8]. “WRITING” is shown.
Pause
recording
Note:
• Wait for a few seconds for the system to prepare the USB
device before you start recording.
• When the next track of the disc is being recorded, it will be
shown on the display.
RQT0A38
12
12
USB B .
USB B .
Select “OFF PLAYMODE”
(Z“Play menu”).
Select “1-TRACK” (Z“Play menu”).
Press [MEMORY REC 7/9] or
[USB REC 7/9] during recording.
Press again to continue recording.
Note:
You can pause during recording from the
radio, AUX 1 or AUX 2 (except in
“SYNCHRO” mode). A track mark is
added every time you pause (Z“Adding
track marks”).
█ High-speed recording
CD-DA disc recording speed:
CD, CD-R: Three times (3x) the normal speed.
CD-RW: Two times (2x) the normal speed.
1 Put in the disc you want to record.
2 Press [REC MODE] to select “NORMAL” or
“HI-SPEED” and then press [OK].
3 Press [USB REC 7/9] or [MEMORY REC 7/9] to
start recording.
Note:
• If you cannot record at high-speed because of the
condition of the disc, record at normal speed.
• The sound is muted during high-speed recording.
█ Adding track marks
When recording from radio or external equipment, you
can divide tracks using various modes.
Before recording
Press [REC MODE] to select the mode.
MANUAL Add a track mark manually.
SYNCHRO
(For AUX 1 or
AUX 2 source)
TIME MARK A track is automatically divided at
Note:
• During recording, if you press [OK] or pause recording
while using “TIME MARK” mode, the 5-minute counter is
reset.
• You cannot add track marks manually in “SYNCHRO”
mode.
Press [OK] during recording to add a
track mark.
Recording starts automatically when
the other equipment starts to play.
Recording pauses when it detects
silence for 3 seconds.
5-minute intervals.
Page 13

Recording MP3 tracks
ENGLISH
offset printing
You can record MP3 tracks from:
• MP3 disc to
•
USB A to USB B or internal memory
•
USB B to internal memory or vice versa
USB B or internal memory
1 Prepare the source you want to record.
Record all
tracks
Record a
specified
album or track
Select “OFF PLAYMODE”
(Z“Play menu”).
Select “1-ALBUM” or “1-TRACK”
(Z“Play menu”).
2 Press [MEMORY REC 7/9] or [USB REC 7/9] to
start recording.
Stop recording Press [8].
Note:
• Some tracks can use a longer time to record.
• Some tracks cannot be recorded because of the condition
of the source.
• When recording from an MP3 disc, the recorded file name
is different from the original file.
• When recording from USB A , the recorded file name is the
same as the original file (maximum 32 characters).
Recording stops at the last fully
recorded track in the album. For
example, if you stop recording during
the fourth track, only the first three
tracks are recorded.
“NO FILE RECORDED” is shown if no
track is recorded.
Deleting the recorded tracks
1 MEMORY
Press [MEMORY] (main unit: [MEMORY/USB]) to
select “MEMORY”.
USB B
Press [USB] (main unit: [MEMORY/USB]) to select
“USB B”.
2 Press [R, T] to select the album.
3 Press [2] or [6] to select the track.
4 Press [EDIT MODE] to select the mode.
TRACK DEL Delete a single track.
ALBUM DEL Delete one album (maximum 999
FORMAT Format the USB device.
ALL DEL Delete all albums in the internal
tracks).
memory.
5 Press [OK].
The selected item to be deleted is shown.
6 Press [OK].
“SURE? NO” is shown.
7 Press [Y, U] to select “SURE? YES” and then
press [OK].
“WRITING” is shown.
To cancel, select “SURE? NO”.
Sound and illumination effects
Sound effects
Preset EQ
1 Press [EQ] (main unit: [LOCAL EQ]) to select
“PRESET EQ”.
2 Press [R, T] to select the desired preset EQ
setting and then press [OK].
Or turn [MULTI CONTROL] to select the desired
preset EQ setting.
Manual EQ
1 Press [EQ] (main unit: [LOCAL EQ]) to select
“MANUAL EQ”.
2 Press [R, T] to select the sound effect.
Or turn [MULTI CONTROL] to select the sound effect.
3 Press [Y, U] to select the setting and then press
[OK].
Or press [2/3] or [5/6] to select the
setting.
BASS/MID/TREBLE –4 to +4
SURROUND “ON SURROUND” or
D.Bass
1 Press [D.BASS] to select “D.BASS LEVEL” or
“D.BASS BEAT”.
To cancel, select “OFF D.BASS”.
2 Press [R, T] to select the setting and then press
[OK].
Or turn [MULTI CONTROL] to select the setting.
Note:
D.BASS BEAT: This function emphasizes the attack level of
the drum beat and produces a punchy sound. Depending on
the track, the effect may be small.
Illumination effects
You can change the illumination effect on the system.
Press [ILLUMINATION] to select the desired effect.
COLOR Illuminate in one colour.
AUTO Illuminate in one colour. The colour changes
OFF Cancel the effect.
You can also press [R, T] to select the next or previous
effect.
Using the main unit
Turn [ILLUMINATION].
automatically.
“OFF SURROUND”
13
13
RQT0A38
Page 14
DJ functions
offset printing
You can use the DJ functions to add sound effect or
sample sound between songs.
Using the “Panasonic MAX Juke” app
You can download and install the free Android app
“Panasonic MAX Juke” on Google Play for additional
features, such as to request song playback from
multiple devices simultaneously.
Note:
The DJ function is switched off when you switch off the
system, change to another source or during recording.
DJ jukebox
USB MEMORY
Press [JUKEBOX] (main unit: [DJ JUKEBOX]).
To cancel, select “OFF”.
Note:
The system switches to repeat mode automatically when you
switch on the DJ Jukebox.
█ Changing the repeat setting
1 Press [PLAY MENU].
2 Press [Y, U] to select the setting and then press
[OK].
Using the main unit
In the stop mode, turn [MULTI CONTROL] to select
the setting and then press [4/9].
RANDOM REPEAT
RND
ALL TITLE REPEAT Repeat all tracks.
RANDOM MIX REPEAT
RND
When “WAITING REQUEST” is shown, you can proceed
to the next step without using the “Panasonic MAX Juke”
app.
█ Changing the DJ jukebox effect
Press [DJ1] to [DJ6] on the main unit to select the
effect.
[DJ1]
[DJ2] to [DJ6]
To cancel, press the button again.
Note:
You cannot select the DJ jukebox effect when you are using
“RANDOM MIX REPEAT” mode.
Repeat random playback.
Repeat random playback.
Sample sound is added to
the intervals of all tracks.
Cross-fade
gradually becomes soft, and the next
track volume gradually becomes loud.
Sample sound mix
added to the intervals of all tracks.
: The current track volume
: Sample sound is
Using the “Panasonic MAX Juke” app
You can call up the tracks you want to play through the
app.
• When “MAKING LIST” is shown, you can call up a
part of tracks.
• When “WAITING REQUEST” is shown, you can call
up the tracks you want to play through the app.
DJ sampler
(Except for AUX 1 and AUX 2 source)
By main unit only
By turning [MULTI CONTROL], you can apply a scratch
sound or sample sound to the track you are playing.
1 Press [DJ SAMPLER].
2 Press [DJ1] to [DJ6] to select the desired sound.
3 Turn [MULTI CONTROL].
To cancel DJ sampler
Press [DJ SAMPLER].
Using the “Panasonic MAX Juke” app
You can change the sample sound on the app. (To
return all sample sounds to the factory preset, press
and hold [DJ SAMPLER] when the DJ sampler is
switched off.)
DJ effect
(Except for AUX 1 and AUX 2 source)
By main unit only
You can use the DJ effect function to add the sound
effects.
1 Press [DJ EFFECT].
2 Press [DJ1] to [DJ6] to select the effect.
[DJ1] PHASER
[DJ2] FILTER
[DJ3] SOUND CHOPPER
[DJ4] ELECTRO ECHO
[DJ5] PITCH SHIFTER
[DJ6] HARMONIZER
Add space and dimension to the sound.
Enhance or filter specific ranges of the
sound.
Cut off the sound periodically.
Add digital echo to the sound.
Adjust the keys of the sound.
Add notes to the sound to create
harmony.
3 Turn [MULTI CONTROL] to select the setting.
To cancel DJ effect
Press [DJ EFFECT].
RQT0A38
14
14
Page 15

Using a microphone
ENGLISH
offset printing
Preparation
Decrease the volume of the system to its minimum before
you connect or disconnect a microphone.
1 Connect a microphone (not supplied) to the
microphone jack.
Plug type: Ø 6.3 mm monaural
2 Turn [MIC VOL, MIN/MAX] on the main unit to
adjust the volume of the microphone.
If you want to sing with the background music.
3 Play the music source and adjust the volume of
the system.
Note:
• If a strange noise (howling) is emitted, move the
microphone away from the speakers, or decrease the
volume of the microphone.
• When you do not use the microphone, disconnect it from
the microphone jack, and decrease the volume of the
microphone level to “MIN”.
• This system cannot record from microphone.
Clock and timers
Setting the clock
This is a 24-hour clock.
1 Press [SETUP] to select “CLOCK”.
2 Press [Y, U] to set the time and then press [OK].
To check the time
Press [SETUP] to select “CLOCK”.
In standby mode, press [DISPLAY].
Note:
Reset the clock regularly to maintain accuracy.
Play timer and record timer
(Except for Bluetooth®, AUX 1 and AUX 2 source)
You can set the timer to come on at a certain time to:
• Wake you up (play timer).
• Record from the radio (record timer).
Play timer and record timer cannot be used together.
Preparation
Set the clock.
1 Press [SETUP] to select “TIMER ADJ”.
2 Press [Y, U] to select “#PLAY” or “#REC” and
then press [OK].
3 Press [Y, U] to set the start time and then press
[OK].
4 Do step 3 again to set the end time.
5 Press [Y, U] to select the source you want to play
or record and then press [OK].
6 For record timer, press [Y, U] to select “MEMORY”
or “USB B” to keep the recording and then press
[OK].
To start the timer
1 Prepare the source.
Play timer Prepare the source you want to
Record timer Connect the USB device to USB B
listen to (disc, USB, internal
memory or radio) and set the
volume.
(for USB recording) and tune in to
the radio station.
2 Press [SETUP] to select “TIMER SET”.
3 Press [Y, U] to select the setting and then press
[OK].
PLAY ON Start the play timer.
PLAY OFF Cancel the play timer.
REC ON Start the record timer.
REC OFF Cancel the record timer.
“#” is shown.
The system must be switched off for the timer to
operate.
To check the setting
1 Press [SETUP] to select “TIMER ADJ”.
2 Press [Y, U] to select “#PLAY” or “#REC” and
then press [OK].
In standby mode, press [DISPLAY] two times.
Note:
• The play timer starts at a low volume and increases
gradually to the preset level.
• The record timer starts 30 seconds before the set time with
the volume muted.
• The timer comes on at the set time every day if the timer is
on.
• If you switch off the system and then switch on again while
a timer is in operation, the timer will not stop at the end
time.
Sleep timer
The sleep timer switches off the system after the set time.
Press [SLEEP] to select the setting (in minutes).
To cancel, select “OFF”.
NIM03 ĺ120 MINĺĺ 60 MINĺ90 MIN FFO
Note:
• The remaining time is always shown on the display. The
display changes temporarily when you perform other
operations.
• The play timer and sleep timer or the record timer and sleep
timer can be used together.
• The sleep timer always comes first. Be sure not to set an
overlap of timers.
15
15
RQT0A38
Page 16
External equipment
Rear panel of
this main unit
Audio cable
(not supplied)
DVD player
(not supplied)
Audio cable
(not supplied)
Portable audio
equipment
(not supplied)
offset printing
Preparation
• Disconnect the AC mains lead.
• Switch off all equipment and read the appropriate
operating instructions.
Note:
Components and cables are sold separately.
Using the auxiliary input
You can connect a VCR, DVD player etc. and listen to the
audio through this system.
1 Connect the external equipment.
2 Press [CD/RADIO/AUX] to select “AUX 1”.
3 Play the external equipment.
Note:
• If you want to connect equipment other than those
described, refer to the audio dealer.
• Sound distortion can occur when you use an adaptor.
Connecting a portable audio equipment
You can play music from a portable audio equipment.
Preparation
• Switch off the equaliser (if any) of the portable audio
equipment to prevent sound distortion.
• Decrease the volume of the system and the portable
audio equipment before you connect or disconnect the
portable audio equipment.
1 Connect the portable audio equipment.
Plug type: Ø 3.5 mm stereo
2 Press [CD/RADIO/AUX] to select “AUX 2”.
3 Play the portable audio equipment.
To adjust the input level
1 Press [PLAY MENU] to select “INPUT LEVEL”.
2 Press [Y, U] to select “NORMAL” or “HIGH” and
then press [OK].
Note:
• You cannot adjust the input level during recording.
• Select “NORMAL” if the sound is distorted during “HIGH”
input level.
• Read the operating instructions of the portable audio
equipment for details.
RQT0A38
16
16
Page 17

Others
ENGLISH
offset printing
Auto off
This system automatically switches off when you do not
use it for approximately 20 minutes.
1 Press [SETUP] to select “AUTO OFF”.
2 Press [Y, U] to select “ON” and then press [OK].
To cancel, select “OFF”.
Note:
This function does not work when you are in radio source or
when a Bluetooth
Bluetooth® standby
This function automatically switches on the system when
you establish a Bluetooth
device.
1 Press [SETUP] to select “BLUETOOTH STANDBY”.
2 Press [Y, U] to select “ON” and then press [OK].
To cancel, select “OFF”.
Note:
Some devices may take longer to respond. If you are
connected to a Bluetooth
system, wait for a minimum of 5 seconds before connecting
to this system from your Bluetooth
Software version
You can check the software version of the system.
1 Press [SETUP] to select “SW VER.” and then press
[OK].
The software version is shown.
2 Press [OK] again to exit.
®
device is connected.
®
connection from a paired
®
device before switching off the
®
device again.
Maintenance
To clean this system, wipe with a soft, dry cloth.
• Never use alcohol, paint thinner or benzine to clean this
system.
• Before using chemically treated cloth, read the
instructions that came with the cloth carefully.
17
17
RQT0A38
Page 18

Troubleshooting
offset printing
Before requesting service, make the following checks. If
you are in doubt about some of the check points, or if the
solutions indicated do not solve the problem, consult
your dealer for instructions.
█ Common problems
The unit does not work.
• The safety device has been activated. Do the following:
1. Press [1] on the main unit to switch the unit to standby
mode. If the unit does not switch to standby mode,
– Press and hold the button for a minimum of 10
seconds. Or,
– Disconnect the AC mains lead and then connect it
again.
2. Press [1] again to switch on the unit. If the problem
persists, consult your dealer.
The display panel lights up and changes continuously in
standby mode.
• Press and hold [8] on the main unit to select “DEMO OFF”.
No operations can be done with the remote control.
• Examine that the battery is installed correctly.
Sound is distorted or no sound.
• Adjust the volume of the system.
• Switch off the system, determine and correct the cause,
and then switch on again. It can be caused by straining of
the speakers through excessive volume or power, and
when using the system in a hot environment.
A humming sound can be heard during playback.
• An AC mains lead or fluorescent light is near the cables.
Keep other appliances and cords away from the cables of
this system.
The sound level reduces.
• The protection circuit has been activated due to the
continuous use at high volume output. This is to protect the
system and maintain the sound quality.
█ Disc
Display not shown correctly.
Playback does not start.
• You have not put in the disc correctly. Put it in correctly.
• Disc is dirty. Clean the disc.
• Replace the disc if it is scratched, warped, or
non-standard.
• There is condensation. Let the system dry for 1 to 2 hours.
The total number of tracks displayed is incorrect.
The disc cannot be read.
Distorted sound is heard.
• You put in a disc that the system cannot play. Change to a
playable disc.
• You put in a disc that has not been finalised.
█ USB
The USB device or the contents in it cannot be read.
• The format of the USB device or the contents in it are not
compatible with the system.
• USB devices with storage capacity of more than 32 GB
cannot work in some conditions.
Slow operation of the USB device.
• Large content size or large memory USB device takes
RQT0A38
longer time to read.
18
18
█ Bluetooth
Pairing cannot be done.
• Check the Bluetooth
• The device is out of the 10 m communication range. Move
the device nearer to the system.
The device cannot be connected.
• The pairing of the device was unsuccessful. Do pairing
again.
• The pairing of the device has been replaced. Do pairing
again.
• This system might be connected to a different device.
Disconnect the other device and try pairing the device
again.
• The system may have a problem. Switch off the system and
then switch on again.
The device is connected but audio cannot be heard
through the system.
• For some built-in Bluetooth
audio output to “SC-MAX4000” manually. Read the
operating instructions of the device for details.
Sound from the device is interrupted.
• The device is out of the 10 m communication range. Move
the device nearer to the system.
• Remove any obstacle between the system and the device.
• Other devices that use the 2.4 GHz frequency band
(wireless router, microwaves, cordless phones, etc.) are
interfering. Move the device nearer to the system and
distance it from the other devices.
• Select “MODE 1” for stable communication.
The one-touch connection (NFC) is not working.
• Make sure the system and the NFC feature of the device
are switched on.
• Touch and hold the device on the NFC touch area of this
system again.
Playback image and sound are not synchronised.
• Restart the playback app of the device.
• Connect the device to the system with an audio cable (not
supplied).
®
®
device condition.
®
devices, you have to set the
█ Radio
Sound is distorted.
• Use an optional FM outdoor antenna. The antenna should
be installed by a competent technician.
A beat sound is heard.
• Switch off the TV or move it away from the system.
• Move mobile telephones away from the system if the
interference is apparent.
• When in AM tuner mode, select the “BEATPROOF” setting
that provides the best reception.
A low hum is heard during AM broadcasts.
• Move the antenna away from other cables and cords.
█ Main unit displays
“ADJUST CLOCK”
• The clock is not set. Adjust the clock.
“ADJUST TIMER”
• The play timer and/or record timer is not set. Adjust the
play timer and/or record timer.
“ALB FULL”
• The number of albums has exceeded the supported limit.
“AUTO OFF”
• The system has not been used for 20 minutes and will
switch off within a minute. To cancel, press any button.
Page 19

“CAN’T REC”
ENGLISH
offset printing
“DEVICE FULL”
• You cannot do recording because the remaining recording
time of the USB device is less than the total time of the
music source. Change to a USB device which has enough
recording time and do the recording again.
“ERROR”
• An incorrect operation was done. Read the instructions and
try again.
“ERROR” (during recording)
• You cannot select other playback source (example: radio,
USB etc.) or press [2] or [6] during recording. Stop
the recording function.
• You cannot open the disc tray when recording from an AM
source.
“F61”
• Examine and correct the speaker cords connection.
• Disconnect the USB device. Switch off the system and then
switch on again.
“F70”
• Examine the Bluetooth
• Disconnect the Bluetooth
and then switch on again.
“F76”
• There is a problem with the power supply.
• Disconnect the AC mains lead and consult your dealer.
“F77”
• Disconnect the AC mains lead and consult your dealer.
“NO DEVICE”
• The USB device is not connected. Examine the connection.
• You cannot do recording or check available storage space
because there is no USB device connected to
“NO DISC”
• You have not put in a disc.
“NO PLAY”
“UNSUPPORT”
• Examine the content. You can only play supported format.
• The files in the USB device can be corrupted. Format the
USB device and try again.
• The system may have a problem. Switch off the system and
then switch on again.
“NO TRACK”
• There is no album or track in the USB device or the internal
memory.
“PLAYERROR”
• You played an unsupported MP3 file. The system will skip
that track and play the next one.
“REC ERROR”
• You disconnected the USB device during recording.
Connect the USB device and do recording again.
• An error occurred during USB recording. Disconnect the
USB device and then connect it again.
“REMOTE 1”
“REMOTE 2”
• The remote control and the main unit are using different
codes. Change the code of the remote control.
– When “REMOTE 1” is shown, press and hold [OK] and
[1] for a minimum of 4 seconds.
– When “REMOTE 2” is shown, press and hold [OK] and
[2] for a minimum of 4 seconds.
®
connection.
®
device. Switch off the system
USB B .
“TEMP NG”
• The temperature protection circuit has been activated, and
the system will switch off. Let the unit cool down before
switching it on again.
• Check that the ventilation opening of the unit is not
obstructed.
• Ensure this unit is well ventilated.
“TRK FULL”
• The number of files has exceeded the supported limit.
“USB OVER CURRENT ERROR”
• The USB device is using too much power. Disconnect the
USB device, switch off the system and then switch on
again.
“VBR”
• The system cannot show the remaining play time for
variable bit rate (VBR) tracks.
Remote control code
When other Panasonic equipment responds to the
remote control of this system, change the remote control
code for this system.
Preparation
Press [CD/RADIO/AUX] to select “AUX 1” or “AUX 2”.
█ To set the code to “REMOTE 2”
1 Press and hold [CD/RADIO/AUX] on the main unit
and [2] on the remote control until “REMOTE 2” is
shown.
2 Press and hold [OK] and [2] for a minimum of
4 seconds.
█ To set the code to “REMOTE 1”
1 Press and hold [CD/RADIO/AUX] on the main unit
and [1] on the remote control until “REMOTE 1” is
shown.
2 Press and hold [OK] and [1] for a minimum of
4 seconds.
System memory reset
Reset the memory when the following situations occur:
• There is no response when buttons are pressed.
• You want to clear and reset the memory contents.
1 Disconnect the AC mains lead.
2 While you press and hold [1] on the main unit,
connect the AC mains lead again.
Continue to press and hold the button until
“–––––––––” is shown.
3 Release [1].
All the settings are set back to the factory preset.
It is necessary to set the memory items again.
19
19
RQT0A38
Page 20

Specifications
offset printing
█ Amplifier section
RMS output power stereo mode
High Ch 350 W per channel (3 Ω), 1 kHz, 30% THD
Mid Ch 350 W per channel (3 Ω), 1 kHz, 30% THD
Low Ch 500 W per channel (2 Ω), 100 Hz, 30% THD
Total RMS stereo mode power 2400 W
█ Disc section
Disc played (8 cm or 12 cm)
MPEG-1 Layer 3, MPEG-2 Layer 3
Pick up
Wavelength 790 nm (CD)
█ Bluetooth
Version Bluetooth® Ver. 2.1 + EDR
Class Class 2
Supported profiles A2DP, AVRCP, SPP, OPP, FTP
Operating frequency 2.4 GHz band FH-SS
Operation distance 10 m line of sight
®
section
CD, CD-R/RW (CD-DA, MP3 )
█ Tuner section
Frequency modulation (FM)
Preset memory 30 stations
Frequency range
Antenna terminals 75 Ω (unbalanced)
Amplitude modulation (AM)
Preset memory 15 stations
Frequency range 522 kHz to 1629 kHz (9 kHz step)
87.50 MHz to 108.00 MHz (50 kHz step)
520 kHz to 1630 kHz (10 kHz step)
█ Internal memory section
Memory
Memory size 2 GB
Media file format support MP3 (*.mp3)
Memory recording
Bit rate 128 kbps
Memory recording speed 1x, 3x max (CD only)
Recording file format MP3 (*.mp3)
█ Terminal section
USB port
USB standard USB 2.0 full speed
Media file format support MP3 (*.mp3)
USB device file system FAT12, FAT16, FAT32
USB recording
Bit rate 128 kbps
USB recording speed 1x, 3x (CD only)
Recording file format MP3 (*.mp3)
AUX IN 1
Audio input Pin jack
AUX IN 2
Terminal Stereo, 3.5 mm jack
Microphone
Terminal Mono, 6.3 mm jack
█ Speaker section
Speaker unit(s)
Tweeter 6 cm cone type
Woofer 20 cm cone type
Super Woofer 30 cm cone type
Impedance High 3 Ω / Mid 3 Ω / Low 2 Ω
Dimensions (W x H x D) 407 mm x 709 mm x 389 mm
Mass 19 kg
█ General
Power supply AC 220 V to 240 V, 50 Hz
Power consumption 155 W
Dimensions (W x H x D) 492 mm x 221 mm x 421 mm
Mass 5.8 kg
Operating temperature range 0°C to +40°C
Operating humidity range
Power consumption in standby mode (approximate)
Power consumption in standby mode (approximate)
(With “BLUETOOTH STANDBY” set to “ON”)
Note:
• Specifications are subject to change without notice.
Mass and dimensions are approximate.
• Total harmonic distortion is measured by the digital
spectrum analyser.
35% to 80% RH (no condensation)
0.4 W
0.5 W
RQT0A38
20
20
Page 21

About Bluetooth
ENGLISH
offset printing
Panasonic bears no responsibility for data and/or
information that can possibly be compromised during a
wireless transmission.
Frequency band
• This system uses the 2.4 GHz frequency band.
Certification
• This system conforms to the frequency restrictions and
has received certification based on frequency laws.
Thus, a wireless permit is not necessary.
• The actions below are punishable by law:
– Taking apart or modifying the main unit.
– Removing specification indications.
Restrictions of use
• Wireless transmission and/or usage with all Bluetooth
equipped devices is not guaranteed.
• All devices must conform to standards set by
Bluetooth SIG, Inc.
• Depending on the specifications and settings of a
device, it can fail to connect or some operations can be
different.
• This system supports Bluetooth
depending on the operating environment and/or
settings, this security is possibly not sufficient.
Transmit data wirelessly to this system with caution.
• This system cannot transmit data to a Bluetooth
device.
Range of use
• Use this device at a maximum range of 10 m.
• The range can decrease depending on the
environment, obstacles or interference.
Interference from other devices
• This system may not function properly and troubles
such as noise and sound jumps may arise due to radio
wave interference if this unit is located too close to
other Bluetooth
2.4 GHz band.
• This system may not function properly if radio waves
from a nearby broadcasting station, etc. is too strong.
Intended usage
• This system is for normal, general use only.
• Do not use this system near an equipment or in an
environment that is sensitive to radio frequency
interference (example: airports, hospitals, laboratories,
etc.).
®
devices or the devices that use the
®
®
security features. But
®
Disposal of Old Equipment and Batteries
Only for European Union and countries with
recycling systems
These symbols on the products, packaging,
and/or accompanying documents mean that
used electrical and electronic products and
batteries must not be mixed with general
household waste.
For proper treatment, recovery and recycling
of old products and used batteries, please
take them to applicable collection points in
accordance with your national legislation.
By disposing of them correctly, you will help
to save valuable resources and prevent any
potential negative effects on human health
and the environment.
®
For more information about collection and
recycling, please contact your local
municipality.
Penalties may be applicable for incorrect
disposal of this waste, in accordance with
national legislation.
Note for the battery symbol (bottom
symbol):
This symbol might be used in combination
with a chemical symbol. In this case it
complies with the requirement set by the
Directive for the chemical involved.
Licenses
®
The Bluetooth
trademarks owned by Bluetooth SIG, Inc. and any use
of such marks by Panasonic Corporation is under
license. Other trademarks and trade names are those of
their respective owners.
Google Play and Android are trademarks of Google Inc.
MPEG Layer-3 audio coding technology licensed from
Fraunhofer IIS and Thomson.
word mark and logos are registered
21
21
RQT0A38
Page 22

English
offset printing
Declaration of Conformity (DoC)
Hereby, “
Panasonic Corporation
product is in compliance with the essential requirements
and other relevant provisions of Directive 1999/5/EC.
Customers can download a copy of the original DoC to
our R&TTE products from our DoC server:
http://www.doc.panasonic.de
Contact to Authorised Representative: Panasonic
Marketing Europe GmbH, Panasonic Testing Centre,
Winsbergring 15, 22525 Hamburg, Germany
This product is intended for general consumer.
(Category 3)
” declares that this
Eesti keel
Vastavusdeklaratsioon (DoC)
Panasonic Corporation
“
toode on vastavuses põhiliste nõuete ja muude direktiivi
1999/5/EÜ asjakohaste sätetega.
Kliendid saavad koopia meie R&TTE toodetele kehtiva
originaalvastavusdeklaratsiooni koopia alla laadida meie
DoC serverist:
http://www.doc.panasonic.de
Võtke ühendust volitatud esindajaga: Panasonic
Marketing Europe GmbH, Panasonic Testing Centre,
Winsbergring 15, 22525 Hamburg, Germany
See toode on mõeldud tavakasutajale. (III kategooria)
” kinnitab käesolevaga, et see
Magyar
Megfelelőségi Nyilatkozat (DoC)
Ezennel a, “
termék kielégíti az 1999/5/EK Irányelv létfontosságú
követelményeit és más vonatkozó rendelkezéseit.
A vásárlók letölthetik az R&TTE termékek eredeti DoC
másolatát a DoC szerverünkről:
http://www.doc.panasonic.de
Forduljon a hivatalos márkaképviselethez: Panasonic
Marketing Europe GmbH, Panasonic Testing Centre,
Winsbergring 15, 22525 Hamburg, Németország
A terméket általános fogyasztóknak szánták.
(3-as kategória)
Slovensky
Vyhlásenie o zhode (DoC)
Panasonic Corporation
“
výrobok je v zhode so základnými požiadavkami a
ďalšími príslušnými ustanoveniami smernice 1999/5/ES.
Zákazníci si môžu stiahnuť kópiu pôvodného DoC na
naše R&TTE výrobky z nášho servera DoC:
http://www.doc.panasonic.de
Kontakt na splnomocneného zástupcu: Panasonic
Marketing Europe GmbH, Panasonic Testing Centre,
Winsbergring 15, 22525 Hamburg, Nemecko
Tento produkt je určený pre všeobecného spotrebiteľa.
(Kategória 3)
Panasonic Corporation
” týmto prehlasuje, že tento
” kijelenti, hogy a jelen
Latviski
Atbilstības deklarācija (DoC)
Kompānija “
izstrādājums atbilst būtiskām prasībām un citām
saistošām Direktīvas 1999/5/EK prasībām.
Pircēji var lejupielādēt oriģinālo DoC kopiju mūsu R&TTE
izstrādājumos no mūsu DoC servera:
http://www.doc.panasonic.de
Lūdzam sazināties ar pilnvaroto parstāvi: Panasonic
Marketing Europe GmbH, Panasonic Testing Centre,
Winsbergring 15, 22525 Hamburg, Germany
Šis izstrādājums ir paredzēts parastam patērētājam.
(3. kategorija)
Lietuviškai
Atitikties deklaracija (AD)
Bendrovė “
gaminys tenkina direktyvos 1999/5/EB esminius
reikalavimus ir kitas taikytinas nuostatas.
Mūsų R&TTE gaminių originalios atitikties deklaracijos
kopiją klientai gali atsisiųsti iš mūsų AD serverio:
http://www.doc.panasonic.de
Įgaliotojo atstovo adresas: “Panasonic Marketing Europe
GmbH”, Panasonic Testing Centre, Winsbergring 15,
22525 Hamburg, Vokietija
Šis gaminys skirtas bendrajam vartojimui. (3 kategorija)
Panasonic Corporation
Panasonic Corporation
” ar šo paziņo, ka šis
” patvirtina, kad šis
RQT0A38
22
22
Page 23

Slovensko
ENGLISH
offset printing
Izjava o skladnosti (DoC)
S pričujočo izjavo podjetje “
izjavlja, da so svoji izdelki skladni s poglavitnimi
zahtevami in drugimi odgovarjajočimi predpisi direktive
1999/5/ES.
Stranka lahko naloži izvod izvirnega DoC o naših izdelkih
R&TTE s strežnika DoC:
http://www.doc.panasonic.de
Pooblaščeni zastopnik: Panasonic Marketing Europe
GmbH, Panasonic Testing Centre, Winsbergring 15,
22525 Hamburg, Nemčija
Izdelek je namenjen splošni uporabi. (Razred 3)
Български
Декларация за съответствие (DoC)
“Panasonic Corporation” декларира, че този продукт
съответства на съществените изисквания и другите
приложими разпоредби на Директива 1999/5/EC.
Потребителите могат да свалят копие от оригиналните
DoC към нашите продуктите от типа R&TTE от
сървъра, на който се съхраняват DoC:
http://www.doc.panasonic.de
За контакт с оторизиран представител: Panasonic
Marketing Europe GmbH, Panasonic Testing Centre,
Winsbergring 15, 22525 Hamburg, Г
Този продукт е предназначен за обща употреба.
(Категория 3)
Român
Declaraţie de Conformitate (DoC)
Prin prezenta, societatea “
declară că produsul este conform cu cerinţele esenţiale şi
cu alte norme corespunzătoare Directivei 1999/5/EC.
Clienţii pot descărca o copie a DoC-ului original al
produselor noastre R&TTE de la adressa noastră DoC din
Internet:
http://www.doc.panasonic.de
Contact la Reprezentanţa autorizată: Panasonic
Marketing Europe GmbH, Panasonic Testing Centre,
Winsbergring 15, 22525 Hamburg, Germania
Acest produs a fost proiectat pentru clientela generală.
(Categoria 3)
Panasonic Corporation
ермания
Panasonic Corporation
”
”
Hrvatski
Deklaracija o podobnosti (DoC)
Panasonic Corporation
Ovime, “
proizvod udovoljava osnovnim zahtjevima i ostalim
relevantnim uvjetima Smjernice 1999/5/EC.
Kupci mogu preuzeti kopiju originalne DoC za naše
R&TTE proizvode s našeg DoC poslužitelja:
http://www.doc.panasonic.de
Obratite se ovlaštenom predstavniku: Panasonic
Marketing Europe GmbH, Panasonic Testing Centre,
Winsbergring 15, 22525 Hamburg, Njemačka
Ovaj proizvod je namijenjen za opću potrošnju.
(Kategorija 3)
” izjavljuje da je ovaj
23
23
RQT0A38
Page 24
Ihr System kann sich von den Abbildungen unterscheiden.
offset printing
Diese Bedienungsanleitung bezieht sich auf das folgende
System.
System SC-MAX4000
Hauptgerät SA-MAX4000
Lautsprecher SB-MAX4000
Für die Aufnahme und Wiedergabe von Inhalten auf
diesem oder anderen Geräten kann die Erlaubnis des
Eigentümers der Urheberrechte oder sonstiger Rechte
dieser Inhalte erforderlich sein. Panasonic hat keine
diesbezügliche Befugnis und gewährt Ihnen diese auch
nicht. Panasonic lehnt außerdem ausdrücklich jegliche
Rechte sowie die Fähigkeit oder Absicht ab, eine solche
Erlaubnis in Ihrem Namen zu erwerben. Es liegt in Ihrer
Verantwortung sicherzustellen, dass Ihre Nutzung
dieses oder eines anderen Geräts der geltenden
Urheberrechtsgesetze in Ihrem Land entspricht. Bitte
entnehmen Sie diesen Rechtsvorschriften weitere
Informationen über die geltenden relevanten Gesetze
und Vorschriften, oder wenden Sie sich an den Besitzer
der Rechte an den Inhalten, die Sie aufnehmen oder
wiedergeben möchten.
Inhaltsverzeichnis
Sicherheitsmaßnahmen . . . . . . . . . . . . . . . . . . . . . . . . . 2
Lizenzen . . . . . . . . . . . . . . . . . . . . . . . . . . . . . . . . . . . . . 3
Mitgeliefertes Zubehör . . . . . . . . . . . . . . . . . . . . . . . . . . 3
Die Fernbedienung vorbereiten . . . . . . . . . . . . . . . . . . . 3
Aufstellung der Lautsprecher . . . . . . . . . . . . . . . . . . . . . 4
Anschließen . . . . . . . . . . . . . . . . . . . . . . . . . . . . . . . . . . 5
Liste der Bedienelemente . . . . . . . . . . . . . . . . . . . . . . . . 6
Vorbereiten des Speichermediums . . . . . . . . . . . . . . . . 8
Wiedergabe von Speichermedien. . . . . . . . . . . . . . . . . . 9
Radio. . . . . . . . . . . . . . . . . . . . . . . . . . . . . . . . . . . . . . . 11
Aufnahme . . . . . . . . . . . . . . . . . . . . . . . . . . . . . . . . . . . 12
Klang- und Beleuchtungseffekte . . . . . . . . . . . . . . . . . 13
DJ-Funktionen . . . . . . . . . . . . . . . . . . . . . . . . . . . . . . . 14
Verwendung des Mikrofons . . . . . . . . . . . . . . . . . . . . . 15
Uhr und Timer . . . . . . . . . . . . . . . . . . . . . . . . . . . . . . . . 15
Externe Geräte . . . . . . . . . . . . . . . . . . . . . . . . . . . . . . . 16
Andere . . . . . . . . . . . . . . . . . . . . . . . . . . . . . . . . . . . . . 17
Pflege und Instandhaltung . . . . . . . . . . . . . . . . . . . . . . 17
Fehlersuchanleitung . . . . . . . . . . . . . . . . . . . . . . . . . . . 17
RQT0A38
Technische Daten . . . . . . . . . . . . . . . . . . . . . . . . . . . . . 20
2
Bluetooth
24
®
-Informationen . . . . . . . . . . . . . . . . . . . . . . . 21
Sicherheitsmaßnahmen
WARNUNG!
Gerät
• Zur Reduzierung der Gefahr von Brand, elektrischem
Schlag und Beschädigung:
– Dieses Gerät sorgfältig vor Nässe, Feuchtigkeit,
Spritz- und Tropfwasser schützen.
– Blumenvasen und andere mit Flüssigkeiten gefüllte
Behälter dürfen nicht auf dieses Gerät gestellt
werden.
– Ausschließlich das empfohlene Zubehör verwenden.
– Auf keinen Fall die Abdeckung entfernen.
– Versuchen Sie nie, dieses Gerät selbst zu reparieren.
Reparaturarbeiten sind grundsätzlich dem
Kundendienstpersonal zu überlassen.
– Lassen Sie keine Metallgegenstände in dieses Gerät
fallen.
VORSICHT!
Gerät
• Zur Reduzierung der Gefahr von Brand, elektrischem
Schlag und Beschädigung:
– Um ausreichende Belüftung zu gewährleisten, darf
dieses Gerät nicht in einem Bücherregal,
Einbauschrank oder einem sonstigen engen Raum
installiert oder aufgestellt werden.
– Achten Sie darauf, die Entlüftungsschlitze des
Gerätes nicht durch Gegenstände aus Papier oder
Stoff zu blockieren, z. B. Zeitungen, Tischdecken
und Vorhänge.
– Stellen Sie keine Quellen offener Flammen, z. B.
brennende Kerzen, auf das Gerät.
• Dieses Gerät ist für den Betrieb in Gebieten mit
gemäßigtem Klima bestimmt.
• Dieses Gerät kann beim Betrieb
Hochfrequenzstörungen auffangen, die von einem in
der Nähe verwendeten Handy verursacht werden. Falls
eine solche Störbeeinflussung festgestellt wird, sollte
das Handy in größerer Entfernung von diesem Gerät
betrieben werden.
• Dieses Gerät erzeugt Laserstrahlung. Durchführung
anderer Vorgänge als der hier angegebenen kann zu
gefährlicher Strahlung führen.
• Stellen Sie das Gerät auf einer ebenen Fläche so auf,
dass es vor direkter Sonneneinstrahlung, hoher
Temperatur, hoher Luftfeuchtigkeit und starken
Erschütterungen geschützt ist.
• Der Netzstecker fungiert als Abschalteinrichtung.
Installieren Sie dieses Gerät so, dass der Netzstecker
sofort aus der Steckdose gezogen werden kann.
Page 25
Batterie
DEUTSCH
offset printing
• Explosionsgefahr bei falschem Einlegen der Batterie.
Nur mit einem vom Hersteller empfohlenen Typ
ersetzen.
• Was die Entsorgung der Batterien betrifft, erfragen Sie
bitte bei den örtlichen Behörden oder Ihrem Händler,
welches die ordnungsgemäße Entsorgungsmethode
ist.
• Niemals starker Wärme oder offenen Flammen
aussetzen.
• Die Batterie(n) nicht über längere Zeit bei
geschlossenen Türen und Fenstern in direktem
Sonnenlicht im Auto liegen lassen.
• Die Batterie niemals zerlegen oder kurzschließen.
• Die Alkali- oder Mangan-Batterie niemals wieder
aufladen.
• Niemals eine Batterie mit abgelöster Umhüllung
benutzen.
• Wenn die Fernbedienung für längere Zeit nicht benutzt
wird, nehmen Sie die Batterie heraus. Bewahren Sie sie
an einem kühlen, dunklen Ort auf.
Lizenzen
®
Die Bluetooth
eingetragene Markenzeichen von Bluetooth SIG, Inc.
und jede Verwendung dieser Marken durch Panasonic
Corporation erfolgt unter Lizenz. Andere Warenzeichen
und Handelsnamen sind Eigentum der jeweiligen
Inhaber.
Google Play und Android sind Warenzeichen von
Google Inc.
Die Verschlüsselungstechnologie für MP3-Dateien
(MPEG Audio Layer-3) wurde von Fraunhofer IIS und
Thomson lizenziert.
-Wortmarke und -Logos sind
Mitgeliefertes Zubehör
Kontrollieren Sie bitte das mitgelieferte Zubehör.
2 Netzkabel
1 AM (MW)-Rahmenantenne
1 FM (UKW)-Zimmerantenne
1 Fernbedienung
(N2QAYB001022)
1 Batterie für die Fernbedienung
Für Großbritannien und Irland
1 Antennensteckeradapter
VORSICHT!
Den Antennensteckeradapter stets außerhalb der
Reichweite von Kleinkindern aufbewahren, um ein
Verschlucken zu verhindern.
Hinweis:
Verwenden Sie ein Netzkabel, das in Ihre Netzsteckdose
passt.
Die Fernbedienung vorbereiten
Benutzen Sie eine Alkali- oder Mangan-Batterie.
Legen Sie die Batterie so ein, dass die Pole (+ und –) mit
den Symbolen in der Fernbedienung übereinstimmen.
RQT0A38
3
25
Page 26
Aufstellung der Lautsprecher
Hochtöner
offset printing
Stellen Sie die Lautsprecher so auf, dass sich der
Hochtöner auf der Außenseite befindet.
Verwenden Sie ausschließlich die mitgelieferten
Lautsprecher.
Die Verwendung anderer Lautsprecher kann zu
Systemschäden führen und die Klangqualität
beeinträchtigen.
Hinweis:
• Stellen Sie die Lautsprecher in einer Entfernung von mehr
als 10 mm vom Hauptgerät auf, um ausreichende
Luftzirkulation zu gewährleisten.
• Stellen Sie die Lautsprecher auf eine sichere und ebene
Oberfläche.
• Mehr als eine Person ist erforderlich, um die Lautsprecher
zu verschieben, zu kippen oder zu transportieren.
VORSICHT!
• Verwenden Sie diese Lautsprecher ausschließlich
mit dem dafür vorgesehenen System.
Anderenfalls kann es zu Schäden am Verstärker
und den Lautsprechern kommen und Brandgefahr
bestehen. Falls ein Schaden auftritt oder sich die
Wiedergabeleistung plötzlich verschlechtert,
wenden Sie sich bitte an den Kundendienst.
• Ändern Sie nicht die Lautsprecher oder die
Lautsprecherkabel, da dies das System
beschädigen könnte.
• Folgen Sie den in dieser Anleitung vorgegebenen
Schritten zum Anschließen der Lautsprecher.
• Berühren Sie nicht die Schalloberflächen der
Lautsprechermembran:
– Anderenfalls kann die Lautsprechermembran
beschädigt werden.
– Die Lautsprechermembran kann sich erhitzen.
• Seien Sie daher vorsichtig, wenn Babys oder
Kinder in der Nähe sind.
• Stellen Sie die Lautsprecher nicht übereinander
auf.
• Diese Lautsprecher sind nicht mit einer magnetischen
Abschirmung ausgestattet. Sie dürfen daher nicht in der
Nähe von Fernsehgeräten, PCs oder anderen Geräten, die
für magnetische Einstreuungen empfindlich sind,
aufgestellt werden.
• Wiedergabe mit hohem Lautstärkepegel über längere
Zeiträume hinweg kann zu einer Beschädigung und einer
Verkürzung der Lebensdauer des Lautsprecher führen.
• Verringern Sie die Lautstärke bei folgenden Bedingungen,
um Schäden vorzubeugen:
– Bei der Klang verzerrt ist.
– Bei der Einstellung des Klangcharakters.
RQT0A38
4
26
Page 27
Anschließen
Klebeband
(nicht mitgeliefert)
Zur
Netzsteckdose
DEUTSCH
offset printing
Schließen Sie das Netzkabel erst an, nachdem alle anderen Anschlüsse vorgenommen wurden.
1 Verbinden Sie die AM (MW)-Rahmenantenne.
Befestigen Sie die Antenne senkrecht in der
Halterung, bis sie einrastet.
2 Verbinden Sie die FM (UKW)-Zimmerantenne.
Befestigen Sie den Antennendraht in der Position, in
der die optimale Empfangsqualität erzielt wird.
3 Verbinden Sie die Lautsprecher.
Schließen Sie die Lautsprecherkabel an die Klemmen
der gleichen Farbe an.
4 Verbinden Sie das Netzkabel.
Kein Netzkabel eines anderen Gerätes verwenden.
Stromsparmodus
Das System verbraucht eine geringe Menge an
Strom, selbst wenn es sich im Standby-Modus
befindet. Bei Nichtverwendung empfehlen wir, das
System von der Stromversorgung zu trennen.
Einige Einstellungen werden gelöscht, wenn das
System von der Stromversorgung getrennt wird.
Diese müssen erneut vorgenommen werden.
RQT0A38
5
27
Page 28
Liste der Bedienelemente
offset printing
Steuern Sie das System per Fernbedienung. Diese Funktionen können auch mit den Tasten des Hauptgeräts
ausgeführt werden, wenn diese die gleichen Bezeichnungen aufweisen.
A Bereitschafts-/Ein-Schalter [`], [1]
Mit diesem Schalter wird das Gerät aus der
elektrischen Betriebsbereitschaft heraus
eingeschaltet. Auch im Bereitschaftszustand nimmt
das Gerät eine geringe Menge Strom auf.
B Informationen anzeigen
C Nummerische Tasten
Wählen einer zweistellige Nummer
Beispiel: 16: [ 10]=[1]=[6]
D Automatische Voreinstellung des Radiosenders
E Audioquelle auswählen
Info über das Hauptgerät:
Um die Bluetooth
die [ –PAIRING] gedrückt.
F Einfache Wiedergabesteuerung
G Klangeffekte auswählen
H Wählen Sie die Beleuchtungseffekte
I Setup-Menü anzeigen
J Steuerung des Aufnahmebetriebs
K Öffnen und schließen des Disc-Fachs
L Helligkeit der Anzeige einstellen
Um diese Funktion zu löschen, Taste erneut drücken.
M Einschlaftimer einstellen
N Stellen Sie den Lautstärkepegel ein
O Stummschalten des Tons
Um diese Funktion zu löschen, Taste erneut drücken.
„MUTE“ wird ebenfalls abgeschaltet, wenn die
Lautstärke verändert oder das Gerät ausgeschaltet
wird.
P Wählen Sie MP3-Album oder -Titel
Q Wählen Sie DJ Jukebox
R Wählen bzw. bestätigen Sie die Option
S Wiedergabemenü anzeigen
®
-Kopplung zu starten, halten Sie
RQT0A38
6
28
Page 29
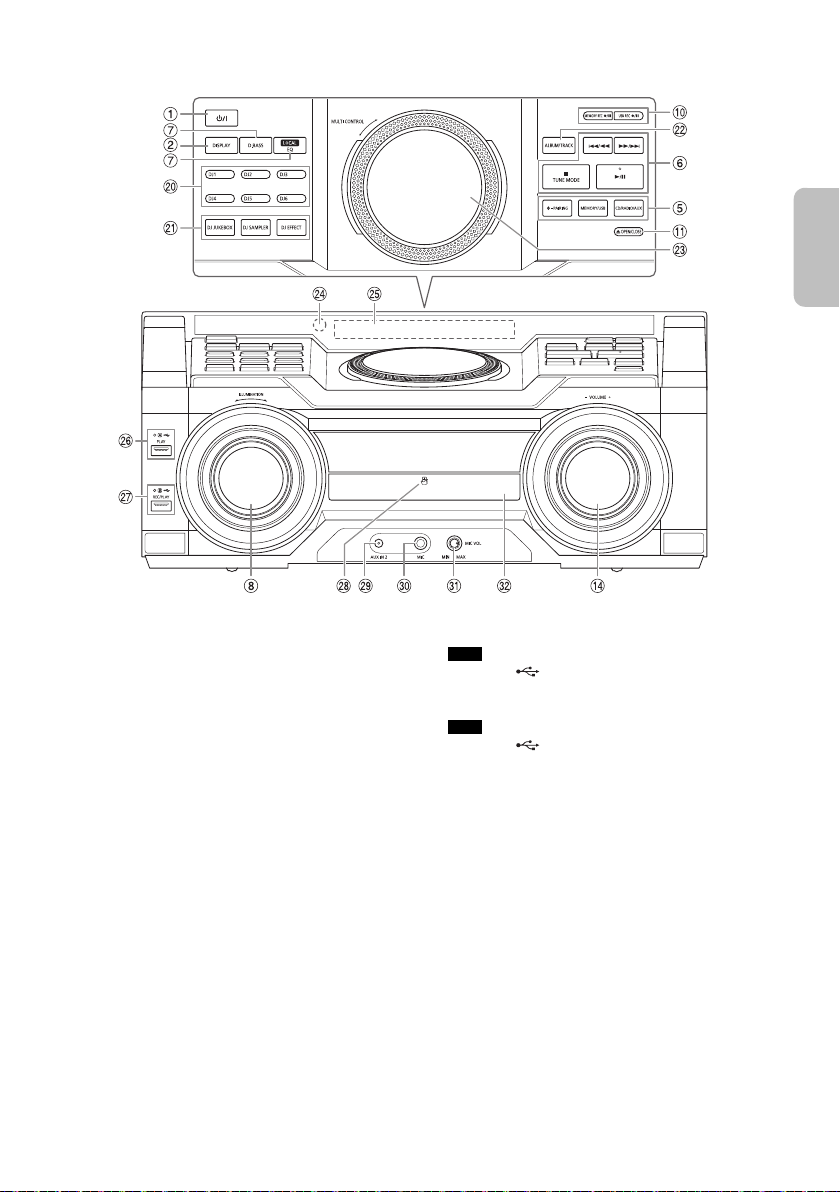
Vorderansicht
Ansicht von oben
DEUTSCH
offset printing
T Direkttasten für die DJ-Funktion
Drücken Sie [DJ JUKEBOX], [DJ SAMPLER] oder
[DJ EFFECT] um die DJ-Funktion einzuschalten.
Drücken Sie [DJ1] bis [DJ6] am Hauptgerät, um die
gewünschte Funktion zu wählen.
Um abzubrechen, drücken Sie die Auswahl [DJ1] bis
[DJ6] erneut.
U Schalten Sie die DJ-Funktion ein
Um diese Funktion zu löschen, Taste erneut drücken.
V Wählen Sie MP3-Album oder -Titel
Drücken Sie [ALBUM/TRACK], um ein Album oder
einen Titel auszuwählen.
Durchsuchen Sie die Titel oder Alben
Drehen Sie [MULTI CONTROL], um zu durchsuchen.
Drücken Sie [4/9], um mit der Wiedergabe der
Auswahl zu beginnen.
W Plattenspieler für DJ- und Mehrfachsteuerung
X Fernbedienungssensor
Entfernung: Innerhalb von ca. 7 m
Winkel: Ca. 20° auf und ab, 30° nach links und rechts
Y Anzeigebereich
Z USB A
USB-Port ( )
USB-Statusanzeige
Wiedergabe von MP3-Titeln.
a USB B
USB-Port ( )
USB-Statusanzeige
Wiedergabe von MP3-Titeln.
Nehmen Sie Audiosignale oder Musiktitel auf.
b NFC-Berührungsfläche
c AUX IN 2 Buchse
d Mikrofonbuchse
e Stellen Sie die Lautstärke des Mikrofons ein
f Disc-Fach
RQT0A38
7
29
Page 30

Vorbereiten des
offset printing
Speichermediums
Disc
1 Drücken Sie [CD x] (Hauptgerät:
[x OPEN/CLOSE]) um das Disc-Fach zu öffnen.
Legen Sie eine Disc mit dem Label nach oben ein.
Drücken Sie erneut, um das Disc-Fach zu schließen.
2 Drücken Sie [CD/RADIO/AUX], um „CD“
auszuwählen.
USB
Vorbereitung
Bevor Sie ein USB-Gerät an das System anschließen,
vergewissern Sie sich, dass Sie eine Sicherheitskopie
Ihrer Daten angelegt haben.
1 Verringern Sie die Lautstärke und schließen Sie
das USB-Gerät an den USB-Anschluss an.
Halten Sie das Hauptgerät fest, wenn Sie das
USB-Gerät anschließen oder entfernen.
2 Drücken Sie [USB] (Hauptgerät: [MEMORY/USB])
um „USB A“ oder „USB B“ auszuwählen.
Bei Auswahl leuchtet die USB-Statusanzeige in rot.
Hinweis:
Verwenden Sie keine USB-Verlängerungskabel. USB-Geräte,
die über ein Kabel angeschlossen sind, werden von diesem
System nicht erkannt.
Bluetooth
Mit Bluetooth® können Sie die Verbindung und
Wiedergabe mit einem Audiogerät drahtlos durchführen.
Vorbereitung
• Schalten Sie die Bluetooth
und platzieren Sie das Gerät in der Nähe des Systems.
• Für weitere Details lesen Sie die Bedienungsanleitung
des Geräts.
█ Koppeln eines Geräts
Vorbereitung
Wenn dieses System mit einem Bluetooth
verbunden ist, trennen Sie es (Z„Trennen der
Verbindung mit dem Gerät“).
1 Drücken Sie [ ].
Wenn „PAIRING“ angezeigt wird, fahren Sie mit
Schritt 4 fort.
2 Drücken Sie [PLAY MENU], um „PAIRING“
auszuwählen.
3 Drücken Sie [Y, U], um „OK? YES“ auszuwählen,
und danach [OK].
„PAIRING“ wird angezeigt.
Um die Funktion abzuschalten, wählen Sie
„OK? NO“.
RQT0A38
8
30
®
®
-Funktion des Geräts ein
®
-Gerät
4 Wählen Sie „SC-MAX4000“ aus dem
Bluetooth
Wenn Sie zur Eingabe eines Passworts aufgefordert
werden, geben Sie „0000“ ein.
Nachdem das Pairing erfolgt ist, wird das Gerät einen
automatischen Verbindungsaufbau mit dem System
herstellen.
Der Name des angeschlossenen Geräts wird einige
Sekunden lang angezeigt.
Verwenden des Hauptgeräts
®
-Menü des Geräts.
1 Halten Sie [ –PAIRING] gedrückt, bis „PAIRING“
angezeigt wird.
2 Wählen Sie „SC-MAX4000“ aus dem
Bluetooth
Hinweis:
Das Pairing kann mit bis zu 8 Geräten mit diesem System
ausgeführt werden. Beim Koppeln eines 9. Geräts wird das
am längsten nicht verwendete Gerät ersetzt.
®
-Menü des Geräts.
█ Anschließen eines Geräts
Vorbereitung
Wenn dieses System mit einem Bluetooth
verbunden ist, trennen Sie es (Z„Trennen der
Verbindung mit dem Gerät“).
®
-Gerät
1 Drücken Sie [ ].
„BLUETOOTH READY“ wird angezeigt.
2 Wählen Sie „SC-MAX4000“ aus dem
Bluetooth
Der Name des angeschlossenen Geräts wird einige
Sekunden lang angezeigt.
®
-Menü des Geräts.
3 Starten Sie die Wiedergabe auf dem Gerät.
Hinweis:
• Damit das Gerät verbunden wird, muss ein Pairing
durchgeführt werden.
• Dieses System kann jeweils nur mit einem Gerät verbunden
werden.
• Wenn „BLUETOOTH“ als Quelle ausgewählt ist, versucht
dieses System automatisch, eine Verbindung mit dem
zuletzt verbundenen Gerät herzustellen. („LINKING“ wird
während dieses Prozesses angezeigt.)
█ Trennen der Verbindung mit dem Gerät
1 Drücken Sie [ ].
2 Drücken Sie [PLAY MENU], um „DISCONNECT?“
auszuwählen.
3 Drücken Sie [Y, U], um „OK? YES“ auszuwählen,
und danach [OK].
„BLUETOOTH READY“ wird angezeigt.
Um die Funktion abzuschalten, wählen Sie
„OK? NO“.
Verwenden des Hauptgeräts
Halten Sie [ –PAIRING] gedrückt, bis „PAIRING“
angezeigt wird.
Hinweis:
Die Verbindung zum Gerät wird unterbrochen, wenn:
• Wählen Sie eine andere Quelle.
• Platzieren Sie das Gerät außerhalb der maximalen
Reichweite.
• Wählen Sie aus dem Bluetooth
• Das System oder das Gerät abgeschaltet wird.
®
-Menü des Geräts.
Page 31
█ One-Touch-Verbindung (NFC)
Bluetooth®-Gerät
(nicht mitgeliefert)
DEUTSCH
offset printing
Nur für NFC-kompatible Bluetooth®-Geräten
(Android™-Geräte)
Durch einfaches Berühren des Systems mit einem NFC
(Near Field Communication)-kompatiblen
Bluetooth
ausführen, vom Registrieren ein Bluetooth
zum Herstellen einer Verbindung.
®
-Gerät können Sie alle Vorbereitungen
Für ältere Android-Geräteversionen als 4.1 ist die
Installations-App „Panasonic MAX Juke“ erforderlich
(kostenlos).
A Geben Sie in das Suchfeld von Google Play™ den
Begriff „Panasonic MAX Juke“ ein, um „Panasonic
MAX Juke“ zu suchen und auszuwählen.
B Starten Sie die App.
– Folgen Sie den Anweisungen, um die
Einstellungen vorzunehmen.
– Vergewissern Sie sich, die neueste Version der
App zu verwenden.
Vorbereitung
Schalten Sie die NFC-Funktion des Geräts ein.
1 Drücken Sie [ ].
2 Halten Sie das Gerät an die
NFC-Berührungsfläche dieses Hauptgerät
gedrückt [ ].
– Halten Sie das Gerät, bis es gibt einen Piepton,
vibriert oder zeigt ein Popup-Fenster, und dann
bewegen Sie das Gerät vom System weg.
– Nachdem Registrierung und Verbindung des
Geräts abgeschlossen sind, der Name des
angeschlossenen Geräts wird auf dem System für
einige Sekunden angezeigt.
– Wird die Verbindung nicht aufgebaut, obwohl Ihr
Gerät den NFC-Berührungsfläche berührt hat,
verändern Sie bitte. Die Verbindung kann sich
verbessern, wenn Sie die „Panasonic MAX
Juke“-App zu verwenden.
3 Starten Sie die Wiedergabe auf dem Gerät.
Hinweis:
• Wenn eine Verbindung besteht, können Sie eine neue
Verbindung mit einem weiteren Gerät herstellen, indem Sie
es an die NFC-Berührungsfläche dieses Hauptgerät
gedrückt halten. Das vorherige Gerät wird automatisch
getrennt.
• Je nach Gerät ist es möglich:
– Die One-Touch-Verbindung nicht funktioniert.
– Die Position der NFC-Berührungsfläche des Geräts
können unterschiedlich sein.
– Wenn die Verbindung hergestellt ist, startet die
Wiedergabe u. U. automatisch.
®
-Gerät bis hin
Wiedergabe von
Speichermedien
Die folgenden Markierungen zeigen die Verfügbarkeit der
Funktion.
CD :
USB :
BLUETOOTH :
MEMORY :
Einfache Wiedergabe
CD USB BLUETOOTH MEMORY
Wiedergabe Drücken Sie [4/9].
Stopp Drücken Sie [8].
Pause Drücken Sie [4/9].
Überspringen Drücken Sie [2] oder [6]
Suchen Halten Sie [3] oder [5]
Hinweis:
Je nach Bluetooth
Funktionen wirkungslos sind.
Verfügbare Informationen anzeigen
CD USB BLUETOOTH MEMORY
Sie können die verfügbaren Informationen, wie z. B.
MP3-Album und Titelnummer, auf dem Display anzeigen.
Drücken Sie [DISPLAY].
Hinweis:
• Maximale Anzahl von Zeichen, die angezeigt werden
• Dieses System unterstützt ID3-Tags der Versionen 1.0, 1.1
• Textdaten, die vom System nicht unterstützt werden,
CD-R/RW im CD-DA-Format oder mit
MP3-Dateien.
USB-Gerät mit MP3-Dateien.
Bluetooth
2-GB-Internspeicher (siehe „Aufnahme“ für
das Hinzufügen von Titeln zum internen
Speicher).
können: Ungefähr 32
und 2.3.
werden womöglich anders angezeigt.
®
-Gerät.
USB MEMORY
Diese Position ist gespeichert.
„RESUME“ wird angezeigt.
Drücken Sie erneut, um vollständig zu
stoppen.
Drücken Sie erneut, um die Wiedergabe
fortzusetzen.
(Hauptgerät: [2/3] oder
[5/6]) um den Titel zu
überspringen.
CD USB MEMORY
Drücken Sie [R, T], um das MP3-Album
zu überspringen.
(Hauptgerät: [2/3] oder
[5/6]).
®
-Gerät ist es möglich, dass einige
RQT0A38
9
31
Page 32
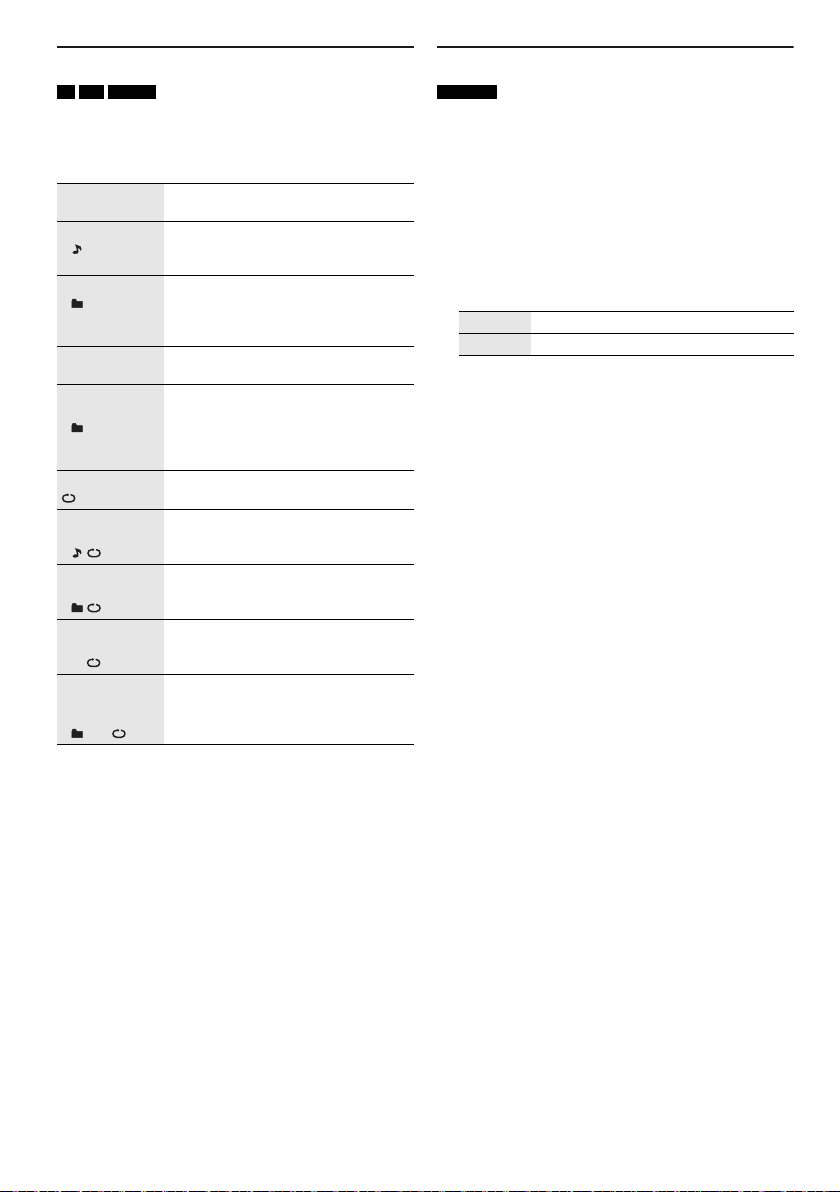
Wiedergabemenü
offset printing
CD USB MEMORY
1 Drücken Sie [PLAY MENU].
2 Drücken Sie [Y, U], um die Einstellung zu wählen,
und drücken Sie dann [OK].
OFF
PLAYMODE
1-TRACK
1
1-ALBUM
1
RANDOM
RND
1-ALBUM
RANDOM
1 RND
ALL REPEAT Alle Titel werden wiederholt.
1-TRACK
REPEAT
1
1-ALBUM
REPEAT
1
RANDOM
REPEAT
RND
1-ALBUM
RANDOM
REPEAT
1 RND
Hinweis:
• Bei Zufallswiedergabe ist kein Sprung zu Titeln möglich, die
bereits abgespielt wurden.
• Beim Öffnen der Disc-Fach wird die Einstellung verworfen.
RQT0A38
10
32
Verwerfen Sie die Einstellung.
Einen ausgewählten Titel abspielen.
Wählen Sie den Titel mithilfe der
Zifferntasten.
Ein ausgewähltes MP3-Album
abspielen.
Drücken Sie [R, T], um das
MP3-Album auszuwählen.
Alle Titel in zufälliger Reihenfolge
abspielen.
Alle Titel eines ausgewählten
MP3-Albums in zufälliger Reihenfolge
abspielen.
Drücken Sie [R, T], um das
MP3-Album auszuwählen.
1-TRACK wiederholen.
1-ALBUM wiederholen.
Wiederholte Zufallswiedergabe.
1-ALBUM RANDOM wiederholen.
Link-Modus
BLUETOOTH
Sie können den Link-Modus ändern, um ihn an den
Verbindungstyp anzupassen.
Vorbereitung
Wenn dieses System mit einem Bluetooth
verbunden ist, trennen Sie es (Z„Trennen der
Verbindung mit dem Gerät“).
®
-Gerät
1 Drücken Sie [PLAY MENU], um „LINK MODE“
auszuwählen.
2 Drücken Sie [Y, U], um den Modus zu wählen, und
drücken Sie dann [OK].
MODE 1 Schwerpunkt auf Konnektivität.
MODE 2 Schwerpunkt auf Klangqualität.
Hinweis:
Wählen Sie „MODE 1“, wenn der die Tonausgabe ist
unterbrochen.
█ Hinweis zu Disc
• Dieses System kann CD-R/RW mit Inhalten im CD-DAoder MP3-Format wiedergeben.
• Finalisieren Sie die Disc vor der Wiedergabe auf dem
Gerät, auf dem sie aufgenommen wurde.
• Einige CD-R/RW können aufgrund der Beschaffenheit
der Aufnahme nicht abgespielt werden.
█ Hinweis zu USB-Geräten
• Es gibt bei diesem System keine Garantie, dass die
Verbindung mit allen USB-Geräten aufgebaut werden
kann.
• Dieses System unterstützt USB 2.0 bei voller
Geschwindigkeit.
• Dieses System kann USB-Geräte von bis zu 32 GB
unterstützen.
• Nur das FAT 12/16/32-Dateisystem wird unterstützt.
█ Hinweis zu MP3-Dateien
• Dateien werden als Titel behandelt, während Ordner
als Alben angesehen werden.
• Die Titel müssen die Erweiterung „.mp3“ oder „.MP3“
besitzen.
• Die Titel werden nicht unbedingt in der Reihenfolge der
Aufnahme abgespielt.
• Je nach Sektorgröße ist es möglich, dass einige
Dateien nicht funktionieren.
MP3-Datei auf einer Disc
• Dieses System hat Zugriffsmöglichkeiten auf bis zu:
– 255 Alben (einschließlich Hauptordner)
–999 Titel
–20 Sitzungen
• Discs müssen dem Format ISO9660 Stufe 1 oder 2
entsprechen (außer erweiterte Formate).
MP3-Datei auf einem USB-Gerät
• Dieses System hat Zugriffsmöglichkeiten auf bis zu:
– 800 Alben (einschließlich Hauptordner)
– 8000 Titel
–999 Titel in einem Album
Page 33

Radio
DEUTSCH
offset printing
Vorbereitung
Drücken Sie [CD/RADIO/AUX], um „FM“ oder „AM“
auszuwählen.
Manuelle Abstimmung
Drücken Sie [3] oder [5], um den Sender
einzustellen.
Zur automatischen Abstimmung halten Sie die Taste
gedrückt, bis die Frequenz sich schnell zu ändern
beginnt.
„STEREO“ wird angezeigt, wenn eine Stereosendung
empfangen wird.
Verwenden des Hauptgeräts
1 Drücken Sie [TUNE MODE], um „MANUAL“
auszuwählen.
2 Drücken Sie [2/3] oder [5/6], um den
Sender einzustellen.
Speicher voreinstellen
Sie können bis zu 30 FM (UKW)- und 15 AM
(MW)-Sender speichern.
█ Automatische Voreinstellung
1 Drücken Sie [AUTO PRESET], um „LOWEST“ oder
„CURRENT“ auszuwählen.
LOWEST Die Abstimmung beginnt mit der
CURRENT Die Abstimmung beginnt mit der
2 Drücken Sie [OK], um mit der Programmierung zu
beginnen.
Danach belegt der Tuner die Speicherplätze in
aufsteigender Reihenfolge mit allen beim Suchlauf
abgestimmten Sendern.
Um die Funktion abzuschalten, [8] drücken.
█ Manuelle Voreinstellung
1 Drücken Sie [3] oder [5] (Hauptgerät:
[2/3] oder [5/6]) um den Sender
einzustellen.
2 Drücken Sie [OK].
3 Drücken Sie die Zifferntasten, um einen
Speicherplatz zu wählen.
Wiederholen die Schritte 1 bis 3, um weitere Sender
einzustellen.
Der neue Sender ersetzt den Sender mit der gleichen
Voreinstellungsnummer.
niedrigsten Frequenz.
aktuellen Frequenz.
█ Einen vorprogrammierten Sender
auswählen
Drücken Sie die Zifferntasten, [2] oder [6], um
den vorprogrammierten Sender auszuwählen.
Verwenden des Hauptgeräts
1 Drücken Sie [TUNE MODE], um „PRESET“
auszuwählen.
2 Drücken Sie [2/3] oder [5/6], um den
vorprogrammierten Sender auszuwählen.
Verbessern der Klangqualität
Wenn „FM“ ausgewählt wurde
1 Drücken Sie [PLAY MENU], um „FM MODE“
auszuwählen.
2 Drücken Sie [Y, U], um „MONO“ auszuwählen,
und danach [OK].
Um die Funktion abzuschalten, wählen Sie
„STEREO“.
Der „MONO“-Modus wird auch aufgehoben, wenn
die Frequenz geändert wird.
Um die Einstellung beizubehalten
Fahren Sie mit Schritt 2 von „Manuelle
Voreinstellung“ fort.
Wenn „AM“ ausgewählt wurde
1 Drücken Sie [PLAY MENU], um „BEATPROOF“
auszuwählen.
2 Drücken Sie [Y, U], um die Einstellung
auszuwählen, die den besten Empfang hat, und
drücken Sie dann [OK].
AM (MW)-Belegung
Nur über Hauptgerät
In diesem System können AM (MW)-Sender in Schritten
von 10 kHz eingestellt werden.
1 Drücken Sie [CD/RADIO/AUX], um „FM“ oder
„AM“ auszuwählen.
2 Halten Sie [CD/RADIO/AUX] gedrückt.
Nach einigen Sekunden wird auf dem Display die aktuelle
Mindestfrequenz angezeigt. Wenn sich die
Mindestfrequenz ändert, die Taste loslassen.
• Wiederholen Sie die Schritte oben, um zur
ursprünglichen Einstellung zurückzukehren.
• Nach Änderung der Einstellung werden voreingestellte
Frequenzen gelöscht.
11
33
RQT0A38
Page 34
Aufnahme
offset printing
Dieses Gerät kann auf bis zu 800 Ordner (max. 999 Titel
pro Album) oder 8000 Titel aufnehmen, je nach
verfügbarem Speicherplatz des internen Speichers oder
des USB-Geräts in
So prüfen Sie den Speicherplatz
Drücken Sie im Stopp-Modus [DISPLAY].
• „UPDATE“ wird angezeigt, wenn das System das Gerät
ausliest.
• „NO DEVICE“ wird angezeigt, wenn kein USB-Gerät an
USB B angeschlossen ist.
Hinweis:
• Alle Aufnahmen sind im „.mp3“-Format.
• Sie können keine Aufnahmen machen, wenn Sie die
Zufallswiedergabe verwenden.
• Die DJ-Funktion wird während der Aufnahme
ausgeschaltet.
• Die Wiederholfunktion ist während der Aufnahme
abgeschaltet.
• Bei jeder Aufnahme wird ein neues Album hinzugefügt.
• Die Reihenfolge des Albums kann sich nach Beendigung
der Aufnahme ändern.
• Die Aufnahmen werden auf dem USB-Gerät oder den
internen Speicher in einem Ordner mit dem Namen
„REC_DATA“ abgespeichert.
• Die Anzeige für den USB-Status blinkt während der
USB-Aufnahme in rot.
Einfache Aufnahme
1 Wählen Sie die Quelle aus, die Sie aufnehmen
möchten.
CD-DA
Stellen Sie den Disc-Wiedergabe-Modus ein.
Alle Titel
aufnehmen
Einen bestimmten
Titel aufnehmen
Stellen Sie sicher, dass die Disc angehalten wurde.
Radio
Radiosender einstellen.
Externe Geräte
Schließen Sie das Gerät an und spielen Sie von ihm
ab (Z„Externe Geräte“).
2 Drücken Sie [MEMORY REC 7/9] oder
[USB REC 7/9], um mit der Aufnahme zu
beginnen.
Der Name des Ordners, in dem die Aufnahmen
abgespeichert wurden, wird angezeigt.
Aufnahme
stoppen
AufnahmePause
RQT0A38
12
34
USB B .
Wählen Sie „OFF PLAYMODE“
(Z„Wiedergabemenü“).
Wählen Sie „1-TRACK“
(Z„Wiedergabemenü“).
Drücken Sie [8]. „WRITING“ wird
angezeigt.
Drücken Sie während der Aufnahme
[MEMORY REC
Drücken Sie erneut, um die Aufnahme
fortzusetzen.
Hinweis:
Die Pause-Funktion kann bei der Aufnahme
aus dem Radio, der AUX 1- oder der AUX 2Quelle (ausgenommen im „SYNCHRO“Modus) aktiviert werden. Bei jeder Pause wird
die Titel-Kennzeichnung eingesetzt
(Z„Titel-Kennzeichen hinzufügen“).
7/9
] oder [USB REC7/9].
Hinweis:
• Warten Sie ein paar Sekunden, bis das System das
USB-Gerät vorbereitet hat, bevor Sie mit der Aufnahme
beginnen.
• Die Aufzeichnung des nächsten Titels der Disc wird auf
dem Display angezeigt.
█ Schnellaufnahme
CD-DA Disc Aufnahmegeschwindigkeit:
CD, CD-R: Dreimal (3x) schneller als die normale
CD-RW: Zweimal (2x) schneller als die normale
Geschwindigkeit.
Geschwindigkeit.
1 Legen Sie die Disc ein, die Sie aufnehmen
möchten.
2 Drücken Sie [REC MODE], um „NORMAL“ oder
„HI-SPEED“ auszuwählen, und danach [OK].
3 Drücken Sie [USB REC 7/9] oder
[MEMORY REC 7/9], um mit der Aufnahme zu
beginnen.
Hinweis:
• Wenn Sie aufgrund des Zustands der Disc nicht mit
Hochgeschwindigkeit aufnehmen können, nehmen Sie mit
Normalgeschwindigkeit auf.
• Bei der Schnellaufnahme wird der Ton stumm geschaltet.
█ Titel-Kennzeichen hinzufügen
Bei Aufnahmen vom Radio oder von externen Geräten
können Sie die Titel mittels verschiedener Modi trennen.
Vor der Aufnahme
Drücken Sie [REC MODE], um den Modus auszuwählen.
MANUAL Manuelles Hinzufügen einer
SYNCHRO
(Für AUX 1oder
AUX 2-Quelle)
TIME MARK Ein Titel wird automatisch in
Hinweis:
• Wenn Sie während der Aufnahme im „TIME MARK“-Modus
auf [OK] drücken oder die Aufnahme anhalten, wird der
Fünf-Minuten-Zähler zurückgesetzt.
• Im „SYNCHRO“-Modus können Sie manuell keine
Titel-Kennzeichen einfügen.
Titel-Kennzeichnung.
Drücken Sie während der Aufnahme
[OK], um eine Titel-Kennzeichnung
hinzuzufügen.
Die Aufnahme beginnt automatisch,
wenn das andere Gerät mit der
Wiedergabe beginnt.
Die Aufnahme wird angehalten, wenn
für 3 Sekunden Ruhe herrscht.
Zeitabständen von 5 Minuten getrennt.
Aufnahme von MP3-Titeln
Sie können MP3-Titel wie folgt aufnehmen:
• von einer MP3-Disc auf
Speicher
•von
USB A auf USB B oder in den internen Speicher
•von
USB B in den internen Speicher oder umgekehrt
USB B oder in den internen
Page 35

1 Wählen Sie die Quelle aus, die Sie aufnehmen
DEUTSCH
offset printing
möchten.
Alle Titel
aufnehmen
Aufnahme eines
bestimmten
Albums oder Titels
Wählen Sie „OFF PLAYMODE“
(Z„Wiedergabemenü“).
Wählen Sie „1-ALBUM“ oder
„1-TRACK“
(Z„Wiedergabemenü“).
2 Drücken Sie [MEMORY REC 7/9] oder
[USB REC 7/9], um mit der Aufnahme zu
beginnen.
Aufnahme
stoppen
Hinweis:
• Einige Titel können längere Zeit zur Aufnahme
beanspruchen.
• Einige Titel können aufgrund der Beschaffenheit der Quelle
nicht aufgenommen werden.
• Bei der Aufnahme von einer MP3-Disc unterscheidet sich
der Name der aufgenommenen Datei von der
ursprünglichen Datei.
• Bei der Aufnahme von USB A ist der Name der
aufgenommenen Datei der gleiche wie der Name der
ursprünglichen Datei (maximal 32 Zeichen).
Drücken Sie [8].
Die Aufnahme wird beim letzten, komplett
aufgenommenen Titel des Albums
angehalten. Zum Beispiel, wenn Sie bei der
Aufnahme des vierten Musiktitels stoppen,
so werden nur die ersten drei Titel
aufgenommen.
„NO FILE RECORDED“ wird angezeigt,
wenn kein Titel aufgenommen wurde.
Löschen des aufgenommenen Titels
1 MEMORY
Drücken Sie [MEMORY] (Hauptgerät:
[MEMORY/USB]) um „MEMORY“ auszuwählen.
USB B
Drücken Sie [USB] (Hauptgerät: [MEMORY/USB])
um „USB B“ auszuwählen.
2 Drücken Sie [R, T], um das gewünschte Album
auszuwählen.
3 Drücken Sie [2] oder [6], um den
gewünschten Titel auszuwählen.
4 Drücken Sie [EDIT MODE], um den Modus
auszuwählen.
TRACK DEL Einen bestimmten Titel löschen.
ALBUM DEL Ein Album löschen (maximal 999
FORMAT Formatieren des USB-Geräte.
ALL DEL Alle Alben des Internspeichers
Titel).
löschen.
5 Drücken Sie [OK].
Die zu löschende Auswahl wird angezeigt.
6 Drücken Sie [OK].
„SURE? NO“ wird angezeigt.
7 Drücken Sie [Y, U], um „SURE? YES“
auszuwählen, und danach [OK].
„WRITING“ wird angezeigt.
Um die Funktion abzuschalten, wählen Sie
„SURE? NO“.
Klang- und Beleuchtungseffekte
Klangeffekte
Voreingestellter EQ (Preset EQ)
1 Drücken Sie [EQ] (Hauptgerät: [LOCAL EQ]) um
„PRESET EQ“ auszuwählen.
2 Drücken Sie [R, T], um die gewünschten
voreingestellte EQ-Einstellung zu wählen, und
drücken Sie dann [OK].
Alternativ können Sie [MULTI CONTROL] drehen, um
die gewünschte voreingestellte EQ-Einstellung
auszuwählen.
Manuelle EQ (Manual EQ)
1 Drücken Sie [EQ] (Hauptgerät: [LOCAL EQ]) um
„MANUAL EQ“ auszuwählen.
2 Drücken Sie [R, T], um den Klangeffekt
auszuwählen.
Alternativ können Sie [MULTI CONTROL] drehen, um
den Klangeffekt auszuwählen.
3 Drücken Sie [Y, U], um die Einstellung zu wählen,
und drücken Sie dann [OK].
Alternativ drücken Sie [2/3] oder [5/6], um
die Einstellung auszuwählen.
BASS/MID/TREBLE –4 bis +4
SURROUND „ON SURROUND“ oder
D.Bass
1 Drücken Sie [D.BASS], um „D.BASS LEVEL“ oder
„D.BASS BEAT“ auszuwählen.
Um die Funktion abzuschalten, wählen Sie
„OFF D.BASS“.
2 Drücken Sie [R, T], um die Einstellung zu wählen,
und drücken Sie dann [OK].
Alternativ können Sie [MULTI CONTROL] drehen, um
die Einstellung auszuwählen.
Hinweis:
D.BASS BEAT: Diese Funktion betont den Trommelschlag
und erzeugt einen druckvollen Klang. Abhängig vom
gewählten Titel ist der Effekt u. U. nur gering.
Beleuchtungseffekte
Sie können den Beleuchtungseffekt am System ändern.
Drücken Sie [ILLUMINATION], um den gewünschten
Effekt auszuwählen.
COLOR Beleuchtung in einer Farbe.
AUTO Beleuchtung in einer Farbe. Die Farbe
OFF Deaktivieren Sie den Effekt.
Sie können auch [R, T] drücken, um den nächsten oder
vorherigen Effekt auszuwählen.
Verwenden des Hauptgeräts
Drehen Sie den Regler [ILLUMINATION].
ändert sich automatisch.
„OFF SURROUND“
13
35
RQT0A38
Page 36

DJ-Funktionen
offset printing
Sie können mit den DJ-Funktionen Klangeffekte oder
Sample-Sounds zwischen den Liedern hinzufügen.
Verwenden der „Panasonic MAX Juke“-App
Sie können die kostenlose Android-App „Panasonic
MAX Juke“ von Google Play herunterladen und
installieren, um zusätzliche Funktionen zu erhalten, wie
beispielsweise die gleichzeitige Liedwiedergabe von
mehreren Geräten.
Hinweis:
Die DJ-Funktion wird ausgeschaltet, wenn Sie das System
ausschalten, auf eine andere Quelle umschalten oder gerade
aufnehmen.
DJ Jukebox
USB MEMORY
Drücken Sie [JUKEBOX] (Hauptgerät:
[DJ JUKEBOX]).
Um die Funktion abzuschalten, wählen Sie „OFF“.
Hinweis:
Das System wechselt automatisch in den Wiederholmodus,
sobald Sie die DJ Jukebox einschalten.
█ Ändern der Wiederholungseinstellung
1 Drücken Sie [PLAY MENU].
2 Drücken Sie [Y, U], um die Einstellung zu wählen,
und drücken Sie dann [OK].
Verwenden des Hauptgeräts
Im Stopp-Modus, drücken Sie [MULTI CONTROL], um
die Einstellung auszuwählen, und drücken Sie dann
[4/9].
RANDOM REPEAT
RND
ALL TITLE REPEAT Alle Titel werden wiederholt.
RANDOM MIX
REPEAT
RND
Wenn „WAITING REQUEST“ angezeigt wird, können Sie
mit dem nächsten Schritt fortfahren, ohne die App
„Panasonic MAX Juke“ zu verwenden.
█ Ändern des DJ Jukebox-Effekts
Drücken Sie [DJ1] bis [DJ6] am Hauptgerät, um den
Effekt auszuwählen.
[DJ1]
[DJ2] bis [DJ6]
Um diese Funktion zu löschen, Taste erneut drücken.
Hinweis:
RQT0A38
Sie können den DJ Jukebox-Effekt nicht auswählen, wenn Sie
14
den „RANDOM MIX REPEAT“-Modus verwenden.
36
Wiederholte Zufallswiedergabe.
Wiederholte Zufallswiedergabe.
Der Sample-Sound wird zu den
Intervallen aller Titel hinzugefügt.
Überblendung
allmählich leiser, und der nächste Titel
wird allmählich lauter.
Sample-Sound-Mix
Sample-Sound wird zu den Intervallen
aller Titel hinzugefügt.
: Der aktuelle Titel wird
: Der
Verwenden der „Panasonic MAX Juke“-App
Sie können die Titel aufrufen, die Sie über die App
wiedergeben möchten.
• Wenn „MAKING LIST“ angezeigt wird, können Sie
einen Teil der Titel aufrufen.
• Wenn „WAITING REQUEST“ angezeigt wird, können
Sie die Titel aufrufen, die Sie über die App
wiedergeben möchten.
DJ-Sampler
(Außer den Quellen AUX 1 und AUX 2)
Nur über Hauptgerät
Durch Drehen von [MULTI CONTROL] können Sie einen
Scratch-Sound oder Sample-Sound zum gerade
wiedergegebenen Titel hinzufügen.
1 Drücken Sie [DJ SAMPLER].
2 Drücken Sie [DJ1] bis [DJ6], um den gewünschten
Klang auszuwählen.
3 Drehen Sie den Regler [MULTI CONTROL].
So brechen Sie den DJ-Sampler ab
Drücken Sie [DJ SAMPLER].
Verwenden der „Panasonic MAX Juke“-App
Sie können den Sample-Sound in der App ändern. (Um
alle Sample-Sounds wieder auf die werkseitige
Voreinstellung zurückzusetzen, drücken und halten Sie
[DJ SAMPLER] bei ausgeschaltetem DJ-Sampler.)
DJ-Effekt
(Außer den Quellen AUX 1 und AUX 2)
Nur über Hauptgerät
Sie können mit der Funktion DJ-Effekt Klangeffekte
hinzufügen.
1 Drücken Sie [DJ EFFECT].
2 Drücken Sie [DJ1] bis [DJ6], um den Effekt
auszuwählen.
[DJ1] PHASER
Erweitern Sie den Klang um eine räumliche
Komponente.
[DJ2] FILTER
Verstärken oder filtern Sie bestimmte
Bereiche der Tonausgabe.
[DJ3] SOUND CHOPPER
Schneiden Sie die Tonausgabe in
regelmäßigen Abständen ab.
[DJ4] ELECTRO ECHO
Fügen Sie ein digitales Echo zur
Tonausgabe hinzu.
[DJ5] PITCH SHIFTER
Dient zum Einstellen der Tonarten.
[DJ6] HARMONIZER
Erweitert die Tonausgabe um Töne, um
Harmonien zu erzeugen.
3 Drehen Sie [MULTI CONTROL], um die Einstellung
auszuwählen.
So brechen Sie den DJ-Effekt ab
Drücken Sie [DJ EFFECT].
Page 37

Verwendung des Mikrofons
DEUTSCH
offset printing
Vorbereitung
Bevor Sie das Mikrofon anschließen oder abziehen,
drehen Sie die Lautstärke des Systems auf sein Minimum
herunter.
1 Stecken Sie ein Mikrofon (nicht mitgeliefert) in die
Mikrofonbuchse.
Steckerausführung: Ø 6,3 mm monophonisch
2 Drehen Sie am Hauptgerät [MIC VOL, MIN/MAX],
um die Lautstärke des Mikrofons einzustellen.
Wenn Sie mit Hintergrundmusik singen wollen.
3 Spielen Sie die Musikquelle ab und stellen Sie die
Lautstärke des Systems ein.
Hinweis:
• Ertönt beim Gebrauch ein seltsamer Ton (heulend),
bewegen Sie das Mikrofon von den Lautsprechern weg
oder verringern Sie die Mikrofon-Lautstärke.
• Wenn Sie das Mikrofon nicht verwenden, ziehen Sie es aus
der Mikrofonbuchse und verringern Sie die
Mikrofon-Lautstärke auf „MIN“.
• Dieses System kann nicht vom Mikrofon aufnehmen.
Uhr und Timer
Uhr einstellen
Dies ist eine 24-Stunden-Uhr.
1 Drücken Sie [SETUP], um „CLOCK“ auszuwählen.
2 Drücken Sie [Y, U], um die Zeit einzustellen, und
drücken Sie dann [OK].
Zum Überprüfen der Zeit
Drücken Sie [SETUP], um „CLOCK“ auszuwählen.
Drücken Sie im Standby-Modus [DISPLAY].
Hinweis:
Achten Sie darauf, die Uhr in regelmäßigen Abständen zu
stellen.
Wiedergabetimer und Aufnahmetimer
(außer den Quellen Bluetooth®, AUX 1 und AUX 2)
Sie können die Zeitschaltuhr so einstellen, dass sich die
Anlage zu einem bestimmten Zeitpunkt einschaltet, um:
• Sie zu wecken (Wiedergabetimer).
• Aufnahme vom Radio (Aufnahmetimer).
Wiedergabetimer und Aufnahmetimer können nicht
zusammen verwendet werden.
Vorbereitung
Stellen Sie die Uhr ein.
1 Drücken Sie [SETUP], um „TIMER ADJ“
auszuwählen.
2 Drücken Sie [Y, U], um „#PLAY“ oder „#REC“
auszuwählen, und danach [OK].
3 Drücken Sie [Y, U], um die Startzeit einzustellen,
und drücken Sie dann [OK].
4 Wiederholen Sie Schritt 3, um die Endzeit
einzustellen.
5 Drücken Sie [Y, U], um die wiederzugebende oder
aufzunehmen Quelle zu wählen, und drücken Sie
dann [OK].
6 Die Funktion der Aufnahmetimer, drücken Sie
[Y, U], um „MEMORY“ oder „USB B“ auszuwählen
und die Aufnahme zu behalten und drücken Sie
dann [OK].
So aktivieren Sie den Timer
1 Bereiten Sie die Quelle vor.
Wiedergabetimer Bereiten Sie die gewünschte
Aufnahmetimer Schließen Sie das USB-Gerät
Quelle vor (Disc, USB, interne
Speicher oder Radio) und
stellen Sie die Lautstärke ein.
an
USB B (für die
USB-Aufnahme) an und
wechseln Sie zum
Radiosender.
2 Drücken Sie [SETUP], um „TIMER SET“
auszuwählen.
3 Drücken Sie [Y, U], um die Einstellung zu wählen,
und drücken Sie dann [OK].
PLAY ON Starten Sie den Wiedergabetimer.
PLAY OFF Brechen Sie den Wiedergabetimer ab.
REC ON Starten Sie den Aufnahmetimer.
REC OFF Brechen Sie den Aufnahmetimer.
„#“ wird angezeigt.
Die Timerfunktionen werden nur aktiviert, wenn das
System ausgeschaltet ist.
Zum Überprüfen der Einstellung
1 Drücken Sie [SETUP], um „TIMER ADJ“
auszuwählen.
2 Drücken Sie [Y, U], um „#PLAY“ oder „#REC“
auszuwählen, und danach [OK].
Drücken Sie im Standby-Modus zweimal [DISPLAY].
Hinweis:
• Der Wiedergabetimer beginnt mit einer niedrigen
Lautstärke und wird sich nach und nach bis zum
voreingestellten Pegel erhöhen.
• Der Aufnahmetimer startet 30 Sekunden vor der
eingestellten Zeit in Stummschaltung.
• Der Timer wird täglich zur eingestellten Zeit aktiviert, wenn
er eingeschaltet ist.
• Wenn Sie das System bei aktiviertem Timer aus- und dann
wieder einschalten, stoppt der Timer nicht bei der Endzeit.
15
37
RQT0A38
Page 38

Einschlaftimer
Rückseite
dieses
Hauptgerätes
Audiokabel
(nicht mitgeliefert)
DVD-Player
(nicht mitgeliefert)
Audiokabel
(nicht mitgeliefert)
Tragbares
Audiogerät
(nicht mitgeliefert)
offset printing
Der Einschlaftimer schaltet das System nach der
festgelegten Zeit ab.
Drücken Sie [SLEEP], um die Zeit auszuwählen (in
Minuten).
Um die Funktion abzuschalten, wählen Sie „OFF“.
NIM03 ĺ120 MINĺĺ 60 MINĺ90 MIN FFO
Hinweis:
• Die verbleibende Zeit wird immer auf dem Display
angezeigt. Das Display ändert sich vorübergehend, wenn
Sie andere Vorgänge ausführen.
• Wiedergabetimer und Einschlaftimer oder Aufnahmetimer
und Einschlaftimer können gemeinsam verwendet werden.
• Der Einschlaftimer hat grundsätzlich Vorrang. Stellen Sie
sicher, dass sich die Timer-Einstellungen nicht
überschneiden.
Externe Geräte
Vorbereitung
• Ziehen Sie das Netzkabel.
• Schalten Sie alle Geräte aus und lesen Sie die
entsprechenden Bedienungsanleitungen.
Hinweis:
Zusatzgeräte und Kabel sind separat erhältlich.
Verwendung des AUX-Eingangs
Sie können einen Videorekorder, DVD-Player usw.
anschließen und Ihr Audio über dieses System laufen
lassen.
Anschluss an ein tragbares Audiogerät
Sie können Musik von einem tragbaren Audiogerät
abspielen.
Vorbereitung
• Schalten Sie (falls vorhanden) die Entzerrerfunktion des
tragbaren Audiogeräts aus, um eine Klangverzerrung
zu vermeiden.
• Senken Sie die Lautstärke des Systems und des
tragbaren Audiogeräts, bevor Sie das tragbare
Audiogerät anschließen oder vom Gerät trennen.
1 Schließen Sie das tragbare Audiogerät an.
Steckerausführung: Ø 3,5 mm Stereostecker
2 Drücken Sie [CD/RADIO/AUX], um „AUX 2“
auszuwählen.
3 Wiedergabe von einem tragbaren Audiogerät.
Zur Einstellung des Eingangspegels
1 Drücken Sie [PLAY MENU], um „INPUT LEVEL“
auszuwählen.
2 Drücken Sie [Y, U], um „NORMAL“ oder „HIGH“
auszuwählen, und danach [OK].
Hinweis:
• Sie können den Eingangspegel während der Aufnahme
nicht regeln.
• Wählen Sie „NORMAL“ (Normal), falls der Ton verzerrt ist,
wenn der „HIGH“ (Hoch) Eingangsschaltpegel aktiviert ist.
• Weitere Informationen zum Betrieb des tragbaren
Audiogeräts finden Sie im dazugehörigen
Benutzerhandbuch.
1 Schließen Sie die externen Geräte an.
2 Drücken Sie [CD/RADIO/AUX], um „AUX 1“
3 Schalten Sie die externen Geräte ein.
Hinweis:
• Wenn Sie andere als die beschriebenen Geräte anschließen
• Wenn Sie einen Adapter verwenden kann es zu
RQT0A38
16
38
auszuwählen.
möchten, fragen Sie Ihren Audio-Fachhändler.
Klangverzerrungen kommen.
Page 39

Andere
DEUTSCH
offset printing
Automatisches Ausschalten
Dieses System schaltet sich automatisch ab, wenn Sie es
ca. 20 Minuten lang nicht verwenden.
1 Drücken Sie [SETUP], um „AUTO OFF“
auszuwählen.
2 Drücken Sie [Y, U], um „ON“ auszuwählen, und
danach [OK].
Um die Funktion abzuschalten, wählen Sie „OFF“.
Hinweis:
Diese Funktion steht nicht zur Verfügung, wenn die Quelle das
Radio ist oder wenn ein Bluetooth
®
-Gerät verbunden ist.
Bluetooth®-Standby
Diese Funktion schaltet automatisch das System ein,
wenn Sie eine Bluetooth
gekoppelten Gerät herstellen.
®
-Verbindung von einem
1 Drücken Sie [SETUP], um
„BLUETOOTH STANDBY“ auszuwählen.
2 Drücken Sie [Y, U], um „ON“ auszuwählen, und
danach [OK].
Um die Funktion abzuschalten, wählen Sie „OFF“.
Hinweis:
Bei einigen Geräten dauert es möglicherweise länger, bis sie
reagieren. Wenn Sie mit einem Bluetooth
sind, bevor Sie das System ausschalten, warten Sie
mindestens 5 Sekunden, bevor Sie eine erneute Verbindung
zu diesem System von Ihrem Bluetooth
®
-Gerät verbunden
®
-Gerät aus herstellen.
Software-Version
Sie können die Software-Version des Systems
überprüfen.
1 Drücken Sie [SETUP], um „SW VER.“
auszuwählen, und danach [OK].
Die Software-Version wird angezeigt.
2 Drücken Sie [OK] erneut, um zu beenden.
Pflege und Instandhaltung
Entfernen Sie Schmutzflecken mit einem weichen,
trockenen Tuch.
• Verwenden Sie zum Reinigen dieser Anlage auf keinen
Fall Alkohol, Farbverdünner oder Benzin.
• Vor Gebrauch eines chemisch behandelten
Reinigungstuchs lesen Sie bitte die dem Tuch
beiliegende Gebrauchsanweisung.
Fehlersuchanleitung
Führen Sie die folgenden Kontrollen durch, bevor Sie den
Kundendienst anrufen. Falls Sie Fragen zu den
Prüfpunkten haben oder sich eine Störung anhand der
angegebenen Abhilfemaßnahmen nicht beseitigen lässt,
nehmen Sie bitte Kontakt mit Ihrem Fachhändler auf.
█ Allgemeine Störungen
Das Gerät funktioniert nicht.
• Die Sicherheitsvorrichtung wurde aktiviert. Führen Sie
Folgendes durch:
1. Drücken Sie [1] am Hauptgerät, um das Gerät in den
Bereitschaftsmodus zu schalten. Wenn das Gerät nicht
in den Bereitschaftsmodus schaltet,
– Halten Sie die Taste mindestens 10 Sekunden lang
gedrückt. Oder,
– Trennen Sie das Netzkabel, und schließen Sie es
wieder an.
2. Drücken Sie [1] erneut, um das Gerät einzuschalten.
Wenn das Problem bestehen bleibt, wenden Sie sich an
Ihren Händler.
Im Bereitschaftsmodus leuchtet die Anzeige auf und
verändert sich ständig.
• Halten Sie [8] am Hauptgerät gedrückt, um „DEMO OFF“
auszuwählen.
Die Fernbedienung funktioniert nicht.
• Überprüfen Sie, ob die Batterie korrekt eingesetzt ist.
Verzerrter bzw. kein Ton.
• Die Systemlautstärke einstellen.
• Schalten Sie das System aus, stellen Sie die Ursache fest
und beheben Sie sie. Schalten Sie das System dann wieder
ein. Ursache können eine Überlastung der Lautsprecher
durch übermäßige Lautstärke oder Strom und der
Gebrauch des Systems in heißer Umgebung sein.
Während der Wiedergabe ist ein Brummton zu hören.
• Das System befindet sich in der Nähe von Netzkabeln oder
Leuchtstofflampen. Halten Sie andere Geräte und Kabel
von den Kabeln dieses Systems fern.
Der Lautstärkepegel wird verringert.
• Wegen der kontinuierlichen Nutzung bei hoher Lautstärke
wurde die Schutzschaltung aktiviert. Dadurch soll das
System geschützt werden und die Tonqualität erhalten
bleiben.
█ Disc
Die Anzeige des Displays funktioniert nicht richtig.
Wiedergabe startet nicht.
• Sie haben die Disc nicht richtig eingelegt. Legen Sie sie
richtig ein.
• Die Disc ist verschmutzt. Reinigen Sie die Disc.
• Wechseln Sie die Disc aus, falls sie zerkratzt, verwellt oder
nicht normgerecht ist.
• Kondenswasser hat sich gebildet. Warten Sie 1 bis 2
Stunden, bis das System wieder trocken ist.
Die Gesamtzahl der angezeigten Titel ist falsch.
Die Disc kann nicht gelesen werden.
Der Klang ist verzerrt.
• Sie haben eine Disc eingelegt, die das System nicht
wiedergeben kann. Legen Sie eine abspielbare Disc ein.
• Sie haben eine Disc eingelegt, die nicht finalisiert wurde.
17
39
RQT0A38
Page 40

█ USB
offset printing
Das USB-Gerät bzw. dessen Inhalt wird nicht erkannt.
• Das Format oder der Inhalt des USB-Geräts ist mit dem
System nicht kompatibel.
• USB-Geräte mit einer Speicherkapazität von mehr als
32 GB funktionieren unter Umständen manchmal nicht.
Langsamer Betrieb des USB-Geräts.
• Große Dateien oder USB-Geräte mit einer hohen
Speicherkapazität werden langsamer gelesen.
█ Bluetooth
Das Pairing kann nicht durchgeführt werden.
• Kontrollieren Sie den Zustand des Bluetooth
• Das Gerät befindet sich außerhalb der 10 m
Kommunikationsreichweite. Platzieren Sie das Gerät näher
zum System.
Das Gerät kann nicht verbunden werden.
• Das Pairing des Geräts ist fehlgeschlagen. Führen Sie das
Pairing nochmals durch.
• Das Pairing des Geräts ersetzt wurde. Führen Sie das
Pairing nochmals durch.
• Dieses System könnte mit einem anderen Gerät verbunden
sein. Trennen Sie das andere Gerät, und versuchen Sie
erneut, das Gerät zu koppeln.
• Das System hat möglicherweise ein Problem. Schalten Sie
das System aus und anschließend wieder ein.
Das Gerät ist verbunden, aber die Audiowiedergabe ist
über das System nicht hörbar.
• Bei einigen eingebauten Bluetooth
Audioausgabe zu „SC-MAX4000“ manuell eingestellt
werden. Für weitere Details lesen Sie die
Bedienungsanleitung des Geräts.
Die Tonausgabe des Geräts ist unterbrochen.
• Das Gerät befindet sich außerhalb der 10 m
Kommunikationsreichweite. Platzieren Sie das Gerät näher
zum System.
• Entfernen Sie etwaige Hindernisse zwischen dem System
und dem Gerät.
• Andere Geräte, die das 2,4 GHz-Frequenzband verwenden
(WLAN-Router, Mikrowellen, schnurlose Telefone usw.),
stören. Stellen Sie das Gerät näher am System und weiter
entfernt von den anderen Geräten auf.
• Wählen Sie „MODE 1“ für eine stabile Kommunikation.
Die One-Touch-Verbindung (NFC) funktioniert nicht.
• Stellen Sie sicher, dass das System und die NFC-Funktion
des Geräts eingeschaltet sind.
• Halten Sie das Gerät wieder an die NFC-Berührungsfläche
dieses Systems gedrückt.
Wiedergabe von Bild und Ton sind nicht synchron.
• Starten Sie die Wiedergabe-App des Geräts neu.
• Schließen Sie das Gerät über ein Audiokabel (nicht
mitgeliefert) an das System an.
®
®
-Geräten, muss die
█ Radio
Der Klang ist verzerrt.
• Installieren Sie eine optionale FM (UKW)-Außenantenne.
Die Außenantenne sollte von einem qualifizierten
Fachmann installiert werden.
Es sind Klopfgeräusche zu hören.
• Schalten Sie das Fernsehgerät aus oder stellen Sie das
System weiter entfernt von Fernsehgeräten auf.
• Wenn Interferenzen auftreten, entfernen Sie Mobiltelefone
aus der Nähe das System.
RQT0A38
• Im AM-Tunermodus wählen Sie die
„BEATPROOF“-Einstellung, die den besten Empfang liefert.
18
40
®
-Geräts.
Beim AM (MW)-Empfang wird ein tieffrequentes
Brummgeräusch gehört.
• Halten Sie den Antennendraht von anderen Kabeln fern.
█ Anzeigen auf dem Hauptgerät
„ADJUST CLOCK“
• Die Uhr ist nicht eingestellt. Stellen Sie die Uhr.
„ADJUST TIMER“
• Der Wiedergabetimer und/oder Aufnahmetimer ist nicht
eingestellt. Stellen Sie den Wiedergabetimer und/oder den
Aufnahmetimern ein.
„ALB FULL“
• Die Anzahl der Alben hat die maximal zulässige Anzahl
überschritten.
„AUTO OFF“
• Das System wurde 20 Minuten lang nicht verwendet und
schaltet sich in einer Minute aus. Um abzubrechen,
drücken Sie eine beliebige Taste.
„CAN’T REC“
„DEVICE FULL“
• Sie können keine Aufnahme erstellen, weil die verbleibende
Aufnahmezeit auf dem USB-Gerät geringer ist als die
Gesamtzeit der Musikquelle. Wechseln Sie zu einem
USB-Gerät, das über ausreichend Aufnahmezeit verfügt
und führen Sie die Aufnahme noch einmal durch.
„ERROR“
• Es wurde ein Fehler in der Bedienung vorgenommen. Bitte
lesen Sie die Bedienungsanleitung und versuchen Sie es
nochmals.
„ERROR“ (während der Aufnahme)
• Sie können während der Aufnahme keine andere
Wiedergabequelle auswählen (Beispiel: Radio, USB usw.)
oder [2] oder [6] drücken. Stoppen Sie die
Aufnahme-Funktion.
• Sie können das Disc-Fach beim Aufnehmen von einer
AM-Quelle nicht öffnen.
„F61“
• Überprüfen Sie die Anschlüsse der Lautsprecherkabel und
korrigieren Sie diese ggf.
• USB-Gerät trennen. Schalten Sie das System aus und
anschließend wieder ein.
„F70“
• Überprüfen Sie das Bluetooth
• Ziehen Sie das Bluetooth
aus und anschließend wieder ein.
„F76“
• Es gibt ein Problem mit der Stromversorgung.
• Trennen Sie das Netzkabel, und wenden Sie sich an Ihren
Händler.
„F77“
• Trennen Sie das Netzkabel, und wenden Sie sich an Ihren
Händler.
„NO DEVICE“
• Das USB-Gerät ist nicht angeschlossen. Überprüfen Sie
den Anschluss.
• Sie können nicht aufnehmen oder den verfügbaren
Speicherplatz prüfen, da kein USB-Gerät an
angeschlossen ist.
„NO DISC“
• Sie haben die Disc nicht eingelegt.
®
-Verbindung.
®
-Gerät. Schalten Sie das System
USB B
Page 41

„NO PLAY“
DEUTSCH
offset printing
„UNSUPPORT“
• Prüfen Sie den Inhalt. Sie können nur unterstützte Formate
wiedergeben.
• Die Dateien des USB-Geräts können beschädigt sein.
Formatieren Sie das USB-Gerät und versuchen Sie es
erneut.
• Das System hat möglicherweise ein Problem. Schalten Sie
das System aus und anschließend wieder ein.
„NO TRACK“
• Es befindet sich kein Album oder Musiktitel auf dem
USB-Gerät oder im Internspeicher.
„PLAYERROR“
• Sie haben eine nicht unterstützte MP3-Datei abgespielt.
Dieser Titel wird übersprungen, und die Wiedergabe wird
mit dem nächsten Titel fortgesetzt.
„REC ERROR“
• Sie haben das USB-Gerät während der Aufnahme getrennt.
Schließen Sie das USB-Gerät an, und führen Sie die
Aufnahme erneut aus.
• Bei der USB-Aufnahme ist ein Fehler aufgetreten. Trennen
Sie das USB-Gerät und anschließend schließen Sie es
wieder an.
„REMOTE 1“
„REMOTE 2“
• Die Fernbedienung und das Hauptgerät verwenden
verschiedene Codes. Ändern Sie den Code der
Fernbedienung.
– Wenn „REMOTE 1“ angezeigt wird, halten Sie [OK] und
[1] mindestens 4 Sekunden lang gedrückt.
– Wenn „REMOTE 2“ angezeigt wird, halten Sie [OK] und
[2] mindestens 4 Sekunden lang gedrückt.
„TEMP NG“
• Die Temperatur-Schutzschaltung wurde aktiviert und
schaltet das System aus. Lassen Sie das Gerät abkühlen,
bevor Sie es wieder einschalten.
• Überprüfen Sie, ob die Lüftungsschlitze des Geräts nicht
behindert werden.
• Stellen Sie sicher, dass dieses Gerät gut belüftet wird.
„TRK FULL“
• Die Anzahl der Dateien hat die maximal zulässige Anzahl
überschritten.
„USB OVER CURRENT ERROR“
• Das USB-Gerät verbraucht zu viel Strom. Trennen Sie das
USB-Gerät, und schalten Sie das System aus und dann
wieder ein.
„VBR“
• Bei Titeln mit variabler Bitrate (VBR) kann die Restspielzeit
nicht angezeigt werden.
Code der Fernbedienung
Wenn andere Geräte von Panasonic mit der
Fernbedienung dieses Systems aktiviert werden, müssen
Sie den Code der System-Fernbedienung ändern.
Vorbereitung
Drücken Sie [CD/RADIO/AUX], um „AUX 1“ oder „AUX 2“
auszuwählen.
█ So setzen Sie den Code auf „REMOTE 2“
1 Halten Sie am Hauptgerät [CD/RADIO/AUX] und
auf der Fernbedienung [2] gedrückt, bis
„REMOTE 2“ angezeigt wird.
2 Halten Sie [OK] und [2] mindestens 4 Sekunden
lang.
█ So setzen Sie den Code auf „REMOTE 1“
1 Halten Sie am Hauptgerät [CD/RADIO/AUX] und
auf der Fernbedienung [1] gedrückt, bis
„REMOTE 1“ angezeigt wird.
2 Halten Sie [OK] und [1] mindestens 4 Sekunden
lang.
Systemspeicher zurücksetzen
Setzen Sie den Speicher in folgenden Fällen zurück:
• Das Gerät reagiert beim Drücken der Knöpfe nicht.
• Sie möchten den gesamten Speicherinhalt löschen und
zurücksetzen.
1 Ziehen Sie das Netzkabel.
2 Halten Sie den Schalter [1] am Hauptgerät
gedrückt und schließen Sie das Netzkabel erneut
an.
Halten Sie den Schalter weiter gedrückt, bis
„–––––––––“ angezeigt wird.
3 [1] Schalter freigeben.
Alle Einstellungen werden auf die werkseitigen
Voreinstellungen zurückgesetzt.
Sämtliche gespeicherte Eingaben müssen neu
festgelegt werden.
19
41
RQT0A38
Page 42

Technische Daten
offset printing
█ Verstärkerteil
Effektive Ausgangsleistung im Stereo-Modus
Hoch Kanal
Mitte Kanal
Niedrig Kanal
Gesamte effektive Ausgangsleistung im Stereo-Modus
350 W pro Kanal (an 3 Ω), 1 kHz, 30% THD
350 W pro Kanal (an 3 Ω), 1 kHz, 30% THD
500 W pro Kanal (an 2 Ω), 100 Hz, 30% THD
2400 W
█ Discteil
Geeignete Discs (Durchmesser 8 cm oder 12 cm)
MPEG-1 Layer 3, MPEG-2 Layer 3
Aufnehmer
Wellenlänge 790 nm (CD)
█ Bluetooth
Version Bluetooth® Ver. 2.1 + EDR
Klasse Klasse 2
Unterstützte Profile A2DP, AVRCP, SPP, OPP, FTP
Betriebsfrequenz 2,4 GHz-Band, FH-SS
Reichweite 10 m Sichtlinie
®
-Teil
CD, CD-R/RW (CD-DA, MP3 )
█ Tunerteil
Frequenzmodulation (FM (UKW))
Anzahl der speicherbaren Festsender 30 Sender
Frequenzbereich
Antennenklemmen 75 Ω (unsymmetrisch)
Amplitudenmodulation (AM (MW))
Anzahl der speicherbaren Festsender 15 Sender
Frequenzbereich
87,50 MHz bis 108,00 MHz (50 kHz-Raster)
522 kHz bis 1629 kHz (9 kHz-Raster)
520 kHz bis 1630 kHz (10 kHz-Raster)
█ Internspeicher-Teil
Speicher
Speichergröße 2 GB
Speichermedium Formatunterstützung MP3 (*.mp3)
Speicheraufnahme
Bitrate 128 kbps
Speicher Aufnahmegeschwindigkeit
Format der Aufnahmedatei MP3 (*.mp3)
1x, 3x max (Nur CD)
█ Anschlussteil
USB-Port
USB-Standard USB 2.0 volle Geschwindigkeit
Speichermedium Formatunterstützung MP3 (*.mp3)
Dateisystem des USB-Geräts FAT12, FAT16, FAT32
USB-Aufnahme
Bitrate 128 kbps
USB-Aufnahmegeschwindigkeit 1x, 3x (Nur CD)
Format der Aufnahmedatei MP3 (*.mp3)
AUX IN 1
Audio-Eingang Pin-Buchse
AUX IN 2
Anschluss Stereo, 3,5 mm-Buchse
Mikrofon
Anschluss Mono, 6,3 mm-Buchse
█ Lautsprecherbox
Lautsprechereinheit(en)
Hochtöner 6 cm Konustyp
Tieftöner 20 cm Konustyp
SuperWoofer 30 cm Konustyp
Impedanz Hoch 3 Ω / Mitte 3 Ω / Niedrig 2 Ω
Abmessungen (B x H x T)
Masse 19 kg
407 mm x 709 mm x 389 mm
█ Allgemeine Daten
Stromversorgung
Leistungsaufnahme 155 W
Abmessungen (B x H x T)
Masse 5,8 kg
Betriebstemperaturbereich 0°C bis +40°C
Betriebsluftfeuchtigkeitsbereich
35% bis 80% rel. Feuchte (ohne Kondensatbildung)
Leistungsaufnahme im Bereitschaftszustand (ca.)
Leistungsaufnahme im Bereitschaftszustand (ca.)
(Wenn „BLUETOOTH STANDBY“ auf „ON“ gesetzt ist)
Hinweis:
• Änderungen der technischen Daten sind jederzeit
vorbehalten.
Die angegebenen Masse- und Abmessungsdaten sind
ungefähre Werte.
• Der Gesamtklirrfaktor wurde mit einem Digitalspektrometer
gemessen.
220 V bis 240 V Wechselstrom, 50 Hz
492 mm x 221 mm x 421 mm
0,4 W
0,5 W
RQT0A38
20
42
Page 43
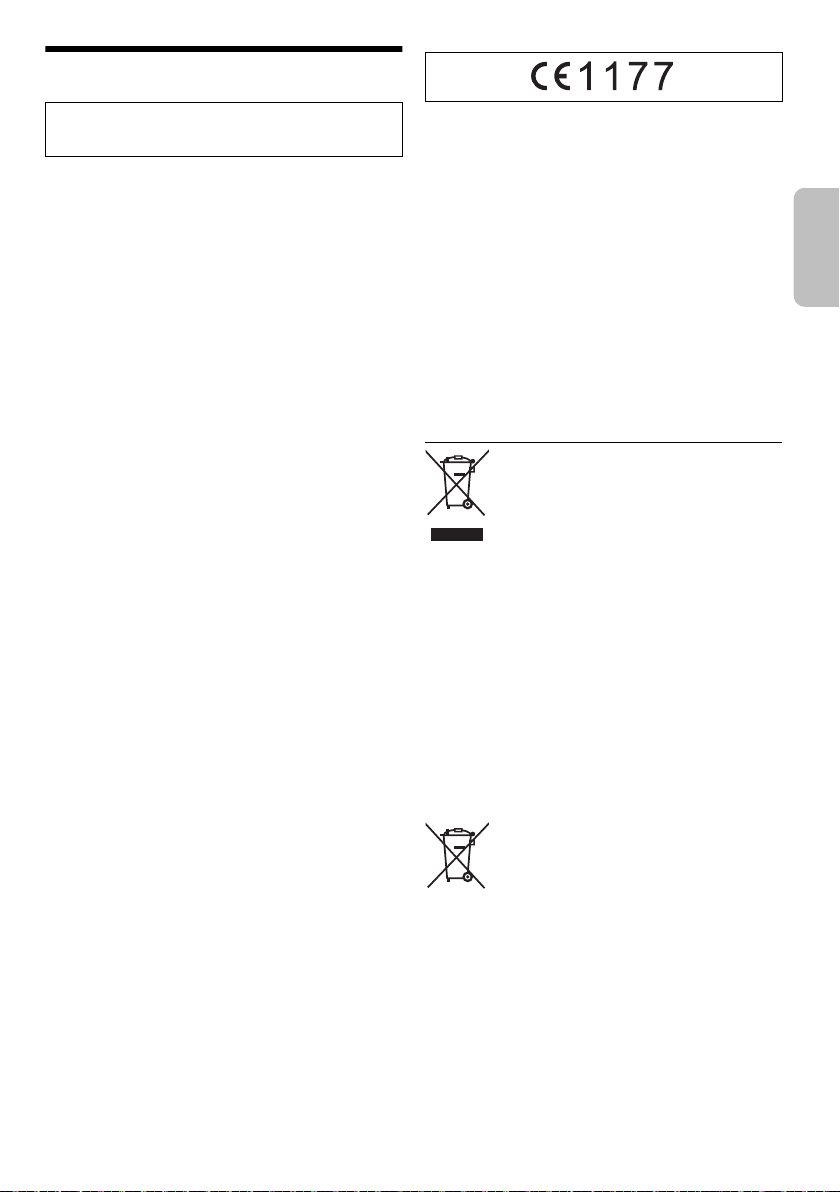
Bluetooth®-Informationen
DEUTSCH
offset printing
Panasonic übernimmt keine Haftung für Daten und/oder
Informationen, die während einer drahtlosen
Übertragung kompromittiert werden.
Frequenzband
• Dieses System nutzt das 2,4 GHz Frequenzband.
Zertifizierung
• Dieses System hält die Frequenzbeschränkungen ein
und verfügt über eine Zertifizierung gemäß der
Frequenznutzungsplanverordnung. Deshalb ist eine
Funkzulassung nicht notwendig.
• Die folgenden Handlungen sind strafbar:
– Das Zerlegen oder Ändern des Hauptgeräts.
– Spezifikationsanzeigen werden entfernt.
Nutzungsbeschränkungen
• Drahtlose Übertragung und/oder Verwendung von mit
• Alle Geräte müssen den Normen der Bluetooth SIG,
• Je nach Spezifikationen und Einstellungen eines
• Dieses System unterstützt Bluetooth
• Dieses System kann keine Daten auf ein
Verwendungsbereich
• Verwenden Sie dieses Gerät in einem maximalen
• Die Reichweite kann sich aufgrund der Umgebung,
Interferenzen von anderen Geräten
• Dieses System funktioniert evtl. nicht richtig, und
• Dieses System funktioniert evtl. nicht ordnungsgemäß,
Verwendungszweck
• Dieses System ist nur für den normalen, allgemeinen
• Verwenden Sie dieses System nicht in der Nähe von
®
Bluetooth
Inc. entsprechen.
Gerätes, kann die Verbindung nicht hergestellt werden
oder einige Funktionen können unterschiedlich sein.
Sicherheitsfunktionen. Je nach Betriebskonfiguration
und/oder Einstellungen ist diese Sicherheit
möglicherweise nicht ausreichend. Die drahtlose
Übertragung von Daten in dieses System sollte mit
Vorsicht erfolgen.
Bluetooth
Bereich von 10 m.
Hindernissen oder Interferenzen verringern.
Probleme wie Rauschen und Tonsprünge können
durch Funkstörungen entstehen, wenn sich das Gerät
zu nahe an anderen Bluetooth
die das 2,4 GHz-Band verwenden, befindet.
wenn Funkwellen von einer in der Nähe befindlichen
Sendestation o. Ä. zu stark sind.
Gebrauch bestimmt.
Geräten oder in einer Umgebung, die empfindlich auf
Radiofrequenzen reagiert (wie z. B. Flughäfen,
Krankenhäuser, Laboratorien usw.).
ausgerüsteten Geräten ist nicht garantiert.
®
®
-Gerät übertragen.
®
-Geräten oder Geräten,
Konformitätserklärung
Hiermit erklärt „
Gerät alle Grundanforderungen und sonstigen relevanten
Auflagen der Direktive 1999/5/EC erfüllt.
Kunden können eine Kopie des Originals der
Konformitätserklärung unserer R&TTE-Produkte von der
folgenden Webseite herunterladen:
http://www.doc.panasonic.de
Kontaktadresse: Panasonic Marketing Europe GmbH,
Panasonic Testing Centre, Winsbergring 15, 22525
Hamburg, Bundesrepublik Deutschland
Dieses Produkt ist für allgemeine Verbraucher bestimmt.
(Kategorie 3)
Entsorgung von veralteten Geräten und benutzten
Batterien
Nur für EU und Länder mit Recycling-Systemen
Panasonic Corporation
Diese Symbole auf den Produkten,
Verpackungen und/oder Begleitdokumenten
bedeuten, dass benutzte elektrische und
elektronische Produkte und Batterien nicht in
den allgemeinen Hausmüll gegeben werden
dürfen.
Bitte bringen Sie diese alten Produkte und
Batterien zur Behandlung, Aufarbeitung bzw.
zum Recycling gemäß Ihrer
Landesgesetzgebung zu Ihren zuständigen
Sammelpunkten.
Indem Sie sie ordnungsgemäß entsorgen,
helfen Sie dabei, wertvolle Ressourcen zu
schützen und eventuelle negative
Auswirkungen auf die menschliche
Gesundheit und die Umwelt zu vermeiden.
Wenn Sie ausführlichere Informationen zur
Sammlung und zum Recycling wünschen,
wenden Sie sich bitte an Ihre örtlichen
Verwaltungsbehörden.
Gemäß Landesvorschriften können wegen
nicht ordnungsgemäßer Entsorgung dieses
Abfalls Strafgelder verhängt werden.
Hinweis zum Batteriesymbol (unteres
Symbol):
Dieses Symbol kann in Kombination mit
einem chemischen Symbol verwendet
werden. In diesem Fall erfüllt es die
Anforderungen derjenigen Richtlinie, die für
die betreffende Chemikalie erlassen wurde.
“, dass sich das
21
43
RQT0A38
Page 44

Votre appareil et les illustrations peuvent se présenter
offset printing
différemment.
Ces instructions de fonctionnement s’appliquent au
système suivant.
Chaîne SC-MAX4000
Appareil principal SA-MAX4000
Enceintes SB-MAX4000
L’enregistrement et la lecture de contenu sur cet
appareil ou n’importe quel autre appareil peuvent exiger
l’autorisation du titulaire des droits d’auteur ou d’autres
droits sur ledit contenu. Panasonic n’a ni l’autorité ni
l’intention de vous accorder cette autorisation et rejette
explicitement tout droit, capacité ou intention d’obtenir
une telle autorisation en votre nom. Il est de votre
responsabilité de vous assurer vous utilisez cet appareil
ou tout autre appareil conformément à la législation sur
les droits d’auteur en vigueur dans votre pays. Veuillez
vous référer à cette législation pour en savoir plus sur
les lois et les réglementations impliquées ou contactez
le titulaire des droits associés au contenu que vous
souhaitez enregistrer ou lire.
Table des matières
Précautions de sécurité . . . . . . . . . . . . . . . . . . . . . . . . . 2
Licences . . . . . . . . . . . . . . . . . . . . . . . . . . . . . . . . . . . . . 3
Accessoires fournis . . . . . . . . . . . . . . . . . . . . . . . . . . . . 3
Préparation de la télécommande . . . . . . . . . . . . . . . . . . 3
Emplacement des enceintes . . . . . . . . . . . . . . . . . . . . . 4
Raccordements . . . . . . . . . . . . . . . . . . . . . . . . . . . . . . . 5
Présentation des commandes . . . . . . . . . . . . . . . . . . . . 6
Préparation du multimédia . . . . . . . . . . . . . . . . . . . . . . . 8
Lecture multimédia . . . . . . . . . . . . . . . . . . . . . . . . . . . . . 9
Radio. . . . . . . . . . . . . . . . . . . . . . . . . . . . . . . . . . . . . . . 11
Enregistrement . . . . . . . . . . . . . . . . . . . . . . . . . . . . . . . 12
Effets de son et d’éclairage . . . . . . . . . . . . . . . . . . . . . 13
Fonctions DJ. . . . . . . . . . . . . . . . . . . . . . . . . . . . . . . . . 14
Utilisation d’un microphone . . . . . . . . . . . . . . . . . . . . . 15
Horloge et minuteries . . . . . . . . . . . . . . . . . . . . . . . . . . 15
Appareils externes . . . . . . . . . . . . . . . . . . . . . . . . . . . . 16
Autres . . . . . . . . . . . . . . . . . . . . . . . . . . . . . . . . . . . . . . 17
Entretien . . . . . . . . . . . . . . . . . . . . . . . . . . . . . . . . . . . . 17
Guide de dépannage . . . . . . . . . . . . . . . . . . . . . . . . . . 17
RQT0A38
Spécifications . . . . . . . . . . . . . . . . . . . . . . . . . . . . . . . . 20
2
À propos de Bluetooth
44
®
. . . . . . . . . . . . . . . . . . . . . . . . 21
Précautions de sécurité
AVERTISSEMENT !
Appareil
• Pour réduire les risques d’incendie, d’électrocution ou
de dommages au produit :
– Ne pas exposer cet appareil à la pluie, à l’humidité, à
la chute de gouttes ou à des éclaboussures.
– Ne placer aucun récipient contenant un liquide, tel
qu’un vase, sur l’appareil.
– N’utiliser que les accessoires recommandés.
– Ne pas retirer les couvercles.
– Ne pas réparer cet appareil soi-même. Pour toute
intervention, faire appel à un technicien qualifié.
– Ne pas laisser d’objets métalliques tomber dans
l’appareil.
ATTENTION !
Appareil
• Pour réduire les risques d’incendie, d’électrocution ou
de dommages au produit :
– Ne pas installer ni placer l’appareil dans une
bibliothèque, un placard encastré ni aucun autre
espace réduit de façon à assurer une bonne
ventilation.
– Ne pas obstruer les orifices de ventilation de
l’appareil avec des journaux, des nappes, des
rideaux ou des objets similaires.
– Ne pas placer des sources de flammes vives, telles
que des bougies allumées, sur l’appareil.
• Cet appareil est destiné aux climats tempérés.
• Cet appareil peut être perturbé par les ondes radio des
téléphones mobiles pendant l’utilisation. Si vous
constatez de telles interférences, éloignez le téléphone
mobile de l’appareil.
• Cet appareil utilise un laser. L’exécution de procédures
ou l’utilisation de commandes ou de réglages autres
que ceux spécifiés ici peuvent provoquer une
exposition à des radiations dangereuses.
• Placer l’appareil sur une surface plane, à l’abri de la
lumière du jour, de températures élevées et de
vibrations excessives.
• La fiche d’alimentation est ce qui permet de
déconnecter l’appareil. Installer cet appareil de telle
sorte que la fiche d’alimentation puisse être
débranchée immédiatement de la prise de courant.
Page 45

Pile
FRANÇAIS
offset printing
• L’utilisation d’une pile de rechange incorrecte peut
entraîner des risques d’explosion. N’utiliser qu’une pile
identique ou le type de pile recommandé par le
fabricant.
• Lors de la mise au rebut des piles, contacter les
autorités locales ou le revendeur pour connaître la
méthode de mise au rebut appropriée.
• Ne pas chauffer ni exposer à une flamme.
• Ne pas laisser la/les pile(s) dans un véhicule exposé à
la lumière directe du soleil, portes et vitres fermées
pendant une longue période.
• Ne pas démonter ou court-circuiter les piles.
• Ne pas charger la pile alcaline ou au manganèse.
• Ne pas utiliser de piles dont l’enveloppe a été retirée.
• Retirez la pile si vous n’utilisez pas la télécommande
pendant une longue période de temps. Ranger dans un
endroit frais et sombre.
Accessoires fournis
Vérifier que tous les accessoires fournis sont présents.
2 Cordon d’alimentation secteur
1 Antenne-cadre AM
1 Antenne FM intérieure
1 Télécommande
(N2QAYB001022)
1 Pile de la télécommande
Pour le Royaume-Uni et l’Irlande
1 Adaptateur de fiche d’antenne
Licences
®
Le nom et les logos de la marque Bluetooth
marques déposées appartenant à Bluetooth SIG, Inc. et
toute utilisation de ces marques par Panasonic
Corporation est effectuée sous licence. Les autres
marques et noms commerciaux appartiennent à leurs
propriétaires respectifs.
Google Play et Android sont des marques de
commerce de Google Inc.
Technologie MPEG avec ses 3 couches de codage
audio sous licence de Fraunhofer IIS et de Thomson.
sont des
ATTENTION !
Garder l’adaptateur de fiche d’antenne hors de portée
des enfants qui pourraient l’avaler.
Remarque :
Utiliser le cordon d’alimentation secteur adapté à votre prise
secteur domestique.
Préparation de la
télécommande
Utiliser des pile alcalines ou au manganèse.
Installez la pile de sorte que les pôles (+ et –) soient
alignés avec ceux de la télécommande.
RQT0A38
3
45
Page 46

Emplacement des enceintes
Tweeter
offset printing
Placer les enceintes de sorte que le tweeter soit du côté
extérieur.
N’utiliser que les enceintes fournies.
Vous pouvez endommager le système et diminuer la
qualité du son si vous utilisez d’autres enceintes.
Remarque :
• Gardez vos enceintes à plus de 10 mm de l’unité principale
pour la ventilation.
• Placez les enceintes sur une surface plane en toute
sécurité.
• Plusieurs personnes sont nécessaires pour déplacer,
incliner ou porter les enceintes.
ATTENTION !
• Utiliser les enceintes seulement avec la chaîne
recommandée. Sinon, l’amplificateur et les
enceintes peuvent subir des dommages, et il y
aura risque d’incendie. En cas de dommages ou
de changement brusque des performances,
s’adresser à un technicien de réparations qualifié.
• Ne pas modifier les enceintes ou les fils
d’enceintes au risque d’endommager l’appareil.
• Suivre les procédures figurant dans ces
instructions lorsque vous montez les enceintes.
• Ne pas toucher les surfaces réverbérantes des
cônes d’enceinte :
– Cela pourrait endommager le cône d’enceinte.
– Le cône d’enceinte peut être chaud.
• Faire attention en cas de proximité de bébés ou
d’enfants.
• Ne pas empiler les enceintes.
• Ces enceintes n’ont pas de blindage magnétique. Ne pas
les placer près de téléviseurs, d’ordinateurs ou d’autres
appareils facilement influencés par le magnétisme.
• Lorsque vous jouez à des niveaux élevés pendant une
longue période, elles peuvent causer des dommages aux
enceintes et diminuer la durée de vie les enceintes.
• Diminuer le volume dans ces conditions pour éviter tout
dommage :
– Lorsque le son est déformé.
– Lorsque vous ajustez la qualité sonore.
RQT0A38
4
46
Page 47

Raccordements
Ruban adhésif
(non fourni)
Vers la prise
secteur
FRANÇAIS
offset printing
Brancher le cordon d’alimentation dans la prise secteur une fois que tous les autres raccordements ont été
effectués.
1 Raccorder l’antenne-cadre AM.
Placer l’antenne debout sur sa base jusqu’à ce
qu’elle s’enclenche.
2 Raccorder l’antenne FM intérieure.
Placer l’antenne là où la réception est maximale.
3 Raccorder les enceintes.
Raccordez les câbles d’enceintes aux bornes de
même couleur.
4 Raccorder le cordon d’alimentation secteur.
Ne pas utiliser le cordon d’alimentation secteur d’un
autre appareil.
Économie d’énergie
L’appareil consomme une petite quantité d’électricité
quand il est en mode veille. Débrancher l’alimentation
si vous n’utilisez pas l’appareil.
Certains réglages seront perdus après avoir
débranché l’appareil. Vous devez les régler de
nouveau.
RQT0A38
5
47
Page 48
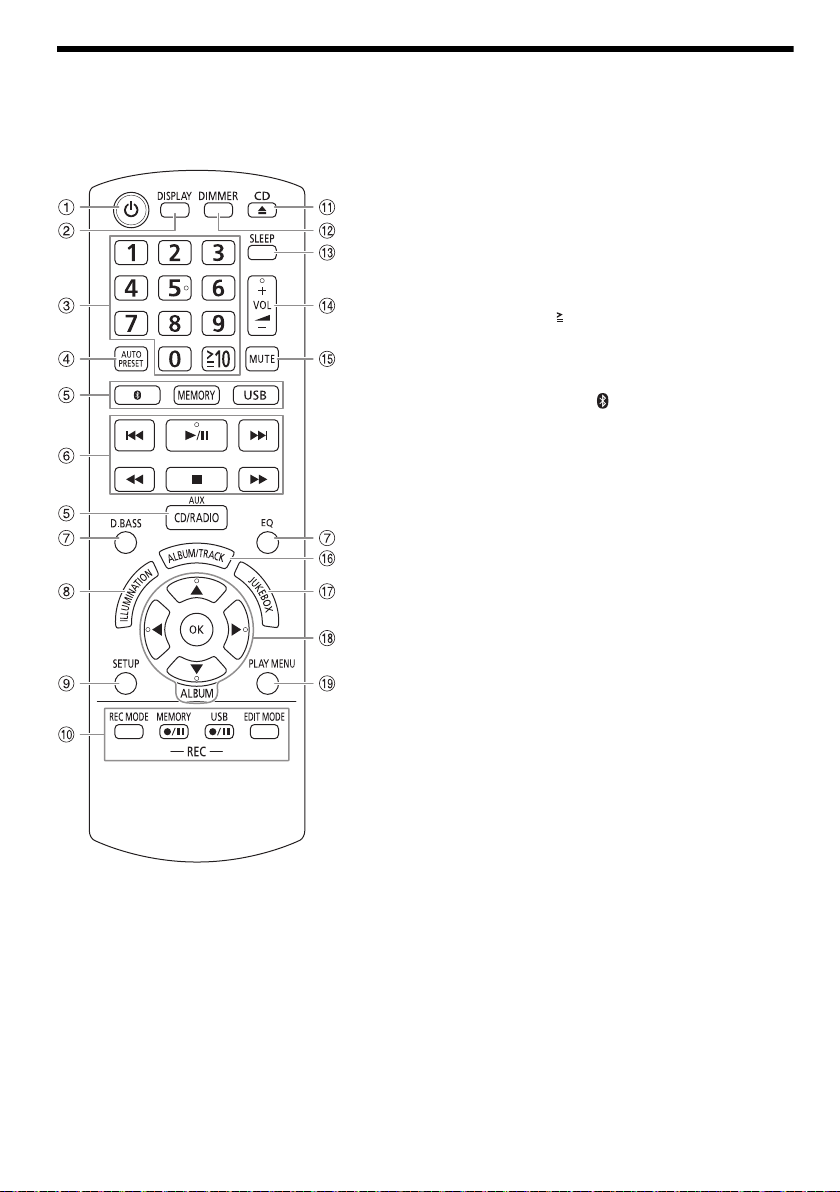
Présentation des commandes
offset printing
Effectuer les procédures avec la télécommande. Il est également possible d’utiliser les touches de l’appareil
principal, si ce sont les mêmes.
A Interrupteur de veille/marche [`], [1]
Appuyer sur cet interrupteur pour faire basculer
l’appareil du mode de marche au mode de veille, et
vice versa. En mode de veille, l’appareil continue de
consommer une petite quantité de courant.
B Afficher les informations le contenu
C Touches numériques
Pour sélectionner un numéro à 2 chiffres
Exemple : 16 : [ 10]=[1]=[6]
D Prérégler automatiquement la station radio
E Sélectionner la source audio
Sur l’appareil principal :
Appuyer et maintenir [ –PAIRING] pour démarrer
l’appairage Bluetooth
F Commande de lecture de base
G Sélectionner des effets sonores
H Sélectionner des effets d’éclairage d’ambiance
I Voir le menu de configuration
J Enregistrement des commandes d’opérations
K Ouvrir ou fermer le tiroir du disque
L Diminuer la luminosité de l’écran
Pour annuler, ré-appuyez sur la touche.
M Régler la minuterie de mise en veille
N Ajuster le niveau de volume
O Désactiver le son
Pour annuler, ré-appuyez sur la touche.
« MUTE » est également annulé lorsque vous ajustez
le volume ou lorsque vous éteignez l’appareil.
P Sélectionner un album ou une plage MP3
Q Sélectionner le DJ Jukebox
R Sélectionner ou confirmer l’option
S Afficher le menu de lecture
®
.
RQT0A38
6
48
Page 49

T Touches directes des fonctions DJ
Vue de face
Vue de dessus
FRANÇAIS
offset printing
Appuyer sur [DJ JUKEBOX], [DJ SAMPLER] ou
[DJ EFFECT] pour activer la fonction DJ.
Appuyer sur [DJ1] à [DJ6] sur l’appareil principal pour
sélectionner la fonction souhaitée.
Pour annuler, ré-appuyer la touche sélectionnée [DJ1]
à [DJ6].
U Activer la fonction DJ
Pour annuler, ré-appuyez sur la touche.
V Sélectionner un album ou une plage MP3
Appuyer sur [ALBUM/TRACK] pour sélectionner
l’album ou la plage.
Parcourir les plages ou albums
Tournez [MULTI CONTROL] pour naviguer.
Pour lancer la lecture depuis la sélection, appuyer sur
[4/9].
W Platine pour commande DJ et multi
X Capteur de la télécommande
Distance : Dans le rayon de 7 m environ
Angle : Environ 20° de haut en bas, 30° à gauche et à
droite
Y Afficheur
Z USB A
Port USB ( )
Voyant d’état USB
Lire les plages MP3.
a USB B
Port USB ( )
Voyant d’état USB
Lire les plages MP3.
Enregistrer du son ou des plages de musique.
b Zone de contact NFC
c AUX IN 2 casque
d Prise du microphone
e Régler le niveau de volume du microphone
f Tiroir de disque
RQT0A38
7
49
Page 50

Préparation du multimédia
offset printing
Disque
1 Appuyez sur [CD x] (appareil principal :
[x OPEN/CLOSE]) pour ouvrir le tiroir de disque.
Y mettre un disque avec l’étiquette faisant face vers
le haut.
Appuyer de nouveau sur pour refermer le tiroir.
2 Appuyer sur [CD/RADIO/AUX] pour sélectionner
«CD».
USB
Préparation
Avant de connecter un périphérique USB sur l’appareil,
veillez à effectuer une sauvegarde des données.
1 Réduire le volume et raccorder le périphérique
USB au port USB.
Immobiliser l’appareil principal lors du raccordement
ou de la déconnexion du périphérique USB.
2 Appuyer sur [USB] (appareil principal :
[MEMORY/USB]) pour sélectionner « USB A » ou
«USBB».
Le voyant d’état USB s’éclaire en rouge une fois
sélectionné.
Remarque :
Ne pas utiliser un câble d’extension USB. L’appareil ne
reconnaît pas le périphérique USB connecté par un câble.
Bluetooth
Vous pouvez connecter et lire un périphérique audio sans
fil via Bluetooth
Préparation
• Activer la fonction Bluetooth
rapprocher le périphérique du système.
• Lire les instructions de fonctionnement du périphérique
pour des détails.
█ Appairage d’un périphérique
Préparation
Si cet appareil est connecté à un périphérique
Bluetooth
périphérique »).
1 Appuyer sur [ ].
Si « PAIRING » s’affiche, passer à l’étape 4.
2 Appuyer sur [PLAY MENU] pour sélectionner
«PAIRING».
3 Appuyer sur [Y, U] pour sélectionner « OK? YES »
puis appuyer sur [OK].
« PAIRING » s’affiche.
Pour annuler, sélectionner « OK? NO ».
RQT0A38
8
50
®
®
.
®
du périphérique et
®
, le déconnecter (Z« Déconnexion d’un
4 Sélectionner « SC-MAX4000 » dans le menu
Bluetooth
Si le système demande un code d’accès, saisir
« 0000 ».
Le périphérique se connecte automatiquement à ce
système une fois l’appairage terminé.
Le nom du périphérique connecté s’affiche pendant
quelques secondes.
Utilisation de l’appareil principal
®
du périphérique.
1 Appuyer et maintenir la touche [ –PAIRING]
enfoncée jusqu’à ce que « PAIRING » s’affiche.
2 Sélectionner « SC-MAX4000 » dans le menu
Bluetooth
Remarque :
Vous pouvez appairer jusqu’à 8 périphériques avec ce
système. Si un 9ème périphérique est appairé, le périphérique
resté le plus longtemps inutilisé est remplacé.
®
du périphérique.
█ Connexion d’un périphérique
Préparation
Si cet appareil est connecté à un périphérique
Bluetooth
périphérique »).
®
, le déconnecter (Z« Déconnexion d’un
1 Appuyer sur [ ].
« BLUETOOTH READY » s’affiche.
2 Sélectionner « SC-MAX4000 » dans le menu
Bluetooth
Le nom du périphérique connecté s’affiche pendant
quelques secondes.
®
du périphérique.
3 Lancer la lecture sur le périphérique.
Remarque :
• Un périphérique doit être appairé pour la connexion.
• Ce système ne peut se connecter qu’à un seul périphérique
à la fois.
• Si la source « BLUETOOTH » est sélectionnée, cet appareil
essaie automatiquement de se connecter au dernier
périphérique connecté. (« LINKING » s
ce processus.)
’affiche au cours de
█ Déconnexion d’un périphérique
1 Appuyer sur [ ].
2 Appuyer sur [PLAY MENU] pour sélectionner
« DISCONNECT? ».
3 Appuyer sur [Y, U] pour sélectionner « OK? YES »
puis appuyer sur [OK].
« BLUETOOTH READY » s’affiche.
Pour annuler, sélectionner « OK? NO ».
Utilisation de l’appareil principal
Appuyer et maintenir la touche [ –PAIRING]
enfoncée jusqu’à ce que « PAIRING » s’affiche.
Remarque :
Un périphérique est déconnecté quand vous :
• Sélectionnez une source audio différente.
• Déplacez le périphérique hors de la plage maximale.
• Désactivez la transmission Bluetooth
• Éteignez le système ou le périphérique.
®
du périphérique.
Page 51

█ Connexion One-Touch (NFC)
Périphérique Bluetooth®
(non fourni)
FRANÇAIS
offset printing
Pour les périphériques Bluetooth® (périphériques
Android™) compatibles NFC uniquement
Simplement en mettant en contact un périphérique
Bluetooth
avec le système, vous pouvez compléter toutes les
préparations, de l’enregistrement d’un périphérique
Bluetooth
®
compatible NFC (Near Field Communication)
®
à l’établissement d’une connexion.
Une version de périphérique Android inférieure à 4.1
nécessite l’installation de l’application « Panasonic
MAX Juke » (gratuite).
A Saisissez « Panasonic MAX Juke » dans le champ
de recherche de Google Play™ pour rechercher
puis sélectionnez « Panasonic MAX Juke ».
B Lancer l’application.
– Suivre les instructions pour effectuer les réglages.
– S’assurer d’utiliser la dernière version de
l’application.
Préparation
Activer la fonction NFC du périphérique.
1 Appuyer sur [ ].
2 Remettre le périphérique en contact avec la zone
de contact NFC de l’appareil principal [ ].
– Maintenir le périphérique jusqu’à entendre un bip,
vibre ou affiche une fenêtre pop-up, puis éloignez
le périphérique de l’appareil.
– Une fois l’enregistrement et la connexion du
périphérique terminés, le nom du périphérique
connecté s’affiche sur le système pendant
quelques secondes.
– Si la connexion n’est pas établie malgré la mise en
contact de votre périphérique avec la zone de
contact NFC, changez sa position de contact. La
connexion peut améliorer si vous utilisez
l’application « Panasonic MAX Juke ».
3 Lancer la lecture sur le périphérique.
Remarque :
• Pendant la connexion, vous pouvez en connecter un autre
en le mettant en contact avec la zone NFC de l’appareil
principal. Le périphérique précédent est automatiquement
déconnecté.
• En fonction du périphérique :
– La connexion One-Touch peut ne pas fonctionner.
– La position de la zone de contact NFC du périphérique
peut être différent.
– Une fois la connexion établie, il se peut que la lecture
démarre automatiquement.
Lecture multimédia
Les repères suivants indiquent la disponibilité de la
fonction.
CD :
USB :
BLUETOOTH :
MEMORY :
Lecture de base
CD USB BLUETOOTH MEMORY
Lecture Appuyer sur [4/9].
Arrêter Appuyer sur [8].
Pause Appuyer sur [4/9].
Saut Appuyer sur [2] ou [6] (appareil
Recherche Maintenir la touche [3] ou [5] (appareil
Remarque :
En fonction du périphérique Bluetooth
peuvent ne pas fonctionner.
Affichage des informations disponibles
CD USB BLUETOOTH MEMORY
Les informations disponibles telles que l’album MP3 et le
numéro de plage sont visibles sur le panneau d’affichage.
Appuyer sur [DISPLAY].
Remarque :
• Nombre maximal de caractères affichables : Environ 32
• Cet appareil peut afficher les balises ID3 versions 1.0, 1.1
• Les données de texte que l’appareil ne prend pas en
CD-R/RW en format CD-DA ou avec des
fichiers MP3.
Périphérique USB avec des fichiers MP3.
Périphérique Bluetooth
Mémoire interne 2 Go (se référer à
« Enregistrement » pour ajouter des plages à
la mémoire interne).
USB MEMORY
La position est mise en mémoire.
« RESUME » s’affiche.
Appuyer de nouveaux deux fois pour arrêter
complètement.
Réappuyer pour continuer la lecture.
principal : [2/3] ou [5/6]) pour
sauter une plage.
CD USB MEMORY
Appuyer sur [R, T] pour sauter un album
MP3.
principal : [2/3] ou [5/6])
enfoncée.
et 2.3.
charge peuvent s’afficher différemment.
®
.
®
, certaines opérations
RQT0A38
9
51
Page 52
Menu de lecture
offset printing
CD USB MEMORY
1 Appuyer sur [PLAY MENU].
2 Appuyer sur [Y, U] pour sélectionner le réglage et
appuyer sur [OK].
OFF
PLAYMODE
1-TRACK
1
1-ALBUM
1
RANDOM
RND
1-ALBUM
RANDOM
1 RND
ALL REPEAT Répéter toutes les plages.
1-TRACK
REPEAT
1
1-ALBUM
REPEAT
1
RANDOM
REPEAT
RND
1-ALBUM
RANDOM
REPEAT
1 RND
Remarque :
• Pendant la lecture aléatoire il n’est pas possible d’accéder
directement aux plages déjà lues.
• Le réglage est annulé lorsque vous ouvrez le tiroir de
disque.
RQT0A38
10
52
Annuler le réglage.
Lire une plage sélectionnée.
Appuyer sur les touches numériques
pour sélectionner la plage.
Lire un album MP3 sélectionné.
Appuyer sur [R, T] pour sélectionner
un album MP3.
Lire toutes les plages de manière
aléatoire.
Lire toutes les plages d’un album MP3
sélectionné de manière aléatoire.
Appuyer sur [R, T] pour sélectionner
un album MP3.
Répéter 1-TRACK.
Répéter 1-ALBUM.
Répéter la lecture aléatoire.
Répéter 1-ALBUM RANDOM.
Mode Liaison
BLUETOOTH
Il est possible de changer le mode de liaison pour
l’adapter au type de connexion.
Préparation
Si cet appareil est connecté à un périphérique
Bluetooth
périphérique »).
®
, le déconnecter (Z« Déconnexion d’un
1 Appuyer sur [PLAY MENU] pour sélectionner
«LINKMODE».
2 Appuyer sur [Y, U] pour sélectionner le mode et
appuyer sur [OK].
MODE 1 Accent sur la connectivité.
MODE 2 Accent sur la qualité sonore.
Remarque :
Sélectionner « MODE 1 » si le son est déformé.
█ Remarque sur le disque
• Cet appareil peut lire les CD-R/RW contenant des
fichiers MP3 ou CD-DA.
• Avant la lecture, finalisez le disque sur le dispositif sur
lequel il a été enregistré.
• Il est possible que certains CD-R/RW ne puissent pas
être lus en raison de l’état de l’enregistrement.
█ Remarque sur les périphériques USB
• La connexion de cet appareil avec tous les
périphériques USB n’est pas garantie.
• Cet appareil prend en charge l’USB 2.0 pleine vitesse.
• Cet appareil peut prendre en charge des périphériques
USB jusqu’à 32 Go.
• Seul le système de fichiers FAT 12/16/32 est pris en
charge.
█ Remarque sur les fichiers MP3
• Les fichiers sont définis en tant que plages et les
dossiers sont définis en tant qu’albums.
• Les plages doivent comporter l’extension « .mp3 » ou
«.MP3».
• Les plages ne seront pas forcément lues dans l’ordre
dans lequel vous les avez enregistrées.
• Certains fichiers peuvent ne pas fonctionner en raison
de la taille du secteur.
Fichier MP3 sur un disque
• Cet appareil peut accéder au maximum à :
– 255 albums (y compris le dossier racine)
– 999 plages
– 20 sessions
• Les disques doivent être conformes à la norme
ISO9660, niveau 1 ou 2 (sauf pour les formats
étendus).
Fichier MP3 sur un périphérique USB
• Cet appareil peut accéder au maximum à :
– 800 albums (y compris le dossier racine)
– 8000 plages
– 999 plages dans un album
Page 53

Radio
FRANÇAIS
offset printing
Préparation
Appuyer sur [CD/RADIO/AUX] pour sélectionner « FM »
ou « AM ».
Réglage manuel
Appuyer sur [3] ou [5] pour syntoniser la station
souhaitée.
Pour effectuer automatiquement la syntonisation,
appuyer sur la touche et la maintenir enfoncée jusqu’à ce
que la fréquence commence à changer rapidement.
« STEREO » s’affiche lors de la réception d’une émission
stéréo.
Utilisation de l’appareil principal
1 Appuyer sur [TUNE MODE] pour sélectionner
«MANUAL».
2 Appuyer sur [2/3] ou [5/6] pour
syntoniser la station souhaitée.
Préréglage de la mémoire
Il est possible de prérégler jusqu’à 30 stations FM et
15 stations AM.
█ Préréglage automatique
1 Appuyer sur [AUTO PRESET] pour sélectionner
«LOWEST» ou «CURRENT».
LOWEST La syntonisation commence à partir de
CURRENT La syntonisation commence à partir de
2 Appuyer sur [OK] pour lancer le préréglage.
Le tuner prérègle toutes les stations captées sur les
canaux dans l’ordre croissant.
Pour annuler, appuyer sur [8].
█ Préréglage manuel
1 Appuyer sur [3] ou [5] (appareil principal :
[2/3] ou [5/6]) pour syntoniser la
station souhaitée.
2 Appuyer sur [OK].
3 Appuyer sur les touches numériques pour
sélectionner un numéro préréglé.
Effectuer les étapes 1 à 3 à nouveau afin de prérégler
plus de stations.
La nouvelle station remplace toute station qui occupe
le même numéro préréglé.
la fréquence la plus basse.
la fréquence en cours.
█ Sélection d’une station préréglée
Appuyer sur les touches numériques, [2] ou [6]
pour sélectionner la station préréglée.
Utilisation de l’appareil principal
1 Appuyer sur [TUNE MODE] pour sélectionner
«PRESET».
2 Appuyer sur [2/3] ou [5/6] pour
sélectionner la station préréglée.
Amélioration de la qualité sonore
Lorsque « FM » est sélectionné
1 Appuyer sur [PLAY MENU] pour sélectionner
«FMMODE».
2 Appuyer sur [Y, U] pour sélectionner « MONO »
puis appuyer sur [OK].
Pour annuler, sélectionner « STEREO ».
« MONO » est également annulé lorsque vous
modifiez la fréquence.
Pour mémoriser le réglage
Passer à l’étape 2 sur « Préréglage manuel ».
Lorsque « AM » est sélectionné
1 Appuyer sur [PLAY MENU] pour sélectionner
«BEATPROOF».
2 Appuyer sur [Y, U] pour sélectionner le réglage
fournissant la meilleure réception et appuyer sur
[OK].
Réglage de la répartition AM
Sur l’appareil principal
Ce système peut également recevoir des émissions AM
réparties en séquences de 10 kHz.
1 Appuyer sur [CD/RADIO/AUX] pour sélectionner
«FM» ou «AM».
2 Maintenir la touche [CD/RADIO/AUX] enfoncée.
Après quelques secondes, l’écran affiche la radio
fréquence minimale actuelle. Relâcher la touche lorsque
la fréquence minimale change.
• Pour revenir au réglage initial, effectuez les étapes
ci-dessus à nouveau.
• Les fréquences préréglées sont effacées après avoir
modifié le réglage.
11
53
RQT0A38
Page 54

Enregistrement
offset printing
Ce système peut enregistrer jusqu’à 800 dossiers
(999 plages maximum dans un album) ou un total de
8000 plages, en fonction de la capacité de stockage
disponible de la mémoire interne ou du périphérique USB
inséré dans
Pour vérifier l’espace de stockage
En mode d’arrêt, appuyer sur [DISPLAY].
•«UPDATE» s
lire le périphérique.
• « NO DEVICE » s
n’est raccordé à
Remarque :
• Tous les enregistrements sont au format « .mp3 ».
• Vous ne pouvez pas enregistrer lorsque vous utilisez le
mode de lecture aléatoire.
• La fonction DJ est désactivée pendant l’enregistrement.
• Le mode de Répétition de lecture est désactivé en cours
d’enregistrement.
• Un nouvel album est ajouté à chaque fois que vous
effectuez un enregistrement.
• La séquence de l’album peut changer après
l’enregistrement.
• Les enregistrements sont conservés dans un dossier
nommé « REC_DATA » dans le périphérique USB.
• Le voyant de statut USB clignote en rouge pendant
l’enregistrement USB.
Enregistrement de base
1 Sélectionnez la source que vous souhaitez
2
Arrêter
l’enregistrement
Interrompre
l’enregistrement
RQT0A38
12
54
USB B .
’affiche lorsque l’appareil est en train de
’affiche si aucun périphérique USB
USB B .
enregistrer.
CD-DA
Préparer le mode de lecture de disque.
Enregistrer
toutes les plages
Enregistrer une
plage spécifique
S’assurer que le disque est à l’arrêt.
Radio
Syntoniser la station de radio.
Appareils externes
Raccorder et lire à partir de l’appareil (Z« Appareils
externes »).
Appuyer sur [MEMORY REC7/9] ou
[USB REC
Le nom du dossier qui contient l’enregistrement est
affiché.
Sélectionner « OFF PLA YMODE »
(Z« Menu de lecture »).
Sélectionner « 1-TRACK »
(Z« Menu de lecture »).
7/9
] pour commencer l’enregistrement.
Appuyer sur [8]. « WRITING »
s’affiche.
Appuyer sur [MEMORY REC 7/9] ou
[USB REC 7/9] pendant la lecture.
Appuyer à nouveau pour continuer
l’enregistrement.
Remarque :
La pause peut être appliquée lors d’un
enregistrement à partir de la radio, de la
source AUX 1 ou AUX 2 (sauf en mode
« SYNCHRO »). Un repère de plage est
inséré à chaque pause (Z« Ajout de
repères de plage »).
Remarque :
• Attendre quelques secondes pendant que l’appareil
prépare le périphérique USB avant de démarrer
l’enregistrement.
• Lorsque la plage suivante sur le disque sera en cours
d
’enregistrement, elle apparaîtra sur l’afficheur.
█ Enregistrement ultra-rapide
Vitesse d’enregistrement CD-DA disque :
CD, CD-R : Trois fois (3x) la vitesse normale.
CD-RW : Deux fois (2x) la vitesse normale.
1 Insérer le disque à enregistrer.
2 Appuyer sur [REC MODE] pour sélectionner
« NORMAL » ou « HI-SPEED » puis appuyer sur
[OK].
3 Appuyer sur [USB REC 7/9] ou
[MEMORY REC 7/9] pour commencer
l’enregistrement.
Remarque :
• Si vous ne pouvez pas enregistrer en haute vitesse à cause
de l’état du disque, enregistrez en vitesse normale.
• Pendant l’enregistrement ultra-rapide, le son est
interrompu.
█ Ajout de repères de plage
Lors de l’enregistrement depuis la radio ou un appareil
externe, vous pouvez diviser les plages à l’aide des
différents modes.
Avant l’enregistrement
Appuyer sur [REC MODE] pour sélectionner le mode.
MANUAL Ajouter un repère de plage manuellement.
SYNCHRO
(Pour la
source
AUX 1 ou
AUX 2)
TIME MARK Une plage est automatiquement divisée
Remarque :
• En appuyant sur [OK] ou en interrompant l’enregistrement à
l’aide du mode « TIME MARK » pendant l’enregistrement,
le compteur des 5 minutes se réinitialise.
• Vous ne pouvez pas ajouter des repères de plage
manuellement en mode « SYNCHRO ».
Appuyer sur [OK] en cours
d’enregistrement pour ajouter un repère
de plage.
L’enregistrement démarre
automatiquement lorsque l’autre appareil
commence la lecture.
L’enregistrement s’interrompt lorsqu’un
silence d’environ trois secondes est
détecté.
en intervalles de 5 minutes.
Enregistrement de plages MP3
Vous pouvez enregistrer des plages MP3 à partir de :
• Disque MP3 vers
•
USB A vers USB B ou mémoire interne
•
USB B vers mémoire interne ou inversement
USB B ou mémoire interne
Page 55
1 Préparer la source que vous souhaitez enregistrer.
FRANÇAIS
offset printing
Enregistrer
toutes les
plages
Enregistrer un
album ou une
plage spécifique
Sélectionner « OFF
PLAYMODE » (Z«Menu de
lecture »).
Sélectionner « 1-ALBUM » ou
«1-TRACK» (Z«Menu de
lecture »).
2 Appuyer sur [MEMORY REC 7/9] ou
[USB REC 7/9] pour commencer
l’enregistrement.
Arrêter
l’enregistrement
Remarque :
• L’enregistrement de certaines plages peut prendre plus de
temps.
• Certaines plages ne peuvent ne pas être enregistrées en
raison de l’état de la source.
• Lors de l’enregistrement depuis un disque MP3, le nom du
fichier enregistré est différent de celui du fichier d’origine.
• Lors de l’enregistrement depuis USB A , le nom du fichier
enregistré est le même que celui du fichier d’origine
(32 caractères maximum).
Appuyer sur [8].
L’enregistrement s’arrête au niveau
de la dernière plage intégralement
enregistrée dans l’album. Par
exemple, si vous arrêtez
l’enregistrement au milieu de la
quatrième plage, seules les trois
premières plages seront enregistrées.
« NO FILE RECORDED » s’affiche si
aucune plage n’est enregistrée.
Suppression des plages enregistrées
1 MEMORY
Appuyer sur [MEMORY] (appareil principal :
[MEMORY/USB]) pour sélectionner « MEMORY ».
USB B
Appuyer sur [USB] (appareil principal :
[MEMORY/USB]) pour sélectionner « USB B ».
2 Appuyer sur [R, T] pour sélectionner un album.
3 Appuyer sur [2] ou [6] pour sélectionner la
plage.
4 Appuyer sur [EDIT MODE] pour sélectionner le
mode.
TRACK DEL Supprimer une seule plage.
ALBUM DEL Supprimer un album (999 plages
FORMAT Formater le périphérique USB.
ALL DEL Supprimer tous les albums dans la
maximum).
mémoire interne.
5 Appuyer sur [OK].
L’élément sélectionné pour être supprimé est affiché.
6 Appuyer sur [OK].
« SURE? NO » s’affiche.
7 Appuyer sur [Y, U] pour sélectionner
« SURE? YES » puis appuyer sur [OK].
« WRITING » s’affiche.
Pour annuler, sélectionner « SURE? NO ».
Effets de son et d’éclairage
Effets sonores
Égaliseur préréglé (Preset EQ)
1 Appuyer sur [EQ] (appareil principal : [LOCAL EQ])
pour sélectionner « PRESET EQ ».
2 Appuyer sur [R, T] pour sélectionner le réglage
souhaité et appuyer sur [OK].
Ou tournez [MULTI CONTROL] pour sélectionner le
réglage EQ préréglé souhaité.
Égaliseur manuel (Manual EQ)
1 Appuyer sur [EQ] (appareil principal : [LOCAL EQ])
pour sélectionner « MANUAL EQ ».
2 Appuyer sur [R, T] pour sélectionner l’effet
sonore.
Ou tournez [MULTI CONTROL] pour sélectionner
l’effet sonore.
3 Appuyer sur [Y, U] pour sélectionner le réglage et
appuyer sur [OK].
Ou appuyer sur [2/3] ou [5/6] pour
sélectionner le réglage.
BASS/MID/TREBLE –4 à +4
SURROUND « ON SURROUND » ou
D.Bass
1 Appuyer sur [D.BASS] pour sélectionner
« D.BASS LEVEL » ou « D.BASS BEAT ».
Pour annuler, sélectionner « OFF D.BASS ».
2 Appuyer sur [R, T] pour sélectionner le réglage et
appuyer sur [OK].
Tourner [MULTI CONTROL] pour sélectionner le
réglage.
Remarque :
D.BASS BEAT : Cette fonction accentue le niveau d’attaque
de la batterie et produit un son percutant. En fonction de la
plage, l’effet peut être faible.
Effets d’éclairage
Il est possible de changer l’effet d’éclairage sur l’appareil.
Appuyer sur [ILLUMINATION] pour sélectionner l’effet
souhaité.
COLOR Éclairage d’ambiance monochrome.
AUTO Éclairage d’ambiance monochrome. La
OFF Annuler l’effet.
Il est également possible d
sélectionner l
Utilisation de l’appareil principal
Tourner [ILLUMINATION].
couleur change automatiquement.
’effet suivant ou précédent.
« OFF SURROUND »
’appuyer sur [R, T] pour
13
55
RQT0A38
Page 56

Fonctions DJ
offset printing
Les fonctions DJ permettent d’ajouter un effet sonore ou
un échantillon sonore entre les chansons.
Utilisation de l’application « Panasonic MAX Juke »
Il est possible de télécharger et d’installer l’application
Android gratuite « Panasonic MAX Juke » sur Google
Play pour obtenir des fonctions supplémentaires, telles
que la demande de lecture simultanée d’une chanson
depuis plusieurs périphériques.
Remarque :
La fonction DJ est désactivée lorsque vous éteignez
l’appareil, changez de source ou pendant l’enregistrement.
DJ Jukebox
USB MEMORY
Appuyer sur [JUKEBOX] (appareil principal :
[DJ JUKEBOX]).
Pour annuler, sélectionner « OFF ».
Remarque :
L’appareil passe automatiquement en mode de répétition
lorsque vous activez le DJ Jukebox.
█ Modification du réglage répétition
1 Appuyer sur [PLAY MENU].
2 Appuyer sur [Y, U] pour sélectionner le réglage et
appuyer sur [OK].
Utilisation de l’appareil principal
En mode d’arrêt, tourner [MULTI CONTROL] pour
sélectionner le réglage et appuyer sur [4/9].
RANDOM REPEAT
RND
ALL TITLE REPEAT Répéter toutes les plages.
RANDOM MIX
REPEAT
RND
Lorsque « WAITING REQUEST » s
de passer à l
« Panasonic MAX Juke ».
’étape suivante sans utiliser l’application
█ Changement de l’effet DJ Jukebox
Appuyer sur [DJ1] à [DJ6] sur l’appareil principal pour
sélectionner l’effet.
[DJ1] Fondu enchaîné : Le volume de la
[DJ2] à [DJ6] Mix par échantillons sonores : Un
Pour annuler, ré-appuyez sur la touche.
Remarque :
RQT0A38
Vous ne pouvez pas sélectionner l’effet DJ Jukebox lorsque
vous utilisez le mode « RANDOM MIX REPEAT ».
14
56
Répéter la lecture aléatoire.
Répéter la lecture aléatoire. Un
échantillon sonore est ajouté
entre toutes les plages.
’affiche, il est possible
plage en cours diminue
graduellement, et le volume de la
plage suivante augmente
graduellement.
échantillon sonore est ajouté entre
toutes les plages.
Utilisation de l’application « Panasonic MAX Juke »
Vous pouvez appeler les plages que vous souhaitez lire
via l’appli.
• Lorsque « MAKING LIST » s’affiche, vous pouvez
appeler une partie des plages.
• Lorsque « WAITING REQUEST » s’affiche, vous
pouvez appeler les plages que vous souhaitez lire via
l’appli.
Échantillonneur DJ
(Sauf pour les sources AUX 1 et AUX 2)
Sur l’appareil principal
En tournant [MULTI CONTROL], il est possible
’appliquer un son de scratch ou un échantillon sonore à
d
la plage en cours de lecture.
1 Appuyer sur [DJ SAMPLER].
2 Appuyer sur [DJ1] à [DJ6] pour sélectionner le son
souhaité.
3 Tourner [MULTI CONTROL].
Pour annuler l’échantillonneur DJ
Appuyer sur [DJ SAMPLER].
Utilisation de l’application « Panasonic MAX Juke »
Il est possible de changer l’échantillon sonore sur
’application. (Pour rétablir tous les échantillons sonores
l
par défaut définis en usine, maintenir la touche
[DJ SAMPLER] enfoncée lorsque l
est désactivé.)
’échantillonneur DJ
Effet DJ
(Sauf pour les sources AUX 1 et AUX 2)
Sur l’appareil principal
La fonction Effet DJ permet d’ajouter des effets sonores.
1 Appuyer sur [DJ EFFECT].
2 Appuyer sur [DJ1] à [DJ6] pour sélectionner l’effet.
[DJ1] PHASER
Ajouter de l’espace et de la dimension au
son.
[DJ2] FILTER
Rehausser ou filtrer des champs spécifiques
du son.
[DJ3] SOUND CHOPPER
Couper le son périodiquement.
[DJ4] ELECTRO ECHO
Ajouter de l’écho numérique au son.
[DJ5] PITCH SHIFTER
Ajuster les tonalités du son.
[DJ6] HARMONIZER
Ajouter des notes au son pour créer de
l’harmonie.
3 Tourner [MULTI CONTROL] pour sélectionner le
réglage.
Pour annuler l’effet DJ
Appuyer sur [DJ EFFECT].
Page 57

Utilisation d’un microphone
FRANÇAIS
offset printing
Préparation
Réduire le volume de l’appareil à son niveau minimal
avant de brancher ou de débrancher un microphone.
1 Connecter un microphone (non fourni) à la prise
du microphone.
Type de fiche : Ø 6,3 mm mono
2 Tourner [MIC VOL, MIN/MAX] sur l’appareil
principal pour ajuster le volume du microphone.
Si vous souhaitez chanter avec une musique de fond.
3 Lire la source de musique et ajuster le volume de
l’appareil.
Remarque :
• Si un bruit étrange (larsen) est émis, éloigner le microphone
des haut-parleurs ou baisser le volume du microphone.
• Si le microphone n’est pas utilisé, le déconnecter de la
prise de microphone et baisser son volume jusqu’à
«MIN».
• L’appareil ne peut pas enregistrer à partir du microphone.
Horloge et minuteries
Réglage de l’horloge
Cette horloge fonctionne avec un cycle horaire de 24
heures.
1 Appuyer sur [SETUP] pour sélectionner
«CLOCK».
2 Appuyer sur [Y, U] pour régler l’heure et appuyer
sur [OK].
Pour vérifier l’heure
Appuyer sur [SETUP] pour sélectionner « CLOCK ».
En mode de veille, appuyer sur [DISPLAY].
Remarque :
Remettre l’horloge à l’heure régulièrement pour maintenir
l’heure juste.
Minuterie de lecture et minuterie
d’enregistrement
(Sauf pour les sources Bluetooth®, AUX 1 et AUX 2)
Vous pouvez régler les minuterie pour qu’elle démarrent à
une heure donnée pour :
• Vous réveiller (minuterie de lecture).
Enregistrer depuis la radio (minuterie d’enregistrement).
•
Il n’est pas possible de combiner la minuterie de lecture
et la minuterie d’enregistrement.
Préparation
Régler l’horloge.
1 Appuyer sur [SETUP] pour sélectionner
«TIMERADJ».
2 Appuyer sur [Y, U] pour sélectionner « #PLAY » ou
« #REC » puis appuyer sur [OK].
3 Appuyer sur [Y, U] pour régler l’heure de début et
appuyer sur [OK].
4 Répéter l’étape 3 pour régler l’heure de fin.
5 Appuyer sur [Y, U] pour sélectionner la source
que vous souhaitez lire ou enregistrer et appuyer
sur [OK].
6 Pour la minuterie d’enregistrement, appuyer sur
[Y, U] pour sélectionner « MEMORY » ou « USB B »
pour stocker l’enregistrement puis appuyer sur
[OK].
Pour activer la minuterie
1 Préparer la source.
Minuterie de
lecture
Minuterie
d’enregistrement
Préparer la source à écouter :
(disque, USB, mémoire interne
ou radio), puis régler le volume.
Connecter le périphérique USB
USB B (pour l’enregistrement
au
USB) et faire l’ accord sur la
station de radio.
2 Appuyer sur [SETUP] pour sélectionner
«TIMERSET».
3 Appuyer sur [Y, U] pour sélectionner le réglage et
appuyer sur [OK].
PLAY ON Lancer la minuterie de lecture.
PLAY OFF Annuler la minuterie de lecture.
REC ON Lancer la minuterie d’enregistrement.
REC OFF Annuler la minuterie d’enregistrement.
« # » s’affiche.
L’appareil doit être éteint pour que la minuterie
fonctionne.
Pour vérifier le réglage
1 Appuyer sur [SETUP] pour sélectionner
«TIMERADJ».
2 Appuyer sur [Y, U] pour sélectionner « #PLAY » ou
« #REC » puis appuyer sur [OK].
En mode de veille, appuyer sur [DISPLAY] deux fois.
Remarque :
• La minuterie commence à un volume faible et augmente
progressivement jusqu’au niveau préréglé.
• La minuterie d’enregistrement démarrera 30 secondes
avant l’heure réglée avec le volume en sourdine.
• Si elle est activée, la minuterie entre en fonction chaque
jour à l’heure spécifiée.
• Si vous éteignez l’appareil et le rallumez tandis qu’une
minuterie est en marche, la minuterie ne s’arrêtera pas à
l’heure de fin.
15
57
RQT0A38
Page 58

Minuterie de veille
Panneau
arrière de cet
appareil
principal
Câble audio
(non fourni)
Lecteur DVD
(non fourni)
Câble audio
(non fourni)
Appareil audio portable
(non fourni)
offset printing
La minuterie de veille éteint l’appareil après l’heure
réglée.
Appuyer sur [SLEEP] pour sélectionner le réglage (en
minutes).
Pour annuler, sélectionner « OFF ».
NIM03 ĺ120 MINĺĺ 60 MINĺ90 MIN FFO
Remarque :
• Le temps restant est toujours indiqué sur l’affichage.
L’affichage change provisoirement lors de l’exécution
d’autres opérations.
• Vous pouvez utiliser la minuterie de lecture avec la
minuterie de veille; vous pouvez aussi utiliser la minuterie
d’enregistrement avec la minuterie de veille.
• La minuterie de veille a toujours priorité. Veiller à ne pas
régler des minuteries qui se chevauchent.
Appareils externes
Préparation
• Débrancher le cordon d’alimentation secteur.
• Éteindre tous les appareils et lire les instructions
d’utilisation appropriées.
Remarque :
Les composants et les câbles sont vendus séparément.
Utilisation de l’entrée auxiliaire
Vous pouvez connecter un magnétoscope, lecteur DVD
etc, et écouter de l’audio grâce à ce système.
Raccordement un appareil audio
portable
Vous pouvez lire de la musique à partir d’un appareil
audio portable.
Préparation
• Éteignez l’égaliseur (le cas échéant) de l’appareil audio
portable pour éviter la distorsion du son.
• Réduire le volume de l’appareil et de l’appareil audio
portable avant de brancher ou de débrancher l’appareil
audio portable.
1 Connecter l’appareil audio portable.
Type de fiche : Ø 3,5 mm stéréo
2 Appuyer sur [CD/RADIO/AUX] pour sélectionner
«AUX2».
3 Lancer la lecture sur l’appareil audio portable.
Pour ajuster le niveau d’entrée
1 Appuyer sur [PLAY MENU] pour sélectionner
« INPUT LEVEL ».
2 Appuyer sur [Y, U] pour sélectionner « NORMAL »
ou « HIGH » puis appuyer sur [OK].
Remarque :
• Impossible d’ajuster le niveau d’entrée pendant
l’enregistrement.
• Sélectionner « NORMAL » (normal), si le son est déformé
lorsque le niveau « HIGH » (élevé) est activé.
• Lire les instructions de fonctionnement de l’appareil audio
portable pour plus de détails.
1 Raccorder l’appareil externe.
2 Appuyer sur [CD/RADIO/AUX] pour sélectionner
3 Lancer la lecture à partir de l’appareil externe.
Remarque :
• Si vous souhaitez connecter d’autres appareils que ceux
• Lorsque vous utilisez un adaptateur il peut se produire de la
RQT0A38
16
58
«AUX1».
décrits, reportez-vous au revendeur de l’appareil audio.
distorsion sonore.
Page 59

Autres
FRANÇAIS
offset printing
Extinction automatique
Cet appareil s’éteint automatiquement si vous ne l’utilisez
pas depuis environ 20 minutes.
1 Appuyer sur [SETUP] pour sélectionner
«AUTOOFF».
2 Appuyer sur [Y, U] pour sélectionner « ON » puis
appuyer sur [OK].
Pour annuler, sélectionner « OFF ».
Remarque :
Cette fonction ne marche pas lorsque la radio est la source ou
lorsqu’un périphérique Bluetooth
Mise en veille Bluetooth
Cette fonction allume automatiquement l’appareil lorsque
vous établissez une connexion Bluetooth
périphérique appairé.
®
est connecté.
®
®
à partir d’un
1 Appuyer sur [SETUP] pour sélectionner
« BLUETOOTH STANDBY ».
2 Appuyer sur [Y, U] pour sélectionner « ON » puis
appuyer sur [OK].
Pour annuler, sélectionner « OFF ».
Remarque :
Certains périphériques peuvent mettre plus de temps à réagir.
Si vous êtes connecté à un périphérique Bluetooth
’éteindre l’appareil, attendre au moins 5 secondes avant de
d
vous reconnecter à nouveau à cet appareil depuis votre
périphérique Bluetooth
®
.
®
avant
Version logicielle
Il est possible de vérifier la version logicielle de l’appareil.
1 Appuyer sur [SETUP] pour sélectionner
« SW VER. » puis appuyer sur [OK].
La version logicielle s
’affiche.
2 Appuyer de nouveau sur [OK] pour quitter.
Entretien
Pour nettoyer l’appareil, l’essuyer avec un chiffon
doux et sec.
• Ne jamais utiliser d’alcool, de diluant pour peinture ni
de benzène pour nettoyer l’appareil.
• Avant d’utiliser un chiffon imprégné d’un produit
chimique, lire attentivement les instructions qui
accompagnent le chiffon.
Guide de dépannage
Avant de faire une demande de réparation, vérifier les
points suivants. En cas de doutes sur certains points
particuliers ou si les solutions indiquées ne résolvent pas
le problème, demander les instructions au revendeur.
█ Problèmes courants
L’appareil ne fonctionne pas.
• La dispositif de sécurité a été activée. Effectuer l’opération
suivante :
1. Appuyer sur [1] sur l’appareil principal pour faire
basculer l’appareil en mode de veille. Si l’appareil ne
passe pas en mode de veille,
– Appuyer et maintenir la touche enfoncée pendant au
moins 10 secondes. Ou,
– Débrancher le cordon d’alimentation secteur et le
rebrancher.
2. Appuyer de nouveau sur [1] pour mettre l’appareil sous
tension. Si le problème persiste, consulter votre
revendeur.
Lorsque l’appareil est en mode de veille, les voyants de
l’afficheur s’éclairent et défilent en permanence.
• Maintenir la touche [8] enfoncée sur l’appareil principal
pour sélectionner « DEMO OFF ».
Aucune opération ne peut être faite avec la
télécommande.
• Vérifier que la pile est bien installée.
Le son est déformé ou il n’y a pas de son.
• Ajuster le volume de l’appareil.
• Éteindre l’appareil, déterminer et corriger la cause, puis le
rallumer. Cela peut être provoqué par l’utilisation des
enceintes à une puissance ou à un volume excessif, et lors
de l’utilisation de l’appareil dans un environnement chaud.
Un son de bourdonnement peut être émis au cours de la
lecture.
• Un cordon d’alimentation secteur CA ou une lampe
fluorescente se trouve à proximité des câbles. Éloigner les
autres appareils et câbles des cordons de cet appareil.
Le niveau sonore réduit.
• Le circuit de protection a été activé à cause de l’usage
continu à un volume élevé. Cela permet de protéger le
système et de maintenir la qualité sonore.
█ Disque
L’affichage est incorrect.
La lecture ne démarre pas.
• Le disque n’a pas été correctement inséré. Le placer
correctement.
• Le disque est sale. Nettoyer le disque.
• Remplacer le disque s’il est rayé, déformé ou non standard.
• Il y a de la condensation. Laisser l’appareil sécher pendant
1 à 2 heures.
Le nombre total de plages affiché est incorrect.
Le disque ne peut pas être lu.
Le son est distordu.
• Le disque inséré ne peut pas être lu par l’appareil. Changer
pour un disque lisible.
• Vous avez mis un disque qui n’a pas été finalisé.
17
59
RQT0A38
Page 60

█ USB
offset printing
Le périphérique USB ou son contenu ne peut pas être lu.
• Le format du périphérique USB ou son contenu n’est pas
compatible avec l’appareil.
• Les périphériques USB dont la capacité de mémoire est
supérieure à 32 Go ne peuvent pas fonctionner dans
certaines conditions.
Le périphérique USB fonctionne lentement.
• Les fichiers volumineux ou les périphériques USB de
grande capacité sont plus longs à lire.
█ Bluetooth
L’appairage ne peut pas avoir lieu.
• Vérifier l’état du périphérique Bluetooth
• Le périphérique se trouve hors de la portée de
communication de 10 m. Rapprocher le périphérique du
système.
Le périphérique ne peut pas être connecté.
• L’appairage du périphérique n’a pas réussi. Refaites
l’appairage.
• L’appairage du périphérique a été remplacé. Refaites
l’appairage.
• Cet appareil est peut-être connecté à un périphérique
différent. Déconnecter l’autre périphérique et essayer de
l’appairer à nouveau.
• Il se peut que le système rencontre un problème. Mettre le
système hors tension et le rallumer ensuite.
Le périphérique est connecté, mais aucun son n’est émis
à travers le système.
• Pour certaines périphériques Bluetooth
devez régler manuellement la sortie audio sur
« SC-MAX4000 ». Lire les instructions de fonctionnement
du périphérique pour des détails.
Le son depuis le périphérique est interrompu.
• Le périphérique se trouve hors de la portée de
communication de 10 m. Rapprocher le périphérique du
système.
• Retirer tout obstacle entre le système et le périphérique.
• D’autres périphériques utilisant la bande de fréquence
2,4 GHz (routeur sans fil, micro-ondes, téléphones sans fil,
etc.) créent des interférences. Rapprocher le périphérique
de l’appareil et l’éloigner des autres périphériques.
• Sélectionner « MODE 1 » pour une communication stable.
La connexion One-Touch (NFC) ne fonctionne pas.
• Vérifier que le système et la fonction NFC du périphérique
sont activés.
• Remettre le périphérique en contact avec la zone de
contact NFC de cet appareil.
L’image et le son à lire ne sont pas synchronisés.
• Redémarrer l’application de lecture du périphérique.
• Raccorder le périphérique à l’appareil avec un câble audio
(non fourni).
®
®
.
®
intégrés, vous
█ Radio
Le son est déformé.
• Utiliser une antenne FM extérieure facultative. L’antenne
doit être installée par un technicien qualifié.
On entend des battements.
• Éteindre le téléviseur ou l’éloigner de l’appareil.
• Éloigner les téléphones mobiles de l’appareil si les
interférences sont apparentes.
• En mode tuner AM, sélectionner le réglage
« BEATPROOF » qui procure une meilleure réception.
On entend un léger bourdonnement pendant une
émission AM.
• Éloigner l’antenne des autres câbles et cordons.
█ L’appareil principal affiche
« ADJUST CLOCK »
• L’horloge n’est pas à l’heure. Régler l’horloge.
« ADJUST TIMER »
• La minuterie de lecture et/ou la minuterie d’enregistrement
n’est pas réglée. Régler la minuterie de lecture et/ou la
minuterie d’enregistrement.
« ALB FULL »
• Le nombre d’albums a dépassé la limite prise en charge.
«AUTOOFF»
• L’appareil est resté inutilisé pendant 20 minutes et
s’éteindra dans la minute qui suit. Pour annuler, appuyer
’importe quelle touche.
sur n
« CAN’T REC »
«DEVICEFULL»
• Vous ne pouvez pas effectuer l’enregistrement, car le
temps d’enregistrement restant sur le périphérique USB est
inférieur au temps total de la source musicale. Utiliser un
périphérique USB doté du temps d’enregistrement
approprié et lancer à nouveau l’enregistrement.
« ERROR »
• Une opération incorrecte a été faite. Lire les instructions et
essayer de nouveau.
« ERROR » (pendant l’enregistrement)
• Vous ne pouvez pas sélectionner une autre source de
lecture (exemple : radio, USB, etc.) ou appuyer sur [2] ou
[6] pendant l’enregistrement. Arrêter la fonction
d’enregistrement.
• Vous ne pouvez pas ouvrir le tiroir de disque lors de
l’enregistrement à partir de la source AM.
« F61 »
• Vérifier et corriger les raccordements des câbles
d’enceintes.
• Déconnecter le périphérique USB. Mettre le système hors
tension et le rallumer ensuite.
« F70 »
• Examiner le périphérique Bluetooth
• Déconnecter le périphérique Bluetooth
hors tension et le rallumer ensuite.
« F76 »
• Il y a un problème d’alimentation électrique.
• Débrancher le cordon d’alimentation secteur et consulter
votre revendeur.
« F77 »
• Débrancher le cordon d’alimentation secteur et consulter
votre revendeur.
®
.
®
. Mettre le système
RQT0A38
18
60
Page 61

« NO DEVICE »
FRANÇAIS
offset printing
• Le périphérique USB n’est pas connecté. Vérifier la
connexion.
• Impossible d’enregistrer ou de vérifier l’espace de
stockage disponible car aucun périphérique USB n’est
raccordé à
«NODISC»
• Aucun disque n’est inséré.
«NOPLAY»
« UNSUPPORT »
• Vérifier son contenu. Seul le format pris en charge peut être
lu.
• Les fichiers contenus dans le périphérique USB peuvent
être corrompus. Formater le périphérique USB et
ré-essayer.
• Il se peut que le système rencontre un problème. Mettre le
système hors tension et le rallumer ensuite.
« NO TRACK »
• Il n’y a pas d’album ou de plage dans le périphérique USB
ou dans la mémoire interne.
« PLAYERROR »
• Vous avez lu un format de fichier MP3 non pris en charge.
L’appareil sautera cette plage et poursuivra la lecture à la
plage suivante.
« REC ERROR »
• Le périphérique USB a été déconnecté pendant
l’enregistrement. Connecter le périphérique USB et
relancer l’enregistrement.
• Une erreur s’est produite au cours de l’enregistrement
USB. Déconnecter le périphérique USB, puis le connecter
de nouveau.
«REMOTE1»
«REMOTE2»
• La télécommande et l’appareil principal utilisent des codes
différents. Changer le code de la télécommande.
– Lorsque « REMOTE 1 » s’affiche, appuyer et maintenir
– Lorsque « REMOTE 2 » s’affiche, appuyer et maintenir
« TEMP NG »
• Le circuit de protection thermique a été activé et l’appareil
va s’éteindre. Laisser l
rallumer.
• Vérifier que l’orifice de ventilation de l’appareil n’est pas
obstrué.
• Veiller à ce que cet appareil soit bien ventilé.
« TRK FULL »
• Le nombre des fichiers a dépassé la limite prise en charge.
« USB OVER CURRENT ERROR »
• Le périphérique USB utilise trop de puissance.
Déconnecter le périphérique USB, éteindre le système puis
le rallumer.
«VBR»
• L’appareil ne peut pas afficher le temps de lecture restant
avec les plages à débit binaire variable (VBR).
USB B .
les touches [OK] et [1] enfoncées pendant 4 secondes
minimum.
les touches [OK] et [2] enfoncées pendant 4 secondes
minimum.
’appareil refroidir avant de le
Code de la télécommande
Lorsque d’autres appareils Panasonic répondent à la
télécommande de ce système, changer le code de
télécommande de ce système.
Préparation
Appuyer sur [CD/RADIO/AUX] pour sélectionner
« AUX 1 » ou « AUX 2 ».
█ Pour définir le code pour « REMOTE 2 »
1 Appuyer et maintenir enfoncée [CD/RADIO/AUX]
sur l’appareil principal et [2] sur la télécommande
jusqu’à ce que « REMOTE 2 » s’affiche.
2 Appuyer et maintenir les touches [OK] et [2]
enfoncées pendant au moins 4 secondes.
█ Pour définir le code pour « REMOTE 1 »
1 Appuyer et maintenir enfoncée [CD/RADIO/AUX]
sur l’appareil principal et [1] sur la télécommande
jusqu’à ce que « REMOTE 1 » s’affiche.
2 Appuyer et maintenir les touches [OK] et [1]
enfoncées pendant au moins 4 secondes.
Réinitialisation de la mémoire système
Dans les situations suivantes, réinitialiser la mémoire :
• La pression sur les touches est sans effet.
• Vous désirez effacer et réinitialiser le contenu de la
mémoire.
1 Débrancher le cordon d’alimentation secteur.
2 Pendant que la touche [1] de l’appareil principal
est maintenue enfoncée longuement, rebrancher
le cordon d’alimentation secteur.
Continuer à appuyer et à maintenir la touche
enfoncée jusqu
’à ce que «–––––––––» s’affiche.
3 Relâcher [1].
Les valeurs par défaut définies en usine de tous les
réglages sont alors rétablies.
Les éléments en mémoire doivent être à nouveau
définis.
19
61
RQT0A38
Page 62

Spécifications
offset printing
█ Section amplificateur
Puissance de sortie RMS en mode stéréo
Canal haut 350 W par canal (3 Ω), 1 kHz,
Canal Mid 350 W par canal (3 Ω), 1 kHz,
Canal bas 500 W par canal (2 Ω), 100 Hz,
Puissance RMS totale en mode stéréo 2400 W
distorsion harmonique totale 30%
distorsion harmonique totale 30%
distorsion harmonique totale 30%
█ Section disque
Disques pris en charge (8 cm ou 12 cm)
MPEG-1 Layer 3, MPEG-2 Layer 3
Capteur
Longueur d’onde 790 nm (CD)
█ Section Bluetooth
Version Bluetooth® Ver. 2.1 + EDR
Classe Classe 2
Profils pris en charge A2DP, AVRCP, SPP, OPP, FTP
Fréquence de fonctionnement Bande 2,4 GHz FH-SS
Distance de fonctionnement Ligne visuelle de 10 m
CD, CD-R/RW (CD-DA, MP3 )
®
█ Section tuner
Modulation de fréquence (FM)
Mémoire préréglée 30 stations
Plage de fréquence
Bornes d’antenne 75 Ω (asymétriques)
Modulation d’amplitude (AM)
Mémoire préréglée 15 stations
Plage de fréquence
87,50 MHz à 108,00 MHz (pas de 50 kHz)
522 kHz à 1629 kHz (pas de 9 kHz)
520 kHz à 1630 kHz (pas de 10 kHz)
█ Section mémoire interne
Mémoire
Taille de la mémoire 2 Go
Prise en charge de fichiers multimédias
Enregistrement dans la mémoire
Débit binaire 128 kbps
Vitesse d’enregistrement dans la mémoire
Format du fichier d’enregistrement MP3 (*.mp3)
1x, 3x max (CD seulement)
MP3 (*.mp3)
█ Section borne
Port USB
Norme USB USB 2.0 pleine vitesse
Prise en charge de fichiers multimédias
Système de fichiers du périphérique USB
Enregistrement USB
Débit binaire 128 kbps
Vitesse d’enregistrement USB
Format du fichier d’enregistrement MP3 (*.mp3)
AUX IN 1
Entrée audio Prise à broches
AUX IN 2
Borne Prise stéréo, 3,5 mm
Microphone
Borne Prise mono, 6,3 mm
MP3 (*.mp3)
FAT12, FAT16, FAT32
1x, 3x (CD seulement)
█ Section enceintes
Enceinte(s)
Tweeter À cône de 6 cm
Woofer À cône de 20 cm
SuperWoofer À cône de 30 cm
Impédance Haut 3 Ω / Mid 3 Ω / Bas 2 Ω
Dimensions (L x H x P) 407 mm x 709 mm x 389 mm
Poids 19 kg
█ Données générales
Alimentation CA 220 V à 240 V, 50 Hz
Consommation 155 W
Dimensions (L x H x P) 492 mm x 221 mm x 421 mm
Poids 5,8 kg
Plage de température de fonctionnement
Plage d’humidité de fonctionnement
Consommation en mode de veille (environ) 0,4 W
Consommation en mode de veille (environ)
(Avec veille « BLUETOOTH STANDBY » réglée sur
«ON»)
Remarque :
• Spécifications sujettes à modifications sans préavis.
Les poids et les dimensions sont approximatifs.
• La distorsion harmonique totale est mesurée au moyen
d’un analyseur de spectre numérique.
35 % à 80 % HR (sans condensation)
0 °C à +40 °C
0,5 W
RQT0A38
20
62
Page 63

À propos de Bluetooth
FRANÇAIS
offset printing
®
Panasonic décline toute responsabilité en cas de
compromission de données et/ou d’informations au
cours d’une transmission sans fil.
Bande fréquence
• Ce système utilise la bande fréquence de 2,4 GHz.
Certification
• Ce système est conforme aux restrictions relatives aux
fréquences et a été certifié relativement aux lois
relatives aux fréquences. Ainsi, une autorisation de
connexion sans fil est inutile.
• Les actions ci-dessous sont passibles d’une peine :
– Démontage ou modification de l’appareil principal.
– Suppression des indications de spécification.
Restrictions d’utilisation
• La transmission sans fil et/ou l’utilisation avec tous les
périphériques équipés de la fonction Bluetooth
pas garantie.
• Tous les périphériques doivent être conformes aux
normes définies par Bluetooth SIG, Inc.
• Selon les spécifications et les réglages d’un
périphérique, ce dernier peut ne pas réussir à se
connecter ou certaines opérations peuvent être
différentes.
• Ce système prend en charge les fonctions de sécurité
• Ce système ne peut pas transmettre de données vers
Portée d’utilisation
• Utiliser ce périphérique à une portée maximale de
• La portée peut décroître en fonction de
Interférences provenant d’autres appareils
• Ce système peut ne pas fonctionner correctement et
• Ce système peut ne pas fonctionner correctement si
Utilisation prévue
• Ce système est pour une utilisation normale et
• Ne pas utiliser ce système à proximité d’un appareil ou
®
Bluetooth
fonctionnement et/ou des réglages, cette sécurité peut
être insuffisante. Transmettre les données sans fil à ce
système avec précaution.
un périphérique Bluetooth
10 m.
l’environnement, des obstacles ou des interférences.
des problèmes tels que du bruit et des sauts sonores
peuvent survenir à cause des interférences des ondes
radio si cet appareil est installé trop près d’autres
dispositifs Bluetooth
bande 2,4 GHz.
les ondes radio d’une station d’émission ou autre se
trouvant à proximité sont trop puissantes.
générale uniquement.
dans un environnement sensible aux perturbations
radioélectriques (exemple : aéroports, hôpitaux,
laboratoires, etc.).
. Mais en fonction de l’environnement de
®
.
®
ou de dispositifs utilisant la
®
n’est
Déclaration de conformité (DoC)
Par la présente, «
cet appareil est conforme aux exigences essentielles et
autres dispositions pertinentes de la Directive 1999/5/CE.
Les clients peuvent télécharger une copie de la DoC
originale de nos appareils R&TTE depuis notre serveur
DoC :
http://www.doc.panasonic.de
Contactez le représentant autorisé : Panasonic Marketing
Europe GmbH, Panasonic Testing Centre, Winsbergring
15, 22525 Hamburg, Allemagne
Cet appareil est conçu pour les consommateurs en
général. (Catégorie 3)
Mise au rebut des piles et des appareils électriques
usagés
Uniquement pour l’Union Européenne et les pays
dotés de systèmes de recyclage
Panasonic Corporation
Apposés sur le produit lui-même, sur son
emballage, ou figurant dans la documentation
qui l’accompagne, ces pictogrammes
indiquent que les piles et appareils
électriques et électroniques usagés doivent
être séparés des ordures ménagères.
Afin de permettre le traitement, la valorisation
et le recyclage adéquats des piles et des
appareils usagés, veuillez les porter à l’un des
points de collecte prévus, conformément à la
législation nationale en vigueur.
En les éliminant correctement, vous
contribuez à prévenir le gaspillage de
ressources précieuses ainsi qu’à protéger la
santé humaine et l’environnement.
Pour de plus amples renseignements sur la
collecte et le recyclage, veuillez vous
renseigner auprès de votre mairie.
Le non-respect de la réglementation relative à
l’élimination des déchets est passible d’une
peine d’amende.
Note relative au pictogramme à apposer
sur les piles (symbole du bas) :
Le pictogramme représentant une poubelle
sur roues barrée d’une croix est conforme à la
réglementation. Si ce pictogramme est
combiné avec un symbole chimique, il remplit
également les exigences posées par la
Directive relative au produit chimique
concerné.
» déclare que
21
63
RQT0A38
Page 64
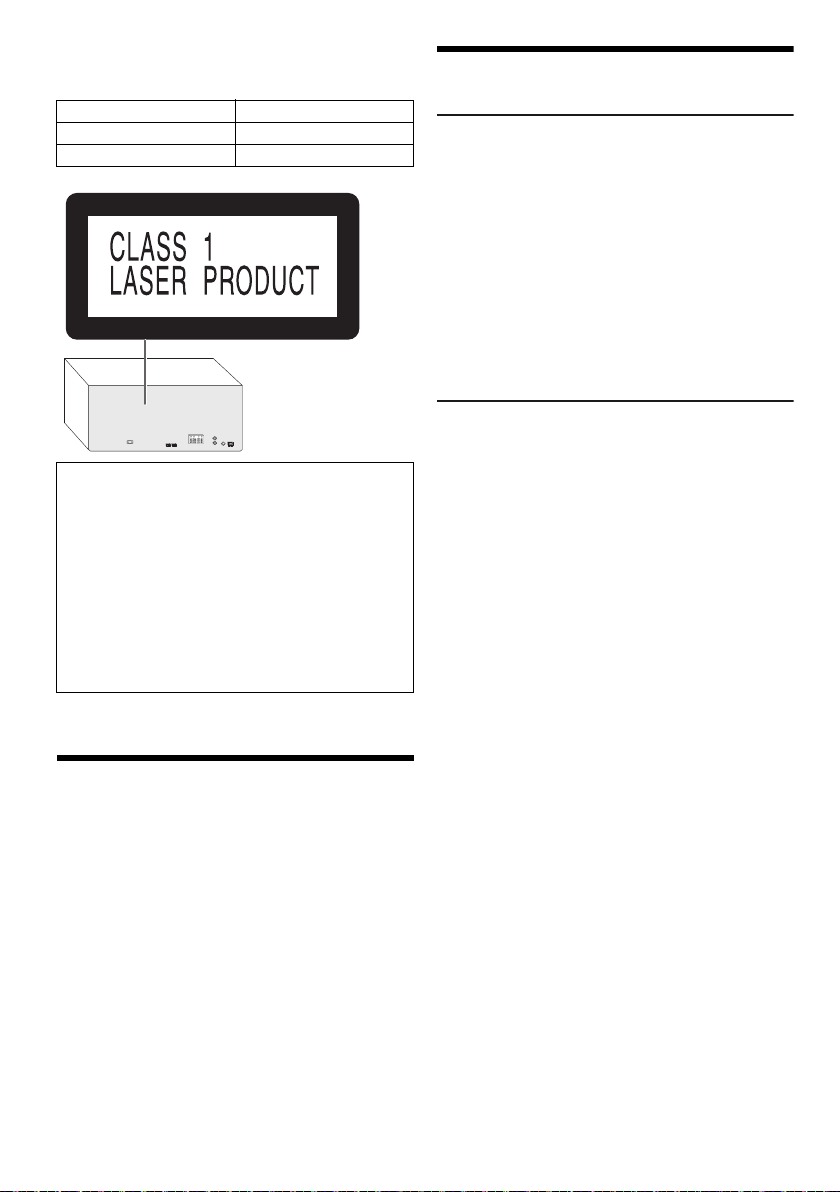
Il sistema e le illustrazioni possono apparire differenti.
offset printing
Queste istruzioni per l’uso sono applicabili al seguente
sistema.
Sistema SC-MAX4000
Unità principale SA-MAX4000
Diffusori SB-MAX4000
La registrazione e la riproduzione di contenuti di questo
o di altri dispositivi possono richiedere l’autorizzazione
del titolare del copyright o di altri diritti di tale
contenuto. Panasonic non ha alcuna autorità in materia
e non garantisce che tale autorizzazione sia rilasciata;
declina espressamente ogni diritto, possibilità o
intenzione di agire per conto terzi per ottenerla. È
responsabilità dell’utente assicurarsi che l’uso di questo
o di altri dispositivi sia conforme alla legislazione
applicabile in materia di diritto d’autore del proprio
Paese. Per maggiori informazioni in merito alle leggi e ai
regolamenti in questione, fare riferimento alla
legislazione vigente o contattare il detentore dei diritti
sui contenuti che si desidera registrare o riprodurre.
Indice
Precauzioni per la sicurezza . . . . . . . . . . . . . . . . . . . . . . 2
Licenze . . . . . . . . . . . . . . . . . . . . . . . . . . . . . . . . . . . . . . 3
Accessori in dotazione . . . . . . . . . . . . . . . . . . . . . . . . . . 3
Preparazione del telecomando . . . . . . . . . . . . . . . . . . . . 3
Disposizione dei diffusori . . . . . . . . . . . . . . . . . . . . . . . . 4
Collegamenti. . . . . . . . . . . . . . . . . . . . . . . . . . . . . . . . . . 5
Panoramica dei comandi . . . . . . . . . . . . . . . . . . . . . . . . 6
Preparazione del supporto multimediale . . . . . . . . . . . . 8
Riproduzione multimediale . . . . . . . . . . . . . . . . . . . . . . . 9
Radio. . . . . . . . . . . . . . . . . . . . . . . . . . . . . . . . . . . . . . . 11
Registrazione . . . . . . . . . . . . . . . . . . . . . . . . . . . . . . . . 12
Effetti sonori e di illuminazione . . . . . . . . . . . . . . . . . . . 13
Funzioni DJ . . . . . . . . . . . . . . . . . . . . . . . . . . . . . . . . . . 14
Uso di un microfono . . . . . . . . . . . . . . . . . . . . . . . . . . . 15
Orologio e timer . . . . . . . . . . . . . . . . . . . . . . . . . . . . . . 15
Apparecchi esterni . . . . . . . . . . . . . . . . . . . . . . . . . . . . 16
Altri . . . . . . . . . . . . . . . . . . . . . . . . . . . . . . . . . . . . . . . . 17
Manutenzione . . . . . . . . . . . . . . . . . . . . . . . . . . . . . . . . 17
Risoluzione dei problemi . . . . . . . . . . . . . . . . . . . . . . . 17
Dati tecnici . . . . . . . . . . . . . . . . . . . . . . . . . . . . . . . . . . 20
RQT0A38
Bluetooth
2
64
®
. . . . . . . . . . . . . . . . . . . . . . . . . . . . . . . . . . . 21
Precauzioni per la sicurezza
AVVERTENZA!
Unità
• Per ridurre il rischio d’incendio, scosse elettriche o
danni al prodotto,
– Non esporlo alla pioggia, umidità, gocciolamenti o
spruzzi.
– Evitare di mettervi sopra oggetti pieni di liquidi, come
vasi.
– Usare soltanto gli accessori consigliati.
– Non aprire i coperchi.
– Non tentare di riparare questa unità da soli. Per le
riparazioni, rivolgersi al personale di assistenza
qualificato.
– Non lasciare che oggetti metallici cadano all’interno
dell’unità.
ATTENZIONE!
Unità
• Per ridurre il rischio d’incendio, scosse elettriche o
danni al prodotto,
– Per mantenere una buona ventilazione, non installare
o sistemare questa unità in uno scaffale per libri,
armadietto incorporato od altro spazio ristretto.
– Non ostruire le aperture di ventilazione dell’unità con
giornali, tovaglie, tende ed altri oggetti simili.
– Non mettere sull’unità sorgenti di fiamme libere,
come candele accese.
• Questa unità è progettata per l’uso nei paesi con clima
temperato.
• Durante l’uso, questa unità potrebbe essere soggetta
alle interferenze radio causate dal cellulare. Se si
dovesse verificare tale interferenza, aumentare la
distanza tra questa unità e il cellulare.
• Questa unità utilizza un laser. L’uso di apparecchi di
controllo o di regolazione, o procedure di utilizzazione
diverse da quelle indicate in questo manuale di
istruzioni, possono causare l’esposizione a radiazioni
pericolose.
• Disporre l’unità su una superficie piana, lontano dalla
luce diretta del sole, da temperature ed umidità elevate
e da vibrazioni eccessive.
• La spina di alimentazione è il dispositivo di
interruzione. Installare questa unità in modo che la
spina di alimentazione possa essere scollegata
immediatamente dalla presa di corrente.
Page 65

Batteria
ITALIANO
offset printing
• Se la batteria non è sostituita correttamente, potrebbe
verificarsi un’esplosione. Per la sostituzione utilizzare
solo batterie di tipo consigliato dal produttore.
• Durante lo smaltimento delle batterie, vi preghiamo di
contattare le autorità locali od il rivenditore ed
informarvi sulle modalità per un corretto smaltimento.
• Non riscaldare o esporre alle fiamme.
• Non lasciare la (le) batteria(e) in un’automobile esposta
alla luce diretta del sole e con sportelli e finestrini chiusi
per un periodo di tempo prolungato.
• Non smontare o cortocircuitare la batteria.
• Non caricare la batteria alcalina o al manganese.
• Non usare la batteria se il coperchio è stato rimosso.
• Rimuovere la batteria se non si intende utilizzare il
telecomando per un periodo di tempo prolungato.
Conservare in un luogo fresco e al buio.
Accessori in dotazione
Controllare e identificare gli accessori in dotazione.
2 Cavi di alimentazione CA
1 Antenna AM a telaio
1 Antenna FM interna
1 Telecomando
(N2QAYB001022)
1 Batteria per il telecomando
Per Regno Unito e Irlanda
1 Adattatore per presa antenna
Licenze
Il marchio denominativo Bluetooth
marchi registrati di proprietà di Bluetooth SIG, Inc. e
qualsiasi utilizzo di tali marchi da parte di Panasonic
Corporation è concesso in licenza. Altri marchi e nomi
di marchi sono di proprietà dei rispettivi proprietari.
Google Play e Android sono marchi di Google Inc.
Tecnologia di codifica audio MPEG Layer-3 concessa in
licenza da Fraunhofer IIS e Thomson.
®
e i loghi sono
ATTENZIONE!
Tenere l’adattatore della spina dell’antenna fuori dalla
portata dei bambini per evitare che venga ingerito.
Nota:
Utilizzare il cavo di alimentazione CA adeguato per la presa di
corrente domestica.
Preparazione del telecomando
Usare batteria alcalina o al manganese.
Installare la batteria in modo che le polarità (+ e –) siano
allineate con quelle del telecomando.
RQT0A38
3
65
Page 66

Disposizione dei diffusori
Tweeter
offset printing
Sistemare i diffusori in modo tale che l’altoparlante si
trovi sul lato esterno.
Usare soltanto i diffusori in dotazione.
Se si usano altri diffusori, si possono causare danni al
sistema e ridurre la qualità dell’audio.
Nota:
• Tenere i diffusori ad una distanza di oltre 10 mm dall’unità
principale per la ventilazione.
• Posizionare i diffusori su una superficie piana sicura.
• Per spostare, inclinare o trasportare i diffusori sono
necessarie varie persone.
ATTENZIONE!
• Utilizzare i diffusori solo con il sistema
consigliato. In caso contrario, si possono causare
danni all’amplificatore e ai diffusori e provocare
incendi. In caso di danni o di evidenti mutamenti
improvvisi nelle prestazioni, rivolgersi a personale
di assistenza autorizzato.
• Non modificare il diffusore o i cavi dei diffusori per
evitare di causare danni al sistema.
• Effettuare le procedure incluse in queste istruzioni
per il collegamento dei diffusori.
• Non toccare le superfici riverberanti del cono del
diffusore:
– si potrebbe danneggiare il cono del diffusore.
– Il cono del diffusore potrebbe essere caldo.
• Fare attenzione quando i bambini sono nelle
vicinanze.
• Non impilare i diffusori.
• Questi diffusori non hanno la schermatura magnetica. Non
posizionarli accanto a televisori, PC o altri apparecchi
facilmente influenzati dal magnetismo.
• Se si effettua la riproduzione a livelli di volume alti per un
periodo prolungato, si possono causare danni ai diffusori e
ridurne la vita utile.
• Abbassare il volume in queste condizioni per evitare danni:
– Quando il suono distorto.
– Quando si regola la qualità del suono.
RQT0A38
4
66
Page 67
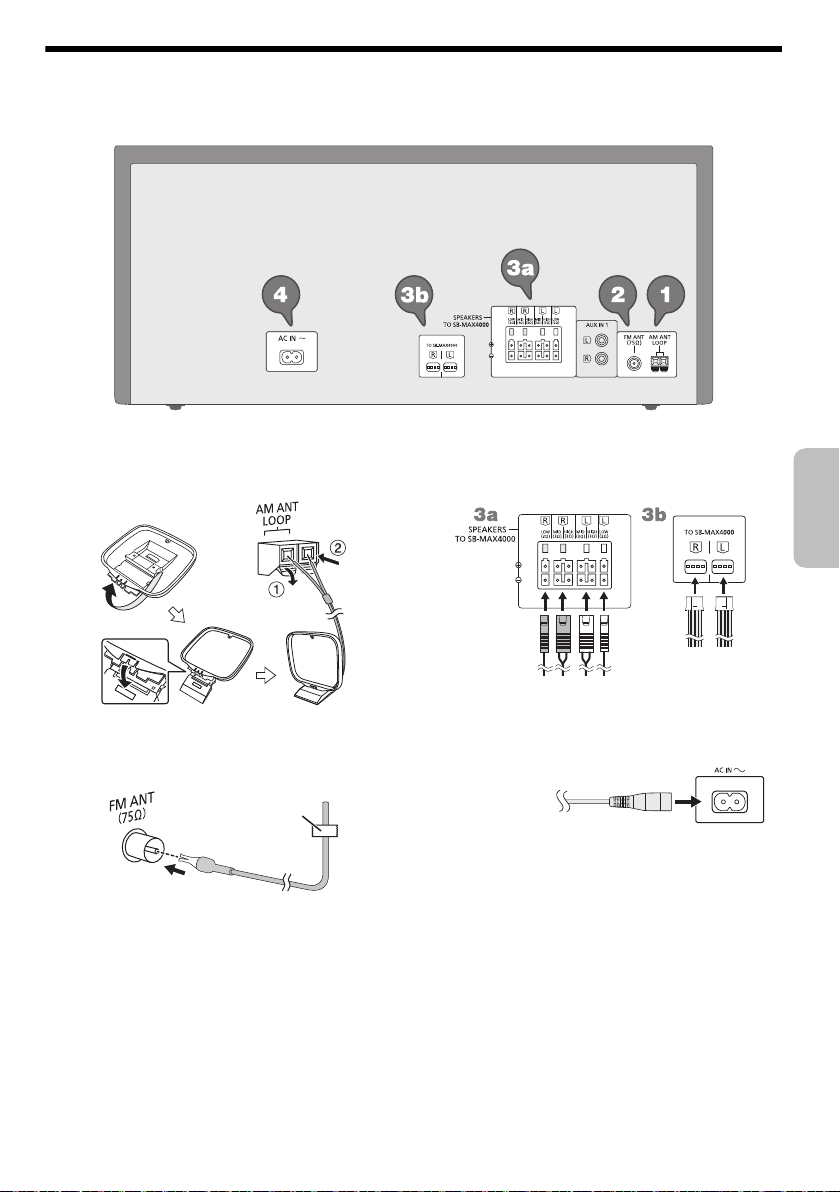
Collegamenti
Nastro adesivo
(non fornito)
Alla presa di
corrente
domestica
ITALIANO
offset printing
Collegare il cavo di alimentazione CA soltanto dopo aver completato tutte le altre connessioni.
1 Collegare l’antenna AM a telaio.
Posizionare l’antenna sulla relativa base finché non
scatta in posizione.
2 Collegare l’antenna FM interna.
Sistemare l’antenna dove la ricezione è migliore.
3 Collegare i diffusori.
Collegare i cavi dei diffusori ai terminali dello stesso
colore.
4 Collegare il cavo di alimentazione CA.
Non usare un cavo di alimentazione CA di altri
apparecchi.
Risparmio di energia
Il sistema consuma poca corrente in modalità di
attesa. Scollegare l’alimentazione se non si utilizza il
sistema.
Alcune impostazioni potrebbero perdesi quando si
scollega il sistema. Effettuare di nuovo le
impostazioni.
RQT0A38
5
67
Page 68

Panoramica dei comandi
offset printing
Eseguire le procedure con il telecomando. È inoltre possibile utilizzare i pulsanti dell’unità principale, qualora
siano uguali.
A Interruttore di attesa/accensione [`], [1]
Premerlo per disporre l’apparecchio nella modalità di
attesa o per accenderlo. Durante la modalità di
attesa, l’apparecchio continua a consumare una
piccola quantità di corrente.
B Visualizzazione le informazioni di contenuto
C Pulsanti numerici
Per selezionare un numero a 2 cifre
Esempio: 16: [ 10]=[1]=[6]
D Preselezione automatica della stazione radio
E Selezione sorgente audio
Sull’unità principale:
Per avviare l’associazione Bluetooth
[ –PAIRING].
F Comando di riproduzione principale
G Selezione degli effetti sonori
H Selezione degli effetti di illuminazione
I Visualizzazione del menu di impostazione
J Controllo registrazione
K Aprire o chiudere l’alloggiamento disco
L Diminuzione della luminosità del pannello del
display
Per annullare, premere di nuovo il pulsante.
M Impostazione del timer di sospensione
N Regolare il livello del volume
O Disattivare l’audio
Per annullare, premere di nuovo il pulsante.
“MUTE” viene annullato quando si regola il volume o
quando si spegne il sistema.
P Selezione dell’album o del brano MP3
Q Selezione di DJ jukebox
R Selezionare o confermare opzione
S Visualizzazione del menu di riproduzione
®
, tenere premuto
RQT0A38
6
68
Page 69
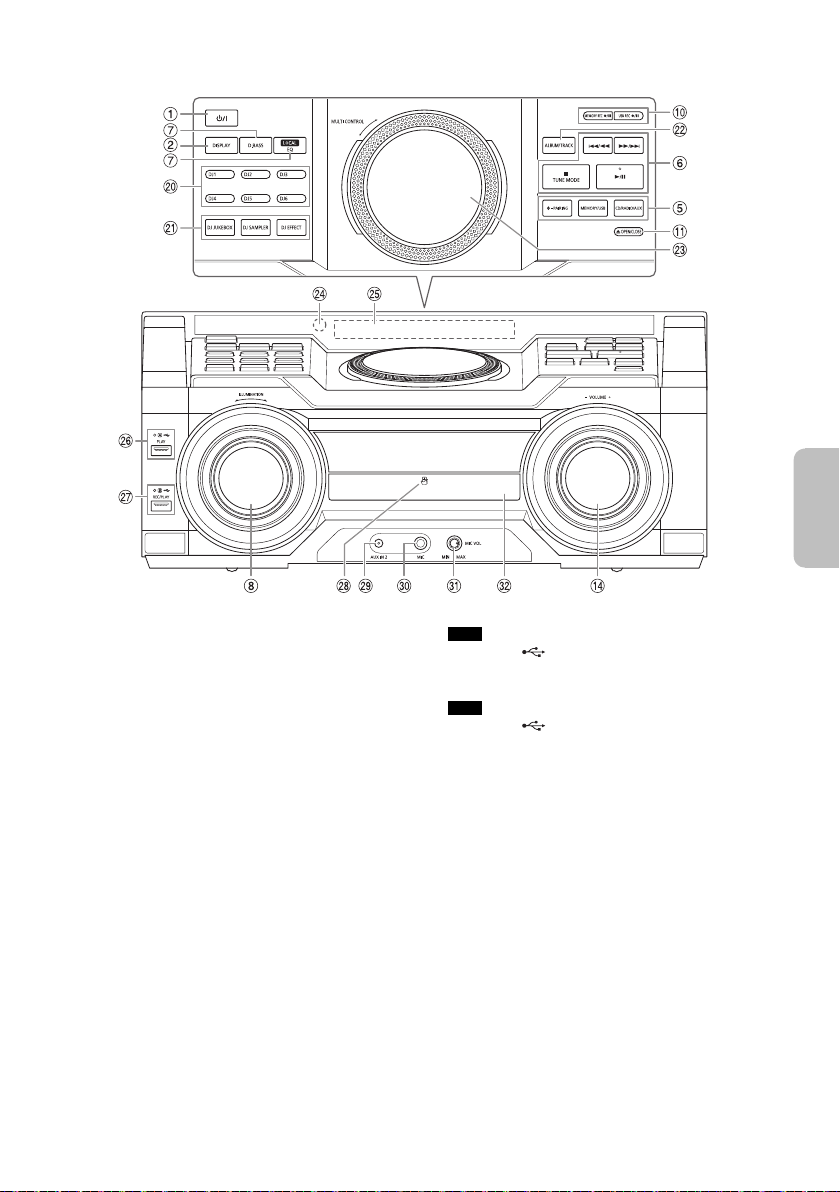
T Pulsanti diretti funzione DJ
Vista frontale
Vista dall’alto
ITALIANO
offset printing
Premere [DJ JUKEBOX], [DJ SAMPLER] o
[DJ EFFECT] per attivare la funzione DJ.
Premere da [DJ1] a [DJ6] sull’unità principale per
selezionare la funzione desiderata.
Per annullare, premere di nuovo da [DJ1] a [DJ6]
selezionato.
U Attivare la funzione DJ.
Per annullare, premere di nuovo il pulsante.
V Selezione dell’album o del brano MP3
Premere [ALBUM/TRACK] per selezionare l’album o il
brano.
Cercare brani o album
Girare [MULTI CONTROL] per cercare.
Premere [4/9] per avviare la riproduzione dalla
selezione.
W Giradischi per DJ e multicontrollo
X Sensore del telecomando
Distanza: Entro circa 7 m
Angolazione: Circa 20° in alto e in basso, 30° a
sinistra e a destra
Y Pannello del display
Z USB A
Porta USB ( )
Indicatore di stato USB
Riproduzione di brani MP3.
a USB B
Porta USB ( )
Indicatore di stato USB
Riproduzione di brani MP3.
Registrare l’audio o i brani musicali.
b Area di tocco NFC
c Presa AUX IN 2
d Presa microfono
e Regolare il livello del volume del microfono
f Alloggiamento disco
RQT0A38
7
69
Page 70

Preparazione del supporto
offset printing
multimediale
Disco
1 Premere di nuovo [CD x] (unità principale:
[x OPEN/CLOSE]) per aprire l’alloggiamento
disco.
Inserire un disco con l’etichetta rivolta verso l’alto.
Premere di nuovo per chiudere l’alloggiamento disco.
2 Premere [CD/RADIO/AUX] per selezionare “CD”.
USB
Preparativi
Prima di collegare un dispositivo USB al sistema,
assicurarsi di effettuare il backup dei dati.
1 Abbassare il volume e collegare il dispositivo USB
alla porta USB.
Mantenere l’unità principale quando si collega o si
scollega il dispositivo USB.
2 Premere [USB] (unità principale: [MEMORY/USB])
per selezionare “USB A” o “USB B”.
L’indicatore di stato USB si accende in rosso quando
viene selezionato.
Nota:
Non usare un cavo di estensione USB. Il sistema potrebbe
non riconoscere il dispositivo USB collegato con un cavo.
Bluetooth
È possibile connettersi e riprodurre un dispositivo audio
in modo wireless tramite Bluetooth
Preparativi
• Attivare la funzione Bluetooth
avvicinarlo al sistema.
• Per i dettagli, leggere le istruzioni per l’uso del
dispositivo.
█ Associazione di un dispositivo
Preparativi
Se il sistema è collegato ad un dispositivo Bluetooth
scollegarlo (Z“Disconnessione di un dispositivo”).
1 Premere [ ].
Se viene visualizzato “PAIRING”, procedere al
punto 4.
2 Premere [PLAY MENU] per selezionare “PAIRING”.
3 Premere [Y, U] per selezionare “OK? YES”, quindi
premere [OK].
Viene visualizzato “PAIRING”.
Per annullare, selezionare “OK? NO”.
®
®
.
®
del dispositivo e
®
,
4 Selezionare “SC-MAX4000” dal menu Bluetooth
del dispositivo.
Se viene richiesta la passkey, digitare “0000”.
Il dispositivo si connette automaticamente al sistema
al termine dell’associazione.
Viene visualizzato il nome del dispositivo collegato
per alcuni secondi.
Uso dell’unità principale
®
1 Tenere premuto [ –PAIRING] finché non viene
visualizzato “PAIRING”.
2 Selezionare “SC-MAX4000” dal menu Bluetooth
del dispositivo.
Nota:
È possibile associare fino a 8 dispositivi con questo sistema.
Se si associa un 9º dispositivo, il dispositivo non utilizzato per
un periodo di tempo superiore viene sostituito.
®
█ Collegamento di un dispositivo
Preparativi
Se il sistema è collegato ad un dispositivo Bluetooth
scollegarlo (Z“Disconnessione di un dispositivo”).
®
,
1 Premere [ ].
Viene visualizzato “BLUETOOTH READY”.
2 Selezionare “SC-MAX4000” dal menu Bluetooth
del dispositivo.
Viene visualizzato il nome del dispositivo collegato
per alcuni secondi.
®
3 Avviare la riproduzione sul dispositivo.
Nota:
• Un dispositivo deve essere associato per effettuare la
connessione.
• Questo sistema può connettersi ad un solo dispositivo per
volta.
• Quando si seleziona “BLUETOOTH” come sorgente, il
sistema cerca di connettersi automaticamente all’ultimo
dispositivo collegato. (Durante questo processo viene
visualizzato “LINKING”.)
█ Disconnessione di un dispositivo
1 Premere [ ].
2 Premere [PLAY MENU] per selezionare
“DISCONNECT?”.
3 Premere [Y, U] per selezionare “OK? YES”, quindi
premere [OK].
Viene visualizzato “BLUETOOTH READY”.
Per annullare, selezionare “OK? NO”.
Uso dell’unità principale
Tenere premuto [ –PAIRING] finché non viene
visualizzato “PAIRING”.
Nota:
Un dispositivo viene disconnesso quando:
• Selezionare un’altra sorgente.
• Si sposta il dispositivo fuori dalla distanza massima.
• Disattiva la trasmissione Bluetooth
• Si spegne il sistema o il dispositivo.
®
del dispositivo.
RQT0A38
8
70
Page 71

█ Connessione con un tocco (NFC)
Dispositivo Bluetooth®
(non fornito)
ITALIANO
offset printing
Solo dispositivi Bluetooth® (dispositivi Android™)
compatibili NFC
Semplicemente toccando un dispositivo Bluetooth
compatibile NFC (Near Field Communication) sul
sistema, è possibile completare tutte le operazioni
preliminari, dalla registrazione di un dispositivo
Bluetooth
®
alla creazione di una connessione.
Per i dispositivi Android con una versione inferiore a 4.1
è necessaria l’installazione dell’app “Panasonic MAX
Juke” (gratuita).
®
A Immettere “Panasonic MAX Juke” nella casella di
ricerca di Google Play™ per cercare e selezionare
“Panasonic MAX Juke”.
B Avviare l’app.
– Per completare le impostazioni, attenersi alle
istruzioni.
– Assicurarsi di utilizzare la versione più recente
dell’app.
Preparativi
Attivare la funzione NFC del dispositivo.
1 Premere [ ].
2 Toccare e tenere il dispositivo nell’area di tocco
NFC dell’unità principale [ ].
– Tenere il dispositivo finché non emette un segnale
acustico, vibra o visualizzata una finestra a
comparsa, quindi allontanare il dispositivo dal
sistema.
– Al termine della registrazione e del collegamento
del dispositivo, sul sistema viene visualizzato il
nome del dispositivo collegato per alcuni secondi.
– Quando non viene stabilita la connessione,
nonostante il dispositivo abbia toccato l’area di
tocco NFC, cambiare la posizione di tocco. La
connessione potrebbe migliorare se si usa l’app
“Panasonic MAX Juke”.
3 Avviare la riproduzione sul dispositivo.
Nota:
• Durante la connessione, è possibile connettersi ad un altro
dispositivo toccando e tenendolo nell’area di tocco NFC
dell’unità principale. Il precedente dispositivo viene
disconnesso automaticamente.
• A seconda del dispositivo:
– La connessione con un tocco potrebbe non funzionare.
– La posizione dell’area tocco NFC del dispositivo
potrebbero essere diverse.
– Quando si stabilisce la connessione, potrebbe avviarsi la
riproduzione automatica.
Riproduzione multimediale
I seguenti contrassegni indicano la disponibilità della
funzione.
CD :
USB :
BLUETOOTH :
MEMORY :
Riproduzione principale
CD USB BLUETOOTH MEMORY
Riprodurre Premere [4/9].
Arresto Premere [8].
Pausa Premere [4/9].
Salto Premere [2] o [6] (unità principale:
Ricerca Tenere premuto [3] o [5]
Nota:
A seconda del dispositivo Bluetooth
potrebbero non funzionare.
Visualizzazione delle informazioni
disponibili
CD USB BLUETOOTH MEMORY
È possibile visualizzare le informazioni disponibili, ad
esempio album MP3 o numero di brano, sul pannello del
display.
Premere [DISPLAY].
Nota:
• Caratteri massimi visualizzabili: Circa 32
• Questo sistema supporta ID3 tag versione 1.0, 1.1 e 2.3.
• I dati di testo non supportati dal sistema possono apparire
CD-R/RW in formato CD-DA o con file MP3.
Dispositivo USB con file MP3.
Dispositivo Bluetooth
Memoria interna da 2 GB (fare riferimento a
“Registrazione” per aggiungere brani nella
memoria interna).
USB MEMORY
La posizione è memorizzata.
Viene visualizzato “RESUME”.
Premere di nuovo per arrestare
completamente.
Premere di nuovo per continuare la
riproduzione.
[2/3] o [5/6]) per saltare il
brano.
CD USB MEMORY
Premere [R, T] per saltare l’album MP3.
(unità principale: [2/3] o [5/6]).
in modo differente.
®
.
®
, alcune operazioni
RQT0A38
9
71
Page 72

Menu di riproduzione
offset printing
CD USB MEMORY
1 Premere [PLAY MENU].
2 Premere [Y, U] per selezionare l’impostazione,
quindi premere [OK].
OFF
PLAYMODE
1-TRACK
1
1-ALBUM
1
RANDOM
RND
1-ALBUM
RANDOM
1 RND
ALL REPEAT Ripetere tutti i brani.
1-TRACK
REPEAT
1
1-ALBUM
REPEAT
1
RANDOM
REPEAT
RND
1-ALBUM
RANDOM
REPEAT
1 RND
Nota:
• Durante la riproduzione casuale, non si può saltare ai brani
già riprodotti.
• Quando si apre l’alloggiamento del disco, l’impostazione
viene annullata.
Annullare l’impostazione.
Riprodurre un brano selezionato.
Premere i pulsanti numerici per
selezionare il brano.
Riprodurre un album MP3 selezionato.
Premere [R, T] per selezionare
l’album MP3.
Riprodurre tutti i brani in ordine
casuale.
Riprodurre in ordine casuale tutti i
brani di un album MP3 selezionato.
Premere [R, T] per selezionare
l’album MP3.
Ripetere 1-TRACK.
Ripetere 1-ALBUM.
Ripetizione della riproduzione casuale.
Ripetere 1-ALBUM RANDOM.
█ Nota sui disco
• Questo sistema è in grado di riprodurre CD-R/RW con
contenuto in formato CD-DA o MP3.
• Prima di riprodurlo, finalizzare il disco sul dispositivo
con cui è stato registrato.
• Alcuni CD-R/RW potrebbero non essere riprodotti a
causa delle condizioni della registrazione.
█ Nota sul dispositivo USB
• Il sistema non garantisce la connessione con tutti i
dispositivi USB.
• Il sistema supporta USB 2.0 ad alta velocità.
• Il sistema è in grado di supportare dispositivi USB fino
a 32 GB.
• È supportato solo il file system FAT 12/16/32.
█ Nota sul file MP3
• I file sono definiti come brani e le cartelle sono definite
come album.
• I brani devono avere l’estensione “.mp3” o “.MP3”.
• I brani non saranno riprodotti necessariamente
nell’ordine in cui sono stati registrati.
• Alcuni file potrebbero non funzionare a causa delle
dimensioni del settore.
File MP3 su disco
• Il sistema può eseguire l’accesso ad un massimo di:
– 255 album (compresa la cartella principale)
–999 brani
– 20 sessioni
• I dischi devono essere conformi al livello 1 o 2 ISO9660
(eccetto per i formati lunghi).
File MP3 su dispositivo USB
• Il sistema può eseguire l’accesso ad un massimo di:
– 800 album (compresa la cartella principale)
– 8000 brani
– 999 brani in un album
Modalità di collegamento
BLUETOOTH
È possibile cambiare la modalità di collegamento in base
al tipo di connessione.
Preparativi
Se il sistema è collegato ad un dispositivo Bluetooth
scollegarlo (Z“Disconnessione di un dispositivo”).
1 Premere [PLAY MENU] per selezionare
“LINK MODE”.
2 Premere [Y, U] per selezionare la modalità, quindi
premere [OK].
MODE 1 Enfasi sulla connettività.
MODE 2 Enfasi sulla qualità del suono.
RQT0A38
Nota:
Selezionare “MODE 1” se il suono interrotto.
10
72
®
,
Page 73

Radio
ITALIANO
offset printing
Preparativi
Premere [CD/RADIO/AUX] per selezionare “FM” o “AM”.
Sintonizzazione manuale
Premere [3] o [5] per sintonizzarsi sulla
stazione.
Per la sintonizzazione automatica, tenere premuto il
pulsante finché la frequenza non inizia a cambiare
rapidamente.
“STEREO” si visualizza quando si riceve una
trasmissione stereo.
Uso dell’unità principale
1 Premere [TUNE MODE] per selezionare
“MANUAL”.
2 Premere [2/3] o [5/6] per sintonizzarsi
sulla stazione.
Preselezione di memoria
È possibile preselezionare fino a 30 stazioni FM e 15
stazioni AM.
█ Preselezione automatica
1 Premere [AUTO PRESET] per selezionare
“LOWEST” o “CURRENT”.
LOWEST La sintonizzazione inizia dalla
CURRENT La sintonizzazione inizia dalla
2 Premere [OK] per cominciare la preselezione.
Il sintonizzatore preseleziona nei canali tutte le
stazioni che può ricevere in ordine ascendente.
Per annullare, premere [8].
█ Preselezione manuale
1 Premere [3] o [5] (unità principale:
[2/3] o [5/6]) per sintonizzarsi sulla
stazione.
2 Premere [OK].
3 Premere i pulsanti numerici per selezionare un
numero preselezionato.
Ripetere i punti da 1 a 3 per preselezionare altre
stazioni.
La nuova stazione sostituisce la stazione che occupa
lo stesso numero preselezionato.
frequenza più bassa.
frequenza corrente.
█ Selezione di una stazione di preselezione
Premere i pulsanti numerici, [2] o [6] per
selezionare la stazione preselezionata.
Uso dell’unità principale
1 Premere [TUNE MODE] per selezionare
“PRESET”.
2 Premere [2/3] o [5/6] per selezionare la
stazione preselezionata.
Migliorare la qualità dell’audio
Quando si seleziona “FM”
1 Premere [PLAY MENU] per selezionare
“FM MODE”.
2 Premere [Y, U] per selezionare “MONO”, quindi
premere [OK].
Per annullare, selezionare “STEREO”.
Anche “MONO” viene cancellato quando si cambia la
frequenza.
Per memorizzare l’impostazione
Continuare con il punto 2 di “Preselezione manuale”.
Quando si seleziona “AM”
1 Premere [PLAY MENU] per selezionare
“BEATPROOF”.
2 Premere [Y, U] per selezionare l’impostazione per
garantire una ricezione ottimale, quindi premere
[OK].
Impostazione di attribuzione AM
Solo con l’unità principale
Questo sistema è inoltre in grado di ricevere trasmissioni
in AM a cui sono stati attribuiti intervalli da 10 kHz.
1 Premere [CD/RADIO/AUX] per selezionare “FM” o
“AM”.
2 Tenere premuto [CD/RADIO/AUX].
Dopo qualche secondo, il pannello del display visualizza
la frequenza radio minima corrente. Rilasciare il pulsante
quando la frequenza minima cambia.
• Per tornare all’impostazione iniziale, ripetere i punti
precedenti.
• Dopo aver modificato l’impostazione, le frequenze
preselezionate vengono cancellate.
11
73
RQT0A38
Page 74
Registrazione
offset printing
Questo sistema può registrare fino a 800 cartelle
(massimo 999 brani in un album) o un totale di 8000 brani
a seconda della capacità di memorizzazione della
memoria interna o del dispositivo USB in
Per controllare lo spazio di memoria
In modalità di arresto, premere [DISPLAY].
• “UPDATE” viene visualizzato quando il sistema legge il
dispositivo.
• “NO DEVICE” viene visualizzato se non viene collegato
alcun dispositivo USB a
Nota:
• Tutte le registrazioni sono in formato “.mp3”.
• Non è possibile effettuare la registrazione quando si usa la
modalità di riproduzione casuale.
• La funzione DJ viene disattivata durante la registrazione.
• La modalità di riproduzione ripetuta viene disattivata
durante la registrazione.
• Ogni volta che si esegue una registrazione si aggiunge un
nuovo album.
• La sequenza dell’album può variare dopo la registrazione.
• Le registrazioni vengono salvate in una cartella denominata
“REC_DATA” nel dispositivo USB.
• L’indicatore di stato USB lampeggia in rosso durante la
registrazione USB.
Registrazione basilare
1 Selezionare la sorgente da registrare.
CD-DA
Preparare la modalità di riproduzione del disco.
Registra tutti i
brani
Registra un
brano specificato
Assicurarsi che il disco sia arrestato.
Radio
Sintonizzazione sulla stazione radio.
Apparecchi esterni
Collegare e avviare l’apparecchio (Z“Apparecchi
esterni”).
2 Premere [MEMORY REC 7/9] o [USB REC 7/9]
per cominciare la registrazione.
Viene visualizzato il nome della cartella in cui è
salvata la registrazione.
Terminare la
registrazione
Pausa della
registrazione
RQT0A38
12
74
USB B .
Selezionare “OFF PLAYMODE”
(Z“Menu di riproduzione”).
Selezionare “1-TRACK”
(Z“Menu di riproduzione”).
Premere [8]. Viene visualizzato
“WRITING”.
Premere [MEMORY REC 7/9] o
[USB REC 7/9] durante la
registrazione.
Premere di nuovo per continuare la
registrazione.
Nota:
È possibile mettere in pausa durante la
registrazione dalla radio, da AUX 1 o
AUX 2 (ad eccezione della modalità
“SYNCHRO”). Ogni volta che si effettua
una pausa viene inserito un segmento
traccia (Z“Aggiunta di segmenti
traccia”).
USB B .
Nota:
• Attendere qualche secondo che il sistema prepari il
dispositivo USB prima di avviare la registrazione.
• Sul display viene visualizzato il brano successivo del disco
registrato.
█ Registrazione ad alta velocità
Velocità di registrazione CD-DA disco:
CD, CD-R: Tre volte (3x) la velocità normale.
CD-RW: Due volte (2x) la velocità normale.
1 Inserire il disco da registrare.
2 Premere [REC MODE] per selezionare “NORMAL”
o “HI-SPEED”, quindi premere [OK].
3 Premere [USB REC 7/9] o [MEMORY REC 7/9]
per cominciare la registrazione.
Nota:
• Se non è possibile registrare ad alta velocità a causa delle
condizioni del disco, registrare a velocità normale.
• L’audio viene passato in modalità muto durante la
registrazione ad alta velocità.
█ Aggiunta di segmenti traccia
Quando si effettua la registrazione da una radio o
apparecchiature esterne, è possibile suddividere i brani
mediante varie modalità.
Prima di registrare
Premere [REC MODE] per selezionare la modalità.
MANUAL Aggiungere manualmente un
SYNCHRO
(Per sorgente
AUX 1 e AUX 2)
TIME MARK Un brano viene automaticamente
Nota:
• Durante la registrazione, se si preme [OK] o si mette in
pausa la registrazione mentre si utilizza la modalità
“TIME MARK”, il conteggio dei 5 minuti viene azzerato.
• Non è possibile aggiungere manualmente i segmenti
traccia in modalità “SYNCHRO”.
segmento traccia.
Per aggiungere un segmento traccia,
premere [OK] durante la registrazione.
La registrazione si avvia
automaticamente quando l’altro
apparecchio inizia la riproduzione.
La registrazione viene messa in pausa
quando non viene rilevato alcun suono
per 3 secondi.
suddiviso in intervalli di 5 minuti.
Registrazione di brani MP3
È possibile registrare brani MP3 da:
• Disco MP3 a
•
USB A a USB B o memoria interna
•
USB B a memoria interna o viceversa
USB B o memoria interna
1 Preparare la sorgente da registrare.
Registra tutti i
brani
Registra l’album
o il brano
specificato
Selezionare “OFF PLAYMODE”
(Z“Menu di riproduzione”).
Selezionare “1-ALBUM” o
“1-TRACK” (Z“Menu di
riproduzione”).
Page 75
2 Premere [MEMORY REC 7/9] o [USB REC 7/9]
ITALIANO
offset printing
per cominciare la registrazione.
Terminare la
registrazione
Nota:
• La registrazione di alcuni brani potrebbe richiedere più
tempo.
• Alcuni brani non possono essere registrati a causa delle
condizioni della sorgente.
• Quando si registra da disco MP3, il nome del file registrato
è diverso dal file originale.
• Quando si registra da USB A , il nome del file registrato è
uguale al file originale (massimo 32 caratteri).
Premere [8].
La registrazione si arresta all’ultimo
brano completamente registrato
dell’album. Esempio, se si arresta la
registrazione al quarto brano, vengono
registrati solamente i primi tre brani.
“NO FILE RECORDED” viene
visualizzato se non si è registrato
alcun brano.
Eliminazione dei brani registrati
1 MEMORY
Premere [MEMORY] (unità principale:
[MEMORY/USB]) per selezionare “MEMORY”.
USB B
Premere [USB] (unità principale: [MEMORY/USB])
per selezionare “USB B”.
2 Premere [R, T] per selezionare l’album.
3 Premere [2] o [6] per selezionare il brano.
4 Premere [EDIT MODE] per selezionare la modalità.
TRACK DEL Eliminare un singolo brano.
ALBUM DEL Eliminare un album (massimo 999
FORMAT Formattare il dispositivo USB.
ALL DEL Eliminare tutti gli album della
brani).
memoria interna.
5 Premere [OK].
Viene visualizzata la voce selezionata da eliminare.
6 Premere [OK].
Viene visualizzato “SURE? NO”.
7 Premere [Y, U] per selezionare “SURE? YES”,
quindi premere [OK].
Viene visualizzato “WRITING”.
Per annullare, selezionare “SURE? NO”.
Effetti sonori e di
illuminazione
Effetti sonori
EQ Preselezionato (Preset EQ)
1 Premere [EQ] (unità principale: [LOCAL EQ]) per
selezionare “PRESET EQ”.
2 Premere [R, T] per selezionare l’impostazione EQ
preselezionato, quindi premere [OK].
O girare [MULTI CONTROL] per selezionare
l’impostazione EQ preselezionato.
EQ Manuale (Manual EQ)
1 Premere [EQ] (unità principale: [LOCAL EQ]) per
selezionare “MANUAL EQ”.
2 Premere [R, T] per selezionare l’effetto sonoro.
O girare [MULTI CONTROL] per selezionare l’effetto
sonoro.
3 Premere [Y, U] per selezionare l’impostazione,
quindi premere [OK].
O premere [2/3] o [5/6] per selezionare
l’impostazione.
BASS/MID/TREBLE –4 a +4
SURROUND “ON SURROUND” o
D.Bass
1 Premere [D.BASS] per selezionare
“D.BASS LEVEL” o “D.BASS BEAT”.
Per annullare, selezionare “OFF D.BASS”.
2 Premere [R, T] per selezionare l’impostazione,
quindi premere [OK].
O girare [MULTI CONTROL] per selezionare
l’impostazione.
Nota:
D.BASS BEAT: Questa funzione enfatizza il livello di attacco
del rullo di tamburi e produce un suono incisivo. A seconda
del brano, l
’effetto potrebbe essere ridotto.
Effetti di illuminazione
È possibile modificare l’effetto di illuminazione sul
sistema.
Premere [ILLUMINATION] per selezionare l’effetto
desiderato.
COLOR Illuminano in un colore.
AUTO Illuminano in un colore. Il colore cambia
OFF Annulla l’effetto.
È inoltre possibile premere [R, T] per selezionare
l’effetto successivo o precedente.
Uso dell’unità principale
Girare [ILLUMINATION].
automaticamente.
“OFF SURROUND”
13
75
RQT0A38
Page 76

Funzioni DJ
offset printing
È possibile utilizzare le funzioni DJ per aggiungere un
effetto sonoro o un suono di campionamento tra i brani.
Uso dell’app “Panasonic MAX Juke”
È possibile scaricare e installare l’app gratuita per
“Panasonic MAX Juke” su Google Play per funzioni
supplementari, ad esempio richiedere la riproduzione
del brano da vari dispositivi contemporaneamente.
Nota:
La funzione DJ viene annullata quando si spegne il sistema, si
passa ad un’altra sorgente o durante la registrazione.
DJ jukebox
USB MEMORY
Premere [JUKEBOX] (unità principale:
[DJ JUKEBOX]).
Per annullare, selezionare “OFF”.
Nota:
Il sistema passa automaticamente alla modalità di ripetizione
quando si accende DJ jukebox.
█ Cambiamento dell’impostazione di
ripetizione
1 Premere [PLAY MENU].
2 Premere [Y, U] per selezionare l’impostazione,
quindi premere [OK].
Uso dell’unità principale
In modalità di arresto, girare [MULTI CONTROL] per
selezionare l’impostazione, quindi premere [4/9].
RANDOM
REPEAT
RND
ALL TITLE
REPEAT
RANDOM MIX
REPEAT
RND
Quando viene visualizzato “WAITING REQUEST”, è
possibile procedere al punto successivo senza utilizzare
l’app “Panasonic MAX Juke”.
█ Modifica dell’effetto DJ jukebox
Premere da [DJ1] a [DJ6] sull’unità principale per
selezionare l’effetto.
[DJ1]
[DJ2] a [DJ6]
RQT0A38
Per annullare, premere di nuovo il pulsante.
14
76
Ripetizione della riproduzione
casuale.
Ripetere tutti i brani.
Ripetizione della riproduzione
casuale. Viene aggiunto suono di
campionamento agli intervalli di tutti i
brani.
Effetto di dissolvenza
brano attuale diventa gradualmente
basso e il volume del brano
successivo diventa gradualmente alto.
Mix suono di campionamento
aggiunto suono di campionamento
agli intervalli di tutti i brani.
: Il volume del
: Viene
Nota:
Non è possibile selezionare l’effetto DJ jukebox quando si usa
la modalità “RANDOM MIX REPEAT”.
Uso dell’app “Panasonic MAX Juke”
È possibile richiamare i brani da riprodurre tramite
l’app.
• Quando viene visualizzato “MAKING LIST” è
possibile richiamare una parte dei brani.
• Quando viene visualizzato “WAITING REQUEST”, è
possibile richiamare i brani da riprodurre tramite
l’app.
Campionatore DJ
(Eccetto sorgente AUX 1 e AUX 2)
Solo con l’unità principale
Attivando [MULTI CONTROL], è possibile applicare il
suono dello scratch o di campionamento al brano in fase
di riproduzione.
1 Premere [DJ SAMPLER].
2 Premere da [DJ1] a [DJ6] per selezionare l’effetto
sonoro desiderato.
3 Girare [MULTI CONTROL].
Per annullare il campionatore DJ
Premere [DJ SAMPLER].
Uso dell’app “Panasonic MAX Juke”
È possibile modificare il suono di campionamento
sull’app. (Per ripristinare le impostazioni di fabbrica di
tutti i suoni di campionamento, tenere premuto
[DJ SAMPLER] con il campionatore DJ spento.)
Effetto DJ
(Eccetto sorgente AUX 1 e AUX 2)
Solo con l’unità principale
È possibile utilizzare l’effetto DJ per aggiungere effetti
sonori.
1 Premere [DJ EFFECT].
2 Premere da [DJ1] a [DJ6] per selezionare l’effetto.
[DJ1] PHASER
Aggiungere spazio e dimensione all’audio.
[DJ2] FILTER
Migliorare o filtrare le gamme specifiche
dell’audio.
[DJ3] SOUND CHOPPER
Interrompere periodicamente l’audio.
[DJ4] ELECTRO ECHO
Aggiungere eco digitale all’audio.
[DJ5] PITCH SHIFTER
Regolare i tasti dell’audio.
[DJ6] HARMONIZER
Aggiungere note all’auto per creare
armonia.
3 Girare [MULTI CONTROL] per selezionare
l’impostazione.
Per annullare l’effetto DJ
Premere [DJ EFFECT].
Page 77
Uso di un microfono
ITALIANO
offset printing
Preparativi
Abbassare il volume del sistema al minimo prima di
collegare o scollegare un microfono.
1 Collegare un microfono (non fornito) alla presa
corrispondente.
Tipo di spina: Ø 6,3 mm mono
2 Girare [MIC VOL, MIN/MAX] sull’unità principale
per regolare il volume del microfono.
Per cantare con musica di sottofondo.
3 Riprodurre la sorgente musicale e regolare il
volume del sistema.
Nota:
• Se viene emesso un rumore strano (tipo fischio),
allontanare il microfono dai diffusori o abbassare il volume
del microfono.
• Se non si utilizza il microfono, scollegarlo dalla presa
corrispondente e abbassate il volume del livello del
microfono a “MIN”.
• Questo sistema non è in grado di registrare da microfono.
Orologio e timer
Impostazione dell’orologio
Questo è un orologio con formato a 24 ore.
1 Premere [SETUP] per selezionare “CLOCK”.
2 Premere [Y, U] per impostare l’ora, quindi
premere [OK].
Per controllare l’ora
Premere [SETUP] per selezionare “CLOCK”.
In modalità di attesa, premere [DISPLAY].
Nota:
Ripristinare l’orologio regolarmente per mantenerne la
precisione.
Timer di riproduzione e timer di
registrazione
(Eccetto sorgente Bluetooth®, AUX 1 e AUX 2)
È possibile impostare i timer in maniera che l’unità si
accenda a una data ora per:
• Funzionare come sveglia (timer riproduzione).
• Registrare dalla radio (timer registrazione)
Il timer di riproduzione e il timer di registrazione non
possono essere usati insieme.
Preparativi
Impostare l’orologio.
1 Premere [SETUP] per selezionare “TIMER ADJ”.
2 Premere [Y, U] per selezionare “#PLAY” o
“#REC”, quindi premere [OK].
3 Premere [Y, U] per impostare l’ora di inizio, quindi
premere [OK].
4 Ripetere il punto 3 per impostare l’ora della fine.
5 Premere [Y, U] per selezionare la sorgente da
riprodurre o registrare, quindi premere [OK].
6 Per il timer di registrazione, premere [Y, U] per
selezionare “MEMORY” o “USB B” per salvare la
registrazione, quindi premere [OK].
Per avviare il timer
1 Preparare la sorgente.
Timer di
riproduzione
Timer di
registrazione
Preparare la sorgente che si
desidera ascoltare (disco, USB,
memoria interna o radio) e
impostare il volume.
Collegare il dispositivo USB alla
USB B (per la registrazione USB) e
sintonizzarsi sulla stazione radio.
2 Premere [SETUP] per selezionare “TIMER SET”.
3 Premere [Y, U] per selezionare l’impostazione,
quindi premere [OK].
PLAY ON Avviare il timer di riproduzione.
PLAY OFF Annullare il timer di riproduzione.
REC ON Avviare il timer di registrazione.
REC OFF Annullare il timer di registrazione.
Viene visualizzato “#”.
Il sistema deve essere spento per permettere al timer
di funzionare.
Per controllare l’impostazione
1 Premere [SETUP] per selezionare “TIMER ADJ”.
2 Premere [Y, U] per selezionare “#PLAY” o
“#REC”, quindi premere [OK].
In modalità di attesa, premere due volte [DISPLAY].
Nota:
• Il timer di riproduzione si avvia a basso volume e aumenta
gradualmente fino al livello preimpostato.
• Il timer di registrazione si avvia 30 secondi prima del tempo
impostato con il volume disattivato.
• Il timer si accende ogni giorno all’ora impostata se è
attivato.
• Se si spegne e riaccende il sistema mentre il timer è in
funzione, il timer non si arresta all’ora della fine.
15
77
RQT0A38
Page 78
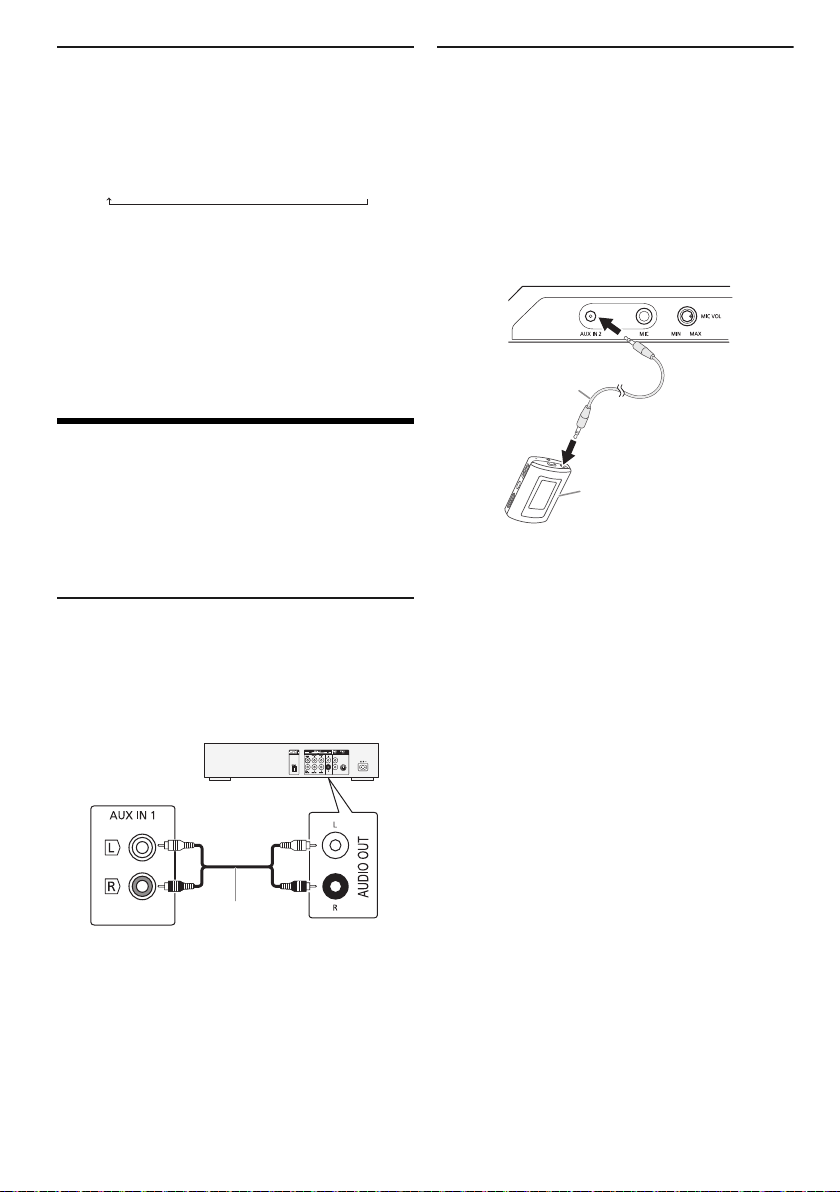
Timer di sospensione
Panello
posteriore
dell’unità
principale
Cavo audio
(non fornito)
Lettore DVD
(non fornito)
Cavo audio
(non fornito)
Apparecchio
audio portatile
(non fornito)
offset printing
Il timer di sospensione spegne il sistema una volta
trascorso il tempo impostato.
Premere [SLEEP] per selezionare l’impostazione (in
minuti).
Per annullare, selezionare “OFF”.
NIM03 ĺ120 MINĺĺ 60 MINĺ90 MIN FFO
Nota:
• Il tempo residuo viene sempre visualizzato sul display. Il
display cambia temporaneamente quando si eseguono
altre operazioni.
• I timer di riproduzione e di sospensione, oppure i timer di
registrazione e di sospensione possono essere usati
insieme.
• Il timer di sospensione ha sempre la precedenza. Accertarsi
che le impostazioni dei timer non si sovrappongano.
Apparecchi esterni
Preparativi
• Staccare il cavo di alimentazione CA.
• Spegnere tutte le apparecchiature e leggere le relative
istruzioni per l’uso.
Nota:
I componenti e i cavi sono venduti separatamente.
Uso dell’ingresso ausiliario
È possibile eseguire il collegamento di un
videoregistratore, lettore DVD, ecc. e ascoltare l’audio da
questo sistema.
Collegamento ad un apparecchio audio
portatile
È possibile riprodurre musica da un apparecchio audio
portatile.
Preparativi
• Spegnere l’equalizzatore (se presente)
dell’apparecchio audio portatile per evitare la
distorsione del suono.
• Abbassare il volume del sistema e dell’apparecchio
audio portatile prima di collegare e scollegare
l’apparecchio audio portatile.
1 Collegare l’apparecchio audio portatile.
Tipo di spina: Ø 3,5 mm stereo
2 Premere [CD/RADIO/AUX] per selezionare
“AUX 2”.
3 Riproduzione dall’apparecchio audio portatile.
Per regolare il livello di ingresso
1 Premere [PLAY MENU] per selezionare
“INPUT LEVEL”.
2 Premere [Y, U] per selezionare “NORMAL” o
“HIGH”, quindi premere [OK].
Nota:
• Non è possibile regolare il livello di ingresso durante la
registrazione.
• Selezionare “NORMAL” (normale) se il suono risulta
distorto in caso di livello di ingresso “HIGH” (alto).
• Per i dettagli, leggere le istruzioni per l’uso dell’apparecchio
audio portatile.
1 Collegare le apparecchiature esterne.
2 Premere [CD/RADIO/AUX] per selezionare
3 Riprodurre le apparecchiature esterne.
Nota:
• Per collegare apparecchiature diverse da quelle descritte,
• Si può verificare una distorsione del suono quando si usa
RQT0A38
16
78
“AUX 1”.
rivolgersi al rivenditore di prodotti audio.
un adattatore.
Page 79

Altri
ITALIANO
offset printing
Spegnimento automatico
Il sistema si spegne automaticamente se non viene
utilizzato per circa 20 minuti.
1 Premere [SETUP] per selezionare “AUTO OFF”.
2 Premere [Y, U] per selezionare “ON”, quindi
premere [OK].
Per annullare, selezionare “OFF”.
Nota:
Questa funzione non è disponibile quando la sorgente è radio
o quando è connesso un dispositivo Bluetooth
Attesa Bluetooth
La funzione si attiva automaticamente sul sistema
quando si stabilisce una connessione Bluetooth
dispositivo associato.
®
®
.
®
da un
1 Premere [SETUP] per selezionare
“BLUETOOTH STANDBY”.
2 Premere [Y, U] per selezionare “ON”, quindi
premere [OK].
Per annullare, selezionare “OFF”.
Nota:
La risposta sarà più lunga per alcuni dispositivi. Se si è
connessi ad un dispositivo Bluetooth
sistema, attendere minimo 5 secondi prima di connettersi di
nuovo al sistema dal dispositivo Bluetooth
®
prima di spegnere il
®
.
Versione software
È possibile controllare la versione software del sistema.
1 Premere [SETUP] per selezionare “SW VER.”,
quindi premere [OK].
Viene visualizzata la versione software.
2 Premere di nuovo [OK] per uscire.
Manutenzione
Per pulire il sistema, strofinarlo con un panno
morbido e asciutto.
• Per pulire il sistema non si devono mai usare alcol,
diluenti per vernici o benzina.
• Prima di usare un panno trattato chimicamente,
leggere attentamente le istruzioni che lo
accompagnano.
Risoluzione dei problemi
Prima di chiamare il tecnico per la riparazione, procedere
con la seguente verifica. In caso di dubbi su alcuni punti
da controllare o se i rimedi indicati non risolvono il
problema, rivolgersi al rivenditore per ulteriori istruzioni.
█ Problemi comuni
L’unità non funziona.
• La dispositivo di sicurezza è stata attivata. Agire come
segue:
1. Premere [1] sull’unità principale per portare l’unità in
modalità di attesa. Se l’unità non passa in modalità di
attesa,
– Tenere premuto il pulsante per un minimo di
10 secondi. O,
– Scollegare il cavo di alimentazione CA e ricollegarlo.
2. Premere di nuovo [1] per accendere l’unità. Se il
problema persiste, rivolgersi al rivenditore.
In modalità di attesa, il display si illumina e cambia
continuamente.
• Tenere premuto [8] sull’unità principale per selezionare
“DEMO OFF”.
Non è possibile effettuare alcuna operazione con il
telecomando.
• Verificare che la batteria sia installata correttamente.
Suono distorto o nessun suono.
• Regolare il volume del sistema.
• Spegnere il sistema, individuare e correggere la causa,
quindi accenderlo nuovamente. Tale situazione può
derivare dal sovraccarico dei diffusori a causa di eccessivo
volume o potenza e dall’uso del sistema in un ambiente
molto caldo.
Si sente un ronzio durante la riproduzione.
• Cavo di alimentazione CA o lampada a fluorescenza vicini
ai cavi. Tenere gli altri apparecchi e cavi lontano dai cavi di
questo sistema.
Il livello audio si riduce.
• Il circuito di protezione è stato attivato a seguito dell’uso
continuo a volume alto. Consente di proteggere il sistema e
mantenere la qualità audio.
█ Disco
Display visualizzato non correttamente.
La riproduzione non si avvia.
• Il disco non è stato inserito correttamente. Inserirlo
correttamente.
• Il disco è sporco. Pulire il disco.
• Sostituire il disco se è graffiato, ondulato o non conforme
agli standard.
• Vi è condensa. Far asciugare il sistema per 1 o 2 ore.
Il numero totale di brani visualizzato è errato.
Impossibile leggere il disco.
Si sente un suono distorto.
• Si è inserito un disco non riproducibile dal sistema. Inserire
un disco riproducibile.
• Si è inserito un disco non finalizzato.
17
79
RQT0A38
Page 80

█ USB
offset printing
Impossibile leggere il dispositivo USB o i contenuti.
• Il formato del dispositivo USB o i suoi contenuti non sono
compatibili con il sistema.
• I dispositivi USB con capacità di archiviazione di oltre
32 GB potrebbero non funzionare in alcune condizioni.
Il dispositivo USB funziona lentamente.
• La lettura del dispositivo USB di grandi dimensioni o dotato
di una capacità di archiviazione elevata richiede più tempo.
█ Bluetooth
Non è possibile effettuare l’associazione.
• Verificare le condizioni del dispositivo Bluetooth
• Il dispositivo è fuori dalla distanza di comunicazione di
10 m. Avvicinare il dispositivo al sistema.
Non è possibile connettere il dispositivo.
• L’associazione del dispositivo non è stata completata
correttamente. Effettuare di nuovo l’associazione.
• L’associazione del dispositivo sia stata sostituita. Effettuare
di nuovo l’associazione.
• Questo sistema potrebbe non connettersi ad un altro
dispositivo. Scollegare l’altro dispositivo e cercare di
associare di nuovo il dispositivo.
• Il sistema potrebbe presentare anomalie. Spegnere e
riaccendere il sistema.
Il dispositivo è connesso, ma non è possibile sentire
l’audio dal sistema.
• Per alcuni dispositivi Bluetooth
impostare manualmente l’uscita audio su “SC-MAX4000”.
Per i dettagli, leggere le istruzioni per l’uso del dispositivo.
L’audio dal dispositivo è interrotto.
• Il dispositivo è fuori dalla distanza di comunicazione di
10 m. Avvicinare il dispositivo al sistema.
• Rimuovere tutti gli ostacoli tra il sistema e il dispositivo.
• Altri dispositivi che usano la banda di frequenza 2,4 GHz
(router wireless, forni a microonde, cordless, ecc.) causano
interferenze. Avvicinare il dispositivo al sistema e
allontanarlo da altri dispositivi.
• Selezionare “MODE 1” per una comunicazione stabile.
Il collegamento con un tocco (NFC) non funziona.
• Assicurarsi che il sistema e la funzione NFC del dispositivo
siano attivati.
• Toccare e tenere di nuovo il dispositivo nell’area di tocco
NFC del sistema.
L’immagine e l’audio riprodotti non sono sincronizzati.
• Riavviare l’app di riproduzione del dispositivo.
• Collegare il dispositivo al sistema con un cavo audio (non
fornito).
®
®
integrati, è necessario
█ Radio
Suono distorto.
• Usare una antenna FM esterna opzionale. L’antenna deve
essere installata da un tecnico competente.
Si sentono dei rumori tipo battiti.
• Spegnere il televisore o allontanarlo dal sistema.
• Allontanare i telefoni cellulari dal sistema in caso di
interferenza.
• In modalità sintonizzatore AM, selezionare l’impostazione
“BEATPROOF” per garantire una ricezione ottimale.
Si sente un ronzio durante le trasmissioni AM.
• Allontanare l’antenna dagli altri cavi.
RQT0A38
18
80
█ Display dell’unità principale
“ADJUST CLOCK”
• L’orologio non è impostato. Regolare l’orologio.
“ADJUST TIMER”
• Il timer di riproduzione e/o registrazione non è impostato.
Regolare il timer di riproduzione e/o registrazione.
“ALB FULL”
• Il numero di album ha superato il limite supportato.
“AUTO OFF”
• Il sistema non è stato utilizzato per circa 20 minuti e si
spegnerà tra un minuto. Per annullare, premere un
®
.
pulsante.
“CAN’T REC”
“DEVICE FULL”
• Non è possibile effettuare la registrazione perché il tempo
di registrazione restante nel dispositivo USB è inferiore al
tempo totale della sorgente musicale. Passare ad un
dispositivo USB con un tempo di registrazione sufficiente
ed eseguire di nuovo la registrazione.
“ERROR”
• È stata effettuata un’operazione errata. Leggere le istruzioni
e riprovare.
“ERROR” (durante la registrazione)
• Non è possibile selezionare un’altra sorgente di
riproduzione (esempio: radio, USB, ecc.) o premere [2] o
[6] durante la registrazione. Interrompere la
registrazione.
• Non è possibile aprire l’alloggiamento del disco quando si
registra da una sorgente AM.
“F61”
• Verificare e correggere il collegamento dei cavi dei diffusori.
• Scollegare il dispositivo USB. Spegnere e riaccendere il
sistema.
“F70”
• Verificare la connessione Bluetooth
• Scollegare il dispositivo Bluetooth
riaccendere il sistema.
“F76”
• C’è un problema di alimentazione.
• Scollegare il cavo di alimentazione CA e rivolgersi al
rivenditore.
“F77”
• Scollegare il cavo di alimentazione CA e rivolgersi al
rivenditore.
“NO DEVICE”
• Il dispositivo USB non è collegato. Verificare il
collegamento.
• Non è possibile effettuare la registrazione o controllare lo
spazio disponibile in memoria in quanto non vi è alcun
dispositivo USB collegato a
“NO DISC”
• Non si è inserito un disco.
“NO PLAY”
“UNSUPPORT”
• Verificare il contenuto. È possibile riprodurre solo il formato
supportato.
• I file contenuti nel dispositivo USB possono essere
danneggiati. Formattare il dispositivo USB e riprovare.
• Il sistema potrebbe presentare anomalie. Spegnere e
riaccendere il sistema.
“NO TRACK”
• Il dispositivo USB o la memoria interna non contengono
album o brani.
USB B .
®
.
®
. Spegnere e
Page 81

“PLAYERROR”
ITALIANO
offset printing
• Si è riprodotto un file MP3 non supportato. Il sistema
salterà quel brano e riprodurrà quello successivo.
“REC ERROR”
• Si è scollegato il dispositivo USB durante la registrazione.
Collegare il dispositivo USB ed effettuare di nuovo la
registrazione.
• Si è verificato un errore durante la registrazione USB.
Scollegare e ricollegare il dispositivo periferica USB.
“REMOTE 1”
“REMOTE 2”
• Il telecomando e questa unità usano codici differenti.
Cambiare il codice del telecomando.
– Quando viene visualizzato “REMOTE 1”, tenere premuti
[OK] e [1] per un minimo di 4 secondi.
– Quando viene visualizzato “REMOTE 2”, tenere premuti
[OK] e [2] per un minimo di 4 secondi.
“TEMP NG”
• Il circuito di protezione temperatura è stato attivato e il
sistema si spegnerà. Lasciare raffreddare l’unità prima di
riaccenderla.
• Controllare che le aperture di ventilazione dell’unità non
siano ostruite.
• Assicurarsi che l’unità sia ben ventilata.
“TRK FULL”
• Il numero di file ha superato il limite supportato.
“USB OVER CURRENT ERROR”
• Il dispositivo USB sta utilizzando troppa corrente.
Scollegare il dispositivo USB, spegnere e riaccendere il
sistema.
“VBR”
• Il sistema non può visualizzare il tempo di lettura restante
per i brani a velocità bit variabile (VBR).
Reimpostazione della memoria di
sistema
Se si verifica quanto segue, ripristinare la memoria:
• Non c’è risposta alla pressione dei pulsanti.
• Si desidera cancellare e ripristinare il contenuto della
memoria.
1 Staccare il cavo di alimentazione CA.
2 Tenendo premuto [1] sull’unità principale,
collegare di nuovo il cavo di alimentazione CA.
Continuare a tenere premuto il pulsante finché non
viene visualizzato “–––––––––”.
3 Rilasciare [1].
Tutte le regolazioni tornano a quelle predefinite di
fabbrica.
È necessario reimpostare il contenuto della memoria.
Codice del telecomando
Se un altro apparecchio Panasonic risponde al
telecomando di questo sistema, cambiare il codice del
telecomando di questo sistema.
Preparativi
Premere [CD/RADIO/AUX] per selezionare “AUX 1” o
“AUX 2”.
█ Per impostare il codice su “REMOTE 2”
1 Tenere premuto [CD/RADIO/AUX] sull’unità
principale e [2] sul telecomando finché non viene
visualizzato “REMOTE 2”.
2 Tenere premuti [OK] e [2] per un minimo di 4
secondi.
█ Per impostare il codice su “REMOTE 1”
1 Tenere premuto [CD/RADIO/AUX] sull’unità
principale e [1] sul telecomando finché non viene
visualizzato “REMOTE 1”.
2 Tenere premuti [OK] e [1] per un minimo di 4
secondi.
19
81
RQT0A38
Page 82

Dati tecnici
offset printing
█ Sezione amplificatore
Modalità stereo con potenza di uscita RMS
Canale alto 350 W per canale (3 Ω), 1 kHz,
Canale medi 350 W per canale (3 Ω), 1 kHz,
Canale basso 500 W per canale (2 Ω), 100 Hz,
Potenza modalità stereo RMS totale 2400 W
distorsione armonica totale 30%
distorsione armonica totale 30%
distorsione armonica totale 30%
█ Sezione disco
Dischi utilizzabili (da 8 cm o 12 cm)
MPEG-1 Layer 3, MPEG-2 Layer 3
Scelta
Lunghezza onda 790 nm (CD)
█ Sezione Bluetooth
Version e Bluetooth® Ver. 2.1 + EDR
Classe Classe 2
Profili supportati A2DP, AVRCP, SPP, OPP, FTP
Frequenza operativa Banda a 2,4 GHz, FH-SS
Distanza operativa Campo visivo di 10 m
CD, CD-R/RW (CD-DA, MP3 )
®
█ Sezione sintonizzatore
Modulazione di frequenza (FM)
Memoria preimpostata 30 stazioni
Gamma di frequenza
Da 87,50 MHz a 108,00 MHz (intervalli di 50 kHz)
Terminali antenna 75 Ω (sbilanciati)
Modulazione d’ampiezza (AM)
Memoria preimpostata 15 stazioni
Gamma di frequenza
Da 522 kHz a 1629 kHz (intervalli di 9 kHz)
Da 520 kHz a 1630 kHz (intervalli di 10 kHz)
█ Sezione memoria interna
Memoria
Dimensioni memoria 2 GB
Supporto formato file multimediale MP3 (*.mp3)
Registrazione memoria
Velocità bit 128 kbps
Velocità di registrazione memoria
Formato file di registrazione MP3 (*.mp3)
1x, 3x max (solo CD)
█ Sezione terminale
Porta USB
USB standard USB 2.0 a velocità massima
Supporto formato file multimediale MP3 (*.mp3)
File system del dispositivo USB
Registrazione USB
Velocità bit 128 kbps
Velocità di registrazione USB 1x, 3x (solo CD)
Formato file di registrazione MP3 (*.mp3)
AUX IN 1
Ingresso audio Presa pin
AUX IN 2
Terminale Presa da 3,5 mm, stereo
Microfono
Terminale Presa da 6,3 mm, mono
FAT12, FAT16, FAT32
█ Sezione diffusori
Diffusore(i)
Tweeter 6 cm tipo a cono
Woofer 20 cm tipo a cono
SuperWoofer 30 cm tipo a cono
Impedenza Alto 3 Ω / Medi 3 Ω / Basso 2 Ω
Dimensioni (L x A x P) 407 mm x 709 mm x 389 mm
Peso 19 kg
█ Dati generali
Alimentazione CA da 220 V a 240 V, 50 Hz
Consumo di corrente 155 W
Dimensioni (L x A x P) 492 mm x 221 mm x 421 mm
Peso 5,8 kg
Intervallo di temperatura durante il funzionamento
Intervallo di umidità durante il funzionamento
Dal 35% all’80% di umidità relativa (senza condensa)
Consumo di corrente nella modalità di attesa (circa)
Consumo di corrente nella modalità di attesa (circa)
(Con “BLUETOOTH STANDBY” impostato su “ON”)
Nota:
• I dati tecnici sono soggetti a modifiche senza preavviso.
Il peso e le dimensioni indicati sono approssimativi.
• La distorsione armonica totale viene misurata con un
analizzatore digitale di spettro.
Da 0°C a +40°C
0,4 W
0,5 W
RQT0A38
20
82
Page 83

Bluetooth
ITALIANO
offset printing
®
Panasonic non si assume alcuna responsabilità per dati
e/o informazioni che potrebbero danneggiarsi nel corso
di una trasmissione wireless.
Banda di frequenza
• Questo sistema usa la banda di frequenza a 2,4 GHz.
Certificazione
• Questo sistema è conforme alle restrizioni delle
frequenze e ha ricevuto la certificazione sulla base
delle norme sulla frequenza. Pertanto, non è
necessaria l’autorizzazione wireless.
• Le azioni di seguito sono punibili per legge:
– Smontare o modificare l’unità principale.
– Rimuovere le indicazioni sui dati tecnici.
Restrizioni sull’uso
• Non si garantisce la trasmissione wireless e/o l’uso con
tutti i dispositivi dotati di Bluetooth
• Tutti i dispositivi devono essere conformi agli standard
di Bluetooth SIG, Inc.
• In base ai dati tecnici e alle impostazioni di un
dispositivo, la connessione potrebbe non riuscire o
alcune operazioni potrebbero essere diverse.
• Questo sistema supporta funzioni di protezione
• Questo sistema non è in grado di trasmettere dati ad
Distanza di utilizzo
• Usare questo dispositivo ad una distanza massima di
• La distanza può diminuire in base all’ambiente, agli
Interferenze da altri dispositivi
• Il sistema potrebbe non funzionare correttamente e
• Il sistema potrebbe non funzionare correttamente se le
Destinazione d’uso
• Questo sistema è solo per uso normale e generico.
• Non utilizzare questo sistema accanto ad
®
Bluetooth
alle impostazioni, la potrezione potrebbe non essere
sufficiente. Trasmettere i dati in modo wireless a
questo sistema con cautela.
un dispositivo Bluetooth
10 m.
ostacoli o alle interferenze.
potrebbero verificarsi problemi quali disturbi e salti
audio a causa di interferenze di onde radio, se questa
unità si trova troppo vicino ad altri dispositivi
Bluetooth
2,4 GHz.
onde radio di una emittente vicina, ecc. sono
eccessive.
un’apparecchiatura o in un ambiente sensibili alle
interferenze da frequenza radio (ad esempio: aeroporti,
ospedali, laboratori, ecc.).
. Tuttavia, in base al sistema operativo e/o
®
®
o dispositivi che utilizzano la banda a
®
.
.
Dichiarazione di Conformità (DdC)
Panasonic Corporation
“
prodotto è conforme ai requisiti essenziali e altre relative
norme della Direttiva 1999/5/CE.
I clienti possono scaricare una copia della DdC originale
dei nostri prodotti R&TTE dal nostro server DdC:
http://www.doc.panasonic.de
Rivolgersi al Rappresentante autorizzato: Panasonic
Marketing Europe GmbH, Panasonic Testing Centre,
Winsbergring 15, 22525 Hamburg, Germania
Questo prodotto è progettato per la clientela generale.
(Categoria 3)
Smaltimento di vecchie apparecchiature e batterie
Solo per l’Unione Europea e Paesi con sistema di
riciclaggio
Questi simboli sui prodotti, sull’imballaggio,
e/o sulle documentazioni o manuali
accompagnanti i prodotti indicano che i
prodotti elettrici, elettronici e le batterie usate
non devono essere buttati nei rifiuti
domestici generici.
Per un trattamento adeguato, recupero e
riciclaggio di vecchi prodotti e batterie usate,
vi preghiamo di portarli negli appositi punti di
raccolta, secondo la legislazione vigente nel
vostro Paese.
Smaltendoli correttamente, contribuirete a
salvare importanti risorse e ad evitare i
potenziali effetti negativi sulla salute umana e
sull’ambiente.
Per ulteriori informazioni sulla raccolta e sul
riciclaggio, vi preghiamo di contattare il
vostro comune.
Sono previste e potrebbero essere applicate
sanzioni qualora questi rifiuti non siano stati
smaltiti in modo corretto ed in accordo con
la legislazione nazionale.
Nota per il simbolo delle batterie (simbolo
sotto):
Questo simbolo può essere usato in
combinazione con un simbolo chimico; In
questo caso è conforme ai requisiti indicati
dalla Direttiva per il prodotto chimico in
questione.
” dichiara qui che questo
21
83
RQT0A38
Page 84

Zakupione urządzenie może różnić się od
offset printing
przedstawionego na ilustracjach.
Niniejsza instrukcja obsługi ma zastosowanie do
następującego zestawu.
Zestaw SC-MAX4000
Urządzenie główne SA-MAX4000
Głośniki SB-MAX4000
Nagrywanie i odtwarzanie zawartości na tym lub innych
urządzeniach wymaga zezwolenia właściciela praw
autorskich lub innych praw do tej zawartości. Firma
Panasonic nie ma uprawnień i nie udziela
użytkownikowi takiego zezwolenia i w sposób jawny
zrzeka się wszelkich praw, zdolności i zamiarów w celu
uzyskania takich zezwoleń na rzecz użytkownika. Na
użytkowniku spoczywa odpowiedzialność za
użytkowanie tego lub innych urządzeń zgodnie z
właściwymi przepisami praw autorskich
obowiązującymi w jego kraju. Na użytkowniku
spoczywa odpowiedzialność za użytkowanie tego lub
innych urządzeń zgodnie z właściwymi przepisami praw
autorskich obowiązującymi w jego kraju.
Spis treści
Środki ostrożności . . . . . . . . . . . . . . . . . . . . . . . . . . . . . 2
Licencje. . . . . . . . . . . . . . . . . . . . . . . . . . . . . . . . . . . . . . 3
Dostarczone wyposażenie . . . . . . . . . . . . . . . . . . . . . . . 3
Przygotowanie pilota zdalnego sterowania . . . . . . . . . . 3
Rozmieszczenie głośników . . . . . . . . . . . . . . . . . . . . . . . 4
Podłączenie . . . . . . . . . . . . . . . . . . . . . . . . . . . . . . . . . . 5
Opis elementów sterowania . . . . . . . . . . . . . . . . . . . . . . 6
Przygotowanie multimediów. . . . . . . . . . . . . . . . . . . . . . 8
Odtwarzanie multimediów . . . . . . . . . . . . . . . . . . . . . . . 9
Radio. . . . . . . . . . . . . . . . . . . . . . . . . . . . . . . . . . . . . . . 11
Nagrywanie . . . . . . . . . . . . . . . . . . . . . . . . . . . . . . . . . . 12
Efekty dźwiękowe i iluminacji . . . . . . . . . . . . . . . . . . . . 13
Funkcje DJ . . . . . . . . . . . . . . . . . . . . . . . . . . . . . . . . . . 14
Używanie mikrofonu . . . . . . . . . . . . . . . . . . . . . . . . . . . 15
Zegar i timer . . . . . . . . . . . . . . . . . . . . . . . . . . . . . . . . . 15
Urządzenia zewnętrzne. . . . . . . . . . . . . . . . . . . . . . . . . 16
Inne . . . . . . . . . . . . . . . . . . . . . . . . . . . . . . . . . . . . . . . . 17
Konserwacja . . . . . . . . . . . . . . . . . . . . . . . . . . . . . . . . . 17
Rozwiązywanie problemów . . . . . . . . . . . . . . . . . . . . . 17
RQT0A38
Dane techniczne . . . . . . . . . . . . . . . . . . . . . . . . . . . . . . 20
2
Informacje o technologii Bluetooth
84
®
. . . . . . . . . . . . . . . 21
Środki ostrożności
OSTRZEŻENIE!
Urządzenie
• Aby ograniczyć niebezpieczeństwo pożaru, porażenia
prądem lub uszkodzenia urządzenia,
– Nie należy wystawiać urządzenia na działanie
deszczu, wilgoci, kapanie lub zachlapanie.
– Na urządzeniu nie należy umieszczać żadnych
przedmiotów napełnionych płynami, np. dzbanków.
– Należy stosować tylko zalecane akcesoria.
– Nie zdejmować pokrywy.
– Użytkownik nie powinien podejmować się naprawy
urządzenia na własną rękę. Serwis należy zlecić w
autoryzowanym punkcie serwisowym.
– Należy uważać, aby do wnętrza urządzenia nie
dostały się metalowe przedmioty.
UWAGA!
Urządzenie
• Aby ograniczyć niebezpieczeństwo pożaru, porażenia
prądem lub uszkodzenia urządzenia,
– Niniejszego urządzenia nie należy instalować lub
umieszczać w biblioteczce, wbudowanej szafce lub
innej ograniczonej przestrzeni. Należy zapewnić
odpowiednią wentylację urządzenia.
– Nie zasłaniaj otworów wentylacyjnych urządzenia
gazetami, obrusami, zasłonami i podobnymi
przedmiotami.
– Nie umieszczać na urządzeniu źródeł otwartego
ognia, jak np. zapalone świece.
• Urządzenie jest przeznaczone do używania w klimacie
umiarkowanym.
• To urządzenie może odbierać zakłócenia wywołane
użyciem telefonu komórkowego. Jeżeli takie
zakłócenia wystąpią, wskazane jest zwiększenie
odległości pomiędzy urządzeniem a telefonem
komórkowym.
• Urządzenie wykorzystuje promień lasera. Sterowanie,
regulacje lub postępowanie w sposób tutaj nie
określony grozi niebezpiecznym naświetleniem
promieniami lasera.
• Urządzenie należy ustawić na równej powierzchni, z
dala od miejsc bezpośrednio nasłonecznionych, w
których panuje wysoka temperatura, duża wilgotność
lub występują nadmierne drgania.
•Wtyczka przewodu sieciowego umożliwia odłączenie
zasilania urządzenia. Urządzenie należy zamontować w
sposób umożliwiający szybkie wyjęcie wtyczki z
gniazda zasilania.
Page 85

Bateria
POLSKI
offset printing
• Istnieje niebezpieczeństwo wybuchu w przypadku, gdy
baterie zostaną nieprawidłowo założone. Baterie należy
wymieniać na takie same lub na baterie
równorzędnego typu, zalecane przez producenta.
• Zużyte baterie należy odpowiednio zutylizować.
Właściwą metodę powinny wskazać władze lokalne.
• Nie zbliżać baterii do źródeł ciepła lub ognia.
• Baterii nie należy pozostawiać przez dłuższy czas, w
pojeździe z zamkniętymi drzwiami i oknami, narażonym
na bezpośrednie promieniowanie słoneczne.
• Nie wolno zwierać biegunów baterii ani jej rozbierać.
• Nie ładować baterii alkalicznych ani manganowych.
• Nie wolno używać baterii, z których została zdjęta
warstwa ochronna.
• Jeśli pilot ma nie być używany przez dłuższy czas,
należy wyjąć z niego baterię. Przechowywać w
chłodnym, ciemnym miejscu.
Dostarczone wyposażenie
Sprawdzić i znaleźć poszczególne elementy
dostarczonego wyposażenia.
2 Przewody zasilania
1 Antena pętlowa AM
1 Antena wewnętrzna FM
1 Pilot zdalnego sterowania
(N2QAYB001022)
1 Bateria do pilota zdalnego sterowania
Dla Wielkiej Brytanii i Irlandii
1 Przejściówka wtyczki anteny
Licencje
Znak ze słowem i logo Bluetooth
znakami towarowymi będącymi własnością Bluetooth
SIG, Inc., a firma Panasonic Corporation używa ich na
mocy licencji. Inne znaki towarowe i nazwy towarowe
są własnością odpowiednich posiadaczy.
Google Play i Android są znakami towarowymi firmy
Google Inc.
Technologia kodowania dźwięku MPEG Layer-3
podlega licencji firmy Fraunhofer IIS i Thomson.
®
są zastrzeżonymi
UWAGA!
Przejściówkę wtyczki anteny należy przechowywać w
miejscu niedostępnym dla dzieci, aby nie dopuścić do
jej połknięcia.
Uwaga:
Należy użyć przewodu zasilania odpowiedniego do danego
gniazda zasilającego.
Przygotowanie pilota zdalnego
sterowania
Należy stosować baterie alkaliczne lub manganowe.
Załóż baterię tak, aby jej bieguny (+ i –) były zgodne z
oznaczeniami wewnątrz obudowy pilota zdalnego
sterowania.
RQT0A38
3
85
Page 86

Rozmieszczenie głośników
Wysokotonowy
offset printing
Ustawić zestawy głośnikowe tak, żeby głośnik
wysokotonowy znajdował się po zewnętrznej stronie.
Prosimy używać tylko zestawów głośnikowych
znajdujących się w wyposażeniu.
Użycie innych zestawów głośnikowych grozi
uszkodzeniem urządzenia i pogorszeniem jakości
dźwięku.
Uwaga:
• Aby zapewnić odpowiednią wentylację, należy zachować
przynajmniej 10 mm odstępu między zestawami
głośnikowymi a urządzeniem głównym.
• Zestawy głośnikowe należy ustawić na płaskim, stabilnym
podłożu.
• Do przesuwania, przechylania lub przenoszenia potrzebna
jest więcej niż jedna osoba.
UWAGA!
• Zestawów głośnikowych należy używać wyłącznie
z zalecanym systemem. W przeciwnym wypadku
może dojść do uszkodzenia wzmacniacza,
zestawów głośnikowych i do pożaru. W
przypadku uszkodzenia urządzenia lub nagłej
zmiany w jakości odtwarzania należy zwrócić się
po radę do wykwalifikowanego specjalisty.
• Nie należy modyfikować głośnika lub przewodów
głośnika, ponieważ mogłoby to doprowadzić do
uszkodzenia systemu.
• W celu podłączenia zestawów głośnikowych
należy zastosować procedury opisane w
niniejszej instrukcji.
• Nie dotykać powierzchni odbijających stożków
głośnikowych:
– Może to spowodować uszkodzenie stożka
głośnikowego.
– Stożek głośnikowy może być gorący.
• Należy zwracać szczególną uwagę, gdy w pobliżu
znajdują się dzieci.
• Nie układać głośników jeden na drugim.
• Niniejsze zestawy głośnikowe nie mają ekranu
magnetycznego. Nie należy ich umieszczać w pobliżu
odbiorników telewizyjnych, komputerów ani innych
urządzeń wrażliwych na oddziaływanie pola
magnetycznego.
• Długotrwałe odtwarzanie przy dużym poziomie głośności
może spowodować uszkodzenia zestawów głośnikowych i
skrócić jego żywotność.
• Aby uniknąć uszkodzenia urządzenia, w następujących
przypadkach należy zmniejszyć głośność:
– W przypadku zniekształcenia dźwięku.
– Podczas regulacji brzmienia dźwięku.
RQT0A38
4
86
Page 87

Podłączenie
Taśma klejąca
(nie należy do
wyposażenia)
Do domowego
gniazdka
zasilającego
POLSKI
offset printing
Przewód zasilania podłaczyć do gniazdka sieciowego dopiero po wykonaniu wszystkich pozostałych połączeń.
1 Podłącz antenę pętlową AM.
Ustaw antenę na jej podstawce aż usłyszysz
kliknięcie.
2 Podłącz antenę wewnętrzną FM.
Antenę należy zainstalować w miejscu
zapewniającym najlepszy odbiór.
3 Podłącz głośniki.
Podłącz przewody głośników do złączy tego samego
koloru.
4 Podłącz przewód zasilania.
Nie stosować przewodów zasilania, pochodzących z
innych urządzeń.
Oszczędzanie energii
System pobiera niewielką ilość energii nawet
pozostając w trybie spoczynku. Gdy system nie jest
używany, należy go odłączać od zasilania.
Po odłączeniu systemu od zasilania niektóre
ustawienia zostaną utracone. Konieczne będzie ich
ponowne ustawienie.
RQT0A38
5
87
Page 88

Opis elementów sterowania
offset printing
Opisane procedury należy wykonać za pomocą pilota zdalnego sterowania. Można również użyć przycisków na
panelu przednim urządzenia, jeśli są identyczne.
A Przełącznik „STANDBY/ON” [`], [1]
Naciśnij ten przycisk, aby wyłączyć urządzenie
(przełączyć je w stan gotowości) lub włączyć je z
powrotem. W stanie gotowości urządzenie nadal
pobiera pewną niewielką moc.
B Wyświetl zawartość
C Przyciski numeryczne
Aby wybrać 2-cyfrowy numer
Przykład: 16: [ 10]=[1]=[6]
D Automatyczne dostrajanie do stacji radiowych
E Wybór źródła audio
Na urządzeniu głównym:
Aby rozpocząć parowanie Bluetooth
przytrzymaj [ –PAIRING].
F Podstawowe elementy sterowania odtwarzaniem
G Wybór charakterystykę dźwięku
H Wybór efektów iluminacji
I Wyświetl menu konfiguracji
J Sterowanie operacją nagrywania
K Otwieranie lub zamykanie kieszeni napędu płyt
L Zmniejszanie jasności wyświetlacza
Ponownie naciśnij przycisk, aby anulować wybór.
M Ustawianie timera wyłączającego
N Dostosuj poziom głośności
O Wycisz dźwięk
Ponownie naciśnij przycisk, aby anulować wybór.
„MUTE” można wyłączyć również przez regulowanie
głośności lub wyłączając system.
P Wybierz album MP3 lub utwór
Q Wybierz DJ jukebox
R Wybierz lub potwierdź opcję
S Wyświetlenie menu odtwarzania
®
, naciśnij i
RQT0A38
6
88
Page 89
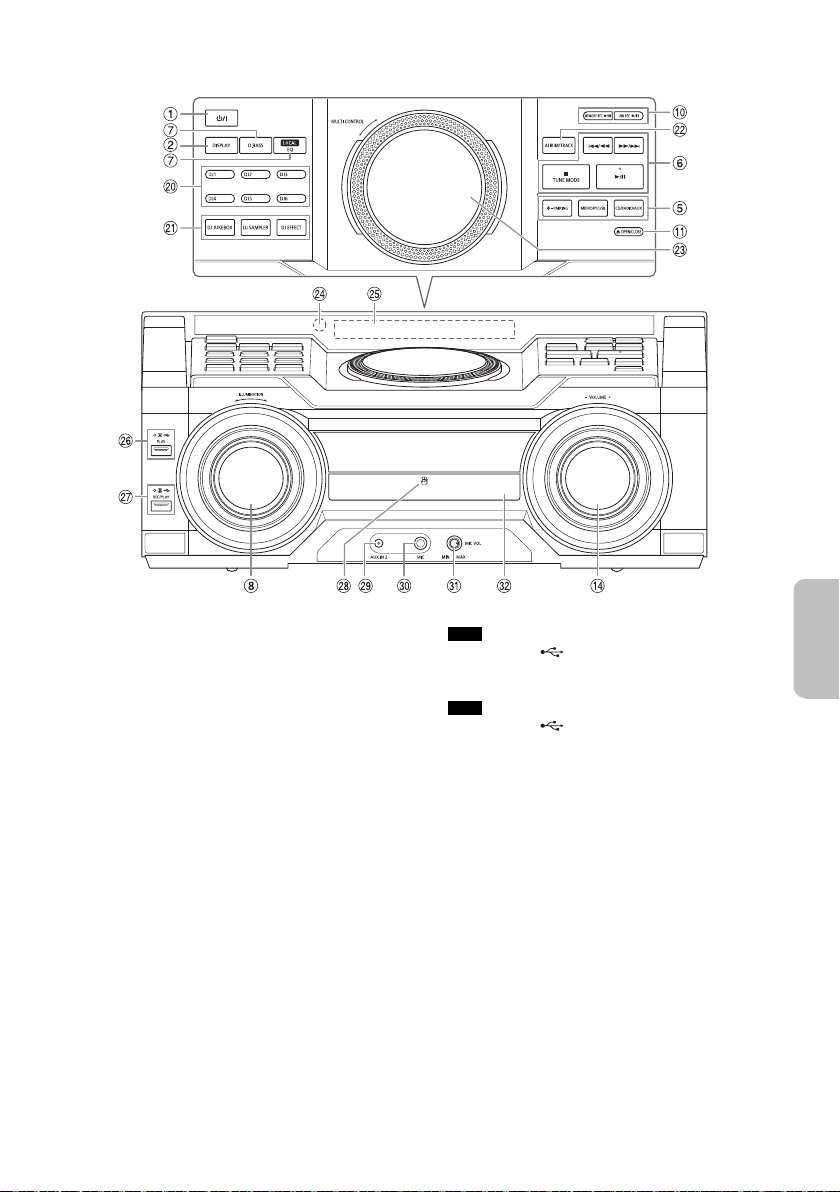
T Bezpośrednie przyciski funkcji DJ
Widok z przodu
Widok od góry
POLSKI
offset printing
Naciśnij [DJ JUKEBOX], [DJ SAMPLER] lub
[DJ EFFECT], aby włączyć funkcję DJ.
Naciśnij [DJ1] do [DJ6] na urządzeniu, aby wybrać
żądaną funkcję.
Aby anulować, naciśnij [DJ1] do [DJ6] ponownie.
U Włącz funkcję DJ
Ponownie naciśnij przycisk, aby anulować wybór.
V Wybierz album MP3 lub utwór
Naciśnij [ALBUM/TRACK], aby wybrać album lub
utwór.
Przeglądanie utworów lub albumów
Aby przeglądać, obróć [MULTI CONTROL].
Naciśnij [4/9], aby rozpocząć odtwarzanie od
wybranej pozycji.
W Talerz obrotowy DJa i obsługa wielu funkcji
X Czujnik zdalnego sterowania
Odległość: W granicach około 7 m
Kąt: W przybliżeniu 20° w pionie, 30° w poziomie
Y Wyświetlacz
Z USB A
Gniazdo USB ( )
Wskaźnik stanu USB
Odtwarzanie plików MP3.
a USB B
Gniazdo USB ( )
Wskaźnik stanu USB
Odtwarzanie plików MP3.
Nagrywanie dźwięku lub utworów muzycznych.
b Obszar dotykowy NFC
c Gniazdo AUX IN 2
d Gniazdo mikrofonu
e Dostosuj poziom głośności mikrofonu
f Kieszeń napędu płyt
RQT0A38
7
89
Page 90

Przygotowanie multimediów
offset printing
Płyty kompaktowe
1 Naciśnij [CD x] (urządzenie główne:
[x OPEN/CLOSE]), aby otworzyć kieszeń napędu
płyt.
Włóż płytę etykietą do góry.
Naciśnij ponownie, aby otworzyć kieszeń napędu
płyt.
2 Naciśnij [CD/RADIO/AUX], aby wybrać „CD”.
USB
Przygotowanie
Przed podłączeniem zewnętrznego urządzenia USB do
systemu pamiętaj, aby wykonać kopię zapasową danych.
1 Zmniejszyć poziom głośności i podłącz
urządzenie USB do gniazda USB.
Przytrzymać główne urządzenie podczas podłączania
lub rozłączania urządzenia USB.
2 Naciśnij [USB] (urządzenie główne:
[MEMORY/USB]), aby wybrać „USB A” lub
„USB B”.
Po wybraniu USB wskaźnik stanu tej opcji zapala się
na czerwono.
Uwaga:
Nie należy używać przedłużacza USB. Nie są obsługiwane
urządzenia USB podłączane za pomocą przewodu.
Bluetooth
Można podłączyć urządzenie audio bezprzewodowo za
pomocą funkcji Bluetooth
Przygotowanie
• Włącz funkcję Bluetooth
pobliżu systemu.
• Aby uzyskać szczegółowe informacje, patrz instrukcja
obsługi.
█ Parowanie urządzenia
Przygotowanie
Jeśli system jest podłączony do urządzenia Bluetooth
odłącz go (Z„Rozłączanie urządzenia”).
1 Naciśnij [ ].
W przypadku wyświetlenia komunikatu „PAIRING”
przejdź do kroku 4.
2 Naciśnij [PLAY MENU], aby wybrać „PAIRING”.
3 Naciśnij [Y, U], aby wybrać „OK? YES”, a
następnie naciśnij [OK].
Wyświetlony zostanie symbol „PAIRING”.
Aby anulować, wybierz „OK? NO”.
RQT0A38
8
90
®
®
i odtwarzać na nim.
®
urządzenia i umieść je w
4 Wybierz w menu Bluetooth
„SC-MAX4000”.
W przypadku wyświetlenia monitu o hasło wprowadź
„0000”.
Urządzenie łączy się automatycznie z tym systemem
po zakończeniu parowania.
Nazwa podłączonego urządzenia jest wyświetlona
przez kilka sekund.
Korzystanie z urządzenia głównego
®
urządzenia opcję
1 Naciśnij i przytrzymaj [ –PAIRING] do chwili, aż
wyświetlony zostanie komunikat „PAIRING”.
2 Wybierz w menu Bluetooth
„SC-MAX4000”.
Uwaga:
Z systemem można sparować do 8 urządzeń. W przypadku
sparowania dziewiątego urządzenia to, które najdłużej nie
było używane zostanie zastąpione.
®
urządzenia opcję
█ Podłączanie urządzenia
Przygotowanie
Jeśli system jest podłączony do urządzenia Bluetooth
odłącz go (Z„Rozłączanie urządzenia”).
1 Naciśnij [ ].
Wyświetlony zostanie symbol
„BLUETOOTH READY”.
2 Wybierz w menu Bluetooth
„SC-MAX4000”.
Nazwa podłączonego urządzenia jest wyświetlona
przez kilka sekund.
®
urządzenia opcję
3 Rozpocznij odtwarzanie na urządzeniu.
Uwaga:
• W celu podłączenia urządzenie należy sparować.
• Urządzenie może połączyć się z tylko jednym urządzeniem
w danym momencie.
• W przypadku wybrania jako źródła „BLUETOOTH” system
automatycznie próbuje połączyć się z ostatnim
podłączonym urządzeniem. (Podczas tej czynności będzie
wyświetlony komunikat „LINKING”).
█ Rozłączanie urządzenia
1 Naciśnij [ ].
2 Naciśnij [PLAY MENU], aby wybrać
®
,
„DISCONNECT?”.
3 Naciśnij [Y, U], aby wybrać „OK? YES”, a
następnie naciśnij [OK].
Wyświetlony zostanie symbol
„BLUETOOTH READY”.
Aby anulować, wybierz „OK? NO”.
Korzystanie z urządzenia głównego
Naciśnij i przytrzymaj [ –PAIRING] do chwili, aż
wyświetlony zostanie komunikat „PAIRING”.
Uwaga:
Urządzenie zostanie odłączone, gdy:
• Zostanie wybrane inne źródło.
• Urządzenie zostanie przemieszczone poza maksymalny
zasięg sygnału.
• Transmisja Bluetooth
• System lub urządzenie zostanie wyłączone.
®
urządzenia zostanie wyłączona.
®
,
Page 91
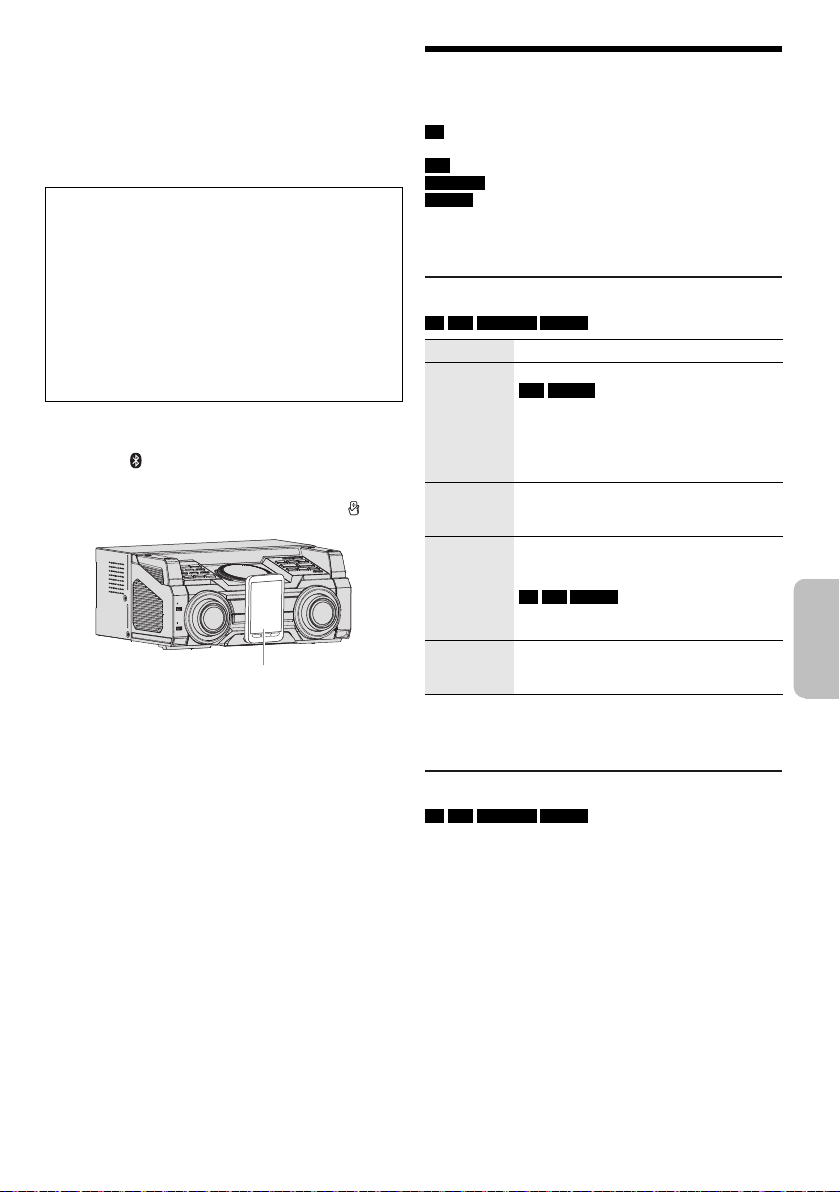
█ Połączenie po jednym dotknięciu (NFC)
Urządzenie Bluetooth®
(nie należy do wyposażenia)
POLSKI
offset printing
Tylko dla urządzeń Bluetooth® (urządzeń z systemem
Android™) zgodnych z NFC
Wystarczy dotknąć tym urządzeniem zgodne z NFC
(Near Field Communication, komunikacja bliskiego
zasięgu) urządzenie Bluetooth
przygotowania, począwszy od rejestracji urządzenia
Bluetooth
®
po ustanowienie połączenia.
Urządzenia Android z systemem w wersji niższej 4.1
wymagają instalacji aplikacji „Panasonic MAX Juke”
(bezpłatna).
®
, aby wykonać wszystkie
A Wprowadź „Panasonic MAX Juke” w polu
wyszukiwania witryny Google Play™ w celu
wyszukania i wybierz pozycję „Panasonic MAX
Juke”.
B Uruchom aplikację.
– Postępuj według instrukcji, aby wprowadzić
ustawienia.
– Należy upewnić się, że używana jest najnowsza
wersja aplikacji.
Przygotowanie
Włącz funkcję NFC urządzenia.
1 Naciśnij [ ].
2 Dotknij i przytrzymaj urządzenie w obszarze
dotykowym NFC na urządzeniu głównym [ ].
– Trzymaj urządzenia, aż usłyszysz sygnał
dźwiękowy, wibracje lub wyświetlana jest okno
wyskakujące, a następnie przenieś urządzenie z
dala od systemu.
– Po zakończeniu rejestracji i podłączenia
urządzenia, w systemie zostanie wyświetlona
nazwa podłączonego urządzenia na kilka sekund.
– Jeśli połączenie nie zostaje nawiązane, mimo że
urządzenie dotknęło obszaru dotykowego NFC,
należy zmienić miejsce dotykania. Połączenie może
poprawić jeśli używasz aplikacji „Panasonic MAX
Juke”.
3 Rozpocznij odtwarzanie na urządzeniu.
Uwaga:
• Po połączeniu się można nawiązać połączenie z innym
urządzeniem przez dotknięcie i przytrzymanie go w
obszarze dotykowym NFC urządzenia. Poprzednie
urządzenie zostanie automatycznie odłączone.
• W zależności od urządzenia:
– Funkcja połączenia jednym dotknięciem może nie
działać.
– Położenie obszarze dotykowym NFC urządzenia mogą
być różne.
– Po nawiązaniu połączenia, odtwarzanie może rozpocząć
się automatycznie.
Odtwarzanie multimediów
Następujące symbole wskazują dostępność funkcji.
CD :
USB :
BLUETOOTH :
MEMORY :
Odtwarzanie podstawowe
CD USB BLUETOOTH MEMORY
Odtwarzanie Naciśnij [4/9].
Zatrzymać Naciśnij [8].
Przerywanie Naciśnij [4/9].
Pomiń Naciśnij [2] lub [6] (urządzenie
Szukaj Naciśnij i przytrzymaj [3] lub [5]
Uwaga:
W zależności od urządzenia Bluetooth
mogą nie być dostępne.
Wyświetlanie dostępnych informacji
CD USB BLUETOOTH MEMORY
Możesz wyświetlić dostępne informacje, takie jak album
MP3 i numer ścieżki na panelu wyświetlacza.
Naciśnij [DISPLAY].
Uwaga:
• Maksymalna liczba wyświetlanych znaków: Około 32
• Urządzenie obsługuje etykiety w formacie 1.0, 1.1 i 2.3 ID3.
• Dane tekstowe nieobsługiwane przez system mogą być
Płyta CD-R/RW w formacie CD-DA lub z
plikami MP3.
Urządzenie USB z plikami MP3.
Urządzenie Bluetooth
Pamięć wewnętrzna o pojemności 2 GB
(Zapoznaj się z sekcją „Nagrywanie”, aby
dowiedzieć się, jak dodawać utwory do
pamięci wbudowanej).
USB MEMORY
Położenie zostanie zapamiętane.
Wyświetlony zostanie symbol
„RESUME”.
Naciśnij ponownie, aby całkowicie
zatrzymać.
Naciśnij ponownie, aby kontynuować
odtwarzanie.
główne: [2/3] lub [5/6]), aby
pominąć utwór.
CD USB MEMORY
Naciśnij [R, T], aby pominąć album
MP3.
(urządzenie główne: [2/3] lub
[5/6]).
wyświetlane odmiennie.
®
.
®
niektóre operacje
RQT0A38
9
91
Page 92

Menu odtwarzania
offset printing
CD USB MEMORY
1 Naciśnij [PLAY MENU].
2 Naciśnij [Y, U], aby wybrać ustawienie, a
następnie naciśnij [OK].
OFF
PLAYMODE
1-TRACK
1
1-ALBUM
1
RANDOM
RND
1-ALBUM
RANDOM
1 RND
ALL REPEAT Powtarzanie wszystkich utworów.
1-TRACK
REPEAT
1
1-ALBUM
REPEAT
1
RANDOM
REPEAT
RND
1-ALBUM
RANDOM
REPEAT
1 RND
Uwaga:
• Podczas odtwarzania w losowej kolejności nie można
przejść do utworów poprzednio odtworzonych.
• Ustawienie to zostanie anulowane z chwilą otwarcia
napędu płyt.
Anuluj ustawienie.
Odtwarzanie jeden wybrany utwór.
Naciśnij odpowiedni przycisk
numeryczny, aby wybrać utwór.
Odtwarzanie jednego wybranego
albumu MP3.
Naciśnij [R, T], aby wybrać album
MP3.
Odtwarzanie losowo wszystkich
utworów.
Odtwarzanie losowo wszystkich
utworów w jednym wybranym albumie
MP3.
Naciśnij [R, T], aby wybrać album
MP3.
Powtórz 1-TRACK.
Powtórz 1-ALBUM.
Powtórz odtwarzanie losowe.
Powtórz 1-ALBUM RANDOM.
Tryb połączenia
BLUETOOTH
Tryb połączenia można zmienić, aby dostosować do
rodzaju połączenia.
Przygotowanie
Jeśli system jest podłączony do urządzenia Bluetooth
odłącz go (Z„Rozłączanie urządzenia”).
®
1 Naciśnij [PLAY MENU], aby wybrać „LINK MODE”.
2 Naciśnij [Y, U], aby wybrać tryb, a następnie
naciśnij [OK].
MODE 1 Nacisk położony na możliwość
MODE 2 Nacisk położony na jakość dźwięku.
Uwaga:
W przypadku przerwane dźwięku wybierz „MODE 1”.
█ Uwaga dotycząca płyty
• Urządzenie może odtwarzać płyty CD-R/RW z
zawartością CD-DA lub MP3.
• Przed odtwarzaniem, należy sfinalizować dysk na
urządzeniu, na którym był nagrywany.
• Niektóre płyty CD-R/RW mogą nie być odtwarzane z
powodu złego stanu nagrania.
█ Uwaga dotycząca urządzenia USB
• To urządzenie nie gwarantuje połączenia ze wszystkimi
urządzeniami USB.
• To urządzenie obsługuje tryb pracy USB 2.0 „full
speed”.
• To urządzenie może obsługiwać urządzenia USB o
pojemności do 32 GB.
• Obsługiwany jest tylko system plików FAT 12/16/32.
█ Uwaga dotycząca pliku MP3
• Pliki są zdefiniowane jako utwory i foldery są
zdefiniowane jako album.
• Utwory powinny mieć rozszerzenie „.mp3” lub „.MP3”.
• Utwory nie zawsze odtwarzane są w kolejności
nagrywania.
• Niektóre pliki mogą nie być obsługiwane z powodu
wielkości sektora.
Plik MP3 na płycie
• Urządzenie może odtwarzać do:
– 255 albumów (włącznie z folderem nadrzędnym)
– 999 utworów
– 20 sesji
• Płyty muszą być zgodne ze standardem ISO9660
poziom 1 lub 2 (z wyjątkiem formatów rozszerzonych).
Plik MP3 na urządzeniu USB
• Urządzenie może odtwarzać do:
– 800 albumów (włącznie z folderem nadrzędnym)
– 8000 utworów
– 999 utworów w jednym albumie
połączenia.
,
RQT0A38
10
92
Page 93

Radio
POLSKI
offset printing
Przygotowanie
Naciśnij [CD/RADIO/AUX], aby wybrać „FM” lub „AM”.
Strojenie ręczne
Naciśnij [3] lub [5], aby dostroić radio do
żądanej stacji.
Aby uruchomić automatyczne strojenie, należy nacisnąć i
przytrzymać ten przycisk, do momentu, gdy wyświetlana
częstotliwość zacznie szybko się zmieniać.
Podczas odbioru stereofonicznego w paśmie,
wyświetlany zostanie symbol „STEREO”.
Korzystanie z urządzenia głównego
1 Naciśnij [TUNE MODE], aby wybrać „MANUAL”.
2 Naciśnij [2/3] lub [5/6], aby dostroić
radio do żądanej stacji.
Poprawy brzmienia dźwięku
Jeśli wybrano pasmo „FM”
1 Naciśnij [PLAY MENU], aby wybrać „FM MODE”.
2 Naciśnij [Y, U], aby wybrać „MONO”, a następnie
naciśnij [OK].
Aby anulować, wybierz „STEREO”.
Tryb „MONO” jest również anulowany z chwilą
zmiany częstotliwości.
Zapamiętanie nastawy
Przejdź do kroku 2 funkcji „Ręczne programowanie
stacji”.
Jeśli wybrano pasmo „AM”
1 Naciśnij [PLAY MENU], aby wybrać
„BEATPROOF”.
2 Naciśnij [Y, U], aby wybrać ustawienie, taki, który
zapewnia najlepszy odbiór, a następnie naciśnij
[OK].
Programowanie stacji
Można zapisać do 30 stacji FM i 15 stacji AM.
█ Automatyczne programowanie
1 Naciśnij [AUTO PRESET], aby wybrać „LOWEST”
lub „CURRENT”.
LOWEST Strojenie rozpocznie się od najniższej
CURRENT Strojenie rozpocznie się od aktualnej
częstotliwości.
częstotliwości.
2 Naciśnij [OK], aby rozpocząć programowanie.
Tuner zaprogramuje na kanałach, w rosnącej
kolejności, wszystkie stacje, które zdoła odebrać.
Aby anulować, naciśnij [8].
█ Ręczne programowanie stacji
1 Naciśnij [3] lub [5] (urządzenie główne:
[2/3] lub [5/6]), aby dostroić radio do
żądanej stacji.
2 Naciśnij [OK].
3 Wybierz żądaną zaprogramowaną stację
przyciskiem numerycznym.
Aby zaprogramować więcej stacji, wykonaj ponownie
kroki od 1 do 3.
Nowa stacja zastąpi wcześniej zaprogramowaną
znajdującą się pod tym samym numerem.
█ Wybieranie zaprogramowanej stacji
Naciśnij przyciski numeryczne, [2] lub [6], aby
wybrać zaprogramowaną stację.
Korzystanie z urządzenia głównego
1 Naciśnij [TUNE MODE], aby wybrać „PRESET”.
2 Naciśnij [2/3] lub [5/6], aby wybrać
zaprogramowaną stację.
Ustawianie stacji w paśmie AM
Tylko poprzez urządzenie główne
Ten system jest w stanie odbierać stacje radiowe w
paśmie AM w krokach co 10 kHz.
1 Naciśnij [CD/RADIO/AUX], aby wybrać „FM” lub
„AM”.
2 Naciśnij i przytrzymaj [CD/RADIO/AUX].
Po kilku sekundach wyświetlona zostanie bieżąca
minimalna częstotliwość radiowa. Zwolnij przycisk po
zmianie minimalnego zakresu częstotliwości.
• Aby powrócić do ustawień początkowych, należy
wykonać ponownie powyższe kroki.
• Po zmianie ustawienia zaprogramowane częstotliwości
zostaną skasowane.
11
93
RQT0A38
Page 94
Nagrywanie
offset printing
Istnieje także możliwość zapisu do 800 folderów
(maksymalnie 999 utworów w albumie) lub łącznie 8000
utworów w zależności od dostępnej pojemności pamięci
wbudowanej lub urządzenia USB w
Aby sprawdzić pojemność pamięci
W trybie zatrzymania naciśnij [DISPLAY].
• Kiedy system będzie odczytywał urządzenie, zostanie
wyświetlone polecenie „UPDATE”.
•Jeśli do
Uwaga:
• Wszystkie nagrania zapisywane są w formacie „.mp3”.
• Nie można włączyć nagrywania w trybie odtwarzania
• Funkcja DJ jest wyłączona podczas nagrywania.
• Podczas nagrywania tryb powtarzania odtwarzania jest
• Za każdym razem, gdy używana jest funkcja nagrywania,
• Kolejność albumów można zmienić po zakończeniu
• Nagrania są przechowywane w folderze o nazwie
• Podczas nagrywania na urządzenie USB wskaźnik stanu
USB B nie podłączono żadnego urządzenia
USB, zostanie wyświetlony komunikat „NO DEVICE”.
losowego.
wyłączony.
tworzony jest nowy album.
nagrywania.
„REC_DATA” na urządzeniu USB lub do pamięci
wbudowanej.
USB miga na czerwono.
Podstawowe nagrywanie
1 Wybierz źródło nagrywania.
CD-DA
Wybierz tryb odtwarzania płyty.
Nagrywanie
wszystkich utworów
Nagrywanie
określonego utworu
Upewnij się, że płyta jest zatrzymana.
Radio
Dostrój odbiornik do stacji radiowej.
Urządzenia zewnętrzne
Podłącz urządzenie zewnętrzne i włącz odtwarzanie
(Z„Urządzenia zewnętrzne”).
2 Naciśnij [MEMORY REC 7/9] lub [USB REC 7/9],
aby rozpocząć nagrywanie.
Wyświetlona zostanie nazwa folderu, w którym
przechowywane są nagrania.
Zatrzymaj
nagrywanie
Wstrzymaj
nagrywanie
RQT0A38
12
94
Naciśnij [8]. Wyświetlony zostanie
symbol „WRITING”.
Naciśnij [MEMORY REC 7/9] lub
[USB REC 7/9] podczas nagrywania.
Naciśnij ponownie, aby kontynuować
nagrywanie.
Uwaga:
Funkcja wstrzymywania może być użyta
tylko podczas nagrywania ścieżki
dźwiękowej z radia, wejście AUX 1 lub AUX 2
(z wyjątkiem przypadku, gdy ustawiony jest
tryb „SYNCHRO”). Każde wstrzymanie
nagrania powoduje wstawienie znacznika
utworu (Z„Dodawanie znaczników utworu”).
USB B .
Wybierz „OFF PLAYMODE”
(Z„Menu odtwarzania”).
Wybierz „1-TRACK”
(Z„Menu odtwarzania”).
Uwaga:
• Przed rozpoczęciem nagrywania odczekaj kilka sekund, aż
system przygotuje urządzenie USB.
• Podczas nagrywania kolejnego utworu z płyty będzie on
wyświetlony na ekranie.
█ Szybkie nagrywanie
Prędkość nagrywania płyta CD-DA:
CD, CD-R: Prędkość trzykrotnie (3x) wyższa od
standardowej.
CD-RW: Prędkość dwukrotnie (2x) wyższa od
standardowej.
1 Włóż płytę, którą chcesz nagrać.
2 Naciśnij [REC MODE], aby wybrać „NORMAL” lub
„HI-SPEED”, a następnie naciśnij [OK].
3 Naciśnij [USB REC 7/9] lub [MEMORY REC 7/9],
aby rozpocząć nagrywanie.
Uwaga:
• Jeśli z powodu stanu płyty nie jest możliwe nagrywanie w
trybie wysokiej prędkości, nagraj z normalną prędkością.
• Podczas szybkiego nagrywania dźwięk zostanie
wyciszony.
█ Dodawanie znaczników utworu
Podczas nagrywania z radia lub urządzenia
zewnętrznego, można dzielić nagranie na utwory
używając różnych trybów.
Przed rozpoczęciem nagrywania
Naciśnij [REC MODE], aby wybrać tryb.
MANUAL Dodaj znacznik utworu ręcznie.
SYNCHRO
(Dotyczy źródła
AUX 1 i AUX 2)
TIME MARK Utwór jest dzielony automatycznie w
Uwaga:
• Podczas nagrywania, po naciśnięciu [OK] lub wstrzymania
nagrywania, gdy używany jest tryb „TIME MARK”,
5-minutowy licznik zostaje wyzerowany.
• Nie można dodawać ręcznie znaczników utworu w trybie
„SYNCHRO”.
Naciśnij [OK], aby dodać znacznik
utworu.
Nagrywanie jest włączane
automatycznie, gdy zostaje włączone
odtwarzanie z innego urządzenia.
Nagrywanie jest wstrzymywane, gdy
wykryta zostanie cisza trwająca
3sekundy.
odstępach 5-minutowych.
Nagrywanie utworów MP3
Można nagrywać utwory MP3 z:
• płyty MP3 na
•
USB A na USB B lub do pamięci wbudowanej
•
USB B do pamięci wbudowanej lub odwrotnie
USB B lub do pamięci wbudowanej
Page 95

1 Przygotuj źródło nagrywania.
POLSKI
offset printing
Nagrywanie
wszystkich
utworów
Nagrywanie
określonego
albumu lub utworu
Wybierz „OFF PLAYMODE”
(Z„Menu odtwarzania”).
Wybierz „1-ALBUM” lub
„1-TRACK” (Z„Menu
odtwarzania”).
2 Naciśnij [MEMORY REC 7/9] lub [USB REC 7/9],
aby rozpocząć nagrywanie.
Zatrzymaj
nagrywanie
Uwaga:
• Nagrywanie niektórych utworów może potrwać dłużej.
• Niektórych utworów nie można nagrać z powodu stanu
źródła.
• Podczas nagrywania z płyty MP3 nazwa nagrywanego pliku
różni się od pliku oryginalnego.
• Podczas nagrywania z USB A nazwa nagrywanego pliku jest
taka sama, jak nazwa pliku oryginalnego (maksymalnie
32 znaków).
Naciśnij [8].
Nagrywanie jest zatrzymywane po
zapisaniu ostatniego utworu w albumie.
Na przykład, w przypadku zatrzymania
nagrywania podczas nagrywania
czwartego utworu, zapisane zostaną tylko
trzy pierwsze.
Jeśli żaden utwór nie zostanie nagrany,
wyświetlony zostanie komunikat
„NO FILE RECORDED”.
Usuwanie nagranych utworów
1 MEMORY
Naciśnij [MEMORY] (urządzenie główne:
[MEMORY/USB]), aby wybrać „MEMORY”.
USB B
Naciśnij [USB] (urządzenie główne:
[MEMORY/USB]), aby wybrać „USB B”.
2 Naciśnij [R, T], aby wybrać album.
3 Naciśnij [2] lub [6], aby wybrać utwór.
4 Naciśnij [EDIT MODE], aby wybrać tryb.
TRACK DEL Usuń jeden utwór.
ALBUM DEL Usuń jeden album (maksymalnie
FORMAT Formatuj urządzenie USB.
ALL DEL Usuń wszystkie albumy z pamięci
999 utworów).
wbudowanej.
5 Naciśnij [OK].
Wyświetlona zostanie pozycja do usunięcia.
6 Naciśnij [OK].
Wyświetlony zostanie symbol „SURE? NO”.
7 Naciśnij [Y, U], aby wybrać „SURE? YES”, a
następnie naciśnij [OK].
Wyświetlony zostanie symbol „WRITING”.
Aby anulować, wybierz „SURE? NO”.
Efekty dźwiękowe i iluminacji
Efekty dźwiękowe
Zaprogramowany korektor (Preset EQ)
1 Naciśnij [EQ] (urządzenie główne: [LOCAL EQ]),
aby wybrać „PRESET EQ”.
2 Naciśnij [R, T], aby wybrać żądany
zaprogramowanych ustawień korektora
ustawienie, a następnie naciśnij [OK].
Lub obróć [MULTI CONTROL], aby wybrać żądany
zaprogramowanych ustawień korektora ustawienie.
Ręczny korektor (Manual EQ)
1 Naciśnij [EQ] (urządzenie główne: [LOCAL EQ]),
aby wybrać „MANUAL EQ”.
2 Naciśnij [R, T], aby wybrać efekt dźwiękowy.
Lub obróć [MULTI CONTROL], aby wybrać efekt
dźwiękowy.
3 Naciśnij [Y, U], aby wybrać ustawienie, a
następnie naciśnij [OK].
Lub naciśnij [2/3] lub [5/6], aby wybrać
ustawienie.
BASS/MID/TREBLE –4 do +4
SURROUND „ON SURROUND” lub
D.Bass
1 Naciśnij [D.BASS], aby wybrać „D.BASS LEVEL”
lub „D.BASS BEAT”.
Aby anulować, wybierz „OFF D.BASS”.
2 Naciśnij [R, T], aby wybrać ustawienie, a
następnie naciśnij [OK].
Lub obróć [MULTI CONTROL], aby wybrać
ustawienie.
Uwaga:
D.BASS BEAT: Funkcja ta wzmacnia poziom wyrazistości
uderzeń perkusji i generuje dynamiczny dźwięk. W zależności
od danego utworu efekt może być nieznaczny.
Efekty iluminacji
Efekt iluminacji można zmienić w systemie.
Naciśnij [ILLUMINATION], aby wybrać żądany efekt.
COLOR Iluminacja w jednym kolorze.
AUTO Iluminacja w jednym kolorze. Kolor zmienia
OFF Anuluj wybrany efekt.
Możesz również nacisnąć [R, T], aby wybrać następny
lub poprzedni efekt.
Korzystanie z urządzenia głównego
Włącz [ILLUMINATION].
się automatycznie.
„OFF SURROUND”
13
95
RQT0A38
Page 96

Funkcje DJ
offset printing
Funkcje DJ umożliwiają dodawanie efektów
dźwiękowych lub dźwięku sampla pomiędzy utworami.
Korzystanie z aplikacji „Panasonic MAX Juke”
Aby móc jednocześnie odtwarzać utwory z wielu
urządzeń, można pobrać i zainstalować bezpłatną
aplikację dla systemu Android „Panasonic MAX Juke”
dostępną w Google Play.
Uwaga:
Funkcja DJ zostanie wyłączona po wyłączeniu systemu,
zmianie źródła na inne lub podczas nagrywania.
DJ jukebox
USB MEMORY
Naciśnij [JUKEBOX] (urządzenie główne:
[DJ JUKEBOX]).
Aby anulować, wybierz „OFF”.
Uwaga:
Po włączeniu efektu DJ Jukebox system zostanie
automatycznie przełączony w tryb powtarzania.
█ Zmienianie ustawienia powtarzania
1 Naciśnij [PLAY MENU].
2 Naciśnij [Y, U], aby wybrać ustawienie, a
następnie naciśnij [OK].
Korzystanie z urządzenia głównego
W trybie zatrzymania obróć [MULTI CONTROL], aby
wybrać ustawienie, a następnie naciśnij [4/9].
RANDOM REPEAT
RND
ALL TITLE REPEAT Powtarzanie wszystkich utworów.
RANDOM MIX
REPEAT
RND
Gdy wyświetlony jest komunikat „WAITING REQUEST”,
można przejść do następnego kroku bez korzystania z
aplikacji „Panasonic MAX Juke”.
█ Zmienianie efektu DJ jukebox
Naciśnij [DJ1] do [DJ6] na urządzeniu, aby wybrać
żądany efekt.
[DJ1]
[DJ2] aby [DJ6]
Ponownie naciśnij przycisk, aby anulować wybór.
Uwaga:
Nie można wybrać efektu DJ jukebox, gdy używany jest tryb
RQT0A38
„RANDOM MIX REPEAT”.
14
96
Powtórz odtwarzanie losowe.
Powtórz odtwarzanie losowe. W
odstępach pomiędzy wszystkimi
utworami dodawany jest dźwięk
sampla.
Płynne przechodzenie
bieżącego utworu stopniowo
zmniejsza się, następnego —
stopniowo się zwiększa.
Miks dźwięku sampla
pomiędzy wszystkimi utworami
dodawany jest dźwięk sampla.
: Głośność
: W odstępach
Korzystanie z aplikacji „Panasonic MAX Juke”
Można wywoływać utwory, które mają być odtwarzane
przez aplikację.
• Gdy zostanie wyświetlony komunikat „MAKING
LIST”, można wywoływać fragmenty utworów.
• Gdy wyświetlony jest komunikat „WAITING
REQUEST”, można wywoływać utwory, które mają
być odtwarzane przez aplikację.
Sampler DJ
(Z wyjątkiem źródeł AUX 1 i AUX 2)
Tylko poprzez urządzenie główne
Kręcąc [MULTI CONTROL] możesz zastosować dźwięk
rysowania lub dźwięk sampla w odtwarzanym utworze.
1 Naciśnij [DJ SAMPLER].
2 Naciśnij [DJ1] do [DJ6], aby wybrać żądany
dźwięk.
3 Włącz [MULTI CONTROL].
Anulowanie samplera DJ
Naciśnij [DJ SAMPLER].
Korzystanie z aplikacji „Panasonic MAX Juke”
Dźwięk sampla można zmienić w aplikacji. (Aby
przywrócić wszystkie dźwięki sampli do ustawień
fabrycznych, naciśnij i przytrzymaj [DJ SAMPLER], gdy
sampler DJ jest wyłączony.)
Efekt DJ
(Z wyjątkiem źródeł AUX 1 i AUX 2)
Tylko poprzez urządzenie główne
Funkcji efekt DJ można użyć w celu dodawania efektów
dźwiękowych.
1 Naciśnij [DJ EFFECT].
2 Naciśnij [DJ1] do [DJ6], aby wybrać efekt.
[DJ1] PHASER
Dodaje dźwiękowi przestrzeni i wymiaru.
[DJ2] FILTER
Rozszerza lub odfiltrowuje określone
zakresy dźwięku.
[DJ3] SOUND CHOPPER
Okresowo odłącza dźwięk.
[DJ4] ELECTRO ECHO
Dodaje cyfrowe echo do dźwięku.
[DJ5] PITCH SHIFTER
Reguluje tonację dźwięku.
[DJ6] HARMONIZER
Dodaje nuty do dźwięku, aby stworzyć
harmonię.
3 Obróć [MULTI CONTROL], aby wybrać ustawienie.
Anulowanie efektu DJ
Naciśnij [DJ EFFECT].
Page 97

Używanie mikrofonu
POLSKI
offset printing
Przygotowanie
Przed podłączeniem lub odłączeniem mikrofonu zmniejsz
głośność systemu do minimum.
1 Podłącz mikrofon (nie należy do wyposażenia) do
gniazda mikrofonowego.
Typ wtyku: Ø 6,3 mm jednouszny
2 Za pomocą pokrętła [MIC VOL, MIN/MAX] na
urządzeniu ustaw głośność mikrofonu.
Jeśli chcesz śpiewać z podkładem muzycznym.
3 Włącz odtwarzanie muzyki i wyreguluj poziom
głośności systemu.
Uwaga:
• Jeśli słyszany jest dziwny, nieprzyjemny dźwięk
(sprzęganie), odsuń mikrofon od głośników lub zmniejsz
poziom głośności mikrofonu.
• Kiedy mikrofon nie jest używany, odłącz go od gniazda i
zmniejsz poziom głośności mikrofonu do „MIN”.
• Nagrywanie z mikrofonu jest niemożliwe w tym systemie.
Zegar i timer
Ustawianie zegara
Jest to zegar 24-godzinny.
1 Naciśnij [SETUP], aby wybrać „CLOCK”.
2 Naciśnij [Y, U], aby ustawić godzinę, a następnie
naciśnij [OK].
Sprawdzanie godziny
Naciśnij [SETUP], aby wybrać „CLOCK”.
W trybie spoczynku naciśnij [DISPLAY].
Uwaga:
Zegar należy regularnie nastawiać, aby zawsze była
ustawiona dokładna godzina.
Timera odtwarzania i timera nagrywania
(Z wyjątkiem źródeł Bluetooth®, AUX 1 i AUX 2)
Timer można ustawić w taki sposób, aby o określonej
godzinie urządzenie:
• Budziło użytkownika (timer odtwarzania).
• Nagrywanie z radia (timer nagrywania).
Nie można jednocześnie używać timera odtwarzania i
nagrywania.
Przygotowanie
Ustaw zegar.
1 Naciśnij [SETUP], aby wybrać „TIMER ADJ”.
2 Naciśnij [Y, U], aby wybrać „#PLAY” lub „#REC”,
a następnie naciśnij [OK].
3 Naciśnij [Y, U], aby ustawić czas rozpoczęcia, a
następnie naciśnij [OK].
4 Powtórz krok 3, aby ustawić godzinę zakończenia.
5 Naciśnij [Y, U], aby wybrać źródło, z którego
chcesz odtwarzać lub nagrywania, a następnie
naciśnij [OK].
6 Aby przejść do timera nagrywania, naciśnij [Y, U]
w celu wybrania „MEMORY” lub „USB B” w celu
kontynuowania nagrywania, a następnie naciśnij
[OK].
Aby uaktywnić timer
1 Przygotuj źródło.
Timer
odtwarzania
Timer
nagrywania
Przygotuj źródło dźwięku do
odsłuchu (płyta, USB, pamięć
wewnętrzna, radio lub urządzenia
zewnętrzne) i ustaw głośność.
Podłącz urządzenie USB do USB B
(w celu nagrywania USB) i dostrój
odbiornik do stacji radiowej.
2 Naciśnij [SETUP], aby wybrać „TIMER SET”.
3 Naciśnij [Y, U], aby wybrać ustawienie, a
następnie naciśnij [OK].
PLAY ON Uruchom timer odtwarzania.
PLAY OFF Anuluj timer odtwarzania.
REC ON Uruchom timer nagrywania.
REC OFF Anuluj timer nagrywania.
Wyświetlony zostanie symbol „#”.
Aby timer działał, system musi być wyłączone.
Sprawdzanie ustawienia
1 Naciśnij [SETUP], aby wybrać „TIMER ADJ”.
2 Naciśnij [Y, U], aby wybrać „#PLAY” lub „#REC”,
a następnie naciśnij [OK].
W trybie spoczynku naciśnij dwukrotnie [DISPLAY].
Uwaga:
• Timer odtwarzania rozpoczyna odtwarzanie z niskim
poziomem głośności, który stopniowo rośnie do
ustawionego poziomu.
• Timer nagrywania włączy się 30 sekund przed ustawionym
czasem z wyciszonym dźwiękiem.
• Jeśli timer jest aktywny, zadziała codziennie o ustawionej
godzinie.
• W przypadku wyłączenia urządzenia a następnie włączenia
go ponownie podczas pracy timera, timer nie zatrzyma się
z chwilą upływu ustawionego czasu.
15
97
RQT0A38
Page 98
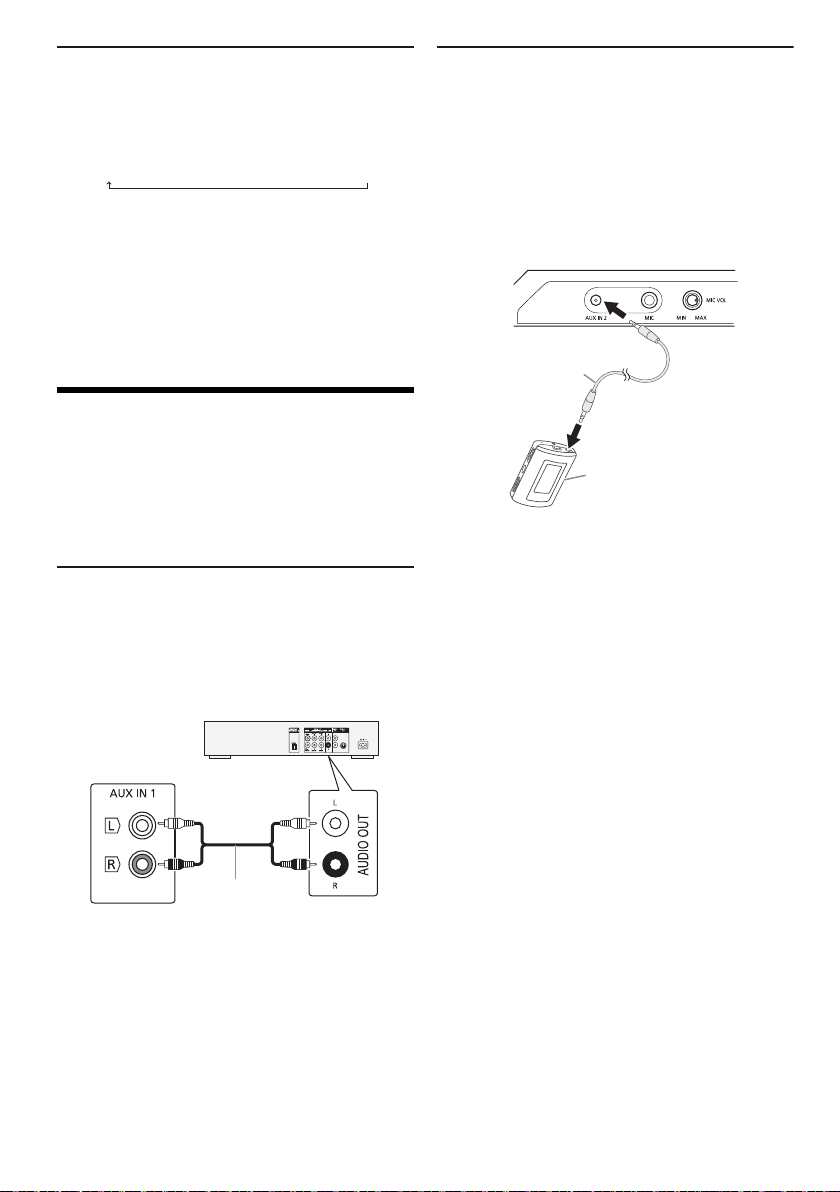
Timer wyłączający
Tylny panel
urządzenia
głównego
Przewód audio
(nie należy do
wyposażenia)
Odtwarzacz DVD (nie
należy do wyposażenia)
Przewód audio
(nie należy do
wyposażenia)
Przenośne urządzenie
audio (nie należy do
wyposażenia)
offset printing
Timer wyłącza system po upływie ustawionego czasu.
Naciśnij [SLEEP], aby wybrać ustawienie (w
minutach).
Aby anulować, wybierz „OFF”.
NIM03 ĺ120 MINĺĺ 60 MINĺ90 MIN FFO
Uwaga:
• Czas pozostały jest zawsze pokazywany na wyświetlaczu.
Podczas wykonywania innych operacji, ekran wyświetlacza
zmienia się co pewien czas.
• Możliwe jest jednoczesne użycie timera odtwarzania i
wyłączającego albo timera nagrywania i wyłączającego.
• Timer wyłączający ma zawsze priorytet. Należy pamiętać,
aby czasy timerów się nie nakładały.
Urządzenia zewnętrzne
Przygotowanie
• Odłącz przewód zasilania.
• Wyłącz wszystkie urządzenia i zapoznaj się z
odpowiednimi instrukcjami obsługi.
Uwaga:
Podzespoły i przewody są sprzedawane oddzielnie.
Korzystanie z wejścia dodatkowego
(AUX)
Umożliwia podłączenie i odsłuch zewnętrznych źródeł
dźwięku, takich jak VCR, DVD itp.
Podłączanie do przenośnego urządzenia
audio
System umożliwia odtwarzanie muzyki z przenośnych
urządzeń dźwiękowych.
Przygotowanie
• Należy wyłączyć korektor dźwięku urządzenia
zewnętrznego (o ile jest włączony), aby zapobiec
zniekształceniom dźwięku.
• Zmniejsz głośność systemu i urządzenia zewnętrznego
przed ich podłączeniem lub rozłączeniem.
1 Podłącz zewnętrzne urządzenie dźwiękowe.
Typ wtyku: o średnicy Ø 3,5 mm, stereo
2 Naciśnij [CD/RADIO/AUX], aby wybrać „AUX 2”.
3 Odtwórz przenośne urządzenie dźwiękowe.
Aby wyregulować poziom sygnału wejściowego
1 Naciśnij [PLAY MENU], aby wybrać
„INPUT LEVEL”.
2 Naciśnij [Y, U], aby wybrać „NORMAL” lub
„HIGH”, a następnie naciśnij [OK].
Uwaga:
• Nie można dostosować poziomu sygnału wejściowego
podczas nagrywania.
• Wybierz opcję „NORMAL” (normalna) jeśli w przypadku
wyboru opcji „HIGH” (wysoki) dźwięk jest zniekształcony.
• Dalsze szczegóły znajdziesz w instrukcji obsługi urządzenia
zewnętrznego.
1 Podłącz urządzenie zewnętrzne.
2 Naciśnij [CD/RADIO/AUX], aby wybrać „AUX 1”.
3 Uruchom odtwarzanie w urządzeniu
Uwaga:
• Aby podłączyć urządzenia innego typu niż opisane w tej
• W przypadku korzystania z przejściówek, może dojść do
RQT0A38
16
98
zewnętrznym.
instrukcji, skonsultuj się ze sprzedawcą.
zniekształcenia dźwięku.
Page 99

Inne
POLSKI
offset printing
Automatyczne wyłączanie
Urządzenie automatycznie wyłącza się po około 20
minutach bezczynności.
1 Naciśnij [SETUP], aby wybrać „AUTO OFF”.
2 Naciśnij [Y, U], aby wybrać „ON”, a następnie
naciśnij [OK].
Aby anulować, wybierz „OFF”.
Uwaga:
Funkcja nie działa, gdy źródłem jest radio lub gdy podłączone
jest urządzenie Bluetooth
®
.
Bluetooth® w trybie spoczynku
Ta funkcja automatycznie włącza urządzenie, gdy
zostanie nawiązane połączenie Bluetooth
sparowanym urządzeniem.
®
ze
1 Naciśnij [SETUP], aby wybrać
„BLUETOOTH STANDBY”.
2 Naciśnij [Y, U], aby wybrać „ON”, a następnie
naciśnij [OK].
Aby anulować, wybierz „OFF”.
Uwaga:
W przypadkach niektórych urządzeń odpowiedź może
wymagać więcej czasu. W przypadku podłączenia do
urządzenia Bluetooth
odczekać co najmniej 5 sekund przed ponownym
podłączeniem tego systemu do urządzenia Bluetooth
®
przed wyłączeniem systemu należy
®
.
Wersja oprogramowania
Umożliwia sprawdzenie wersji oprogramowania systemu.
1 Naciśnij [SETUP], aby wybrać „SW VER.”, a
następnie naciśnij [OK].
Wyświetlana jest wersja oprogramowania.
2 Naciśnij ponownie [OK], aby zakończyć.
Konserwacja
W celu oczyszczenia urządzenia należy przetrzeć je
miękką, suchą szmatką.
• Do czyszczenia urządzenia nie należy stosować
alkoholu, rozcieńczalnika ani benzyny.
• Przed użyciem chusteczki nasączonej środkiem
chemicznym należy zapoznać się z dołączoną do niej
instrukcją.
Rozwiązywanie problemów
Przed oddaniem urządzenia do naprawy należy
przeprowadzić następujące kontrole. W przypadku
wątpliwości, co do niektórych punktów kontrolnych lub
jeśli podane rozwiązania nie eliminują problemu, należy
zwrócić się po wskazówki do sprzedawcy.
█ Typowe problemy
Urządzenie nie działa.
• Został aktywowany system bezpieczeństwa. Wykonaj
następujące czynności:
1. Naciśnij [1] na urządzeniu głównym, aby przełączyć je
do trybu gotowości. Jeśli urządzenie nie przechodzi do
trybu gotowości,
– Naciśnij i przytrzymaj przycisk na urządzeniu głównym
przynajmniej przez 10 sekundy. Lub,
– Odłącz przewód zasilania i podłącz go ponownie.
2. Naciśnij [1] ponownie, aby włączyć urządzenie. Jeśli
problem nie ustąpi, skonsultuj się z dystrybutorem.
W trybie spoczynku wyświetlacz jest włączony, a
wyświetlane informacje stale się zmieniają.
• Naciśnij i przytrzymaj [8] na urządzeniu głównym, aby
wybrać „DEMO OFF”.
Nie działa pilot zdalnego sterowania.
• Sprawdź, czy bateria została prawidłowo włożona.
Dźwięk jest zniekształcony lub brak dźwięku.
• Regulacja głośności systemu.
• Wyłącz urządzenie, określ i usuń przyczynę, a następnie
włącz urządzenie ponownie. Może to być spowodowane
przeciążeniem głośników wskutek nadmiernego poziomu
głośności, zbyt wysokiego zasilania lub użytkowania
systemu w warunkach, w których panuje zbyt wysoka
temperatura.
Podczas odtwarzania słychać buczenie.
• Blisko urządzenia znajdują się przewody zasilania prądem
przemiennym lub oświetlenie fluorescencyjne. Utrzymywać
przewody zasilania tego urządzenia z dala od innych
urządzeń lub przewodów zasilających.
Poziom głośności zostaje zmniejszony.
• Obwód zabezpieczający został uruchomiony z powodu
ciągłego użycia przy wysokiej głośności. Ma to na celu
zabezpieczenie systemu i zachowanie jakości dźwięku.
█ Płyty kompaktowe
Błędne informacje na wyświetlaczu.
Nie uruchamia się odtwarzanie.
• Płyta nie została włożona prawidłowo. Włóż prawidłowo
płytę.
• Płyta jest zabrudzona. Wyczyść plytę.
• Użyj innej płyty, jeśli jest zarysowana, wygięta lub
niestandardowa.
• Nastąpiło skroplenie pary wodnej. Odczekaj 1 - 2 godzin,
aż skroplona para wodna odparuje z systemu.
Całkowita liczba wyświetlanych utworów jest
nieprawidłowa.
Płyta nie może być odczytywana.
Słyszalny zniekształcony dźwięk.
• Włożona płyta nie jest obsługiwana przez system. Zmień
płytę.
• Włożona płyta nie jest sfinalizowana.
17
99
RQT0A38
Page 100

█ USB
offset printing
Nie można odczytać urządzenia USB lub jego zawartości.
• Format urządzenia USB lub jego zawartość nie jest
obsługiwana przez urządzenie.
• W niektórych przypadkach nie będą obsługiwane
urządzenia USB o pojemności większej niż 32 GB.
Powolne działanie urządzenia USB.
• Pliki o dużych rozmiarach lub urządzenia USB z dużą
ilością pamięci wymagają dłuższego czasu wczytywania.
█ Bluetooth
Nie można wykonać parowania.
• Sprawdź stan urządzenia Bluetooth
• Urządzenie znajduje się poza zasięgiem komunikacji
wynoszącym 10 m. Przemieść urządzenie bliżej systemu.
Nie można podłączyć urządzenia.
• Parowanie urządzenia zakończyło się niepowodzeniem.
Wykonaj ponownie parowanie.
• Sparowanie urządzenia zostało zastąpione. Wykonaj
ponownie parowanie.
• System może być połączony z innym urządzeniem. Odłącz
inne urządzenie i spróbuj powtórzyć parowanie urządzenia.
• System może napotkać problem. Wyłącz urządzenie, a
następnie włącz je ponownie.
Urządzenie jest podłączone, ale nie można odsłuchiwać
dźwięku przez system.
• W przypadku niektórych wbudowanych urządzeń
Bluetooth
„SC-MAX4000”. Aby uzyskać szczegółowe informacje,
patrz instrukcja obsługi.
Dźwięk z urządzenia jest przerywany.
• Urządzenie znajduje się poza zasięgiem komunikacji
wynoszącym 10 m. Przemieść urządzenie bliżej systemu.
• Usuń wszystkie przeszkody spomiędzy systemu i
urządzenia.
• Zakłócenia powodują inne urządzenia używające pasma
częstotliwości 2,4 GHz (router bezprzewodowy, kuchenki
mikrofalowe, telefony bezprzewodowe itp.). Przesuń
urządzenie bliżej systemu i oddal je od innych urządzeń.
• W celu zapewnienia stabilnej komunikacji wybierz
„MODE 1”.
Funkcja połączenia jednym dotknięciem (NFC) nie działa.
• Sprawdź, czy system oraz funkcja NFC urządzenia są
włączone.
• Dotknij i przytrzymaj ponownie urządzenie w obszarze
dotykowym NFC urządzenia.
Odtwarzany obraz i dźwięk nie są zsynchronizowane.
• Uruchom ponownie aplikację do odtwarzania na
urządzeniu.
• Podłącz urządzenie do systemu za pomocą przewodu
audio (nie należy do zestawu).
®
®
.
®
należy ręcznie ustawić wyjście audio na
█ Radio
Zniekształcenia dźwięku.
• Zastosować opcjonalnie zewnętrzną antenę FM. Montaż
anteny należy zlecić fachowcowi.
Słychać dudnienie.
• Wyłącz telewizor lub odsuń go od urządzenia.
• W przypadku występowania zakłóceń odsuń telefon
komórkowy od systemu.
• W trybie tunera AM, wybierz „BEATPROOF” ustawienie,
taki, który zapewnia najlepszy odbiór.
Podczas odbioru w paśmie AM słychać przydźwięk o
RQT0A38
niskiej częstotliwości.
18
• Odsuń antenę od innych kabli i przewodów.
100
█ Wyświetlacz urządzenia
„ADJUST CLOCK”
• Zegar nie jest ustawiony. Wyreguluj zegar.
„ADJUST TIMER”
• Timer odtwarzania i/lub nagrywania nie jest ustawiony.
Dostosuj ustawienia timera odtwarzania i/lub nagrywania.
„ALB FULL”
• Liczba albumów przekroczyła obsługiwany limit.
„AUTO OFF”
• Urządzenie było nieużywane przez 20 minut i zostanie
wyłączone w ciągu minuty. Aby anulować, naciśnij dowolny
przycisk.
„CAN’T REC”
„DEVICE FULL”
• Nie można użyć funkcji nagrywania, ponieważ pozostały
całkowity czas zapisu na urządzeniu USB jest krótszy od
całkowitego czasu źródła muzyki. Zmień urządzenie USB
na takie, które posiada odpowiednią ilość wolnego miejsca
i uruchom ponownie nagrywanie.
„ERROR”
• Wykonano niewłaściwą operację. Przeczytaj instrukcję i
spróbuj ponownie.
„ERROR” (w trakcie nagrywania)
• Nie można wybrać innego źródła odtwarzania (na przykład
radio, USB itp.) ani naciskać przycisków [2] lub [6]
podczas nagrywania. Zatrzymaj nagrywanie.
• Nie można otworzyć napędu płyt podczas nagrywania ze
źródła AM.
„F61”
• Sprawdź i popraw podłączenie kabli głośników.
• Odłącz urządzenie USB. Wyłącz urządzenie, a następnie
włącz je ponownie.
„F70”
• Sprawdź połączenie Bluetooth
• Odłącz urządzenie Bluetooth
następnie włącz je ponownie.
„F76”
• Wystąpił problem z zasilaniem.
• Odłącz przewód zasilania i skonsultuj się z dystrybutorem.
„F77”
• Odłącz przewód zasilania i skonsultuj się z dystrybutorem.
„NO DEVICE”
• Nie podłączono zewnętrznego urządzenia USB. Sprawdź
połączenie.
• Nie można nagrywać lub sprawdzić dostępnego miejsca,
ponieważ do
„NO DISC”
• Nie włożono płyty.
„NO PLAY”
„UNSUPPORT”
• Sprawdź zawartość. Odtwarzać można wyłącznie utwory o
obsługiwanym formacie.
• Pliki urządzenia USB mogą być uszkodzone. Sformatuj
urządzenie USB i spróbuj ponownie.
• System może napotkać problem. Wyłącz urządzenie, a
następnie włącz je ponownie.
„NO TRACK”
• W urządzeniu USB lub w pamięci wbudowanej brak
zapisanych albumów lub utworów.
„PLAYERROR”
• Próba odtworzenia nieobsługiwanego pliku MP3.
Urządzenie pominie ten utwór i odtworzy następny.
USB B nie podłączono urządzenia USB.
®
.
®
. Wyłącz urządzenie, a
 Loading...