

Page 1
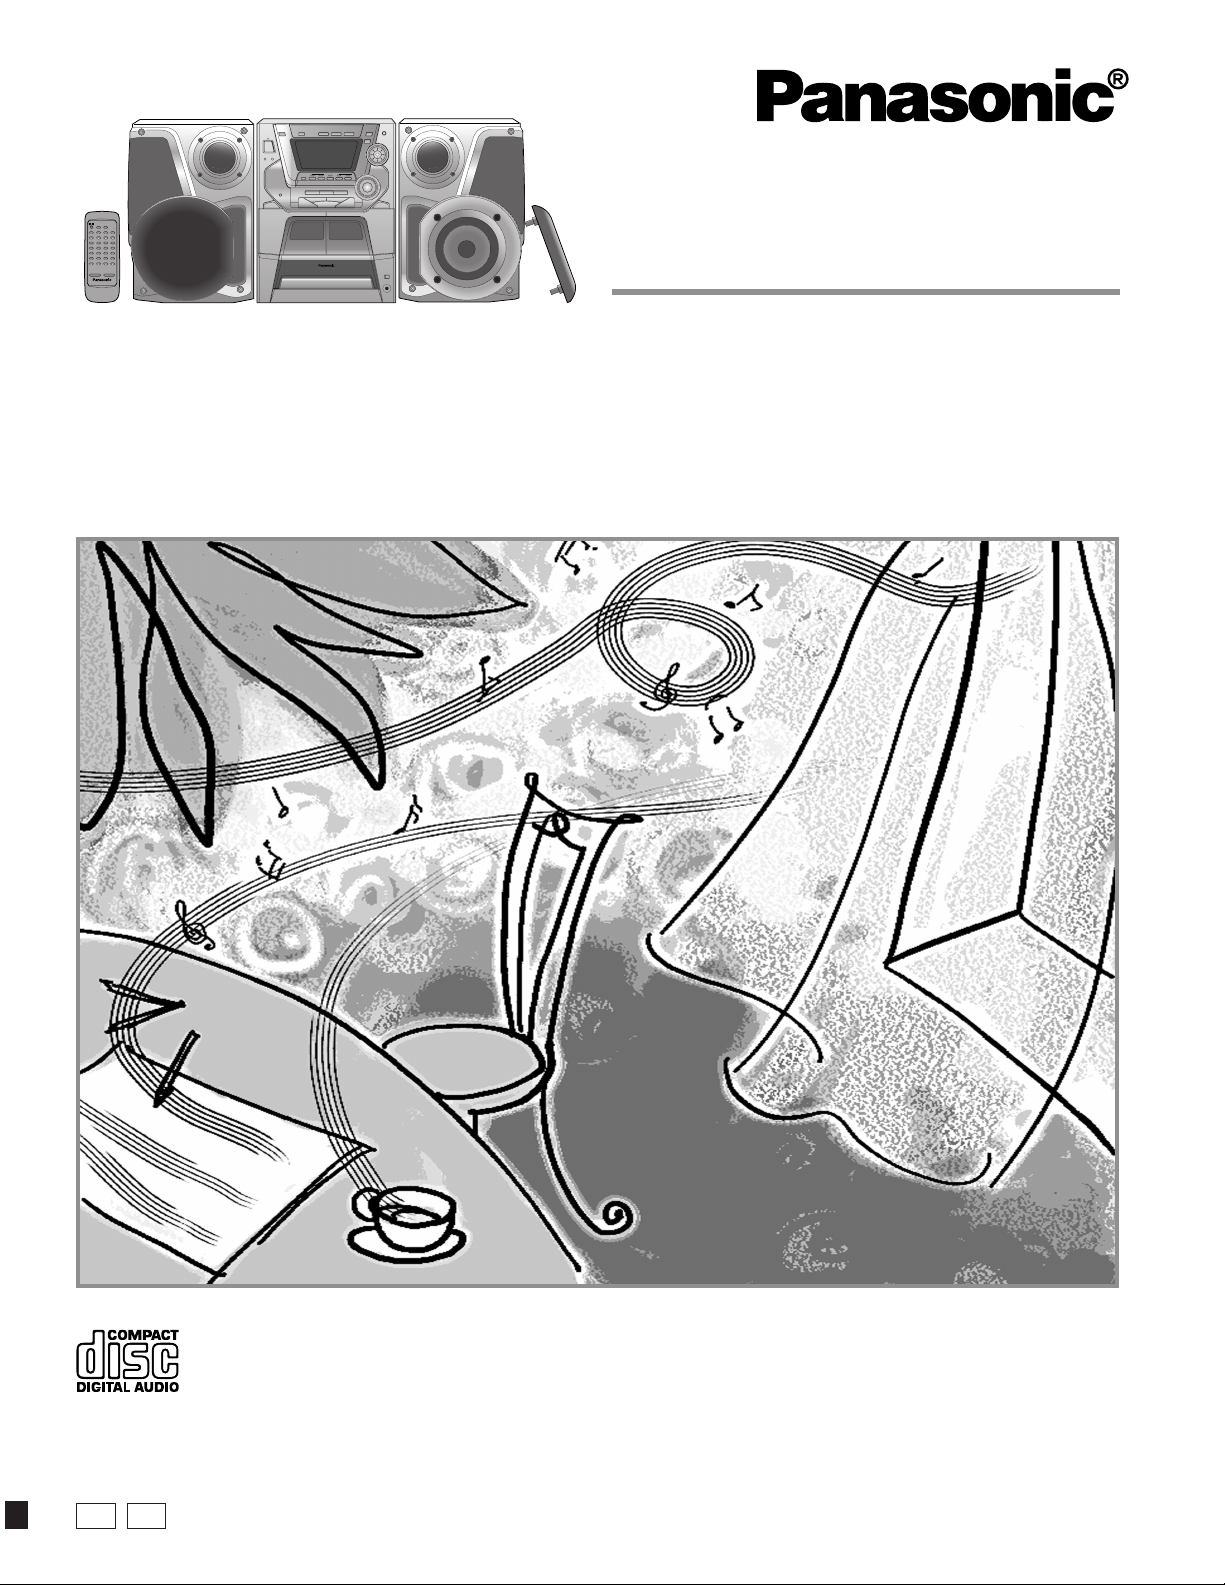
The illustrations show SC-AK44.
CD Stereo System
Operating Instructions
Model No. SC-AK44
SC-AK33
SC-AK22
SC-AK12
P
PC
Before connecting, operating or adjusting this product, please read these
instructions completely.
Please keep this manual for future reference.
RQT5621-4P
Page 2
Dear customer
Table of contents
Thank you for purchasing this product.
For optimum performance and safety, please read these instructions
carefully.
These operating instructions are applicable to the following system.
These operating instructions, however, fundamentally explain the op-
eration of system SC-AK44.
System SC-AK44 SC-AK33 SC-AK22 SC-AK12
Main unit SA-AK44 SA-AK33 SA-AK22 SA-AK12
Speakers SB-AK44 SB-AK33 SB-AK22 SB-AK12
The model number and serial number of this product can be
Before using
found on either the back or the bottom of the unit.
Please note them in the space provided below and keep for
future reference.
MODEL NUMBER
SERIAL NUMBER
User memo:
DATE OF PURCHASE
DEALER NAME
DEALER ADDRESS
TELEPHONE NUMBER
CAUTION!
THIS PRODUCT UTILIZES A LASER.
USE OF CONTROLS OR ADJUSTMENTS OR PERFORMANCE
OF PROCEDURES OTHER THAN THOSE SPECIFIED HEREIN
MAY RESULT IN HAZARDOUS RADIATION EXPOSURE.
DO NOT OPEN COVERS AND DO NOT REPAIR YOURSELF.
REFER SERVICING TO QUALIFIED PERSONNEL.
Before using
Supplied accessories .............................................. 2
PRECAUTIONS ........................................................ 4
Placement of speakers ............................................ 5
Concerning the remote control .............................. 5
Battery installation .......................................................... 5
Correct method of use ................................................... 5
Connections ............................................................. 6
Basic connections (for supplied accessories) ................. 6
Optional antenna connections ........................................ 7
External unit connection ................................................. 7
Front panel controls ................................................ 8
Turning the demo function off .............................. 10
Auto-off function .................................................... 10
Setting the time...................................................... 11
Convenient functions ............................................ 11
Radio operations
Listening to radio broadcasts ............................... 12
Presetting radio broadcasts ................................. 13
Compact disc operations
Concerning compact discs ................................... 14
Listening to compact discs .................................. 15
Direct access play ........................................................ 16
Repeat play .................................................................. 16
Random play ................................................................ 16
Program play ............................................................... 17
To listen to special CDs and tracks
(CD Manager function) .............................................. 18
Cassette deck operations
Listening to tapes .................................................. 19
WARNING:
TO REDUCE THE RISK OF FIRE, ELECTRIC SHOCK OR
PRODUCT DAMAGE, DO NOT EXPOSE THIS APPLIANCE TO
RAIN, SPLASHING, DRIPPING OR MOISTURE.
CAUTION:
TO PREVENT ELECTRIC SHOCK MATCH WIDE BLADE OF
PLUG TO WIDE SLOT, FULLY INSERT.
Supplied accessories
Please check and identify the supplied
accessories.
Use numbers indicated in parentheses when
asking for replacement parts.
(Only for U.S.A.)
To order accessories contact 1-800-332-5368
or web site (http://www.panasonic.com).
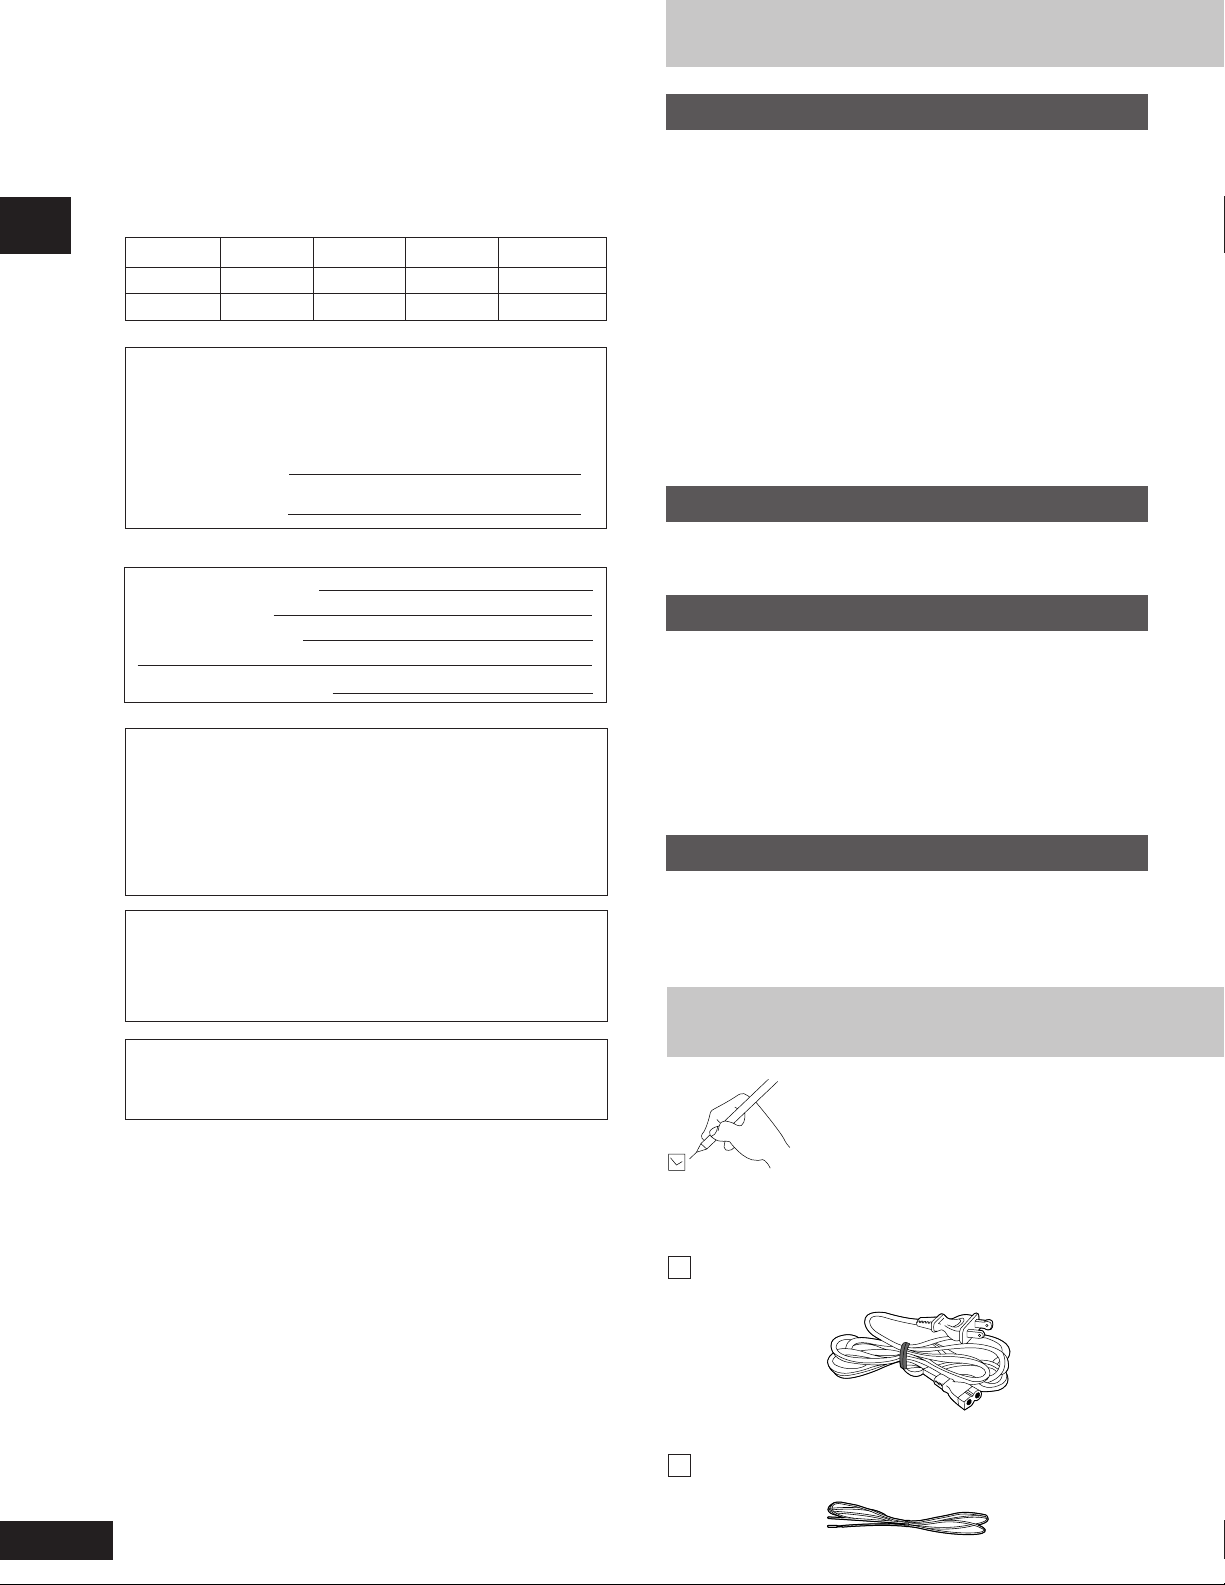
AC power supply cord . . . . . . . . . . . . . . . . . . . . . . . . . . 1 pc.
(RJA0065-A)
FM indoor antenna (RSA0006-J) . . . . . . . . . . . . . . . . . . 1 pc.
RQT5621
2
Page 3
Recording operations
Before recording (Deck 2 only) ............................ 20
Tape-to-tape recording .......................................... 21
Recording from radio broadcasts ........................ 22
Recording from compact discs ............................ 23
To record special CDs and tracks
(CD Manager function) ............................................. 24
Sound quality/sound field operations
Using the built-in sound quality/
sound field settings .......................................... 25
Enhancing the sound quality ................................ 25
Boosting the super woofer ................................... 25
Varying the sound quality with the manual
equalizer ............................................................ 26
Varying the sound quality with
the acoustic image (Al) equalizer .................... 26
Timer operations
Using the timer ...................................................... 27
Using the play/record timer .......................................... 27
Using the sleep timer ................................................... 29
Reference
Using an external unit ........................................... 29
Troubleshooting guide .......................................... 30
Maintenance ........................................................... 30
Servicenter List (U.S.A.) ........................................ 31
Specifications ......................................... Back Cover
Product Service ...................................... Back Cover
THE FOLLOWING APPLIES ONLY IN THE U.S.A.:
CAUTION:
This equipment has been tested and found to comply with
the limits for a Class B digital device, pursuant to Part 15 of
the FCC Rules.
These limits are designed to provide reasonable protection
against harmful interference in a residential installation. This
equipment generates, uses and can radiate radio frequency
energy and, if not installed and used in accordance with the
instructions, may cause harmful interference to radio
communications. However, there is no guarantee that interference will not occur in a particular installation. If this equipment does cause harmful interference to radio or television
reception, which can be determined by turning the equipment off and on, the user is encouraged to try to correct the
interference by one or more of the following measures:
¡Reorient or relocate the receiving antenna.
¡Increase the separation between the equipment and re-
ceiver.
¡Connect the equipment into an outlet on a circuit different
from that to which the receiver is connected.
¡Consult the dealer or an experienced radio/TV technician
for help.
Any unauthorized changes or modifications to this equipment would void the user’s authority to operate this device.
This device complies with Part 15 of the FCC Rules. Operation is subject to the following two conditions: (1) This device
may not cause harmful interference, and (2) this device must
accept any interference received, including interference that
may cause undesired operation.
Before using
AM loop antenna
(RSA0029-L) .................. 1 pc.
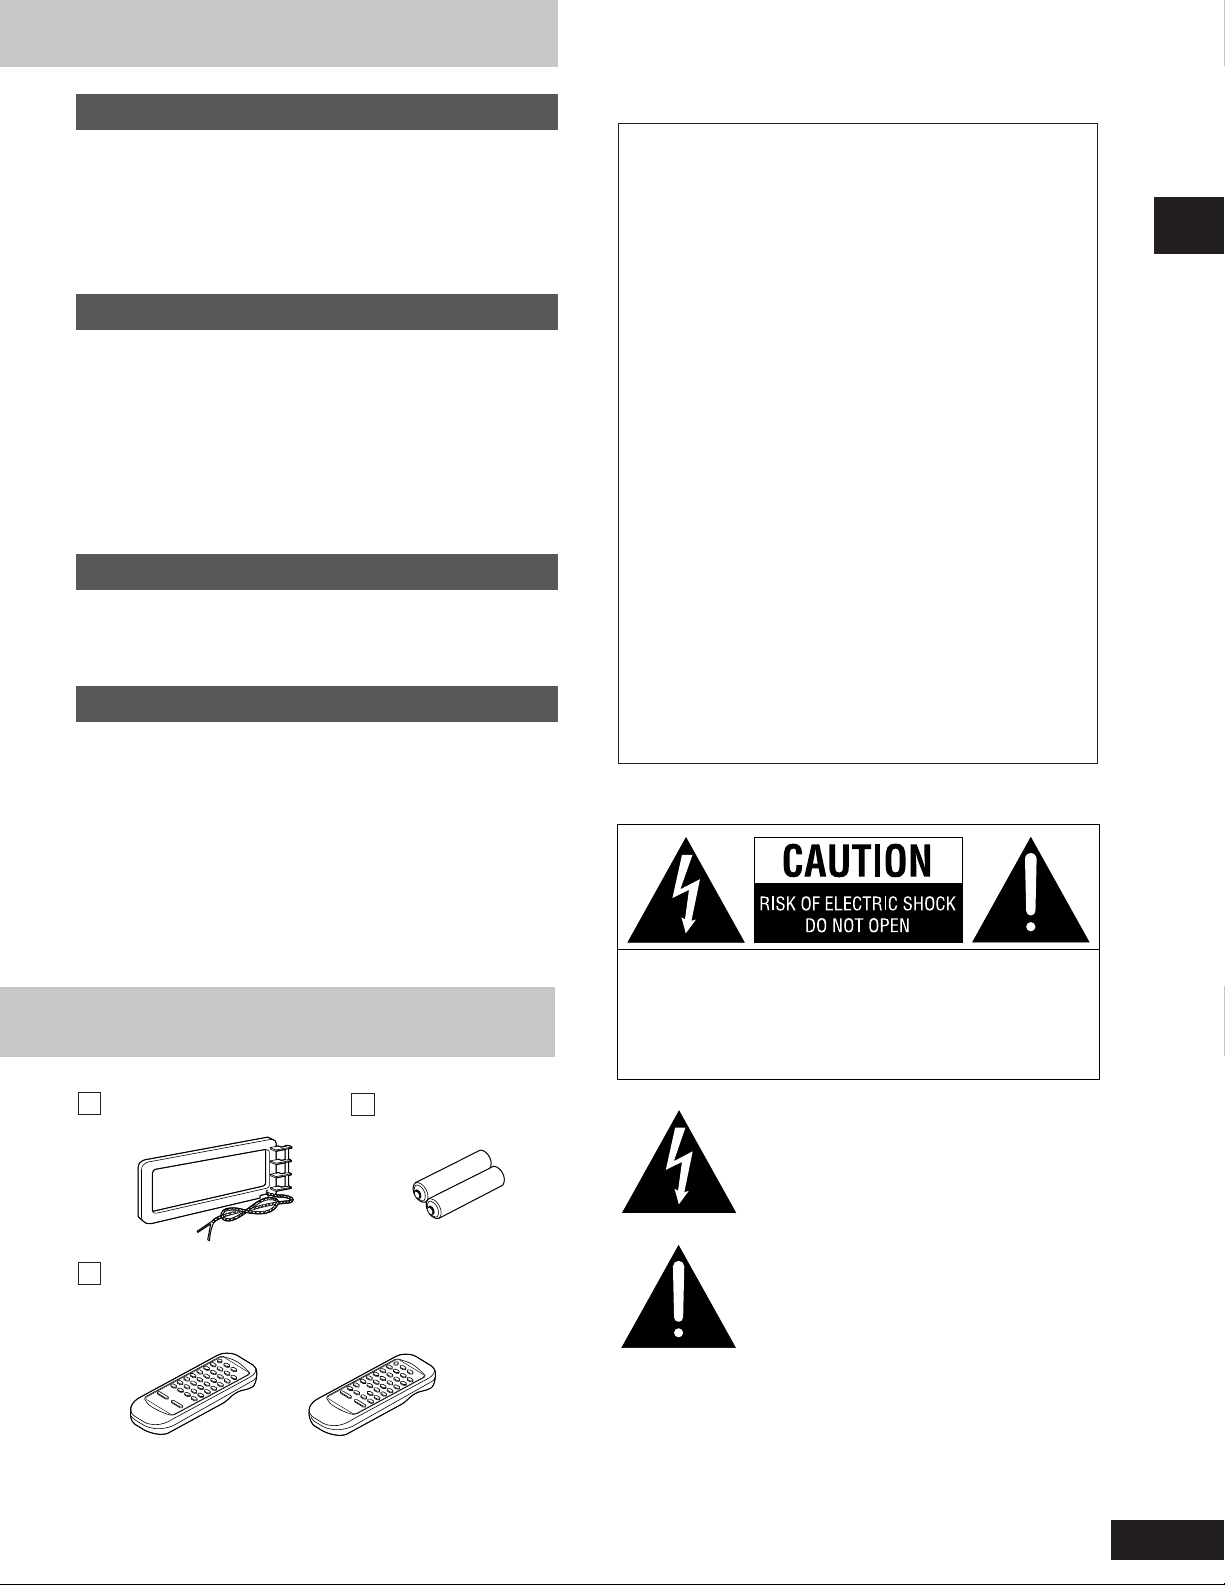
Remote control transmitter .............................................. 1 pc.
SC-AK44:
•
(N2QAGB000004)
SC-AK33, SC-AK22, SC-AK12:
•
(Silver: N2QAGB000002)
(Black: N2QAGB000010)
Batteries ........... 2 pcs.
(R6, AA, UM-3)
CAUTION: TO REDUCE THE RISK OF ELECTRIC
SHOCK, DO NOT REMOVE SCREWS.
NO USER-SERVICEABLE PARTS
INSIDE.
REFER SERVICING TO QUALIFIED
SERVICE PERSONNEL.
The lightning flash with arrowhead symbol, within
an equilateral triangle, is intended to alert the user
to the presence of uninsulated “dangerous voltage”
within the product’s enclosure that may be of
sufficient magnitude to constitute a risk of electric
shock to persons.
The exclamation point within an equilateral triangle
is intended to alert the user to the presence of
important operating and maintenance (servicing)
instructions in the literature accompanying the
appliance.
3
RQT5621
Page 4
PRECAUTIONS
Before using this unit please read these operating instructions carefully.
Take special care to follow the warnings indicated on the unit itself as
well as the safety suggestions listed below.
Afterwards keep them handy for future reference.
Safety
1. Power Source —The unit should be connected to power supply
only of the type described in the operating instructions or as
marked on the unit.
2. Polarization—If the unit is equipped with a polarized AC power
plug (a plug having one blade wider than the other), that plug will
fit into the AC outlet only one way. This is a safety feature. If you
Before using
are unable to insert the plug fully into the outlet, try reversing the
plug. If the plug should still fail to fit, contact your electrician to
replace your obsolete outlet. Do not defeat the safety purpose of
the polarized plug.
3. Power Cord Protection—AC power supply cords should be
routed so that they are not likely to be walked on or pinched by
items placed upon or against them. Never take hold of the plug
or cord if your hand is wet, and always grasp the plug body
when connecting or disconnecting it.
4. Nonuse Periods—When the unit is not used, turn the power off.
When left unused for a long period of time, the unit should be
unplugged from the household AC outlet.
Installation
Environment
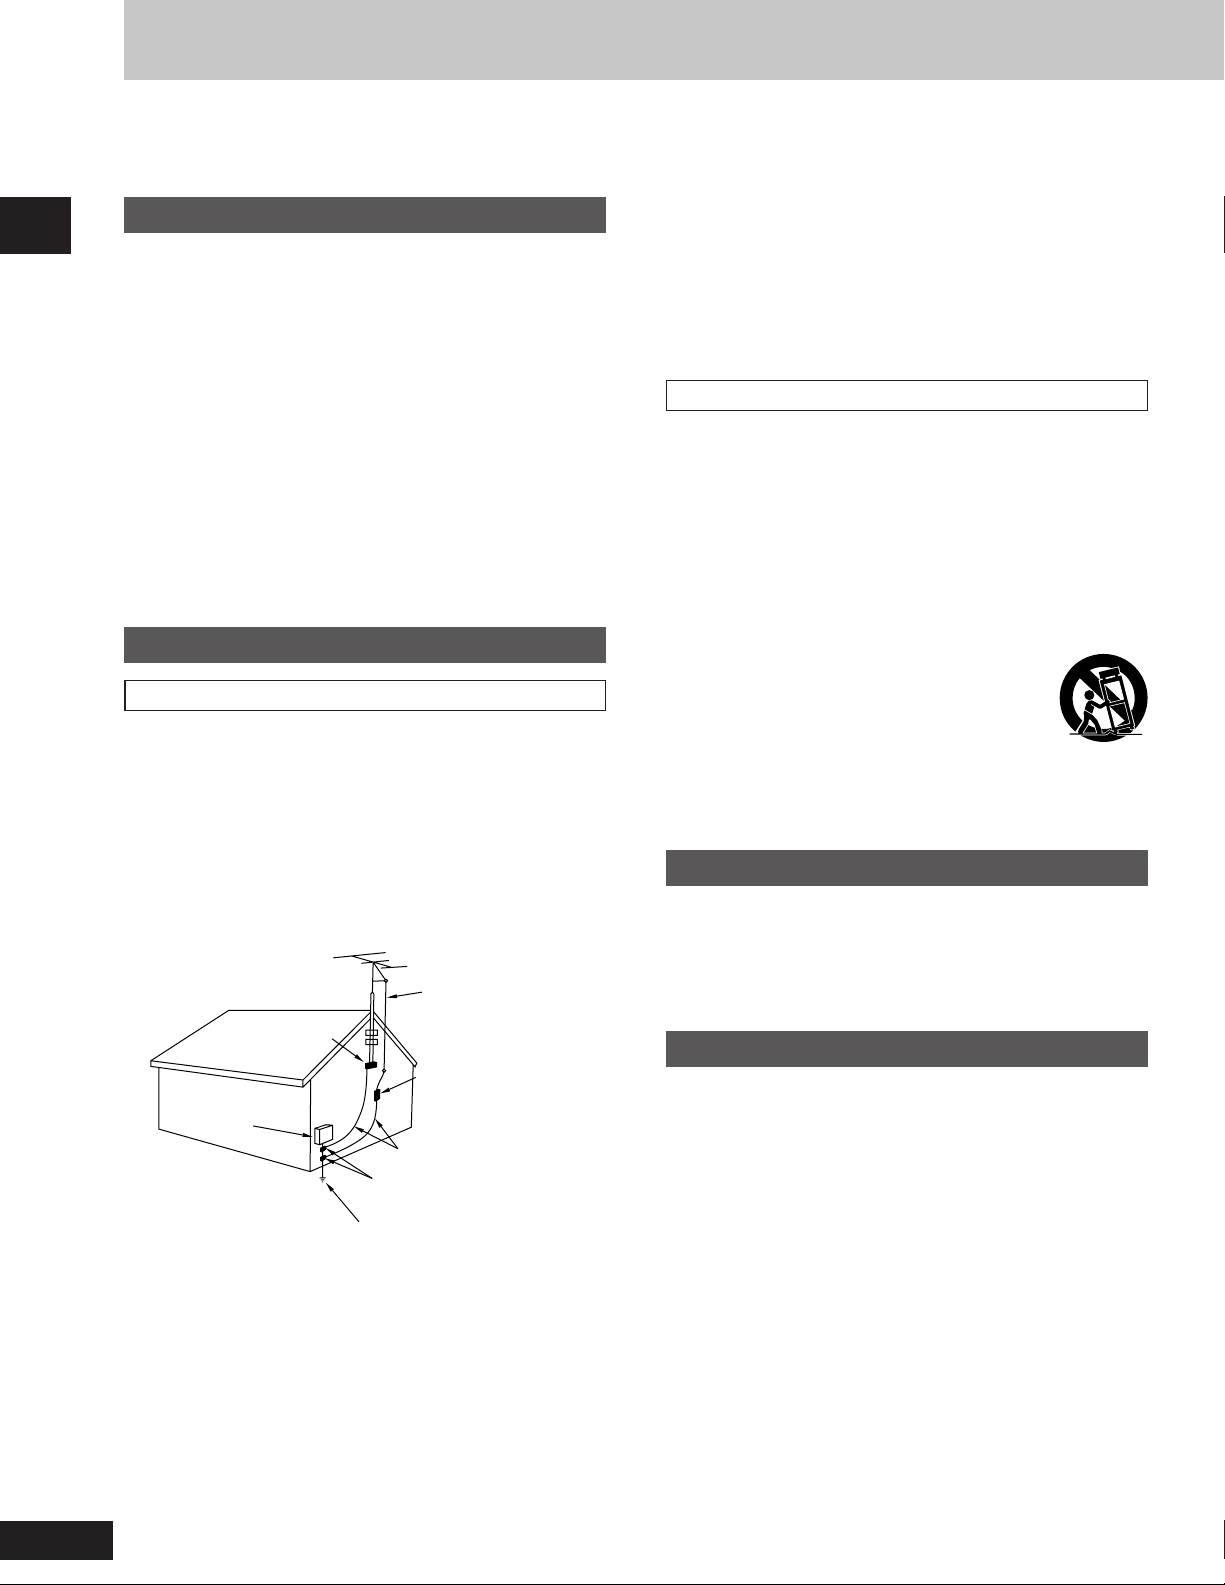
1. Outdoor Antenna Grounding—If an outside antenna is connected to the receiver, be sure the antenna system is grounded
so as to provide some protection against voltage surges and
built-up static charges. Section 810 of the National Electrical
Code, ANSI/NFPA No. 70-1990, provides information with respect to proper grounding of the mast and supporting structure,
grounding of the lead-in wire to an antenna discharge unit, size
of grounding conductors, location of antenna-discharge unit,
connection to grounding electrodes, and requirements for the
grounding electrode. See figure below.
ANTENNA LEAD
GROUND
CLAMP
ELECTRIC
SERVICE
EQUIPMENT
POWER SERVICE GROUNDING
ELECTRODE SYSTEM
(NEC ART 250, PART H)
NEC–NATIONAL ELECTRICAL CODE
2. Water and Moisture—Do not use this unit near water—for ex-
ample, near a bathtub, washbowl, swimming pool, or the like.
Damp basements should also be avoided.
IN WIRE
ANTENNA
DISCHARGE UNIT
(NEC SECTION 810-20)
GROUNDING CONDUCTORS
(NEC SECTION 810-21)
GROUND CLAMPS
3. Heat—The unit should be situated away from heat sources such
as radiators and the like.
It also should not be placed in temperatures less than 5°C (41°F)
or greater than 35°C (95°F).
4. Condensation—Moisture may form on the lens in the following
conditions...
immediately after a heater has been turned on.
•
in a steamy or very humid room.
•
when the unit is suddenly moved from a cold environment to a
•
warm one.
If moisture forms inside this unit, it may not operate properly. To
correct this problem, turn on the power and wait about one hour
for the moisture to evaporate.
Placement
1. Ventilation—The unit should be situated so that its location or
position does not interfere with its proper ventilation. Allow 10
cm (4") clearance from the rear of the unit.
2. Foreign Material—Care should be taken so that objects do not
fall into and liquids are not spilled into the unit. Do not subject
this unit to excessive smoke, dust, mechanical vibration, or shock.
3. Magnetism—The unit should be situated away from equipment
or devices that generate strong magnetic fields.
4. Stacking—Do not place heavy objects, other than system com-
ponents, on top of the unit.
5. Surface—Place the unit on a flat, level surface.
6. Carts and Stands—The unit should be used only
with a cart or stand that is recommended by the
manufacturer.
The unit and cart combination should be moved
with care. Quick stops, excessive force, and uneven surfaces may cause the unit and cart combination to overturn.
7. Wall or Ceiling Mounting—The unit should not be mounted to
a wall or ceiling, unless specified in this operating instructions.
Maintenance
(See page 30 for details.)
Clean the cabinet, panel and controls with a soft cloth lightly moistened with mild detergent solution.
Do not use any type of abrasive pad, scouring powder or solvent
such as alcohol or benzine.
Service
1. Damage Requiring Service —The unit should be serviced by
qualified service personnel when:
(a) The AC power supply cord or the plug has been damaged; or
(b) Objects have fallen or liquid has been spilled into the unit; or
(c) The unit has been exposed to rain; or
(d) The unit does not appear to operate normally or exhibits a
marked change in performance; or
(e) The unit has been dropped, or the enclosure damaged.
2. Servicing —The user should not attempt to service the unit
beyond that described in the operating instructions. All other
servicing should be referred to an authorized service personnel.
For the address of an authorized servicenter:
In the U.S.A., call 1-800-211-7262, e-mail
[email protected], or visit
www.panasonic.com
In Canada, call 905-624-5505 or visit www.panasonic.ca
RQT5621
4
Page 5
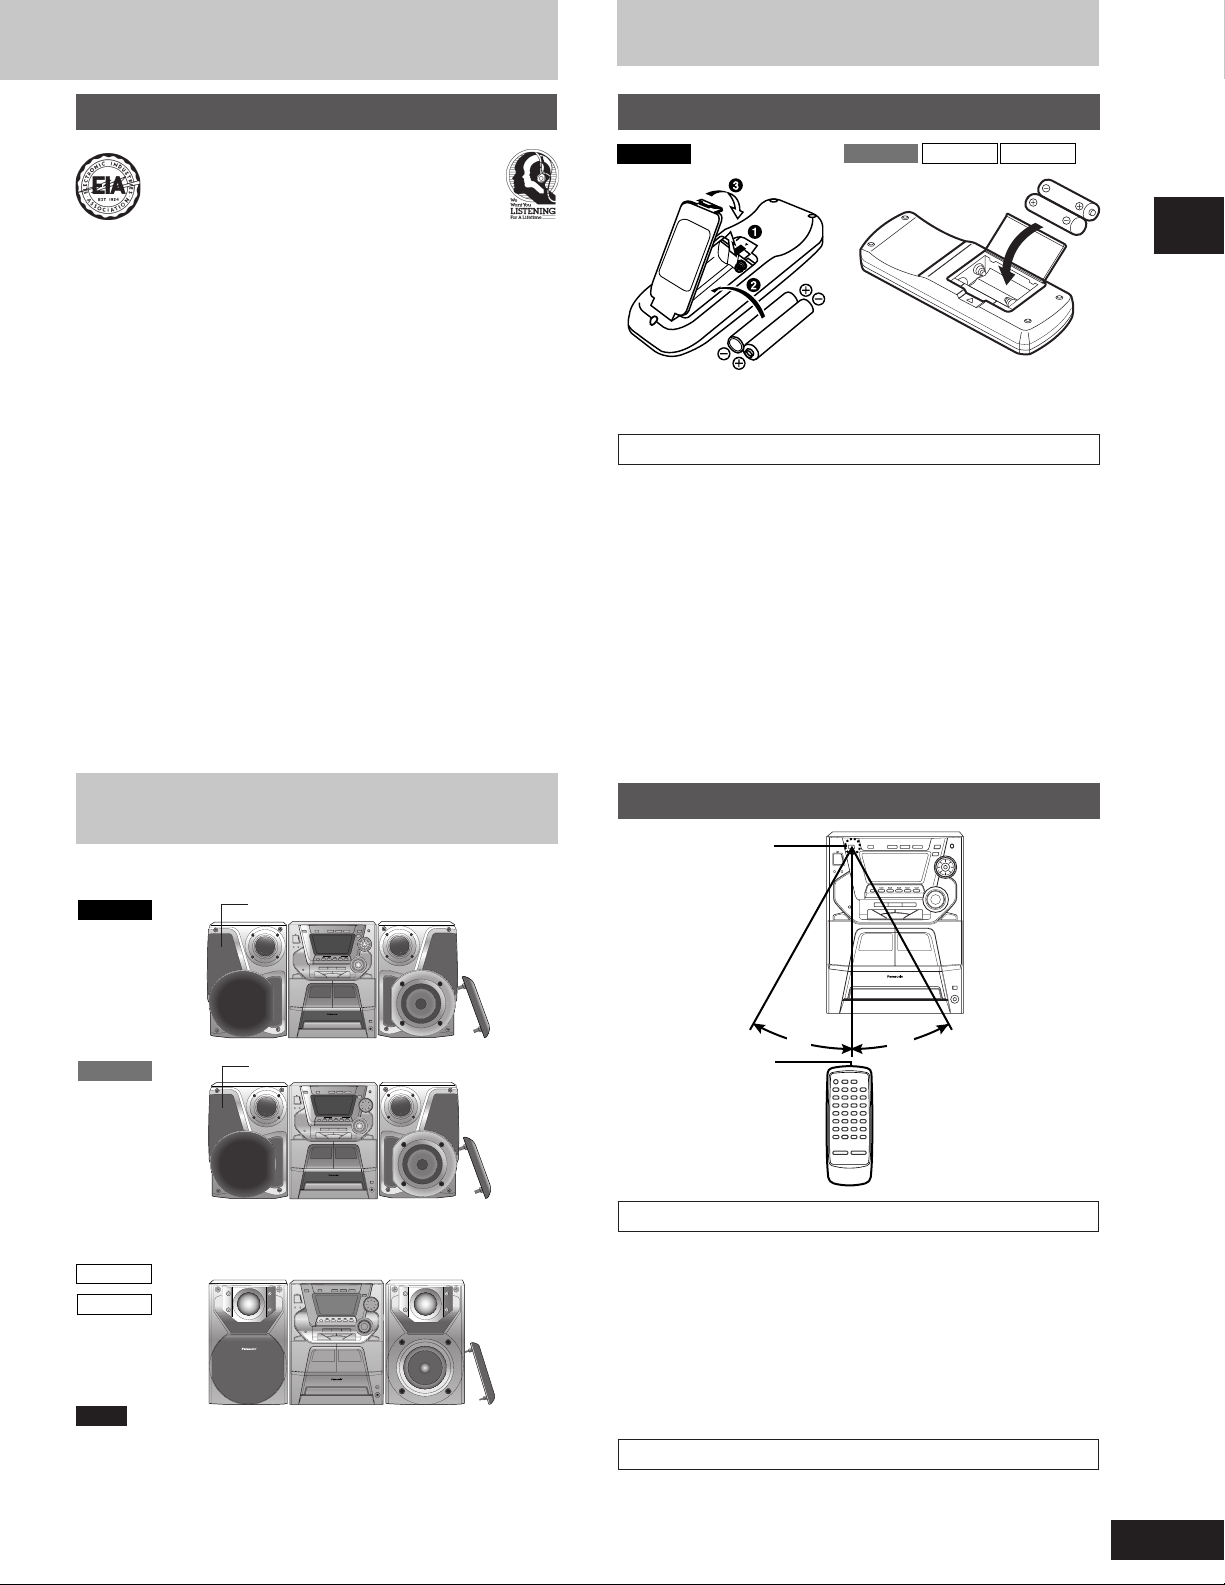
Concerning the remote control
30
30
˚
˚
Listening caution
Selecting fine audio equipment such as the unit you’ve just purchased is only the start of your musical enjoyment. Now it’s time to
consider how you can maximize the fun and excitement your equipment offers. This manufacturer and the Electronic Industries Association’s Consumer Electronics Group want you to get the most out of
your equipment by playing it at a safe level. One that lets the sound
come through loud and clear without annoying blaring or
distortion—and, most importantly, without affecting your sensitive
hearing.
We recommend you to avoid prolonged exposure to excessive noise.
Sound can be deceiving. Over time your hearing “comfort level”
adapts to higher volumes of sound. So what sounds “normal” can
actually be loud and harmful to your hearing.
Guard against this by setting your equipment at a safe level BEFORE
your hearing adapts.
To establish a safe level:
Start your volume control at a low setting.
•
Slowly increase the sound until you can hear it comfortably and
•
clearly, and without distortion.
Once you have established a comfortable sound level:
Set the dial and leave it there.
•
Taking a minute to do this now will help to prevent hearing damage
or loss in the future. After all, we want you listening for a lifetime.
Battery installation
SC-AK44
Insert the batteries observing the correct polarities (e, d).
SC-AK33
R6, AA, UM-3
Use of batteries
Align the poles (+ and –) properly when inserting the batteries.
•
Do not mix old and new batteries or different types of batteries.
•
Do not recharge ordinary dry cell batteries.
•
Do not heat or disassemble the batteries. Do not allow them to
•
contact flame or water.
Remove the batteries if the unit is not to be used for a long time.
•
Do not keep together with metallic objects such as necklaces.
•
Do not use rechargeable type batteries.
•
Do not use batteries if the covering has been peeled off.
•
Mishandling of batteries can cause electrolyte leakage which can
damage items the fluid contacts and may cause a fire.
If electrolyte leaks from the batteries, consult your dealer.
Wash thoroughly with water if electrolyte comes in contact with any
part of your body.
SC-AK22 SC-AK12
R6, AA, UM-3
Before using
Placement of speakers
Place the speakers so that the super woofer is on the outside.
SC-AK44
SC-AK33
Speakers are designed identically so that no left or right channel
orientation is necessary.S
SC-AK22
SC-AK12
Notes
•
•
•
Keep your speakers at least 10 mm (13/32˝) away from the system for
proper ventilation.
These speakers do not have magnetic shielding. Do not place them
near televisions, personal computers or other devices easily
influenced by magnetism.
To avoid damage to the speakers, do not touch the speaker cones
if you have taken the nets off.
Super woofer
Super woofer
Correct method of use
Remote control
signal sensor
Transmission
window
Operation notes
Do not place obstacles between the remote control signal sensor
•
and remote control unit.
Do not expose the remote control signal sensor to direct sunlight or
•
to the bright light of a fluorescent light.
Take care to keep the remote control signal sensor and end of the
•
remote control unit free from dust.
If this system is installed in a rack with glass doors, the glass doors’
•
thickness or color might make it necessary to use the remote control
a shorter distance from the system.
To prevent damage
Never place heavy items on top of the unit.
•
Do not disassemble or reconstruct the unit.
•
Do not spill water or other liquids into the unit.
•
About 7 meters in front of
the signal sensor
5
RQT5621
Page 6
Connections
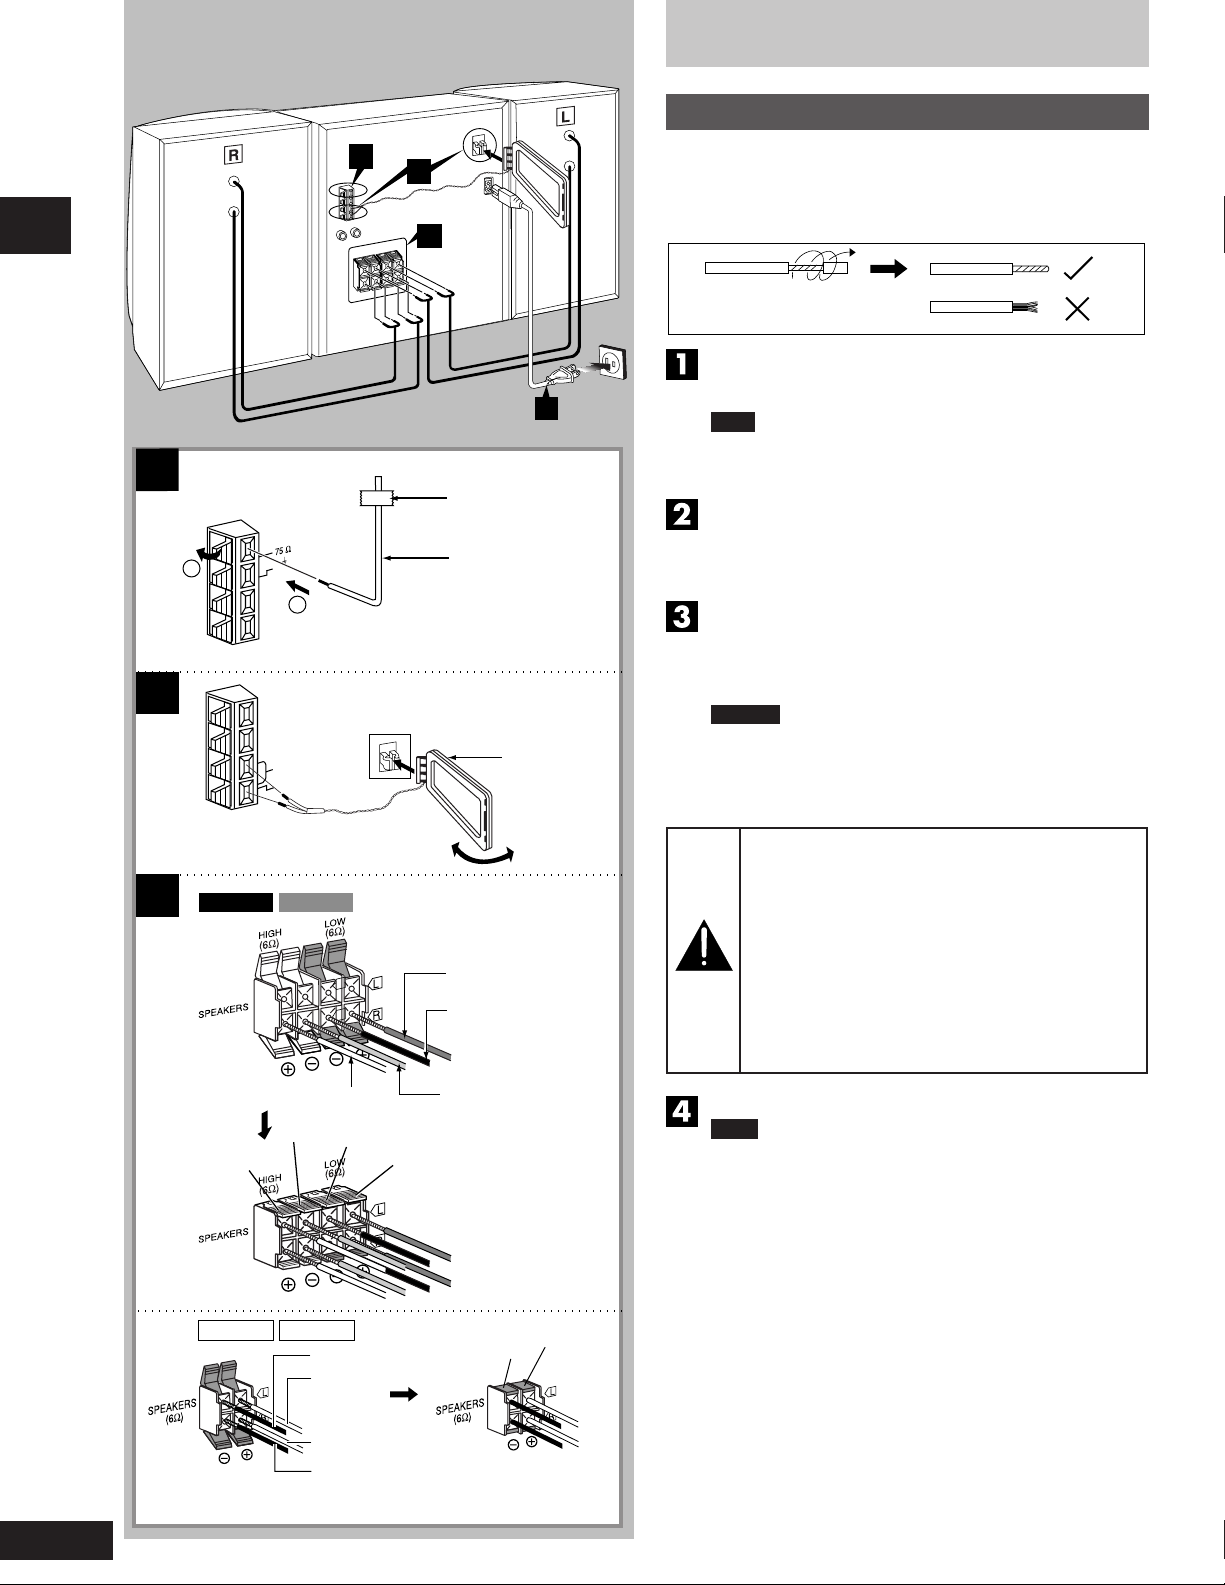
Basic connections (for supplied accessories)
Before using
1
2
1
2
Plug the AC power cord into a household AC outlet only after all
•
other connections have been made.
To prepare the antenna wires and speaker cords, twist the vinyl
•
cover tip and pull off.
3
Connect the FM indoor antenna.
Tape the antenna to a wall or column, in a position where radio
4
Adhesive tape
FM ANT
1
( )
GND
AM ANT
LOOP
EXT
2
FM indoor antenna
AM loop
antenna
signals are received with the least amount of interference.
Note
For best reception sound quality:
An FM outdoor antenna is recommended. (See page 7.)
Connect the AM loop antenna.
After attaching the antenna, turn on the system and tune in a
broadcast station. Then, turn the antenna to the angle of best
reception and least interference.
Connect the speaker cables.
Connect each end of the speaker cables to the terminal lever of
the same color so (+) and (–) are correct. Never allow the
exposed wires to contact each other when connected.
Incorrect connection can damage the unit.
Caution
Use only the supplied speakers.
•
The combination of the main unit and speakers provide the
best sound. Using other speakers can damage the unit and
sound quality will be negatively affected.
SC-AK44 SC-AK33
3
SC-AK22 SC-AK12
Gray
Blue
Gray (+)
Black
Black (–)
Red (+)
Red
Red (+)
Black (–)
Blue (–)
Black
Caution
• Use the speakers only with the recom-
mended system.
Failure to do so may lead to damage to the
amplifier and/or the speakers, and may result
in the risk of fire.
Consult a qualified service person if damage
has occurred or if you experience a sudden
change in performance.
• Do not attach these speakers to walls or
ceilings.
Connect the AC power cord.
Note
The included AC power supply cord is for use with this unit
only. Do not use it with other equipment.
Red
RQT5621
Red (+)
Black (–)
6
Page 7
Connections
A
B
FM outdoor antenna
(not included)
75 Ω coaxial cable (not included)
FM ANT
( )
GND
2
AM outdoor antenna (not included)
AM ANT
LOOP
EXT
1
2
3
5 -12 m
(16 – 40
15 mm
(
ft.)
30 mm
3/16˝)
(1
Shield braid
19
/
˝)
32
Core wire
AM loop antenna
(included)
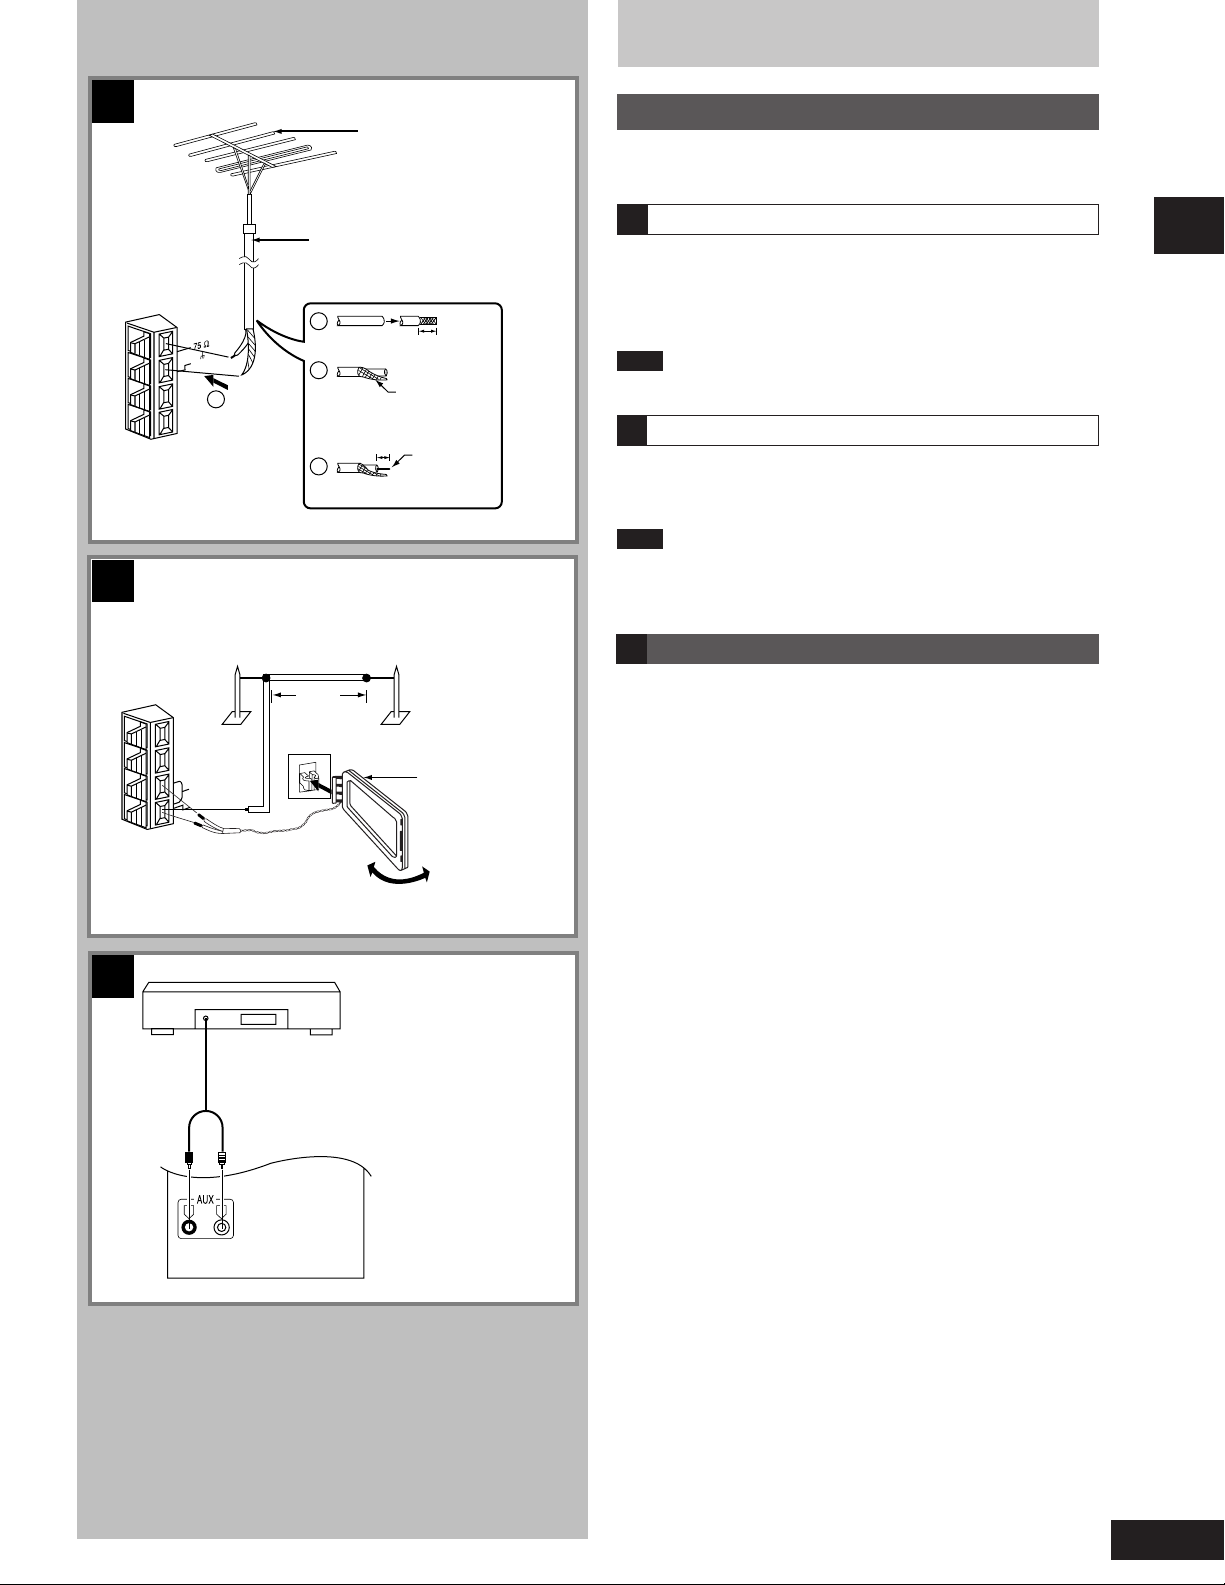
Optional antenna connections
You may need an outdoor antenna if you use this system in a
mountainous region or inside a reinforced-concrete building, etc.
FM outdoor antenna
A
Disconnect the FM indoor antenna if an FM outdoor antenna is installed.
1 Remove a piece of the outer vinyl insulator.
2 Twist the shield braid.
3 Expose the core wire.
Note
An outdoor antenna should be installed by a qualified technician only.
AM outdoor antenna
B
Connect the outdoor antenna without removing the AM loop antenna.
Run 5 to 12 m of vinyl-covered wire horizontally along a window or
other convenient location.
Note
When the unit is not in use, disconnect the outdoor antenna to prevent
possible damage that may be caused by lightning. Never use an
outdoor antenna during an electrical storm.
External unit connection
C
An analog player with a built-in phono equalizer can be connected.
•
For details, refer to the instruction manual of the units which are to
•
be connected.
When units other than those described above are to be connected,
•
please consult with your audio dealer.
Before using
C
R L
Analog player (not included)
(L)(R)
Rear panel of this unit
7
RQT5621
Page 8
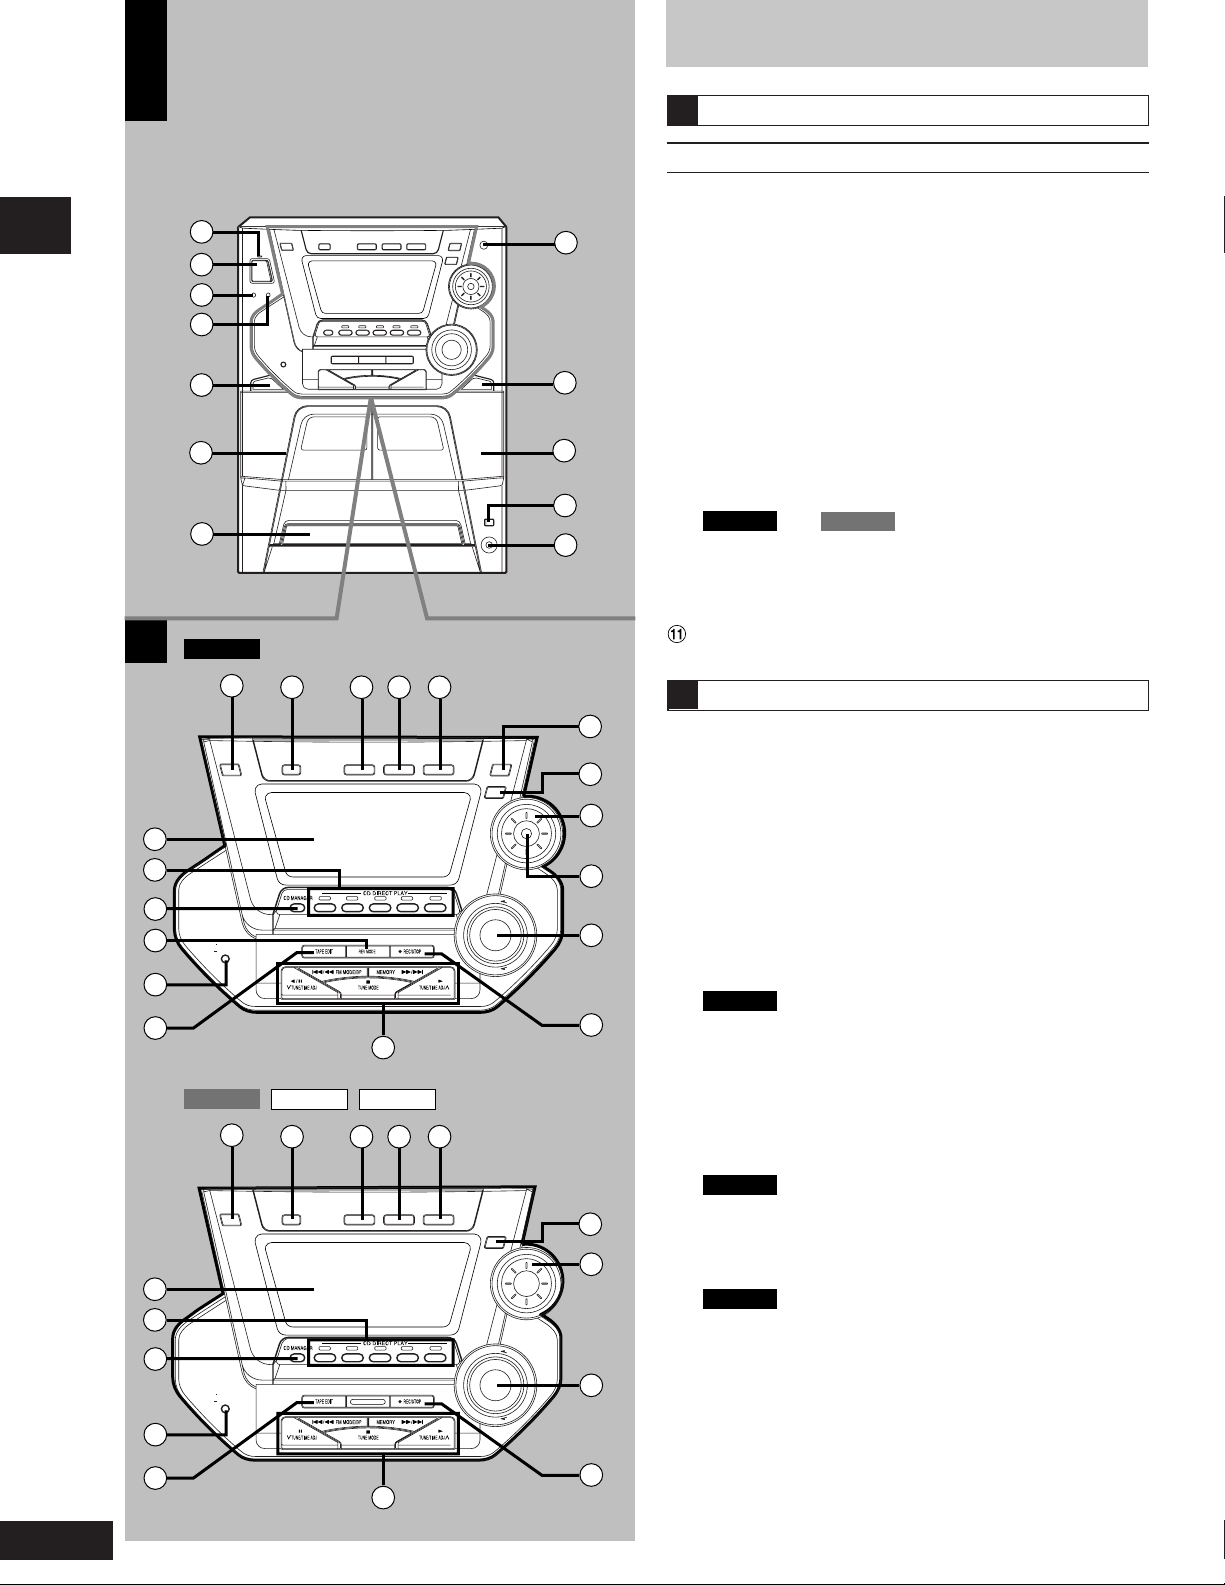
Front panel controls
A
Before using
B
18
19
20
21
22
23
18
19
20
22
1
2
3
4
5
6
7
SC-AK44
13
DISPLAY/
DEMO
13
DISPLAY/
DEMO
14 15 16 17
BAND
DECK 1/2
TUNER
AUX CD
CD 1 CD 2 CD 3 CD 4 CD 5
TAPE
24
SC-AK22 SC-AK12SC-AK33
14 15 16 17
BAND
DECK 1/2
TUNER
AUX CD
CD 1 CD 2 CD 3 CD 4 CD 5
TAPE
3D AI
SUPER SOUND EQ
SOUND EQ
SUPER SOUND EQ
SOUND EQ
Main unit
A
No. Name Ref. page
1 AC supply indicator (AC IN)
This indicator lights when the unit is connected to the AC power
8
supply.
2 Standby/on switch (f/I, POWER) ............................. 11
Press to switch the unit from on to standby mode or vice versa.
In standby mode, the unit is still consuming a small amount of
power.
3 Play timer/record timer button
9
(rPLAY/rREC) ......................................................... 27
4 Clock/timer button (CLOCK/TIMER) ............ 11, 27, 28
5 Deck 1 open button (c DECK 1 OPEN) .................. 19
10
6 Deck 1 cassette holder ..............................................19
7 Disc tray
11
12
8
SC-AK44
and
SC-AK33
only
Super woofer on/off button (S.WOOFER) ............... 25
9 Deck 2 open button (c DECK 2 OPEN) .................. 19
! Deck 2 cassette holder ..............................................19
CD open/close button (c, OPEN/CLOSE) ............... 15
# Headphone jack (PHONES) ...................................... 29
Center console
B
25
26
27
$ Remote control signal sensor ................................... 5
% AUX button (AUX) ...................................................... 29
& Tuner/band select button (TUNER, BAND) ............. 12
( Tape/deck select button (TAPE, DECK 1/2) ............ 19
) CD button (CD) ........................................................... 18
28
DOWN
VOL
29
UP
30
~ Display
+ Disc direct play buttons and indicators
(CD 1 ~ CD 5) .............................................................15
, CD manager button
(CD MANAGER) ................................................... 18, 24
SC-AK44
-
SC Reverse mode select button (REV MODE) .............. 19
only
. Display select/demonstration button
(-DISPLAY/–DEMO) ............................................. 10, 11
/ Tape edit button (TAPE EDIT) .................................. 21
: Basic operating buttons
Functions change according to the source.
SC-AK44
26
27
;
3D AI button (3D AI) .................................................. 26
< Super sound EQ button (SUPER SOUND EQ) ........ 25
= Jog control (SOUND EQ) ........................................... 25
SC-AK44
>
only
only
Joy stick (SOUND EQ) ...............................................26
DOWN
VOL
29
UP
? Volume control (VOL) ................................................ 12
@ Recording start/stop button (a REC/STOP) ............ 22
RQT5621
23
30
24
8
Page 9
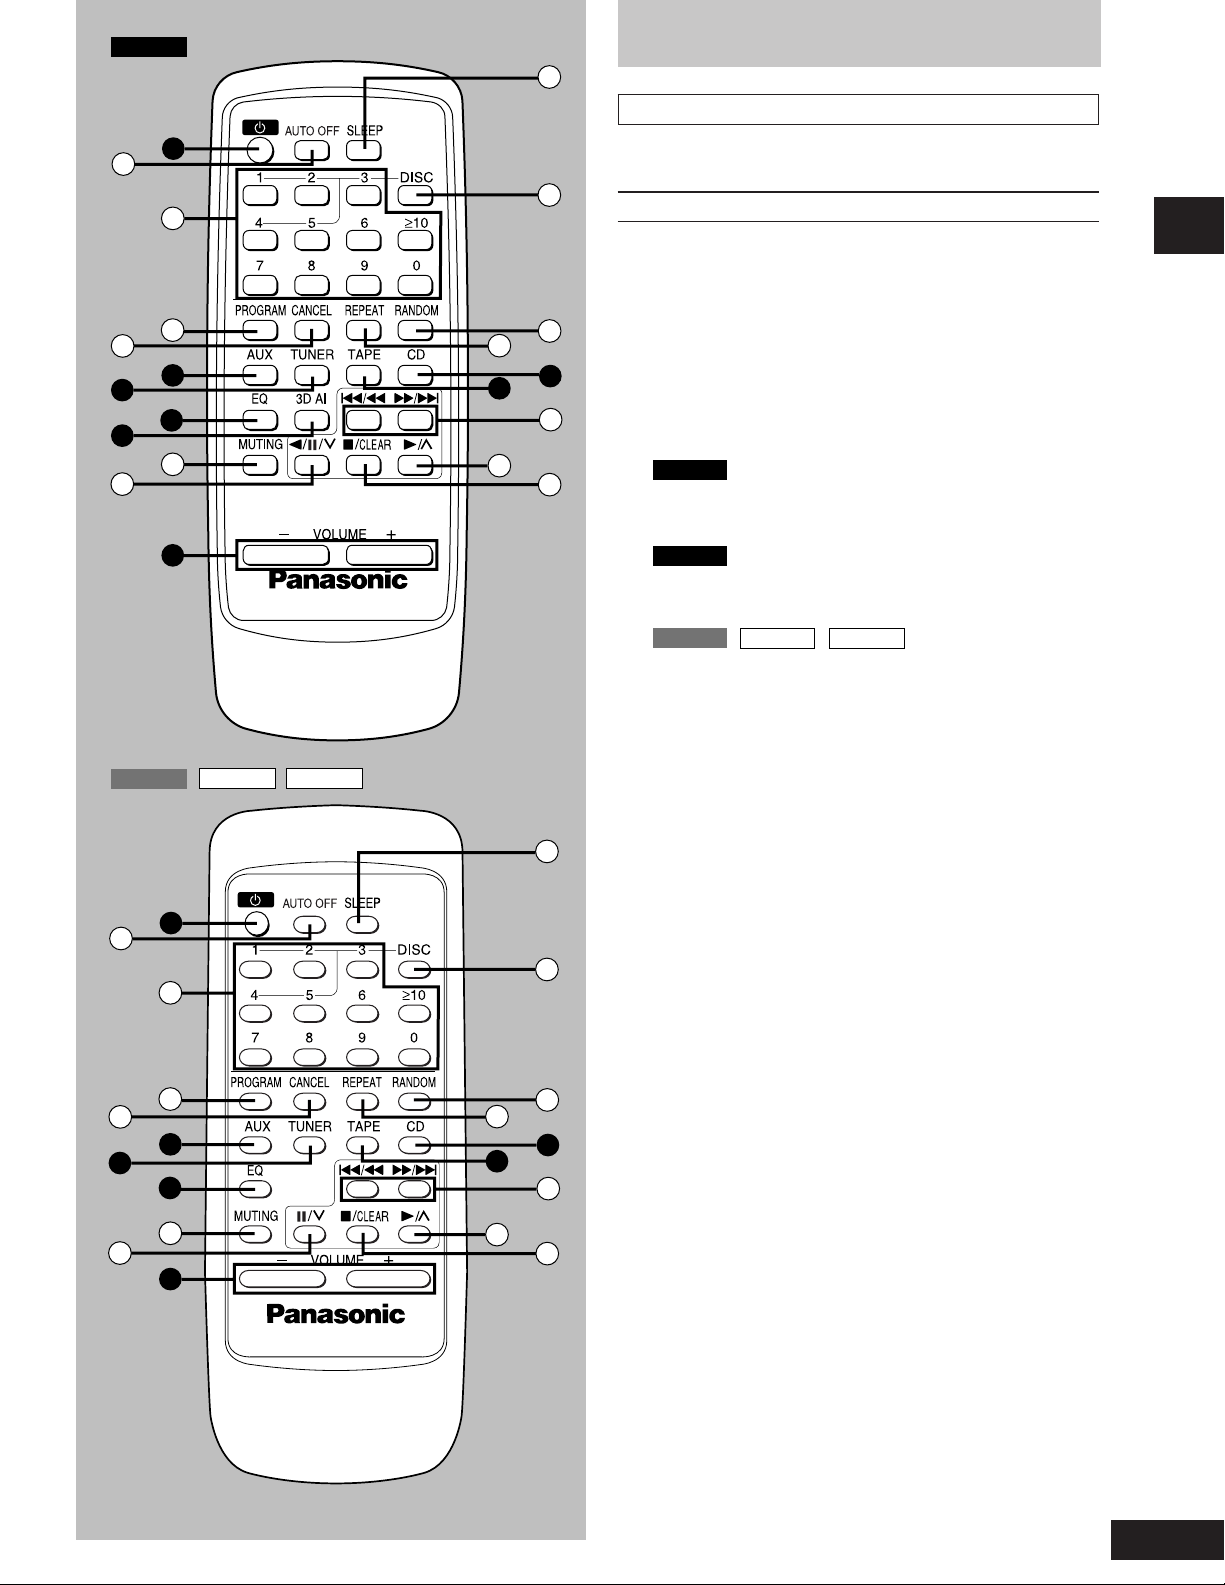
SC-AK44
Front panel controls
37
Remote control
31
34
15
25
36
31
32
33
14
27
35
29
32
2
38
39
40
17
16
41
42
43
SC-AK22 SC-AK12SC-AK33
37
2
Buttons such as 2 functions in exactly the same way as the buttons
on the main unit.
No. Name Ref. page
2 Standby/on button (f) ...............................................11
[ Auto off button (AUTO OFF) .................................... 10
\ Numeric buttons (≥10, 1–9, 0) ............................ 13, 16
] Program button (PROGRAM) ................................... 17
^ Cancel button (CANCEL) ........................................... 17
% AUX button (AUX) ...................................................... 29
& Tuner/band select button (TUNER) ......................... 12
= EQ select button (EQ) ................................................ 25
SC-AK44
;
3D AI select button (3D AI) ...................................... 26
_ Muting button (MUTING) ........................................... 11
SC-AK44
{
Reverse side playback/pause/preset
channel select button (
SC-AK33 SC-AK22 SC-AK12
Pause/preset channel select button (
? Volume buttons (– VOLUME +) ................................ 12
| Sleep button (SLEEP) ................................................ 29
} Disc button (DISC) .....................................................16
V Random button (RANDOM) ...................................... 16
0 Repeat button (REPEAT) ...........................................16
) CD button (CD) ........................................................... 17
( Tape/deck select button (TAPE) .............................. 19
1 Skip/search buttons (
2 Play/preset channel select button (-/4).... 13, 15, 19
3 Stop/program clear button (L/CLEAR) ........ 15, 17, 19
only
;;
JJ
;/
J/3) ..................... 13, 15, 19
;;
JJ
JJ
J/3)........ 13, 15
JJ
gg
((
))
g/
gg
(,
((
ff
)/
f) ........ 15, 20
))
ff
Before using
38
34
15
36
33
14
27
35
29
39
40
17
16
41
42
43
9
RQT5621
Page 10
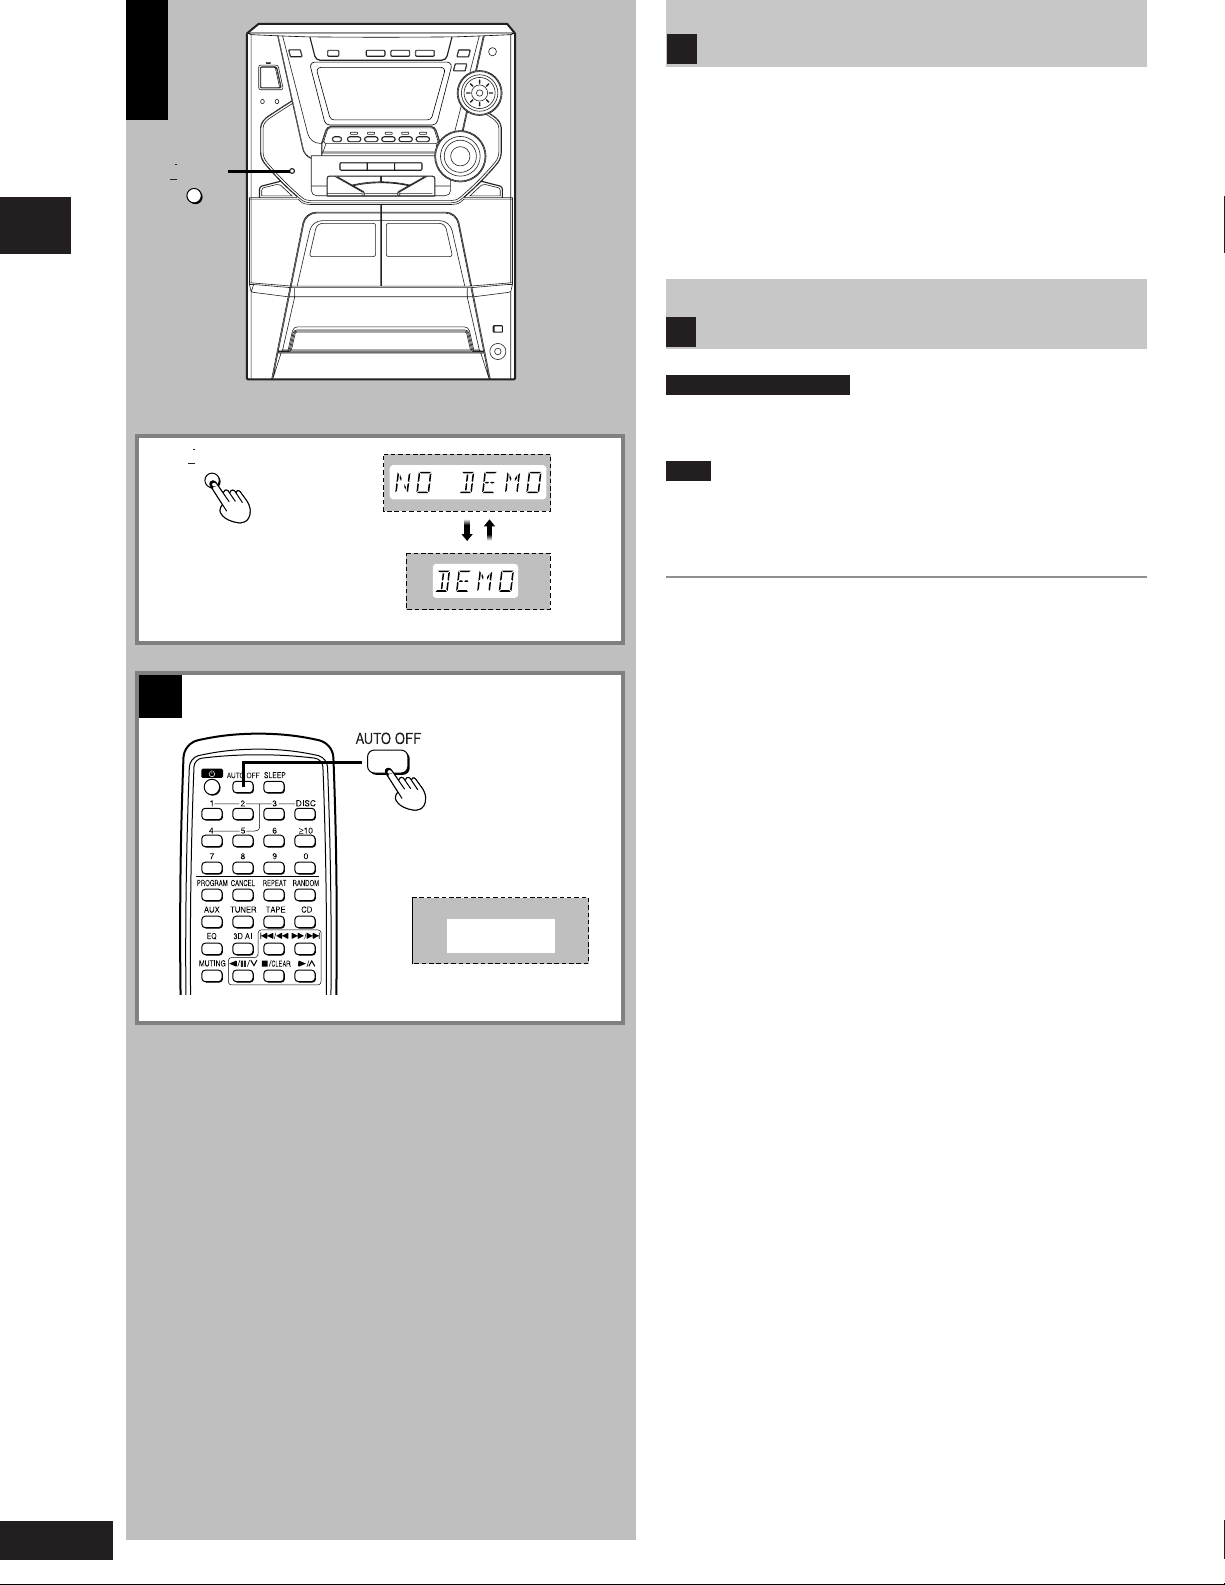
A
Turning the demo function off
A
DISPLAY/
DEMO
Before using
B
DISPLAY/
DEMO
If the clock has not been set, a demonstration of the display is shown
when the unit is switched to standby.
This function is set to on at the time of purchase.
Press and hold [-DISPLAY/–DEMO] until “NO DEMO” is
displayed.
The display changes each time the button is held down.
NO DEMO (off) ↔ DEMO (on)
Auto-off function
B
by remote control only
When CD or tape is selected as the source
To save power, the unit turns off if it is left unused for ten minutes.
Note
This function does not work if the source is tuner or AUX.
Press [AUTO OFF].
“AUTO OFF” is shown on the display.
To cancel
Press [AUTO OFF] again to clear “AUTO OFF” from the display.
For your reference
The setting is maintained even if the unit is turned off. When the unit
is turned on again, “AUTO OFF” is displayed and the unit functions as
described above.
“AUTO OFF” disappears from the display if either tuner or AUX is
selected as the source but continues to function normally.
“AUTO OFF” remains displayed if CD or tape is selected as the source.
AUTO OFF
10
RQT5621
Page 11
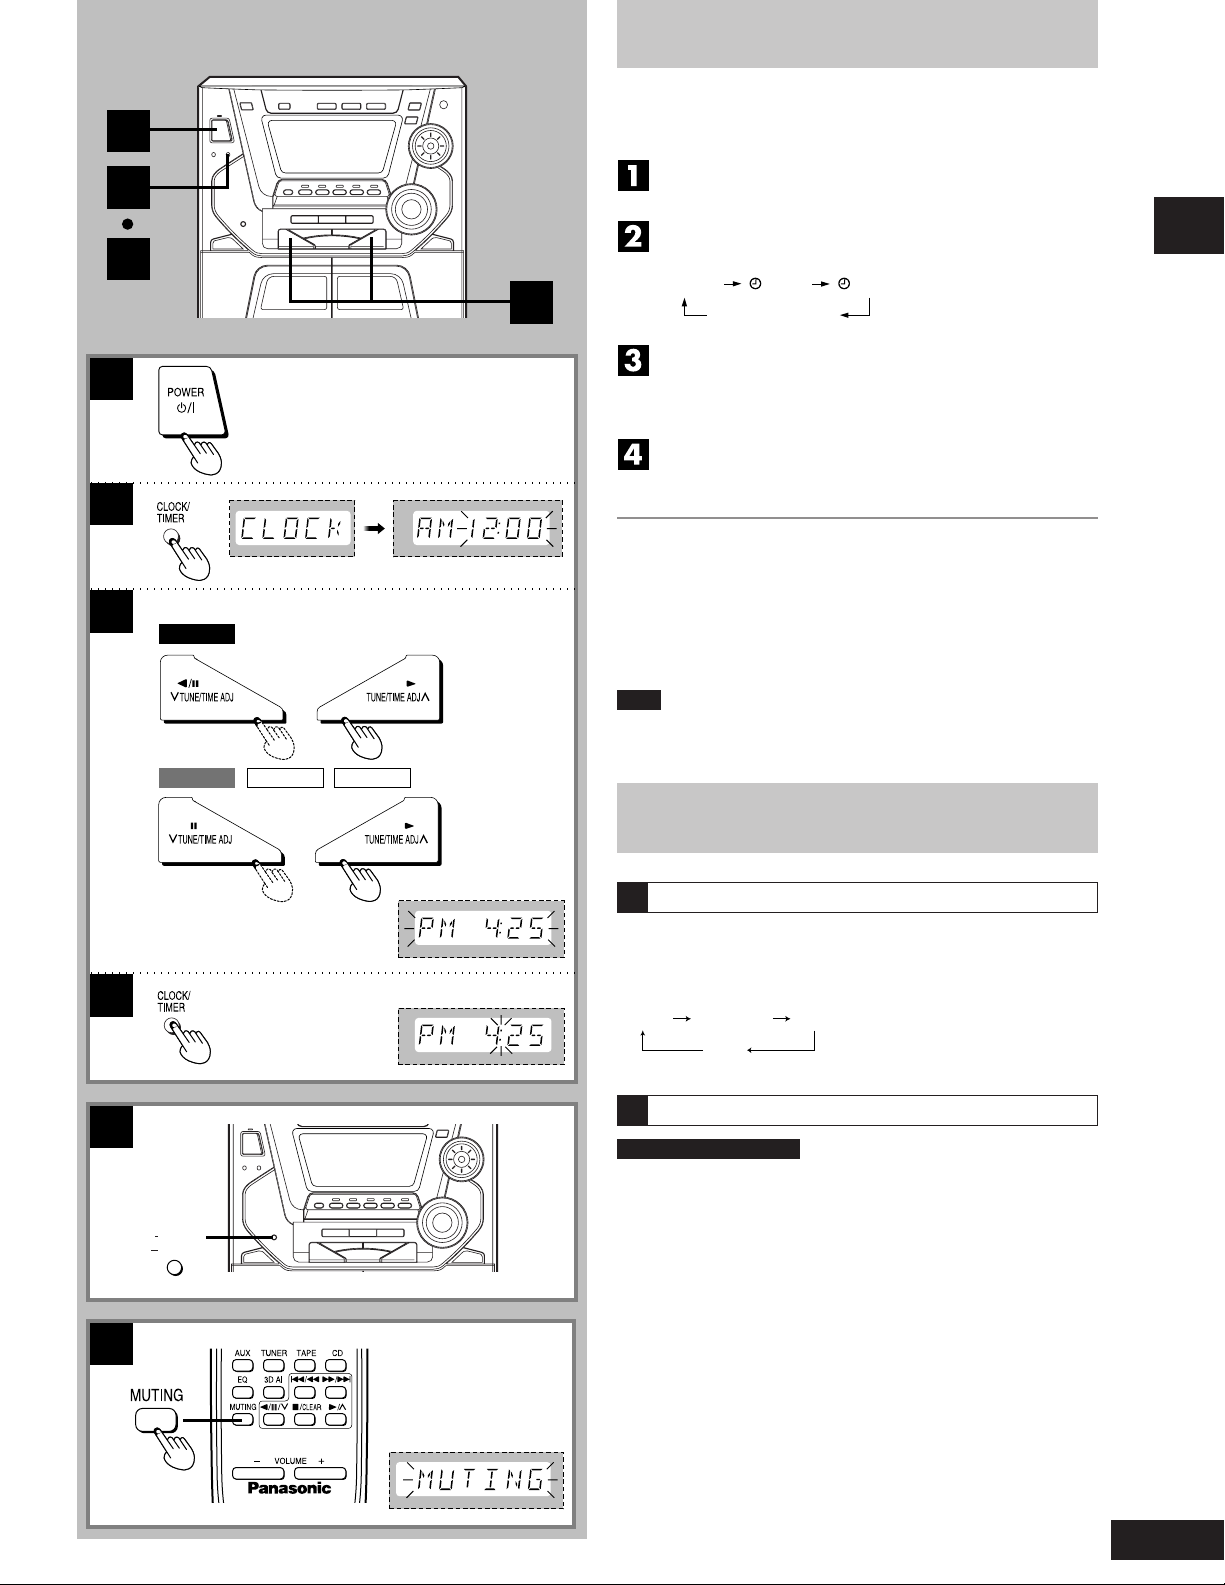
1
CLOCK RECPLAY
2
4
Setting the time
This is a 12-hour display clock.
This example in the figure shows how to set the time for 4:25 p.m..
Switch on the power.
Press [CLOCK/TIMER] to select “CLOCK”.
Every time you press the button:
1
2
3
SC-AK44
3
To display the time when system is ON
Press [CLOCK/TIMER] to select “CLOCK”.
To display the time when system is OFF
Press [CLOCK/TIMER].
The time will be displayed for about 5 seconds and then the display
will return to whatever was previously displayed.
Note
The clock may lose or gain some time over a period. Readjust if
necessary.
SC-AK22 SC-AK12SC-AK33
Previous display
(within 7 seconds or so)
Press [TUNE/TIME ADJ (3) or (4)] to show the
present time.
Press [CLOCK/TIMER] to finish setting the time.
The display will return to whatever was displayed before you
set the time.
Before using
Convenient functions
4
A
B
DISPLAY/
DEMO
Switching displays
A
Press [-DISPLAY/–DEMO] to select the desired spectrum
analyzer.
Every time you press the button:
Normal Peak hold Aurora
(OFF)
To mute the volume
B
by remote control only
This feature is convenient when you have a telephone call, etc.
Press [MUTING].
Press the button again to cancel.
“MUTING” goes out.
Muting can also be canceled by lowering the volume all the
way (--dB).
When the system is turned off, the muting operation will be
automatically canceled.
11
RQT5621
Page 12
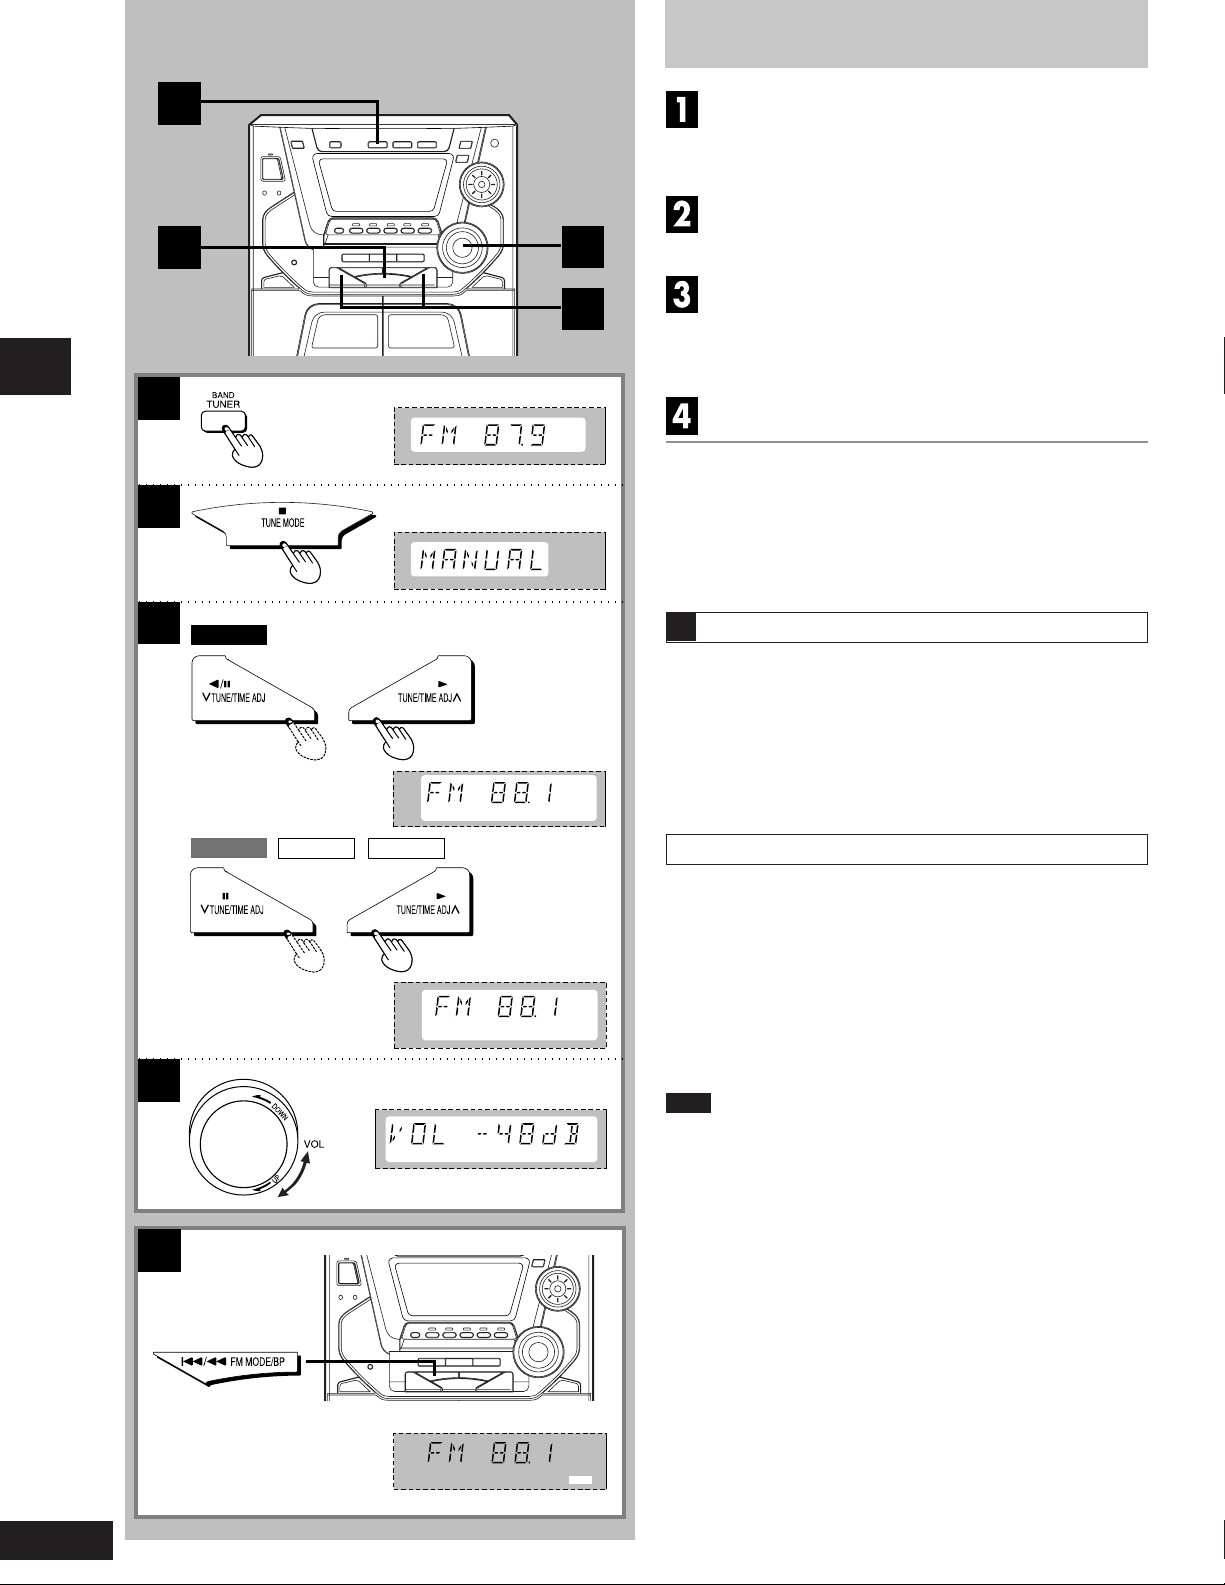
Listening to radio broadcasts
1
2
1
2
Radio operations
3
SC-AK44
4
3
TUNED
STEREO
Press [TUNER, BAND] to select band.
The unit comes on automatically.
Every time you press the button:
FM ↔ AM
LL
Press [
L, TUNE MODE] to select “MANUAL”.
LL
Every time you press the button:
MANUAL ↔ PRESET.
Press [TUNE/TIME ADJ (3) or (4)] to select the
frequency of the required station.
“TUNED” is displayed when a radio station is tuned.
“STEREO” (“ST” for SC-AK33, SC-AK22 and SC-AK12) is displayed when a stereo FM broadcast is being received.
Adjust the volume.
MHz
Auto tuning
Press and hold [TUNE/TIME ADJ (3) or (4)] for a moment until the
frequency starts changing rapidly. The unit begins auto tuning,
stopping when it finds a station.
Auto tuning may not function when there is excessive interference.
•
To cancel auto tuning, press [TUNE/TIME ADJ (3) or (4)] once
•
again.
If noise is excessive in FM
A
Press [ g/( FM MODE/BP] to display “MONO”.
This mode improves sound quality if reception is weak, but
broadcasts will be heard in monaural.
Press [ g/( FM MODE/BP] again to cancel the mode.
“MONO” goes out. MONO is also canceled if the frequency is
changed.
MHz
Turn off “MONO” for normal listening. Stereo and monaural
broadcasts are automatically played as they are received.
4
A
SC-AK22 SC-AK12SC-AK33
MHz
TUNED
ST
FM allocation setting
By adjusting the allocation, you can enable this tuner to receive FM
broadcasts allocated in 0.1 MHz steps.
Press and hold [TUNER, BAND]. After a few seconds, the display will
change to a flashing display of the current minimum FM frequency.
If you continue to hold the button down, the minimum frequency will
change. Release the button at this time.
To return to the original frequency indication, repeat above.
Note
After changing the “allocation” setting, the frequencies you previously
•
preset in the memory will be cleared.
Sound is momentarily interrupted if you load/unload tapes while
•
listening to an AM broadcast.
12
RQT5621
MHz
MONO
Page 13
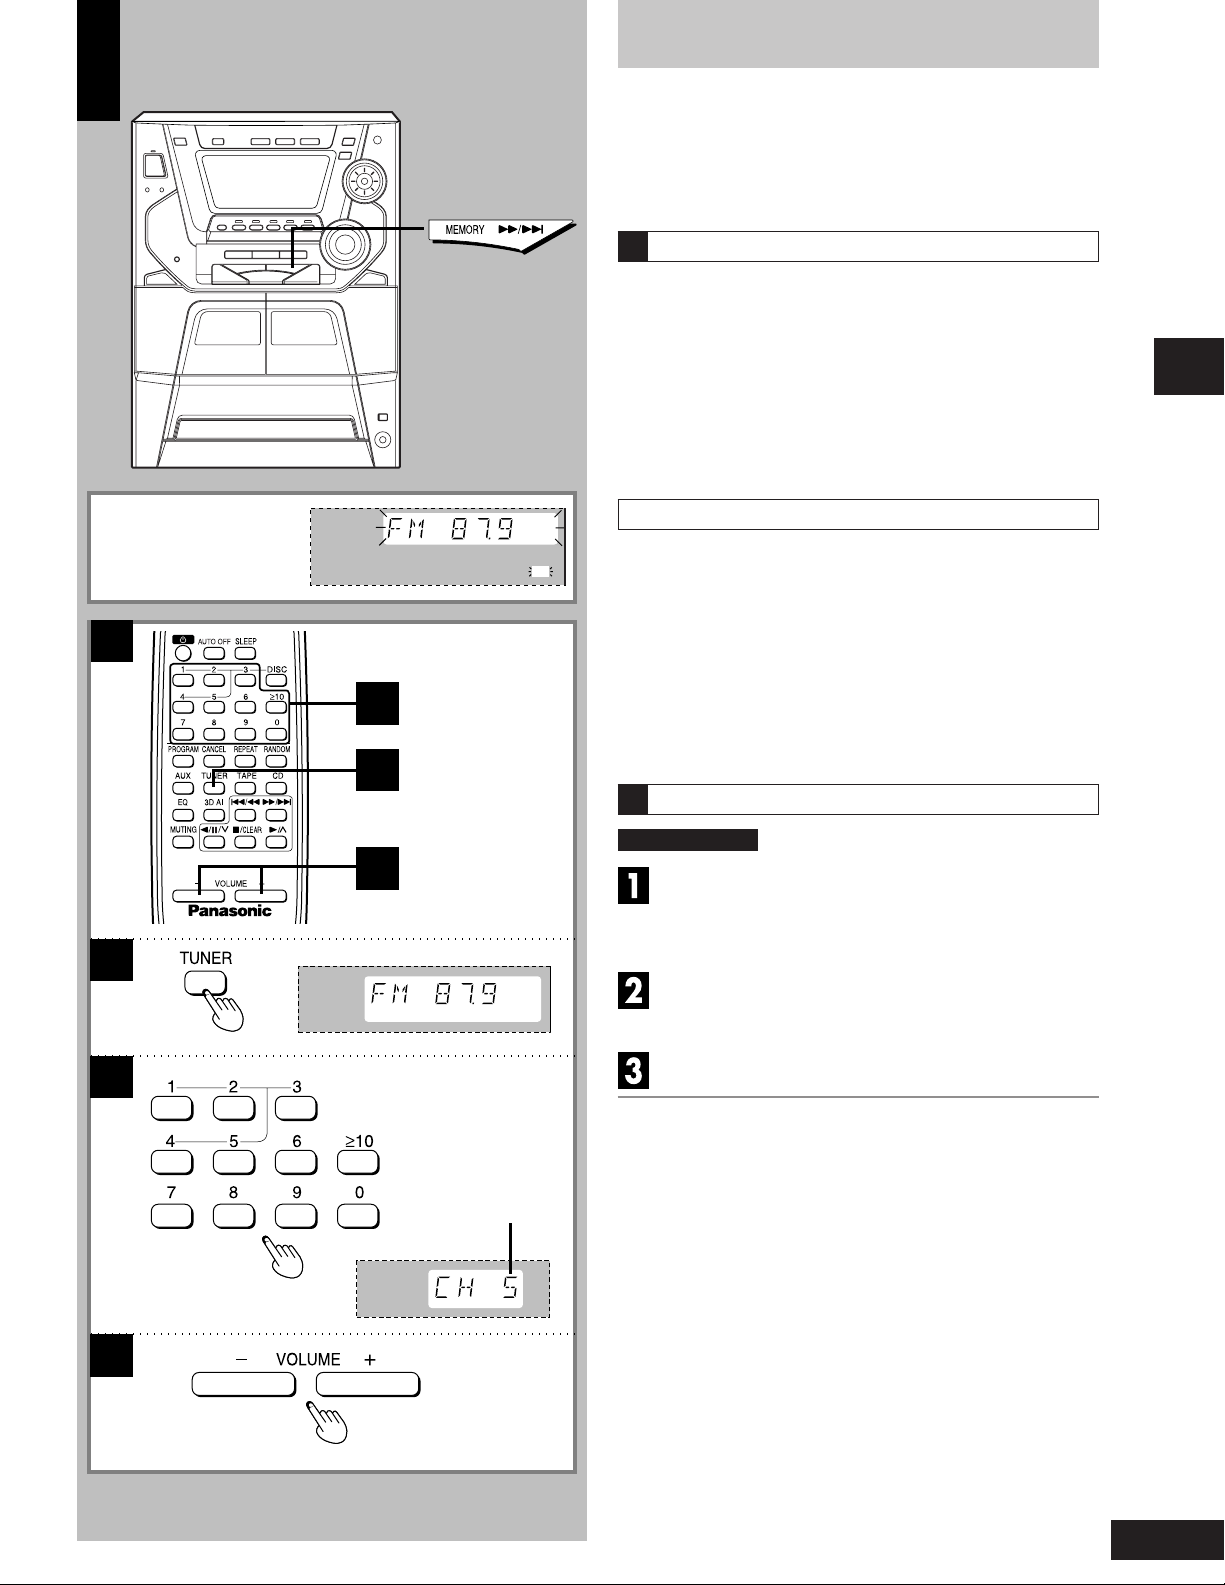
Presetting radio broadcasts
A
B
2
1
MEMO
There are two methods of presetting stations.
Automatic presetting : All the stations the tuner can receive are
Manual presetting : You can select the stations to preset and
Up to 12 stations each can be set in the FM and AM bands.
Automatic presetting
A
Do the following once each for FM and AM.
Preparation:
Tune to the frequency where presetting is to begin (A page 12).
•
Press and hold [MEMORY
Release the button when frequency begins to change.
The tuner presets all the stations it can receive into the channels in
ascending order. When finished, the last station memorized is tuned
in.
MHz
Manual presetting
Preset the stations one at a time.
1 Press [TUNER, BAND] to select the “FM” or “AM”.
2 Press [MEMORY )/f ] then press [TUNE/TIME ADJ (3)
or (4)] to tune to the required station.
3 Press [MEMORY )/f ] then press [TUNE/TIME ADJ (3)
or (4)] to tune to select a channel.
4 Press [MEMORY )/f ].
The station occupying a channel is erased if another station is preset
in that channel.
Selecting channels
B
preset.
the order they are preset in.
))
ff
)/
f ] .
))
ff
Radio operations
1
2
3
3
MHz
Preset channel
by remote control
Press [TUNER] to select “FM” or “AM”.
The unit comes on automatically.
Every time you press the button:
FM ↔ AM
Press the numbered buttons to select the channel.
• To select channel 10 or over
Press [j] then the two digits.
Adjust the volume.
On the main unit
1 Press [TUNER, BAND] to select “FM” or “AM”.
2 Press [L, TUNE MODE] to select “PRESET”.
3 Press [TUNE/TIME ADJ (3) or (4)] to select the preset channel.
13
RQT5621
Page 14
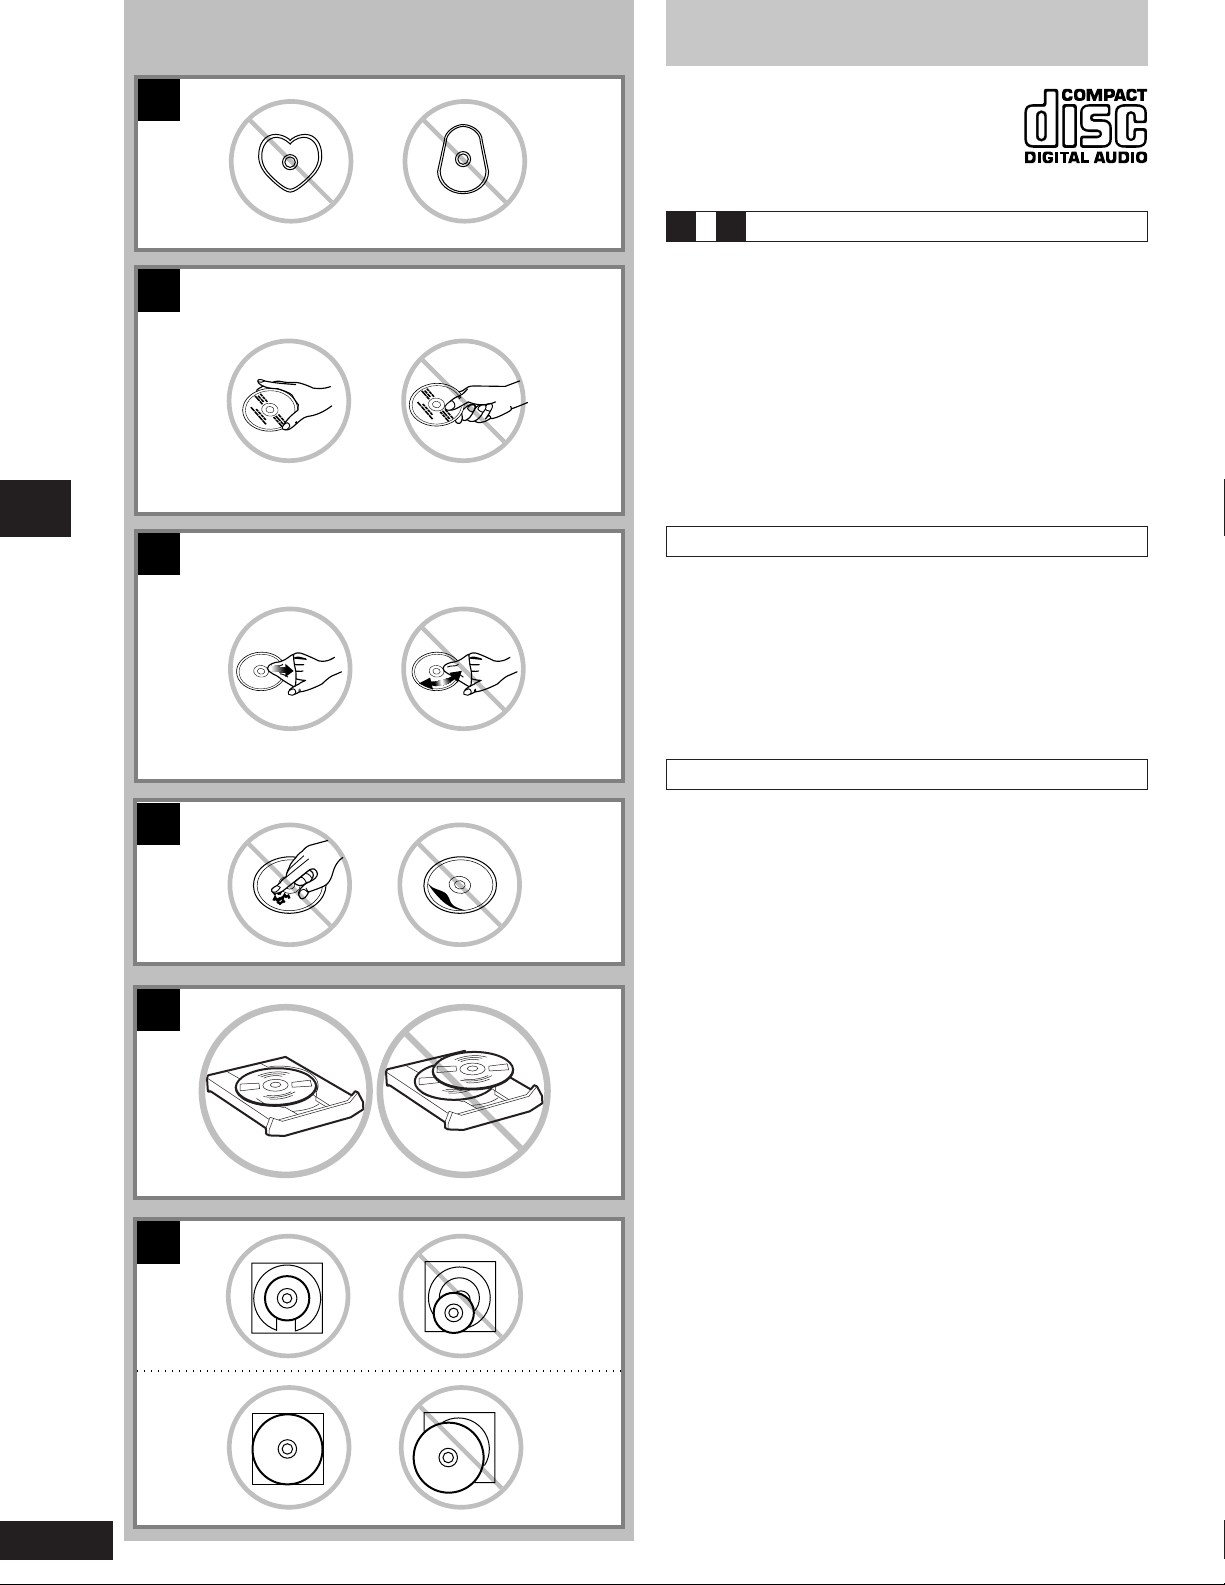
Concerning compact discs
A
XXXX XXXX XXXXX XXXX XX
XXXX XXXX XXXXX
XXXX XXXX XXXXX
XXXX XXXX
How to hold CDs
B
How to clean CDs
C
Wipe from inside outward.
Compact disc operations
D
E
x
x
x
x
x
x
x
x
x
x
x
x
x
x
x
x
x
x
x
x
x
x
x
x
x
x
x
x
x
x
x
x
x
x
x
x
x
x
x
x
x
x
x
x
x
x
x
x
x
x
x
x
x
x
Do not touch the recorded
surface.
With this system, you can only play compact discs
having this mark.
A However, do not use irregular shaped CDs.
CDs of the sort can damage the unit.
~ Handling precautions
B D
If you are taking the disc from a cold to a warm environment,
•
moisture may form on the disc. Wipe this off with a soft, dry, lint-free
cloth before using the disc.
Do not write on the label side with a ball-point pen or other writing
•
instrument.
Do not use record cleaning sprays, benzine, thinner, static electric-
•
ity prevention liquids or any other solvent.
Do not attach labels or stickers to CDs. (Do not use CDs with
•
exposed adhesive from tape or left over peeled off stickers.)
Do not use scratch-proof protectors or covers other than those
•
specified for use with this system.
Do not use CDs printed with label printers available on the market.
•
Storage precautions
Be sure to store discs in their cases to protect them from dust,
scratches, and warping.
Do not place or store discs in the following places
Locations exposed to direct sunlight
•
Humid or dusty locations
•
Locations directly exposed to a heat vent or heating appliance
•
In the glove compartment or on the rear deck of an automobile
•
To prevent damage
Always observe the following points.
E Load only 1 CD on the tray.
•
F Load CDs as shown in the figure.
•
The adapter is not needed with 8 cm CDs (singles).
Set the system on a flat, level surface.
•
Do not set it on top of magazines, inclined surfaces, etc.
Do not move the system while tray is opening/closing, or when
•
loaded.
Always unload all CDs before moving the system.
Do not put anything except CD in tray.
•
Do not use cleaning CDs or CDs which are badly warped or
•
cracked.
Do not disconnect the power cord from the household AC outlet
•
during disc changing operation.
14
RQT5621
F
XXXX XX XXXXX
XXXX XXXX XXXXX
X
X
X
X
X
X
X
X
X
X
XXX
X
X
XX
X XXX
X
XX
X
XXX
XX
X
X
XX
X
XXXXXX XXX XXXXXXX
XXXX XX XXXXX
XXX XXXX
XXXX
X
X
X
X
XX
X
X
X
X
X
X
XXXX XX XXXXX
XXXX XXXX XXXXX
XXXX XX XXXXX
XXXX XXXX XXXXX
XXXX
XXX XXXX
XXXX
XXX XXXX
XX
XXX XXX XXXXX
XXXXXXXX XXXX
XXXX
XXX XXXX
XXXXXX XXX XXXXXXX
XXXX XX XXXXX
XXXX XX XXXXX
XXXX XXXX XXXXX
8 cm CD
12 cm CD
Page 15
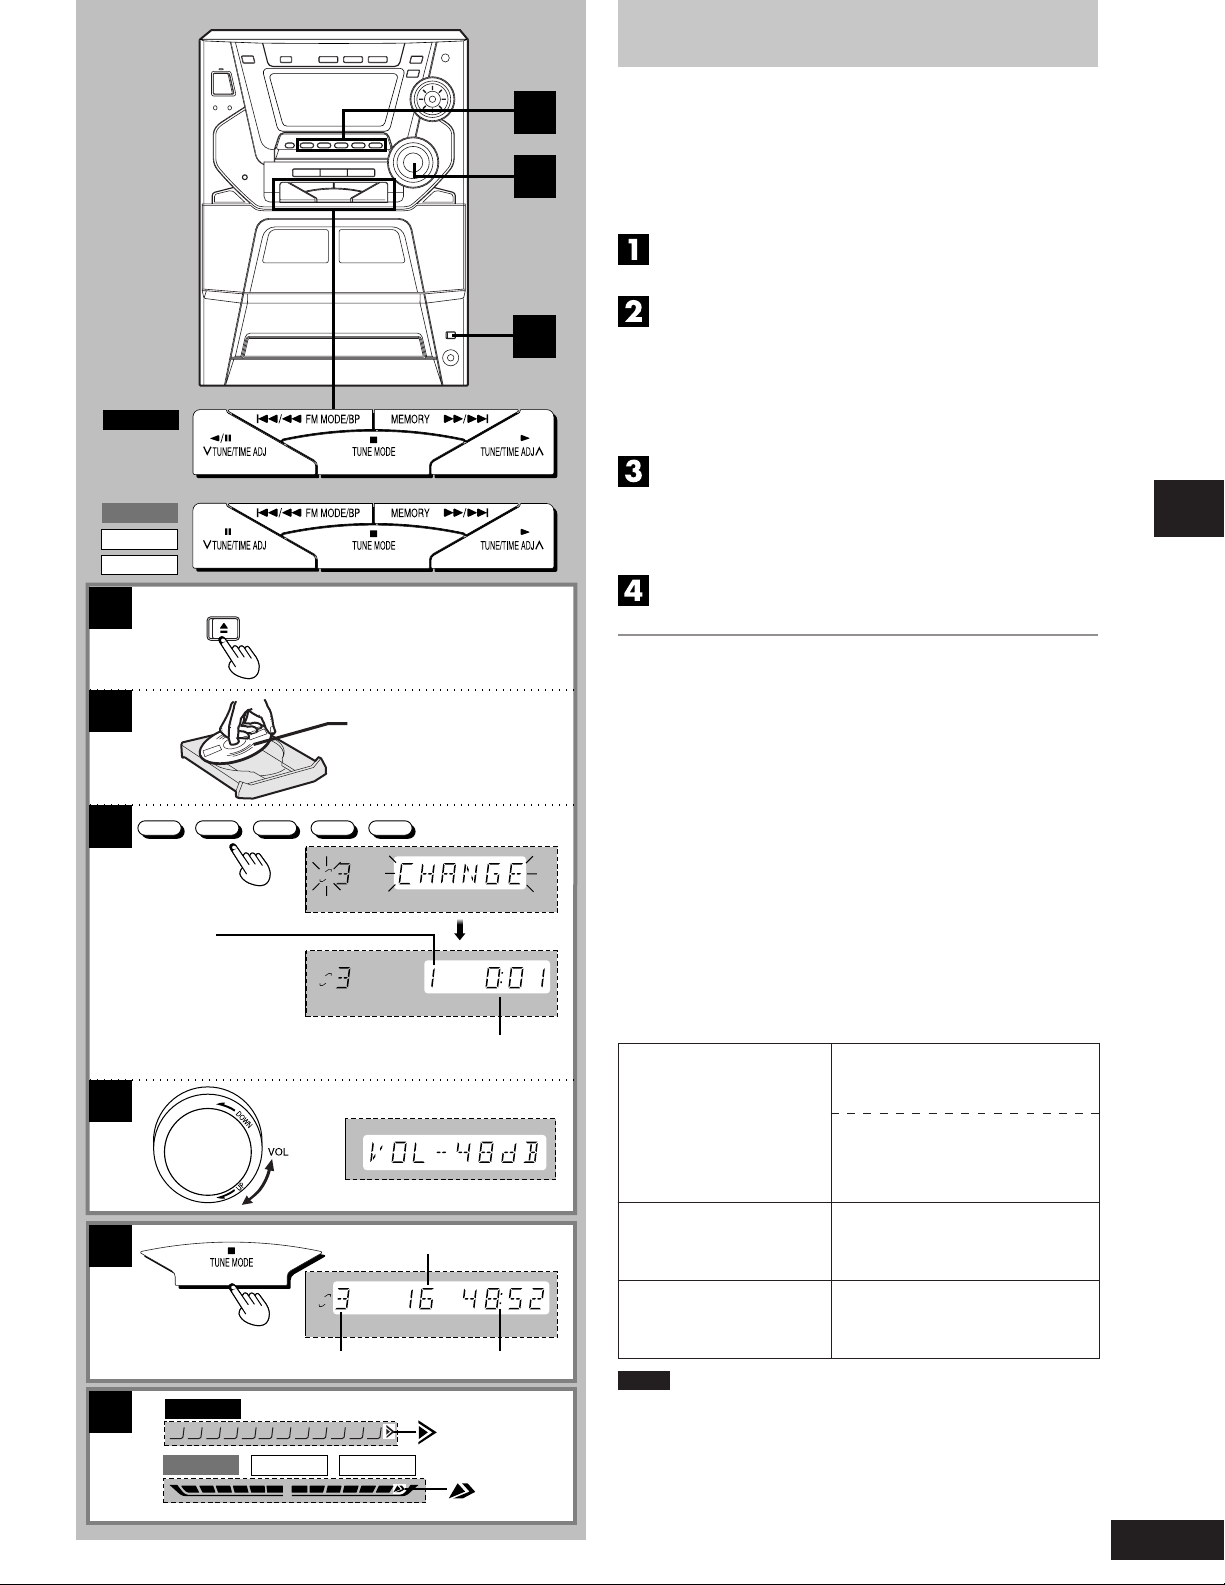
Listening to compact discs
SC-AK44
SC-AK33
SC-AK22
SC-AK12
1
OPEN/CLOSE
3
4
1
This unit can play CD-DA format audio CD-R and CD-RW that have
been finalized
It may not be able to play some CD-R or CD-RW due to the condition
of the recording.
❈
Finalizing is a process that enables CD-R/CD-RW players to play
audio CD-R and CD-RW.
A To stop the disc play
Press [L].
❈ upon completion of recording.
Press [c, OPEN/CLOSE] button.
The unit will come on automatically and the tray opens.
Set CD in the tray.
To continue loading CDs in the other trays
Press another [(CD 1) ~ (CD 5)] to select the required tray and
press [c, OPEN/CLOSE] to open the tray.
The current tray closes and the selected tray automatically
opens.
Press [c, OPEN/CLOSE] to close the tray.
Press [(CD 1) ~ (CD 5)] to play your desired disc.
(If the desired CD is indicated on the display panel, the same
operation can be accomplished by pressing [-].)
Play will start from the first track on the disc and will continue
until the last track of the final disc is played (see below).
Adjust the volume.
2
CD 1 CD 2 CD 3 CD 4 CD 5
3
Track number
4
A
B
SC-AK44
12 345 678 9101112
SC-AK22 SC-AK12SC-AK33
Label must face upward.
DISC
DISC
Elapsed playing time
(Of current track number)
Number of tracks
DISC
Disc number
891075 64321 11 12
Total playing time
B When “
Disc indicators
The disc indicators light whenever the tray is in the playing position
whether it is loaded or not.
What is meant by “final disc”?
For example, if play starts from disc 4, disc 3 will be the “final disc”.
Order of progression:
Disc 4➞5➞1➞2➞3
One touch play
If the unit is in standby mode and a CD is loaded, press [CD] or
[(CD 1) ~ (CD 5)].
The unit will come on automatically and play will start.
To pause (For SC-AK44)
To search forward/ Hold down [g/(] (backward)
backward (Search) or [)/f] (forward) during
To skip forward/ Press [g/(] (backward) or
backward [)/f] (forward) during
Notes
During random play (A page 16), you cannot skip to tracks which
•
have already been played.
During program play (A page 17) or random play, you can search
•
forward or backward only within the current track.
During program play, skipping is always in the programmed order,
•
whether forward or backward.
Always stop the changer before loading or changing CDs. You
•
cannot change CDs while a disc is playing.
B
It indicates there are 13 or more tracks on the disc in the playing
position.
” appears on the display
Press [;/J] during playback.
To resume playback, press [;/J].
(For SC-AK33, SC-AK22 and
SC-AK12)
Press [ J ] during playback.
To resume playback, press [ J ].
playback or pause mode.
playback or pause mode.
Compact disc operations
15
RQT5621
Page 16
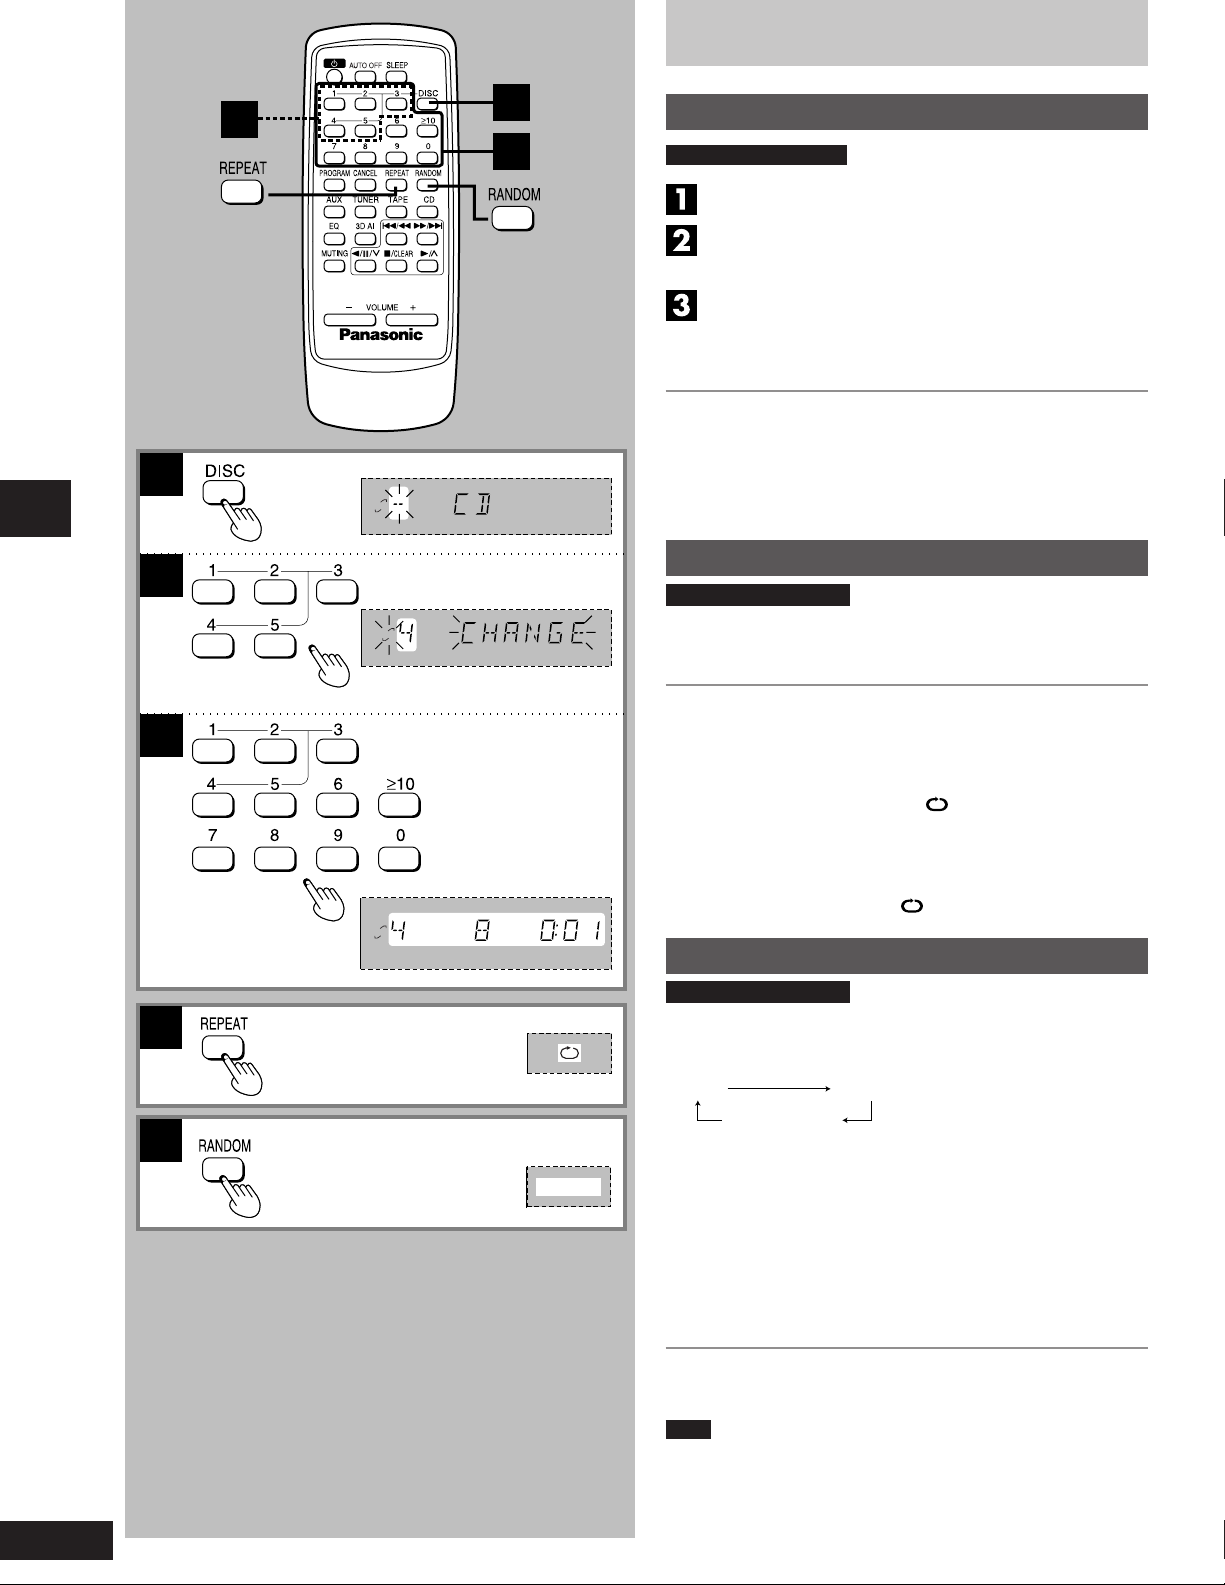
Listening to compact discs
1
2
2
DISC
DISC
1
3
Direct access play
by remote control only
Press [DISC].
(within 10 seconds or so)
Press [1] – [5] to select the disc you want.
Press the numeric button to select the desired track
number.
The CD will be played from the selected track to the last track
of the final disc (A page 15).
To select a two-digit track
Press [≥10] and then the two numbers you want within 10 seconds or
so.
For example
Track no. 20: [≥10] ➞ [2] ➞ [0]
Track no. 35: [≥10] ➞ [3] ➞ [5]
Repeat play
by remote control only
A Press [REPEAT] before or during play.
All tracks on the loaded CDs are repeated.
3
Compact disc operations
A
B
DISC
RANDOM
To cancel repeat play
Press [REPEAT] once again.
To repeat your favorite tracks
1. Program the tracks you want (perform steps 1 ~ 6 on page 17).
2. Press [REPEAT] and make sure “ ” is displayed.
3. Press [-/4]. Playback will start.
To repeat just one track
Set the 1-TRACK mode (A page 18), press [REPEAT] before or
during playback, and make sure “ ” is displayed.
Random play
by remote control only
B Press [RANDOM].
Every time you press the button:
1-DISC ALL-DISC
Previous display
To random play just one disc
Select the CD you want to random play with [(CD 1) ~ (CD 5)] and
press [RANDOM] to select “1-DISC”.
To random play all the loaded CDs
Press [RANDOM] to select “ALL-DISC”.
16
RQT5621
All tracks on the CD(s) will be played in random order. Playback will
stop automatically when all tracks have been played.
To cancel random play
Press [RANDOM] to clear “RANDOM” display.
Note
You can use random play with your program. Only the programmed
tracks will be played, but in random order.
Page 17
Listening to compact discs
1
2
3
4
4
2
DISC
DISC
3
5
1
7
PRGM
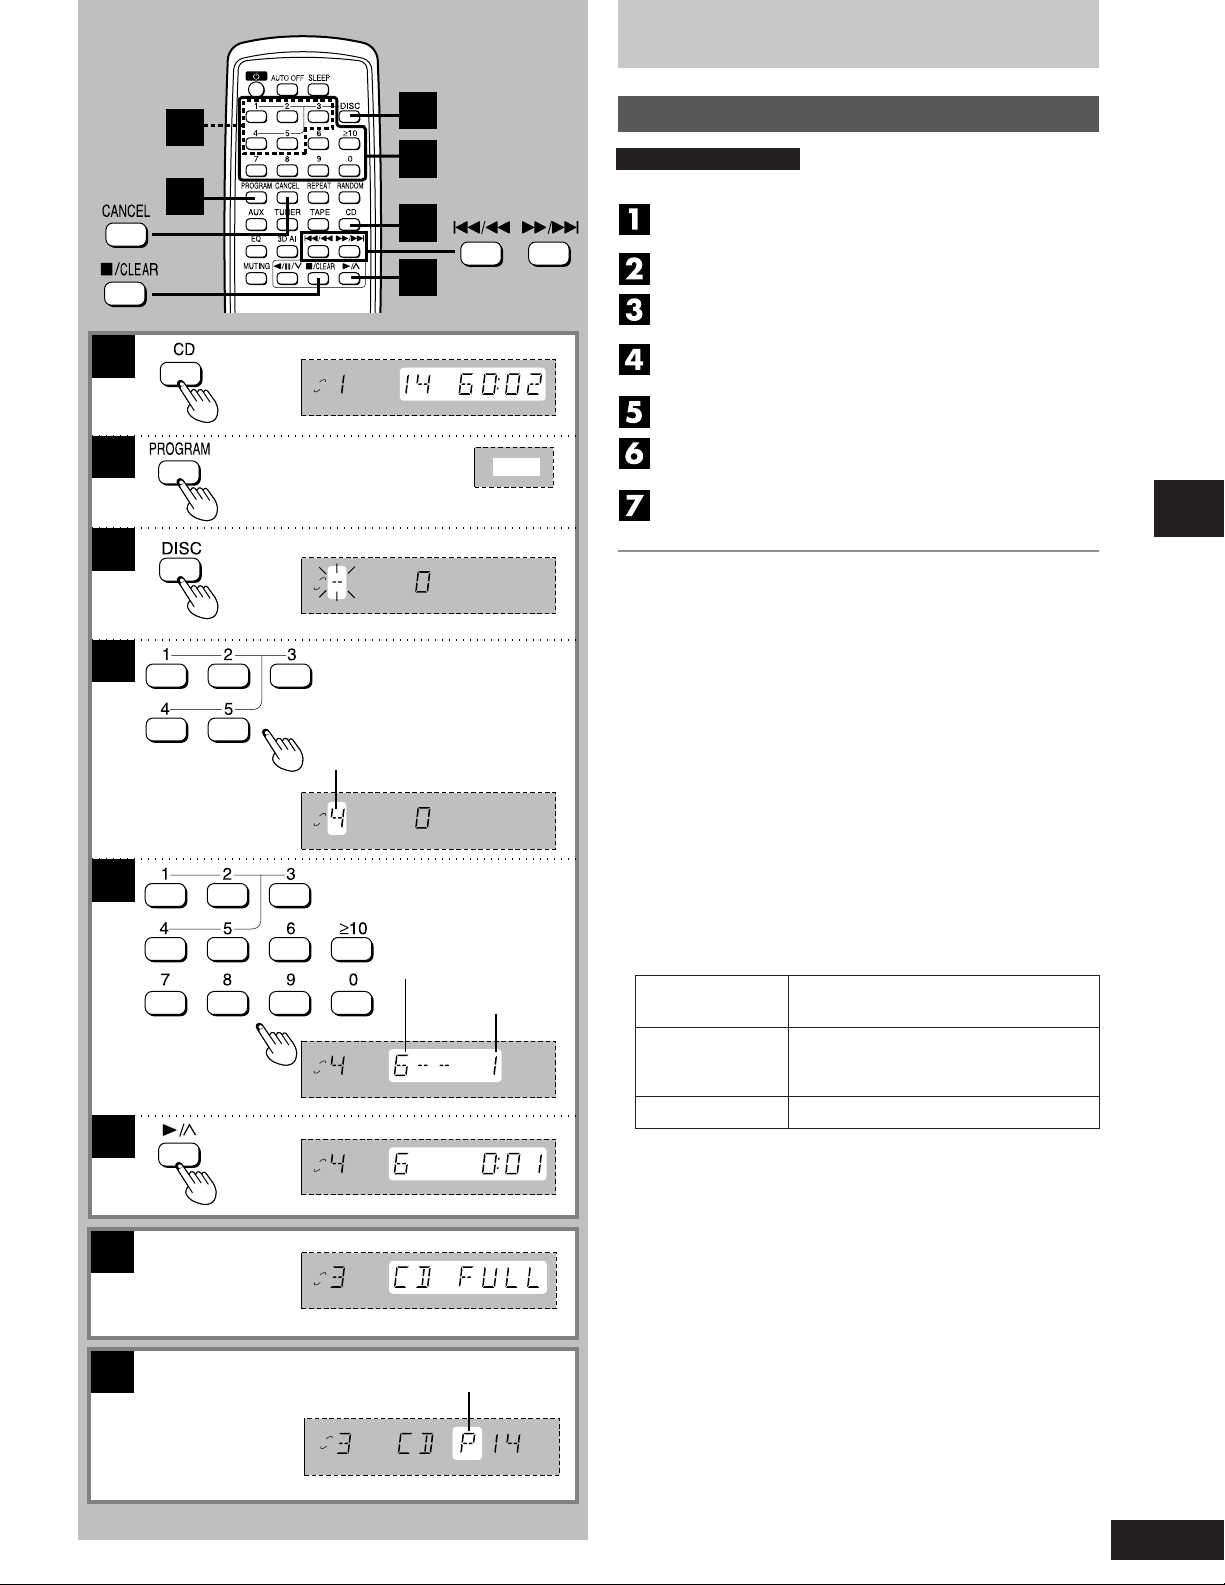
Program play
by remote control only
by remote control only
You can program up to 24 tracks.
Press [CD].
Ensure CD is stopped.
Press [PROGRAM].
Press [DISC].
(within 10 seconds or so)
Press [1] – [5] to select the disc you want.
Press the numeric button to select the desired track.
Repeat steps 3 through 5 until you have programmed all the tracks you want.
Press [
Play will start in the programmed sequence.
To cancel program play mode
Press [PROGRAM] in the stop mode.
Programmed contents will be saved in memory.
Pressing [L/ CLEAR] will cancel program play, but it will also erase
the entire program.
To select a two-digit track
Press [≥10] and then the two numbers you want.
--
-/4].
--
5
7
A
Specified disc number
DISC
Specified track number
Program order
DISC
DISC
DISC
A When “CD FULL” appears
The number of programmed tracks is limited to 24. No further
tracks can be programmed.
B You can do the following during program mode
Check program contents.
•
Press [g/(] or [)/f].
Every time you press one of the buttons, the track and program
No. are shown on the display.
Add to the program.
•
Repeat steps 3 through 5.
Cancel entries.
•
From the last Press [CANCEL].
programmed track
A specified track Select the track with [g/(] or
only [)/f], and press [CANCEL] within
All tracks Press [L/CLEAR].
Memory retention
Your program is retained in memory for about 2 weeks while the
system is unplugged.
To replay your program
If you turned OFF your program with [PROGRAM], you can play it
again as explained below.
1. Press [PROGRAM].
2. Press [-/4].
3 seconds.
Compact disc operations
B
DISC
Indicates
program mode
If you program a track not on your CDs
The track is initially programmed, but during program play, the player
will skip that track and will continue playing from the next programmed
item.
17
RQT5621
Page 18
1
1-TRACK
NORMAL
(OFF)
1-DISC 1-ALL
Listening to compact discs
To listen to special CDs and tracks
(CD Manager function)
2
1
2
DISC
3
4
5
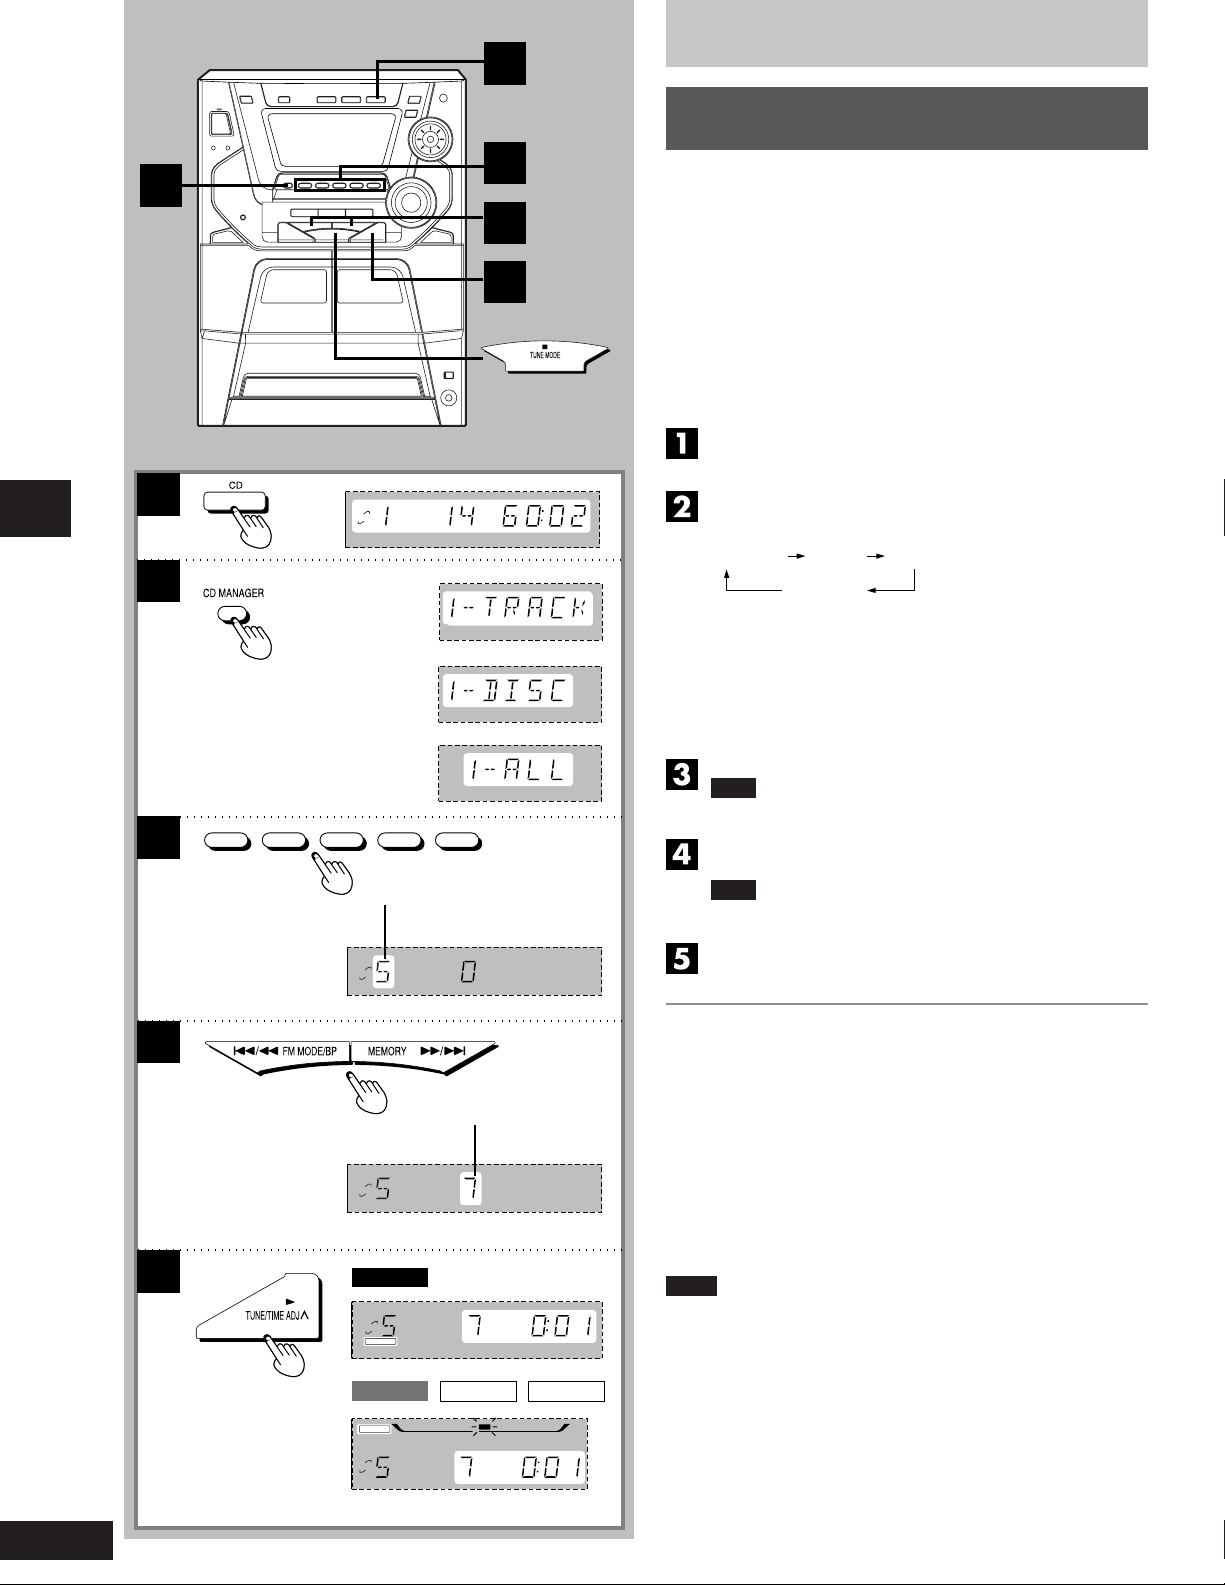
This function makes it easier for you to select special CDs and tracks
from amongst those loaded in the player.
You can use this function to make recordings as well.
There are 3 CD/track selection modes.
For playing back 1 track only from all loaded CDs
•
1-Track mode (1-TRACK)
For playing back 1 CD only from all loaded CDs
•
1-Disc mode (1-DISC)
For playing back 1 track on all loaded CDs
•
1-Track All-Disc mode (1-ALL)
Press [CD].
Ensure CD is stopped.
Press [CD MANAGER] to select the desired mode.
Every time you press the button:
1-TRACK: Only one particular track is played.
1-DISC: The tracks on only one particular disc are played.
1-ALL: The same track numbers on each of the CDs are
(NORMAL: The original display is restored in about 3
played in succession.
seconds.)
Compact disc operations
3
CD 1 CD 2 CD 3 CD 4 CD 5
4
5
Specified disc number
DISC
Specified track number
DISC
SC-AK44
DISC
CD MANAGER
Press [(CD 1) ~ (CD 5)] to select the disc you want.
Note
This step is not required if 1-ALL was selected in step 2.
))
Press [g/(] or [
track.
Note
This step is not required if 1-DISC was selected in step 2.
Press [-].
The selected track will start.
To stop play
Press [L].
When playback ends
“NORMAL” will appear on the display for about 3 seconds, then the
CD MANAGER function will turn OFF automatically.
During play in the 1-ALL mode:
It is not possible to skip back to a CD whose track has already been
•
played.
If a CD does not have the designated track number, it is skipped
•
and play continues.
Notes
You can use the CD Manager function together with repeat play.
•
CD Manager function will be canceled when you press the
•
[RANDOM] button.
ff
)/
f] to select the desired
))
ff
RQT5621
18
CD MANAGER
DISC
SC-AK22 SC-AK12SC-AK33
7
Page 19
SC-AK44
3
2
only
4
1
5
2
4
Listening to tapes
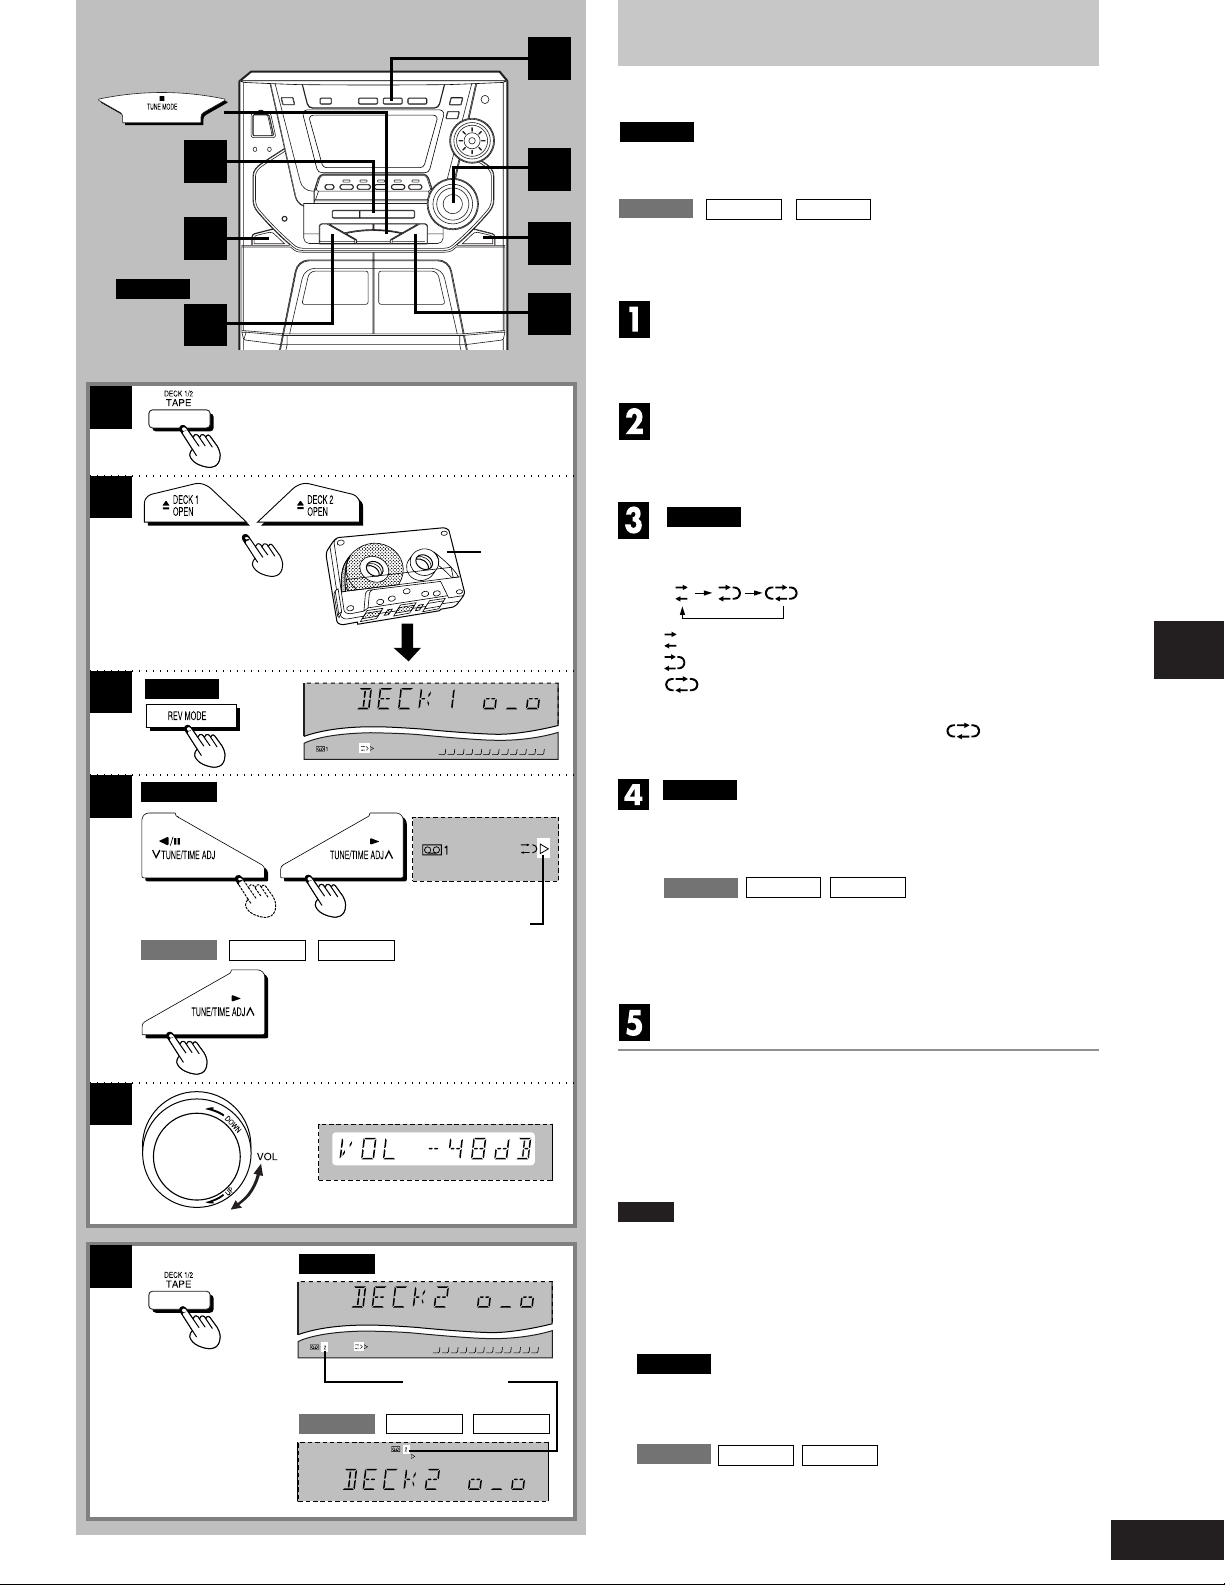
You can use either deck 1 or deck 2 for tape playback.
SC-AK44
The unit can play normal, high and metal position tapes.
It identifies the type automatically.
SC-AK33 SC-AK22 SC-AK12
Use normal position tapes.
High position and metal position tapes can be played, but the unit will
not be able to do full justice to the characteristics of these tapes.
-AK44
Press [TAPE, DECK 1/2].
The unit will come on automatically.
If the unit was off and a cassette was loaded, play will start
automatically (One touch play function).
1
2
3
4
SC-AK44
SC-AK44
only
SC-AK22 SC-AK12SC-AK33
Front side
Tape direction
Press [c DECK 1 OPEN] or [c DECK 2 OPEN] and
insert the tape.
Insert the tape with the exposed tape facing down.
Close the holder by hand.
SC-AK44
Press [REV MODE] to select the reverse mode.
Every time you press the button:
To listen to 2 tapes consecutively
Load a tape into each deck and select “ ”. Both tapes will
be played 8 times each.
SC-AK44
Press [// J] or [-] to start playback.
[
-] : The forward side (front side) will play.
[// J] : The reverse side will play.
SC-AK33
Press [-] to start playback.
One side is played, then playback stops automatically.
To play on the other side of the tape, turn the tape over and
press [-].
only
: One side is played.
: Both sides are played.
: Both sides are played 8 times each.
SC-AK22
SC-AK12
Cassette deck operations
5
A
SC-AK44
Deck in use
SC-AK22 SC-AK12SC-AK33
Adjust the volume.
To stop tape playback
Press [L].
A To change the deck to be used
Press [TAPE, DECK 1/2] to select the deck you want to use when
you load cassettes into both decks.
Notes
Playback is momentarily interrupted while playing back tapes, if you
•
open the other deck.
Tapes exceeding 100 minutes are thin and can break or get caught
•
in the mechanism.
Tape slack can get caught up in the mechanism and should be
•
taken up before the tape is played.
•
SC-AK44
Endless tapes can get caught up in the deck’s moving parts if used
incorrectly. Use tapes appropriate to this unit’s auto-reverse mechanism.
FLAT
•
SC-AK33
Failure to operate these tapes correctly may cause the tape to wind
around the revolving parts. Always read the instructions provided
with your tapes.
SC-AK22
SC-AK12
19
RQT5621
Page 20
A
Listening to tapes
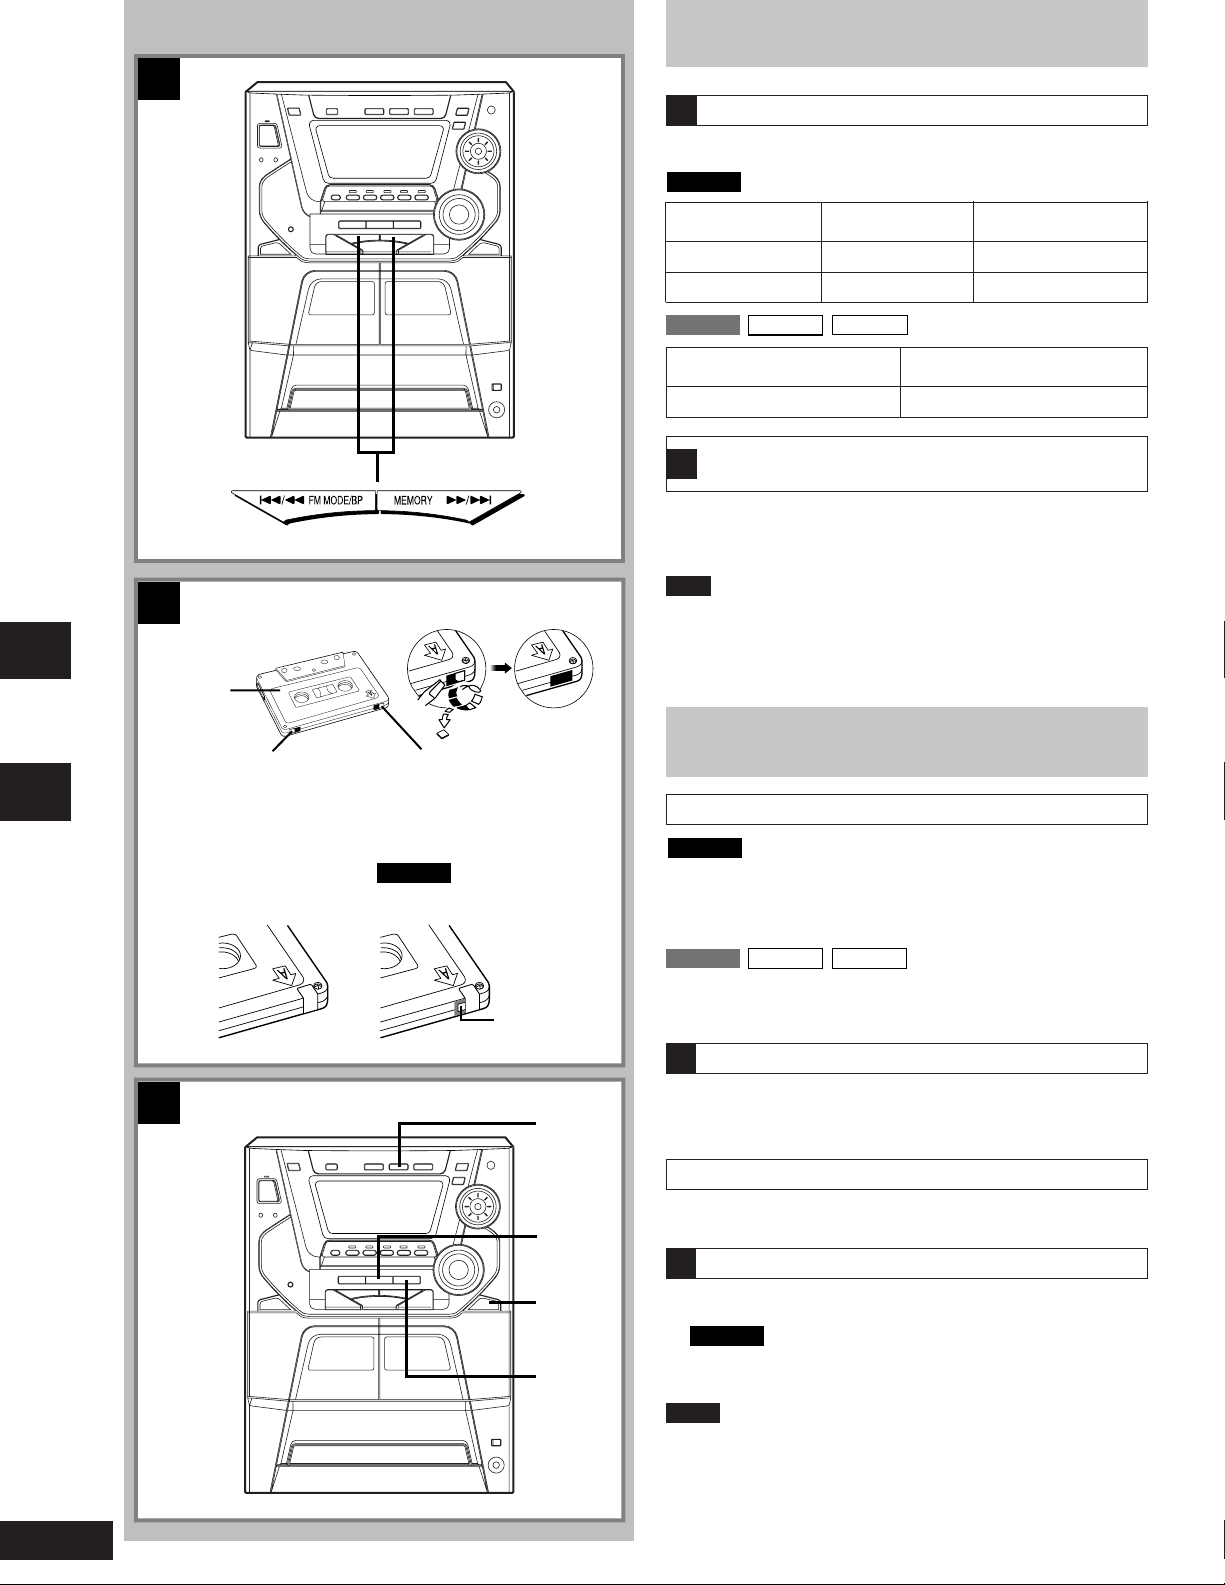
To fast-forward or rewind the tape
A
Press [g/(] or [)/f] in the stop mode.
SC-AK44
Tape direction To rewind To fast-forward
“ 3” [g/(][)/f]
“4” [)/f][g/(]
Cassette deck operations
B
To protect tapes against further recording
Side A
Tab for side “B”
To re-record
Normal position tape
Recording operations
Tab for side “A”
SC-AK44
Hi-position tape
only
Detection hole
SC-AK33
SC-AK33
A
TPS finds the beginning of a track and resumes play from there. Each
press increases the number of tracks skipped, up to a maximum of 9.
Press [g/(] or [)/f] during play.
Note
TPS may not operate correctly in the following situations:
•
If the interval between tracks is less than 4 seconds.
If there is noise between tracks.
If there are silent parts within tracks.
SC-AK22
To rewind To fast-forward
[g/(][)/f]
To find the beginning of a program
(TPS: Tape Program Sensor)
SC-AK12
Before recording (Deck 2 only)
Types of tapes which can be recorded correctly
SC-AK44
Use normal and high position tapes.
Metal position tapes can be used, but the unit will not be able to
record or erase them correctly.
The unit automatically identifies the type of tape.
SC-AK33
Use normal position tapes.
High position and metal position tapes can be used, but this unit will
not be able to record or erase them correctly.
B
SC-AK22
Erasure prevention
SC-AK12
20
RQT5621
C
1
3
2
4
The illustration shows how to remove the tabs to prevent recording.
To record on the tape again, cover as shown, being careful not to
cover the high position discrimination hole.
How volume, sound quality/field affect recording
The tape you are recording is not affected whatsoever by changes in
volume, sound quality/field.
To erase a recorded sound
C
1. Press [TAPE, DECK 1/2].
2. Insert the recorded tape into deck 2.
SC-AK44
3.
Press [REV MODE] to select reverse mode.
4. Press [a
Notes
You cannot open deck 1 while recording.
•
You cannot fast-forward or rewind one deck while recording with
•
the other.
only
REC/STOP].
Page 21
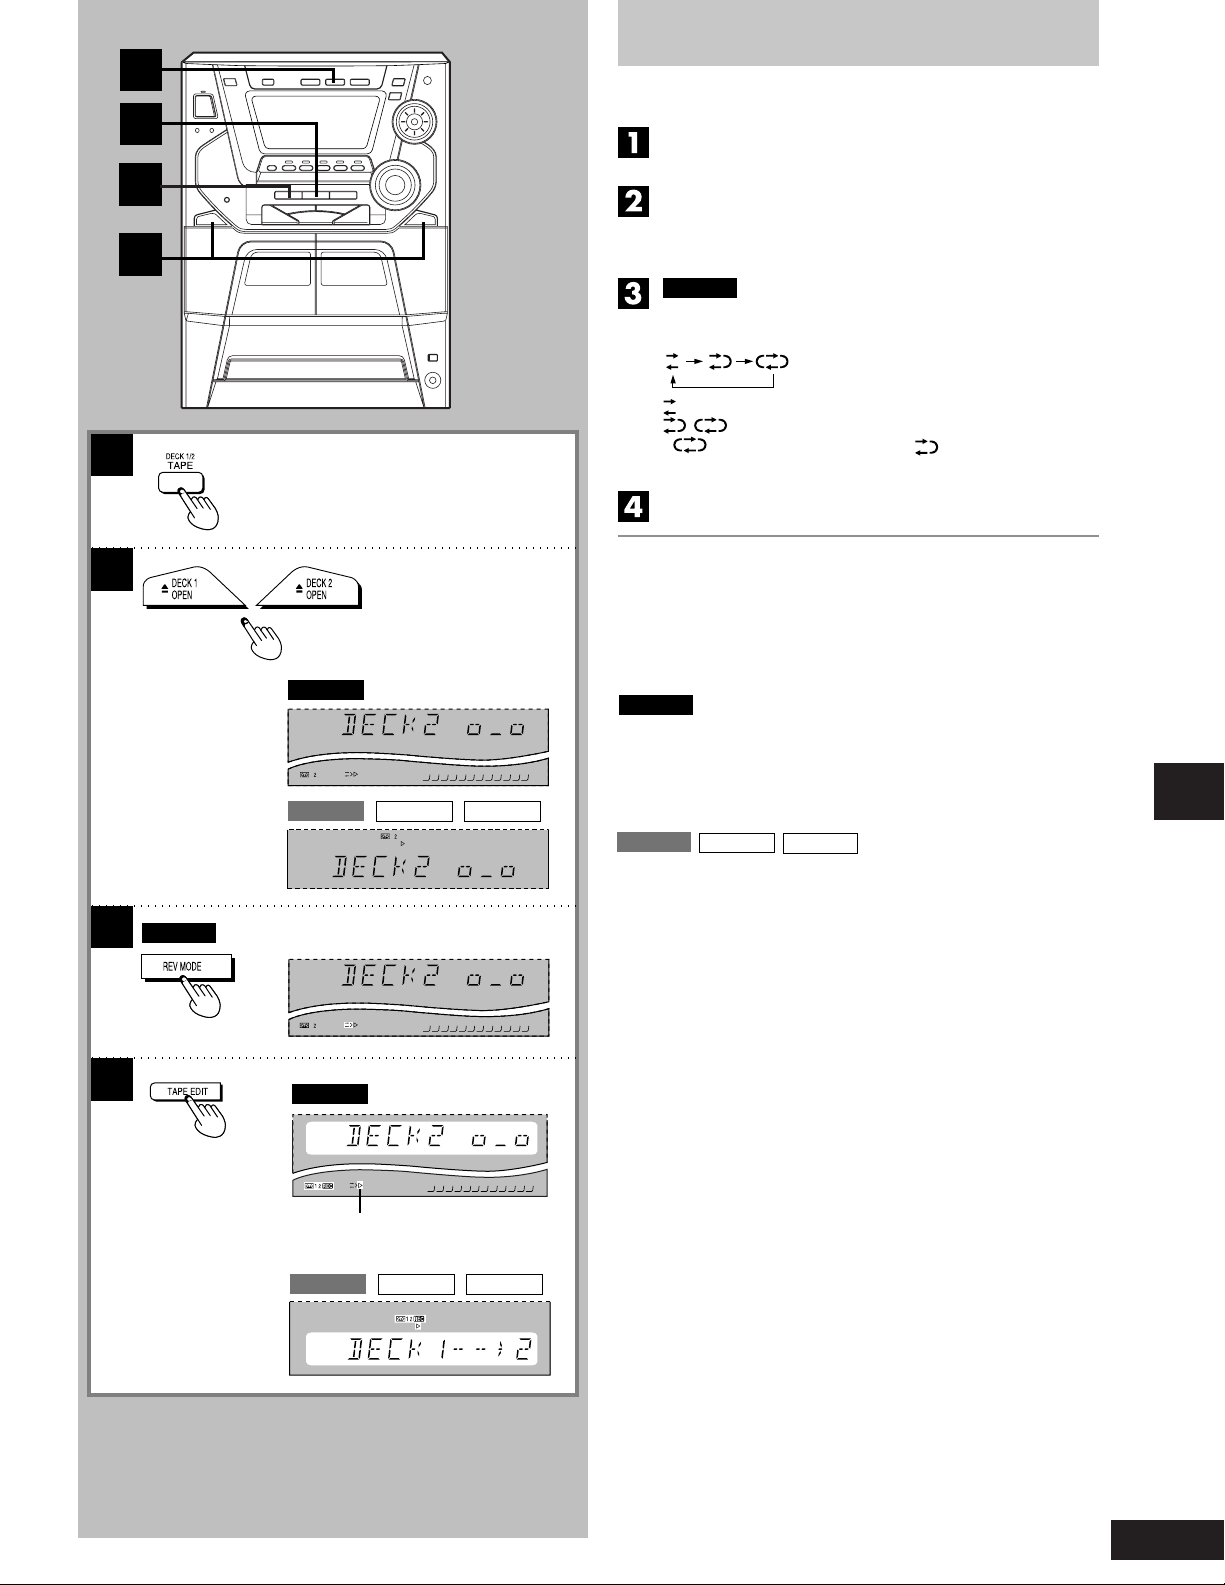
1
3
Tape-to-tape recording
The recording level will be recorded as it is on the tape being played
back.
Press [TAPE, DECK 1/2].
1
2
4
2
SC-AK44
Press [c OPEN] on both decks and insert the tapes.
For playback: Into deck 1
For recording: Into deck 2
Close the holders by hand.
SC-AK44
Press [REV MODE] to select the reverse mode.
Every time you press the button:
“ ”
pressed.
Press [TAPE EDIT] to start recording.
To stop recording
Press [L].
Both decks will stop.
To record from a specific point on a tape
Before recording, advance the tape to the point from where you want
to start recording.
SC-AK44
SC-AK44
To start recording on the reverse side
Load a tape and change the tape direction as follows:
1. Press [TAPE, DECK 1/2] and select tape deck 2.
2. Press [/] and immediately thereafter [L]. The tape direction will
SC-AK22 SC-AK12SC-AK33
FLAT
be shown as “4”.
SC-AK33
To record on the other side of the tape
Turn the tape over and press [TAPE EDIT].
only
:One side records only.
:Both sides record (front → reverse).
,
automatically changes to “ ” when [TAPE EDIT] is
SC-AK22
SC-AK12
3
4
SC-AK44
only
Recording operations
SC-AK44SC-AK44SC-AK44
Tape direction of the tape you are
recording onto
SC-AK22 SC-AK12SC-AK33
FLAT
21
RQT5621
Page 22
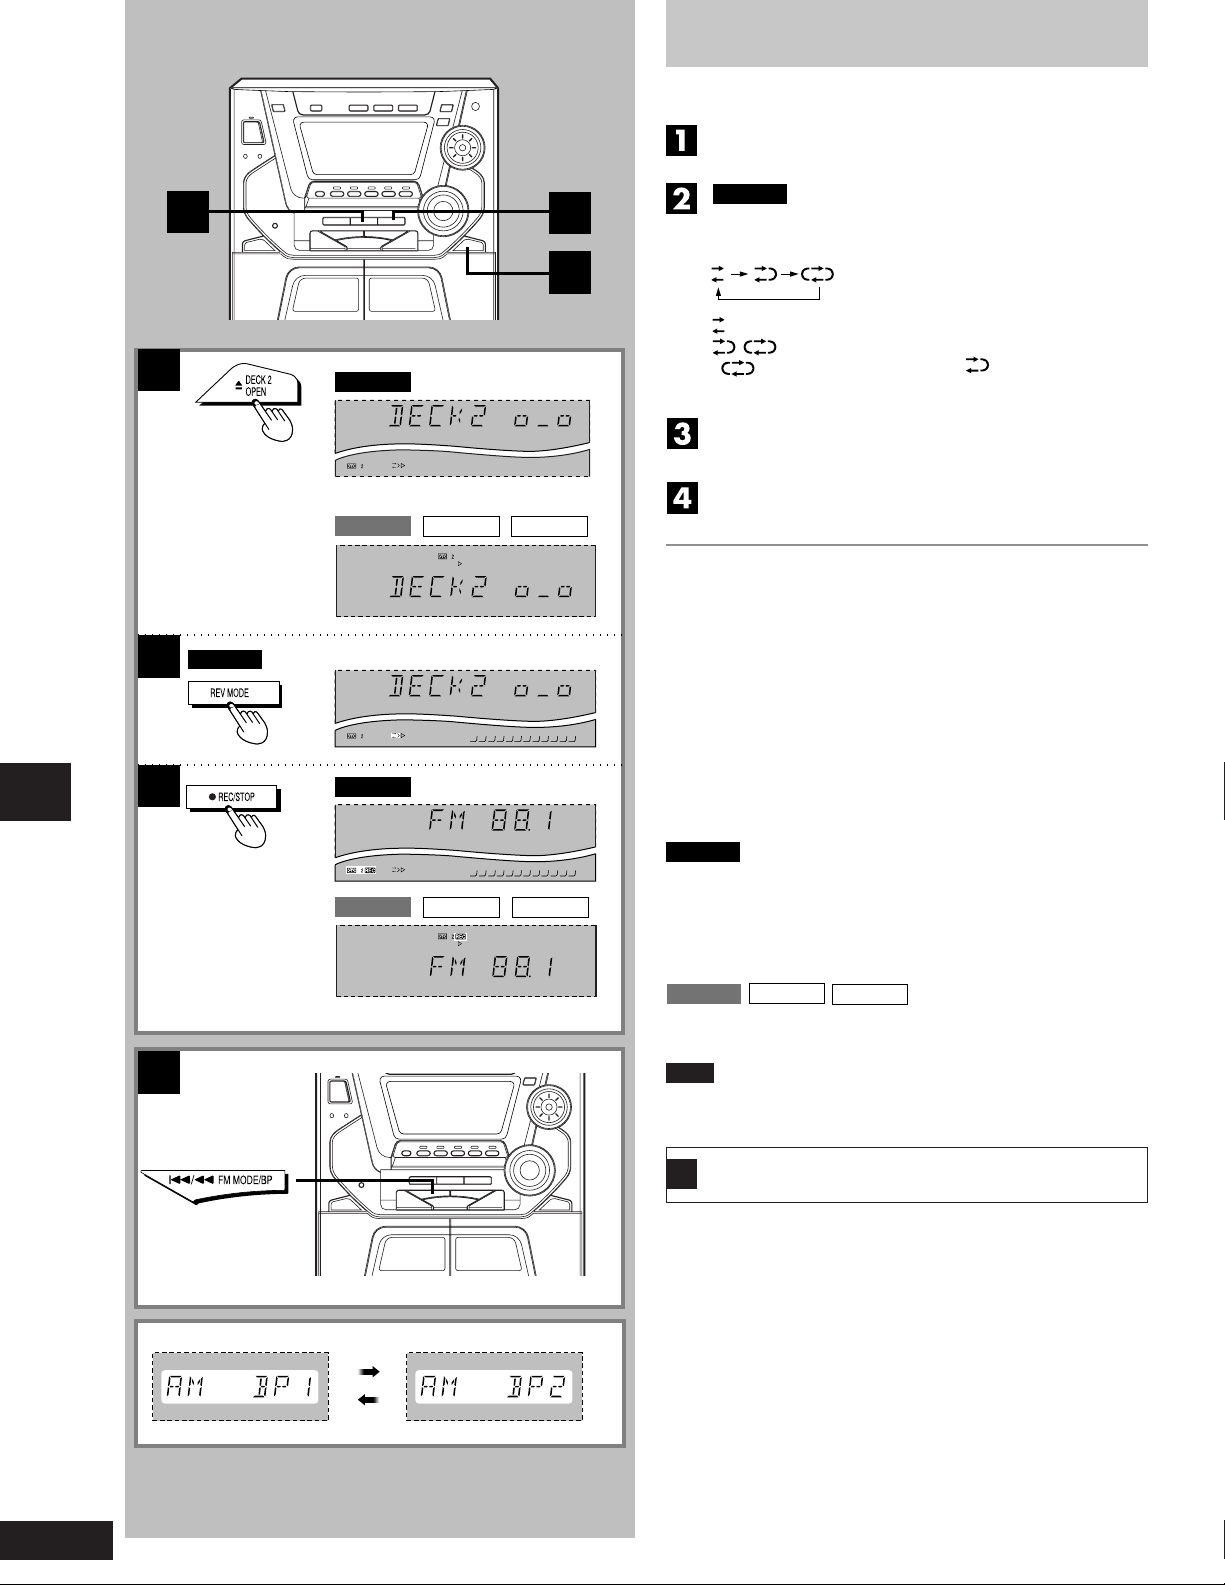
Recording from radio broadcasts
Wind up the leader tape so recording can begin immediately.
Press [c DECK 2 OPEN] and insert the tape.
Close the holder by hand.
2
1
2
SC-AK44
only
4
Recording operations
A
SC-AK44
SC-AK44
only
4
SC-AK44
Press [REV MODE] to select the reverse mode.
Every time you press the button:
1
: One side, only, records.
: Both sides record (front side → reverse side).
,
“ ”
is pressed.
Select a radio station. Perform steps 1 through 3
on page 12.
Press [a
SC-AK22 SC-AK12SC-AK33
FLAT
MHz
SC-AK22 SC-AK12SC-AK33
FLAT
MHz
To stop recording
Press [a REC/STOP] again.
Recording can also be stopped by pressing [L].
To record from a specific point on a tape
Before recording, advance the tape to the point from where you want
to start recording.
To cut an unnecessary part while recording
1. Press [a REC/STOP] during the unnecessary part. The cassette
deck will go into the stop mode.
2. Press [a REC/STOP] to resume recording again. Recording will
continue in the same direction as before.
SC-AK44
To start recording on the reverse side
Load a tape and change the tape direction as follows:
1. Press [TAPE, DECK 1/2] and select tape deck 2.
2. Press [// J] and immediately thereafter [L]. The tape direction
will be shown as “4”.
SC-AK33
To record on the other side of the tape
Turn the tape over and press [a REC/STOP].
Note
When recording an AM broadcast, sound is momentarily interrupted
when you start and stop the recording.
automatically changes to “ ” when [aREC/STOP]
REC/STOP] to start recording.
SC-AK22
SC-AK12
22
RQT5621
To reduce noise while AM recording (Beat proof
A
function)
Press [g/(, FM MODE/BP] while recording.
Each time you press the button, “BP1” and “BP2” will be displayed
alternately.
Select the position where there is less noise.
Page 23
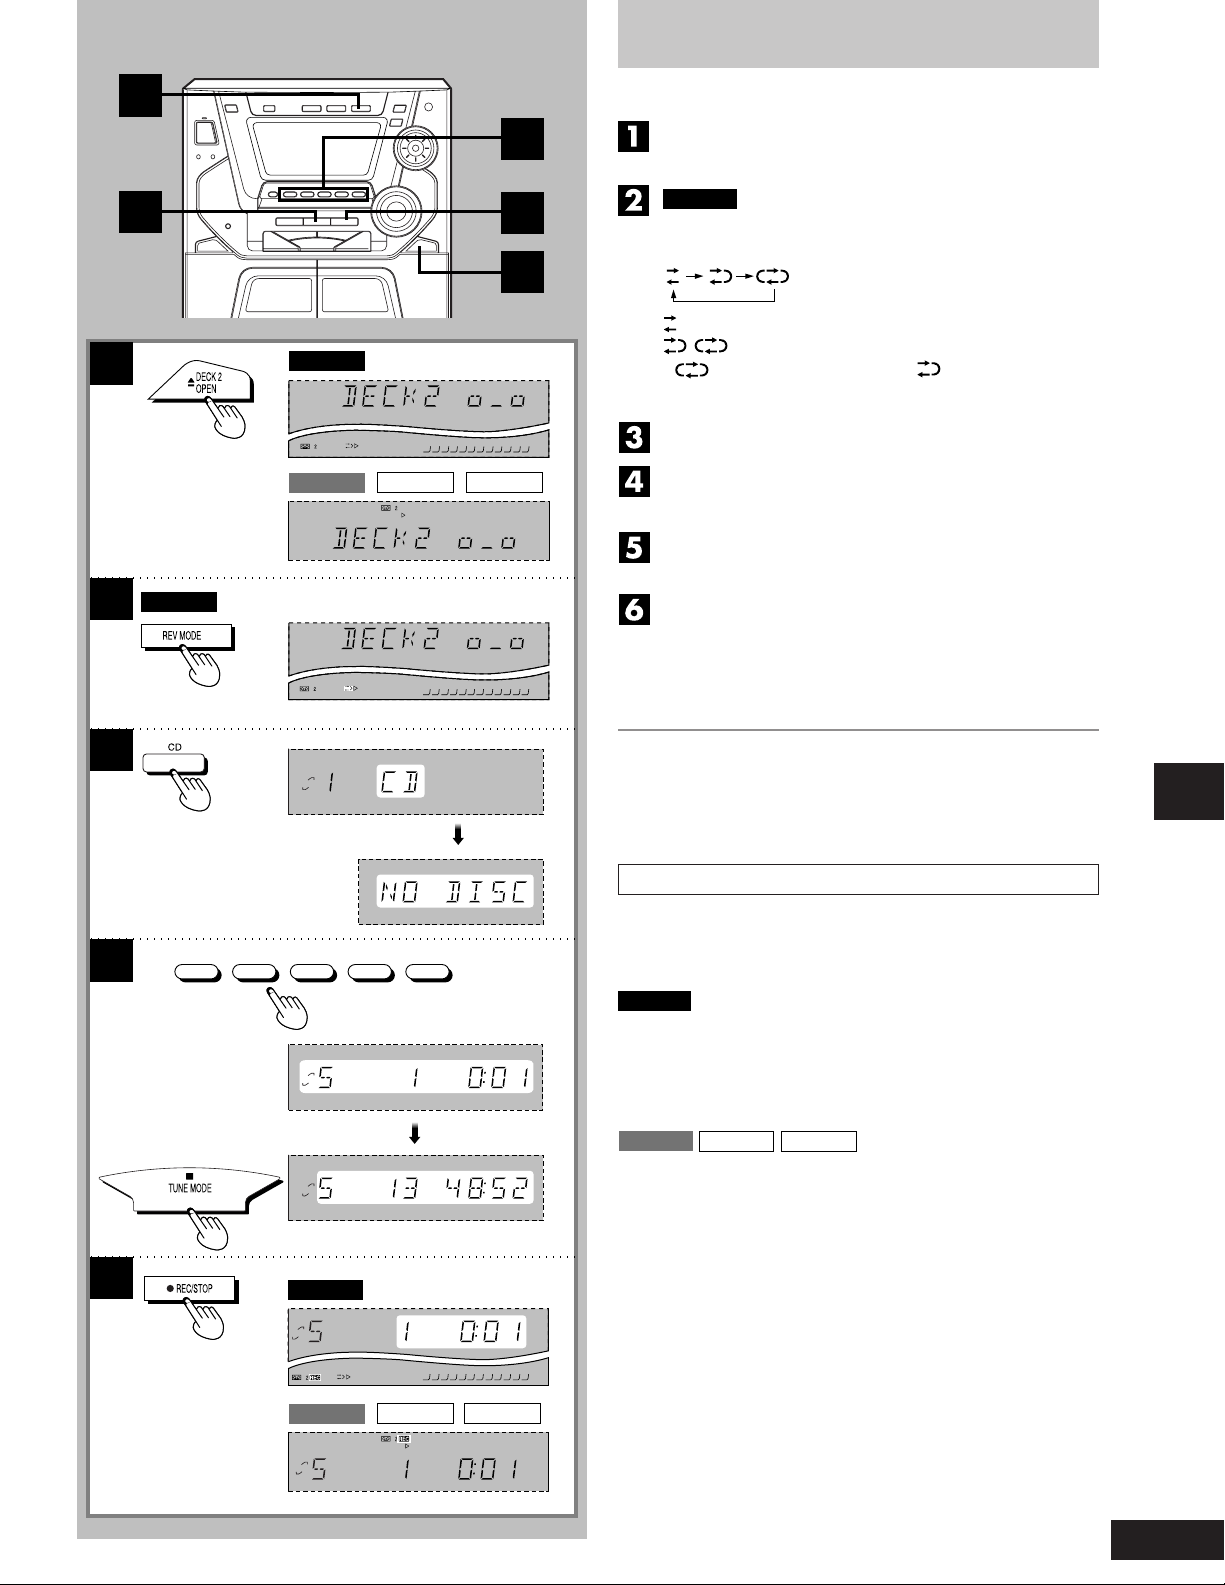
Recording from compact discs
3
2
1
SC-AK44 only
2
SC-AK44
Wind up the leader tape so recording can begin immediately.
5
6
Press [c DECK 2 OPEN], and insert the tape.
Close the holder by hand.
SC-AK44
Press [REV MODE] to select the reverse mode.
Every time you press the button:
only
1
: One side only records.
: Both sides (front → reverse) record.
,
“ ”
is pressed.
Press [CD].
SC-AK22 SC-AK12SC-AK33
FLAT
Insert CD in the tray.
(Perform steps 1 ~ 2 on page 15).
Press [(CD 1) ~ (CD 5)] to select the disc you want.
Pressing [L] will stop playback.
Press [a
• The recording will proceed from the first track on the selected
•
automatically changes to “ ” when [aREC/STOP]
REC/STOP] to start recording.
CD and will continue on through the last track of the final disc
(page 15).
The tape deck stops automatically when the CD is finished.
3
5
6
DISC
CD 1 CD 2 CD 3 CD 4 CD 5
1
DISC
2
DISC
SC-AK44
DISC
To stop recording
To add a 4 second silent interval before stopping
•
Press [L]. The CD will stop automatically too.
To stop recording without a silent interval
•
Press [a REC/STOP]. The CD will stop automatically too.
To record programmed tracks
1. After step 4, program the track you want (perform steps 2 ~ 6
on page 17).
2. Press [a REC/STOP] to start recording.
SC-AK44
To start recording on the reverse side
Load a tape and change the tape direction as follows:
1. Press [TAPE, DECK 1/2] and select tape deck 2.
2. Press [// J] and immediately thereafter [L]. The tape direction
will be shown as “4”.
SC-AK33
To record on the other side of the tape
Turn the tape over and press [a REC/STOP].
SC-AK22 SC-AK12
Recording operations
DISC
SC-AK22 SC-AK12SC-AK33
FLAT
23
RQT5621
Page 24
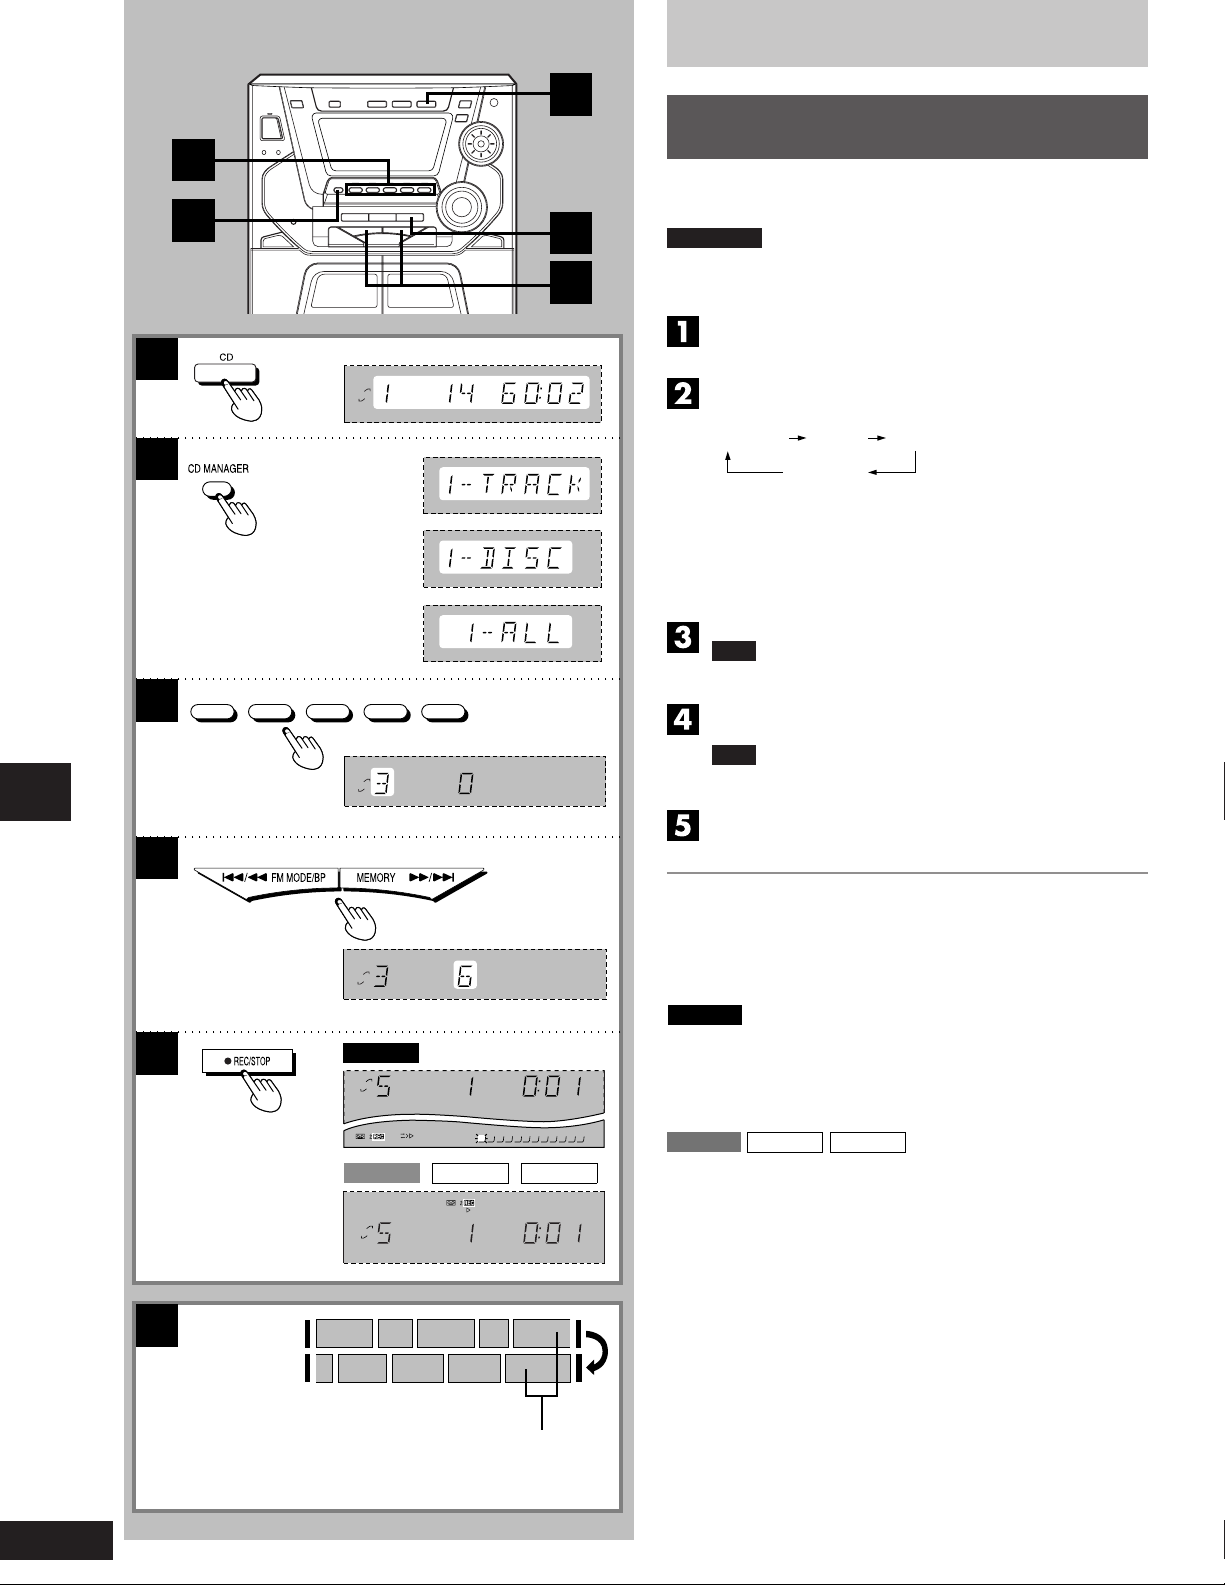
Recording from compact discs
1
2
3
2
DISC
1
5
4
To record special CDs and tracks
(CD Manager function)
This function makes it easier for you to select special CDs and tracks
from amongst those loaded in the player.
Preparation
Press [cDECK 2 OPEN] and insert the tape. Wind up the leader tape
so recording can begin immediately.
Press [CD].
Press [CD MANAGER] to select the desired mode.
Every time you press the button:
1-TRACK
1-TRACK: Only one particular track is recorded.
1-DISC: The tracks on only one particular disc are recorded.
1-ALL: The same track numbers on each of the CDs are
(NORMAL: The original display is restored in about 3 seconds.)
Press [(CD 1) ~ (CD 5)] to select the disc you want.
Note
This step is not required if 1-ALL was selected in step 2.
1-DISC 1-ALL
NORMAL
(OFF)
recorded in succession.
3
CD 1 CD 2 CD 3 CD 4 CD 5
4
Recording operations
5
DISC
DISC
SC-AK44
DISC
DISC
gg
Press [
track.
Note
This step is not required if 1-DISC was selected in step 2.
Press [a
To stop recording
To add a 4 second silent interval before stopping
•
Press [L]. The CD will stop automatically too.
To stop recording without a silent interval
•
Press [a REC/STOP]. The CD will stop automatically too.
SC-AK44
A While recording, if a track is cut off in the middle at the end of the
•
front side, it is re-recorded from the beginning, on the reverse side.
At the end of the reverse side recording stops and the current
•
track will be interrupted.
1
SC-AK22 SC-AK12SC-AK33
FLAT
SC-AK33
If the tape finishes before the CD
The CD continues playing. Press [L] to stop it. (CD Manager function
will also be canceled.)
SC-AK22 SC-AK12
((
g/
(] or [
gg
((
REC/STOP] to start recording.
))
ff
)/
f] to select the desired
))
ff
24
RQT5621
A
1
Front side
Reverse side
The interrupted track is re-recorded in its entirety on the
reverse side.
2345
89765
Page 25
A
MID (medium) MAX (high) Light off (OFF)
SC-AK44
SC-AK33
SC-AK22
SC-AK12
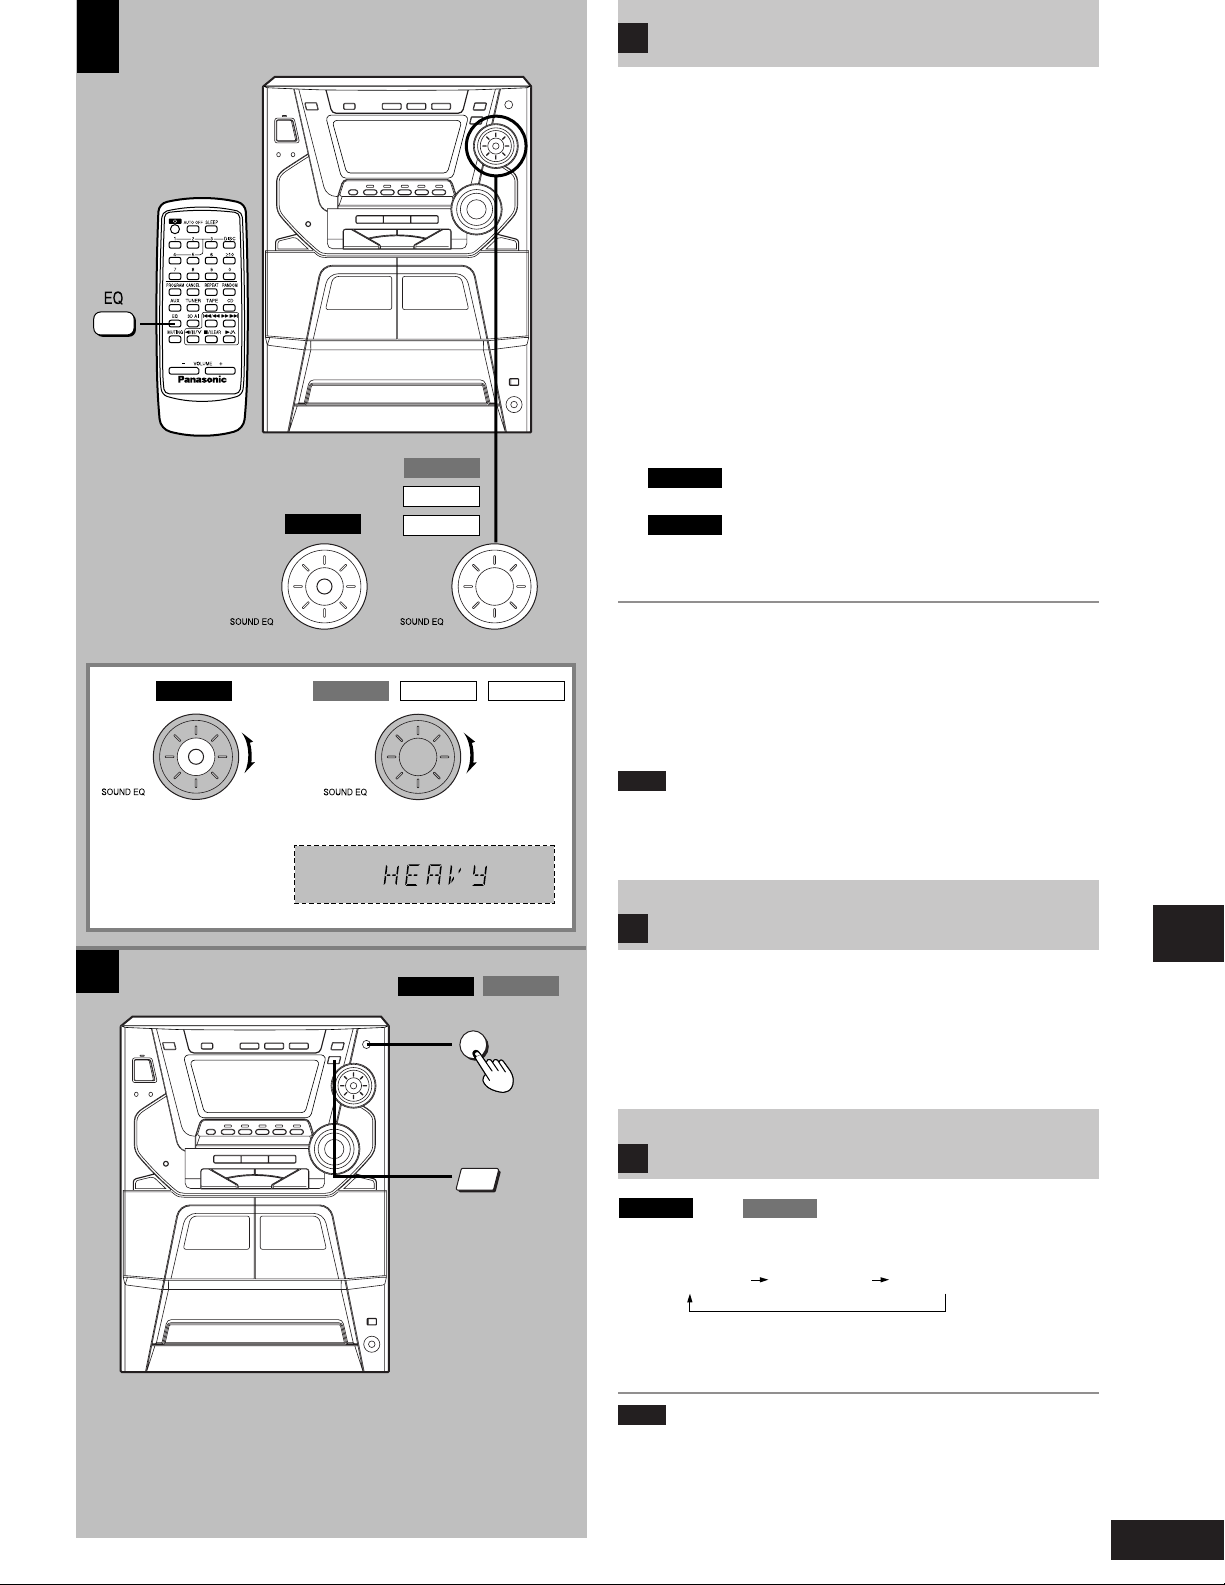
Using the built-in sound quality/
A
sound field settings
Dial [SOUND EQ] to select the sound quality or sound field.
When it is turned clockwise, the settings are selected in the following
sequence.
1 HEAVY (sound quality)
Select this when playing rock or other kinds of music that sound
better with an added punch.
2 CLEAR (sound quality)
Select this for jazz or other kinds of music for which clarity in the
treble range is desired.
3 SOFT (sound quality)
Select this when listening to background music.
4 DISCO (sound field)
Select this to produce sound with the same kind of lengthy
reverberations heard at a disco.
5 LIVE (sound field)
Select this to make vocals more alive.
6 HALL (sound field)
Select this to add an expansiveness to the sound to produce the
atmosphere of a great concert hall.
SC-AK44
7
MANUAL (see page 26)
SC-AK44
8
AI-EQ (see page 26)
The original display is restored on the display panel in about 5 seconds.
only
only
B
SC-AK44
SC-AK22 SC-AK12SC-AK33
SC-AK44
S. WOOFER
SUPER SOUND EQ
SC-AK33
To release the equalizer
Dial [SOUND EQ] to display “FLAT”.
When using the remote control to perform the operations
described above
Press [EQ].
Each time this button is pressed, the setting is changed in the sequence
described above.
Note
All recordings are performed at the flat setting even if an alternative
sound quality/sound field setting has been selected.
B
Enhancing the sound quality
This feature enhances the bass and treble effect of the sound.
Press [SUPER SOUND EQ].
Press the button again to cancel.
The button light goes out.
B
Boosting the super woofer
SC-AK44
SC-AK44 and SC-AK33 only
SC-AK33
Press [S.WOOFER].
When listening to the sound through the speakers
•
When listening to the sound through the headphones
•
Light on (ON) W Light off (OFF)
Note
You cannot record super woofer effect, but you can use it for playback
sound.
Sound quality/sound field operations
25
RQT5621
Page 26
1
1 HEAVY
2 CLEAR
3 SOFT
4 DISCO
5 LIVE
6 HALL
7 MANUAL
8 AI-EQ
9 FLAT
2
1
1kHz100Hz 10kHz
1
1
2
2
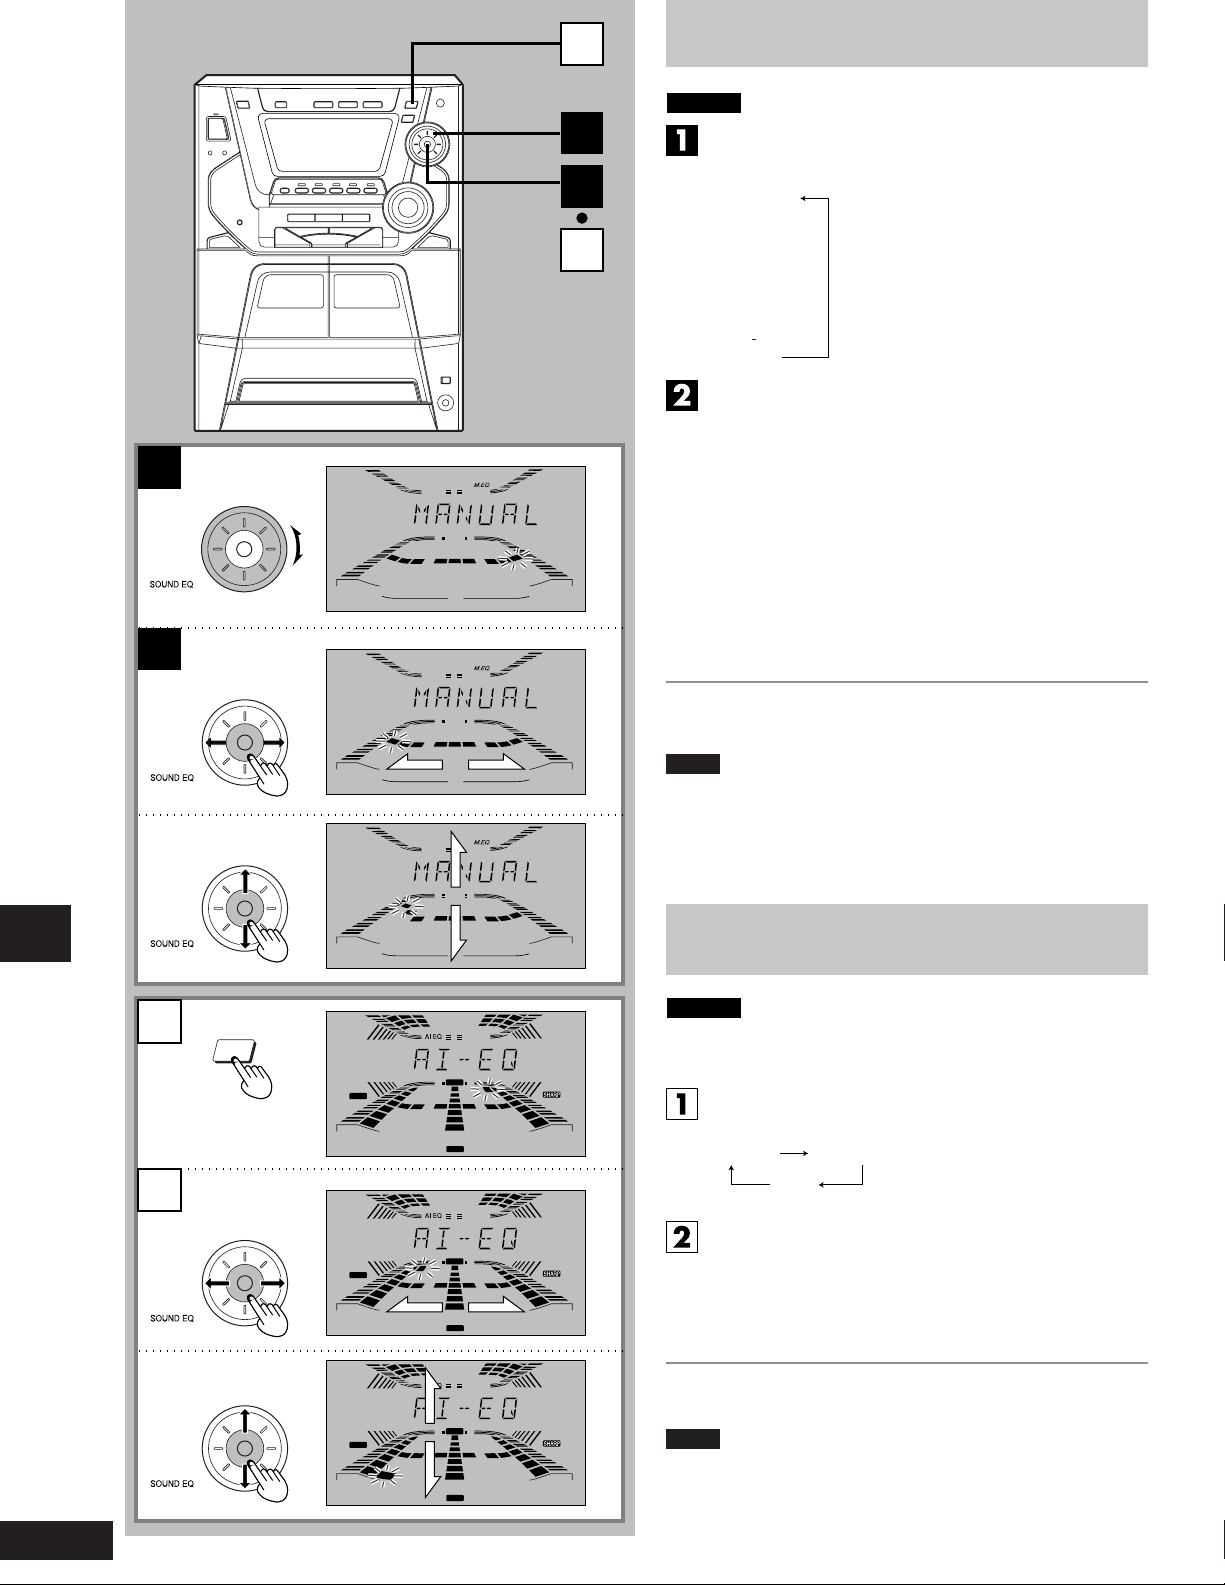
Varying the sound quality with the
manual equalizer
SC-AK44
only
Dial [SOUND EQ] to display “MANUAL”.
When it is turned clockwise, the settings are selected in the
following sequence.
Adjust the sound quality.
1 ←→direction: For selecting the range of the sound to
Characteristics of each sound range
Under 100 Hz: Super woofer range
Around 330 Hz: Bass to midrange
Around 1 kHz: Midrange
Around 3.3 kHz: Midrange to treble
Above 10 kHz: Treble
2 ↓ ↑ direction: For adjusting the level (7 steps)
When the level is in the center, the dot flashes rapidly.
Repeat steps 1 and 2 to set the desired sound quality.
The original display is restored on the display panel in about 5
seconds.
To release the equalizer
Dial [SOUND EQ] to display “FLAT”.
be adjusted
Sound quality/sound field operations
26
RQT5621
2
1
2
1
2
3D AI
SOFT
SOFT
SOFT
1kHz100Hz 10kHz
1kHz100Hz 10kHz
HEAVY
LIGHT
HEAVY
LIGHT
HEAVY
LIGHT
Notes
The sound quality setting is stored automatically. It is recalled when
•
“MANUAL” is next selected.
All recordings are performed at the flat setting even if an alternative
•
sound quality setting has been selected.
Varying the sound quality with the
acoustic image (Al) equalizer
SC-AK44
only
The Al equalizer uses the SOFT, SHARP, HEAVY and LIGHT sound
quality coordinates to achieve subtle sound quality settings with ease.
Press [3D AI] to adjust the surround level.
Every time you press the button:
3D AI 1 3D AI 2
AI-EQ
Adjust the sound quality.
1 ←→direction: SOFT–SHARP setting
2 ↓ ↑ direction: LIGHT–HEAVY setting
Repeat steps 1 and 2 to set the desired sound quality.
The original display is restored on the display panel in about 5
seconds.
To release the equalizer
Dial [SOUND EQ] to display “FLAT”.
Notes
The sound quality setting is stored automatically. It is recalled when
•
“Al-EQ” is next selected.
All recordings are performed at the flat setting even if an alternative
•
sound quality setting has been selected.
Page 27
1
2
3
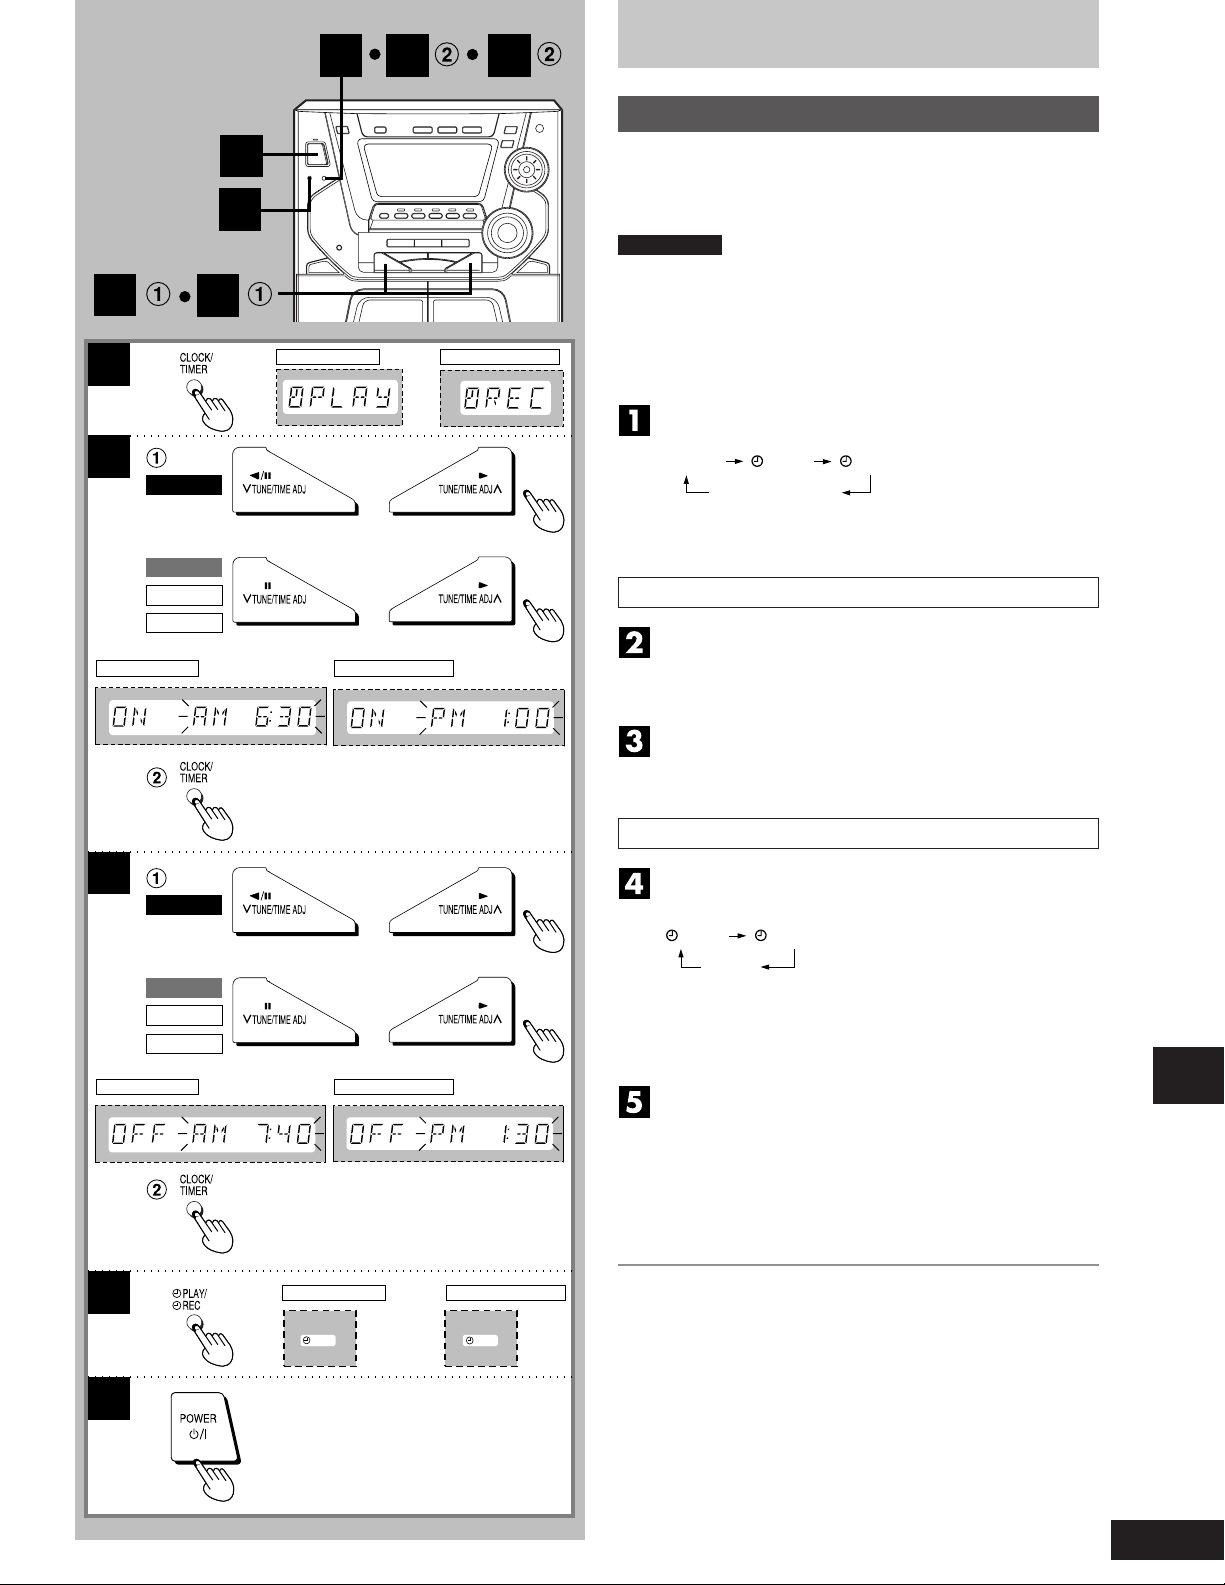
Using the timer
Using the play/record timer
2
1
2
SC-AK44
SC-AK33
SC-AK22
SC-AK12
FOR PLAY TIMER
3
5
4
FOR PLAY TIMER
FOR RECORD TIMER
FOR RECORD TIMER
The timer has two functions. It can be set to on at a certain time to
wake you up, or it can be set to record the radio or from the aux
source.
The play timer cannot be used in combination with the record timer.
Preparations
Turn the unit on and set the clock (A page 11).
•
For the play timer, prepare the music source you want to listen to;
•
tape, CD, radio or aux, and set the volume.
For the record timer, check the cassette’s erasure prevention tabs
•
(A page 20: B), insert the tape in deck 2, select the reverse mode
(for SC-AK44) (A page 22) and tune to the radio station (A page
12) or select the aux source (A page 29).
Press [CLOCK/TIMER] to select the timer function.
Every time you press the button:
CLOCK RECPLAY
Previous display
rPLAY : to set the play timer
rREC : to set the record timer
Setting the start and finish times
1 (Within 8 seconds or so)
Press [TUNE/TIME ADJ (3) or (4)] to select the
starting time.
2 Press [CLOCK/TIMER].
1 Press [TUNE/TIME ADJ (3) or (4)] to select the
finishing time.
2 Press [CLOCK/TIMER].
The start and finish times are now set.
3
SC-AK44
SC-AK33
SC-AK22
SC-AK12
FOR PLAY TIMER
4
5
FOR RECORD TIMER
FOR PLAY TIMER
PLAY
FOR RECORD TIMER
REC
Turning the timer on
Press [rPLAY/rREC] to display the timer indicator.
Every time you press the button:
RECPLAY
(OFF)
(OFF)
rPLAY : to turn the play timer on
rREC : to turn the record timer on
(The indicator doesn’t appear if the start and finish times or the
clock haven’t been set.)
Press [f/I, POWER] to turn the unit off.
The unit must be off for the timers to operate.
For play timer
•
The timer play will start at the preset time with volume
increasing gradually up to the volume level you preset.
For record timer
•
The record timer comes on about 30 seconds earlier than
the set time.
To cancel the timer
Press [rPLAY/rREC] to clear the timer indicators from the display.
(The timer comes on at the set time everyday if the timer is on.)
To change the settings (when unit is on)
To change the play/record times
•
Do steps 1, 2, 3 and 5.
To change the source or volume
•
1. Press [rPLAY/rREC] to clear the timer indicator from the
display.
2. Make changes to the source or volume.
3. Do steps 4 to 5.
Timer operations
Timer operations
Reference
(Continued on next page)
27
RQT5621
Page 28
Using the timer
Using the play/record timer
PLAY/
REC
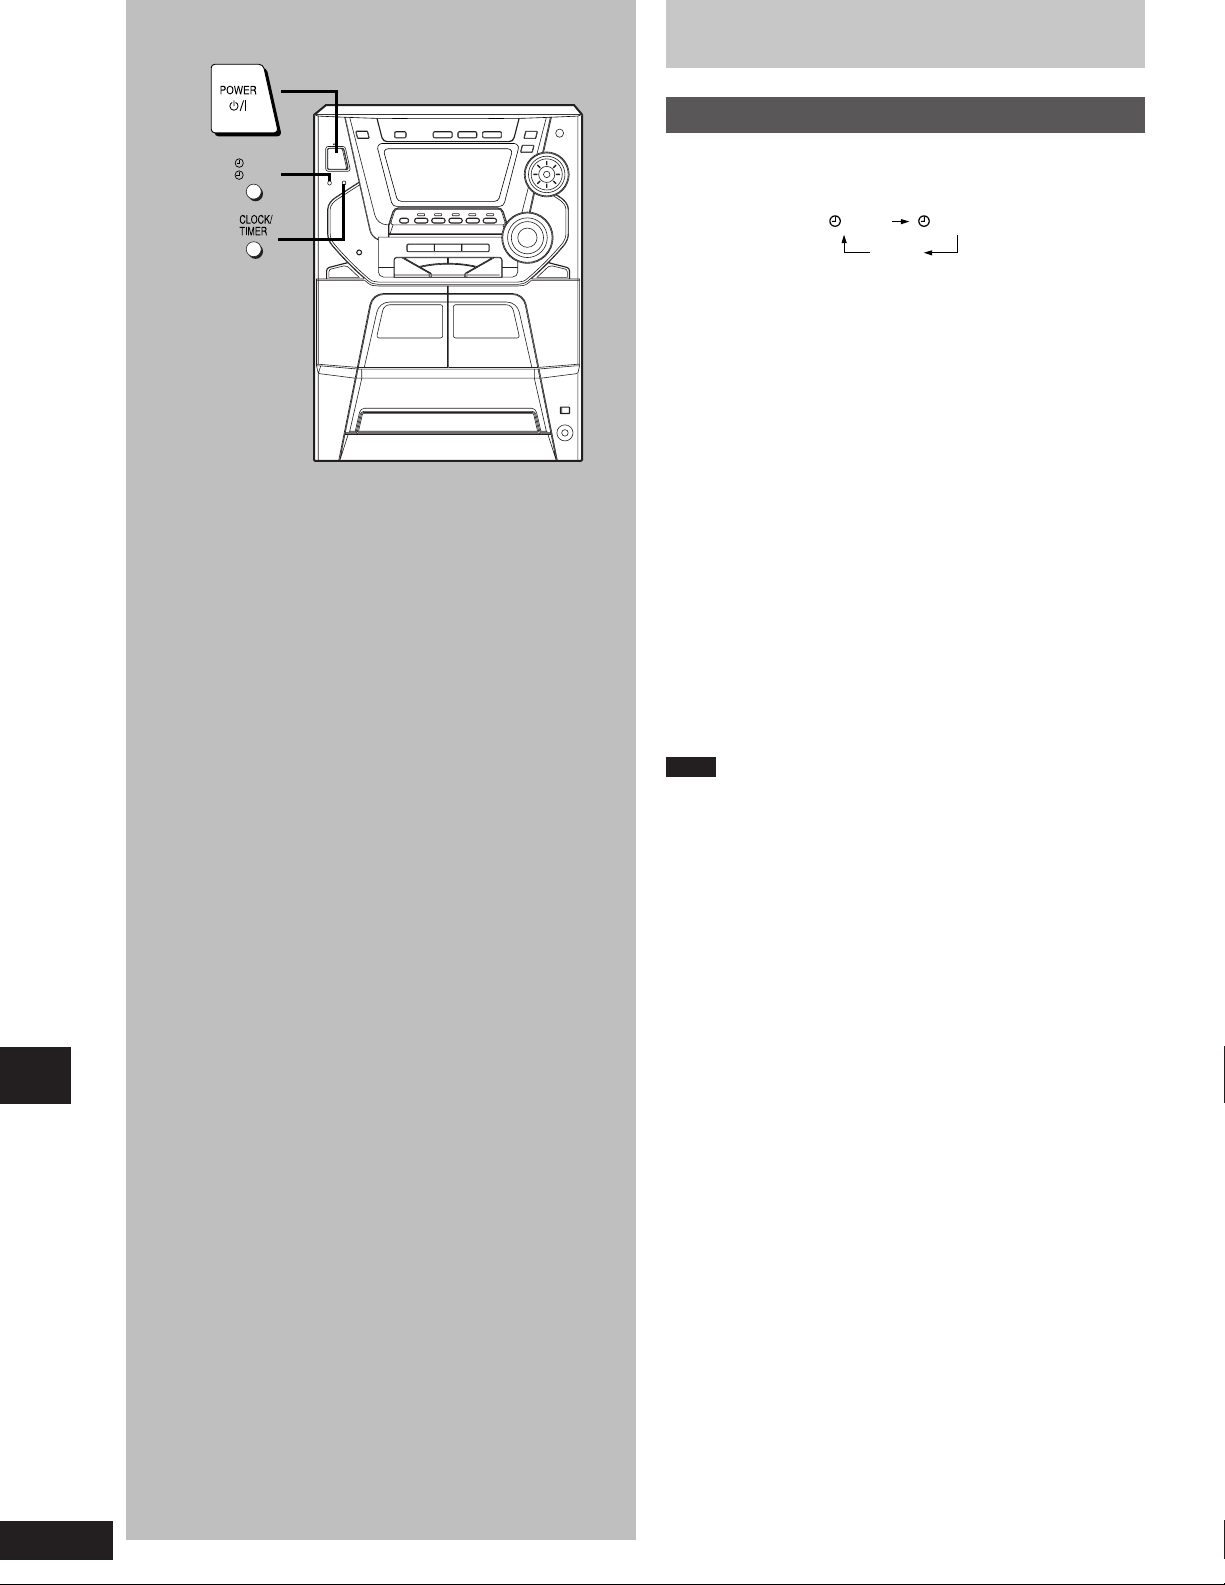
To change the timer
Press [rPLAY/rREC] to select the desired timer.
Every time the button is pressed the setting changes as follows.
RECPLAY
(OFF)
(OFF)
To check settings
While the unit is on and the “rPLAY” (or “rREC”) indicator is on,
press [CLOCK/TIMER] so “rPLAY” (or “rREC”) appears on the
display.
Two seconds after “rPLAY” (or “rREC”) appear, the settings are
displayed in the following order:
For play timer
•
1 Play start time 1 Recording start time
2 Play finish time 2 Recording finish time
3 Play source 3 Recording source
4 Playback volume
You can check the settings even when the system is OFF by pressing
[CLOCK/TIMER] twice.
To enjoy the desired source after the timer setting is completed
The volume level (for play timer) and music source are stored in the
timer memory and the timer will start in these preset conditions.
However, the Disc numbers and reverse mode (for SC-AK44) do not
get stored in the timer memory.
1. After step 4, start playing the desired source.
2. Reset the Disc numbers and reverse mode (for SC-AK44) if you
have changed any of them, confirm that a Disc or cassette is
inserted, then press [f/7, POWER] to put the unit on standby.
For record timer
•
Timer operations
Notes
If you switch the system to the standby mode while the play/record
•
timer is functioning, the OFF time setting will not be activated.
If AUX is selected as the source, when the timer comes ON, the
•
system will turn ON and will engage “AUX” as the source. If you
want to playback or record from a connected component, set the
component’s timer to the same time. (See the instruction manual
that came with the component.)
28
RQT5621
Page 29
Using the timer
A
B
AUX
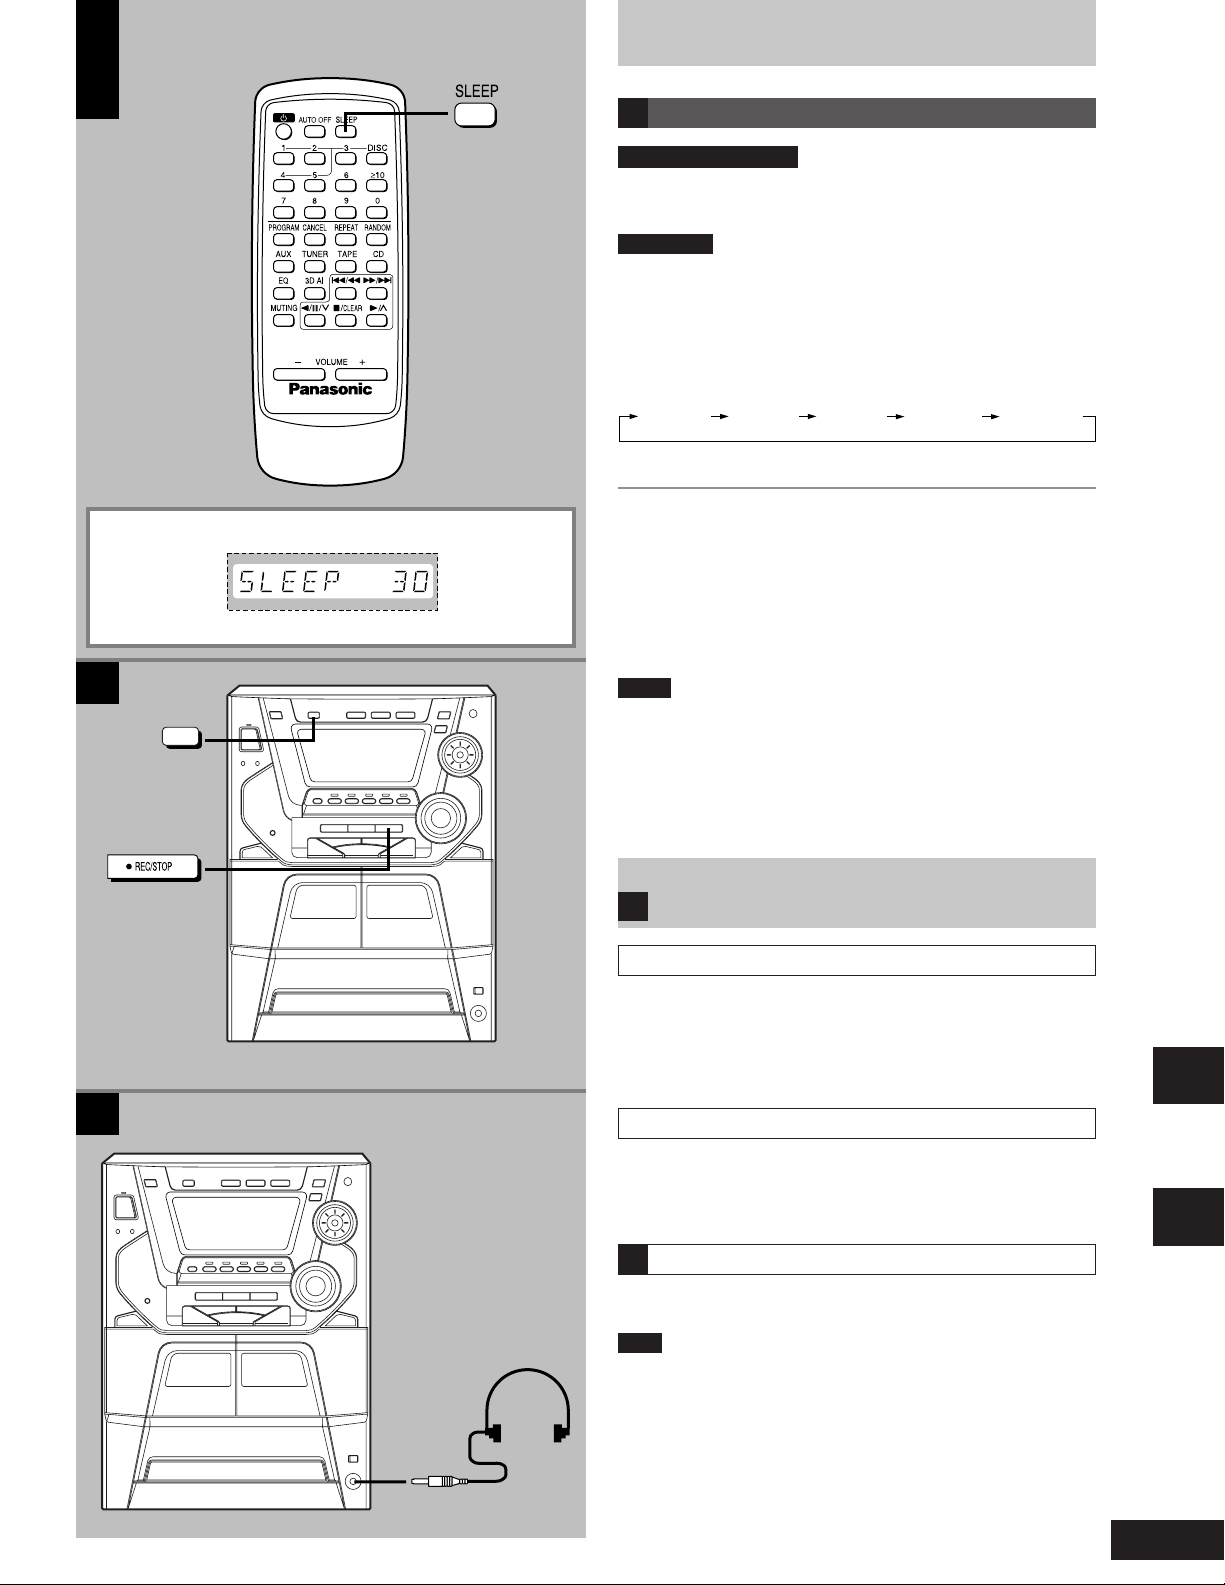
Using the sleep timer
A
by remote control only
This timer turns your system OFF at the set time (Max. 2 hours,
settable at 30-minute intervals). It lets you fall asleep listening to
music.
Preparation
Switch on the power.
The figure shows how to set the system to standby mode after 30
minutes.
While enjoying the desired source:
Press [SLEEP] to select the desired time.
Every time you press the button:
SLEEP 90 SLEEP 120SLEEP 60SLEEP 30
The system is turned off after the set time has elapsed.
To cancel the sleep timer:
Press [SLEEP] to select “SLEEP OFF”.
To confirm the remaining time:
(only while system is ON)
Press [SLEEP].
To change the time remaining during operation:
Press [SLEEP] to show the remaining time then press [SLEEP] to
select the desired time.
Notes
The sleep timer turns OFF automatically the moment you attempt
•
to edit-record a CD using CD Manager function.
The sleep timer can be used in combination with the play/record
•
timer.
The sleep timer always has priority.
Be sure not to overlap timer settings.
SLEEP OFF
C
Headphones
(not included)
B
Using an external unit
Listening to an external source
(See page 7 for external unit connection)
1. Press [AUX].
The system will come on automatically.
2. Start playback from the external source. (For details, refer to the
owner’s manual of the equipment.)
Recording from an external source
1. Press [AUX].
2. Press [a REC/STOP] (recording starts).
3. Start playback from the external source. (For details, refer to the
owner’s manual of the equipment.)
Listening with headphones
C
Reduce the volume level, and connect the headphones.
Plug type: 3.5 mm (1/8˝) stereo
Note
Avoid listening for prolonged periods of time to prevent hearing
damage.
Timer operations
Reference
29
RQT5621
Page 30

Troubleshooting guide
Before requesting service, make the checks below. If you can’t fix the system as described below, or if something not listed here occurs, refer to the
enclosed directory to locate an Authorized Service Center convenient to you or contact your dealer.
For detailed instructions, contact an authorized servicenter in the U.S.A. and Panasonic Canada Inc. Customer Care Centre in Canada.
In the U.S.A., call 1-800-211-7262, e-mail [email protected], or visit www.panasonic.com
In Canada, call 905-624-5505 or visit www.panasonic.ca
Reference pages are shown as black circled numbers 6.
Common Problems
No sound.
Sound is unfixed, reversed
or comes from one speaker
only.
Humming heard during play.
“ERROR” is displayed.
“– –:– –” appears on the
display.
“F61” is displayed.
Listening to the radio
Noise is heard.
The stereo indicator flickers
or doesn’t light.
Sound is distorted.
A beat sound is heard.
A low hum is heard during
AM broadcasts.
Turn the volume up.
The speaker cables may be shorted. Turn the unit off, check and correct the connections and turn the
unit on. 6
Check the speaker connections. 6
An AC power supply cord or fluorescent light is near the cables. Keep other appliances and cords away
from this unit’s cables.
Incorrect operation performed. Read the instructions and try again.
You plugged the power supply cord in for the first time or there was a power failure recently. Set the time.
Check and correct the speaker cords connection. 6
If this does not fix the problem, there is a power supply problem. Consult the dealer.
Use an outdoor antenna. 7
Turn the TV off or separate it from the unit.
Separate the antenna from other cables and cords.
When there is a television set nearby
The picture on the TV
disappears or stripes
appear on the screen.
Using the cassette deck
Poor quality sound.
Recording is not possible.
Playing discs
The display is wrong or
play won’t start.
“TAKE OUT/DISC” appears
on the display.
Remote control
Remote control doesn’t
work.
Maintenance
Reference
If the surfaces are dirty
The location and orientation of the antenna are incorrect. If you are using an indoor antenna, change to
an outdoor antenna.
The TV antenna wire is too close to the unit. Separate the antenna wire of the TV set from the unit.
Clean the heads. @
If the erasure prevention tabs have been removed, cover the holes with adhesive tape. ,
The disc may be upside down. &
Wipe the disc.
Replace the disc if it is scratched, warped, or non-standard.
Condensation may have formed inside the unit due to a sudden change in temperature. Wait about an
hour for it to clear and try again.
There is a problem with the disc mechanism. (A power failure may have occurred.)
The tray will open automatically. Remove the disc from the tray, and after ensuring there is no disc in the tray,
close it. The unit will make the disc changing noises for a few moments and then it should operate normally.
Check the batteries are inserted correctly. 5
Replace the batteries if they are worn.
For a cleaner, crisper sound
30
RQT5621
To clean this unit, wipe with a soft, dry cloth.
If the surfaces are extremely dirty, use a soft cloth dipped in a soapand-water solution or a weak detergent solution.
• Never use alcohol, paint thinner or benzine to clean this unit.
• Before using a chemically treated cloth, carefully read the instructions that came with the cloth.
Clean the heads regularly to assure good quality playback and recording.
Use a cleaning tape (not included).
Page 31
Servicenter List (U.S.A.)
Reference
31
RQT5621
Page 32
Specifications
AMPLIFIER SECTION SC-AK44
Power output
10% Total harmonic distortion
70 Hz–120 Hz, both channels driven
(Low channel) 100 W per channel (6 Ω)
120 Hz–16 kHz, both channels driven
(High channel) 40 W per channel (6 Ω)
Total Bi-Amp power 140 W per channel
Power output
10% Total harmonic distortion
80 Hz, both channels driven
(Low channel) 105 W per channel (6 Ω)
1 kHz, both channels driven
(High channel) 45 W per channel (6 Ω)
Total Bi-Amp power 150 W per channel
Input sensitivity
AUX 250 mV
Input Impedance
AUX 13 kΩ
AMPLIFIER SECTION
Power output
10% Total harmonic distortion
70 Hz–120 Hz, both channels driven
(Low channel) 85 W per channel (6 Ω)
120 Hz–16 kHz, both channels driven
(High channel) 35 W per channel (6 Ω)
Total Bi-Amp power 120 W per channel
Power output
10% Total harmonic distortion
80 Hz, both channels driven
(Low channel) 90 W per channel (6 Ω)
1 kHz, both channels driven
(High channel) 40 W per channel (6 Ω)
Total Bi-Amp power 130 W per channel
Input sensitivity
AUX 250 mV
Input Impedance
AUX 13 kΩ
AMPLIFIER SECTION
Power output
10% Total harmonic distortion
70 Hz–16 kHz, both channels driven
Power output
10% Total harmonic distortion
1 kHz, both channels driven
Input sensitivity
AUX 250 mV
Input Impedance
AUX 13 kΩ
AMPLIFIER SECTION
Power output
10% Total harmonic distortion
70 Hz–16 kHz, both channels driven
Power output
10% Total harmonic distortion
1 kHz, both channels driven
Input sensitivity
AUX 250 mV
Input Impedance
AUX 13 kΩ
Reference
SC-AK33
SC-AK22
60 W per channel (6 Ω)
70 W per channel (6 Ω)
SC-AK12
45 W per channel (6 Ω)
50 W per channel (6 Ω)
FM TUNER SECTION
Frequency range
Sensitivity 2.5 µV (IHF)
S/N 26 dB 2.2 µV
Antenna terminal(s) 75 Ω (unbalanced)
AM TUNER SECTION
Frequency range
Sensitivity
CASSETTE DECK SECTION
Track system 4 track, 2 channel
Heads
Record/playback Solid permalloy head
Erasure Double gap ferrite head
Motor DC servo motor
Recording system AC bias 100 kHz
Erasing system AC erase 100 kHz
Tape speed 4.8 cm/s
Frequency response
(+3 dB, –6 dB at DECK OUT)
NORMAL (TYPE I) 35 Hz – 14 kHz
(SC-AK44 only)
HIGH (TYPE II) 35 Hz – 14 kHz
S/N 50 dB (A weighted)
Wow and flutter 0.18% (WRMS)
Fast forward and rewind time
87.9 – 107.9 MHz (200 kHz steps)
87.5 – 108.0 MHz (100 kHz steps)
520 – 1710 kHz (10 kHz steps)
S/N 20 dB (at 1000 kHz) 560 µV/m
Approx. 120 seconds with
C-60 cassette tape
CD SECTION
Sampling frequency 44.1 kHz
Decoding 16 bit linear
Beam source/wavelength
Number of channels Stereo
Frequency response
Wow and flutter Below measurable limit
Digital filter 8 fs
D/A converter MASH (1 bit DAC)
SPEAKER SECTION
Type 3 way speaker system
Speaker(s)
Super Woofer 17 cm (63/4˝) cone type
Woofer 12 cm (43/4˝) cone type
Tweeter 6 cm (23/8˝) cone type
Impedance
HIGH 6 Ω
LOW 6 Ω
Input power
HIGH 60 W (Music)
LOW 140 W (Music)
Output sound pressure level
Cross over frequency 150 Hz, 5 kHz
Frequency range 45 Hz–22 kHz (–16 dB)
Dimensions (WxHxD) 230 x 332 x 291 mm
Mass 4.3 kg (9.5 lb)
Semiconductor laser/780 nm
20 Hz–20 kHz (+1, –2 dB)
SB-AK44
55 Hz–20 kHz (–10 dB)
(91/16˝ x 131/16˝ x 1115/32˝)
SB-AK33
87 dB/W (1.0 m)
SPEAKER SECTION
Type 2 way speaker system
Speaker(s)
Woofer 12 cm (43/4˝) cone type
Tweeter 6 cm (23/8˝) cone type
Impedance 6 Ω
Input power 100 W (Music)
Output sound pressure level
Cross over frequency 5 kHz
Frequency range 45 Hz–22 kHz (–16 dB)
Dimensions (WxHxD) 211 x 332 x 250 mm
Mass 2.8 kg (6.2 lb)
SPEAKER SECTION
Type 2 way speaker system
Speaker(s)
Woofer 12 cm (43/4˝) cone type
Tweeter 6 cm (23/8˝) cone type
Impedance 6 Ω
Input power 80 W (Music)
Output sound pressure level
Cross over frequency 5 kHz
Frequency range 45 Hz–22 kHz (–16 dB)
Dimensions (WxHxD) 211 x 332 x 220 mm
Mass 2.5 kg (5.5 lb)
SB-AK22
85 dB/W (1.0 m)
55 Hz–20 kHz (–10 dB)
(85/16˝ x 131/16˝ x 927/32˝)
SB-AK12
85 dB/W (1.0 m)
55 Hz–20 kHz (–10 dB)
(85/16˝ x 131/16˝ x 821/32˝)
GENERAL
Power supply AC 120 V, 60 Hz
Power consumption (SC-AK44) 180 W
Standby 0.29 W
Dimensions (WxHxD) 250 x 332 x 316 mm
Mass (SC-AK44) 8.5 kg (18.7 lb)
Notes:
1. Specifications are subject to change
without notice.
Mass and dimensions are approximate.
2. Total harmonic distortion is measured by
the digital spectrum analyzer.
3. (For SB-AK44 and SB-AK33)
The labels “HIGH” and “LOW” on the rear of
the speakers refer to High frequency and
Low frequency.
(SC-AK33) 165 W
(SC-AK22) 155 W
(SC-AK12) 130 W
(927/32˝ x 131/16˝ x 127/16˝)
(SC-AK33) 8.3 kg (18.3 lb)
(SC-AK22) 7.6 kg (16.8 lb)
(SC-AK12) 7.6 kg (16.8 lb)
Product Service
Do not attempt to remove the cover(s) or repair
the unit yourself.
Refer servicing to qualified personnel only.
Product information
For product service, product information or assistance with product operation, refer to the
servicenter directory.
32
RQT5258
Panasonic Consumer Electronics
Company, Division of Matsushita
Electric Corporation of America
One Panasonic Way Secaucus,
New Jersey 07094
http://www.panasonic.com
©2000 Matsushita Electric Industrial Co., Ltd.
Printed in Singapore
Panasonic Sales Company,
Division of Matsushita Electric of
Puerto Rico, Inc. (“PSC”)
Ave. 65 de Infantería, Km. 9.5
San Gabriel Industrial Park, Carolina,
Puerto Rico 00985
Panasonic Canada Inc.
5770 Ambler Drive
Mississauga, Ontario
L4W 2T3
www.panasonic.ca
RQT5621-4P
En
P1000GL4071
 Loading...