

Page 1
Operating Instructions/Bedienungsanleitung
Instrucciones de funcionamiento/Gebruiksaanwijzing
Инструкция по эксплуатации/Інструкції з експлуатації
These products are optional, exclusive-use speakers of the
SC-BTX70/SC-BTX68 that are to be combined and used with
the optional Panasonic Wireless system SH-FX70.
Before connecting, operating or adjusting this product, please read the
instructions completely. Please keep this manual for future reference.
Bei diesen Produkten handelt es sich um optionale Lautsprecher,
die ausschließlich für die Anlage SC-BTX70/SC-BTX68 und
den Anschluss an das separat erhältliche Panasonic Wireless
System SH-FX70 vorgesehen sind.
Bitte lesen Sie diese Bedienungsanleitung vor dem Anschließen,
Inbetriebnehmen oder Einstellen dieses Gerätes vollständig durch.
Diese Anleitung bitte aufbewahren.
Ces produits sont des enceintes en option dédiées pour le SCBTX70/SC-BTX68, et elles doivent être utilisées en combinaison
avec le système sans fi l SH-FX70 de Panasonic, en option.
Avant de raccorder, faire fonctionner ou régler l’appareil, lire
attentivement tout ce mode d’emploi. Conserver ce manuel.
Questi sono diffusori opzionali di uso esclusivo del modello
SC-BTX70/SC-BTX68 da combinare e usare con il sistema
opzionale senza cavi SH-FX70 Panasonic.
Prima di collegare, far funzionare o regolare l’apparecchio, leggere
completamente queste istruzioni. Conservare questo manuale.
Estos productos son altavoces opcionales para uso exclusivo con el
sistema de cine en casa SC-BTX70/SC-BTX68 que se combinarán y
utilizarán con el sistema inalámbrico SH-FX70 opcional de Panasonic.
Antes de conectar, operar o ajustar este producto, sírvase leer estas
instrucciones completamente. Guarde este manual.
Deze optionele luidsprekers zijn speciaal bestemd voor de SCBTX70/SC-BTX68 en kunnen worden gecombineerd en gebruikt
met het optionele draadloze Panasonic SH-FX70-systeem.
Gelieve deze gebruiksaanwijzing volledig door te lezen alvorens dit product
aan te sluiten, te bedienen of af te stellen. Bewaar deze gebruiksaanwijzing.
Disse produkter købes separat og er højttalere til eksklusiv brug
for SC-BTX70/SC-BTX68, som skal kombineres og anvendes
med Panasonic trådløst system SH-FX70, som købes separat.
Læs venligst hele denne betjeningsvejledning, før du tilslutter, betjener
eller indstiller dette apparat. Gem vejledningen til senere brug.
Dessa produkter är tillvalshögtalare som endast är ämnade för
SC-BTX70/SC-BTX68 och som ska kombineras och användas
tillsammans med Panasonics trådlösa tillvalssystem SH-FX70.
Läs denna bruksanvisning helt innan du ansluter, använder eller
justerar denna produkt. Spara denna bruksanvisning.
Tyto produkty představují volitelné, výlučně používané reprosoustavy
systému SC-BTX70/SC-BTX68, které je nutno kombinovat a používat
s volitelným bezdrátovým systémem Panasonic SH-FX70.
Dříve než začnete jakékoli zapojování, operace nebo nastavování
tohoto výrobku, prostudujte si prosím celý tento návod. Uschovejte
si prosím tento návod k obsluze.
Niniejsze wyroby są opcjonalne, przeznaczone do użytku
wyłącznie dla SC-BTX70/SC-BTX68 i przeznaczone do współpracy z
opcjonalnym systemem bezprzewodowym SH-FX70 Panasonic.
Przed uruchomieniem sprzętu prosimy o dokładne zapoznanie się z treścią
niniejszej instrukcji. Prosimy o zachowanie niniejszej instrukcji obsługi.
Niniejsza instrukcja została opracowana na podstawie oryginalnej
publikacji fi rmy Panasonic Corporation.
Эти изделия представляют собой дополнительные
специально предназначенные динамики для модели SCBTX70/SC-BTX68, которые следует использовать совместно с
дополнительной беспроводной системой Panasonic SH-FX70.
Перед подключением, работой или регулировкой данного
аппарата прочтите, пожалуйста, эту инструкцию полностью.
Coxpaните, пожалуйста, эту инструкцию.
Ці вироби, що не входять до комплекту, є динаміками
виключного призначення для SC-BTX70/SC-BTX68. Їх слід
об’єднати та використовувати з бездротовою системою
Panasonic SH-FX70, яку можна придбати окремо.
Перед тим, як підключати, використовувати або налаштовувати
цей пристрій
Збережіть цей документ для використання в майбутньому.
ENGLISH ............................... See pages 2-8, and 10
DEUTSCH ...........................Siehe Seiten 2-8, und 10
FRANÇAIS .............................Voir pages 2-7, 9, et 11
ITALIANO ................. Vedere alle pagine 2-7, 9, e 11
ESPAÑOL ...............
NEDERLANDS ........................... Zie blz. 12-18 en 20
DANSK ................................Se side 12-17, 19, og 21
SVENSKA ..................... Se sidorna 12-17, 19 och 21
ČESKY .......................................... Viz str. 22-28, а 30
POLSKI ................................. Patrz strony 22-28, i 30
РУССКИЙ ЯЗЫК ................ См. стр. 22-27, 29, и 31
УКРАЇНСЬКА ...................Див. стор. 22-27, 29, а 31
Mode d’emploi/Istruzioni per l’uso
Betjeningsvejledning/Bruksanvisning
Návod k obsluze/Instrukcja obsługi
Speaker System
Lautsprecheranlage
Enceintes acoustiques
Cassa acustica
Cajas acústicas
Luidsprekersysteem
Højttalersystem
Högtalarsystem
Reprosoustava
Zestaw głośników
Акустическая система
Акустична система
Model No.
, будь ласка, повністю прочитайте ці інструкції.
SB-HSX70
Consulte las páginas 12-18, y 20
E
RQT9498-E
Page 2
ENGLISHDEUTSCHFRANÇAISITALIANO
a 45° to 60°
45° bis 60°
45° à 60°
Da 45° a 60°
Dear customer
Thank you for purchasing this product.
For optimum performance and safety, please read
these instructions carefully.
The 2 speakers are the same.
Use these speakers as the surround speakers.
Contents
Location .................................................................... 2
Connections .............................................................4
Installation options ....................................................6
Notes ........................................................................ 8
Maintenance ............................................................. 8
Specifi cations .........................................................10
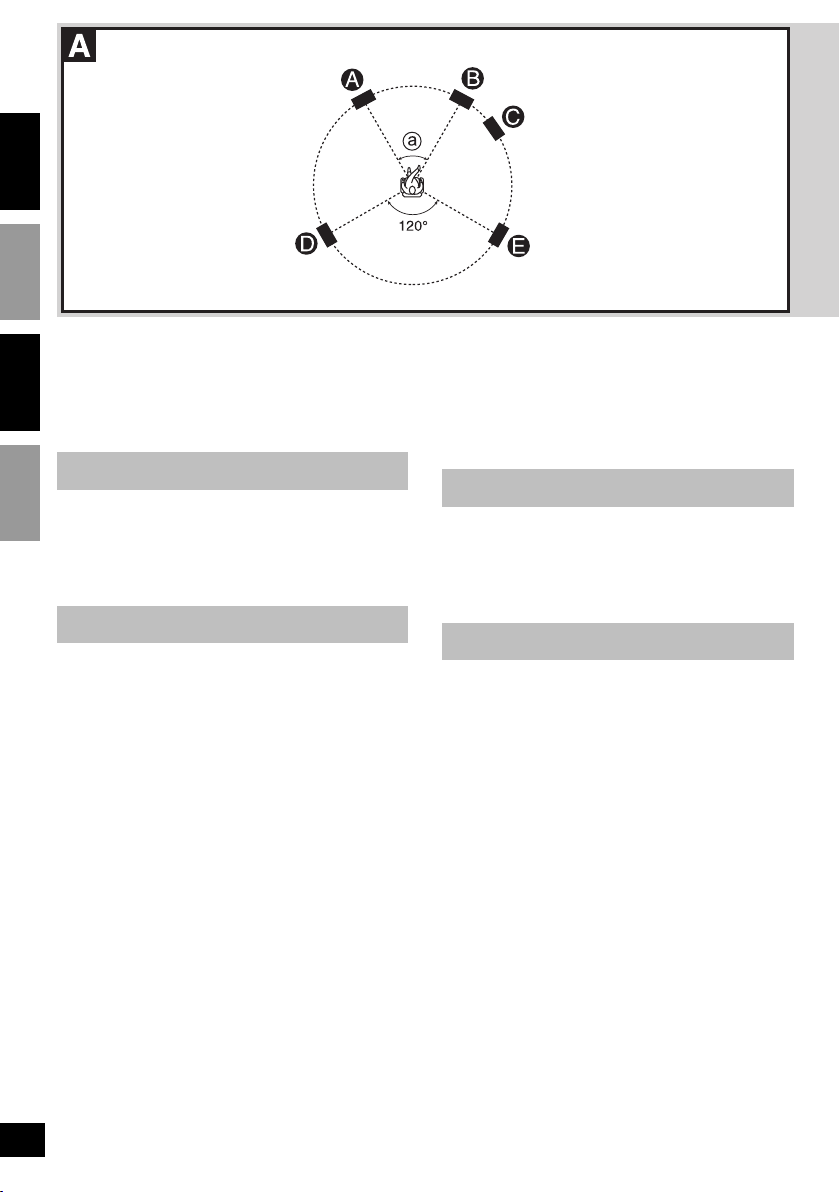
Location
The front and surround speakers should be placed at
approximately the same distance from the listening
position. The angles in the diagram are approximate.
Front speakers (± left, ≤ right: not included)
Subwoofer (≥: not included)
A 4.1-channel surround sound
Surround speakers (¥ left, μ right: SB-HSX70)
• Position the speakers as illustrated and place them
about 1 m higher than ear level.
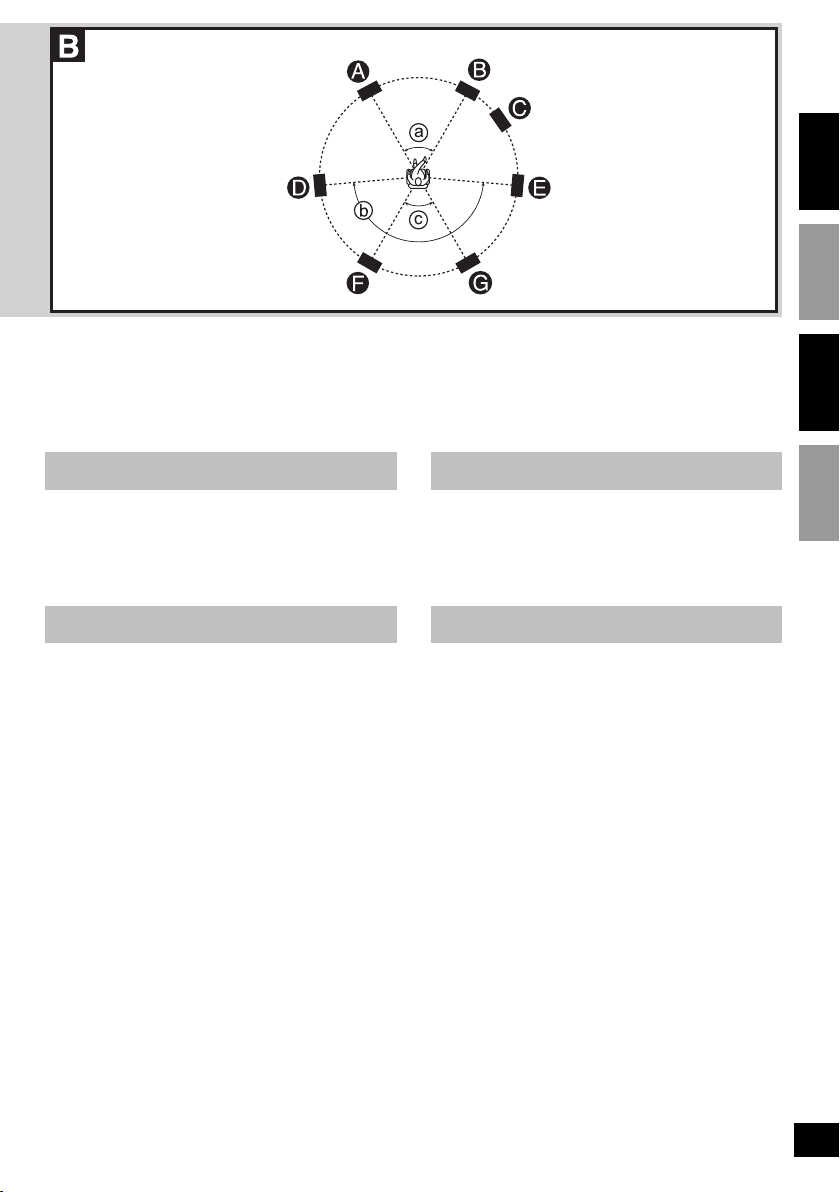
B 6.1-channel surround sound
Surround speakers (¥ left, μ right: SB-HSX70)
• Position the speakers as illustrated and place them
about 1 m higher than ear level.
Surround back speakers (∂ left, ∑ right: SB-HSX70)
•
Position the speakers as illustrated and place them
about 1 m higher than ear level.
How you set up your speakers can affect the sound
fi eld. Note the following points.
• Place them on a fl at, level secure surface.
Use spacers or similar items to stop them from
rocking.
• Cover walls and windows with a thick curtain.
RQT9498
2
Sehr geehrter Kunde
Wir möchten Ihnen dafür danken, dass Sie sich für
dieses Gerät entschieden haben.
Für optimale Leistung und Sicherheit lesen Sie bitte
diese Bedienungsanleitung aufmerksam durch.
Die beiden Lautsprecher sind baugleich.
Verwenden Sie diese Lautsprecher als Surround-Lautsprecher.
Inhaltsverzeichnis
Aufstellung ................................................................ 2
Anschlüsse ............................................................... 4
Aufstellungsoptionen ................................................ 6
Hinweise ................................................................... 8
Pfl ege und Instandhaltung ......................................10
Technische Daten ................................................... 10
Aufstellung
Die vorderen Lautsprecher und die Surround-°Lautsprecher
sollten etwa jeweils im gleichen Abstand von der Hörposition
aufgestellt werden. Das Diagramm zeigt die ungefähren
Aufstellungswinkel zur Anlage.
Vorderer Lautsprecher
(± links, ≤ rechts: separat erhältlich)
Subwoofer (≥: separat erhältlich)
A 4.1-kanaliger Surround Sound
Surround-Lautsprecher (¥ links, μ rechts: SB-HSX70)
•
Stellen Sie die Lautsprecher wie im obigen Diagramm gezeigt
in einer Höhe von ca. 1 m oberhalb des Ohrenniveaus auf.
B 6.1-kanaliger Surround Sound
Surround-Lautsprecher (¥ links, μ rechts: SB-HSX70)
•
Stellen Sie die Lautsprecher wie im obigen Diagramm gezeigt
in einer Höhe von ca. 1 m oberhalb des Ohrenniveaus auf.
Hintere Surround-Lautsprecher
(∂ links, ∑ rechts: SB-HSX70)
•
Stellen Sie die Lautsprecher wie im obigen Diagramm gezeigt
in einer Höhe von ca. 1 m oberhalb des Ohrenniveaus auf.
Durch die Art und Weise, wie die Lautsprecher platziert
werden, kann das Klangfeld beeinfl usst werden. Bitte
beachten Sie die folgenden Hinweise.
• Stellen Sie die Lautsprecher auf einer ebenen,
horizontalen, stabilen Unterlage auf.
Verwenden Sie bei Bedarf Abstandsstücke o.ä., um
ein Wackeln der Lautsprecher zu verhindern.
• Wände und Fenster sollten möglichst mit dicken
Vorhängen verhängt werden.
Page 3
a 45° to 60°
45° bis 60°
45° à 60°
Da 45° a 60°
b 160° to 170°
160° bis 170°
160° à 170°
Da 160° a 170°
ENGLISHDEUTSCHFRANÇAISITALIANO
c 60° to 90°
60° bis 90°
60° à 90°
Da 60° a 90°
Cher client
Nous vous remercions pour votre achat de cet appareil.
Pour en obtenir des performances idéales et pour votre
sécurité, veuillez lire attentivement le présent manuel.
Les 2 enceintes sont identiques.
Utilisez ces enceintes en tant qu’enceintes surround.
Tables des matières
Positionnement ......................................................... 3
Raccordements ........................................................5
Options d’installation ................................................7
Remarques ............................................................... 9
Entretien ................................................................. 11
Données techniques ............................................... 11
Positionnement
Les enceintes avant et surround doivent être placées
environ à une même distance de la position d’écoute. Les
angles indiqués sur le diagramme sont approximatifs.
Enceintes avant (± gauche, ≤ droite : non fournie)
Subwoofer (≥ : non fournie)
A Son surround 4.1 canaux
Enceintes surround (¥ gauche, μ droite : SB-HSX70)
• Placez les enceintes tel qu’illustré, environ 1 mètre
plus haut que le niveau des oreilles.
B Son surround 6.1 canaux
Enceintes surround (¥ gauche, μ droite : SB-HSX70)
• Placez les enceintes tel qu’illustré, environ 1 mètre
plus haut que le niveau des oreilles.
Enceintes arrière surround
(∂ gauche, ∑ droite : SB-HSX70)
• Placez les enceintes tel qu’illustré, environ 1 mètre
plus haut que le niveau des oreilles.
La confi guration des enceintes peut affecter le
champ sonore. Veuillez noter les points suivants.
•
Placez-les sur des bases planes, de niveau et stables.
Utilisez des entretoises ou objets similaires pour les
empêcher de balancer.
• Recouvrez les murs et fenêtres de rideaux épais.
Caro cliente
La ringraziamo per l’acquisto di questo prodotto.
Per ottenerne le prestazioni migliori e per la sua
sicurezza, legga attentamente queste istruzioni.
I 2 diffusori sono uguali.
Usare questi diffusori come diffusori surround.
Sommario
Collocazione ............................................................. 3
Collegamenti ............................................................5
Opzioni di installazione .............................................7
Note .......................................................................... 9
Manutenzione ......................................................... 11
Dati tecnici ..............................................................11
Collocazione
I diffusori anteriori e surround devono essere sistemati
alla stessa distanza circa dalla posizione di ascolto. Gli
angoli dello schema sono approssimativi.
Diffusore anteriore (± sinistro, ≤ destro: non forniti)
Subwoofer (≥: non fornito)
A Suono surround di 4.1 canali
Diffusore surround (¥ sinistro, μ destro: SB-HSX70)
• Posizionare i diffusori come illustrato e sistemarli a
circa 1 metro più alti delle orecchie.
B Suono surround di 6.1 canali
Diffusore surround (¥ sinistro, μ destro: SB-HSX70)
• Posizionare i diffusori come illustrato e sistemarli a
circa 1 metro più alti delle orecchie.
Diffusori surround posteriori
(∂ sinistro, ∑ destro: SB-HSX70)
• Posizionare i diffusori come illustrato e sistemarli a
circa 1 metro più alti delle orecchie.
Il campo sonoro può essere infl uenzato da come si
installano i diffusori. Notare i punti seguenti.
• Sistemare su basi piane e stabili.
Usare distanziatori o qualcosa di simile per impedire
che si spostino.
• Coprire le pareti e le fi nestre con tende.
RQT9498
3
Page 4
ENGLISHDEUTSCHFRANÇAISITALIANO
white
weiß
blanc
bianco
blue
blau
bleu
blu
Connections
These products are optional, exclusiveuse speakers of the SC-BTX70/SC-BTX68
that are to be combined and used with
the optional Panasonic Wireless system
SH-FX70. Do not connect these speakers
with other equipment.
Connect to the optional Panasonic Wireless system
SH-FX70.
• Refer to the relevant operating Instructions for
details.
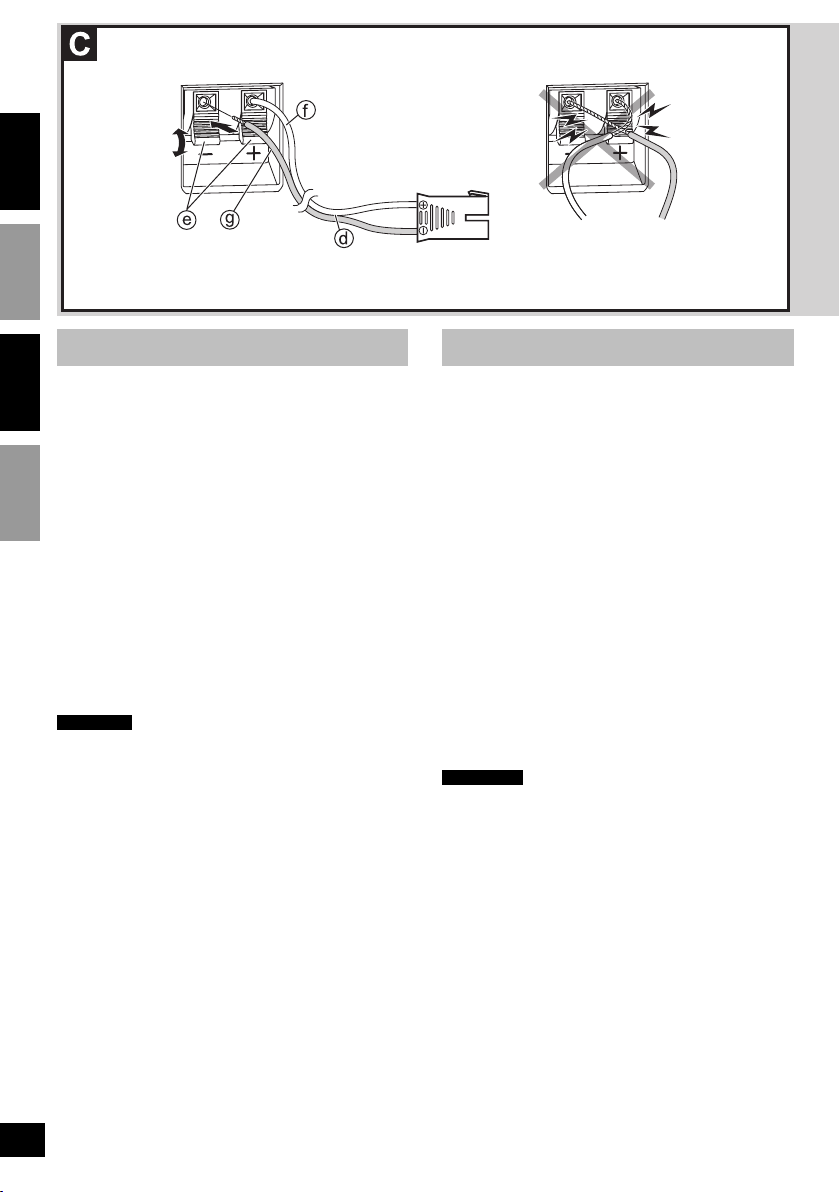
C Connect the speaker cable d to the speaker
terminals e.
d Speaker cable supplied with the wireless system
SH-FX70
Be sure to connect only positive wire f to positive
(+) terminal and negative wire g to negative (–)
terminal.
Press the spring lever to open the wire inlet, then insert
the lead before releasing the spring lever.
CAUTION
Never short-circuit positive (+) and negative (–)
speaker wires.
Anschlüsse
Bei diesen Produkten handelt es sich um
optionale Lautsprecher, die ausschließlich
für die Anlage SC-BTX70/SC-BTX68 und
den Anschluss an das separat erhältliche
Panasonic Wireless System SH-FX70
vorgesehen sind. Schließen Sie diese
Lautsprecher auf keinen Fall an andere
Geräte an.
Stellen Sie den Anschluss an das separat erhältliche
Panasonic Wireless System SH-FX70 her.
• Einzelheiten hierzu fi nden Sie in der relevanten
Bedienungsanleitung.
C Schließen Sie das Lautsprecherkabel d an
die Lautsprecherklemmen e an.
d Lautsprecherkabel im Lieferumfang des Wireless
Systems SH-FX70
Achten Sie darauf, den positiven Draht f an die
positive (+) Klemme, und den negativen Draht g an
die negative (–) Klemme anzuschließen.
Drücken Sie auf den Federhebel, um den Drahteinlass
zu öffnen, führen Sie den Draht ein, und lassen Sie
den Federhebel dann wieder los.
ACHTUNG
Die positiven (+) und negativen (–) Drähte der
Lautsprecherkabel dürfen auf keinen Fall
kurzgeschlossen werden.
RQT9498
4
Page 5

Raccordements
Ces produits sont des enceintes en option
dédiées pour le SC-BTX70/SC-BTX68, et elles
doivent être utilisées en combinaison avec
le système sans fi l SH-FX70 de Panasonic,
en option. Ne raccordez pas ces enceintes
à d’autres appareils.
Raccordez au système sans fi l SH-FX70 de Panasonic,
en option.
• Pour plus de détails, reportez-vous au mode d’emploi
de l’appareil en question.
C Raccordez le câble d’enceinte d aux bornes
d’enceintes e.
d Câble d’enceinte fourni avec le système sans fi l
SH-FX70
Assurez-vous de brancher uniquement un fi l positif f
à la borne positive (+) et un fi l négatif g à la borne
negative (–).
Appuyez sur le taquet pour ouvrir l’entrée du fi l, puis
insérez le fi l avant de relâcher le taquet.
ATTENTION
Prenez bien garde de court-circuiter les fi ls d’enceinte
positifs (+) et négatifs (–).
Collegamenti
Questi sono diffusori opzionali di uso
esclusivo del modello SC-BTX70/SC-BTX68
da combinare e usare con il sistema opzionale
senza cavi SH-FX70 Panasonic. Questi
diffusori non devono essere collegati ad altri
componenti.
Collegare al sistema opzionale senza cavi SH-FX70
Panasonic.
•
Per i dettagli, vedere le istruzioni per l’uso pertinenti.
C Collegare il cavo del diffusore d ai terminali
del diffusore e.
d Cavo del diffusore in dotazione al sistema senza
cavi SH-FX70
Collegare il fi lo positivo f soltanto al terminale positivo
(+), e il fi lo negativo g al terminale negativo (–).
Premere la leva molla fi nché il foro del terminale
diventa visibile, e inserire poi il conduttore prima di
rilasciare la leva molla.
PRECAUZIONE
Non cortocircuitare i fi li positivi (+) e negativi (–) dei
diffusori.
FRANÇAISITALIANO
RQT9498
5
Page 6
ENGLISHDEUTSCHFRANÇAISITALIANO
62 mm
155 mm
Ø7.5 to 9.4 mm
Ø7,5 bis 9,4 mm
Ø7,5 à 9,4 mm
Da Ø7,5 a 9,4 mm
3 to 5 mm
3 bis 5 mm
3 à 5 mm
Da 3 a 5 mm
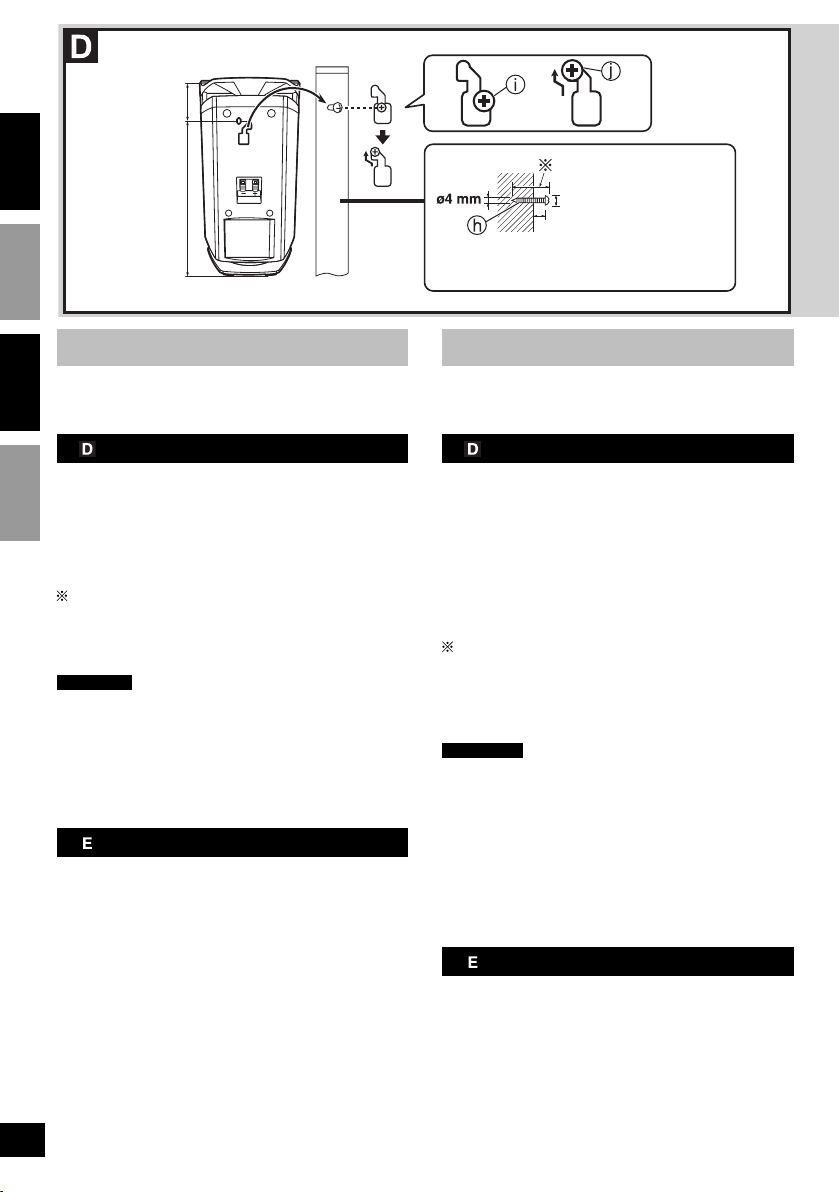
Installation options
Do not apply an unreasonable force to the net at
the front of the speaker unit. You cannot remove the
front net.
Attaching to a wall
Drive a screw h (not included) into the wall.
• Ensure that the screw h is positioned at least 62
mm away from the ceiling.
The wall on which the speaker is to be mounted and the
screw h (not included) used for installing the speaker
must be strong enough to support a weight of at least
10 kg. Consult the contractor in charge of the work.
A screw which is at least 30 mm long (p see
above) is used when installing the speaker on a
wooden post or pillar. In all other cases, use a
screw which is strong enough to support a weight
of at least 10 kg.
CAUTION
Do not attach this speaker to walls or ceilings using
methods other than those described here.
Fit the speaker securely onto the screw with the hole.
i In this position, the speaker will likely fall if moved
to the left or right.
j Move the speaker so that the screw is in this
position.
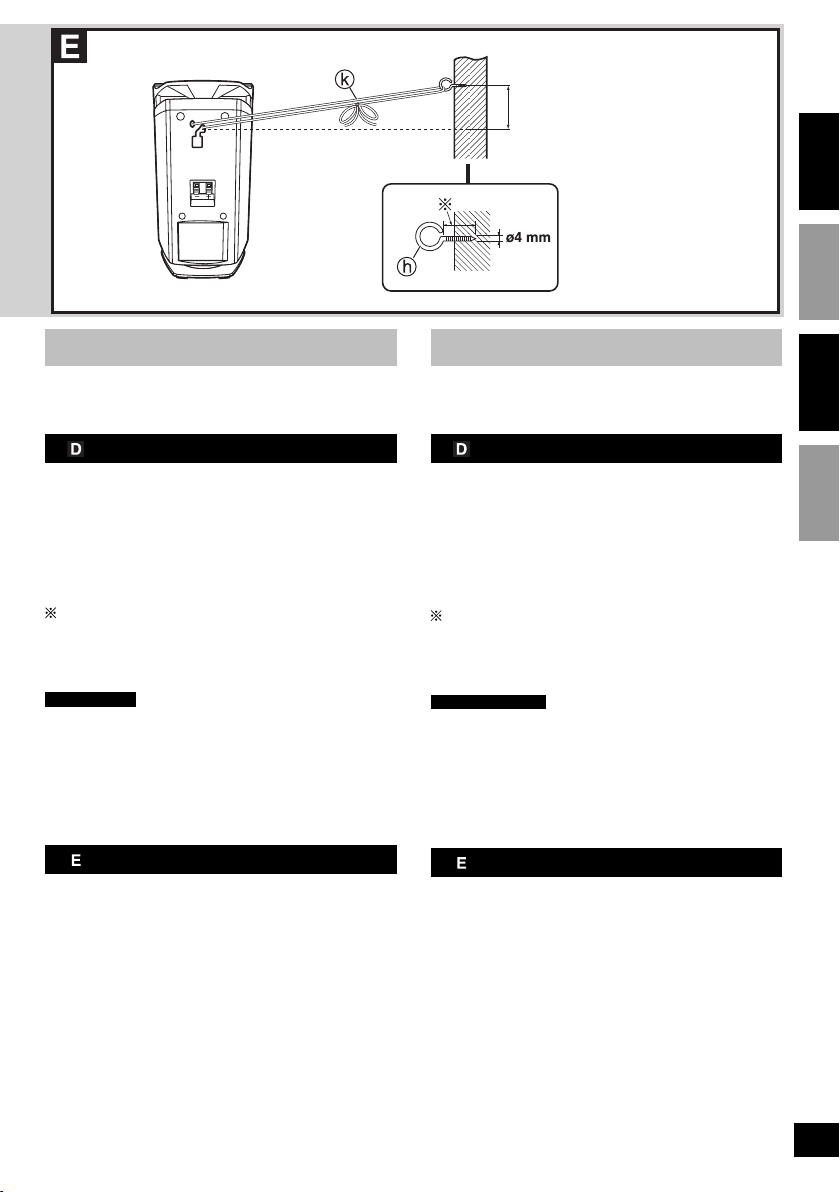
Attaching a stabilizing wire
k Wire (not included)
Drive a screw h (not included) into the wall.
(p see above (Attaching to a wall))
Aufstellungsoptionen
Üben Sie keine starke Kraft auf die Frontverkleidung
des Lautsprechers aus. Die Frontverkleidung ist nicht
abnehmbar.
Befestigung an einer Wand
Schrauben Sie eine Schraube h (separat
erhältlich) in die Wand ein.
• Halten Sie unbedingt einen Mindestabstand von 62
mm zwischen der Schraube h und der Decke ein.
Die Stelle der Wand, an der der Lautsprecher montiert
werden soll, sowie die zur Montage des Lautsprechers
verwendete Schraube h (separat erhältlich) müssen
ein Tragvermögen von mindestens 10 kg besitzen. Bitte
konsultieren Sie den mit der Montage beauftragten
Installateur.
Zur Montage des Lautsprechers an einer Holzfl äche,
z.B. einem Pfeiler oder einer Säule, muss eine
Schraube mit einer Länge von mindestens 30 mm
(p siehe oben) verwendet werden. Verwenden Sie
in allen anderen Montagesituationen eine Schraube
mit einem Tragvermögen von mindestens 10 kg.
ACHTUNG
Befestigen Sie diesen Lautsprecher auf keine andere
Weise als hier beschrieben an einer Wand oder der
Decke.
Passen Sie die Schraube sicher in das Loch an der
Rückwand des Lautsprechers ein.
i In dieser Position besteht die Gefahr, dass der
Lautsprecher herunterfällt, wenn er nach links oder
rechts bewegt wird.
j Bewegen Sie den Lautsprecher so, dass sich die
Schraube in dieser Position befi ndet.
RQT9498
6
Befestigung eines Stabilisierungsdrahts
k Draht (separat erhältlich)
Schrauben Sie eine Schraube h (separat
erhältlich) in die Wand ein. (p siehe oben
(Befestigung an einer Wand))
Page 7
Approx. 150 mm
ca. 150 mm
Environ 150 mm
150 mm circa
ENGLISHDEUTSCHFRANÇAISITALIANO
Options d’installation
N’exercez pas une force excessive sur le fi let sur le
devant de l’enceinte. Il est impossible de retirer le
fi let avant.
Fixation à un mur
Vissez une vis h (non fournie) dans le mur.
• Assurez-vous que la vis h est placée à au moins 62
mm du plafond.
Le mur sur lequel l’enceinte sera fi xée et la vis h
(non fournie) utilisée pour visser l’enceinte doivent
être suffi samment solides pour supporter un poids
d’au moins 10 kg. Consultez l’installateur responsable
du montage.
Une vis d’au moins 30 mm de long (p voir ci-
dessus) est utilisée lors de la fi xation de l’enceinte
sur un poteau ou pilier en bois. Dans tous les autres
cas, utilisez une vis suffi samment résistante pour
supporter un poids d’au moins 10 kg.
ATTENTION
Pour fi xer cette enceinte à un mur ou au plafond, n’utilisez
aucune autre méthode que celle décrite ici.
Accrochez solidement l’enceinte à la vis, par l’orifi ce.
i
Dans cette position, l’enceinte risque fort de tomber si
elle est déplacée vers la gauche ou vers la droite.
j Déplacez l’enceinte de sorte que la vis se trouve
dans cette position.
Fixation d’un câble stabilisateur
k Fil (non fourni)
Vissez une vis h (non fournie) dans le mur. (p
voir ci-dessus (Fixation à un mur))
Opzioni di installazione
Non esercitare una forza eccessiva sulla griglia
frontale dell’unità diffusore. La griglia frontale non è
rimovibile.
Modo di attaccare alla parete
Avvitare alla parete una vite h (non fornita).
• Accertarsi che la vite h sia posizionata a una
distanza di almeno 62 mm dal soffitto.
La parete su cui si monta il diffusore e la vite h
(non fornita) usata per l’installazione devono essere
sufficientemente robuste per sopportare un peso
di almeno 10 kg. Rivolgersi alla persona che deve
eseguire il lavoro.
Per l’installazione del diffusore su un montante o
pilastro di legno, usare una vite di almeno 30 mm
di lunghezza (p vedere sopra). In tutti gli altri
casi, usare una vite suffi cientemente robusta per
sopportare un peso di almeno 10 kg.
PRECAUZIONE
Non attaccare questo diffusore alla parete o al soffi tto
con metodi diversi da quelli descritti sopra.
Montare saldamente il diffusore alla vite con il foro.
i In questa posizione, il diffusore potrebbe facilmente
cadere se spostato a destra o a sinistra.
j Spostare il diffusore in modo che la vite sia in questa
posizione.
Modo di attaccare il fi lo di stabilizzazione
k Filo (non fornito)
Avvitare alla parete una vite h (non fornita).
(p vedere sopra (Modo di attaccare alla parete))
RQT9498
7
Page 8

Notes
Hinweise
Caution
Use the speakers only with the exclusive-use
system. Failure to do so may lead to damage to
the amplifier and/or speakers, and may result in
the risk of fire. Consult a qualified service person
if damage or a sudden change in performance
has occurred.
ENGLISHDEUTSCH
Protection element
Protection elements are incorporated in these units.
However, they do not protect these units from damage
caused by wrong use. Use the speakers only with the
exclusive-use system.
Excessive input
You can damage your speakers and shorten their
life span if you keep the volume high over extended
periods.
Reduce the volume in the following cases to avoid
damage:
• When playing distorted sound.
• When the speakers are receiving howling from
a microphone or record player, noise from FM
broadcasts, or continuous signals from an oscillator,
test disc, or electronic instrument.
• When adjusting the sound quality.
• When turning the amplifi er on or off.
Other notes
These speakers do not have magnetic shielding.
Do not place it near a television set, PC, or other device
that is affected by magnetic fi elds.
Keep magnetized items away.
Magnetized cards, bank cards, commuter passes, etc.,
can be damaged if placed too closed to the speaker
magnets. Clocks may also be affected.
Avoid locations such as described below:
• In direct sunlight
• Near heating appliances or other sources of heat
• Where the humidity is high
Maintenance
Clean these units with a soft, clean, dry cloth.
• Never use alcohol, paint thinner, or benzine to clean
these units.
• Before using chemically treated cloth, read the
instructions that came with the cloth carefully.
Achtung
Verwenden Sie diese Lautsprecher ausschließlich
mit der dafür vorgesehenen Anlage. Anderenfalls
kann eine Beschädigung des Verstärkers und/
oder der Lautsprecher verursacht werden, und
es besteht die Gefahr eines Brandausbruchs.
Falls eine Beschädigung oder eine plötzliche
Leistungsminderung festgestellt wird, wenden
Sie sich bitte an eine Kundendienststelle.
Schutzelement
In diese Lautsprecher sind Schutzelemente eingebaut.
Diese Elemente schützen die Lautsprecher jedoch nicht
gegen eine durch unsachgemäßen Gebrauch verursachte
Beschädigung. Verwenden Sie diese Lautsprecher
ausschließlich mit der dafür vorgesehenen Anlage.
Hinweise zur Überbelastung
Durch Wiedergabe mit hohem Lautstärkepegel über
längere Zeiträume hinweg können die Lautsprecher
beschädigt werden, und ihre Lebensdauer verkürzt
sich.
Drehen Sie die Lautstärke in den folgenden Situationen
zurück, um eine Beschädigung der Lautsprecher zu
vermeiden:
• Wenn eine Programmquelle mit verzerrtem Klang
wiedergegeben wird.
•
Wenn die Lautsprecher Rückkopplungsheulen von einem
Mikrofon oder Plattenspieler, Rauscheinstreuungen
von einem UKW-Sender oder Sinussignale auffangen,
die von einem Oszillator, einer Test- Disc oder einem
elektronischen Musikinstrument erzeugt werden.
• Beim Einstellen des Klangcharakters.
• Beim Ein- und Ausschalten des Verstärkers.
Weitere Hinweise
Diese Lautsprecher besitzen keine magnetische
Abschirmung.
Stellen Sie ihn daher nicht in der Nähe eines
Fernsehgerätes, Personal computers oder anderen
Gerätes auf, dessen Betrieb durch Magnetfelder
beeinträchtigt werden kann.
Halten Sie magnetisierte Gegenstände von den
Lautsprechern fern.
Magnetische Karten, Bankkarten, Monatskarten
usw. können beschädigt werden, wenn sie in die
Nähe der Lautsprechermagneten gebracht werden.
Die Ganggenauigkeit von Uhren kann ebenfalls
beeinträchtigt werden.
Vermeiden Sie die folgenden Aufstellungsorte:
• Orte mit direkter Sonneneinstrahlung
• Orte in der Nähe von Heizgeräten oder anderen
Wärmequellen
• Orte mit hoher Luftfeuchtigkeit
RQT9498
8
Page 9

Remarques
Note
Attention
Utilisez ces enceintes uniquement avec le système
dédié. Autrement vous risquez d’endommager
l’amplificateur et/ou les enceintes, et de provoquer
un incendie. Si l’appareil est endommagé ou si
des anomalies de fonctionnement se produisent,
adressez-vous à une personne de service
qualifiée.
Circuit de protection
Ces enceintes contiennent un circuit de protection. Ce
circuit ne protège toutefois pas les enceintes contre les
dommages causés par une utilisation inadéquate. Utilisez
ces enceintes uniquement avec le système dédié.
Puissance d’entrée excessive
Vous risquez d’endommager les enceintes et de
réduire leur durée de vie si vous laissez le son à un
niveau élevé sur des périodes prolongées.
Pour éviter les dommages, réduisez le volume dans
les cas suivants :
• Lorsque le son est distordu.
• Lorsqu’il y a une réaction acoustique sur les
enceintes depuis un microphone ou un tournedisque, des parasites d’émissions FM ou l’émission
continue de signaux par un oscillateur, un disque de
test ou un instrument électronique.
• Lors du réglage de la qualité sonore.
•
Lors de la mise sous ou hors tension de l’amplifi cateur.
Autres remarques
Ces enceintes n’ont pas de blindage magnétique.
Ne le placez pas à proximité d’un téléviseur, ordinateur ou
tout autre appareil affecté par les champs magnétiques.
Eloignez les objets magnétiques.
Les cartes magnétiques, cartes bancaires, titres de
transport, etc. risquent d’être endommagés si on les
amène trop près des aimants d’enceinte. Les horloges
risquent également d’être affectées.
Evitez de placer l’appareil aux endroits suivants:
• Sous les rayons directs du soleil
• A proximité d’appareils de chauffage ou d’autres
sources de chaleur
• Dans des endroits très humides
Precauzione
Usare i diffusori soltanto con il sistema di uso
esclusivo. In caso contrario si potrebbero
danneggiare l’amplificatore e/o i diffusori, e si
potrebbe creare un pericolo d’incendio. Rivolgersi
a un tecnico qualificato se si verifica un danno o
un improvviso cambiamento delle prestazioni.
Elemento di protezione
In queste unità sono incorporati elementi di protezione.
Essi però non proteggono queste unità dai danni
causati dall’utilizzo sbagliato. Usare i diffusori soltanto
con il sistema di uso esclusivo.
Ingresso eccessivo
Si potrebbero danneggiare i diffusori e ridurre la
loro vita di servizio se si riproduce il suono agli alti
livelli del volume per lunghi periodi di tempo.
Per evitare danni, ridurre il volume nei casi seguenti:
• Quando si riproduce un suono distorto.
• Quando i diffusori ricevono la controreazione da un
microfono o giradischi, rumore da trasmissioni in FM
o segnali continui da un oscillatore, disco di test o
strumento elettronico.
• Quando si regola la qualità del suono.
• Quando si accende o spegne l’amplifi catore.
Altre note
Questi diffusori non hanno la schermatura
magnatica.
Non sistemarlo vicino al televisore, PC o altro dispositivo
infl uenzato dai campi magnetici.
Tenere lontani gli oggetti magnetizzati
Le schede magnetizzate, le carte di credito, le schede
telefoniche, ecc., potrebbero essere danneggiate se
vengono avvicinate troppo ai magneti dei diffusori. Essi
possono anche infl uenzare gli orologi.
Evitare posti quali quelli descritti di seguito.
• Esposti alla luce diretta del sole
• Vicini ad apparecchi di riscaldamento o ad altre
sorgenti di calore
• Dove l’umidità è elevata
FRANÇAISITALIANO
RQT9498
9
Page 10
Specifi cations
Type 2 way 3 speaker system Bass-refl ex type
Speaker
Woofer Top: 6.5 cm cone type x 1
Tweeter: 5 cm cone type (Bamboo) x 1
Impedance 6 Ω
Input power (IEC) 125 W (MAX)*1
Sound pressure level 80 dB/W (1.0 m)
ENGLISHDEUTSCH
Frequency range 80 Hz – 50 kHz (at –16 dB)
100 Hz – 40 kHz (at –10 dB)
Dimensions (W x H x D) 134 mm x 246.5 mm x 114 mm
Mass Approx. 1.3 kg
Note
*1 Rating with the low-cut fi lter of exclusive-use amplifi er.
Specifi cations are subject to change without notice.
–If you see this symbol–
RQT9498
10
Woofer Front: 6.5 cm cone type (Bamboo) x 1
Sales and Support Information
(For United Kingdom and Republic of Ireland)
Customer Care Centre
• For customers within the UK: 0844 844 3852
•
For customers within the Republic of Ireland: 01 289 8333
• Visit our website for product information
• E-mail: customer.care@panasonic.co.uk
Direct Sales at Panasonic UK
• For customers: 0844 844 3856
•
Order accessory and consumable items for your product with ease and confi dence by phoning our Customer
Care Centre Monday - Thursday 9:00am – 5:30pm,
Friday 9:30am – 5:30pm (Excluding public holidays).
• Or go on line through our Internet Accessory ordering
application at www.panasonic.co.uk.
• Most major credit and debit cards accepted.
• All enquiries transactions and distribution facilities are
provided directly by Panasonic UK Ltd.
• It couldn’t be simpler!
• Also available through our Internet is direct shopping
for a wide range of fi nished products, take a browse
on our website for further details.
Interested in purchasing an extended guarantee?
Please call 0870 240 6284 or visit our website
www.panasonic.co.uk/guarantee.
Information on Disposal for Users of Waste Electrical
& Electronic Equipment (private households)
This symbol on the products and/or
accompanying documents means that used
electrical and electronic products should not
be mixed with general household waste.
For proper treatment, recovery and recycling, please take
these products to designated collection points, where they will
be accepted on a free of charge basis. Alternatively, in some
countries you may be able to return your products to your local
retailer upon the purchase of an equivalent new product.
Disposing of this product correctly will help to save
valuable resources and prevent any potential negative
effects on human health and the environment which
could otherwise arise from inappropriate waste handling.
Please contact your local authority for further details of
your nearest designated collection point.
Penalties may be applicable for incorrect disposal of this
waste, in accordance with national legislation.
For business users in the European Union
If you wish to discard electrical and electronic equipment,
please contact your dealer or supplier for further information.
Information on Disposal in other Countries outside
the European Union
This symbol is only valid in the European Union.
If you wish to discard this product, please contact your
local authorities or dealer and ask for the correct method
of disposal.
Pfl ege und Instandhaltung
Reinigen Sie die Boxen mit einem weichen, sauberen,
trockenen Tuch.
• Auf keinen Fall Alkohol, Farbverdünner oder Benzin zum
Reinigen verwenden.
• Vor Verwendung eines chemisch behandelten
Reinigungstuchs die dem Tuch beiliegende
Gebrauchsanweisung sorgfältig durchlesen.
Technische Daten
Bauart 2-Weg-Lautsprechersystem, 3 Lautsprecher
Bassrefl ex-Ausführung
Lautsprecher
Woofer Front: 6,5 cm Konustyp (Bomboo) x 1
Woofer Top: 6,5 cm Konustyp x 1
Tweeter: 5 cm Konustyp (Bomboo) x 1
Impedanz 6 Ω
Belastbarkeit (IEC) 125 W (MAX)*1
Ausgangsschalldruckpegel 80 dB/W (1,0 m)
Frequenzbereich 80 Hz bis 50 kHz (bei –16 dB)
100 Hz bis 40 kHz (bei –10 dB)
Abmessungen (B x H x T)
134 mm x 246,5 mm x 114 mm
Masse ca. 1,3 kg
Hinweis
*1 Nennwert mit Tiefenbeschneidungsfi lter des
exklusiven Verstärkers
Änderungen der technischen Daten jederzeit
vorbehalten.
-Bedeutung des nachstehend abgebildeten Symbols-
Benutzerinformationen zur Entsorgung von
elektrischen und elektronischen Geräten (private
Haushalte)
Entsprechend der grundlegenden
Firmengrundsätzen der Panasonic-Gruppe
wurde ihr Produkt aus hochwertigen
Materialien und Komponenten entwickelt
und hergestellt, die recycelbar und wieder
verwendbar sind.
Dieses Symbol auf Produkten und/oder begleitenden
Dokumenten bedeutet, dass elektrische und
elektronische Produkte am Ende ihrer Lebensdauer
vom Hausmüll getrennt entsorgt werden müssen.
Bringen Sie bitte diese Produkte für die Behandlung,
Rohstoffrückgewinnung und Recycling zu den
eingerichteten kommunalen Sammelstellen bzw.
Wertstoffsammelhöfen, die diese Geräte kostenlos
entgegennehmen.
Die ordnungsgemäße Entsorgung dieses Produkts dient
dem Umweltschutz und verhindert mögliche schädliche
Auswirkungen auf Mensch und Umwelt, die sich aus
einer unsachgemäßen Handhabung der Geräte am
Ende Ihrer Lebensdauer ergeben könnten.
Genauere Informationen zur nächstgelegenen
Sammelstelle bzw. Recyclinghof erhalten Sie bei Ihrer
Gemeindeverwaltung.
Für Geschäftskunden in der Europäischen Union
Bitte treten Sie mit Ihrem Händler oder Lieferanten in
Kontakt, wenn Sie elektrische und elektronische Geräte
entsorgen möchten. Er hält weitere Informationen für
sie bereit.
Informationen zur Entsorgung in Ländern außerhalb
der Europäischen Union
Dieses Symbol ist nur in der Europäischen Union gültig.
Page 11

Entretien
Nettoyez ces enceintes avec un chiffon doux,
propre et sec.
• N’utilisez jamais d’alcool, diluant pour peinture ni de
benzine pour nettoyer ces enceintes.
• Avant d’utiliser un chiffon imprégné chimiquement,
lisez attentivement les instructions qui accompagnent
le chiffon.
Données techniques
Type Enceinte à 2 voies 3 haut-parleurs, de type
Bass-refl ex
Enceinte
Avant du haut-parleur de graves:
6,5 cm Type conique (Bambou) x 1
Haut du haut-parleur de graves:
6,5 cm Type conique x 1
Haut-parleur d’aigus:
5 cm Type conique (Bambou) x 1
Impédance 6 Ω
Puissance d’entrée (IEC) 125 W (MAX)*1
Niveau de pression sonore 80 dB/W (1,0 m)
Gamme de fréquences 80 Hz – 50 kHz (à –16 dB)
100 Hz – 40 kHz (à –10 dB)
Dimensions (L x H x P)
134 mm x 246,5 mm x 114 mm
Poids Environ 1,3 kg
Remarque
*1 Valeur nominale avec le fi ltre passe-haut de
l’amplifi cateur dédié.
Spécifi cations sujettes à modifi cations sans préavis.
-Si vous voyez ce symbole-
Informations relatives à l’évacuation des déchets,
destinées aux utilisateurs d’appareils électriques et
électroniques (appareils ménagers domestiques)
Lorsque ce symbole figure sur les produits
et/ou les documents qui les accompagnent,
cela signifie que les appareils électriques et
électroniques ne doivent pas être jetés avec
les ordures ménagères.
Pour que ces produits subissent un traitement, une
récupération et un recyclage appropriés, envoyez-les
dans les points de collecte désignés, où ils peuvent
être déposés gratuitement. Dans certains pays, il est
possible de renvoyer les produits au revendeur local
en cas d’achat d’un produit équivalent.
En éliminant correctement ce produit, vous contribuerez
à la conservation des ressources vitales et à la prévention
des éventuels effets négatifs sur l’environnement et
la santé humaine qui pourraient survenir dans le cas
contraire.
Afin de connaître le point de collecte le plus proche,
veuillez contacter vos autorités locales.
Des sanctions peuvent être appliquées en cas
d’élimination incorrecte de ces déchets, conformément
à la législation nationale.
Utilisateurs professionnels de l’Union européenne
Pour en savoir plus sur l’élimination des appareils
électriques et électroniques, contactez votre revendeur
ou fournisseur.
Informations sur l’évacuation des déchets dans les
pays ne faisant pas partie de l’Union européenne
Ce symbole n’est reconnu que dans l’Union européenne.
Pour vous débarrasser de ce produit, veuillez contacter
les autorités locales ou votre revendeur afin de connaître
la procédure d’élimination à suivre.
Manutenzione
Pulire queste unità con un panno morbido, pulito
e asciutto.
• Per pulire le unita non si deve mai usare alcol, diluenti
per vernici o benzina.
• Prima di usare un panno trattato chimicamente, leggere
con cura le istruzioni che lo accompagnano.
Dati tecnici
Tipo Sistema di 3 altoparlanti a 2 vie tipo bass-refl ex
Diffusore
Woofer frontale: 6,5 cm Tipo a cono (Bambù) x 1
Woofer alto: 6,5 cm Tipo a cono x 1
Tweeter: 5 cm Tipo a cono (Bambù) x 1
Impedenza 6 Ω
Potenza di ingresso (IEC) 125 W (MAX)*1
Livello di pressione sonora 80 dB/W (1,0 m)
Gamma di frequenza 80 Hz – 50 kHz (–16 dB)
100 Hz – 40 kHz (–10 dB)
Dimensioni (L x A x P)
134 mm x 246,5 mm x 114 mm
Peso 1,3 kg circa
Nota
*1 Classifi cazione con il fi ltro passa basso dell’amplifi catore
di uso esclusivo.
Dati tecnici soggetti a modifi che senza avviso.
-Se vedete questo simbolo-
Informazioni per gli utenti sullo smaltimento di
apparecchiature elettriche ed elettroniche obsolete
(per i nuclei familiari privati)
Questo simbolo sui prodotti e/o sulla
documentazione di accompagnamento
significa che i prodotti elettrici ed elettronici
usati non devono essere mescolati con i rifiuti
domestici generici.
Per un corretto trattamento, recupero e riciclaggio,
portare questi prodotti ai punti di raccolta designati,
dove verranno accettati gratuitamente. In alternativa,
in alcune nazioni potrebbe essere possibile restituire i
prodotti al rivenditore locale, al momento dell’acquisto
di un nuovo prodotto equivalente.
Uno smaltimento corretto di questo prodotto contribuirà
a far risparmiare preziose risorse ed evitare potenziali
effetti negativi sulla salute umana e sull’ambiente, che
potrebbero derivare, altrimenti, da uno smaltimento
inappropriato. Per ulteriori dettagli, contattare la
propria autorità locale o il punto di raccolta designato
più vicino.
In caso di smaltimento errato di questo materiale di
scarto, potrebbero venire applicate delle penali, in base
alle leggi nazionali.
Per gli utenti aziendali nell’Unione Europea
Qualora si desideri smaltire apparecchiature elettriche
ed elettroniche, contattare il rivenditore o il fornitore per
ulteriori informazioni.
Informazioni sullo smaltimento in nazioni al di fuori
dell’Unione Europea
Questo simbolo è valido solo nell’Unione Europea.
Qualora si desideri smaltire questo prodotto, contattare
le autorità locali o il rivenditore e chiedere informazioni
sul metodo corretto di smaltimento.
FRANÇAISITALIANO
RQT9498
11
Page 12

a 45° a 60°
45° tot 60°
45° til 60°
45° till 60°
Estimado cliente
Muchísimas gracias por haber adquirido este aparato.
Lea con atención estas instrucciones para obtener
las máximas prestaciones y seguridad.
Los 2 altavoces son iguales.
Utilice estos altavoces como altavoces de sonido ambiental.
Índice
Ubicación ................................................................ 12
Conexiones ............................................................14
Opciones de instalación .........................................16
Notas ...................................................................... 18
Mantenimiento ........................................................ 20
Especifi caciones técnicas ...................................... 20
Ubicación
ESPAÑOL
Los altavoces delanteros y de sonido ambiental deberán
colocarse aproximadamente a la misma altura de la
posición de escucha. Los ángulos del diagrama son
aproximados.
Altavoz delantero
(± izquierdo, ≤ derecho: no suministrados)
Altavoz de extra-graves (≥: no suministrados)
NEDERLANDS
A Sonido ambiental de 4.1 canales
Altavoz de sonido ambiental
(¥ izquierdo, μ derecho: SB-HSX70)
•
Coloque los altavoces como se muestra en la ilustración
y póngalos a 1 m aproximadamente por encima del nivel
DANSKSVENSKA
de los oídos.
B Sonido ambiental de 6.1 canales
Altavoz de sonido ambiental
(¥ izquierdo, μ derecho: SB-HSX70)
•
Coloque los altavoces como se muestra en la ilustración
y póngalos a 1 m aproximadamente por encima del nivel
de los oídos.
Altavoces de sonido ambiental traseros
(∂ izquierdo, ∑ derecho: SB-HSX70)
•
Coloque los altavoces como se muestra en la ilustración
y póngalos a 1 m aproximadamente por encima del nivel
de los oídos.
La forma en que instala sus altavoces puede afectar
al campo acústico. Tenga en cuenta los puntos
siguientes.
• Colóquelos en bases planas, niveladas y seguras.
RQT9498
Utilice espaciadores o cosas similares para impedir
12
que se muevan.
•
Tape las paredes y las ventanas con cortinas gruesas.
Geachte klant
Hartelijk dank voor de aankoop van dit product.
Gelieve deze gebruiksaanwijzing aandachtig door
le lezen voor een optimale prestatie en een veilig
gebruik van het systeem.
De 2 luidsprekers zijn gelijk.
Gebruik deze luidsprekers als uw surroundluidsprekers.
Inhoud
Opstelling ...............................................................12
Aansluitingen .......................................................... 14
Installatiemogelijkheden ......................................... 16
Opmerkingen .......................................................... 18
Onderhoud .............................................................20
Technische gegevens ............................................. 20
Opstelling
De voorluidsprekers en surroundluidsprekers moeten
op ongeveer gelijke afstand van de luisterpositie
worden geplaatst. De hoeken op het schema zijn bij
benadering aangegeven.
Voorluidspreker (± links, ≤ rechts: niet bijgeleverd)
Subwoofer (≥: niet bijgeleverd)
A 4.1-kanaals surround-sound
Surroundluidspreker (¥ links, μ rechts: SB-HSX70)
• Plaats de luidsprekers zoals aangegeven en zet ze
ongeveer 1 m boven oorhoogte.
B 6.1-kanaals surround-sound
Surroundluidspreker (¥ links, μ rechts: SB-HSX70)
• Plaats de luidsprekers zoals aangegeven en zet ze
ongeveer 1 m boven oorhoogte.
Surround-achterluidsprekers
(∂ links, ∑ rechts: SB-HSX70)
• Plaats de luidsprekers zoals aangegeven en zet ze
ongeveer 1 m boven oorhoogte.
De manier waarop u de luidsprekers opstelt kan het
klankbeeld beïnvloeden. Let op de volgende punten.
• Plaats de luidsprekers op een effen, horizontaal en
stevig oppervlak.
Gebruik vulstukken of iets dergelijks om te voorkomen
dat de luidsprekers wiegelen.
• Hang een dik gordijn voor muren en ramen.
Page 13

a 45° a 60°
45° tot 60°
45° til 60°
45° till 60°
b 160° a 170°
160° tot 170°
160° til 170°
160° till 170°
Kære kunde
Tak fordi du har købt dette apparat.
For at få fuldt udbytte af apparatet og af hensyn til din
sikkerhed, bør du læse denne betjeningsvejledning
omhyggeligt.
De 2 højttalere er identiske.
Anvend disse højttalere som surroundhøjttalere.
Indhold
Placering ................................................................13
Tilslutninger ............................................................15
Installationsmuligheder ........................................... 17
Praktiske oplysninger .............................................19
Vedligeholdelse ......................................................21
Tekniske data .........................................................21
Placering
Front- og surround-højttalerne bør placeres i omtrent
same afstand fra lyttepositionen. Vinklerne på
diagrammet er omtrentlige.
Fronthøjttaler (± venstre, ≤ højre: medfølger ikke)
Subwoofer (≥: medfølger ikke)
A 4.1-kanals surroundlyd
Surroundhøjttaler (¥ venstre, μ højre: SB-HSX70)
• Anbring højttalerne som vist på illustrationen og
placér dem omkring 1 m højere end ørehøjde.
B 6.1-kanals surroundlyd
Surroundhøjttaler (¥ venstre, μ højre: SB-HSX70)
• Anbring højttalerne som vist på illustrationen og
placér dem omkring 1 m højere end ørehøjde.
Bagsurroundhøjttalere
(∂ venstre, ∑ højre: SB-HSX70)
• Anbring højttalerne som vist på illustrationen og
placér dem omkring 1 m højere end ørehøjde.
Placering af højttalerne kan påvirke lydfeltet.
• Anbring på en plan, solid fl ade.
Anvend afstandsstykker eller lignende for at forhindre
dem i at rokke.
• Dæk vægge og vinduer med tykke gardiner.
c 60° a 90°
60° tot 90°
60° til 90°
60° till 90°
Kära kund
Tack för valet av denna produkt.
Läs igenom bruksanvisningen noga för bästa resultat
och för säkerhets skull.
Två högtalarna är lika.
Använd dessa högtalare som surroundhögtalare.
Innehåll
Placering ................................................................13
Anslutningar ...........................................................15
Installationsalternativ .............................................. 17
Anmärkningar ......................................................... 19
Underhåll ................................................................ 21
Tekniska data .........................................................21
Placering
De främre högtalarna och surroundhögtalarna
bör placeras på ungefär samma avstånd från
lyssningspositionen. Vinklarna som anges i fi guren
är ungefärliga.
Främre högtalare (± vänster, ≤ höger: medföljer ej)
Bashögtalare (≥: medföljer ej)
A 4.1-kanaligt surroundljud
Surroundhögtalare (¥ vänster, μ höger: SB-HSX70)
• Placera högtalarna enligt illustrationen och cirka 1 m
högre än öronens nivå.
B 6.1-kanaligt surroundljud
Surroundhögtalare (¥ vänster, μ höger: SB-HSX70)
• Placera högtalarna enligt illustrationen och cirka 1 m
högre än öronens nivå.
Bakre surroundhögtalare
(∂ vänster, ∑ höger: SB-HSX70)
• Placera högtalarna enligt illustrationen och cirka 1 m
högre än öronens nivå.
Hur du placerar högtalarna kan påverka ljudfältet.
Var uppmärksam på följande punkter.
• Placera dem på stadiga, plana ytor som inte lutar.
Använd träblock eller dylikt för att hindra dem från
att röra på sig.
• Täck väggar och fönster med tjocka gardiner.
ESPAÑOL
NEDERLANDS
DANSKSVENSKA
RQT9498
13
Page 14

azul
blauw
blå
blå
blanco
wit
hvid
vit
Conexiones
Estos productos son altavoces opcionales
para uso exclusivo con el sistema de cine en
casa SC-BTX70/SC-BTX68 que se combinarán
y utilizarán con el sistema inalámbrico SHFX70 opcional de Panasonic. No conecte
estos altavoces a otros equipos.
Conecte al sistema inalámbrico SH-FX70 opcional
de Panasonic.
• Consulte las instrucciones de funcionamiento
pertinentes para conocer detalles.
C Conecte el cable de altavoz d al terminal de
altavoz e.
d Cable de altavoz suministrado con el sistema
inalámbrico SH-FX70
ESPAÑOL
Asegúrese de conectar solamente el cable positivo
f al terminal positivo (+) y el cable negativo g al
terminal negative (–).
Presione la palanca de resorte para abrir el orifi cio de
entrada del cable y luego inserte el conductor antes
de soltar la palanca de resorte.
PRECAUCIÓN
NEDERLANDS
No cortocircuite nunca los cables positivos (+) y
negativos (–) de los altavoces.
DANSKSVENSKA
Aansluitingen
Deze optionele luidsprekers zijn speciaal
bestemd voor de SC-BTX70/SC-BTX68 en
kunnen worden gecombineerd en gebruikt
met het optionele draadloze Panasonic
SH-FX70-systeem. Sluit deze luidsprekers
niet aan op andere apparatuur.
Aansluiten op het optionele draadloze Panasonic SH-
FX70 systeem.
• Zie voor nadere details de betreffende
gebruiksaanwijzing.
C Sluit de luidsprekerkabel d aan op de
luidsprekeraansluitingen e.
d Luidsprekerkabel die is bijgeleverd bij het draadloze
SH-FX70 systeem
Zorg ervoor dat u de positieve draden f op positieve
(+) aansluitingen en de negatieve draden g op
negatieve (–) aansluitingen aansluit.
Houd de veerknop ingedrukt om de kabelopening
te openen, steek vervolgens hierin het ontblote
draadeinde, en laat de veerknop tenslotte los.
LET OP
Pas op dat u de positieve (+) en negatieve (–)
luidsprekerdraden niet kortsluit.
14
RQT9498
Page 15

Tilslutninger
Disse produkter købes separat og er
højttalere til eksklusiv brug for SC-BTX70/
SC-BTX68, som skal kombineres og
anvendes med Panasonic trådløst system
SH-FX70, som købes separat. Slut ikke
disse højttalere til noget andet udstyr.
Slut til Panasonic trådløst system SH-FX70
(ekstraudstyr).
• Se de relevante betjeningsvejledninger angående
detaljer.
C Slut højttalerkablet d til højttalerterminalerne
e.
d Højttalerkabel, som følger med det trådløse system
SH-FX70
Sørg for kun at slutte den positive ledning f til den
positive (+) terminal, og den negative ledning g til den
negative (–) terminal.
Tryk på fjederarmen for at åbne ledningsindgangen,
og sæt derefter ledningen ind, inden du slipper
fjederarmen.
FORSIGTIG
Positive (+) og negative (–) højttalerledere må aldrig
kortsluttes.
Anslutningar
Dessa produkter är tillvalshögtalare som
endast är ämnade för SC-BTX70/SC-BTX68
och som ska kombineras och användas
tillsammans med Panasonics trådlösa
tillvalssystem SH-FX70. Anslut inte dessa
högtalare till någon annan utrustning.
Anslut till Panasonics trådlösa tillvalssystem SH-FX70.
• Se lämplig bruksanvisning för information.
C Anslut högtalarkabeln d till högtalaruttaget
e.
d Högtalarkabeln medföljer det trådlösa systemet
SH-FX70.
Se till att positiva ledningar f ansluts till positiva uttag
(+), och negativa ledningar g till negativa uttag (–).
Tryck på den fjädrande spaken tills hålet i uttaget
blir synligt, och sätt sedan i ledningstråden innan du
släpper den fjädrande spaken igen.
VARNING
Kortslut aldrig positiva (+) och negativa (–) ledningar.
DANSKSVENSKA
RQT9498
15
Page 16

62 mm
155 mm
7,5 a 9,4 mm ø
Ø 7,5 tot 9,4 mm
Diam. 7,5 mm til 9,4 mm
Ø7,5 till 9,4 mm
3 a 5 mm
3 tot 5 mm
3 til 5 mm
3 till 5 mm
Opciones de instalación
No aplique una fuerza excesiva a la red de la parte
delantera del altavoz. La red delantera no puede
desmontarse.
Colocación en una pared
Meta un tornillo h (no suministrado) en la
pared.
• Asegúrese de que el tornillo h esté posicionado a
62 mm como mínimo del techo.
La pared en la que se va a montar el altavoz y el tornillo
h (no suministrado) utilizado para instalar el altavoz
deberán ser lo sufi cientemente fuertes como para
soportar un peso de 10 kg como mínimo. Consulte al
contratista encargado del trabajo de instalación.
ESPAÑOL
Cuando se instala el altavoz en un poste o en un
pilar de madera se utiliza un tornillo de 30 mm de
longitud como mínimo (p vea más arriba). En
todos los demás casos, utilice un tornillo que sea
lo sufi cientemente fuerte como para soportar un
peso de 10 kg como mínimo.
PRECAUCIÓN
NEDERLANDS
No coloque este altavoz en una pared o techo utilizando
métodos diferentes de los descritos en este manual.
Coloque fi rmemente el altavoz en el tornillo empleando
el agujero.
i En esta posición, el altavoz se caerá probablemente
DANSKSVENSKA
si se mueve a la izquierda o a la derecha.
j Mueva el altavoz de forma que el tornillo esté en
esta posición.
Colocación de un alambre estabilizador
k Alambre (no suministrado)
Meta un tornillo h (no suministrado) en la
pared.
(p vea más arriba (Colocación en una
pared))
Installatiemogelijkheden
Oefen geen overmatige druk uit op de voorgrilles van
de luidspreker. U kunt de voorgrilles niet verwijderen.
Bevestigen aan een muur
Draai een schroef h (niet bijgeleverd) in de
muur.
• Zorg dat de schroef h tenminste 62 mm van het
plafond verwijderd is.
De muur waaraan de luidspreker wordt bevestigd en
de schroef h (niet bijgeleverd) die gebruikt wordt voor
het bevestigen van de luidspreker, moeten voldoende
sterk zijn om een gewicht van minstens 10 kg te
dragen. Communiceer dit naar de persoon die de
werkzaamheden uitvoert.
Een schroef van minimaal 30 mm lengte (p zie
hierboven) wordt gebruikt voor het bevestigen van
de luidspreker aan een houten paal of pilaar. In alle
andere gevallen, moet een schroef worden gebruikt
die sterk genoeg is om een gewicht van minstens
10 kg te dragen.
LET OP
Gebruik geen andere dan de hieronder beschreven
methode om deze luidspreker aan een muur of
zoldering te bevestigen.
Plaats de luidspreker met de opening stevig op de
schroef.
i
In deze stand zou de luidspreker gemakkelijk kunnen
vallen als die naar links of rechts wordt verplaatst.
j Verplaats de luidspreker zo dat de schroef in deze
stand komt.
Bevestigen van een stabiliseringsdraad
k Draad (niet bijgeleverd)
Draai een schroef h (niet bijgeleverd) in de
muur.
(p zie hierboven (Bevestigen aan een muur))
16
RQT9498
Page 17

Aprox. 150 mm
Ongeveer 150 mm
Ca. 150 mm
Ungefär 150 mm
Installationsmuligheder
Udsæt ikke nettet på forsiden af højttaleren for et for
stort tryk. Det er ikke muligt at tage nettet af.
Ophængning på væggen
Skru en skrue h (medfølger ikke) i væggen.
• Sørg for, at skruen h er placeret mindst 62 mm fra
loftet.
Væggen, hvorpå højttaleren skal hænges op, og
den skrue h (medfølger ikke), der anvendes til
ophængning af højttaleren, skal være tilstrækkelig
stærke til at bære en vægt på mindst 10 kg. Rådfør
dig med den person, som udfører arbejdet.
Der skal anvendes en skrue, som er mindst 30
mm lang (p se herover), hvis højttaleren skal
installeres på en træstolpe eller søjle. I alle andre
tilfælde anvendes en skrue, som er tilstrækkelig
stærk til at bære en vægt på mindst 10 kg.
FORSIGTIG
Anbring ikke denne højttaler på væggen eller i loftet ved
hjælp af andre metoder end de her beskrevne.
Sæt højttaleren godt fast på skruen med hullet.
i I denne stilling vil højttaleren sandsynligvis falde
ned, hvis den fl yttes til venstre eller højre.
j Flyt højttaleren, så skruen er i denne stilling.
Montering af en stabiliserende tråd
k Tråd (medfølger ikke)
Skru en skrue h (medfølger ikke) i væggen.
(p se herover (Ophængning på væggen))
Installationsalternativ
Lägg inte mer tryck än nödvändigt mot nätet på
högtalarens framsida. Nätet kan inte tas bort.
Väggmontering
Skruva in en skruv h (medföljer ej) i väggen.
• Se till att skruven h är placerad minst 62 mm från
taket.
Den vägg där högtalaren ska sättas upp och den skruv
h (medföljer ej) som ska användas för detta måste
hålla för minst 10 kg. Rådgör med montören.
En skruv som är minst 30 mm lång (p se ovan)
används för montering av högtalaren på bjälkar eller
pelare av trä. I alla andra fall används en skruv som
är tillräcklig för att hålla 10 kg.
VARNING
Montera inte högtalaren på väggen eller i taket
på något annat sätt än vad som förklaras i denna
bruksanvisning.
Fäst högtalaren ordentligt på skruven med hålet.
i I det här läget är det troligt att högtalaren lossar om
den förs åt vänster eller höger.
j Flytta högtalaren så att skruven befi nner sig i det
här läget.
Fastsättning av stabiliseringsvajer
k Vajer (medföljer ej)
Skruva in en skruv h (medföljer ej) i väggen.
(p se ovan (Väggmontering))
ESPAÑOL
NEDERLANDS
DANSKSVENSKA
RQT9498
17
Page 18

Notas
Opmerkingen
Precaución
Utilice los altavoces sólo con el sistema de uso
exclusivo. De lo contrario puede que se dañen el
amplificador y/o los altavoces, y también se puede
correr el riesgo de que se produzca un incendio.
Consulte al personal de servicio cualificado si
se produce un daño o un cambio repentino en el
funcionamiento.
Elementos de protección
En estas unidades se incorporan elementos de
protección. Sin embargo, estos elementos no protegen
estas unidades contra los daños causados por un uso
incorrecto. Utilice los altavoces sólo con el sistema de
uso exclusivo.
Entrada excesiva
Si reproduce el sonido con niveles altos durante
períodos de tiempo prolongados podrá estropear
sus altavoces y reducir su duración.
Para evitar daños, reduzca el volumen en los casos
siguientes:
• Cuando reproduzca sonido distorsionado.
• Cuando los altavoces reciban aullido procedente de
un micrófono o giradiscos, ruido de emisiones de FM
o señales continuas procedentes de un oscilador,
disco de prueba o instrumento electrónico.
• Cuando ajuste la calidad del sonido.
• Cuando encienda o apague el amplifi cador.
Otras notas
ESPAÑOL
Estos altavoces no tienen blindaje magnético.
No lo coloque cerca de un televisor, PC u otro dispositivo
que sea afectado por los campos magnéticos.
Aleje los objetos magnetizados.
Las tarjetas magnetizadas, las tarjetas de bancos, los
pases de viajeros, etc., pueden estropearse si se dejan
NEDERLANDS
demasiado cerca de los imanes de los altavoces. Los
relojes también pueden ser afectados.
Evite ubicaciones como las indicadas a continuación:
• Expuestas a los rayos solares directos
• Próximas a dispositivos de calefacción u otras
fuentes de calor
• Donde la humedad sea excesiva
Let op
Gebruik de luidsprekers alleen met het speciaal
hiervoor bestemde systeem. Als u dat niet doet,
kan dit leiden tot schade aan de versterker en/of
luidsprekers en mogelijk resulteren in brand. Neem
bij schade of plotseling veranderde prestaties
contact op met een erkende servicemonteur.
Beschermingselement
In deze eenheden zijn beschermingselementen
ingebouwd. Deze elementen beschermen de eenheden
echter niet tegen schade die het gevolg is van verkeerd
gebruik. Gebruik de luidsprekers alleen met het
speciaal hiervoor bestemde systeem.
Te groot ingangsvermogen
De luidsprekers kunnen beschadigd raken en
zullen minder lang meegaan indien u voor langere
perioden geluid op hoge niveaus weergeeft.
Voorkom beschadiging door het volumeniveau in
de volgende gevallen te verminderen:
• Bij het weergeven van vervormd geluid.
• Wanneer de luidsprekers janktonen van een
microfoon of platenspeler, ruis van FM-uitzendingen,
of continue signalen van een oscillator, testdisk of
elektronisch instrument ontvangen.
• Wanneer u de geluidskwaliteit wilt regelen.
• Wanneer u de versterker in- of uitschakelt.
Overige opmerkingen
Deze luidsprekers hebben geen magnetische
afscherming.
Plaats het niet in de buurt van een tv-toestel, computer
of andere apparatuur die gevoelig is voor magnetische
velden.
Houd gemagnetiseerde voorwerpen uit de buurt.
Gemagnetiseerde kaarten, bankkaarten, pasjes e.d.
kunnen beschadigd raken wanneer deze te dicht bij de
luidsprekermagneten worden gebracht. Ook klokken
kunnen nadelige invloed ondergaan.
Vermijd de hieronder aangegeven plaatsen:
• Plaatsen in direct zonlicht
• In de nabijheid van verwarmingstoestellen of andere
warmtebronnen
• Plaatsen met een hoge vochtigheid
18
RQT9498
Page 19

Praktiske oplysninger
Anmärkningar
Forsigtig
Anvend kun højttalerne med systemet til
eksklusiv brug. Forsømmelse af dette kan føre
til skade på forstærkeren og/eller højttalerne
og kan resultere i risiko for brand. Konsulter en
kvalificeret serviceperson, hvis beskadigelse eller
en pludselig ændring i ydelsen er opstået.
Beskyttelseselement
Disse enheder har indbyggede beskyttelseselementer.
Beskyttelseselementerne kan dog ikke beskytte
enhederne mod skade, som er forårsaget af forkert
anvendelse. Anvend kun højttalerne med systemet til
eksklusiv brug.
Undgå overbelastning
Højttalerne kan lide skade og deres levetid afkortes,
hvis der spilles med høj lydstyrke i længere tid.
Sænk lydstyrken i følgende tilfælde for at undgå
skade:
• Ved afpilning forvrænget lyd.
• Hvis højttalerne udsættes for hylen fra en mikrofon
eller en pladespiller, støj fra FM-udsendelser eller
uafbrudte signaler fra en oscillator, en testdisk eller
et elektronisk instrument.
• Når lydkvaliteten indstilles.
• Når der tændes og slukkes for forstærkeren.
Andre forsigtighedsregler
Disse højttalere har ingen magnetisk afskærmning.
Anbring den ikke i nærheden af et fjernsyn, en pc’er
eller et andet apparat, som påvirkes af magnetfelter.
Hold magnetiserede genstande væk.
Kort med magnetstriber, f.eks. kreditkort og
adgangskort, kan tage skade, hvis de kommer for tæt
på højttalerens magneter. Mekaniske ure kan også
tage skade.
Undgå steder som de nedennævnte:
• Direkte i solen
• I nærheden af varmeapparater eller andre
varmekilder
• Hvor der er høj luftfugtighed
Varning
Använd endast högtalarna tillsammans med det
avsedda systemet. Om du inte gör detta kan det
leda till skada på förstärkaren och/eller högtalarna
samt leda till fara för brand. Kontakta en utbildad
servicetekniker om skada eller hastig förändring
av prestanda har uppstått.
Skyddselement
Skyddselement fi nns inbyggda i dessa enheter. De kan
dock inte skydda dessa enheter från skada som orsakas
av felaktig användning. Använd endast högtalarna
tillsammans med det avsedda systemet.
Vid alltför hög ineffekt
Du kan orsaka skador på dina högtalare, och
förkorta deras bruksliv, om du spelar med hög
volym under längre perioder.
Minska volymen i följande fall för att undvika skador:
• När du spelar ljud med distorsion.
• När högtalarna mottar tjutande från en mikrofon
eller grammofon, brus från en FM-sändning, eller
kontinuerliga signaler från en oscillator, testskiva
eller elektroniskt instrument.
• När du justerar ljudkvaliteten.
• När du sätter på och stänger av förstärkaren.
Andra anmärkningar
Dessa högtalare är inte magnetiskt avskärmade.
Placera den inte i närheten av TV-apparater, PC eller
andra apparater som påverkas av magnetfält.
Håll magnetiserade föremål på avstånd.
Magnetkort, bankkort, månadskort osv. kan skadas om
de får ligga alltför nära magneterna i högtalare. Klockor
kan också påverkas.
Undvik platser som beskrivs nedan:
• Direkt solljus
• Nära värmeelement eller andra källor som genererar
värme
• Platser med hög luftfuktighet
DANSKSVENSKA
RQT9498
19
Page 20

Mantenimiento
Limpie estas unidades con un paño blando, limpio
y seco.
• No utilice nunca alcohol, diluyente de pintura ni
bencina para limpiar estas unidades.
• Antes de utilizar un paño impregnado químicamente,
lea con atención las instrucciones suministradas con
la unidad.
Onderhoud
Reinig de luidsprekers met een zachte, schone,
droge doek.
• Gebruik nooit alcohol, verfverdunner of benzine voor
het schoonmaken van de buitenpanelen.
•
Alvorens een chemisch behandelde doek te gebruiken,
dient u de bij de doek horende instructies zorgvuldig
te lezen.
Especifi caciones técnicas
Tipo Sistema de 3 altavoces de 2 vías tipo Bass-refl ex
(refl ejo de graves)
Altavoz
Parte delantera altavoz de graves:
6,5 cm tipo de cono (Bambú) x 1
Parte superior altavoz de graves:
6,5 cm tipo de cono x 1
Altavoz de frecuencias altas:
5 cm tipo de cono (Bambú) x 1
Impedancia 6 Ω
Potencia de entrada (IEC) 125 W (MAX)*1
Nivel de presión de sonido 80 dB/W (1
Gama de frecuencias 80 Hz – 50 kHz (a –16 dB)
100 Hz – 40 kHz (a –10 dB)
Dimensiones (An. x Al. x Prof.)
134 mm x 246,5 mm x 114 mm
Peso Aprox. 1,3 kg
Nota
*1 Capacidad de potencia con el fi ltro pasaalto del
amplifi cador de uso exclusivo.
Las especifi caciones están sujetas a cambios sin previo
aviso.
ESPAÑOL
-Si ve este símbolo-
Información sobre la eliminación para los usuarios
de equipos eléctricos y electrónicos usados
(particulares)
La aparición de este símbolo en un producto
y/o en la documentación adjunta indica
NEDERLANDS
Para que estos productos se sometan a un proceso
adecuado de tratamiento, recuperación y reciclaje, llévelos
a los puntos de recogida designados, donde los admitirán
sin coste alguno. En algunos países existe también la
posibilidad de devolver los productos a su minorista local
al comprar un producto nuevo equivalente.
Si desecha el producto correctamente, estará contribuyendo
a preservar valiosos recursos y a evitar cualquier posible
efecto negativo en la salud de las personas y en el medio
ambiente que pudiera producirse debido al tratamiento
inadecuado de desechos. Póngase en contacto con su
autoridad local para que le informen detalladamente sobre
el punto de recogida designado más cercano.
De acuerdo con la legislación nacional, podrían aplicarse
multas por la eliminación incorrecta de estos desechos.
Para empresas de la Unión Europea
Si desea desechar equipos eléctricos y electrónicos,
póngase en contacto con su distribuidor o proveedor
para que le informe detalladamente.
Información sobre la eliminación en otros países
no pertenecientes a la Unión Europea
Este símbolo sólo es válido en la Unión Europea.
RQT9498
Si desea desechar este producto, póngase en contacto
con las autoridades locales o con su distribuidor para que
20
le informen sobre el método correcto de eliminación.
que los productos eléctricos y electrónicos
usados no deben mezclarse con la basura
doméstica general.
,
0 m)
Technische gegevens
Type 2-wegs 3-luidsprekers systeem Basrefl extype
Luidspreker
Woofer voor: 6,5 cm Conustype (Bamboo) x 1
Woofer boven: 6,5 cm Conustype x 1
Tweeter: 5 cm Conustype (Bamboo) x 1
Impedantie 6 Ω
Ingangsvermogen (IEC) 125 W (MAX)*1
Geluidsdrukniveau 80 dB/W (1,0 m)
Frequentiebereik 80 Hz – 50 kHz (bij –16 dB)
100 Hz – 40 kHz (bij –10 dB)
Afmetingen (B x H x D)
134 mm x 246,5 mm x 114 mm
Gewicht Ongeveer 1,3 kg
Opmerking
*1 Metingen met de low-cut fi lter van speciaal hiervoor
bestemde versterker.
Specifi caties onder voorbehoud van wijzigingen zonder
voorafgaande kennisgeving.
-Als u dit symbool ziet-
Informatie over het weggooien van elektrische en
elektronische apparatuur (particulieren)
Dit symbool betekent in Europa dat gebruikte
elektrische en elektronische producten niet bij
het normale huishoudelijke afval mogen.
Lever deze producten in bij de aangewezen
inzamelingspunten, waar ze gratis worden geaccepteerd
en op de juiste manier worden verwerkt, teruggewonnen
en hergebruikt. In Nederland kunt u uw producten bij uw
winkelier inleveren bij de aanschaf van een vergelijkbaar
nieuw product.
Wanneer u dit product op de juiste manier als afval
inlevert, spaart u waardevolle hulpbronnen en voorkomt u
potentiële negatieve gevolgen voor de volksgezondheid
en het milieu, die anders kunnen ontstaan door een
onjuiste verwerking van afval. Neem contact op met uw
gemeente voor meer informatie over het dichtstbijzijnde
inzamelingspunt of raadpleeg www.nvmp.nl, www.
ictoffice.nl of www.stibat.nl.
Voor zakelijke gebruikers in de Europese Unie
Neem voor het weggooien van elektrische en
elektronische apparatuur contact op met uw leverancier
voor verdere informatie.
Informatie over verwijdering van afval in landen
buiten de Europese Unie
Dit symbool is alleen geldig in de Europese Unie.
Neem wanneer u dit product wilt weggooien, contact op
met de lokale overheid of uw leverancier en vraag wat
de juiste verwijderingsmethode is.
Page 21

Vedligeholdelse
Rengør disse enheder med en tør, blød klud.
•
Brug aldrig sprit, fortynder, rensebenzin til rengøringen.
• Før du evt. benytter en kemisk imprægneret klud, bør
du omhyggeligt læse den vejledning, som følger med
kluden.
Underhåll
Rengör enheterna med en mjuk, ren och torr tygduk.
• Använd aldrig alkohol, målarthinner eller ren bensin
för att rengöra enheterna.
• Innan du använder en kemiskt preparerad tygduk, läs
instruktionerna som följde med tygduken ordentligt.
Tekniske data
Type 2-vejs system med 3 højttalere, basrefl ekstype
Højttaler
Wooferforside: 6,5 cm Konustype (Bamboo) x 1
Woofertop: 6,5 cm Konustype x 1
Tweeter: 5 cm Konustype (Bamboo) x 1
Impedans 6 Ω
Indgangseffekt (IEC) 125 W (MAX)*1
Lydtryksniveau 80 dB/W (1,0 m)
Frekvensområde 80 Hz – 50 kHz (ved –16 dB)
100 Hz – 40 kHz (ved –10 dB)
Mål (B x H x D) 134 mm x 246,5 mm x 114 mm
Vægt Ca. 1,3 kg
Bemærk
*1 Nominel effekt med højpasfi lter i forstærker til
eksklusiv brug.
De tekniske specifi kationer kan ændres uden varsel.
–Hvis du ser dette symbol–
Oplysninger til brugerne om afhændelse af
elektriske apparater og elektronisk udstyr (private
husholdninger)
Når produkter og/eller medfølgende
dokumenter indeholder dette symbol, betyder
det, at elektriske apparater og elektronisk
udstyr ikke må smides ud sammen med det
almindelige husholdningsaffald.
For at sikre en korrekt behandling, indsamling og
genbrug, skal du afl evere disse produkter på dertil
indrettede indsamlingssteder, hvor de vil blive
modtaget uden ekstra omkostninger. I nogle lande
er der også mulighed for, at du kan indlevere dine
produkter hos den lokale forhandler, hvis du køber et
nyt og tilsvarende produkt.
Hvis du afhænder dette produkt på korrekt vis, vil det
være med at spare på de værdifulde naturlige råstoffer
og forhindre eventuelle negative påvirkninger på
folkesundheden og miljøet, hvilket ellers kunne blive
følgerne af en forkert håndtering af affaldet. Kontakt de
lokale myndigheder for at få yderligere oplysninger om,
hvor du kan fi nde det nærmeste indsamlingssted.
I visse lande vil en forkert afhændelse af affaldet
medføre en bødestraf i henhold til de gældende
bestemmelser på området.
Professionelle brugere i EU
Hvis du ønsker at smide elektriske apparater eller
elektronisk udstyr ud, skal du kontakte din forhandler
eller leverandør for at få yderligere oplysninger.
Oplysninger om afhændelse i lande uden for EU
Dette symbol er kun gyldigt i EU.
Hvis du ønsker at afhænde dette produkt, skal du
rette henvendelse til de lokale myndigheder eller din
forhandler. Her kan du få oplysninger om, hvordan du
bedst kommer af med produktet.
Tekniska data
Typ 2-vägs 3-högtalarsystem av basrefl extyp
Högtalare
Woofer Främre: 6,5 cm Konisk (Bamboo) x 1
Woofer Topp: 6,5 cm Konisk x 1
Tweeter: 5 cm Konisk (Bamboo) x 1
Impedans 6 Ω
Ineffekt (IEC) 125 W (MAX)*1
Ljudtrycksnivå 80 dB/W (1,0 m)
Frekvensomfång 80 Hz – 50 kHz (vid –16 dB)
100 Hz – 40 kHz (vid –10 dB)
Mått (B x H x D) 134 mm x 246,5 mm x 114 mm
Vikt Ungefär 1,3 kg
Observera
*1 Klassning med det låga delningsfi ltret hos den
avsedda förstärkaren.
Tekniska data kan ändras utan föregående meddelande.
–Om du ser den här symbolen–
Information om kassering för användare av elektrisk
& elektronisk utrustning (privata konsumenter)
Om denna symbol finns på produkterna och/
eller medföljande dokumentation, betyder
det att förbrukade elektriska och elektroniska
produkter inte ska blandas med vanliga
hushållssopor.
För korrekt hantering, inhämtning och återvinning, ska
dessa produkter lämnas på återvinningscentraler, där
de tas emot utan kostnad. I vissa länder kan du som ett
alternativ lämna in dina produkter hos återförsäljaren,
när du köper en motsvarande, ny produkt.
Om denna produkt avyttras korrekt sparas värdefulla
resurser och eventuellt negativa effekter på den
mänskliga hälsan och miljön förhindras, vilket kan
bli fallet vid felaktig avyttring. Kontakta din lokala
myndighet för mer information om var din närmsta
återvinningsstation fi nns.
Böter kan tillämpas vid felaktig avyttring av dessa
sopor, i enlighet med lagstiftningen i landet.
För företagsanvändare inom den Europeiska
gemenskapen
Om ni vill kassera elektrisk eller elektronisk utrustning,
vänligen kontakta er återförsäljare eller leverantör för
mer information.
Information om kassering i övriga länder utanför
den Europeiska gemenskapen
Denna symbol gäller bara inom den Europeiska
gemenskapen.
Om du vill kassera denna produkt ska du kontakta de
lokala myndigheterna eller din återförsäljare, och fråga
om korrekt avyttringsmetod.
DANSKSVENSKA
RQT9498
21
Page 22

ČESKYPOLSKI
a 45° až 60°
Od 45° do 60°
от 45° до 60°
від 45° до 60°
Vážený zákazníku
Děkujeme za zakoupení tohoto výrobku.
Abyste jej mohl optimálním způsobem a bezpečně
používat, přečtěte si prosím pozorně tento návod.
Obě reprosoustavy jsou stejné.
РУССКИЙ ЯЗЫК
Použijte je jako prostorové reprosoustavy.
Obsah
Umístění ................................................................. 22
Zapojení .................................................................24
УКРАЇНСЬКА
Možnosti instalace ..................................................26
Poznámky ............................................................... 28
Údržba přístroje ...................................................... 30
Technické údaje ......................................................30
Umístění
Čelní a prostorové reprosoustavy by měly být umístěny
v přibližně stejné vzdálenosti od místa poslechu. Úhly
na obrázku jsou přibližné.
Čelní reprosoustava (± levý, ≤ pravý: neni přiložena)
Subwoofer (≥: neni přiložena)
A Prostorový zvuk ve formátu 4.1
Prostorová reprosoustava
(¥ levý, μ pravý: SB-HSX70)
• Reprosoustavy uspořádejte podle vyobrazení a
umístěte je zhruba o 1 m výš, než je úroveň uší.
B Prostorový zvuk ve formátu 6.1
Prostorová reprosoustava
(¥ levý, μ pravý: SB-HSX70)
• Reprosoustavy uspořádejte podle vyobrazení a
umístěte je zhruba o 1 m výš, než je úroveň uší.
Zadní prostorové reprosoustavy
(∂ levý, ∑ pravý: SB-HSX70)
• Reprosoustavy uspořádejte podle vyobrazení a
umístěte je zhruba o 1 m výš, než je úroveň uší.
Rozmístění reprosoustav může ovlivnit zvukové
pole. Vezměte v úvahu následující body.
• Umístěte na plochou vodorovnou a stabilní
podložku.
Použijte podložky apod. pro zábranu kývání.
• Přikryjte stěny a okna silným závěsem.
RQT9498
22
Drogi Kliencie
Dziękujemy Ci za zakupienie tego produktu.
Aby zapewnić optymalną pracę urządzenia i bezpieczną
obsługę, prosimy o uważne przeczytanie niniejszej
instrukcji obsługi.
Oba głośniki są identyczne.
Używaj tych głośników jako głośników surround.
Spis treści
Ustawienie .............................................................. 22
Podłączenia ............................................................ 24
Sposoby mocowania ..............................................26
Uwagi .....................................................................28
Konserwacja ........................................................... 30
Dane techniczne .....................................................30
Ustawienie
Głośniki przednie i surround powinny być umieszczone
w przybliżeniu w tej samej odległości od słuchacza. Kąty
na rysunku podane są w przybliżeniu.
Głośniki przednie (± lewy, ≤ prawy: nie dołączony)
Głośnik superniskotonowy (≥: nie dołączony)
A 4.1-kanałowy dźwięk surround
Głośniki surround (¥ lewy, μ prawy: SB-HSX70)
• Ustaw głośniki w sposób pokazany na rysunku i
umieść je około 1 m ponad poziomem uszu.
B 6.1-kanałowy dźwięk surround
Głośniki surround (¥ lewy, μ prawy: SB-HSX70)
• Ustaw głośniki w sposób pokazany na rysunku i
umieść je około 1 m ponad poziomem uszu.
Głośniki surround tylne
(∂ lewy, ∑ prawy: SB-HSX70)
• Ustaw głośniki w sposób pokazany na rysunku i
umieść je około 1 m ponad poziomem uszu.
Sposób ustawienia głośników może mieć wpływ
na pole dźwiękowe. Zwróć uwagę na poniższe
wskazówki.
•
Ustaw na płaskich, równych i pewnych powierzchniach.
Aby zapobiec kołysaniu, użyj podkładek dystansowych
itp.
• Zasłoń ściany i okna grubymi zasłonami.
Page 23

a 45° až 60°
Od 45° do 60°
от 45° до 60°
від 45° до 60°
b 160° až 170°
Od 160° do 170°
от 160° до 170°
від 160° до 170°
ČESKYPOLSKI
c 60° až 90°
Od 60° do 90°
от 60° до 90°
від 60° до 90°
Уважаемый покупатель
Благодарим Вас за то, что Вы приобрели эту систему.
Чтобы получить оптимальное качество работы
системы и обеспечить безопасность, пожалуйста,
внимательно прочитайте эту инструкцию.
2 динамика являются одинаковыми.
Используйте эти динамики в качестве динамиков
окружающего звучания.
Содержание
Расположение .......................................................23
Подсоединения .....................................................25
Варианты установки .............................................27
Примечания ...........................................................29
Уxoд .......................................................................31
Te xничecкиe xapaктepиcтики ................................31
Расположение
Передние динамики и динамики окружающего
звучания должны быть расположены на
приблизительно одинаковом расстоянии от позиции
прослушивания. Углы на диаграмме являются
приблизительными.
Передний динамик
(± Левый, ≤ Правый: не прилагаются)
Сабвуфер (≥: не прилагаются)
A 4.1-канальное окружающее звучание
Динамик окружающего звучания
(¥ Левый, μ Правый: SB-HSX70)
• Расположите динамики, как показано на рисунке,
и поместите их на высоте примерно 1 м выше, чем
уровень ушей.
B 6.1-канальное окружающее звучание
Динамик окружающего звучания
(¥ Левый, μ Правый: SB-HSX70)
•
Расположите динамики, как показано на рисунке,
и поместите их на высоте примерно 1 м выше, чем
уровень ушей.
Задний динамик окружающего звучания
(∂ Левый, ∑ Правый: SB-HSX70)
• Расположите динамики, как показано на рисунке,
и поместите их на высоте примерно 1 м выше, чем
уровень ушей.
То, как Вы установите динамики, может влиять на звуковое
поле. Обратите внимание на следующие пункты.
•
Располагайте динамики на плоской ровной и
устойчивой поверхности.
Используйте прокладки или подобные принадлежности
для предохранения динамиков от качания.
• Закройте стены и окна толстыми занавесками.
Шановний покупець
Дякуємо за придбання цього виробу.
Щоб забезпечити найбільш оптимальну та безпечну
роботу, будь ласка, уважно ознайомтеся з цими
інструкціями.
Ці два динаміки однакові.
Використовуйте їх як динаміки об’ємного звучання.
Зміст
Розташування ........................................................23
Під’єднання ...........................................................25
Варіанти встановлення ......................................... 27
Примітки ................................................................29
Обслуговування ....................................................31
Технічні характеристики .......................................31
Розташування
Передні динаміки та динаміки об’ємного звучання
необхідно розташовувати приблизно на однаковій
відстані від місця прослуховування. Кути вказані на
діаграмі приблизно.
Передні динаміки
(± лівий, ≤ правий: не входять до комплекту)
НЧ–динамік (≥: не входять до комплекту)
A 4.1-канальний об’ємний звук
Динаміки об’ємного звучання
(¥ лівий, μ правий: SB-HSX70)
• Розташуйте динаміки, як вказано на малюнку, та
встановіть їх на 1 м вище рівня вух.
B 6.1-канальний об’ємний звук
Динаміки об’ємного звучання
(¥ лівий, μ правий: SB-HSX70)
• Розташуйте динаміки, як вказано на малюнку, та
встановіть їх на 1 м вище рівня вух.
Задні динаміки об’ємного звучання
(∂ лівий, ∑ правий: SB-HSX70)
• Розташуйте динаміки, як вказано на малюнку, та
встановіть їх на 1 м вище рівня вух.
Розташування динаміків може вплинути на зону
розповсюдження звуку. Необхідно враховувати
наступні моменти.
•
Розташовуйте динаміки на рівній стійкій поверхні.
Використовуйте прокладки або інші подібні засоби
для запобігання розгойдуванню динаміків.
•
Закрийте стіни та вікна за допомогою товстої завіски.
РУССКИЙ ЯЗЫК
УКРАЇНСЬКА
RQT9498
23
Page 24

ČESKYPOLSKI
bílý
biały
белый
білий
modrý
niebieski
голубой
синій
Zapojení
Tyto produkty představují volitelné, výlučně
používané reprosoustavy systému SC-BTX70/
SC-BTX68, které je nutno kombinovat a
РУССКИЙ ЯЗЫК
používat s volitelným bezdrátovým systémem
Panasonic SH-FX70. Tyto reprosoustavy
nepřipojujte k jinému zařízení.
Připojte do volitelného bezdrátového systému
Panasonic SH-FX70.
• Podrobnosti vyhledejte v příslušné dokumentaci.
УКРАЇНСЬКА
C
Kabel reprosoustavy d připojte ke konektorům
e
.
d Kabel reprosoustavy dodávaný k bezdrátovému
systému SH-FX70
Dbejte na připojení pouze kladného vodiče f ke
kladnému (+) konektoru a záporného vodiče g k
zápornému (–) konektoru.
Stiskněte pérovou páčku, abyste otevřeli vstup pro
vodič, poté vsuňte vodič a pérovou páčku uvolněte.
POZOR
Nikdy nezkratujte kladné (+) a záporné (–) vodiče
reprosoustav.
Podłączenia
Niniejsze wyroby są opcjonalne, przeznaczone
do użytku wyłącznie dla SC-BTX70/SC-BTX68
i przeznaczone do współpracy z opcjonalnym
systemem bezprzewodowym SH-FX70
Panasonic. Nie podłączaj tych głośników do
innych urządzeń.
Podłącz do dodatkowego systemu bezprzewodowego
SH-FX70 Panasonic.
•
Ze szczegółami zapoznaj się w odpowiedniej instrukcji
obsługi.
C Podłącz kabel głośnika d do złączy głośnika
e.
d Kabel głośnika należący do wyposażenia systemu
bezprzewodowego SH-FX70
Koniecznie podłącz dodatni przewód f do dodatniego
(+) złącza i ujemny przewód g do ujemnego (–)
złącza.
Naciśnij dźwignię, aż widać będzie otwór w złączu, a
następnie włóż przewód przed zwolnieniem dźwigni.
OSTRZEŻENIE
Nigdy nie zwieraj dodatnich (+) i ujemnych (–)
przewodów głośnikowych.
24
RQT9498
Page 25

Подсоединения
Эти изделия представляют собой
дополнительные специально
предназначенные динамики для
модели SC-BTX70/SC-BTX68, которые
следует использовать совместно с
дополнительной беспроводной системой
Panasonic SH-FX70. Не подсоединяйте
эти динамики к другому оборудованию.
Подсоедините дополнительную беспроводную
систему Panasonic SH-FX70.
• Относительно подробностей обращайтесь к
соответствующим инструкциям по эксплуатации.
C
Подсоедините шнур динамика d к разъемам
динамиков e.
d Шнур динамика поставляется с беспроводной
системой SH-FX70.
Обязательно подсоединяйте положительные
провода f только к положительным (+) разъемам, а
отрицательные провода g только к отрицательным
(–) разъемам.
Нажмите пружинный рычаг, чтобы открыть гнездо для
провода, затем вставьте шнур перед тем высвободить
пружинный рычаг.
ПРИМЕЧАНИЕ
Никогда не закорачивайте положительные (+) и
отрицательные (–) провода динамиков.
Під’єднання
Ці вироби, що не входять до комплекту,
є динаміками виключного призначення
для SC-BTX70/SC-BTX68. Їх слід об’єднати
та використовувати з бездротовою
системою Panasonic SH-FX70, яку можна
придбати окремо. Не підключайте ці
динаміки до іншого обладнання.
Підключіться до додаткової бездротової системи
Panasonic SH-FX70.
• За докладною інформацією зверніться до
відповідної інструкції з експлуатації.
C Під’єднайте кабель динаміка d до гнізд
динаміка e.
d Кабель динаміка, що постачається з бездротовою
системою SH-FX70.
Перевірте підключення плюсового дроту f до
гнізда з позначкою (+) та мінусового дроту g до
гнізда з позначкою (–).
Натисніть пружний важіль для відкриття отвору в
гнізді, потім вставте кабель та відпустіть важіль.
ЗАСТЕРЕЖЕННЯ
Ніколи не закорочуйте плюсовий (+) та мінусовий
(-) дроти динаміка.
РУССКИЙ ЯЗЫК
УКРАЇНСЬКА
RQT9498
25
Page 26

ČESKYPOLSKI
62 mm
155 mm
Ø 7,5 až 9,4 mm
Ø7,5 do 9,4 mm
от ø7,5 до 9,4 мм
Ø від 7,5 до 9,4 мм
3 až 5 mm
Od 3 do 5 mm
от 3 до 5 мм
від 3 до 5 мм
Možnosti instalace
Neaplikujte přílišnou sílu na síťku čelní strany
reprosoustavy. Čelní síťku nelze odejmout.
РУССКИЙ ЯЗЫК
УКРАЇНСЬКА
Připevnění na zeď
Šroub h (není přiložen) zašroubujte do zdi.
• Přesvědčte se, že je šroub h umístěn nejméně 62
mm od stropu.
Zeď, na kterou bude reprosoustava zavěšena, a vrut
h (není přiložen) použitý pro instalaci reprosoustavy
musí být dostatečně dimenzované, aby byly schopny
unést hmotnost alespoň 10 kg. Poraďte se s fi rmou,
která provádí instalaci.
Při instalaci reprosoustavy na dřevěný stojan
nebo sloupek se používá šroub, který je dlouhý
minimálně 30 mm (p viz výše). Ve všech
ostatních případech použijte šroub, který je
schopen unést alespoň 10 kg.
POZOR
Neumisť ujte tuto reprosoustavu na zeď nebo strop
jinak, než je zde popsáno.
Reprosoustavu spolehlivě nasaďte na šroub s
otvorem.
i Při pohybu reprosoustavou v této pozici doleva či
doprava pravděpodobně spadne.
j Reprosoustavu usaďte tak, aby byl šroub v této
poloze.
Připevnění stabilizačního lanka
k Vodič (není přiložen)
Šroub h (není přiložen) zašroubujte do zdi.
(p viz výše (Připevnění na zeď))
Sposoby mocowania
Nie wywieraj nadmiernej siły na siatkę z przodu
głośnika. Nie można zdjąć siatki przedniej.
Mocowanie do ściany
Wkręć wkręt h (nie dołączony) w ścianę.
• Upewnij się, czy wkręt h znajduje się przynajmniej
62 mm od sufitu.
Ściana, do której ma być przymocowany głośnik, i wkręt
h (nie dołączony) używany do mocowania głośnika
muszą mieć wystarczającą wytrzymałość, aby mogły
utrzymać ciężar przynajmniej 10 kg. Skonsultuj się z
osobą odpowiedzialną za wykonanie pracy.
W przypadku mocowania głośnika do drewnianego
słupa lub podpory wymagany jest wkręt o długości
przynajmniej 30 mm (p patrz powyżej). We wszystkich
innych przypadkach użyj wkrętu o wytrzymałości takiej,
aby mogł utrzymać ciężar przynajmniej 10 kg.
OSTRZEŻENIE
Nie zawieszaj głośnika na ścianie lub sufi cie w inny
sposób niż tutajpodane.
Zawieś pewnie głośnik na jego otworze na wkręcie.
i W takim położeniu głośnik może łatwo spaść, jeżeli
zostanie przesunięty w prawo lub w lewo.
j Przesuń głośnik tak, aby wkręt znalazł się w tym
położeniu.
Mocowanie kabla stabilizującego
k Kabel (nie dołączony)
Wkręć wkręt h (nie dołączony) w ścianę.
(p patrz powyżej (Mocowanie do ściany))
26
RQT9498
Page 27

Přibližně 150 mm
Około 150 mm
Приблиз. 150 мм
прибл. 150 мм
ČESKYPOLSKI
Варианты установки
Не прилагайте чрезмерную силу к сетке на
передней поверхности блока динамика. Вы не
можете удалить переднюю сетку.
Прикрепление к стене
Ввинтите винт h (не прилагается) в стену.
•
Убедитесь в том, что винт h расположен не ближе,
чем 62 мм от потолка.
Стена, на которую крепится динамик, и шурупы h (не
прилагается), используемые для установки динамика,
должны выдерживать вес по крайней мере 10 кг.
Проконсультируйтесь у ответственного подрядчика.
При установке динамика на деревянной стойке или
колонне используется шуруп длиной по крайней
мере 30 мм (p см. выше). Во всех других случаях
используйте шуруп, который выдерживает вес по
крайней мере 10 кг.
ПРИМЕЧАНИЕ
Не прикрепляйте этот динамик к стене или к потолку
используя методы, отличающиеся от описанных здесь.
Надежно поместите динамик отверстием на винт.
i В таком положении динамик, вероятно, упадет,
если его передвинуть влево или вправо.
j Передвиньте динамик так, чтобы винт был в
этом положении.
Прикрепление стабилизирующего провода
k Провод (не прилагается)
Ввинтите винт h (не прилагается) в стену.
(p см. выше (Прикрепление к стене))
Варіанти встановлення
Не докладайте зусилля для знімання решітки
на передній панелі динаміка. Передня решітка з
динаміків не знімається.
Закріплення на стіні
Вкрутіть гвинт h (не входить до комплекту)
у стіну.
• Переконайтеся, що гвинт h розташовано на
відстані щонайменше 62 мм від стелі.
Стіна, на яку монтується динамік, та гвинти h (не
входять до комплекту), що використовуються для
закріплення динаміка, повинні бути достатньо міцними,
щоб витримати вагу щонайменше 10 кг. Порадьтеся з
тим, хто виконуватиме монтаж.
При встановленні динаміка на дерев’яну стійку
або стовп використовуються гвинти довжиною
щонайменше 30 мм (p див. вище). В усіх інших
випадках використовуйте гвинти, які достатньо
міцні, щоб утримувати вагу 10 кг.
ЗАСТЕРЕЖЕННЯ
Не закріплюйте цей динамік на стінах або на стелі,
використовуючи інші способи, які не описані у цьому
розділі.
Припасуйте отвір динаміка точно до гвинта.
i У цьому положенні динамік цілком імовірно
впаде, якщо його зсунути вліво чи вправо.
j Зсуньте динамік так, щоб гвинт зайняв таке
положення.
Підключення дроту кріплення
k
Дріт (до комплекту не входить)
Вкрутіть гвинт h (не входить до комплекту) у
стіну. (p див. Вище (Закріплення на стіні))
РУССКИЙ ЯЗЫК
УКРАЇНСЬКА
RQT9498
27
Page 28

Poznámky
Uwagi
Upozornění
Tyto reprosoustavy používejte pouze se systémem
k výlučnému použití. Při porušení těchto pokynů
může dojít k poškození zesilovače a/nebo
reprosoustav a hrozí nebezpečí vzniku požáru. V
případě poškození nebo náhlé změny výkonu se
ČESKYPOLSKI
obraťte na kvalifikovaného servisního technika.
Ochranný prvek
Součástí těchto jednotek jsou ochranné prvky, které
však jednotky nechrání před poškozením způsobeným
nesprávným použitím. Tyto reprosoustavy používejte
pouze se systémem k výlučnému použití.
Poznámky týkající se přetížení
Reprodukce zvuku vysoké hlasitosti po delší dobu
může způsobit poškození Vašich reprosoustav a
zkrátit jejich životnost.
Abyste se vyhnuli poškození, snižte v následujících
případech hlasitost:
• Při reprodukci zkresleného zvuku.
• Když reprosoustavy přijímají zpětnou vazbu (pískání)
z mikrofonu nebo gramofonu, při příjmu šumu z
FM vysílání nebo při příjmu kontinuálního signálu z
oscilátoru, testovacího disku nebo z elektronických
přístrojů.
• Při nastavování barvy zvuku.
• Při zapínání nebo vypínání zesilovače.
Další poznámky
Tyto reprosoustavy nemají magnetické stínění.
Neumisťujte jej poblíž televizoru, počítače nebo jiných
zařízení, která lze ovlivnit magnetickým polem.
Nenechávejte v blízkosti předměty, které by se mohly
zmagnetovat.
Pokud byste nechali v blízkosti reproduktorových soustav
magnetické karty, bankovní karty, magnetické klíče apod.,
mohlo by dojít ke znehodnocení jejich magnetického
záznamu. Může dojít i ke zmagnetování hodinek.
Reprosoustavy neumist’ujte na níže popsaných
místech:
• Na přímém slunečním svitu
• V blízkosti topidel nebo jiných zdrojů tepla
• Na místech s vysokou vlhkostí
Ostrzeżenie
Korzystaj z tych głośników tylko dla systemu, dla
którego są wyłącznie przeznaczone. Niestosowanie
się do tego zalecenia może doprowadzić do
uszkodzenia wzmacniacza i/lub głośników i może
być przyczyną ryzyka pożaru. Jeżeli dojdzie do
uszkodzenia lub wystąpi nagła zmiana w działaniu,
poradź się wykwalifikowanego pracownika
serwisu.
Elementy ochronne
W głośnikach znajdują się elementy ochronne.
Nie chronią one jednak ich przed uszkodzeniami
spowodowanymi nieprawidłowym uż ywaniem.
Korzystaj z głośników wyłącznie dla systemu, dla
którego są wyłącznie przeznaczone.
Zbyt wysoka moc wejściowa
Jeżeli będziesz długo odtwarzał bardzo głośne
dźwięki, możesz uszkodzić głośniki i skrócić ich
żywotność.
W następujących przypadkach zmniejsz głośność,
aby zapobiec uszkodzeniu:
• Podczas odtwarzania zniekształconego dźwięku.
• Podczas odtwarzania przez głośniki wyjących
dźwięków z mikrofonu lub odtwarzacza płyt, zakłóceń
w audycjach FM lub ciągłych sygnałów z oscylatora,
płyty kontrolnej lub urządzenia elektronicznego.
• Podczas regulacji brzmienia dźwięku.
• Podczas włączania i wyłączania wzmacniacza.
Inne uwagi
Głośniki nie są ekranowane magnetycznie.
Nie ustawiaj go w pobliżu telewizora, komputera
lub innych urządzeń ulegających wpływowi pola
magnetycznego.
Przedmioty namagnesowane trzymaj z dala.
Karty magnetyczne, karty bankomatowe, bilety z
paskami magnetycznymi itp. mogą zostać uszkodzone,
jeśli znajdą się zbyt blisko magnesów głośnika. Może
to również dotyczyć zegarów.
Unikaj umieszczania w miejscach opisanych poniżej:
• Wystawionych na bezpośrednie nasłoreczrienie
•
W pobliżu urządzeń grzewczych lub innych źródeł ciepła
• W miejscach o wysokiej wilgotności
28
RQT9498
Page 29

Примечания
Примітки
Предостережение
Используйте динамики только со специально
предназначенной системой. Несоблюдение
этого требования может вызвать повреждение
усилителя и/или динамиков и может привести
к пожару. Если произошло повреждение, или
возникло внезапное изменение характера работы,
проконсультируйтесь с квалифицированным
специалистом по техобслуживанию.
Защитный элемент
В конструкцию этих изделий входят защитные
элементы. Однако они не предохраняют эти
изделия от повреждений, вызванных неправильным
использованием. Используйте динамики только со
специально предназначенной системой.
Чрезмерно мощный входной сигнал
Вы можете повредить динамики и уменьшить срок их
службы, если Вы воспроизводите звук на высоком
уровне громкости в течение продолжительного
периода времени.
Уменьшите громкость в следующих случаях, чтобы
избежать повреждения:
• Когда воспроизводится искаженный звук.
• Когда динамики принимают “завывание” от
микрофона или проигрывателя грампластинок,
шум от FM радиовещания, или непрерывные
сигналы от осциллятора, тестового диска или
электронного инструмента.
• Когда регулируется качество звука.
• Когда усилитель включается или выключается.
Другие примечания
Эти динамики не имеют магнитного экранирования.
Не располагайте его вблизи телевизора, ПК или
других приборов, которые подвержены влиянию
магнитных полей.
Храните магнитные предметы подальше.
Магнитные карты, банковские карты, проездные
билеты и т.д. могут быть повреждены, если они
расположены слишком близко от магнитов динамиков.
Воздействие может распространяться и на часы.
Избегайте описанных ниже мест:
•
Под прямым солнечным светом
•
Вблизи нагревательных приборов и других источников
тепла
•
В местах с высокой влажностью
Увага!
Використовуйте динаміки лише із системою, для
якої вони призначені. Недотримання цієї умови
може призвести до пошкодження підсилювача
та/або динаміків, а також до виникнення
пожежі. У разі пошкодження пристрою або
різкого погіршення його роботи зверніться до
кваліфікованого спеціаліста.
Захисний елемент
Ці пристрої містять в собі захисні елементи. Проте
вони не захищають ці пристрої від ушкодження,
спричиненого неналежним використанням.
Використовуйте динаміки лише із системою, для
якої вони призначені.
Надмірна вхідна потужність
Динаміки можуть бути пошкоджені та їх строк
експлуатації скорочений, якщо протягом тривалого
часу прослуховувати звук на високій гучності.
Зменште гучність звуку в наступних випадках для
уникнення пошкоджень динаміків:
• Коли відтворюється викривлений звук.
• Коли динаміки відтворюють незвичайний
шум (виття) при використанні мікрофона
або програвача, шуми при прослуховуванні
радіопрограм FM-діапазону або постійні сигнали
від осцилятора, пробного диска чи електронних
інструментів.
• Під час регулювання якості звучання.
• При вмиканні чи вимиканні пристрою.
Інші примітки
Динаміки пристрою не обладнані магнітним екраном.
Не розташовуйте його поблизу телевізора, ПК або інших
пристроїв, що піддаються впливу магнітних полів.
Зберігайте речі з магнітними полями в іншому
місці.
Магнітні картки, банківські картки, проїздні квиткикартки та інші можуть бути пошкоджені, якщо
знаходяться занадто близько до магнітів динаміків.
Годинники також можуть піддаватися впливу.
Уникайте розташування у місцях, вказаних нижче:
•
Під прямим сонячним промінням
•
Біля нагрівальних приладів або інших джерел тепла
•
У місцях з підвищеною вологістю
РУССКИЙ ЯЗЫК
УКРАЇНСЬКА
RQT9498
29
Page 30

Údržba přístroje
Tyto jednotky čistěte měkkým čistým a suchým
hadříkem.
• Nikdy nepoužívejte líh, ředidlo nebo benzín pro
čištění těchto přístrojů.
• Před použitím chemicky impregnované látky si
prosím pečlivě přečtěte návod k utěrce přiložený.
ČESKYPOLSKI
Technické údaje
Typ Dvoupásmový systém se 3 reproduktorem.
Typ Bass-refl ex
Reproduktor
Woofer čelní:
6,5 cm Kuželový typ (Bamboo)
Woofer horní: 6,5 cm Kuželový typ x 1 ks
Výškový reproduktor:
5 cm Kuželový typ (Bamboo)
Impedance 6 Ω
Příkon (IEC) 125 W (MAX)*1
Hladina akustického tlaku 80 dB/W (1,0 m)
Kmitočtový rozsah 80 Hz – 50 kHz (–16 dB)
100 Hz – 40 kHz (–10 dB)
Rozměry (Š x V x H) 134 mm x 246,5 mm x 114 mm
Hmotnost Přibližně 1,3 kg
Poznámka
*1 Údaj zatížení platí s fi ltrem k potlačení hloubek
výlučně používaného zesilovače.
Technickě údaje mohou být změněny bez předchozího
upozornění.
-Pokud uvidíte tento symbol-
Informace pro uživatele k likvidaci elektrických a
elektronických zařízení (domácnosti)
Tento symbol na produktech anebo v
průvodních dokumentech znamená, že
použité elektrické a elektronické výrobky
nesmí být přidány do běžného komunálního
odpadu.
Ke správné likvidaci, obnově a recyklaci doručte tyto
výrobky na určená sběrná místa, kde budou přijata
zdarma. Alternativně v některých zemích můžete vrátit
své výrobky místnímu prodejci při koupi ekvivalentního
nového produktu.
Správnou likvidací tohoto produktu pomůžete zachovat
cenné přírodní zdroje a napomáháte prevenci
potenciálních negativních dopadů na životní prostředí
a lidské zdraví, což by mohly být důsledky nesprávné
likvidace odpadů. Další podrobnosti si vyžádejte od
místního úřadu nebo nejbližšího sběrného místa.
Při nesprávné likvidaci tohoto druhu odpadu mohou být
v souladu s národními předpisy uděleny pokuty.
Pro podnikové uživatele v zemích Evropské unie
Chcete-li likvidovat elektrická a elektronická zařízení,
vyžádejte si potřebné informace od svého prodejce
nebo dodavatele.
Informace k likvidaci v ostatních zemích mimo
Evropskou unii
Tento symbol je platný jen v Evropské unii.
Chcete-li tento výrobek zlikvidovat, vyžádejte si potřebné
informace o správném způsobu likvidace od místních
úřadů nebo od svého prodejce.
RQT9498
30
x 1 ks
x 1 ks
Konserwacja
Czyść urządzenia miękką, czystą, suchą szmatką.
• Nigdy nie używaj alkoholu, rozpuszczalnika do farb
lub benzyny do czyszczenia niniejszych urządzeń.
• W razie używania chemicznie impregnowanej
ściereczki, starannie przeczytaj zalecenia dołączone
do ściereczki.
Dane techniczne
Typ System 2-drożny, 3-głośnikowy z układem
odbicia basów
Głośnik
Głośnik niskotonowy przedni:
6,5 cm Typ stożkowy (Bamboo)
Głośnik niskotonowy górny: 6,5 cm Typ stożkowy x 1
Głośnik wysokotonowy:
5 cm Typ stożkowy (Bamboo)
Impedancja 6 Ω
Moc wejściowa (IEC) 125 W (MAX)*1
Poziom ciśnienia akustycznego 80 dB/W (1,0 m)
Zakres częstotliwości 80 Hz – 50 kHz (dla –16 dB)
100 Hz – 40 kHz (dla –10 dB)
Wymiary (szer. x wys. x głęb.)
134 mm x 246,5 mm x 114 mm
Masa Około 1,3 kg
Uwaga
*1
Wartość dla fi ltra wysokoprzepustowego wzmacniacza,
dla którego głośniki są wyłącznie przeznaczone.
Producent zastrzega sobie możliwość wprowadzenia
zmian bez uprzedzenia.
-Jeżeli widzisz następujące oznaczenie-
Informacja dla użytkowników o pozbywaniu się
urządzeń elektrycznych i elektronicznych (dotyczy
gospodarstw domowych)
Przedstawiony symbol umieszczony na
produktach lub dołączonej do nich dokumentacji
informuje, że niesprawnych urządzeń
elektrycznych lub elektronicznych nie można
wyrzucać razem z odpadami gospodarczymi.
Prawidłowe postępowanie w razie konieczności pozbycia
się urządzeń elektrycznych lub elektronicznych, utylizacji,
powtórnego użycia lub odzysku podzespołów polega na
przekazaniu urządzenia do wyspecjalizowanego punktu
zbiórki, gdzie będzie przyjęte bezpłatnie. W niektórych
krajach produkt można oddać lokalnemu dystrybutorowi
podczas zakupu innego urządzenia.
Prawidłowa utylizacja urządzenia umożliwia zachowanie
cennych zasobów i uniknięcie negatywnego wpływu
na zdrowie i środowisko, które może być zagrożone
przez nieodpowiednie postępowanie z odpadami.
Szczegółowe informacje o najbliższym punkcie zbiórki
można uzyskać u władz lokalnych.
Nieprawidłowa utylizacja odpadów zagrożona jest
karami przewidzianymi w odpowiednich przepisach
lokalnych.
Użytkownicy biznesowi w krajach Unii Europejskiej
W razie konieczności pozbycia się urządzeń
elektrycznych lub elektronicznych, prosimy skontaktować
się z najbliższym punktem sprzedaży lub z dostawcą,
którzy udzielą dodatkowych informacji.
Pozbywanie się odpadów w krajach poza Unią
Europejską
Taki symbol jest ważny tylko w Unii Europejskej.
W razie potrzeby pozbycia się niniejszego produktu
prosimy skontaktować się z lokalnymi władzami lub ze
sprzedawcą celem uzyskania informacji o prawidłowym
sposobie postępowania.
x 1
x 1
Page 31

Уxoд
Для очистки Данного аппарата используйте мягкую,
чистую и сухую ткань.
• Никогда не используйте для оцистки аппарата
спирт, растворитель или бензин.
• При использоваии ткани, подвергнутой химиуеской
обработке, обратитесь к инструкции по обращению
с ней.
Обслуговування
Протирайте пристрої м’якою сухою та чистою
тканиною.
• Не використовуйте для чищення пристроїв спирт,
розріджувач або бензин.
• Перш ніж застосовувати хімічно оброблену
тканину, уважно ознайомтеся з інструкціями для
її використання.
Texничecкиe xapaктepиcтики
Тип 2-полосная система с 3 динамиками
Отражающего бас типа
Динамик
Передний НЧ-динамик:
6,5 см Конический тип (Bamboo)
Верхний НЧ-динамик: 6,5 см Конический тип х 1
ВЧ-динамик (твитер):
5см Конический тип (Bamboo)
Импеданс 6 Ом
Входная мощность (IEC) 125 Вт (MAX)*1
Уровень звукового давления 80 дБ/Вт (1,0 м)
Частотный диапазон 80 Гц – 50 кГц (при –16 дБ)
100 Гц – 40 кГц (при –10 дБ)
Размеры (Ш x В x Г) 134 мм x 246,5 мм x 114 мм
Масса Приблиз. 1,3 кг
Примечание
*1 Измерено со специально предназначенным
усилителем, оборудованным фильтром
отсечения низких частот.
Технические характеристики могут быть изменены
без уведомления.
-Если Вы увидите такой символ-
Информация по обращению с отходами для
стран, не входящих в Европейский Союз
Действие этого символа распространяется
Если Вы собираетесь выбросить данный
только на Европейский Союз.
продукт, узнайте в местных органах власти
или у дилера, как следует поступать с
отходами такого типа.
Информация для покупателя
Название продукции: Акустическая система
Название страны производителя: Малайзия
Название производителя: Панасоник Корпорэйшн
Юридический адрес: 1006 Кадома, Осака, Япония
Дата производства: Вы можете уточнить год и
Пример маркировки—Серийный номер
Год: Трeтья цифра в серийном номере
Месяц: Четвeртая бy
Примечание: Сентябрь может укаэываться как “S”
Дополнительная информация:
месяц по серийному номеру на табличке.
№ XX1AXXXXXXX (X-любая цифра или буква)
(1—2001, 2—2002, ... 0—2010)
ква в серийном номере
(А—Январь, В—Февраль, ...L—Декабрь)
вместо “I”.
внимательно прочитайте инструкцию по эксплуатации.
Пожалуйста
Установленный производителем в порядке п. 2
ст. 5 федерального закона РФ “О защите прав
потребителей” срок службы данного изделия
равен 7 годам с даты производства при условии,
что изделие используется в строгом соответствии
с настоящей инструкцией по эксплуатации и
применимыми техническими стандартами.
х 1
х 1
Технічні характеристики
Тип двостороння система з 3 динаміком,
тип Фазоінвертор (Bass refl ex)
Динамік
Передній НЧ-динамік:
6,5 cм Конічного типу (Bamboo)
Верхній НЧ-динамік: 6,5 cм Конічного типу x 1
ВЧ-динамiк (твiтер):
5cм Конічного типу (Bamboo)
Імпеданс 6 Ω
Вхідна потужність (IEC) 125 Вт (макс.)*1
Рівень звуку 80 дБ/Вт (1,0 м)
Діапазон частот 80 Гц – 50 кГц (при –16 дБ)
100 Гц – 40 кГц (при –10 дБ)
Розміри (Ш х В х Г) 134 мм x 246,5 мм x 114 мм
Вага прибл. 1,3 кг
Примітка
*1 Характеристики з фільтром високих частот для
спеціально призначеного підсилювача.
Технічні характеристики можуть змінюватись без
сповіщення.
-За наявності цього знаку-
Інформація щодо утилізації в країнах, які не
входять в Європейський Союз
Даний символ дійсний тільки на території
Європейського Союзу.
При потребі утилізації даного виробу
зверніться до місцевого керівництва
або дилера щодо правильного методу її
здійснення.
Інформація для покупця
Назва продукту: Акустична система
Назва країни виробника: Малайзія
Назва виробника:
Юридична адреса: 1006 Кадома, Осака, Японія
Дата виробництва: Ви можете довідатися про рік
та місяць із серійного номера на табличці.
Приклад маркування — серійний номер
№ XX1AXXXXXXX (X-будь-яка цифра або літера)
Рік: третій символ (цифра) у серійному номері
Місяць: четвертий символ (літера) у серійному номері
Примітка: вересень може вказуватися як “S” замість “I”.
Додаткова інформація: Будь ласка, уважно
Панасонік Корпорейшн
(1—2001, 2—2002, ... 0—2010)
(А—січень, В—лютий, ...L—грудень)
прочитайте інструкцію з експлуатації
Установлений виробником згідно з п. 2 ст.
5 федерального закону РФ “О защите прав
потребителей” строк служби даного виробу
дорівнює 7 рокам з дати виробництва за умови,
що виріб використовується у точній відповідності
з цією інструкцією з експлуатації і застосовними
технічними стандартами.
x 1
x 1
РУССКИЙ ЯЗЫК
УКРАЇНСЬКА
RQT9498
31
Page 32

Web Site: http://panasonic.net
Der tages forbehold for trykfejl.
En
Ge Fr It Sp Du
Da Cz Po Ru UrSw
RQT9498-E
M0409TK0
 Loading...