

Panasonic SA-PTX7, SB-FCX9, SB-HWX7 Operating Instructions Manual
Operating Instructions
Q
UICK STAR
T GUIDE
DVD Home Theater Sound System
Model No. SC-PTX7
VOLUME
Dear customer
Thank you for purchasing this product.
For optimum performance and safety, please read these instructions carefully.
Before connecting, operating or adjusting this product, please read the instructions completely.
Please keep this manual for future reference.
T GUID
UICK S
QUICK START GUIDE P9 – 18
System SC-PTX7
Main unit SA-PTX7
Front/center
speakers
Subwoofer SB-HWX7
SB-FCX9
Region number supported by this unit
Region numbers are allocated to DVD players and DVD-Video according to
where they are sold.
≥The region number of this unit is “2”.
≥The unit will play DVD-Video marked with labels containing “2” or “ALL”.
Web Site: http://www.panasonic-europe.com
[Note]
“EB” on the packaging indicates the United Kingdom.
Example:
2 ALL
2
3
5
EB
RQT8927-B
Features
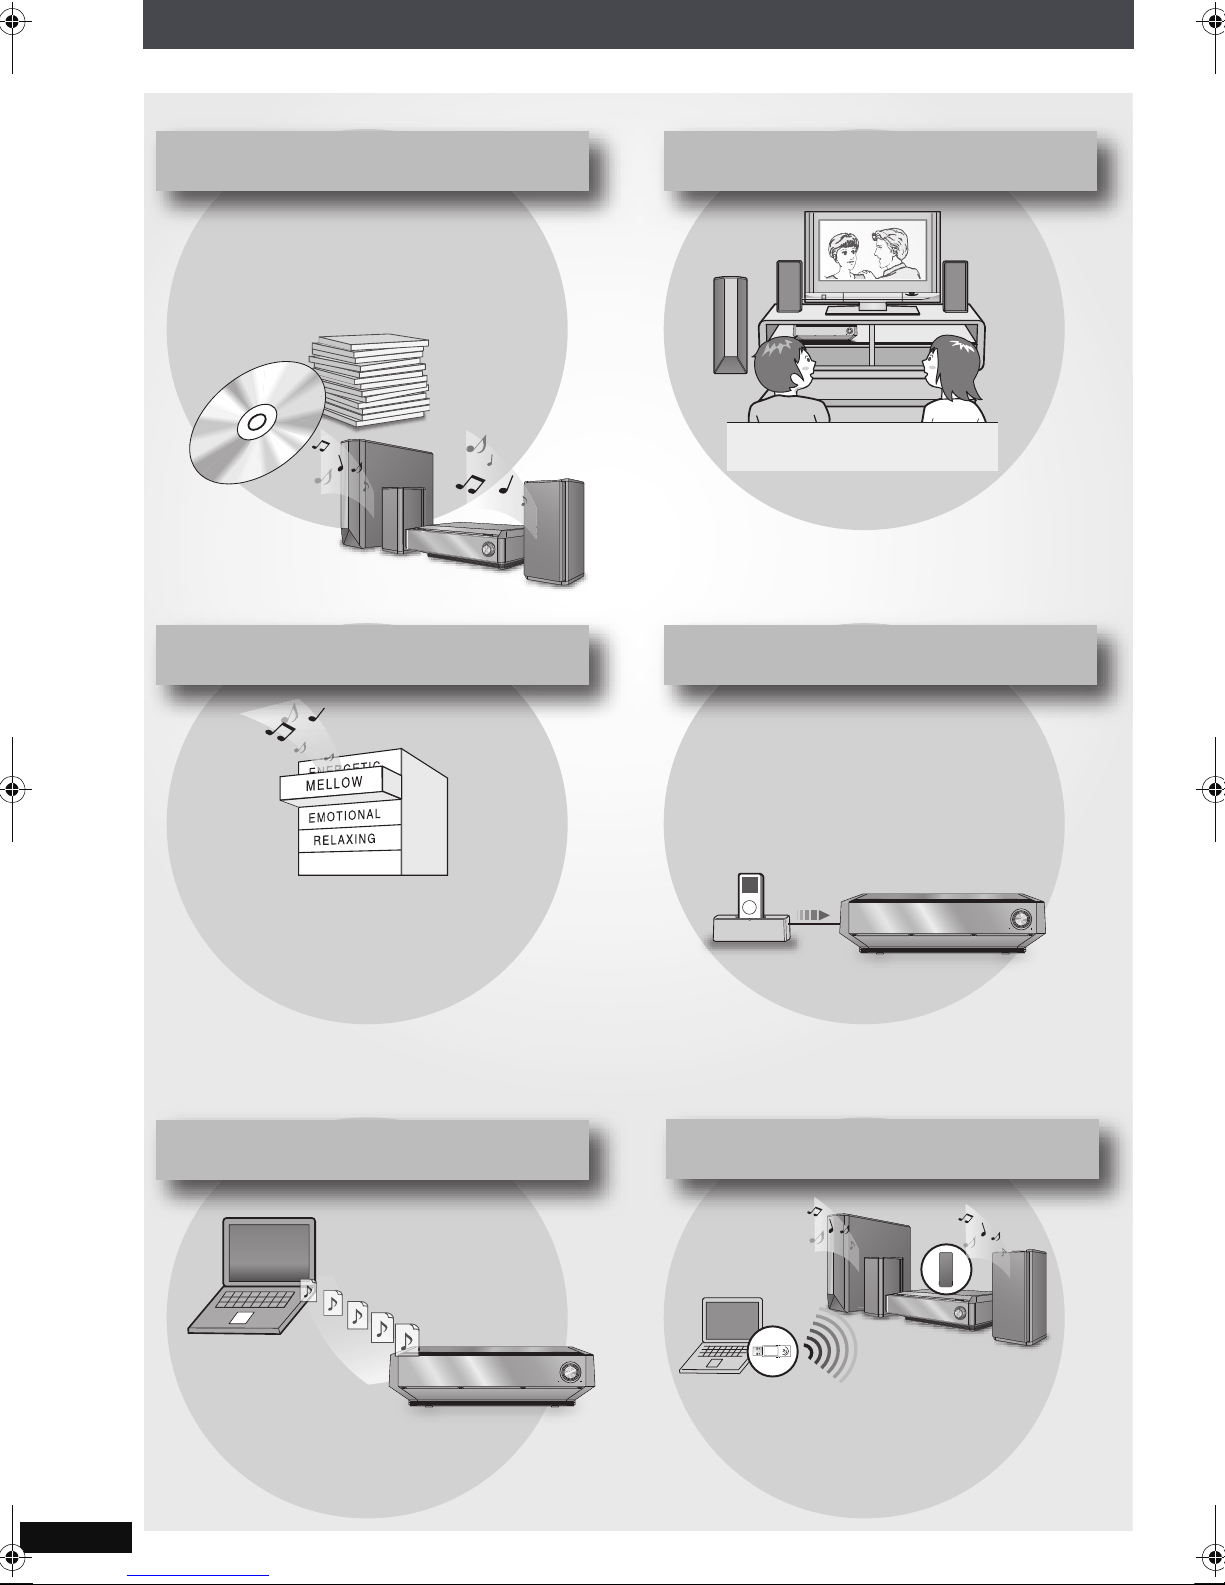
High Speed Recording from CD to HDD
(up to 4X recording speed)
Recorded songs are automatically provided with the
title, artist, and other information by the built-in
Gracenote database
§
.
§A connection to the Internet is necessary to obtain
the newest CD title information.
(➜ page 28)
Easy Location of HDD recording
contents
(➜ page 32)
DVD Playback
(➜ page 37)
VOLUME
ޓ
You can enjoy DVD movie software with the
included 3.1 ch speakers.
iPod recording/playings
(➜ page 72)
≥You can search for tracks recorded to the HDD by
using several methods such as song title, artist,
album, most recently recorded, or most often
played.
≥By simply pressing one of the MUSIC SHUFFLE
buttons, you can play tracks that have a certain
impression or mood (Energetic, Mellow, Relaxing,
or Emotional).
Import WMA/MP3 from a PC
(➜ page 44) (➜ page 74)
You can record tracks in iPod to the HDD, and
also play tracks in iPod using this unit’s speakers.
VOLUME
Playing tracks from your PC wirelessly
through this unit’s speakers
You can import WMA/MP3 from a PC via a
network connection.
RQT8927
2
VOLUME
By using the optional Panasonic wireless audio
kit SH-FX570K (not included), you can enjoy
audio tracks from your PC on this unit
wirelessly.
Caution for AC Mains Lead
For your safety, please read the following text carefully.
This appliance is supplied with a moulded three pin
mains plug for your safety and convenience.
A 5-ampere fuse is fitted in this plug.
Should the fuse need to be replaced please ensure that
the replacement fuse has a rating of 5-ampere and that
it is approved by ASTA or BSI to BS1362.
Check for the ASTA mark Ï or the BSI mark Ì on the
body of the fuse.
If the plug contains a removable fuse cover you must
ensure that it is refitted when the fuse is replaced.
If you lose the fuse cover the plug must not be used
until a replacement cover is obtained.
A replacement fuse cover can be purchased from your
local dealer.
CAUTION!
IF THE FITTED MOULDED PLUG IS UNSUITABLE
FOR THE SOCKET OUTLET IN YOUR HOME THEN
THE FUSE SHOULD BE REMOVED AND THE
PLUG CUT OFF AND DISPOSED OF SAFELY.
THERE IS A DANGER OF SEVERE ELECTRICAL
SHOCK IF THE CUT OFF PLUG IS INSERTED
INTO ANY 13-AMPERE SOCKET.
If a new plug is to be fitted please observe the wiring
code as stated below.
If in any doubt please consult a qualified electrician.
IMPORTANT
The wires in this mains lead are coloured in accordance
with the following code:
Blue: Neutral, Brown: Live.
As these colours may not correspond with the coloured
markings identifying the terminals in your plug, proceed
as follows:
The wire which is coloured Blue must be connected to
the terminal which is marked with the letter N or
coloured Black or Blue.
The wire which is coloured Brown must be connected to
the terminal which is marked with the letter L or
coloured Brown or Red.
WARNING: DO NOT CONNECT EITHER WIRE TO
THE EARTH TERMINAL WHICH IS MARKED WITH
THE LETTER E, BY THE EARTH SYMBOL Ó OR
COLOURED GREEN OR GREEN/YELLOW.
THIS PLUG IS NOT WATERPROOF—KEEP DRY.
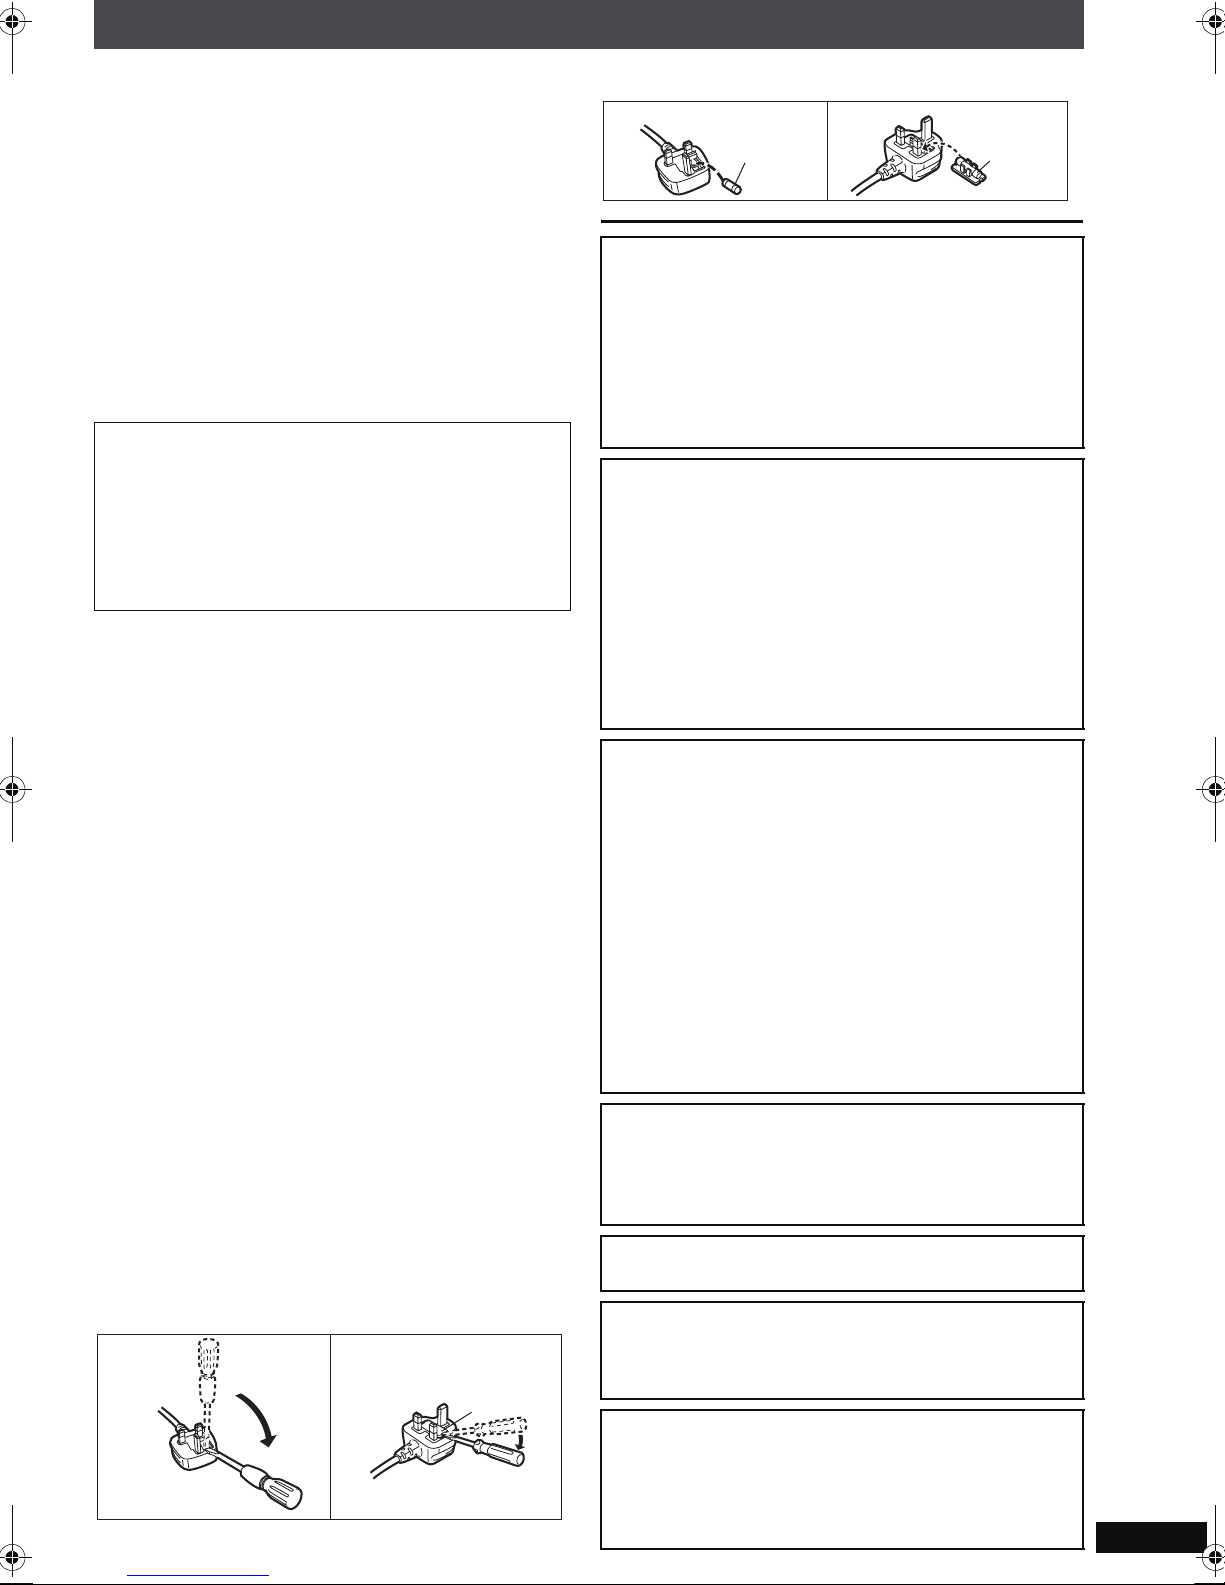
Before use
Remove the connector cover.
How to replace the fuse
The location of the fuse differ according to the type of
AC mains plug (figures A and B). Confirm the AC mains
plug fitted and follow the instructions below.
Illustrations may differ from actual AC mains plug.
2. Replace the fuse and close or attach the fuse cover.
Figure A
Fuse
(5 ampere)
Figure B
Fuse
(5 ampere)
CAUTION!
THIS PRODUCT UTILIZES A LASER.
USE OF CONTROLS OR ADJUSTMENTS OR
PERFORMANCE OF PROCEDURES OTHER THAN
THOSE SPECIFIED HEREIN MAY RESULT IN
HAZARDOUS RADIATION EXPOSURE.
DO NOT OPEN COVERS AND DO NOT REPAIR
YOURSELF. REFER SERVICING TO QUALIFIED
PERSONNEL.
WARNING:
TO REDUCE THE RISK OF FIRE, ELECTRIC
SHOCK OR PRODUCT DAMAGE,
≥
DO NOT EXPOSE THIS APPARATUS TO RAIN,
MOISTURE, DRIPPING OR SPLASHING AND THAT
NO OBJECTS FILLED WITH LIQUIDS, SUCH AS
VASES, SHALL BE PLACED ON THE APPARATUS.
≥
USE ONLY THE RECOMMENDED ACCESSORIES.
≥DO NOT REMOVE THE COVER (OR BACK);
THERE ARE NO USER SERVICEABLE PARTS
INSIDE. REFER SERVICING TO QUALIFIED
SERVICE PERSONNEL.
CAUTION!
≥DO NOT INSTALL OR PLACE THIS UNIT IN A
BOOKCASE, BUILT-IN CABINET OR IN
ANOTHER CONFINED SPACE. ENSURE THE
UNIT IS WELL VENTILATED. TO PREVENT RISK
OF ELECTRIC SHOCK OR FIRE HAZARD DUE
TO OVERHEATING, ENSURE THAT CURTAINS
AND ANY OTHER MATERIALS DO NOT
OBSTRUCT THE VENTILATION VENTS.
≥
DO NOT OBSTRUCT THE UNIT’S VENTILATION
OPENINGS WITH NEWSPAPERS, TABLECLOTHS,
CURTAINS, AND SIMILAR ITEMS.
≥DO NOT PLACE SOURCES OF NAKED FLAMES,
SUCH AS LIGHTED CANDLES, ON THE UNIT.
≥DISPOSE OF BATTERIES IN AN
ENVIRONMENTALLY FRIENDLY MANNER.
CAUTION
Danger of explosion if battery is incorrectly replaced.
Replace only with the same or equivalent type
recommended by the manufacturer. Dispose of used
batteries according to the manufacturer’s instructions.
THIS UNIT IS INTENDED FOR USE IN MODERATE
CLIMATES.
1. Open the fuse cover with a screwdriver.
Figure A Figure B
Fuse cover
This product may receive radio interference caused
by mobile telephones during use. If such interference
is apparent, please increase separation between the
product and the mobile telephone.
The socket outlet shall be installed near the
equipment and easily accessible. The mains plug of
the power supply cord shall remain readily operable.
To completely disconnect this apparatus from the AC
Mains, disconnect the power supply cord plug from
AC receptacle.
RQT8927
3
Table of contents
UICK STAR
T GUIDEQ
UICK STAR
T GUIDE
Getting
Started
Basic
Operations
Features ..................................................... 2
Caution for AC Mains Lead.......................3
■ Read Me First
Safety precautions ....................................6
Cautions about personal and recorded
data........................................................... 6
HDD (Hard disk drive) handling care....... 7
Accessories .............................................8
QQUICK S
UICK S
QUICK START GUIDE
Control reference guide..........................9
STEP1 Speaker location....................12
STEP2 Basic connections.................14
STEP3 Performing QUICK SETUP.... 16
STEP4 Setting the clock....................17
STEP5 Setting the FM radio stations
T GUID
T GUID
presets ..................................18
■ Basic recording to HDD
Before recording......................................25
A brief introduction about recording and
importing from a PC.............................. 25
®
About the Gracenote
You can make these kinds of recordings.....26
How recordings work...............................26
Recording modes.................................... 27
Recording from a CD...............................28
Setting the recording mode/recording
method..................................................28
Basic recordings......................................29
database..............25
■ Basic playback
A brief introduction about search and
playback of tracks recorded to
the HDD.................................................. 30
Playing tracks from the HDD.................. 31
Basic playback ........................................ 31
■ Information
Disc handling care ..................................19
Unit care ...................................................19
Discs used with this unit ........................20
About compatible USB devices ............. 23
Utilizing the Start menu ..........................24
Displaying track information.................. 24
Operations during playback.....................31
Searching for tracks in the HDD............. 32
Searching from various playlists.............. 32
Playing a CD or VCD ...............................36
Basic playback ........................................ 36
Selecting and playing tracks from a
commercial music CD ........................... 36
Operations during playback.....................36
Playing DVD-Video, recordable DVD or
DVD-Audio .............................................37
Basic playback
Operations during playback.....................37
Different methods of play for recordable
DVDs..................................................... 38
To play audio from your television
through this unit’s speakers ................38
.......................................... 37
■ Basic radio operations
Using the FM radio..................................39
Manual tuning..........................................39
Selecting the preset channels................. 39
■ Advanced recording to HDD
Advanced
Operations
RQT8927
Recording WMA/MP3 on recordable discs
or USB devices ..................................... 40
Basic WMA/MP3 recording..................... 40
Selecting specific WMA/MP3 tracks to
record from recordable discs or USB
devices ................................................. 40
Recording FM radio broadcasts ............ 41
Recording audio from
external devices.................................... 42
Importing WMA/MP3 from a PC ............. 44
Managing data on the HDD .................... 46
Performing conversion and analysis
immediately .......................................... 46
Compressing LPCM tracks to AAC........ 47
Viewing track or HDD information.......... 47
■ Advanced playback
4
Playing music or video files on recordable
discs or USB devices ............................48
Playing items in order (Playback Menu) ..48
Playing from the selected item (Navigation
Menu) ....................................................48
Playing HighMATTM discs .........................49
About DivX VOD content .........................49
Play mode settings of tracks recorded on
the HDD...................................................50
Repeat playback ......................................50
Random playback ....................................50
Changing the play range settings ............51
Various playback methods of discs or
data on a USB device............................52
Features for adjusting the video...............52
Switching subtitles and soundtracks........53
Changing the order and speed of play.....53
Other convenient features........................55
Using on-screen menu.............................56
Advanced
Operations
■ Advanced radio operations
Advanced radio operations .................... 59
Setting preset stations automatically.......59
Selecting the preset channels................. 59
Using FM outdoor aerial (optional).......... 59
RDS broadcasting...................................59
■ Editing
Editing playlists.......................................60
Creating a user playlist/adding tracks .....60
Removing tracks from a playlist...............61
Changing the order of a playlist...............61
Changing the name of a playlist.............. 62
Deleting a user playlist ............................63
Adding tracks to “Favorites”.....................63
Removing a track from “Favorites” ..........63
Setting of Music Shuffle information........ 64
Clearing the history for “Most Often Played”
and/or “Recently Ripped” playlists ........64
Deleting tracks........................................ 65
Changing titles.........................................66
Changing a track name manually............66
Changing an artist name or album name
manually................................................66
Searching for track names, artist names and
album names within the Gracenote database
and entering them automatically
Correcting title information obtained from
the Gracenote database .......................67
Dividing and combining tracks on
the HDD ................................................. 68
Dividing tracks .........................................68
Combining tracks.....................................69
..............67
■ VIERA Link “HDAVI Control”
Using the VIERA Link
“HDAVI Control
VIERA Link “HDAVI Control” ................... 70
Functions made possible with VIERA Link
“HDAVI Control” are... ..........................70
TM
TM
” .................................70
■ OPTION port
Operating iPod with this unit..................72
Playing tracks of iPod with the remote
control for this unit.................................73
Recording tracks from iPod to the HDD ..73
Playing audio tracks wirelessly from your
PC with this unit ....................................74
Basic play ................................................75
Playing tracks from your PC with the remote
control for this unit.................................75
Recording wirelessly transmitted tracks to
the HDD ................................................75
■ Convenient functions
Changing audio quality/sound field.......76
Setting the sound effects .........................76
Setting the volume balance.....................76
Setting the Dolby Virtual Speaker ........... 77
Setting the sound effects for digital
broadcasts or satellite receiver .............77
Using the scheduled timer recording
function ..................................................78
Setting the details of the scheduled timer
recording............................................... 78
Selecting the settings for the scheduled
timer recording you want to use............ 79
Using other convenient functions .........80
Setting the sleep timer ............................ 80
Muting the sound..................................... 80
Using headphones .................................. 80
Using the Music Port ...............................80
Backing up HDD data to a PC................. 81
Backing up data recorded to the HDD.....82
Restoring backed up data ....................... 83
For reference: connecting this unit
directly to a PC......................................84
Settings on this unit.................................84
Settings on the PC .................................. 84
Getting Started
Basic Operations
Advanced Operations
■ Changing the unit’s settings
Reference
Changing the settings.............................85
Changing video settings..........................85
Changing other settings ..........................88
■ Optional settings and connections
Optional remote control settings.......... 90
Optional connections............................. 91
To enjoy higher picture quality
Connecting to the set top box, satellite
receiver or video cassette recorder
Connecting to the 5.1 channel amplifier
Operations in these instructions are described mainly with the remote control, but you can perform the
operations on the main unit if the controls are the same.
................. 91
....... 92
.. 92
Connecting to the other audio
equipment .............................................93
Other video connections
Network connection
Changing the network settings ............. 96
.......................... 93
................................. 94
■ Useful information
Frequently asked questions................... 97
Messages ................................................ 98
Troubleshooting guide..........................101
Specifications ....................................... 106
Glossary .................................................108
Index ..........................................Back cover
Reference
RQT8927
5

Safety precautions
Cautions about personal
and recorded data
Placement
Set the unit up on an even surface away from direct
sunlight, high temperatures, high humidity, and
excessive vibration. These conditions can damage the
cabinet and other components, thereby shortening the
unit’s service life. Do not place heavy items on the unit.
Volt ag e
Do not use high voltage power sources. This can
overload the unit and cause a fire. Do not use a DC
power source. Check the source carefully when setting
the unit up on a ship or other place where DC is used.
AC mains lead protection
Ensure the AC mains lead is connected correctly and
not damaged. Poor connection and lead damage can
cause fire or electric shock. Do not pull, bend, or place
heavy items on the lead.
Grasp the plug firmly when unplugging the lead. Pulling
the AC mains lead can cause electric shock. Do not
handle the plug with wet hands. This can cause electric
shock.
∫ Indemnity concerning recorded content
Panasonic does not accept any responsibility for
damages directly or indirectly due to any type of
problems that result in loss of recording or edited
content (data), and does not guarantee any content if
recording or editing does not work properly. Likewise,
the above also applies in a case where any type of
repair is made to the unit (including any other non-HDD
related component).
∫ A warning about data management:
This unit records the history of your operations (user
information), and this history includes data such as
track data recorded, user playlist information, and the
various settings you made on this unit.
Depending on where you place this unit, your personal
information could be compromised and used by a third
party.
Use caution and discretion when considering where to
use this unit.
Also note that if this unit is sent for repair, user
information may be checked as well.
To prevent compromising your personal information,
please delete or change all personal user information
before sending in for repair.
Foreign matter
Do not let metal objects fall inside the unit. This can
cause electric shock or malfunction.
Do not let liquids get into the unit. This can cause
electric shock or malfunction. If this occurs, immediately
disconnect the unit from the power supply and contact
your dealer.
Do not spray insecticides onto or into the unit. They
contain flammable gases which can ignite if sprayed
into the unit.
Service
Do not attempt to repair this unit by yourself. If sound is
interrupted, indicators fail to light, smoke appears, or
any other problem that is not covered in these
instructions occurs, disconnect the AC mains lead and
contact your dealer or an authorized service center.
Electric shock or damage to the unit can occur if the unit
is repaired, disassembled or reconstructed by
unqualified persons.
Extend operating life by disconnecting the unit from the
power source if it is not to be used for a long time.
∫ Cautions about disposal or transferring
ownership of this unit
Before disposing or transferring ownership of this unit,
delete all recorded data and user playlist information
(➜ page 89, Delete All Tracks in the Music Collection).
Furthermore, change any settings as necessary.
In the event that user information is changed, lost,
misused, compromised, or any damage or loss occurs
as a result, Panasonic will not accept any responsibility.
Please be aware of this before using this unit.
RQT8927
6

HDD (Hard disk drive) handling care
The HDD is a high precision recording instrument and because of its long recording capability and high speed
operation it is a very special device that is easily susceptible to damage.
∫ The HDD is a device that is not built to withstand vibration/shock or dust
Depending on the setup environment and handling of the HDD some content may become damaged and play and
recording may no longer be possible. Especially during operation, do not subject the unit to any vibration, shock, or
remove the AC mains lead from the household mains socket. In the event of a power failure during recording or
play, the content may be damaged.
∫ Back up the HDD periodically
As a precaution for HDD failure, we recommend making a backup of the HDD periodically. However, in some cases
where the HDD is heavily damaged, backups may not be restored.
∫ Immediately request service as soon as you feel there may be a problem with the HDD
If there is an irregularity within the HDD, repetitive strange sounds or distortion (“broken up” audio) may result.
Using the HDD in this condition may worsen the problem and in the worst case the HDD may no longer become
usable. As soon as you notice this type of problem, request service. Recorded content (data) on an HDD that has
become unusable is unrecoverable.
∫ Setup precautions
≥Do not place in an enclosed area where the rear
cooling fan is covered up.
≥Place the unit on a surface that is flat and not
subject to vibration or impact.
≥Do not place on anything that
generates heat like a video
cassette recorder, etc.
≥Do not place in an area often
subject to temperature
changes.
Place in an area where
≥
condensation does not occur. Condensation is a
phenomenon where moisture forms on a cold surface
when there is an extreme change in temperature.
Condensation may cause internal damage to the unit.
≥Conditions where condensation may occur
–When there is an extreme change in temperature
(moving from a very hot location to a very cold
location, or vice versa, or when subjected to an air
conditioner or when cooled air directly impacts the
unit.) When the HDD (warms during operation) is
subjected to cold air, condensation may form on the
inside of the HDD and may cause damage to the
HDD heads, etc.
–When there is high humidity or a lot of steam in the
room.
–During the rainy season.
In the above situation, without turning the unit on,
let the unit adjust to the room temperature and wait 2–
3 hours until condensation is gone.
DO NOT
This unit
VCR
∫ While operating
≥Do not move the unit or subject to vibration or
impact. (The HDD may become damaged.)
≥Do not remove the AC mains lead from the
household mains socket, or flip the power breaker
switch.
While the unit is on, the HDD is rotating at high speed.
Sound or movement due to rotation is normal.
∫ When moving the unit
1
Remove the CD.
2
Turn the unit off.
3
After “GOOD-BYE” is finished displaying, remove
the plug from the wall within 2 minutes, or wait
until conversion and analysis is complete to
remove the AC mains lead from the household
mains socket.
4
Once the HDD is no longer rotating and has
come to a complete stop (after waiting about 2
minutes), move the unit carefully so as to avoid
any vibration or shock. (After the power has been
turned off, the HDD will briefly continue to rotate
due to inertia.)
After the power to the unit has been turned off, (unit
enters “Standby Mode”), if there are recorded tracks
that have not yet been converted or analysed, the
HDD will begin conversion and analysis of these
recorded tracks after about 2 minutes.
During conversion/analysis:
≥Do not remove the AC mains lead.
≥If you are using an extension cord and/or power strip
with the standby/on switch, do not switch the power
to off.
Getting Started
Read Me First
∫ Cigarette smoke, etc. causes malfunction
or breakdown
The unit may breakdown if cigarette smoke or bug
spray/vapor, etc. gets inside the unit.
RQT8927
7
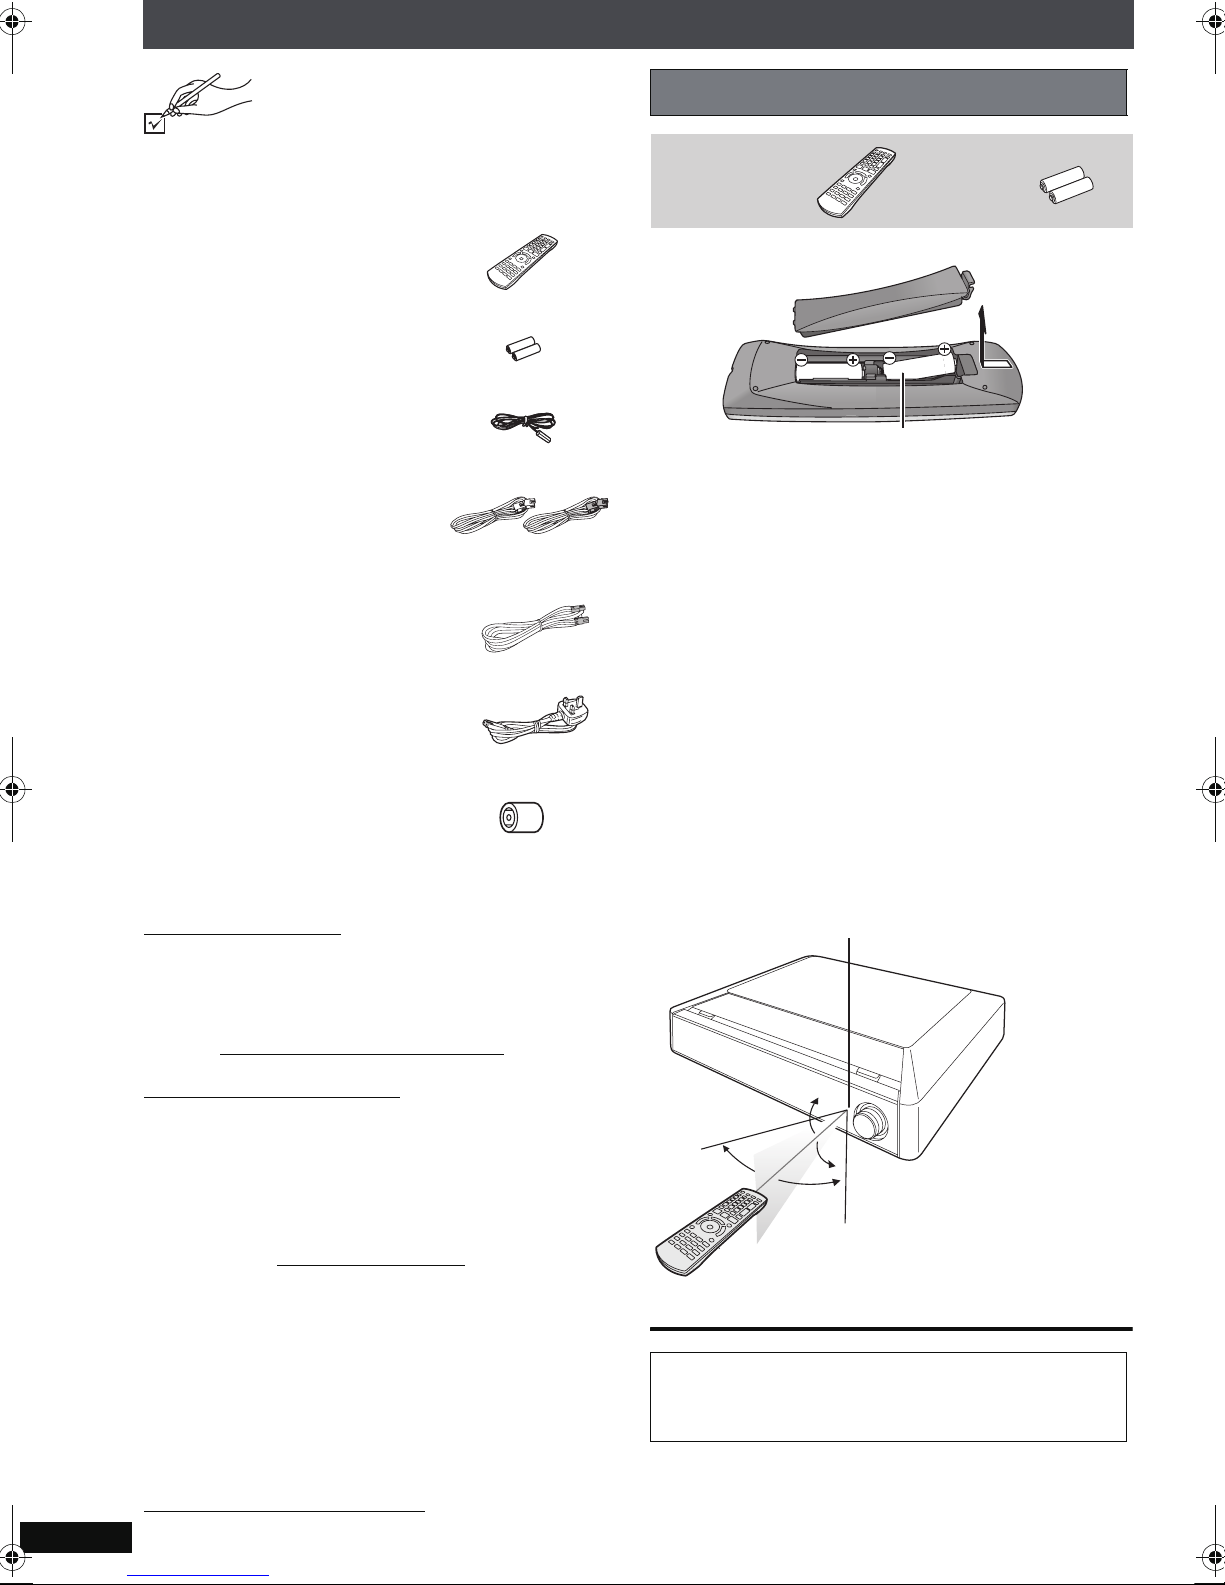
Accessories
Please check and identify the supplied
accessories.
(Product numbers correct as of
February 2007. These may be subject
to change.)
∏1 Remote control
(N2QAYB000150)
∏2 Remote control batteries
∏1 FM indoor aerial
(RSA0007-L)
∏2 Speaker cables for
front/center speaker
[REEX0720A (White)]
[REEX0720B (Red)]
∏1 Speaker cable for
subwoofer
(REE1402)
∏1 AC mains lead
(K2CT3CA00004)
∏1 Aerial plug adaptor
(K1YZ02000013)
∫ Sales and Support Information
Customer Care Centre
≥For customers within the UK: 0844 844 3852
≥
For customers within the Republic of Ireland:
01 289 8333
≥Visit our website for product information
E-mail: customer.care@panasonic.co.uk
Preparing the remote control
Remote control Batteries
Insert so the poles (i and j) match those in the
remote control.
R6/LR6, AA
≥Do not use rechargeable type batteries.
Do not:
≥mix old and new batteries.
≥use different types at the same time.
≥heat or expose to flame.
≥take apart or short circuit.
≥attempt to recharge alkaline or manganese batteries.
≥use batteries if the covering has been peeled off.
Mishandling of batteries can cause electrolyte leakage
which can severely damage the remote control.
Remove the batteries if the remote control is not going
to be used for a long period of time. Store in a cool, dark
place.
∫ Use
Aim at the remote control signal sensor, avoiding
obstacles, at a maximum range of 7 m directly in front of
the unit.
Direct Sales at Panasonic UK
≥
Order accessory and consumable items for your
product with ease and confidence by phoning our
Customer Care Centre Monday-Thursday 9:00am–
5:30pm, Friday 9:30am–5:30pm (Excluding public
holidays).
≥Or go on line through our Internet Accessory ordering
application at www.panasonic.co.uk
≥Most major credit and debit cards accepted.
≥All enquiries transactions and distribution facilities are
provided directly by Panasonic UK Ltd.
≥It couldn’t be simpler!
≥Also available through our Internet is direct shopping
for a wide range of finished products, take a browse on
our website for further details.
Interested in purchasing an extended guarantee?
Please call 0870 240 6284 or visit our website
RQT8927
www.panasonic.co.uk/guarantee
8
10°
30°
Your attention is drawn to the fact that the recording
pre-recorded tapes or discs or other published or
broadcast material may infringe copyright laws.
.
30°
30°
QUICK START GUIDE
QUICK START GUIDE
ENTER
Q
UICK STAR
T GUIDE
QUICK START GUIDE
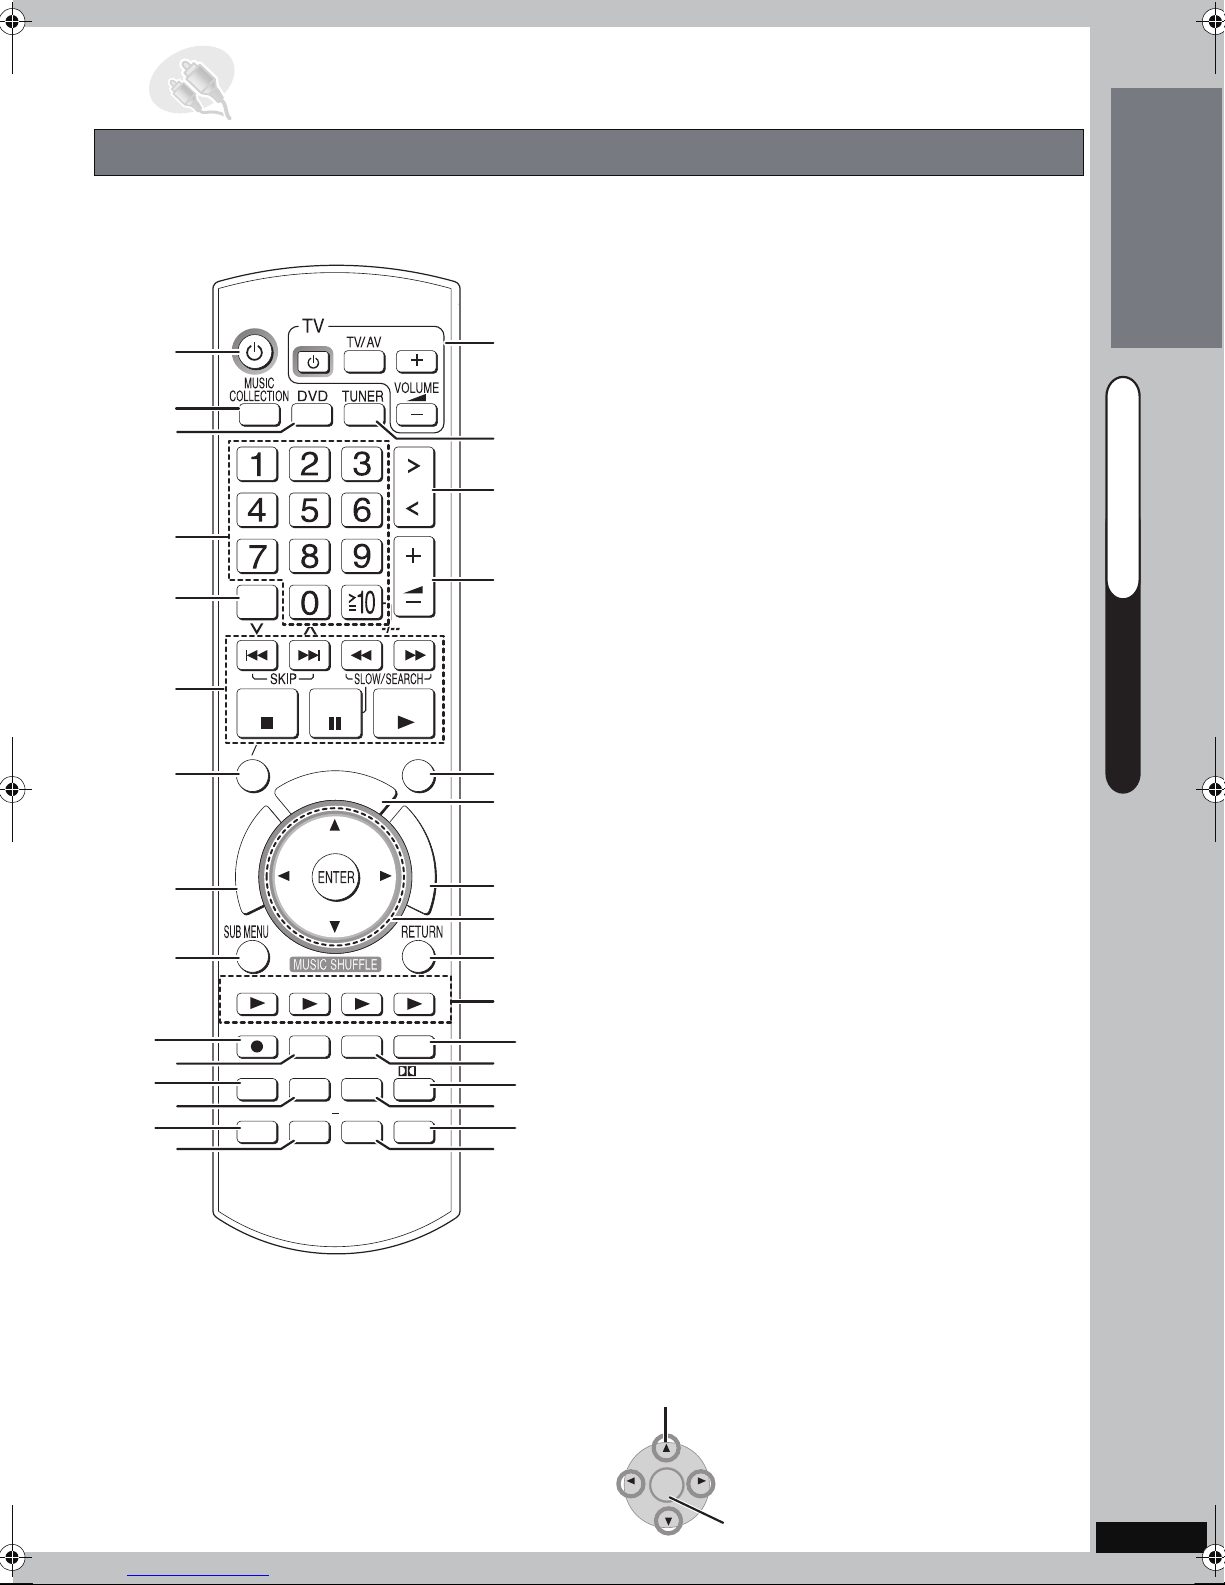
Control reference guide
Remote control
Instructions for operations are generally described using the remote control.
HDD
CANCEL
MENU PLAYLIST
T
E
N
O
R
O
T
A
G
I
V
A
U
N
T
N
C
E
E
R
I
M
D
P
ޓ
O
T
ENERGETIC RELAXINGMELLOW
CH SELECT
HDD REC
PLAY MODE
FL DISPLAY
SOUND
U
C
H
O
FAVORITE
SLEEP
SELECT
P
L
REG
SELECT
VOLUME
PLAYPAU S ESTOP
FUNCTIONS
A
Y
EMOTIONAL
QUICK OSD
MUTINGSETUP
1 Turn the unit on (➜ page 16)
2 Select the HDD drive (➜ page 31)
Getting Started
3 Select the DVD/CD drive
Select channels and title numbers, etc./Enter numbers
4
5 Cancel items
36, 37
40, 48
)
)
, 38)
6 Basic operations for playback (➜ page 31,
7 Show a disc menu or playlist (➜ page 38,
8
Show a disc top menu or program list (
➜ page 37
9 Show sub menu
: Start recording to HDD (➜ page 29)
; Select speaker channels (➜ page 76)
53
< Select play mode (➜ page 50,
)
= Switch information on the main unit’s display
–When the selector is set to “DVD/CD” or “USB”,
elapsed time, track number information etc. can be
switched depending on what is being played.
–When listening the RDS broadcasting (➜ page 59)
> Show Setup menu (➜ page 16,
85
)
T GUID
? Select the sound effect to set (➜ page 76)
@ Television operations
A Select the FM tuner
S
T
A
R
T
ޓ
ޓ
ޓ
B Select the source
Music Collection ) DVD/C D ) FM ) TV Audio
fv
OPTION (= USB (= MUSIC PORT ( AUX
C Adjust the volume
D Show FUNCTIONS window
E Start up and play a disc automatically/control both
the home theater system and the television
(➜ page 70)
F Show Start menu (➜ page 24)
UICK S
QUICK START GUIDE Control reference guide
Read Me First/
G Selection/enter, frame-by-frame (➜ page 37)
VS
!
"
#
$
%
H Return to previous screen
I Music shuffle (➜ page 35)
J Show Quick OSD (➜ page 55)
K Register the current track to Favorites (➜ page 63)
L Turn Dolby Virtual Speaker on/off (➜ page 77)
M Set SLEEP timer (➜ page 80)
N Mute the sound (➜ page 80)
O Set the sound effect (➜ page 76)
∫ Using the cursor
≥Select items on menu screens and set items.
Press up, down, left, or right to select an item.
You can also move frame-by-frame (backward/
forward).
While paused, press [2] or [1] (left/right).
ENTER
Press [ENTER] to confirm.
RQT8927
9
QUICK START GUIDE
QUICK START GUIDE
QUICK START GUIDE
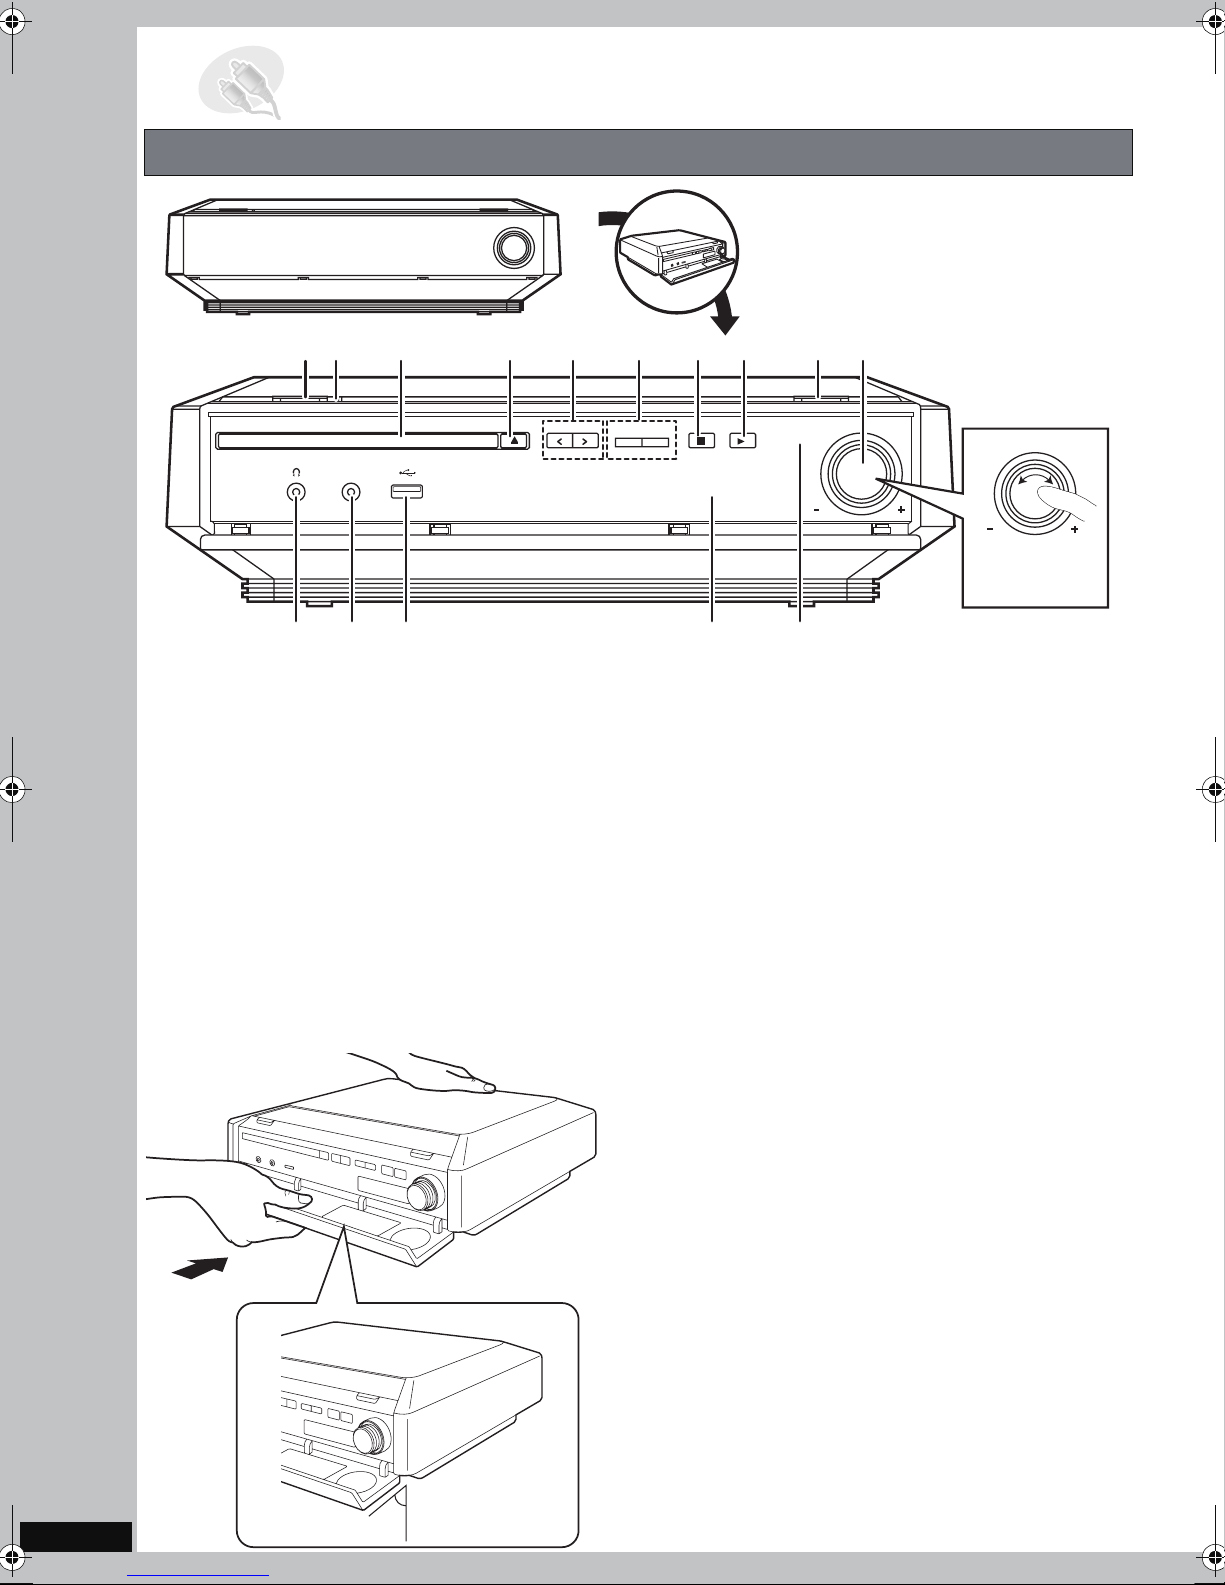
Control reference guide
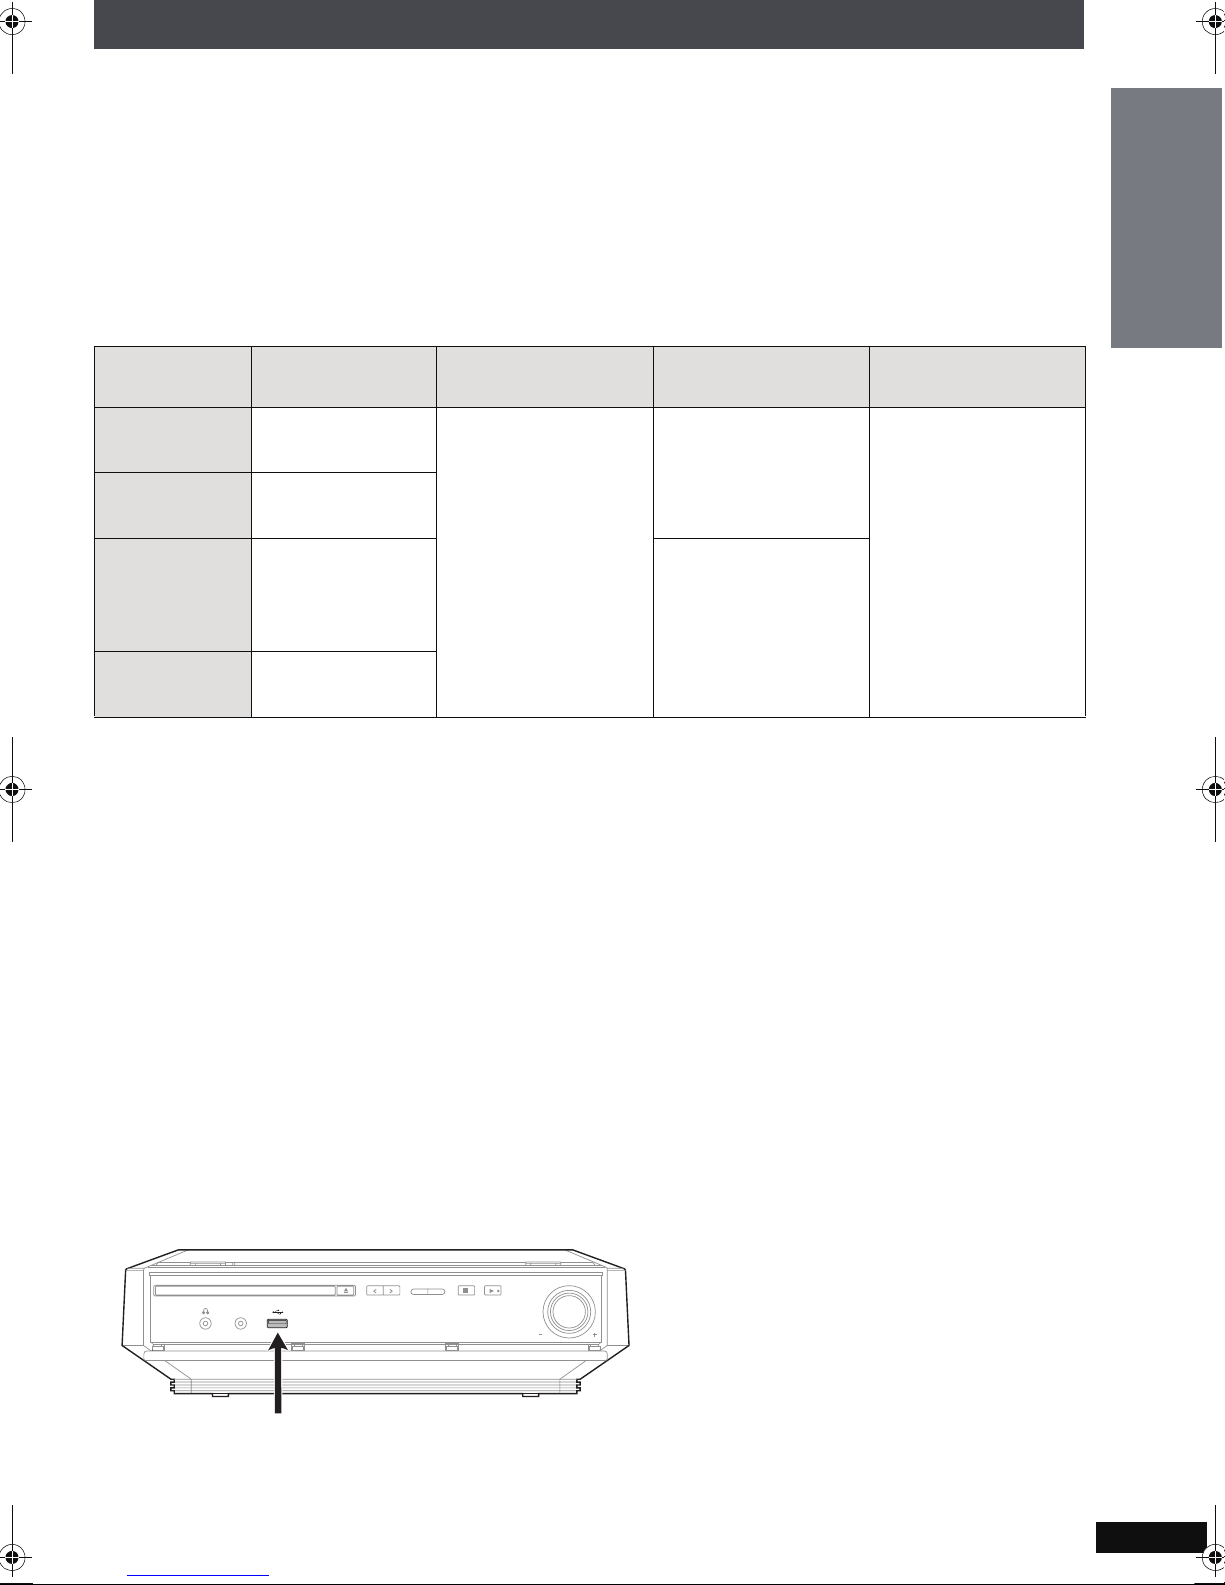
Main unit
When opening and closing the front
cover, be careful not to touch the
standby/on switch, especially during
recording.
OPEN/CLOSE SELECTOR
MUSIC PORT
1 Standby/on switch (Í/I) (➜ page 16)
Press to switch the unit from on to standby mode or
vice versa. In standby mode, the unit is still
consuming a small amount of power.
2 Standby/on indicator
When the unit is connected to the AC mains supply,
this indicator lights up in standby mode and goes out
when the unit is turned on.
3 Disc tray
4 Open/close disc tray (➜ page 11)
5 Select the source
Music Collection ) DVD/CD ) FM ) TV Audio
TUNING
6 Skip, Select preset radio stations/channels
7 Stop playback (➜ page 31
8 Start playback (➜ page 31
9 Start recording to HDD (➜ page 29)
: Adjust the volume
; Connector for headphones (➜ page 80)
< Connector for external device (➜ page 80)
= USB terminal (➜ page 23)
> Display (➜ page 11)
? Remote control signal sensor
Rear panel terminals (➜ page 14–
fv
OPTION (= USB (= MUSIC PORT ( AUX
VOLUME
, 36, 37
, 36, 37
15, 91–94
VOLUME
Adjust the volume
of the main unit.
)
)
)
∫ If the front cover comes off
RQT8927
10
90°
1 Hold rear side of main unit by one hand and
match up left or right side protruding hook on the
cover first with the corresponding slot on the
unit.
2 Push the hook firmly towards the unit until it
clicks into place. Then push the succeeding
hooks one by one until all have clicked into
place.
3 Check that the cover now moves correctly.
≥If it does not, remove it and repeat the above
procedure.
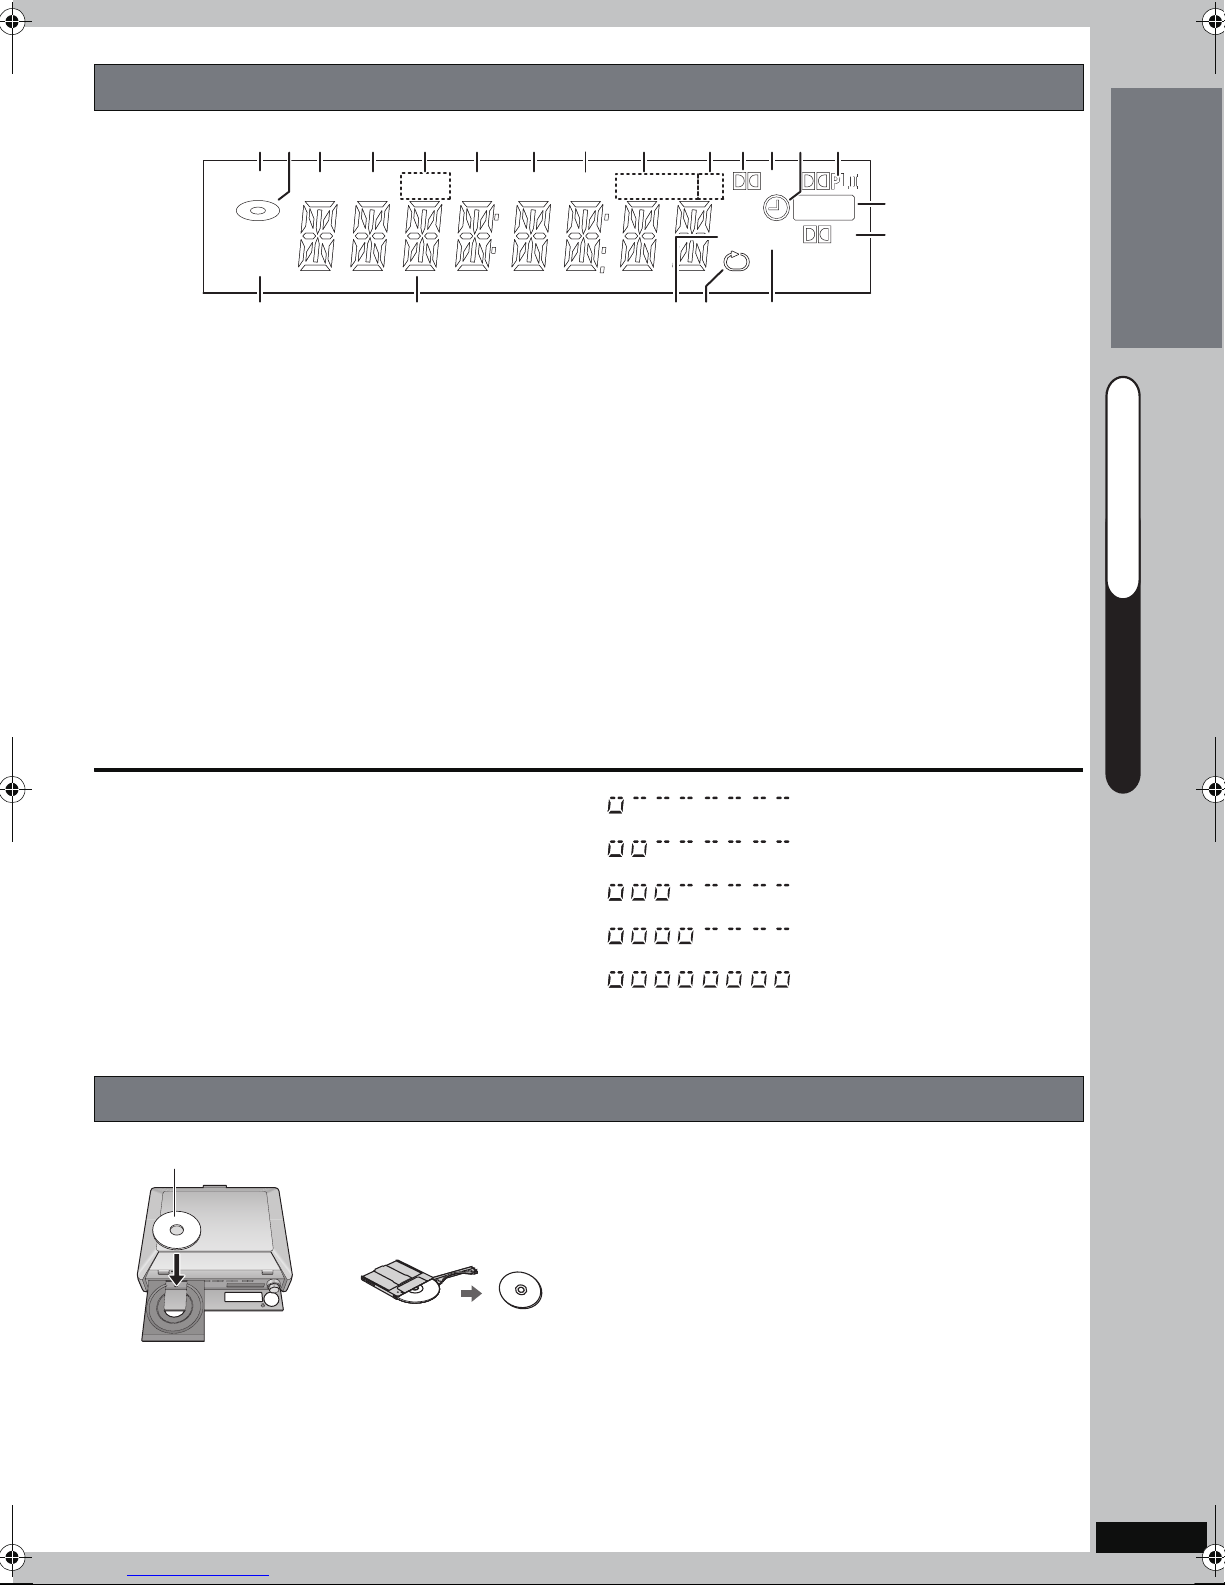
The unit’s display
PRG
USB
PGM
RND
D.MIX
SLP
MONO
CT
DDTS
REC
EQ H.BASS
RDS
Q
UICK STAR
T GUIDE
USB
USB
RDSRDS
RDS
PRG
PRG
PGM
PGM
TGTGTG
RND
RND
D.MIX
D.MIX
SLP
SLP
MONO
MONOSTCT
ST CT
DDTS
DDTS
REC
REC
EQ H.BASS
EQ H.BASS
W2W2
VSVSVS
Getting Started
1 Lights when connected USB device is ready to use.
2 Lights when disc is ready to use.
3 Lights when the unit outputs progressive video
signal.
4 Program playback indicator (➜ page 53)
5 T: Title number / Track number
G: Group number
53
6 Random playback indicator (➜ page 50,
7 D.MIX i n dicat o r
When off:Down-mixing is possible.
When lit: The disc prevents down-mixing so only the
two front channels can be played.
8 SLEEP indicator (➜ page 80)
9 Radio broadcast display (➜ page 39)
ST: Stereo
MONO: Monaural
: C: Content number
T: Track number
≥Indicators on the front display for functions that this unit does not support will not light.
)
; Dolby Digital indicator
Lights when Dolby Digital decoder is being used.
< DTS indicator
Lights when DTS decoder is being used.
= Timer setting indicator (➜ page 79)
Lights when the scheduled timer recording is set.
> Dolby Pro Logic II indicator (➜ page 77)
? Recording indicator (➜ page 29)
@ Dolby Virtual Speaker indicator (➜ page 77)
A Lights when receiving RDS (radio data system).
(➜ page 59)
B Main display section/Progress indicator (➜ below)
C Equalizer indicator (➜ page 76)
D Repeat play indicator (➜ page 50,
E H.BASS indicator (➜ page 76)
∫ Progress indicator
The progress of the following operations:
–importing MP3/WMA to the HDD
–conversion and analysis of data on the HDD
–compression of data on the HDD
–division/combination of LPCM tracks
–back-up of data from the HDD
–restoring of data to the HDD
is indicated on the unit's display as shown on the right:
54
)
12.5% completed
25% completed
37.5% completed
50% completed
100% completed
T GUID
UICK S
QUICK START GUIDE Control reference guide
How to insert the disc
Press [<OPEN/CLOSE] on the main unit to open the tray and insert a disc. (Press
the button again to close the tray.)
≥It is not possible to play continuously from one side of a double sided disc to the
other. You will need to eject the disc and turn it over.
≥[RAM] Remove the disc from its cartridge before use.
Insert label-up.
RQT8927
11
QUICK START GUIDE
QUICK START GUIDE
QUICK START GUIDE
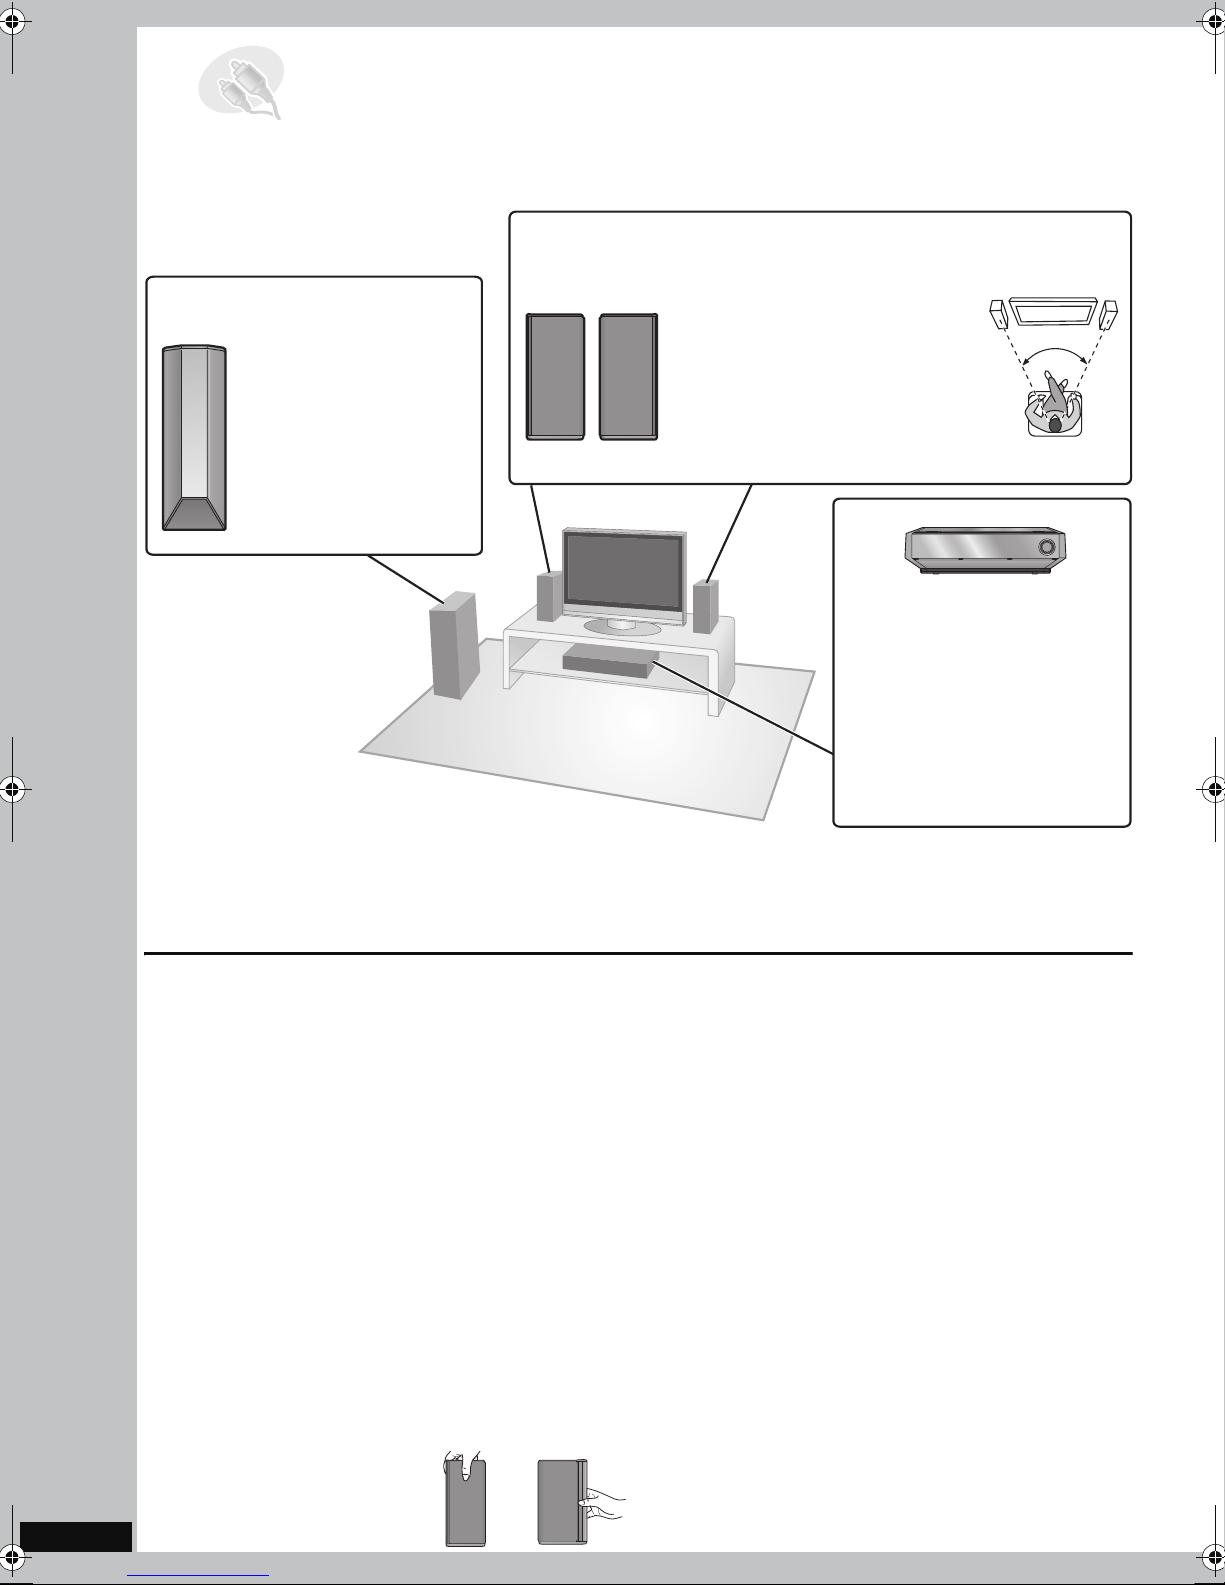
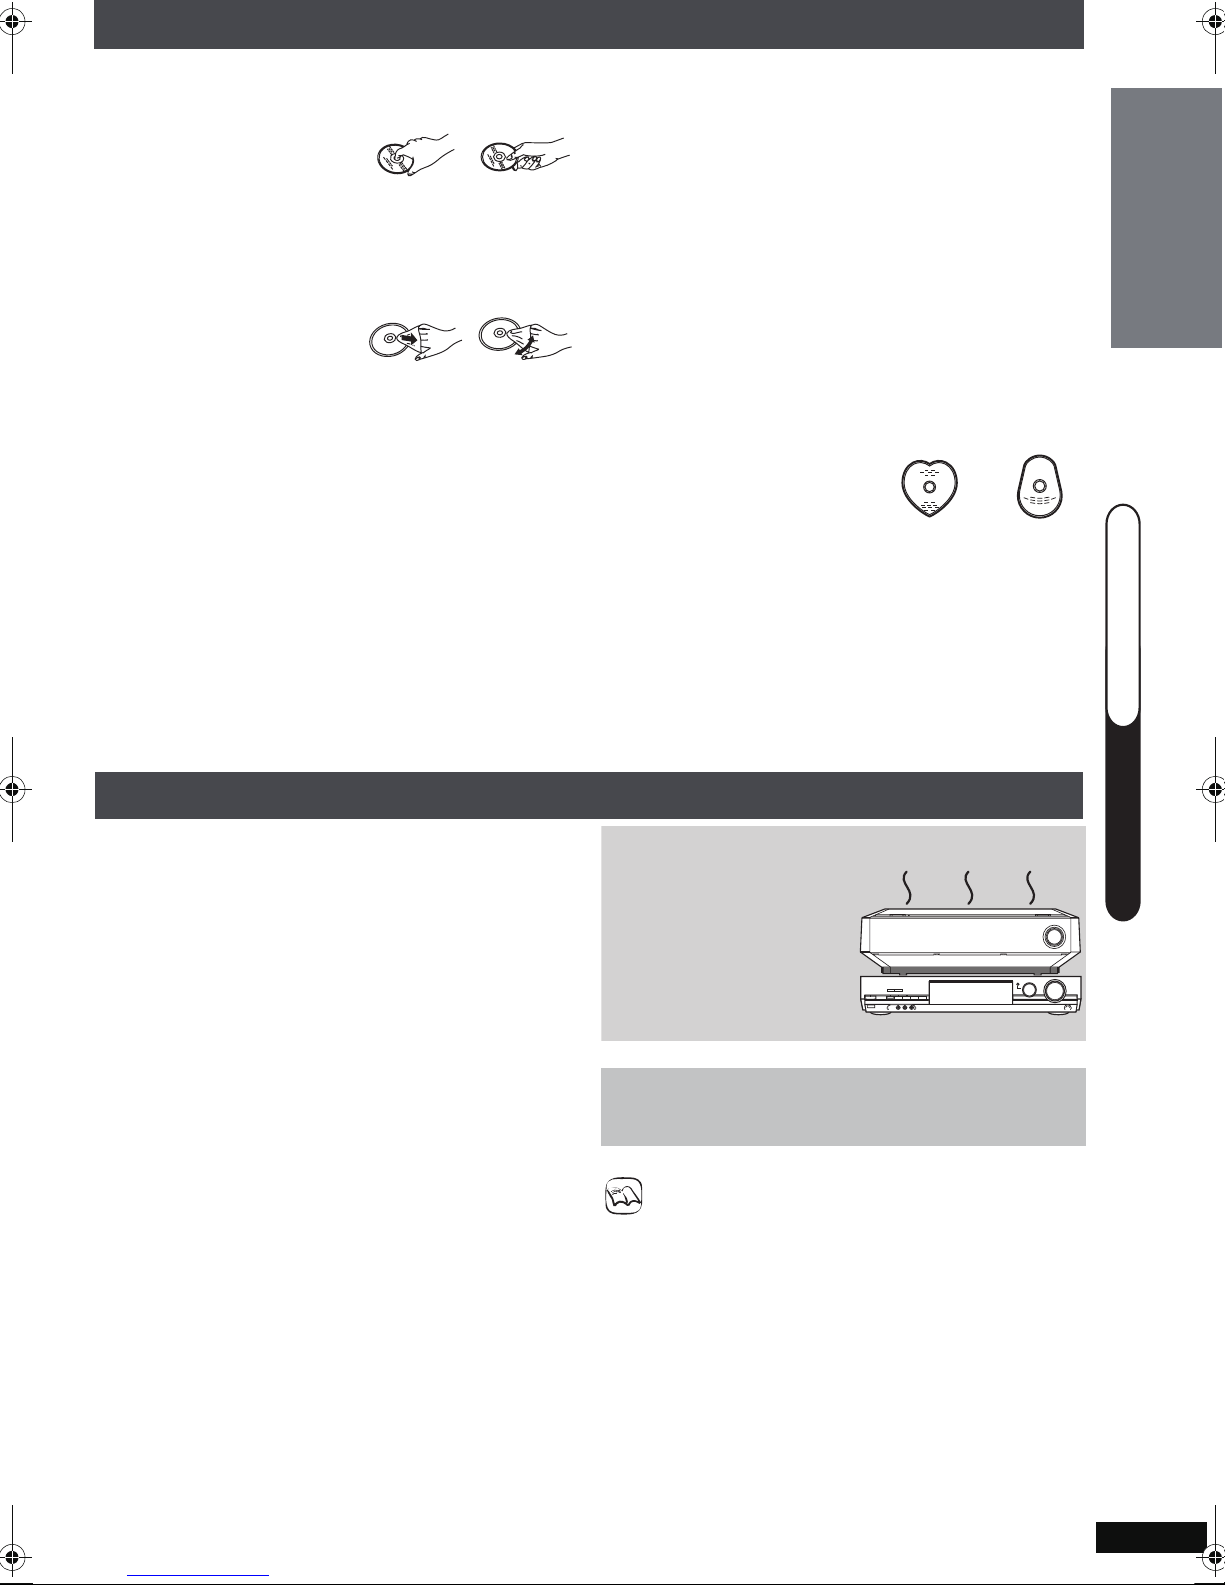
This unit comes equipped with a Dolby Virtual Speaker circuit installed. Using just the front/center speakers, the
subwoofer, and by reproducing acoustic effects very similar to 5.1ch surround, you can enjoy a true “home theater”
experience even within a limited space.
Subwoofer
≥Place to the right or left
of the television, on the
floor, or a sturdy shelf so
that it will not cause
vibration. Leave about
30 cm from the
television.
≥Leave 50 mm (or further)
from the wall.
STEP1 Speaker location
Front/center speaker
≥Outputs the elements of the front and
center speakers. An effect similar to
hearing the audio track from the
center of the TV screen can be
obtained.
≥Leave 70 mm (or more) of space in
between the TV and the speakers
and adjust audio to your liking.
≥Look on the bottom of the speakers to
identify the left and right speakers.
60º
Main unit
How you set up your speakers can affect the bass and the sound field. Note the following points:
≥Place speakers on flat, secure bases.
≥Placing speakers too close to floors, walls, and corners can result in excessive bass. Cover walls and windows
with thick curtains.
Use only supplied speakers
Using other speakers can damage the unit, and sound
quality will be adversely affected.
≥Set the speakers up on an even surface to prevent
them from falling. Take proper precautions to prevent
the speakers from falling if you cannot set them up on
an even surface.
Notes on speaker use
≥You can damage your speakers and shorten their
useful life if you play sound at high levels over
extended periods.
≥Reduce the volume in the following cases to avoid
damage:
–When playing distorted sound.
–When the speakers are reverberating due to a record
player, noise from FM broadcasts, or continuous
signals from an oscillator, test disc, or electronic
instrument.
–When adjusting the sound quality.
–When turning the unit on or off.
≥Do not touch the netted
area of the speakers.
RQT8927
12
DO
NOT
(L)
DO
(R)
If irregular colouring occurs on your television
The front/center speakers are designed to be used
close to a television, but the picture may be affected
with some televisions and setup combinations.
If this occurs, turn the television off for about
30 minutes.
The demagnetizing function of the television should
correct the problem. If it persists, move the speakers
further away from the television.
Caution
≥The main unit and supplied speakers are to be
used only as indicated in this setup. Failure to do
so may lead to damage to the amplifier and/or the
speakers, and may result in the risk of fire.
Consult a qualified service person if damage has
occurred or if you experience a sudden change in
performance.
≥Do not attempt to attach these speakers to walls
using methods other than those described in this
manual.
≥Keep your speakers at least
10 mm away from the system
for proper ventilation.
≥To allow for proper ventilation
and to maintain good airflow
around the main unit, position
it with at least 50 mm of space
on all sides.
≥Do not block the ventilation
holes of the main unit.
Speaker installation options
Q
UICK STAR
T GUIDE
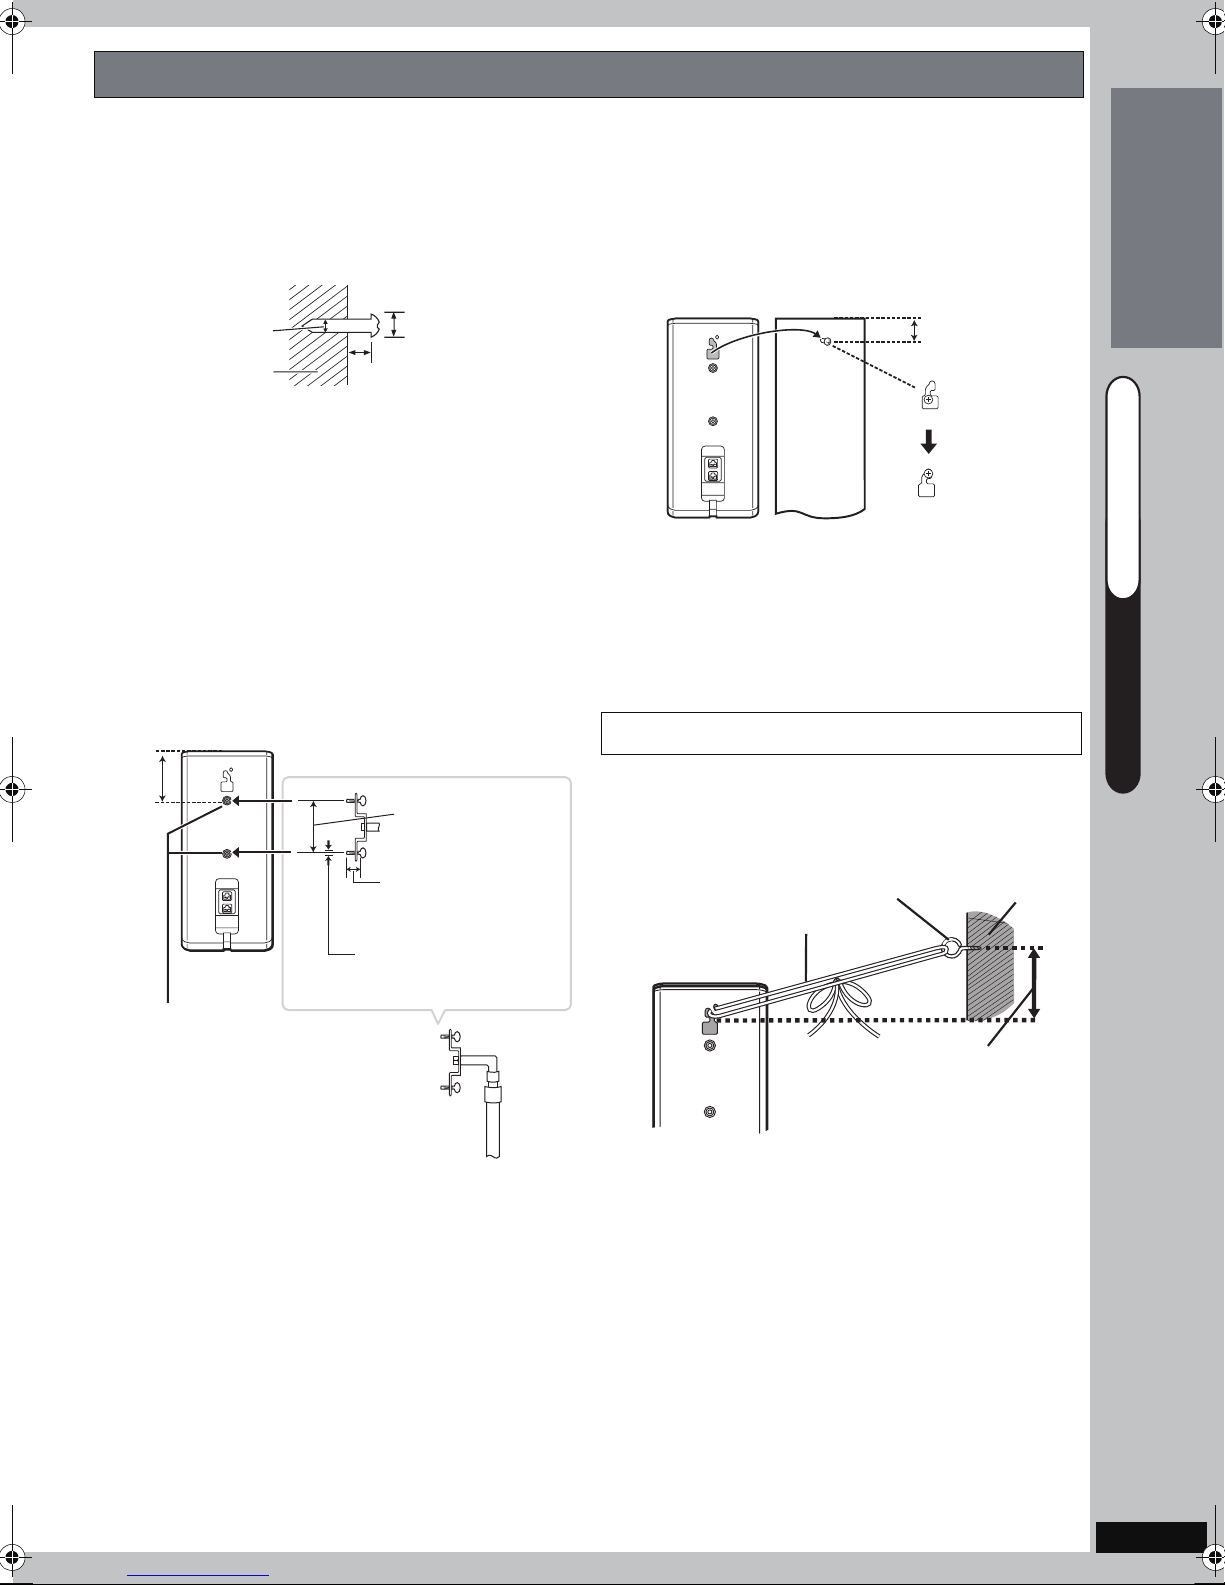
∫ Attaching to a wall
You can attach the front/center speakers to a wall.
≥The wall or pillar on which the speakers are to be attached should be capable of supporting 10 kg per screw.
Consult a qualified building contractor when attaching the speakers to a wall. Improper attachment may result
in damage to the wall and speakers.
1 Drive a screw (not included) into the wall. 2 Fit the speaker securely onto the screw(s) by
matching them with the hole(s).
Front/center speaker
‰4.0 mm
‰7.5 to 9.4 mm
24.5 mm
Getting Started
Wall or pillar
4.0 to 6.0 mm
∫ Fitting speaker stands (not included)
Ensure the stands meet these conditions before purchasing them.
Note the diameter and length of the screws and the distance between screws as shown in the diagram.
≥The stands must be able to support over 10 kg.
≥The stands must be stable even if the speakers are in a high position.
Front/center speaker
55 mm
60 mm
Plate thickness
plus 7 mm to
10 mm
5 mm, pitch
0.8 mm
Preventing the speakers from falling over
Preparation
Attach screw eyes (not included) to secure the speakers
to a wall.
Screw eye (not included)
String (not included)
Wall
T GUID
UICK S
QUICK START GUIDE STEP 1
Metal screw
holes
For attaching to
speaker stands
Speaker stand
(not included)
§This is one example of configuring speaker stands.
Approx. 150 mm
§
1 Thread the string (not included) through the slot
on the rear of the front/center speakers to
prevent them from falling over.
2 Loop the string through the screw eye and tie
tightly.
≥You will need to obtain the appropriate screw eyes to
match the walls and pillars to which the screw eyes
are going to be fastened.
≥Consult with a qualified housing contractor concerning
the appropriate procedure when attaching to a
concrete wall or a surface that may not have strong
enough support. Improper attachment may result in
damage to the wall or speakers.
RQT8927
13
QUICK START GUIDE
QUICK START GUIDE
s
QUICK START GUIDE
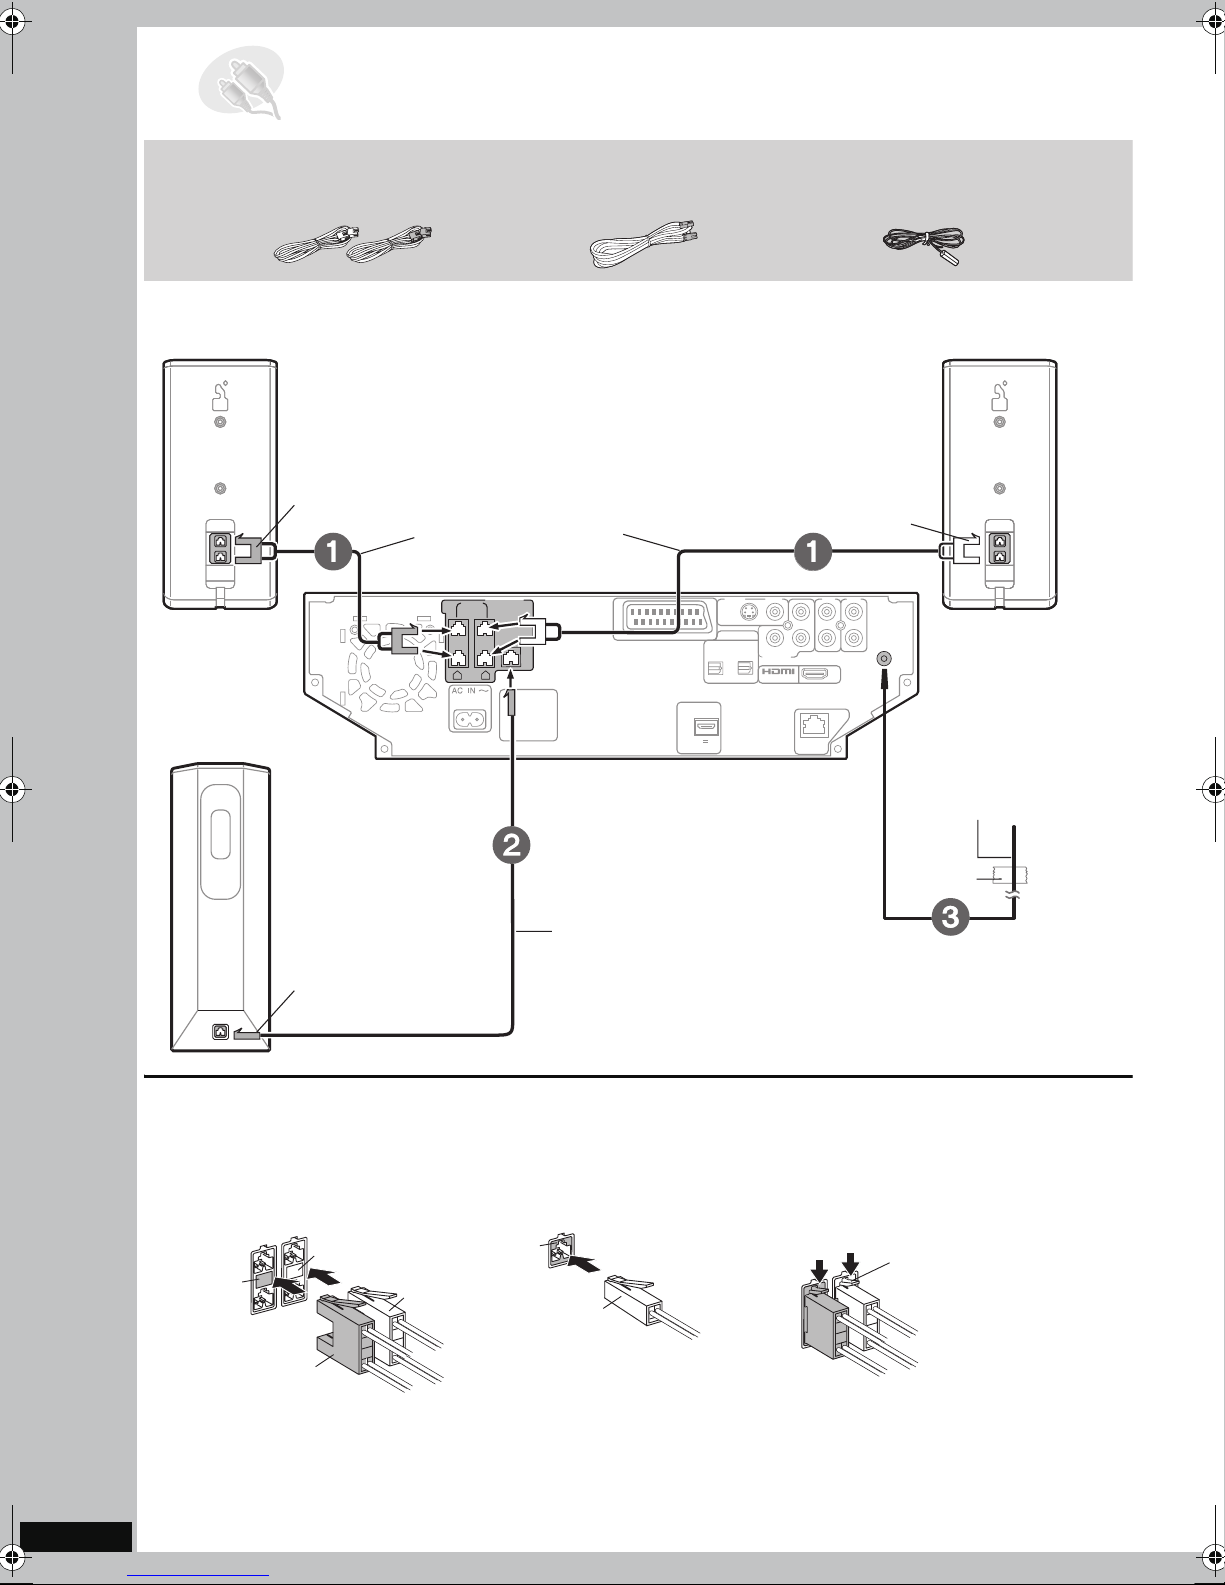
STEP2 Basic connections
Included parts to be used
Speaker cable for
center speakers
subwoofer
Using FM outdoor aerial (optional) (➜ page 59).
≥Look on the bottom of the speakers to identify the left and right speakers.
FM indoor aerialSpeaker cable for front/
Front/center
peaker (R)
Subwoofer
Red
Violet
Speaker cable for front/
center speakers
SPEAKERS
CENTER
(8Ω)
SUB-
WOOFER
(4Ω)
FRONT
RL
(8Ω)
Main unit
(TV)
AV
OUT
OPTION
V.1
DC OUT 5V
500mA MAX
Speaker cable for
subwoofer
DIGITAL
OPTICAL
VIDEO S-VIDEO
OUTOUT
Y
COMPONENT
VIDEO OUT
IN(TV) AV OUT
P
B
P
R
(10BASE-T/
100BASE-TX)
L
R
TV IN
White
AUX
LAN
L
R
FM
ANT
75
Ω
Adhesive
tape
Front/center
speaker (L)
FM indoor aerial
Affix this end of
the aerial where
reception is best.
Connecting the speakers and subwoofer to the terminals (1, 2)
Connect the speaker to the terminal that matches the
colour of the speaker connector. (Insert until you hear it
click into place.)
Front/center speaker
White
Red
Red
RQT8927
14
Subwoofer
White
Violet
When disconnecting:
Press down on the protruding piece and pull
out.
Protruding piece
Violet
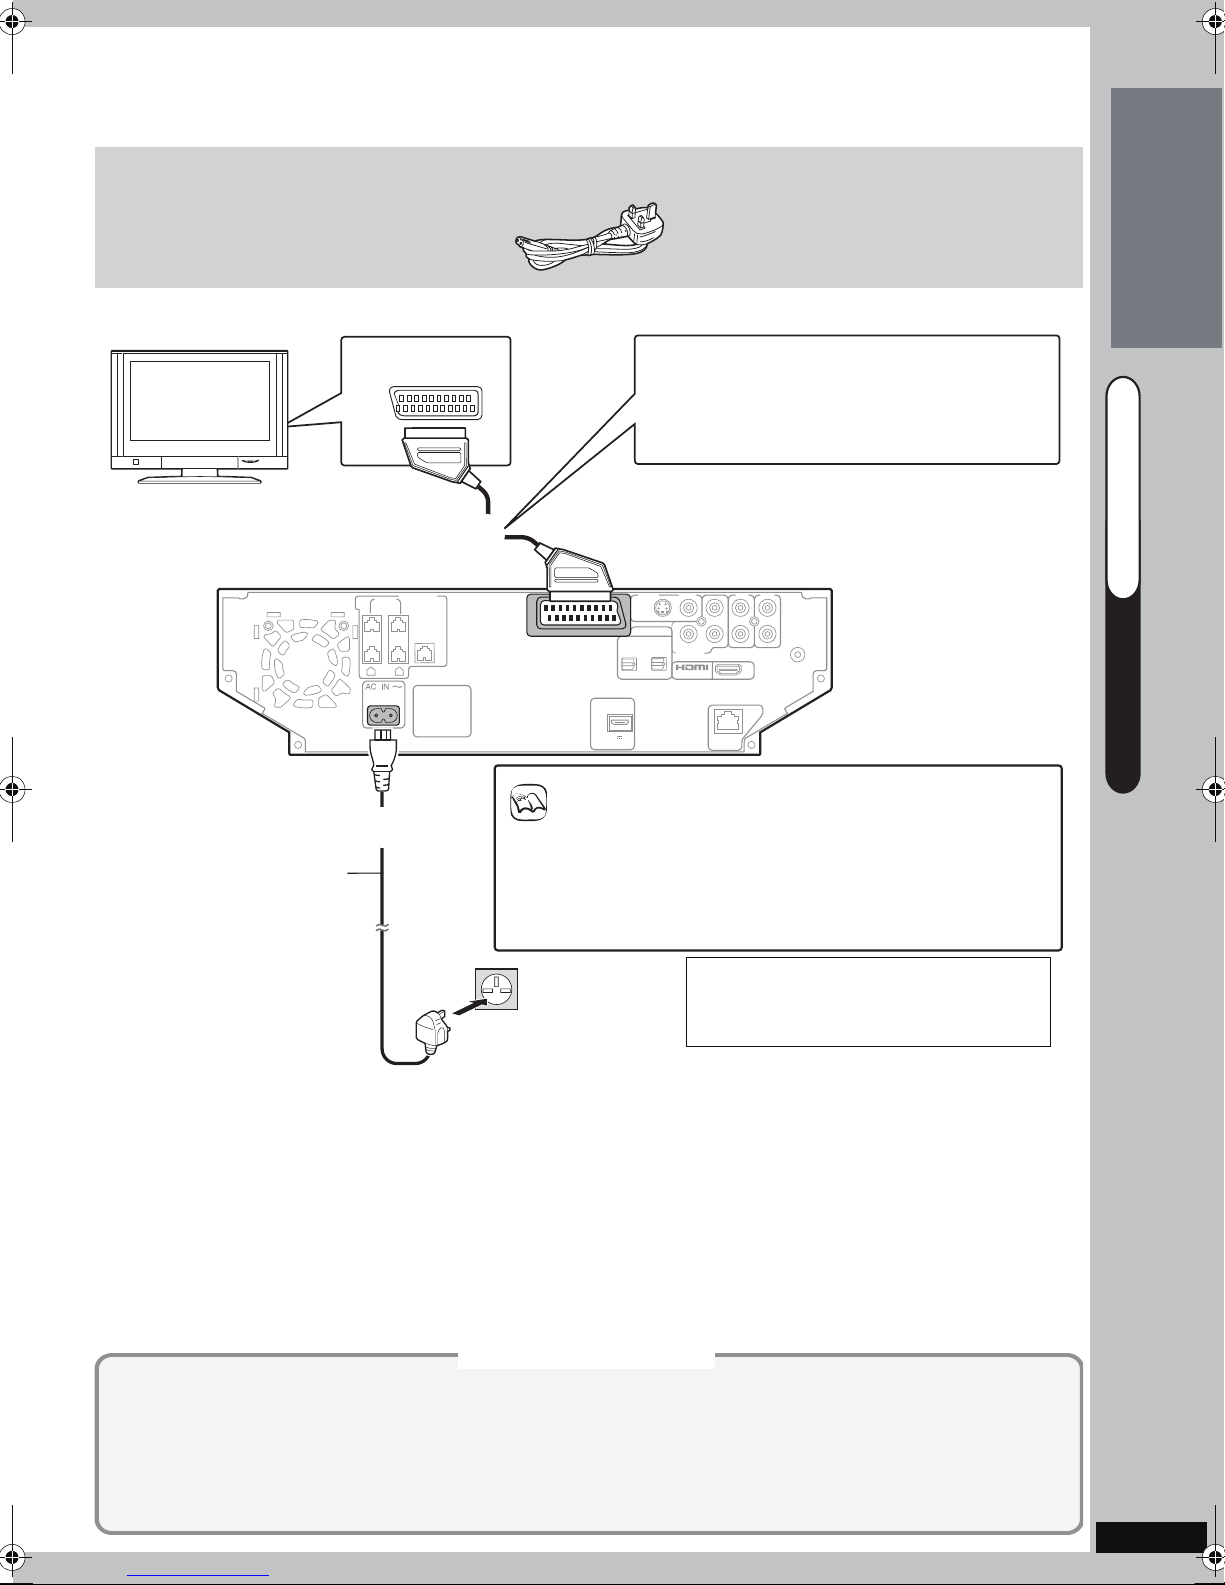
Television (not included)
Q
UICK STAR
T GUIDE
AC mains lead
Getting Started
Main unit
AC mains lead
CENTER
(8Ω)
FRONT
RL
(8Ω)
SPEAKERS
SUB-
WOOFER
(4Ω)
AV
(➜ page 38, To play audio from your
television through this unit’s speakers)
21-pin Scart lead
Sound from the television
(not included)
DIGITAL
(TV)
AV
OPTION
V.1
DC OUT 5V
500mA MAX
OPTICAL
IN(TV)
OUT
VIDEO S-VIDEO
OUTOUT
Y
COMPONENT
VIDEO OUT
AV OUT
P
B
P
R
(10BASE-T/
100BASE-TX)
TV IN
AUX
L
L
R
R
FM
ANT
75
Ω
LAN
T GUID
UICK S
QUICK START GUIDE STEP 2
NOTE
≥The included AC mains lead is for use with the main unit only.
Do not use it with other equipment. Also, do not use cord for
other equipment with the main unit.
Conserving power
The main unit consumes a small amount of power when it is in standby mode (approx. 0.6 W). To save power
when it is not to be used for a long time, unplug it from the household mains socket.
You will need to reset some memory items after plugging in the main unit.
∫ To listen to sound from this unit through your television’s speakers
Press and hold [MUTING] until “AV MUTE OFF” appears on the unit’s display.
The audio is output from both the speakers and the television.
To mute sound from this unit’s speakers (➜ page 80)
≥To cancel, press and hold [MUTING] and select “AV MUTE ON”.
≥If the selector is set to “TV Audio”, this function does not work.
∫
For those who want to enjoy higher picture quality and have a TV equipped with an HDMI terminal
∫ For those who have a satellite receiver or VCR (➜ page 92)
∫
For those who want to enjoy 5.1 ch surround sound by connecting with an amplifier or
∫ For those who want to connect this unit with an external device (such as an MP3 player) (➜ page 93)
∫ For those who want to connect to a television with VIDEO terminal or S VIDEO terminal (➜ page 93)
∫ For those who want to connect to a network and import new album/artist information (➜ page 94)
To household
mains socket
(AC 230 to 240V,
50 Hz)
Optional Connections
BE SURE TO READ THE CAUTION
FOR THE AC MAINS LEAD ON
PAGE 3 BEFORE CONNECTION.
(➜ page 91)
receiver (➜ page 92)
RQT8927
15
QUICK START GUIDE
QUICK START GUIDE
QUICK START GUIDE
STEP3 Performing QUICK SETUP
HDD
SELECT
U
O
T
E
N
O
CH SELECT
FL DISPLAY
SOUND
C
H
FAVORITE
REG
SLEEP
SELECT
P
L
A
Y
VOLUME
PLAYPAU S ESTOP
FUNCTIONS
S
EMOTIONAL
QUICK OSD
MUTINGSETUP
T
A
R
T
ޓ
ޓ
ޓ
VS
CANCEL
MENU PLAYLIST
R
O
T
A
G
I
V
A
U
N
T
N
C
E
E
R
I
M
D
P
ޓ
O
T
ENERGETIC RELAXINGMELLOW
HDDREC
PLAYMODE
SETUP
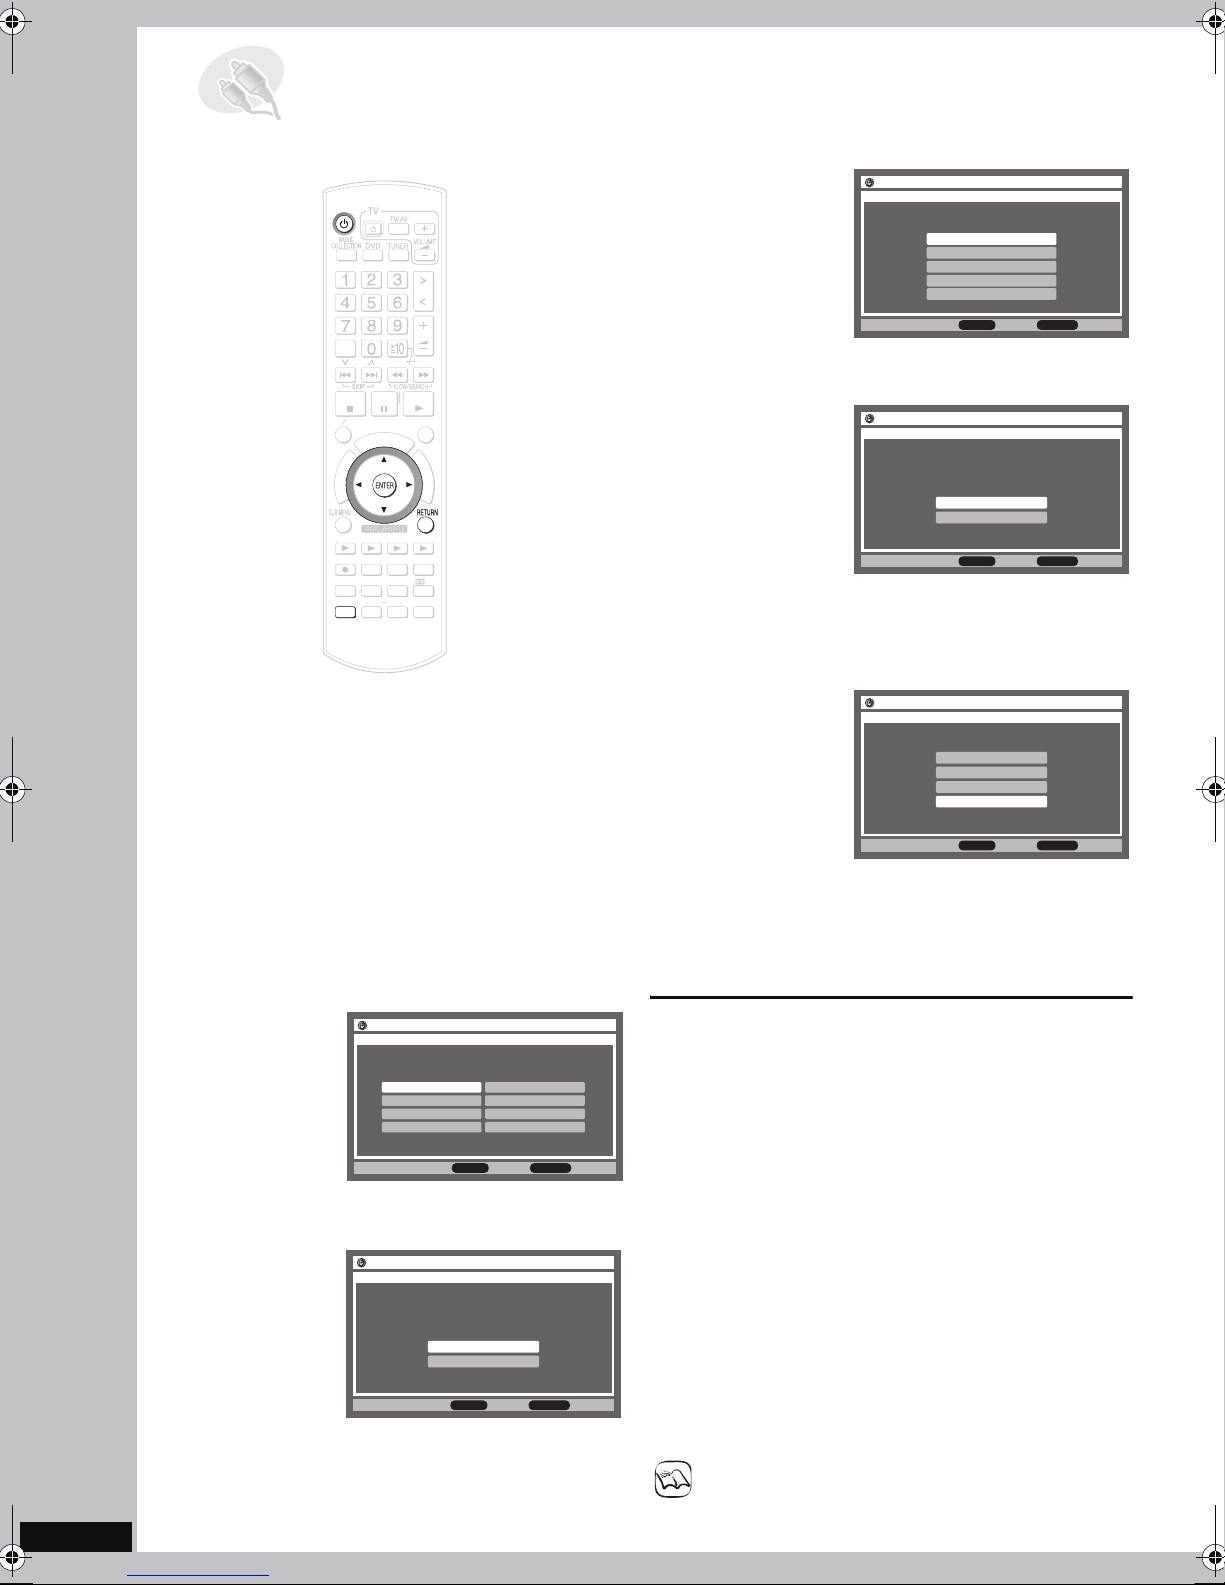
The QUICK SETUP screen assists you to make
necessary settings.
Preparation
To display the picture turn on the television and select
the appropriate video input to suit the connections to
this unit.
5 Press [34] to select “Yes” and press [ENTER].
Setup
to select and press ENTER
QUICK SETUP
Select the type of TV you have connected.
Standard (Direct View TV)
CRT Projector
LCD TV/Projector
Projection TV
Plasma TV
RETURN to return
6 Press [34] to select the TV Type and press
[ENTER].
Setup
to select and press ENTER
QUICK SETUP
Select your TV’s aspect ratio
4 : 3
16 : 9
RETURN to return
7 Press [34] to select TV Aspect ratio and press
[ENTER].
4:3: Regular aspect television (4:3)
16:9: Widescreen television (16:9)
Setup
to select and press ENTER
QUICK SETUP
Select the output combination for the AV
and component terminals.
Video/YPbPr
S-Video/YPbPr
RGB 1/No Output
RGB 2/No Output
Select "YPbPr" for the component terminals
if you want progressive output.
RETURN to return
1 Press [Í].
2 Press [SETUP].
3 Press [34] to select “Setup for Video” and
press [ENTER].
Setup
to select and press ENTER
QUICK SETUP
Select the menu language.
English
Español
Italiano
Svenska
Français
Deutsch
Nederlands
Polski
RETURN to return
4 Press [34] to select the menu language and
press [ENTER].
Setup
to select and press ENTER
QUICK SETUP
Use QUICK SETUP to make basic settings.
Would you like to use QUICK SETUP?
Yes
No
RETURN to return
8 Press [34] to select the output combination
for the AV and component terminals, and press
[ENTER].
9 Press [ENTER].
To return to the previous screen
Press [RETURN].
To exit the screen
Press [RETURN] several times.
To change these settings later
Select “QUICK SETUP” in the “Others” menu
(➜ page 87).
∫ To have the unit start up immediately
By setting “Power Off Mode” to “Quick-Start Mode”, this
unit can be started up immediately from standby mode.
1 Press [SETUP].
2Press [34] to select “Other Setup ”.
3Press [34] to select “Power On/Off” and press [1].
4Press [34] to select “Power Off Mode” and press
[ENTER].
5Press [34] to select “Quick-Start Mode” and press
[ENTER].
RQT8927
16
NOTE
≥Power consumption during standby will increase when
this unit is set to “Quick-Start Mode”.
QUICK START GUIDE
QUICK START GUIDE
Q
UICK STAR
T GUIDE
QUICK START GUIDE
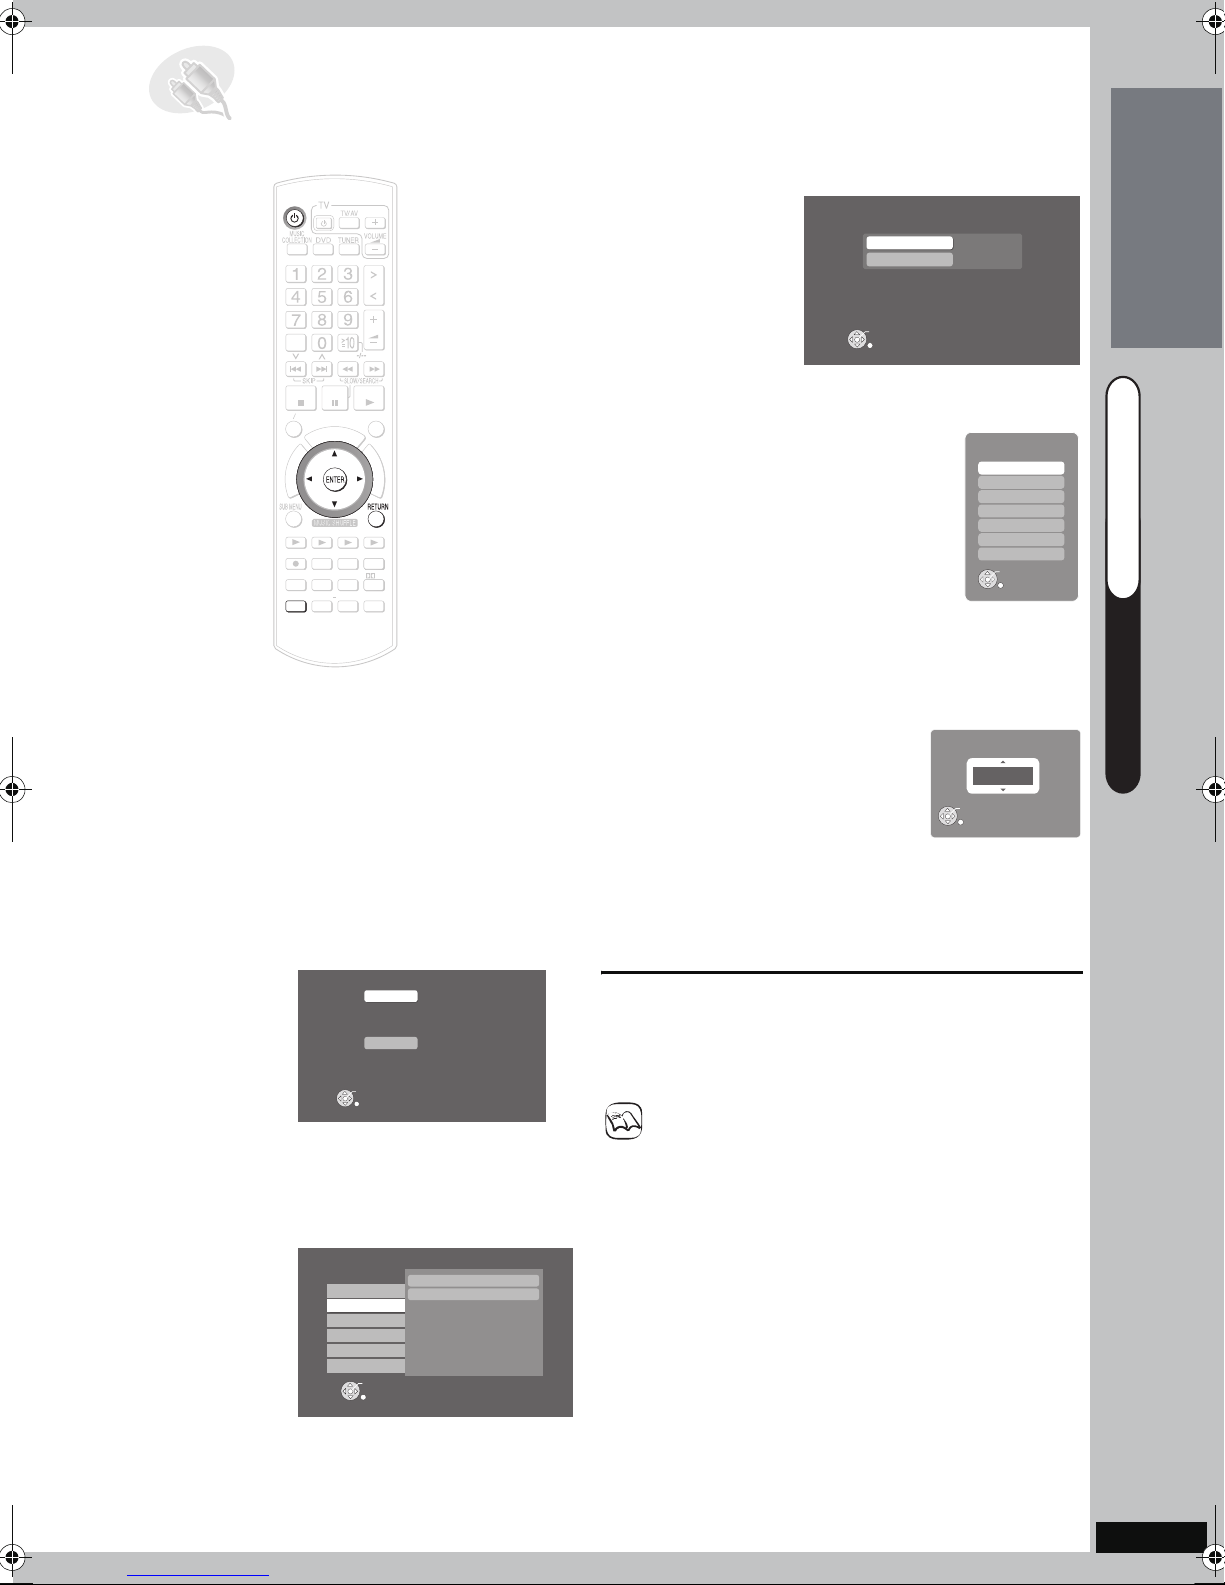
STEP4 Setting the clock
HDD
SELECT
4 Press [34] to select “Setting the Day and
Time” and press [ENTER].
Setting the Day and Time
Day
Adjusting Time
SUN
- - : - -
Getting Started
E
N
O
CH SELECT
FL DISPLAY
SOUND
T
O
U
C
H
P
L
A
FAVORITE
REG
SLEEP
SELECT
VOLUME
PLAYPAU S ESTOP
FUNCTIONS
Y
EMOTIONAL
QUICK OSD
MUTINGSETUP
S
T
A
R
T
ޓ
ޓ
ޓ
VS
CANCEL
MENU PLAYLIST
R
O
T
A
G
I
V
A
U
N
T
N
C
E
E
R
I
M
D
P
ޓ
O
T
ENERGETIC RELAXINGMELLOW
HDDREC
PLAYMODE
SETUP
Preparation
1 To display the picture turn on the television and
select the appropriate video input to suit the
connections to this unit.
2Press [Í].
1 While stopped
Press [SETUP].
ENTER
RETURN
5 Press [34] to select the “Day” and press
[ENTER]
.
Day
SUN
MON
TUE
WED
THU
FRI
SAT
ENTER
Cancel
6 Press [34] to select the day and press
[ENTER].
7 Press [34] to select “Adjusting Time” and
press [ENTER].
Adjusting Time
0 :00
ENTER
Cancel
8 Press [34] to set the time and press [ENTER].
≥This can be set quickly by pressing and holding
[34].
The clock starts.
T GUID
UICK S
QUICK START GUIDE STEP 3 / 4
Setup
Setup for Video
Other Setup
ENTER
Main screen
2 Press [34] to select “Other Setup” and press
[ENTER].
3 Press [34] to select “Clock/Timer” and press
[1].
Setup
Remote Control
Clock / Timer
Power On/Off
TV Audio Input
Network
Maintenance
ENTER
Main screen
DVD
VIDEO
HDMI
DISPLAY
Remote Control
Clock / Timer
Power On/Off
TV Audio Input
Network
Maintenance
Setting the Day and Time
Timer Setup
To return to the previous screen
Press [RETURN].
To exit the screen
Press [RETURN] several times.
NOTE
≥This is a 24-hour clock.
≥Reset the clock regularly to maintain accuracy.
≥If there is a power failure or the plug is disconnected
from the household mains socket, set this again.
RQT8927
17
QUICK START GUIDE
QUICK START GUIDE
FM Sub Menu
Audio Mode Auto(Stereo)
Set Preset Channel
Erase Preset Channel
Recording Mode LPCM
Auto Track Divide
Auto 5 Minutes
FM Set Preset Channel
CH1 88.10 MHz
CH2 88.50 MHz
CH3 MHz
CH4 MHz
CH5
MHz
88.70
- -
.- -
- - .- -
Preset: CH4
Frequency: 89.90 MHz
Set Preset CH.
QUICK START GUIDE
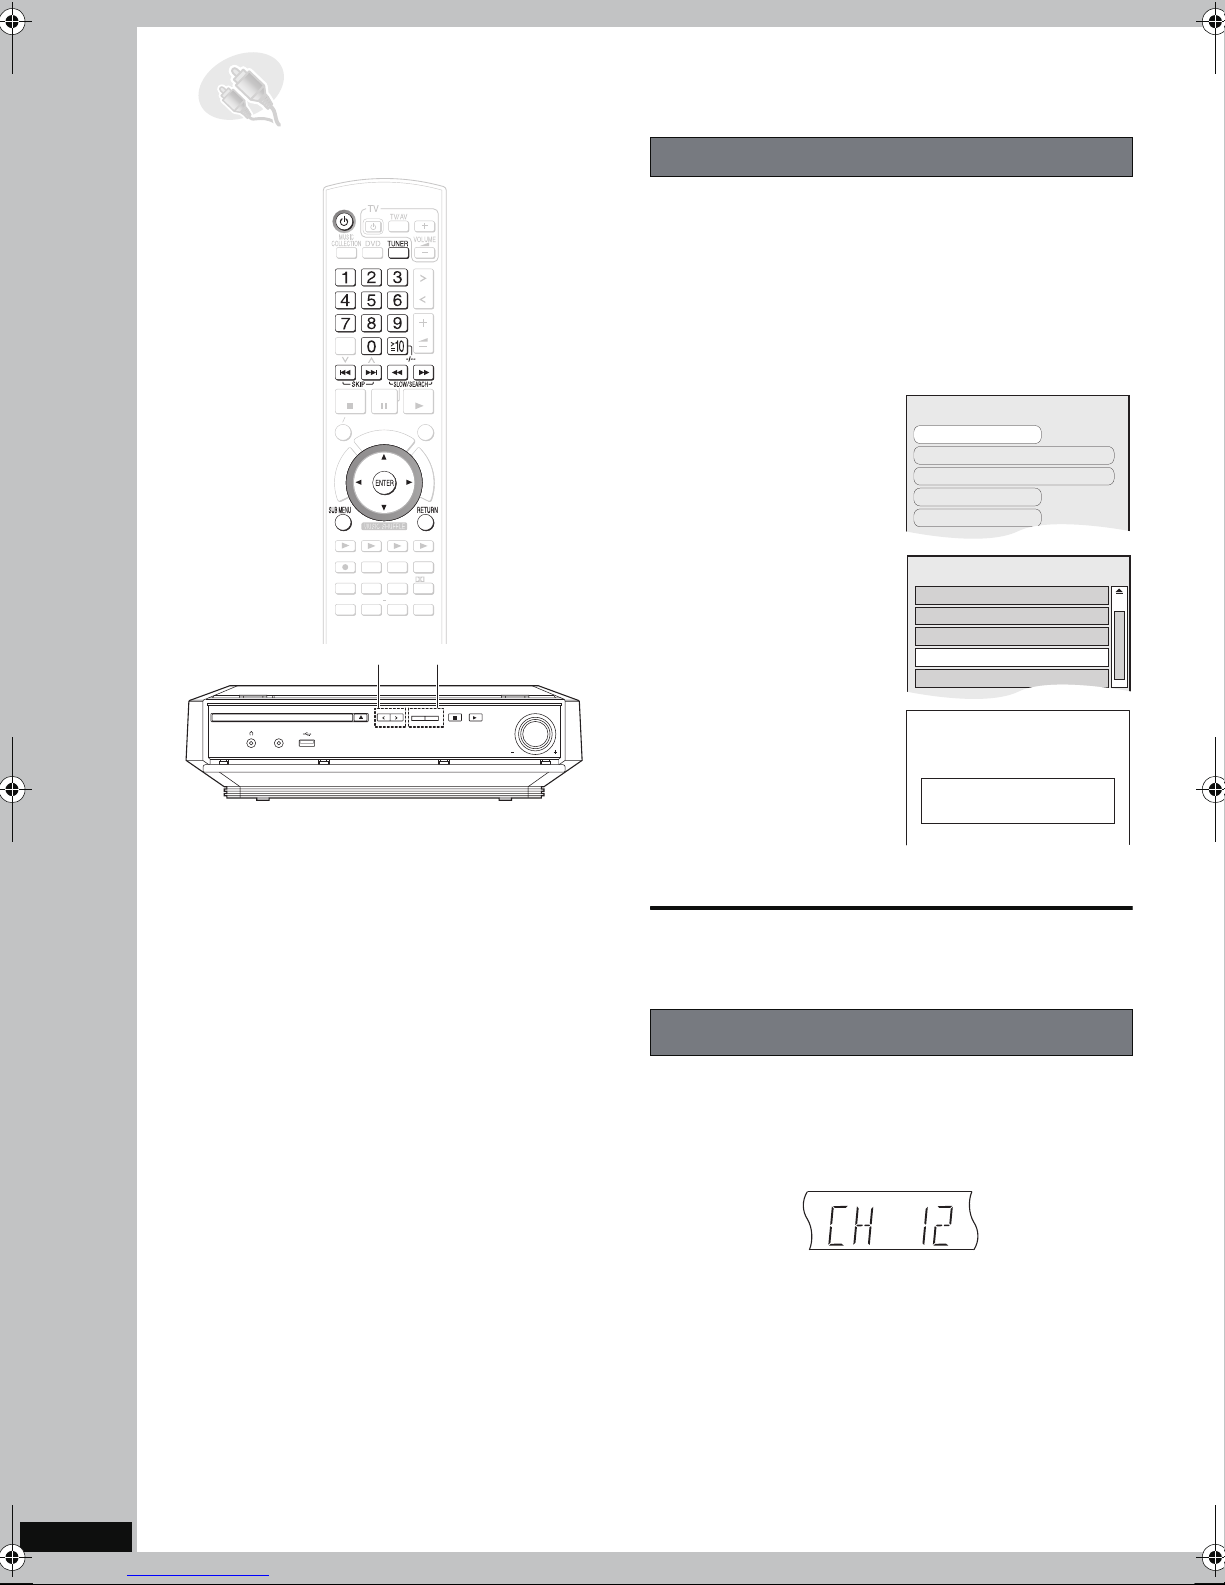
STEP5 Setting the FM radio stations presets
HDD
CANCEL
CANCEL
MENU PLAYLIST
T
E
N
O
R
O
T
A
G
I
V
A
U
N
T
N
C
E
E
R
I
M
D
P
ޓ
O
T
Setting preset channels
Up to 30 stations can be set.
Preparation
BAND
SELECT
VOLUME
To display the picture turn on the television and select
the appropriate video input to suit the connections to
this unit.
1 Press [6 5] to select the frequency.
2 Press [SUB MENU].
PLAYPAU S ESTOP
FUNCTIONS
U
C
O
H
P
L
A
Y
S
T
A
R
T
ޓ
ޓ
ޓ
CH SELECT
CH SELECT
FL DISPLAY
SOUND
FAVORITE
REG
SLEEP
SELECT
EMOTIONAL
QUICK OSD
VS
MUTINGSETUP
TUNING
TUNING
VOLUME
MUSIC PORT
ENERGETIC RELAXINGMELLOW
HDDREC
PLAYMODE
SELECTOR
10
OPEN/CLOSE SELECTOR
Radio operations are described mainly with the remote
control.
You can alternatively use the corresponding button on
the main unit.
§1
[O N SELECTOR]
§2
[X TUNING W]
Preparation
1 To display the picture turn on the television and
select the appropriate video input to suit the
connections to this unit.
2Press [Í].
3 Press [TUNER]§1 to switch the selector to “FM”.
3 Press [34] to select
“Set Preset Channel”
and press [ENTER].
4 Press [34] to select
the channel and
press [ENTER].
Repeat steps 2–4 to set other channels.
To return to the previous screen
Press [RETURN].
Selecting the preset channels
Check that the radio station(s) are correctly set.
Press the numbered buttons to select the channel.
≥To select a 2-digit number
e.g. “12”: [S10] ➜ [1] ➜ [2].
DISC SFC
TG
DVD
CD
PL
DTS
D
MODE
RDS
PRG
AC
APSPTY
Alternatively, press [: 9]
channel.
D.MIX
MONO
SLPSTCT
§2
to select the
SRD
E.
HDCD
H.BASS
W
PGM
2
1
RND
18
RQT8927
Disc handling care
Q
UICK STAR
T GUIDE
∫ How to hold a disc
Do not touch the
recorded surface.
DO
DO NOT
∫ Concerning non-cartridge discs
Be careful about scratches and dirt.
∫ If there is dirt or condensation on the disc
Wipe with a damp cloth and
then wipe dry.
DO
DO NOT
∫ Handling precautions
≥Do not attach labels or stickers to discs. (This may
cause disc warping and un-balanced rotation,
rendering it unusable.)
≥Write on the label side of the disc only with a soft, oil-
based felt pen. Do not use ballpoint pens or other hard
writing implements.
≥Do not use record cleaning sprays, benzine, thinner,
static electricity prevention liquids or any other solvent.
≥Do not use scratch-proof protectors or covers.
≥Do not drop, stack, or impact discs. Do not place
objects on them.
≥Do not use the following discs:
–Discs with exposed adhesive from removed stickers
or labels (rental discs, etc.).
–Discs that are badly warped or cracked.
–Irregularly shaped discs,
such as heart shapes.
≥Do not place in the following
areas:
–In direct sunlight.
–In very dusty or humid areas.
–Near a heater.
–Locations susceptible to significant difference in
temperature (condensation can occur).
≥To protect discs from scratches and dirt, return them
to their cases or cartridges when you are not using
them.
DO NOT
Getting Started
/Information
Unit care
The precision parts in this unit are readily affected
by the environment, especially temperature,
humidity, and dust. Cigarette smoke can also cause
the unit to break or malfunction.
Clean this unit with a soft, dry cloth.
≥Never use alcohol, paint thinner or benzine to clean
this unit.
≥Before using chemically treated cloth, carefully read
the instructions that came with the cloth.
Do not use commercially available lens cleaners as
they may cause malfunction. Cleaning of the lens is
generally not necessary although this depends on the
operating environment.
DO NOT
Do not place the unit on
amplifiers or equipment
that may become hot.
The heat can damage the
unit.
Before moving the unit, ensure the disc trays are
empty. Failure to do so will risk severely damaging
the discs and the unit.
NOTE
Do not obstruct the rear panel’s internal cooling fan.
T GUID
UICK S
QUICK START GUIDE STEP 5
RQT8927
19
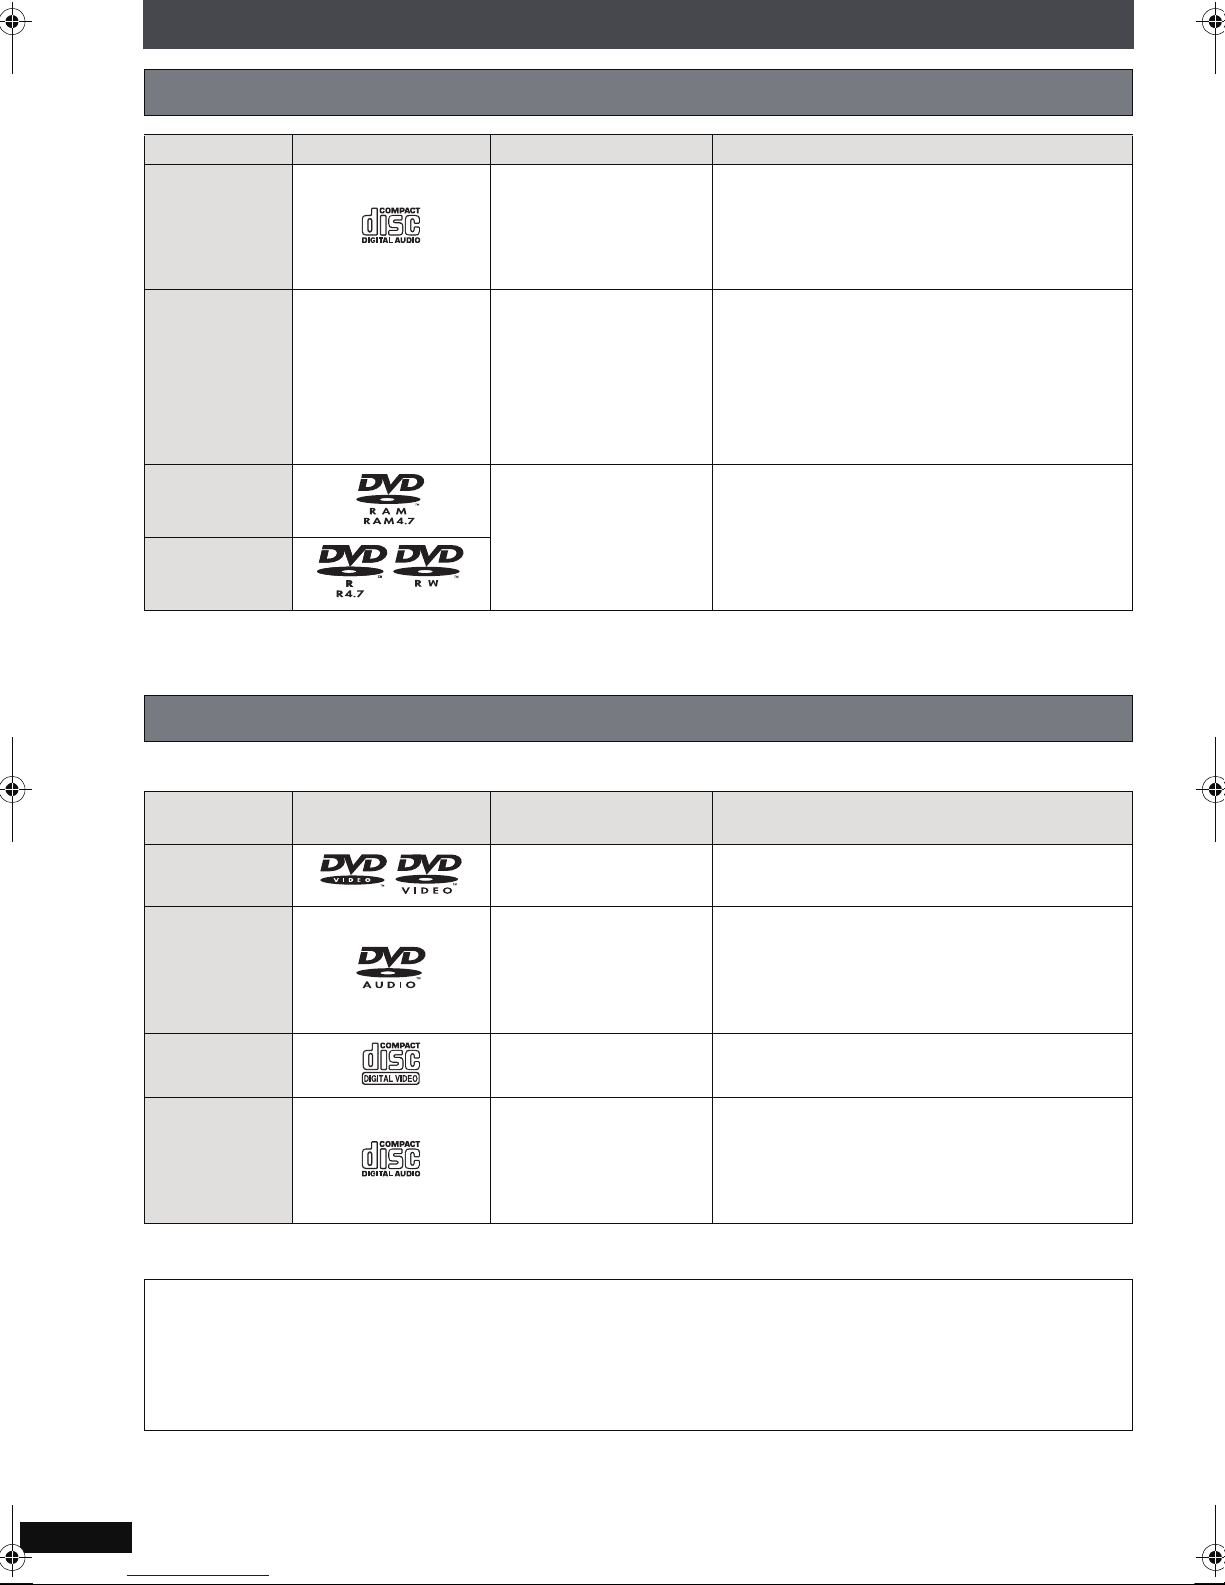
Discs used with this unit
Discs that can be recorded to this unit’s HDD ([HDD])
Disc Logo Data type Remarks
Music discs
≥This unit is not compatible with HDCD.
CD [CD]
[CD] / [WMA]
§1
CD-R/RW —
See also “Tips for
making data discs”
(➜ page 22).
§1
/ [MP3]
≥Operation and sound quality of CDs that do
not conform to CD-DA specifications (copy
control CDs, etc.) cannot be guaranteed.
By recording in CD-DA, WMA, or MP3 format,
and closing the session or finalizing
§1
R/CD-RW disc when recording is complete,
you can record tracks from the disc to this
unit’s HDD.
§2
A process that allows play on other
equipment.
§2
the CD-
DVD-RAM
[MP3]
DVD-R/RW
This unit can record only MP3 files on these
recordable DVDs. DVD-R/RW discs need to be
finalized.
≥DVD content cannot be recorded to this unit’s HDD (except for MP3 files in recordable DVD).
Discs that can be played
∫ Commercial discs
Disc Logo
DVD-Video [DVD-V] High quality movie and music discs
DVD-Audio [DVD-A]
VCD [VCD]
Indicated in these
instructions by
Remarks
High fidelity music discs
§
Some DVD-Audio discs contain DVD-Video
§
content. To play DVD-Video content, select
“Play as DVD-Video” (➜ page 58, Other
Menu).
Music discs with video
Including SVCD (Conforming to IEC62107)
CD [CD]
Regarding DVD-Audio
Some multi-channel DVD-Audio will prevent down-mixing (➜ page 108, Glossary) of all or part of their contents if
this is the manufacturer’s intention. When playing such discs, or such parts of the disc, unless the number of
connected speakers is the same as the disc’s channel specification, audio will not be output properly (e.g., part of
the audio is missing, multi-channel audio cannot be selected and audio is played in two channels). Refer to the
disc’s jacket for more information.
RQT8927
20
Music discs
≥This unit is not compatible with HDCD.
≥Operation and sound quality of CDs that do
not conform to CD-DA specifications (copy
control CDs, etc.) cannot be guaranteed.
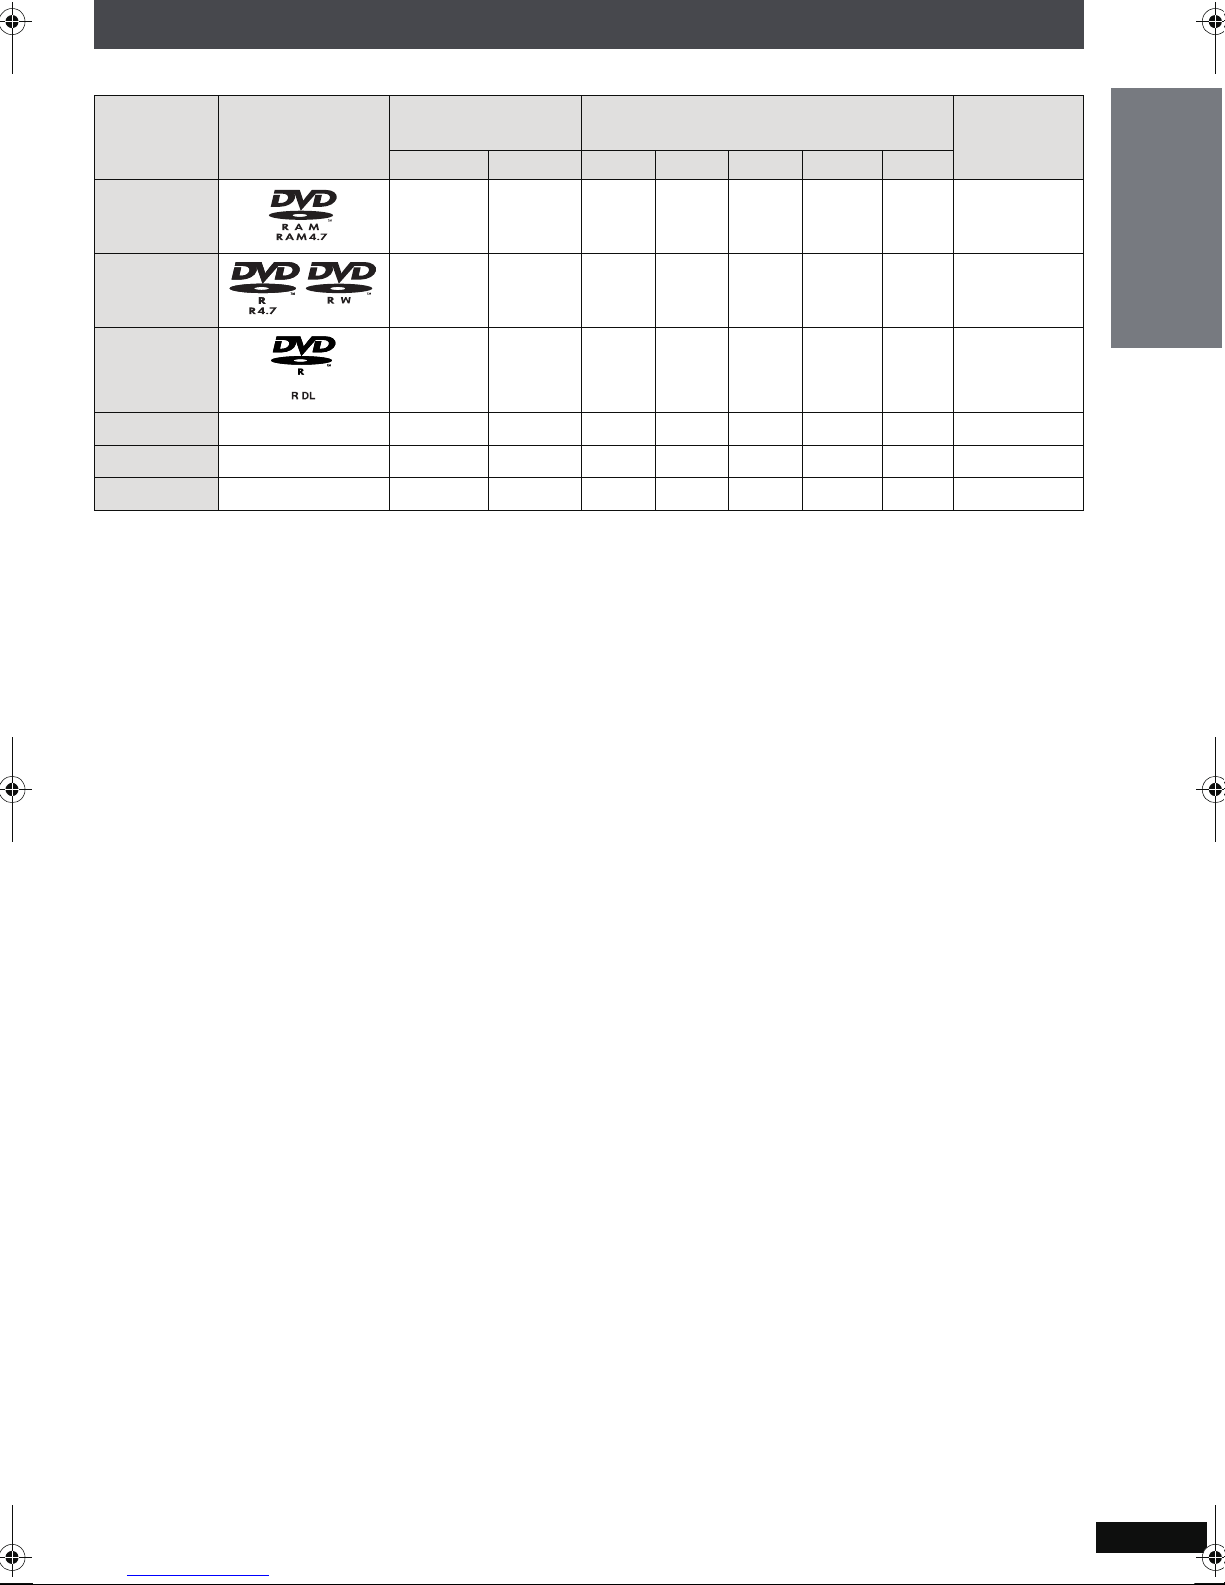
∫ Recorded discs (≤: Can be used, —: Cannot be used)
Recorded on a
Disc Logo
DVD recorder, etc.
[DVD-VR]§2[DVD-V]
§4
[WMA] [MP3] [JPEG] [MPEG4] [DivX]
Recorded on PC, etc.
Necessity
of finalize
§6
DVD-RAM
DVD-R/RW
DVD-R DL
iR/iRW —
iR
DL
CD-R/RW
§1
≤
—
—
≤≤— ≤≤ ≤≤
§3
≤
—(
—
———
—(
≤ ——— ——
§5
≤)
≤)
§5
——— ——
——— ——
≤≤≤≤≤
≤≤ ≤≤
Not
necessary
Necessary
Necessary
Necessary
Necessary
Necessary
≥It may not be possible to play the discs in all cases due to the type of discs, the condition of the recording, the
recording method and how the files were created (➜ page 22, Tips for making data discs).
§1
This unit can play CD-R/RW recorded with CD-DA or Video CD format.
[WMA] [MP3] [JPEG] This unit also plays HighMAT discs.
§2
Discs recorded on DVD recorders or DVD video cameras, etc. using Version 1.1 of the Video Recording Format
(a unified video recording standard).
§3
Discs recorded on DVD recorders or DVD video cameras using Version 1.2 of the Video Recording Format (a
unified video recording standard).
§4
Discs recorded on DVD recorders or DVD video cameras using DVD-Video Format.
§5
Recorded using a format different from DVD-Video Format, therefore some functions cannot be used.
§6
A process that allows play on compatible equipment. To play a disc that is displayed as “Necessary”, the disc
must first be finalized on the device it was recorded on.
§7
Closing the session will also work.
§7
Getting Started
Information
∫ Discs that cannot be played
Blu-ray, HD DVD, AVCHD discs, Version 1.0 of DVD-RW, DVD-ROM, CD-ROM, CDV, CD-G, SACD, Photo CD,
DVD-RAM that cannot be removed from their cartridges, 2.6-GB and 5.2-GB DVD-RAM, and “Chaoji VCD”
available on the market including CVD, DVCD and SVCD that do not conform to IEC62107.
RQT8927
21
Discs used with this unit
3
3
3
3
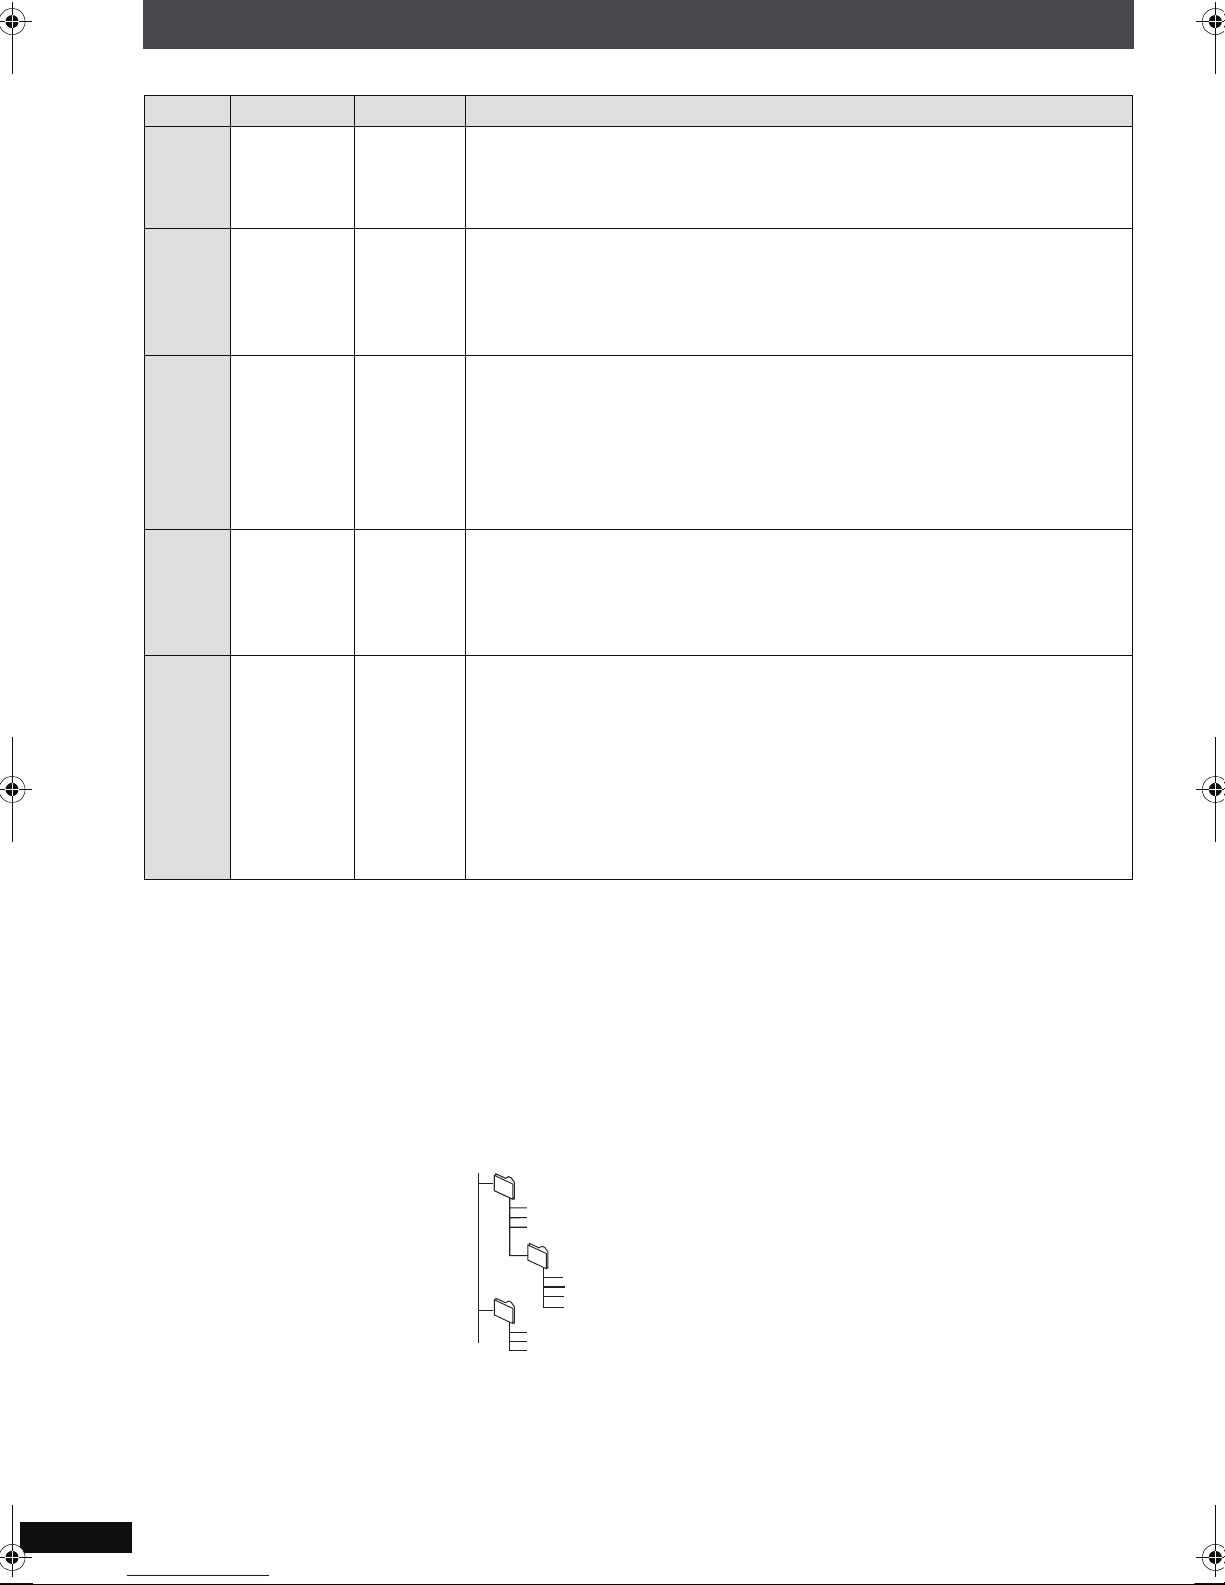
∫ Tips for making data discs
Format Disc Extension Reference
≥Compatible compression rate: between 48 kbps and 320 kbps
[WMA] CD-R/RW
DVD-RAM
[MP3]
DVD-R/RW
CD-R/RW
DVD-RAM
[JPEG]
DVD-R/RW
CD-R/RW
DVD-RAM
[MPEG4]
DVD-R/RW
CD-R/RW
DVD-RAM
[DivX]
DVD-R/RW
CD-R/RW
“.WMA”
“.wma”
“.MP3”
“.mp3”
“.JPG”
“.jpg”
“.JPEG”
“.jpeg”
“.ASF”
“.asf”
“.DIVX”
“.divx”
“.AVI”
“.avi”
≥You cannot play WMA files that are copy protected.
≥This unit is not compatible with Multiple Bit Rate (MBR: a file that contains
the same content encoded at several different bit rates).
≥Sampling frequency and compatible compression rate
:
DVD-RAM, DVD-R/RW
11.02, 12, 22.05, 24 kHz (8–160 kbps)
44.1, 48 kHz (32–320 kbps)
CD-R/RW : 8, 11.02, 12, 16, 22.05, 24 kHz (8–160 kbps)
32, 44.1, 48 kHz (32–320 kbps)
≥JPEG files taken on a digital camera that conforms to DCF Standard
Version 1.0 are displayed.
–Files that have been altered, edited or saved with picture editing
software may not be displayed.
≥This unit cannot display moving pictures, MOTION JPEG and other such
formats, still pictures other than JPEG (e.g., TIFF) or play pictures with
attached audio.
≥You can play MPEG4 data [conforming to SD VIDEO specifications (ASF
standard)/MPEG4 (Simple Profile) video system/G.726 audio system]
recorded with the Panasonic SD multi cameras or DVD recorders with this
unit.
≥The recording date may differ from that of the actual date.
≥Plays all versions of DivX video (including DivX
MP3, Dolby Digital or MPEG audio system] with standard playback of
DivX® media files.
Functions added with DivX Ultra are not supported.
≥DivX files greater than 2GB or have no index may not play properly on this
unit.
≥This unit supports all resolutions up to maximum of 720 k480 (NTSC)/
720 k576 (PAL).
≥You can select up to 8 types of audio and subtitles on this unit.
®
6) [DivX video system/
≥If groups were created away from the root like “002
group” in the illustration below, the eighth one onwards
is displayed on the same vertical line in the menu
screen.
≥There may be differences in the display order on the
menu screen and PC screen.
≥This unit cannot play files recorded using packet write.
≥This unit is not compatible with ID3 tags.
Naming folders and files (Files
are treated as contents and
folders are treated as groups on
this unit.)
At the time of recording, prefix
folder and file names. This should
be with numbers that have an
equal number of digits, and should
be done in the order you want to
play them (this may not work at
e.g., [MP3]
root
001 group
001
003 group
001 track.mp3
002 track.mp3
003 track.mp3
002 group
001 track.mp
002 track.mp
003 track.mp
004 track.mp
001 track.mp3
002 track.mp3
003 track.mp3
times).
DVD-RAM
≥Discs must conform to UDF 2.0.
DVD-R/RW
≥Discs must conform to UDF bridge (UDF 1.02/
ISO9660).
≥This unit is not compatible with multi-session. The
default session only is played.
CD-R/RW
≥Discs must conform to ISO9660 level 1 or 2 (except for
extended formats).
≥This unit is compatible with multi-session but if there
are a lot of sessions it takes more time for play to start.
Keep the number of sessions to a minimum to avoid
this.
RQT8927
22
About compatible USB devices
The USB connectivity enables you to connect and play or record tracks or files from USB mass storage class
devices. Typically, USB memory devices (Bulk only transfer).
∫ Compatible devices
Devices which are defined as USB mass storage class:
–USB devices that support bulk only transfer.
–USB devices that support USB 2.0 full speed.
∫ Playable/recordable formats
Getting Started
Format Extension
[WMA]
“.WMA”
“.wma”
Playable /
Not playable
Recordable /
Not recordable
Reference
Recordable
[MP3]
[JPEG]
[MPEG4]
“.MP3”
“.mp3”
“.JPG”
“.jpg”
“.JPEG”
“.jpeg”
“.ASF”
“.asf”
Playable
See “Reference” for
each format in “Tips
for making data
discs” on page 22.
Not recordable
≥CBI (Control/Bulk/Interrupt) is not supported.
≥Digital Cameras that use PTP protocol or which require additional program installation when connected to a PC
are not supported.
≥A device using NTFS file system is not supported.
[Only FAT 12/16/32 (File Allocation Table 12/16/32) file system is supported].
≥Depending on the sector size, some files may not work.
≥It will not operate with Janus enabled MTP (Media Transfer Protocol) devices.
≥Maximum folder: 400 folders
≥Maximum file: 4000 files
≥Maximum file name: 44 characters
≥Maximum folder name: 44 characters
≥Only one memory card will be selected when connecting a multi-port USB card reader. Typically the first memory
card inserted.
Information
∫ Connecting compatible USB devices
Preparation
Before connecting any USB mass storage device to the unit, ensure that the data stored therein has been backed up.
It is not recommended to use a USB extension cable. The USB device is not recognized by this unit.
OPEN/CLOSE SELECTOR
MUSIC PORT
Main unit
Compatible USB device (not included)
It is not recommended to use a USB
extension cable. The device connected via
the cable will not be recognized by this unit.
TUNING
VOLUME
RQT8927
23

Utilizing the Start menu
By using the Start menu you can access the main functions quickly and easily.
1 Press [START].
Start
Listen
Watch
Import/Record
Setup
ENTER
Main Screen
2 Press [34] to select an item and press [ENTER].
Each sub-level menu is displayed. Follow the on-screen instructions for operation.
Listen:
Play music or receive radio broadcasts
Watch:
Operate DVD playback
Listen
Music Collection
Disc
Tun er
TV Audio
Other Inputs
ENTER
RETURN
Import/Record:
Import/Record music
Import / Record
From Disc
From PC
From Others
From Tuner
ENTER
RETURN
Setup:
Change the unit’s settings, set timer and use other
functions
Setup
Setup for Video
Other Setup
ENTER
Main Screen
DVD
VIDEO
HDMI
DISPLAY
Remote Control
Clock / Timer
Power On/Off
TV Audio Input
Network
Maintenance
Displaying track information
When [MUSIC COLLECTION] is pressed, or while a
track from the HDD is playing, the following screen is
displayed on the television. You can check information
about the track.
Main Screen
RQT8927
24
Music Collection > Other Playlists
Mozart
Life with Mozart
Eine Kleine Nacht Musik
2:45
LPCM
PL
Repeat
REC
&
Track List
Favorites
Tracks 3 of 12
Total Time 56:00
5:42
1 How the track was selected is displayed
2 Track information
3 Playback status, elapsed playtime, track time
4 Playback range/mode
1
One track
PL
Playlist
PL
All playlists
Repeat play mode
Random play mode
5 The availability and functions for [3421],
[ENTER], [RETURN] is displayed.
6 Timer setting indicator (➜ page 79)
Before recording
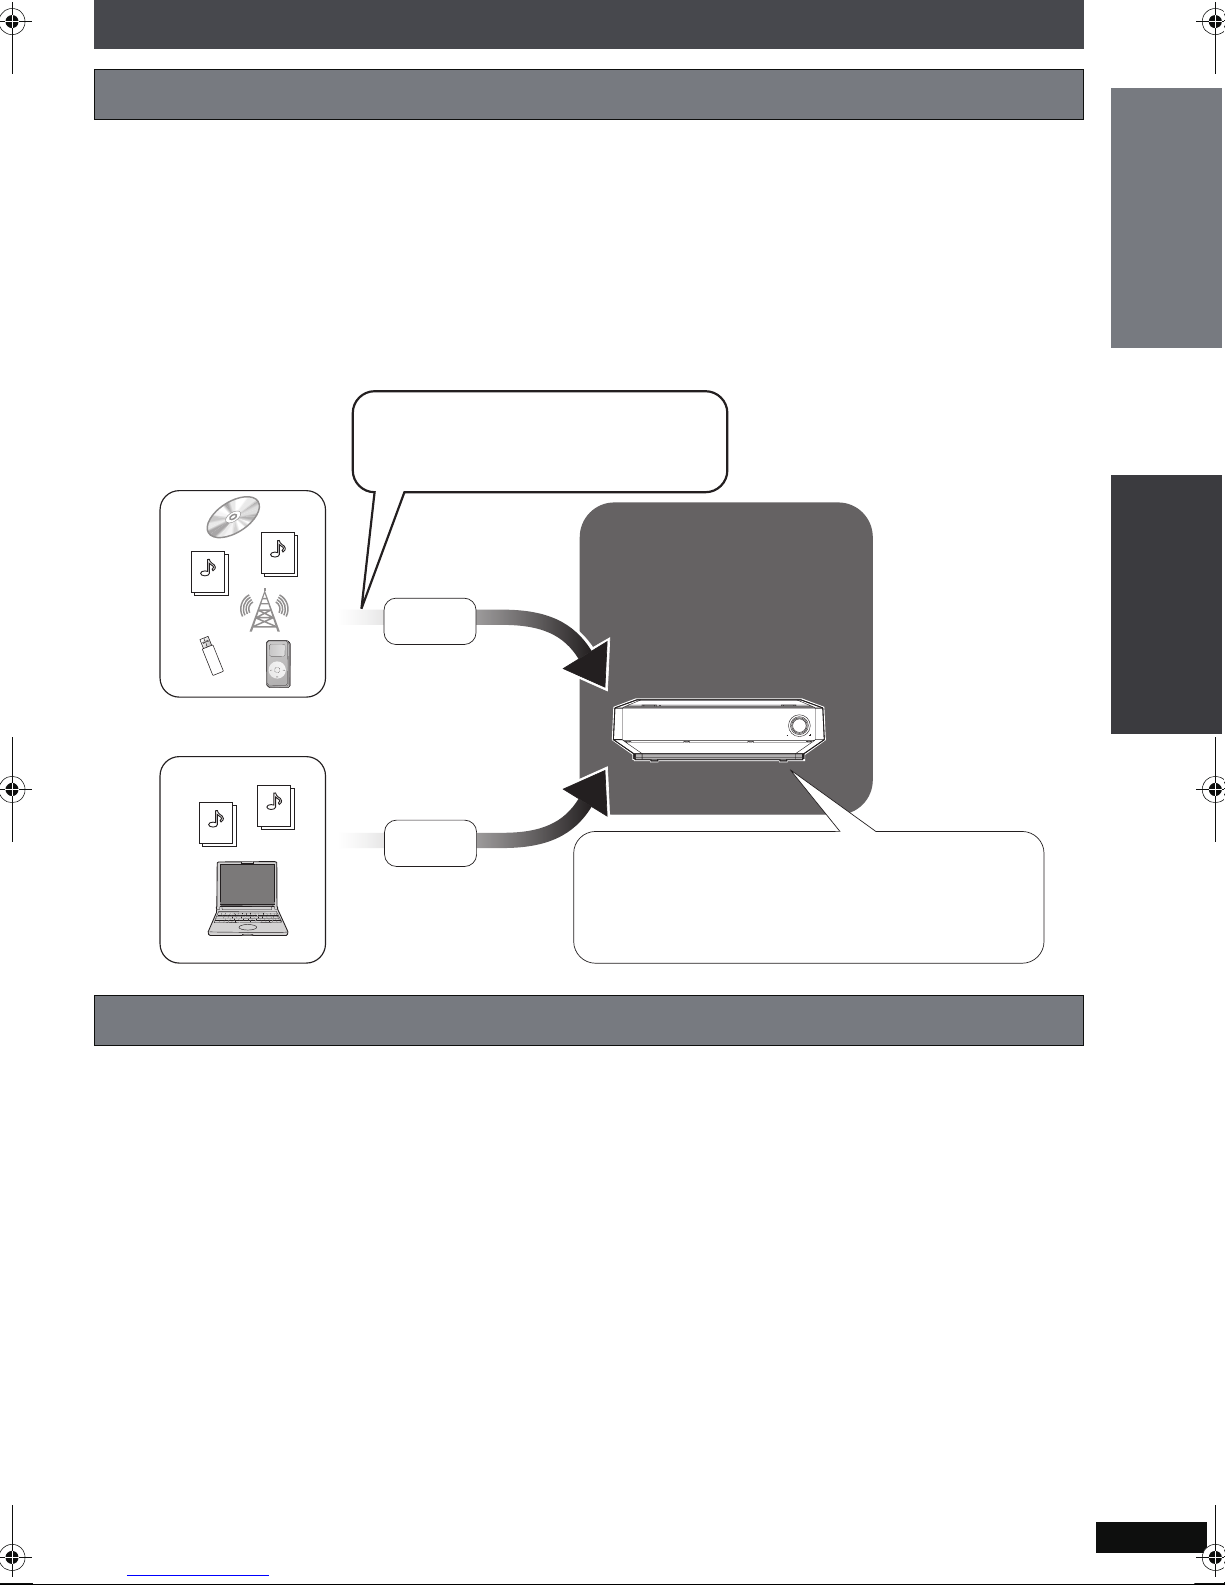
A brief introduction about recording and importing from a PC
Recording
This unit can record audio to the internal HDD from a variety of sources including commercial CDs,
radio, music files (WMA/MP3), and audio from externally connected devices (portable digital audio
players, etc.). This unit can also access the Gracenote database to obtain title information for music
CDs, radio broadcasts, or other analogue recordings made with externally connected devices. (For
recording details, see page 26.)
Importing from a PC
You can import WMA/MP3 files from your PC to this unit. This differs from recording because the files
are saved in the HDD in the same format as they are saved on your PC. (LPCM and AAC conversion is
not performed.)
[CD]
Automatically connects to the
Gracenote database and track
Various audio sources
WMA
MP3
/
'
0
7
WMA/MP3 file on PC
title information, etc. is obtained
(➜ below).
RECORD
All tracks recorded
are saved as LPCM.
(See page 27.)
Music Jukebox
You can record up to
39,000
Music Jukebox.
§The number of songs
§
songs in the
depends upon various
conditions.
VOLUMEVOLUME
Getting Started
Basic Operations
WMA
MP3
IMPORT
Imported WMA/MP3
files are saved “as-is”
(without conversion)
in this unit’s HDD.
About the Gracenote
The Gracenote
®
database is a database used to search and retrieve CD title information.
®
database
By connecting to the Internet, the unit can access the Gracenote server and obtain the most recent CD
title information. When a CD is inserted or recording from a CD begins, the unit will automatically
search for and obtain information about the inserted CD (➜ page 28).
If this unit is not connected to the Internet:
A portion of the Gracenote database comes pre-installed on this unit, so titles and artist information can
be obtained. Please note however that the newest CD titles, etc. may not be registered yet to the
internal database. This unit has an internal database containing information for approximately 350,000
album titles.
Searching for titles other than on CD:
Using the Gracenote database, information can also be obtained for other types of tracks recorded to
the HDD (➜ page 67, Searching for track names, artist names and album names within the Gracenote
database and entering them automatically).
≥If it takes a long time to access the Gracenote database, check if the unit’s network connection
(➜ page 94) and the network settings (➜ page 96) are correct.
≥Some CDs may have title information that is similar to other CDs. In this case, try obtaining the CD
title information again (➜ page 67), or after recording to the HDD has completed enter the CD title
information manually (➜ page 66).
≥For some CDs, multiple title suggestions will be found, therefore select the appropriate title
(➜ page 67). When you want to change the title, manually make changes after recording to the HDD
is complete (➜ page 66).
This unit
After tracks recorded from sources other than
a CD or WMA/MP3 files imported from a PC
are saved in this unit’s HDD, you can
manually access the Gracenote database to
obtain track title information, etc. (➜ below)
Information/Basic recording to HDD
RQT8927
25
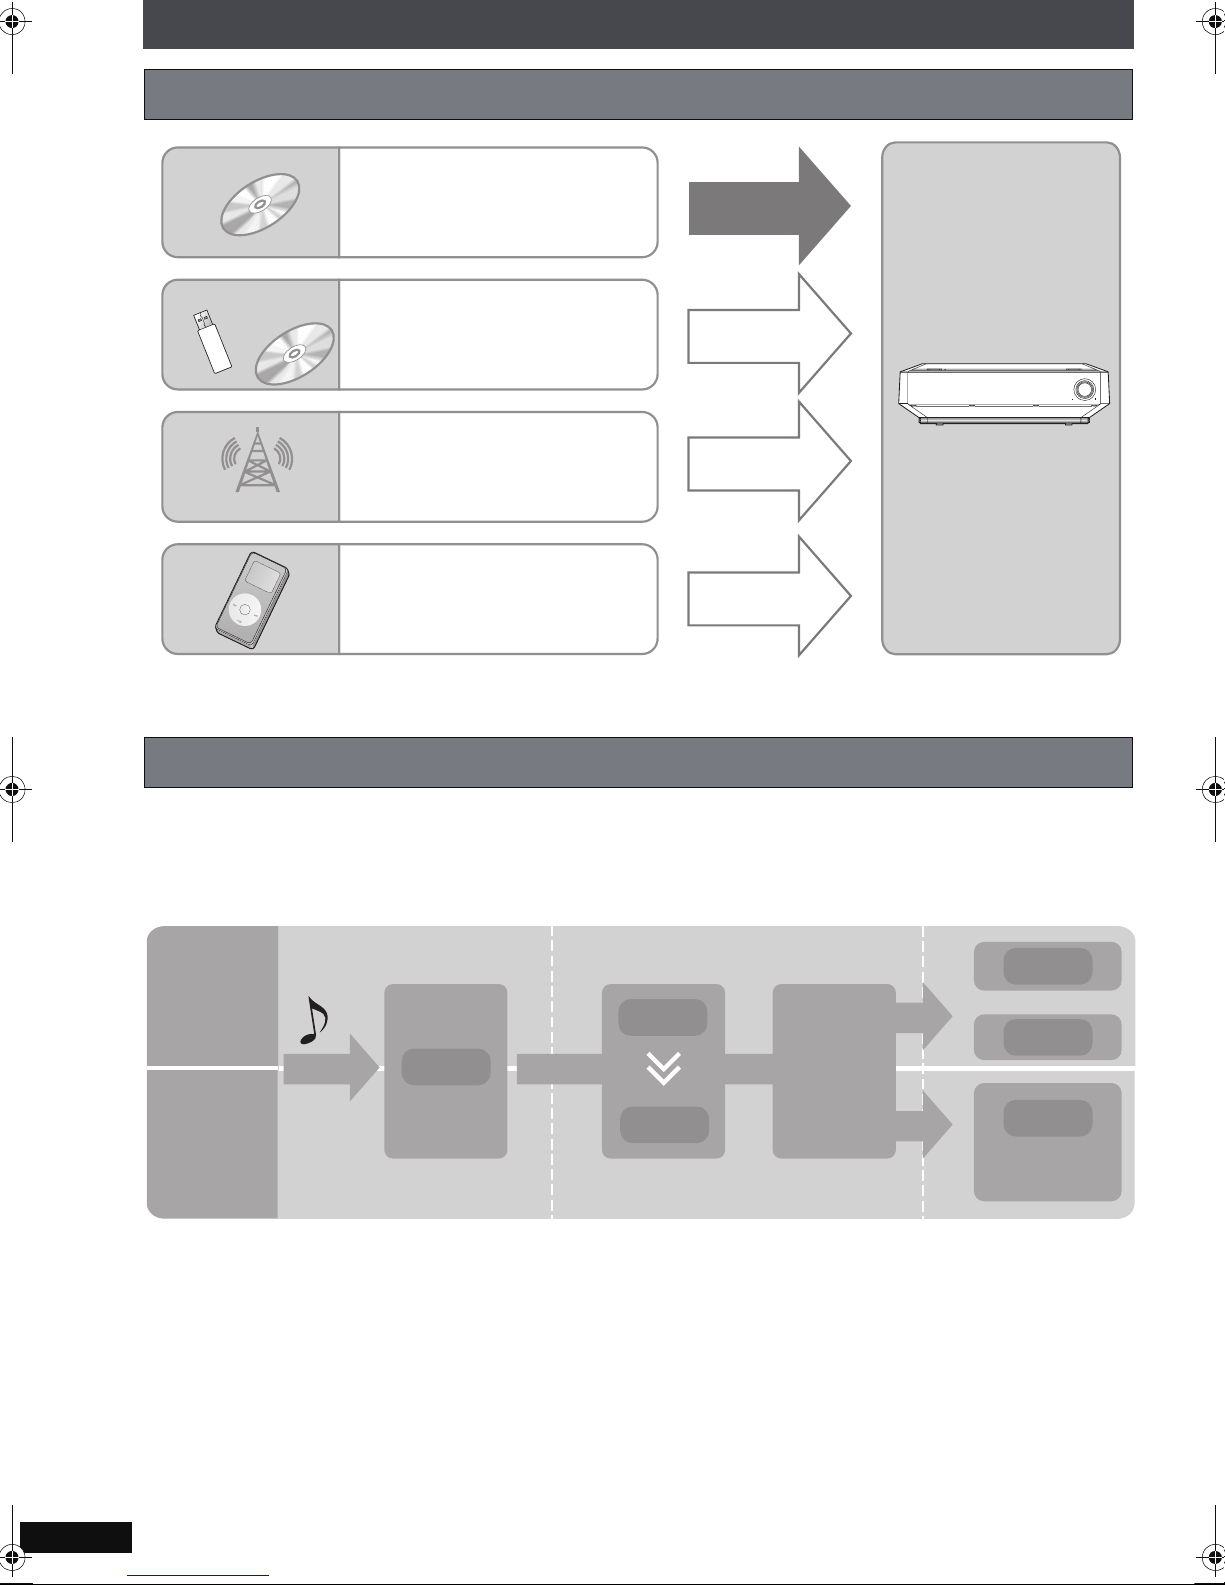
Before recording
You can make these kinds of recordings
Recording tracks from a
music CD (CD-DA)
(Commercial CD, Recordable CD)
Recording WMA/MP3 tracks
from recordable discs
(Recordable CD or DVD) or
USB devices
Digital
recording
Analogue
recording
This unit’s HDD
VOLUME
Recording from the FM radio
/
'0
7
Recording from an external
device
recording
Analogue
recording
IMPORTANT
DVD content cannot be recorded to this unit’s HDD (except for MP3 files in recordable DVD).
How recordings work
Tracks are initially recorded to the HDD and saved as LPCM. When the recording mode is set to AAC,
AAC conversion takes place while the unit is in standby mode. In addition to AAC conversion, track
analysis for the “Music Shuffle” function (➜ page 35) also takes place during standby mode.
While the unit is in standby modeInitially recorded as LPCM Track data in the HDD
Analogue
Recording
in LPCM
recording
mode
Recording
in AAC
recording
mode
Audio signal is recorded
(uncompressed)
Record
LPCM
This unit’s
HDD
Converted to AAC and
compressed
LPCM
Analysis
for Music
Shuffle
AAC
LPCM
+
§
AAC
AAC
LPCM data
is deleted
§With LPCM recording mode, AAC data created (XP mode only) is not displayed in the Track List.
∫ About AAC conversion of recorded tracks and Music Shuffle analysis
≥Conversion/analysis is performed when the unit is in standby mode. 2 minutes after the unit is set to
standby mode, conversion/analysis starts and the unit’s display starts to show “_ _ _ _”. Leave the AC
mains lead plugged in. You can also perform conversion/analysis immediately (➜ page 46).
≥This unit usually takes about one-third of the recording time to complete analysis and conversion.
For example, a 60-minute recording will take about 20 minutes to complete conversion and analysis.
(For tracks imported from a PC, time will be shorter as the tracks only need to be analysed.)
≥Tracks can be played even if conversion and analysis is incomplete. However, the same track may
sound slightly different before and after AAC conversion.
RQT8927
≥You can also compress LPCM tracks to AAC to increase the amount of the available space on the
26
HDD (➜ page 47).
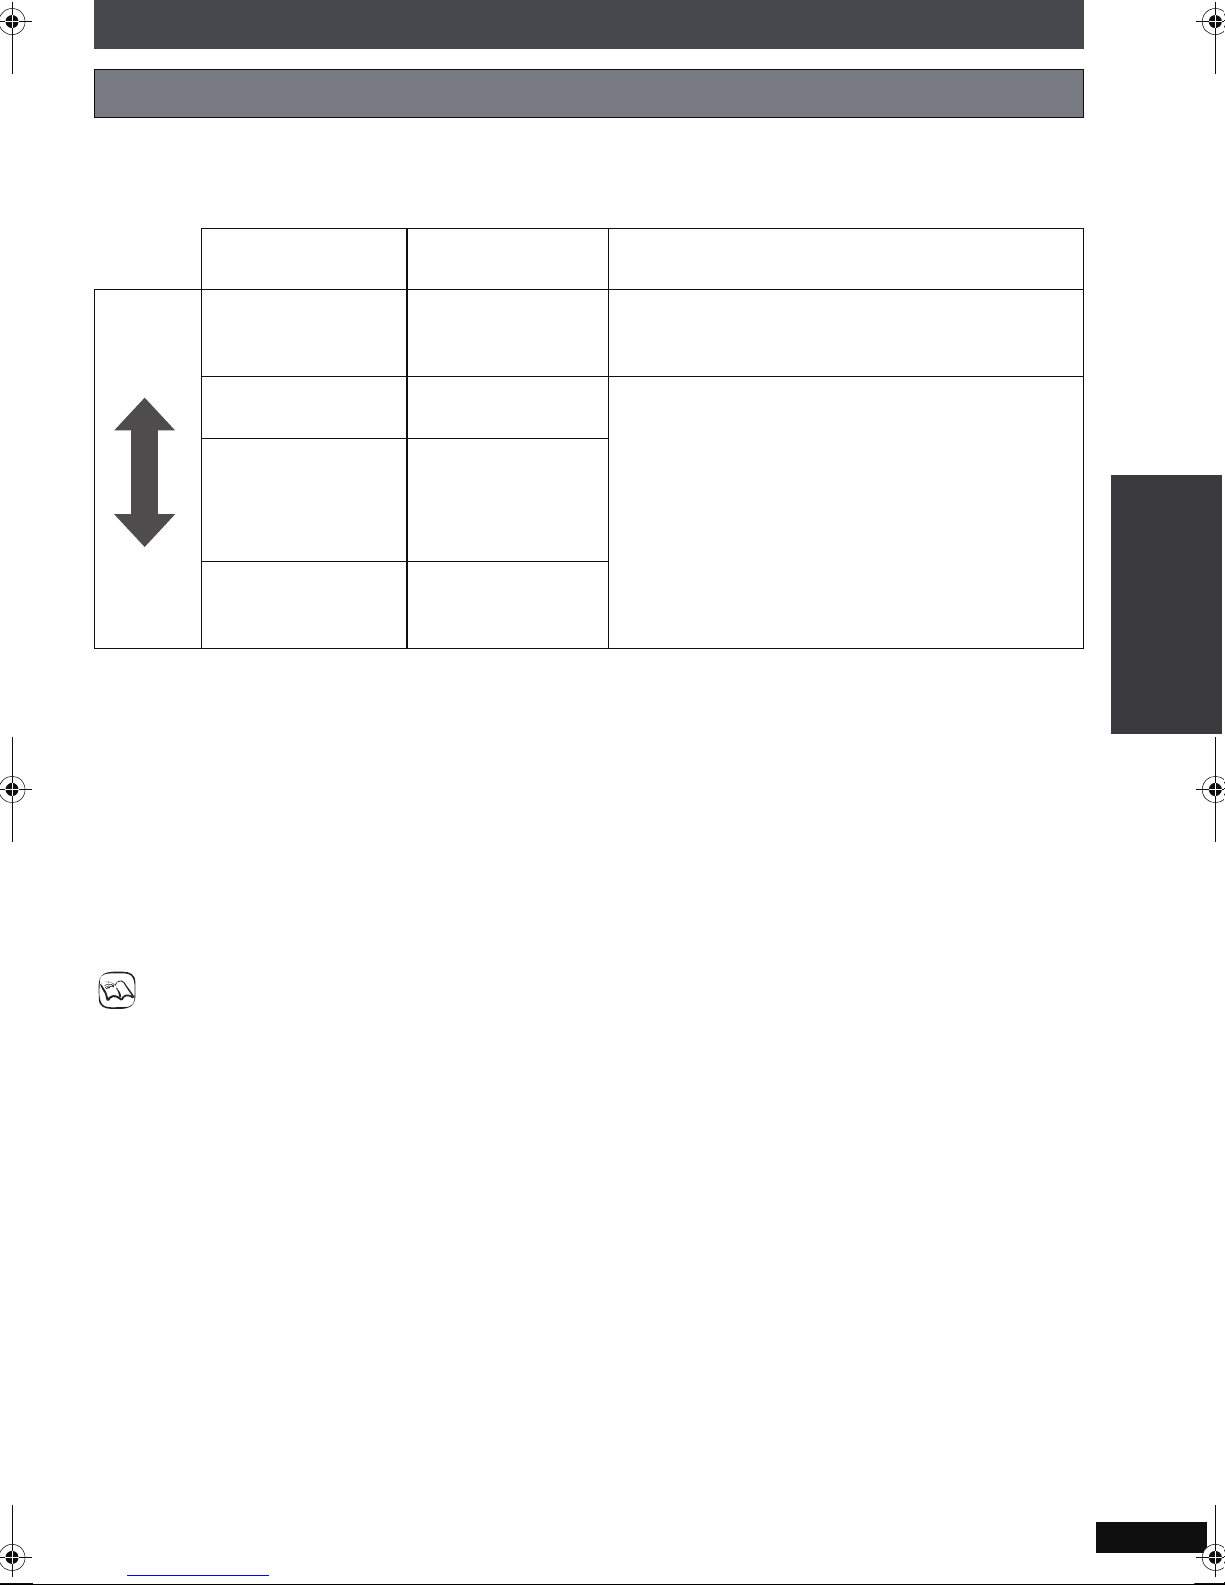
Recording modes
With these settings you can adjust the audio quality when recording tracks to the HDD. Recordings
made with higher bitrates use more space, reducing the total available space on the HDD.
Recording mode
Higher
audio
Recording mode/
bitrate
LPCM Approx. 104 hours
Possible
recording time
Explanation
The audio signal is digitally recorded without
any compression.
quality
AAC(XP)
128 kbps
Approx. 1,230
hours
The audio is initially recorded as LPCM and
converted to AAC when this unit is in standby
mode.
AAC(SP)
96 kbps
Approx. 1,640
hours
AAC is a compression format which
compresses the audio data into a smaller size.
Audio quality and the amount of tracks that can
be recorded will differ depending on the bitrate.
Longer
recording
time
AAC(LP)
64 kbps
Approx. 2,460
hours
Recording mode settings at the time of purchase:
The recording mode for each selector is set to “LPCM” at the time of purchase. The recording mode for
each selector can be set individually (➜ page 28).
If you want to change the recording mode to AAC, please note the following:
Recordings made to this unit are initially recorded in LPCM, and then are converted to AAC. Therefore
if you are making continuous, long recordings, the maximum amount of recordings you can make must
fit within the LPCM limits for maximum possible recording time as described in the chart above. In the
event that you are making many recordings, continue recording after the music data has been
converted to AAC format (➜ page 26, How recordings work).
Basic Operations
NOTE
LPCM audio quality does not exceed the audio quality of the original recording.
Basic recording to HDD
RQT8927
27
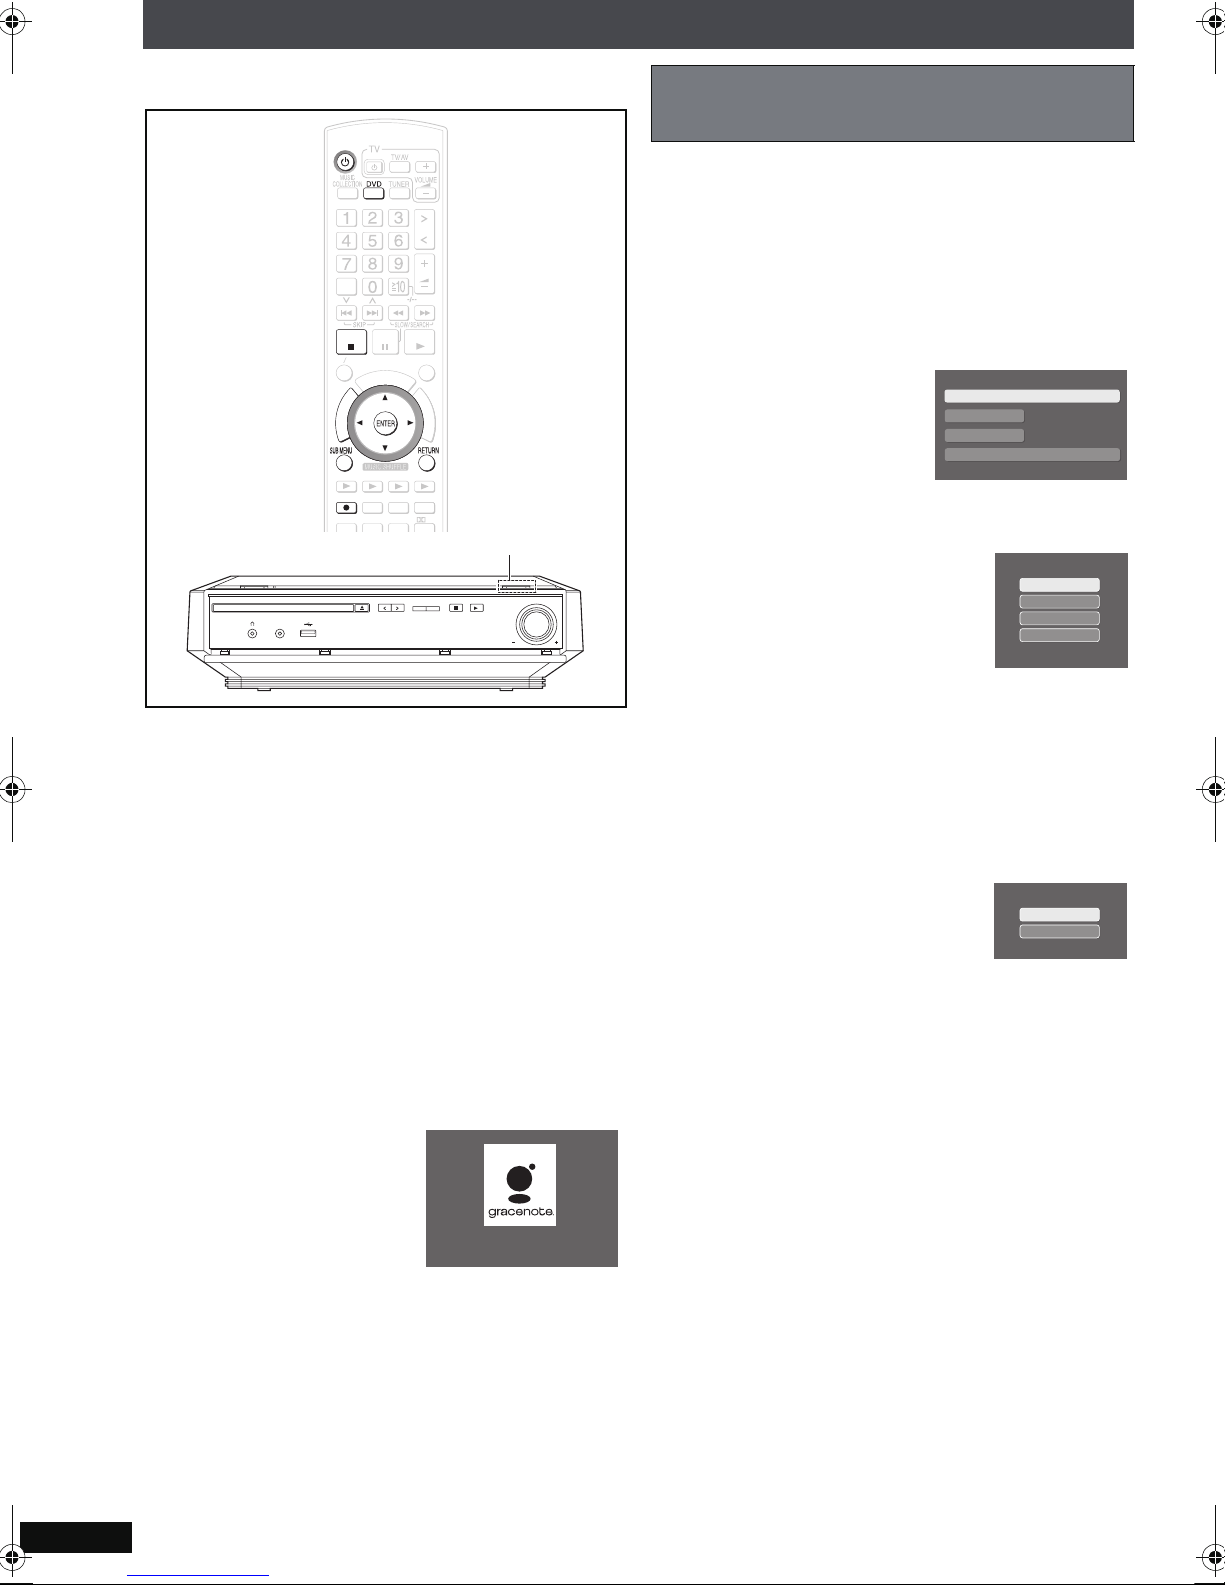
Recording from a CD
a CD
MUSIC PORT
HDD
CANCEL
CANCEL
STOP
MENU PLAYLIST
N
O
R
R
O
O
T
T
A
A
G
G
I
I
V
V
A
A
U
U
N
N
T
T
N
N
C
C
E
E
E
E
R
R
I
I
M
M
D
D
P
P
ޓ
ޓ
O
O
T
T
ENERGETIC RELAXINGMELLOW
CH SELECT
CH SELECT
HDDREC
HDDREC
PLAYMODE
FL DISPLAY
SOUND
OPEN/CLOSE SELECTOR
Setting the recording mode/
recording method
Use the following methods to change the settings
for audio quality of recordings and how recording
SELECT
VOLUME
PLAYPAU S ESTOP
FUNCTIONS
U
C
O
H
T
P
E
L
A
Y
S
S
T
T
A
A
R
R
T
T
ޓ
ޓ
ޓ
ޓ
ޓ
ޓ
EMOTIONAL
FAVORITE
QUICK OSD
REG
SLEEP
VS
MUTINGSETUP
SELECT
TUNING
CD HDD
●
VOLUME
is executed.
≥You will also perform this procedure when
recording audio formats other than CD. Items
displayed will change depending on the audio
format used for recording.
1 Press [SUB MENU].
DVD/CD Sub Menu
Obtain CD / Track(s) Title
Recording Mode
Recording Method
Start Recording
AAC(XP)
High-speed Recording
2 Press [34] to select “Recording
Mode” and press [ENTER].
Recording Mode
LPCM
AAC (XP)
AAC (SP)
AAC (LP)
[CD]
This unit digitally records tracks in CD-DA format
from a commercial CD or recordable CD to this
unit’s HDD.
Using the Gracenote database, the unit
automatically searches for the CD title.
Preparation
1 To display the picture turn on the television and
select the appropriate video input to suit the
connections to this unit.
2 Press [Í].
3 Press [DVD] to switch the selector to “DVD/CD”.
4 Insert a disc (➜ page 11).
The unit starts accessing the Gracenote
database and searches for the title information.
POWERED BY
Searching the database.
3 Press
[
34] to select the recording
mode and press [ENTER].
Recording modes (➜ page 27)
[CD[ only
4 Press [34] to select “Recording
Method” and press [ENTER].
Recording Method
High-speed Recording
Listening while Recording
5 Press [34] to select the recording
method and press [ENTER].
High-speed Recording:
Records in high speed (max. 4k).
Listening while Recording:
Audio is recorded at normal speed when
listening while recording to the HDD.
≥A network connection (➜ page 94) is
necessary to obtain CD title information for
the newest releases.
If search results indicate that multiple titles
were found
Press [34] to select the appropriate title and
press [ENTER].
RQT8927
28
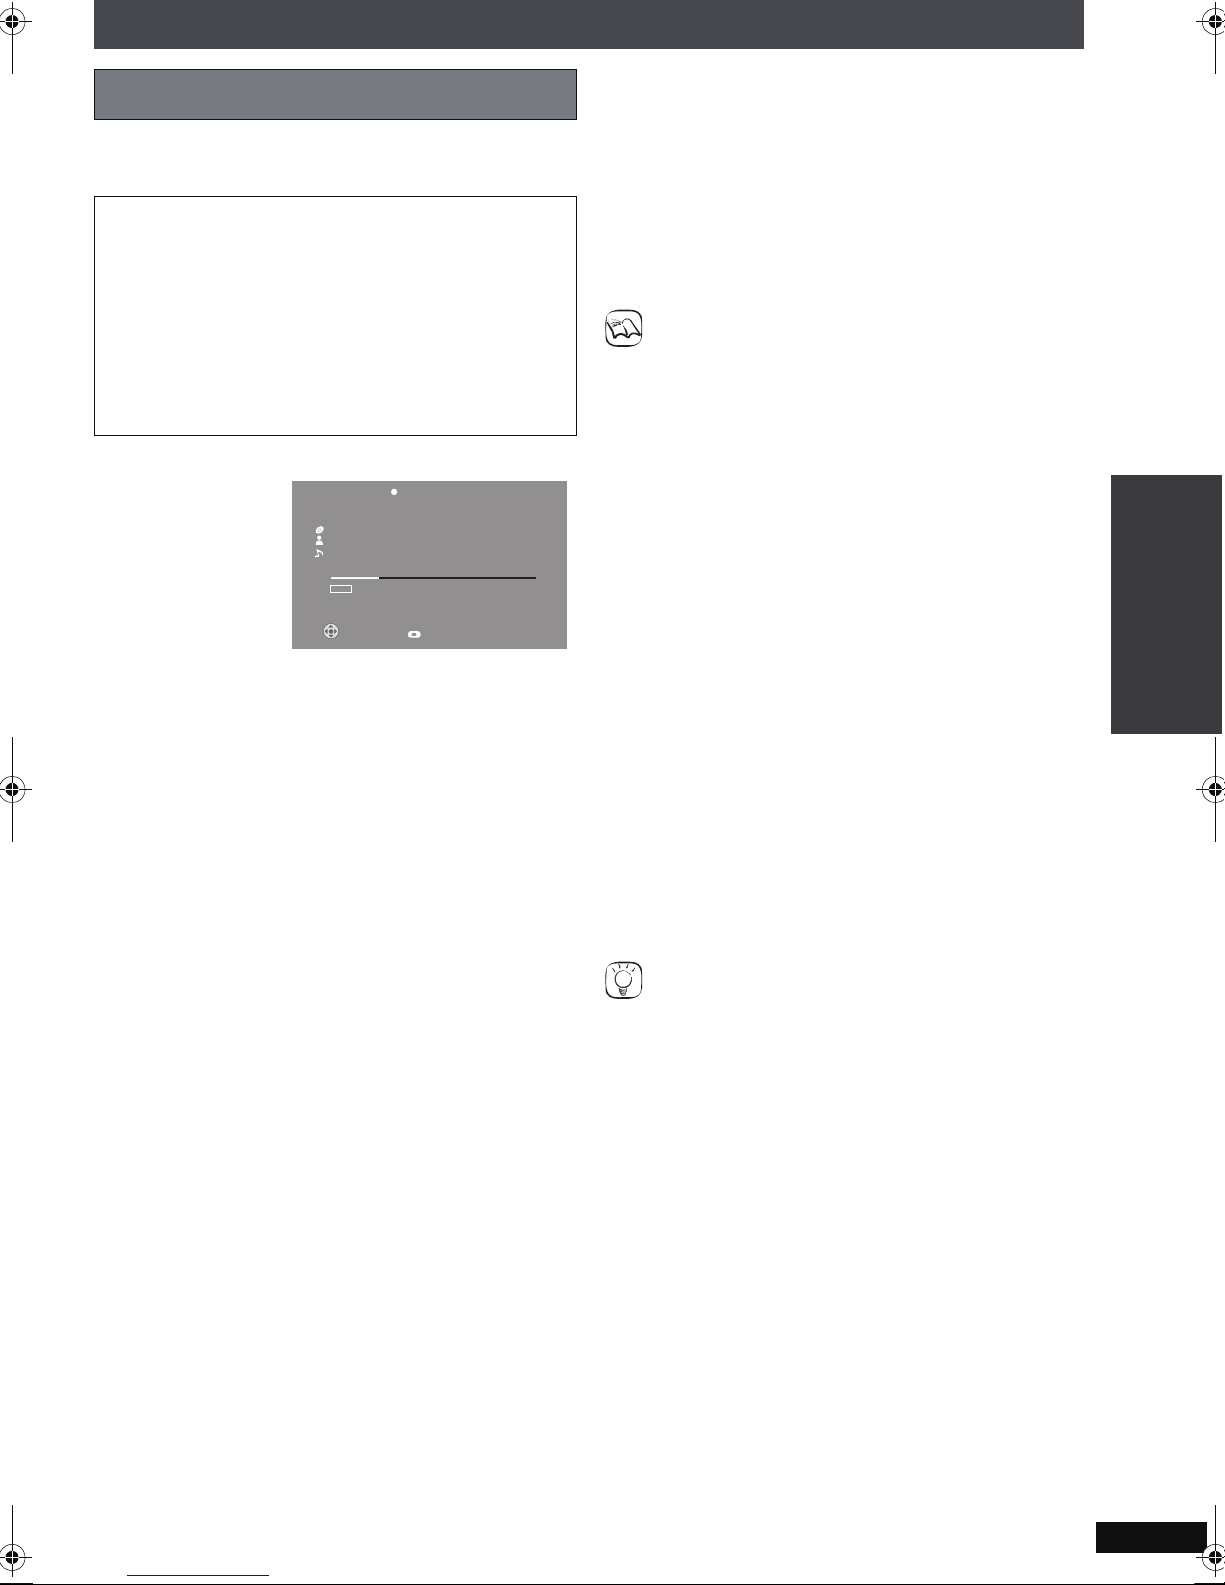
Basic recordings
On the remote control: press
[¥ HDD REC].
On the main unit: press [¥ CD 1HDD].
To start recording immediately after the
recording mode/recording method settings
(➜ page 28)
After step 5 of “Setting the recording mode/
recording method” (➜ page 28)
1Press [34] to select “Start Recording” and
press [ENTER].
2Press [21] to select “Yes” and press
[ENTER].
Recording of the all tracks on the CD starts.
DVD/CD
Life with Mozart
Mozart
Eine Kleine Nacht Musik
6:45
AAC(XP)
≥Titles obtained from the Gracenote database will
be applied to the tracks recorded.
≥If the play mode is set to Repeat playback or
Random playback (➜ page 53, 54):
–With [¥ HDD REC] (remote control):
Recording cannot be performed. Turn repeat
and random settings off.
–With [¥ CD 1HDD] (main unit):
Recording of the all tracks of the CD starts.
Repeat and random play settings are
automatically turned off.
To stop recording
Press [∫].
Tracks that are stopped partially through recording
(incomplete recordings) will not be recorded to the
HDD.
≥Additionally, nothing will be recorded if the
current recording is stopped in the index portion
(e.g. when “j0:03” etc. is displayed) between
two tracks.
To select the track to start recording with
[Possible only when the recording method is set to
“Listening while Recording” (➜ page 28, step 5)].
1 Press [TOP MENU], and the track list will be
displayed.
2Press [34] to select the track to start
recording with and press [ENTER].
3Press [¥ HDD REC].
Recording starts from the selected track and
continues to the end of the CD.
High-speed Recording
1 of 12
Stop Recording
10%
To record a track while playing
[Possible only when the recording method is set to
“Listening while Recording” (➜ page 28, step 5)].
While the disc is playing, press [¥ HDD REC].
≥Playback stops, and then restarts from the
beginning of the track being played and records
until the end of the disc.
To return to the previous screen
Press [RETURN].
NOTE
≥Recordings cannot be paused.
≥No audio can be heard during high-speed
recording.
≥The response to adjustments made to the
volume while recording may be a bit slow,
however this is not an indication of any problem.
≥During high-speed recording, the elapsed time
and status bar shown on-screen may appear to
have stopped, but this is not an indication of a
problem.
≥When listening while recording audio from CDs
that have no intermissions between tracks (e.g.
DJ mix CDs), there may be some distortion
when switching tracks. (However, this has no
effect on the quality of the recording itself.)
≥Recording or play of CDs, etc. with copyright
restrictions that are not in compliance with CD
standards is not guaranteed.
≥Some music CDs have SCMS (Serial Copy
Management System) restrictions. Due to
copyright protection restrictions, these types of
CDs cannot be recorded to the HDD.
TIPS
≥If “The CD has already been recorded.” is
displayed, the unit is trying to record a CD again
that has previously been recorded. Follow the
on-screen menu and select the appropriate
operation.
Add to this Album playlist:
The CD will be recorded and added in the Album
playlist of the CD (which has already been
recorded). If the album title has been changed
since it was recorded first, this item cannot be
displayed.
Record as a New Album:
The CD will be recorded as a different album.
The recorded album will be named “XXXXX
(Name of the Album)~XX (Number)”.
Basic Operations
Basic recording to HDD
Cancel:
Recording will be cancelled.
RQT8927
29
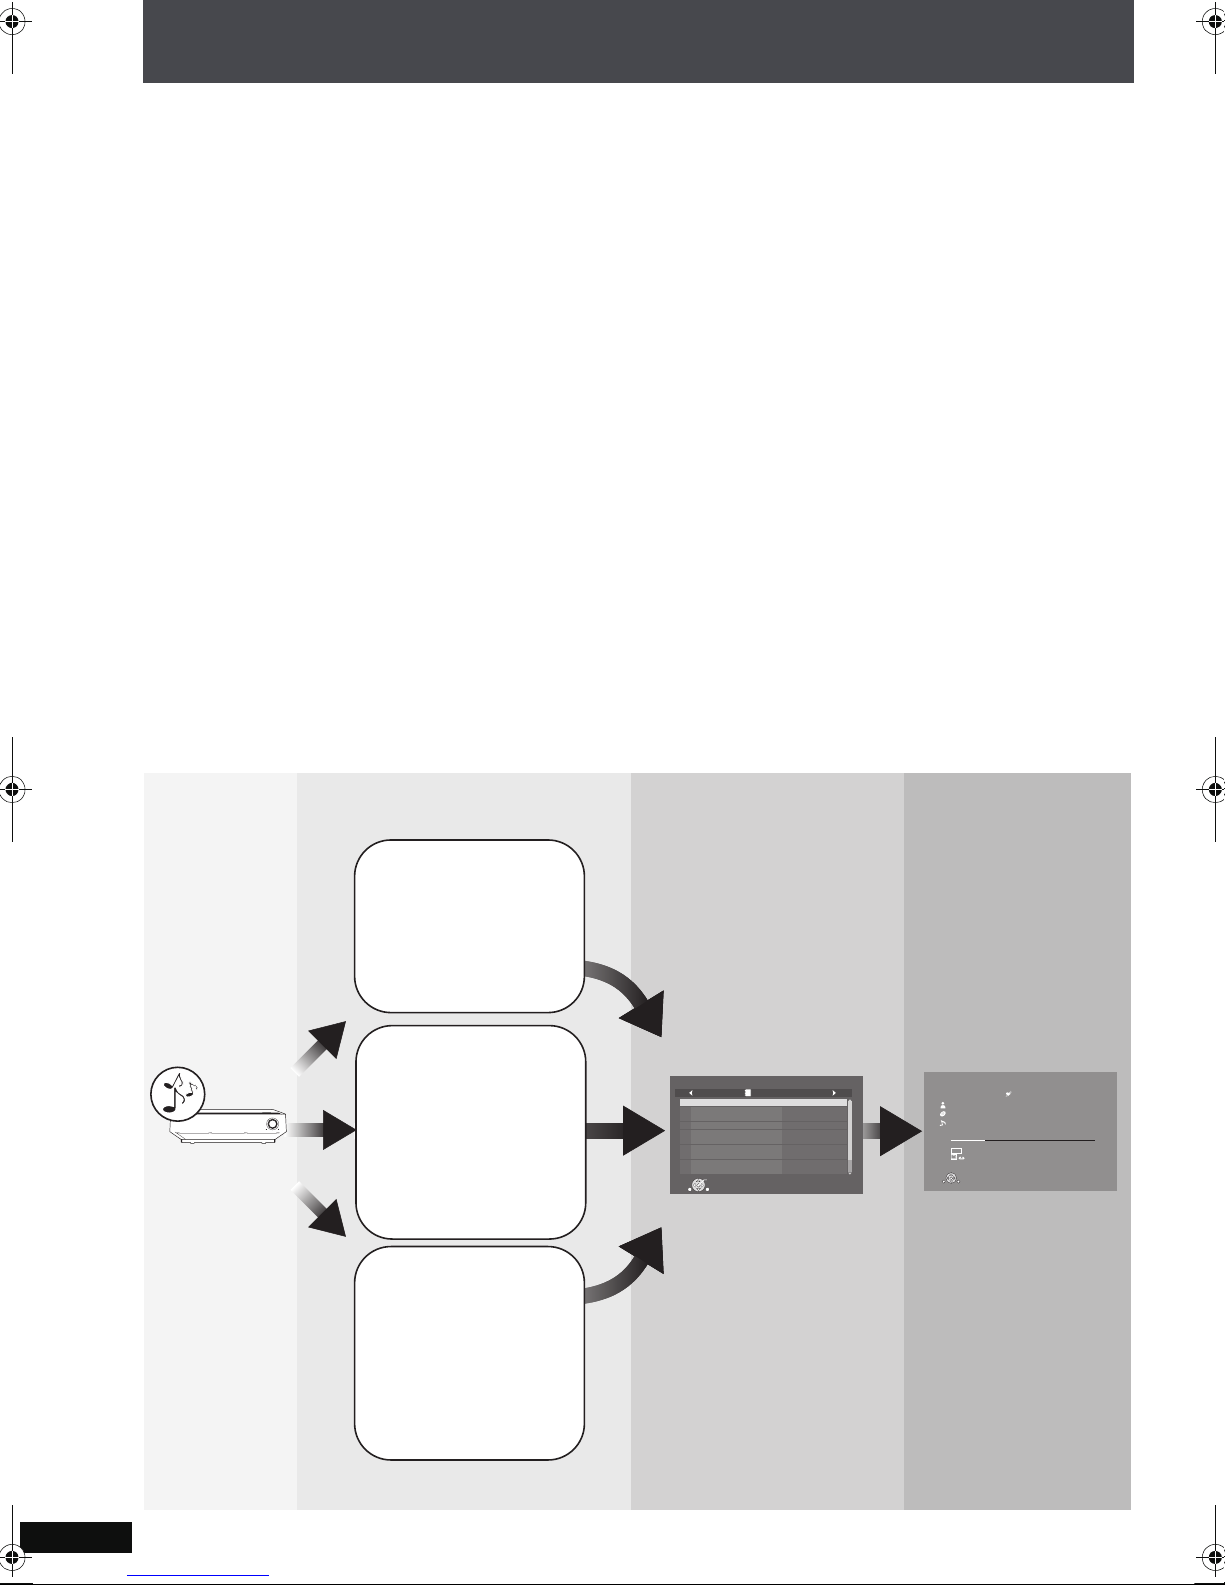
A brief introduction about search and playback of tracks
recorded to the HDD
You can easily search for tracks that have been recorded to this unit’s HDD by using a variety of
categories based on your preferences. From the lists created by your search, you can select the tracks
that you want to listen to. These lists that are created are referred to as “Playlists”. Tracks are played
when a selection is made in a playlist. Playlists are classified into the following categories.
∫ Playlists with tracks sorted by basic details (artist, album, track)
These playlists are created using basic details such as artist names or album names. Also you can
search tracks by track names (➜ page 33).
∫ Playlists generated by Music Shuffle function
“Music Shuffle” is a function that automatically decides the feeling or impression of tracks, and then
classifies the track into one of four different groups. If you select a specific group from “Music Shuffle”,
the tracks within the group will appear in a random playlist each time. Depending on the track, some
tracks cannot be classified into any groups of Music Shuffle playlists (➜ page 35).
∫ User-specific playlists (“Other Playlists” in the top menu of Music Collection)
Aside from the playlists created by using basic details (as mentioned above), this unit has some other
special types of playlists such as “User Playlists”, which allow you to arrange any tracks in any order, or
“Most Often Played” playlist, the tracks of which are automatically selected and arranged based on the
frequency of playback. There are other user-specific or automatically arranged playlists like “Favorites”,
“Recently Ripped” and “Analogue Recorded”. For more information about these useful playlists, see
page 34.
Tracks
recorded
to HDD
HDD
Select the playlist Tracks are shown
and select the track
Select a category
Track is played
and enjoy
listening
to search for tracks
≥Artist name
≥Album name
≥Track name
(➜ page 33)
Select a playlist
from Music
Shuffle function
VOLUME
≥Energetic
≥Mellow
≥Relaxing
≥Emotional
Track List (playlist) Main Screen
Music Collection
Eine Kleine Nacht Musik
Fantasia K.397
Le nozze di Figaro, overture
Symphony No.34
Symphony No.35 "Haffner"
Symphony No.40
The Elopement from the Harem
Turkischer Marsch
Six German Dances
Symphony No.36
Play
S
RETURN
PL
Playlist001
MOZART
MOZART
MOZART
MOZART
MOZART
MOZART
MOZART
MOZART
MOZART
MOZART
1 of 10
Music Collection > Other Playlists
Mozart
Life with Mozart
Eine Kleine Nacht Musik
2:45
LPCM
PL
Repeat
REC
&
Track List
Favorites
Tracks 3 of 12
Total Time 56:00
5:42
(➜ page 35)
User-specific
playlist selection
≥User Playlists
≥Favorites
≥Most Often Played
≥Recently Ripped
≥
Analogue Recorded
(➜ page 34)
RQT8927
30
 Loading...