

Panasonic SA-PT660, SA-954, SA-PT760, SA-956, SA-PT960 Technical Manual
...
Models:
SA-PT660
SA-PT760
SA-PT960
SA-PT1060
SH-FX67, 85
Outline
Wireless
Mech
Pwr Supply
Protection
Audio
Home Theater Products Repair
Panasonic Service and Technology Company
SA-PT660
SA-PT760 / 954 / 956
SA-PT960
SH-FX65, 67, FX85
(wireless)
For 2008-9 models:
Technical Guide
National Training
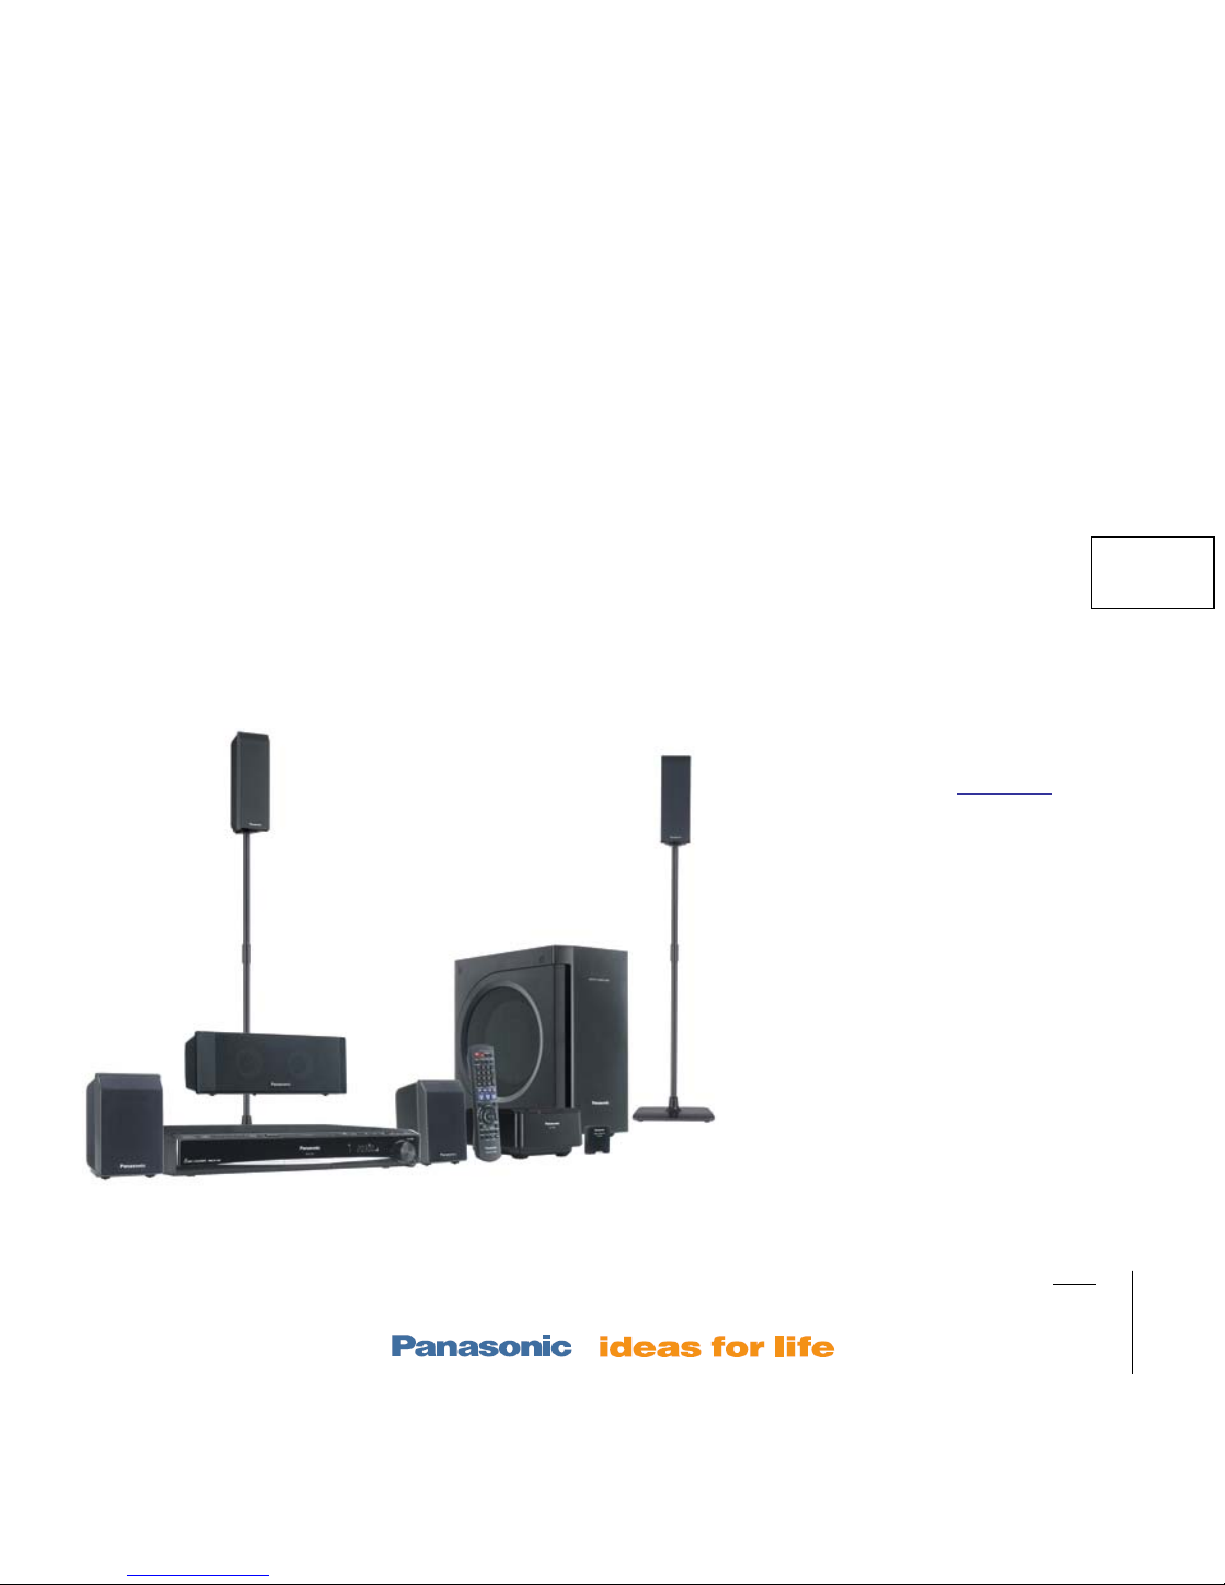
Sample Model SC-PT760 Home Theater System
Contents
Hints / Layout / Reset 4
Wireless Section 8
Power On Sequence 14
5 Disc Mechanism (
CR-14)
o Operation 15
o Alignment 16
o Troubleshooting 21
o Laser replacement 25
Power Supply, 31
Protection Troubleshooting
(F61 or F76 Error Code) 34
No Audio (main unit) 39
SA-
PT7
60
Herb Chin

Models:
SA-PT660
SA-PT760
SA-PT960
SA-PT1060
SH-FX67, 85
Outline
Wireless
Mech
Pwr Supply
Protection
Audio
Panasonic Service and Technology Company
Produced by
Panasonic Services and Technology Company
National Training Department
Secaucus, NJ
Warning
This service information is designed for experienced repair technicians only and is not designed for use by
the general public. It does not contain warnings or cautions to advise non-technical individuals of potential
dangers in attempting to service a product. Products powered by electricity should be serviced or repaired
only by experienced professional technicians. Any attempt to service or repair the product or products dealt
with in this service information by anyone else could result in seri ou s injury or de at h .
Copyright © 2008 by Panasonic Services Company
All rights reserved. Unauthorized copying and distribution is a violation of law
Slide # 3
Models:
SA-PT660
SA-PT760
SA-PT960
SA-PT1060
SH-FX67, 85
Outline
Wireless
Mech
Pwr Supply
Protection
Audio
Home Theater Products Repair
Table of Contents
Electronics –Layouts / Hints
Hints – p/n, New codes, Tests, Reset 4
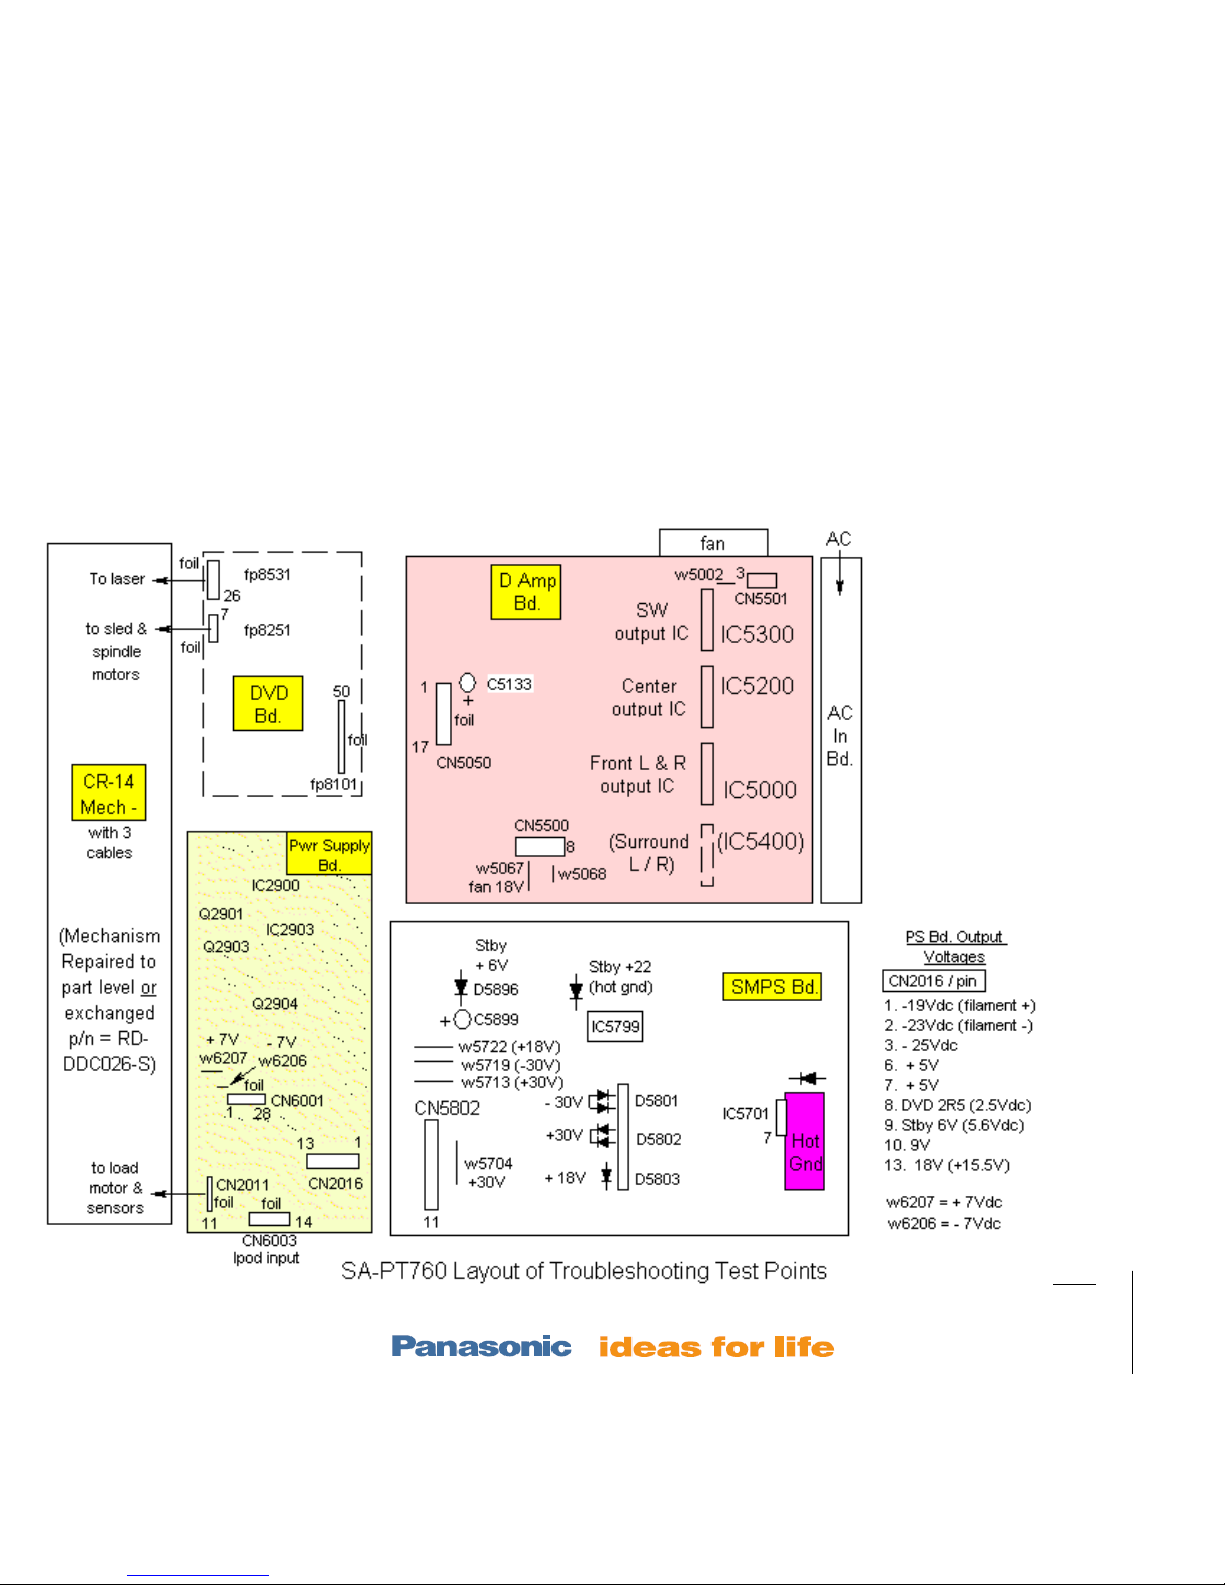
Layout w test points and PS voltages 5
Wireless
SH-FX65/66 Rear Receiver Setup 8
Wireless Troubleshooting Plan 9
Testing & Paring Trans & Rec 10
Transmitter / Receiver Repair Info 11
Power ON
Power On Sequence 14
Mechanism – stacked 5 Disc model CR-14
Operation 15
Alignment 16
Troubleshooting 21
Laser Replacement (removal & install) 25
Power Supply
PS Block with isolation strategy 31
PS Circuit with ref voltages 32
Protection
Protection Concept (F61 & F76 codes) 34
Protection Circuitry 35
Protection Repair Procedure 36
Audio
Concept 39
Speaker Output Waveform 40
Sample Problems & Repair Methods 41
SA-PT660
SA-PT760
SA-PT960
T
R
SW
center
center SW
T
R
center
SW
Slide # 4
Models:
SA-PT660
SA-PT760
SA-PT960
SA-PT1060
SH-FX67, 85
Outline
Wireless
Mech
Pwr Supply
Protection
Audio
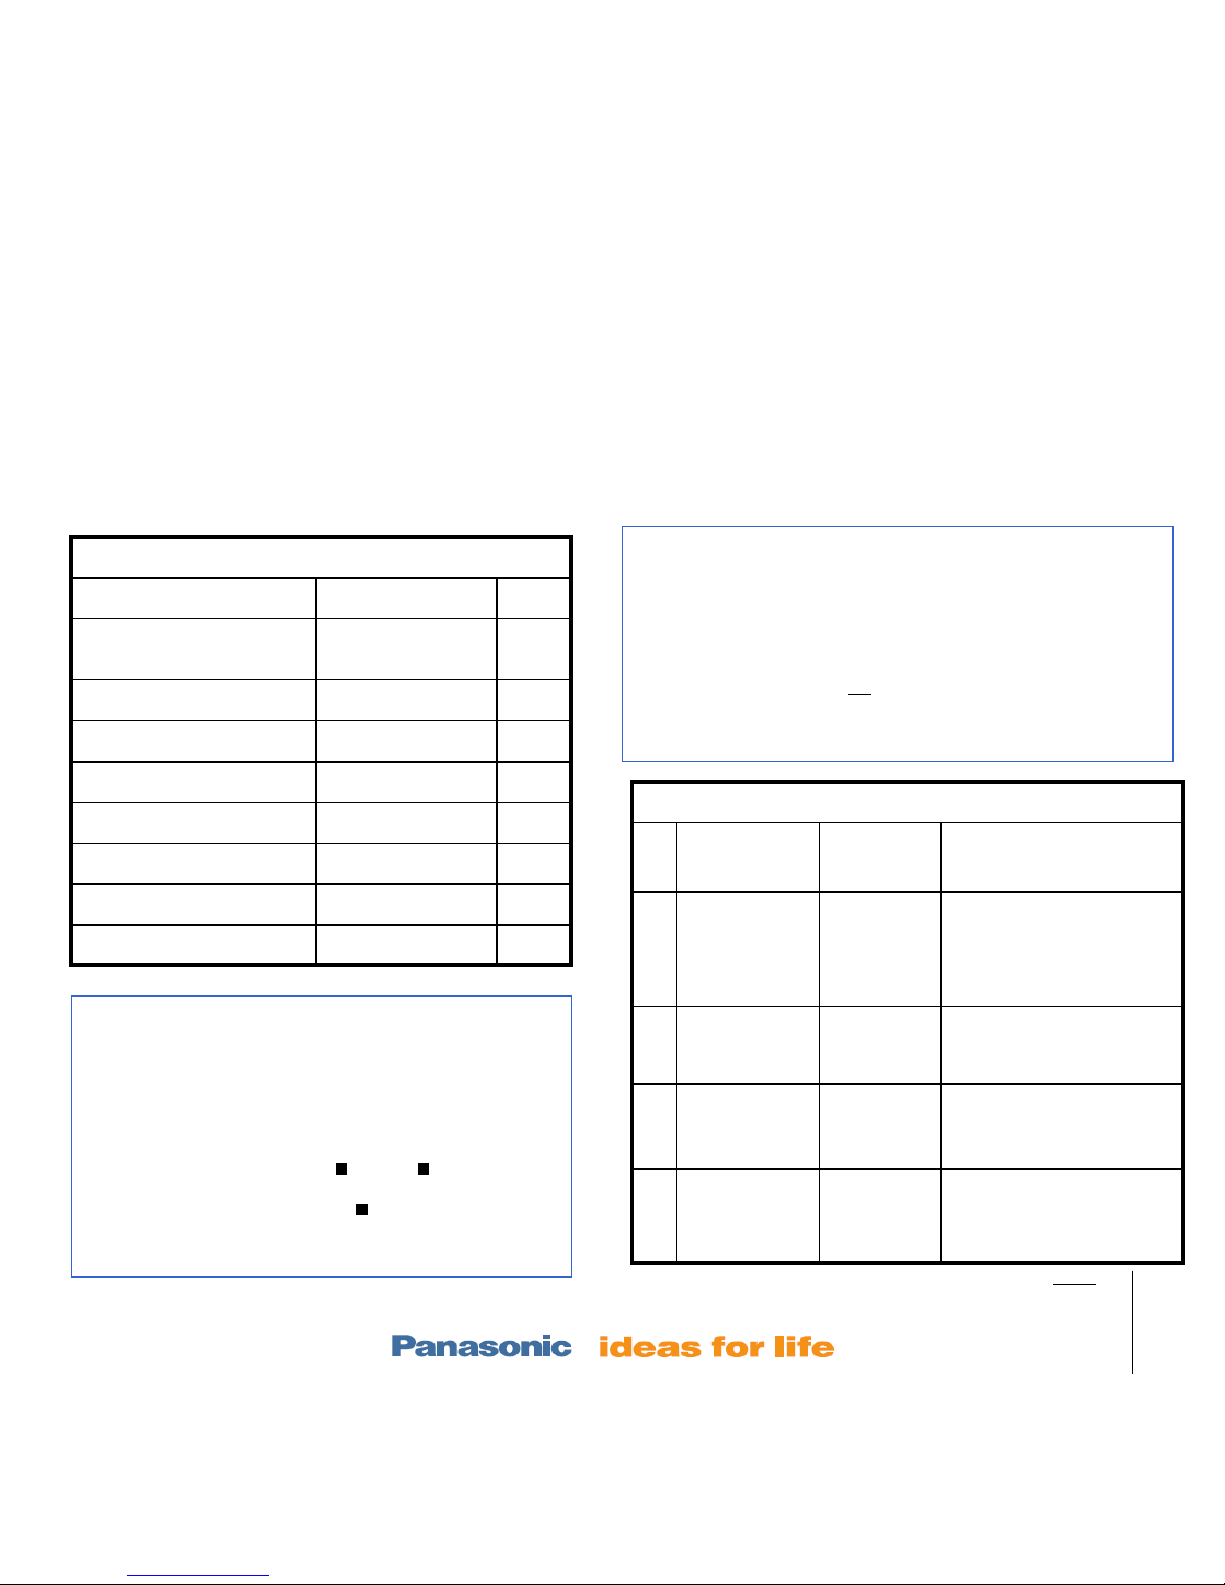
Hints – I Common P/N, II Missing error codes, III Unplugged cable symptoms, IV Reset
I Popular Part Numbers
Description P/N Note
Remote SA-PT760,
PT960
N2QAyb 000 214
Remote SA-PT660 N2QAyb 000 210
Fan L6FAJCCH 0007
Output ICs C1bA 00000 487
Transmit Card Repx 0644b
Receiver card Repx 0645b
CR-14 Mechanism RD-DDC026-S Exch
Traverse / Laser Assem RR-DDtx002-V
II Error Codes not in the Service Manual:
Changer Error – appears when a button is pressed and the
mechanism is not responding. Go to the mechanism troubleshooting of
this book to determine if it is mechanical.
Sum Error – Incorrect communications with DVD board micro.
Transport is dead, DVD can not
be selected. Replace 50 pin ribbon
cable or DVD bd.
F897 – Play the recovery disc and reset the unit. (see IV at left)
III Troubleshooting by cable Removal
Cable
Removed
Display Symptom
1 Large 50 pin
DVD cable
CN2001 off
Hello, Aux
(last input),
Close,
“change
error”
Fan on, No AM/FM mode,
No audio. Unit remains on.
Vol level # changes w knob
but no audio.
2 2 rear mech
cables off
(fp8531,fp8251)
Hello, Din.
Fan on, Mech motor buzzes,
display skips DVD when
press Sel button, No audio.
3 Main Bd.
CN2007 off
None
CN2007 is only for the
display. No display. Unit
works OK otherwise.
4 PS Bd /
mech
CN2011 off
Hello,
Change,
Open.
Fan on, locked on last input
mode used but that audio
works fine with volume
control.
IV Reset after DVD Board replacement
1. After replacing the DVD board Play recovery disc
(p/n = RFKZD 03r005) containing firmware +
update. Select yes or no for update.
2. Reset –
1. Select DVD mode & wait for “1 No Disc” display.
2. Press >10 (remote) and (panel). = Stop.
3. Until the display = “INIT”.
4. While still pressing STOP , also press the remote
OK button until the word “RESET” appears.
5. Power off the unit and unplug for 1 min.
Slide # 5
Models:
SA-PT660
SA-PT760
SA-PT960
SA-PT1060
SH-FX67, 85
Outline
Wireless
Mech
Pwr Supply
Protection
Audio
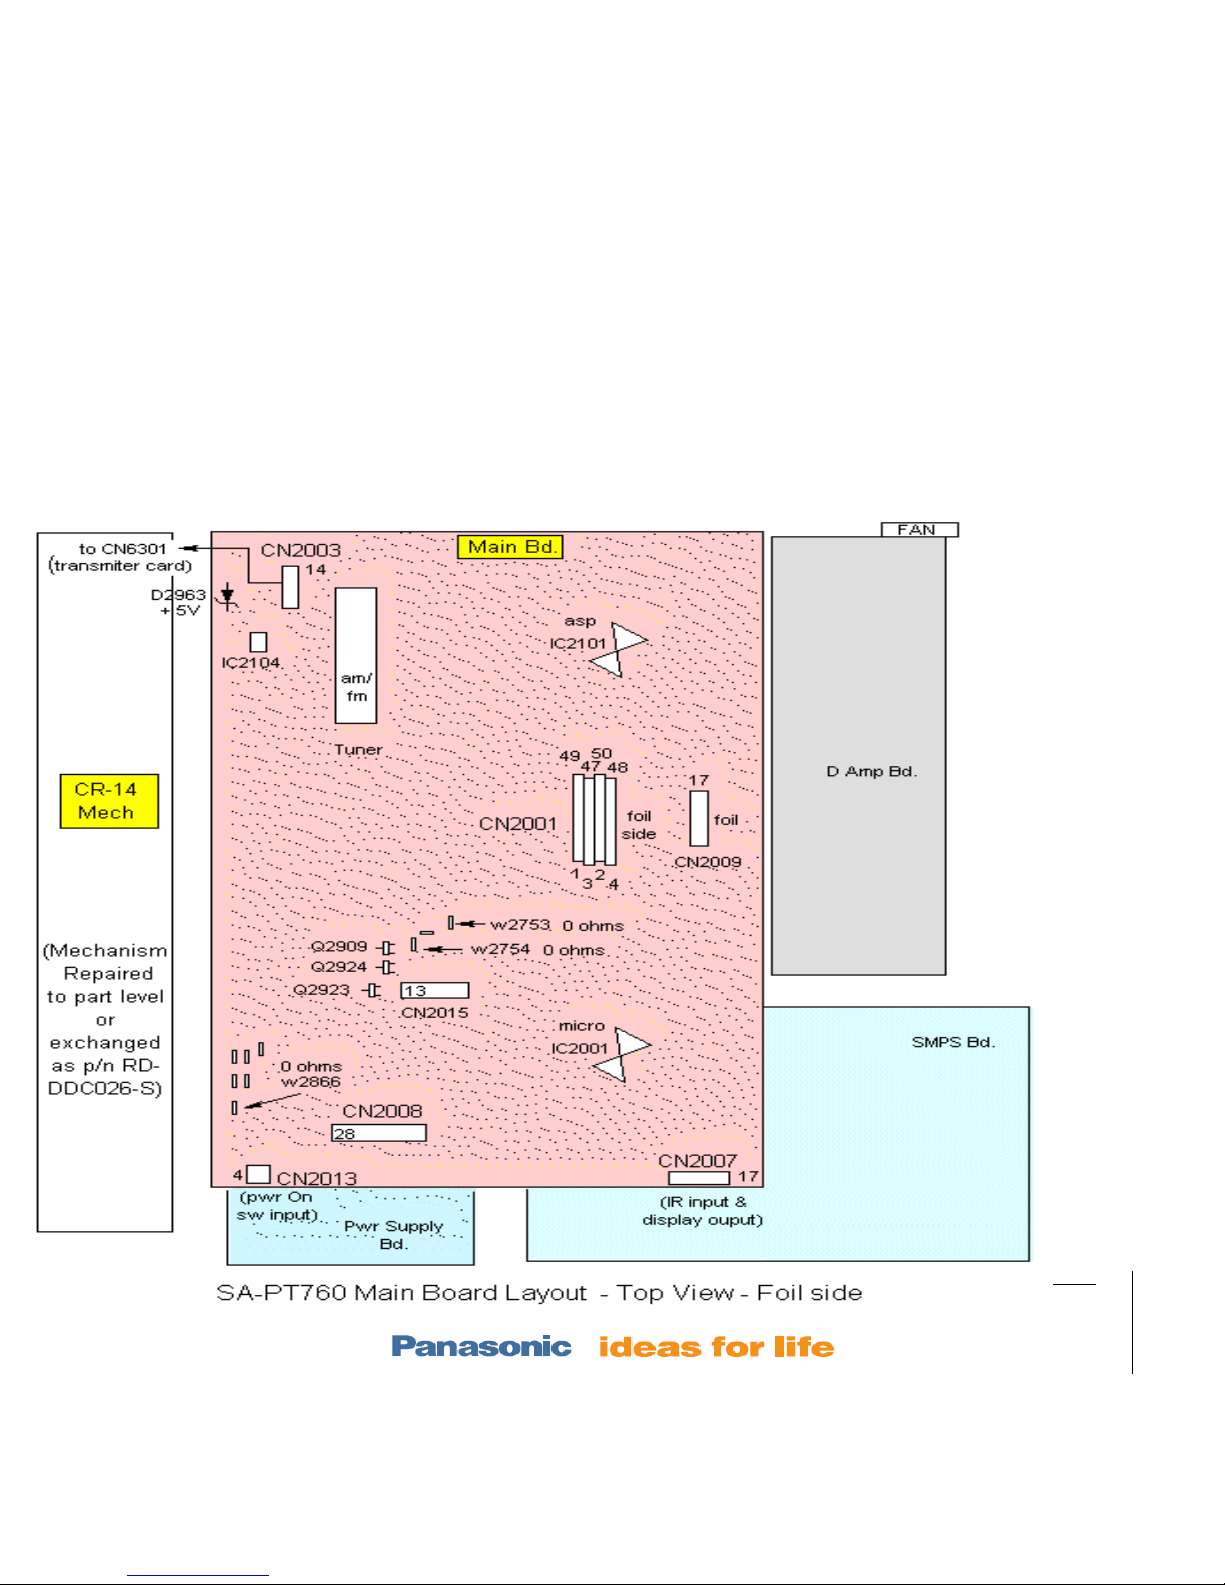
PT760 Layout 1 – Top Level
Slide # 6
Models:
SA-PT660
SA-PT760
SA-PT960
SA-PT1060
SH-FX67, 85
Outline
Wireless
Mech
Pwr Supply
Protection
Audio
PT760 Layout – Bottom Level
Slide # 7
Models:
SA-PT660
SA-PT760
SA-PT960
SA-PT1060
SH-FX67, 85
Outline
Wireless
Mech
Pwr Supply
Protection
Audio
Home Theater Products Repair
Table of Contents
Electronics –Layouts / Hints
Hints – p/n, New codes, Tests, Reset 4
Layout w test points and PS voltages 5
Wireless
SH-FX65/66 Rear Receiver Setup 8
Wireless Troubleshooting Plan 9
Testing & Paring Trans & Rec 10
Transmitter / Receiver Repair Info 11
Power ON
Power On Sequence 14
Mechanism – stacked 5 Disc model CR-14
Operation 15
Alignment 16
Troubleshooting 21
Laser Replacement (removal & install) 25
Power Supply
PS Block with isolation strategy 31
PS Circuit with ref voltages 32
Protection
Protection Concept (F61 & F76 codes) 34
Protection Circuitry 35
Protection Repair Procedure 36
Audio
Concept 39
Speaker Output Waveform 40
Sample Problems & Repair Methods 41
SA-PT660
SA-PT760
SA-PT960
T
R
SW
center
center SW
T
R
center
SW
Slide # 8
Models:
SA-PT660
SA-PT760
SA-PT960
SA-PT1060
SH-FX67, 85
Outline
Wireless
Mech
Pwr Supply
Protection
Audio
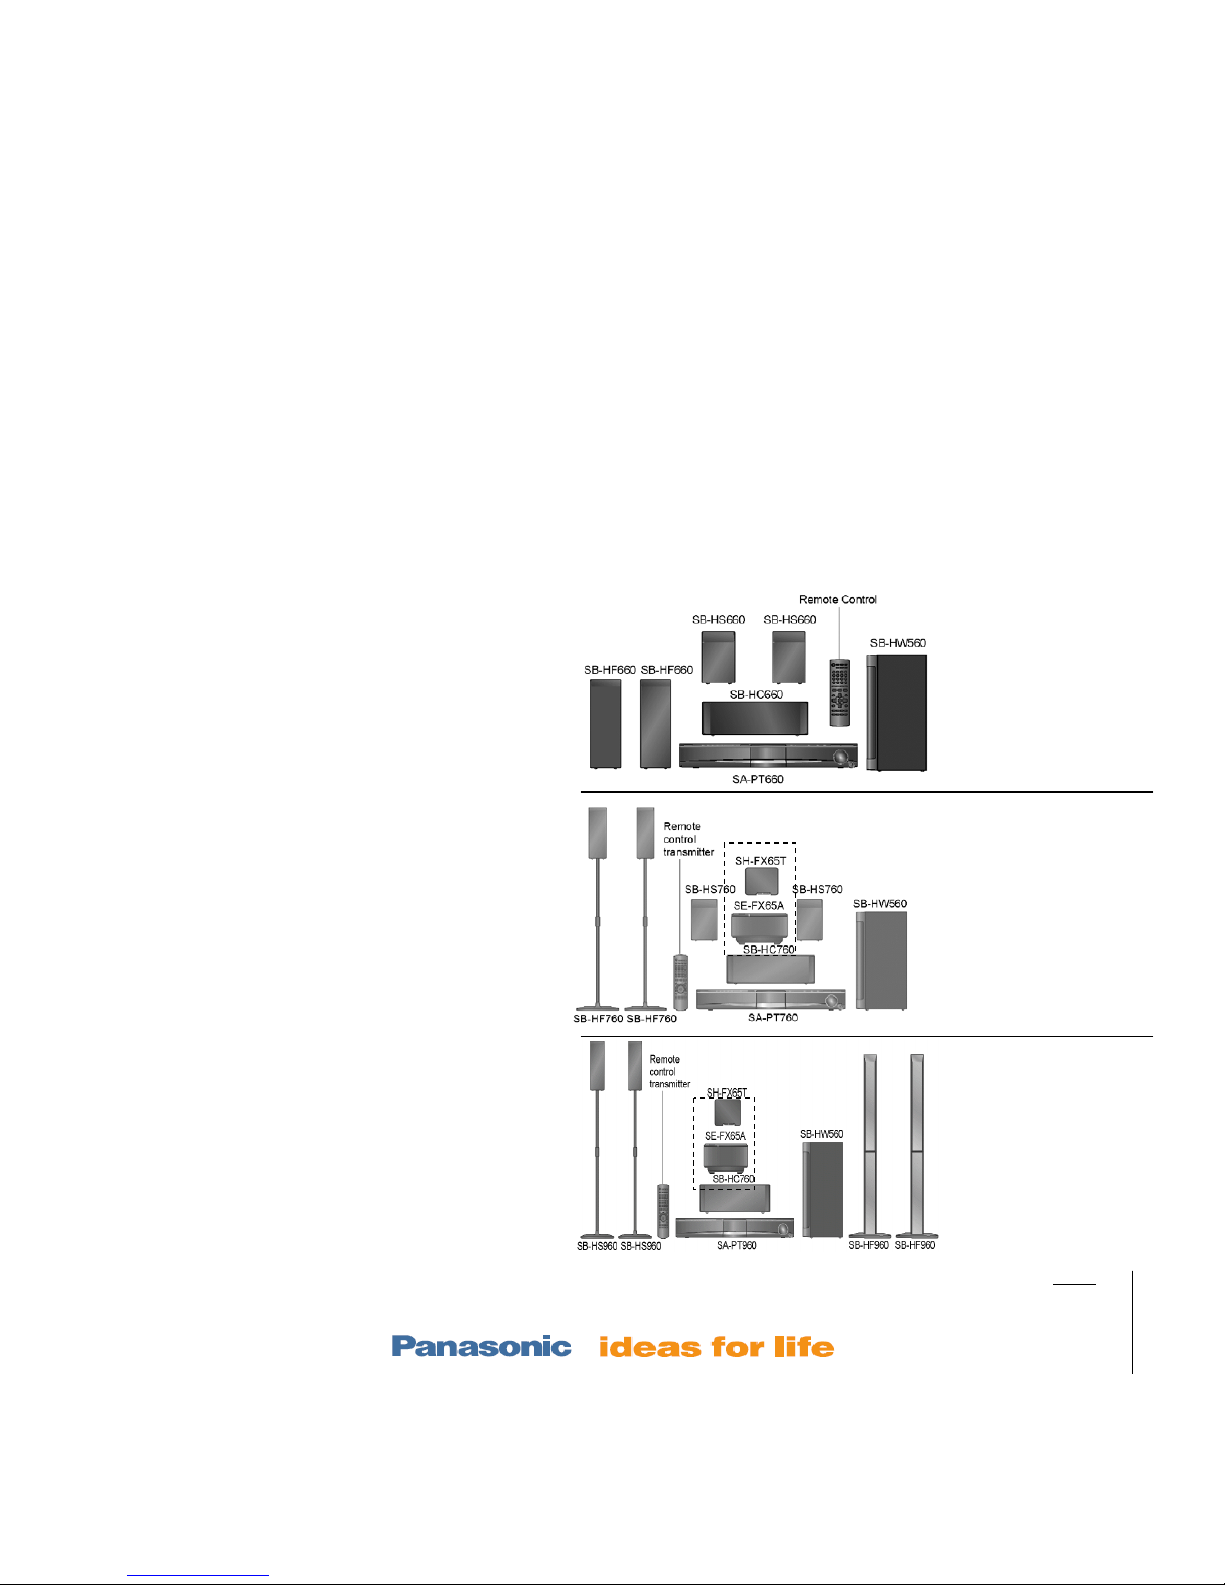
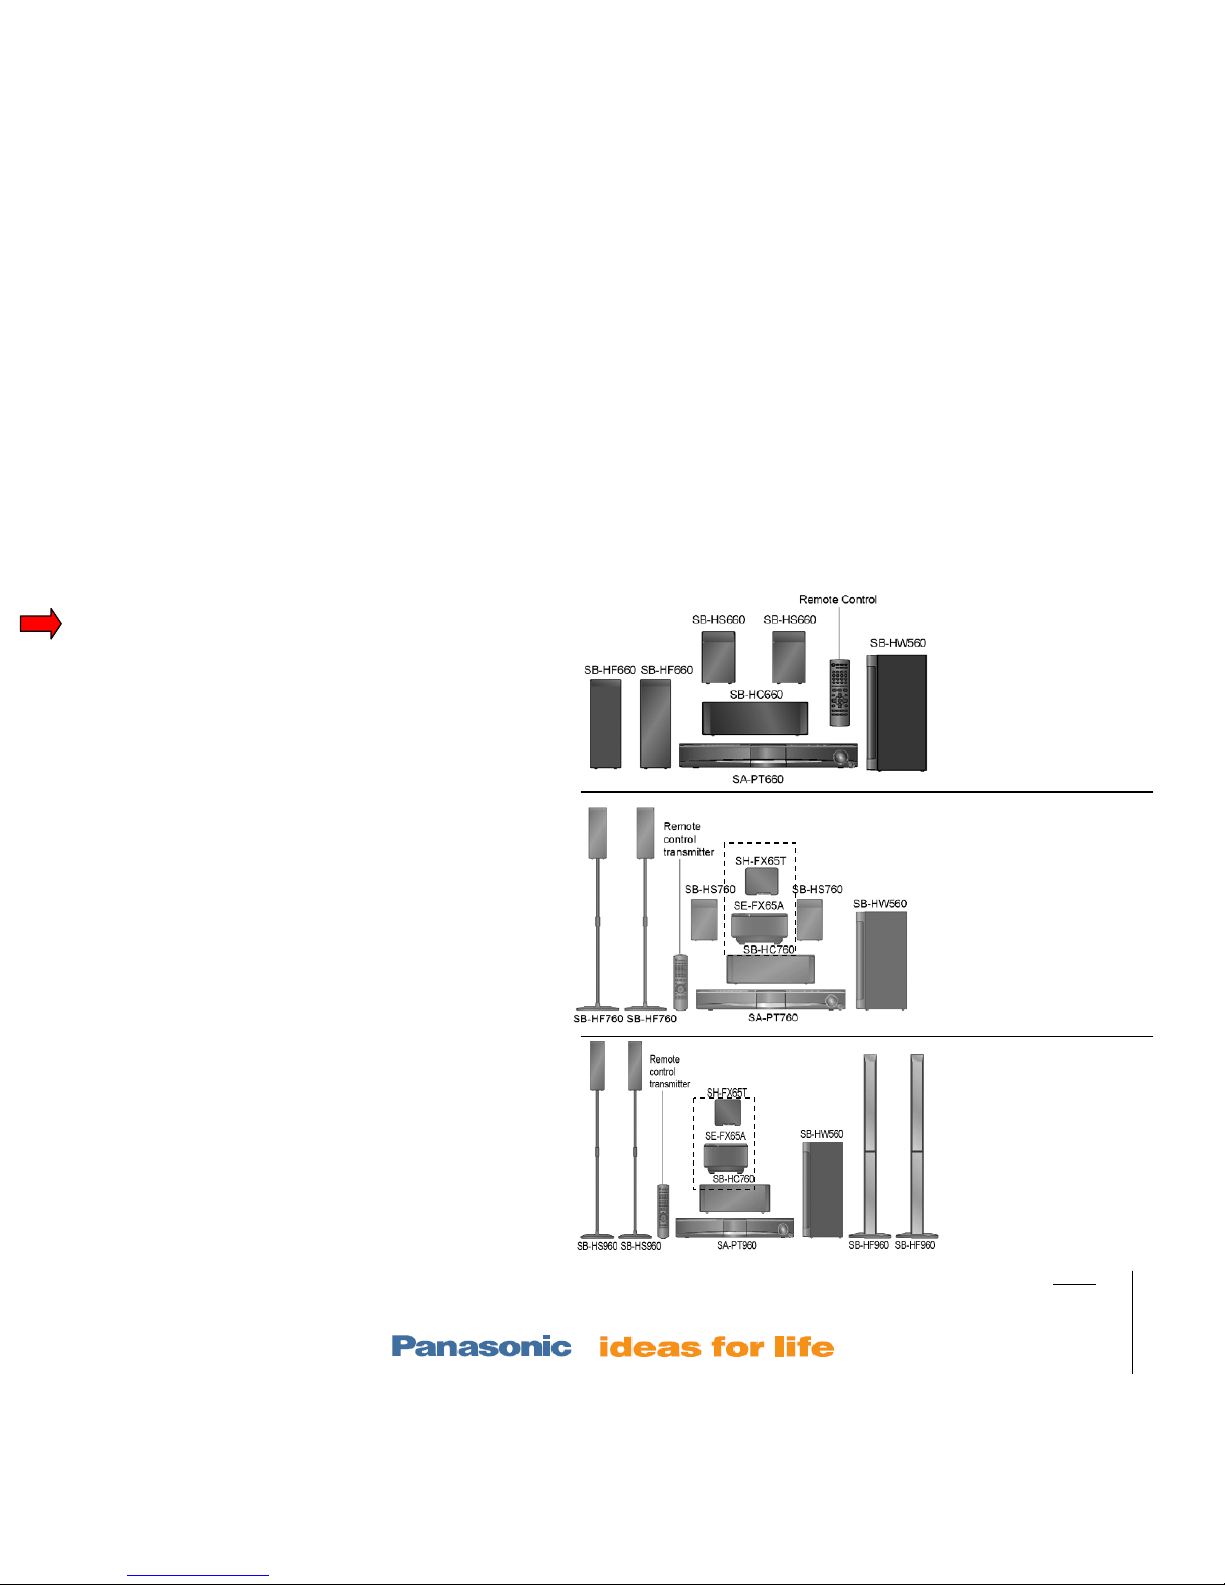
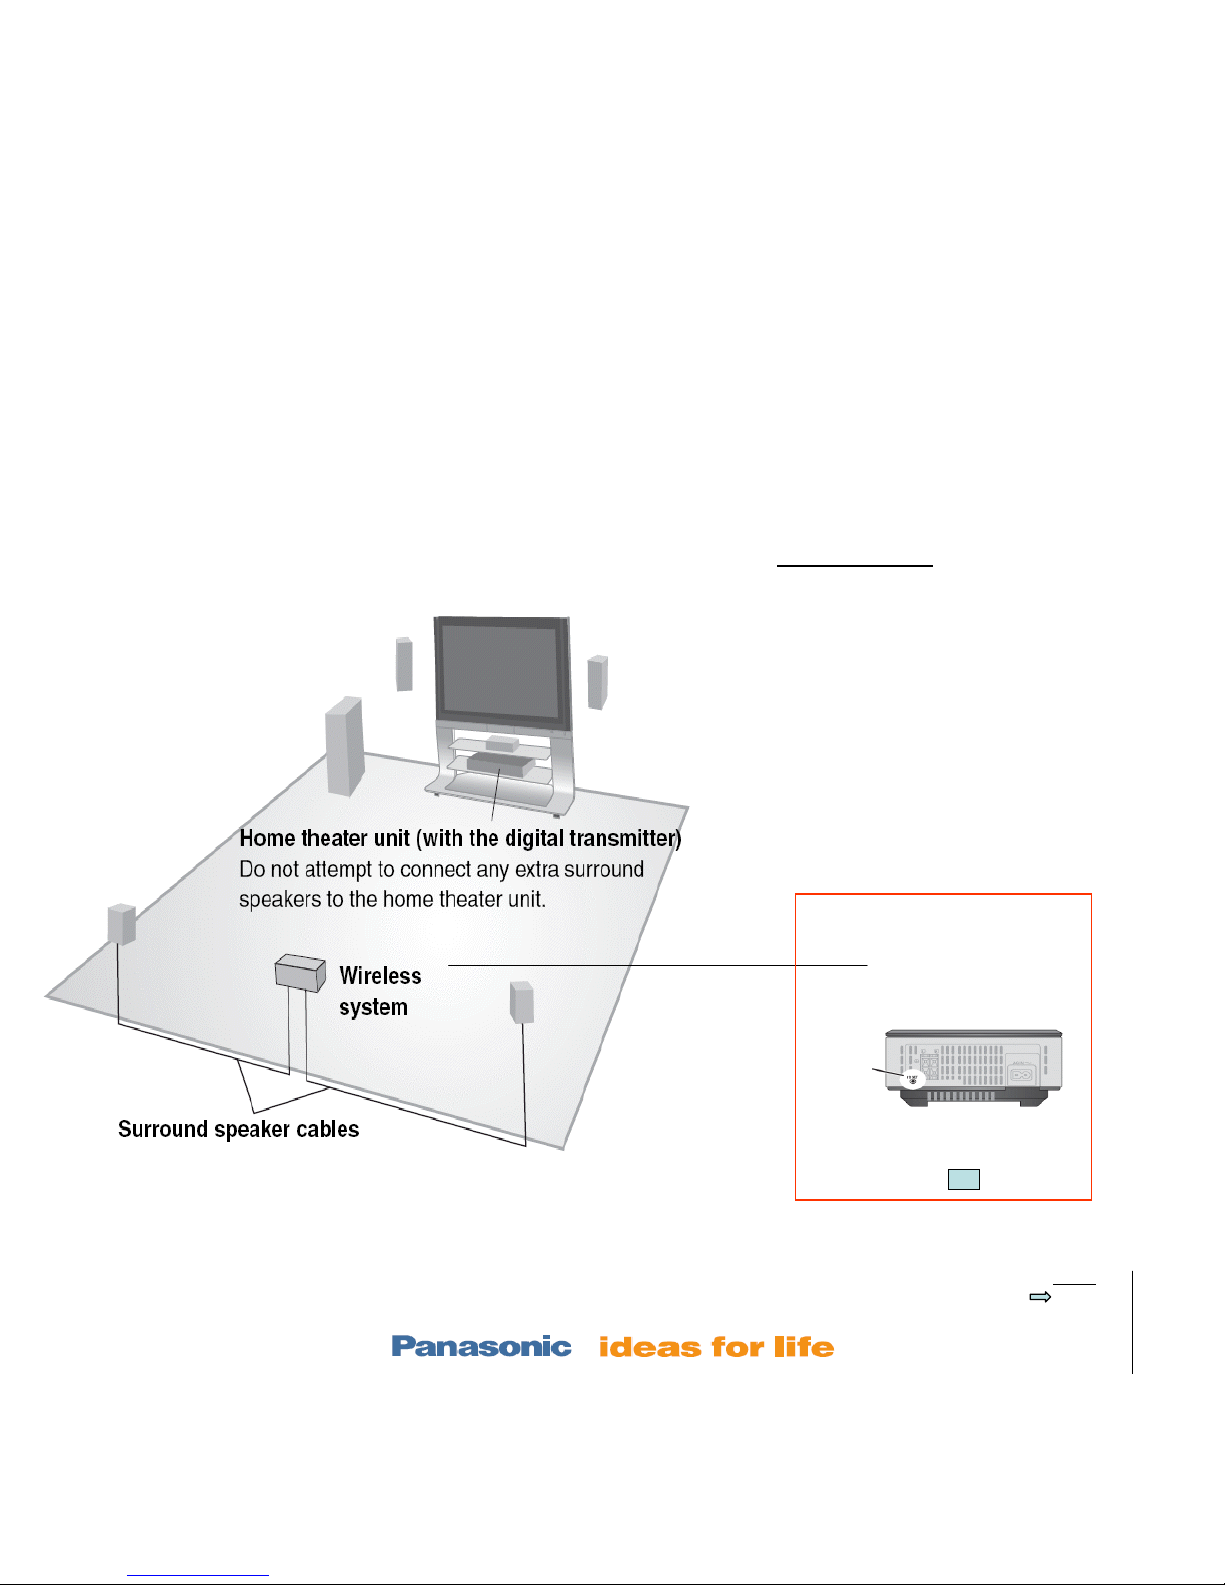
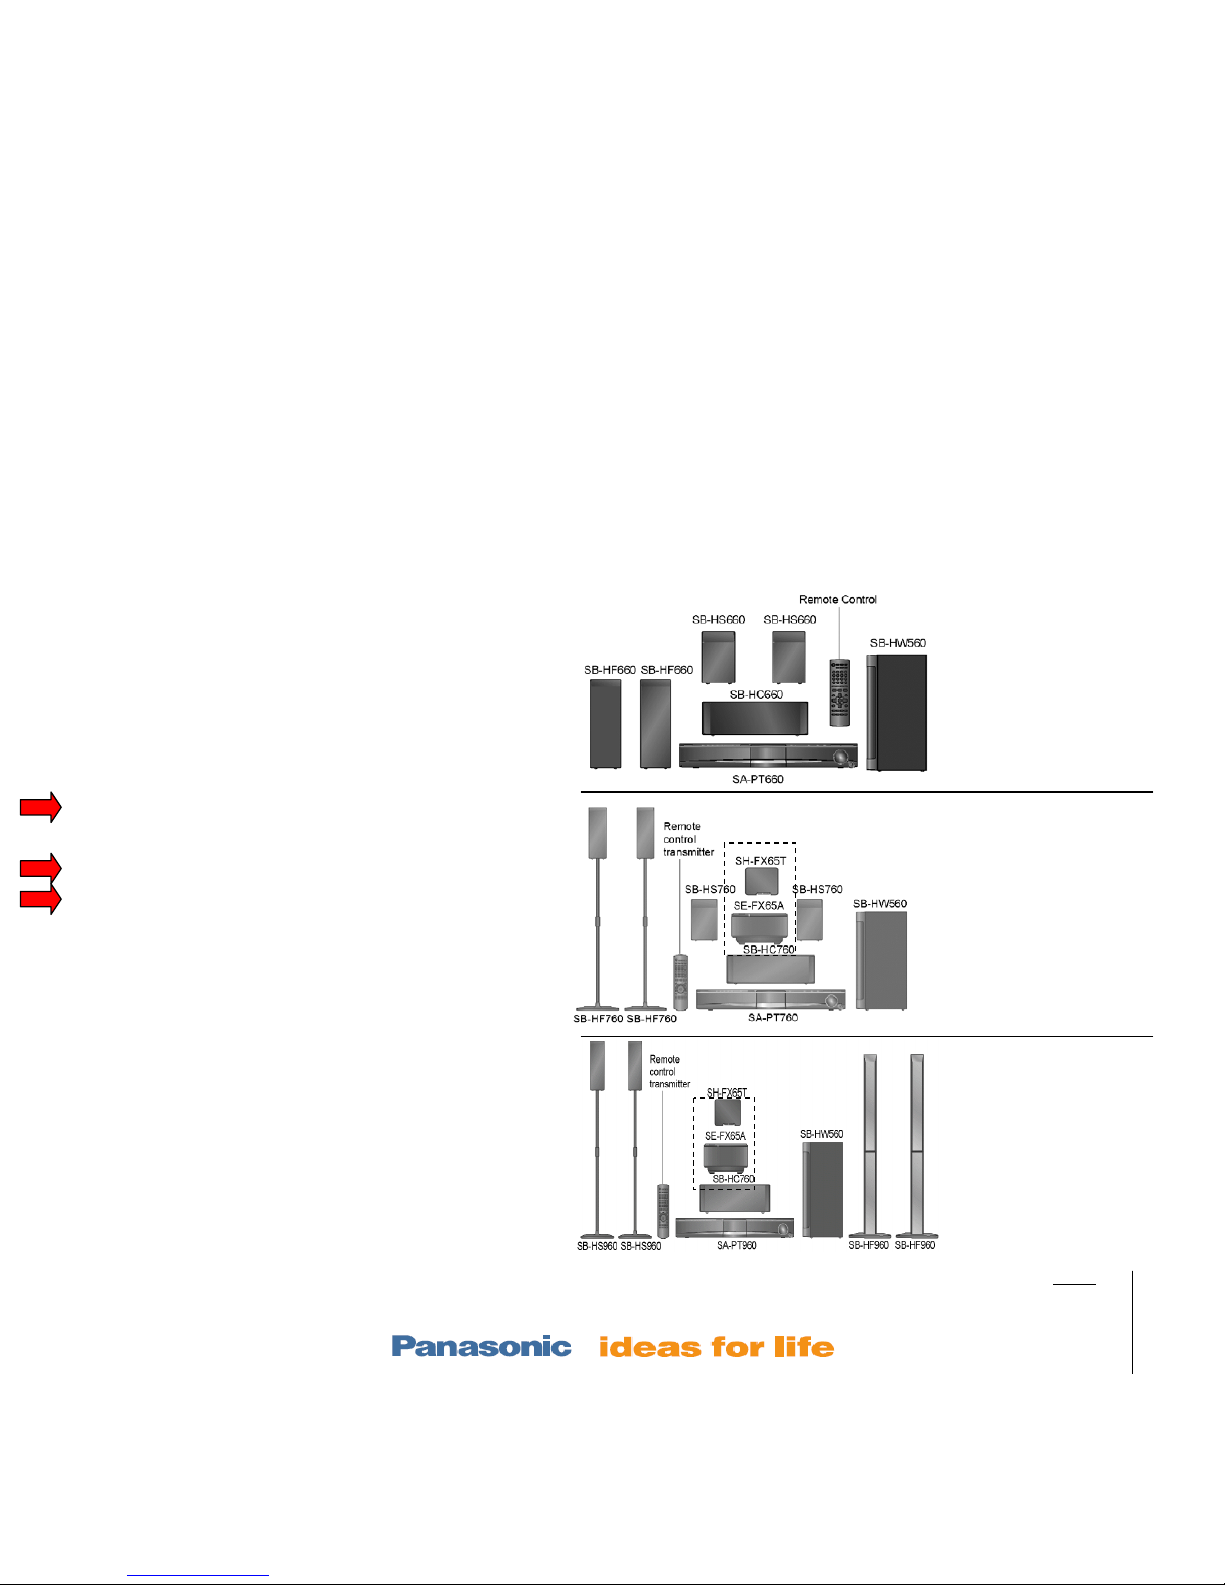
Home Theater Wireless Products
Panasonic Model
SA-PT660 – no wireless spks.
(optional FX67 or / & FX85)
SA-PT760 – wireless rear spks.
SA-PT960 – wireless rear spks + more pwr
SH-FX65/67
max range = 49’
ID set
button
(back)
Receiver
Transmitter card
Wireless rear receiver
Optional for the ‘PT660
Transmitter card – REPX 0644b
Receiver card - REPX 0645b
Need a manual for the wireless
portions of the above units? Try a
model below.
SH-FX65 – takes spk wires.
SH-FX67 – takes spk plug.

Slide # 9
Models:
SA-PT660
SA-PT760
SA-PT960
SA-PT1060
SH-FX67, 85
Outline
Wireless
Mech
Pwr Supply
Protection
Audio
SA-PT760 Wireless Troubleshooting Plan
Wireless rear does not work – W1 or W2 display icons do blink at power on.
Wireless rear does not work – W1 or W2 display icons do NOT blink at power on.
1. RF connection has not been made. Go to slide 6 to pair the transmitter and receiver.
Steps 1-6.
2. Go to slide 8 to troubleshoot the receiver. Make sure there is standby voltage input the
receiver and the pair button is working (pin 9 grounds when the button is pressed.
3. Go to slide 7 to check the transmitter card Sw +5V voltage at the main board (CN2003)
or at the card socket itself CN6301).
1. The RF connection is OK. No audio is the problem. Replace the transmitter card if
hot (damaged when plugged in while the unit was powered on).
2. Go to slide 6 and follow steps 7 to turn on “S Music” mode (surround music). This
makes the rear surround speaker sound the same as main L & R.
3. Input an audio source (play some music).
4. Disconnect the speakers and turn the volume control to max (level number 50 is
displayed).
5. Go to slide 8. Check for audio at the receiver card CN1100/pins 2 & 4.
6. If there was no audio present at CN1100 (receiver), Go to slide 7. Check for audio at
the transmitter socket CN6301/pins 10 & 12.
Slide # 10
Models:
SA-PT660
SA-PT760
SA-PT960
SA-PT1060
SH-FX67, 85
Outline
Wireless
Mech
Pwr Supply
Protection
Audio
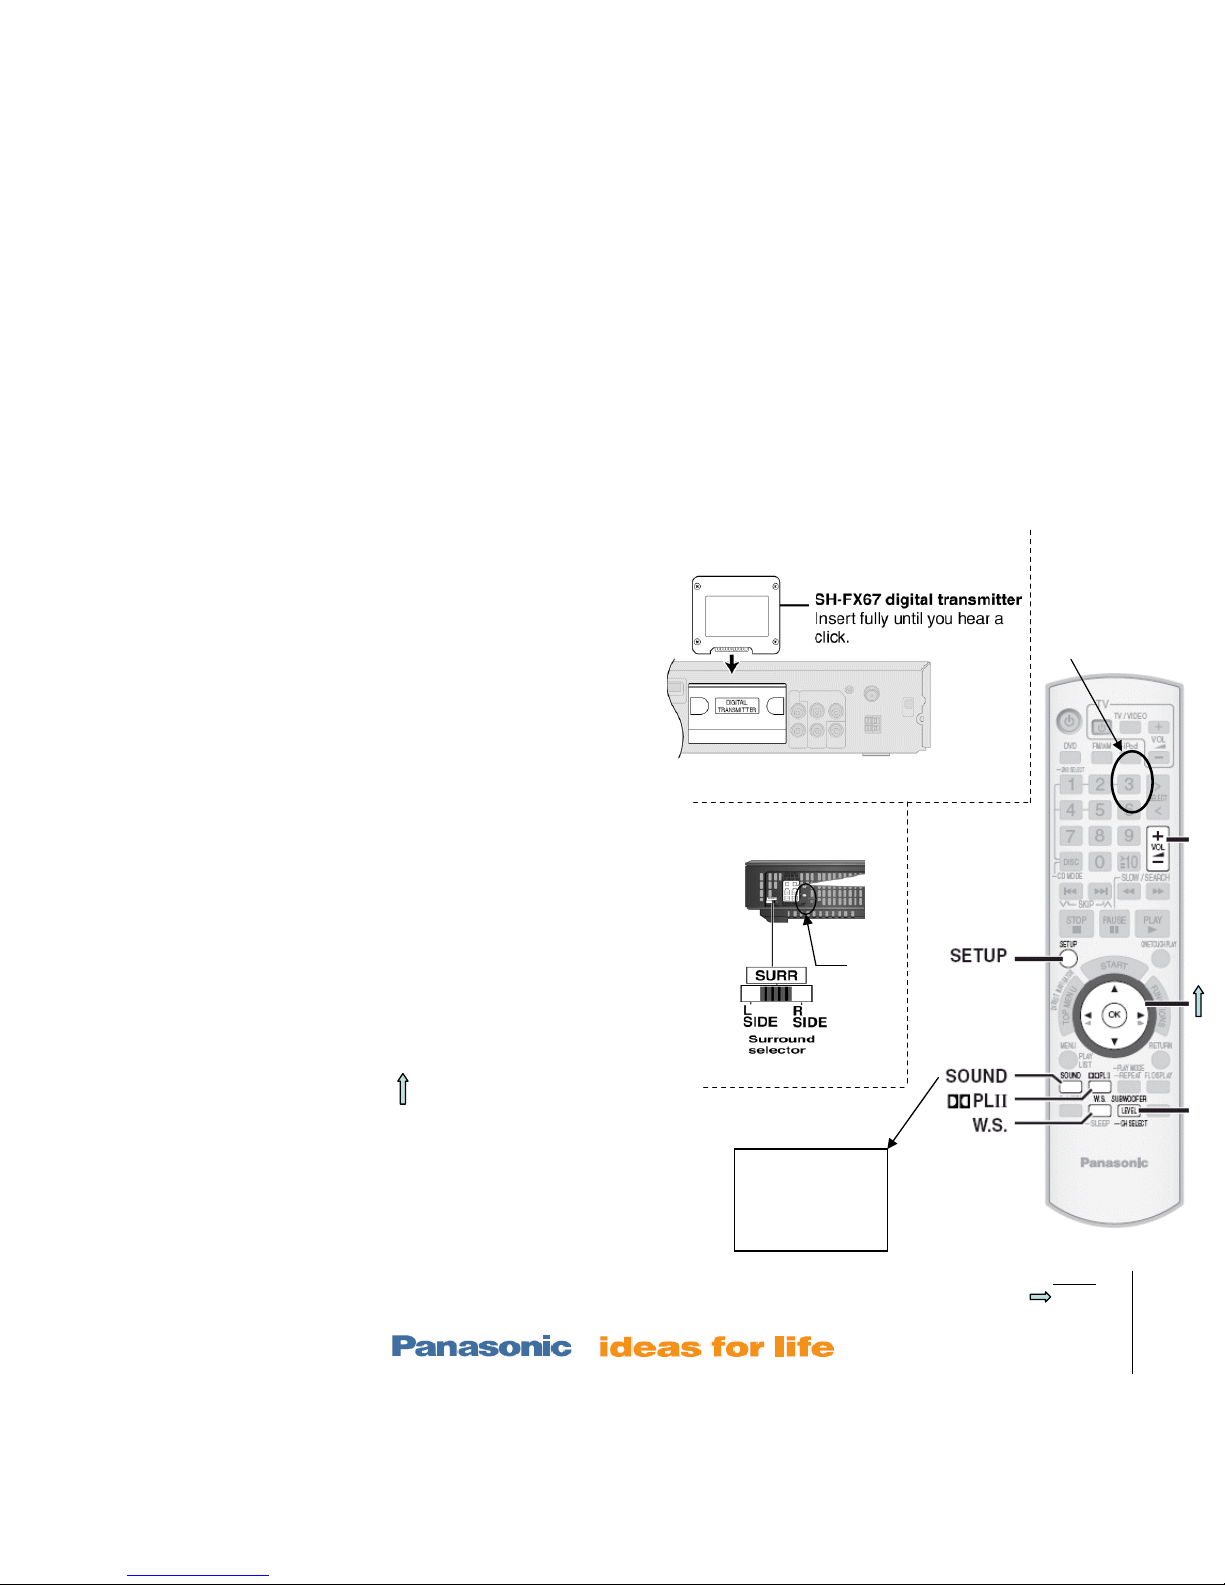
Wireless Information – RF Pairing / Matching T & R
2. Transmitter card
5. ID Set button
ID
Set
3. Press
panel FF &
3 buttons
RF Pairing
1. Proximity – Bring the wireless receiver to the transmitter.
2. Power ON – Plug the transmitter card in. Turn everything on
and press the selector button for DVD mode. (Do not plug
the card in with the unit on. A damaged card will get hot.)
3. Setup – While the W1 / W2 icon is blinking in the unit’s
display, hold down the front panel FF button and the
remote’s “3” Button.
4. Indicators – a) W1 / W2 will blink on the main unit’s display
if the transmitter card is inserted. b) “P” icon will be
displayed when the pairing process is started.
5. Mating – While the “P” is present, press the rear receiver
recessed “ID Set” button.
6. Indicator – The W1 / W2 will stop blinking proving an RF
match has been made.
7. Audio Test – Repeatedly press the remote’s SOUND button until the
panel displays “S.Music”. Then press the arrow button to turn ON “S.
Music”. The rear speakers will have the same music as the front L & R.
8. W1 / W2 still blinking? – Use the troubleshooting info in the next pages.
On
7. Rear Audio Test
1. H. Bass
2. R.C. FCS
3. SRD Enh(ance)
4. S.Music

Slide # 11
Models:
SA-PT660
SA-PT760
SA-PT960
SA-PT1060
SH-FX67, 85
Outline
Wireless
Mech
Pwr Supply
Protection
Audio
Wireless - Troubleshooting Information ½ - Transmitter part
Use this diagram to:
Prove that the T card is recognized (CN2003/pin 11).
Power is getting to the T card (CN2003/pin 9).
Audio is getting to the T card (CN2003/ pin 2-8).
Notes:
1. Measure the voltages at the CN2003 main board with the Transmitter
card / Bd. plugged in.
2. Channel 2 audio is present with a surround sound DVD or if the S
Music is turned ON. See the previous slide, step 7 for access S Music.
3. Channel 1 audio is only present when its 2
nd
room accessory
transmitter card is plugged in. Otherwise channel 1 is muted.
4. Data is only present when the T card is in.
Rear of Main Unit
When the T card is
inserted, the micro
blinks a W1 icon
Transmitter card – REPX 0644b
Receiver card - REPX 0645b
Slide # 12
Models:
SA-PT660
SA-PT760
SA-PT960
SA-PT1060
SH-FX67, 85
Outline
Wireless
Mech
Pwr Supply
Protection
Audio
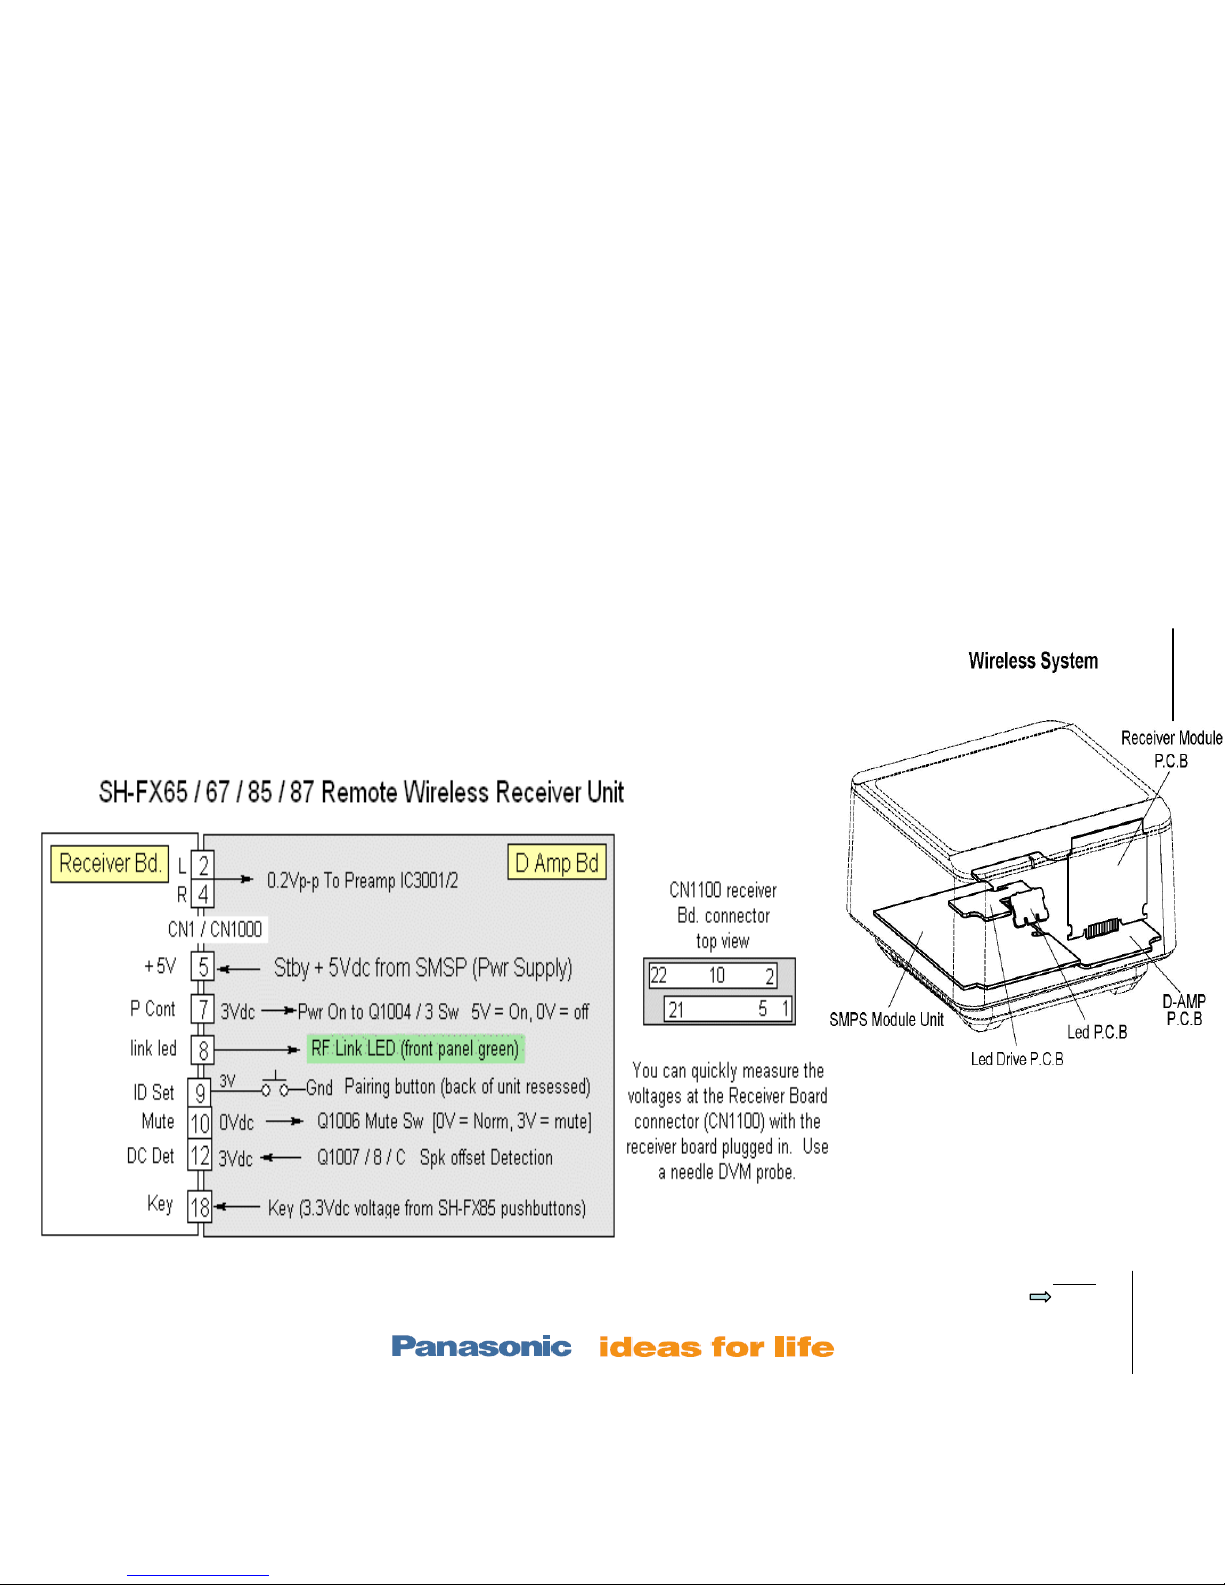
Wireless - Troubleshooting Information 2/2 – Receiver part
Use this diagram to:
Receiver card is getting power (CN1100/pin 5).
Receiver card is outputting Audio (CN1100/ pin 2).
Receiver card is not muting the audio (CN1100/ pin 10).
Transmitter card – REPX 0644b
Receiver card - REPX 0645b
SH-FX67
receiver / amp
Slide # 13
Models:
SA-PT660
SA-PT760
SA-PT960
SA-PT1060
SH-FX67, 85
Outline
Wireless
Mech
Pwr Supply
Protection
Audio
Home Theater Products Repair
Table of Contents
Electronics –Layouts / Hints
Hints – p/n, New codes, Tests, Reset 4
Layout w test points and PS voltages 5
Wireless
SH-FX65/66 Rear Receiver Setup 8
Wireless Troubleshooting Plan 9
Testing & Paring Trans & Rec 10
Transmitter / Receiver Repair Info 11
Power ON
Power On Sequence 14
Mechanism – stacked 5 Disc model CR-14
Operation 15
Alignment 16
Troubleshooting 21
Laser Replacement (removal & install) 25
Power Supply
PS Block with isolation strategy 31
PS Circuit with ref voltages 32
Protection
Protection Concept (F61 & F76 codes) 34
Protection Circuitry 35
Protection Repair Procedure 36
Audio
Concept 39
Speaker Output Waveform 40
Sample Problems & Repair Methods 41
SA-PT660
SA-PT760
SA-PT960
T
R
SW
center
center SW
T
R
center
SW
 Loading...