

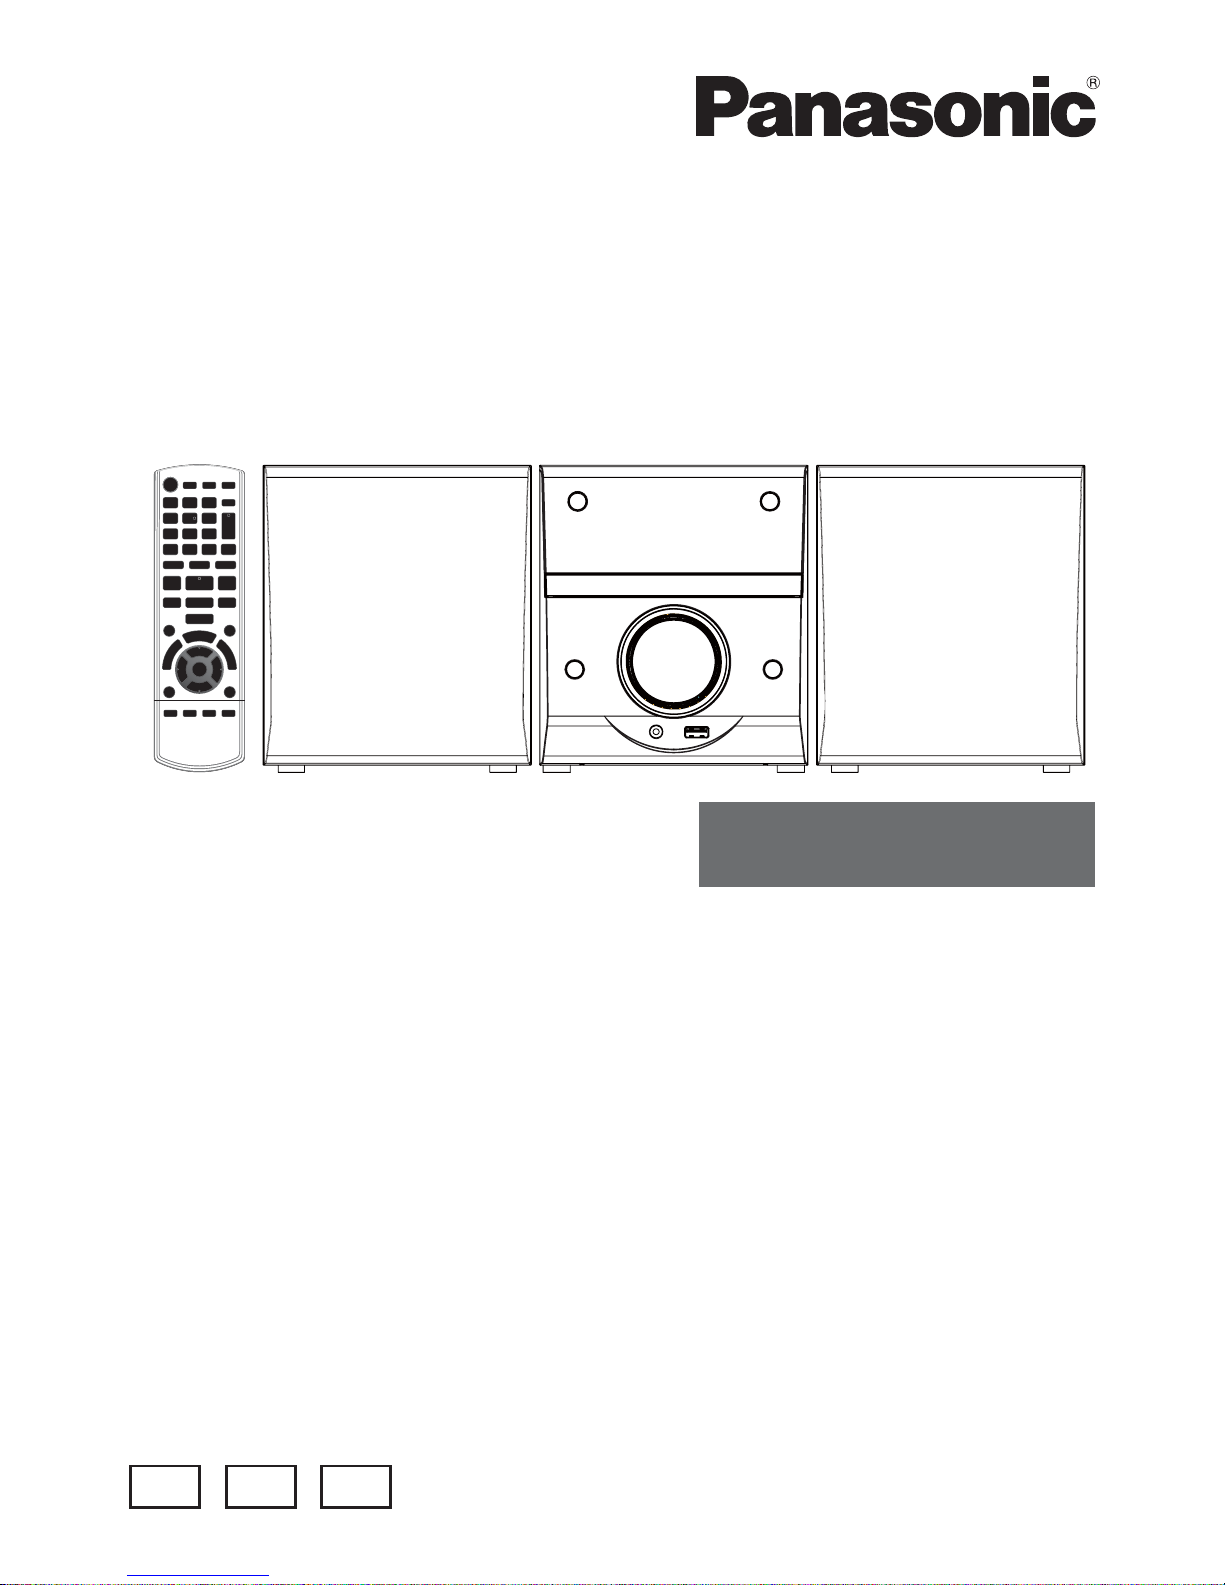
Panasonic SC-PM50D, SA-PM50D, SB-PM50D Operating Instructions Manual
リワヱヶヵ
Operating Instructions
DVD Stereo System
Model No. SC-PM50D
ヱンユヴユヵチユヲ
Thank you for purchasing this product.
For optimum performance and safety, please read
these instructions carefully.
Please keep this manual for future reference.
Table of contents
Safety precautions .................................2
Caution for AC mains lead .....................3
Accessories ............................................4
About Discs/Files ...................................4
Control reference guide .........................6
Preparation..............................................8
System setup ........................................10
Discs/USB operation ............................12
DVD/VCD operation ..............................17
Picture operation (JPEG) .....................18
Listening to the radio ...........................19
Clock setting .........................................20
Sleep timer setting ...............................20
Timer setting .........................................21
External equipment operation .............22
Changing the main unit and remote
control mode .........................................23
About USB device ................................23
Reference information .........................24
Troubleshooting guide .........................25
Specifi cations .......................................27
GA
GS
GN
VQT4L45-2
System SC-PM50D
Main unit SA-PM50D
Speakers SB-PM50D
Safety precautions
Warning!
Unit
• To reduce the risk of fire, electric shock or
product damage,
- Do not expose this unit to rain, moisture,
dripping or splashing.
- Do not place objects filled with liquids,
such as vases, on this unit.
- Use only the recommended accessories.
- Do not remove covers.
- Do not repair this unit by yourself. Refer
servicing to qualifi ed service personnel.
Caution!
Unit
• To reduce the risk of fire, electric shock or
product damage,
- Do not install or place this unit in a
bookcase, built-in cabinet or in another
confined space. Ensure this unit is well
ventilated.
- Do not obstruct this unit’s ventilation
openings with newspapers, tablecloths,
curtains, and similar items.
- Do not place sources of naked flames,
such as lighted candles, on this unit.
• Install this unit so that the AC mains lead
can be unplugged from the socket outlet
immediately if any problem occurs.
• This unit may receive radio interference
caused by mobile telephones during use. If
such interference occurs, please increase
separation between this unit and the mobile
telephone.
(For Southeast Asia, Thailand, South Africa,
the Middle East)
• This unit is intended for use in tropical climates.
(For others)
• This unit is intended for use in moderate
climates.
Battery
• Do not break open or short-circuit the battery.
• Do not charge the alkaline or manganese
battery.
• Do not use the battery if the cover has peeled
off.
• Do not heat or expose to fl ame.
• Do not leave the battery(ies) in a car exposed
to direct sunlight for a long period of time with
doors and windows closed.
• Remove the battery if you do not use the
remote control for a long period of time. Keep
in a cool, dark area.
• Danger of explosion if battery is incorrectly
replaced. Replace only with the type recomm-
ended by the manufacturer.
• When disposing the batteries, please contact
your local authorities or dealer and ask for the
correct method of disposal.
CAUTION
RISK OF ELECTRIC SHOCK
DO NOT OPEN
CAUTION:
TO REDUCE THE RISK OF ELECTRIC SHOCK,
DO NOT REMOVE SCREWS. NO USER-SERVICEABLE PARTS INSIDE.
REFER SERVICING TO QUALIFIED SERVICE
The lightning flash with arrowhead symbol, within an equilateral triangle, is intended to alert the user to the presence
of uninsulated: "dangerous voltage"
within the product's enclosure that may
be of sufficient magnitude to constitute
a risk of electric shock to persons.
The exclamation point within an equilateral triangle is intended to alert the user
to the presence of important operating
and maintenance (servicing) instructions in the literature accompanying the
appliance.
VQT4L45
2
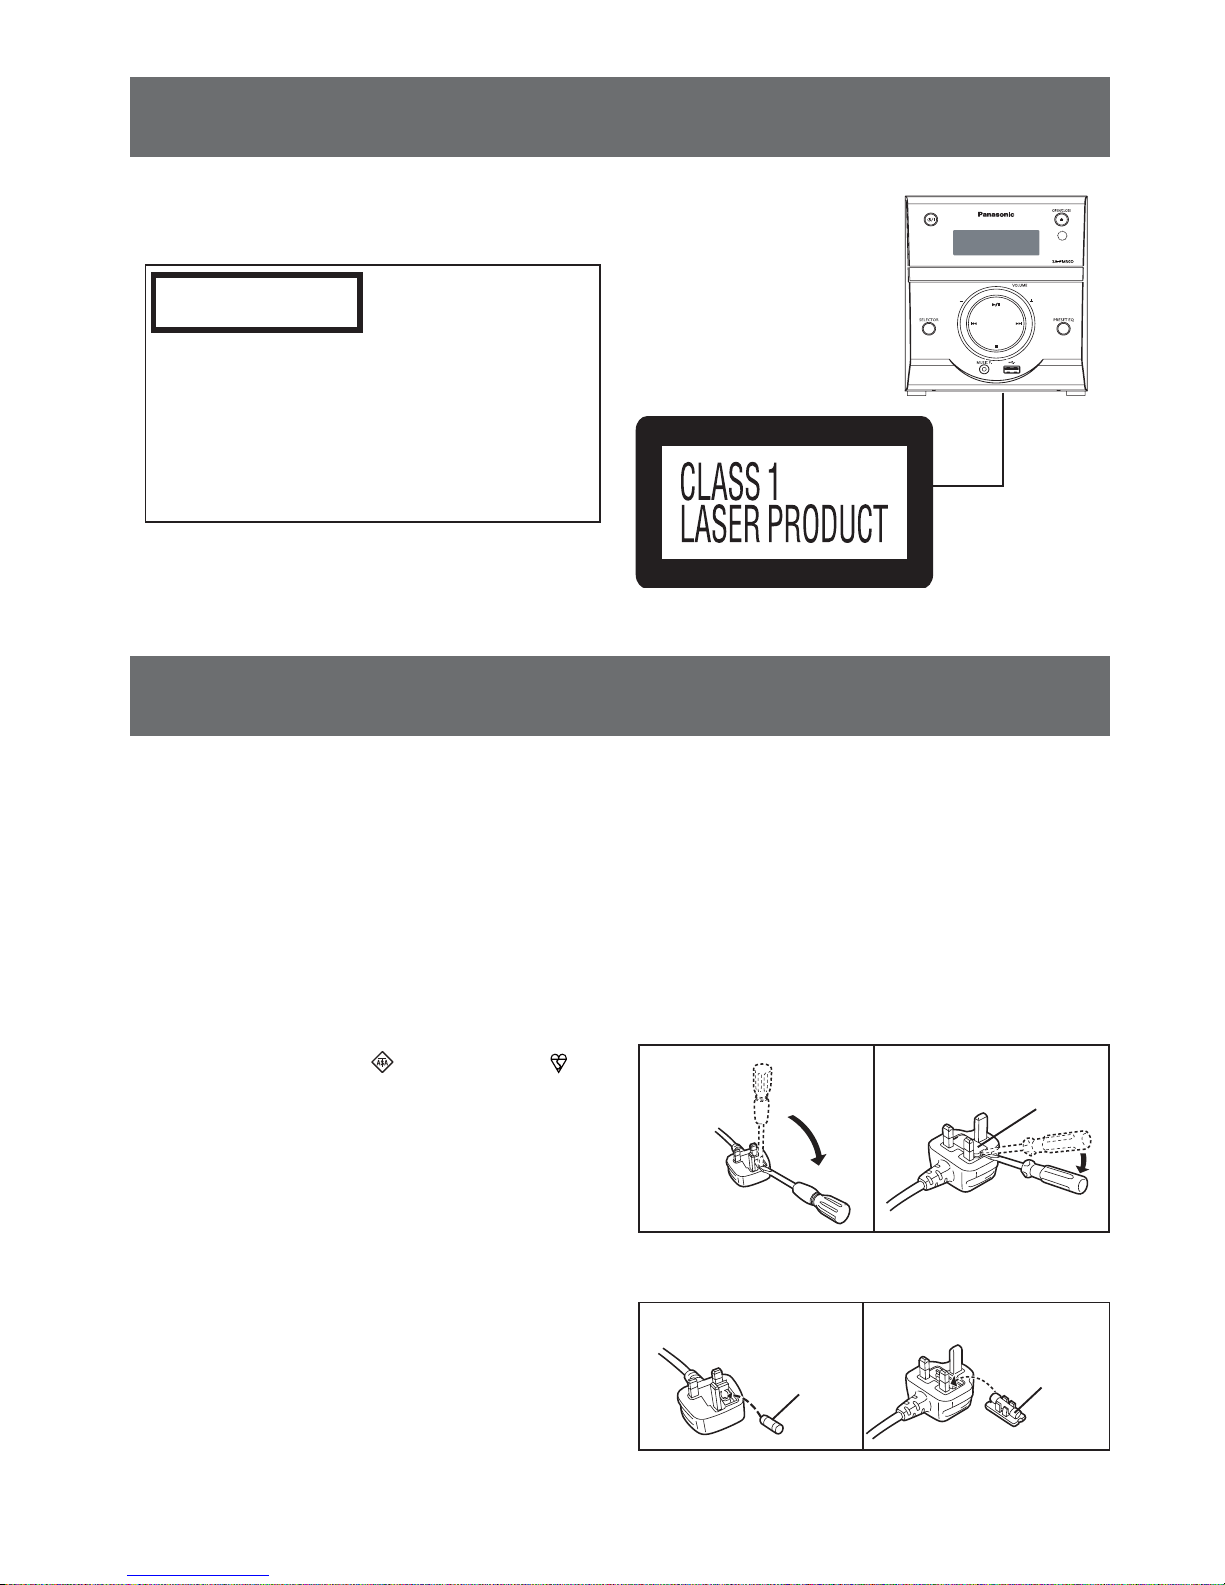
Caution!
•
CLASS 1
LASER PRODUCT
CAUTION
This product contains a laser diode of higher
class than 1.
To ensure continued safety, do not remove
any covers or attempt to gain access to the
inside of the product.
Refer all servicing to qualifi ed personnel.
IEC60825-1:2001
Caution for AC mains lead
Bottom of product
(When using the moulded three pin
mains plug)
For your safety, please read the following text
carefully.
This appliance is supplied with a moulded three
pin mains plug for your safety and convenience.
A 5-ampere fuse is fitted in this plug.
Should the fuse need to be replaced please ensure that the replacement fuse has a rating of 5ampere and that it is approved by ASTA or BSI
to BS1362.
Check for the ASTA mark or the BSI mark on
the body of the fuse.
If the plug contains a removable fuse cover you
must ensure that it is refitted when the fuse is replaced.
If you lose the fuse cover the plug must not be
used until a replacement cover is obtained.
A replacement fuse cover can be purchased from
your local dealer.
Before use
Remove the connector cover.
How to replace the fuse
The location of the fuse differ according to the
type of AC mains plug (Figures A and B). Confirm
instructions below.
Illustrations may differ from actual AC mains
plug.
1. Open the fuse cover with a screwdriver.
Figure A
2. Replace the fuse and close or attach the fuse
cover.
Figure A
Fuse
(5 ampere)
Figure B
Fuse cover
Figure B
Fuse
(5 ampere)
VQT4L45
3
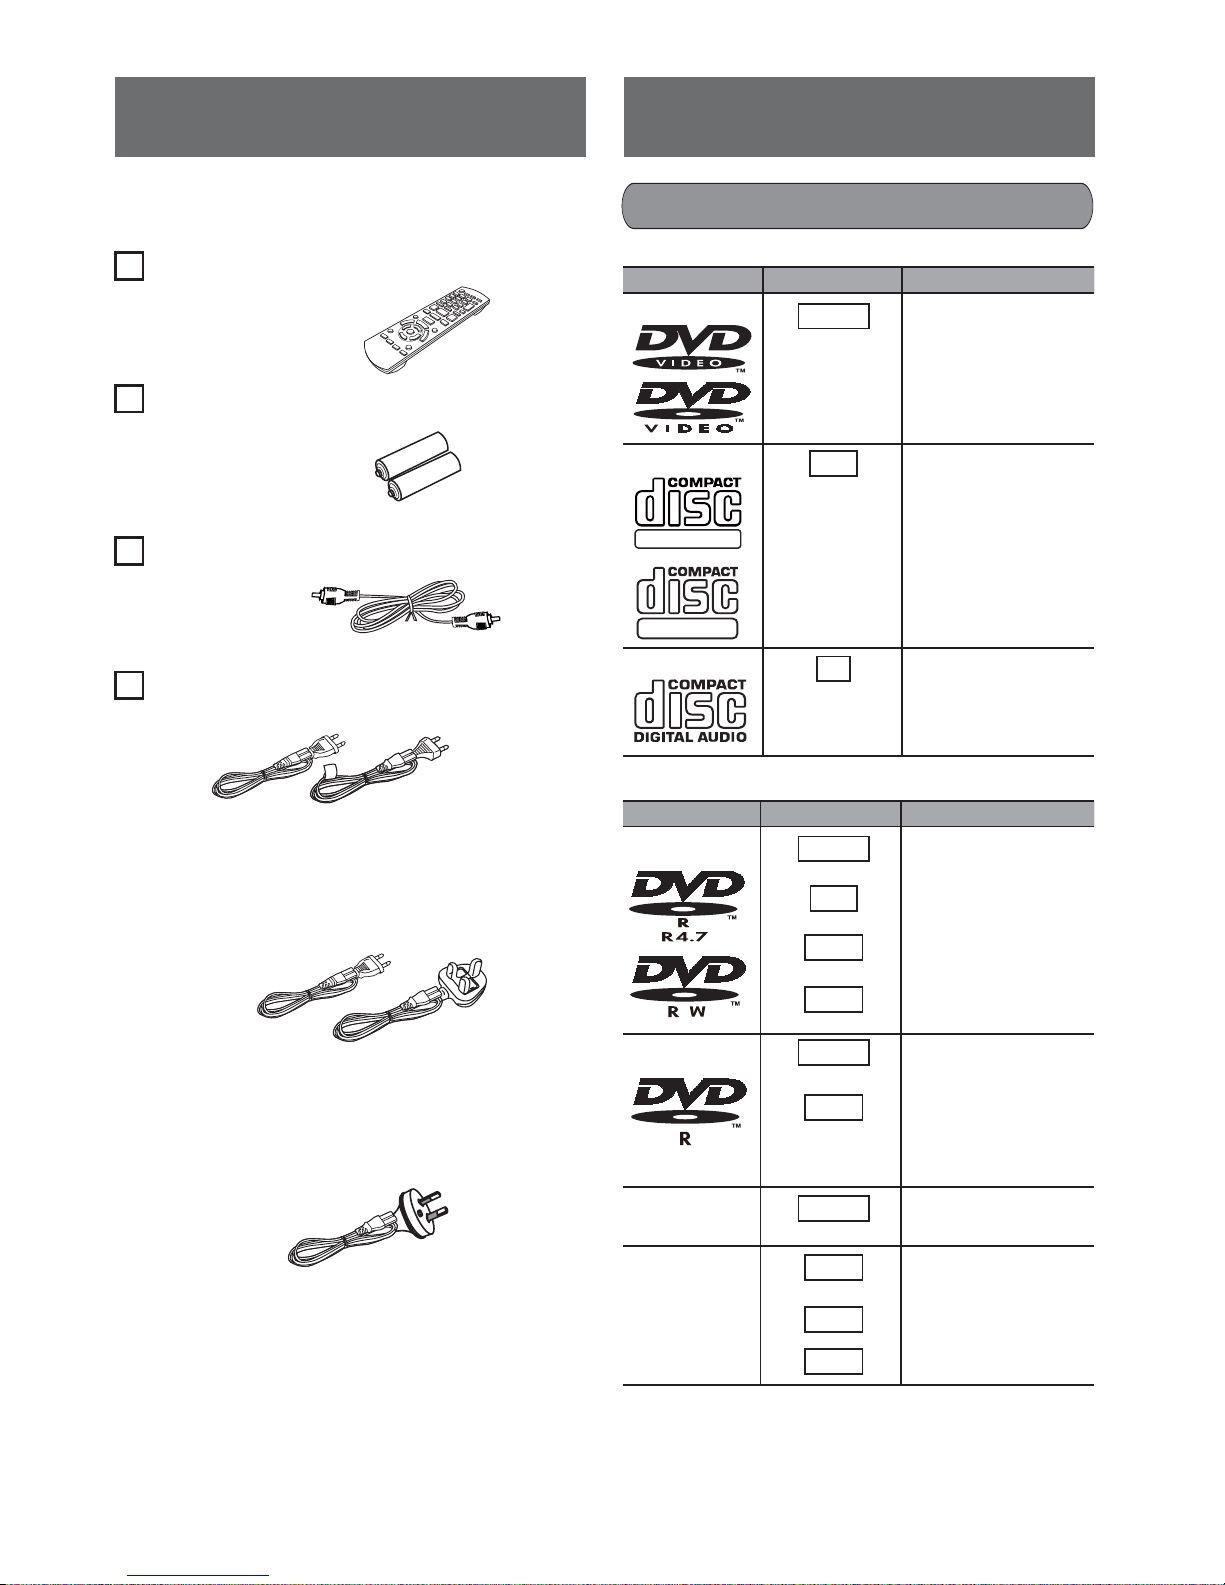
Accessories
About Discs/Files
Check the supplied accessories before using this
unit.
1 Remote control
N2QAYB000810
2
Batteries for remote control
1 Video cable
AC mains lead
2 For Southeast Asia, Thailand
Playable Discs/Files
Commercial discs
Type Icon Details
DVD-Video • High quality video
Video CD • Video discs
DIGITAL VIDEO
SUPER VIDEO
CD • Audio discs
DVD-V
and audio discs
VCD
• Including SVCD
(conforms to IEC-
62107)
CD
(The AC mains lead with a label is for
Thailand)
2 For South Africa, the Middle East
(The AC mains lead with 3-pin plug is for
Saudi Arabia,)
1 For Australia, New Zealand
Recorded discs
Type Icon Details
DVD-R/RW • DVD-Video Format
DVD-R DL
DVD-V
MP3
JPEG
DivX
DVD-V
DivX
• MP3 format
• JPEG format
• DivX® format
• DVD-Video Format
• DivX® Format
R DL
+R/+RW/+R DL
CD-R/RW
DVD-V
MP3
JPEG
DivX
• +VR (+R/+RW Video
Recording) Format
• MP3 format
• JPEG format
®
• DivX
format
VQT4L45
4

Playable Discs/Files
• Before playback, finalize the disc on the
equipment it was recorded on.
• It is not possible to play all the above-mentioned
discs in some conditions because of:
- The type of disc.
- The condition of the recording.
- The recording procedure.
- How the files were made.
• In this manual, the word “fi le” and “track” is used
alternately.
Video systems
• This system can play discs with PAL and
NTSC.
Tips for making data
(Extension: “.MP3”, “.mp3”)
MP3
• Standard, sampling frequency, and the bit rate:
32kHz, 44.1kHz, 48kHz
32kbps - 320kbps (constant bit rate or variable
bit rate).
• This system does not support ID3 tags.
•
MP3 fi les may not be played in the recorded
order. Do not make an empty folder. It may not
work correctly.
(Extension: “.JPG”, “.jpg”, “.JPEG”, “.jpeg”)
JPEG
• JPEG resolution is up to 2150 X 1432 (baseline)
or 1400 x 900 (progressive).
• The unit only can play standard JPEG and cannot
play loss free JPEG.
Standard JPEG format: For digital camera,
network, etc.
Loss free JPEG format: Older type. Now rarely
used.
(Extension: “.DIVX”, “.divx”, “.AVI”, “.avi”)
DivX
• DivX fi les that are more than 2 GB or have
no index may be fail to play correctly on this
system.
• This system supports all resolutions until a
maximum of 720 x 480 (NTSC)/720 x 576
(PAL).
• You can select a maximum of eight types of
audio and subtitles on this system.
Discs that cannot be played
Blu-ray, HD DVD, AVCHD discs, DVD-RW version 1.0, DVD-Audio, DVD-ROM, CD-ROM, CDV,
CD-G, SACD, Photo CD, DVD-RAM, and “Chaoji
VCD” (including CVD, DVCD and SVCD) that do
not conform to IEC62107.
• The unit cannot support the discs recorded using
DVD Video Recording (DVD-VR) Format.
• There may be differences in the display sequence
on the menu screen and computer screen.
• This system cannot play fi les recorded using
packet writing.
DVD-R/RW
• Discs must conform to UDF bridge (UDF 1.02/
ISO9660).
• This system does not support multi-session.
Only the default session can be played back.
CD-R/RW
• Discs must conform to ISO9660 level 1 or 2
(except for extended formats).
• Single-session disc can be played back. As for
multi-session disc, only the fi rst session can be
played back.
Note on using a DualDisc
A DualDisc could possibly not playback if
the side of the digital audio content does
not meet the technical specifications of the
Compact Disc Digital Audio (CD-DA) format.
VQT4L45
5
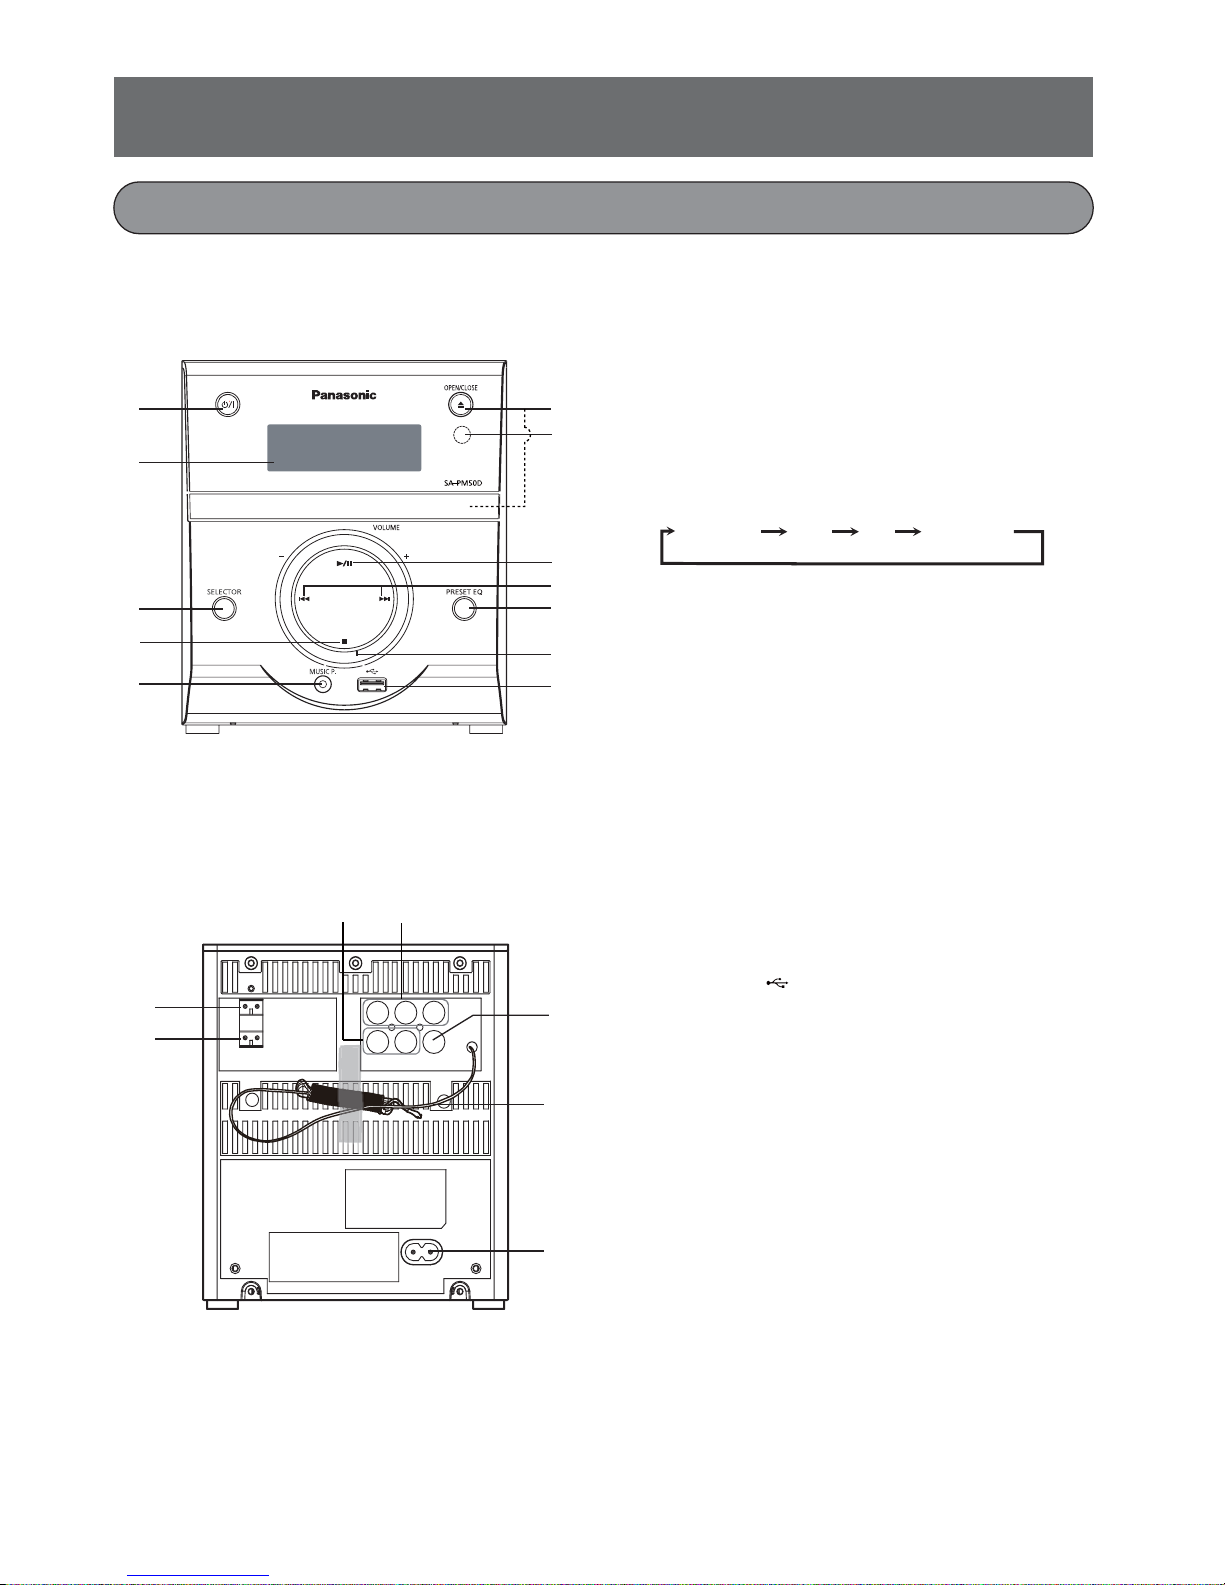
Control reference guide
Main unit
Front panel
1
2
3
4
5
Back panel
13
14
1. Standby/on switch (z/I)
Press to switch the unit from on to standby mode
or vice versa. In standby mode, the unit is still
consuming a small amount of power.
6
7
8
9
10
11
12
1615
17
18
2. FL display
3. Source select button (SELECTOR)
Each time the button is pressed, the display
changes as follows.
DVD/CD USB FM
MUSIC P.
䚼ԡৡ⿄
4. Stop button (n)
5. Music port jack (MUSIC P.)
6. Open or close the disc tray button (OPEN/
CLOSE q)
To open or close the disc tray, be sure to use
the OPEN/CLOSE q button. Do not press the
disc tray with your hand.
7. Remote sensor
8. Play/Pause button (i)
9. Skip to the previous or next title, chapter, track,
or fi le buttons (f/e)
10. Sound mode button (PRESET EQ)
11. Volume control (VOLUME+/-)
Turn the VOLUME control, the volume level
appears on the display (VOL MIN - MAX).
12. USB port ( )
13. Left speaker output terminal
14. Right speaker output terminal
15. Audio output terminals
16. Component video output terminals
17. Composite video output terminal
18. FM antenna wire
19. AC input socket (AC IN ~)
VQT4L45
6
19
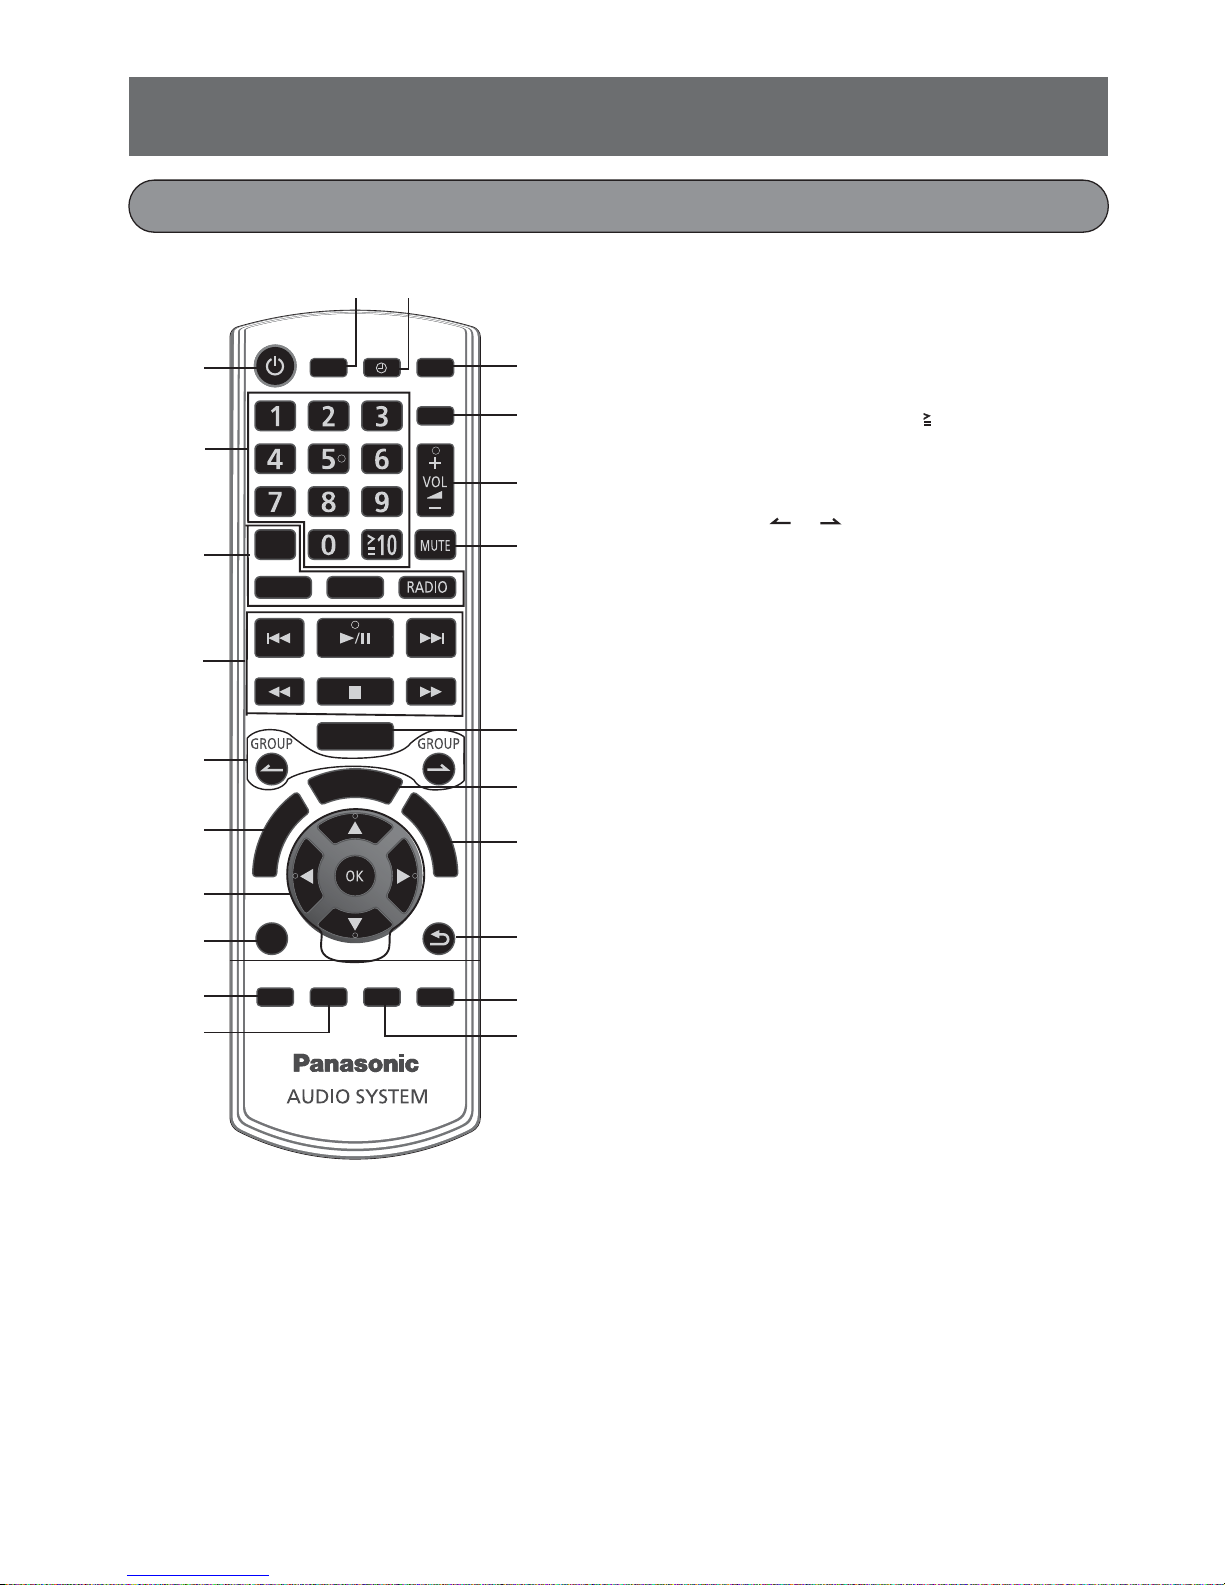
Control buttons of remote control
C
B
C
11 12
ュリヴヱロモヺバ
1
ヤロヰヤレ
ヴロユユヱバ
ヵリヮユン
ヴユモンヤラチ
チヮヰュユ
ヱンヰヨバ
モワヨロユ
13
14
2
15
ヮヶヴリヤ
3
ヱヰンヵ
ヶヴャ
ュヷュバヤュ
16
4
ヱンユヴユヵチユヲヱンユヴユヵチユヲ
17
5
ヮ
ユ
ヤ
ワ
ヴ
リ
ヶ
ュ
ヶ
ワ
ユ
6
ヮ
ヮ
ユ
ヵ
ヴ
ヺ
ヴ
ヴ
ヶ
ャ
ヵ
リ
ヵ
ロ
ユ
18
19
7
モヶュリヰ
8
リワヱヶヵ
ュハャモヴヴ ・ヰヰヮ
ヴロヰヸ
ヱロモヺ
チヮヰュユ
9
10
チモノャ
ンユヱユモヵ
ンユヵヶンワ
20
21
22
1. Standby/on switch [z]
Press to switch the unit from on to standby
mode or vice versa. In standby mode, the unit
is still consuming a small amount of power.
2. Numeric buttons [1 to 9, 0, 10]
3. Source select buttons
4. Basic playback buttons
5. Skip group or folder buttons
(GROUP , )
6. View system setting menu button
(SYSTEM MENU)
7. Cursor move buttons [o,p,b,a]
Confi rm the selection button [OK]
Slow playback button [SLOW p]
8. Select audio (AUDIO)
9. Select bass boost effect (D. BASS)
10. Select the playback mode (PLAY MODE)
11. Display disc information/Clock button
(DISPLAY/CLOCK)
12. Sleep/Timer operation button (SLEEP/TIMER)
13. On-screen information search button
(SEARCH MODE)
14. Set program function/Select camera angle
(PROG./ANGLE)
15. Adjust the volume (VOL +/-)
16. Mute the sound from the speakers (MUTE)
Press the button again to cancel.
“MUTE” is also cancelled when you adjust the
volume or when you switch off the system.
17. Select the sound mode (PRESET EQ)
18. Disc top menu button (DISC MENU)
19. Select subtitle language (SUBTITLE)
20. During system setting return to previous screen
(RETURN)
21. Select picture zoom (ZOOM)
22. Select A-B repeat playback
(A-B REPEAT)
VQT4L45
7
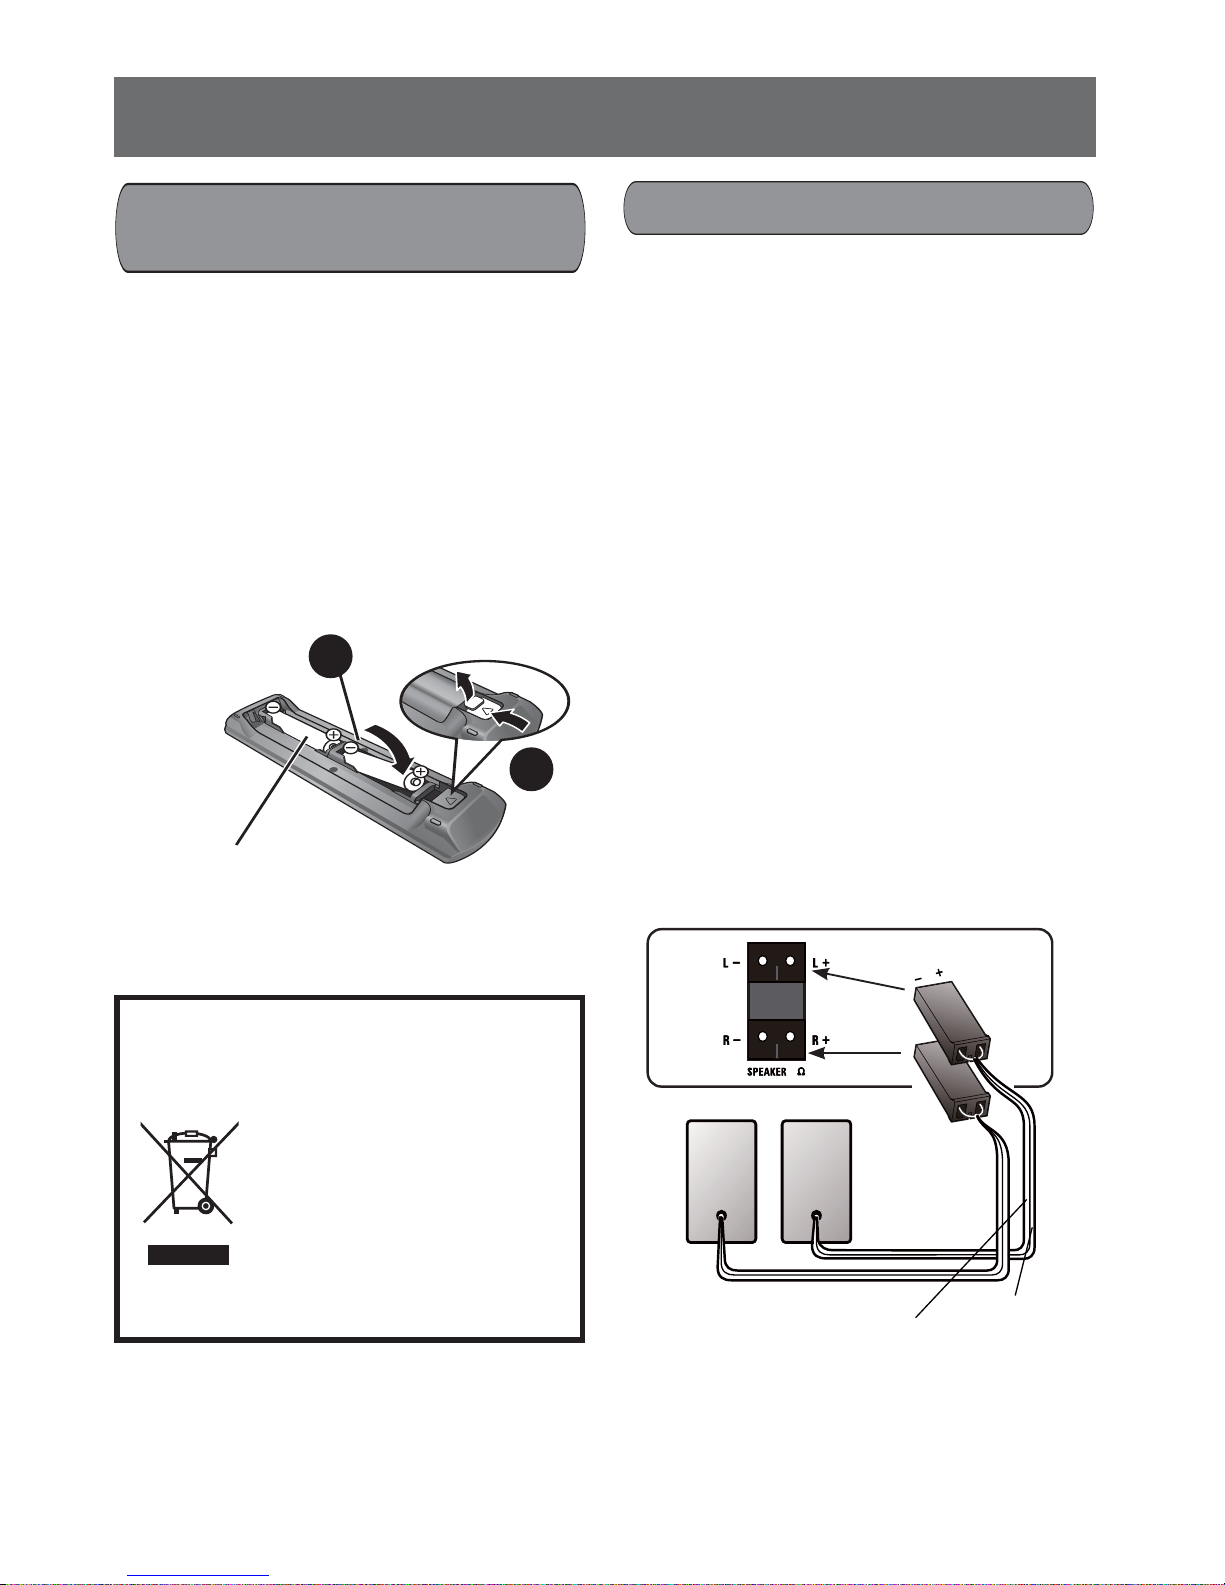
Preparation
(-)
Install and replace the
batteries of remote control
- Risk of explosion! Keep battery(ies) away from
heat, sunshine or fi re. Never discard the battery
in fi re.
- Install the batteries so that the poles (+ and -)
align with those in the remote control.
- Point the remote control at the remote control
sensor, away from obstacles, at a maximum
range of 7 m directly in front of the main unit.
- If you are not going to use the remote control
for a long time, remove the batteries.
2
1
R6/LR6, AA
Speaker connections
Use only the supplied speakers
The combination of the main unit and speakers
give the best sound. If you use other speakers,
the system may be damaged and the sound
quality may be decreased.
Note:
- Put the speakers on a fl at safe surface.
- These speakers do not have magnetic shielding.
Do not put them near PCs or other equipment
easily infl uenced by magnetism.
- When playing at high levels for a long period, it
may cause damage to the system and decrease
the life of the system.
- Decrease the volume in following conditions to
prevent damage:
- When playing the distorted sound.
- When adjusting the sound quality.
- Connect only speakers with the same or
higher impedance. Refer to “Specifi cations” for
details.
- When connecting the speakers, make sure that
“+” and “-” polarities are matched properly.
- If you see this symbol -
Information on Disposal in other
Countries outside the European
Union
This symbol is only valid in the
European Union.
If you wish to discard this
product, please contact your
local authorities or dealer and
ask for the correct method of
disposal.
VQT4L45
8
Red wire
Black wire
(+)
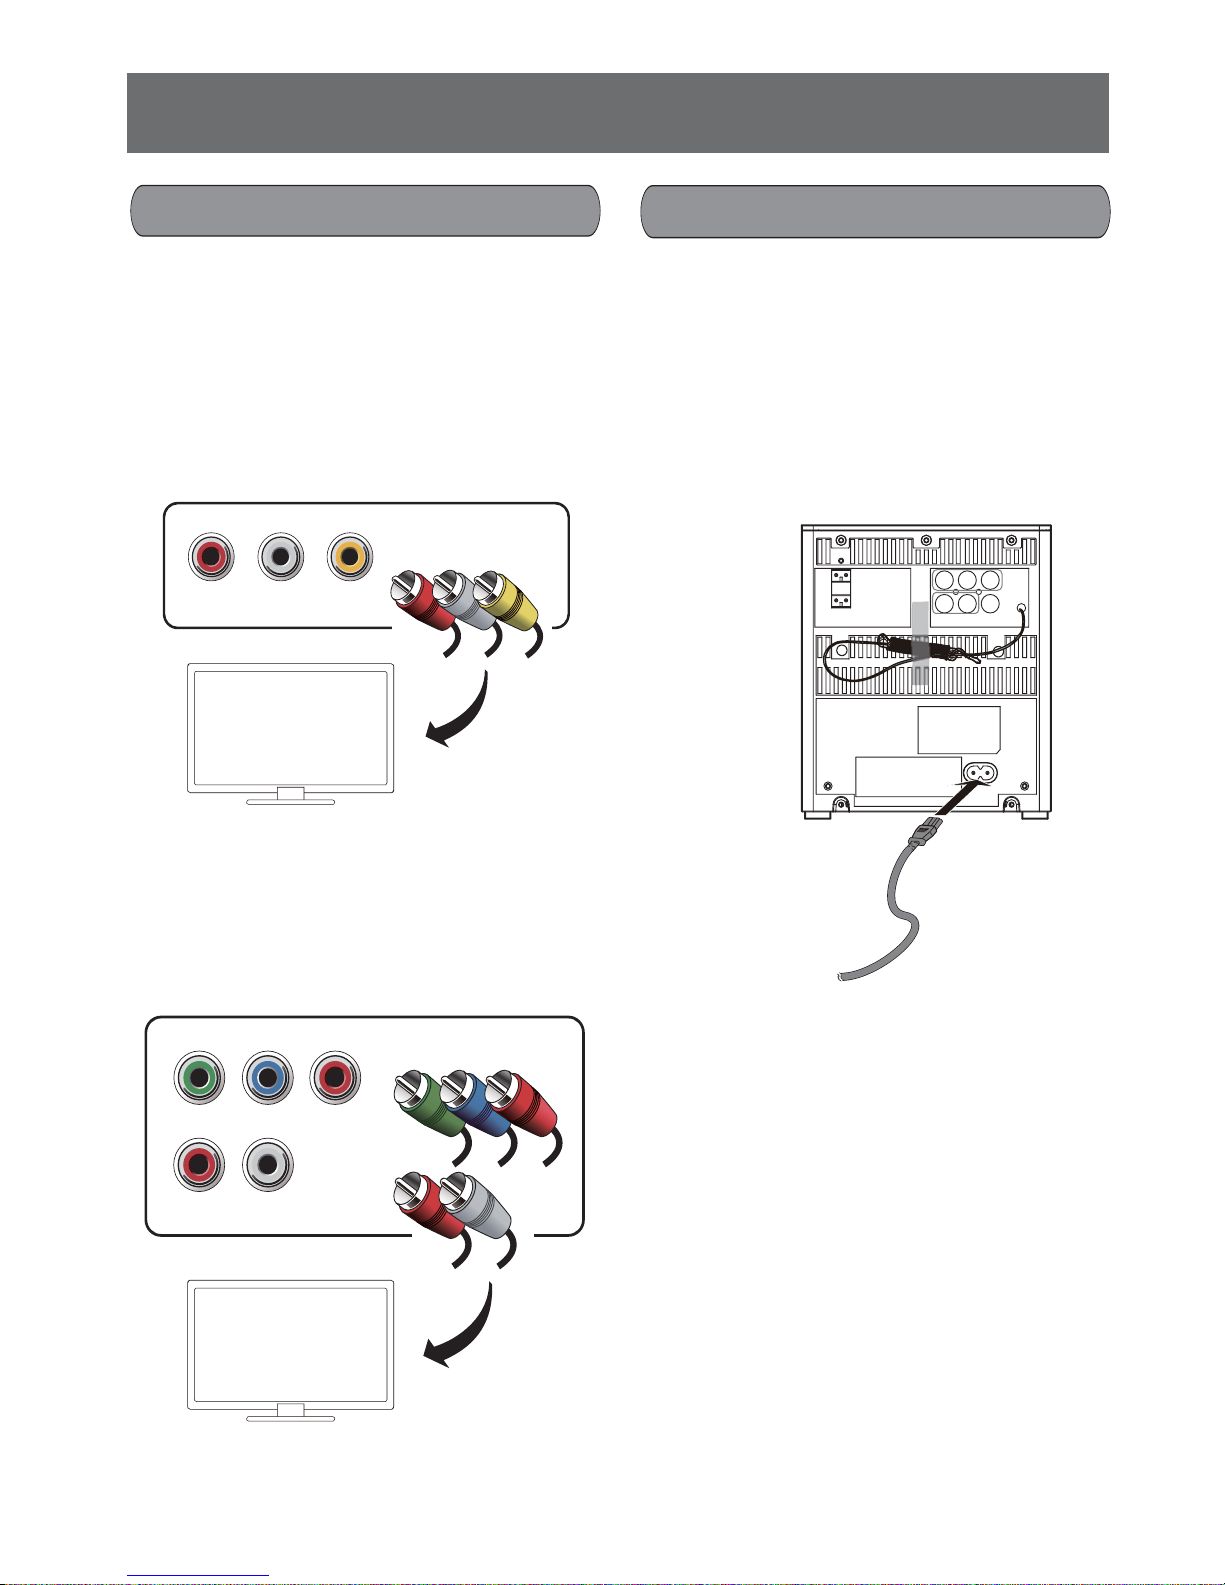
Connecting to a TV
Connecting AC mains lead
Connect audio and video cable to output terminals
of this unit and related input terminals of TV.
Select the best video connection that your TV
supports.
Option 1: For a standard TV connect through a
composite video cable (included) and
audio cable (not included).
Terminal color: R (Red), L ( White),
VIDEO ( Yellow)
VIDEOR L
Option 2: For a Progressive Scan TV connect
through component video cables (not
included) and audio cable (not includ ed).
Terminal color: Y (Green), Pb/Cb ( Blue),
Pr/Cr ( Red)
- Install this unit near the AC outlet where the AC
mains plug can be easily reached.
- Connect the AC mains lead only after all the
other connections have been made.
- Don’t step on or pinch the AC mains lead,
especially at plug, convenience receptacles,
and the point where they exit from the unit.
- Unplug the unit during lightning storms or when
not be used for a long time.
AC mains lead
To household
mains socket
Pb/Cb
Pr/CrY
LR
Note:
Use the AC mains lead that matches the socket
for the area you live in.
• In Saudi Arabia, always use the 3-pin AC mains
lead.
• The 2-pin AC mains lead with a label is for
Thailand.
VQT4L45
9
 Loading...