

Page 1
A
SA-AK250GCP
(1) CD-Audio (CD-DA)
(2) CD-R/RW (CD-DA, MP3* formatted disc)
(3) MP3*
*MPEG-1 Layer 3, MPEG-2 Layer 3
Bit rate
MP3 32 kbps to 320 kbps
Sampling frequency
MP3 32 kHz, 44.1 kHz, 48 kHz
CD-DA 44.1 kHz
Decoding 16 bit linear
Digital filter 8fs
D/A converter MASH (1 bit DAC)
Pick up
Wavelength 780 nm
Beam Source Semiconductor laser
udio output (Disc)
Number of channels 2 (Stereo) (FL, FR)
n GENERAL
Power supply
AC 110 to 127/220 to 240 V, 50/60Hz
Power consumption 95 W
Power consumption in standby
mode
Dimensions (W x H x D) 250 x 330 x 323 mm
Mass 7.1 kg
Operating temperature range +5 to +35°C
Operating humidity range 5 to 90% RH (no condensation)
n SYSTEM
SC-AK250 (GCP) Music center: SA-AK250 (GCP)
Speakers: SB-AK250 (PL)
For Information on speaker system, plesae refer to the original
Service Manual (Order No. MD0704055CE) for SB-AK250PL-S.
Notes:
1. Specifications are subject to change without notice. Mass and
dimensions are approximate.
2. Total harmonic distortion is measured by the digital spectrum
analyzer.
0.7 W (Approx.)
CONTENTS
Page Page
1 Safety Precautions 4
1.1. General Guidelines
1.2. Before Use
1.3. Before repair and adjustment
1.4. Protection Circuitry
1.5. Safety Part Information
2 Prevention of Electro Static Discharge (ESD) to
Electrostatically Sensitive (ES) Devices
3 Handling Precautions For Traverse Unit
4 Precaution of Laser Diode
5 About Lead Free Solder (PbF)
5.1. Service caution based on legal restrictions
6 Accessories
7 Operating Procedures
7.1. Main Unit Key Buttons Operations
7.2. Remote Control Key Buttons Operations
8 New Features
8.1. Using the Music Port
9 Self diagnosis and special mode setting
9.1. Service Mode Summary Table
9.2. Special Mode Table 1
9.3. Reliability Test Mode (CRS1 Mechanism)
9.4. Error code Table Display
10 Assembling and Disassembling
10.1. Caution
10.2. Disassembly flow chart
10.3. Main Parts Location
10
10
11
12
12
13
14
14
16
16
16
19
21
26
26
27
28
10.4. Disassembly of Top Cabinet
4
4
4
4
5
5
7
9
10.5. Disassembly of CD Changer Unit (CRS1)
10.6. Disassembly of Rear Panel
10.7. Disassembly of Main P.C.B.
10.8. Disassembly of Transformer P.C.B.
10.9. Disassembly of Power P.C.B.
10.10. Disassembly of Front Panel Unit
10.11. Disassembly for Panel P.C.B.
10.12. Disassembly of Tact Switch P.C.B.
10.13. Disassembly of Deck mechanism unit
10.14. Disassembly of Deck P.C.B.
10.15. Disassembly of Traverse Unit
10.16. Disassembly for Deck Mechanism
10.17. Disassembly of Deck Mechanism P.C.B.
10.18. Disassembly of cassette lid
10.19. Rectification for tape jam problem
11 Service Fixture and Tools
12 Service Positions
12.1. Checking and Repairing of Main P.C.B.
12.2. Checking and Repairing of Transformer P.C.B.
12.3. Checking and Repairing of Panel, Deck & Deck
Mechanism P.C.B.
12.4. Checking and Repairing of Power P.C.B.
13 Procedure for Checking Operation of Individual Parts of Deck
Mechanism Unit
13.1. Operation Check with Cassette Tape
13.2. Operation Check without Cassette Tape
29
29
30
31
31
32
32
33
34
34
34
35
36
39
40
40
42
42
42
43
43
44
45
45
45
2
Page 2
SA-AK250GCP
14 Measurem ent And Adjustments 47
14.1. Cassette Deck Section
15 Voltage and Waveform Chart
15.1. CD Servo P.C.B.
15.2. Deck P.C.B. & Deck Mechanism P.C.B.
15.3. Main P.C.B.
15.4. Panel P.C.B. & Transformer P.C.B.
15.5. Power P.C.B.
15.6. Waveform Chart
16 Wiring Connection Diagram
17 Block Diagram
17.1. CD Servo Diagram
17.2. Deck/ Deck Mechanism Diagram
17.3. Main Diagram
17.4. Panel Diagram
17.5. Power Diagram
17.6. Transformer Diagram
18 Notes Of Schematic Diagram
19 Schematic Diagram
19.1. (A) CD Servo Circuit
19.2. (B) Main Circuit
19.3. (C) Panel Circuit
19.4. (D) Sub Panel Circuit & (G) Deck Mechanism Circuit
47
49
49
49
50
51
51
52
53
55
55
56
57
59
60
61
63
65
65
66
70
71
19.5. (E) Power Circuit
19.6. (F) Deck Circuit
19.7. (H) Transformer Circuit
20 Printed Circuit Board
20.1. (A) CD Servo P.C.B., (F) Deck P.C.B. & (G) Deck
Mechanism P.C.B.
20.2. (B) Main P.C.B.
20.3. (C) Panel P.C.B.
20.4. (D) Sub Panel P.C.B.
20.5. (E) Power P.C.B.
20.6. (H) Transformer P.C.B.
21 Illustration of ICs, Transistors and Diodes
22 Terminal Function of IC's
22.1. IC7001 (MN6627954MA) Servo Processor,Digital Signal
Processor/Digital filter and D/A Converter
22.2. IC7002 (BA5948FPE2) IC 4CH Drive
22.3. IC2801 (C2CBYY000482) System Microprocessor
23 Exploded Views
23.1. Cabinet Parts Location
23.2. Deck Mechanism Parts Location (RAA4403-S)
23.3. Packaging
24 Replaceme nt Parts List
72
74
75
77
78
79
80
81
82
83
85
86
86
87
87
89
89
91
92
93
3
Page 3
SA-AK250GCP
1 Safety Precautions
1.1. General Guidelines
1. When servicing, observe the original lead dress. If a short circuit is found, replace all parts which have been overheated or
damaged by the short circuit.
2. After servicing, ensure that all the protective devices such as insulation barriers and insulation papers shields are properly
installed.
3. After servicing, check for leakage current checks to prevent from being exposed to shock hazards.
1.1.1. Leakage Current Cold Check
1. Unplug the AC cord and connect a jumper between the two prongs on the plug.
2. Using an ohmmeter measure the resistance value, between the jumpered AC plug and each exposed metallic cabinet part on
the equipment such as screwheads, connectors, control shafts, etc. When the exposed metallic part has a return path to the
chassis, the reading should be between 1MΩ and 5.2MΩ.
When the exposed metal does not have a return path to the chassis, the reading must be
1.1.2. Leakage Current Hot Check (See Figure 1)
1. Plug the AC cord directly into the AC outlet. Do not use an isolation transformer for this check.
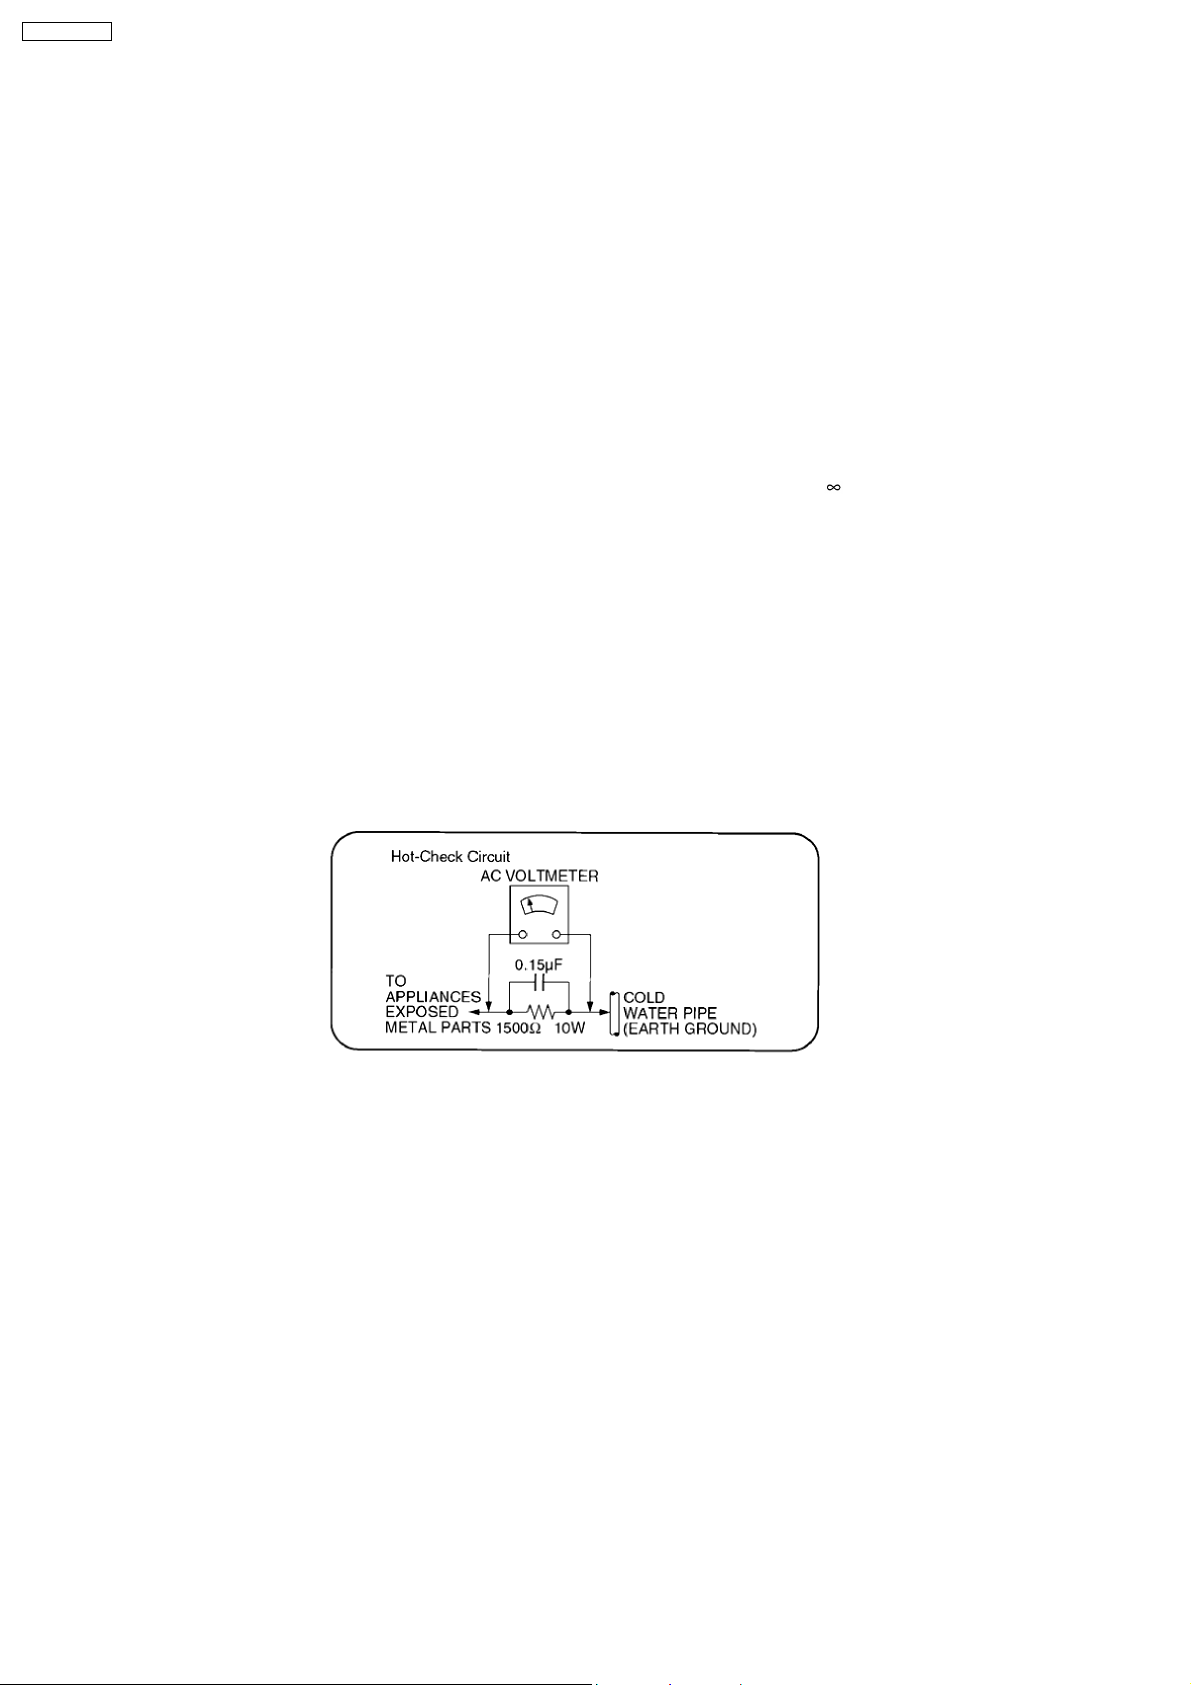
2. Connect a 1.5kΩ, 10 watts resistor, in parallel with a 0.15µF capacitor, between each exposed metallic part on the set and a
good earth ground such as a water pipe, as shown in Figure 1.
3. Use an AC voltmeter, with 1000 ohms/volt or more sensitivity, to measure the potential across the resistor.
4. Check each exposed metallic part, and measure the voltage at each point.
5. Reverse the AC plug in the AC outlet and repeat each of the above measurements.
6. The potential at any point should not exceed 0.75 volts RMS. A leakage current tester (Simpson Model 229 or equivalent) may
be used to make the hot checks, leakage current must not exceed 1/2 milliamp. Should the measurement is out of the limits
specified, there is a possibility of a shock hazard, and the equipment should be repaired and rechecked before it is returned to
the customer.
.
Fig. 1
1.2. Before Use
Be sure to disconnect the mains cord before adjusting the voltage selector.
Use a minus(-) screwdriver to set the voltage selector (on the rear panel) to the voltage setting for the area in which the unit will
be used. (If the power supply in your area is 110V or 127V, set to the “127V” position.)
Note that this unit will be seriously damaged if this setting is not made correctly. (There is no voltage selector for some countries,
the correct voltage is already set.)
1.3. Before repair and adjustment
Disconnect AC power, discharge power capacitors C5101, C5104, C5171, C5172, C5920, C5940 and C5950 through a 10Ω,5W
resistor to ground.
DO NOT SHORT-CIRCUIT DIRECTLY (with a screwdriver blade, for instance), as this may destroy solid state devices.
After repairs are completed, restore power gradually using a variac, to avoid overcurrent.
Current consumption at AC 110 ~ 127V, 50 Hz in NO SIGNAL mode (at volume min at CD mode) should be ~ 500mA.
Current consumption at AC 220 ~240V, 60 Hz in NO SIGNAL mode (at volume min at CD mode) should be ~ 350mA.
1.4. Protection Circuitry
The protection circuitry may have operated if either of the following conditions are noticed:
4
Page 4
SA-AK250GCP
· No sound is heard when the power is turned on.
· Sound stops during a performance.
The function of this circuitry is to prevent circuitry damage if, for example, the positive and negative speaker connection wires are
“shorted”, or if speaker systems with an impedance less than the indicated rated impedance of the amplifier are used.
If this occurs, follow the procedure outlines below:
1. Turn off the power.
2. Determine the cause of the problem and correct it.
3. Turn on the power once again after one minute.
Note :
When the protection circuitry functions, the unit will not operate unless the power is first turned off and then on again.
1.5. Safety Part Information
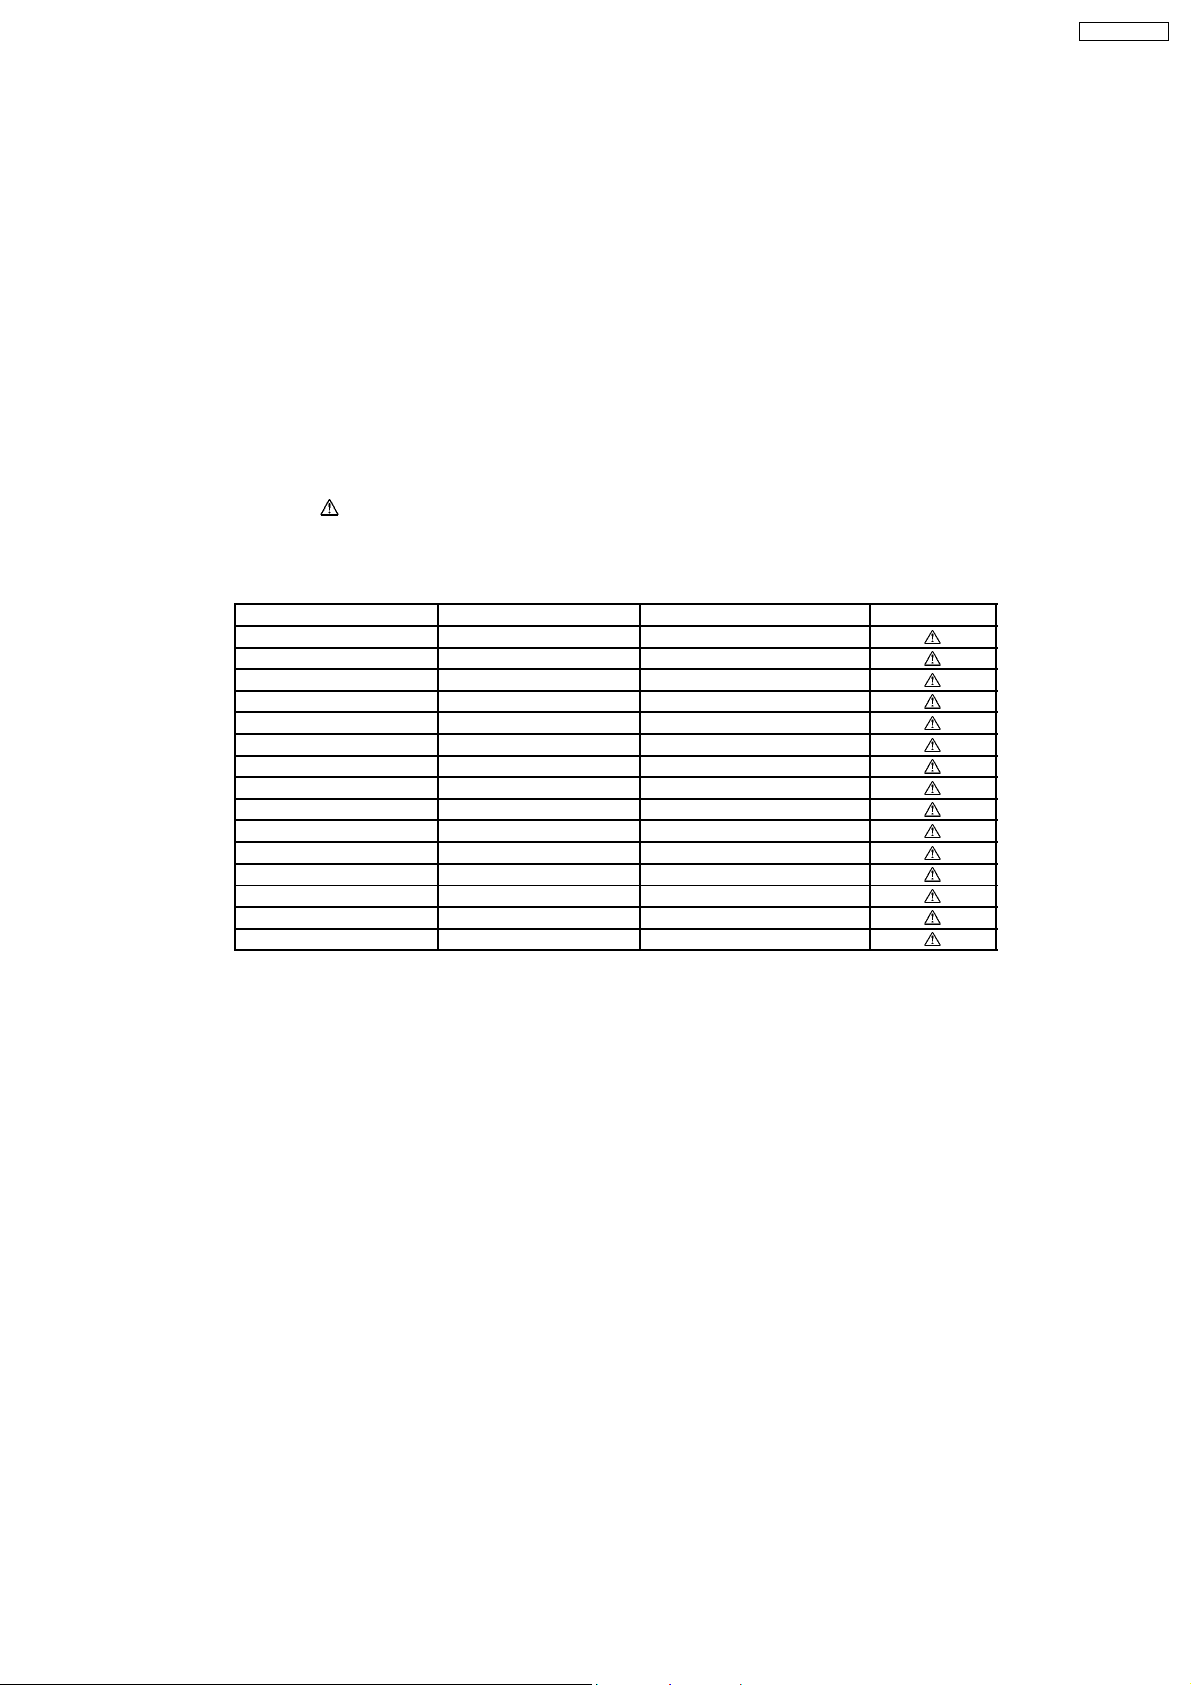
Safety Parts List:
There are special components used in this equipment which are important for safety.
These parts are marked by
be replaced with manufacturer’s specified parts to prevent shock, fire or other hazards. Do not modify the original design without
permission of manufacturer.
Table 1
Reference No. Part No. Part name & Description Remarks
in the Schematic Diagrams & Replacement Parts List. It is essential that these critical parts should
360 RAE0165A-V TRAVERSE UNIT
L5601 G0B9R5K00001 CHOKE COIL
L5602 G0B9R5K00001 CHOKE COIL
S5950 K0ABLB000003 SW VOLTAGE SELECTOR
T5950 G4CYAYY00135 MAIN TRANSFORMER
T5951 G4C2AAJ00005 SUB TRANSFORMER
Z5950 ERZV10V511CS ZENER
RL5950 K6B1AEA00015 POWER RELAY
F1 K5D312BLA015 FUSE
F2 K5D162BLA013 FUSE
FP5920 K5G702A00009 FUSE PROTECTOR
FP5940 K5G702Z00004 FUSE PROTECTOR
FP5950 K5G402A00025 FUSE PROTECTOR
JK5950 K2AA2B000011 JK AC INLET
A2 K2CQ2CA00006 AC CORD
2 Prevention of Electro Static Discharge (ESD) to
Electrostatically Sensitive (ES) Devices
Some semiconductor (solid state) devices can be damaged easily by electricity. Such components commonly are called
Electrostatically Sensitive (ES) Devices. Examples of typical ES devices are integrated circuits and some field-effect transistors and
semiconductor “chip” components. The following techniques should be used to help reduce the incidence of component damage
caused by electro static discharge (ESD).
1. Immediately before handling any semiconductor component or semiconductor-equiped assembly, drain off any ESD on your
body by touching a known earth ground. Alternatively, obtain and wear a commercially available discharging ESD wrist strap,
which should be removed for potential shock reasons prior to applying power to the unit under test.
2. After removing an electrical assembly equiped with ES devices, place the assembly on a conductive surface such as aluminium
foil, to prevent electrostatic charge build up or exposure of the assembly.
3. Use only a grounded-tip soldering iron to solder or unsolder ES devices.
4. Use only an anti-static solder remover device. Some solder removal devices not classified as “anti-static (ESD protected)” can
generate electrical charge to damage ES devices.
5. Do not use freon-propelled chemicals. These can generate electrical charges sufficient to damage ES devices.
6. Do not remove a replacement ES device from its protective package until immediately before you are ready to install it. (Most
replacement ES devices are packaged with leads electrically shorted together by conductive foam, aluminium foil or
comparable conductive material).
7. Immediately before removing the protective material from the leads of a replacement ES device, touch the protective material
to the chassis or circuit assembly into which the device will be installed.
5
Page 5

SA-AK250GCP
Caution
Be sure no power is applied to the chassis or circuit, and observe all other safety precautions.
8. Minimize body motions when handling unpackaged replacement ES devices. (Otherwise harmless motion such as the brushing
together of your clothes fabric or the lifting of your foot from a carpeted floor can generate static electricity (ESD) sufficient to
damage an ES device).
6
Page 6

SA-AK250GCP
3 Handling Precautions For Traverse Unit
The laser diode in the traverse unit (with optical pickup) may break down due to potential difference caused by the static electricity
of clothes or our human body.
So, be careful of electrostatic breakdown during repair of the traverse unit (with optical pickup).
· Way of handling the traverse unit (with optical pickup)
1. Do not subject the traverse unit (with optical pickup) to static electricity as it is extremely sensitive to electrical shock.
2. To prevent the breakdown of the laser diode, an antistatic shorting pin is inserted into the flexible board (FFC board).
3. Do not to apply excessive stress to the flexible board (FFC board). When removing or connecting the short pin, finish the job
in as short time as possible.
4. Do not turn the variable resistor for laser power adjustment. (It is pre-adjusted during production time)
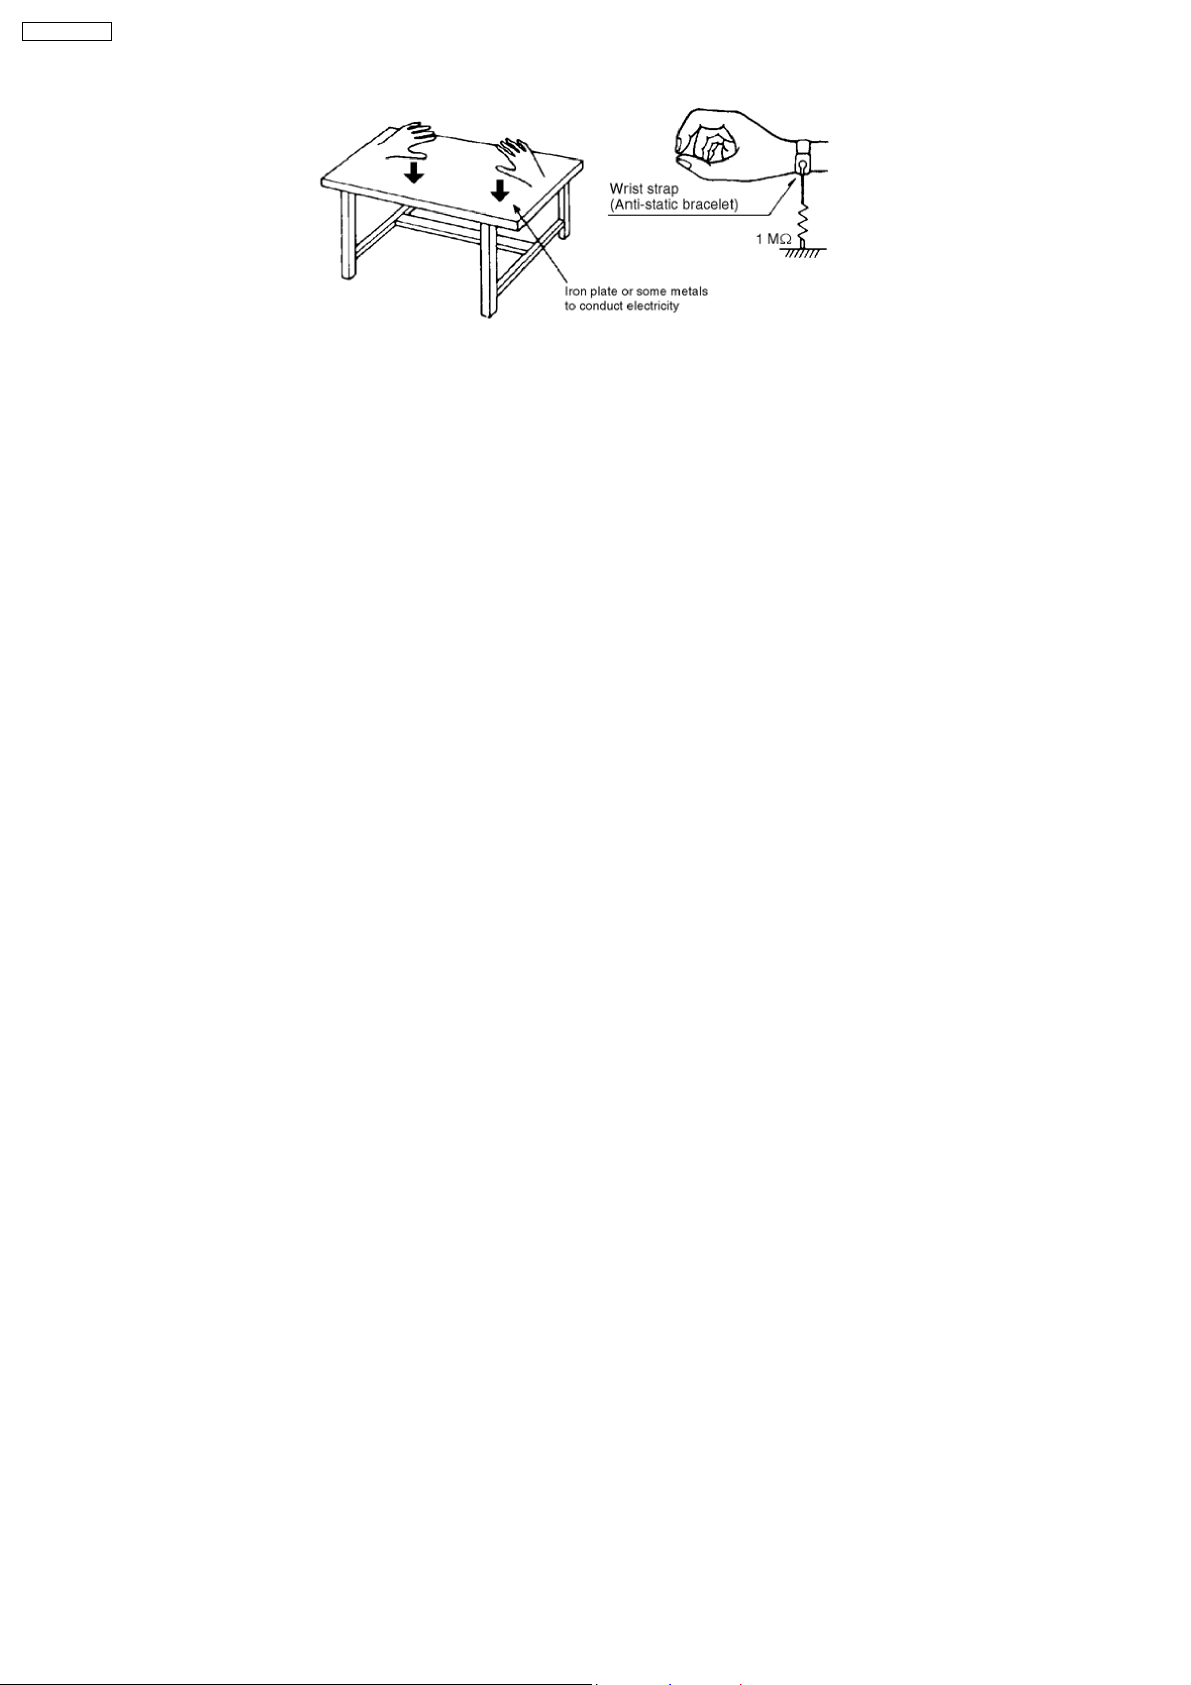
Grounding for electrostatic breakdown prevention
1. Human body grounding
Use the anti-static wrist strap to discharge the static electricity from your body.
2. Work table grounding
Put a conductive material (sheet) or steel sheet on the area where the traverse unit (with optical pickup) is place, and ground
the sheet.
Caution :
The static electricity of your clothes will not be grounded through the wrist strap. So, take care not to let your clothes touch the
traverse unit (with optical pickup).
Caution when replacing the Traverse Unit
The traverse unit has a short point shorted with solder to protect the laser diode against electrostatics breakdown. Be sure to
remove the solder from the short point before making connections.
7
Page 7
SA-AK250GCP
8
Page 8
SA-AK250GCP
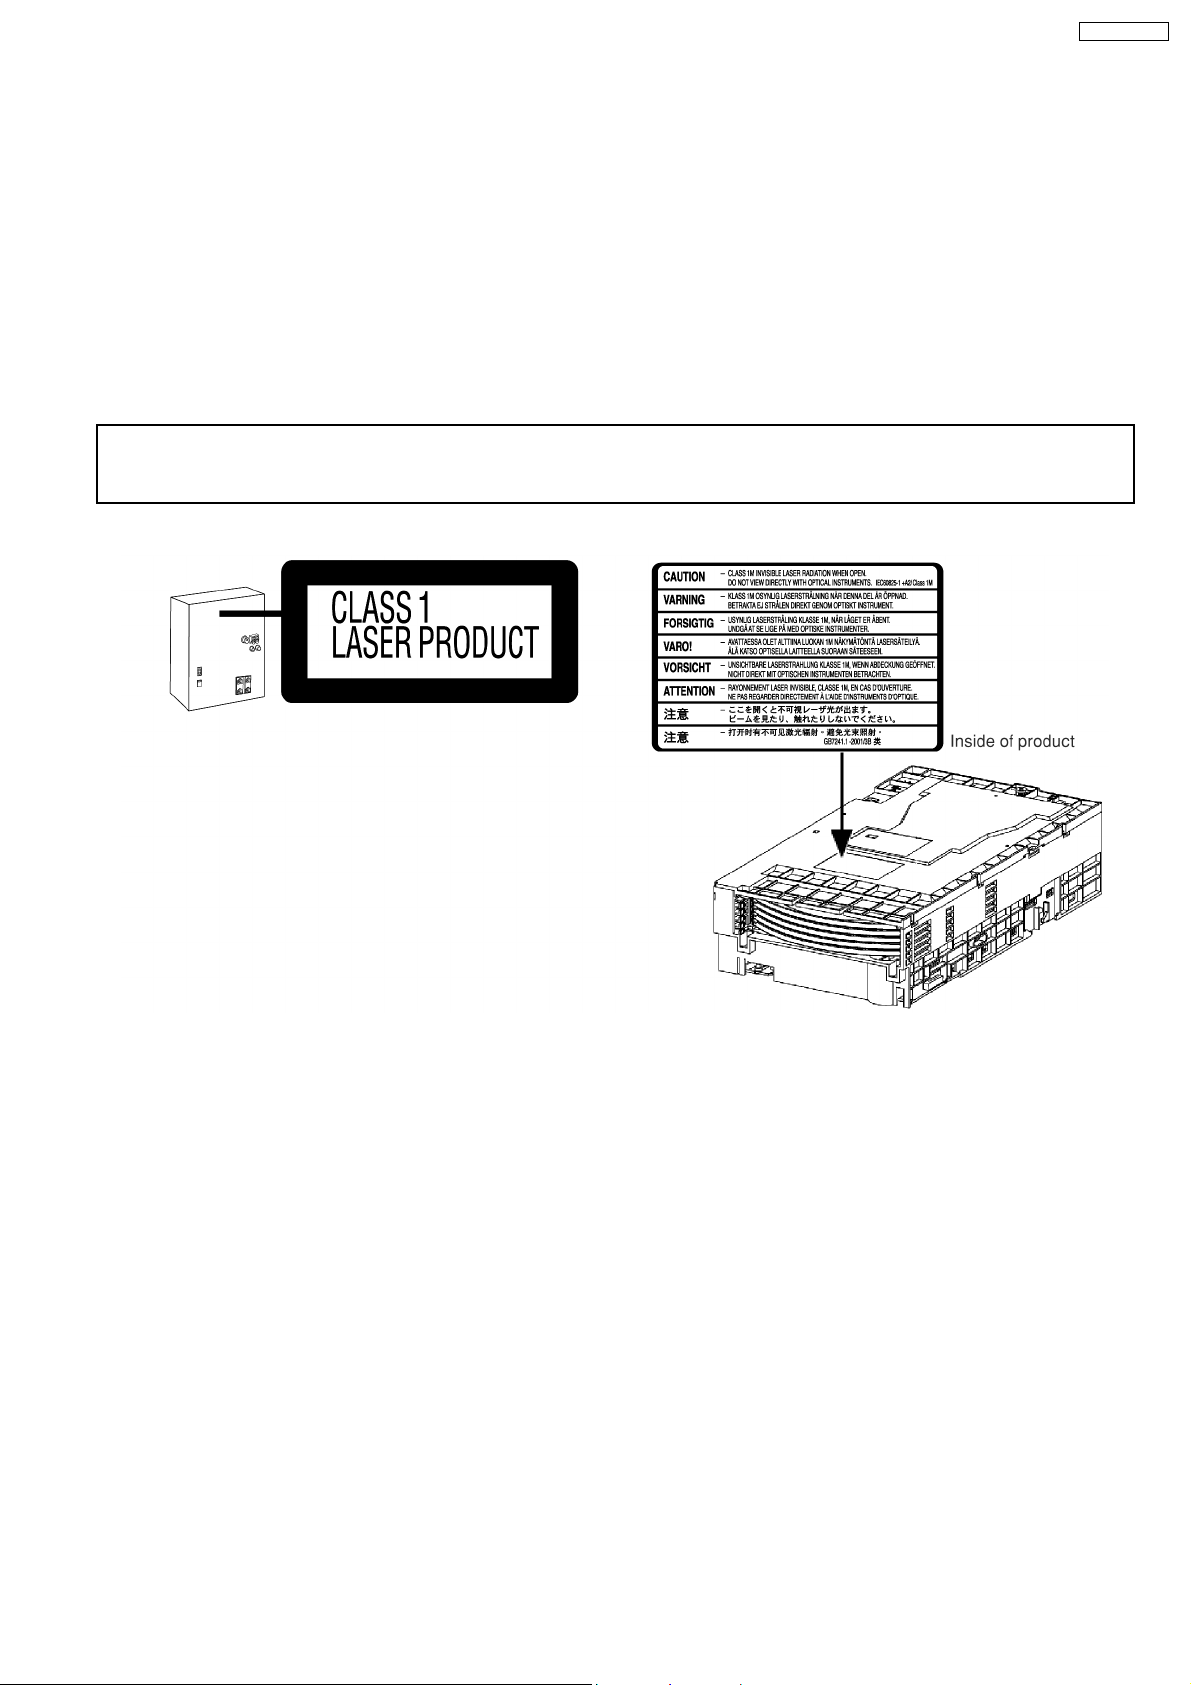
4 Precaution of Laser Diode
Caution :
This product utilizes a laser diode with the unit turned "ON", invisible laser radiation is emitted from the pick up lens.
Wavelength : 780 nm
Maximum output radiation power from pick up : 100 µW/VDE
Laser radiation from pick up unit is safety level, but be sure the followings:
1. Do not disassemble the optical pick up unit, since radiation from exposed laser diode is dangerous.
2. Do not adjust the variable resistor on the pick up unit. It was already adjusted.
3. Do not look at the focus lens using optical instruments.
4. Recommend not to look at pick up lens for a long time.
CAUTION!
THIS PRODUCT UTILIZES A LASER.
USE OF CONTROLS OR ADJUSTMENTS OR PERFORMANCE OF PROCEDURES OTHER THAN THOSE SPECIFIED HEREIN MAY RESULT
IN HAZARDOUS RADIATION EXPOSURE.
n Use of Caution Labels
9
Page 9

SA-AK250GCP
5 About Lead Free Solder (PbF)
5.1. Service caution based on legal restrictions
5.1.1. General description about Lead Free Solder (PbF)
The lead free solder has been used in the mounting process of all electrical components on the printed circuit boards used for this
equipment in considering the globally environmental conservation.
The normal solder is the alloy of tin (Sn) and lead (Pb). On the other hand, the lead free solder is the alloy mainly consists of tin
(Sn), silver (Ag) and Copper (Cu), and the melting point of the lead free solder is higher approx.30 degrees C (86°F) more than that
of the normal solder.
Definition of PCB Lead Free Solder being used
The letter of “PbF” is printed either foil side or components side on the PCB using the lead free solder.
(See right figure)
Service caution for repair work using Lead Free Solder (PbF)
· The lead free solder has to be used when repairing the equipment for which the lead free solder is used.
(Definition: The letter of “PbF” is printed on the PCB using the lead free solder.)
· To put lead free solder, it should be well molten and mixed with the original lead free solder.
· Remove the remaining lead free solder on the PCB cleanly for soldering of the new IC.
· Since the melting point of the lead free solder is higher than that of the normal lead solder, it takes the longer time to melt
the lead free solder.
· Use the soldering iron (more than 70W) equipped with the temperature control after setting the temperature at 350±30
degrees C (662±86°F).
Recommended Lead Free Solder (Service Parts Route.)
· The following 3 types of lead free solder are available through the service parts route.
RFKZ03D01K-----------(0.3mm 100g Reel)
RFKZ06D01K-----------(0.6mm 100g Reel)
RFKZ10D01K-----------(1.0mm 100g Reel)
Note
* Ingredient: Tin (Sn), 96.5%, Silver (Ag) 3.0%, Copper (Cu) 0.5%, Cobalt (Co) / Germanium (Ge) 0.1 to 0.3%
10
Page 10
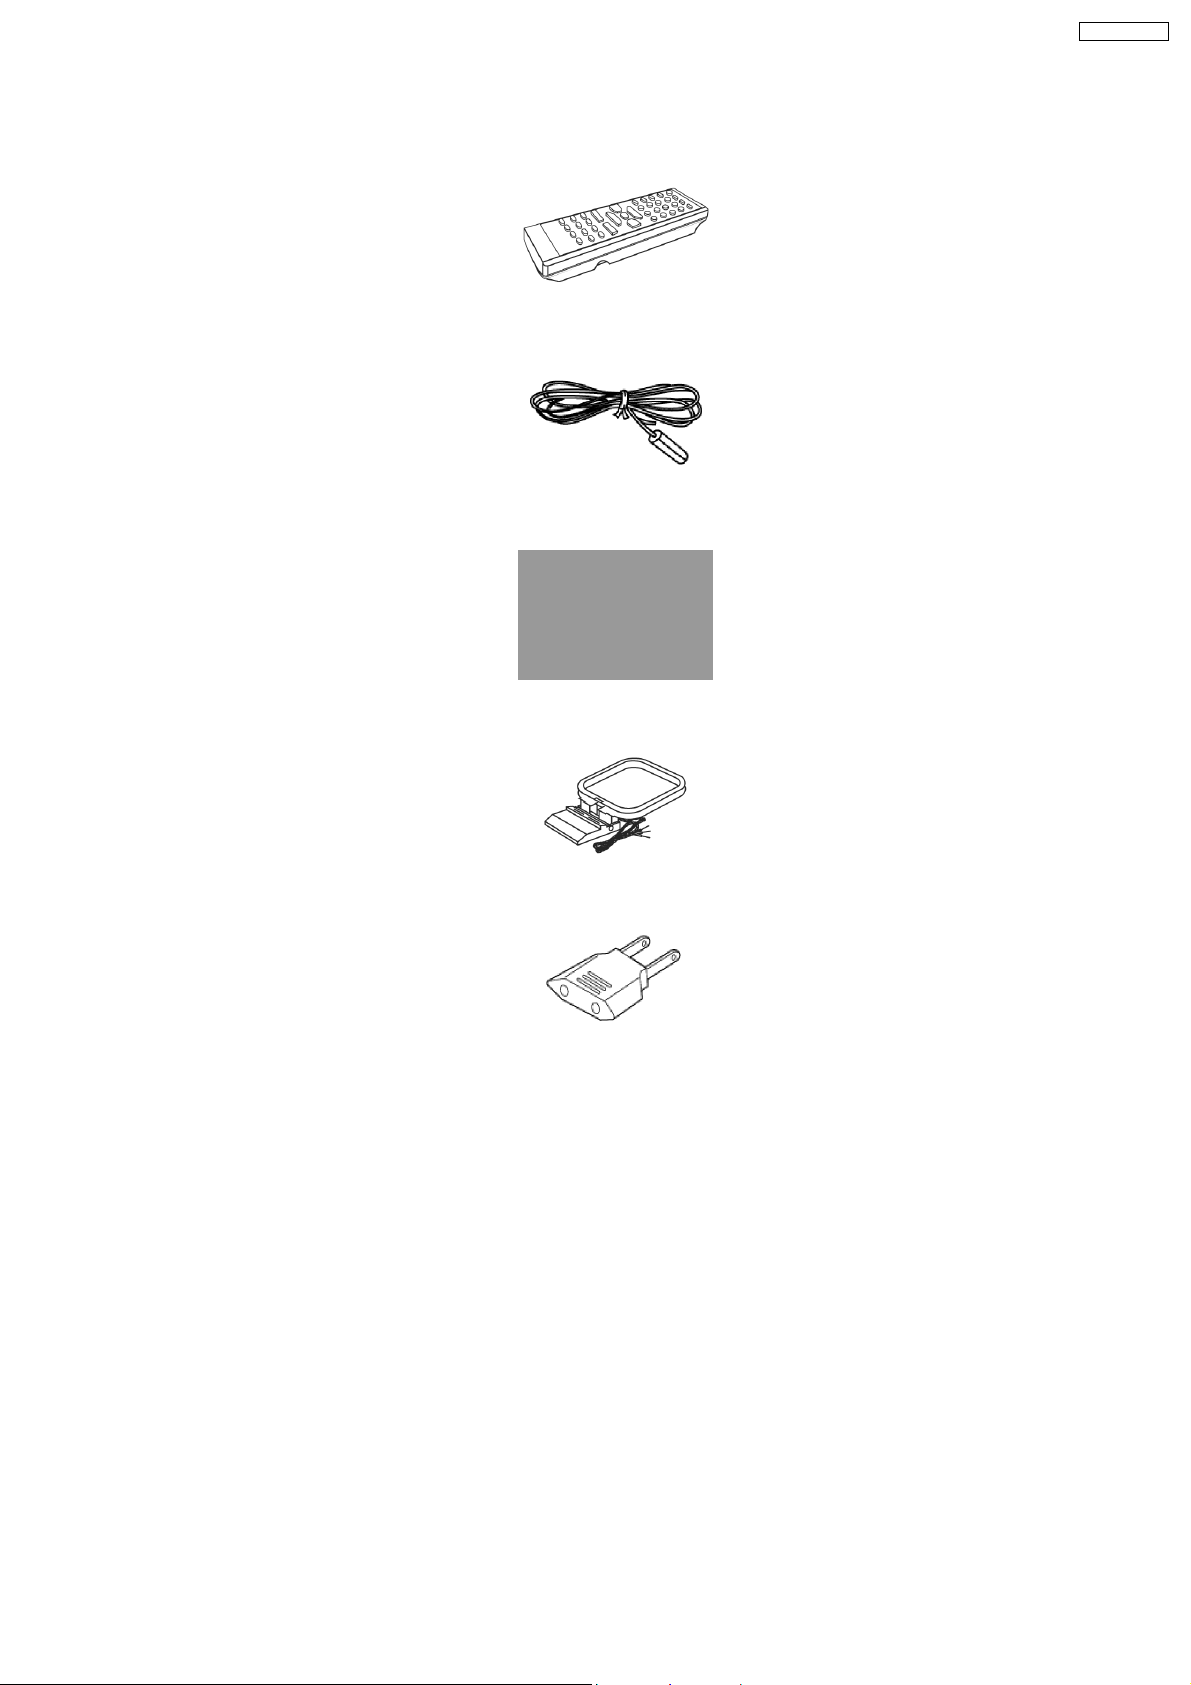
6 Accessories
Note: Refer to “Replacement Parts List” (Section 24) for part number.
Remote Control
FM Antenna Wire
SA-AK250GCP
AC Cord
AM Loop Antenna
Power Plug Adapter
11
Page 11
SA-AK250GCP
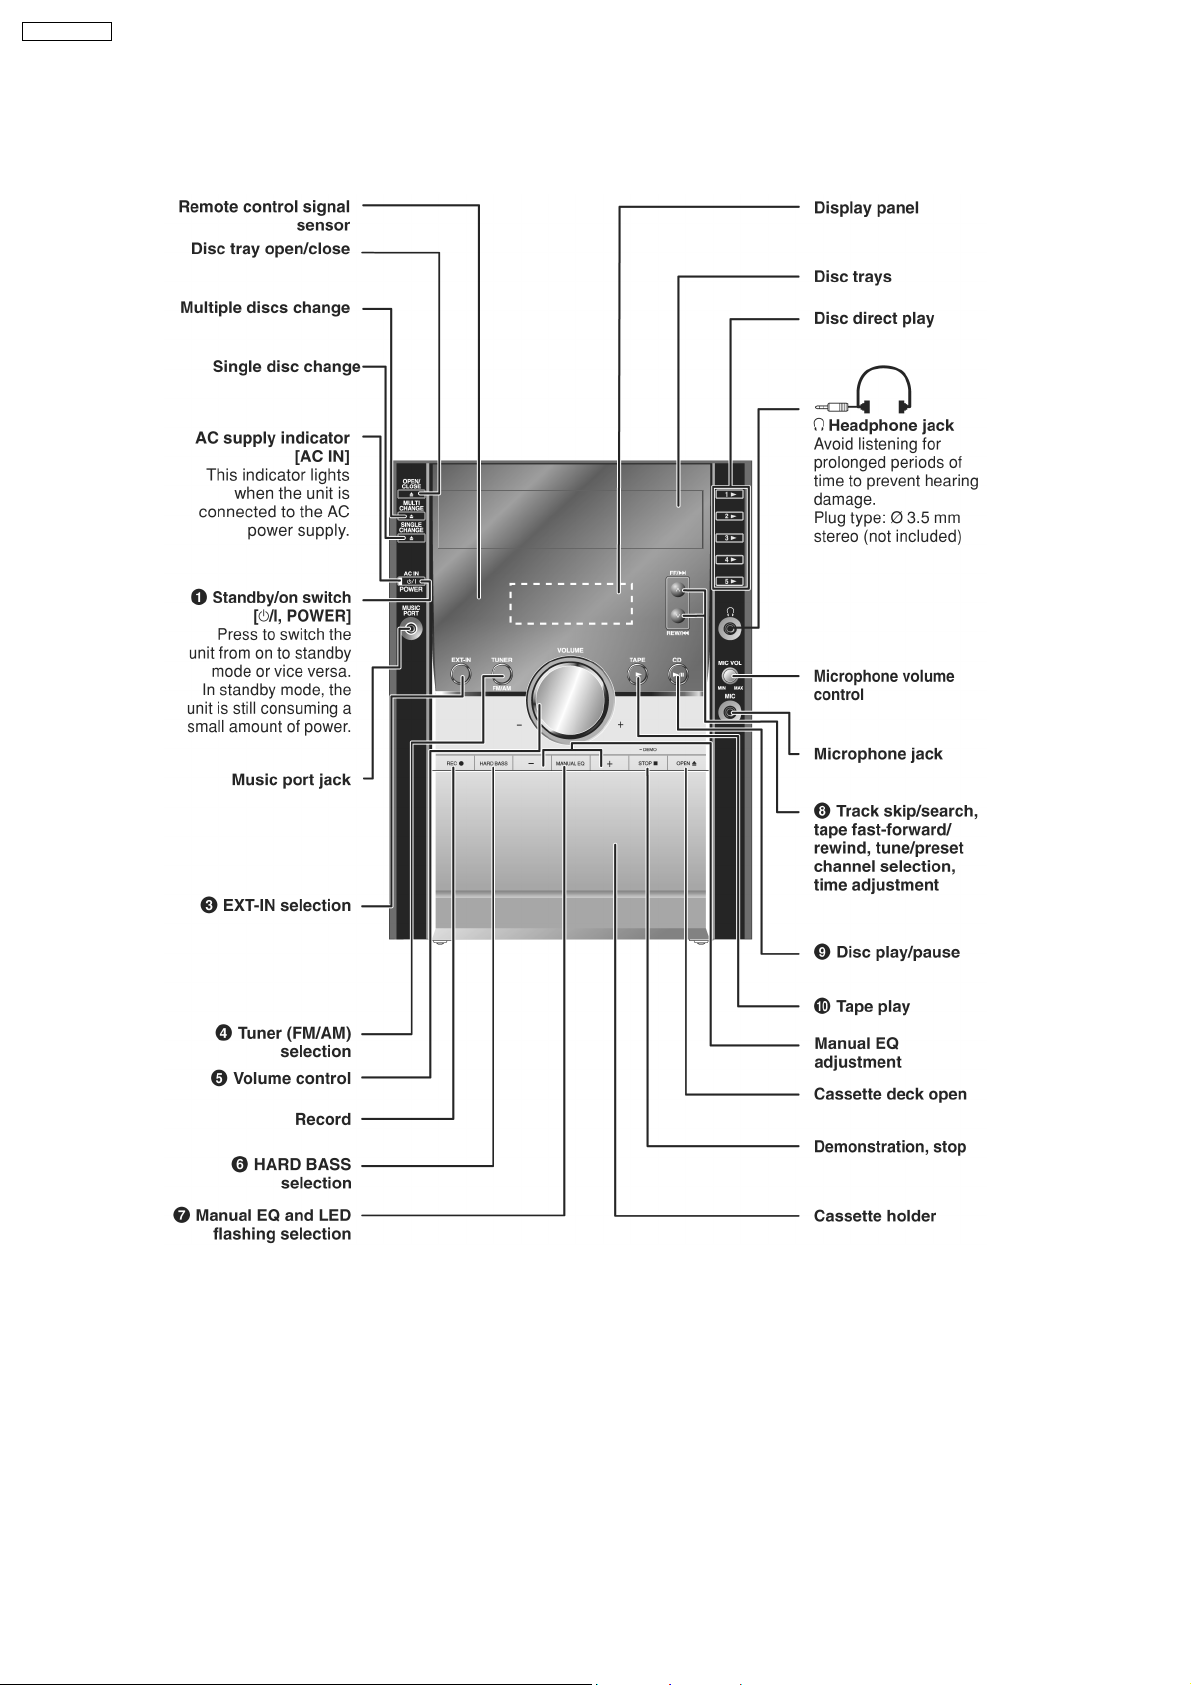
7 Operating Procedures
7.1. Main Unit Key Buttons Operations
12
Page 12
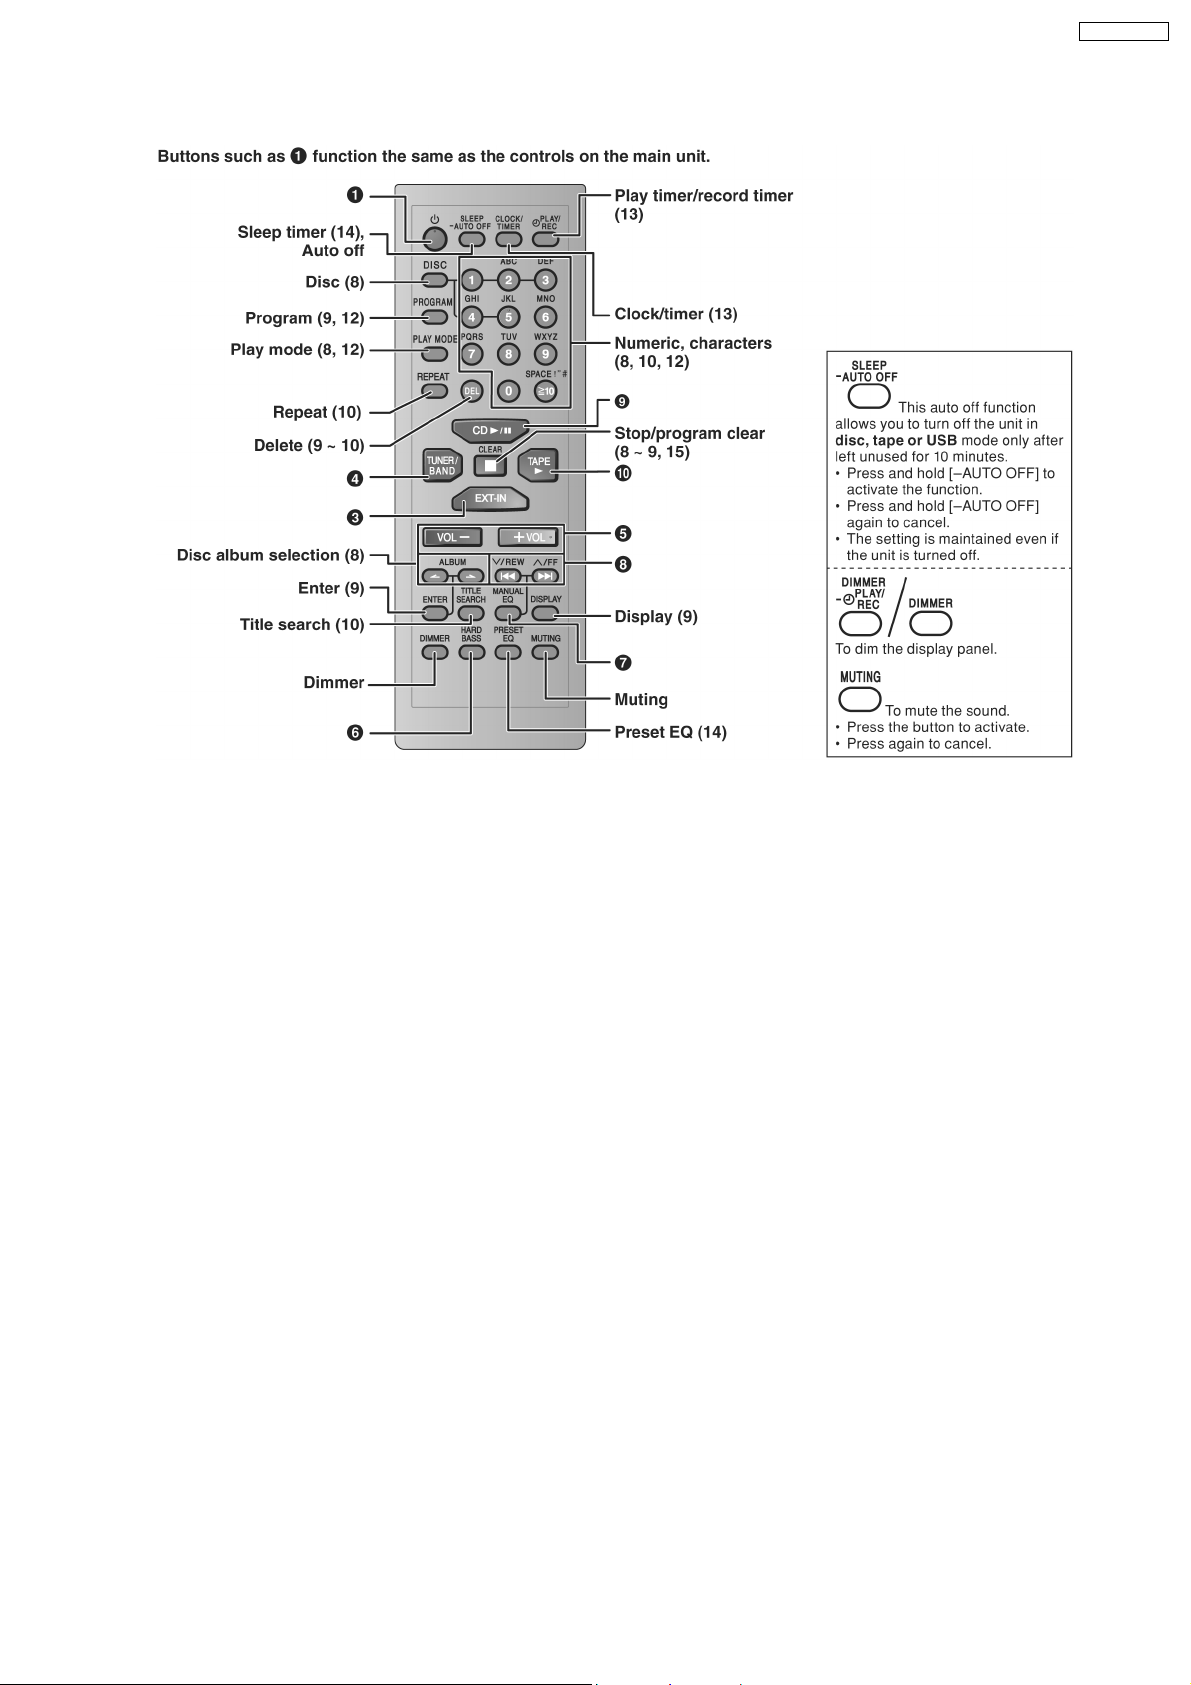
7.2. Remote Control Key Buttons Operations
SA-AK250GCP
13
Page 13
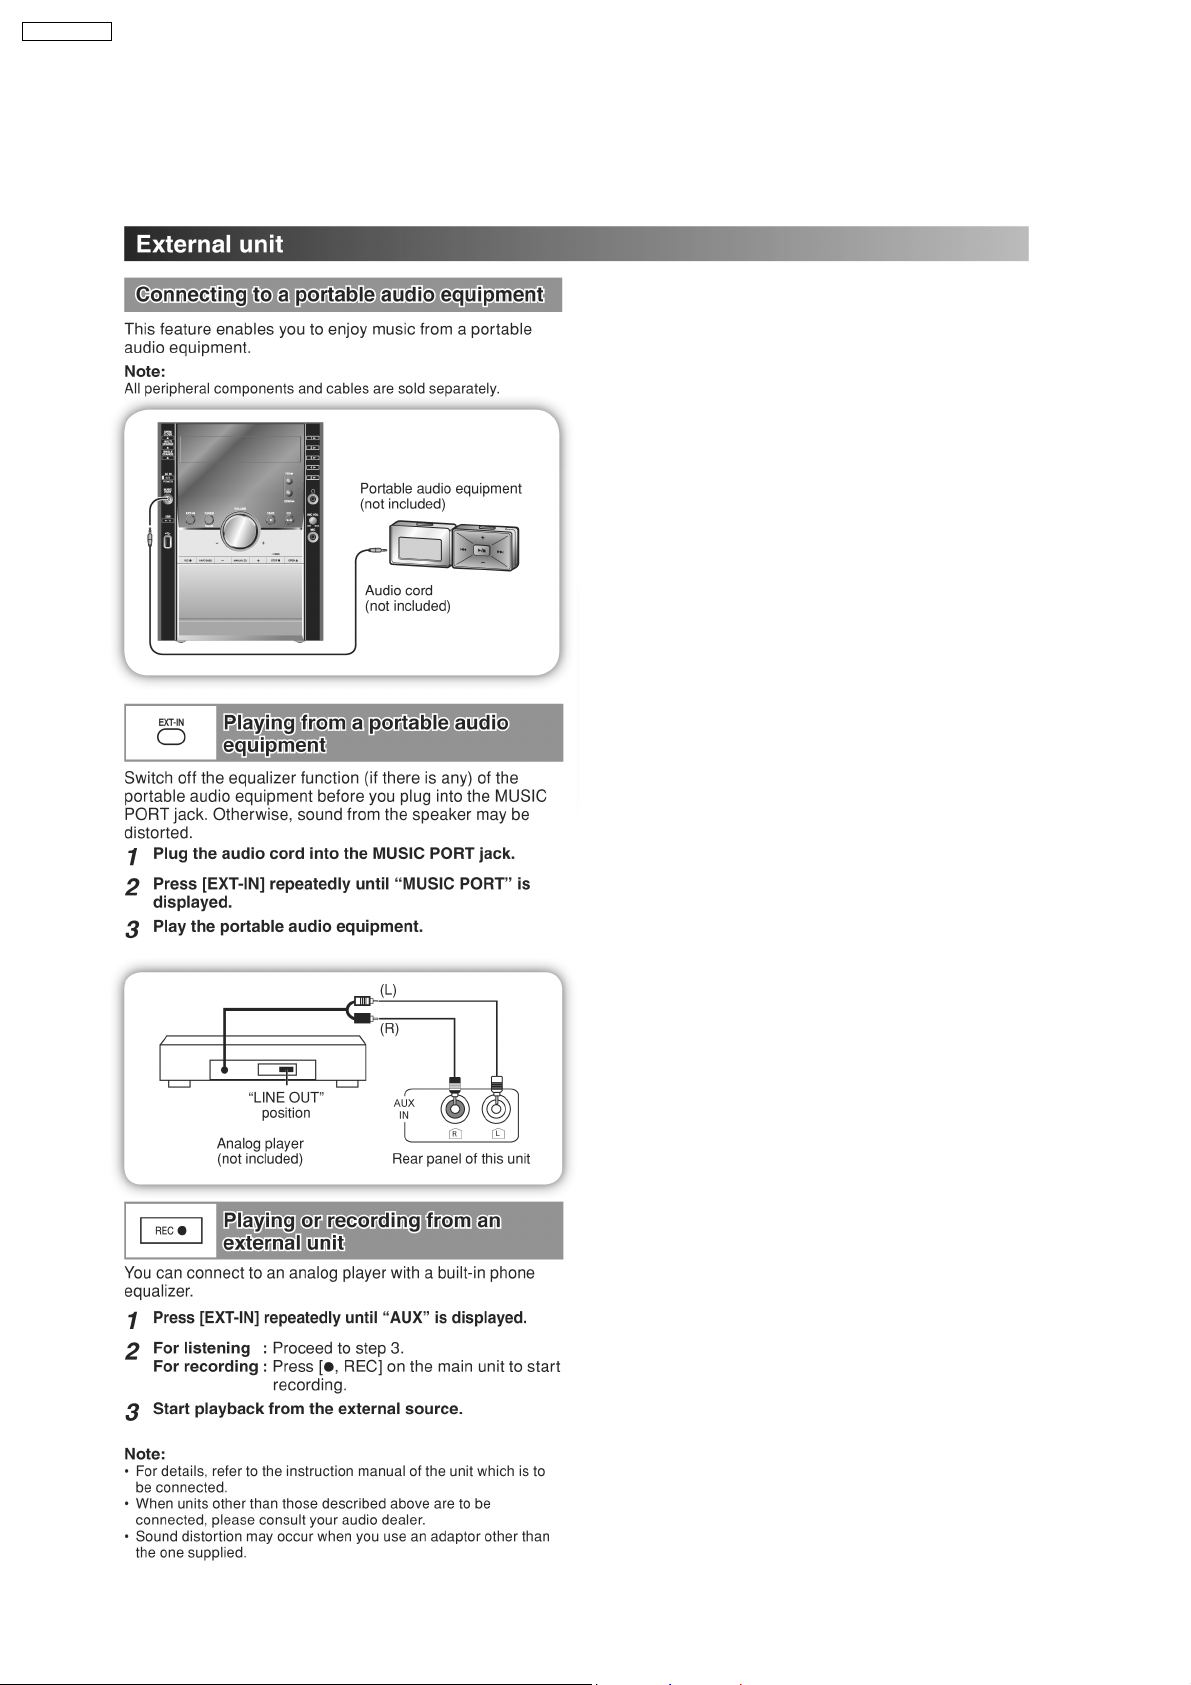
SA-AK250GCP
8 New Features
8.1. Using the Music Port
This feature enables you to enjoy music from a portable audio equipment.
14
Page 14

With reference to page 15 of the operating instruction manual.
SA-AK250GCP
15
Page 15
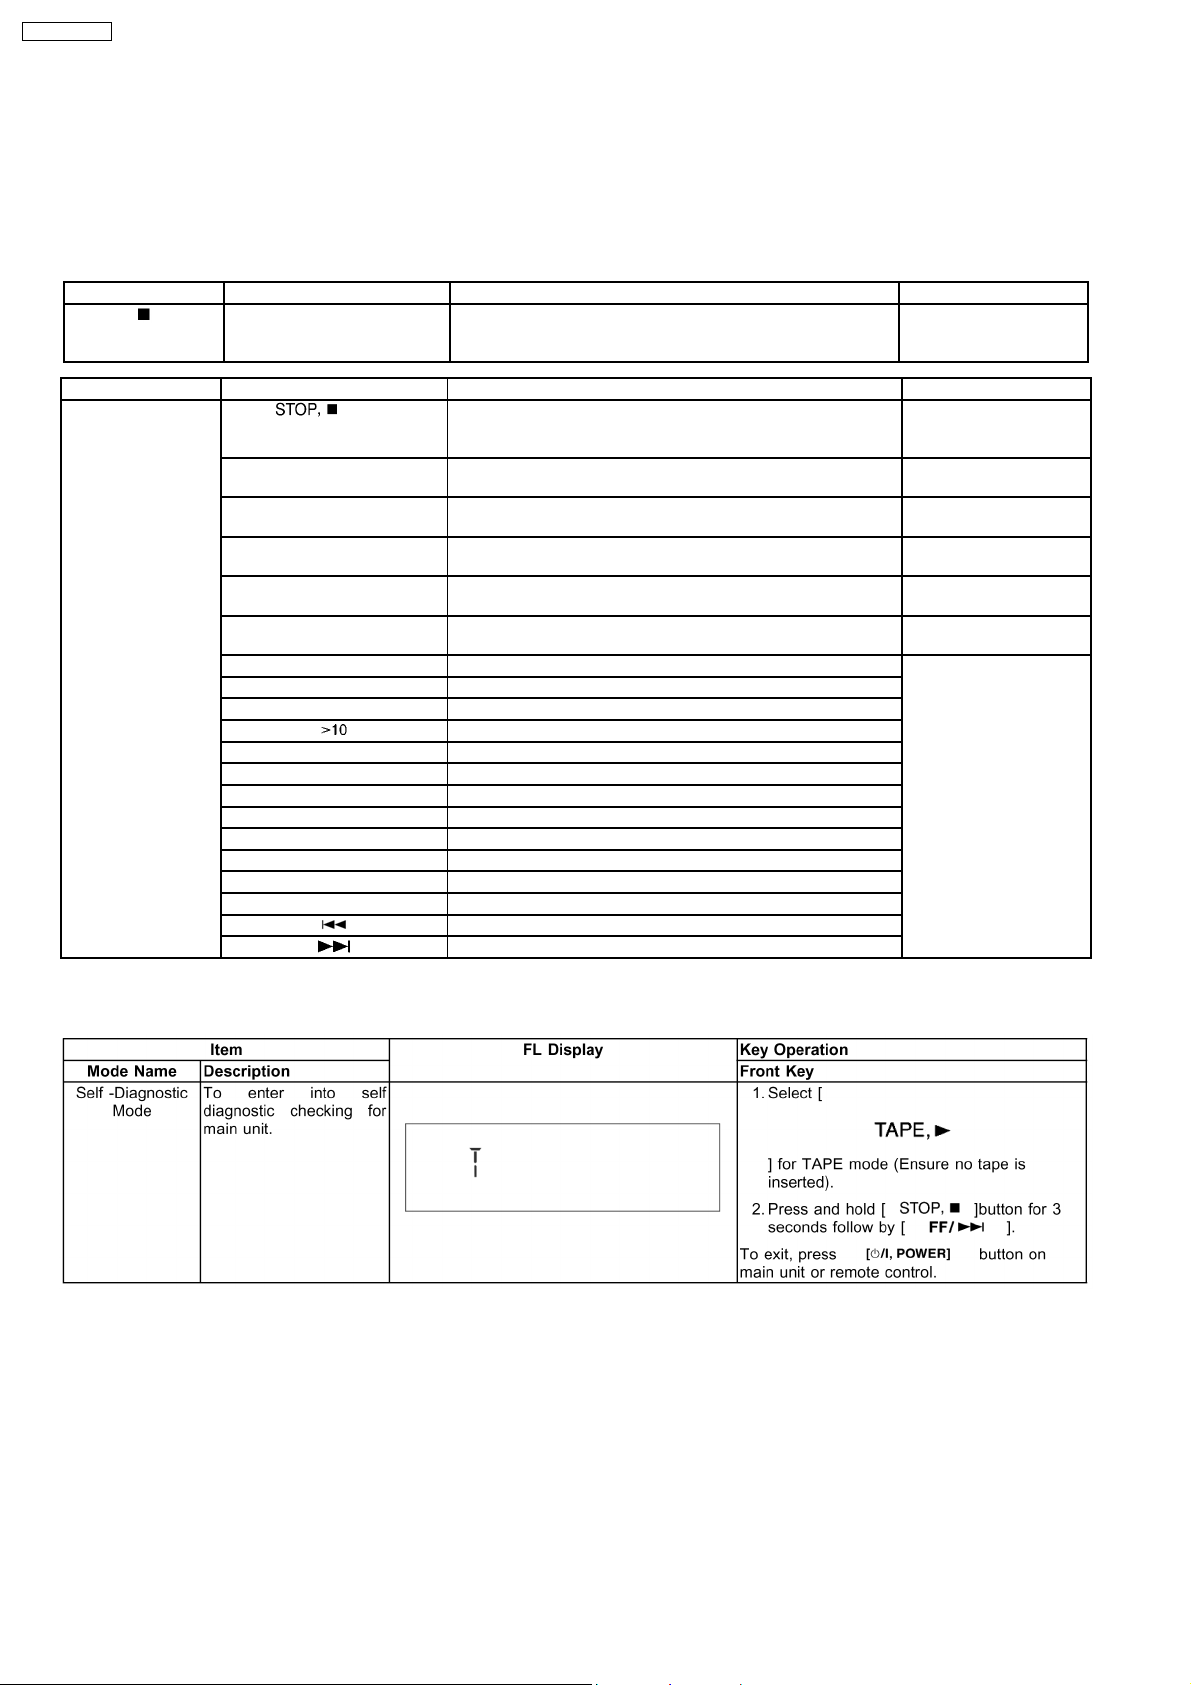
SA-AK250GCP
9 Self diagnosis and special mode setting
This unit is equipped with functions for checking and inspecting namely: Self-Diagnostic and Test Mode.
9.1. Service Mode Summary Table
The service modes can be activated by pressing various button combination on the main unit and remote control unit. Below is the
summary for the various modes for checking:
Player button Remote control button unit Application Note
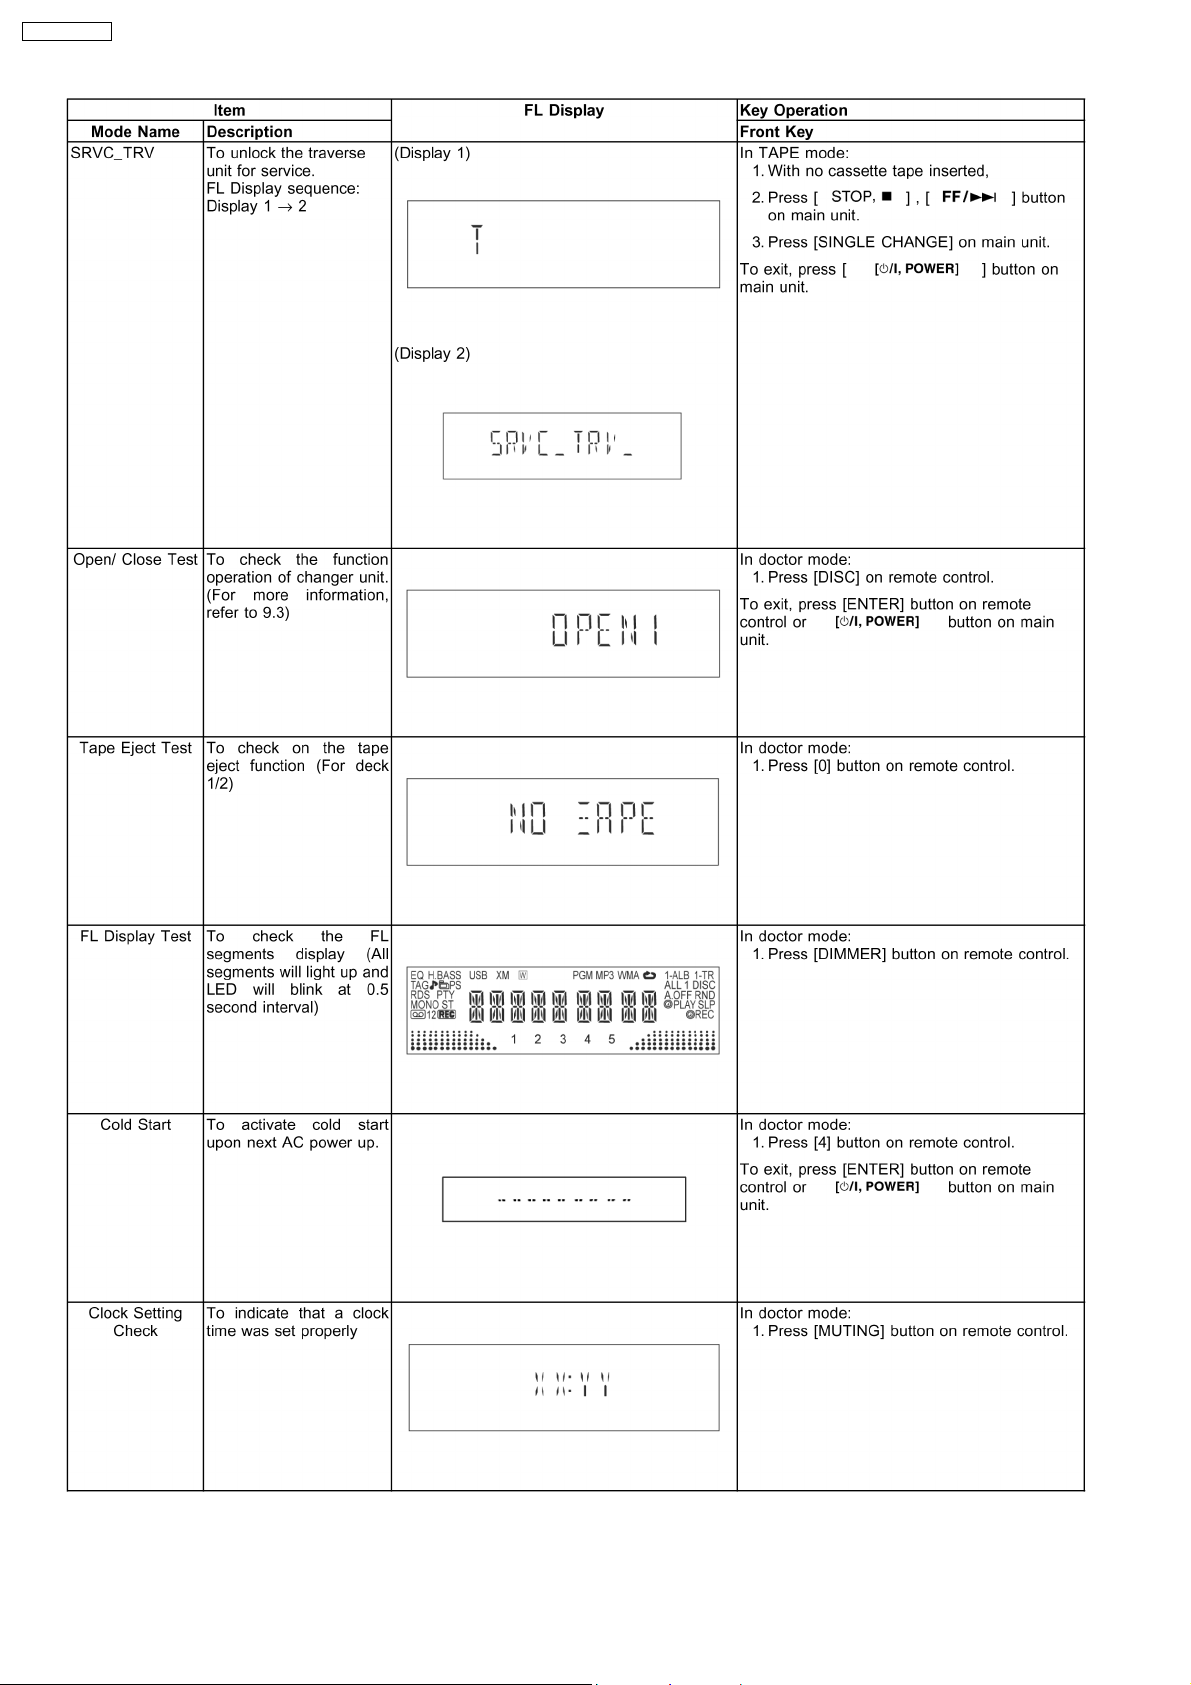
[ ] [4], [7] Entering into Doctor Mode Refer to the section, “9.2
Mode Remote control button unit Application Note
In Doctor Mode [ ], [4]+[7] Display firmware version & EEPROM checksum Refer to the section,
[4] <Set for cold start when reset start is executed the next time> Refer to the section, “9.2
[Muting] Clock Setting Refer to the section, “9.2
[0] Tape Eject Test Refer to the section, “9.2
[DIMMER] All segment display for the FL Refer to the section, “9.2
[DISC] CRS1 Inspection Refer to the section, “9.2
[7] Volume 50 Setting check
[8] Volume 41 Setting check
[9] Volume 35 Setting check
[ ] Volume 0 Setting check
[PRESET EQ] EQ Off
[H. Bass] EQ Heavy
[PROGRAM] HIC force MUTE ON/ OFF
[5] CD To Tape recording Inspection
[6] Tape record’s playback
[SLEEP] TPS Inspection
[<] FM Tuning check
[>] Tuner STEREO/ forced MONO
[ ] FM Checking
[ ] AM Checking
Special Mode Table 1 for
more information.
“9.2.1 for more
information.
for more information.
for more information.
for more information.
for more information.
for more information.
9.2. Special Mode Table 1
16
Page 16
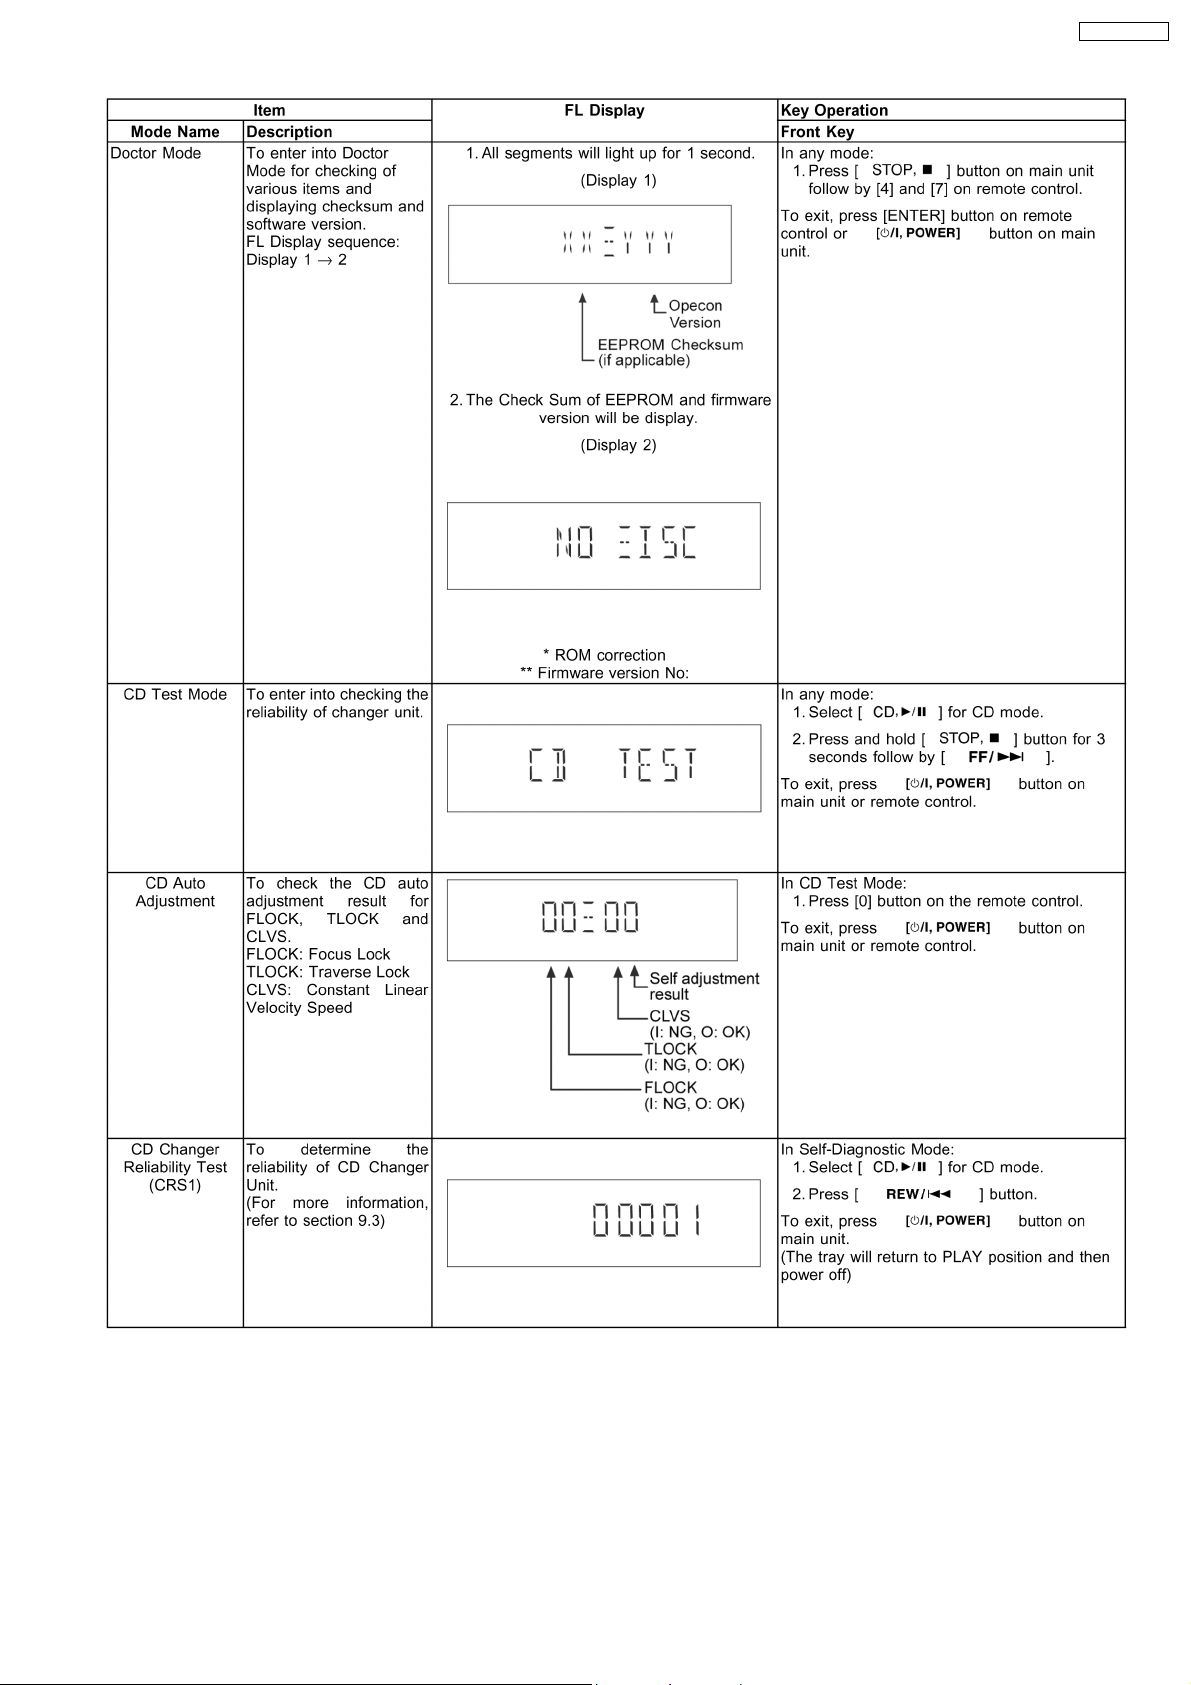
SA-AK250GCP
17
Page 17
SA-AK250GCP
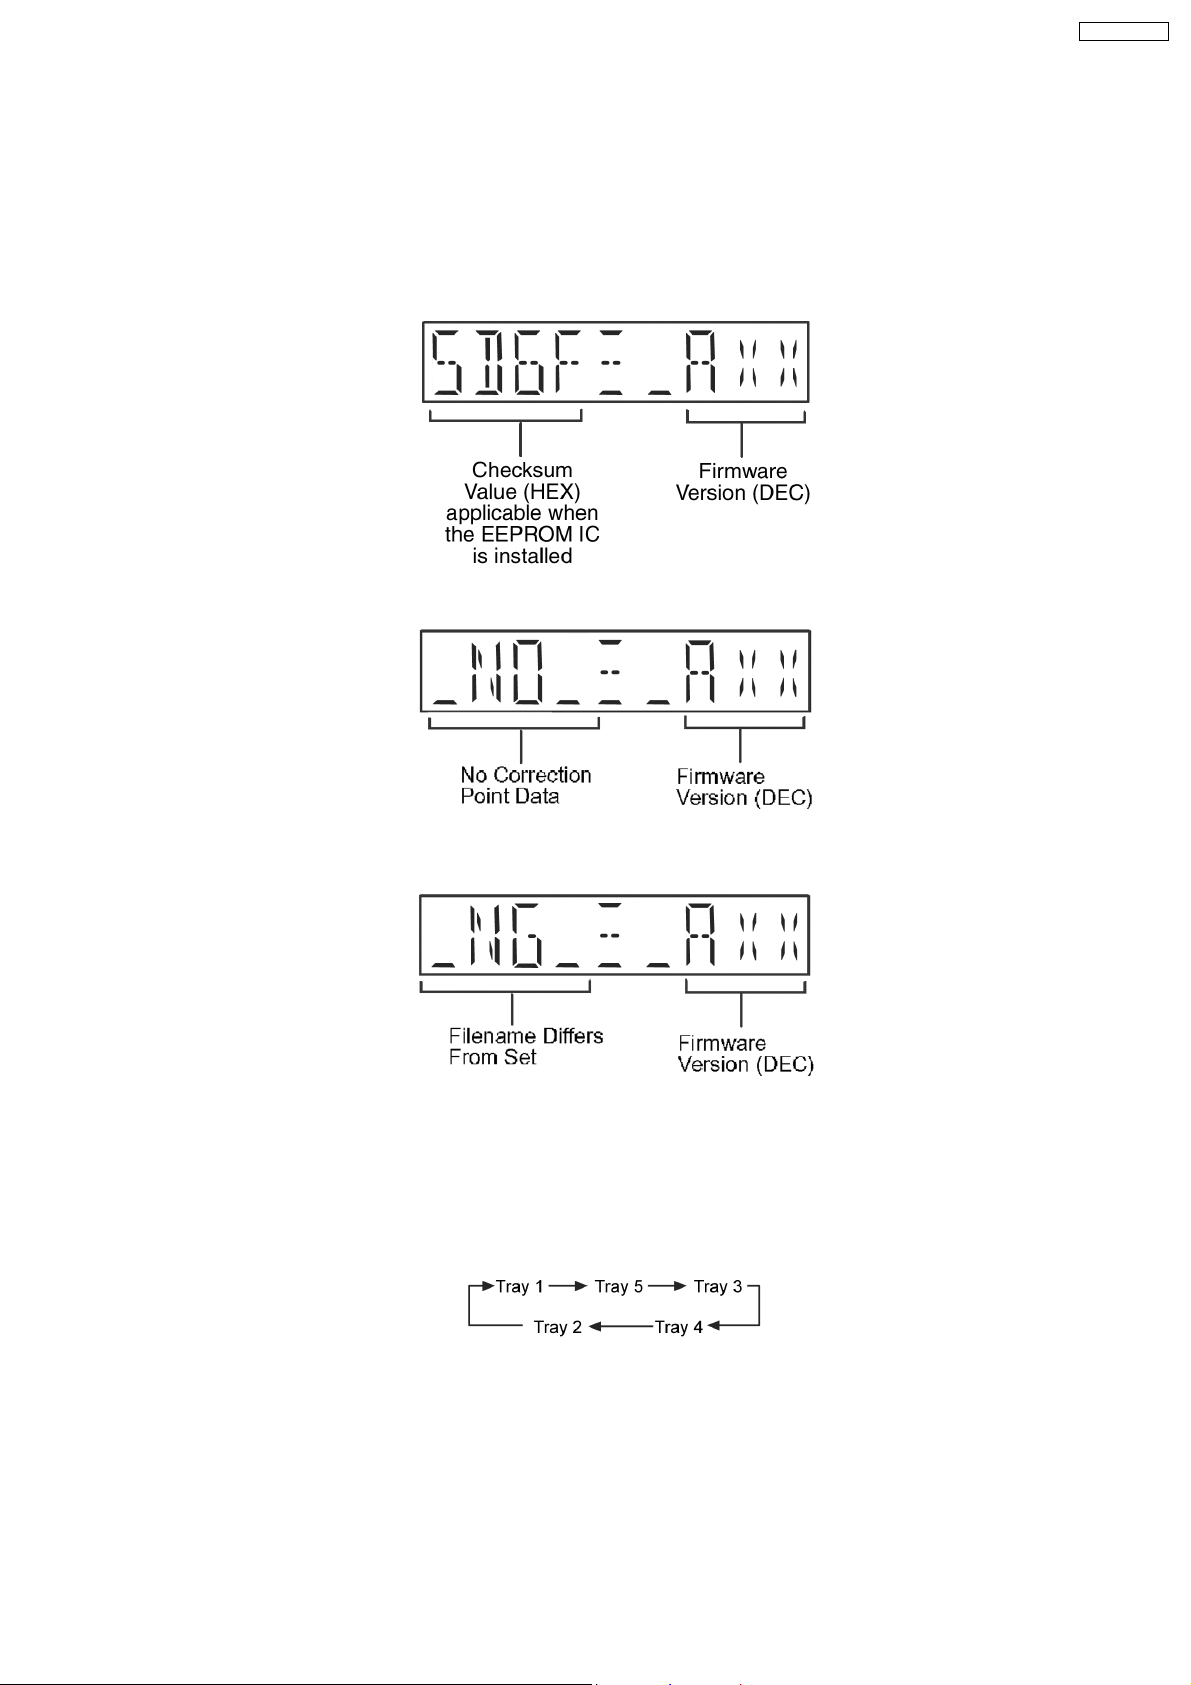
9.2.1. EEPROM Checksum (ROM Correction)
Purpose: To check for microprocessor firmware version and EEPROM checksum (ROM correction).
18
Page 18
SA-AK250GCP
Below are the procedures for this mode.
Step 1: Enter into Doctor mode (for more information, refer to section 9.2 on the key operation to enter into this mode.
Step 2: Check for firmware version and EEPROM checksum (By pressing STOP button on main unit followed by “4” and “7” on
remote control).
· When entering into DOCTOR MODE, the firmware version and checksum data of EEPROM (if applicable) will appear on FL
display. Below is the information on the EEPROM IC (ROM correction) under 3 possible situations:
1. In the case that the correction point existence data is other than 0 (ie. correction file exists), EEPROM checksum display for
the microprocessor shall be made after calculating checksum by summing up the content of data area from EEPROM IC.
2. In the case when no EEPROM IC is installed. It is display as below (no display of checksum data)
3. In cases that the filename is different even though a EEPROM is installed, or no correction file exists, [NG] shall be displayed
(the correction point existence data is set to 0 at this condition).
Note: Microprocessor firmware refers to version number for microprocessor IC located on PANEL P.C.B.. It is subject to change
which would be updated accordingly. ROM correction checksum refers to the HEX code that is displayed upon key buttons pressed
if an EEPROM is loaded in the unit.
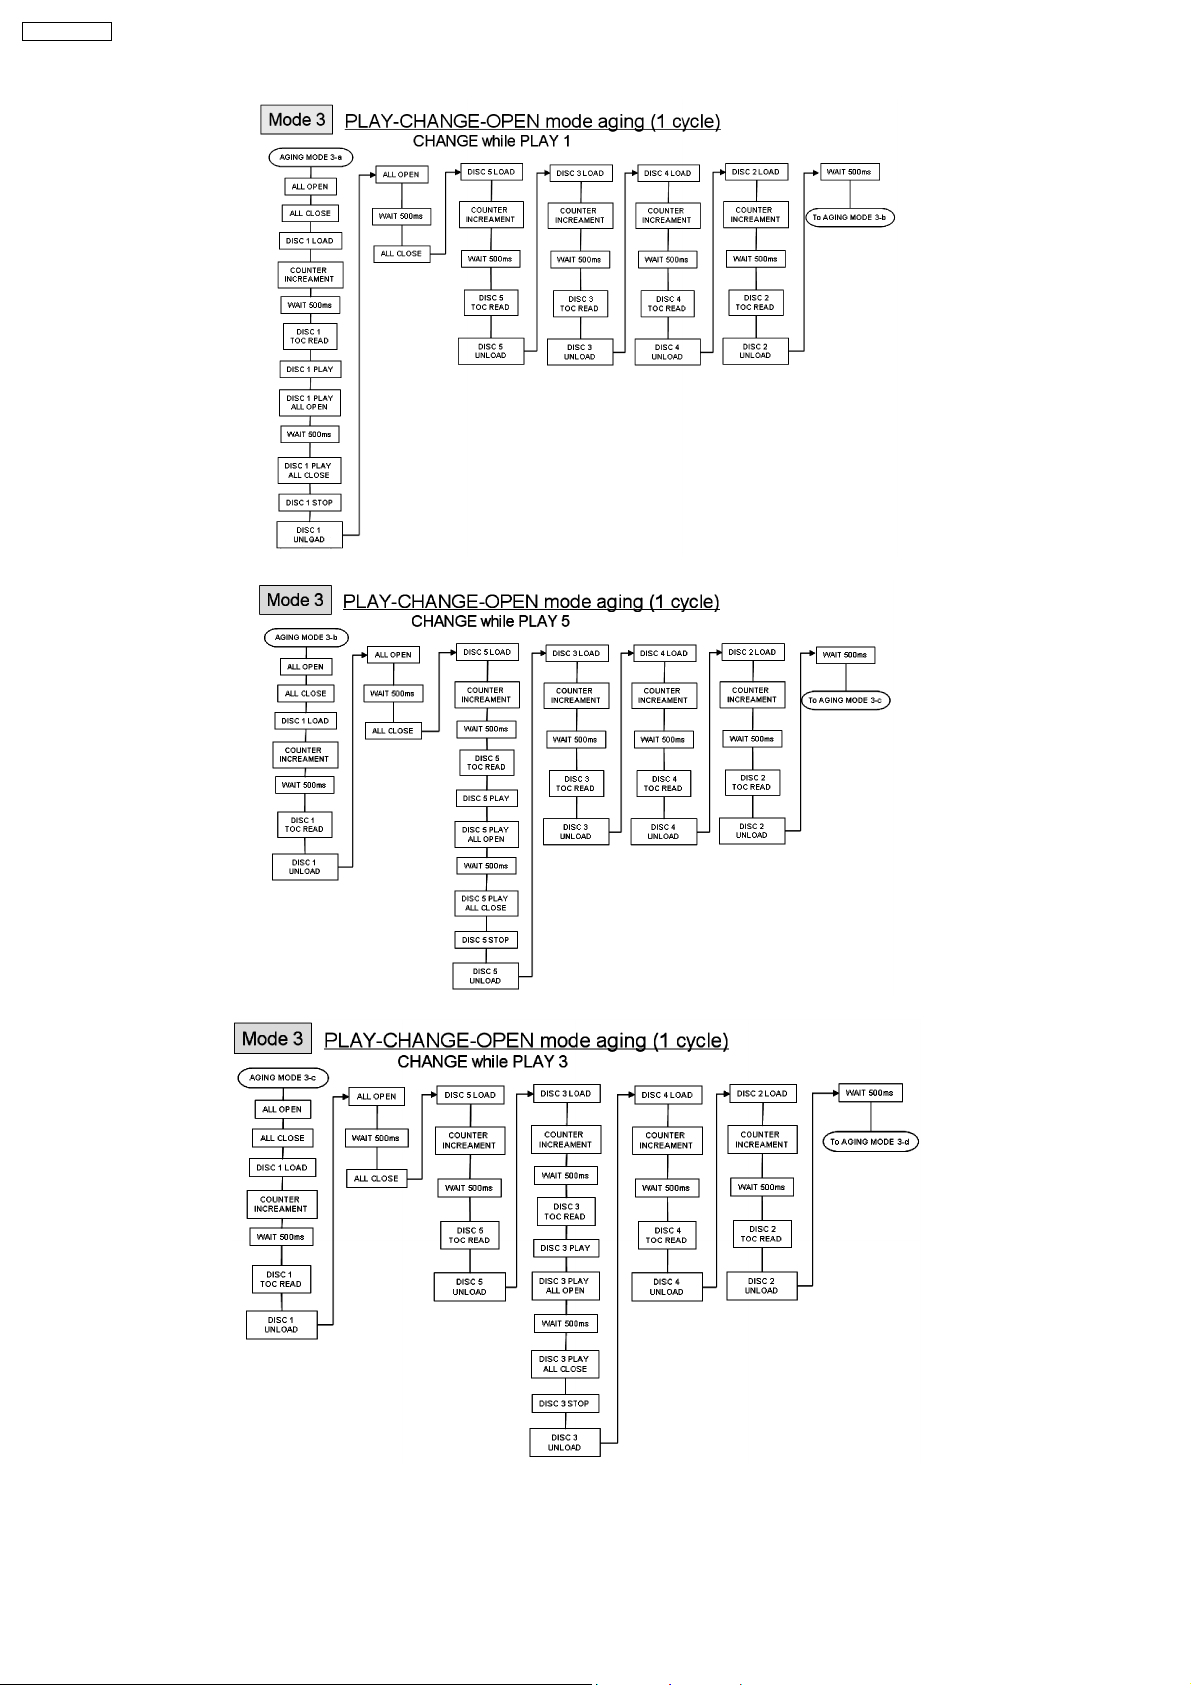
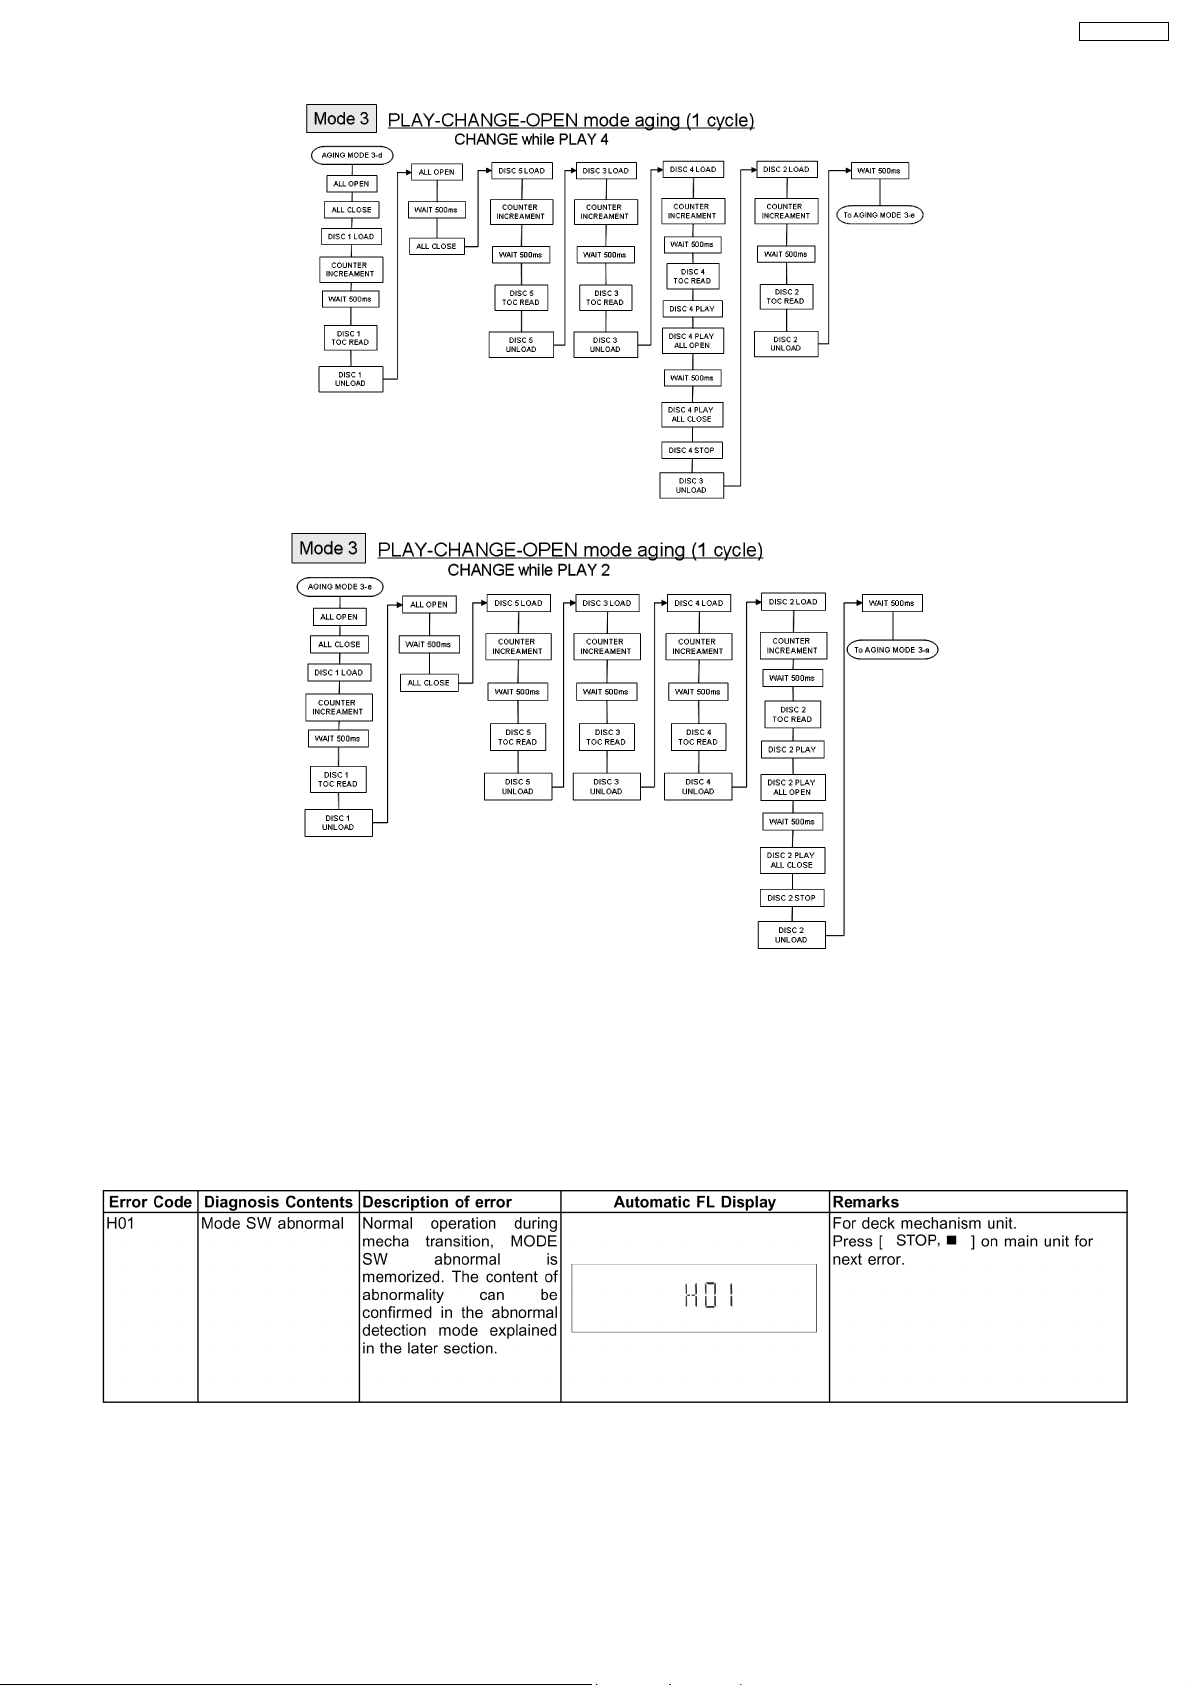
9.3. Reliability Test Mode (CRS1 Mechanism)
Below is the process flow chart of ageing for the CD changer unit. (CRS1)
19
Page 19
SA-AK250GCP
20
Page 20
SA-AK250GCP
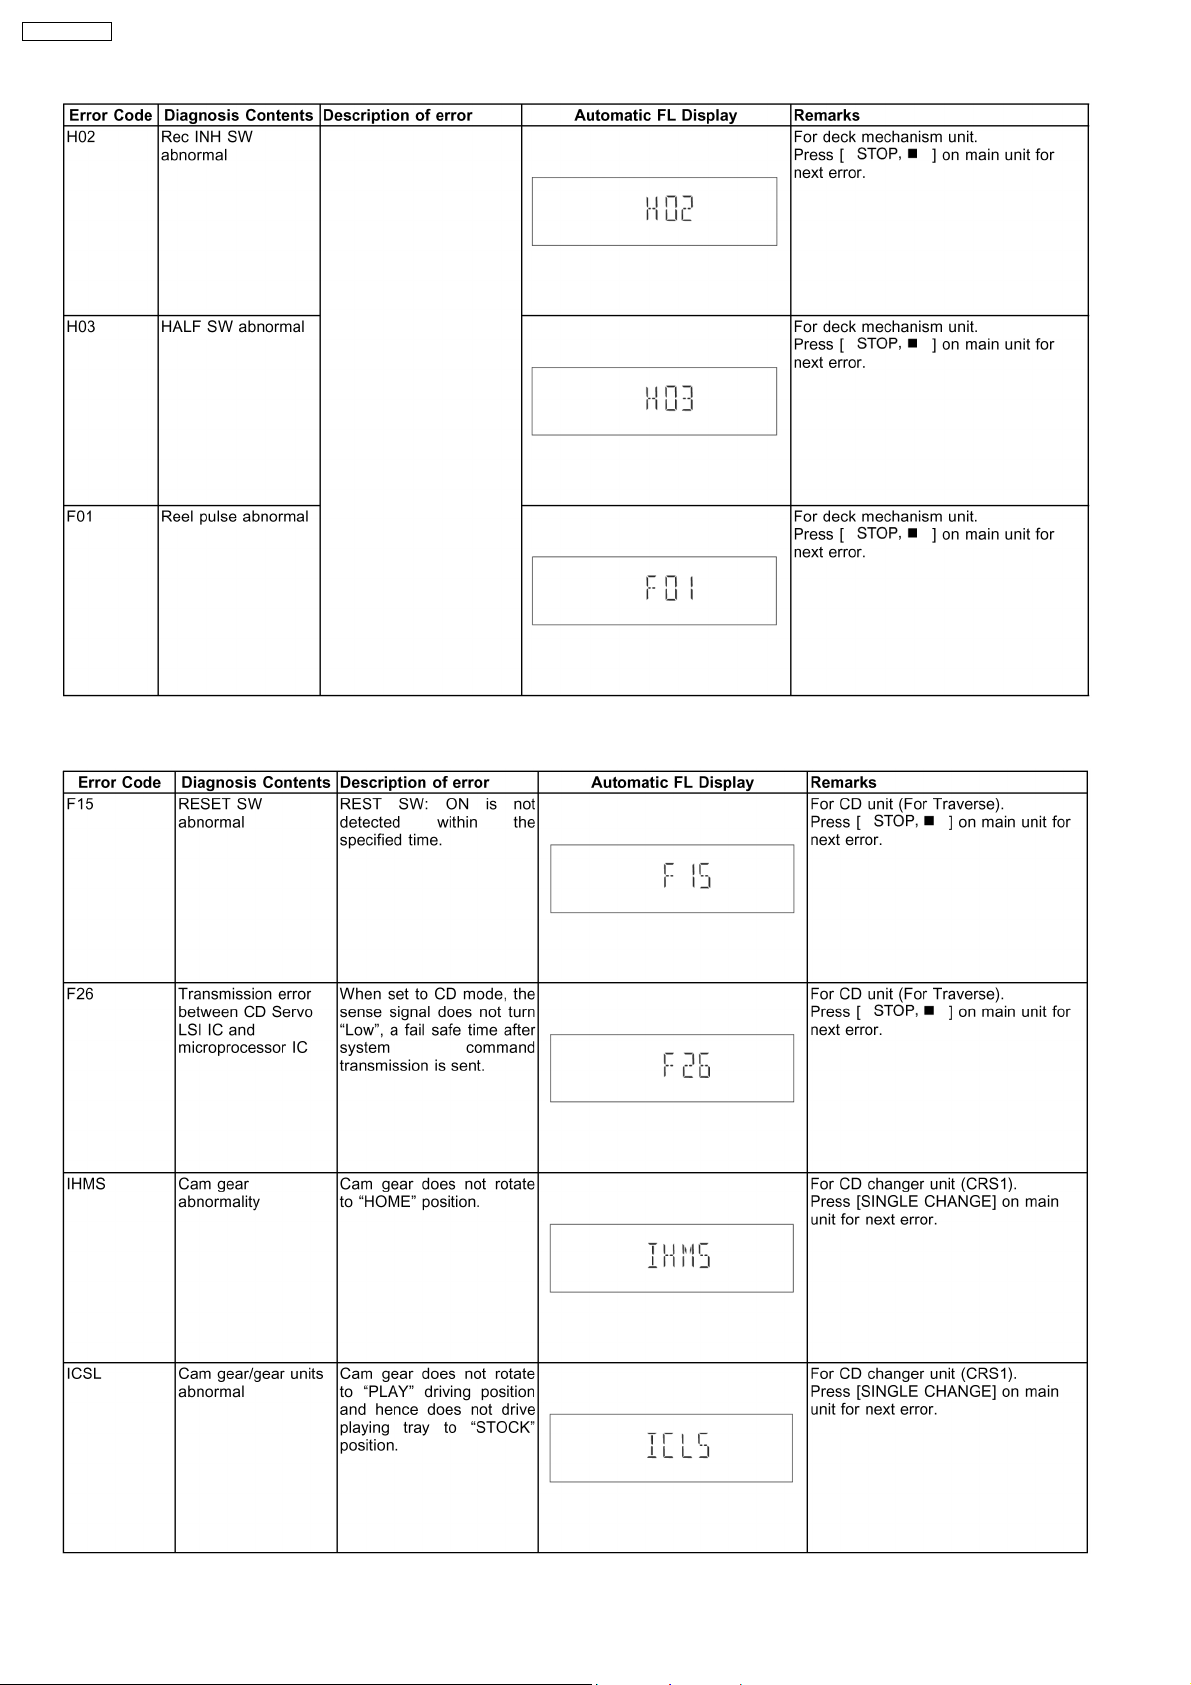
9.4. Error code Table Display
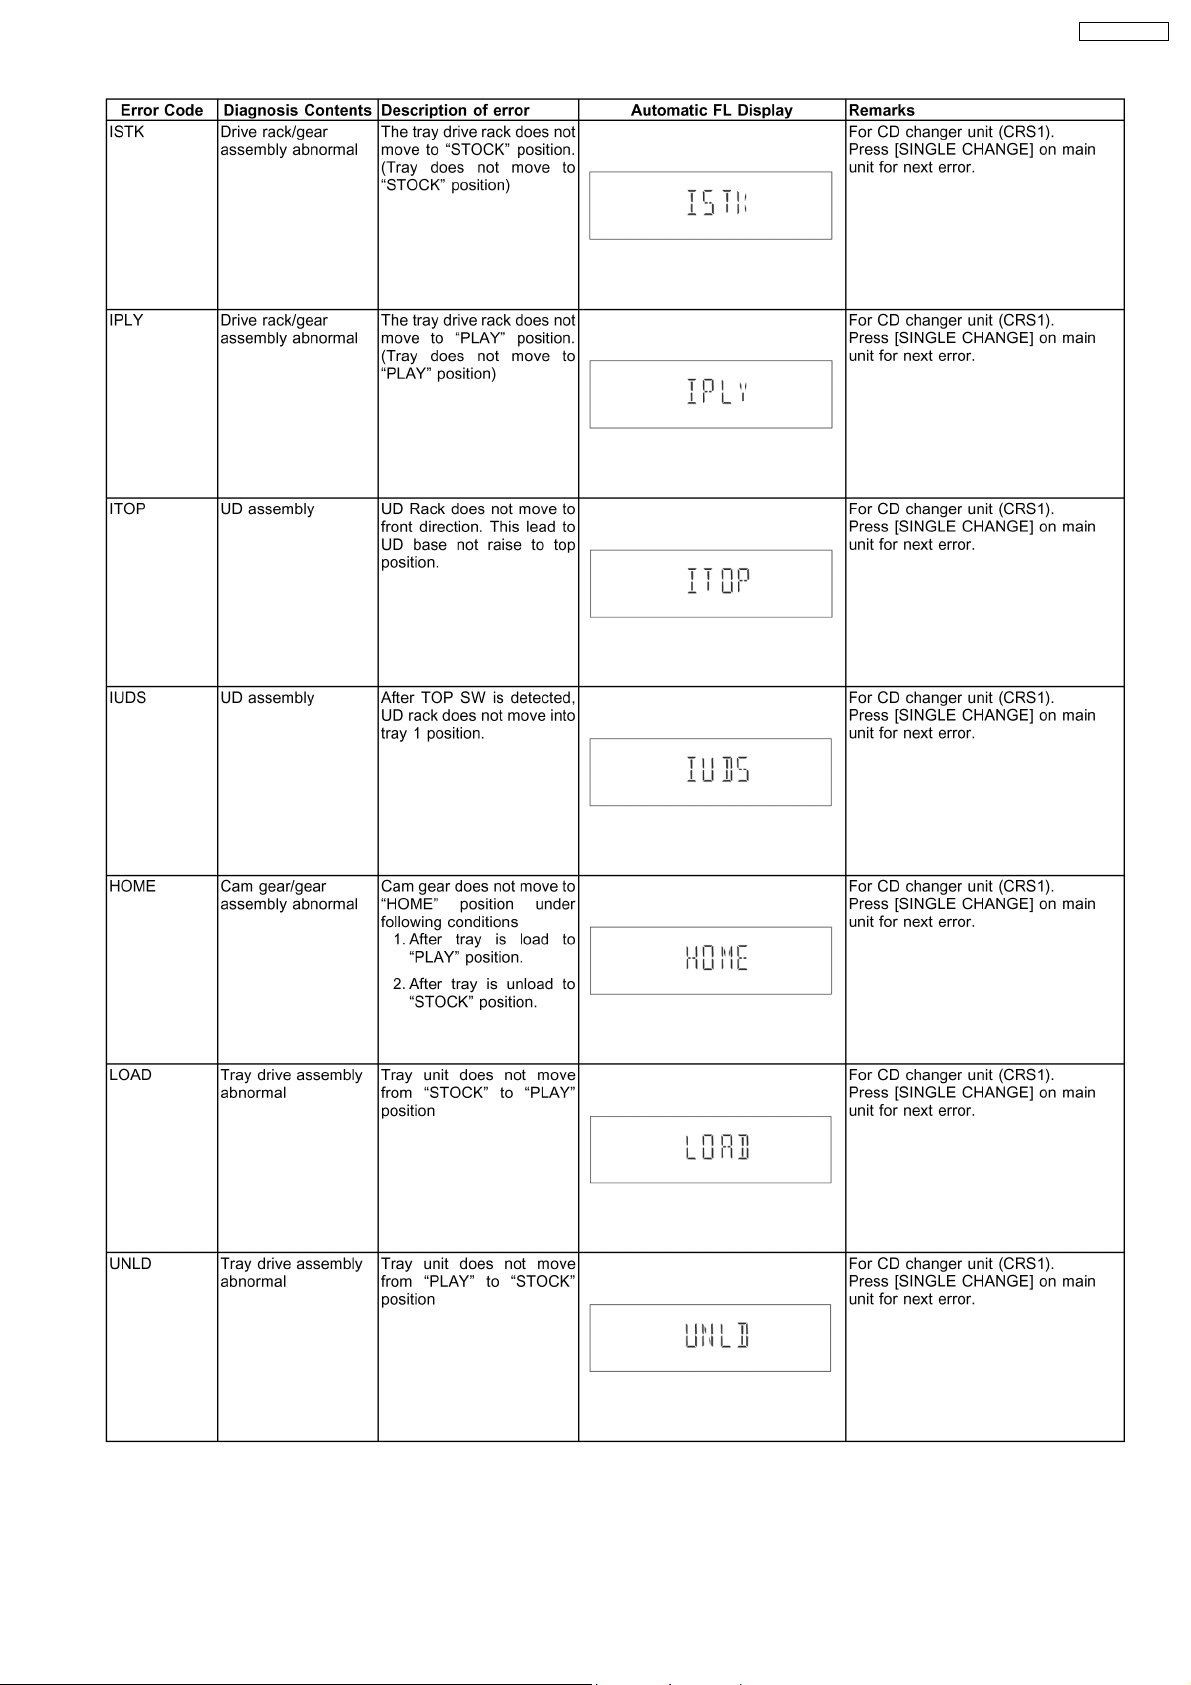
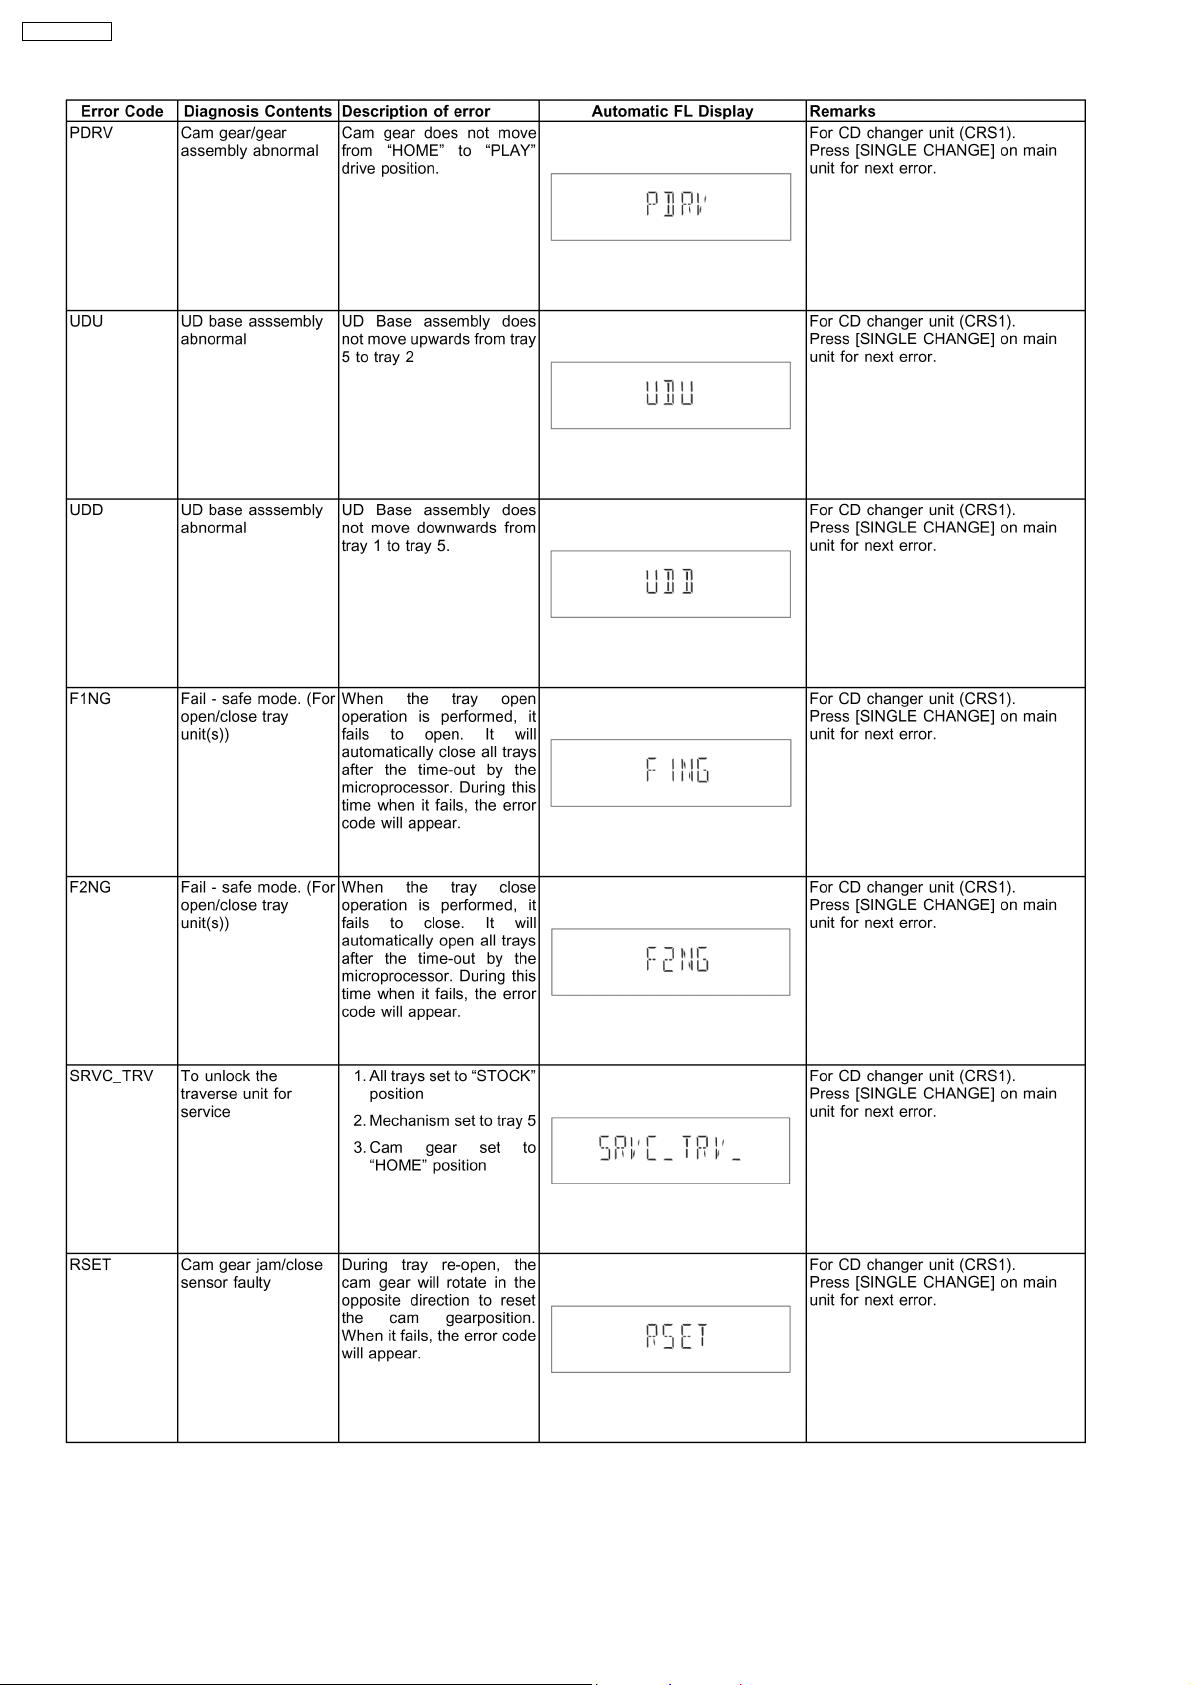
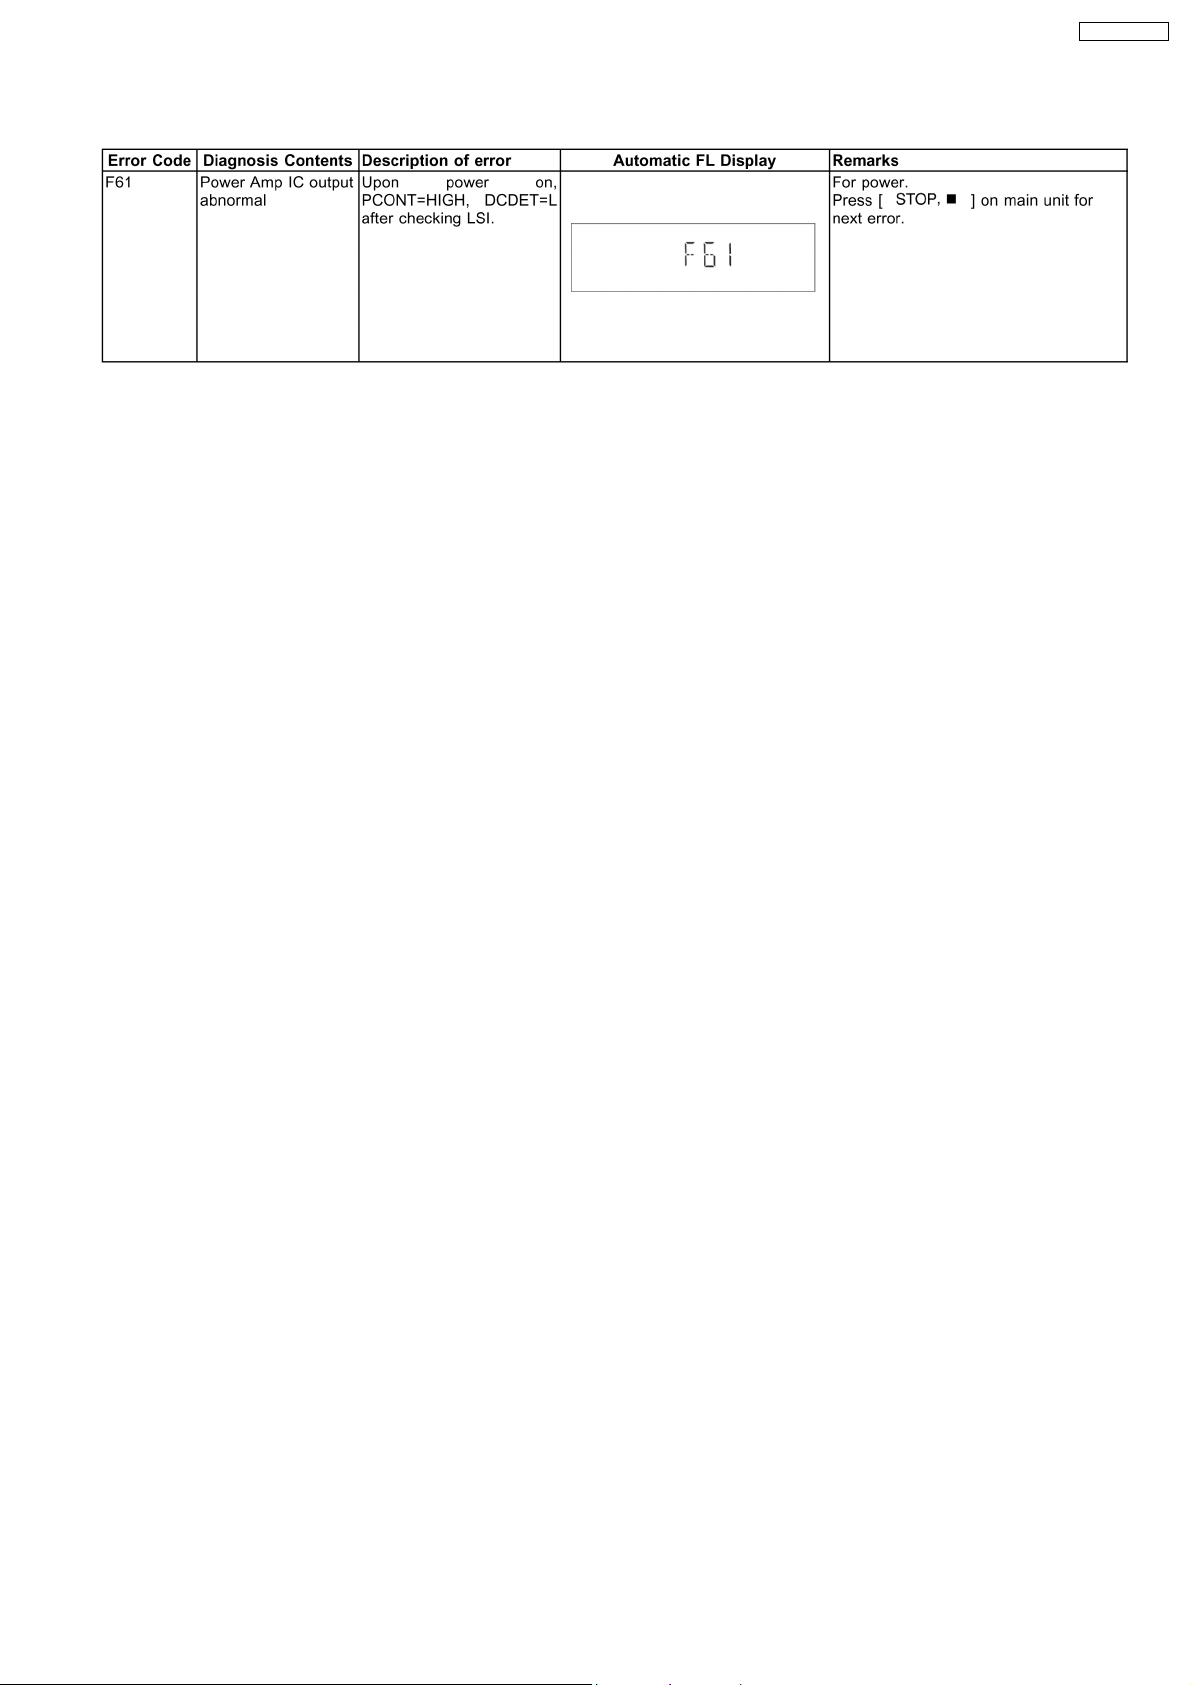
Self-Diagnosis Function (refer Section 9.2) provides information on any problems occuring for the unit and its respective
components by displaying the error codes. These error code such as U**, H** and F** are stored in memory and held unless it is
cleared.
The error code is automatically display after entering into self-diagnostic mode.
9.4.1. Error Code Table for Deck Mechanism
21
Page 21
SA-AK250GCP
9.4.2. Error Code Table For CD Changer Block
22
Page 22
SA-AK250GCP
23
Page 23
SA-AK250GCP
24
Page 24
SA-AK250GCP
9.4.3. Error Code Table For Power Supply
9.4.4. CRS1 Error Code display
CRS1 Error Code display
1. The errors that occured in CRS1 Mechanism can be recalled and displayed, in the order of the occurence under self-diagnostic
for procedures to enter this mode.
· Only the first 5 errors will be memo rized (in backup memory). The subsequence error shall be ignored and not memorize.
For system with EEPROM as memory backup,memory space in EEPROM is neccesary.
2. To display all error code memo rized
In CRS1 Self-Diagnostic mode, press [SINGLE CHANGE] to display subsequence error code.
It shall repeat after reaching error no. 5.
e.g.:
[1____IHMS]→ [SINGLE CHANGE]
[2____ITOP]→ [SINGLE CHANGE]
[3____HOME]→ [SINGLE CHANGE]
[4____LOAD]→ [SINGLE CHANGE]
[5_____UDD]→ [SINGLE CHANGE]
3. To clear the error code memory
In CRS1 Self-Diagnostic mode, long press [SINGLE CHANGE] key (2s or more)
25
Page 25
SA-AK250GCP
10 Assembling and Disassem bling
10.1. Caution
Special Note:
This model uses a new CD changer unit CRS1. In this following section does not contain the necessary disassembly &
assembly information for the CD changer unit (CRS1) except the disasembly & assembly of traverse unit. Kindly refer to the
original service manual for the CD changer unit. (Order No. MD0509368C0).
“ATTENTION SERVICER”
Some chassis components may have sharp edges. Be careful when disassembling and servicing.
1. This section describes procedures for checking the operation of the major printed circuit boards and replacing the main
components.
2. For reassembly after operation checks or replacement, reverse the respective procedures.
Special reassembly procedures are described only when required.
3. Select items from the following index when checks or replacement are required.
4. Refer to the Parts No. on the page of “Parts Location and Replacement Parts List” (Section 24), if necessary.
Caution:
After replacing of CD Changer Unit, ageing test is necessary. Please confirm operation for CD Changer Unit.
Below is the list of disassembly sections
· Disassembly of Top Cabinet
· Disassembly of Rear Panel
· Disassembly of CD Changer Unit (CRS1)
· Disassembly of Main P.C.B.
· Disassembly of Transformer P.C.B.
· Disassembly of Power P.C.B.
· Disassembly of Front Panel Unit
· Disassembly of Panel P.C.B.
· Disassembly of Tact Switch P.C.B.
· Disassembly of Deck Mechanism Unit
· Disassembly for Deck P.C.B.
· Disassembly of Traverse Unit
· Disassembly of Deck Mechanism
· Disassembly of Deck Mechanism P.C.B.
· Disassembly of cassette lid
· Rectification for tape jam problem
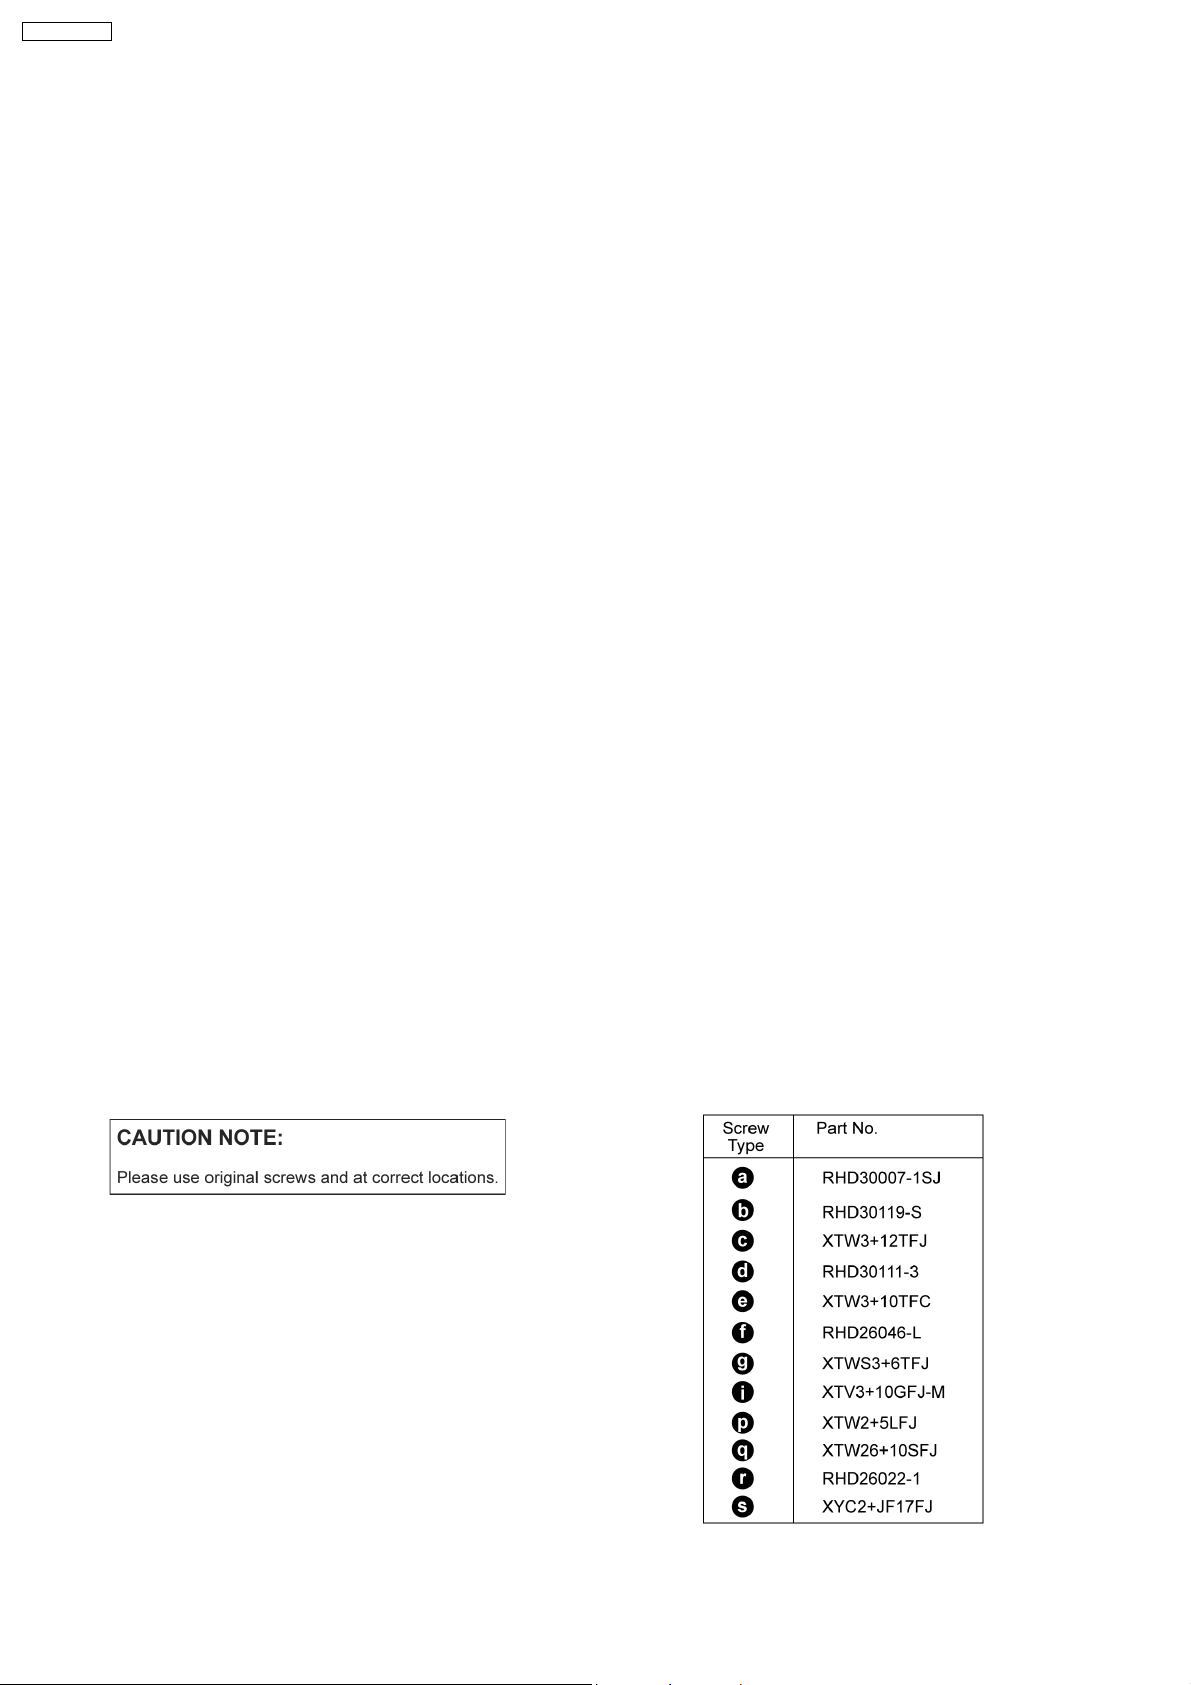
Below shown is part no. of different screws types used:
26
Page 26
SA-AK250GCP
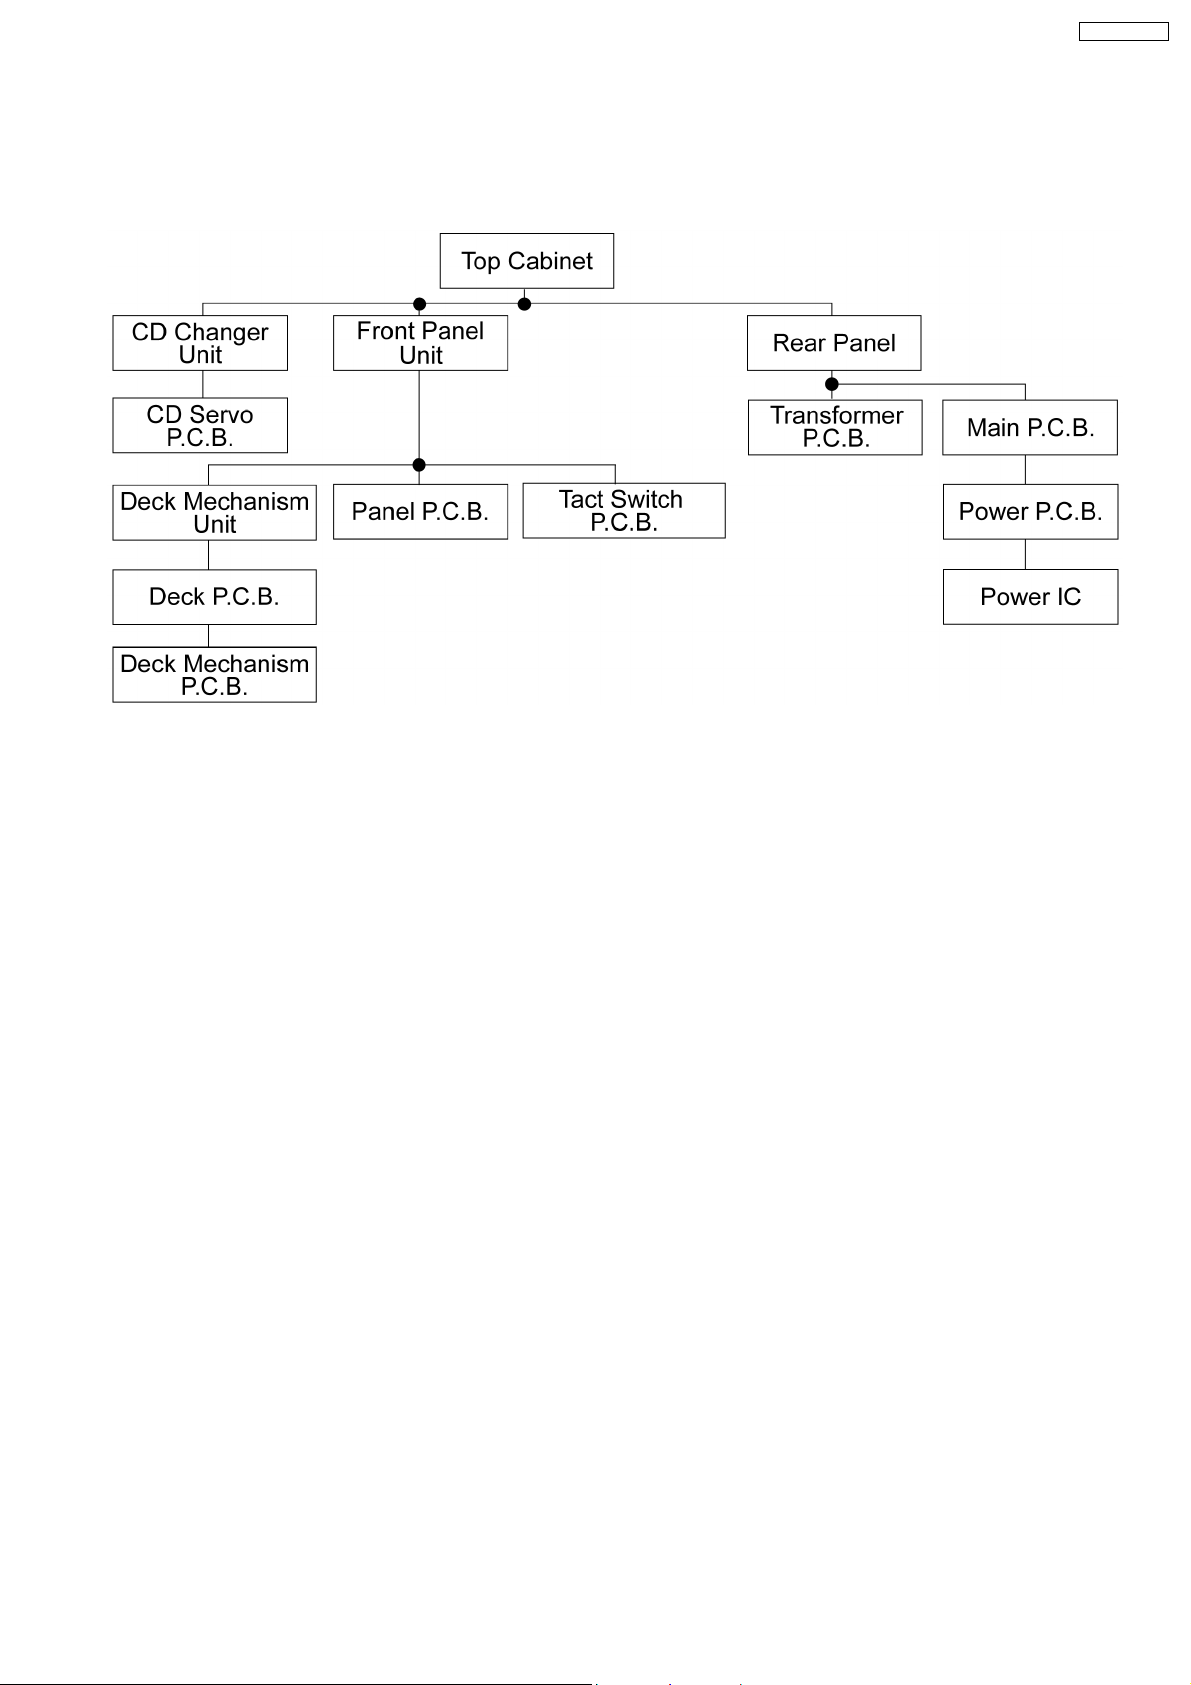
10.2. Disassembly flow chart
The following chart is the procedure for disassembling the casing and inside parts for internal inspection when carrying out the
servicing.
To assemble the unit, reverse the steps shown in the chart as below.
27
Page 27
SA-AK250GCP
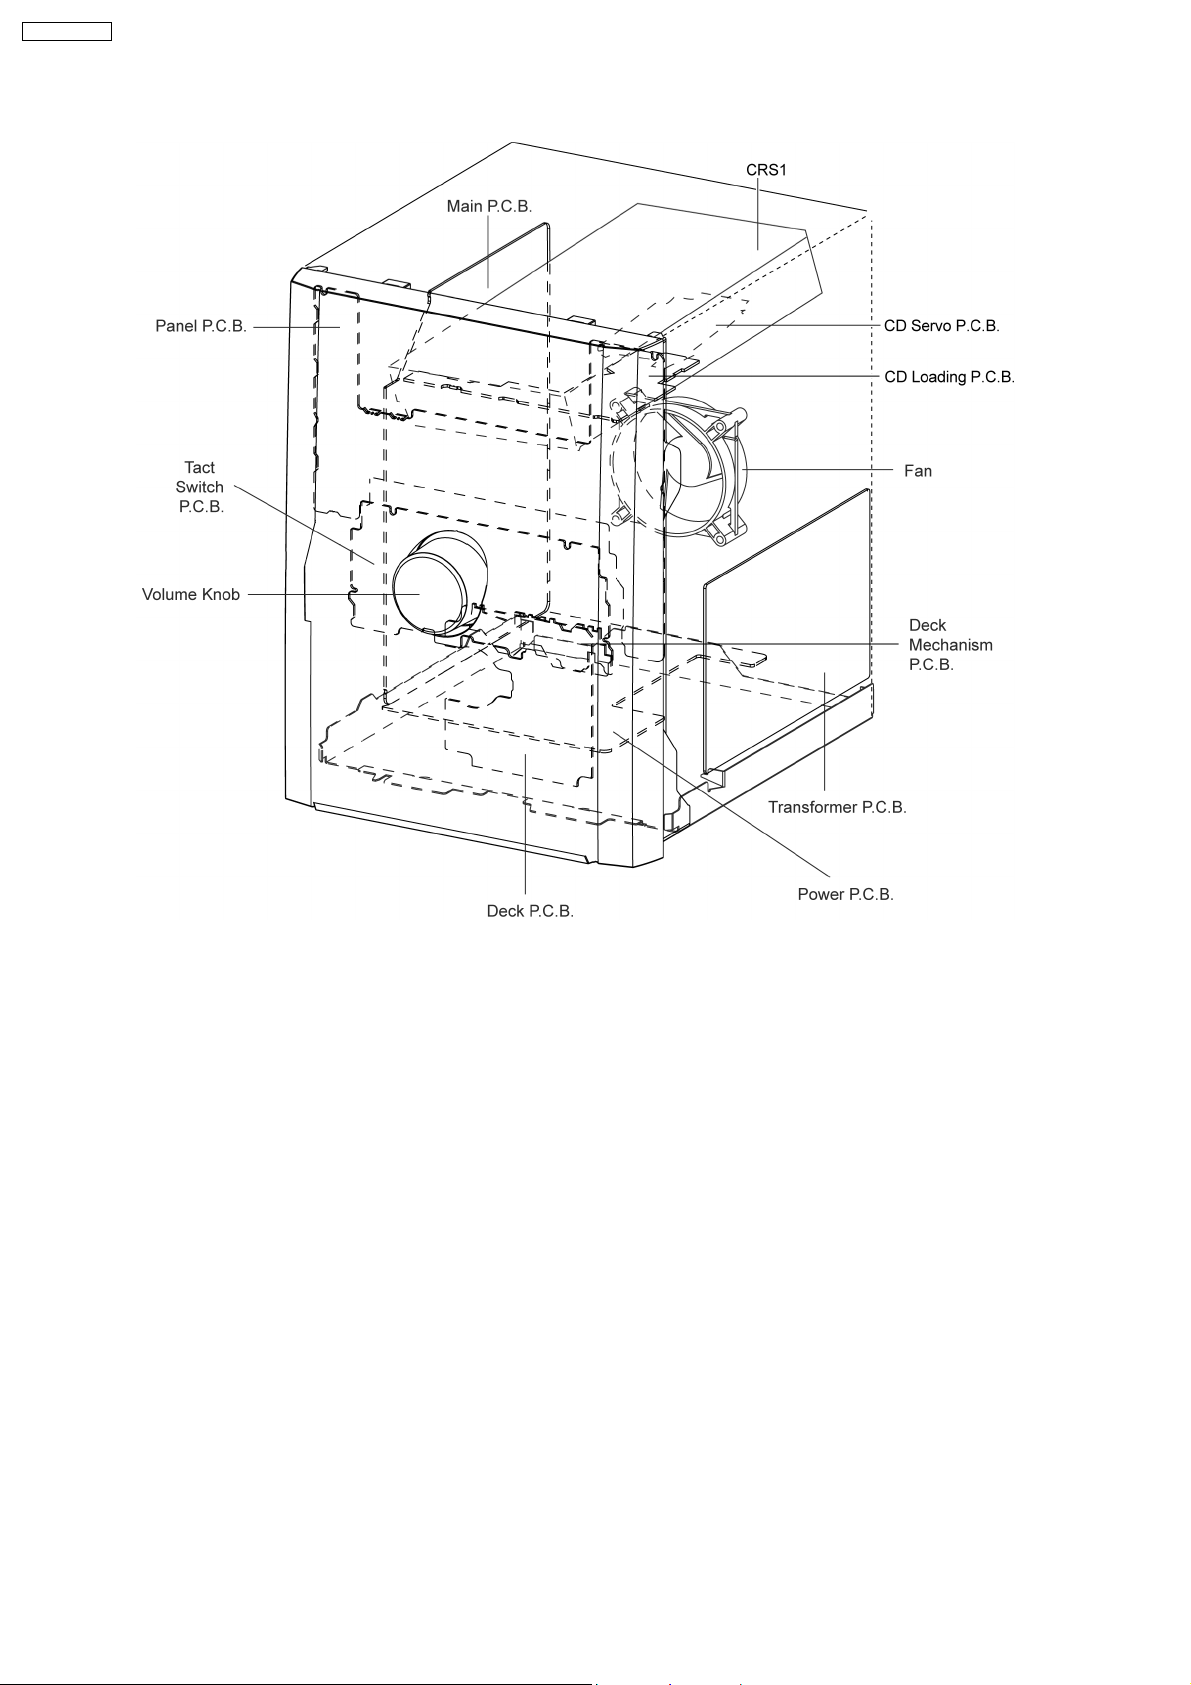
10.3. Main Parts Location
28
Page 28
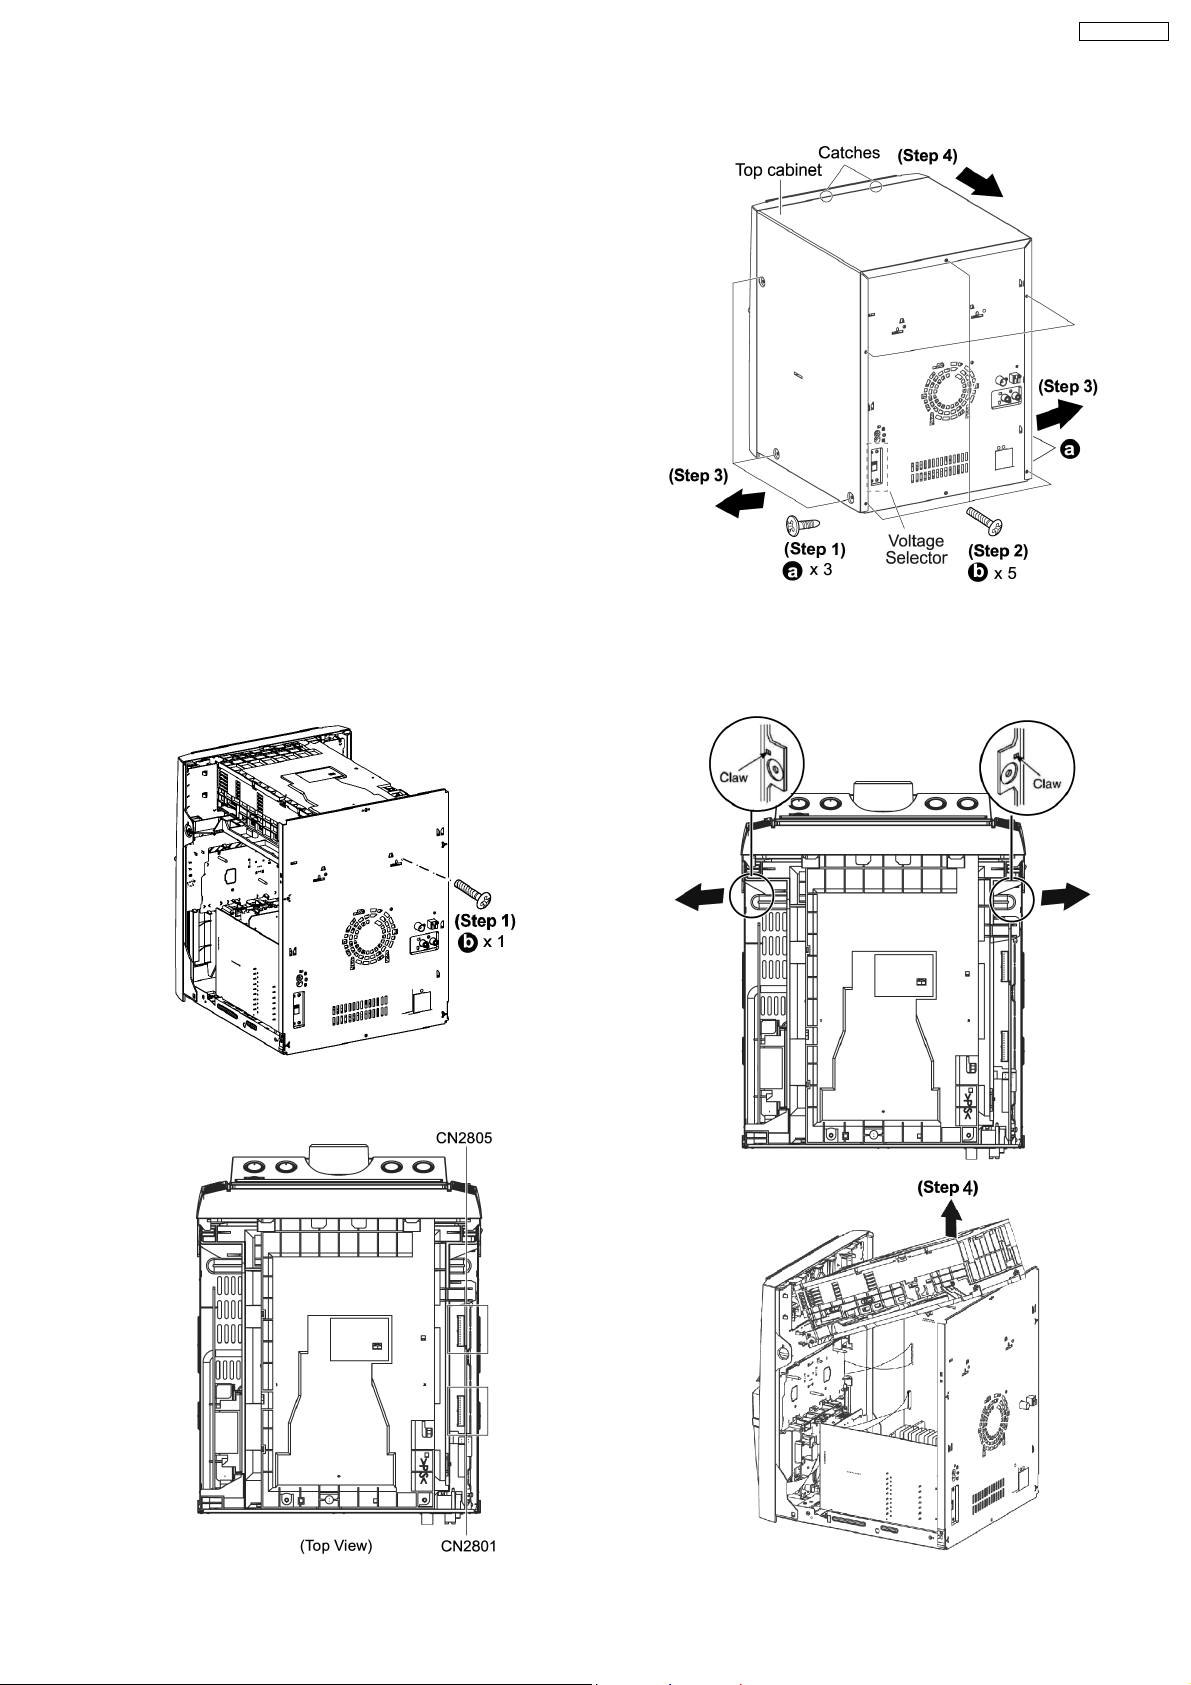
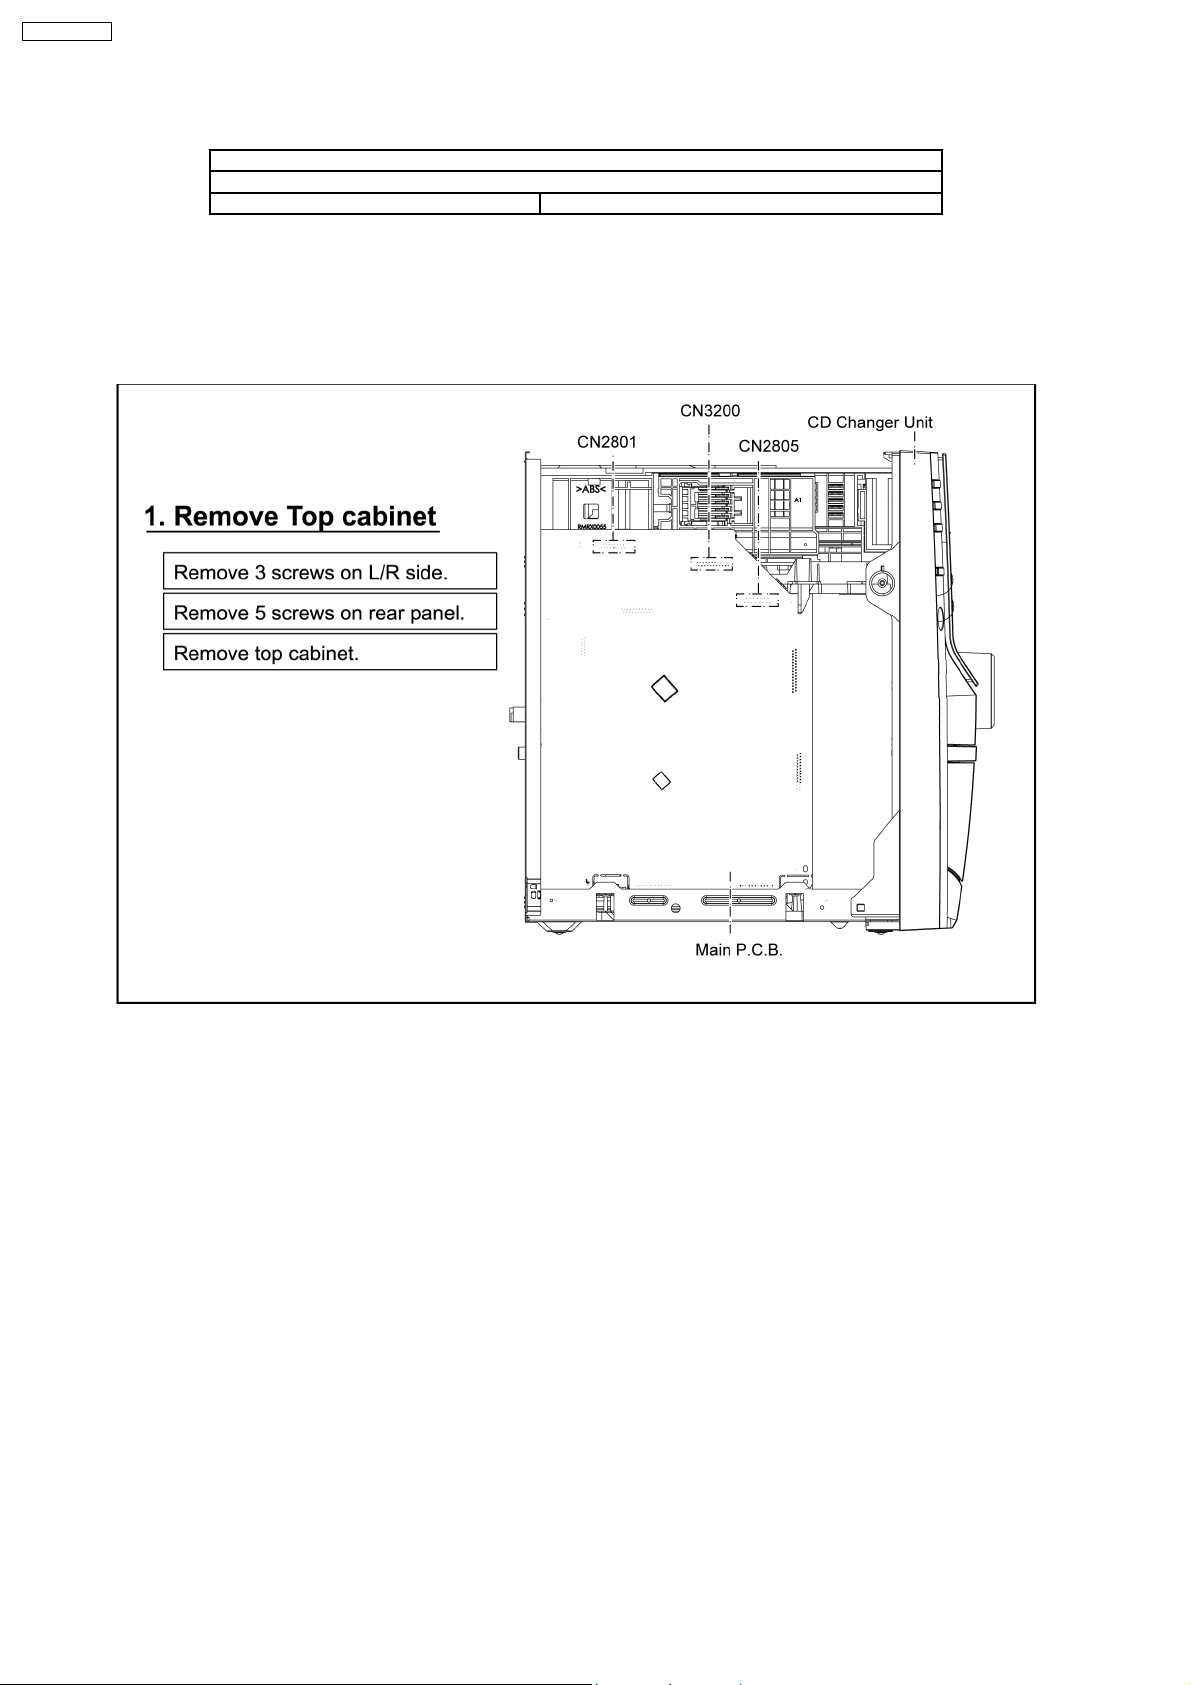
10.4. Disassembly of Top Cabinet
Step 1 Remove 3 screws on both sides on top cabinet.
Step 2 Remove 5 screws at the rear.
Step 3 Lift the sides of top cabinet outwards.
Step 4 Push the top cabinet backwards to release catches.
Step 5 Remove top cabinet.
SA-AK250GCP
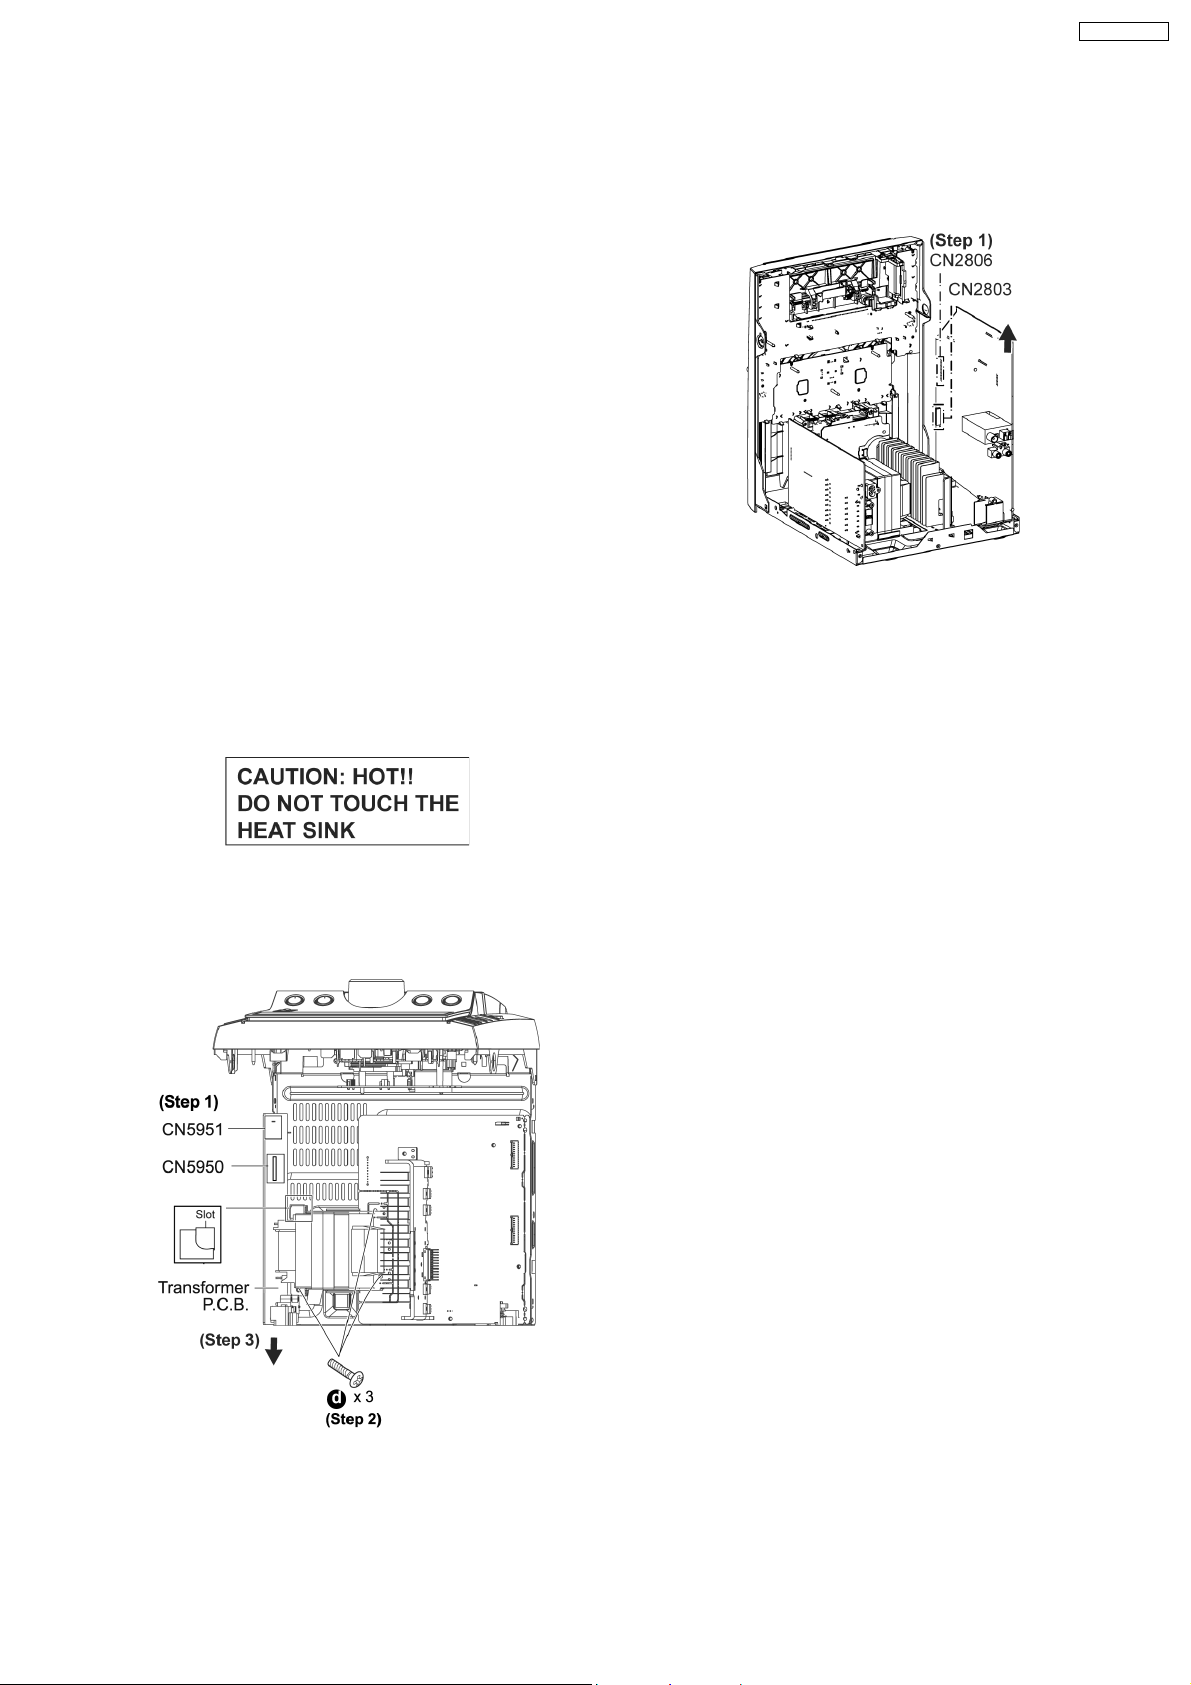
10.5. Disassembly of CD Changer Unit (CRS1)
· Follow the (Step 1) - (Step 5) of Item 10.4
Step 1 Remove 1 screw at rear panel.
Step 2 Detach the FFC cables at connectors (CN2801 &
CN2805) on Main P.C.B..
Step 3 Release the claws outwards on both ends.
29
Page 29
SA-AK250GCP
Step 4 Lift the CD changer unit upwards to remove it.
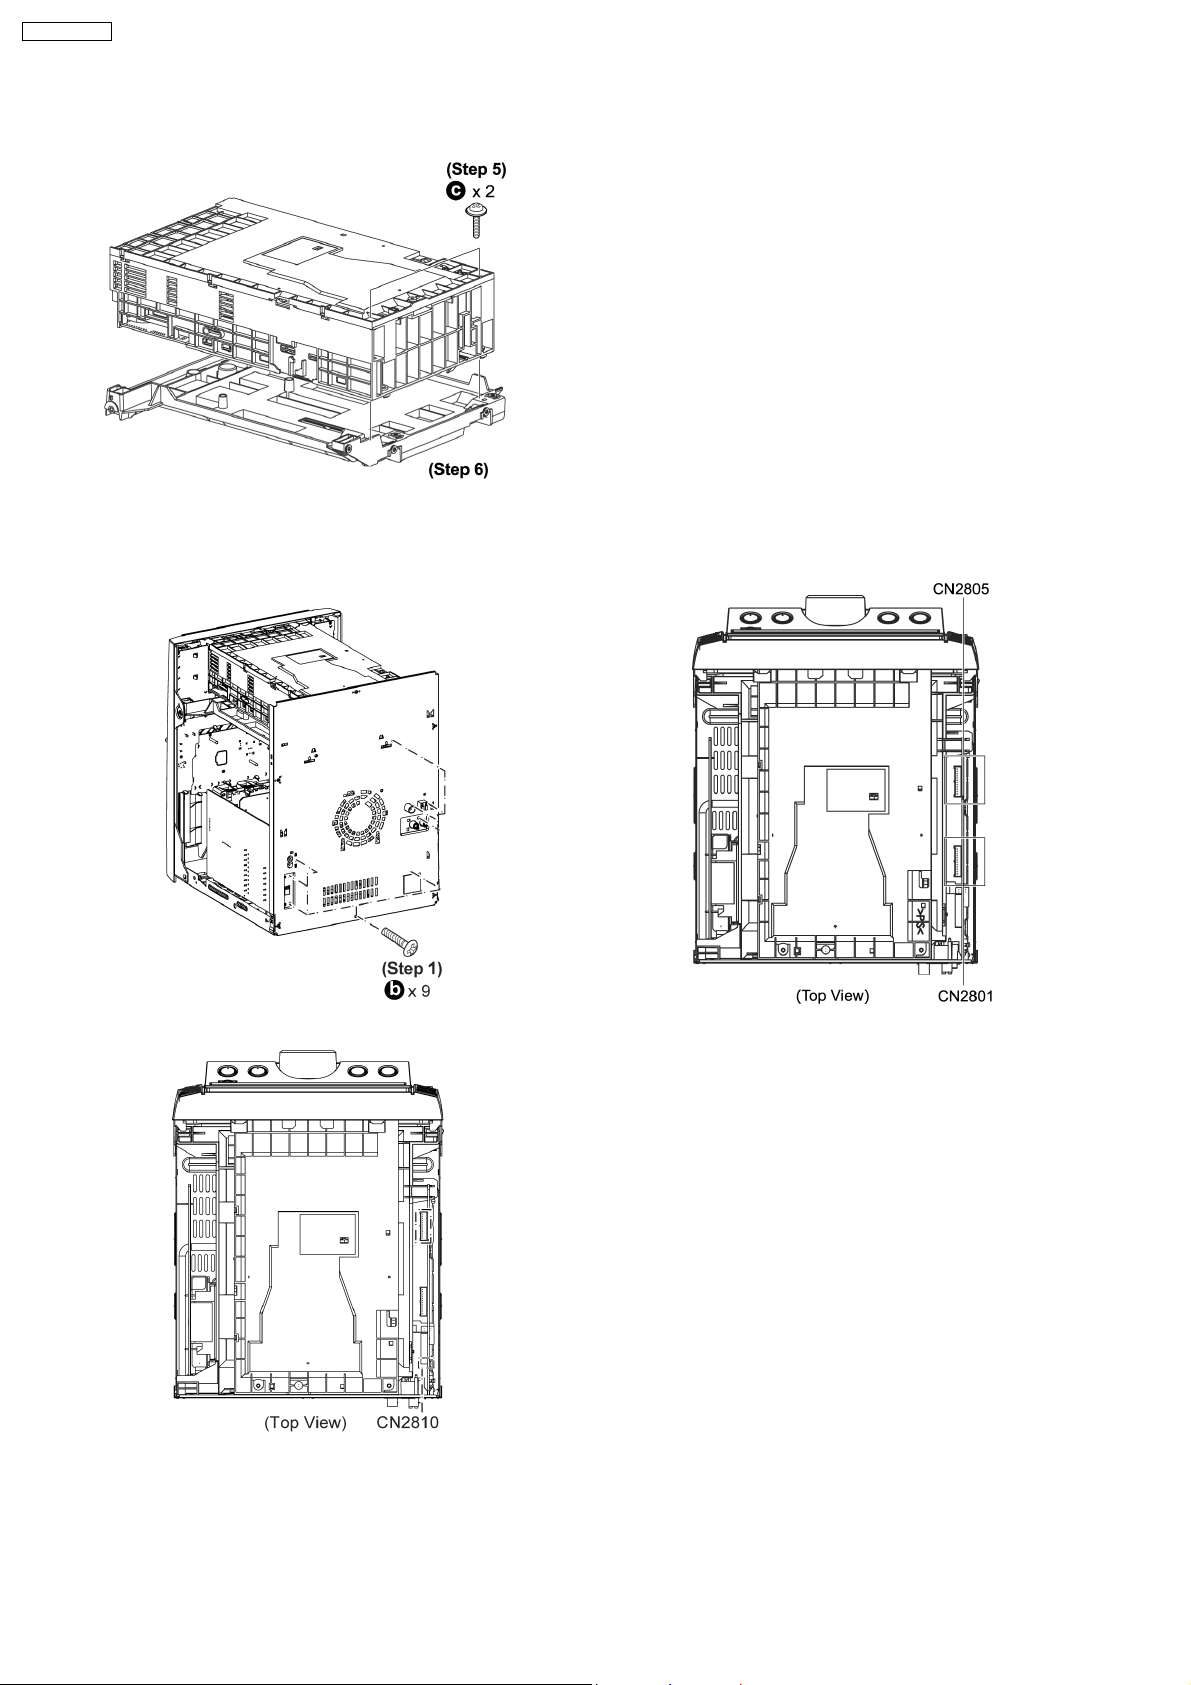
· Disassembly of Mecha Chassis
10.6. Disassembly of Rear Panel
· Follow the (Step 1) - (Step 5) of Item 10.4
Step 1 Remove 9 screws.
Step 5 Remove 2 screws.
Step 6 Remove the Mecha Chassis.
Note:
For disassembly & assembly of traverse unit, please refer to
section 10.15 of this service manual. Please refer to original
Service Manual for the Disassembly and Assembly of the CD
Changer Unit (CRS1).
Step 2 Detach cable at connector CN2810 on Main P.C.B..
Step 3 Detach FFC cables at connectors (CN2801 & CN2805)
on Main P.C.B..
Step 4 Remove rear panel.
30
Page 30
10.7. Disassembly of Main P.C.B.
· Follow the (Step 1) - (Step 5) of Item 10.4
· Follow the (Step 1) - (Step 4) of Item 10.5
· Follow the (Step 1) - (Step 4) of Item 10.6
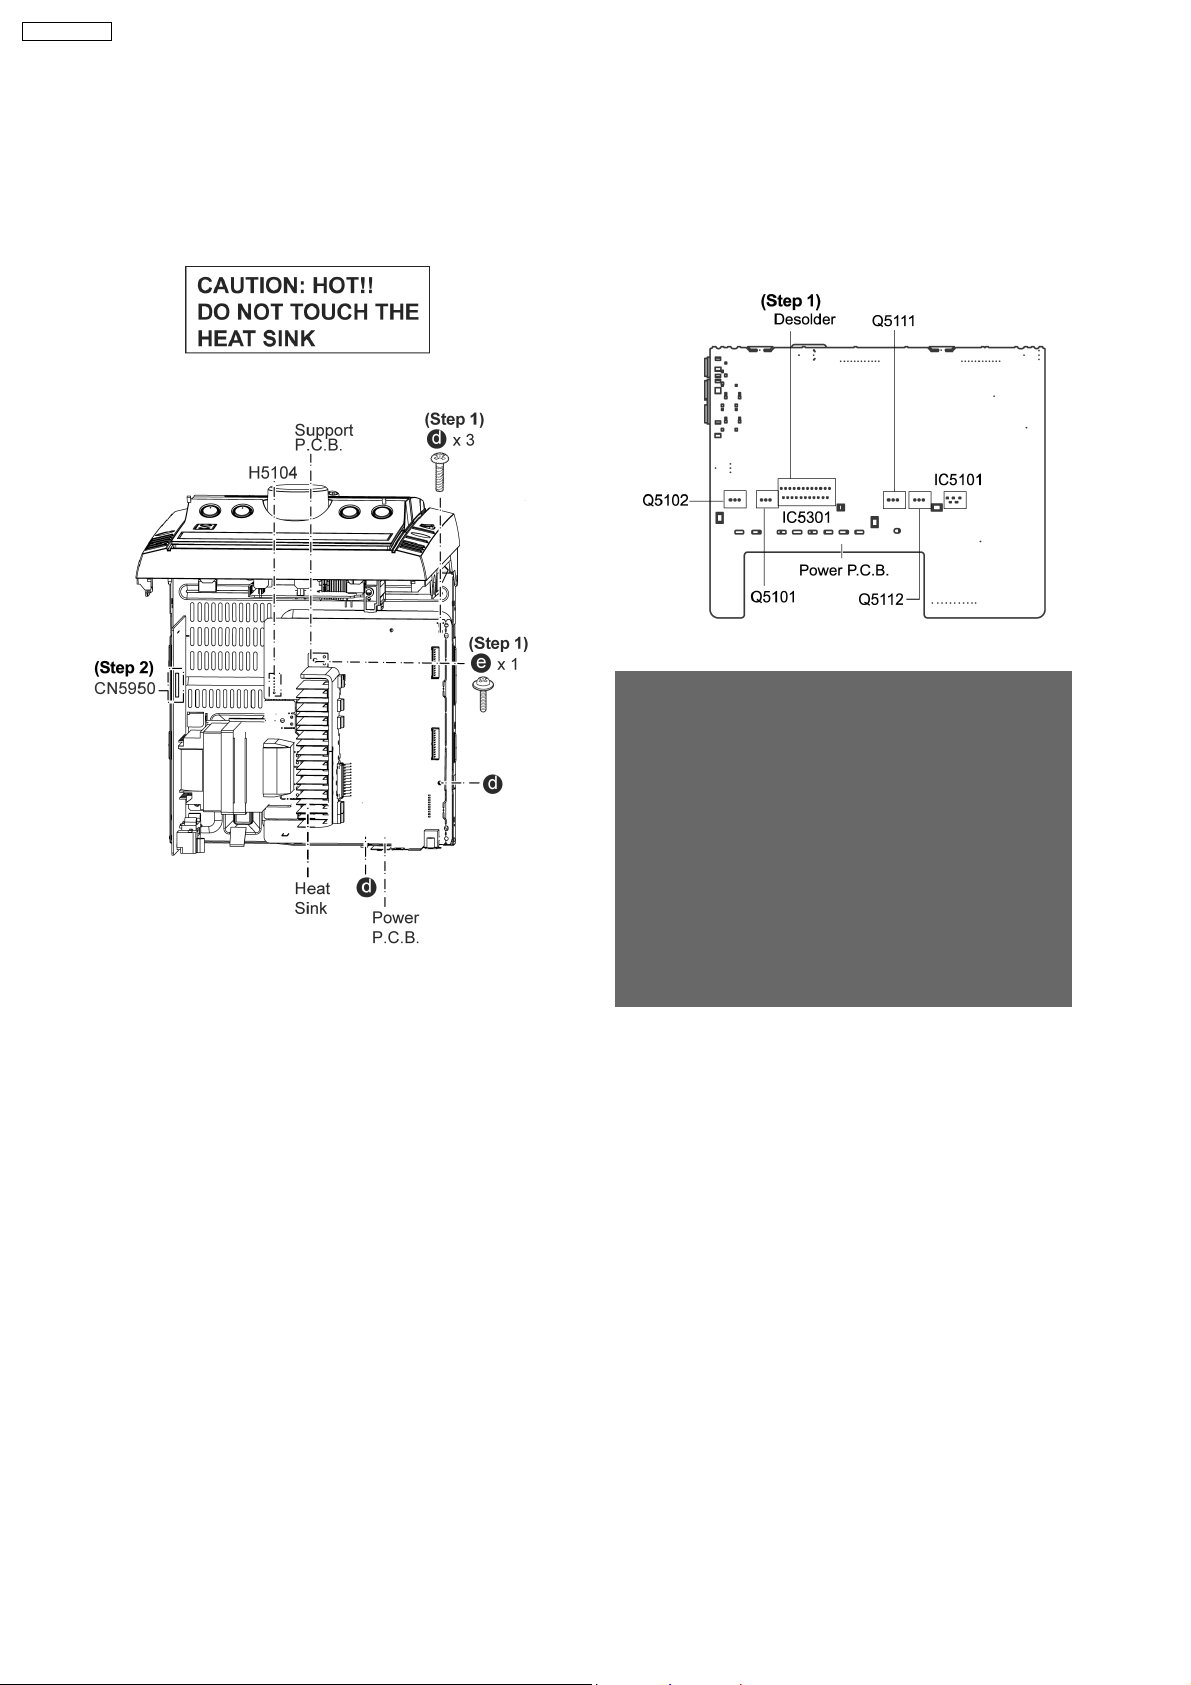
Step 1 Detach FFC cables at connectors (CN2803 & CN2806)
on Main P.C.B..
SA-AK250GCP
Step 2 Remove Main P.C.B..
10.8. Disassembly of Transformer P.C.B.
· Follow the (Step 1) - (Step 5) of Item 10.4
· Follow the (Step 1) - (Step 4) of Item 10.5
· Follow the (Step 1) - (Step 4) of Item 10.6
Step 1 Detach cables at connectors (CN5950 & CN5951) on
Transformer P.C.B..
Step 2 Remove 3 screws (Mounting screws for transformer to
bottom chassis).
Step 3 Push the Transformer P.C.B. backwards to remove it.
31
Page 31
SA-AK250GCP
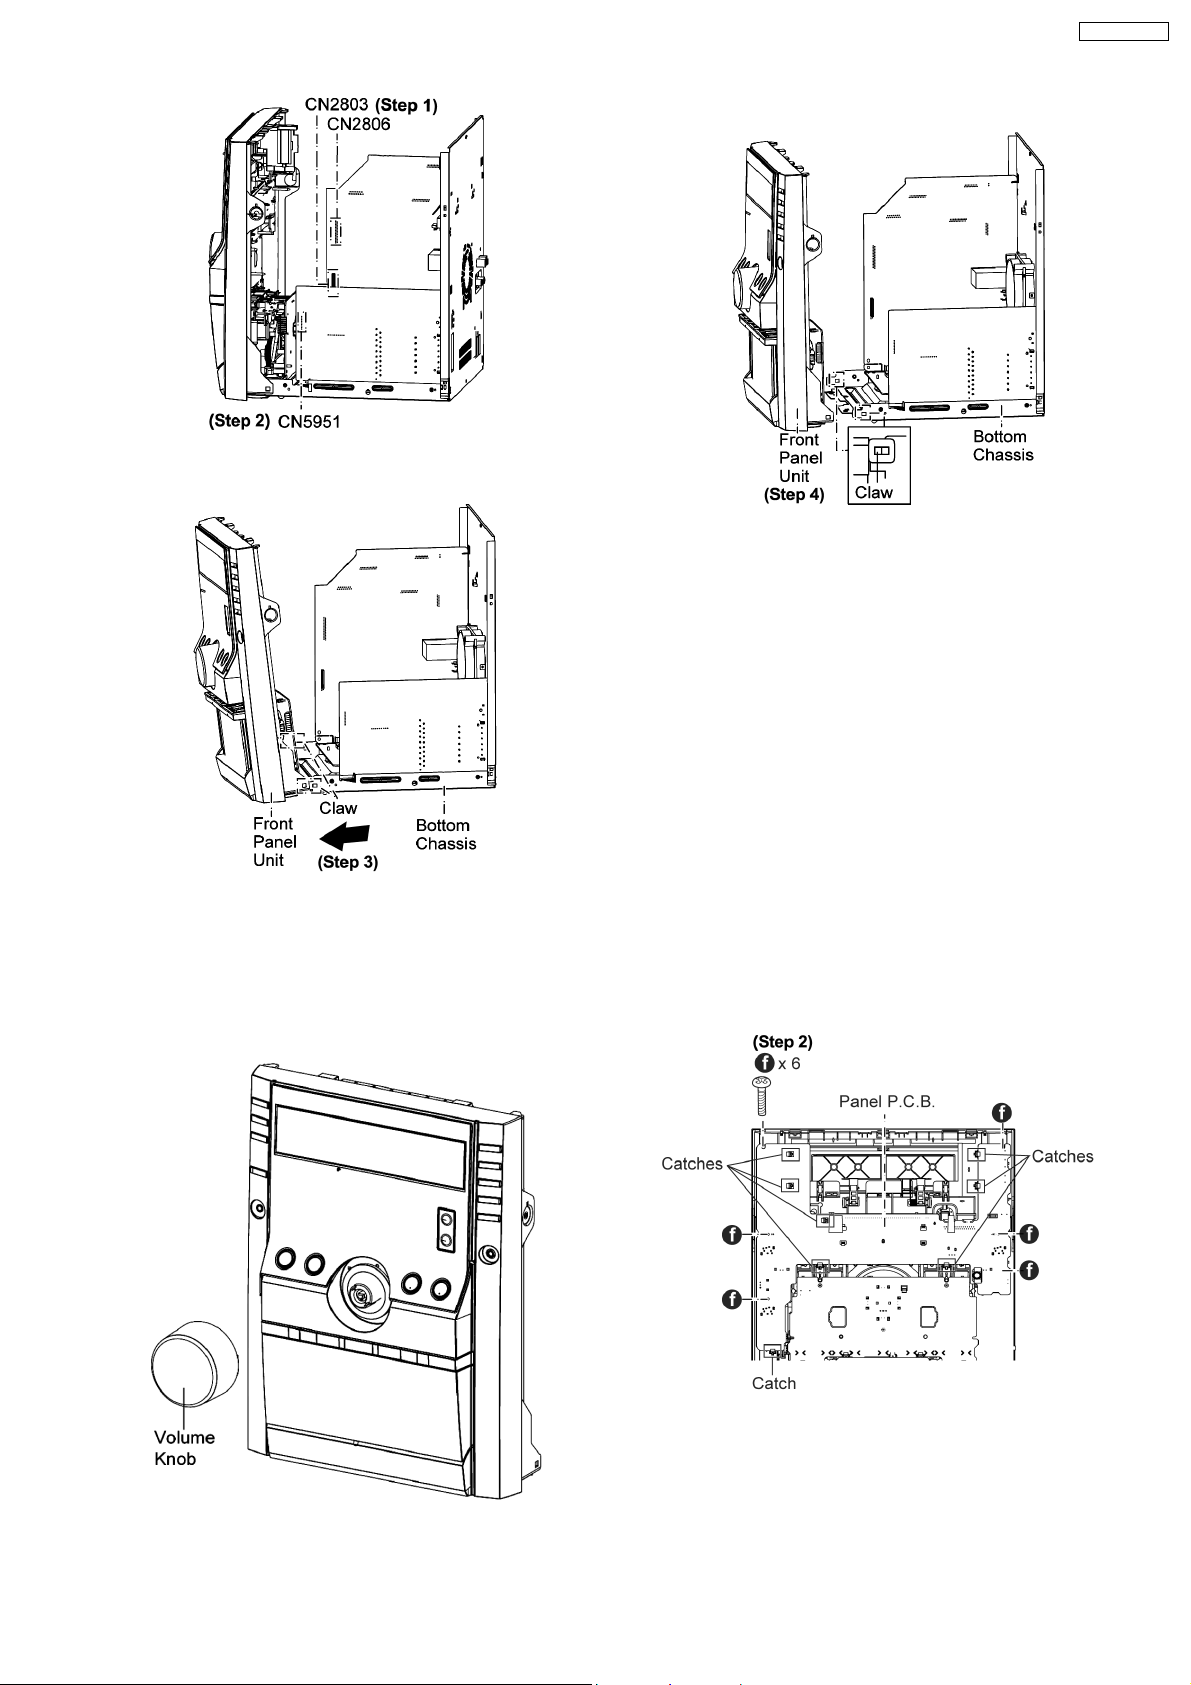
10.9. Disassembly of Power P.C.B.
· Follow the (Step 1) - (Step 5) of Item 10.4
· Follow the (Step 1) - (Step 4) of Item 10.5
· Follow the (Step 1) - (Step 4) of Item 10.6
· Follow the (Step 1) - (Step 3) of Item 10.7
Step 1 Remove the 4 screws on Power P.C.B..
Step 1 Flip the Power P.C.B. over and desolder the pins.
Step 2 Detach cable at connector (CN5950) on Transformer
P.C.B..
Step 3 Remove Power P.C.B..
Note:
Insulate the Power P.C.B. with insulation material to avoid short
circuit.
· Replacement of Power Amp IC (IC5301).
10.10. Disassembly of Front Panel Unit
· Follow the (Step 1) - (Step 5) of Item 10.4
· Follow the (Step 1) - (Step 4) of Item 10.5
Step 1 Detach FFC cables at connectors (CN2803 & CN2806)
on Main P.C.B..
Step 2 Detach cable at connector (CN5951) on Transformer
P.C.B..
Step 2 Remove 1 screw and IC clip (For IC5301 only).
Step 3 Remove IC5301 from heat sink unit.
Note: For disassembly of IC5101, Q5101, Q5102, Q5111
and Q5112 repeat (Step 1) to (Step 2). (For information,
IC5101, Q5101, Q5102, Q5111 and Q5112 does not have
IC clip.)
32
Page 32
Step 3 Bent the front panel unit slightly forward as arrow
shown.
SA-AK250GCP
Step 4 Release 2 claws outwards.
Step 5 Remove the front panel unit.
Note: Ensure 2 claws located at the bottom chassis is seated
into the 2 slots at bottom of front panel at 2 catches (one on
each side) of bottom chassis to be aligned to front panel’s slot.
Assembly is secured upon hearing clicking sound.
10.11. Disassembly for Panel P.C.B.
· Follow the (Step 1) - (Step 5) of Item 10.4
· Follow the (Step 1) - (Step 4) of Item 10.5
· Follow the (Step 1) - (Step 5) of Item 10.10
Step 1 Remove the volume knob.
Step 4 Remove Panel P.C.B..
10.11.1. Disass embly of Lid
Step 2 Remove 6 screws at Panel P.C.B..
Step 3 Release 8 catches.
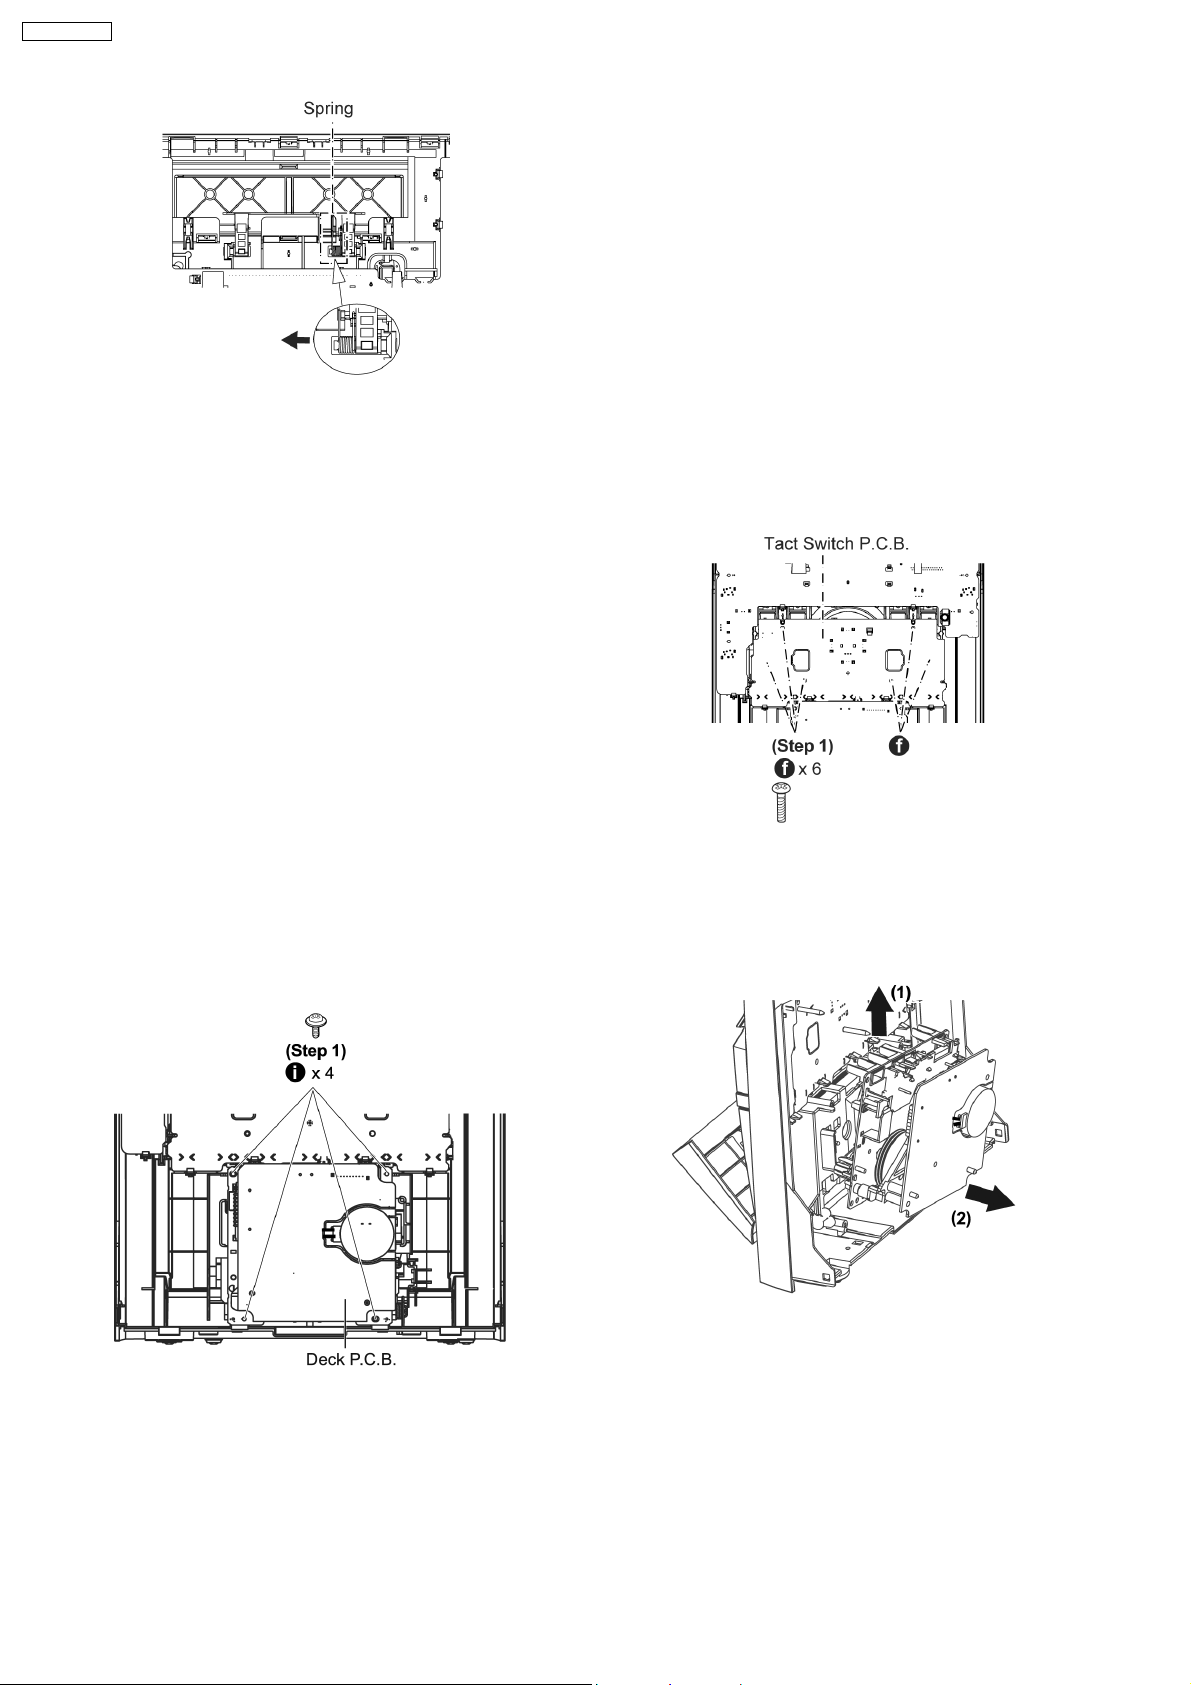
Step 1 Lift the spring sideward.
33
Page 33
SA-AK250GCP
10.12. Disassembly of Tact Switch P.C.B.
· Follow the (Step 1) - (Step 5) of Item 10.4
· Follow the (Step 1) - (Step 4) of Item 10.5
· Follow the (Step 1) - (Step 5) of Item 10.10
Step 1 Remove 6 screws at Tact Switch P.C.B..
Step 2 Remove Tact Switch P.C.B..
Step 2 Remove Lid.
Note: Do not misplace the spring.
10.13. Disassembly of Deck mechanism unit
· Follow the (Step 1) - (Step 5) of Item 10.4
· Follow the (Step 1) - (Step 4) of Item 10.5
· Follow the (Step 1) - (Step 5) of Item 10.10
Step 1 Remove the 4 screws.
Step 3 Tilt the cassette mechanism unit in the direction of
arrow (1), and then remove it in the direction of arrow (2).
Note: For disassembly of parts for deck mechanism unit,
Step 2 Push the lever upward, and then open the cassette lid
ass’y.
refer to Section 10.16.
10.14. Disassembly of Deck P.C.B.
· Follow the (Step 1) - (Step 5) of Item 10.4
· Follow the (Step 1) - (Step 4) of Item 10.5
· Follow the (Step 1) - (Step 5) of Item 10.10
34
Page 34
SA-AK250GCP
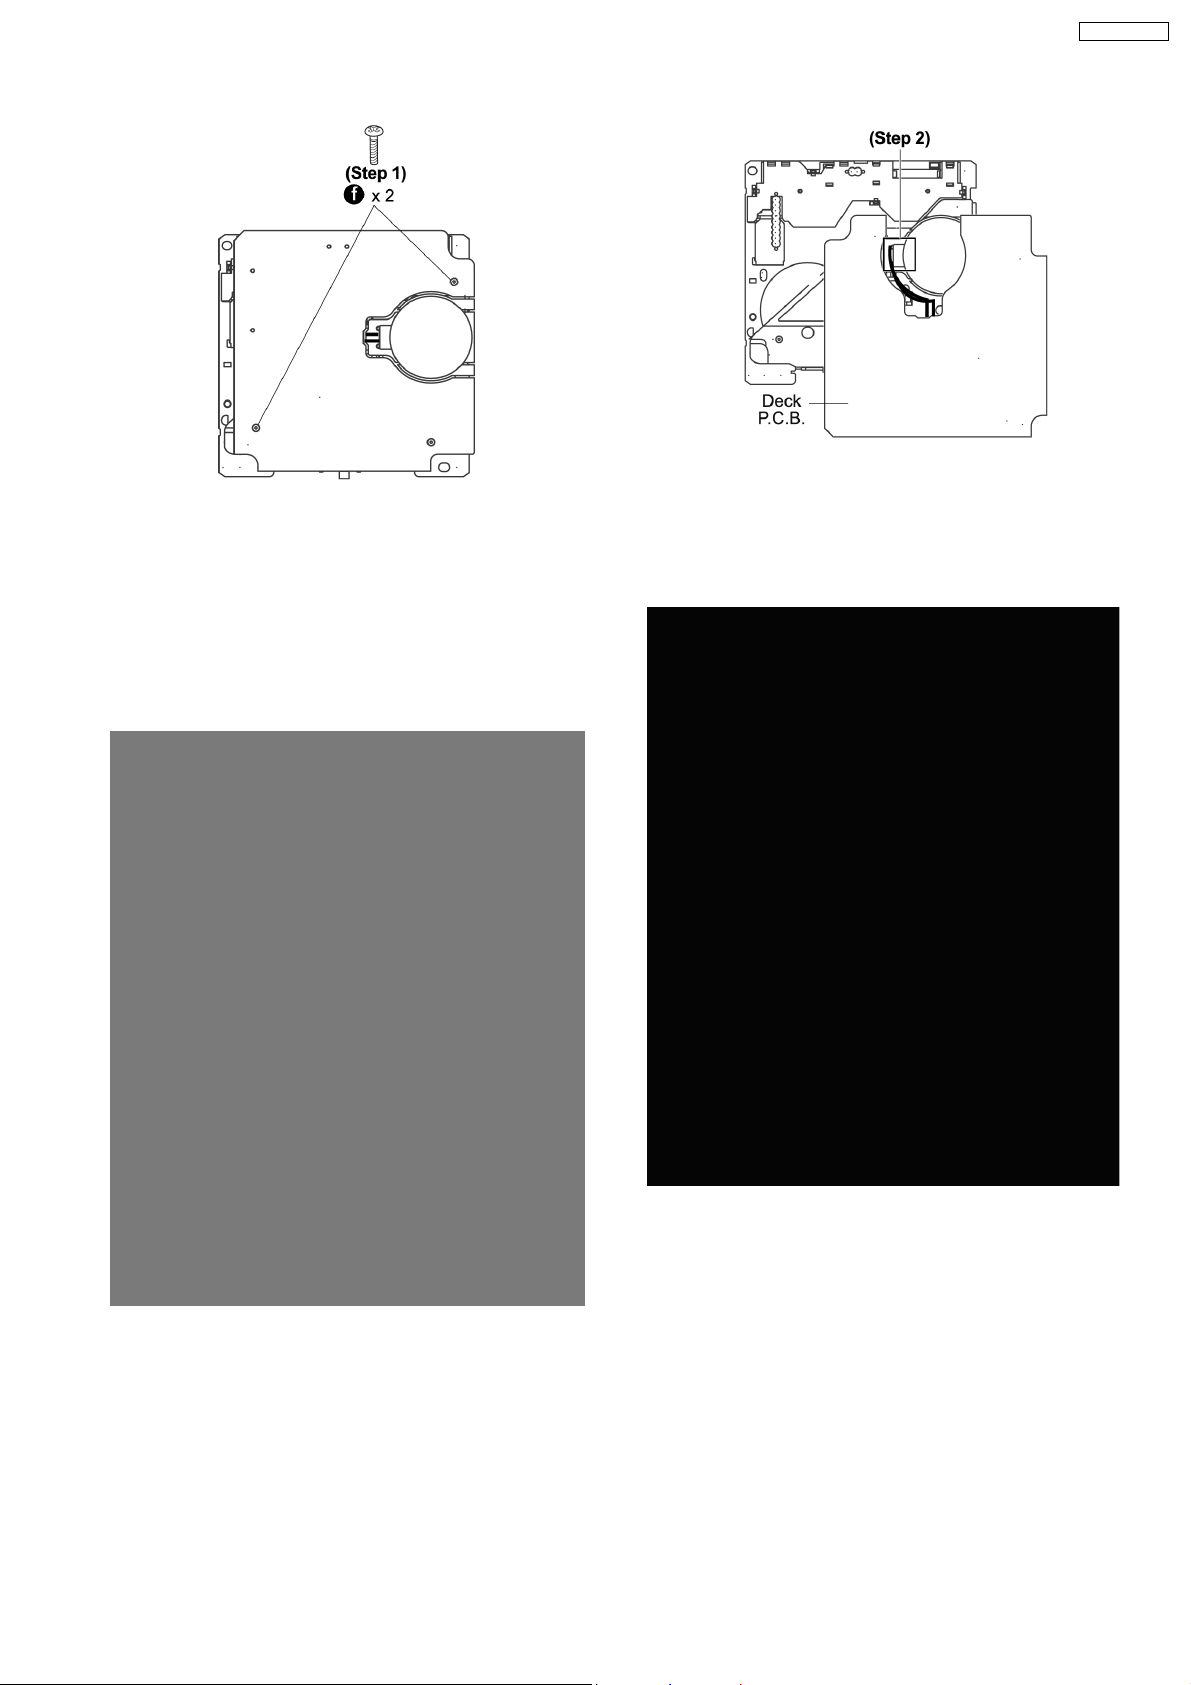
Step 1 Remove 2 screws.
10.15. Disassembly of Traverse Unit
· Follow the (Step 1) - (Step 5) of Item 10.4
· Follow the (Step 1) - (Step 4) of Item 10.5
Important notes: Ensure all the trays are in the “STOCK”
position before proceeding to the disassemble of traverse
unit. For procedures to set the trays in “STOCK” position,
please refer to (5.3 Setting the Tray In “STOCK” position
for CRS1 Service Manual order no. MD0509368C0)
Step 2 Desolder wire at deck motor terminals.
Step 3 Remove Deck P.C.B.
Step 1: Press and hold the plunger lever and rotate the
gear as arrows shown until it stop.
Step 2: Push the traverse slide plate as arrow shown to
release the traverse unit.
Caution: Do not exert strong force on the traverse
slide plate.
35
Page 35

SA-AK250GCP
Step 3: Remove the traverse unit as arrow shown.
· Assembly of Traver se Unit
Step 1: Turn over the unit and install the traverse unit.
10.16. Disassembly for Deck Mechanism
· Follow the (Step 1) - (Step 4) of Item 10.4
· Follow the (Step 1) - (Step 4) of Item 10.5
· Follow the (Step 1) - (Step 5) of Item 10.10
· Follow the (Step 1) - (Step 3) of Item 10.14
· Follow the (Step 1) - (Step 3) of Item 10.15
Step 2: Push the traverse slide plate as arrow shown to
lock the traverse unit.
36
Page 36
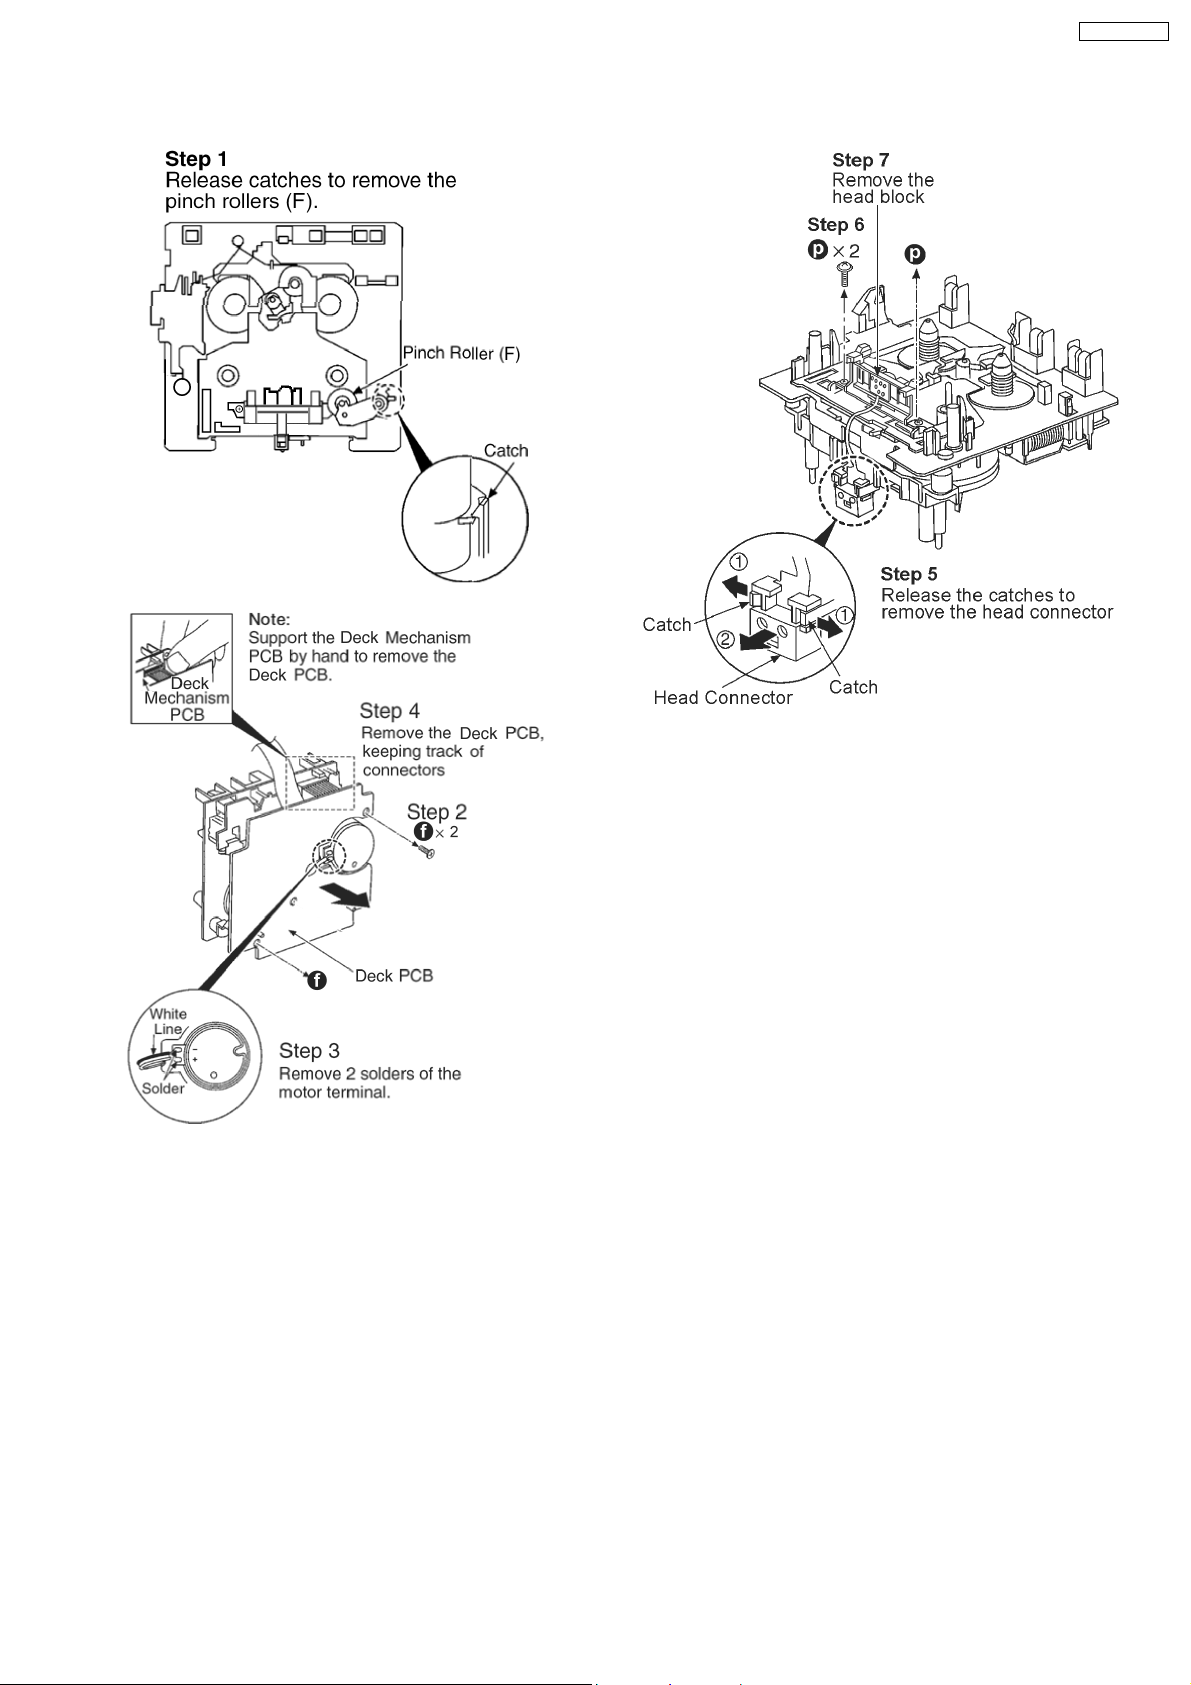
10.16.1. Replac ement of Pinch Roller and Head Block
SA-AK250GCP
37
Page 37
SA-AK250GCP
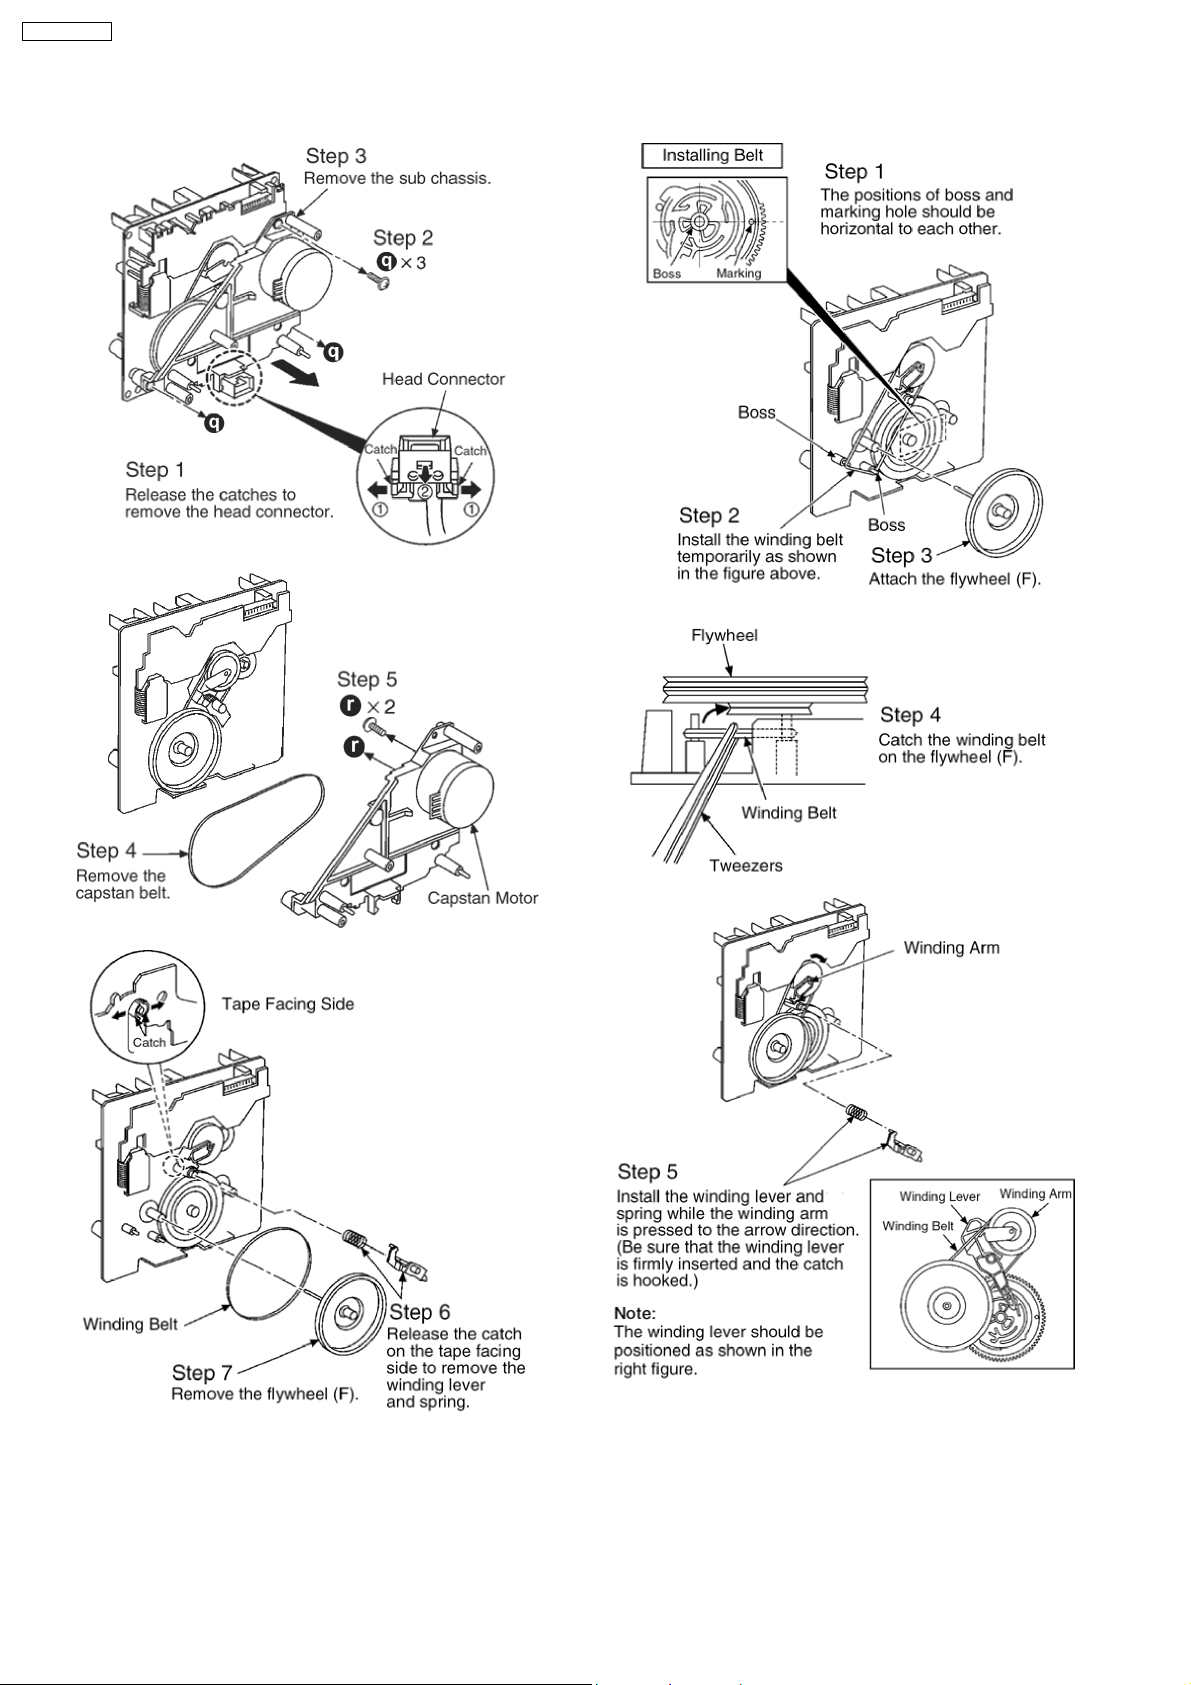
10.16.2. Replac ement of Motor, Capstan Belt A, Capstan Belt B, and Winding Belt
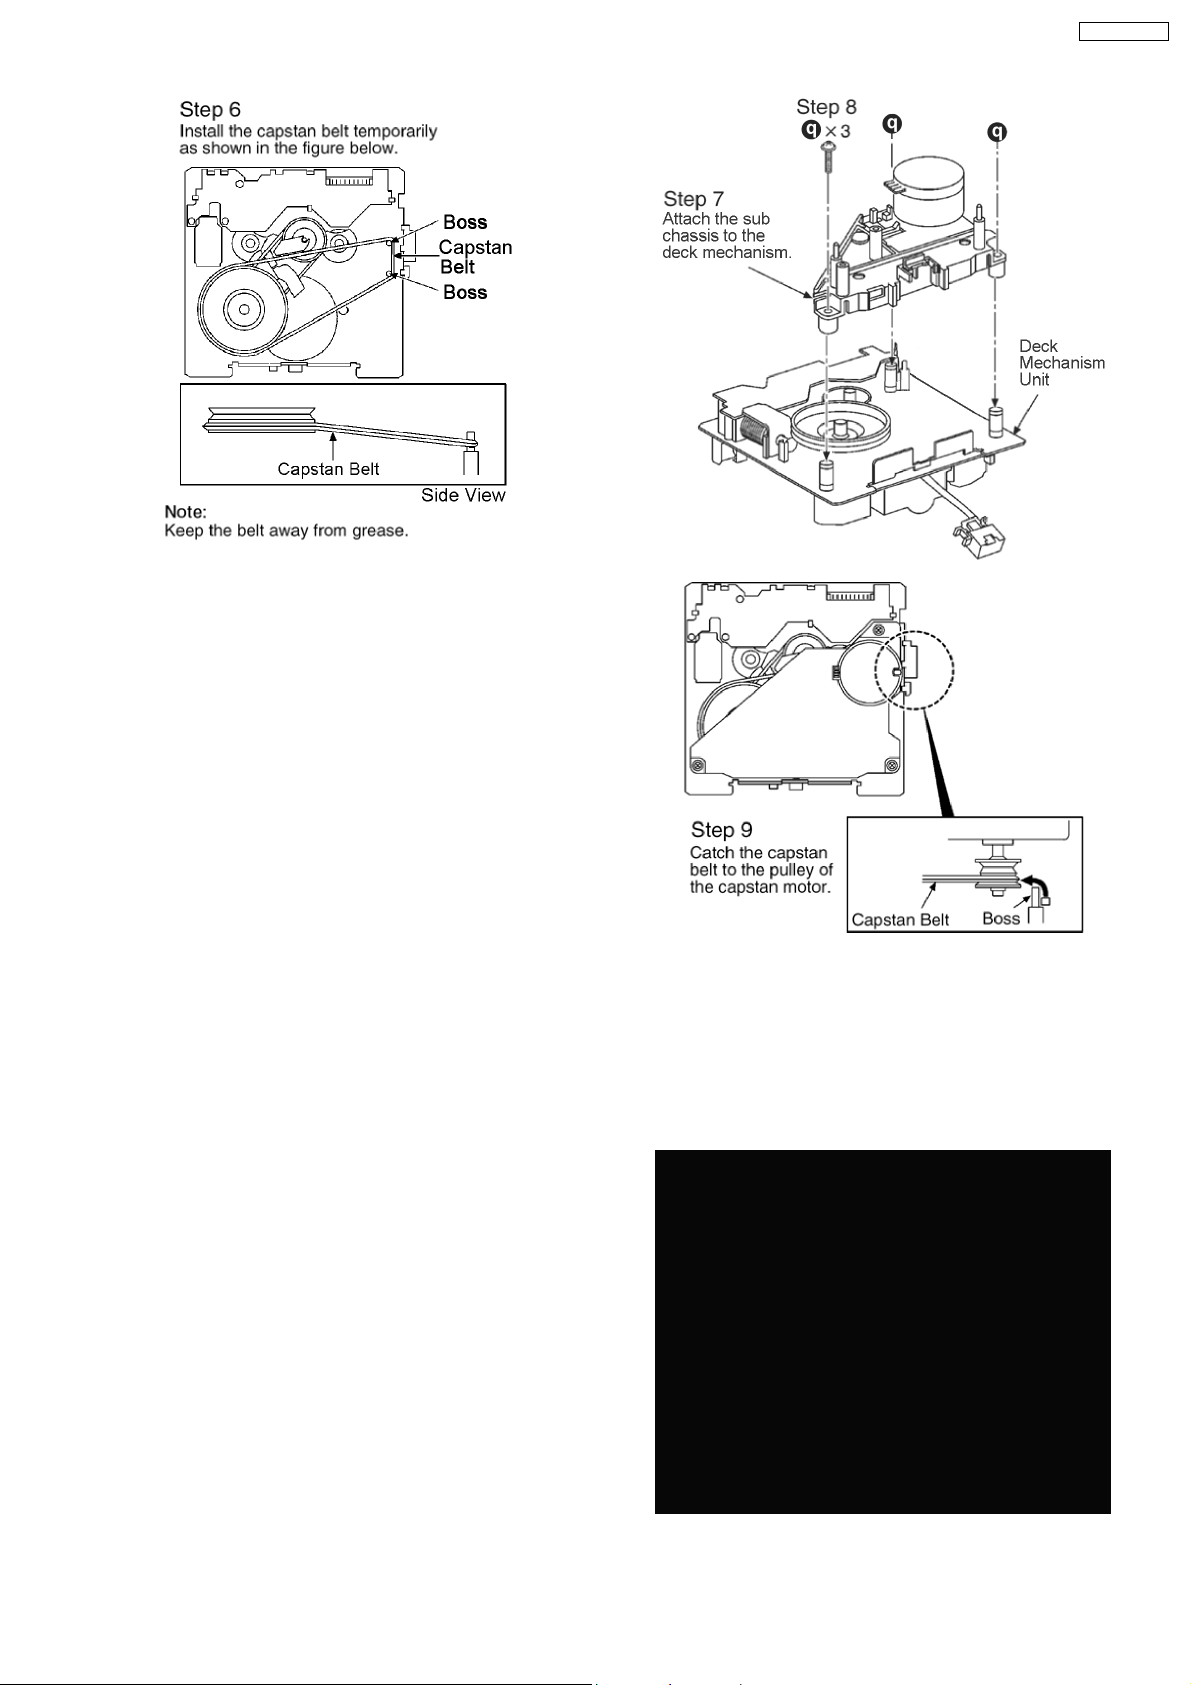
38
Page 38
SA-AK250GCP
10.17. Disassembly of Deck Mechanism P.C.B.
· Follow the (Step 1) - (Step 4) of Item 10.4
· Follow the (Step 1) - (Step 4) of Item 10.5
· Follow the (Step 1) - (Step 5) of Item 10.10
· Follow the (Step 1) - (Step 3) of Item 10.13
· Follow the (Step 1) - (Step 3) of Item 10.14
Step 1 Remove 1 screw.
Step 2 Desolder plunger terminals.
Step 3 Release catches.
Step 4 Remove Deck Mechanism P.C.B..
39
Page 39
SA-AK250GCP
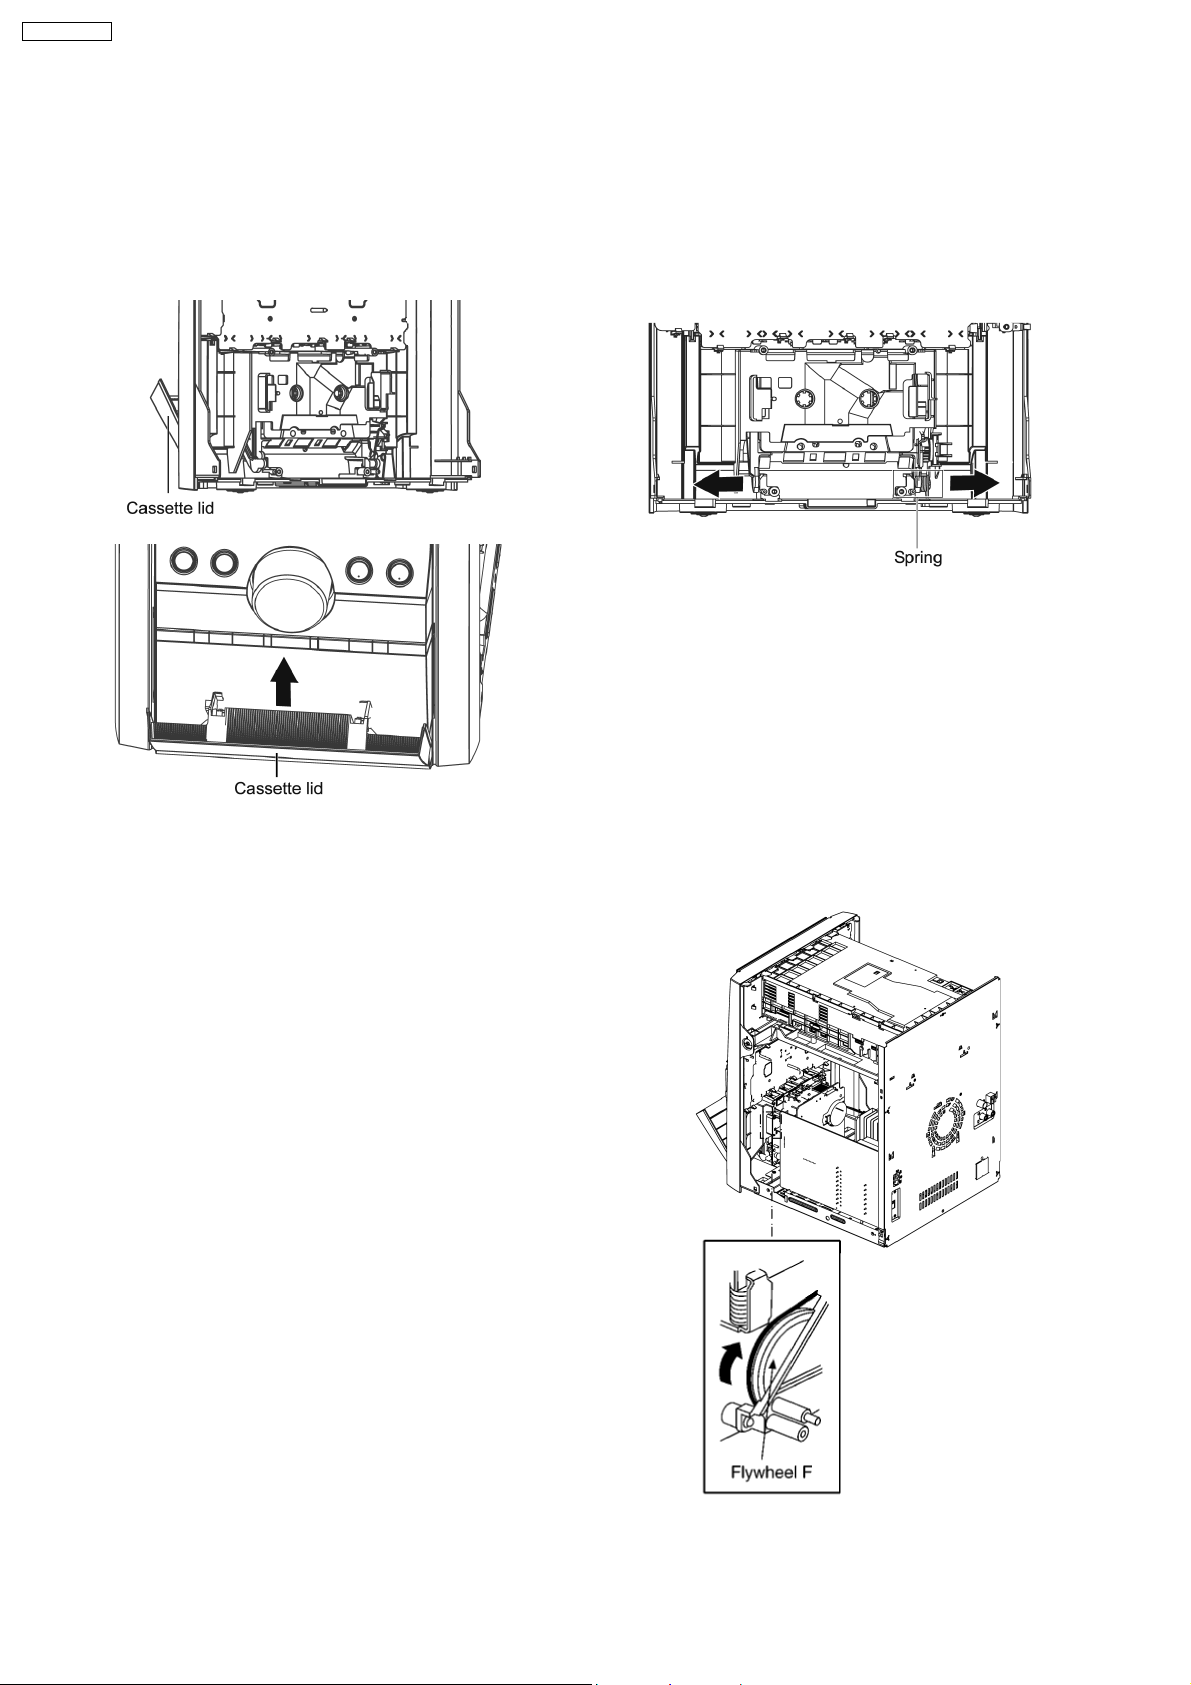
10.18. Disassembly of cassette lid
· Follow the (Step 1) - (Step 4) of Item 10.4
· Follow the (Step 1) - (Step 4) of Item 10.5
· Follow the (Step 1) - (Step 5) of Item 10.10
· Follow the (Step 1) - (Step 3) of Item 10.13
Step 1 Open the cassette lid.
Step 2 Remove spring and push the cassette lid in the direction
of arrows.
10.19. Rectification for tape jam problem
· Follow the (Step 1) - (Step 5) of Item 10.4
Step 1 If a cassette tape cannot be removed from the deck (the
tape is caught by the capstan or pinch roller during playback or
recording), rotate the flywheel F in the direction of the arrow to
remove it.
Step 2 Push the lever upward and open the cassette lid.
Remove the cassette tape.
40
Page 40

Note: Follow 10.18 Disassembly of cassette lid (Step1) to
(Step 3). Remove the cassette tape.
SA-AK250GCP
41
Page 41
SA-AK250GCP
11 Service Fixture and Tools
Service Tools
Extension FFC
(A) Deck P.C.B. - Main P.C.B. REEX0485 (14 Pins)
12 Service Positions
Note: For description of the disassembly procedures, see the Section 10.
12.1. Checking and Repairing of Main P.C.B.
42
Page 42
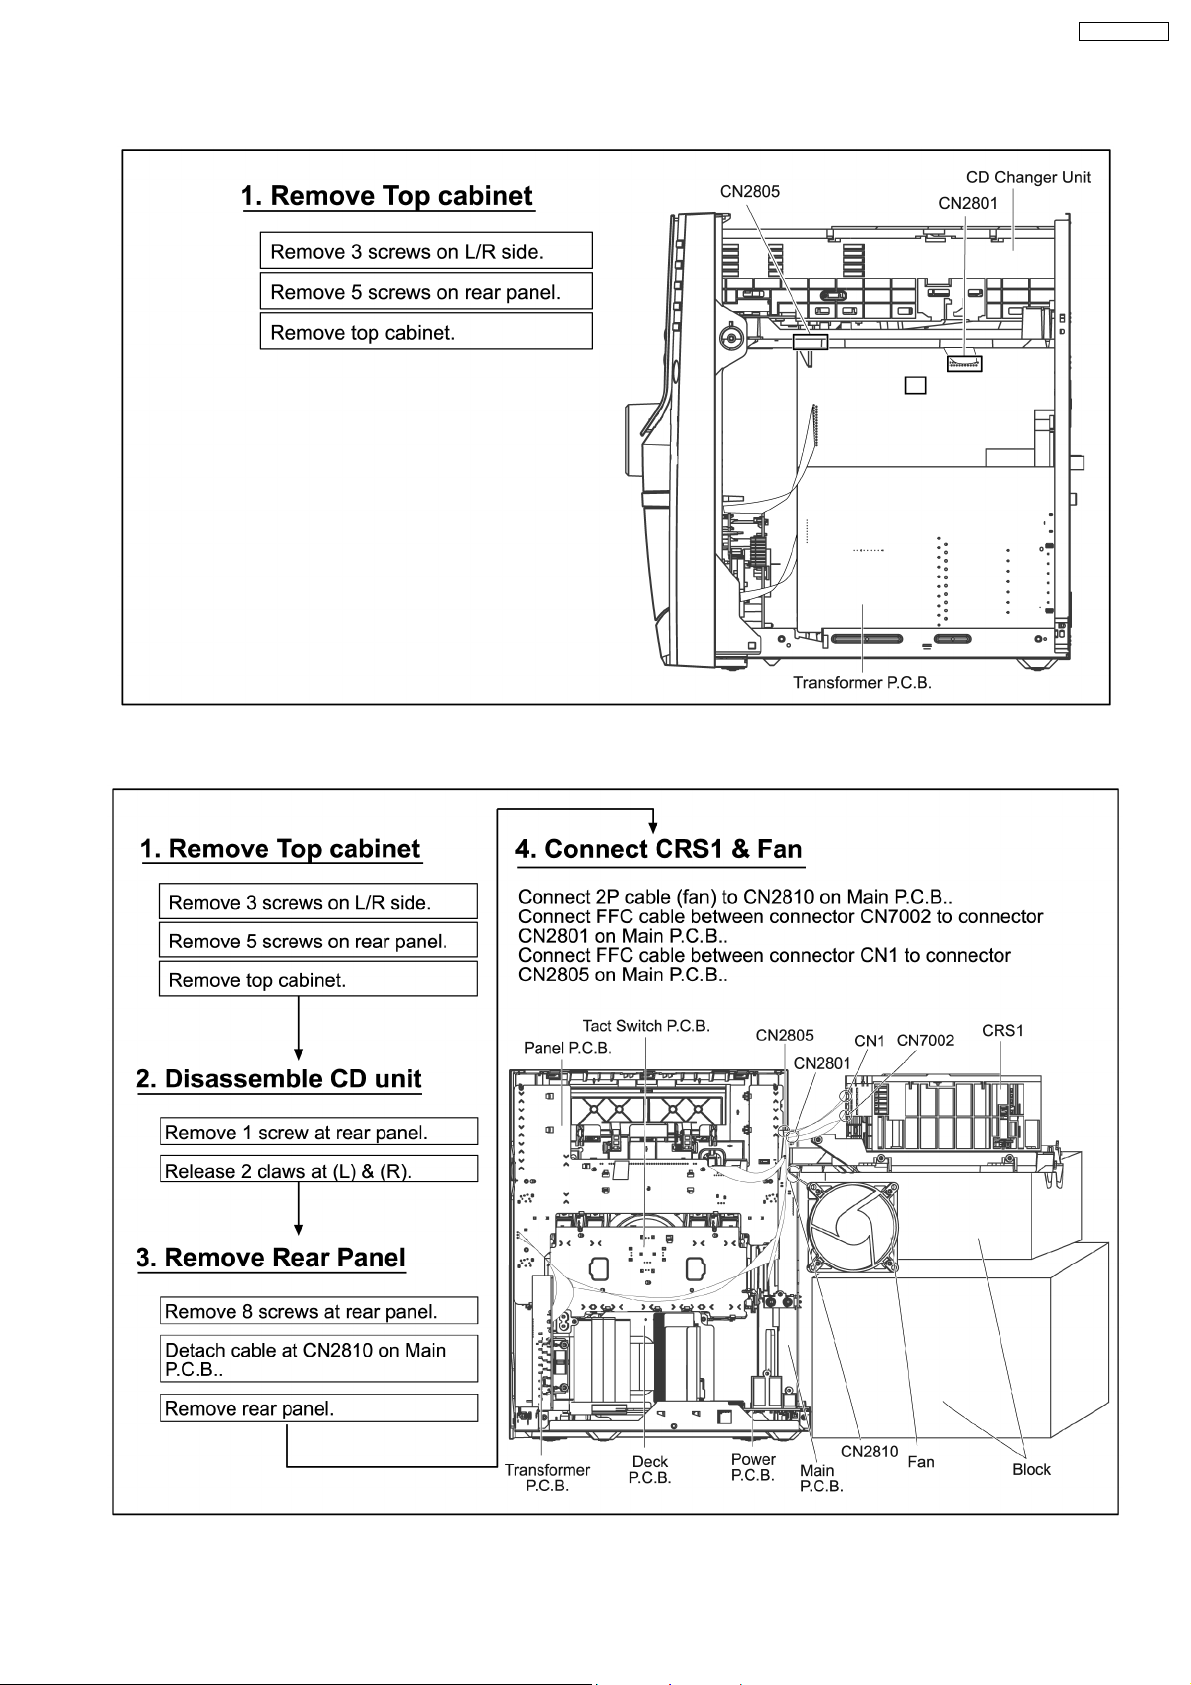
12.2. Checking and Repairing of Transformer P.C.B.
SA-AK250GCP
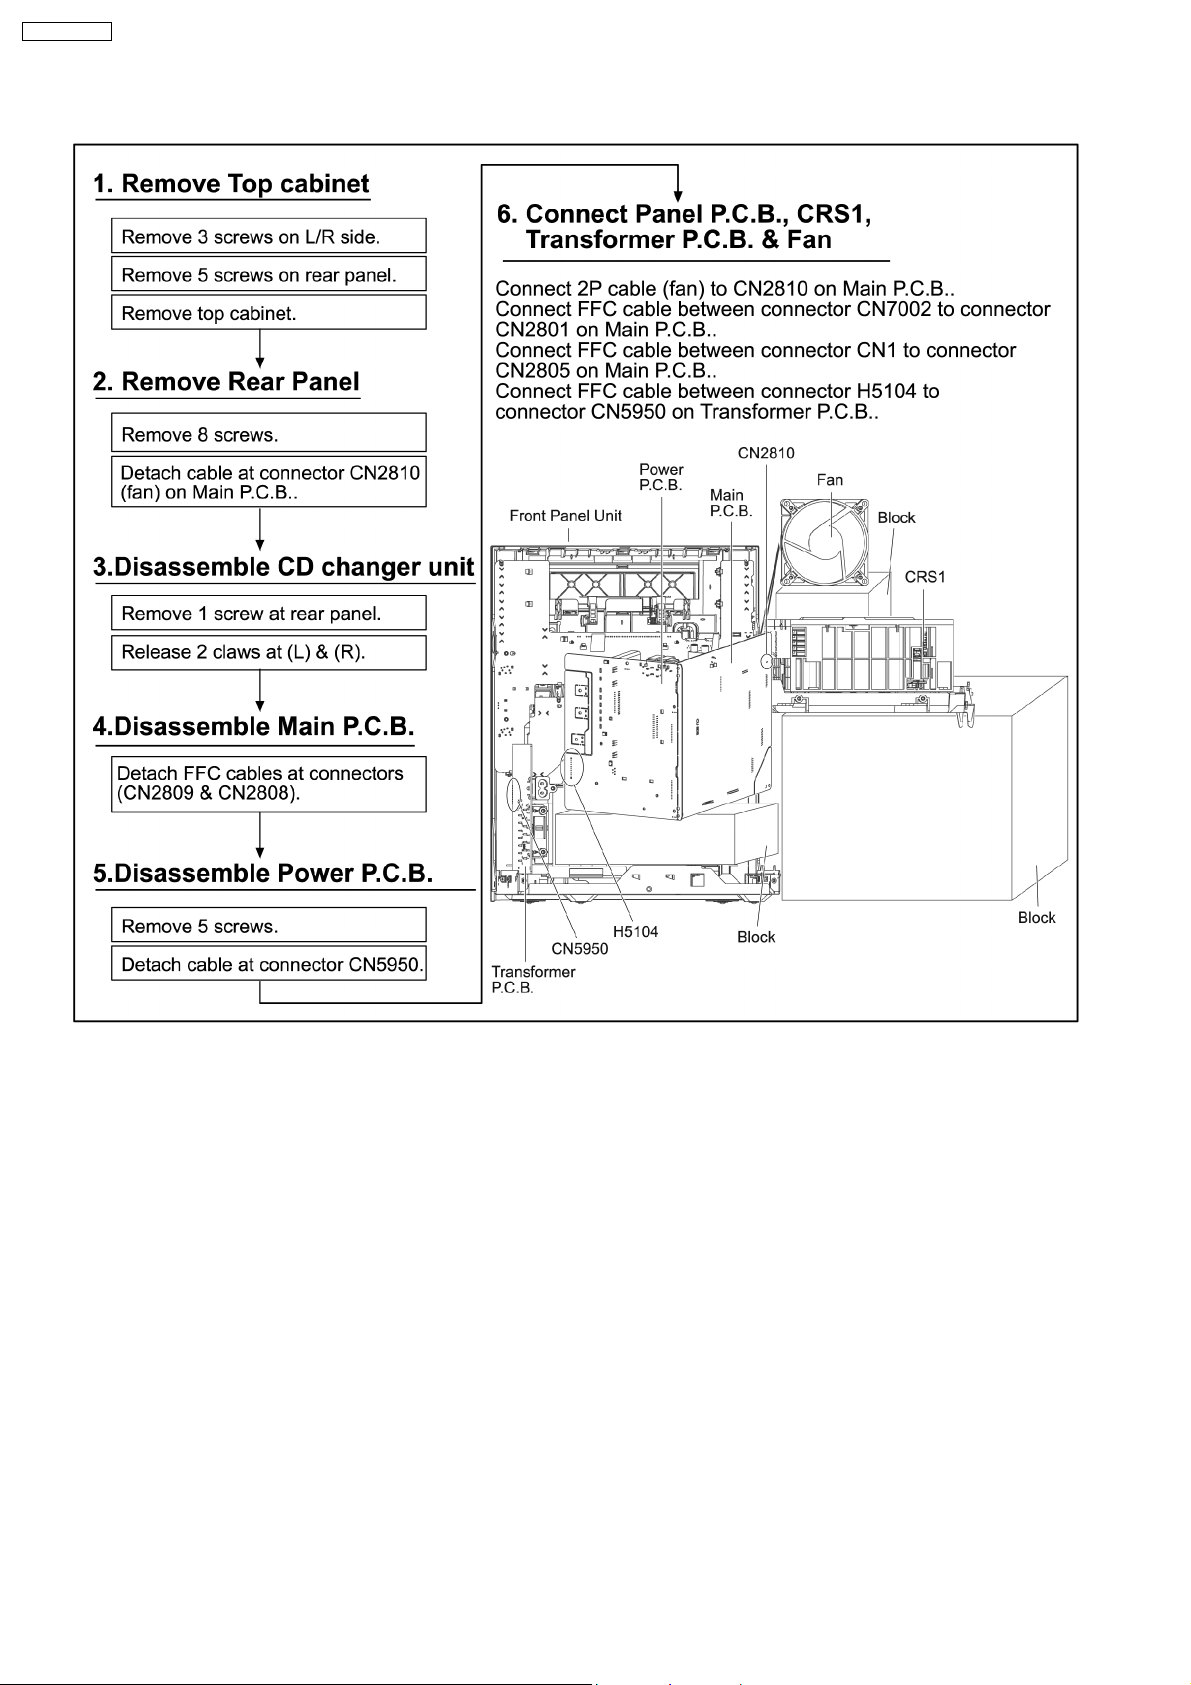
12.3. Checking and Repairing of Panel, Deck & Deck Mechanism P.C.B.
43
Page 43
SA-AK250GCP
12.4. Checking and Repairing of Power P.C.B.
44
Page 44
SA-AK250GCP
13 Procedure for Checking Operation of Individual Parts of
Deck Mechanism Unit
13.1. Operation Check with Cassette Tape
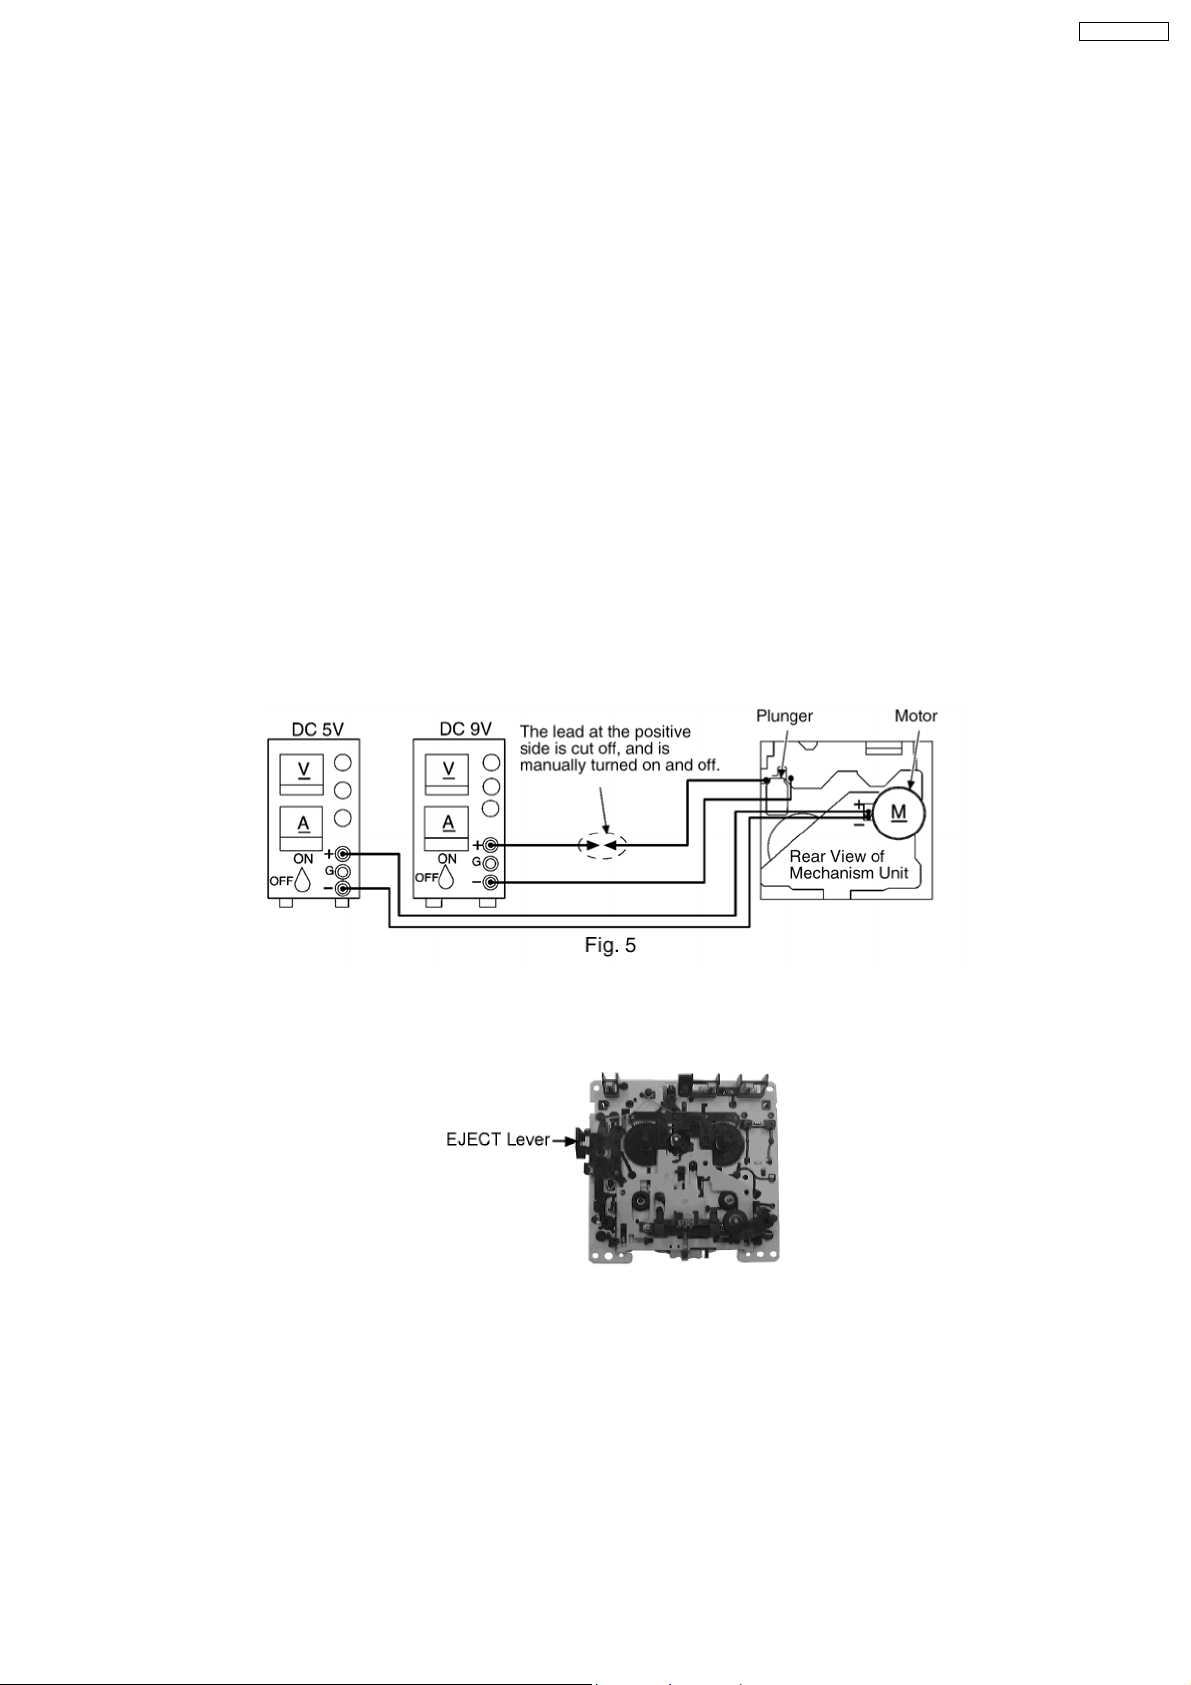
1. Pull up the EJECT lever using a rubber band. (Fig. 6)
2. Supply DC5V to MOTOR. (→ MOTOR rotates.) (Fig. 5)
3. Insert a cassette tape to the unit.
4. Supply DC9V to the plunger, and turn the power ON and OFF. (→ Power +PL, -PL) (Fig. 5)
a. FWD PLAY: Supply the plunger power in a flash. (ON: approx. 5msec)
b. FWD FF: Supply the plunger power in a flash at PLAY mode. (ON: approx. 5msec)
c. STOP: Supply the plunger power in a flash at FWD FF mode. (ON: approx. 5msec)
d. REV PLAY: Supply the plunger power in a normal timing at STOP mode. (ON: approx. 200msec)
e. REV REW: Supply the plunger power in a flash at REV PLAY mode. (ON: approx. 50msec)
f. STOP: Supply the plunger power in a flash at FF mode. (ON: approx. 50msec)
Repeat the operation (→ FWD PLAY)
(Note) Other operation may start if a timing of supplying the plunger power is missed.
13.1.1. Connection Status between Mechanism and Power Supply (Motor, Plunger)
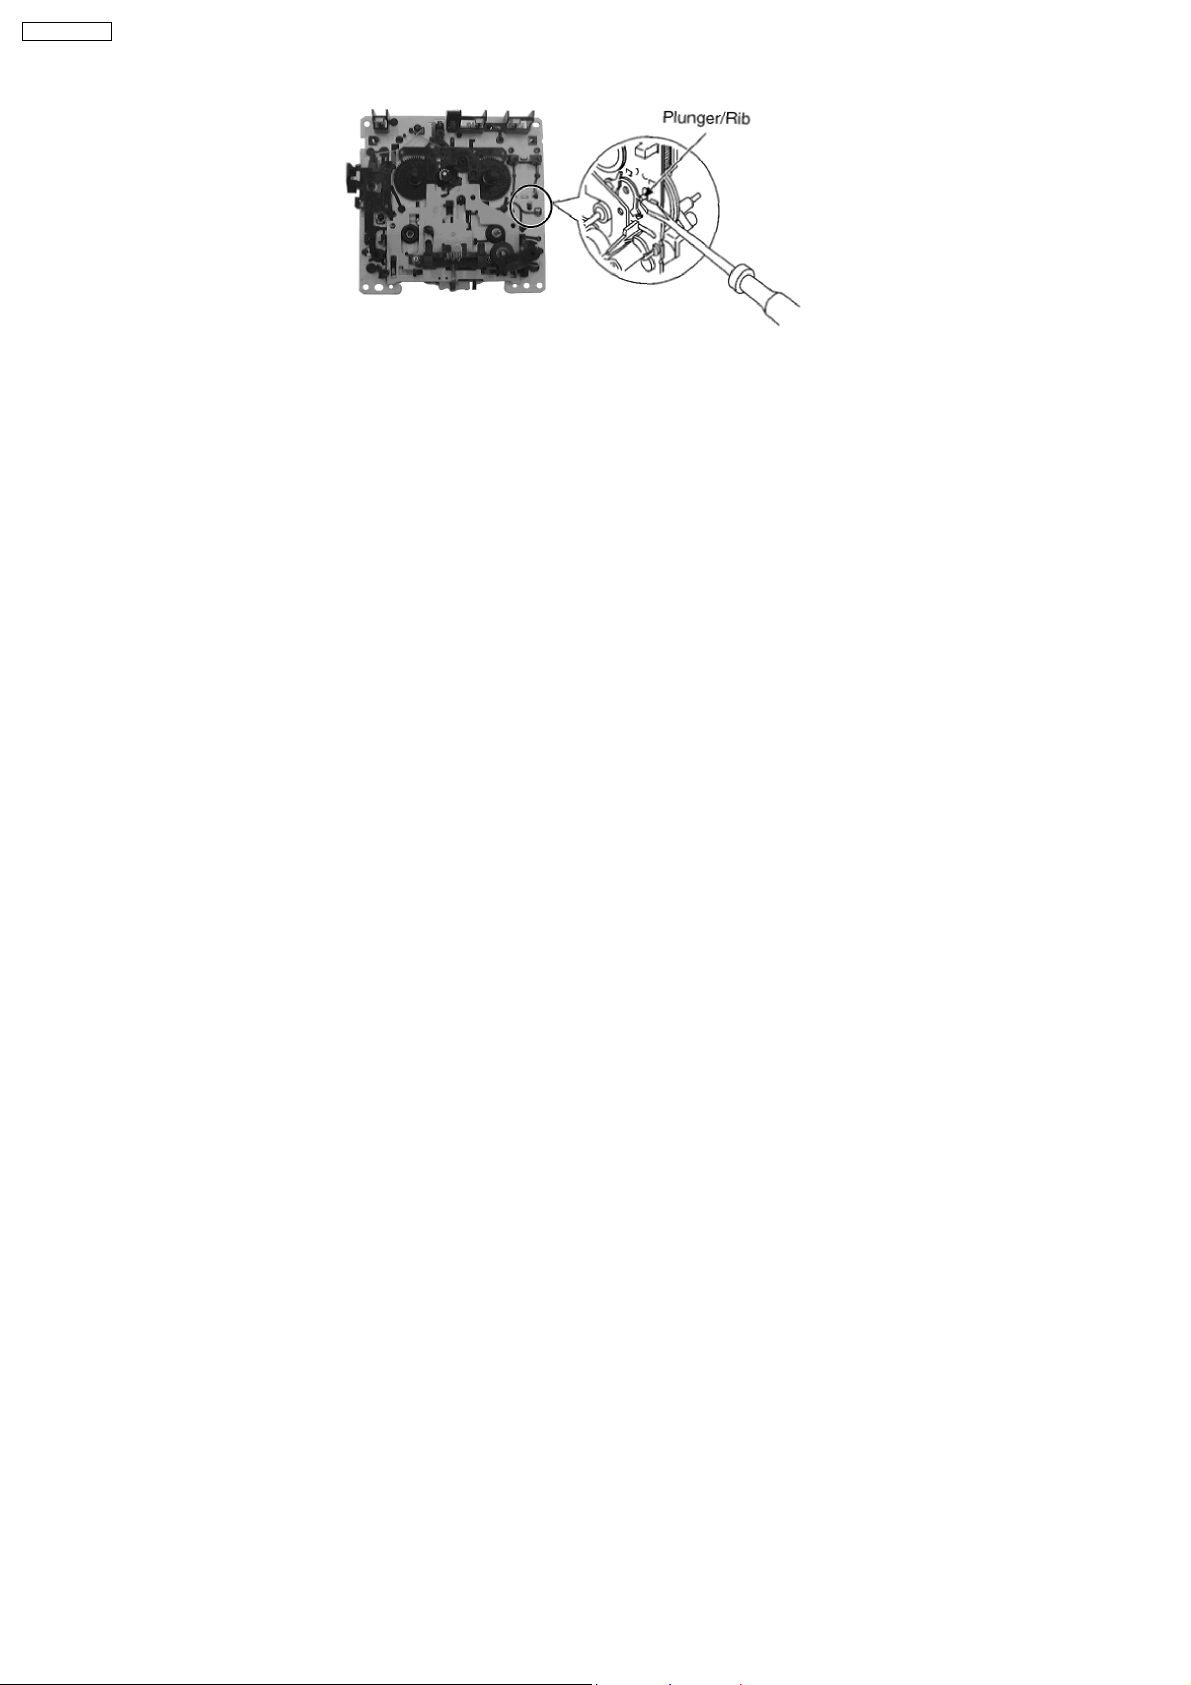
13.1.2. Operative Parts of Deck Mechanism Unit (EJECT lever fitted with rubber band,
Plunger/Rib operation)
Fig. 6
13.2. Operation Check without Cassette Tape
1. Pull up the EJECT lever using a rubber band. (Fig. 6)
2. Supply DC5V to MOTOR. (→ MOTOR rotates.)
3. Lift up the mechanism unit’s plunger/rib with the tip of a negative screwdriver, and operate the unit in the same timing as
supplying the power. (Fig. 7)
45
Page 45
SA-AK250GCP
46
Page 46
14 Measurement And Adjustments
14.1. Cassette Deck Section
14.1.1. Requirements
· Test tape (QZZCFM) (QZZCWAT)
· Normal blank cassette tape (QZZCRA)
· Digital frequency counter
· Oscilloscope
· Electrical voltmeter
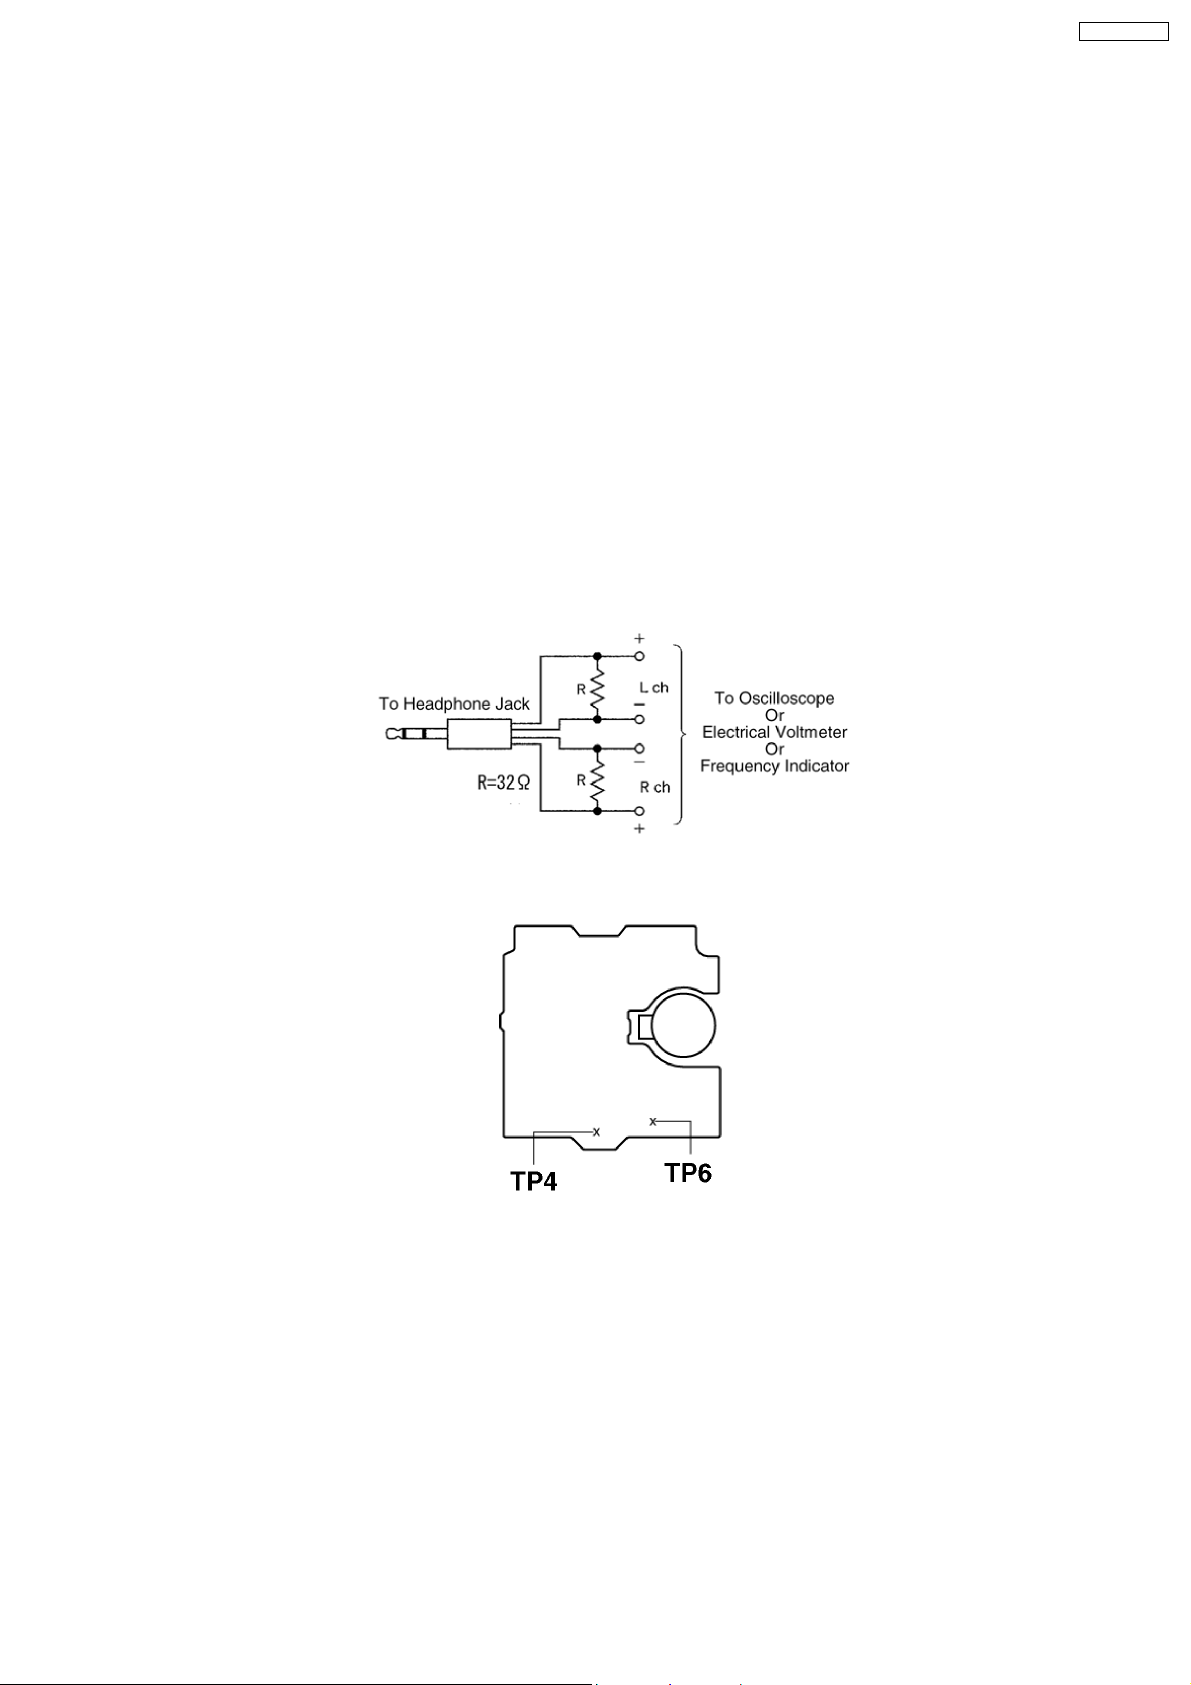
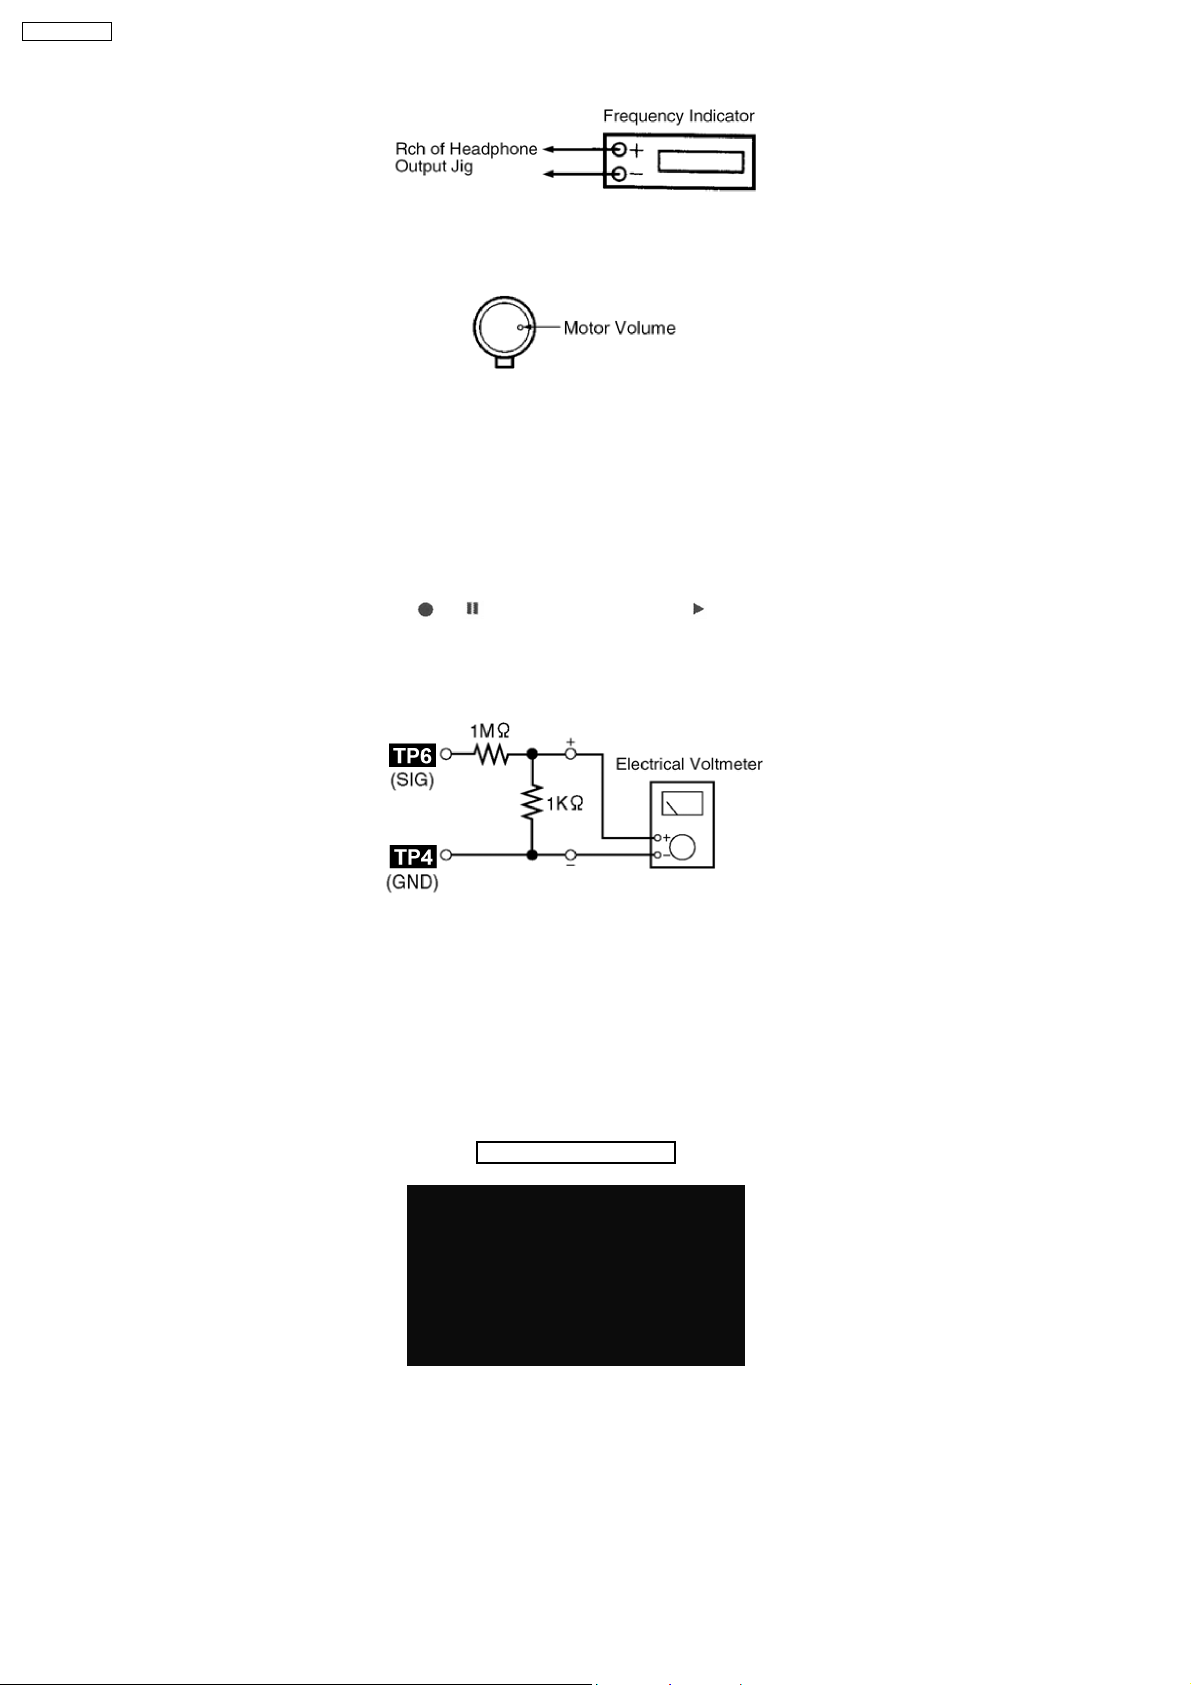
· Headphone jack output jig (Fig 8)
14.1.2. Setting of Unit
· VOLUME: MAX
14.1.3. Preparations
1. Apply under [10. Assembling and disassembling].
2. Remove 4 screws from the mechanism unit to disassemble. under [10. 13 Disassembly of Deck Mechanism Unit].
3. Connect the headphone jack output jig (Fig 8) to headphone jack.
SA-AK250GCP
Fig. 8
Fig. 9
14.1.4. Tape Speed Adjustment
· Normal speed adjustment (only during forward playback)
(Product reference value: 3,000±90Hz)
1. Connect a frequency indicator. (Fig 10)
2. Playback the middle portion of the test tape (QZZCWAT).
3. Adjust the motor screw so that the following output level is produced. (Fig 11)
Adjustment Range: 3,000 ± 90Hz (a constant speed)
47
Page 47
SA-AK250GCP
Fig. 10
Fig. 11
14.1.5. Bias Voltage Check
1. Connect an electrical voltmeter. (Fig 12) ( Fig 9 for location of test points)
2. Set the function to “TAPE” position.
3. Insert a normal blank cassette tape (QZZCRA).
4. While pressing and holding down [REC(
pressing the buttons till the recording pause mode is activated.)
5. Check that the output level is within the standard range.
Standard Range: 16 ± 3mV
/ )] button, press [TAPE( )] button to pause the recording mode. (Repeat
Fig. 12
14.1.6. Bias Frequency Check
1. Connect a digital frequency counter (Fig 13).
2. Set the function to “TAPE” position.
3. Insert a normal blank cassette tape (QZZCRA) and press “REC” mode on main unit.
4. Check that the output frequency is within the standard range.
Standard Value: 98 ±8 kHz
Fig. 13
48
Page 48

SA-AK250GCP
15 Voltage and Waveform Chart
Note:
Circuit voltage and waveform described herein shall be regarded as reference information when probing defect point, because it
may differ from an actual measuring value due to difference of Measuring instrument and its measuring condition and product itself.
15.1. CD Servo P.C.B.
15.2. Deck P.C.B. & Deck Mechanism P.C.B.
49
Page 49

SA-AK250GCP
15.3. Main P.C.B.
50
Page 50

15.4. Panel P.C.B. & Transformer P.C.B.
15.5. Power P.C.B.
SA-AK250GCP
51
Page 51

SA-AK250GCP
15.6. Waveform Chart
52
Page 52
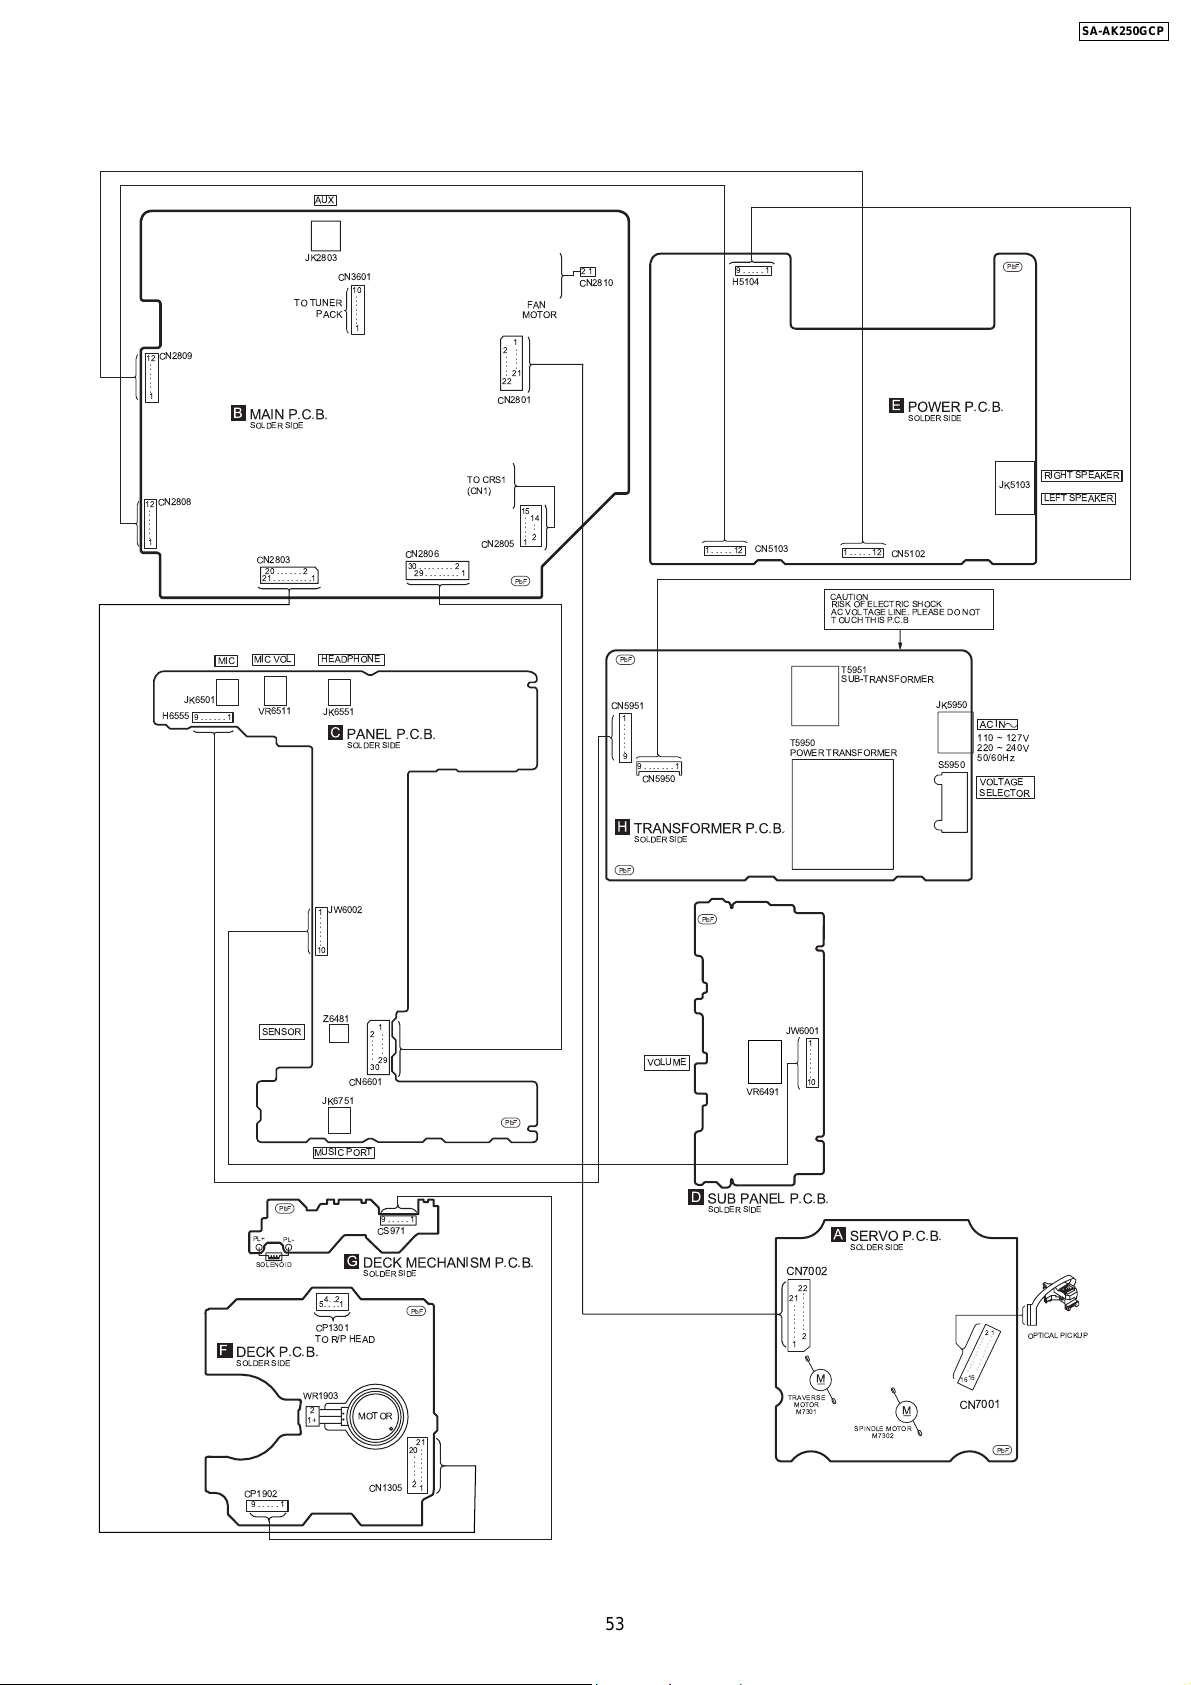
16 Wiring Connection Diagram
AUX
SA-AK250GCP
12
.......
1
12
.......
1
CN2809
CN2808
H6555
JK6501
9......1
B
MIC
JK2803
TO TUNER
MAIN P.C.B.
SOLDER SIDE
CN2803
20......2
21.........1
MIC VOL
VR6511
CN3601
10
.......
PACK
1
HEADPHONE
JK6551
C
PANEL P.C.B.
SOLDER SIDE
CN2806
30........2
29........1
TO CRS1
(CN1)
CN2805
1
2
.....
21
22
CN2801
FAN
MOTOR
.....
15
.....
1
PbF
PbF
JK5103
AC IN
110 ~ 127V
220 ~ 240V
50/60Hz
VOLTAGE
SELECTOR
RIGHT SPEAKER
LEFT SPEAKER
1.....12
9.....1
H5104
CN5103
1.....12
CAUTION
RISK OF ELECTRIC SHOCK
AC VOL TAGE LINE. PLEASE DO NOT
T OUCH THIS P.C.B
T5951
SUB-TRANSFORMER
T5950
POWER TRANSFORMER
E
POWER P.C.B.
SOLDER SIDE
CN5102
JK5950
S5950
21
CN2810
14
...
2
PbF
CN5951
1
.......
9
9.......1
CN5950
H
TRANSFORMER P.C.B.
SOLDER SIDE
PbF
-
F
DECK P.C.B.
SOLDER SIDE
PL+
SOLENOID
CP1902
9.....1
SENSOR
PbF
PL-
JW6002
1
.......
10
Z6481
1
.....
2
.....
29
30
CN6601
JK6751
MUSIC PORT
9.....1
CS971
G
DECK MECHANISM P.C.B.
SOLDER SIDE
4. .2
5....1
CP1301
TO R/P HEAD
WR1903
2
MOTOR
1+
CN1305
PbF
20
......
2
21
........
1
PbF
JW6001
1
.......
VOLUME
VR6491
PbF
D
SUB PANEL P.C.B.
SOLDER SIDE
10
A
SERVO P.C.B.
SOLDER SIDE
CN7002
22
.........
21
........
2
1
...........
15
OPTICAL PICKUP
...........
PbF
2
1
TRAVERSE
MOTOR
M7301
M
SPINDLE MOTOR
M7302
16
CN7001
M
53
Page 53

SA-AK250GCP
54
Page 54
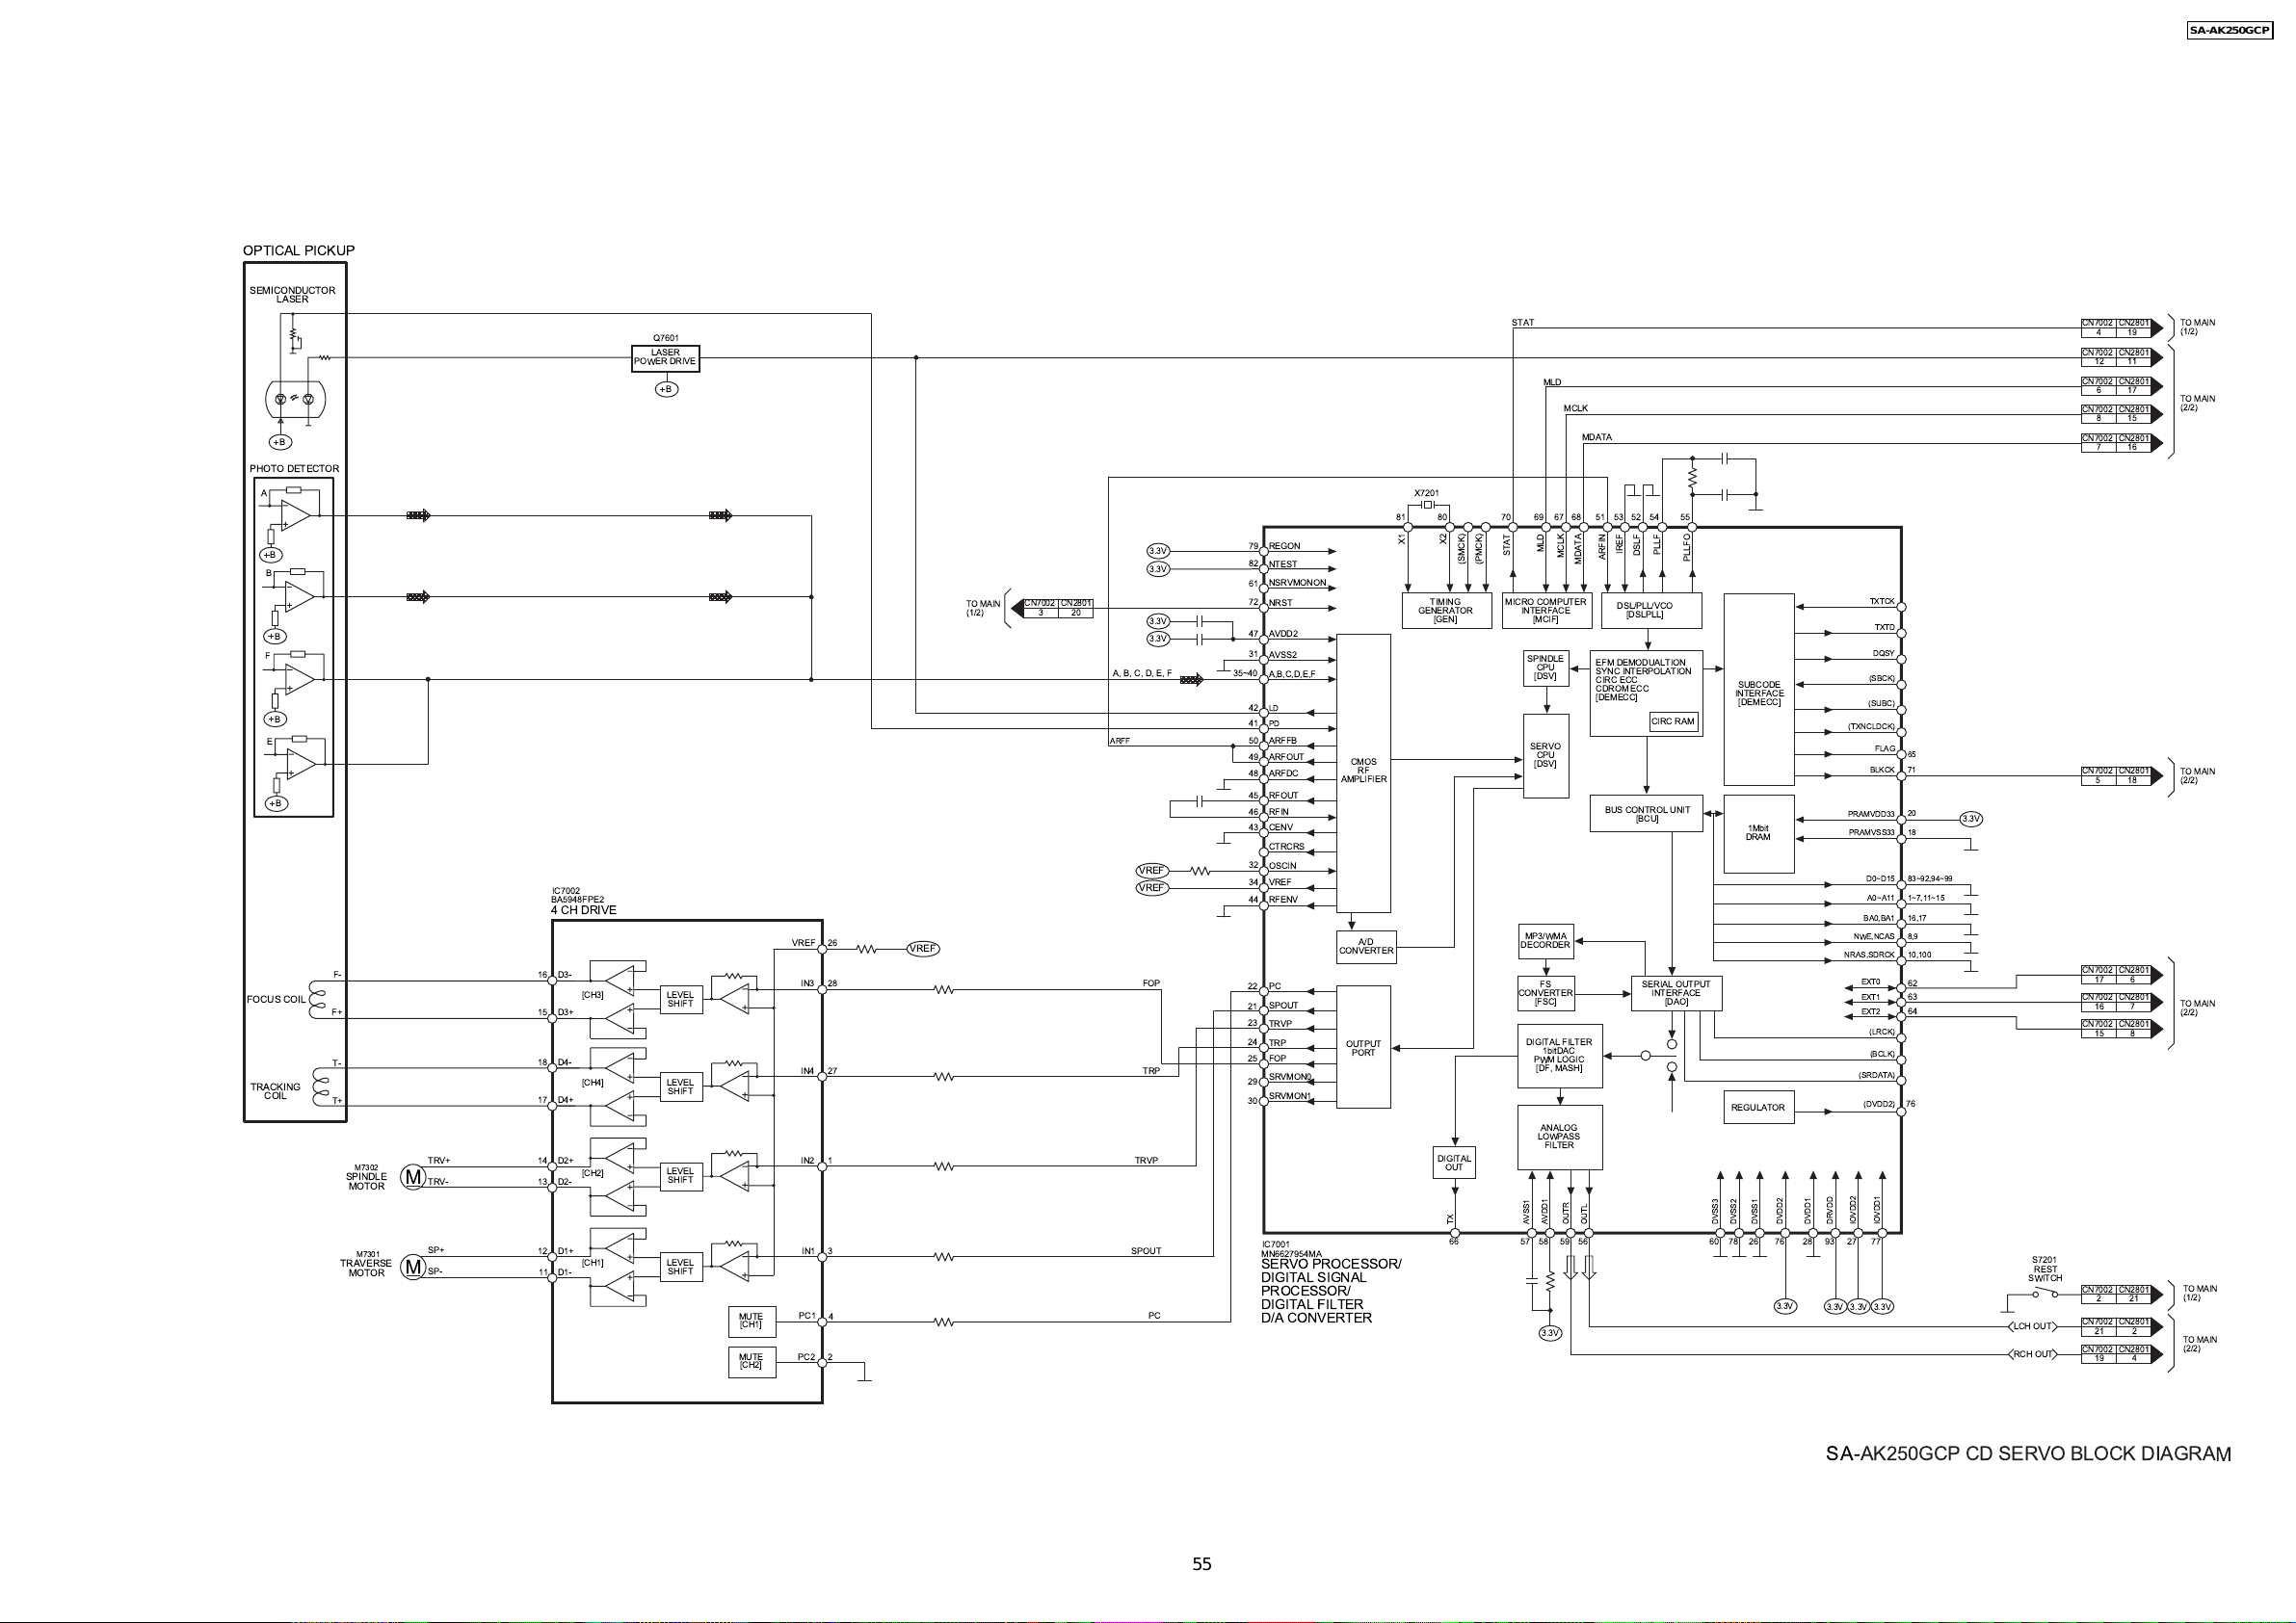
17 Block Diagram
17.1. CD Servo Diagram
OPTICAL PICKUP
SEMICONDUCTOR
LASER
B
PHOTO DETECTOR
A
B
B
B
F
B
E
B
F-
FOCUS COIL
TRACKING
COIL
F+
T-
T+
M7302
SPINDLE
MOTOR
M
TRV+
TRV-
IC7002
BA5948FPE2
4 CH DRIVE
D3-
16
D3+
15
D4-
18
17
D4+
D2+14
13
D2-
[CH3]
[CH4]
[CH2]
Q7601
LASER
POWER DRIVE
B
LEVEL
SHIFT
LEVEL
SHIFT
LEVEL
SHIFT
TO MAIN
(1/2)
26
VREF
IN3
28
27 TRP
IN4
IN2 1
VREF
CN7002 CN2801
320
3.3V
3.3V
3.3V
3.3V
A, B, C, D, E, F
ARFF
VREF
VREF
FOP
TRVP
35~40
79
82
61
72
47
31
42
41
50
49
48
45
46
43
32
34
44
22
21
23
24
25
29
30
REGON
NTEST
NSRVMONON
NRST
AVDD2
AVSS2
A,B,C,D,E,F
LD
PD
ARFFB
ARFOUT
ARFDC
RFOUT
RFIN
CENV
CTRCRS
OSCIN
VREF
RFENV
PC
SPOUT
TRVP
TRP
FOP
SRVMON0
SRVMON1
STAT
MLD
X7201
81 80 70 69 67 68 51 53 52 54 55
X2
CMOS
RF
AMPLIFIER
A/D
CONVERTER
OUTPUT
PORT
X1
TIMING
GENERATOR
[GEN]
DIGITAL
OUT
(SMCK)
(PMCK)
MLD
STAT
MICRO COMPUTER
INTERFACE
[MCIF]
SPINDLE
CPU
[DSV]
SERVO
CPU
[DSV]
MP3/WMA
DECORDER
FS
CONVERTER
[FSC]
DIGITAL FILTER
1bitDAC
PWM LOGIC
[DF, MASH]
ANALOG
LOWPASS
FILTER
MCLK
MDATA
MCLK
ARFIN
MDATA
EFM DEMODUALTION
SYNC INTERPOLATION
CIRC ECC
CDROM ECC
[DEMECC]
BUS CONTROL UNIT
IREF
DSLF
DSL/PLL/VCO
[DSLPLL]
CIRC RAM
[BCU]
SERIAL OUTPUT
INTERFACE
PLLF
[DAO]
PLLFO
SUBCODE
INTERFACE
[DEMECC]
1Mbit
DRAM
REGULATOR
TXTCK
TXTD
DQSY
(SBCK)
(SUBC)
(TXNCLDCK)
FLAG
BLKCK
PRAMVDD33
PRAMVSS33
D0~D15
A0~A11
BA0,BA1
NWE,NCAS
NRAS,SDRCK
EXT0
EXT1
EXT2
(LRCK)
(BCLK)
(SRDATA)
(DVDD2)
65
71
20
18
83~92,94~99
1~7,11~15
16,17
8,9
10,100
62
63
64
76
3.3V
CN7002 CN2801
4
19
CN7002 CN2801
11
12
CN7002 CN2801
6
17
CN7002 CN2801
8
15
CN7002 CN2801
7
16
CN7002 CN2801
518
CN7002 CN2801
17
6
CN7002 CN2801
16
7
CN7002 CN2801
8
15
SA-AK250GCP
TO MAIN
(1/2)
TO MAIN
(2/2)
TO MAIN
(2/2)
TO MAIN
(2/2)
M7301
TRAVERSE
MOTOR
M
SP+
SP-
TX
3
PC1
PC2
IN1
4
2
D1+
12
[CH1]
D1-
11
LEVEL
SHIFT
MUTE
[CH1]
MUTE
[CH2]
SPOUT
PC
IC7001
MN6627954MA
SERVO PROCESSOR/
DIGITAL SIGNAL
PROCESSOR/
DIGITAL FILTER
D/A CONVERTER
66 57
AVSS1
58
3.3V
AVDD1
OUTR
OUTL
6059 56
DVSS3
78
DVSS2
26
DVSS1
76
3.3V
DVDD2
DVDD1
93
28
3.3V 3.3V 3.3V
DRVDD
27
IOVDD2
77
IOVDD1
S7201
REST
SWITCH
LCH OUT
RCH OUT
CN7002 CN2801
21
2
CN7002 CN2801
2
21
CN7002 CN2801
4
19
TO MAIN
(1/2)
TO MAIN
(2/2)
SA-AK250GCP CD SERVO BLOCK DIAGRAM
55
Page 55
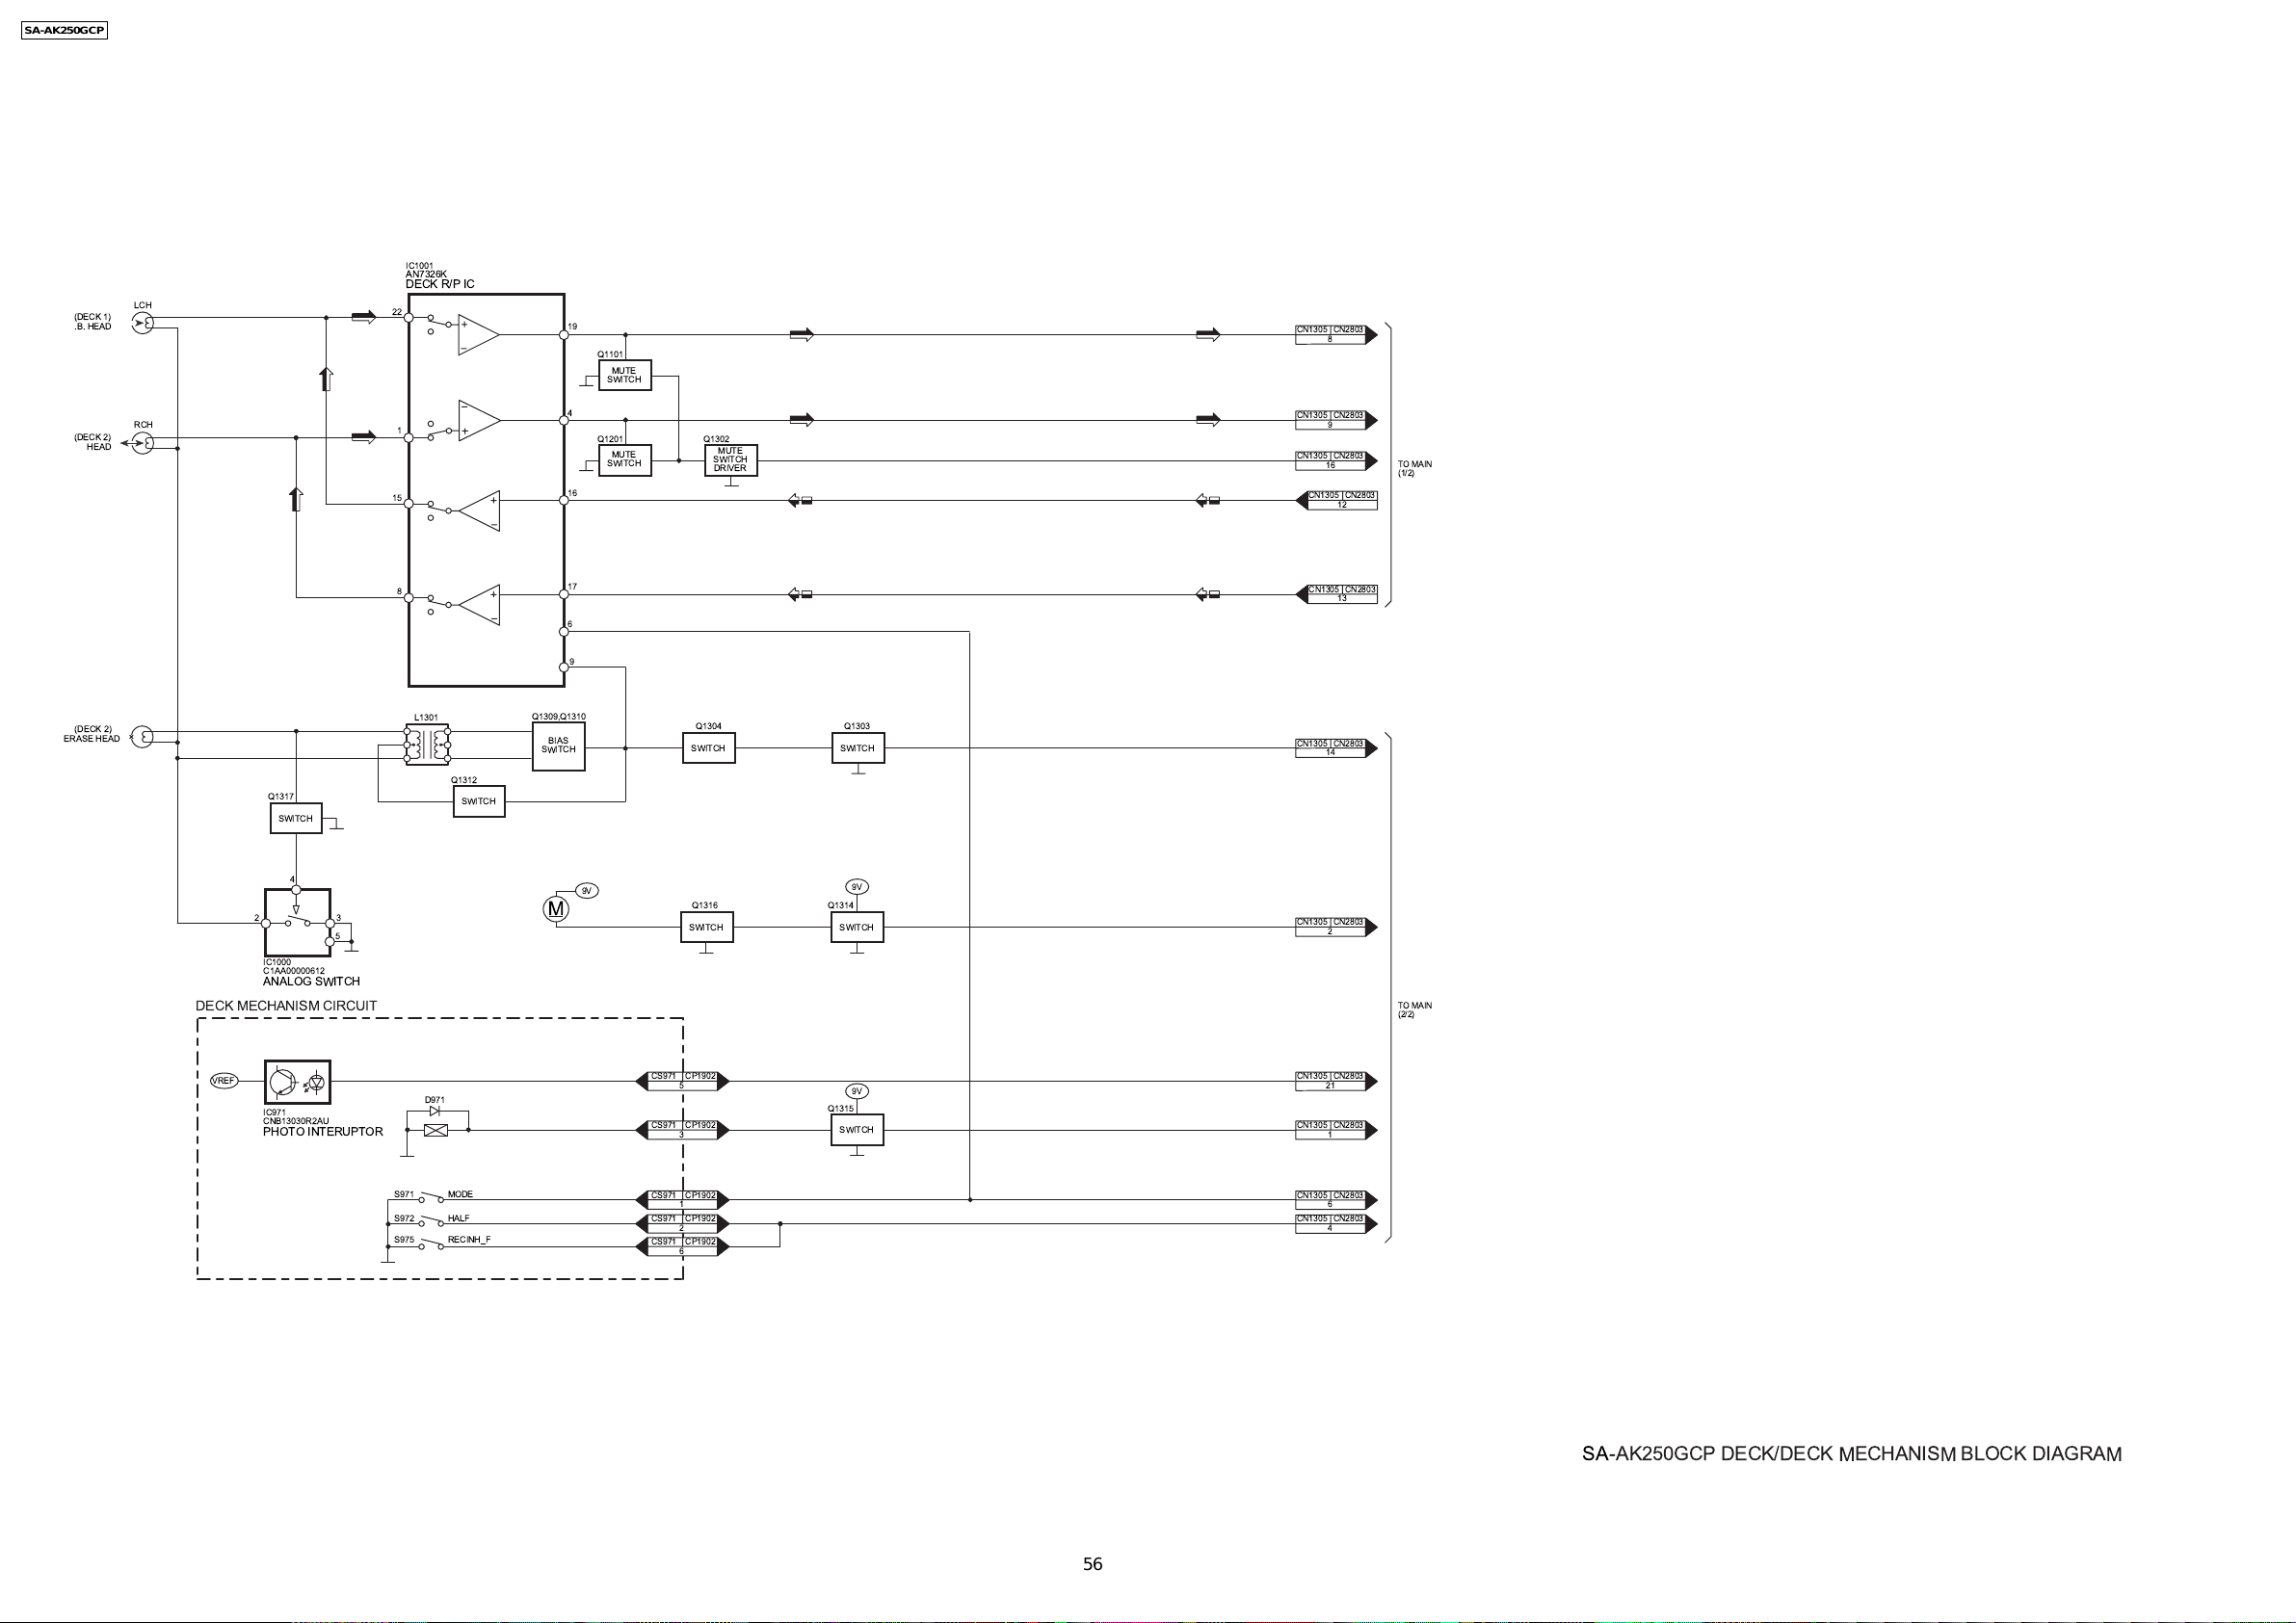
SA-AK250GCP
(DECK 1)
.B. HEAD
17.2. Deck/ Deck Mechanism Diagram
IC1001
AN7326K
DECK R/P IC
LCH
22
19
Q1101
SWITCH
MUTE
CN1305 CN2803
8
(DECK 2)
HEAD
(DECK 2)
ERASE HEAD
RCH
Q1317
SWITCH
4
2
IC1000
C1AA00000612
ANALOG SWITCH
3
5
DECK MECHANISM CIRCUIT
1
15
8
L1301
Q1312
SWITCH
4
16
17
6
9
Q1309,Q1310
BIAS
SWITCH
M
Q1201
MUTE
SWITCH
9V
Q1302
Q1304
SWITCH
Q1316
SWITCH
MUTE
SWITCH
DRIVER
Q1303
SWITCH
9V
Q1314
SWITCH
CN1305 CN2803
9
CN1305 CN2803
16
CN1305 CN2803
12
CN1305 CN2803
13
CN1305 CN2803
14
CN1305 CN2803
2
TO MAIN
(1/2)
TO MAIN
(2/2)
VREF
IC971
CNB13030R2AU
PHOTO INTERUPTOR
D971
S971 MODE
S972 HALF
S975 RECINH_F
CS971 CP1902
5
CS971 CP1902
3
CS971 CP1902
1
CS971 CP1902
2
CS971 CP1902
6
Q1315
9V
SWITCH
56
CN1305 CN2803
21
CN1305 CN2803
1
CN1305 CN2803
6
CN1305 CN2803
4
SA-AK250GCP DECK/DECK MECHANISM BLOCK DIAGRAM
Page 56
FROM DECK
TO TUNER
PACK
FROM
CD SERVO
FROM PANEL
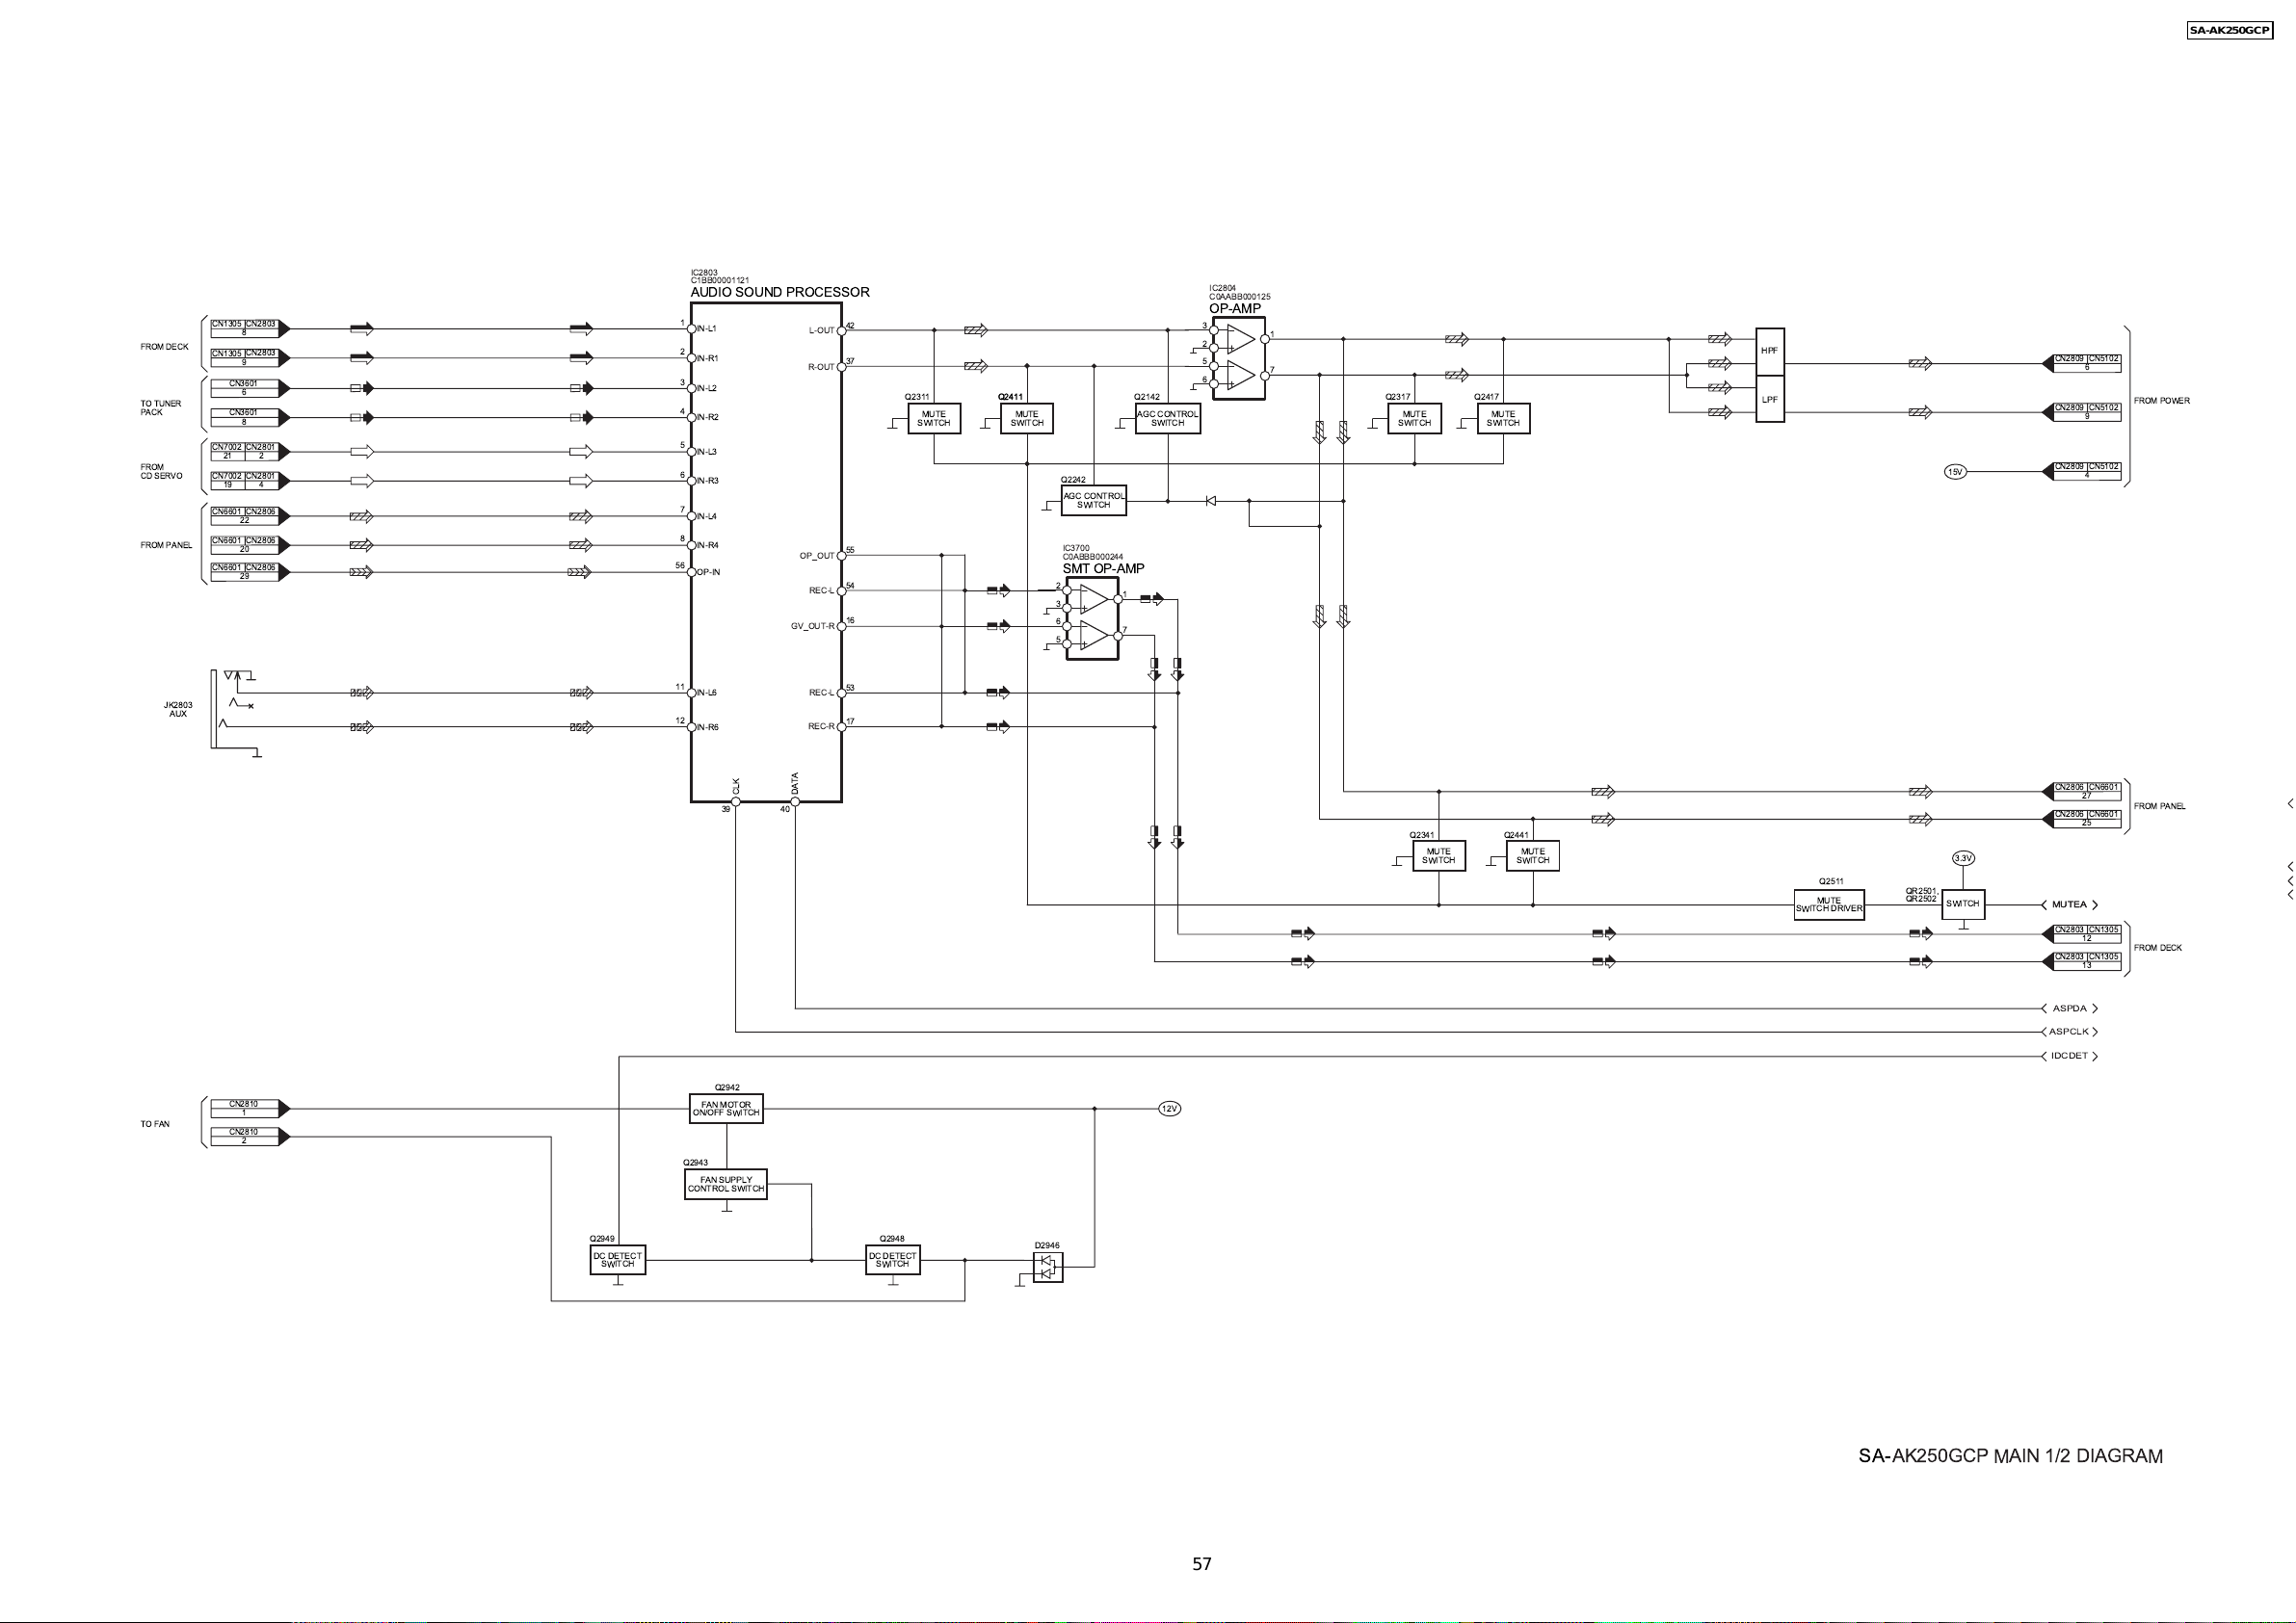
17.3. Main Diagram
CN1305 CN2803
8
CN1305 CN2803
9
CN3601
6
CN3601
8
CN7002 CN2801
21
2
CN7002 CN2801
19
4
CN6601 CN2806
22
CN6601 CN2806
20
CN6601 CN2806
29
IC2803
C1BB00001121
AUDIO SOUND PROCESSOR
1
IN-L1
2
IN-R1
3
IN-L2
4
IN-R2
5
IN-L3
6
IN-R3
7
IN-L4
8
IN-R4
56
OP-IN
L-OUT
R-OUT
OP_OUT
REC-L
GV_OUT-R
SA-AK250GCP
IC2804
C0AABB000125
42
37
SWITCH
Q2142
AGC CONTROL
SWITCH
1
7
Q2311
MUTE
SWITCH
55
54
16
Q2411
Q2411
MUTE
MUTE
SWITCH
SWITCH
Q2242
AGC CONTROL
IC3700
C0ABBB000244
SMT OP-AMP
2
3
6
5
OP-AMP
3
2
5
6
1
7
Q2317
MUTE
SWITCH
Q2417
MUTE
SWITCH
HPF
LPF
CN2809 CN5102
6
CN2809 CN5102
15V
CN2809 CN5102
FROM POWER
9
4
TO FAN
JK2803
AUX
CN2810
1
CN2810
2
Q2949
DC DETECT
SWITCH
11
IN-L6
12
IN-R6
39 40
Q2942
FAN MOTOR
ON/OFF SWITCH
Q2943
FAN SUPPLY
CONTROL SWITCH
CLK
DATA
REC-L
REC-R
53
17
Q2948
DC DETECT
SWITCH
D2946
CN2806 CN6601
27
CN2806 CN6601
Q2341
MUTE
SWITCH
12V
Q2441
MUTE
SWITCH
Q2511
MUTE
SWITCH DRIVER
QR2501,
QR2502
3.3V
SWITCH
MUTEA
MUTEA
CN2803 CN1305
CN2803 CN1305
ASPDA
ASPCLK
IDCDET
FROM PANEL
25
12
FROM DECK
13
57
SA-AK250GCP MAIN 1/2 DIAGRAM
Page 57
SA-AK250GCP
MUTEA
IDCDET
ASPDA
ASPCLK
40
SW_LVL1
SW_LVL2
MUTE_A
ASP_DAT
26 27
ASP_CLK
/RESET EFP_RESET
MUTE_DA
PLG
MTR
DECK_AD2
DECK AD1
REC
PHOTO
5995973912 302252
5
CN3200 P901
74
D1
USB_IRQ/XM10
PLL_CLK
DO
IC2801
C2CBYY000482
MICROPROCESSOR
CE
FROM USB
13
11
X2802
CN3200 P901
CN3200 P90115CN3200 P90116CN3200 P901
X2801
Xin
XciN
Xcout
ST_SW
HOME_SW
CW
CCW
CN3200 P9018CN3200 P90110CN3200 P901
15 13 10 11 78 77 76 19 75 81 79 50 47 46
Xout
17
CN3200 P901
OPEN_SW
19
18
CN3200 P901
33
USB_RST(CLK)
PLAY_SW
CLOSE_SW
17
CN2801 CN70026CN2801 CN70027CN2801 CN7002
BOTTOM_SW
UP_SENSOR
FROM CD SERVO
8
6
16
7
15
8
CN2801 CN700215CN2801 CN700216CN2801 CN700217CN2801 CN700218CN2801 CN700219CN2801 CN700220CN2801 CN7002
MLD
MCLK
BLKCK
MDATA_OUT
5
3
4
2
21
/RESTSW
STANDBY
DCDET
VOL_LED
STATUS
CD_RST
PLUNGER
PCONT/EFP/CS
FL_CS
VOL_JOG
EE_CS
354
41 42 43
EE_CS/EFP/EPM
FL_CLK
FL_DOUT
EE_CLK
EE_CLK
12V
5.3V
5V
3.3V
3.3V
-9V
E-EPROM IC
(NOT SUPPLIED)
EE_DAT
EE_DAT
KEY3
KEY2
94 2018937190 927270518854558782838680848521575856
IC2871
KEY1
RMT
SYNC
CN2808 CN5103
9
CN2808 CN5103
10
CN2808 CN5103
5
CN2808 CN5103
6
CN2808 CN5103
12
CN2808 CN5103
11
CN2808 CN5103
8
CN2808 CN5103
7
CN2808 CN5103
4
FROM POWER
IC4000
C0DBZGC00067
3.3 REGULATOR
3
STBY
1
OUT
GND
2
D2813
Q2936
CD SUPPLY
CONTROLSWITCH
17
CN6601 CN2806
16
CN6601 CN2806
13
CN6601 CN2806
12
CN6601 CN2806
11
CN6601 CN2806
FROM PANEL
9
CN6601 CN2806
8
CN6601 CN2806
7
CN6601 CN2806
5
CN6601 CN2806
3
CN6601 CN2806
14
CN2805
CN2805
Q2937
CHANGER PLUNGER
ON/OFF SWITCH
12
D2936
VREF
CN2803
1
CN1305
QR3106
FROM DECK
SWITCH
CN1305 CN2803
21
CN1305 CN2803
1
CN3601
CN3601
2
CN1305 CN2803
CN1305 CN2803
14
CN1305 CN2803
6
4
2
QR3105
Q2803
RESET (MICRO-P)
SWITCH
6V
IC2872
C0CBAHG00011
VOLTAGE
REGULATOR
OUT
3
3.3V5V15V
D2811
3
CN5102 CN2809
FROM POWER
CN2803
5
CN1305
SWITCH
3
CN3601
TO TUNER
CN3601
PACK
Q3601
4
15V
SWITCH
CN3601
7
D2937-D2941
4
CN2805
1
CN2805
2
CN2805
5
CN2805
6
CN2805
7
CN2805
TO CRSI (CN1)
8
CN2805
11
CN2805
13
CN2805
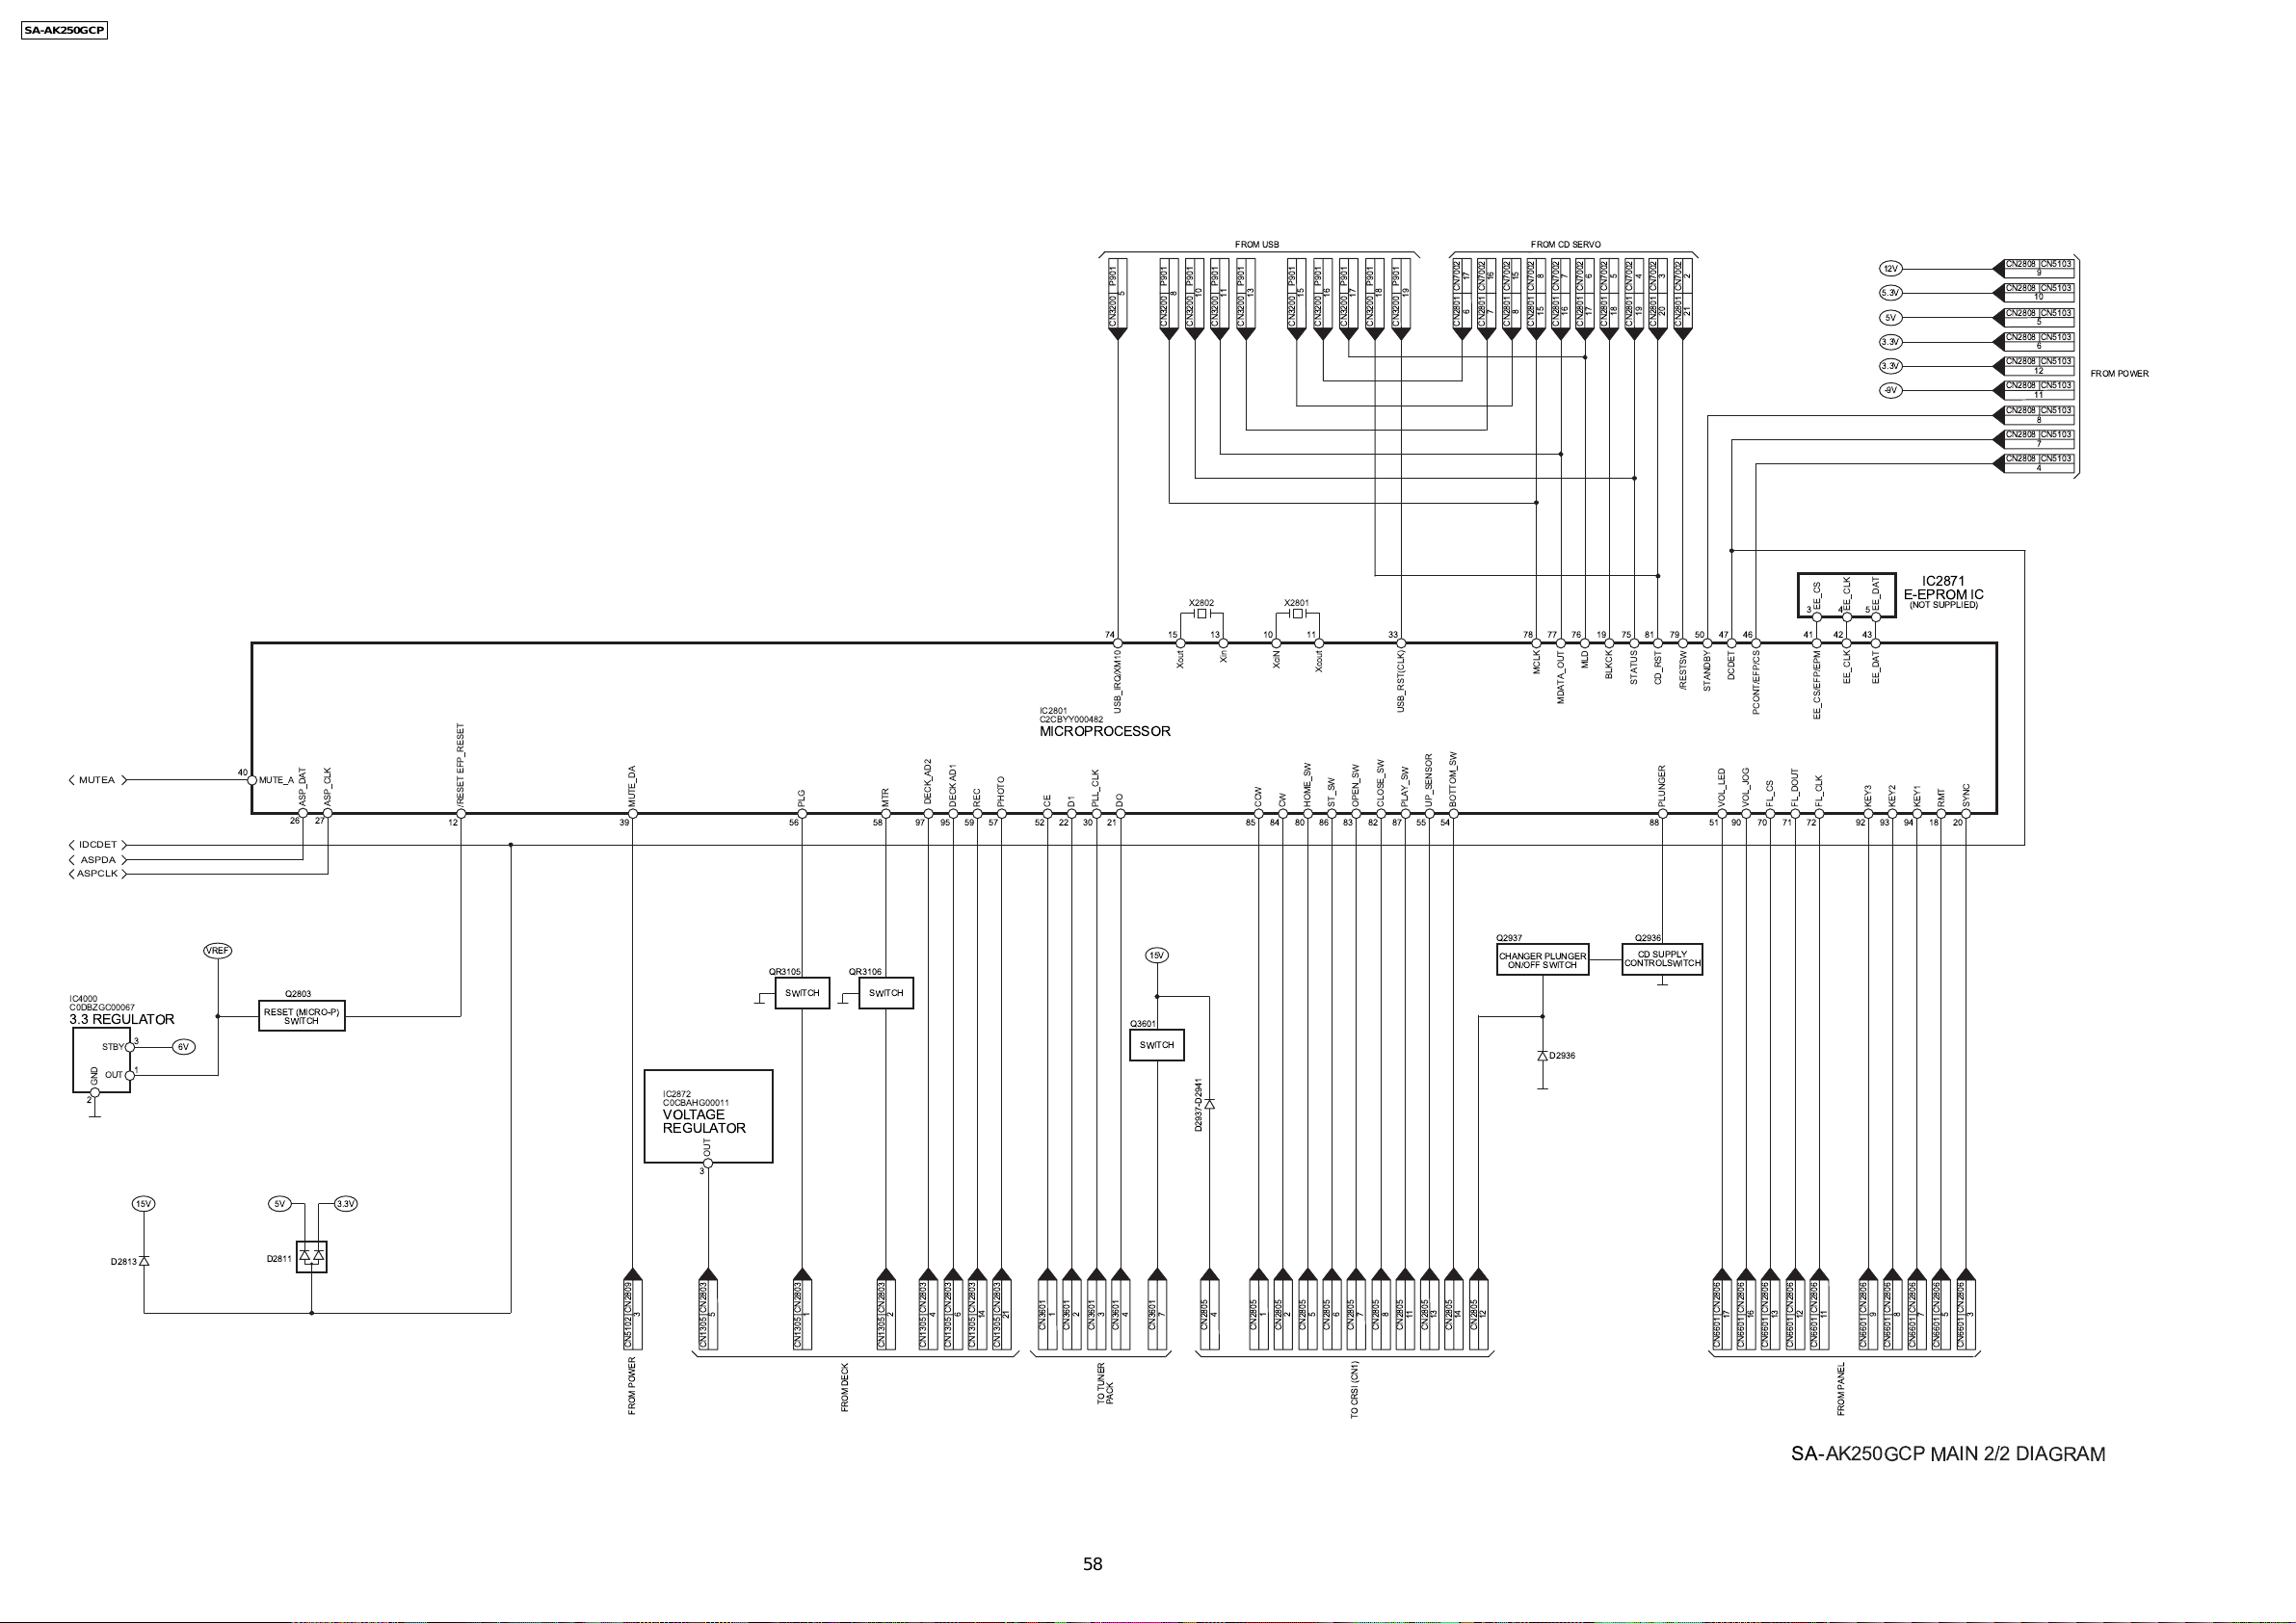
SA-AK250GCP MAIN 2/2 DIAGRAM
58
Page 58
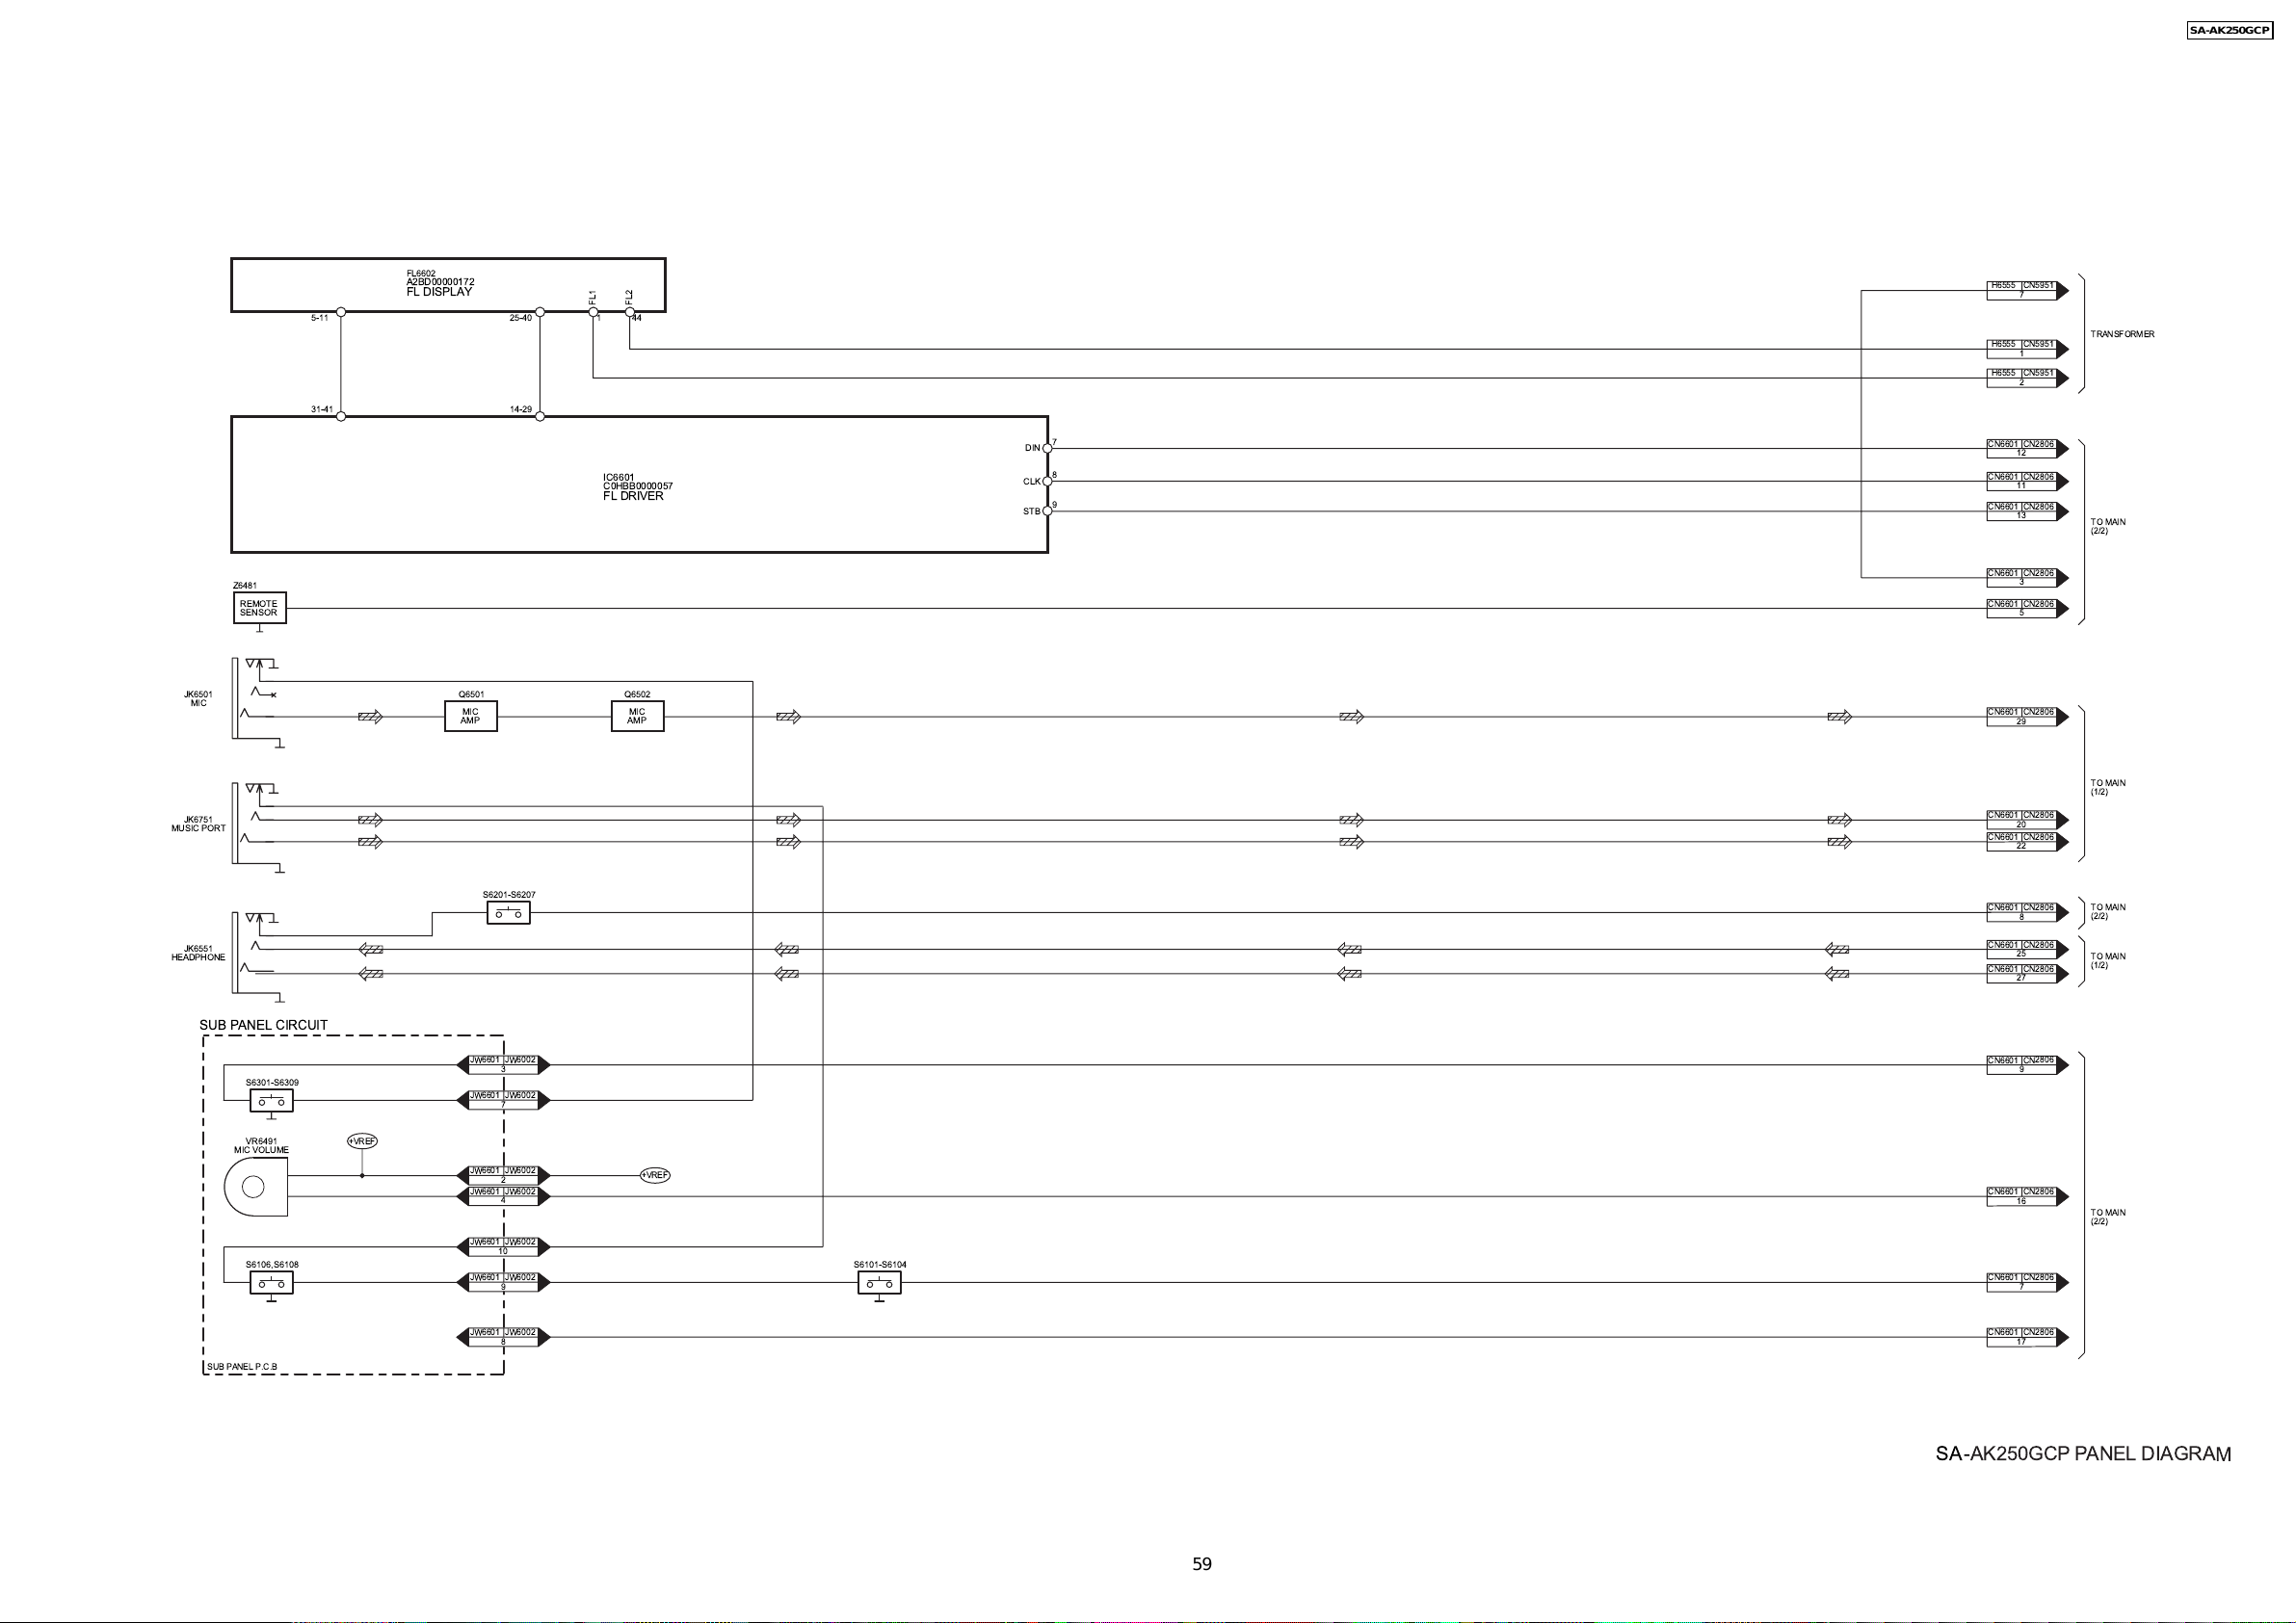
17.4. Panel Diagram
FL6602
A2BD00000172
FL DISPLAY
5-11
31-41
25-40 1 44
FL1
14-29
SA-AK250GCP
H6555 CN5951
FL2
7
H6555 CN5951
1
H6555 CN5951
2
TRANSFORMER
JK6501
MIC
JK6751
MUSIC PORT
JK6551
HEADPHONE
Z6481
REMOTE
SENSOR
Q6501
MIC
AMP
S6201-S6207
IC6601
C0HBB0000057
FL DRIVER
Q6502
MIC
AMP
DIN
CLK
STB
7
8
9
CN6601 CN2806
12
CN6601 CN2806
11
CN6601 CN2806
13
CN6601 CN2806
3
CN6601 CN2806
5
CN6601 CN2806
29
CN6601 CN2806
20
CN6601 CN2806
22
CN6601 CN2806
8
CN6601 CN2806
25
CN6601 CN2806
27
TO MAIN
(2/2)
TO MAIN
(1/2)
TO MAIN
(2/2)
TO MAIN
(1/2)
SUB PANEL CIRCUIT
JW6601 JW6002
S6301-S6309
VR6491
MIC VOLUME
S6106,S6108 S6101-S6104
SUB PANEL P.C.B
+VREF
3
JW6601 JW6002
7
JW6601 JW6002
2
JW6601 JW6002
4
JW6601 JW6002
10
JW6601 JW6002
9
JW6601 JW6002
8
+VREF
59
CN6601 CN2806
9
CN6601 CN2806
16
CN6601 CN2806
7
CN6601 CN2806
17
TO MAIN
(2/2)
SA-AK250GCP PANEL DIAGRAM
Page 59
SA-AK250GCP
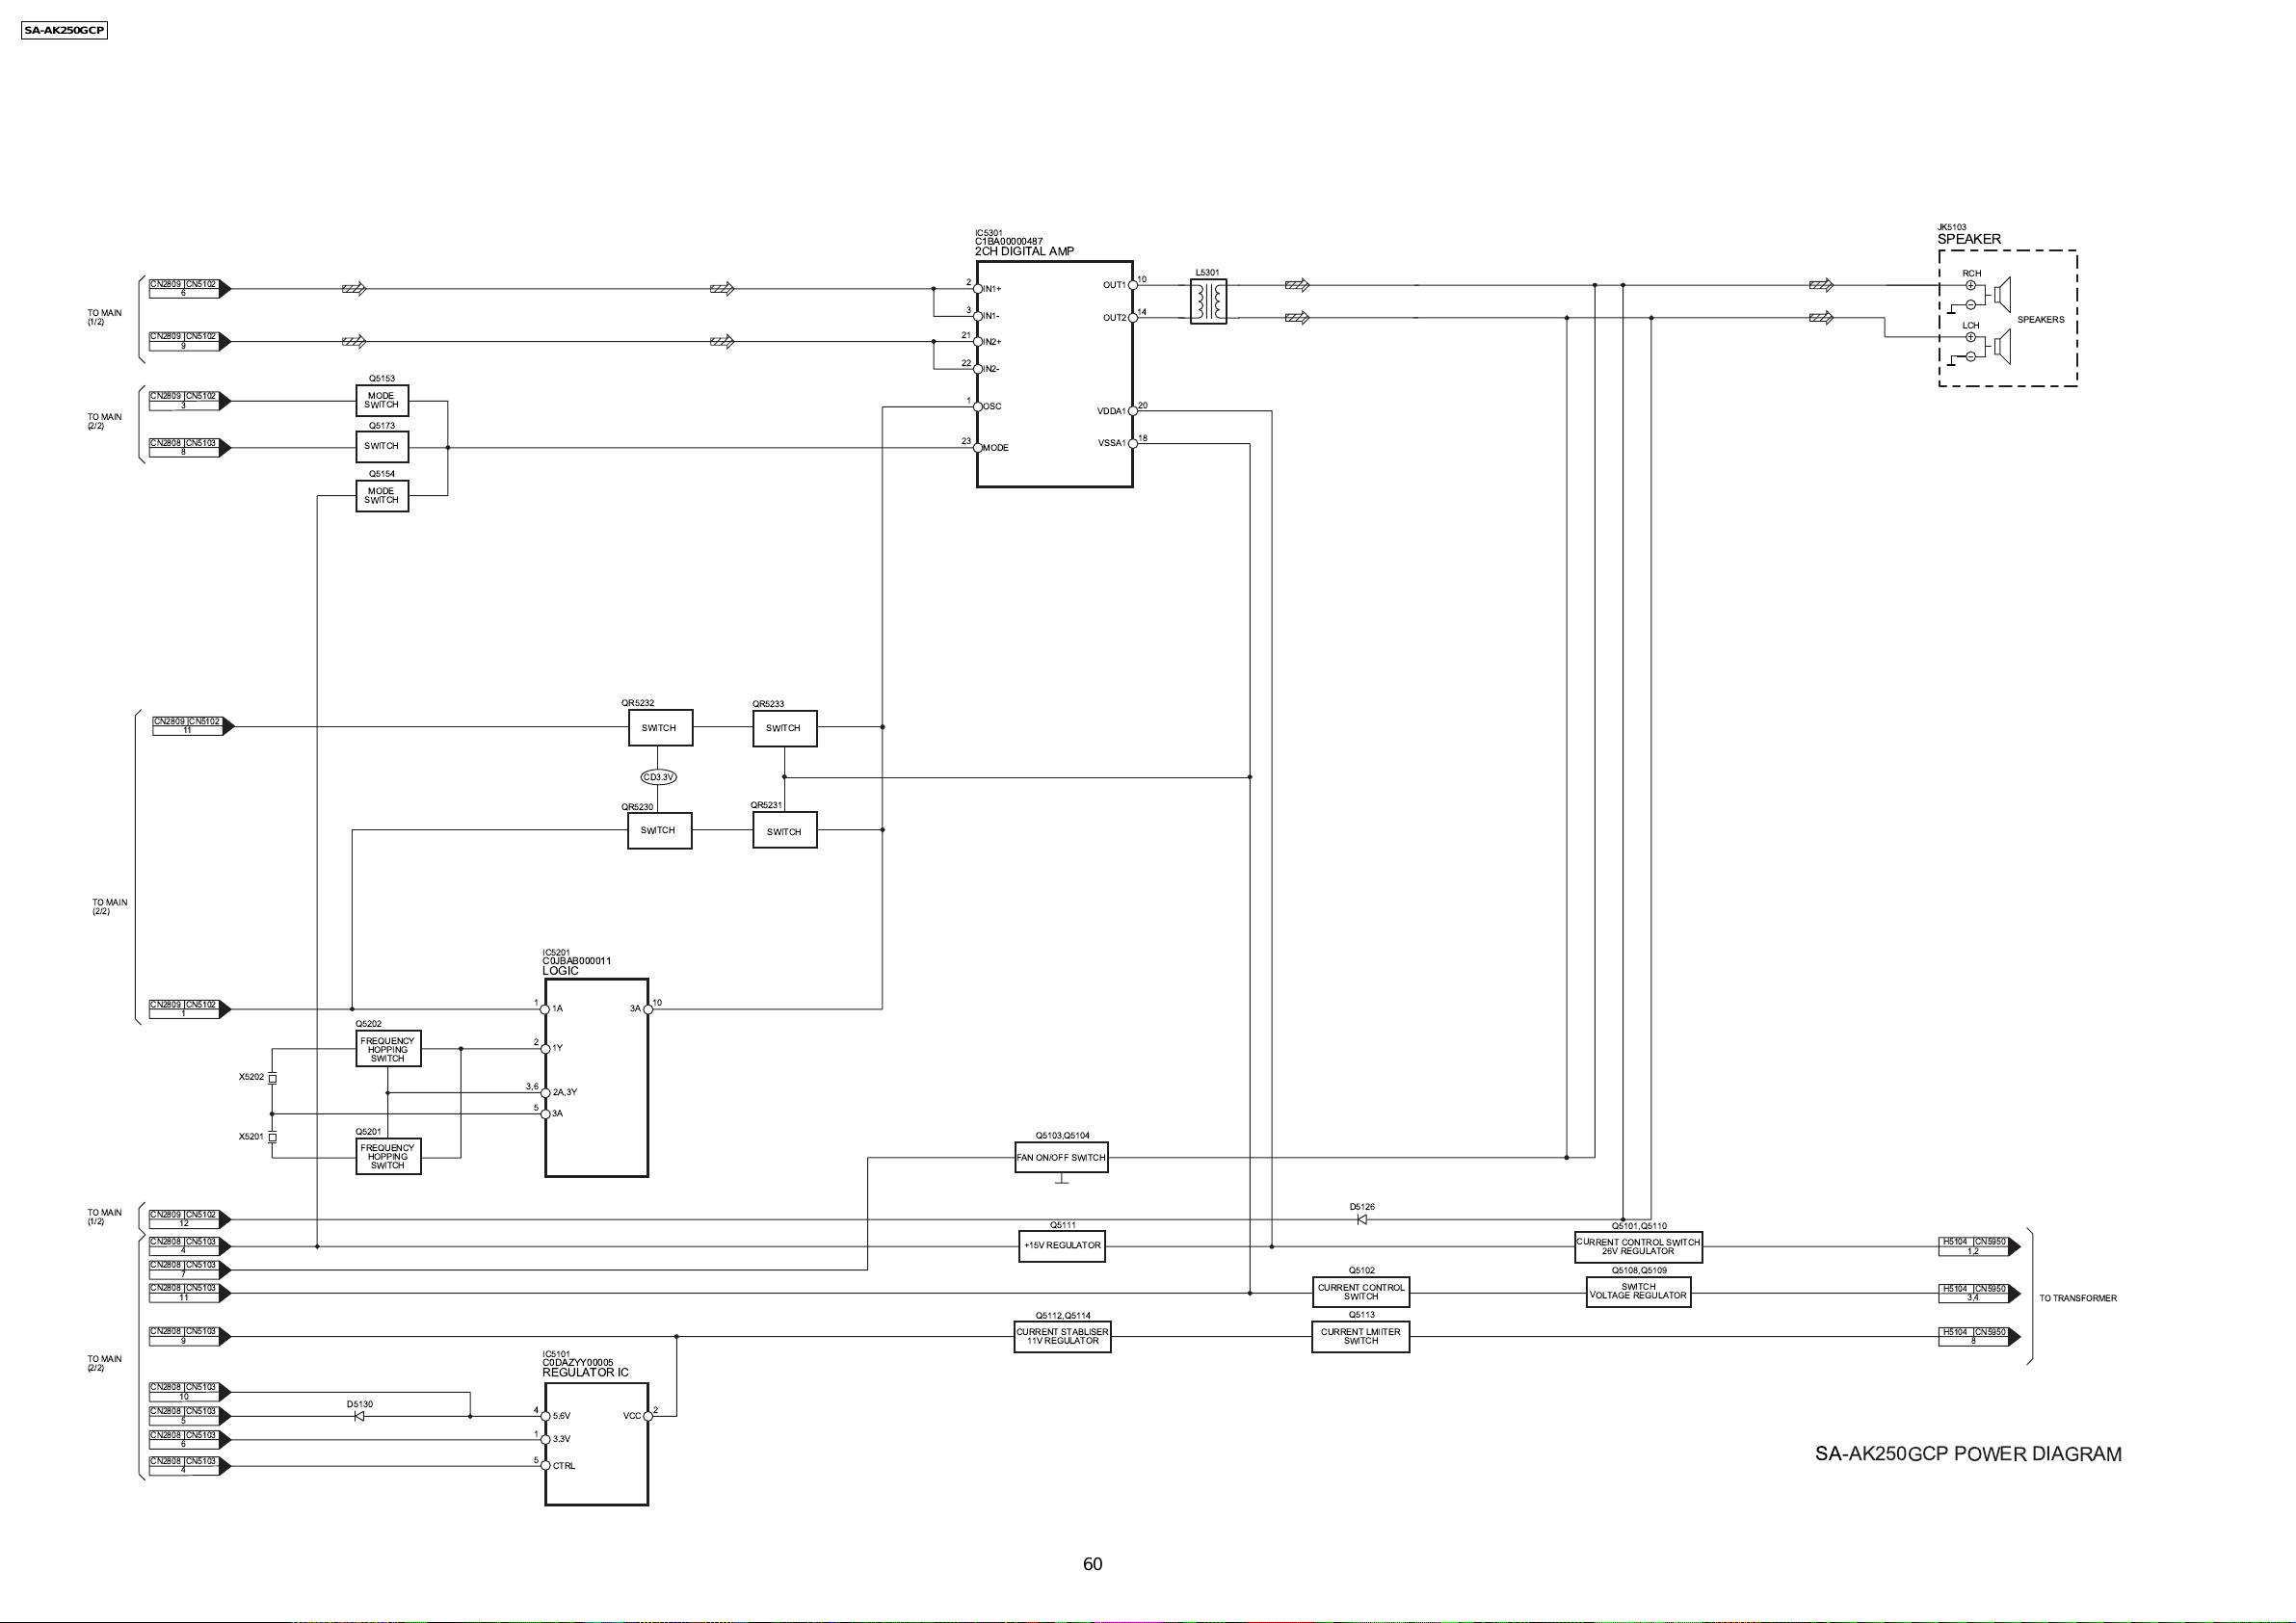
17.5. Power Diagram
TO MAIN
(1/2)
TO MAIN
(2/2)
CN2809 CN5102
6
CN2809 CN5102
9
CN2809 CN5102
3
CN2808 CN5103
8
CN2809 CN5102
11
Q5153
MODE
SWITCH
Q5173
SWITCH
Q5154
MODE
SWITCH
QR5232
QR5230
SWITCH
CD3.3V
SWITCH
QR5233
SWITCH
QR5231
SWITCH
IC5301
C1BA00000487
2CH DIGITAL AMP
2
IN1+
3
IN1-
21
IN2+
22
IN2-
1
OSC
23
MODE
OUT1
OUT2
VDDA1
VSSA1
JK5103
SPEAKER
10
14
20
18
L5301
RCH
LCH
SPEAKERS
TO MAIN
(2/2)
TO MAIN
(1/2)
TO MAIN
(2/2)
CN2809 CN5102
1
CN2809 CN5102
12
CN2808 CN5103
4
CN2808 CN5103
7
CN2808 CN5103
11
CN2808 CN5103
9
CN2808 CN5103
10
CN2808 CN5103
5
CN2808 CN5103
6
CN2808 CN5103
4
X5202
X5201
Q5202
FREQUENCY
HOPPING
Q5201
FREQUENCY
HOPPING
D5130
SWITCH
SWITCH
IC5201
C0JBAB000011
LOGIC
1
1A
2
1Y
3,6
2A,3Y
5
3A
IC5101
C0DAZYY00005
REGULATOR IC
42
5.6V VCC
1
3.3V
5
CTRL
10
3A
Q5103,Q5104
FAN ON/OFF SWITCH
Q5111
+15V REGULATOR
Q5112,Q5114
CURRENT STABLISER
11V REGULATOR
D5126
Q5102
CURRENT CONTROL
SWITCH
Q5113
CURRENT LMIITER
SWITCH
Q5101,Q5110
CURRENT CONTROL SWITCH
26V REGULATOR
Q5108,Q5109
SWITCH
VOLTAGE REGULATOR
H5104 CN5950
1,2
H5104 CN5950
3,4
H5104 CN5950
8
TO TRANSFORMER
SA-AK250GCP POWER DIAGRAM
60
Page 60
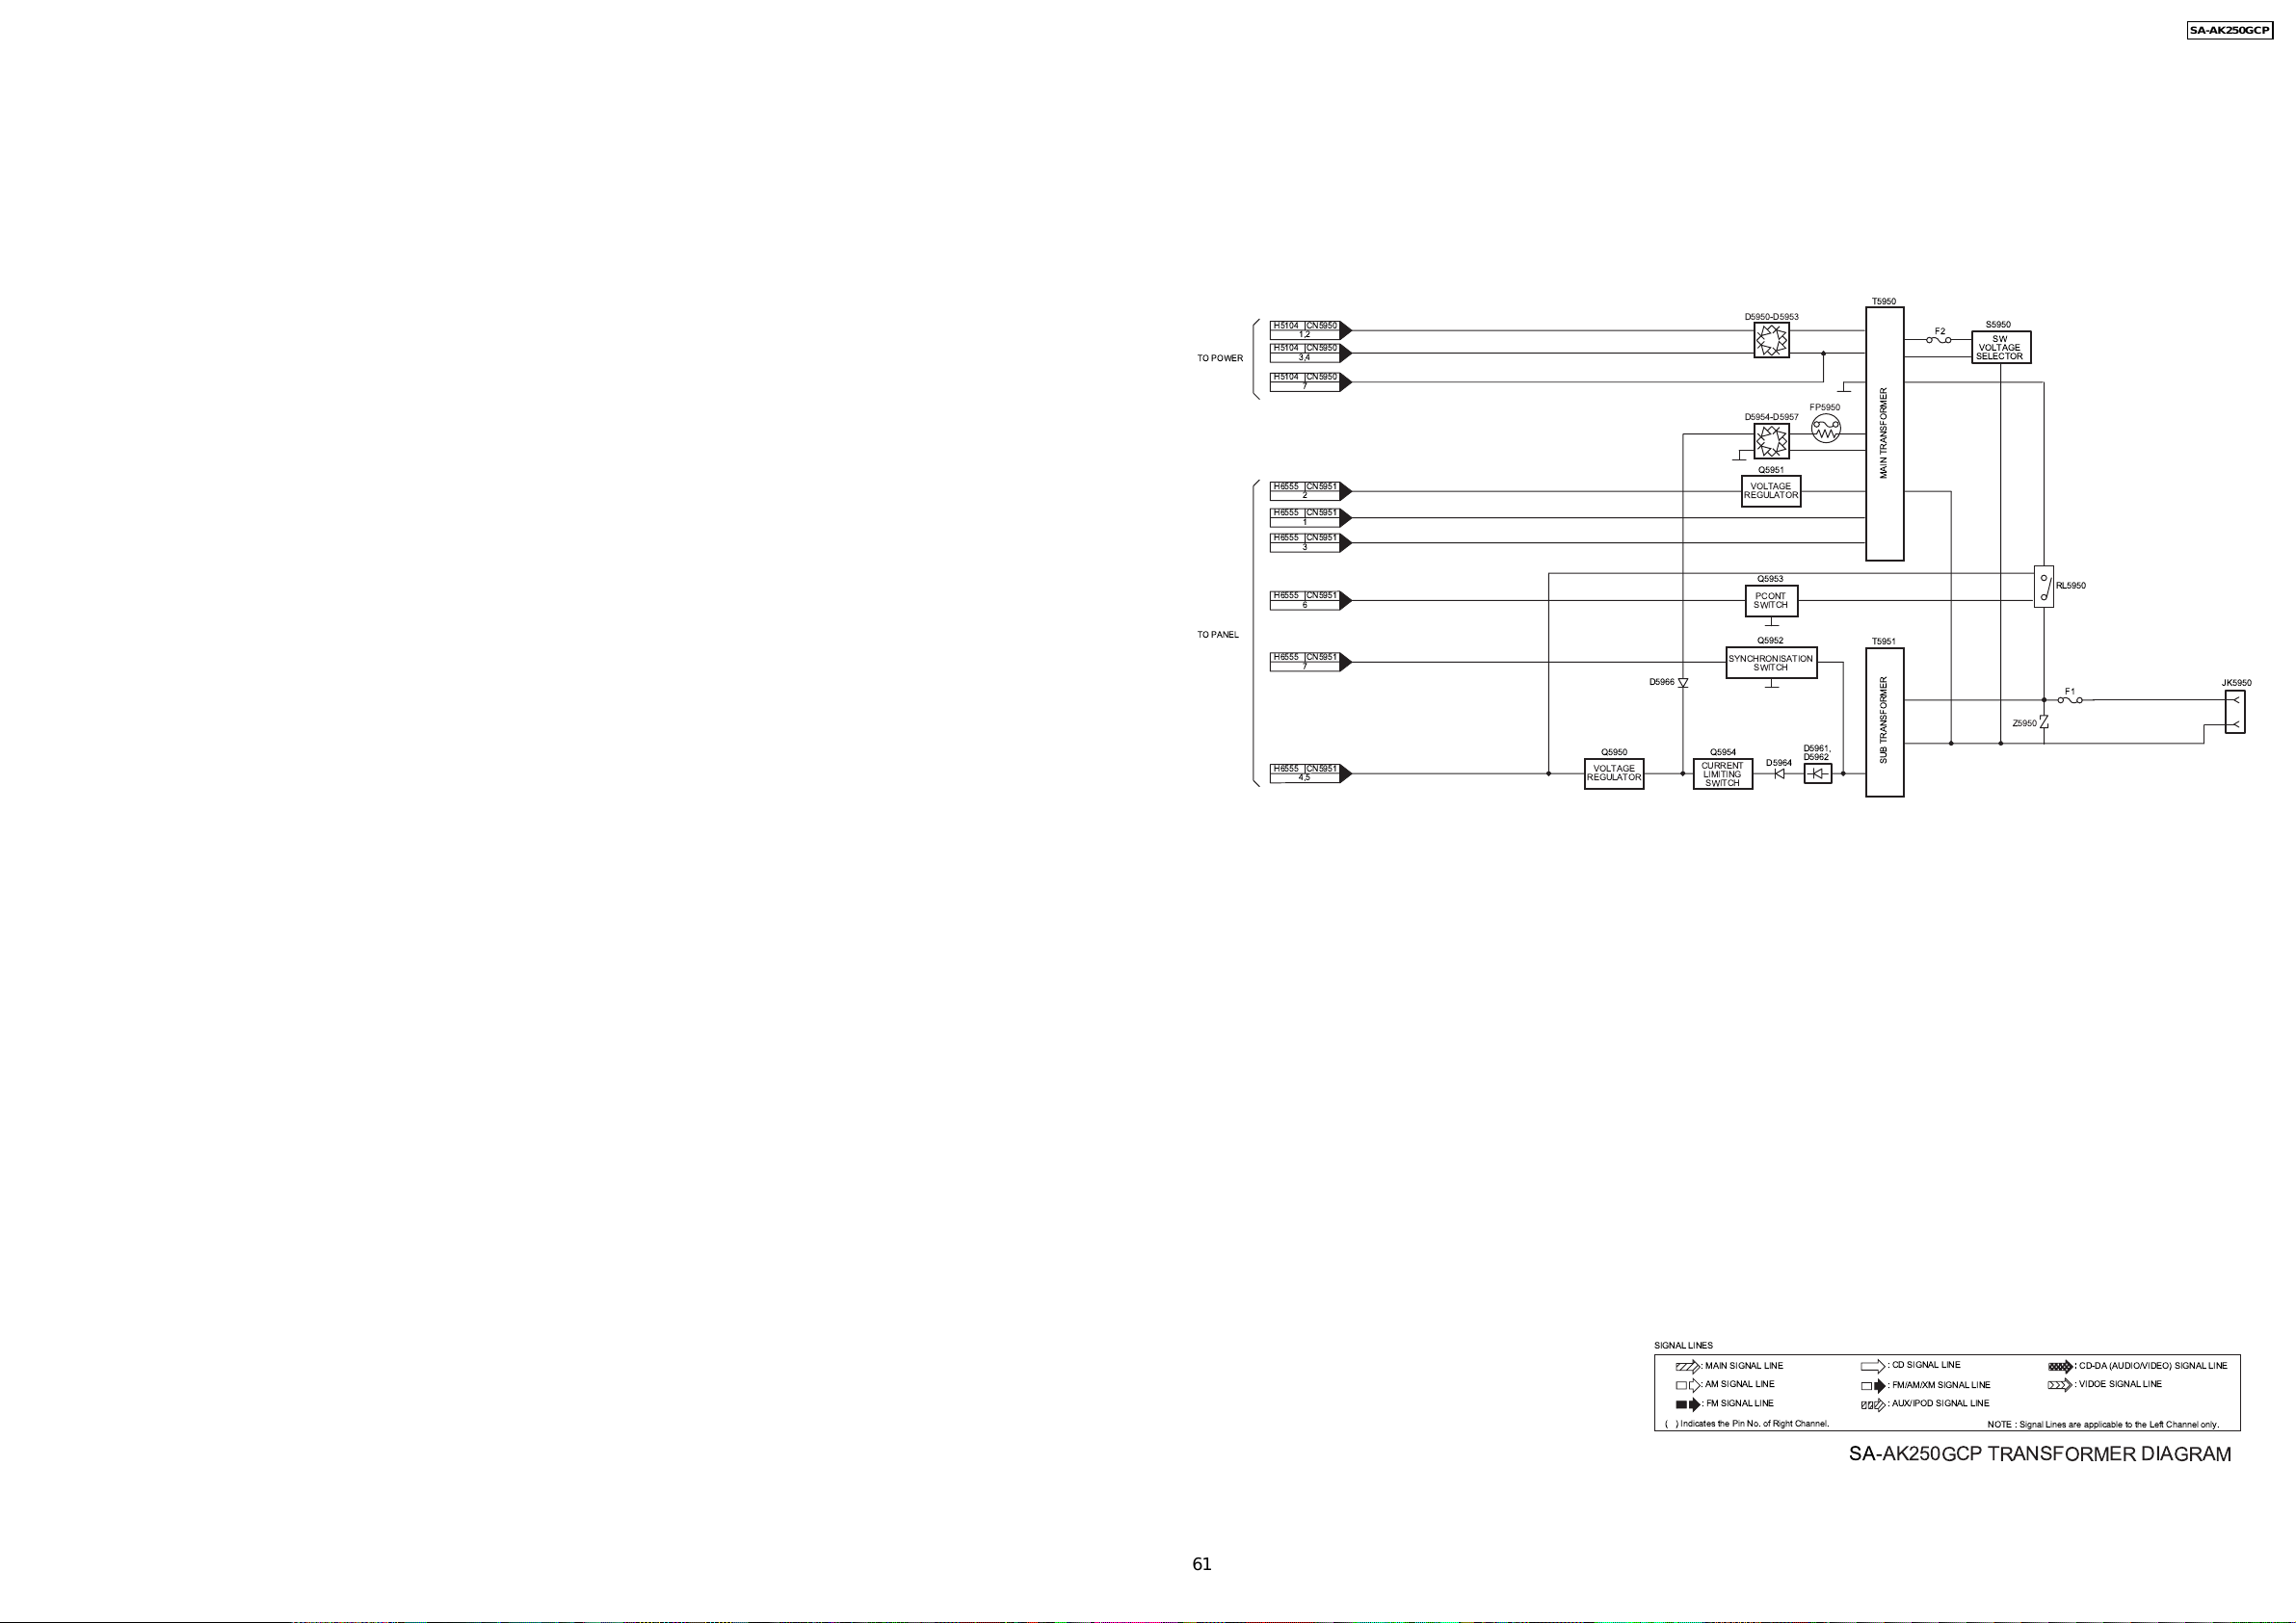
17.6. Transformer Diagram
SA-AK250GCP
TO POWER
TO PANEL
H5104 CN5950
1,2
H5104 CN5950
3,4
H5104 CN5950
7
H6555 CN5951
2
H6555 CN5951
1
H6555 CN5951
3
H6555 CN5951
6
H6555 CN5951
7
H6555 CN5951
4,5
Q5950
VOLTAGE
REGULATOR
D5966
SYNCHRONISATION
Q5954
CURRENT
LIMITING
SWITCH
D5950-D5953
D5954-D5957
Q5951
VOLTAGE
REGULATOR
Q5953
PCONT
SWITCH
Q5952
SWITCH
D5964
FP5950
D5961,
D5962
T5950
MAIN TRANSFORMERSUB TRANSFORMER
T5951
S5950
F2
SW
VOLTAGE
SELECTOR
RL5950
F1
Z5950
JK5950
61
SIGNAL LINES
: MAIN SIGNAL LINE
: AM SIGNAL LINE
: FM SIGNAL LINE
( ) Indicates the Pin No. of Right Channel.
: CD SIGNAL LINE
: FM/AM/XM SIGNAL LINE
: AUX/IPOD SIGNAL LINE
NOTE : Signal Lines are applicable to the Left Channel only.
:
: CD-DA (AUDIO/VIDEO) SIGNAL LINE
: VIDOE SIGNAL LINE
SA-AK250GCP TRANSFORMER DIAGRAM
Page 61

SA-AK250GCP
62
Page 62
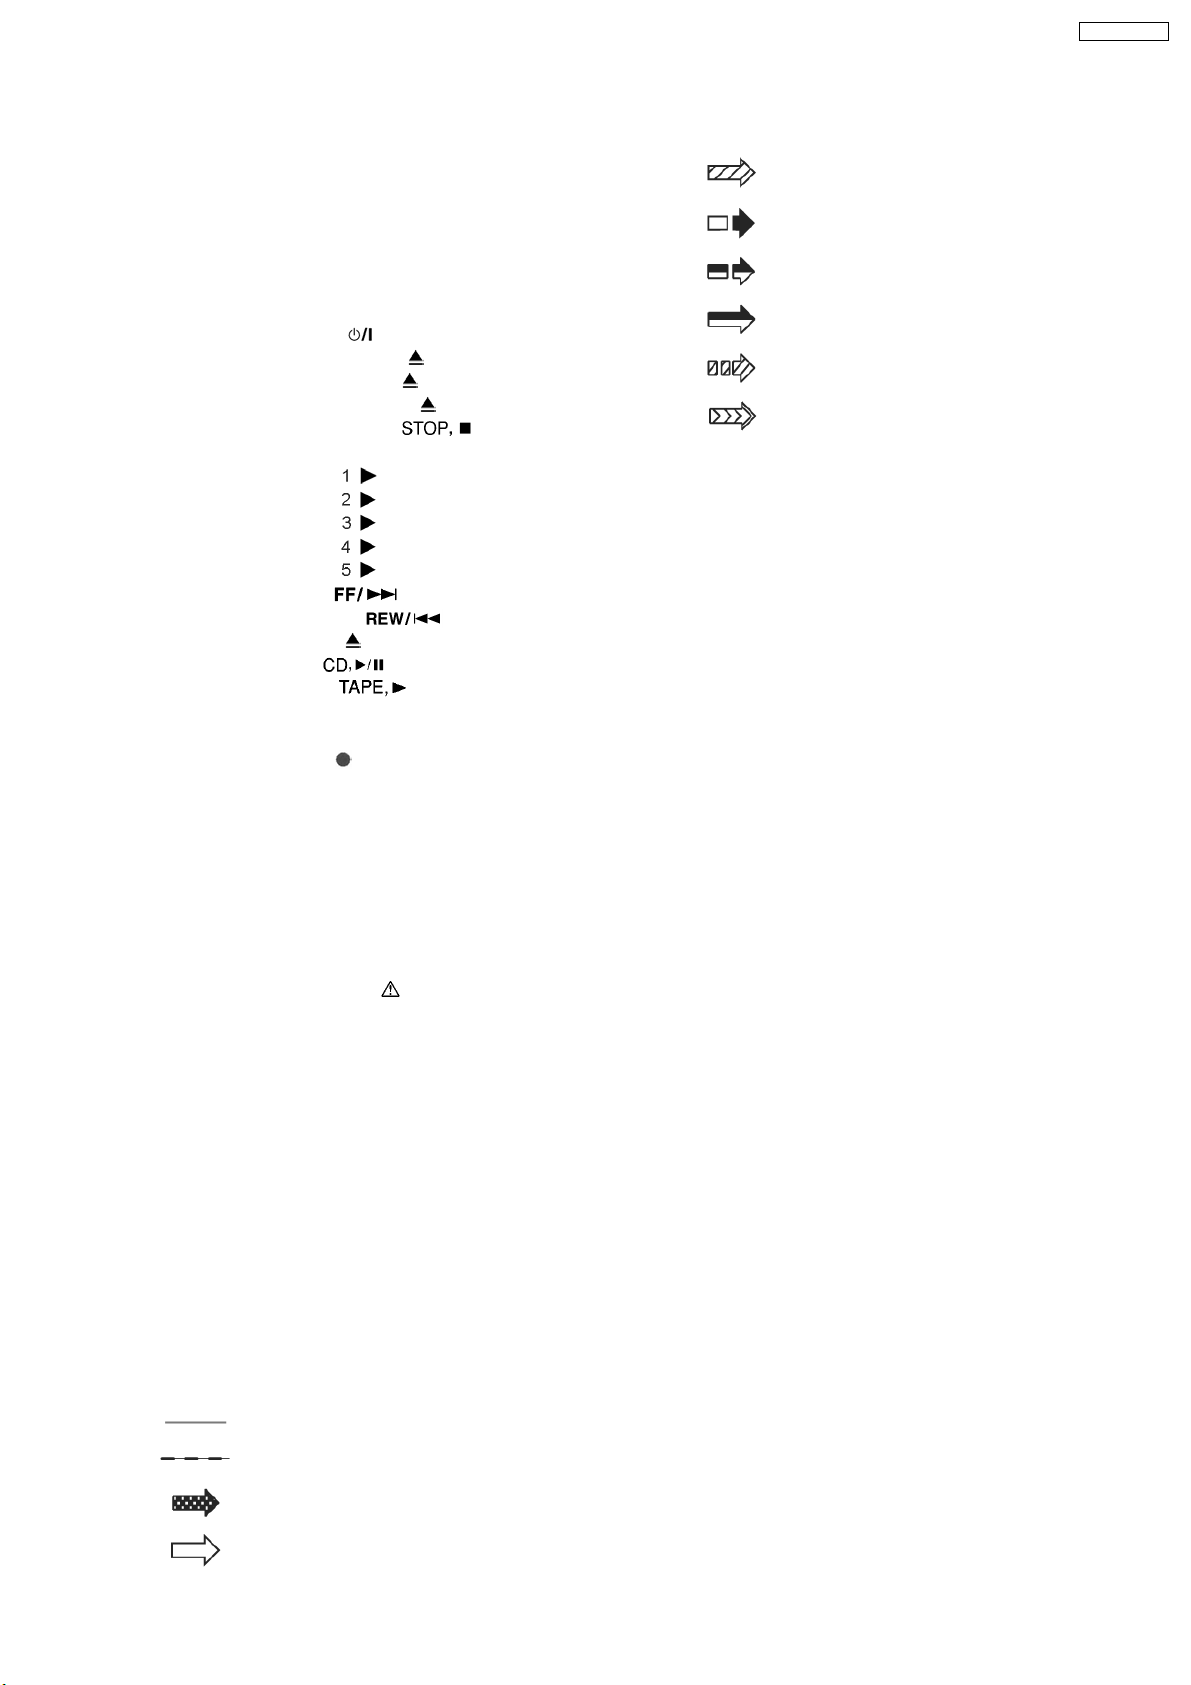
18 Notes Of Schematic Diagram
SA-AK250GCP
(All schematic diagrams may be modified at any time with
the development of new technology)
Notes:
S971: Mode switch.
S972: Half switch.
S975: RecInh_F switch.
S5950: Voltage Selector switch.
S6101: AC In (
S6102: Multi Change (
S6103: Open/ Close (
S6104: Single Change (
S6106: Stop/ -Demo (
S6108: Hard Bass switch.
S6201: CD1 (
S6202: CD2 (
S6203: CD3 (
S6204: CD4 (
S6205: CD5 (
S6206: /FF/ (
S6207: /REW/ (
S6301: Open (
S6302: CD (
S6303: Tape (
S6304: Tuner/FM/AM switch.
S6305: Ext In switch.
S6306: Rec (
S6307: M.EQ+ switch.
S6308: Manual EQ switch.
S6309: M.EQ- switch.
S7201: Rest switch.
VR6491: VR Volume jog.
VR6511: VR Mic jog.
) switch.
) switch.
) switch.
) switch.
) switch.
) switch.
) switch.
) switch.
) switch.
) switch.
) switch.
) switch.
) switch.
) switch.
) switch.
) switch.
: Main Signal line
: FM/AM Signal line
: Tape Record Signal line
: Tape Playback Signal line
: Aux Signal line
: MIC Signal line
· Importance safety notice :
Components identified by
characteristics important for safety.
Furthermore, special parts which have purposes of fireretardant (resistors), high-quality sound (capacitors), lownoise (resistors), etc. are used.
When replacing any of components, be sure to use only
manufacturer´s specified parts shown in the parts list.
· Resistor
Unit of resistance is OHM [Ω] (K=1,000,000).
· Capacitor
Unit of resistance is µF, unless otherwise noted. F=Farad,
pF=Pico-Farad
· Coil
Unit of inductance is H, unless otherwise noted.
· Voltage and Signal lines:
: +B Signal line
: -B Signal line
: CD DA Signal line
mark have special
: CD Signal line
63
Page 63

SA-AK250GCP
64
Page 64
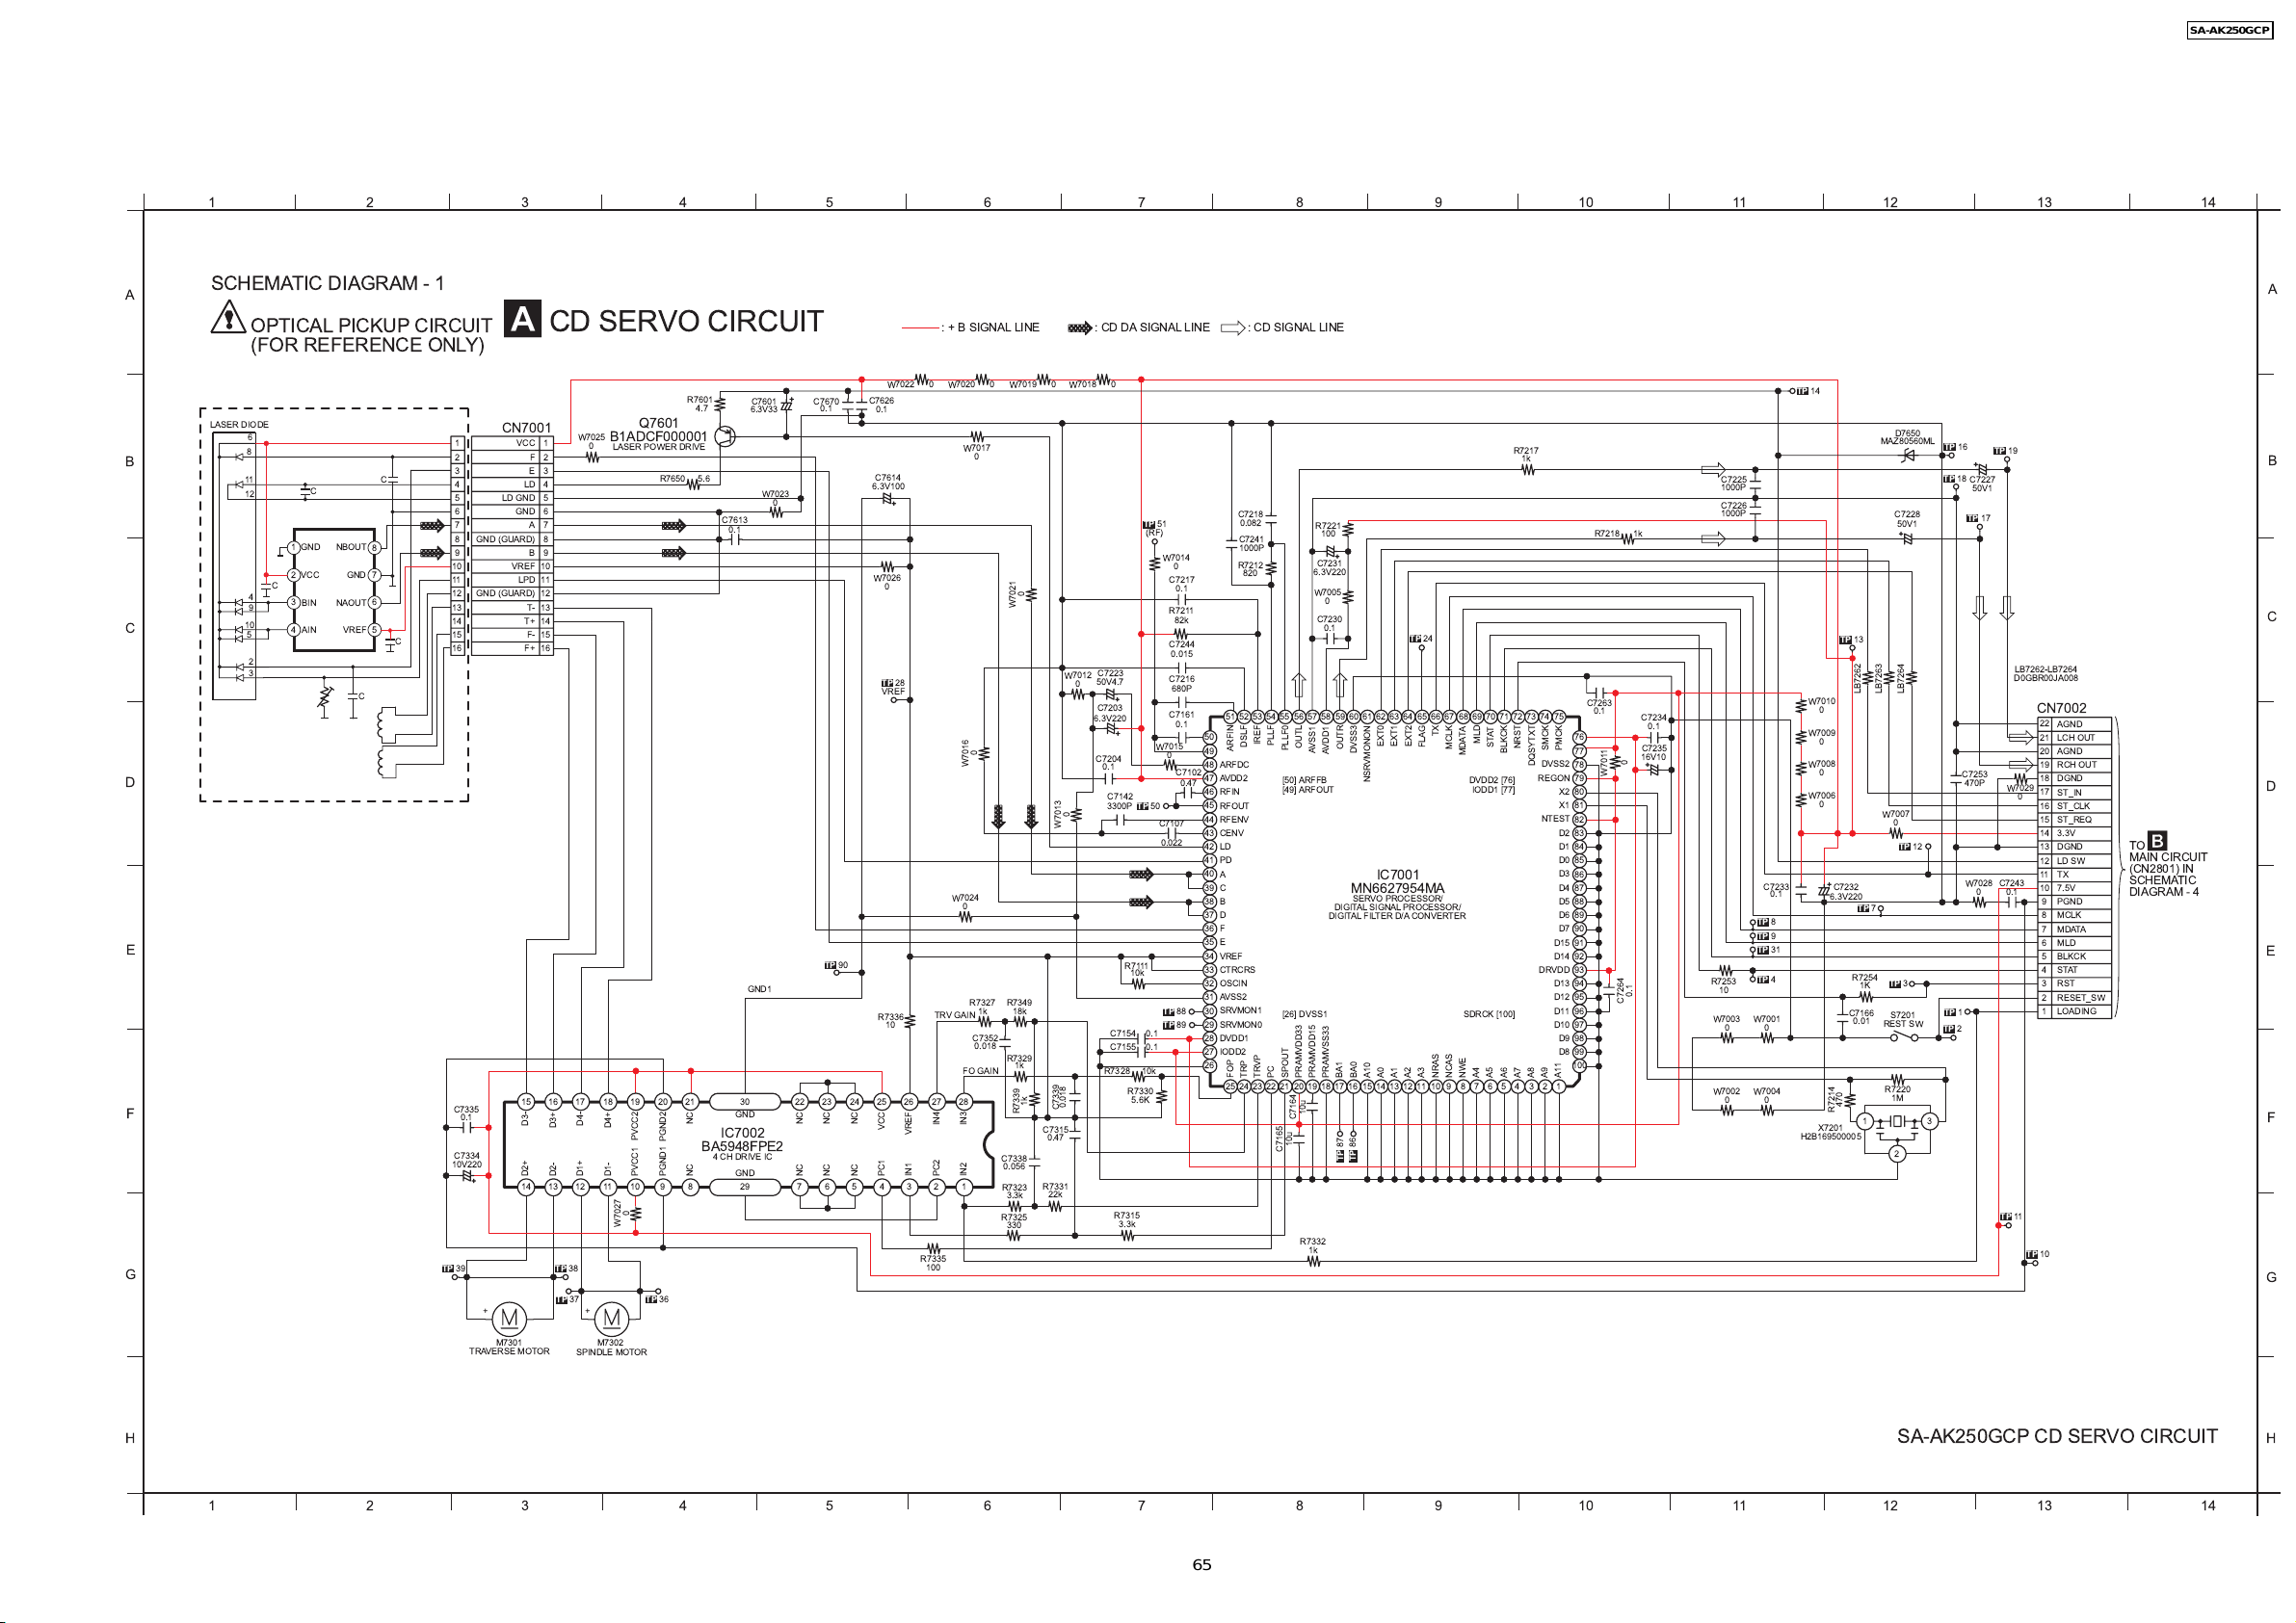
SA-AK250GCP
19 Schematic Diagram
19.1. (A) CD Servo Circuit
1234567891011121314
A
SCHEMATIC DIAGRAM - 1
OPTICAL PICKUP CIRCUIT
CD SERVO CIRCUIT
: + B SIGNAL LINE
: CD DA SIGNAL LINE
: CD SIGNAL LINE
A
(FOR REFERENCE ONLY)
R7601
LASER DIODE
6
B
C
8
NBOUT
GND
NAOUT
VREF
C
8
7
6
5
C
C
11
12
4
9
10
5
2
3
C
GND
1
2
VCC
C
3
BIN
4
AIN
1
2
3
4
5
6
7
8
9
10
11
12
13
14
15
16
CN7001
VCC
LD GND
GND
GND (GUARD)
VREF
LPD
GND (GUARD)
W7025
1
F
2
E
3
LD
4
5
6
A
7
8
9
B
10
11
12
T-
13
T+
14
F-
15
F+
16
Q7601
B1ADCF000001
0
LASER POWER DRIVE
C7601
4.7
6.3V33
5.6R7650
C7613
0.1
W7023
C7670
0.1
0
D
E
GND1
F
G
C7335
0.1
C7334
10V220
TP
39
+
M7301 M7302
TRAVERSE MOTOR
D3-D2+
14 12 911 1013
D3+D2-
TP
38
TP
37
191817 2015 16
D4-
D4+
D1+
D1-
0
W7027
+
SPINDLE MOTOR
PVCC2
PVCC1
TP
PGND2
PGND1
36
GND
NC
IC7002
BA5948FPE2
4 CH DRIVE IC
GND
NC
TP
22 233021 282724 25 26
NC
NC
W7022 0 W7020 0 W7019 0 W7018 0
C7626
0.1
W7017
0
C7614
6.3V100
W7026
0
TP
28
VREF
0
W7016
W7024
0
90
R7327
1k
TRV GAIN
R7336
10
NC
NC
VCC
VREF
NC
NC
PC1
IN1
R7335
100
C7352
0.018
FO GAIN
IN4
IN3
IN2
PC2
2167298345
R7349
R7329
C7338
0.056
R7323
3.3k
R7325
330
W7021
18k
1k
R7339
R7217
1k
C7225
1000P
C7226
C7218
50
49
48
47
46
45
44
43
42
41
40
39
38
37
36
35
34
33
32
31
30
29
28
27
26
0.082
C7241
1000P
R7212
820
ARFIN
ARFDC
AVDD2
RFIN
RFOUT
RFENV
CENV
LD
PD
A
C
B
D
F
E
VREF
CTRCRS
OSCIN
AVSS2
SRVMON1
SRVMON0
DVDD1
IODD2
FOP
24
25
DSLF
TRP
23 21 2022
IREF
TRVP
PLLF
PC
R7221
100
C7231
6.3V220
W7005
0
C7230
0.1
OUTL
OUTR
PLLF0
AVSS1
DVSS3
AVDD1
[50] ARFFB
[49] ARFOUT
MN6627954MA
SERVO PROCESSOR/
DIGITAL SIGNAL PROCESSOR/
DIGITAL FILTER D/A CONVERTER
[26] DVSS1
BA1
BA0
PRAMVDD15
PRAMVDD33
PRAMVSS33
SPOUT
19 17 15 141618
10u
C7164
10u
C7165
R7332
1k
TP87TP
86
EXT0
NSRVMONON
IC7001
A0
A10
13
EXT1
A1
TP
EXT2
A2
24
FLAG
A3
10 8 7912 11
TX
NRAS
MCLK
MDATA
DVDD2 [76]
IODD1 [77]
SDRCK [100]
NWE
NCAS
MLD
A4
R7218 1k
C7263
0.1
7471 7267 685655 58575251 5453 65 6661 6259 60 6463 7069 73 75
NRST
SMCK
DQSYTXT
DVSS2
REGON
X2
X1
NTEST
D2
D1
D0
D3
D4
D5
D6
D7
D15
D14
DRVDD
D13
D12
D11
D10
D9
D8
A9
PMCK
A11
76
77
78
79
80
81
82
83
84
85
86
87
88
89
90
91
92
93
94
95
96
97
98
99
100
STAT
BLKCK
A6A8A7
A5
465 213
C7234
0.1
C7235
16V10
0
W7011
0.1
C7264
TP
51
(RF)
W7014
0
C7217
3.3k
R7111
10k
R7330
5.6K
0.1
R7211
82k
C7244
0.015
C7216
680P
C7161
0.1
W7015
0
C7102
0.47
TP
50
C7107
0.022
TP
88
TP
89
0.1C7154
10kR7328
0
C7223
W7012
50V4.7
0
C7203
6.3V220
C7204
0.1
C7142
3300P
0
W7013
C7155 0.1
1k
0.018
C7339
C7315
0.47
R7331
22k
R7315
1000P
R7253
10
W7003
W7002
0
0
C7233
TP
TP
TP
TP
W7001
0
W7004
0
0.1
8
9
31
4
TP
14
W7010
0
W7009
0
W7008
0
W7006
0
C7232
6.3V220
R7214
X7201
H2B169500005
TP
470
13
R7254
C7166
0.01
LB7262
TP
1K
7
D7650
MAZ80560ML
C7228
50V1
LB7264
LB7263
W7007
0
TP
12
TP
3
S7201
REST SW
R7220
1M
2
TP
16
TP
19
TP
18
C7227
50V1
TP
17
B
C
LB7262-LB7264
D0GBR00JA008
CN7002
22
AGND
21
LCH OUT
20
AGND
19
W7029
C7243
0.1
TP
RCH OUT
18
DGND
17
ST_IN
0
16
ST_CLK
15
ST_REQ
14
3.3V
13
12
11
10
9
8
7
6
5
4
3
2
1
DGND
LD SW
TX
7.5V
PGND
MCLK
MDATA
MLD
BLKCK
STAT
RST
RESET_SW
LOADING
TO
MAIN CIRCUIT
(CN2801) IN
SCHEMATIC
DIAGRAM - 4
D
E
F
11
TP
10
C7253
470P
W7028
0
TP
1
TP
2
31
G
H
SA-AK250GCP CD SERVO CIRCUIT
H
1234567891011121314
65
Page 65
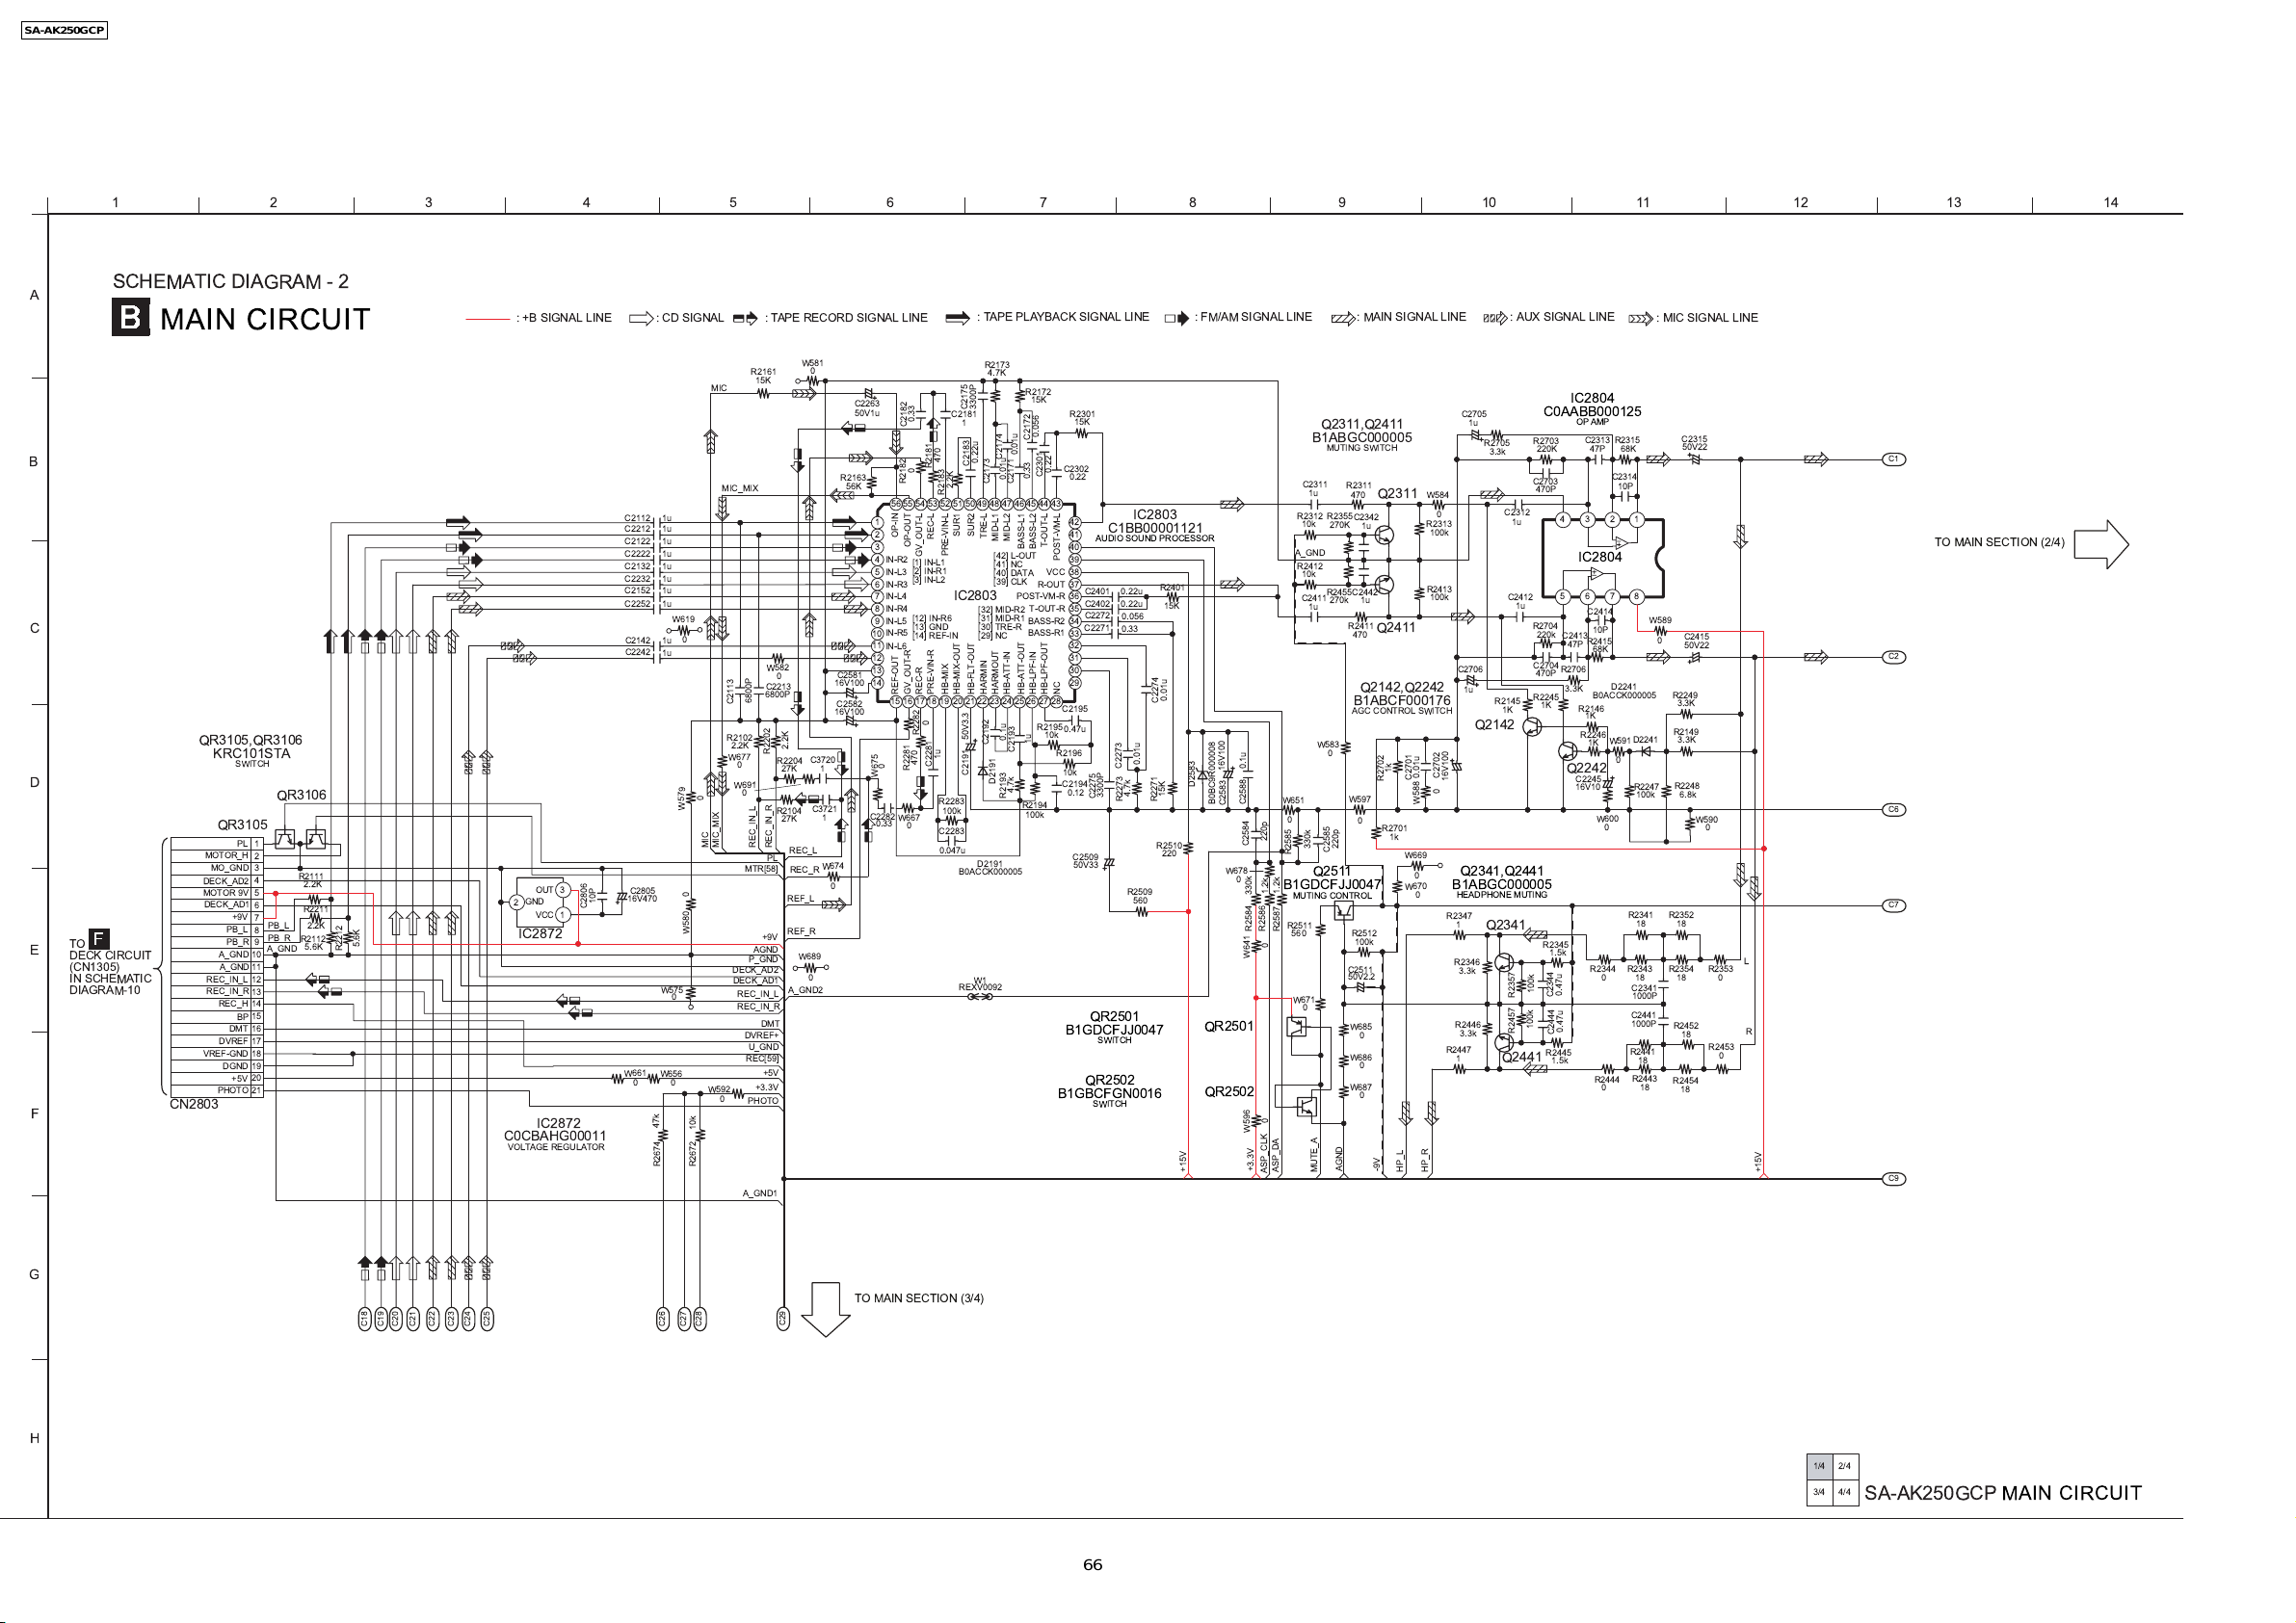
SA-AK250GCP
19.2. (B) Main Circuit
1234567891011121314
A
B
C
D
E
F
SCHEMATIC DIAGRAM - 2
MAIN CIRCUIT
QR3105,QR3106
KRC101STA
SWITCH
QR3105
PL
MOTOR_H
MO_GND
DECK_AD2
MOTOR 9V
DECK_AD1
+9V
PB_L
VREF-GND
CN2803
PB_R
A_GND
A_GND
REC_IN_L
REC_IN_R
REC_H
DMT
DVREF
DGND
+5V
PHOTO
BP
TO
DECK CIRCUIT
(CN1305)
IN SCHEMATIC
DIAGRAM-10
1
2
3
4
5
6
7
8
9
10
11
12
13
14
15
16
17
18
19
20
21
QR3106
PB_L
PB_R
A_GND
R2111
2.2K
R2211
2.2K
R2112
5.6K
R2212
5.6K
: +B SIGNAL LINE
OUT
3
GND
2
VCC
C2806
1
IC2872
IC2872
C0CBAHG00011
VOLTAGE REGULATOR
10P
C2112 1u
C2212
C2122
C2222
C2132
C2232
C2152
C2252
C2142
C2242
C2805
16V470
W661
0
: CD SIGNAL
1u
1u
1u
1u
1u
1u
1u
W619
0
1u
1u
0
W579
0
W580
W575
0
W656
0
W592
47k
10k
R2672
R2674
: TAPE RECORD SIGNAL LINE
W581
R2161
15K
MIC
MIC_MIX
W582
0
C2213
6800P
6800P
C2113
R2102
2.2K
2.2K
R2202
W677
R2204
0
27K
W691
0
R2104
27K
REC_IN_L
MIC
MIC_MIX
DECK_AD2
DECK_AD1
REC_IN_L
REC_IN_R
0
MTR[58]
AGND
P_GND
DMT
DVREF+
U_GND
REC[59]
+3.3V
PHOTO
A_GND1
REC_IN_R
PL
+9V
+5V
REC_L
REC_R
REF_L
REF_R
W689
A_GND2
0
C3720
1
C3721
W674
0
1
C2581
16V100
C2582
16V100
0
R2163
56K
C2263
50V1u
1
2
3
4
5
6
7
8
9
10
11
12
13
14
W675
C2282
0.33
IN-R2
IN-L3
IN-R3
IN-L4
IN-R4
IN-L5
IN-R5
IN-L6
0
0.33
C2182
0
R2182
OP-IN
OP-OUT
[1] IN-L1
[2] IN-R1
[3] IN-L2
[12] IN-R6
[13] GND
[14] REF-IN
GV_OUT-R
REF-OUT
16 1715
R2282
470
R2281
W667
0
: TAPE PLAYBACK SIGNAL LINE : FM/AM SIGNAL LINE : MAIN SIGNAL LINE
R2173
4.7K
R2172
15K
3300P
C2175
470
R2181
R2183
53 51 50525556 54
REC-L
PRE-VIN-L
GV_OUT-L
HB-MIX
PRE-VIN-R
REC-R
1918
0
1u
C2281
R2283
100k
C2283
0.047u
C2181
1
0.22u
C2183
C2173
2.2K
SUR2
SUR1
TRE-L
IC2803
[32] MID-R2
[31] MID-R1
[30] TRE-R
[29] NC
HARMIN
HB-FLT-OUT
HB-MIX-OUT
50V3.3
C2192
C2191
D2191
B0ACCK000005
W1
REXV0092
C2174
0.01u
MID-L2
MID-L1
[42] L-OUT
[41] NC
[40] DATA
[39] CLK
HB-ATT-IN
HARMOUT
2421 2220 23 27 2825 26
0.1u
D2191
R2193
0.056
C2172
0.01u
C2302
0.22
C2301
0.33
C2171
46 44454849 47 43
T-OUT-L
BASS-L2
BASS-L1
POST-VM-L
VCC
R-OUT
POST-VM-R
T-OUT-R
BASS-R2
BASS-R1
NC
HB-LPF-OUT
HB-LPF-IN
HB-ATT-OUT
C2195
R2195
0.47u
10k
1u
C2193
R2196
10k
C2194
4.7k
R2194
100k
B1GBCFGN0016
R2301
15K
0.22
42
41
40
39
38
37
36
35
34
33
32
31
30
29
0.12
C2509
50V33
B1GDCFJJ0047
IC2803
C1BB00001121
AUDIO SOUND PROCESSOR
0.22u
C2401
0.22u
C2402
C2272
0.056
C2271
0.33
0.01u
C2273
4.7k
3300P
C2275
R2273
R2509
R2271
R2510
560
QR2501
SWITCH
QR2502
SWITCH
R2401
15K
0.01u
C2274
15K
220
D2583
QR2501
+15V
16V100
B0BC9R000008
C2583
W678
0
QR2502
C2311
R2312
10k
A_GND
R2412
10k
C2411
0.1u
W651
C2588
0
220p
C2584
R2585
B1GDCFJJ0047
1.2k
1.2k
330k
MUTING CONTROL
R2511
R2584
R2586
R2587
560
0
W641
W671
0
0
W596
+3.3V
ASP_DA
ASP_CLK
Q2311,Q2411
B1ABGC000005
MUTING SWITCH
1u
R2355
270K
R2455
270k
1u
W583
0
220p
330k
C2585
Q2511
MUTE_A
R2311
470
Q2311
C2342
1u
C2442
1u
R2411
Q2411
470
Q2142,Q2242
B1ABCF000176
AGC CONTROL SWITCH
1k
0.01u
C2701
R2702
W597
C2511
50V2.2
W685
W686
W687
AGND
0
R2512
100k
0
0
0
R2701
-9V
W588
1k
W669
0
W670
0
HP_L
C2705
1u
R2705
3.3k
W584
0
R2313
100k
R2413
100k
C2706
1u
R2145
Q2142
C2702
16V100
0
Q2341,Q2441
B1ABGC000005
HEADPHONE MUTING
R2347
1
Q2341
R2346
3.3k
R2446
3.3k
R2447
1
HP_R
: AUX SIGNAL LINE
IC2804
C0AABB000125
OP AMP
R2703
220K
C2703
470P
C2312
1u
IC2804
C2412
1u
R2704
220k
C2413
47P
C2704
R2706
470P
3.3K
R2245
1K
100k
100k
R2345
1.5k
R2445
1.5k
Q2242
0.47u
C2344
0.47u
C2444
R2146
R2246
C2245
16V10
1K
R2357
R2457
Q2441
: MIC SIGNAL LINE
C2313
R2315
68K
47P
C2314
10P
243 1
6758
C2414
10P
R2415
68K
D2241
B0ACCK000005
1K
W591
1K
0
W600
0
R2344
0
R2444
0
C2315
W589
0
R2249
3.3K
R2149
3.3K
D2241
R2248
R2247
6.8k
100k
R234118R2352
18
R2354
R2343
18
18
C2341
1000P
C2441
1000P
R2452
18
R2441
18
R2443
R2454
18
18
50V22
C2415
50V22
W590
0
R2353
0
R2453
C1
TO MAIN SECTION (2/4)
C2
C6
C7
L
R
0
+15V
C9
G
TO MAIN SECTION (3/4)
C18
C19
C21
C23
C24
C20
C25
C22
C26
C27
C28
C29
H
1/4 2/4
3/4 4/4
SA-AK250GCP MAIN CIRCUIT
66
Page 66
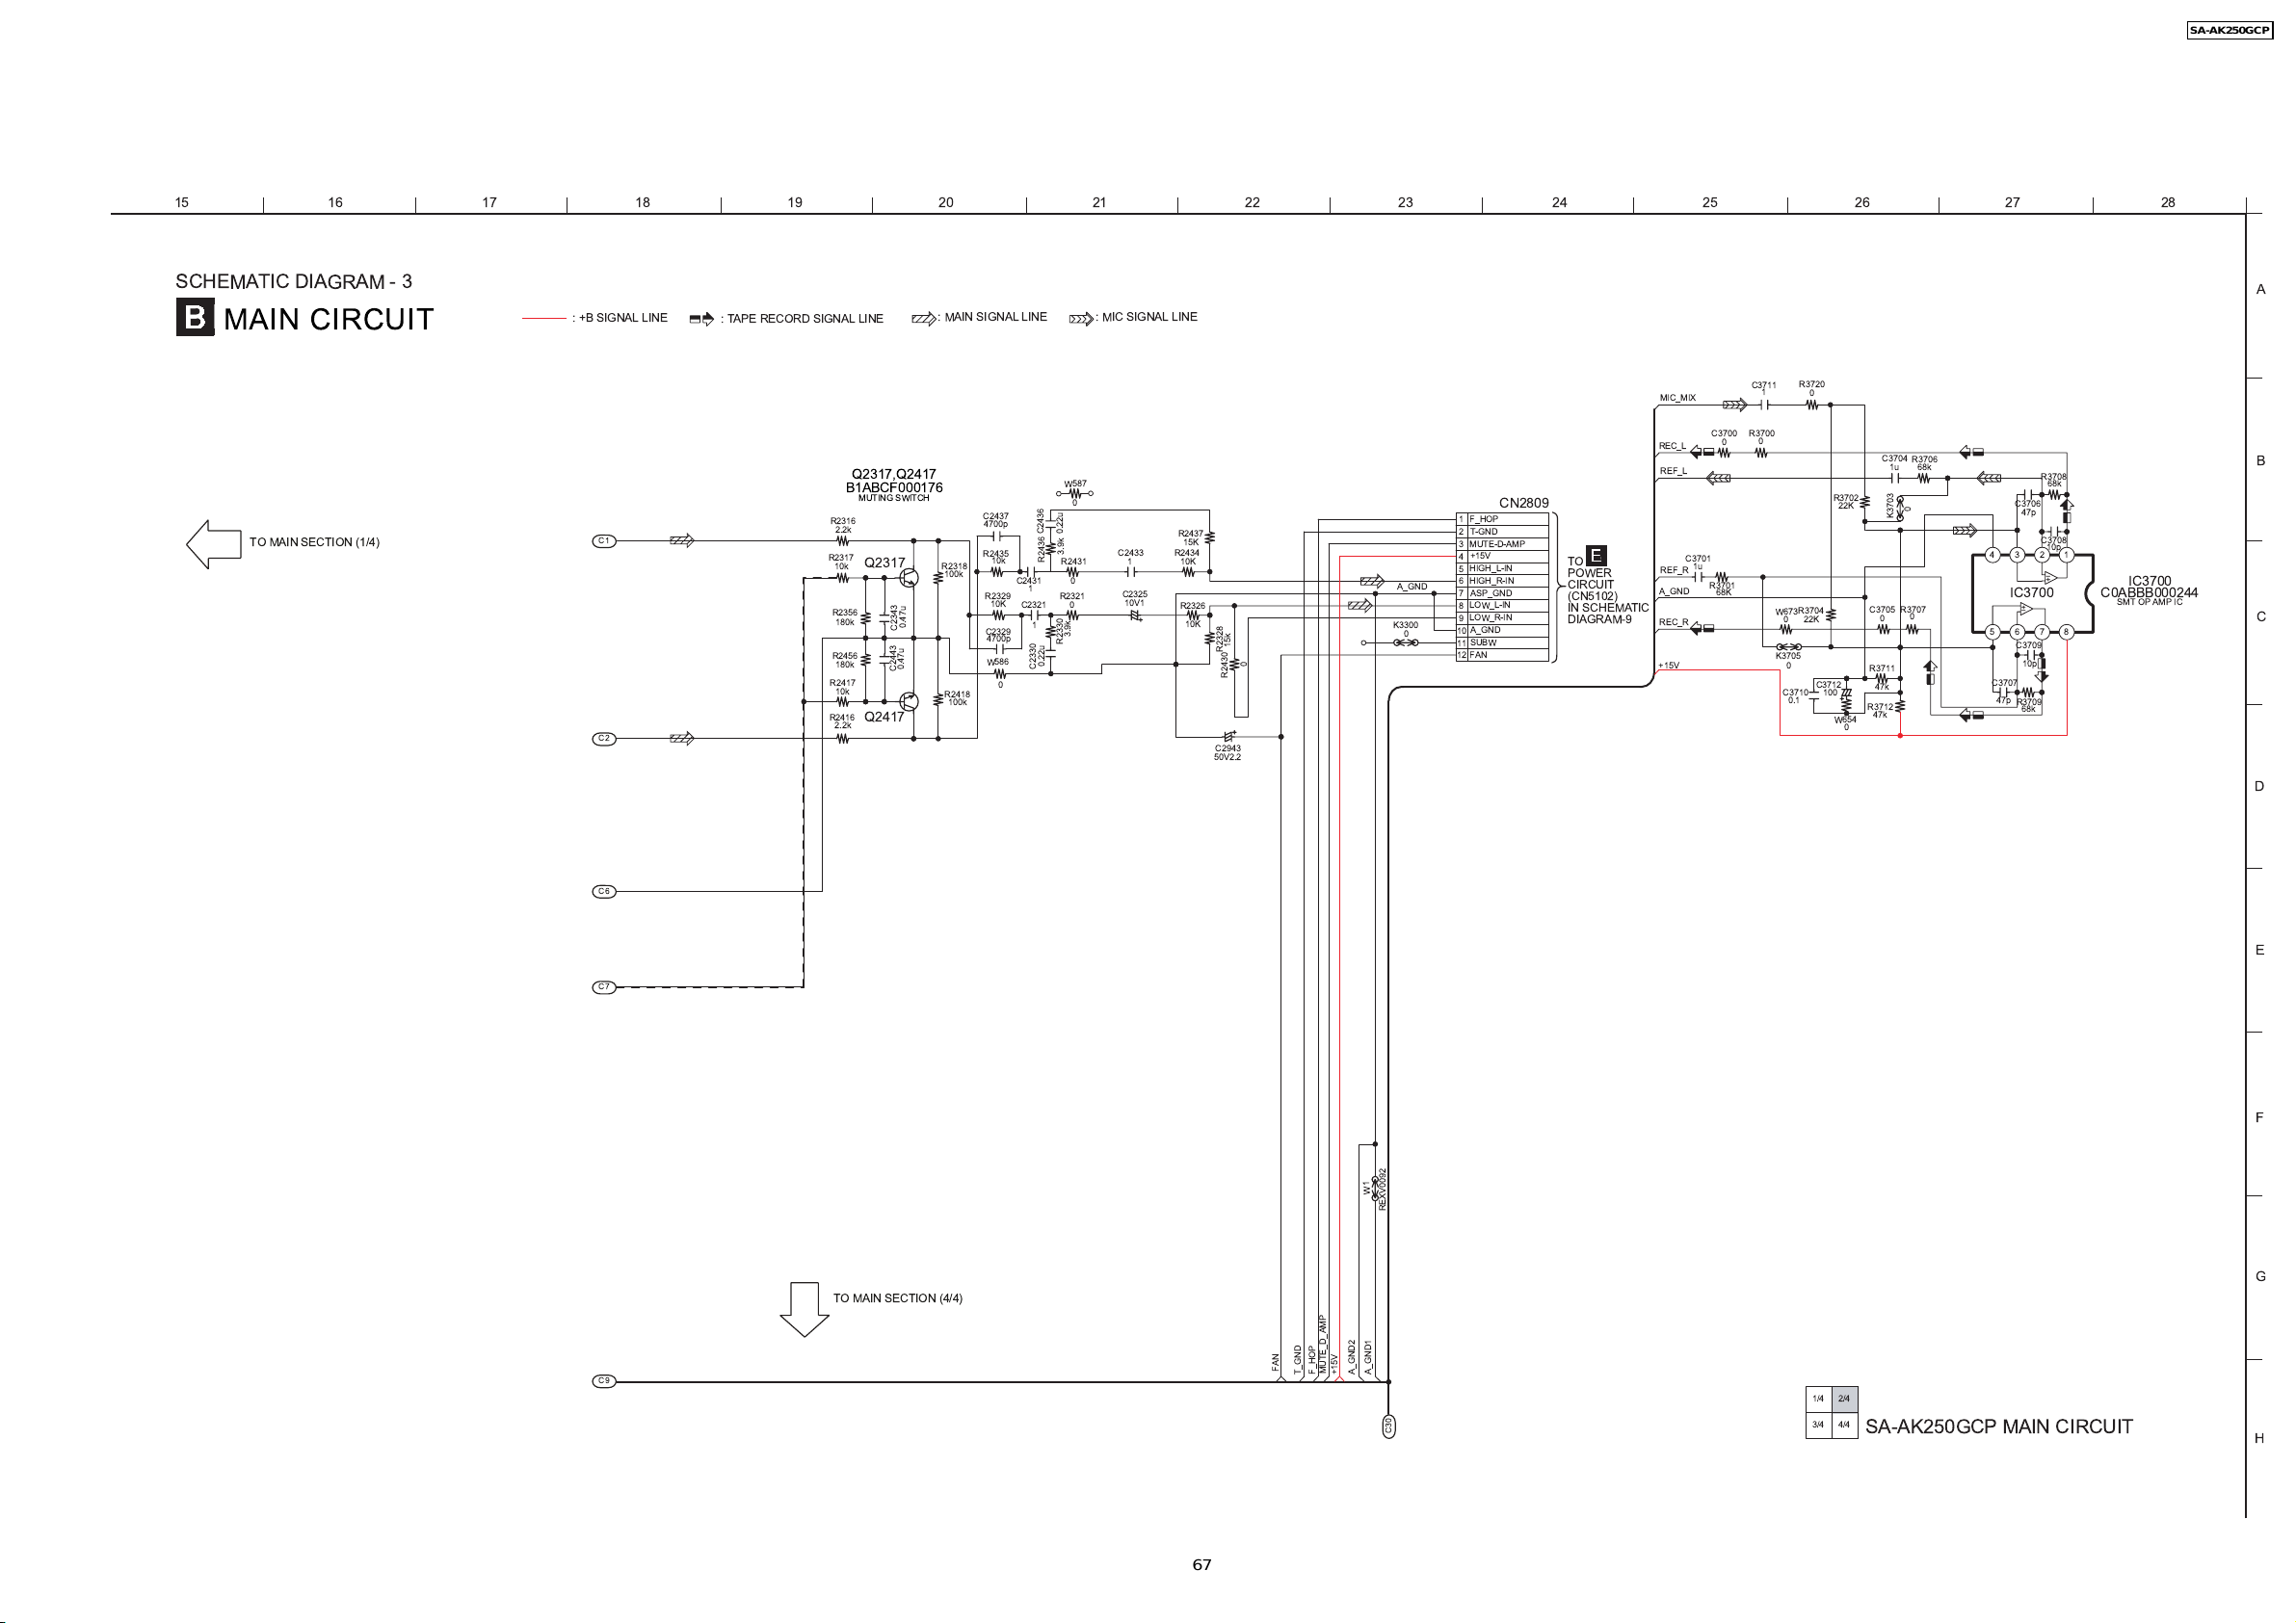
15 16 17 18 19 20 21 22 23 24 25 26 27 28
SA-AK250GCP
SCHEMATIC DIAGRAM - 3
MAIN CIRCUIT
TO MAIN SECTION (1/4)
: +B SIGNAL LINE
C1
C2
: TAPE RECORD SIGNAL LINE
Q2317,Q2417
B1ABCF000176
MUTING SWITCH
R2316
2.2k
R2317
Q2317
10k
R2356
180k
R2456
180k
R2417
10k
R2416
Q2417
2.2k
: MAIN SIGNAL LINE : MIC SIGNAL LINE
W587
C2431
C2321
1
1
C2436
R2436
0.22u
C2330
0.22u
3.9k
R2431
R2321
R2330
0
0
0
3.9k
C2343
0.47u
C2443
0.47u
R2318
100k
R2418
100k
C2437
4700p
R2435
10k
R2329
10K
C2329
4700p
W586
0
C2433
1
C2325
10V1
R2437
15K
R2434
10K
R2326
10K
R2328
C2943
50V2.2
15k
R2430
A
R3720
C3711
1
MIC_MIX
R3700
C3700
C3701
1u
R3701
68K
0
REC_L
REF_L
CN2809
F_HOP
1
T-GND
2
MUTE-D-AMP
3
+15V
4
HIGH_L-IN
5
HIGH_R-IN
A_GND
K3300
0
6
ASP_GND
7
LOW_L-IN
8
LOW_R-IN
9
A_GND
10
0
SUBW
11
FAN
12
TO
POWER
CIRCUIT
(CN5102)
IN SCHEMATIC
DIAGRAM-9
REF_R
A_GND
REC_R
+15V
0
0
R3704
W673
0
22K
K3705
0
C3712
100
C3710
0.1
R3702
22K
W654
C3704
R3706
1u
68k
0
K3703
C3705
R3707
0
0
R3711
47k
R3712
47k
0
C3707
47p
C3706
47p
IC3700
675
C3709
10p
R3709
68k
R3708
68k
C3708
10p
24381
IC3700
C0ABBB000244
SMT OP AMP IC
B
C
D
C6
E
C7
F
W1
REXV0092
G
TO MAIN SECTION (4/4)
FAN
MUTE_D_AMP
A_GND1
F_HOP
A_GND2
+15V
C9
T_GND
1/4 2/4
3/4 4/4
C30
SA-AK250GCP MAIN CIRCUIT
H
67
Page 67
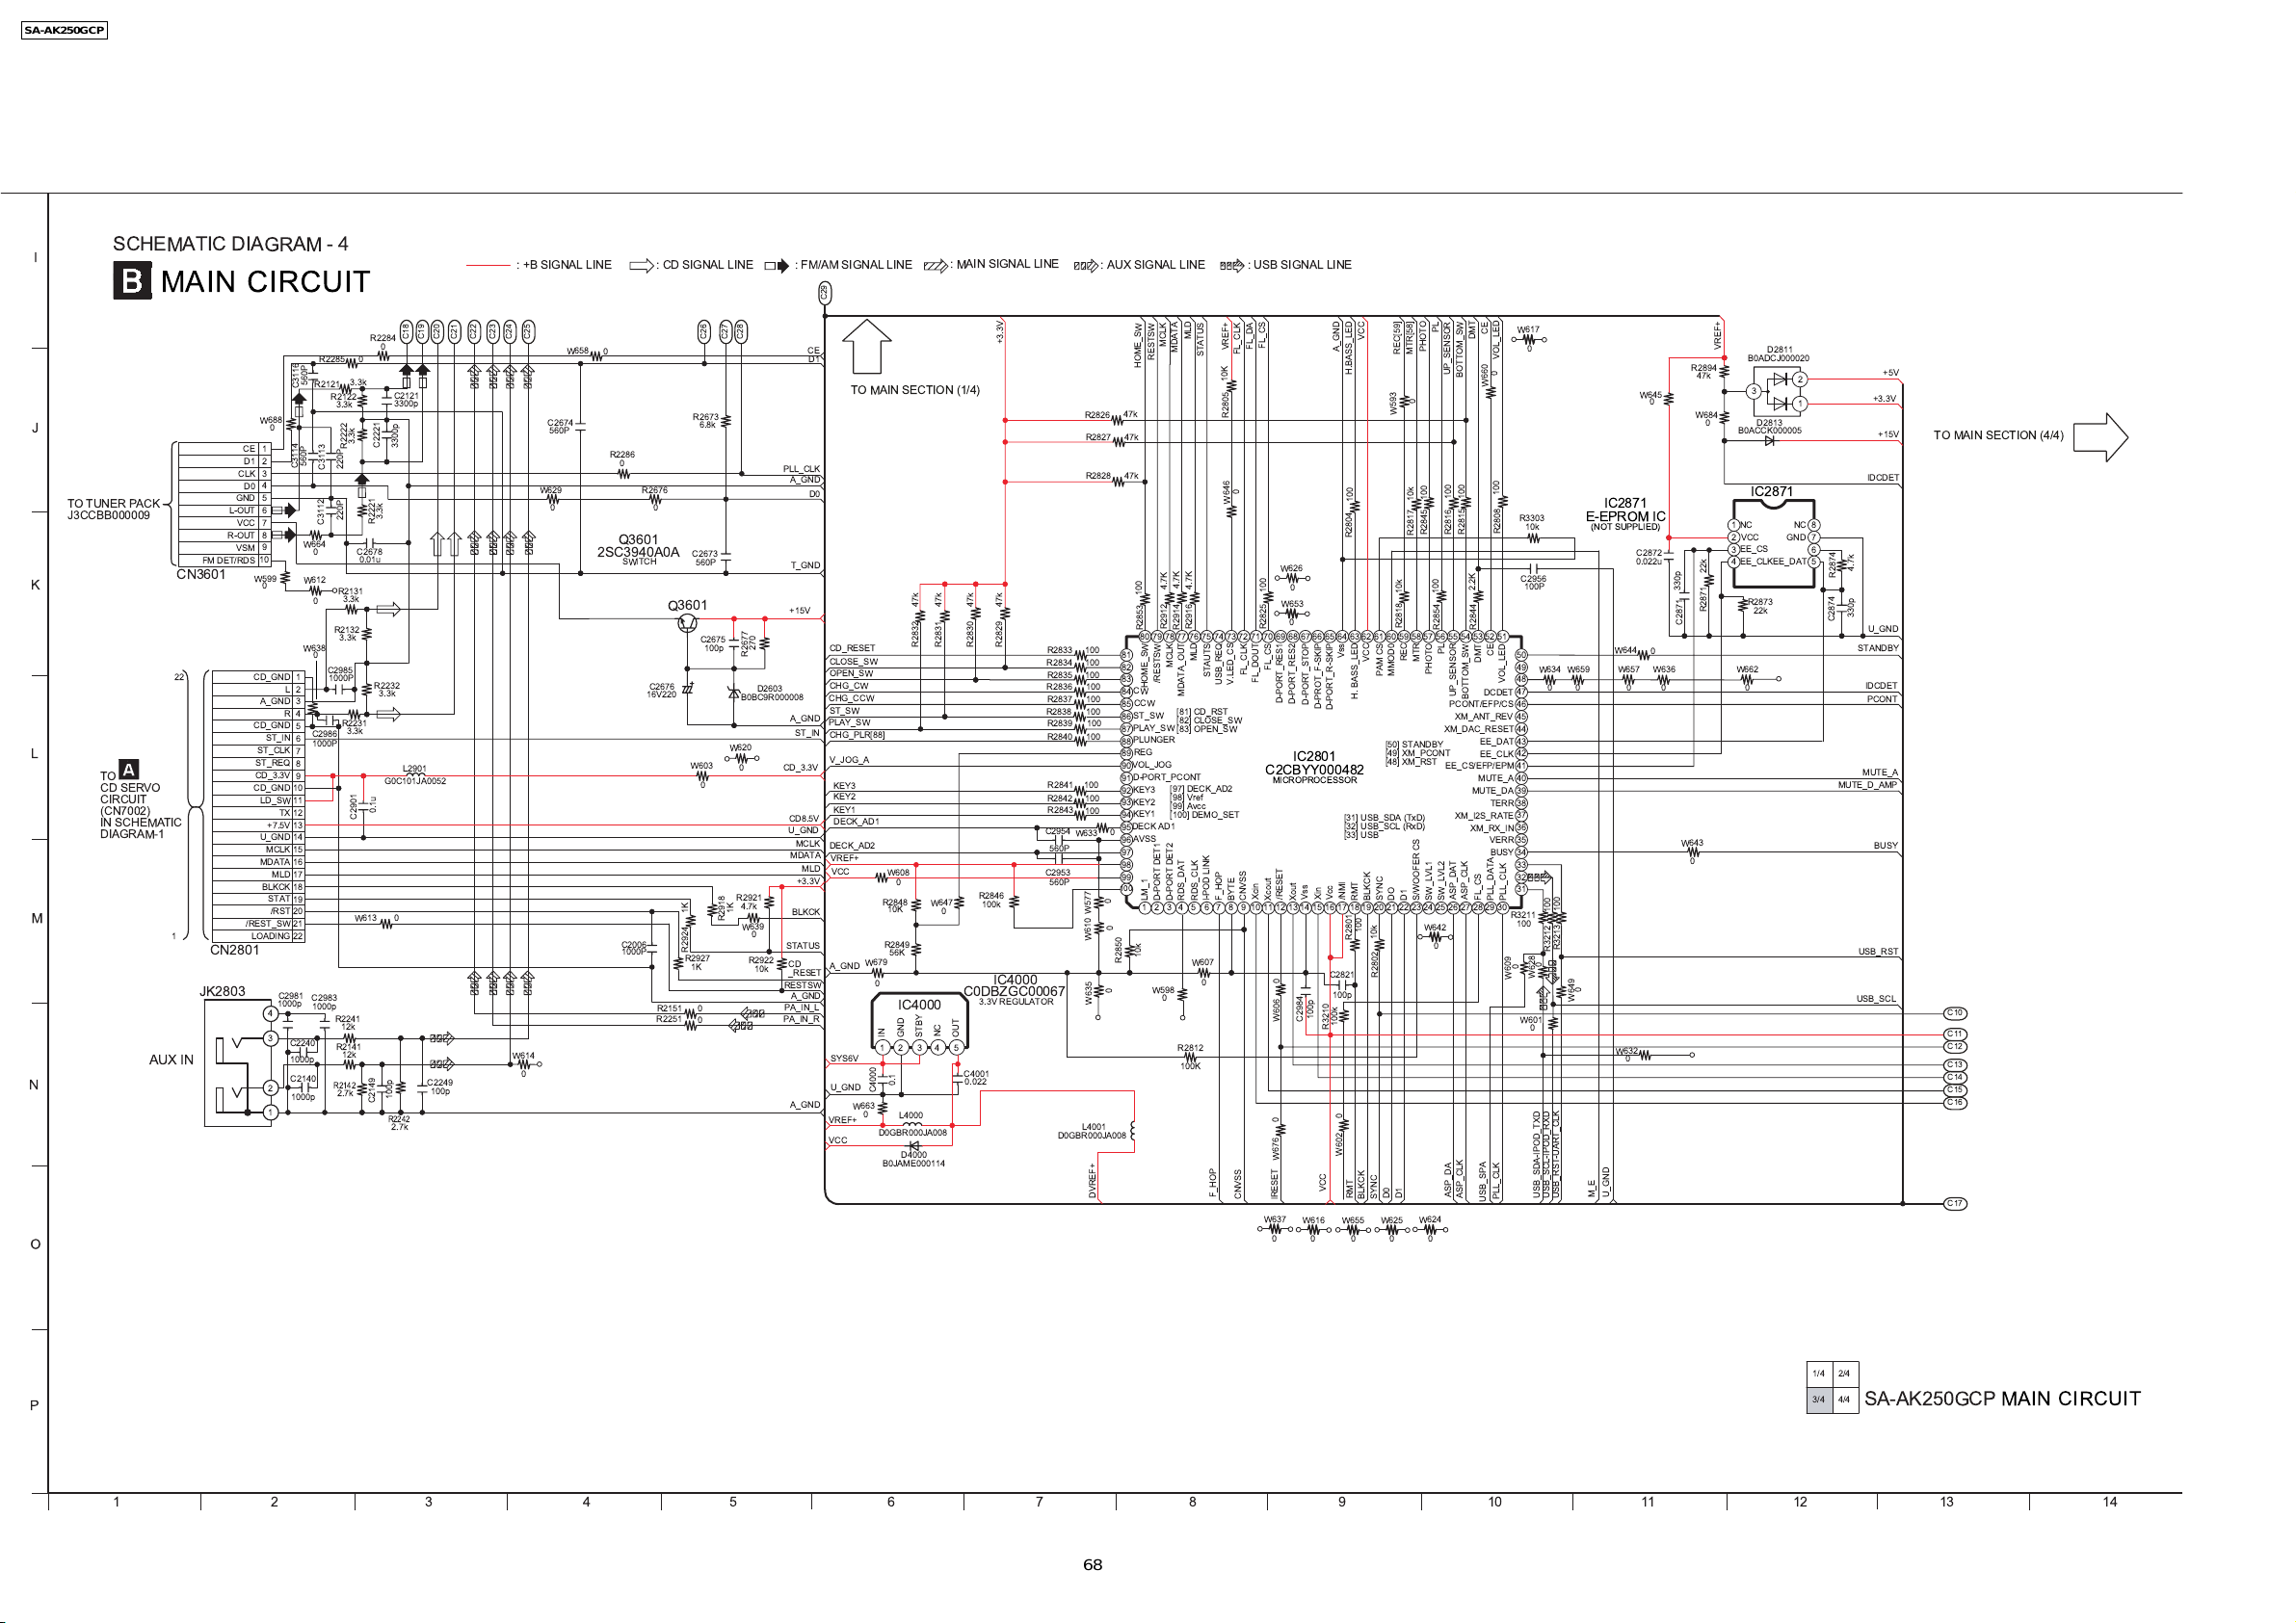
SA-AK250GCP
I
J
TO TUNER PACK
J3CCBB000009
K
L
M
N
O
SCHEMATIC DIAGRAM - 4
MAIN CIRCUIT
560P
C3116
W688
0
CE
1
2
TO
CD SERVO
CIRCUIT
(CN7002)
IN SCHEMATIC
DIAGRAM-1
AUX IN
CN3601
22
1
JK2803
CLK
GND
L-OUT
VCC
R-OUT
VSM
FM DET/RDS
CN2801
D1
D0
/REST_SW
3
4
5
6
7
8
9
10
W599
0
CD_GND
A_GND
CD_GND
ST_IN
ST_CLK
ST_REQ
CD_3.3V
CD_GND
LD_SW
+7.5V
U_GND
MCLK
MDATA
MLD
BLKCK
STAT
/RST
LOADING
4
3
2
1
L
R
TX
C2981
1000p
C3114
1
2
3
4
5
6
7
8
9
10
11
12
13
14
15
16
17
18
19
20
21
22
C2240
1000p
C2140
1000p
560P
W664
W612
W638
R2285
R2121
0
0
0
C2986
1000P
C2983
1000p
R2122
C3113
C3112
R2132
C2985
1000P
R2241
R2142
3.3k
220P
220P
R2131
3.3k
3.3k
R2231
12k
R2141
12k
2.7k
3.3k
3.3k
R2222
3.3k
W613
0
C2678
0.01u
C2901
R2284
R2221
R2232
0.1u
C2149
C18
0
C2121
3300p
C2221
3300p
3.3k
3.3k
L2901
G0C101JA0052
0
100p
R2242
2.7k
C19
C2249
100p
47k
R2832
0
IC4000
GND
21543
0.1
L4000
D4000
W647
STBY
: MAIN SIGNAL LINE
+3.3V
47k
47k
R2831
0
NC
47k
R2829
R2830
R2846
100k
IC4000
C0DBZGC00067
3.3V REGULATOR
OUT
C4001
0.022
: AUX SIGNAL LINE : USB SIGNAL LINE
MLD
MCLK
MDATA
STATUS
RESTSW
HOME_SW
47k
R2826
R2827
47k
47k
R2828
4.7K
4.7K
4.7K
100
R2912
R2916
R2914
R2853
80 78 767779
100
R2833
R2834
R2835
R2836
R2837
R2838
R2839
R2840
R2841
R2842
R2843
C2954
560P
C2953
560P
D0GBR000JA008
W633
100
100
100
100
100
100
100
100
100
100
W577
W610
W635
L4001
0
0
0
0
DVREF+
81
82
83
HOME_SW
CW
84
CCW
85
ST_SW
86
PLAY_SW
87
PLUNGER
88
REG
89
VOL_JOG
90
D-PORT_PCONT
91
KEY3
92
KEY2
93
KEY1
94
DECK AD1
95
AVSS
96
97
98
99
100
LM_1
1
10k
R2850
W598
MLD
MCLK
/RESTSW
MDATA_OUT
[81] CD_RST
[82] CLOSE_SW
[83] OPEN_SW
[97] DECK_AD2
[98] Vref
[99] Avcc
[100] DEMO_SET
RDS_CLK
RDS_DAT
D-PORT DET1
D-PORT DET2
3425
W607
0
0
R2812
100K
STAUTS
USB_REQ
F_HOP
I-POD LINK
F_HOP
FL_CS
FL_DA
VREF+
FL_CLK
10K
R2805
0
W646
W626
0
100
W653
0
R2825
69 67 65 64666870 51
FL_CS
FL_CLK
FL_DOUT
V.LED_CS
D-PORT_RES1
D-PORT_RES2
IC2801
C2CBYY000482
MICROPROCESSOR
/RESET
Xcin
Xout
Xcout
CNVSS
BYTE
9768
10
0
W606
C2984
0
W676
CNVSS
lRESET
W637
W616
0000 0
A_GND
H.BASS_LED
100
R2804
Vss
D-PORT_STOP
D-PROT_F-SKIP
D-PORT_R-SKIP
[31] USB_SDA (TxD)
[32] USB_SCL (RxD)
[33] USB
Vss
/NMI
Vcc
Xin
1614 15 1711 1312
R2801
C2821
100p
100p
100k
R3210
0
W602
VCC
RMT
W655
VCC
VCC
PAM CS
H. BASS_LED
[50] STANDBY
[49] XM_PCONT
[48] XM_RST
SYNC
BLKCK
RMT
100
10k
R2802
SYNC
BLKCK
W625
MMOD0
DO
D0
REC[59]
W593
10k
R2818
REC
D1
22 2320 21 26 282724 2518 19
D1
PHOTO
MTR[58]
0
100
10k
R2845
R2817
MTR
S/WOOFER CS
W642
W624
PHOTO
SW_LVL1
0
PL
DMT
UP_SENSOR
BOTTOM_SW
100
100
R2815
R2816
2.2K
100
R2844
R2854
53
555762 60 596163 58 56 54295275 73 717274
PL
DMT
DCDET
UP_SENSOR
BOTTOM_SW
PCONT/EFP/CS
XM_ANT_REV
XM_DAC_RESET
EE_DAT
EE_CLK
EE_CS/EFP/EPM
MUTE_A
MUTE_DA
XM_I2S_RATE
XM_RX_IN
ASP_CLK
ASP_DAT
FL_CS
SW_LVL2
ASP_DA
ASP_CLK
USB_SPA
CE
VOL_LED
0
W660
100
R2808
CE
VOL_LED
TERR
VERR
BUSY
PLL_DATA
PLL_CLK
30
PLL_CLK
W617
0
R3303
10k
C2956
100P
50
49
W634 W659
48
47
46
45
44
43
42
41
40
39
38
37
36
35
34
33
32
31
100
R3211
100
R3212
0
0
W628
W609
W601
0
USB_SDA-IPOD_TXD
USB_SCL-IPOD_RXD
IC2871
E-EPROM IC
(NOT SUPPLIED)
W644
W657 W636
100
R3213
0
W649
W632
0
M_E
U_GND
USB_RST-UART_CLK
W645
C2872
0.022u
VREF+
D2811
B0ADCJ000020
R2894
47k
0
W684
0
B0ACCK000005
3
2
1
D2813
IC2871
1
NC
NC
2
VCC GND
EE_CS
3
EE_CLK
22k
330p
C2871
0
W643
R2873
R2871
W662
00000
0
8
7
6
EE_DAT
54
22k
+3.3V
IDCDET
4.7k
R2874
330p
C2874
U_GND
STANDBY
IDCDET
PCONT
MUTE_A
MUTE_D_AMP
BUSY
USB_RST
USB_SCL
+5V
+15V
TO MAIN SECTION (4/4)
C10
C11
C12
C13
C14
C15
C16
C17
C28
: FM/AM SIGNAL LINE
C29
CE
D1
: +B SIGNAL LINE
C21
C23
C24
C20
C25
C22
W658
0
: CD SIGNAL LINE
C26
C27
TO MAIN SECTION (1/4)
R2676
C2676
16V220
0
R2151
R2251
C2673
Q3601
W603
1K
R2924
R2927
1K
R2673
6.8k
560P
C2675
0
0
0
100p
270
R2677
B0BC9R000008
W620
0
R2921
4.7k
1K
R2918
W639
0
R2922
10k
D2603
PLL_CLK
A_GND
T_GND
+15V
A_GND
ST_IN
CD_3.3V
CD8.5V
U_GND
MCLK
MDATA
MLD
+3.3V
BLKCK
STATUS
CD
_RESET
RESTSW
A_GND
PA_IN_L
PA_IN_R
A_GND
D0
CD_RESET
CLOSE_SW
OPEN_SW
CHG_CW
CHG_CCW
ST_SW
PLAY_SW
CHG_PLR[88]
V_JOG_A
KEY3
KEY2
KEY1
DECK_AD1
DECK_AD2
VREF+
VCC
W679
A_GND
SYS6V
U_GND
W663
0
VREF+
VCC
W608
R2848
10K
R2849
56K
0
IN
C4000
D0GBR000JA008
B0JAME000114
W614
C2674
560P
R2286
0
W629
0
Q3601
2SC3940A0A
SWITCH
C2006
1000P
0
1/4 2/4
3/4 4/4
P
SA-AK250GCP MAIN CIRCUIT
1234567891011121314
68
Page 68
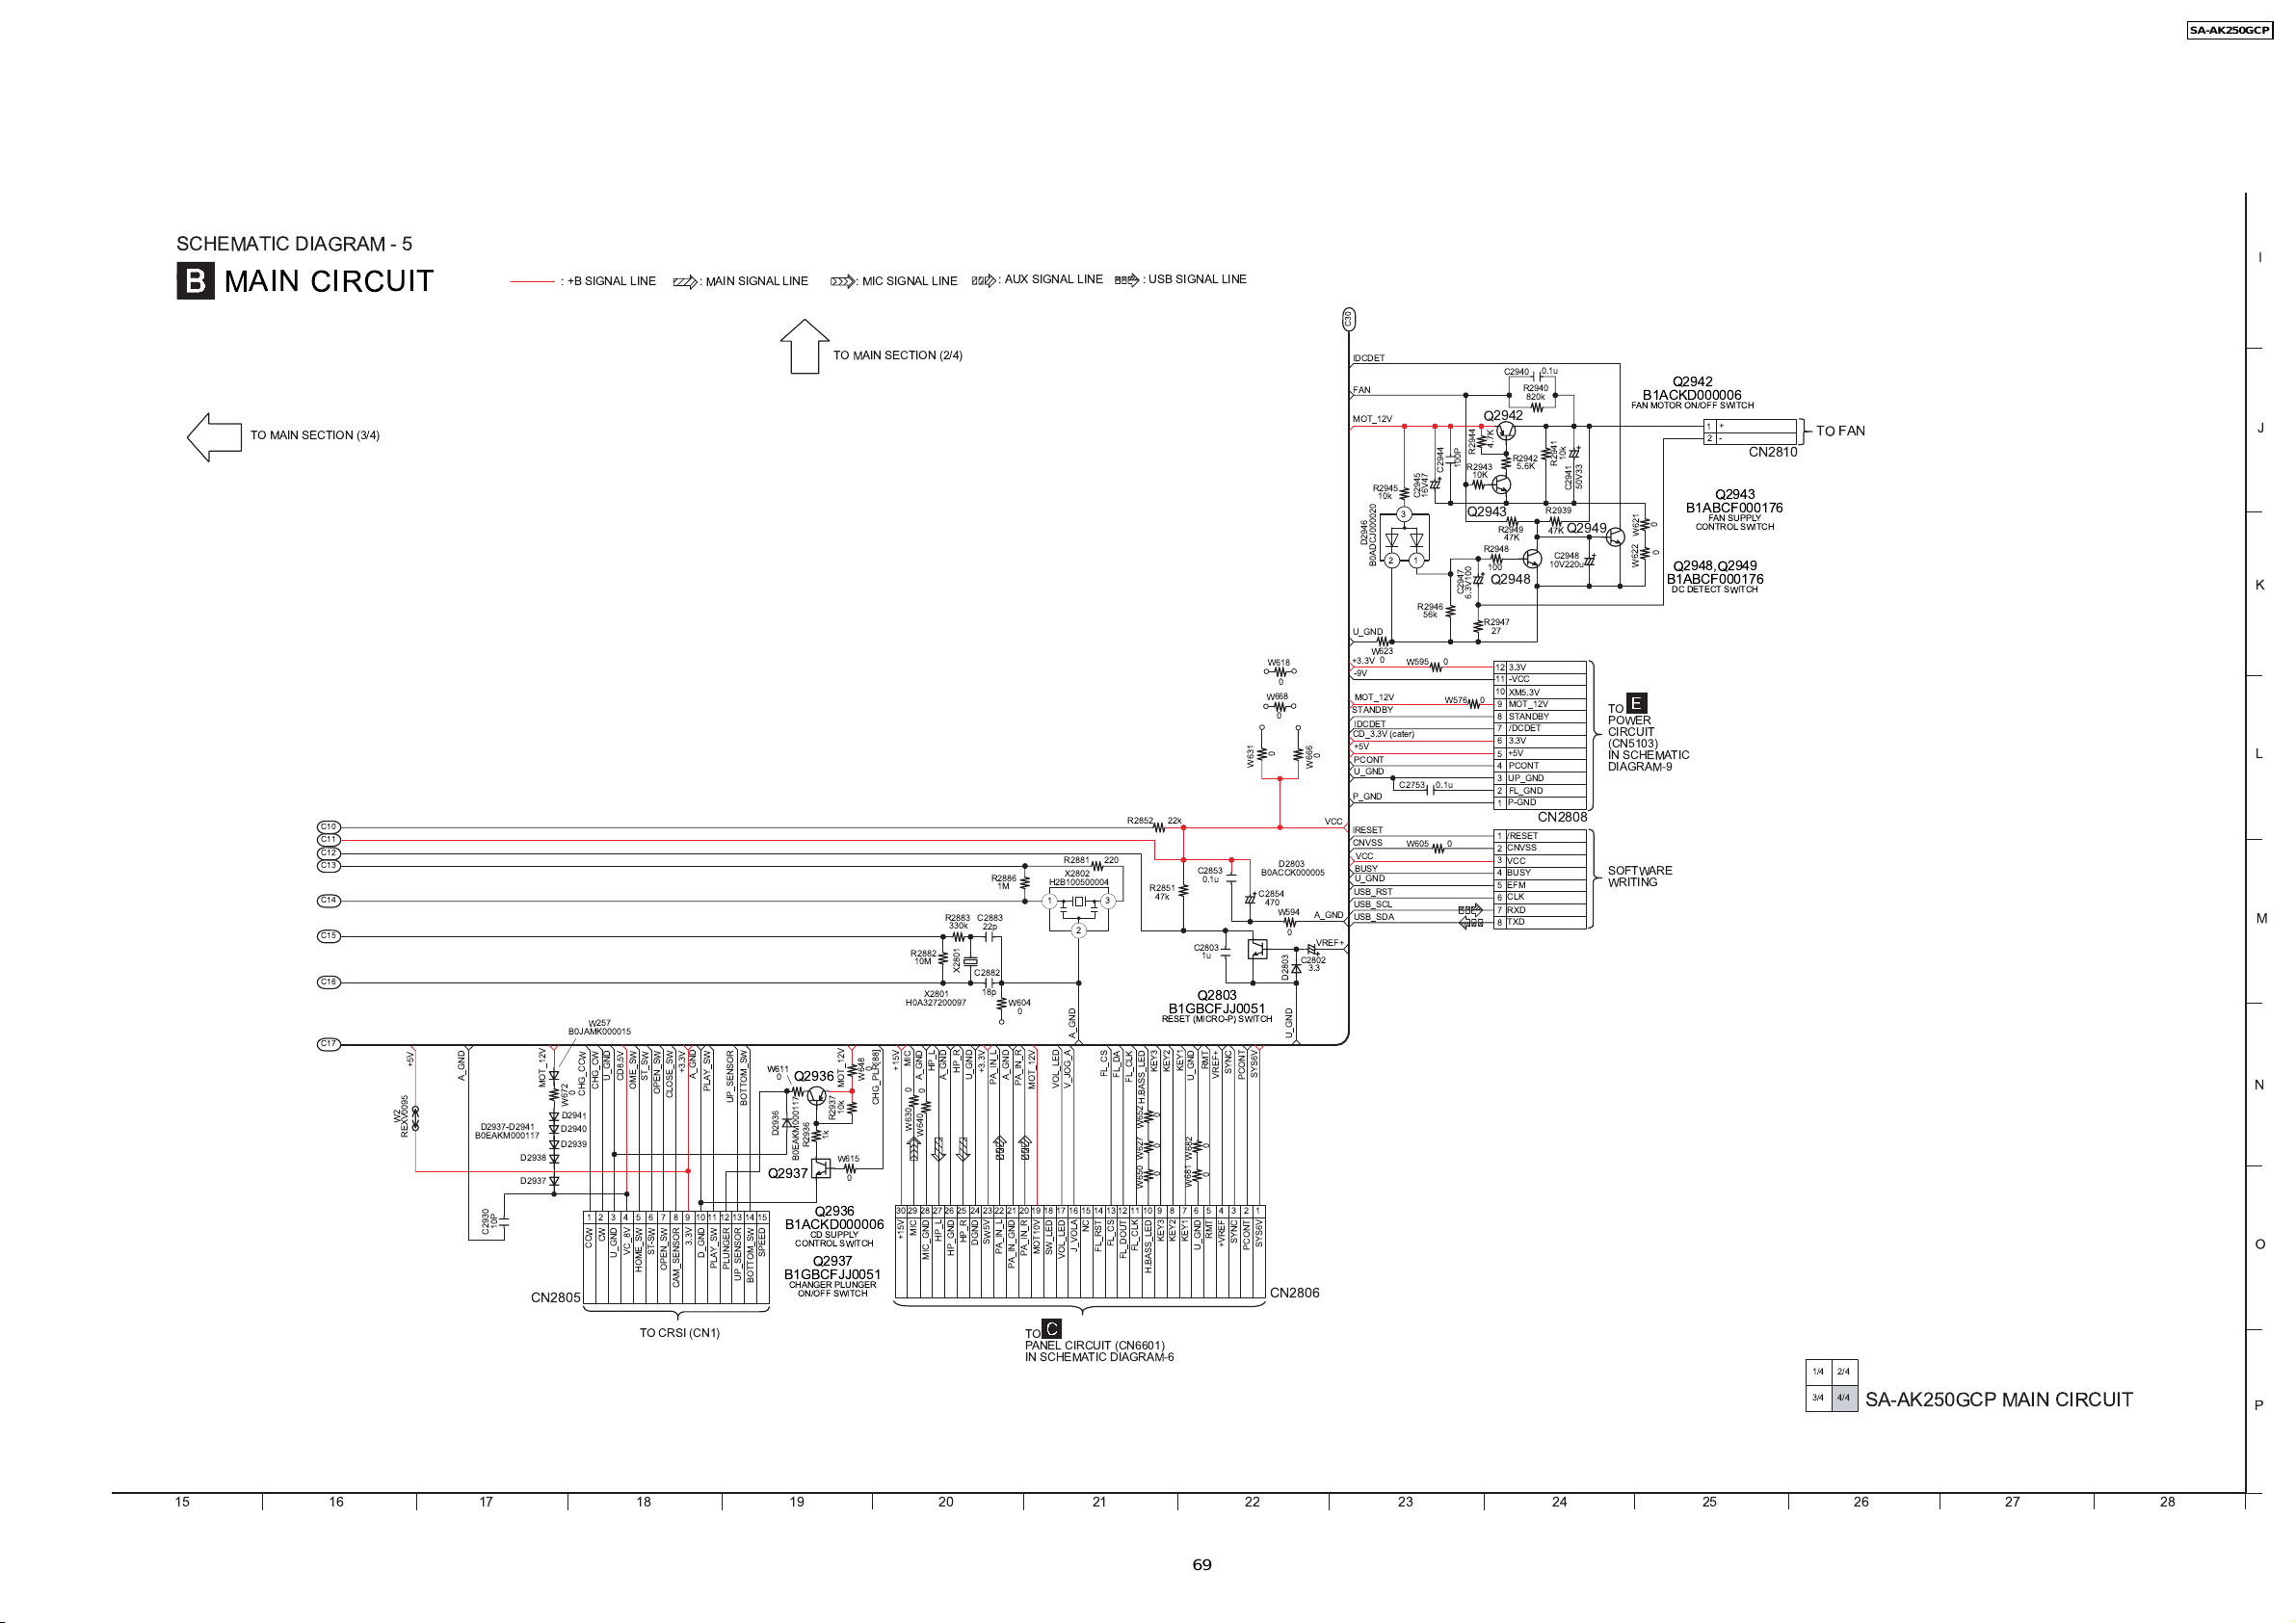
SA-AK250GCP
SCHEMATIC DIAGRAM - 5
MAIN CIRCUIT
TO MAIN SECTION (3/4)
C10
C11
C12
C13
C14
C15
C16
C17
+5V
W2
REXV0095
A_GND
D2937-D2941
B0EAKM000117
10P
C2930
MOT_12V
D2938
D2937
CN2805
: +B SIGNAL LINE
W257
B0JAMK000015
U_GND
CD8.5V
OME_SW
CHG_CW
0
CHG_CCW
W672
D2941
D2940
D2939
CW
CCW
VC_8V
U_GND
+3.3V
ST_SW
OPEN_SW
CLOSE_SW
6589
72143
3.3V
ST-SW
OPEN_SW
HOME_SW
CAM_SENSOR
: MAIN SIGNAL LINE
PLAY_SW
UP_SENSOR
W611
0
BOTTOM_SW
D2936
A_GND
Q2937
11 1210 1513 14
D_GND
PLAY_SW
PLUNGER
UP_SENSOR
BOTTOM_SW
SPEED
B1ACKD000006
B1GBCFJJ0051
: MIC SIGNAL LINE
TO MAIN SECTION (2/4)
R2936
1k
MOT_12V
10k
R2937
W615
0
W648
Q2936
B0EAKM000117
Q2936
CD SUPPLY
CONTROL SWITCH
Q2937
CHANGER PLUNGER
ON/OFF SWITCH
+15V
0
CHG_PLR[88]
+15V
R2883
330k
R2882
10M
X2801
H0A327200097
MIC
HP_L
A_GND
A_GND
0
0
W630
W640
2930
MIC
HP_L
MIC_GND
X2801
HP_R
U_GND
25 2426 21 2022 1718 13 1012 1116 1415192328 27
HP_R
HP_GND
C2883
22p
C2882
18p
+3.3V
DGND
R2886
PA_IN_L
SW5V
: AUX SIGNAL LINE
R2881
X2802
H2B100500004
1M
2
W604
0
A_GND
A_GND
PA_IN_R
VOL_LED
V_JOG_A
MOT_12V
J_VOLA
MOT10V
PA_IN_L
SW_LED
PA_IN_R
VOL_LED
PA_IN_GND
NC
220
31
FL_CS
FL_CS
FL_RST
FL_DA
FL_DOUT
: USB SIGNAL LINE
R2852
22k
C2853
0.1u
R2851
47k
C2803
1u
Q2803
B1GBCFJJ0051
RESET (MICRO-P) SWITCH
KEY1
KEY2
KEY3
H.BASS_LED
0
W652
W627
00
W650
81342
KEY3
KEY2
KEY1
FL_CLK
H.BASS_LED
U_GND
W682
W681
6759
U_GND
FL_CLK
RMT
SYNC
VREF+
PCONT
00
RMT
SYNC
+VREF
W618
0
W668
0
0
W631
D2803
B0ACCK000005
C2854
470
W594
SYS6V
SYS6V
PCONT
CN2806
0
D2803
U_GND
C2802
3.3
0
W666
VCC
A_GND
VREF+
C30
IDCDET
FAN
MOT_12V
R2945
D2946
U_GND
W623
+3.3V
-9V
MOT_12V
STANDBY
IDCDET
CD_3.3V
+5V
PCONT
U_GND
P_GND
lRESET
CNVSS
VCC
BUSY
U_GND
USB_RST
USB_SCL
USB_SDA
C2945
10k
3
12
B0ADCJ000020
R2946
56k
0
W595
(cater)
C2753
W605
16V47
0.1u
C2944
0
W576
0
R2944
100P
R2943
10K
Q2943
C2947
6.3V100
0
C2940
Q2942
4.7K
R2949
47K
R2948
100
Q2948
R2947
27
12
11
10
9
8
7
6
5
4
3
2
1
1
/RESET
CNVSS
2
3
VCC
BUSY
4
5
EFM
CLK
6
RXD
7
TXD
8
R2940
820k
R2942
5.6K
3.3V
-VCC
XM5.3V
MOT_12V
STANDBY
/DCDET
3.3V
+5V
PCONT
UP_GND
FL_GND
P-GND
0.1u
10k
R2941
C2941
R2939
Q2949
47K
C2948
10V220u
CN2808
FAN MOTOR ON/OFF SWITCH
50V33
W621
W622
TO
POWER
CIRCUIT
(CN5103)
IN SCHEMATIC
DIAGRAM-9
SOFTWARE
WRITING
Q2942
B1ACKD000006
+
1
2
-
Q2943
B1ABCF000176
FAN SUPPLY
0
CONTROL SWITCH
0
Q2948,Q2949
B1ABCF000176
DC DETECT SWITCH
CN2810
TO FAN
I
J
K
L
M
N
O
TO CRSI (CN1)
TO
PANEL CIRCUIT (CN6601)
IN SCHEMATIC DIAGRAM-6
1/4 2/4
3/4 4/4
SA-AK250GCP MAIN CIRCUIT
15 16 17 18 19 20 21 22 23 24 25 26 27 28
69
P
Page 69
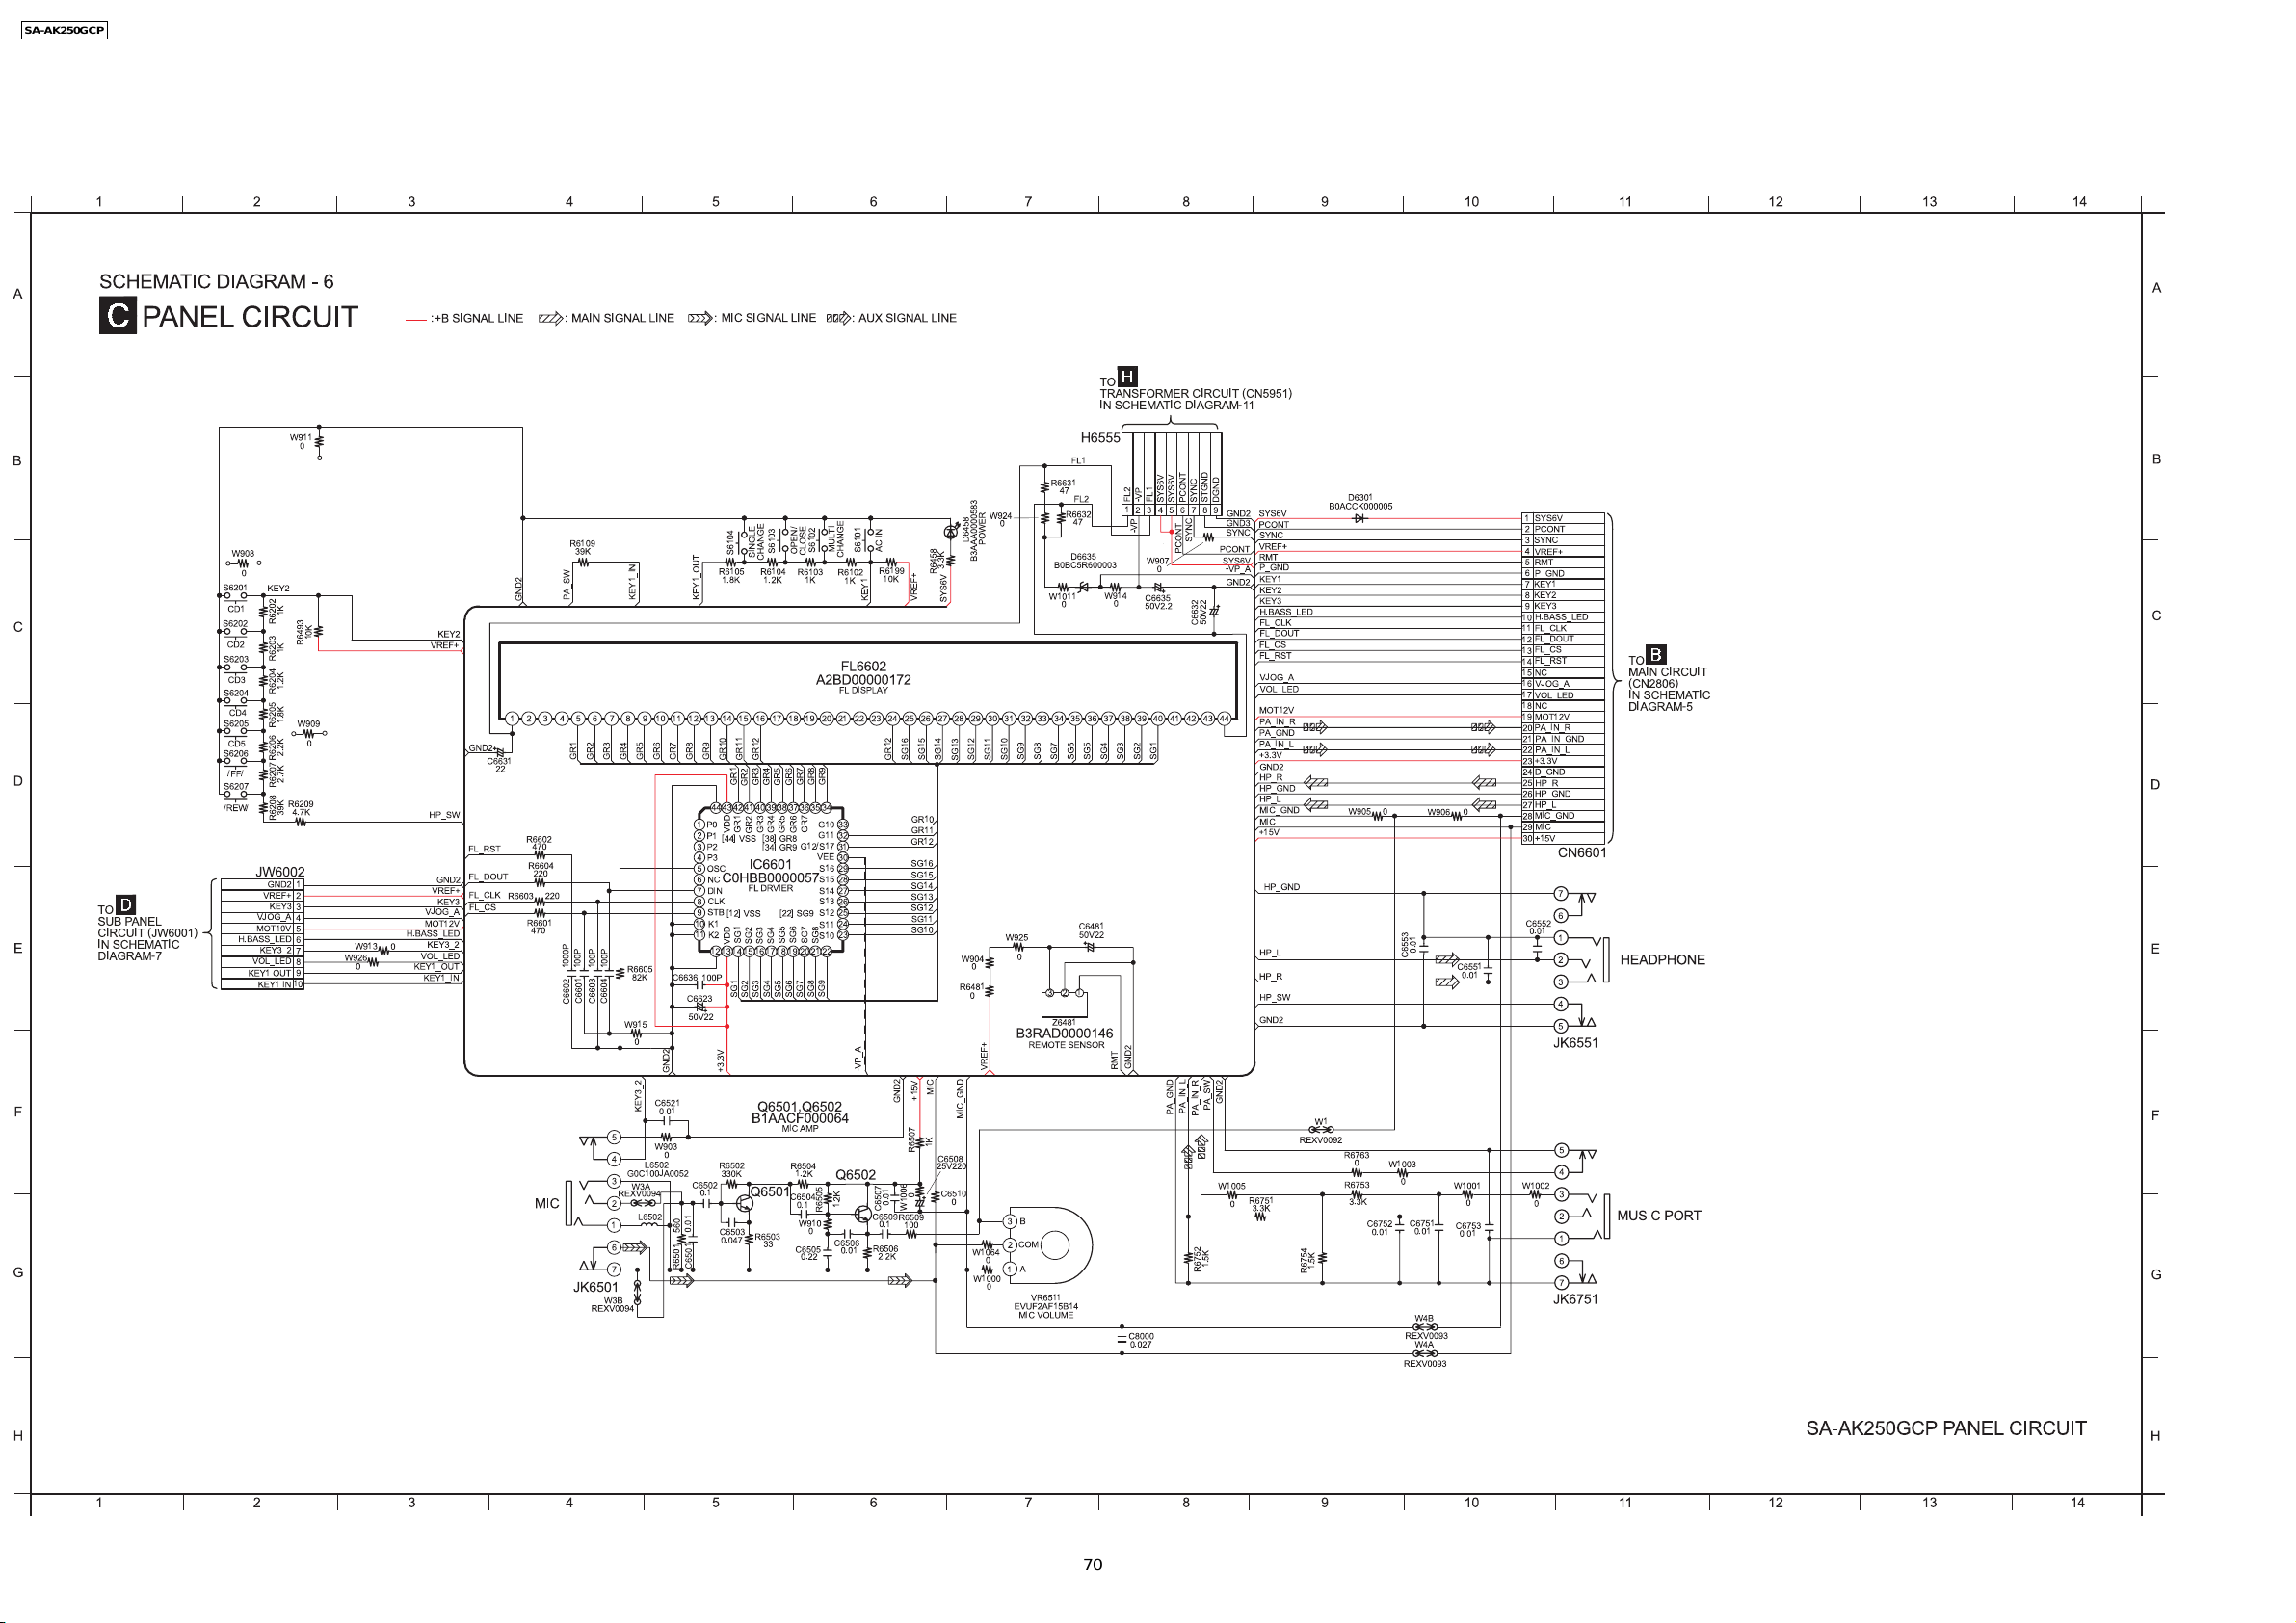
SA-AK250GCP
19.3. (C) Panel Circuit
1234567891011121314
A
B
C
D
E
F
G
SCHEMATIC DIAGRAM - 6
PANEL CIRCUIT
W911
0
W908
0
S6201
KEY2
CD1
R6202
TO
SUB PANEL
CIRCUIT (JW6001)
IN SCHEMATIC
DIAGRAM-7
S6202
CD2
S6203
CD3
S6204
CD4
S6205
CD5
S6206
/FF/
S6207
/REW/
H.BASS_LED
VOL_LED
KEY1 OUT
1K
R6203
1.2K 1K
R6204
1.8K
R6205R6206
2.2K
2.7K39K
R6207R6208
R6209
JW6002
GND2
VREF+
KEY3
VJOG_A
MOT10V
KEY3_2
KEY1 IN
4.7K
10
R6493
W909
1
2
3
4
5
6
7
8
9
10K
0
W926
W913
0
H.BASS_LED
0
VJOG_A
MOT12V
VOL_LED
KEY1_OUT
KEY1_IN
:+B SIGNAL LINE
KEY2
VREF+
GND2
C6631
22
HP_SW
FL_RST
FL_DOUT
GND2
VREF+
FL_CLK
KEY3
FL_CS
KEY3_2
R6603
GND2
R6602
R6604
R6601
470
220
470
MIC
: MAIN SIGNAL LINE
R6109
39K
PA_SW
GR1
GR2
GR3
220
100P
100P
100P
1000P
C6601
C6604
C6603
C6602
5
4
3
2
1
6
7
JK6501
W3B
REXV0094
KEY1_IN
GR5
GR4
R6605
82K
W915
0
C6521
KEY3_2
W903
L6502
G0C100JA0052
W3A
REXV0094
L6502
: MIC SIGNAL LINE
R6105
1.8K
KEY1_OUT
GR6
GR8
GR9
GR7
GR10
1
P0 G10
2
P1
[44] VSS
3
P2
4
P3
5
OSC
C0HBB0000057
6
NC
7
DIN
CLK
8
STB
9
[12] VSS
10
K1
11
K2
12 151413 18 20
C6636
100P
C6623
50V22
+3.3V
GND2
0.01
0
R6502
330K
C6502
0.1
0.01
560
C6503
0.047
C6501
R6501
S6103
S6104
SINGLE
CHANGE
R6104
1.2K 1K
GR11
GR12
GR1
GR4
GR3
GR5
GR2
GR1
VDDVDD
GR4
GR3
GR5
GR2
[38] GR8
[34] GR9
IC6601
FL DRVIER
[22] SG9
SG1
SG5
SG4
SG2
SG3
19
1617
SG4
SG5
SG2
SG1
SG3
Q6501,Q6502
B1AACF000064
MIC AMP
Q6501
C6504
R6503
33
MULTI
S6102
OPEN/
CLOSE
CHANGE
R6103
R6102
1K
FL6602
A2BD00000172
FL DISPLAY
GR7
GR9
GR8
GR6
35374244 43 39384140 36
34
33
GR7
GR6
G11
32
G12/S17
31
VEE
30
S16
29
S15
28
27
S14
S13
26
25
S12
24
S11
23
S10
SG6
SG7
SG8
22
21
SG9
SG8
SG7
SG6
R6504
1.2K
Q6502
0.1
1.2K
R6505
W910
0
C6506
C6505
0.01
0.22
: AUX SIGNAL LINE
AC IN
S6101
R6199
R6458
10K
KEY1
VREF+
SG15
SG16
SG14
GR12
GR10
GR11
GR12
SG16
SG15
SG14
SG13
SG12
SG11
SG10
-VP_A
MIC
+15V
GND2
1K
R6507
C6508
25V220
C6510
0
0.01
W1006
C6507
C6509
R6509
0.1
100
R6506
2.2K
3.3K
SYS6V
SG13
0
W924
D6458
POWER
B3AAA0000583
SG12
W904
0
R6481
0
VREF+
MIC_GND
W1064
0
W1000
0
0
SG8
SG9
SG11
SG10
W925
0
B3RAD0000146
REMOTE SENSOR
B
3
COM
2
A
1
VR6511
EVUF2AF15B14
MIC VOLUME
TO
TRANSFORMER CIRCUIT (CN5951)
IN SCHEMATIC DIAGRAM-11
H6555
FL1
R6631
47
R6632
D6635
B0BC5R600003
W1011
0
SG7
3
21
Z6481
FL2
47
SG6
C6481
50V22
1
SG5
W914
SG4
0
SG3
RMT
FL2
FL1
-VP
326745198
-VP
W907
C6635
50V2.2
SG2
GND2
C8000
0.027
SYS6V
0
SG1
SYS6V
PCONT
SYNC
PCONT
PA_IN_L
PA_GND
STGND
SYNC
50V22
C6632
4339353127 2825 26 3029 3432 33 3836 37 4240 41131211 15 161410 23 2418 1917 21 22207135246 98 44
PA_SW
PA_IN_R
1.5K
R6752
DGND
GND2
GND3
SYNC
PCONT
SYS6V
-VP_A
GND2
GND2
W1005
0
SYS6V
PCONT
SYNC
VREF+
RMT
P_GND
KEY1
KEY2
KEY3
H.BASS_LED
FL_CLK
FL_DOUT
FL_CS
FL_RST
VJOG_A
VOL_LED
MOT12V
PA_IN_R
PA_GND
PA_IN_L
+3.3V
GND2
HP_R
HP_GND
HP_L
MIC_GND
MIC
+15V
HP_GND
HP_L
HP_R
HP_SW
GND2
R6751
3.3K
W1
REXV0092
1.5K
R6754
D6301
B0ACCK000005
W905
R6763
0
R6753
3.3K
C6752
0.01
0
W1003
0.01
C6553
0
C6751
0.01
W4B
REXV0093
W4A
REXV0093
W906
0
C6551
0.01
W1001
C6753
0.01
1
SYS6V
2
PCONT
SYNC
3
4
VREF+
5
RMT
6
P_GND
KEY1
7
KEY2
8
KEY3
9
H.BASS_LED
10
FL_CLK
11
FL_DOUT
12
FL_CS
13
FL_RST
14
15
NC
16
VJOG_A
17
VOL_LED
18
NC
19
MOT12V
PA_IN_R
20
PA_IN_GND
21
PA_IN_L
22
+3.3V
23
D_GND
24
25
HP_R
HP_GND
26
HP_L
27
MIC_GND
28
MIC
29
30
+15V
TO
MAIN CIRCUIT
(CN2806)
IN SCHEMATIC
DIAGRAM-5
CN6601
7
6
C6552
0.01
1
2
3
4
5
HEADPHONE
JK6551
5
4
W1002
0
3
0
2
1
6
7
MUSIC PORT
JK6751
A
B
C
D
E
F
G
H
SA-AK250GCP PANEL CIRCUIT
H
1234567891011121314
70
Page 70
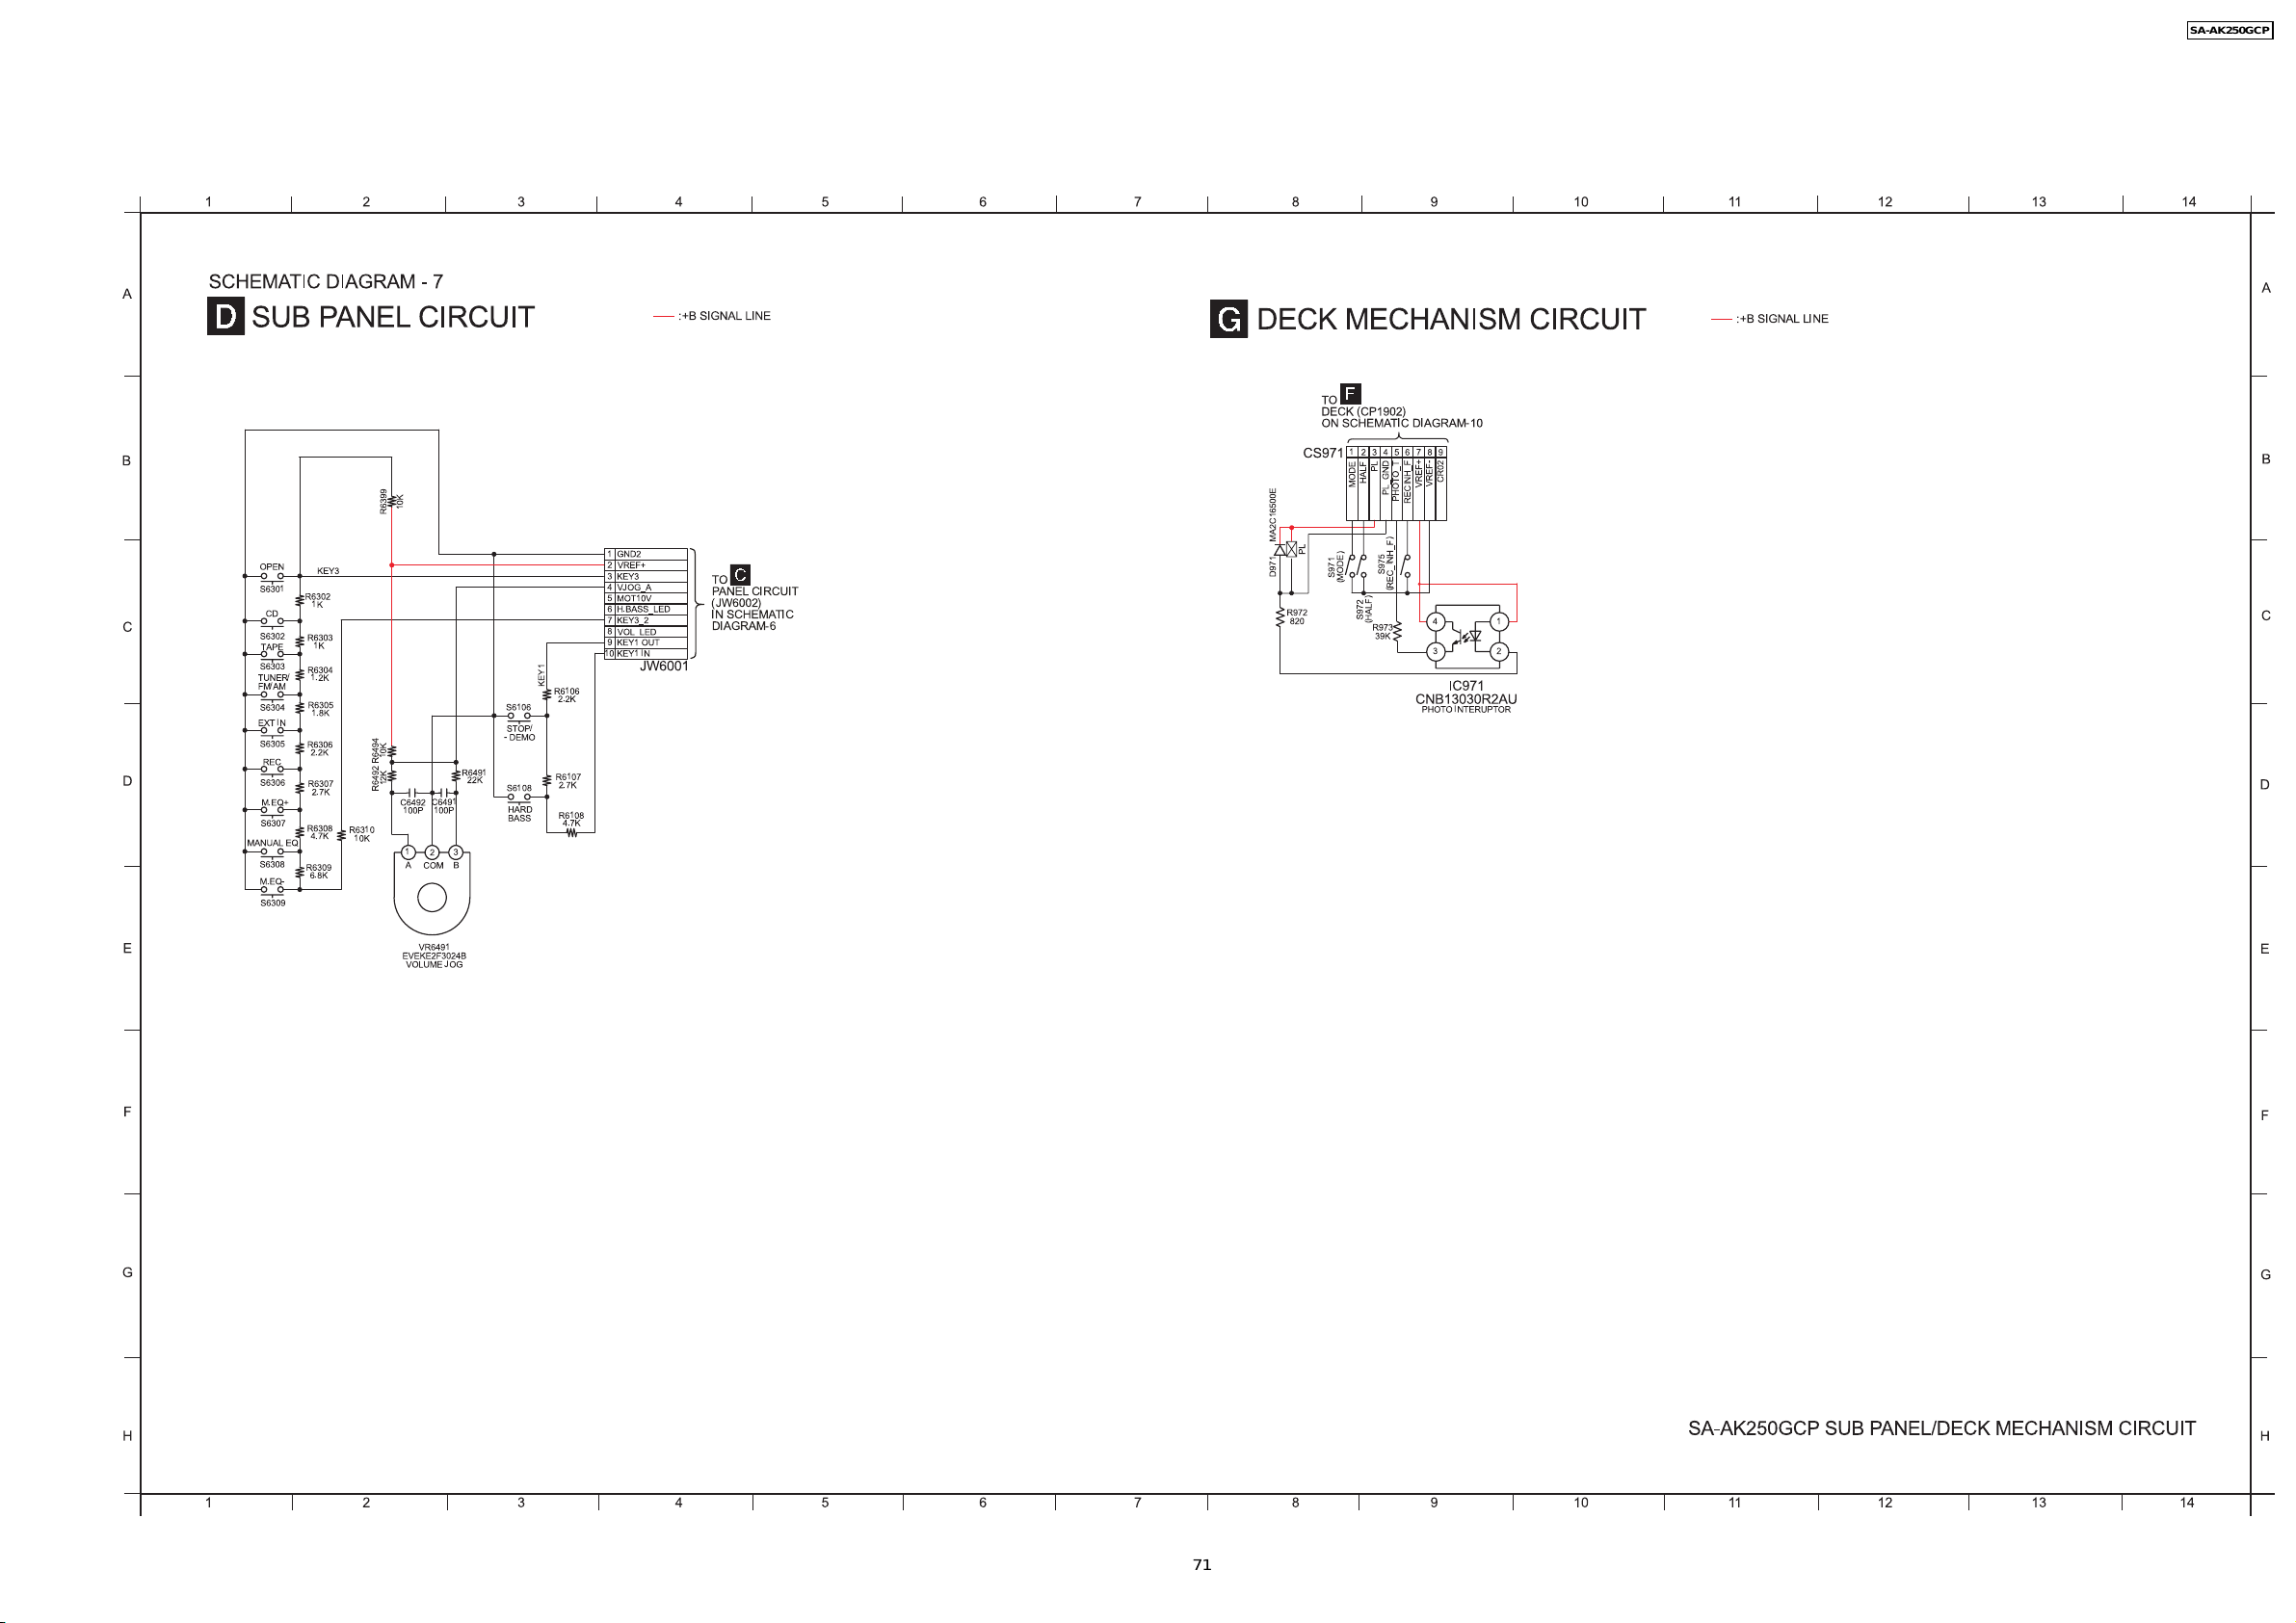
SA-AK250GCP
19.4. (D) Sub Panel Circuit & (G) Deck Mechanism Circuit
1234567891011121314
A
B
C
D
SCHEMATIC DIAGRAM - 7
SUB PANEL CIRCUIT
10K
R6399
OPEN
KEY3
S6301
R6302
1K
CD
S6302
R6303
1K
TAPE
S6303
R6304
TUNER/
1.2K
FM/AM
R6305
S6304
1.8K
EXT IN
S6305
R6306
REC
S6306
M.EQ+
S6307
MANUAL EQ
S6308
M.EQ-
S6309
2.2K
R6307
2.7K
R6308
4.7K
R6309
6.8K
R6310
10K
10K
R6494
12K
R6492
C6492
100P
1
A
COM
C6491
100P
2
3
B
R6491
22K
S6106
STOP/
- DEMO
S6108
HARD
BASS
KEY1
R6106
2.2K
R6107
2.7K
R6108
4.7K
GND2
1
2
VREF+
3
KEY3
4
VJOG_A
5
MOT10V
6
H.BASS_LED
KEY3_2
7
8
VOL_LED
9
KEY1 OUT
10
KEY1 IN
JW6001
:+B SIGNAL LINE
TO
PANEL CIRCUIT
(JW6002)
IN SCHEMATIC
DIAGRAM-6
DECK MECHANISM CIRCUIT
TO
DECK (CP1902)
ON SCHEMATIC DIAGRAM-10
CS971
PL
D971 MA2C16500E
R972
820
S971
(MODE)
HALF
MODE
S972
PL
(HALF)
R973
39K
987654321
VREF-
VREF+
PL_GND
PHOTO_T
RECINH_F
S975
(REC_INH_F)
4
3
CNB13030R2AU
PHOTO INTERUPTOR
CR02
1
2
IC971
:+B SIGNAL LINE
A
B
C
D
E
F
G
H
VR6491
EVEKE2F3024B
VOLUME JOG
SA-AK250GCP SUB PANEL/DECK MECHANISM CIRCUIT
E
F
G
H
1234567891011121314
71
Page 71
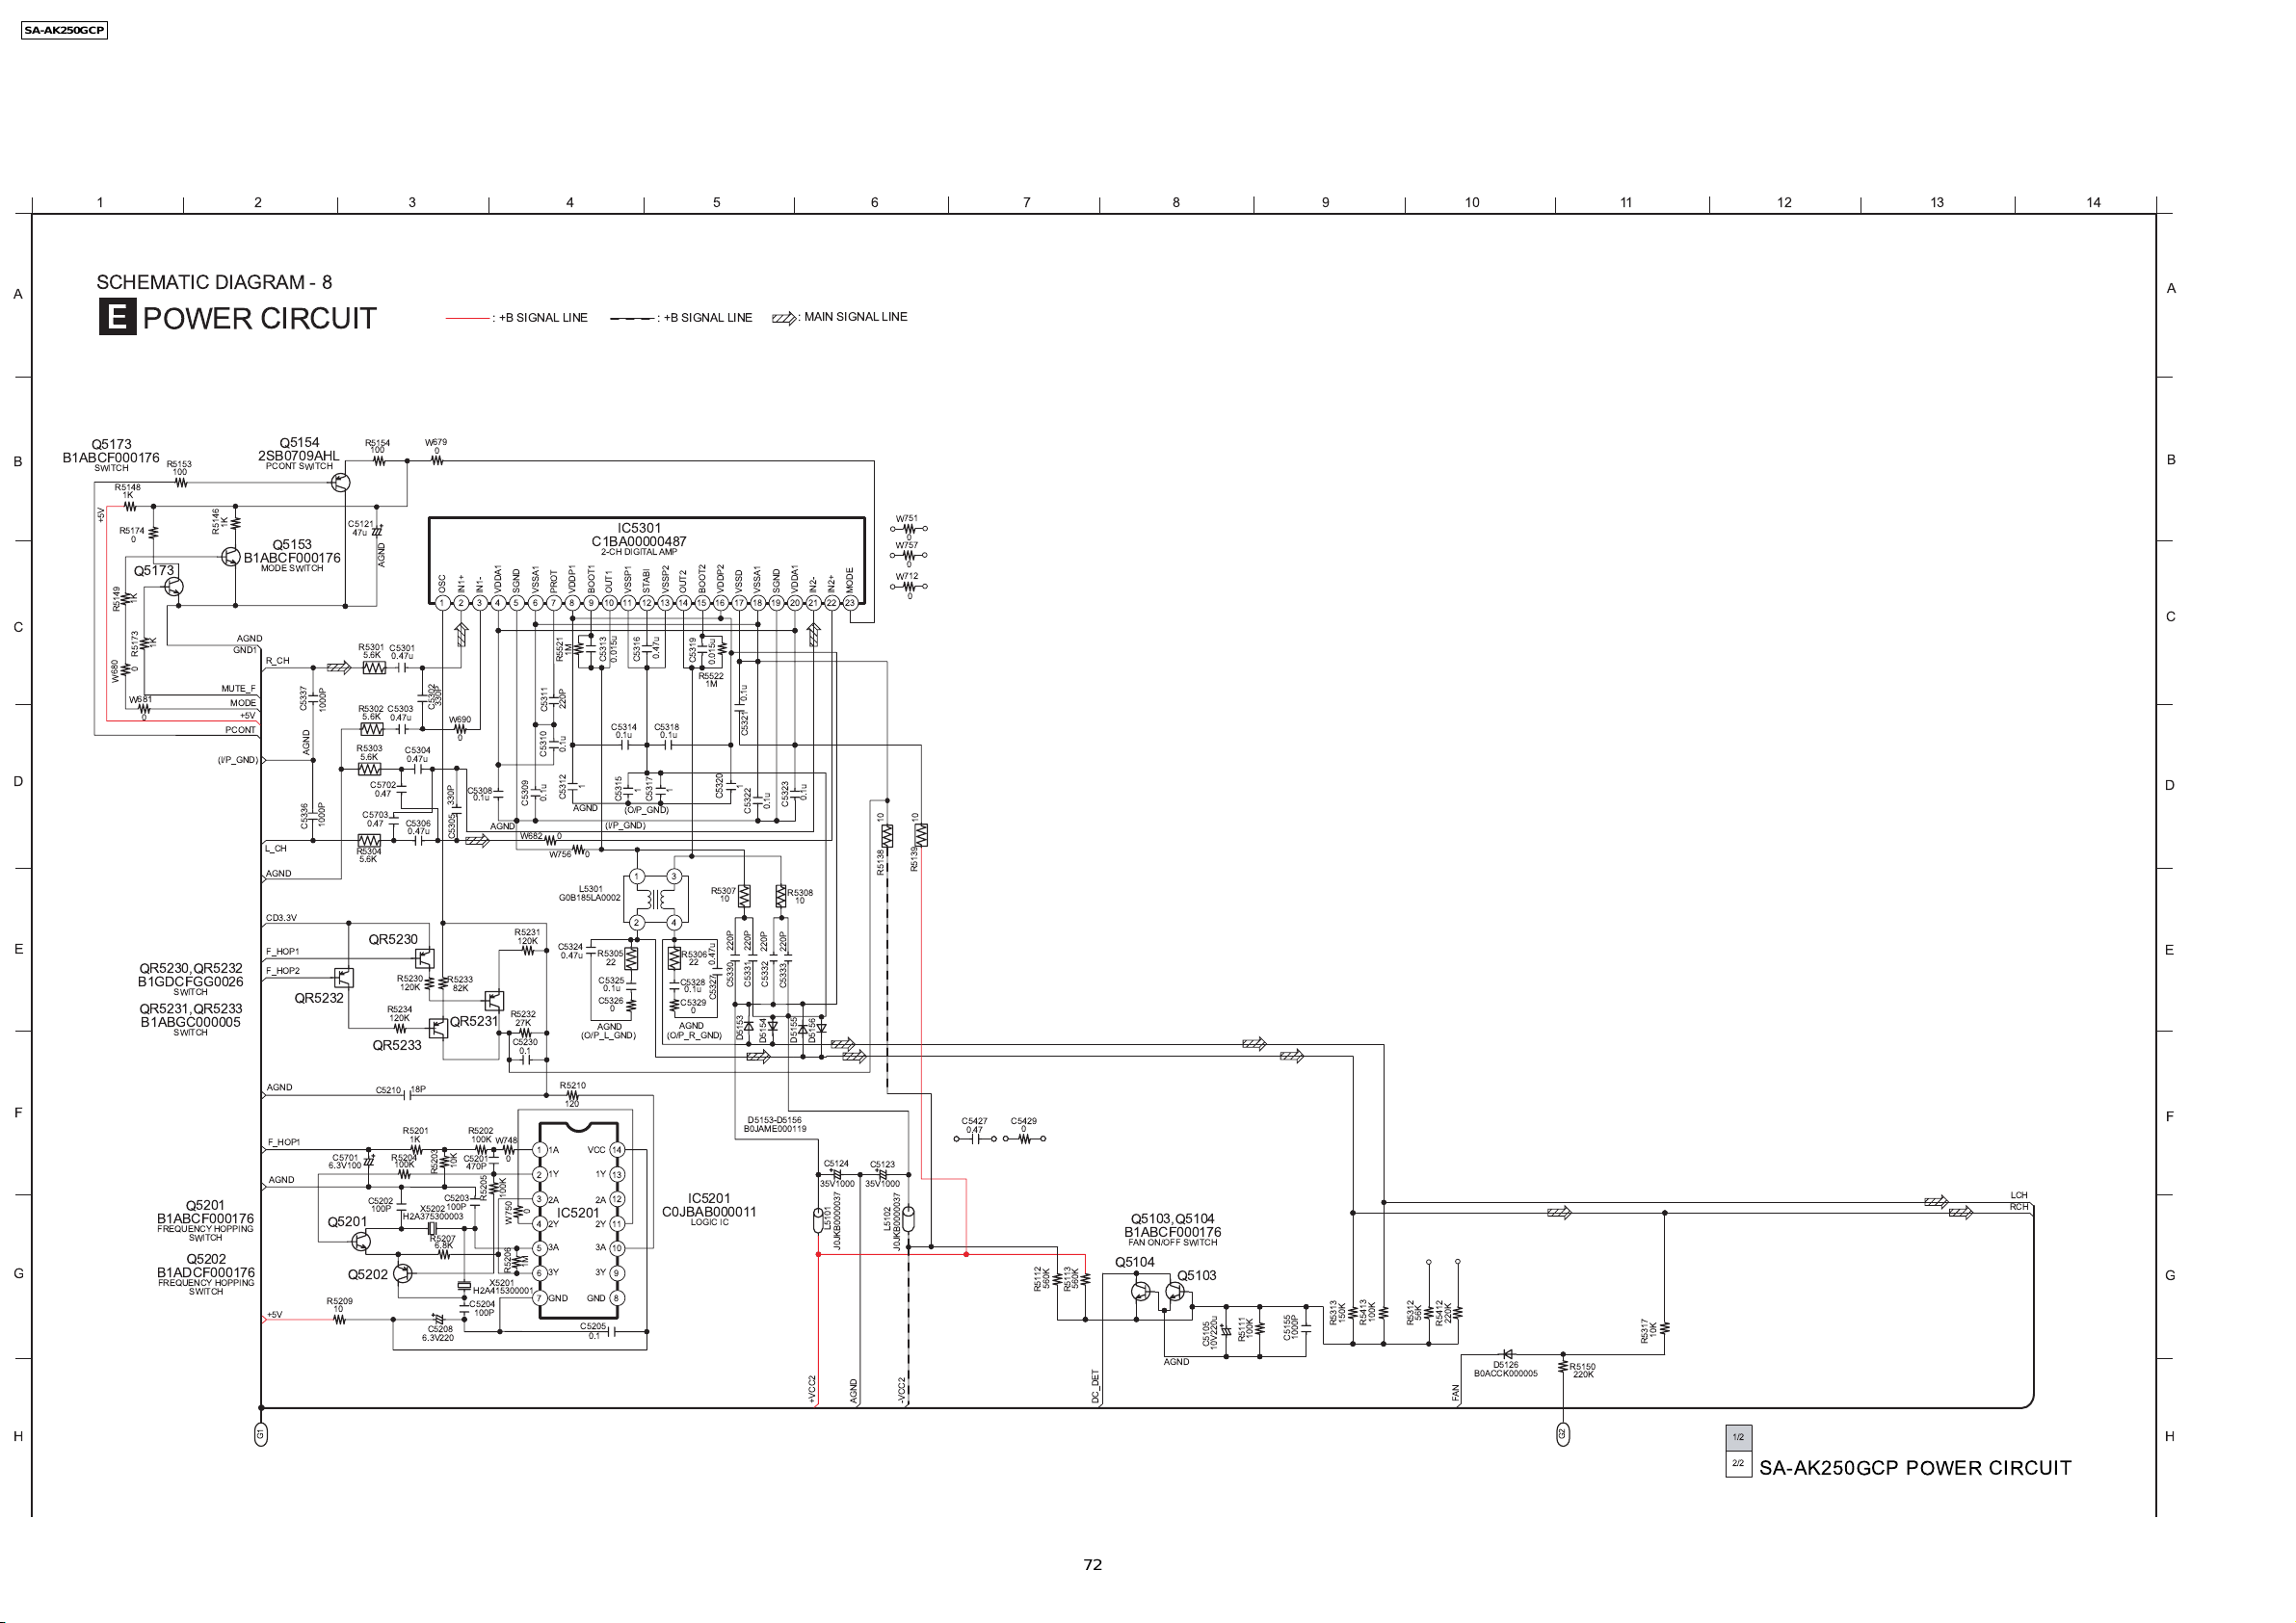
SA-AK250GCP
19.5. (E) Power Circuit
1234567891011121314
A
B
C
D
E
SCHEMATIC DIAGRAM - 8
POWER CIRCUIT
Q5173
B1ABCF000176
SWITCH
R5148
1K
+5V
R5174
0
Q5173
1K
R5149
R5173
0
W680
W681
0
QR5230,QR5232
B1GDCFGG0026
QR5231,QR5233
B1ABGC000005
1K
R5153
100
SWITCH
SWITCH
1K
R5146
B1ABCF000176
AGND
GND1
MUTE_F
MODE
+5V
PCONT
(I/P_GND)
Q5154
2SB0709AHL
PCONT SWITCH
Q5153
MODE SWITCH
R_CH
C5337
1000P
AGND
1000P
C5336
L_CH
AGND
CD3.3V
F_HOP1
F_HOP2
QR5232
C5121
47u
R5303
R5304
R5301
R5302
5.6K
5.6K
R5154
100
AGND
C5301
5.6K
0.47u
C5303
5.6K
0.47u
C5702
0.47
C5703
0.47
QR5230
R5234
120K
QR5233
: +B SIGNAL LINE
W679
0
C1BA00000487
VDDA1
IN1-
AGND
SGND
W682
R5231
120K
R5232
27K
C5230
0.1
VSSA1
C5309
VDDP1
PROT
1M
R5521
220P
C5311
0.1u
C5310
C5312
0.1u
AGND
0
W756
L5301
G0B185LA0002
C5324
0.47u
BOOT1
1
0
R5305
C5325
C5326
AGND
(O/P_L_GND)
OSC
IN1+
123456789101112 13 14 15 16 17 18 19 20 21 22 23
330P
C5302
W690
0
C5304
0.47u
C5308
0.1u
330P
C5306
0.47u
C5305
R5230
R5233
120K
82K
QR5231
: +B SIGNAL LINE
IC5301
2-CH DIGITAL AMP
VSSP1
OUT1
STABI
0.47u
C5313
C5316
0.015u
C5318
C5314
0.1u
0.1u
1
C5317
C5315
(O/P_GND)
(I/P_GND)
2
22
0.1u
0
VSSP2
OUT2
C5319
R5522
1
31
4
R5306
22
C5328
0.1u
C5329
0
AGND
(O/P_R_GND)
BOOT2
0.015u
1M
R5307
10
0.47u
C5327
VDDP2
C5320
220P
C5330
VSSD
0.1u
C5321
1
C5322
220P
C5331
D5153
: MAIN SIGNAL LINE
VSSA1
VDDA1
SGND
IN2-
0.1u
C5323
0.1u
R5308
10
220P
220P
C5332
C5333
D5155
D5156
D5154
IN2+
MODE
10
R5138
W751
W757
W712
A
B
0
0
0
C
D
10
R5139
E
AGND
C5210
18P
F
1K
X5202
R5207
C5208
6.3V220
R5203
6.8K
C5203
100P
10K
R5202
100K
W748
C5201
470P
R5205
X5201
H2A415300001
C5204
100P
C5202
100P
Q5202
R5201
R5204
100K
H2A375300003
F_HOP1
AGND
Q5201
B1ABCF000176
FREQUENCY HOPPING
SWITCH
Q5202
G
B1ADCF000176
FREQUENCY HOPPING
H
SWITCH
+5V
G1
C5701
6.3V100
Q5201
R5209
10
R5210
120
1
1A
0
1Y
2
100K
3
2A
0
W750
2Y
4
3A
5
1M
R5206
3Y
6
GND
78
IC5201
C5205
VCC
GND
0.1
14
1Y
13
12
2A
2Y
11
3A
10
3Y
9
D5153-D5156
B0JAME000119
IC5201
C0JBAB000011
LOGIC IC
C5124
35V1000
L5101
+VCC2
C5123
35V1000
J0JKB0000037
AGND
L5102
J0JKB0000037
-VCC2
C5427
0.47
C5429
0
LCH
RCH
560K
R5112
560K
R5113
DC_DET
Q5103,Q5104
B1ABCF000176
FAN ON/OFF SWITCH
Q5104
Q5103
AGND
C5105
10V220u
100K
R5111
1000P
C5155
150K
R5313
100K
R5413
56K
R5312
220K
R5412
FAN
D5126
B0ACCK000005
R5150
220K
G2
10K
R5317
1/2
2/2
SA-AK250GCP POWER CIRCUIT
F
G
H
72
Page 72
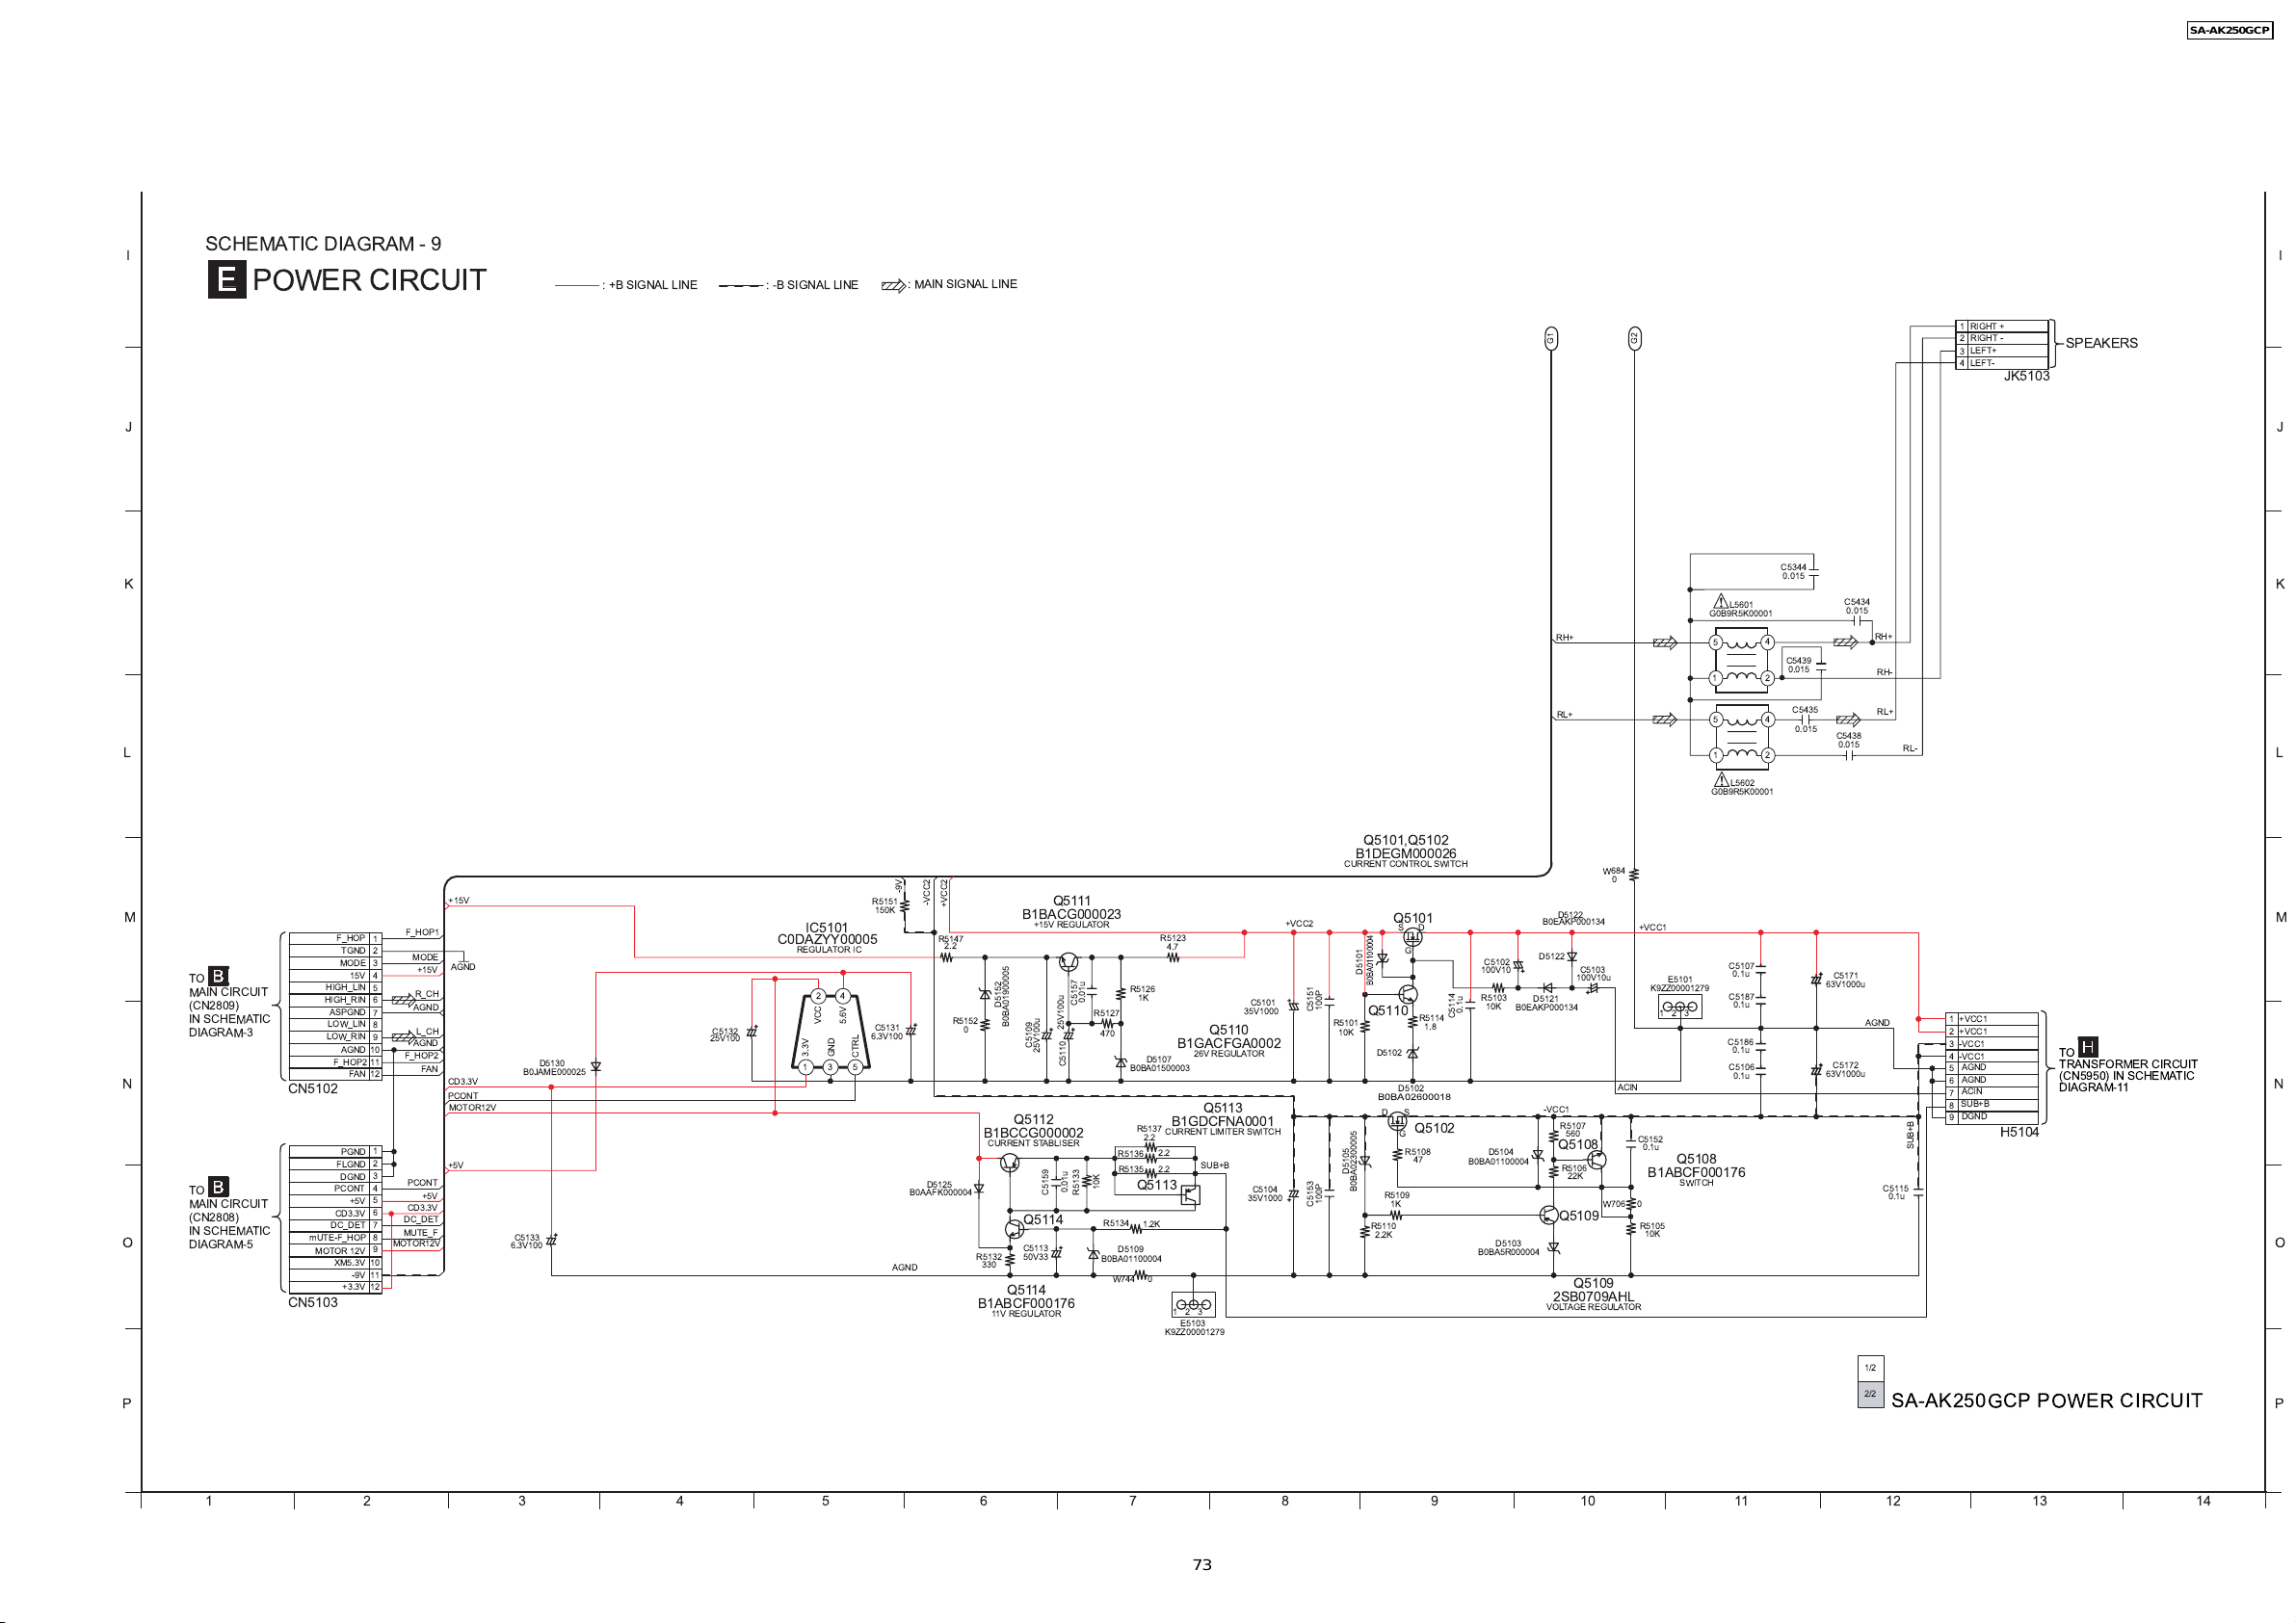
SA-AK250GCP
I
SCHEMATIC DIAGRAM - 9
POWER CIRCUIT
: +B SIGNAL LINE : -B SIGNAL LINE
: MAIN SIGNAL LINE
RIGHT +
1
2
G1
G2
3
4
RIGHT -
LEFT+
LEFT-
SPEAKERS
JK5103
J
C5344
L5601
L5602
0.015
C5434
0.015
C5438
0.015
RH+
RH-
RL+
RL-
4
C5439
0.015
2
C5435
4
0.015
2
K
G0B9R5K00001
RH+
RL+
L
5
1
5
1
G0B9R5K00001
I
J
K
L
Q5101,Q5102
B1DEGM000026
CURRENT CONTROL SWITCH
5.6V
CTRL
R5151
150K
C5131
6.3V100
-9V
B0AAFK000004
AGND
-VCC2
D5125
+VCC2
R5147
2.2
R5152
0
Q5111
B1BACG000023
+15V REGULATOR
D5152
B0BA01900005
25V100u
C5109
25V100u
Q5112
B1BCCG000002
CURRENT STABLISER
C5159
Q5114
C5113
50V33
R5132
330
Q5114
B1ABCF000176
11V REGULATOR
C5157
C5110
0.01u
0.01u
R5127
470
10K
R5133
R5134
B0BA01100004
R5126
1K
B0BA01500003
R5137
R5136
R5135
Q5113
D5109
W744
D5107
2.2
2.2
2.2
1.2K
0
R5123
4.7
C5101
35V1000
Q5110
B1GACFGA0002
26V REGULATOR
Q5113
SUB+B
C5104
35V1000
B1GDCFNA0001
CURRENT LIMITER SWITCH
132
E5103
K9ZZ00001279
+VCC2
C5151
100P 100P
C5153
R5101
10K
D5105
D5101
B0BA01100004
Q5110
D5102
B0BA02600018
D
B0BA02300005
R5109
R5110
2.2K
M
F_HOP
1
TGND
2
MODE
3
15V
TO
MAIN CIRCUIT
(CN2809)
IN SCHEMATIC
DIAGRAM-3
N
TO
MAIN CIRCUIT
(CN2808)
O
IN SCHEMATIC
DIAGRAM-5
CN5102
mUTE-F_HOP
HIGH_LIN
HIGH_RIN
ASPGND
LOW_LIN
LOW_RIN
AGND
F_HOP2
FAN
PGND
FLGND
DGND
PCONT
+5V
CD3.3V
DC_DET
MOTOR 12V
XM5.3V
+3.3V
4
5
6
7
8
9
10
11
12
1
2
3
4
5
6
7
8
9
10
11
-9V
12
F_HOP1
MODE
+15V
R_CH
AGND
L_CH
AGND
F_HOP2
FAN
PCONT
+5V
CD3.3V
DC_DET
MUTE_F
MOTOR12V
+15V
AGND
CD3.3V
PCONT
MOTOR12V
+5V
D5130
B0JAME000025
C5133
6.3V100
C5132
25V100
IC5101
C0DAZYY00005
REGULATOR IC
24
VCC
3.3V
GND
135
CN5103
P
Q5101
S
G
D5102
S
G
R5108
47
1K
D
R5114
1.8
Q5102
0.1u
C5114
B0BA01100004
C5102
100V10
R5103
10K
B0EAKP000134
D5104
D5103
B0BA5R000004
D5122
B0EAKP000134
D5122
C5103
100V10u
D5121
-VCC1
R5107
560
Q5108
R5106
22K
Q5109
Q5109
2SB0709AHL
VOLTAGEREGULATOR
W684
0
+VCC1
ACIN
C5152
0.1u
B1ABCF000176
W706
0
R5105
10K
E5101
K9ZZ00001279
132
Q5108
SWITCH
M
C5107
0.1u
C5187
0.1u
C5186
0.1u
C5106
0.1u
C5171
63V1000u
C5172
63V1000u
AGND
C5115
0.1u
SUB+B
1
2
3
4
5
6
7
8
9
+VCC1
+VCC1
-VCC1
-VCC1
AGND
AGND
ACIN
SUB+B
DGND
H5104
TO
TRANSFORMER CIRCUIT
(CN5950) IN SCHEMATIC
DIAGRAM-11
N
O
1/2
2/2
SA-AK250GCP POWER CIRCUIT
P
1234567891011121314
73
Page 73
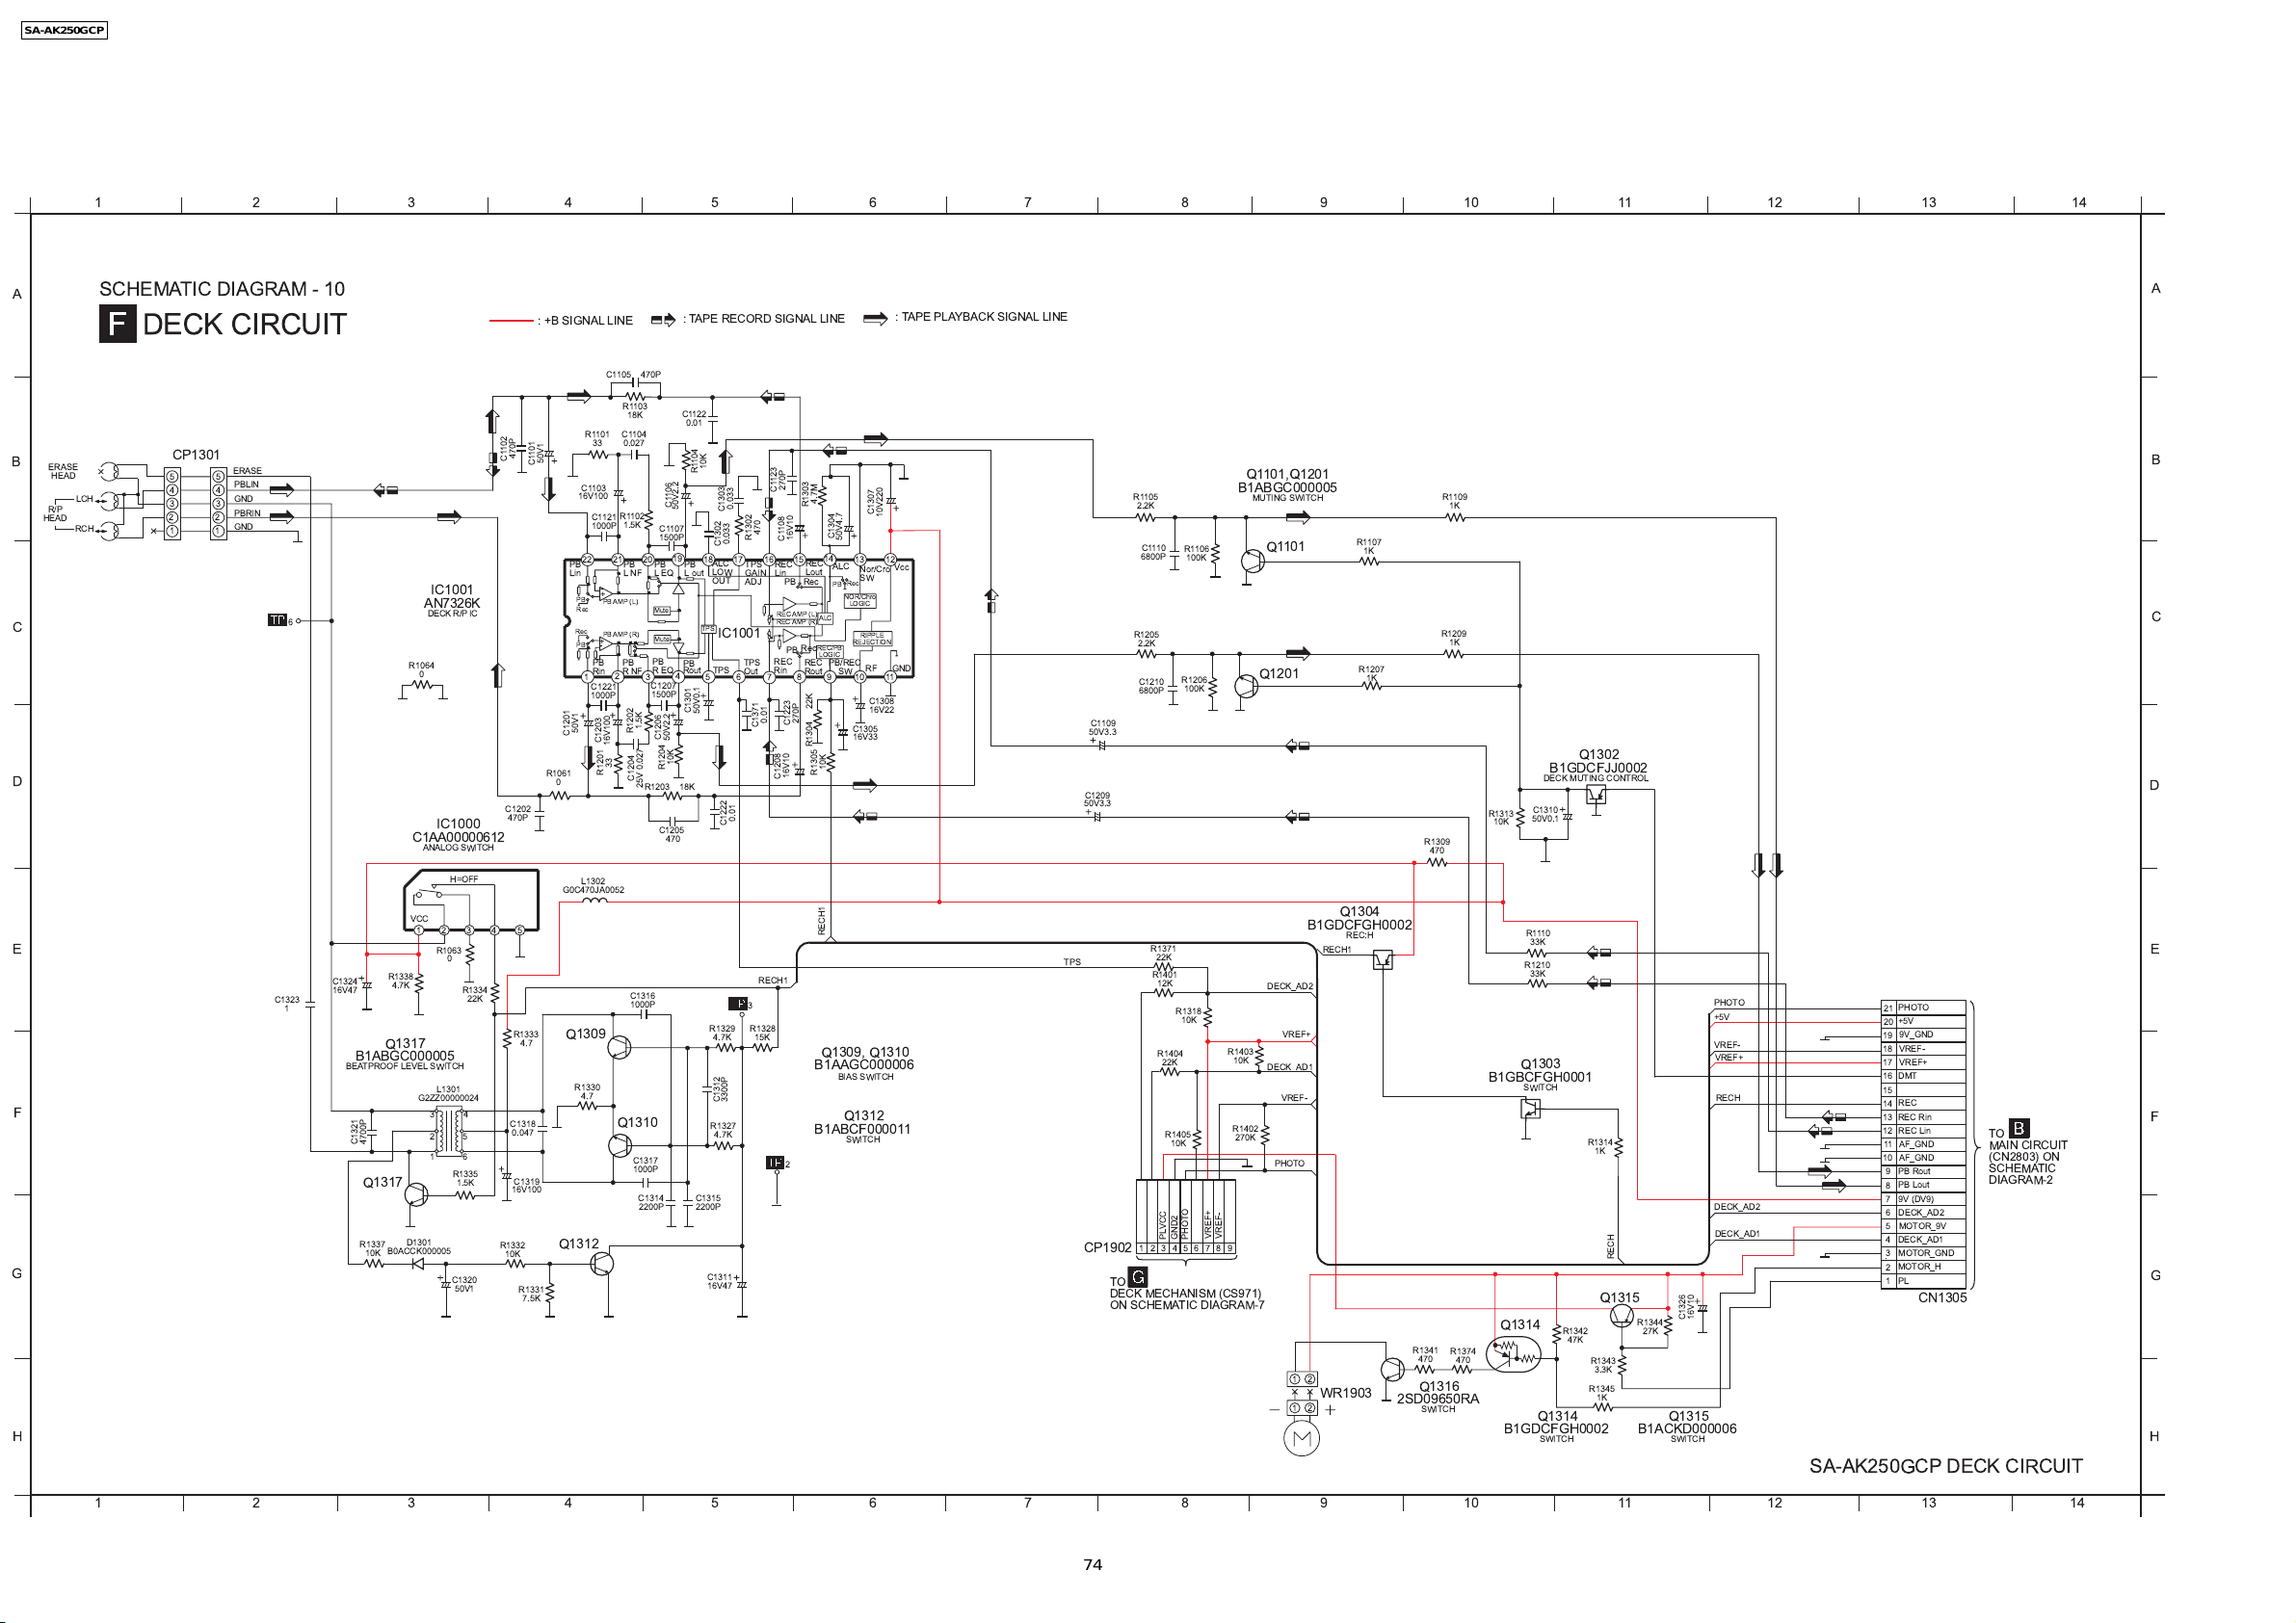
SA-AK250GCP
19.6. (F) Deck Circuit
1234567891011121314
A
B
C
D
E
F
G
H
SCHEMATIC DIAGRAM - 10
DECK CIRCUIT
ERASE
HEAD
R/P
HEAD
LCH
RCH
CP1301
5
4
3
2
1
5
4
3
2
1
ERASE
PBLIN
GND
PBRIN
GND
C1323
: +B SIGNAL LINE
C1105 470P
R1103
R110133C1104
16V100
PB
Lin
PB
Rec
Rec
PB
50V1
C1201
R1330
C1103
1
C1221
1000P
L1302
4.7
C1121
1000P
-
+
+
-
PB
Rin
C1203
0.027
R1102
1.5K
2122
PB
LNF
PB AMP (L)
PB AMP (R)
PB
RNF
2
16V100
33
R1201
Q1310
470P
C1102
50V1
C1101
IC1001
AN7326K
6
C1324
16V47
1
B1ABGC000005
BEATPROOF LEVEL SWITCH
4700P
C1321
Q1317
R1337
10K
DECK R/P IC
R1064
0
IC1000
C1AA00000612
ANALOG SWITCH
H=OFF
VCC
12 435
R1063
4.7K
0
R1334
22K
R1338
Q1317
L1301
G2ZZ00000024
324
5
1
6
R1335
1.5K
D1301
B0ACCK000005
C1320
50V1
C1202
470P
R1332
10K
R1333
4.7
C1318
0.047
C1319
16V100
R1331
7.5K
R1061
0
G0C470JA0052
Q1309
Q1312
: TAPE RECORD SIGNAL LINE
C1122
18K
0.01
10K
R1104
C1106
50V2.2
C1107
1500P
19
20
PB
REQ
3
C1207
1500P
1.5K
R1202
C1204
25V 0.027
R1203 18K
C1316
1000P
C1317
1000P
C1314
2200P
PB
LEQ
Mute
Mute
C1205
C1206
50V2.2
R1204
470
ALC
PB
LOW
L out
OUT
TPS
IC1001
PB
TPS
Rout
4
5
C1301
50V0.1
10K
R1329
4.7K
C1312
R1327
4.7K
C1315
2200P
C1311
16V47
C1303
0.033
C1302
C1222
3300P
0.033
1718
6
0.01
TPS
GAIN
ADJ
TPS
Out
3
470
R1302
C1371
RECH1
R1328
15K
16
REC
Lin
REC
Rin
7
0.01
270P
C1123
16V10
C1108
15
PB
REC AMP (L)
REC AMP (R)
PB
8
C1223
16V10
C1208
2
4.7M
R1303
C1304
14
REC
ALC
Lout
Rec
PB
ALC
REC/PB
Rec
LOGIC
PB/REC
REC
Rout
911
270P
R1304 22K
10K
R1305
RECH1
Q1309, Q1310
B1AAGC000006
BIAS SWITCH
B1ABCF000011
: TAPE PLAYBACK SIGNAL LINE
C1307
10V220
50V4.7
12
13
Vcc
Nor/Cro
SW
Rec
NOR/Chro
LOGIC
RIPPLE
REJECTION
GND
RF
SW
10
C1308
16V22
C1305
16V33
Q1312
SWITCH
R1105
2.2K
C1110
6800P
R1205
2.2K
C1210
6800P
C1109
50V3.3
C1209
50V3.3
R1371
TPS
22K
R1401
CP1902
TO
DECK MECHANISM (CS971)
ON SCHEMATIC DIAGRAM-7
12K
R1404
22K
R1405
10K
PLVCC
R1106
100K
R1206
100K
R1318
10K
GND2
R1403
10K
R1402
VREF+
VREF-
PHOTO
987654321
Q1101,Q1201
B1ABGC000005
MUTING SWITCH
Q1101
Q1201
B1GDCFGH0002
RECH1
DECK_AD2
VREF+
DECK_AD1
VREF-
270K
PHOTO
21
WR1903
21
R1107
1K
R1207
Q1304
REC:H
1K
2SD09650RA
R1309
470
R1341
470
Q1316
SWITCH
R1109
1K
R1209
1K
R1374
470
B1GDCFJJ0002
DECK MUTING CONTROL
C1310
R1313
50V0.1
10K
R1110
33K
R1210
33K
Q1303
B1GBCFGH0001
SWITCH
Q1314
B1GDCFGH0002
Q1314
SWITCH
R1342
47K
Q1302
R1314
1K
Q1315
R1343
3.3K
R1345
1K
RECH
R1344
27K
Q1315
B1ACKD000006
C1326
SWITCH
16V10
PHOTO
+5V
VREF-
VREF+
RECH
DECK_AD2
DECK_AD1
PHOTO
21
+5V
20
9V_GND
19
VREF-
18
VREF+
17
DMT
16
15
REC
14
REC Rin
13
REC Lin
12
AF_GND
11
AF_GND
10
PB Rout
9
PB Lout
8
9V (DV9)
7
DECK_AD2
6
5
MOTOR_9V
DECK_AD1
4
3
MOTOR_GND
MOTOR_H
2
PL
1
CN1305
TO
MAIN CIRCUIT
(CN2803) ON
SCHEMATIC
DIAGRAM-2
A
B
C
D
E
F
G
H
SA-AK250GCP DECK CIRCUIT
1234567891011121314
74
Page 74
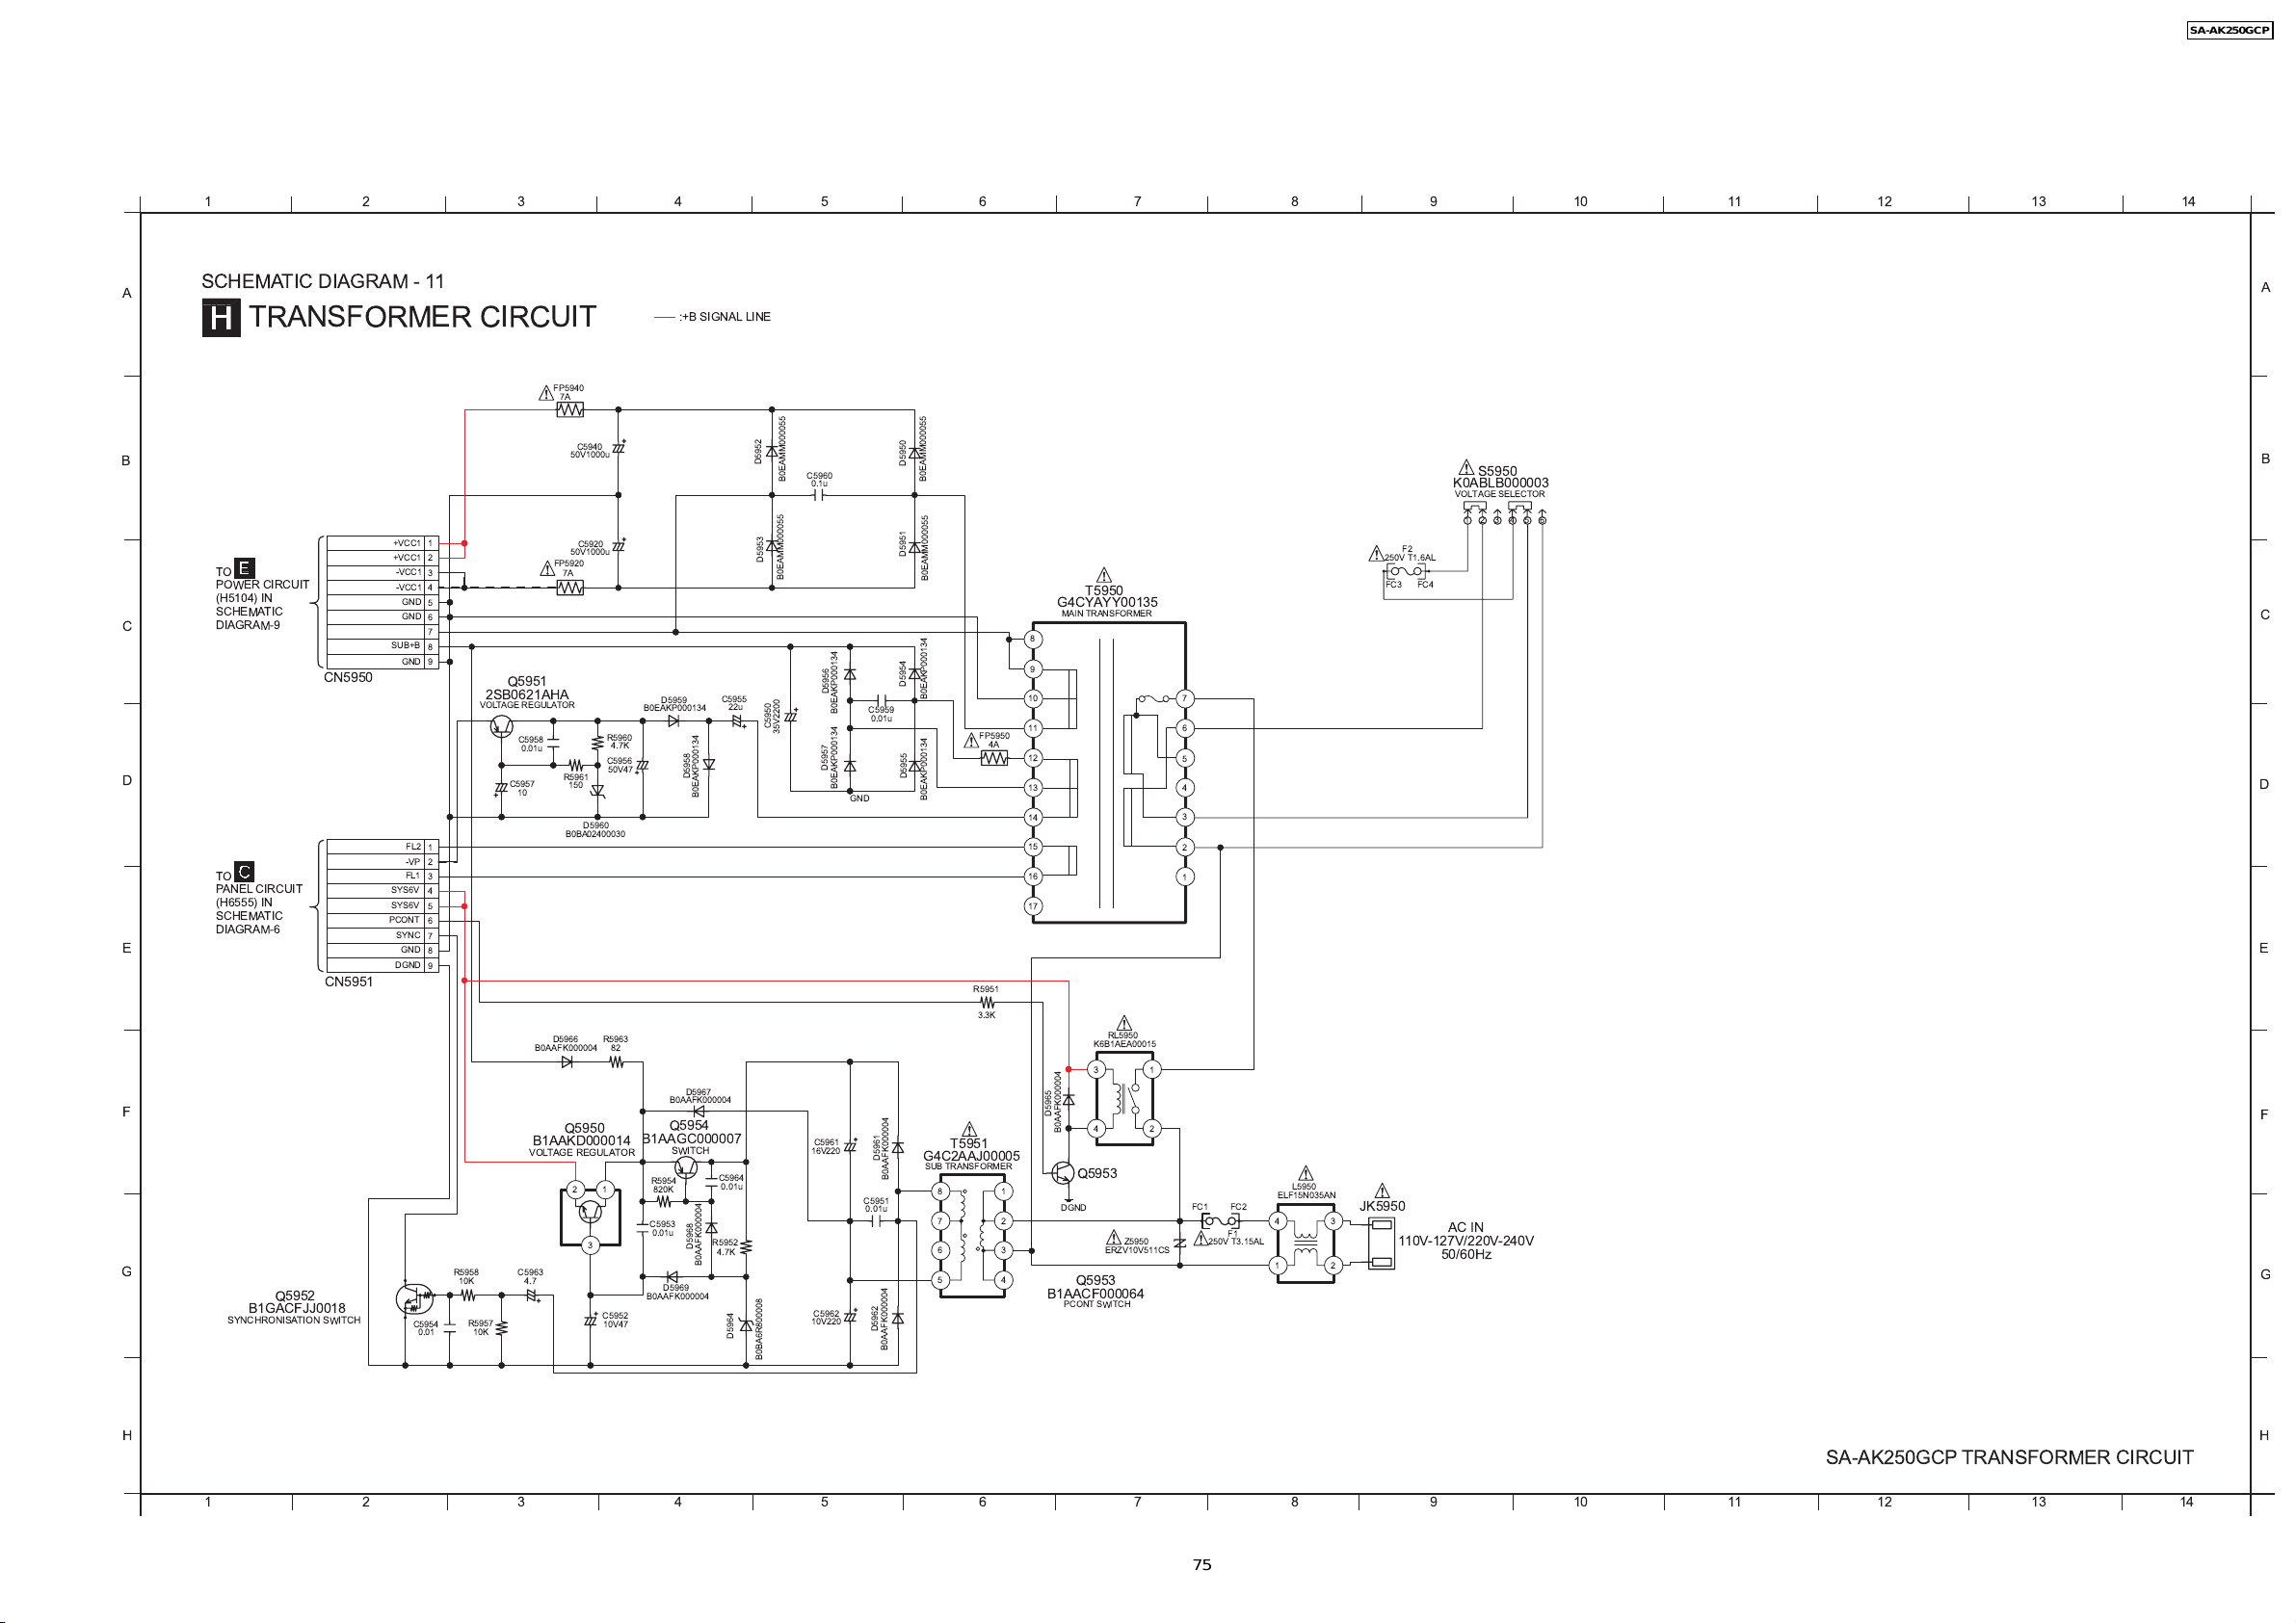
SA-AK250GCP
19.7. (H) Transformer Circuit
1234567891011121314
A
B
C
D
E
F
G
SCHEMATIC DIAGRAM - 11
TRANSFORMER CIRCUIT
+VCC1
1
+VCC1
2
-VCC1
TO
POWER CIRCUIT
(H5104) IN
SCHEMATIC
DIAGRAM-9
TO
PANEL CIRCUIT
(H6555) IN
SCHEMATIC
DIAGRAM-6
Q5952
B1GACFJJ0018
SYNCHRONISATION SWITCH
CN5950
CN5951
-VCC1
GND
GND
SUB+B
GND
SYS6V
SYS6V
PCONT
SYNC
GND
DGND
FL2
-VP
FL1
C5954
0.01
3
4
5
6
7
8
9
1
2
3
4
5
6
7
8
9
R5958
VOLTAGEREGULATOR
10K
R5957
10K
FP5940
7A
FP5920
7A
Q5951
2SB0621AHA
C5958
0.01u
R5961
C5957
10
D5966
B0AAFK000004
B1AAKD000014
VOLTAGE REGULATOR
C5963
4.7
C5940
50V1000u
C5920
50V1000u
R5960
C5956
50V47
150
D5960
B0BA02400030
R5963
Q5950
12
3
C5952
10V47
D5959
B0EAKP000134
4.7K
82
B1AAGC000007
R5954
820K
C5953
0.01u
D5969
B0AAFK000004
:+B SIGNAL LINE
C5955
22u
D5958
B0EAKP000134
D5967
B0AAFK000004
Q5954
SWITCH
C5964
0.01u
R5952
D5968
4.7K
B0AAFK000004
D5964
D5952
C5960
B0EAMM000055
D5953
B0EAMM000055
C5950
35V2200
B0BA6R800008
0.1u
C5961
16V220
C5962
10V220
D5956
D5957
C5959
B0EAKP000134
0.01u
B0EAKP000134
GND
D5961
C5951
0.01u
D5962
D5950D5951
B0EAMM000055
B0EAMM000055
D5954
B0EAKP000134
D5955
B0EAKP000134
T5951
G4C2AAJ00005
SUB TRANSFORMER
B0AAFK000004
8
72
6
5
B0AAFK000004
FP5950
R5951
3.3K
S5950
K0ABLB000003
VOLTAGE SELECTOR
123456
F2
250V T1.6AL
FC4
3
2
FC3
JK5950
110V-127V/220V-240V
50/60Hz
AC IN
T5950
G4CYAYY00135
MAIN TRANSFORMER
8
9
10
11
4A
12
13
14
15
16
17
RL5950
K6B1AEA00015
3
D5965
4
B0AAFK000004
Q5953
1
3
4
DGND
Z5950
ERZV10V511CS
Q5953
B1AACF000064
PCONT SWITCH
7
6
5
4
3
2
1
1
2
L5950
ELF15N035AN
FC2
FC1
250V T3.15AL
4
F1
1
A
B
C
D
E
F
G
H
H
SA-AK250GCP TRANSFORMER CIRCUIT
1234567891011121314
75
Page 75

SA-AK250GCP
76
Page 76

20 Printed Circuit Board
Note: Circuit board diagrams may be modified at any time with the development of new technology.
SA-AK250GCP
77
Page 77
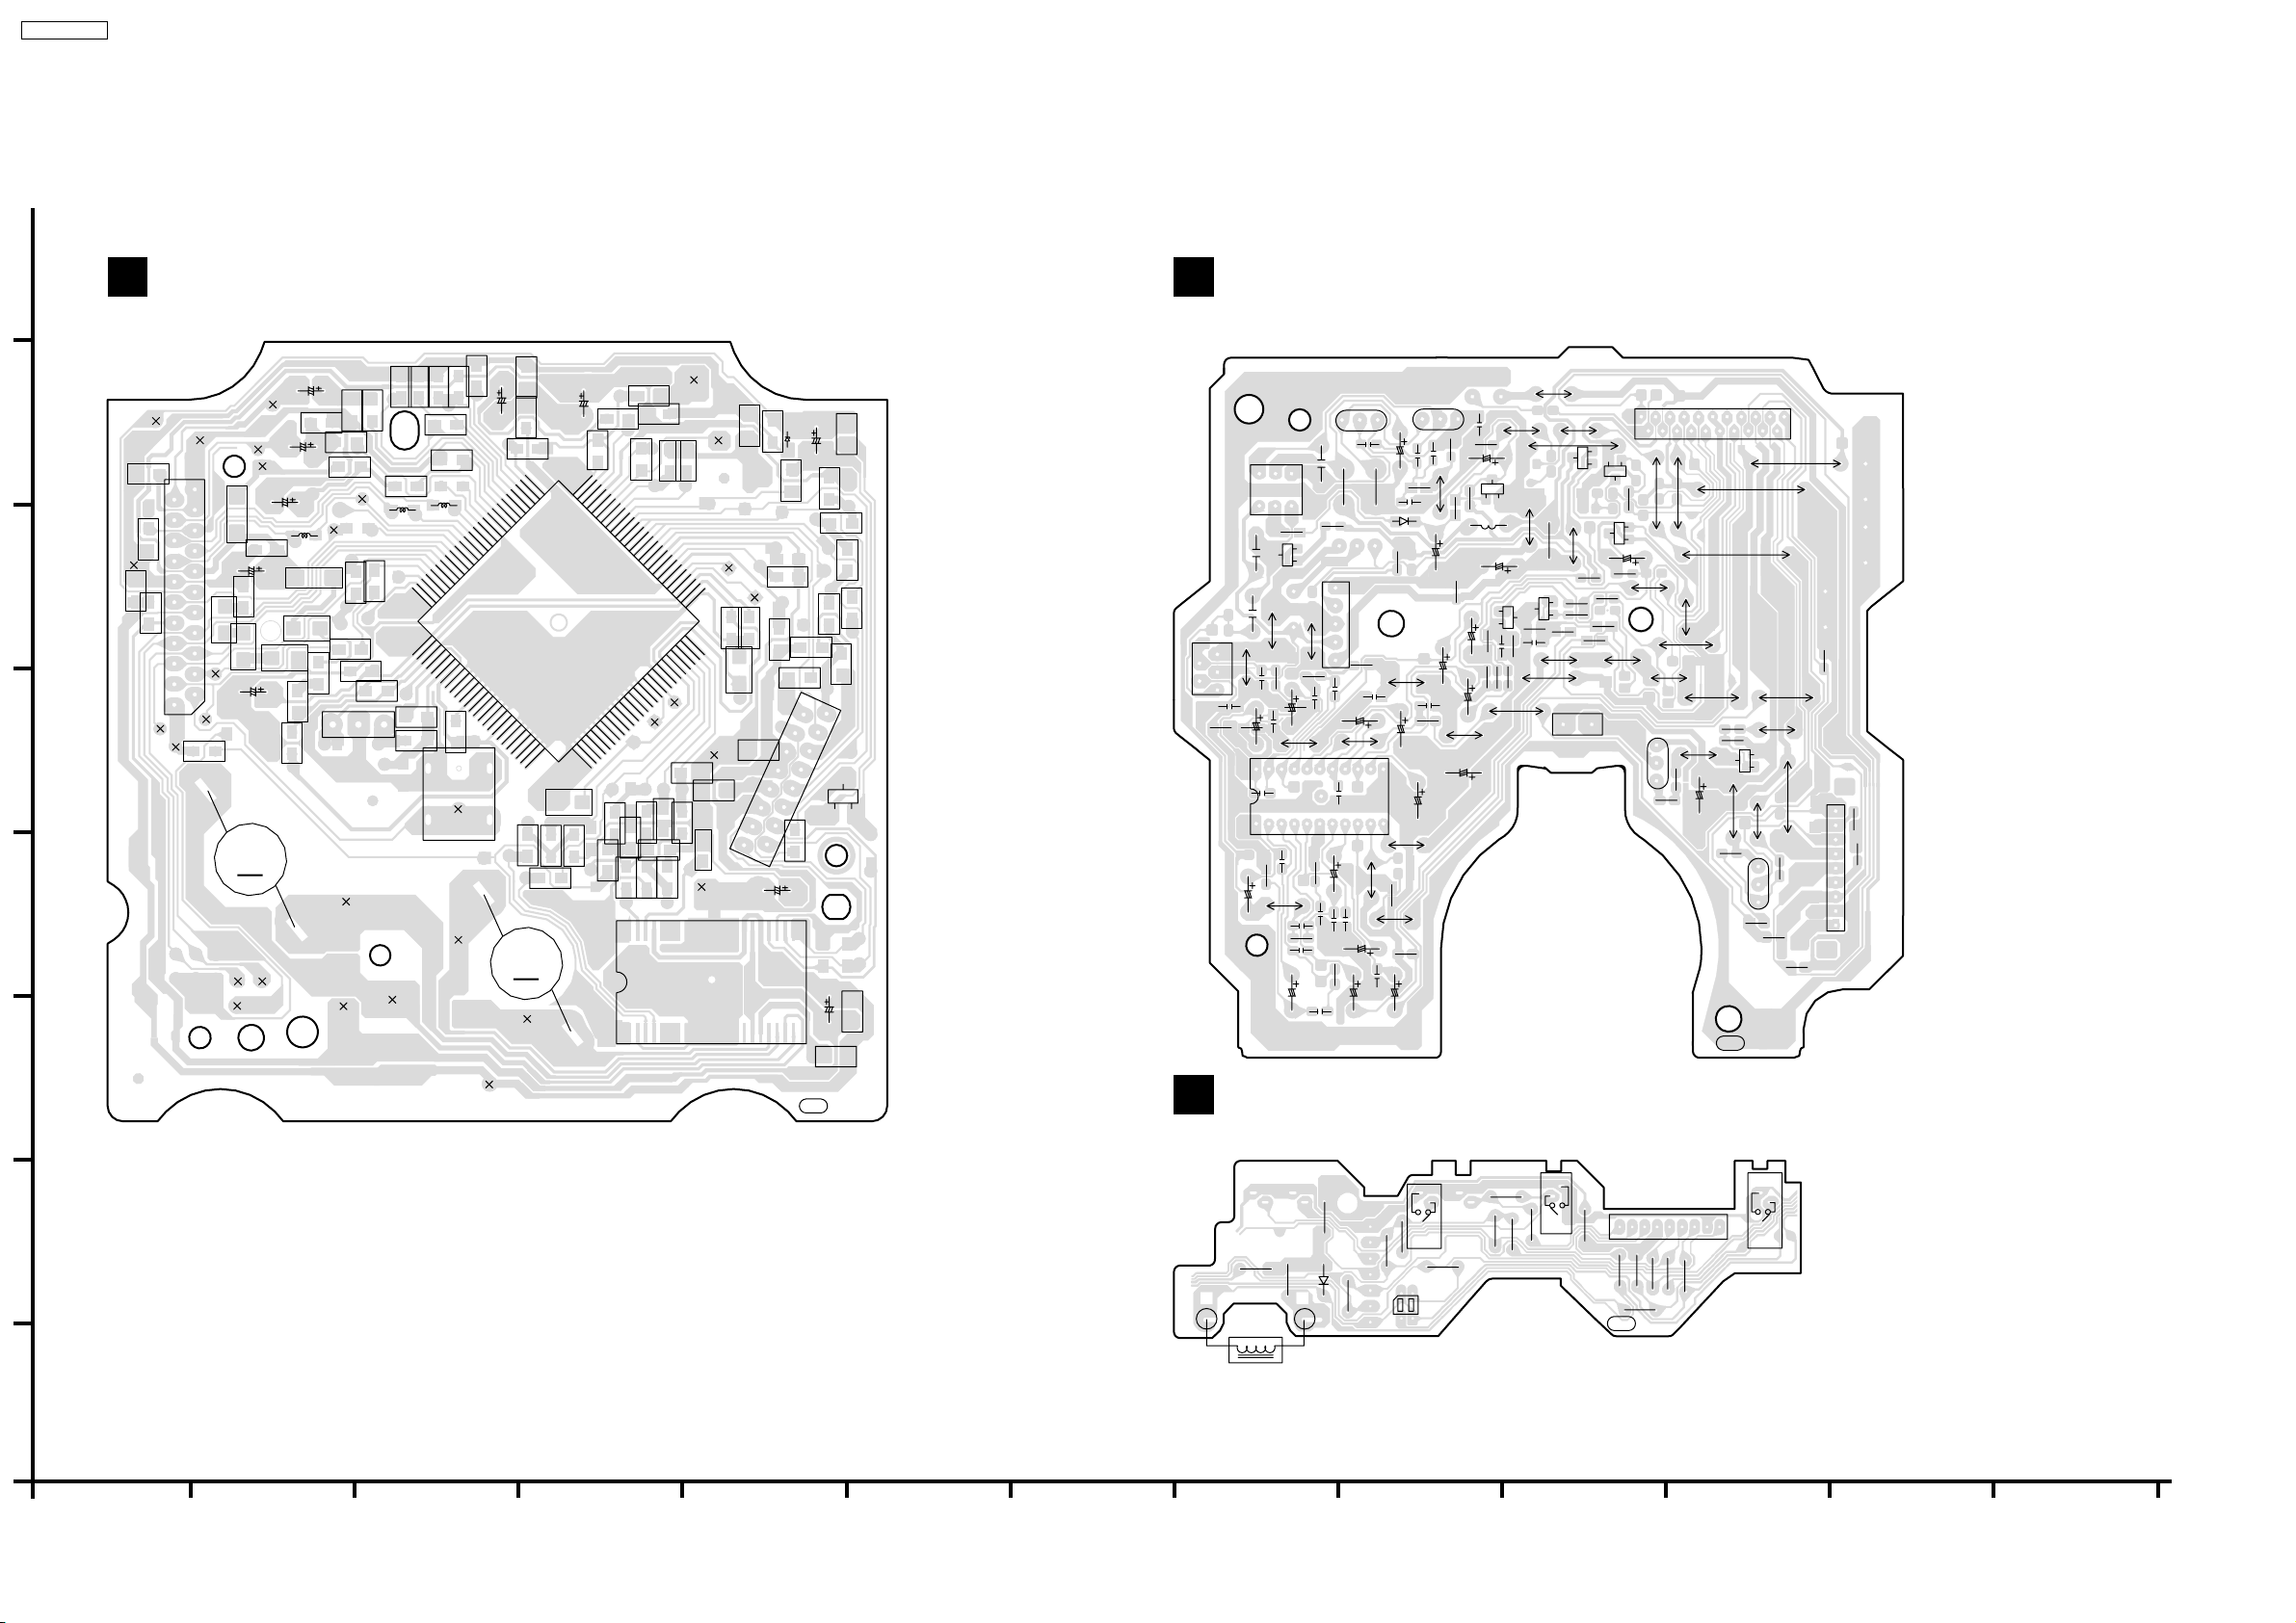
SA-AK250GCP
H
G
F
E
D
C
20.1. (A) CD Servo P.C.B., (F) Deck P.C.B. & (G) Deck Mechanism P.C.B.
A
CD SERVO P.C.B (REPV0111A)
(RF)
W7014
40
10
C7338
R7327
C7204
C7102
TP86
R7349
C7352
R7329
15
35
TP87
C7142
R7330
R7339
C7339
TP51
C7107
30
20
(VREF)
W7026
R7328
TP90
IC7002
TP50
TP88
26
25
TP28
R7336
CN7001
TP89
C7155
C7164
C7613
16
W7016
C7154
12
14
C7670
R7111
8
10
13
15
C7614
W7024
W7025
4
6
9
11
D7650
C7601
W7017
W7023
2
5
7
R7650
PbF
W7018
W7019
W7022
1
3
Q7601
C7334
W7027
0111A
0111A
B
R7601
W7020
W7021
C7626
C
E
C7335
TP16
TP14
C7253
W7028
W7029
C7243
TP31
TP1
TP18
CN7002
22
21
20
19
18
17
16
15
14
13
12
11
10
9
8
7
6
5
4
3
2
1
TP3
R7332
W7007
C7232
W7002
C7235
TP4
M7301
(TRV MOTOR)
TP7 TP8
TP9
TP19
TP17
C7233
W7004
W7003
TP13
C7231
W7001
M
C7227
C7228
LB7264
W7006
W7008
W7010
W7011
C7226
R7218
R7221
TP12
R7254
W7009
TP39
TP10
C7225
TP24
C7234
X7201
R7253
C7263
R7217
LB7263
C7166
123
TP38
C7218
W7005
75
76
R7220
R7214
C7241
C7217
R7212
C7230
LB7262
70
80
1
2
S7201
(REST SW)
85
TP2
TP37
65
C7264
C7244
R7211
60
90
TP11
W7012
C7223
W7013
C7216
51
55
95
1
100
2
R7325
M7302
(SPDLE MOTOR)
TP36
IC7001
R7315
R7335
M
C7165
C7203
W7015
C7161
50
45
5
1
R7331
C7315
R7323
28 15203025
1 5 29 10 14
F
DECK P.C.B (REPV0134B)
R1331
C
B
C1324
E
R1205
R1304
W1909
E
B
C1210
R1210
R1204
W1948
W1910
Q1101
C
R1106
C1110
R1206
W1930
W1977
C
W1938
W1934
W1935
C
Q1303
Q1302
R1309
W1908
R1305
R1207
E
R1107
B
R1105
2
WR1903
TO MOTOR
E
B
R1109
R1110
1
C
R1313
R1209
W1939
Q1304
E
B
C
R1314
E
B
C1310
CN1305
21
19
20
W1907
Q1316
R1341
C
C1222
W1906
B
R1330
11
12
W1915
C1123
C1319
R1327
C1314
D1301
R1334
W1913
C1301
W1914
R1303
R1104
C1109
Q1309
E
C1312
C1316
C1320
C1371
R1371
C1308
C
R1329
W1912
C1305
W1911
C1307
B
R1332
R1338
C1209
C1315
C1311
Q1312
R1328
L1302
Q1201
C1206
Q1310
E
C1317
L1301
1
3
2
C1318
6
5
R1337
C
C1321
Q1317
C1323
CP1301
TO R/P HEAD
2
4
R1064
1
3
5
C1102
R1203
W1921
C1201
1
W1919
C1202
C1221
R1061
C1205
IC1001
22
C1121
R1101
W1920
C1101
C1105
G
DECK MECHANISM P.C.B (REPX0321F)
R1333
4
R1335
E
B
IC1000
5
4
3
2
W1917
1
R1063
R1202
C1207
C1204
C1208
R1201
W1916
C1203
W1918
510
C1223
1520
R1302
C1108
C1303
C1122
C1302
R1103
C1107
C1103
C1104
C1304
R1102
C1106
17
18
W1951
W1975
E
C
B
W1945
W1905
W1933
W1976
R1374
141516
13
12
W1931
C1326
11
10
R1345
R1342
R1344
W1942
7
9
8
W1946
C
Q1314
W1932
Q1315
R1401
PbF
5
6
4
W1903
W1902
E
B
W1904
E
C
B
R1318
0380B-3
0380B-3
13
2
W1947
R1343
R1402
W1941
R1403
CP1902
1
2
3
4
5
6
7
8
9
R1404
R1405
B
A
1
2
3
4
5
6
7
78
PL+
J150
SOLENOID
8
J5
J13
J2
J6
D971
J4
PL-
J30
IC971
4
1
32
R973
S972
(HALF)
J12
J1
J11
S971
(MODE)
9876 5432
J140
CS971
J10
R972
PbF
J8
J16
0303B-3
0303B-3
1
S975
J9
(RECINH_F)
J7
SA-AK250GCP
CD SERVO/ DECK/ DECK MECHANISM P.C.B
9
10 11 12 13
Page 78
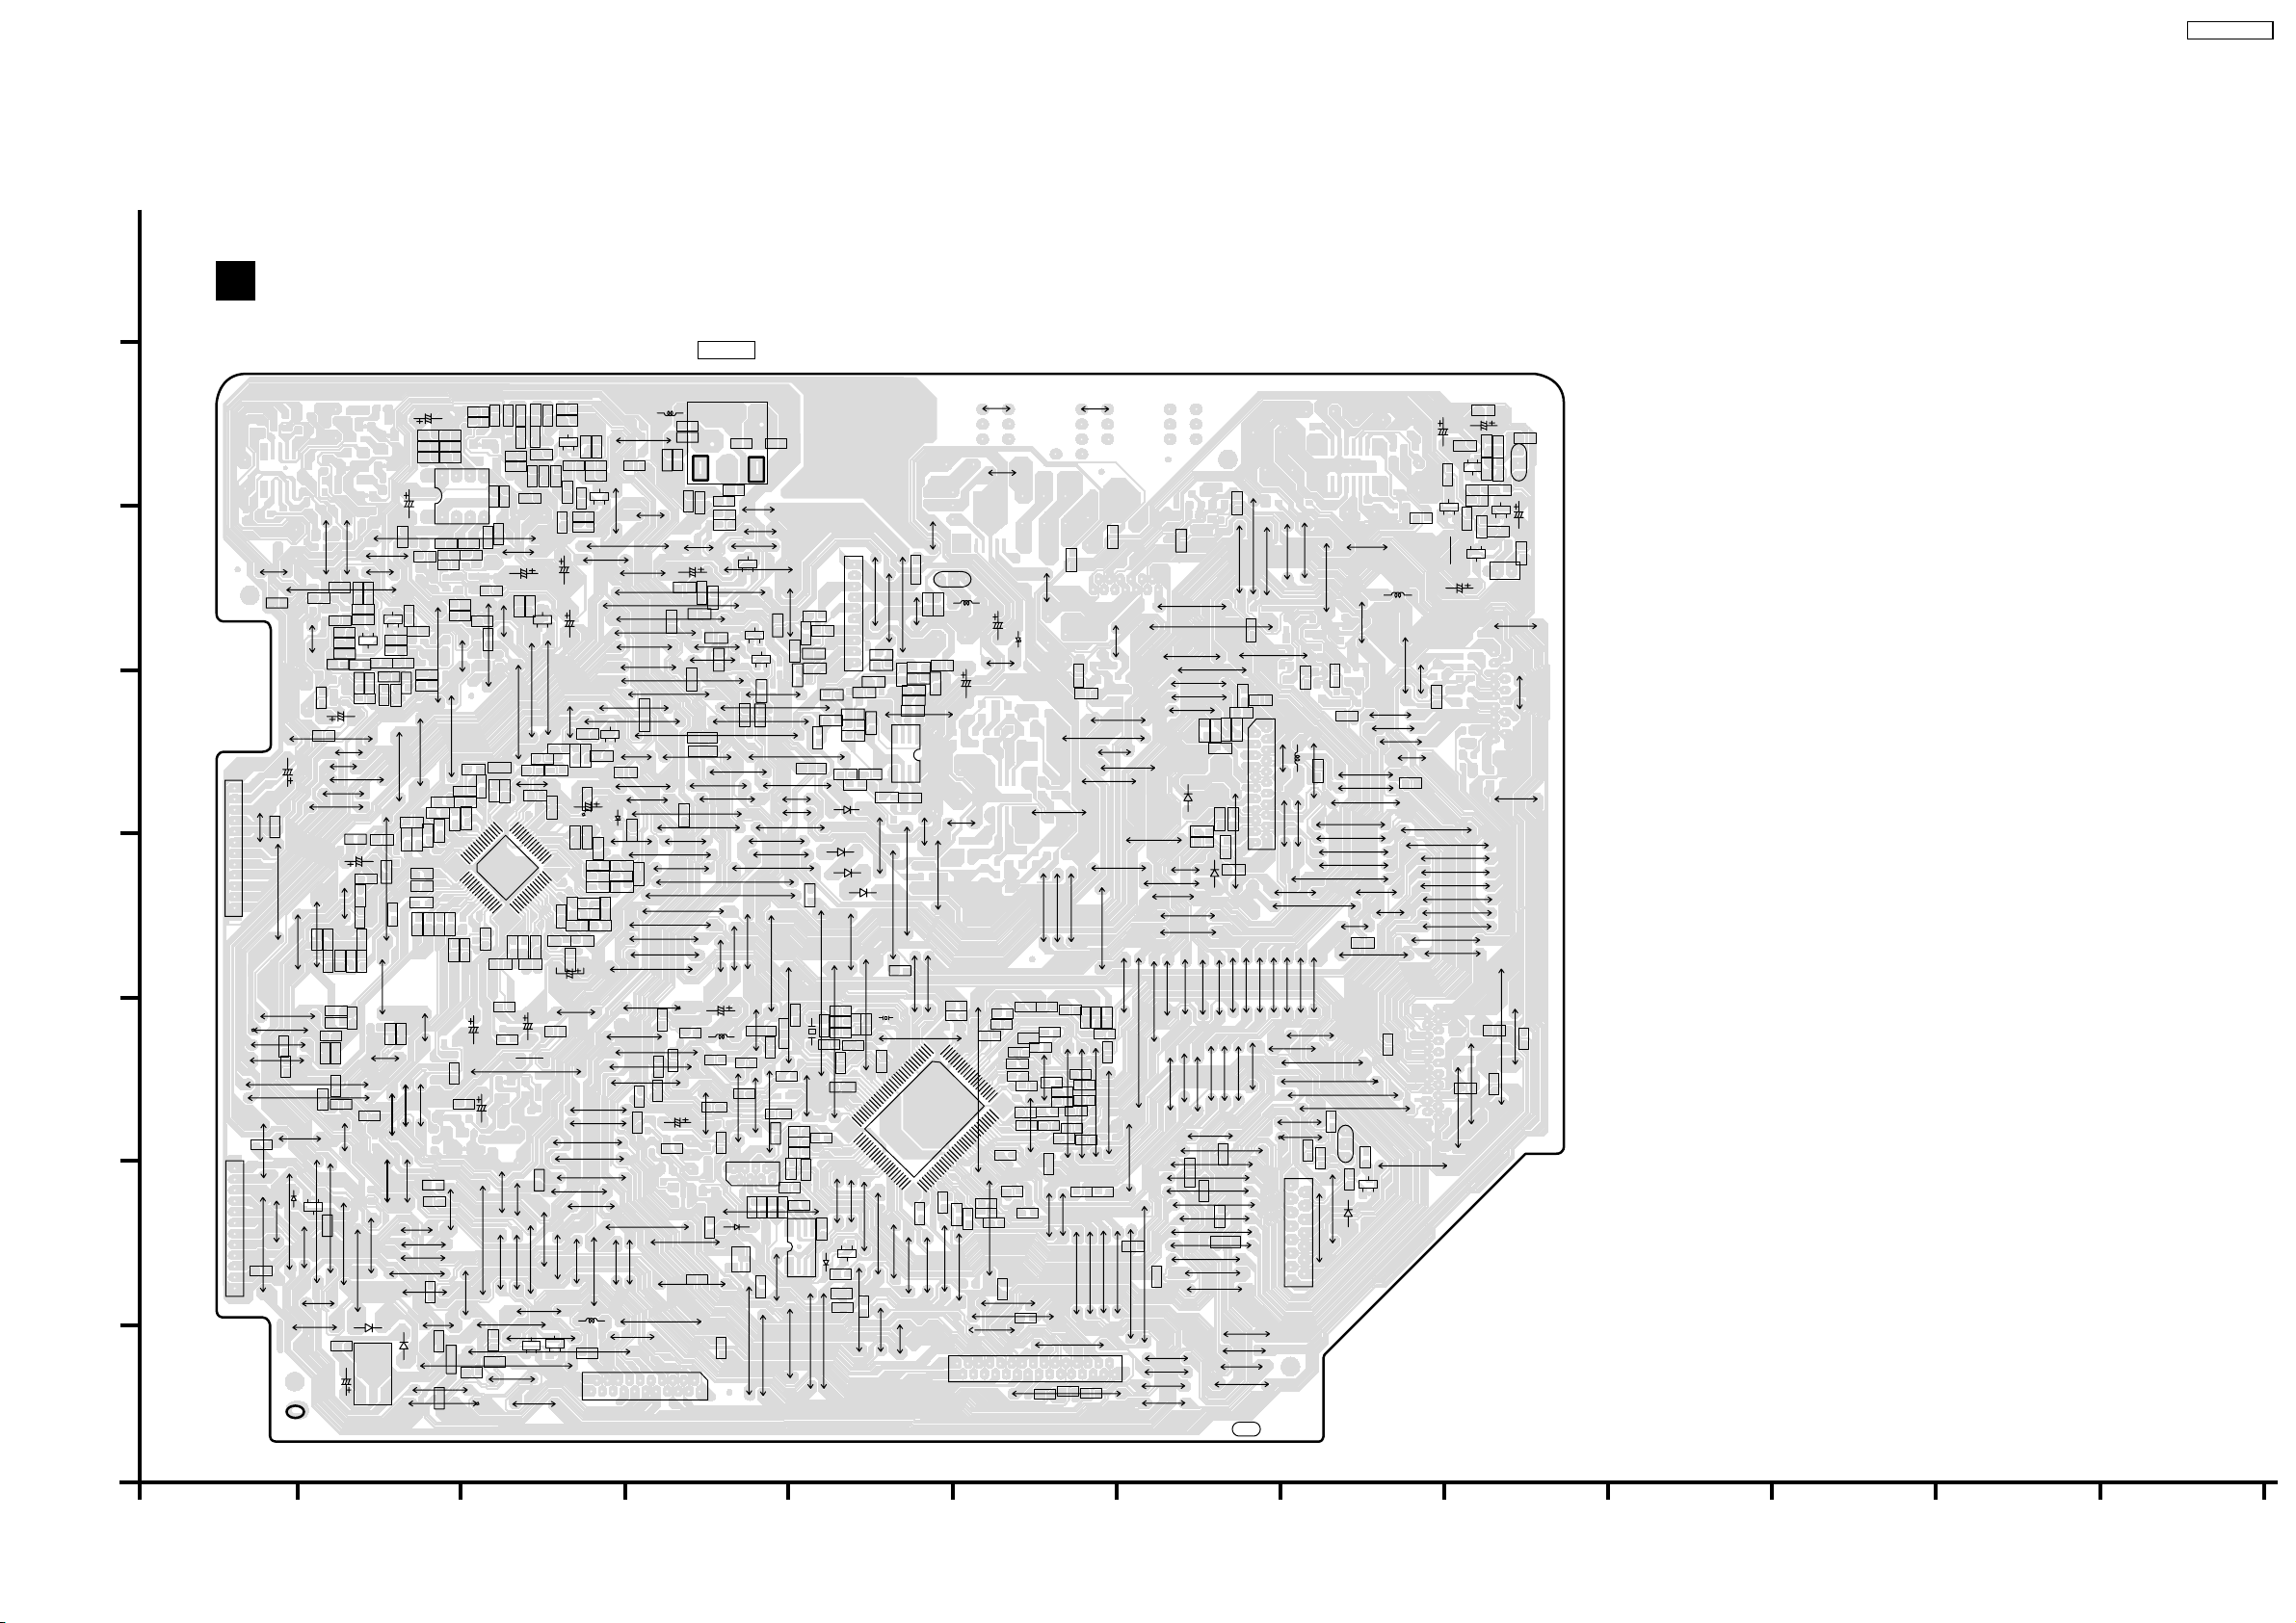
H
20.2. (B) Main P.C.B.
B
MAIN P.C.B (REPV0130N)
SA-AK250GCP
AUX
G
F
E
D
C
B
A
CN2809
12
11
10
9
8
7
6
5
4
3
2
1
W1
CN2808
12
11
10
9
8
7
6
5
4
3
2
1
W255
W256
W107
W168
W401
W177
K3300
C2753
W441
W254
R2894
W235
C2943
R2430
W173
W462
W400
W579
W258
W189
W580
W480
W461
R2204
D2811
D2813
W250
CAACA
R2328
W112
W130
W108
W172
W344
R2326
R2437
R2111
R2221
R2416
C2330
W174
R2112
R2211
R2121
C2121
C2221
W581
W684
W251
W261
W586
R2318
R2329
C2329
C2325
K2302
W175
W691
C2806
W106
W526
R2212
R2222
W102
W402
C2805
R2418
R2330
W403
W260
R2161
W262
W109
C2443
R2456
B
E
C
Q2417
C2321
C2437
R2435
W587
W677
C2263
C3721
R2104
R2102
C2113
C2213
R2202
R2122
C3720
W252
W532
D2874
IC2872
123
W176
R2417
Q2317
B
R2356
C2343
C2436
R2434
R2163
W114
W131
W101
W162
W170
W589
C
R2321
W270
C2122
R2151
C2315
E
C2433
C2182
R2251
W166
W163
D2873
W259
W104
W253
R2317
R2316
R2436
R2182
C2222
C2705
R2705
R2315
W590
R2431
C2431
W263
C2112
C2212
W160
W161
C2314
R2181
C2132
W150
W167
W689
W575
W576
W681
R2173
C2183
C2181
C2232
W308
C2414
W443
R2703
C2703
C2313
1
5
W510
R2415
R2706
R2183
C2152
W663
23
IC2804
67
C2413
W583
W584
R2313
W343
R2172
C2173
C2175
55
56
1
C2252
C2142
W619
R2509
W169
W358
W682
W100
W460
C2412
W111
C2171
5
C2581
W113
W440
W593
R2702
C2312
C2174
50
C2242
4
8
45
10
W426
W1
W588
R2701
R2704
W591
W404
W110
R2311
R2312
C2172
C2301
43 42
IC2803
14
W582
W667
R2282
C2282
W266
C2509
W187
W264
W165
W656
W661
R2453
C2341
R2353
C2701
C2704
W197
C2702
W244
C2302
R2281
W103
W265
W164
QR3105
W184
R2454
R2452
W600
R2355
Q2311
W445
R2301
W122
W651
40
15
C2281
C2283
C2582
R2510
W340
W183
B
W115
R2443R2441
C2441
R2352
C2342
C2411
20
R2283
C
E
R2444
R2354
C
E
B
W444
R2411
C2311
35
25
C2192
C2191
W675
W690
W179
QR3106
B
30
C2588
29
28
W178
C
R2447
R2446
R2343
C2706
R2344
C2193
E
C
B
R2341
R2445
W119
R2196
W501
Q2441
E
R2357
C2344
R2413
R2412
W1
C2401
C2195
C2194
R2194
R2193
D2191
W269
W180
C2956
R2347
R2346
R2345
C2415
C2585
W351
W352
W353
W188
L2951
R2457
R2455
C2442
R2401
R2271
C2272
C2271
R2195
W267
W268
W185
20
21
B
W198
C2583
19
C2444
Q2341
C
E
B
C2402
C2275
18
W195
W190
C
W415
R2273
C2274
C2273
17
W277
W412
D2583
W181
16
W416
E
Q2411
W678
W194
W406
W349
W341
14
15
W642
W356
W182
W123
W417
W120
13
W278
W272
C2584
W411
W257
W506
W518
W273
W192
W276
R2585
W271
R2587
L4000
W208
W409
W674
W347
W354
C2240
R2241
W359
W355
W346
L2996
W464
W413
W597
W596
W408
W594
W641
C2802
L4001
C2249
R2242
C2511
W685
W614
W357
W125
W414
W503
W502
W1
C2853
W595
W345
CN2803
4
6789101112
3
5
R2142
C2149
W196
R2512
W670
W686
R2673
W672
W673
W463
W504
W511
R2851
R2584
W186
(SOFTWARE
WRITING)
IC4000
W640
2
1
3
R2141
R2676
C2678
W687
W275
W490
C2854
L2801
R2802
C4001
1
2
C2140
Q2511
R2511
QR2502
R2674
W191
W193
W116
W676
W156
D4000
W630
C2981
K2301
W124
W207
C
B
QR2501
B
W524
W283
R2852
W348
1234567
C2874
45
3
1
W465
4
E
C
R2672
W117
W282
B
W679
W405
E
C
W286
E
W671
W515
W245
W410
W407
R2873
C4000
C2983
JK2803
W522
C3114
C3113
R2285
W118
W507
W342
W505
W508
W669
W274
W519
W520
W523
W243
W448
R2850
W606
R2886
W605
R2801
R2586
W609
R3210
R3212
R3213
W601
8
W602
R2874
C2871
R2871
1
W202
IC2871
(NOT SUPPLIED)
W363
CN3601
(TO TUNER PACK)
W664
W629
C3112
W688
C3116
R3714
R3711
R3720
C3710
K3705
C3711
C3701
C3705
D2941
D2940
D2939
R2286
W512
W500
W604
R2881
C2882
C2883
X2802
W607
W608
R2812
W204
30
R3211
31
W643
W200
58
C2872
Q2803
E
C
4
D2803
C2803
W644
W645
W447
W446
10
W284
W201
B
9
8
7
6
5
4
3
2
1
R3704
IC3700
R3701
D2938
R2882
25
35
W361
W420
R3702
W449
40
R2844
W247
C3700
R3700
R3715
W232
R2883
X2801
20
W418
W203
C3707
15
45
W528
C2984
W248
W529
C3704
R3706
K3703
C3706
R3708
C3708
14
58
C3709
W509
W146
R2284
W205
W421
5
10
IC2801
50
W279
W280
W126
W599
W527
1
R2808
W281
K3403
W206
51
Q3601
B
R2677
W654
R3712
W530
W233
100
55
C
C2675
C2821
R2846
60
R2815
W364
CN2806
W240
30
L3601
C3712
95
65
R2816
W360
29 123456789101112131415161718192021222324252627
E
28
R2818
R2854
90
70
W514
R2842
85
W362
W288
W565
75
W466
W525
C2676
W517
R2843
R2841
R2845
R2825
R2817
81
80
W635
R2804
R2838
R2835
R2853
R2805
D2603
R2831
C2953
R2839
R2830
R3303
W287
W603
W290
R2832
W650
W229
W237
W577
R2840
W216
R2828
R2912
R2834
R2829
R2833
R2916
W217
W646
W521
W236
W633
R2914
W218
W419
W627
W241
W468
R2922
W592
R2827
W422
W666
W469
W631
W574
W652
C2954
R2837
R2921
W423
W610
R2826
W145
W199
W470
R2849
W467
R2836
R2927
W424
W244
W238
W234
W531
R2848
W647
W428
W427
W612
W373
W293
W137
W368
W121
W369
W239
W323
W660
W430
W214
W215
W628
W212
W213
W141
W219
W294
W289
W634
W242
W291
W292
W299
W680
W132
W223
D3101
W318
W303
W659
W298
W154
W365
W147
W296
W297
W425
R2924
W613
W304
W153
W319
W127
W295
W366
C2986
C2901
D2937
W305
W155
R2231
W310
W662
W306
W370
W639
W371
W372
W636
R2131
R2232
W231
C2006
W311
W657
R2918
W429
W209
W301
W668
W152
W246
W618
W171
W638
C2985
2
R2132
4
6
8
10
12
14
16
18
20
22
CN2801
C2930
W312
W307
W481
W211
W210
PbF
W149
1
3
5
7
9
11
13
15
17
19
21
W313
W314
W2
0108A-1
0108A-1
W140
W227
L2902
W157
W230
W105
W315
W316
W129
W221
W128
CN2805
15
13
11
9
7
5
3
1
W151
W220
14
12
10
8
6
4
2
W626
W321
W309
W317
W615
W450
W620
W451
W142
W648
W222
W388
W158
W135
R2937
W617
W653
W381
W383
W384
W386
E
C
B
D2936
W136
W611
W320
W324
W322
W379
W380
W658
W471
Q2936
B
Q2937
W133
W378
R2936
C
R2941
C2941
E
C
R2949
W621
E
Q2949
W431
W482
W622
C
B
B
W616
R2940
R2943
R2939
R2946
R2948
CN2810
(TO FAN)
W649
C2940
R2942
B
W491
W637
C
W143
W139
R2944
E
C
B
Q2948
E
12
W434
W453
Q2942
C2948
W623
W632
C2945
C2944
Q2943
R2945
A
D2946
CA
CA
W598
R2947
L2901
W224
W225
K3202
W625
W2
E
W226
W228
W138
W624
W134
W144
W382
W655
W433
W376
K3200
W385
W387
C2947
W389
W390
W374
W375
SA-AK250GCP
MAIN P.C.B
1
2
3
4
5
6
7
79
8
9
10 1 12 13
1
Page 79
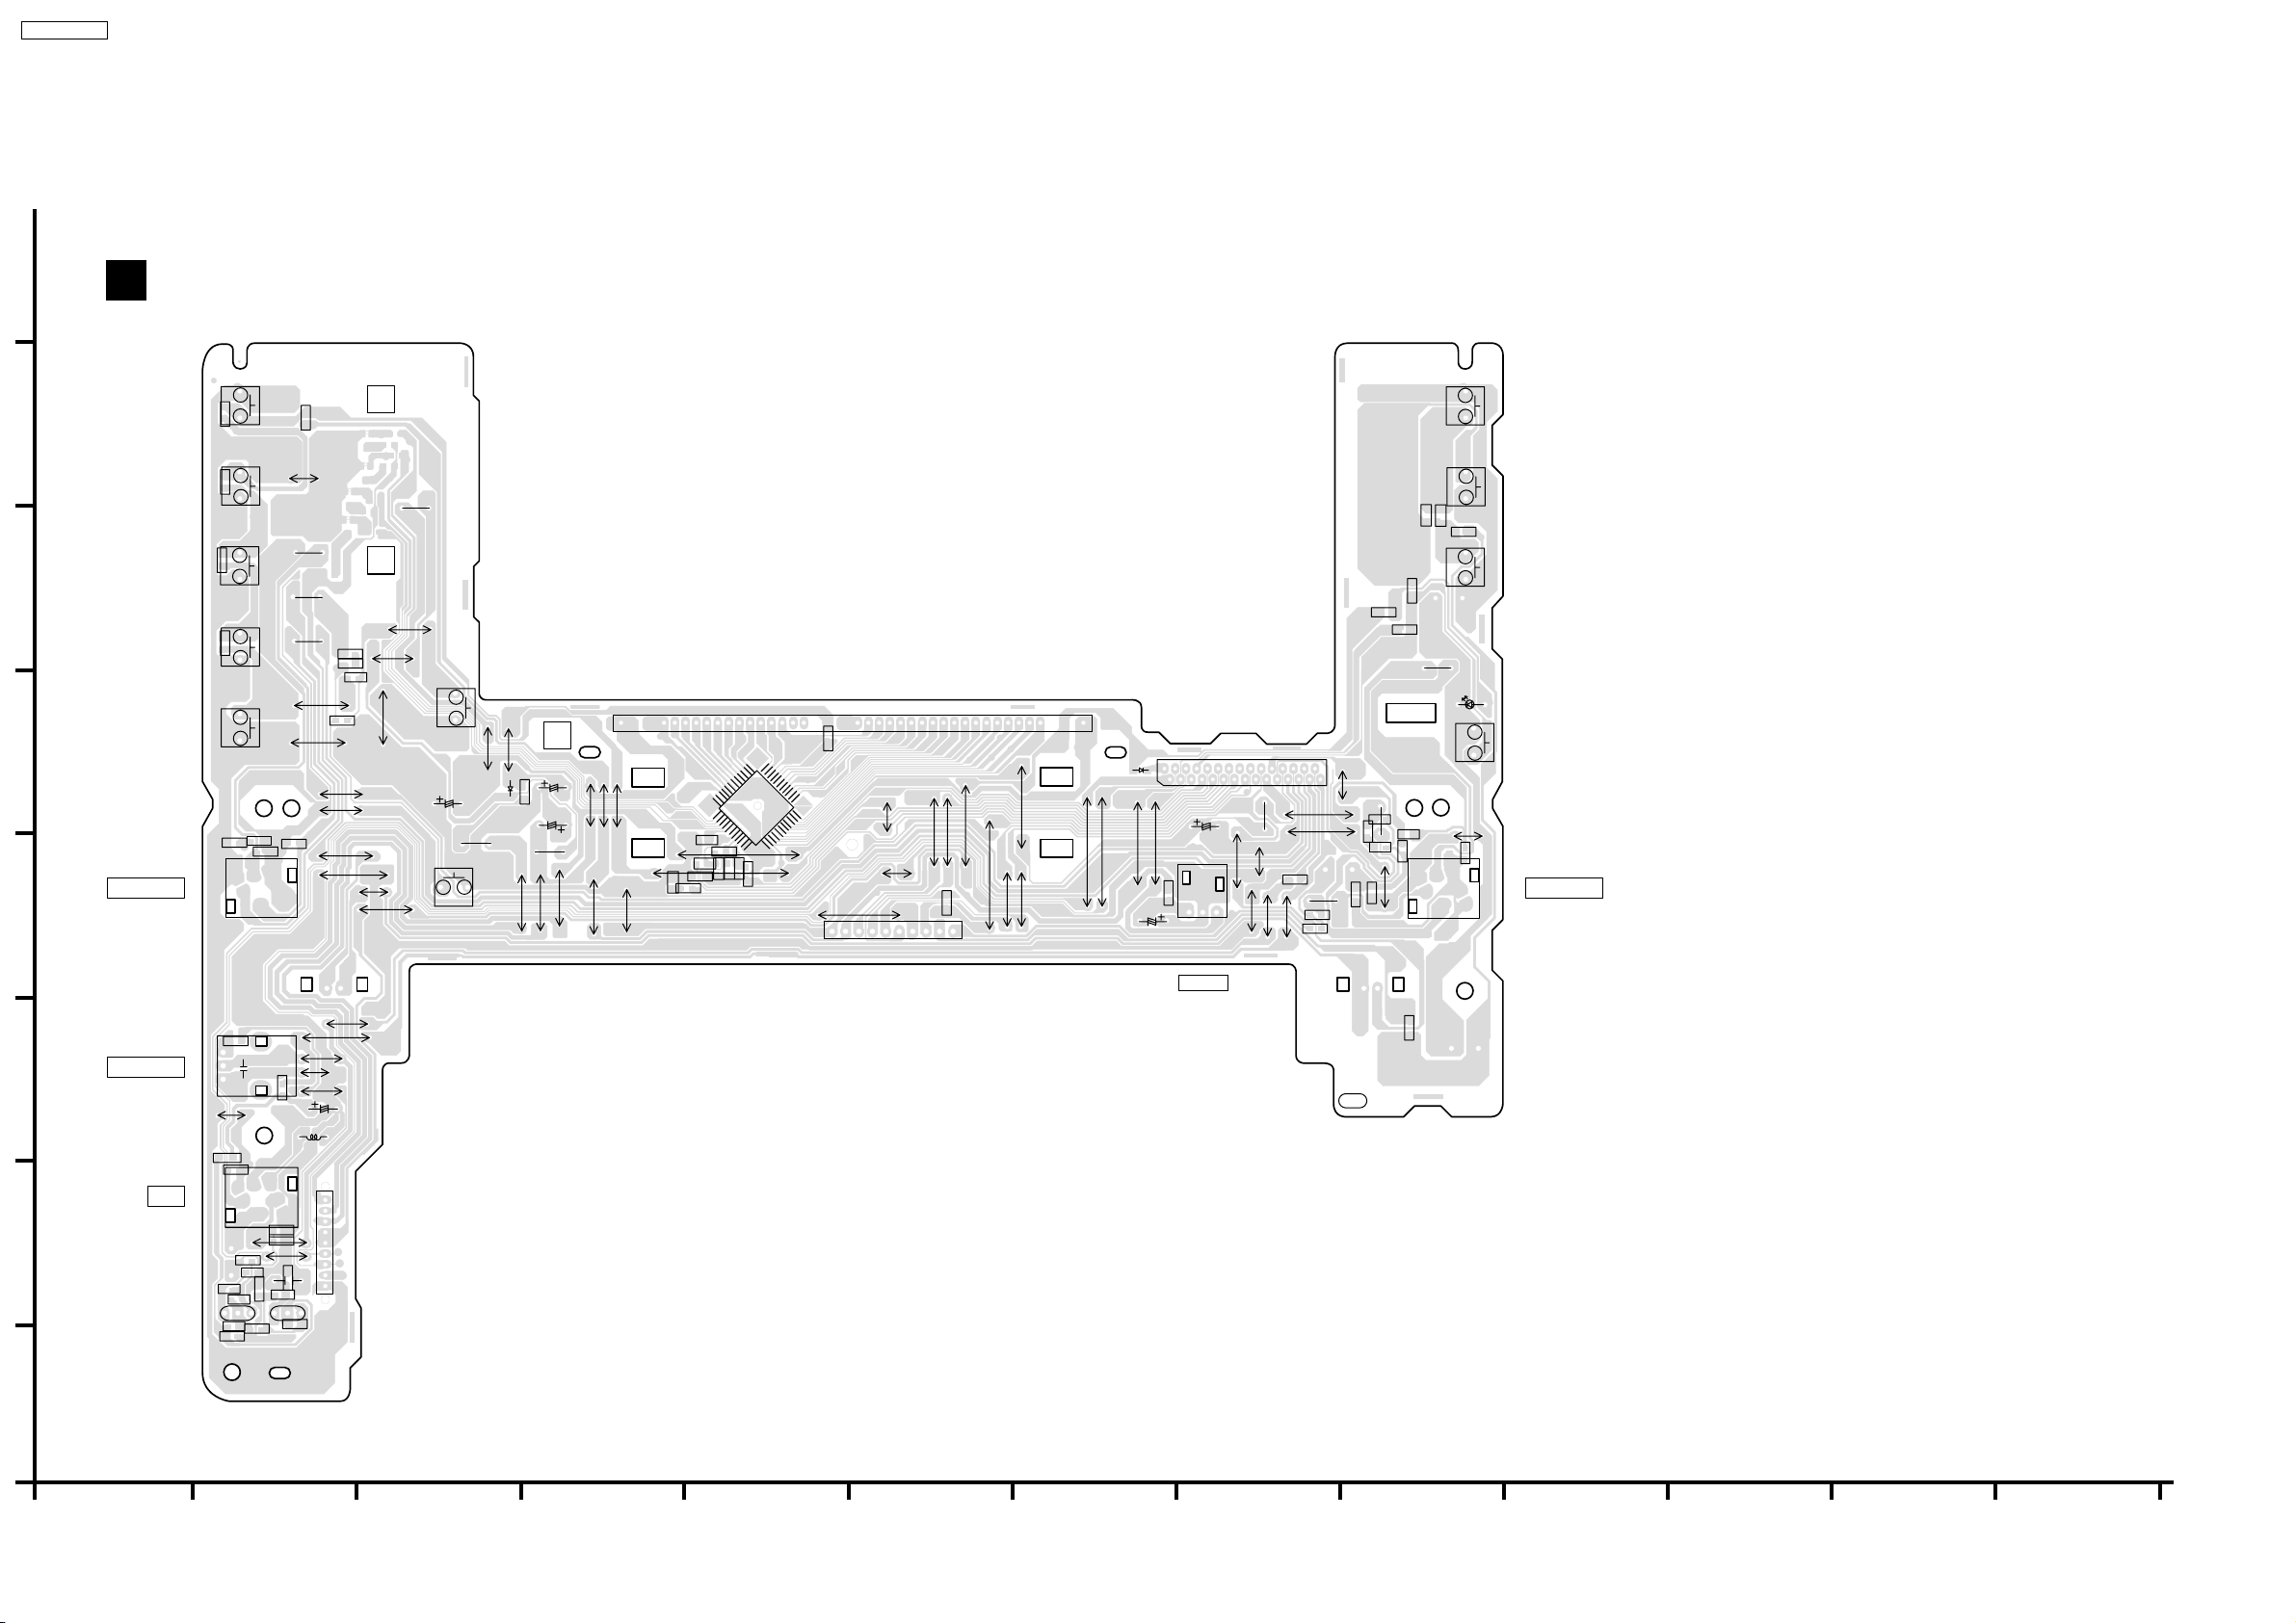
SA-AK250GCP
H
20.3. (C) Panel P.C.B.
C
PANEL P.C.B (REPV0131K)
G
F
E
D
S6201
(CD1)
R6202
S6202
(CD2)
R6203
S6203
(CD3)
R6204
S6204
(CD4)
R6205
S6205
(CD5)
W1006
C6553
HEADPHONE MUSIC PORT
5
4
JK6551
C6551
3
R6493
W805
R6632
J6553
J6551
R6458
30
W817
J6752
C6752
R6751
R6752
W675
C6753
W1001
R6206
W1020
W677
W1017
W873
W840
S6206
C6632
S6207
(/REW/)
(/FF/)
J6631
W1010
W845
D6635
W874
W905
W875
C6631
R6631
C6635
W877
W847
W876
W848
10
R6603
C6604
C6603
34
IC6601
11
C6601
R6601
15
33
12
5
1
W1103
C6602
R6602
W814
W1011
44
1
R6605
R6604
W811
W843
FL6602
25
30
35
W914
23
22
JW6002
W816
24
1
W813
W853
W852
W673
W1005
9
5
10
6783
W854
W882
W880
W851
W881
44
40
CN6601
W855
W856
D6301
W892
C6481
W893
1
2
456
R6481
9
783
11 13 15 17 19 21 23 25 27
10 12 14 16 18 20 22 24 26 28
C6623
W858
W670
312
Z6481
W671
J6621
W860
C6510
W672
R6763
R6109
29
W857
W859
J6751
J6552
R6209
R6208
W841
R6207
W803
W837
W838
C6552
W871
1
6
2
W833
7
R6199
R6753
R6754
(MULTI CHANGE)
R6103
R6102
(SINGLE CHANGE)
J6753
S6101
(AC IN)
3
5
4
S6103
(OPEN/CLOSE)
S6102
R6104
R6105
S6104
D6458
W818
C6751
1
6
7
2
JK6751
C
B
A
MIC VOLUME
1
MIC
R6509
3
2
1
VR6511
W801
W1004
C6521
JK6501
W1015
C6503
R6502
E
Q6501
R6504
C6507
SENSOR
W802
W800
W832
W676
C8000
3
5
4
C6502
R6503
C
B
C6504
2
C6505
1
C6501
R6501
W891
C6506
E
W831
R6507
C6508
L6502
H6555
1
6
2
7
3
4
5
6
7
8
R6506
C6509
9
B
C
Q6502
R6505
PbF
0109A-1
0109A-1
W925
SA-AK250GCP
PANEL P.C.B
2
3
4
5
6
7
8
9
10 1 12 13
1
80
Page 80
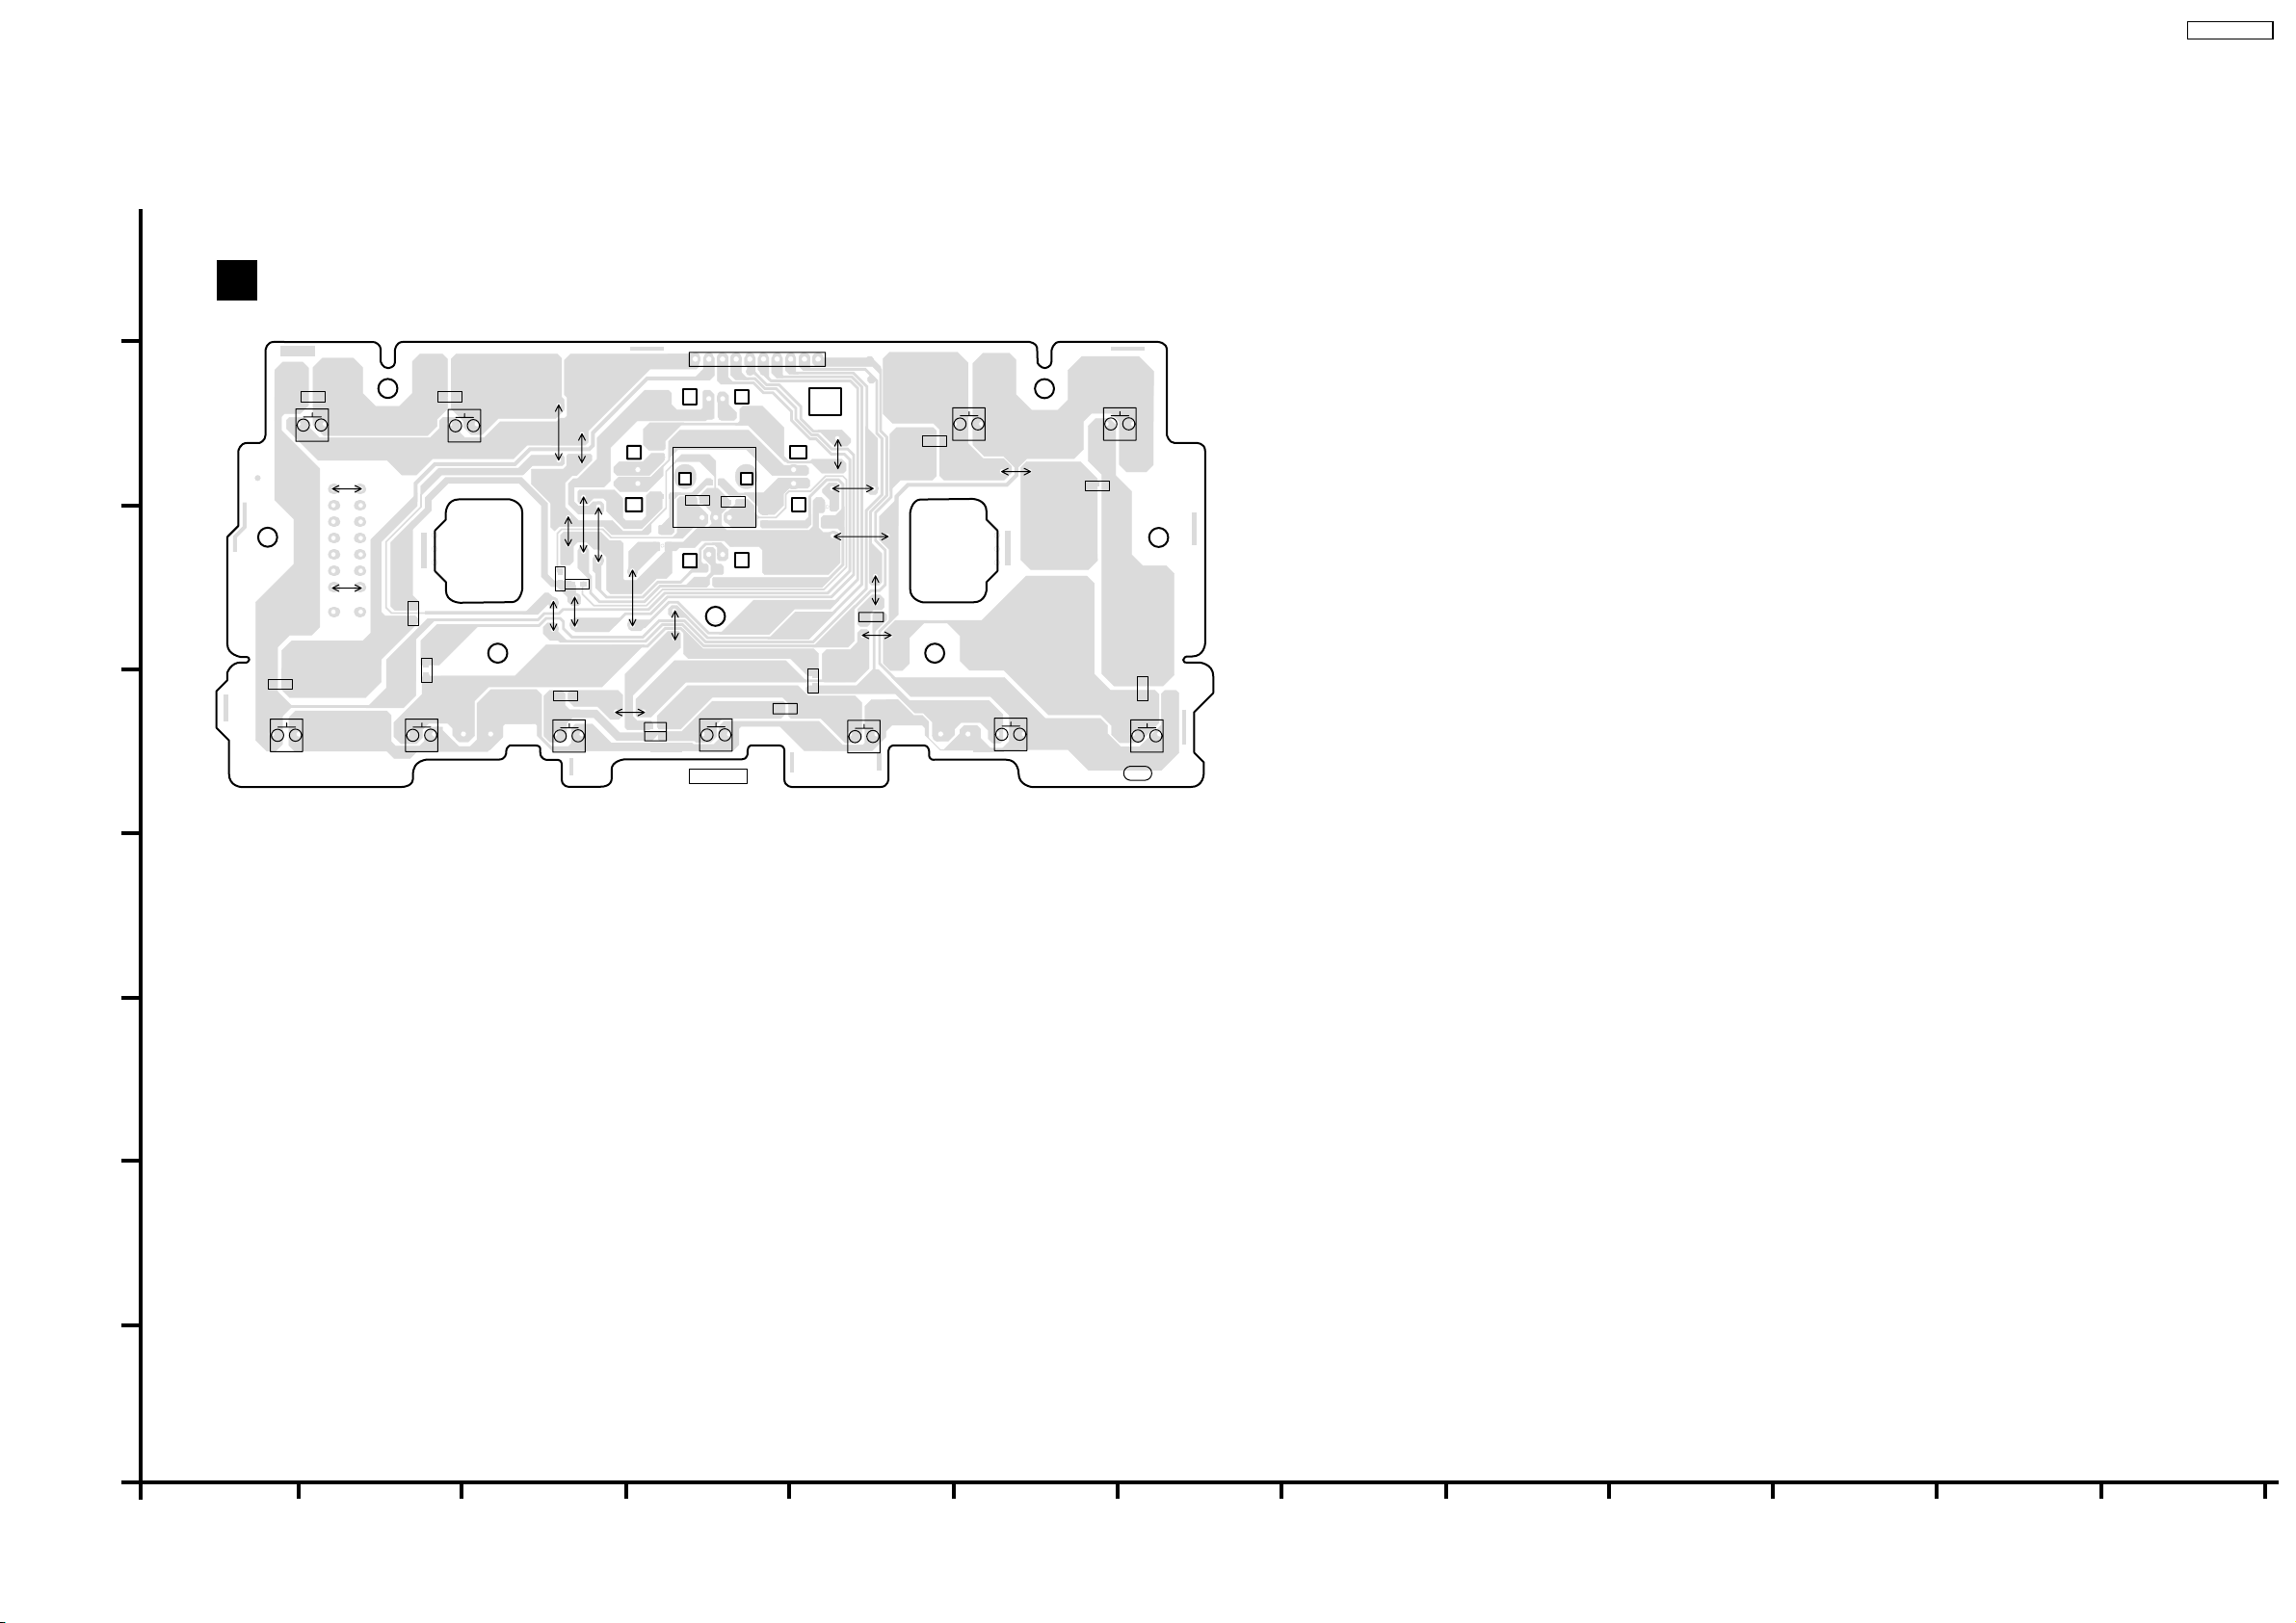
H
G
20.4. (D) Sub Panel P.C.B.
D
SUB PANEL P.C.B (REPV0131K)
R6302
S6302
(CD)
W750
R6303
S6303
(TAPE)
W955
W950
W969
W966
W954
JW6001
1
24567893
VR6491
C6491
C6492
123
SA-AK250GCP
10
S6304
W959
W968
W971
R6304
(TUNER/
FM/AM)
W960
R6305
S6305
(EXT_IN)
F
E
D
C
R6399
S6301
(OPEN)
W756
R6494
R6106
S6106
(STOP/-DEMO)
W952
R6491
R6307
S6307
(M.EQ +)
R6492
W953
W951
W967
R6308
R6310
W956
S6308
(MANUAL EQ)
VOLUME
R6309
R6107
R6108
S6309
(M.EQ -)
W957
W958
S6108
(HARD
BASS)
S6306
PbF
R6306
(REC)
0109A-1-1
0109A
B
A
1
2
3
4
5
6
7
81
8
9
SA-AK250GCP
SUB PANEL P.C.B
10 1 12 13
1
Page 81
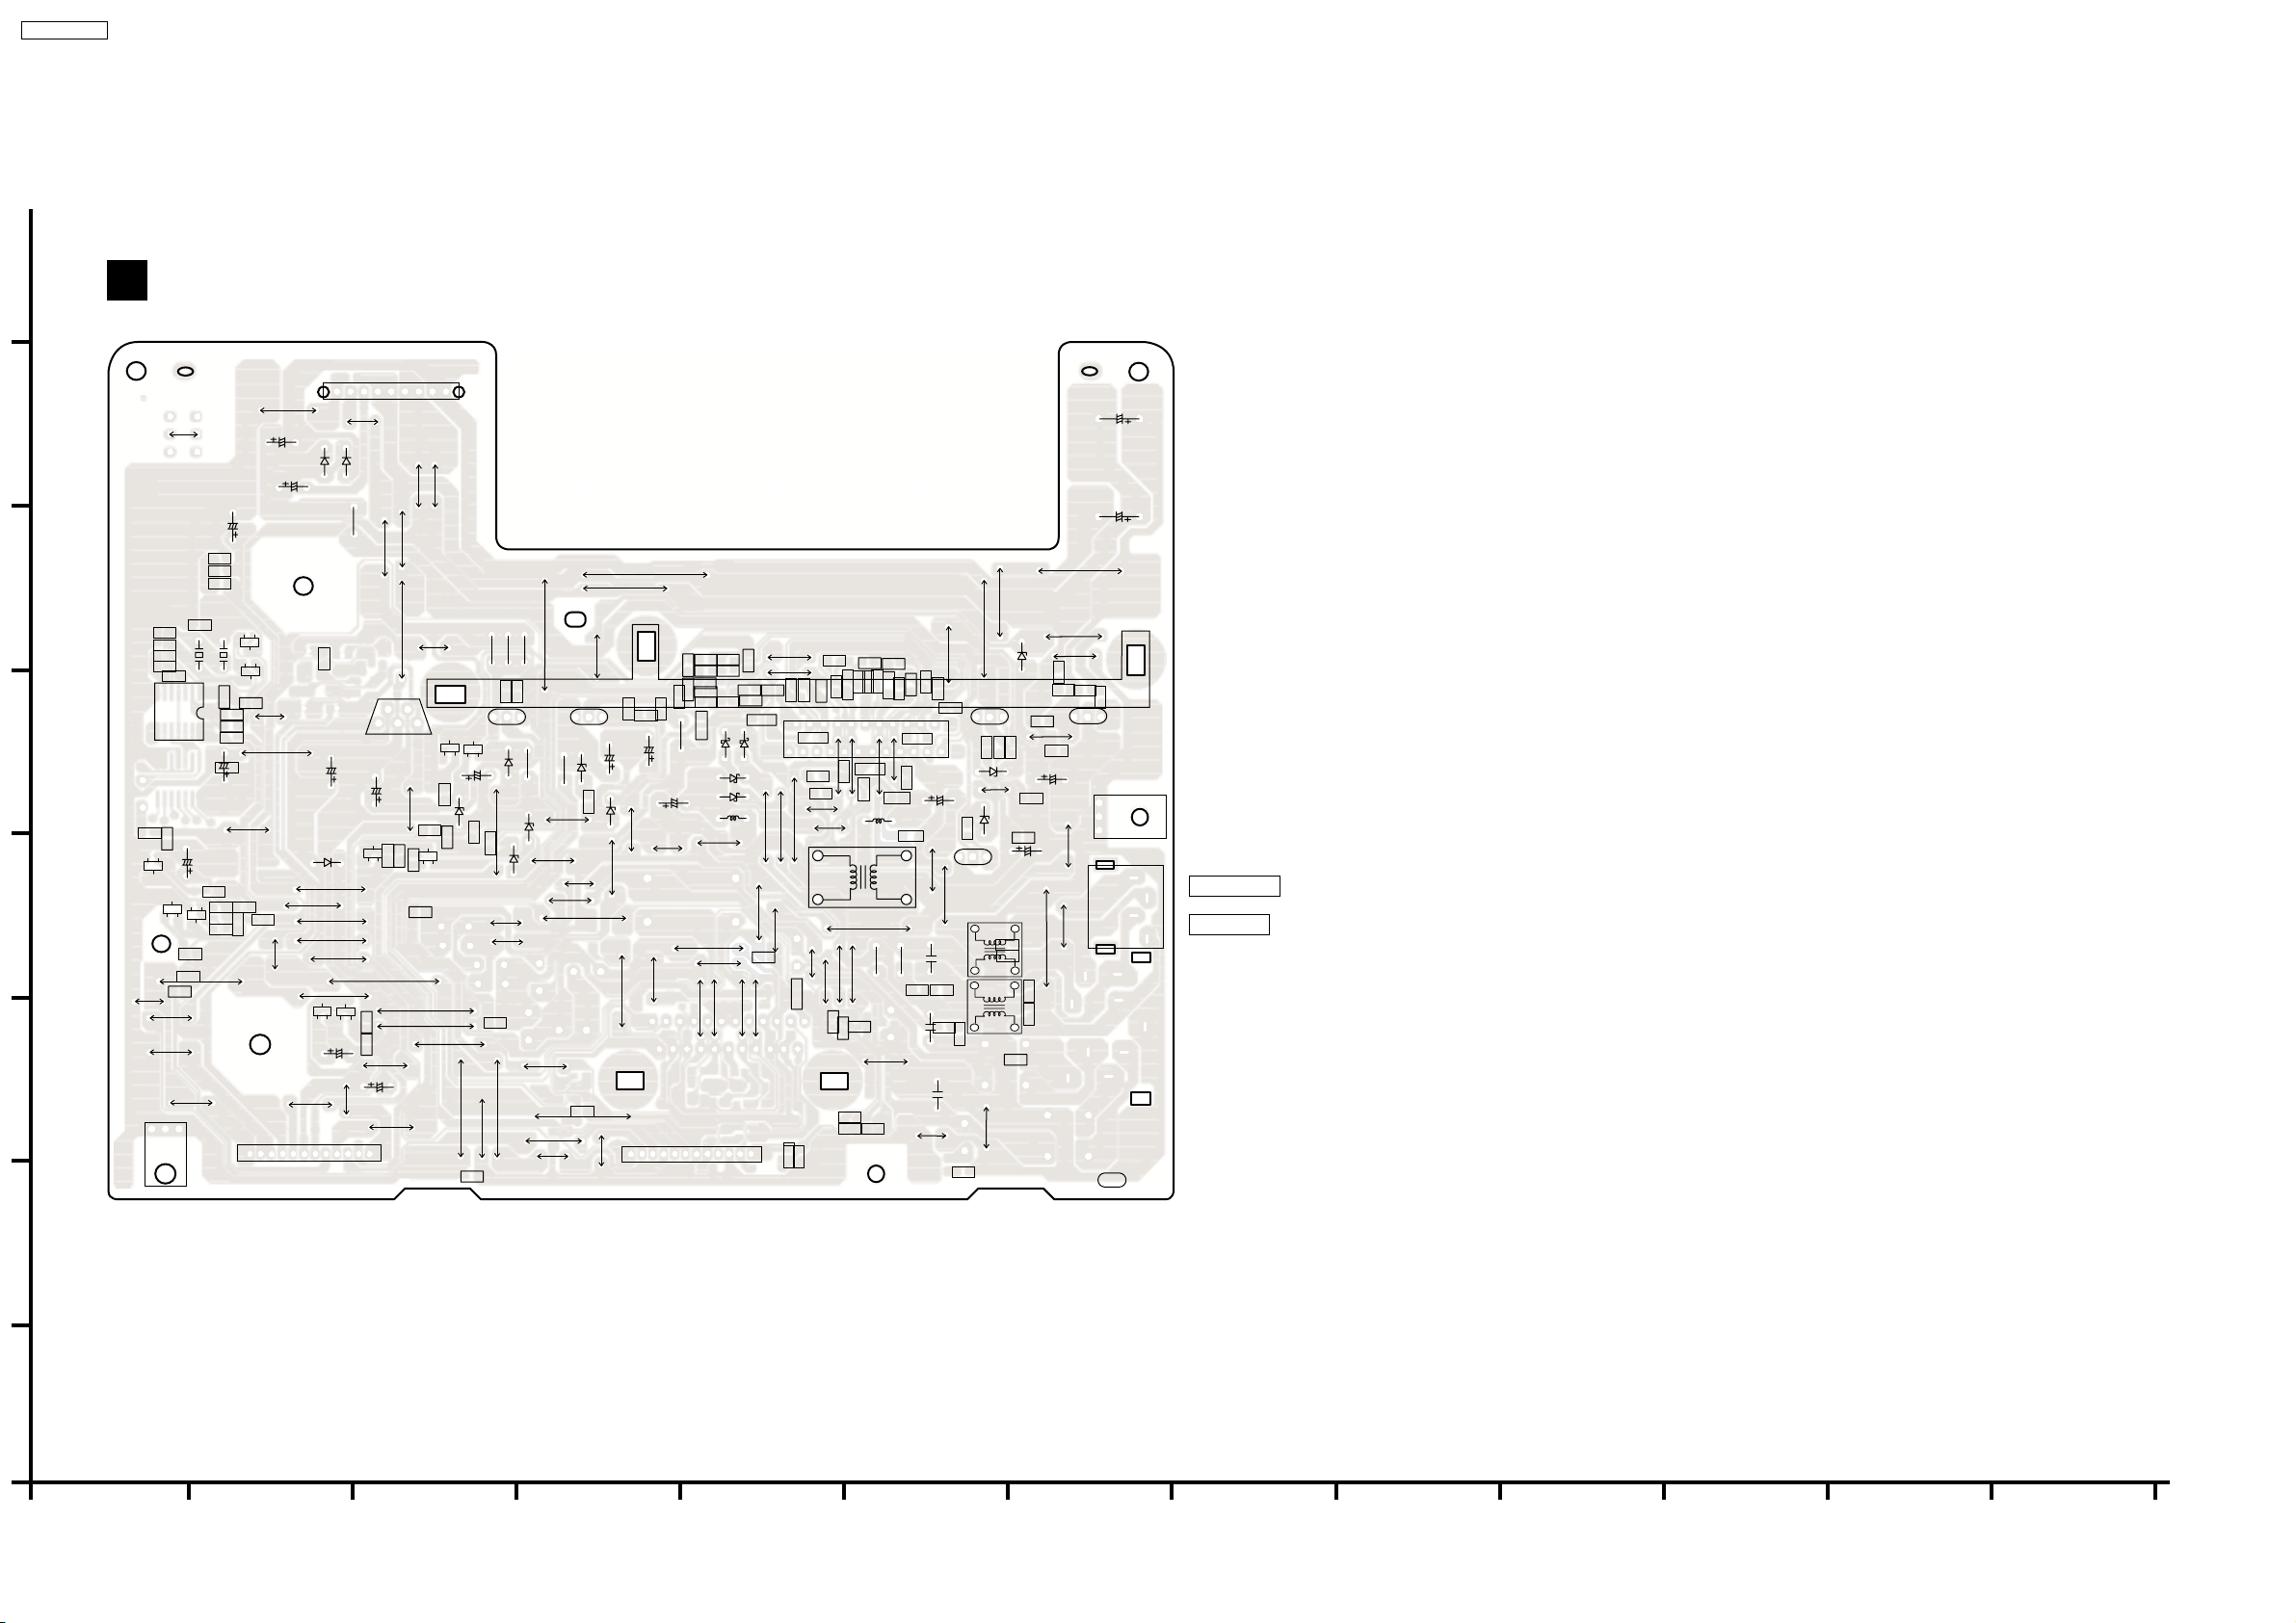
SA-AK250GCP
H
G
F
E
D
C
20.5. (E) Power P.C.B.
E
POWER P.C.B (REPV0133D)
H5104
C5203
C5202
R5207
R5206
W750
71
IC5201
814
R5210
C5210
B
E
C
Q5153
Q5173
C
Q5154
B
W681
W610
W611
W612
E5103
2
3
W714
C5121
E
W680
W613
1
E
R5153
C5204
X5202
B
C
C5701
R5203
R5201
R5202
Q5202
B
E
C
Q5201
X5201
B
E
C
W748
C5201
R5204
R5205
R5209
C5208
C5205
W614
R5149
R5146 R5148
R5174
W679
R5173
R5154
W609
CN5103
23456789101112
1
W701
C5102
C5103
W607
W606
W619
Q5104
W702
W618
D5121
D5130
B
C5131
W617
W620
W711
W674
C
W712
W623
E
Q5103
C5105
D5122
B
W703
R5103
C
W602
Q5108
E
C5132
B
R5111 C5155
C5133
1
C
E
W624
W626
W604
IC5101
2
R5107
W627
W745
3
W749
W615
R5106
W725
4
5
Q5113
R5109
R5112
W724
W625
W691
R5151
B
123456789
W728
HEATSINK
B
C
Q5109
E
W710
C
R5134
R5105
Q5112
E
B
C5113
W630
W744
C
D5109
Q5114
E
R5110
W747
R5137
R5113
B
W706
W632
W721
W727
R5136
C
D5125
R5133
W616
D5105
R5135
C5159
E
D5103
R5132
W672
W695
Q5 111
W709
W634
J5104
R5147
W633
W726
W722
W697
W698
W696
E
B
C
C5109
D5152
R5152
D5107
W643
W640
W635
W636
W684
123456789101112
J5103
CN5102
R5127
C5157
C5110
W694
W705
R5126
C5123
R5123
C5336
R5301C5337
R5303
R5304
C5702
W655
W657
W740
W641
W656
W658
C5302C5301
C5303R5302
C5703
D5153
D5156
D5154
L5102
W659
C5305
W682
W741
R5139
W660
D5155
W730
W757
W720
W739
W754
W719
W638
W639
W752
D5126
C5323
22
2123
W751
C5321
R5150
C5322
C5318
C5320
W654
W718
4
3
C5319
R5138
181920
W644
W653
R5522
C5171
C5172
W662
W661
D5104
C5114
R5101
2
4
2
4
C5187
C5101
C5439
C5434
L5602
C5115
C5438
C5435
W671
C5104
W746
C5153
C5106
C5186
W699
W700
W665
W737
C5152
E
R5108
B
C
Q5102
E5101
1
2
3
JK5103
PbF
1
3
0110B
0110B
2
4
RIGHT SPEAKER
LEFT SPEAKER
W663
C5331
C5316
C5332
C5330
C5333
R5308
IC5301
16
121314
W647
15
91011
17
C5314
W645
C5317
C5315
C5312
W646
L5101
L5301
W650
R5306
W652
W651
R5317
R5312
R5313
W732
R5413
R5412
R5316
R5307
8
W648
W755
C5309
R5521
W690
C5308
C5313
E
B
2
C5326
C5328
C5427
1
W743
C5324
E
C5429
R5114
C
Q5110
1
3
1
3
C5329
C
Q5101
C5151
W733
B
L5601
W738
D5101
D5102
C5107
C5344
4
6
C5310
3
5
7
C5311
C5124
W756
1
W704
2
R5305
C5325
C5327
W735
B
A
1
2
3
4
5
6
7
82
8
9
SA-AK250GCP
POWER P.C.B
10 1 12 13
1
Page 82
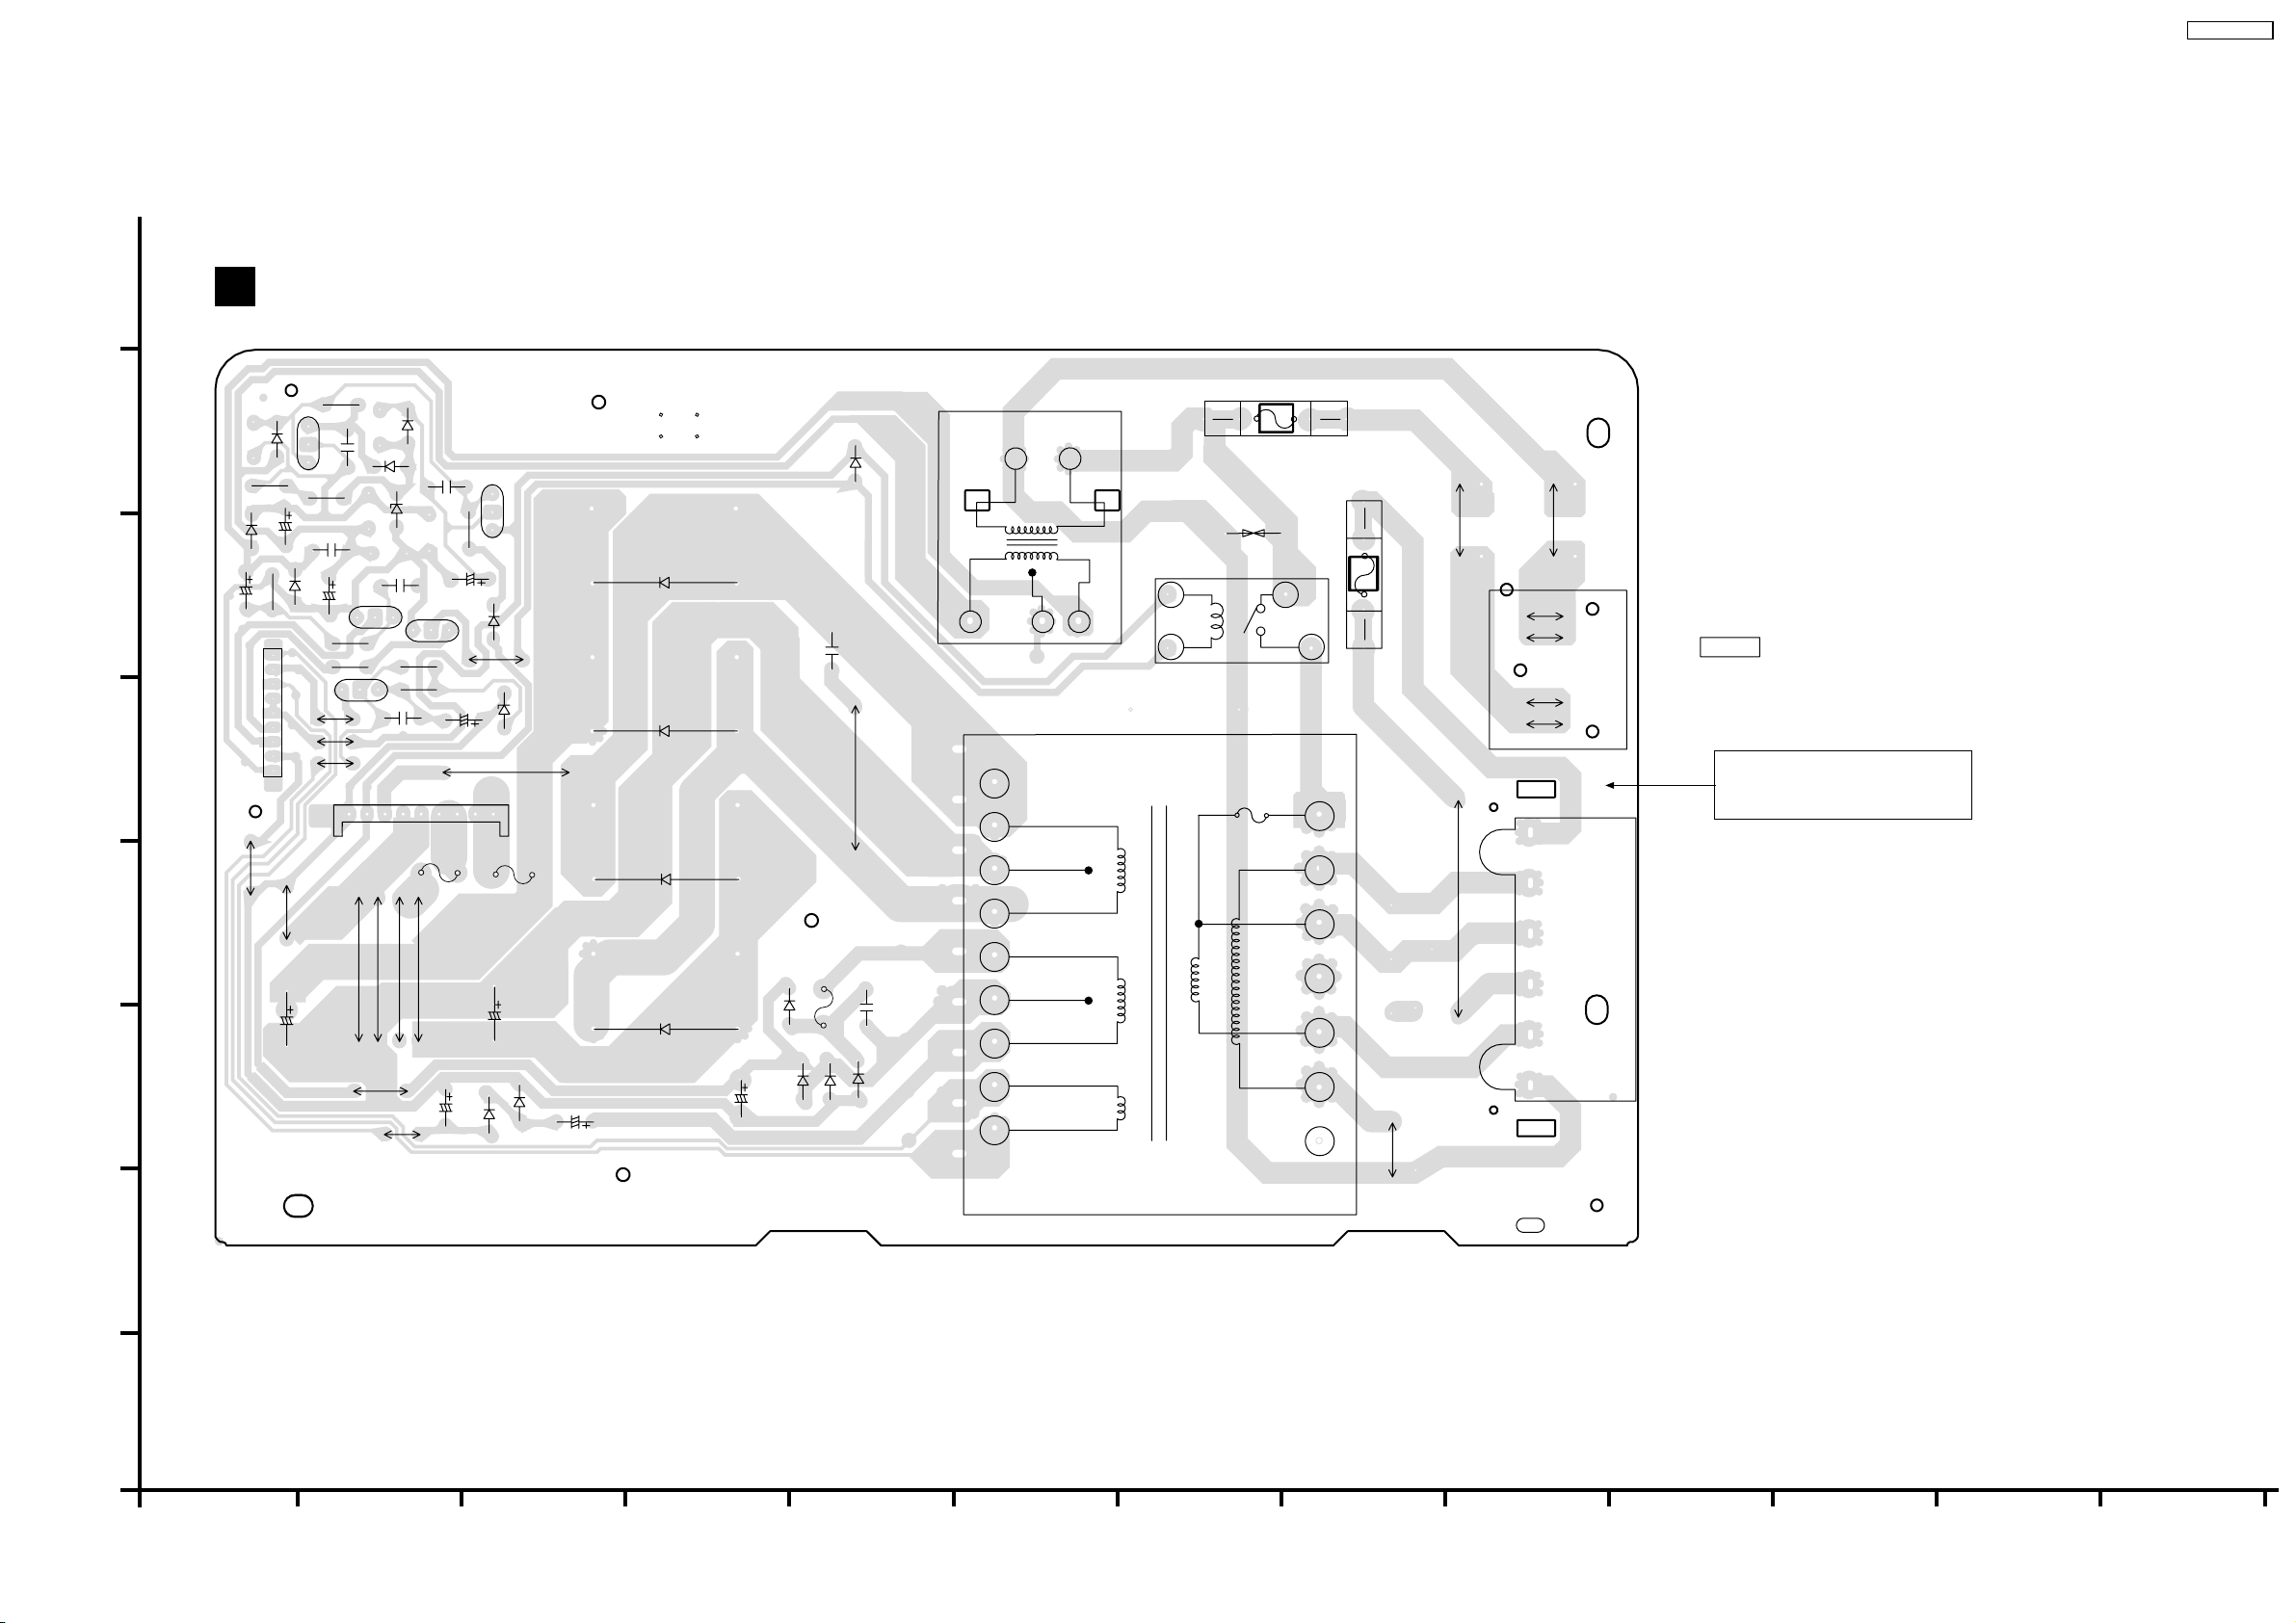
H
20.6. (H) Transformer P.C.B.
H
TRANSFORMER P.C.B (REPV0132K)
SA-AK250GCP
G
F
E
D
J5955
D5961
C5963
CN5951
W5904
D5967
C5961
R5957
1
2
3
4
5
6
7
8
9
C5940
Q5954
D5962
Q5951
W5920
R5954
B
C
E
R5952
C5964
C5951
C5962
R5958
R5951
E
W5923
W5922
W5906
Q5952
C
E
C
D5968
C5954
B
D5969
D5964
B
C5958
Q5953
E
R5960
R5961
CN5950
987654321
FP5920
W5908
W5902
W5903
W5907
C5953
C
7A
B
C5957
R5963
C5952
Q5950
1
3
2
D5966
W5905
D5960
W5909
FP5940
C5920
FC1
RL5950
F1
250V T3.15AL
Z5950
PRIMARYSECONDARY
FC2
FC4
1
2
7
6
5
4
3
250V T1.6AL
FC3
F2
K5918
K5913
K5919
JK5950
W5914
W5915
W5916
W5917
S5950
VOLTAGE SELECTOR
1
1
2
2
3
3
4
4
5
5
AC IN ~
110V-127V/220V-240V
50/60HZ
CAUTION
RISK OF ELECTRIC SHOCK
AC VOLTAGE LINE.
PLEASE DO NOT TOUCH THIS P.C.B
T5951
(SUB TRANSFORMER)
2
D5965
D5952
C5960
D5950
W5910
7A
D5953
D5951
D5954
FP5950
4A
C5959
3
5
T5950
(POWER TRANSFORMER)
7
8
9
10
11
12
13
14
3
8
4
C
B
A
1
W5930
2
W5901
C5956
D5959
D5958
3
C5955
4
C5950
D5956
D5957
D5955
5
6
PbF
6
0462L
0462L
15
16
2
1
K5971
SA-AK250GCP
TRANSFORMER P.C.B
6
7
83
8
9
10 11 12 13
Page 83

SA-AK250GCP
84
Page 84
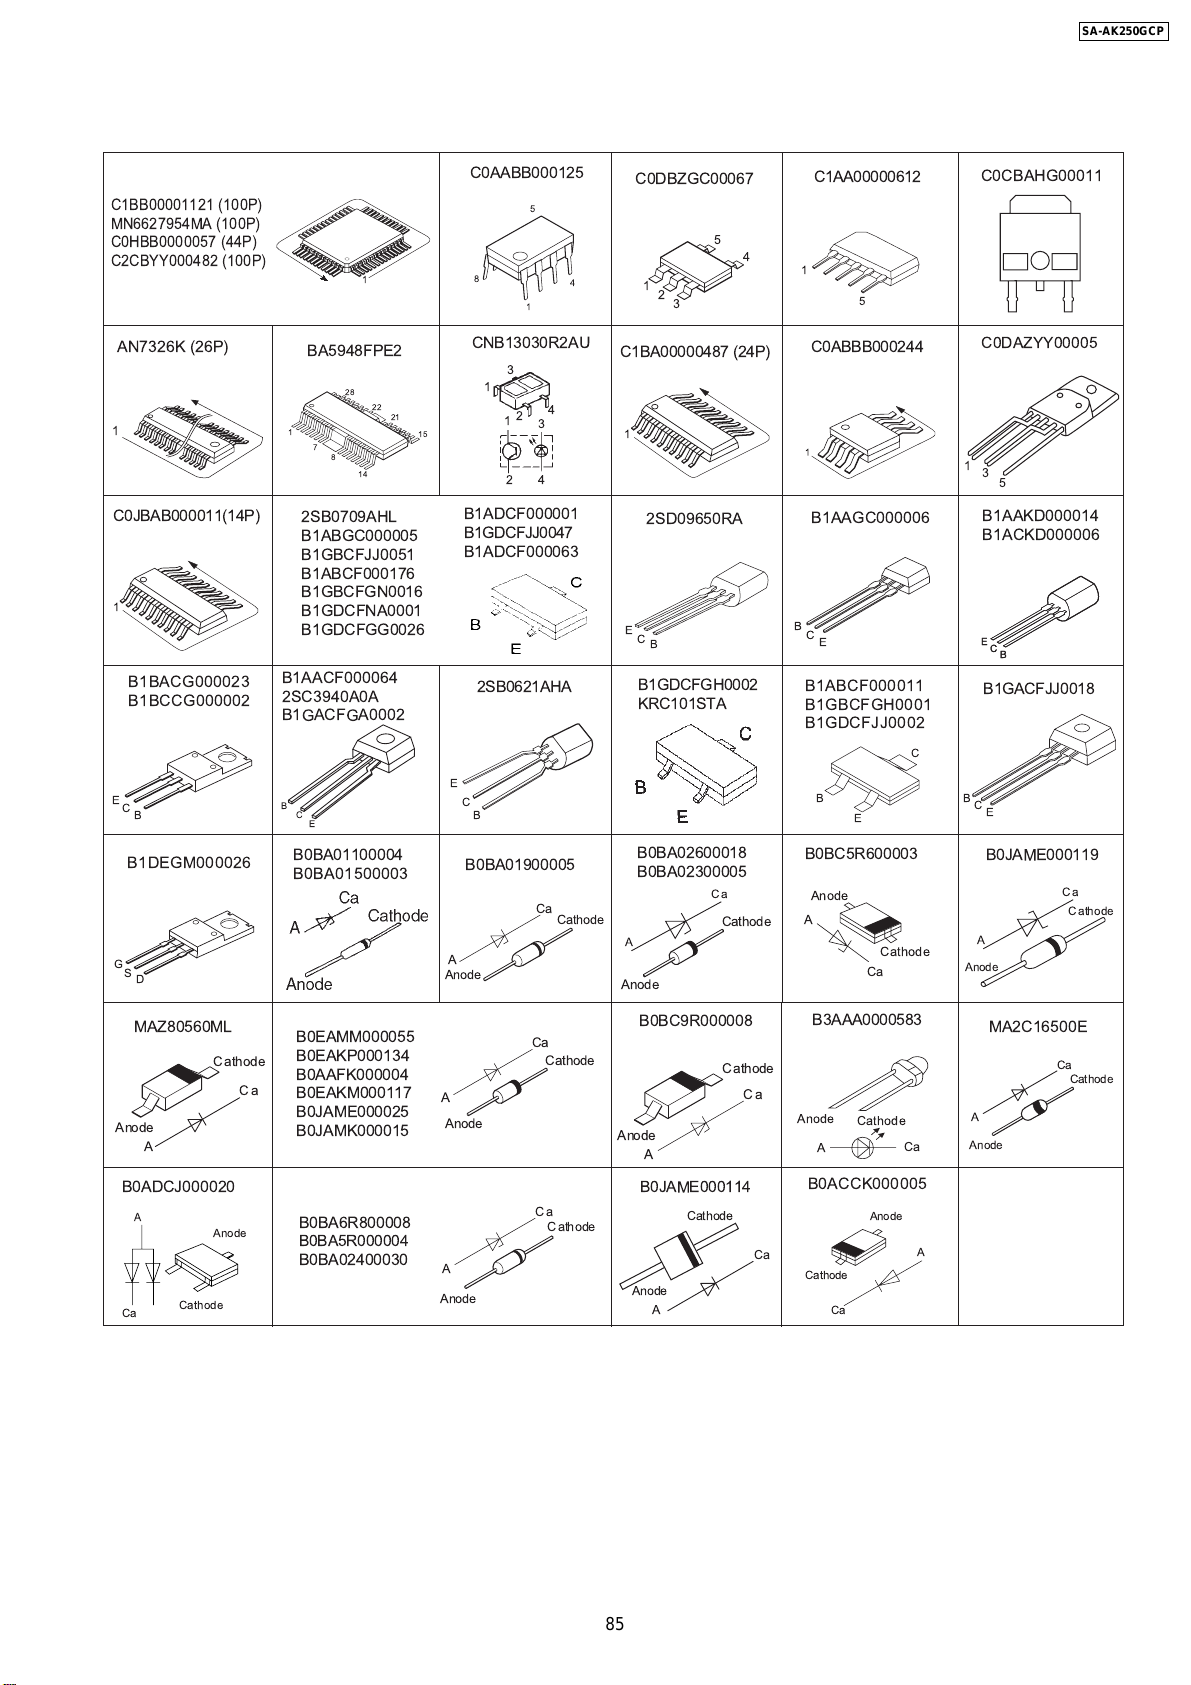
21 Illustration of ICs, Transistors and Diodes
SA-AK250GCP
C1BB00001121 (100P)
MN6627954MA (100P)
C0HBB0000057 (44P)
C2CBYY000482 (100P)
AN7326K (26P)
1
C0JBAB000011(14P)
1
B1BACG000023
B1BCCG000002
E
C
B
B1DEGM000026
G
S
D
1
BA5948FPE2
28
22
1
7
8
14
2SB0709AHL
B1ABGC000005
B1GBCFJJ0051
B1ABCF000176
B1GBCFGN0016
B1GDCFNA0001
B1GDCFGG0026
B1AACF000064
2SC3940A0A
B1GACFGA0002
B
C
E
B0BA01100004
B0BA01500003
C0AABB000125
5
8
4
1
CNB13030R2AU
3
1
4
21
15
2
1
3
2
4
B1ADCF000001
B1GDCFJJ0047
C0DBZGC00067
5
4
1
2
3
C1BA00000487 (24P)
1
2SD09650RA
C1AA00000612
1
5
C0ABBB000244
B1AAGC000006
C0CBAHG00011
C0DAZYY00005
1
3
5
B1AAKD000014
B1ACKD000006
B1ADCF000063
B
C
E
B1ABCF000011
B1GBCFGH0001
E
E
C
C
B
B
B1GACFJJ0018
2SB0621AHA
E
C
B
B1GDCFGH0002
KRC101STA
B1GDCFJJ0002
C
E
C
B
B0BA01900005
A
Anode
Ca
Cathode
B0BA02600018
B0BA02300005
Ca
Cathode
A
Anode
B
E
B0BC5R600003
Anode
A
Cathode
Ca
B
C
E
B0JAME000119
A
Anode
Ca
Cathode
MAZ80560ML
Anode
A
B0ADCJ000020
A
Cathode
Ca
Cathode
Ca
Anode
B0EAMM000055
B0EAKP000134
B0AAFK000004
B0EAKM000117
B0JAME000025
B0JAMK000015
B0BA6R800008
B0BA5R000004
B0BA02400030
A
Anode
A
Anode
Ca
Cathode
Ca
Cathode
B0BC9R000008
Anode
A
B0JAME000114
Cathode
Anode
A
Cathode
Ca
Ca
B3AAA0000583
Anode
Cathode
A
B0ACCK000005
Anode
Cathode
Ca
Ca
MA2C16500E
Ca
Cathode
A
Anode
A
85
Page 85
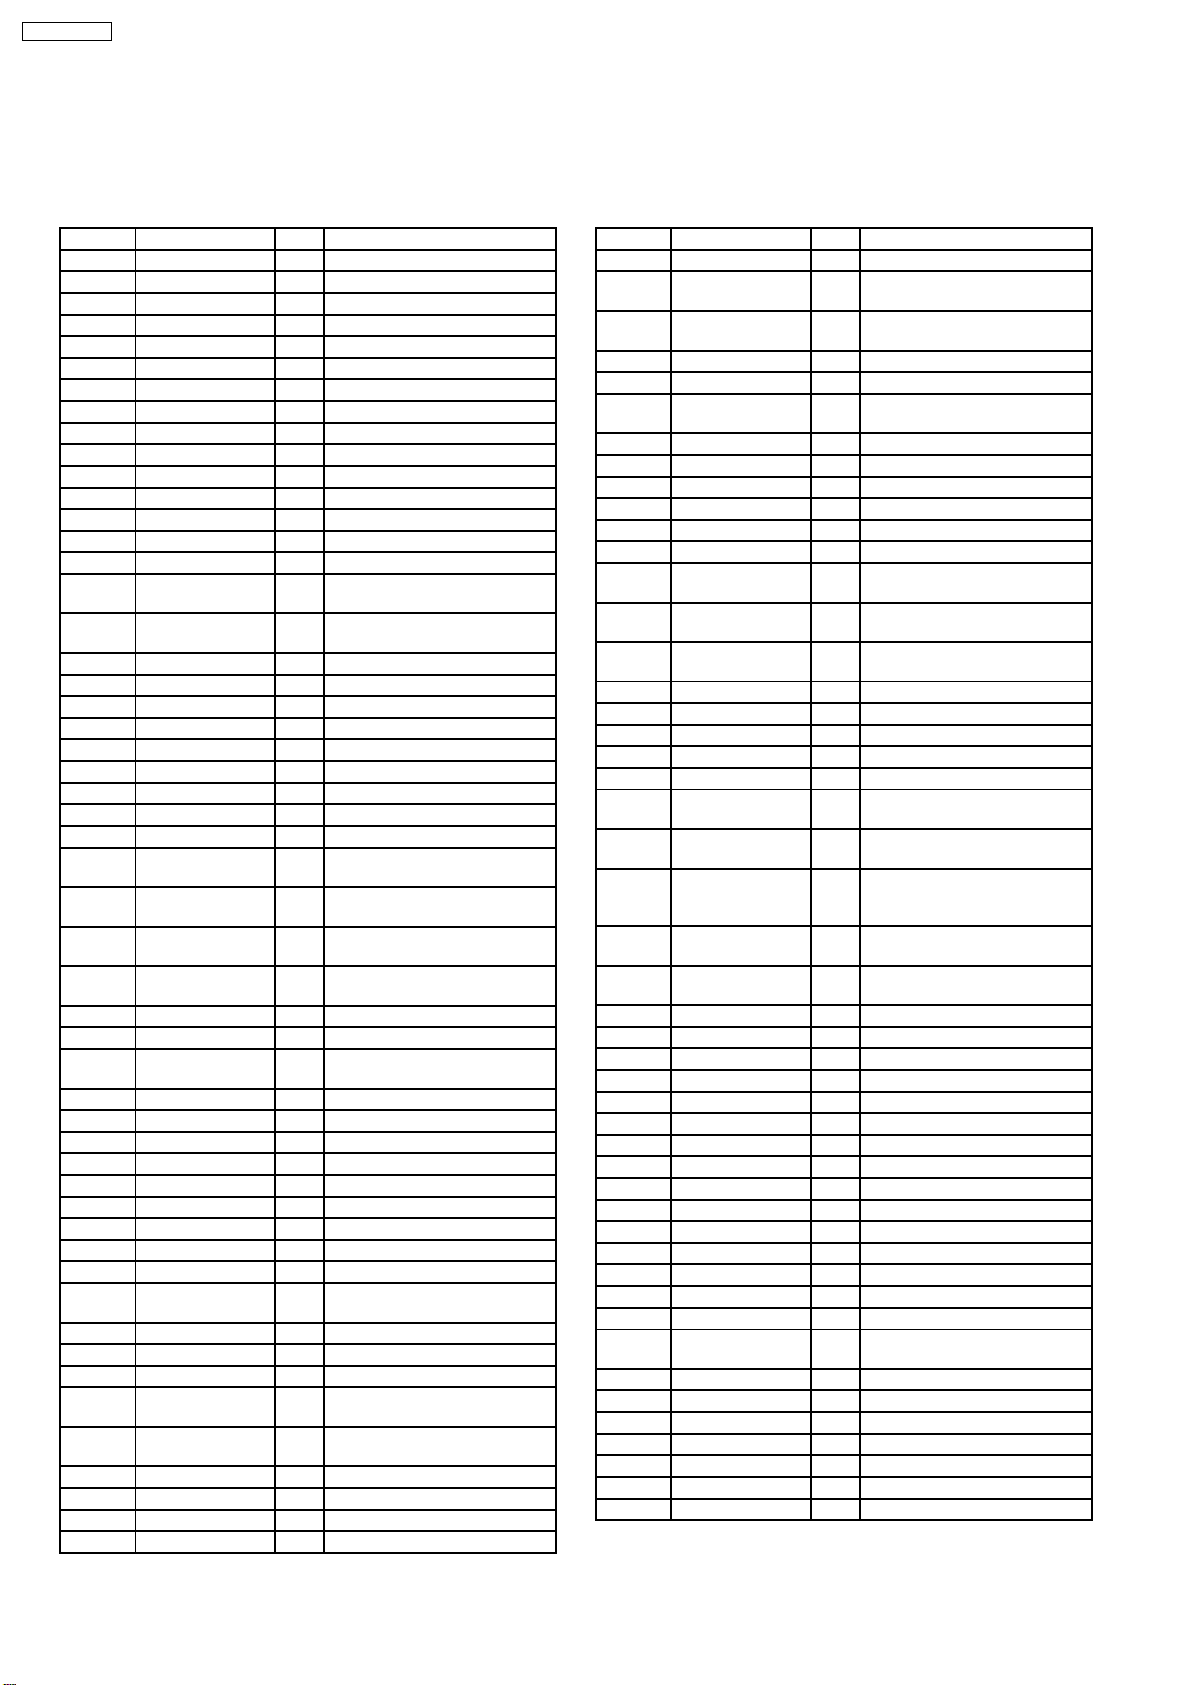
SA-AK250GCP
22 Terminal Function of IC's
22.1. IC7001 (MN6627954MA) Servo Processor,Digital Signal
Processor/Digital filter and D/A Converter
Pin No. Mark I/O Function
1 A11 O DRAM address signal O/P 11
2 A9 O DRAM address signal O/P 9
3 A8 O DRAM address signal O/P 8
4 A7 O DRAM address signal O/P 7
5 A6 O DRAM address signal O/P 6
6 A5 O DRAM address signal O/P 5
7 A4 O DRAM address signal O/P 4
8 NWE O Write Enable Signal (DRAM)
9 NCAS O DRAM CAS Control Signal
10 NRAS O DRAM ARS Control Signal
11 A3 O DRAM address Signal O/P 3
12 A2 O DRAM address Signal O/P 2
13 A1 O DRAM address Signal O/P 1
14 A0 O DRAM address Signal O/P 0
15 A10 O DRAM address Signal O/P 10
16 BA0 - Motor O/P (0);/Serial I/P (No
connection)
17 BA1 - Motor O/P (1);/Serial I/P (No
connection)
18 PRAMVSS33 - GND (DRAM)
19 PRAMVDD33 - Power Supply Voltage (DRAM)
20 PRAMVDD15 - Power Supply Voltage (+1.6V)
21 SPOUT O Spindle Drive O/P
22 PC I/O Spindle motor drive O/P signal
23 TRVP O Traverse Drive O/P (+ve)
24 TRP O Tracking Drive O/P (+ve)
25 FOP O Focusing Drive O/P (+ve)
26 DVSS1 - GND
27 IOVDD2 - Digital Power Supply Voltage 2
(I/O)
28 DVDD1 - Digital Power Supply Voltage 1
(Built-In)
29 SRVMON0 - Servo Monitor (0) O/P (No
connection)
30 SRVMON1 - Servo Monitor (1) O/P (No
connection
31 AVSS2 - GND
32 OSCIN - Oscillating Input
33 CTRCRS - Tracking Cross Comparator
Terminal
34 VREF - +Vref Supply Voltage
35 E I Tracking Input Signal 1
36 F I Tracking Input Signal 2
37 D I Focusing Input Signal 4
38 B I Focusing Input Signal 2
39 C I Focusing Input Signal 3
40 A I Focusing Input Signal 1
41 PD I APC Amp I/P
42 LD O Laser Drive Current O/P
43 CENV - Detection Capacitance
Connection terminal
44 RFENV O RF Envelope O/P
45 RFOUT O RF Summing Amp O/P
46 RFIN I SGC I/P
47 AVDD2 - Analog Power Supply voltage 2
(For DSL/PLL)
48 ARFDC - AGC Capacitive Connection
Terminal
49 ARFOUT O AGC Output
50 ARFFB I ARF Feedback Signal I/P
51 ARFIN I Audio RF Signal I/P
52 DSLF - Loop Filter Terminal (For DSL)
Pin No. Mark I/O Function
53 IREF I Reference I/P
54 PLLF - PLL Loop Filter Terminal
(Phase Compare)
55 PLLF0 - PLL Loop Filter Terminal
(Speed Compare)
56 OUTL O Audio O/P (LCH)
57 AVSS1 - GND
58 AVDD1 - Analog Power Supply Voltage
1
59 OUTR O Audio O/P (RCH)
60 DVSS3 - GND3 (Digital Circuit)
61 NSRVMONON O Servo Motor O/P Enabling
62 EXT0 O Expansion O/P Port 0
63 EXT1 O Expansion O/P Port 1
64 EXT2 O Expansion O/P Port 2
65 FLAG - Flag Signal O/P (No
connection)
66 TX - Digital Audio Interface O/P
signal
67 MCLK I Micro-Computer Command
Clock I/P
68 MDATA I Micro-Computer Data I/P
69 MLD I Micro-Computer Load I/P
70 STAT O Status Signal O/P
71 *BLKCK O Subcode Blk Clock
72 NRST O LSI Reset Signal
73 *DQSYTXT - Pack Signal O/P for CD-Text
data (No connection)
74 *SMCK - Micro-Computer Clock O/P (No
connection)
75 *PMCK - IOCNT Serial data O/P
(Synchronous O/P) (No
connection)
76 DVDD2 - Digital Power Supply Voltage 2
(+1.5V)
77 IOVDD1 - Digital Power Supply Voltage 1
(For I/O)
78 DVSS2 - GND2 (For Digital Circuit)
79 NTEST2 I Test Mode Setting (ON:H)
80 X2 O Crystal Oscillating Circuit O/P
81 X1 I Crystal Oscillating Circuit I/P
82 NTEST I Test Mode Setting I/P (ON:H)
83 D2 I/O Data Sigmal O/P 2
84 D1 I/O Data Signal O/P 1
85 D0 I/O Data Signal O/P 0
86 D3 I/O Data Signal O/P 3
87 D4 I/O Data Signal O/P 4
88 D5 I/O Data Signal O/P 5
89 D6 I/O Data Signal O/P 6
90 D7 I/O Data Signal O/P 7
91 D15 I/O Data Signal O/P 15
92 D14 I/O Data Signal O/P 14
93 DRVDD - I/O Power Supply Voltage
(DRAM)
94 D13 I/O Data Signal O/P 13
95 D12 I/O Data Signal O/P 12
96 D11 I/O Data Signal O/P 11
97 D10 I/O Data Signal O/P 10
98 D9 I/O Data Signal O/P 9
99 D8 I/O Data Signal O/P 8
100 SDRCK O Clock Signal O/P
86
Page 86
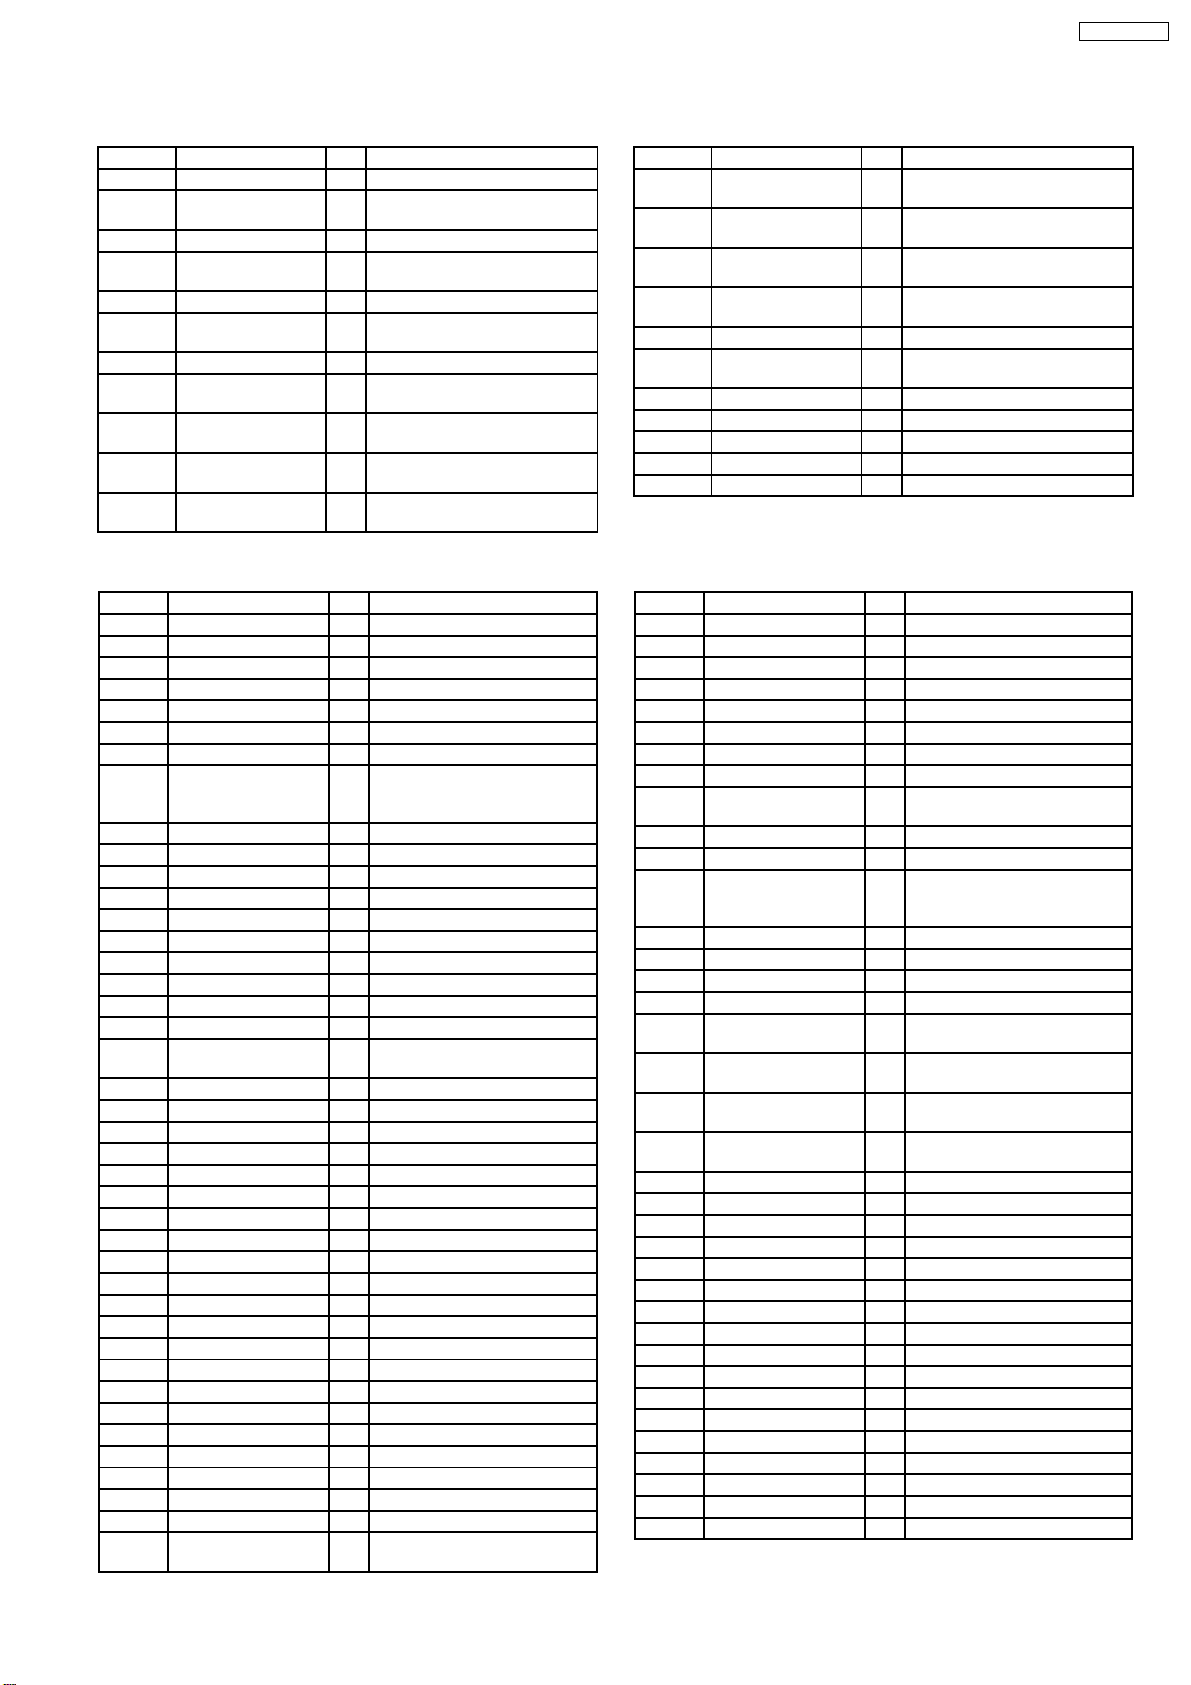
22.2. IC7002 (BA5948FPE2) IC 4CH Drive
SA-AK250GCP
Pin No. Mark I/O Function
1 IN2 I Motor Driver 92 Input
2 PC2 I Turntable Motor Drive Signal
(“L”:ON)
3 IN1 I Motor Drive (1) Input
4 PC1 - Traverse Motor Drive Signal
(“L”): ON)
5-8 N.C. - No Connection
9 PGND1 - Ground Connection (1) for
Drive
10 PVCC1 - Power Supply (1) for Drive
11 D1- O Motor Drive (1) reverse - action
output
12 D1+ O Motor Drive (1) forward - action
output
13 D2- O Motor Drive (2) reverse - action
output
14 D2+ O Motor Drive (2) forward - action
output
Pin No. Mark I/O Function
15 D3- O Motor Drive (3) reverse - action
16 D3+ O Motor Drive (3) forward - action
17 D4- O Motor Drive (4) reverse - action
18 D4+ O Motor Drive (4) forward - action
19 PVCC2 - Power Supply (2) for Driver
20 PGND2 - Ground Connection (2) for
21-24 N.C. - No Connection
25 VCC - Power Supply terminal
26 VREF - Reference Voltage Input
27 IN4 I Motor Driver (4) Input
28 IN3 I Motor Driver (3) Input
22.3. IC2801 (C2CBYY000482) System Microprocessor
Pin No. Mark I/O Function
1 LM_1 - No connection
2 D_PORT DET1 - No connection
3 D_PORT DET2 - No connection
4 RDS_DAT - No connection
5 RDS_CLK - No connection
6 IP_LINK - No connection
7 F_HOP O Frequency Hopping
8 BYTE - External Data Bus Width
Select Input (Connect to
Ground)
9 CNVSS - Flash Mode Terminal
10 Xcin - 32.768 kHz Sub Clock
11 Xcout - 32.768 kHz Sub Clock
12 /RESET - /RESET Input (ACTIVE L)
13 Xout - 10 MHz Main Clock
14 Vss - Ground (0V)
15 Xin - 10 MHz Main Clock
16 Vcc - Power Supply (+5V)
17 /NMI - Connect to Vcc (+5V)
18 RMT I Remote Control Input
19 BLKCK I CD Block Clock Input
(Inverted)
20 SYNC I AC Failure Detect Input
21 D0 O Serial Output Data
22 DI I Serial Input Data
23 S/WOOFER CS I Subwoofer Chip Select
24 SW_LVL1 - No connection
25 SW_LVL2 - No connection
26 ASP DAT O ASP Data
27 ASP_CLK O ASP Clock
28 FL CS I FL Chip Select
29 PLL_DATA I Tuner PLL Data
30 PLL_CLK I Tuner PLL Clock
31 USB_SDA (TxD) - No connection
32 USB_SCL (RxD) - No connection
33 USB_RST - No connection
34 XM_MUTE (BUSY) - No connection
35 XM_TX_OUT - No connection
36 XM_RX_IN - No connection
37 XM_I2S_RATE - No connection
38 XM_LINK ACTIVE - No connection
39 MUTE_DA O D-Amp Muting Control
40 MUTE_A O Audio Muting Control
41 EE_CS/EFP/EPM O EEPROM Chip Select (Flash
EPM for On board writer)
Pin No. Mark I/O Function
42 EE_CLK O EEPROM CLOCK
43 EE_DAT I/O EEPROM DATA
44 XM_DAC_RESET - No connection
45 XM_ANT_REV - No connection
46 PCONT/EFP/CS O Power Control Output
47 DCDET I DC Detect Input
48 XM_RST - No connection
49 XM_PCONT - No connection
50 STANDBY O For Digital AMP 5->0v during
51 VOL_LED O Volume LED Drive
52 CE I TUNER CE
53 DMT O Deck mute at mecha
54 BOTTOM_SW I Bottom switch for CRS1
55 UP_SENSOR I Up/Down sensor for CRS1
56 PLG O Plunger Control O/P
57 PHOTO I Photo (SG mechanism only)
58 MTR I/O Deck motor control
59 REC I/O H when record circuit is
60 MMOD0 I Micon Mode Switching for
61 PAM CS I PAM Region Model Chip
62 VCC - Power Supply (+5V)
63 H BASS_LED O Harmonic Bass LED Drive
64 Vss - Ground (0V)
65 D-PORT_R-SKIP - No connection
66 D-PORT_F-SKIP - No connection
67 D-PORT_STOP - No connection
68 D-PORT_RES2 - No connection
69 D-PORT_RES1 - No connection
70 FL_CS O FL Driver Chip Select
71 FL_DOUT O Serial Data To FL Driver
72 FL_CLK O Serial Clock To FL Driver
73 VOL_LED_CS I VOL LED Chip Select
74 USB_REQ - No connection
75 STATUS I CD Servo LSI Status Input
76 MLD I/O CD Command Load Output
77 MDATA_OUT I/O CD Command Data Output
78 MCLK I/O CD Command Clock Output
output
output
output
output
Driver
FHOP
transition.
L=mute OFF, H=mute ON
(“L” for motor OFF)
operating
USB Version Up using CD
Select
87
Page 87
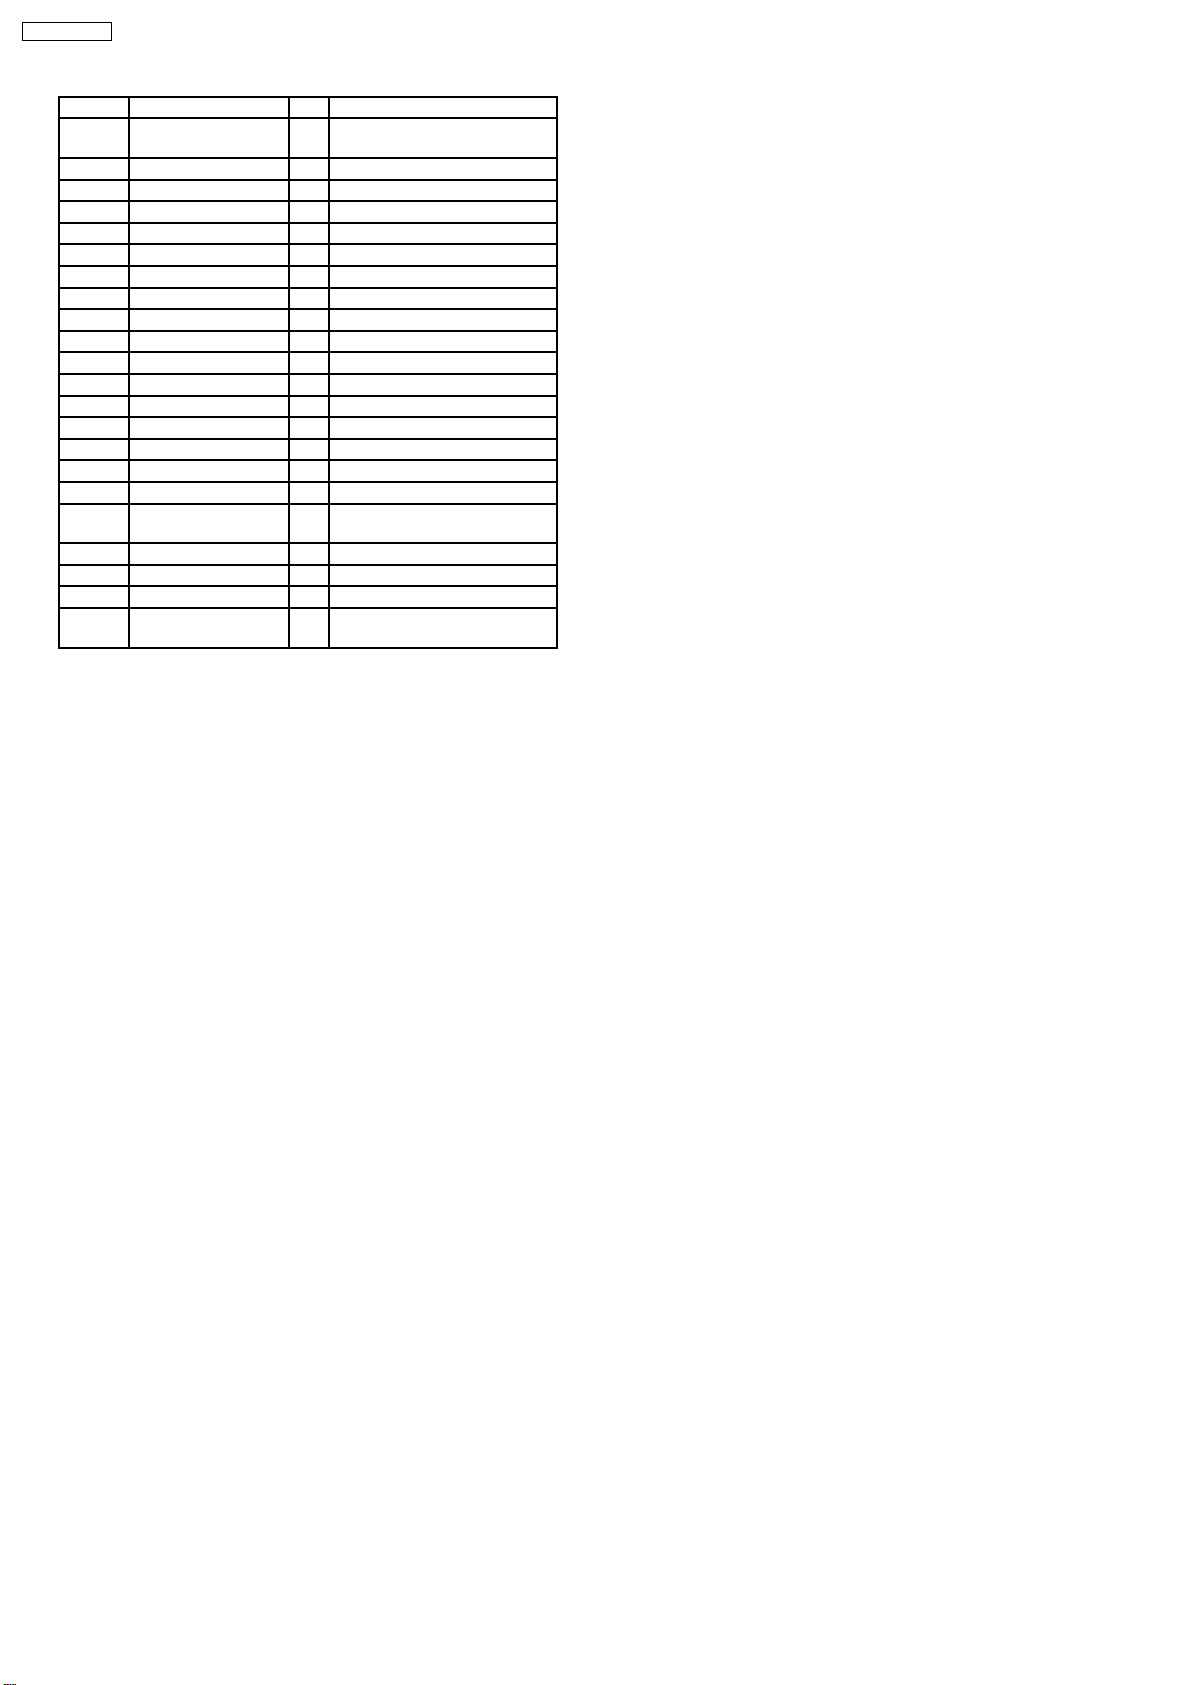
SA-AK250GCP
Pin No. Mark I/O Function
79 /RESET_SW I CD Limit Switch Input for the
most Inner Point (Active Low)
80 HOME_SW I Home Switch for CRS1
81 CD_RST I/O CD Reset output
82 CLOSE_SW I CLOSE switch for CRS1
83 OPEN_SW I Open switch for CRS1
84 CW O CRS1 motor CW
85 CCW O CRS1 motor CCW
86 ST_SW I Stock switch for CRS1
87 PLAY_SW I Play switch for CRS1
88 PLUNGER O Plunger for CRS1
89 REG - Region Setting
90 VOL_JOG I Volume jog
91 D-PORT_ PCONT - No connection
92 KEY3 I Key 3 Input
93 KEY2 I Key 2 Input
94 KEY1 I Key 1 Input
95 DECK_AD1 I Deck AD input 1
96 AVSS - Analog Power Supply Input
(Connect to GND)
97 DECK_AD2 I Deck AD input 2
98 VREF - Reference for A-D (5V)
99 AVCC - Analog Power Supply Input
100 DEMO_SET I (H= Default demo On, L=
Default demo off)
88
Page 88
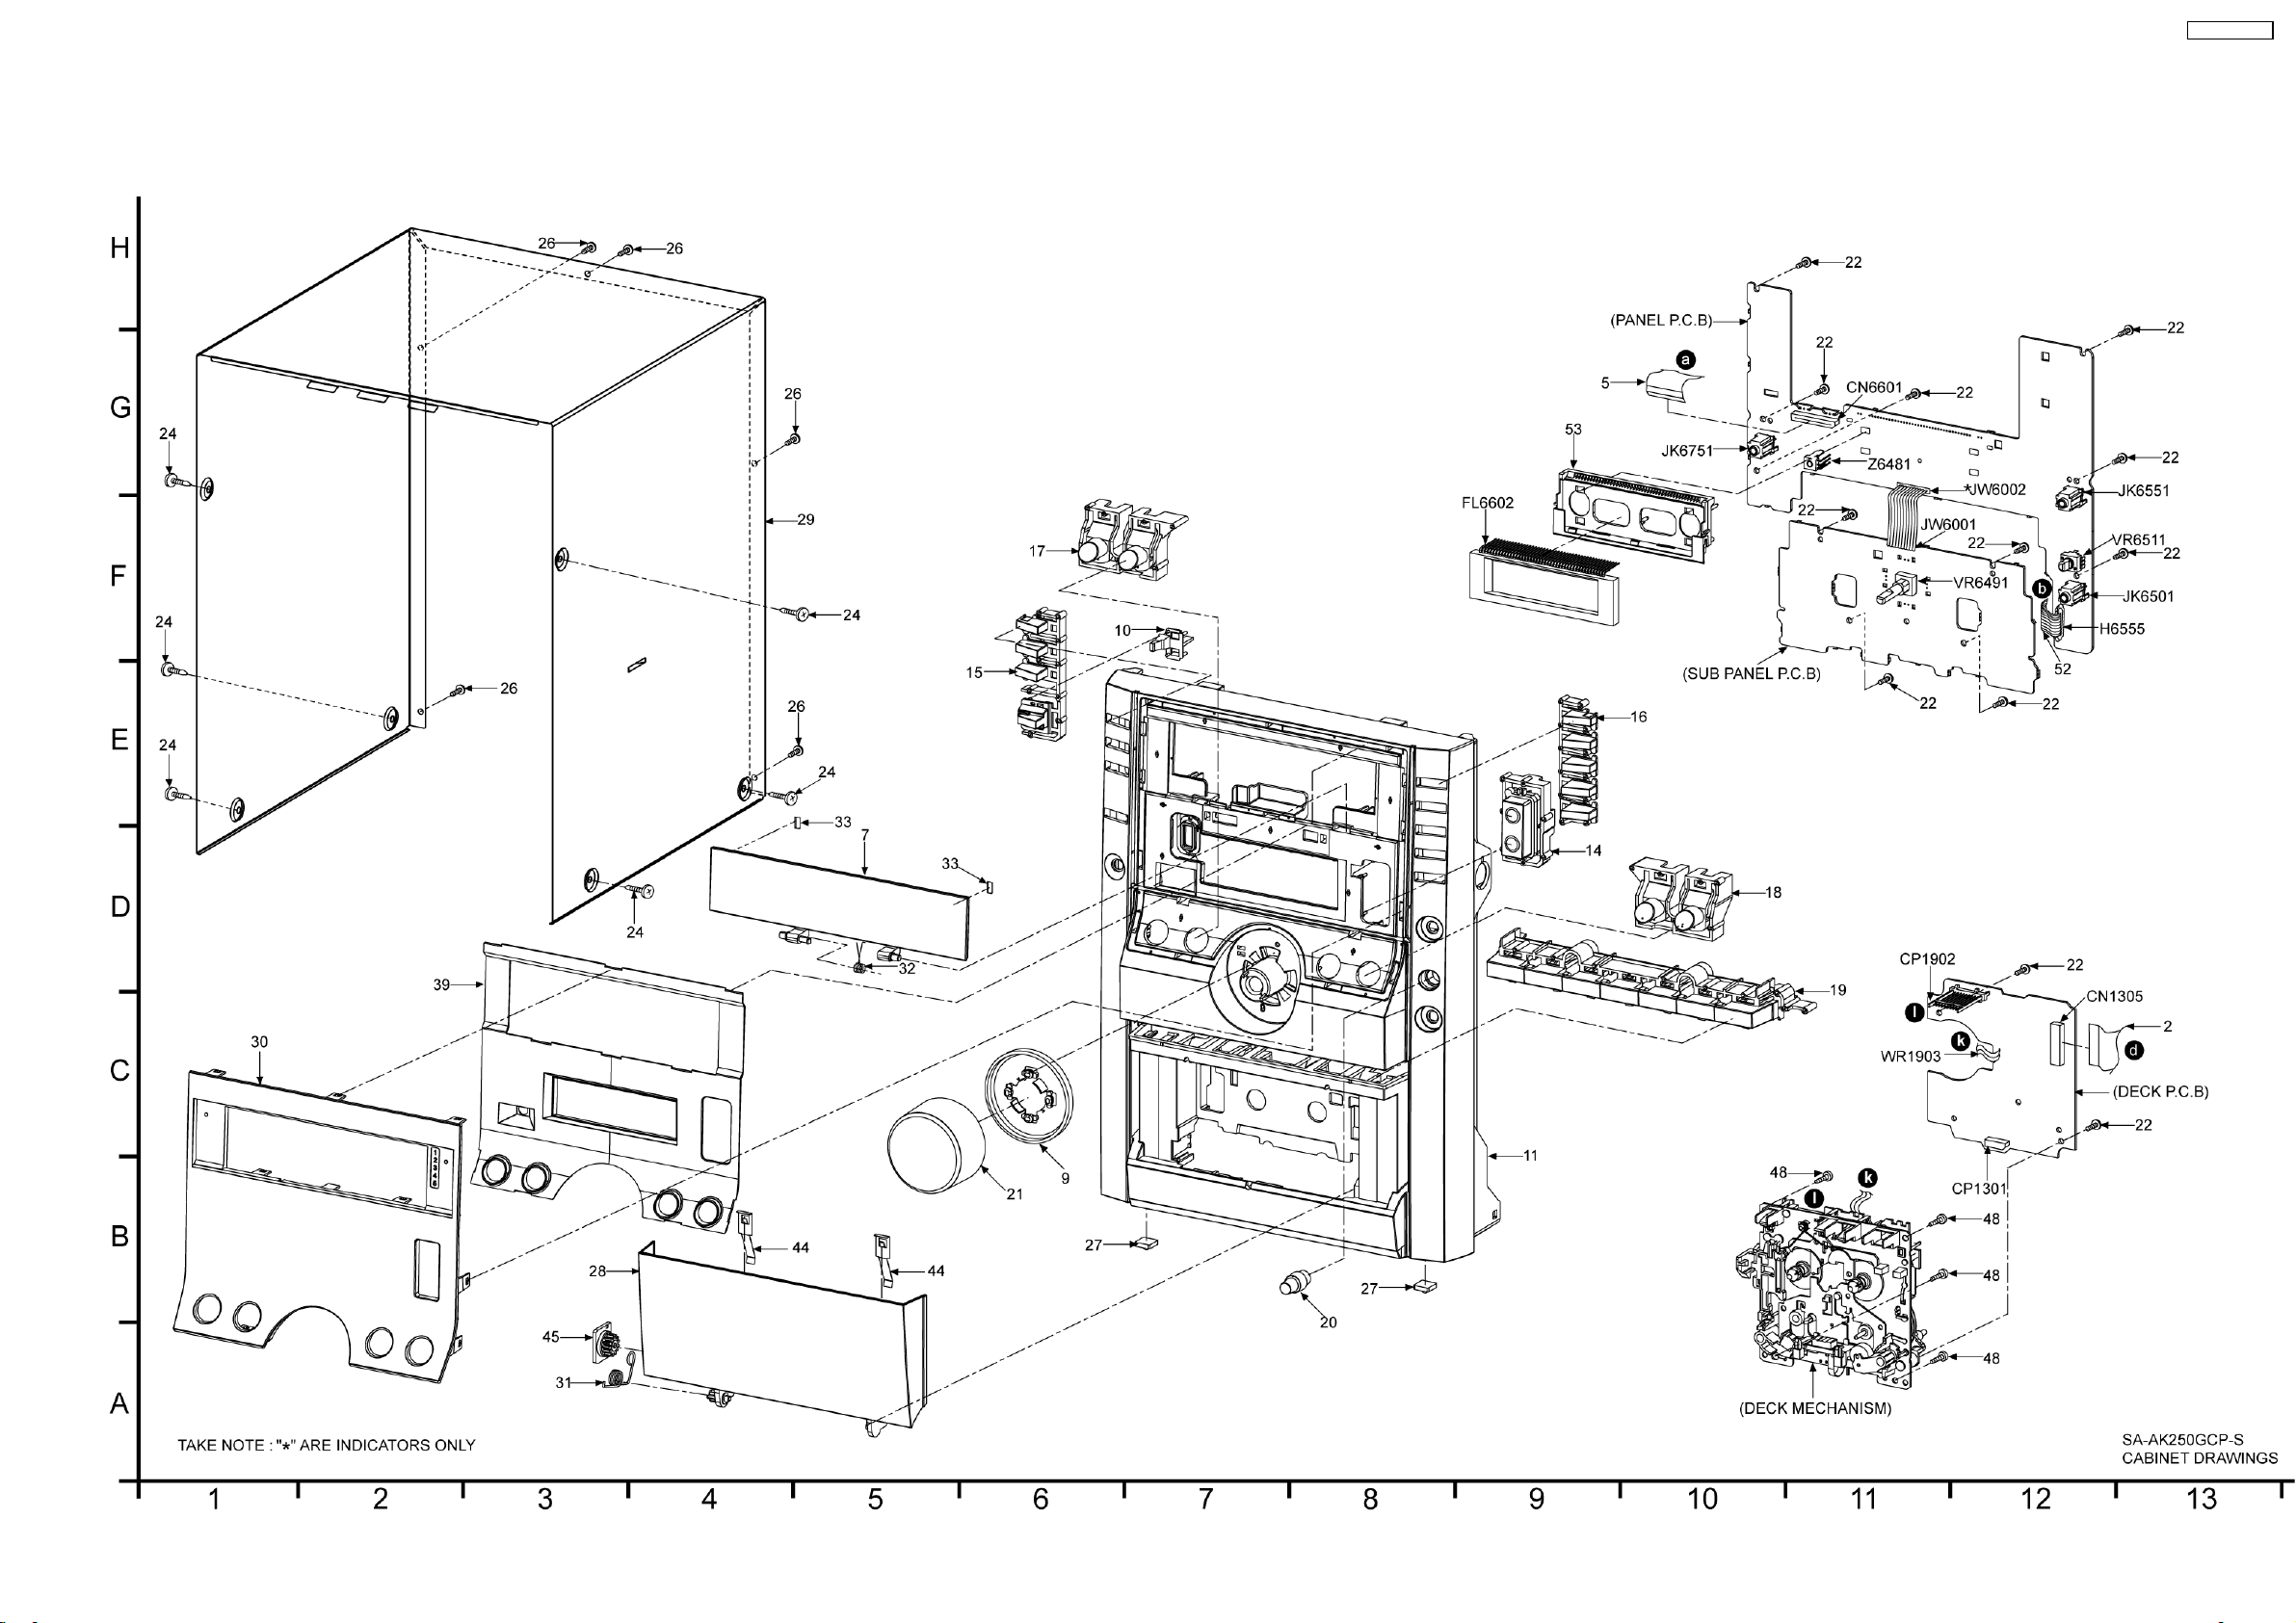
23 Exploded Views
23.1. Cabinet Parts Location
SA-AK250GCP
89
Page 89
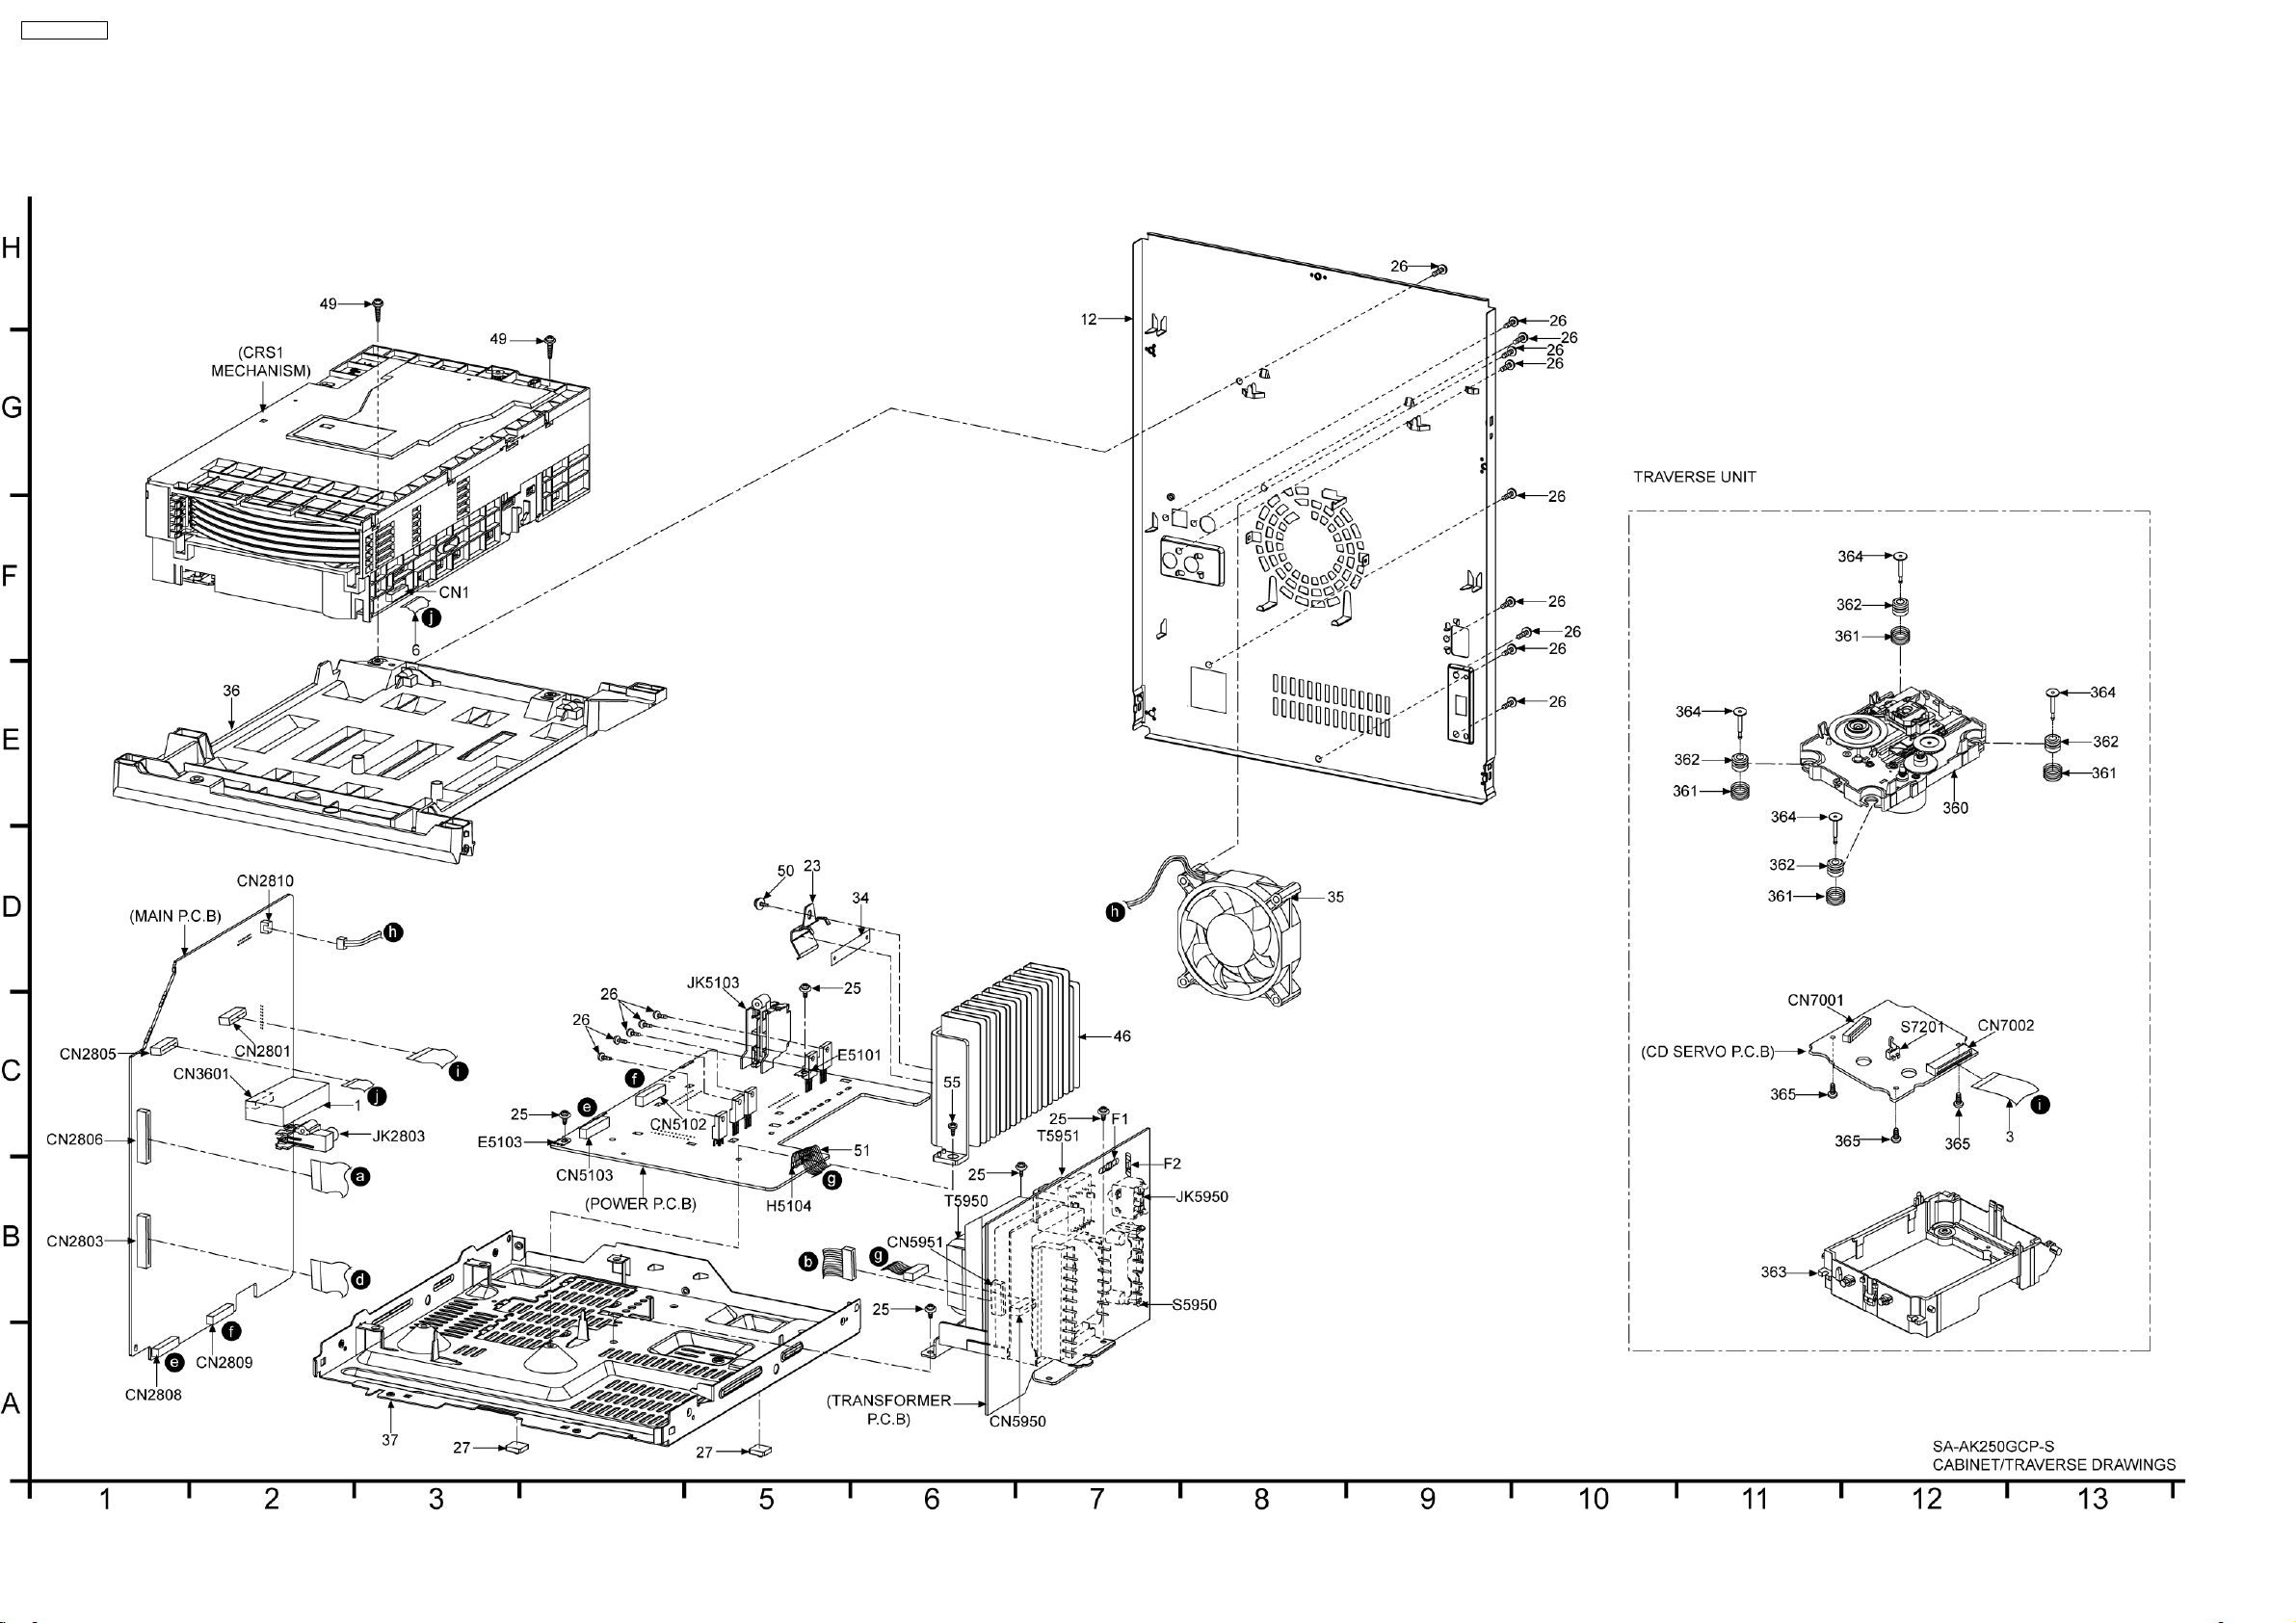
SA-AK250GCP
90
Page 90
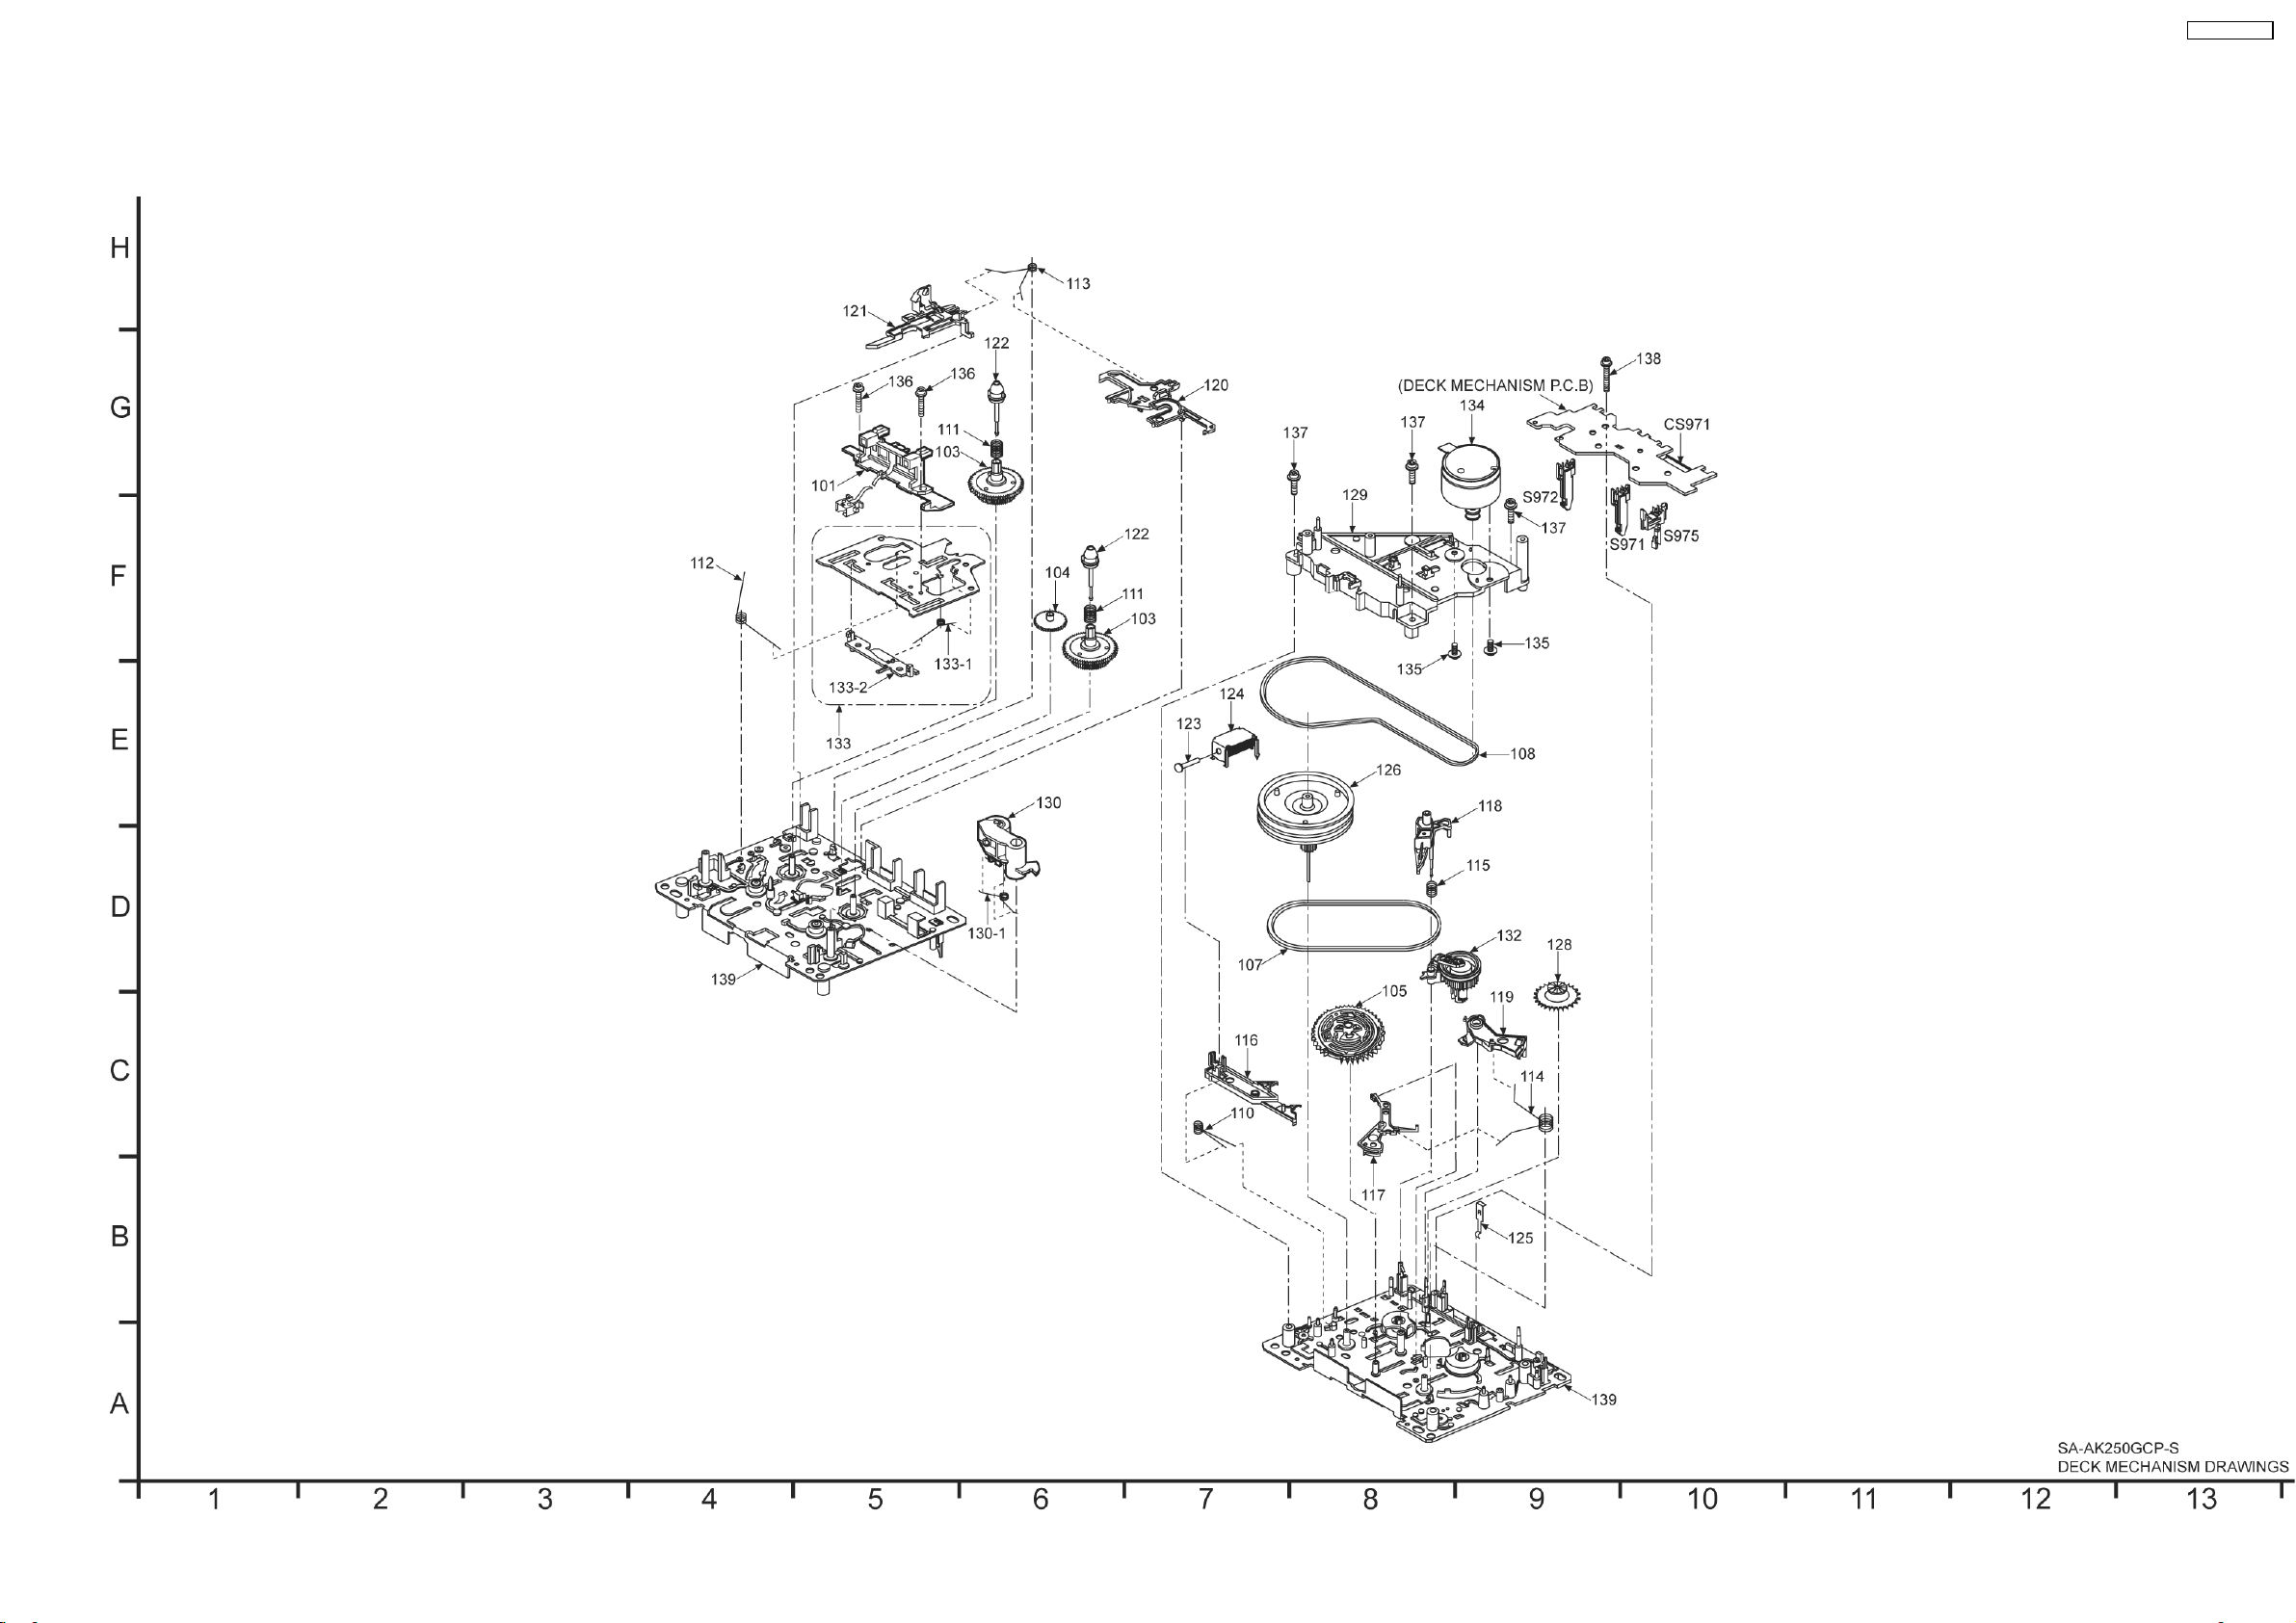
23.2. Deck Mechanism Parts Location (RAA4403-S)
SA-AK250GCP
91
Page 91
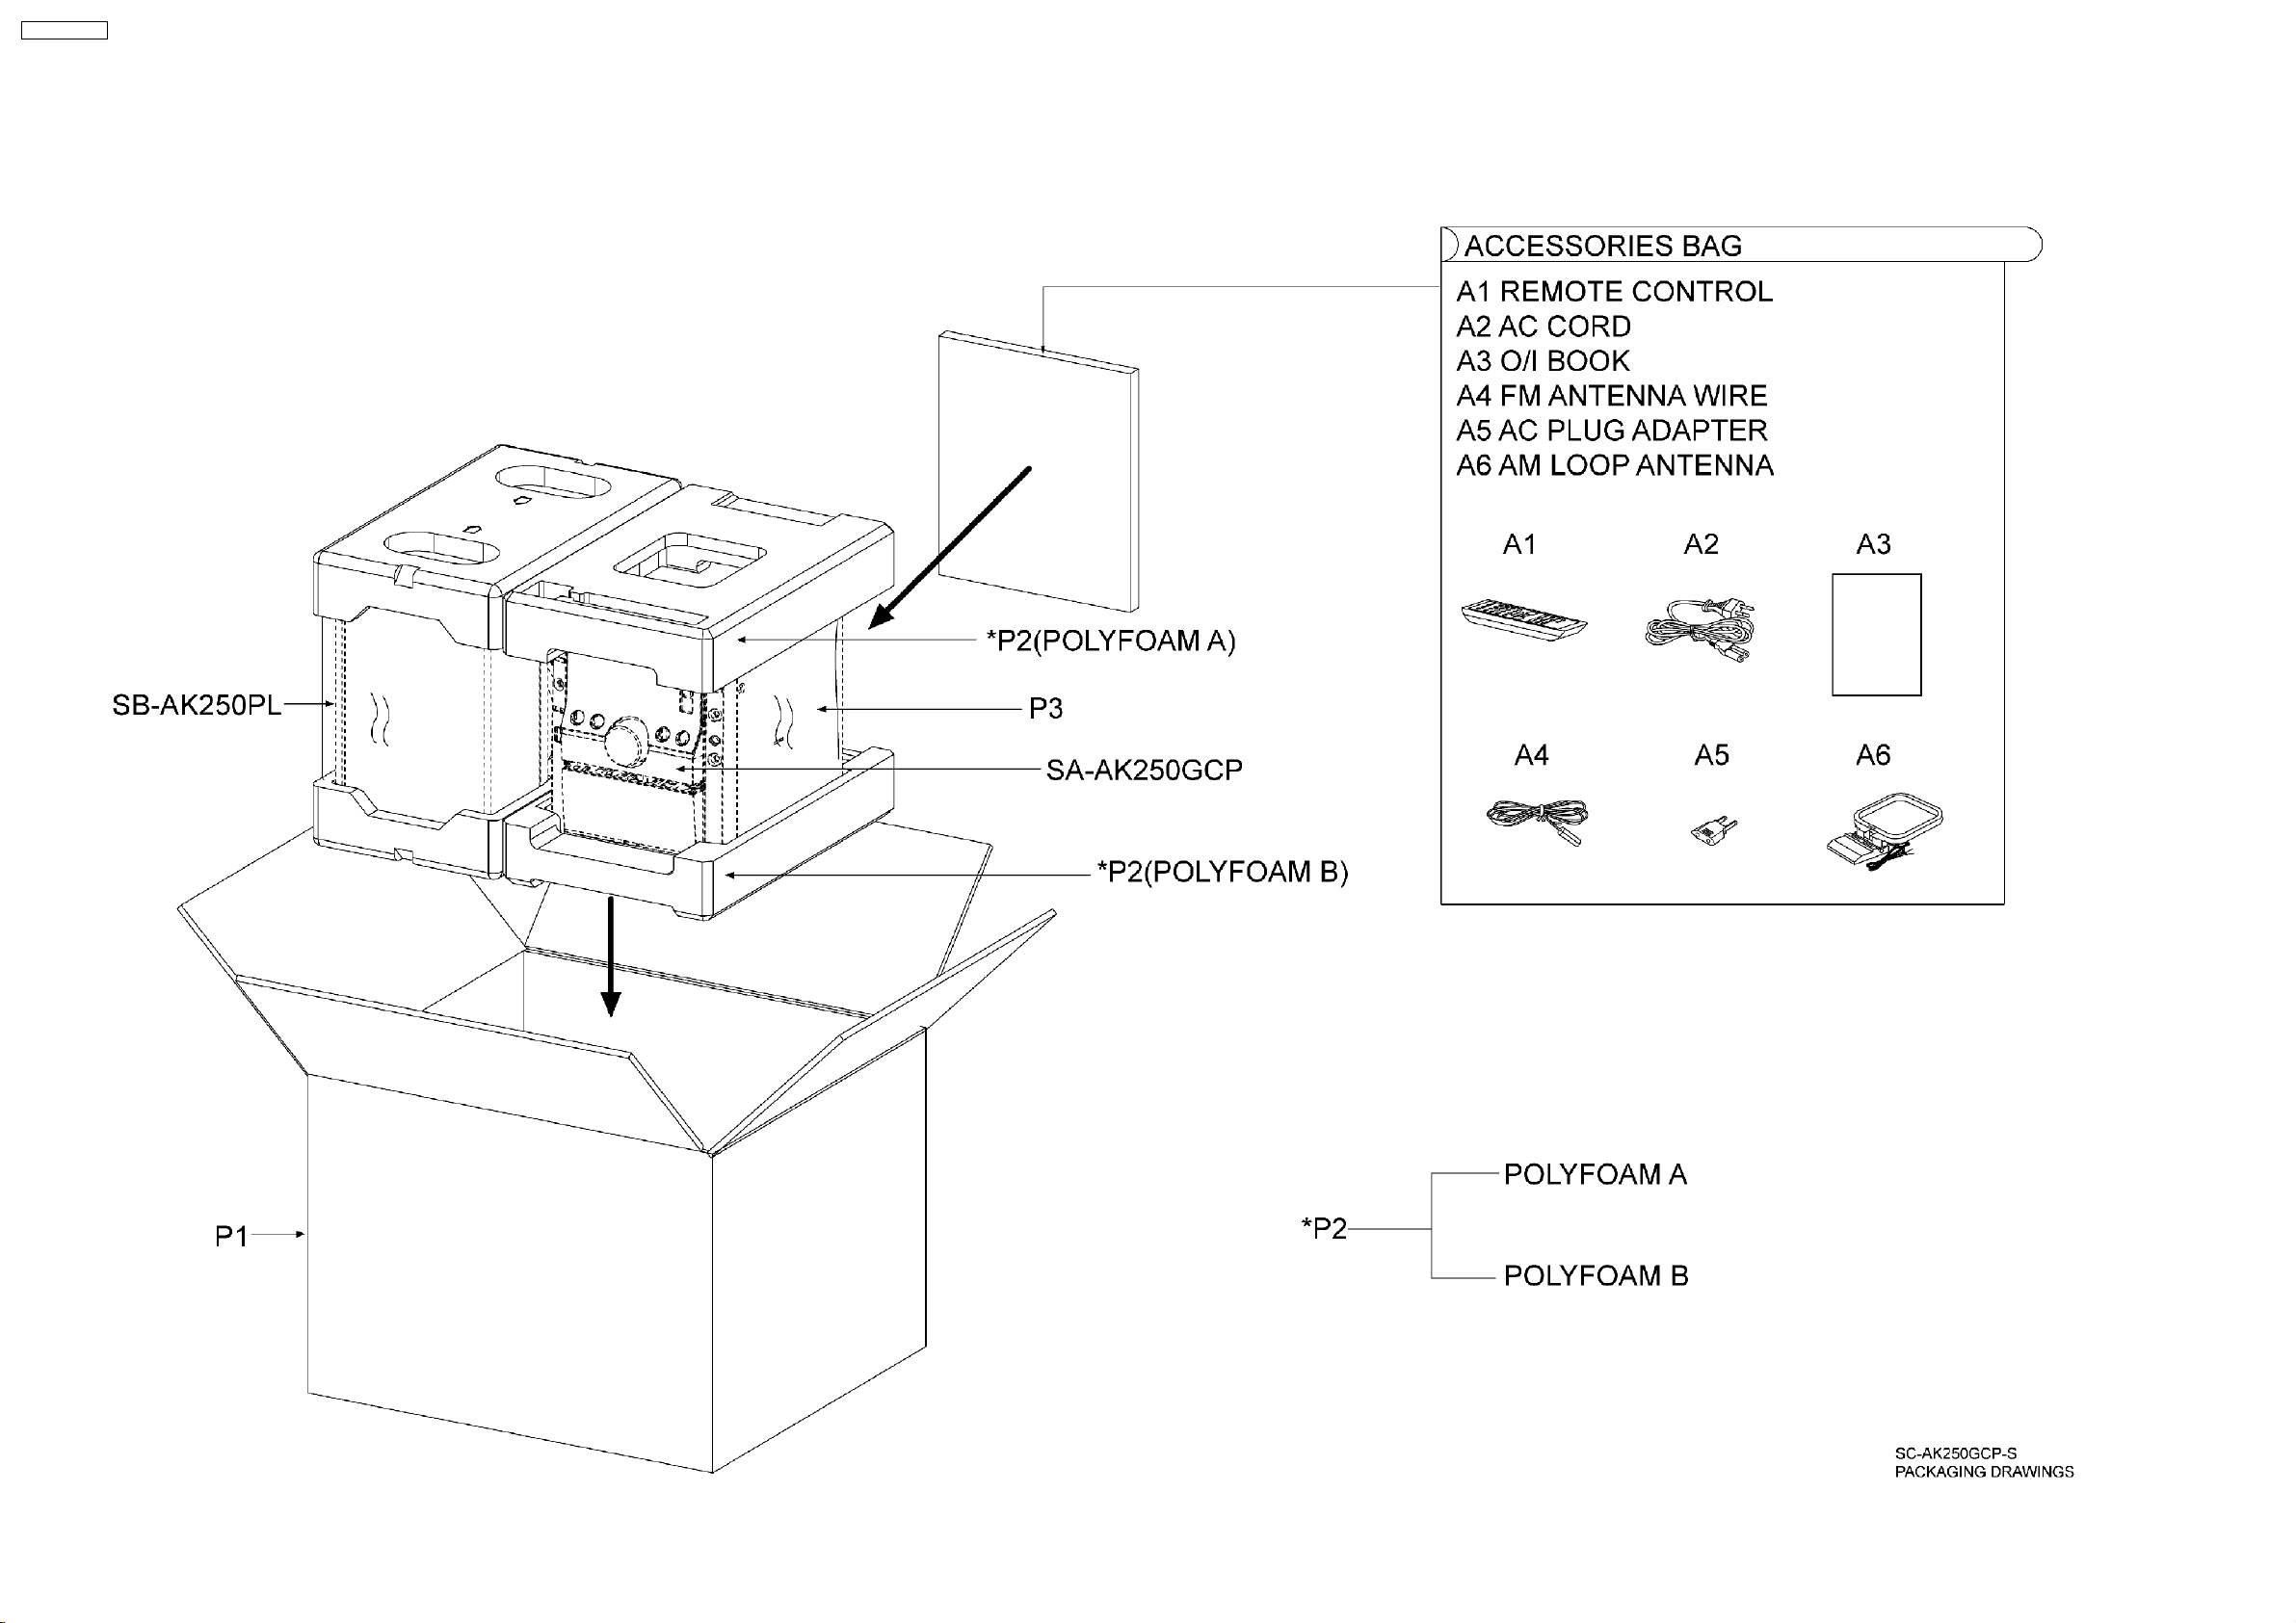
SA-AK250GCP
23.3. Packaging
92
Page 92
SA-AK250GCP
24 Replacement Parts List
Notes:
· Important safety notice:
Components identified by
Furthermore, special parts which have purposes of fire-retardent (resistors), high-quality sound (capacitors), low noise
(resistors), etc are used.
When replacing any of these components, be sure to use only manufacturer’s specified parts shown in the parts list.
· The parenthesized indications in the Remarks columns specify the areas or colour. (Refer to the cover page for area or colour)
Parts without these indications can be used for all areas.
· Warning: This product uses a laser diode. Refer to caution statements on “Precaution of Laser Diode”.
· Capacitor values are in microfarads (µF) unless specified otherwise, P= Pico-farads (pF), F= Farads.
· Resistance values are in ohms, unless specified otherwise, 1K=1,000 (OHM).
· The marking (RTL) indicates that the Retention Time is limited for this items. After the discontinuation of this assembly in
production, the item will continue to be available for a specific period of time. The retention period of a availability is dependent
on the type of assembly, and in accordance with the laws governing part and product retention. After the end of this period, the
assembly will no longer be available.
· [M] Indicates in the Remarks columns indicates parts supplied by PAVCSG.
· Reference for O/I book languages are as follows:
Ar: Arabic Du: Dutch It: Italian Sp Spanish
Cf: Canadian French En: English Ko: Korean Sw: Swedish
Cz: Czech Fr: French Po: Polish Co: Traditional Chinese
Da: Danish Ge: German Ru: Russian Cn: Simplified Chinese
Pe: Persian Ur: Ukraine Pr: Portuguese
mark have special characteristics important for safety.
Ref. No. Part No. Part Name & Description Remarks
CABINET AND CHASSIS
1 J3CCBB000009 TUNER PACK [M]
2 REEV0139 21P FFC (DECK-MAIN) [M]
3 REEV0140 22P FFC (CD-MAIN) [M]
5 REEV0190 30P FFC [M]
6 REEX0747 14P FFC WIRE [M]
7 RGKV0158-K CD LID [M]
9 RGLV0069-Q VOLUME KNOB LIGHT [M]
10 RGLV0070-Q POWER BUTTON LIGHT [M]
11 RGPV0105-S FRONT PANEL [M]
12 RGRV0052M-A REAR PANEL [M]
14 RGUV0163-K SELECTOR BUTTON [M]
15 RGUV0164-S CD CHANGER/POWER BTN [M]
16 RGUV0165-S 5CD CHANGE BUTTON [M]
17 RGUV0166-K FUNCTION BUTTON L [M]
18 RGUV0167-K FUNCTION BUTTON R [M]
19 RGUV0177-1S 7 CONTROL BUTTON [M]
20 RGWX0056-3S MIC VOLUME KNOB [M]
21 RGWX0072-1S VOLUMR KNOB [M]
22 RHD26046-L SCREW [M]
23 RMC0158-S2 TRANSISTOR HOLDER [M]
24 RHD30007-1SJ SCREW [M]
25 RHD30111-3 SCREW [M]
26 RHD30119-S SCREW [M]
27 RKA0072-KJ LEG CUSHION [M]
28 RKFV0062-1S CASSETTE LID [M]
29 RKMV0071-SJ TOP PANEL [M]
30 RKWV0068H-K FL WINDOW [M]
31 RMBV0042-2 CASS LID SPRING [M]
32 RMBV0052 DVD LID SPRING [M]
33 RMGX0033 CUSHION RUBBER [M]
34 RMGX0044-1 D.AMP. INSULATOR [M]
35 L6FALEFH0030 FAN UNIT [M]
36 RMKX0113-3 CD CHASSIS [M]
37 RMKX0118A BOTTOM CHASSIS [M]
39 RMVV0073-K FL WINDOW BACKGROUND [M]
44 RUS757ZAA CASS HALF SPRING [M]
45 RXGX0002 DAMPER GEAR [M]
46 RXXV0048 HEAT SINK UNIT [M]
Ref. No. Part No. Part Name & Description Remarks
48 XTV3+10GFJ-M SCREW [M]
49 XTW3+12TFJ SCREW [M]
50 XTWS3+6TFJ SCREW [M]
51 REXX0325 9P FLAT WIRE [M]
52 REXX0324-1 9P FLAT WIRE [M]
53 RMNV0079 FL HOLDER [M]
55 XTW3+10TFC SCREW [M]
CASSETTE DECK
101 RED0067-2 P/B HEAD [M]
103 RDG0300 REEL BASE GEAR [M]
104 RDG0301 WINDING RELAY GEAR [M]
105 RDK0026-4 MAIN GEAR [M]
107 RDV0033-4 WINDING BELT [M]
108 RDV0064-1 CAPSTAN BELT [M]
110 RMB0312 TRIGGER LEVER SPRING [M]
111 RMB0400 REEL SPRING [M]
112 RMB0403 HEAD PANEL SPRING [M]
113 RMB0404 BRAKE ROD SPRING [M]
114 RMB0406-5 FR LEVER SPRING [M]
115 RMB0408 THRUST SPRING [M]
116 RML0370-4 TRIGGER LEVER [M]
117 RML0371 FR LEVER [M]
118 RML0372-2 WINDING LEVER [M]
119 RML0374-2 EJECT LEVER [M]
120 RMM0131-1 BRAKE ROD [M]
121 RMM0133-1 EJECT ROD [M]
122 RMQ0519 REEL HUB [M]
123 RMS0398-1 MOVING CORE [M]
124 RXQ0470-2 PLUNGER ASS’Y [M]
125 RMC0061 PACK SPRING [M]
126 RXF0061-1 FLYWHEEL F ASS’Y [M]
128 RXG0040 FF RELAY GEAR ASS’Y [M]
129 RMK0283A-2 SUB-CHASSIS [M]
130 RXL0124 PINCH ROLLER F ASS’Y [M]
130-1 RMB0401 PINCH ARM SPRING F [M]
132 RXL0126 WINDING ARM ASS’Y [M]
133 RXQ0412-3 HEAD PANEL ASS’Y [M]
133-1 RMB0405-1 FR ROD SPRING [M]
93
Page 93
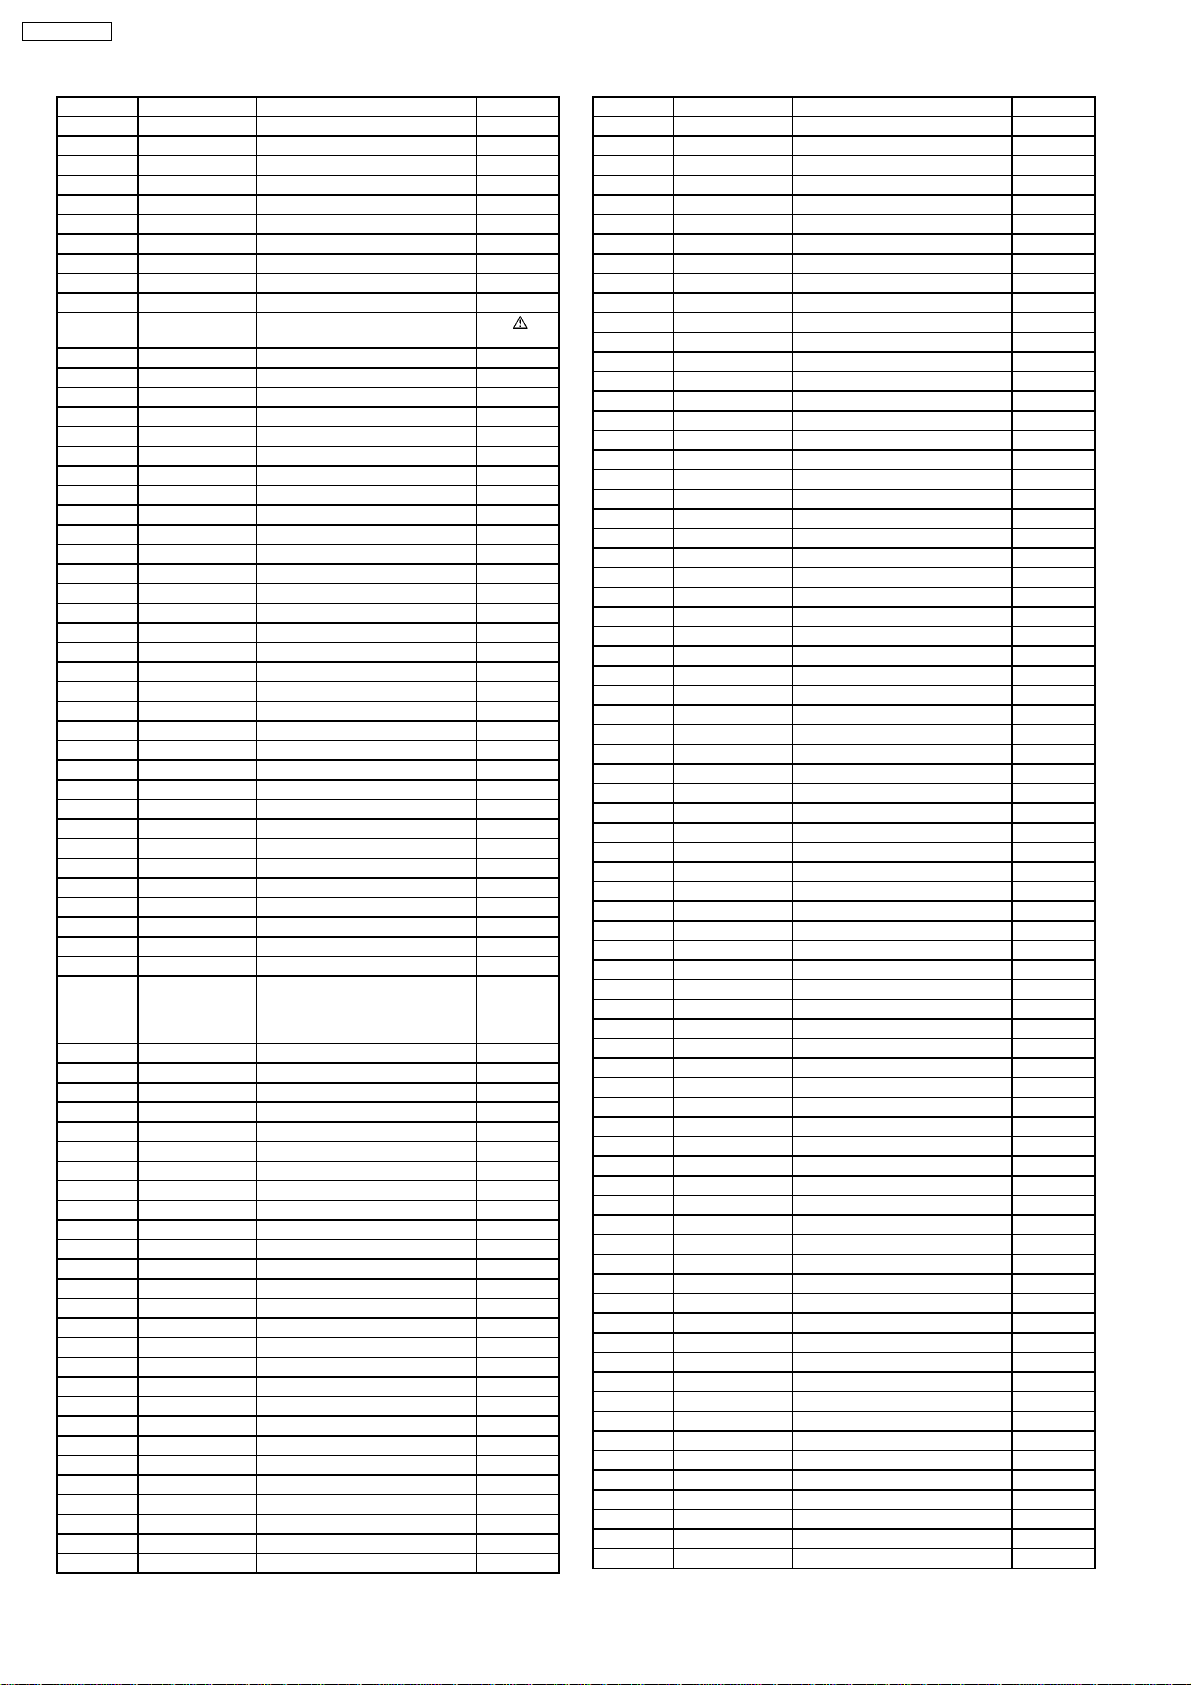
SA-AK250GCP
Ref. No. Part No. Part Name & Description Remarks
133-2 RMM0132-1 FR ROD [M]
134 REM0120 CAP MOTOR ASS’Y [M]
135 RHD26022-1 MOTOR SCREW [M]
136 XTW2+5LFJ H/BLOCK UNIT SCREW [M]
137 XTW26+10SFJ SUB-CHASSIS SCREW [M]
138 XYC2+JF17FJ PCB EARTH SCREW [M]
139 RFKJSTR280PP CHASSIS ASS’Y [M]
TRAVERSE DECK
360 RAE0165A-V TRV UNIT (WITHOUT CD
361 RME0109-1 FLOATING SPRING [M]
362 RMG0703-R FLOATING RUBBER [M]
363 RMRX0064-1 MIDDLE CHASSIS [M]
364 RMS0757-1 FIXED PIN [M]
365 XTN2+6GFJ SCREW [M]
REPV0111A CD SERVO P.C.B. [M](RTL)
REPV0134B DECK P.C.B. [M](RTL)
REPX0321F DECK MECHANISM P.C.B. [M](RTL)
REPV0130N MAIN P.C.B. [M](RTL)
REPV0131K PANEL P.C.B. [M](RTL)
REPV0131K SUB PANEL P.C.B. [M](RTL)
REPV0133D POWER P.C.B. [M](RTL)
REPV0132K TRANSFORMER P.C.B. [M](RTL)
IC971 CNB13030R2AU IC PHOTO INTERUPTOR [M]
IC1000 C1AA00000612 IC ANALOG SWITCH [M]
IC1001 AN7326K IC DECK R/P [M]
IC2801 C2CBYY000482 IC MICROPROCESSOR [M]
IC2803 C1BB00001121 IC AUDIO SOUND PROCESSOR [M]
IC2804 C0AABB000125 IC OP AMP [M]
IC2872 C0CBAHG00011 IC VOLTAGE REGULATOR [M]
IC3700 C0ABBB000244 IC SMT OP AMP [M]
IC4000 C0DBZGC00067 IC 3.3V REGULATOR [M]
IC5101 C0DAZYY00005 IC REGULATOR [M]
IC5201 C0JBAB000011 IC LOGIC [M]
IC5301 C1BA00000487 IC 2-CH DIGITAL AMP [M]
IC6601 C0HBB0000057 IC FL DRIVER [M]
IC7001 MN6627954MA IC SERVO PROCESSOR/
IC7002 BA5948FPE2 IC 4 CH DRIVE [M]
Q1101 B1ABGC000005 TRANSISTOR [M]
Q1201 B1ABGC000005 TRANSISTOR [M]
Q1302 B1GDCFJJ0002 TRANSISTOR [M]
Q1303 B1GBCFGH0001 TRANSISTOR [M]
Q1304 B1GDCFGH0002 TRANSISTOR [M]
Q1309 B1AAGC000006 TRANSISTOR [M]
Q1310 B1AAGC000006 TRANSISTOR [M]
Q1312 B1ABCF000011 TRANSISTOR [M]
Q1314 B1GDCFGH0002 TRANSISTOR [M]
Q1315 B1ACKD000006 TRANSISTOR [M]
Q1316 2SD09650RA TRANSISTOR [M]
Q1317 B1ABGC000005 TRANSISTOR [M]
Q2142 B1ABCF000176 TRANSISTOR [M]
Q2242 B1ABCF000176 TRANSISTOR [M]
Q2311 B1ABGC000005 TRANSISTOR [M]
Q2317 B1ABCF000176 TRANSISTOR [M]
Q2341 B1ABGC000005 TRANSISTOR [M]
Q2411 B1ABGC000005 TRANSISTOR [M]
Q2417 B1ABCF000176 TRANSISTOR [M]
Q2441 B1ABGC000005 TRANSISTOR [M]
Q2511 B1GDCFJJ0047 TRANSISTOR [M]
Q2803 B1GBCFJJ0051 TRANSISTOR [M]
Q2936 B1ACKD000006 TRANSISTOR [M]
SERVO P.C.B.)
PRINTED CIRCUIT BOARD
INTEGRATED CIRCUITS
DIGITAL SIGNAL PROCESSOR/
DIGITAL FILTER D/A
CONVERTER
TRANSISTORS
[M]
[M]
Ref. No. Part No. Part Name & Description Remarks
Q2937 B1GBCFJJ0051 TRANSISTOR [M]
Q2942 B1ACKD000006 TRANSISTOR [M]
Q2943 B1ABCF000176 TRANSISTOR [M]
Q2948 B1ABCF000176 TRANSISTOR [M]
Q2949 B1ABCF000176 TRANSISTOR [M]
Q3601 2SC3940A0A TRANSISTOR [M]
Q5101 B1DEGM000026 TRANSISTOR [M]
Q5102 B1DEGM000026 TRANSISTOR [M]
Q5103 B1ABCF000176 TRANSISTOR [M]
Q5104 B1ABCF000176 TRANSISTOR [M]
Q5108 B1ABCF000176 TRANSISTOR [M]
Q5109 2SB0709AHL TRANSISTOR [M]
Q5110 B1GACFGA0002 TRANSISTOR [M]
Q5111 B1BACG000023 TRANSISTOR [M]
Q5112 B1BCCG000002 TRANSISTOR [M]
Q5113 B1GDCFNA0001 TRANSISTOR [M]
Q5114 B1ABCF000176 TRANSISTOR [M]
Q5153 B1ABCF000176 TRANSISTOR [M]
Q5154 2SB0709AHL TRANSISTOR [M]
Q5173 B1ABCF000176 TRANSISTOR [M]
Q5201 B1ABCF000176 TRANSISTOR [M]
Q5202 B1ADCF000063 CHIP TRANSISTOR [M]
Q5231 B1ABGC000005 TRANSISTOR [M]
Q5950 B1AAKD000014 TRANSISTOR [M]
Q5951 2SB0621AHA TRANSISTOR [M]
Q5952 B1GACFJJ0018 TRANSISTOR [M]
Q5953 B1AACF000064 TRANSISTOR [M]
Q5954 B1AAGC000007 TRANSISTOR [M]
Q6501 B1AACF000064 TRANSISTOR [M]
Q6502 B1AACF000064 TRANSISTOR [M]
Q7601 B1ADCF000001 TRANSISTOR [M]
QR2501 B1GDCFJJ0047 CHIP TRANSISTOR [M]
QR2502 B1GBCFGN0016 CHIP TRANSISTOR [M]
QR3105 KRC101STA CHIP TRANSISTOR [M]
QR3106 KRC101STA CHIP TRANSISTOR [M]
QR5230 B1GDCFGG0026 TRANSISTOR [M]
QR5231 B1ABGC000005 CHIP TRANSISTOR [M]
QR5232 B1GDCFGG0026 TRANSISTOR [M]
QR5233 B1ABGC000005 CHIP TRANSISTOR [M]
DIODES
D971 MA2C16500E DIODE [M]
D1301 B0ACCK000005 DIODE [M]
D2191 B0ACCK000005 DIODE [M]
D2241 B0ACCK000005 DIODE [M]
D2583 B0BC9R000008 DIODE [M]
D2603 B0BC9R000008 DIODE [M]
D2803 B0ACCK000005 DIODE [M]
D2811 B0ADCJ000020 DIODE [M]
D2813 B0ACCK000005 DIODE [M]
D2936 B0EAKM000117 DIODE [M]
D2937 B0EAKM000117 DIODE [M]
D2938 B0EAKM000117 DIODE [M]
D2939 B0EAKM000117 DIODE [M]
D2940 B0EAKM000117 DIODE [M]
D2941 B0EAKM000117 DIODE [M]
D2946 B0ADCJ000020 DIODE [M]
D4000 B0JAME000114 DIODE [M]
D5101 B0BA01100004 DIODE [M]
D5102 B0BA02600018 DIODE [M]
D5103 B0BA5R000004 DIODE [M]
D5104 B0BA01100004 DIODE [M]
D5105 B0BA02300005 DIODE [M]
D5107 B0BA01500003 DIODE [M]
D5109 B0BA01100004 DIODE [M]
D5121 B0EAKP000134 DIODE [M]
D5122 B0EAKP000134 DIODE [M]
D5125 B0AAFK000004 DIODE [M]
D5126 B0ACCK000005 DIODE [M]
D5130 B0JAME000025 DIODE [M]
D5152 B0BA01900005 DIODE [M]
D5153 B0JAME000119 DIODE [M]
94
Page 94
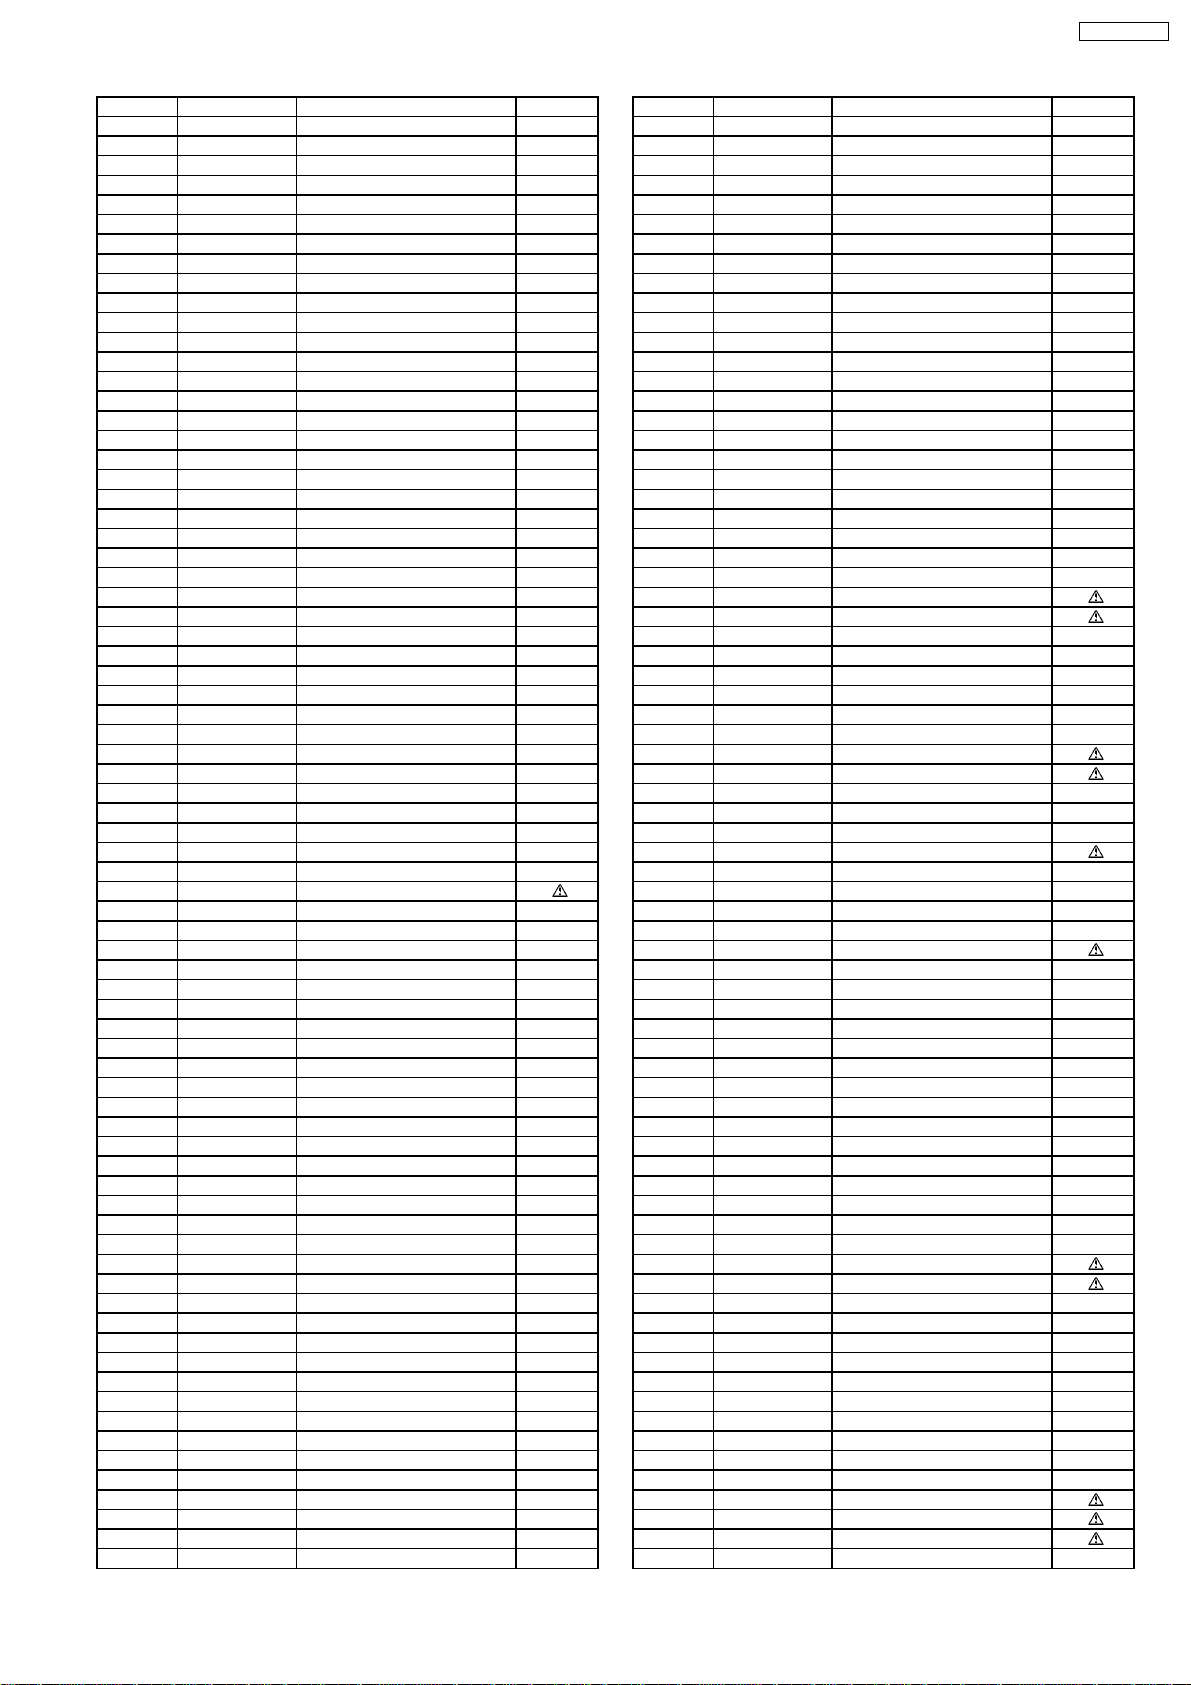
SA-AK250GCP
Ref. No. Part No. Part Name & Description Remarks
D5154 B0JAME000119 DIODE [M]
D5155 B0JAME000119 DIODE [M]
D5156 B0JAME000119 DIODE [M]
D5950 B0EAMM000055 DIODE [M]
D5951 B0EAMM000055 DIODE [M]
D5952 B0EAMM000055 DIODE [M]
D5953 B0EAMM000055 DIODE [M]
D5954 B0EAKP000134 DIODE [M]
D5955 B0EAKP000134 DIODE [M]
D5956 B0EAKP000134 DIODE [M]
D5957 B0EAKP000134 DIODE [M]
D5958 B0EAKP000134 DIODE [M]
D5959 B0EAKP000134 DIODE [M]
D5960 B0BA02400030 DIODE [M]
D5961 B0AAFK000004 DIODE [M]
D5962 B0AAFK000004 DIODE [M]
D5964 B0BA6R800008 DIODE [M]
D5965 B0AAFK000004 DIODE [M]
D5966 B0AAFK000004 DIODE [M]
D5967 B0AAFK000004 DIODE [M]
D5968 B0AAFK000004 DIODE [M]
D5969 B0AAFK000004 DIODE [M]
D6301 B0ACCK000005 DIODE [M]
D6458 B3AAA0000583 DIODE [M]
D6635 B0BC5R600003 DIODE [M]
D7650 MAZ80560ML DIODE [M]
W257 B0JAMK000015 DIODE [M]
VARIABLE RESISTORS
VR6491 EVEKE2F3024B VR VOLUME JOG [M]
VR6511 EVUF2AF15B14 VR MIC JOG [M]
SWITCHES
S971 K0J1BB000017 SW MODE [M]
S972 K0J1BB000021 SW HALF [M]
S975 K0J1BB000021 SW RECINH_F [M]
S5950 K0ABLB000003 SW VOLTAGE SELECTOR [M]
S6101 EVQ21405RJ SW AC IN [M]
S6102 EVQ21405RJ SW MULTI CHANGE [M]
S6103 EVQ21405RJ SW OPEN/ CLOSE [M]
S6104 EVQ21405RJ SW SINGLE CHANGE [M]
S6106 EVQ21405RJ SW STOP/ -DEMO [M]
S6108 EVQ21405RJ SW HARD BASS [M]
S6201 EVQ21405RJ SW CD1 [M]
S6202 EVQ21405RJ SW CD2 [M]
S6203 EVQ21405RJ SW CD3 [M]
S6204 EVQ21405RJ SW CD4 [M]
S6205 EVQ21405RJ SW CD5 [M]
S6206 EVQ21405RJ SW /FF/ [M]
S6207 EVQ21405RJ SW /REW/ [M]
S6301 EVQ21405RJ SW OPEN [M]
S6302 EVQ21405RJ SW CD [M]
S6303 EVQ21405RJ SW TAPE [M]
S6304 EVQ21405RJ SW TUNER/FM/AM [M]
S6305 EVQ21405RJ SW EXT IN [M]
S6306 EVQ21405RJ SW REC [M]
S6307 EVQ21405RJ SW M.EQ+ [M]
S6308 EVQ21405RJ SW MANUAL EQ [M]
S6309 EVQ21405RJ SW M.EQ- [M]
S7201 RSH1A048-A SW REST [M]
CONNECTORS
CN1305 K1MN21B00010 21P CONNECTOR [M]
CN2801 K1MN22AA0004 22P CONNECTOR [M]
CN2803 K1MN21A00005 21P CONNECTOR [M]
CN2805 K1MN14A00049 15P CONNECTOR [M]
CN2806 K1MN30AA0004 30P CONNECTOR [M]
CN2808 K1KB12B00037 12P CONNECTOR [M]
CN2809 K1KB12B00037 12P CONNECTOR [M]
CN2810 K1KA02AA0186 2P CONNECTOR [M]
Ref. No. Part No. Part Name & Description Remarks
CN3601 K1KA10AA0031 10P CONNECTOR [M]
CN5102 K1KA12AA0031 12P CONNECTOR [M]
CN5103 K1KA12AA0031 12P CONNECTOR [M]
CN5950 K1KA09AA0319 9P CONNECTOR [M]
CN5951 K1KA09AA0193 9P CONNECTOR [M]
CN6601 K1MN30AA0004 30P CONNECTOR [M]
CN7001 K1MN16B00154 16P CONNECTOR [M]
CN7002 K1MN22BA0005 22P CONNECTOR [M]
CP1301 K1MY05AA0043 5P CONNECTOR [M]
CP1902 K1KA09BA0153 9P CONNECTOR [M]
CS971 RJU071H09M1 9P CONNECTOR [M]
COILS & TRANSFORMERS
L1301 G2ZZ00000024 BIAS OCS COIL [M]
L1302 G0C470JA0052 RF CHOKE COIL [M]
L2901 G0C101JA0052 INDUCTOR [M]
L4000 D0GBR00JA008 CHIP JUMPER [M]
L4001 D0GBR00JA008 CHIP JUMPER [M]
L5101 J0JKB0000037 FILTER [M]
L5102 J0JKB0000037 FILTER [M]
L5301 G0B185LA0002 COIL [M]
L5601 G0B9R5K00001 CHOKE COIL [M]
L5602 G0B9R5K00001 CHOKE COIL [M]
L6502 G0C100JA0052 INDUCTOR [M]
LB7262 D0GBR00JA008 CHIP JUMPER [M]
LB7263 D0GBR00JA008 CHIP JUMPER [M]
LB7264 D0GBR00JA008 CHIP JUMPER [M]
T5950 G4CYAYY00135 MAIN TRANSFORMER [M]
T5951 G4C2AAJ00005 SUB TRANSFORMER [M]
COMPONENT COMBINATIONS
Z5950 ERZV10V511CS ZENER [M]
Z6481 B3RAD0000146 REMOTE SENSOR [M]
RELAY
RL5950 K6B1AEA00015 POWER RELAY [M]
OSCILLATORS
X2801 H0A327200097 CRYSTAL OSCILLATOR [M]
X2802 H2B100500004 CERAMIC RESONATOR [M]
X5201 H2A415300001 CRYSTAL OSCILLATOR [M]
X5202 H2A375300003 CRYSTAL OSCILLATOR [M]
X7201 H2B169500005 CRYSTAL OSCILLATOR [M]
DISPLAY TUBE
FL6602 A2BD00000172 FL DISPLAY [M]
FUSES
F1 K5D312BLA015 FUSE [M]
F2 K5D162BLA013 FUSE [M]
FUSE HOLDER
FC1 EYF52BCY FUSE CLIP [M]
FC2 EYF52BCY FUSE CLIP [M]
FC3 EYF52BCY FUSE CLIP [M]
FC4 EYF52BCY FUSE CLIP [M]
FUSE PROTECTORS
FP5920 K5G702A00009 FUSE PROTECTOR [M]
FP5940 K5G702Z00004 FUSE PROTECTOR [M]
FP5950 K5G402A00025 FUSE PROTECTOR [M]
95
Page 95
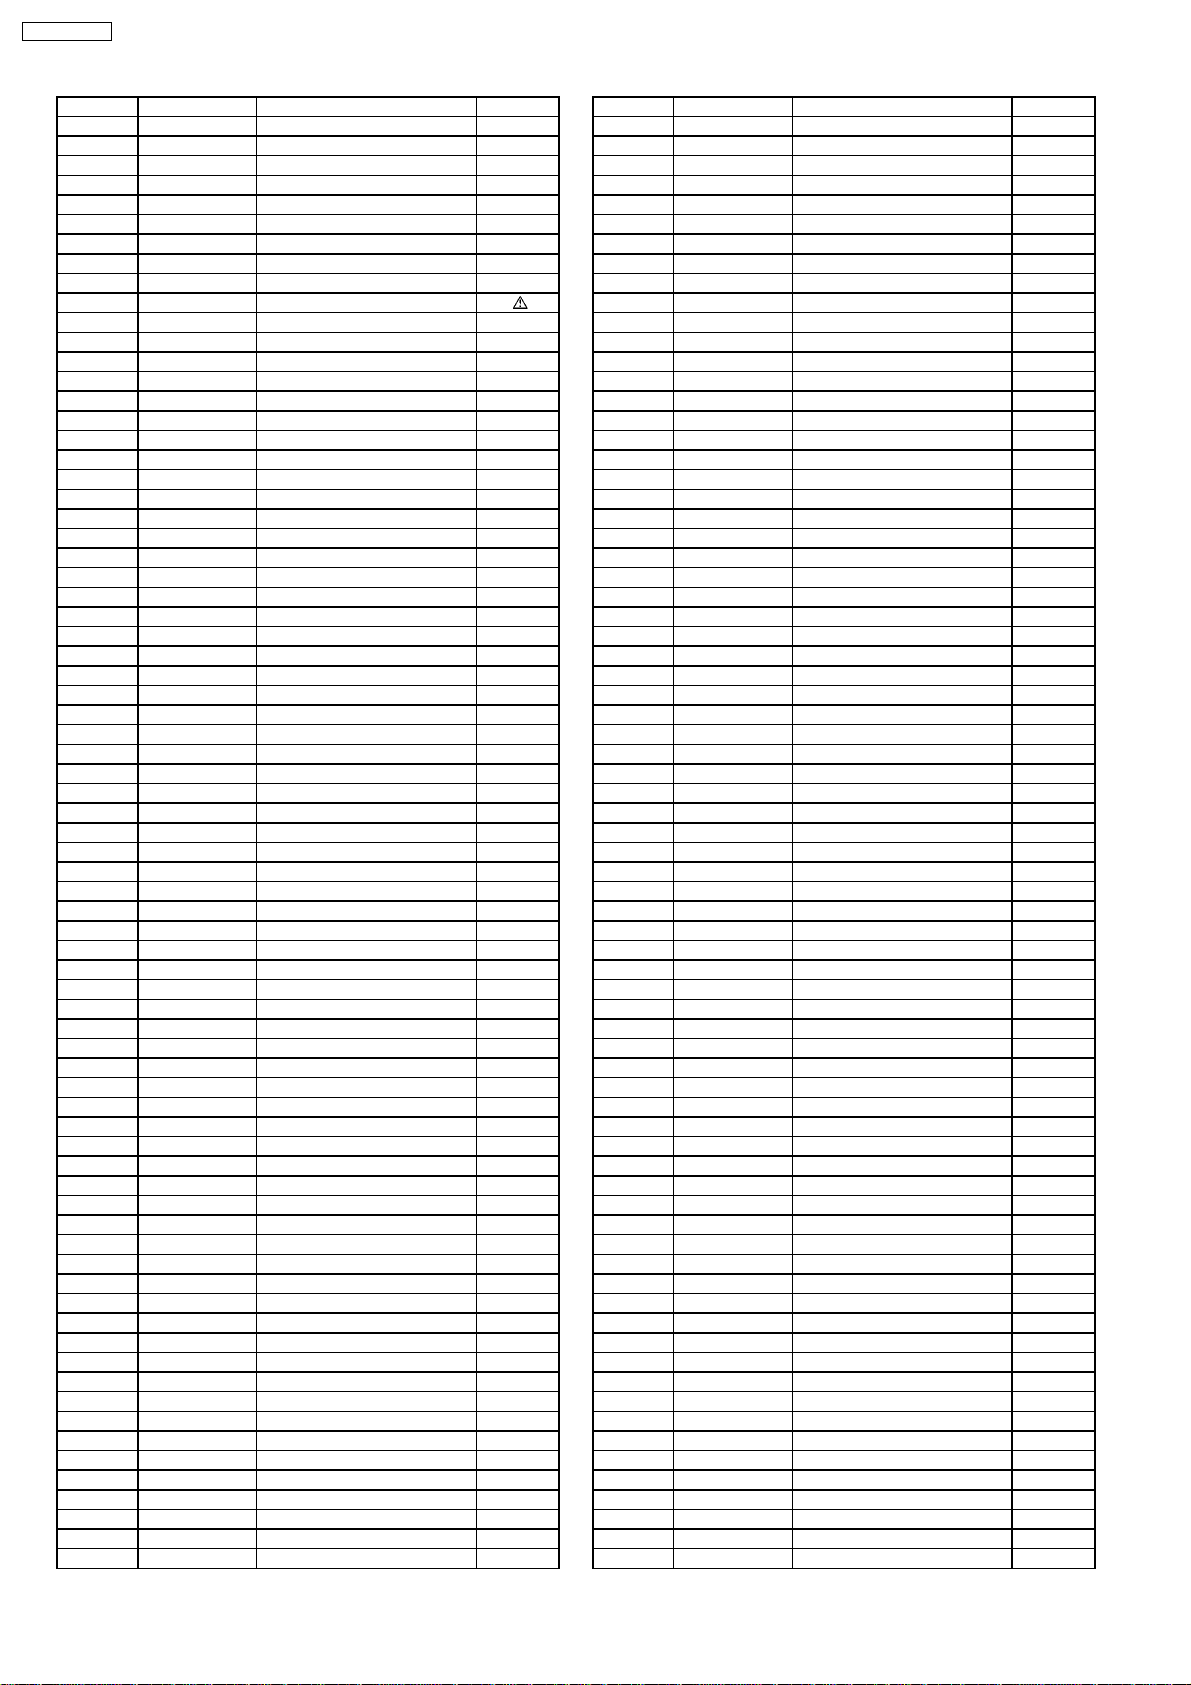
SA-AK250GCP
Ref. No. Part No. Part Name & Description Remarks
HOLDERS
H5104 K1YF09000001 9P WIRE HOLDER [M]
H6555 K1YZ09000002 CABLE HOLDER [M]
JACKS
JK2803 K2HA204B0153 JK AUX [M]
JK5103 K4AC04B00014 JK SPEAKER [M]
JK5950 K2AA2B000011 JK AC INLET [M]
JK6501 K2HC103A0024 JK MIC [M]
JK6551 K2HC103A0024 JK HP [M]
JK6751 K2HC1YYA0002 JK MUSIC PORT [M]
EARTH TERMINALS
E5101 K9ZZ00001279 EARTH PLATE [M]
E5103 K9ZZ00001279 EARTH PLATE [M]
WIRE
W12 ERJ8GEY0R00V CHIP JUMPER [M]
W575 ERJ3GEY0R00V CHIP JUMPER [M]
W576 ERJ3GEY0R00V CHIP JUMPER [M]
W577 ERJ3GEY0R00V CHIP JUMPER [M]
W579 ERJ3GEY0R00V CHIP JUMPER [M]
W580 ERJ3GEY0R00V CHIP JUMPER [M]
W581 ERJ3GEY0R00V CHIP JUMPER [M]
W582 ERJ3GEY0R00V CHIP JUMPER [M]
W583 ERJ3GEY0R00V CHIP JUMPER [M]
W584 ERJ3GEY0R00V CHIP JUMPER [M]
W586 ERJ3GEY0R00V CHIP JUMPER [M]
W587 ERJ3GEY0R00V CHIP JUMPER [M]
W588 ERJ3GEY0R00V CHIP JUMPER [M]
W589 ERJ3GEY0R00V CHIP JUMPER [M]
W590 ERJ3GEY0R00V CHIP JUMPER [M]
W591 ERJ3GEY0R00V CHIP JUMPER [M]
W592 ERJ6GEY0R00V CHIP JUMPER [M]
W593 ERJ3GEY0R00V CHIP JUMPER [M]
W594 ERJ3GEY0R00V CHIP JUMPER [M]
W595 ERJ3GEY0R00V CHIP JUMPER [M]
W596 ERJ3GEY0R00V CHIP JUMPER [M]
W597 ERJ3GEY0R00V CHIP JUMPER [M]
W598 ERJ3GEY0R00V CHIP JUMPER [M]
W599 ERJ8GEY0R00V CHIP JUMPER [M]
W600 ERJ3GEY0R00V CHIP JUMPER [M]
W601 ERJ3GEY0R00V CHIP JUMPER [M]
W602 ERJ3GEY0R00V CHIP JUMPER [M]
W603 ERJ3GEY0R00V CHIP JUMPER [M]
W604 ERJ3GEY0R00V CHIP JUMPER [M]
W605 ERJ3GEY0R00V CHIP JUMPER [M]
W606 ERJ8GEY0R00V CHIP JUMPER [M]
W607 ERJ3GEY0R00V CHIP JUMPER [M]
W608 ERJ3GEY0R00V CHIP JUMPER [M]
W609 ERJ3GEY0R00V CHIP JUMPER [M]
W610 ERJ3GEY0R00V CHIP JUMPER [M]
W611 ERJ3GEY0R00V CHIP JUMPER [M]
W612 ERJ6GEY0R00V CHIP JUMPER [M]
W613 ERJ3GEY0R00V CHIP JUMPER [M]
W614 ERJ6GEY0R00V CHIP JUMPER [M]
W615 ERJ3GEY0R00V CHIP JUMPER [M]
W616 ERJ3GEY0R00V CHIP JUMPER [M]
W617 ERJ3GEY0R00V CHIP JUMPER [M]
W618 ERJ3GEY0R00V CHIP JUMPER [M]
W619 ERJ3GEY0R00V CHIP JUMPER [M]
W620 ERJ3GEY0R00V CHIP JUMPER [M]
W621 ERJ3GEY0R00V CHIP JUMPER [M]
W622 ERJ3GEY0R00V CHIP JUMPER [M]
W623 ERJ3GEY0R00V CHIP JUMPER [M]
W624 ERJ3GEY0R00V CHIP JUMPER [M]
W625 ERJ3GEY0R00V CHIP JUMPER [M]
W626 ERJ3GEY0R00V CHIP JUMPER [M]
W627 ERJ3GEY0R00V CHIP JUMPER [M]
W628 ERJ6GEY0R00V CHIP JUMPER [M]
Ref. No. Part No. Part Name & Description Remarks
W629 ERJ3GEY0R00V CHIP JUMPER [M]
W630 ERJ6GEY0R00V CHIP JUMPER [M]
W631 ERJ6GEY0R00V CHIP JUMPER [M]
W632 ERJ3GEY0R00V CHIP JUMPER [M]
W633 ERJ3GEY0R00V CHIP JUMPER [M]
W634 ERJ8GEY0R00V CHIP JUMPER [M]
W635 ERJ3GEY0R00V CHIP JUMPER [M]
W636 ERJ3GEY0R00V CHIP JUMPER [M]
W637 ERJ3GEY0R00V CHIP JUMPER [M]
W638 ERJ6GEY0R00V CHIP JUMPER [M]
W639 ERJ6GEY0R00V CHIP JUMPER [M]
W640 ERJ6GEY0R00V CHIP JUMPER [M]
W641 ERJ6GEY0R00V CHIP JUMPER [M]
W642 ERJ6GEY0R00V CHIP JUMPER [M]
W643 ERJ6GEY0R00V CHIP JUMPER [M]
W644 ERJ6GEY0R00V CHIP JUMPER [M]
W645 ERJ6GEY0R00V CHIP JUMPER [M]
W646 ERJ6GEY0R00V CHIP JUMPER [M]
W647 ERJ6GEY0R00V CHIP JUMPER [M]
W648 ERJ6GEY0R00V CHIP JUMPER [M]
W649 ERJ6GEY0R00V CHIP JUMPER [M]
W650 ERJ6GEY0R00V CHIP JUMPER [M]
W651 ERJ3GEY0R00V CHIP JUMPER [M]
W652 ERJ6GEY0R00V CHIP JUMPER [M]
W653 ERJ6GEY0R00V CHIP JUMPER [M]
W654 ERJ6GEY0R00V CHIP JUMPER [M]
W655 ERJ6GEY0R00V CHIP JUMPER [M]
W656 ERJ6GEY0R00V CHIP JUMPER [M]
W657 ERJ6GEY0R00V CHIP JUMPER [M]
W658 ERJ6GEY0R00V CHIP JUMPER [M]
W659 ERJ6GEY0R00V CHIP JUMPER [M]
W660 ERJ6GEY0R00V CHIP JUMPER [M]
W661 ERJ6GEY0R00V CHIP JUMPER [M]
W662 ERJ8GEY0R00V CHIP JUMPER [M]
W663 ERJ6GEY0R00V CHIP JUMPER [M]
W664 ERJ3GEY0R00V CHIP JUMPER [M]
W666 ERJ6GEY0R00V CHIP JUMPER [M]
W667 ERJ6GEY0R00V CHIP JUMPER [M]
W668 ERJ6GEY0R00V CHIP JUMPER [M]
W669 ERJ8GEY0R00V CHIP JUMPER [M]
W670 ERJ6GEY0R00V CHIP JUMPER [M]
W671 D0GDR00JA017 CHIP JUMPER [M]
W672 ERJ8GEY0R00V CHIP JUMPER [M]
W673 ERJ8GEY0R00V CHIP JUMPER [M]
W674 ERJ8GEY0R00V CHIP JUMPER [M]
W675 ERJ6GEY0R00V CHIP JUMPER [M]
W676 ERJ6GEY0R00V CHIP JUMPER [M]
W677 ERJ6GEY0R00V CHIP JUMPER [M]
W678 ERJ6GEY0R00V CHIP JUMPER [M]
W679 ERJ3GEY0R00V CHIP JUMPER [M]
W679 ERJ8GEY0R00V CHIP JUMPER [M]
W680 ERJ3GEY0R00V CHIP JUMPER [M]
W681 ERJ3GEY0R00V CHIP JUMPER [M]
W682 ERJ3GEY0R00V CHIP JUMPER [M]
W684 ERJ3GEY0R00V CHIP JUMPER [M]
W690 D0GDR00JA017 CHIP JUMPER [M]
W690 ERJ3GEY0R00V CHIP JUMPER [M]
W706 ERJ6GEY0R00V CHIP JUMPER [M]
W712 ERJ3GEY0R00V CHIP JUMPER [M]
W744 D0GBR00JA008 CHIP JUMPER [M]
W748 ERJ6GEY0R00V CHIP JUMPER [M]
W750 D0GBR00JA008 CHIP JUMPER [M]
W751 ERJ8GEY0R00V CHIP JUMPER [M]
W756 D0GDR00JA017 CHIP JUMPER [M]
W757 D0GDR00JA017 CHIP JUMPER [M]
W903 ERJ6GEY0R00V CHIP JUMPER [M]
W904 ERJ6GEY0R00V CHIP JUMPER [M]
W905 ERJ6GEY0R00V CHIP JUMPER [M]
W906 ERJ6GEY0R00V CHIP JUMPER [M]
W907 ERJ6GEY0R00V CHIP JUMPER [M]
W908 ERJ6GEY0R00V CHIP JUMPER [M]
W909 ERJ6GEY0R00V CHIP JUMPER [M]
W910 ERJ6GEY0R00V CHIP JUMPER [M]
W911 ERJ6GEY0R00V CHIP JUMPER [M]
96
Page 96
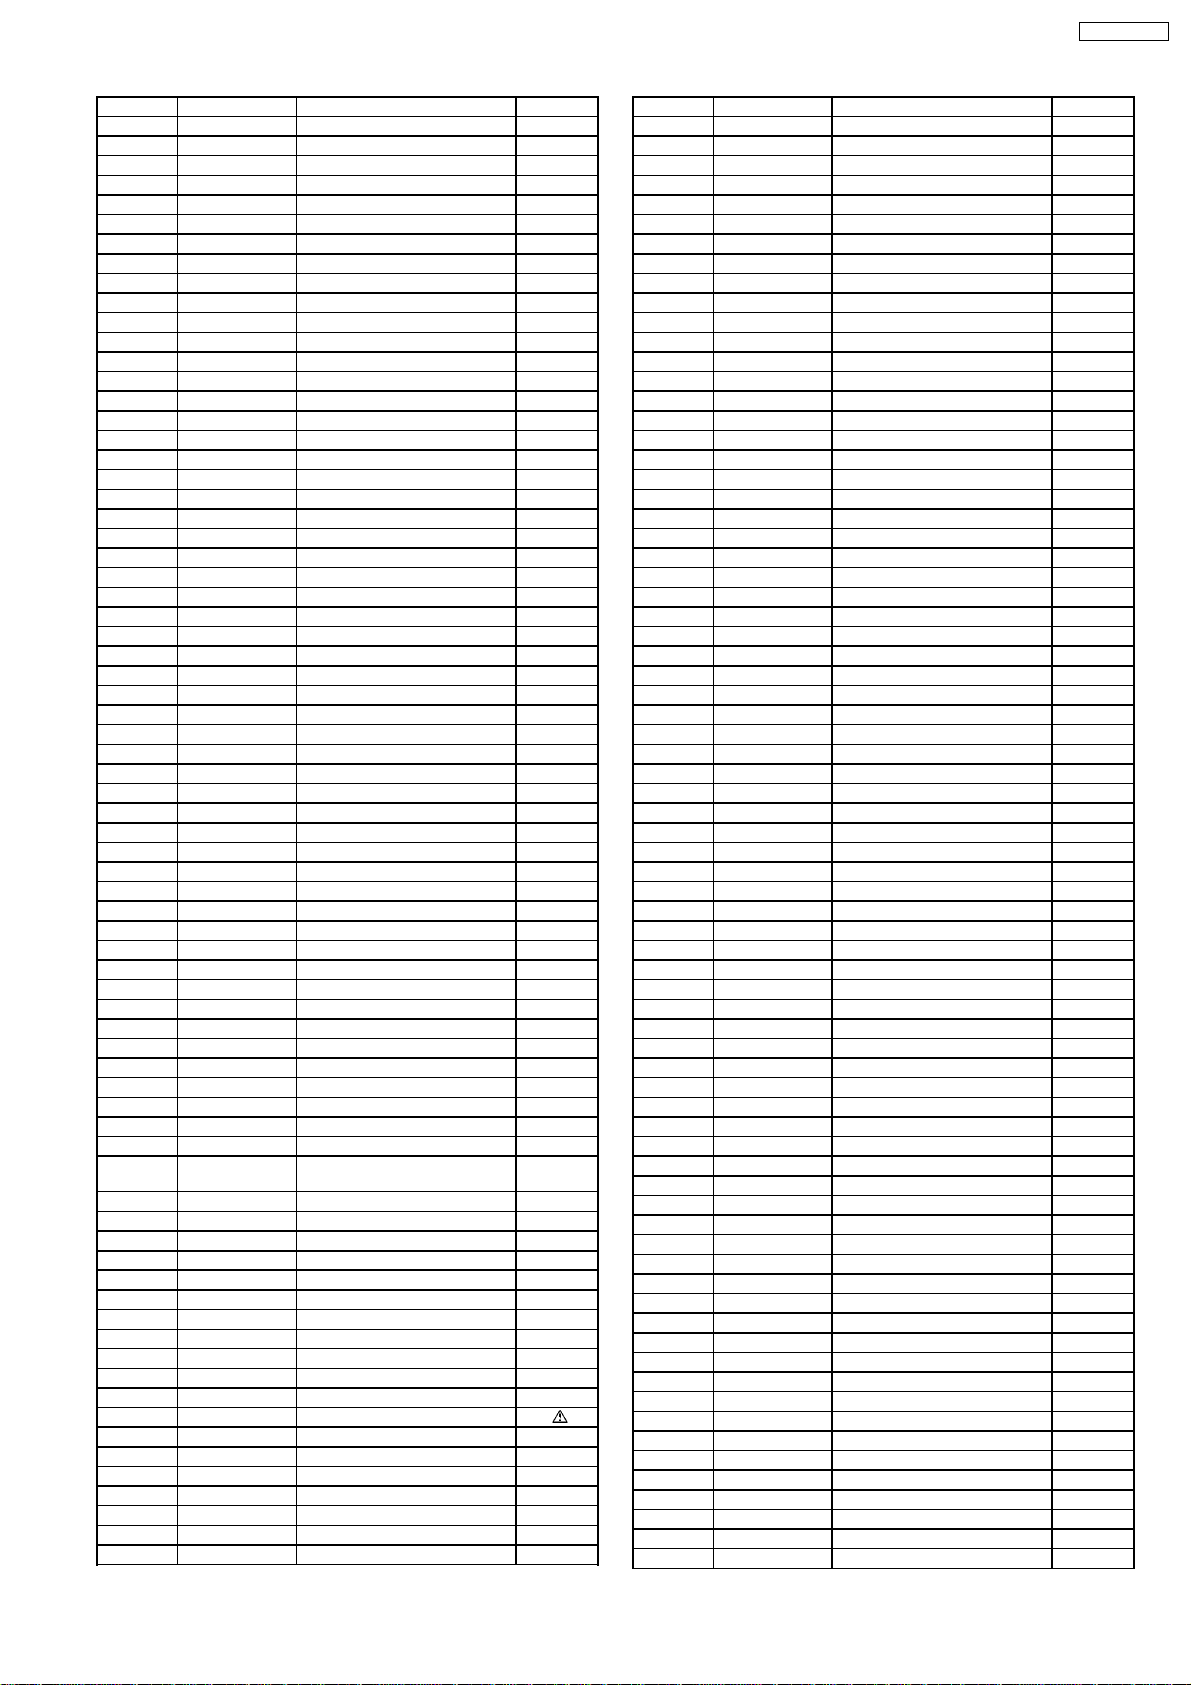
SA-AK250GCP
Ref. No. Part No. Part Name & Description Remarks
W913 ERJ6GEY0R00V CHIP JUMPER [M]
W914 ERJ6GEY0R00V CHIP JUMPER [M]
W915 ERJ6GEY0R00V CHIP JUMPER [M]
W924 ERJ6GEY0R00V CHIP JUMPER [M]
W925 ERJ6GEY0R00V CHIP JUMPER [M]
W926 ERJ6GEY0R00V CHIP JUMPER [M]
W1000 ERJ8GEY0R00V CHIP JUMPER [M]
W1001 ERJ6GEY0R00V CHIP JUMPER [M]
W1002 ERJ6GEY0R00V CHIP JUMPER [M]
W1003 ERJ8GEY0R00V CHIP JUMPER [M]
W1004 ERJ8GEY0R00V CHIP JUMPER [M]
W1005 ERJ3GEY0R00V CHIP JUMPER [M]
W1006 ERJ8GEY0R00V CHIP JUMPER [M]
W1011 ERJ6GEY0R00V CHIP JUMPER [M]
W7001 D0GDR00JA017 CHIP JUMPER [M]
W7002 D0GDR00JA017 CHIP JUMPER [M]
W7003 D0GDR00JA017 CHIP JUMPER [M]
W7004 D0GBR00JA008 CHIP JUMPER [M]
W7005 D0GBR00JA008 CHIP JUMPER [M]
W7006 ERJ8GEY0R00V CHIP JUMPER [M]
W7007 ERJ8GEY0R00V CHIP JUMPER [M]
W7008 D0GDR00JA017 CHIP JUMPER [M]
W7009 D0GBR00JA008 CHIP JUMPER [M]
W7010 D0GBR00JA008 CHIP JUMPER [M]
W7011 D0GBR00JA008 CHIP JUMPER [M]
W7012 D0GBR00JA008 CHIP JUMPER [M]
W7013 D0GBR00JA008 CHIP JUMPER [M]
W7014 D0GBR00JA008 CHIP JUMPER [M]
W7015 D0GBR00JA008 CHIP JUMPER [M]
W7016 D0GBR00JA008 CHIP JUMPER [M]
W7017 D0GBR00JA008 CHIP JUMPER [M]
W7018 D0GBR00JA008 CHIP JUMPER [M]
W7019 D0GBR00JA008 CHIP JUMPER [M]
W7020 D0GBR00JA008 CHIP JUMPER [M]
W7021 D0GBR00JA008 CHIP JUMPER [M]
W7022 D0GBR00JA008 CHIP JUMPER [M]
W7023 D0GBR00JA008 CHIP JUMPER [M]
W7024 D0GBR00JA008 CHIP JUMPER [M]
W7025 D0GBR00JA008 CHIP JUMPER [M]
W7026 D0GBR00JA008 CHIP JUMPER [M]
W7027 D0GBR00JA008 CHIP JUMPER [M]
W7028 D0GBR00JA008 CHIP JUMPER [M]
W7029 D0GBR00JA008 CHIP JUMPER [M]
WIRES
W1 REXV0092 WIRE [M]
W2 REXV0095 WIRE [M]
W3 REXV0094 WIRE [M]
W4 REXV0093 WIRE [M]
WR1903 RWJ0102050KR 2P MOTOR WIRE [M]
JW6001 RWJ1810060SS PANEL TO SUB PANEL WIRE
P1 RPGV0345-1 PACKING CASE [M]
P2 RPNV0117 POLYFOAM [M]
P3 RPFX0198 MIRAMAT SHEET [M]
A1 N2QAYB000142 REMOTE CONTROL [M]
A1-1 RKK-HTR0283H R/C BATTERY COVER [M]
A2 K2CQ2CA00006 AC CORD [M]
A3 RQTV0199-1M O/I BOOK (En/ Sp) [M]
A4 RSA0007-L1 FM ANTENNA WIRE [M]
A5 K2DA42E00001 AC PLUG ADAPTOR [M]
A6 N1DAAAA00001 AM LOOP ANTENNA [M]
(JW6002)
PACKING MATERIALS
ACCESSORIES
RESISTORS
[M]
Ref. No. Part No. Part Name & Description Remarks
R972 ERDS2TJ821T 820 1/4W [M]
R973 ERDS2TJ393T 39K 1/4W [M]
R1061 ERJ3GEY0R00V 0 1/16W [M]
R1063 ERJ3GEY0R00V 0 1/16W [M]
R1064 ERJ3GEY0R00V 0 1/16W [M]
R1101 D0GB330JA008 33 1/16W [M]
R1102 D0GB152JA008 1.5K 1/16W [M]
R1103 D0GB183JA008 18K 1/16W [M]
R1104 D0GB103JA008 10K 1/16W [M]
R1105 D0GB222JA007 2.2K 1/16W [M]
R1106 D0GB104JA008 100K 1/16W [M]
R1107 D0GB102JA008 1K 1/16W [M]
R1109 D0GB102JA008 1K 1/16W [M]
R1110 D0GB333JA008 33K 1/16W [M]
R1201 D0GB330JA008 33 1/16W [M]
R1202 D0GB152JA008 1.5K 1/16W [M]
R1203 D0GB183JA008 18K 1/16W [M]
R1204 D0GB103JA008 10K 1/16W [M]
R1205 D0GB222JA007 2.2K 1/16W [M]
R1206 D0GB104JA008 100K 1/16W [M]
R1207 D0GB102JA008 1K 1/16W [M]
R1209 D0GB102JA008 1K 1/16W [M]
R1210 D0GB333JA008 33K 1/16W [M]
R1302 D0GB471JA007 470 1/16W [M]
R1303 D0GB475JA008 4.7M 1/16W [M]
R1304 D0GB223JA007 22K 1/16W [M]
R1305 D0GB103JA008 10K 1/16W [M]
R1309 D0AF471JA039 470 1/4W [M]
R1313 D0GB103JA008 10K 1/16W [M]
R1314 D0GB102JA008 1K 1/16W [M]
R1318 D0GB103JA008 10K 1/16W [M]
R1327 D0GB472JA007 4.7K 1/16W [M]
R1328 D0GB153JA008 15K 1/16W [M]
R1329 D0GB472JA007 4.7K 1/16W [M]
R1330 ERD2FCVJ4R7T 4.7 1/4W [M]
R1331 D0GB752JA008 7.5K 1/16W [M]
R1332 D0GB103JA008 10K 1/16W [M]
R1333 ERD2FCVJ4R7T 4.7 1/4W [M]
R1334 D0GB223JA007 22K 1/16W [M]
R1335 D0GB152JA008 1.5K 1/16W [M]
R1337 D0GB103JA008 10K 1/16W [M]
R1338 D0GB472JA007 4.7K 1/16W [M]
R1341 D0GB471JA007 470 1/16W [M]
R1342 D0GB473JA007 47K 1/16W [M]
R1343 D0GB332JA008 3.3K 1/16W [M]
R1344 D0GB273JA008 27K 1/16W [M]
R1345 D0GB102JA008 1K 1/16W [M]
R1371 D0GB223JA007 22K 1/16W [M]
R1374 D0GB471JA007 470 1/16W [M]
R1401 D0GB123JA008 12K 1/16W [M]
R1402 D0GB274JA008 270K 1/16W [M]
R1403 D0GB103JA008 10K 1/16W [M]
R1404 D0GB223JA007 22K 1/16W [M]
R1405 D0GB103JA008 10K 1/16W [M]
R2102 D0GB222JA007 2.2K 1/16W [M]
R2104 D0GB273JA007 27K 1/16W [M]
R2111 D0GB222JA041 2.2K 1/16W [M]
R2112 D0GB562JA007 5.6K 1/16W [M]
R2121 D0GB332JA007 3.3K 1/16W [M]
R2122 D0GB332JA007 3.3K 1/16W [M]
R2131 D0GB332JA007 3.3K 1/16W [M]
R2132 D0GB332JA007 3.3K 1/16W [M]
R2141 D0GB123JA008 12K 1/16W [M]
R2142 D0GB272JA008 2.7K 1/16W [M]
R2145 D0GB102JA008 1K 1/16W [M]
R2146 D0GB102JA008 1K 1/16W [M]
R2149 D0GB332JA008 3.3K 1/16W [M]
R2151 D0GBR00JA008 0 1/16W [M]
R2161 D0GB153JA008 15K 1/16W [M]
R2163 D0GB563JA007 56K 1/16W [M]
R2172 D0GB153JA008 15K 1/16W [M]
R2173 D0GB472JA041 4.7K 1/16W [M]
R2181 D0GB471JA008 470 1/16W [M]
R2182 D0GBR00JA008 0 1/16W [M]
97
Page 97
SA-AK250GCP
Ref. No. Part No. Part Name & Description Remarks
R2183 D0GB222JA008 2.2K 1/16W [M]
R2193 D0GB472JA041 4.7K 1/16W [M]
R2194 D0GB104JA007 100K 1/16W [M]
R2195 D0GB103JA008 10K 1/16W [M]
R2196 D0GB103JA008 10K 1/16W [M]
R2202 D0GB222JA007 2.2K 1/16W [M]
R2204 D0GB273JA007 27K 1/16W [M]
R2211 D0GB222JA041 2.2K 1/16W [M]
R2212 D0GB562JA007 5.6K 1/16W [M]
R2221 D0GB332JA007 3.3K 1/16W [M]
R2222 D0GB332JA007 3.3K 1/16W [M]
R2231 D0GB332JA007 3.3K 1/16W [M]
R2232 D0GB332JA007 3.3K 1/16W [M]
R2241 D0GB123JA008 12K 1/16W [M]
R2242 D0GB272JA008 2.7K 1/16W [M]
R2245 D0GB102JA008 1K 1/16W [M]
R2246 D0GB102JA008 1K 1/16W [M]
R2247 D0GB104JA007 100K 1/16W [M]
R2248 D0GB682JA008 6.8K 1/16W [M]
R2249 D0GB332JA007 3.3K 1/16W [M]
R2251 D0GBR00JA008 0 1/16W [M]
R2271 D0GB153JA008 15K 1/16W [M]
R2273 D0GB472JA041 4.7K 1/16W [M]
R2281 D0GB471JA008 470 1/16W [M]
R2282 D0GBR00JA008 0 1/16W [M]
R2283 D0GB104JA007 100K 1/16W [M]
R2284 D0GBR00JA008 0 1/16W [M]
R2285 D0GBR00JA008 0 1/16W [M]
R2286 D0GBR00JA008 0 1/16W [M]
R2301 D0GB153JA007 15K 1/16W [M]
R2311 D0GB471JA008 470 1/16W [M]
R2312 D0GB103JA007 10K 1/16W [M]
R2313 D0GB104JA007 100K 1/16W [M]
R2315 D0GB683JA007 68K 1/16W [M]
R2316 D0GB222JA041 2.2K 1/16W [M]
R2317 D0GB103JA007 10K 1/16W [M]
R2318 D0GB104JA007 100K 1/16W [M]
R2321 D0GBR00JA008 0 1/16W [M]
R2326 D0GB103JA008 10K 1/16W [M]
R2328 D0GB153JA007 15K 1/16W [M]
R2329 D0GB103JA007 10K 1/16W [M]
R2330 D0GB392JA007 3.9K 1/16W [M]
R2341 D0GB180JA008 18 1/16W [M]
R2343 D0GB180JA008 18 1/16W [M]
R2344 D0GBR00JA008 0 1/16W [M]
R2345 D0GB152JA008 1.5K 1/16W [M]
R2346 D0GB332JA007 3.3K 1/16W [M]
R2347 D0GB1R0JA007 1 1/16W [M]
R2352 D0GB180JA008 18 1/16W [M]
R2353 D0GBR00JA008 0 1/16W [M]
R2354 D0GB180JA008 18 1/16W [M]
R2355 D0GB274JA007 270K 1/16W [M]
R2356 D0GB184JA007 180K 1/16W [M]
R2357 D0GB104JA007 100K 1/16W [M]
R2401 D0GB153JA007 15K 1/16W [M]
R2411 D0GB471JA008 470 1/16W [M]
R2412 D0GB103JA007 10K 1/16W [M]
R2413 D0GB104JA007 100K 1/16W [M]
R2415 D0GB683JA007 68K 1/16W [M]
R2416 D0GB222JA041 2.2K 1/16W [M]
R2417 D0GB103JA007 10K 1/16W [M]
R2418 D0GB104JA007 100K 1/16W [M]
R2430 D0GBR00JA008 0 1/16W [M]
R2431 D0GBR00JA008 0 1/16W [M]
R2434 D0GB103JA008 10K 1/16W [M]
R2435 D0GB103JA008 10K 1/16W [M]
R2436 D0GB392JA007 3.9K 1/16W [M]
R2437 D0GB153JA007 15K 1/16W [M]
R2441 D0GB180JA008 18 1/16W [M]
R2443 D0GB180JA008 18 1/16W [M]
R2444 D0GBR00JA008 0 1/16W [M]
R2445 D0GB152JA008 1.5K 1/16W [M]
R2446 D0GB332JA007 3.3K 1/16W [M]
R2447 D0GB1R0JA007 1 1/16W [M]
Ref. No. Part No. Part Name & Description Remarks
R2452 D0GB180JA008 18 1/16W [M]
R2453 D0GBR00JA008 0 1/16W [M]
R2454 D0GB180JA008 18 1/16W [M]
R2455 D0GB274JA007 270K 1/16W [M]
R2456 D0GB184JA007 180K 1/16W [M]
R2457 D0GB104JA007 100K 1/16W [M]
R2509 D0GB561JA007 560 1/16W [M]
R2510 D0AF221JA039 220 1/4W [M]
R2511 D0GB561JA007 560 1/16W [M]
R2512 D0GB104JA007 100K 1/16W [M]
R2584 D0GB334JA007 330K 1/16W [M]
R2585 D0GB334JA007 330K 1/16W [M]
R2586 D0GB122JA008 1.2K 1/16W [M]
R2587 D0GB122JA008 1.2K 1/16W [M]
R2672 D0GB103JA008 10K 1/16W [M]
R2673 D0GB682JA008 6.8K 1/16W [M]
R2674 D0GB473JA041 47K 1/16W [M]
R2676 D0GBR00JA008 0 1/16W [M]
R2677 ERJ6GEYJ271V 270 1/10W [M]
R2701 D0GB102JA008 1K 1/16W [M]
R2702 D0GB102JA008 1K 1/16W [M]
R2703 D0GB224JA007 220K 1/16W [M]
R2704 D0GB224JA007 220K 1/16W [M]
R2705 D0GB332JA007 3.3K 1/16W [M]
R2706 D0GB332JA007 3.3K 1/16W [M]
R2801 D0GB101JA007 100 1/16W [M]
R2802 D0GB103JA008 10K 1/16W [M]
R2804 D0GB101JA008 100 1/16W [M]
R2805 D0GB103JA008 10K 1/16W [M]
R2808 D0GB101JA008 100 1/16W [M]
R2812 D0GB104JA007 100K 1/16W [M]
R2815 D0GB101JA008 100 1/16W [M]
R2816 D0GB101JA008 100 1/16W [M]
R2817 D0GB103JA008 10K 1/16W [M]
R2818 D0GB103JA007 10K 1/16W [M]
R2825 D0GB101JA007 100 1/16W [M]
R2826 D0GB473JA041 47K 1/16W [M]
R2827 D0GB473JA041 47K 1/16W [M]
R2828 D0GB473JA041 47K 1/16W [M]
R2829 D0GB473JA041 47K 1/16W [M]
R2830 D0GB473JA041 47K 1/16W [M]
R2831 D0GB473JA041 47K 1/16W [M]
R2832 D0GB473JA041 47K 1/16W [M]
R2833 D0GB101JA007 100 1/16W [M]
R2834 D0GB101JA007 100 1/16W [M]
R2835 D0GB101JA007 100 1/16W [M]
R2836 D0GB101JA007 100 1/16W [M]
R2837 D0GB101JA007 100 1/16W [M]
R2838 D0GB101JA007 100 1/16W [M]
R2839 D0GB101JA007 100 1/16W [M]
R2840 D0GB101JA007 100 1/16W [M]
R2841 D0GB101JA007 100 1/16W [M]
R2842 D0GB101JA007 100 1/16W [M]
R2843 D0GB101JA007 100 1/16W [M]
R2844 D0GB222JA041 2.2K 1/16W [M]
R2845 D0GB101JA007 100 1/16W [M]
R2846 D0GB104JA007 100K 1/16W [M]
R2848 D0GB103JA008 10K 1/16W [M]
R2849 D0GB563JA008 56K 1/16W [M]
R2850 D0GB103JA008 10K 1/16W [M]
R2851 D0GB473JA041 47K 1/16W [M]
R2852 D0GB223JA041 22K 1/16W [M]
R2853 D0GB101JA007 100 1/16W [M]
R2854 D0GB101JA008 100 1/16W [M]
R2871 D0GB223JA041 22K 1/16W [M]
R2873 D0GB223JA041 22K 1/16W [M]
R2874 D0GB472JA041 4.7K 1/16W [M]
R2881 D0GB221JA041 220 1/16W [M]
R2882 D0GB106JA007 10M 1/16W [M]
R2883 D0GB334JA007 330K 1/16W [M]
R2886 D0GB105JA007 1M 1/16W [M]
R2894 D0GB473JA041 47K 1/16W [M]
R2912 D0GB472JA008 4.7K 1/16W [M]
R2914 D0GB472JA008 4.7K 1/16W [M]
98
Page 98
SA-AK250GCP
Ref. No. Part No. Part Name & Description Remarks
R2916 D0GB472JA008 4.7K 1/16W [M]
R2918 D0GB102JA008 1K 1/16W [M]
R2921 D0GB472JA041 4.7K 1/16W [M]
R2922 D0GB103JA008 10K 1/16W [M]
R2924 D0GB102JA008 1K 1/16W [M]
R2927 D0GB102JA008 1K 1/16W [M]
R2936 D0GB102JA008 1K 1/16W [M]
R2937 D0GB103JA008 10K 1/16W [M]
R2939 D0GB473JA041 47K 1/16W [M]
R2940 D0GB824JA008 820K 1/16W [M]
R2941 D0GB103JA008 10K 1/16W [M]
R2942 D0GB562JA007 5.6K 1/16W [M]
R2943 D0GB103JA008 10K 1/16W [M]
R2944 D0GB472JA041 4.7K 1/16W [M]
R2945 D0GB103JA008 10K 1/16W [M]
R2946 D0GB563JA007 56K 1/16W [M]
R2947 D0AF270JA039 27 1/4W [M]
R2948 D0GB101JA007 100 1/16W [M]
R2949 D0GB473JA041 47K 1/16W [M]
R3210 D0GB104JA007 100K 1/16W [M]
R3211 D0GB101JA007 100 1/16W [M]
R3212 D0GB101JA007 100 1/16W [M]
R3213 D0GB101JA007 100 1/16W [M]
R3303 D0GB103JA008 10K 1/16W [M]
R3700 D0GBR00JA008 0 1/16W [M]
R3701 D0GB683JA007 68K 1/16W [M]
R3702 D0GB223JA008 22K 1/16W [M]
R3704 D0GB223JA008 22K 1/16W [M]
R3706 D0GB683JA007 68K 1/16W [M]
R3707 D0GBR00JA008 0 1/16W [M]
R3708 D0GB683JA007 68K 1/16W [M]
R3709 D0GB683JA007 68K 1/16W [M]
R3711 D0GB473JA008 47K 1/16W [M]
R3712 D0GB473JA008 47K 1/16W [M]
R3720 D0GBR00JA008 0 1/16W [M]
R5101 D0GB103JA008 10K 1/16W [M]
R5103 D0C1103JA020 10K 1W [M]
R5105 D0GB103JA008 10K 1/16W [M]
R5106 D0GB223JA041 22K 1/16W [M]
R5107 D0GB561JA007 560 1/16W [M]
R5108 D0GB470JA008 47 1/16W [M]
R5109 D0GB102JA008 1K 1/16W [M]
R5110 D0GB222JA041 2.2K 1/16W [M]
R5111 D0GB104JA007 100K 1/16W [M]
R5112 ERJ3GEYJ564V 560K 1/16W [M]
R5113 ERJ3GEYJ564V 560K 1/16W [M]
R5114 ERJ3GEYJ1R8V 1.8 1/16W [M]
R5123 D0C14R7JA020 4.7 1W [M]
R5126 D0GB102JA008 1K 1/16W [M]
R5127 D0GB471JA041 470 1/16W [M]
R5132 D0AF331JA039 330 1/4W [M]
R5133 D0GB103JA008 10K 1/16W [M]
R5134 D0GB122JA008 1.2K 1/16W [M]
R5135 D0AE2R2JA048 2.2 1/4W [M]
R5136 D0AE2R2JA048 2.2 1/4W [M]
R5137 D0AE2R2JA048 2.2 1/4W [M]
R5138 ERJ8GEYJ100V 10 1/8W [M]
R5139 ERJ8GEYJ100V 10 1/8W [M]
R5146 D0GB102JA008 1K 1/16W [M]
R5147 D0AF2R2JA039 2.2 1/4W [M]
R5148 D0GB102JA008 1K 1/16W [M]
R5149 D0GB102JA008 1K 1/16W [M]
R5150 D0GB224JA007 220K 1/16W [M]
R5151 D0GB154JA007 150K 1/16W [M]
R5152 ERJ3GEY0R00V 0 1/16W [M]
R5153 D0GB101JA007 100 1/16W [M]
R5154 D0GB101JA007 100 1/16W [M]
R5173 D0GB102JA008 1K 1/16W [M]
R5174 ERJ3GEY0R00V 0 1/16W [M]
R5201 D0GB102JA008 1K 1/16W [M]
R5202 D0GB104JA007 100K 1/16W [M]
R5203 D0GB103JA008 10K 1/16W [M]
R5204 D0GB104JA007 100K 1/16W [M]
R5205 D0GB104JA007 100K 1/16W [M]
Ref. No. Part No. Part Name & Description Remarks
R5206 D0GB105JA007 1M 1/16W [M]
R5207 D0GB682JA008 6.8K 1/16W [M]
R5209 D0GB100JA007 10 1/16W [M]
R5210 D0GB121JA007 120 1/16W [M]
R5230 ERJ3GEYJ124V 120K 1/16W [M]
R5231 ERJ3GEYF124V 120K 1/16W [M]
R5232 ERJ3GEYF273V 27K 1/16W [M]
R5233 ERJ3GEYF823V 82K 1/16W [M]
R5234 D0GB124JA008 120K 1/16W [M]
R5301 D0GB562JA007 5.6K 1/16W [M]
R5302 D0GB562JA007 5.6K 1/16W [M]
R5303 D0GB562JA007 5.6K 1/16W [M]
R5304 D0GB562JA007 5.6K 1/16W [M]
R5305 ERG1SJ220E 22 1W [M]
R5306 ERG1SJ220E 22 1W [M]
R5307 ERJ8GEYJ100V 10 1/8W [M]
R5308 ERJ8GEYJ100V 10 1/8W [M]
R5312 D0GB563JA007 56K 1/16W [M]
R5313 D0GB154JA007 150K 1/16W [M]
R5317 D0GB103JA008 10K 1/16W [M]
R5330 D0GB124JA008 120K 1/16W [M]
R5412 D0GB224JA007 220K 1/16W [M]
R5413 D0GB104JA007 100K 1/16W [M]
R5521 ERJ6GEYJ105V 1M 1/10W [M]
R5522 ERJ6GEYJ105V 1M 1/10W [M]
R5951 D0AE332JA048 3.3K 1/4W [M]
R5952 D0AE472JA048 4.7K 1/4W [M]
R5954 D0AE824JA048 820K 1/4W [M]
R5957 D0AE103JA048 10K 1/4W [M]
R5958 D0AE103JA048 10K 1/4W [M]
R5960 D0AE472JA048 4.7K 1/4W [M]
R5961 D0AE151JA048 150 1/4W [M]
R5963 D0AF820JA039 82 1/4W [M]
R6102 D0GB102JA008 1K 1/16W [M]
R6103 D0GB102JA008 1K 1/16W [M]
R6104 D0GB122JA008 1.2K 1/16W [M]
R6105 D0GB182JA008 1.8K 1/16W [M]
R6106 D0GB222JA041 2.2K 1/16W [M]
R6107 D0GB272JA007 2.7K 1/16W [M]
R6108 D0GB472JA008 4.7K 1/16W [M]
R6109 D0GB393JA007 39K 1/16W [M]
R6199 D0GB103JA008 10K 1/16W [M]
R6202 D0GB102JA008 1K 1/16W [M]
R6203 D0GB102JA008 1K 1/16W [M]
R6204 D0GB122JA008 1.2K 1/16W [M]
R6205 D0GB182JA008 1.8K 1/16W [M]
R6206 D0GB222JA041 2.2K 1/16W [M]
R6207 D0GB272JA007 2.7K 1/16W [M]
R6208 D0GB393JA007 39K 1/16W [M]
R6209 D0GB472JA008 4.7K 1/16W [M]
R6302 D0GB102JA008 1K 1/16W [M]
R6303 D0GB102JA008 1K 1/16W [M]
R6304 D0GB122JA008 1.2K 1/16W [M]
R6305 D0GB182JA008 1.8K 1/16W [M]
R6306 D0GB222JA041 2.2K 1/16W [M]
R6307 D0GB272JA007 2.7K 1/16W [M]
R6308 D0GB472JA008 4.7K 1/16W [M]
R6309 D0GB682JA008 6.8K 1/16W [M]
R6310 D0GB103JA008 10K 1/16W [M]
R6399 D0GB103JA008 10K 1/16W [M]
R6458 D0GB332JA007 3.3K 1/16W [M]
R6481 ERJ3GEY0R00V 0 1/16W [M]
R6491 D0GB223JA041 22K 1/16W [M]
R6492 D0GB123JA008 12K 1/16W [M]
R6493 D0GB103JA008 10K 1/16W [M]
R6494 D0GB103JA008 10K 1/16W [M]
R6501 D0GB561JA007 560 1/16W [M]
R6502 D0GB334JA007 330K 1/16W [M]
R6503 D0GB330JA007 33 1/16W [M]
R6504 D0GB122JA008 1.2K 1/16W [M]
R6505 D0GB122JA008 1.2K 1/16W [M]
R6506 ERJ3GEYJ561V 560 1/16W [M]
R6506 D0GB222JA007 2.2K 1/16W [M]
R6507 D0GB102JA008 1K 1/16W [M]
99
Page 99
SA-AK250GCP
Ref. No. Part No. Part Name & Description Remarks
R6509 D0GB101JA007 100 1/16W [M]
R6601 D0GB471JA041 470 1/16W [M]
R6602 D0GB471JA041 470 1/16W [M]
R6603 D0GB221JA041 220 1/16W [M]
R6604 D0GB221JA041 220 1/16W [M]
R6605 D0GB823JA007 82K 1/16W [M]
R6631 ERD2FCVG470T 47 1/4W [M]
R6632 ERD2FCVG470T 47 1/4W [M]
R6751 D0GB332JA007 3.3K 1/16W [M]
R6752 D0GB152JA008 1.5K 1/16W [M]
R6753 D0GB332JA007 3.3K 1/16W [M]
R6754 D0GB152JA008 1.5K 1/16W [M]
R6763 ERJ3GEY0R00V 0 1/16W [M]
R7111 D0GB103JA008 10K 1/16W [M]
R7211 ERJ3GEYJ823V 82K 1/16W [M]
R7212 ERJ3GEYJ821V 820 1/16W [M]
R7214 ERJ3GEYJ471V 470 1/16W [M]
R7217 D0GB102JA008 1K 1/16W [M]
R7218 D0GB102JA008 1K 1/16W [M]
R7220 ERJ3GEYJ105V 1M 1/16W [M]
R7221 ERJ3GEYJ101V 100 1/16W [M]
R7253 ERJ3GEYJ100V 10 1/16W [M]
R7254 D0GB102JA008 1K 1/16W [M]
R7315 ERJ3GEYJ332V 3.3K 1/16W [M]
R7323 ERJ3GEYJ332V 3.3K 1/16W [M]
R7325 ERJ3GEYJ331V 330 1/16W [M]
R7327 D0GB102JA008 1K 1/16W [M]
R7328 D0GB103JA008 10K 1/16W [M]
R7329 D0GB102JA008 1K 1/16W [M]
R7330 ERJ3GEYJ562V 5.6K 1/16W [M]
R7331 D0GB223JA008 22K 1/16W [M]
R7332 D0GB102JA008 1K 1/16W [M]
R7335 ERJ3GEYJ101V 100 1/16W [M]
R7336 ERJ3GEYJ100V 10 1/16W [M]
R7339 D0GB102JA008 1K 1/16W [M]
R7349 ERJ3GEYJ183V 18K 1/16W [M]
R7601 ERJ3GEYJ4R7V 4.7 1/16W [M]
R7650 ERJ3GEYJ5R6V 5.6 1/16W [M]
K3300 D0GBR00JA008 CHIP JUMPER [M]
K3703 D0GBR00JA008 CHIP JUMPER [M]
K3705 D0GBR00JA008 CHIP JUMPER [M]
CAPACITORS
C1101 F2A1H1R0A145 1 50V [M]
C1102 F1H1H471A219 470P 50V [M]
C1103 F2A1C101A147 100 16V [M]
C1104 F1H1E273A002 0.027 25V [M]
C1105 F1H1H471A219 470P 50V [M]
C1106 F2A1H2R2A145 2.2 50V [M]
C1107 F1H1H152A219 1500 50V [M]
C1108 F2A1C100A147 10 16V [M]
C1109 F2A1H3R3A145 3.3 50V [M]
C1110 ECJ1VB1H682K 6800P 50V [M]
C1121 F1H1H102A219 1000P 50V [M]
C1122 F1H1E103A029 0.01 25V [M]
C1123 ECJ1VB1H271K 270P 50V [M]
C1201 F2A1H1R0A145 1 50V [M]
C1202 F1H1H471A219 470P 50V [M]
C1203 F2A1C101A147 100 16V [M]
C1204 F1H1E273A002 0.027 25V [M]
C1205 F1H1H471A219 470P 50V [M]
C1206 F2A1H2R2A145 2.2 50V [M]
C1207 F1H1H152A219 1500P 50V [M]
C1208 F2A1C100A147 10 16V [M]
C1209 F2A1H3R3A145 3.3 50V [M]
C1210 ECJ1VB1H682K 6800P 50V [M]
C1221 F1H1H102A219 1000P 50V [M]
C1222 F1H1E103A029 0.01 25V [M]
C1223 ECJ1VB1H271K 270P 50V [M]
C1301 ECA1HAK0R1XB 0.1 50V [M]
C1302 F1H1C333A071 0.033 16V [M]
C1303 F1H1C333A071 0.033 16V [M]
Ref. No. Part No. Part Name & Description Remarks
C1304 F2A1H4R7A014 4.7 50V [M]
C1305 F2A1C330A234 33 16V [M]
C1307 ECA1AAK221XQ 220 10V [M]
C1308 F2A1C220A234 22 16V [M]
C1310 ECA1HAK0R1XB 0.1 50V [M]
C1311 ECA1CAK470XB 47 16V [M]
C1312 F1H1H332A013 3300P 50V [M]
C1314 F1H1H222A013 2200P 50V [M]
C1315 F1H1H222A013 2200P 50V [M]
C1316 F1H1H102A219 1000P 50V [M]
C1317 F1H1H102A219 1000P 50V [M]
C1318 ECQV1H473JL3 0.047 50V [M]
C1319 F2A1C101A147 100 16V [M]
C1320 F2A1H1R0A145 1 50V [M]
C1321 F0A2A472A019 4700P 100V [M]
C1323 ECEA1HKN010B 1 50V [M]
C1324 ECA1CAK470XB 47 16V [M]
C1326 F2A1C100A147 10 16V [M]
C1371 F1H1E103A029 0.01 25V [M]
C2006 F1H1H102A219 1000P 50V [M]
C2112 ECJ1VB1C105K 1 16V [M]
C2113 F1H1H682A219 6800P 50V [M]
C2121 F1H1H332A013 3300P 50V [M]
C2122 ECJ1VB1C105K 1 16V [M]
C2132 ECJ1VB1C105K 1 16V [M]
C2140 F1H1H102A219 1000P 50V [M]
C2142 ECJ1VB1C105K 1 16V [M]
C2149 ECJ1VC1H101K 100P 50V [M]
C2152 ECJ1VB1C105K 1 16V [M]
C2171 F1H1A334A036 0.33 10V [M]
C2172 ECJ1VB1C563K 0.056 16V [M]
C2173 F1H1H103A219 0.01 50V [M]
C2174 F1H1H103A219 0.01 50V [M]
C2175 F1H1H332A013 3300P 50V [M]
C2181 F1H1A105A025 1 10V [M]
C2182 F1H1A334A036 0.33 10V [M]
C2183 ECJ1VB1C224K 0.22 16V [M]
C2191 F2A1H3R3A234 3.3 50V [M]
C2192 F1H1C104A041 0.1 16V [M]
C2193 F1H1A105A025 1 10V [M]
C2194 ECJ1VB1A124K 0.12 10V [M]
C2195 F1H1A474A025 0.47 10V [M]
C2212 ECJ1VB1C105K 1 16V [M]
C2213 F1H1H682A219 6800P 50V [M]
C2221 F1H1H332A013 3300P 50V [M]
C2222 ECJ1VB1C105K 1 16V [M]
C2232 ECJ1VB1C105K 1 16V [M]
C2240 F1H1H102A219 1000P 50V [M]
C2242 ECJ1VB1C105K 1 16V [M]
C2245 F2A1C100A234 10 16V [M]
C2249 ECJ1VC1H101K 100P 50V [M]
C2252 ECJ1VB1C105K 1 16V [M]
C2263 F2A1H1R0A234 1 50V [M]
C2271 F1H1A334A036 0.33 10V [M]
C2272 ECJ1VB1C563K 0.056 16V [M]
C2273 F1H1H103A219 0.01 50V [M]
C2274 F1H1H103A219 0.01 50V [M]
C2275 F1H1H332A013 3300P 50V [M]
C2281 F1H1A105A025 1 10V [M]
C2282 F1H1A334A036 0.33 10V [M]
C2283 F1H1H473A783 0.047 50V [M]
C2301 F1H1A224A007 0.22 10V [M]
C2302 F1H1A224A007 0.22 10V [M]
C2311 F1H1A105A025 1 10V [M]
C2312 F1H1A105A025 1 10V [M]
C2313 F1H1H470A230 47P 50V [M]
C2314 F1H1H100A230 10P 50V [M]
C2315 F2A1H220A216 22 50V [M]
C2321 F1H1A105A025 1 10V [M]
C2325 ECA1HAK010XB 1 50V [M]
C2329 ECJ1VB1H472K 4700P 50V [M]
C2330 ECJ1VB1A224K 0.22 10V [M]
C2341 F1H1H102A219 1000P 50V [M]
C2342 F1H1A105A025 1 10V [M]
100
Page 100
SA-AK250GCP
Ref. No. Part No. Part Name & Description Remarks
C2343 ECJ1VB1A474K 0.47 10V [M]
C2344 ECJ1VB1A474K 0.47 10V [M]
C2401 F1H1A224A007 0.22 10V [M]
C2402 F1H1A224A007 0.22 10V [M]
C2411 F1H1A105A025 1 10V [M]
C2412 F1H1A105A025 1 10V [M]
C2413 F1H1H470A230 47P 50V [M]
C2414 F1H1H100A230 10P 50V [M]
C2415 F2A1H220A216 22 50V [M]
C2431 F1H1A105A025 1 10V [M]
C2433 F1H1A105A025 1 10V [M]
C2436 ECJ1VB1A224K 0.22 10V [M]
C2437 ECJ1VB1H472K 4700P 50V [M]
C2441 F1H1H102A219 1000P 50V [M]
C2442 F1H1A105A025 1 10V [M]
C2443 ECJ1VB1A474K 0.47 10V [M]
C2444 ECJ1VB1A474K 0.47 10V [M]
C2509 F2A1H330A215 33 50V [M]
C2511 ECEA1HKN2R2B 2.2 50V [M]
C2581 F2A1C101A234 100 16V [M]
C2582 F2A1C101A234 100 16V [M]
C2583 F2A1C101A234 100 16V [M]
C2584 F1H1H221A748 220P 50V [M]
C2585 F1H1H221A748 220P 50V [M]
C2588 F1H1C104A041 0.1 16V [M]
C2673 ECJ1VB1H561K 560P 50V [M]
C2674 ECJ1VB1H561K 560P 50V [M]
C2675 ECJ1VC1H101K 100P 50V [M]
C2676 F2A1C221A236 220 16V [M]
C2678 F1H1H103A219 0.01 50V [M]
C2701 F1H1H103A219 0.01 50V [M]
C2702 F2A1C101A234 100 16V [M]
C2703 F1H1H471A219 470P 50V [M]
C2704 F1H1H471A219 470P 50V [M]
C2705 ECA1HAK010XB 1 50V [M]
C2706 ECA1HAK010XB 1 50V [M]
C2753 F1H1C104A042 0.1 16V [M]
C2802 F2A1H3R3A234 3.3 50V [M]
C2803 F1H1A105A025 1 10V [M]
C2805 F2A1C471A236 470 16V [M]
C2806 F1H1H100A230 10P 50V [M]
C2821 ECJ1VC1H101K 100P 50V [M]
C2853 F1H1C104A041 0.1 16V [M]
C2854 ECA0JAM471XB 470 6.3V [M]
C2871 F1H1H331A013 330P 50V [M]
C2872 F1H1C223A001 0.022 16V [M]
C2874 F1H1H331A013 330P 50V [M]
C2882 F1H1H180A230 18P 50V [M]
C2883 F1H1H220A230 22P 50V [M]
C2901 F1H1C104A041 0.1 16V [M]
C2930 F1H1H100A230 10P 50V [M]
C2940 F1H1C104A041 0.1 16V [M]
C2941 F2A1H330A215 33 50V [M]
C2943 F2A1H2R2A234 2.2 50V [M]
C2944 ECJ1VC1H101K 100P 50V [M]
C2945 F2A1C470A234 47 16V [M]
C2947 F2A0J101A208 100 6.3V [M]
C2948 ECA1AAK221XB 220 10V [M]
C2953 ECJ1VB1H561K 560P 50V [M]
C2954 ECJ1VB1H561K 560P 50V [M]
C2956 ECJ1VC1H101K 100P 50V [M]
C2981 F1H1H102A219 1000P 50V [M]
C2983 F1H1H102A219 1000P 50V [M]
C2984 ECJ1VC1H101K 100P 50V [M]
C2985 F1H1H102A219 1000P 50V [M]
C2986 F1H1H102A219 1000P 50V [M]
C3112 ECJ1VB1H221K 220P 50V [M]
C3113 ECJ1VB1H221K 220P 50V [M]
C3114 ECJ1VB1H561K 560P 50V [M]
C3116 ECJ1VB1H561K 560P 50V [M]
C3700 D0GBR00JA008 0 1/16W [M]
C3701 F1H1A105A025 1 10V [M]
C3704 F1H1A105A025 1 10V [M]
C3705 D0GBR00JA008 0 1/16W [M]
Ref. No. Part No. Part Name & Description Remarks
C3706 F1H1H470A230 47P 50V [M]
C3707 F1H1H470A230 47P 50V [M]
C3708 F1H1H100A230 10P 50V [M]
C3709 F1H1H100A230 10P 50V [M]
C3710 F1H1H104A783 0.1 50V [M]
C3711 F1H1A105A025 1 10V [M]
C3712 F2A1C101A234 100 16V [M]
C3720 F1H1A105A025 1 10V [M]
C3721 F1H1A105A025 1 10V [M]
C4000 F1H1H104A783 0.1 50V [M]
C4001 F1H1H223A219 0.022 50V [M]
C5101 F2A1V102A154 1000 35V [M]
C5102 ECA2AM100B 10 100V [M]
C5103 ECA2AM100B 10 100V [M]
C5104 F2A1V102A154 1000 35V [M]
C5105 ECA1AAK221XB 220 10V [M]
C5106 ECJ1VB1H104K 0.1 50V [M]
C5107 ECJ1VB1H104K 0.1 50V [M]
C5109 ECA1EAM101XB 100 25V [M]
C5110 ECA1EAM101XB 100 25V [M]
C5113 ECA1HM330B 33 50V [M]
C5114 ECJ1VB1H104K 0.1 50V [M]
C5115 ECJ1VB1H104K 0.1 50V [M]
C5121 ECA1HAM470XB 47 50V [M]
C5123 F2A1V102A154 1000 35V [M]
C5124 F2A1V102A154 1000 35V [M]
C5131 ECA0JAK101XB 100 6.3V [M]
C5132 F2A1E1010056 100 25V [M]
C5133 ECA0JAK101XB 100 6.3V [M]
C5151 F1H1H101A230 100P 50V [M]
C5152 ECJ1VB1H104K 0.1 50V [M]
C5153 F1H1H101A230 100P 50V [M]
C5155 F1H1H102A219 1000P 50V [M]
C5157 F1H1H103A219 0.01 50V [M]
C5159 F1H1H103A219 0.01 50V [M]
C5171 ECA1JM102E 1000 63V [M]
C5172 ECA1JM102E 1000 63V [M]
C5186 ECJ1VB1H104K 0.1 50V [M]
C5187 ECJ1VB1H104K 0.1 50V [M]
C5201 F1H1H471A219 470P 50V [M]
C5202 ECJ1VC1H101K 100P 50V [M]
C5203 ECJ1VC1H101K 100P 50V [M]
C5204 ECJ1VC1H101K 100P 50V [M]
C5205 ECJ1VB1H104K 0.1 50V [M]
C5208 ECA0JM221B 220 6.3V [M]
C5210 F1H1H180A230 18P 50V [M]
C5230 ECJ1VB1H104K 0.1 50V [M]
C5301 ECJ1VB1A474K 0.47 10V [M]
C5302 F1H1H331A013 330P 50V [M]
C5303 ECJ1VB1A474K 0.47 10V [M]
C5305 F1H1H331A013 330P 50V [M]
C5308 ECJ1VB1H104K 0.1 50V [M]
C5309 ECJ1VB1H104K 0.1 50V [M]
C5310 F1K2A1040006 0.1 100V [M]
C5311 F1H1H221A748 220P 50V [M]
C5312 F1K1V105A003 0.1 50V [M]
C5313 F1H1H153A219 0.015 50V [M]
C5314 F1K2A1040006 0.1 100V [M]
C5315 F1K1V105A003 0.1 50V [M]
C5316 F1J1H474A757 0.47 50V [M]
C5317 F1K1V105A003 0.1 50V [M]
C5318 F1K2A1040007 0.1 100V [M]
C5319 F1H1H153A219 0.015 50V [M]
C5320 F1K1V105A003 0.1 50V [M]
C5321 F1K2A1040006 0.1 100V [M]
C5322 ECJ1VB1H104K 0.1 50V [M]
C5323 ECJ1VB1H104K 0.1 50V [M]
C5324 ECQV1H474JL3 0.47 50V [M]
C5325 ECJ1VB1H104K 0.1 50V [M]
C5326 ERJ3GEY0R00V 0 1/16W [M]
C5327 ECQV1H474JL3 0.47 50V [M]
C5328 ECJ1VB1H104K 0.1 50V [M]
C5329 ERJ3GEY0R00V 0 1/16W [M]
C5330 F1H2A221A009 220P 100V [M]
101
 Loading...