

Panasonic RXD45EG Operating Instructions
Operating Instructions
Instrucciones de funcionamiento
Instrukcja obsługi
Návod k obsluze
Portable Stereo CD System
Sistema estéreo portátil con
reproductor de discos compactos
Przenośny Zestaw Stereo CD
Přenosný stereo CD systém
Dear Customer
Thank you for purchasing this product.
For optimum performance and safety, please read these instructions thoroughly before connecting,
operating or adjusting this product.
Please keep this manual for future reference.
Estimado Cliente
Muchísimas gracias por haber adquirido este aparato.
Para un funcionamiento y seguridad óptimos, lea con atención estas instrucciones antes de conectar,
utilizar o confi gurar este producto.
Guarde este manual para su consulta en el futuro.
Drogi Kliencie
Dziękujemy Ci za zakupienie tego produktu.
W celu zapewnienia optymalnej jakości odbioru i bezpieczeństwa, przed podłączeniem,
uruchomieniem lub zmianą ustawień urządzenia należy dokładnie zapoznać się z niniejszą instrukcją
obsługi.
Prosimy o zachowanie niniejszej instrukcji obsługi.
Niniejsza instrukcja została opracowana na podstawie or yginalnej publikacji fi rmy Panasonic
Corporation.
Vážený Zákazníku
Děkujeme za zakoupení tohoto výrobku.
Pro optimální využití a bezpečnost si přečtěte pečlivě tento návod před připojováním, používáním
nebo nastavováním tohoto produktu.
Uschovejte si prosím tento návod k obsluze.
Model No. RX-D45
Operations in these instructions are described mainly using the remote control, but you can perform the operations on the main unit if the controls
are the same.
Your unit may not look exactly the same as illustrated.
Las operaciones de estas instrucciones se describen principalmente usando el mando a distancia, pero puede realizar las mismas operaciones en la
unidad principal.
Es posible que su unidad no se parezca exactamente a la que se muestra.
W niniejszej instrukcji opisano przede wszystkim sposoby wykonywania operacji przy użyciu pilota, można je jednak wykonywać także na
urządzeniu głównym, jeśli są na nim dostępne identyczne elementy sterujące.
Urządzenie może się nieznacznie różnić od przedstawionego na ilustracji.
Činnosti v těchto pokynech jsou popsány většinou pro použití dálkového ovládání, ale můžete je provádět i na hlavní jednotce, pokud jsou ovládací
prvky totožné.
Vzhled výrobku nemusí přesně odpovídat uvedeným obrázkům.
EG
RQTX1040-1Z
CAUTION!
THIS PRODUCT UTILIZES A LASER.
USE OF CONTROLS OR ADJUSTMENTS OR PERFORMANCE OF
PROCEDURES OTHER THAN THOSE SPECIFIED HEREIN MAY RESULT IN
HAZARDOUS RADIATION EXPOSURE.
DO NOT OPEN COVERS AND DO NOT REPAIR YOURSELF. REFER
ENGLISHESPAÑOL
SERVICING TO QUALIFIED PERSONNEL.
WARNING:
TO REDUCE THE RISK OF FIRE, ELECTRIC SHOCK OR PRODUCT
DAMAGE,
• DO NOT EXPOSE THIS APPARATUS TO RAIN, MOISTURE, DRIPPING
OR SPLASHING AND THAT NO OBJECTS FILLED WITH LIQUIDS, SUCH
AS VASES, SHALL BE PLACED ON THE APPARATUS.
• USE ONLY THE RECOMMENDED ACCESSORIES.
• DO NOT REMOVE THE COVER (OR BACK); THERE ARE NO USER
SERVICEABLE PARTS INSIDE. REFER SERVICING TO QUALIFIED
SERVICE PERSONNEL.
CAUTION!
• DO NOT INSTALL OR PLACE THIS UNIT IN A BOOKCASE, BUILT-IN
CABINET OR IN ANOTHER CONFINED SPACE. ENSURE THE UNIT IS
WELL VENTILATED. TO PREVENT RISK OF ELECTRIC SHOCK OR FIRE
HAZARD DUE TO OVERHEATING, ENSURE THAT CURTAINS AND ANY
OTHER MATERIALS DO NOT OBSTRUCT THE VENTILATION VENTS.
• DO NOT OBSTRUCT THE UNIT’S VENTILATION OPENINGS WITH
NEWSPAPERS, TABLECLOTHS, CURTAINS, AND SIMILAR ITEMS.
• DO NOT PLACE SOURCES OF NAKED FLAMES, SUCH AS LIGHTED
CANDLES, ON THE UNIT.
• DISPOSE OF BATTERIES IN AN ENVIRONMENTALLY FRIENDLY
MANNER.
The socket outlet shall be installed near the equipment and easily accessible.
The mains plug of the power supply cord shall remain readily operable.
To completely disconnect this apparatus from the AC Mains, disconnect the
power supply cord plug from AC receptacle.
This product may receive radio interference caused by mobile telephones
during use. If such interference is apparent, please increase separation
between the product and the mobile telephone.
THIS UNIT IS INTENDED FOR USE IN MODERATE CLIMATES.
NORSK
ADVARSEL!
DETTE PRODUKTET ANVENDER EN LASER.
BETJENING AV KONTROLLER, JUSTERINGER ELLER ANDRE INNGREP
ENN DE SOM ER BESKREVET I DENNE BRUKSANVISNING, KAN FØRE TIL
FARLIG BESTRÅLING.
DEKSLER MÅ IKKE ÅPNES, OG FORSØK ALDRI Å REPARERE
APPARATET PÅ EGENHÅND. ALT SERVICE OG REPARASJONSARBEID
MÅ UTFØRES AV KVALIFISERT PERSONELL.
ADVARSEL:
FØLG NEDENSTÅENDE INSTRUKSER FOR Å REDUSERE RISIKOEN FOR
BRANN, ELEKTRISK STØT OG SKADE PÅ PRODUKTET:
• DETTE APPARATET MÅ IKKE UTSETTES FOR REGN, FUKTIGHET,
DRYPP ELLER SPRUT, OG INGEN VÆSKEFYLTE GJENSTANDER, SOM
F.EKS. VASER, MÅ PLASSERES PÅ APPARATET.
• BRUK KUN ANBEFALT TILBEHØR.
• IKKE FJERN DEKSELET (ELLER BAKSIDEN); APPARATET
INNEHOLDER INGEN DELER SOM KAN SKIFTES ELLER REPARERES
AV BRUKEREN. OVERLAT TIL KVALIFISERTE SERVICETEKNIKERE Å
UTFØRE SERVICE.
ADVARSEL!
• APPARATET MÅ IKKE PLASSERES I EN BOKHYLLE, ET
INNEBYGGET KABINETT ELLER ET ANNET LUKKET STED
HVOR VENTILASJONSFORHOLDENE ER UTILSTREKKELIGE.
SØRG FOR AT GARDINER ELLER LIGNENDE IKKE FORVERRER
VENTILASJONSFORHOLDENE, SÅ RISIKO FOR ELEKTRISK SJOKK
ELLER BRANN FORÅRSAKET AV OVERHETING UNNGÅS.
• APPARATETS VENTILASJONSÅPNINGER MÅ IKKE DEKKES TIL MED
AVISER, BORDDUKER, GARDINER OG LIGNENDE.
• PLASSER IKKE ÅPEN ILD, SLIK SOM LEVENDE LYS, OPPÅ
APPARATET.
• BRUKTE BATTERIER MÅ KASSERES UTEN FARE FOR MILJØET.
Strømuttaket må befi nne seg i nærheten av utstyret og være lett tilgjengelig.
Støpslet på strømkabelen må være klart til bruk.
Når dette apparatet skal kobles helt fra strømnettet (AC), må støpslet på
strømkabelen trekkes ut av stikkontakten.
DETTE APPARATET ER BEREGNET TIL BRUK UNDER MODERATE
KLIMAFORHOLD.
SUOMI
VAROITUS!
LAITTEEN KÄYTTÄMINEN MUULLA KUIN TÄSSÄ KÄYTTÖOHJEESSA
MAINITULLA TAVALLA SAATTAA ALTISTAA KÄYTTÄJÄN
TURVALLISUUSLUOKAN 1
LASERSÄTEILYLLE
YLITTÄ VÄLLE NÄKYMÄTTÖMÄLLE
.
VAROITUS:
VÄHENNÄ TULIPALON, SÄHKÖISKUN TAI LAITTEISTON
VAHINGOITTUMISEN VAARAA
• TÄTÄ LAITETTA EI SAA ALTISTAA SATEELLE, KOSTEUDELLE,
ROISKEILLE TAI TIPPUVILLE NESTEILLE. LAITTEEN PÄÄLLE EI SAA
MYÖSKÄÄN ASETTAA MITÄÄN NESTEELLÄ TÄYTETTYÄ ESINETTÄ,
KUTEN MALJAKKOA.
• KÄYTÄ VAIN SUOSITELTUJA LISÄVARUSTEITA.
• ÄLÄ IRROTA KANTTA (TAI TAUSTAA). SISÄLLÄ EI OLE KÄYTTÄJÄN
HUOLLETTAVISSA OLEVIA OSIA. HUOLLON SAA SUORITTAA VAIN
AMMATTITAITOINEN HENKILÖKUNTA.
VAROITUS!
• ÄLÄ ASENNA TAI LAITA TÄTÄ LAITETTA KABINETTITYYPPISEEN
KIRJAKAAPPIIN TAI MUUHUN SULJET TUUN TILAAN, JOTTA
TUULETUS ONNISTUISI. VAR MISTA, ETTÄ VERHO TAI MIKÄÄN MUU
MATERIAALI EI HUONONNA TUULETUSTA, JOTTA VÄLTETTÄISIIN
YLIKUUMENEMISESTA JOHTUVA SÄHKÖISKU- TAI TU LIPALOVAARA.
• ÄLÄ PEITÄ LAITTEEN TUULETUSAUKKOJA SANOMALEHDELLÄ,
PÖYTÄLIINALLA, VERHOLLA TAI MUULLA VASTAAVALLA ESINEELLÄ.
• ÄLÄ ASETA PALAVAA KYNTTILÄÄ TAI MUUTA AVOTULEN LÄHDETTÄ
LAITTEEN PÄÄLLE.
• HÄVITÄ PARISTOT LUONTOA VAHINGOITTAMATTOMALLA TAVALLA.
Pistorasia tulee asentaa laitteen lähelle helppopääsyiseen paikkaan.
Verkkojohdon pistokkeen on oltava aina helposti käytettävissä.
Tämä laite voidaan kytkeä kokonaan irti verkkovirrasta irrottamalla
verkkojohdon pistoke pistorasiasta.
RQTX1040
TÄMÄ LAITE ON TARKOITETTU KÄYTETTÄVÄKSI LEUDOSSA
2
ILMASTOSSA.
2
Information for Users on Collection and Disposal of Old Equipment and
used Batteries
These symbols on the products, packaging, and/or
accompanying documents mean that used electrical and
electronic products and batteries should not be mixed with
general household waste.
For proper treatment, recovery and recycling of old products and
used batteries, please take them to applicable collection points,
in accordance with your national legislation and the Directives
2002/96/EC and 2006/66/EC.
By disposing of these products and batteries correctly, you
will help to save valuable resources and prevent any potential
negative effects on human health and the environment which
could otherwise arise from inappropriate waste handling.
For more information about collection and recycling of old
products and batteries, please contact your local municipality,
your waste disposal service or the point of sale where you
purchased the items.
Penalties may be applicable for incorrect disposal of this waste,
in accordance with national legislation.
For business users in the European Union
If you wish to discard electrical and electronic equipment,
please contact your dealer or supplier for further information.
[Information on Disposal in other Countries outside the
European Union]
These symbols are only valid in the European Union. If you wish
to discard these items, please contact your local authorities or
dealer and ask for the correct method of disposal.
Note for the battery symbol (bottom two symbol
examples):
This symbol might be used in combination with a chemical
symbol. In this case it complies with the requirement set by the
Directive for the chemical involved.
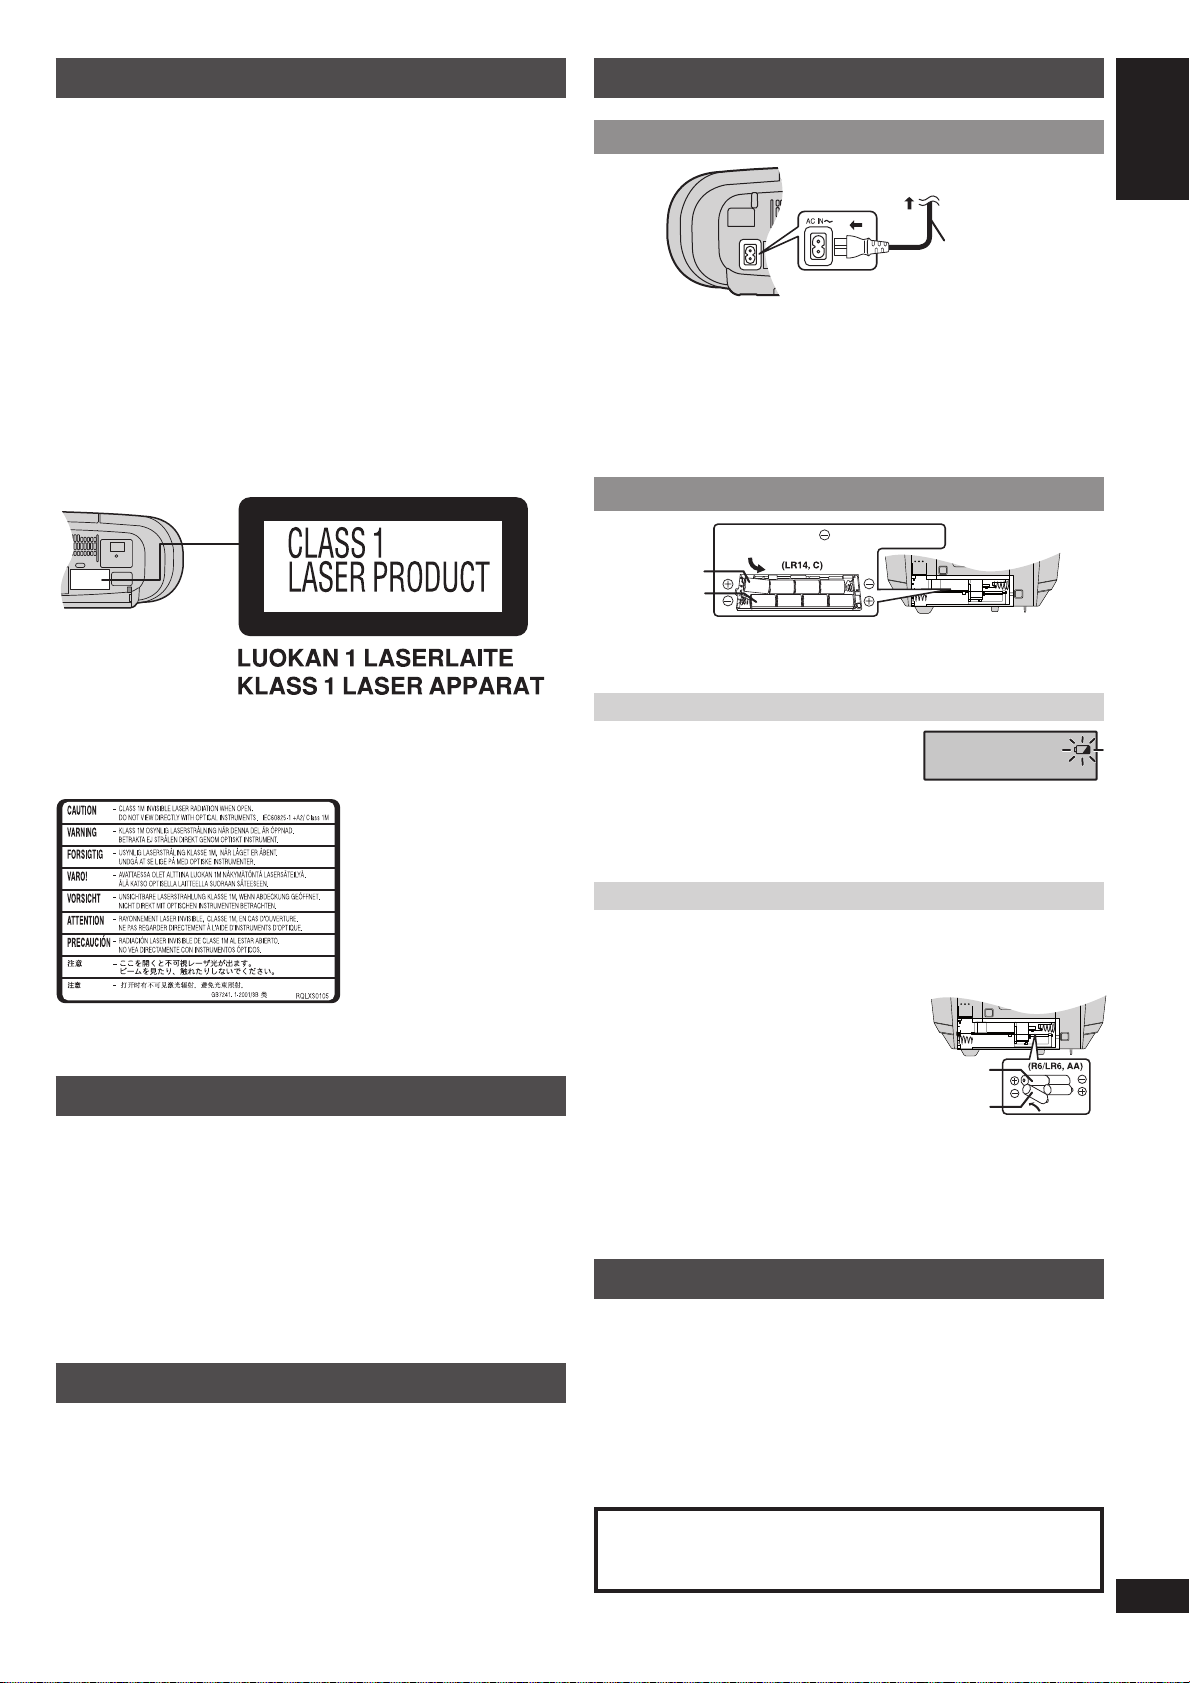
Table of contents
Power sources
Safety precautions ........................................................ 3
Supplied accessories .................................................... 3
Power sources ............................................................... 3
Use of batteries .............................................................. 3
Overview of controls ..................................................... 4
Discs ............................................................................... 4
Using the FM/AM radio .................................................. 5
Cassette tape – Play and record .................................. 5
Using the clock and timers ........................................... 6
Using sound effects ...................................................... 6
Troubleshooting guide .................................................. 6
Specifi cations ................................................................ 7
Maintenance ................................................................... 7
Using the household mains socket Using the household mains socket
To household
mains socket
AC mains lead
(included)
Connect the AC mains lead fi rmly to the unit and the household mains socket.
Note
✒
• The included AC mains lead is for use with this unit only. Do not use it with
other equipment.
• The unit is in the standby condition when the AC power supply cord is
connected. The primary circuit is always “live” as long as the power cord is
connected to an electrical outlet.
Using batteries (not included) Using batteries (not included)
Press towards while inserting
the battery.
Inner row
Outer row
• The unit cannot be powered by batteries if the AC mains lead is connected.
Disconnect the AC mains lead from the unit to operate on battery power.
• Use only alkaline batteries.
8
567
1
43
2
ENGLISHESPAÑOL
Inside of product
Tuo t t een s i s ällä
Produktets innside
Safety precautions
• Avoid using or placing this unit near sources of heat. Do not leave it in an
automobile exposed to direct sunlight for a long time with the doors and
windows closed as this may deform the cabinet.
• Avoid cuts, scratches, or poor connections in the AC mains lead, as they may
result in possible fi re or electric shock hazard. Also, excessive bending, pulling
or splicing of the lead should be avoided.
• Do not unplug the AC mains lead by pulling on the lead. To do so may cause
premature failure or shock hazard.
• Do not operate this unit in a bathroom, as a potential shock hazard may result.
• When not in use, disconnect the AC mains lead from the household mains
socket.
Supplied accessories
Please check and identify the supplied accessories.
1 x AC mains lead
When to change the batteries
When the battery indicator begins fl ashing, replace
all 8 of the batteries. It is also a good idea to
replace all the batteries before recording.
Note
✒
Before any function starts, the battery indicator may fl ash although the batteries
are not drained. The indicator will display its current status when the unit is
powered from the household mains socket by using the AC mains lead.
Memory back-up
When the power supply is interrupted, the current time, timer settings and radio
stations you have set are saved if you have inserted back-up batteries (not
included).
These batteries do not power the unit.
When to change the batteries
The batteries last about a year.
Connect the unit to AC power before replacing the
batteries.
Before connecting or disconnecting the AC mains
lead, press [8 /x, STOP/EJECT] to stop the tape
and press [TAPE/OFF] to turn the unit off. The
back-up batteries ware out faster if the cord is
disconnected with the power still on.
Note
✒
Use either alkaline or manganese batteries.
Inner row
Outer row
21
3
4
Use of batteries
• If this unit is not used for a long period of time or is used only from an
AC power source, remove all the batteries to prevent potential damage
due to possible battery leakage.
• Do not mix old and new batteries.
• Do not use different types of batteries at the same time.
• Do not take apart or short circuit the batteries.
• Do not attempt to recharge alkaline or manganese batteries.
• Do not use batteries if the covering has been peeled off.
• Do not heat or expose to fl ame.
• Do not leave the battery(ies) in an automobile exposed to direct sunlight for a
long period of time with doors and windows closed.
• Mishandling of batteries can cause electrolyte leakage, which may cause a fi re.
CAUTION
Danger of explosion if battery is incorrectly replaced. Replace only with the
same or equivalent type recommended by the manufacturer. Dispose of
used batteries according to the manufacturer’s instructions.
RQTX1040
3
3
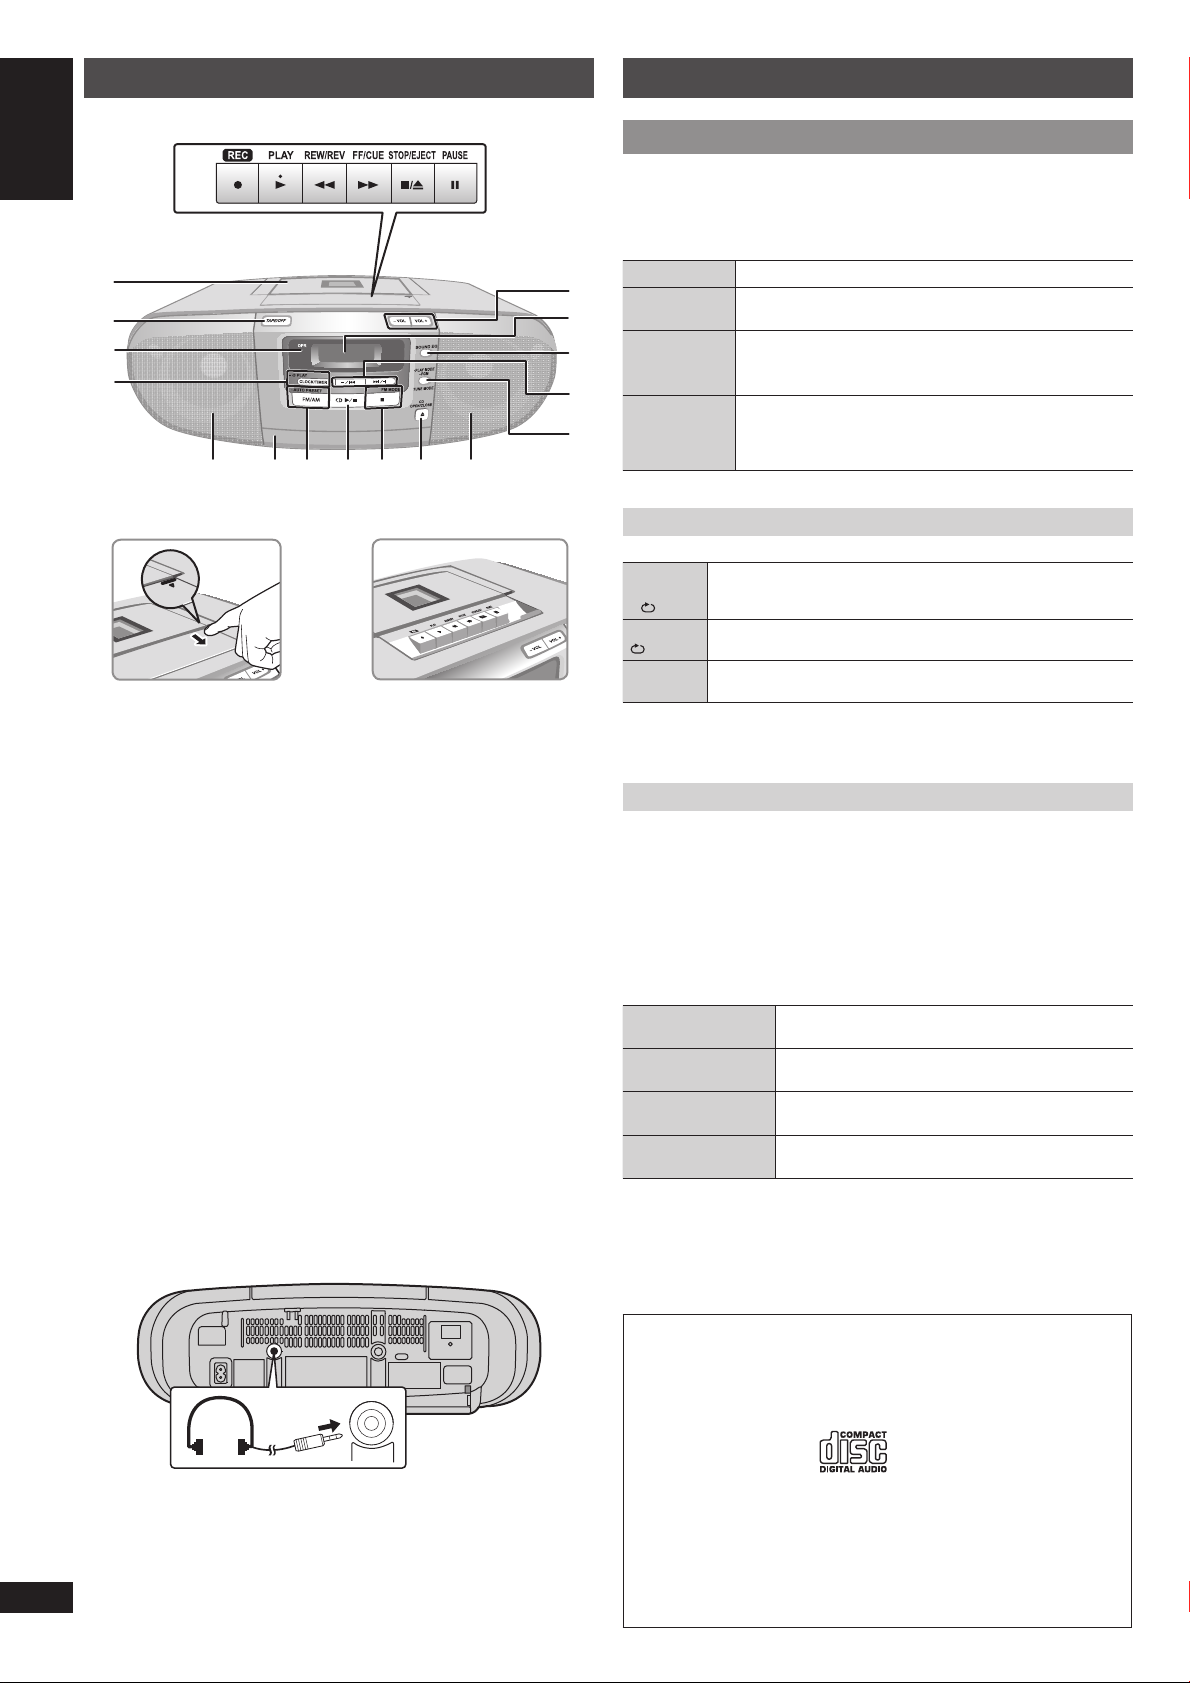
Overview of controls
ENGLISHESPAÑOL
P
A
B
C
O
GH
Discs
Basic play Basic play
1 Press [x, CD OPEN/CLOSE] to open the disc tray and then load the
disc with the label facing up.
2 Press [x, CD OPEN/CLOSE] again to close.
3 Press [4/9, CD] to start play.
Stop playback
N
Pause play
M
Skip tracks
L
K
Search
through
J
tracks
DE
IDF
Play Mode function
Press [·PLAY MODE] repeatedly to select the desired mode.
1-TRACK
REPEAT
1-
REPEAT
Press [8] (stop) during play.
Press [4/9, CD] during play.
Press again to resume play.
Press [–/2] or [6/+].
During RANDOM play, you cannot skip to tracks that have
been played.
Press and hold [–/2] or [6/+] during play or pause.
• During program play (Z see below), or random play
(Z see below, “Play Mode function”), you can search
only within the track.
Play one selected track repeatedly on the disc.
Press [–/2] or [6/+] to select the track.
Repeat play a disc or programmed tracks (Z see below).
A Tape mode/standby switch
Unit will be in standby mode.
B OPR (operation) indicator
The indicator lights up when the unit is turned on.
C Clock or timer setting, play timer setting
D Speakers
These speakers do not have magnetic shielding. Do not place them near
televisions, personal computers or other devices easily infl uenced by
magnetism.
E Disc tray
F Tuner (FM/AM) selection, auto preset selection
G Disc play or pause
H Stop disc playback, MONO selection for FM mode
I Disc tray open or close
J Play mode function, program function, tuning mode selection
K Track skip or search, check program content, preset channel selection,
tuning function, time adjustment
L Sound equalizer (EQ) selection
M Display panel
N Volume control
O Cassette play operations
P Cassette deck
Headphone jack (PHONES)
Plug type: Ø 3.5 mm stereo (not included)
• Avoid listening for prolonged periods of time to prevent hearing damage.
• Excessive sound pressure from earphones and headphones can cause
hearing loss.
RANDOM
RND
Note
✒
During “Program play”, “Play Mode function” cannot be activated.
Program play
This function allows you to program up to 24 tracks.
Play a disc randomly.
1 Press [4/9, CD] and then [8] (stop).
2 Press and hold [–PGM] .
“PGM” is displayed.
3 Press [ – /2] or [6/+] to select your desired track.
4 Press [ –PGM].
Repeat steps 3 and 4 to program other tracks.
5 Press [4/9, CD] to start play.
Cancel program
mode
Replay the program
Check program
contents
Clear all
programmed tracks
Note
✒
• When you try to program more than 24 tracks, “FULL” appears.
• You will not be able to add more tracks to the existing program. The existing
program has to be cleared.
• The program memory is cleared when you open the disc tray.
Press and hold [–PGM] in the stop mode.
Press and hold [–PGM] then [4/9, CD] in the stop
mode.
Press [–/2] or [6/+] when “PGM” is displayed in
the stop mode.
Press and hold [8 ] (stop) in the stop mode.
“CLEAR” is displayed.
RQTX1040
4
4
PHONES
NOTE about using a DualDisc
✒
The digital audio content side of a DualDisc does not meet the technical
specifi cations of the Compact Disc Digital Audio (CD-DA) format so playback
may not be possible.
NOTE on CDs
✒
Choose discs with this mark:
• This unit can access up to 99 tracks.
• This unit can play CD-DA format audio CD-R/RW that have been fi nalised.
• It may not be able to play some CD-R/RW due to the condition of the
recording.
• Do not use irregularly shaped disc.
• Do not use disc with labels and stickers that are coming off or with adhesive
exuding from under labels and stickers.
• Do not attach extra labels or stickers on the disc.
• Do not write anything on the disc.
Using the FM/AM radio
Cassette tape – Play and record
Manual tuning Manual tuning
1 Press [FM/AM] to select “FM” or “AM”.
2 If “PGM” is displayed, press [TUNE MODE] to clear it.
3 Press [ – /2] or [6/+] to select the frequency of the required station.
To tune automatically
Press and hold [–/2] or [6/+] until the frequency starts changing
rapidly. The unit begins auto tuning, stopping when it fi nds a station.
• Auto tuning may not function when there is excessive interference.
• To cancel auto tuning, press [–/2 ] or [6 /+] once again.
To improve reception
FM: Extend the whip antenna and adjust its direction.
AM: Adjust the position of the unit.
To improve FM sound quality
When “FM” is selected
Press [FM MODE] to display “MONO”.
To c anc e l
Press [FM MODE] again.
• MONO is also cancelled if the frequency is changed.
• Turn off “MONO” for normal listening.
Memory preset Memory preset
Up to 16 stations each can be set in the FM and AM bands.
Preparation
✒
Press [FM/AM] to select “FM” or “AM”.
Automatic presetting
Press and hold [–AUTO PRESET] to start presetting.
The tuner presets all the stations it can receive into the channels in ascending
order. When fi nished, the last station memorised is tuned in.
Manual presetting
1 If “PGM” is displayed, press [TUNE MODE] to clear it.
2 Press [ – /2] or [6/+] to select the frequency of the required station.
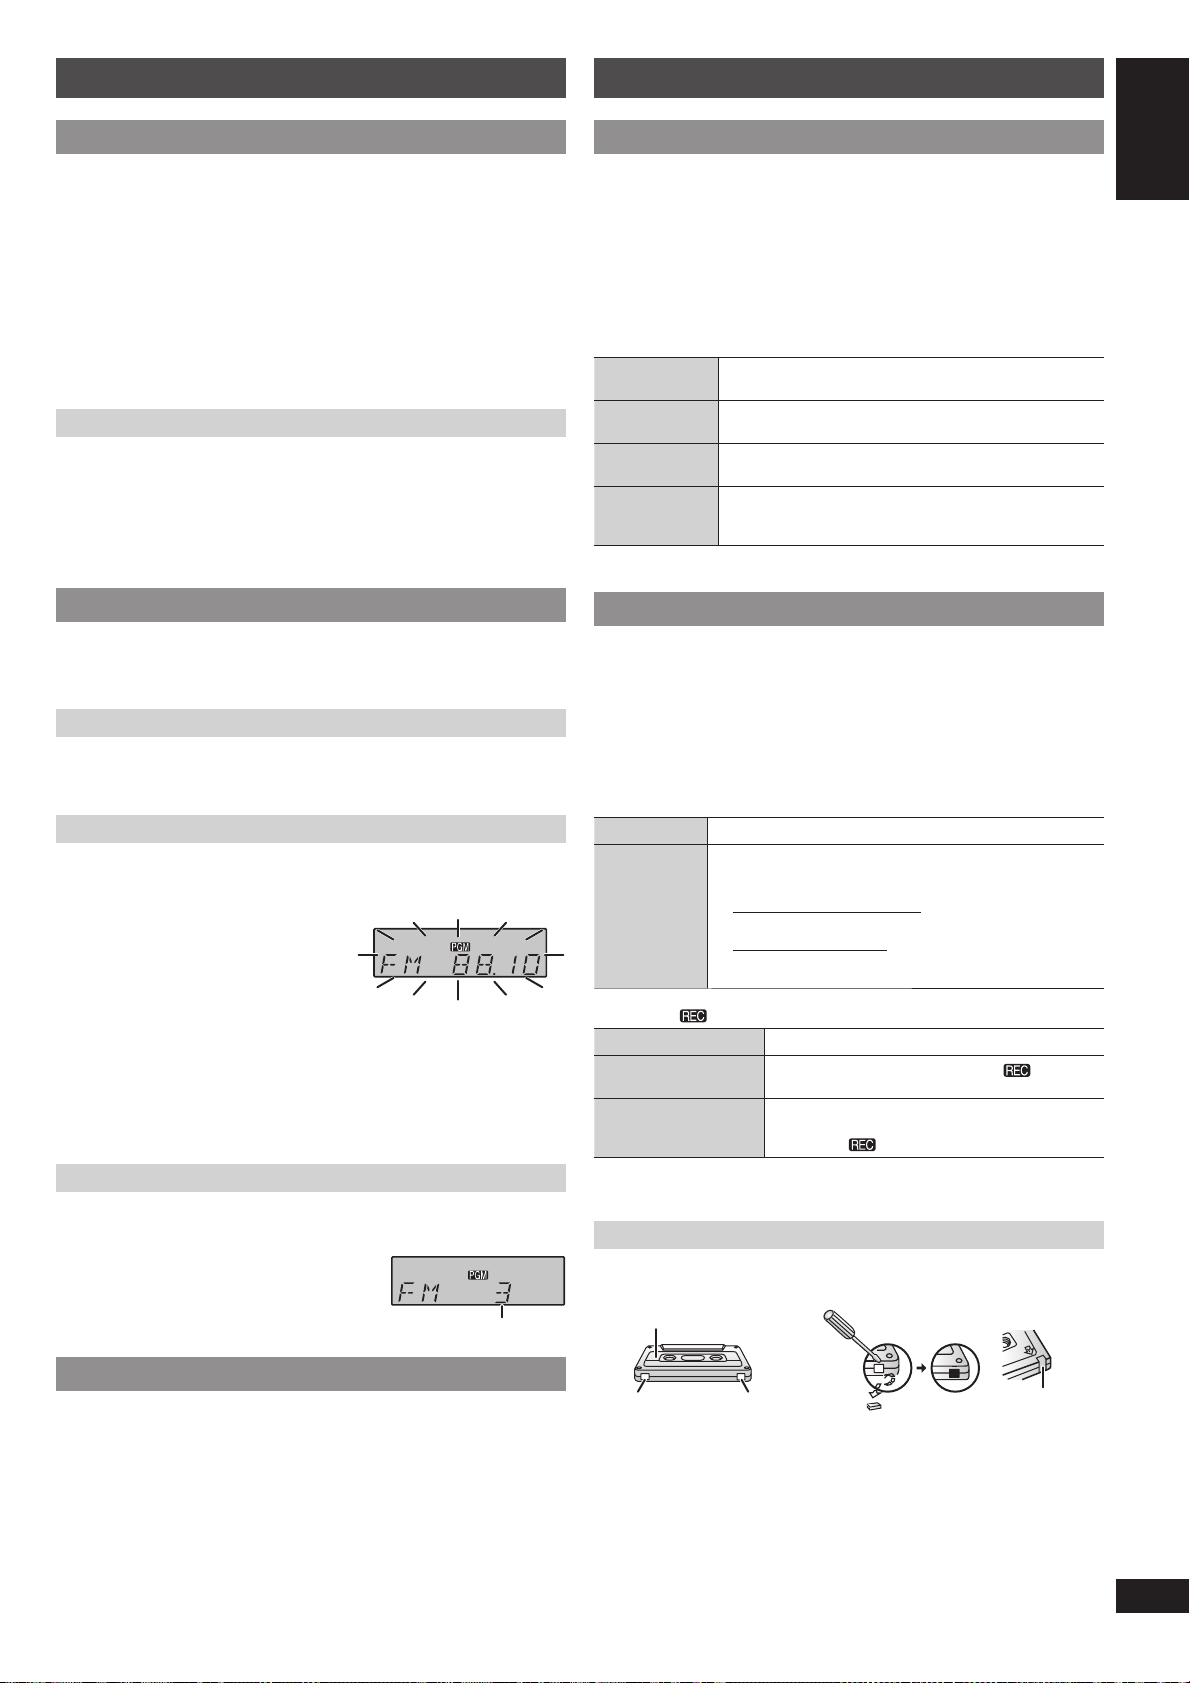
3 Press and hold [–PGM] .
“PGM” and the selected frequency blinks.
Basic play Basic play
Use normal position tapes.
High position and metal position tapes can be played, but the unit will not be
able to identify the characteristics of these tapes.
1 Press [TAPE/OFF].
2 Open the cassette operation buttons’ lid.
3 Press [8 /x , STOP/EJECT] and insert the cassette.
Insert with the side to be played facing up and the exposed tape facing
towards you. Close the deck by hand.
4 Press [4, PLAY] to start play.
Stop tape
playback
Pause play
Fast-forward
and rewind
Search for a
specifi c point
Recording Recording
Use normal position tapes.
High position and metal position tapes can be used, but the unit will not be able
to record or erase them correctly.
Preparation
✒
Wind up the source tape so recording can begin immediately.
Press [8/x, STOP/EJECT].
Press [9, PAUSE].
Press again to resume play.
Press [3, REW/REV] or [5, FF/CUE] in the stop
mode.
Press [3, REW/REV] (to search backward) or
[5, FF/CUE] (to search forward) during playback.
Play is resumed when the button is released.
1 Press [0, STOP/EJECT] and insert the cassette to be recorded.
Insert with the side to be recorded facing up and the exposed tape facing
towards you.
2 Select the source to be recorded.
Radio
Disc
Tune in the station (Z see left).
1. Insert the disc you want to record.
Press [4/9, CD] and then [8 ] (stop).
2. Prepare the desired disc recording mode.
Record programmed tracks
Program the tracks you want (Z page 4).
Record specifi c tracks
Press [·PLAY MODE] to select the desired mode
(Z page 4).
ENGLISHESPAÑOL
4 Within 10 seconds or so
Press [–PGM] followed by [–/2] or [6/+] to select the desired
channel.
5 Press [ –PGM].
The station occupying a channel is erased if another station is preset to that
channel.
6 Repeat steps 2 to 5 to preset more stations.
Selecting a preset station
1 Press [TUNE MODE].
“PGM” is displayed.
2 Press [–/2] or [6/+] to select the
channel.
Preset channel
AM allocation setting AM allocation setting
This system can also receive AM broadcasts allocated in 10 kHz steps.
To change the step from 9 kHz to 10 kHz
1 Press and hold [8] (stop).
After a few seconds the display changes to a fl ashing display of the current
minimum frequency.
2 Continue to hold down [8] (stop).
• When the minimum frequency changes, release the button. To return to the
original step, repeat the above steps.
• After the setting is changed, any previously preset frequency will be
cleared.
3 Press [
Stop recording
Record on the other
side of the tape
Erase a recorded
sound
Changes to volume and sound quality do not affect recording.
Erasure prevention
The illustration shows how to remove the tabs to prevent recording. To record on
the tape again, cover as shown.
To prevent recording
• Tapes exceeding 100 minutes are thin and can break or get caught in the
• Tape slack can get caught up in the mechanism and should be wound up
• Endless tapes can get caught up in the deck’s moving parts if used incorrectly.
V
] to start recording.
Note
✒
Side A
Tab for Side ATab for Side B
Note
✒
mechanism.
before the tape is played.
Press [8/x, STOP/EJECT].
Turn the cassette over and press [
1. Press [TAPE/OFF] .
2. Insert the recorded cassette.
3. Press [
V
].
V
].
To re-record
Adhesive tape
RQTX1040
5
5
Using the clock and timers
Using sound effects
Setting the clock Setting the clock
ENGLISHESPAÑOL
This is a 24-hour clock.
1 Press [CLOCK /TIMER] .
Each time you press the button:
CLOCK
# PLAY ON SLEEP
Original display
2 Within 5 seconds or so
Press [–/2] or [6/+] to set the time.
Holding down the button will speed up the time selection.
3 Press [CLOCK /TIMER] to fi nish setting the time.
Displaying the clock
Press [CLOCK/TIMER] to display the clock for few seconds.
Note
✒
• Reset the clock regularly to maintain accuracy.
• When the unit is in standby mode and it is powered by batteries, clock will not
be displayed.
Using the play timer Using the play timer
You can set the timer to come on at a certain time to wake you up.
Preparation
✒
• Turn the unit on and set the clock.
• Prepare the music source you want to listen to; disc or radio source, and set
the volume.
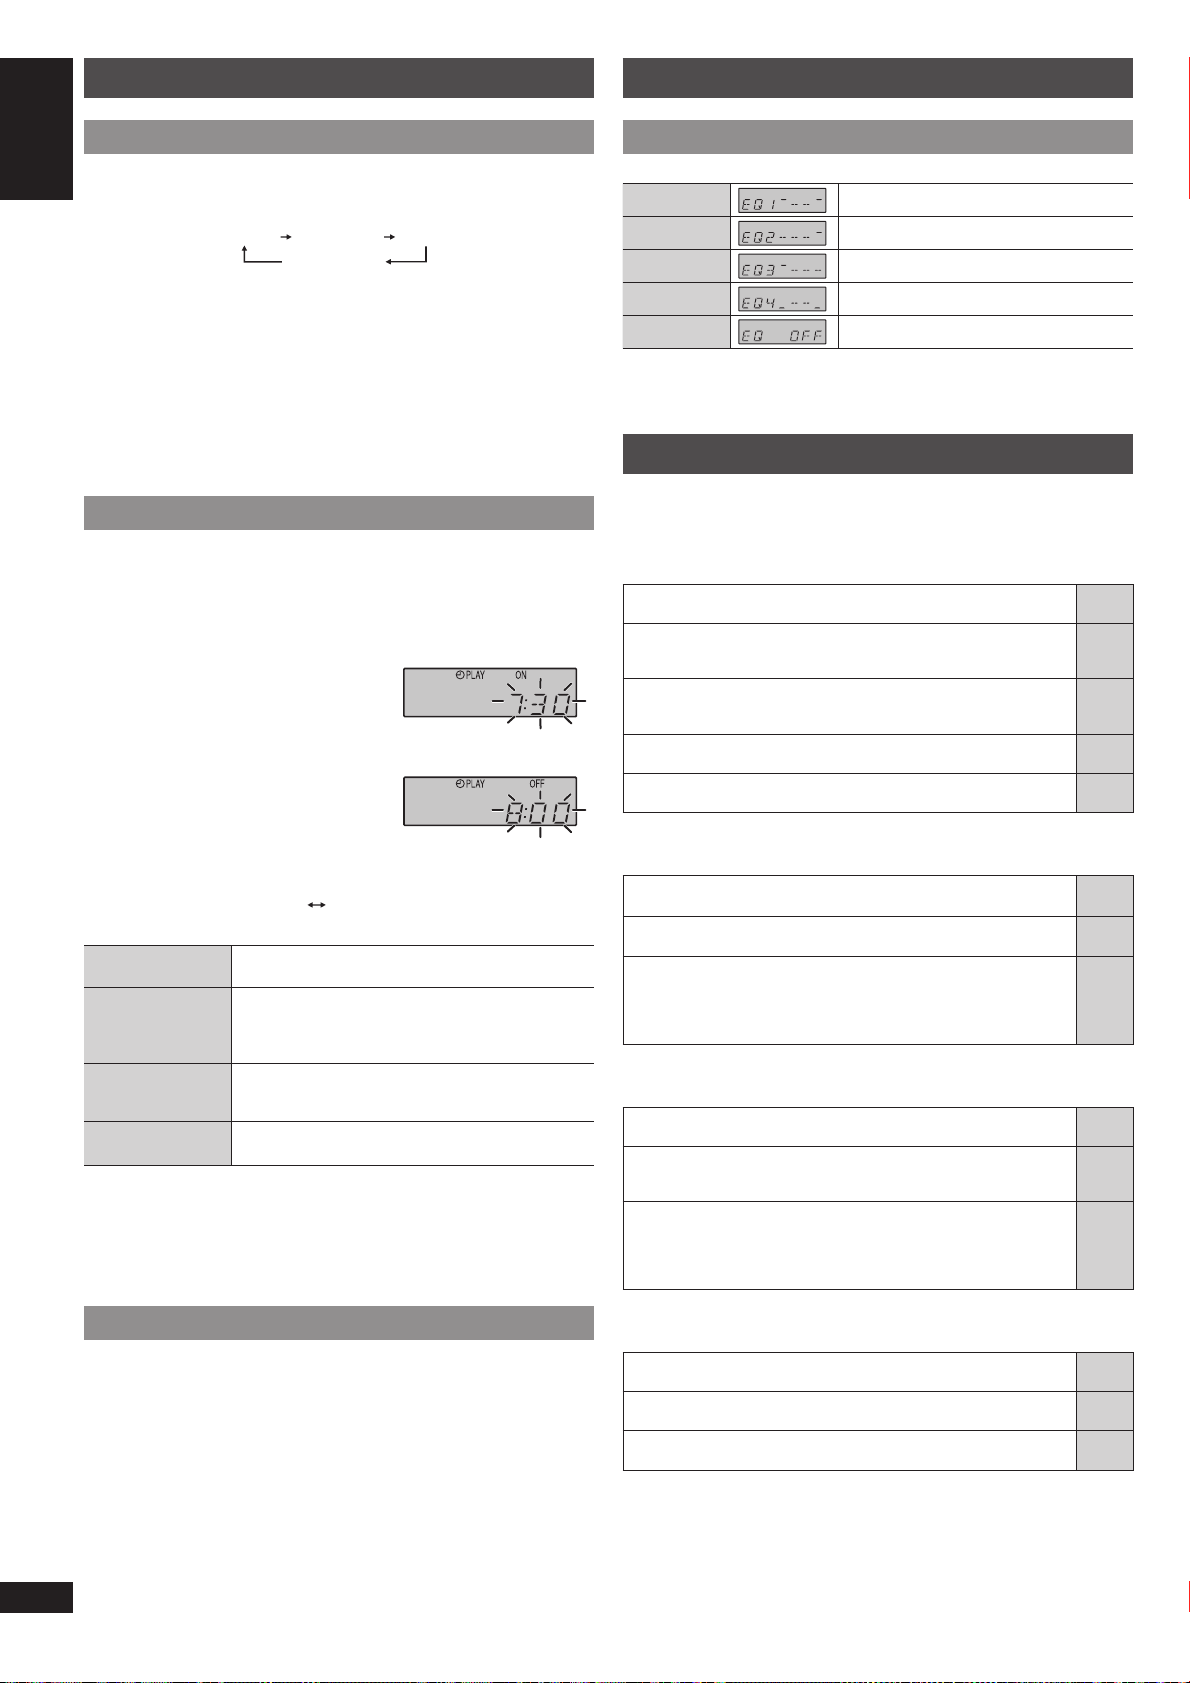
1 Press [CLOCK /TIMER] repeatedly to select the play timer.
2 Within 5 seconds or so
Press [–/2] or [6/+] to set the
starting time.
3 Press [CLOCK /TIMER] to confi rm.
4 Repeat steps 2 and 3 to set the fi nishing
time.
Changing the sound quality: Sound EQ Changing the sound quality: Sound EQ
Press [SOUND EQ] repeatedly to select your desired setting.
EQ1 (HEAVY)
EQ2 (CLEAR)
EQ3 (SOFT)
EQ4 (VOCAL)
EQ OFF
Adds punch to rock
Clarifi es higher frequencies
For background music
Adds gloss to vocal
Cancels the EQ selection
Troubleshooting guide
Before requesting service, make the following checks. If you are in doubt about
some of the check points, or if the solutions indicated in the chart do not solve
the problem, consult your dealer for instructions.
Common problems Page
■
Distorted sound or no sound.
• Turn the volume up.
A “humming” sound can be heard during play.
• An AC mains lead or fl uorescent light is near the unit. Keep other
appliances and cords away from the unit.
Clock display is not shown when the unit is powered by
batteries and is in standby mode.
• Connect to the household AC power in order to view the display.
“UO1” is displayed.
• Replace the batteries or use household AC power.
“F76” is displayed.
• There is a power supply problem. Consult the dealer.
—
—
3
—
—
To activate the timer
5 Press and hold [– # PLAY] to turn on the timer.
# PLAY
No display (off)
6 Press [TAPE/OFF] to turn off the unit.
Change the
settings
Change the source
or volume
Check the settings
(when the unit is on
or in standby mode)
Cancel
Note
✒
• The play timer will start at the preset time, with the volume increasing
gradually to the preset level.
• The timer comes on at the set time every day if the timer is on.
• The unit must be in the standby mode for the timer to function.
• If you turn the unit off and on again while a timer is functioning, the fi nish time
setting will not be activated.
Using the sleep timer Using the sleep timer
This function enables you to turn off the unit automatically after the set time
except in tape mode.
Repeat steps 1 to 4 and 6 (Z see above).
1. Press and hold [– # PLAY] to clear the timer
indicator from the display.
2. Make changes to the source or volume.
3. Perform steps 5 and 6 (Z see above).
Press [CLOCK/TIMER] repeatedly to select # PL AY.
Press and hold [– # PLAY] to clear the timer indicator
from the display.
1 Press [CLOCK /TIMER] repeatedly to select “SLEEP”.
2 Press [ – /2] or [6/+] to select your desired time (in minutes).
To c anc e l
Press [CLOCK/TIMER] repeatedly to show the remaining time, and press
[–/2] or [6/+] to select “OFF”.
Changing the remaining time
Press [CLOCK/TIMER] repeatedly to show the remaining time, and press
[–/2] or [6/+] to select your desired time.
RQTX1040
Note
✒
• The play and sleep timer can be used together.
6
• The sleep timer always has priority. Be sure not to overlap timer settings.
6
Discs
■
“ERROR”
• Incorrect operation performed. Read the instructions and try again.
“NOPLAY”
• Incorrect disc format. Insert the correct disc.
Incorrect display or play will not start.
• You have not inserted the disc correctly; insert it correctly.
• Disc may be dirty. Wipe it clean.
• Replace the disc if it is scratched, warped, or non-standard.
• Condensation has formed: Wait 1 to 2 hours for it to evaporate.
Cassette tape
■
Poor sound quality.
• Clean the heads.
Recording cannot be performed.
• If the erasure prevention tabs have been removed, cover the holes
with adhesive tape.
The cassette cannot be ejected or the deck cannot be closed
when loading a cassette.
• The batteries are fl at. Replace the batteries or connect to
household AC power.
• Press [4, PLAY] then [8 /x, STOP/EJECT].
Radio
■
Distorted sound or noise is heard.
• Use an outdoor antenna.
A beat sound is heard.
• Turn the television off or move it away from the unit.
A low hum is heard during AM broadcast.
• Separate the antenna from other cables and cords.
—
—
—
—
—
—
7
5
—
—
—
—
—
 Loading...