

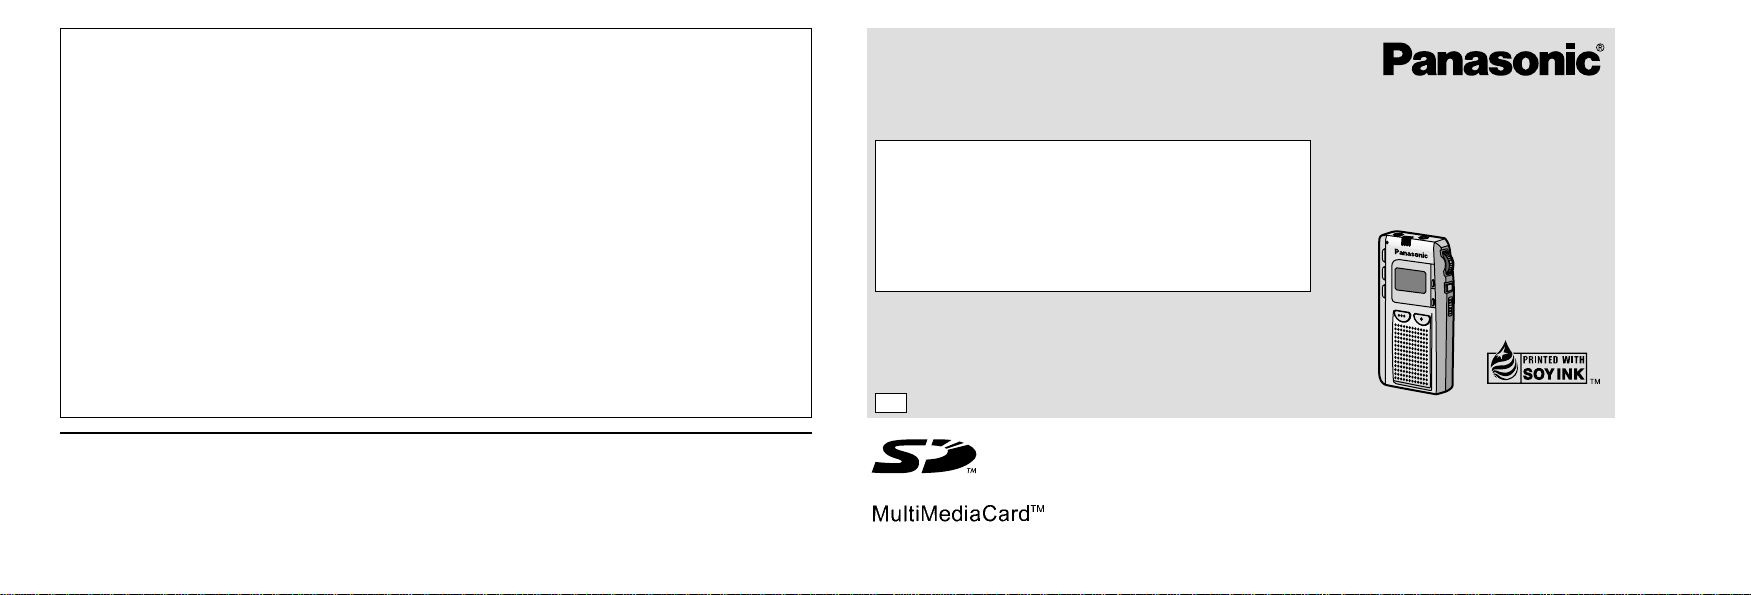
Page 1
p
Panasonic Consumer Electronics Company,Division of Matsushita Electric Corporation of America
One Panasonic Way Secaucus, New Jersey 07094
http://www.panasonic.com
Panasonic Sales Company, Division of Matsushita Electric of Puerto Rico, Inc. (“PSC”)
Ave. 65 de Infantería, Km. 9.5 San Gabriel Industrial Park, Carolina, Puerto Rico 00985
c
2000 Matsushita Electric Industrial Co., Ltd.
Printed in Japan
RQT5626-P
RQT5626-P F1200KB0
Before connecting, operating or adjusting this product, please
read these instructions completely. Please keep this manual
for future reference.
≥SD logo is a trademark.
≥Portions of this product are protected under copyright law and
are provided under license by ARIS/SOLANA/4C.
Follow these steps to save from an SD Memory Card to
your computer.
1.Connect the USB Reader/Writer to your personal
computer.
2.Install the SD Voice Editor software from the CD-ROM.
Read the operating instructions for SD Voice Editor for
details.
IC Recorder
Operating Instructions
Model No.
RR-XR320
CAUTION:
This equipment has been tested and found to comply with the limits for a Class B digital device, pursuant to Part 15
of the FCC Rules.
These limits are designed to provide reasonable protection against harmful interference in a residential installation.
This equipment generates, uses and can radiate radio frequency energy and, if not installed and used in accordance
with the instructions, may cause harmful interference to radio communications. However, there is no guarantee that
interference will not occur in a particular installation. If this equipment does cause harmful interference to radio or
television reception, which can be determined by turning the equipment off and on, the user is encouraged to try to
correct the interference by one or more of the following measures:
≥Reorient or relocate the receiving antenna.
≥Increase the separation between the equipment and receiver.
≥Connect the equipment into an outlet on a circuit different from that to which the receiver is connected.
≥Consult the dealer or an experienced radio/TV technician for help.
Any unauthorized changes or modifications to this equipment would void the user’s authority to operate this device.
This device complies with Part 15 of the FCC Rules. Operation is subject to the following two conditions: (1) This
device may not cause harmful interference, and (2) this device must accept any interference received, including
interference that may cause undesired operation.
Responsible Party:Matsushita Electric Corporation of America
One Panasonic Way Secaucus, NJ, 07094 USA
Telephone No.: 1-800-211-7262
P
This manual was printed
with soy based ink.
Page 2

2
3
RQT5626
RQT5626
Dear Customer
Thank you for purchasing this product.
For optimum performance and safety, please read these instructions carefully.
Optional accessories
ª
USB Reader/Writer
Replacement part number:BN-SDCAPU/1B
Table of contents
Before use
Basic operations
Advanced operations
References
LIstening caution . . . . . . . . . . . . . . . . . . . . . . . 4
Inserting the batteries. . . . . . . . . . . . . . . . . . . . 5
Hold function. . . . . . . . . . . . . . . . . . . . . . . . . . . 6
Setting the time. . . . . . . . . . . . . . . . . . . . . . . . . 7
Inserting SD Memory cards . . . . . . . . . . . . . . . 8
Selecting modes . . . . . . . . . . . . . . . . . . . . . . . . 9
Recording . . . . . . . . . . . . . . . . . . . . . . . . . . . . 10
Play. . . . . . . . . . . . . . . . . . . . . . . . . . . . . . . . . . 14
The operation tone . . . . . . . . . . . . . . . . . . . . . 17
Deleting files . . . . . . . . . . . . . . . . . . . . . . . . . . 18
Locking files . . . . . . . . . . . . . . . . . . . . . . . . . . 19
Formatting cards. . . . . . . . . . . . . . . . . . . . . . . 20
Adding and deleting folders. . . . . . . . . . . . . . 21
Dividing files . . . . . . . . . . . . . . . . . . . . . . . . . . 22
Moving files . . . . . . . . . . . . . . . . . . . . . . . . . . . 24
Titling folders and files. . . . . . . . . . . . . . . . . . 25
Using the timers . . . . . . . . . . . . . . . . . . . . . . . 29
Product service. . . . . . . . . . . . . . . . . . . . . . . . 32
Maintenance . . . . . . . . . . . . . . . . . . . . . . . . . . 32
Care and use . . . . . . . . . . . . . . . . . . . . . . . . . . 33
Control guide. . . . . . . . . . . . . . . . . . . . . . . . . . 34
SD Memory Cards. . . . . . . . . . . . . . . . . . . . . . 35
Displays . . . . . . . . . . . . . . . . . . . . . . . . . . . . . . 36
Troubleshooting guide. . . . . . . . . . . . . . . . . . 37
Specifications . . . . . . . . . . . . . . . . . . . . . . . . . 39
Servicenter list . . . . . . . . . . . . . . . . . . . . . . . . 40
Panasonic Audio Products Limited Warranty
. . . 42
DATE OF PURCHASE
DEALER NAME
DEALER ADDRESS
TELEPHONE NUMBER
User memo:
Supplied accessories
Please check and identify the supplied
accessories.
Use numbers indicated in parentheses when
asking for replacement parts.
To order accessories contact 1-800-332-5368
or web site (http://www.panasonic.com).
SD Memory card 16MB
USB Reader/Writer
Refer below for this replacement part number.
CD-ROM§(RFE0074)
§
Read the operating instructions for SD Voice
Editor for details.
The serial number of this product can be found on the
back of the cassette compartment cover or inside the
battery compartment.
Please note it in the space provided below and keep
as a permanent record of your purchase to aid
identification in the event of theft.
MODEL NUMBER RR-XR320
SERIAL NUMBER
Before use
Page 3
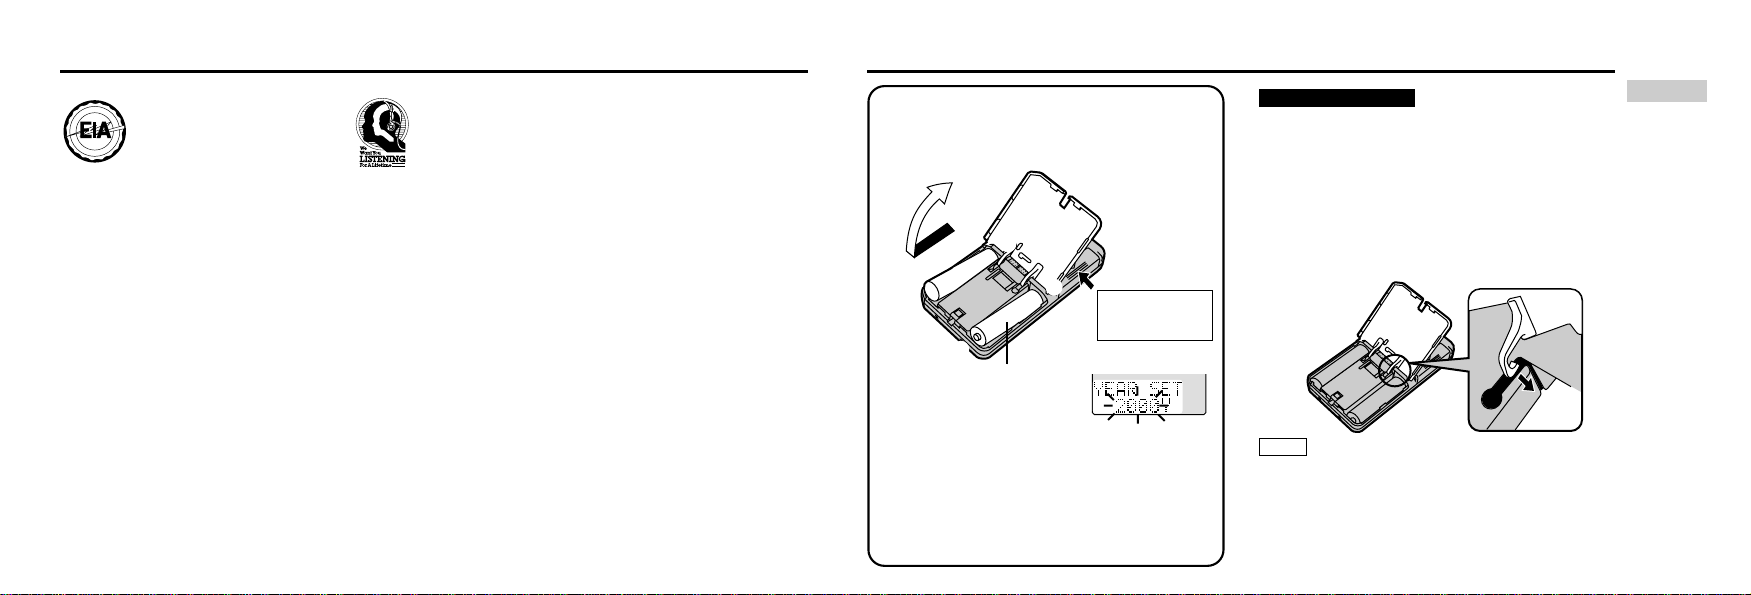
Inserting the batteriesListening caution
4 5
+
+
-
-
2
1
3
If strong impacts or dropping of the unit cause the
batteries, battery cover, card and card cover to come
loose while recording:
≥Recording can be lost.
or
≥The card may not be read correctly. (Reinsert the
batteries and card.)
≥Use alkaline batteries. Manganese batteries cannot be
used.
≥
Do not press any of the buttons while inserting the batteries.
≥Ensure the battery cover is completely closed to avoid
malfunction. The display goes out if the cover is open.
≥If rechargeable batteries are to be used, rechargeable
batteries manufactured by Panasonic are recommended.
ªIf the cover comes loose
Insert the cover’s hinges into the slots in the
battery compartment.
The year display starts flashing after you insert
the batteries.
Set the date and time (
‘
page 7, from step 2, 2).
If the display doesn’t flash, remove the
batteries and reinsert them ensuring the poles
are correctly aligned.
Ensure the card
cover is closed.
LR03, AAA, AM-4 batteries
(not included)
RQT5626
RQT5626
1 Slide the battery cover in the direction of
the arrow.
2 Open the cover.
3 Insert the batteries and close the cover.
For your reference
Note
Do not play your headphones or earphones at a
high volume. Hearing experts advise against
continuous extended play.
If you experience a ringing in your ears, reduce
the volume or discontinue use.
Do not use while operating a motorized vehicle. It
may create a traffic hazard and is illegal in many
areas.
You should use extreme caution or temporarily
discontinue use in potentially hazardous
situations.
Even if your headphones or earphones are the
open-air type designed to let you hear outside
sounds, don’t turn up the volume so high that you
can’t hear what’s around you.
Sound can be deceiving. Over time your hearing
“comfort level” adapts to higher volumes of sound.
So what sounds “normal” can actually be loud and
harmful to your hearing.
Guard against this by setting your equipment at a
safe level BEFORE your hearing adapts.
To establish a safe level:
≥Start your volume control at a low setting.
≥Slowly increase the sound until you can hear it
comfortably and clearly, and without distortion.
Once you have established a comfortable sound
level:
≥Leave it there.
E
L
E
C
T
R
O
N
I
C
I
N
D
U
S
T
R
I
E
S
•
A
S
S
O
C
I
A
T
I
O
N
•
EST. 1924
Before use
Page 4
Full
Low
MODE
6 7
Inserting the batteries
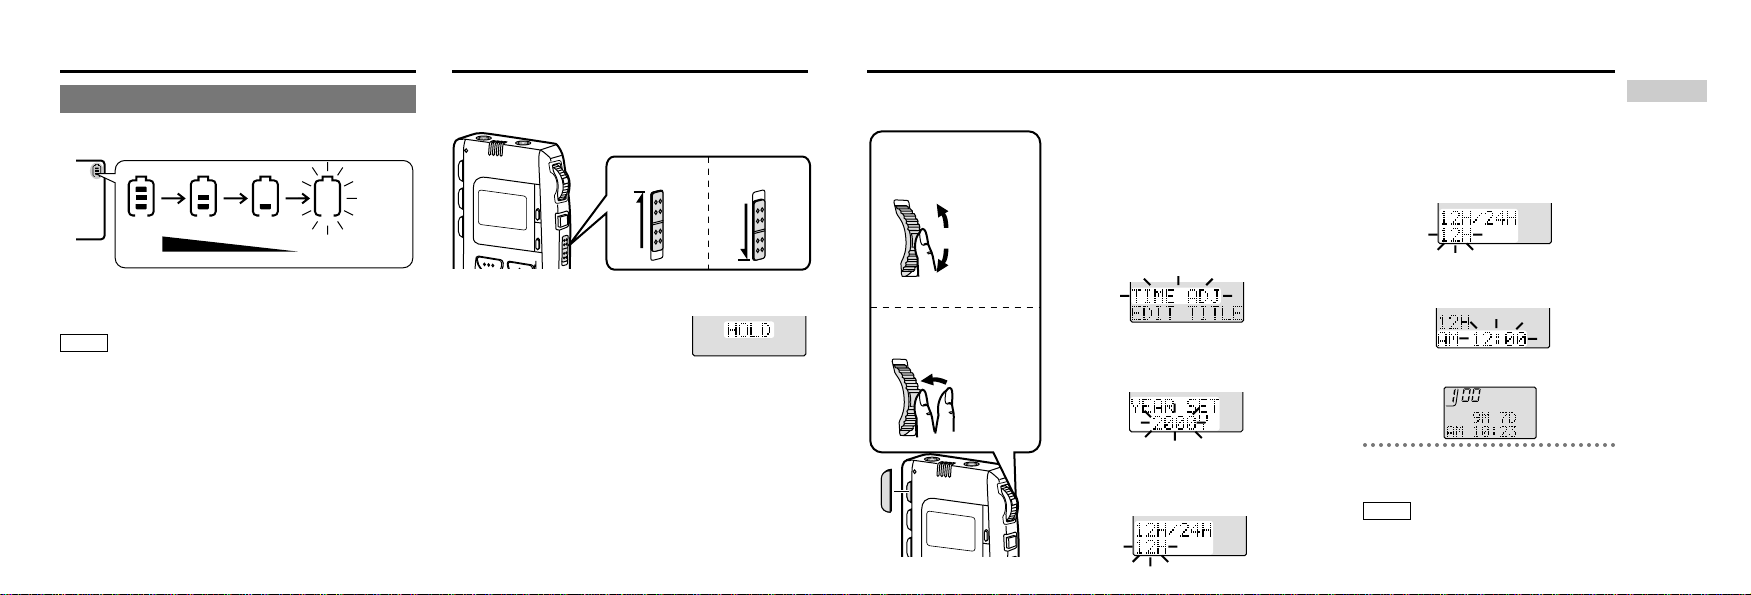
Hold function
The battery indicator
The indicator is shown during operation.
This prevents accidental operation causing the
batteries to run down.
When switched on
‘‘HOLD’’ appears for a few
seconds and then the display
goes out. Switch hold on
when not using the unit to
preserve the batteries.
Release hold before operation.
Replace the batteries when the indicator starts
flashing.
(Flashes)
≥The unit indicates the batteries are low even
when there is still some life left in them. This is
to preserve the contents of the memory.
≥Replace the batteries within 30 seconds to
preserve the clock settings. Recordings remain
intact.
Setting the time
Set the time to keep track of when recordings were made. Start from step 2, 2 after inserting the
batteries. Reset the clock regularly to maintain accuracy. (Monthly accuracy i/j60 seconds)
1To select
2To confirm
selection
1 Press [MODE].
You can now select a mode
(‘ page 9, “Selecting modes”).
2 1Within 10 seconds
Push [SELECT, ENTER] up
or down so “TIME ADJ”
flashes.
2 Within 10 seconds
Press [SELECT, ENTER].
The year display flashes.
3 Using the operations
described in 1 and 2, set
the year, month, and day.
“12 H” flashes.
4 1Within 10 seconds
Push [SELECT, ENTER] up
or down to select 12 or 24
hour display.
2 Within 10 seconds
Press [SELECT, ENTER].
The time display flashes.
5 Using the operations described
in 1 and 2, set the time.
ªIf the normal display appears
before you finish
Start again from step 1.
The clock stops when you replace the
batteries but starts again when you insert
the batteries and close the battery cover.
Hold Release
HQ
RQT5626
RQT5626
Note
Push up
or down
Press
Note
Normal
display
Before use
Page 5
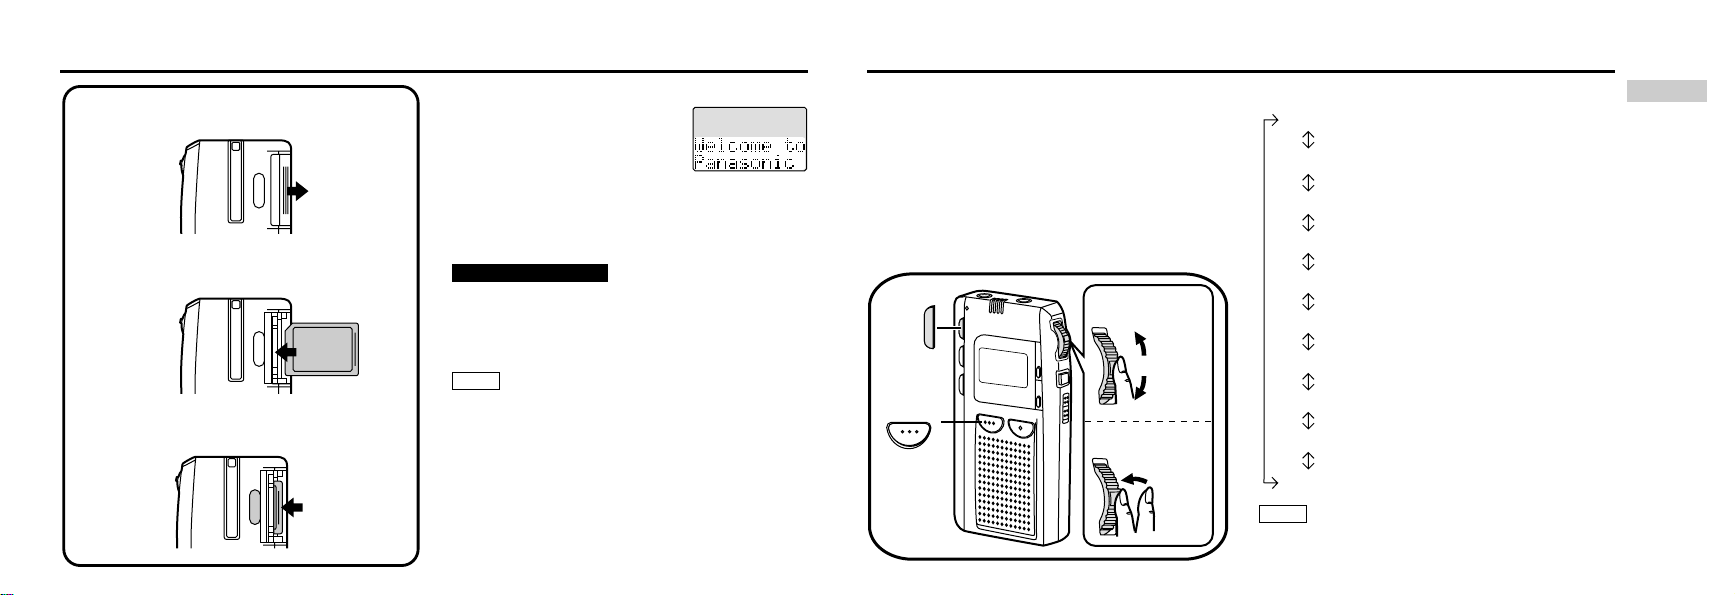
ªAfter you insert a card
‘‘Welcome to Panasonic’’
appears on the display.
The unit creates four new folders
if you insert a new, unused card.
ªTo remove the card
While the unit is stopped, open the cover and
press on the center of the card to unlock it.
Do not remove the card or batteries while the unit is
performing operations. This can cause data to be
destroyed.
Read the notes on SD Memory Cards on page 35.
You can use MultiMedia Cards in place of SD Memory
Cards, but you must format them before use.
Modes
“FILE LOCK” (File lock) ‘See page 19
“QUALITY” (Recording quality) ‘See page 11
“MIC SENSE” (Microphone sensitivity)
‘See page 13
“VAS SET” (VAS function) ‘See page 13
“BEEP SET” (Operation tone) ‘See page 17
“TIMER REC” (Timer recording)‘See page 29
“TIMER PLAY” (Timer play) ‘See page 30
“TIME ADJ” (Time setting) ‘See page 7
“EDIT TITLE” (Title editing) ‘See page 25
“FORMAT ALL” (Format card) ‘See page 20
≥The normal display is restored after 10 seconds.
≥Press [STOP] to cancel.
8 9
1 Slide the cover in the direction indicated by
the arrow.
2 Insert label-up with the cut-off corner facing
in.
3 Press on the center of the card so it locks
into place and close the cover.
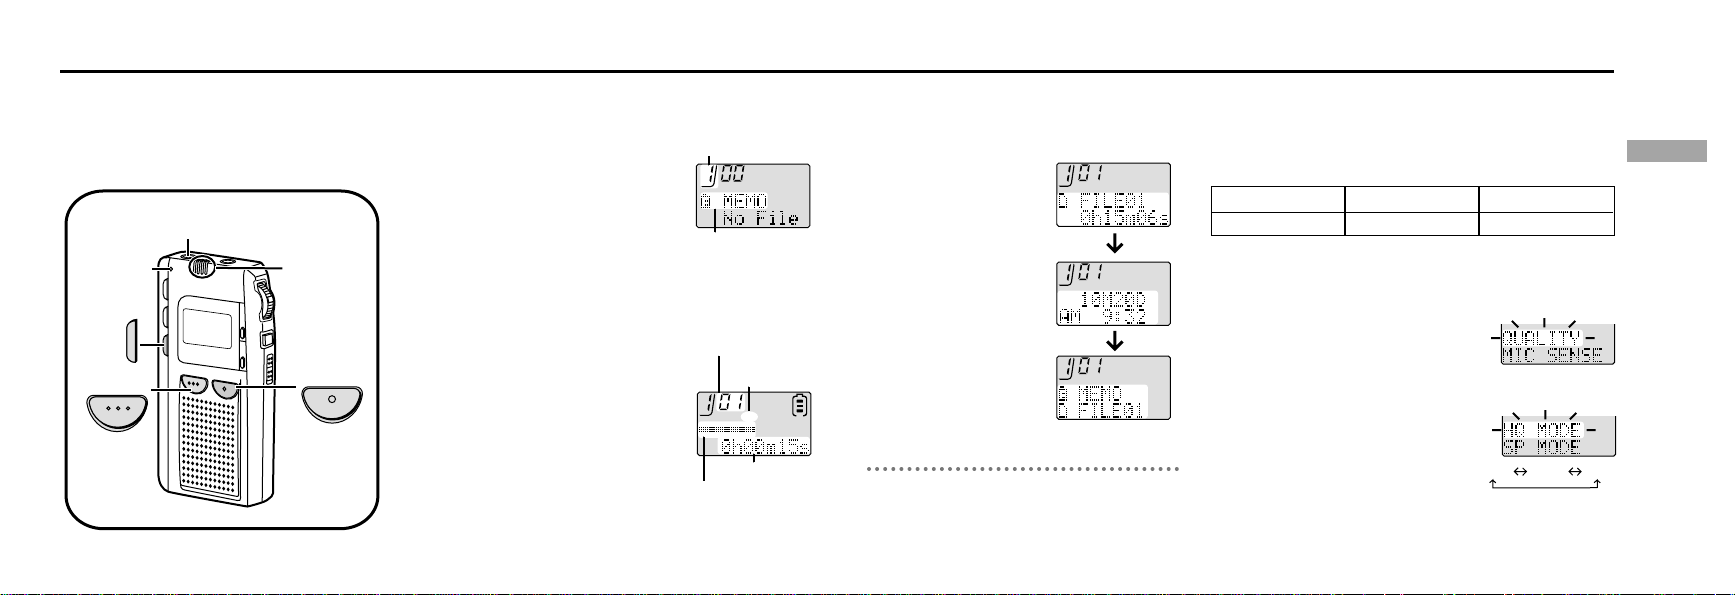
MODE
STSTOPOP
Use this operation to enter the various setting modes.
1 Press [MODE].
You can now select a mode.
2 1Within 10 seconds
Push [SELECT, ENTER] up or down so
the mode flashes.
2 Within 10 seconds
Press [SELECT, ENTER].
Refer to the pages indicated for further details.
RQT5626
RQT5626
Inserting SD Memory cards Selecting modes
For your reference
Note
Note
1To select
2To confirm
selection
Push
up or
down
Press
Before use
Page 6
ªRecording quality
The total recording time depends on the recording quality
you select. HQ (high quality) is factory setting and provides
the best sound quality.
Approximate recording times on the included 16 MB SD Memory Card
ªTo change the quality (‘ illustration on page 9)
This example shows how to set quality to HQ.
1 Press [MODE].
2 1Within 10 seconds
Push [SELECT, ENTER] up or
down so “QUALITY” flashes.
2 Within 10 seconds
Press [SELECT, ENTER].
3 1Within 10 seconds
Push [SELECT, ENTER] up or
down to select a mode.
2 Within 10 seconds
Press [SELECT, ENTER].
“HQ MODE SET” is displayed.
HQ mode
30 min.
LP mode
150 min.
SP mode
60 min.
Recording
3 Press [STOP] to stop recording.
The file information is shown in the
following order.
(File title and recording
time)
(Recording date and
time)
(Folder and file title)
Files are given titles automatically, but you
can change them (‘page 25).
ªTo pause recording
Press and hold [REC, PAUSE] until the
recording indicator starts flashing.
Press to resume recording.
$
RECREC%P A U S EP A U S E
STSTOPOP
FOLDERFOLDER
Preparation
Select the recording quality (‘page 11)
1 Press [FOLDER] to select a
folder to record into.
The folder changes with each press.
The initial four folders are titled: 1 MEMO, 2 MEETING,
3 TO DO, 4 PRIVATE. You can change the titles
(‘page 25).
2 Press [REC, PAUSE] to start
recording.
The recording indicator lights and
sound is recorded through the
built-in microphone.
Files are kept in folders. The unit creates
four folders when a new card is used and
you can create another five for a maximum
of nine (‘page 21). Each folder can hold
up to 99 files.
HQ
HQ
HQ
HQ
HQ
Plug-in power microphone jack
Built-in
microphone
Recording
indicator
Folder number
File number
Recording level meter
Recording time
Recording
quality
Folder title
10 11
RQT5626
RQT5626
HQ SP LP
Basic operations
Page 7
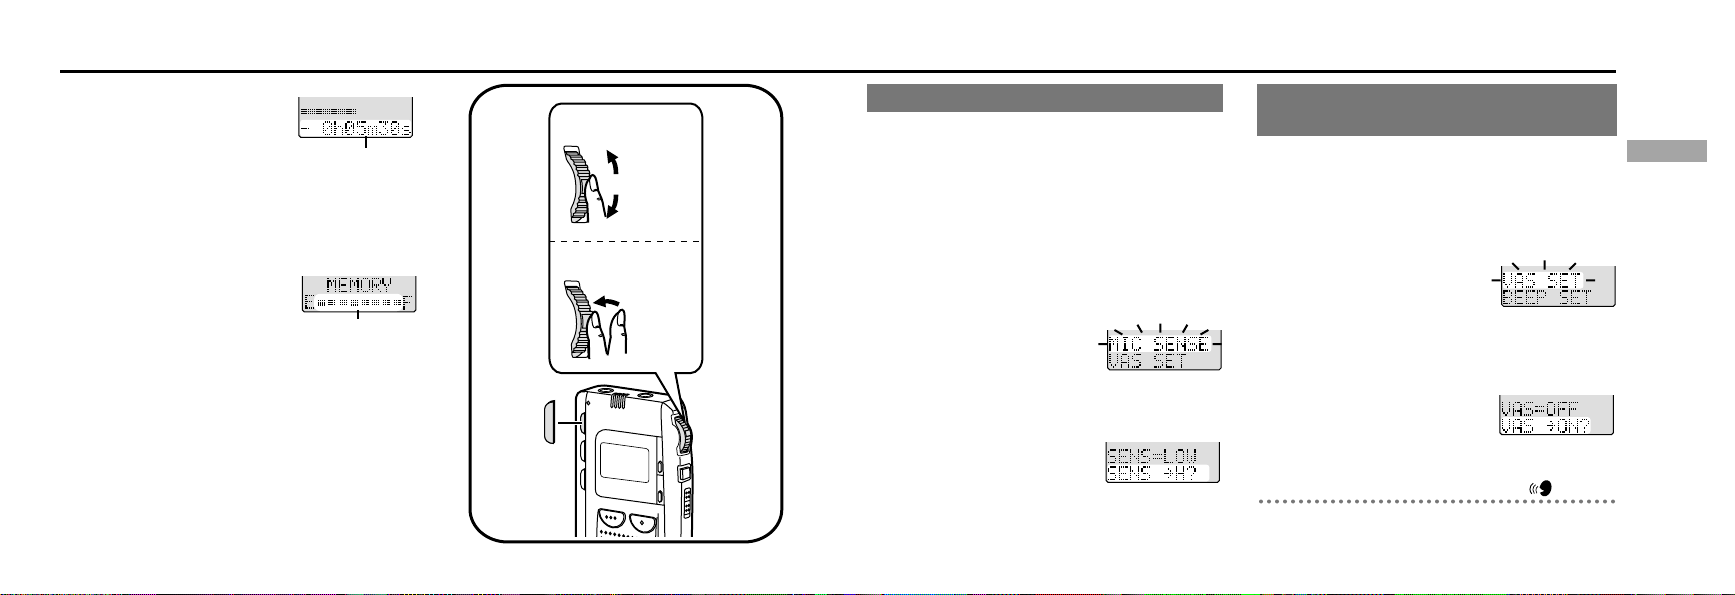
ªChecking the remaining
recording time
Press [MODE] while recording.
Press again to return to the
previous display.
The above display is shown automatically when the
remaining recording time becomes very short. Press
[MODE] to show the recording time in this case.
ªChecking the remaining
memory on the card
While the unit is stopped, press
and hold [STOP] for 2 seconds.
The meter reduces from right
to left as the remaining
memory reduces.
ªConnecting external microphone
Connect the microphone to the [MIC (PLUG IN
POWER)] jack. The built-in microphone is turned off.
Plug type: 3.5 mm (1/8in.) monaural
ªWhen a “NO MORE...” display appears
There are nine folders, there are 99 files in the folder,
or the card is out of memory.
Delete unneeded folders, and files or use another
card.
You can set sensitivity to high (to record relatively
softer sounds) or low (to record only relatively
louder sounds) to suit the circumstances. The
recording level meter can help you determine
which level is needed. The sensitivity also works if
you have connected external microphone.
This example shows how to set sensitivity to “HIGH”.
1 Press [MODE].
You can now select a mode.
2 1Within 10 seconds
Push [SELECT, ENTER] up
or down so “MIC SENSE”
flashes.
2 Within 10 seconds
Press [SELECT, ENTER].
3 1Within 10 seconds
Push [SELECT, ENTER]
up or down so “SENS
>
H?” flashes.
2 Within 10 seconds
Press [SELECT, ENTER].
“SENS=HIGH SET” is displayed.
The digital voice activating system (VAS) pauses
recording during periods of silence and so prevents
recording unnecessarily. VAS works better when
microphone sensitivity is set to “LOW”.
1 Press [MODE].
You can now select a mode.
2 1Within 10 seconds
Push [SELECT, ENTER]
up or down so “VAS
SET” flashes.
2 Within 10 seconds
Press [SELECT, ENTER].
3 1Within 10 seconds
Push [SELECT, ENTER] up or
down to select “VAS>ON?”.
2 Within 10 seconds
Press [SELECT, ENTER].
“VAS=ON SET” is displayed and “ ” lights.
ªTo turn VAS off
Select “VAS >OFF?” in step 3and press [SELECT, ENTER].
Turn VAS off when making important recordings.
MODEMODE
12 13
RQT5626
RQT5626
Remaining
recording time
Memory meter
Recording
1To select
2To confirm
selection
Push
up or
down
Press
Changing microphone sensitivity Using the voice activating system to
prevent unnecessary recording
Basic operations
Page 8

Preparation
Select the folder containing the file you want to play.
1 Push [SELECT, ENTER] up or down to select the
file.
The file information is shown in the following order.
2 Press [SELECT, ENTER] to start
play.
3 Press [VOLUME (r, s)] to adjust the volume.
ªTo stop play
Press [STOP].
Press [SELECT, ENTER] to resume play from where you
stopped.
Play
FOLDER
_
`
STOP
Volume may change during cue/review and after dividing files.
ªControlling play with [SELECT, ENTER]
To stop play
Press during
play
Push down
once
Push up once Push and hold in
position
To skip to
the next file
during play
To return to
the start of the
file playing
Cue and review
To play a recording you just made, start
from step 2. When play of a file finishes,
play stops and the next file number is
displayed.
HQ
Press again to
resume play
from where
you stopped.
The speed increases
in three steps when
held in position.
To return to the
start of the previous
file, push within the
first two seconds.
14 15
RQT5626
RQT5626
Plug in
firmly.
HQ
HQ
HQ
File title and
recording time
Recording date
and time
Folder and file
title
Play time
1To select
2To confirm
selection
Push
up or
down
Press
Note
Note
Up
(Review)
Down
(Cue)
ªUsing an earphone
Plug type:3.5 mm (1/8in.) monaural
≥Leave some slack in the
earphone cord if you wind it
around the unit.
≥The speaker is off while the
earphone is connected.
≥If a gritty noise is heard, wipe
away the dirt on the plug.
Basic operations
Page 9

Play
There are three play speeds. The speed is factory set to
normal.
ªChecking the remaining play time
Press [MODE] during play.
Press again to return to
the previous display.
ªScanning the files: Intro-scan
This plays the first five seconds of all the
files in a folder in order.
While stopped, press and hold [SELECT,
ENTER] for about two seconds.
When you find the file you want to play,
press [SELECT, ENTER]. The file is played
through to the end.
This example shows how to turn the tone off.
1 Press [MODE].
You can now select a mode.
2 1Within 10 seconds
Push [SELECT, ENTER] up or
down so “BEEP SET”flashes.
2 Within 10 seconds
Press [SELECT, ENTER].
3 1Within 10 seconds
Push [SELECT, ENTER] up or
down so “BEEP>OFF?”
flashes.
2 Within 10 seconds
Press [SELECT, ENTER].
“BEEP = OFF SET” is displayed.
ªTo turn the tone on
Select “BEEP>ON?” in step3, 1 and press [SELECT,
ENTER].
The tone is factory set to on, but you can
turn it off.
MODE
HQ
PLAYBACK SPEED
NORFASTSLOW
16 17
RQT5626
RQT5626
Remaining play time
Changing the play speed
Slow
Fast
The operation tone
1To select
2To confirm
selection
Push
up or
down
Press
Basic operations
Page 10

Deleting files
3 Press [ERASE].
If you deleted one file, the file numbers after
that file decrease by one.
ªTo cancel partway through
Press [STOP] before step 3.
≥If you have selected an empty folder, “File
Erase?” will not be displayed when you press
and hold [ERASE].
≥You cannot delete locked files. Unlock the files
before deleting them (‘right, Locking files).
≥After repeatedly recording and deleting files, the
total possible recording time may be reduced.
You can remedy this by reformatting the card
(‘page 20).
Note
Preparation
Select the folder containing the file(s) you want to delete.
Do not open the battery or card covers or remove
the card during the deleting process.
1 Press and hold [ERASE] for 2 seconds.
“FileErase?” is displayed.
2 Within 10 seconds
Push [SELECT, ENTER] up or down to select the
item you want to erase.
The display changes as follows.
You can delete individual files or all files at
once. You cannot restore files that you
have deleted.
FOLDER
ERASE
STOP
Locking files prevents them from being deleted in
error.
Preparation
Select the file you want to lock.
1 Press [MODE].
You can now select a mode.
“FILE LOCK” flashes.
2 Press [SELECT, ENTER].
3 1Push [SELECT, ENTER]
up or down to select
“LOCK>ON?”.
2Press [SELECT, ENTER].
“ LOCK SET” is
displayed and “ ” is
displayed in front of the
file name.
ªTo cancel partway through
Press [STOP] before step 3, 2.
ªTo unlock the file
Select “LOCK>OFF?” in step 3, 1 and press
[SELECT, ENTER].
18 19
RQT5626
RQT5626
a First file in the folder
d All files in all folders c All files in the folder
b Last file in the folder
Locking files
1To select
2To confirm
selection
Push
up or
down
Press
Important
Basic operations
Page 11

Adding and deleting folders
ªTo cancel partway through
Press [STOP] before step 4.
Use the appropriate software to format cards if you
intend to use the card to record SD Audio and similar
material.
≥All data on the card, including recordings made with
another unit, is deleted when the card is formatted.
≥You cannot format the card if the write-protect switch is
engaged (‘page 35).
≥Four folders are created when you format a card.
FOLDER
±±
§
, MEMO, MEETING, TO DO, PRIVATE,
SCHEDULE, OFFICE, HOME, BUSINESS, STUDY,
SPEECH, IDEA, TRAVEL, LESSON, MESSAGE
Formatting is not necessary under normal
circumstances. If the unit appears to be having
trouble reading the card, try reinserting the card and
the batteries. Use this unit to reformat the card if this
is ineffective.
1 Press [MODE].
You can now select a mode.
2 1Within 10 seconds
Push [SELECT, ENTER]
up or down so “FORMAT
ALL” flashes.
2 Within 10 seconds
Press [SELECT, ENTER].
“FORMAT THE CARD?”is
displayed.
3 Within 10 seconds
Press [SELECT, ENTER].
“DELETE ALL CONTENTS?”
is displayed.
4 Within 10 seconds
Press and hold [SELECT, ENTER] for about
2 seconds.
“FORMAT THE CARD NOW” is displayed and
formatting starts.
1 While stopped
Press and hold [FOLDER] for
two seconds.
2 Within 10 seconds
Press [SELECT, ENTER].
3 1Push [SELECT, ENTER] up or
down to select a title (‘below
for a list of titles).
2 Press [SELECT, ENTER].
The title is entered and the
folder is added.
See “Titling folders and files” on page 25 to change the
title.
§
Folder number
FOLDER
ERASE
STOP
A card can have up to nine folders. You can
delete unneeded folders.
20 21
RQT5626
RQT5626
Formatting cards
Note
Note
For your reference
1To select
2To confirm
selection
Push
up or
down
Press
Adding folders
Advanced operations
Page 12

Dividing files
Adding and deleting folders
Preparation
Select the file you want to divide
(‘page 14).
1 Press [SELECT, ENTER] to play
the file.
2 Press [DIVIDE] at the point you
want to divide the file.
Play stops and the file number
and play time flash.
3 Press and hold [DIVIDE] for two
seconds.
The file numbers after the file you
divide increase by one.
ªTo cancel partway through
Press [STOP] before step 3.
When you divide a file, the part after the
division takes a different file number,
making it easier to find parts you want to
play or save separately.
DIVIDE
STOP
≥You cannot divide a file if there are already 99
files in a folder.
≥You may not be able to divide files less than 1
second.
≥The information about the divided file may not be
correct. Use it as a guide only.
≥Even after the total possible recording time has
been reached and “NO MORE SPACE” is
displayed, it is still possible to divide files two
more times.
Erase unneeded files to make further divisions.
Preparation
Select the folder you want to delete.
1 While pressing [ERASE], press
and hold [FOLDER] for two
seconds.
The folder number flashes.
2 Press and hold [ERASE] for two
seconds.
The folder is deleted.
ªTo cancel partway through
Press [STOP] before step 2.
You cannot delete the four original folders with this unit.
22 23
RQT5626
RQT5626
Press
HQ
HQ
Deleting folders
Note
Note
File number
File number
after division
Advanced operations
Page 13

Moving files Titling folders and files
ªTo cancel partway through
Press [STOP] before step 3, 2.
You cannot move a file to a folder that already
contains 99 files.
You can move files to other folders to keep
related files together.
Preparation
Select the file you want to move (‘page 14).
1 Press [SELECT, ENTER] to play
the file.
2 Press [FOLDER].
3 1Within 10 seconds
Push [SELECT, ENTER] up or
down to select the other
folder.
2 Within 10 seconds
Press [SELECT, ENTER].
The file is added to the end of
the other folder.
You can give folders and files titles of up to 32
characters.
≥You can also use SD Voice Editor (included) to title folders and
files. Refer to the operating instructions for SD Voice Editor for
details.
≥You can make file titles of up to 200 characters with SD Voice
Editor, but this unit can only make titles with 32 characters.
Longer titles are still displayed.
≥Some characters you can enter with a computer may not be
displayed correctly on this unit.
FOLDER
STOP
24 25
RQT5626
RQT5626
HQ
HQ
Folder number
Number of other folder
Title of other folder
1To select
2To confirm
selection
Push
up or
down
Press
Note Note
Advanced operations
Page 14

ªIf the normal display appears before you finish
Start again from step 1.
ªTo cancel partway through
Press [STOP].
The unit’s display can show eight characters at one time. Titles
longer than this scroll across the screen when you select the
folder or file.
Titling folders and files
4 1When “GO EDIT” is displayed,
push [SELECT, ENTER] up or
down to select the position where
you want to start entering the title.
2 Press [SELECT, ENTER].
The characters you
can enter appear
below the title.
5 Enter the characters (‘page 28).
6 Press and hold [SELECT, ENTER] for
one second.
“EXIT EDIT” is displayed.
7 Press [SELECT, ENTER].
The normal display is restored.
1 Press [MODE].
You can now select a mode.
2 1 Within 10 seconds
Push [SELECT, ENTER] up or
down so “EDIT TITLE”flashes.
2 Within 10 seconds
Press [SELECT, ENTER].
3
1 Push [SELECT, ENTER] up or
down so “FOLDER?” flashes.
2 Press [SELECT, ENTER].
1 Push [SELECT, ENTER] up or
down so “FILE?” flashes.
2 Press [SELECT, ENTER].
Enter titles of up to 32 characters. Write
over the current title.
MODE
STOP
26 27
RQT5626
RQT5626
Titling folders and files
1To select
2To confirm
selection
Push
up or
down
Press
When titling a folder
When titling a files
Note
Advanced operations
Page 15

Character
ABCDEFGHIJKLMNOPQRSTUVWXYZ
abcdefghijklmnopqrstuvwxyz
0123456789
@
∑ (space)
! ”fl $ % & ’( ) £i , . / : ; O b N ?
Using the timers
Preparation
Set the clock (‘page 7).
Select the folder to record into (‘page 10).
1 Press [MODE].
You can now select a mode.
2 1Within 10 seconds
Push [SELECT, ENTER] up or
down so “TIMER REC” flashes.
2 Within 10 seconds
Press [SELECT, ENTER].
The current setting is displayed
for 2 seconds.
3 1Within 10 seconds
Push [SELECT, ENTER] up or
down so “TIMER ON”
flashes.
2 Within 10 seconds
Press [SELECT, ENTER].
The start time flashes.
ªDeleting characters
First display “EXIT EDIT” (‘page 27, step 6).
1 1Push [SELECT, ENTER] up or down to select the
character you want to correct.
2Press [SELECT, ENTER].
2 Press [ERASE].
The character is deleted, leaving a space.
Use the following procedures while the
folder or file entering display is shown (the
cursor is flashing).
ªEntering characters
1 1Push [SELECT, ENTER] up or down to
select the character you want to enter.
2 Press [SELECT, ENTER].
The cursor moves to the right.
2 Use the same procedure to enter the
next character.
ªMaking corrections
First display “EXIT EDIT” (‘page 27, step 6).
1 1Push [SELECT, ENTER] up or down
to select the character you want to
correct.
2 Press [SELECT, ENTER].
2 1Push [SELECT, ENTER] up or down
to select the new character.
2Press [SELECT, ENTER].
3 Use the same procedure to correct other
characters.
≥Press [VOLUME (i, j)] to change the character type.
≥Characters change five at a time if you push and hold
[SELECT, ENTER].
You can set start and finish times for
recording.
MODE
F
REC
28 29
RQT5626
RQT5626
Titling folders and files
Entering characters
Characters you can use
Record timer
1To select
2To confirm
selection
Push
up or
down
Press
Note
Text mode
CAPITALS
lower case
Numerals and
symbols
Advanced operations
Page 16

Using the timers
4 1Within 10 seconds
Push [SELECT, ENTER] up or
down to set the start time.
2 Within 10 seconds
Press [SELECT, ENTER].
“TIMER PLAY SET” is displayed.
The start time and file information are
displayed, then the normal display is
restored.
“F PLAY” flashes while the play timer is
functioning.
Set a time to start play.
Play stops when the file ends.
Preparation
Set the clock (‘page 7)
Select the file you want to play (‘page 14)
1 Press [MODE].
You can now select a mode.
2 1Within 10 seconds
Push [SELECT, ENTER] up or down so “TIMER
PLAY” flashes.
2 Within 10 seconds
Press [SELECT, ENTER].
The current setting is displayed for 2 seconds.
3 1Within 10 seconds
Push [SELECT, ENTER] up or down so “TIMER
ON” flashes.
2 Within 10 seconds
Press [SELECT, ENTER].
The start time flashes.
MODE
F
PLAY
30 31
RQT5626
RQT5626
Record timer Play timer
4 1Within 10 seconds
Push [SELECT, ENTER] up or down to set the
start time.
2 Within 10 seconds
Press [SELECT, ENTER].
5 Use the same steps to set the finish time
“TIMER REC SET” is displayed.
The start and finish times are displayed, then the
normal display is restored.
≥If VAS is on, the recording may be shorter than the set time.
≥If you make recordings before the timer recording starts, be
careful that there is enough time remaining for the timer.
≥You cannot set the timer if there is less than one second of
recording time left.
≥“F REC” flashes while the record timer is functioning.
1To select
2To confirm
selection
Push
up or
down
Press
Note
Note
Advanced operations
Page 17

Using the timers
ªTo cancel the timer
In step 3 of the above two timer setting
procedures, select “OFF” and press
[SELECT, ENTER]. The indicator for the
timer (“F REC” or “F PLAY”) goes out.
ªTo check the timer settings
1 Press [MODE].
You can now select a mode.
2 1Within 10 seconds
Push [SELECT, ENTER] up or down
to select “TIMER REC” or “TIMER
PLAY”.
2 Within 10 seconds
Press [SELECT, ENTER].
The timer settings are shown for about two
seconds.
≥You can set the timer within twenty-four hours of
the present time.
≥You cannot use the two timers at the same time.
The timer you set last will work.
≥The timer settings are cleared if the batteries are
removed or if the time information is lost, or the
card is removed from the unit.
∫Unit
≥Avoid using or placing this unit near sources of
heat. Do not leave it in an automobile exposed
to direct sunlight for a long period of time with
the doors and windows closed.
≥To avoid product damage, do not expose this
product to rain, water or other liquids.
≥Do not keep this unit and magnetized cards
(bank cards, commuter passes, etc.) close
together.
≥These speakers do not have magnetic shelding.
Do not place them near televisions, personal
computers or other devices easily influenced by
magnetism.
∫Dry cell battery
≥Align the poles (+ and - ) properly when
inserting the batteries.
≥Do not mix old and new batteries or different
types of batteries.
≥Do not recharge ordinary dry cell batteries.
≥Remove the batteries if the unit is not to be used
for a long time.
≥Do not use the batteries if the covering has been
peeled off.
Mishandling of batteries can cause electrolyte
leakage which can damage items the fluid
contacts and may cause a fire.
If electrolyte leaks from the batteries, consult your
dealer. Wash thoroughly with water if electrolyte
comes in contact with any part of your body.
Do not attempt to remove the cover(s) or repair the unit
yourself. Refer servicing to qualified personnel only.
∫Product information
For product service, product information or assistance
with product operation, refer to the servicenter directory.
∫If the surfaces are dirty
To clean this unit, wipe with a soft, dry cloth.
If the surfaces are extremely dirty, use a soft cloth
dipped in a soap-and-water solution or a weak detergent
solution.
≥Never use alcohol, paint thinner or benzine to clean
this unit.
≥Before using chemically treated cloth, read the
instructions that came with the cloth carefully.
32 33
RQT5626
RQT5626
Timer settings
Note
Care and useProduct service
Maintenance
References
Page 18

SP mode
LP mode
Recording Quality
65
12026
34 35
RQT5626
RQT5626
3
2
4
5
6
1
78 9 :
;
<
=
>
?
A
@
B
C
D
E
1 Card window
2 SD Memory Card cover
3 Clip
4 Play speed switch [PLAYBACK SPEED]
5 Battery cover
6 Hand strap hole
7 Microphone jack [MIC (PLUG IN POWER)]
8 Built-in microphone [MIC]
9 Earphone jack [#]
: Display screen
; Volume [VOLUME (r, s)]
< Shuttle key [SELECT, ENTER]
= Erase [ERASE]
> Hold [HOLD]
? Recording, pause [REC, PAUSE]
@ Stop [STOP]
A Speaker
B Recording indicator
C Mode [MODE]
D Divide [DIVIDE]
E Folder [FOLDER]
Ensure the battery cover can close completely if you fit a hand
strap. Fitting a thick strap can cause the cover to close
incompletely and lead to incorrect operation.
Control guide SD Memory Cards
SD Memory Cards are small, light, removable
memory media. With one SD card, you can record
sounds with this unit and graphics using other
equipment.
ªTo protect your data
≥Set the write-protect switch to LOCK. Release
the switch to make other recordings.
≥Use a felt pen to write on the space provided.
≥Do not remove the card or batteries while
operating the unit as this can damage your data.
≥Backup your data on a computer to guard
against loss due to accidental erasure or card or
unit damage.
ªReplacement
Purchase a new card if the included one becomes
full. The total available recording time depends on
the type of card (see below).
Approximate available recording times (min.)
Memory and recording times may differ to those given
above when using MultiMedia Cards.
See page 11 for details about 16 MB cards.
HQ mode
Memory
13
8MB 32MB 64MB
60 130
260
300 650
Note
Note
Write-protect
switch
Memo space
Rear
view
References
Page 19

No sound, low level sound, or excessive
noise while using an earphone.
“ILLEGAL FILE”
“CAN’T REC”
The hold function is on.
The battery cover is open.
The batteries are loose.
The batteries are flat. If not, try reinserting them.
Insert a card.
The card’s write-protect switch is engaged.
The card is full. Delete unneeded files or use another card.
“U01 LOW BATT”
Plug it in firmly.
Wipe the plug clean.
“ERROR”
The time and date of recording is not displayed if the
clock isn’t set.
No operations.
No recording.
The write-protect switch is
engaged.
36 37
RQT5626
RQT5626
Troubleshooting guideDisplays
“CARD COVER”
“NO CARD”
“CARD WRITE PROTECTED”
“NO MORE 99 FILE REC”
“NO MORE 9 FOLDER”
“NO MORE SPACE”
“LOCKEDFILE”
The card cover is open.
You haven't inserted a card.
An error has occurred.
There is a problem with the file.
The batteries are flat.
The folder contains 99 files.
There are already nine folders on
the card.
The card is out of memory.
The file cannot be deleted
because it is locked.
Replace the batteries.
Delete unneeded files before
recording or editing.
Delete unneeded folders before
proceeding.
Delete unneeded files before
recording or editing.
Unlock the file before deleting it.
Close the cover.
Insert a card.
Record and edit after releasing
the switch.
Reinsert the card and batteries. If
this doesn't remedy the situation,
use a computer to make a backup
of the data, then reformat the card.
Either you can continue or you
can make a backup of the data
and reformat the card.
Before requesting service, make the below checks. If you are in doubt about some of the check
points, or if the remedies indicated in the chart do not solve the problem, contact the Panasonic
Customer Call Center at 1-800-211-7262, or e-mail consumerproducts@panasonic.com, or web
site (http://www.panasonic.com/sd).
The time and date of recording is not
shown.
6
5
5
6
8
35
18
15
—
7
References
Page 20

Some characters you can enter with a computer
may not be displayed correctly on this unit.
There is no sound if you connect an earphone.
Raise the volume.
The card’s write-protect switch is engaged.
You cannot delete the four original folders.
No sound from the speaker.
Cannot play.
—
39
RQT5626
38
RQT5626
Troubleshooting guide
Play is too fast or too slow.
Recording stops unexpectedly.
The characters in a title are displayed
incorrectly.
The remaining time shown on this unit is
shorter than that shown on a computer.
Cannot delete a file.
Cannot delete a folder.
VAS is on.
Check the play speed.
The file is locked.
The card’s write-protect switch is engaged.
The unit’s system uses some memory so the
remaining time will be reduced.
This unit can only play ADPCM 2 codec VM1 format
files.
13
15
14
35
22
19
35
16
25
—
Power requirement: DC 3 V (two LR03, AAA, AM-4 batteries)
Power output: 200 mW (max.)
Frequency response: 400 Hz–6000 Hz (HQ mode)
Jack:
Output jack; Earphone, 3.5 mm (1/8in.); 3 mW, 16 h
Input jack; Mic, 3.5 mm (1/8in.); 0.56 mV
Speaker: 28 mm (13/32in.), 8 h
Dimensions (WtHtD):
Max dimensions; 47.9k91.5k16.0 mm (17/8k35/
8
k
5
/8in.)
Cabinet dimensions; 47.5k91.0k13.0 mm (17/8k39/
16
k
1
/2in.)
Mass:
with batteries; About 68 g (2.4 oz)
without batteries; About 45 g (1.6 oz)
Battery life:
[When used at 25oC (77oF), on a flat, stable surface]
Specifications
Batteries
Panasonic
alkaline batteries
About 6 hours About 11 hours
Playback Recording
≥The battery life may be less depending on the operating conditions.
Specifications are subject to change without notice.
Mass and dimensions are approximate.
Note
References
Page 21

Servicenter list
Accessory Purchases::::::
1-800-332-5368 (Customer Orders Only)
Panasonic Services Company 20421 84th Avenue South, Kent, WA 98032
(6 am to 5 pm Monday-Friday; 6 am to 10:30 am Saturday; PST)
(Visa, MasterCard, Discover Card, American Express, Check)
For Product Information, Operating Assistance, Literature Request, Dealer
Locations, and all Customer Service inquiries please contact:
1-800-211-PANA (7262), Monday–Friday 9 am–9 pm; Saturday–Sunday
9 am–7 pm, EST.
Web Site:http://www.panasonic.com
You can purchase parts, accessories or
locate your nearest servicenter by
visiting our Web Site.
Service in Puerto Rico
Matsushita Electric of Puerto Rico, Inc. Panasonic Sales Company/Factory Servicenter:
Ave. 65 de Infanteria, Km. 9.5, San Gabriel Industrial Park, Carolina, Puerto Rico 00985
Phone (787) 750-4300 Fax (787) 768-2910
CALIFORNIA
6550 Katella Avenue
Cypress, CA 90630
800 Dubuque Avenue
S. San Francisco
CA 94080
20201 Sherman Way
Suite 102
Canoga Park, CA 91306
3878 Ruffin Road
Suite A
San Diego, CA 92123
COLORADO
1640 South Abilene Street
Suite D
Aurora, CO 80012
FLORIDA
3700 North 29
th
Avenue
Suite 102
Hollywood, FL 33020
GEORGIA
8655 Roswell Road
Suite 100
Atlanta, GA 30350
ILLINOIS
9060 Golf Road
Niles, IL 60714
1703 North Randall Road
Elgin, IL 60123
(Pick-up/Drop-off only)
MARYLAND
62 Mountain Road
Glen Burnie, MD 21061
MASSACHUSETTS
60 Glacier Drive
Suite G
Westwood, MA 02090
MICHIGAN
37048 Van Dyke Avenue
Sterling Heights, MI 48312
MINNESOTA
7850-12
th
Avenue South
Airport Business Center
Bloomington, MN 55425
OHIO
2236 Waycross Road
Civic Center Plaza
Forest Park, OH 45240
PENNSYLVANIA
2221 Cabot Blvd. West
Suite B
Langhorne, PA 19047
TEXAS
13615 Welch Road
Suite 101
Farmers Branch
TX 75244
WASHINGTON
20425-84
th
Avenue South
Kent, WA 98032
HAWAII
99-859 Iwaiwa Street
Aiea, Hawaii 96701
Phone (808) 488-1996
Fax (808) 486-4369
Factory Servicenters Locations
F04030 As of APR ’00
41
RQT5626
40
RQT5626
Page 22

Panasonic Consumer Electronics Company or Panasonic Sales Company
(collectively referred to as “the warrantor”) will repair this product with new or
refurbished parts in the event of a defect in materials or workmanship, free of
charge, in the U.S.A. or Puerto Rico as follows ( all time periods start from the
date of original purchase ) :
AUDIO PRODUCTS—labor and parts for one (1) year.
ALL AUDIO RACKS(cabinets)—parts only 30 days.
TECHNICS STAND ALONE SPEAKERS, SUBWOOFER SPEAKERS—labor
and parts for three (3) years.
USB READER-WRITER, PERSONAL COMPUTER CARD ADAPTERS—
(when applicable)—exchange defective unit with a new or refurbished one for
one (1) year.
ACCESSORIES—HEADPHONES, CARTRIDGES,
MICROPHONES, ADAPTERS—labor and parts for ninety (90) days.
RECHARGEABLE BATTERIES—(when applicable) —exchange defective item
for new one for ten (10) days. Non-rechargeable batteries are not warranted.
SD MEMORY CARDS, RECHARGEABLE BATTERY PACKS—(when
applicable)—exchange defective item for new one for ninety (90) days. Nonrechargeable battery packs are not warranted.
Carry-in or mail-in service in the U.S.A. can be obtained during the warranty
period by contacting a Panasonic Services Company (PASC) Factory
Servicenter listed in the Servicenter Directory. Or call toll free, 1-800-211-7262
to locate a PASC authorized Servicenter. Carry-in or mail-in service in Puerto
Rico can be obtained during the warranty period by calling the Panasonic Sales
Company telephone number listed in the Servicenter Directory.
This warranty is extended only to the original purchaser. A purchase receipt
or other proof of date of original purchase will be required before warranty
service is rendered.
This warranty only covers failures due to defects in materials and workmanship
which occur during normal use and does not cover normal wear to the stylus
(when applicable) or a dealer installed cartridge or stylus. The warranty does not
cover damages which occur in shipment or failures which are caused by
products not supplied by the warrantor, or failures which result from accident,
misuse, abuse, neglect, mishandling, faulty installation, misapplication, set-up
adjustments, maladjustment of consumer controls, improper operation or
maintenance, improper antenna, inadequate signal reception or pick-up,
alteration, modification, power line surge, improper voltage supply, lightning
damage, commercial use, such as; hotel, office, restaurant, or other business or
rental use of the product, or service by anyone other than a PASC Factory
Servicenter or a PASC authorized Servicenter, or damage that is attributable to
acts of God.
LIMITS AND EXCLUSIONS
There are no express warranties except as listed above.
THE WARRANTOR SHALL NOT BE LIABLE FOR INCIDENTAL OR
CONSEQUENTIAL DAMAGES RESULTING FROM THE USE OF THIS
PRODUCT, OR ARISING OUT OF ANY BREACH OF THIS WARRANTY,
INCLUDING WITHOUT LIMITATION, DAMAGE TO TAPES, RECORDS OR
DISCS. ALL EXPRESS AND IMPLIED WARRANTIES, INCLUDING THE
WARRANTIES OF MERCHANTABILITY, AND FITNESS FOR A PARTICULAR
PURPOSE, ARE LIMITED TO THE APPLICABLE WARRANTY PERIOD SET
FORTH ABOVE. Some states do not allow the exclusion or limitation of
incidental or consequential damages, or limitations on how long an implied
warranty lasts, so the above exclusions or limitations may not apply to you.
This warranty gives you specific legal rights and you may also have other
rights which vary from state to state.
If a problem with this product develops during or after the warranty period,
you may contact your dealer or Servicenter. If the problem is not handled to your
satisfaction, then write to the Consumer Affairs Department at the company
address indicated above.
Panasonic/Technics Audio Products
Limited Warranty
Panasonic Consumer Electronics
Company, Division of Matsushita
Electric Corporation of America
One Panasonic Way,
Secaucus, New Jersey 07094
Panasonic Sales Company, Division
of Matsushita Electric Corporation
of Puerto Rico, Inc.
Ave. 65 de InfanterÍa, Km. 9.5,
San Gabriel Industrial Park,
Carolina, Puerto Rico 00985
42
RQT5626
If you ship the product
Carefully pack and send it prepaid, adequately insured and preferably in the original carton.
Attach a postage-affixed letter, detailing the complaint, to the outside of the carton.
Do NOT send the product to the Executive or Regional Sales offices. They are NOT equipped to
make repairs.
Model
No.
Serial
No.
or
Code
No.
Date
of
Purchase
Dealer’s
Name
Dealer’s
Address
Customer’s Record
43
RQT5626
 Loading...