

PANASONIC RR US300 Instruction Manual [fr]
Operating Instructions
Bedienungsanleitung
Istruzioni per l’uso
Mode d’emploi
Instrucciones de funcionamiento
Gebruiksaanwijzing
Betjeningsvejledning
Bruksanvisning
IC Recorder
Digitales Diktiergerät
Registratore IC
Magnétophone à puce
Grabadora IC
IC-recorder
IC-optager
IC-inspelare
Model No.
Modell Nr.
Modello numero
Modèle n°
Nº de modelo
Model Nr.
Modelnr.
Modellnr.
RR-US300
ENGLISH
DEUTSCH
ITALIANO
FRANÇAIS
ESPAÑOL
NEDERLANDS
DANSK
SVENSKA
E
VQT3T18

Dear customer
Thank you for purchasing this product.
For optimum performance and safety, please read these instructions carefully.
Before connecting, operating or adjusting this product, please read the instructions completely.
Please keep this manual for future reference.
Supplied accessories
Please check and identify the supplied
accessories.
Use numbers indicated in parentheses
when asking for replacement parts.
(Product numbers correct as of June 2011.
These may be subject to change.)
1 USB extension cable [K2ZZ04Y00005]
■ For the United Kingdom and Ireland
customers
(Sales and Support Information)
Customer Care Centre
• For customers within the UK: 0844 844 3852
• For customers within Ireland: 01 289 8333
• Visit our website for product information
VQT3T18
www.panasonic.co.uk
• E-mail: customer.care@panasonic.co.uk
2
2
Direct Sales at Panasonic UK
• For customers: 0844 844 3856
• Order accessory and consumable items for your
product with ease and confidence by phoning our
Customer Care Centre
Monday-Thursday 9:00 a.m.-5:30 p.m., Friday
9:30 a.m.-5:30 p.m. (Excluding public holidays)
• Or go on line through our Internet Accessory
ordering application at www.pas-europe.com.
• Most major credit and debit cards accepted.
• All enquiries transactions and distribution facilities
are provided directly by Panasonic UK.
• It couldn’t be simpler!
• Also available through our Internet is direct shopping
for a wide range of finished products, take a browse
on our website for further details.
Table of contents
Preparation
Supplied accessories........................................ 2
Part names ....................................................... 4
Screen display ..................................................5
Inserting a battery .............................................6
Turning the power on/off ................................... 7
Hold function..................................................... 7
Setting the time................................................. 8
Basic Operations
Recording ......................................................... 9
Playing ............................................................ 10
Deleting files and formatting ........................... 11
Advanced Operations
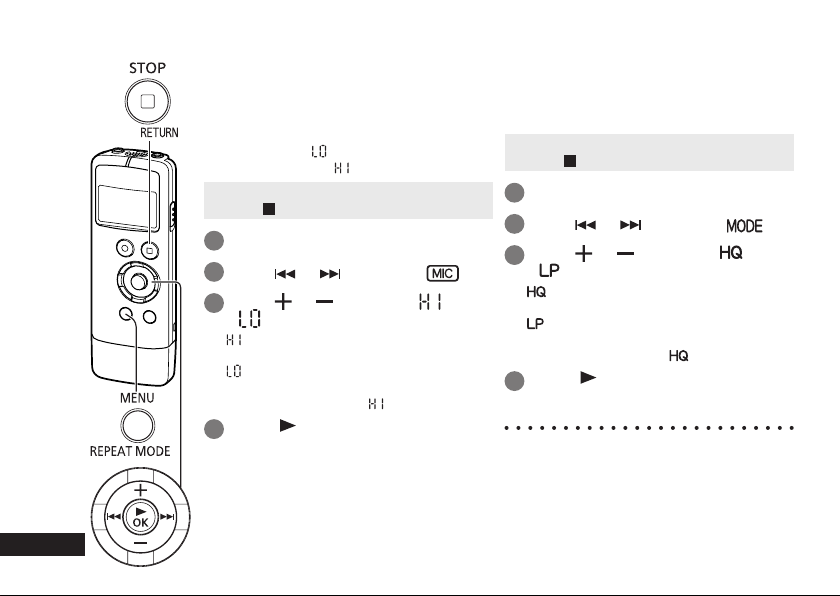
Changing the microphone sensitivity .............. 12
Changing the sound quality ............................12
Recording at a specified time
(Timer recording) ............................................13
Changing the playback speed ........................ 14
A-B Repeat playback ...................................... 14
Playback from a specified position
(Time search) .................................................15
Repeat play (Repeat) .....................................15
Dividing files ...................................................16
Listening to audio with earphones ..................17
Recording by connecting an external
microphone ..................................................... 18
Connecting to other devices ...........................19
Common settings............................................ 20
Using the unit with a computer
System requirements...................................... 21
Connecting the unit to a computer..................22
Opening the folders of the unit .......................24
Importing files to a computer and organising
files ................................................................. 25
File names ......................................................26
Others
Q & A (Frequently Asked Questions) ..............27
Error messages .............................................. 27
Troubleshooting guide ....................................28
Specifications ................................................. 33
Care and use ..................................................34
Maintenance ................................................... 35
Useful Information ..........................................37
ENGLISH
VQT3T18
3
3
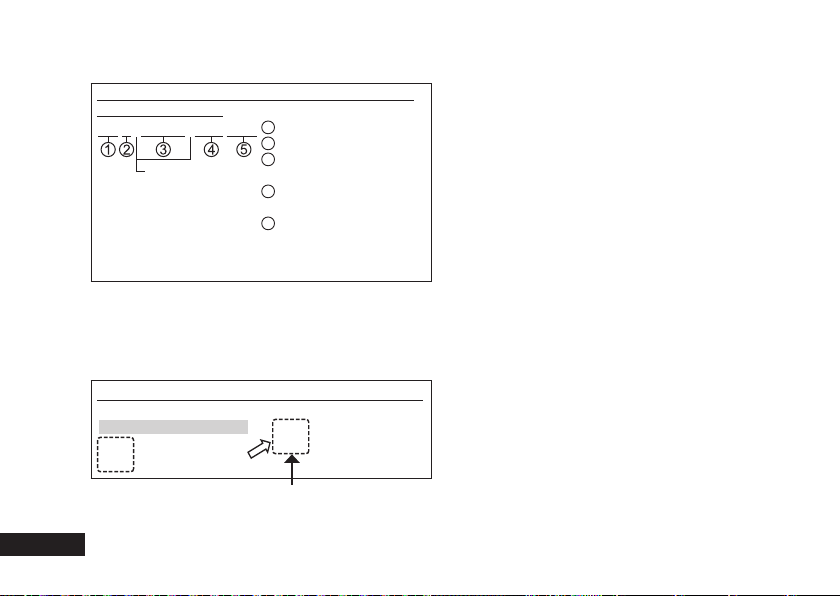
Part names
VQT3T18
4
4
External microphone jack (
1
(ø 3.5 mm monaural mini jack)
Headphone/earphone jack (
2
(ø 3.5 mm monaural mini jack)
3
Recording indicator (Operation indicator)
OPR/HOLD switch
4
OPR: Operation
5
LCD display
6
STOP/RETURN]
[
7
REC]
[
8
(Volume up)
9
(Fast backward)
10
(Volume down)
11
(Fast forward)
12
[ OK] (Play/OK)
13
[MENU/REPEAT MODE]
14
[ERASE/ ]
15
Built-in monaural microphone
16
Built-in speaker
17
Battery cover
18
Hand strap hole
19
USB plug
20
USB plug cover
)
)
Screen display
The following explains the screen items. Some items may not be displayed simultaneously.
ENGLISH
Status indication
• Indicates the recorded
audio file number and other
information.
Battery indicator (➜ page 6)
Recording sound quality
(➜ page 12)
Level meter
• Indicated while volume of
the recording sound source,
playback position, remaining
recording time when stopped,
or volume or other settings are
being adjusted.
A-B Repeat playback/
Repeat play
(➜ pages 14 and 15)
Screen display during
playback (➜ page 10)
Screen display during
recording (➜ page 9)
Status indication
• Indicates the time and other
information.
Menu setting items
(➜ pages 8, 12, 13, 16 and 20)
VQT3T18
5
5
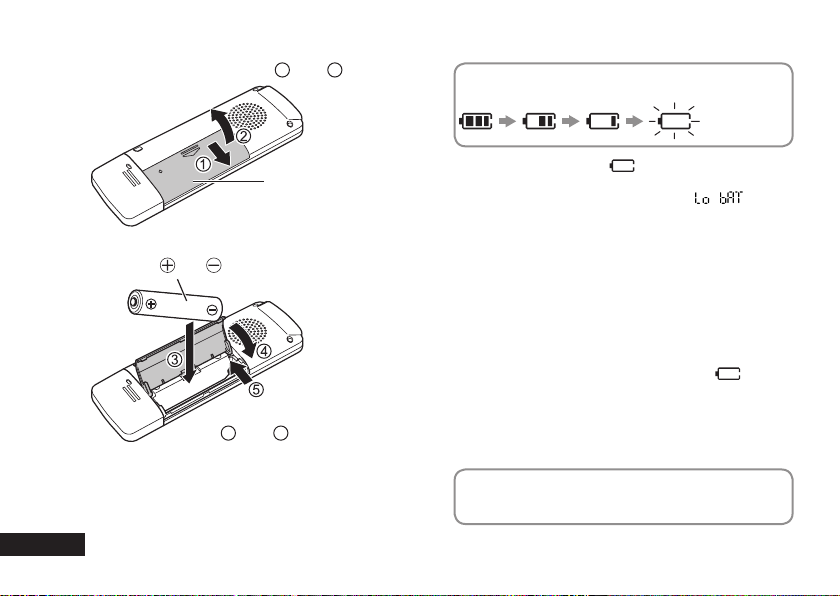
Inserting a battery
Open the battery cover (1 and 2)
The remaining battery level is indicated as shown
below while the unit is operating.
Blinking
Battery
cover
AAA LR03 battery (not supplied)
1
Make sure
and are correctly oriented.
Close the battery cover
(
and 5)
4
VQT3T18
● Use an alkaline battery.
● Remove the battery from the unit when you will not
6
use the unit for a long period of time.
6
● If the battery runs out, “ ” blinks. Replace the
battery as soon as possible.
● When the battery runs out of power, “
indicated and then the power turns off automatically.
● Depending on the battery state and the operation to
be performed, even if the power turned of
the battery ran out of power, the unit may be able to
be used for a while if it is turned on again. However,
the unit may suddenly turns off during operation due
to insufficient battery power.
● A certain level of battery power is required to
delete files, format the unit (➜ page 1
files (➜ page 16). If any of these operations are
performed when the battery indicator is “
power will be turned off because the battery will run
out of power.
● Turn the power off before removing the battery.
If the battery is removed while the power is on,
•
data may be lost or the unit may be damaged.
Set the clock after inserting a battery for the first time
or replacing the battery. (➜ page 8)
” is
f because
1) and divide
”, the

Turning the power on/off
OPR/HOLD switch:
OFF ON
Hold function
Button operations are ignored when the Hold function
is on.
To switch the Hold function on:
Slide the OPR/HOLD switch to the “HOLD” side during
recording or playback.
“
” appears and the Hold function turns on.
ENGLISH
To turn the power on:
Slide the OPR/HOLD switch to the ON side to turn the
power on. The display lights up.
To turn the power off:
Slide the OPR/HOLD switch to the OFF side while the
unit is in the stop state.
Auto power off:
The power automatically turns off after 30 minutes
elapse when the unit is in a recording pause or stop
state.
If the power is turned off by the auto power off
function, slide the OPR/HOLD switch to the OFF side
before turning the power on.
Set the clock after turning the power on for the first
time. (➜ page 8)
To switch the Hold function off:
Slide the OPR/HOLD switch in the opposite direction
of “HOLD”.
“
● When the Hold function is on, operation is ignored
● When recording or playback finishes while the Hold
” appears and the Hold function turns off.
even if the buttons are pressed while the power is
on (“
unintended operations such as the stopping of
recording or playback.
function is on, the power turns of
” is displayed), enabling you to prevent
f automatically.
VQT3T18
7
7
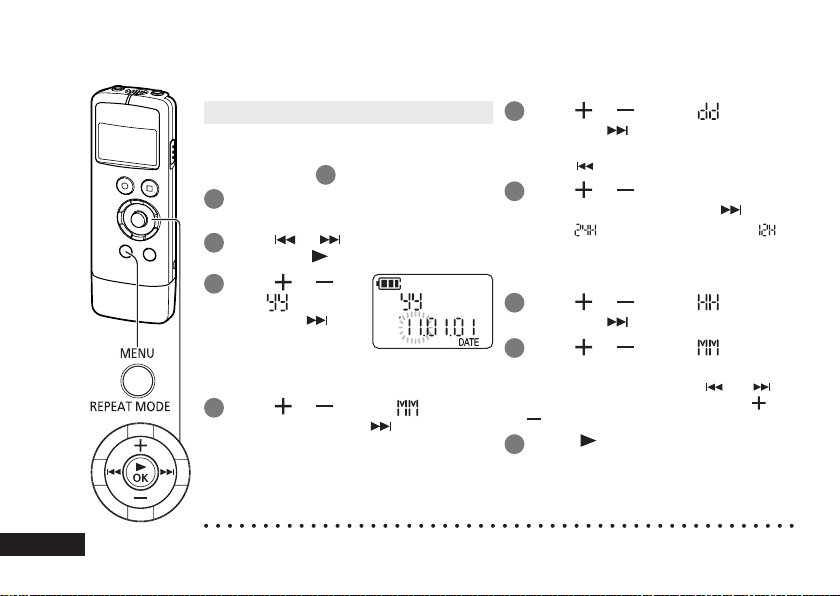
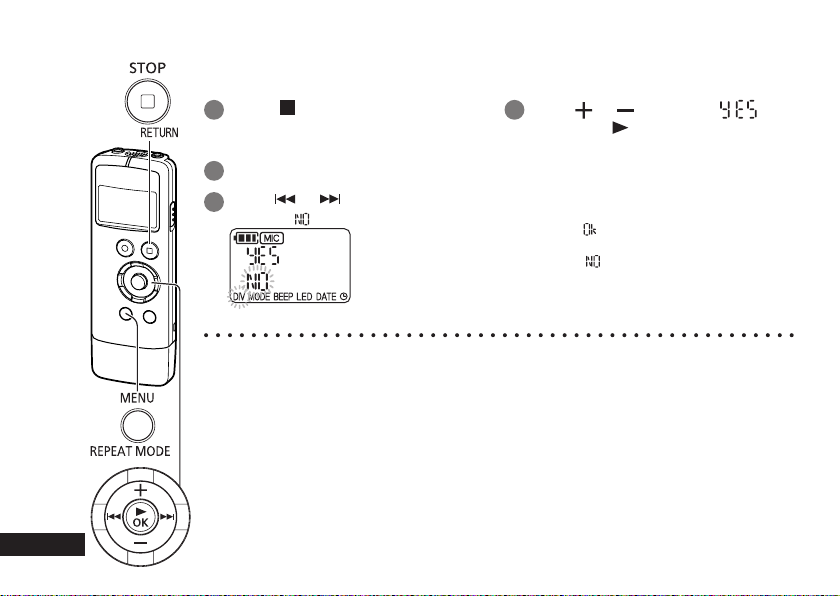
Setting the time
The clock is used for file names (➜ page 26) and recording date and time information so set
the correct date and time. The date and time need to be set after the battery is replaced.
• Turn the power on beforehand. (➜ page 7)
• After turning the power on for the first time
after purchase or replacing the battery,
proceed to step
Press [MENU/REPEAT MODE].
1
Press or to select “DATE”
2
and press [ OK].
Press
3
set “ ” (year)
and press .
• Set the last two digits of the year.
(“11” in the case of 2011)
Press
4
(month) and press .
8
VQT3T18
8
● The clock operates with a monthly loss/gain of approx. ±60 seconds at normal temperature.
● The clock setting will be cleared if the battery completely runs out of power.
.
3
or to
or to set “ ”
5
Press
or to set “ ” (day)
and press .
• To return to the previous setting item,
Press
6
.
press
or to select the time
display format and press .
Select “ ” for 24-hour display, and “ ”
for 12-hour display.
• The display format that is blinking is
currently selected.
7
Press
or to set “ ” (hour)
and press .
8
Press
or to set “ ”
(minute).
To change the setting, press and to
move between the items, and press
again to make the setting.
Press [
9
setting.
• The date and time are set and the clock
OK] to confirm the
starts to operate.
and
Recording
• Turn the power on beforehand. (➜ page 7)
• When the unit is not in the stop state,
press [
Press [
1
Each press: Pause Resume recording
STOP/RETURN].
REC]. (Recording starts.)
• If you press [MENU/REPEAT MODE] during
recording, the indication switches between
the remaining recording time and elapsed
recording time.
Stopping recording:
STOP/RETURN].
Press [
ENGLISH
The recording indicator
lights.
(Blinks while paused.)
Level meter
Number of file
being recorded
● Before recording, check that there is sufficient battery power remaining.
● If no operation is performed for approx. 30 minutes while recording is paused, the unit turns
f.
of
● Change the microphone sensitivity or sound quality as necessary. (➜ page 12)
● Note that if you rub the unit with a hand or an object touches the unit during recording,
a rustling sound will be recorded through the microphone.
(Blinks while paused.)
Remaining recording time
File
Recorded audio data from the starting point
to the ending point is saved as a file.
The saved data is called a file.
• The maximum number of files that can be
recorded is 199.
VQT3T18
9
9
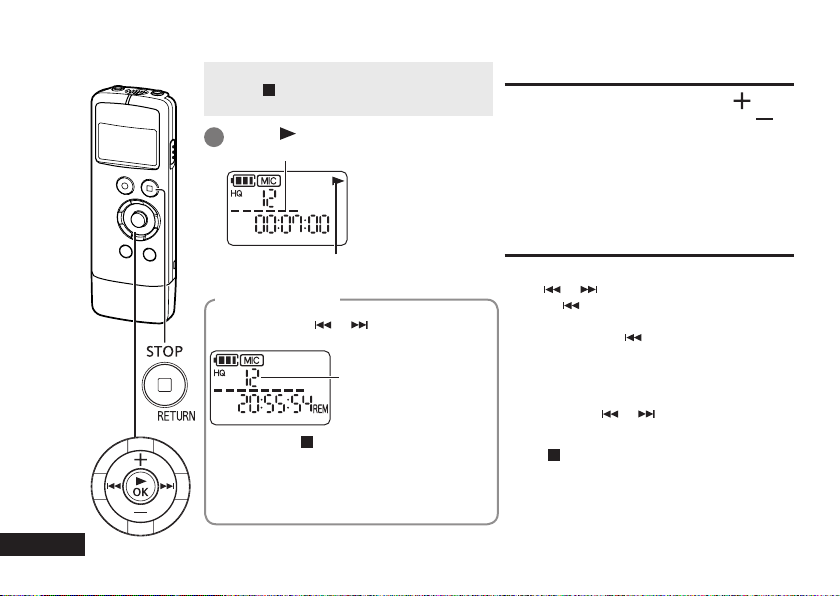
Playing
• When the unit is not in the stop state,
• Select a file beforehand. (See below)
1
STOP/RETURN].
press [
Press [
Playback progress
OK]. (Playback starts.)
Adjusting the volume
Turning up the volume: Press .
Turning down the volume: Press .
The volume range is 0 to 20.
(The factory setting is “10”.)
If you turn the power off with the volume set to
17 or higher, the volume will be set to 16 the
next time the power is turned on.
10
VQT3T18
10
Displayed during playback
Selecting a file
Select a file with or .
Each press changes the file number.
File number
Each press of [ STOP/RETURN] changes
the displayed information (remaining recording
time/Total playback time (Length of the
selected file (duration of time))/current time/
date/recording time/recording date).
Operations during playback
Jumping (skipping):
Press or quickly.
Pressing
to the beginning of that file. To return to the
previous file, press
from the beginning of the file.
Fast backwarding/Fast forwarding
(searching):
Press and hold or .
Stopping playback:
Press [
part way through a file jumps
within approx. 1 second
STOP/RETURN].

Deleting files and formatting
Delete unnecessary files.
• When the unit is not in the stop state,
There are three methods to delete files.
● Deleted files cannot be restored.
● Cancelling is not possible while formatting.
● Before deleting data, check that there is sufficient battery power remaining.
● Do not remove the battery while formatting.
● With file deletion (
● After a file is deleted, the subsequent file numbers displayed on the unit are decreased.
STOP/RETURN].
press [
: Select one file and then delete it.
: Delete all files in the MIC folder
(the actual folder is not deleted).
: Delete all data in internal memory
such as the data in the MIC folder
and the data in the DATA folder
that you can see when the unit is
connected to a computer (format).
), only files that can be played on the unit can be deleted.
The operation indicator blinks during deletion.
It may take several minutes for the deletion to
complete.
Press
1
number of the file to delete.
This step is not necessary for the
“
methods.
Press [ERASE/
2
• To cancel the deletion, press
Press or to select the
3
deletion method and press
or to select the
” and “ ” deletion
[ERASE/
STOP/RETURN].
[
] again or press
].
[ OK].
• When you want to delete only one file,
select the method while making sure you
do not accidentally select “
“
Press
4
”.
or to select “ ”
and press [ OK].
” or
ENGLISH
VQT3T18
11
11
12
VQT3T18
12
Changing the
microphone sensitivity
Change the microphone sensitivity in
accordance with the loudness of the sound
source. When the sound source is loud, set
the sensitivity to “
set the sensitivity to “
• When the unit is not in the stop state,
press [
1 Press [MENU/REPEAT MODE].
2
Press or to select “ ”.
Press or to select “ ” or
3
” (LOW). When it is quiet,
” (HIGH).
STOP/RETURN].
Changing the
sound quality
You can change the sound quality for
recording.
• When the unit is not in the stop state,
press [
1 Press [MENU/REPEAT MODE].
2 Press or to select “ ”.
Press or to select “ ” or
3
“ ”.
“ ”.
: Sets the microphone sensitivity to the
high level.
: Sets the microphone sensitivity to the
low level.
(The factory setting is “
Press [
4
setting.
OK] to confirm the
”.)
(The factory setting is “
Press [
4
setting.
● The length of time that recording is possible
changes depending on the sound quality.
(➜ page 33)
STOP/RETURN].
: High sound quality mode
(128 kbps, monaural)
: Long recording mode
(32 kbps, monaural)
OK] to confirm the
”.)
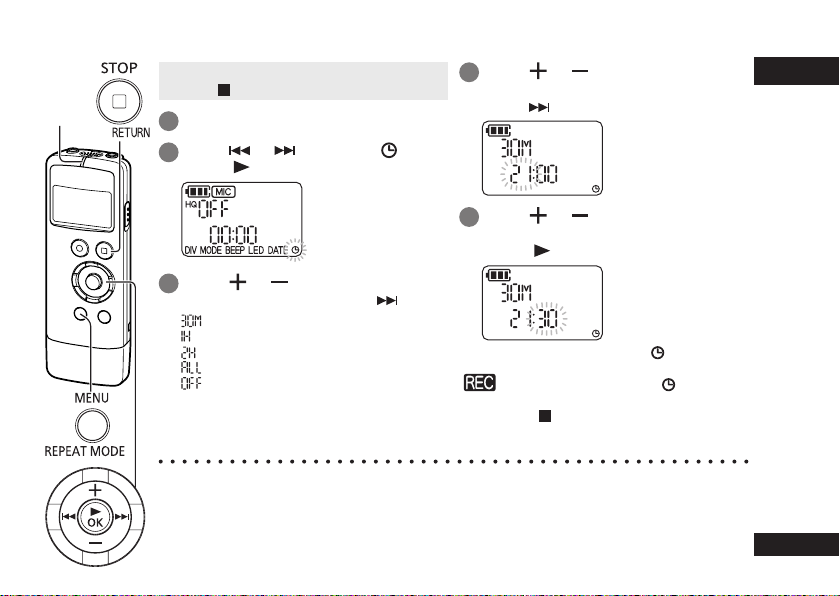
Recording at a specified time (Timer recording)
Recording
indicator
Press
• When the unit is not in the stop state,
press [
STOP/RETURN].
1 Press [MENU/REPEAT MODE].
Press
2
press [ OK].
or to select “ ” and
4
for the time to start recording and
press .
Press or to select the minute
5
for the time to start recording and
press [ OK].
Press or to select the
3
recording time and press .
: 30 minutes
: 1 hour
: 2 hours
: Until there is no empty space
: Disable the timer setting
● If the power is off at the specified time, the power turns on and the timer recording starts, and
then the power turns of
If the unit is in a playback state, playback stops and the timer recording starts.
● Timer recording is not possible in the following cases:
When the unit is connected to a computer, when the number of recording files has reached 199, when
there is no free space in the internal memory, and during recording or while recording is paused.
f at the end time.
After you set a timer recording, “ ” is displayed.
At 1 minute before the specified time, the
“
the unit enters the standby state.
If you press [
timer recording or standby, you can cancel the
timer recording.
or to select the hour
”, recording indicator, and “ ” blink and
STOP/RETURN] during a
ENGLISH
VQT3T18
13
13
14
VQT3T18
14
Changing the
playback speed
The playback speed can be adjusted in
21 steps from the slow speed of 0.5 times
normal speed (50%) to the fast speed of
2 times normal speed (200%).
1
Press [
Press
2
playback speed.
• : Each press of this button increases
•
The playback speed can be adjusted in
10% steps for speeds faster than normal
speed, and 5% steps for speeds slower
than normal speed.
•
Press [
3
The setting value is confirmed.
● Normal playback may not be possible
depending on the file.
OK] during playback.
or to adjust the
Playback speed
the playback speed.
: Each press of this button reduces the
playback speed.
Press [ STOP/RETURN] to return to 100%.
OK].
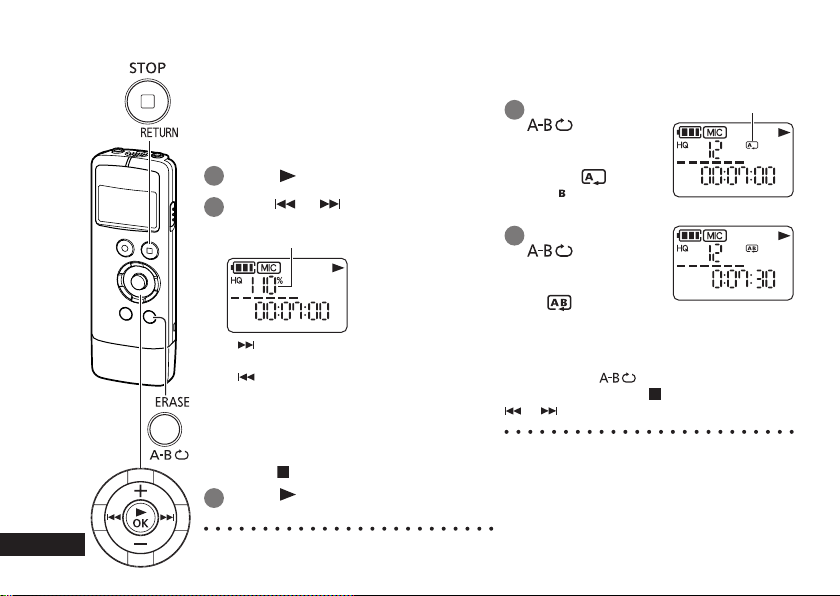
A-B Repeat playback
Set a start point (A) and finish point (B) to
repeat playback between those points.
Press [ERASE/
1
] during
playback.
The start point (A) is
set and “
and “
displayed.
Press [ERASE/
2
” (lighting)
” (blinking) are
] at the
finish point (B).
The indication changes
” (lighting) and
to “
A-B repeat playback
starts.
Cancelling A-B Repeat:
Press [ERASE/ ] again. (A-B Repeat can
also be cancelled with [
or .)
● You cannot set A-B Repeat when the time
between the start point (A) and finish point
(B) is approx. 2 seconds or less.
● If the file is played to the end while the start
point (A) is set, the end of the file is set as
the finish point (B) and
● A range that spans across two files cannot
be set for
A-B Repeat.
A-B Repeat indication
STOP/RETURN],
A-B Repeat starts.
Playback from a specified
position (Time search)
Playback is possible from a time-specified
position.
Press [MENU/REPEAT MODE]
1
during playback.
Playback stops and the current playback
position (time) is displayed.
Set the playback
2
start position.
Press or to
select “hour”, “minute”,
and “second” and
or to
press
change the values.
• Press [MENU/REPEAT MODE] or
STOP/RETURN] to return to
[
playback.
Press [
3
Playback starts from the specified position.
● Time search playback applies only to the
currently selected file.
OK].
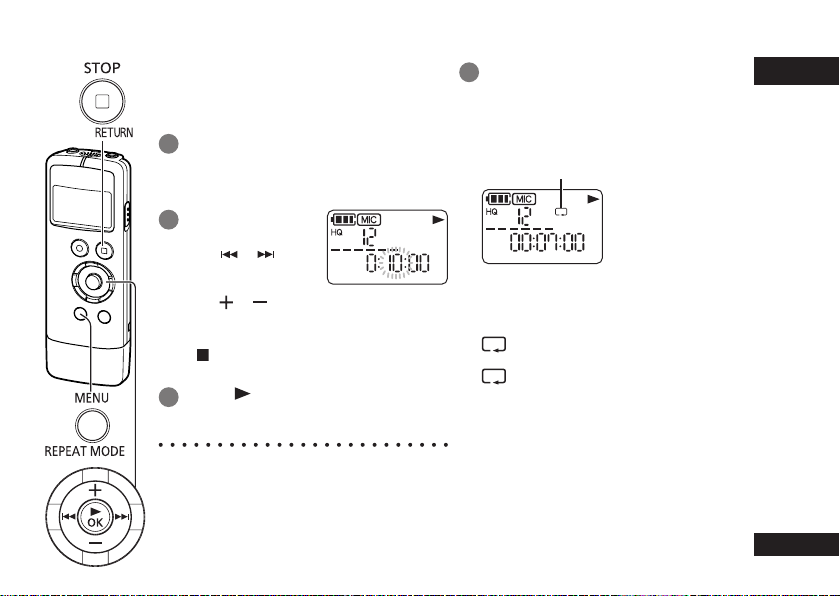
Repeat play (Repeat)
Press [MENU/REPEAT MODE]
1
for at least 2 seconds during
playback.
The repeat mode changes each time you
press [MENU/REPEAT MODE] for at least
2 seconds.
Repeat mode indication
No indication: Plays back the files
(lighting): Plays back only the one
(blinking): Plays back all the files
normally. The unit enters
the stop state after playback
of the last file finishes.
selected file repeatedly.
repeatedly.
ENGLISH
VQT3T18
15
15
Dividing files
VQT3T18
16
16
You can divide 1 file into 2 files at a specified position. A necessary part can be extracted or an
unnecessary part can be cut.
Press [
1
position you want to divide the file
during playback.
2 Press [MENU/REPEAT MODE].
Press
3
“DIV” and “ ” blink.
● A file length of approx. 2 seconds or more is required to divide a file.
● A file cannot be divided at the beginning.
● Divided files cannot be restored.
● After a file is divided, one file is added.
● If there is no empty space in internal memory or if 199 files have already been recorded, a file
cannot be divided.
● For the file names displayed on a computer after the file is divided, see page 26.
STOP/RETURN] at the
or to select “DIV”.
4
Press
or to select “ ”
and press [ OK].
The operation indicator blinks during
dividing.
Then, the file is divided into 2 files and
the playback stops at the beginning of the
second file.
• When “
• Select “
” appears, file dividing is
complete.
” to stop dividing.
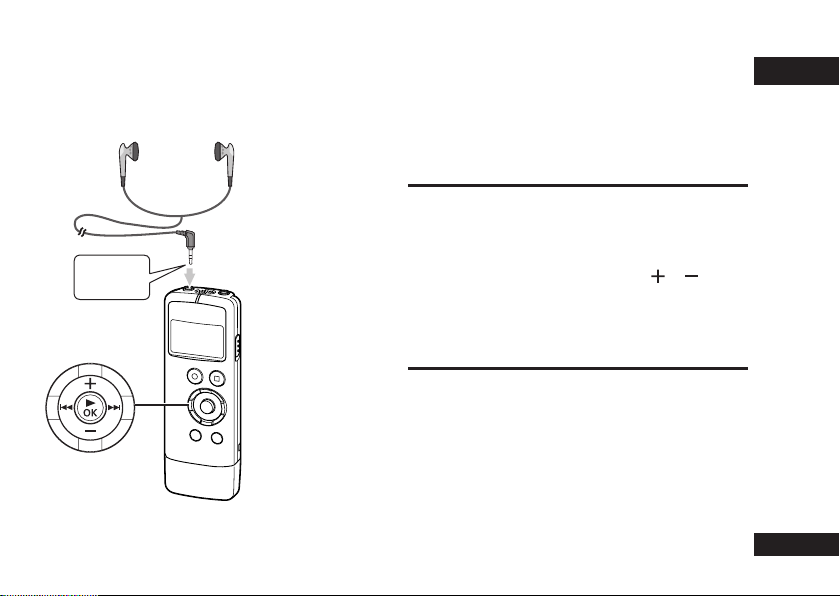
Listening to audio with earphones
Connect earphones (not supplied). (Plug type: ø 3.5 mm monaural mini plug)
Recommended additional earphones: Panasonic RP-HV154, RP-HJE120
(the product number is correct as of June 2011.)
When stereo type earphones are used, the audio from both the left and right is monaural.
Monitoring the audio during
recording
You can listen to the audio to monitor it during
recording.
ENGLISH
Insert all
the way in.
Adjusting the volume:
You can adjust the volume by pressing or but the
audio that is recorded will not be affected.
Listening to the audio during
playback
The audio can be heard from the built-in speaker
during playback. In places that are noisy or where it is
difficult to hear, listen to the audio through earphones.
● If you connect earphones, the audio will no longer be
output from the built-in speaker
.
VQT3T18
17
17

Recording by connecting an external microphone
Record by connecting an external microphone (monaural microphone) to the external microphone jack of the unit.
With a stereo microphone, the audio of just the L channel side is recorded in monaural.
1 Connect the external microphone.
2
● Also read the operating instructions for the device to be connected.
● If the loudness of the sound source is too low or high, adjust the microphone sensitivity. (➜ page 12)
● The built-in microphone of the unit does not work while a device is connected to the external microphone jack.
VQT3T18
18
18
Microphone (not supplied)
Insert all
the way in.
Use a microphone with a plug-in-power function and ø 3.5 mm mini plug.
Press [
For the recording operations, see page 9.
REC] to start recording.
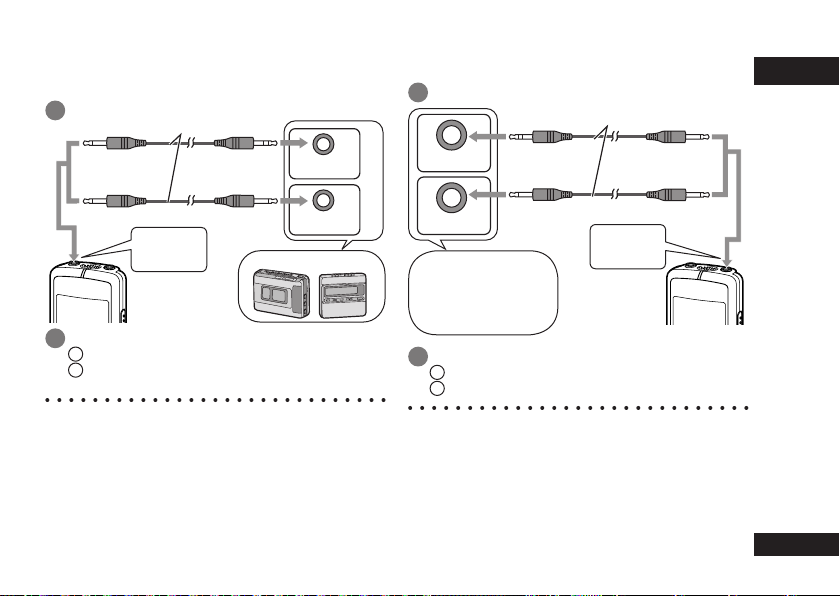
Connecting to other devices
Recording from the unit to another device
(dubbing):
1 Connect as shown below.
Audio cable with resistor (not supplied)
Monaural mini plug Stereo mini plug
Stereo device
Recording from another device to the unit:
1 Connect as shown below.
Mini microphone jack
Stereo device
ENGLISH
Audio cable with resistor (not supplied)
Stereo mini plug Monaural mini plug
Monaural mini plug Monaural mini plug
Monaural device
Insert all
the way in.
Plug type:
ø 3.5 mm monaural
mini plug
Record.
2
Start recording on the recording device.
1
On the unit, play the file you want to dub.
2
(➜ page 10)
Recording device
● Also read the operating instructions for the
device to be connected.
Select the connection cable to use in accordance with
●
whether the device to be connected is monaural or
stereo. If the wrong cable is used in combination with
the unit, recording may not be able to be performed
properly. For example, only 1 channel may be recorded.
● The sound quality after dubbing may differ from the
sound quality before dubbing.
To record at a suitable volume, adjust the volume on the unit.
●
Monaural device
Monaural mini plug Monaural mini plug
Insert all
the way in.
Headphone jack of
a portable device,
component stereo,
etc.
Record.
2
Start recording on the unit. (➜ page 9)
1
Start playback on the external device.
2
Plug type:
ø 3.5 mm monaural
mini plug
● Also read the operating instructions for the
device to be connected.
● If the loudness of the sound source is too low or
high, adjust the microphone sensitivity (➜ page 12).
Alternatively, adjust the volume of the other device.
● If a stereo type cable is used, the R channel is not
recorded.
VQT3T18
19
19
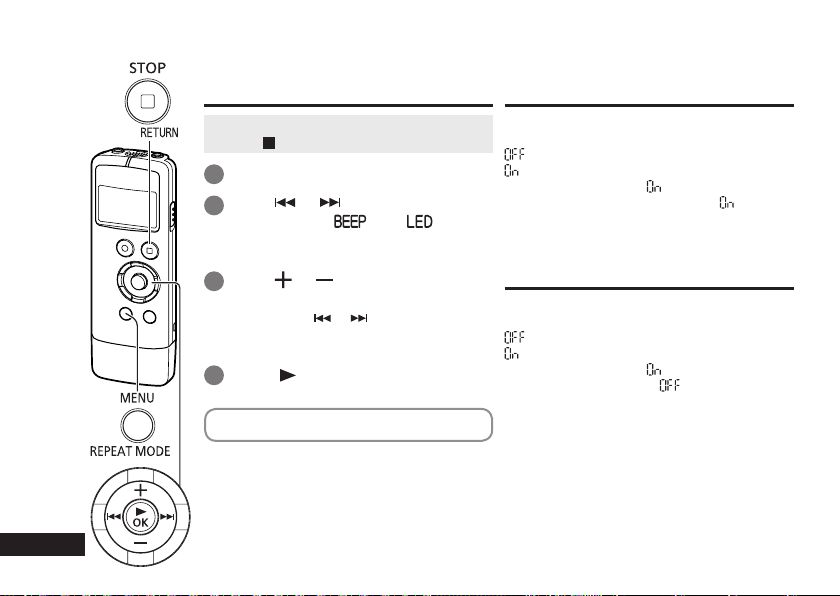
Common settings
The following settings of the unit are common to both recording and playback.
Common settings operation
• When the unit is not in the stop state,
press [
1 Press [MENU/REPEAT MODE].
Press
2
setting item (“ ” or “ ”).
• The setting item that is blinking is
currently selected.
Press or to change the
3
setting.
• If you press or , the setting is
confirmed and you can set the next
setting item.
4
Press [
For “Setting the time”, see page 8.
VQT3T18
20
20
STOP/RETURN].
or to select the
OK].
BEEP (Beep sound)
Set the beep sound for during button
operation.
: No beep sound.
: Beep sound.
(The factory setting is “
● Even if the beep sound is set to “
operation beep sound is not output during
recording or while recording is paused.
”.)
”, the
LED (Recording indicator)
Set whether the recording indicator lights
during recording.
: Does not light.
: Lights.
(The factory setting is “
● Even if “LED” is set to “
blinks during operations such as file
deletion.
”.)
”, the indicator
System requirements
Computer IBM PC/AT compatible machines, Macintosh
• Windows
• Windows Vista
OS
Interface USB port (Operation cannot be guaranteed if you use a USB hub.)
Even if the system requirements mentioned in this document are fulfilled, some personal computers cannot be used.
∗
(Macintosh) This software operates on the standard driver of OS.
∗
Operation is guaranteed only on a compliant OS. ∗ Operation is not guaranteed on an upgraded OS.
∗
Operation is not guaranteed on home-made computers.
∗
When using Windows Media® Player, your computer must fulfill the system requirements of Windows Media®
∗
Player. Please consult Microsoft Corporation for details of Windows Media
Microsoft, Windows, Windows Media and Windows Vista are registered trademarks or trademarks of
∗
Microsoft Corporation of the U.S. and other countries.
MPEG Layer-3 audio coding technology licensed from Fraunhofer IIS and Thomson.
∗
IBM and PC/AT are registered trademarks of International Business Machines Corporation of the U.S.
∗
Macintosh and Mac OS are trademarks of Apple Inc.
∗
Other system names and product names appearing in this document are in general the registered trademarks or
∗
trademarks of the respective developer companies. Note that the ™ mark and ® mark do not appear in this document.
Depending on the computer environment, malfunctions may occur (e.g. Audio data recorded on this unit
∗
cannot be used. etc.). Panasonic and Panasonic dealers cannot be held liable for any lost audio data or other
direct or indirect damage except in cases of intentional of gross negligence.
This model is not compatible with TRC/ADPCM format IC recorders made by Panasonic. Also, files recorded
∗
on this unit cannot be played on those IC recorders and/or MP3 files recorded on this unit cannot be read
using Voice Editing software supplied with those IC recorders.
You can transfer contents recorded on this unit to your PC without using the dedicated software. The
∗
computer software (Voice Editing) is not supplied with this unit.
• Windows
• Mac OS X 10.2.8 - 10.6
®
XP Home Edition/Professional and SP2, SP3
®
and SP1, SP2
®
Ultimate and SP1
7 Starter/Home Basic/Home Premium/Professional/
Home Basic/Home Premium/Business/Ultimate
®
Player.
(As of June 2011)
Pre-installed version
ENGLISH
VQT3T18
21
21
Connecting the unit to a computer
You can import the recording files that were recorded
with the unit to a computer.
• Start the computer beforehand.
• Turn the unit off beforehand.
Remove the USB plug cover.
1
Store the removed USB plug
cover in a safe place.
● Keep the USB plug cover out of reach of children to
prevent swallowing.
Insert the unit into the computer.
2
Match the orientation
of the USB plug with
that of the USB port
and insert it straight
into the USB port.
Computer
● If the USB plug cannot be inserted firmly due to
the condition around the USB port, use the USB
extension cable (supplied).
VQT3T18
● Operation is not guaranteed if the unit is connected
22
with a cable other than the supplied USB extension
22
cable.
This unit
● Do not use any other USB extension cables except
the supplied one.
Do not use the supplied cable with other devices.
Caution: Use only the supplied USB extension cable
with a ferrite core when connecting to computer.
● When the unit is connected to your computer, it
can operate without the battery
supplied by the computer.
■ The first time you connect the unit to a
computer
Because multiple “Found New Hardware” messages
will appear, do not disconnect the unit from your
computer until all messages disappear.
■ Screen display when connected to a
computer
During connection During file transfer
Never remove the unit during data transfer.
The file data or the unit may be damaged.
The unit cannot be operated while connected to a
computer.
, because power is

● When the unit is connected to a computer, the
computer may not start (restart). It is recommended
that the unit be disconnected before starting
(restarting) the computer.
● Operation is not guaranteed when two or more USB
devices are connected to one computer or a USB
hub or cable other than the supplied extension cable
is used.
● If a computer is started (restarted) or enters standby
mode while the unit is connected to it, the computer
may not recognise the unit. Disconnect and then
reconnect the unit or reconnect the unit after the
computer is restarted.
● Please see the Operating Instructions for the
computer
.
■ Removing the unit
Double-click the icon (Windows XP: [ ], Windows
Vista / Windows 7: [
of the computer screen and follow the on-screen
instructions for removing the unit. (The icon may not
be displayed depending on the operating system
settings.)
The unit turns off after it is removed.
]) on the task tray at the bottom
■ USB mass storage function
The unit functions as USB memory and is recognised
as a computer’s external storage device.
The data files on the computer can be transferred and
saved to the unit.
ENGLISH
VQT3T18
23
23
Opening the folders of the unit
The screenshots are for Windows XP (operating system). The display may differ depending on the operating
system.
Right-click “IC RECORDER (G:)” (this
• Connect the unit to a computer beforehand.
(➜ page 22)
Right-click “My Computer” from the Start
1
menu and select "Open".
The unit is indicated as “IC RECORDER”.
The components of the computer and the external
storage device shown here are examples. They may
differ depending on your computer.
A different letter may be indicated for “G” of
“IC RECORDER (G:)”.
Depending on the computer you use, the unit may be
VQT3T18
indicated as “Removable Disk”.
24
24
2
unit) and select “Open”.
Right-click the MIC folder and select
3
“Open”.
The recording files on the unit appear.
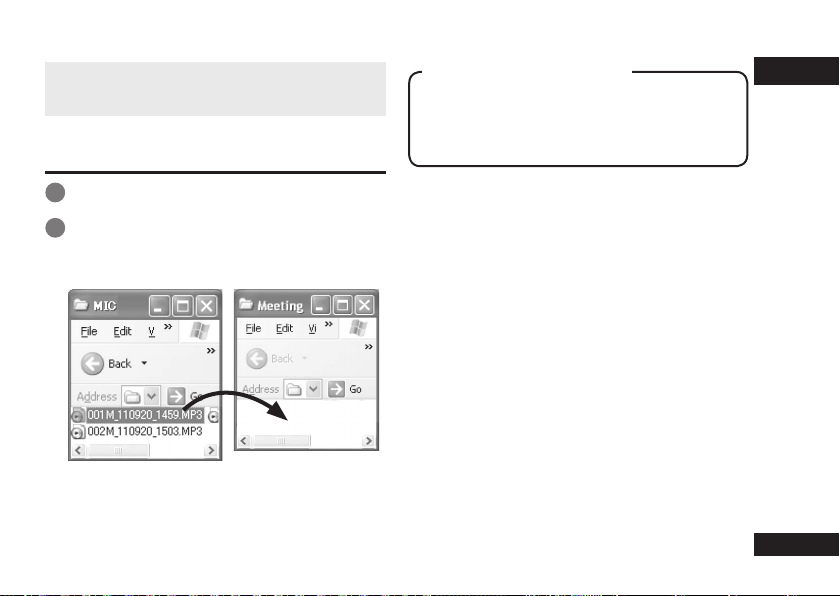
Importing files to a computer and organising files
• Open the IC RECORDER (this unit) displayed
on the computer screen and open the MIC folder
beforehand. (➜ page 24)
Importing recording files to a
computer
Right-click a recording file on the unit
1
and select “Copy”.
Right-click a folder on the computer and
2
select “Paste” to import the file to the
computer
Folder on the unit Folder on the computer
Playing recording files from a computer:
Right-click a recording file on the unit and select “Play”.
Deleting unnecessary files from a computer:
Right-click a recording file on the unit, select “Delete”,
and select “Yes” to confirm the deletion.
.
Do not rename the folder.
If you use a computer to rename the MIC folder, a
new MIC folder will be created when you turn on the
unit and the files in the folder that was renamed will
no longer be able to be played.
● You can also import recording files to a computer by
dragging and dropping them.
● Never remove the unit during data transfer
data or unit may be damaged or all of the data may
be lost.
● Do not use a computer to format the unit.
● The extension of the files displayed on a computer
is “MP3”.
● The DATA folder is used to store data files. You
can see this folder from the computer but it is not
displayed on the screen of the unit.
. The file
ENGLISH
VQT3T18
25
25
File names
File names displayed on the computer:
Example: In the case of a file recorded at 17:20 on
September 20, 2011
001M_110920_1720.MP3
“_”
(Single-byte)
A file name like the one above is displayed on the
computer but a number such as 1 is displayed
for a file on the screen of the unit.
Automatic changing of file names as a result
of file deletion/division:
If a recording file on the unit is deleted, the subsequent
files are moved back one place and the file numbers
are automatically reassigned accordingly.
Example: When “002M_110925_0905.MP3” is deleted
001M_110920_1720.MP3
002M_110925_0905.MP3
003M_111003_1233.MP3
004M_111231_1915.MP3
The file number parts of all file names
VQT3T18
If a file is divided, one file is added. The file numbers of the
files following the added file are automatically increased and
26
the file number parts of the file names are changed.
26
following the deleted file are changed.
File number (001 to 199)
1
Folder name (MIC)
2
Recording date
3
(6 single-byte characters)
Recording time
4
(4 single-byte characters)
File extension
5
001M_110920_1720.MP3
002M_111003_1233.MP3
003M_111231_1915.MP3
To return files imported to a computer to the
unit:
Returning the files imported to a computer to the
original folder on the unit enables them to be played
on the unit. (Files that have been renamed cannot be
played.)
However, if files on the unit have been renamed as a
result of an operation such as deleting a file, the files
you are attempting to return will have the same file
numbers as files on the unit and may not be able to be
played on the unit.
Q & A (Frequently Asked Questions)
Question Answer
Can I play files recorded on other
Panasonic IC recorders?
Can I use the audio editing
software (Voice Editing) supplied
with other Panasonic IC recorders?
Can I use a manganese battery? • A manganese battery and nickel-cadmium battery cannot be used.
• The unit cannot play files recorded on other Panasonic IC recorders.
However, files recorded on the unit can be played on another
Panasonic IC recorder if you place them in its MUSIC folder.
• The software cannot be used for files recorded on the unit.
Panasonic recommends using an alkaline battery.
Error messages
Error message Checkpoints
• This is displayed when you attempt to record more than the
maximum number of files (199) that can be recorded. (➜ page 9)
• This is displayed when you attempt to record to internal memory
when there is no space. (➜ page 33)
• This is displayed when you attempt to play a file when there is no file
in the folder.
• Replace the battery with a new one.
ENGLISH
VQT3T18
27
27

Troubleshooting guide
Before requesting service, make the following checks. If you are in doubt about some of the check points, or if the
remedies indicated in the chart do not solve the problem, consult your dealer for instructions.
Symptom Checkpoints
Battery
Cannot use a battery that
can still be used with another
device.
Operations
The unit does not work. • Has the battery become dislodged? Remove the battery completely and
Cannot operate the unit.
Recording
Memory space is used up
quicker than expected.
I hear a howling noise mixed
with the audio when I listen
with earphones (not supplied)
during recording.
Recording ended part way
through.
VQT3T18
28
28
• The unit considers the battery to be empty at the point in time when the
battery level becomes low.
then reinsert it properly. Also try replacing the battery with a new one.
• Is the unit in the hold state? Cancel hold. (➜ page 7)
• The unit cannot be operated when connected to a computer.
• Is the unit in the hold state? Cancel hold. (➜ page 7)
• The unit cannot be operated when connected to a computer.
• The length of time that recording is possible greatly differs depending on
the sound quality. (➜ page 33) Select the sound quality according to the
purpose of use. (➜ page 12)
• Is there a large number of files? Organise the files. (➜ page 11)
• Turn down the volume. (➜ page 10)
• Keep the earphones and unit away from each other.
• When using an external microphone, keep the earphones and external
microphone away from each other.
• If the unit is dropped or otherwise subjected to an impact or the battery
becomes dislodged or runs out of power during recording, the recording
data may not be able to be updated.
• Has the internal memory run out of space?
Symptom Checkpoints
Recording
Cannot record. • Is there free space in internal memory?
• Does the folder contain the maximum number of files that can be
recorded (199)?
If there are 199 files recorded, no more files can be recorded.
” is displayed during
“
recording.
Sound skipping occurs in the
recording file.
• Writing to internal memory may have become slow. Back up the files to a
computer and then format the unit.
• Was the unit formatted using a computer? If the internal memory is
formatted using a computer, the optimum performance of the unit may not
be achieved. Format it with the unit. (➜ page 11)
Recorded audio includes a
rustling noise.
• If you rub the unit with a hand or an object touches the unit during
recording, a rustling sound will be recorded through the microphone.
Try your hardest to avoid contact with an object during recording with a
microphone.
Recorded sound is distorted.
There is a noise at the
beginning of the audio.
Noise is incorporated in the
recorded audio, making it
difficult to hear.
• Lower the microphone sensitivity (➜ page 12) or move further away from
the recording sound source.
• If you are using the unit and a mobile phone close to each other, keep
them away from each other.
• Set the optimal recording settings by changing the sound quality and
microphone sensitivity (➜ page 12) and performing trial recordings.
Recorded sound is too loud or
too quiet.
• Change the microphone sensitivity. (➜ page 12)
ENGLISH
VQT3T18
29
29

Troubleshooting guide
Symptom Checkpoints
Recording
Cannot perform timer
recording.
Playing
No sound is output from the
speaker.
Cannot hear any sound.
Cannot play a recording file
even though it was recorded
on the unit.
Cannot play or correctly play
files in the MIC folder.
The playback speed is fast or
slow.
No sound is output from the
earphones (not supplied) or
the sound is difficult to hear or
includes noise.
VQT3T18
30
30
• Is there free space in internal memory?
• Does the folder contain the maximum number of files that can be
recorded (199)?
If there are 199 files recorded, no more files can be recorded.
• The unit cannot be operated when connected to a computer. Remove it
from the computer.
• Are earphones (not supplied) connected? (➜ page 17)
• Adjust the volume. (➜ page 10)
• Has the file been renamed? Only files in the MIC folder that are named
according to the file naming conventions can be played. Even if a file has
not been renamed, it cannot be played if its file number is the same as
that of another file in the folder. (➜ page 26)
• Have MP3 files created with a computer been transferred to the unit?
MP3 files created with a computer cannot be played even if they are
transferred to the unit.
• Did you change the playback speed? (➜ page 14)
• Is the plug firmly inserted all the way in?
• Is the plug dirty? (Wipe the plug clean.)
 Loading...