

Page 1
RQT6118-Y
Before connecting, operating or adjusting this product, please read these instructions completely.
Please keep this manual for future reference.
Basic Operating Instructions
Panasonic Media Manager V2.1
Before enjoying music with
your SD Audio Player
· These instructions describe basic
operations such as installation and
checking out tracks. For more
detailed instructions, refer to the
online help included on the CD-ROM.
· For details on using Windows, the
computer, and peripheral equipment, refer
to the appropriate operating instructions.
Follow the instructions in this
manual and online help to record
music onto your SD Memory Card.
PP
En
Page 2
Before use
2
RQT6118
Registration
Please register your copy of RealJukebox for Panasonic. Registration allows
you to take advantage of product support and to receive information about the
latest version of the software and other products.
Visit the registration site on the Internet and fill out the online form.
Registering on the Internet
1. After starting RealJukebox for Panasonic, click on the [Panasonic] button in
the main window.
2. Follow the instructions found on the homepage.
· Panasonic in no way provides a guarantee for the RealJukebox Player Application
or associated plug-in module. Panasonic accepts no liability for any problems that
may arise either during the installation or through use of the RealJukebox Player
Application and/or associated plug-in module. Panasonic does not provide a
guarantee that content managed by the RealJukebox Player Application and/or
associated plug-in module can be transferred to an SD Memory Card.
· Electronic Music Distribution services are provided by a third party and not by
Panasonic. Therefore Panasonic has no responsibility and accepts no liability for
any problems that may arise with an Electronic Music Distribution service.
· You may be unable to record or use music data under some computer
environments. This company accepts no responsibility for any loss of data or
damages incurred by loss of data.
· Modifications to the product and these operating instructions may be made without
prior notice.
· Illustrations and screen examples in these operating instructions may differ from
the actual product.
Panasonic Media Manager:
Is a software package that includes RealJukebox for Panasonic, an AAC plugin, an SD Interface plug-in, driver software for the USB Reader/Writer, and the
setup programs for all these components.
Page 3
Before use
3
RQT6118
Contents
Before use
System requirements . . . . . . . . . . . . . . . . . . . . . . . . . . . . . . . . . . . . . .4
What you can do with RealJukebox for Panasonic . . . . . . . . . . . . . . .5
Installation . . . . . . . . . . . . . . . . . . . . . . . . . . . . . . . . . . . . . . . . . . . . . .6
Using the online help . . . . . . . . . . . . . . . . . . . . . . . . . . . . . . . . . . . . .10
Connecting an SD Memory Card . . . . . . . . . . . . . . . . . . . . . . . . . . . .12
· The USB Reader/Writer . . . . . . . . . . . . . . . . . . . . . . . . . . . . . . . . . . .13
· Protecting the data on your SD Memory Card . . . . . . . . . . . . . . . . . .14
Getting started
Reference
Troubleshooting . . . . . . . . . . . . . . . . . . . . . . . . . . . . . . . . . . . . . . . . .25
Formatting SD Memory Cards . . . . . . . . . . . . . . . . . . . . . . . . . . . . . .26
Copyright protection limitations . . . . . . . . . . . . . . . . . . . . . . . . . . . . .27
Limitations in Windows Explorer . . . . . . . . . . . . . . . . . . . . . . . . . . . .27
Product information . . . . . . . . . . . . . . . . . . . . . . . . . . . . . . . . . . . . . .27
Startup . . . . . . . . . . . . . . . . . . . . . . . . . . . . . . . . . . . . . . . . . . . . . . . .15
· Startup . . . . . . . . . . . . . . . . . . . . . . . . . . . . . . . . . . . . . . . . . . . . . . . . .15
· Exiting . . . . . . . . . . . . . . . . . . . . . . . . . . . . . . . . . . . . . . . . . . . . . . . . .17
Main features of the display . . . . . . . . . . . . . . . . . . . . . . . . . . . . . . . .18
Checking out tracks to an SD Memory Card . . . . . . . . . . . . . . . . . . .24
Page 4
Before use
4
RQT6118
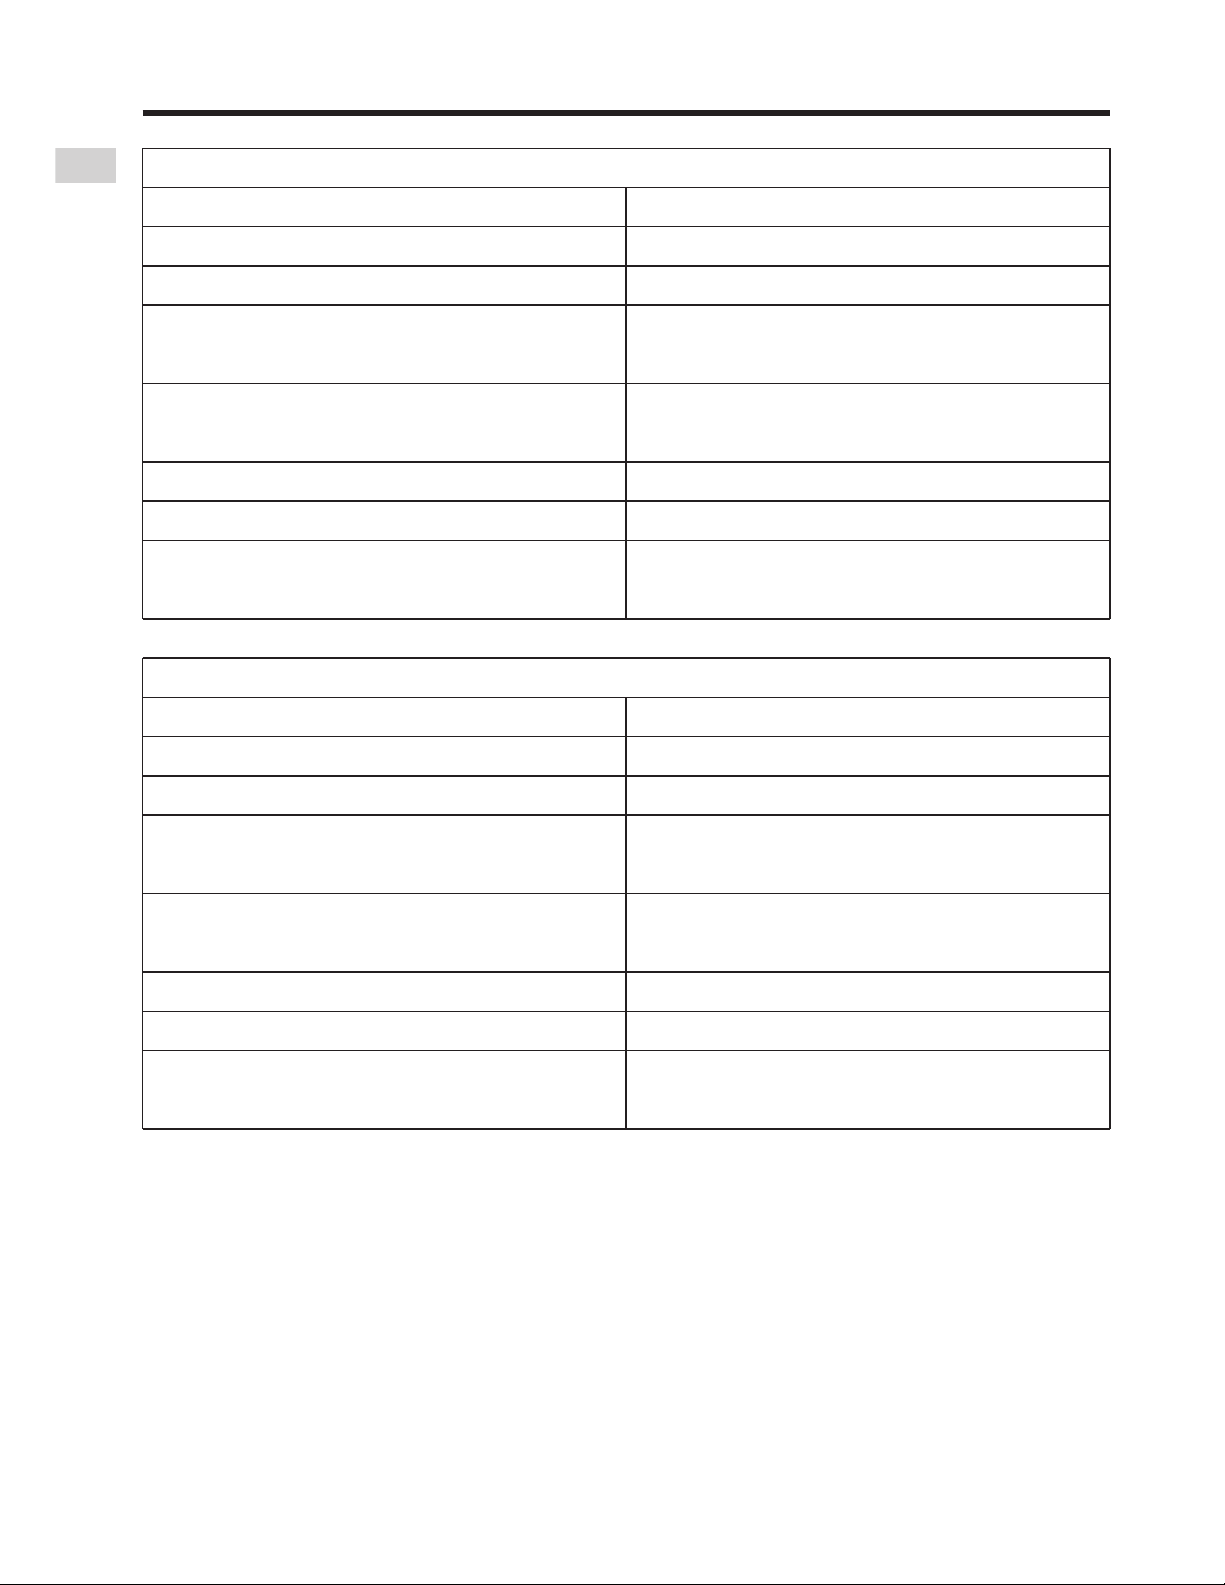
System requirements
Operation under Windows XP RC2 confirmed.
Visit " http://www.panasonic.com/sd " for updates on operation under Windows XP.
RealJukebox for Panasonic cannot be used on Microsoft Windows 3.1,
Microsoft Windows NT and Macintosh.
Correct operation cannot be guaranteed when used on Microsoft Windows 95
or when used on Microsoft Windows 98,98SE,Windows Me upgraded from
Windows 95/3.1.
Operating System requirements apply to Real products only.
Third party plug-ins or add-ons may have different system requirements.
Minimum System:
Pentium 233MHz MMX or equivalent CPU
64MB RAM
Hard Disk Space:
30MB for Software
200MB for Music
CD-ROM drive
16 bit Sound card and speakers
16 bit color video display card
Internet connection and web browser
(Microsoft Internet Explorer 5.01 or later)
Windows®98, 98SE, Windows®Me, Windows®2000 (Professional)
Recommended System:
Pentium II 333MHz or equivalent CPU
64MB RAM
Hard Disk Space:
30MB for Software
1GB for Music
CD-ROM drive that supports digital
audio extraction
Full Duplex Sound card and speakers
16 bit color video display card
Internet connection and web browser
(Microsoft Internet Explorer 5.01 or later)
Minimum System:
Pentium II 333MHz or equivalent CPU
128MB RAM
Hard Disk Space:
30MB for Software
200MB for Music
CD-ROM drive
16 bit Sound card and speakers
16 bit color video display card
Internet connection and web browser
(Microsoft Internet Explorer 5.01 or later)
Windows®XP (Home Edition/Professional)
Recommended System:
Pentium III 500MHz or equivalent CPU
128MB RAM
Hard Disk Space:
30MB for Software
1GB for Music
CD-ROM drive that supports digital
audio extraction
Full Duplex Sound card and speakers
16 bit color video display card
Internet connection and web browser
(Microsoft Internet Explorer 5.01 or later)
Page 5
Before use
5
RQT6118
What you can do with RealJukebox for Panasonic
RealJukebox for Panasonic includes the following new features:
· New Skins - radically new ways to enjoy your RealJukebox for Panasonic
· Navigation Bar - access to key sections with the touch of a button
· Broken Links Management - remove all missing files from RealJukebox for
Panasonic
· Watch Music Folders - allows you to quickly import tracks that you have
downloaded
· AutoPlaylists - create track mixes automatically
·
Improved Interface - Navigation Bar, Command Bar, optional tree view, and more
· Keyword Search - find the songs you like in seconds
· Recently Played Tracks displays the last 20 tracks you played
· Radio tuner - access thousands of radio stations via the RealPlayer
· Online Track/Artist info - live information via the web
· Track Info - add album art, lyrics, and more to your tracks and albums
· Print Jewel Cases - Print CD covers/inserts with graphics and track lists
· Visualizations - animate to the rhythm of your music
· Record from Mic/Line In - transfer your vinyl or cassette collection to your PC
or simply record from your microphone
· SD Audio Player and SD Memory Card support
· Edit Track Properties
· Drag-and-drop track editing
· Windows Media Audio (WMA) compatibility will be available with a download
of an updated version of the software.
Visit " http://www.panasonic.com/sd " for details on when the update will be
available.
Using Electronic Music Distribution services
After starting RealJukebox for Panasonic, click on the [Panasonic] button in
the main window. The homepage has the latest information about music data
services. Follow the onscreen instructions.
You will need an Internet connection and an Internet service provider in order to use
music data services.
Note
The copyright protection technology used by RealJukebox for Panasonic follows the
guidelines set by the Secure Digital Music Initiative (SDMI).
Page 6
Before use
6
RQT6118
Installation
The driver for the USB Reader/Writer and RealJukebox for Panasonic are
included on the supplied CD-ROM. Follow these steps to install them.
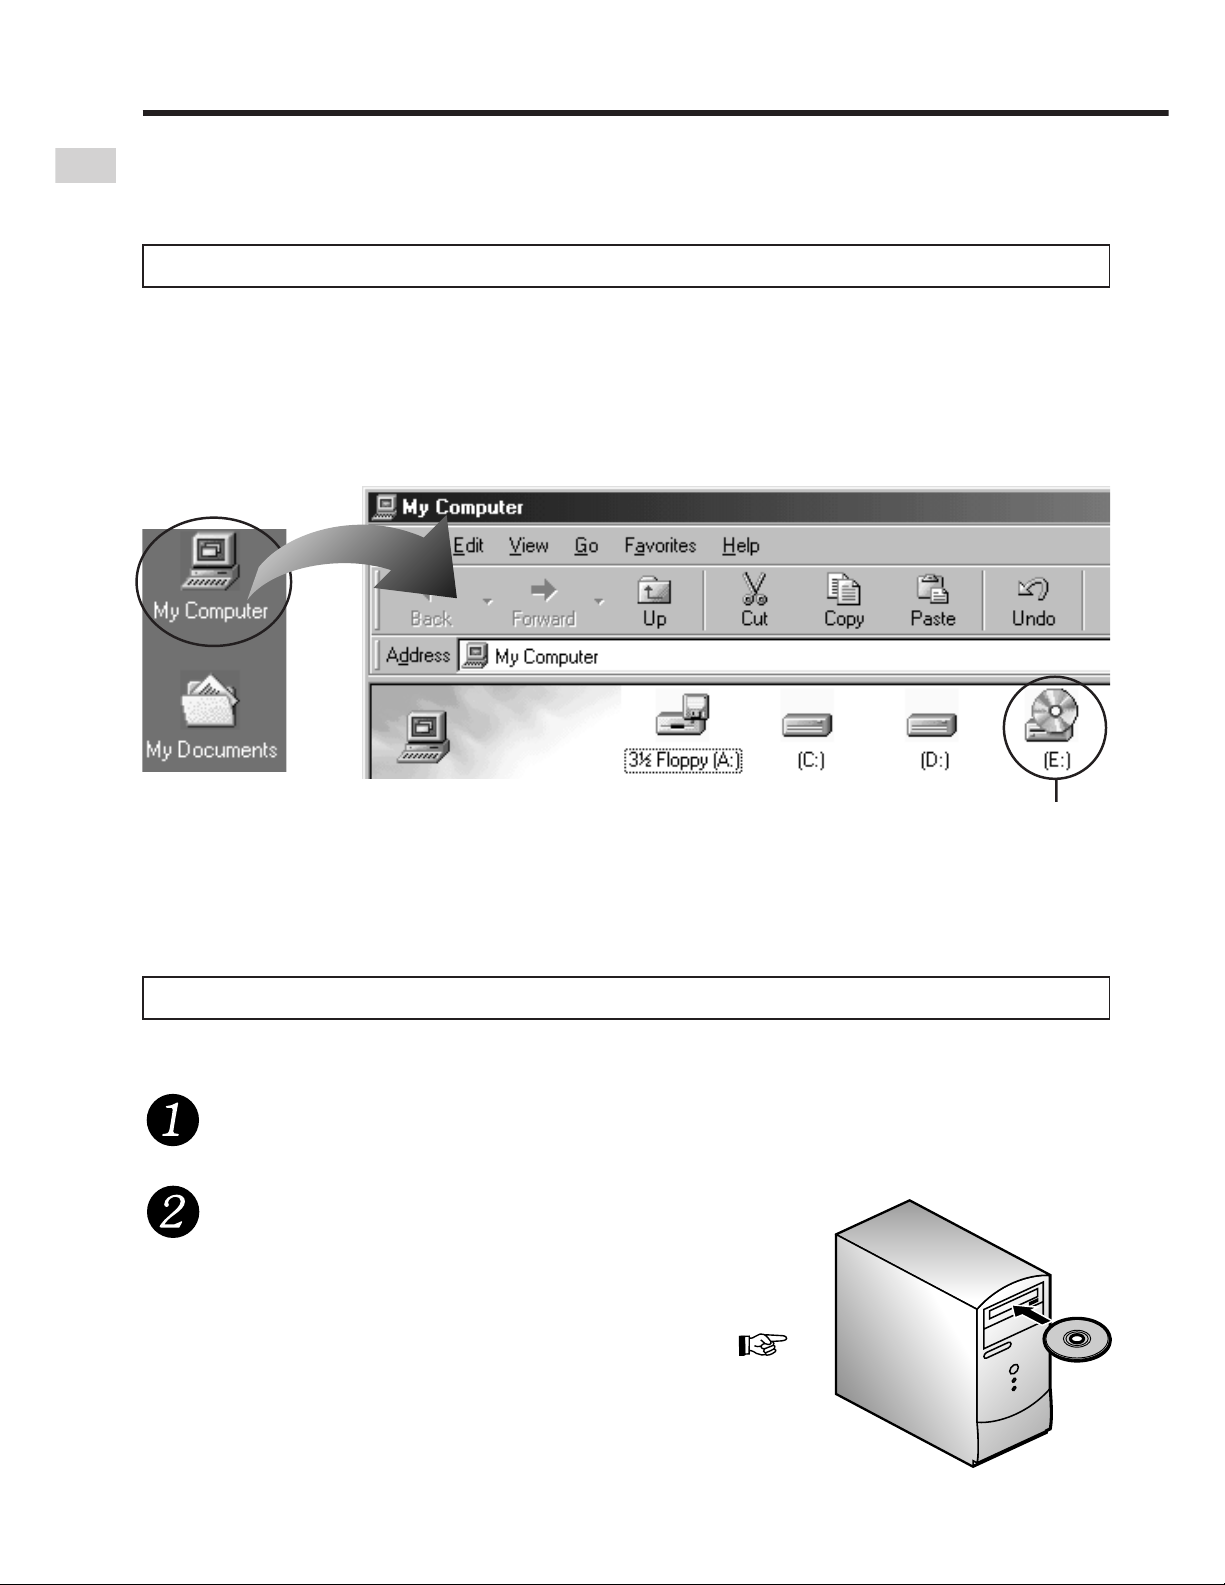
You may have to specify the drive ID during installation. Turn on the computer
and start Windows. Refer to the following to check the ID of the drive.
If you have more than one CD-ROM
drive, select the one into which you
have inserted the CD-ROM.
Double click on
the "My Computer"
icon at the top left
of the screen.
CD-ROM drive ID
(E in this case)
· The installer program starts automatically .
· If the installer program doesn't start, run the
program by specifying the file name (
page 9).
Checking drive ID
Installation steps
Turn on the computer and start Windows.
Insert the included CD-ROM into
the CD-ROM drive.
Do not connect the USB Reader/Writer until installation is complete.
Page 7

Before use
7
RQT6118
Select all two applications under
normal circumstances.
Make changes if your computeroperating environment requires then
click on [Next].
Click on [Next].
Continued on next page
Read the user agreement and click on [Accept].
Click on [Next].
Make changes to the destination if
necessary before clicking on [Next].
Page 8
Before use
8
RQT6118
Installation
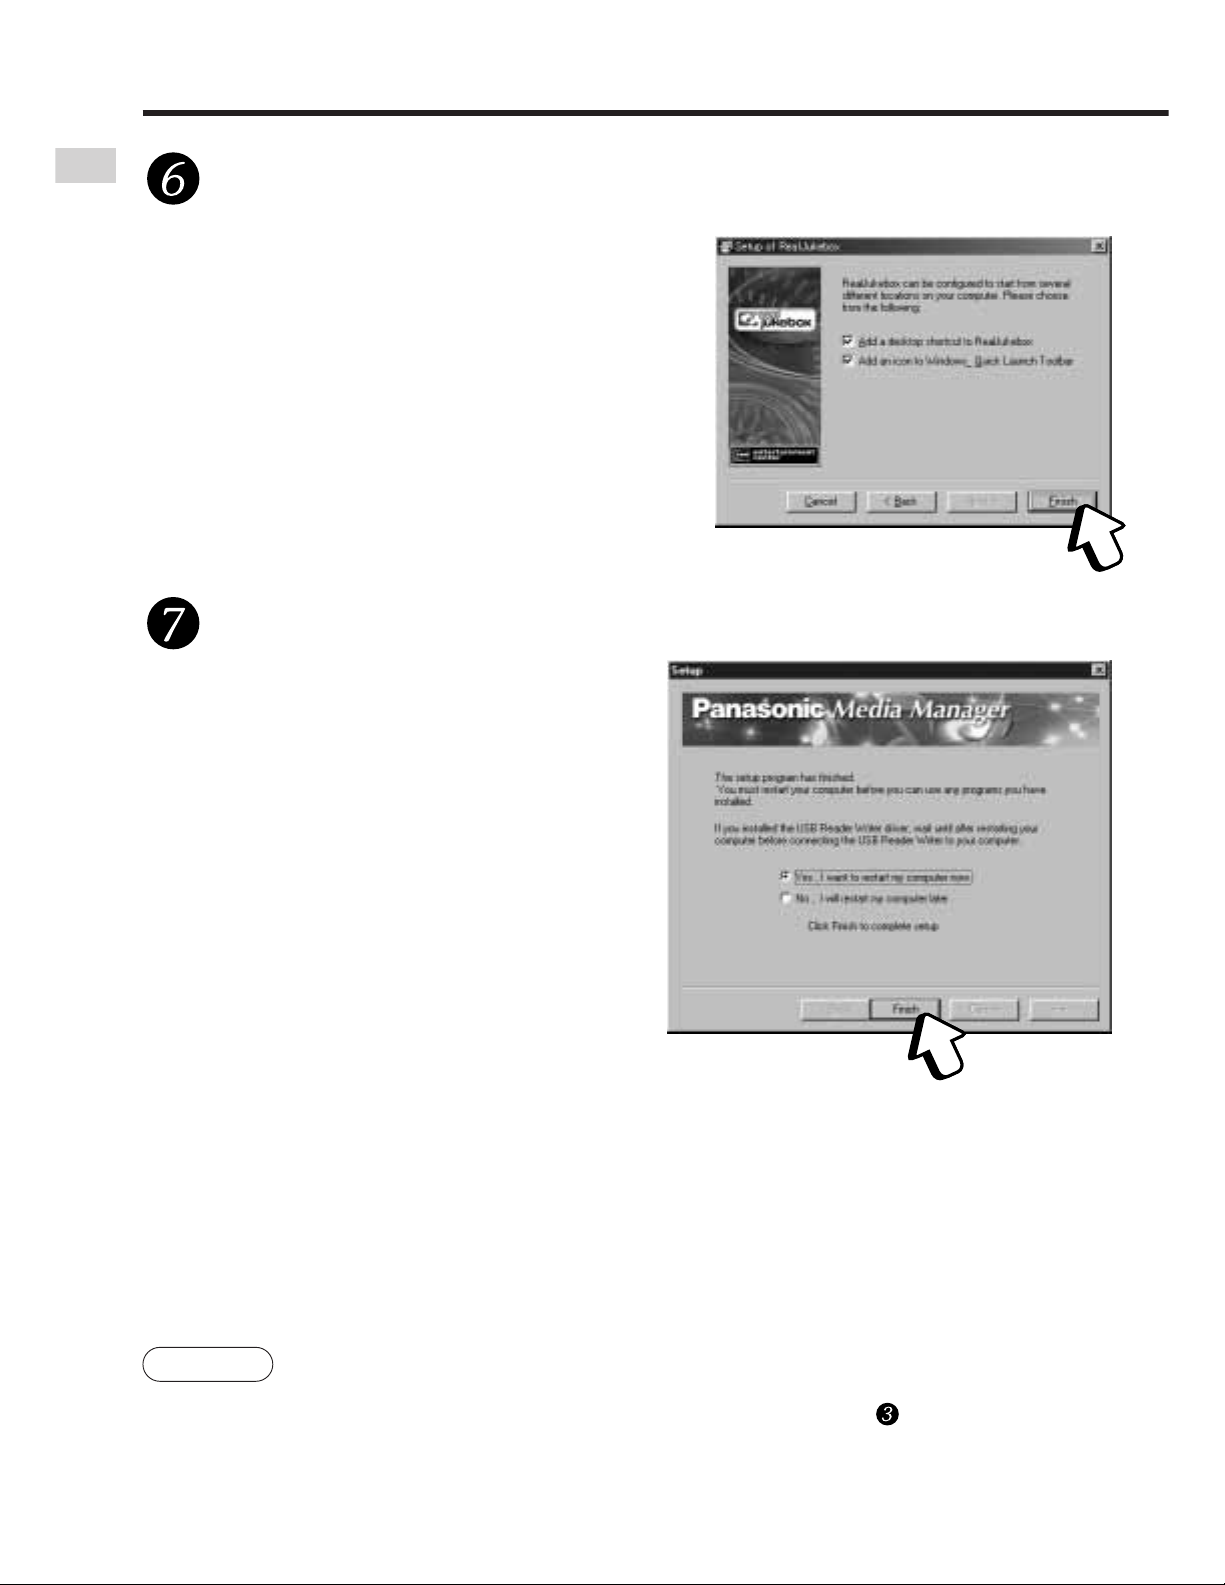
Select whether to create icons on the desktop and toolbar,
and click on [Finish].
The computer restarts and
installation is complete.
Recommendation: create both icons.
The setup program starts.
Check "Yes" and click on [Finish].
If you decided not to install the USB Reader/Writer driver in step , the computer will
not restart automatically.
Note
Page 9

Before use
9
RQT6118
If the installation program doesn't start automatically
Click on [Start] and, click
on "Run...".
Type in "#:\setup.exe" and click on [OK].
· The installation program starts.
Continue from step on page 7.
· #: Enter the CD-ROM ID here.
( page 6, Checking drive ID)
· Letters you enter here can be
either upper or lower case.
Page 10

Before use
10
RQT6118
Do one of the following.
· Click on [Start] and select
"Programs" → "Real" →
"RealJukebox" →
"RealJukebox Help".
· After starting RealJukebox for
Panasonic, select [Contents]
from the "Help" menu.
Using the online help
To show the online help
These instructions describe basic operations such as installation and checking
out tracks. For more detailed instructions, refer to the online help included on
the CD-ROM.
Online help for RealJukebox
· Double click on to display its contents.
· Double click on to see an explanation.
To search using the table of contents
(Example)
The table of contents is replaced by a list of keywords when you click on the
"Index" tab.
You can find a keyword by either entering it or scrolling through the list.
Double click on the keyword to see an explanation.
Searching by keyword
Page 11

Before use
11
RQT6118
The SD Audio Help includes explanations about the sections of RealJukebox
for Panasonic specific to Panasonic that have not been explained in these
operating instructions or in the Online Help for RealJukebox.
· AAC settings and explanations
· Data conversion
· Checking out and checking in with SD Memory Cards
And more
SD Audio HELP
After starting RealJukebox for Panasonic.( page 15 )
Connect the USB Reader/Writer ( page 12).
Insert an SD Memory Card into the USB Reader/Writer.
Click on [Devices].
Double click on "Panasonic Device" and then double click on
"SD Card".
Click on the [SD Audio Help] button.
To show the online help for SD Audio
Page 12

Before use
12
RQT6118
Connecting an SD Memory Card
Connect the included USB Reader/Writer to checkout (record) tracks to your
SD Memory Card.
Turn on the computer and start Windows.
Connect the USB Reader/Writer
to the computer's USB port.
The "New Hardware Found" screen appears.
The driver for the USB Reader/Writer is enabled
automatically.
Check that it appears in Windows Explorer as a removable drive.
Taking care that the card is
facing the right way, insert the
SD Memory Card into the USB
Reader/Writer.
Insert label-up
with the cut-off
corner facing in
ACCESS lamp
To the
computer's
USB port
· Connect to an AC power supply when using a portable computer. Data can be lost or
errors can occur if the computer turns off during operation.
· Operation cannot be guaranteed under the following circumstances:
*When you have connected two or more USB Reader/Writer to your computer or are
using another USB device.
*When you have connected another SD Memory Card adapter.
*When you are using a USB hub or extension cord.
You can damage the card and USB Reader/Writer's slot if you insert the card
incorrectly.
Ensure the USB Reader/Writer's ACCESS lamp is off before inserting or ejecting
SD Memory Cards.
Do not remove the SD Memory Card while checking out even if
the ACCESS lamp is off.
Note
Note
Page 13

13
RQT6118
Before use
· Do not wet, drop, or expose the USB Reader/Writer to impacts.
· Do not use or store in locations directly exposed to sunlight, a heat vent,
or a heating appliance.
· Do not disassemble or modify.
· Do not insert foreign objects into the slot.
The USB Reader/Writer
CAUTION:
This equipment has been tested and found to comply with the limits for a Class B
digital device, pursuant to Part 15 of the FCC Rules.
These limits are designed to provide reasonable protection against harmful
interference in a residential installation. This equipment generates, uses and can
radiate radio frequency energy and, if not installed and used in accordance with the
instructions, may cause harmful interference to radio communications. However,
there is no guarantee that interference will not occur in a particular installation. If this
equipment does cause harmful interference to radio or television reception, which
can be determined by turning the equipment off and on, the user is encouraged to try
to correct the interference by one or more of the following measures:
· Reorient or relocate the receiving antenna.
· Increase the separation between the equipment and receiver.
· Connect the equipment into an outlet on a circuit different from that to which the
receiver is connected.
· Consult the dealer or an experienced radio/TV technician for help.
Any unauthorized changes or modifications to this equipment would void the user’s
authority to operate this device.
This device complies with Part 15 of the FCC Rules. Operation is subject to the
following two conditions: (1) This device may not cause harmful interference, and (2)
this device must accept any interference received, including interference that may
cause undesired operation.
Responsible Party: Matsushita Electric Corporation of America
One Panasonic Way Secaucus, NJ, 07094 USA
Telephone No.: 1-800-211-7262
THE FOLLWING APPLIES ONLY IN THE U.S.A.:
This Class B digital apparatus complies with Canadian ICES-003.
THE FOLLWING APPLIES ONLY IN CANADA:
Page 14

Before use
14
RQT6118
Protecting the data on your SD Memory Card
Performing the following actions before RealJukebox for Panasonic has
started completely, while the USB Reader/Writer's ACCESS lamp is on, and
while checking out tracks can damage your SD Memory Card and corrupt the
data it contains.
· Inserting or ejecting the SD Memory Card
· Connecting or disconnecting the USB Reader/Writer
· Shutting down RealJukebox for Panasonic or Windows forcefully
· Turning the computer off forcefully (for example, unplugging the AC
power supply cord)
Connecting an SD Memory Card
Page 15

15
RQT6118
Getting started
Startup
Startup
Double-click on the desktop icon.
Fill out the form and Click
on [Next].
Click on [Next].
Click on [Next].
Select "Express Setup
(Recommended)" under normal
circumstances. Select "Custom
Setup" if necessary before clicking
on [Next].
RealJukebox for Panasonic starts and the registration
wizard begins.
If the icon is not on the desktop, from the [Start] menu, select
"Programs" → "Real" → "RealJukebox" → "RealJukebox".
Note
Continued on next page
Page 16

16
RQT6118
Getting started
Click on [Finish].
You are connected to
http://www.Real.com/central/ and
your registration information is
sent. A screen appears asking if
you want to use RealJukebox as
the default player.
Click on [Yes].
Setup of RealJukebox for
Panasonic finishes and the
operation window appears.
After doing this once, the RealJukebox for Panasonic operation window will be
displayed by simply clicking on the desktop icon.
Turn off the power-saving functions on your computer while using RealJukebox for
Panasonic.
Startup
Note
Page 17

Getting started
17
RQT6118
Click on the xbox at the top
of the main window.
Exiting
Page 18

18
RQT6118
Main features of the display
Use the Navigation Bar to display track lists and other RealJukebox for
Panasonic feature areas, and the Control Panel to play and record tracks. The
Command Bar contains commands you can use on tracks or track lists,
Playlists, devices, and more. RealJukebox for Panasonic menus contain many
additional options, including Preferences, Navigation options, and Help.
Navigation Bar
( page 20)
Menu Bar
( page 23)
Header Bar
Location
Bar
Editing Tools
Control Panel
( page 22)
Organizer buttonStatus Bars
( page 23)
Track Info
Organizer
Display Area Partner
Windows
Panasonic
homepage
link
Command Bar
( page 21)
If play starts automatically when you insert a CD into the CD-ROM drive, you
will need to shutdown any CD playing applications before you can use
RealJukebox for Panasonic.
Getting started
Playlists created with RealJukebox for Panasonic cannot be played on
SD Audio Players (SV-SD75,SV-SD05,SV-SD80).
Note
Page 19

19
RQT6118
Getting started
Quick Start
This section will help you get started using some of RealJukebox for
Panasonic's basic features. As you become more experienced using
RealJukebox for Panasonic, be sure to explore both the program and this Help
system to learn about the many additional tools and options available to you.
The following instructions assume that all default automatic playback options are on
.
RealJukebox Homepage
RealJukebox Homepage gives you an easy way to get started using
RealJukebox. Each item in the window provides a brief description of a
RealJukebox feature, and you can click a link to display track lists, create
Playlists, download music, and more.
To see an overview of all options, click the organizer button to see RealJukebox for
Panasonic in organizer view. To go back to the previous location, use the Back or
Forward buttons or the Location Bar.
Feature
Record/Play CDs
Play Tracks
Create Playlists
Download Music
Description
To Record and Play a CD, insert it into your CD-ROM
drive. To toggle recording on/off, click the Record
button on the Control Panel. To toggle playback
on/off, click the Play button.
To view and play your recorded music, click a Group
button (Genre, Artist, Album), then double-click items
in the display window to open or play them, or select a
track and click the Play button in the control panel.
To create a custom Playlist, click New Playlist in the
Command Bar and follow the on-screen instructions.
To download music from the Internet, click the Music
Guide button in the Navigation Bar and follow the
links.
Note
Note
Page 20

20
RQT6118
Main features of the display
The Navigation Bar gives you instant access to every RealJukebox for
Panasonic feature area. Just click a button to display the track list or feature
you want to use, then use the Control Panel and Command Bar to play tracks,
create Playlists, and more.
The Navigation Bar
RealJukebox for Panasonic Controls and Navigation
Feature
Home
CD
Music Guide
All Tracks
Genre
Artist/Album
Search
Playlists
AutoPlaylists
Radio
Devices
Description
Go to the RealJukebox homepage.
Record or play a CD.
Go to Music Guide and download music from the
Internet.
View all tracks in your music library.
Click a Group button to go to the desired Track Group.
View the Artist and Album Track Groups.
Search your music library using keywords. If you don't
see this button in the Navigation Bar, click the
>>
on
the right end.
View your Playlists. If you don't see this button in the
Navigation Bar, click the
>>
on the right end.
View your AutoPlaylists. If you don't see this button in
the Navigation Bar, click the
>>
on the right end.
Go to Real.com and play live streamed radio
broadcasts using the RealPlayer.
View your installed portable devices. If you don't see
this button in the Navigation Bar, click the
>>
on the
right end.
Getting started
You can customize the Navigation Bar: right-click the Navigation Bar and
choose the buttons you wish to display by checking/unchecking the boxes.
Note
Shows
hidden
buttons.
Page 21

21
RQT6118
The Command Bar displays context-sensitive options based on the current
track list or feature area . Many of these options are only available under the
certain circumstances, such as when an appropriate item is selected.
The Command Bar
Feature
New Playlist
New AutoPlaylist
Edit AutoPlaylist
Copy to Playlist
Copy to Device
Add Tracks
Check All
Check None
Remix Now
Update Now
Begin Transfer
Configure
View Track Info
Edit View Track
Info
Clear History
New Stations
New Music Guide
Description
Launch a new window to help you create a new Playlist.
Launch a new window to help you create and design
a new AutoPlaylist.
Lets you change the criteria for the selected AutoPlaylist.
Send selected tracks to an existing Playlist.
Send selected tracks to a portable device queue.
Add selected tracks to a Playlist, AutoPlaylist, or
portable device.
Select all tracks for recording from CD or transfer to a
portable device.
Skip all tracks when recording from CD or transferring
to a portable device.
Remix a selected AutoPlaylist: Automatically generates
a new compilation of tracks using the same criteria.
Updates the Music Guide display.
Transfer queued tracks to a portable device. (Changes
to "Cancel Transfer" when tracks are being transferred)
Configure a portable device in preparation for transferring
tracks. (Available only when a portable device is selected)
View Track Info associated with the selected track.
Change artist name, album title, and genre for
multiple tracks. Add lyrics, album art, and more.
Erase the list of recently played tracks.
Available only in the Recent window.
Appears only when new radio stations are available. Click
the New Stations button to display the Radio window.
Appears only when Music Guide has been updated.
Click New Music Guide to display the latest version of
the Music Guide.
Getting started
Page 22

22
RQT6118
Main features of the display
The Control Panel provides recording and playback control as well as skip,
seek (search), shuffle (random), continuous play (repeat) options.
The Control Panel also offers Visualization settings, quick access to your
RealPlayer, and Skin mode.
The Control Panel
Feature
Record
Play
Pause
Stop
Previous
Next
Continuous
Shuffle
Return
Volume
Control
Progress Bar
Launch RealPlayer
Description
Click to begin recording the CD in your CD drive. Click
again to stop recording.
Click to play the selected track. Click again to stop playing.
Click to pause playback. Click again to resume playback.
Click to stop both playback and recording.
Click to jump to previous track on the current CD or track list.
Click to jump to next track on the current CD or track list.
Play current CD or track list repeatedly.
Play current CD or track list randomly.
Click the return button to return to the currently
playing track list. For example, if you're playing a track
from a Playlist, and you're browsing your Groups
(Genre, Artist, Album), clicking the return button takes
you back to the Playlist your track is playing from.
Click and drag the slider to pump up the volume
(right) or tone it down (left). Use the arrow keys to
“fine tune” your settings.
The Progress Bar displays the current track's
playback progress. You can skip forward and
backward in the currently playing track by dragging
the slider left (back) or right (forward).
Launches the RealPlayer.
Getting started
Page 23

23
RQT6118
· Play Status Bar
This bar provides up-to-date information on the currently playing track,
including the name of the track and artist and the time elapsed/length of the
track. Other information includes icons that tell you whether the track is
playing from a CD (CD) or a recorded music file (an icon will tell you the
format), and whether the track is playing in stereo ((((· · · ·))))
· Record Status Bar
This bar provides up-to-date information on the currently recording track,
including the name of the track and artist, the track number, and the
recording progress. The Record Status bar only appears while a track is
recording.
The Status Bars
The menu bar offers dozens of options including navigation, preferences,
playlists, plus online sites and Help. Click to open a menu, then click again to
select an option.
The Menu Bar
The Header Bar is the bar just above any track list. With a Group, Playlist, or All
Tracks open, it contains the headers Track Name, Album, Artist, etc. You can
specify which headers and columns appear in Tools>Preferences>Display.
· To sort tracks by header criteria, click a header. For instance, to
sort by name, click the "Name" header (Track Name, Playlist
Name, Grouping Name).
The Header Bar
Tracks on CD cannot be sorted, and Playlist tracks cannot be sorted using the Header
Bar.
Getting started
Note
Page 24

Getting started
24
RQT6118
Checking out tracks to an SD Memory Card
Select tracks you have recorded on your computer and check them out to an
SD Memory Card. The tracks are converted as they are checked out, so
ensure you have made the correct conversion settings.
Connect the SD Memory Card.
Select tracks.
Click on “Copy to”→
“Device”.
Click on “OK”.
Click on “Begin T ransfer”.
“On Device” is shown when
checking out is finished.
· Do not insert or remove SD Memory Cards while the “Check-out to SD
card” window is being displayed.
· You cannot make playlists on SD Memory Cards with RealJukebox.
Note
Page 25

25
RQT6118
Reference
Troubleshooting
Installation and startup
Before requesting service, make the below checks and refer to the online Help.
If you are in doubt about some of the check points, or if the remedies indicated
in the chart do not solve the problem,
Contact the Panasonic Customer Call Center at 1-800-211-7262, or e-mail
consumerproducts@panasonic.com, or web site
(http://www.panasonic.com/sd).
Problems
Cannot install
Cannot start.
I want to install
just the USB
Reader/Writer
driver.
Check points or causes
· Insert the CD-ROM.
· Ensure you have specified the correct CD-ROM drive.
· Ensure the program is installed on the hard disc. The
program cannot be run from the CD-ROM.
· Ensure the computer has at least 64 MB of RAM.
Install the driver from the included CD-ROM. In step
of the installation procedure, remove the checks from
RealJukebox [with Panasonic plug-in].
Page 26

26
RQT6118
Reference
Formatting SD Memory Cards
Format your SD Memory Card to use SD Audio data. Some or all of the data
on the card will be lost when you format it. Select "Format only for SD Audio
(Erase all Audio data)" under normal circumstances. Select "Format entire
card (Erase all data)" only when necessary.
Click on "Devices".
Double-click on
"Panasonic Device".
Right Click on "SD Card".
Click on "Configure".
Click on "Initialize (Format)".
Click on [Start].
Tracks you have checked out using software other than RealJukebox for Panasonic are also
deleted when you format the card. Check the data on the card before commencing formatting.
Use only the method described below to format your card. Using other methods can
render the card unable to checkout or play.
The SD Memory Card is formatted.
Recomended: "Format only for SD Audio
(Erase all Audio data)"
Note
Page 27

27
RQT6118
Reference
Copyright protection limitations
· This software includes copyright limitations decided upon by the Secure
Digital Music Initiative (SDMI).
*
You may be unable to use music data with this software if the data is
copyright-protected or if you have recorded from a DVD-Audio player.
*
Where the owner of the copyright or music data providers have set
conditions with regard to the use of the data, you are obliged to abide by
those conditions.
· Your attention is drawn to the fact that recording pre-recorded SD Memory
Card may infringe copyright laws.
· Upgrading RealJukebox for Panasonic
RealJukebox for Panasonic follows the guidelines set by the SDMI. Future
changes to these guidelines may render some functions of RealJukebox for
Panasonic inoperable. Upgraded versions of RealJukebox for Panasonic will
be offered in such circumstances. A charge may be applied to these
upgrades.
Limitations in Windows Explorer
· SD Memory Cards are shown as external drives (for example, "D") in
Windows Explorer when they are connected to the computer.
Do not use Explorer to move SD Memory Card music data or folders, change
their names, or delete them. This can render the music data unplayable. Use
only RealJukebox for Panasonic for editing.
· Similarly, do not use Explorer to move, change the names of, or delete music
data and folders you have saved to your computer.
Product information
For product service, product information or assistance with product operation,
contact the Panasonic Customer Call Center at 1-800-211-7262, or e-mail
consumerproducts@panasonic.com, or web site
(http://www.panasonic.com/sd).
Page 28

· SD logo is a trademark.
· Portions of this product are protected under copyright law and are provided under license
by ARIS / SOLANA /4C.
· Microsoft and its logo as well as Windows and Windows NT, Windows 2000, Windows
XP are registered trademarks of Microsoft Corporation of the U.S. in both the United
States and other countries.
· Pentium and MMX are registered trademarks of Intel Corporation of the U.S.
· IBM and PC/AT are registered trademarks of International Business Machines
Corporation of the U.S.
· Macintosh is a registered trademark of Apple Computer, Inc. of the U.S. in both the
United States and other countries.
· The Real logo, RealAudio, RealNetworks, RealPlayer, RealJukebox, RealDownload and
Real.com are trademarks or registered trademarks of RealNetworks, Inc.
· Other names of systems and products mentioned in these instructions are usually the
registered trademarks or trademarks of the manufacturers who developed the system or
product concerned.
The ™ and ® marks are not used to identify registered trademarks and trademarks in
these instructions.
· Licensed AAC Patents(U.S. patent numbers);
This manual was printed
with soy based ink.
© 2001 Matsushita Electric Industrial Co., Ltd.
Printed in Japan
RQT6118-Y
MS1001F0
08/937,950
5848391
5,291,557
5,451,954
5 400 433
5,222,189
5,357,594
5 752 225
5,394,473
5,583,962
5,274,740
5,633,981
5 297 236
4,914,701
5,235,671
07/640,550
5,579,430
08/678,666
98/03037
97/02875
97/02874
98/03036
5,227,788
5,285,498
5,481,614
5,592,584
5,781,888
08/039,478
08/211,547
5,703,999
08/557,046
08/894,844
5,299,238
5,299,239
5,299,240
5,197,087
5,490,170
5,264,846
5,268,685
5,375,189
5,581,654
05-183,988
5,548,574
08/506,729
08/576,495
5,717,821
08/392,756
Panasonic Consumer
Electronics Company,
Division of
Matsushita Electric
Corporation of America
One Panasonic Way
Secaucus, New Jersey 07094
http://www.panasonic.com
Panasonic Sales
Company, Division of
Matsushita Electric of
Puerto Rico, Inc. (“PSC”)
Ave. 65 de InfanterÍa, Km. 9.5
San Gabriel Industrial Park,
Carolina, Puerto Rico 00985
Panasonic Canada Inc.
5770 Ambler Drive,
Mississauga, Ontario
L4W 2T3
www.panasonic.ca
 Loading...