

Page 1

Panasonic
Stereo Clock Radio
RC-X230
Operating InstructkHis
CB
cowciing. operating or adM^ng 9m
product, pteaee read theee inemicdone
compteUty-
Page 2

Thank you for purchasing this unit.
Table of Contents
For optimum performance and
safety, please read these instruc
tions carefully.
Before Use
Precautions
Safety
Installation
Maintenance .................................
Service...........................................
..................................
............................................
.....................................
Time-Protecting Battery
Back-Up
Battery installation
Battery replacement
Operation....................................... ___8
Notes
....................................
.........................
......................
.............................................
Functions
Location and Function of
Controis
......................
Top and front panel section .
Rear panel section
..............
Connections ...................
How to use the headphones
How to use the unit as an
amplifier
..........................
___
_ _
_ _
_ _
___
___
_ _
___
4
4
4
5
5
7
7
7
fi
.9
10
11
12
12
12
Operations
Setting the Correct Time
...............
Listening to Radio
Broadcasts
Tone button
Surround button
...........................
.................................
...........................
Antennas.....................................15
Operation of Duai Wake-Up
System
Alarm time setting
Radio alarm (ALARM 1)
..................................
.........................
...............
Buzzer alarm (ALARM 2)...............18
Combination of alarms
Speciai Features
..................
.....................
Doze operation ............................20
Radio sleep timer
.........................
Combination of sleep timer and
alarm function
..........................
Reference
Specifications ...
Product Service .
Product information
Index
...................
............
............
.................
.Back cover
13
14
15
15
16
16
17
19
20
21
22
23
23
23
Page 3

•The following mark and symbols are
located on bottom of the unit.
CAimON: TO REDUCE THE RISK OF ELECTRIC
SHOCK, DO NOT REMOVE SCREWS.
NO USet-SERVICEABLJE PARTS
MStOE.
REFER SERViaNQ TO OUAUF1EO
SERVICE PERSONNB„
The lightning flash with arrow
head symbol, within an equi
á k.
A
lateral triangle, is Intendéd to
alert the user to the presence
of uninsulated “dangerous
voltage" within the product’s
enclosure that may be of suf
ficient magnitude to constitute
a risk of electric shock to per
sons.
The exclamation point within
an equilateral triangle is in
tended to alert the user to the
presence of important oper
ating and maintenance (ser
vicing) instructions in the lit
erature accompanyir>g the
appliance.
WARNING:
TO REDUCE THE RISK OF FIRE OR
ELECTRIC SHOCK. DO NOT EX
POSE THIS APPLIANCE TO RAIN
OR MOISTURE.
The model number and serial number of
this product can be found on either the back
or the bottom of the unit.
Please note them in the space provided
below and retain them for future reference.
MODEL NUMBER RC-X230 ■
SERIAL NUMBER
___________
CAUTION:
TO PREVENT ELECTRIC SHOCK MATCH
WIDE BLADE OF PLUG TO WIDE SLOT,
FULLY INSERT.
Page 4

Precautions
Before using this unit please read these
operating instructions carefully. Take spe
cial care to follow the warnings indicated
on the unit itself as well as the safety
suggestions listed below.
Afterwards keep them handy for future
refererrce.
Safety
1. Power Source - The unit should be
connected to power supply only of the
type described in the operating in
structions or as marked on the unit.
2. Polarization - If the unit is equipped
with a polarized AC power plug (a plug
having one blade wider than the other),
that plug will fit into the AC outlet only
one way. This is a safety feature. If you
are unabte to insert the plug fully into
the outlet, try reversing the plug, if the
plug should still fail to fit, contact your
electrician to replace your obsolete
outlet. Do not defeat the safety purpose
of the polarized plug.
Installation
Environment
1. Water and Moisture - Do not use this
unit near water—for example, near a
bathtub, washbowl, swtmmirtg pool, or
the like. Damp basements should also
be avoided.
3. Power Cord Protection -• AC power
supply cords should be routed so that
they are not likely to be walked on or
pinched by items placed upon or
against them. Never take hold of the
plug or cord it your hand is wet, and
always grasp the plug body when
connecting or disconnecting it.
4. Nonuse Periods » When the unit is not
used, turn the power off. When left
unused for a long period of time, the
unit should be unplugged from the
household AC outlet.
2. Heat - The unit should be situated
away from heat sources such as ra
diators and the like. It also should not
be placed in temperatures less than 5'*C
(41“F) or greater than 35®C (95®F).
Page 5

Placement
1. Ventilation - The unit should be
situated so that its location or position
does not interfere with its proper
ventilation. Allow 10 cm (4") clearance
from the rear of the unit.
2. Foreign Materiai - Care should be
taken so that objects do r\ot fall into and
liquids are not spilled into the unit. Do
not subject this unit to excessive
smoke, dust, mechanical vibration, or
shock.
3. Magrtetism -- The unit should be
situated away from equipment or de
vices that generate strong magnetism.
4. Stacking - Do not place heavy objects
on top of the unit.
Maintenance
Clean the cabinet, panel and controls with
a soft cloth lightly moistened with mild
detergent solution.
Service-------------------------
1. Damage Requiring Service - The unit
should be serviced by qualified service
personnel when;
(a) The AC power supply cord or the
plug has been damaged; or
(b) Objects have fallen or liquid has
been spilled into the unit; or
(c) The unit has been exposed to rain;
or
5. Surface - Place the unit on a flat, level
surface.
6. Carts and Stands -- The unit should be
' used only with a cart or stand that is
recommended by the manufacturer.
The unit and cart combination should
be moved with care. Quick st(^s,
excessive force, and
uneven surfaces may
cause the unit and cart f
combination to overturn.
7. Wall or Ceiling Mounting - The unit
should not be mounted to a wall or
ceiling, unless specified in this oper
ating instructions.
Do not use any type of abrasive pad,
scouring powder or solvent such as alcohol
or benzine.
(d) The unit does not appear to operate
normally or exhibits a marked
change in performance; or
(e) The unit has been dropped, or the
enclosure damaged.
2. Servicing -- The user should not at
tempt to service the unit beyond that
described in the operating instructions.
All other servicing should be referred to
qualified service personnel.
Quick st(^s.
Page 6

Precautions (continued)
Keep the unit away from heating devices
and electrical noise generating devices
such as fluorescent lamps and motors.
The unit should be kept free from dust,
moisture, and vibration, and should not be
exposed to direct sunlight.
Do not clean the plastic cabinet with
benzine or thinner. Clean it with a solution
of soap and water.
Avoid spray-type insecticides. Some in
secticides contain chemicals that could
cause cabinet deformation.
Do not connect the unit to an AC outlet
other than one supplying the specified
voltage.
Avoid cuts, scratches, or poor connections
in the AC power cord which may result in
fire or electric shock hazard. Also exces
sive bending, pulling, or splicing of the cord
should be avoided.
Do not unplug the AC power cord by
pulling on the cord. To do so may cause
premature failure or shock hazard.
If the unit is not going to be used for a tong
period of time, remove the back up battery
to prevent possible damage due to battery
leakage.
Page 7
Time-Protecting Battery Back-Up
The back-up battery will keep the clock
operating during a power interruption.
When power is resumed, the display will
show the current time.
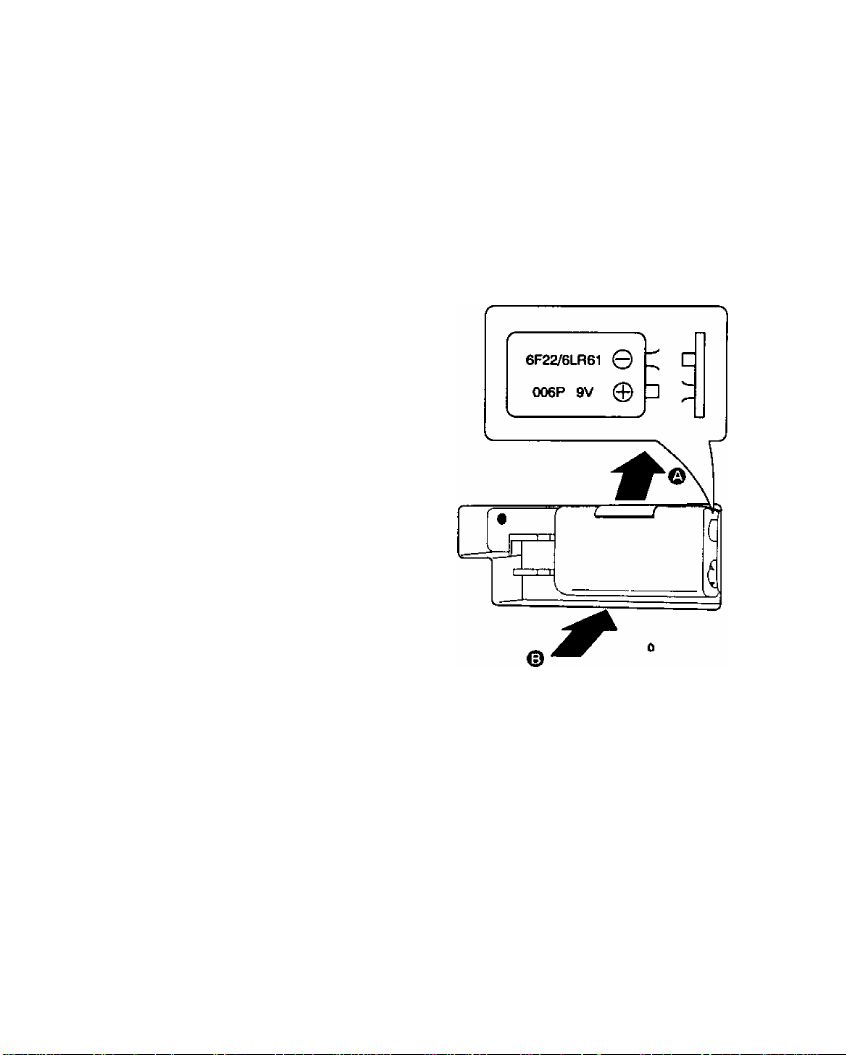
Battery installation
--------
1 Connect a 9-Volt battery
(not included) to the snaps,
observing correct polarity.
A battery installed with incorrect
polarity may leak and damage the
unit.
Place the battery in the
compartment by inserting it
in the direction of the arrow
while pushing the bat
tery holder in the direction
of the arrow O-
Note no battery cover is used.
The alarm time is not affected by a power
interruption—so there is no need to reset
the alarm.
Bottom of the unit
Battery replacement
Unplug the AC power cord from the AC
power outlet. After several seconds, plug it
back irito the outlet. If the digits flash con
tinuously, replace the battery with a new
one.
Replace the battery with a new one after
or>e year of use (most batteries have a
shelf life of approximately one year).
If an extended power failure or interruption
occurs, replace the battery with a new one.
Page 8

Time-Protecting Battery Back-Up (continued)
Operation
The time battery back-up is designed to
keep the clodt operating in the event of a
power failure or interruption. (Such as
when moving this unit to a different room.)
Whenever a power interruption occurs, the
clock display will disappear. However,
even though the display is completely
blacked out, the 9-volt back-up battery will
take over as the power source, preserving
present time and the alarm time.
Notes
When the set is unplugged (not in use) for
a long time, remove the back-up battery to
prevent possible battery leakage.
Power failures may occur at any time of the
night or day and can be of a long or short
duration.
Most failures are so short that people don’t
even notice the interruption. These inter
ruptions do, however, affect clocks which
do not incorporate a battery back-up.
If the power is not resumed by the wake-up
time, the radio alarm will not activate.
Even if the power is not resumed by the
wake-up time, the buzzer alarm wll acti
vate.
If the back-up battery goes dead during a
power interruption, the present time and
alarm time must also be reset after the
interruption.
The back-up battery will be exhausted
after about 23 hours of total (accumulative)
use. (The battery life will vary depending
on №e frequency of the power interrup
tion.)
After a power interruption, the time shown
in the display window may not be always
correct (it may gain or lose approximately 6
minutes per hour).
Page 9

Location and Function of Controls
Page 10

Location and Function of Controls (continued)
Top and front panel section
(D Brightness selector (8]
(BRIGHTNESS)
Time set buttons (TIME SET)
The FWD button forwards the dis
played time and the REV button
reverses it. To forward or reverse the (§)
displayed time rapidly, press and hold
the FAST button with the FWD or REV
button.
Surround button (SURROUND)
Press to enjoy the stereo sound as if
you were in a concert hall.
^ Tone button (TONE)
(5) Alarm 1 (radio) and 2 (buzzer)
select buttons
Press the alarm 1 or 2 select button,
the corresponding indicator will light
up.
^ Alarm 1 and 2 display/adjust
buttons (DISP/ADJ)
Set the desired time using the time set
buttons while pressing this button. If
the alarm 1 and 2 display/adjust but
tons are pressed at the same time, the
clock display shows the alarm 1 time.
(t) Sleep button (SLEEP)
Press this button when you wish to fall
asleep while listening to radio.
(8) Off/time set button
@ Radio button (RADIO)
® Band selector (BAND)
(Q) Volume control (VOLUME)
@ Doze button (DOZE)
@ Speakers
@ Alarm 1 and 2 indicators
(||) Radio dial display
@ Clock display
® PM indicator
@ FM stereo indicator (FM ST)
® Tuning control (TUNING)
(giaa TIME SET)
Press this button to shut off the radio.
£üarm, doze, and steep functions.
Press and hold to set the correct time,
Press this button to listen to the radio.
When the alarm sounds, if you do not
wish to wake up immediately, press
this button. The alarm will shut off for 7
minutes, and then the alarm will
operate again.
1Ü
Page 11

Rear panel section
@ Audio Input Jack (AUDIO IN)
@ Headphonea Jack (O )
@ AC power cord
n
Page 12

Connections
Mini cassette recorder
Portable CD plaver
How to use the headphones
Connect the plug from the headphones
(not included) to the headphones lack.
Speakers are automatically shut off when
the headphones connected.
Never fall asleep while using the head
phones.
Avoid listening tor prolonged periods of
time to prevent hearing damage.
When the headphones are in use, the
buzzer alarm and radio alarm will still func
tion, but only the buzzer alarm will be
heard from the speaker.
How to use the unit as an amplifier
1. Connect the output of the external
unit to the audio Input Jack.
12
2. Press the radio button.
When the connection cord is connected
to the audio input jack, the sound of the
external unit is given priority.
Headphones
(not included)
Page 13

Setting the Correct Time
To set the correct time on the clock dis
play, use the following procedure.
Connect the AC power cord to
your household AC power out
let.
The clock display will begin to flash
continuously.
While pressing the radio
off/time set button, press and
hold the time set buttons until
the correct time appears on the
clock display.
The digits should stop flashing.
To fomard or reverse the displayed
time rapidly, press and hold the FAST
button with the FWD or REV button.
To forward or reverse the displayed
time minute by minute, press the
FWD or REV button repeatedly.
The seconds are automatically set to
“0” when the FWD or REV button is
pressed.
Observe the PM indicator, A green
dot (PM indicator) indicates “PM" and
no dot indicates "AM".
3 Set the brightness selector to
“HIGH” or “LOW”.
To increase the brightness of the time
display, set this selector to HIGH"; to
decrease it, set to “LOW".
The correct time can usually be obtained
by listening for time checks on the radio, or
from telephone time services.
Page 14

Listening to Radio Broadcasts
Set the band selector to “FM ST", “AM".
To receive FM stereo broadcasts, set
the band selector to “FM ST". The FM
stereo indicator will light when receiv
ing FM stereo broadcasts.
If FM stereo reception is poor (exces
sive noise, the FM stereo indicator
flickers), set the band seleaor to
“FM”. This will reduce the noise and
provide clear reception; however, the
broadcast will not be heard in stereo.
14
the tuning control,
4 Adjust the volume control to
the desired level.
To turn off the radio, press the offAlme
set button.
Page 15

Tone button
HIGH: Emphasize the high-pitch tone
LOW; Suppress the high-pitch tone
Surround button
When this button is set to “ON”, the sur
round system enhances the sound from a
normal stereo sound source. Surround
mode increases the stereo imaging,
thereby broadening the listening area of
the stereo sound.
Antennas
FM: The AC power cord functions as an
FM antenna. To obtain the best FM
reception, extend and change the
direction of the AC power cord.
AM: A sensitive ferrite core antenna is
built in this unit to assure excellent
AM reception in most areas.
To inrjprove the reception of weak
stations, turn the unit in the direction
which gives the best results.
15
Page 16

Operation of Dual Wake-Up System
This set incorporates a dual wake-up sys
tem. Each alarm wake-up time can be set
as shown below.
Alarm time setting
1 Press end hold the slarm 1 (or
2) display/adlust button.
The clock display shows 'i^; qq"-
While pressing the alarm 1 (or
2) display/adjust button, press
and hold the time set buttons
until desired wake-up time ap
pears on the clock display.
Make sure the AM or PM setting is
correct.
When desired wake-up time appears
on the display, release the alarm 1 (or
2) display/adjust button. The present
time is restored on the clock display.
To make sure of the preset time,
press the alarm 1 (or 2) display/adjust
button.
Page 17

(See page 16.)
2 Press the alarm 1 select but
ton.
The alarm 1 indicator will light up.
At the specified wake-up time, the radio
alarm wiii activate.
The alarm will shut off automatically after
about 59 minutes.
3 Tune in the desired broadcast
ing station.
(See page 14.)
To shut off the alarm before automatic
shut-off, press the off/time set button.
To release the alarm function, press the
alarm 1 select button.
Do not connect the headphones when the
radio alarm is set.
u
Page 18

Operation of Dual Wake-up System
(continued)
Buzzer alarm (ALARM 2)
ri
----------
BUZZER
1
Page 19

Combination of alarms
The buzzer alarm and the radio alarm can
be set at the same time. Both alarms will
activate simultaneously.
Example
Set the wake up time for weekdays on
alarm 2, and for weekends on alarm 1.
ALARM 1...OFF
ALARM 2...BUZZER
The alarm will activate automatically at the
same time every day.
Make sure to set the alarm select button to
“OFF” when you want to cancel the alarm.
Combination of alarm 1 and alarm 2 per
mits the following convenience.
ALARM 2...OFF
m
Page 20

Special Features
Doze operation----------
When the alarm activates, but you do not
wish to wake up immediately, press №e
doze button.
The alarm will turn off for 7 minutes, then
the alarm will operate again.
If you do not need doze time, and want to
cancel the alarm, press the offAirre set
button.
While pressing the doze button, the clock
display changes from “hours and minutes”
to “minutes and seconds”.
2Q
Page 21

Radío sleep timer
You can set the dock radio to play up to
about 59 minutes, then shut off automati
cally.
Press and hold the sleep button until
the length of time for which you wish to
listen to the radio Is shown on the clock
display.
Watch the display as it counts backward
from 59 to 00.
At first, the clock display shows 59 minutes
when you release the sleep button. Press
this botton until the correct time returns on
the clock display.
During radio-listening, you can confirm the
number of minutes remaining by pressing
the sleep button and looking at clock dis
play.
To change the length of time for which you
wish to listen to the radio, press the time
set buttons while pressing the sleep button
(See page 13).
Radio will be shut off automatically
after the preset steep time elapses.
To cancel the sleep timer and shut off the
radio, press the off/time set button.
21
Page 22

Special Features
(continued)
Combination of sleep timer
and alarm function
You can set the clock radio to play for the
desired time (up to 59 minutes) and shut
off automatically, then activate the alarm
automatically at the desired wake-up time.
--------------
1 Set the desired wake*up time
and press the desired alarm
select button (alarm 1 or 2
select button).
2 Set the desired length of time
for which you wish to listen to
the radio.
(See page 21.)
22
Page 23

Specifications
Frequency Range:
Power
Requirement:
FM; 08-1O8 MHZ
AM; 52&-1710kHz
AC; 120V, 60Hz
Power consumption;
10 W
Battery: 9V (6F22/OO6P)
for back-up
Product Service
Do not attempt to remove the cover(s) or
repair the unit yourself. Refer servicing to
qualified personnel only.
Product information
For product service, product information or
assistance with product operation, refer to
the servicenter directory.
Speakers:
Jacks
Input;
Output:
Dimensions
(WxHxD):
Weight:
Note:
Specifications are subject to change
without notice.
Weight and dimensions are approximate.
8 cm (3")>c2
AUDIO IN
Headphones (32Q)
311x108x143 mm
(12V4"x4V4"x5^e")
1.4 kg (31b. 1 oz.)
without battery
23
Page 24

Index
Audio input jack
AC power cord
...................
.....................
Alarm 1 and 2 disptay/adjust
buttons
.............................
Alarm 1 and 2 indicators ...,
_ _
11, 12
_ _
11, 13
___10.16
. 10,17,18
Offftime set button ...
Pm indicator
Radio button
..............
...............
Alarm 1 and 2 select buttons . , 10, 17, 18
Antennas
.............................
...........
15
Sleep button
Surround button
_ _
Band selector
.......................
Brightness selector
...............
10. 14
_ _
10, 13 Time set buttons
Tone button
_ _
Clock display
Doze button
........................
........................
FM stereo indicator..............
Headphones jack .................
Panasonic Consumer Electronics Company, Division of
Matsushita Electric Corporation of America
One Panasonic Way Secaucus, New Jersey 07094
Panasonic Sales Company, Division ol Matsushita Electric of
Puerto Rico, Inc. (“PSC”)
•Ave. 65 de Infantería, Km. 9.5 San Gabriel Industrial Park, Caroiina,
Puerto Rico 00985
Panasonic Canada Inc.
5770 Ambler Drive, Mississauga, Ontario L4W 2T3
10, 13
. . . . 10, 20
_ _
10, 14
_ _
11, 12
Tuning control
Volume control
...............
.........
..........
................
.............
............
_ _
10,13,14,17
18, 20, 21
................10. 13
................10, 14
................
10,21
................10,15
..........
10,13, 16
................10, 15
................10, 14
................10, 14
RQT1918-1P
FOI93D1027
 Loading...