

Page 1
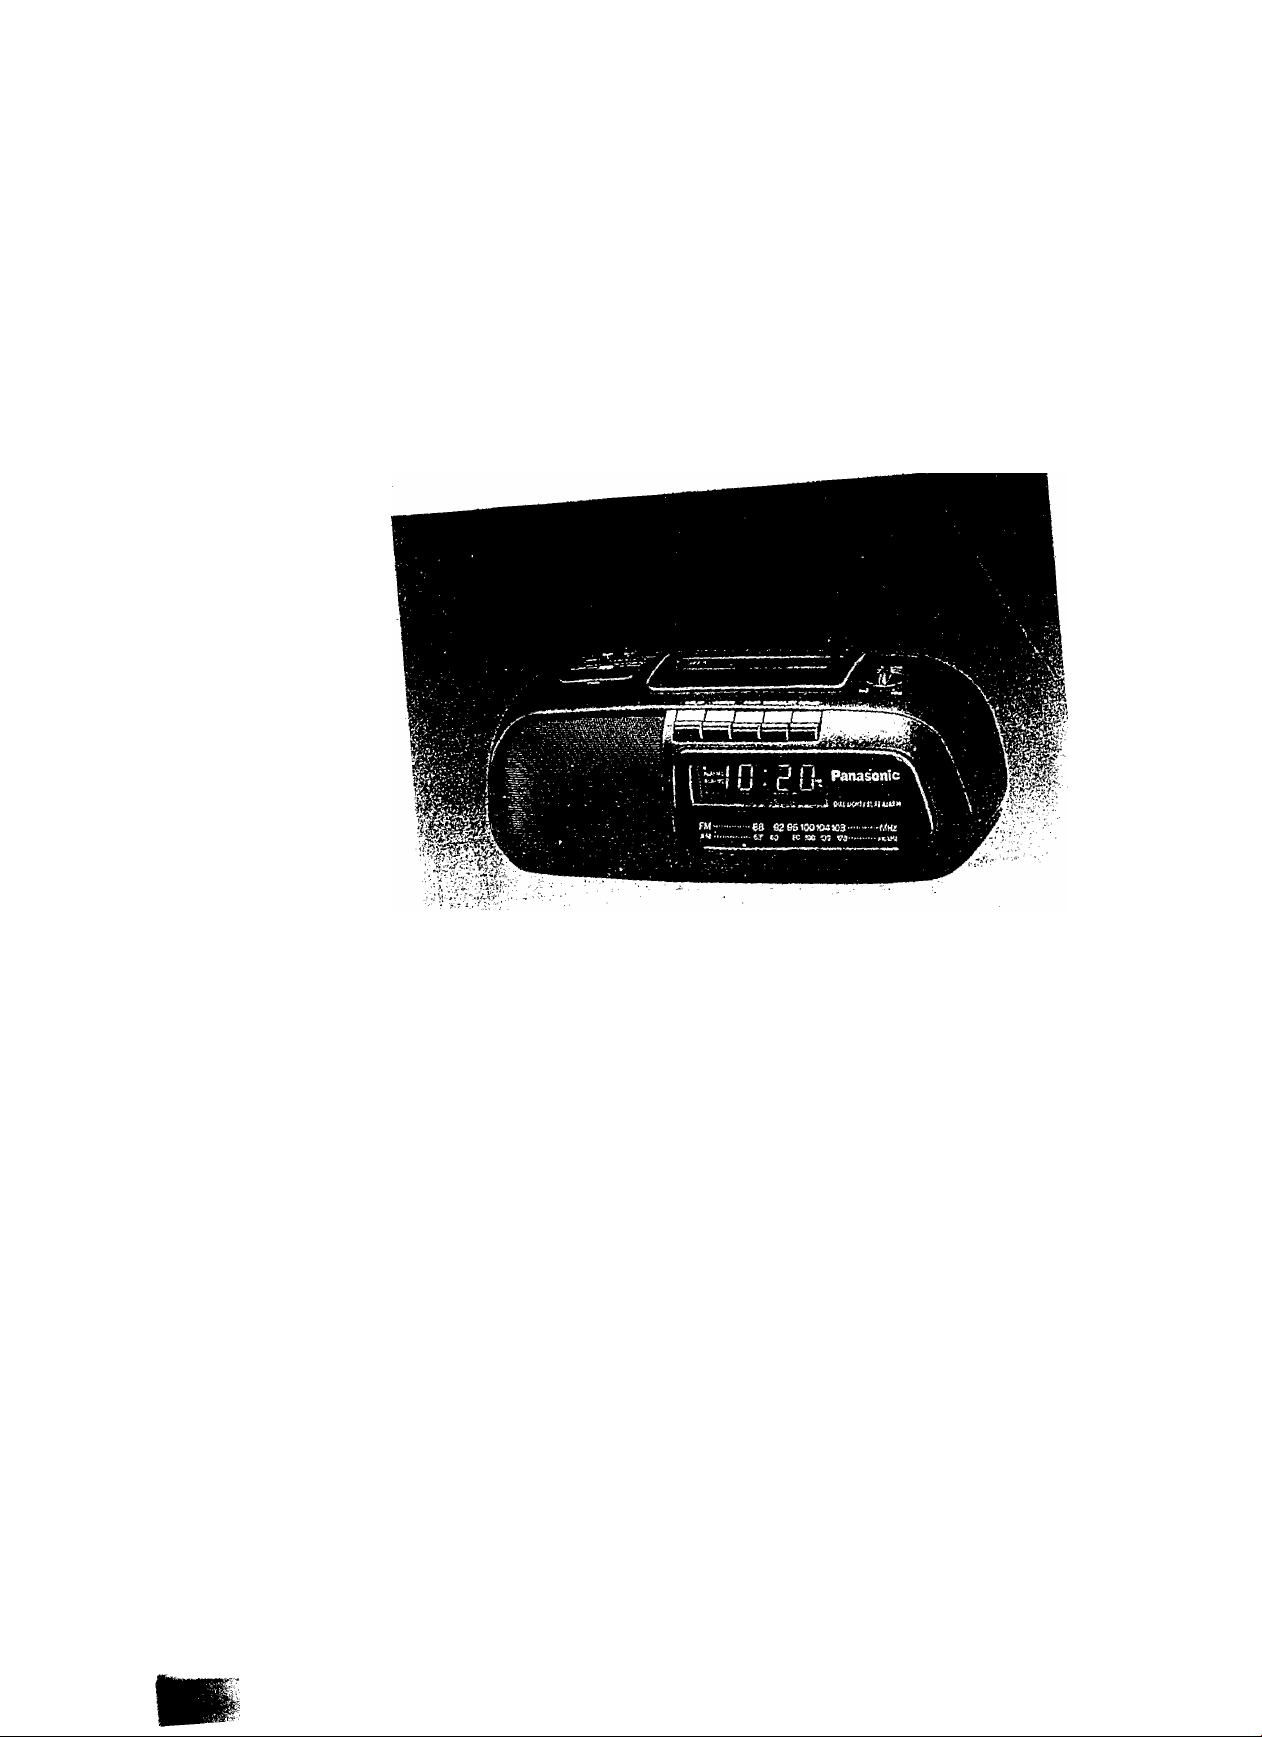
Panasonic
Clock Radio Cassette Player
RC-X160
Operating Instructions
Before connecting, operating or adjusting this
product, please
pletely-
read these instructions corn-
Page 2

Thank you for purchasing the RCX16G Clock Radio Cassette Player.
For optimum performance and
safety, please read these instruc
tions carefully.
Sure Time Battery Back-Up
The back-up batten' will keep the clock
operating during a power interruption.
When power is resumed, the display will
show the cunent time.
Battery installation
-----------
1 Connect a 9-Volt battery (not
included) to the snaps, obserw
ing correct polarity.
A battery installed with incorrect
polarity may leak and damage the
unit.
P 06F22/6LR61
V
D
Bottom of the unit
Q 006P 9V
The alarm time is not affected by a power
interruption—so there is no need to reset
the alarm.
Place the battery in the com
partment by inserting it in the
direction of the arrow ©, while
pushing the battery holder in
the direction of the arrow O-
Note no battery cover is used.
©
Page 3

When should the battery be replaced
№
Unplug the AC power cord from the AC
power outlet. After several seconds, plug it
back into the outlet. If the digits flash con
tinuously, replace the battery with a new
one.
Replace the battery Wij.h a new one after
one year of use (most batteries have a
shelf life of approximatery one year).
Operation
The sure time battery back-up is designed
to keep the clock operating in the event of
a power failure or interruption. (Such as
when moving this unit to a different room.)
Whenever a power interruption occurs, the
clock display will disappear. However even
though the display is completely blacked
out, the 9-volt back-up battery will take
over as the power source and the present
time and the alarm time will be preserved.
Notes----------------------------
When the set is unplugged (not in use) for
a long time, remove.the back-up battery to
prevent possible battery leakage.
Power failures may occur at any time of the
night or day and can be of a long or short
duration.
Most failures are so short that people don’t
even notice the interruption. These inter
ruptions do, however; affect clocks v/hich
do not incorporate a battery back-up.
If the power is not resumed by the wake-up
time, the radio alarm will not activate.
If an extended power failure or interruption
occurs, replace the battery with a new one.
Even ifkhe power is not resumed by the
wake-up time, the buzzer alarm wilt acti
vate.
[f the back-up battery goes dead during a
power interruption, the present time and
alarm time must also be reset after the
interruption.
The back-up battery will be exhausted
after about 17 hours of total (accumulative)
use. (The batlery life will vary depending
on the frequency of the power interrup
tion.)
After a power interruption, the time shown
in the display window may not be always
correct (it may gain or lose about six
minutes per hour).
Page 4
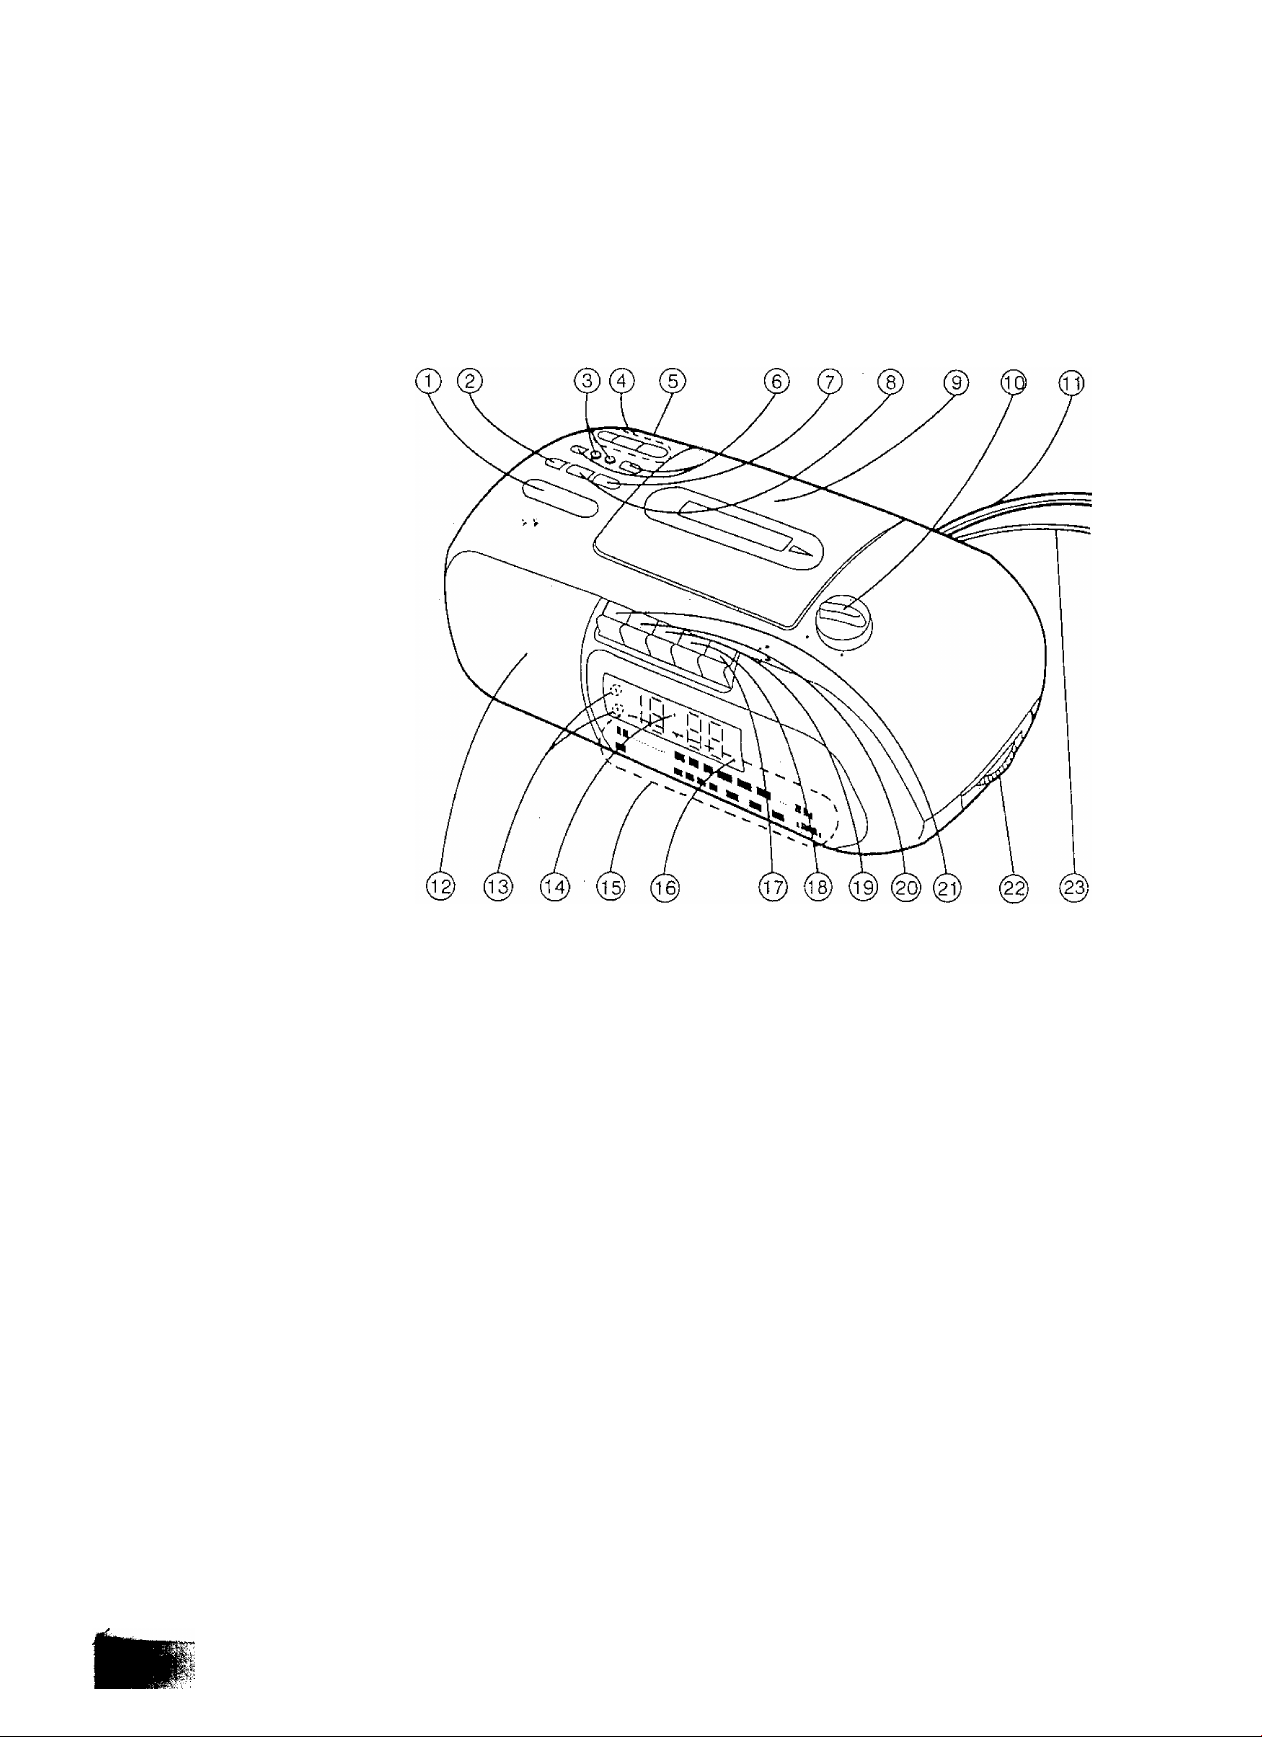
Location and Function of Controls
I"
I'.'
■f
w"
Page 5

(T) Doze button (DOZE)
When the alarm activates, but you do
not wish to wake up immediately,
press this button. The alarm v/ill be
quiet for 7 minutes, then the alarm will
operate again.
(D Sleep button (SLEEP)
Press this button when you wish to fall
a sleep while listening to radio.
(3 } Alarm 1 and 2 select buttons
Press the alarm 1 select button, the
alarm 1 indicator will light up. Press
the alarm 2 select button, the alarm 2
indicator Witt light up. Alarm 1 is radio
or tape alarm, alarm 2 is buzzer alarm.
(4) Time set buttons (TIME SET)
The FWD button forwards the dis
played time and the REV button
reverses it. To forward or reverse the
displayed time rapidly, press and hold
the FAST button with the FWD or REV
button.
@ Band Selector (BAND)
[back of the unit]
@ Alarm 1 and 2 display/adjust
buttons (DISP/ADJ)
Set the desired time by the time set
buttons, while pressing this button. If
the alarm 1 and 2 display/adjust
buttons are pressed at the same time,
the clock display shows the alarm 1
time.
@ Radio button (RADIO)
Press this button to listen to the radio.
Off/time set button
(CS® TIME SET)
Press this button to shut off the radio,
alarm, doze and sleep operation.
Press and hold to set the correct time.
Cassette compartment cover
@ Volume control (VOLUME)
(ij) AC power cord
@ Speaker
@ Alarm 1 and 2 indicators
® Clock display
Radio dial display
(1 ^ PM indicator
@ Pause button (I I PAUSE)
(1 ^ Stop/eject button
;(H STOP/A EJECT)
(Tg) Fast forward button
(►►FF)
(^ Rewind button
REW)
(§) Play button {►■ PLAY)
Tuning control (TUNING)
(2^ FM antenna cord
Page 6

Helpful Hints
Keep the unit away from heating devices
and electrical noise generating devices
such as fluorescent lamps and motors.
The unit should be kept free from dust,
moisture, and vibration, and should not be
exposed to direct sunlight.
Do not el^an the plastic cabinet with
benzine or thinner. Clean it with a solution
of soap and water.
Avoid spray-type insecticides. Some in
secticides contain chemicals that could
cause cabinet deformation.
Do not connect the unit to an AC outlet
other than one supplying the specified
voltage.
Avoid cuts, scratches, or poor connections
in the AC power cord which may result in
fire or electric shock hazard. Also exces
sive bending, pulling, or splicing of the cord
should be avoided.
Do not unplug the AC power cord by
pulling on the cord. To do so may cause
premature failure or shock hazard.
If the unit is not going to be used for a long
period of time, remove the back up batfery
to prevent possible damage due to battery
leakage.
Page 7
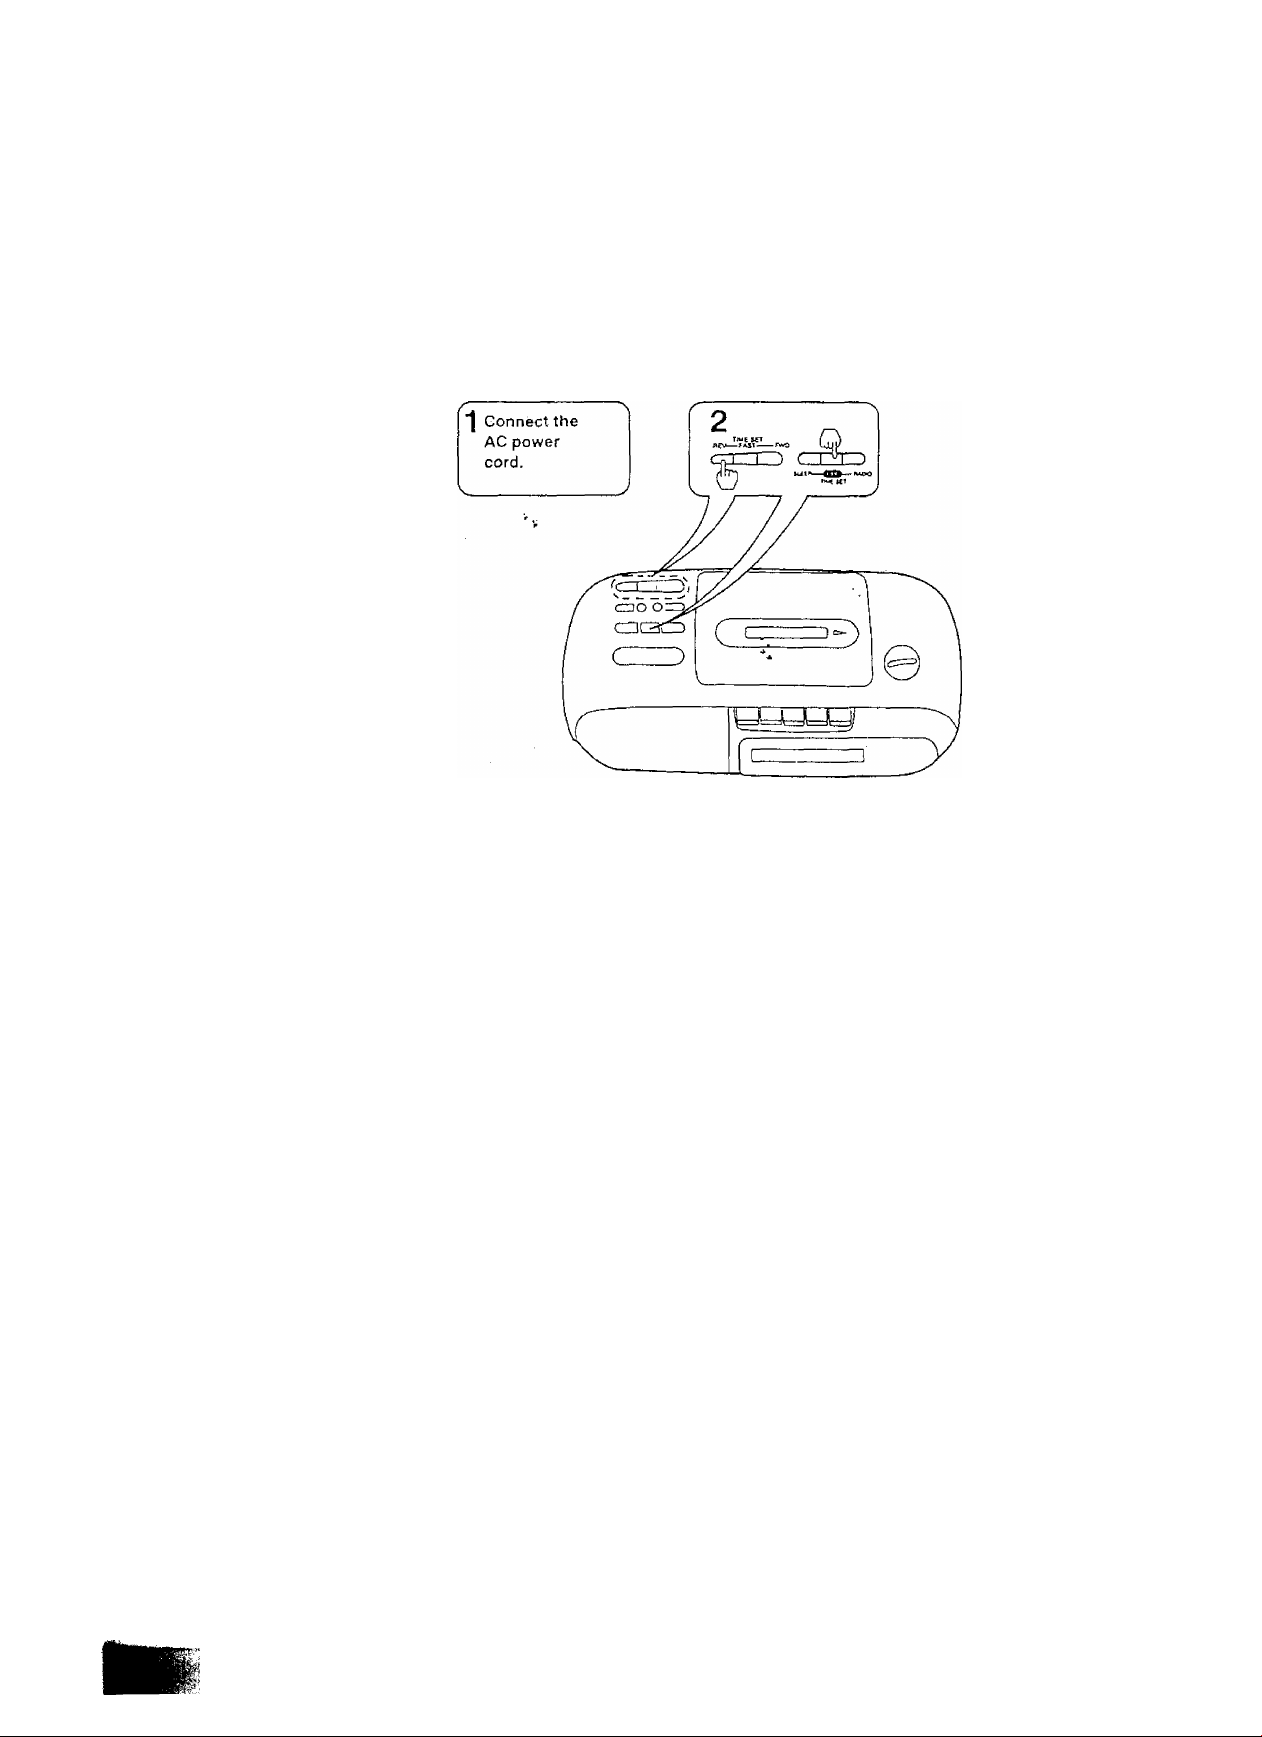
To Set the Correct Time
To set the correct time on the clock display,
use the following procedure.
m-
Connect the AC power cord to
your household AC power out
let.
The clock display will begin to flash
continuously.
While pressing the ohf/time set
button, press and hold the time
set buttons until the correct
time appears on the clock dis
play.
The digits should stop flashing.
To forward or reverse the displayed
time rapidly, press and hold the FAST
button with the FWD or REV button.
To forward or reverse the displayed
time minute by minute, press the
FWD or REV button repeatedly.
The seconds are automatically set to
“0" when the FWD or REV button is
pressed.
Observe the PM indicator. A green
dot (PM indicator) indicates "PM" and
no dot indicates “AM".
The correct time can usually be obtained
by listening for time checks on the radio or
from telephone time services.
The time set (REV-FAST-FWD) buttons
can only activate when the off/time button
is pressed.
if
Page 8

Listening to Radio Broadcasts
2 Set the band selector on the
back of the unit to "AM” or
"FM”.
3 Tune in the desired station with
the tuning control.
To turn off the radio, press the otf/time
set button.
Page 9

Antennas
FM : To obtain the best FM reception, extend
and change the direction of the FM
antenna cord.
'■ V
AM: A sensitive ferrite core antenna is
built in this unit to assure excellent
AM reception in most areas.
To improve the reception of weak
stations, turn the unit in the direction
which gives the best results.
if
Page 10

I
I
h
Listening to Tapes
Before use, press the off/time set button to button to off position,
turn off the radio. Set the alarm 1 select
1 Press the stop/eject button to 3 Press the play button to begin
open the cassette compart- tape playback,
ment cover. -
^ Insert the cassette tape. the desired level.
Use normal types of cassette tapes
only.
10
^ Adjust the volume control to
To stop playback, press the stop/ eject
button.
Page 11

Fast forward and rewind
This unit aliows the tape to fast forward or
rewind by simply pressing the fast forward
or rewind button.
■*-1 fl£W FF
Pause button
To fast forward the tape, press the fast
forward button.
To rewind the tape, press the rewind
button.
The pause button can be used to tempo
rarily stop the tape from moving during
playback.
i. ;
T7
Full auto-stop
When the tape reaches its end during play
back, fast forward or rev-'ind, the automatic
stop system will release the operation
buttons.
-----------------
Do not use the pause button to slop the
tape for a long period of time. This may
cause damage to the tape.
ri
■ I. ■
11
iti
Page 12

4ì.v.
Concerning Cassette Tapes
Cassette tapes exceeding 90 minutes
These tapes are handy for their long play
back time but be careful about repeatedly
stopping and starting, rewinding and fast
forwarding these tapes in short intervals as
they are thin, tend to stretch and may be
come entangled in the machine.
OK
If the tape loosens,
take up the slack by
turning the reel in the
proper direction.
Pencil
NO
Do not handle, or
pull the tape out of
the cassette.
Use normal types of cassette tapes only. If
other tapes are used, you may not obtain
optimum performance.
Cassette tapes, both recorded and un
recorded, should not be stored in locations
with high temperature, high humidity or
direct sunlight. Never place a recorded
cassette near a magnetic source, such as
a magnet or a TV set as this may affect
tape performance.
12
Page 13

Operation for Dual Wake-Up System
/
This set incorporates a dual wake-up sys
tem. You can set each alarm time to
Alarm time setting
any desired wake-up time in the following
way.
Press and hold the alarm 1 (or
2) dispiay/adiust button.
The clock display shows " | P ; |j|j”-
While pressing the alarm 1 (or
2) display/adjust button, press
and hold time set buttons until
desired wake-up time appears
on the clock display.
Make sure the AM or PM setting is
correct.
Release the alarm 1 (or 2} display/ad
just button, and the present time is
restored on the clock display.
To make sure of the preset time,
press the alarm 1 (or 2) display/adjust
button again.
la
I
;:llf
Page 14

Operation for Dual Wake-Up System
(continued)
Radio alarm (ALARM 1)
--------
----------------------
m.
1
Press the alarm 1 select but
ton.
The aiarm 1 indicator will light up.
2
Set the desired wake-up time
on alarm 1.
(See page 13.)
Tune in the desired broadcast-
3
ing^station.
(See page 8.)
li
Press the off/time set button.
At the set wake-up time, the radio alarm
will activate.
The alarm will shut oft automatically in
about 59 minutes.
To shut off the alarm before automatic
shut-off, press the off/time set button.
Ib
Page 15

Tape alarm (ALARM 1)
1
Press the alarm 1 select but
ton.
The alarm 1 indicator will light up.
2
Set the desired wake-up time
on alarm 1.
(See page 13.)
3
Insert thp cassette tape.
(See page'IO.)
4
Press the play button.
At the set wake-up time, the tape alarm
will activate. ■
•To shut off the tape alarm, press the
stop/eject button. The tape play slops
and the radio alarm will continue automaticaily.
• The alarm will shut off automatically in 59
minutes. When the tape reaches the end
during playback, the automatic stop sys
tem will release the playback button and
the radio alarm wit! continue automati
cally.
• To shut off the alarm before automatic
shut-off, press the off/time set button.
15
If
Page 16

Operation for Dual Wake-up System
(continued)
Buzzer alarm (ALARM 2)
/
m.
1 Press the alarm 2 select but
ton.
The aiarm 2 indicator will light up.
2 Set the desired wake-up time
on alarm 2.
(See page 13.)
i£
At the set wake-up time, the buzzer
alarm will activate.
The alarm v/ill shut oft automatically in
about 59 minutes.
To shut off the alarm before automatic
shut-off, press the off/time set button.
Page 17

Combination of the alarm 1 and the alarm 2
I
/
The buzzer alarm and the radio (or tape
alarrr.) are set at the same time. Both
alarms will activate simultaneousiy.
Example
Set the wake up time for weekday on the
alarm 2, and for weekend on the alarm 1.
ALARM2..,pUZZER
Note:
The alarm will activate automatically
at the same time every day.
Make sure to set the alarm select
button to “OFF" when you want to
Cancel the alarm.
Combination of the alarm 1 and the alarm
2 permits the following convenience.
ALARM 1...RADIO/TAPE
ALARM 2...OFF
12
Page 18

Special Features
Doze operation —-—
When the alarm activates, but you do not
wish to wake up immediatety, press the
doze button.
The alarm will be quiet for 7 minutes, then
the alarm will operate again.
If you do not need doze time and want to
cancel the alarm, press the off/time set
button.
While preying the doze button, the sec
onds will also appear. (At this time, the
clock display changes from hours and min
utes to minutes and seconds.)
IS
Page 19

Radio sleep timer
You can set the dock radio to play up to
about 59 minutes, and then to shut off
automatically. •
Press and held the sleep button until
the length of time for which you wish to
listen to the radio is shown on the clock
display.
Watch the display as it counts backwards
from 59 to 00,
At first, the clock display shows 59 min
utes. When you release the sleep button,
the Correct time returns on the clock dis
play.
During radio-listening, you can confirm the
number of minutes remaining by pressing
the sleep button and looking at clock dis
play.
You can change the length of time, for
which you wish to listen to the radio, by the
time set buttons while pressing the sleep
button.
Radio will be shut off automatically in the
preset sleep time.
To cancel the sleep timer and shut off
the radio, press the off/time set button.
Page 20

Special Features (continued)
Radio sleep timer and alarm
You can set the clock radio to play for the
desired time (up to 59 minutes) and shut
off automatically, then activate the alarm
automatically at the desired wake-up time.
1 Set the desired wake-up time
and press the desired alarm se
lect button (alarm 1 select but
ton or alarm 2 select button).
2 Set the desired length of time
for which you wish to listen to
the radio.
(See page 19.)
2Q
Page 21

Maintenance
m
ll==E^
PLAYl
The head assembly, capstan and pressure
roller are in constant contact with the tape.
If these parts are dirty, the sound quality
will be impaired. Periodically, clean these
parts as shown above.
1. Open the cassette compartment
cover by pressing the stop/eject but
ton.
2. Press the. play button.
The playback head, capstan and the
pressure roller can be seen. Clean
them with a cotton swab.
Head demagnetization
In order to maintain good sound quality
during playback, it is recommended that
the head assembly be demagnetized when
distortion or poor sound quality persists
after cleaning the head.
Cotton swab
r
If the head assembly is extremely dirty,
clean it with a soft cloth dampened with a
little alcohol.
The use of cleaning tapes is not recom
mended, as some are abrasive and may
cause premature wear of the heads. Sim
ply, clean the head assembly as described.
Avoid spray-type insecticides. Some insec
ticides contain chemicals that could cause
cabinet deformation.
Several types of head demagnetizers are
available and may be purchased sepa
rately at local electronics supply stores.
Follow the instructions that are supplied
with the device.
Head
/
Capstan
Pressure
roller
If the head assembly becomes magnet
ized! it could create loss of high end
frequency response.
Do not bring any type of metal objects or
tools such as magnetic screwdrivers in
contact with the head assembly.
21
Page 22

Specifications
/
/
Radio
Frequency Range: FM; 88-108 MHz
AM; 525-1710 kHz
Tape Player
Frequency Range:
Normal;
Track Systefn;
50-14000 Hz
MONO
General
Power
Requirement: AC; 230-240 V, 50 Hz
Power consumption;
8 W
Battery; 9 V (006P/6F22)
Speaker:
Dimensions
(WxHxD):
Weight: .
Note;
Specifications are subject to change with
out notice.
Weight and dimensions are approximate.
lor back-up
8 cm
303^113x152 mm
1600g
without battery
22
Page 23

Index
Band selector
Fast forward button
. . 5
. 13
. . 5 Play button
Pm indicator...........................
Pause button
1, 16
. . 9
. . 5 Rewind button
. . 5
, 18
. 11
7, 8
Radio button..........................
Radio dial display
Sleep button
Speaker
................................
Stop/eject button
Time set buttons....................
Tuning control........................
VoIl^^ control
........................
............................
..................
.......................
..........................
...................
........................
.................
...............
...............
......................8
......................5
...................
...................
......................5
...............
...............
.....................
...............
5. 7
5, 11
5, 10
11
19
5, 10
7, 13
8, 10
8
23
 Loading...